
Leaderboard


Popular Content
Showing content with the highest reputation on 06/06/15 in all areas
-
Todays meet was awesome. Thanks to those that made it along. Thanks to those that attempted to make it along but their Russian cars lived up to the hype and left them..dry..... It was quite a misty mountain crossing both ways and the road was mega slippery. This made for some very fun antics. I spent my driving the Viva chasing Sam in his E30 as we both pushed the limits of our open diffs. We all stopped not far from the top at a view point which gave us all fantastic views of clouds. Stopped again at another view point on the other side and more clouds. Then continued down and cruised along from the bottom to Takaka where we met the local group. Big nom nom nom in the wholemeal cafe which never lets me down for both coffee and grub. Lots of car banter mainly revolved around handling, racetracks, racecars, traction and lack of in old cars and it was all good. Then we joined the local group and cruised in convoy out to a local private museum. This was an awesome place and had so much more interesting stuff then I ever imagined. Hell- it started off with the first display being bloody machine guns from the first and second world wars! Man- all I could think of was how cool this place would be for a big OS group visit. It just got better and better. old army trucks, a Bren gun carrier, army memorabilia, rows of sweet old army rifles, heaps of old radios and records and then old motorbikes. like heaps of them. Anything old, random interesting squeezed in all the gaps between. One of those places you know you have to come back to and properly soak in all the details. The owner is a cool fella and just obviously loves seeing peoples delight in such treasures. We said our goodbyes to the Takaka group and they promised to make it to the next meet in a months time over to Pelorus bridge. Then we cruised back and hit that hill. Even more misty and man it was fun. Very sketchy but very fun. Yep- both Hannah have had a good day out- very much looking forward to next cruise! Lots of photos were taken by others so please throw them up here- especially museum ones because so many cool things to see. These are my phone efforts.. This one...note Shane thinking..'Yeah..yeah one day Im gonna get me a Holden. So cool!" This next one.. a Bren gun carrier powered by a flat head ford V8. Lush.5 points
-
Untitled by sheepers, on Flickr5 points
-
Hey guys. I am the owner of the BFMR. To answer your questions Orion, yes the car has taken a hit to the side, however, it was repaired costing a total of $2730. And that was with me supplying what was needed. So, no expense was spared. Why would there be if I had intended to store it and keep it? If any of you happen to be prospective buyers your more than welcome to come around and view it it, I can remove panels and put it on axle stands if need be. There is nothing to hide on the car. I doubt you would have known anything was different if I didn't point it out to you. The car is free of rust and has a straight chassis. inspite of the speculation.I encourage you to come and see for yourself. I am selling it to fund 3 months of work for my helicopter pilots licence which wasn't ment to be until the start of next year so yes, there is a genuine reason for the sale! Craig.4 points
-
Ok ok. I'll attend the tour. I shall check if a tour of the workshop is all sweet and get back to you.3 points
-
6 days to Dirt Masters, and I might actually have a going bike Today I... Had to notch the frame a little to mount the engine. Fit the swing arm that a GC that goes by the title of Born Loser lengthened for me Extended the chain Cut and rewelded the bars Cut out more of the back of the frame to fit the rear wheel and stuck on other bits and pieces not long to go now2 points
-
Another weekend of fine weather so got some painting done and the trial fit the spoiler, arrived this morning2 points
-
Coupe Echo life! Do you even lift, bro? Oooohhhh, yep that'll do it... Centrifugal clutch conversion! haha. Flywheel still looks good and shold skim up fine! stoked. No idea why engine oil came out of the flywheel bolt holes though! Do they block off a gallery in the crank or something? Bizarre as there were no signs of oil leaking into the bell housing at all.2 points
-
It might be because of the overhead gantry you need to lift that big arsed indexhead to re position it in order to present the axle flange to the spindle, lol. The indexer weighs as much as it does because its a substantial piece of iron due to it having a bore big enuff to take a reasonable size axle through its guts ... but yeah mate - agree. they go for not much more than scrap value which is a shame. I jumped on a HMT FN2U off TM a few years back and have it set up solely to do respline work. Its a rigid piece for sure and I love using it. I never tried using the turret for doing it (resplining) but after watching Youtube clips of respline work being carried out on Verticals - decided a dedicated Horizontal was a much more rigid set up that could be had for not a lot.2 points
-
I cant help myself, after selling these a couple of years ago, I just bought them back, these were in the old slug that made 200hp at the flywheel and ran a 12.43 before I had some major oiling issues. Long term Im thinking maybe a small capacity destroked screamer. 64 stroke 94 bore 1776 ccs. lots of lift/duration/revs... *insert money into pit here*2 points
-
video up! ah man this was a fun afternoon. http://www.machineofmayhem.com/m-o-ms-motor-racing-2015/ we went for a bike ride that night too, a video of which should surface at some point soon.2 points
-
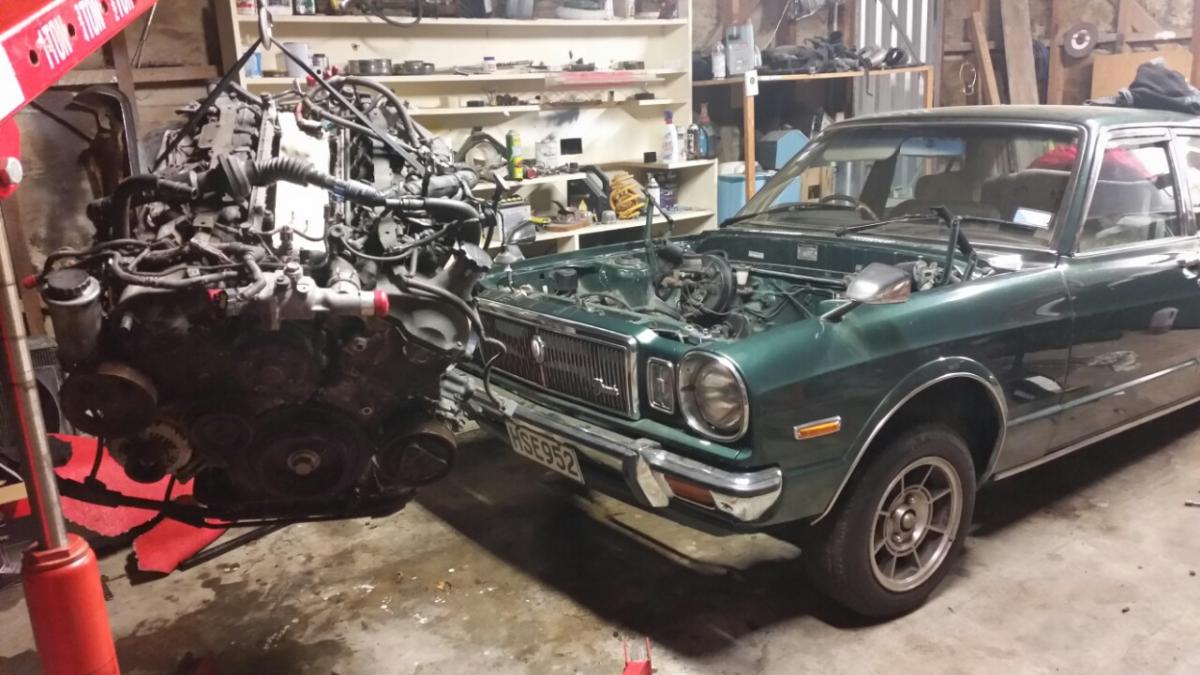
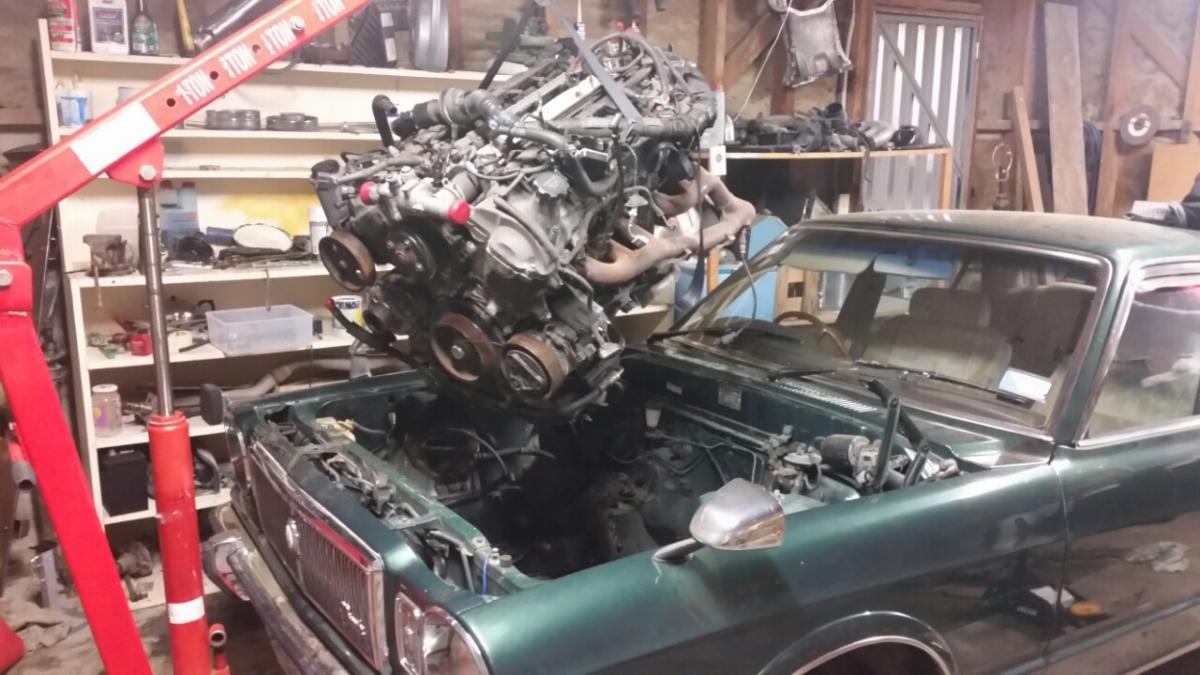
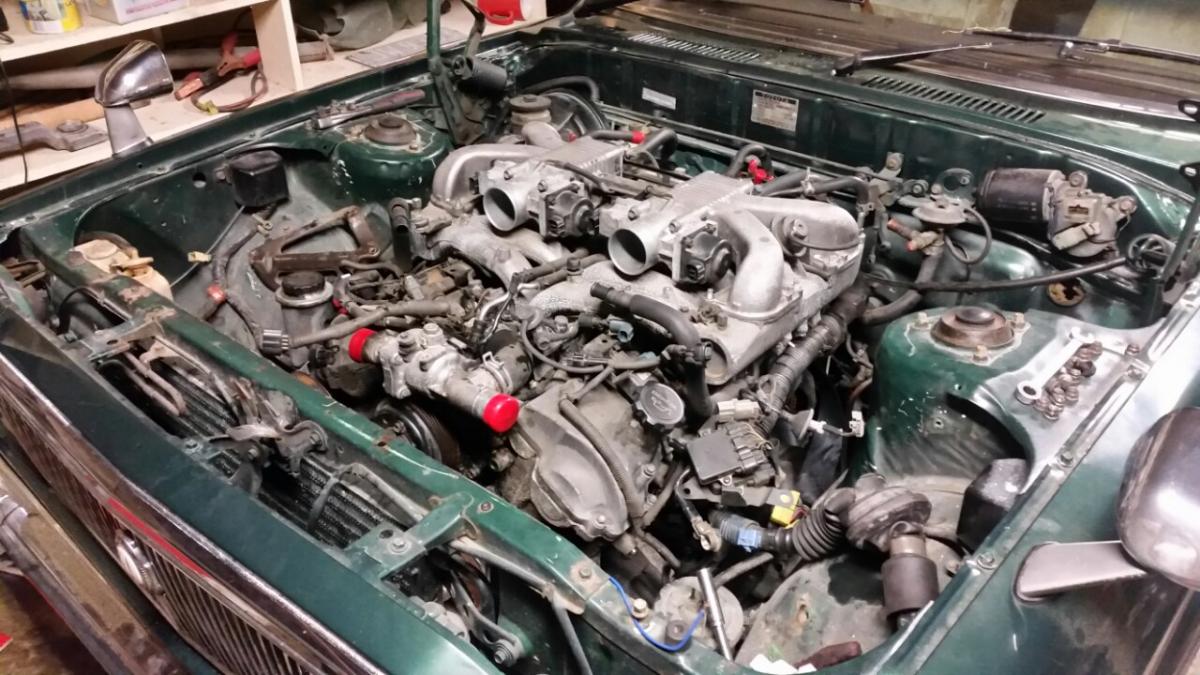
This deserves its own update The engine was off the stand for a reason. In she went... Exhausts need a tweek to clear steering box and rail but have heaps of room to move them in towards the block. Sump fits perfect and the engine mounts are pretty much on top of the subframe mounts. Still heaps of room for radiator. Was meant to be.
 2 points
 -
Oh what a day! Next up is to lengthen the swing arm.2 points
-
Hey man! Saw your car today at Mission Bay and I had to snap a shot, loving it!1 point
-
I had an awesome day including driving (and being driven in) the Fiat X19. Such a fun car. The museum had a very eclectic mix of exhibits and just so many of them that a second visit is definitely required. Here are some of my point and shoot images: The first part of the museum is housed in the old Takaka jail: This lady is sitting casually amongst the army trucks: Imagine how long it would have taken to set up this display: There are little stories and information panels dotted around the place. This was my favourite (the one about pens and death was a classic too but I didn't get a photo):1 point
-
Still truckin' along. Mrs has been dailying it as her 65 bird isn't charging. Lately I've added an oil pressure gauge, and brought a new turbo. I sent the original one to Turbocare and they pronounced it dead. The cleaned the carcass really really well though! Didn't want to upgrade or change much at the moment so managed to find another real good T3 from a guy who posted a pic of a sweet HR30 on Facebook. Cheekily asked if he had any spare and he bloody did! $200 for turb and down pipe was a fair price, I was stoked. Have cleaned it up and painted it, few new gaskets and shit. Blocked off the temp sensor hole ( mine and Scott's never had this) Bunged on the super clean inlet housing from RIP turbo and she's looking sharp. Was going to cost over 1100 for a new core and rebuild. Charged me just under 60 for strip, clean and assess. Also got talking to a piner who did some turbo LDs back in the day and he was schooling me on oil feed. Reckons they had pressure drop taking it from same place as me but with bigger feed line. Messed round with bronzing and drilling the feed to restrict it and got decent pressures and solid feed. I currently cheech a fair amount of oil smelling smoke between gears when driving it decently and couldn't attribute it to turbo seals, over oiling or just being the cost of boosting it. So I had what I though to be my only ever stroke of genius and came up with this Make a panel steel 'gasket' for between the turbo and feed banjo flange and that knocks down the size by a bit. Plus with it being at the top and easily accessable I can make new ones either bigger or smaller to suit, and swap between while test driving it. That hole is about 2.5mm. We shall see, not sure when I'll swap the turbos over..need to get the bluebird fixed so I can have my damn car back! I also re-re-redid the roof paint today. Where I did a rust hole from roof racks, I used zinc spray to prime it as I had nothing else, it softened the bog and peeled. Then I took it back to bare and used can primer, and it peeled. Last week I did it again but got some decent sandable etch and ran out of daylight so hit it again today and finished it. I got a 2nd hand stereo, it's a few series above the one I had but identical looking. Means I don't have to change wiring, know how it works. This one is lit blue so matches interior. I fucked the last one by watering my cactus on the dash and overflow trickling down the speaker vent. First the display died, then it wouldn't turn off with the car, then It got to a point where it was functioning but only the subs worked, hahaha. Mrs had an accident in it last week. The battery shucked the hold-down clamps on a bumpy street and bridged the terminals. She said the clutch disappeared and she pulled over then much smoke. A passer by jumped out, knew how to open the bonnet and extinguished it. I always have extinguishers in my old heaps. It burnt a mega hole in the side of the battery, melted very little wiring and the extinguisher blew acid and melted plastic all over the side of the engine/bay. Didn't even blow a fuse, so fucking lucky. So gutted, got another battery and clamps and back to where we started. Could have done without the expense, but that's life. Dunno how or why clutch disappeared. Was fine when I drove it home. Then I brought another bench seat! The one toddy mentioned in discussion, it should be here on Monday. It's pretty ugly, but it's miles ahead of mine currently. Will buy me some time to get one re-upholstered. After the wedding.1 point
-
ill see what I'm up to. kind of keen. i have a random celica in my shed at the mo which id like to get rid of because you have to go outside to change your mind at the mo. i shall get back to you all.1 point
-
Finally got around to applying power to my megasquirt ECU today to make sure i didnt Chernobyl it during construction. seemed to function properly. synced up no worries. and i jammed the vac hose into the MAP sensor. and it displayed its albiet dismal vacuum properly. tomorrow will hopefully consist of making the mods required to run my engine and getting a bit more of the ecu functional. hopefully wont be too long till its running the engine!1 point
-
Oxy sensor thread is M18x1.5. Can get bungs from Chase Exhaust, Pitstop, Trademe etc. When I bought my Innovate wideband it came with the socket and bung. What G4+ ECU are you using, Storm?1 point
-
Good productive day today. Motor is out, now have to swap over some parts from old one to new old one. Also does anyone know what I can use to extend my oil pressure gauges. At the moment it is this blue rubber hose, doesn't look very nice.1 point
-
1 point
-
I'm sure she will think its a supreme idea1 point
-
Engine oil causing clutch issues no leak because its all being burnt off/atomized slowly? Maybe the flywheel bolts need that sealant on them similar to a JZ1 point
-
^ i have never understood why turrets mills are popular/common, on a horizontal+universal head everything is literaly 500x easier. i lumbered myself with the former only because it was for sale 500m down the road & cry everytime a dirt cheap hori comes up on tm as no cunt ever wants them/has realised how much better they are.1 point
-
Hi There, I have some AJPS coilovers from Australia, i have had them x-rayed and they passed, however the collars are stitchwelded and not welded right the way around. Would this pass cert? Also, i have some UEO STYLE (Nagisa Autos, made in Japan) lower control arms that have rose joints. These couldnt be xrayed without stripping the paint. Do these need to pass an xray inspection for cert also? Thanks1 point
-
I bought that brochure sorry. Need it for work.1 point
-
Coolest 50cc ever? Due to the lack of raw information on the ‘Net about the small motor Suzuki’s I have decided to dig up information the ‘old school’ way- by digging around a Book. From Mick Walker’s 2006 published by Crowood Press titled ‘Suzuki Production Motorcycles 1952-1980. There was also a smaller ‘50’ version with the same disc-valve induction (49.9cc, 41 x 37.8mm) which, running a compression ratio of 6.7:1, put out 4.9bhp at 8,500rpm. The A50 series also had the advantage of a five-speed instead of four-speed gearbox. Over the years (starting with the sporty AS50 of 1968), various versions were built with the same basic engine, including the A50, the AC50 (like the AS50, with raised exhaust, abbreviated chainguard, and either exposed springs or gaited forks), the AP50 (‘P’ for pedals) and A50K (a restricted performance model. Sadly the book does little more than mention the TS50 and RV50 simply exist.1 point
-
Things to do... I've still got the factory narrowband oxy sensor in the exhaust manifold, only for sake of preventing an exhaust leak. (left hand side) So I need a nut to weld or screw in, anyone know what the thread pitch is? I guess I can just take the oxy sensor to an engineering shop or whatever. Had this guy lend a helping hand: Just a note on the T3 AE86 castor arms - If I were to do this again I would likely just use standard arms instead with polyurethane bushes. Reason being that these things seem way overkill on weight and size, and also the adjustor part looks to have rusted which is going to make it a pain to adjust later on. Where as the standard castor arms still seemed fine after 30 years on the road or whatever, rather than 10,000kms later looking a bit worse for wear. Very high quality product dont get me wrong - but just not really ideal for my application I dont think. I havent checked the rose joints but I consider them a maintenance item which will likely need replacing at some stage too. Also the Aliexpress 'titanium' heat wrap is actually excellent. It's lasted way better than the fibreglass stuff I've used previously, and it's only having problems where I've been a noob wrapping it. Even when banging it on the side of the car getting the exhaust in or out, it looks to hold up pretty well. Reccomended! It looks rugged using hose clamps all over it, but works better than anything else I've tried and is easily adjustable if you need to rewrap a part or whatever. The goal was to reduce under bonnet temperatures, I havent measured this either way but it seems to have made an improvement to intake manifold temperatures according to the hand-ometer. I have taken both of the front gaurds off, and it is absolutely shit caked in dirt! From some gravel bashing/nats/etc. I wouldnt normally care except for that dirt holds moisture, which means rust of course. Need to dig out the wheel well gaurds if they still fit, or come up with some other solution. Anyone done anything like this before? Not too sure where to start. Annnnddddd another thing I want to fix, is that the wiring comes through the firewall at a really fiddly spot. It's only this way because it's how the factory loom needed to go, which is no longer relevant. I think I'm gonna end up buying the 2.5 meter long look for the LInk, and run the link wiring all the way to the motor. As the other problem that this would fix is the absolute clusterfuck of messy wiring under the dash that I can easily get rid of. It's just been an hour or two of basic spannering and I've got the whole front of the car off, and the motor and gearbox are about ready to come out. Love how easy it is working on this thing!! And as time goes on I find ways to make it better and easier too. Will get the engine crane tomorrow and hopefully have the motor and box apart some time over the weekend.1 point
-
1 point
-
arr shucks thanks best part I can still go to the swap meet on the sunday at vegas1 point
-
I take it op is taking about a k50 gearbox. Have always ran castrol vmx in my rwd toyota boxes. No drama's guessing everyone likes the redline stuff because it says "shockproof" on it and has some die in it, so it looks fancy when you pull apart the gearbox ?1 point
-
Hey guys, Meet at the ferguson street lower plaza carpark at 7pm (the ashley street/farmers side can't happen unfortunately) meet us there at 7, then we'll grab some takeaway feeds at 7:30-8 from surrounding places. - Just a note, feel free to invite other cars/people along, but you will be responsible for them! Please leave no rubbish and no skids/rowdy driving in the carpark - We've been given permission from the Plaza to use this, and we don't want to loose it. We have a rain free car park, and the barrier arms go up shortly after we arrive, meaning no parking fees. This won't be on facebook as such, so make sure you write it in your diaries/phones. Make sure you bring some warm clothes and a camera. Seeya there!1 point
-
It is assembled, new brake hardlines made up. All that's left are brake pads and the clips to hold the flexible lines in place. IMG_1855 by Richard Opie, on Flickr IMG_1878 by Richard Opie, on Flickr IMG_1863 by Richard Opie, on Flickr That, my friends is the exercise in doing things the hard way. But pretty stoked it's sussed. IMG_1900 by Richard Opie, on Flickr IMG_1910 by Richard Opie, on Flickr Had some of the fasteners and suchlike for the ITB's plated in the last batch I had done, so I thought it would be rude not to pop all the bits on the motor for a little bit of motivation. It's not going to take too much effort to get this thing clean enough to eat off, that's a couple of jobs down the list at this stage though! Thanks for looking1 point
-
More progress. Finished cleaning up all the seams and seam welding the chassis. Once I got into the swing of it it wasn't too bad and Simons welder was ace for it. Sneak shot of engine bay: Decided to cut the spare tyre well out and make a diffuser from some Sheetmetal. Quite happy with how it turned out. Will add fins and underbody panels once all the bumper (what will be left of it) etc goes back on Currently working on trying to figure out how to get the exhaust to exit above the diffuser.. best option so far is to weld up the rear section of the staonless exhaust then weld it into a 3" mild steel pipe and weld it into the car.. just means the rear section will never come out. Undecided at this stage - open to ideas! Also making a box for the 60l fuel cell to sit in the rear seat. I decided on 60l because the long term goal with this car is to do targa. The standard 45l tank would of never been enough and also gives me the option of endurance racing. The old man's ae82 uses approx 1l per km and this will be making about the same power so when being thrashed it's sure guna drink the gas.. Just trying to source a jaaz fuel cell with all the fuel senders etc for a decent price. I know this doesn't look like much but for me this has been a huge step forward welding in this cut outs in the tunnel and finishing off the floor repairs. There were so many holes I'd drilled in the past for seat/battery mounting! I filled at least 15 on just one side of the car. Next step is to mount the seat rails and mock up the dash.. then it will be off to the sandblasters again for the shell and the dash will be sent off to be flocked. Speaking of the dash quite happy with myself here.. Had planned on spending big money molding a carbon dash for coolness factor/lightweight. Turns out abs plastic has a density much less than carbon fibre! So I stripped the vinyl and foam off a ae111 dash (about 5 kg lighter than the Ae101 dash). Total weight is between 2-3kg I'm stoked! Still trying to decide on colour.. options are either white or something along these lines http://lh6.googleusercontent.com/proxy/A2INBHCZhvLKzpoWlW1meodeWGwBvkiG50ZLxglHQmgLcL6uXCcHypQRpEZ0U2u_JzJeLOarO1BIYrmKNGWm0crX3VwCu_hhWOsU0Msc6BzBIffDrg=w443-h332-nc1 point
-
http://page4.auctions.yahoo.co.jp/jp/auction/d1661872501 point
-
Keen to tour sheds. Might be option A though, unfortunately i don't have a shed to show off, my cars live on my parent's driveway... Have met some of you at monthly meets, hope i'm not too much of a weirdo.1 point
-
Sleeektoy was at nats bro. You might not have met him but I will vouch for him with no qualms.1 point
-
Yeap definitely count me in for July date. I understand I haven't spoken to many of you, but do turn up to monthly/other meets now and then, others will confirm I'm not (too much) a weirdo.1 point
-
spotted I'm hugely proud of this. The same issue as the immaculate ZERO3 as well, A++1 point
-
Yeah that sucks. Your garage is miles from that corner! must have been going far too quick to make the turn. (Yeah, one of your later pics gave it away, I recognise the jeep)1 point
-
Totally fixable bra.1 point
-
Geez, that sucks! Hope the insurance comes through for you.1 point
-
I've put the rego on hold for three months, because it'll be a while till I can get the clutch out. In the meantime however, I thought I'd do some work on other bits on the car write a haiku: Registration holds with more confidence than clutch. Fuck you, stupid car In super fricken awesome news though , Link decided to make all of their unlockable ECU upgrades free with the lates bout of firmware for the G4+ So this means I can now setup knock control, extra datalogging, OBD2 junk, and electronic throttle control if I want. I was looking at buying knock control eventually, so pretty happy with that. So I'll wire up the knock sensor to the proper input now instead of laptop and headphones. I'm super keen on launch control and flat shifting! These were existing features but need a clutch switch wired in. I thought this might be a bit tricky to do, but I had a look under the dash... The clutch pedal has a stopper bolt to limit its travel. The brake pedal has a stopper too, but it's threaded switch instead of a bolt. That has the same thread pitch, woot! So I got another brake switch from a Toyota at Zebra today, just need to screw it in and wire it up. Easy! This in conjunction with traction brackets and the higher rpm limit now, i reckon I might scrub a little time off my PB of 14.3 at the drags.1 point
-
I scored some wheels off Tank a while ago in anticipation of getting one of these things. They're Enkei 知りますか 14x6 Didnt know what tyre size to run on these. I ended up choosing 155/55/14. Found a pair on trademe from JP Auto Spares. I asked if they had another pair which they did and had them fitted up. Awesome service and very cheap. The Japanese guy there was extremely thorough. Cant praise them enough. So all fitted up Time to try them on. Side profile pic for reference And with them fitted I need to sort the front rims out. The rotors have bolts on the mounting face and the rims foul on them. Ive asked a few people for ideas. And of course you need to do a MS Panit lowering job Now to get it around that height. If you've had experience with lowering a Mirage or fitting mags to the front please let me know Thanks1 point
-
Been a bit slack in posting but heres a couple vids from late. This was Taupo yesterday https://youtu.be/eavApF-8qC4 And Hampton a couple weeks back https://youtu.be/yEk7r5H0P5M Not much has happened with the car as usual apart from the panels getting a little rougher and the rear bumper is pretty toast.1 point
-
So I wanted indicator and warning lamps for between my gauges. The factory warning lamps were aged beyond use and I wasn't paying for replacements (plus they wouldn't fit anyway with my gauges) I started looking for aftermarket warning/indicator lamps but they are either in the wrong configuration, extremely expensive, extremely ugly or just not available. Even the kit car guys don't seem to have a nice supplier of lamps and for some reason I had myself set on having logos visible when lit. (For the record, the nicest I found was this, but the CAR version with battery rather than N isn't available. AND LOOK AT THE PRICE http://www.carbuildersolutions.com/uk/t-shaped-warning-light-panel-bike-version) so I bought a Nissan maxima gauge cluster off trademe for $1+ post and cut out the lenses.. Then bought some 3mm white diffused lense LED's And machined these stainless bolts. 3mm hole right through with a very large chamfer to spread the light out kinda. Sat them in a stand and gave them power, not enough volts per LED so very dim I needed them to light up so that I could quickly fill each one with clear epoxy and then plop the lenses down on top in the correct position. As the lenses are black when not lit its impossible to line them up without the led on. The idea was that epoxy would help diffuse the light out to the extremities of each lense.. Seems to have worked OK. So now I have these. Very hard to photograph. They look good in person but photographs with real bad hotspots tomorrow I will trim the lenses down and finish on the linisher with a worn belt..STOAKED with the outcome considering total $20 spent Edit. Well, I tried. Turns out this plastic has completely rejected the epoxy. I wonder what other adhesives could be used? To bond the lenses to the epoxy beneath.1 point
-
66 rebuilt speedo, recalibrate to 200 mph. I'm stoked with this thing !1 point
-
All barred up and exhausted. Home for wiring / plumbing / coating / painting stuff.1 point
-
Turned up to work 6.30am this morning to the best surprise. A present from Stacked inc, in Japan. So stoked with them. Best find ever. from http://www.i-love-recycle.com/ if anybody cares. Now just to wait patiently for the parts in the container thats due to land any day now.1 point


This leaderboard is set to Auckland/GMT+12:00