
Leaderboard


Popular Content
Showing content with the highest reputation since 12/06/25 in all areas
-
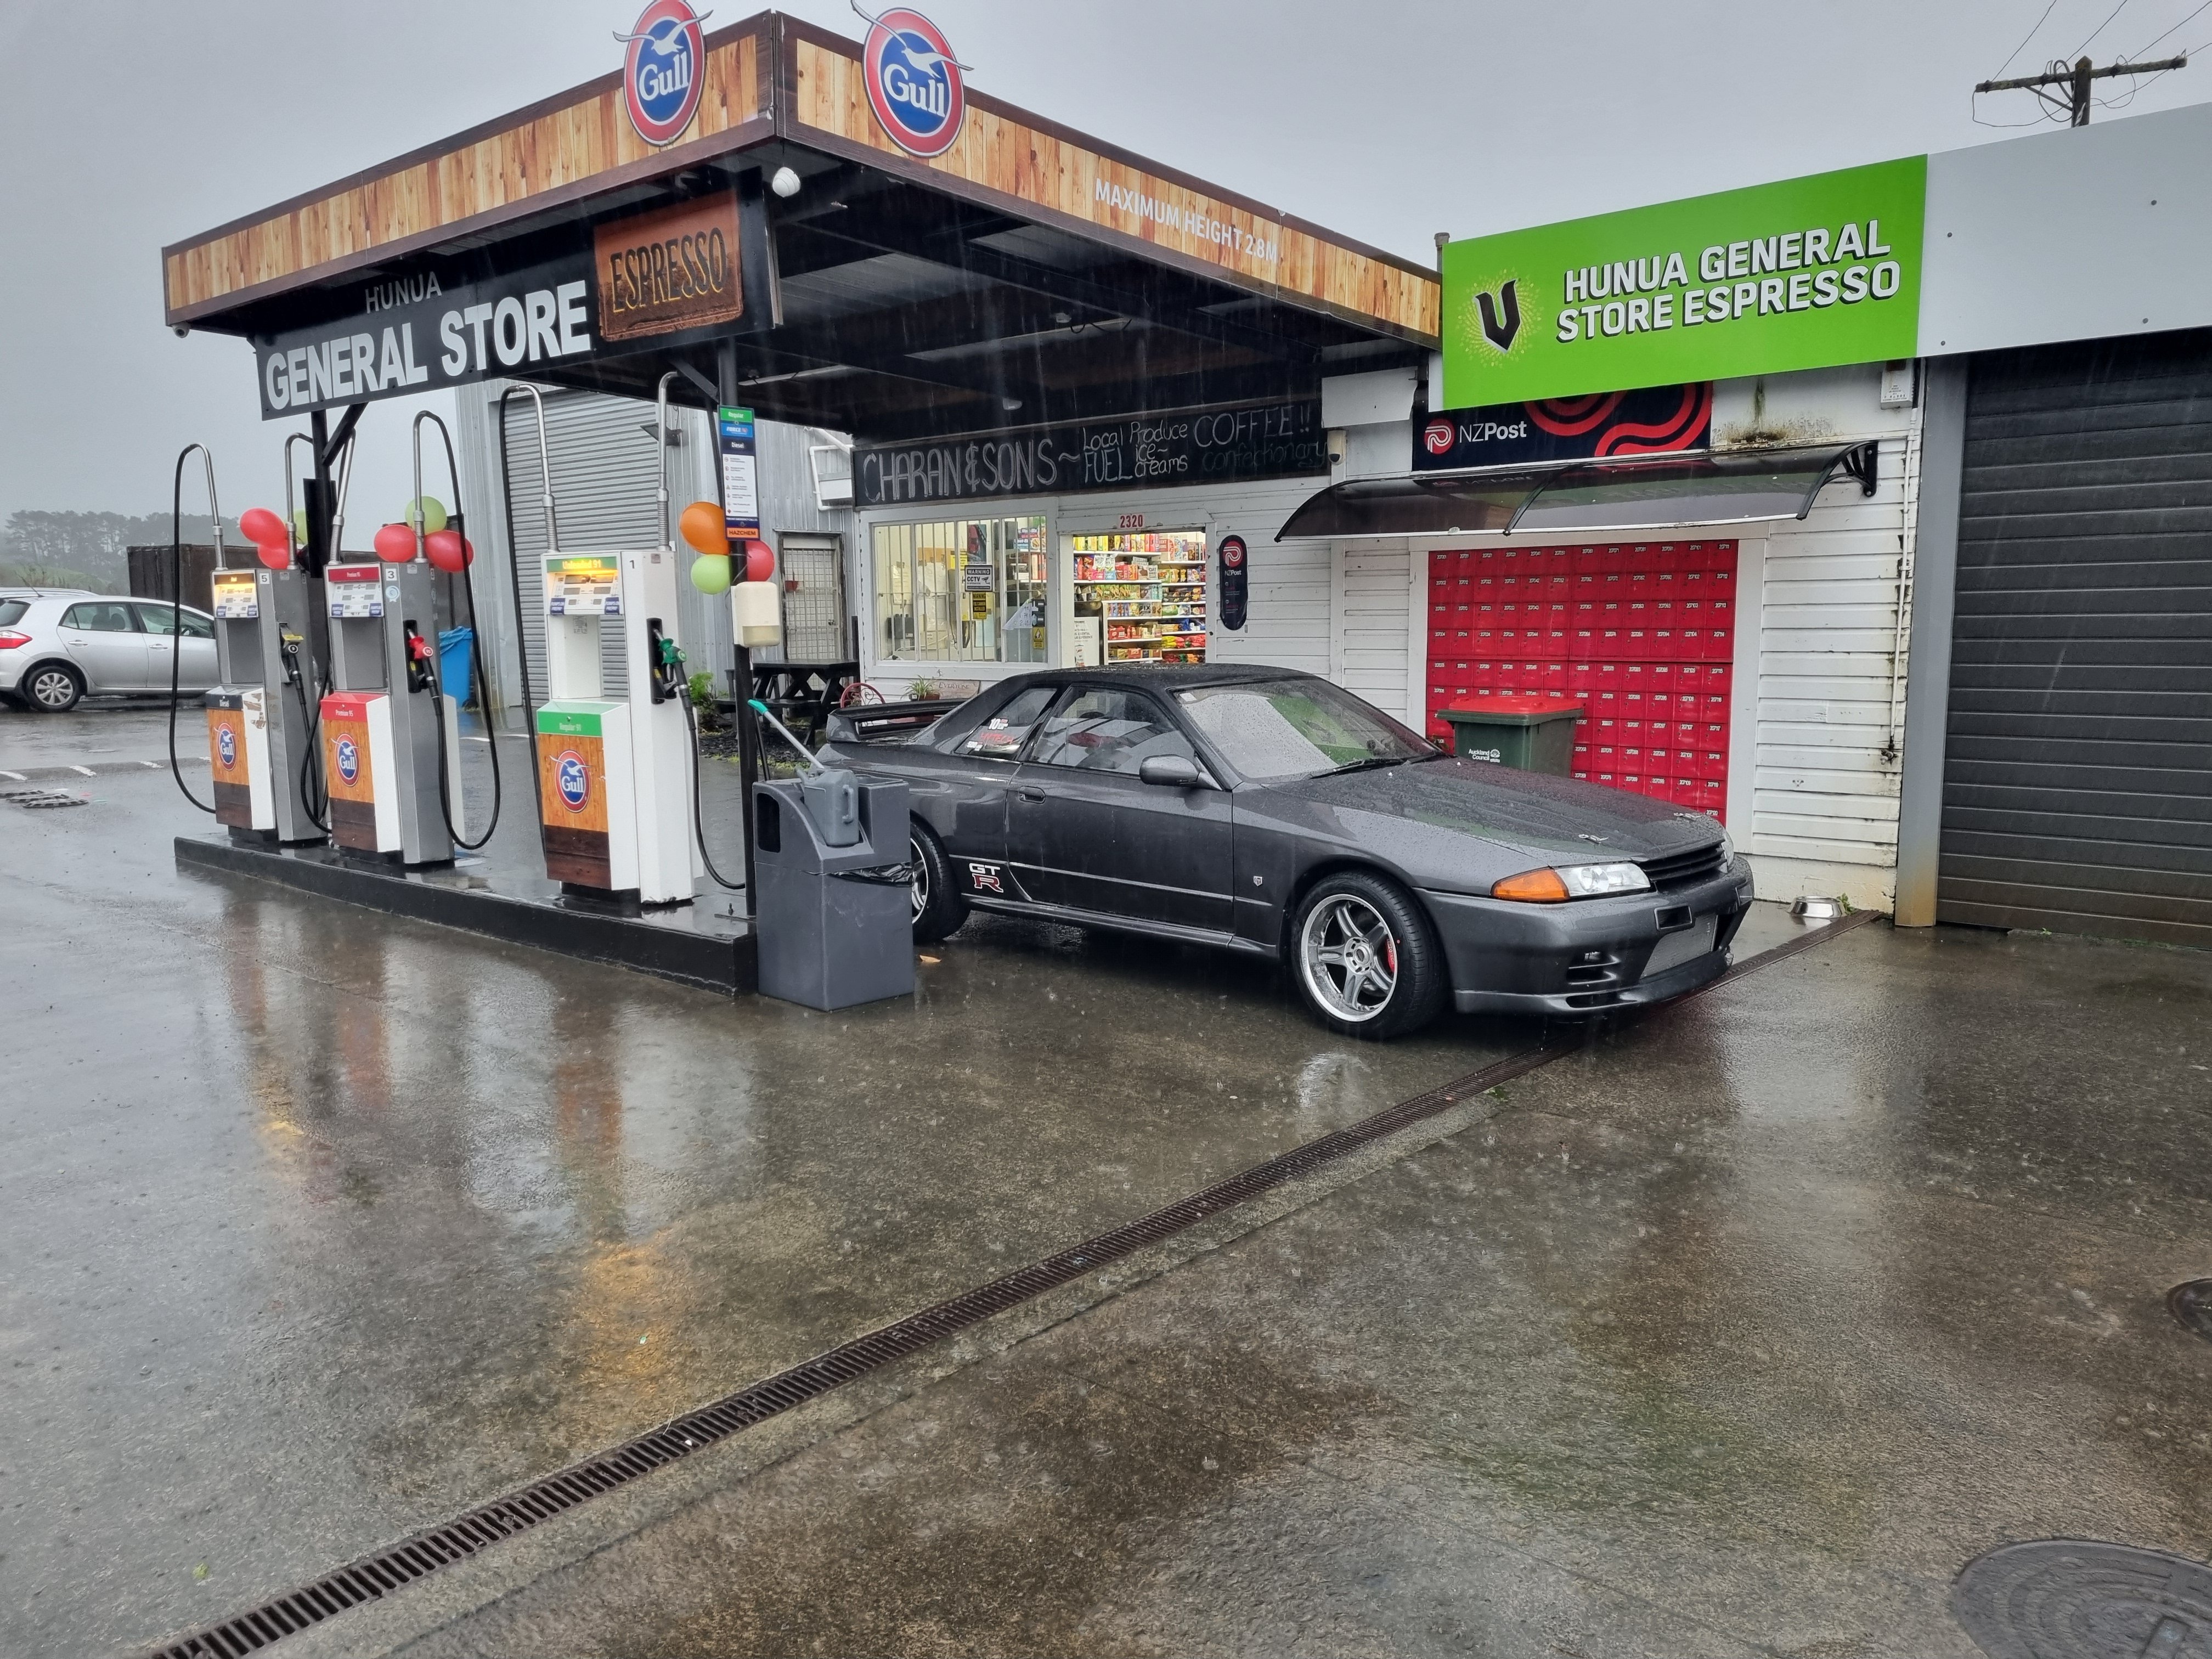
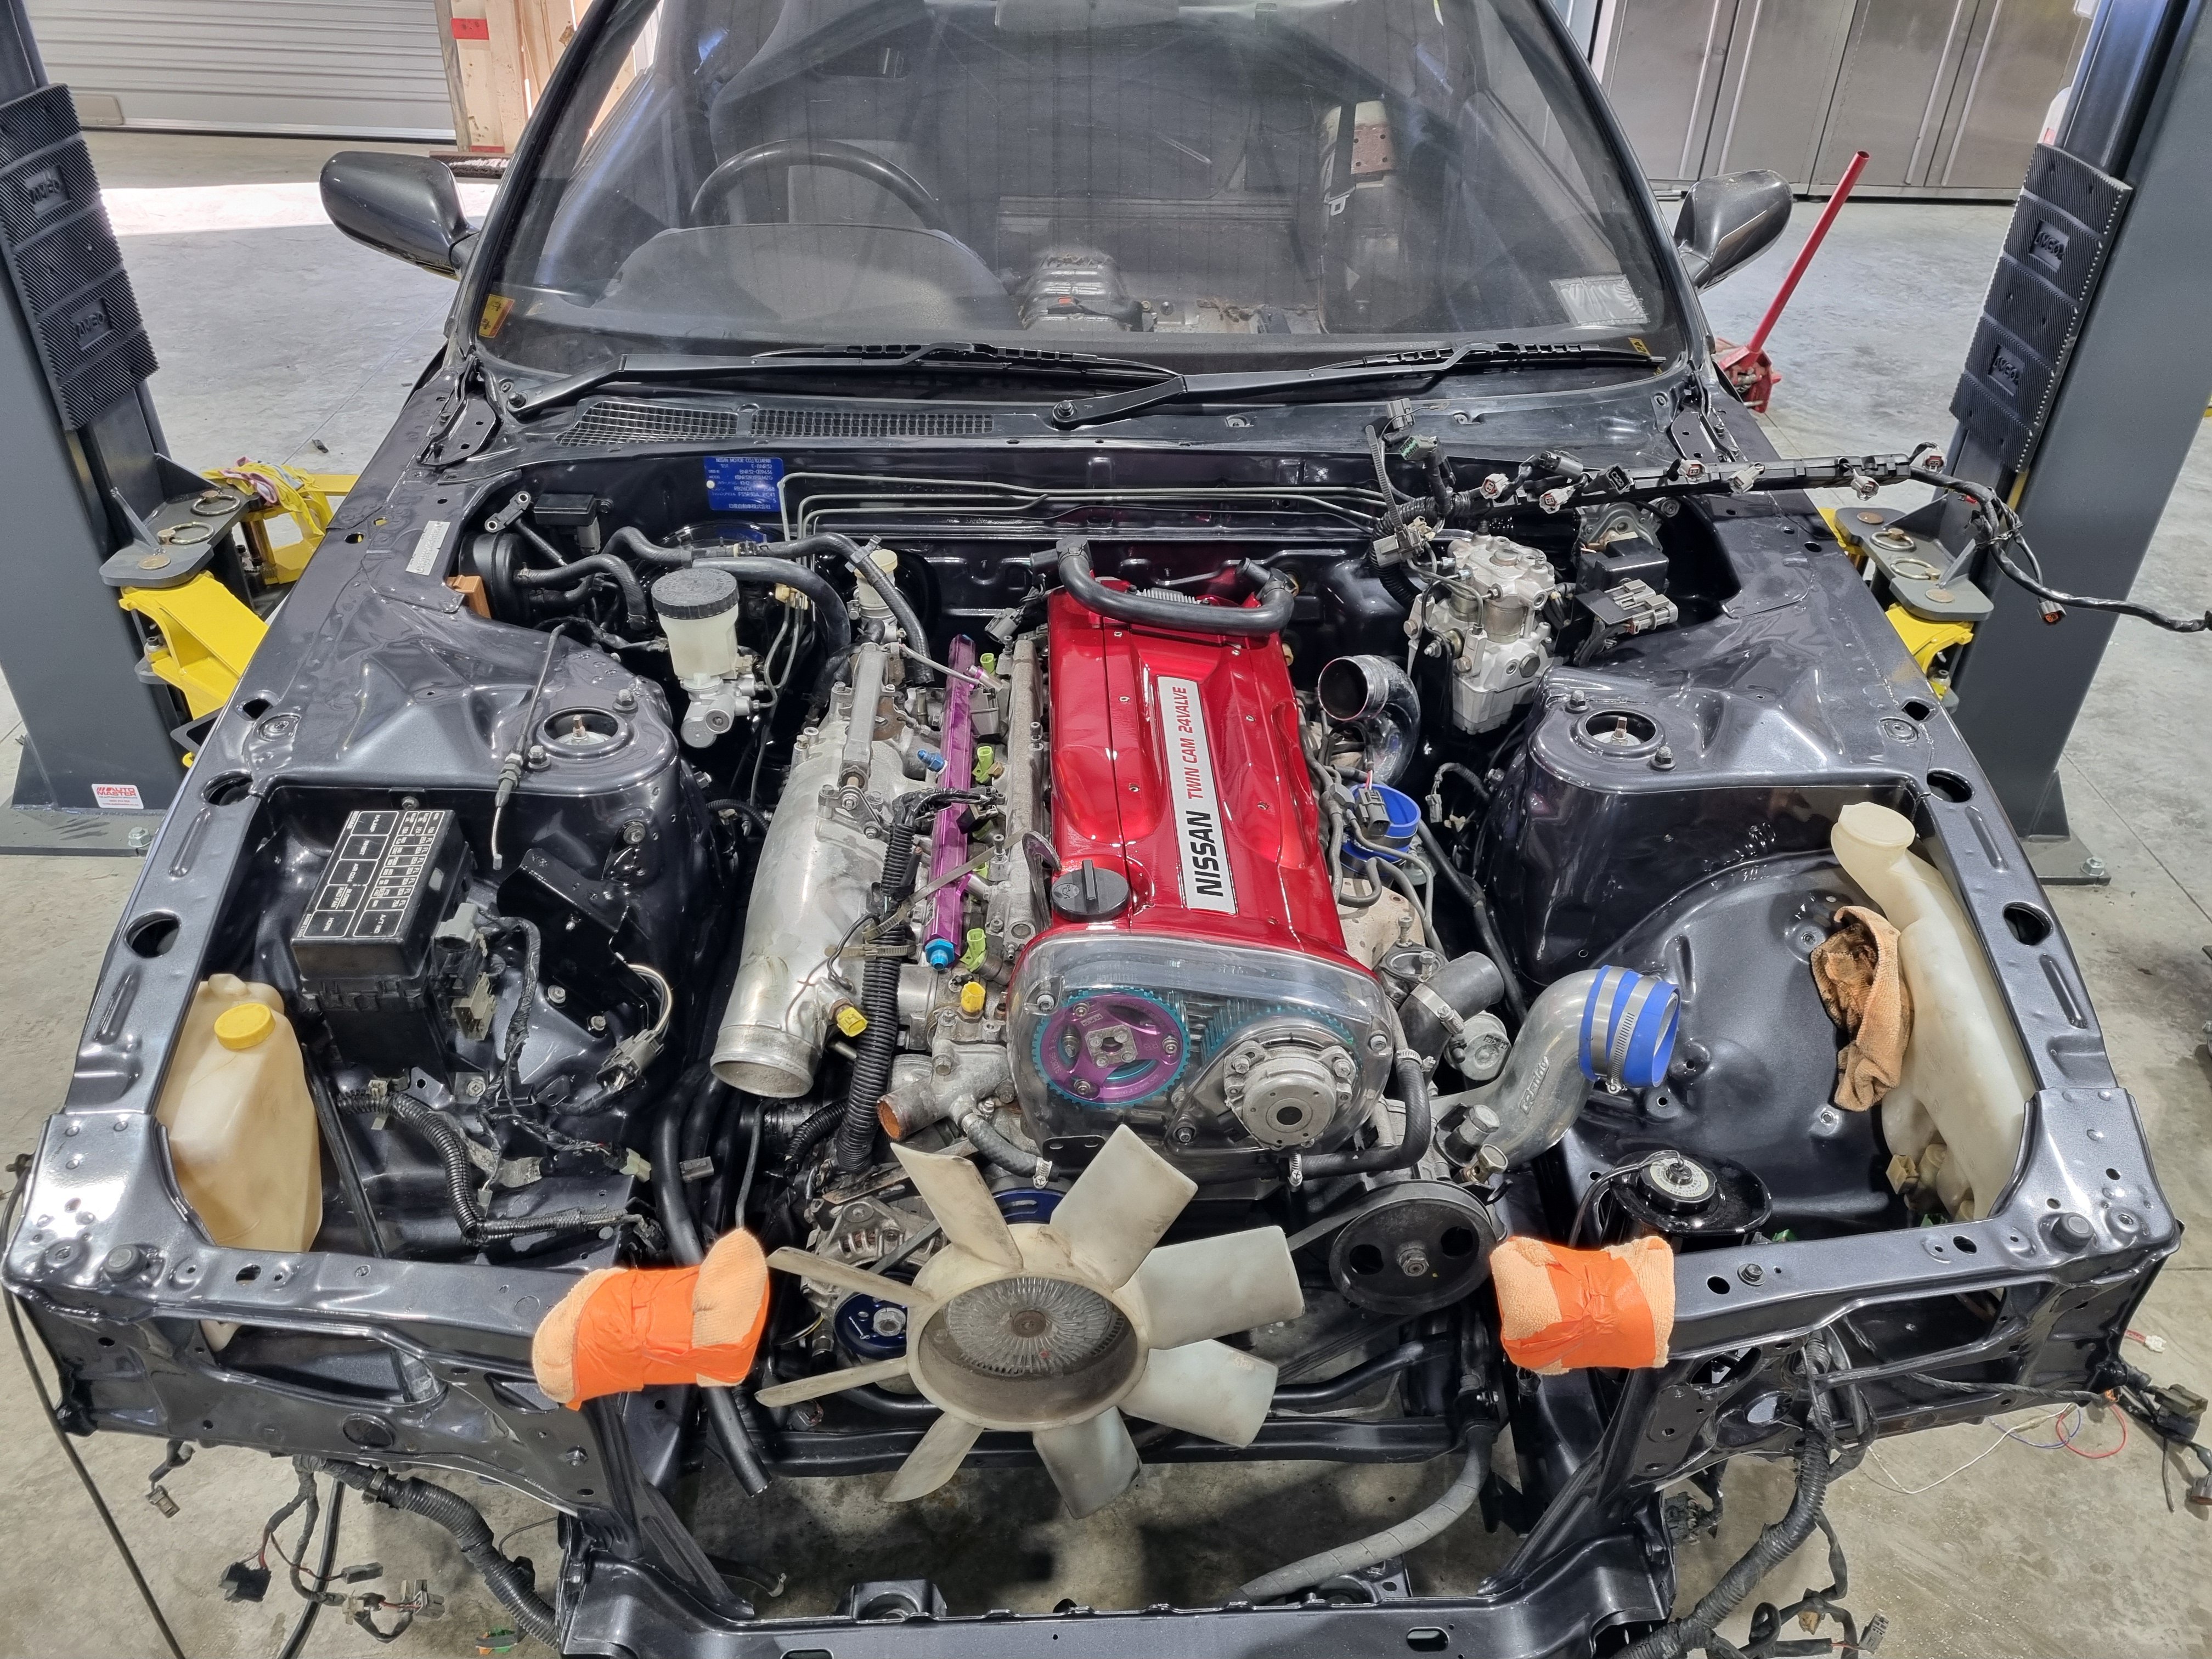
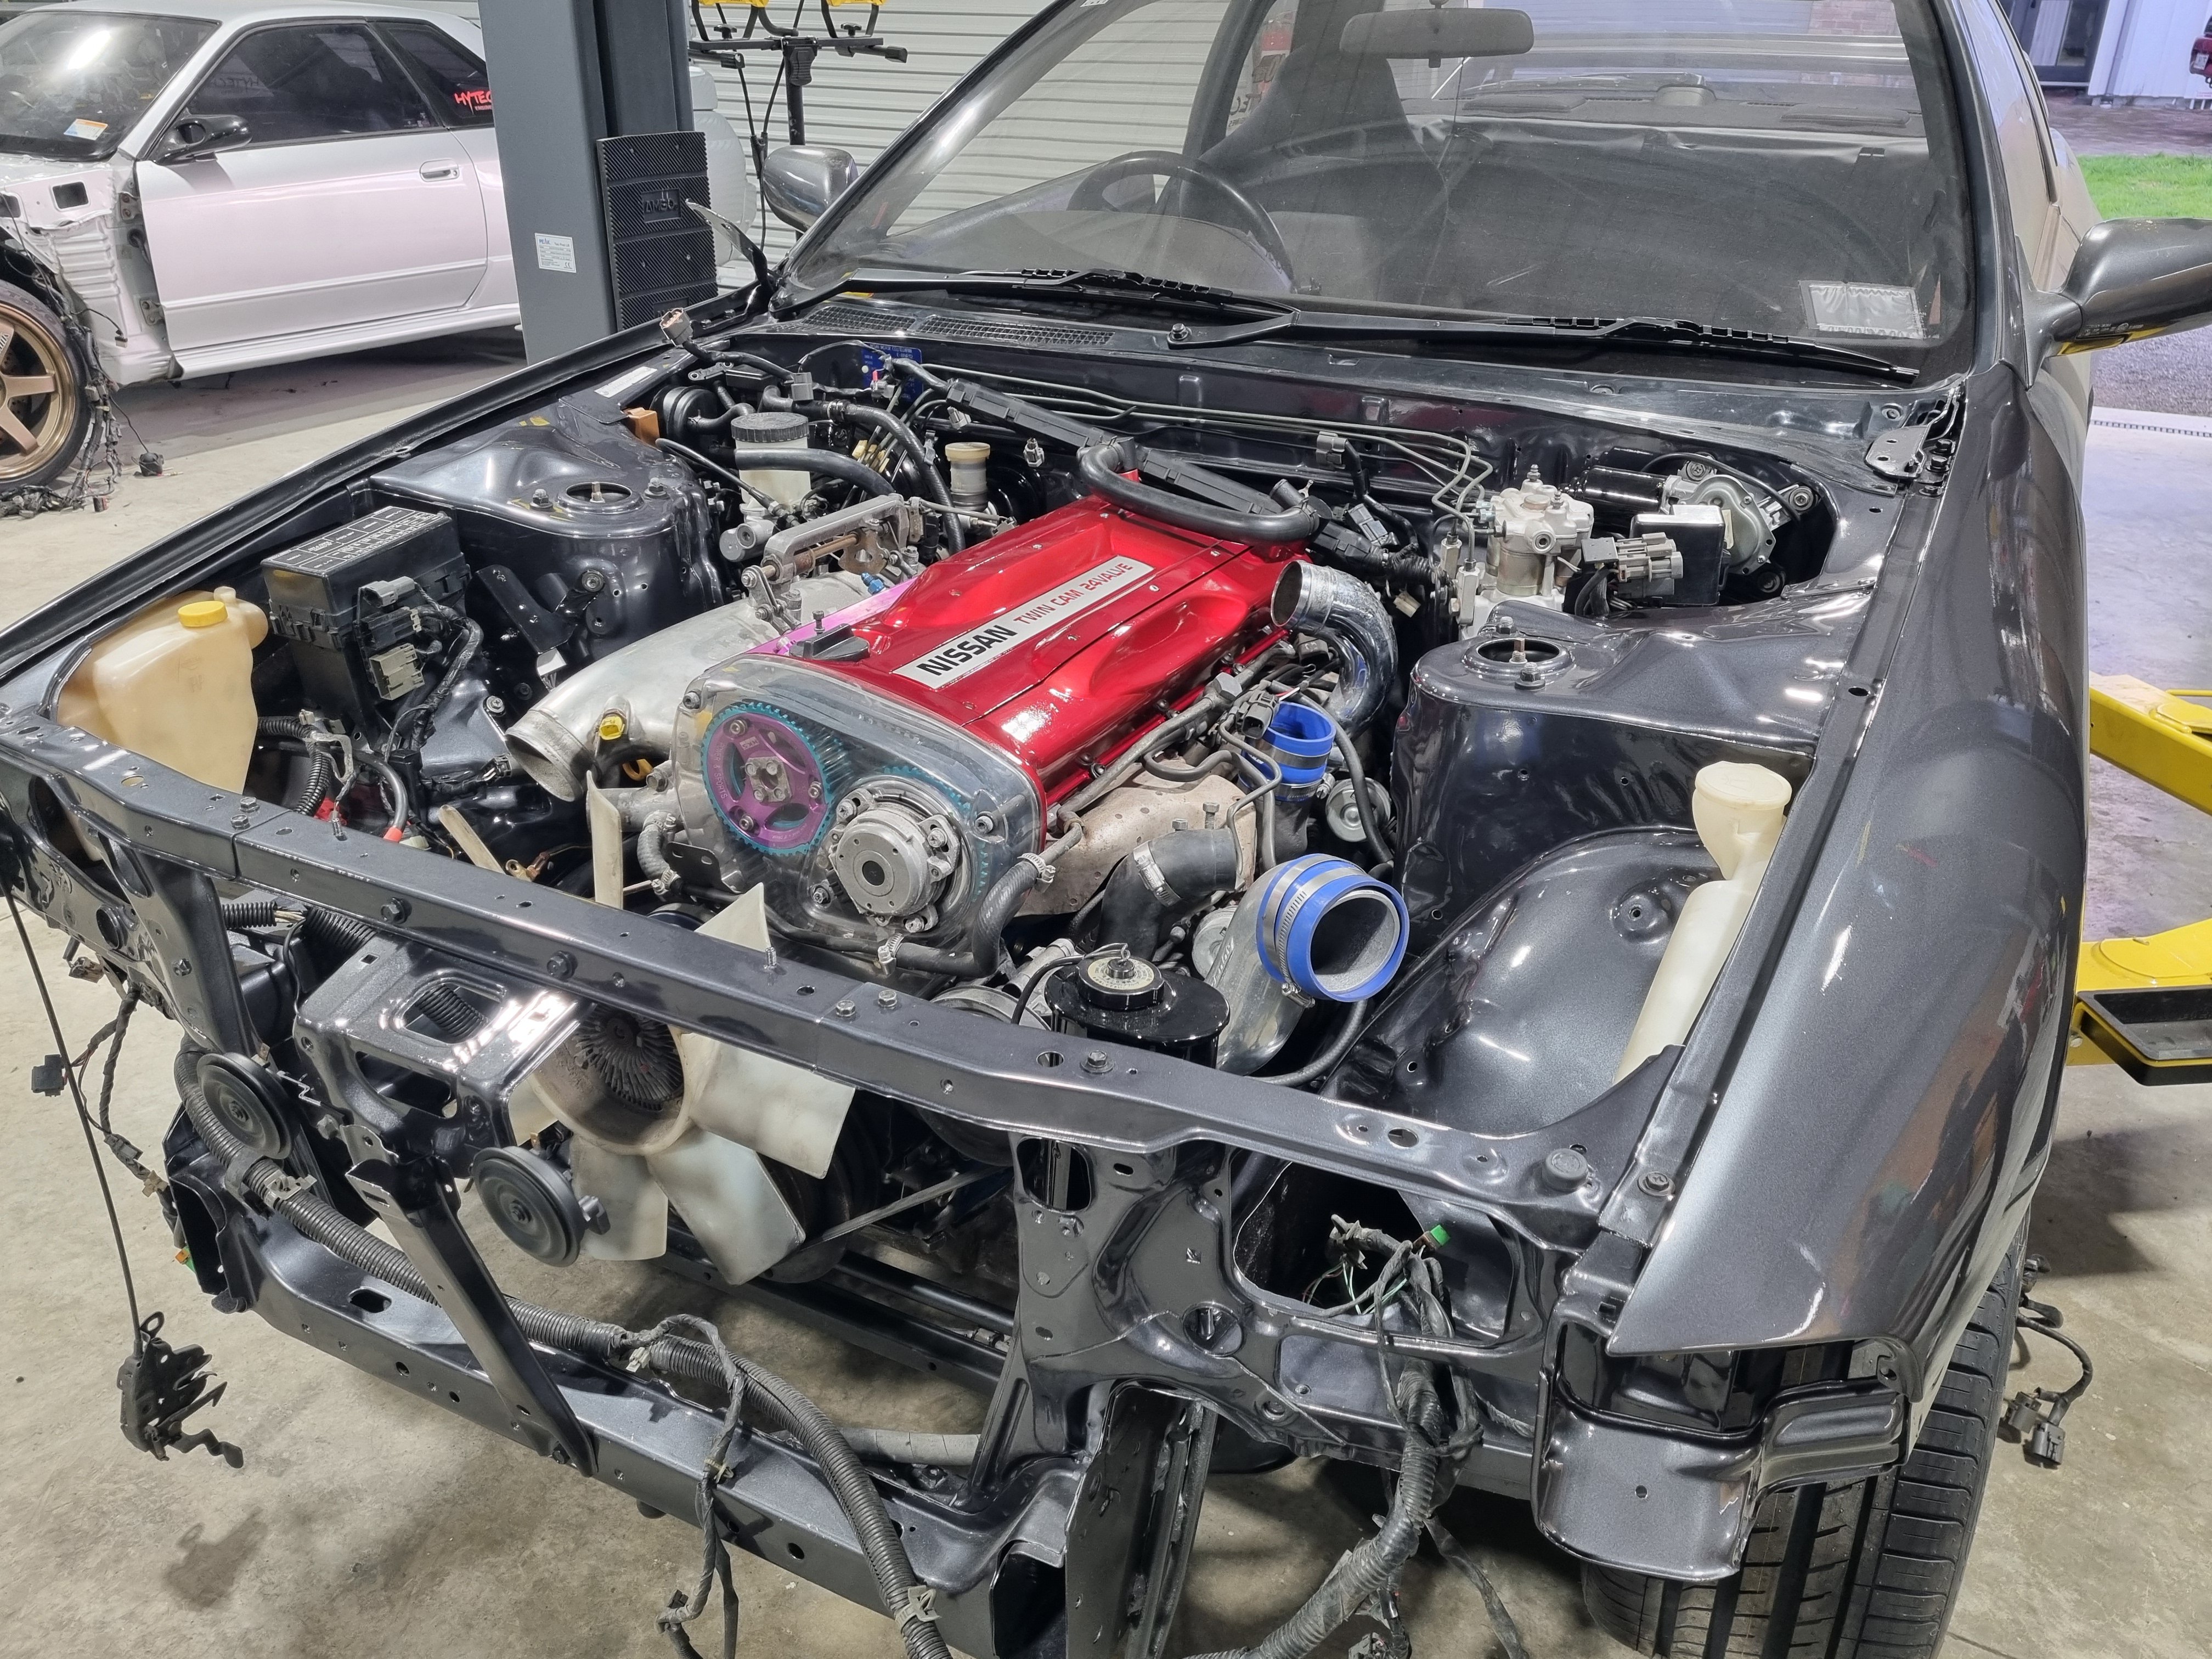
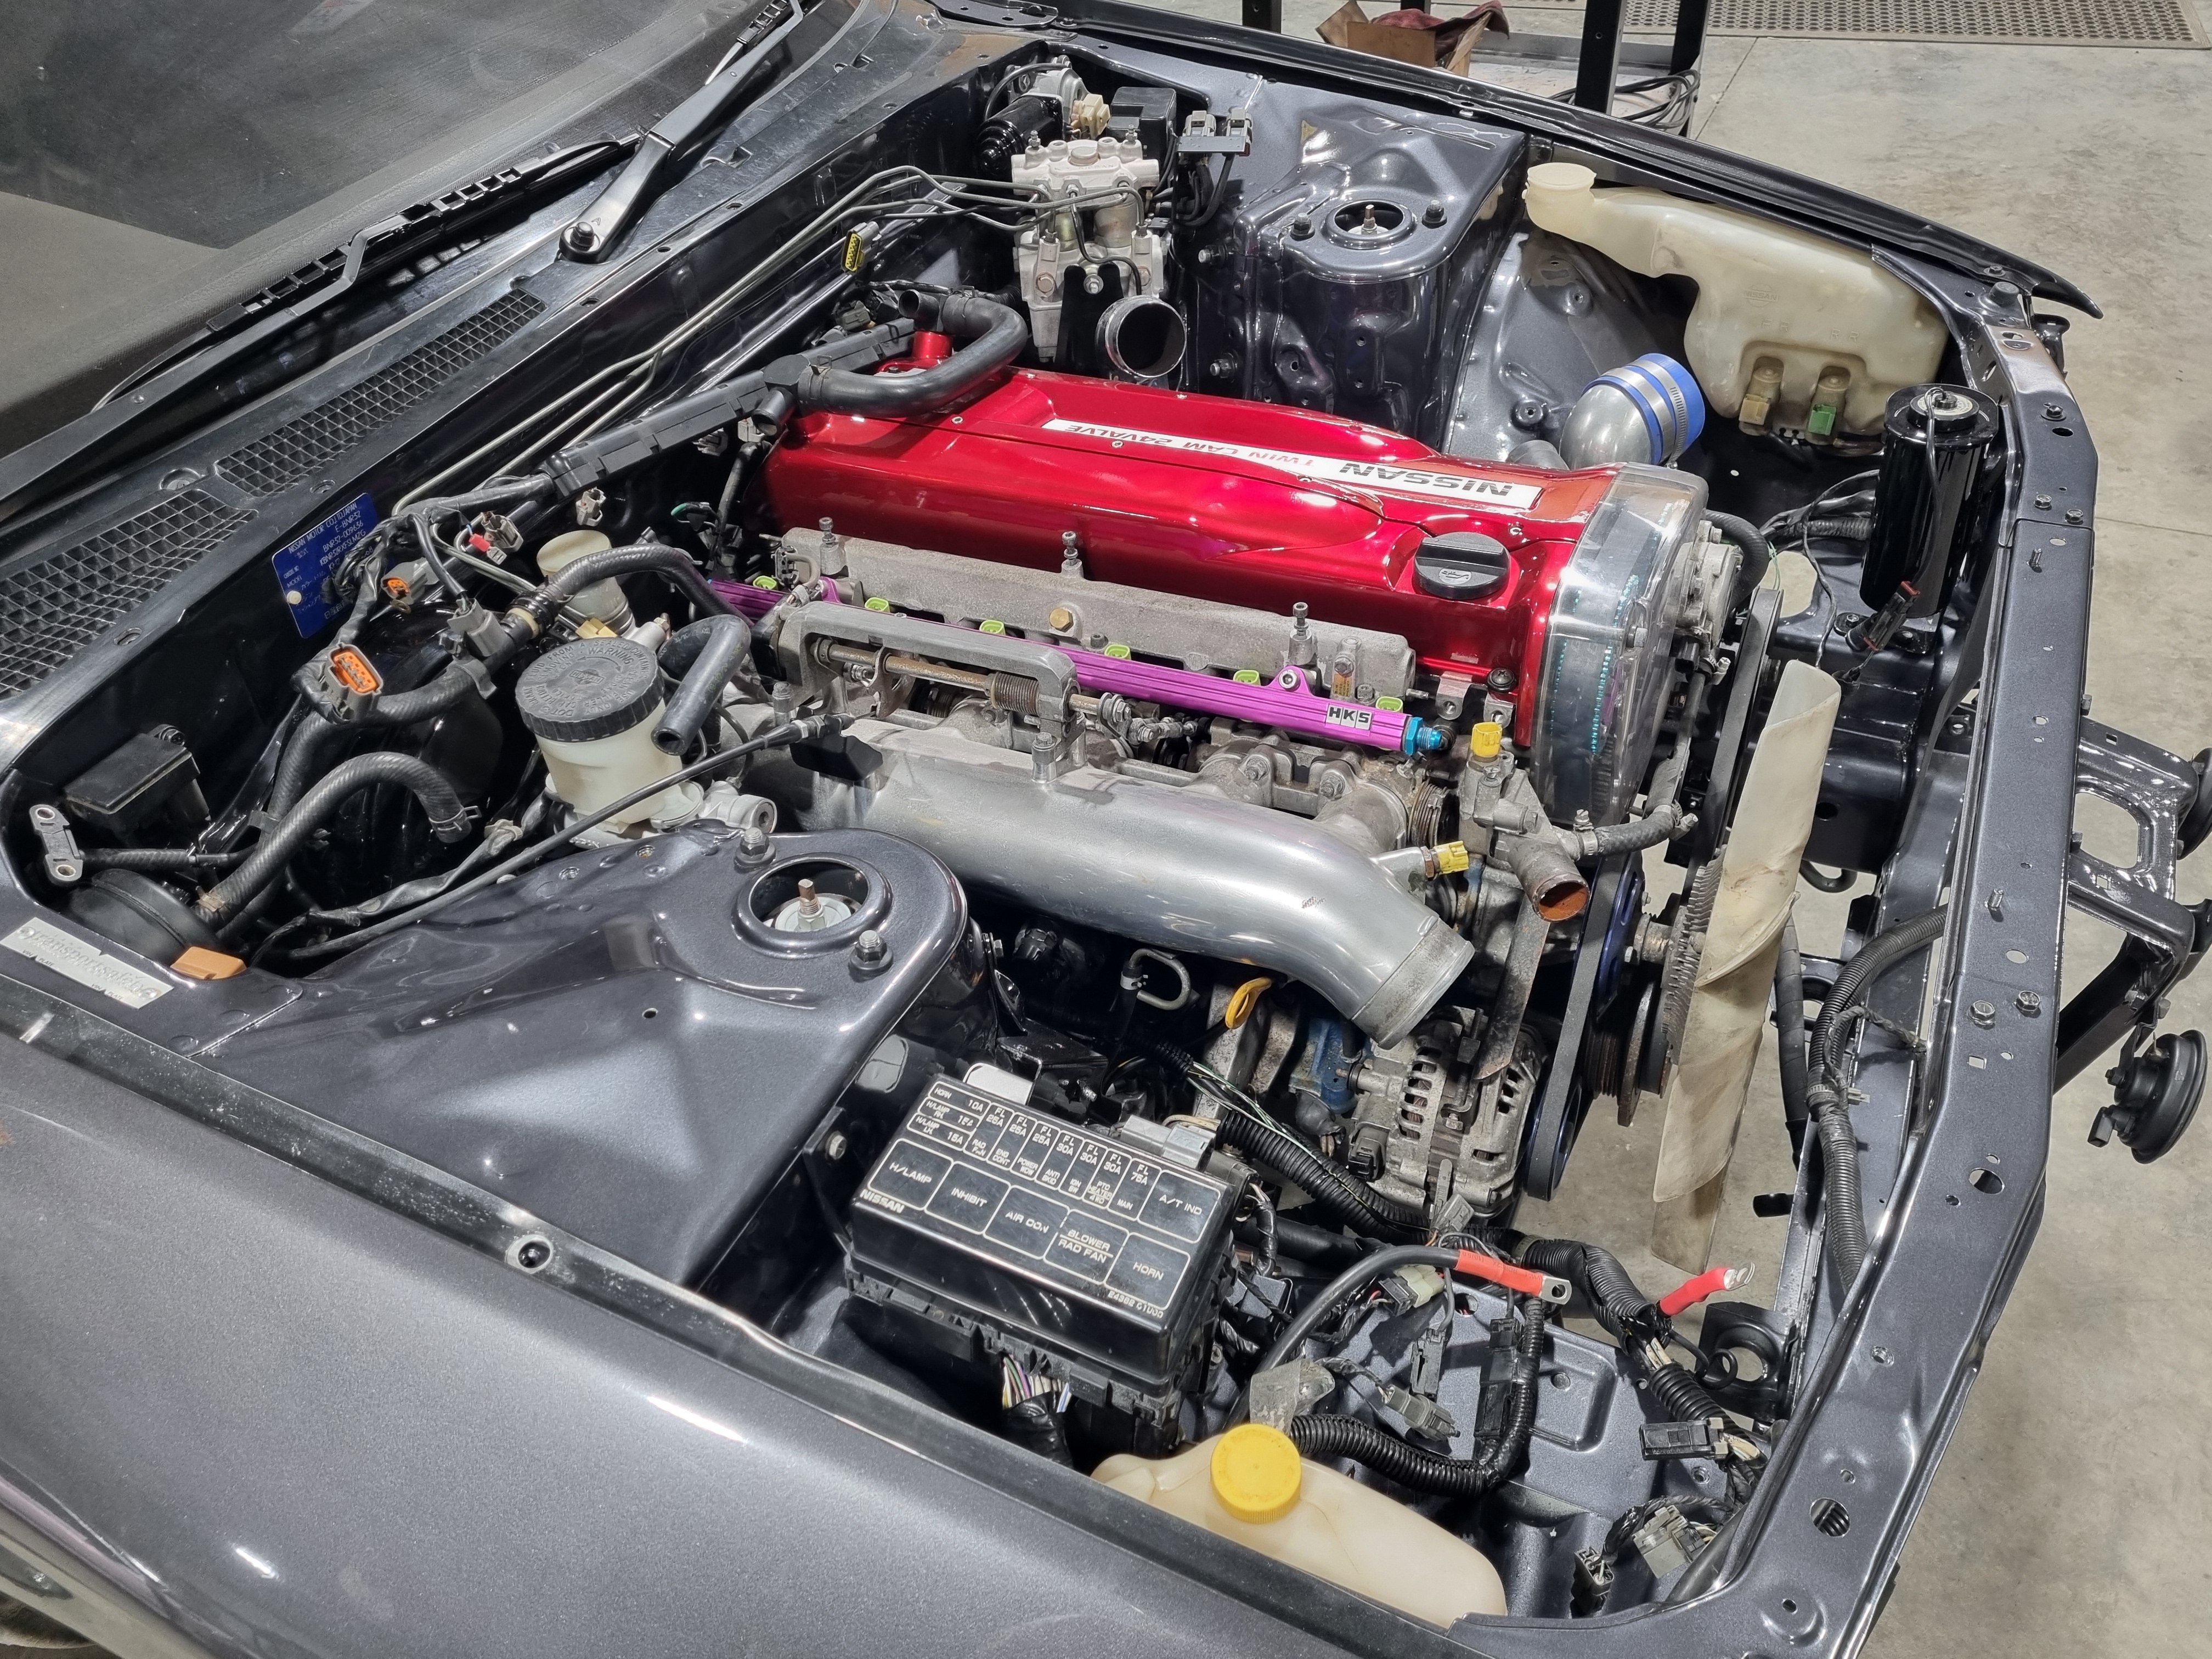
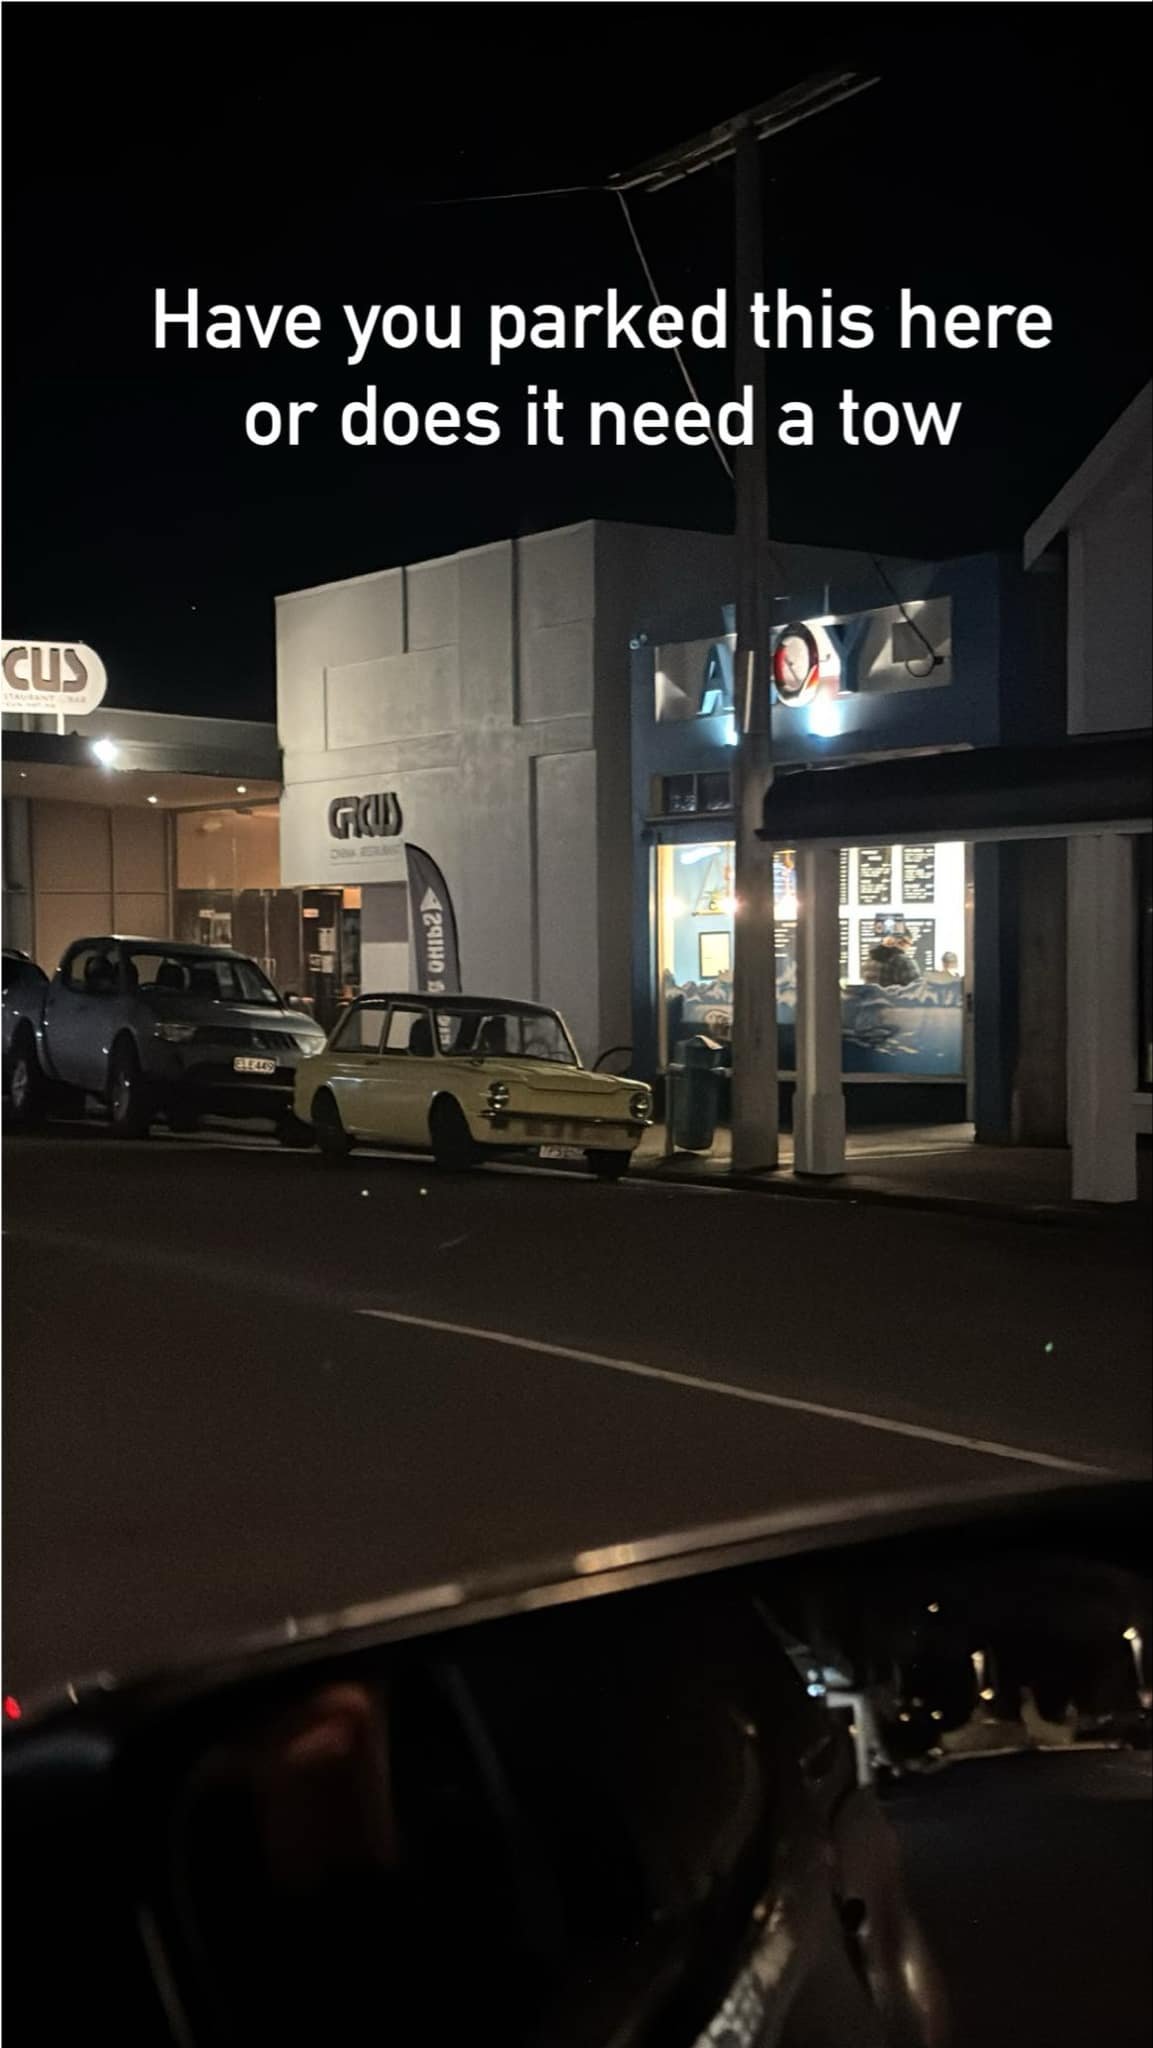
Fuck did i have some issues getting it running. On the plus side I now know what every single wire on the ecu plug does, and that it's properly connected and working, as well as 90% of the entire cars looms. One i got the thing to actually run i thought the sensible thing to do would be take it for a drive. It's still running like a dog but I drove it anyway. Fuck it's choice, even though I've only driven it 10ks in a fucking cyclone I can already feel how amazing the thing is. I'M HAVING A BEER WHO'S WITH ME!!!!!!
 67 points
 -
As many on here will know Tasman district has had fair amount of rainy weather recently. Last weekend we had a big atmospheric river and got 320mm over 36 hours. Lots of local flooding and quite a few unlucky souls have lost quite a lot. For us it was just some of our driveway getting washed downhill and a few trees coming down so mustn't grumble. Anyway - it was a good excuse to stay indoors, crank the fireplace, music, espresso machine and tinker with the Imp. Ages ago I had picked up these Mitsubishi V6 pajaro instruments from the wreckers.. In previous posts I had stripped them down, chopped off all the excess bits not needed (trip meter etc) so they'd fit into some housings I machined out of thick walled alloy tube. I had found a Toyota speed sensor that I adapted to fit my Subaru transmission. Wired them up and checked it worked, which it did well but it was reading a good 10 ~ 15kph out. I then packed the lot away in a box and stashed it away. It was time to crack on and make something of them. First job was to work out an accurate speedo face to suit the setup. I cut a circle of paper, fit it in place and we went driving. Using a GPS speedo we marked out all the various speed points. Then I used a program online... https://www.blocklayer.com/gauge-templates ..however it didn't create what I wanted as most speedos have non linear markings, especially 0-20. I chatted to the fella who was running the website and he added some custom bins into the program to suit and it worked great. We printed off a new face that matched the hand drawn one and went for a drive to check it was good.. Then I spent some time having fun creating some gauge faces. I had a particular style in mind. My current design turned out pretty boring given how far one could go with the variety of fonts, colours, images, text but I wanted a 60s/70s look to suit the car and dash layout I have in mind. Fun thing is I can change it easily now I have a saved accurate template * Used the big printer we have that barely gets used. Cut them out to suit. Machined up some tiny wad punches to do the holes. Into the housings. The backside. Later on I'll need to add some led lights to shine through the white font.I'll also re-set the odometer to match the current reading even though it'll be in km from now on. The needles will then go back in place once I have finished all this. I removed the original Imp dash pads and instrument cluster. Its a heavy bit of kit. Comical wiring layout too. Sat in the car and eyed up how I'd like the gauges to sit. The idea is to build a pod that will work with the original MK1 Imp dash pads which I really do like the style of. I had part sheet of 1.2mm alloy which I cut, bent, rolled, twisted and tweaked to shape, welding all the bits together doing my very best to try not to create holes. Not the easiest thickness alloy to tig weld but managed ok. I also welded up a bolt on pod that sits below to take the original Imp indicator stalks. Checked it was ok. Covered the outside in medium density foam.. Bought some more cow that local canvas place still had a stash of.. Very carefully cut and glued it in place. Painted the other alloy parts in etch primer then satin black. Added some tiny warning lamps. Most important gauge, the oil pressure gauge, resides in the middle.. Really happy with the finish. There's a couple of blemishes (tiny knife nick) but overall considering the awkwardness of this build I'm stoked. And bolted in place. I can adjust the angles of the gauges quite easily too but its currently good for both of us. Ties in really nicely with the dash pads.. Next job is to sort out the wiring. I'd already made it far more user friendly compared to stock by having added several multi plugs. I'm going to re-do it though and use some smaller wire where I can along with Deutsch plugs. There will be a new dash face below the dash pads that will house 3 gauges, some rocker switches and a Triumph eyeball vent at each end. * Edit - here's an example..50 points
-
Got the draglites polished and tyres on, some 175 65 on the front and Hoosiers on the back with the white lettering removed can actually use full steam ahead in 1st and 2nd without it doing wheelspins so maybe I need a better tyre for general use
39 points
-
Fuck I'm so stoked. This is so So Rad.
38 points
-
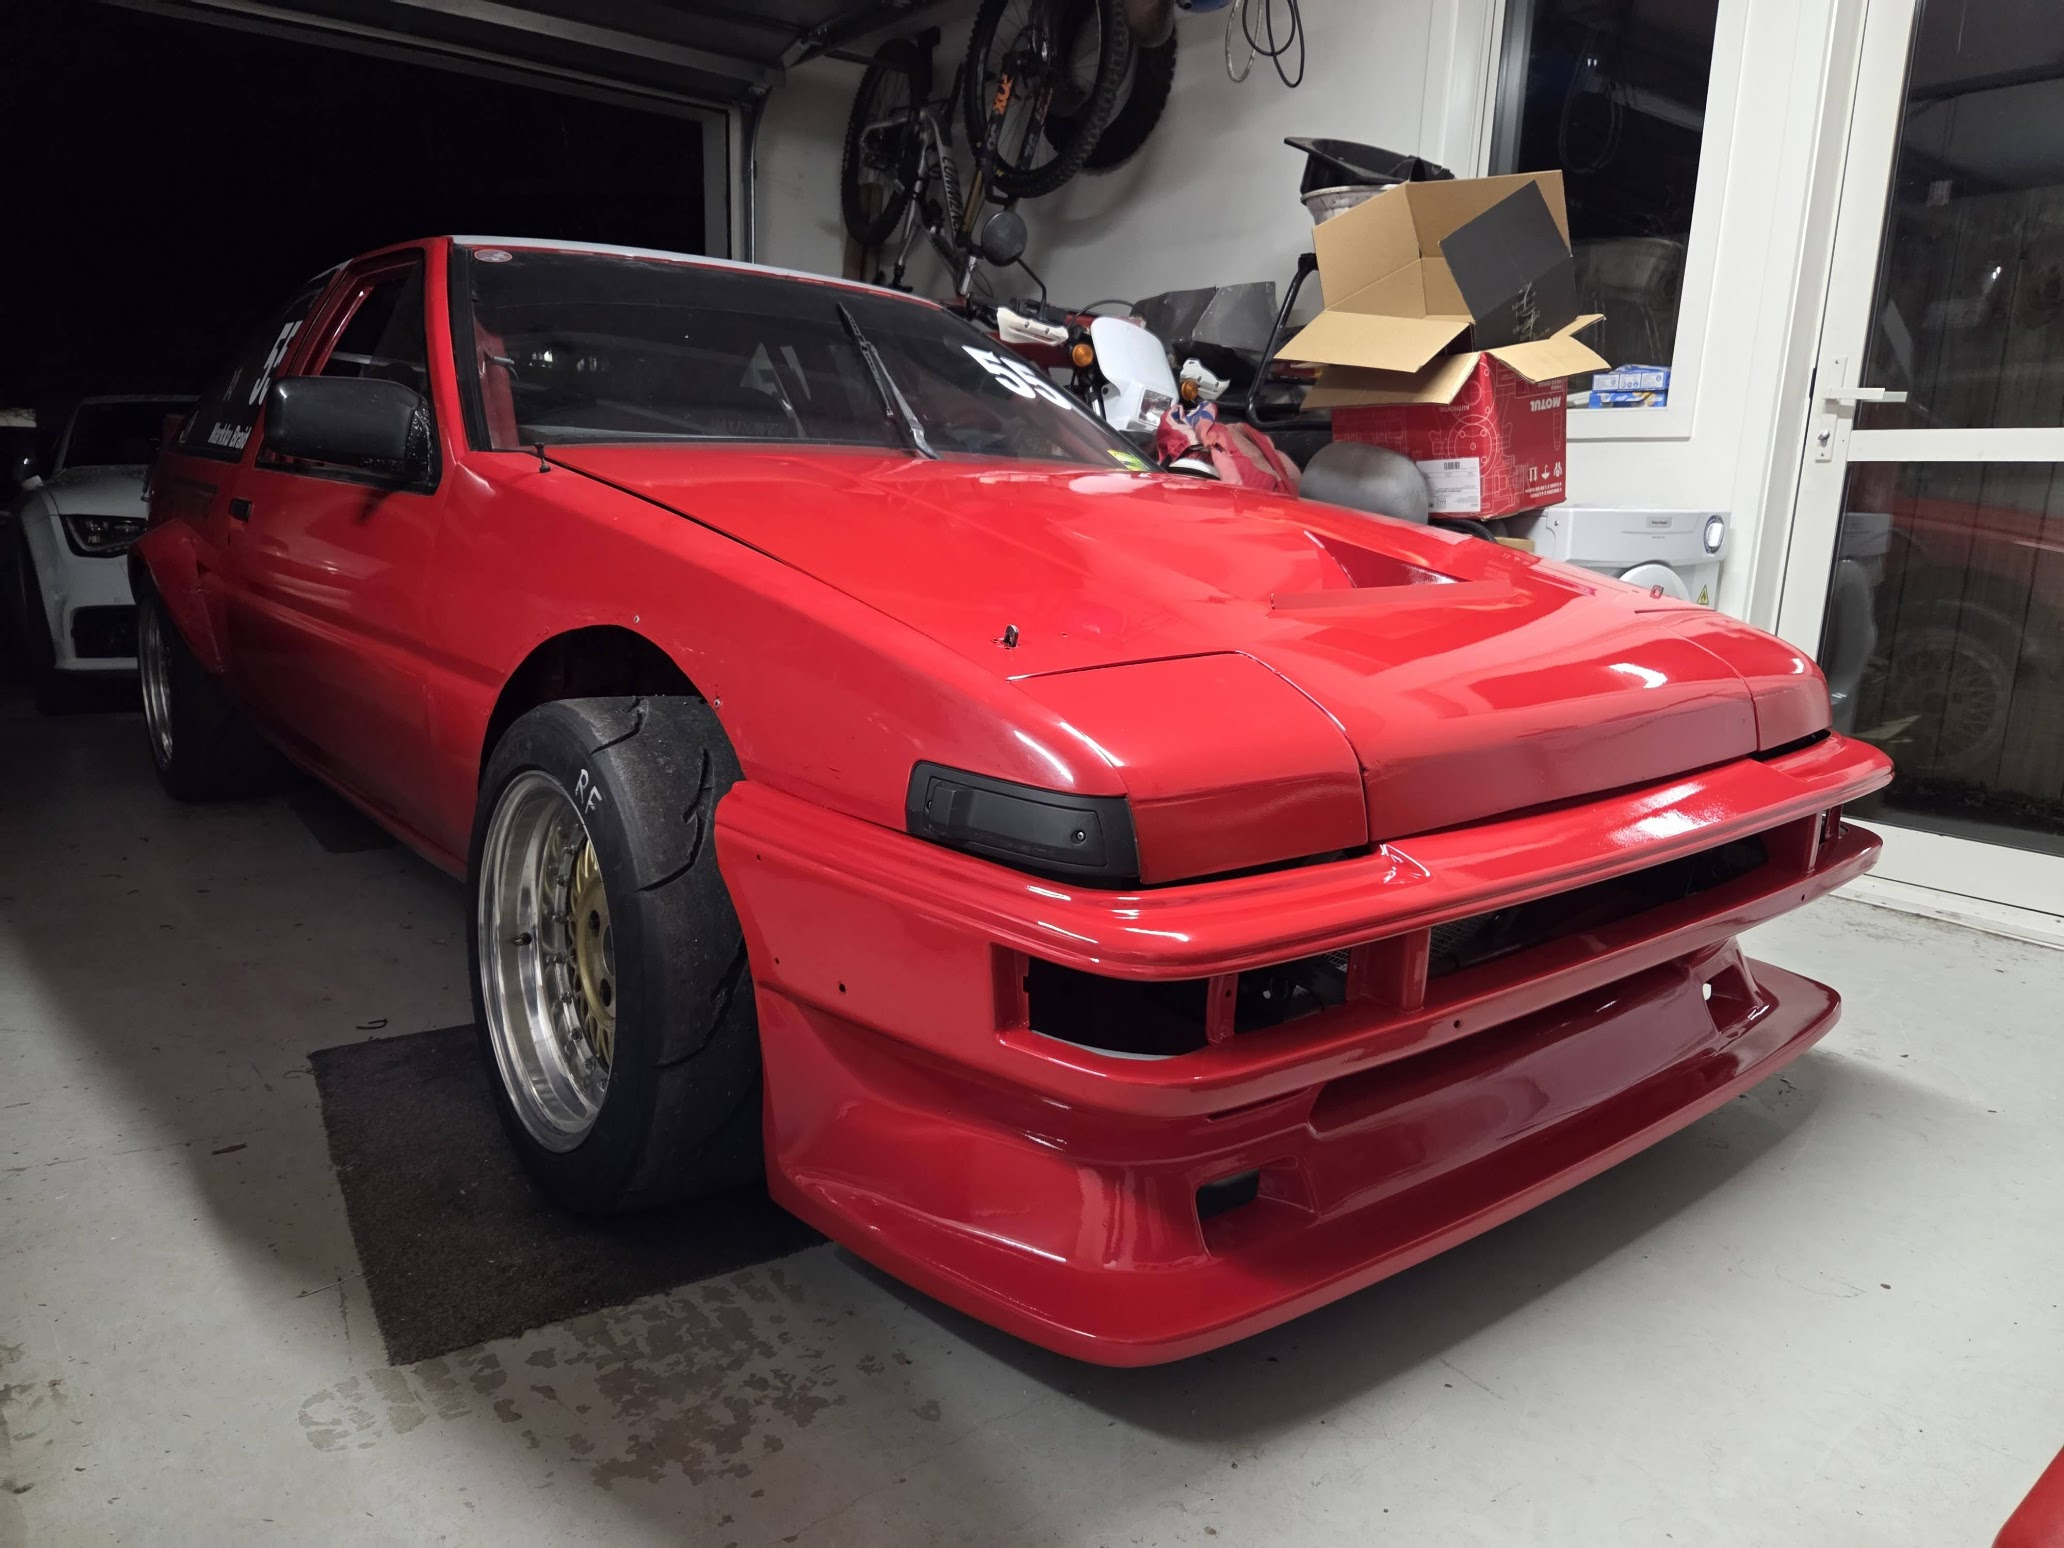
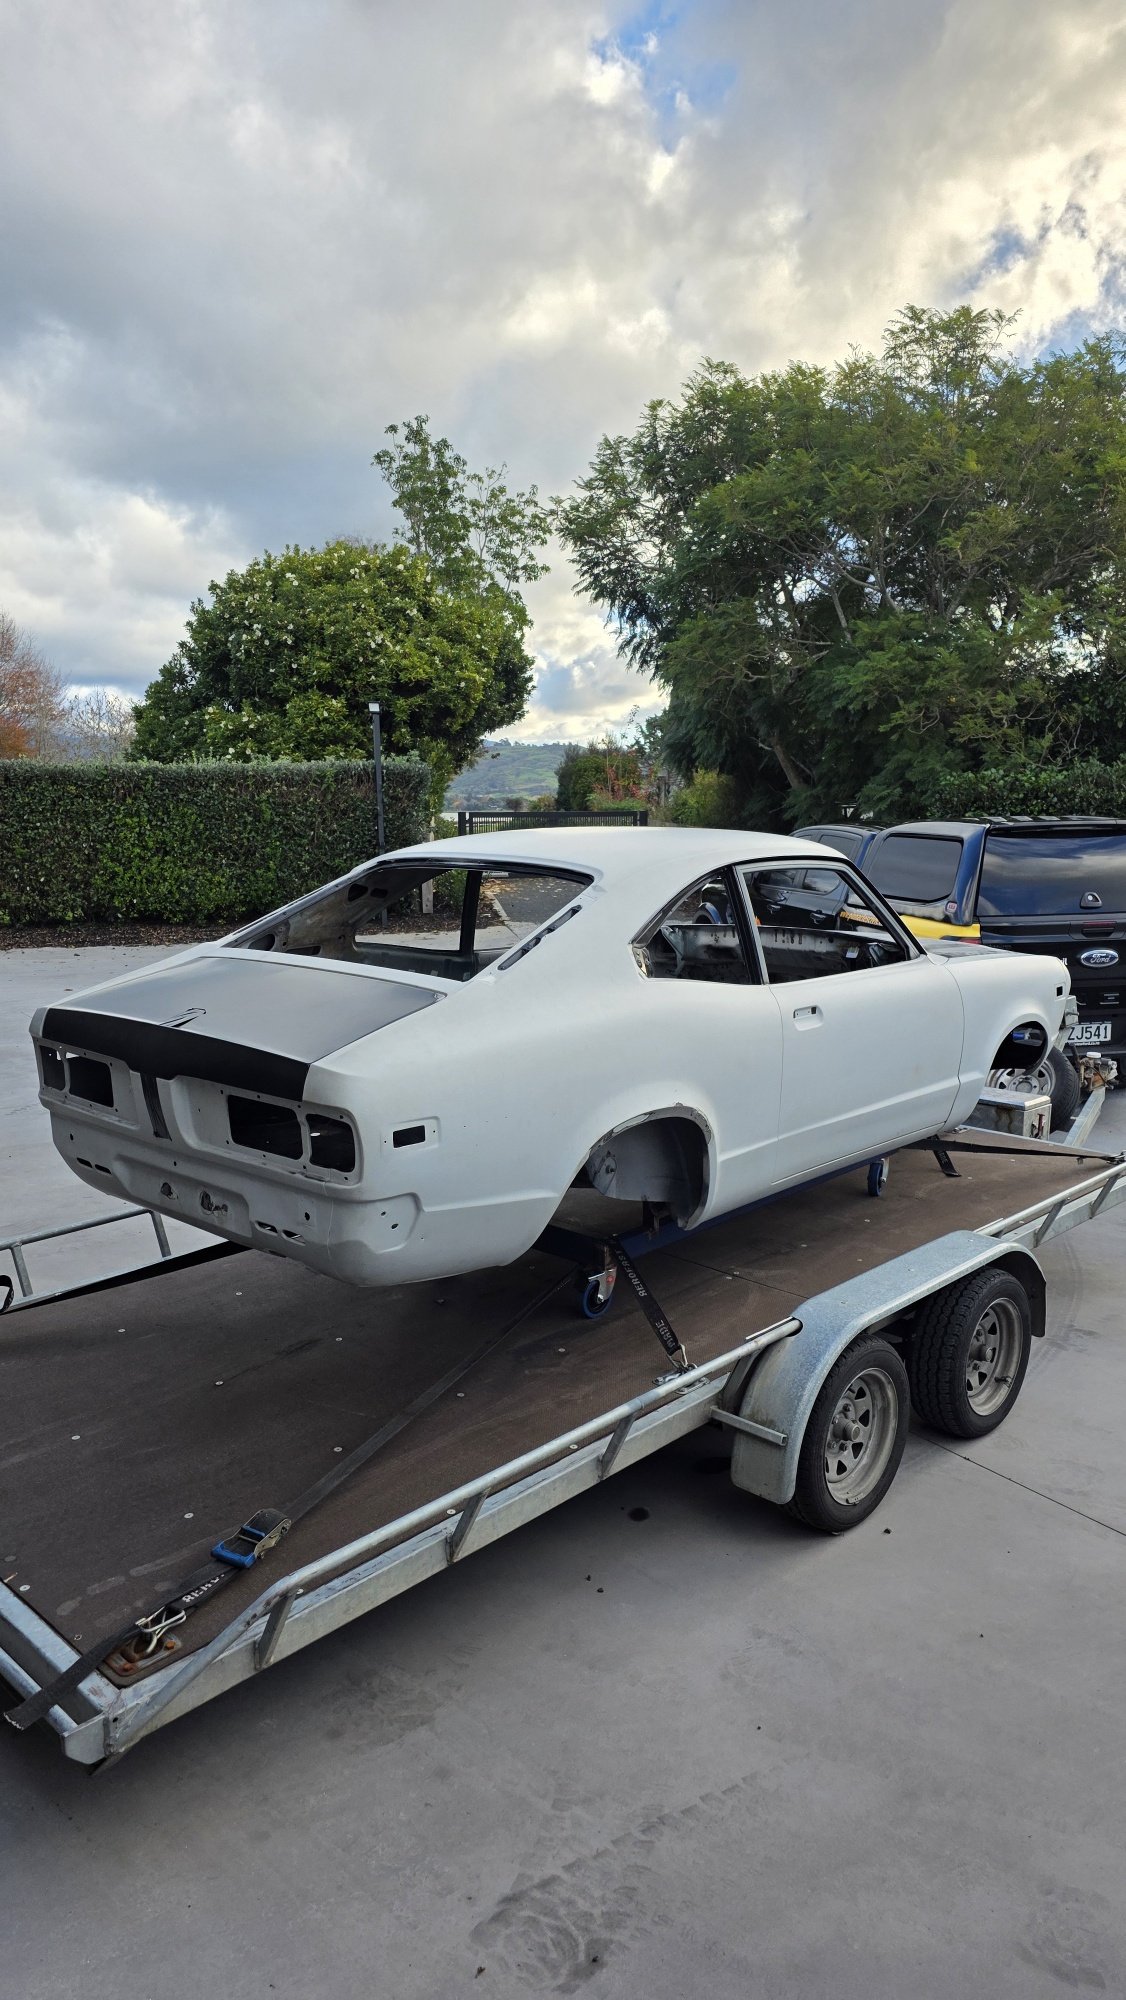
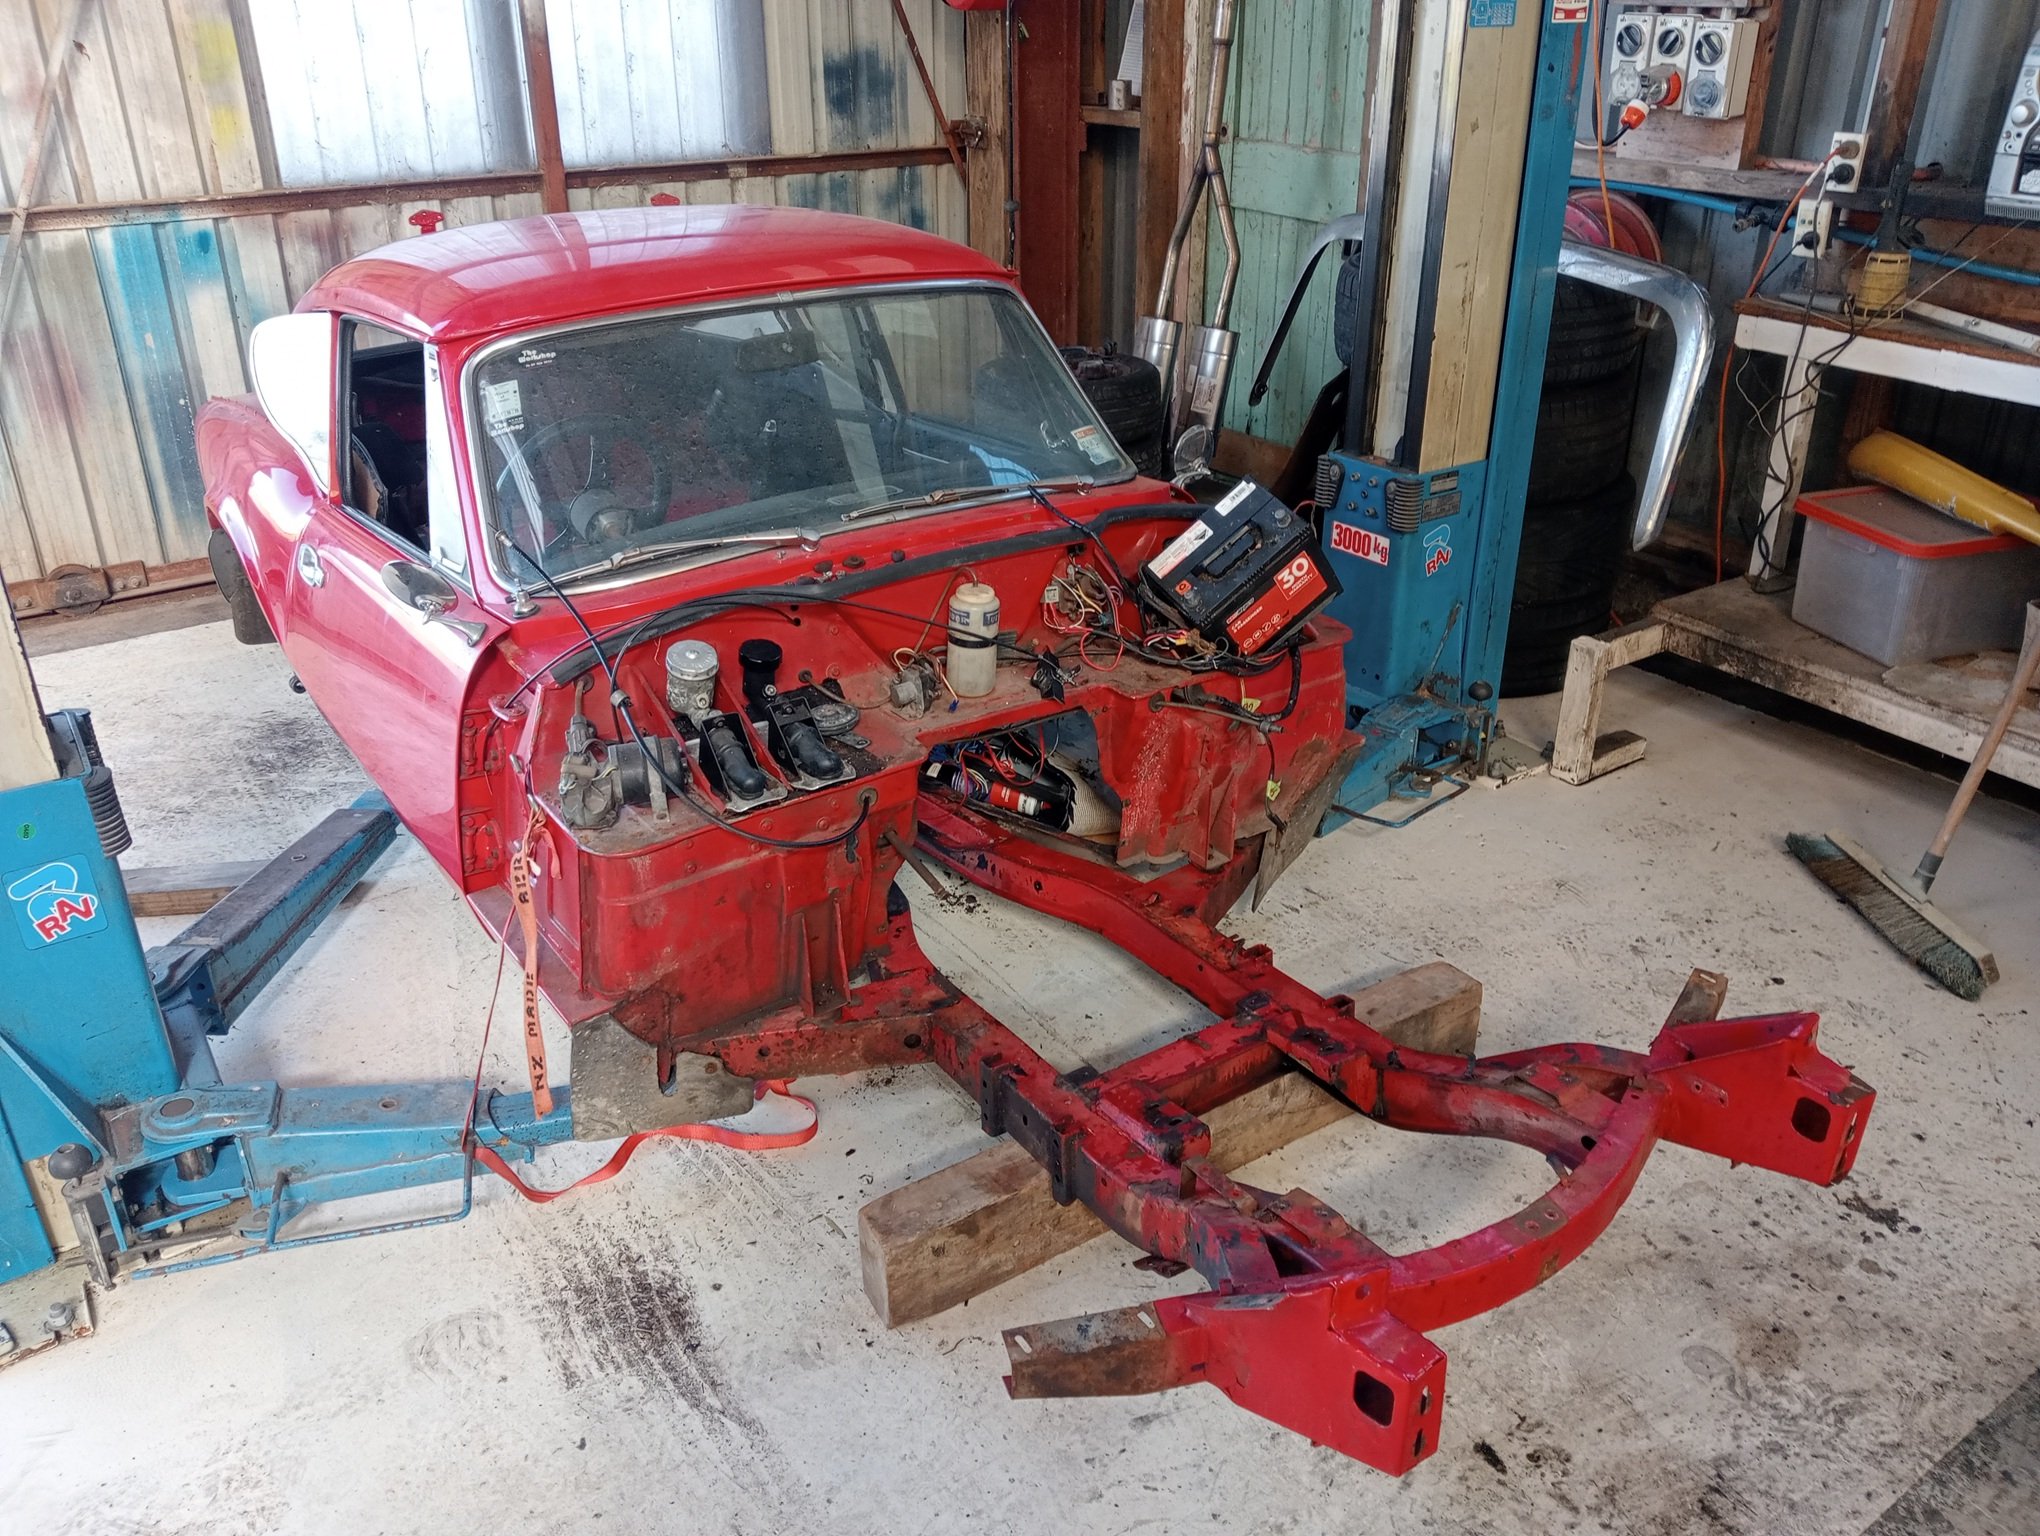
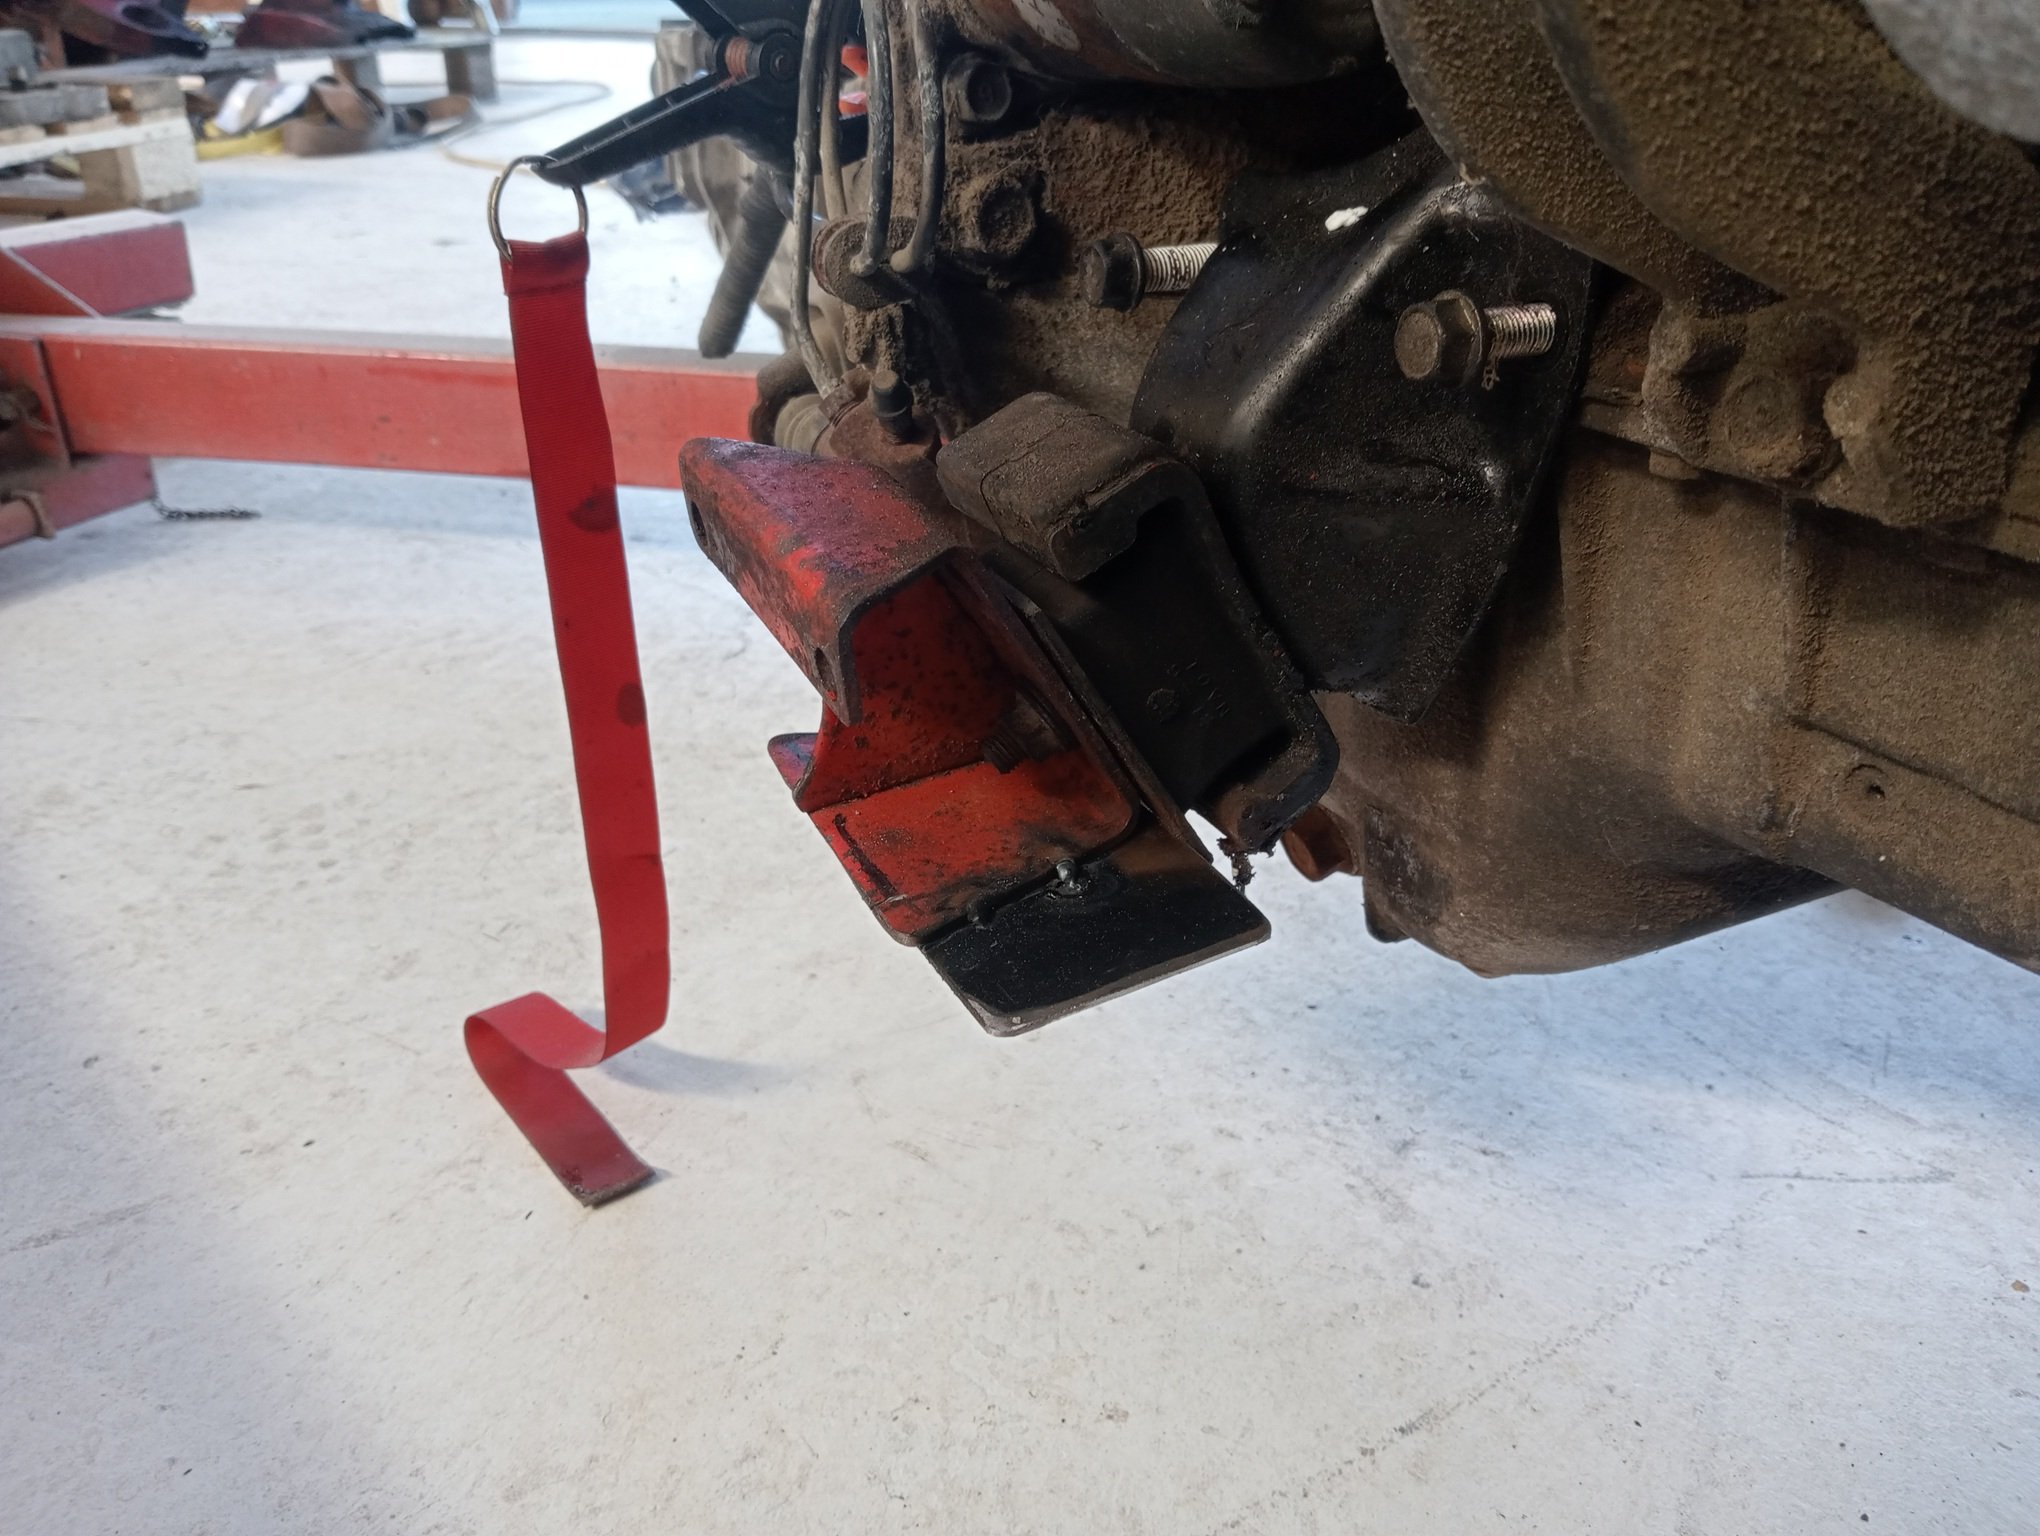
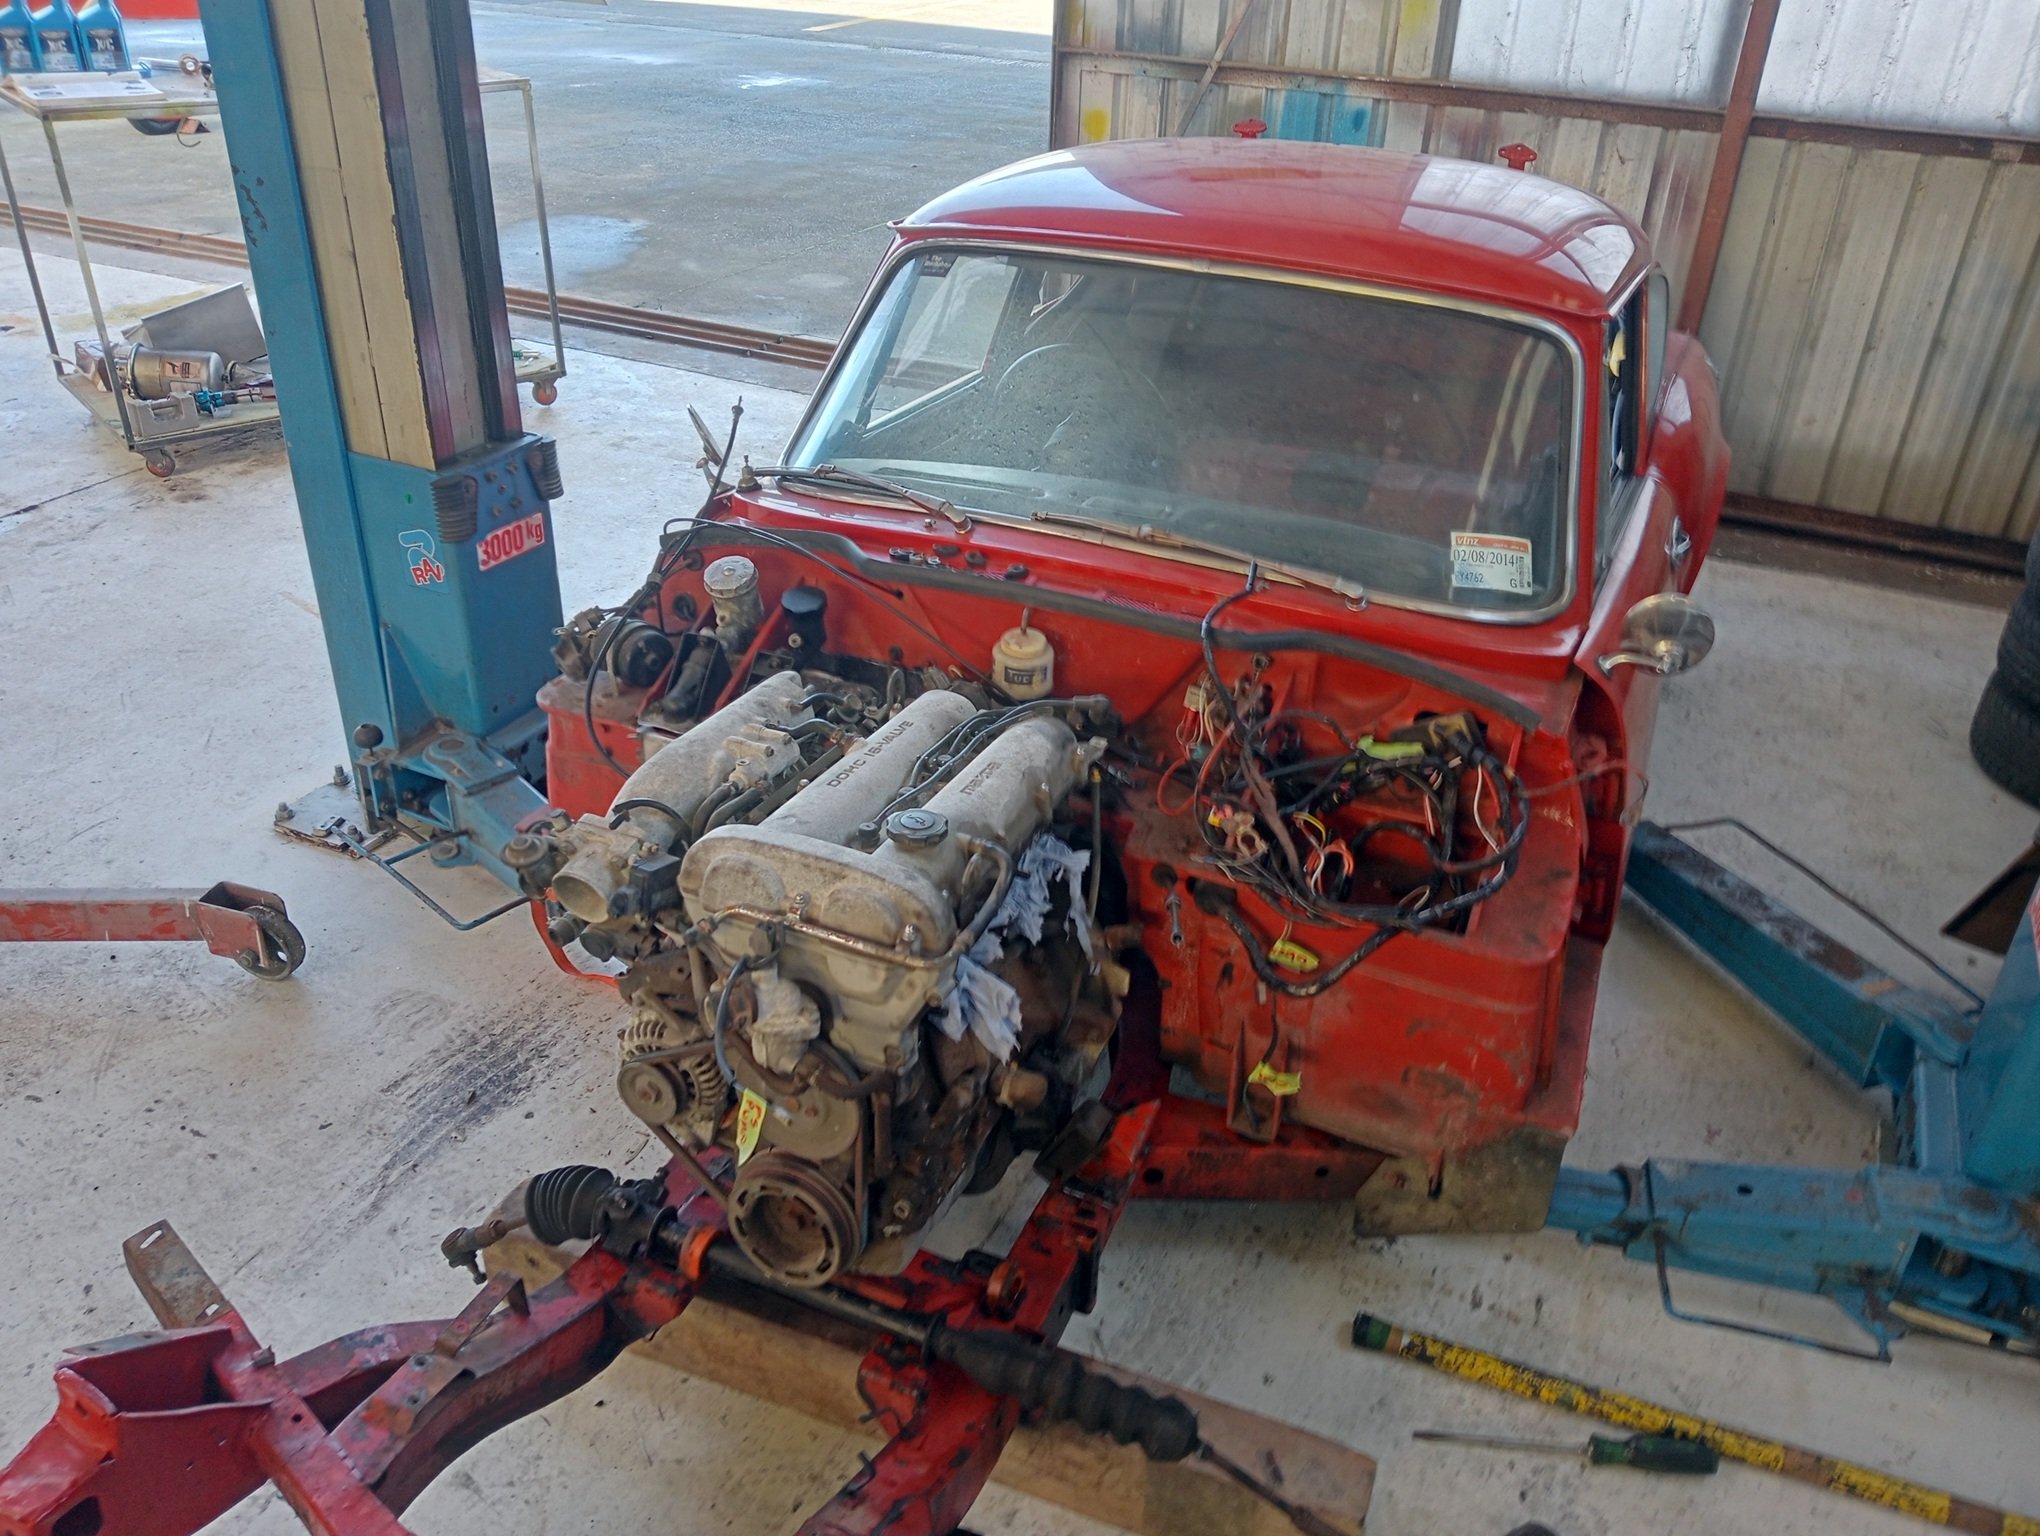
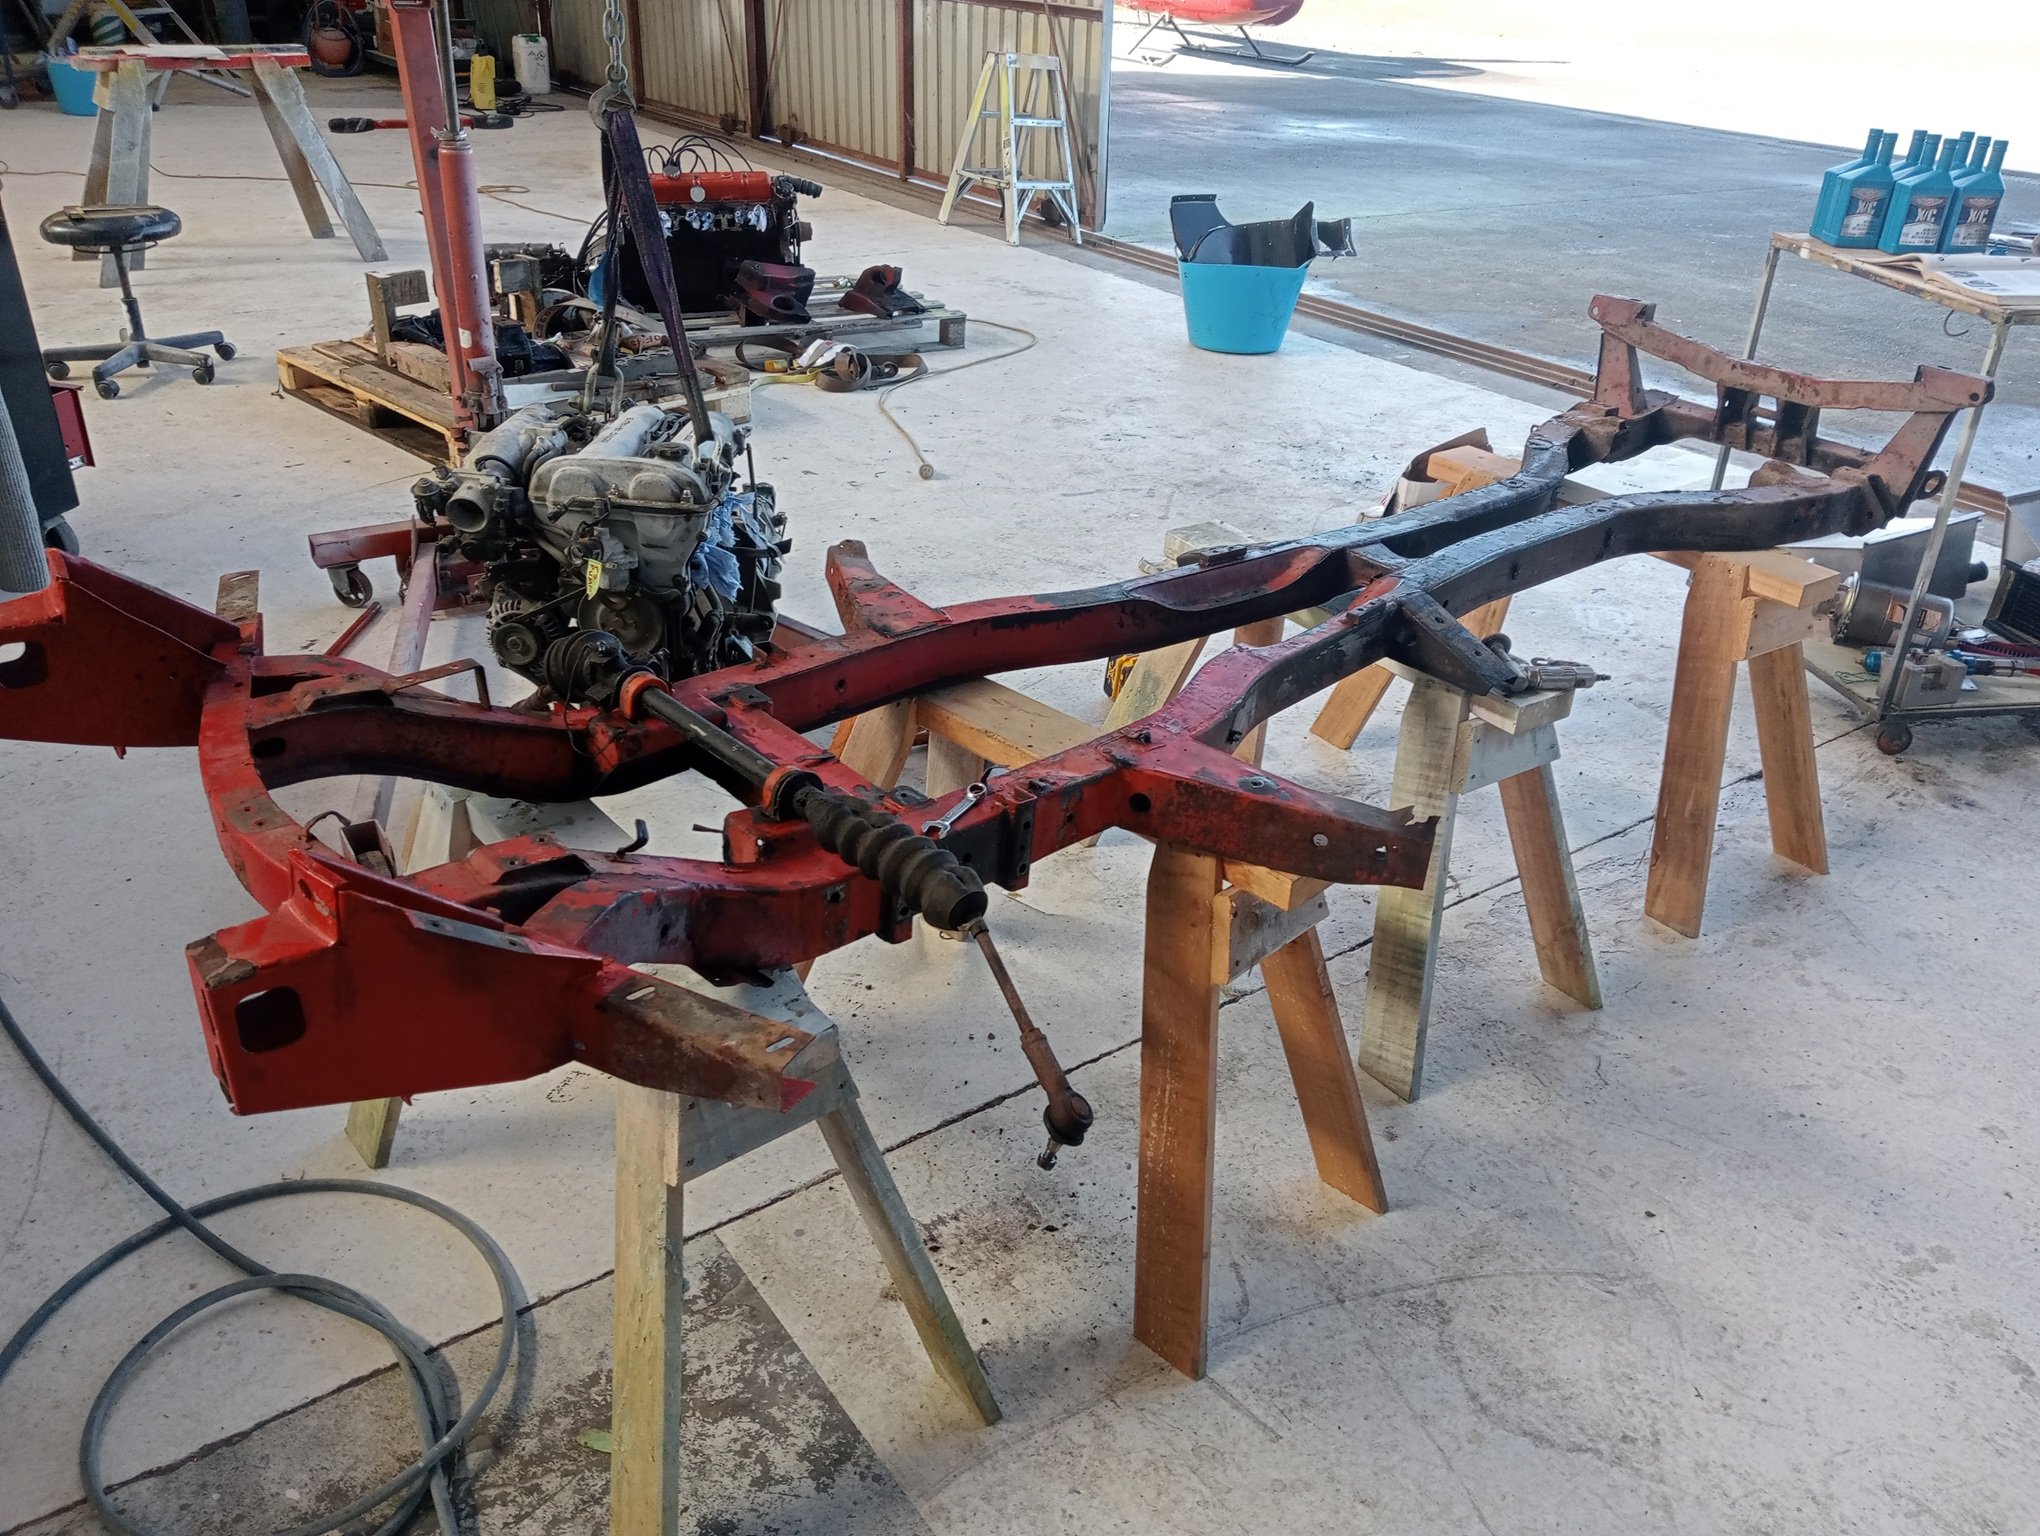
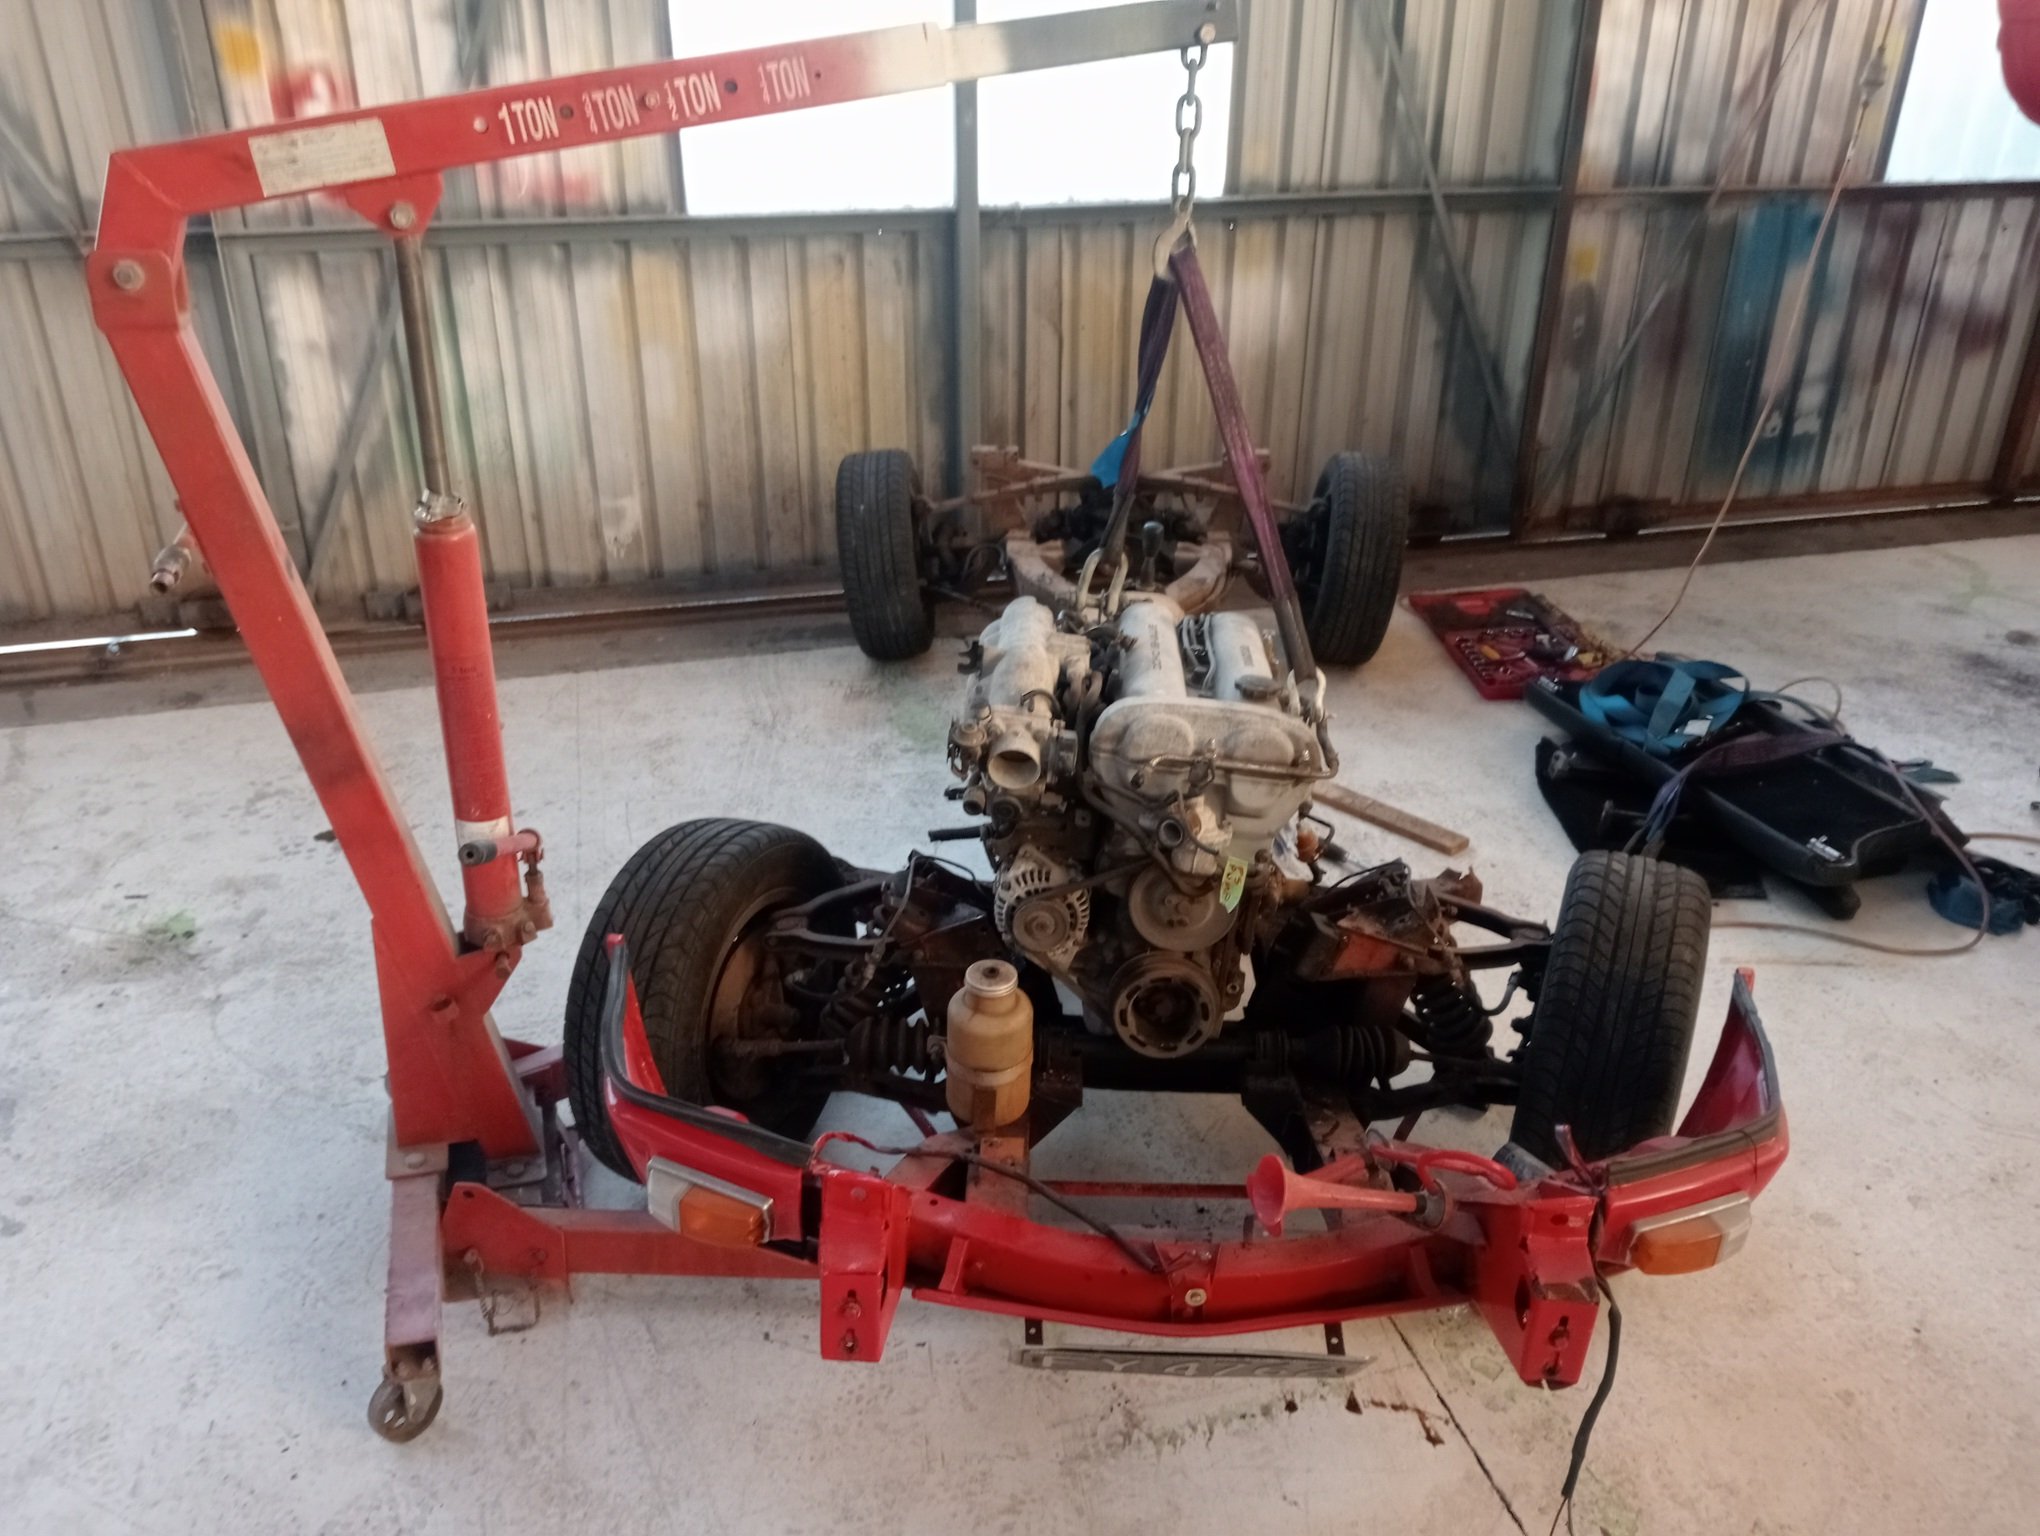
So.. When you have too many projects..... An old mate has had a Mk1 Cortina since 1997. Started as a run about, turned into a project, then along came life, so it was parked for ??? years. The time has come to bring it out of hibernation and see if some life can be breathed into it. Disclaimer: This is not my car, this is not my project, but I'm involved and connected and figured some of your might enjoy the thing. Also disclaimer, the owner and chap who's restoring it are 100% happy for me to share the project here. Step 1: Unbury The light of day for the first time in ???? Load 'er up Delivered down to the (Hawkes) Bay and ready for revival. Since the car was imported pre 19?? it doesn't have a vin. Annoyingly the rego had lapsed with an address change, so it required a trip to VTNZ for us to tell them how to do their jobs and get the car a VIN. Tow vehicle activated. As we'd researched the process and let VTNZ know what to do we got through this pretty easily so the car was back to the workshop in good company. Some tidy up required. Throttle body was pretty well stuck, fuel tank has a leak, oil was ??? years old. Some remedial work and.. Gotta love that toyota reliability and a link ECU with an good link base map, albeit a bit rich. The body looks pretty straight, it's had some repair in the right rear at some point in the distant past. There's some re-work to do on some questionable mounting that was done in it's early mod life but nothing that can't be fixed etc. Other projects have been moving in the right direction so there will be some more movement on this coming soon. Further disclaimer, Projects are fun but take time and I have little of the latter. I'll try to keep the updates rolling as they come in but don't expect them weekly. P.P.P.S. I'll get an engine bay shot next time I'm there. LeftChevronThree.37 points
-
This is so fucking great.
34 points
-
Got 2 great sump castings and a 3rd with a small defect that would be fine once welded.33 points
-
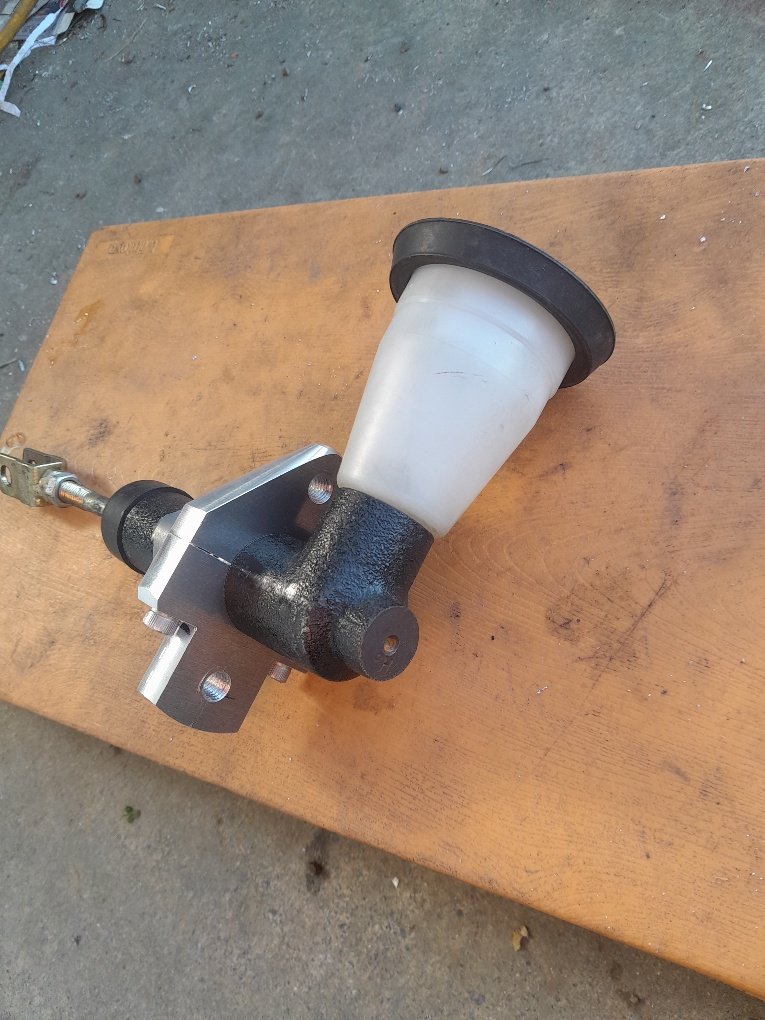
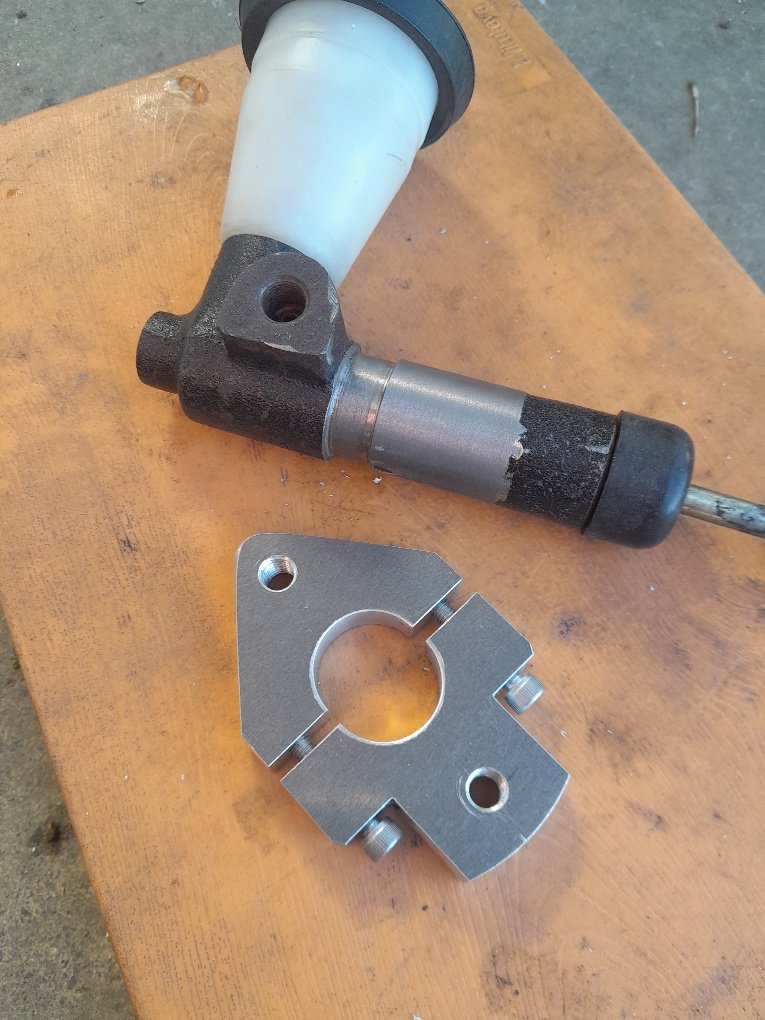
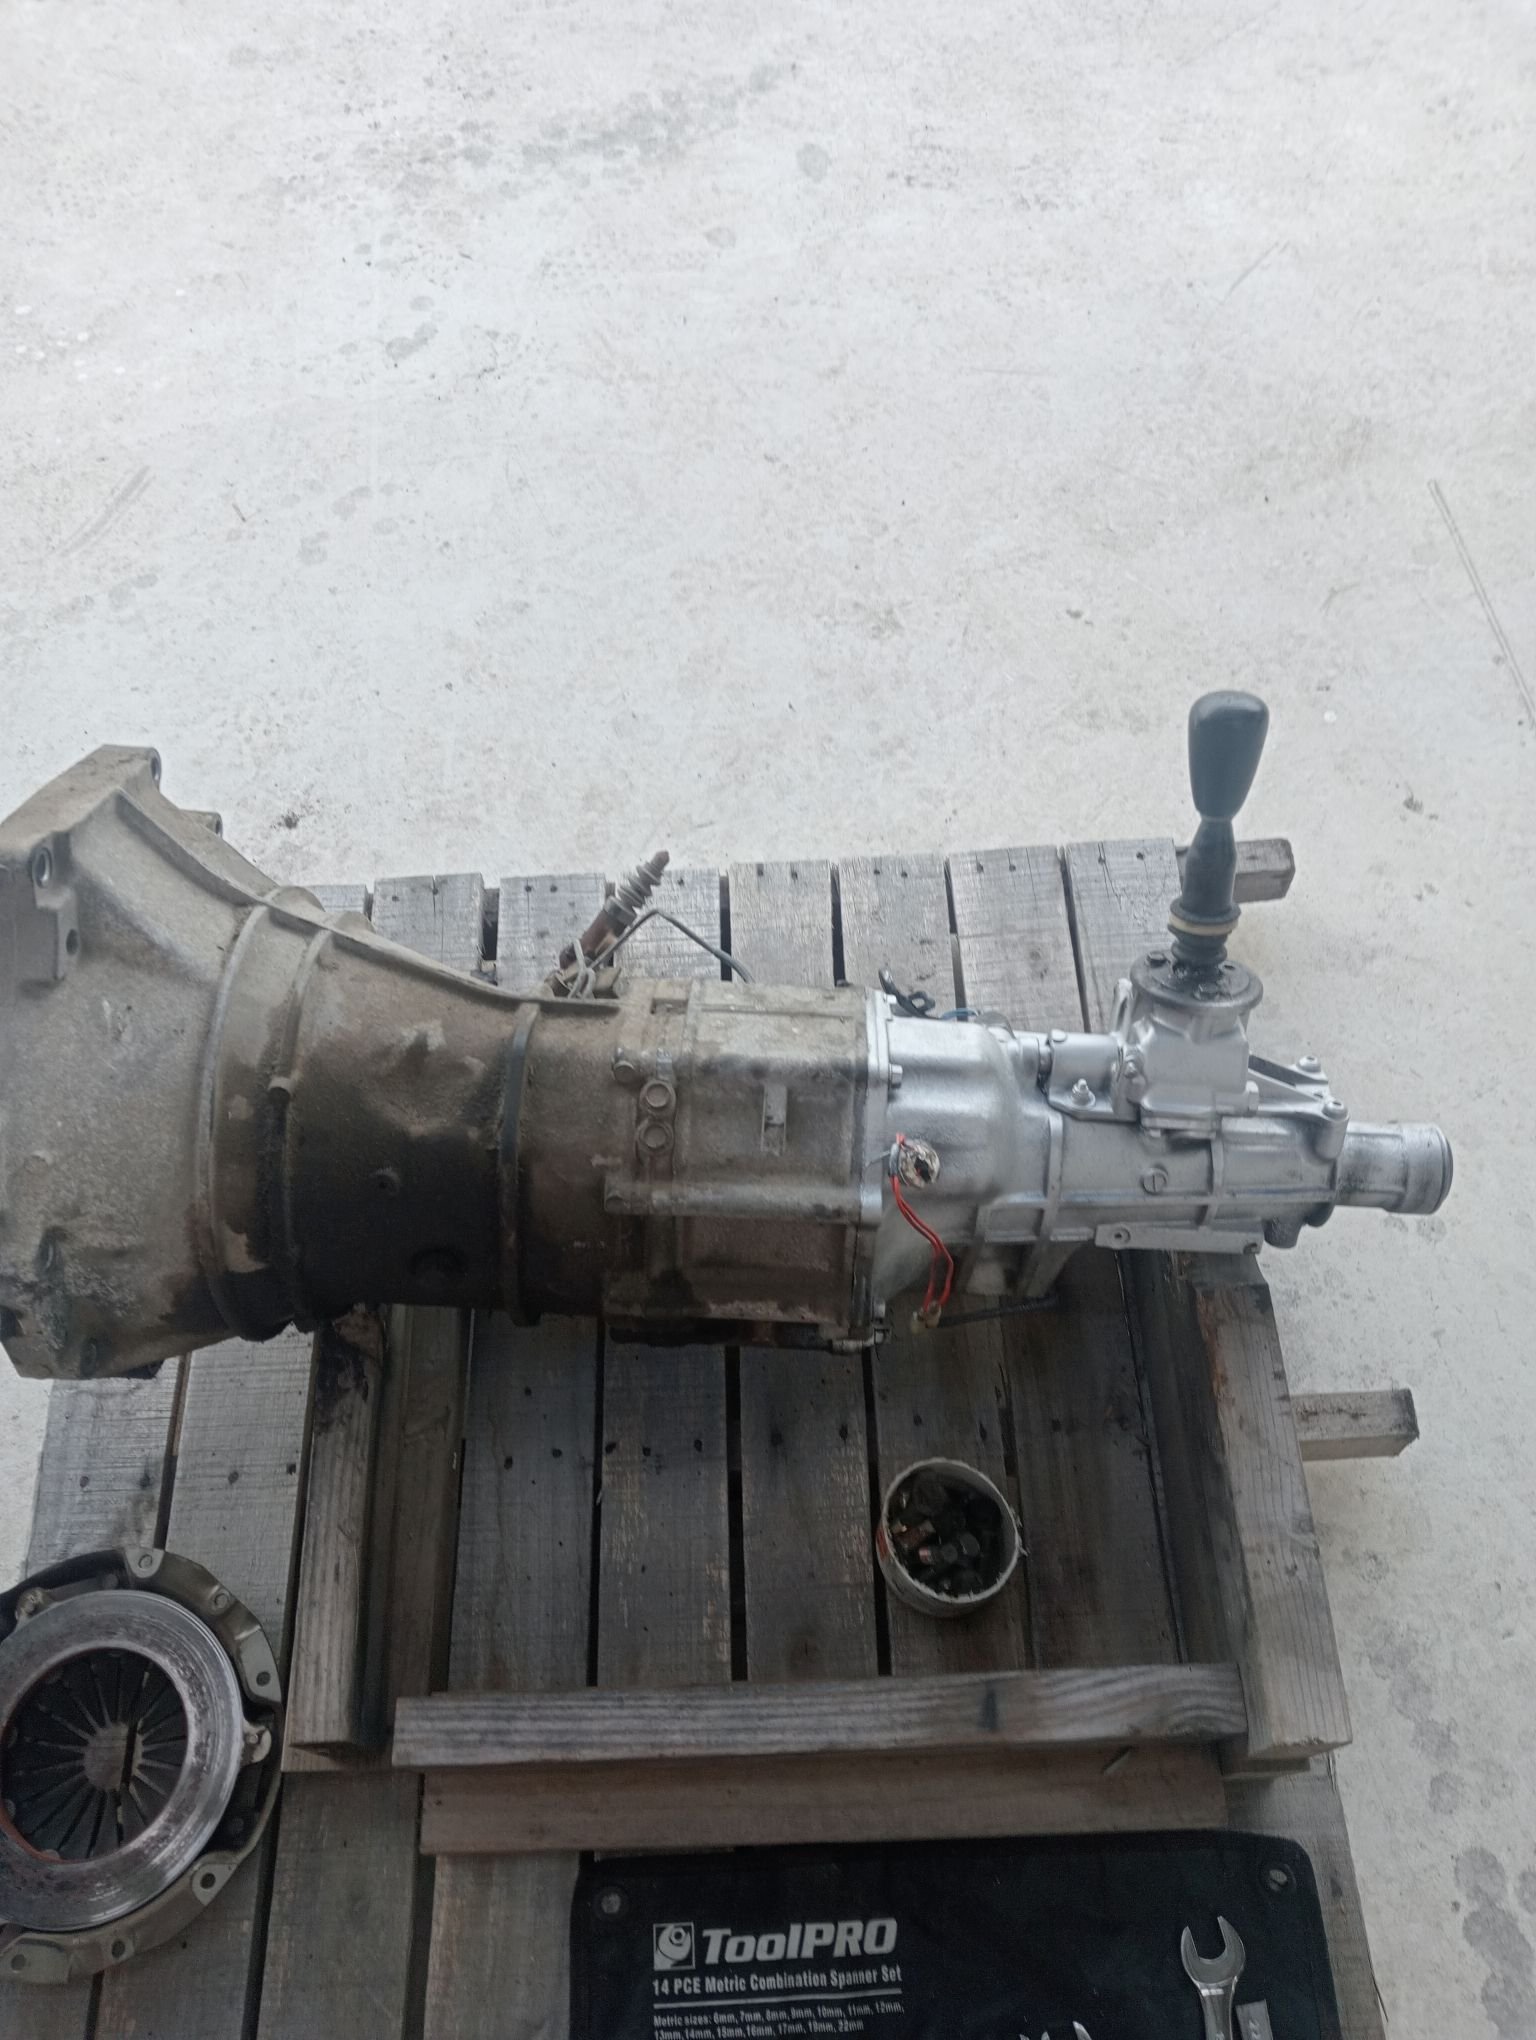
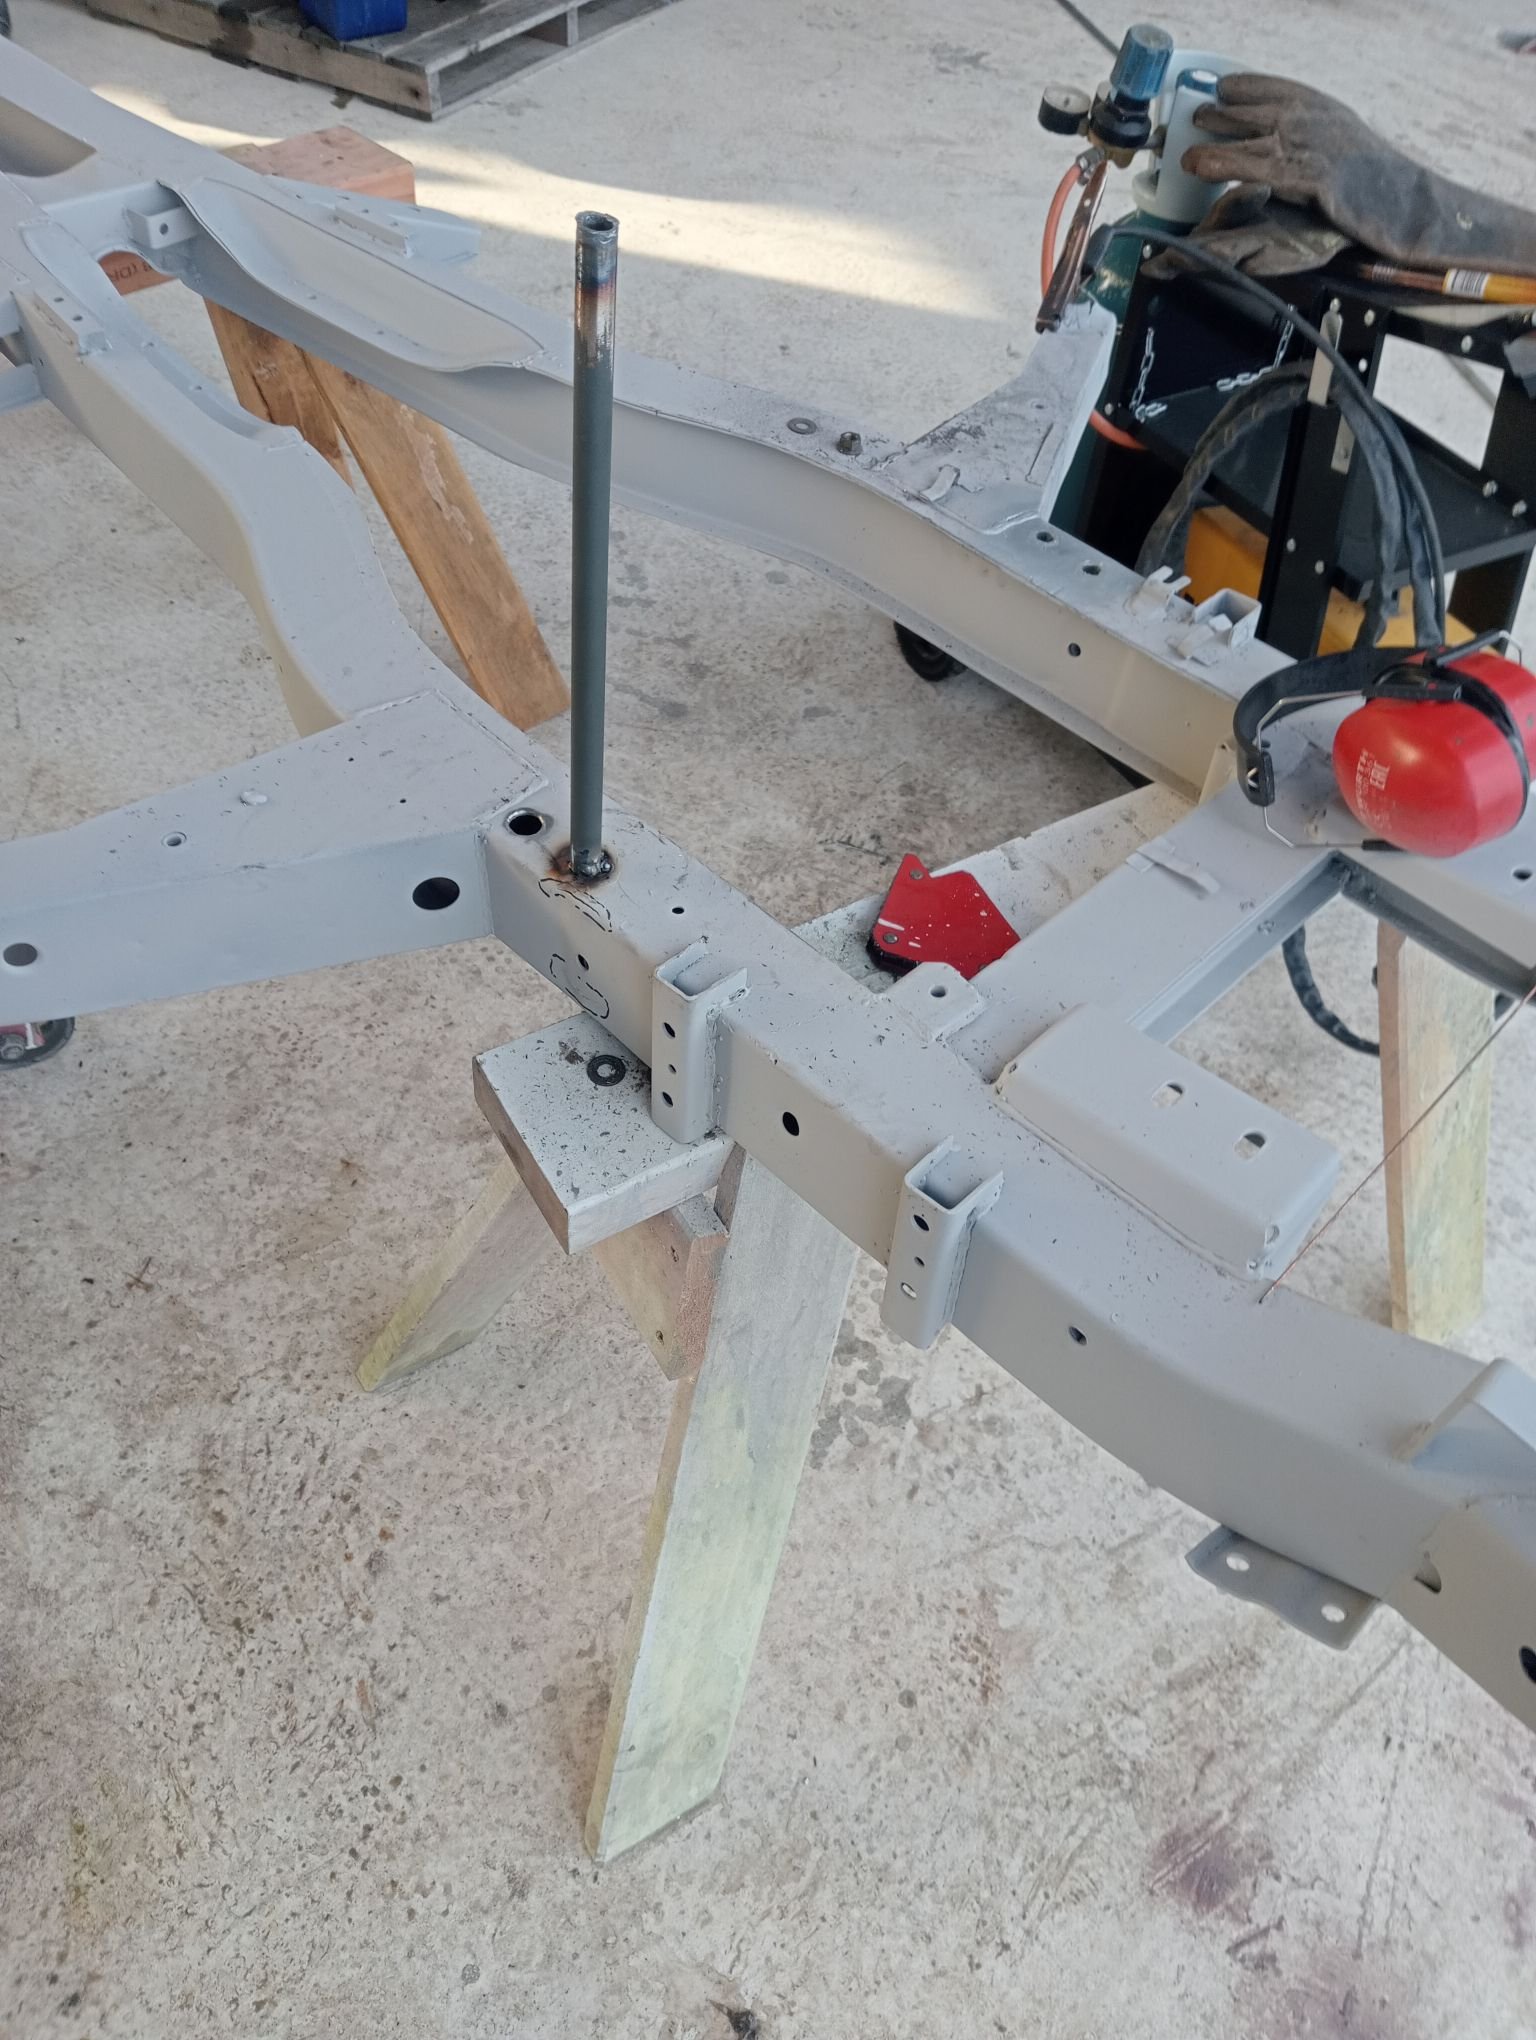
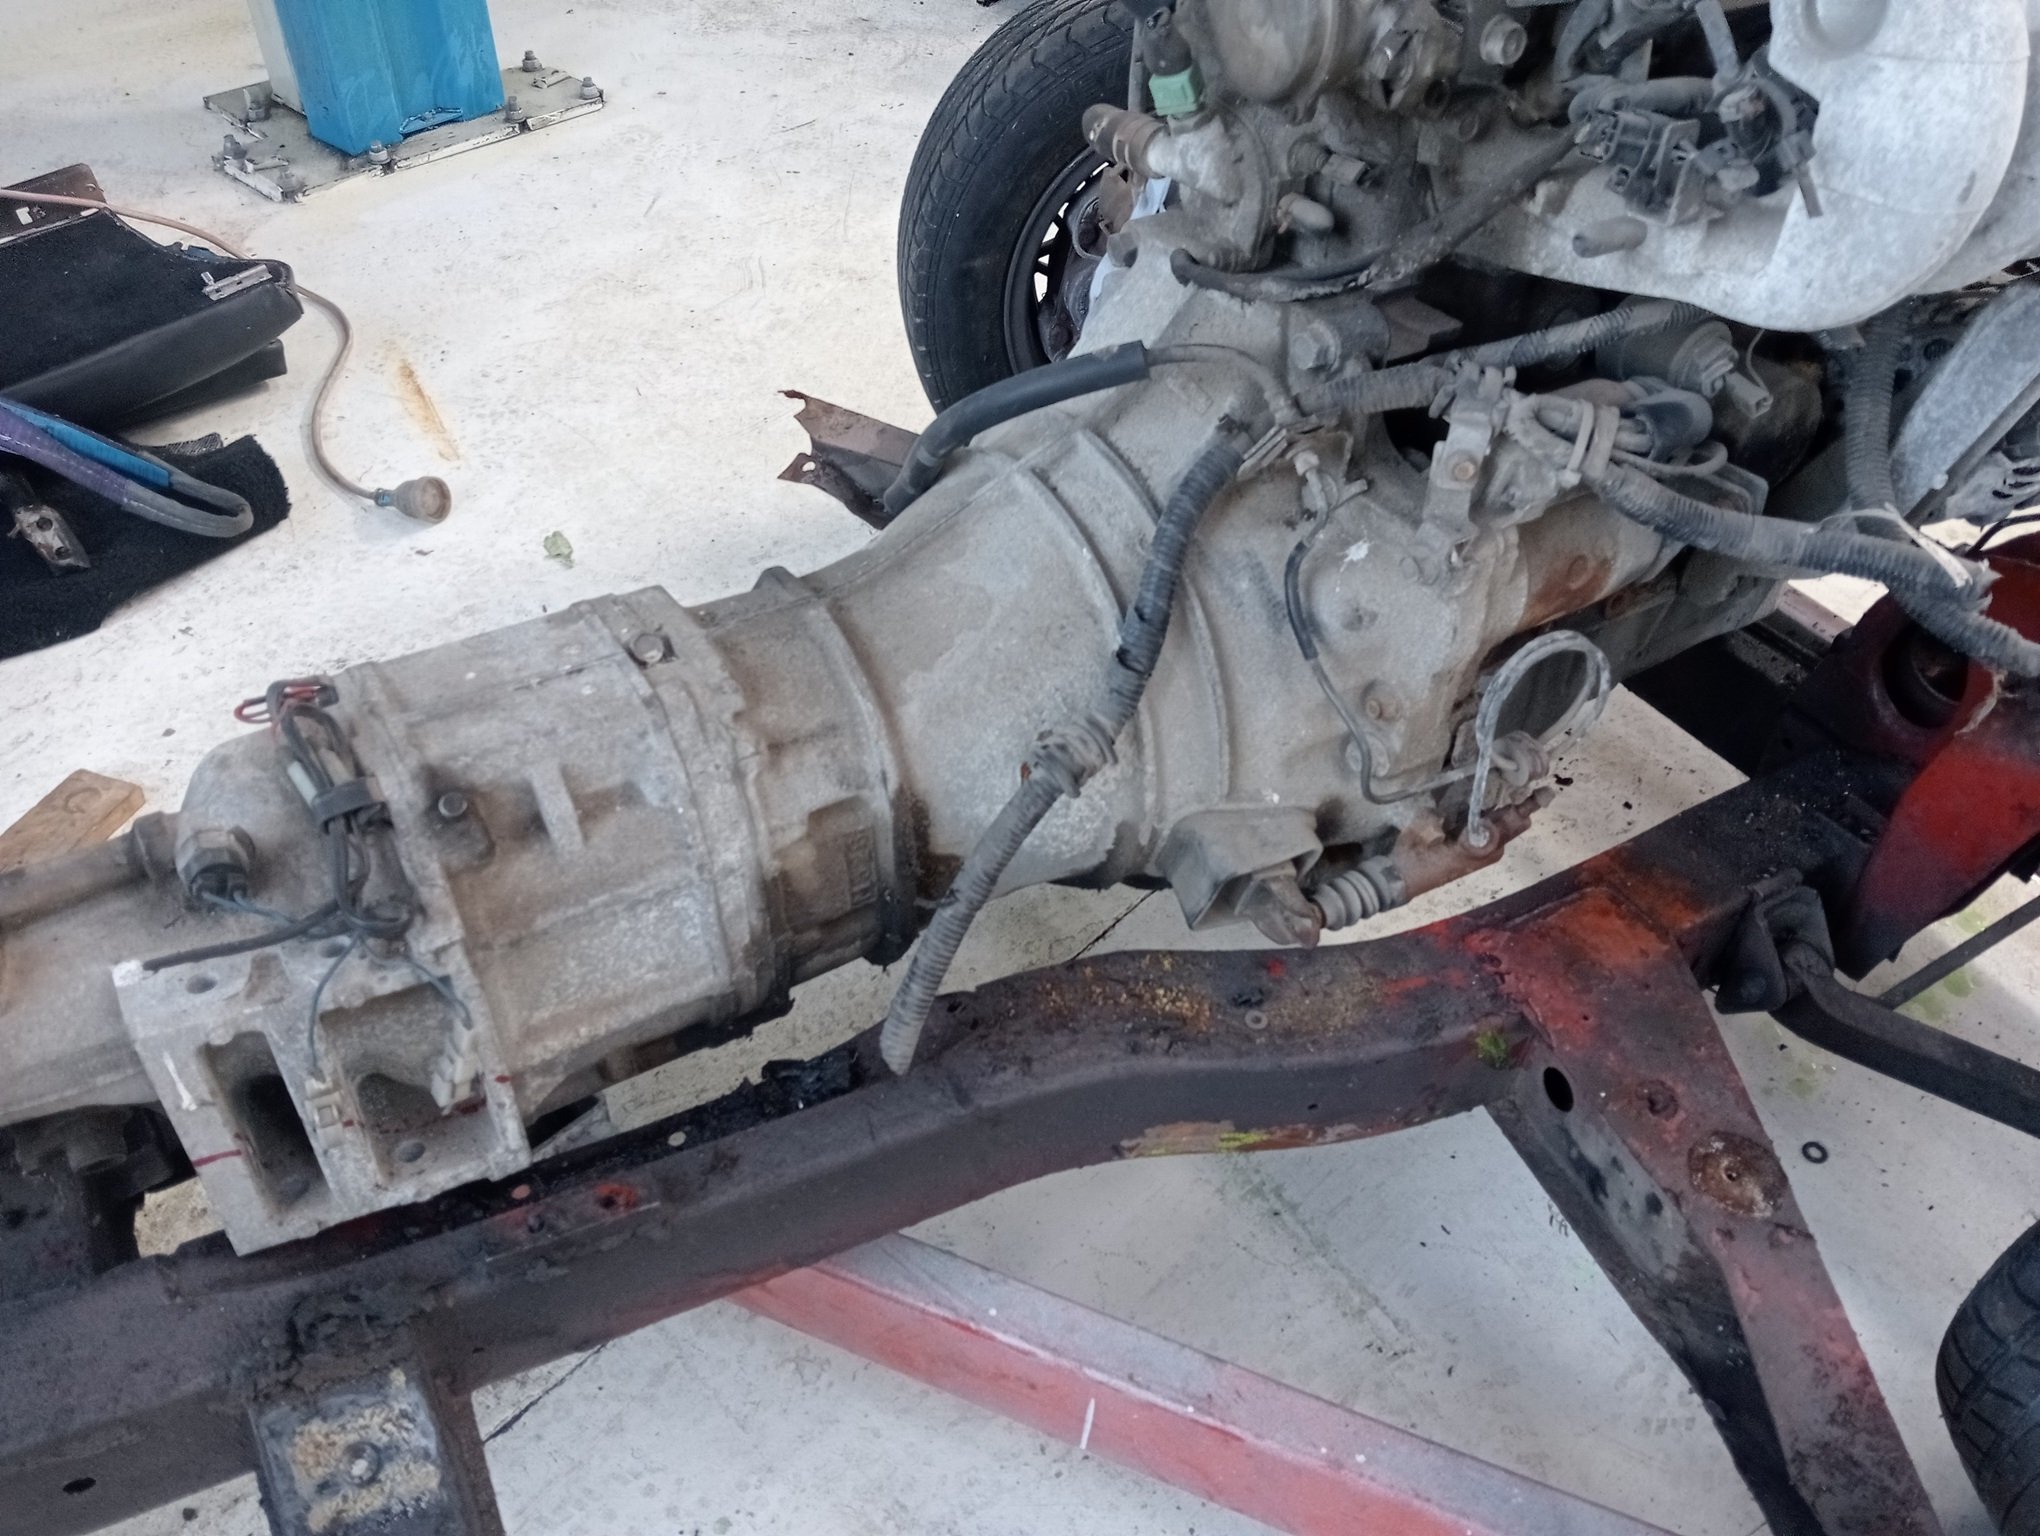
Got gearbox mounted, which isn't exciting update wise. But means i can confirm everything fits and start on things it was holding up. intake runner number 4 is tight on the brake booster. but can tweak the intake or trumpets up a touch and should be happy days. as have a little clearance left on number 1 to the bonnet I was going to do a reverso mount on the clutch master like a fellow os geezer done. but ended up with a little more room than expected. So a shorter master or one that mounts closer to the firewall looked like it should fit. Rather than spending forever trying to find something that would work. picked up the angle grinder and zinged the flange off the one i already had. Tidied it up in the lathe and cut a groove in it. then wasted half my life making a clamp on flange.
32 points
-
Looks like its come out great! They will do another one and Ill pick them up next week. Next up I think Im going to machine the blocks. Need to make a big trunnion for the 4th axis!31 points
-
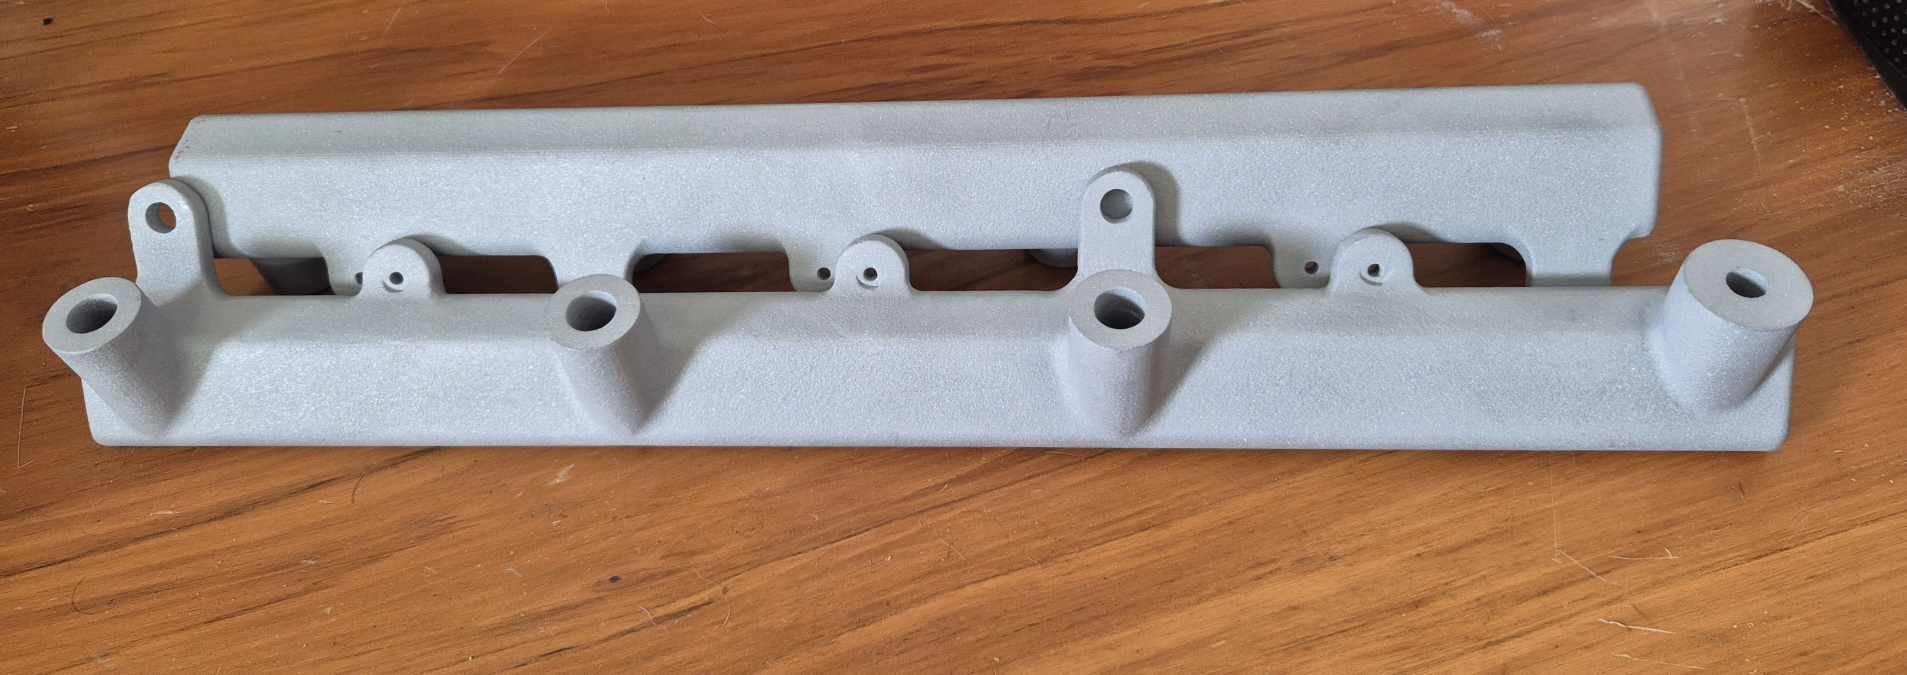
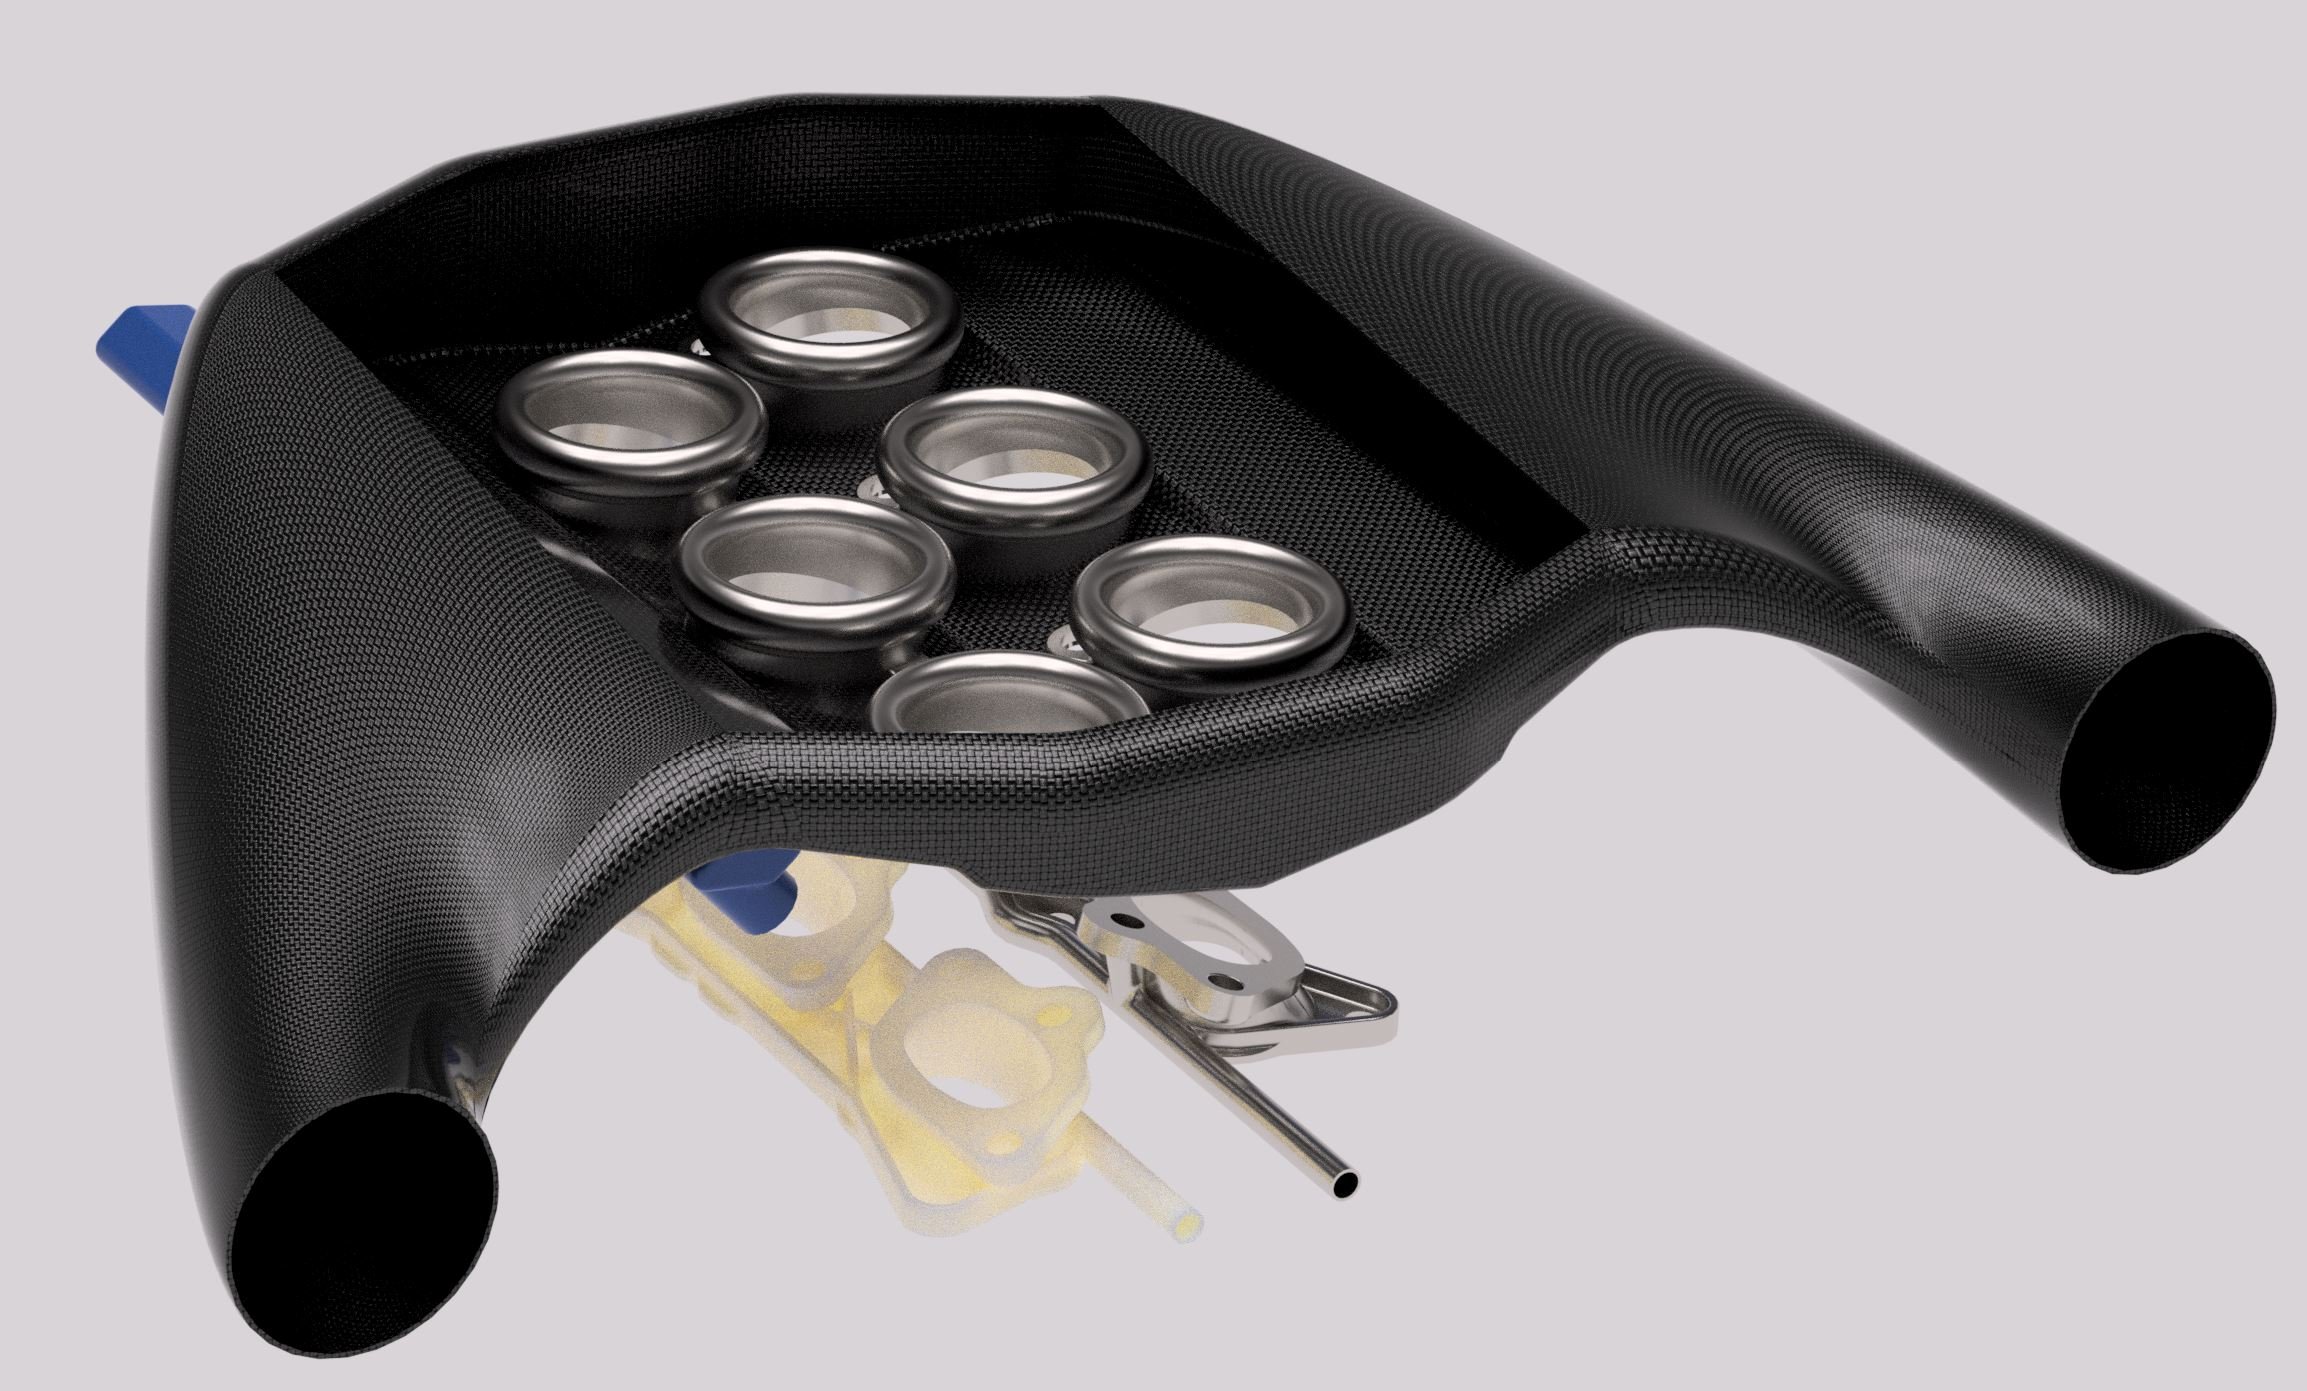
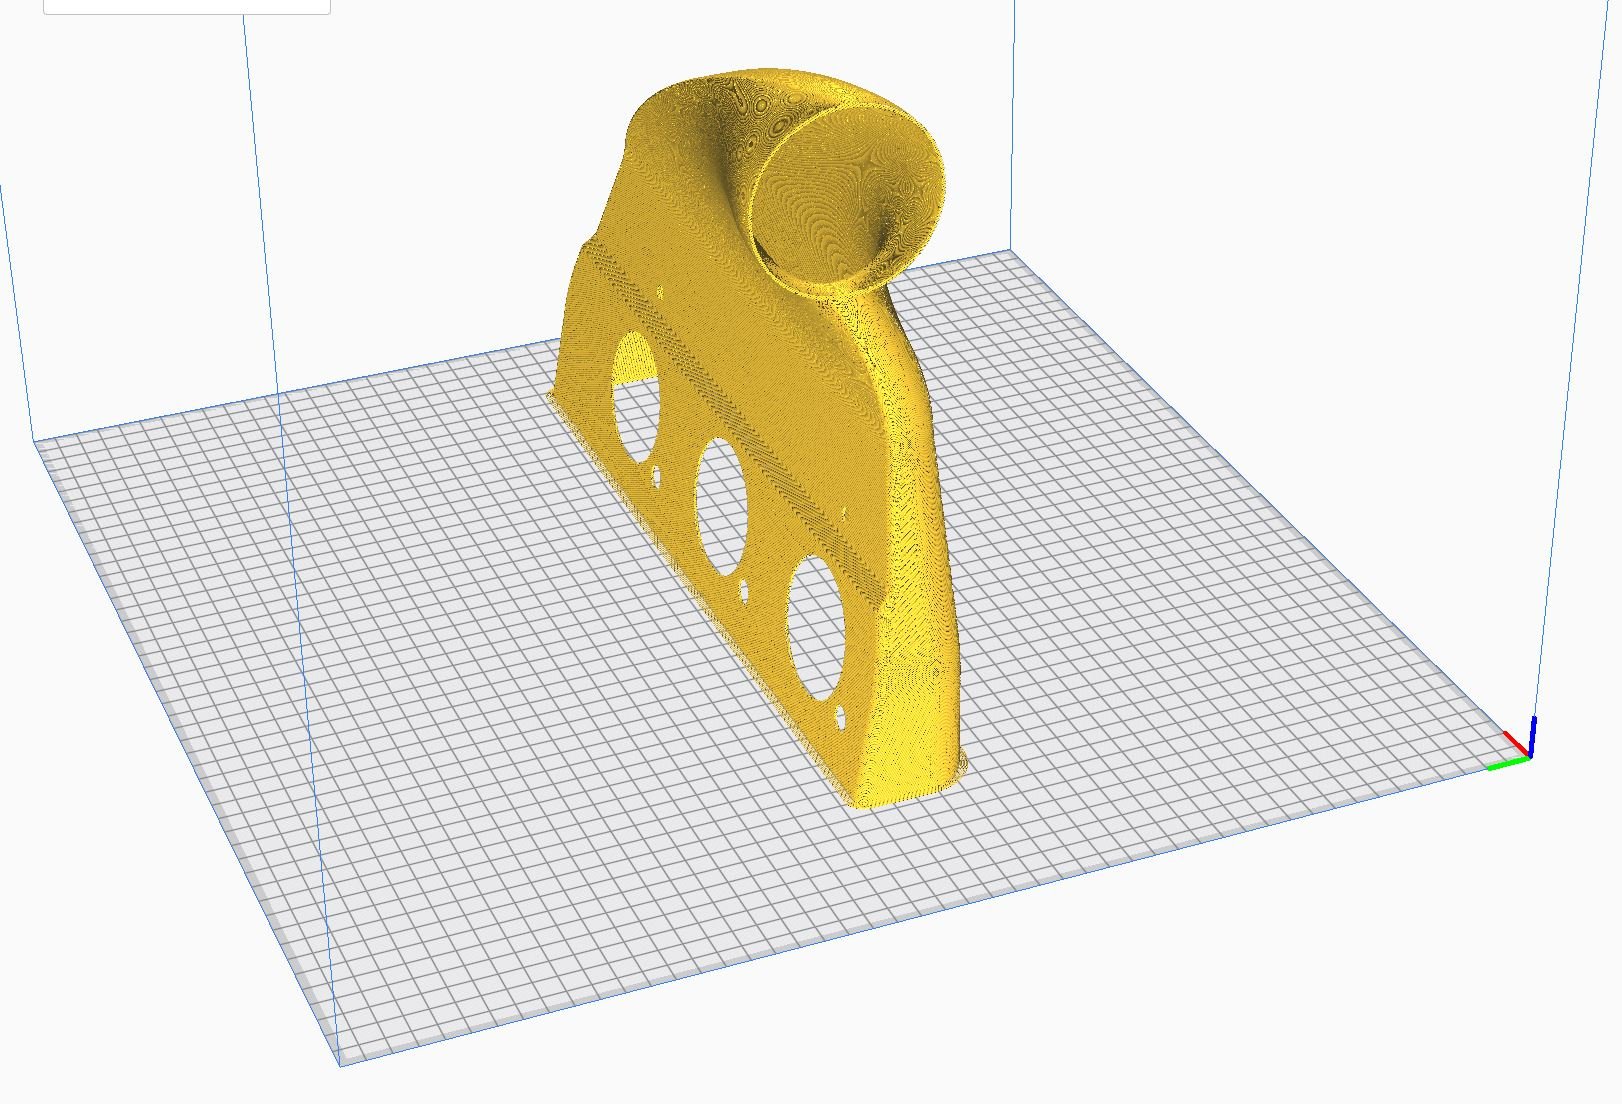
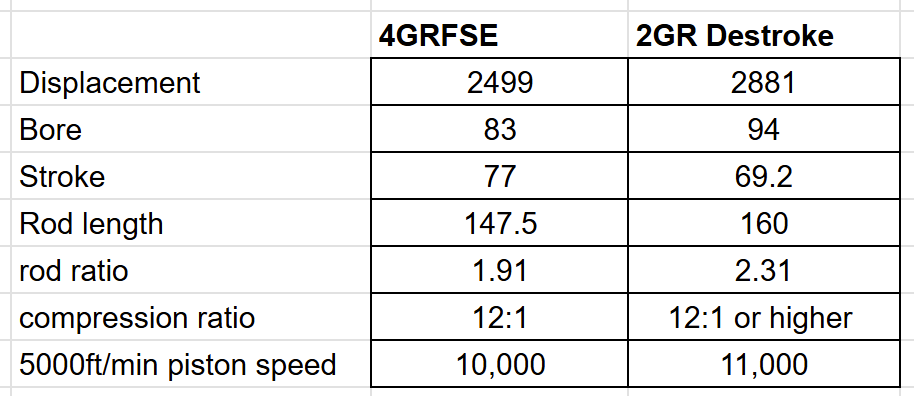
I got my throttle pulleys machined down to a smaller size, so they can open the throttles all of the way (Thanks Dad!) So this is all now working GREAT. and it's super snappy. So I started doing some tuning to try figure out the area just off idle, and why its such a bag of crap. I found that adding considerably more ignition timing helped a lot, and increasing injection timing to around 600deg (usually 400) However, at a fairly early stage I managed to blitz one of my ethrottle motors with about 100 amps too many haha. It still worked, but smelled funky. Well, it ended up crapping itself. So I've ordered another one but it's still a few weeks away which is annoying. Since I couldnt do anything else meaningful for that stuff, I figured probably a good idea to take all of the exhaust completely off and check it. I found a worst case scenario leak for my extractors on both sides. There were signs of a small leak coming from somewhere between the 3 pipes, up the middle of them. Blargh! Impossible to get to this to fix it without cutting everything up. I was fretting about it for longer than it actually took to fix. I cut off the collectors just slightly up past the 3x pipes. Then fully welded both halves, flattened it off, then welded back together. No more leaks and it solved what one of the ticking noises from the motor was. Even if these extractors eventually crack or something. I'm still absolutely stoked to have made these myself. My new fuel rails turned up, but I havent had them machined yet. But fits a lot better. Given the available space I think I'm gonna give up on having a front feed airbox. So thinking dual sides instead. I guess these could both rejoin around the front and grab some air from on top of the radiator. Or I could have air intakes behind the headlights, and go back to a full height radiator. Which probably isnt a bad plan. I cant fit the entire thing on my printer but I can do half at a time. So just banging one out to test fit. 2GRFSE Scheming "Since I am doing this, may as well do this" Since I need a custom rod for the 2GR destroke scheme. Has made me consider piston options. The factory piston is typical Toyota stuff, fairly big and chunky/strong. But for high rpm the lighter the better... No point in reinventing the wheel if something else already exists? I found a 94mm piston from a 400cc quad bike that runs 10k rpm from factory. Cheap and easily available, and nice and light! It has a 22mm pin so might even fit the 2GR rod (apart from that the rod is too short) So I've ordered one of these to test fit and see what sort of compression ratio will be achievable. A destroked 2GR doesnt end up tooooooo far off the geometry of the Opel Calibra DTM car which was absolutely hectic. I wonder if you could grind the journals down to lose another 9mm stroke out of it... Would only need 4.5mm taken off one side I think? Just to be 100% clear though, none of the above are detracting from getting the car onto the dyno ASAP! Once my ethrottle motor turns up, its ready to go. 2GR Destroke comparison for future scope creeping:
30 points
-
Just a quick update. After a visit to the local compliance centre we've put the car in storage awaiting the results of our "request To Use Alternative Documents" (CA30) application. Have to say once they saw the car they the guys from the North Shore Compliance Centre were very enthusiastic and have gone out of their way to be helpful. I've sent over 15 MB of documentation and affidavits to to VINZ - so fingers crossed!
29 points
-
Not bad.
29 points
-
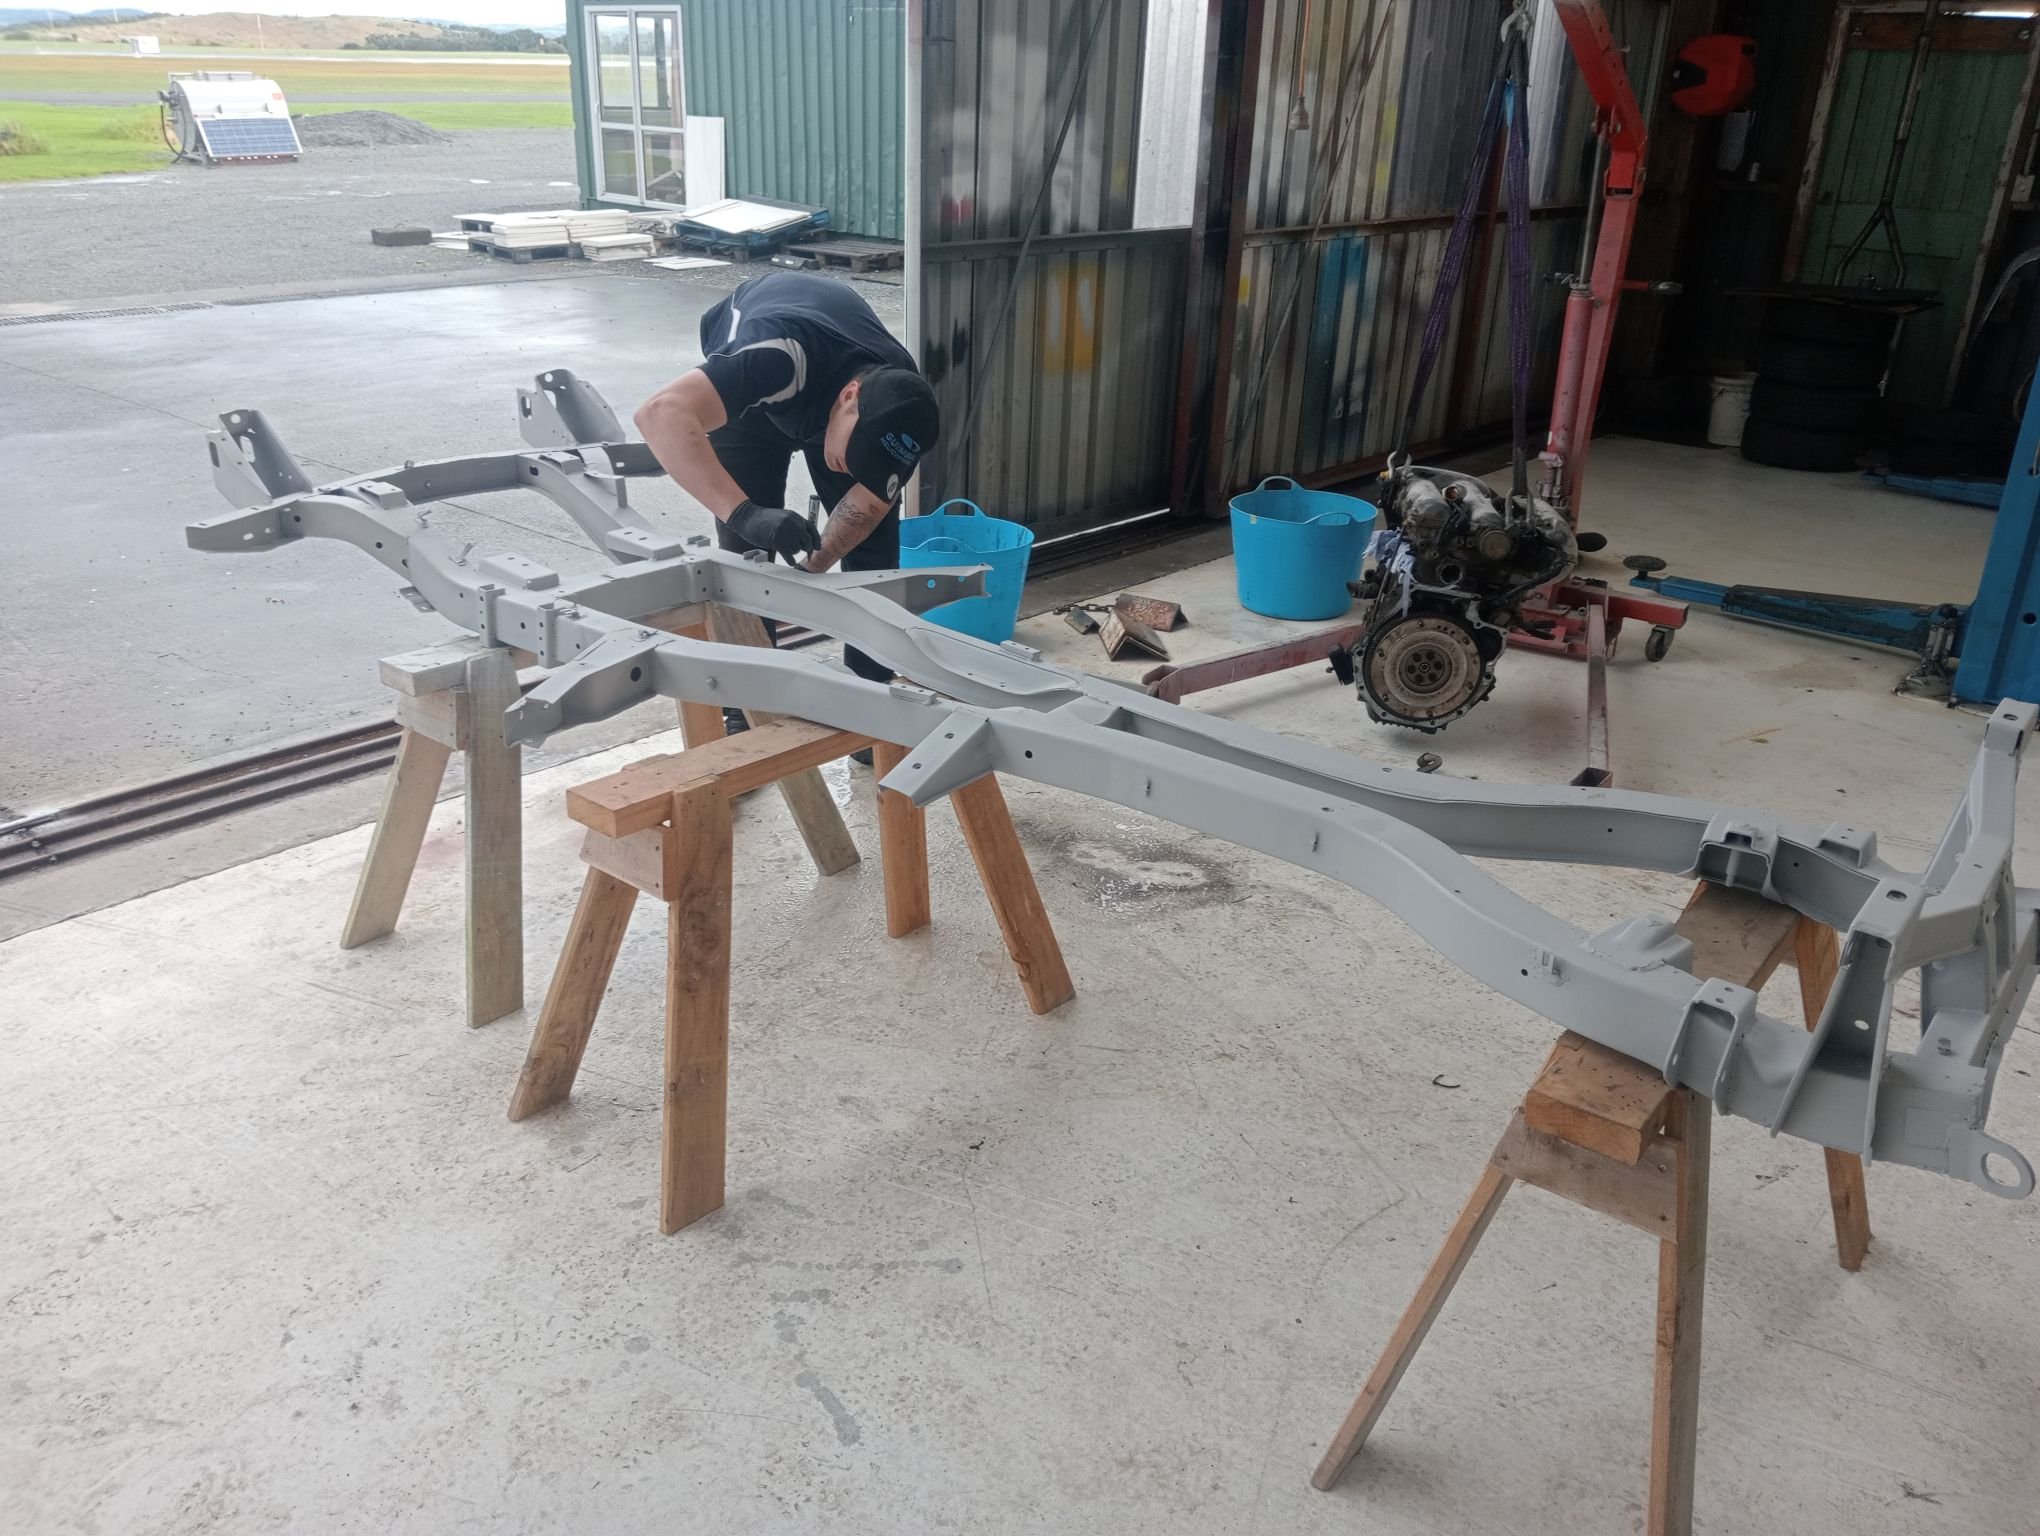
extension housing finished, installed and cynically painted in a coat of hammerite direct-to-shit silver. presented on this angle which just so happens to hide every single weld, how convenient. Ended up having to ream it out as the selector rod kept getting locked up mounts welded up and pretty much finalised, these are comprised of 80% stock triumph mounts on their side and 20% bunnings pool umbrella stand. chassis came back, one of my guys got to play "mark all the cracks" uh oh. as suspected, it was definitely time for a birthday. (Also, are all chassis welds this bad under the paint?) RHS lower wishbone attach point lots of other bits came back at the same time I was having a mental health moment earlier, the diff did NOT have a drain port. It does now. crush tubes going in for where the mounts will sit. I guess I could have welded the brackets on directly but it might've made getting the engine back out a bit funny. Plus the chassis is so thin I'd much rather have the big bolt sandwich Frustratingly I don't have half the suspension bushes that I need, otherwise I'd probably have the chassis repainted and all the doodads back on it this week. Also waiting on a new clutch and drive axles.
28 points
-
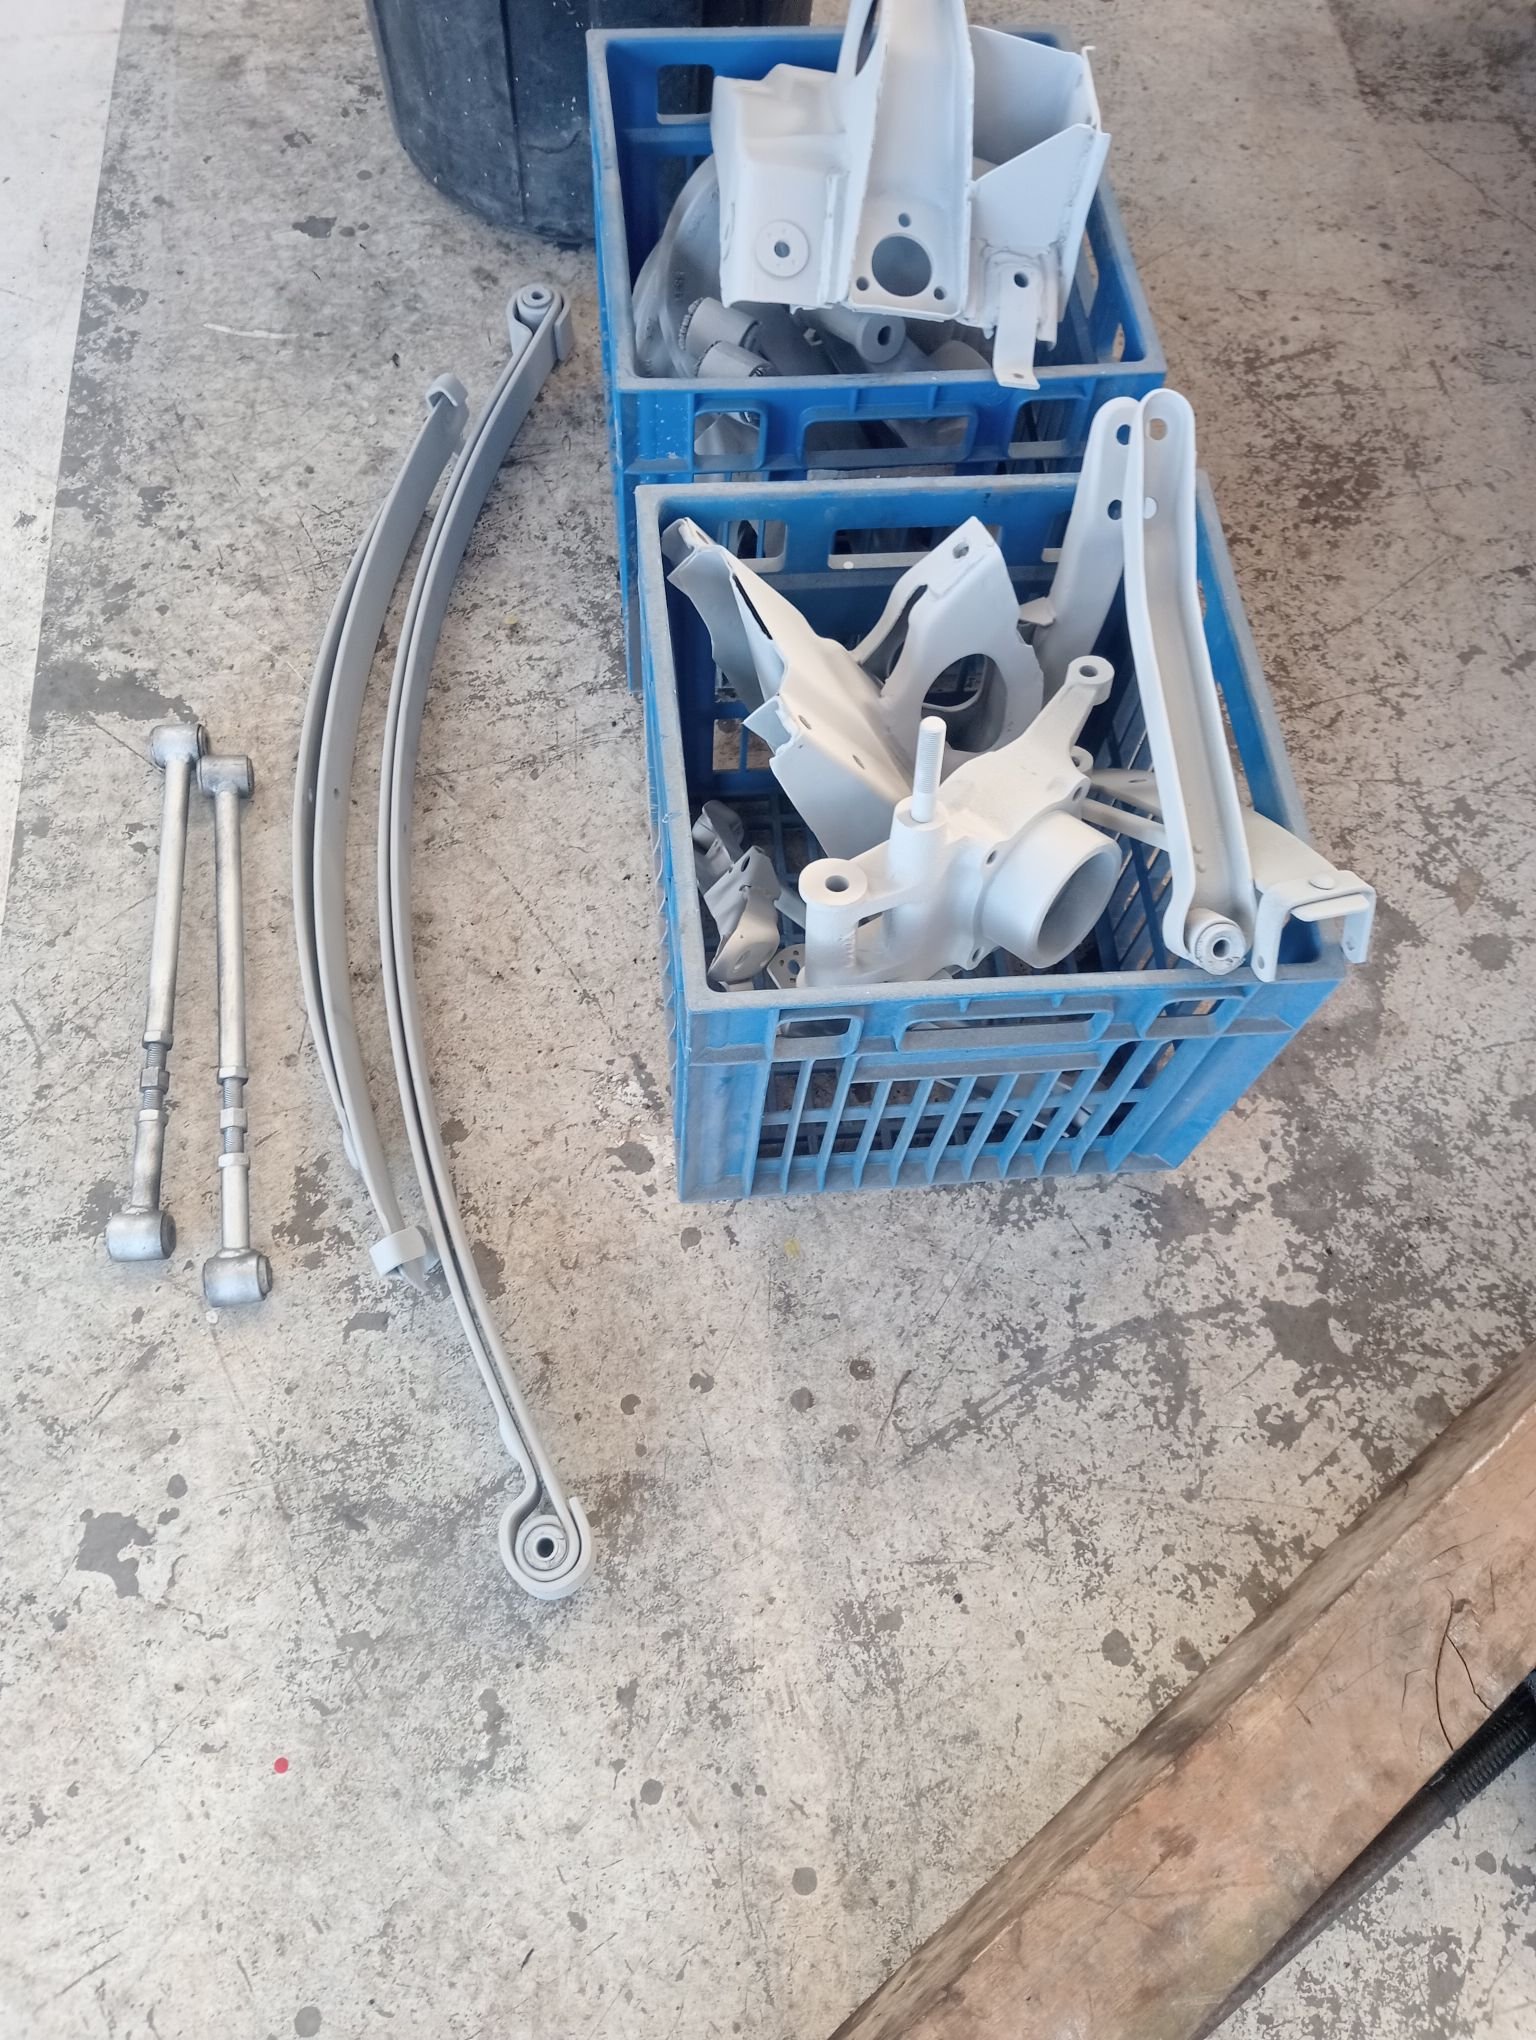
Well shes been all bloody go round here! Progressing along real nice getting alot of finishing touches off Got a ton of stuff powder coated, subframe, lower arms, gearbox xmember, radiator, oil cooler, catch can, over flow, all the dash brackets, a ton of brackets made for the loom etc. Came up bloody mint! Also got a few engine bits and gearbox adaptor etc anodized black. And RKM polished my housings, front cover, intake manifold, water pump adaptor, EWP etc. Came up bloody mint And the shell has been back at my painter for about 4 weeks. All go, Blocked in 80g and 140g and about to hit it with the 240g before final prime. Body lines, gaps etc are coming up mint! Photo before the journey to painter, looking alot different now!
28 points
-
One. Two. Miss a few. 99. Paint! Came out good enough. Satin black for the pillars. PPG 2K epoxy primer, seam sealed & Deltron single stage. The previous repairs stand out quite a bit. There's a bit of dust in these photos from removing the masking.28 points
-
All boxed up at the foundry and moulds filled. They added their expertise with risers and runner system. See how it goes in the next couple of days.27 points
-
oh where to begin. this little car has been a part of my life for almost two decades now. one decade where it was driven, and one where it languished in it's current state. Here's a photo from better times such a pretty, poorly designed car. anyway since another car took it's spot it's been relegated to hanging out in the workshop and generally getting in the way (luckily it's tiny). one day I woke up and thought we may as well sell it. so it looked it over, considered the rust in the sills and around the windscreen, how it's impossible to get into gear, how the brakes are jammed on, how the engine leaks like a sieve, doesn't like to start, makes weird noises when you select gears, has crankshaft play... and thought "why just sell it, when I could waste a lot of money on it and THEN sell it?" and so, this build began The plan, aside from a general refurb, is a 1.6L NA MX5 engine and transmission swap. Nothing that I am doing here is uncharted territory. The MX5 engine is considered one of the easiest swaps and everything has been done before is documented... well, everything is anecdotally documented. ie there's a lot of build threads that encompass what I'm doing, but they all seem to skip over the nitty-gritty and focus on the successful bits. I am not a fabricator. I am impatient, and rough, and careless. I'm going to try and make a note of all the bits and pieces that I wish I had seen prior to starting this swap in the hopes that it helps the next guy And if I totally fuck it up I'll just repost all the pictures in reverse order and pretend that I rescued the car from some butcher and restored it
26 points
-
It's starting to look like a complete dogs breakfast in here. That's how you know you're making progress.
26 points
-
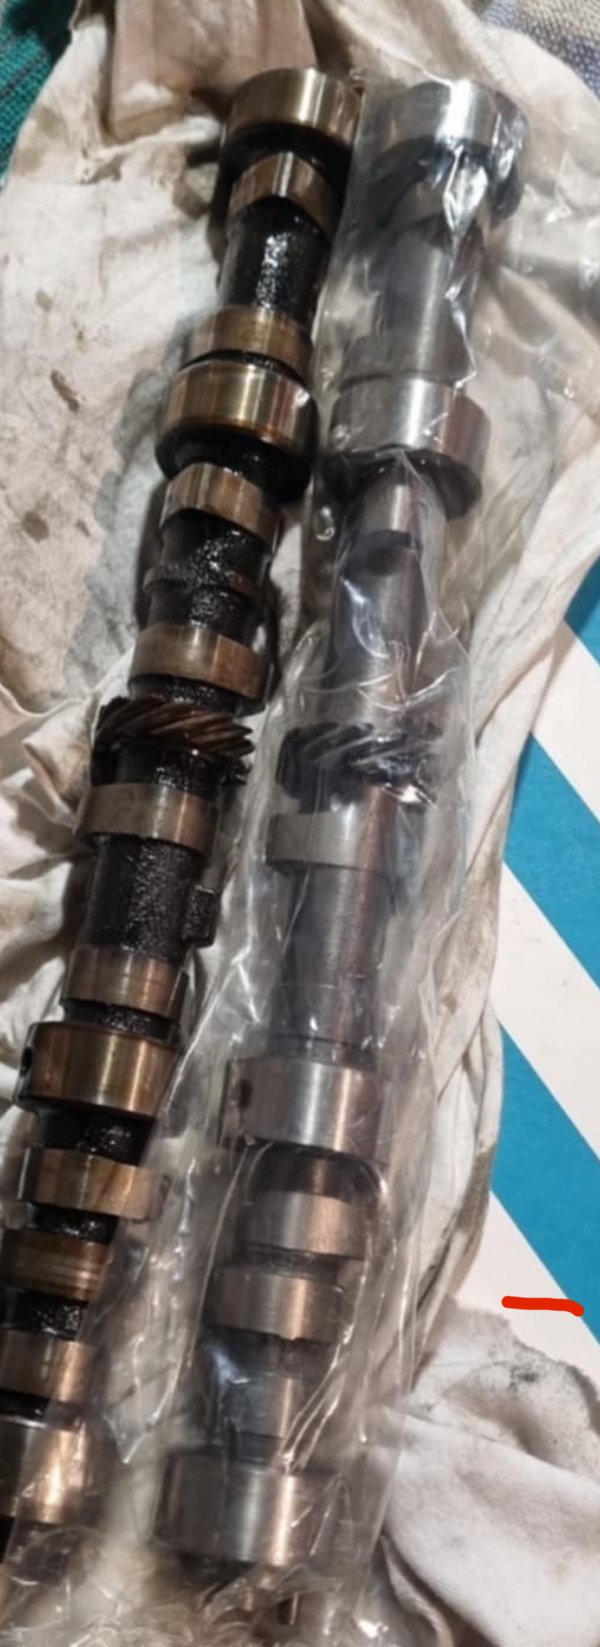
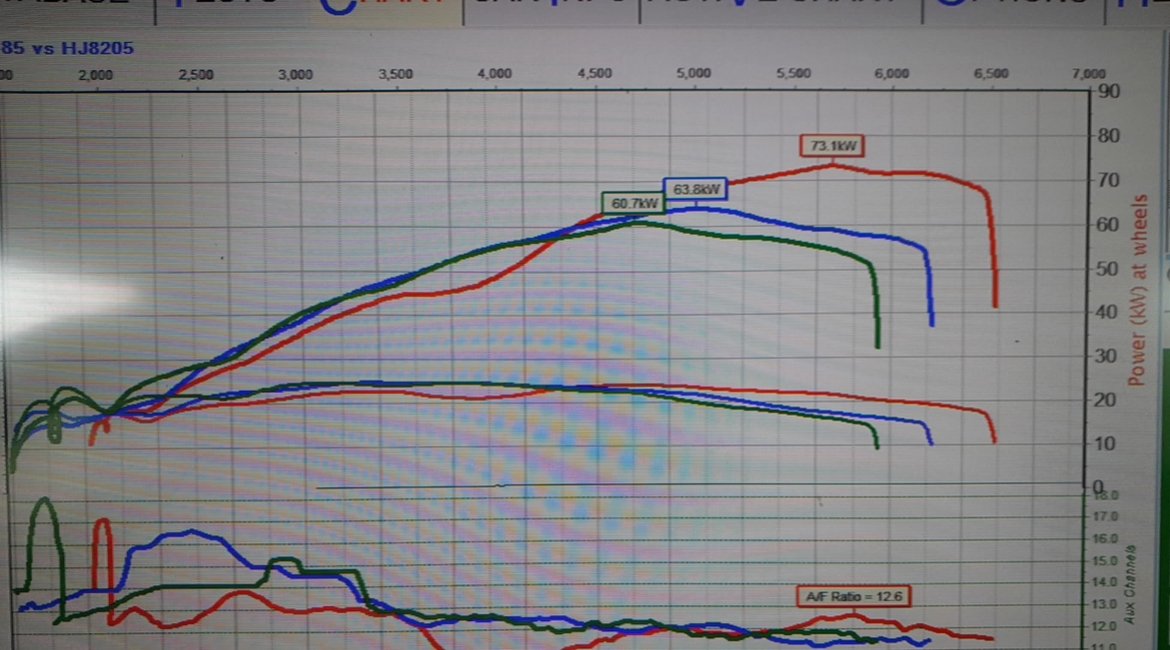
Stage 4 Auckland 7/8 race cam added and @kpr with the kfry fuelled dyno sesh
25 points
-
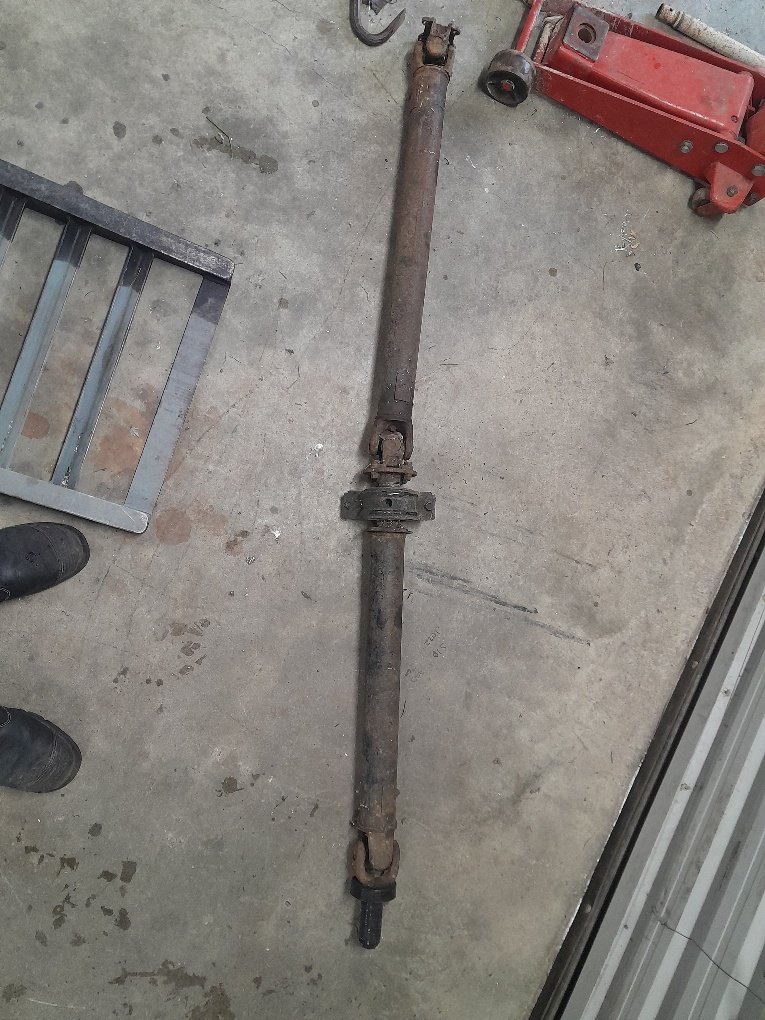
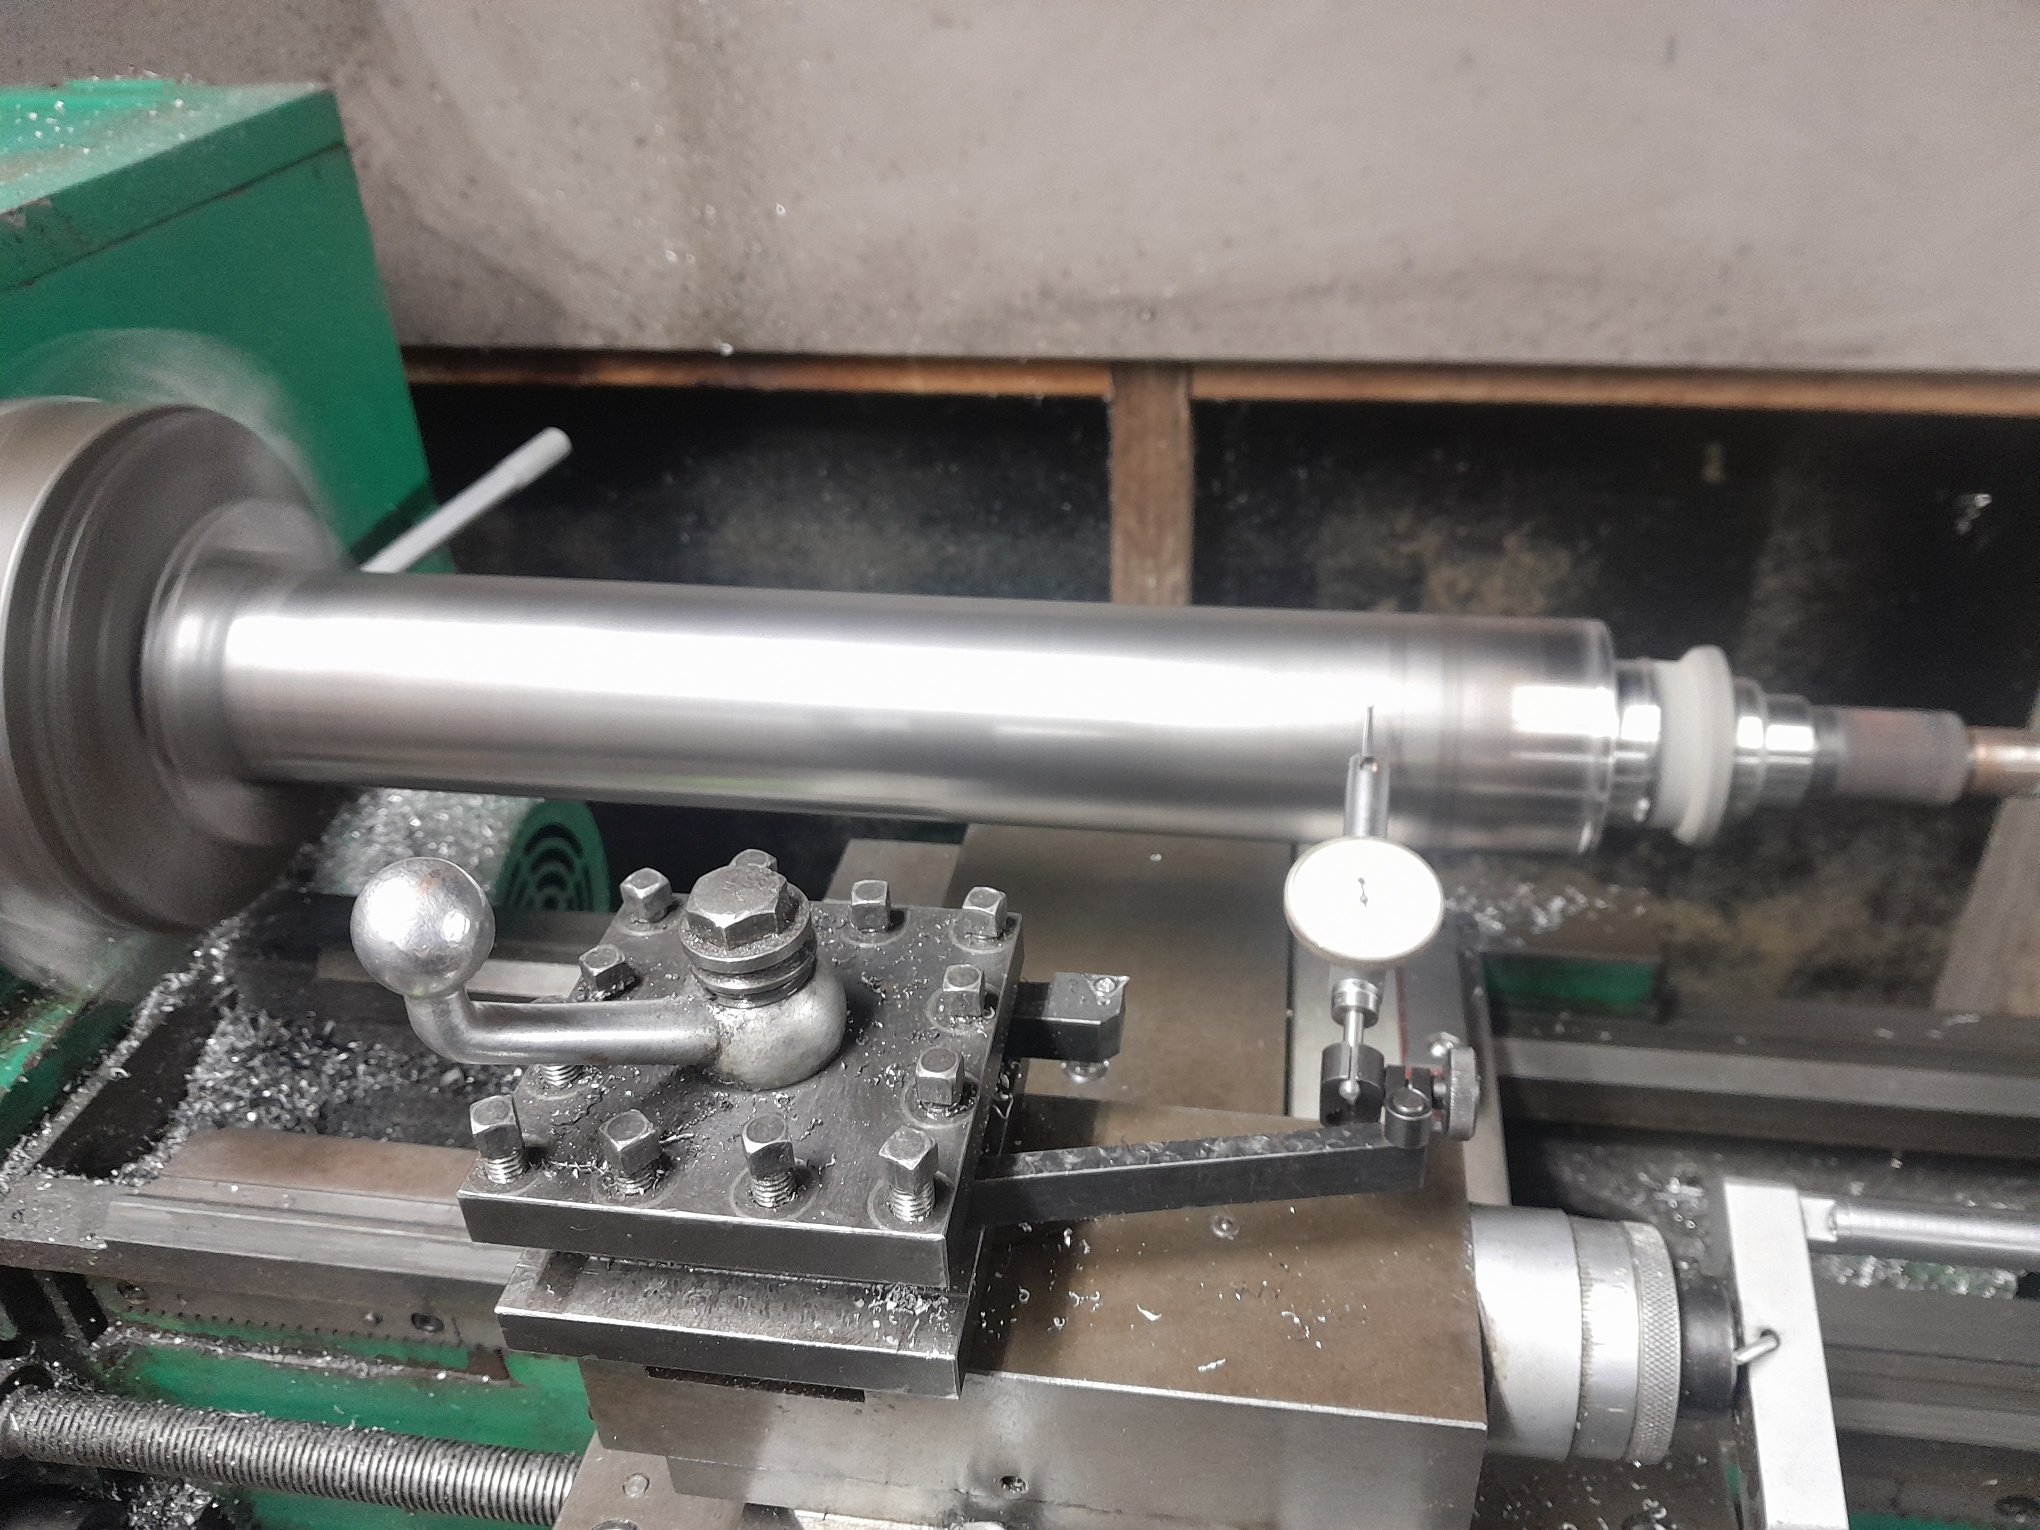
Avoiding making the pedal work with that ^ So started on some other stuff that i haven't finished either I have a 2 piece hilux driveshaft, which has the right ends and the hanger bearing will directly fit in the chassis, once zing the captive nuts off. Just need shorten both the front and rear shafts. plan was to just cut the end off each. shorten, weld, done. But decided to put front half the lathe as is and dial it up, before giving it the chop. turns out it spun like a skipping rope with around 0.7mm run out on both ends. Mr toyota just wacked some balancing weights on the low side at both ends. And yeah turns out the tube wasn't just welded on the piss. the bits the tube spigot onto were machined wack. So far i have trued up the hanger bearing end, building up the low side a touch then machined to a tolerance fit . Got the tube on there and is bang on. Probably getting way to picky but yeah. Rest is on hold till new uni's show up Next for no particular reason. decided to do some stuff with radiator Old setup used to look like this Some kinda nissan radiator. which i still had. was too tall to sit in normal place without sticking up and looking ugly, so done some butchery to the bottom tank to drop it down further Buying a radiator that fits may sound wise. but I wanted to make a gap on the intake side to feed the intake cold air. so an ae86 specific one would need to be cut anyway. So yep i cut some more off the side of this one which you can kinda see the rough cut above^ That meant the twin fans wouldn't fit anymore (they didnt fit good anyway) Again a normal person would have brought a fan that works But i despise junk aftermarket fans. So i cut one of the twin fans out leaving a flange around it. made an ali shroud. then wasted half of my life making this plastic ring to clamp the fan to the shroud Would have been a good job for a 3d printer and made in a couple of bits. but i have lathe and a bit of acetal that has been hanging around forever I haven't finished it yet either. still need to attach shroud to radiator and but made an amazing mess
25 points
-
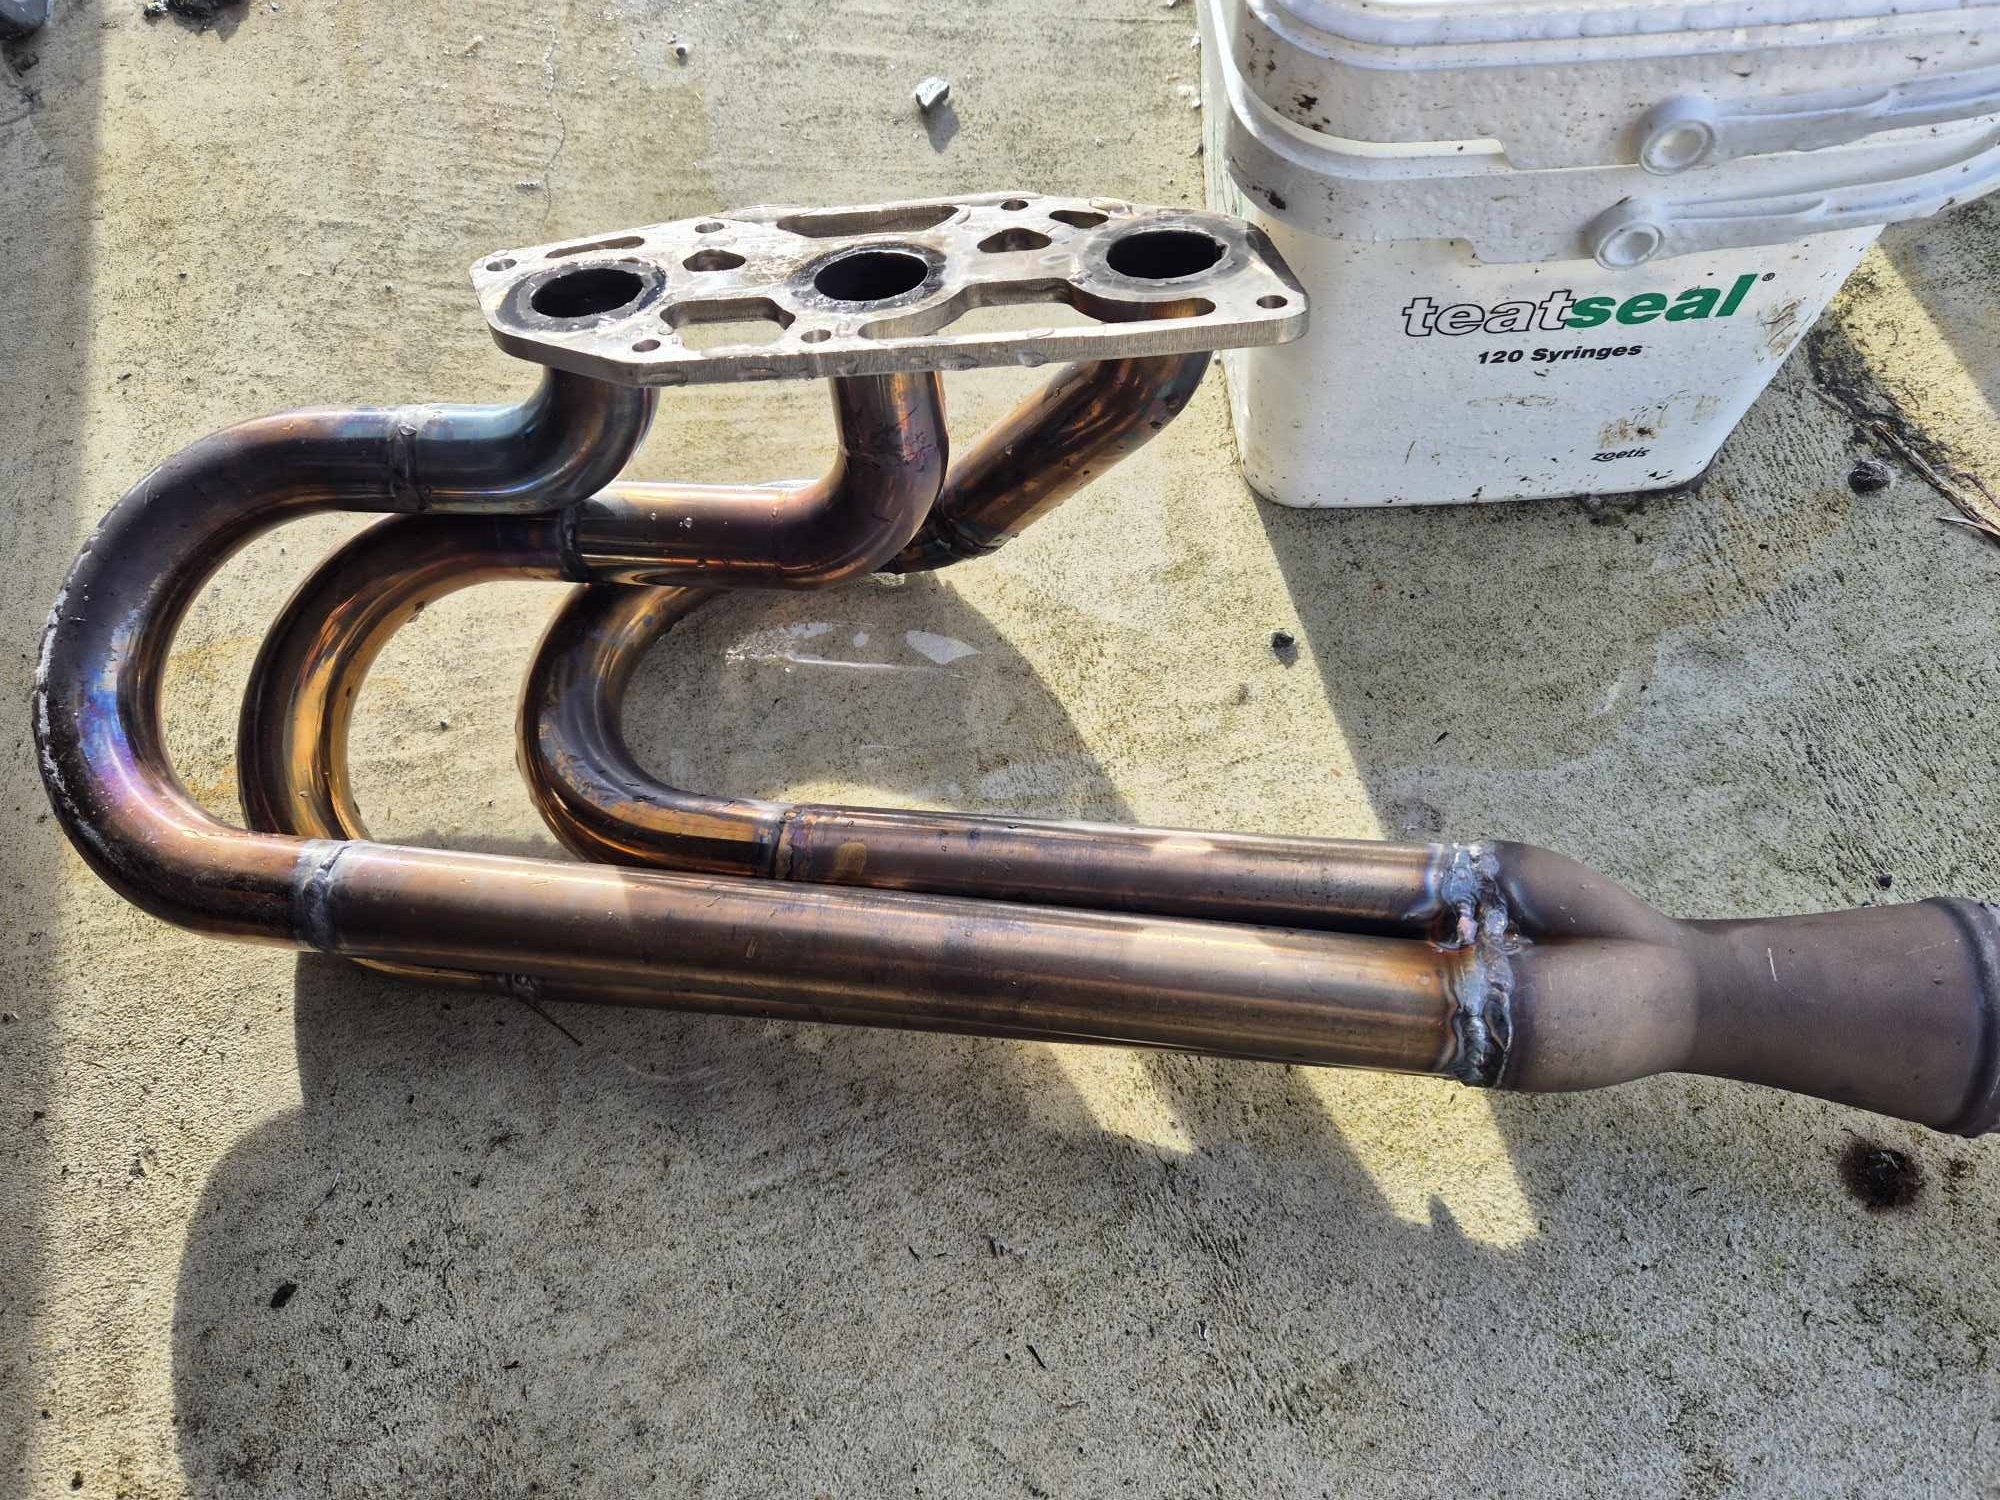
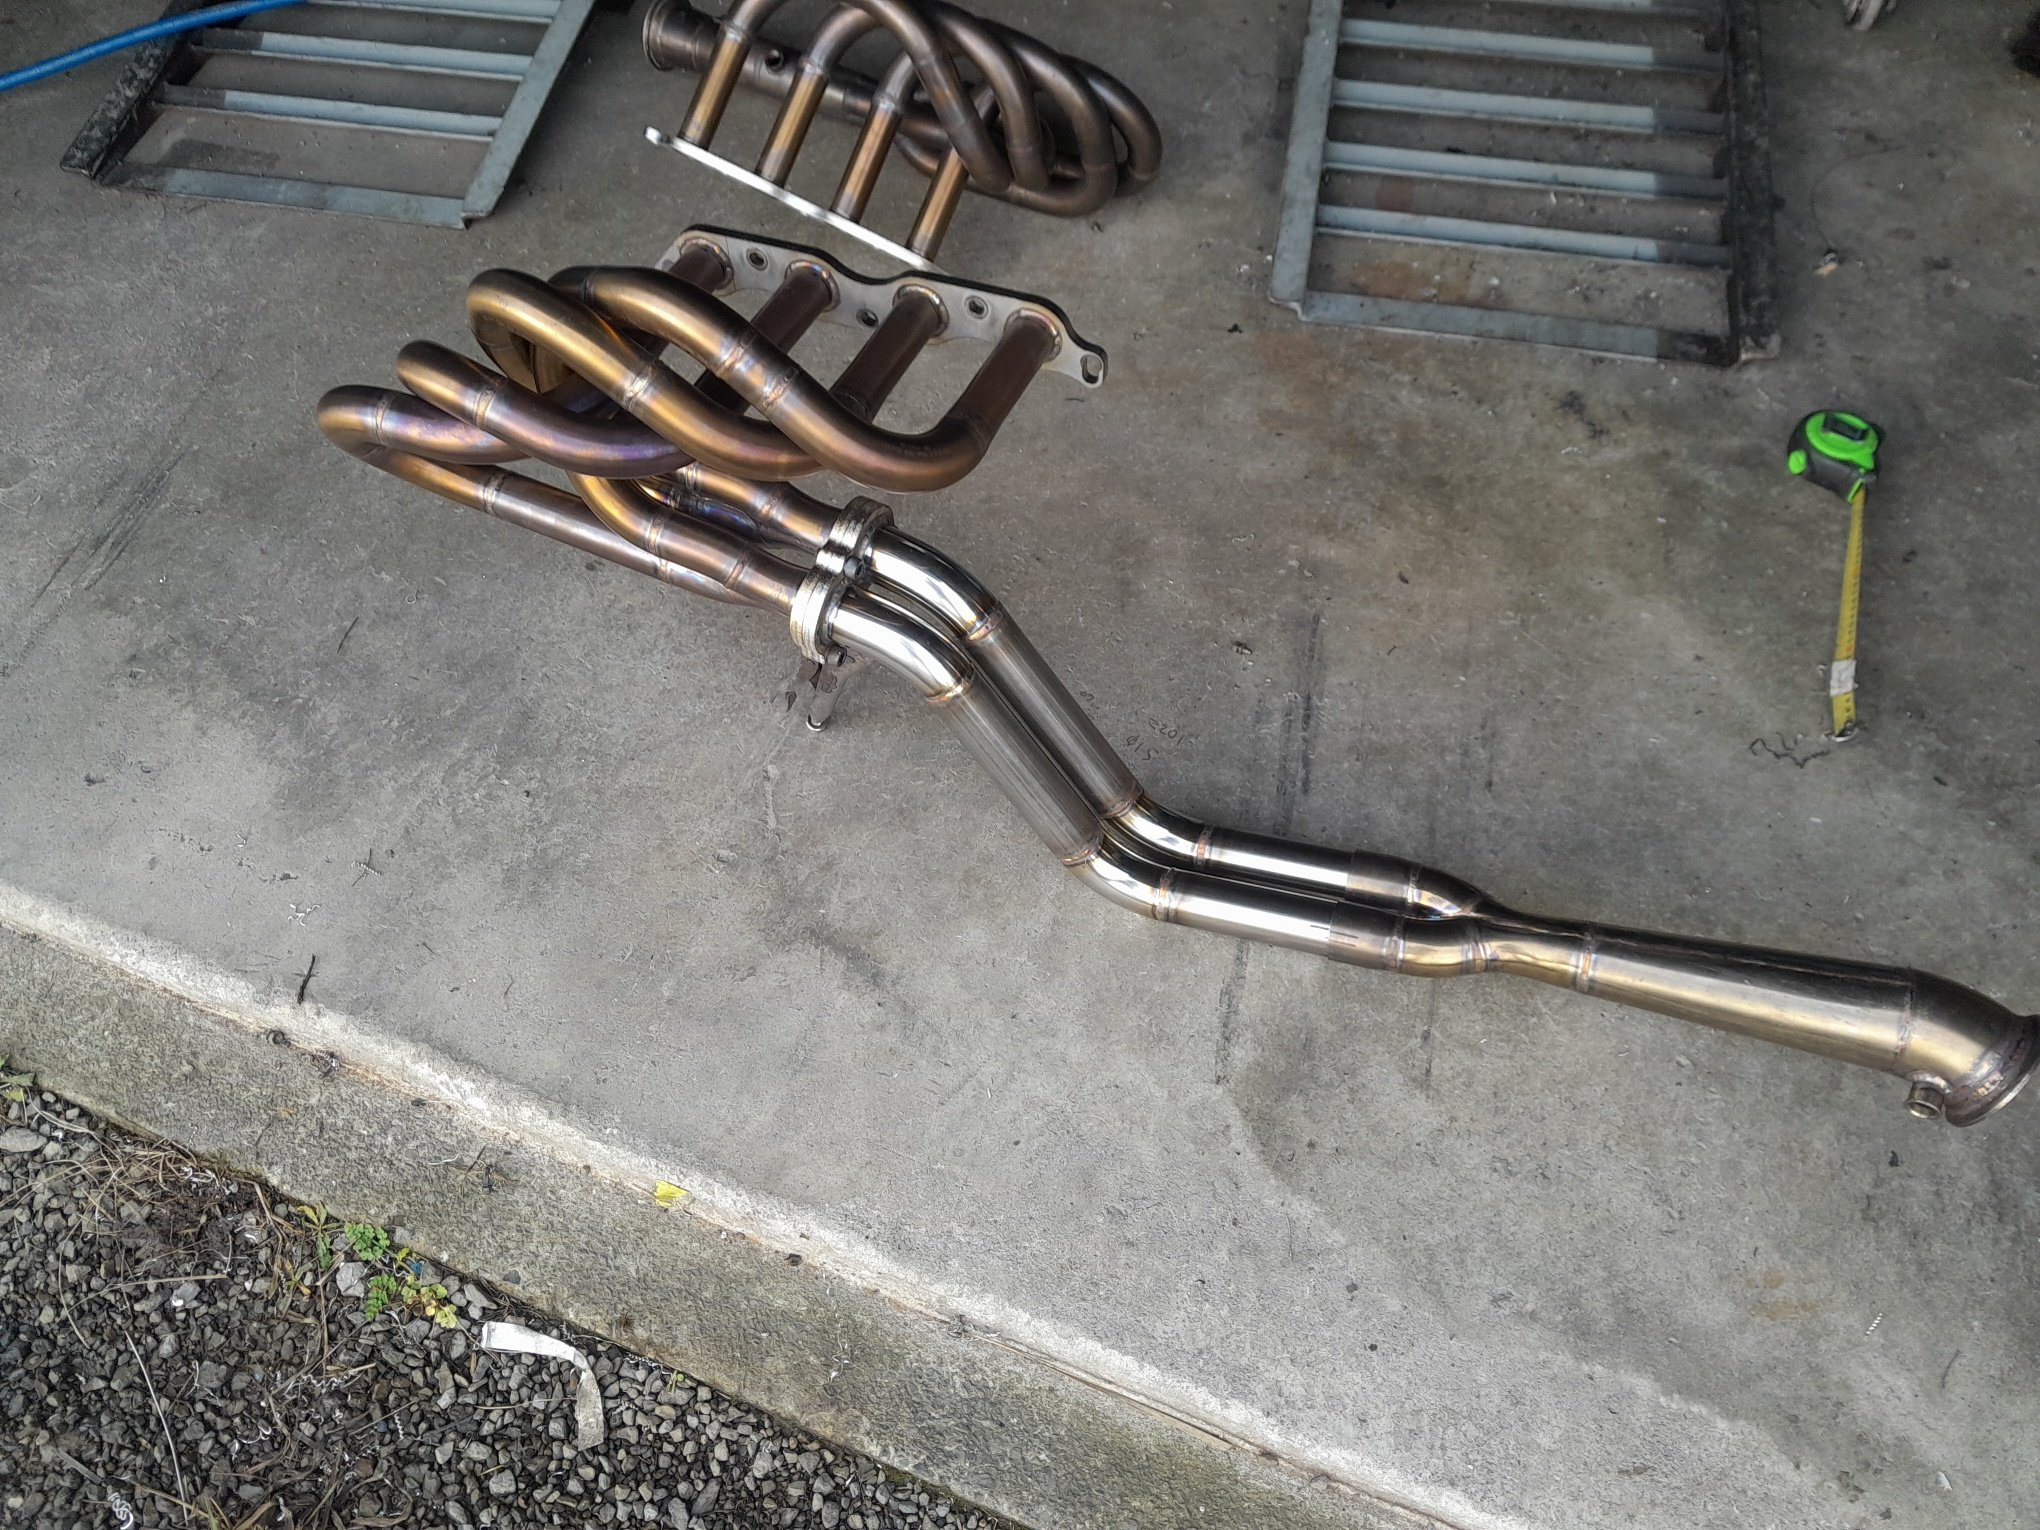
Got the fan mounted properly. waiting to see what water pump, top outlet etc can get hold before weld on tabs to mount in car. as may have to relocate the top pipe. Redone the tab on clutch pedal. so clutch master should be good to go Been making a new 2-1 section on headers specific to this car. Was going to use what was left of the test setup as starting point. but needed to gain a little more length, to get the correct length, before it got to the spot for the first muffler. so started from scratch my normal stainless place stopped selling the size i need for the 2-1 section, so the pipe is some crappy china stuff. which sucks to weld due to wall thickness being all over the shop. but got it done. will see how long before it cracks. i may change the flange for slip joints if has issues Somehow it all worked out after all that testing, that the correct length just happens to fit perfect in the car. the first muffler will go almost directly after the megaphone. If the 4-2 section wasn't the loop design, would have gone straight past the spot for the muffler. which would be a bad day. as need to have all of them to shut up a na 4age. 2-1 length is just under 700mm long
24 points
-
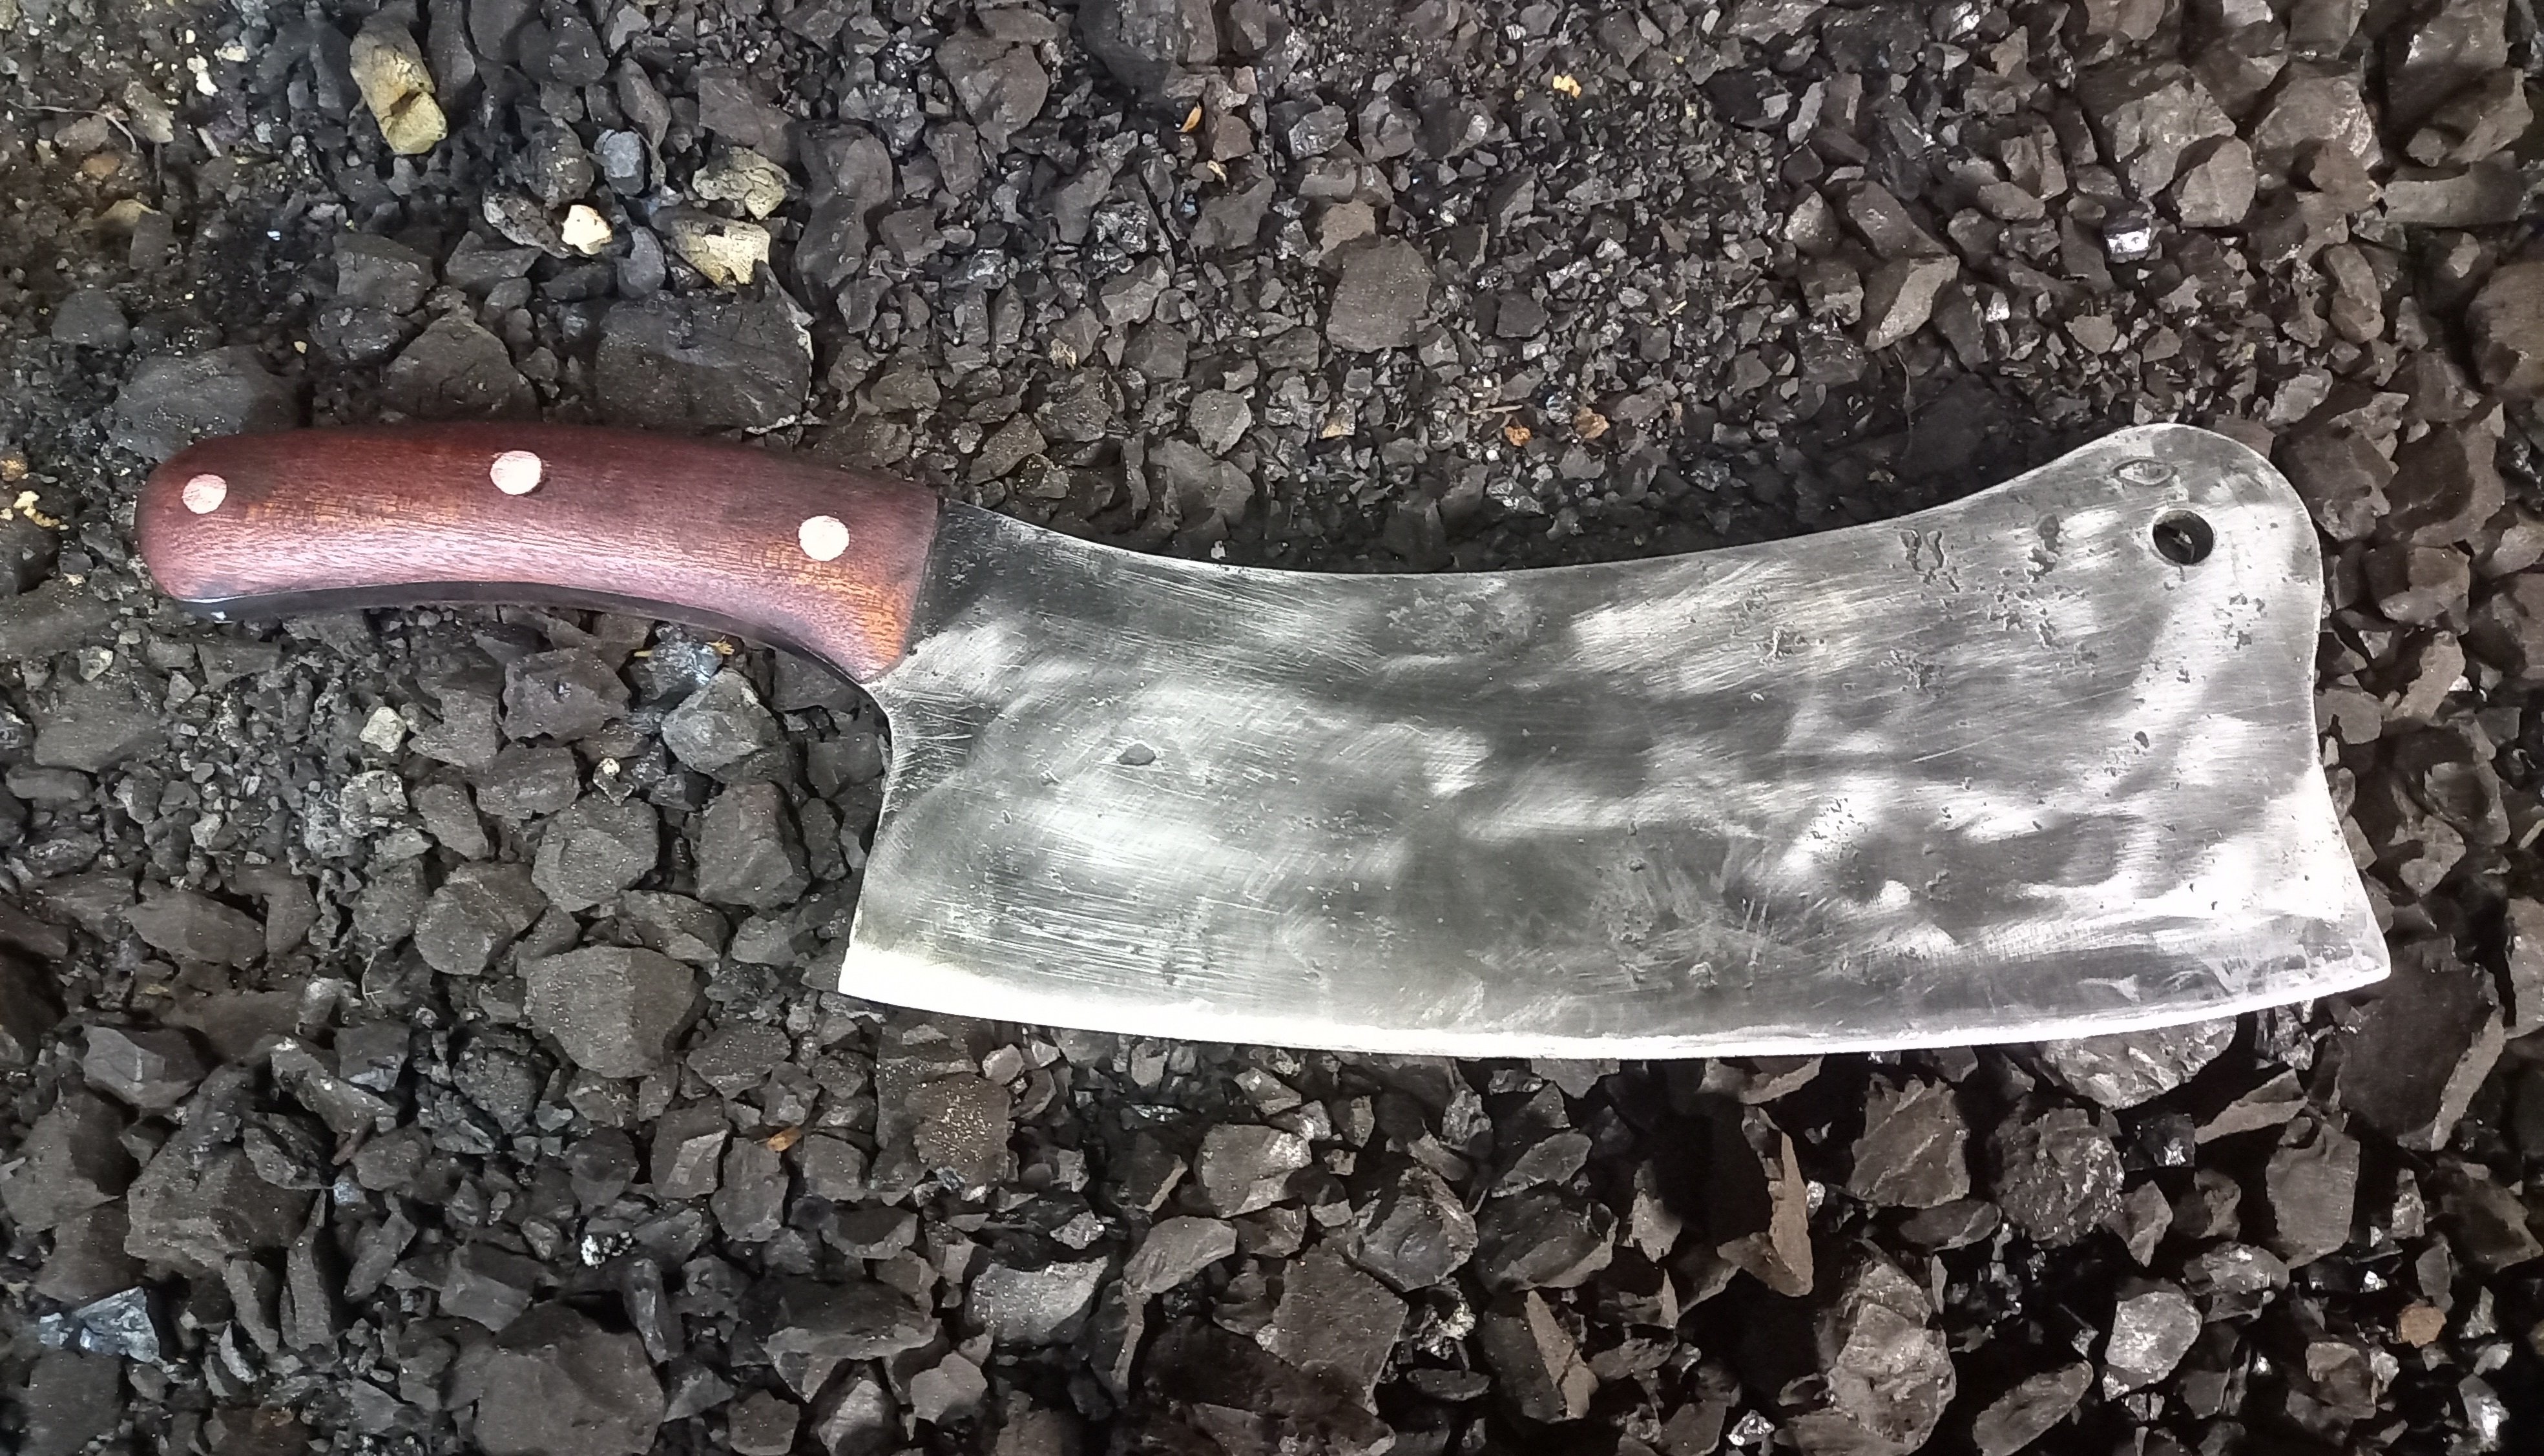
Heavy duty meat cleaver I forged, its not cut from plate, it will cut virtually anything and hold an edge, I spent the afternoon splitting fire wood with it and cut an old tire off a rim with it.
24 points
-
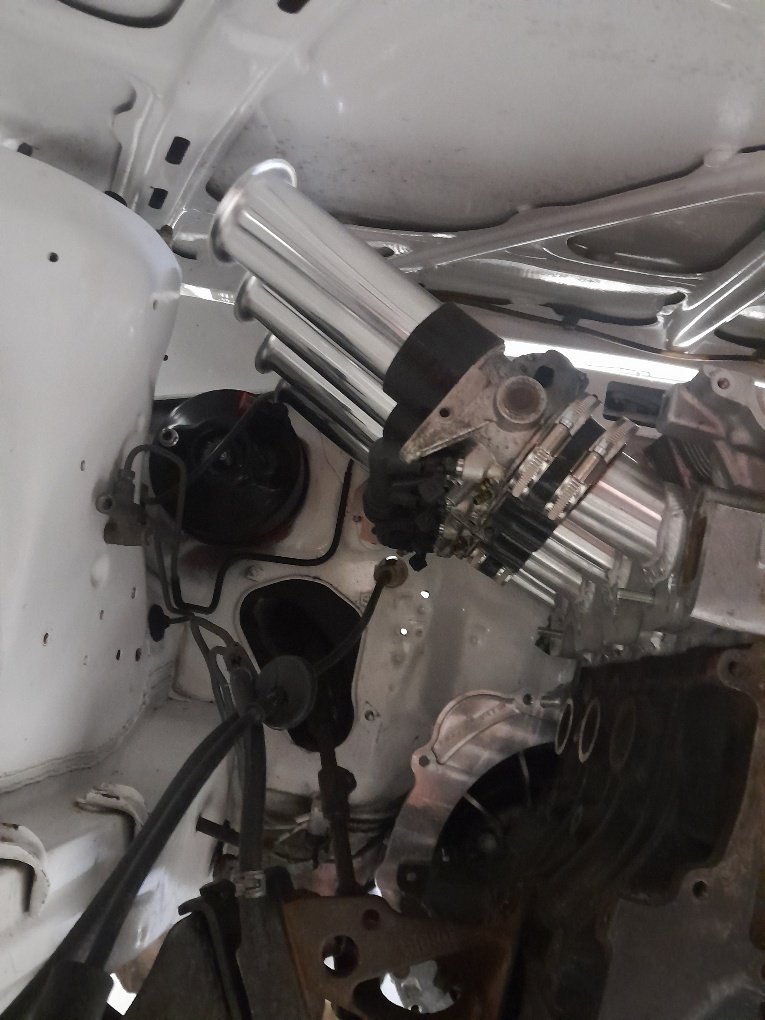
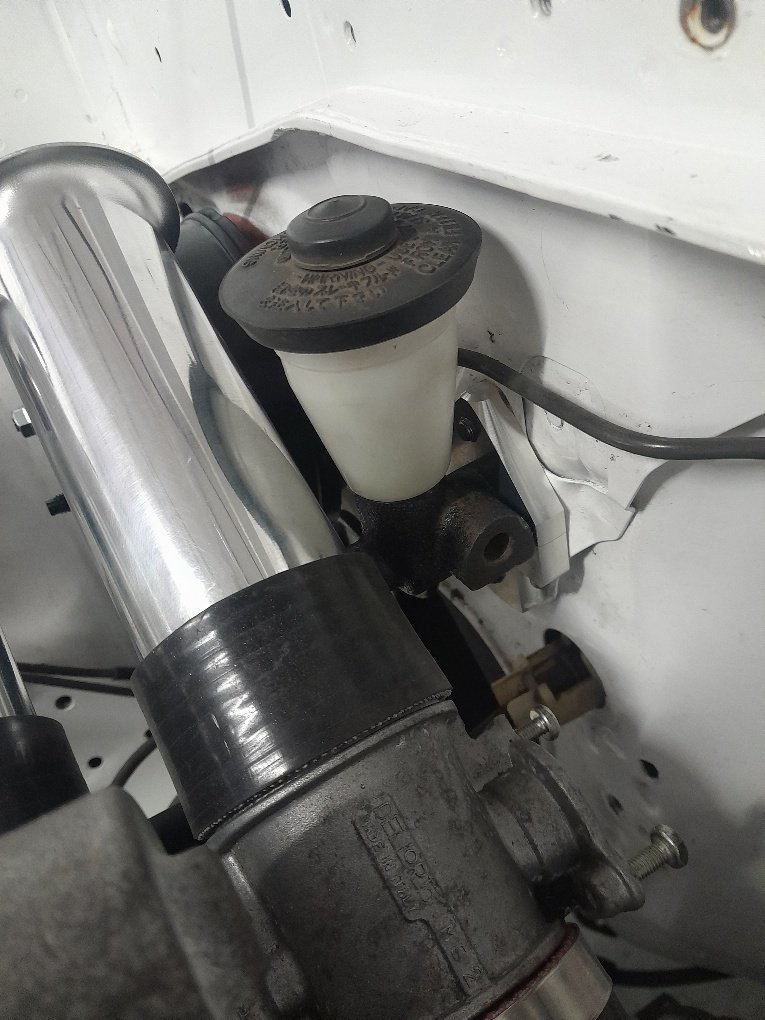
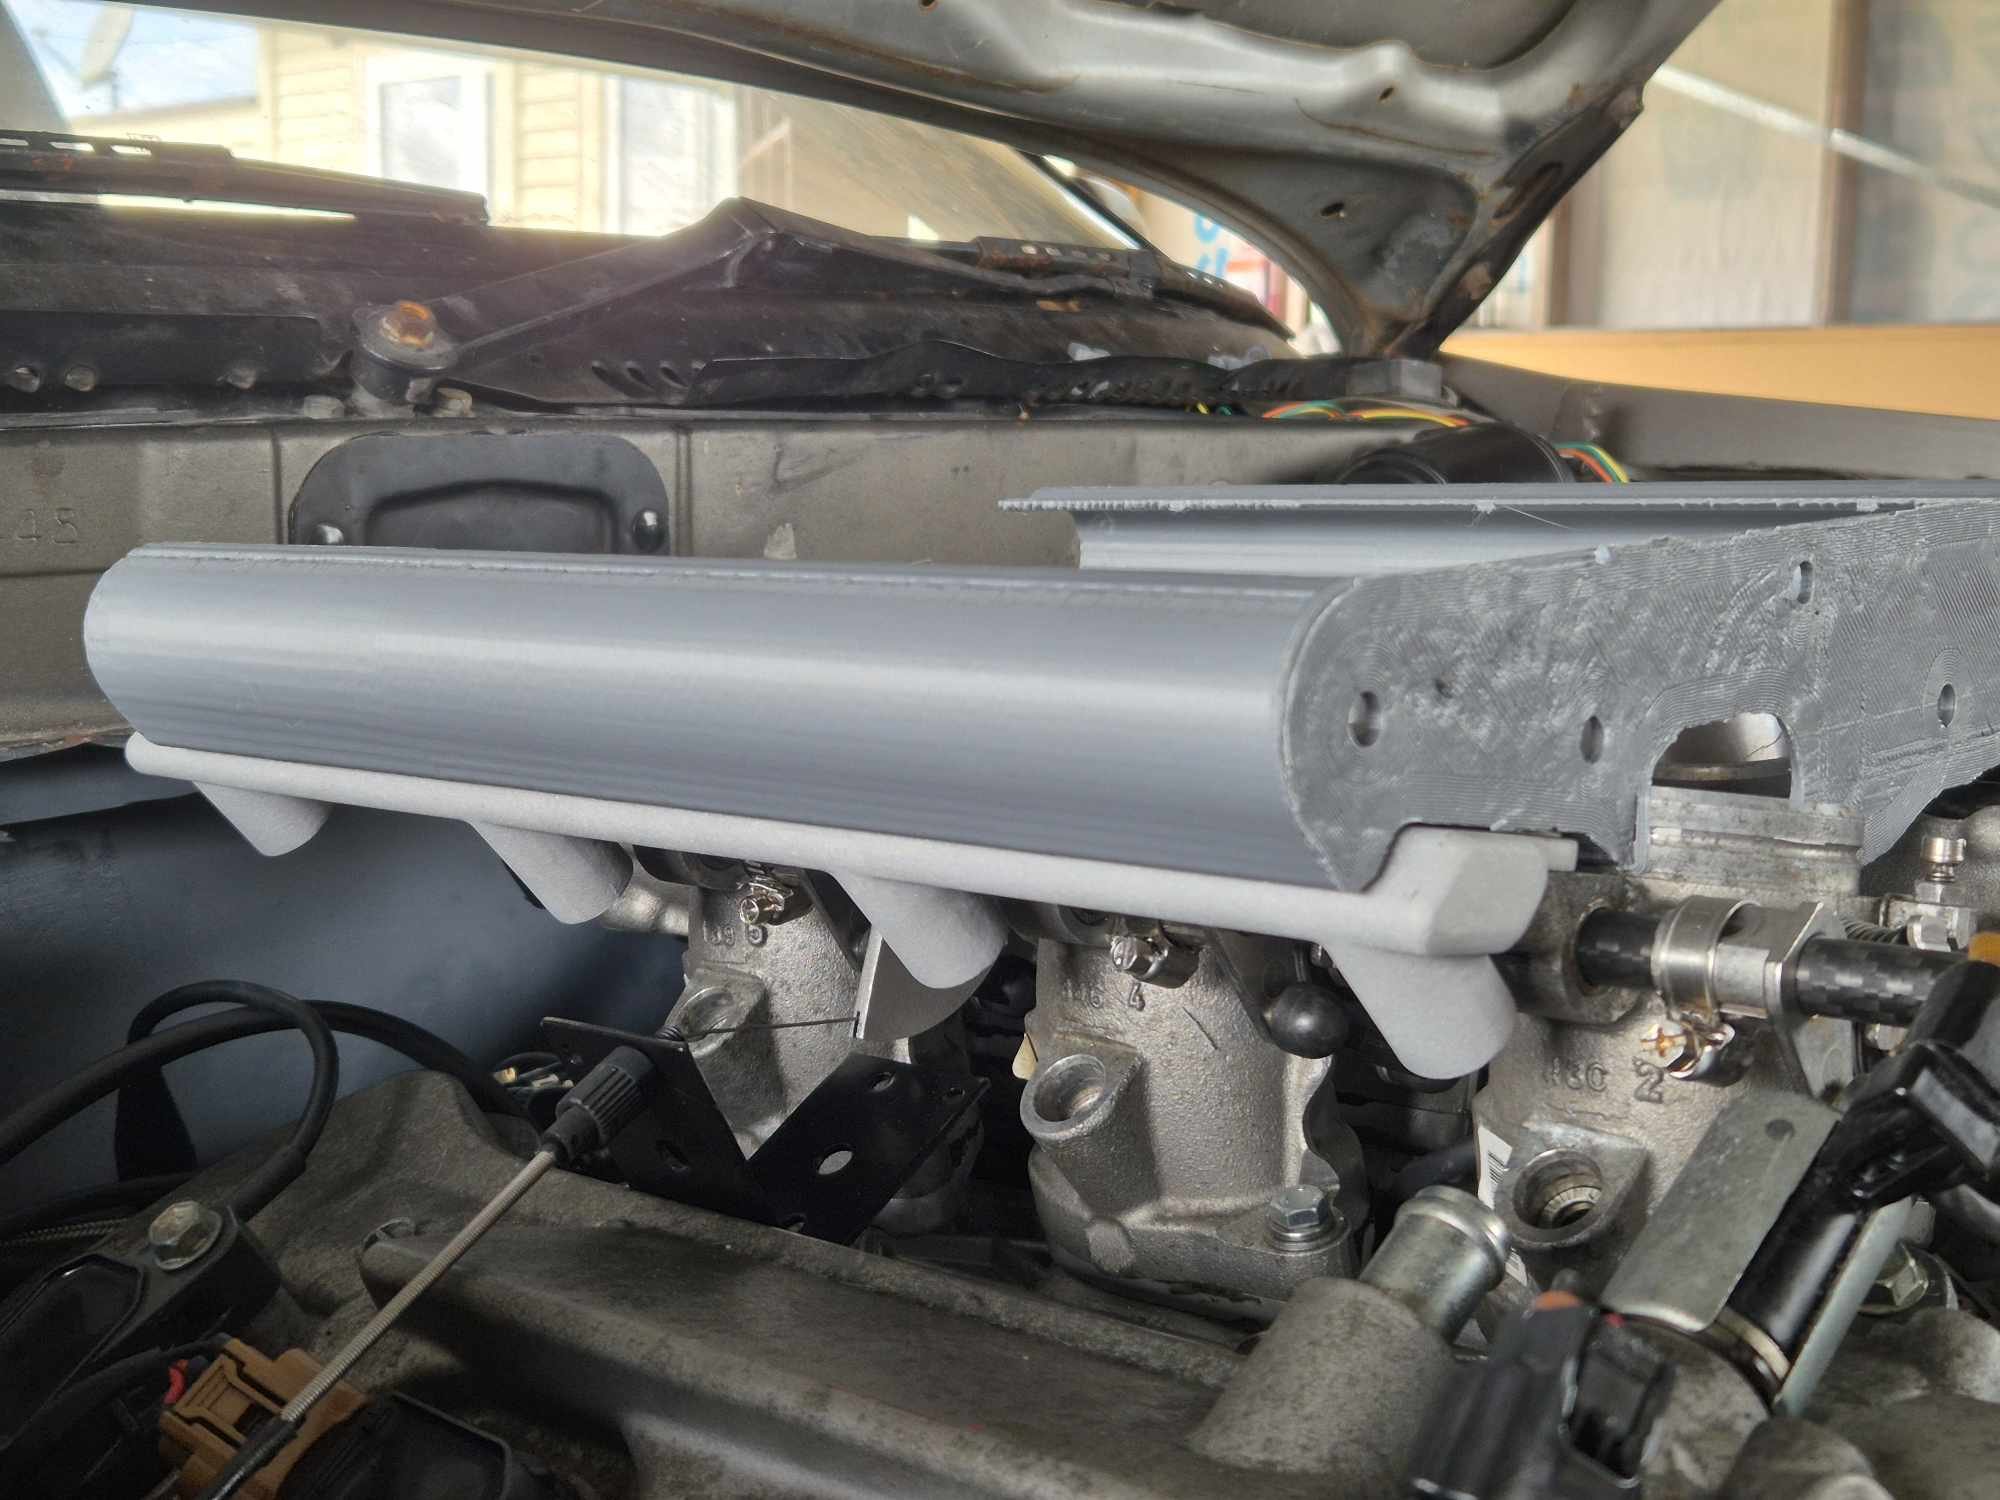
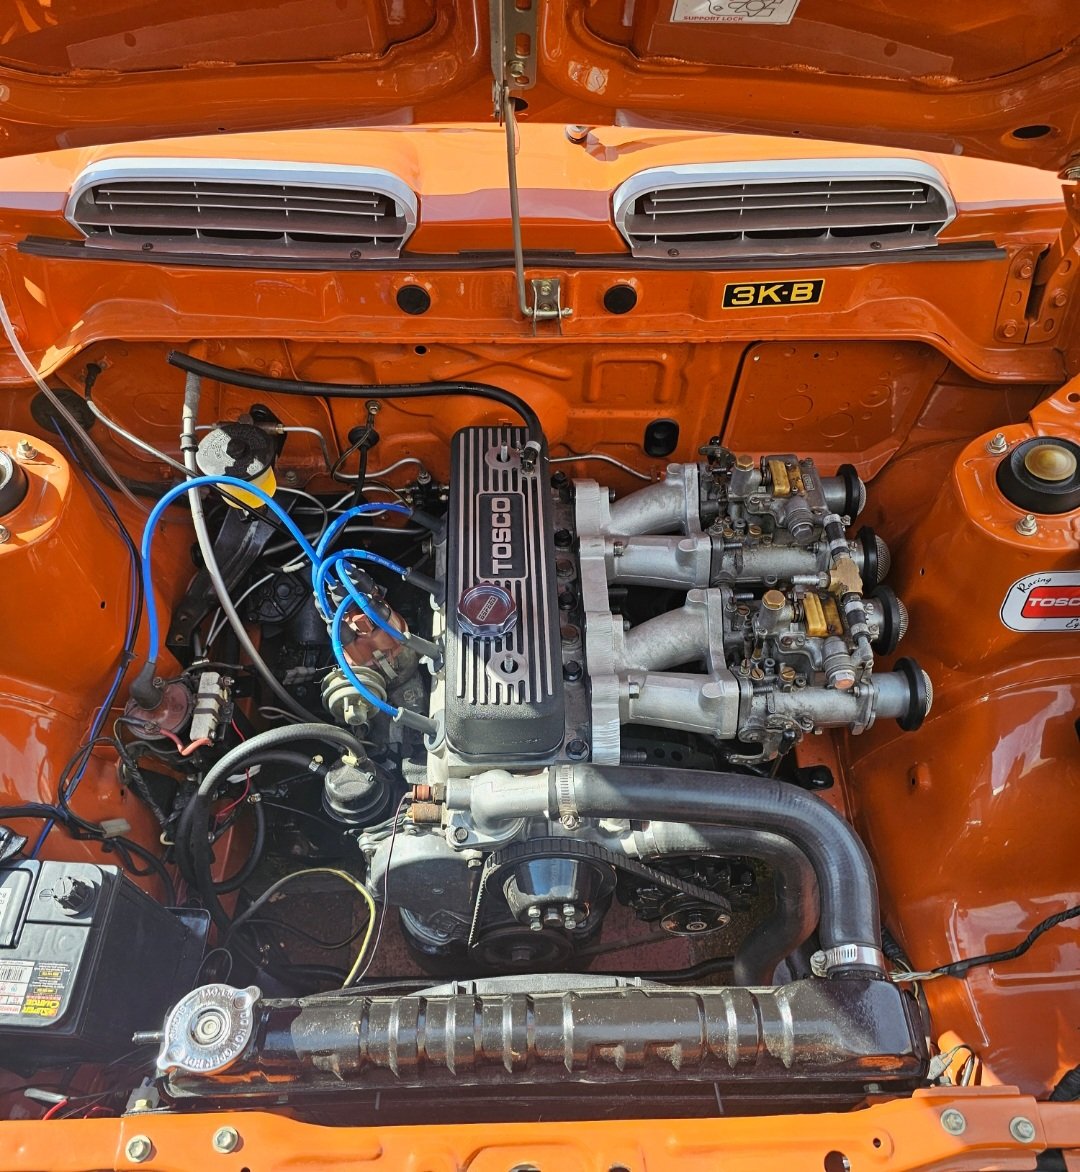
I really struggle for free time these days but have been ticking off the odd job when I can. Now the engine is in I could continue with the game of making the trumpets fit. In the last photo of the previous post the rear pair of trumpets weren't fitted as they hit the brake booster. I had various schemes in mind for sorting this including a change of angle for the quads, or printing different trumpets, but an easy solution was to change the booster to a smaller unit. Quite a while back I managed to pickup a second hand KE70 booster to measure up, and seeing as it looked like it would all work I got a new one and finally got around to fitting it. Here's the comparison: I also picked up a new master cylinder and threw that in. The rubber line from the reservoir to the master touches the strut tower but I'll muck around with that later on. At least now there is ample room: Also finished up the fuel rail spacers and fitted the rail Got some new cam cover washers so bolted them down properly and fitted the coils: Can't decide which spark plug cover to run, tempted to stain the wood version and run that till it catches on fire: I also took the starlet for a quick loop around the neighbourhood, When I got back one of my nieghbours was waiting for me which made me worry for a bit, but he just wanted a ride... Poor things gets warmed up then trashed, then put away again. One day I will revisit it and make it betterer... or worserer... but definitely faster. Anyway, thats all for now. PS: All of this is @kpr's fault24 points
-
some uninteresting photos unless you're interested - here's the current longitudinal alignment; which results in this arrangement over the steering rack and this somewhat tight throttle body clearance under the bonnet (with bonnet set to it's lowest) - but clearance nonetheless
24 points
-
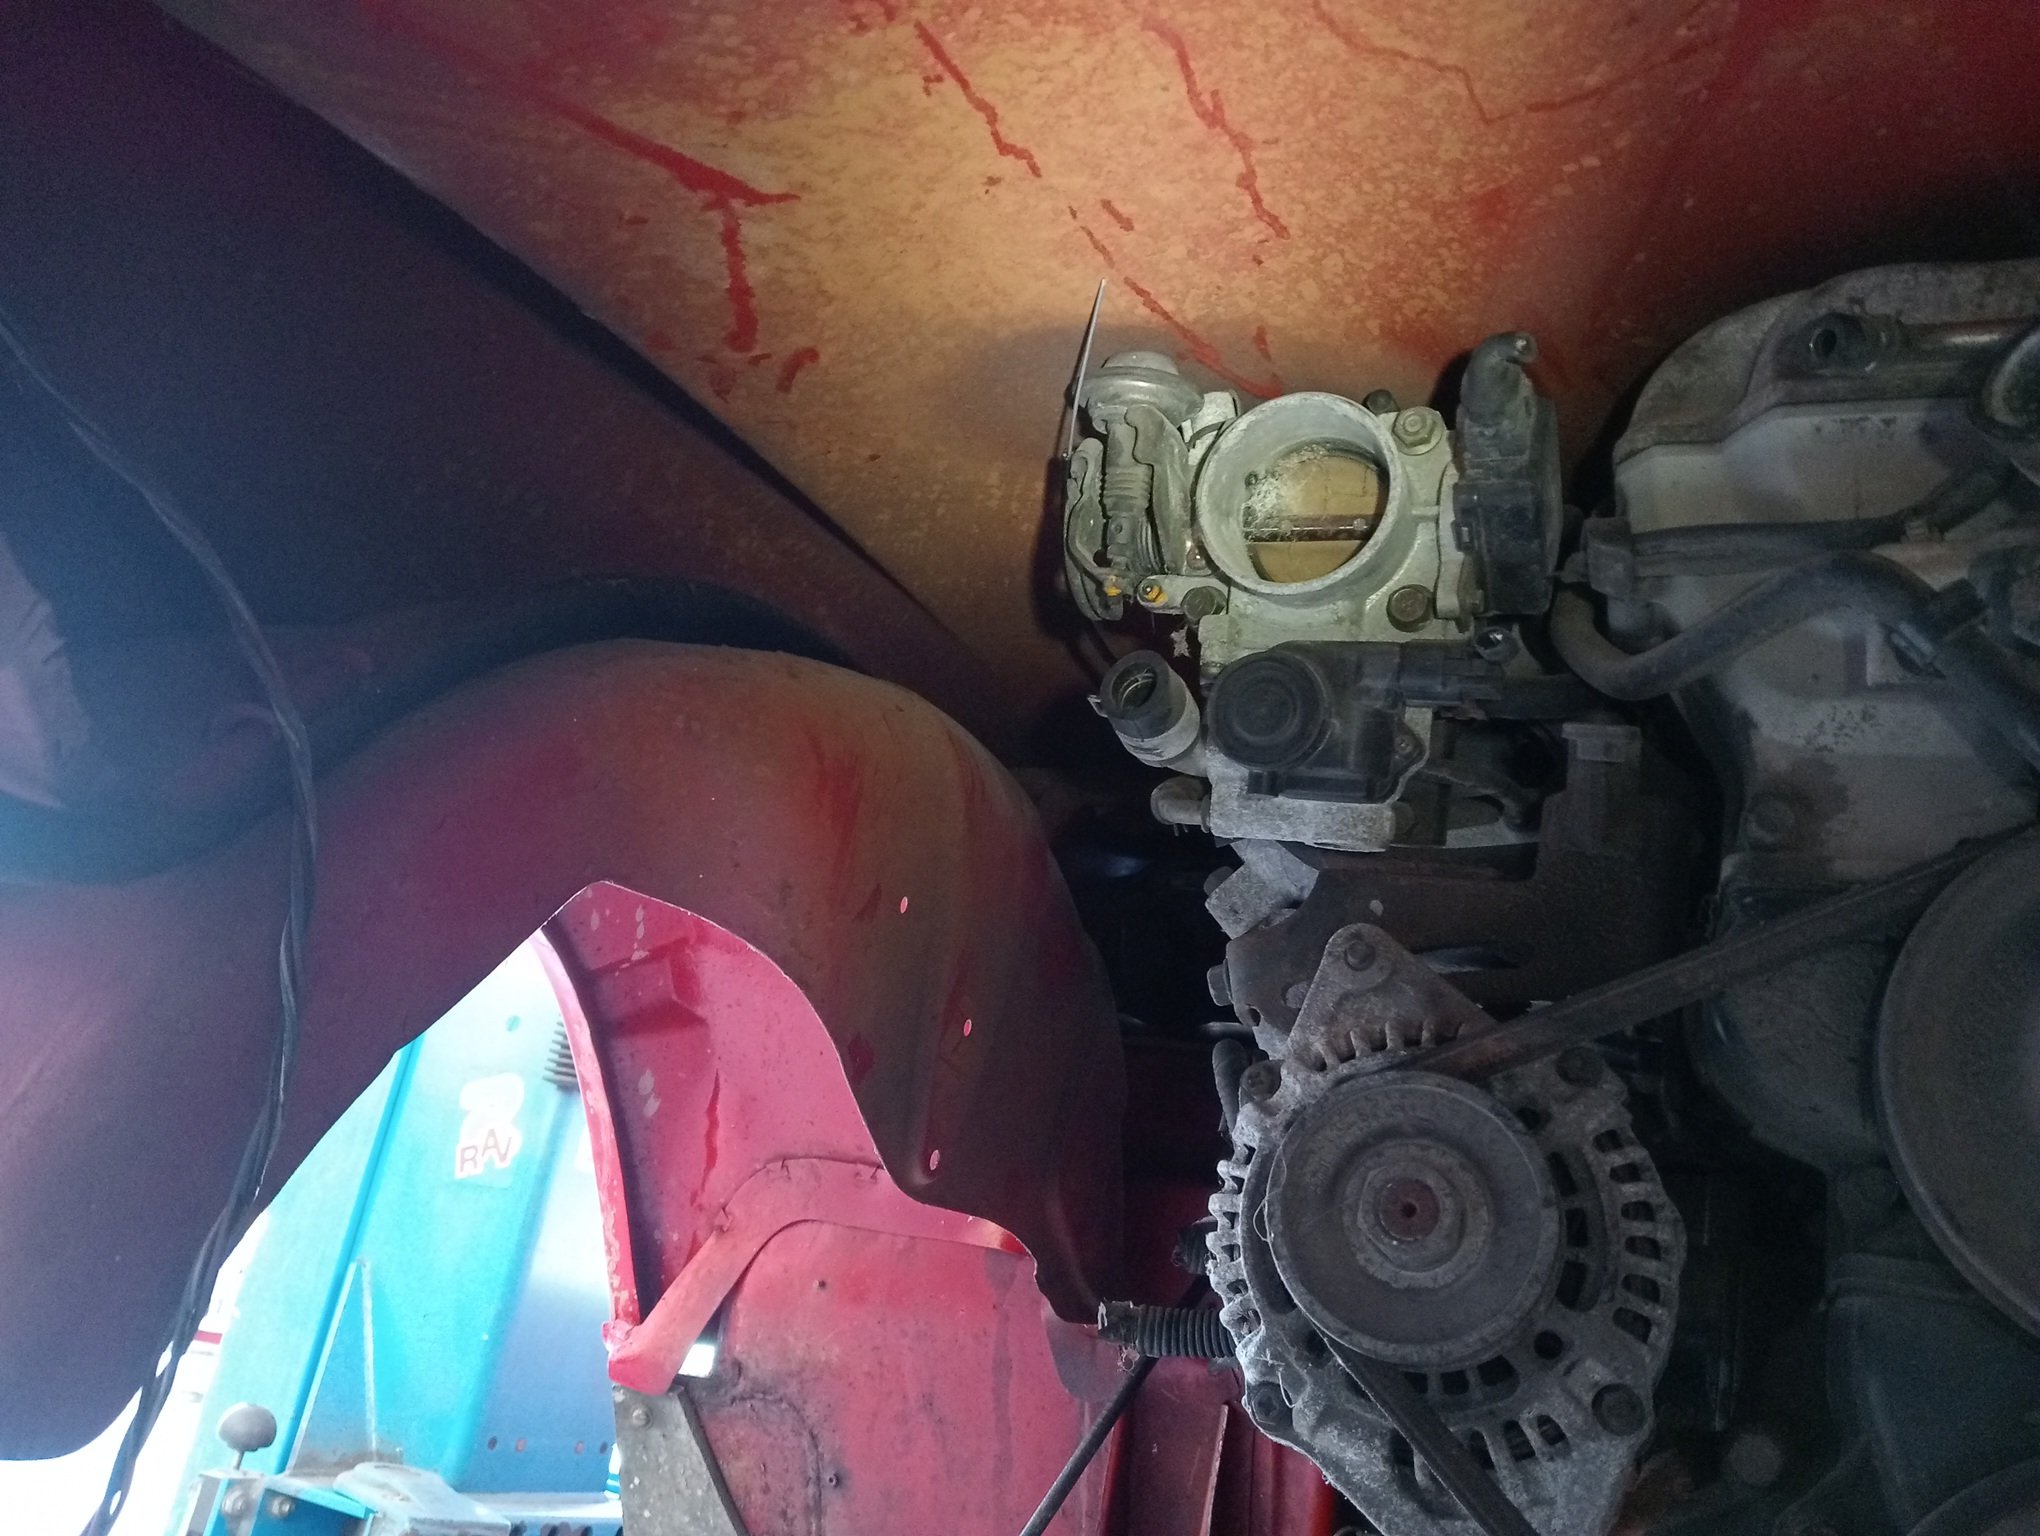
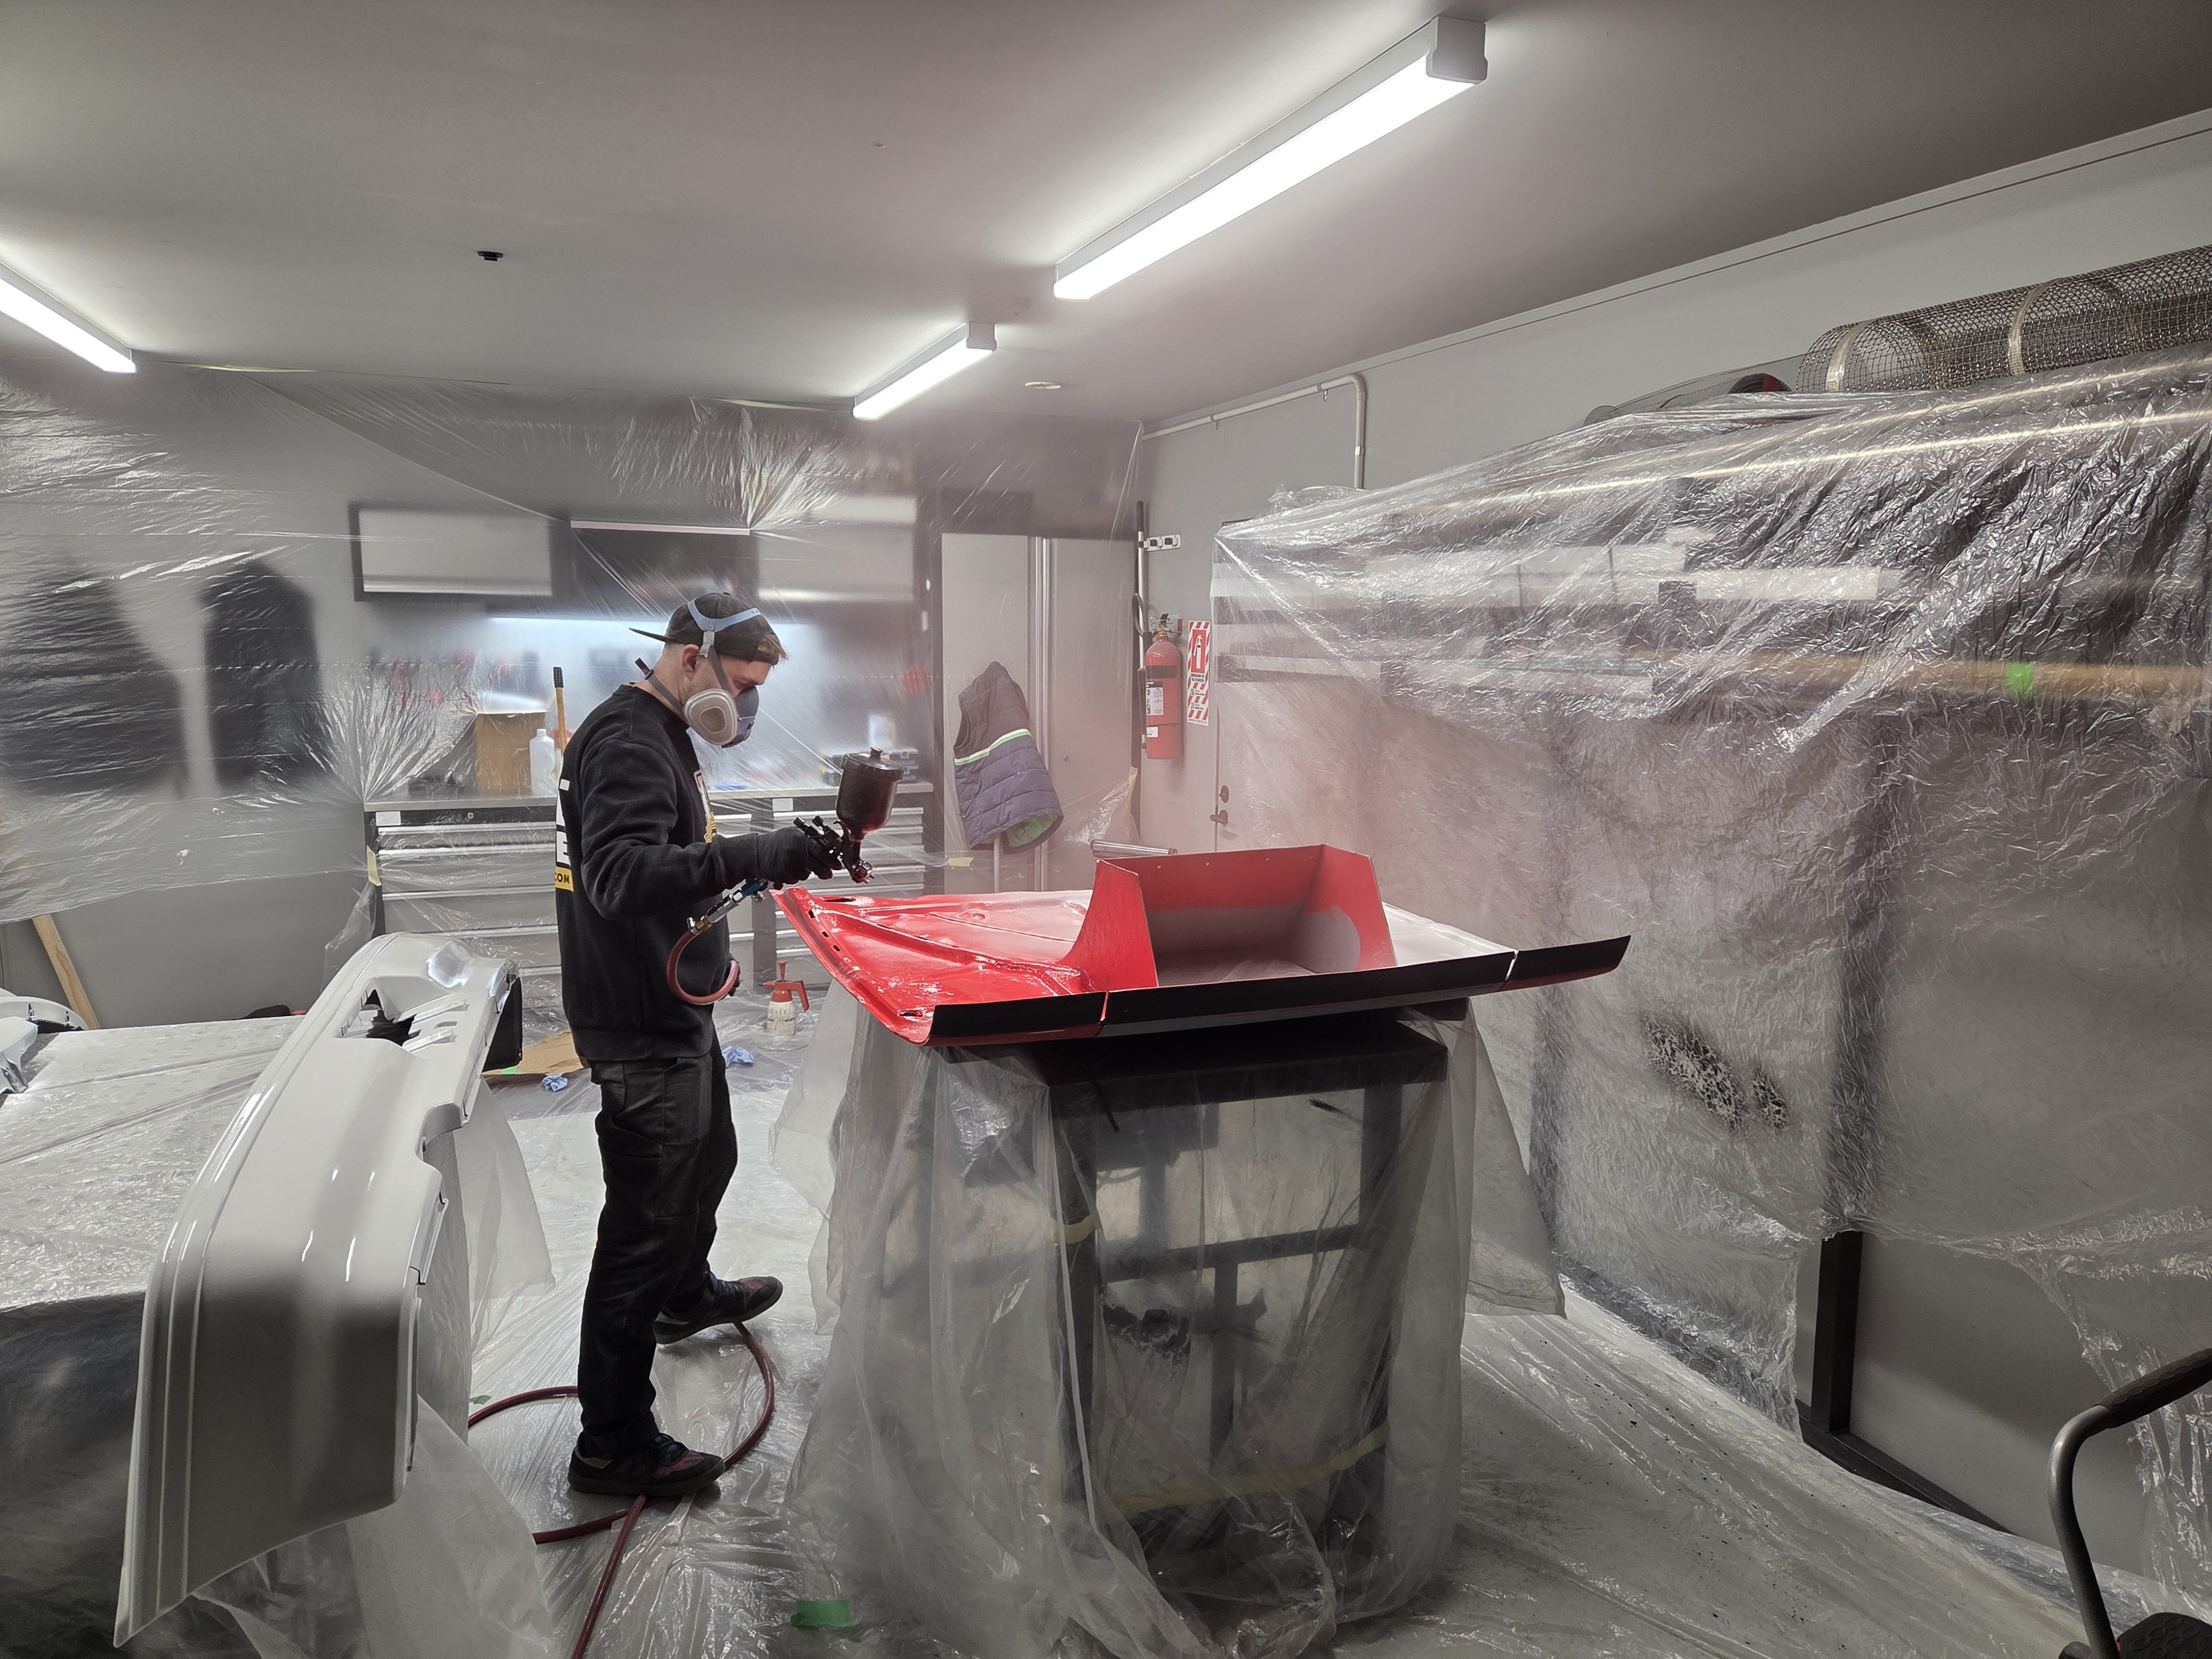
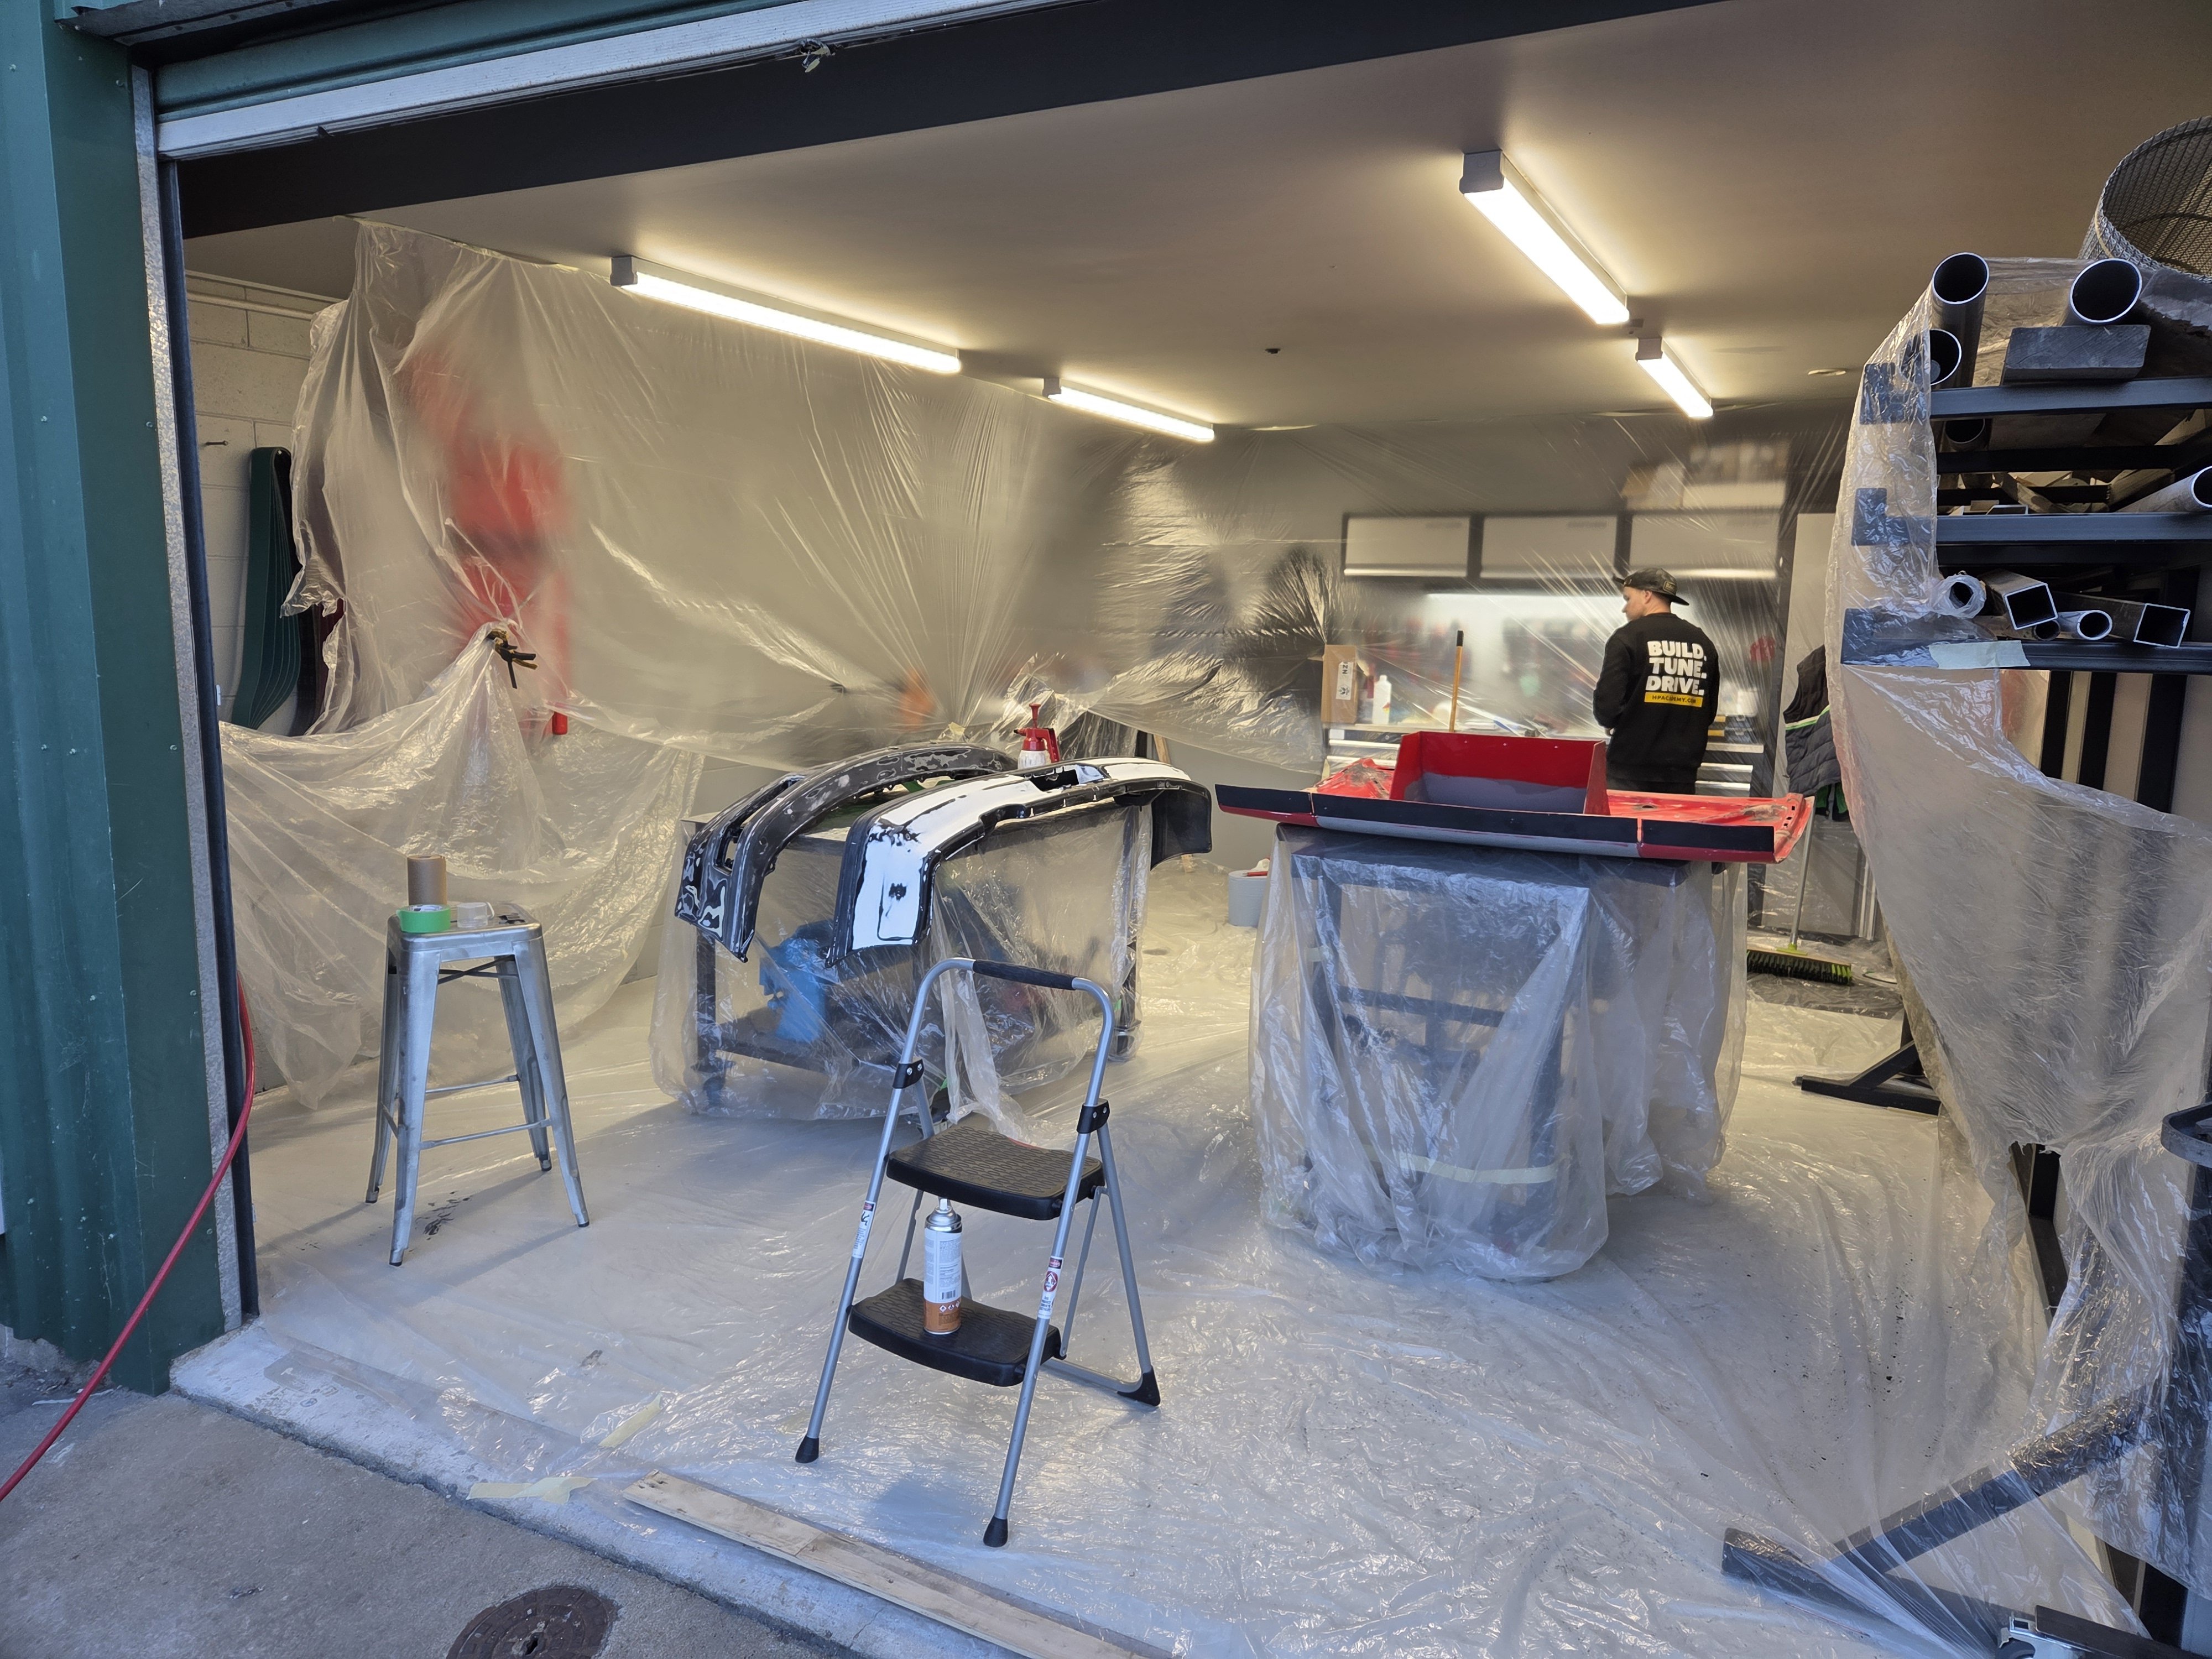
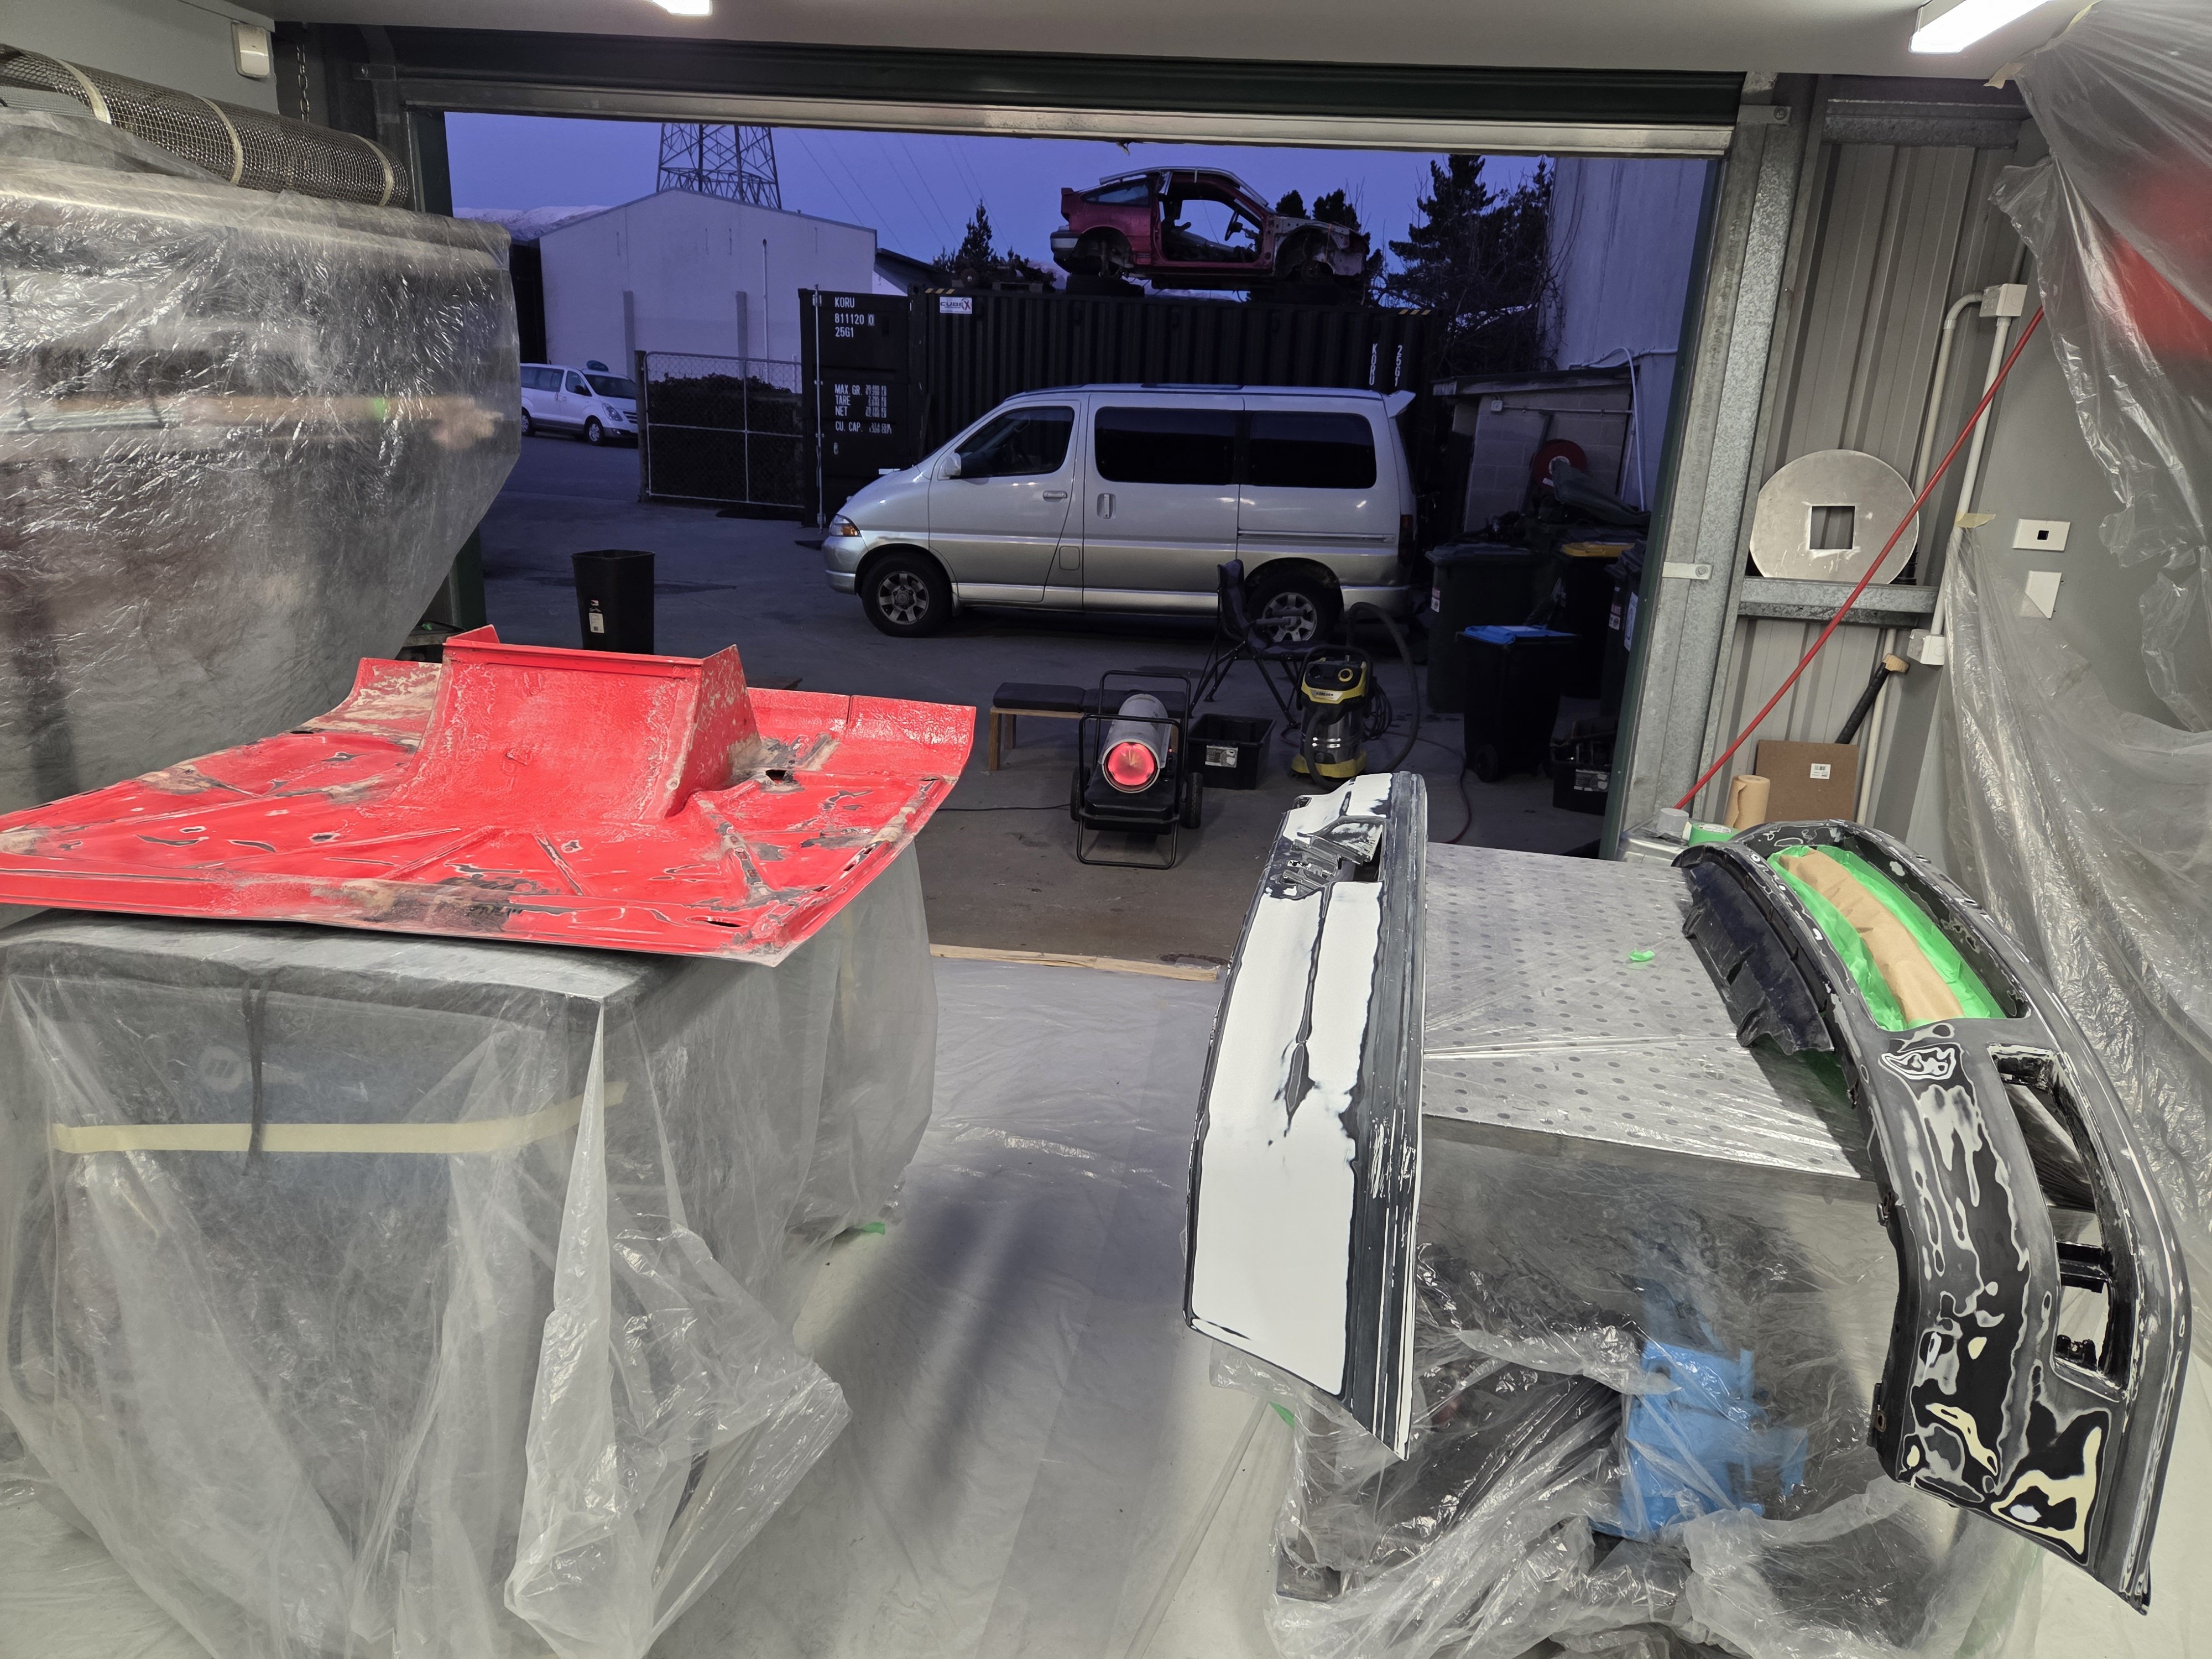
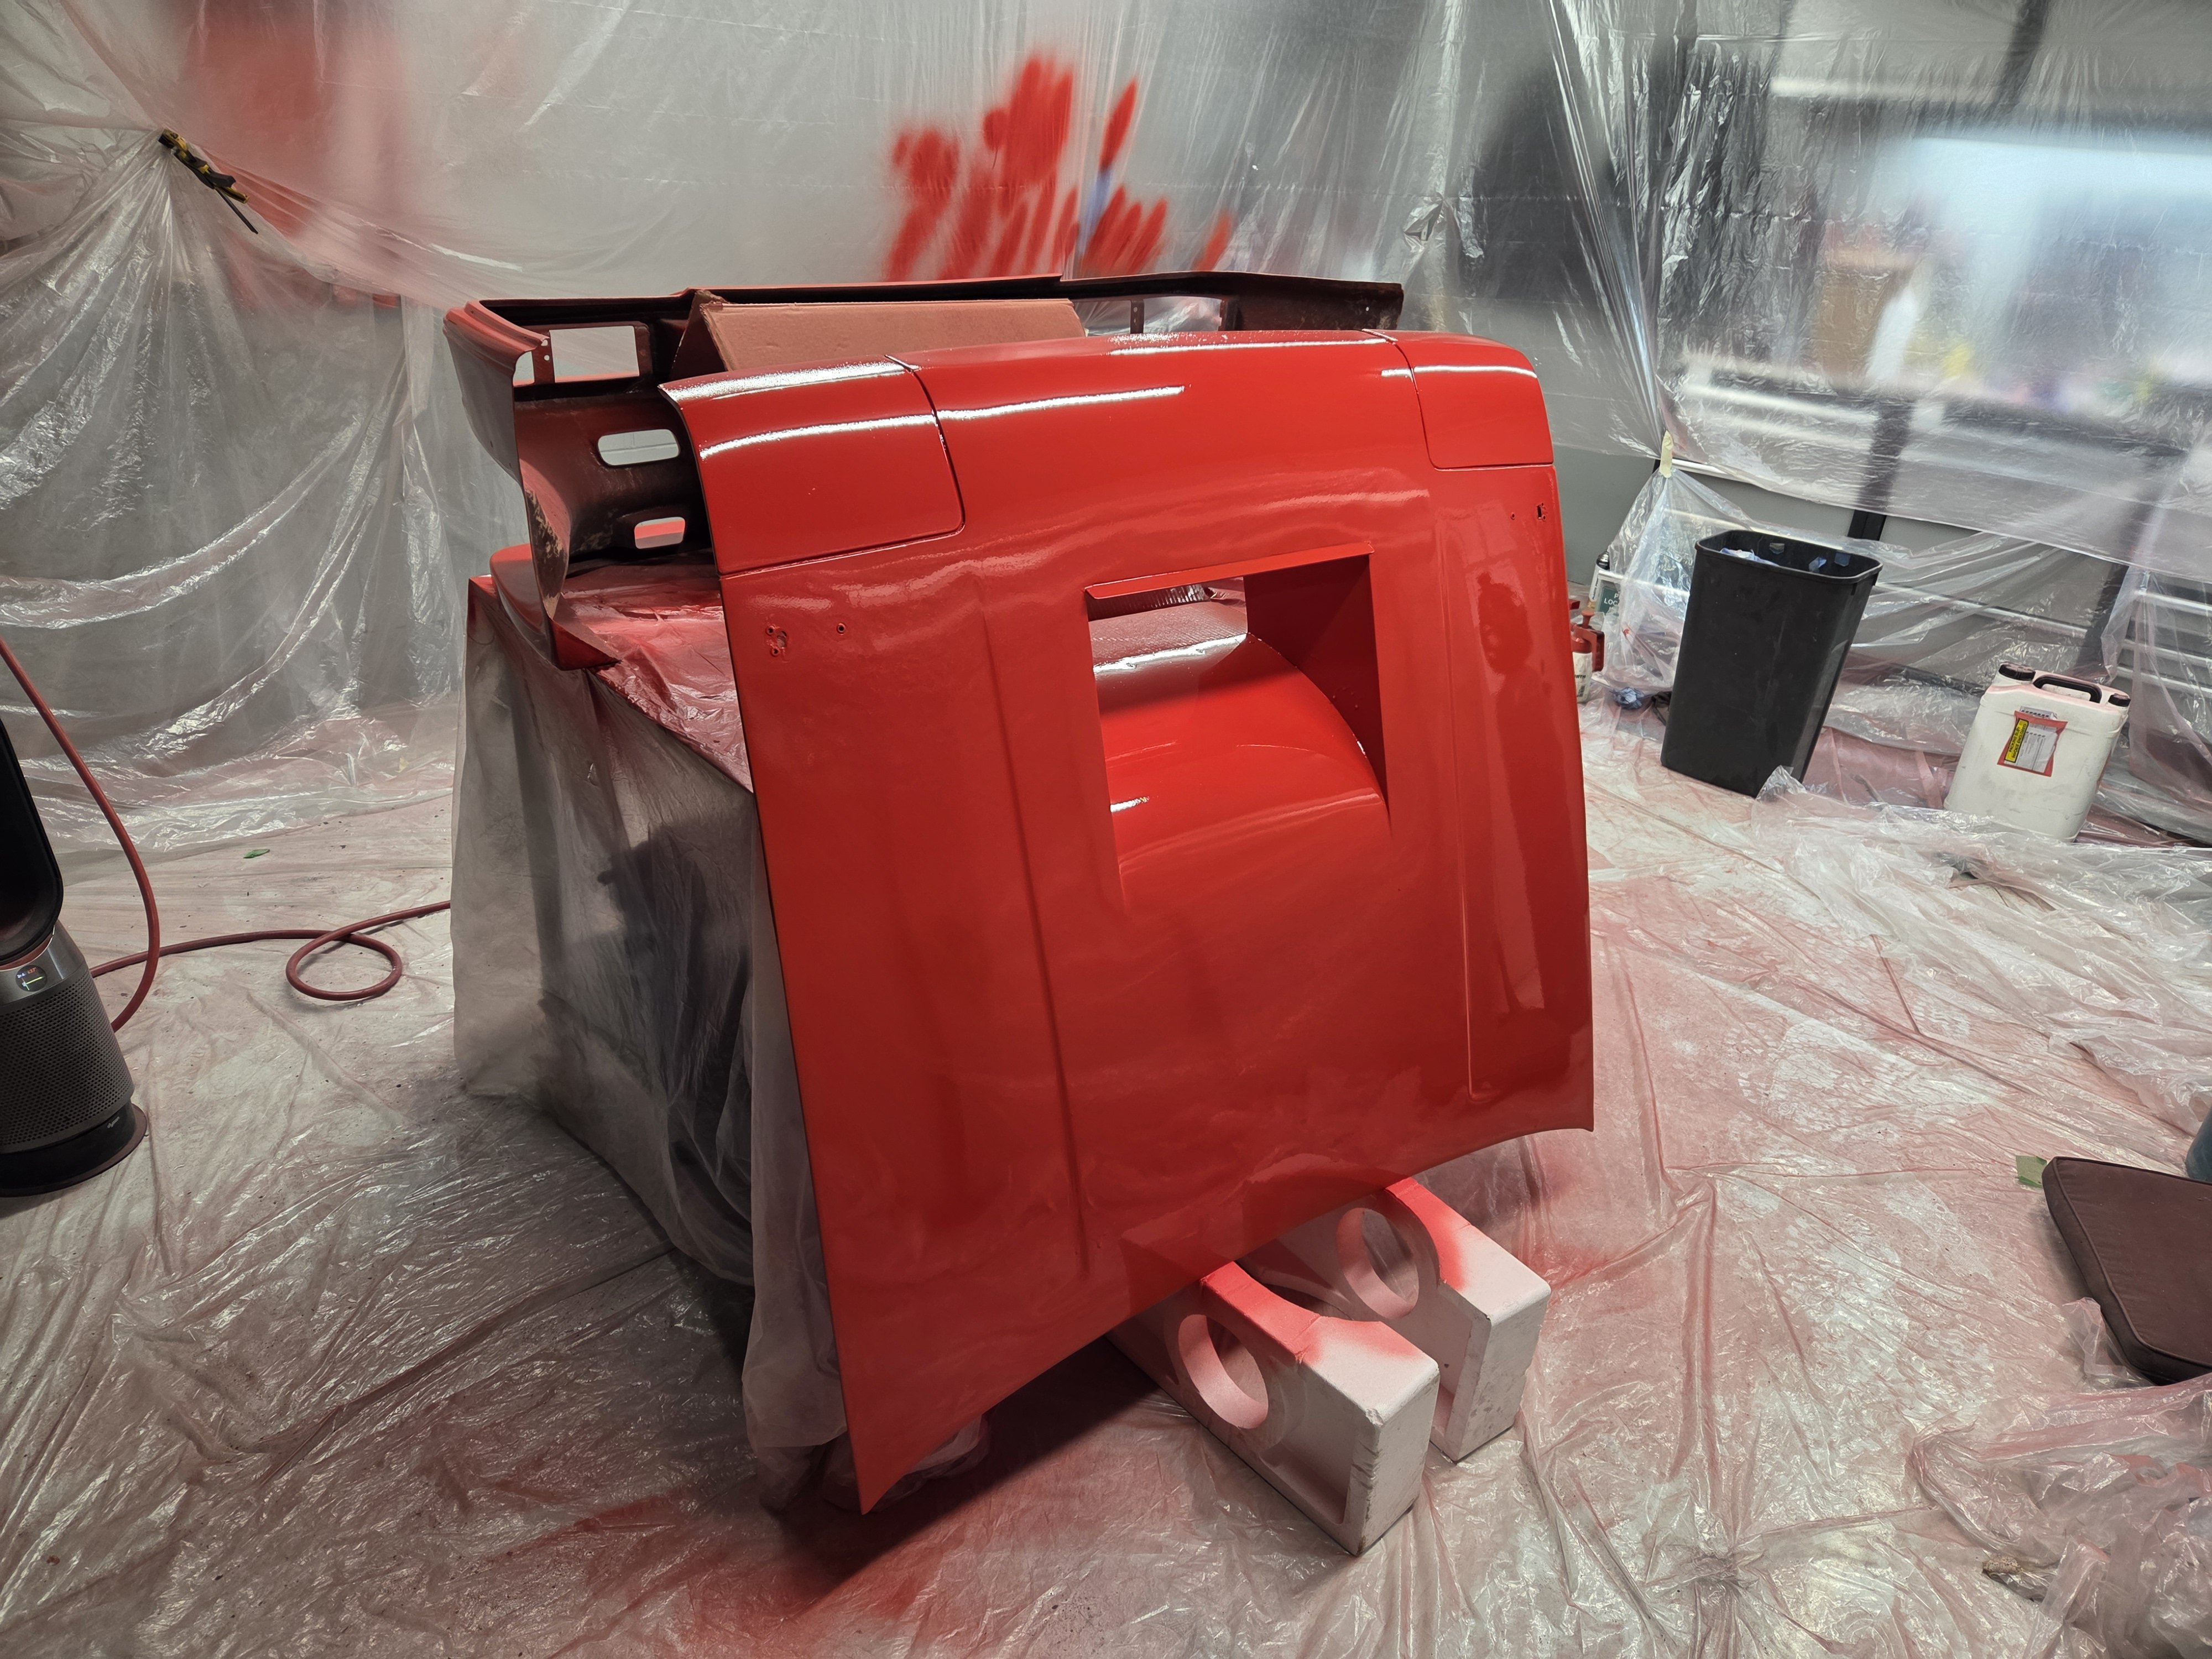
Bit o' red going down. My workmate Brandon is the man on the gun. Got the lab set up first: Got the room warmed up. Then made a murder scene at the mixing station and Brandon got to work: The results are great, which is promising for the top side! This part of the bonnet is rough because I hate sanding, but the smooth parts look lovely and glossy. hopefully we'll get some top side work done in the next couple of days.
24 points
-
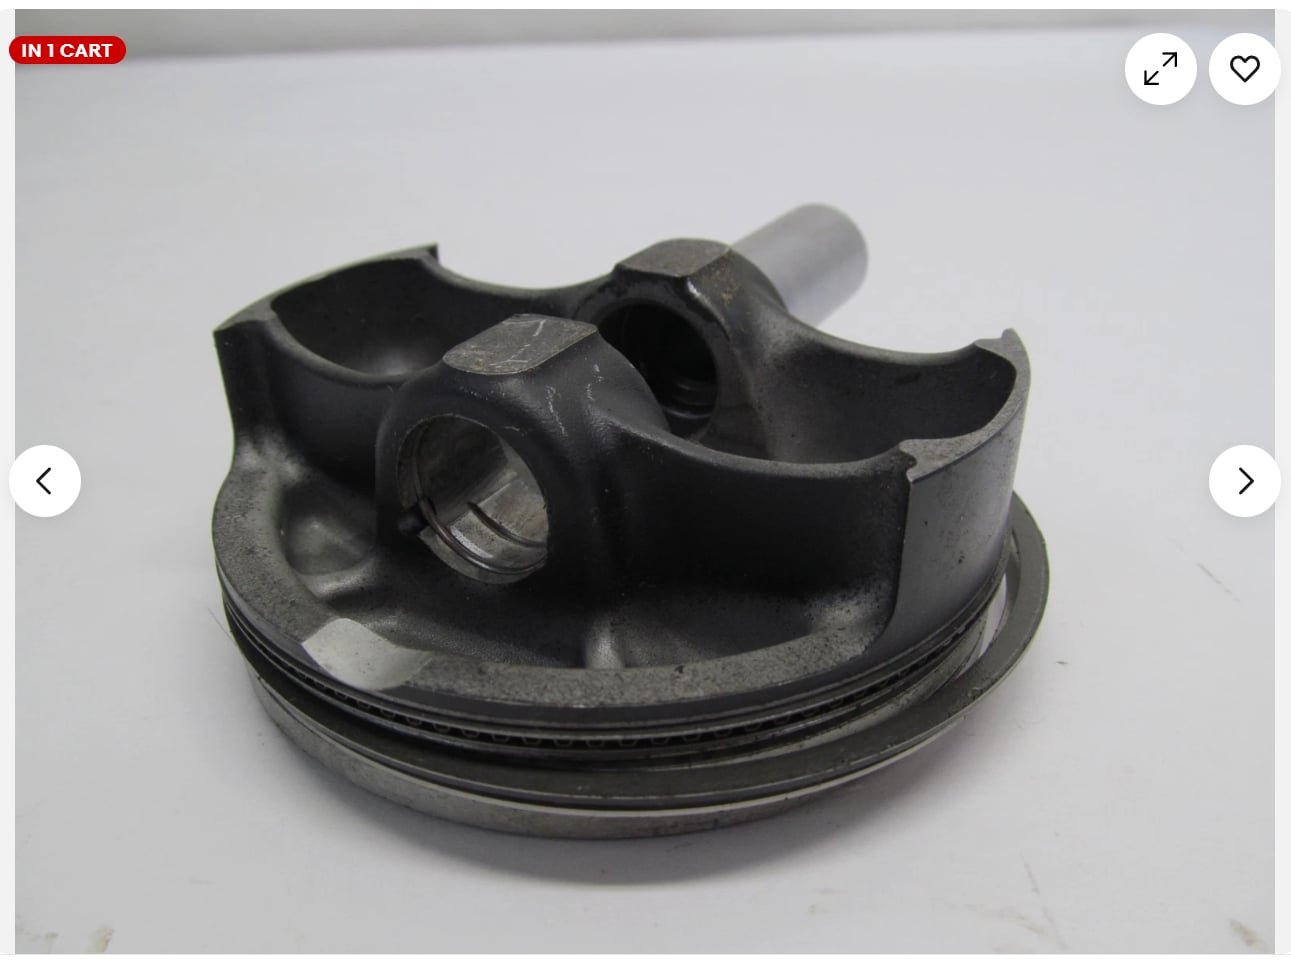
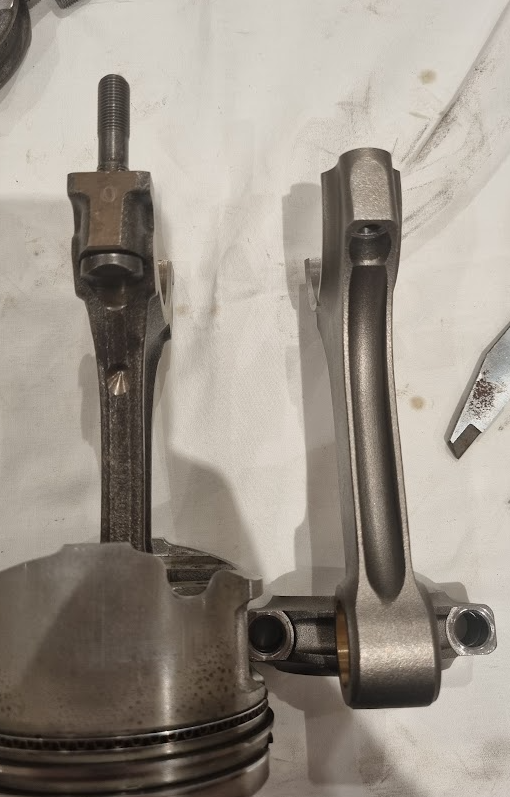
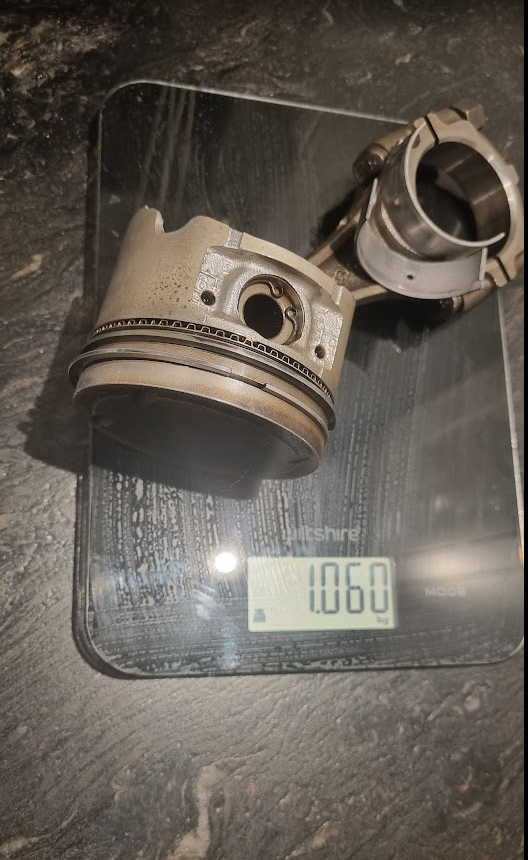
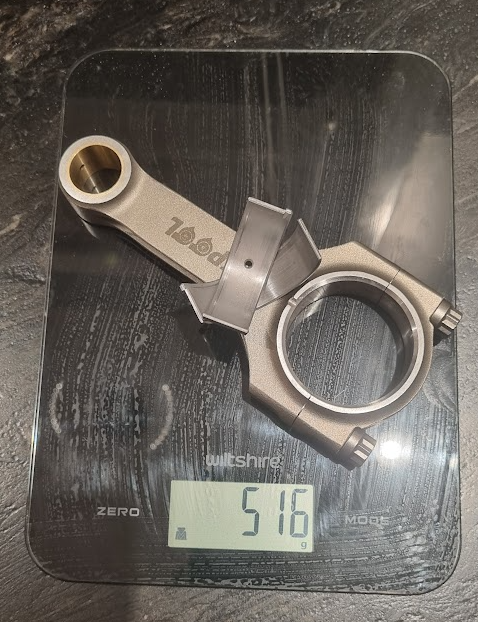
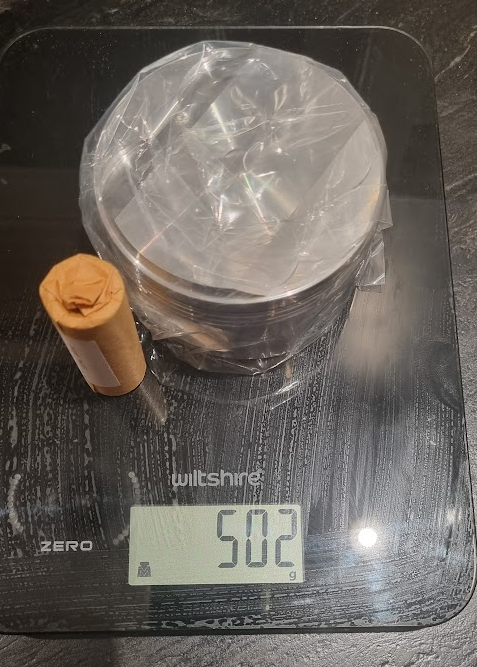
And a bit of a weight comparison Factory RB20DET 1060g And Spool RB20DET rod plus HKS piston (less rings) + = 1018g Im guessing once the plastic and paper is gone and rings added it might be a handle of grams more net... plus the 4mm extra length in the rod to come So all in all looking like pretty much the same sub-assembly mass for the 20det factory rod and piston (121.7mm rod, 78mm dia piston) and the "RB24" combo (125.5mm rod and 86.5mm dia piston) which while i was hoping forged equals lighter, it is bigger so its good to know I havent significantly added mass Next steps are dummy up the rb20det crank in the rb25det block and cradle to verify the mains are the same size as all the literature says, and I should probably fit up one rod/piston to confirm the relative height to deck before pulling the trigger on the rods tell me im silly etc
23 points
-
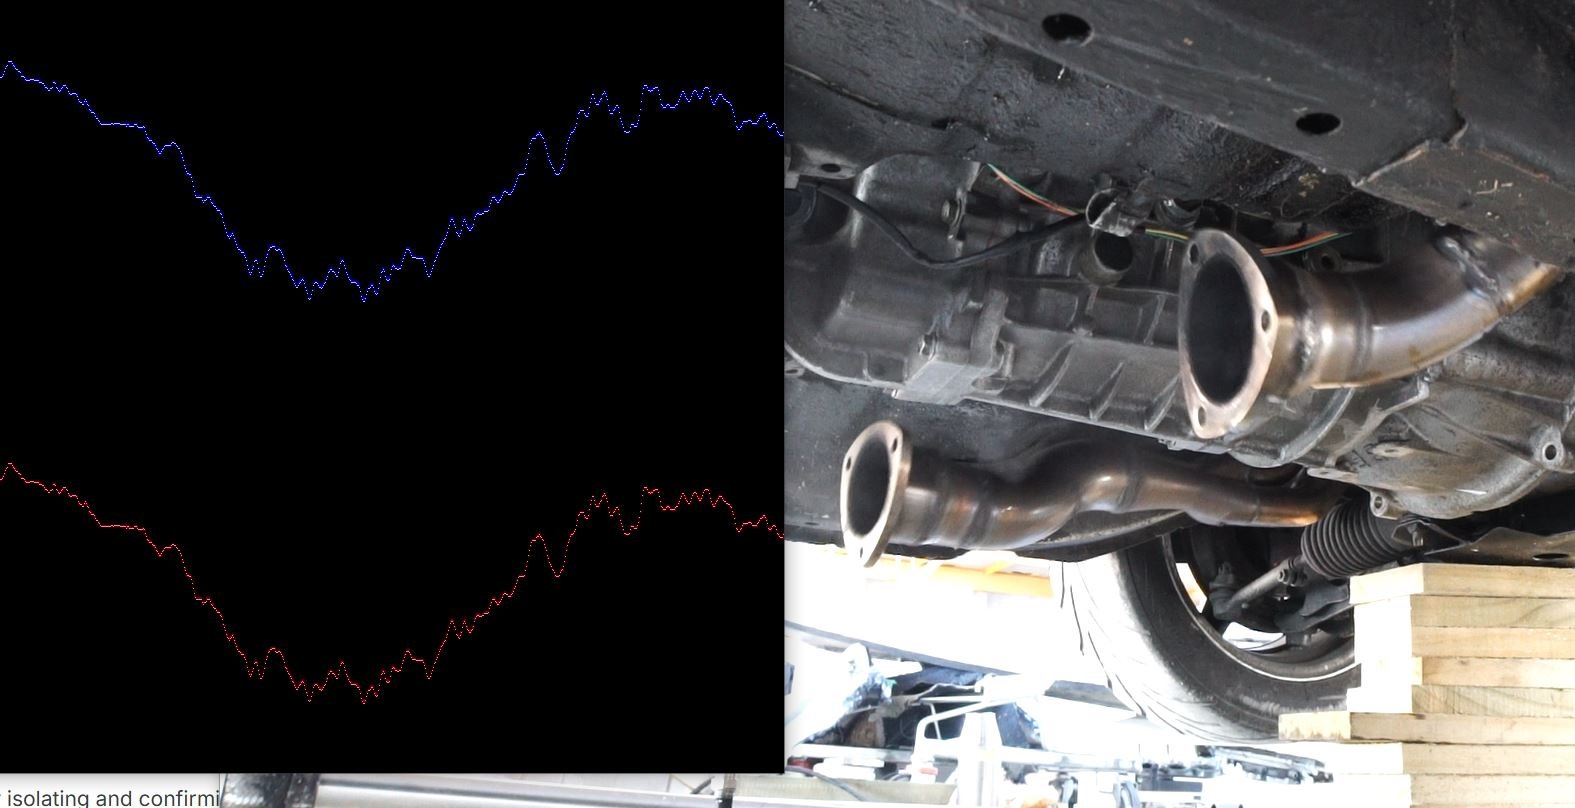
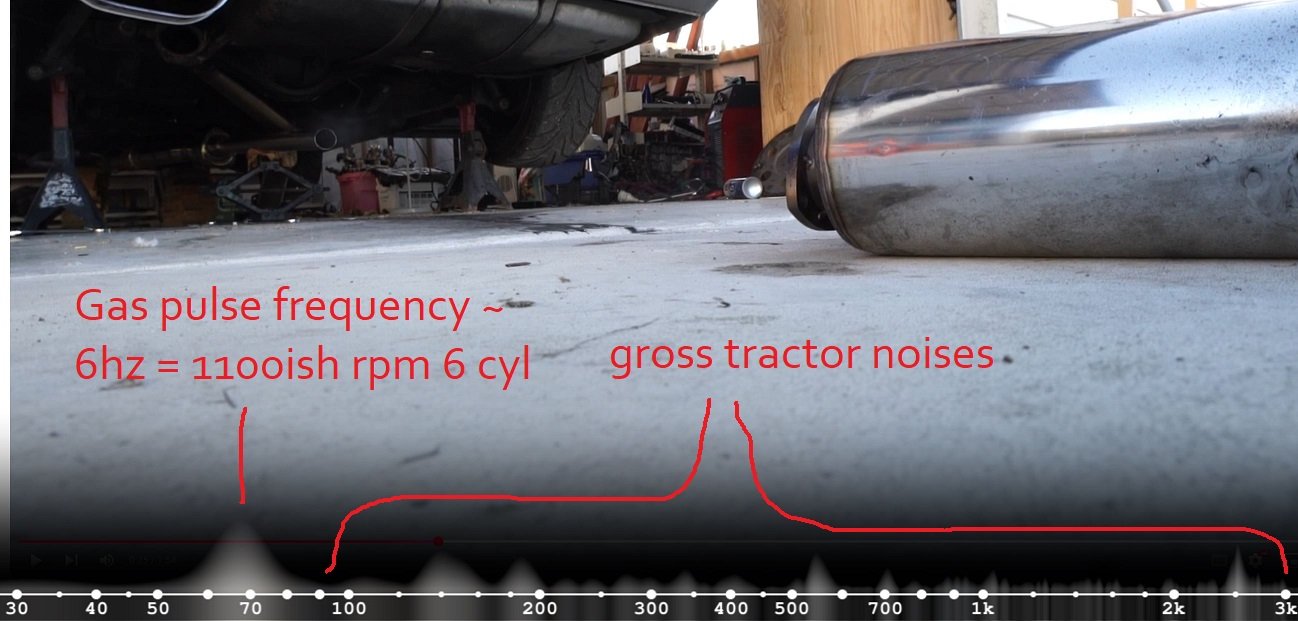
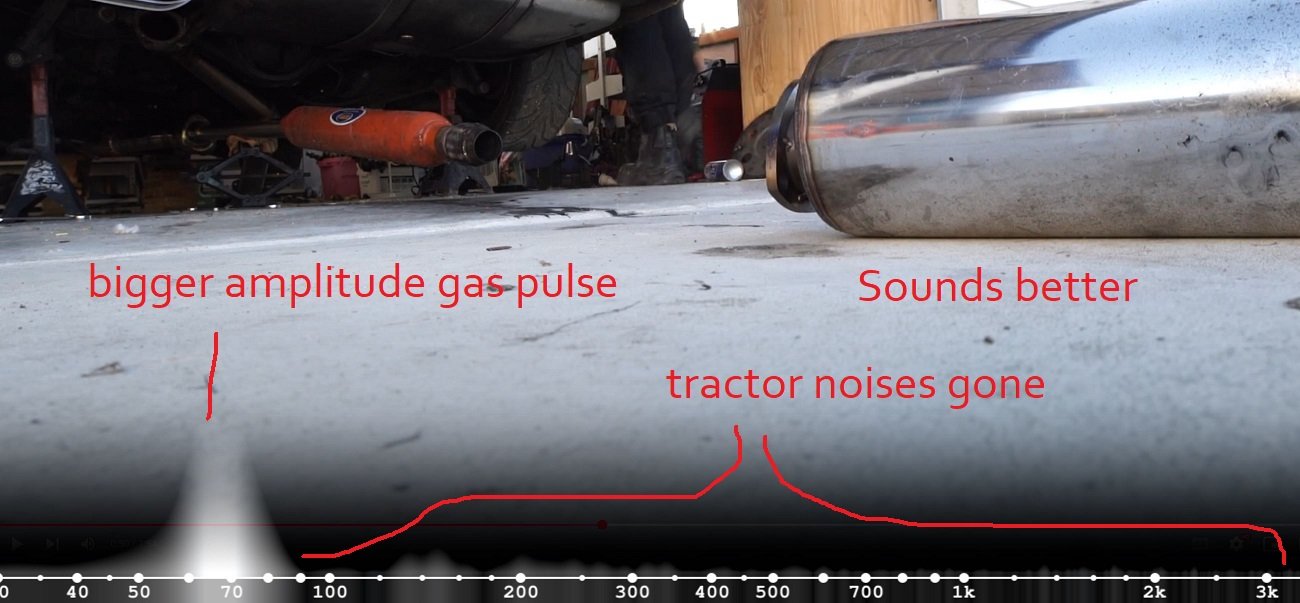
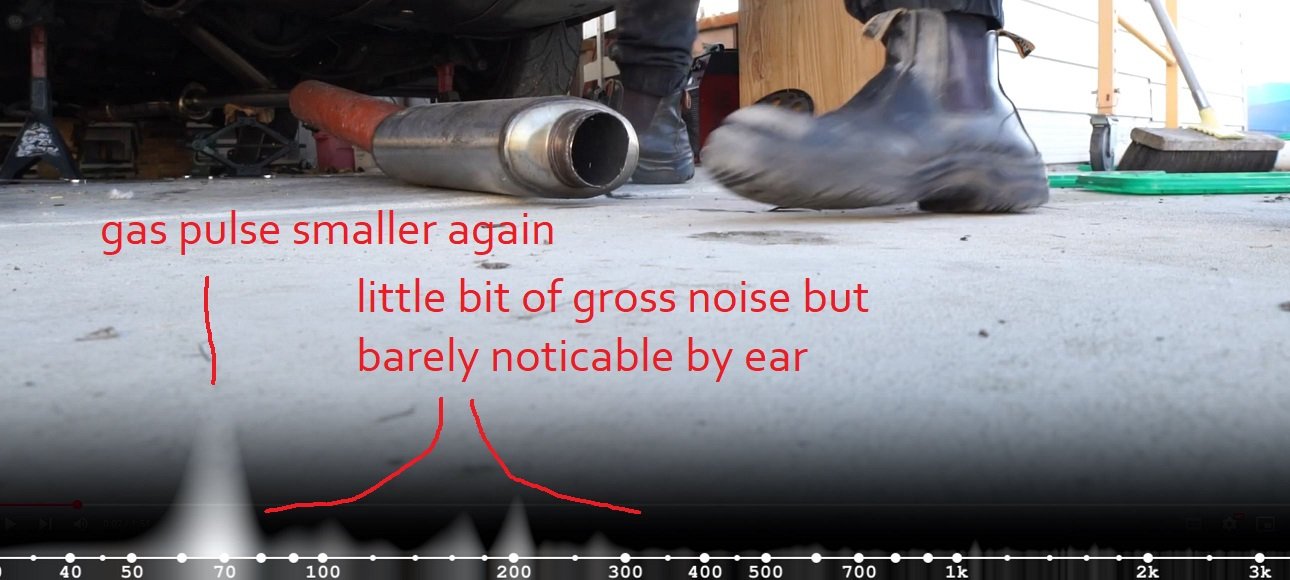
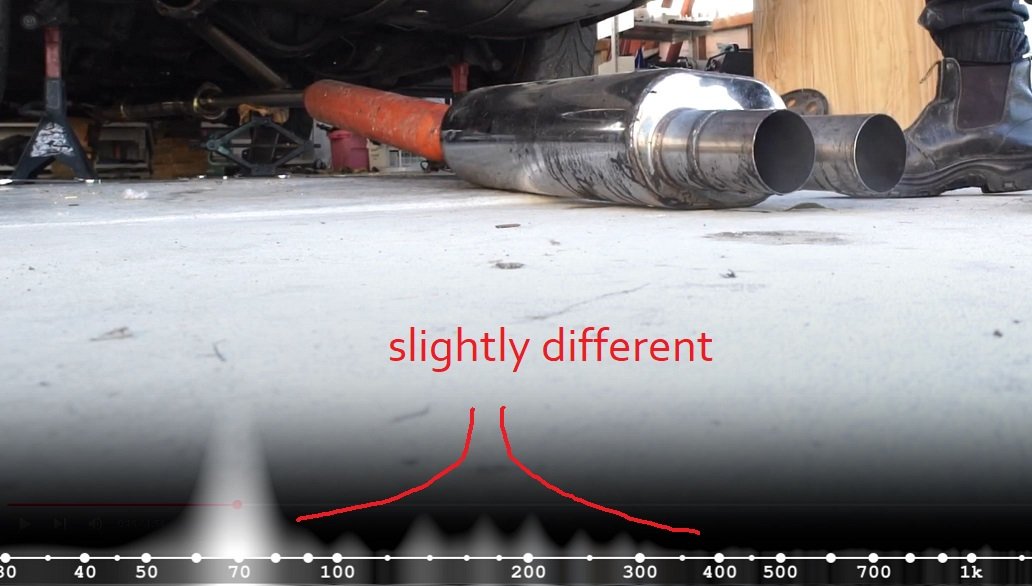
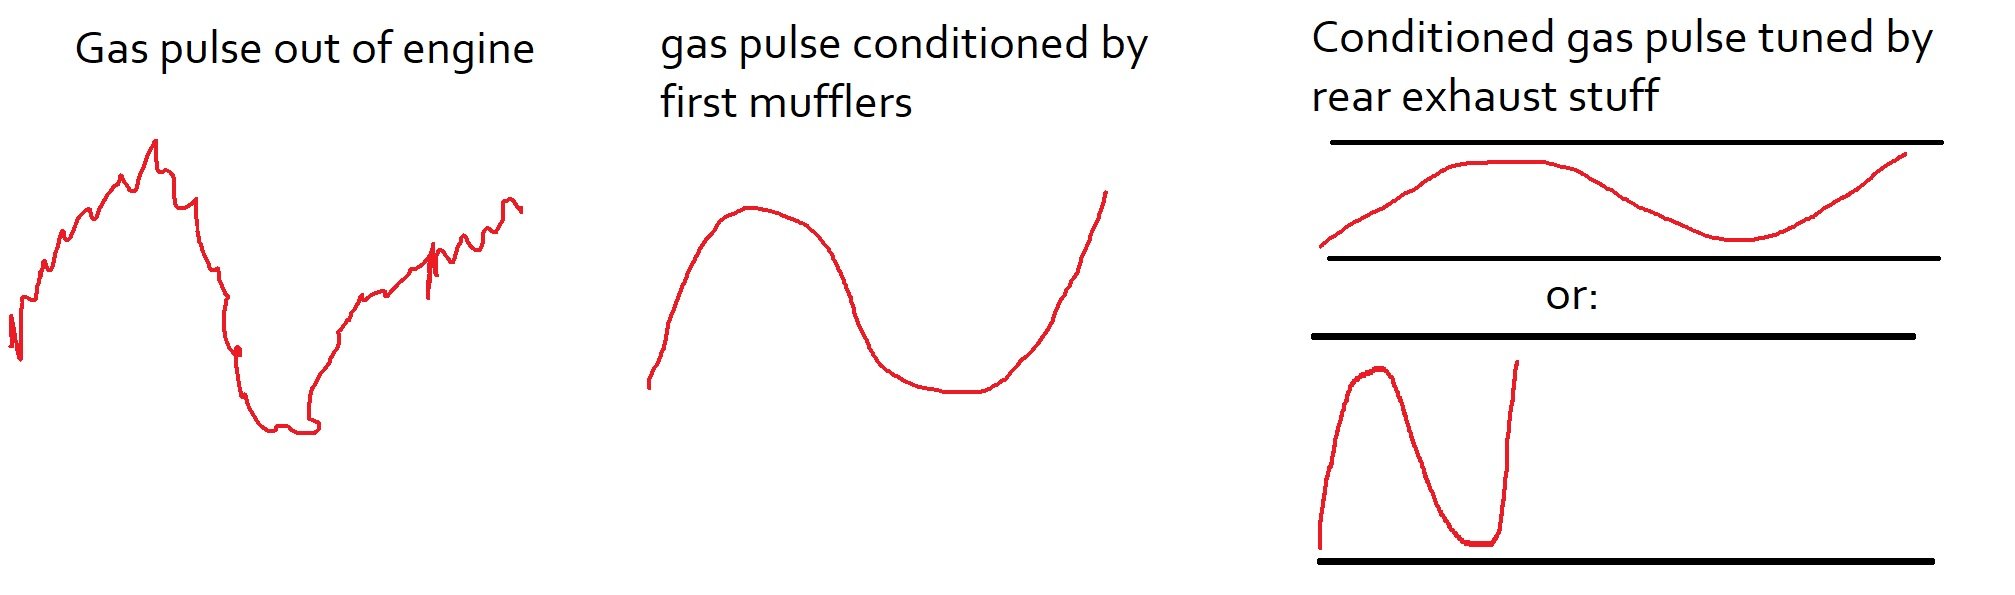
2GRFSE pull down I finished pulling the 2GRFSE to bits, and found that the total sum of damage was: 1x exhaust VVT pulley starting to push its guts out 1x chain tensioner broken 2x big end bearings damaged 1x big end journal on crank looking damaged So the great news here is, all of the damage is confined to bolt on stuff, or, relating to the crank/rods that I am planning to bin anyway. Perfect! If anyone has a 2MZFE motor kicking around, or just the crank, let me know. Keen. Exhaust noise rambling part 2 I thought I would try come up with some practical testing methods for further isolating and confirming what "good noise" is, and isnt. So I can quickly make some iterations and see if they meet objectives or not. Keeping in mind that this is nothing to do with what makes best power, just sounds "better". At this stage this is just testing at a constant idle speed. Which obviously isnt indicative of full throttle performance, or noise. However I'd prefer if it does not sound like a clattery bag of dicks at idle too. So its a relevant test. I will do some medium and full load testing once my ethrottle setup is sorted properly. For a TL;DR version of this considerably overlength post. Here's a video of me just putting a Coby hotdog muffler on or off the back of a 2" exhaust pipe. It sound different with it on or off. The end. Rest of post here:
23 points
-
its hard to keep track of all of the different revenue gathering that us certifiers do, especially after i hurt my head diving into my swimming pool full of money, i wasnt thinking about my money diving because i was preoccupied with thinking up new random rules to make things difficult for the peasants modifiying their motor vehicles and also trying to find a new hitler uniform because my old one is worn out from wearing it to work (where i do 10 minutes of work and write out an invoice for $2500) also i have a tiny penis, that is why i became a certifier22 points
-
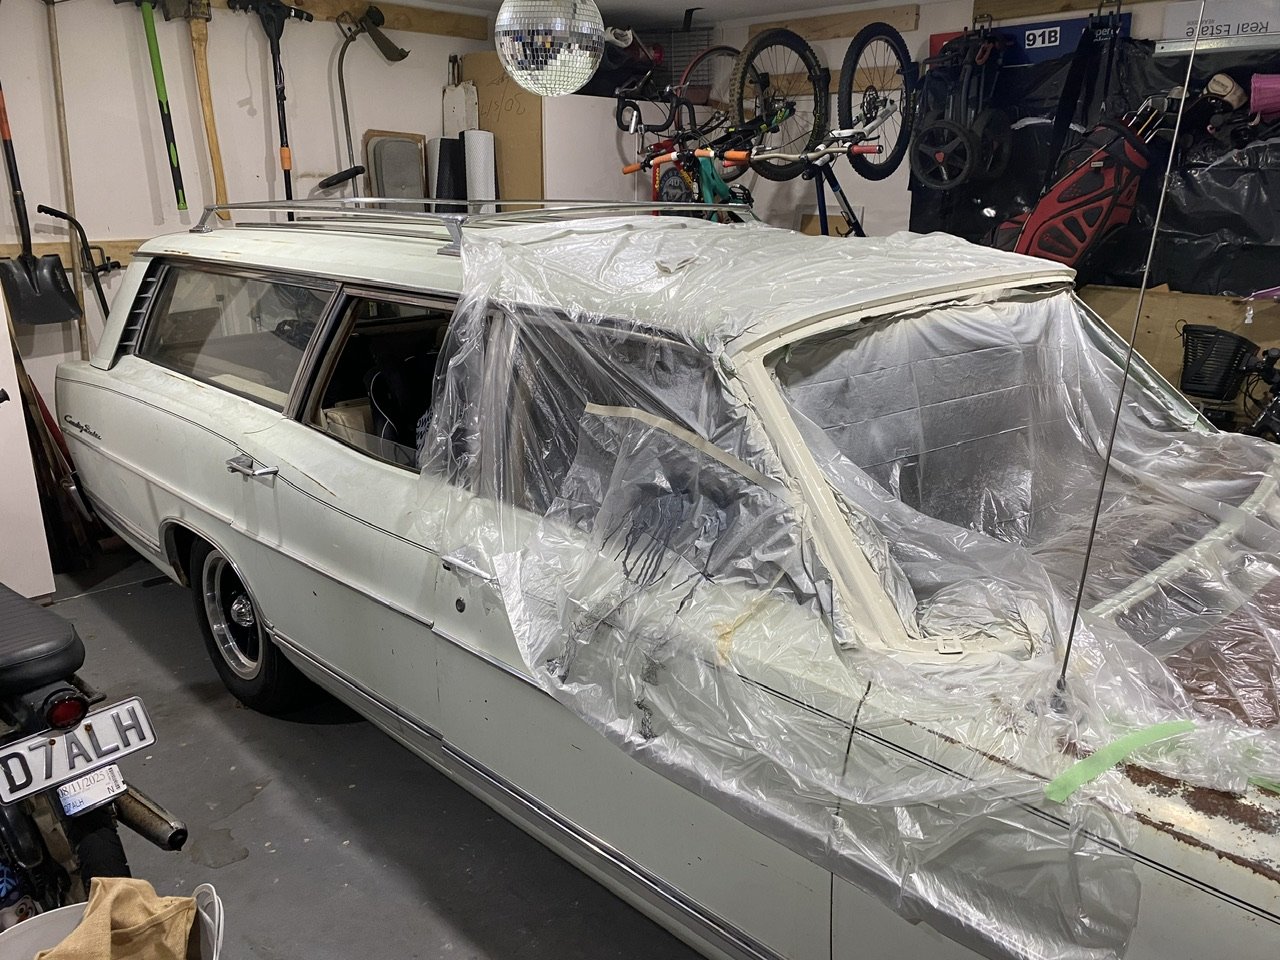
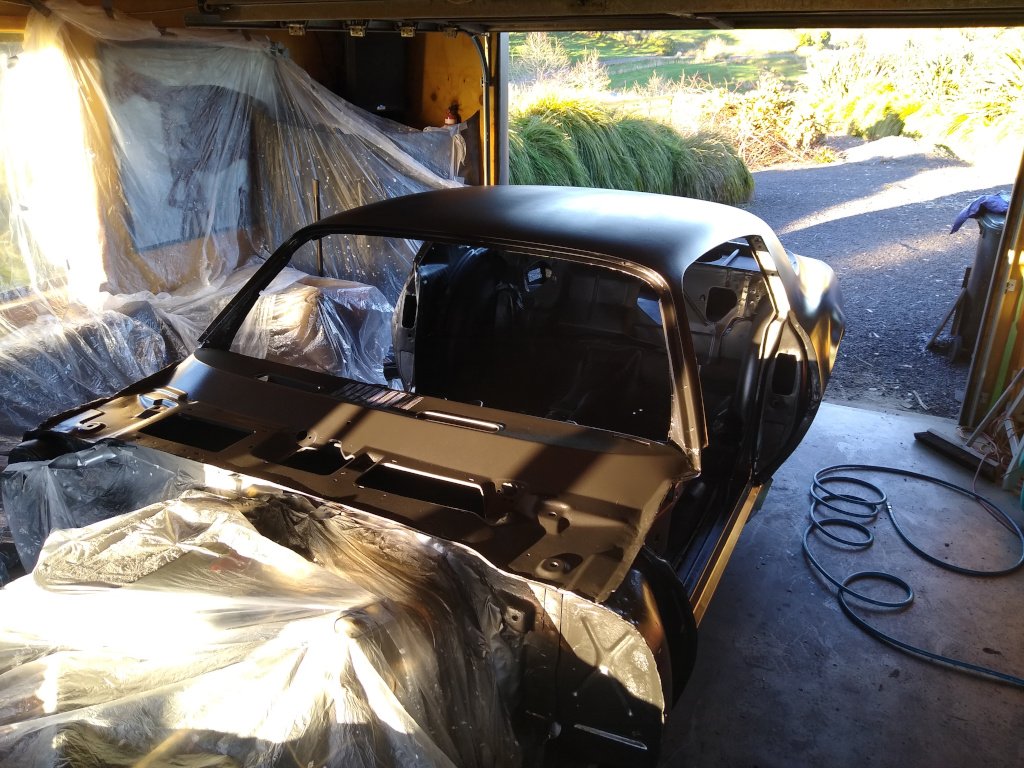
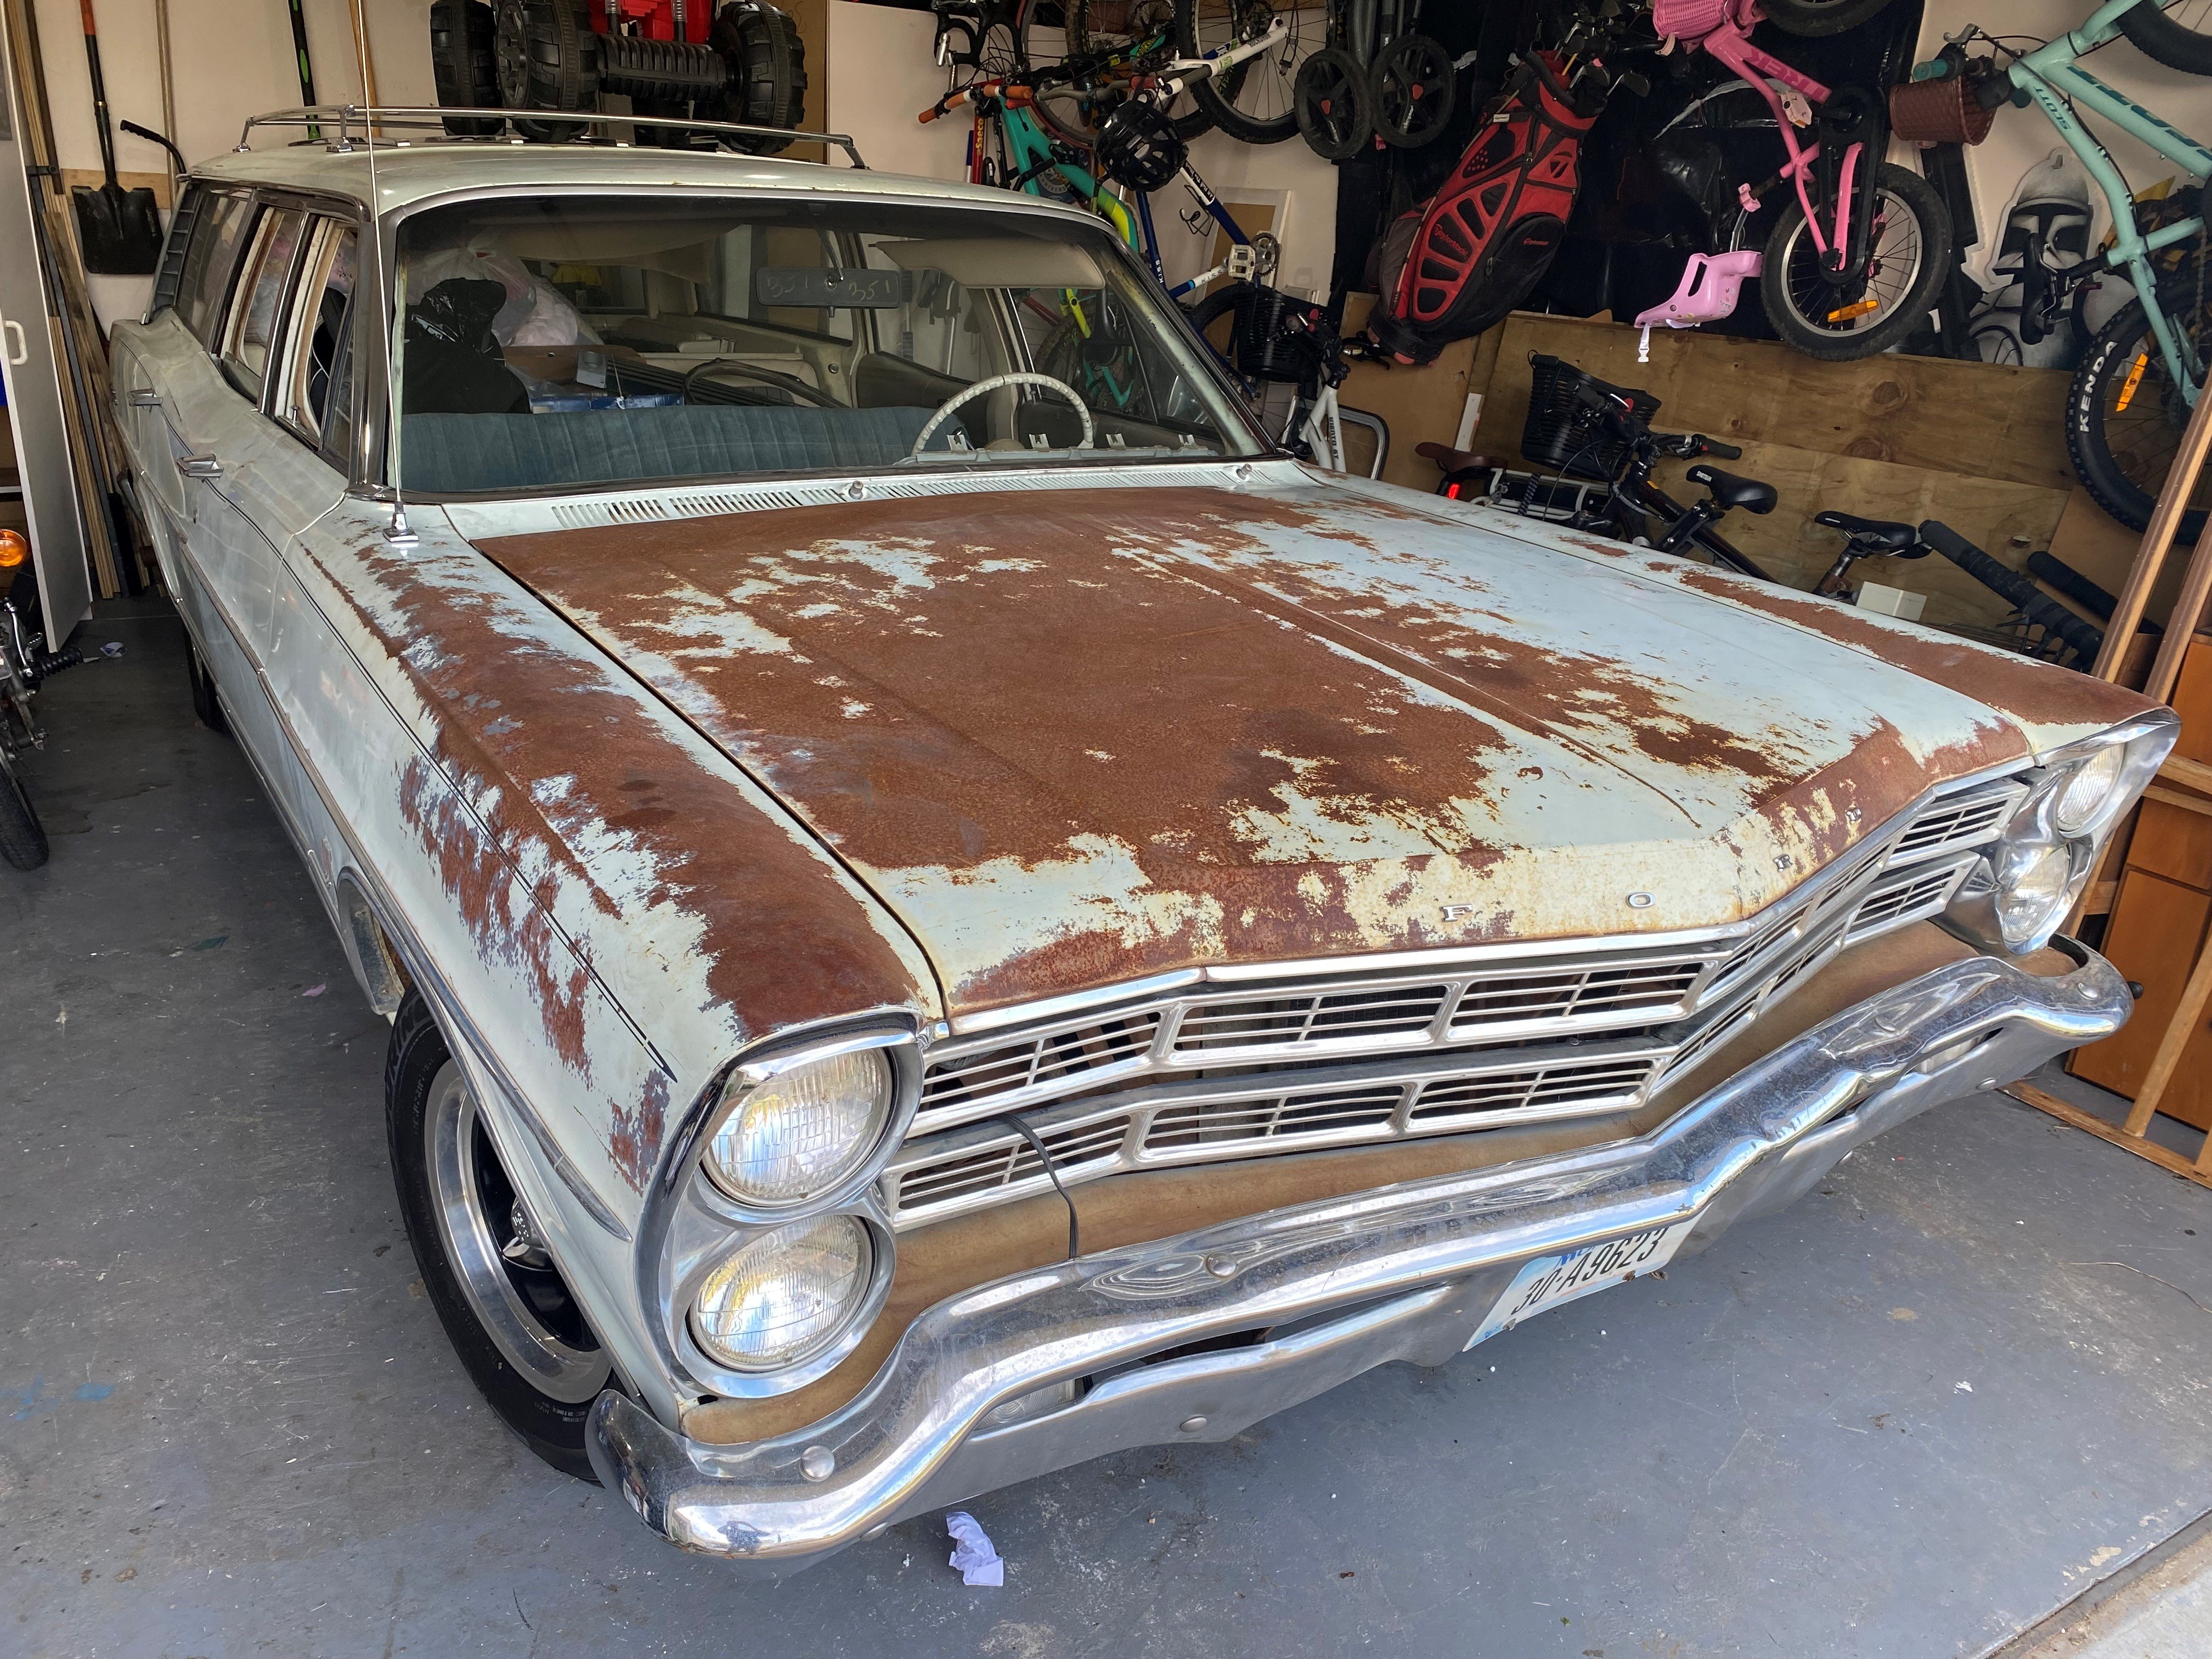
I’ve been spending some time locked in my garage with a heater running and some strong aerosol paint fumes this week. Primed it, smoothed out some pitting, primered again, and sprayed white. Don’t let me forget the clearcoat… I only remembered that as I’m writing this… It’s nearly ready for the windscreen to go back in. I also fitted the roof rack. It’s a proper wagon now.
22 points
-
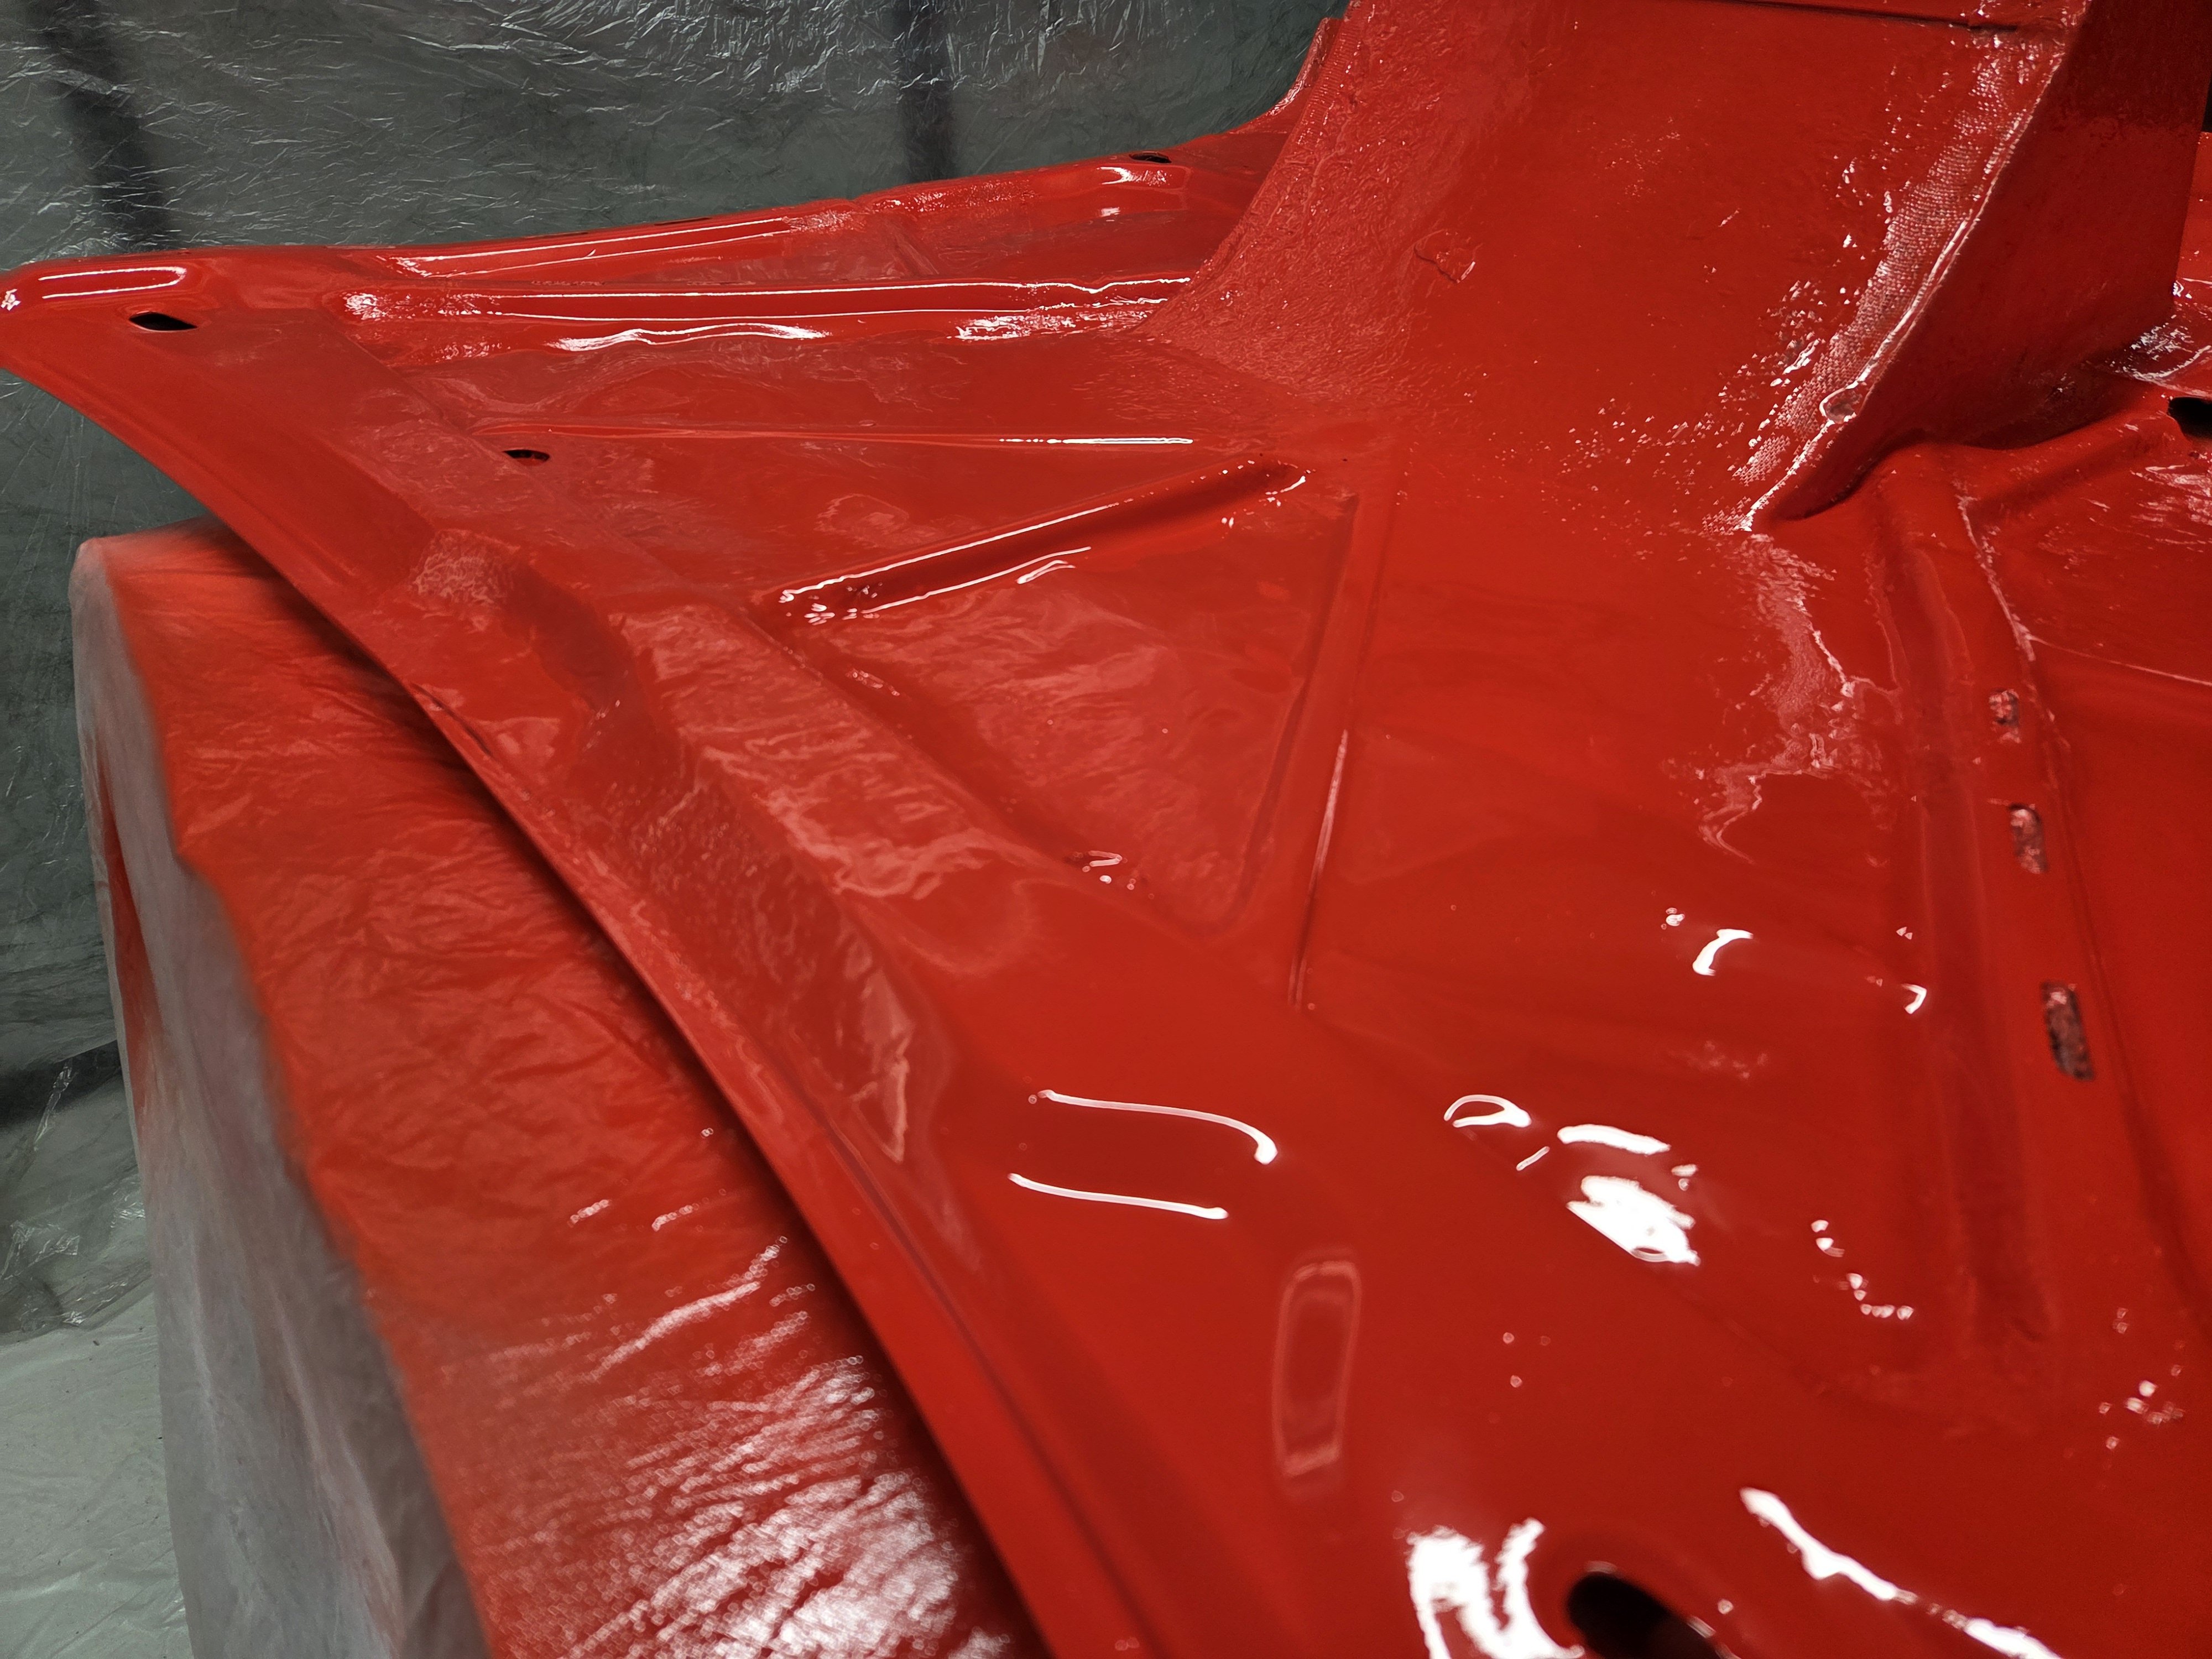
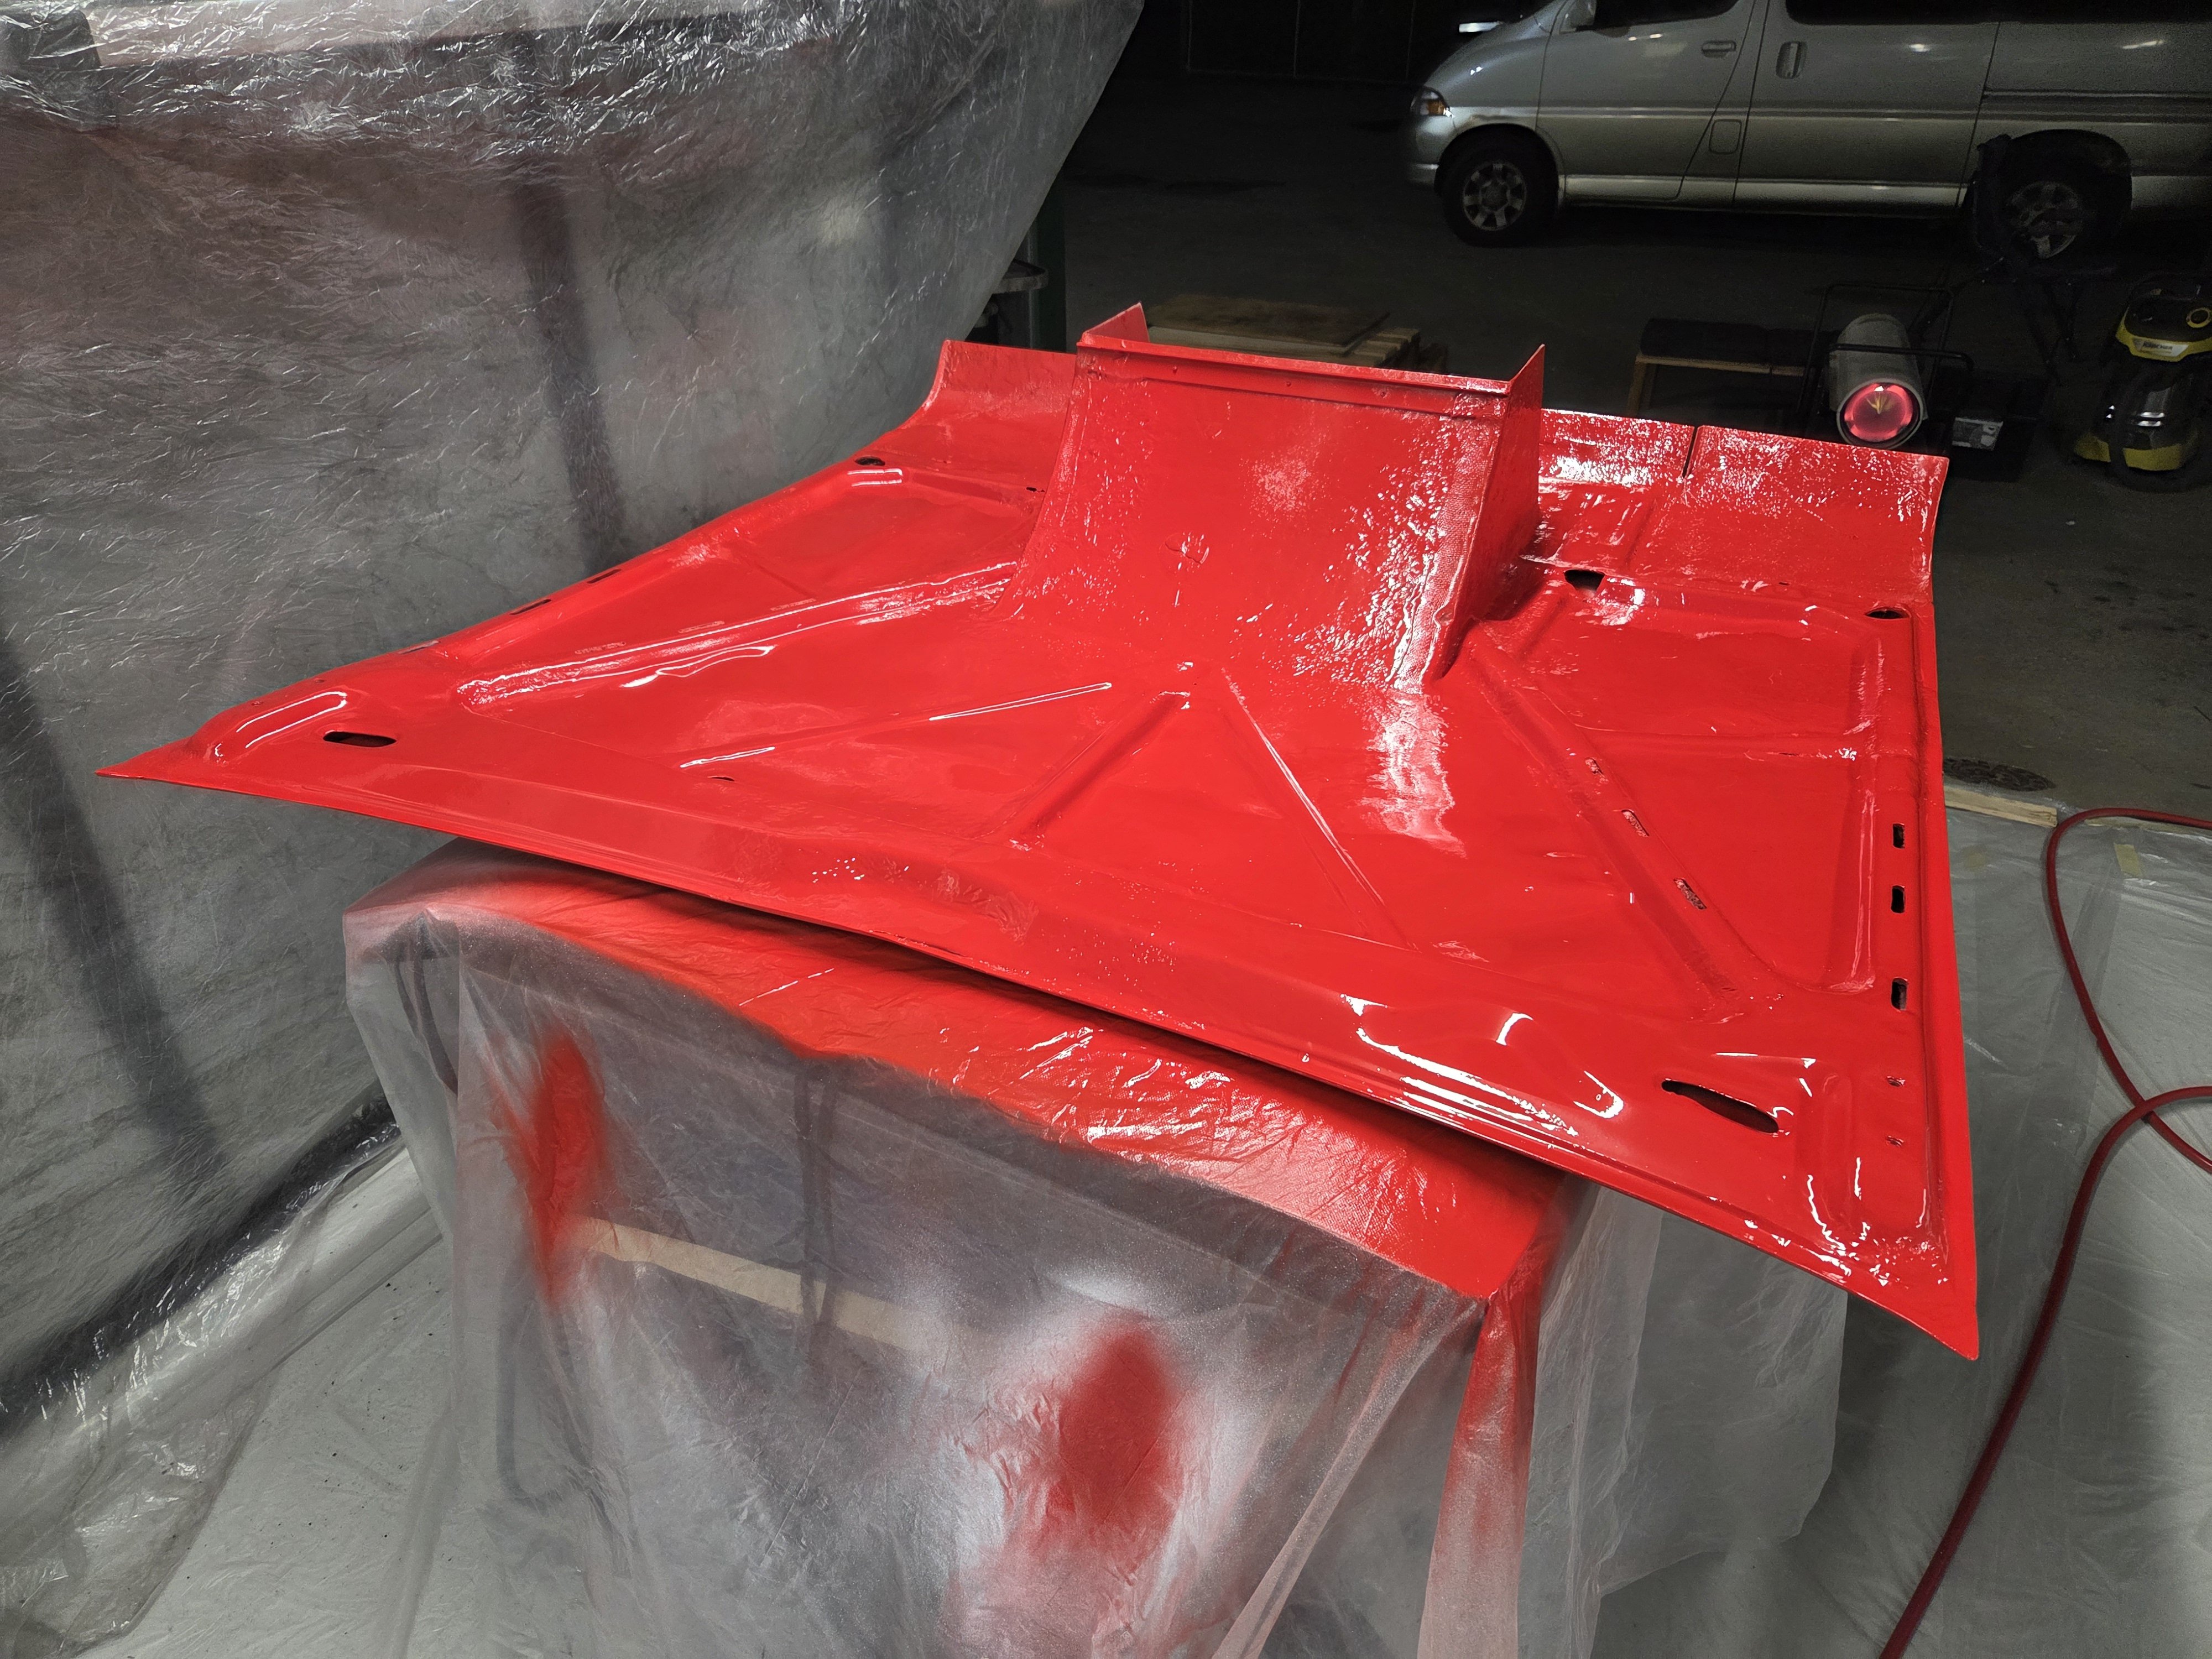
Bit more red today. Man, the overspray goes everywhere! I was aggressively pink after this one. I'll need a bit more paint to do the roof. So far we've used about 700ml of the 1L colour.
21 points
-
So I pulled the body. I had a GT6 "workshop manual" which was totally useless. Didn't even mention disconnecting the radius arms or rear suspension. I don't actually have a photo of it with the body off and engine still in because by the time the body was off there was pretty much nothing left to remove so I forged on and tore the motor out. only thing I had was this reference photo of the propshaft angle: the motor was then removed and carefully placed on a pallet which it immediately destroyed because it is the heaviest son of a bitch I have ever come across my phone decided to spruce up this photo, I don't know why
21 points
-
So before I picked it up I had already planned its first outing in two weeks but had a few things to fix (tho lockup rules state no working on vehicles) first was the LH Indicator not selecting. so after carefully removing the cracked bakerlight wheel I cleaned and played with the mechanism to get it working again.
21 points
-
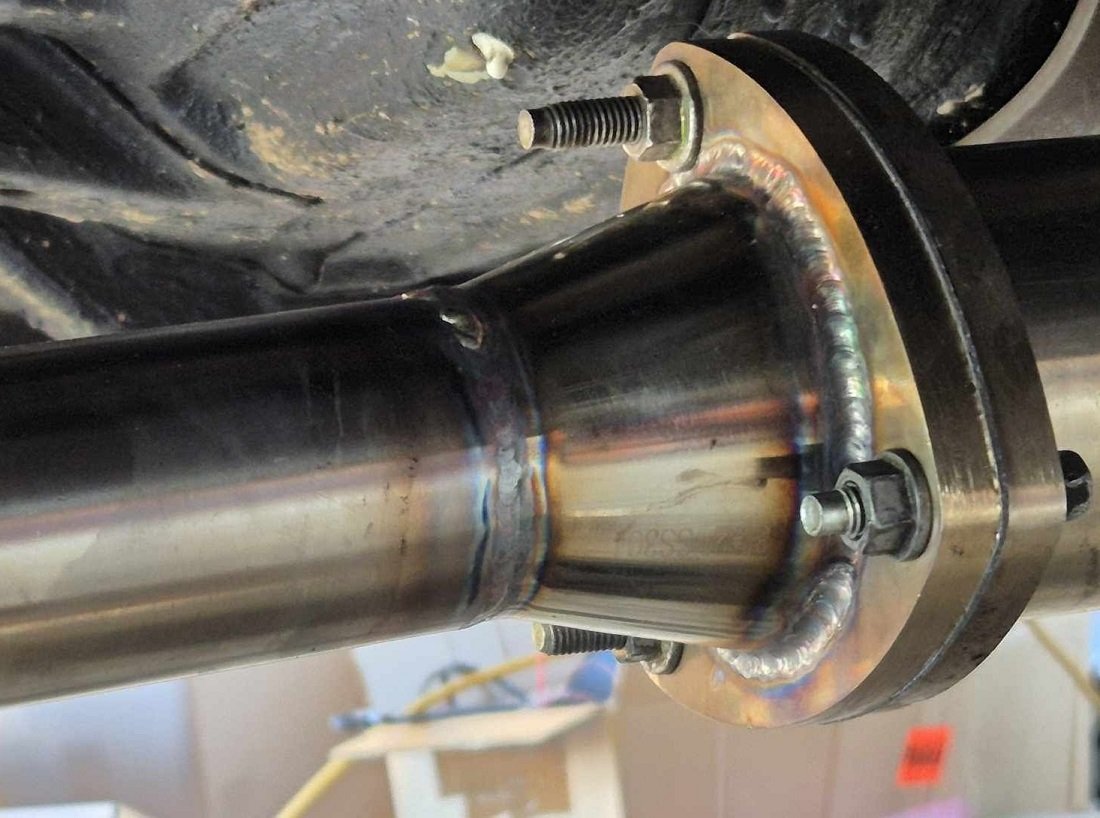
Since the last post Stripped paint off the underside of the body and repainted it Exhaust; Modified to hang it closer to the body to avoid dragging it down the road. I added flanges to the pipes near the rear axle to make any future removal possible without cutting anything. Replaced a few sections of 2.25" pipe that had been used in some bends with 2.5" to match the rest of the exhaust. Probably added 50 odd HP there alone. Painted the headers and rest of the pipes with high temp paint Cleaned out the fuel tank and repainted Painted the whole body car inside and outside with 2 coats of epoxy primer. The plan is to do body work over the top of this epoxy primer This was my first time using a paint gun. There were some runs and overspray so I'm getting the full beginner experience. My plan is to now reassemble the car after cleaning up the parts and priming them while off the body. It feels like a real milestone getting paint on it. I was getting sick and tired of seeing surface rust slowly build up on the bare metal or any new patch panels I'd welded on. Anyway, time to start on the rear bumper, then the boot lid, then, then, then, etc
20 points
-
I still can't get this thing to run right. I'm fucking pissed off with it tbh. Is the same motor and ecu that I drove into my shed with no issue in a different car and now it won't run for shit. It's got too much fuel at idle and goes lean at throttle input. Is like the fuel controller is backwards. I haven't checked the pump voltage yet because I decided to do something to actually make progress. So I went back to being an upholstery expert. A very shit one. Whatever, so i pulled the front seats apart to see if I could swap the cushions and covers left to right. Seat base i was able to swap but the seat backs are too different left to right to make it work. I washed the seats too and got a mountain of disgusting shit out of the fabric, then I put them back together. They still look terrible. Maybe I'll die them to try and hide some of the sun fading.
20 points
-
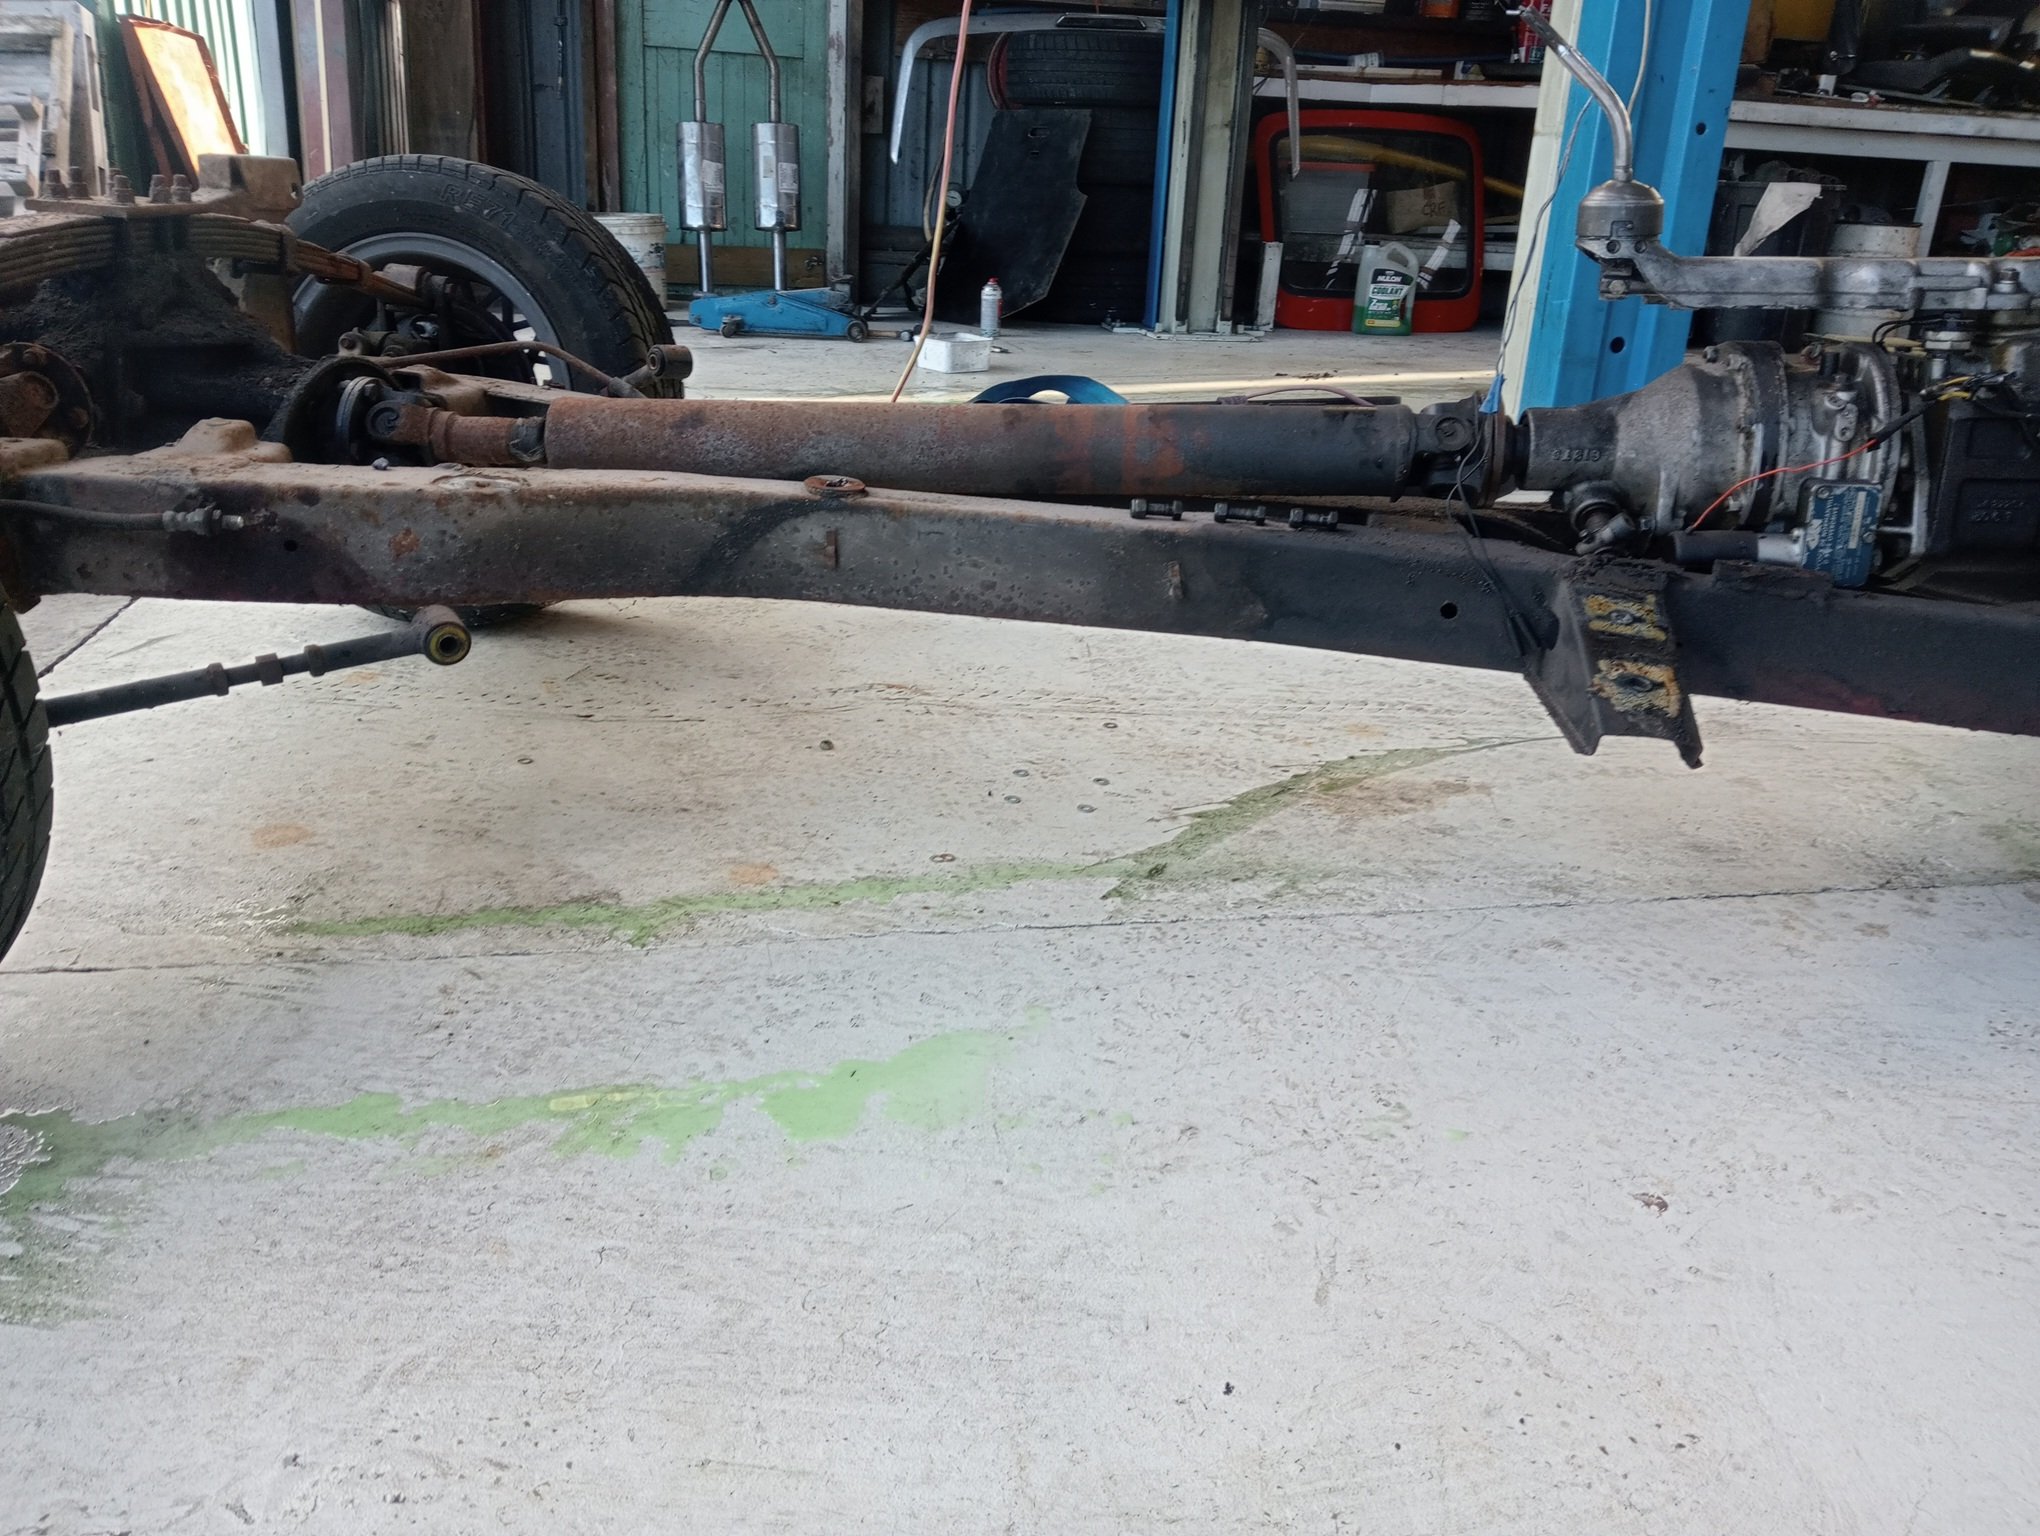
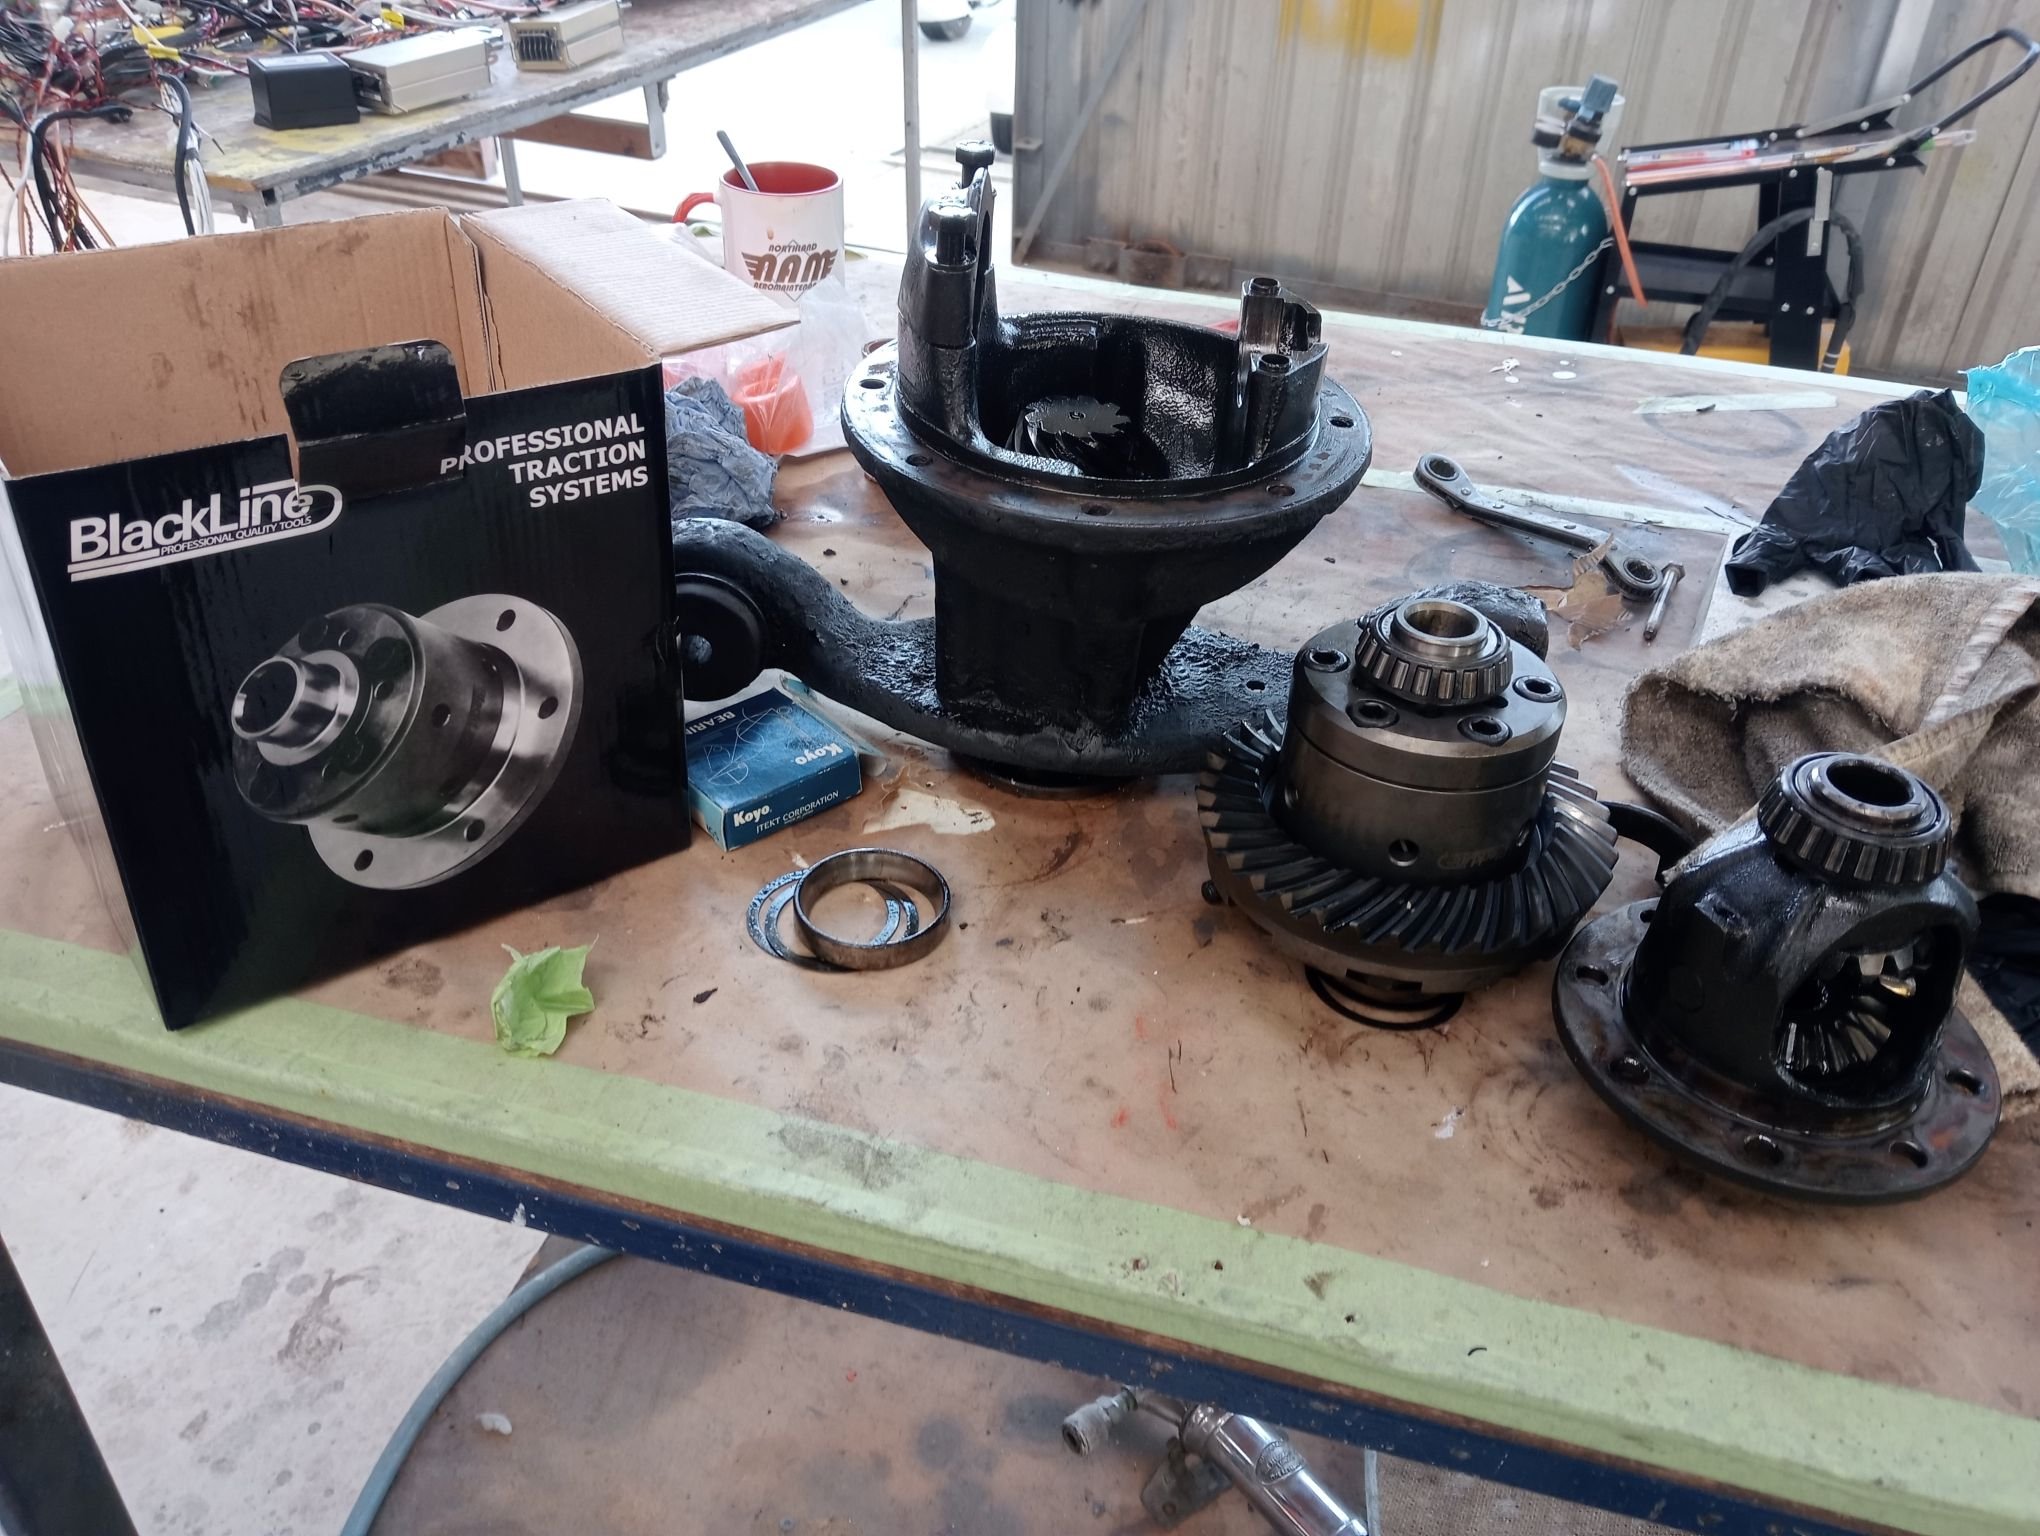
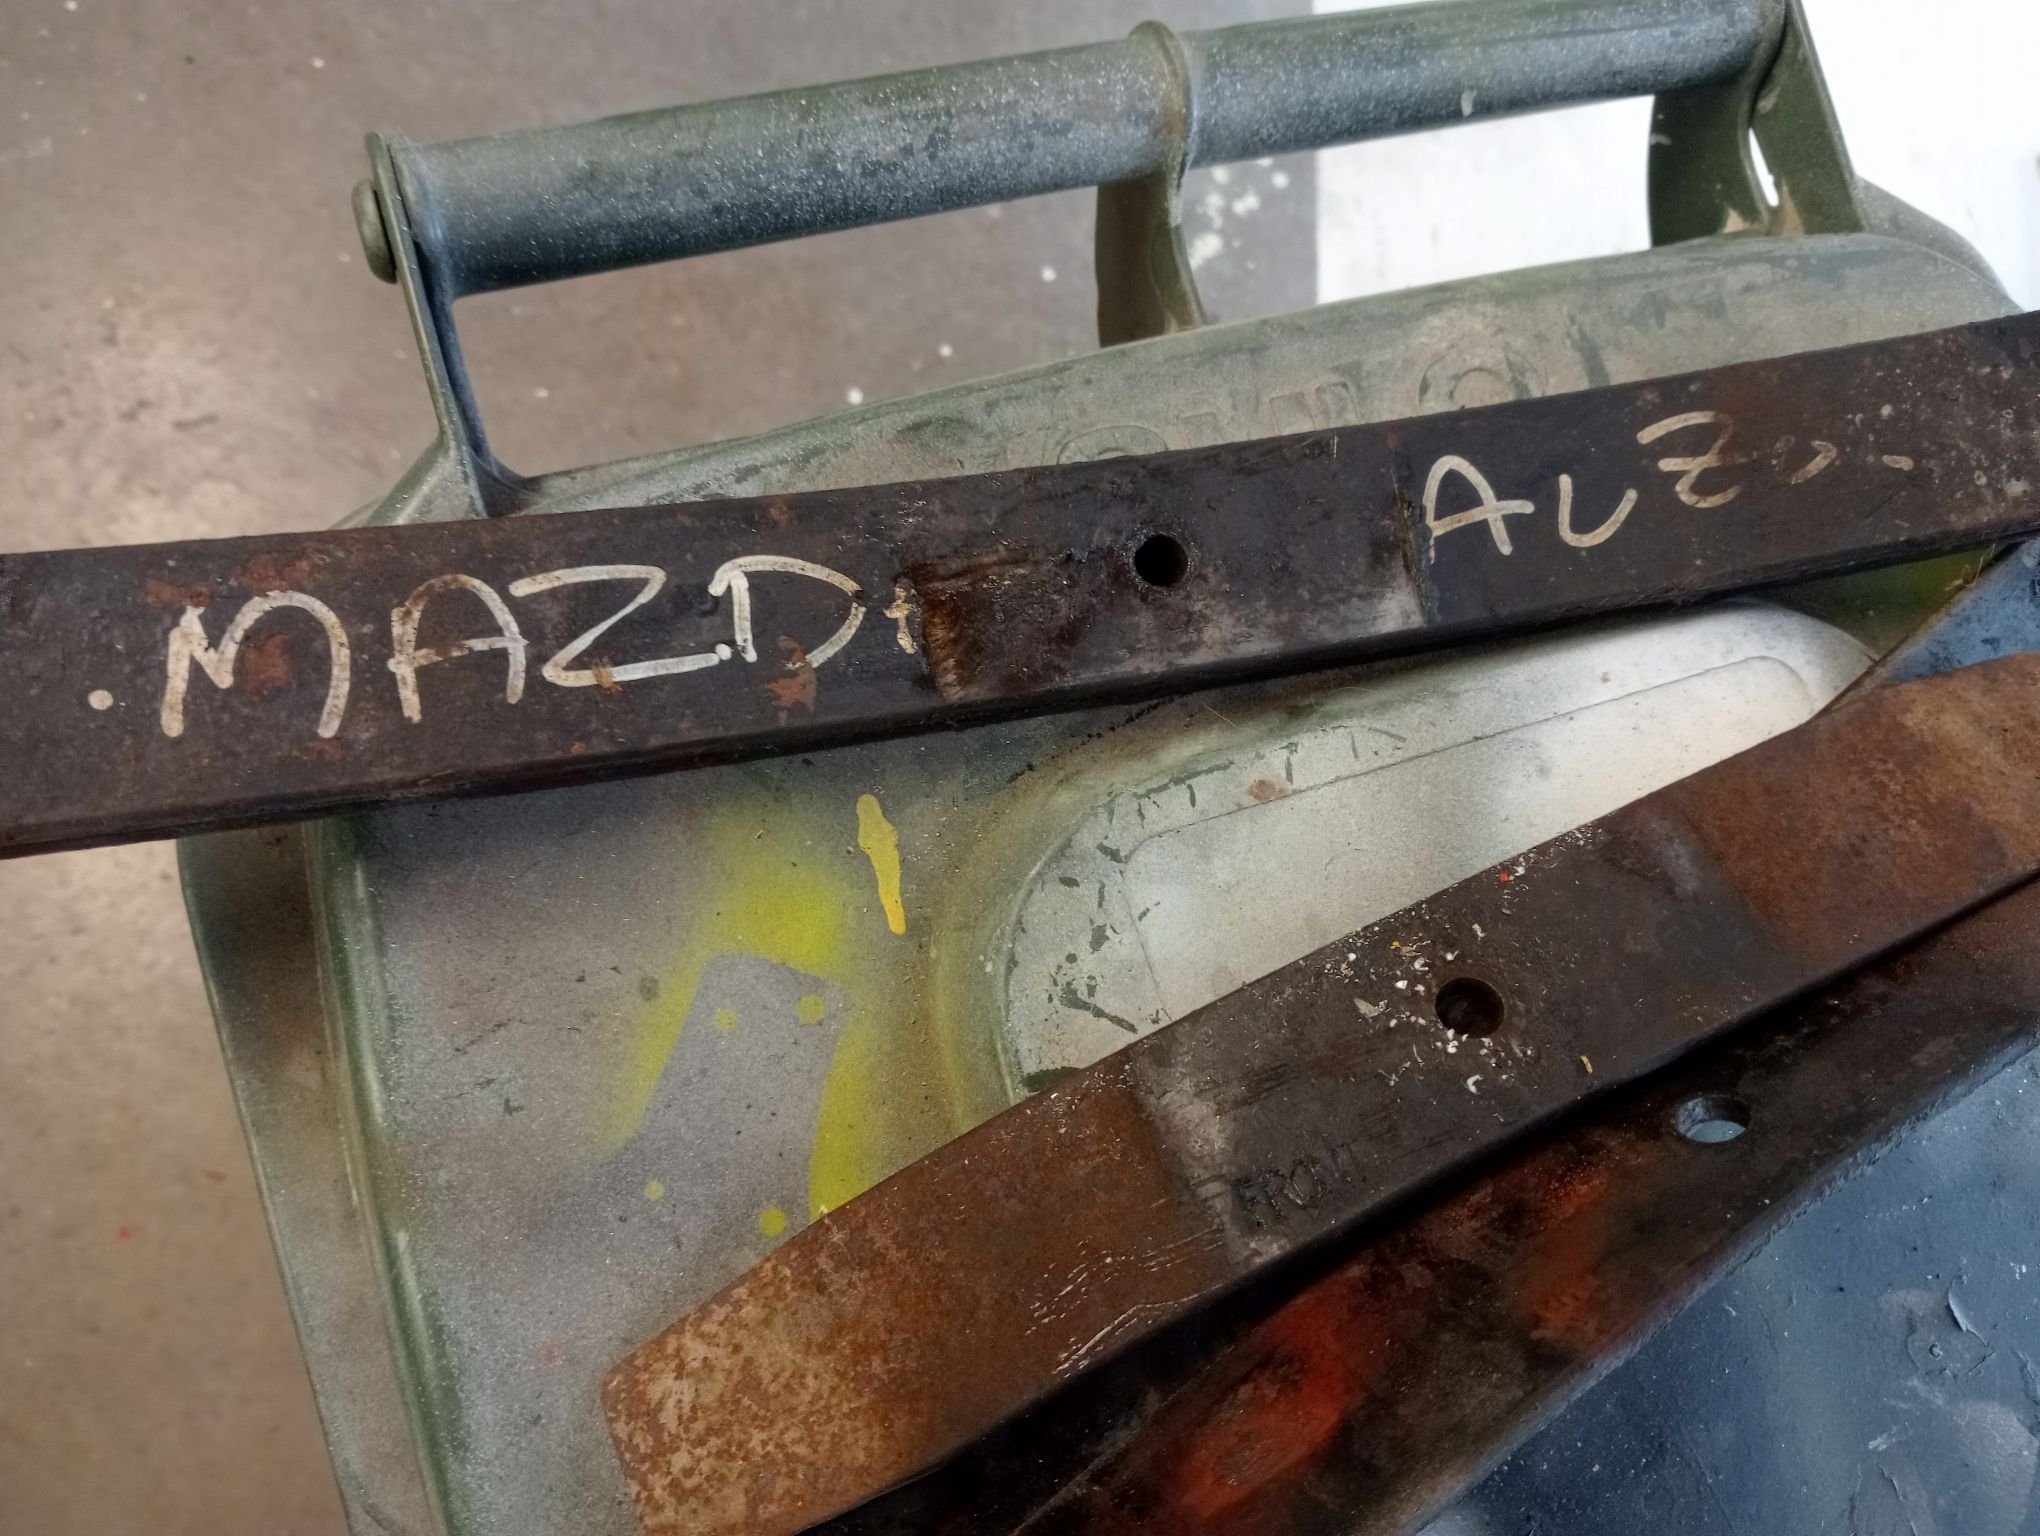
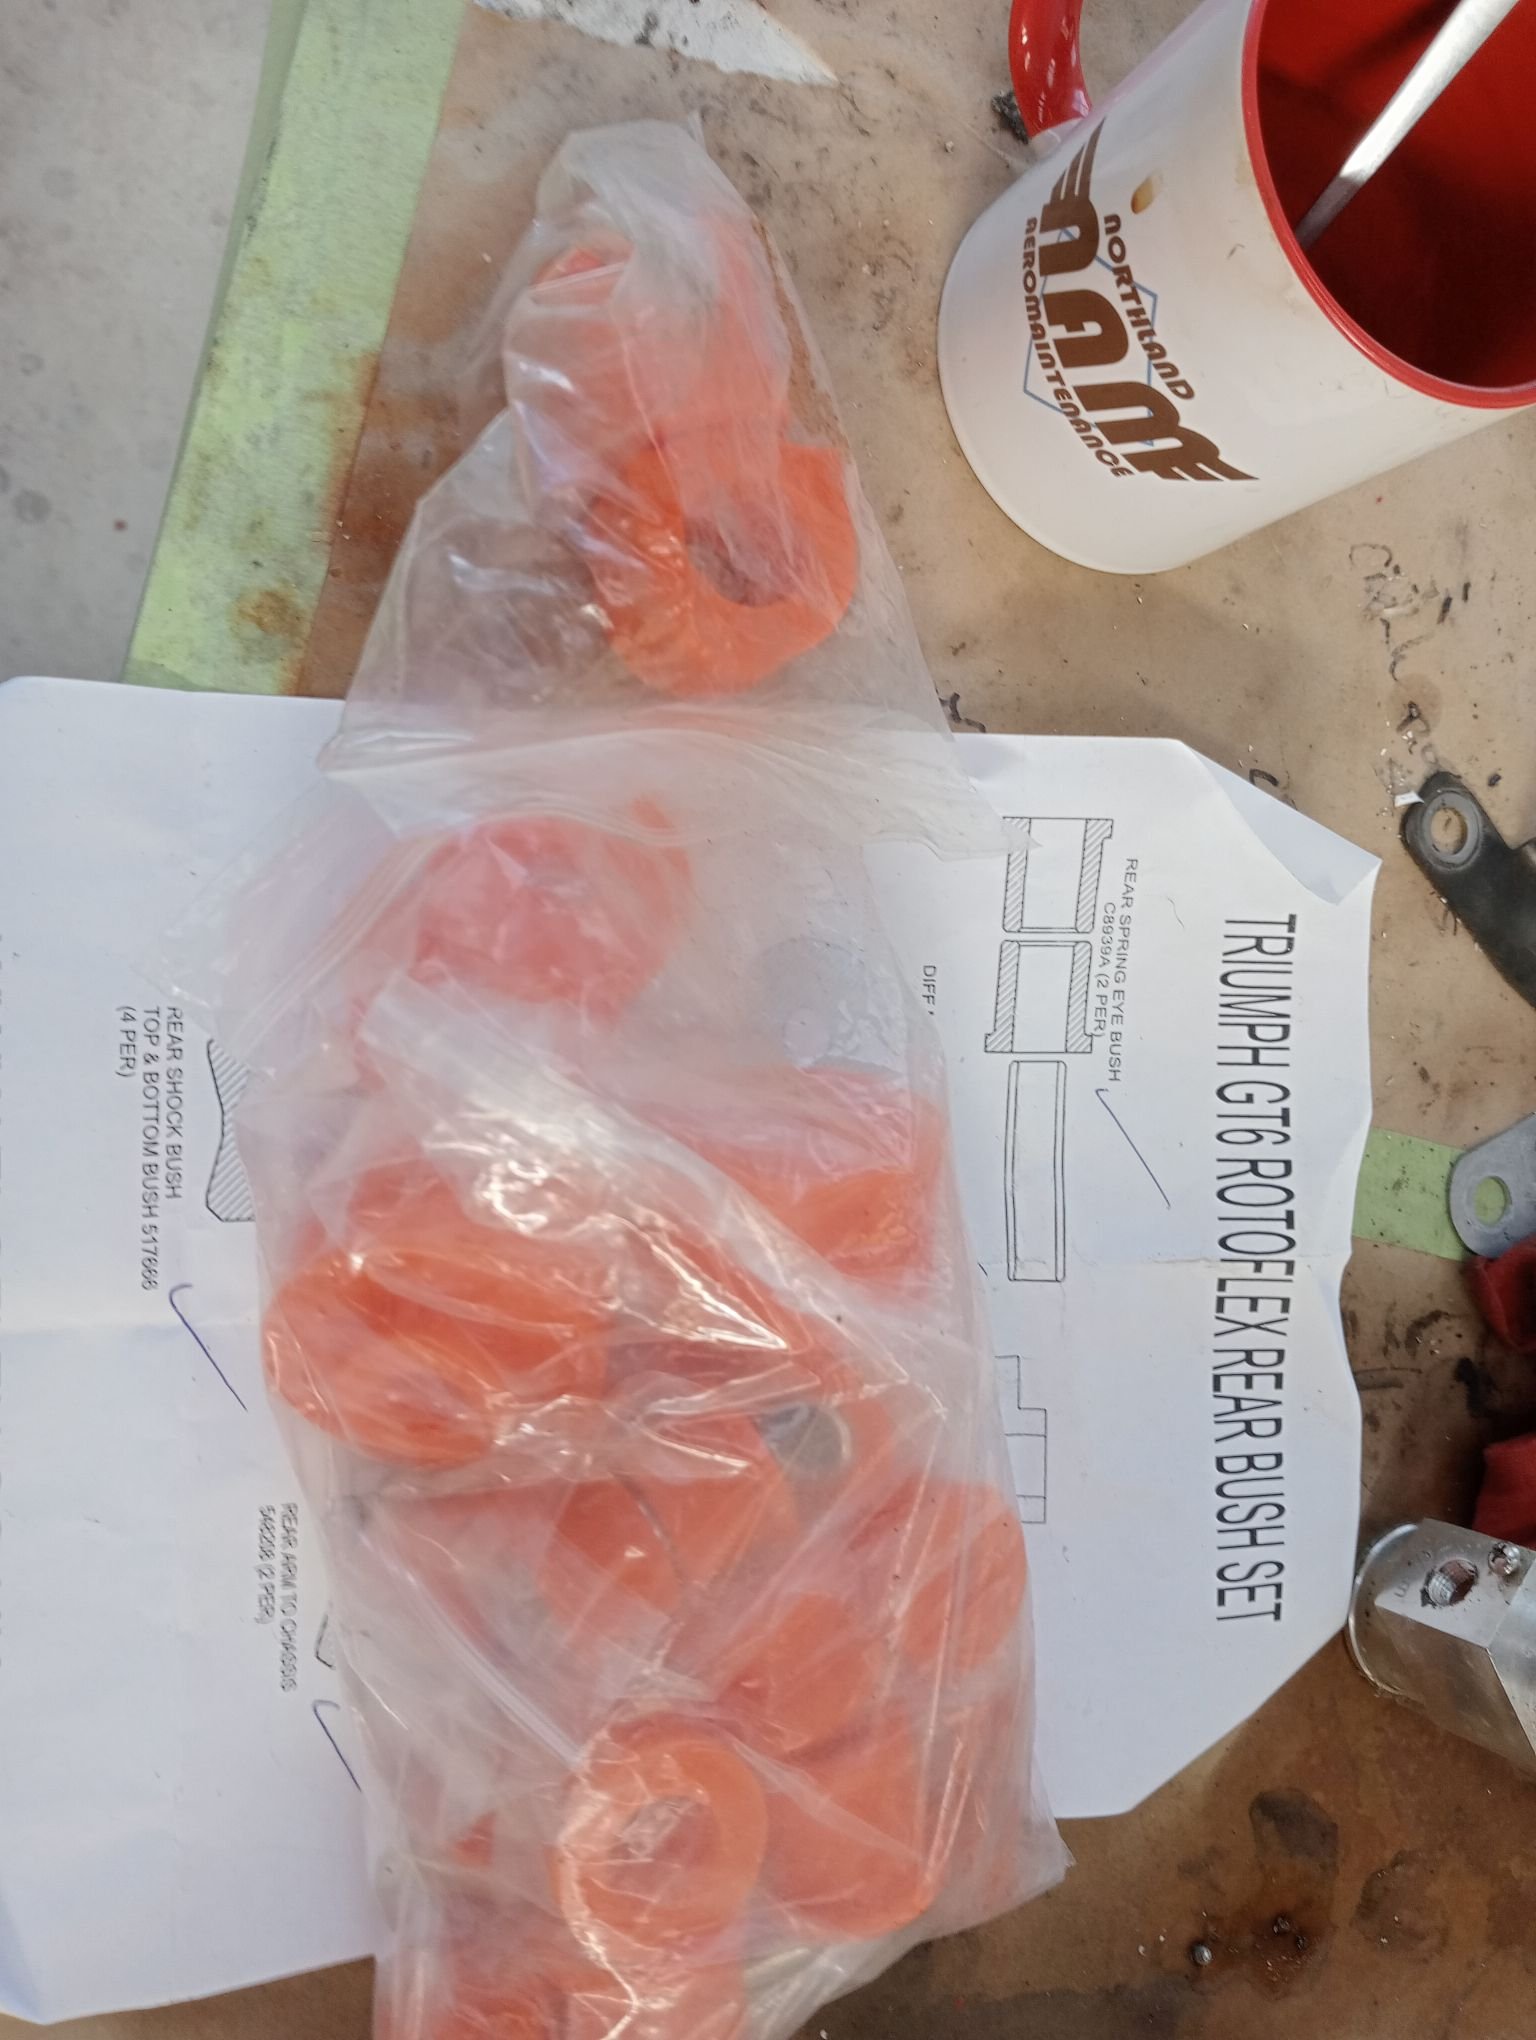
the wife and kids went away for the day so I snuck downtown for some filthy rear end action Having being informed that the gear carrier was the weakest point of the diff, and that the diff is the weakest point of the car, it seemed the simplest solution to replace the whole unit with an "I Can't Believe It's Not Quaife" LSD. The maintenance manual talked about carefully spreading the carrier bearing caps with a Churchill tool in order to extricate the carrier, well mine just fell straight out, but I decided to not be worried about this and forge ahead. By the looks of things someone has been in here before. Another thing to do was install a drain plug, and that's already been done. It was difficult to see originally because the entire diff looked like a small planetoid consisting of mud and oil. Surprisingly had a lot of oil still in it. Going to give it the mega clean off but I'm doubtful it'll ever get clean enough to repaint it. Incidentally the carrier on this on is in good condition, perhaps it's worth something to someone pulled the rear suspension and hubs to bits, which was shitty and greasy but not difficult. Did some research and couldn't see any truly compelling reason to not send the drums off to the sandblasters along with the rest of the bits and pieces. The buggered bushings can stay in place because I suddenly had an ancestral memory from decades ago and remembered; I still have a set of rear poly bushes in the garage! I bought them shortly after I bought the car, did the fronts which was a huge pain in the ass, took one look at the rears and decided it'd keep for another day. Incidentally the radius arms and lower wishbones in the rear already have polybushes, guessing the previous owner was slowly replacing them as they crapped out. They actually look pretty good and sometimes I wonder if a quarter-century old bush is actually better than a modern pirate part made God knows where pulled the rear leaf apart and wondered why it has "MAZDA" written on it, very odd. There's apparently some button guide thingies which are supposed to be between them but they are long gone there is now a large and growing list of things that I am waiting on which is preventing anything from going back together. Ergo the only way to progress is to pull things more apart. I also have some major grudge purchases like new engine mounts, probably a clutch and a cambelt and all the other bits and pieces you really wished you did when it was in bits and easy
20 points
-
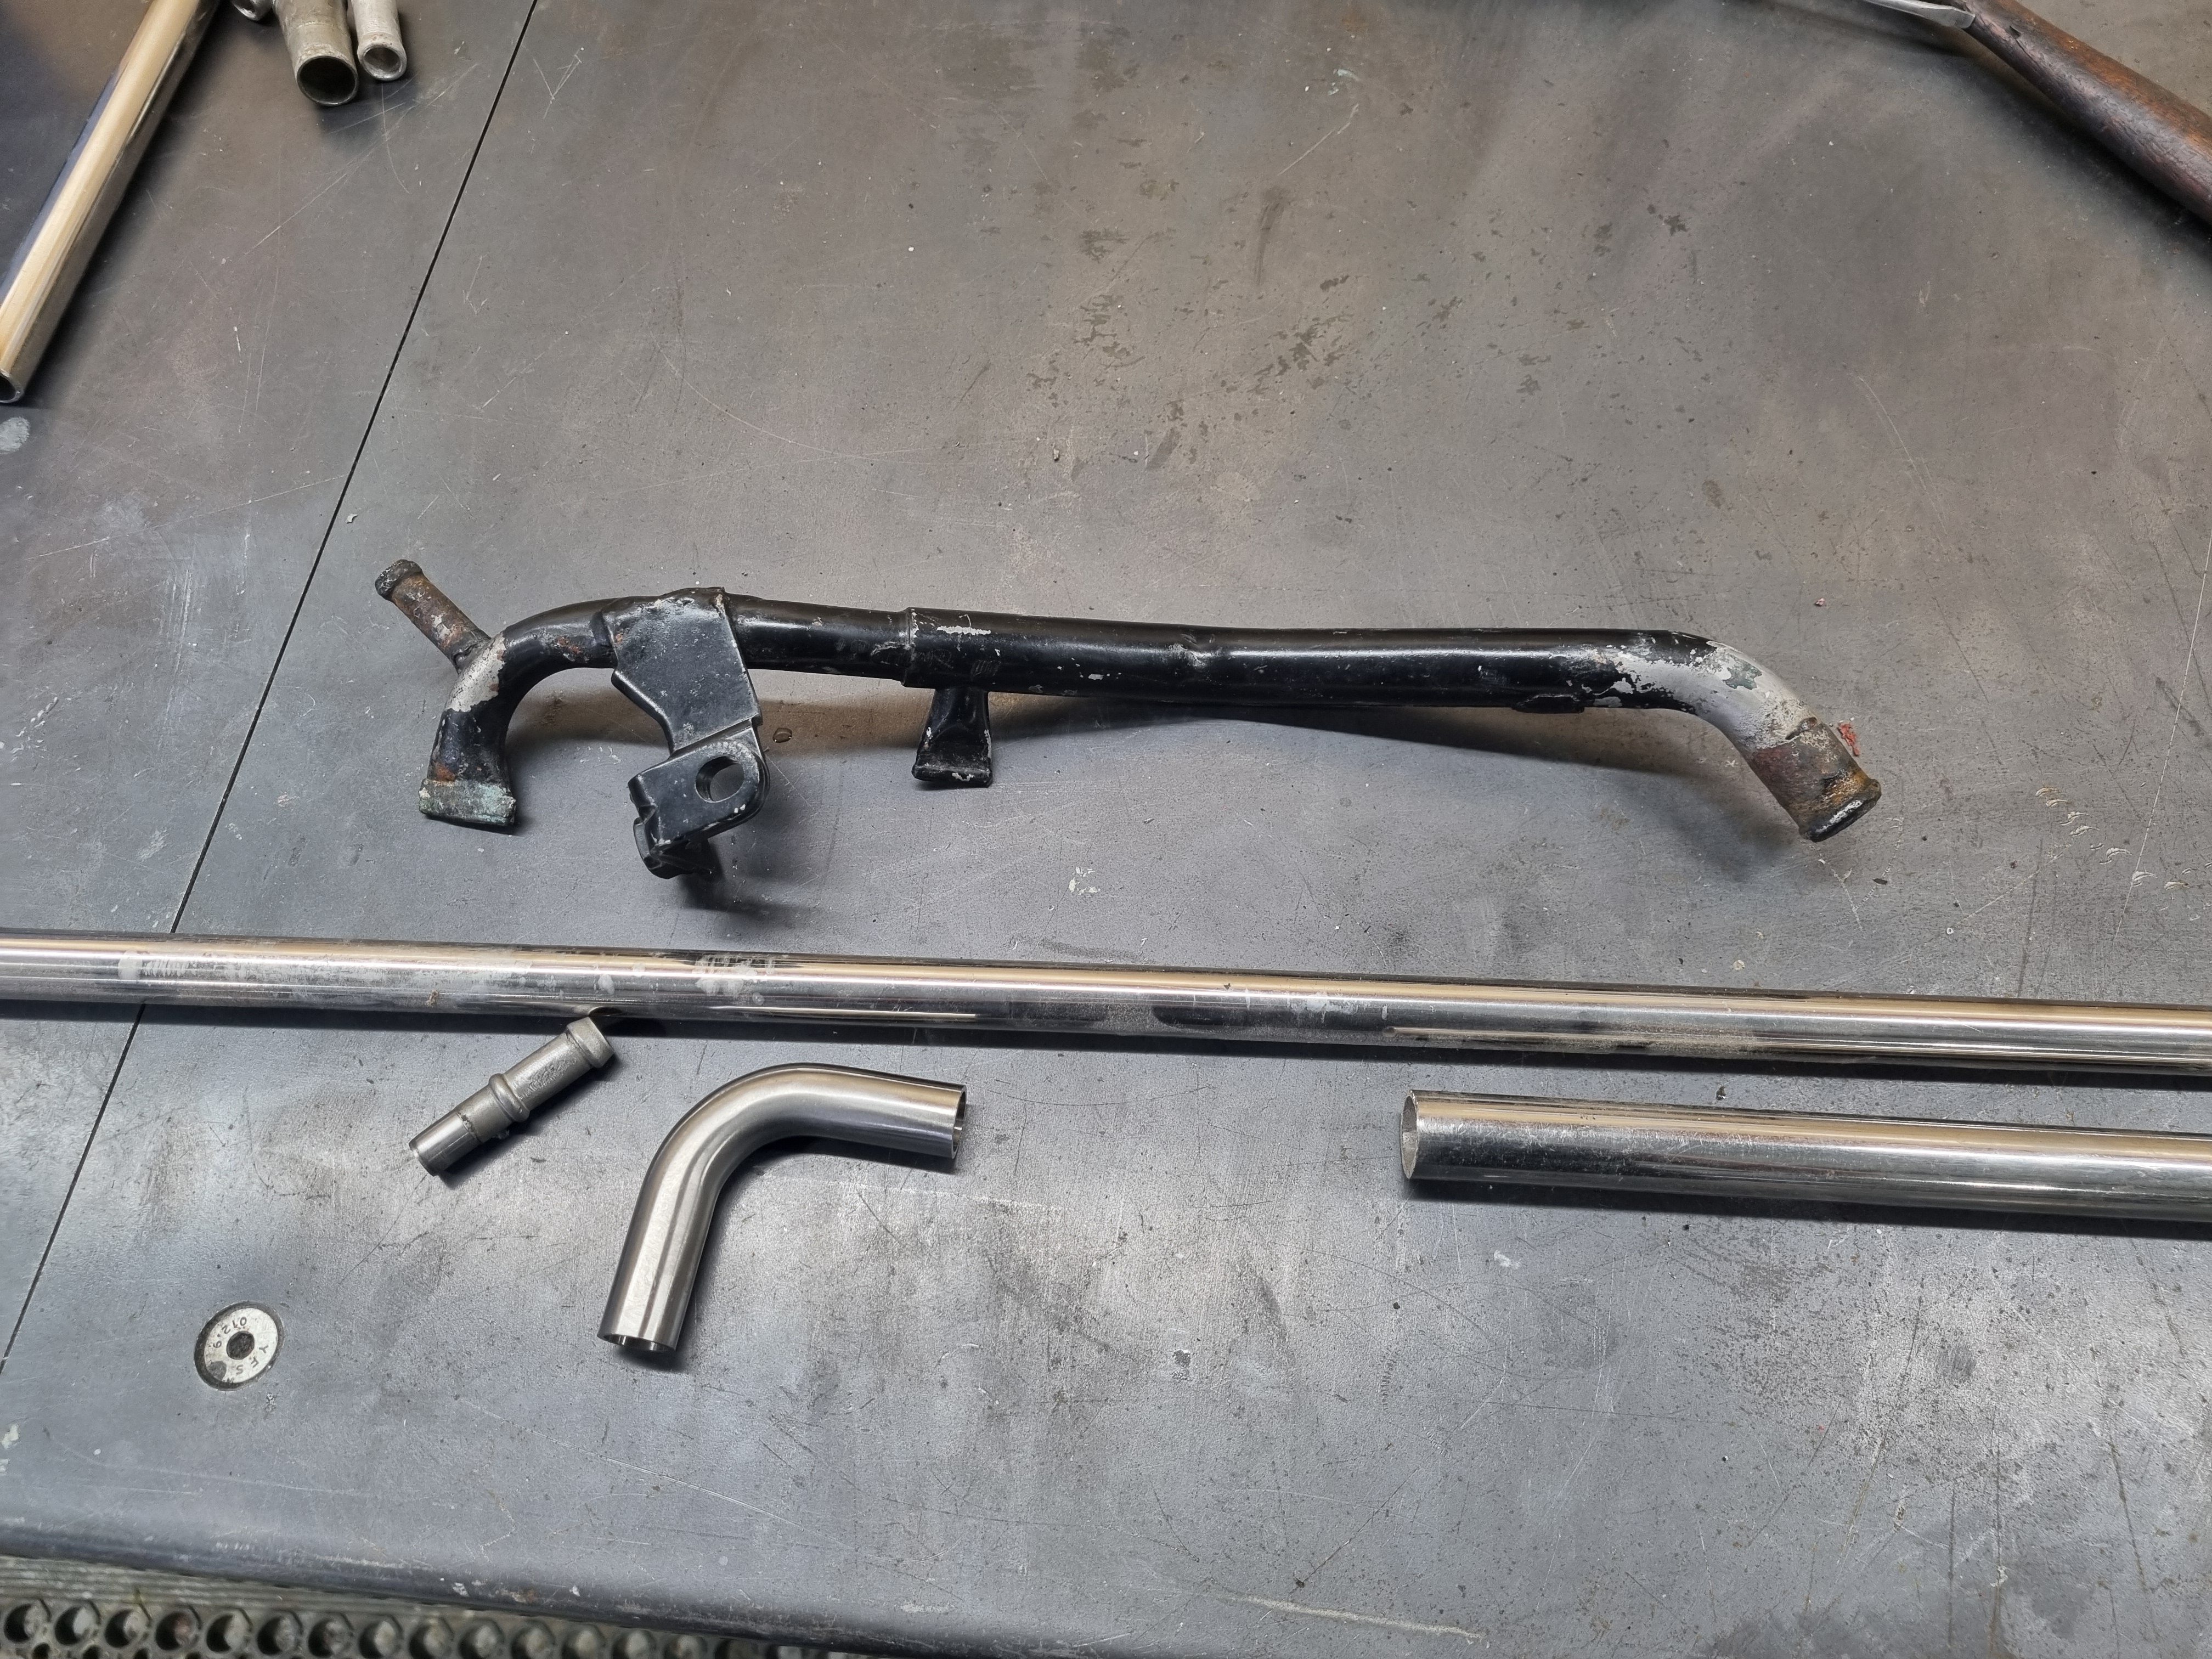
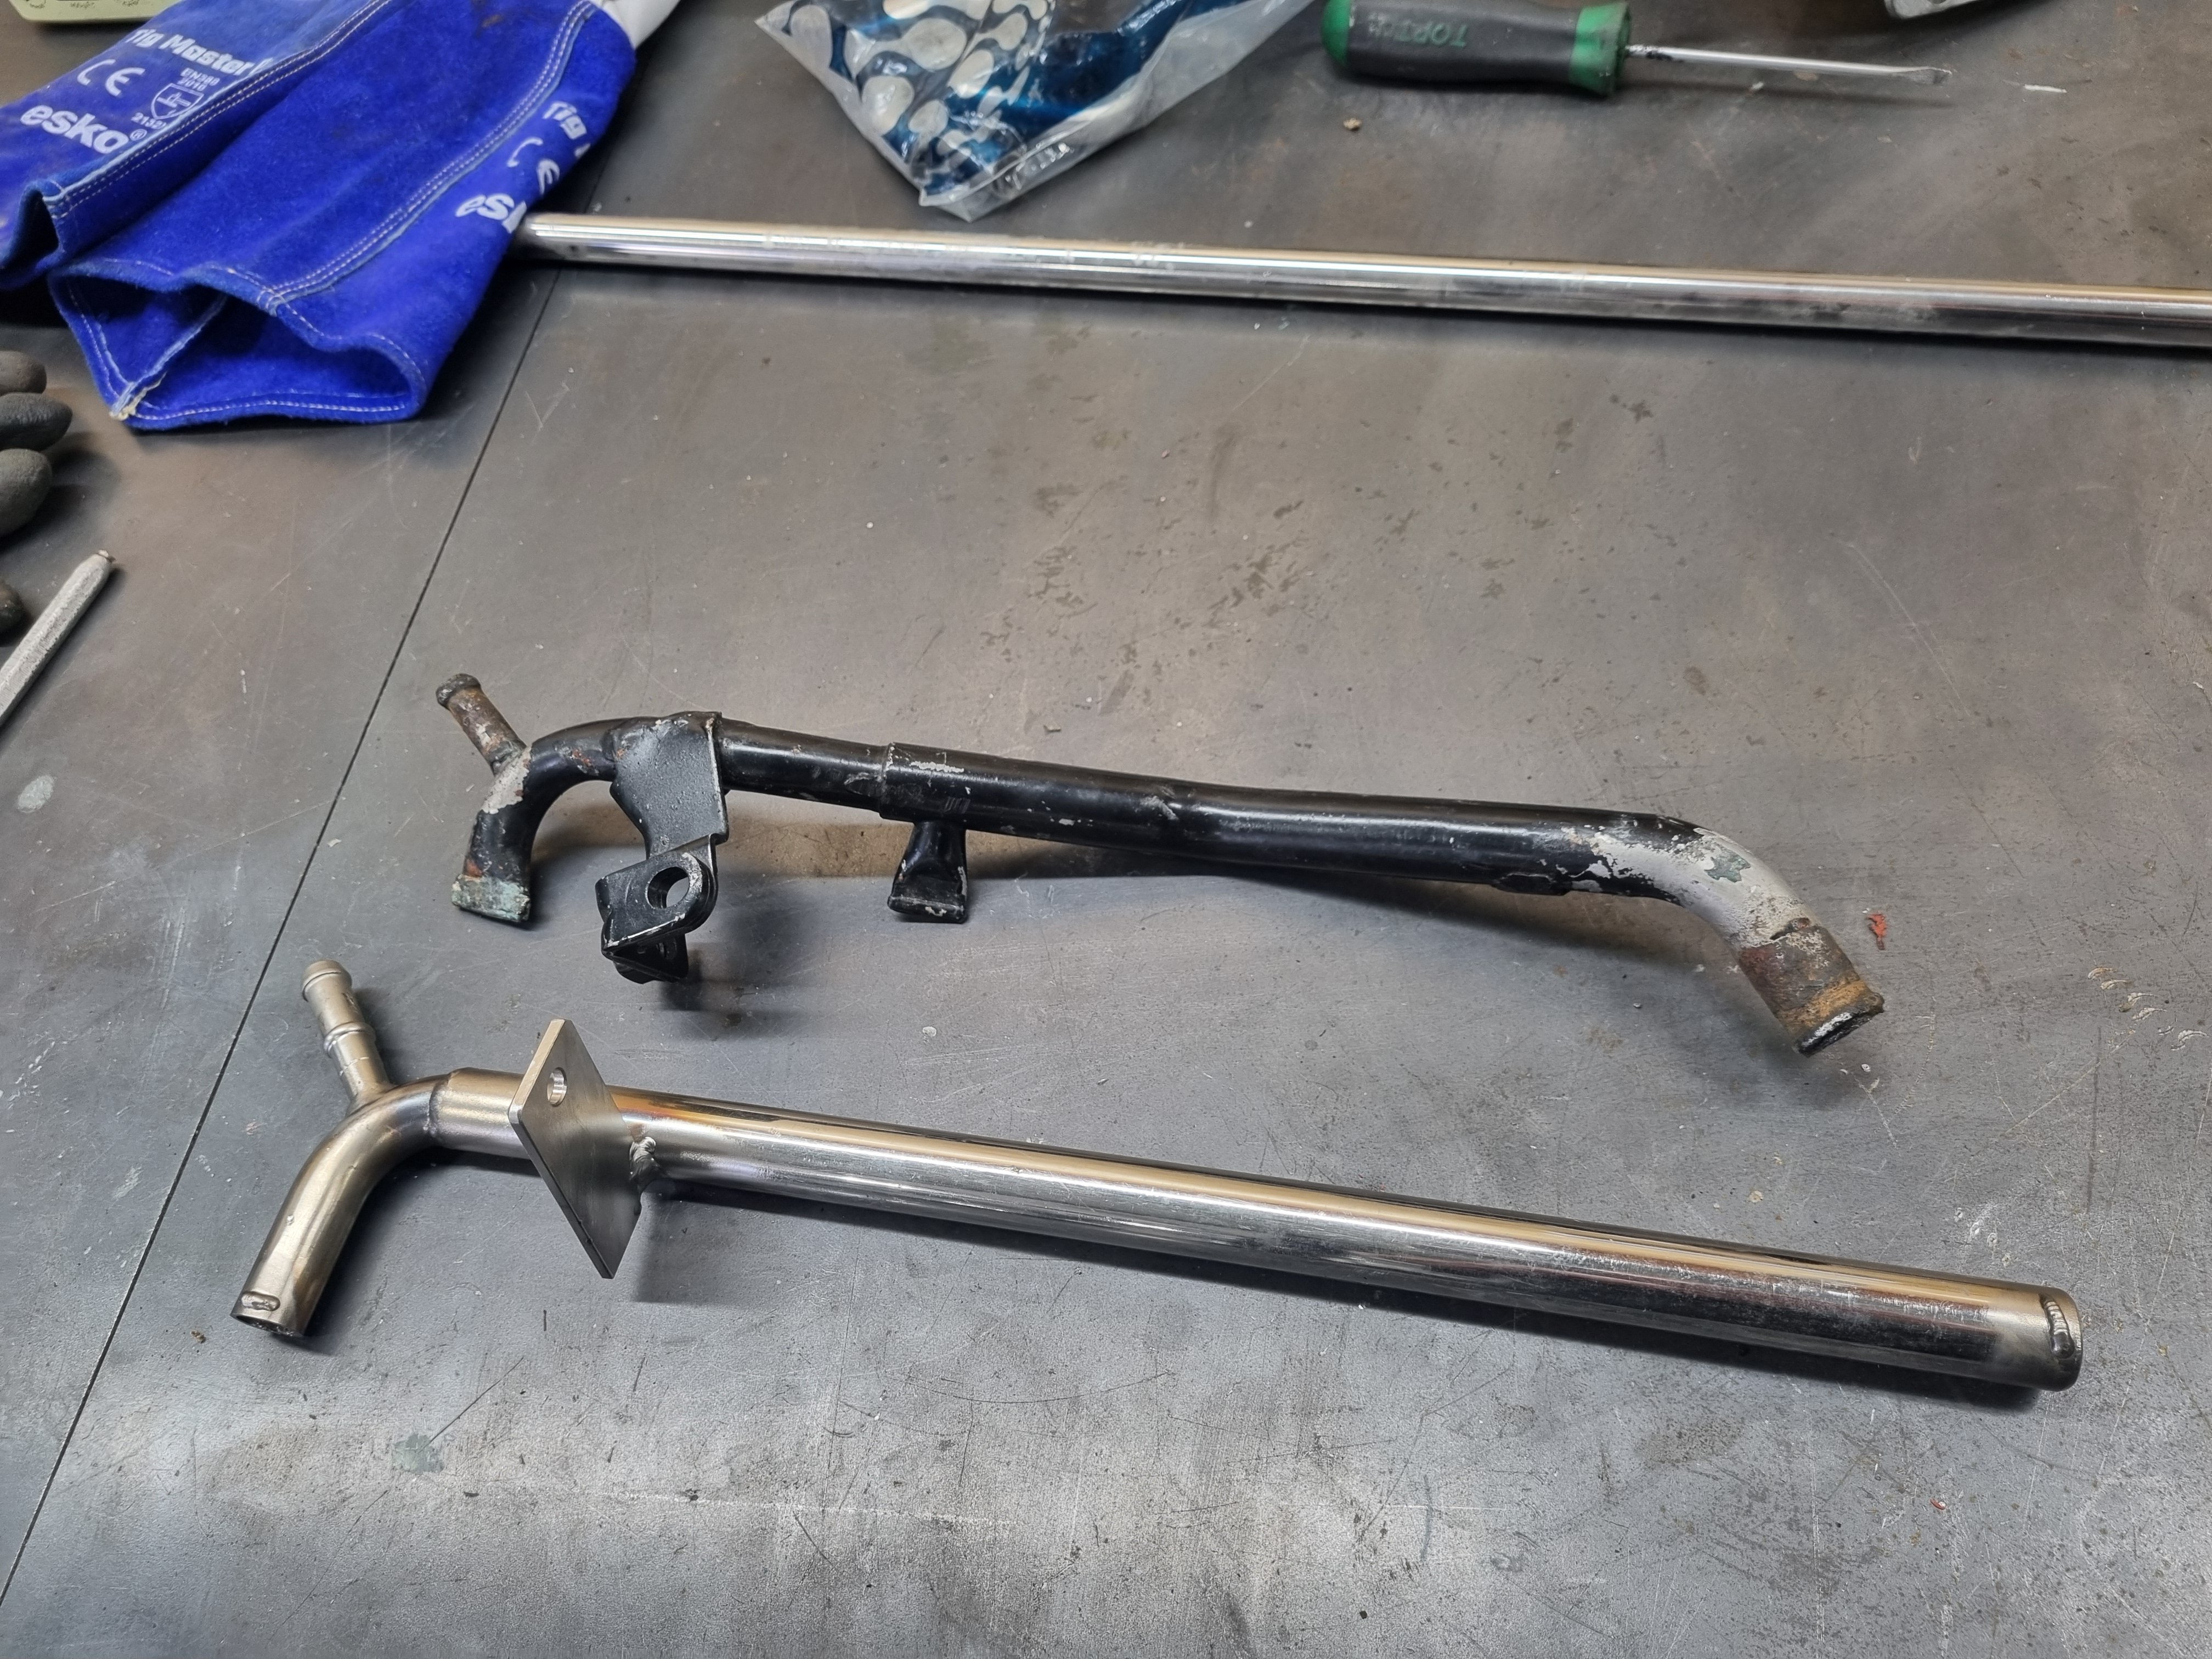
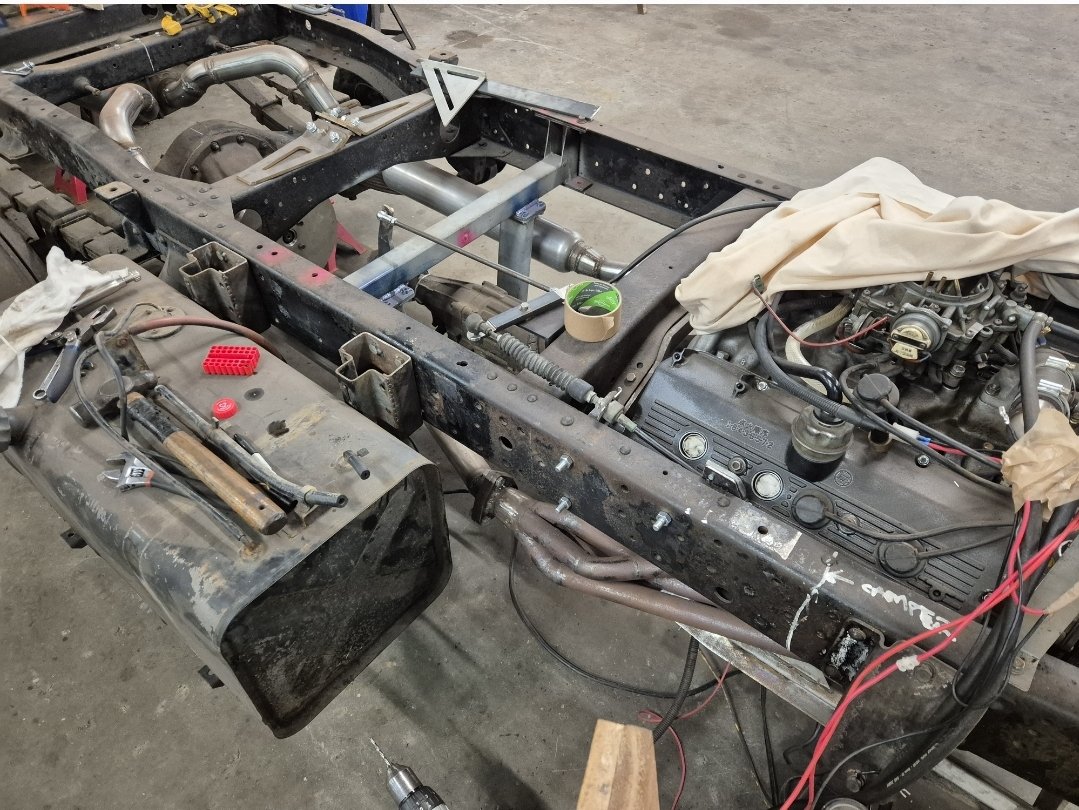
I'm trying to get the motor back in the car. Couple of mods that have been made to the engine that I need to unmod. There's no feed or return for the heater because racecar so I need to reinstate them. Block part was easy, I found a spigot off a 5M that I could make work by drilling and tapping the blanking plug. easy. The other bit was a bit more fucked so I ended up making a whole new one out of stainless. is made from the hot water feed pipe for a 1UZ idle speed controller that I managed to get out of the aluminium body, a bit of 19mm ss tube and a generic 16mm ss bend. added a bracket and Bob's your wombat.
20 points
-
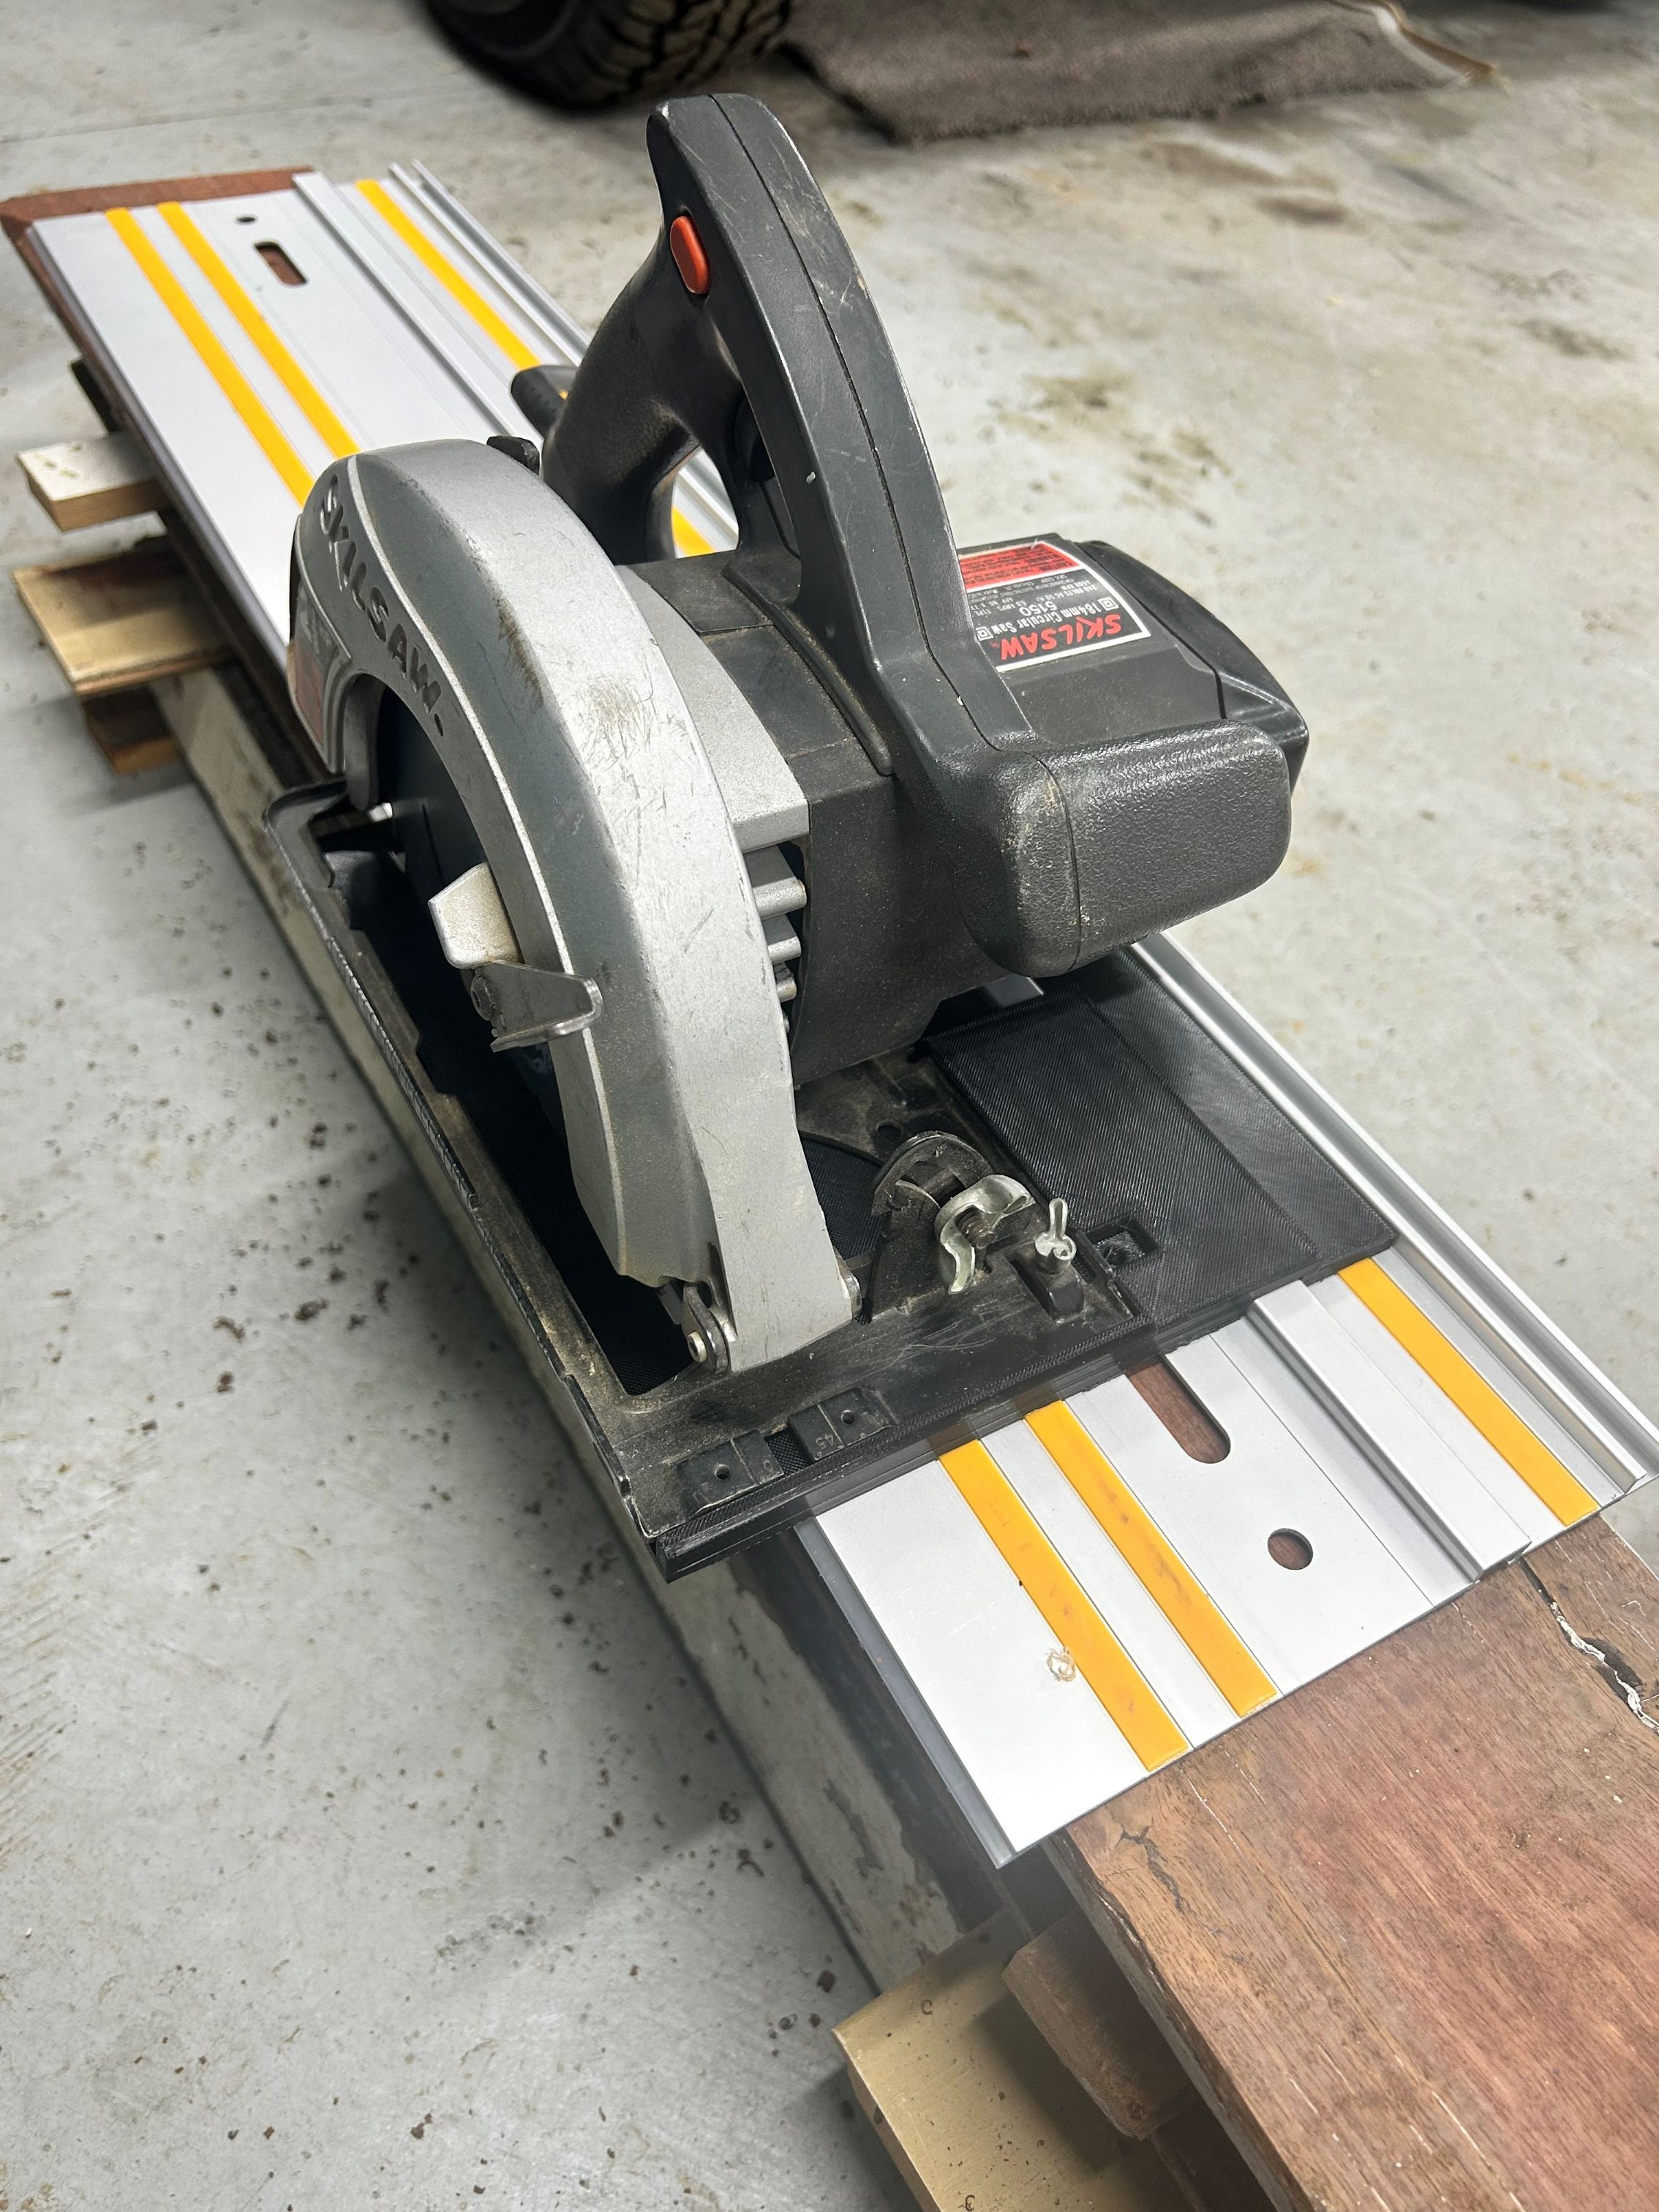
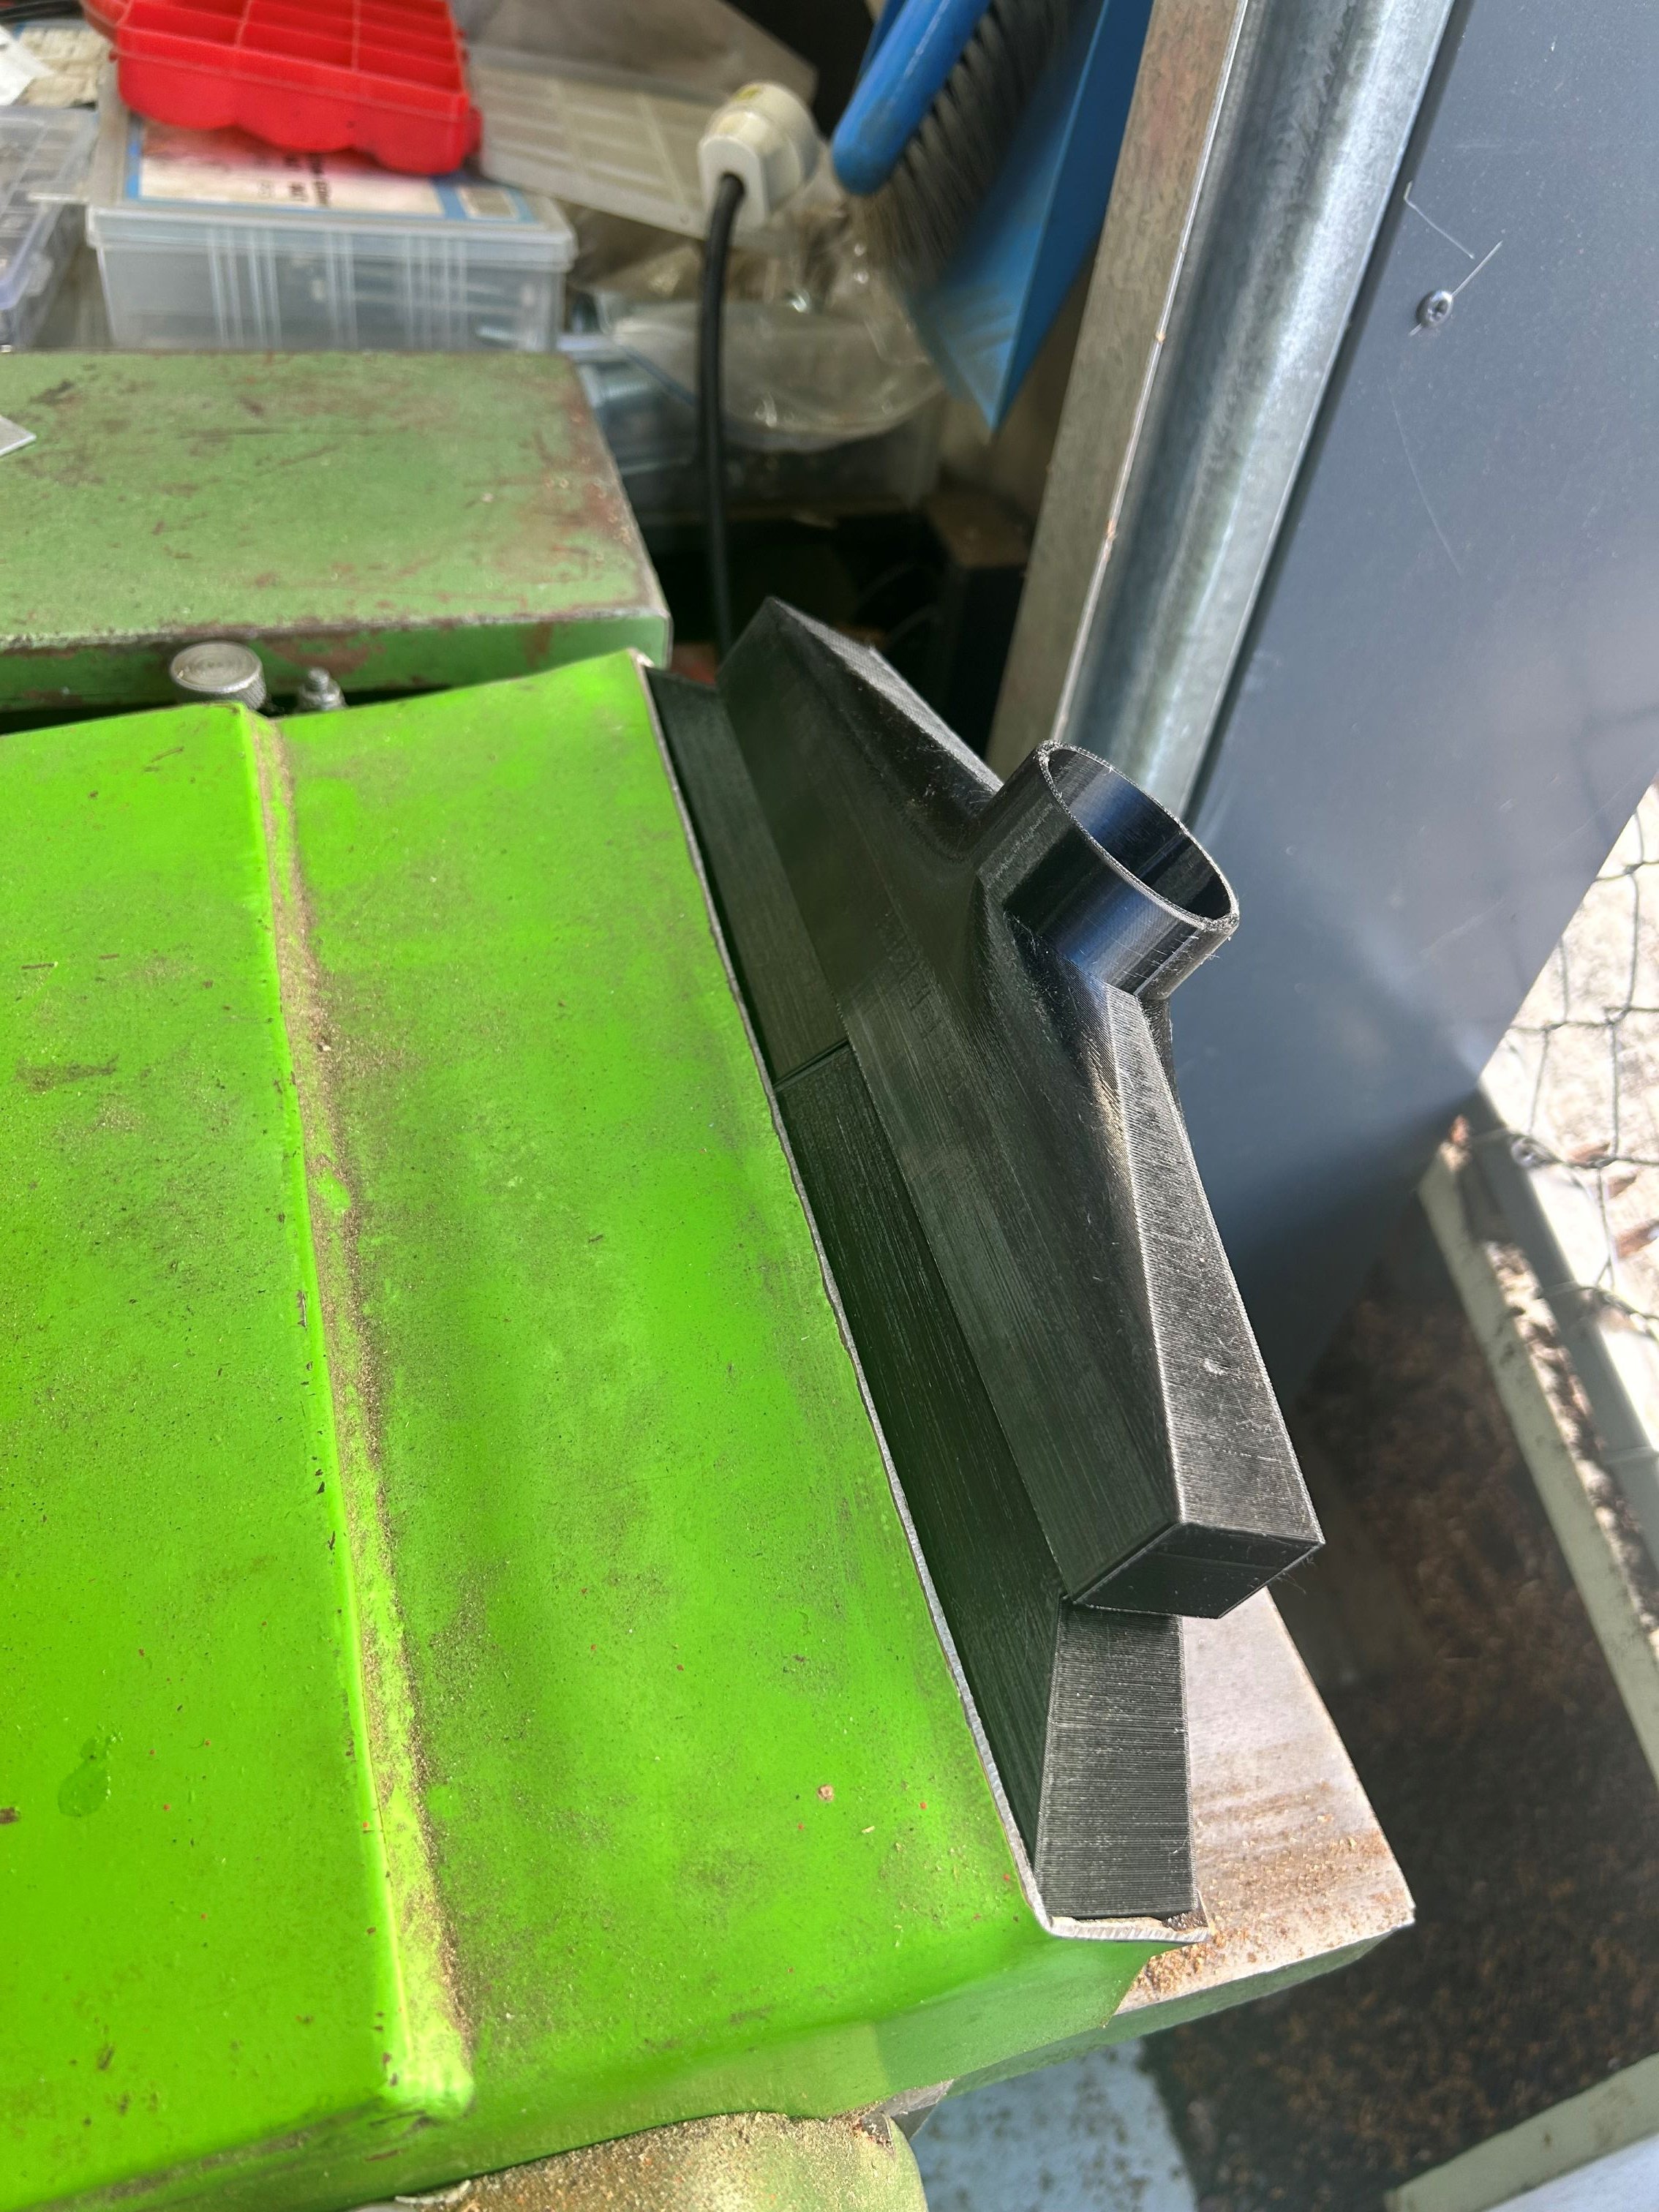
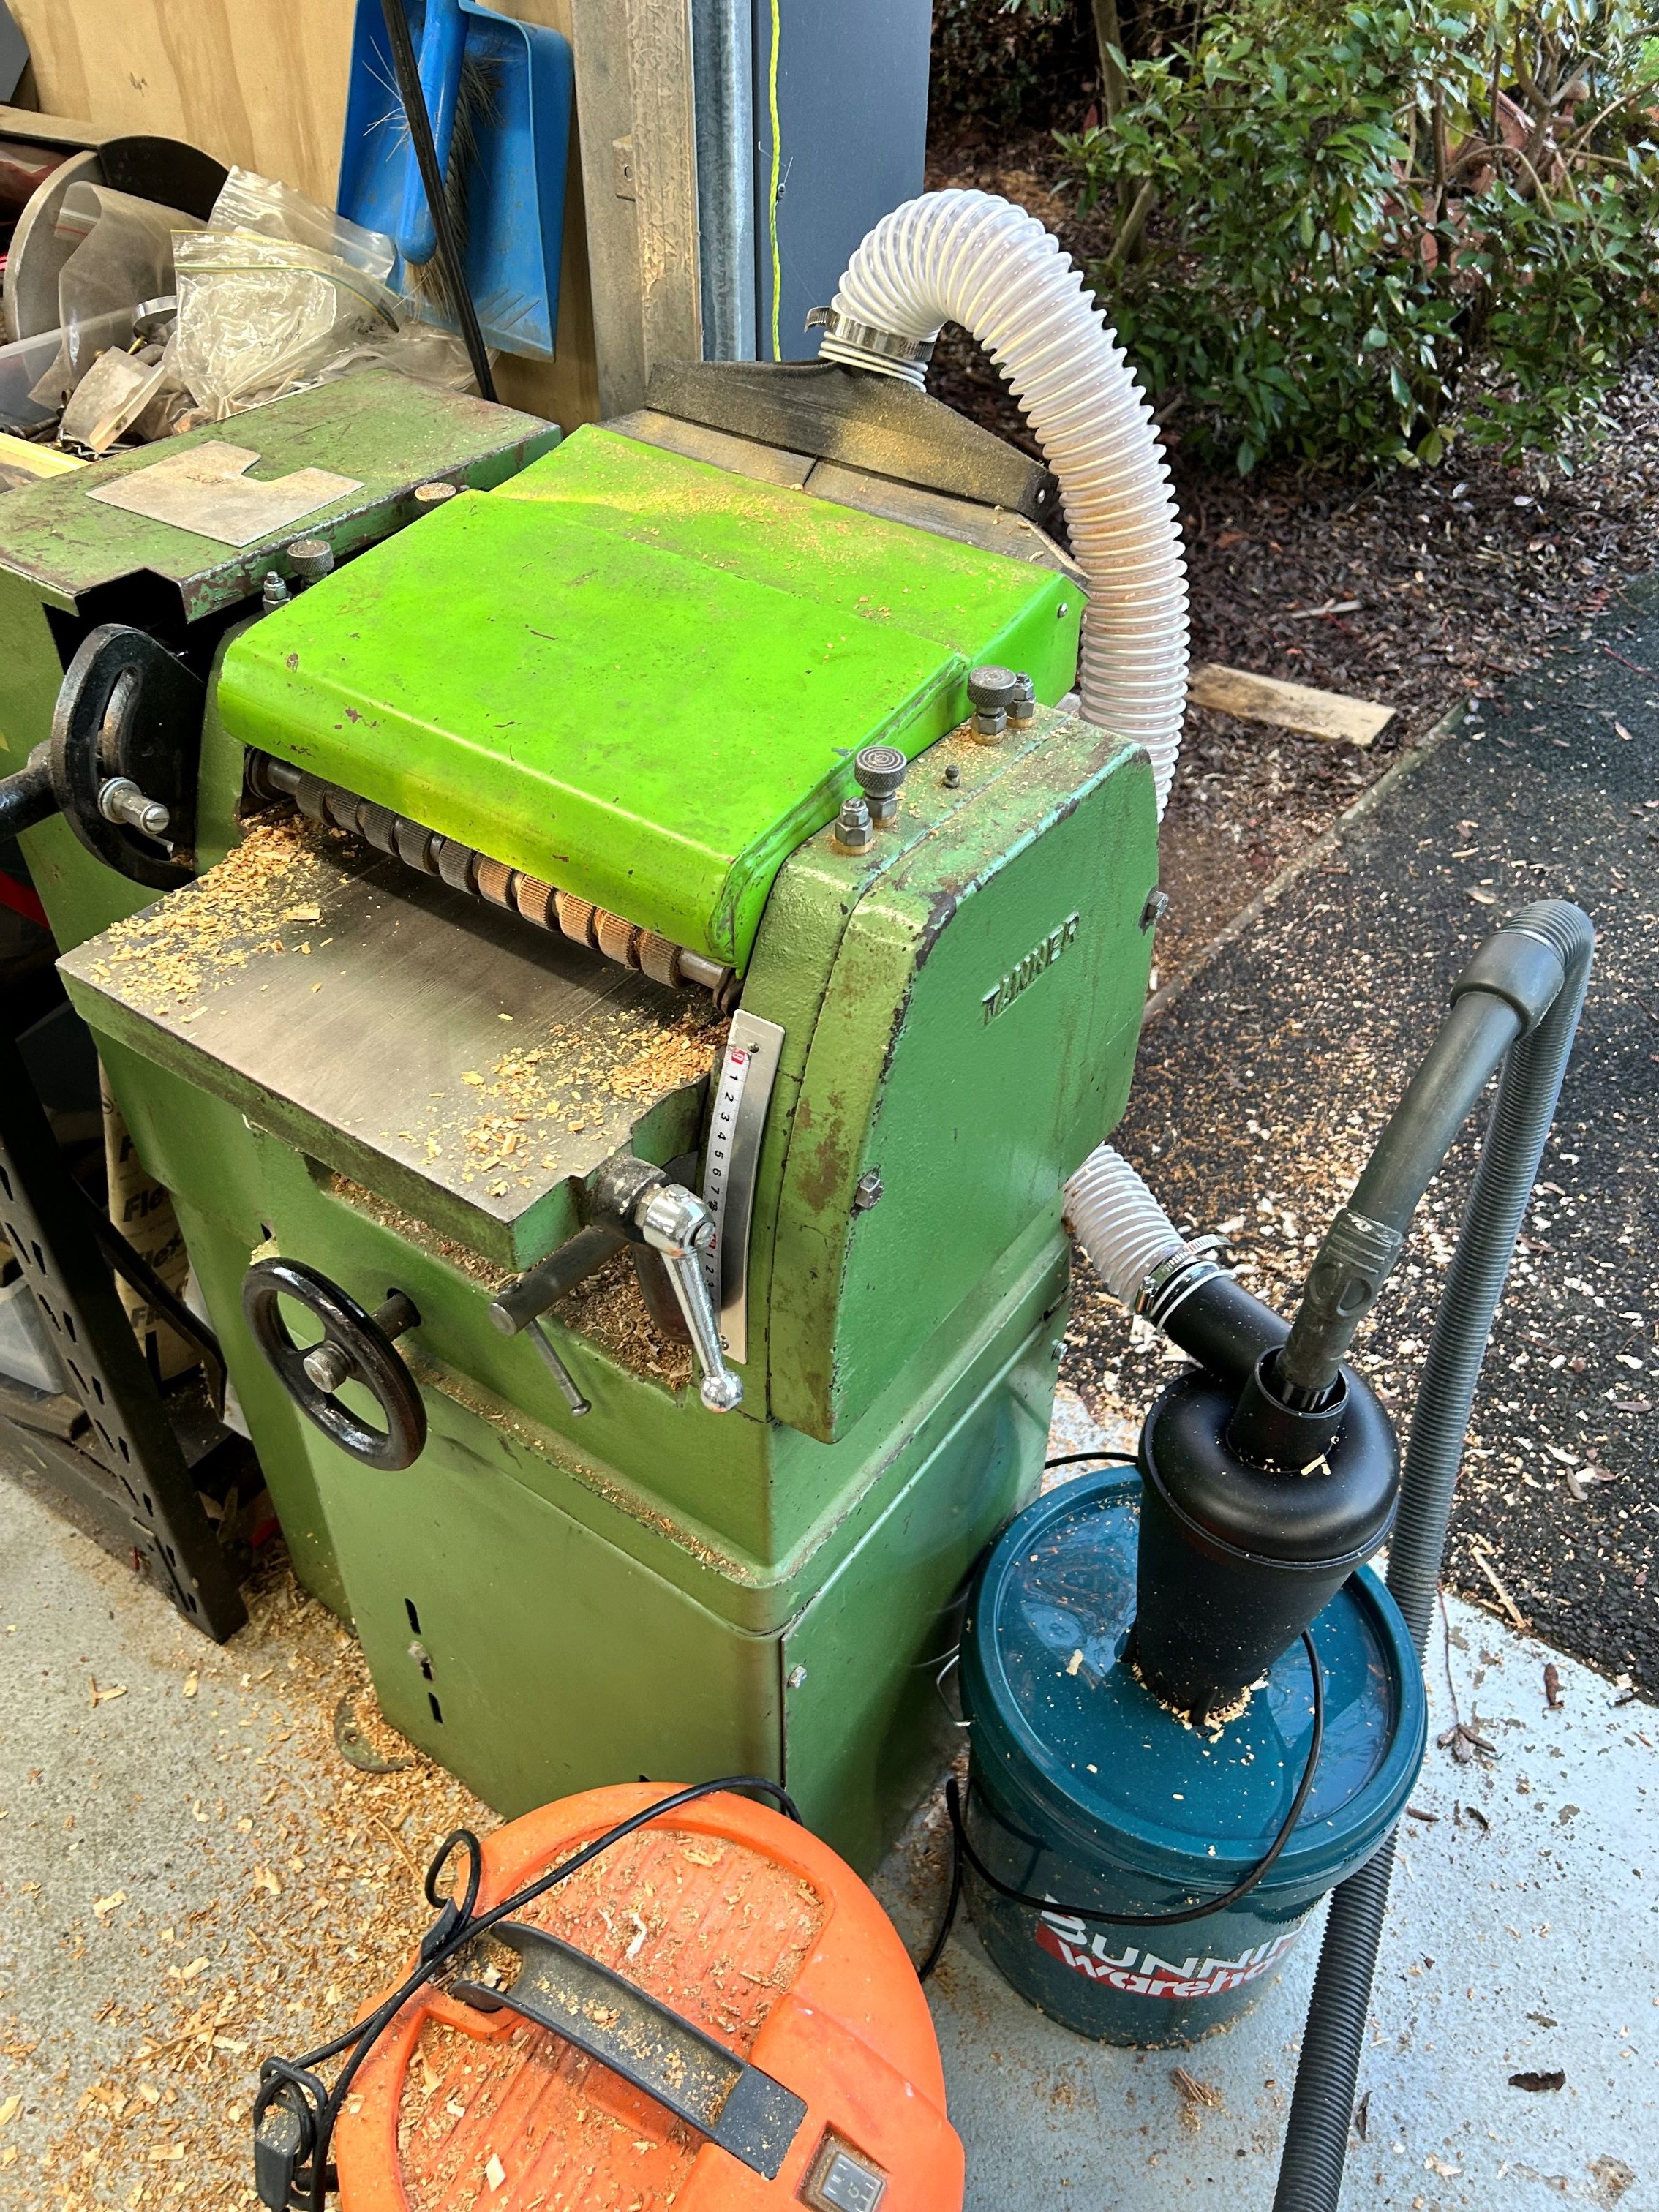
Kinda 3d print thread, but also here. I have decided that I do need a little bit of dust collection on my thickensser as have a project upcoming where I'll be using it alot. I made up a simple 2 piece collector housing to go on the thickesser and printed it out in PETG, found a cheap vortex separator on Temu (though in hindsight I could have printed that too), then a bunnings bucket + hose completed the ensumble. Isnt 100% (but I dont need it to be) and a quick test run has it working fine as long as you're not expecting it too much of it. Beware of the 'dust collection barry' rabbithole which exists on the internet. Continuing the wood tool theme.... I very much like the concept of a track saw (and will be handy to process some beams I have here) but refuse to pay the $$ that is demanded by festool + others considering. Found some alloy extrusions from Temu for ~$40 which come close to the Festool profile and the printed a 'sled' which matches the groove profile + my skilsaw base. Doest have the depth of cut as a retail plunge saw but worth it for the $ I have into the whole affair.
20 points
-
So I made went to check it out, looked it over, started it, drove it back and forth in the driveway and said I would pay asking price. went to pick it up a couple days later and drove out of the driveway went to select 2nd … nope it will not select any other gear while stuck in 1st??? Stopped tried it with engine stopped- no problem except for a bit of play in selectors eventually just drove it to my lockup with 2nd and 3rd gears #pooroldclutch
20 points
-
19 points
-
Yes page 4 I think I'm gonna start battery box next and sort fuel pump mounting etc as I'm over the Jerry rigged starting setup being in my way, it has served its purpose.
19 points
-
Overnight parts from Japan. 5 days from place order to arrive rural delivery. Pretty fuckin good
19 points
-
Windscreen is installed. Thanks to Taranaki Windscreens. Now, FINALLY, I will be able to give it a wash. When it arrived from the states it got pushed straight into the shed, then had no suspension, then no window, now its ready for a bath.
18 points
-
18 points
-
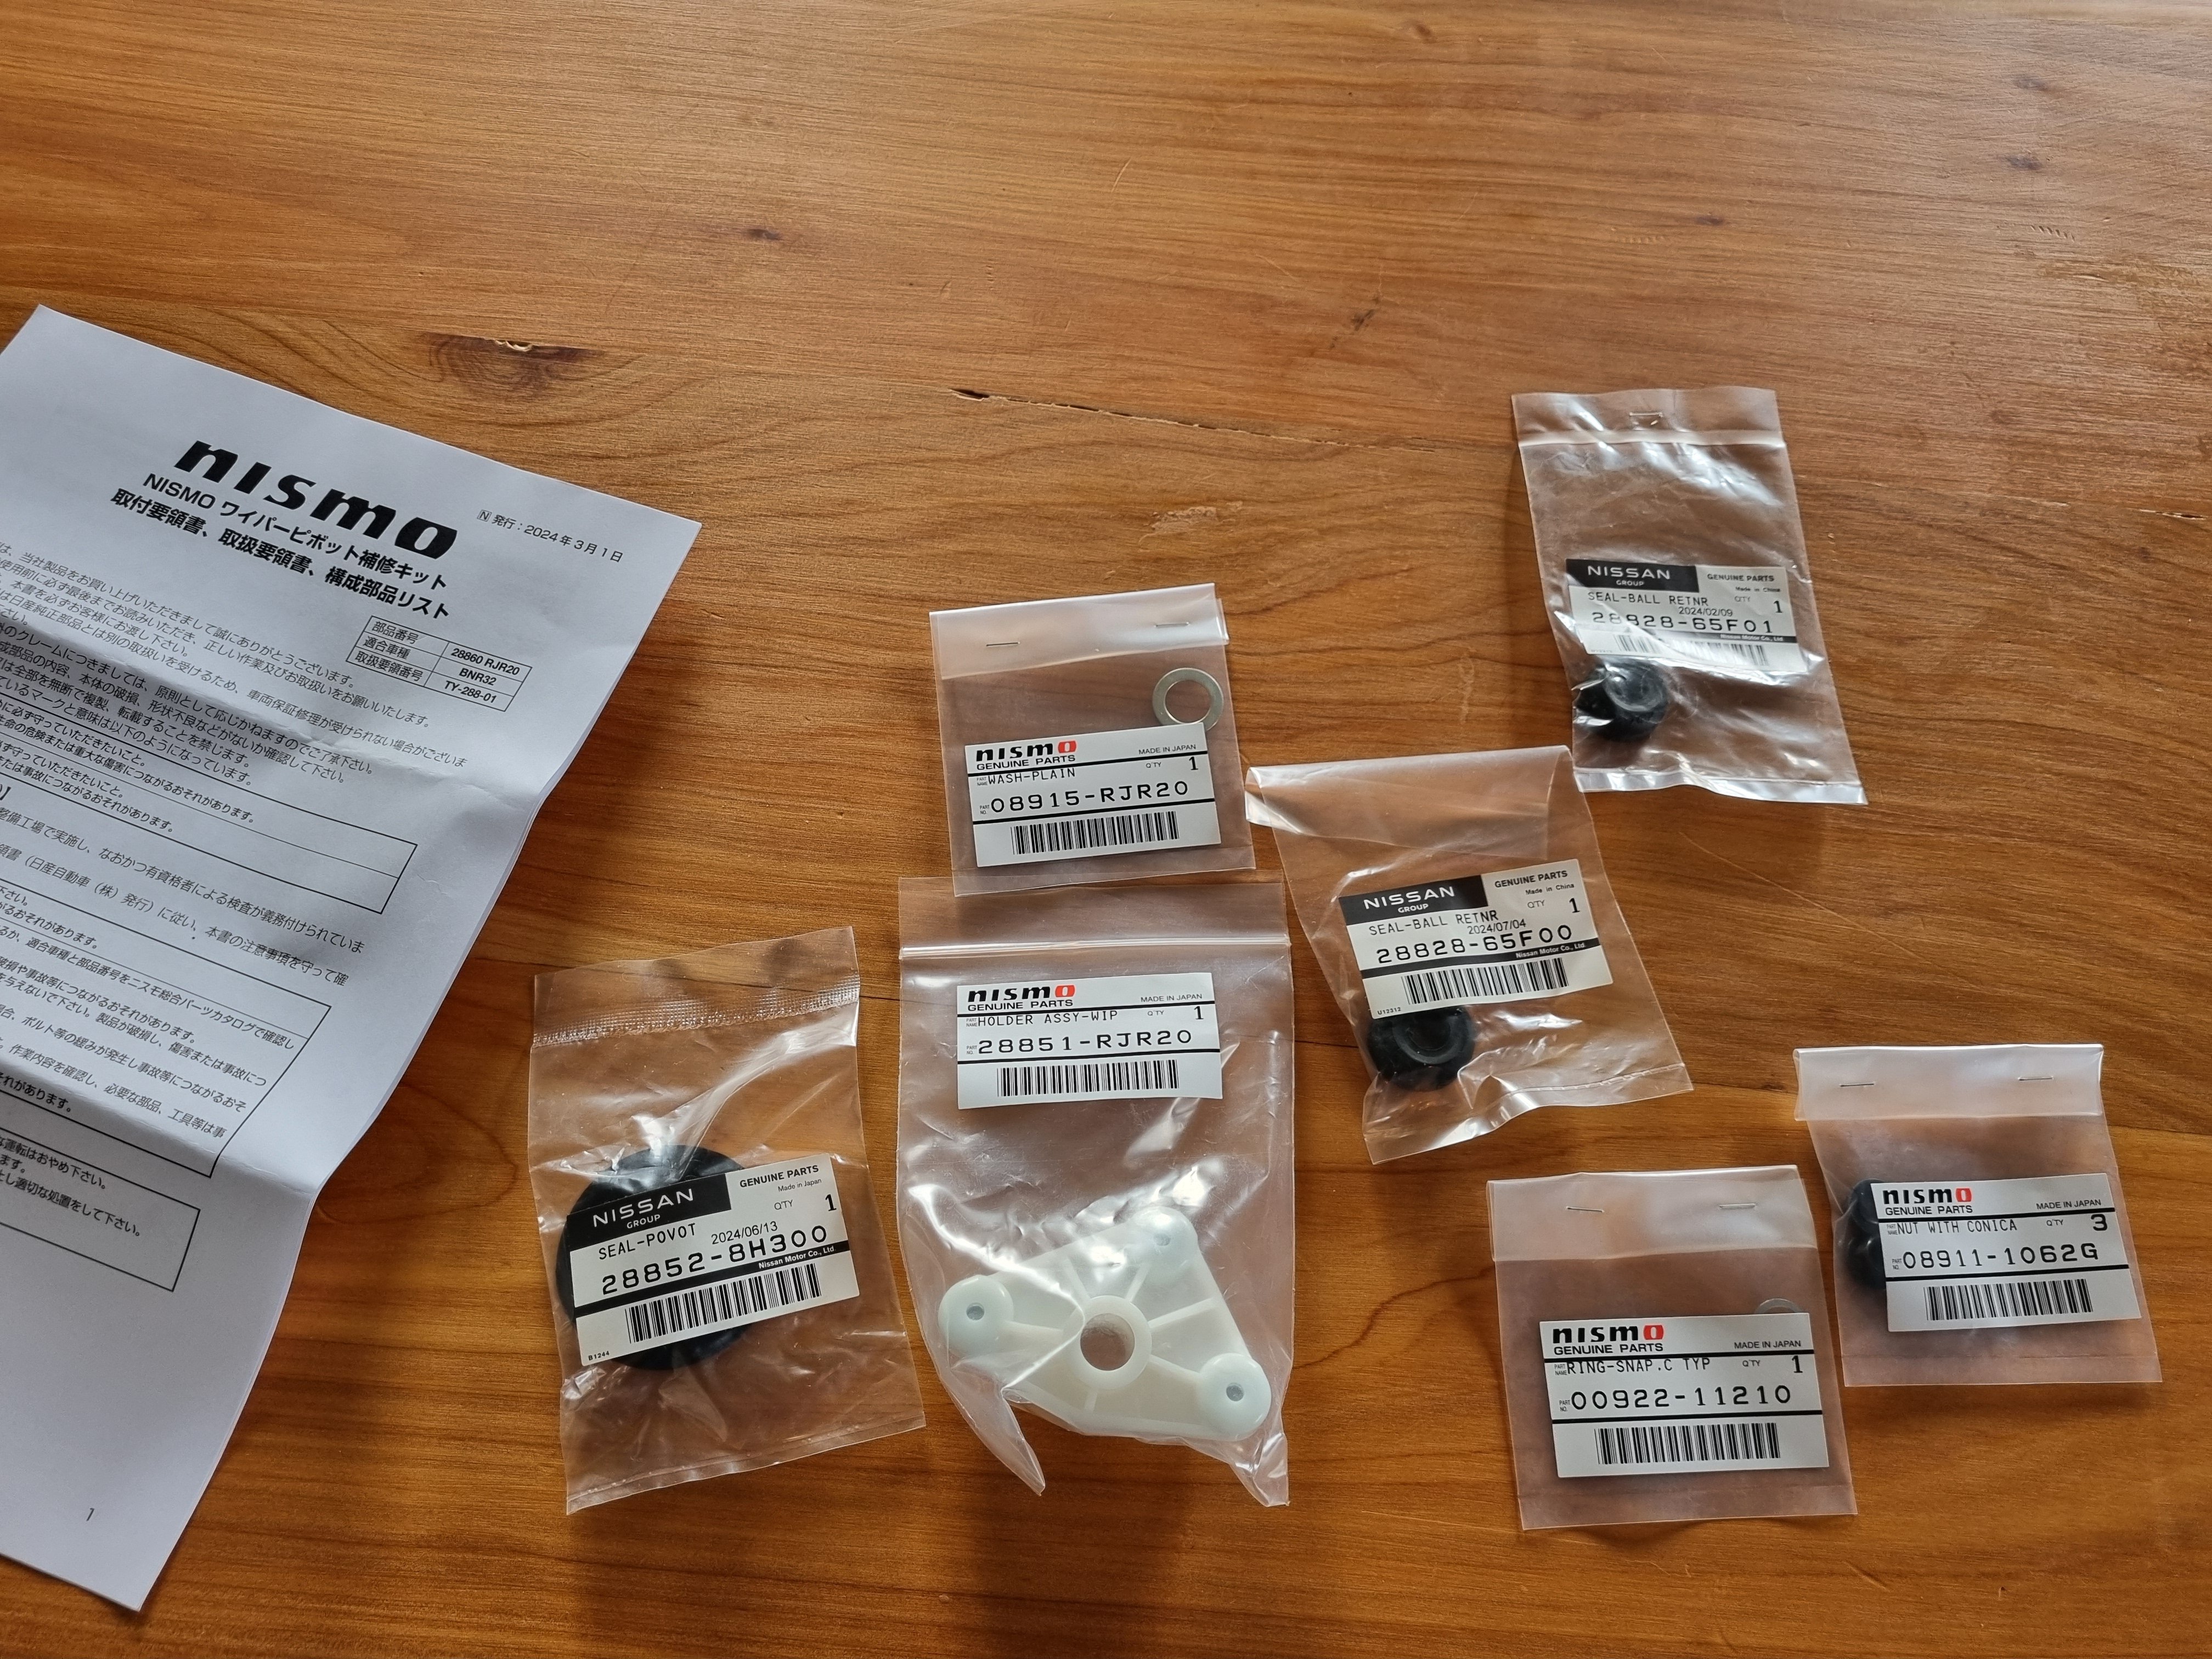
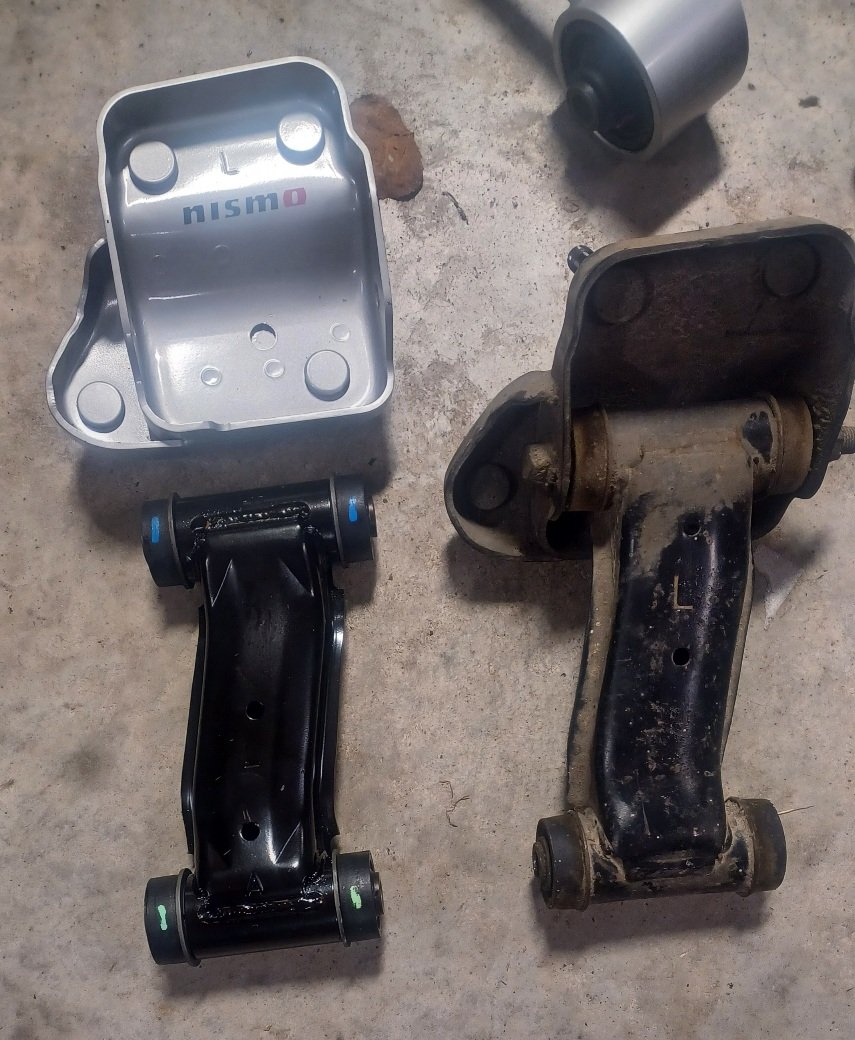
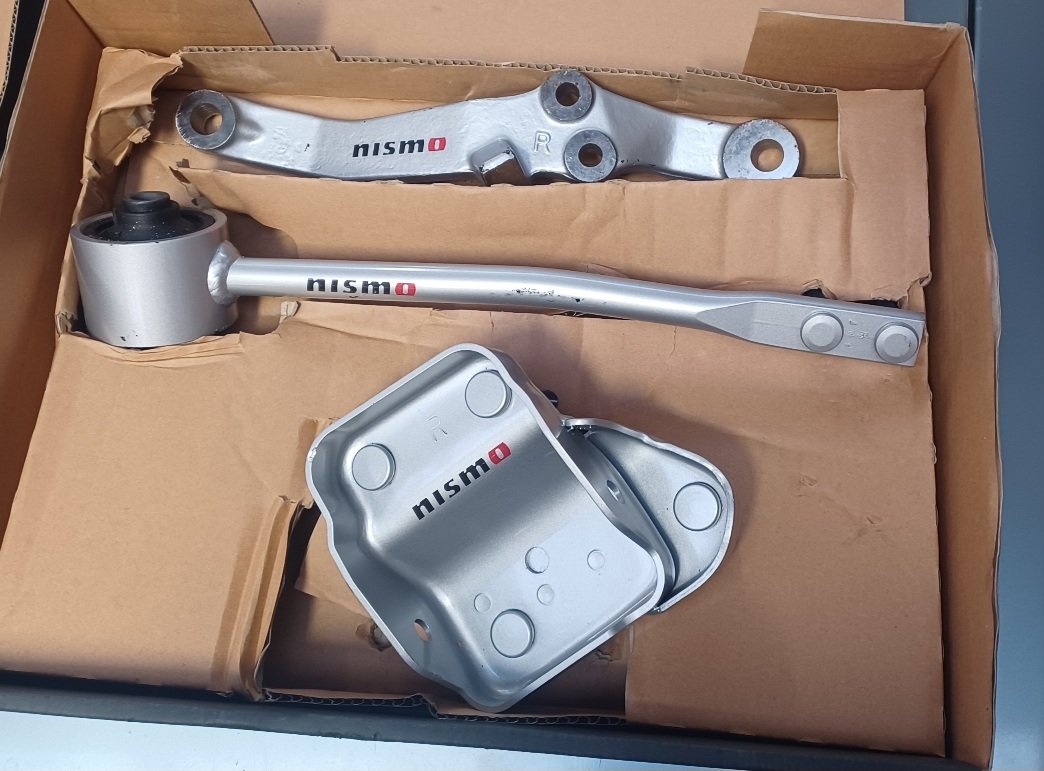
Pretty much all the front bushes and joints were stuffed so I am replacing as many as I can. Many years ago I got a good deal on some upgrade suspension parts. Nismo circuit link upgrade. The caster rod is a bit shorter than standard, the lower arm is 4mm longer for a bit more negative camber. The upper arm mount has the holes drilled slightly differently to try and reduce the misalignment in the arm so the bushes last longer. I also bought new upper arms. All of the ones I have are stuffed and it was similar money for a whole arm as it was for new bushes.
17 points
-
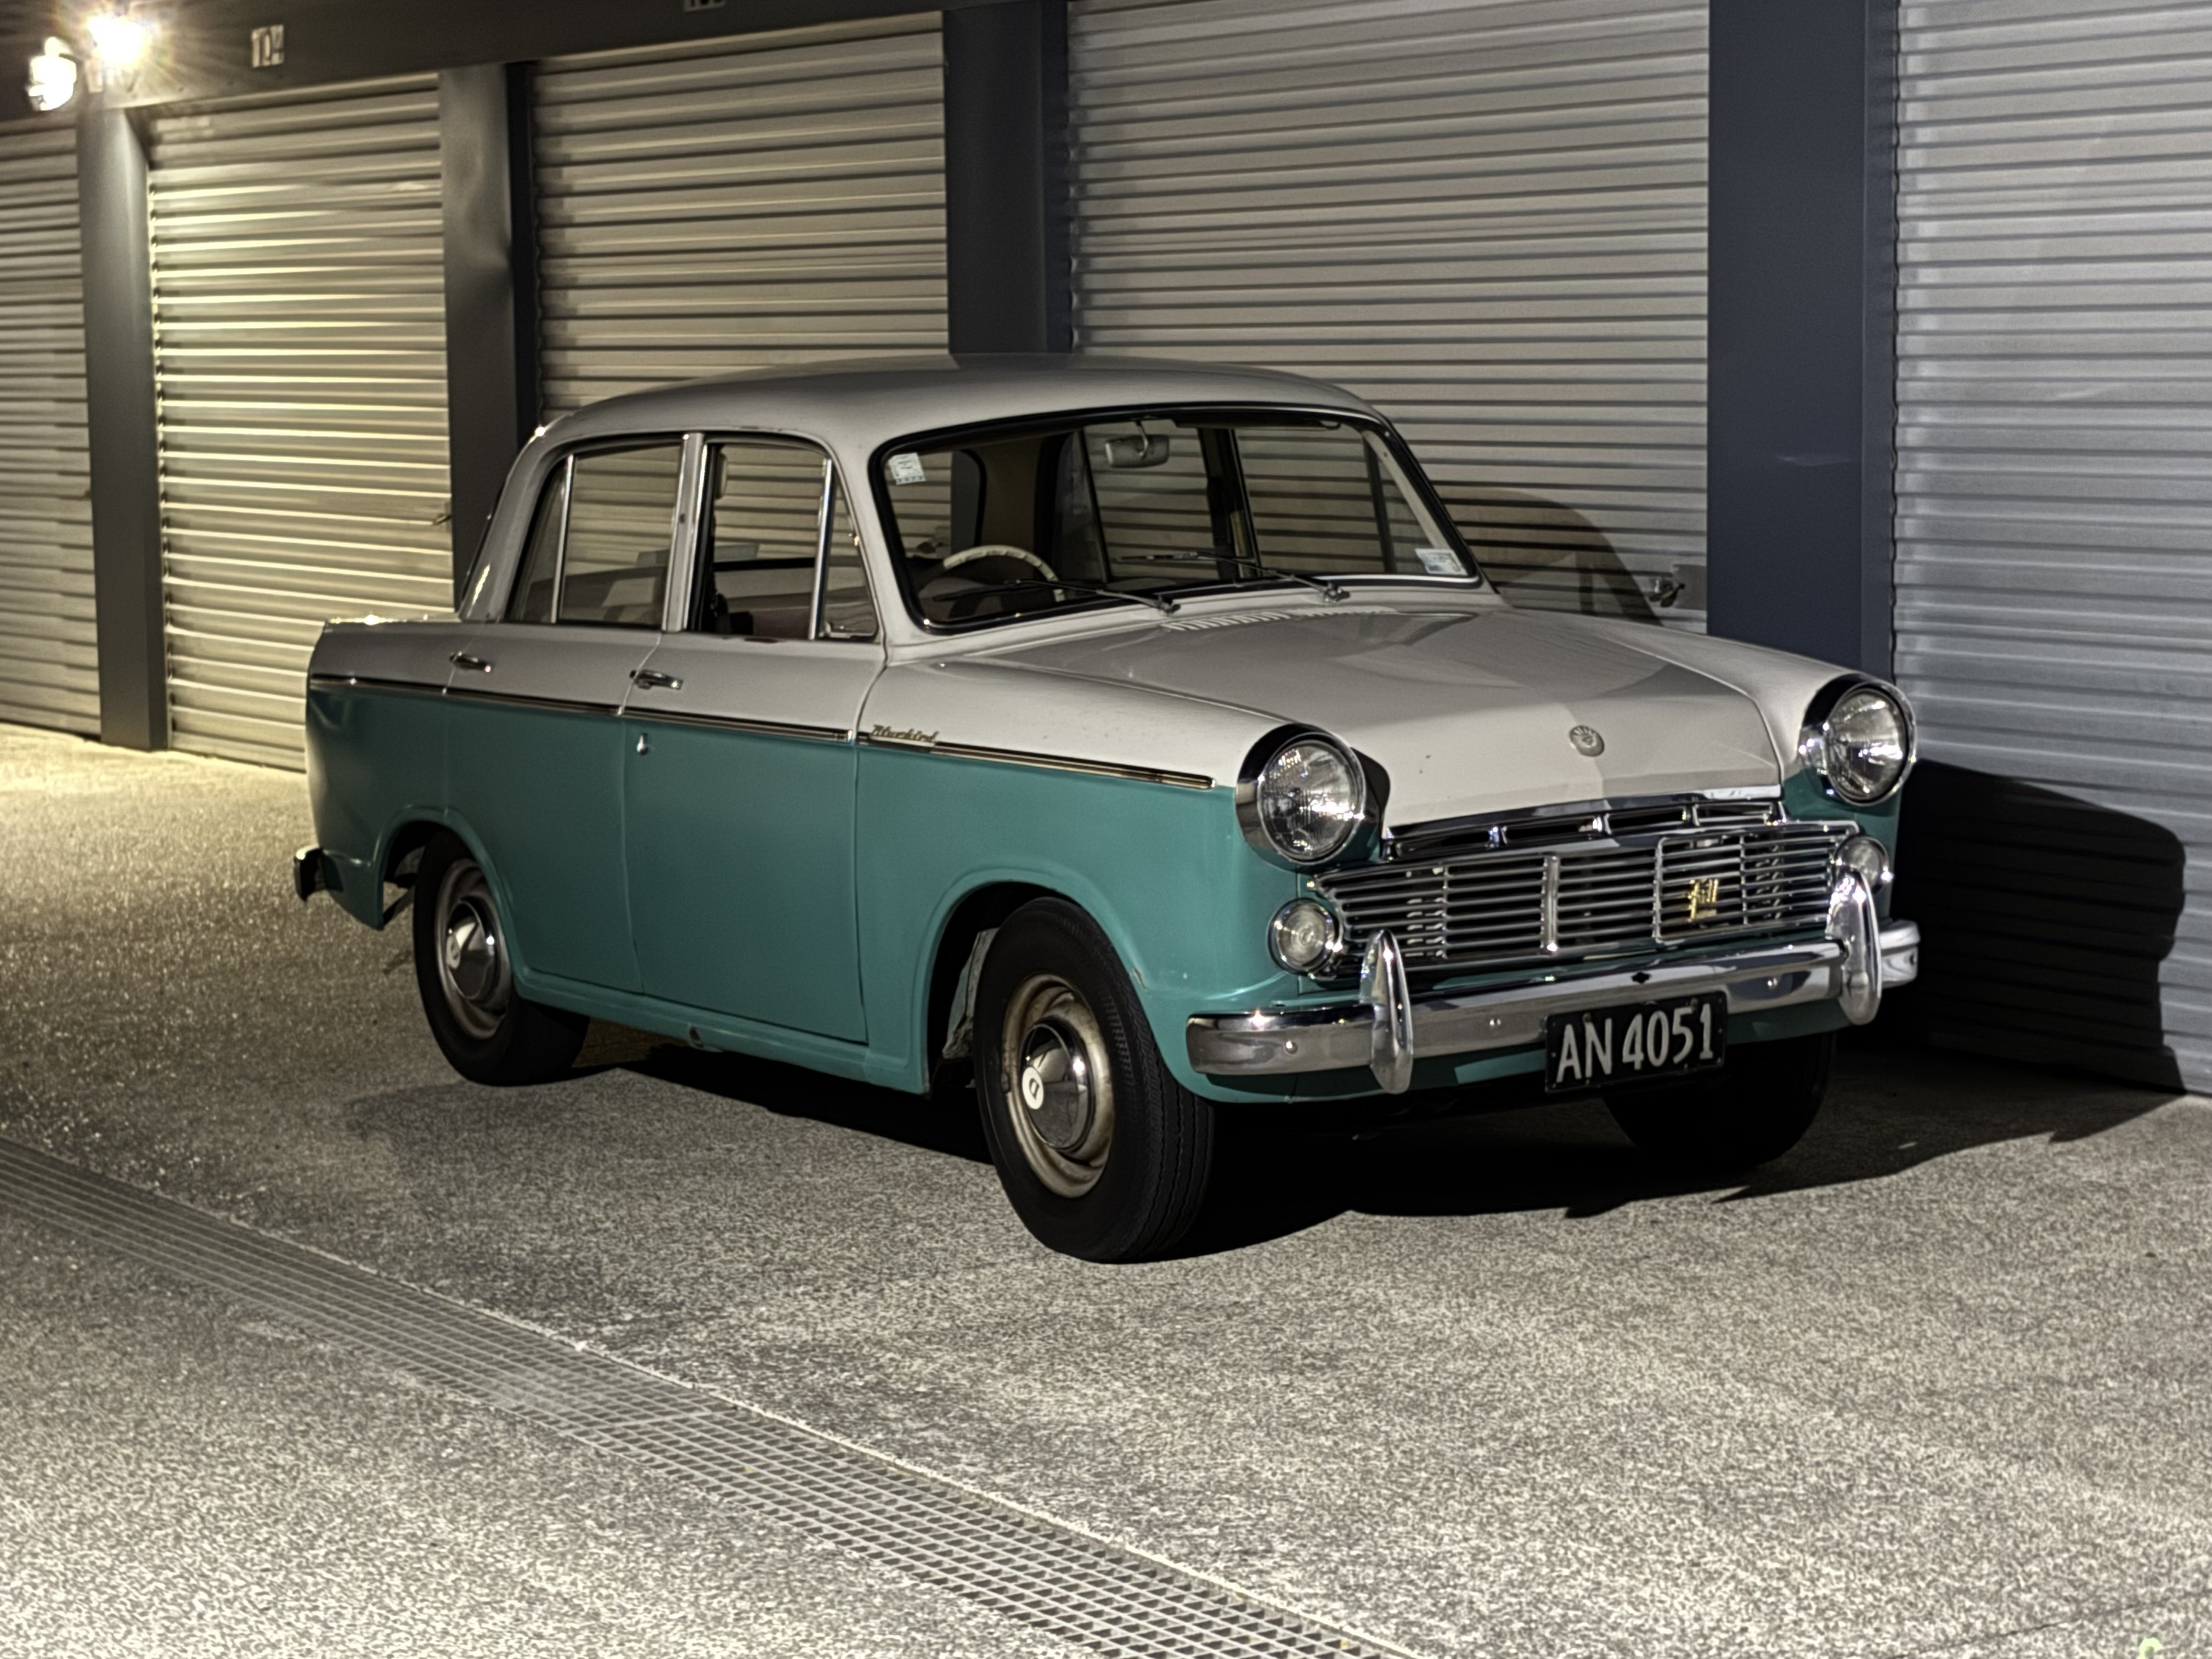
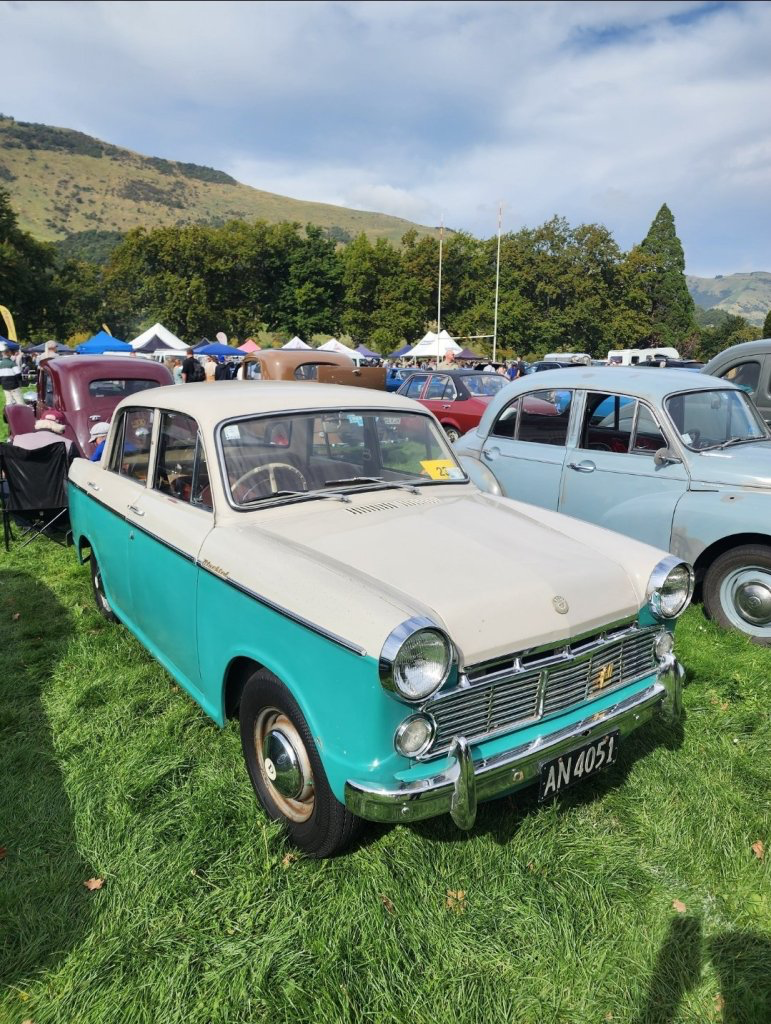
So for the first outing I joined the local VCC for a run out to little river for a school fair/ pumpkin festival was quite the test for the car, it did OK, going up the steep hills in mt pleasant was difficult to keep momentum when doing a 1-2 shift. Also was a test that the cooling system is good as it’s a long way up for a 63yo 1.2L to go but it did it. pic stolen from os spotted..
17 points
-
Maiden drive to the chip shop. The vibration comes and goes. I can feel it in the steering wheel rather than my bum so probably the front end. Booked in for first of many LVV checks next week. Got this from a neighbour:
16 points
-
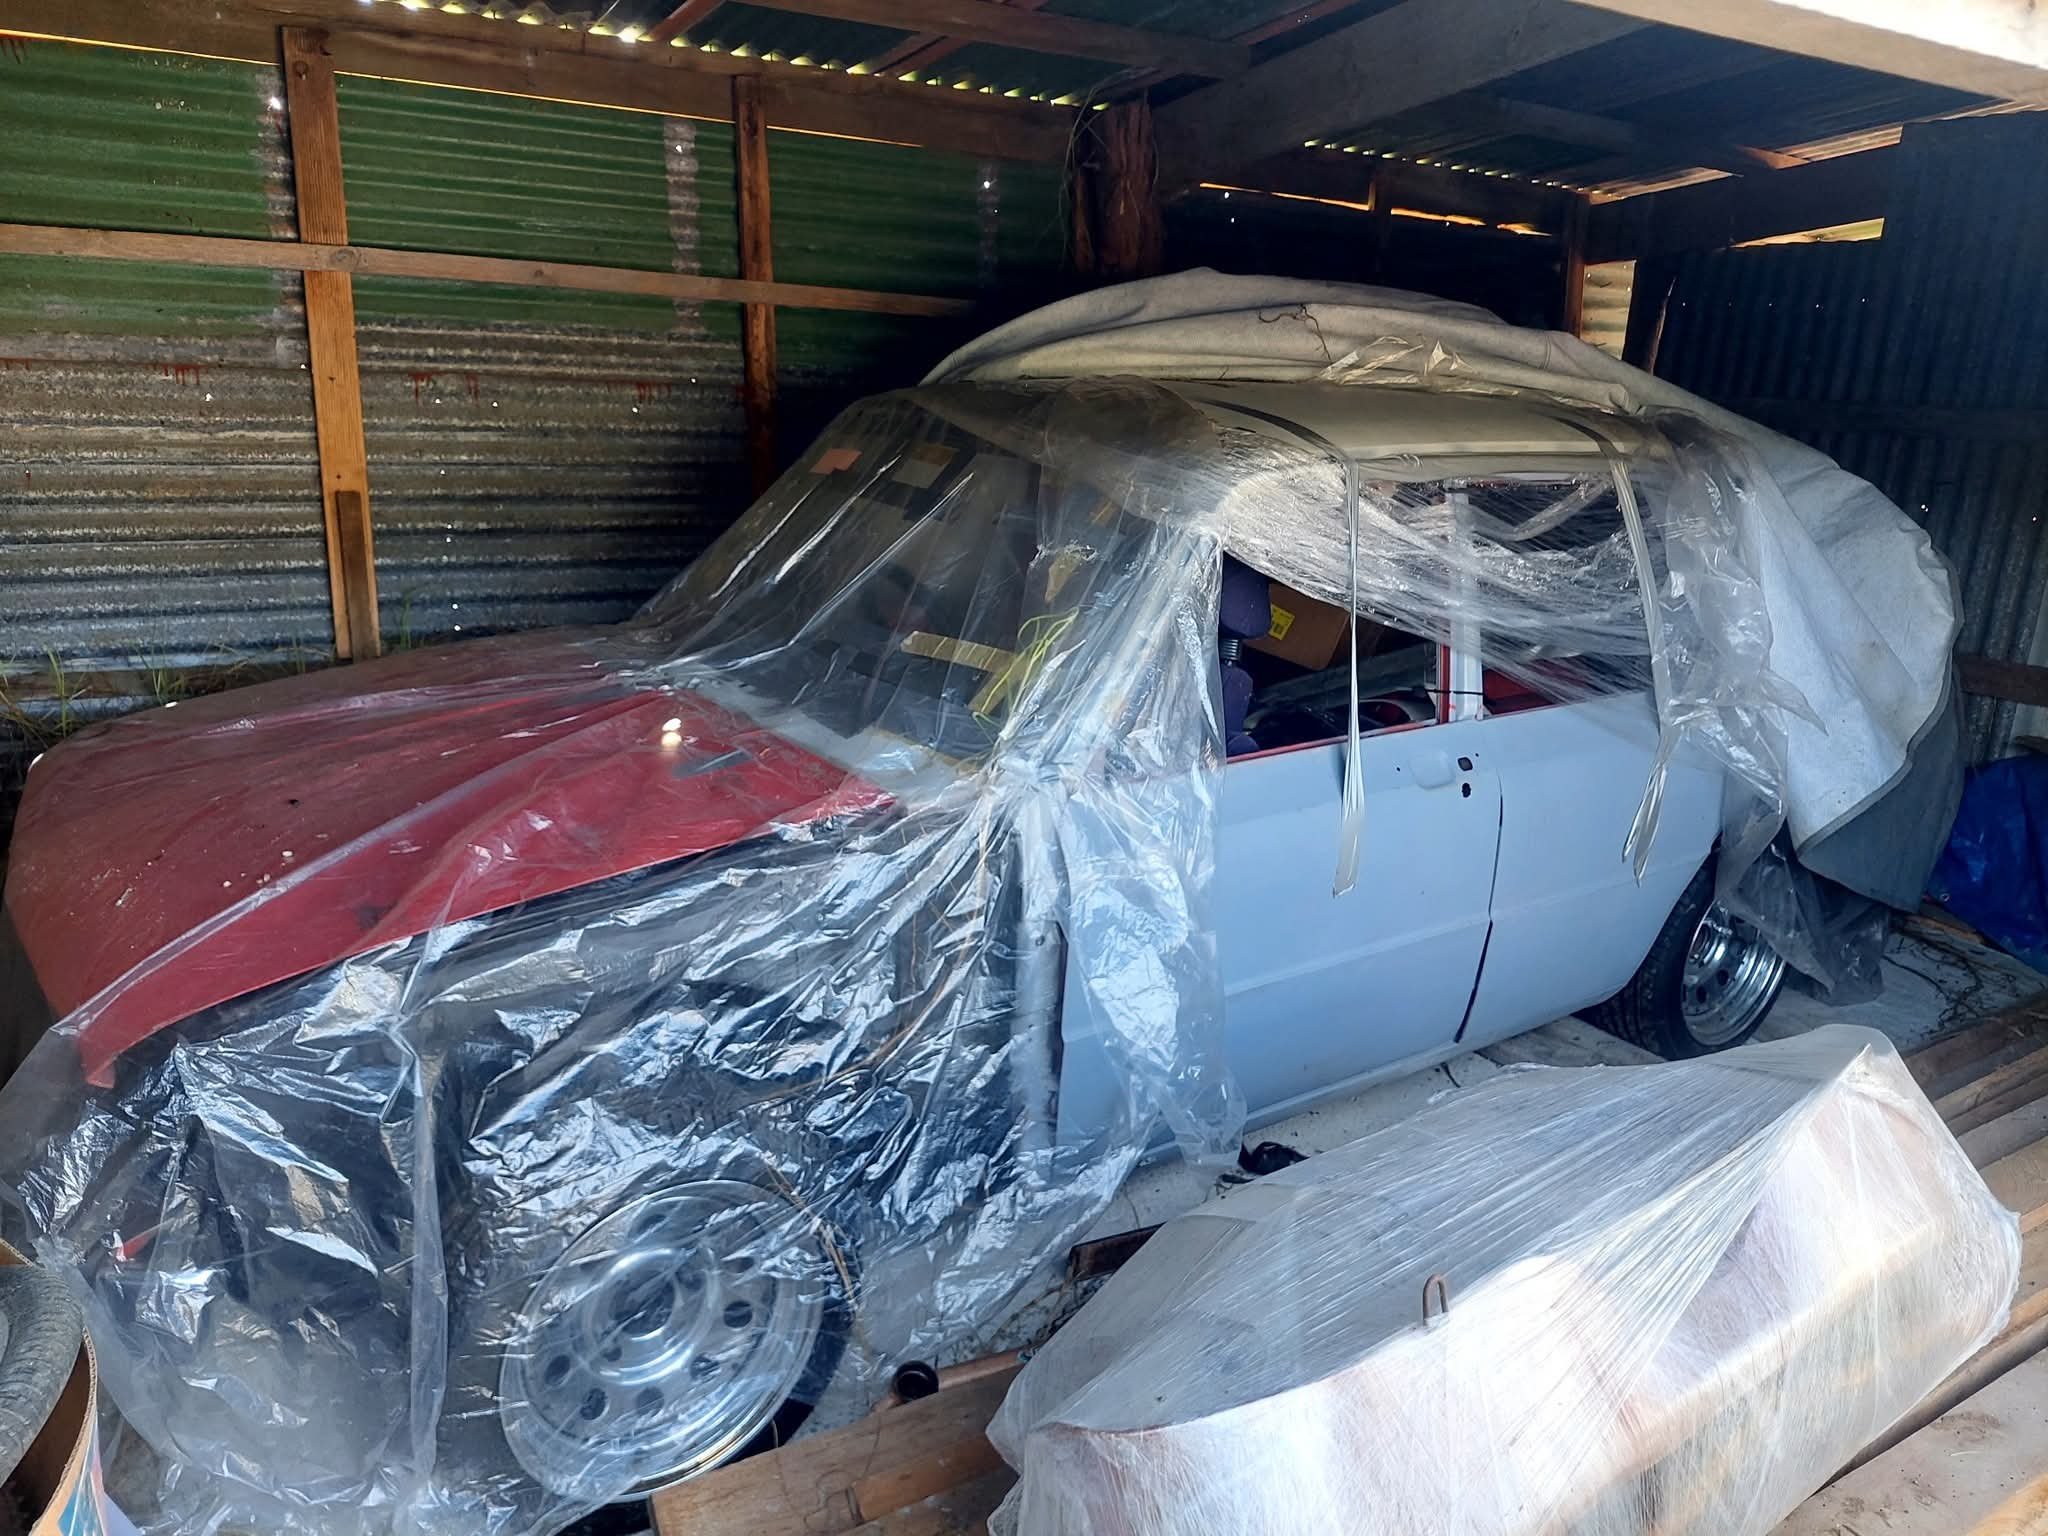
Fake news This still exists, its not full of rat droppings and looks basically how it was left (bar some extra cobwebs). The boy was stoked to check it out. Pretty happy as that the seats haven't been eaten up by rats and the engine still turns over all good by hand. I've just moved back to NZ and now living up close to where it's stored. Slowly getting the new rental setup and shifting all the stuff that I left at mum and dad's over. I'll start sifting through the car parts and bits and pieces soon, then make a plan on the next step with the slow burn build. Stoked the shed hasn't fallen over yet as the posts have all rotted out haha. See how we go anyway. Chur, Tai
16 points
-
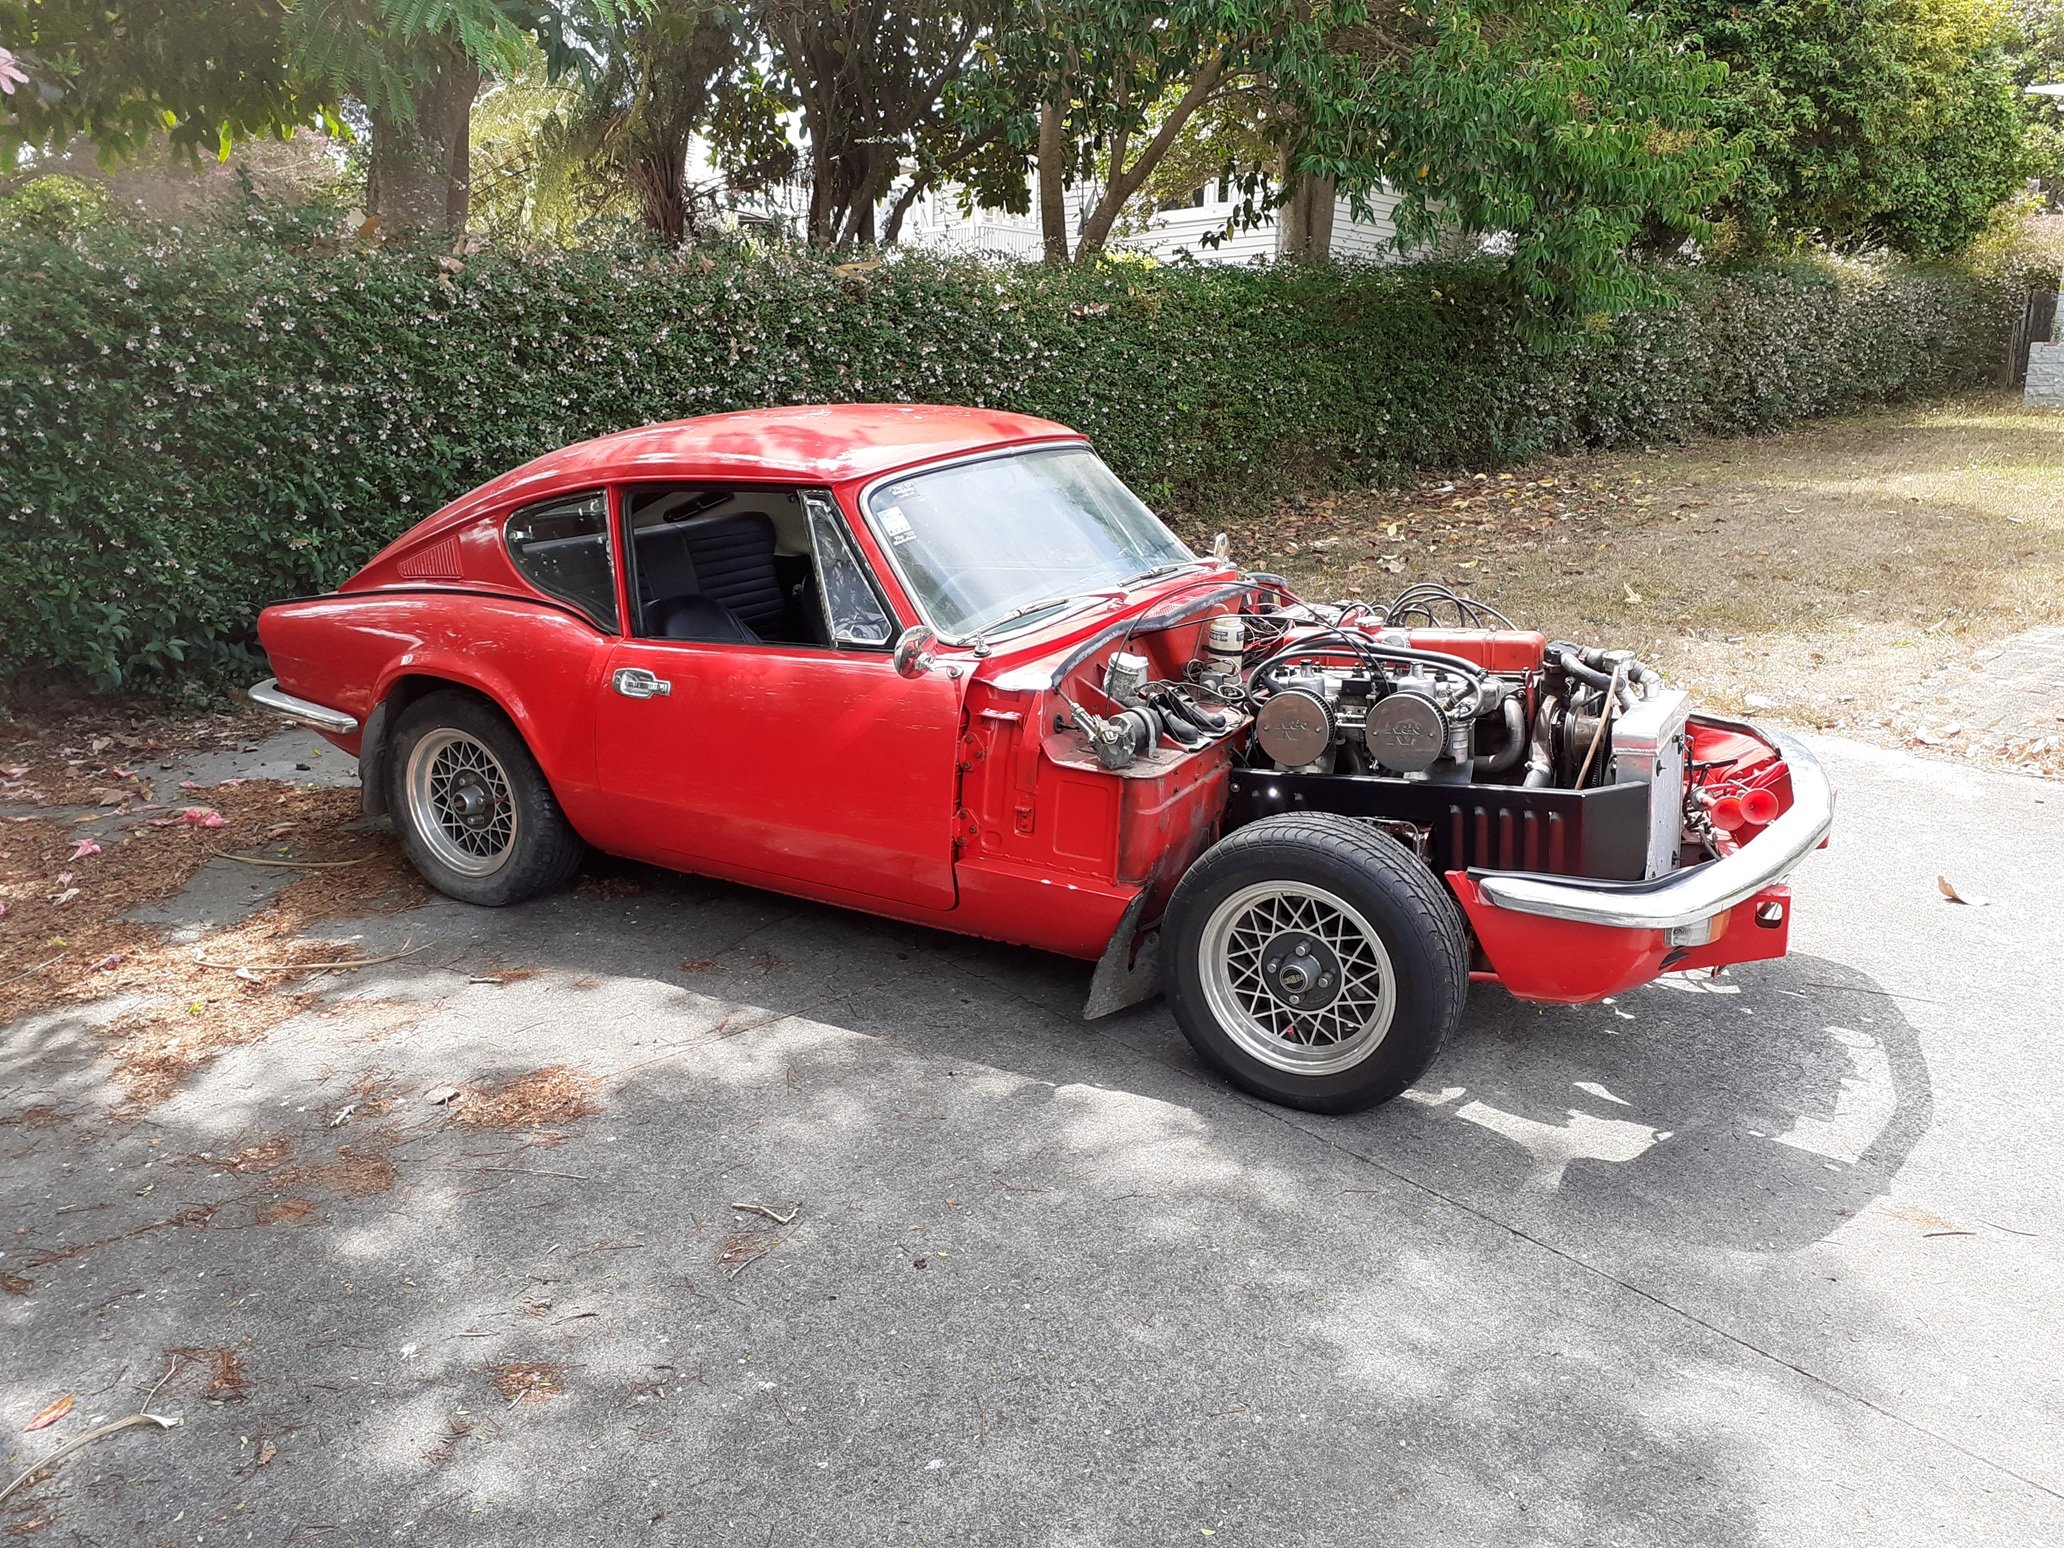
Having satisfied myself that there was nothing inherently wrong with the chassis fitment (as evidenced by others by the fact that's it's quite a common swap), most of the agonising I did was around how the engine would fit up to the body. most little triumph engine swaps end with a throwaway line like "and then I cut a hole in the body/firewall/chassis/made an ugly as hell transmission cover", which is something that I really want to avoid. so much so in fact, that I actually bothered to test-fit the body. so I'm juggling trying to avoid the chassis/bonnet/firewall, while trying to work out if I'm going to place the crank pulley over or behind the steering rack, while also being aware that the mx5 tailshaft is VERY long, putting the shifter farther and farther back, and the propshaft on a more and more marginal angle. But first, body momentarily back on; note the battery plonked back in place as ballast to stop the bastard trying to fall off the back of the hoist the gt6 engine mounts sit at 60 degrees and the mx5 engine mounts sit at 30 degrees. So a gt6 engine mount bracket on it's side becomes a 30 degree bracket and matches up to an mx5 engine pretty good. (did I mention I am impatient, and rough, and lazy) str8 in m8 no fukin worries
16 points
-
the engine plonks on and sits between the strut towers pretty good. the stock engine mounts are no good as they cater to two nonexistent cylinders. This pic has the engine rotated a little too far, it needs to be pretty flat to clear the bonnet as of the mounting plan at this time of writing the mx5 gearbox has some major alloy hanging off the side that needs to be dealt with as it fouls the frame. as far as I know any early rx7 tail housing will bolt on but I value money more than time at the moment so I just laid into it with a grinder and buzzed it all off. otherwise the clutch slave seems to clear OK and aside from a wee bracket on the other side, there are no clearance issues with the chassis that I can see With the initial "I just want to drop the engine on it and take a photo" frivolity out of the way I stripped everything off the chassis and carefully documented everything into piles of bits on the ground and piles of bits on various tables. I misplaced all my tools but some of the other guys were away so I borrowed theirs and misplaced them too. The chassis has a few cracks and the outboard ends of the outriggers are torn, the hoist might've got them on the way up, although they didn't appear to have any cushions installed between them and the body so they might've already been pulled up hard against the underside and distorted. was hoping to get it off to the sandblasters this week but they're busy, so I had no choice but to continue fiddling around with it
16 points
-
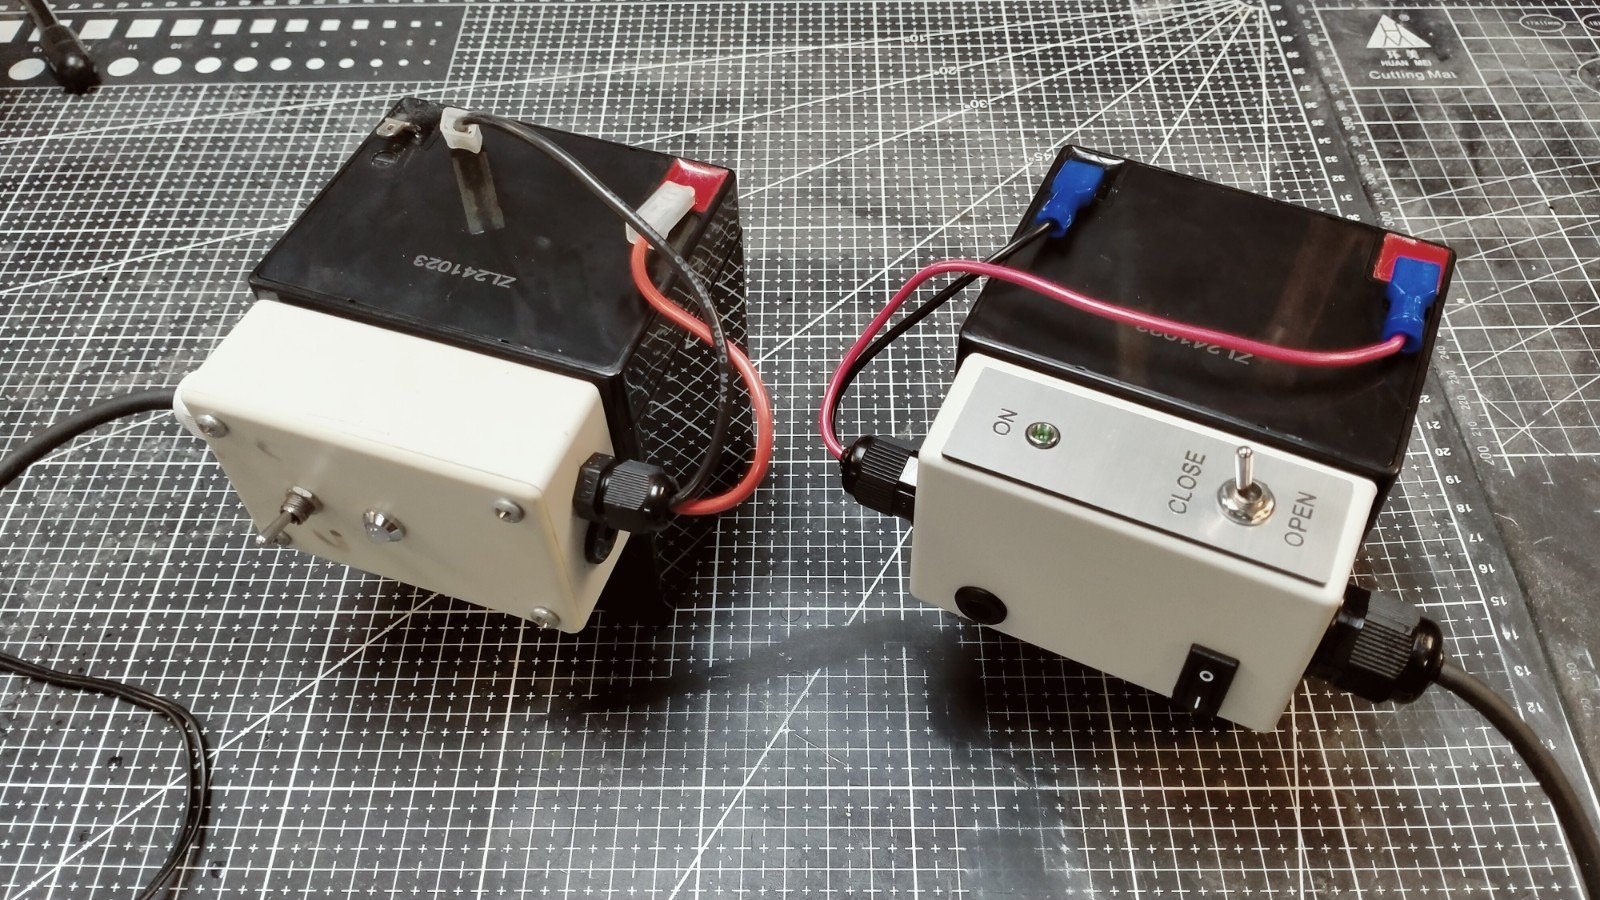
Built this little switch box this week at work, nice little project. Customer supplied the old on on the left, needed a new battery, it just opens a electric ball valve for testing. We needed another so I got some parts from jaycar. Who ever built the old one didn't include a power switch so you would have to unhook the battery every time you were finished and the wiring was a mess, half through the lid and half through the box, no heat shrink etc. also made a nice label on the laser, very satisfying.
16 points


This leaderboard is set to Auckland/GMT+12:00