Roman
-
Posts
7,218 -
Joined
-
Last visited
-
Days Won
39
1 Follower

Roman's Achievements
Committed (5/5)
30.5k
Reputation
-
It's going to look amazing once that radiator shroud is powdercoated! Annoying to have to cut the airbox again but at least its on the underside.
-
So funny story about those, I was talking with Nathan about them about a year or so ago. He said something like "What? Nah no way you bought one, they stopped manufacturing CRTs in 1996 or something like that" and I said "Well, I bought one brand new, so you must be wrong" Then it had a QC sticker on it from 1996. (or whenever) Haha. There's an arduino library to interface with them, seems like a simple single wire output and you can do some cool stuff. However one of my cats knocked mine off the desk and it chipped the housing so never got around to having a go with it. I think VFDs are probably the coolest looking retro screen type. But quite expensive & usually small
-
I have one of those already haha
-
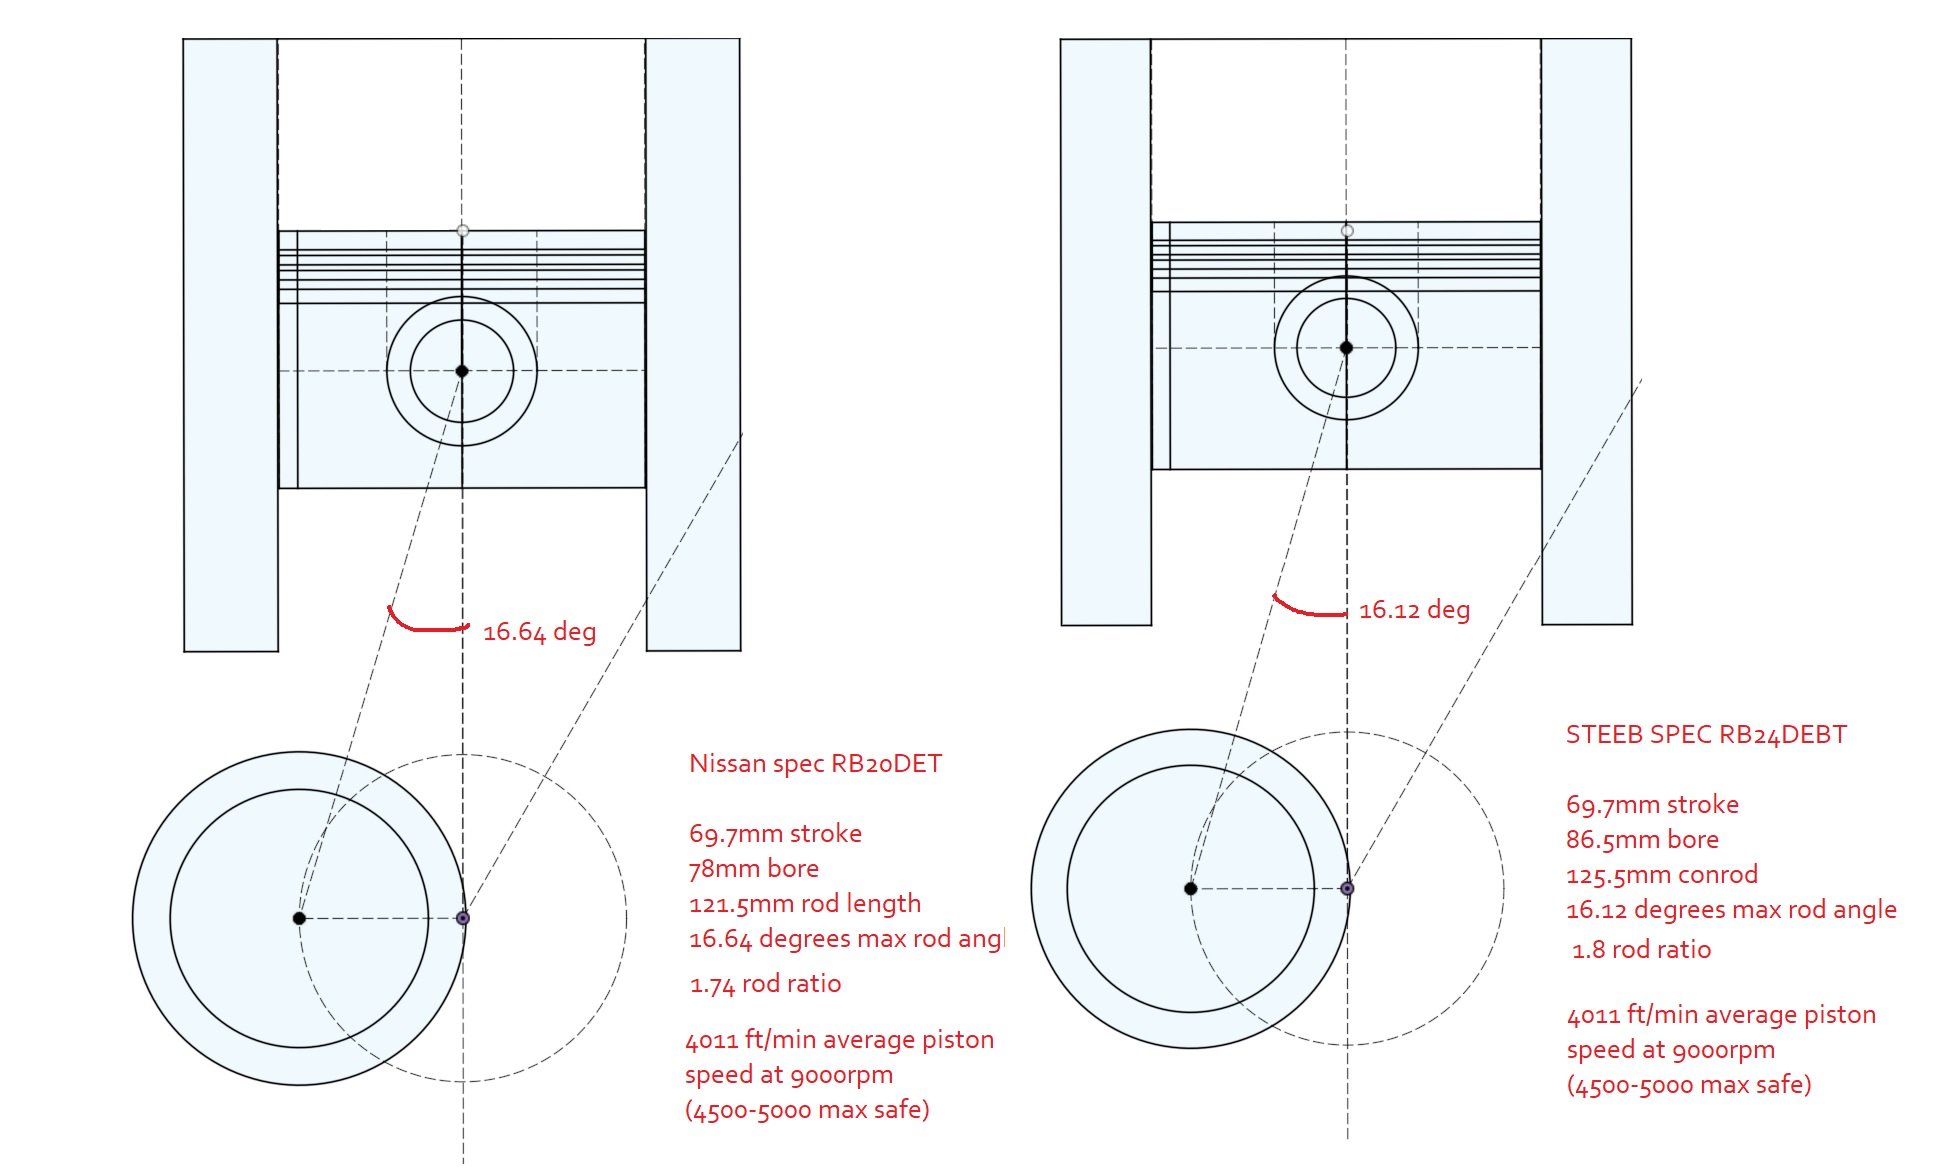
[scope creep trigger warning] Have you considered going full retard, and using an RB30 block? Assuming the 30 block is taller "up" by the extra stroke length. You would need a 9.65mm longer rod over standard RB20, if you use the 28mm compression height pistons. End up with a 1.88 rod ratio instead of 1.8 I made this little script type thing in Fusion360 that will generate engine geometry when you type in all of the appropriate variables. I put in some numbers for a standard RB20 and a Steeb spec motor to see how some things like rod angle look before and after. Then seasoned to taste with mspaint

-
Pretty sure its staying turbo. And can confirm that ITB with 6 cyl is nightmarish, although more so on a v6. Love your work Steeb! Be interesting to see how this goes. I guess the crux of projects like this or mine. Are that even if things are mechanically decent for lots of rpm, still need head/cams/etc that can flow decently. As that American guy found out. Maybe not such an issue with turbo though.
-
Hey come on, no one needs that sort of pressure
-
-
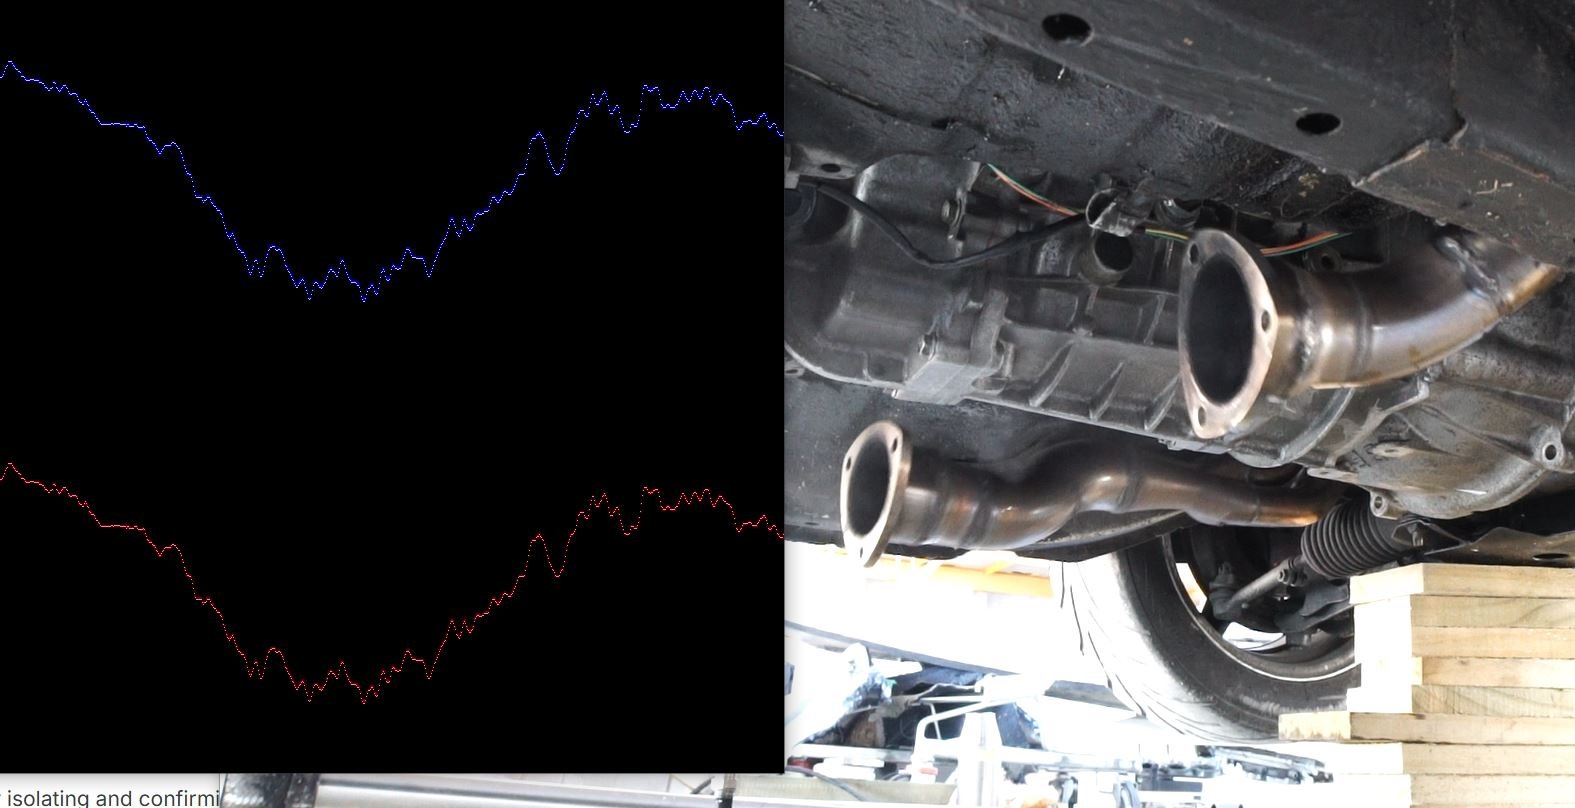
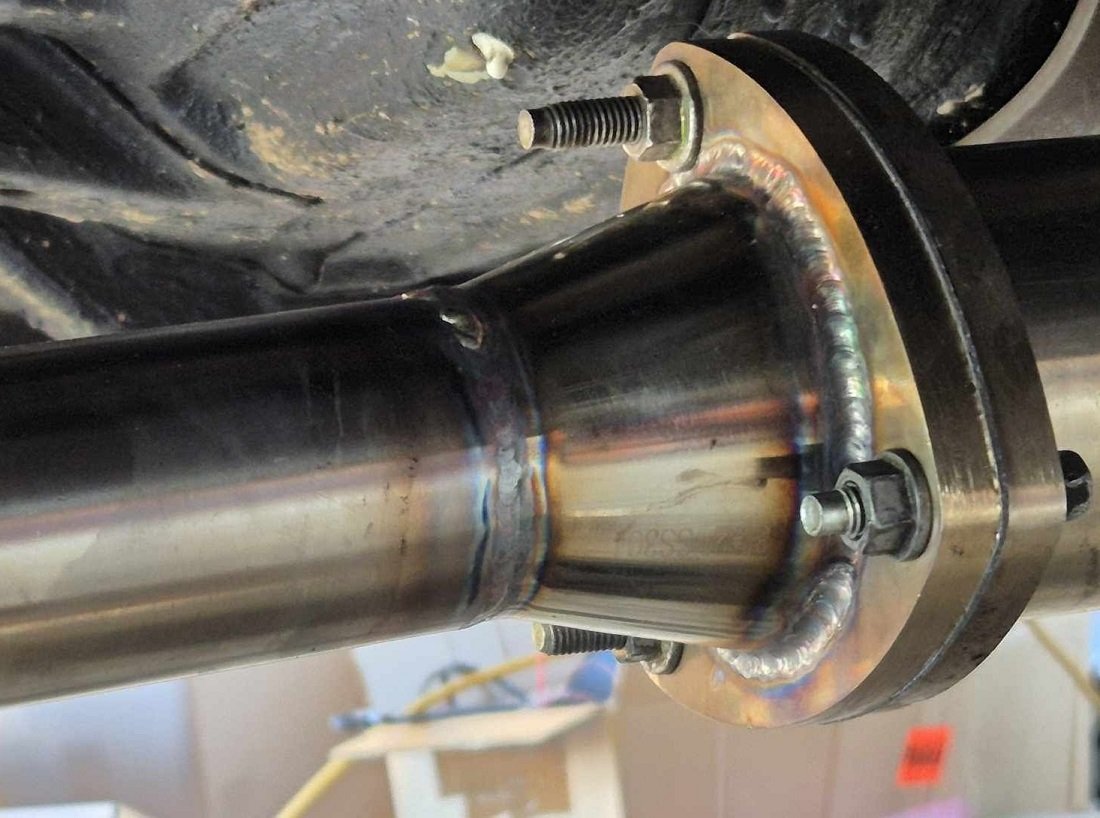
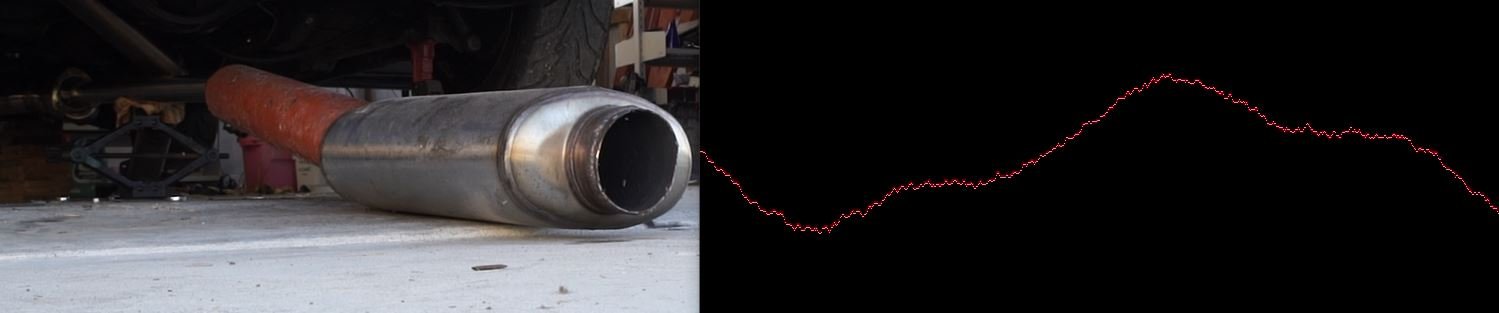
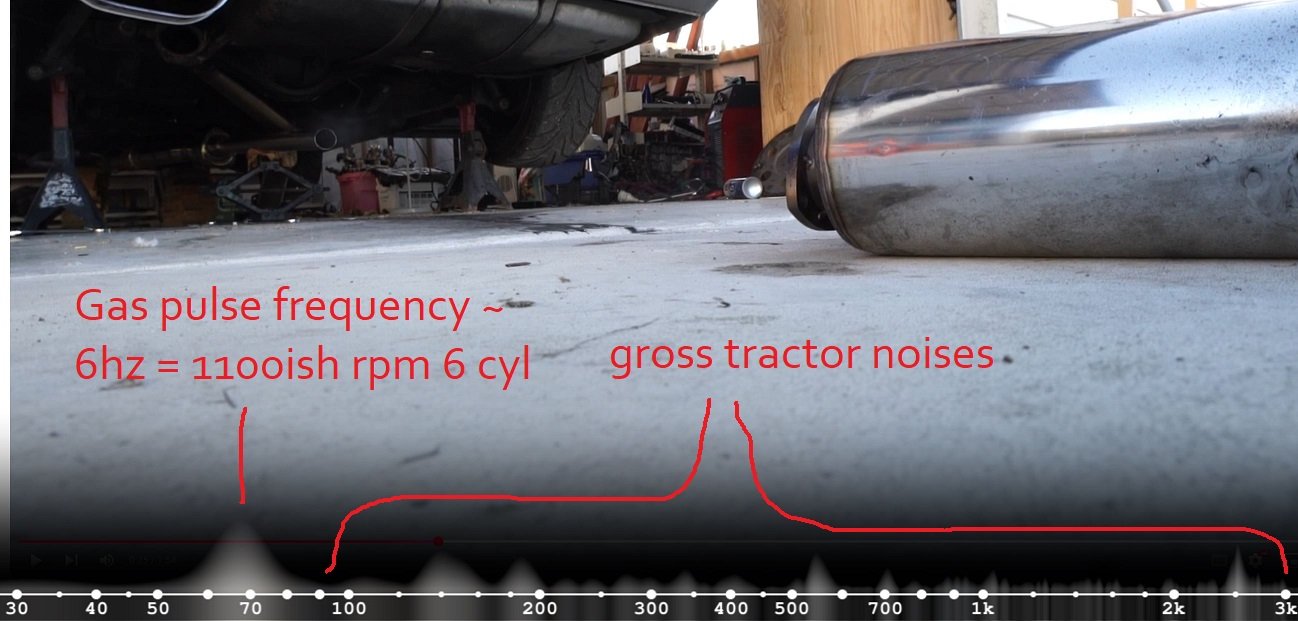
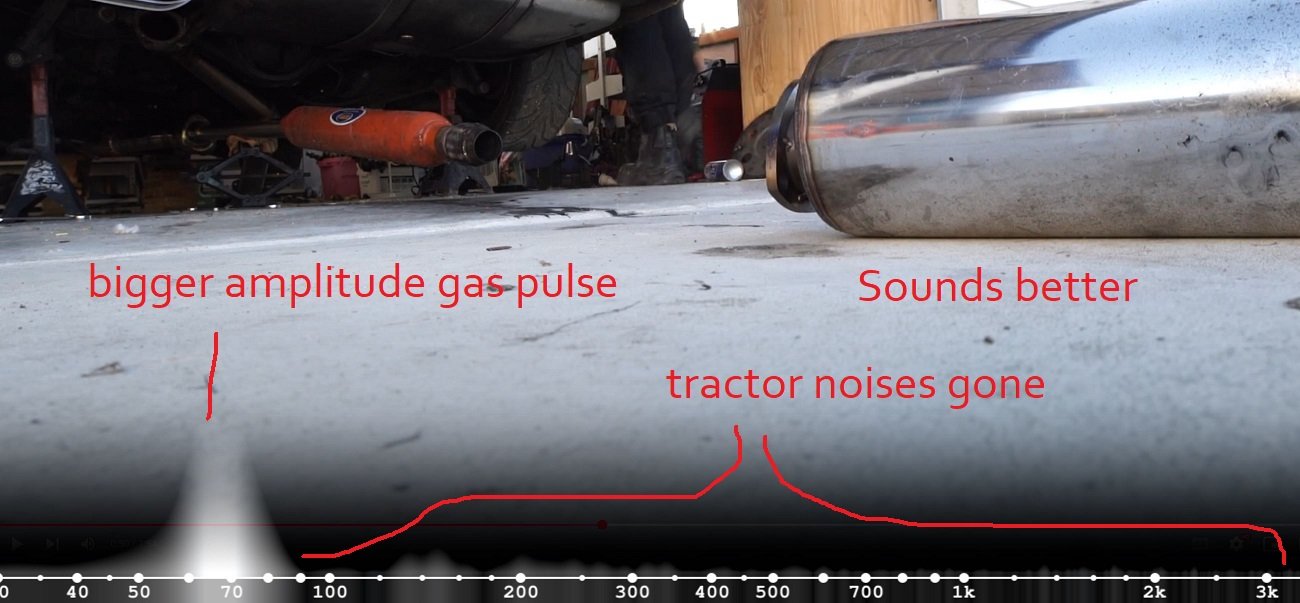
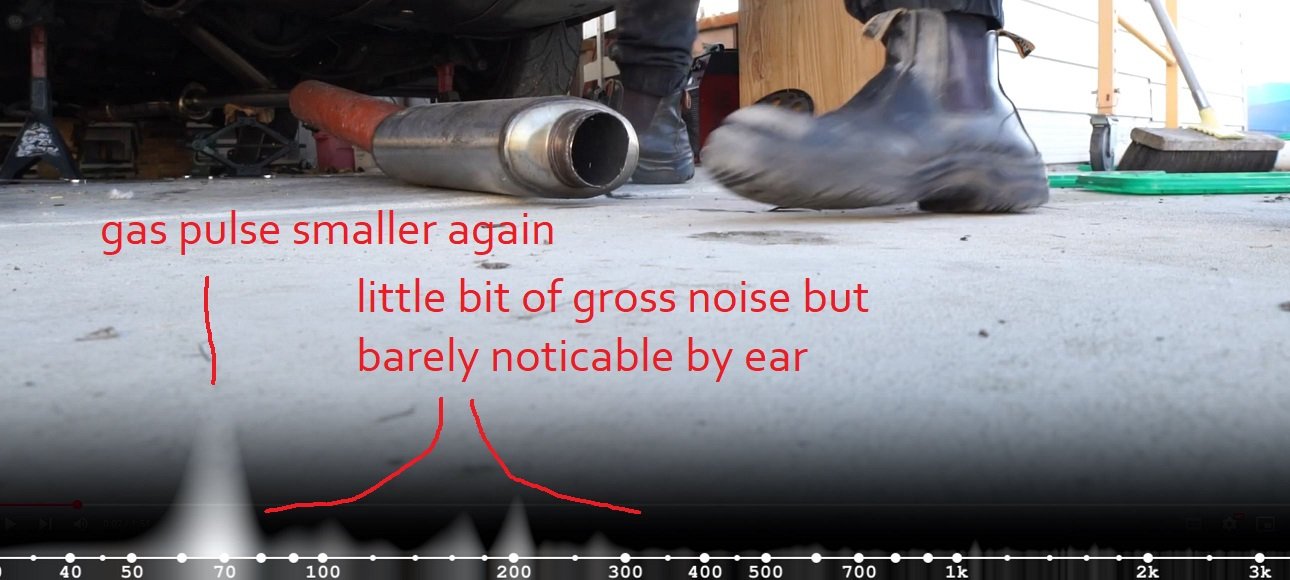
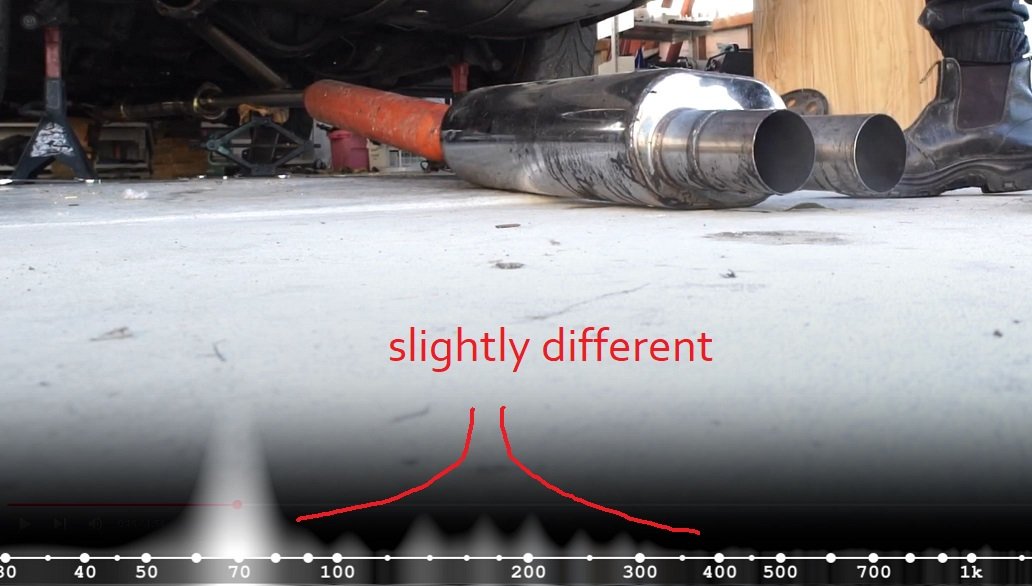
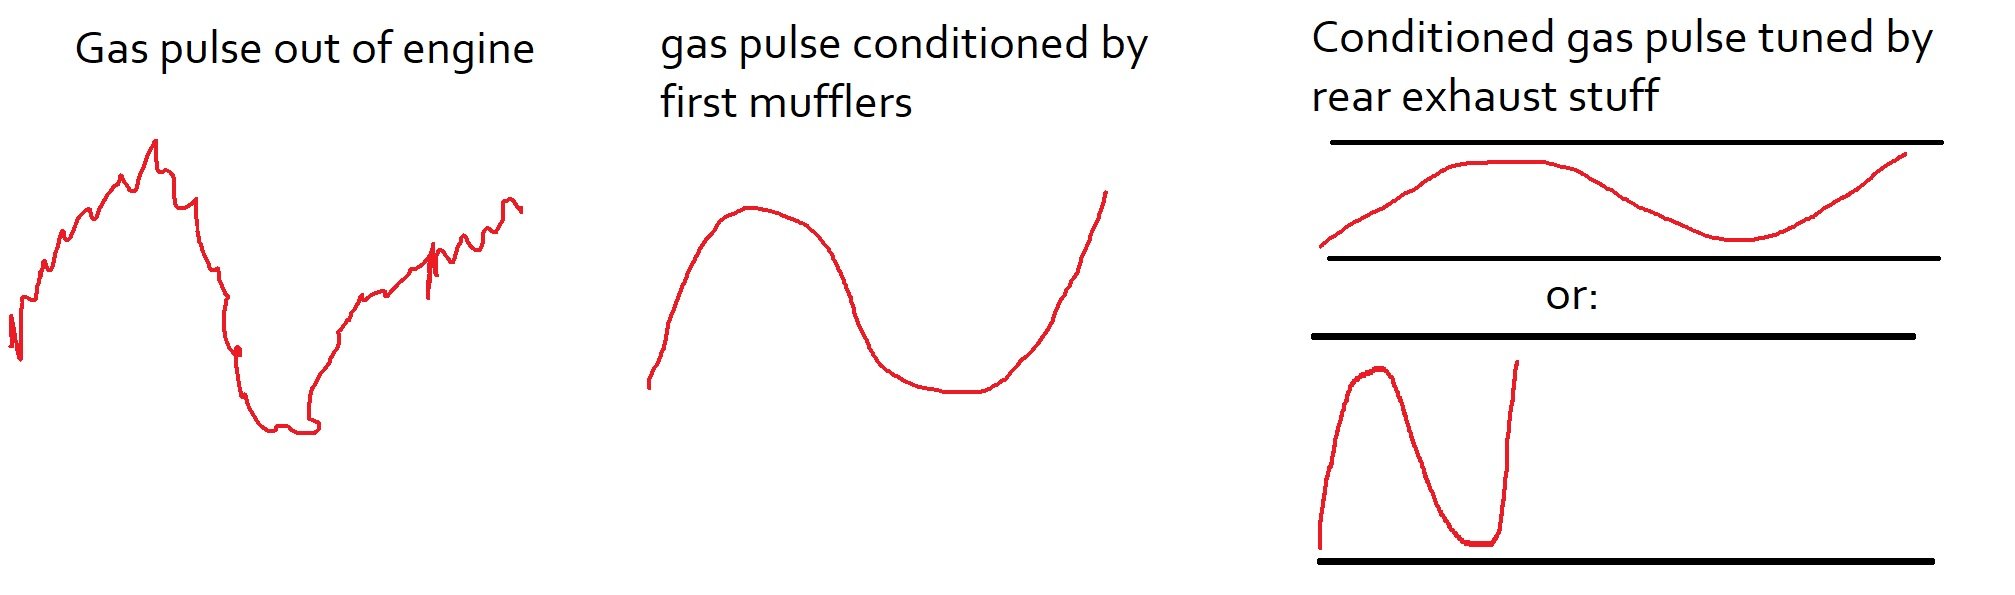
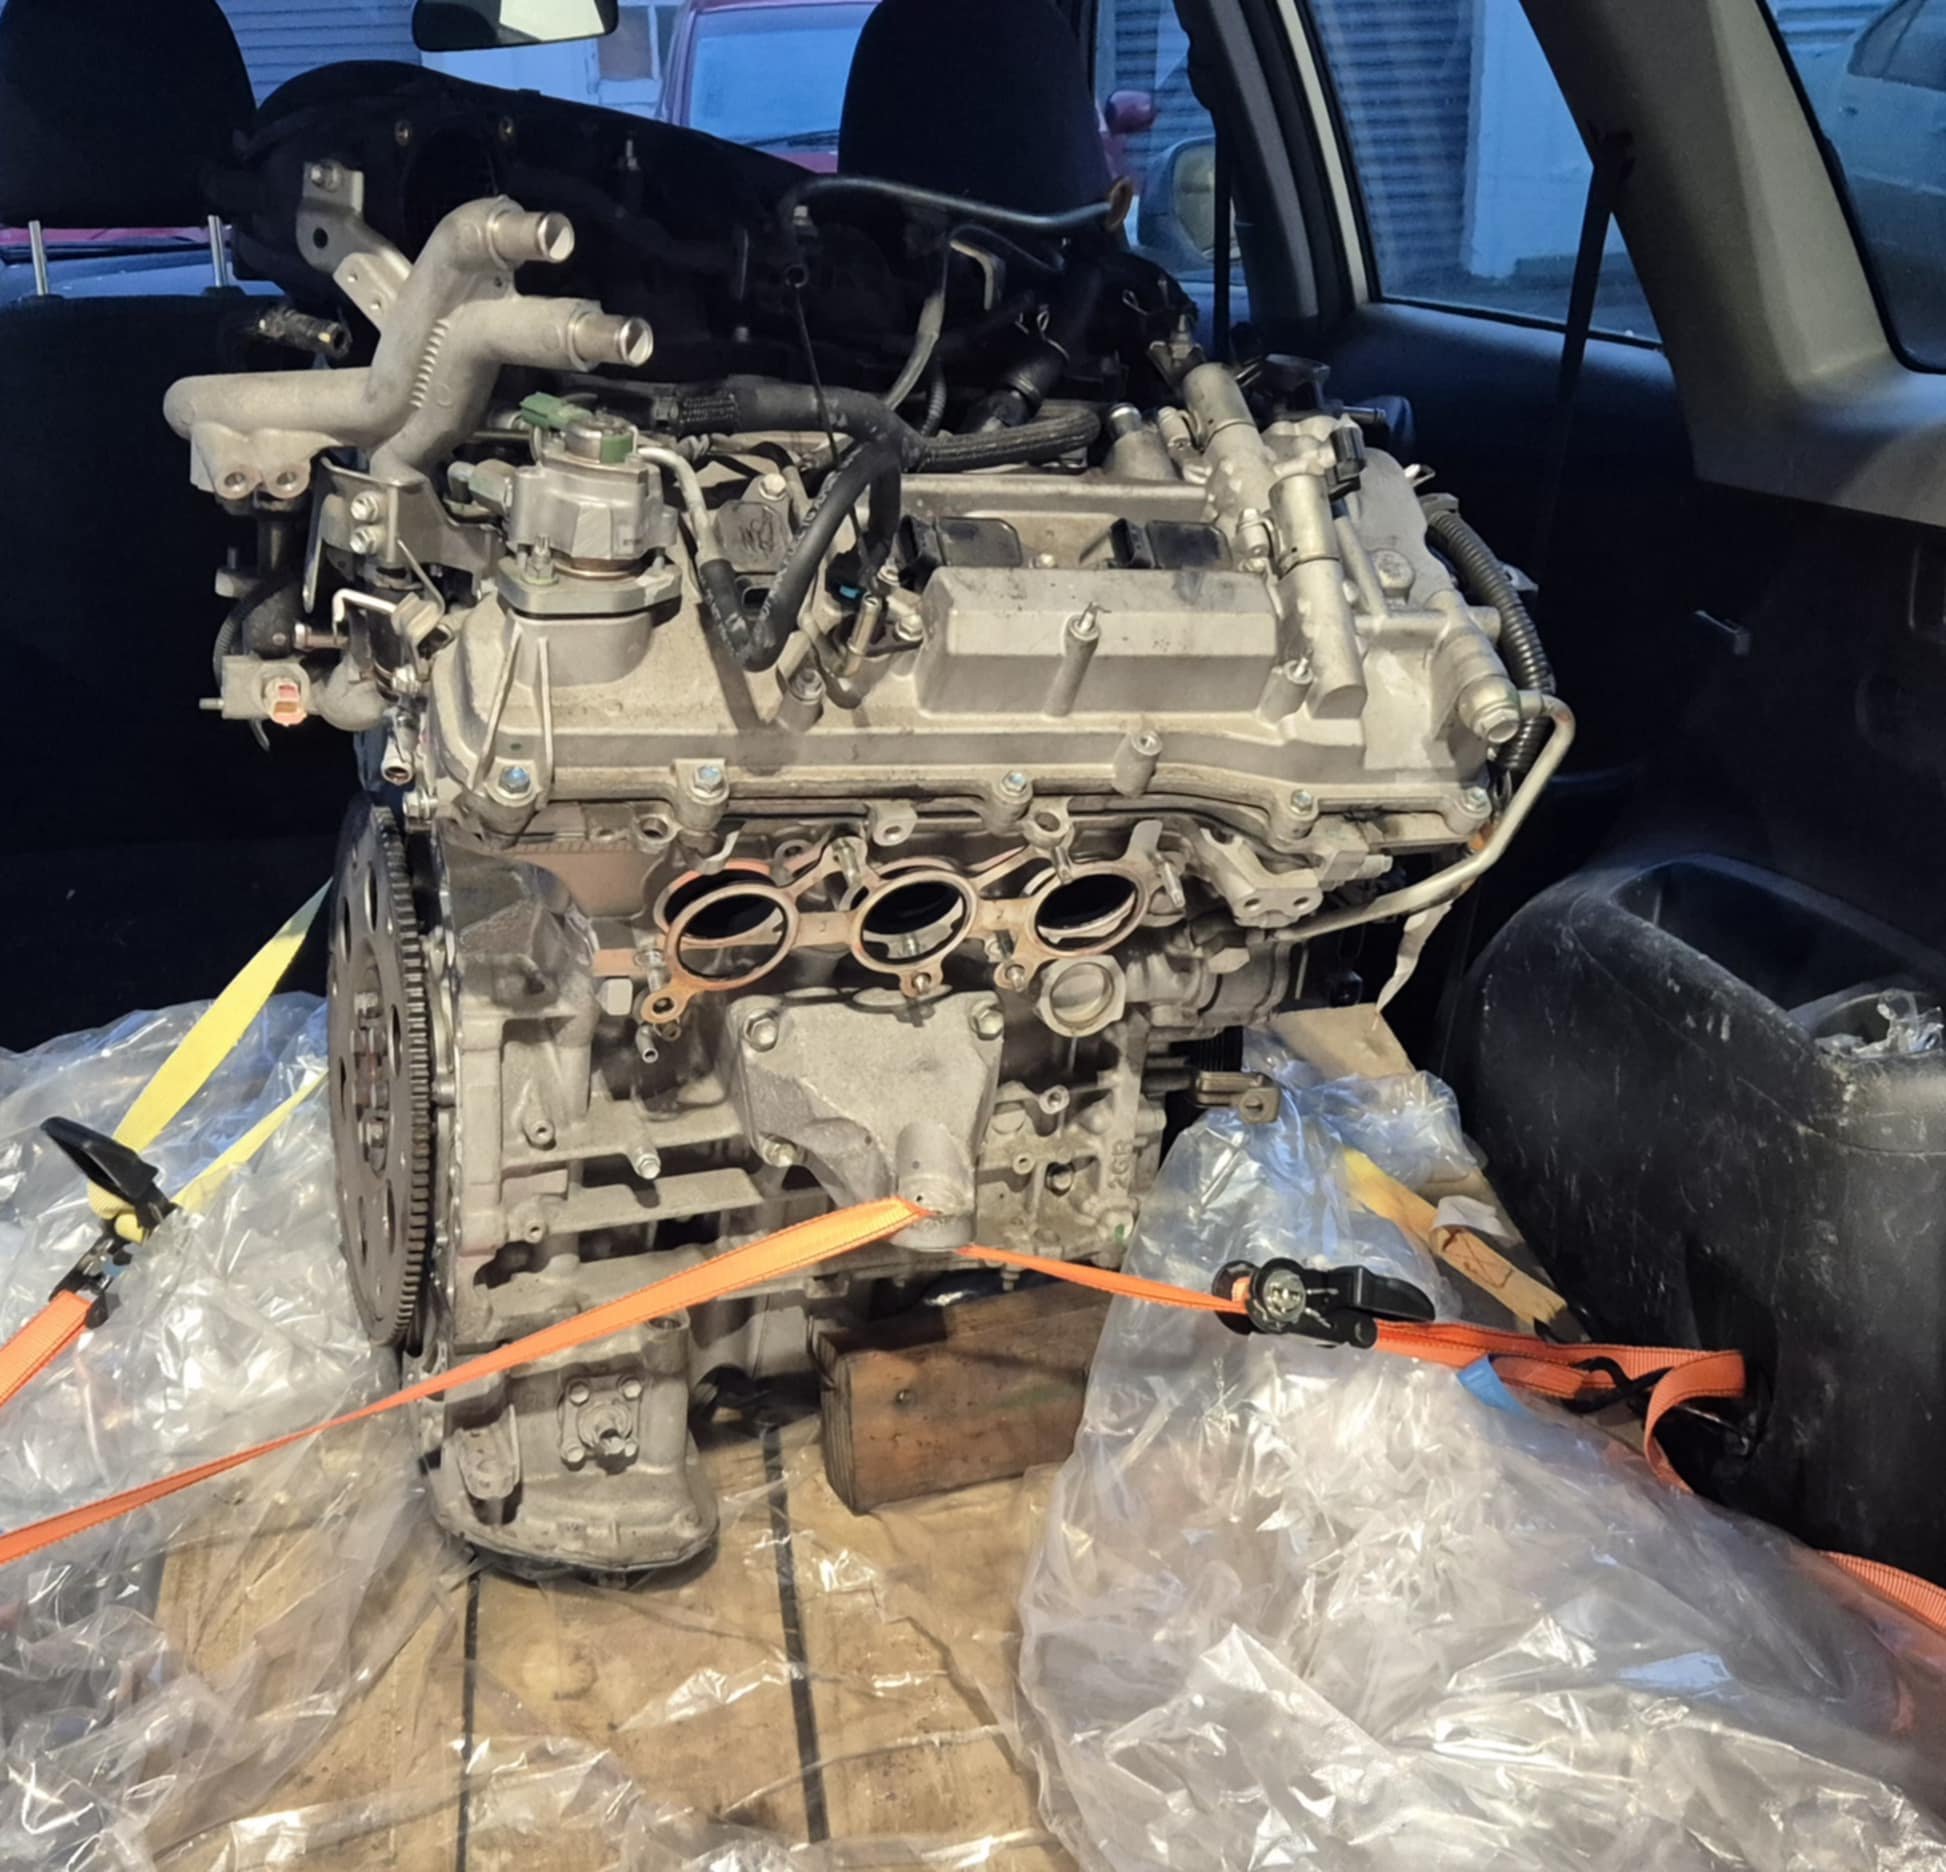
2GRFSE pull down I finished pulling the 2GRFSE to bits, and found that the total sum of damage was: 1x exhaust VVT pulley starting to push its guts out 1x chain tensioner broken 2x big end bearings damaged 1x big end journal on crank looking damaged So the great news here is, all of the damage is confined to bolt on stuff, or, relating to the crank/rods that I am planning to bin anyway. Perfect! If anyone has a 2MZFE motor kicking around, or just the crank, let me know. Keen. Exhaust noise rambling part 2 I thought I would try come up with some practical testing methods for further isolating and confirming what "good noise" is, and isnt. So I can quickly make some iterations and see if they meet objectives or not. Keeping in mind that this is nothing to do with what makes best power, just sounds "better". At this stage this is just testing at a constant idle speed. Which obviously isnt indicative of full throttle performance, or noise. However I'd prefer if it does not sound like a clattery bag of dicks at idle too. So its a relevant test. I will do some medium and full load testing once my ethrottle setup is sorted properly. For a TL;DR version of this considerably overlength post. Here's a video of me just putting a Coby hotdog muffler on or off the back of a 2" exhaust pipe. It sound different with it on or off. The end. Rest of post here:
- 130 replies
-
- 21
-

-
100% keen for this! Gonna be good
-
Nah I bet its like in The Shawshank Redemption, where they are using their pant legs to get rid of the dirt from digging their tunnels. But Kris is slowly getting rid of 20v engines by sneaking the parts into other peoples cars
-
He's got the best evasion tactics for shit posting. "Police! Hurry! There's a guy on OS named Dave, and we need to arrest him" "Uhhhhh you're gonna need to be a lot more specific there bud"
-
Definitely interesting that "4-2-1 does this" and "4-1 does this" is less important than having either of those with the right lengths. Really interesting to see how hollowed out the low rpm power is, by those super long secondaries. Would have expected the opposite. Cant wait to see results for the new head/ports!
-
1700rpm idle too, god, he's never going to get good fuel economy acting like that
-
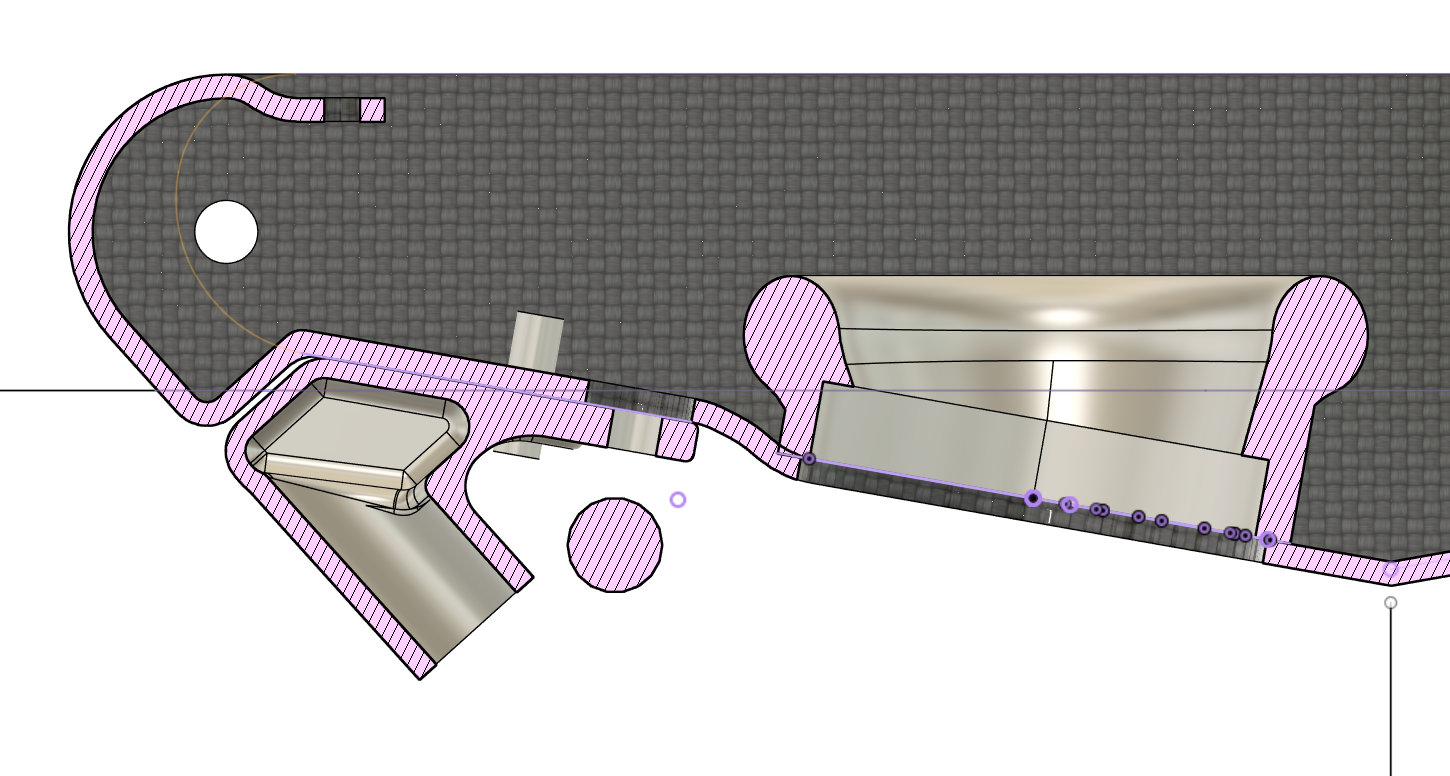
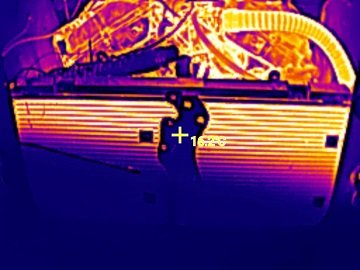
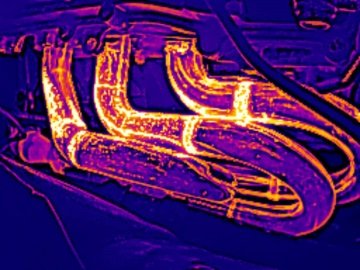
Another motor? Be rude not to A friend had a customer's car come in with a seized 2GRFSE engine. It was deemed uneconomical to try and repair, so they replaced it. Being the local V6 weirdo, I was asked if I would like the seized engine for V6 activities. Why, yes I would! Thanks. I've mostly stripped it down, and found nothing particularly wrong so far. It turns over smoothly except for a small portion of rotation where it "sticks" for some reason. I found a broken chain tensioner, but this looks to be a symptom rather than cause. With the chain fully off, it still does the same thing. With a camera stuck down the spark plug holes, all of the bores are looking good as best I can tell. I am guessing either it's a main bearing that is stuffed, or maybe a piston has cracked a ringland, so it jams when it first starts going up (or down) But it's looking though its still going to be a useable engine with a minor fix hopefully. So, what to do with this motor? Well, it looks like a good candidate for destroking with the 5GR or 2MZ crank. Hopefully the heads and the bores are 100% okay on this motor. As the crank and rods get binned anyway. Once I've confirmed its all okay, I'll just put it mostly back together and park it in the corner of the garage for now. The only "downside" of this motor is that the ports on intake and exhaust are incompatible with my existing manifolds. However it'll be no stress to make some new ones later on to test. Throttle Pulley problems It seems I messed up my measurements for cable length for the dual ethrottle setup. So it's now working amazingly, and both banks are getting to target and really quickly. However I can only reach about 70% throttle before it runs out of cable pull. So my pulleys are off with Dad to cut them down a bit with the CNC machine, so I can reach full travel. Ahhhh well shit happens. Airbox stuff Height of airbox to the bonnet is still the main issue I'm contending with. Rhys had a suggestion to try trumpets that are parallel to the roof of the airbox, to gain a bit more clearance. Good idea! So just printing some of these out. Thermal camera side quest I last had a thermal camera about 10 years ago. Technology has come leaps and bounds since then. My last one was very low resolution, and limited to either 5hz or 10hz refresh rate. It could only read up to 200ish degrees, which wasnt hugely useful for things like brakes or exhaust stuff. My new one is a little device the clips into the bottom of my phone. It can record video at 25hz, has 256*192 resolution, and scales up to 600 degrees C. Considerably cheaper than last time too. Bloody awesome! The thing about it that will be absolutely magnificent though. Is that I've confirmed it works with a decent quality USB-C extension cable. So this means I can mount the tiny device somewhere in my engine bay, wheel area, brake area, or whatever else. Then record and view results from in the cabin. Gonna be awesome. But obviously I need to have all of the bread and butter parts of the car sorted before this will be much use. Although 256*192 resolution seems low for a modern type of camera. It's awesome when you think about what it's replacing. If you put a temp sensor into something, you only have 2 datapoints. temperature and time. This has over 50,000 datapoints instead of 1. So instead of "radiator is hot at this particular spot" you can now see the temperature gradient across the whole thing. Interesting to see the temp gradient on this SW20 radiator, which has both its inlet and outlet mounted at the top of the radiator. It's cool to be able to see the exhaust pipes without maxxing out the sensor instantly. The bright areas are because of the different emissivity of the material, not because my welds are bad. That's my story, and I'm sticking to it.
- 130 replies
-
- 36
-
-

-
Ha, thats awesome! Sounds amazing.