
Leaderboard


Popular Content
Showing content with the highest reputation on 08/24/17 in all areas
-
Update time on Viva two.... Lesson learned. Don't leave Vivas parked up for two months on damp ground. I went to move it the other day and the clutch is stuck ! I have tried all the usual things to fix it and no luck. Its now sitting out there with a stick holding the clutch pedal down. Funny thing is that I have only recently worked on a mates Viva HC and it had come in with the same problem, which meant we had to remove the box and free up a very corroded clutch. The reason for this mighty wagon of mine being laid up? Well it ran out of WOF at about the same time as I had picked up a genuine Viva '90' engine. I had plans to fit it but its not happened yet. Hannah went to the UK to see family and brought back some parts, seals etc so next week we will tidy it up and fit it soon. What is a Viva '90' engine you ask? Its the uprated 1159cc engine that was offered as an option on HB vivas, and standard in the Brabham spec model. It has higher compression, high lift cam (that found its way into the 1256 Chevette/Viva HC engine), twin outlet exhaust manifold and Stromberg carb. Possibly some other things too.. some foamer can quip in here.. It all combines to give a very useful jump in power from 50 to 70 bhp! Twenty extra ponies is not to be laughed at when you only start with 50. My wagons chassis plate states in the options that it came with one of these engines but at some point it has been stolen from the car. The engine I have scored actually came from this ropey old car here... ...which Slacker Sam had bought and then sold on to the fella I bought the wagon from. He split the car down as it was rusty as (although some of its shell has also made its way into my wagon) , hung on to the motor and I managed to score it a few years later for $100. Its been rebuilt and apparently goes really well he said, useful for towing other Vauxhalls around etc ... Came with all new ignition parts too. Pretty happy with this lot and looking forwards to fitting it! I have cleared a little area in the workshop to work on it....20 points
-
Update time. Vivadom daily driving has been pretty damn good. Especially when 2 months ago I finally got around to changing the voltage settings for the wideband O2 sensor on the ECU so that the ECU would get the same reading as what the Innovate gauge shows. It’s a common setting fault and took all of 5 mins to get them to read almost the same. What does this mean though? Well for ages the ECU and hence the tuning program, Tunerstudio, have been receiving a ‘leaner’ voltage than what the engine was really at. This meant that in tuning the final outcome was always a bit too rich. When the ECU was in closed loop ego control it would take my preferred AFR table settings and adjust to what it thought was correct.. which was not. With the ECU now getting the proper signal we re-tuned the car on the way back from Blenheim to Motueka. It was too rich everywhere and after not long was leaned right back. Driveability remained the same, but tail pipe smells improved J I have not gone super lean, sticking to around 15~15.5 on cruise. We filled the tank back up in Motueka and the cars economy had improved returning 32 mpg (8.8l/100km). There is still room to improve but happy with that. So this was all good and everything was fine and dandy for the last month or two. Then the other day while leaving town I started to hear a teeny whistle sound. I just put it down to the throttle body making the sound because sometimes it does just this. The other thing I thought it might be was the idle control valve. I didn’t look into it any further. However, over the next few drives I noticed it was hunting a little at really light throttle openings, like slowly accelerating away from standstill. Hmmmm?... Then that whistle again, this time when I got home one evening. I popped the bonnet and listened around. I couldn’t pinpoint it but when I ran my fingers around the back underside of the plenum box where one of the runners joins I heard the note change. An air leak. Bugger. I looked with a torch and could just make out a little crack on one of the welds I had machined down…hmmmm. Bugger. Oh well.. I was planning on doing a modification to the throttle body pulley so why not sort it out now. I drove the car into the Viva hospital and started surgery. It didn’t take long to pop the bonnet off, unplug all the bits needed and start removing the inlet manifold. The trickiest bit was the return fuel line which was stuck to the pipe and hard to get too. One hour after having parked the car in the surgery and picking up the scalpels I had the manifold on the bench. I worked out pretty quickly why the manifold had cracked where it had. To explain how we need to pop into the police box and go back in time…. Maybe not that far though. Lets try again… Nup.. still too far. This time… Errrgggg. Again… Oh dear lordy..one more time… Ahh… that’s better! Righto..now remember this original plenum chamber? Made from some bent up 2.5mm alloy sheet. It had buckled diagonally when welded and I had then set up the runner heights to suit when I tacked them in place. I had to try and straighten it so it sealed correctly (using our house as a press).. It all worked out OK at the time because it flexed enough to seal when bolted down to the runner flanges. However a few years later I had that backfire and blew the lid off. I then fabricated a new plenum from 5mm alloy sheet and its was nice and straight.. It did not flex. This is how I think the crack happened. I decided I was not going to try to weld up this little crack because I knew the heat would warp the runner flange and nothing will seal. So I bought some posh looking South African epoxy putty, a bit like minute mend or quicksteel. It requires a lot more mixing than the others but sticks really well and smoothed off nicely. Kevin kept guard while it set. While the inlet was off I did some measuring and worked out the dimensions for a new offset/eccentric throttle body pulley. Then I machined down a lump of alloy bar and ended up with a new pulley. I got to use our new mill with a 2mm slot drill ( I could have used a hacksaw and file but this was more fun..) The new pulley effectively gears down the cable pull at the start of the throttle pedal travel and speeds up at the end making for a much easier off idle transition. You can see the difference between old and new here.. No more kangarooing down the road for people not used to this engine with its lightweight flywheel etc. I refitted the inlet manifold, plugged everything in and tried it out. WAY BETTER!!! Went for a drive and its so much easier to ease the throttle on out of corners or from standstill. Much more user friendly and I now wish I’d done this mod ages ago!16 points
-
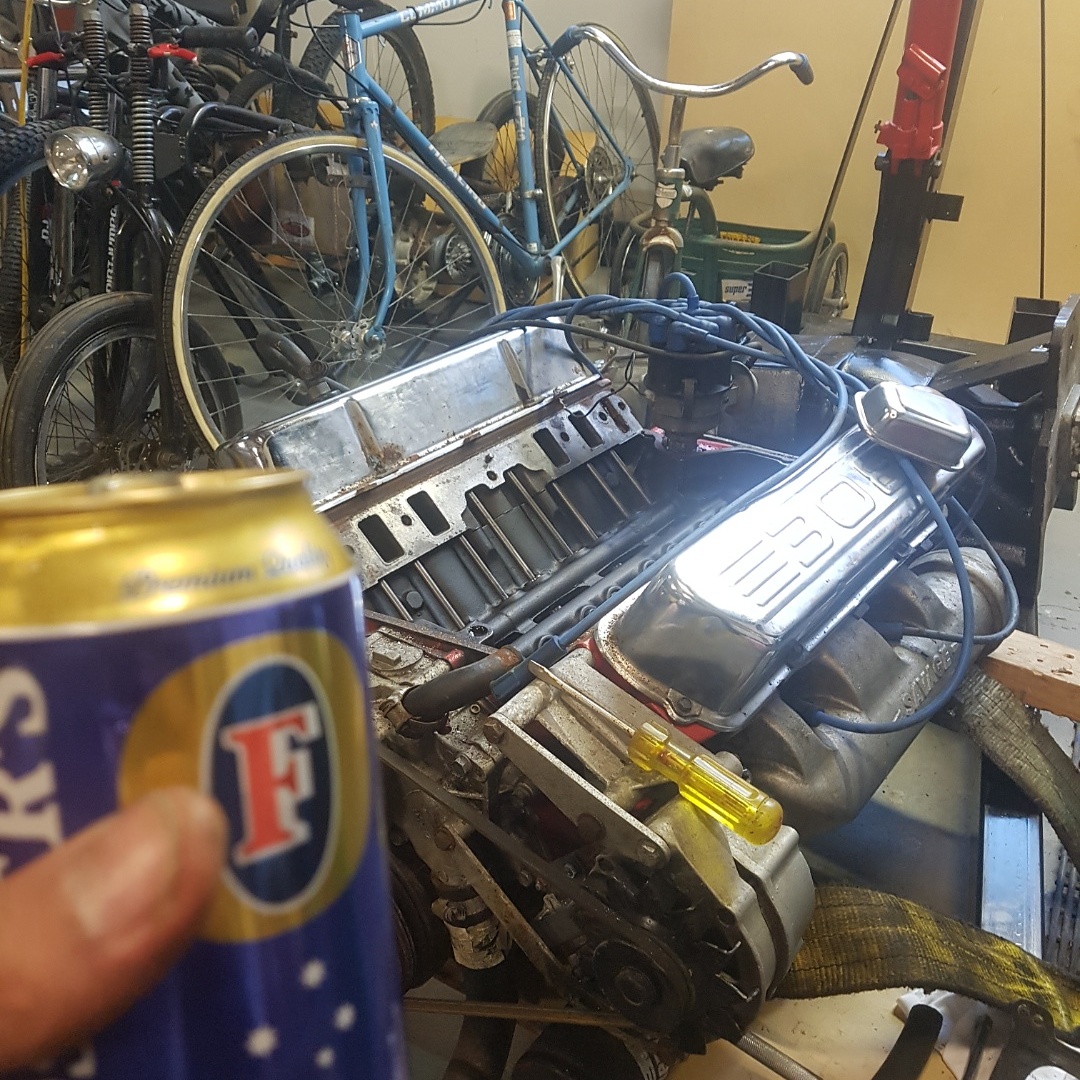
Thirsty Thursday
 7 points
 -
I'd always though the Gyro was a uniquely Honda idea, turns out it's pivot system is a British invention, which played a part in BSA's demise Ariel 3 by BSA Then Diahatsu had a go at it with there Hallo4 points
-
man i have been fucking around with this thing something shocking, need to commit and just finish it as i have everything to do so now. Shed is currently taken over my honda monza red, cams C50 is in for a new exhaust treatment and sparkle has given me his CT110 to chop Quickly hacked the rear guard off sparkles CT at lunch today, looks gay as frig now with the extremely large postie seat but once he gets a new one it should be lush Mocked up my cub with sparkles brown seat off his C50, i have ordered one of the same but in black which should look pretty lush. The bars are on now but i need to cut them down as they are too wide for the wheelbase of the cub and look a bit out of proportion Scratched my head with the wires a little bit but got all that sorted the other night. I know i could get away without running a battery but it thought id be a good boy and run one, then lights can work if engine isnt running etc which could be handy at times, and the new gel battery was only 30 bucks went to put the side cover on and realised i didnt have a screw for it, bit of threaded rod and an old imperial spanner later and jobs done jim Hope sunday will be a good day, will mod bars a bit and get them straight (seems forks are slightly bent) make some changes to the exhaust and get that on properly, re jet the carb with the jets that arrived today, slap the chain on, mod the rear brake pedal then slap some gas and oil in it and go do a skid, yeowww!4 points
-
HAAHHH!!! PUZZLE MASTER!!!!!.. I cut the end off the triumph exhaust to get it in there. Now I have to walk all the way down the other end of the garage through my 'living quarters', the storage piles and the 'workshop area' to get the the other side of the car. Might be faster to just crawl through the doors. Motorbike battery was nearly flat, wouldn't start it, same deal for the STARVIA battery. I put the motorbike battery on charge.
4 points
-
lemon party golden shower squirt munro, geyser wilhelm, donald pump, gush gush, gone fistin', dirty hose, pump in the trunk4 points
-
Botany burger fuel used to do hot rod nights there, there's usually heaps of car parks there during the week3 points
-
I'll bring the Buick Humber, or the Wolseley 6/110 or the Triumph 2500 Keen.3 points
-
Had it alll back together and on , still had symptoms of a vac leak and couldn't find it after hours of trying nothing i did would change engine rpm or show signs of where it was leaking... , so borrowed an osgc's air fuel ratio gauge and wide band o2 sensor, which showed me i was correct in my assumption of vac leak , turns out the venturi gasket was leaking so one is on the way from " mikes carb parts" in the usa, was $4.95 and so got a new accelerator pump plunger and main manifold gasket too , hopefully they will show up this week... and now with o2 sensor tuning it will be sooo easy to get it dialed.3 points
-
If my trailer stud pattern is falcon i just remembered I have some hustlers that will fit!3 points
-
I hope you have turbos/trideys for the trailer3 points
-
I tried out its towing capabilities today...
3 points
-
Gone fistin' 10/102 points
-
There is no plan but we're looking into finding a more suitable location. More suggestions are welcome I don't agree with the statement regarding not being able to park more than 2 cars beside eachother or having no parking. That's just having a whinge. But I do agree that we need to keep searching to find a venue that is more suitable. This is just a side effect of living in a city: Things are busy. The Mt Wellington carpark is worse for several reasons including; - A similar lack of adequate parking (construction and repairs are currently underway further limiting the available parking) - Standard of driving there is horrendous. The Manukau Burgerfuel is an option. It has more available car parking than the Mt Wellington and Mt Roskill Burgerfuels combined. It also has a large covered carpark which is well lit and generally very empty. We could commandeer and entire corner to ourselves. The only issue is the fact that the cars will be undercover and not visible from the food establishments like Burgerfuel. However, we often have part of our group remaining with the group while other parts go and get food, as per our Ellerslie location so this may still work. More suggestions are welcome.2 points
-
sweet, am looking at renting a bach with the mrs and taking her singer wagon down for a drive. Should try organise a mini old school meet up down there? Agree with the weather, October's always 50% with rain or not.2 points
-
No. My British car doesn't go Said everybody2 points
-
So busy there no parking. What is the plan for meets moving forward ? What about Mt Wellington Burger Fuel car park is no where near as crazy busy we might be able to park more than 2 cars beside each other2 points
-
we got the trusses made with a reverse kingpin so the floor bit in the middle would have more space. I hope to fill it with car parts.2 points
-
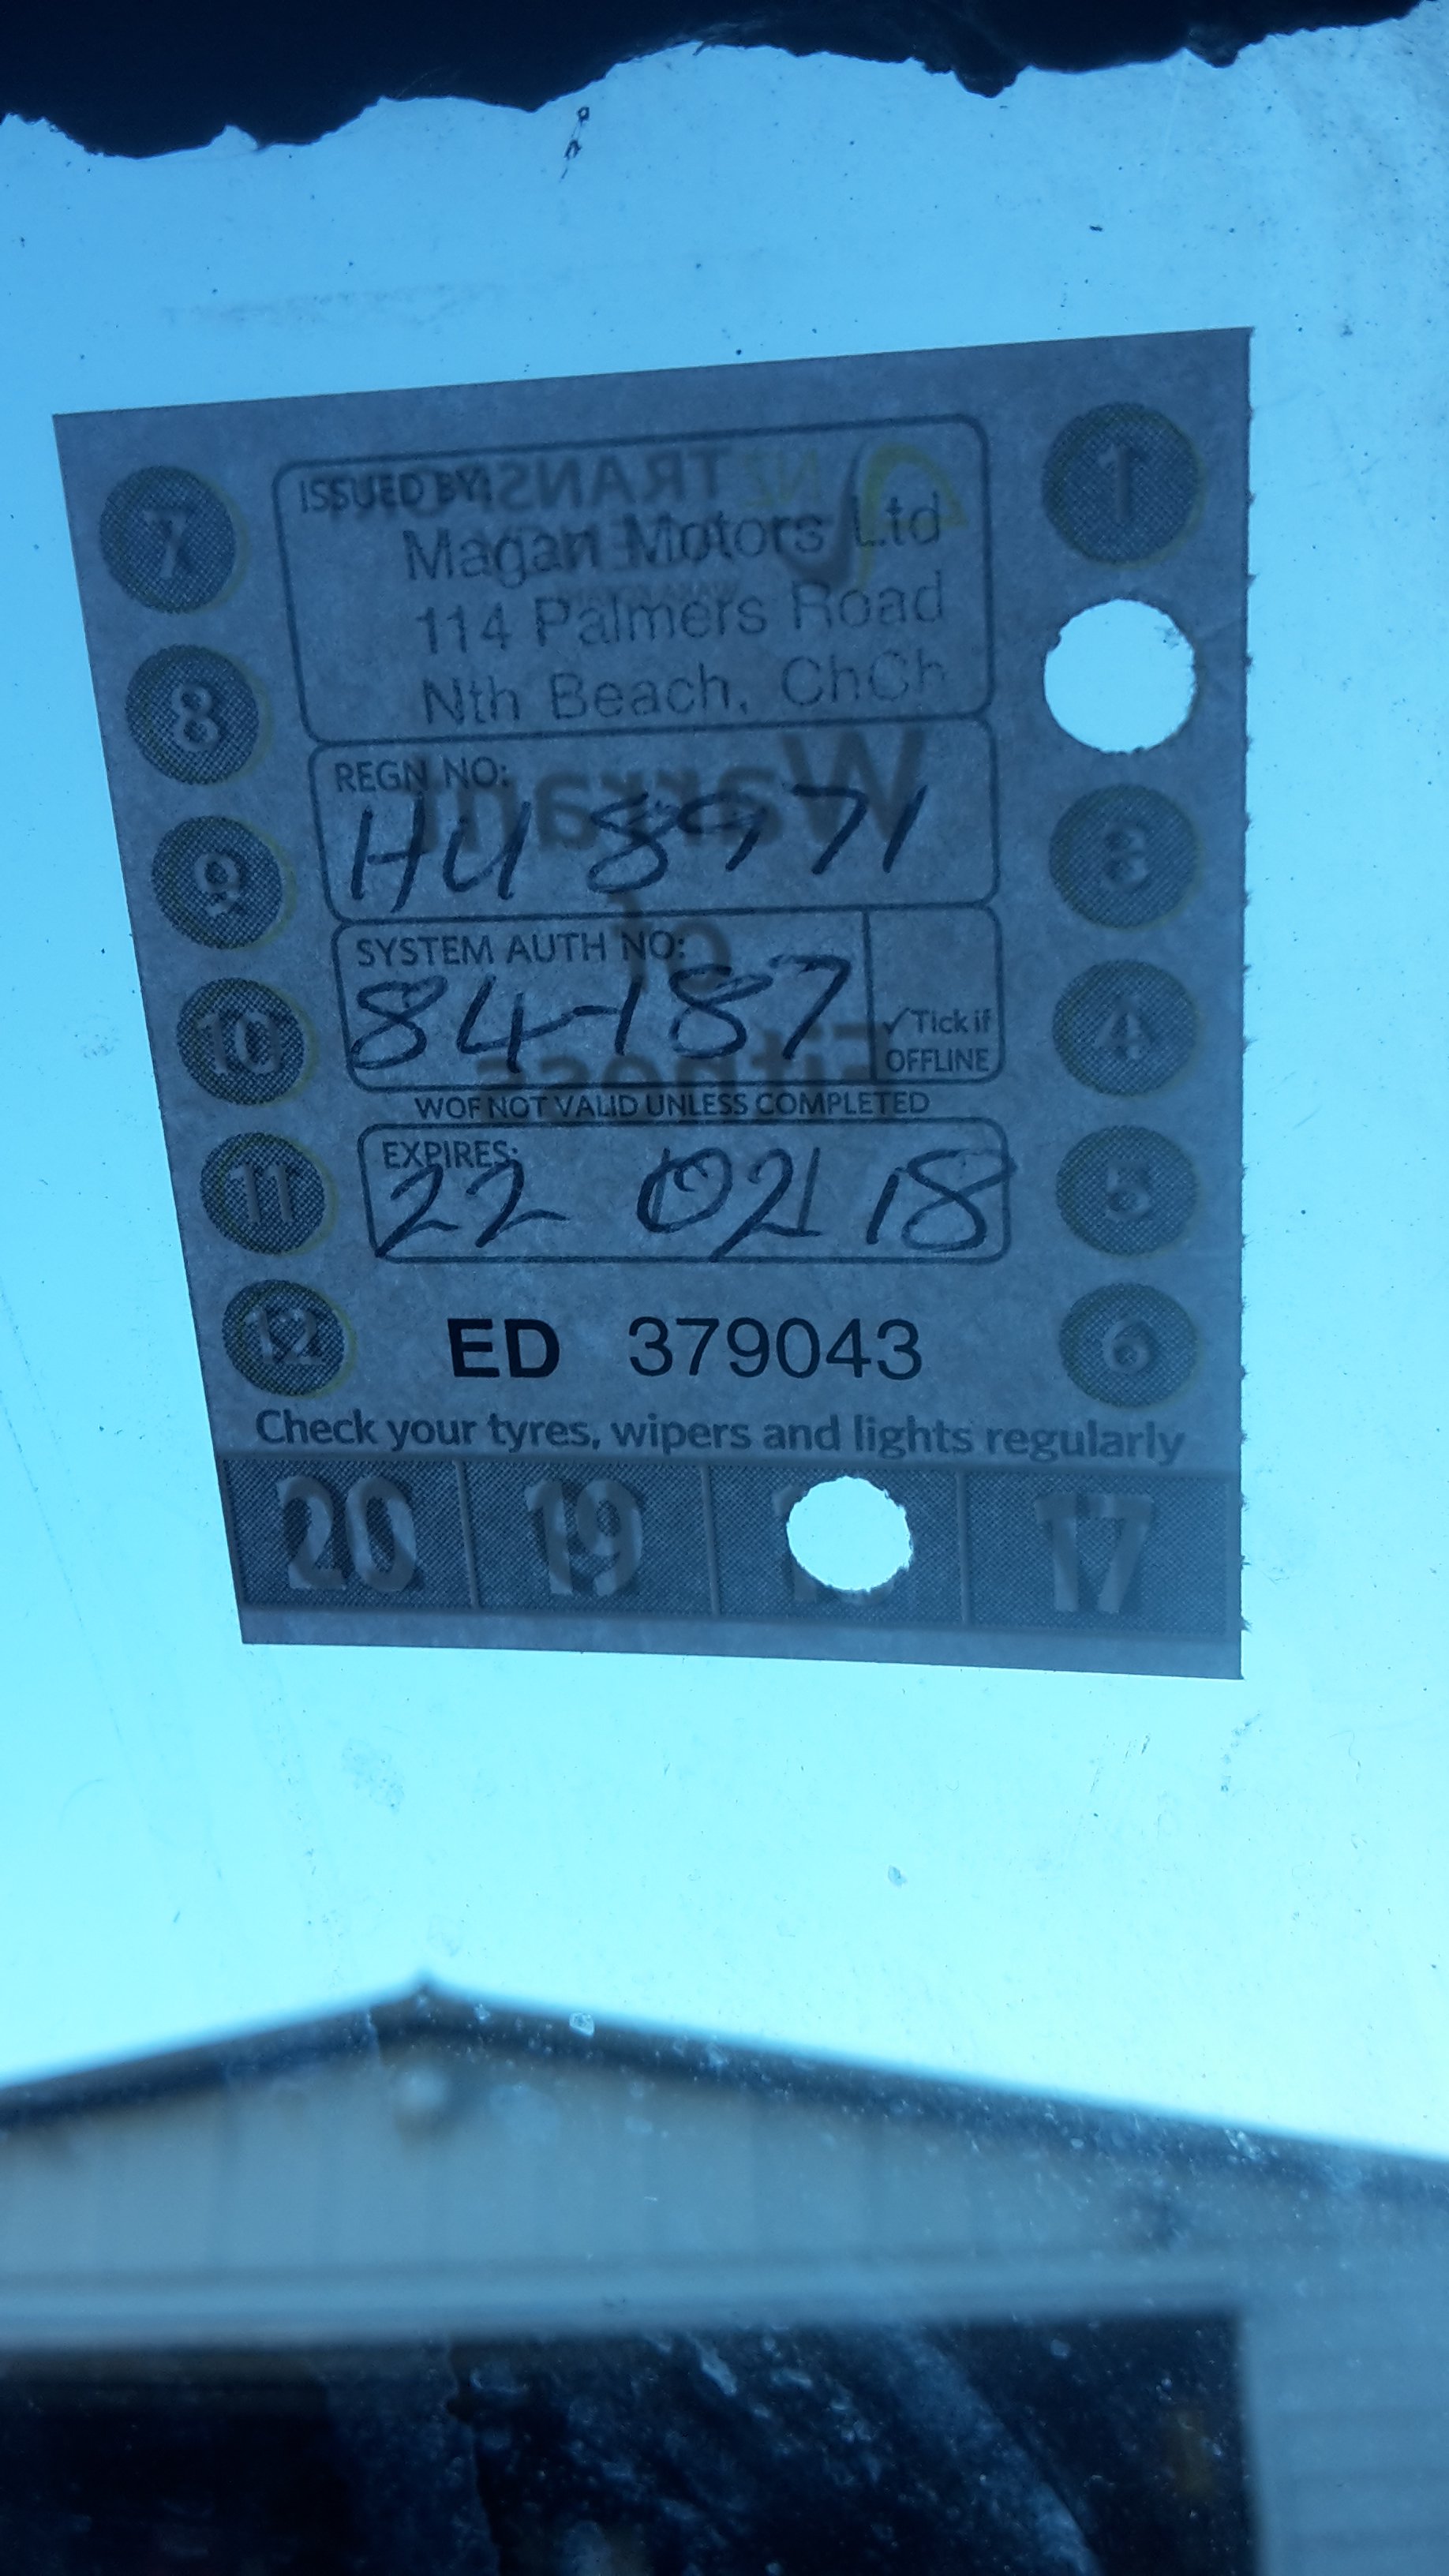
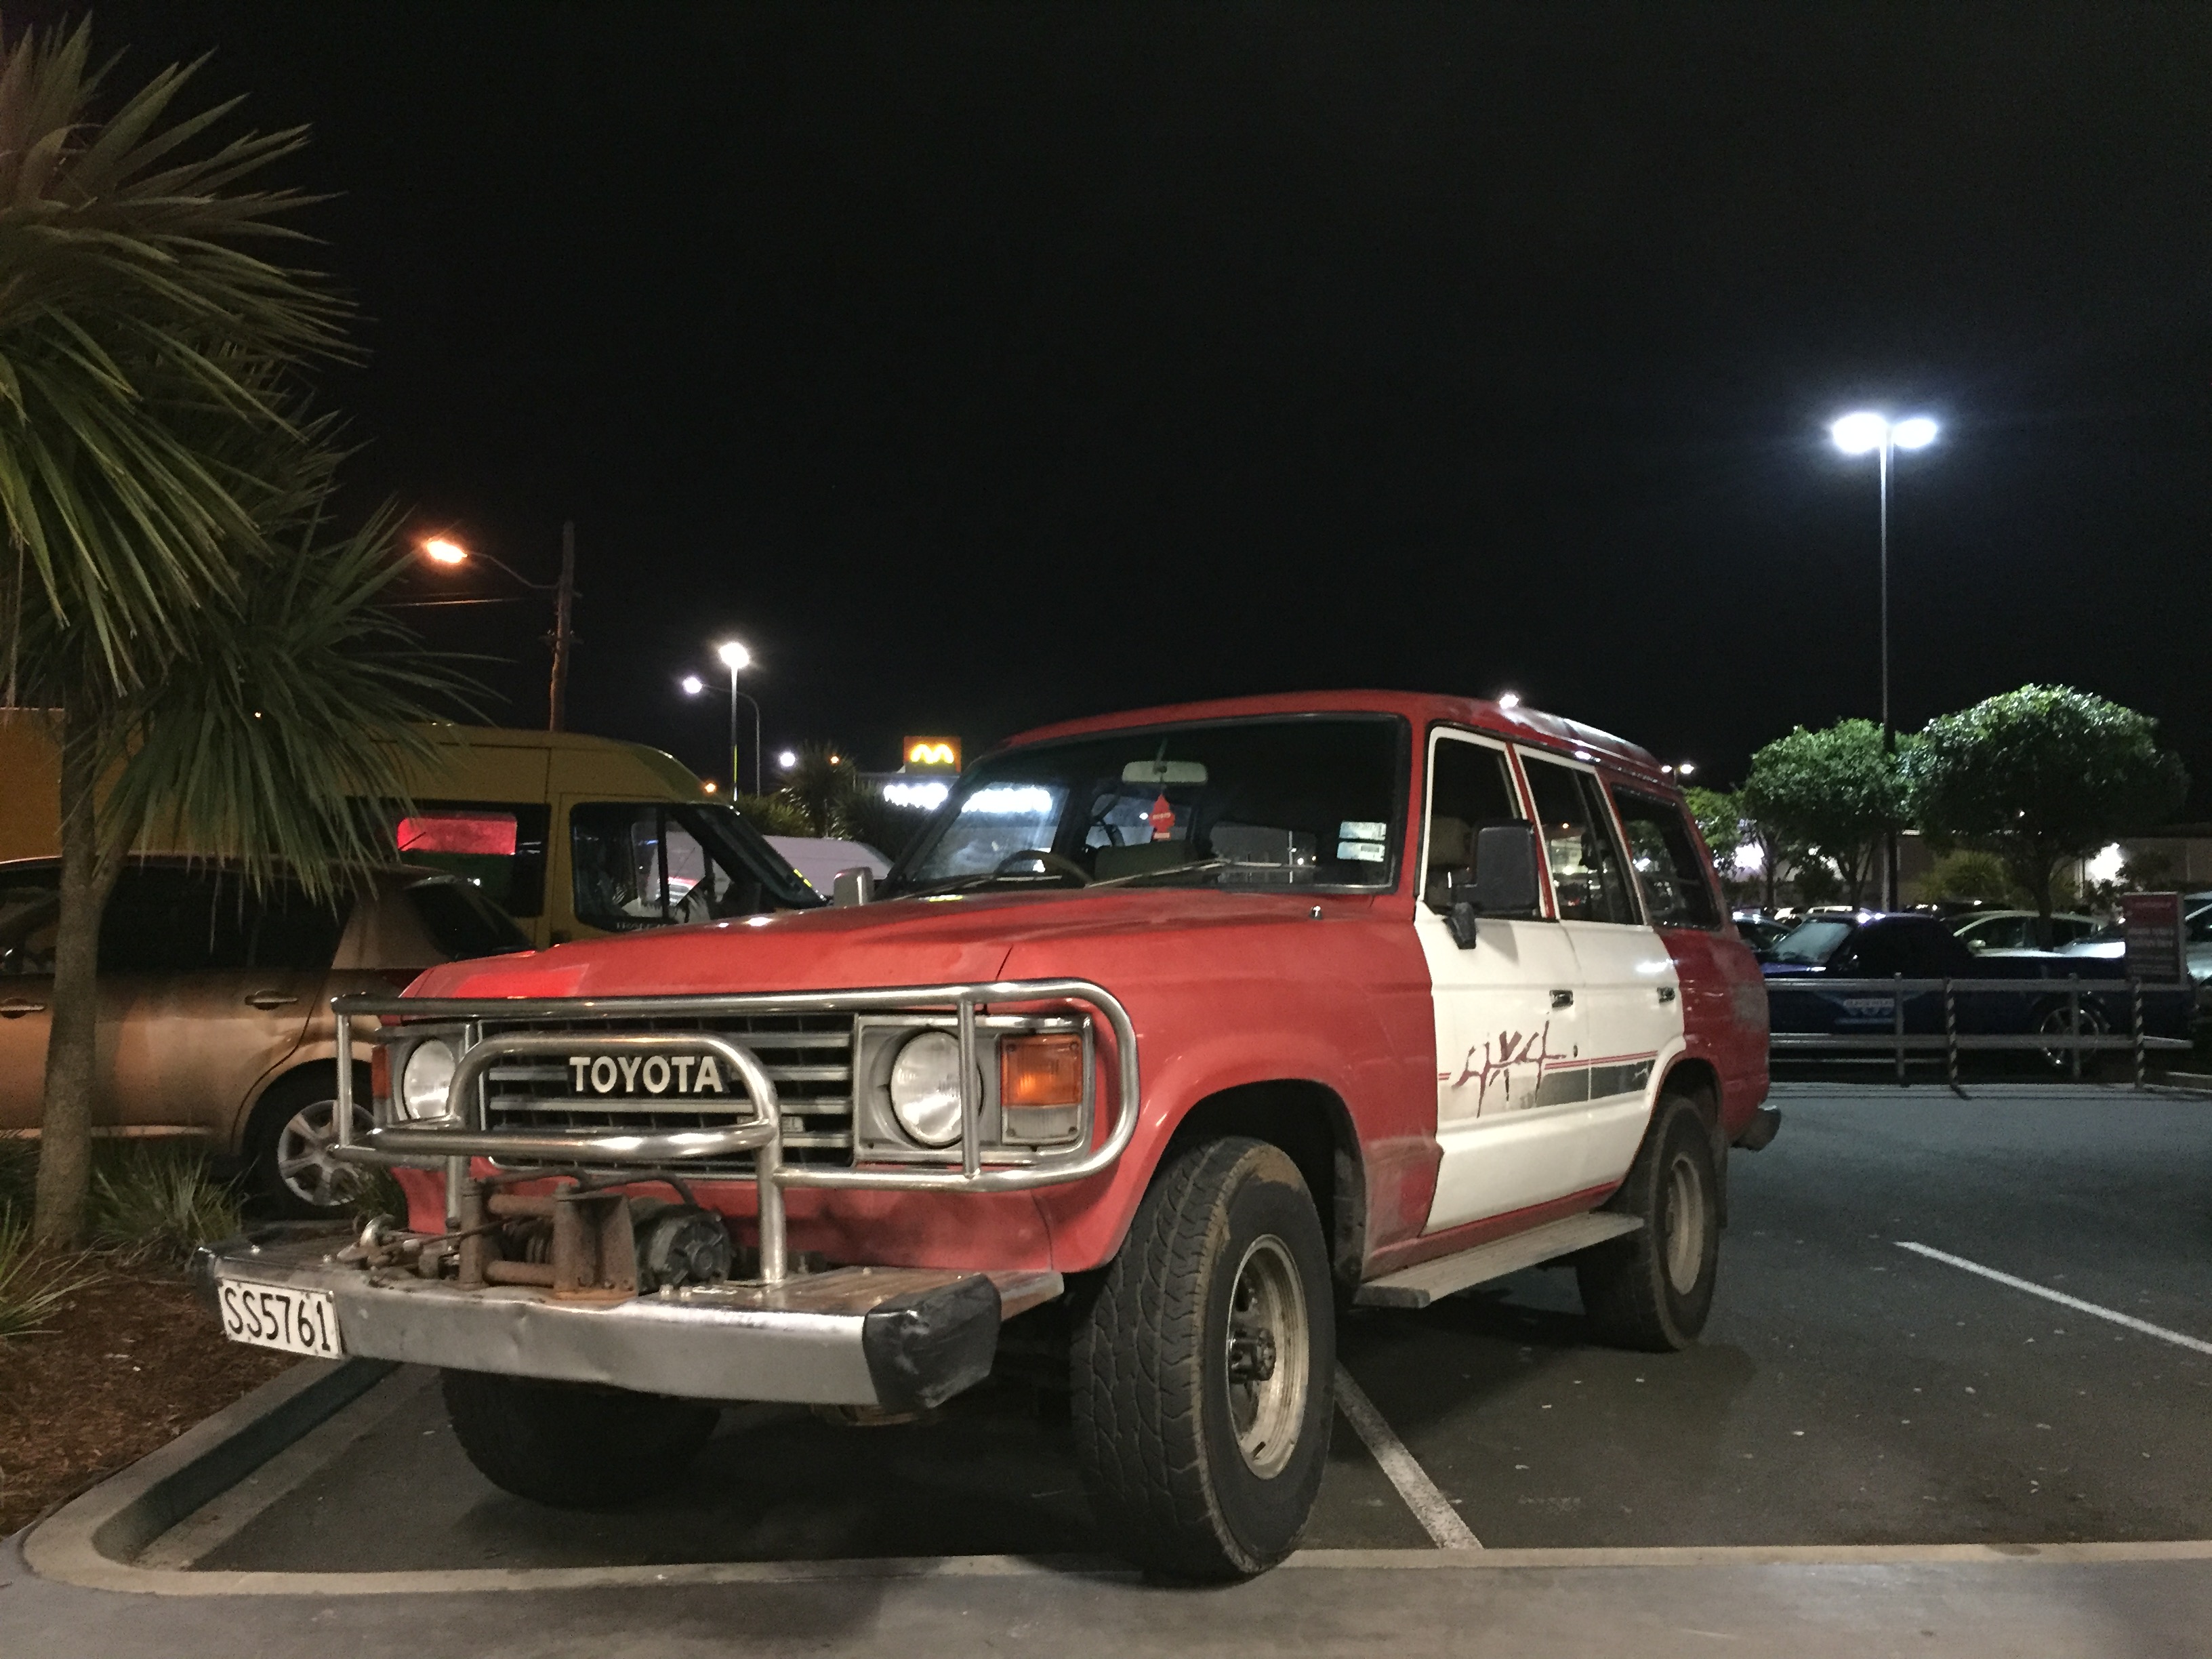
update time. out in the daylight and re assembled. with a new sticker
2 points
-
This weekend, @Alistair bowled around and helped me with a lush polishing effort on the painted surfaces of the 944. Here's a few shots of the result, taken under some neat skies on Sunday evening. 1991 Porsche 944 S2-179-Edit by Richard Opie, on Flickr 1991 Porsche 944 S2-96-Edit by Richard Opie, on Flickr 1991 Porsche 944 S2-172-Edit by Richard Opie, on Flickr 1991 Porsche 944 S2-141-Edit by Richard Opie, on Flickr 1991 Porsche 944 S2-170-Edit by Richard Opie, on Flickr Some of the S2 differences: 1991 Porsche 944 S2-129 by Richard Opie, on Flickr Turbo nosecone, a big upgrade over the old 924-style front my 8v car had on it. 1991 Porsche 944 S2-92-Edit by Richard Opie, on Flickr "Bridge" spoiler in place of the squishy rubber ducktail thing, and the under spoiler/bum flap thing. 1991 Porsche 944 S2-47 by Richard Opie, on Flickr 1991 Porsche 944 S2-106 by Richard Opie, on Flickr 16x7 and 8" "Design 90" wheels and Brembo 4-pot clappers on 300mm rotors at either end. 1991 Porsche 944 S2-116 by Richard Opie, on Flickr 1991 Porsche 944 S2-119 by Richard Opie, on Flickr 3-litre 16 valve 4-banger engine. A shade under 220hp, lol redline of 6500rpm but sooooo torquey. Actually a very smooth thing to drive, with twin balance shafts and all that jazz. 1991 Porsche 944 S2-189-Edit by Richard Opie, on Flickr Delicious pop-up headlights, I can watch these go up and down all day. 1991 Porsche 944 S2-108 by Richard Opie, on Flickr 1991 Porsche 944 S2-68 by Richard Opie, on Flickr 1991 Porsche 944 S2-80 by Richard Opie, on Flickr 1991 Porsche 944 S2-82 by Richard Opie, on Flickr 1991 Porsche 944 S2-112-Edit by Richard Opie, on Flickr Interior things and stuff. Headunit will be switched out shortly for something not silver, and Bluetooth capable.2 points
-
Yes...yes...hell yes!!!! Boom!!!2 points
-
*YARN THREAD* Walking around the Kumeu car show 2015, the old man was telling how one of his mates at work had two Escorts he wanted to sell, a Mk4 convertible and a Mk1. But seeing as I was knuckle deep into turbocharging my MX5 at the time I merely shrugged it off as I didn't have anywhere to keep another project. Two years down the line I was eating a tuna steak at The Esplanade in Devonport and all of a sudden "Boy, remember that Escort I told you about a few years ago, would you like to go and see it after lunch?" "Sure why not".... you can work out the rest Beatrix is a November build 1969 Ford Escort 1300 Sport assembled in Lower Hutt. When I brought her in March she hadn't run for about 15 years and her rego has lapsed. I got the engine going with a bit of fresh fuel and some new plugs and did a few laps around the block. I then pulled her apart to have a look at what we got and got a few good surprises, Some spring adjustable front shocks 4 pot AP racing front calipers a 711M 1600 block and the biggest surprise apart from the battery tray, no real rust to speak of. The plan at the moment is, rebuild/replace all that's perished over the years of sitting still. Rebuild the engine. Reregister her. Replace the seats with something less offensive. Repaint it back to its stock color, Ford Diamond Blue.1 point
-
Nothing too exciting to report really One little Aliexpress parcel came this AM Looks the part for $12. And started having a look at my bars, this is how they come from the factory with mounts for all the trim and optional windscreen etc etc Bit of rough cutting later and there already starting to look a bit better Spent a bit of time with a flap disc cleaning them up some more, when I realized I'd better check that they actually fit on the AF35 stem haha And this should pretty much show my intentions with them Going to finally fire up my TIG tomorrow too, taking it and the bars down to a mates for a lesson. Also tried the new carrier rack on, took a couple little tweaks and the threads drilled out of the factory holes but it fits nicely (took a gamble on a late model rack fitting the earliest model) , I need to draw up some light mounting brackets to get cut out on the waterjet tomorrow too.1 point
-
Long overdue update! I've been using this car as a weekend pleasure cruiser, done a few tow jobs here and there. Just enjoying the car In a more Legal manner. So we headed away for a weekend in June and took the Stato on its first maiden voyage-not too far just an hour and a half drive from Waimate to Twizel to see the inlaws. I absolutely loved loading up the car with the wife and kids and going on a drive up the high country but... it wasnt with out a few hiccups. We were 1 km out of Omarama when the whole car started to shake up and down and side to side. ( quite a weird shake really cant explain it!) limped into omarama went to put the spare on and that was a no go as it was bald and deflated I was caught with my pants down. the old whitewall had started to separate $120 later and a mediocre replacement fitted we were back on the road anyways made it to the inlaws house enjoyed my weekend even though it was freezing cold. all was good until we had to leave two days later. The car started to miss just outside of Twizel that then grew into a backfiring out the carb. rang the inlaws got towed back to their house and we borrowed the Mother in laws cressida. I said my goodbyes and left a big slut in Twizel I called John from South Island couriers to bring the car back to me 2 weeks later along with $250. I tell you what it was an expensive weekend. Since then its just sat in my Garage I've been at the point where I dont want to sink anymore money into it ( as its hemmoraged so much money already more than I've let on here at OS) I have even considered moving it on. I'd tested the waters on Facecrack and got some interest but then it dawned on me I just cant bear to part with it. The thought of some young fuckwit making it into a boozer makes me angry. since June Mrs Wylde removed the Right hand rocker cover and found the rocker arm on Ex #7 torn in half and a destroyed lifter the cam lobe survived the ordeal though. My intial thought was that It jammed a valve when we were up in Twizel. so Today I took the head off unfortunately I stopped taking photos at this point but I got the Head off and removed the valve spring. The valve was not stuck! I'm confused as to why or how this happened. Can I get away with replacing the lifter? or will I need a new cam too? Or just LS/Chev/Big block it? TL:DR - A new tyre and a fucked engine!1 point
-
Surely that must've come from Shane ? Towing Vauxhalls around, and parked outside a Radiator shop?1 point
-
I love the idea of those little 3 cylinder ecoboost engines. Very interested in them when they came out. I think the L4 engines are the same as Mazda skyactivs? I've priced them up and they are still pretty damn expensive here in NZ. However- if I sold the V6 Viva I'd have some coin to realistically import some bits and bobs from the UK, where these engines are plentiful and cheap! I'd love to do a GM Saab L4 engine from a 9.5 which bolts straight up to a 4 cylinder commy box among others. Great engines, understressed, awesome power potential. Amazing what power the Saab guys are getting from them overseas on the stock bottom end. But they are sadly a heavy engine.1 point
-
You can thank old mate bugalugs with the "insomniac" child for that. Someone suggested last night that we could park in the section further away from the Warehouse and food places (roughly in front of the Reduced to Clear store) as that whole area remained fairly empty all evening. Sure it's not right next to Burgerfuel, but as mentioned neither was the top carpark at Ellerslie nor Countdown Manukau.1 point
-
I'm not having a winge . Just really missed the relaxed style in the way the meeting are held where we all have a look at each others cars and talk about them. I'm keen for any where and I agree its just a really busy city now days1 point
-
didn't get to make it last night because the car wouldn't start - either a battery or starter motor issue I think - shut the garage door without too much further investigation . Westgate would be too far west (IMO) - has to be fairly 'central' ie; no further south/east than Mt Wellington - No further North than Takapuna - no futher west than current location. that way its sort of fair to everyone-ish. Difficult to think of locations that aren't Greenlane McDicks to be honest.1 point
-
No. It doesn't need to be at Burgerfuel. They've been good to us for quite some time though and keeping this relationship going would be nice but is not mandatory. Good suggestions. Go and scout them out on a Wednesday night and let us know if there's enough parking and space etc. I'll be doing the same with a few places that I can think of.1 point
-
Does it need to be at a Burgerfuel? Just thinking of spots with parking, there's the Cock n Bull (or whatever it's called now) in Lynfield which has a handful of restaurants around it. Tonnes of parking at Westgate for 10 pin bowling, a foodcourt, or a game of pool? Also handy that it's just off the motorway1 point
-
I did try to hold a couple of carparks, moved too early and someone else snaked the second spot though. I find Mt Wellington is often very busy with the supermarket being there and construction going on at the moment limiting carparking spaces.
1 point
-
Looks like enough room to swing a cat1 point
-
The other good one is to just start it in gear, go for a drive with your foot on the clutch - give the throttle a few sudden stabs - that always worked for my '71 corolla that had the same problem.1 point
-
More of a negative pressure wave (from my limited understanding), being negative it travels towards the engine but draws exhaust gas out of the chamber aiding scavenging1 point
-
@brocky41 adblue is mainly urea which reacts with NO and NO2 resulting in it being broken down into N2 and O2. It also makes the exhaust smell even worse.1 point
-
Nice. That's what I was going to use for my beams conversion but we couldn't find them. Ended up just slotting urethane in there and bolting it down, so more like a solid mount than a rubber one. Might look into these ones - cheers!1 point
-
@Truenotch I can't remember the thread width, want to say m10? Tons of these on ebay, really cheap too. Reasonably solid, minimal distortion with a 4age hanging off them at 45deg.1 point
-
Who knew all your previous Google searches would be relevant in another context? I think the big issue here is why no bug catcher?1 point
-
If anyone is keen the Nelson car club is holding a standing 400m sprint on Redwood Road Oct 1st. Car should be of wof standard or motorsport logbook. Helmet and cotton overalls. A great chance to find out how fast your car really is!1 point
-
Got some more parts Roobars and a long range tank to turn this into a true Aussie battler. Bars are off an 83 4wd, and Ive just noticed they are not going to fit because I have the bumper with only 1 set of holes in it, and I'm not going to cut holes in it, so will need to cut it up and make something work.* Scratch that I looked again and they appear to mount to the towing eyes. Which is weird I thought. It also has a mount for an A frame on it that I won't need because a holden 6 will run forever)it's an auto. So that can go. Side bars should fit fine. Also from the 4wd I got the fuel tank which is 18 usgallon vs the 2wd 15. So should get about 100km more from it. Speaking of. I changed the thermostat and now it's actually getting to temp. Sits at half to the next mark depending on driving conditions (2 marks from red, 3 from cold) which seems high compared to what every Holden owner says they sit at (fans on at 1/4 to halfway) but maybe it's a NZ market thing. It won't go past that mark if I hoon up the Bombay's or leave it at idle with the fan on. Will see how it goes as the weather warms up. I'm using 1L less per 100km so that's a good thing. Also got a nos heavy vinyl floor covering without any shifter hole in it, so probably aftermarket. Should be ideal1 point
-
Been busy over the last few months A12 out and A14 in! Ended up building a fresh A14 9.8:1 Compression (pistons flycut) Cam with 2500rpm-6500rpm range 9.4kg Flywheel (2kg lighter than standard) Firmer Kelford valve springs Ported and polished head & manifold to my ability Twin 40mm dellortos & extractors New alloy radiator on its way, also have to install the e15 electronic dizzy at some point down the track. Here is a quick video of a small test start with single carb when I first installed the engine... Pics following Pistons flycut for clearance H89 head, water jackets tapped and grub screw inserted. Also drilled a small hole to locate a roll pin from the dellorto manifold to keep it alinged Discussion1 point
-
Paint it pink, call it wet on the inside1 point
-
Went for a hoon over the hills and took in a few country pubs with some other 1200s and a 260, car went well and no issues. Today I butchered a couple of old standard A12 downpipes I no longer need and made a flange so this will make life a lot easier in the future! Not to mention tidier looking. There's a pie cut left open cause I don't know what angle it needs to be yet
1 point
-
I'll be there with something.1 point
-
You could explain that the M engine was designed by toyota to have a safety release valve when excessive hp is developed, thus protecting the driveshaft from failure.
1 point
-
I have just popped in to give sort of a quick "hey there fella..how's your car working out so far and what do you think of it?" update like thing. Well.. glad you asked. Note one; Its not very fast but keeps up with traffic fine if traffic drives slowly. Hills scare me. In the other Viva, Viva One, hills are fun and something to look forward to. In fact I often plan a passing move on a hill to really put a point across to what ever I'm passing, really lay down the house rules in a quick simple move No such fun with Viva wagon I'm afraid. Now all I plan is where can I wind up the rubber band and how fast can I take a corner so not to scrub off too much speed. Momentum is king. Note two; Its light. Lighter over the front end which makes for really light steering and a throw it into everything, chuckable sort of fun drive. Great for not slowing down *see note one. Note three; The brakes need a lot more effort to stop. Suspect servo maybe not playing its part and has decided its going to just sit in the bay taking space and to hell with assistance. The brakes work fine but you have to push them hard. So best not to bother using them and just hold that speed which is good again for speed.. see note one. Note four; Its only running on 3 at idle but smooths out when revved? Or is it me thinking its smoothing out and its actually only running on three most of the time. I wonder if its the worn dizzy cap and once up to speed it doesnt affect the engine. But I think its more. I will check the plugs in the morning. The exhaust knocks the cross member in a very noisy horrible way when the engine bounces about on three. This totally goes with the style of the car though. Passers by probably just think 'old cars.. aint they so sweet with the clouds of smoke and noise' Note five; Its not burning any oil. This is good. Instead its doing a very British car thing and leaving puddles on the floor. I thought it was mainly the rear main seal but then I noticed I had not re-tightened down the rocker cover since its been run a few times. Hopefully this might help. If the car continues to behave well with regards to oil use then I may well just dump out the 15 year old oil and treat it to new stuff. I really should change it shouldn't I... I'm so mean. Note six; It needs music. The wheezy little four pot struggling up a hill, gasping for air, stumbling and hurting when I try to make the gigantic leap over the hole the size of the Isle of man that is between 2nd gear and 3rd gear is not music. I have been given an 80's tape deck stereo headunit and I have some plastic speakers that cost me nothing. So perfect for this car. I will fit them and then hunt out the best music the local recycling center will have on tape. I will post up the build of this mega sound system as we all like ICE. Anyway- we took both Vivas to the OS Nelson area meet today. It made it there fine and did not have too large a queue built up behind and didn't blow a cloud of smoke. So that was nice. Event went well and I took some photos. There was actually 4 Vivas there in the end. This is a record surely. Certainly for Nelson.. Then we drove back home- Hannah following in Viva one which she now claims as hers..pfff no taste. Snobbery. It was a nice day out and as I drove home to the sound of rattles, bangs and clunks I made my list of things to fix. I will report back as I sort through them.1 point
-
I am quite happy to say that I have managed to get quite a bit of work finished on this little wagon. With the evenings being brighter and warmer and having a new dose of enthusiasm I have spent more time on it and its been fun. So where was I last update. Lets start with the doors. I knew they had rust but not too bad and in places that’s easy to get to. I have been putting off repairing them so now is the time after having just finished the last few bits on the tailgate (hatch..) Luckily the rust was mainly on the outer skin wrapping over the inner strengthening panels that the hinges are welded to. I cut it away and let in some nice new thick sheet. I actually ground back the welds afterwards because it it made sense to have it all finished properly in a place that is hard to get to once the doors are back on. Plus the seals, speaking of which I will need to get some decent second hand ones with the originals having fallen apart, will need a good smooth surface to squash against. There was minimal rust along the inner bottom of one door and they fixed up well. Really glad they are in good condition otherwise with minimal dents on the outside (just dented enough I say..) While I was working on them I also had one of those ‘expecting it to be a arse but it was actually easy’ moments when I had to remove a broken screw from a window winder stub. The screw was small, broken unevenly and I sure that Id not be able to drill it central enough. But I did, it worked and I was happy.. With the doors repaired and the repairs painted over I put them aside and started on the wiring. I enjoy wiring and have always planned to tidy all the original stuff up. I got carried away and its now pretty well hidden from view. I added some extra wires for the fan etc and decided to run the main loom out of sight via a hole I added in the tunnel. The original bulkhead grommet worked perfectly. Once I started hiding things I got even more carried away. I disliked the look of the fan wires running externally along the top of the bulkhead so they were carefully re-routed then back through the heater box and through another added hole. The main loom sorted back through inside the car and I was happy with it all. So onto the heater hoses. First I fitted them as per original. Oh dear. No, no ,no.. this will not suffice !… Damn they are ugly hoses, just running over the engine like an afterthought, looking like a scaled up version of a badly designed Lego tecnics kit with poorly scaled pneumatics. Nup. No sir..I don’t like it! So I rummaged through my always handy supply of random hoses and found a few Mazda items that will help in my quest for neatness, a Toyota bottom hose and a ideal tee piece. I also found a heater pipe from the Crysler Northstar quadcam V8 I have been gifted (another story…). Still not enough pieces to complete my puzzle. Back to the wreckers then… I love going to wreckers, especially when they let you roam about by yourself and get your own bits, a rare thing these days with so many OSH rules. Luckily Hannah enjoys it too because she was along for this sortee. We found a variety of hoses from a Datsun something, a Mitsubishi Mirage, a Honda Shuttle and also scored an ideal inline heater valve from said Honda. A few hose clips and other handy bits. All this for $10 free image uploading Back home and I assembled my scavenged findings together and came up with a design. I cut that steel pipe down, welded on a bracket so it mounts onto the carb support bracket beneath the carb. Chopped the excess bits off the heater valve and mounted that in the original place using various bends from my even more awesome stash of bends. Added the Tee into the Toyota bottom pipe. It worked out fine except for one thing.. the heater valve works backwards. Hot is cold and vice versa. Luckily my other Viva, with its Chevette sourced heater valve is exactly the same. So no confusion for us.. just everyone else.. After finishing them I noticed my exhaust was not yet connected to the manifold. Then I discovered holes. Bugger! So old towels out to protect things and I carefully welded in some repairs. I am a bit upset in that the blobby welds might well restrict things and lose me a pony or two. However I shall learn to deal with this. Then on to the breather and brake servo hoses. I have decent PCV valve to use and some pipe now. But nothing matches. Out with my stock of alloy bits and I worked out a plan using my 1/8th bsp taps. I machined up an adaptor and it worked a treat. Finished and mounted.. With that lot finished and looking a lot neater it was now it was time to sort out the throttle pedal to carb interface system. I am using a HC Viva floor mounted pedal like in Viva one. The original top mounted pedal system uses rods and is..ugly. I copied the design of cable clamp and pedal mount from Viva one. Noted how much cable pull was offered by the pedal. Did some maths and worked out the diameter of pully needed. Then I machined up a pulley from a lump of alloy on the trusty old, leaky, English lathe. Made a new cable bracket and used some old bike barrel adjuster. It was an easy enough job but just time and I’m glad its done. Cable clamp so the nipple will go at pulley end for neatness... Measure cable pull.. Pedal mounts here on new base... A leaky (because English made) old but trustworthy lathe and a lump of alloy.. A new pulley.. I wont mount it yet as some wiring to do for the starter solenoid yet to be done. But I’m not far from firing the little 1159cc block of fury up and I’m quite excited. Here's a photo of the new hose layout. I'm much happier with it and it was worth the hassle... Back soon1 point


This leaderboard is set to Auckland/GMT+12:00