
Leaderboard


Popular Content
Showing content with the highest reputation on 05/07/20 in all areas
-
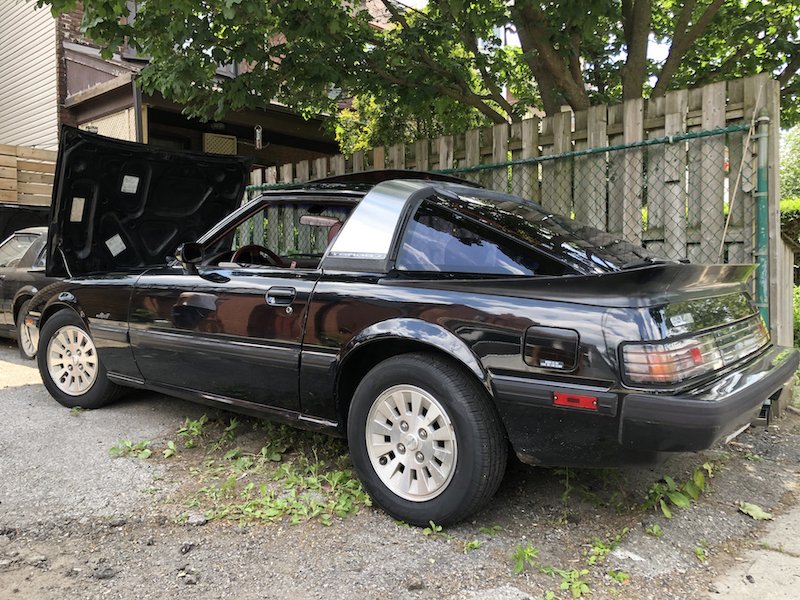
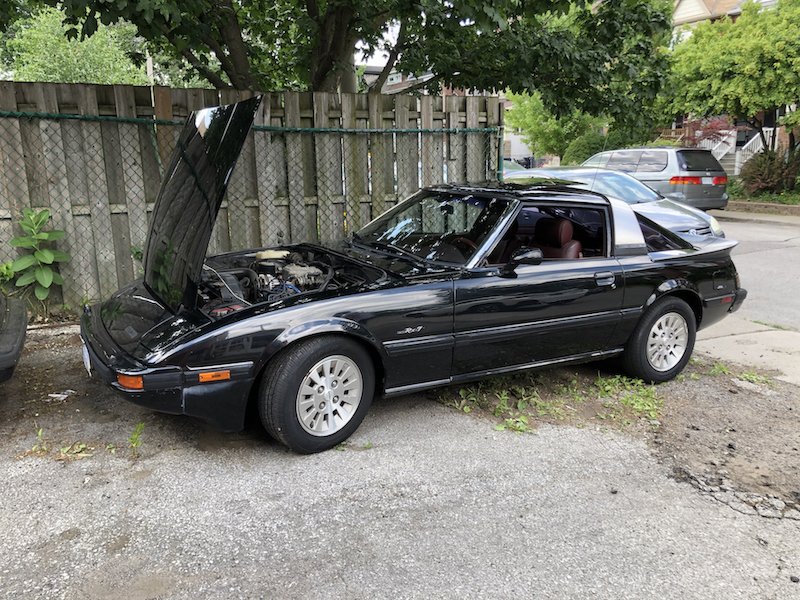
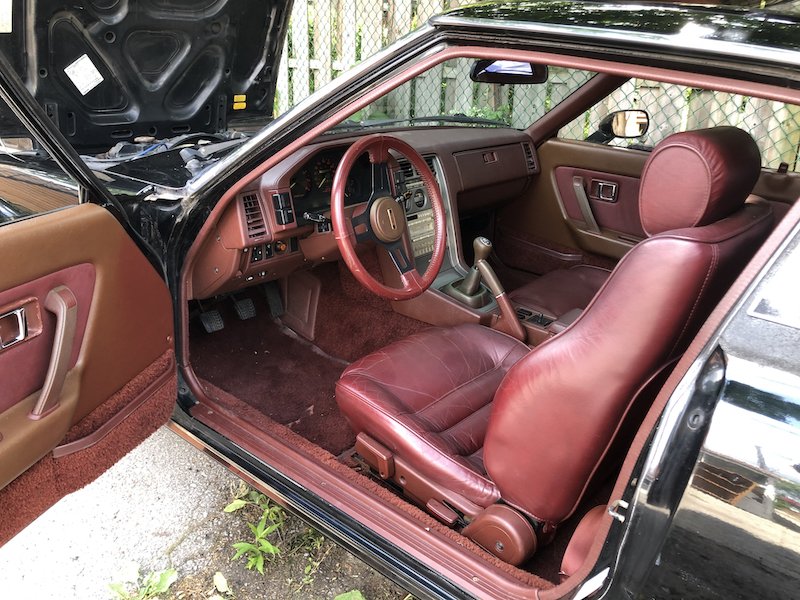
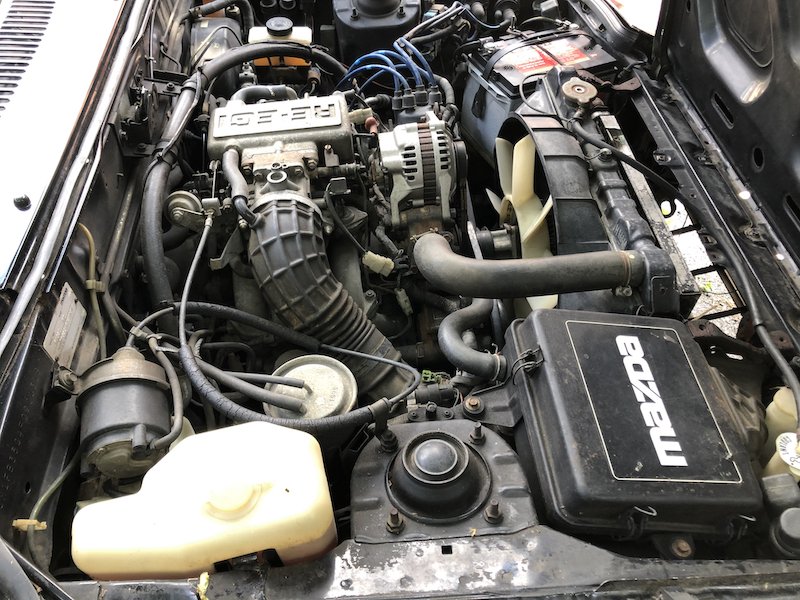
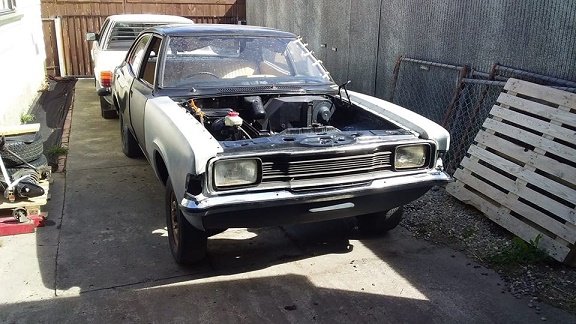
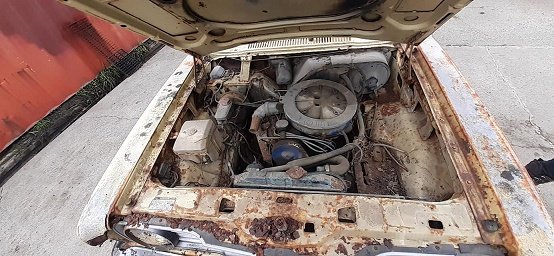
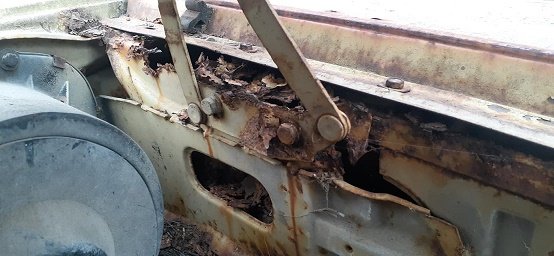
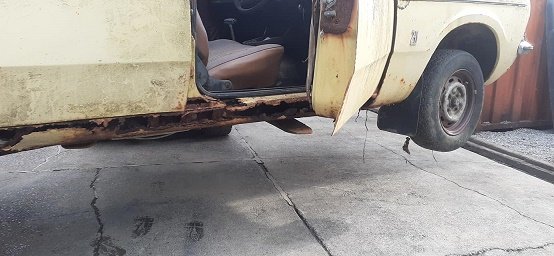
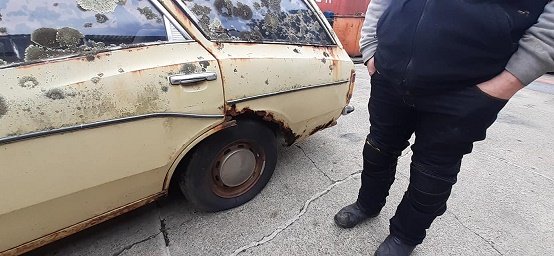
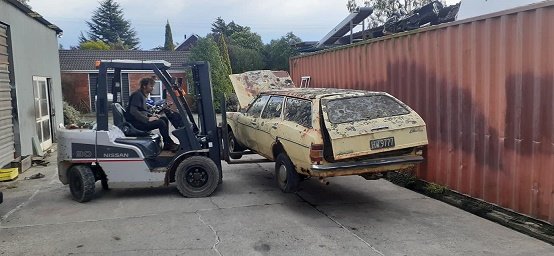
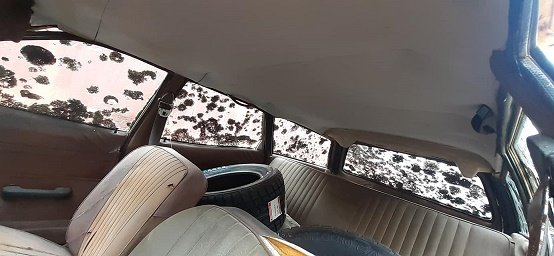
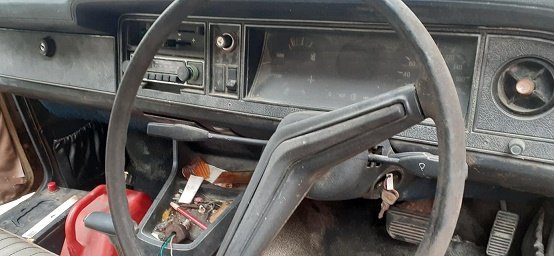
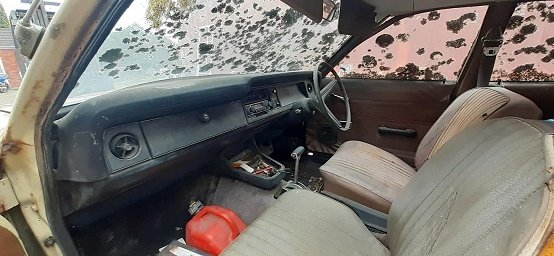
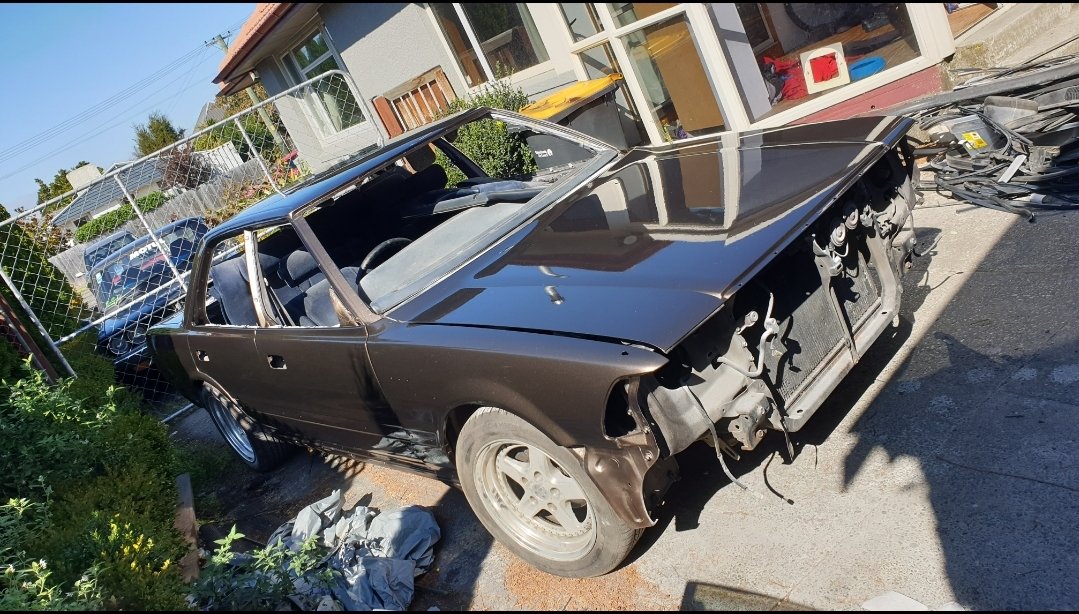
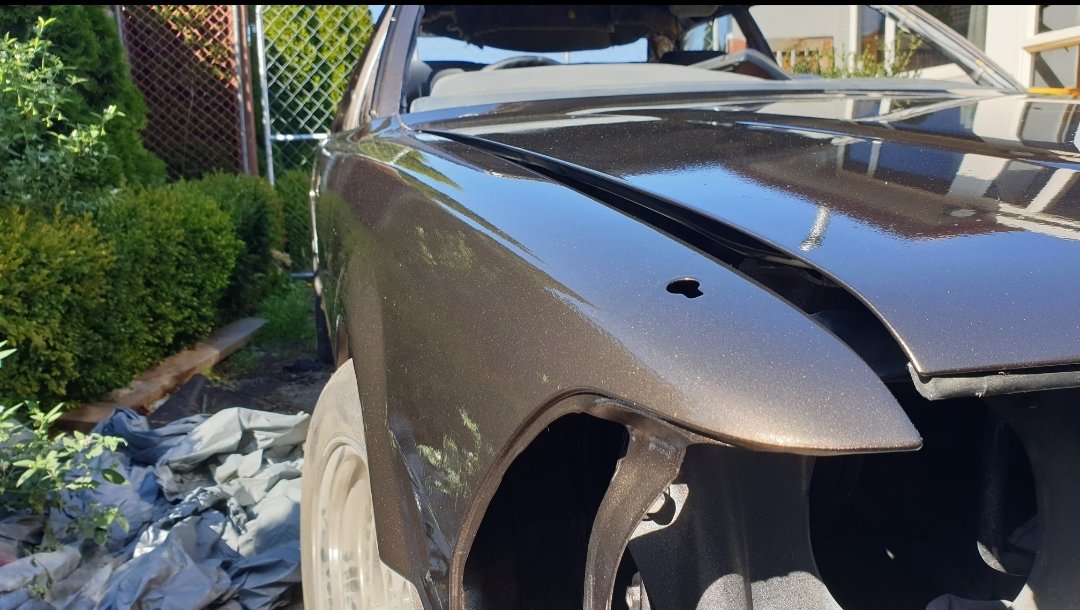
** Discussion https://oldschool.co.nz/index.php?/topic/74793-helium-elbows-magical-rx-7-fb/ ** So I never thought I would end up owning a rotary any time soon but wasn't having too much luck finding a sweet Starion/Conquest near me over the last year or so. This came up locally for a good price and thought why the fuck not. It's a 1985 Canadian spec FB RX-7 GSL-SE with the IMSA Targa option. It's basically the same as US spec top of the line GSL-SE with 13B RE-EGI engine just with km/h dials instead of mph. IMSA Targa package adds faux brushed metal targa band (I'm not the biggest fan), front splitter (currently off the car broken) and rear wrap around wing. Factory options include maroon leather interior, electric windows/mirrors, push button climate control A/C, LSD with larger vented disc brakes F&R, cruise control, and glass moon roof with carry bag. It's a two owner car with 167k kms on the clock. Needs a little tidy up with a few small rust patches but otherwise it's a solid body and completely factory original inside and out. It comes with an almost complete '84 GSL-SE parts car that has a 10k old rebuilt engine (though hasn't run for years) and a Racing Beat full exhaust which will probably find its way onto the good car. Plans are to tidy it up over time and bring it back to as factory fresh condition as possible. Probably hang onto it here in Canada for a while and perhaps even bring back to NZ with me. Discussion https://oldschool.co.nz/index.php?/topic/74793-helium-elbows-magical-rx-7-fb/
 14 points
 -
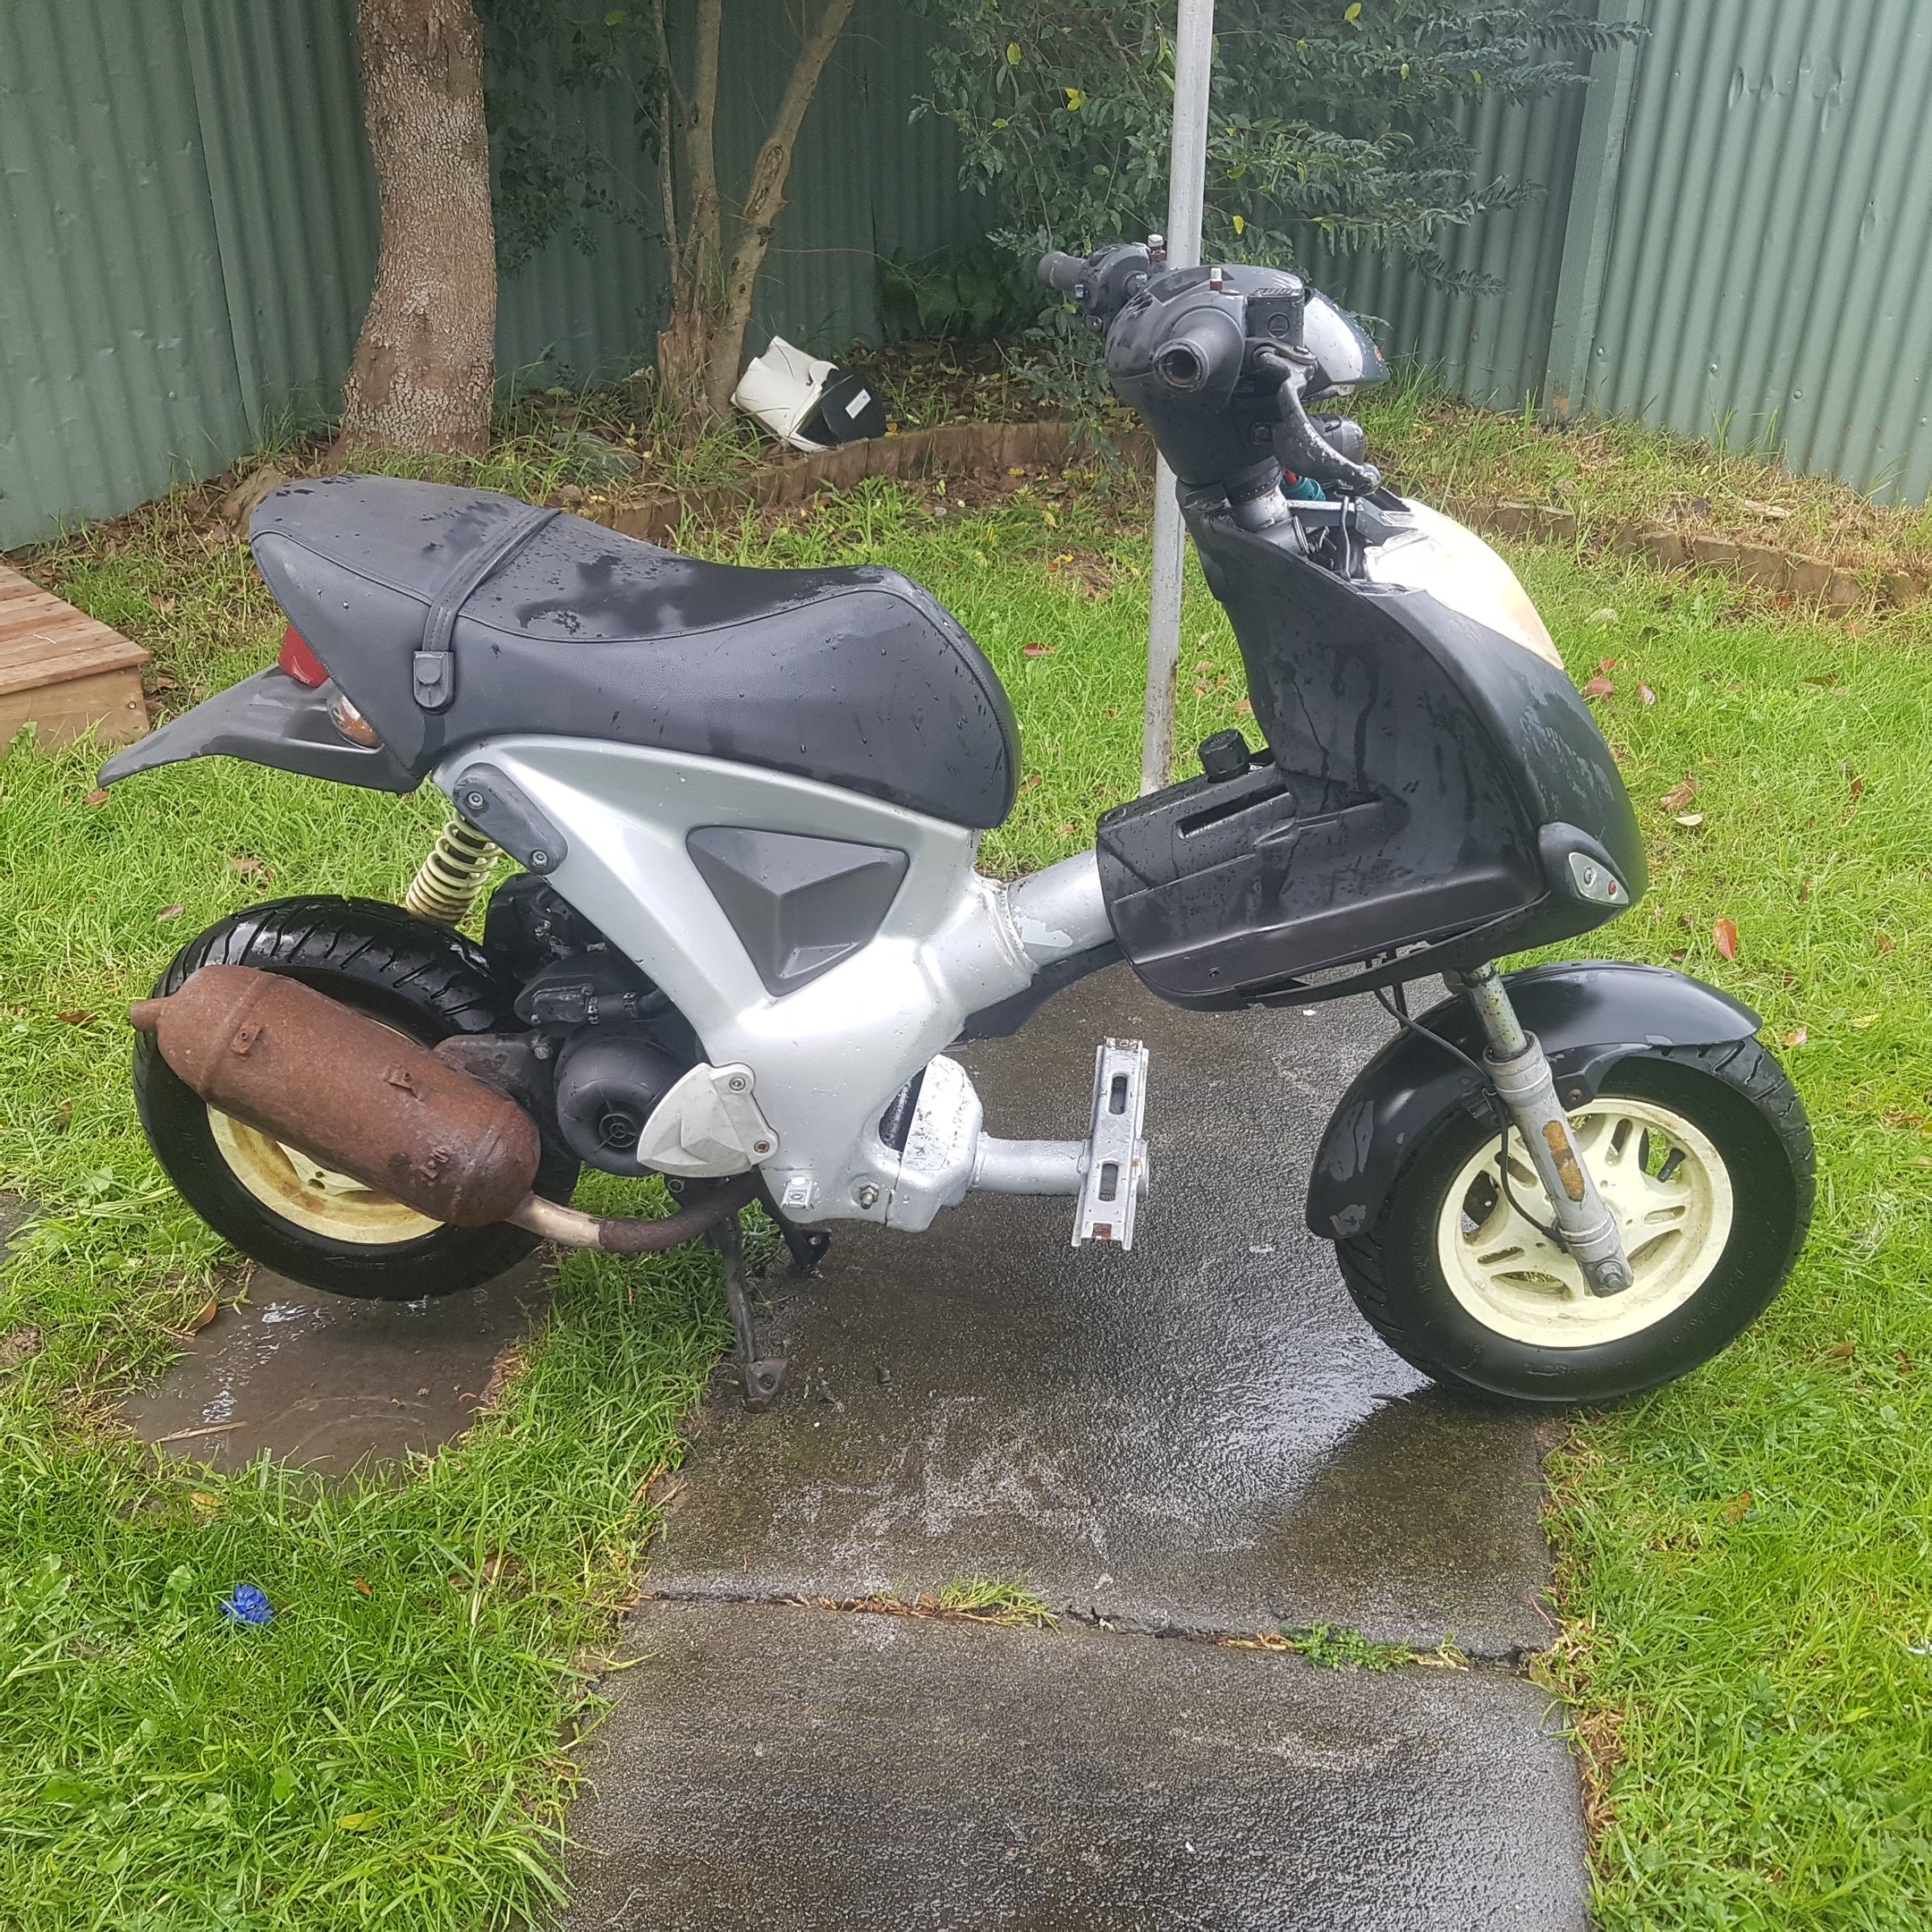
tried to think of a catchy title ^ for my new 2002 gilera ice 50.... I've always wanted one of these as the cool kids were riding them when I was in England (you can hide spliffs and 8ths in the glove box real well) I've had "gilera ice" on my favorites search on trademe since trademe was invented.... there are now only 100 odd on the road in the uk so becoming very rare, this one came up on marketplace hahaha bloke wanted 400 I gave him 300 and said cheers, has a live plate, non working front brakes and seized front shocks.... i can work with that. I have a 70cc malossi cylinder kit in stock and have on order a malossi flip exhaust, new front brake lever and master cylinder new tires and malossi multivar 2000 variator kit, new 19mm pwk carb. I'm hoping for 100kph. any way ill dump photos here, it came in ok condition but definitely worse for ware first up is starting to strip and hot water blasting grime and oil. ps if you haven't hooked your water blaster up to the laundry hot tap are you even living?
12 points
-
Wow, it's been almost six months since I got this back on the road and warranted. Took it in for its WOF check today, and passed with a clean sheet. Good feels. I better get my arse into gear and do more than the 186 miles I've done in the last 6 month period! Before the WOF I thought I had better take it for a quick shakedown, so went out for a hoon last night.10 points
-
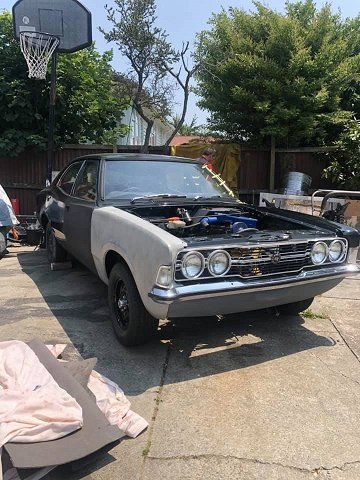
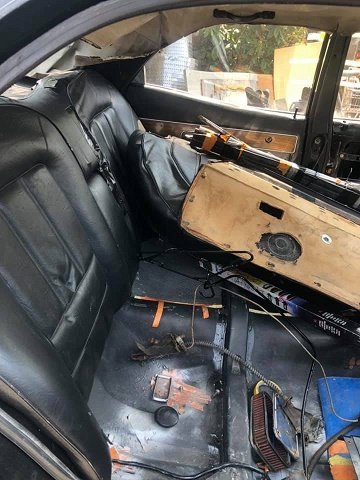
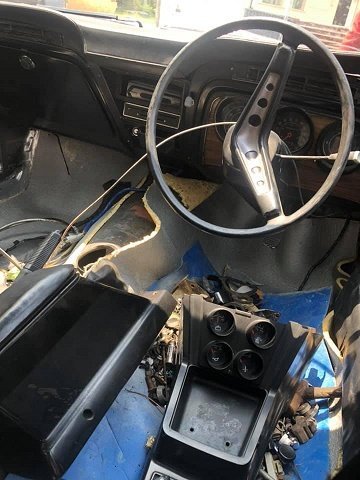
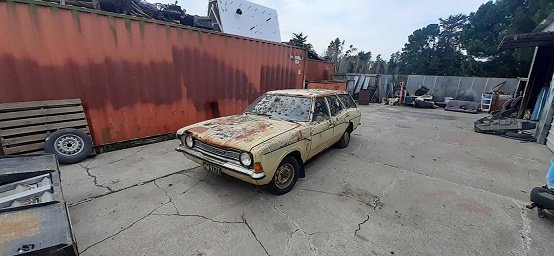
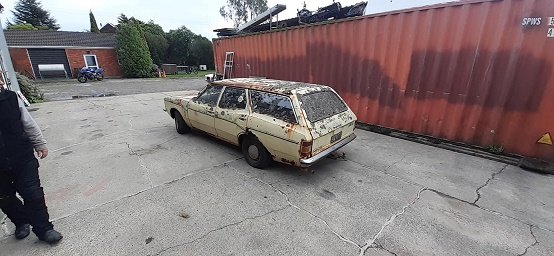
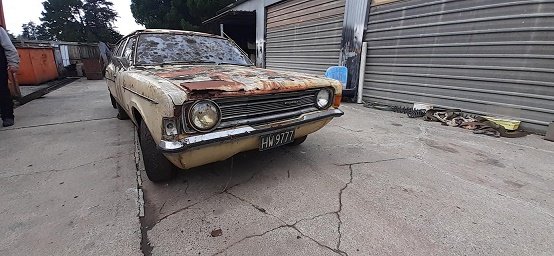
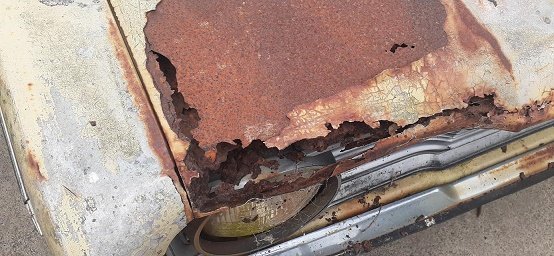
Discussion here ahhhhh the other mk3... as some of you know i bought a parts car for my 4.1 mk3 im building ...this one when i got it. i stripped every part i needed from that car done to the loom ,nuts and bolts and even the pre facelift dash... i did put the facelift dash back into it tho. i then added some seats i had sitting around and some random wheels and sold it off to a mate as he just had to have it......it meant that i got most of the parts for my 4.1 build for nothingin the end. as it sat when i sold it. (minus lights and grill....at best it was a good rolling shell) and i did get the bonnet for it as well.. so some weeks later my mate asked if i knew any one that would buy as he just couldn't be arsed having a car around that didn't run....i knew it was a good car and just needed a facelift mk3 or a mk4 or a mk5 parts car and it could be put on the road pretty easily....as reg on hold.......(origanal black plates) registered with the mighty 1300 xflow tho......not the big block pinto....bugger... i had sold my mk2 to another mate so i bought it back.....and put it in storage and kept an eye out for a parts car..... now i had seen a few around but they had been parts cars for others and i didnt want to have to find screws ,missing nuts and bolts ect ect....i wanted something complete that had never been pulled a part..........so i could pull it apart and then i found it on trademe the almost perfect parts car for my parts car ...i say almost because it doesnt have a 1300 and manual box......its an auto pinto.. so i won the auction and the car was in invercargill i had 20 days to collect...and we did that yesterday... a mate bought a fwd fiat ducato (ex ambulance) converted to transporter on tuesday and we decided to drive it to invercargill on Saturday....so we loaded up a vc valiant to take done for his mate got up at 5am and hit the road....the lights died just after asburton ...fixed that. the auto played up going into dunedin.....fixed that (kinda) .got to invercargill and droipped the vc off....drove back out of invercargill to pick up the cortina that was 3 feilds deep off the road in a barn....no tracks just knee lengh grass and massive mud holes where the 2 hedges we had to pass were.( the guy had a tractor but it was broken down next to the cortina we only just got the fiat in there we had to gun it threw the mud full on duke of hazard style ...he showed us where it was and asked us to shut the gate and buggered off.....justb then it started pissing down we tried to air up the tyre and only got 3.....winched it onto the truck and then backed the truck under cover to strap it down....had to strap the bonnet down as well and the rear door..as well as the passenger sided doors.....then we tried to leave....but wet grass,pissing down rain,fiat fwd ,,,,no lsd or locker just the 1 tyre fryer ...took us and hour to get threw the 1st feild and didnt stop till we hit the road....broke a head light,,ripped the sump guard off .....shut the gate and headed home.the auto was having a fit....by the time we got to gay old gore we had it sussed flick it into neutraland back into drive and it would select the next gear......down shift worked ok ish.. so after 1200 ks 17.5 hours door to door its back at my mates place and here is the little sweet heart. 1 careful lady owner ..never been raced or rallied rolled bowled or arseholed...has been on the road since 84 i think i know right ...what a wee darling .but its all there on the inside and what all i need....even put a battery on and all the lights work the motor turned over but wouldnt fire....sorry about the long read but cheers
7 points
-
Entrants, as of 5-07-2020 @ 2pm @johnnyfive Daniel, aka Ruckus guy, aka Grom guy. @GuyWithAviators @UTERUS @MopedNZ @TimShadboltfan27 Shannon D Daniel W @Shakotom @Threeonthetree @Tumeke Brudda @Tumeke @keltik @Vintage Grumble @Truenotch @Mr Vapour @tortron @WankBankA100 @BLIZZO @anglia4 @mark105 @RUNAMUCK @Duke Blackwood @HighLUX @Mitch.W @Beaver @00quattro00 Bucket Barry on bike @MaxPower (Vehicle) @rumrum @slacker.cam @sentra @Dolan @Itchybear @Deliboylurker @Kass @Chunky_t @Thphantum (vehicle) @Geophy Brudda @TimShadboltfan27 @Geophy SNR Jason H Jamie F Paul A @Atex Tofa / Chris R 44 riders 2 vehicles If theres anyone who has missed out at this point, speak up and we'll see.7 points
-
All back together and you can barely tell, lol.7 points
-
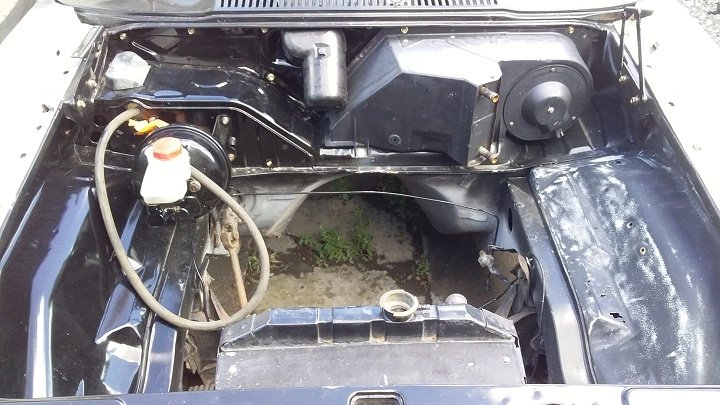
The tie rod end situation is hopefully getting resolved, I have sent a new Y60 rod end plus one of the ball joints from the Y61 drag link that came with the axles down to HBI Engineering in Christchurch, they will make a new ball and taper to suit and reseat it in the new rod end. Because of this I didn't really get onto the axle install, as I would like to keep the truck as mobile as possible. I did give the new axles a scrub and blew some black zinc over them in preparation though. I also looked at my brake bias valve, the setup appears correct for the lift, but while I was jiggling it my fingers came away with a wee bit of brake fluid on, so I will strip this one to see of it is salvageable, otherwise look for a new one.. So instead of installing the axles this weekend I tidied up some other things. Mostly I spent the time installing a wideband to assist with tuning once I get the boost compensator on. This is a Glowshift unit I got cheap off TradeMe, it goes up to 20:1, but who knows if it will be any use really. It was hosing with rain today so even though I finished the install I didn't check it out. This might not be the best place for the sensor, but it was pretty convenient for welding the nut on; I now have any number of mismatched gauges jammed into the dash, I am not one to care about aesthetics over function, but this looks a bit of a dog's breakfast. I'll do something about this later I think; The other wee job was to stop the lid of the toolbox banging, this was clearly audible in the vid I posted while driving up my driveway. I hacked this device out of one of the seat rails that came from the Suzuki seats, we will see if it has the desired effect;6 points
-
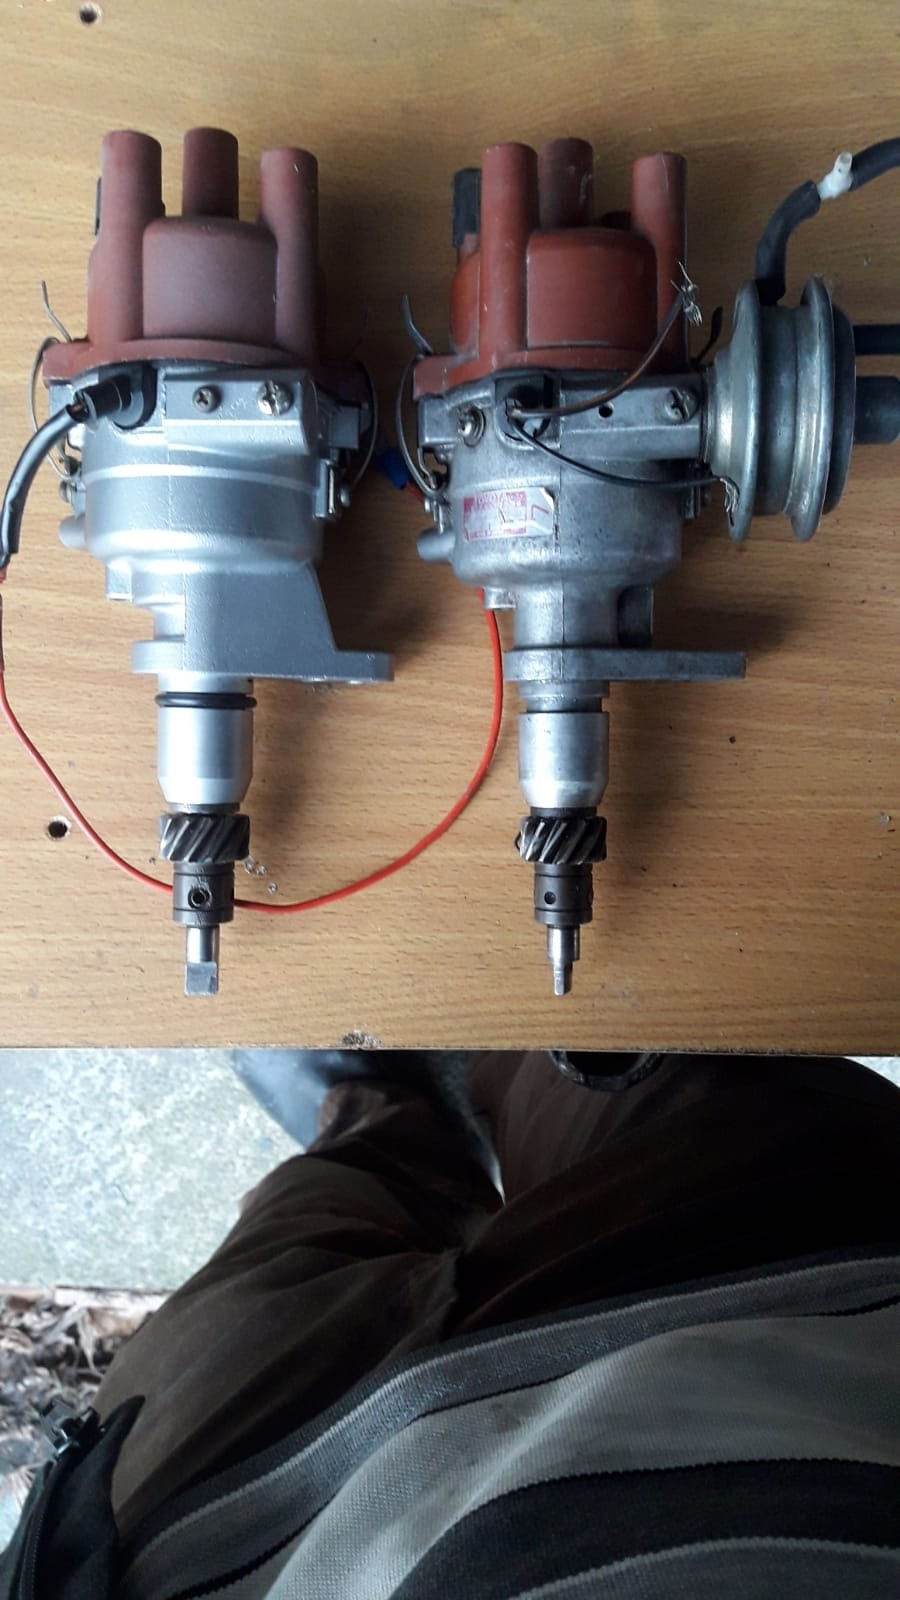
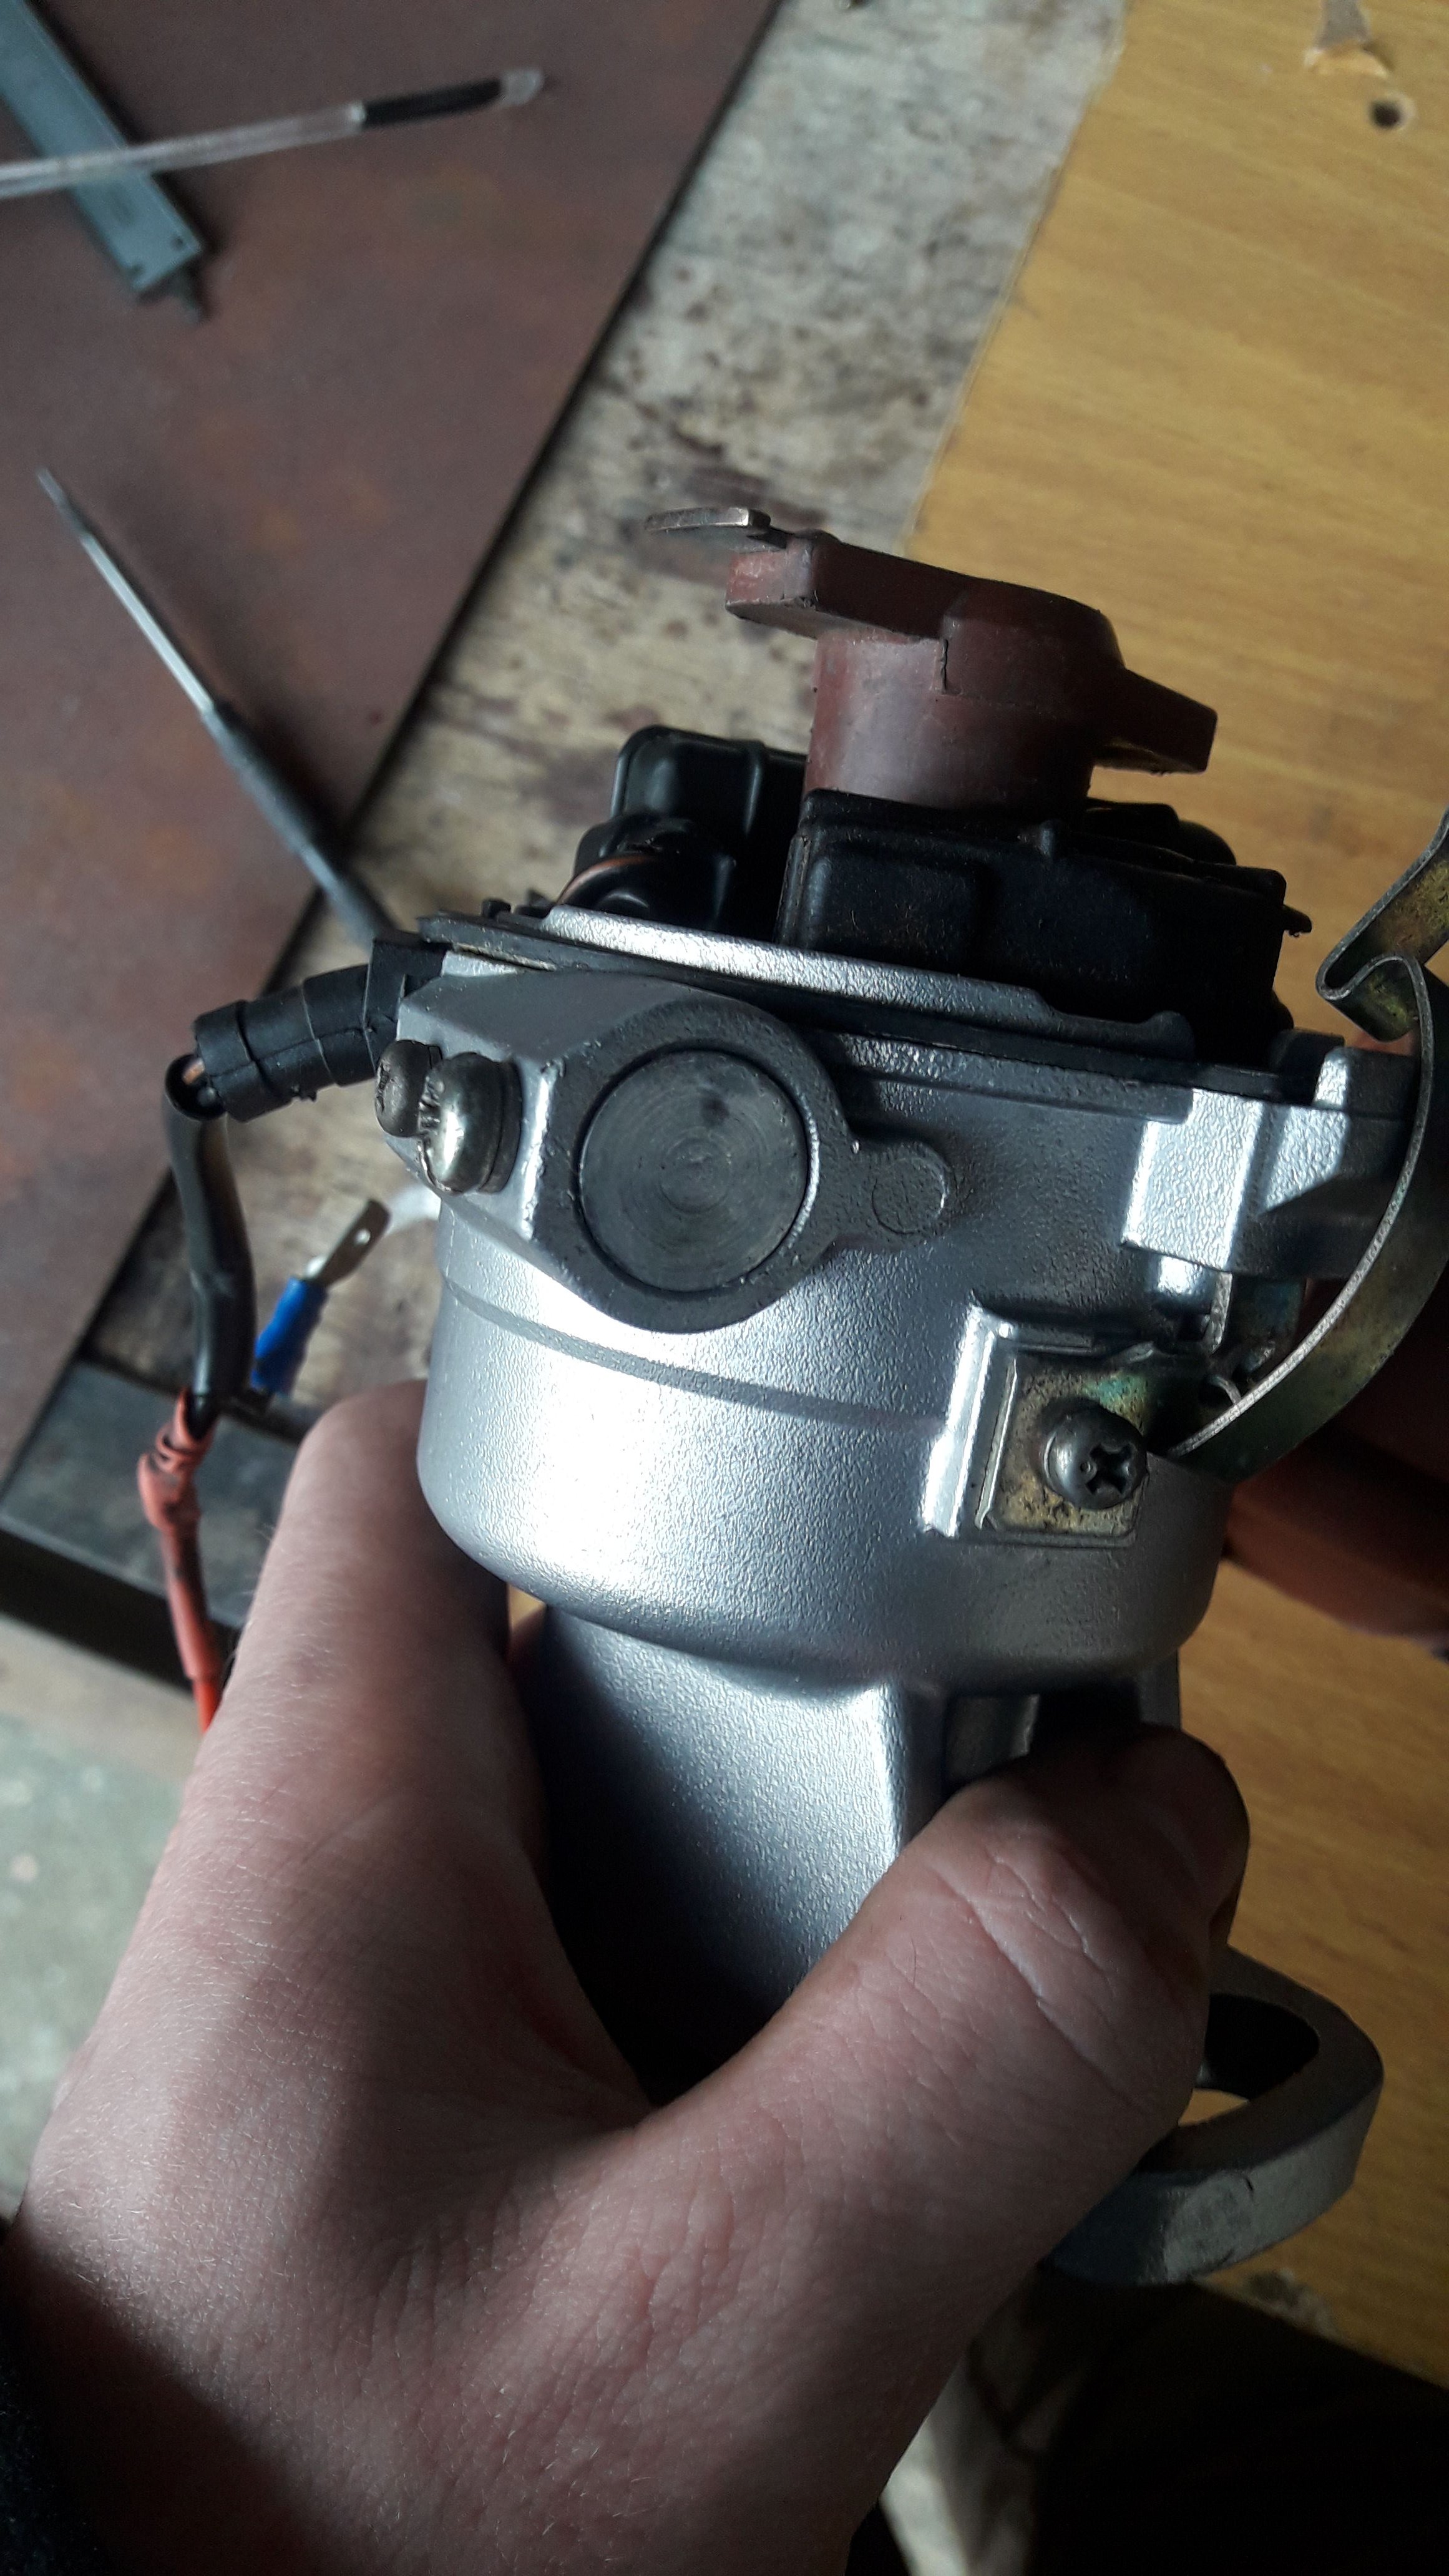
Modified and rebuilt a toyota k series electronic distributor for a friend today. His engine is rather modified, so he doesn't use vacuum advance. I just made a plug with an arm on it, locking vacuum advance. It's based on a commercial engine 5k distributor so has a bearing instead of a bushing, this should make it more reliable. Some measurements indicate it should give 24 crankshaft degrees of mechanical advance at top end - so he should be good if he sets base timing at around 10 or 11
5 points
-
next meet: Wednesday the 15th July, 7PM @ Spitfire Square5 points
-
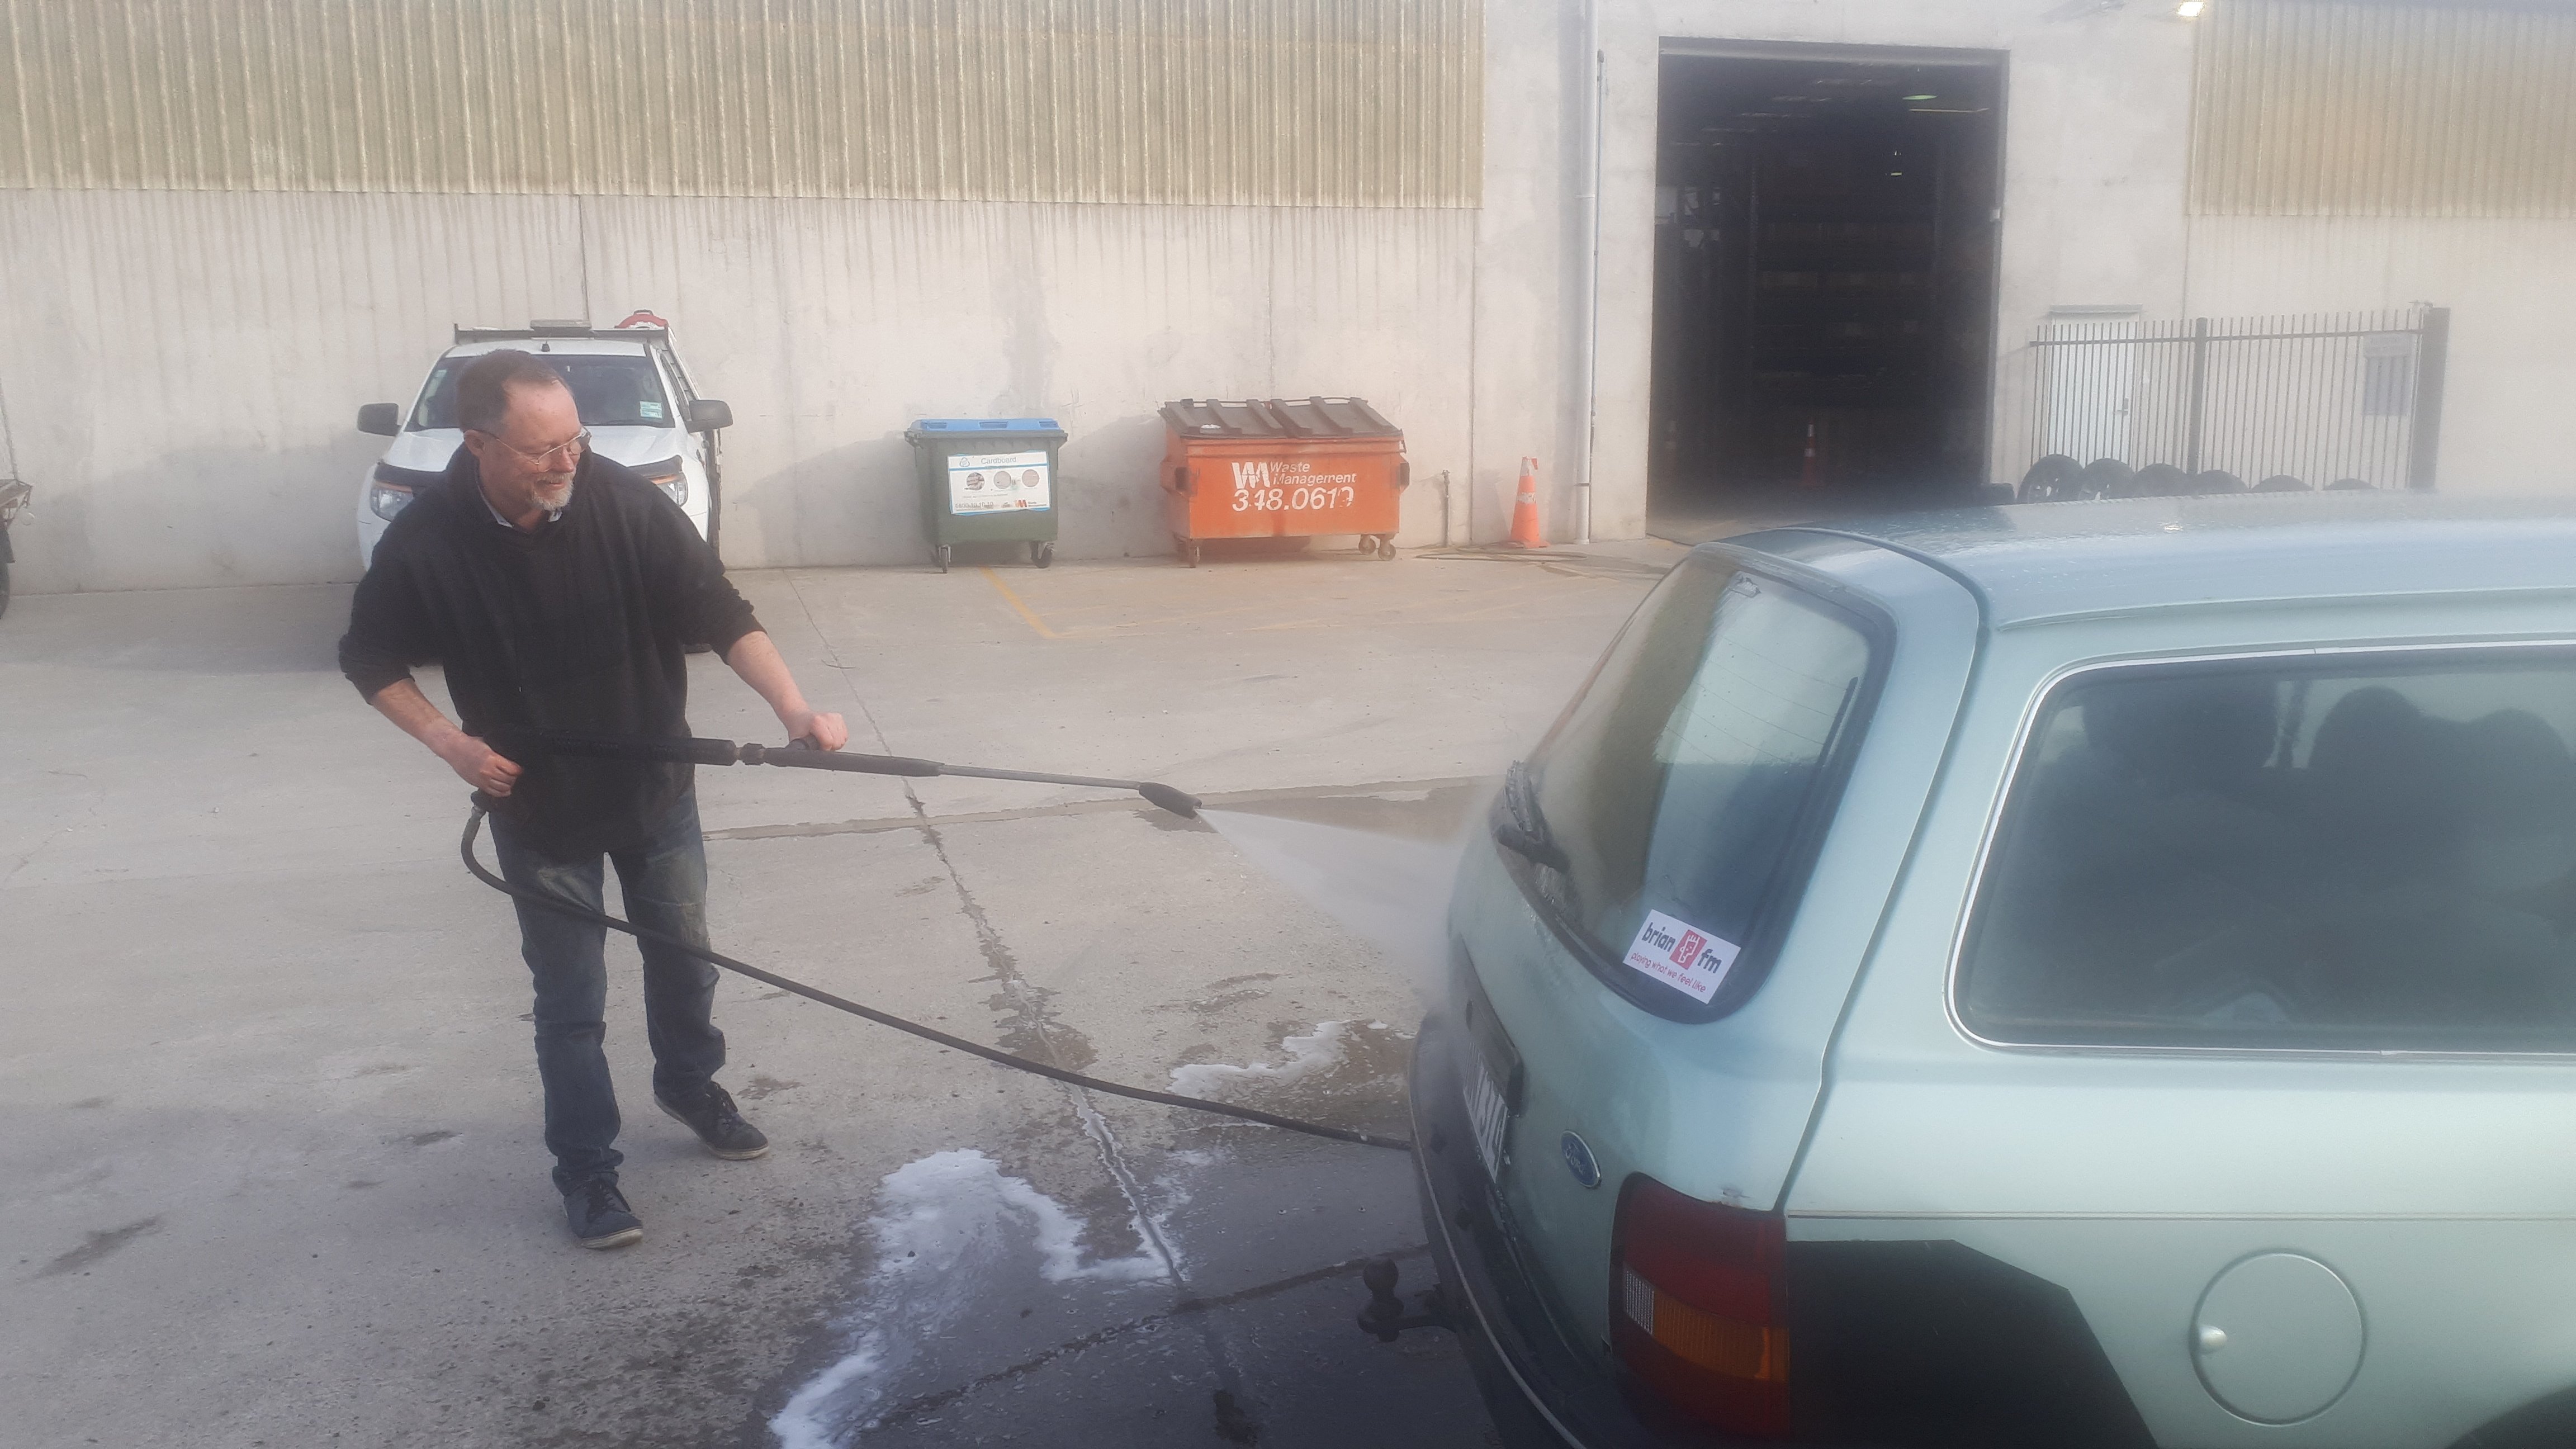
@EpochNZ was washing his new car today in preparation for the 15th!
4 points
-
Seal imports? I always seem to find something that'll work, or can be made to work from those guys.4 points
-
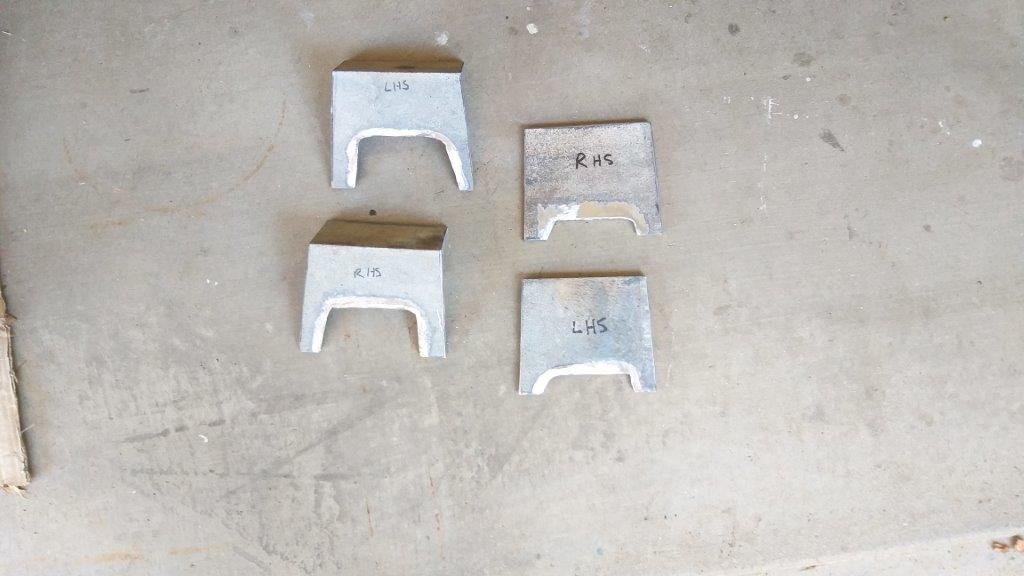
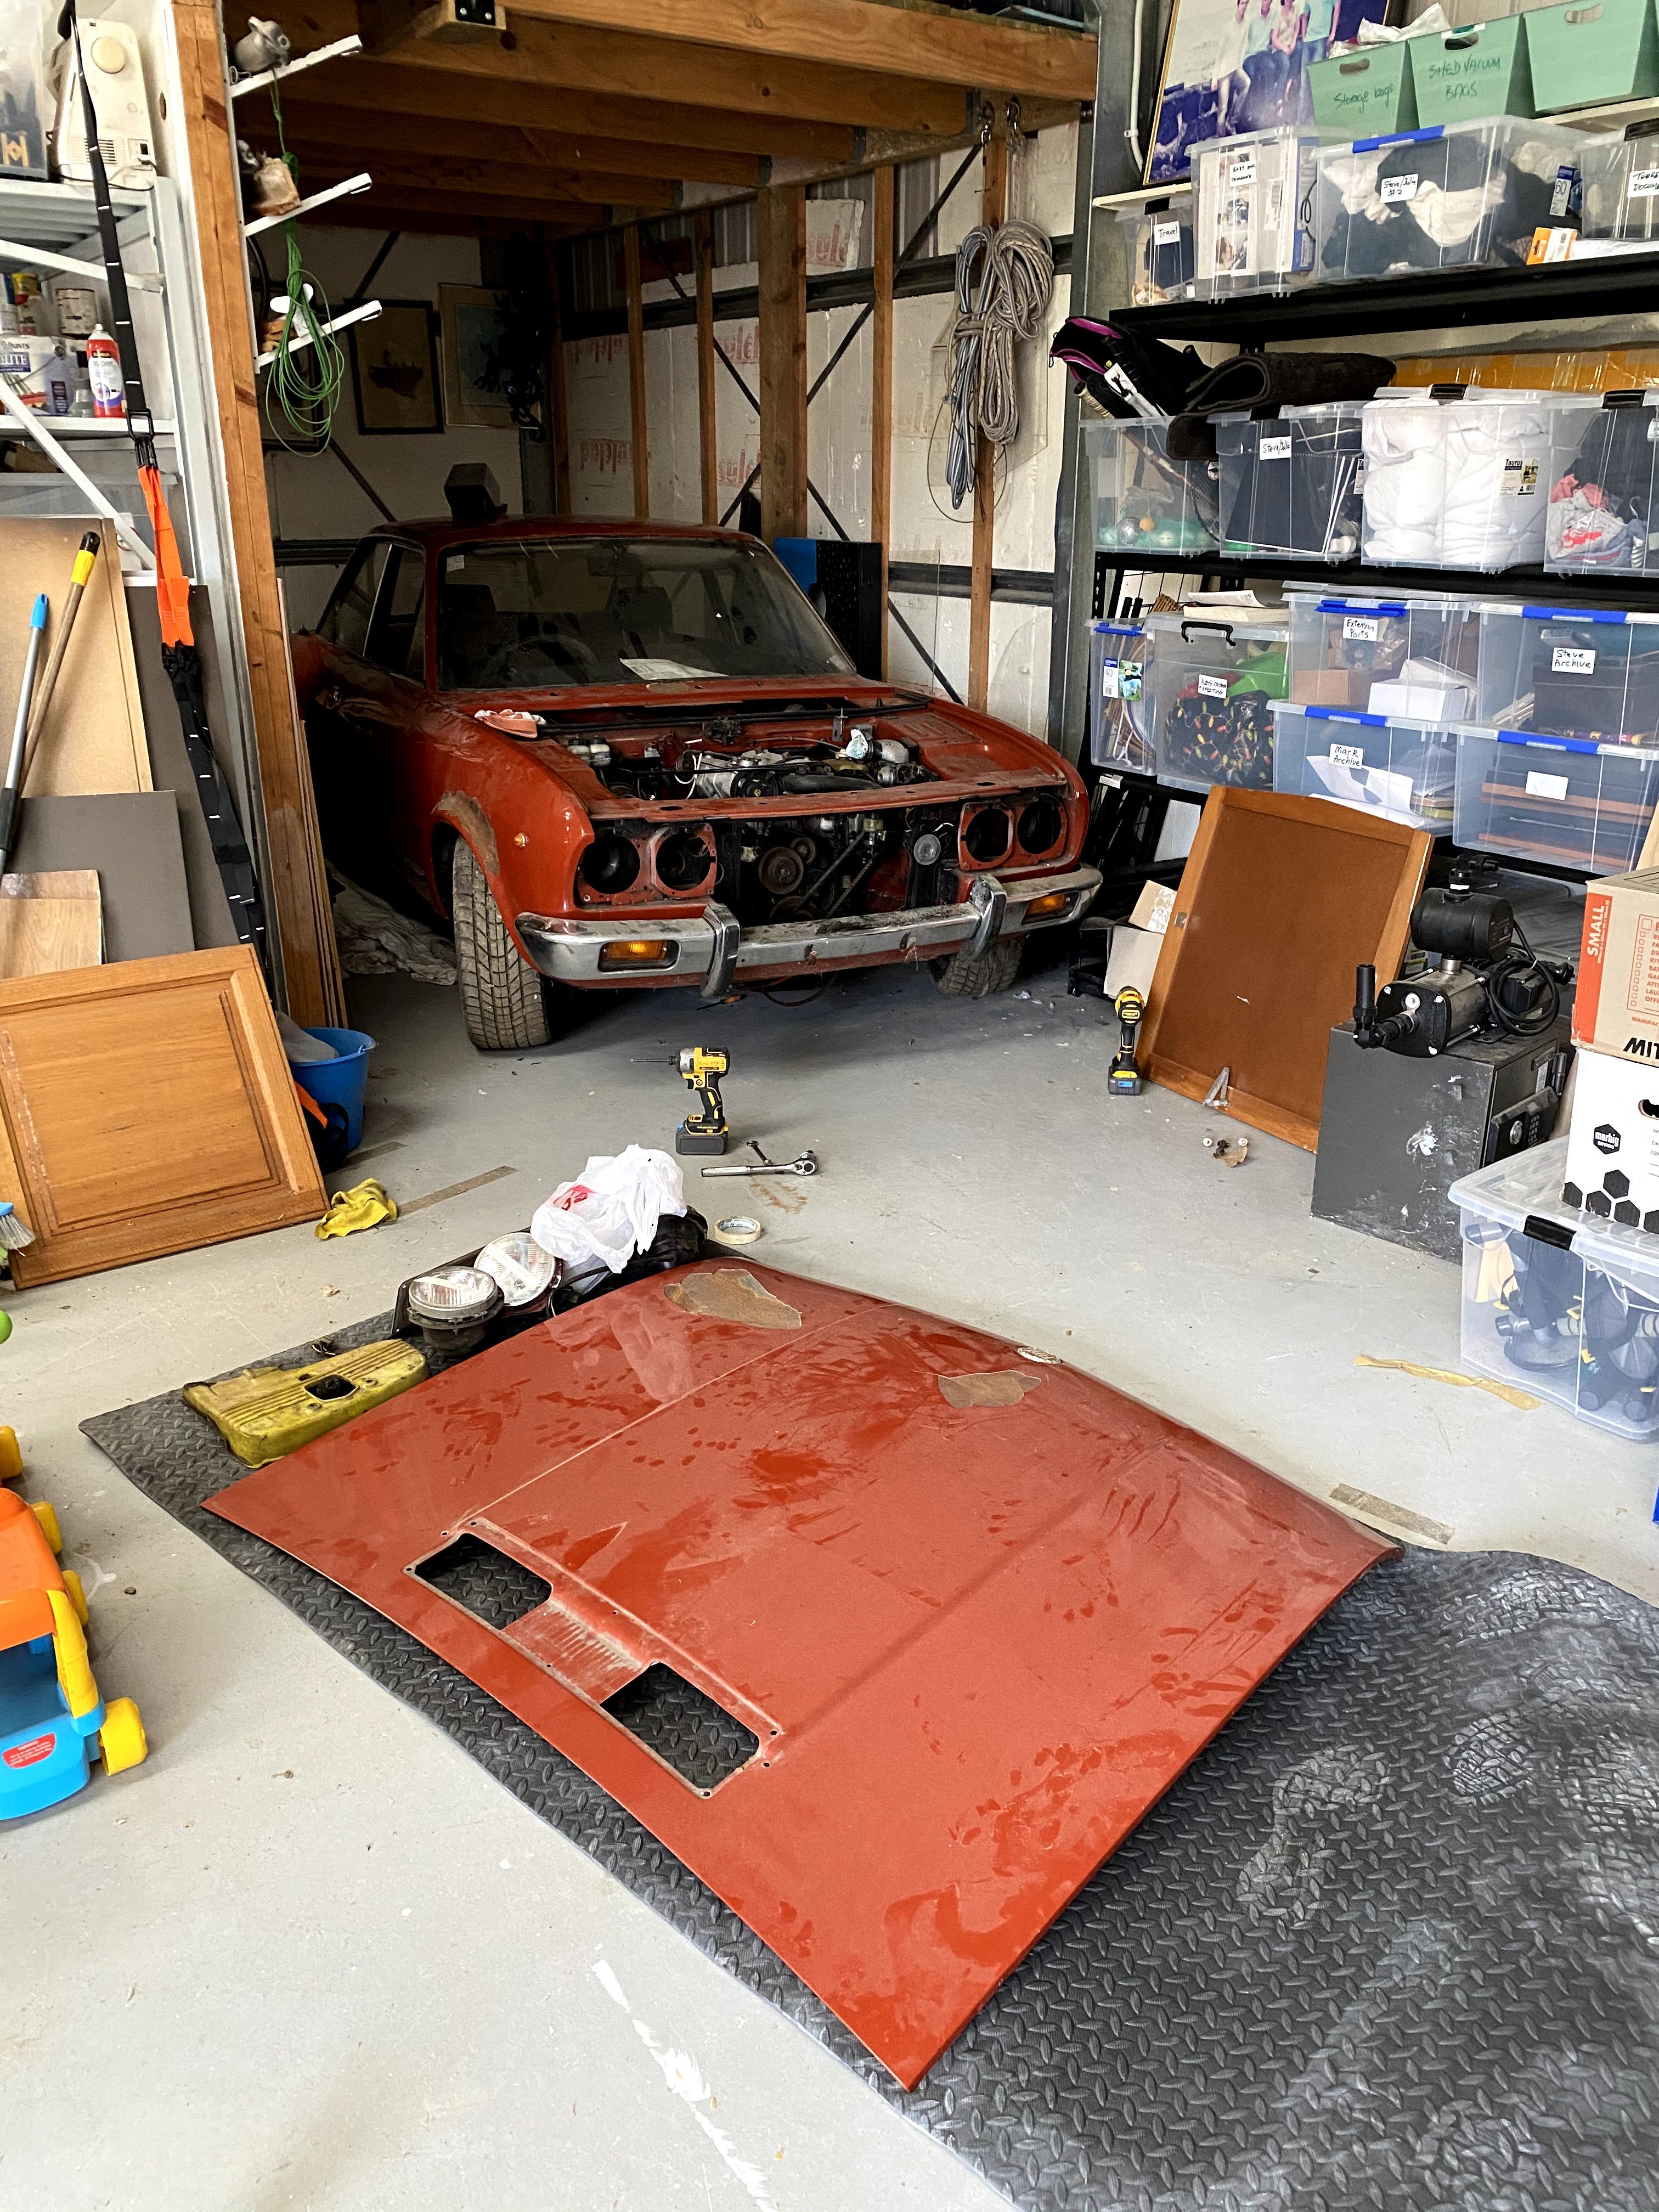
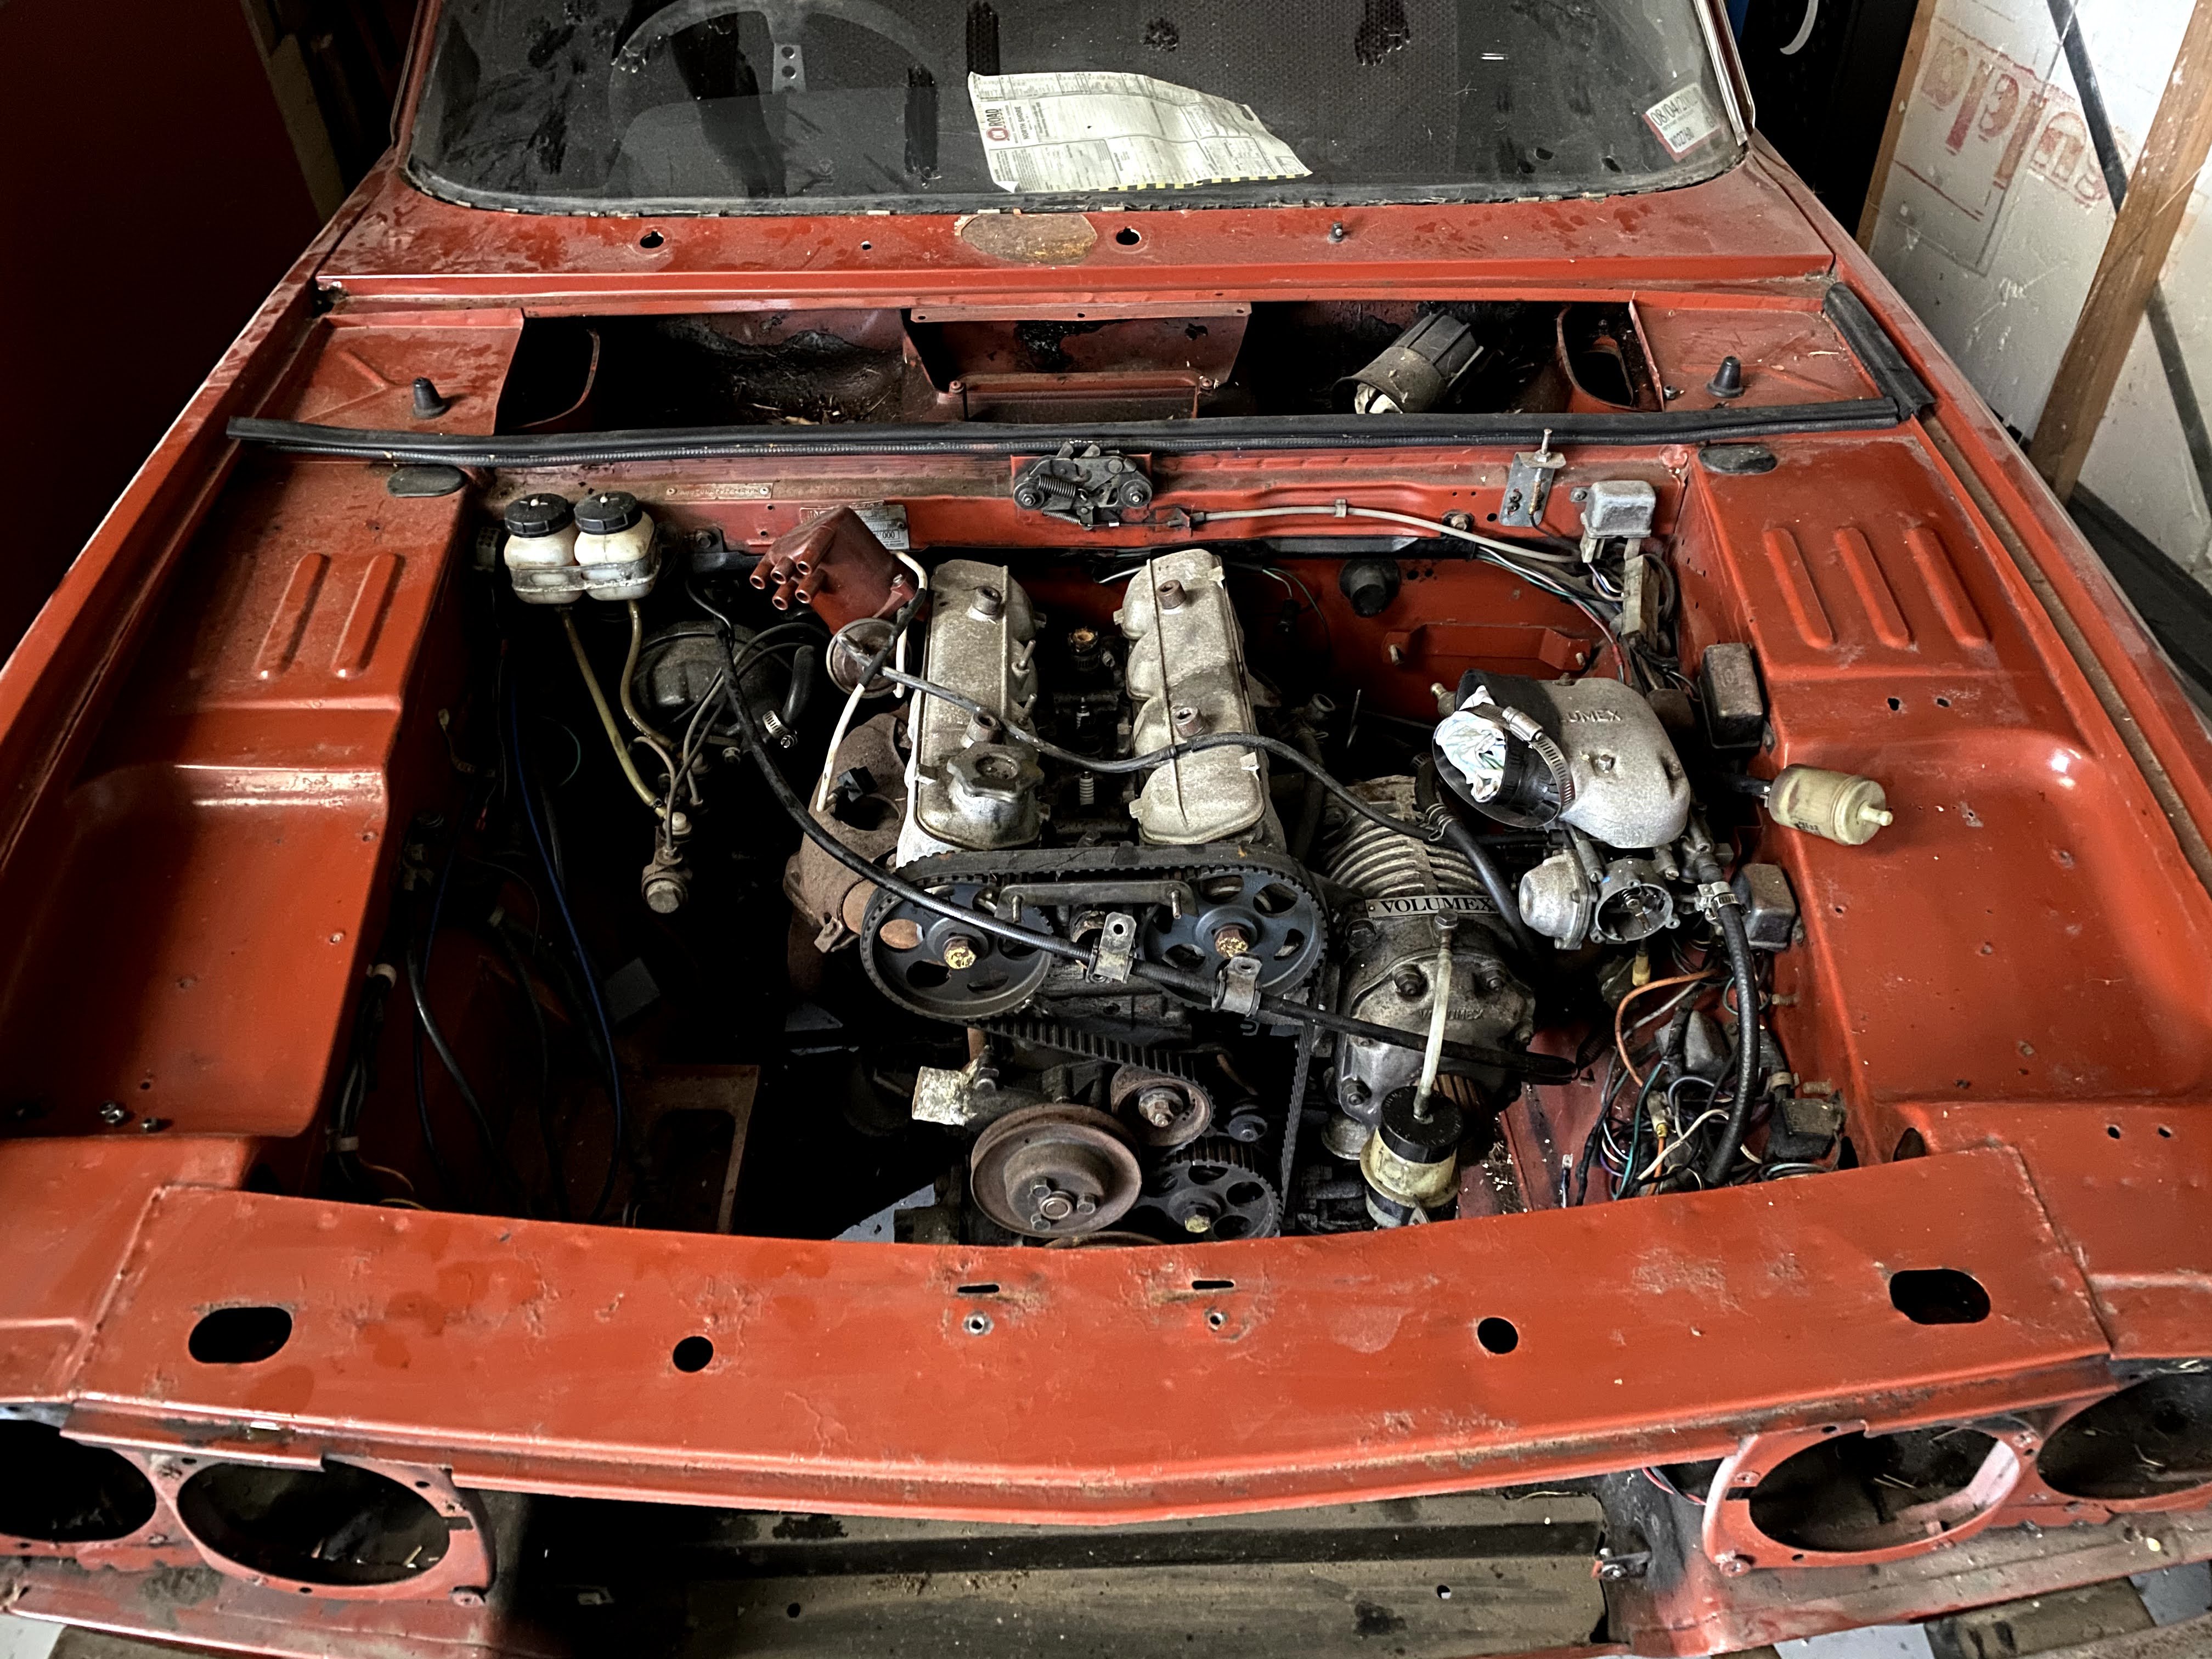
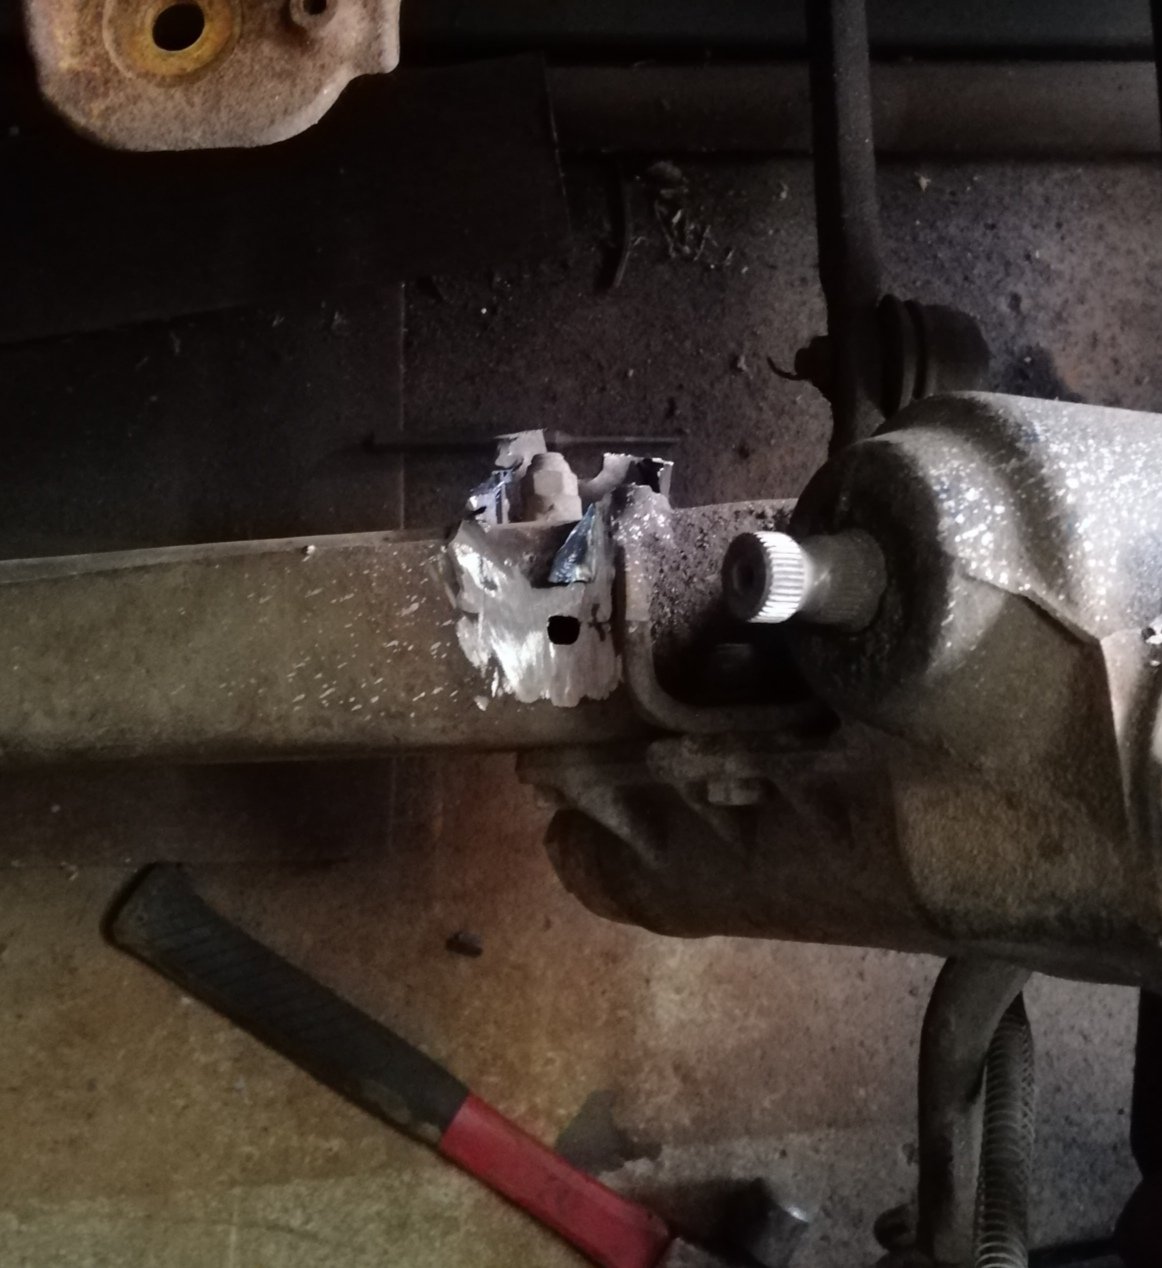
Did some more metal carving today. The Starwagon beam has an extra reinforcing skin welded on where the original mounting perches sat. Even although it was factory done the sides are not uniform so it took me ages to get the cardboard templates just right to ensure minimal gaps. Clamped them up and sat them in position on the beam. Needed to fine tune the cuts a bit, but levels are now spot on so next step is to glue everything together. Ground away the galvanising to aid penetration.
4 points
-
You might think so, but I was cleverer than that. I want to turn up in a 3 door hatch....so I've started with something oversize knowing it will shrink.3 points
-
High pressure water, it'll be rusted out by then3 points
-
Nothing disappointing about this! She runs like a little honey now.2 points
-
DoBros....Not just for Breakfast... @DoBro Jesus and @JustHarry working on the latest Mitsubishi of Disappointment...
2 points
-
Pizza, dobros, and fixing shit cars, Sundays at mimico are always great haha.2 points
-
Had another track day go badly - 2 laps in, an o-ring on the oil cooler pushed out and pumped a sump load of oil on the track, without realizing we did a lap with zero oil pressure. I put it on the trailer and took it home, pulled the sump off and thankfully the crank looked ok, so I put a fresh set of bearings in and fixed the oil cooler issue. This weekend we made another trek up to Taupo for Drift Antics. The car went well all day with no hick ups, which meant I could focus on learning to drive instead. Here's a video showing a few laps.2 points
-
Ok finally a moment to continue pulling things off the car #timepoor.
2 points
-
That second clutch (on the right) is spun by the rear wheel through the final drive, so yeah X amount of road speed kicks the arms out and locks it into 2nd gear. Your down hill limiter is likely to be from mechanical resistance rather than an electrical limit. Depending how carried away you want to get I've got cases etc from a vertical Jog, with a bit of customising you can run Zuma (BWS?) cylinders and pipes etc.2 points
-
so I made a note of the jets etc Primary main fuel jet is 140 secondary main fuel jet is 210 primary air corrector jet 170 Secondary air corrector jet is 180 Didn't pull the emulsion tubes out as cbf I'm assuming bigger number = More fuel / air? I'll wack the points dizzy back in as I don't fully trust the aliexpress and second hand dizzy to do its thing properly. That way I'll only be working with one variable/unknown rather than two.2 points
-
Must be able to find a generic seal by dimensions...? Cool looking scoot btw.2 points
-
These aren't belt driven/don't have a variatior. There's 2 clutches, first clutch engages to start moving, then the second one locks to engage second gear at about 30k.
2 points
-
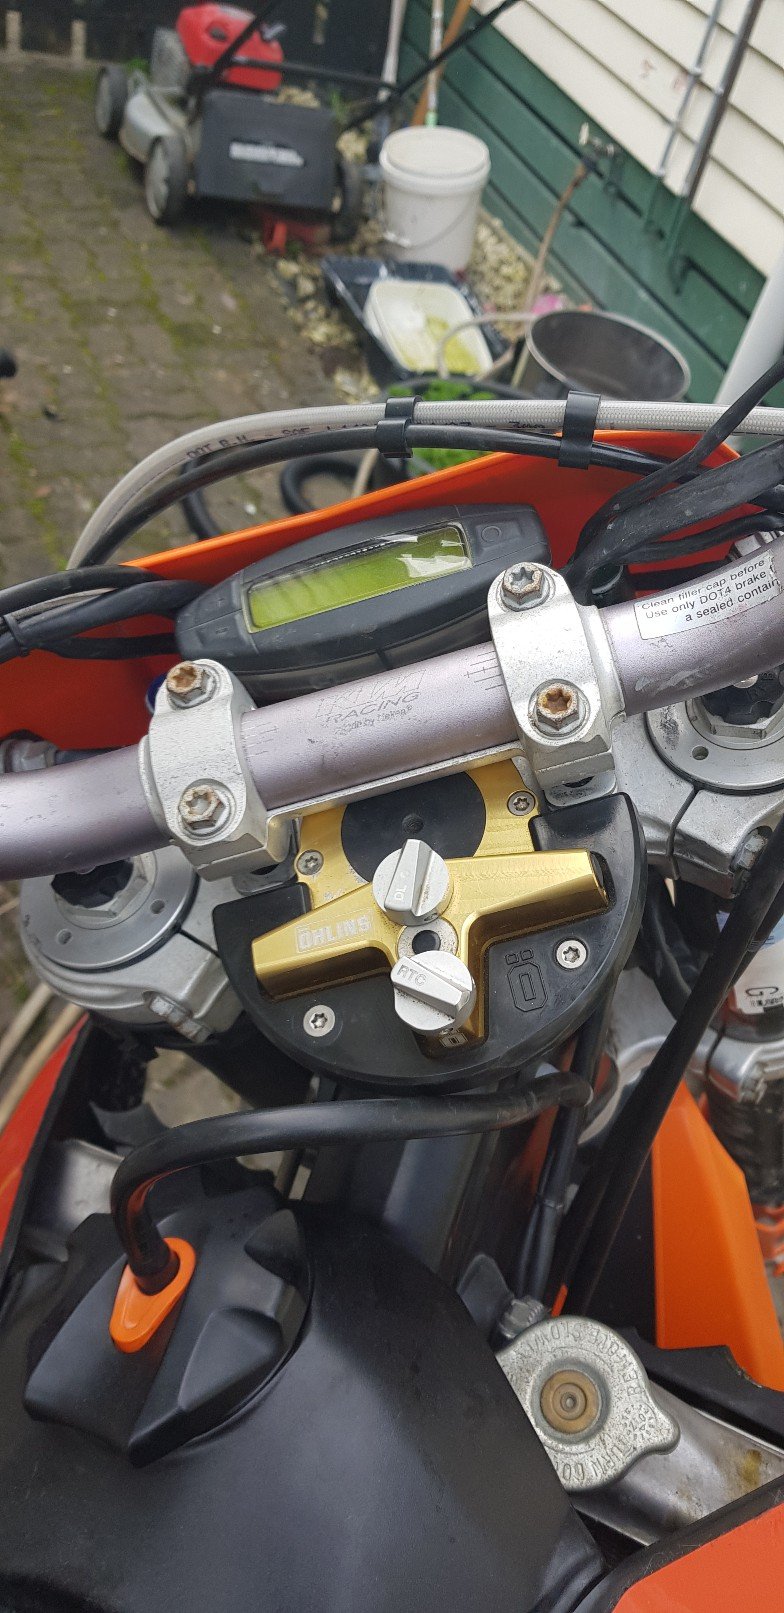
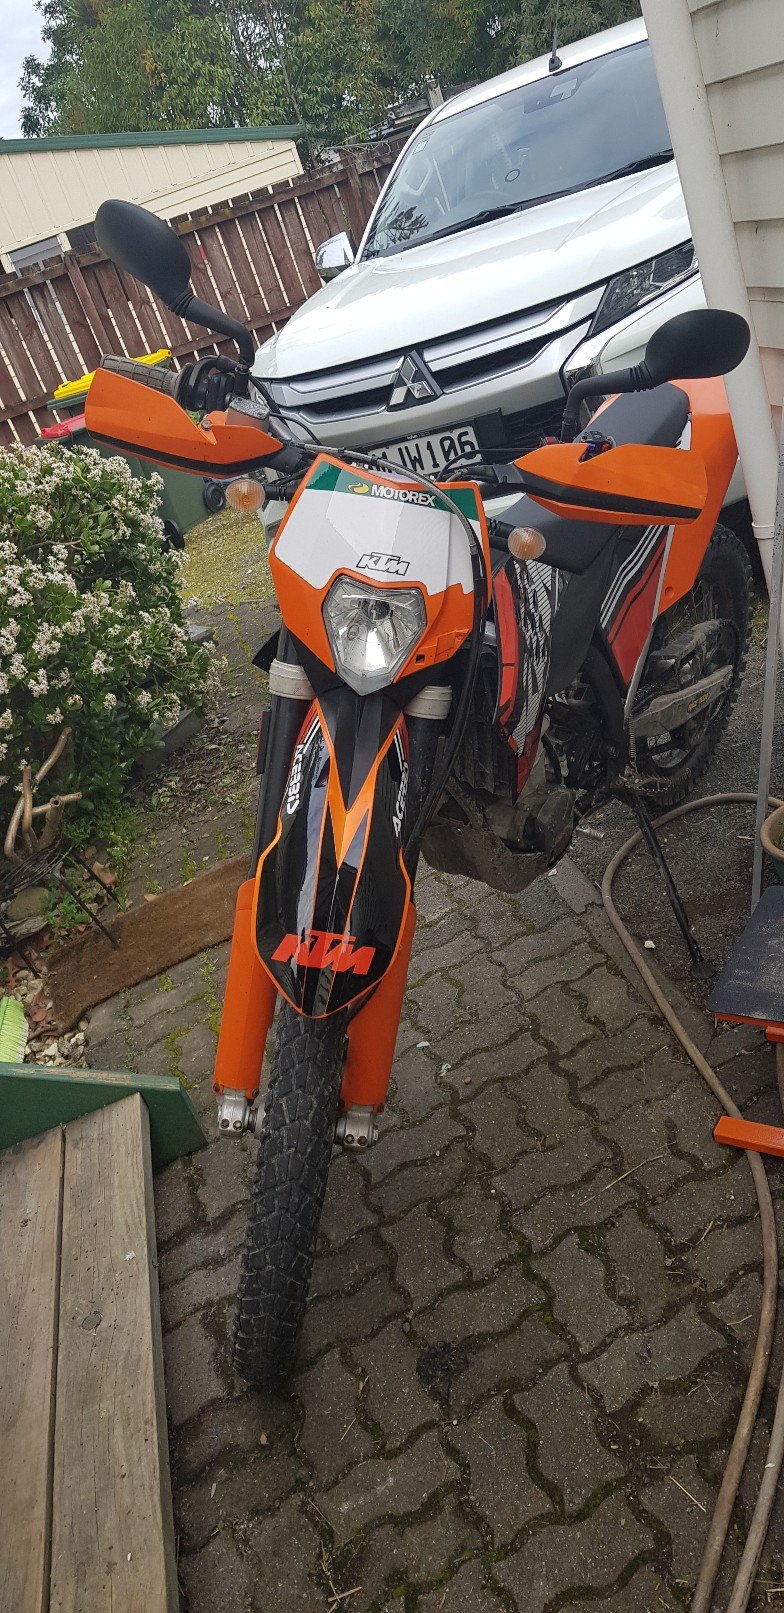
Done around 350km on this so far, fuck i love it. Slowly working through all the little niggly (is that word racist? ) problems like idle tune, loose rear view mirrors, lever adjustment etc after each ride. Fitted the steering dampener off bike #1. Also got a sticker kit off trademe for $50. It was good practice but unfortunately half the stickers were missing and some were completely wrong for the bike. Next on the list has got to be a seat recover and widening with maybe denser foam or something. Right now it feels soft and luscious until You get an hour into the ride.. then it feels like ya arse bones are hard against the hard plastic seat base.
2 points
-
Had a family lunch so we had a play with the plasma cutter and made some exhaust hanger mounts I borrowed a charger and fired up the laptop which talked to the stinger which is nice. I raided a k20 a zebra for the cam sensors which I plan to use for the crank trigger. Scoped out the sensor on the daily so I know what's going on2 points
-
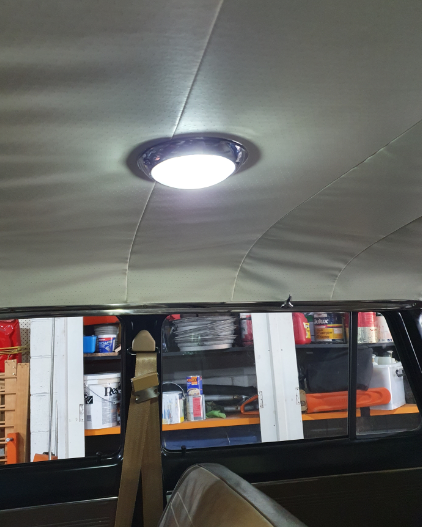
Got some more bits knocked off my list. Clearance created by the oil filter, a few minutes work with a power file did the trick. Wired up the interior light, complete with a flash LED bulb. Its way brighter than the original type bulb. Still killed a couple of hours by the time I soldered the wires together, fixed my multi meter so I could trouble shoot why it didn't work and finally fix both door switches. The other job that got done was making some clearance between the brake pads and the hub. I am using Torana stubs with HQ discs and HZ calipers. The discs were turned down 12 mm to fit and it all bolts together. It was a Peter Brock fix back in the day of XU1 Torana's using HQ calipers. I went round to a mates place to use his linisher. Half an hour catching up and bitching about the cold and useless Politicians, 5 mins on the linisher, then another half hour to sort out the mk1 Escort wiper mother that he was playing with.That all put a dent in the morning. It all went together and plenty of space. The pads had a lip on the bottom edge that went below the friction material, that is gone now so there wont be any probles as the pads wear. I also figured out during the week that the IAC valve had died. Tried to buy one on Friday with no luck. I'll get one ordered Monday. I have pulled the intake track apart so many times I can just about do it in my sleep. Hopefully this will be the last one for a while. Last one was buying some flanges and tube to make the balance pipe. I had to go to Pakuranga for work so easy to get to Auto Bend to pick up the bits. The flange will go in the middle so that the exhaust can be split and removed.
2 points
-
Went down and have hacked out the old mounts as good as I can with engine in place. Need to get the 202/auto combo sold so I can plonk the 4.0l on the ground. I've only got so much room
2 points
-
So looking at the "path of least resistance" I've decided to stick to something closer to standard road height. Not only does it solve my rubbing front wheels, but it addresses a few other smaller challenges including a steering rag joint that is rubbing on a chassis leg. Someone on the Book of Faces posted a pic of their Thames running on 15 inch diameter Torque Thrust 2s at standard road height. He is running 6Js up front and 7J rears. The 15s fill the arches really nicely. The Torque Thrusts give a similar look to the Dragways, but the chrome on my Dragways is flogged and would cost moonbeams to re-chrome. The Torque Thrusts are alloy so no similar problems going forward.
2 points
-
The rotor is basically a diamond @fuelmate. That stainless targa band is weird.1 point
-
I forgot that Hell-bows was the nickname for Phuel. Also sick new whip Phuel. Needs SSR Mk3's1 point
-
Good score! Looks like a two for one kind of sweet deal. Never seen a targa themed RX7 either. Seems someone at Mazda liked the 911 targa quite a lot at the time obviously and then hey Presto new trim spec RX7 model. Mate just bought an RX7 here in Melbourne last week actually. Hasnt run in 17 years but fired up with some fresh fuel. I thought 3k AUD for a S1 banana yellow / brown interior seemed like a good price.1 point
-
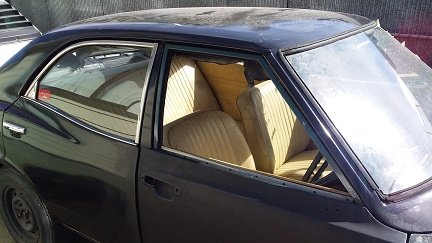
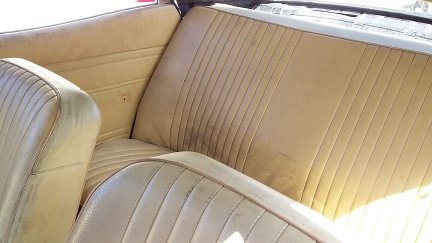
Can't keep away from these things. Did an oil change on the transmission. Yip...yes it did... Cut and polished the 40 year old paint. Came up better than expected, but wont be winning best paint award at SEMA this year tho. Still, I'm happy with it.
1 point
-
Tomorrow I'll cut the front faces out of the same angle to form the last bit of the U. Thanks for reading.1 point
-
So not much to see here but I did manage to get all the supplies I need to complete my test wiring of the tail lights. So here is one of the finished light holders. Learned all the pitfalls of using this wire / plug / sheathing which is good because I don't want to make any mistakes on the balance of the car wiring.1 point
-
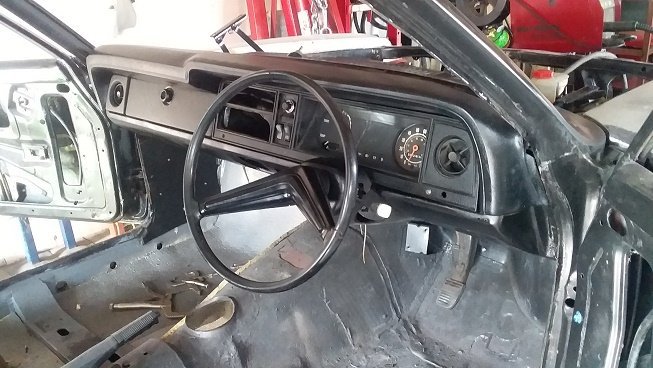
A fair bit has been done since the last update. I spoke to Trevor at Holden Diagnostics. We agreed that the tune was causing the issues, and he could sort it out. The guy who did the original tune has been known to have trouble with VT engines. I had a bunch of people coming round from work on Saturday night and wanted the car running. Trevor sent me a spare memcal and said send your old one back when all is good. Thursday night I fitted the new for the water pump. The old one looked pretty tired. I put the throttle body and everything else back together and fired it up. Then swapped out the Memcal and all good. I spend a lot of Saturday working on the car. a couple of hours went into getting the wiper motor fitted. I had made up an adapter plate ages ago which was fine. The challenge was getting clearance for the motor body on one side and the actuator arm in the plenum chamber on the other side. Using a couple of washers under one side of the adapter plate did the trick. Sorry no photos. I also put in my Dakota Digital interface box to make the speedo work. This is mounted behind where the kick panel will be. Hopefully it wont be annoyingly loud. To night, June 30, had been my goal date to have the car finished. I finished off the wiring for the wiper motor back to the switch, installed the instrument panel, and went for a drive. I consider this a win. It has got some real get up and go, the brakes actually work pretty good and the steering is OK. The exhaust is too loud, so a balance pipe will get made, the engine idles at about 1200 in drive, I'll have to work that out, and there are still lots of finishing off things to do. Not to mention registration and certification. Here is the view from the drivers seat
1 point
-
Monkey shot by @Raizer1 point
-
smashed some progress, on this today, thanks heaps to @Mitch.W for doing almost all the work while i stood around, talked shit and drunk beer. Mitch spent ages on the tig and fabbed up this lush new subframe on the bike. thicker rear stays in the same spot as the stock one but the thicker pipe looks way better. a nice flat frame with a wee kink at the end that all ties in nice and level with the tank to give a lush flat backbone to the bike. I cut the mounts off the swingarm for the shocks are remounted them on the inside of the swingarm to narrow the shocks up which also helped heaps with the bikes aesthetic. Nice wee tank mount, unfortunately theI cheapo chinese CG tank isnt level so the left side drops below frame, might grab a Jap CG tank if one ever pops up. m super stoked how it all turned out and cant wait to make a seat base for it. I might still shorten the rear guard out as i dont know if i like it out that far but will see once the seats sorted.1 point
-
More bits arrived It's all the shit I ordered while locked down.
1 point
-
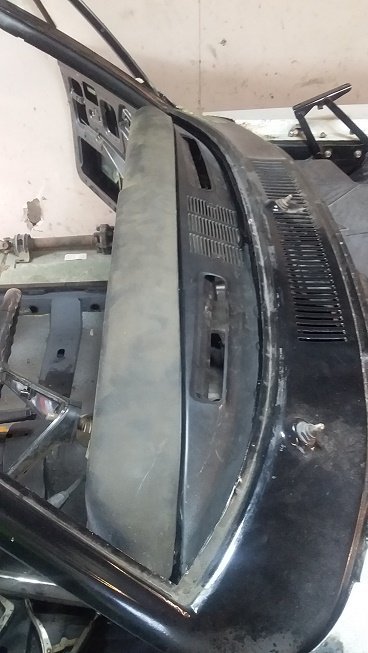
The final part of the interior job was to recondition a few of the switches. The window, panel and headlight switches all needed an overhaul. It was pretty obvious just by looking at the window switches why they needed a strip down and clean It's no surprise that the windows were a tad slow, and the connectors had taken a real beating with excessive resistance melting the plastic around a couple of the pins. A sure sign of bad contact. I decided to start with one of the window switches. These were filthy, having soaked up any fluff and muck that has been in the center console for years. Start by removing the top casing from the bottom, using a small screwdriver to unhook the clips on each side. Before I removed it, I marked the top of the switch so I could refit the casing in the same orientation. With the top casing off you can see the switch guts Using that same small screwdriver carefully lever the toggle legs off their pins and lift the toggle up off the base. Take care, as under the toggle are two small plastic spring loaded pogo pins. Don't let these ping away. After a quick wipe down to remove the dust and dirt, this is what we have Make sure to note which way the metal strips go as they aren't all the same. These are the little pogo pins in the toggle. They should face the other way with the spring going first into the toggle. Remove the strips and inspect the contacts. Mine were coated in old dry grease and corrosion I took the time to clean both the contacts and the strips and then using fine sandpaper give them all a good polish The outer casing was given a good degrease and clean inside and out The holes the pogo pins go into in the toggle had to be scraped out as old grease had solidified in there too. The pogo pins didn't escape the cleaning, they carefully had all the grease removed. They needed it. Once everything was clean it was time to reassemble. The strips and contacts got a thin coating of dielectric grease, as did the pogo pins and the toggle was refitted to the base. The casing was reinstalled and we were ready to go. The action was now quite nice and solid. The muck in it previously must have been dampening the feel. The other window switch wasn't any better, so that got the same treatment. Next was the panel light brightness switch. Unfortunately, this was in a pretty sorry state, with cracks and missing plastic in various places. Thankfully with switch doesn't get a lot of use. The contacts and strips in this were disgusting Everything got cleaned up as much as possible The cracks in the casing were glued up, and it was refitted. The headlight switch was the last one I wasn't to overhaul. The connector was in very bad shape, so I wanted to be sure the switch wasn't causing it. Looking at how clean the switch was, I suspect it was recently replaced with a New Old Stock item. This was mostly just old congealed grease. All that got cleaned out and the contacts polished And that's the switches done. Easy to strip down and clean, with minimal moving parts. They are quite a reliable design, but let down by not having the housing a bit better sealed, and the old grease drying out. Before I could refit the center console and switches I had to do some quick repairs to the connectors on a couple of the switches. The headlight switch, in particular, had an issue with one terminal falling out as the plastic had melted from around the pin. I had obtained replacement plugs from Minispares (Part PM03) as they sell a kit to replace the connectors for the Classic Mini hazard light switch. The plug isn't identical, as it's missing the locking tabs the TVR has, but it's a nice tight fit regardless and shouldn't fall out. The kit comes with new pins too, but as my pins were OK I chose to reuse the existing ones in the new housings. Using a small flat blade I pushed the locking tabs on each side of the pin in and slipped it out the back of the housing. Flip the tabs back out again, and into the new housing it goes. The big white plug is the old one, the black one is the new one. The only other one I needed to replace was the blower fan switch, as for some reason this didn't even have a plug at all, just bare terminals stuck on the pins and wrapped in tape! Bodge city. This was as easy as just transferring the pins into the housing in the correct order The center console went in next, and it was finally time to refit the switches into their freshly wrinkle-painted panel The radio blank needs to be stuck in, but it looks good with the rest of the console The switch panel looks a damn sight better than the old peeling and rusty look The windows are still slow, I'll need to get in there and clean and grease the runners as I did for my SD1 (same regulator), but the blower fan and headlight switches work more reliably, and it appears I've gained a new full brightness setting on my dash lights. All in all a good achievement, even just to know the switches will keep working for a bit longer.1 point
-
The final piece of the puzzle for getting the interior finished was the gear and hand brake boots. The old ones were worn out, torn and manky. I couldn't refit them, they're letting the team down. Old Gross Stuff From day one I wasn't really happy with the boots and knew I was going to have to do something about them. The shift boot in particular just looks gross, all loose and full of splits and holes. The top of it didn't seem to fit either. And the hand brake boot was old and hard, with a big split down the back. Not to mention it was glued to some of the worst looking carpet in the car So I knew what I had to do. I could hardly just buy these off the shelf, so it was up to me to make replacements. Singing Machine The first step was to decide on a sewing machine and obtain one. We were lucky enough to use our Airpoints to get this, so didn't cost us any "real" money. Its a Singer Heavy Duty 4411 Its still a consumer machine, but its meant to be gruntier than your average dinky little white plastic thing. At the advice of my sewing pro Sister in Law, I also purchased a teflon coated plastic foot, some "leather" needles and heavy-duty dark blue thread. These items are highly recommended when sewing vinyl as its quite thick and hard, but will also stick to a metal foot if used. Automotive upholstery grade vinyl was obtained from Trademe cheap, as someone that had redone their interior had some leftover. This was perfect as it was dark blue and cheap. I did some initial practice on an offcut of the vinyl, just to see what the machine could do. It seems as long as I get the settings right, it actually does pretty well through multiple layers. Its been probably 20+ years since I last touched a sewing machine, but hey, I still kinda know what to do. Grotty Tracing In order to make copies of the old pieces I needed to unpick all the existing stitching and flatten them out for tracing around. I started with the hand brake boot as I thought this would be easier as there are only a couple of stitches. It was pretty gross. To be fair, most of it is old contact adhesive (why there is so much INSIDE the boot, well, who even knows?) This is the template I made on brown paper. I flattened the original out as much as possible, including the folded over edges. I then traced this onto vinyl, cut it out and whacked a needle through it a few times. The trial fit actually came out looking pretty decent The shift boot was more complex. For a start, it was all one piece, not four panels stitched together. This is the one real join, the rest are all just "fake" stitches. Eww, grotty. This resulted in a weird looking template Which I decided was too hard, so turned it into four panels, two short and two long (as the recess in the center console is rectangular). In hindsight I would make these from scratch instead of tracing the original, as it ended up with those weird looking shapes. Stitch Up With the templates traced up and cut out of the vinyl, it was time to get sewing. The trick here was to sew the inside seam of the two pieces, to join them together, and then stitch the outside to reinforce them, and give it a nice external stitch like the original had. If I didn't do that external stitch, you just get this ugly fold With all four sides stitched, and only a couple of issues (probably user error), it was time to trial fit The top didn't look right, so I tried folding it over and attaching it to the rubber boot under the shift boot It was better, although still needed some tweaking at the top. Unfortunately, the new vinyl is thicker than the old stuff so appears bulkier. It also needs a lot of free and loose material as the throw of the shifter is so long into 4th gear that the boot gets quite tight when shifted. This was an issue with the original boot too. A little bit of tweaking at the top and we had an OK result. I was planning on remaking it, but tbh its OK as it is and I would probably make it worse if I did it again All that was left to do was to staple the boot to the underside of the console, glue the carpet and board to the handbrake boot and install it all. One note is that the handbrake boot cannot be attached to the console, otherwise it wouldn't be possible to install it all in one go (or it appears that way anyway, the old one shows no signs of being attached previously). Jobs a good 'un.1 point
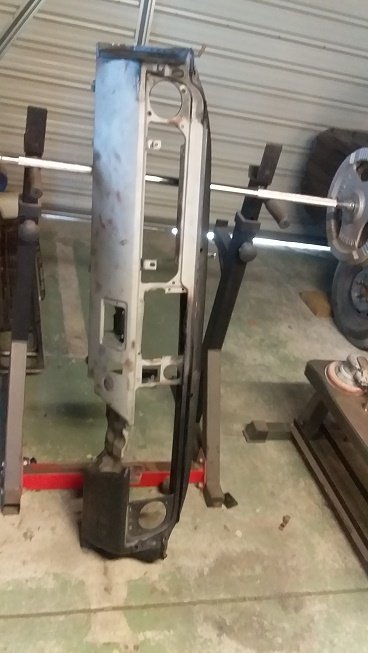
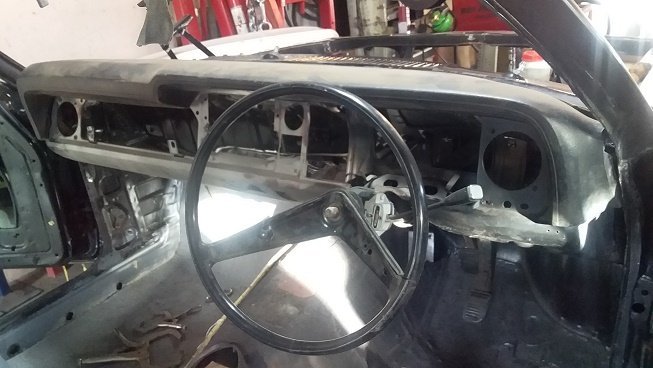
-
Once again, it has been a bleeding long time since the last post, but of course, I haven't just been sitting around doing nothing. It may be a whole new world out there thanks to the current chaos, but the free time I suddenly had was enough to kick start work on the TVR. Way back before Christmas last year I ordered new carpet and underlay. Until now it's been sitting in the garage waiting for me to get around to pulling the old carpet out and replacing it. It's not a job I was looking forward to. I'm not a huge fan of working in interiors due to cramped access and lots of kneeling on the ground. This is what I was dealing with. Old faded carpet which had started to come apart, especially in the footwells, due to being exposed to moisture for long periods of time. When I got the car the whole floor pan was soaked in water and had been for a while I suspect. Even after drying the carpet out it always had a certain smell, and the carpet was dry and crunchy to the touch. What I didn't realise until later was that the carpet wasn't mean to be that tan colour, it actually used to be dark blue. There were some spots, like this section in front of the hand brake and under the center console, that hadn't seen the sun and were still the original blue (albeit in this case, filthy and squished). The first task was to remove the center console. First the surround on the center stack has to be removed, then the gear knob comes off, and there are three screws holding the console in. One at the back under the flap of carpet in the cubby, and two behind the radio in the cubby. Don't forget to disconnect and remove the switches too. It was pretty dirty under the console, with lots of shredded bits of insulation floating around. Lots of black wiring and heat wrap Next, the seats should be removed. I tried to remove the rails from the floor but had real issues. The rails are held in with two bolts, one on each end, which go through the floor and are secured with nuts from under the car. A combination of a little rust buildup on the threads, and a bolt head that isn't captive but is also inaccessible (no space for a socket or spanner) with the seat in place almost made me rage quit. I got a couple of the nuts off but got stuck fast on the passengers side, where the whole bolt was just spinning. The usual method is to jam the bolt head with a screwdriver to stop it spinning and wind the nut off, but this bolt wasn't having a bar of it. I rounded the head off quite nicely. Thankfully, as is good practice, I walked away and left it for a bit, and when I came back I had a new game plan; remove the seats from the rails. This is FAR quicker than messing with the rails, as there are four bolts under the seats, easily accessible with a 13mm ratcheting spanner, and then the seat just lifts off. One last thing that needs to come out are the roof struts. They are held in with a nut on the top hoop of the roof, and then nut/bolts through into the boot. Since the roof will not stay up without them, a couple of bungee cords were employed to keep it erect. One went between the two bolts on the hoop, and another from the wiper spindle to the cord between the bolts. A third was later added to hold the rear edge of the soft top up against the hoop for better access to the parcel shelf and rear bulkhead. I quickly added some offcut underlay under the cord where it touches the top of the windscreen frame to stop it damaging the paint. Now it was just a case of pulling, tearing and cutting the old carpet out (but keeping the sections in one piece). The carpet on the sides of the tunnel was barely stuck on, but some of the other carpet like the parcel shelf was a real prick to remove since it had really thick jute underlay. I don't think this was the original carpet, there were a few telltale signs it had been replaced at least once before, but obviously a long time ago, and not that well. This was a real time consuming and back-breaking process. Once all the carpet was off I needed to try and remove as much old adhesive as I could. This was done with a mixture of a wire brush and a grinder with a twist cup on it. It was very messy but quick to strip the glue off without damaging the body. As each section of carpet was removed I tagged them all with a paint pen, according to the official layout in the parts guide. This was so I always knew where the sections came from and where to refit them. With the carpet out it was time to start the job of measuring, cutting and fitting the new underlay and carpet. First was to lay out the underlay and trace the sections I would be fitting it to. The underlay I purchased although isn't waterproof (yeah, I know, but I was struggling to find any decent padded waterproof underlay and this car now has a phobia of water, so shouldn't be an issue), should work well. Its sold in 1.8m sections, and in the end I only needed to use 1.8x2m total (I'm not sure why it's slightly longer than advertised but I ain't complaining). I wasn't going to pad the whole car, only select sections, which were the inner tunnel walls, footwells, rear bulkhead and parcel shelf. Mainly places that will be touched, pressed or rested upon. I used the removed carpet sections as templates to trace around. All sections were also numbered with their identifier (or named for the obvious bits like bulkhead), and if needed, an arrow to show direction. We also got our first glimpse of the new carpet colour. TBH its not as dark or as "blue" as I had hoped, but it ended up looking better than I was expecting. Cutting the underlay with scissors literally tore my hands to bits. I ended up with a couple of gnarly blisters from the effort needed, as this underlay does not cut well. Regardless, I pushed on. Once the sections were cut, they were test fitted and trimmed Once I was happy with the fit, they were glued on with copious amounts of Ados high temp F38 contact adhesive, applied by a large brush. This stuff stinks (You MUST use a decent respirator as this stuff will get you as high as a kite before you get too far), but flashes off quickly and is as sticky as anything. I initially got two tins of this but had to buy two more later on as I ran out (and if I didn't change to spray adhesive for the rest of the work I would have needed a fifth tin). Work quick and get it in the right place first time as this glue isn't here to fornicate arachnids and sticks quick and sticks hard. The underlay didn't need to be perfect as the carpet was going to cover it anyway, but any bumps, creases and edges in the underlay will show in the carpet over the top of it. The bumps in the sections behind the seats are from the wires and fuel tank brace strap that reside there; they do end up showing as bumps in the carpet too, but not much I can do about that. Next was to trace and cut the carpet sections. This is where I made a fairly major whoopsie. I had been told to make sure my carpet "grain" was always going in the same direction on each part otherwise sections will look "shaded" as the grain will be going in different directions. Well, guess who immediately forgot this advice, and instead used his awesome Tetris skills to make all the carpet fit into the smallest space possible? Sigh. By the time I realised what I had done, I had cut all the sections out and couldn't start over. But hey, I got it all onto the carpet with some spare! As you can see in the later photos its not that big of an issue but might look a little more obvious if I had used a thicker pile carpet. I used engineers chalk to mark the back of the carpet, which was quick and easy to see. Everything was marked slightly oversize as it's far easier to trim it down than to make it bigger. A combo of scissors and a brand new knife were used to cut the carpet. Slight colour difference Trial fit, and then some trimming On went the glue. I did this in two sections so I could ensure it was all lined up front to back. Before these side sections went on there are little sections on the floor that cover the humps inside and out, these were fitted too. The corresponding outer section went on too. This was a real prick to do. I wondered why it was in two sections (split just aft of the A-pillar) when I removed it and thought "oh I'll just make it one piece, how hard can it be?", well, it didn't work and I had to cut my section into two pieces too as I just couldn't get it to line up at all. Working up under the dash and into the A-pillar space wasn't much fun either. The little strips of green tape behind the seat rails is to indicate the position of the now covered seatbelt mounting holes on each side, so I could cut the carpet in the right place later. Both sides had their inner and outer sections glued on, and then the front bulkhead, under seat and footwell sections went in Now, keep in mind this looks easy and seems to be progressing quickly, but in reality, the work was slow, painful and very hard to motivate myself to keep going. I also couldn't do too much in one go as I needed to wait for other sections to cure before moving forward with the next part. Stripping the carpet was about four days work, there were about ten days between finishing the underlay and fitting the first piece of carpet, and the last piece of carpet was fitted almost a month later. Anyway, with the footwell and tunnel done it was only the rear bulkhead and parcel shelf to do. These were never going to be fun due to their location and size. Before the bulkhead went in I had to fit the little sections that cover the arches. Now, I thought it was doing this right, and it looked right, until I later went to fit the interior trim panels, and found that I had placed them in the wrong order, but not until I had already screwed screws through them. I had glued the carpet to the arches Which was bad when the trim went on But what needed to happen was to have the trim panel screwed into the arch and then the carpet glued in over the top of that, not the other way around. It's obvious now but wasn't at the time. Now the parcel shelf carpet can go in. I did this in a couple of stages. First I trial fit it, trimmed and then using the Ados high temp I ran a strip of adhesive along the very back edge, making sure it butted up nicely against the bulkhead carpet. After 24 hours I came back and using ultra strong spray adhesive (which I had moved to for the footwell carpets and bulkhead due to ease of use and speed, but not needing the high temp for those sections) sprayed the top section This allowed me to place the top section perfectly, and then once that was cured to move onto doing the lower section on each side. In the very unflattering light, the bumps in the carpet behind the seats from the wiring/bracing is very obvious but in person, it's not that bad and is mostly hidden by the seat backs. But that was it. I had finally glued in the last section of the carpet! This is about the point where I was finally starting to feel happy with the work I had done, as getting the parcel shelf carpet in really tied it all together and made the difference. Before this, I just wasn't really feeling it and wondered if it had even been worth the effort. Now it was a case of refitting the seats, after a quick clean. I also cleaned and greased the rails. There has been a lot of other work going in during this. Since I had the center console out the switches got overhauled, various bits got painted, the shifter got rebuilt, and new shift and handbrake boots are being made. There will be another post on that work later. Today I decided to see what the carpet looked like out in the real world, not from under the harsh cold lights and out in the overcast day. I connected the battery up, primed the fuel system and turned the key for the first time in about two months. The engine turned and sprang into life. I still can't believe how well it starts and runs hot or cold. Reverse gear was selected, and I slowly backed out of the garage into the driveway. This is what I had done. Enjoy. I know I did. It's not perfect; there are still some bits I'm not 100% happy with, but overall I'm pleased. My first time working with carpet, and not even having a pre-cut or moulded carpet to work with. It was hard work, but the transformation from the old carpet is huge.1 point
-
Literally the day after selling the clone Z50, I got a message from a mate -Hey I’ve got a rough Z50J sitting here that I only bought for the motor, wanna buy the rolling frame? Slept on it for the night and thought ah, it’s an actual Honda Z50, let’s do it properly this time. Got it home, and assembled it to a rolling frame. Put it in the corner of the shed while I placed a couple of orders for various bits and pieces and waited for them to turn up. then assembled. Ended up with backdated 4L tank, 8x3.50 alloy wheels, undercowl, alloy foot peg covers, Windsheild, lowering the suspension a bunch, fork brace to lower the front guard, OEM style tail light and frame extension. Fairly happy with how this has turned out this time, and it’s at about as far as I can get it during this lockdown. - need access to a welder/vice to make rear indicator mounts. Keyring Details.1 point
-
The clears a bit of a disaster really and reasonably gutted, so many things I'd have done differently in hindsight. But it's done. Drove it into the sun yesterday and it's not all bad news.
1 point
-
Yanked the motor out of the red one, and swapped it into the white one, spent too much time on Instagram and ended up spending some coin to import some bits to make the jog cooler. sourced some bits from Yahoo Japan -8inch wheels (OEM is 10inch) -UnderCowl and Rear spoiler from Japan -OEM Yamaha Jog floormat -repro lower rear side panels Then lowered to a inappropriate ride height, and purchased a sweet helmet to suit the style.1 point
-
And painted. Replacing that oil seal so left it in.
1 point
-
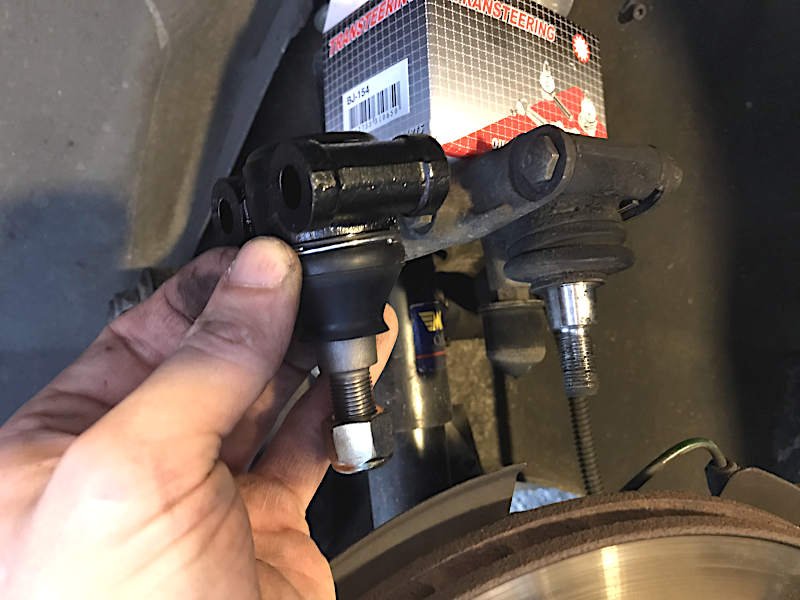
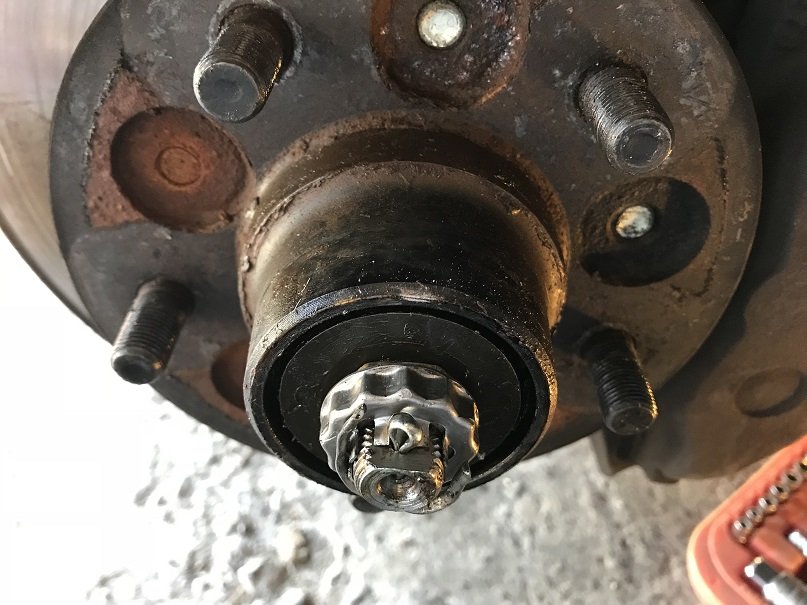
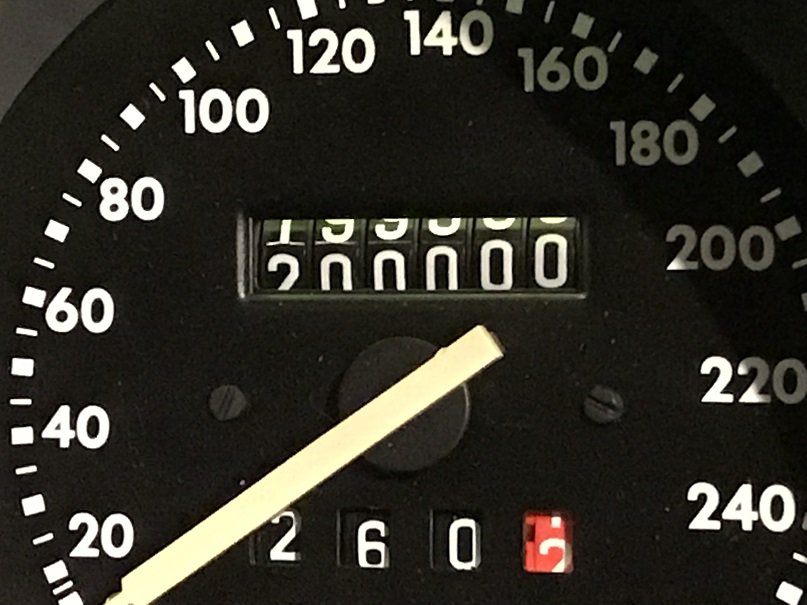
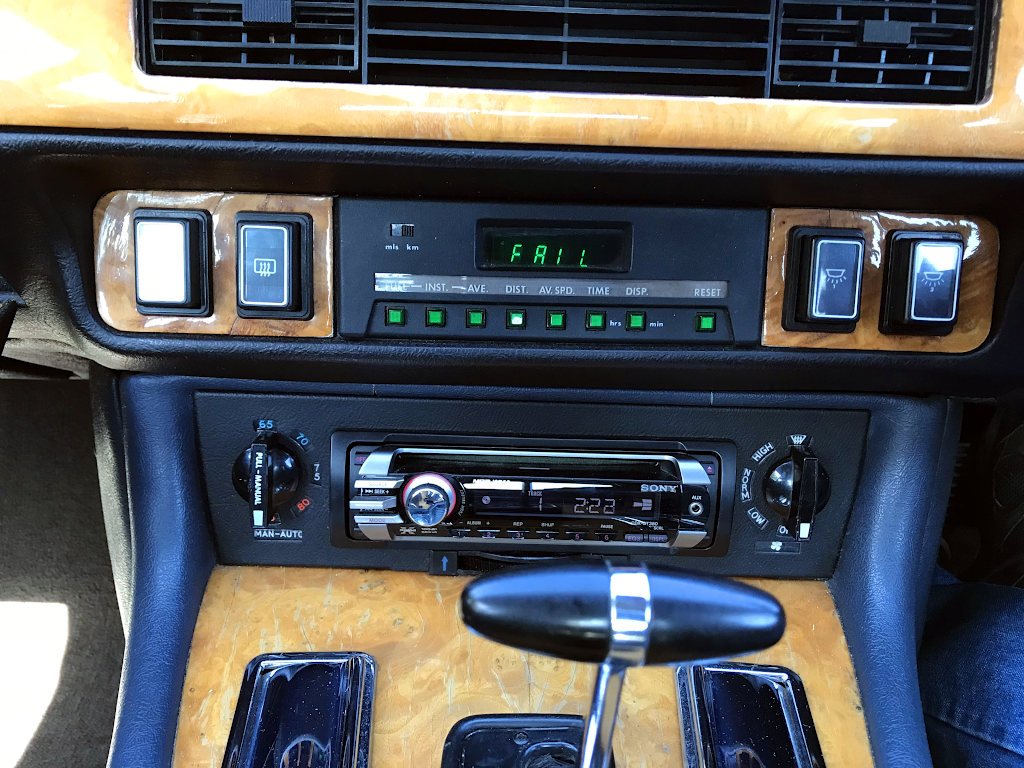
So I did the upper ball joints as well.. ..but it wasn't those. The push/pull play at 6 and 12 o'clock was still there. So I looked at how to adjust the wheel bearings.. I was expecting it to be horrible but it was easy, and now the play is gone. Should have done that first. Alas, the vibration is still not quite gone. It's probably just something I have to live with in a British car which has made it all the way to..... 200,000kms. So I got a new obsession instead. The engine doesn't run all that well - it has a random half-stumble at idle and low rpm.. You can see the misfires by watching the shaking of the motor, and although it appears to smooth out if you raise the rpm sufficiently, the higher engine speeds could possibly be disguising the problem. The car has also never really started that well from cold. I checked the spark plugs and they looked amazing to someone who has never owned fuel injection before. I looked for bad connections and vacuum leaks, since the ECU directly reads manifold vacuum (in V12 cars, the ECU is in the boot and its vacuum line has to run the whole length of the car, because why not... ). Nothing stood out though. Several tanks of fuel system cleaning pills didn't help either. Today I took off the airflow meter and cleaned it, and this did make an improvement. The raise in engine speed on startup is more pronounced, and the idle speed seems to have raised slightly which makes the car coast better / makes it not decelerate as aggressively when you lift off the accelerator. But just like my reduced 80kph vibration, the shaky running issue's still detectable. I'll try a compression test and then randomly change every ignition system part, idle valve, fuel pressure regulator and injector before giving up in 6 months from now. The Jag let me know what it thinks of my diagnostic skills:
1 point
-
Can someone from the 3D printing thread please whip up a few sets of hotwire's, turbo's and tridon's? Cheers.1 point
-
Those aren't turbos!1 point
-
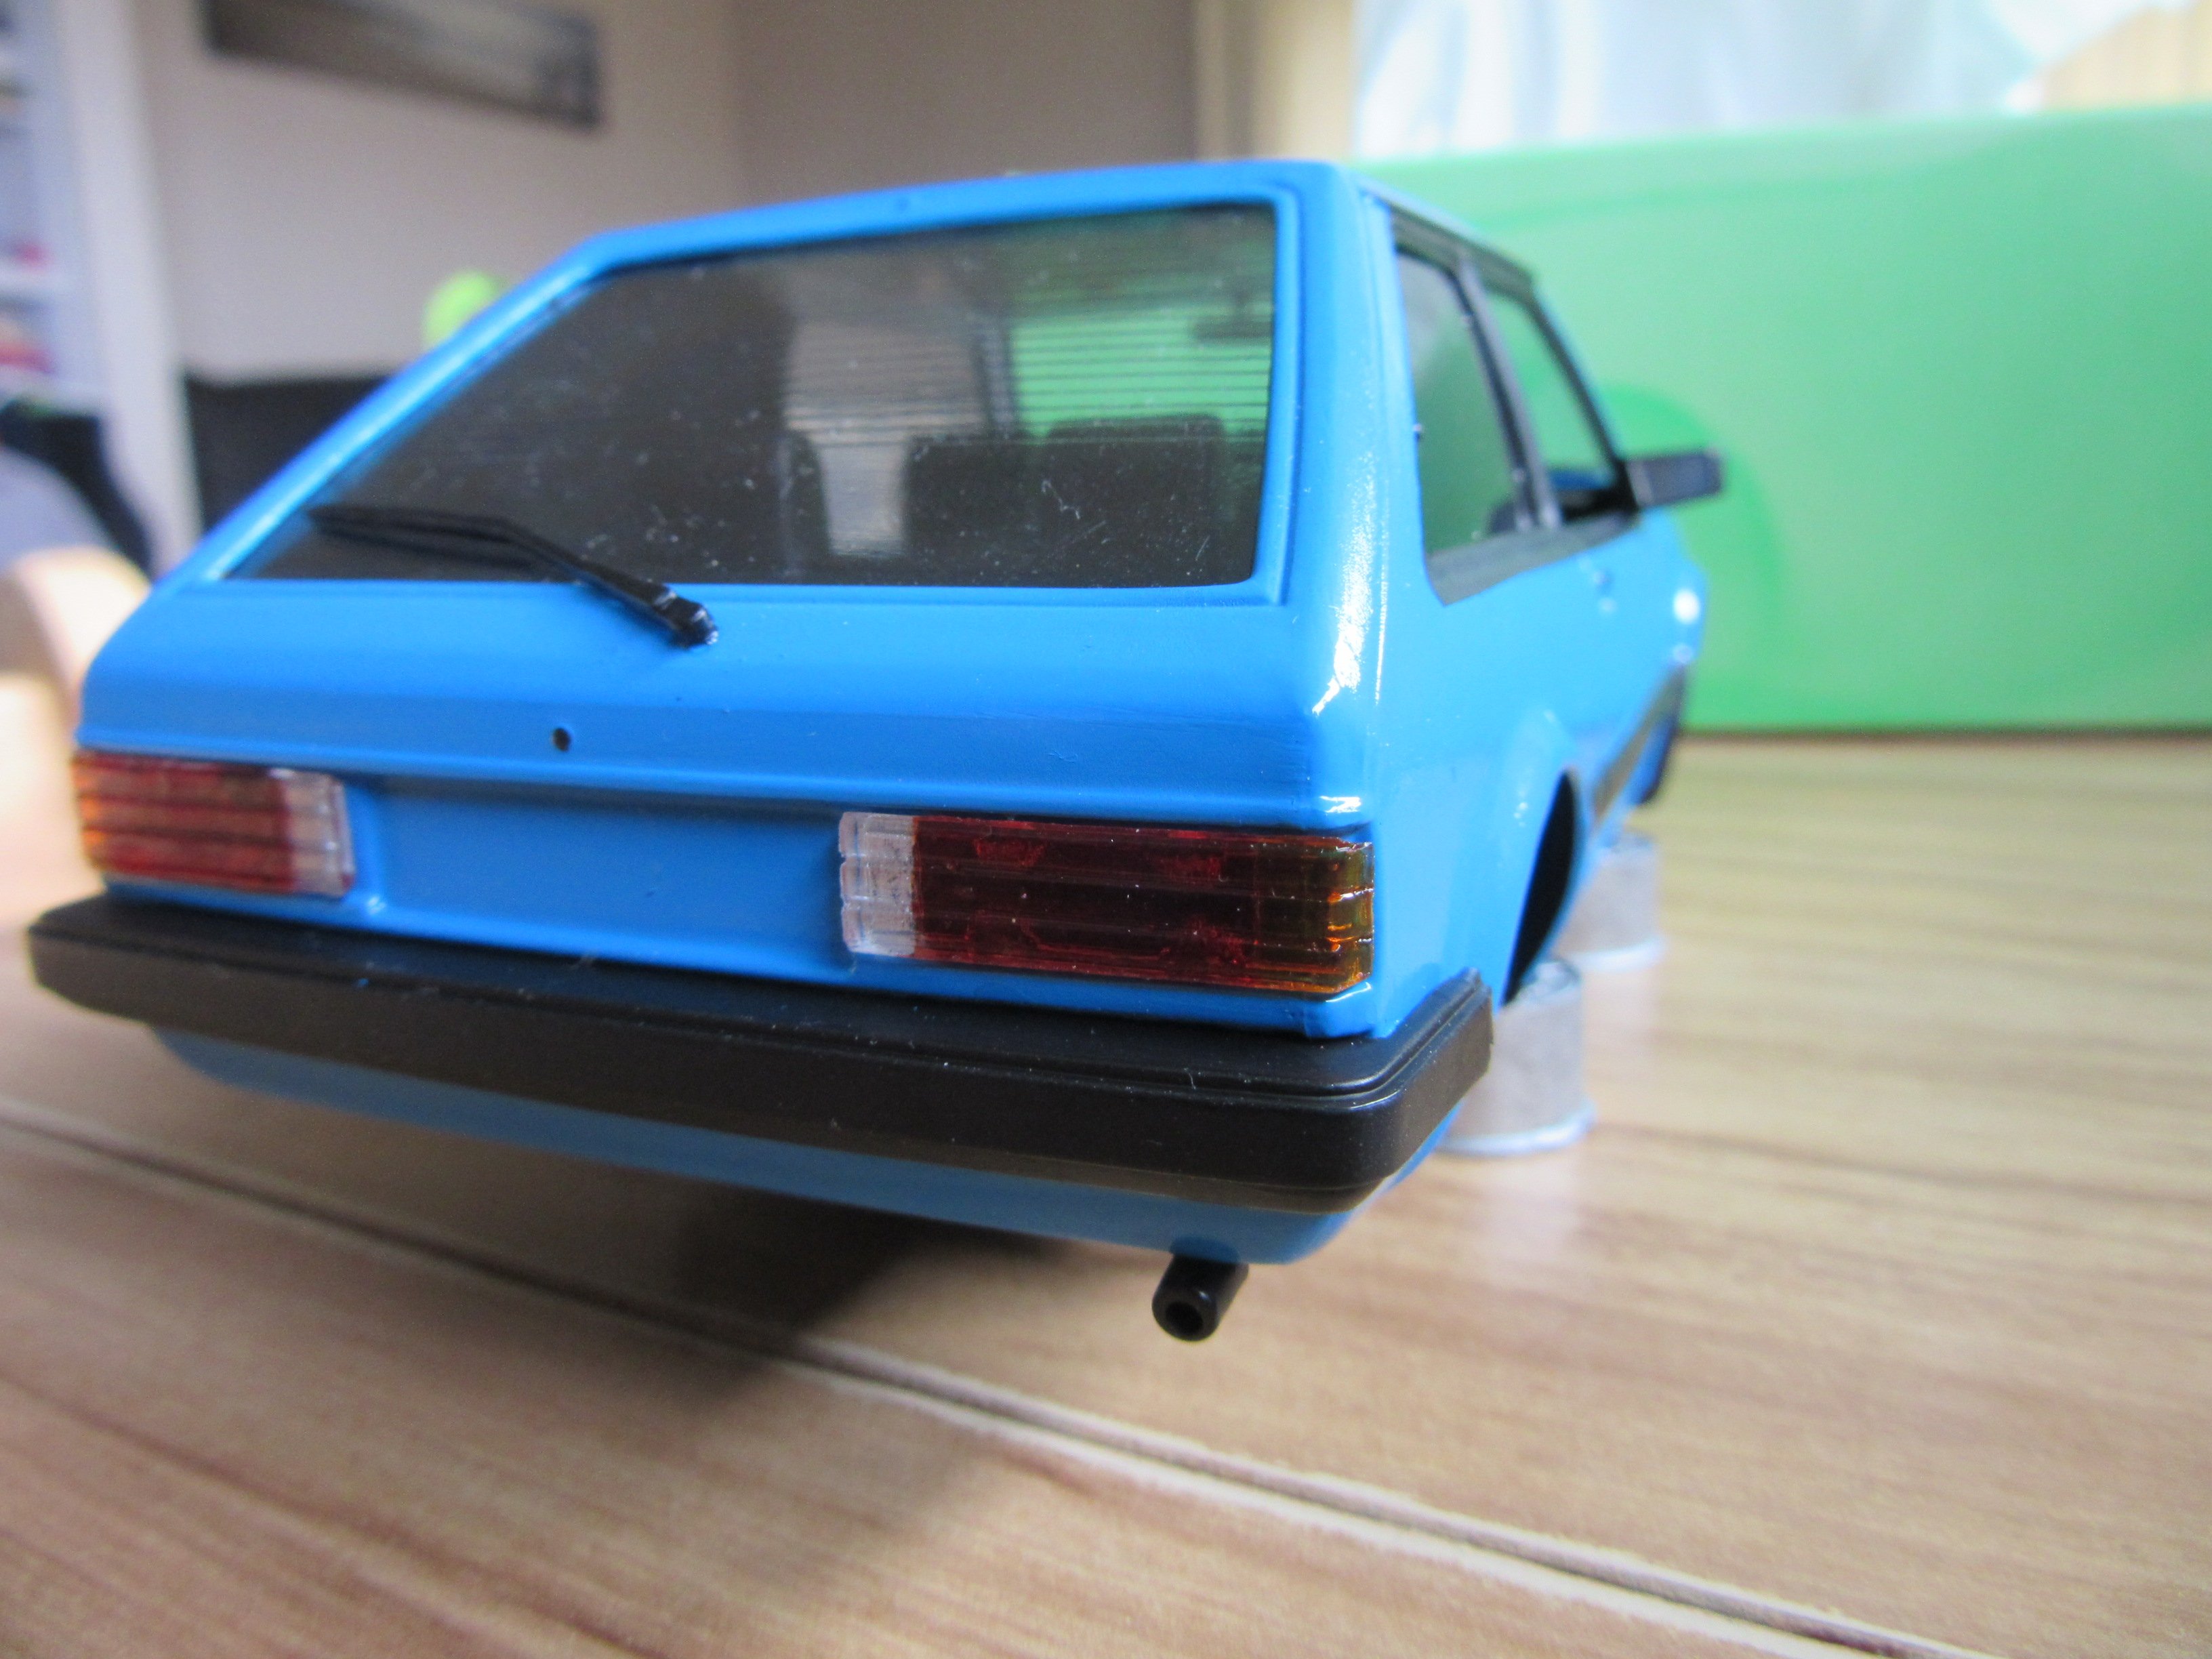
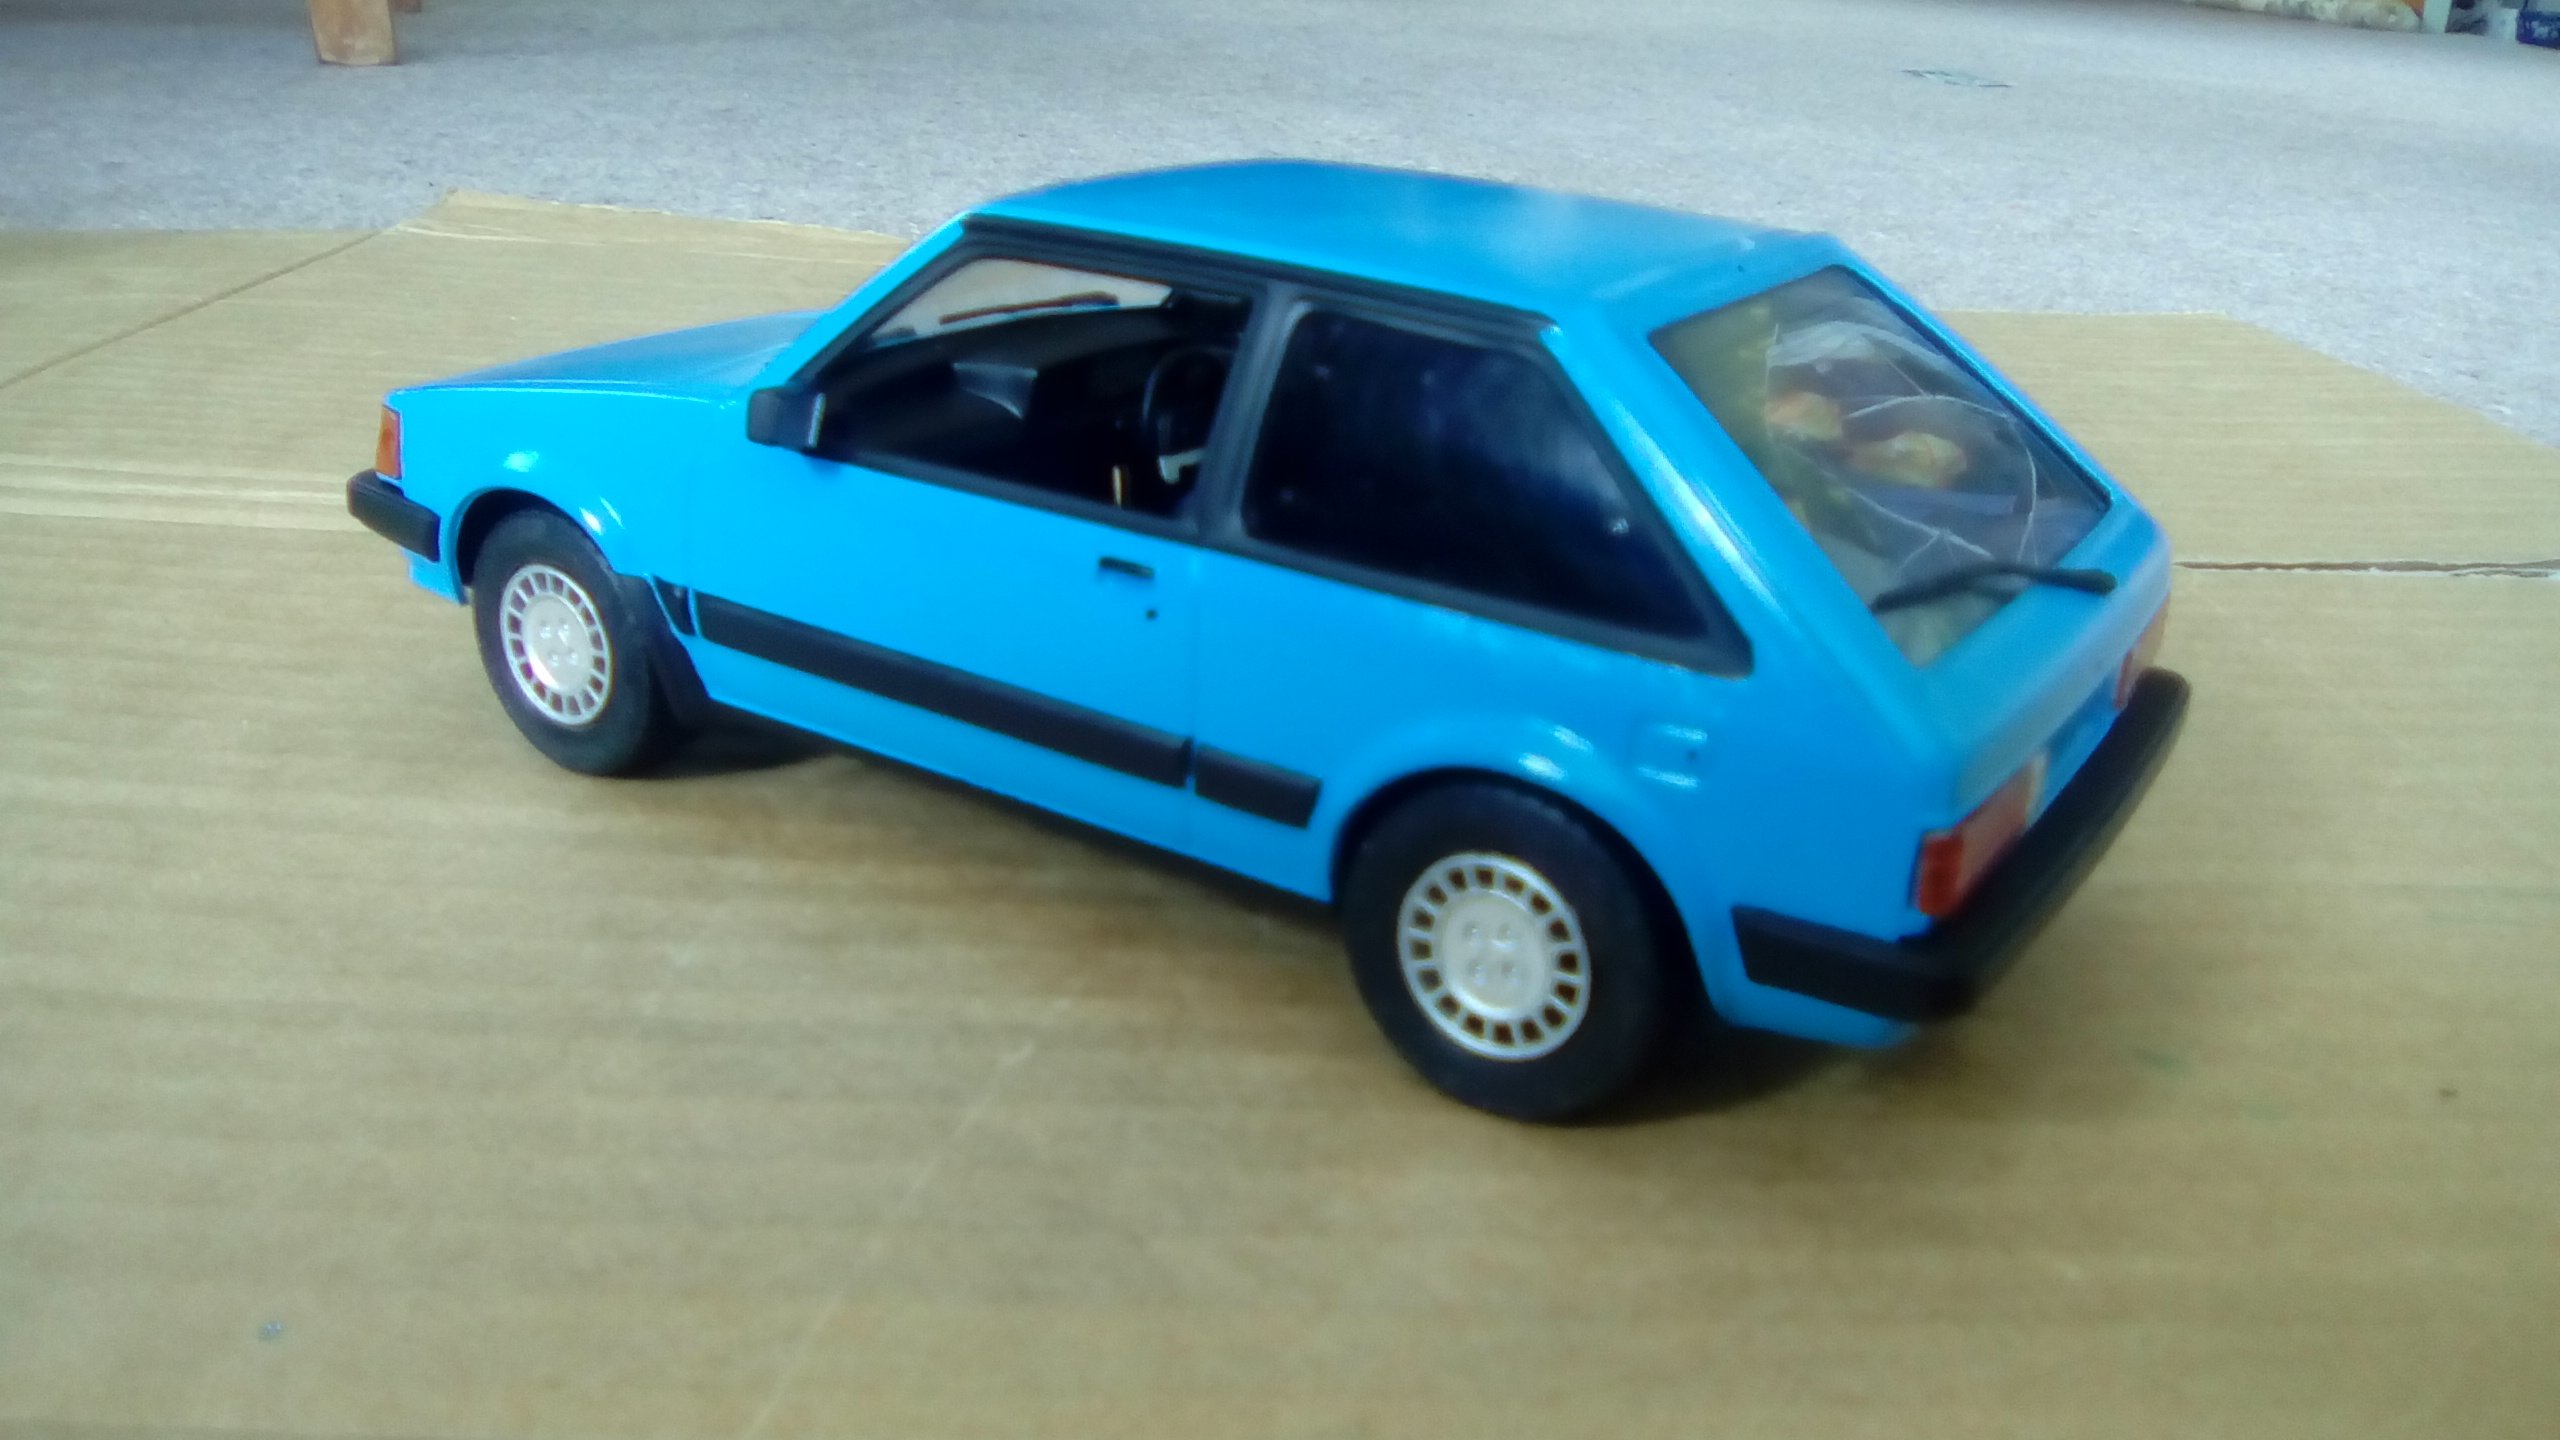
This is my first 1:24 car model I've just done recently. No mods, just a copy of the wife's first car.
1 point
-
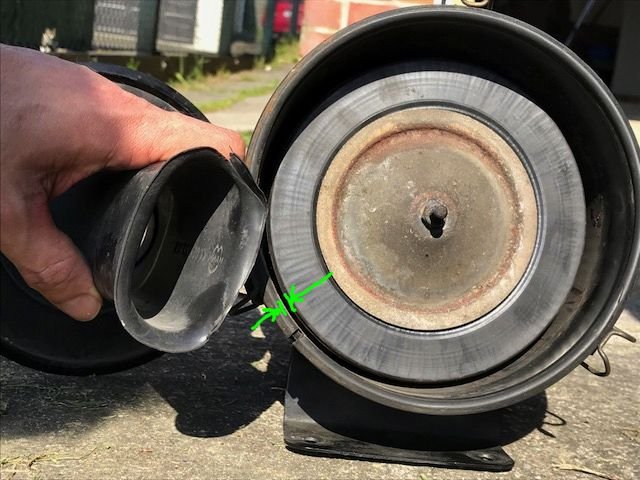
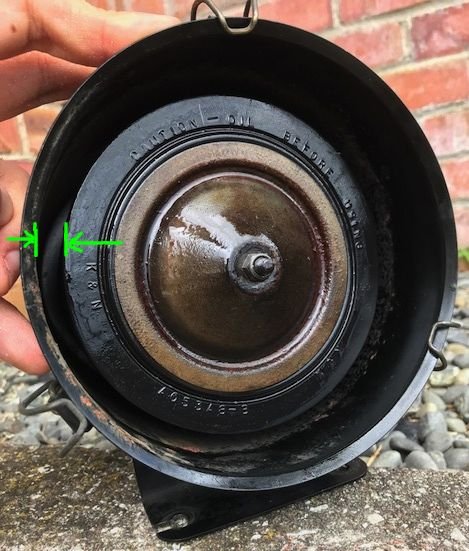
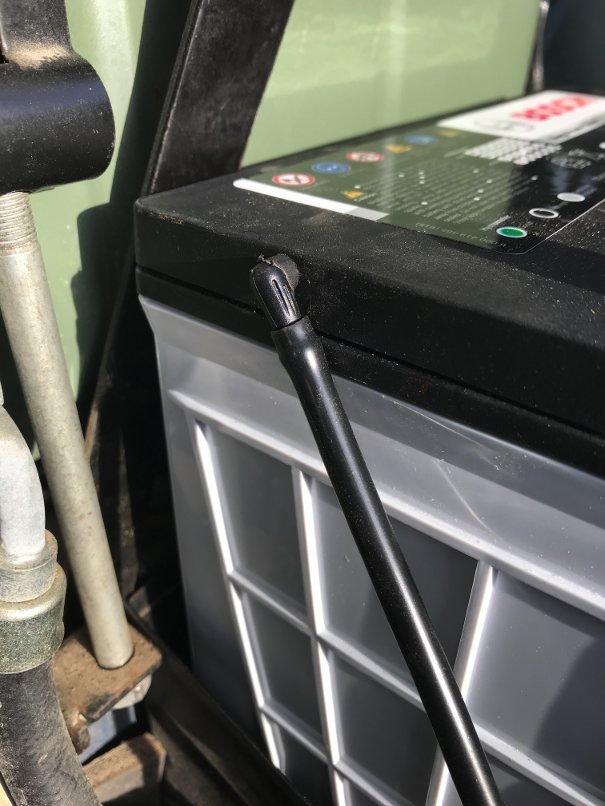
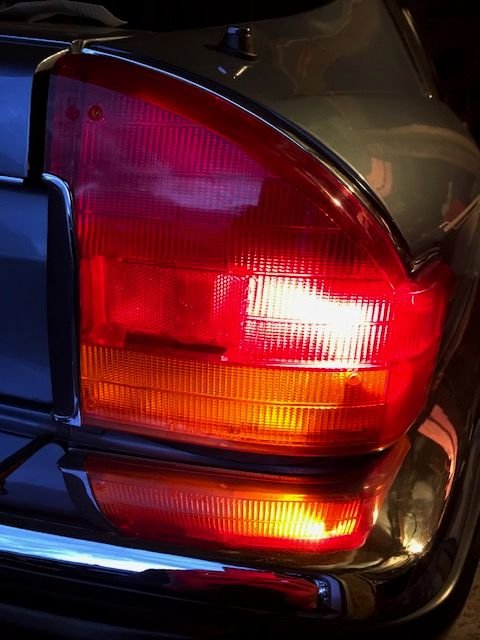
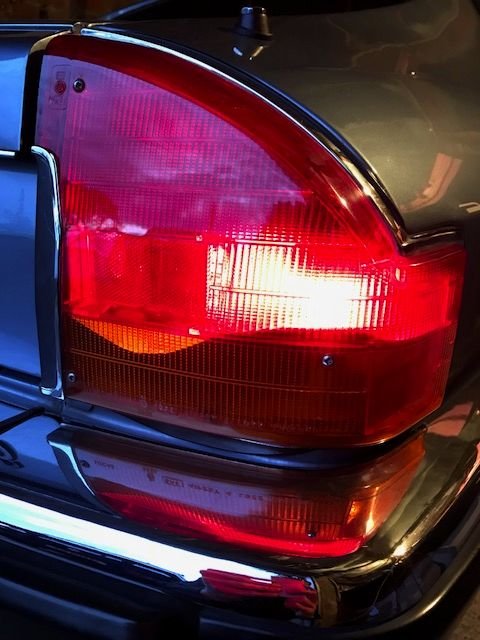
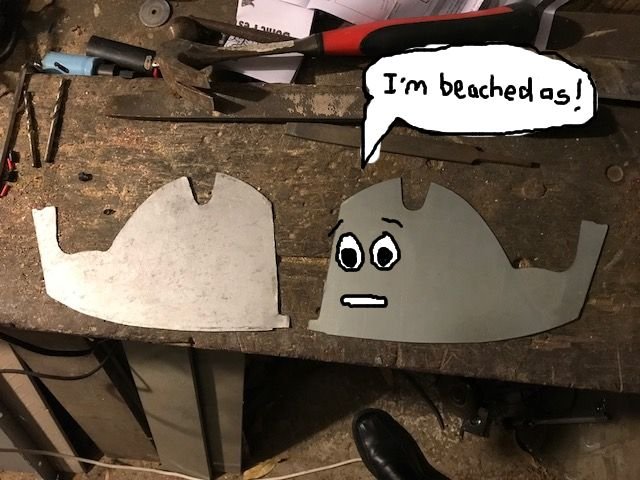
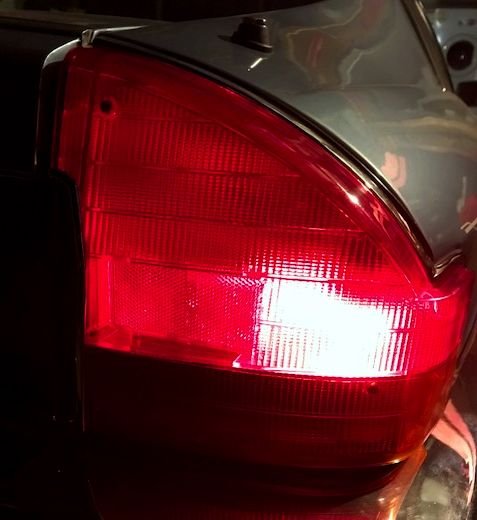
I promised a zorst recording. I hoped to record some runs up to redline under load, but this will have to do for now. It already took me ages to edit out all the smoke. I think the exhaust sounds more like what you'd want from a car like this - payoff for the hassles and fuel economy. It's no lumpy V8 burble, and of course it would be more interesting with carbs and a manual transmission, but it'll do. Even if the auto sometimes keeps the engine at a steady maximum rasp up hills, which sounds like someone's cutting grass with a line trimmer... Also, gotta love that ultra refined starter motor, for sneaking out to the club late at night. =\ Pity that this plan..... ....wasn't going to work, but I'm happy enough with the result. I also ended up increasing the induction noise, because I decided to check the air filter and found this: The filter diameter seemed a bit big for the housing, leaving a gap of only a couple of mm as shown by the arrows. Despite appearances, the gap was pretty uniformly small the whole way around. Rather than think too hard about whether that total area could in fact be adequate for a whole 220 horsepower, I ordered a K&N filter which has a smaller diameter: I'm also now running this with the intake snorkel removed. Despite the long intake manifold etc, there's some decent induction noise at large throttle openings (kinda the whole point if I'm honest). I could have gone for a pod filter, but I read that it's important not to alter the airflow pattern through the type of airflow meter sitting right behind this filter housing. The changes I've made don't seem to have made the car run any worse. What else... I got some piping to suit the vents in my battery and carry any corrosive fumes outside the car, equivalent to the system the car apparently would have had when new: When I got the car, the RHS rear light was missing its internal divider so that the tail light bulb could illuminate the indicator and vice versa: That was stink, so I made up a temporary divider out of cardboard. It wasn't long before the cardboard started to warp: That looked pretty dumb, so I made a proper one out of metal, using the divider from the other side as a template. Here they are: Now it's sweet.
1 point


.jpeg.74d1f6e1daf6a6adde0a4714aa618515.jpeg)


This leaderboard is set to Auckland/GMT+12:00