
Thousand Dollar Supercar
-
Posts
2,029 -
Joined
-
Last visited
-
Days Won
3
1 Follower

Recent Profile Visitors
3,780 profile views


Thousand Dollar Supercar's Achievements
Committed (5/5)
6.2k
Reputation
-

Datlows 67 Eldorado discussion
Thousand Dollar Supercar replied to datlow's topic in Project Discussion
Yeah, if Uncle Bob did start it recently after all, perhaps the engine is OK and the starter's just not working when in the car. Have you tried starting the car with the lights on? Lights dim when trying to crank engine = starter is drawing current = more likely that engine is seized. -
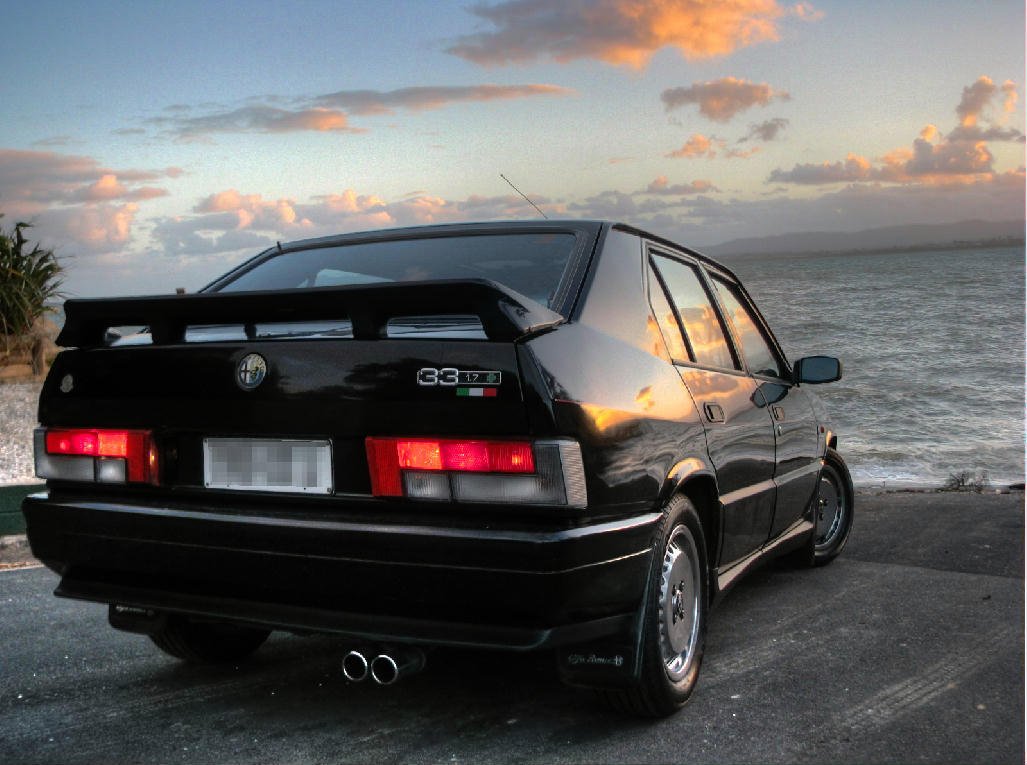
Maybe. I assume the pitch of an exhaust note would be a function of pipe diameter, which should be a function of engine displacement, assuming you want to keep the gas flow speeds high for good performance... but I suppose you could still put fat pipes on a small engine to make it sound deep like a Harley... in exchange for it performing like a Harley. Don't go for a cheap rolled tip like I used to have on my Alfa 33: The rolled ends of the tips were in the path of the exhaust and I think they were responsible for adding a wooshy turbulent air noise. This reminds me of oldschool Nats 2016, where someone brought a 911 to the track day and swapped on a manifold like that in the pits: I don't think I knew who those guys were, and I don't know whether I still have the original footage without music over it. Are these the stock headers from your generation of Goldwing engine? They don't look equal length, which might mean less of a smooth / clean straight 6 sound than you're currently getting?

-
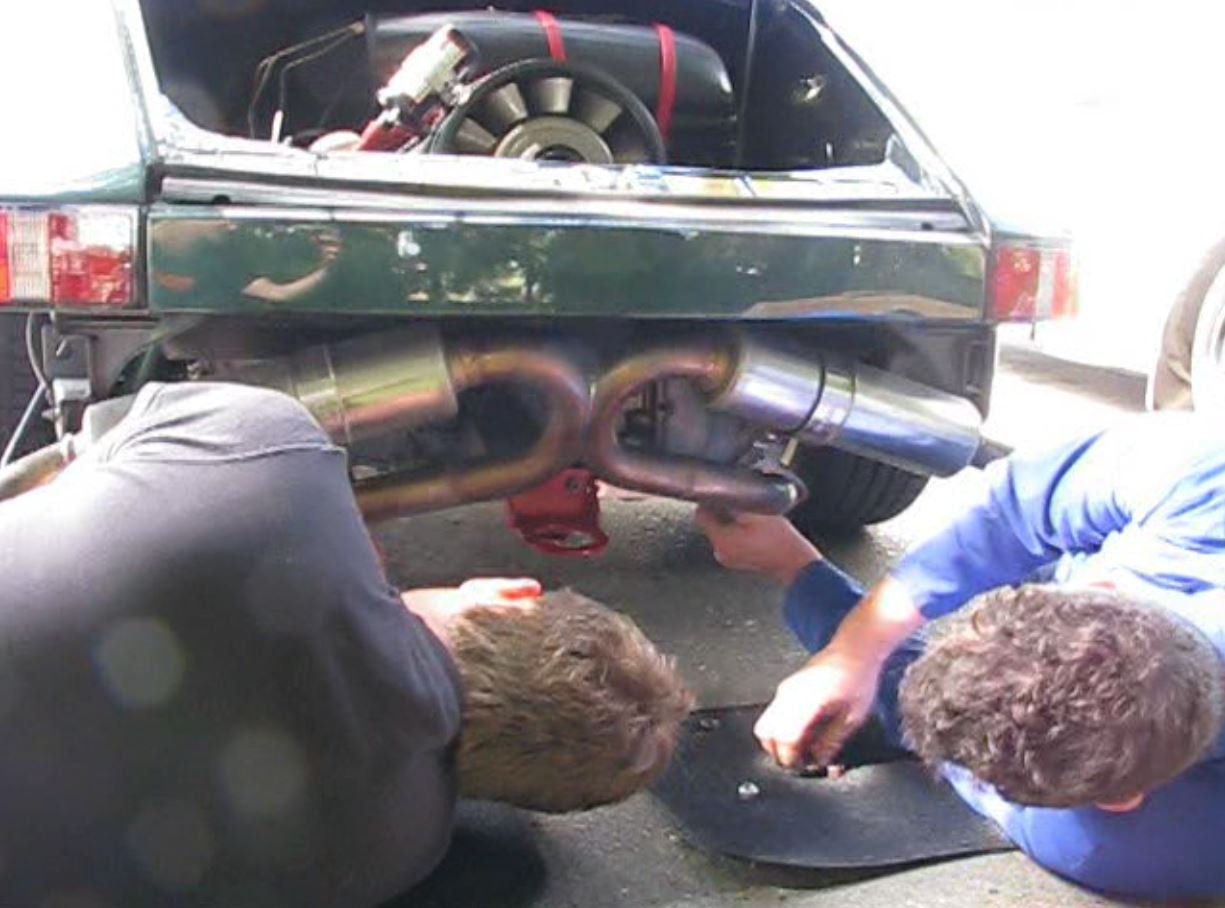
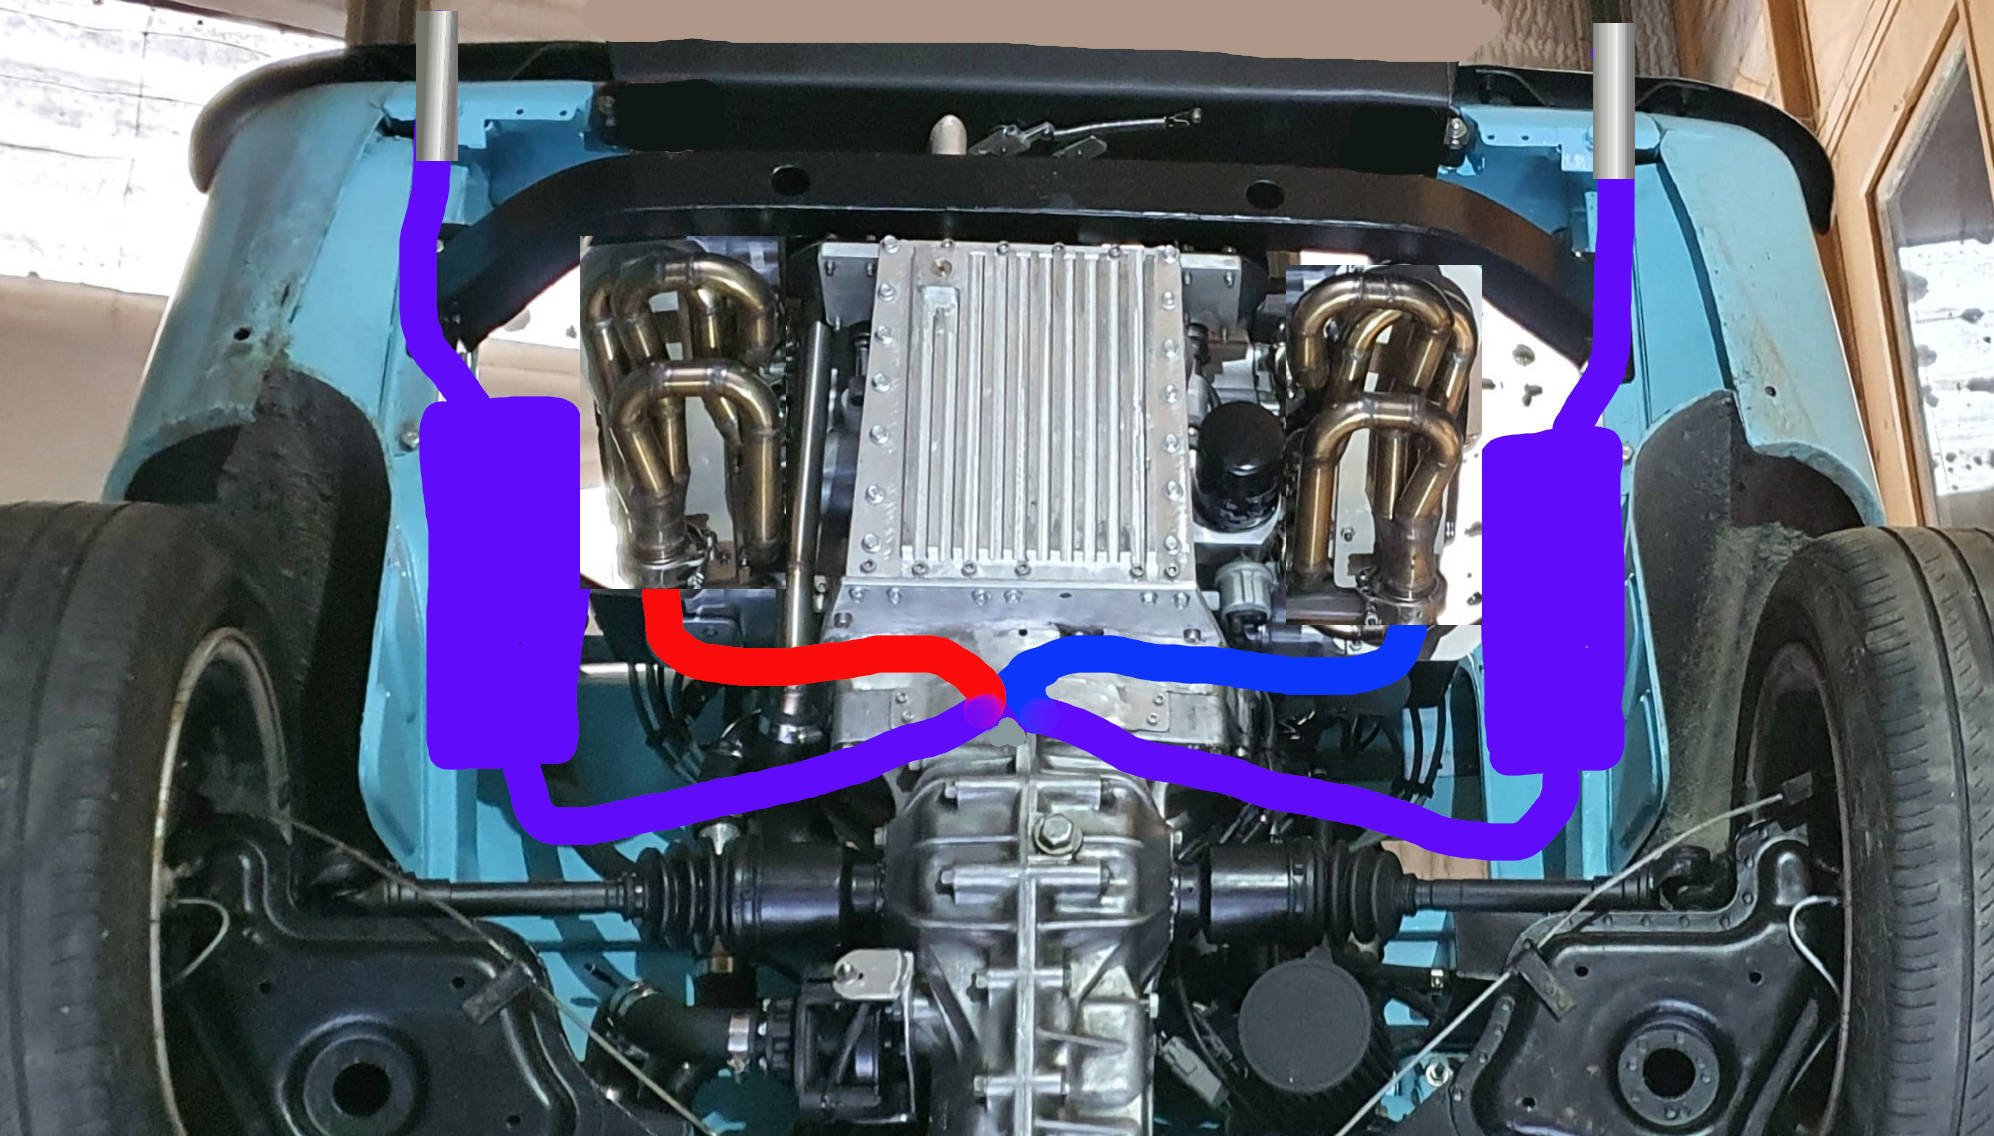
Here's what you do: Swap the headers left and right - they'll bolt straight up and fit perfectly without fouling the crossmember (guaranteed), and the outlets will point forward Run new pipes from each header to partially merge in some sort of crossover x-pipe under the engine, but offset it slightly to one side (make the blue pipe and red pipe different lengths) to vary the amount of flat 6 vs straight 6 sound Put mufflers under both sides of the car alongside the engine, with exhaust outlets close enough to the ends of the bumper that the fumes get swept away Put some chrome tips on so it looks staunch as Alternatively, I see the classic Porsche single rear muffler was a hotdog shape / cylindrical with rounded ends, which must be for a reason.. Maybe you want to avoid large flat parallel surfaces where possible, to break up standing waves / reduce resonance / for strength? I definitely know what I'm talking about because of all the exhaust fabrication I do for a day job.
-
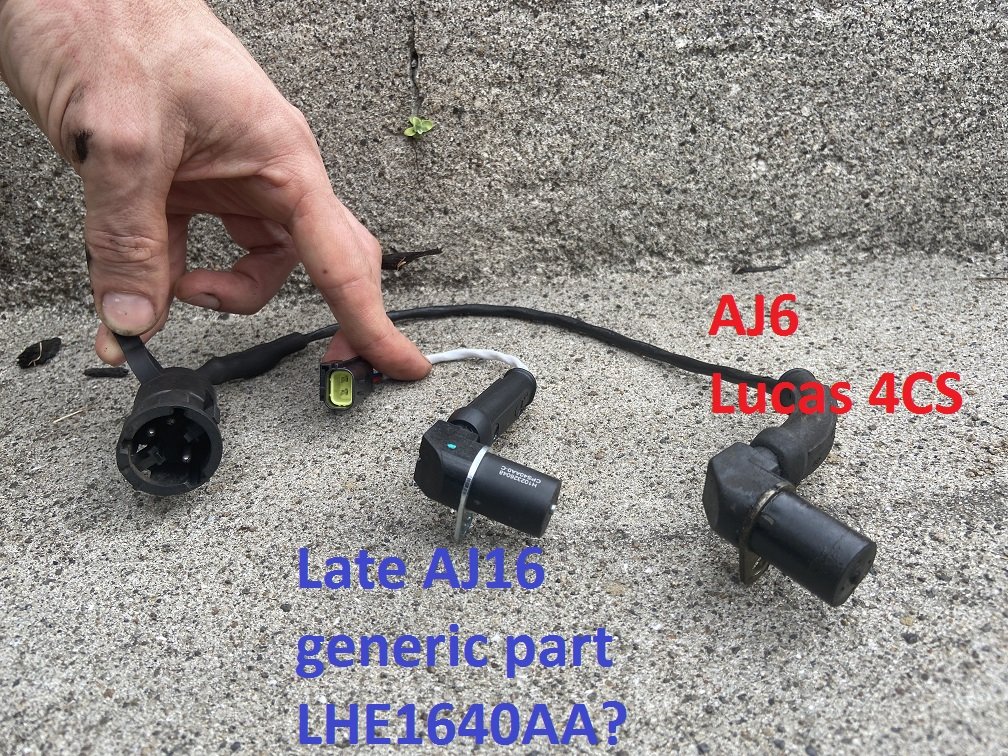
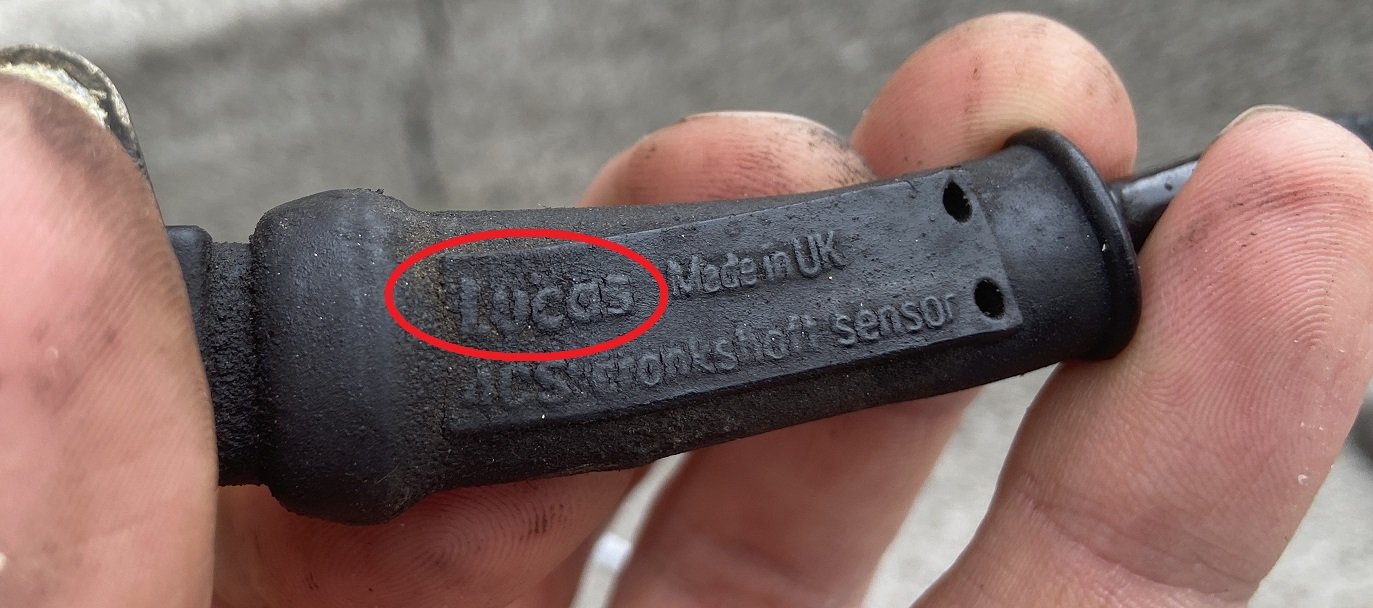
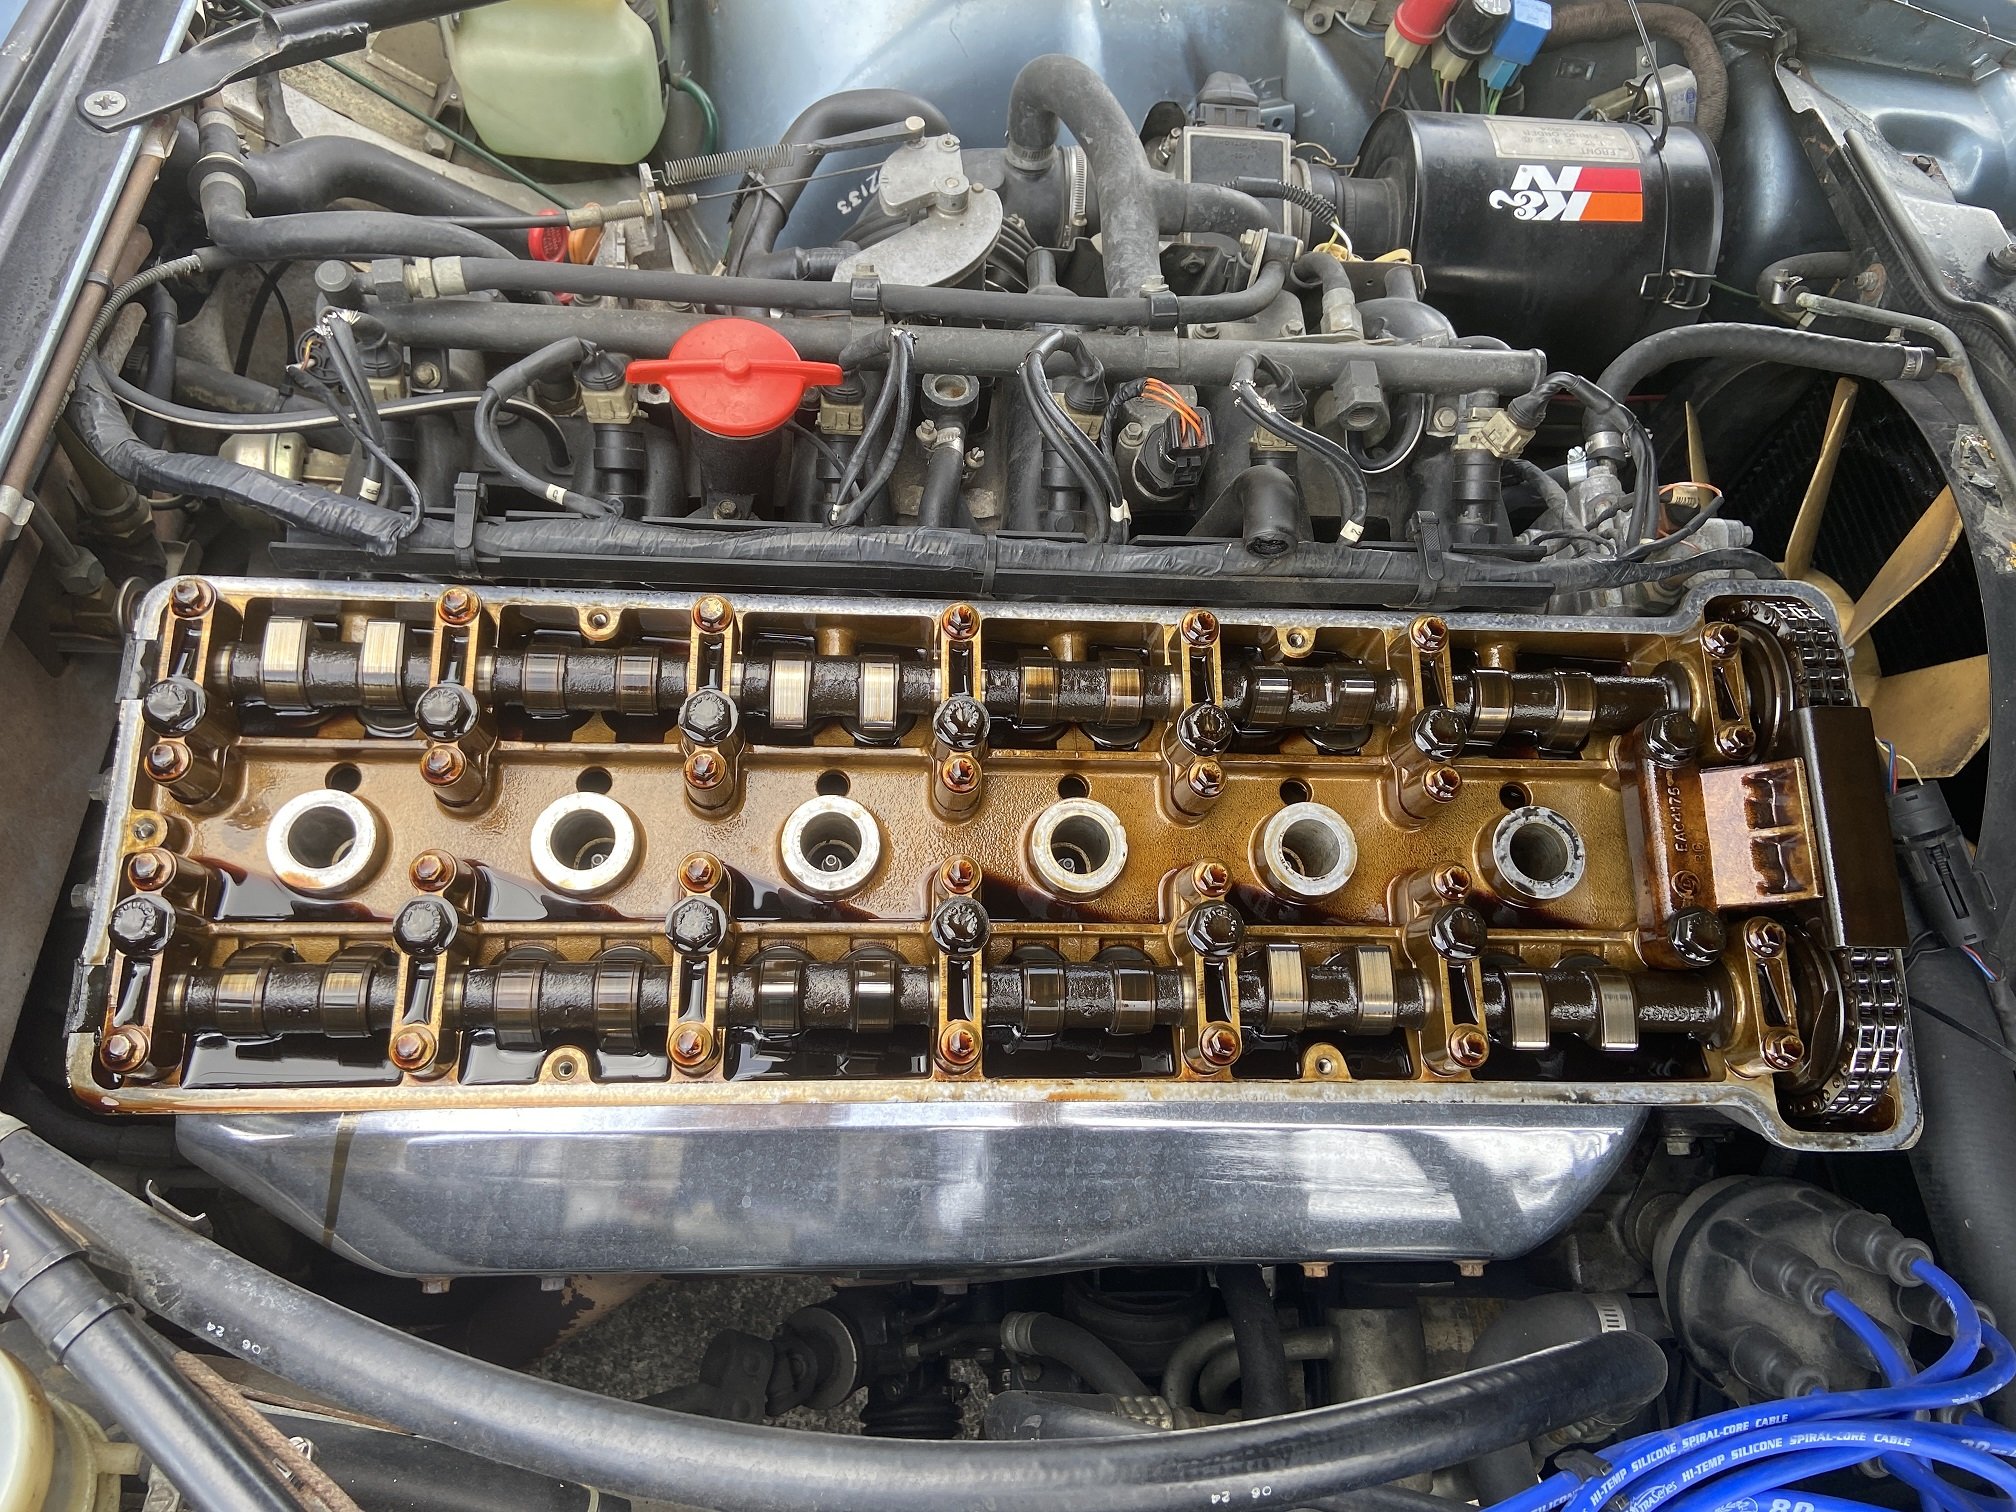
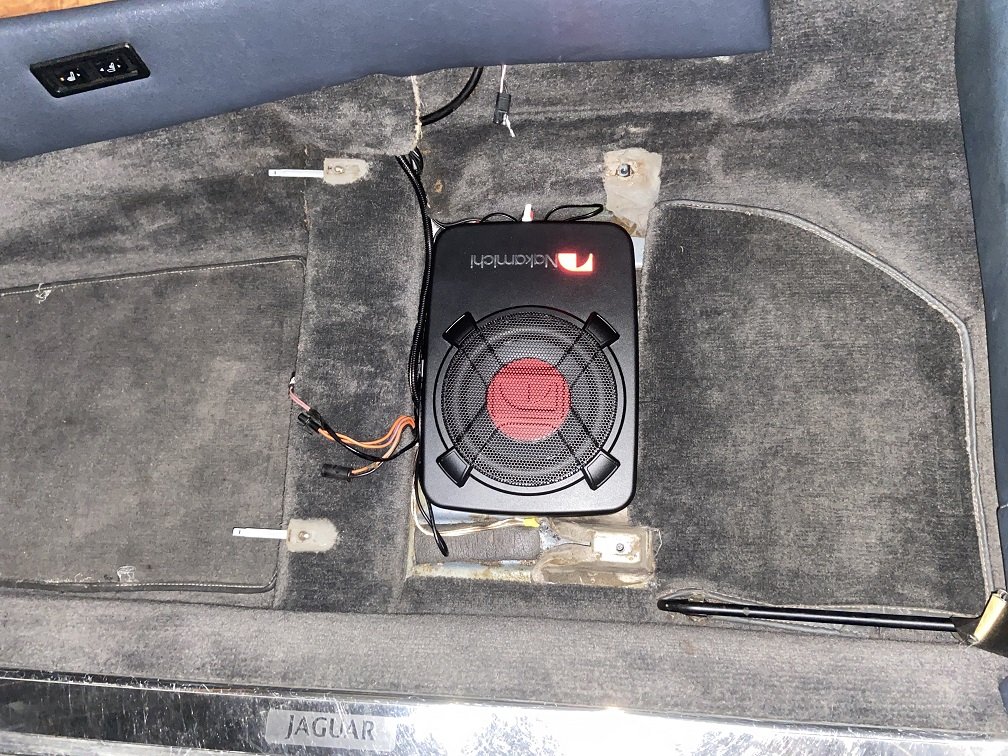
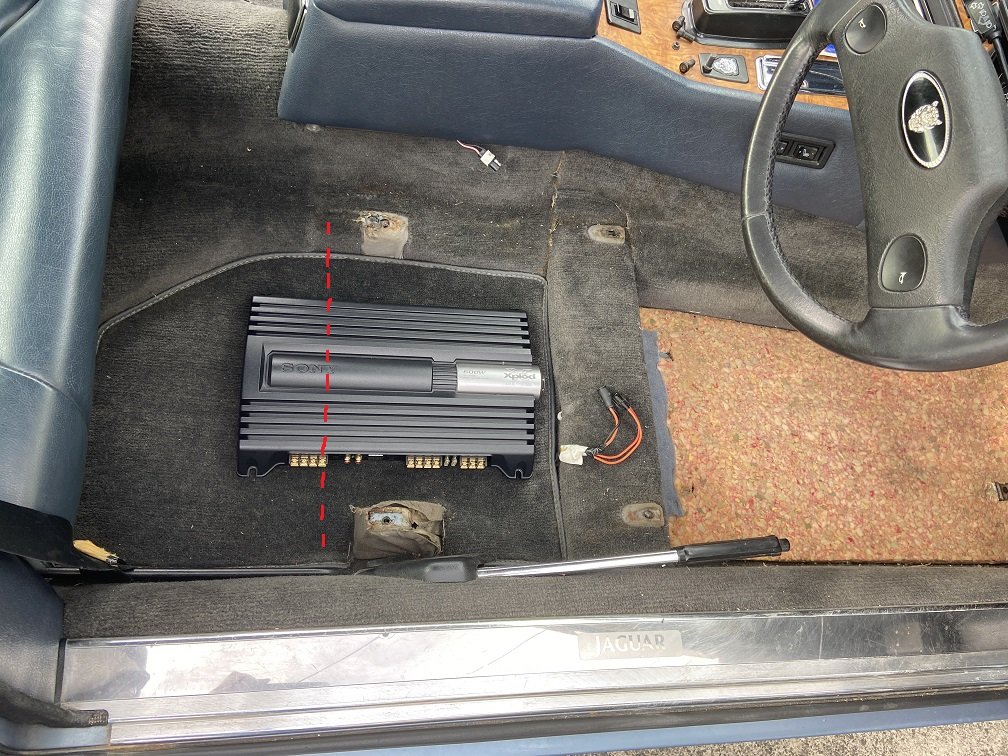
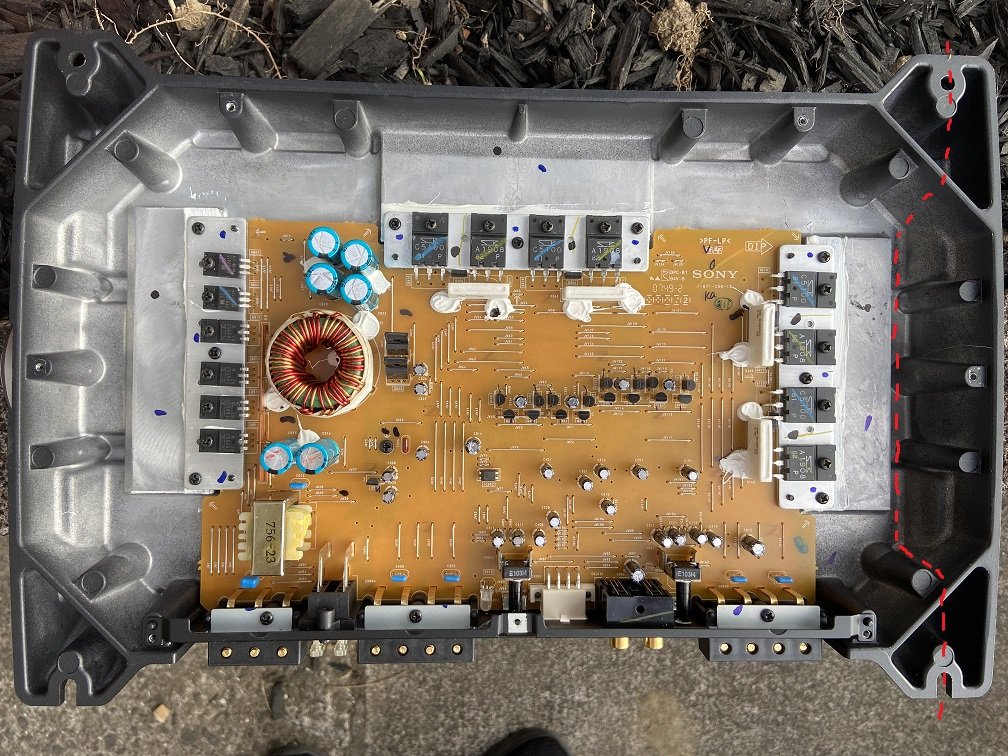
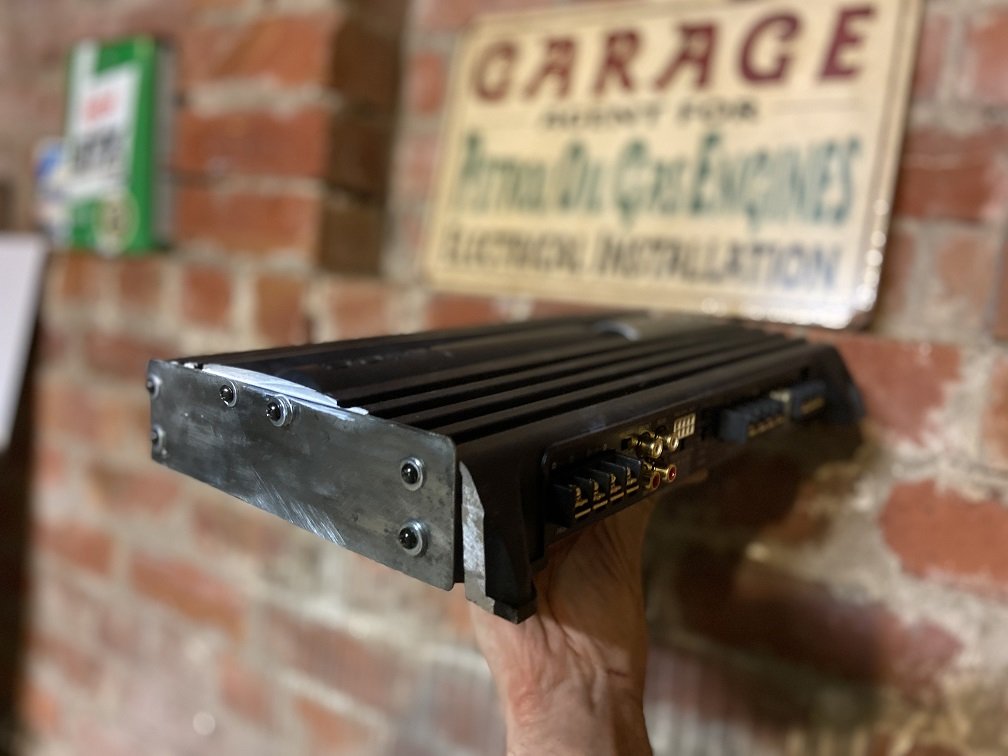
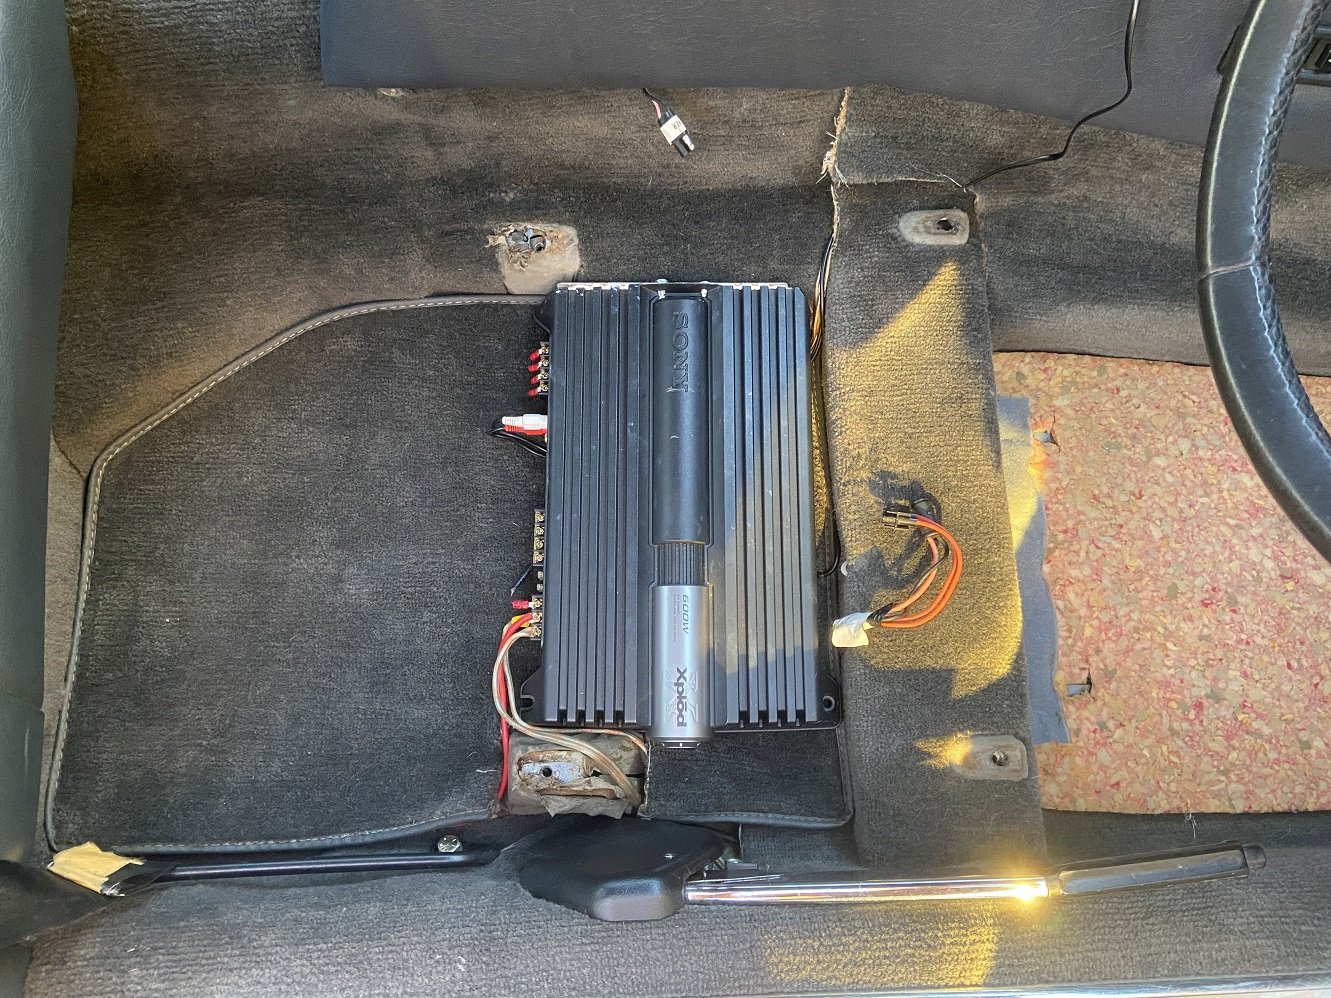
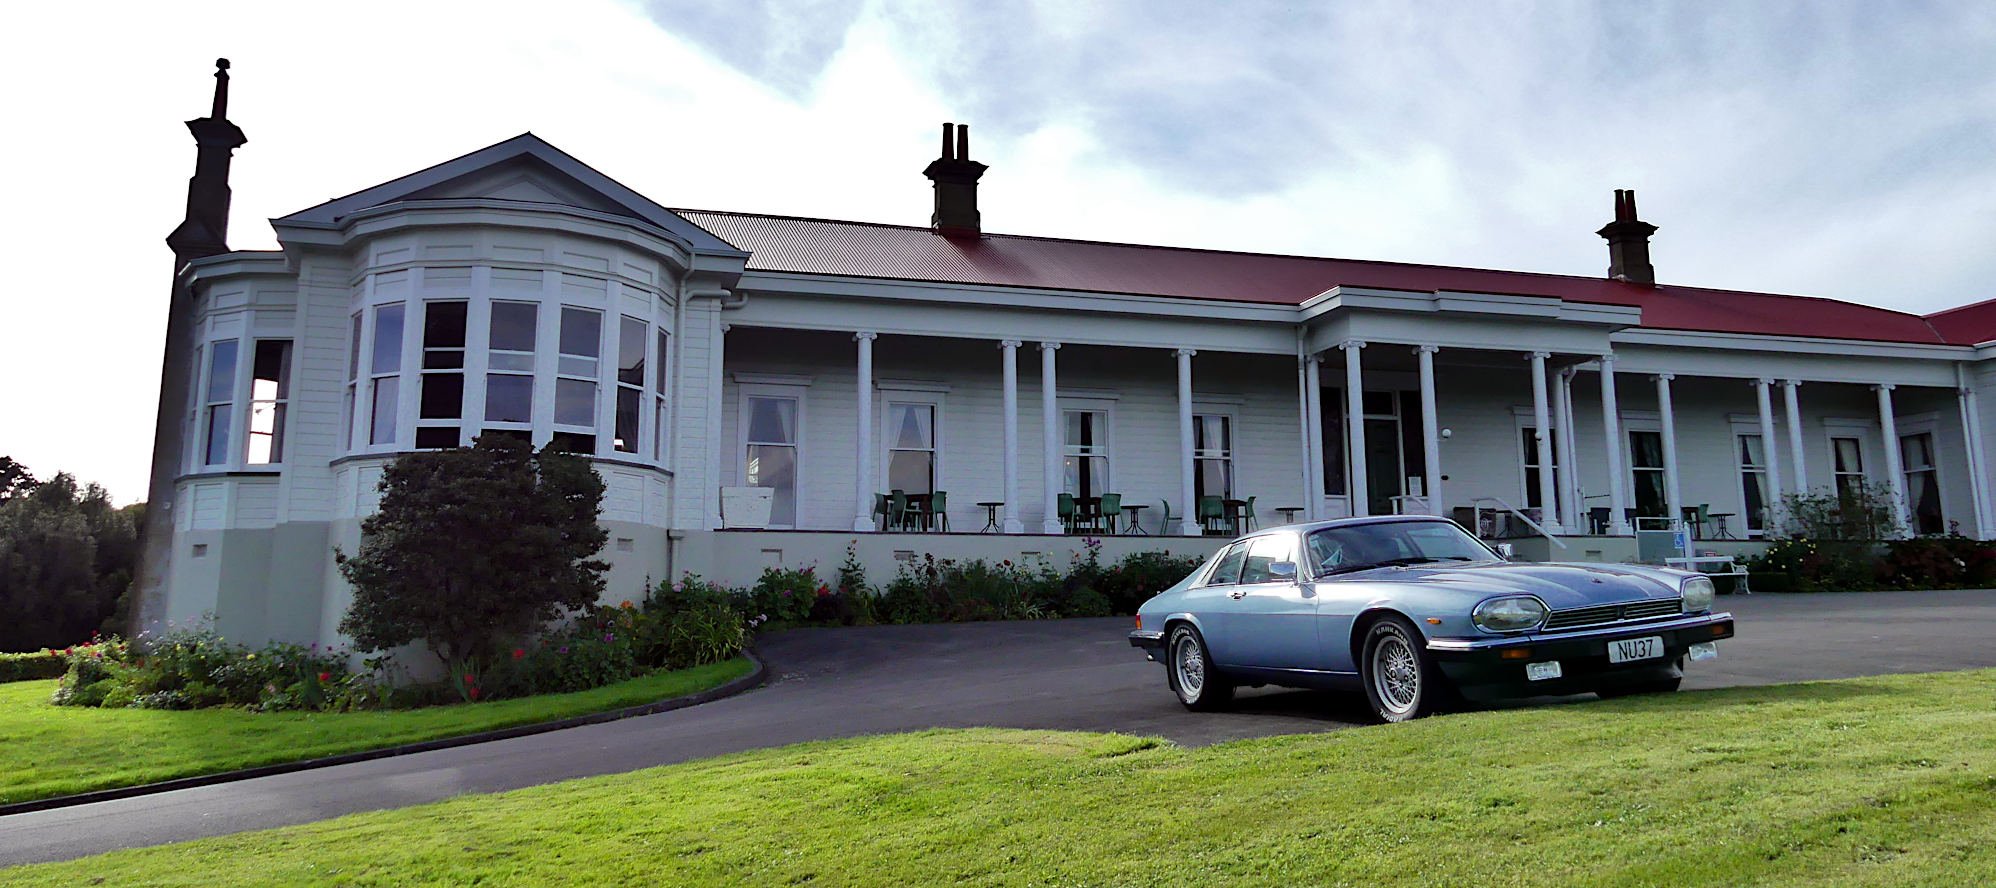
Fast forward six months and I've cracked the high-rpm misfire. transmission issue fuel issue (injector, pump, filter, pressure regulator) spark issue (plugs, leads, coil, ignition module) ECU issue (water damage, failing components) crankshaft position sensor / crank angle sensor I know I previously measured the crankshaft position sensor signal at the ECU and declared it OK, but I must have been... missing... something (har de har har ). The CPS pulses were almost too rapid for my scope to capture in much detail - they must have been deficient in some way that I couldn't see on the scope. Maybe they just had inadequate voltage at high revs. A random Barry on the internet concurs that Jag CPSs can give weird issues on the AJ6/AJ16 engines: You can't easily buy a new Lucas '4CS' CPS for the AJ6 engine for sensible money, so I bought one of these later versions for the revised AJ16 engine, cut the wires, swapped the plugs over and crossed my fingers. It works. The original sensor shall be inspected with a hammer, in retaliation for all that it has cost me in Uber rides, time off work, lost weekends, replacement parts that didn't need replacing etc. Now back to our regularly-scheduled programme - the impossible quest to make a Jaguar XJ-S into a good car. I decided to install the rocker cover gasket I bought when I was worried that oil leaking into the spark plug wells was causing misfires. The end snapped off the cam breather hose when I tried to detach the hose from the cam cover, so I guess the hose gets to be shorter now. Check out the mighty 24V DOHC valvetrain which gives the AJ6 the ability to rev all the way to 5750 or so.. Gasket changed. Next thing: Audio system upgrade. Before: Front 5.25" component speakers in the doors running off the head unit, tweeters mounted on the A-pillars Rear 6x9 speakers in the rear seat storage bin areas, also running off the head unit There was not enough bass. If I tried to fix that with EQ adjustments and the fade control (sending more sound to the larger rear speakers), it still didn't sound great and it caused distortion to kick in earlier / reduced my maximum volume. I had previously decided there wasn't enough room in the XJ-S interior to improve on this setup, but this time I was determined. After: 8" under-seat subwoofer under the front passenger seat Amp under the driver's seat Front speakers run off the amp Rear speakers still run off the head unit, because I need the ability to control them independently from the fronts and I had to devote the head unit's rear outputs to the sub How did I make it fit? The XJ-S seats are so close to the floor and the bases are so saggy that there's not much height underneath them, so the new sub has to sit directly on the floorpan (carpet and foam underlay removed): This sub was a brand new purchase, but the amp is an old beast from 2010 (Fast and Furious 4 / 5) that has been hanging around in my wardrobe since I sold my Rover SD-1. It was too long to fit under the seat lengthwise: I was determined to use it anyway, and Nats was literally the next day so there wasn't time to find anything else. It wouldn't quite fit widthwise / transversely, even upside down. I opened it up and found that its case engaged in a bit of crotch stuffing: Look at all that empty space in there, making the amp look so big that all your mates are impressed, even though the circuit board doesn't need that much room. What to do? You've heard of Panaphonics, Magnetbox and Sorny: I call this one 'Sawny'. I literally sawed the end off the Sony amp with a hacksaw, following the dotted lines a few photos above. Now I won't be able to sell it on Facebook Marketplace to buy weed... I covered the end with a metal panel sealed with thermal paste to offset the reduced heat dissipation of the cut-down case (yeah, probably not), and hey presto, it fits under the seat, job done: I pulled apart the car interior running all the necessary wires, and swapped in my better head unit, now with an improvised condensation deflector shield (see earlier post). I turned it all on and discovered that the last panelbeater to remove my front door cards hadn't reconnected the RF speaker afterwards. Sorted that. By the time I got the interior back together and convinced the car to run (I thought I'd blown something when swapping ECUs, but I'd just left the kill switch on ), it was after midnight on the first day of Nats. I couldn't wake the neighbours testing my new soundz, so I hit the highway. The radio picked a most appropriate 80s song to crank up in an XJ-S when cruising down a city motorway after midnight: Now that I've tested the new setup over Nats, it's a big step up, except for Sawny heating my seat after a while.
- 37 replies
-
- 27
-

-

-
Apparently the meeting on New Years Day is gonna feature the Six Shooter "Predator Series". Is that one of these?
-
There was an Odyssey in the derby last night. It managed to complete both jalopy races and come close to winning the derby, but something started burning underneath it. The derby was won by what looked like the remains of a Primera. The number of entrants in the derby was fairly low compared to what I've seen in the past - only around 25 cars. Maybe some of the entrants couldn't make the rescheduling, or there was less advertising, or it's already getting hard to find suitable cars. The racing was good though - a race leader blew an engine, there were a couple of rollovers etc, and they have a whole field of cars running the Buick V6. It sounded like a herd of cattle. Next event is the 1st of Jan, and it includes a fireworks display.
-
Back when I entered, they were not allowing '4WDs', presumably because they get too much traction even on a wet track, so they can hit too hard? A car-based 2WD SUV like the Nissan Cashcow could be OK on that basis.
-
The next one's in April, so you've got time. @sentra and @peteretep have both entered in the past, as per photo in first post. I wonder what they're going to do with derbies now that end-of-life cars will be starting to include a lot of SUVs and EVs...
-
I've already done it three times. It's more effort than you think, and assuming they're still doing jalopy racing, it kinda helps to have an engine that's running properly. I was more thinking about going along as a spectator.
-
Back in our bogan days:
-
No, I was thinking that since aftermarket ECUs support O2 sensors, that would be a sensible addition for magical self-learning idle and fuel maps? I am not informed on this subject. This XJ-S is the only fuel-injected car I've ever owned. I bet an AJ6 would feel ready to explode at 6500rpm! I hear that AJ6s have plenty of limitations that keep them from even making their quoted power, and so they have no business doing such crazy engine speeds. "Fully rebuilt, balance & blueprinted engine with custom intake and Jenvey throttle bodies. Custom exhaust headers and system. Link engine management. Engine rebuild and setup carried out by Dyno Tuner Uk Ltd 351 BHP @ the Flywheel"
-
Yes, I’ve heard that the crank angle sensors on AJ6s are known for instantly and completely dying. I can’t see anything wrong with the signal from mine though. Its pulses get a bit rapid for my oscilloscope at higher rpm, but you can still see enough detail to be fairly confident it’s OK. If I end up going with an aftermarket ECU as Bigfoot suggests, perhaps that would be a good opportunity to fit an O2 sensor and to get a bit more power via advanced timing (a common AJ6 mod was to move the crank angle sensor because the ignition timing of the factory ECU is too conservative). Lots of work and lots of learning though. Stock ECU replacement sounds easier if I can get one.
-
The spark signal from the ECU to the ignition module deteriorates with engine speed and throttle angle. The engine still runs normally in normal driving, but the ignition problem seems to be creeping further down the rev range over time. I found a small amount of water seemed to have leaked into the ECU, and maybe that has done some damage, maybe not... The reason for involving the auto electrician is that I wanted to rule out what seemed to be electrical noise on the 12V supply / from the alternator. My oscilloscope seemed to show this noise being absent at idle but increasing as I got to the engine speeds where the misfire would begin, and I thought maybe the noise could be 'confusing' the otherwise-functional ECU. I hoped the auto sparky could tell me whether the noise was normal / could test the alternator safely without blowing its regulator or something. I told him not to hurry, as I'm back and forward from Australia for work at the moment. I haven't checked in on him lately.
-
My previous car was an Alfa Romeo, and the speedometer got progressively more intermittent due to a bad connection between parts of the instrument cluster. It took me years to discover that, because I had figured out a temporary solution to kick-start the speedo using a seemingly unrelated button on the dash.
-
I actually discussed with the fuel injection guys the fact that my Jag's ECU predates OBD1. It has a circular serial connector which you could presumably connect to your BBC Microcomputer, but once you loaded the Jaguar software from floppy disk, it would probably tell you nothing is wrong. My version of the Advanced Jaguar Six engine wasn't advanced enough to have an exhaust gas oxygen sensor for feedback, so its ECU presumably believes it's sending perfectly good pulses to the injectors and coil and everything is fine. Edit: Also, when I went to the European car specialist, they said they didn't work on these cars much any more. I could hear the fear in the guy's voice when he asked if it was a V12, and I got the impression I'd have been turned away immediately if I'd answered 'yes'. There's now only one guy left in Auckland who hates himself enough to work on classic Jags for a living, and last time I checked, he had a 3-month waiting list.