
Leaderboard


Popular Content
Showing content with the highest reputation on 09/17/17 in all areas
-
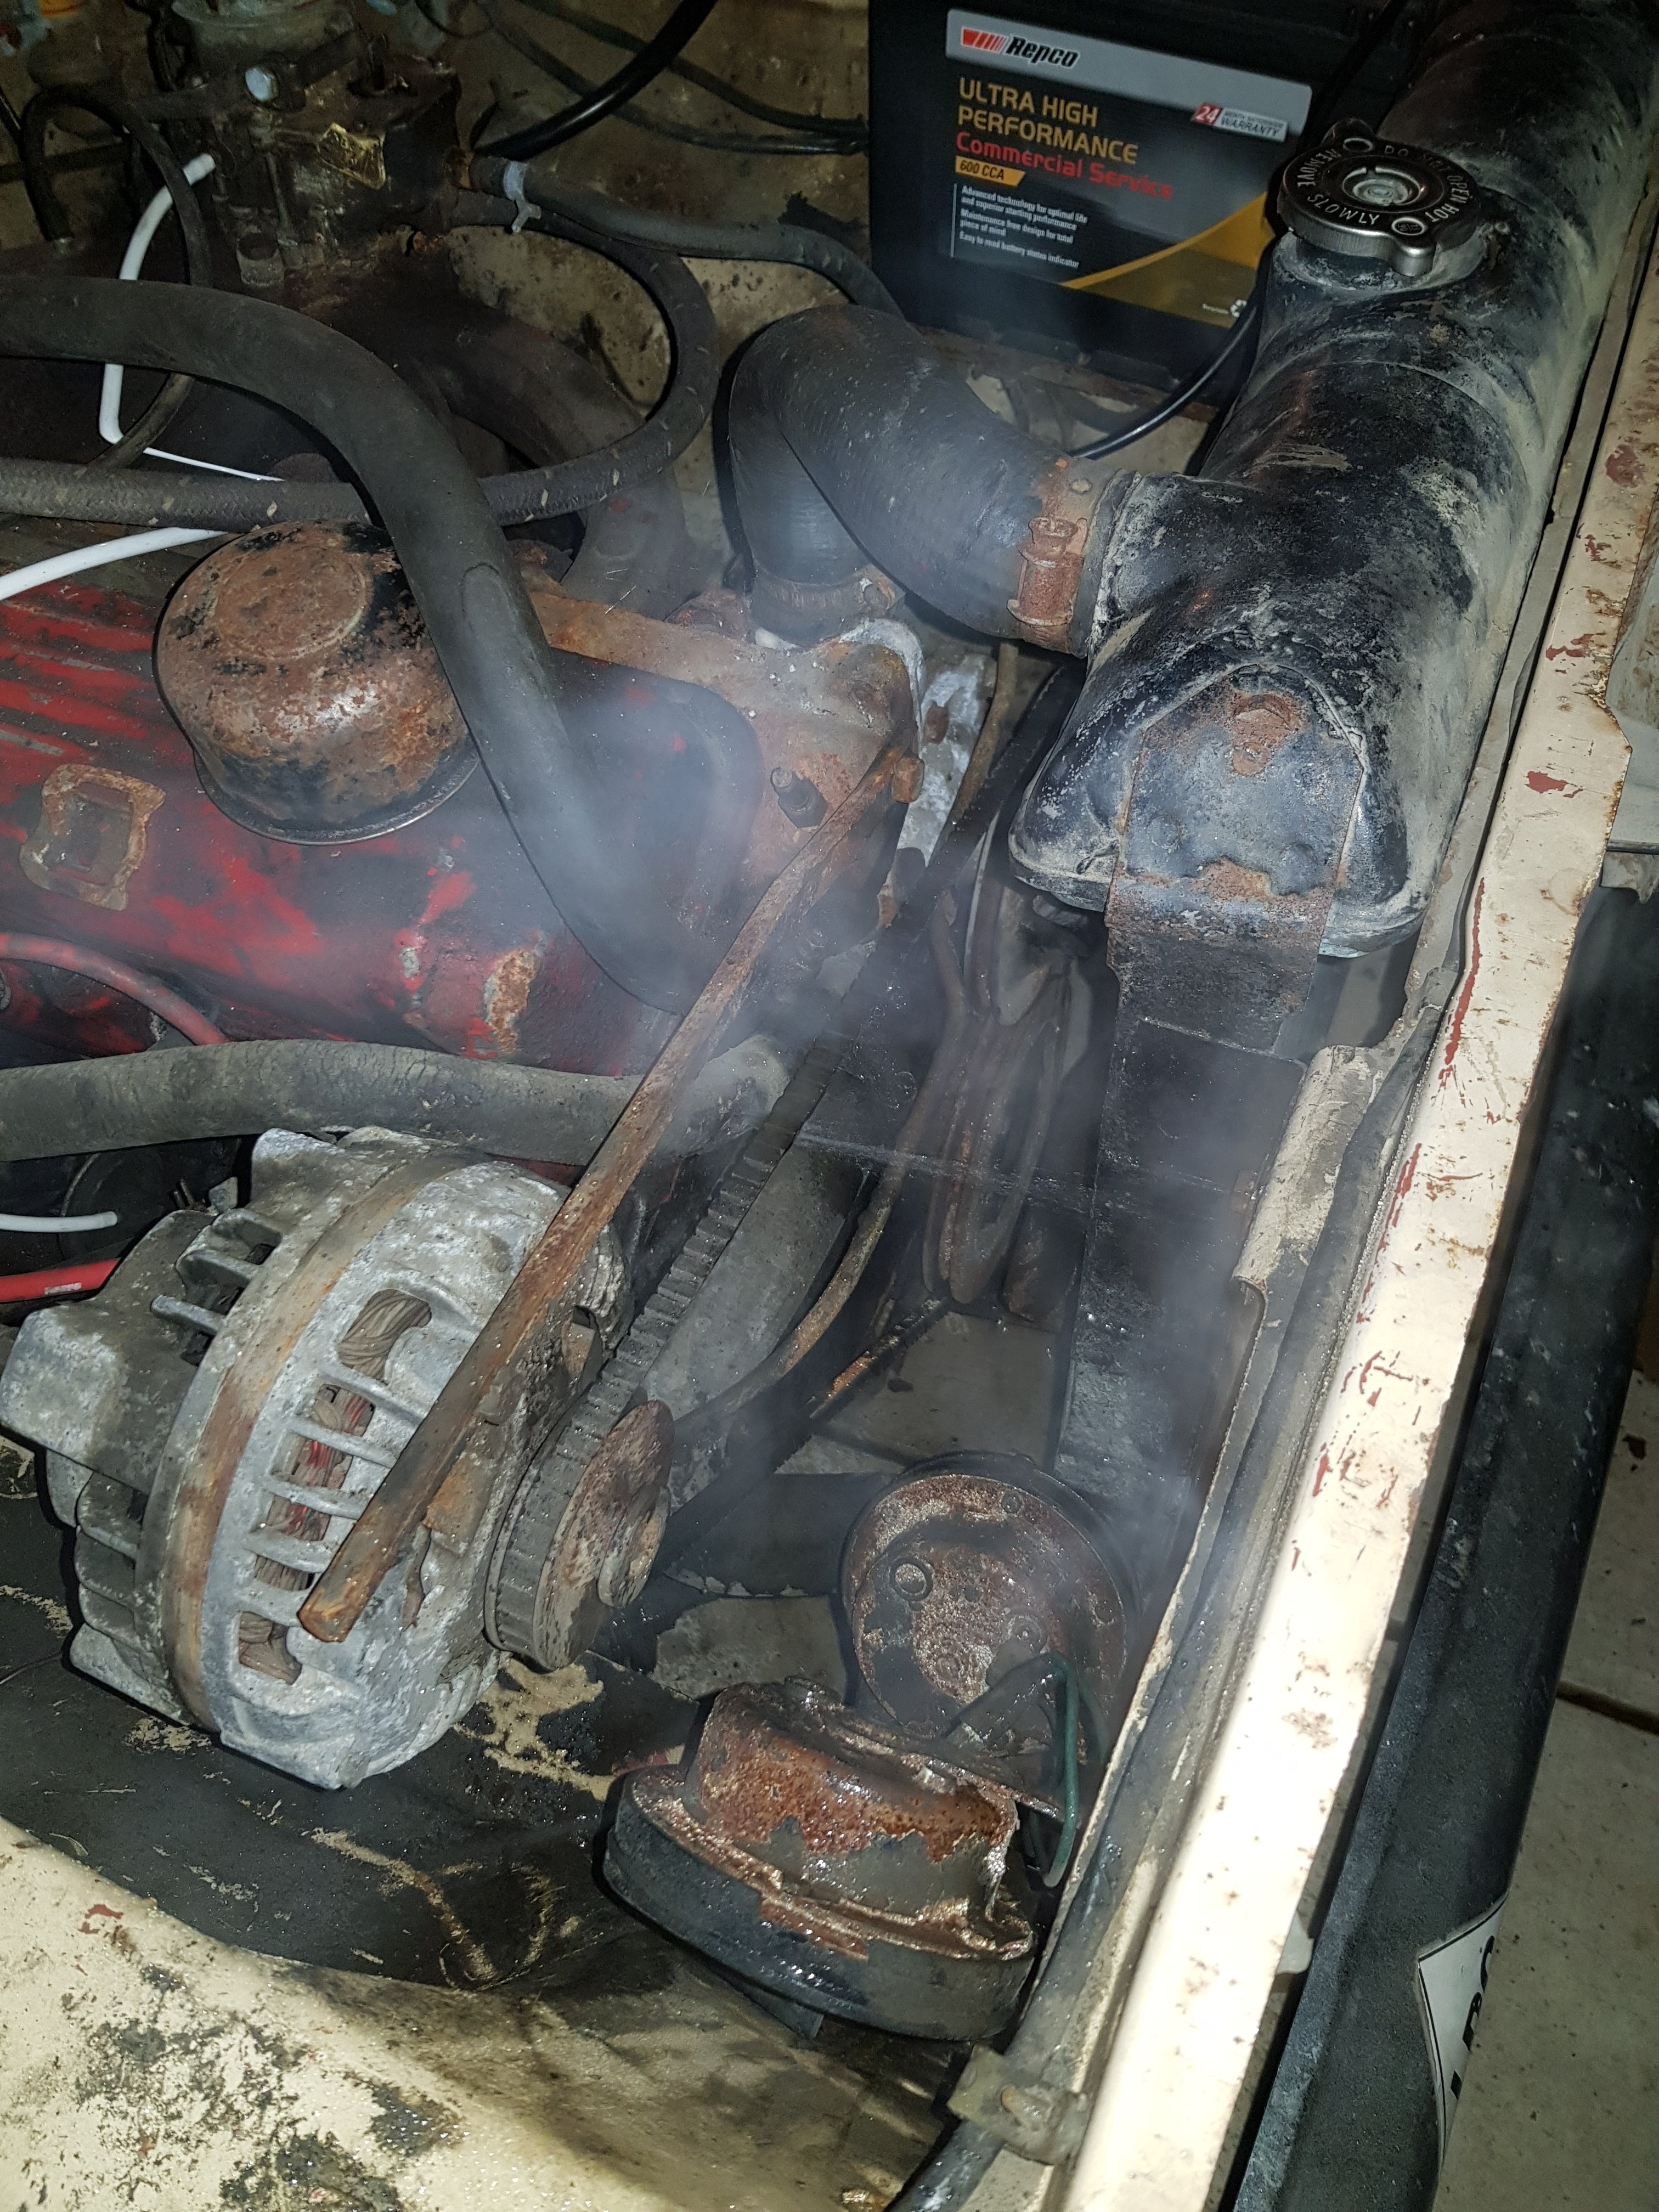
Ok that was a fail ^ and a few more followed. Did some more runs and wasn't happy how unstable boost was. Put a bigger 40mm gate on it. inc bigger pipe off manifold Was just as bad, if not worse. Probably should have brought a 45mm and may have worked. Decided to try mount the gate on the turbo housing, before buying yet another wastegate Grill weld Grill cut a patch out of an old collector fixed Finally holds boost perfect now.11 points
-
The end is in sight. I've got the handbrake & throttle cables in at a Control Connections being modified. Car is booked for mid October to get custom wiring done. In the meantime I have a bolt in steel half cage to fit. It came from a 4 door so the rear legs need shortening. Then after it's wired, will get it tuned and on the road
 7 points
 -
Ok so I haven't been documenting this car very well so here's a rundown down from the past year or so. The car blew it's third auto trans, so one night after work I put a manual box in it. Conveniently I had everything I needed in stock so it was a quick and easy job. Later I got bored and removed some coils and fitted the above posted AGX shock absorbers. The fronts are SW20 rears, and the rears are some Ford Focus units. The fronts are shorter than MX73 shocks to they're held in place with some T3 spacer top nuts. T3 RCAs are also fitted to correct the lower arm angles. The engine BHG'd over new years (yeah, yeah..) so I put in a spare engine that I had laying around intended for my MS65. It's a stock standard 5MGE but built on a 7M block coz it's a bit stronger and has piston oil squiters, the guy who built it was gonna turbo it. As far as I'm aware the internals are stock 5MG. I then fit an Altezza LSD. Later my rear tyres wore out (funny that) so I bought some cheap Advante 17x7s in the wrong offset and wrapped them in some 215/45 Nitto NT555s. Bought some spacers off eBay to make the wrong offset right, Manu spun me up some hubcentric rings to fit them all together and now I have plenty of grips. I've also had to repair plenty, the brake master cylinder shat out, the shifter position on the gearbag was wrong so swapped that to the correct one, which cost me way more than the gearbox did, rocker covers were leaking, driveshaft was incorrectly phased, balljoints were shot, windscreen was leaking, seatbelt jammed up, radiator split, radiator hose split, heater core split (what a shit job that was), I attempted to revive the AC but the compressor leaked all the gas out aaaaaaaaand probably some other bits. Still to fix is the a pillar rust, boot lip rust, shot passengers electric window, leaky tailshaft seal, very leaky crankshaft seal, horrible engine vibration (pretty sure it's flywheel / clutch out of balance), some of the instrument backlights not working, excessive rear wheel camber, pathetic brakes, pathetic head lights, cracked indicators, falling off boot trim, worn hanger bearing, worn subframe bushes, worn caster arm bushes, and anything else that fails in the near future. Stupid car.6 points
-
So @mark105 came over this arvo and helped out with a few things. Started with putting new brake hoses in cause old rear one was just going on and locking up. So new one for the back and thought while I was there I better buy ones for the front, all on. Almost ran the system dry trying to swap them out. Bleed the system up and sweet. No more problems with the rear brake hose been a egg. Chucked the tyres back on and put it on the ground. Time to start it. Needed a battery and since I'm not using the beetle atm I stole 1 of its batteries. Dam thats the old one. It's kinda flat also so that didn't help it start at all. Better put the other one in then. Yup bit of start ya bastard down the carb and away..... Running on just start ya bastard but running. Slowly sucking the gas up. Wasn't the best a couple of big flames later and some high revs she's idling away. So a pretty productive arvo in the shed. Drives forward and stops. Will keep an eye out for a mint carb see what pops up. Time to get some steel and start filling some holes in the floor. Will take the seats into town find a good upholstery to trim them. Also highly don't recommend doing a key banger in the shed with no tail gate on. Ears hummed for a bit.....
6 points
-
Break in time after a dyno. Came in at 21hp with a solid amount of toque. Pretty happy with that. Scooter rally in 2015 and first run on the new build. Left from Wellington with a loop around the central north island. Day 1, 50kms from start line and team mate had a good seize. Team down to 3. Came across this shop, and this old legend ( I think his name was Bill?) let us use a bunch of his tools and talked for hours. Some amazing bikes stashed in side, well worth a look if you are in Upper Hutt. Open carbs and gravel roads... Great pub though. Late night re builds. Buddy crashed on the way into Waiouru, went on to fix his bike and continue. Gentle Annie road from Waiouru to Naiper was awesome, such a fun road. Finish line in Wellington. Very exhausted after the 1600km. Stoked on how well the untested bike went! Took a while to clean all the grim off it! Fresh coat of tyre paint too More to come if you are still following...5 points
-
Fuck I hope you just made that up for giggles5 points
-
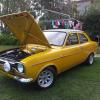
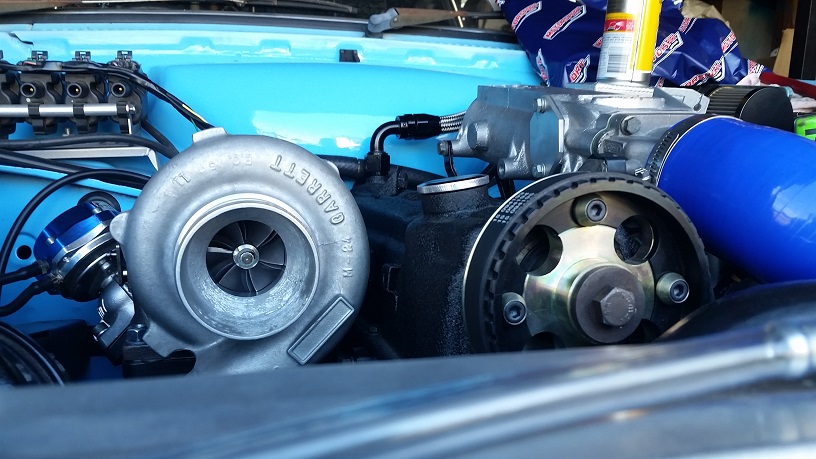
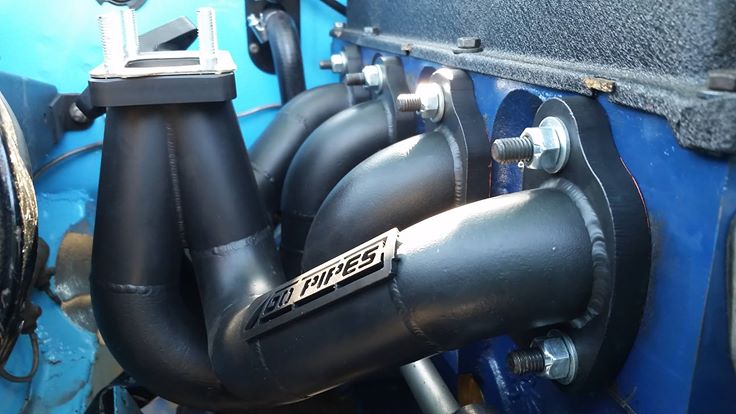
Final spec on the motor was Standard bore 2.0L pinto block YB cosworth rods & pistons Ported, big valve 1600 Pinto head (9.1:1CR) MLS head gasket & ARP bolts throughout Custom turbo grind camshaft, HD valve springs, Newman long pad followers YB under piston oil squirters, high volume oil pump & Peterson oil pressure relief valve Custom Go Pipes steam pipe manifold & 3" dump, ceramic coated 3" mandrel bent exhaust GT2860RS turbo Turbosmart 38mm external wastegate, FPR800 and Kompact bypass/BOV Romac harmonic balancer & custom trigger wheel Modified (1 tooth) YB distributor with phase sensor Sierra EFI manifold with 630cc Siemens injectors LS1 coil packs Haltech PS1000 ECU Haltech wideband controller5 points
-
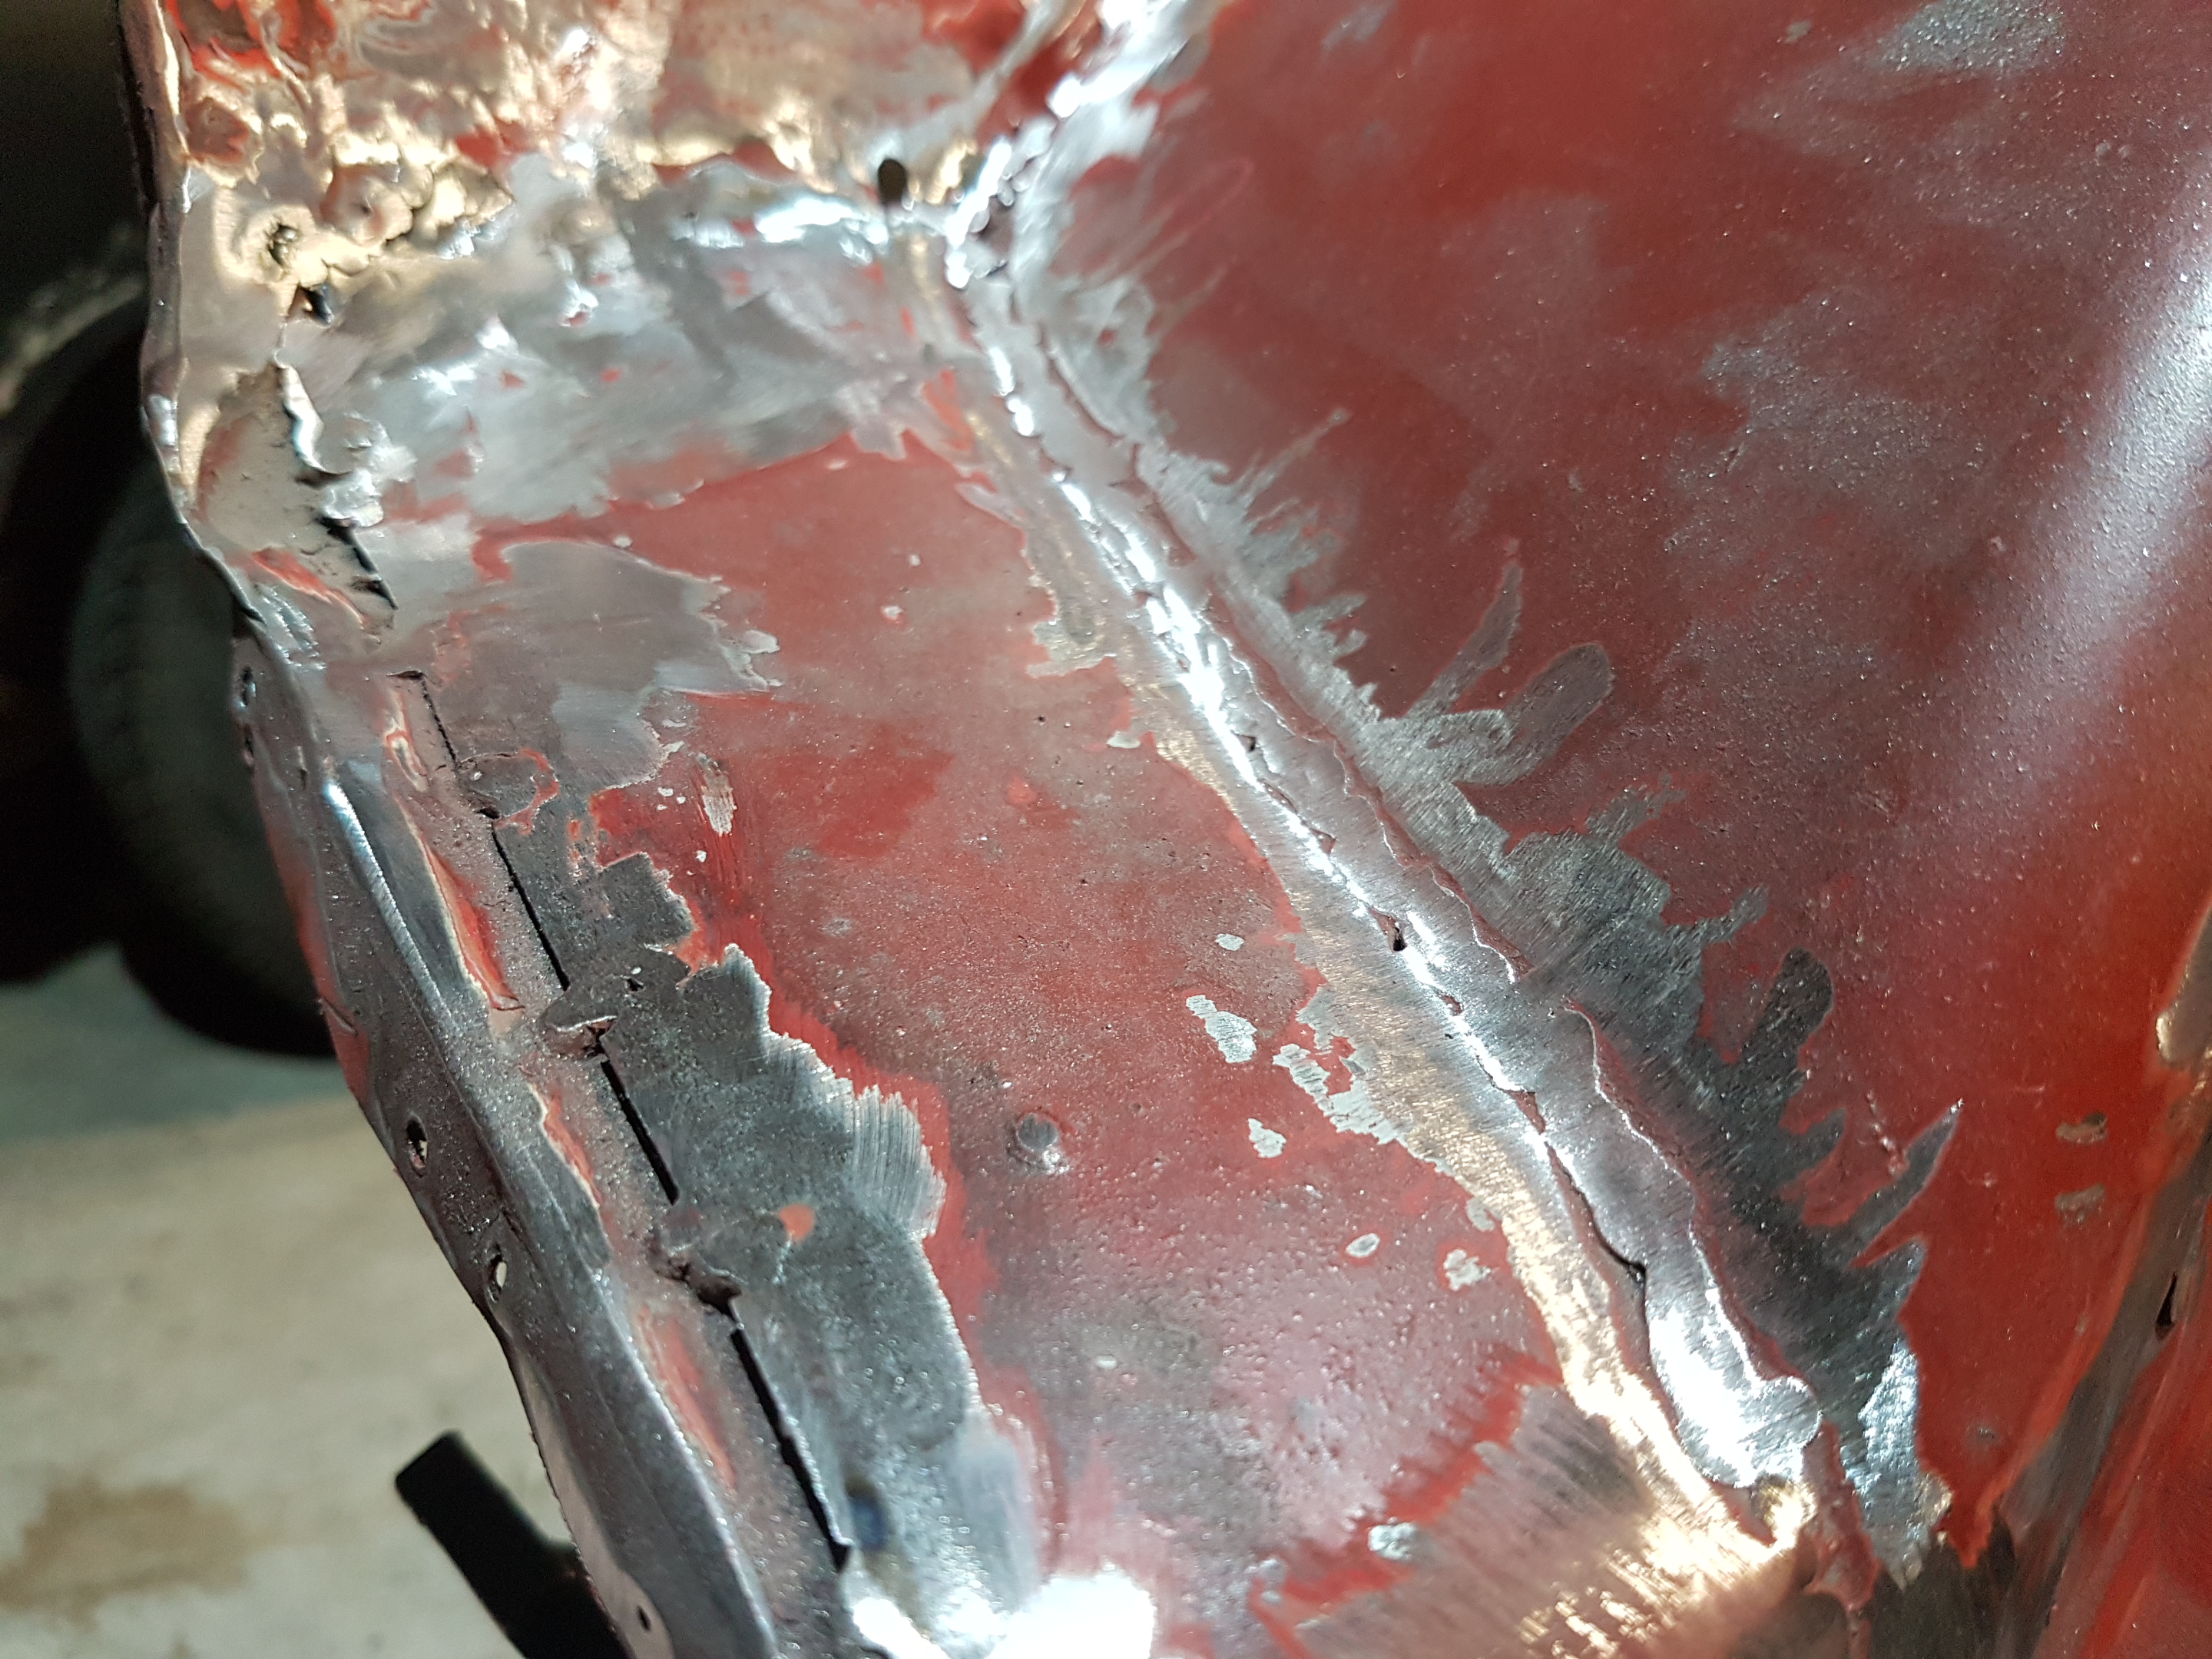
the valance, the last stop on my round the 125 tour of rust. doesnt look toooo bad, i guess? LOL. Dirt and crap from off the front wheel gets into the upper panel from the bumper irons hole and makes its way to the lower section that has no drain holes of any note, so it rod rots out the front of the control arm mount. Top stuff. pretty happy with the patch i made Also let in a later model radiator vent. My car has never had cooling problems even with the 2 litre engine and a radiator that is a decade over due for a recore, but seems silly not to have extra flow - the big holes end up behind the bumper. Also seems silly cutting out solid metal You can seen the cross-member closing-panel all in above as well, double skinned like factory. pick below is from inside, you can see the curve of the valance panel opening by the bumper holes, so dumb. tac tac tac, grind grind tac, tac, grind, etc, pretty stoked with the patch tbh, always seems to comes out better on the bits no one will see! Thats all the rust on the body (till next time!) so i can start layering on the bog now, and start on patching/swapping the doors around4 points
-
So long time no update. Have been chipping away at the minor things over the last year to get this thing closer to being road legal. Not too many things to go to get legal but have been working on getting it track ready for this Octobers Jerkfest track day. Finally got the Bride Brix mounted up and sitting at an acceptable height. Also picked up a TOM'S ECU - makes a fair amount of difference to mid range torque compared to factory ECU. Also removes speed cut and up rev limit to 8400rpm. Found some new/old stock Pioneer parcel shelf speakers. Got around to undersealing the whole bottom of the car and also made up some driveshaft loops. Also painted the gearbox crossmember and shortened the studs on the runner mount. Also managed to do a few more bits like fitted rear the swaybar, bought some Direzza ZII Semis, fitted AE86 accelerator pedal. Did Cambelt,Water pump etc also. As it sits currently: So the list to get it legal currently stands at: - NSDT cert for the front struts - Fit new speedo pickup - Fix rust spots in doors - Replace seat belts - Fix hole in rear muffler - Align Headlights - Do skids (oh wait, too late) Im aiming to drive it to Leadfoot this year so I better get cracking!4 points
-
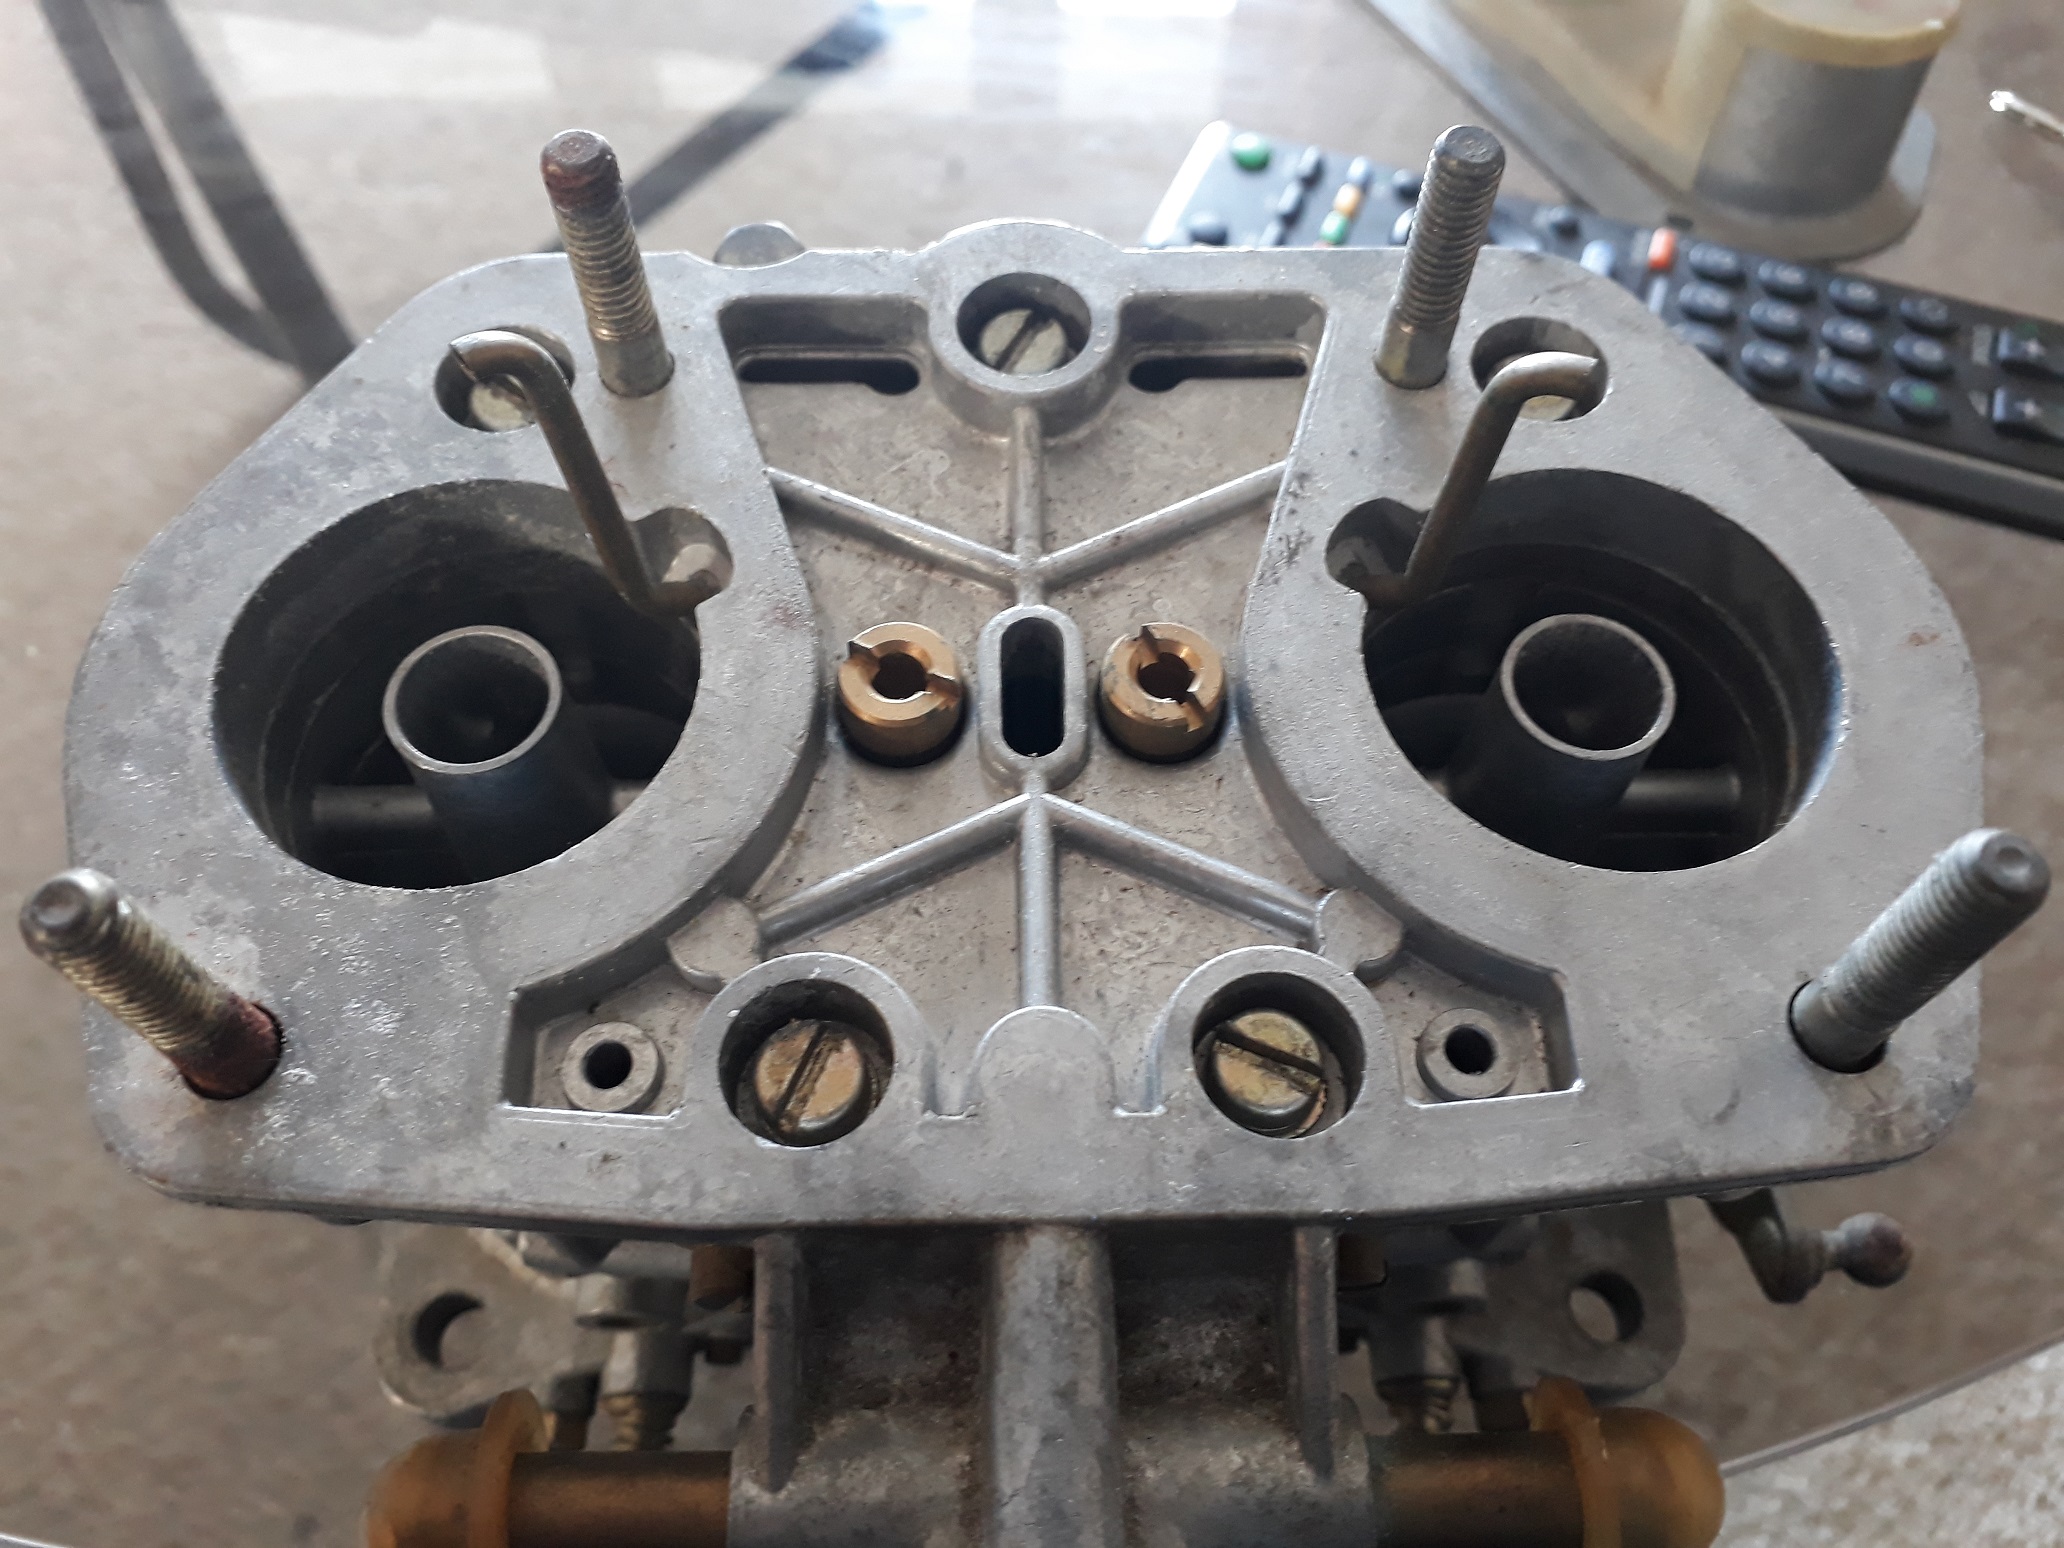
Also get a load of this for some Carburetor foam. I put up a wanted ad on here for some more 40mm Weber IDF type 13/15s. Someone said there was one on trademe, it's mine now. When I saw the ad I thought it was weird that it had all the caps on the fuel line pipes and on top plate, no matter it's the right type so I brought it. When it showed up I set about pulling it apart so that I can get it vapour blasted like the other 3 I have, the remarkable thing about this one, is that is appears to be brand new, although it is dull and a bit dirty on the outside I don't think this thing has ever had fuel though it. Remarkable for something that is 40 years old, Once I get around to getting it blasted I'll slap it back together and put it next to the other 3. Still on the hunt for another 2 if anyone knows of any.
4 points
-
the oncoming side !!!4 points
-
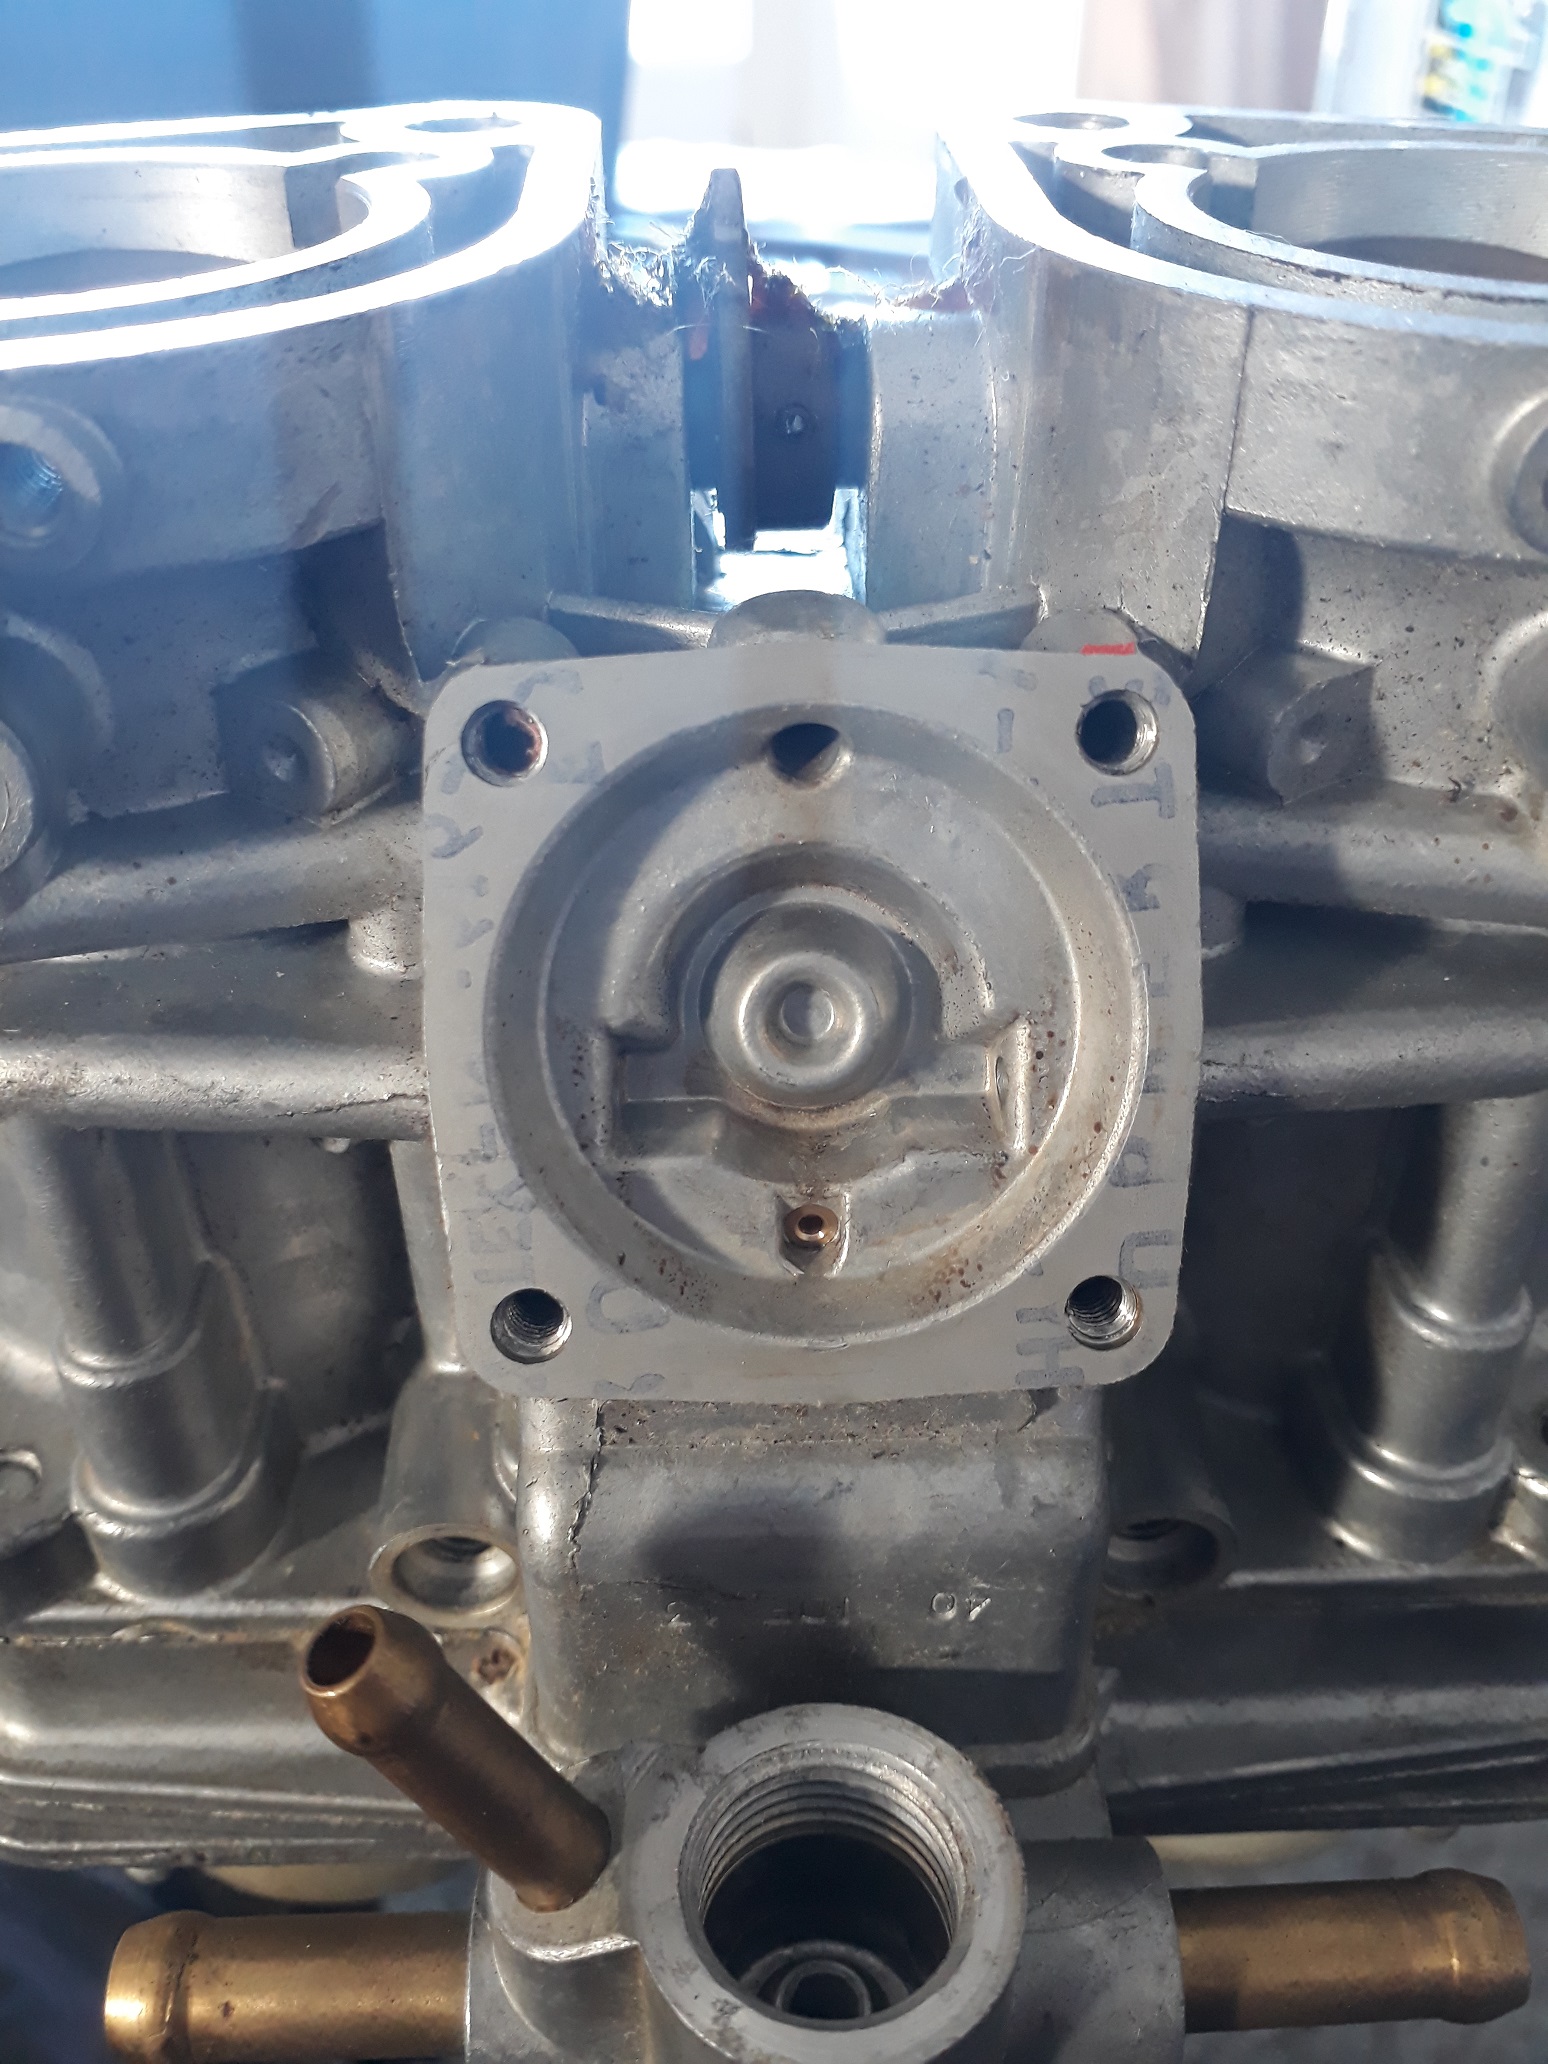
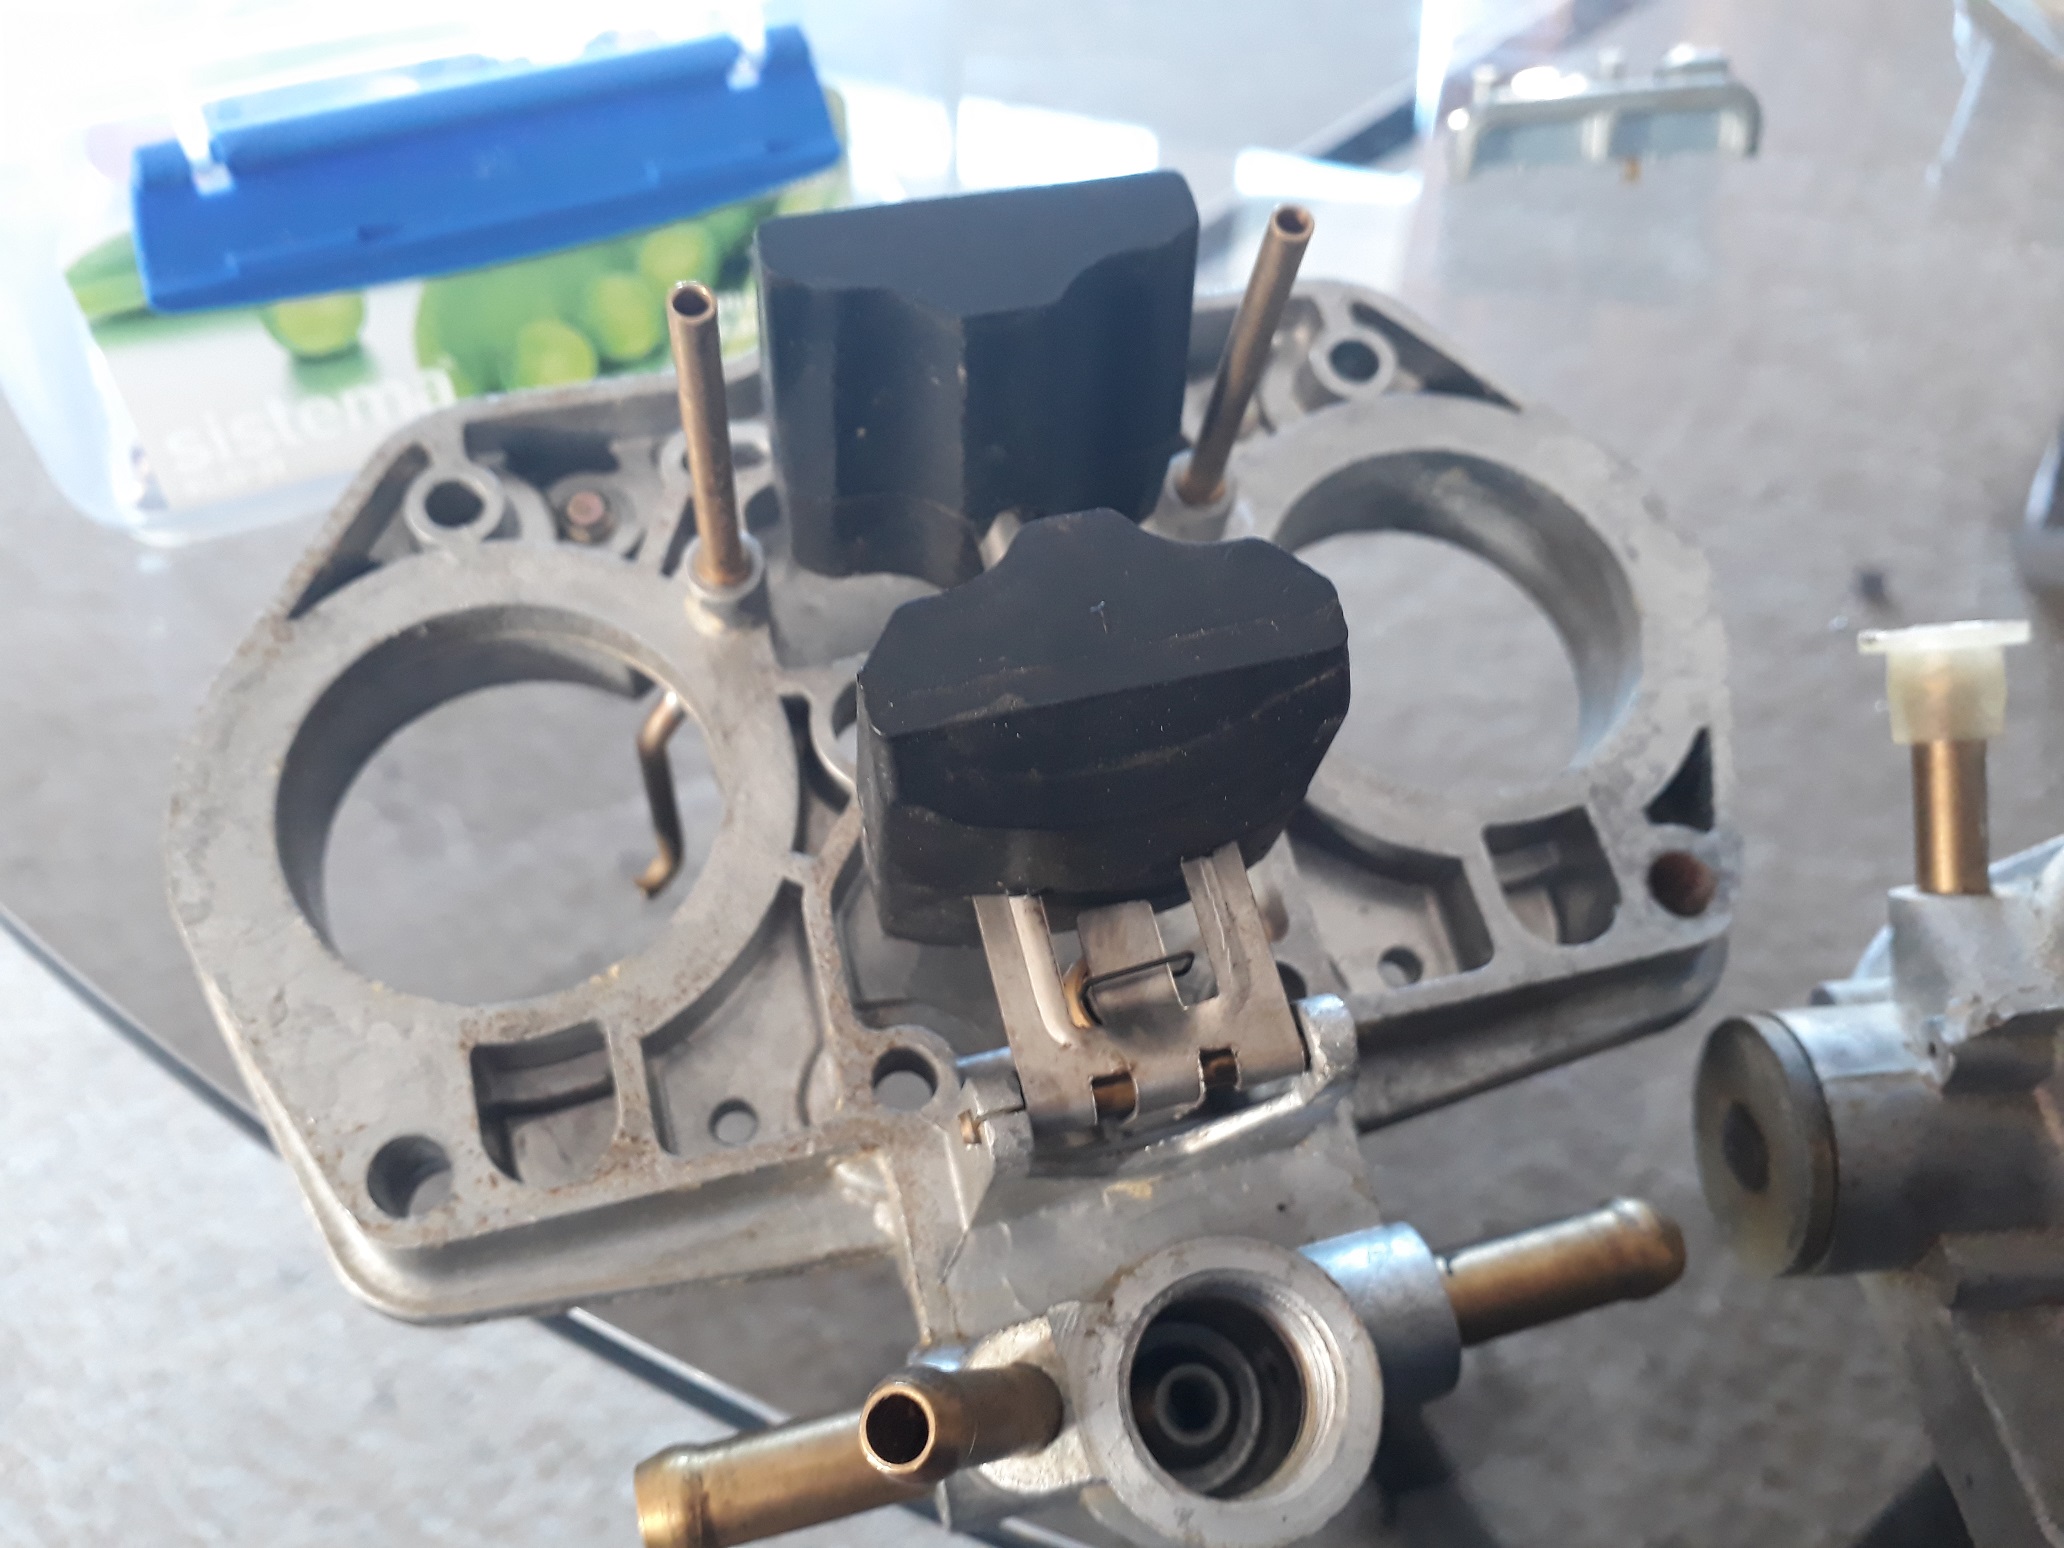
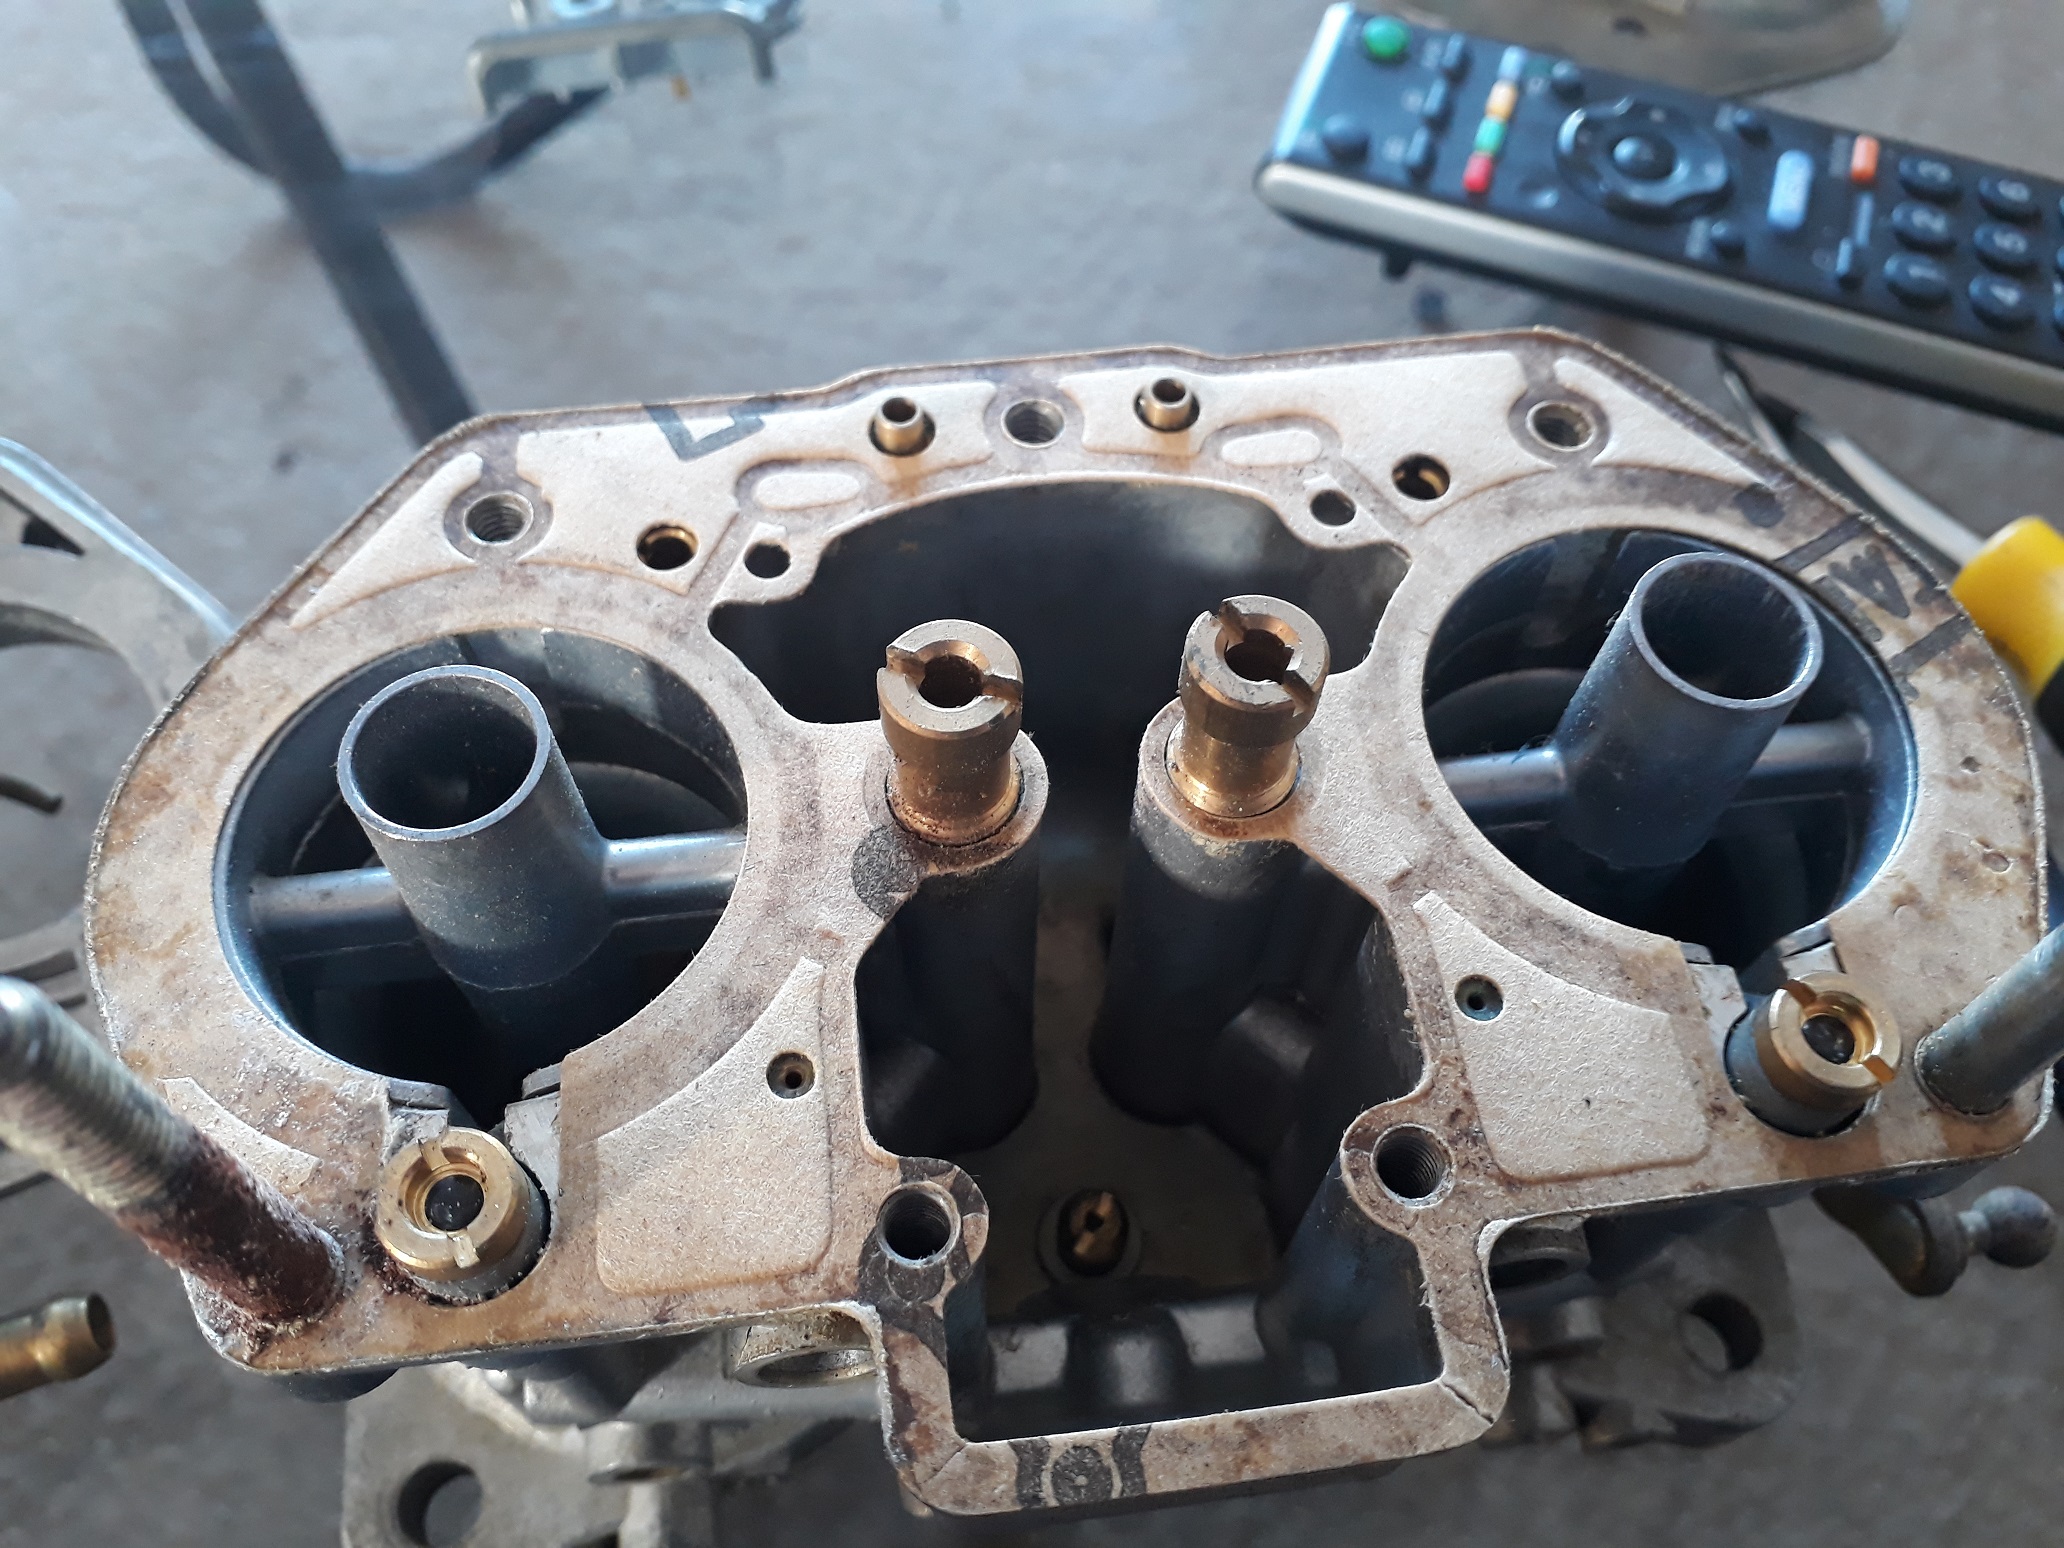
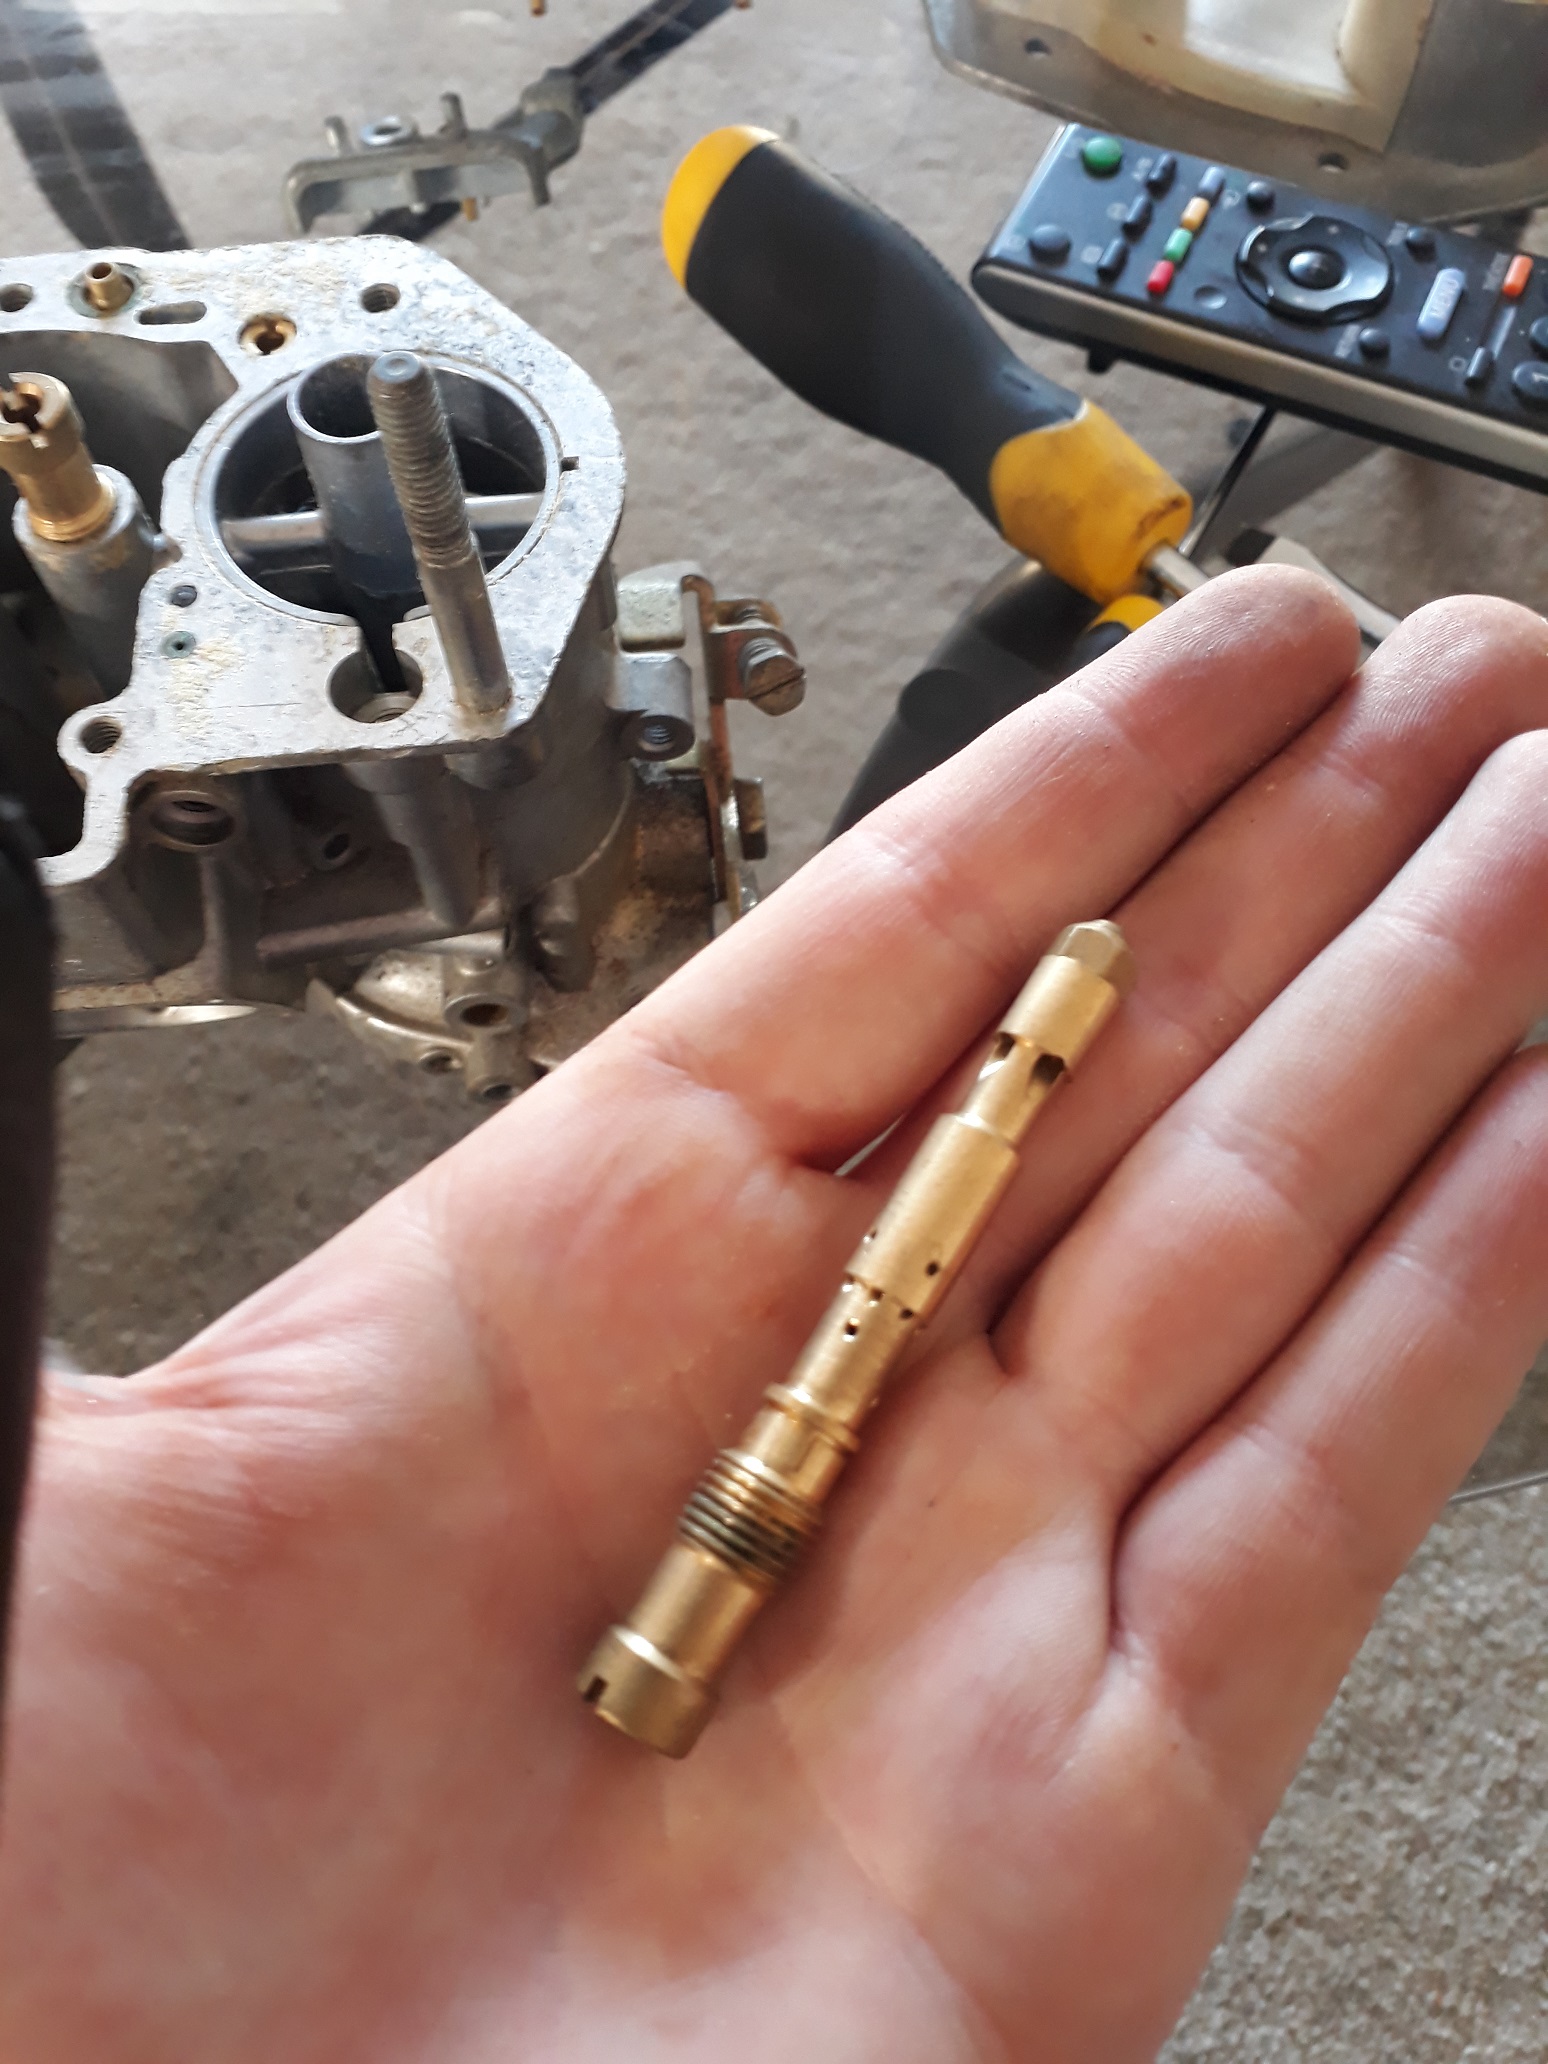
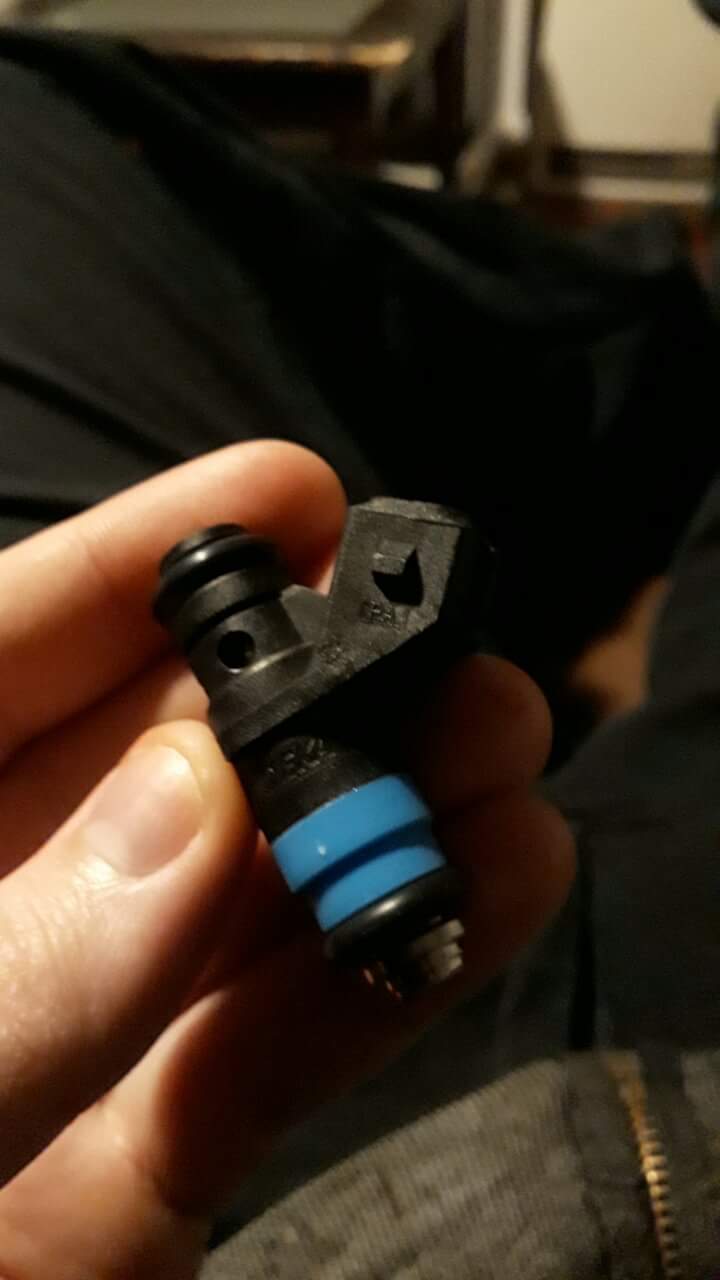
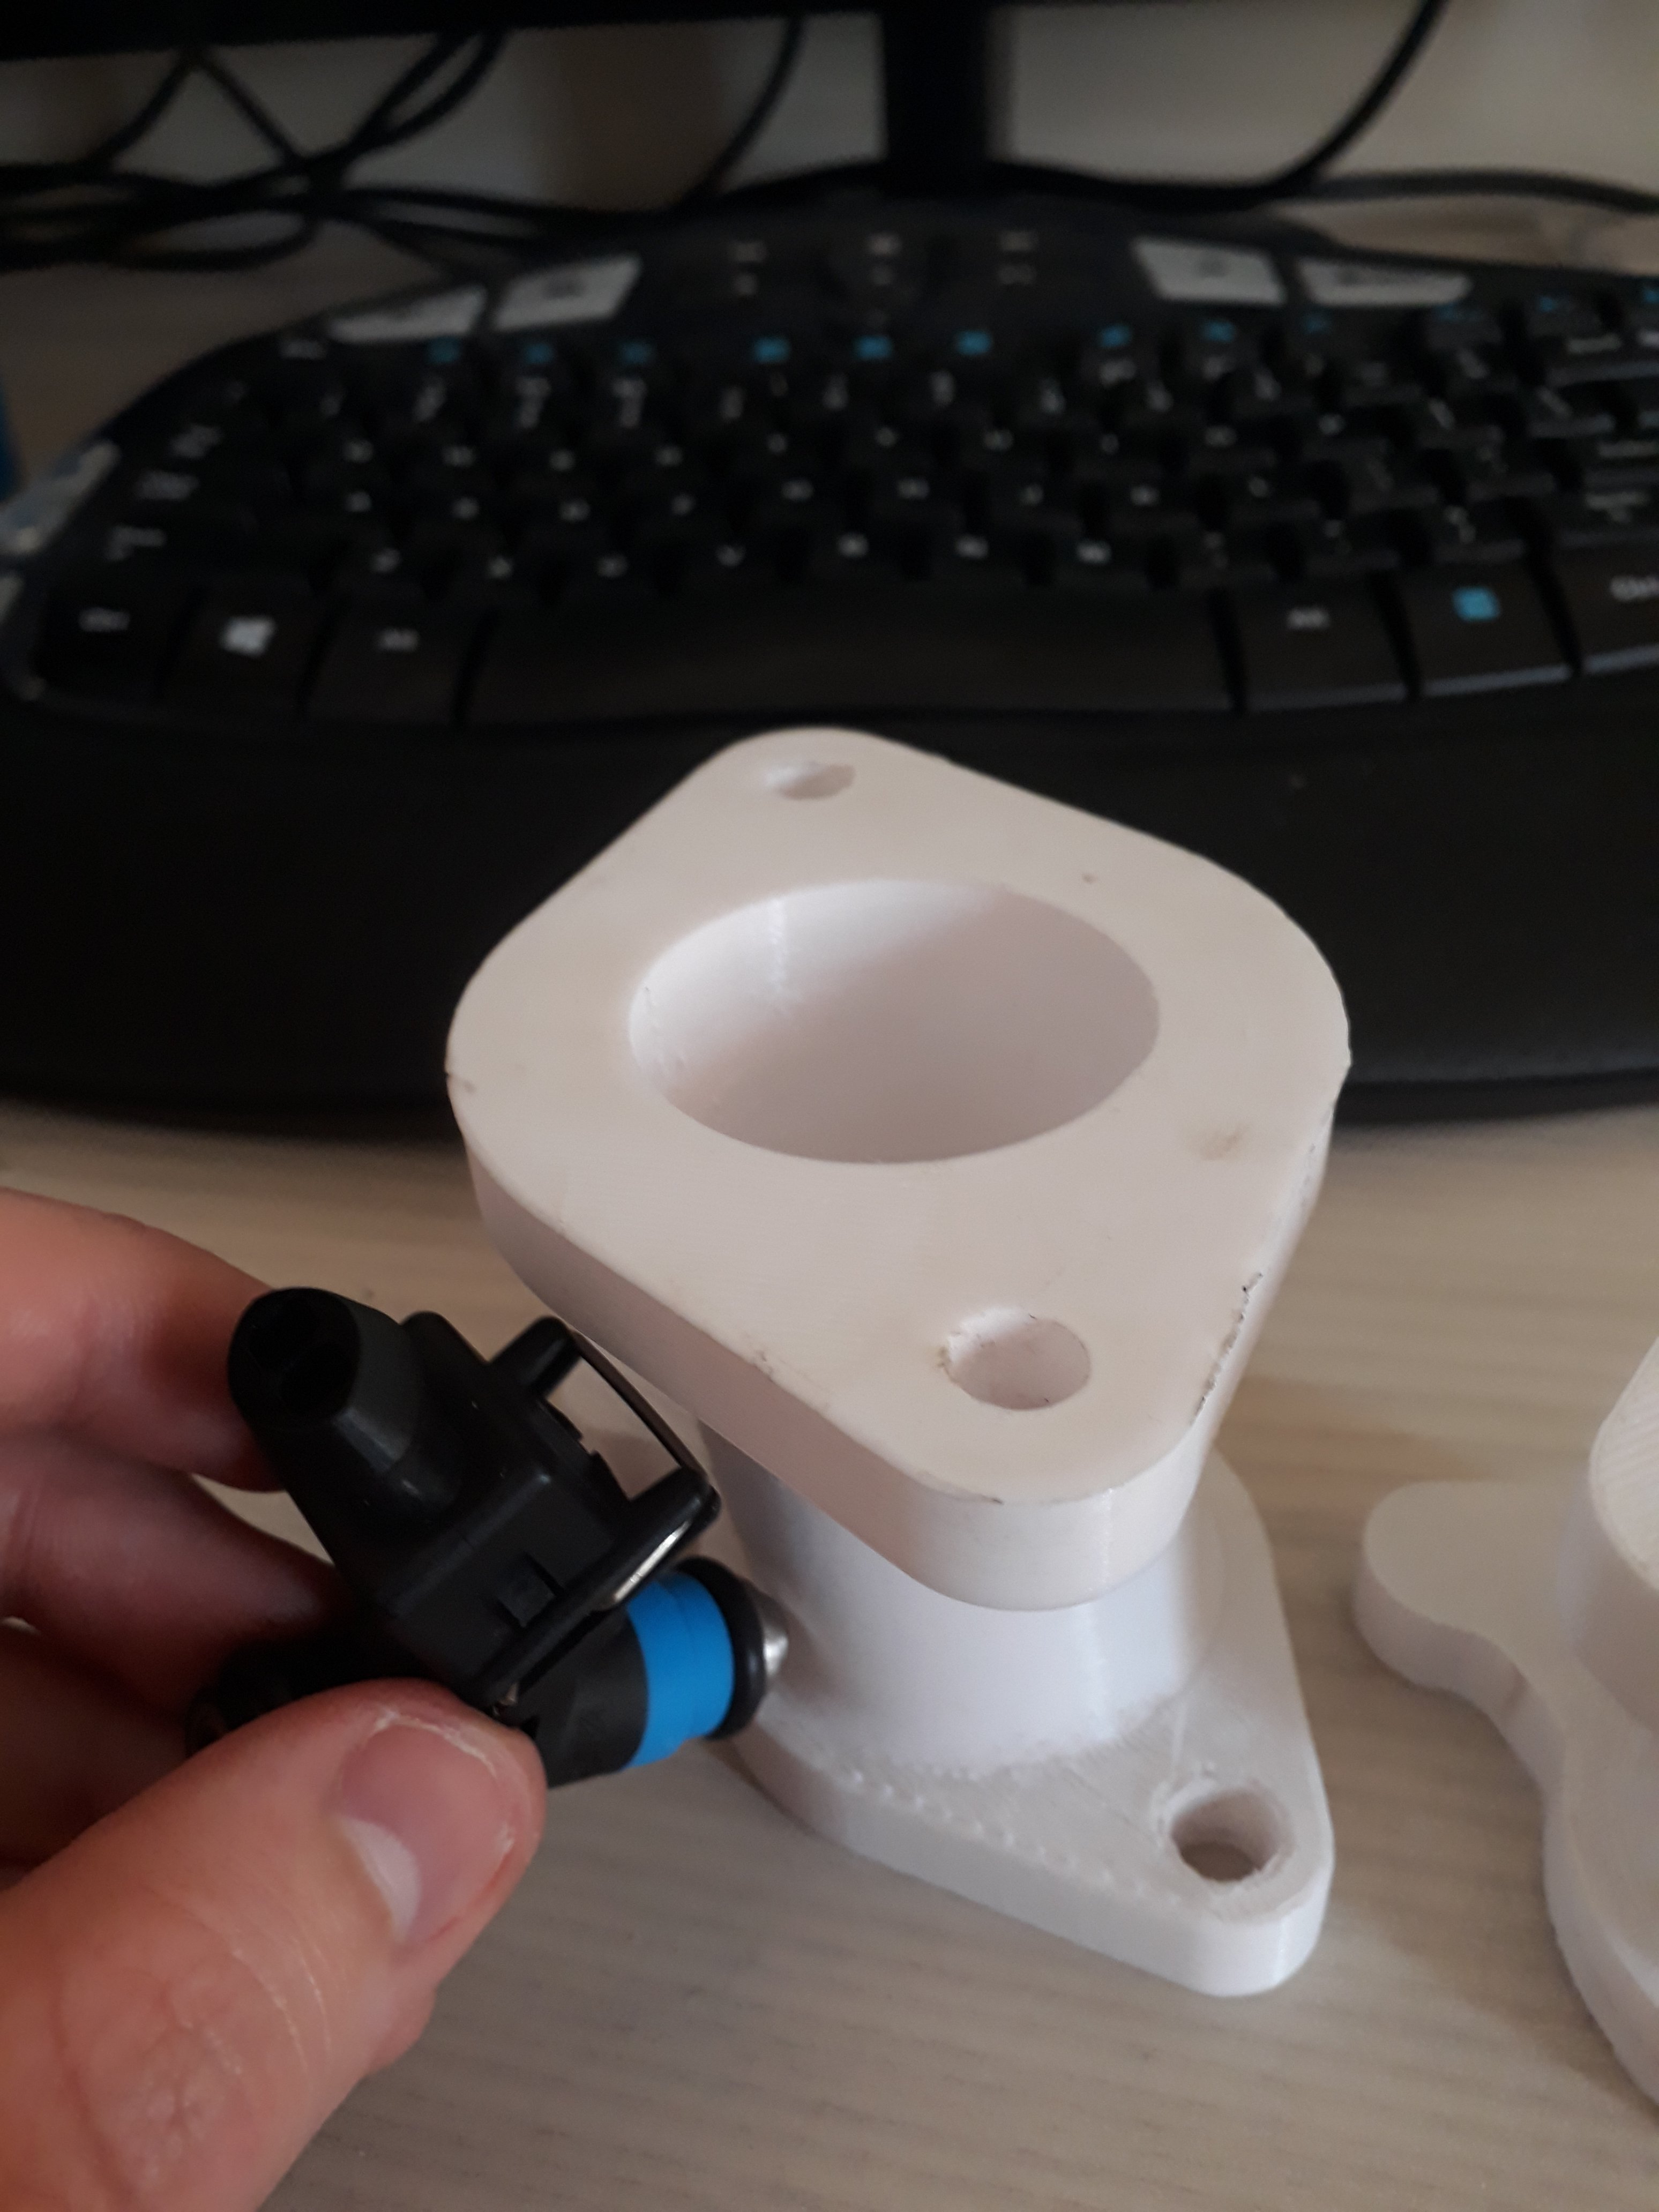
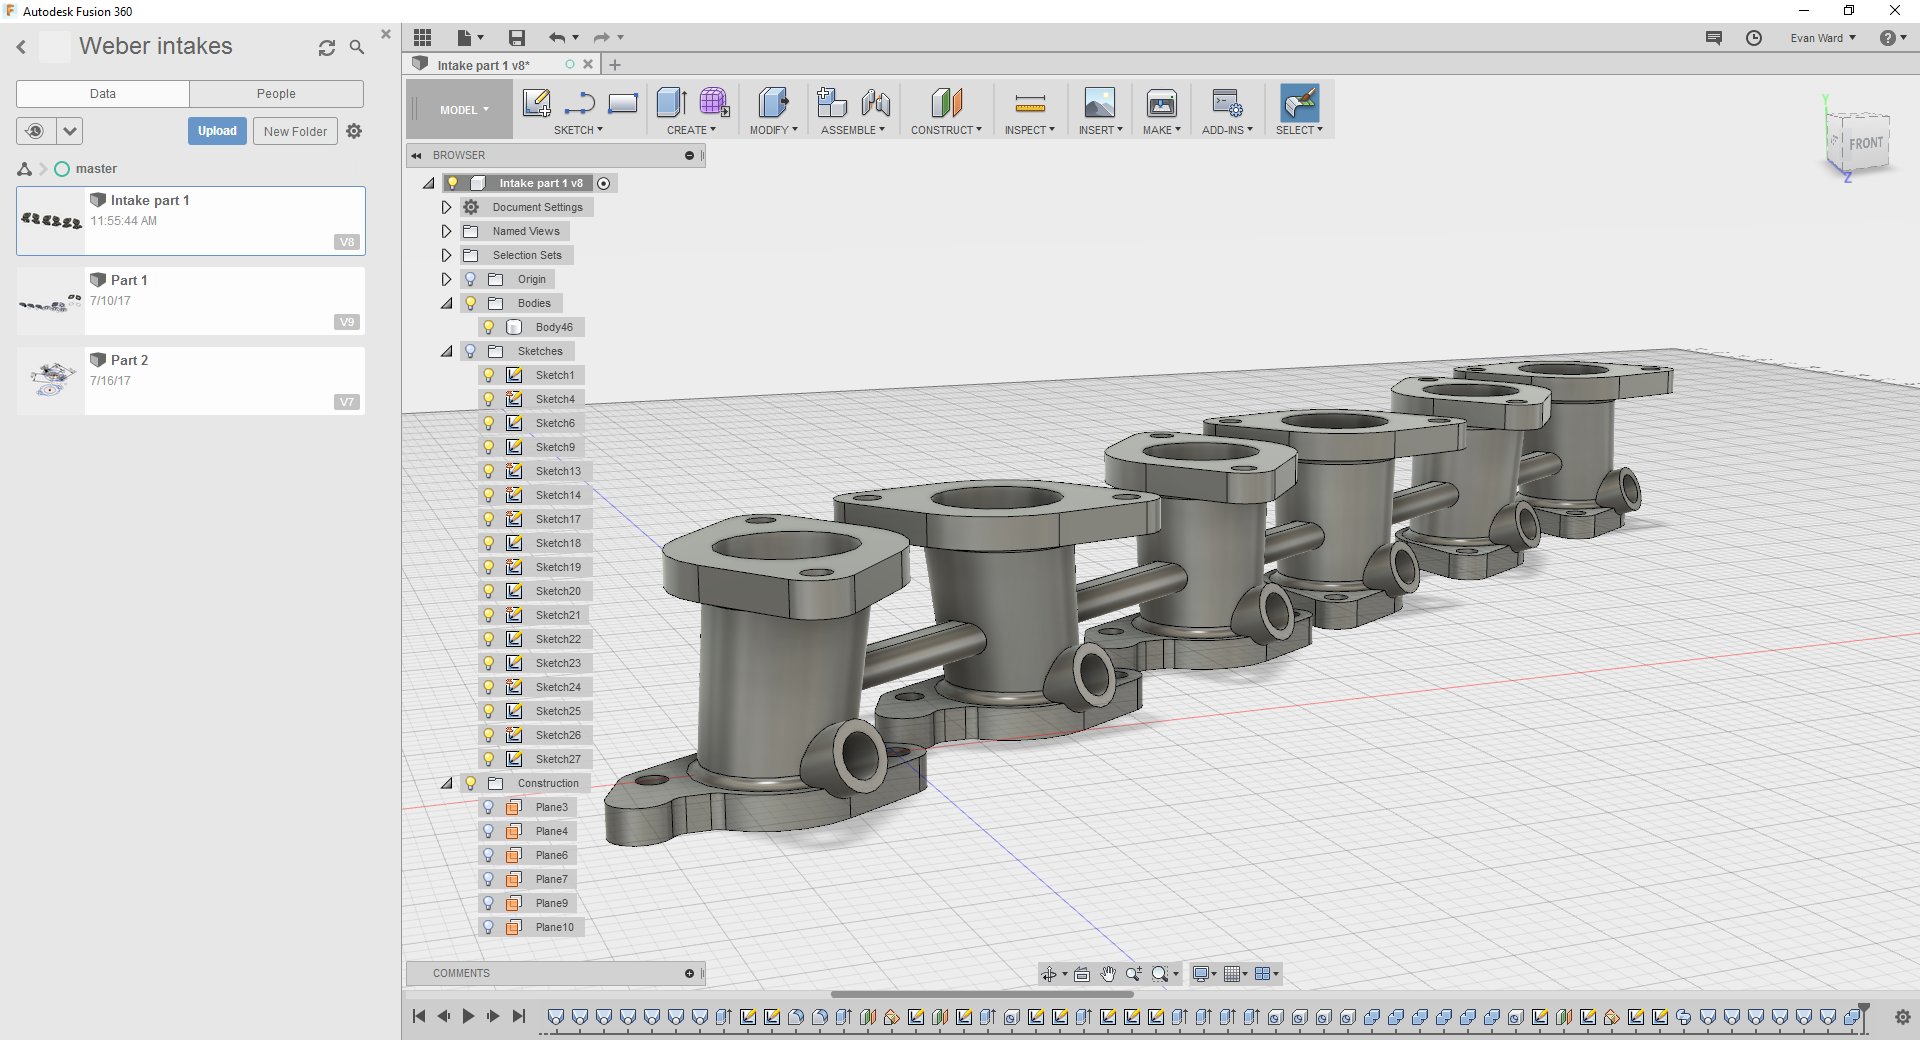
So Mr Vapour let the cat out of the bag earlier on about having the Webers act as throttle bodies with the injectors sitting in the manifolds underneath. Hopefully this gives an illusion of running on carbs when really it isn't. Buying 6 of the Heritage setup shown above would be cheaper (maybe) but where's the fun in that? Also I don't think they do an IDF/IDA style - only a DCOE rep - might be wrong on that one though. So I picked up a lone 'short' injector from NZEFI to get some basic dimensions off and see if things are going to fit. I have concerns about the amount of real estate between the two banks of intake manifolds and whether or not there is enough space to fit 2 rows of injectors and fuel rails, at this stage I think things are going to be ok. That injector is a Siemens 600 and something cc job that should be more than plenty, it's 42mm front to back. Originally I then drew up some injector bosses on the model shown a page or 2 back with the injectors put in at a 90 degree angle to the intake runner, so they are spraying perpendicular to the airflow. not Ideal but at the time I was too scared to try and draw them on an angle because I don't know what I'm doing/ learning as I go. 872463 people said that was dumb so I watched some more youtube videos and redrew it with the injectors pointing down, can't get too carried away with the angle because the wiring plug is going to clash with flange the Weber bolts to So picked a number of 20 degrees from horizontal and called that good enough, also added a bar to tie all the pieces together and give the fuel rail something to bolt to. Have ended up with:
3 points
-
keeping on smashing at this nugget quite a bit of time in welding up a bunch of seams, small holes and little reinforcements here and there. working on getting everything on the bottom of the car sorted. a bunch more measurements to figure more or less where things will likely sit. got prehistoric on the back end of the trans tunnel to make some more room for the drive shaft. fiexed up the hori gearbox mount rookiedave and mott made ages ago. ground off the bits they had glued on, welded up all the holes and re machined the crossmember to suit a factory GM powerglide mount. started on the exhaust next. with it being 3.5"/90mm really trying to tuck it up to the maximum possible to avoid getting beached at the still relatively unslammed slammedness that will be possible. to further this following some stick poking, umming, ahhing decided to make a nascar boom tube inspired rear section. keeps the same or greater cross sectional area with 40mm more clearance. still a bit of work to go go from round to rectangle but happy with the progress. need to get some more tube in 22x3 this week and try to scrounge a section of 200NB steam pipe for the driveshaft hoop. once those are done re fit the fuel tank temporarily to figure out how to mount the fuel system and get all the mounting points for fuel lines, trans cooler lines and such things done.2 points
-
Oh actually JW Speaker does RHD spec sealed LED units. http://www.jwspeaker.com/products/led-headlight-model-8631-evolution/ Even has a built in indicator.2 points
-
Thought I'd try a video blog style update, just dealing with fiddly bits and pieces now. Big bit of news, some of you already know - I'm moving back to the UK in December, and taking the Starlet with me. Aim is to get it road ready by then, so I can MOT and register her straight away on the other side...2 points
-
All the shit out of the way, ready for the RB conversion Wasn't the easiest, but wasn't the worst. Tidy up time. Getting it back in will be interesting.2 points
-
2 points
-
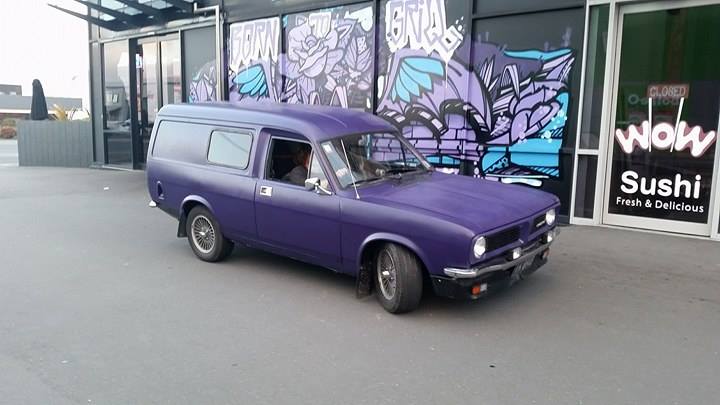
Shakedown run today, "little van in the big city". Went well, just need to tighten fanbelt a touch & vent the fuelcap (is a radiator cap fitting, typical leyland build-efficiency) bit of excess lash in the diff too to look at, not terrible though.
2 points
-
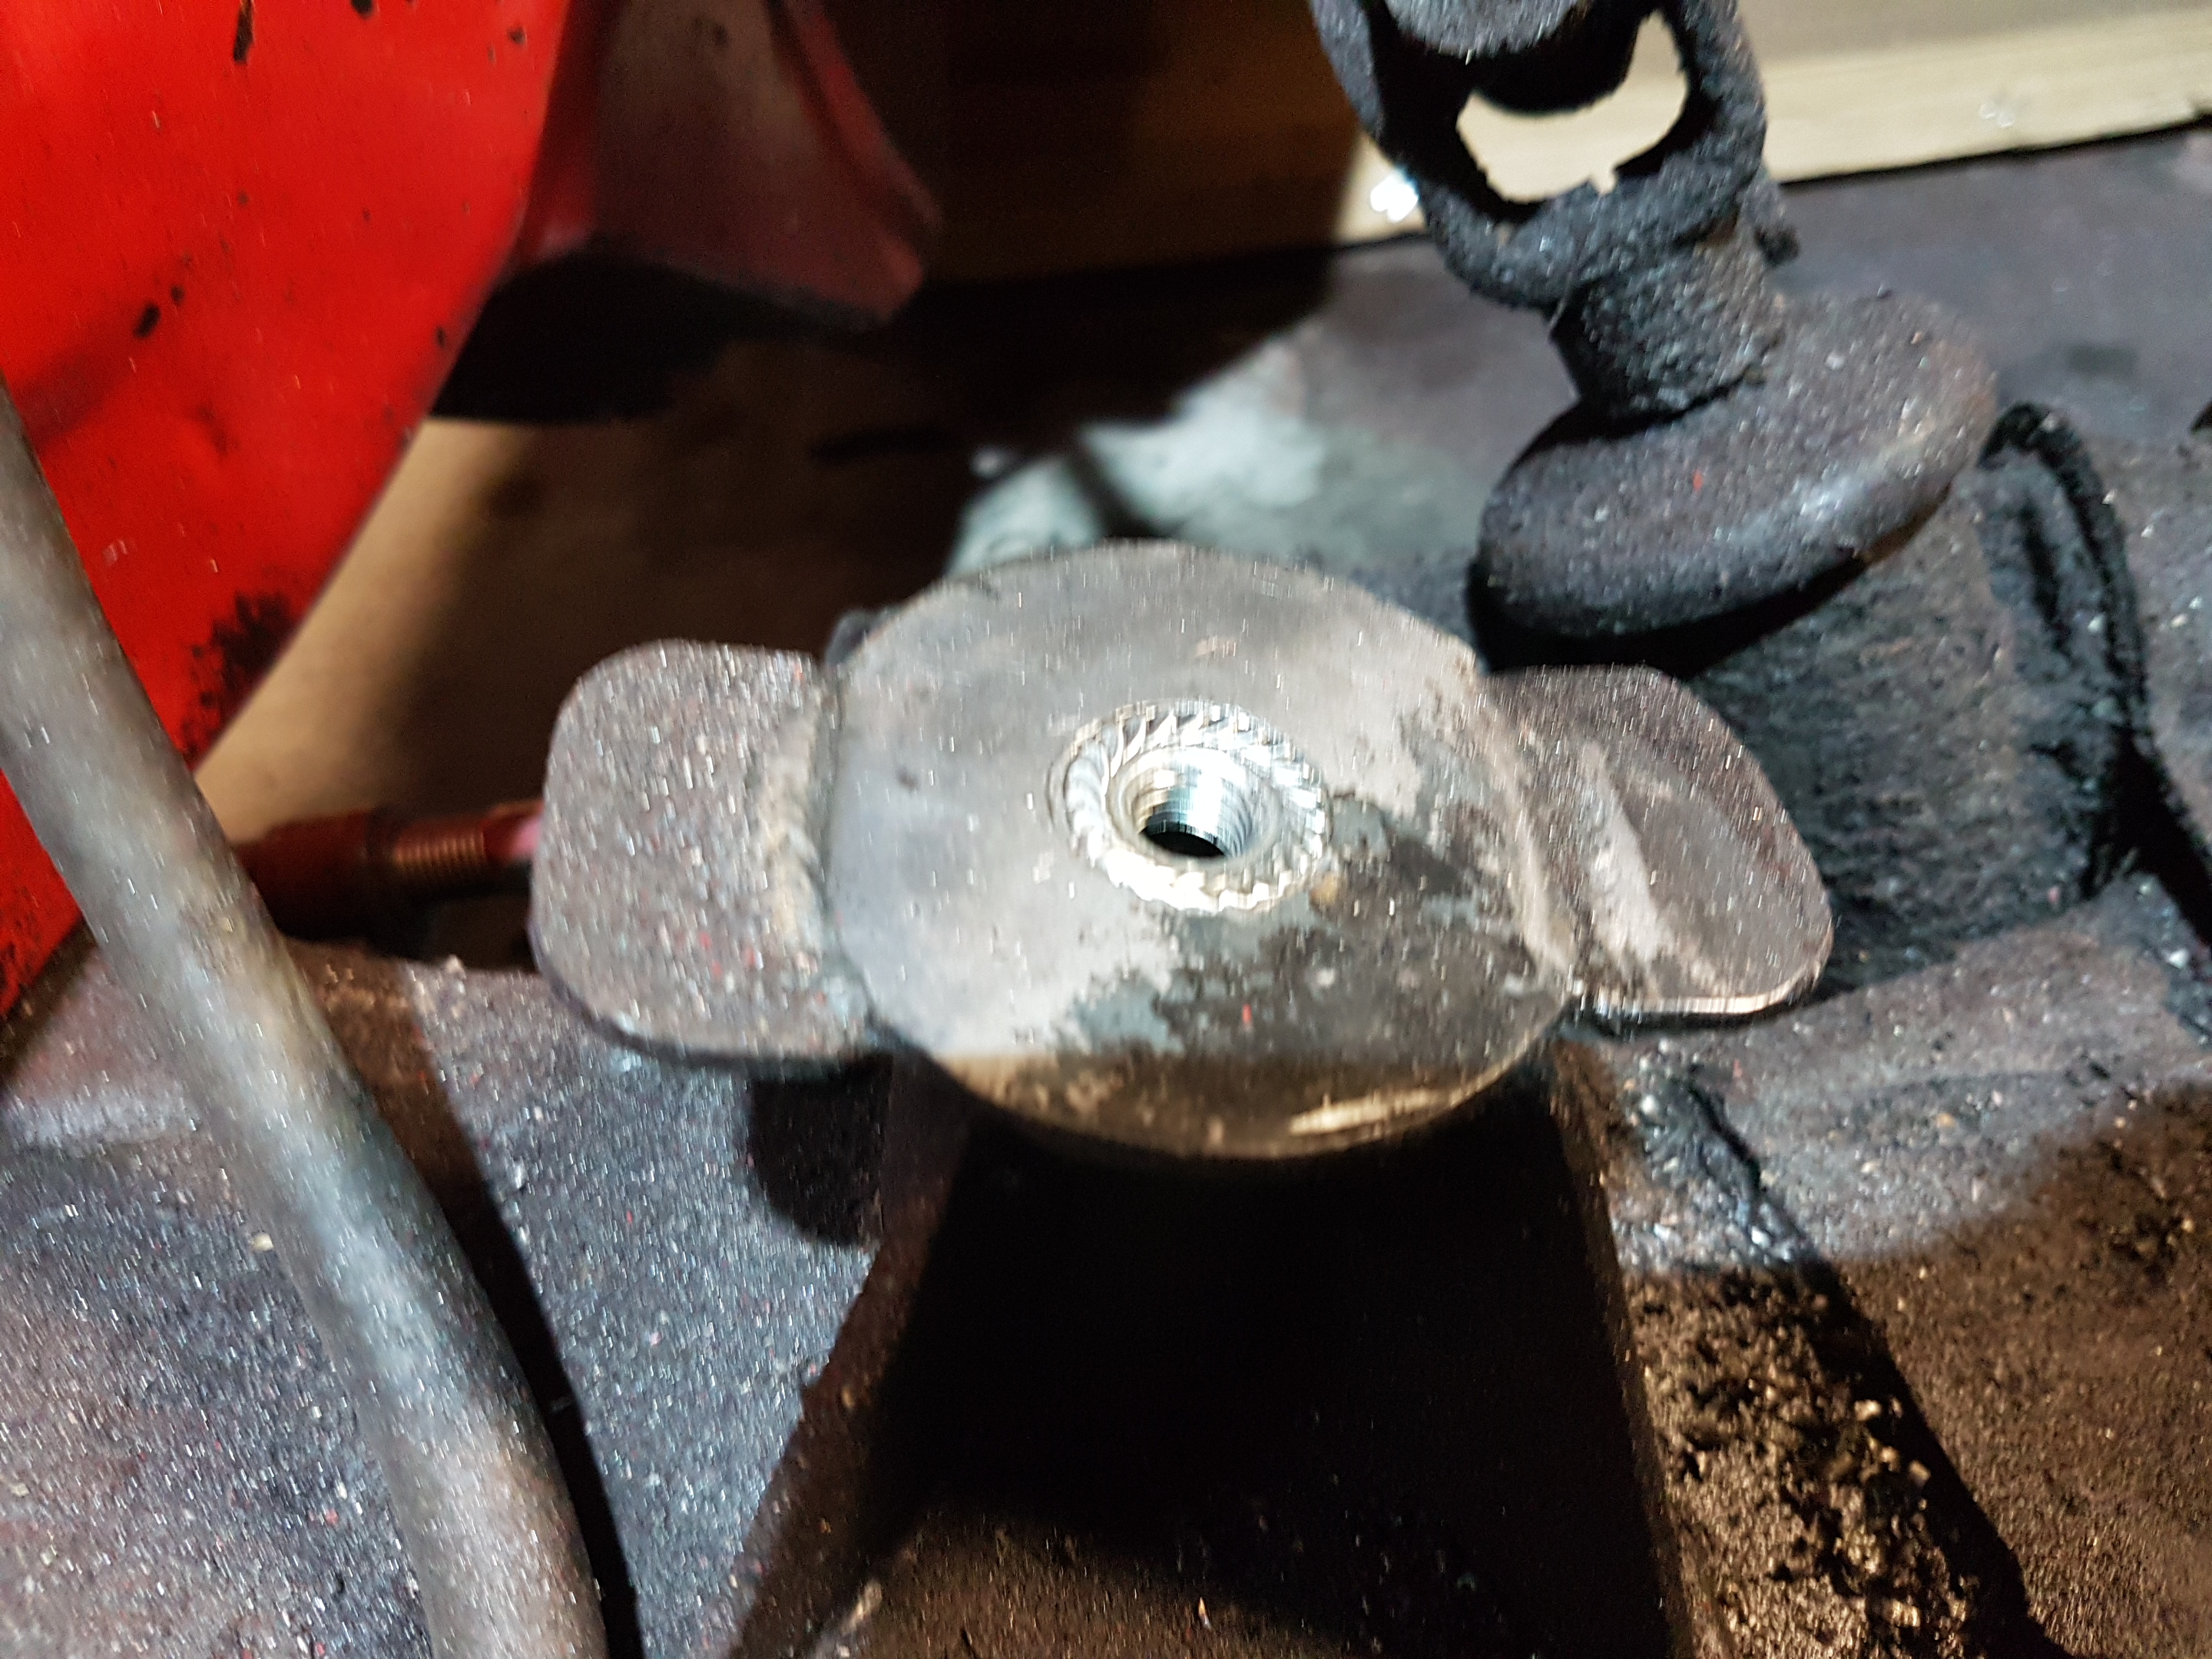
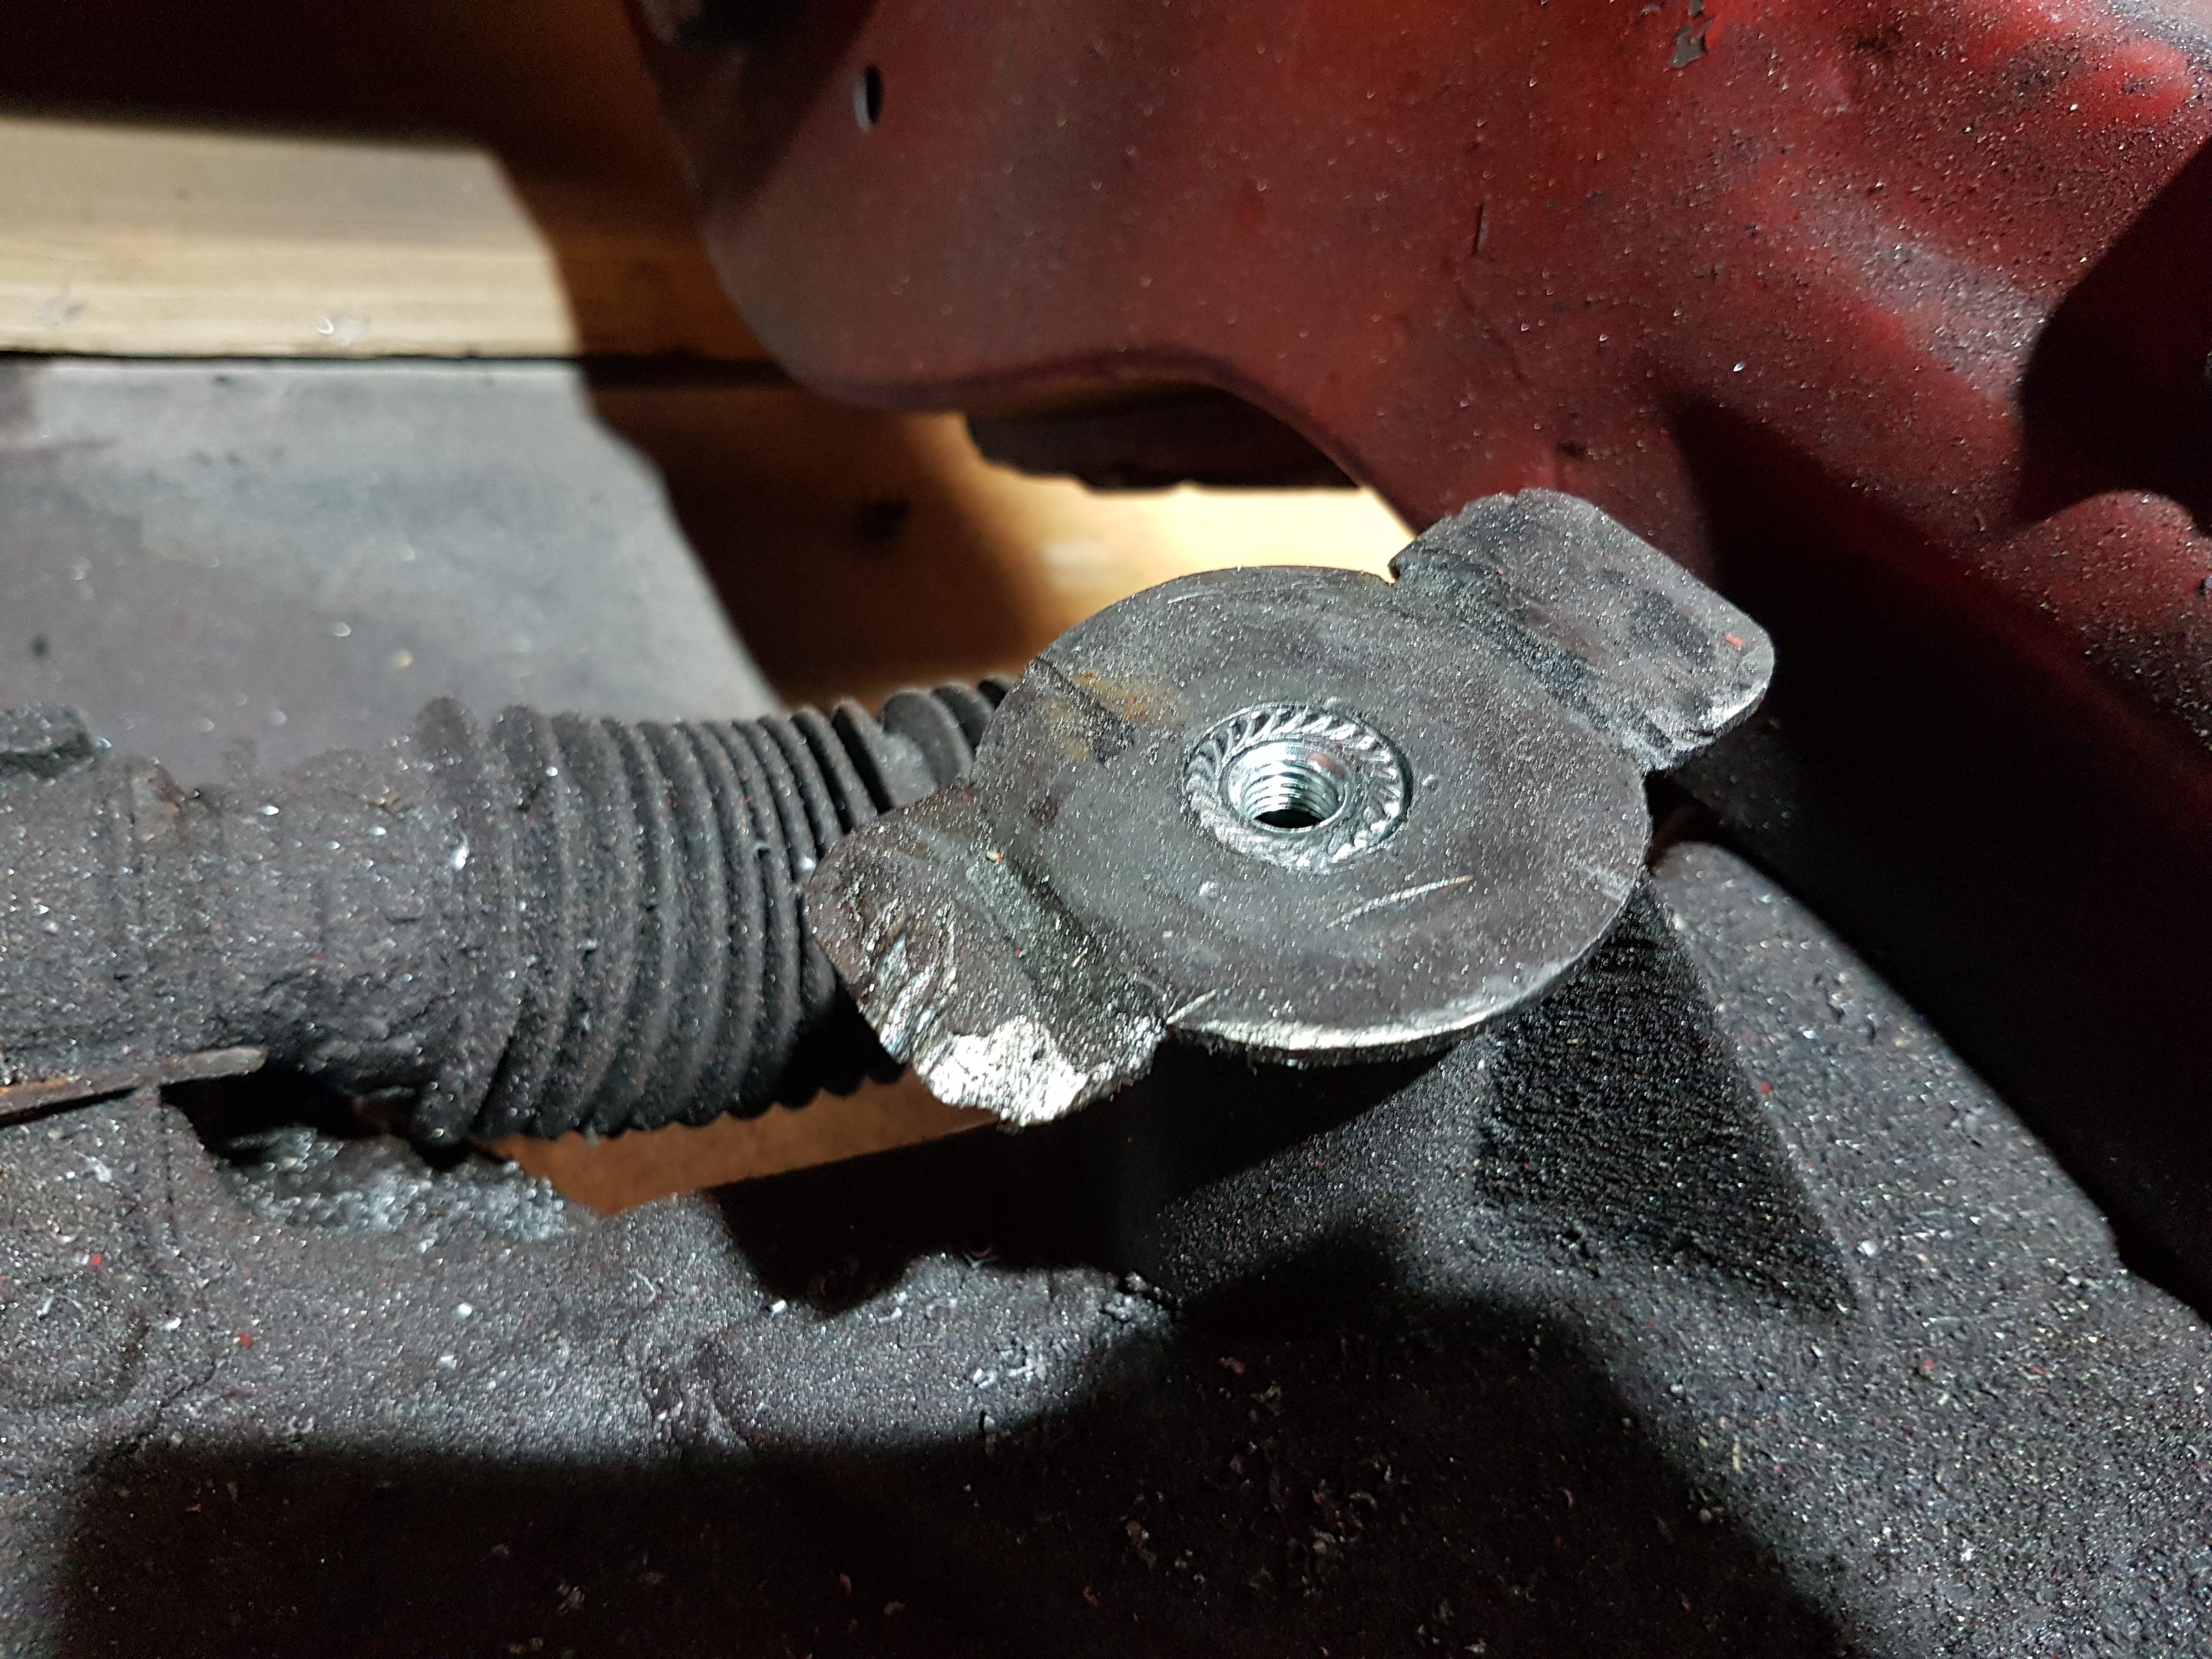
Everyone should have one of these. They make it super easy to get into tight spaces to clean up welds etc. They're on special for $99 at the Toolshed this month too. Got stuck into the engine bay with the powerfile and a flap disc. Still a bunch of finishing work to do, but the powerfile did an awesome job of the radius on this weld: Also bought myself a set of step drills. Their first job was to make the correct sized holes for the new engine mount threads: The nuts sit in there really nicely. It's a slight hammer fit to get them below/even with the surface and they can't drop any lower because the hole steps down as it gets deeper. The nuts need to be tigged in and tidied up, then that job's done.
2 points
-
What we have here is a 1963 Galaxie 500 2 door hardtop. Its got a 390ci V8 and lush column shift auto. Right about now it’s got about 115k miles on the clock; about 3000 of those were racked up after I picked it up in San Fran last August. I’d spent a few years thinking about it then a few more months sussing out the which/why and what to buy; I knew it was a 60-64 Ford of some sort, with two doors and max cool; no Mustangs, I’m not that much douche, then this popped up at good money. I had planned to go halves with a mate over there and sell it when I got it back to make cash, but got a divorce payout so.. sweet justice. So I bit the bullet and got someone over there to check this out after finding it on Craigslist, chucked down a deposit and told the guy I’d see him in August. Headed to NY for a week then flew to SF, caught a train out to the woops and met the guy. Went back to his shack, admired his guns, 4x4s and animal heads then made tracks the fuck out of there. Straight onto a freeway at max summer heat where she ran mega-lush (sorta) thru to about 50 miles from Reno, where the generator light came on and I shat my pants. Found a local Mexican Donk shop with an old fella who changed out the generator for an alternator for $100, then I cruised round and soaked up the pre-Hot August Nights hype. Then, hit the freeways for another massive haul to Wendover, which is the support town next to the Bonneville flats where I caught up with some mates, one of whom had brought down his Rat Rod he’d had built up at Washington, and we hung out there for a few days watching people go fast and drinking PBR. Then Vegas. Then LA. Then shipping container. Then MAF and flagged for rust. Then tears. Then some repairs to the roof, a new zorst and I replaced brakes, hoses, shocks, seat belts, headlights, all sorts a fiddly little stuff, and then complied the day before beach hop with a new green roof, colour keyed wheels and some shittily installed flappers. Didn’t even have it cleaned. But, she’s legal, and she’s mine, and she got there under her own steam. Right now the carb is off and I 94 percent rebuilt it last night, just need to put the top plate back on, but the gasket was kinked so I’ve got it under a book to straighten it out a bit. Umm, that’s about it. Long term plan is to go Mild Custom – shave the spears off the side and the big badges, scallops in a colour to match the roof (white ones on the c-pillars). Retrim the ripped interior in a matching kinda way, install some of the stereo gear I’ve amassed, relays on the headlights, dual plane manifold would be nice, paint match the valve covers and aircleaner with some pinstriping, generally clean up under there, replace some old rubbers here and there. But mainly I want to drive the arse off it. Tumblrsss: http://monkeygrease.tumblr.com/post/55669796757 Degustation: //oldschool.co.nz/index.php?/topic/39341-1963-ford-galaxie-hardtop-of-glory-the-bronze/1 point
-
the might vaz2102
1 point
-
Make sure you hold your mouth straight too.1 point
-
Key on, Do not start. Try pushing both buttons for 3 secs, then alternate lock/unlock. This is may not be the correct procedure for your car, but is common for most toyotas if that era.1 point
-
If anything lazy goes in it I can garantee it be dieseasel mmmm 6bt or duramax.1 point
-
Ha ha laughing at wipers. Mine do exactly the same thing at speed. They also do the 'not wiping water off the screen like they are meant to' thing as well. Although I suspect I need to replace my inserts, which although quite new just seem to be really shit. How many ponies do you think that little engine has stashed away ? 140-150? Looking forwards to next years update.1 point
-
Think I broke the forum, try that?1 point
-
Bent drag links, certifiable? The joints on the end of my drag link bind up when at full suspension travel, if i put 2 bends in it so it becomes sort of a "s" shape ( its a solid bar like 25mm round) to get around the joints binding (it will be a new custom drag link not a bent oem one) or can a single shear high misalignment heim set up be certed?1 point
-
Turns out in the excitement of getting the engine running I forgot to secure the loom out of the way of things. It contacted exhaust manifold and melted through an injector ground wire, locking injectors 1 and 2 full open. I've now fixed up the loom and tidied some stuff up, securing the loom properly. I pulled the head off the engine yesterday to make sure the flooding and fuel diluted oil didn't damage any cylinders (long story behind that choice). It all looks good in there so I'll throw a new gasket/oil/filter in on Tuesday and should hopefully be away laughing. I'm also going to install a fuel pressure gauge, even if only temporary I also put on a more durable MAP sensor. I calibrated the upper end of the readings to give atmospheric, but still need to see about calibrating the low end. It's a denso unit and I haven't found any data sheet for it.1 point
-
Seven inch sealed beams on my BMC cars and the Civic are actually better than the replaceable bulb seven inch round lights on my XC coon.1 point
-
Yeah looking for smometing to replace te lights on my Mk2 golf. Got a rock though one the other day. The correct h4 hella unit is shit and expensive. Thought LED might be cool.1 point
-
Got this thing strumming ! Goes hard for what it is. Pipe was coked up real bad1 point
-
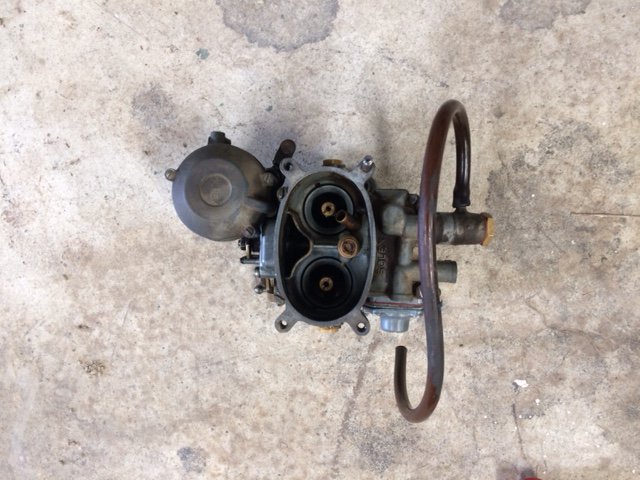
Thanks to @azzurro I have another carb to try. Out with the old: In with the new (well, older actually) I'm getting quite quick at removing and installing Fiat 125 Carburettors. As you can see, it is slightly different around the fuel inlet side and is missing the breather hose thingy. Must have been pretty well dialled in because it fired up straight away. I then took it for a hoon down the road and maaaayte it's much better. Some fine tuning to be done with the idle but very driveable. I'm calling it a win.
1 point
-
Van is now road legal for the first time in a decade Just needed a couple of bits & pieces, wiper bolts tightened, one plate light out, rear brake balance, rear door weatherstripping (chucked some random stuff on, effective and s&m looking) and headlight aim. Still heaps to tutu with as I go Next on the list: -get a needle point grease nozzle/ maybe jack van up on random angles so I can grease front & rearmost universal -halogen headlight conversion -pair of 70s house speakers for GWAR and slayer only (and jethro tull's aqualung) -keep tidying the body -idle past educational institutions etc
1 point
-
Big win tonight! Made a big hole... And filled another... Tonight was focused on simply getting the motor out of the car and by the time that happened it was pretty late so I spent very little time at all putting the engine in the right place. That said, considering how worried I was that it would be a tight fit requiring lots of firewall cutting, I'm very happy with the initial mock up. It is nowhere near the final height in the engine bay, nor tilted correctly fore and aft or side to side, but the over all length looks like it will fit a radiator just fine and the sump shouldn't require much extensive modification. I'll have to get the gearbox adapter plate finalised before I can get the engine position sorted but there's still a few steps before that can happen. Still, progress has occurred.1 point
-
Yep...
1 point
-
Whack a carb on it mate. Problem solved. Pewhuehue1 point
-
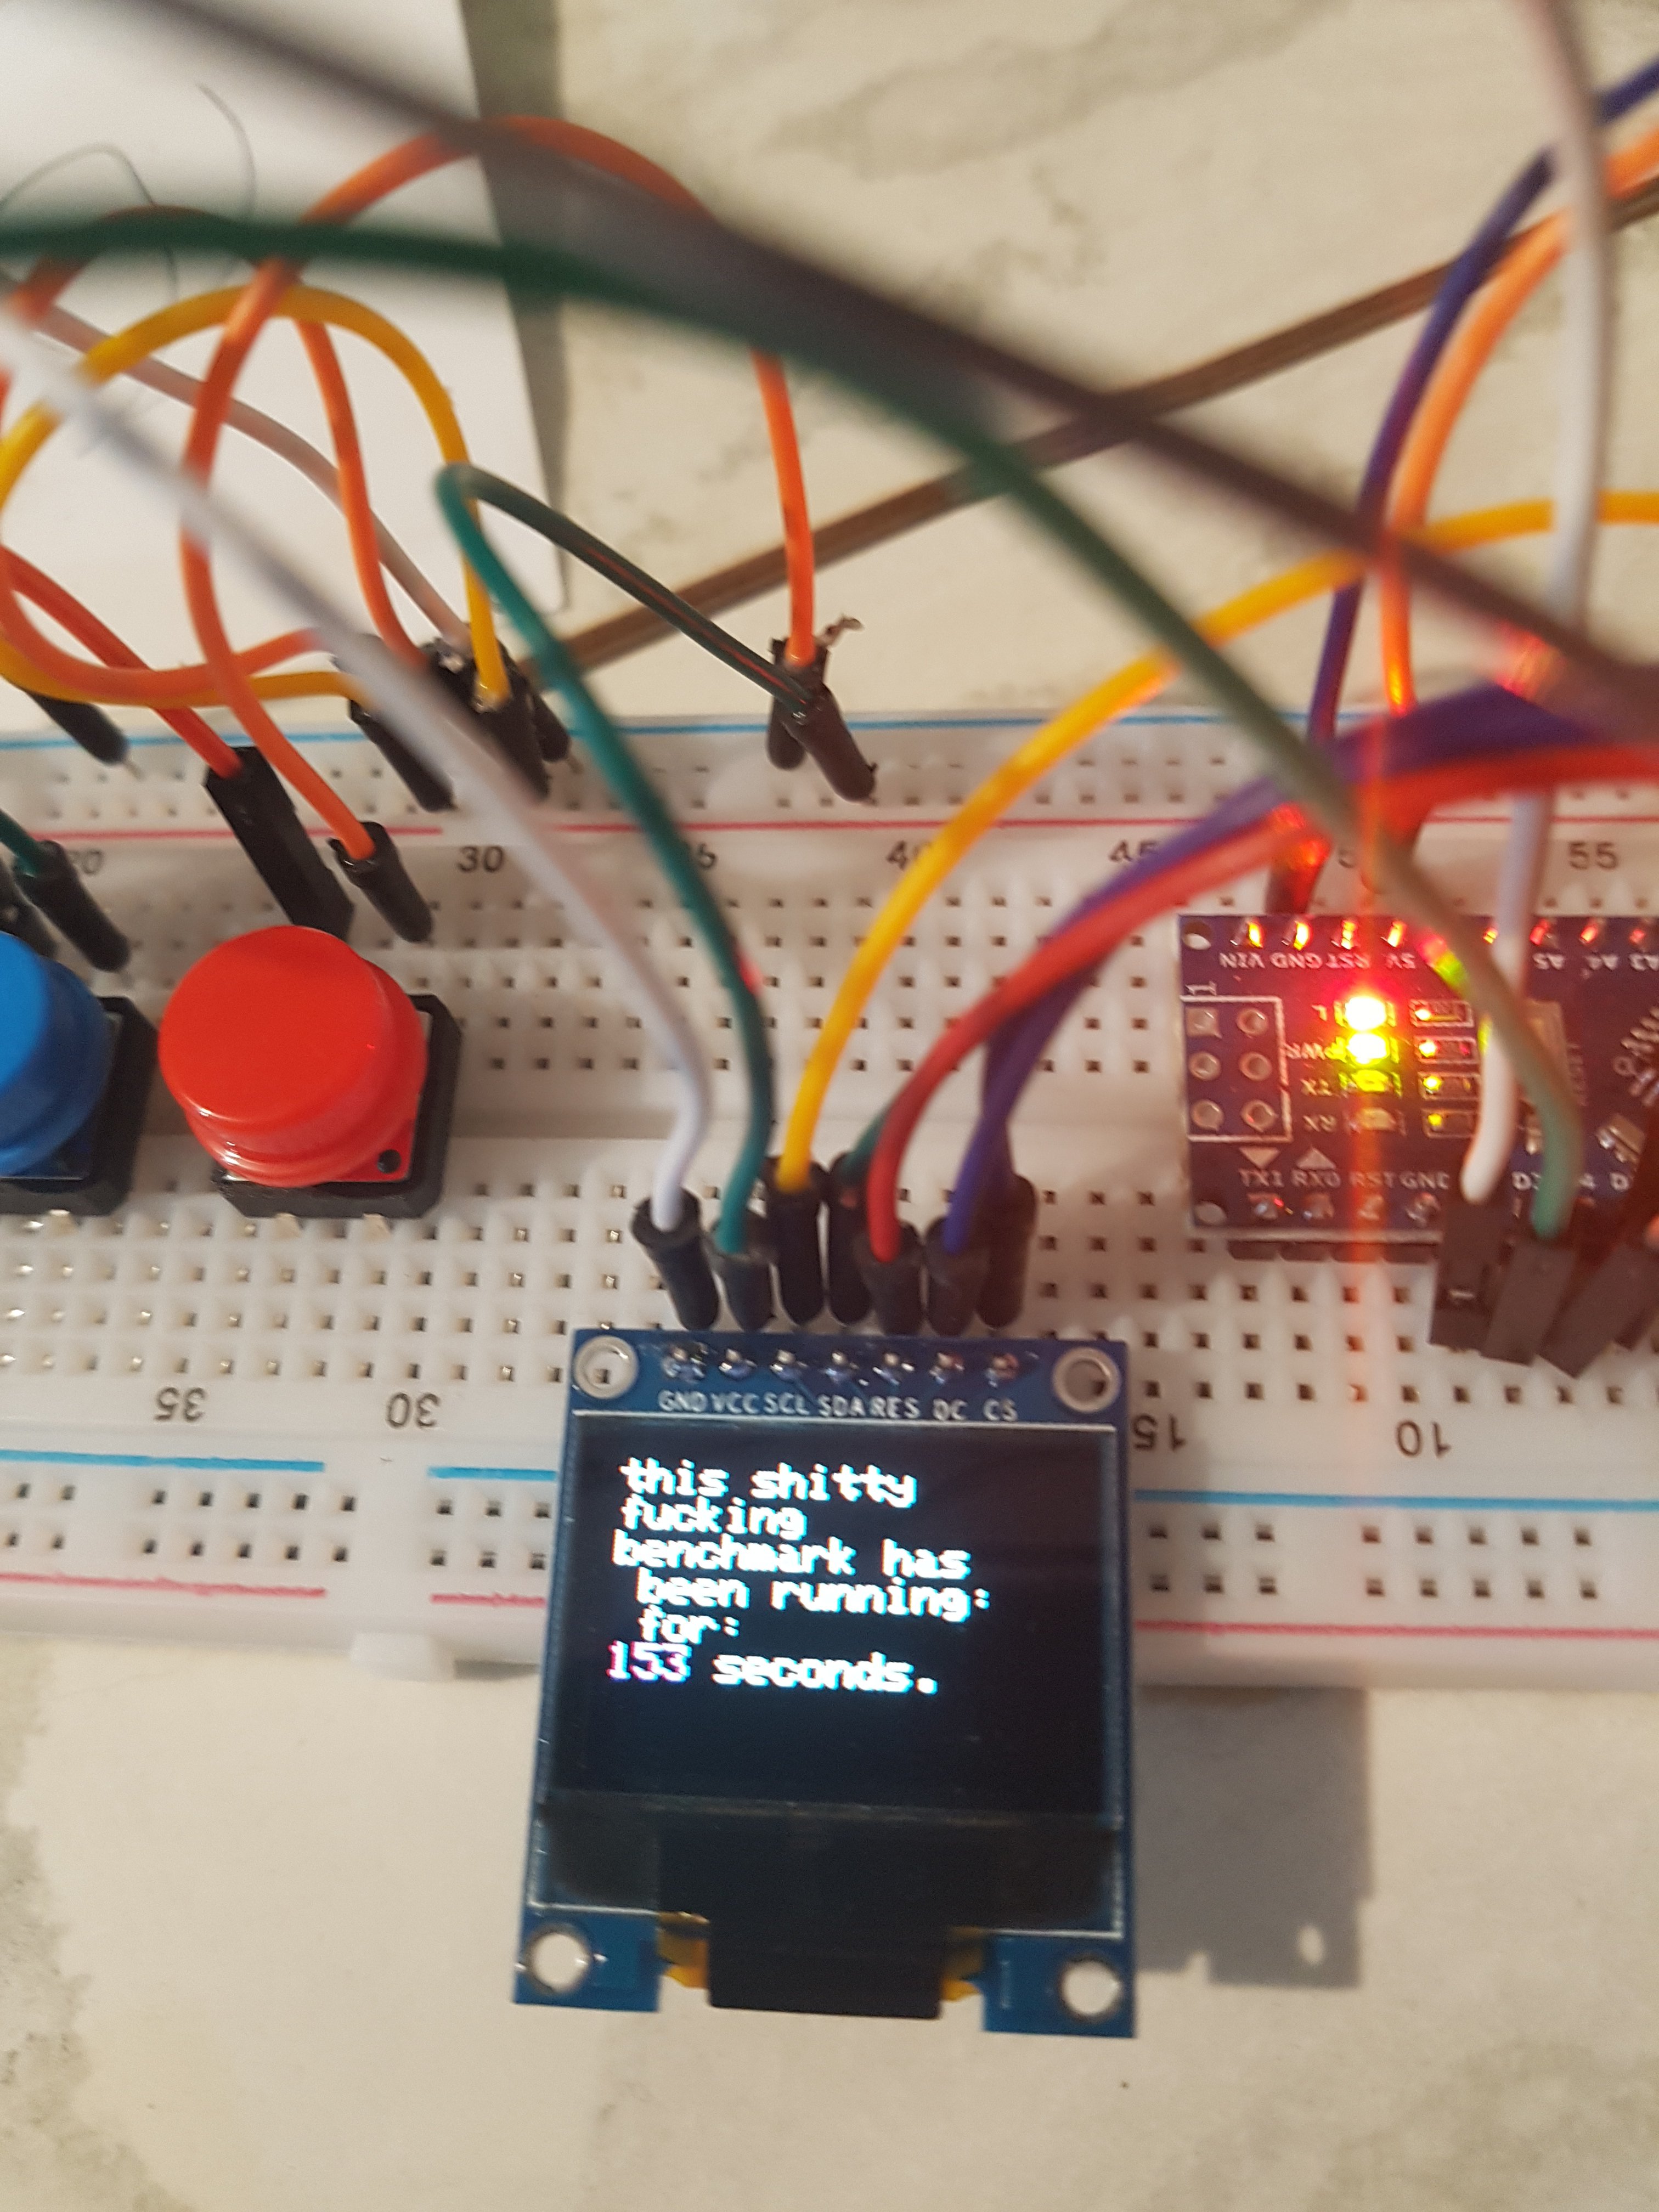
I have had a huge amount of success since these last posts- my biggest is a change from the CRAP adafruit library to the one on this link https://github.com/sumotoy/SSD_13XX/blob/master/README.md This new library is fuggin amazing- a tiny change and my benchmark drops from the 33 seconds I was happy about above to FOUR SECONDS. I'm now happy I took the time to produce the quick benchmark program and actually record the times. All logos/warning lamps are now BMP files converted to code like this I was starting to lose interest because it took a visible amount of time to draw each icon! now they appear instantly..oh and theres a seriously wanky startup logo now
1 point
-
just fitted a one piece driveshaft. old two piece had an original celica center bearing in it. as you can well imagine after 16 odd years of massive abuse it was fucked. you cant get a replacement that isint garbage so i decided to go to a one piece. ages ago i tried to use a much stronger center bearing but because of many issues including weird gearbox and diff angles and an inability to get it sitting in the right place it never really worked very well. so, one piece shaft. its a 75mm diameter tube and its max RPM is about 8000, or 255KPH. i can live with that. fitted it tonight and took it for a test hoon. christ what a difference. its probably about 50% how fucked the old shaft was and 50% how stunningly smooth the new shaft is. its like a new car.1 point
-
Hello, I'm looking at purchasing this motorsickle which also comes with spare engines and numerous parts: Is anybody able to collect this on my behalf in exchange for payment and possibly that sweet OG Warehouse plastic bag in the bottom picture? @Goat has kindly offered to store in in Masterton if someone is able to collect it. Thought I'd ask before I have a bid. Cheers, Neal.1 point
-
I cannot put into words, how jaulous I am of your trinkets.1 point
-
1 point
-
Wow, I haven't updated this thread for 2 years. Things I've done - new tyres, new fuel pump, routine servicing, replaced the harness because it expired. That's about it. I have done a few events, but not a lot. Pretty happy with how it's going at the moment so the turbo 7A has gone on hold. Also there's not a lot running in the 0-1600cc class these days so it's reasonably competitive. OS Drag Day 2015 - here's a video from Markku "Battle of the Titans" (that grin...) Golden Cross Hillclimb 2016 Matahi Rd Hillclimb 2016 Got a 3rd in class (only 1.2 secs spread between 1st and 3rd so it was close) and 11th overall. Even beat a WRX and an Evo on a damp hillclimb which made my day. Have to sort out the sloppy linkages in the wipers, had to use them a few times and they didn't park nicely and they drift up the screen at speed. Not to mention that they are utterly crap at being windscreen wipers. This video is poor quality because I couldn't be bothered waiting for Youtube to upload 1.3 GB of decent quality video. Next update in 2 years time. Here's the discussion bit -> //oldschool.co.nz/index.php?/topic/29131-vivaspeeds-1969-hb-viva-racing-type-car-discussion1 point
-
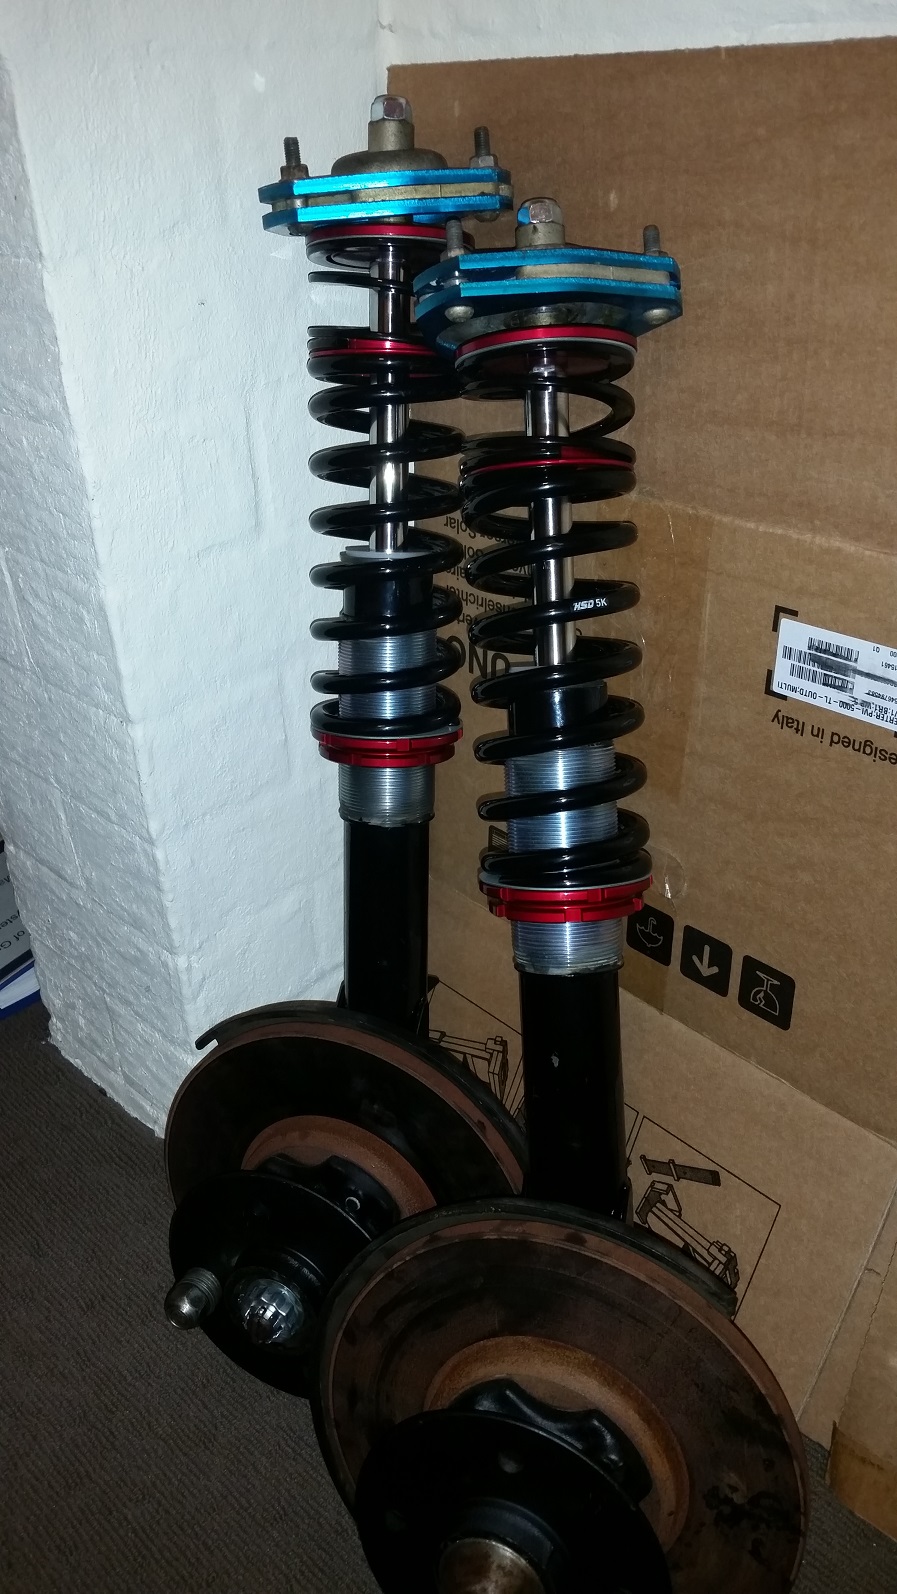
I finally assembled my Capri/ RS struts tonight after having the bearing and seal kits installed by a local mechanic. These are the same set up as the struts I had in my MK1. HSD 51mm 5kg coilover kit, Koni 86-1835SPORT inserts and some Noltec adjustable tops this time around which should get the front a little lower. I put one king leaf spring in the back to see how it looks with my JBW minilites. No point in doing both sides as the diff is coming out soon to swap for R31. Not too bad but needs some 1.5" blocks to get it looking just right ;D
1 point
-
Cheers Valiant for the calipers! I got a bit carried away this afternoon Completely forgot to get a pic of the state of them when I got them, but this is the state of the struts they came off, the car had been on fire Stripped down, Wire wheeled, honed, sanded, painted And fitted And back on wheels, first time since June Discussinate //oldschool.co.nz/index.php?/topic/43865-mofs-1979-escort-panel-van/1 point
-
Spot the difference. Wow, camera shows how much that trim needs polishing.1 point
-
Now the next cool thing you will see is how amazingly this lines up for mounting with the given rules and parts I used. Remember the subframe is from a FD3S RX7 Batman, well the rubber joining mounts im using are hard type JZA80 Supra items (I don't believe in hard/solid mounting engines as its hell on the chassis and the engine itself). I had to drill the subframe holes out from 12mm to 14mm, make a 20mm thick spacer to raise them up and in they went then i got some 6mm steel plate and plated the engine and the rubber mount. Then welded a piece of rhs between the two. Check out how well it lines up, no crazy stretch frame mounts here its almost as if it was meant to be! Cool huh! Heres the finished mount next to a factory Toyota Supra one..... Whats going on in the back ground? Mixing up some bog... Yea who can guess what im going to do here lol File action from a hooded bubble goose1 point
-
I priced up a few turbo 2jzgte engines and the goin price averaged $4000 hmmm research time. I'd heard a few rumours that the naturally aspirated 2jzge shared a few common parts so after a few hours internet study and shit yarns with people I took a punt and went and found a good 120,000km naturally aspirated motor cheap for $300. I striped it down and confirmed the exact same crank and rods as the turbo engine the only difference in the block is that it has no oil return for the turbo and no oil squirter's for the pistons. The oil return is an easy mod and the oil squirter's as well because the block already has the oil galleries and only requires the 6 m8 holes drilled and taped in the crank case then bolt in some squirter's from any toyota engine, easy as!! Even the pistons are of the same material and forming technique as the turbo ones just higher compression... if your really cheeky you could machine them down to lower compression and effectively have a turbo bottom end cheap. I cut the hole a wee bit bigger and started making the engine mounts. Shes sitting well back! Rules allow 305mm moving of the firewall or 5% of the wheel base (120mm) from a line drawn through the front spindles back to the 1st spark plug. I choose the latter as it gave me another 40mm.1 point
-
Righty! now all the excitement of finishing the wide body plug and silencing all the doubters along the way (yea f*%$# you guys haha) it was time to return to the engine side of things, been pretty quite on the 3SGTE conversion yeah? thats because I did a wee bit more study and a few calculations ($$$ x Reliability / Hp) I decided the 3SGTE wasn't going to cut it. I would need to sleeve the block work the head and it would still be a potential grenade, money grenade.. Sooo whats better than a 3SGTE I asked myself...1 point
-
Heres the finished plug straight off the gun Dressed up a wee bit Bumper black touched up1 point


.thumb.jpeg.384ff72c8d2b0ee0d34a7bdedb55bdcf.jpeg)


This leaderboard is set to Auckland/GMT+12:00