
Leaderboard


Popular Content
Showing content with the highest reputation on 25/11/16 in all areas
-
great success. car ran really well and made good power, 375RWKS to be exact and 520lbft of torque. which is a lot. the poor little turbo just couldn't flow any more air. it tried its best but thats the absolute max it will do. I'm happy with that. the car is going really really well, not that i could give it the jandels in the rain, but its running faultlessly. 2016-11-25_12-31-05 by sheepers, on Flickr this is old 2.5L vs new 3L 2016-11-25_12-31-19 by sheepers, on Flickr18 points
-
So she got a tune the other day. Vvt not activated due to solinoid issue an time constraints. Still made 367hp and 450nm. Going for cert next week then back for vvt tune https://m.youtube.com/watch?v=HaLmpLiUPUI13 points
-
I pulled that radiator out, it was pretty rotten. It is currently getting a recore at Richmond Radiators for an eye bleeding amount of money. I tried to find a replacement but there are very few of this model bus lying around. While I was there I pulled the thermostat lid off to see what things looked like and found not one but two thermostats! both were 88 degrees and fucked. Naturally the many places I rang to find correct replacements for it could tell me literally nothing. Thus I fully owned the internet and discovered that the space they each fit into is exactly the same sizes as a Nissan TD42. Hence from the links and info in a thread I found, I could make a call on what to stick in there, which is an 82 deg that will open first during normal running, then a 90 degree which will open when things get hot going over the Takaka hill. There will be a 5mm gap to the bypass poppet on both. Tell me if that sounds wrong, but holy shit i am now the worlds foremost authority on specifying thermostats on early ED33 motors, so basically you can fuck off. Actually no, please give many opinions. Here we have a radiator sized hole; After all that some exciting things arrived and i got to installing, firstly the 130Ah 12v AGM Batteries that actually fitted in the hole i made for them; The battery meter and chunkier switch for the fridge with a separate feed, as it is the biggest consumer of Ah's; The charge controller; A super tight, pro wiring job using many types of stuff; A fucking enormous 310W solar panel; Also a gas man came and sorted the hob, I can now die of CO poisoning in supreme comfort.8 points
-
Swapped the old commodore driveshaft for a station wagon one which is slightly longer and pretty much the perfect length. So then picked up a new yoke and universal joint to mate up to the transmission. Even clears the floor by ~2mm! Made a driveshaft mount to dummy it up, which worked alright but the driveshaft angled quite a lot when the bags are right down. Need to make another that's about 30mm higher. Running gear basically complete!7 points
-
Hey ya. So recently I picked up a new project now my 52 Buick is complete – a 1949 Hudson Super. Story goes I was browsing auctions with no intention of buying anything just cyber tire kicking so to speak. “Hey a cool old barn find car has surfaced 45 mins away. Want go take a look?” i ask my better half. With a promise that we would go get something tasty for lunch we pile in the old 52. Walking up to it & seeing the fastback shape and roof that looks chopped straight from the factory the better half mutters “I wont say no if you want to buy it” ^^ what more can i say… talked the price down for cash & shook hands with plans to pick it up the following day. Next day swapped the fat wad of bills for the original registration papers, original ownership papers showing two owners (father then son), a few old photos from 1962 and a set of keys to a car that hadn’t been started for 47 years. Now I already have a Straight 8 in the Buick and not really interested in another inline. Fabulous Hudson Hornet NASCAR history or not. Saying this im not into chevy swaps. I do like Buick Nailheads… rare here in New Zealand and always catch my attention when dressed up. I look at the Husdon, scratch the ol chin and go “yus sir that would be mighty fine”. Nailheads have an old school look that would suit that engine bay mighty fine. Images from the Auction & First Look. So what the old timer said was wrong with it: Fuel tank out as he has had it patched n cleaned cus had a few small leaks. trunk floor has a split where fuel tank mounts. guessing due to weight & old NZ roads being not the best etc small patch rust on left rear skirt. patch rust on right front panel. front right door pillar has a split at bottom. apparently he use to chat to people leaning on the open door and thinks this might of been the issue. brake Master cylinder needs put back in as it and all the drums have been redone. Water pump is at a shop getting redone. Rats have nested in seats. All easy stuff really. the splits are clean stress splits with no rust or nasty stuff to be seen. Still trying to figure out my build. Any help or ideas are most welcome. I do know the history of Hudson and NASCAR etc but I already have a hotrod looking restored car and dont want another. im after a more custom look. I haven’t been in a Hudson moving under its own power so im unsure of many things like suspension etc. Plan so far: worked 401 Nailhead. (hard to get here so may need import) Worked 700R4 trans rewire using American Autowire highway 22kit. Wilwood disks all around. Media blast. Shave the handles. French the lights. and do all the normal custom shiz Change up the grill. Lower it. new interior. Thinking 9 inch in the rear to handle the Nailheads torque and power. Not sure what ratio. Not sure for front end. I read how great the near 70 year old front end was. Maybe new hubs for disk brakes and a thicker swaybar. But then i think why not just throw in a jag IFS. comes with disks, power steering etc and is cheap here in New Zealand (cheaper than reworking the old hudsons setup) Driveshaft – unsure. one or 2 piece… So ideas? Suggestions? This will be an expensive project for me. Being at the bottom of the world/New Zealand means expensive shipping. We have a lot of Holdens here and a fair few Euro cars. after a old school look & sound with if possible a more modern handling. Thanks guys Alex6 points
-
thanks fullahs! i got to give it one low boost "semi jandle" just before it started raining proper and it fucked off in a big hurry so I'm looking forward to giving it some dry weather jandle with all the boosts. that might be later next week because i accidentally cut a hole in it with an angle grinder this afternoon so ill have to do something about that……...4 points
-
might have got 380 if you used the triumph head4 points
-
thinking i'll be getting 185/60/13's. I've got some old 205/60/13's that i'll get them to test fit and see. Gonna be tight!4 points
-
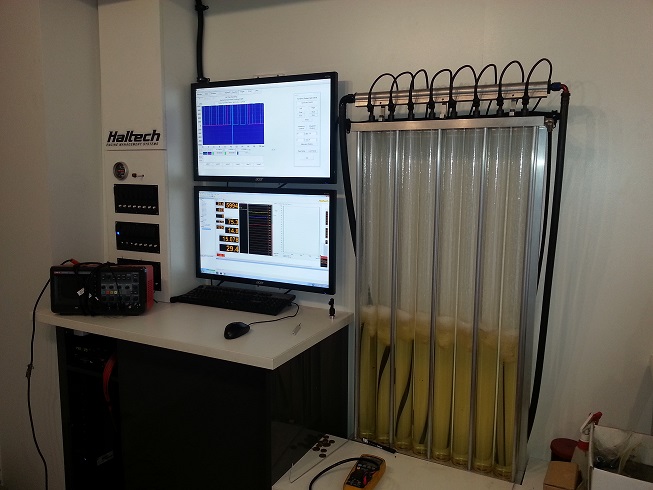
Hey Guys. I'm so new it's not even funny to old school. I thought id start a thread on a shed project that started out as something simple and has turned into a thing that is now taking over. All I wanted to do was test fuel injectors. I'm a mechanic by trade so I have the basics. I get that you can touch a injector on a 12v battery and get it to click. But what if we need to find out things about our injectors? I could out source them for a quick service and drop $30 per injector for a quick buzz in a ultrasonic bath.... But I think we are only scratching the surface. What if we need to find out some data? I think these little clicking givers of fuel are more important than you think. for a start: Battery offset standard dynamic service of injectors deviation vs pulse width injector latency injector linearity This will get us started. I am going to build a injector test rig that will do far more than a injector test machine. Im at a total loss why a quality test bench like a ASNU costs $12.000 kiwi. It's just out of control and will give no control over injector voltage. So with that for a intro i'll just leave a few pics and come back in the weekend. This is the pic that started this all off. It's a big dollar bench that is run on a haltech. It has the grunt to handle injectors of 5000cc it's the balls if you run methanol or if you want to know about injectors. What I will build will be first of all the prototype and a proof of concept that I can develop out. many more pics to come.
 3 points
 -
Angle grinder? So you doing full tub for Micky T drag slicks then! Good job sheepers3 points
-
Well, have sold the KE20 and the guy wanted the original running gear in it. Removed the hilux rear end and coil over front end (from a starlet I think originally). Had some TA63 LCA's lying around and though I would try them with the struts I had, they are about 25mm longer than standard and mated up the the struts so chuffed about that! Now as you can see the tie rods don't really reach that far... would wind them out if they weren't rusted and acually let me to turn them out. ah well. Looks quite staunch for the time being. On the list over the coming weeks #Rebuild 4A-GE Small port. have bought heaps of OEM bolts and a few things from Bazza at MRP and also some TODA gear in from Japan. Should be a beautiful engine bay somewhere down the line **Spin a yarn** //oldschool.co.nz/index.php?/topic/52401-pbaines-1971-toyota-corolla-ke25/3 points
-
Made the extension parts on the front end for where the sway bar mounts to. Cut out old piece that looked like this: Fabricate a new piece that fits in nicely. And another piece for strength. Weld, weld, weld Mounts like so, just waiting until I get some sway bar link bushes first before drilling the holes, as the current ones are pretty stuffed and pull it over to one side.3 points
-
Could be keen if you dont want to be lonely and shit?2 points
-
2 points
-
Awesome result! That's a hefty stack of power, and I admire your persistence to turn this around so quickly from the fault with the other engine. I'll buy you a pie for your efforts, top work Dave.2 points
-
Always wanted one of these... http://www.internationalmotorgroups.com/imgmagazine1.html2 points
-
I wouldn't consider it cured until you've performed a stationary full load cooling system test. I can come up and do this for you if you like.2 points
-
Just bought a factory thermostat myself, ain't got time for the Tridon shuffle you put the tridon part in, you take the tridon part out you put the tridon part in and shake your fist all about2 points
-
Pretty excited to get these on the car!!!! tyre choice is gonna be interesting2 points
-
I have thrown a few more hours at the old fruit since the last update. Finished the interior insulation/lining/wiring, the lining was very time consuming... My eldest daughter is on a massive sewing malarky at the moment making pillows and such, so once the mattresses arrived I trimmed them down to suit the space and together we re-sewed the covers. She did a bloody good job too. The main bed width is 40mm shy of super king size, it is a lush and spacious area, I am looking forward to the first kip I have on this. We took it to the speedway on the weekend and lounged about while everyone else sat in their cars waiting to get out, it was mint. You can also see the start of the control panel for all the stuff that will be connected to the solar power. You can also just see those two black dots above the main bed - those are usb ports for night time phone charging etc. Must remember to install the bilge blower eh.2 points
-
Spun up some shock mounts for the rear. Top ones got welded through the RHS that goes between the C-notch. Bottom pair got welded to a plate which was then welded to the lower 4-link brackets. Added the commodore sway bar as well. Once everything was fitted we tested it and worked well. Fully welded all the diff and airbag mounts etc so is pretty done for now. Started on the front end again. Test fitted the sway bar and it only just fits in between the chassis and front end. Need to make up some mounts and maybe scallop a bit out for more clearance. Front shock mounts will look something like this. Drew them up and now just waiting for them to be laser cut.2 points
-
Tried on the bumper guard that my parent's bought back from the USA a few years ago. Might need some slight modifications if I want to use it, as it already sits on the ground even though it's not as it's lowest. Started stripping some of the inside. Pulled out the seat and fuel tank which still had about 10 litres of petrol in it. Had some decent lumps of something in there and the outlet was blocked up, which is probably why it never ran anymore. 65 year old sound deadening is the worst to try and remove! Also some steel that surprisingly doesn't have any rust on it. Re-mounted the airbag mounts in the correct place and did some tests.2 points
-
Hey Aim of this thread is to try and get us to get together as a community and hang out more often/meet each other and get our junk going! This thread can be used to organise help/working bees ect. Firstly I think it would be great for those of you who have a scooter or a bike that doesn't run or needs work to try get it going before our ride next year. (As I know there's a few of you out there) I understand it's a super busy/expensive time of year to do this. But where's the harm in trying?1 point
-
Nice work! This thing would be a handful in today's weather!1 point
-
Cool. Cheers. Just thinking.. if one was to wire up a relay to the oil pressure switch it would have to be a 'normally on' or two way relay eh. I think.. (from early morning sleepy time electrical circuit planning) Or with a timer just wire it to ignition circuit? No good if someone leaves ignition on though.1 point
-
that turbo should have near falcon like spool (mine makes 22psi at 2300rpm) on your 3 litre but it might just make all of the heat at more than 1.5 bar boost. Should do ~330-350kw depending on your fuel of choice how effective the intercooler is at reducing intake temps, oh - and the happiness of the dyno paramaters??1 point
-
That was a fun fang back to Hamilton.1 point
-
How was it driving you're hiace out there brent? I think our 1st order of fush nd chups was 68 and we went threw to 112 I remember another mate ordering. Bloody good night. Ready for Januarys one now.1 point
-
A+, would trade again.1 point
-
If people have starters/alternator that need looking at I can. And when I'm less broken I can do some auto sparky stuff. I have a new project/toy which I would like a hand with but need to write a list of things to do1 point
-
if you space the sensor out so only the very tip is in the exhaust flow, will help if you have over temp issues. and can put piece of copper plate or something between the sensor and bung to pull a little more heat away from it.1 point
-
I can do not alot but can change tyres do polishing etc etc also have access to random tools through work dynadrill taps welding stuff give us a bell if you need some assistance.1 point
-
I'm good at making cups of tea and shit coffee so if you need that give me a shout1 point
-
As Roman Dave said. in the y pipe will be fine, closer to the top of the pipe the better. Tuning off one bank probably isn't much of a drama. you're not going to know which cylinders are running leaner/ richer either way. unless you run 8 o2's or egt's. if you do go pre y pipe, put a bung in both banks and swap the sensor over once you've tuned off one side. then recheck1 point
-
1 point
-
I have an alternative west aucks shed with assorted tools and shit that GC's are semi-welcome to use - ONly prob is the bay with cars that intermittently run parked in it, depending on whether i've started something and not got the right part to finish it, or too broke to finish, or too many beers, you know the drill, but yeah, if I have notice can usually move a car and create a west auck option with a light duty welder, compressor and fluff like that. No hondas. Well, maybe.1 point
-
Great idea Mayte, I'm happy to volunteer my shed in Ardmore as a venue for working on things together. It has power, lighting, water and a bunch of tools etc. Also, I'll be needing a hand to make some modifications to the shed in the near future, consisting of: - Building a small wall in one corner (dynabolted bottom plates and a basic frame) - Chipping out part of the entry ramp into the shed (it's just hardfill and rocks) - Trimming the weeds with a line trimmer - Sealing some of the minor roof leaks - Replacing the old chicken wire with a solid barrier - Possibly removing a wall between my two sheds - Installing lights and powerpoints in one shed (just a hand to run the cables would be swell) Happy to provide beers/Sharns/music/a BBQ and get a few blokes 'round to chip in.1 point
-
Took car for a wof.. clean sheet !! Although I did fix what it had failed for back in April when I took it for a wof.. which it failed and sat in the garage for 6 months. Anyway gave it good clean n polish and brought some rego so pretty much all set for drag day ! Need to sort a throttle cable issue out. Install my eletric ignition and eletric tacho. but no big deal and take it back to carb specialist as since I've removed all the emission stuff it seems to be running rich. Bring it on ! I picked up my 18rg exhaust manifold from autobend today. You can see how close it is to the sr20det. It's out 4/5mm per port over 278mm Didn't really like the old plastic gearstick/sterio surround so got another rubber and mounted it direct to carpet looks alot tidier in my opinion going to run a Bluetooth amp so don't need a sterio. Gave her a good polish too. How she currently sits. //oldschool.co.nz/index.php?/topic/42444-matteybeans-1978-rt104-corona/page-3#entry1783849 Cheers1 point
-
maybe check the tree tops and high up in the lamp posts for crumpled blue celicas.1 point
-
Got it back Friday arvo. Took it for a run around the Bombays and then Hamilton during the weekend. Aint no slug now. A quick wash & chrome polish today. Decided to throw on the tridents to see what they look like. Needs lowing, but atleast the rear sticks to the road now with the 245s.
1 point
-
Man, I heard from Richy about what happened - so gutted! Epic how fast you got the show on the road again, though. Are you still running that turbo we discussed ages ago? Was only really expecting that to be used at about 20psi for a fairly responsive setup on a bone stock 1JZGTE, I wouldn't be aiming for 400kw on a hearty 2JZGTE setup with it... even if it somehow managed to actually made that power Hope you have better luck with this weeks tune, it was insane with the 1JZ - the 2JZ should be hilarious with any amount of power haha1 point
-
So has been a busy month for the Impala. Had been meaning to take the ITB's off and balance them on the bench as well as service the injectors. Whipped them off and did that, found the idle screws and been locktighted shut so might explain a bit of a funny idle, Also got injectors serviced which turned out to have 3 a bit chocked up which may explain a couple of things also! While i had the intake off we thought we would do the valve stem seals as i had a set and some new head gaskets lying around, Whipped the heads off got them faced, got some LS7 lifters and new head bolts and put back together. Went to start and it was smoking out one bank, turns out one of the injectors got stuck wide open and was pissing fuel out the exhaust, Got another set of injectors which turned out to be off a later LS1 and 240cc instead off 300cc -.- cant bloody win. Anyways have chucked them back in and car is running and best it ever has. Mates wiring in a Link ECU this weekend and its off for a dyno tune at DTech next Monday so that should cross off all the motor work and have her 100% for summer!! Couple of pics below: Weekend just gone went hard with Mr Midnight Upholstery and finally got around to doing my boot upholstery how i always intended. Real happy with the result, just got some polished hard lines for the airbags to go in and its complete! Sharn down here //oldschool.co.nz/index.php?/topic/34313-the-westpala/page-101 point
-
horsepower? no,no. not 400 horsepower. 400 killerwasps.1 point
-
Friday took the day off and painted it... prob should have posted this before the last post but meh!1 point
-
2T... or not 2T... that is the question... And the answer is that 2T can fuck off because 2JZ no shit1 point
-
found this last night on the u-tubes https://flyermotorwerks.com/1 point
-
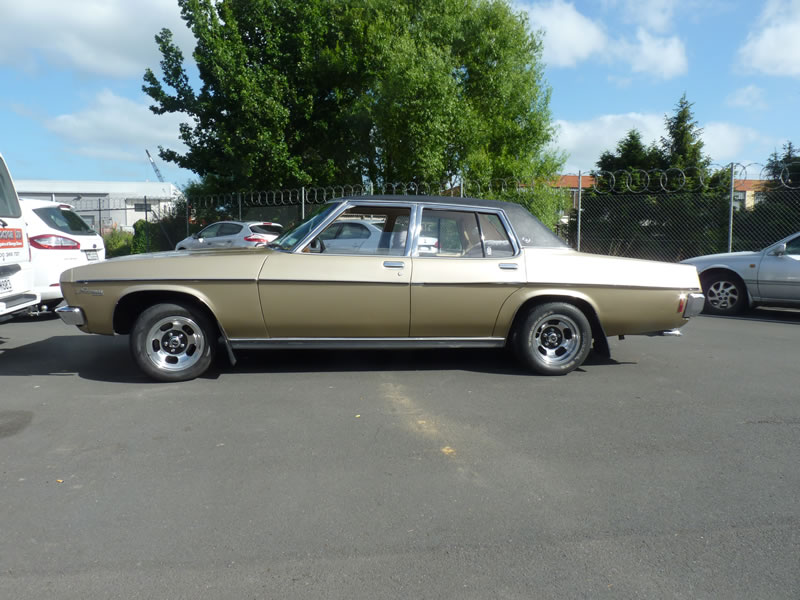
So had a little shopping spree while I was off work for two weeks. Got a LSD, thanks to Gnarlydude to bringing it up from Palmerston North to Hamilton! It's a 26 spline, but will look into getting some 24 spline side gears from Australia and getting them installed, then it'll be a bolt in upgrade. Saw the wheels on trademe and couldn't resist, not often you see these in 4x110! The wheels will eventually get widened to 7" and 8" i'm thinking, rear guards have a fair bit of space; hopefully being only 13" they wont look too funny or small on such a large car. Couldn't help to see what they look like1 point
-
Went for a boys weekend up to Auckland last weekend and did a Car wreckers crawl. I came across an NZ new KE70 with an 'auto roof' sunroof at Zebra, $45 later she was in my car! Some of you may dis-like sunroofs, I somewhat have a fetish for them although I was concerned as to how it would effect the cars structural integrity. Since I had a spare shell I test fitted the sunroof to see how well it fit, turned out to be a bit of a fail cutting the hole to big. On the upside I used the piece i cut out as a template after trimming to suit. With the help of the old man & 4 tin snips I nervously cut the hole out in the good shell. Took another good hour carefully trimming/filing the hole till the sunroof frame slotted in perfectly. 4 hours later.. Really happy with the way it turned out & really enjoyed fitting it, quite a cool feeling knowing that this would have been one of the jobs to be done at Toyota 30 years ago, similar to what I do today. Structurally the roof Is actually more rigid due to the fact the bottom half clamps the sunroof down from the inside. I also like this design better as the glass is sealed from underneath rather than on the sides & whether the glass is in or out there is always a frame securing the roof. TRD Big end bearings, main bearings & 0.8mm Headgasket literally arrived overnight from Japan! +1 for the 'JDM' newspaper. My wheel collection so far 4 x Advan ADA's 14 x 6" +15 4 x Advan A3A's 14 x 6" +6 4 x Toyota Cressida factory wheels 15 x ? 2 X SSR MKIII 14 x 6.5" +9.5 Can never have enough wheels1 point


This leaderboard is set to Auckland/GMT+12:00