
Leaderboard


Popular Content
Showing content with the highest reputation on 04/20/16 in all areas
-
also because i have no idea how to plan anything i bought these flares. $_57-2 by sheepers, on Flickr $_57 by sheepers, on Flickr9 points
-
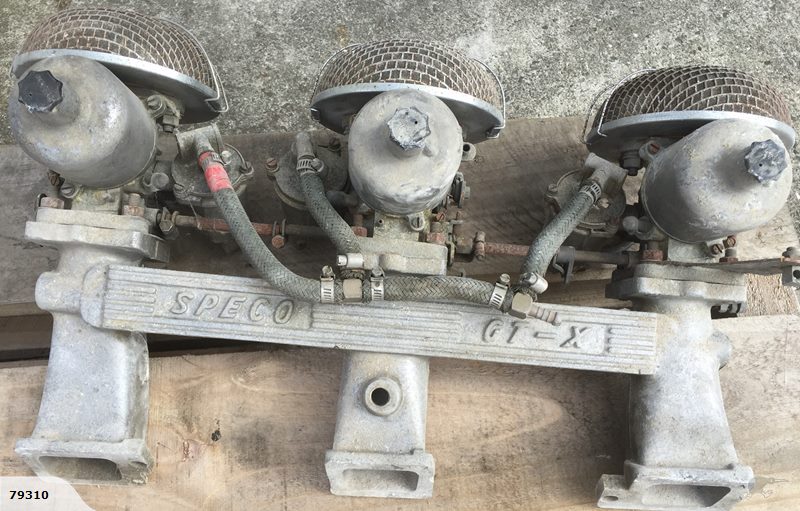
Not a lot of progress to report (still waiting on the new exhaust valves) but as hinted at previously I managed to score these for $455 on Trademe... Yes I know I've got the Webers but at that price we just couldn't resist!
 8 points
 -
Lapped the valves in last night;5 points
-
And here we are. The most finished it will be for a while. Have gotten the diff rebuilt at Geartech, no more ear piercing whines from the rear. Also got some Falken 912's all round (165/65/14 on 7jj front & 185/60/14 8jj rear) Now to drive it and enjoy it, until I decide to stick a blowey thing on there to make it go chu chu Discussion: //oldschool.co.nz/index.php?/topic/49929-pbaines-1985-ae86-corolla-levin/page-25 points
-
https://www.flickr.com/photos/92011807@N03/albums/721576673613256454 points
-
Mow-one knows.4 points
-
Long time, nothing done. Starting to get back into it, have ordered some more parts, tacho cable etc I plan on renewing the charging system with cheap and easy to obtain parts. A three phase bridge rectifier for a windmill and a regulator from an old Ford. Will post more on that when they arrive. I was hoping to be able to run a TZR 4-pot caliper but I don't think they'll clear the spokes (they would probably fit with the alloy wheels but I'm not gonna be using them). So I'm resurrecting the stock caliper, had trouble getting the pistons out, compressed air failed so swapped the banjo for a bolt and put the grease gun on the bleed nipple, took a bit of effort but finally got those suckers free. The pistons were pretty clean so will chuck some more seals in and wang it back together.4 points
-
Small update. did oil filter and plugs on the weekend. Suddenly the car has life above 5,000rpm shes alot quicker now so good result. pulled the diff out for an inspection and discovered its a U code (Larger of the ones that fits the KP housing) so thats a good result also the diff oil looked fresh and all the parts in great condition. I replaced the oil and sealed her all back up. Ordered the fuel pump today so she can sit on a solid 3.5psi and I can look at some tuning.4 points
-
I had a thread up a while ago but its gone. I got it off my great aunty, Her partner bought it new and made the tray for it. He used it as his builders vehicle for years and after he died it went in the garage and did the odd tip run. They put some covering on the door cards which has gone a bit dumb bit I'll leave it as it'll do more damage than its worth to take them off. I just about sucked the seat up my bum on a couple of corners on the drive home. Anything close to the recommended retail speed on corners was at the limit of the tyres The day I got it home No options ticked here, it had a radio blank and a cigarette lighter blank, and just a you have cooked the engine light instead of a temp gauge I've taken the tray off and given it a cleanup/under seal. I'll need to do it again later. It didn't want to go up the drive without doing skids, 20 year old commercial tires are a bit shit in the wet. I pulled the bench out and rangid in some speakers with only the finest mdf and cable ties I had3 points
-
Sorry guys, bit late notice this month. Few of us discussed the idea of pizzas at drovers next Tues in Feilding. Drovers is on manchester street near the clocktower if you haven't been there before. Blake suggested the Westpac carpark for somewhere to meet up beforehand. See you there!3 points
-
One more of the engine in cars021 At this stage I got the Fordson out, took the motor and box back out and welded up the rest of the underside. I have also started on the framing for the firewall and the rear of the body. You can also see the centre mounted tramp rod I added to the diff to stop the leaf springs winding up under power - but still allowing for plenty of travel on the rough stuff. Also to be seen is the mount for the Steering Rack. cars079 cars080 The framing of the body is just 1/2 inch galv water pipe, hand bent around a from. I love the smell of galv burning off when welding! BTW the car is not a Justy.3 points
-
3 points
-
The easiest way to tell an RTS and non-RTS front suspension/chassis apart is by looking at the upper shock absorber mount on the chassis. The RTS models have the shock mount hole exactly in the middle of the two wheel alignment bolts. The non- RTS chassis will have the shock mount hole much closer to the wheel alignment bolt closest to the rear of the vehicle. Chris I think your Tonner is a non-RTS but will pop my head under there and take a look when I'm pulling off the grille for re-chroming. Top photo shows RTS. Bottom photo is the earlier non-RTS. RTS: Non- RTS:3 points
-
Height, pitch of voice and youthful appearance add to that illusion also... ...wait. Chris. Are you married to a high school student???3 points
-
So I was now on the lookout for an engine and gearbox and came across this beauty an HT Holden with a not very factory Chev V8 in it. Got it from some extremely dodgy guys in Linwood, Christchurch for $1000. Trailered it home and proceeded to do burnouts until the diff blew - not surprising it was just the standard banjo type! 2 17-04-2016 3-52-39 PM 3 17-04-2016 3-52-44 PM This is my Father (GuyWithAvaiators grandfather) giving it a go as well - I remember seeing mum coming down the road in the distance and Dad encouraging me to light it up as she passed! 4 17-04-2016 3-52-37 PM 17-04-2016 3-52-37 PM 17-04-2016 3-52-37 PM Was kind of glad the diff blew as when we got back home and took a look at the front suspension was about to fall out from rust anyway. It turns out it was a 307 Chev with a powerglide - with some nice Holly rocker covers and it ran extremely well - great oil pressure and good compressions all round. I sold the genuine Holden V8 radiator for $100 - ripped out the pedal box and floor shifter and dumped the rest. (Actually we attempted to blow it up with a Oxy/Acetylene bomb first) I mentioned we got it some some dodgy types - when we dumped the body a Butterfly knife (the completely illegal type) appeared from under the dash.3 points
-
Here's a build from way back in the day - I finally found an old photo album I had lost - It may be of interest to some... It starts when I was 14 and lived on a farm in Mid Canterbury by the beach. I decided I wanted to build a beach buggy - visited the local wrecker and told him so, looking for suitable chassis to base it on. He said "How about this Trekka I have here" I said OK (not knowing anything about them) I also said I don't have the $60 you want for it, he said "Would you like a job?" The deal was done, so 1 Trekka chassis + a Humber 80 for the motor and box turned into this with my fathers help. 1 20-04-2013 8-04-16 PM 20-04-2013 8-04-16 PM This equated to many happy years of sideways driving around the farm / scaring my friends / rolled it once etc. But I decided that I needed more POWER - so here is the story of what came next.2 points
-
Neat meat. Good little convoy from out west too!2 points
-
I got the zorst bits. Flow master mufflers etc so very happy. Then bought 4 sets of mild steel vband flanges from DSR (great blokes to deal with and great pricing) and got some flexis from STA. Had 15 minutes spare at work today so zzzzzt. Bloody love doing exhausts for some reason.2 points
-
I think from next month i'm going to take the suggestion of locking it down to the same day/week and the same location (for the winter at least) and see how we go with that. Say 3rd Wednesday evening of each month @7PM @ Spitfire Square or Bush Inn (as there are plenty of options for people) does that work for most people some of the time etc? and spitfire square or bush inn?2 points
-
2 points
-
Maybe 7 at Z Lincoln? Will get oldmate fels along2 points
-
I would like to partake, will let you know my movements later today. Chrison8, I shall collect burger payment tonite for all dem state quarters I gave your wife.2 points
-
Am going to pull the pick up out abd have a look anyway to see what the internal deal is. Shame I totally forgot when I pulled the tank out that the last thing I did before getting a pink sticker was full the car up. 60l tank is fucken heavy2 points
-
Was up past midnight last night putting car back together. Didnt quite get it finished as needed to use some noisy tools. Should be sweet by this afternoon though. Getting new tires this week, ooooooohh aaaahhhhh2 points
-
Ha makes you sound like your dating a high school student2 points
-
Last weekend neal gave me a hand and we pulled the nose cone/rad support off. There is a bit of surface rust I'd like to sort out before it gets bad. Grill has some rust spots so that'll get re chromed. I'll pull the 202 out and give it a refresh, new rings bearings and a mild cam. I'll probably get carried away and do a wire tuck/shove the battery under the tray. It'll annoy/confuse the barrys/foamers Discussion : //oldschool.co.nz/index.php?/topic/52622-chrisr-hz-tonenr-discussion/2 points
-
rattle rattle nunga nunga?1 point
-
Very cool. Ive managed to score myself an Armors manifold so very much wanting to to give this a go. Just need to get the motivation lol Kinda hard when it is currently running so good too. But back to the project at hand..... Are you keeping this on petrol? As in your not putting lpg on it are you?1 point
-
Still at work lols. Hopefully get outta here soon.1 point
-
Gonna have to roll around in my red / green mirage that's got junk sitting in the back of it. Argh1 point
-
Z station is at 200 Lincoln Road, Henderson. Just in case you're not familiar with the area or want to GPS it etc. See you at the MEAT MATE1 point
-
This is great - never change it!1 point
-
Nah that's a GAS, Z is further up on the left by Mitre 10 MEGA1 point
-
close enough.1 point
-
Holden foamers unite! Cool truck.1 point
-
Sounds good!1 point
-
West Auckland convoy?1 point
-
All good. Thanks Cletus. Something something cut outs not that big something something ahem.1 point
-
Started first pull. Had to battle exhaust bolts first.1 point
-
RWD 626's are solid diff aren't they? I remember pulling some air shocks out of one to replace the fucked shocks in the rear of my datsun 180b. My 180b sat at normal height with no air in them but went quite high when pumped up. So datsun 180b one's must be shorter, same mount type. Btw my 180b was a 75, early shape with independent rear end.1 point
-
well the bad news was that the above "TRD close ratio gearkit" turned out to actually be just a standard K50 gearkit so that went back and i got my money back, wasn't the sellers fault as he was misinformed when he received it etc, cheers Stu for being an honest chap and taking it back. So last week i was quite busy on the car and as a result didnt get many photos but i got the coilovers finished, guesstimated the springs to be about 150-160kg so about right for the starlet. Becuase the struts are longer they gave the car some positive camber so some bug eye steering knuckles courtesy of Andy C sorted that out and they are now neutral, at some stage ill do longer bottom arms to get a wee bit more negative but probs not as it handles and turns in really well now. They other thing i did the night before my event on saturday was put in a quaife quick rack, this is one of the coolest mods i have done so far and makes such a huge difference, the steering is now 2 turns lock to lock rather than the standard 3.5 and it drives like an absolute go kart, check out the video below and see the minimal steering input compared to my previous videos, it is much much safer to drive hard. The rack is a AE86 quaife quick rack and pinion from palmside.co.nz and was very easy to modify to go into the starlet rack, its very obvious when you put them next to each other but all it needs was i think 32mm off the long side of the rack to make it the same length as the starlet rack, then drill a new hole and tap it in the end for the rack end to screw into and your sorted.org.nz. I got a new bearing for the pinion rather that try deal with swapping the old one over. So for the event on saturday just been i have new suspension, 15mm castor, slight neg camber and a quick rack and the car is now much easier and very fun to drive, particularly on the tight flowing sections of road. Saturdays sprint was a 4.9km gravel sprint on Tararua road, run by the Danniverke car club. It was good to have Rhys there in the KE20 to have something to aim for and bench mark myself against. The car was struggling with gearing again, 2nd gear was to slow in road speed and high in the revs for a lot of the flowing stuff but the car was bogging and not revving in 3rd, it needs either a 5.1 diff and ignore first gear or a close ratio box quite bad, watching rhys's video i can see how the box helps so much (apart from getting off the line). I was super stoked to be close to him in my first run, then actually got about 2 seconds on him in the second run but he put down a solid 3rd run and got me by 3 seconds. Im really happy to be close to him like that tho and it shows the changes to the car have helped, also stoked that the both of us took down a couple of 4age powered cars in our little 4K's. well here's a few photos courtesy of Jeff Wells, ill buy some final res shots off him at some stage. And a video i banged together of run 2 (outcar) and run 3 (incar), bloody youtube decreased the quality heaps tho which sucks a bum.1 point
-
1 point
-
All I have to say about last night is this:1 point
-
I made a thing in this pic yea the woody thing with the Paua inlay "W" logo, also the back 'seats' : full article http://www.themotorhood.com/themotorhood/2016/4/12/weekly-motor-fix-gas-attack1 point
-
Good luck mate Good to see a young fella doing this1 point
-
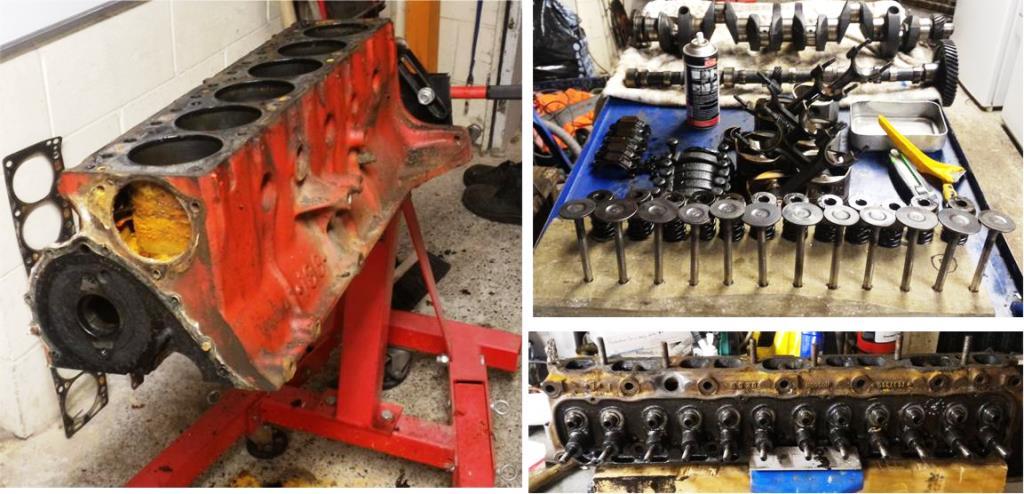
Finally the fun part, time to breathe a little life into Rigamortice’ s much used and abused 186 X2 Holden 6….. A little TLC with the rattle gun and Motor came to bits easily…….. As expected the tired old girl will need a full rebuild but sadly some of the exhaust valves on Rigamortice’s Classic Vintage Yella Terra head had corroded stems from where they had been left open in one position for too long. My fault entirely, I should have been turning the motor over on a more regular basis. (Shame I can’t buy another one for $85!). I contacted Yella Terra and they haven’t made these valves for decades, to further complicate things the valve stems are already 5 thou oversize. Any help on tracking down replacement valves would be appreciated.
1 point
-
rustisize knows what's up. The right solution - available in your average kitchen -and you can have rust like this in about an hour. This took me much longer because I didn't understand what was happening.1 point
-
The plot thickens.... Today I called Gavin at Euro - Italian Car Parts to see what head gaskets he had in stock, confirming size and thickness I measured up the bore, its 4mm smaller???? taking further measurements, 80mm bore, 80mm stroke, for a 1800TC it should be 84mm bore, 80mm stroke, seems I was told wrong when I got the motor and it is a 1600, that means the last head gasket was too big (see image above, doh!) So with this i'm certain the gasket failed due to the steel band being too close to the water gallery under the split and the correct gasket should solve the trouble! And, the jetting i've been setting up is all wrong, maybe i'll get further economy......... maybe yay!!!!!1 point
-
Greets Amigos, Since last update, The gearbox is back in with new clutch assembly, frost plug and crank seal. After that, we looked into the brakes which were bled for maybe 45 mins before all the air was out (hopefully). The rusty old pressure plate Shiny new clutch plate Also installed this weekend are four new heater hoses and a pertronix electronic ignition system which was suspiciously easy to install... one of the hoses ripped to bits as I took it off so probably worth the time it took to replace them. Heater hoses are my new pet hate! Awkward little suckers to get to but worth replacing since they are the 40yr old originals. Also installed were a new inner and outer shifter boot I got from the states. Now she's going to Speedwells in Hamilton to sort out the carbs and get her running properly. Currently only one carb is working so 3 cylinders are firing. Really need the compression to build up so we can see if the brake booster brings the spongy brake pedal up to a good spot. After that's done, it's just shocks and a windscreen rubber to put in and we can go for a vin check. Cheers, Reubin1 point
-
these cars are so easy to take apart, getting it back together, well. had to buy a grinder plus wire wheel. this side had quite a bit of damage which was poorly repaired, then covered in bog. driver side not so bad. hello rust, i can see you. so i got this pair of front fenders off a 50's era car, even though the headlights are the same and fit the body, vw changed the pressing though the years, these have been blasted and i hope to repair them. I've now go three pairs of front fenders for the car, should be able to fix these with parts of the other two sets. wheel sits perfectly in the wheelarch got me some spotweld drills started by removing the seal strip holder thing crusty removed the mighty rust trap that is the horn mount. then got the valance off. pretty fucked1 point


This leaderboard is set to Auckland/GMT+12:00