
Leaderboard


Popular Content
Showing content with the highest reputation on 11/20/15 in all areas
-
Cheers guys!! Pretty much done apart from Handlebar control wiring & Seat upholstry Have parked it up until after xmas as ive got other commitments that need $$ And a comparison shot from before i took it off the road to chop it up6 points
-
God damnit I really should have put my car together last night instead of playing fallout 44 points
-
Disclaimer: this video may be faked. i took some time to polish my wiring loom. *Imagine a wiring loom made from copper tubing with wood insulators that was polished. This didn't last. Putting wire inside the tubing was ok for a while but when the wire gets damaged inside there's nothing i can do to fix it.*4 points
-
Been for a few hoons on this now, good fun. Oddly I have more trouble with the indicator switch being on the right than the 4 down shift pattern. It sounded like it had a bit of a knock when running, only on deceleration, so I whipped the cylinder off to check the big and small end bearings. Everything feels good, piston and cylinder also look fine. Internet says it could actually be related to carburetion, it only does it on deceleration (ie throttle closed or closing) and it surges a bit too so it could be leaning out. Pulled the carb apart but wasn't able to get the pilot jet out, looks like the slot has been worn down, hmmm. Might source a china carb, could buy a whole china copy engine including carb for $400, it's still rideable and for what it cost me the fucks given are low so I may not do anything.3 points
-
Just picked a few bits up for my v50 and c50. Only took a year to find an alternative to eBay. A darn sight cheaper too.3 points
-
Bloody lovely evening babes xo3 points
-
Cheers just trying to be respectful.2 points
-
why not just use the copper tubing as the wiring i bet the electricity will flow reall fast through the inside2 points
-
Just carefully skim the head and block with flap discs and a level. Mitre ten sell packs of ten for $15. Then use lots of silicone to reseal old gasket. Again M10 will be your friend here. When doing the bolts up just give them one extra turn each past max torque. Then come back to us with photos of the result. Would be a nice thing to see on a Friday night.2 points
-
Same rules as an OS monthly meet apply. Basically, you can bring whoever you like but you are responsible for their behavior. If they're enough of a GC that you'd want to bring them in the first place then I don't anticipate there being an issue at all.2 points
-
Are non members but potential future members allowed to come? I got a mate who's keen on a spin he's just got his mini all legal begal. Lemme know. Respectful as, not a shithead like myself. Cheers2 points
-
2 points
-
i bought some leather seats out of a BMW E92 thing. why did you do that sheepers? well, i need some seats for the TA23 and i have to cert it so i though i would put some SW20 seats in it because they are pretty good and they suit the car. what the fuck has this got to do with anything? I couldn't find any SW20 seats that went fucked and it occurred to me that I've always wanted leather seats. so i bought some leather seats for the blue car (this one) and ill chuck the SW20 seats out of this car into the TA23 (the other one) unfortunately fitting the BMW seats to the blue car isn't straight forward. at all. they are electric and the seat control buttons are on the seat. if you put power to the seat it moves. there is a timer that switches the seat off after a minute or so. there is probably a trigger that we can sort out to stop this from cutting out but for now, if you put power to the seat, it moves. but to make them fit so they aren't sticking through the roof they need to mount pretty low. so low in fact that one of the rails needs to be bellow the floor. so I've made these frames that bolt to the bottom of the seat. ill recess them into the floor and weld them in. to be fair there is only one point on the inside at the front that needs to go through the floor. the rest of it is above. this is the frame sitting on the floor of a celica, you can see the hump that is causing the issue. the frame will recess into this. 2015-11-19_08-07-43 by sheepers, on Flickr 2015-11-19_08-07-52 by sheepers, on Flickr 2015-11-19_08-13-16 by sheepers, on Flickr2 points
-
Bit of filler here and there2 points
-
Had a few fuel problems with this with daily use so we changed fuel pump filters and lines..... It didn't turn out to be the problem.... it just turns out that under a quarter tank the pump stops picking up and pumping fuel!! Now i know to keep it above quarter of a tank... haha In other news the car is booked in for a full respray next Wednesday!! I have decided to keep the sunroof for now at the advice from my panelbeater who said it would be a lot of work to fill so will look at this at a later date That means this weekend will consist of stripping all the chrome from the outside so its ready to be dropped off on Wednesday!! Two things to look at while car is in paint is building a roof rack like below to fit the existing roof rack holes and getting the roof rack chromed and ready to put on with new gaskets!! Stoked to finally be doing things to make it look better!! This also means slam is closer.... Discuss here.. //oldschool.co.nz/index.php?/topic/49975-connors-pi-wag/#entry15827742 points
-
Oil Filter There was no filter on this when I got it, I could have used the drop-in type that sits in the oil tank, but I prefer the automotive style spin-on jobs, plus at the time I was looking at making a new oil tank... I bought a 3/4" x 19 tpi bolt and some BSP connectors and spun up a mount that would bolt up to the front engine plate, just turned a lump of 100 x 10mm m/s plate... And drilled and tapped the 3/4" bolt, and turned the barbs off the hose-type connectors... There was no easy way round this, just used cutoff discs and files to shape the thing... And finished the surfaces on the old Myford... Welded in the centre piece, tapped the inlet/outlet connector tubes, and cut some recesses to fit around the engine plate bolts... and painted... I use a Bosch 3300 filter, has the right pressure settings for the old ironhead (a low pressure, high flow system). Pretty pleased how this turned out, but took a bit of effort...2 points
-
Another awesome find saved from the Jaws of Death by Three on the Tree. Hmmmm should you be five on the floor now?2 points
-
Z'd frame and de-arched front spring on this one.2 points
-
And knocked up an engine frame to help with the mechanical side of things... And here's a tip for those with clogged up old two stroke exhausts, an easy way to burn out the crap is to hook up a hot air gun and it should turn to ash that can be tapped out. It may need a propane torch to get going, but once it takes off, you (and your neighbours) will know it is working - thick clouds of reeking smoke pour out till it's done and you can shake out the crud (wear welding gloves)... The beauty of this method is it doesn't damage the finish as much as other methods can.2 points
-
Bumpers all in etch primer read to start filling and shaping it.2 points
-
Kapow. This is some next level shit if I do say so myself. Still needs finishing touches but you get the idea. Main box area will be cladded and need a few more slats for the top. Top hinges up for storage underneath, and plenty off room down the side for hauling bikes etc. When its party time, the top slides out to reveal double bed. Matress will be split down the middle but still atatched so it will just fold in half.2 points
-
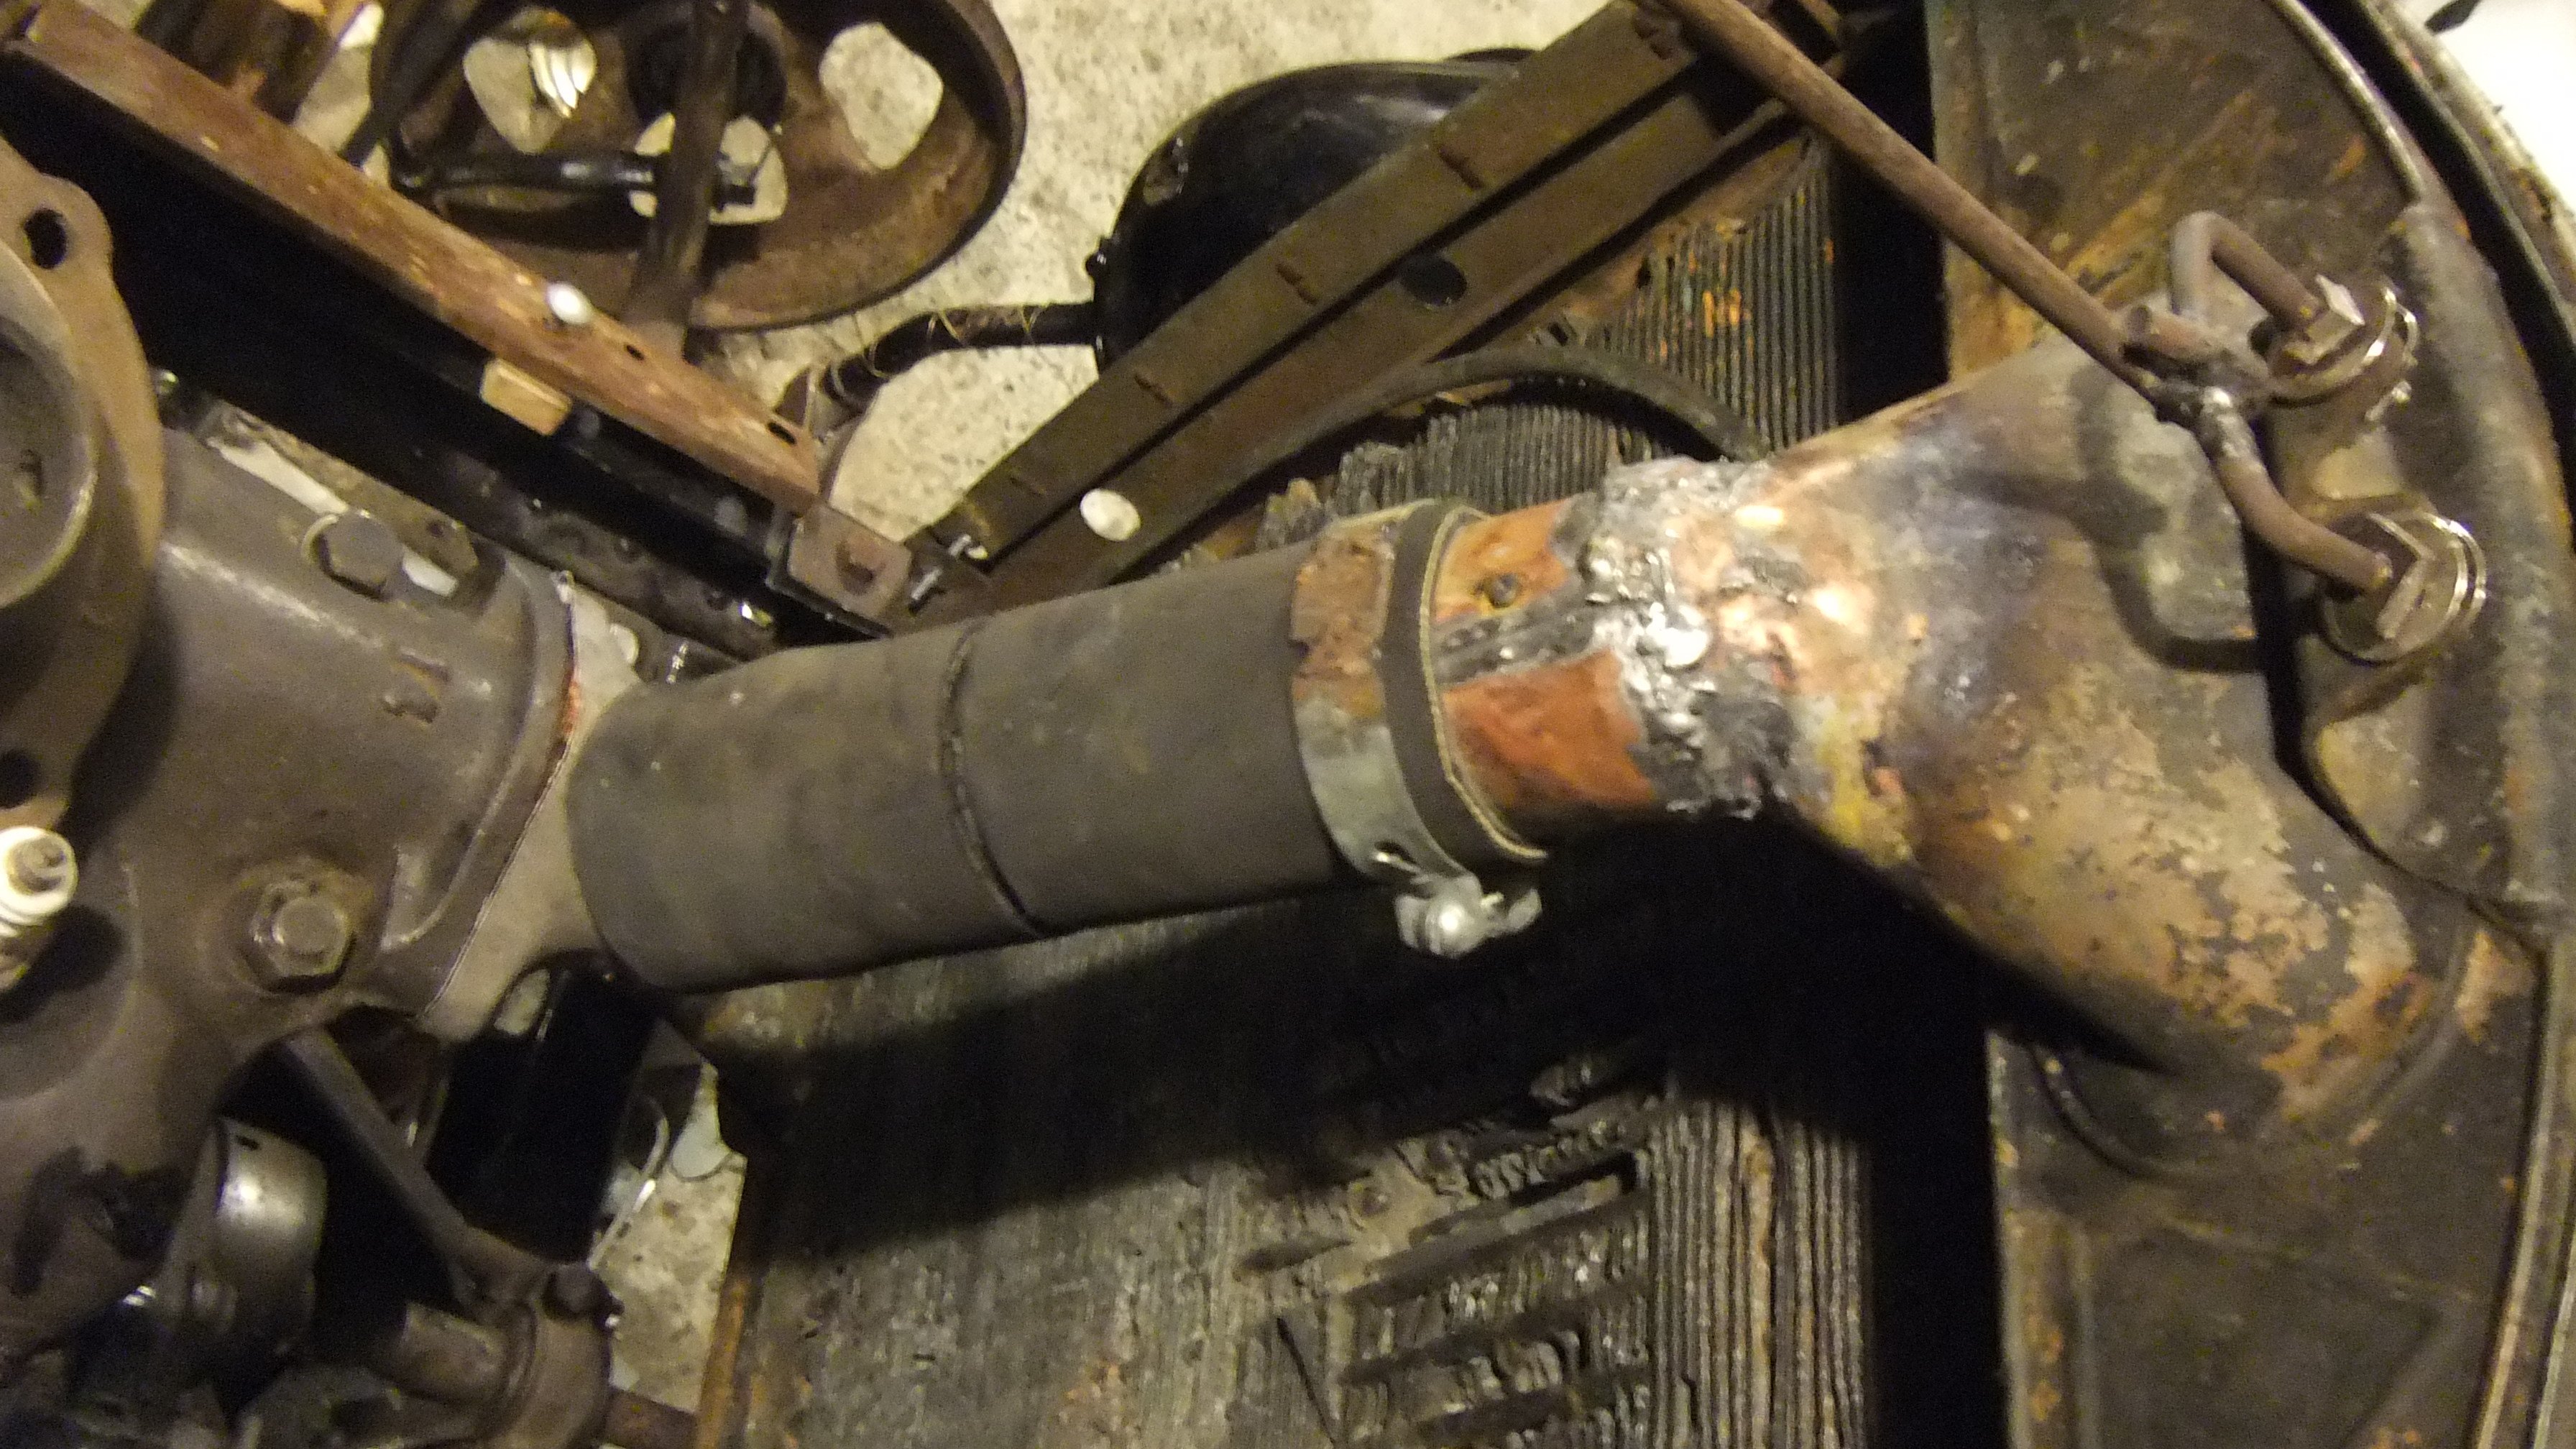
That radiator is full of holes and half the tubes have been cut and soldered up. Some when a fan went through it, some from what might have been collision damage. Tanks are pretty had it too. Can't make a new one as i don't work at a radiator shop anymore. Metal fatigue has taken its toll on the top hose fitting, it is cracked in several places and the pipe rotted off completely so i soldered this copper strip on there. Not sure how long it will last but then i'm pretty sure the rest of that rad' is nearly dead too. Liking the way it fits the whole "barely much left of anything" build style. (Edit: lasted until the year 2020 when i got tired of it's leaks and overheating on hills. Would still work on something driven to the ice cream shop & back once a month, if you wanted to shove black pepper and bread into the holes.)
 2 points
 -
Haha yeah names are hard. Im Andrew (blue datsun van) although everyone calls me beaver anyway1 point
-
What's a indicator switch ? My left arm works and so does my right1 point
-
I did a thing last week with my new friend Clint. I have since spent all my monies on more parts, when they arrive I will put them in and try not to drink too much beer. Then I will beg Clint to see me again. you may talk about how useless I am here: //oldschool.co.nz/index.php?/topic/38275-thminimans-1977-leyland-mini/#entry10775981 point
-
Hey where did ya get those cool led strips from?1 point
-
raindance seems to be helping1 point
-
Nah might start pulling the engine out this weekend1 point
-
Sold pipe and bits on tardme to Waiheke. A well travelled zorst...1 point
-
Considering his location is southland, I suspect not haha1 point
-
Yeah thats cool. Thanks for the heads up N3K.1 point
-
So much more work goes into bikes than it appears in a photo! Your attention to detail is amazing! Well done Loser, that's the stuff dreams are made off!1 point
-
This is the aforementioned circlip that was/still is giving me grief. It will hold fine for about four kicks them will slightly pop out of the groove and let the kickstart over extend and jam up. So every four kicks, Its poke it with a object and itll sit back into the groove DSC_0464 by OR4NGE, on Flickr I pulled the carb off, and took it to work to soak in carb cleaner Untitled by OR4NGE, on Flickr Gave it a once over and put it all back together Untitled by OR4NGE, on Flickr First thing I wanted to do was check for spark but,as it was missing a spark plug, and the HT lead coming out of the coil was fairly well past its used by date, and the lead being part of the coil. I checked for power to the coil. Yup. Took the coil/bike details to my local Honda motorcycle shop to see if they could find me a coil/plug. Gave it a few days with out hearing back from them so went and collected my coil off them. "waiting for honda to reply to our email" Meh.I wanted to see if this will run before spending money on it really, so pulled the lead out of the coil, stripped some insulation off some left over HT lead from when I made a new lead for the FA50, Jammed that in the end of the coil and checked continuity. Yup. Scavanged a plug end off a old set of leads and jammed that on the end of the HT lead. Spark plug from a two stroke stationary engine to check for spark. PRESENT AND ACCOUNTED FOR! Assembled all that onto the motor, mixed up some fuel and put that in the tank. Primed the carb and about 30 odd kicks later, It spluttered into life and smoked like a train as there must still be carb cleaner/crc mix from crankcase. Turned it off, Pumped up the tyres, Fitted the drive belt and gave it another kick and it coughed into life. So of course, I engaged the drive to the rear wheel and gingerly rode it down the drive and back. (no brake cables) So it runs. whats next? of course not making sure the carbs set up right ectect... I removed the huge seat, carrier rack, indicators, headlight and all the unnecessary things. Flipped the bars, screwed some bolts into the rear passanger foot rest mount holes as they are missing and ended up with this. DSC_0454 by OR4NGE, on Flickr Plan is to of cousrse get it running a bit better, because it doesnt go very hard for a 75cc bike (I think the FA is quicker at present) safety stuff like get the rear brakes working, new fat tyres. and minimise the wiring to just the basics to run it Then look into getting new bars so they sit in front of or in line with the forks. sort a low profile seat and probably hardtail the rear end/lower the front DSC_0457 by OR4NGE, on Flickr1 point
-
PARTS PARTS PARTS PARTS! Old filter out, new filter in. Just as well Nissan still make parts for old Datsun trucks! Big up to Brdflu for hooking that up for us. Wow.. reasonable chance this is the OEM coil that came in the car when new. Could just be placebo but car feels easier to rev up to redline, still gutless but sounds sweet. Also at about 6k vibrations start to happen so that's as far as I went. Car did a shart. I was feeling all awesome about having installed the coil so went to crank it over.. after cranking over longer than probably should have the car didn't start. Hm.. quick glance out saw the coil lead sitting on top of the radiator, derp! After the engine got over the fact that it was now flooded it cranked up to life and business as usual. Discuss: //oldschool.co.nz/index.php?/topic/49704-mlracings-hakosuka/page-6#entry16160091 point
-
Again everyone welcome to swing into my pad on state highway 1 in wellsford for a beer on way back south.1 point
-
I flagged work like a boss1 point
-
How hard is it to send a Supreme to Rota and get some cast ones made and chromed...1 point
-
Shit yarn #2. Factory AW11 boot mat. Apparently these are rare, and foamers foam over them. Gonna hit it with some Jif and Simple Green then it should be mint, mayte. Discuss: http://oldschool.co....1-sc-chit-chat/1 point
-
So, a bit of history on this thing. Bought it about 4 years ago sight unseen from a DJ in Dunedin, organised to meet him in Wellington to finalise details, and drive it up to Auckland! As I was boarding a flight to wellington I received a call saying the car had run a big end by Blenheim, apparently because the turbo seals had gone and shat most of the oil out the exhaust! not fun. Results below: Weldy weldy. Towed it to Auckland, where the donk was removed and sat in a sorry state while the engine was slowly pieced back together with a new crank, forged H-beam rods, forged pistons and s15 t28. After too long the mighty CA went back in the hole, a little shinier. essentially, it had a whole metric shit-ton of teething issues, rust in the fuel tank clogging the vr4 injectors, bad tune, awful looking engine bay. Over the next couple of years, I tweaked it here and there, re-sealing the fuel tank (not fun!) new injectors, tune, new turbo, new cams, cam gears, and so on and so forth. It went from this: to this: Now with a fan shroud. (sorry for big pics, will work on it) Specs as of right now: CA18det (forged) standard crank Balanced/ matched rotating assembly 269/8.7mm cosworth grind cams, Garrett GTX2863r Turbosmart 38mm wastegate Parts shop max Hi-mount intercooler 1000cc Deatschwerks injectors 320lph deatschwerks fuel pump Tomei FPR All engine paint + cam cover etc done by me. Catch can by C's garage. Estimated 220kw atw.( no dyno yet!) So now my dilemma is whether to go to a link ECU or stick to the standard CA ecu which can barely keep up with my injectors ( 8 bit lyf!)1 point
-
I am fairly certain it will be completely enfuckulated. Install blacktop 4AG stat1 point
-
Pretty good day out at the ATCC show n shine today. A fairly decent turnout of about 35 cars at a guess. My TC was lucky enough to come away with an award for best 2000/2500. Was only marked down for the rear bumper, drivers seat and the general untidiness of the engine bay.1 point
-
Here's how I see myself riding the dusty, palm tree lined back roads of Southland once she's done...1 point
-
I started cutting out the rust and replacing that shit. Now I weld all day err day but have very little experience with panel work so let me know if you see something stupid Left side if windscreen before Patch 1 Patch 2 Patch 3 And patch 4 I killed the rust before each patch went on and have finished it off with an etch primer. Just needs a touch of spray filler before I paint. I then did the same with the left rear wheel arch Before. After. Basically the same to do on the opposite side, then alot of repair needed around the boot seal part. I've also realized that I'm totally not rich enough to bag it this time round. So that will have to wait. Chur1 point
-
Engine sitting in hole now with gearbox attached. Very happy how it sits with plenty of clearance so far for headers, mounts, starter etc. Even the gear lever lines up (almost) with the hole in the tunnel. Pushed it outside with the engine and box in place and the front didn't drop much, indicating the V8 weights approx 50-60KG heavier than the I4 4 cylinder.1 point
-
Well its been a while since ive put up any updates, probably because not much has happened since last update. Anyway a few pics:1 point
-
I don't think Beaver should lower this. Coz as soon as he does, he will sell it.1 point
-
Hey Rusti, is it one of these? I have this one and don't use it apart from shocking unsuspecting victims, yours if you want.1 point
-
you can get a re print of your cert plate through another certifier, contact don hoff and he should be able to get you another one printed with correct details, probably get the amount of body lift put on it. quite often, there are changes that result in more emphasis being put on certain things, and what may have been no problem 5 years ago, now it is1 point
-
Chin Spoiler1 point
-
Hi thminiman, welcome aboard. Good to see a nicely built Mini on the forums, I trust you'll enjoy your time here. Care for a shot of absinthe?1 point


This leaderboard is set to Auckland/GMT+12:00