
Leaderboard


Popular Content
Showing content with the highest reputation on 09/18/15 in all areas
-
OH MEAN. So yeah did't get compeltely finished with a few things. I wasn't completely happy with the brakes, exhaust is still buggered. headlamp adjustment was done by me on the shed wall and I thought it was stil way out of whack, and yeah she's got a couple of rotten looking tyres, but the compliance man was happy as a dog with two dicks with the thing and only kicked me out for the exhaust. Took it straight to exhaust shop once the testing station lad rang me, and will hopefully collect it from there mid morning tomorrow and go get a recheck and win at legality. CHOICE13 points
-
underside of the bonnet prepped and painted. there was a tiny bit of rust in between the skins right at the front lip. i tried to take a photo but it was pointing into the light so it didnt work to well. but you can see right at the front of the bonnet the lip is all wrinkly. what i did was prize the two skins apart between the spot welds and i used the air hacksaw in the gap to act as a scraper, using the sides of the blade rather than the face, to get the shit off the two surfaces, then i rust killed it a few times while using the air hacksaw in between coats of the rust kill. it came up really well. so then i painted it. i mixed up the paint then used a brush to flow paint down between the two skins. its better than new in there now. then i painted the rest of the underside of the bonnet. ill give it a sand with 240 odd then wet lay another coat of primer then colour but thats a little way off yet. next is to fit the bonnet and get the hinges right then ill weld some gussets into the hinges so they don't fold like the frenchmen they are. 2015-09-17_11-36-05 by sheepers, on Flickr 2015-09-17_02-37-20 by sheepers, on Flickr also i blocked the bonnet down and wasn't happy with it so i put a tiny bit of green spot putty in it and primed it again. i hope that this is the last coat of primer before colour. i bet somewhere in this thread there is the immortal phrase "I'm not going to get to carried away with this build" whatever dick. 2015-09-18_12-43-47 by sheepers, on Flickr 2015-09-18_01-58-58 by sheepers, on Flickr also did some snow tyre traction testing. snow tires don't traction too well. 2015-09-18_05-50-17 by sheepers, on Flickr8 points
-
Im back! Well I was always around but on one night a couple of weeks ago A cold sneaked up behind me, threw a sack over my head and dragged me off to a place where I did not want to do anything but sniff and feel yucky. This was just after having been busy fixing other peoples cars for that money thing. Basically put.. my roll had stopped rolling and this wagon stayed up on blocks. But yesterday I got my rust mojo back and got stuck back in. The wagon has been sharing the workshop for the last few weeks with a cool old Volvo 145, a very bright Saab 95, Bimmer 320 plus Hannahs Trump Mk1 wag. I do like lifting the door to see intersting cars in there Not too much to show because it was all slow repairs around the chassis rails and jacking points which I want to really make sure is nice and solid. I have now just earlier finished the worst of this area with not much to go. I used a combination of 1.6mm steel and a very handy piece of box section that happens to be the correct width and thickness. This has been saving my folder from trying to fold 1.6 too often- it being really only designed to fold up to 1.2mm. Luckily the rust has been along the bottom of the rails where the damp has sat thus leaving the uppers attached to the floor nice and strong. I remade the gearbox mounting brackets and made them semi fixed with an extra bolt rather then the little tabs that Vauxhall had fitted, now rusted away. As I have been working my way along the rails I have sprayed the insides of the new steel with zinc rich paint. Later on it will get a heavy dosing of wax. So the last very interesting photo for this mega update is of the underside sort of almost rot free. I promise I will try to do better next time although I most likely will just take more photos of rust. I am very much looking forward to the mechanical/bodging/fiddling/tweeking updates when I get the car moving and stopping. I have been having many day dreams whilst chilling in the sun under the influence of man flu about what I could do with the engine/what I could swap it with. I still love the absurdity of a grand plan I dream about where I squeeze a BMW V12 with a manual box in place However I usually come back down from cloud nine and mull over more realistic propositions such as a sneaky carb fed turbo, perhaps a Datsun engine or maybe fit fuel injection from another 1200cc car (that last one more for the technical fun in doing so rather than any real benefits it most likely wouldn't really bring) For now though it has to be rust removal.5 points
-
Cool might see you there then. Supposedly back around 1870 they had only invented 3 colors. They were Black, dark blue and burgundy. As i am trying to make this one look like an original Its going to be a dark burgundy as lots of pennys are black and blue. I got the first coat of epoxy primer on the bikes and i got them all sanded up last night I will hopefully get another coat of primer on tonight and then give the bits a good wet sand and then topcoat sometime this weekend!5 points
-
OK sorry for more spam but Shane just sent over some more close up images with various repair stuff which is good and thorough. Engine had a strange miss which turned out to be a bung plug, replaced that with some random one and it worked. Compression appears to be a little low on one cylinder but the car still seems to run relatively well so when I get it I'll do plugs/leads/dizzy cap etc anyway as a precaution. Shane also has some MDI spark booster thing (you know those boxes you always see on old Jap cars to boost the spark) so he'll throw that in too. A few more pics.. Powerhouse! I'm actually happy that the numbers match on this and the body.. otherwise that could be a bit of a problem come time for VIN etc. Angry face! Interior is overall very clean, will need new centre console as that one looks banged up and not correct for the car (more holes for buttons and switches than my povo one has). Plus side, less things to go wrong in mine right? But this really got me excited.. https://vid.me/fhmd Annd they reckon we should have a booking for shipping next week so that's pretty exciting.5 points
-
Emma told me I had to confirm, so hi. Can't pay you until October though, I'm scint.3 points
-
right been a while. lots of waiting when parts have to come from the other side of the world, any way first to arrive was my new shift drum and selector dogs. i had to buy a whole set to get one dog. but thats the way it goes sitting nicely in their new home next up was cleaning the gear box, removing and replacing all the bearings, thankfully simply bearings in the uk had every thing i needed in stock, most of the bits i need arrived from richards relics in the U.S, the new intake to airbox rubbers and chrome joiner the new pistons, rings, pins, small end bearings, and circlips gasket set and brake shoes and a funky little key ring also a new cam lobe for the points inside the alternator/generator still waiting on http://www.poetonaptec.co.uk/ to return my barrels, they were remarkably quick to take my money, but refuse to return an email, i guess ill have to suck it and see but the good news is i can atleast rebuild the bottom end back up.3 points
-
Negative offset Not allowed any camber in nz that shit is dangerous3 points
-
Haha man that's just how it is, when I'm 40 I'll think the shit I'm posting now is retarded.2 points
-
Great to see you are back on the rustwagon. There sure are some interesting cars turning up in your shed. I just had a look into my crystal ball and I foresee a full time business repairing old cars in your shed in 12 months for now.2 points
-
I had a hair drier in one of the ports, a fan heater kind of blowing on the biggest one, and in the sun, left it like that for a couple of hours, though "that'll do" moved the drier and heater, and proceeded to pick it up with my bare hands........ realised when I had it about chest height that my hands were burning, didn't want to drop it so had to suffer those few extra moments gently putting it down. I'm not a smart man, Jenny2 points
-
Received word from Rob at the panel shop earlier that the sandblasters completed their work yesterday and the certifier had paid yet another visit to survey the damage. Some choice words were exchanged between Rob and Dale (certifier) about why this wasn't picked up in the initial inspection, apparently there have been a few upheavals and slippage of standards at the compliance centre due to the company changing hands - which is unfortunate as they were a good crowd to deal with initially. Popped down on my break to have a look: Eek. Fortunately the rot is only confined to the bottom of the crossmember; elsewhere the steel appears good, and is consistent with the car being exposed to the elements over the years and more than likely striking road debris on more than a few occasions. The least painful recommendation was to cut out the affected piece, make up a new one, and slot it into place followed by a liberal coating of Brunox/underseal, so the signal has been given to git 'er done. Tomorrow morning I will go in and (carefully) deconstruct the front of the car so work can be started. Discuss: http://oldschool.co....1-sc-chit-chat/2 points
-
The wheel has a different shape on the outside(?) edge, to allow the tire to get on and off. If you use two inner halves of a wheel, it's next to impossible to put tires on. It's been done before, but I think it required assembly of a three piece wheel around the tire lol. Not particularly convenient.2 points
-
mock up with your cock up goofy frame welded. ingredients here are bits of 3 bikes, perked/leftover tube, flymo bits, curtain rail and falcon leaf spring.2 points
-
Don't rub him the wrong way...2 points
-
Shelves & benches were finished off a few weeks ago, just finally got around to running that cable so I could set everything up. I'm really happy how it's all turned out. The idea was to put something together with what I already had, & getting the Metrapanel boards was the final piece to the puzzle. Already had the steel, & this way I could build what I wanted the way I wanted it Had to lift the shelf up with the engine crane it was that fucken heavy! 2.4 x 2.4 & could do with more intermediate shelves but for now it works for me.. Pic's of shelves & benches all finished.. I did have a couple of steel shelves that you can see in the background of one of the previous pic's, but they looked like shit. What I've made is so much more purdy. All I gotta do now is fix down the vice & make some stands out of some wheel rims & steel pipe for the drill press & bench grinder so they're off the work bench2 points
-
Don't give up on your dreams Alex, v12 or bust...1 point
-
http://www.trademe.co.nz/950458676 Spencer what are ya thoughts on this stuff? Sounds basically like clear epoxy and nothing else special. Do you think it would work alright?1 point
-
Japnese NOS points and chinese fake mikuni jets...hopefully a good mix!! Raizer heres your pic of chinese jets... And another awesome cellphone pic this time Japanese.. Need to suss this seat out finally1 point
-
LISTEN TO THAT HORN OH BOY1 point
-
already got a clown bike and a chopper, going for dirt look here! square headlight or number plate??1 point
-
Grate meat last night. Lovely to spend time with those who came. Two months in a row with Panhead Supercharger on tap = liquid delicious. My favourite part was the Rusty Slidewhistle (Melody Pop) conversation at the southern end of the table.1 point
-
Yeah they were pretty faint compared to those. Yeah sure! I'll measure them next when I'm back in AKL next week for ya1 point
-
Righto, I'll buzz yours through now for you.1 point
-
I can be your bank sweetheart. Just let me know.1 point
-
I'm still keen to get on this bandwagon, I'm a couple of weeks off having the money for accomodation also.1 point
-
chur! large chilf size, 16". the seat is a huge DH thing kk gave me some years ago, also wacks out proportion1 point
-
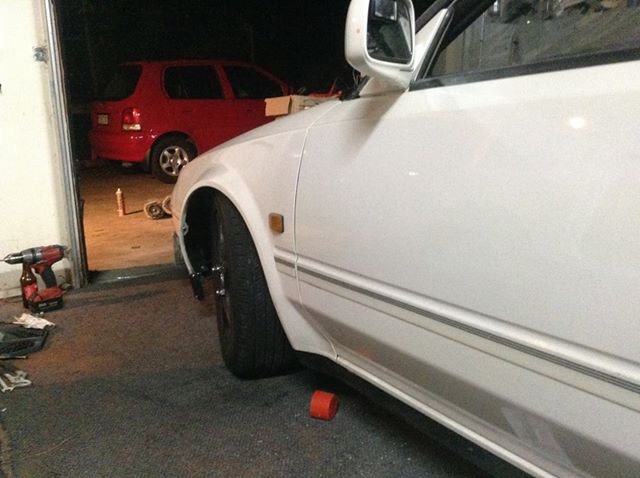
been doing a wee bit of fettling. Brakes came up pooze at the rear on the brake rollers at work. LH side shoes were damp with old diff oil. rear diff breather has recently been off and cleaned out. there's the culprit! Wheel cylinders seem pretty new all round so just slammed some new rear shoes at it, gave brakes a bleed (have a weird brake holding delay issue now which may be master cylinder related) and chucked a new set of front seatbelts at it and looked at how much water the radiator is leaking. Few more jobs to do (two tyres are perished, and needs exhaust love and a couple of other bits and pieces) but I'm presenting it for revin tomorrow! Will definitely have a list of things to fix before it's legal but at least I'll have an idea of what I need to crack on with, and best for me: I'll have that 28 day deadline to get it sorted coz we all know I'm a procrastinator unless I've a looming deadline! che also, got a needless, weird, irrelevant plate off the tard to smack on it. If I can't have black plates it might as well have something ridiculous!1 point
-
Another motorkhana - outside view this time1 point
-
Thought I should have a ramble on this topic. Have held various tickets including an Ali one so might just clarify a few things: 1. Aluminium MUST be cleaned prior to welding but the predominant reason for this is not to remove dust and dirt but to remove the oxide layer which forms on it naturally which is the reason it doesn't corrode. Cleaning can either be done with IPA or mechanically with a stainless wire brush. The wire brush should be kept in a zip lock bag or plastic container when it's not being used so it doesn't get contaminated. If the brush accidentally gets used on carbon steel then don't use it on Ali again. The reason Ali is almost always CNC router cut such as in Alloy boat production and not lasercut is because the CNC router leaves a nice clean freshly cut edge whereas the laser heavily oxidises the edge which would all need to be cleaned back again to weld. 2. AC balance - You can quite safely probably leave at 50% for what you're doing. This setting is all about how much penetration you get. Some info on why you need an AC Tig for Aluminium: A standard DC Tig for Stainless or mild runs DCEN which means your earth is positive and your electrode (The tungsten in the torch) is negative. When welding Aluminium the oxide layer requires a 'cleaning action' whilst welding which is only achieved if you switch the polarity to DCEP (Negative Earth, positive electrode) The problem with this is that running a positive electrode will melt your electrode away almost instantly hence the reason you have to cycle between polarities which is what AC does. It cycles between DCEN and DCEP so the DCEP part of the cycle achieves the desired cleaning action of the oxide layer while the DCEN part of the cycle prevents your tungsten getting hot enough to melt away. Some more info on AC Balance control: http://www.millerwelds.com/resources/articles/Understanding-AC-TIG-GTAW-Balance-Control/ 3. Tungsten grinding - Never grind from side on if you can avoid it, it tends to cause arc wander. Your grind marks should follow the same direction as the length of the Tungsten. For DC TIG (Stainless and Mild) grind to a sharp point. The length of the point should be twice the width of the tungsten you're using and the sharp tip knocked off ever so slightly. If you leave it super sharp at the point it can result in a small piece of tungsten melting off and falling into your weld which causes a tungsten inclusion and would fail an Xray test. If you don't knock the point of it's not a big deal, many people don't do this. For AC Tig (Alloy) grind the tip at a 45 degree angle but leave a flat spot on the end the same length as the angle section. There are numerous ways to 'ball' the tungsten but this is not at all critical, just grind as above and start welding. Having a clean tungsten is critical. If you contaminate it with the filler rod or in the weld pool you MUST regrind it. Gas Flow- TOO MUCH GAS WILL INTRODUCE POROSITY INTO YOUR WELD. More is not better. Should be roughly 8-10Lmin. A few other things: Use the correct cutting and grinding discs for Ali which won't contaminate the material and introduce contaminants into the weld. When finishing the weld don't back off the pedal too suddenly. Taper it back gently. Important for Ali or you get crater cracks which can spread down the length of your weld. Torch angle is important! NEVER EVER use brake cleaner or anything with chlorine to clean any metal prior to welding!!!!! It creates phosgene gas and can kill you very very quickly. If it doesn't kill you it'll FUCK you up and leave you with permanent health problems.1 point
-
You could register this under the Exempt Class A and it would be road legal.1 point
-
No mate I just head down for the day. I'll look out for you. What colour are you going to paint it?1 point
-
Gotta find me first1 point
-
So Sunday the 27th @ Ouruhia Domain?1 point
-
I found a mint one in Berlin a few months back.1 point
-
Thanks Matt My neighbour came over and told me the same thing. I tested the power on coil and it stayed at 12 volts. Couldn't find a ballast resistor any where. Not sure if it has one because it is electronic. It is a bit different to the NZ laser sport twin carb. Putting it back together tomorrow with original inlet injection system so the only things that have changed will be the block and the head. If it does the same thing will investigate the ballast resistor further. Cheers Paul //oldschool.co.nz/index.php?/topic/45696-paulluap-1984-ford-laser-turbo/?p=15879141 point
-
That Crown was being worked on by Shane at Stacked for a domestic customer who wanted it delivered to where my car was being collected from. Not going to NZ, sorry!1 point
-
The other thing I had to do was drill the other side of the gear box casing then press a seal in for the new leaver location So here's where I am now SSR formal mesh 4x100 15x7.5 15x8.5 +20 How ever to clear the brakes I'm getting spacers CNC'd so they will poke anouther 10mm, maybe 15mm on the front. Believe it or not it's cheaper to get them cnc'd then made in a lathe Spacers will fixed to the hubs for cert Flyers an old flyer from 85 from the Toyota dealership advertising the AW
 1 point
 -
As an engineer I probs wouldn't sign off on my handywork this weekend.1 point
-
The only thing "R Fucken B" skylines are good for. Brakes.1 point
-
Getting down to it. Coated stuff back from HPC, shroud nearly there, and I've been painting seat/rollbar interior stuff.1 point
-
possibly a hijack.? ive got no idea on velobikes 'rules' but has anyone tried a petrol generator running an electric motor? my mates dad used to have one of these flymos, tied a rope to the handle and dangled it down his super steep back section to mow where he couldnt push a wheeled one. they only sucked dragging them round when not running lol.1 point
-
yep, now i'm jealous. nice shed.1 point
-
Where's Jeff when you need wild ideas for things1 point
-
I'm looking forward to seeing a video of this thing literally flying around the track. Because flymo. If nothing else you should make one of those stopmotion videos of you going around the track but always in the air, throw a flymo commerical image or clip/overlay into the mix and you're onto a winner.1 point
-
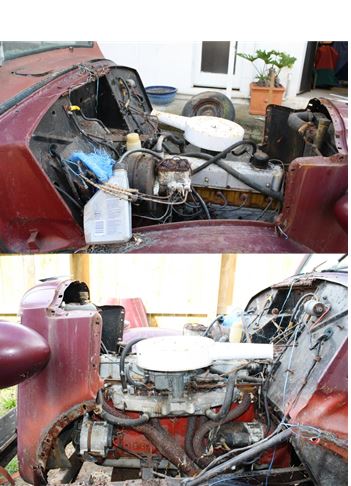
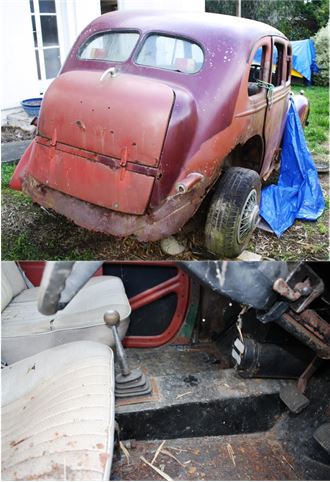
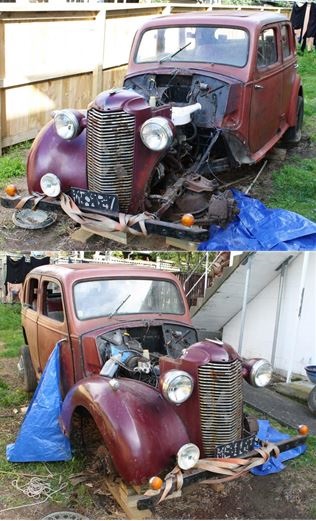
Suddenly our son is 19 years old; the latest race car (135I BMW) doesn’t need me working on it every night and Sharon’s dropping none too subtle hints about cleaning up the back yard. Could it be time for a Rigamortice resurrection! With some trepidation I pulled off the obligatory blue Warehouse tarpaulin and surveyed the remains of a car that I’d bought 43 years ago…. It was obvious that the ravages of time and damage from the last accident had reduced my old ride Rigamortice to the stage where she needed one big resto job…….
1 point
-
Othila i hink i have them someplace/my brother has them in his stored stuff il straight up give em to you if they havnt gone lost dont think they were ever transfered to my name tho. But i think just rock em for a while and they become yiurs?1 point
-
Well now... a little update. Its started to rain here in normally sunny old nelson and I didn't like seeing the wagon out there filling with water due to no doors (although the fist sized holes in the sills let the water out..) My brother was over this evening so while extra hands were about we pushed the little wagon into the shed where Hannah has been spending a few hours here and there doing her wagon thing. I felt like I was missing out.. not helped by Hannah now giving me grief that I dont actually own a wagon. She claims its just a mere hatchback. Not fair! Once inside I emptied it out. There was a spare tailgate (or hatch......) and the doors off a white car. The tailhatchgate is actaully the original item. Not sure why it was swapped over but luckily its much better rust wise. Still rusty but not terminal. Then I set to picking out all the various bits that old cars collect. So far I found some money as usual...Im now up to 7c. So car now only owes me $599.93 I also found various tiny plastic toys, a key ring clip, a bicycle combination lock - missing the chain, a eraser and a tow ball. Quite a score... The fella I bought the car from cut up another Viva a while back. I managed to score a complete floor plan half along with the sill for the rusty(er) side. It will be bloody handy and will make the repair job so much quicker! The worse of the sills.. The floor/sill for transplant.. Now some might say "why bother trying to rescue such a rusty old car" and my answer would be...well just look at the interior. Check out the mint dash for example... The doors need to be put in place before I start bracing and chopping things up. Not so easy when they were removed by simply chopping through the pins. Vivas dont use bolt on hinges! This I have only just learned. They are instead welded in place and the only way to remove the doors is to 'carefully' hammer the pins out. So I have some rusted in pins to deal with. Fun times. Tomorrow I will have a go at starting the awesome 1200cc power plant. Hopefully fit the doors so it can go back outside and dealwith rain a bit easier and I can sleep easy.1 point


This leaderboard is set to Auckland/GMT+12:00