
Leaderboard


Popular Content
Showing content with the highest reputation on 02/16/15 in all areas
-
Got the fenders off. What a bugger of a job. They were held on with 12 screw/bolts each with some of them easily accessible from the outside, then most of them were up under the guards under an inch of muck and underseal. It's as if the guy who previously tried to restore this had the bright idea of painting five cars worth of underseal up under there, then parking it in a swamp. Great work Here's the fun part. The 2002s were braised with lead on the very top end where the fender meets the nose so it's nice and flush with no gap. I've read that it's a simple job of melting the lead away and separating the fender away from it. The guy who fixed this up previously not only leaded the seam but also spot welded it. You'll have to imagine me flailing away on the end of a fender trying to rip the thing off, fighting some shitty welds. I'm surprised I didn't rip any sheet metal, or worse.. Careful application with an angle grinder soon fixed that. I should be a surgeon Next update will be after all that old underseal/filler muck has been cleaned up as well as fixing some rust holes n shit.5 points
-
This week is one year being on the road, so tidy up was required after making the milestone of its first ever Leadfoot Festival. Started off parked alone, but then I found some friends. Semi related, this was Dad's other white sedan RX3 project- Rod Millen's tribute RX3. So yeah last week we had to say goodbye to our Mk5 Cortina Ghia, which allowed for extra garage space... so why not park diagonally and become garage king? Also that wall features many hundreds of layered posters of 70's rally cars- all have been subject to stray darts. Firstly: my windscreen cracked in two places- one reaching 29cm and one 17cm. Many thanks to Jeremy at Bespoke Auto Glass- not only does he do a great job, he also has incredible life stories and history of rallying, and travels to you to work out of his Imp! Secondly: the door handle decided it wanted to not work as a door handle anymore, thanks bud. This was all sorted by bribing Stephen with beers. Shout out to Mexico for Corona payments. Finally here is RX wedged between its two Ford brothers5 points
-
Works so far. Lucky using thermostat sandwich plate, as think it would over cool the oil on road. even after driving for 20mins then dorting up some hills, only first 50mm of cooler is warm. rest stone cold. also threw in some better thinner oil this time to attempt to free up some power. actually made heat shield next job is to make this out of something that isn't beer boxes. stu said ali would be a dort amplifier. sounds good to me.5 points
-
And then there were 3! Finally I can stop drilling all those fucking holes.4 points
-
All three back to the future films over three nights at firefly drive in. http://www.fireflycinemas.co.nz/movie/back-future-oct-2015/3 points
-
Mayte, your jacking that back of the car up because oldschool So you've got to repair the rust in the period way. I'm sure that goes like this: Poke rust with screwdriver until at solid metal Cover hole with mesh? Cover mesh with bog Paint. Tadah no more rust! Link for clarification: http://m.instructables.com/id/repairing-a-rust-hole-in-a-car/?ALLSTEPS3 points
-
You are going to be trolling a lot of people.2 points
-
We are heading to Wanaka next month for a mates wedding. Been planning to take the Mustang but also want to take my mountain bike. So the other day I widened the roof rack I made for the Cortina to see how it would fit/look and made a bike mount. Looks a bit silly but gets the job done I took it to a car show yesterday and the rack got plenty of comments. The guys in the Mustang club weren't fans haha. I was walking behind a couple of guys who were going on about how it was "Ruined" haha I told them not to laugh too hard as it served a practical purpose and then jumped in and drove off. They looked a bit embarassed at being busted bagging my car.2 points
-
Tonight!2 points
-
Thought I'd better have an update, work, women & kids get in the way. Window regulator on the driver's side has never winded down fully so got off my arse and took a look. Appears some joker has replaced it at some stage with a different regulator as it isn't the same as the one on the passenger side. (Bracket circled in red is meant to have 3 screw holes, as per the following photo). Have replaced it for the moment until I can source a replacement. Discussion2 points
-
Been busy busy working on the suspension. Rear triangulated 4-link is built, airbags set up at the back. Currently all out of the car so I could weld the brackets (done now), and re-route the exhaust (partly done). Have gone back to the front end to sort some disc brakes and plumbing/wiring. BA Falcon caliper and disc. Hopefully the brakes will work OK when driven, I have a big M/C from a US ford (77 t-bird or something like that). Keeping the standard drums on the back. Only just fits inside the wheel, with a tiny bit of filing on the caliper. I cut the caliper bracket like that in case I needed to pick up the third boss on the spindle. I think it will be OK with two though, because the big 1/2" bolt on the upright part took the main load of the drum brakes. Adding the third point would mean getting more tig welding and crack testing done and I am short of time. This is tonight, one side pretty sorted. The Falcon flex hoses should work too. New upper balljoint fitted. New shocks on relocated mounts. Height sensor fitted. Have to do other side next, which needs the shock mount welded on then assembling. Then finish exhausts and reinstall diff. Finish plumbing, mount air tank, hook up some power and test it out. Hope to have it all working next week for cert prior to Beach Hop. Clipping the air lines every 300mm is a pain. Any suggestions on easy ways to mount the clips to the chassis rail? I have done with a pop rivet, but I think that is crappy. Maybe some hex headed self tappers? Drilling and tapping is difficult due to clearance issues.2 points
-
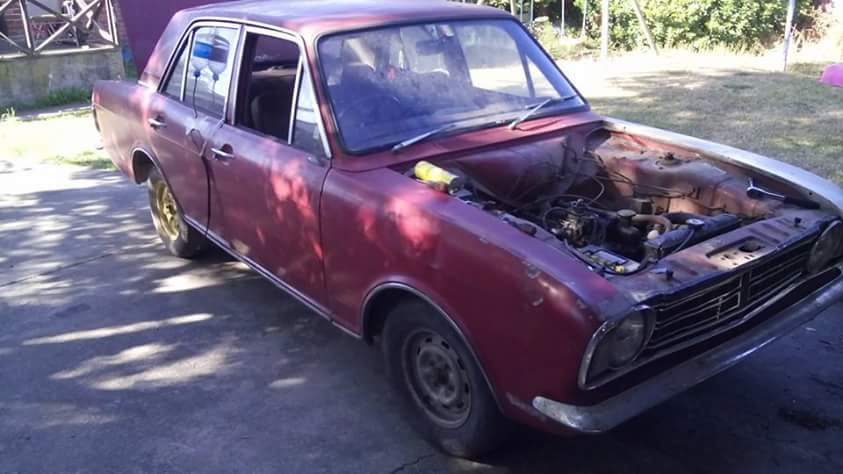
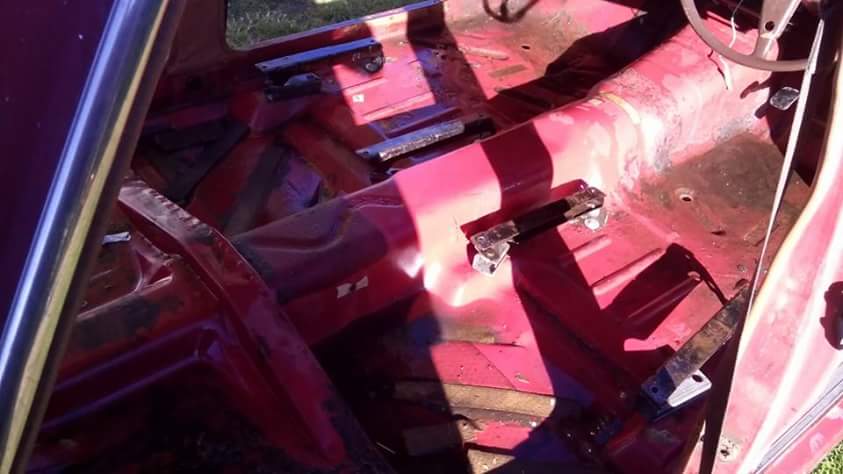
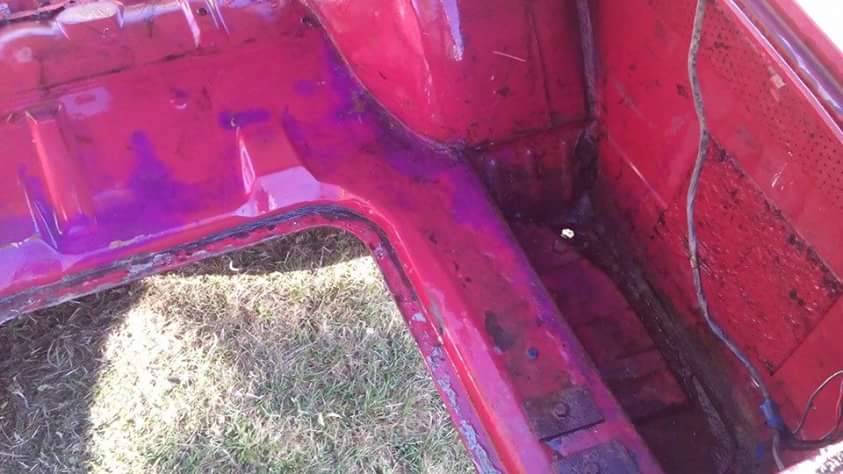
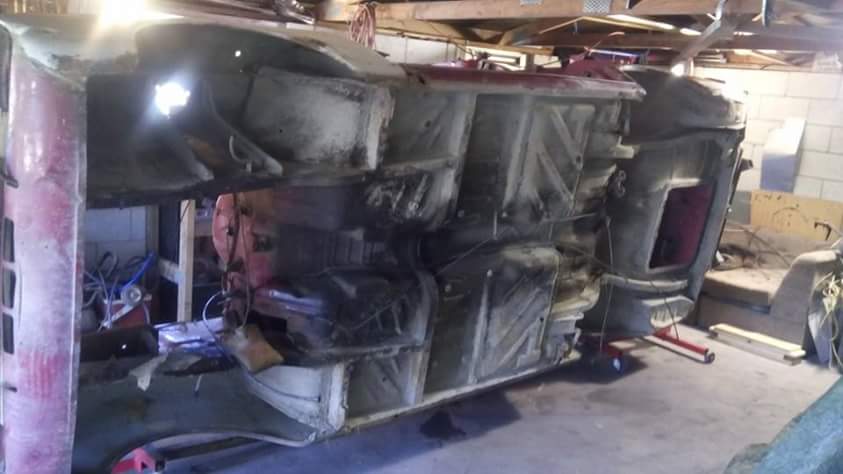
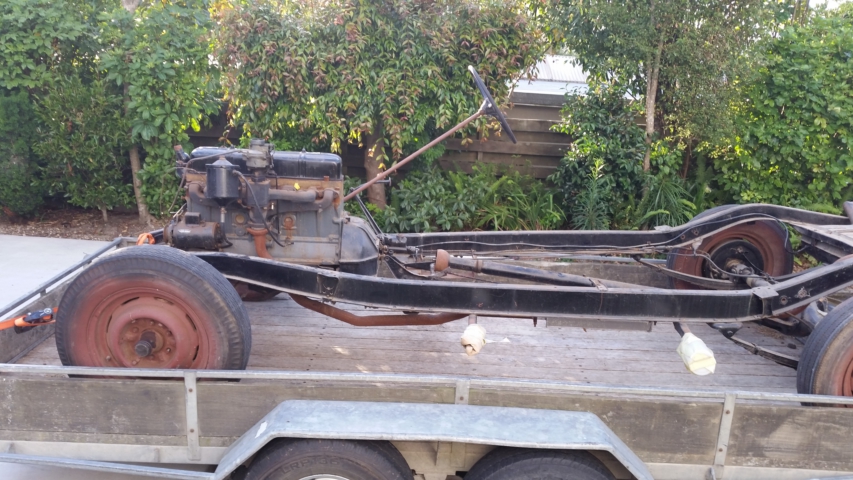
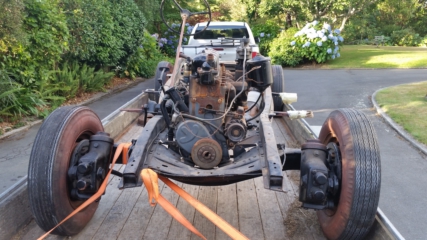
Howdy all So as some of you know I sold all projects last year( apart from a bike I'm building) and to be honest I wasn't really looking for a he project. Anyway a mate rang me to ask if I know of anyone wanting a mk2 Tina.......I asked around and no takers........so fucking bang it turned up on Wednesday..... Even drove it of the truck So its 1970 ( I think) mk2 cortina 1600 super. Pretty much the least amount of rust in a ford shell I've bought in the past 8 years....even the ciggy lighter worked. Sat in a shed since 1988 So I stripped it down and cleaned the years off it Got up Saturday stripped the rest of the running gear and made a spit . mounted it to start on the underside And that's as it sits at the moment
 1 point
 -
Bit of an update. Still not running reliably - been busy sorting non-car related stuff over the weekends/evenings. Can get it started now and running but still getting a bit of fuel coming out of the venturis of one carb. Might be as simple as a bit more float tweaking needed, seemed to clear it up on the other carb and there might be less leaking from this one than there was. Don't think I'm going to have exhaust sorted for Nats, so depending how much progress I get next weekend It'll be in one of 2 states: -Big crabs with standard exhaust or -Stock and sad We'll see... Oh, in the meantime, got a full set of these from Beaver: Currently tyre browsing. 175/60/13s are top of my list at the moment.1 point
-
we will start with a good note car looks pretty cool!!! on the bad side of things what a flippen lemon!!!!!!!!!!!!!!!!!!!!!!!!!!!!!!!!!!!!!!!!!!!!!!!!!!!!!!!!!!!!!!!!!! i thought my brakes needed a bit of adjusting with a little squeak squeak... ended up in a crunch and tuns out yea wheel bearing didnt want to cooperate any more.... smashed and then miniman cut the rest of it out went to buy a new one and brought the wrong one...... so then pulled the other side out so yeah pain in the bum but ahh well i will sort it out.1 point
-
YEAH, KEEP DOING STUFF.1 point
-
Please tell me your family van is a rotor bongo on 17" chromies?!?!?!?!1 point
-
Pic thats missing from previous post Got some tyres fitted up to my MK 1s, have the fronts all mounted up but the rears will take some work to get to fit. Now just need to sort some more lows and centre caps.1 point
-
Are there any legendary take away shops nearby?1 point
-
or give them to me, and can drop off to ben who lives just near work1 point
-
Dammit, now I'm horny1 point
-
Oh lawdy! I should post some pictures of the Morris Oxford wagon we stripped and scrapped. The sills were both completely filled with concrete! The tailgate was made of wood nailed to the rusty steel and then bogged over. Holes in the chassis were stealthily covered up with pop riveted tin. Ben tapped the left front guard with a hammer and ended up wrist (and hammer) deep in a gaping hole.1 point
-
The excitement is building... If anybody else is keen to come along and talk about cars while watching a film with awesome cars and car chases, then drive your car down to Zebra Dude's place and get amongst it!1 point
-
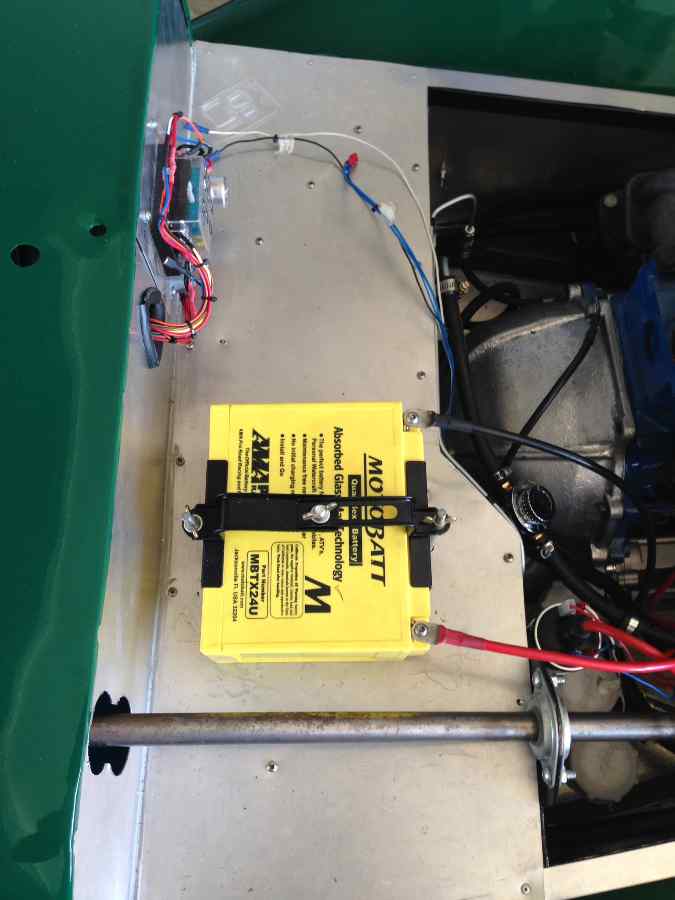
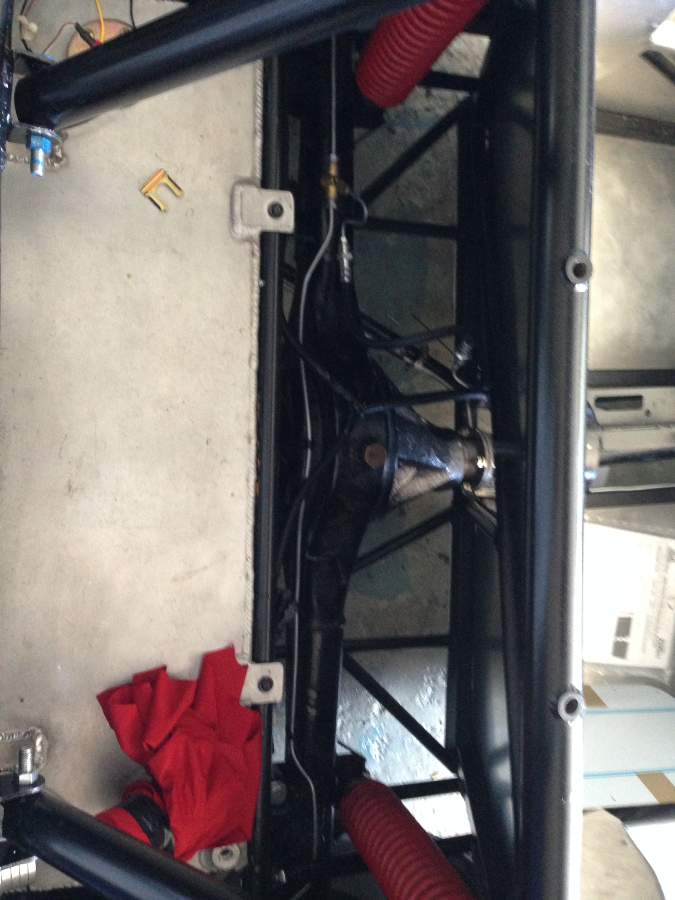
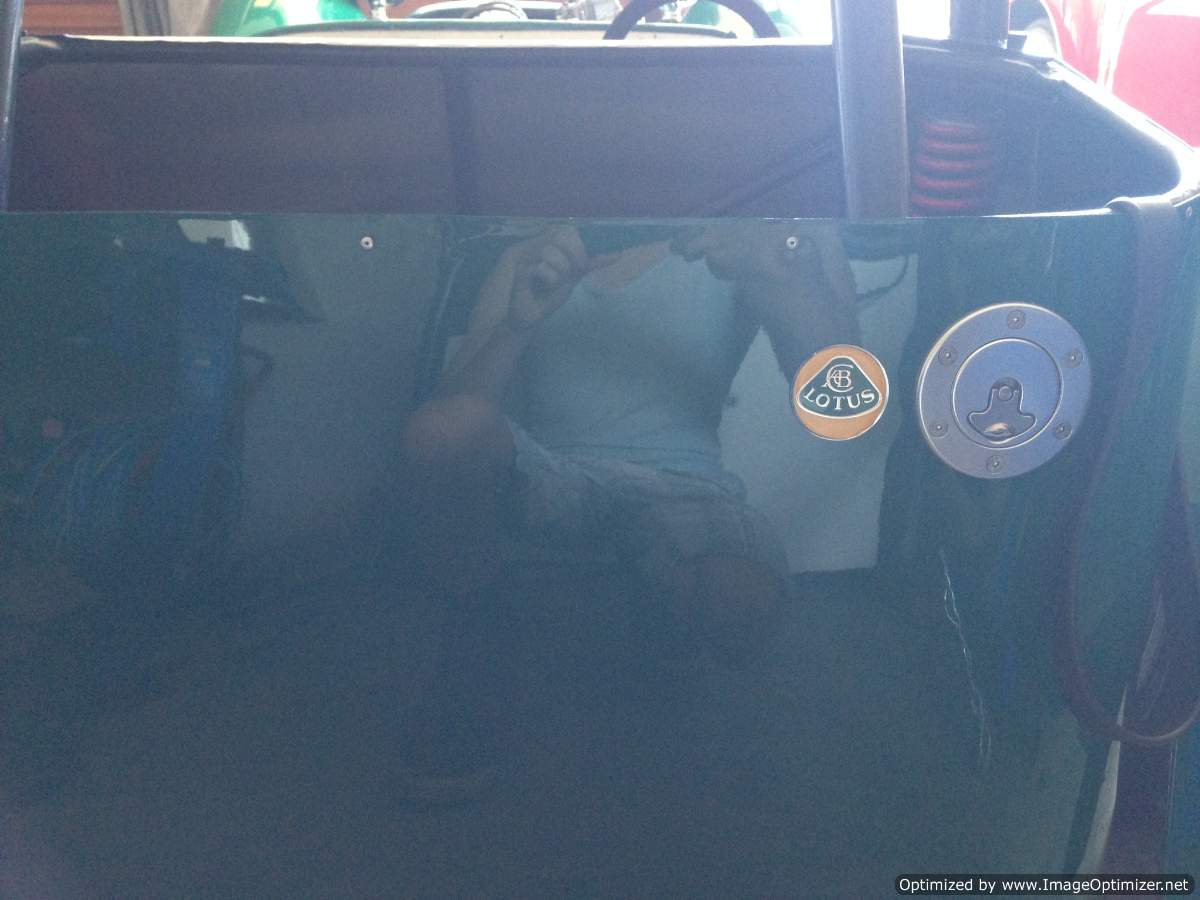
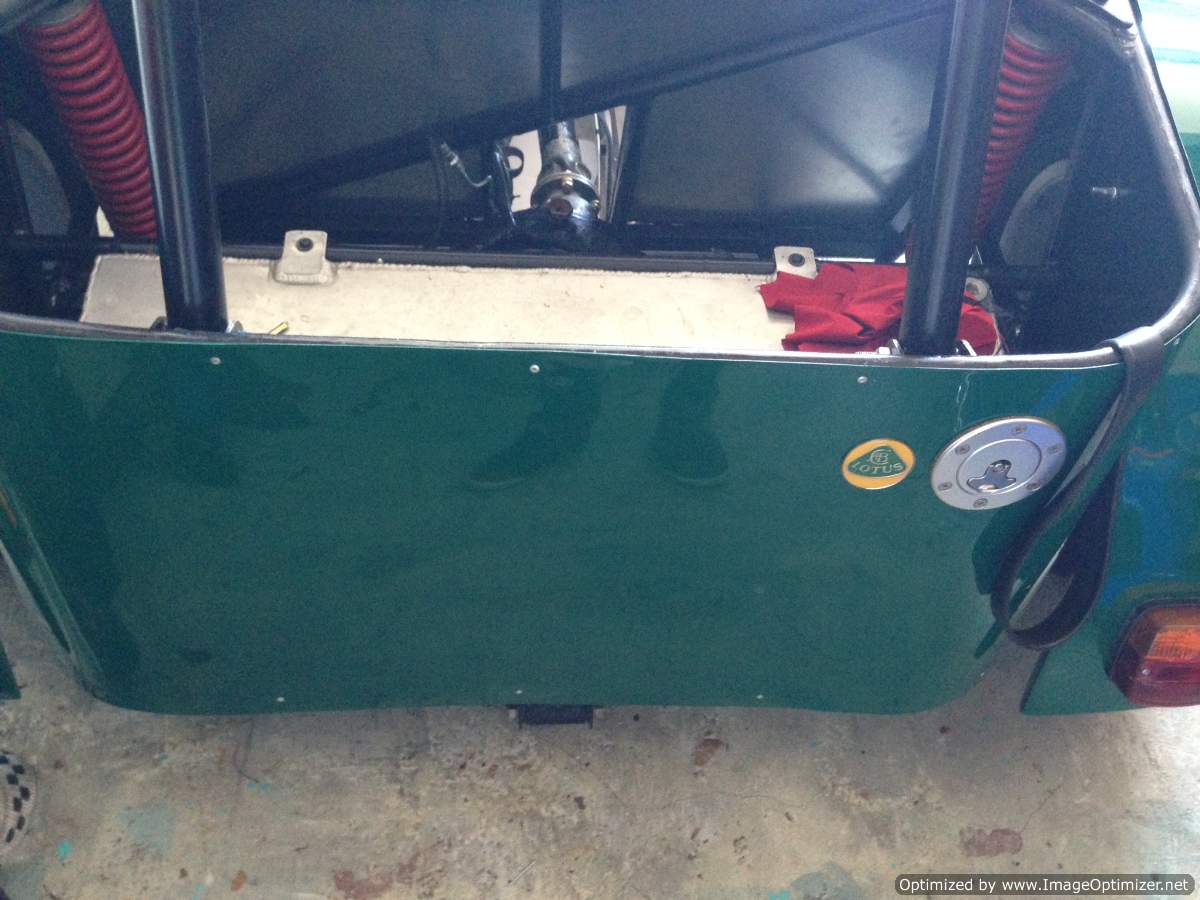
Due to buying a new daily driver I have been somewhat distracted with turbo noises, I digress This update will probably bring me to where I'm at presently with the car: Mounted the battery, it's from a motorbike which is pretty cool- more than enough cranking power for my psychotic starter motor. Mounted the other electrical bits and pieces, bit of a mess currently but I will tidy once I know everything works as it should. I also got the brake lines in- had a mobile guy come up and run them which was very reasonably priced and he did an awesome job. Brakes, not something I mind spending money on... Haven't bled the system yet as the front brakes need some adjustment on their mounts to get the rotor running properly between the pads- very fiddly and hard to get motivated for such a job- but it will be done soon. I want to drive it so badly! Mounted the rear panel, glue and riveted into place, looks pretty good. Aero style filler cap looks awesome, well worth the money. Couple of enamel Lotus badges from Ebay... All guards on, and exhaust in place Shift remote on aswell, I've got a tunnel and handbrake ready to slot in but will need to be adjusted so leaving off for now What the car looks like presently, all guards on, headlamps in and nosecone on. Bought some Land Rover Series/Defender indicator units as well- look like original parts from lotus and they fit really well on the guard brackets. It's been like this a few weeks now as I don't really know which direction to go next... lots of fiddly little jobs to do which all hold it back. Biggest issue currently could be that the clutch fork can't actuate far enough to move the release bearing... but luckily a mechanic I know had a lotus in his workshop with the same problem and rectified it by fitting a different pressure plate and clutch cover. Fingers crossed it will work for me as well. I guess I should bleed the clutch up and try engage a gear but I don't have high hopes... If that doesn't work there is always the option of a grinder and some repainting... Things left to do: Windscreen Bonnet- probably get it rolled by the same guys who did the body panels Interior Bleed and adjust brakes, fit handbrake Wheel alignment/set up suspension for our delightful Christchurch roads... which will assist with undoing the alignment Troubleshoot and fix the clutch I will probably get my mechanic to fix the clutch and do an overall check to make sure everything is as it should be... Don't want anything coming off! WOF Super happy days. 6 lines of things left to do, down from about 6,000,000. Still a fair way to go though- will I ever finish the bastard? Discussion if anyone wants to, I really appreciate comments and feedback. Also provides motivation to finish it: //oldschool.co.nz/index.php?/topic/46798-hkm400s-1969-lotus-7-series-3/ Cheers
1 point
-
give em to me, dave will be 208ing at some point i presume, as will I.1 point
-
Yeah mang sounds like a plan. I wI'll text rig rog some sweet sweet nothings and organise a pickup sundayish1 point
-
Extended shackles for sure.1 point
-
I removed the lowering blocks: It now sits two inches higher which is much better. For now....1 point
-
Just the ticket for Breaker Bay Roj!1 point
-
That's the wiring diagram from this book.1 point
-
Just a relay inline with the start excitor a 40a automotive relay will be fine. As for the reverse lights trace cable back from rear plonk it on one side of the reverse switch then the other to a fused ign feed.1 point
-
Oh an this happened too1 point
-
this. there is the possibility of doing things outside the manual (welding to a casting/forging, welding a steering component) via getting it approved by the TAC. but- you would have to have some very good reasons/no other options to do it, and proof that it could be done properly. the fact that it ticks two of the 'dont ever do this' boxes i highly doubt they would approve it1 point
-
The other thing I had done since last time I posted was a bit of interior trimming. I managed to find some black loop pile carpet, which as any of you old Ford nutters will know is the correct carpet for any self respecting 1970's Ford, and had a carpet set made, as well as a vinyl engine cover. As well as looking quite good, it has cut down the cabin noice quite a bit! I have a nice set of black trimmed high backed seats which I am also going to fit //oldschool.co.nz/index.php?/topic/45289-browndogs-1972-v8-transit/page-21 point
-
ok, well as some of you know, on my way to do my euro trip i blew the gearbox coming into stormin the castle, so i ditched the beemer and bought a bandit12 to do it on, fast foward to a few weeks ago when i finally got round to picking up thebmw and dropping it off to a local guy who is an expert on air head boxes, he has dozens of them and they get sent to him from around europe to do, luckily he agreed to do mine as he had nothing on, and didnt even want to get paid for the job, just pay for parts, so here is his write up on the job I had a quick look at the bike after you had gone. That box sounds as though its got a really serious problem, I've never heard a noise like that before. It will be interesting to see what happened (I'll post pictures). I was out with horses today and tomorrow I've got to sort out a neighbour's chainsaw before doing anything else but hopefully I'll make a start at getting the box out. I'll report back on progress. .... Just to remind you, this is what turned up: It was very difficult to push about as the box wasn't running free in Neutral, this was accompanied by horrible 'clunking' noises. Pretty soon it was a sorry little Rat Bike Taking it apart wasn't difficult. The tank was held on by the single fuel pipe and the airbox only had one bolt - which was very loose. The seat was clinging on with two nuts that were just started on their threads The air filter is a scrapper :blast. Anyway, the box was soon on the bench: The Output Flange nut came off OK, but the taper was very tight (a good sign). The box was very dirty around the clutch end. The clutch lever was very stiff so I was expecting trouble there. The magnetic drain plug didn't look too bad - which surprised me as I was expecting more swarf than this: Soon the box was apart to reveal . . Swarf everywhere I can't show it in stills, but the rear bearing on the output shaft was the worst I've ever seen - its almost possible to remove the outer track from what's left of the balls and cage. The other bearings are shot as well - but are not as bad. The output shaft has been pulled back from the front bearing. There shouldn't be any discernible space between the bearing and the fifth gear pinion. This is why we fit circlips to the front of the inner bearing The swarf has contaminated the oil and has worn the two bearing sleeves that the first and second gear pinions run on - The plain sleeve for First Gear: The First Gear pinion has a plain thrust washer on each side. The inner one has been pressed into the Third Gear sliding pinion - its supposed to be flat. This has further damaged the bearing sleeve that did the damage to it. The (expensive) roller Bearing on the front of the Input Shaft is usually OK, however, this one is jammed solid and the rollers won't turn so I guess its full of swarf I think the box has run low on oil at some point in its life (there was oil in it when I drained it) as the Input and Output shafts have been 'blued' with heat where the bearings have been choked with swarf: I'm not intending to replace them as the bearing sleeves will be renewed. I can't see them going soft (or brittle) with the heat treatment. Some of the retaining washers and circlips on the Output Shaft are damaged and will be replaced. One circlip has been reduced to almost half its circumference, yet I didn't find any broken pieces The 'clunking' noise heard when the bike was being wheeled about came from the Drive shaft. The rear bearing on the Output Shaft was so worn that the Drive Flange was hitting the outer sleeve on the rear gearbox cover - where the 'boot' attaches. This movement allowed the Worm Drive on the Flange to chew-up the Speedometer Drive gear - you can see how the spline teeth are now tapered towards the lower end. I have ordered a 'Good used' one from Motorworks. Worse, the Drive Flange has cracked the rear cover. Its not critical and I'll put a touch of Epoxy adhesive on it. A 'Good Used' rear cover is £110 from Motorworks The good news: There is some. The selector forks are fine with just one tip showing signs of heat. They will go back in OK. The complete Selector Mechanism is also A-OK. I'll replace the springs and Indexing Roller as a matter of course but this is actually better than some I've seen The cam faces on the Input Shaft Shock Absorber are also very good. The Clutch: The Clutch assembly looked well past its sell-by date and I wasn't very hopeful about saving all of it. I removed the six 'hold down' bolts and expected the outer retaining ring to fall off and the Friction Plate to fall out . . . not a bit of it, the thing was welded together and nothing would shift it. I soaked the three locating pegs in Penetrating Oil and left it for a couple of days - still no movement. So with a gas torch and a hammer and cold chisel (to use as a wedge) I eventually got the bits separated. The Friction Plate is just down to the rivets and the rest is rusty and seized. I'll save what I can but I have ordered three new parts from Moto-Bins today. The problem then was that all the components were contaminated with very fine metal swarf and I didn't want to put anything back in that state. Washing the Gear Pinions in Kerosene didn't remove the swarf so I dug out my 27 litre Ultrasonic Cleaner "Hubble-Bubble" After two 20-minute sessions, the cleaning fluid was a dark brown colour. When the fluid was drained the bottom was coated in particles - mostly steel swarf. I cleaned the tank out with a large clump of paper towel which came out covered in sparkly bits. As the gear pinions and so on were now thoroughly de-greased I carefully re-oiled everything and set it aside ready for assembly. I have a couple of (large) orders outstanding with Moto-Bins and Motorworks so assembly will have to wait until the shiny new bits have arrived. To be continued.... ..... I fitted the centre track from a 6403 bearing onto the Output Shaft and then stuck it in the lathe. Using a carbide strip ground down to a shade over 1mm thickness and given a cutting tip, I cut a circlip groove into the forward end. It doesn't take long and a new circlip fitted OK. Then a van arrived . . Oooooh, shiny bits Hmmmm, doesn't look like £432-worth does it It's not all for this bike as I'm re-stocking some of the small stuff . New vs. Old. The second gear bearing sleeve was a nice tight fit on the shaft. Always ensure that these oil holes are lined up as there isn't an oil groove on the inside of the sleeve. The new 'High Fifth' gear was fitted, along with fourth & Second gears, front bearing and the all-important circlip. Second gear is a lovely fit on that new sleeve - smooth without any hint of play I then added the third and first gear pinions. First gear is also a nice smooth fit without shake on its new sleeve - quite unlike the way it was when it came off originally. The 'Standard Fifth' gear is shown, there is no difference in diameter they just cunningly re-profile it to include fewer teeth I built up the Input and Intermediate shafts yesterday, but didn't take pictures (it involves spring compressors, various home-made steel 'dollies' and my floor press) all three shafts are now ready to go back in. The Gear Selector mechanism is also ready with new springs and Indexing Roller. I may get the box assembled tomorrow but then there will be a short break as I'm off to "The Bristol Classic Bike Show" at Shepton Mallet on Friday/Saturday. I won't be on the 1150GSA this year as I don't fancy the M6 on a Friday with snow and ice - I'll be taking a large 4x4 . I must be getting old and soft I put the gearbox casing through the Ultrasonic Cleaner yesterday. It is clean but the alloy is now dark and mottled. I'll see if I can clean it up with something before building it up. To be continued . . . . ..... More progress to report Having assembled the three shafts I heated the gearbox case with a Propane torch and fitted them along with the intermediate shaft selector fork that has to go in at the same time. There are two oil baffles in front of the Intermediate & Output shafts and the Input shaft's roller bearing has to go in before the others as all three bearings are an Interference fit. It entails a bit of juggling and one has to be quick. A quick tap with a rubber mallet ensures that all bearings are seated before the case cools. Then the Selector mechanism, Output Shaft Selector forks and shaft and main oil baffle are fitted. When the case has cooled the gear lever if fitted and the gearchange is checked. It isn't great with the rear bearings unsupported but as long as all gears can be selected it will be OK when the rear cover is fitted. Then the rear cover gasket goes on with a light smear of Blue Hylomar. And now for the technical bit - Shimming the end-float . One needs a 'Shimming Plate' for this job: I have drilled mine so that I can bolt it down on top of the gasket. I think that this gives me the most accurate measurements but people have different approaches and may just rest the plate on the case or put the gasket in after the measuring has been done - each to his own. I use a 'Outside Micrometer' and a 'Depth Micrometer' for this job. First measure the thickness of the Shimming Plate: Then measure the thickness of the oil baffle that goes on the rear of the Intermediate shaft: Using the Depth Micrometer, measure the height of each bearing above the plate - I take about six measurements around each bearing. Then measure the depth of the bearing housings in the rear cover - again, I take about six per bearing. All of this is written down and then the shim thickness is calculated for each bearing: The formula goes . . (Depth in cover - 0.05mm clearance) - (height above plate + plate thickness + baffle thickness) = Shim thickness. One then has to assemble a collection of shims to the right value. These come in four nominal sizes - 0.20mm / 0.28mm / 0.38mm / 0.50mm. However there is quite a variation and I spend time mixing & matching until I get the right result to within 0.02mm. Here, I am looking for 0.95mm for the Output shaft and the shims measure 0.94 - good enough for me . The collection of shims are lightly greased and placed centrally on the bearings - you don't want them moving as the cover is fitted I screw four 6mm studs into the back if the case as a guide for the cover. It will be hot and if fumbled causes mayhem with shims falling about the place . A final check is made of the rear cover to ensure it is flat. If not it will cause problems. And then the cover is heated with the Propane torch and carefully lowered onto the bearings. It is then tapped down with a rubber mallet and five of the nine set screws are fitted. The studs are removed and all set screws fitted and torqued-down to 9 lbs/ft. When the box has cooled and I am happy that the clearances feel right I fit the three oil seals. First the input shaft splines are masked and the shaft given a light smear of grease. I use a long socket of appropriate size to seat the oil seal into the case. The seal is given a light coat of Blue Hylomar to ensure its oil tight around the case. Surplus compound is wiped away and that's one done :thumb. Now remove the gear lever and repeat the process with the gear lever shaft oil seal. I used an 18mm socket to seat it. The gear lever shaft is given a light smear of grease and replaced. The Output Shaft oil seal is given the same treatment. This is a Monolever bike so the oil seal lips face outwards to let the box breath into the leg (which has oil in it). Paralevers have a different oil seal that is faced inwards as the leg is dry. Paralever boxes breath through the hollow bolt that secures the speedometer cable and battery earth strap. I use a flat steel disk I turned on the lathe with a 50mm 3/4" drive socket to seat the rear oil seal. The output Shaft drive flange is then given a light greasing and fitted to the taper shaft - the taper is kept dry. The nut is torqued down to 161 lbs/ft which is a bit of a heave. I use a long locking bar and a Certified 50-300 lbs/ft 3/4"-drive torque wrench for this. Almost finished now. The Neutral Switch is checked with a Multi-Meter and fitted with a new washer. The Drain Plug is also fitted with a new washer. I cleaned the swarf off the magnet with cloth and a high-pressure air line (don't try this at home kids :rob). The replacement Speedometer Drive, a new collar and the breather bolt are then fitted (it doesn't strictly need a breather bolt as a plain one would do but it has one so it went back in). And that's it - the box is finished . . . . Now for the clutch . . . . ...... so thats it, box is done clutch done, bike back together and a massive parts bill to pay, almost to the price i paid for the bike a couple of years ago1 point
-
So finally got back to this. Was looking thru the tard and came across this origanil chassis for way too cheap to say no so it came home. Rebuilt suspension an motor .no gearbox . Don't really know what to do with it but my body bolts strait on so figured I'd get it going while building up my hot rod chassis had no dizzy, water pump. , and other random bits missing so found all the missing parts that my dad had conveniently stored away many years earlier. Tryed turning it over. Took about 4 hours to unseize . Result bent push rod seized valve
1 point
-
Update! JZA70 R154 from Yahoo Auctions Japan. Massive thanks to Alex and his crew at mlracing.co.nz for getting this to me. (for the same price as I sold my smelly old w55 for) Mrs kicked me out of the lounge, so I took over the dining room instead. New seals, reverse switch, Marlin Crawler bearing retainer, thrust washer (already installed in this pic), shift fork, shifter seat etc - Thanks to kpr for clearing up my confusion. Swapped the LSD back into the supra housing and also put in a Weir performance kit to hopefully help the shitty Toyota LSD lock a bit better The Weir kit comes with shims and replaces the coil spring that pushes against the clutch packs with a solid spacer and 2 spring washers, which has doubled the breakaway torque The reason I went back to the Supra center is because it has an extra mount at the front. These cars tend to rip the factory centers out of the subframe with a little abuse even behind stock 7Ms lol Subframe out The subframe needed modifying to fit the Supra center, here's a pic of the front mount I made. it's basically 4mm plate welded to the subframe with some tube and nuts welded to the top Reinforced the rear section where the diff mounts with 4mm plate Solid diff and subframe bushes Painted bits and installed diff bushes So while the subframe was out I also ripped the fuel tank out and started preparing for the new fuel setup. Walbro 400lph e85 pump next to the factory pump. It was a little longer but wasn't too hard to install. The ID of the pump outlet was slightly smaller than the original Toyota fuel line (but bigger than the Toyota fitting ID), so the fuel now comes out of the pump, through the original hardline, then cut before the original (small) fitting and now has a -8 compression fitting with -8 line all the way up to the fuel rail. I'm hoping this won't effect flow too much using the hardline? Forgot to take pics I also tested the compression fitting up to the pumps relief pressure (70psi?) and it seems to be fine, although a lot of people warn not to use them for injection. It is hidden up above the tank where it can't get knocked and is away from heat so should be safe? -8 ptfe line, was much cheaper than buying a decent 37 degree flaring tool for hardline. Will this be ok for cert? It is mostly protected by the subframe and then plastic covers most of the way up front ID1000s More dining room madness! Wired in an Emanage Ultimate (lol), which was cheap, but some times I regret buying and wish I had gone with a standalone. We'll see how it goes first as I can't afford to change at the moment. Turns out I can ditch the distributor cap and run individual coils with it so may also try that later on if funds allow I also tidied up a lot of the loom and moved some plugs to suit the new inlet manifold, and changed to bosch injector plugs Engine bay looks a little like this at the moment, I had to pull the wiring loom apart again as the plastic bit around the injector plugs didn't fit with the new manifold and looked super ugly, so now it goes underneath and looks a lot tidier I've also mounted a couple of oil catch cans and made lines for them aswell as a -12 oil drain etc1 point
-
Some of the stuff outta sepolia is cringe worthy.1 point
-
Our golf has a l/100km display I know it has a wideband so must use some of that data along with injector pw and load it probably does some calculation to figure out where your at1 point
-
No pictures as I couldn't find the camera, Replaced all the front wheel studs tonight, I thought it was too easy so timed it. 23 mins to jack it up, pull drums & hub off, smack out the old studs and smack in the new adjust the shoes and slap the wheel back on. Since that went so easily I thought I'd attack the non working washer pump had tp pull all the old brittle air con ducting out along with the radio and ash tray. Ipulled it out and put the seal kit in it. still didn't work and all the hoses are split and perished. I'll cheat and put a universal inline pump in it tomorrow and get some new hoses1 point
-
I got sick of dealing with "Skyline Army" retards who either wanted to charge eye-watering amounts of money or failed to respond, so ended up buying one of these from Yahoo for less than the local price, even after taking shipping into account. Yeah, factory steering wheel. Just so I have a "stock" piece for the coupe should I ever decide to repurpose my Nardi. Discussion: //oldschool.co.nz/index.php?/topic/21738-orions-dr30-wedges/1 point
-
So spent some time at our lock-up this weekend. Mostly taking photos of Tim's 240z for Trademe and fixing a bit of rust on my supra. Did manage to make a template for the trans tunnel and firewall for the celica, as well as mock up positioning for flares and race seats. Gotta get some mounts for those seats that will flip forward so I can keep the rear seats, as well as chop down the back of them so that they are like those classic datsun race seats. Pics: Gonna cut out the steel for the firewall and tunnel next time I'm down, then maybe get some swage lines in the bits, before welding it in.1 point
-
Or slap a 5MGE head on the 7M block for the best of no worlds1 point
-
Lock that shit in.1 point
-
When I get passed with rusty nuts and bolts etc I tend to go out the back of the workshop with the digger or bulldozer and wreck shit other day took the motor box out of a corolla on about 10 minutes ,flipped it over and ripped it out with out undoing nothing1 point


This leaderboard is set to Auckland/GMT+12:00