
Leaderboard


Popular Content
Showing content with the highest reputation on 12/09/19 in Posts
-
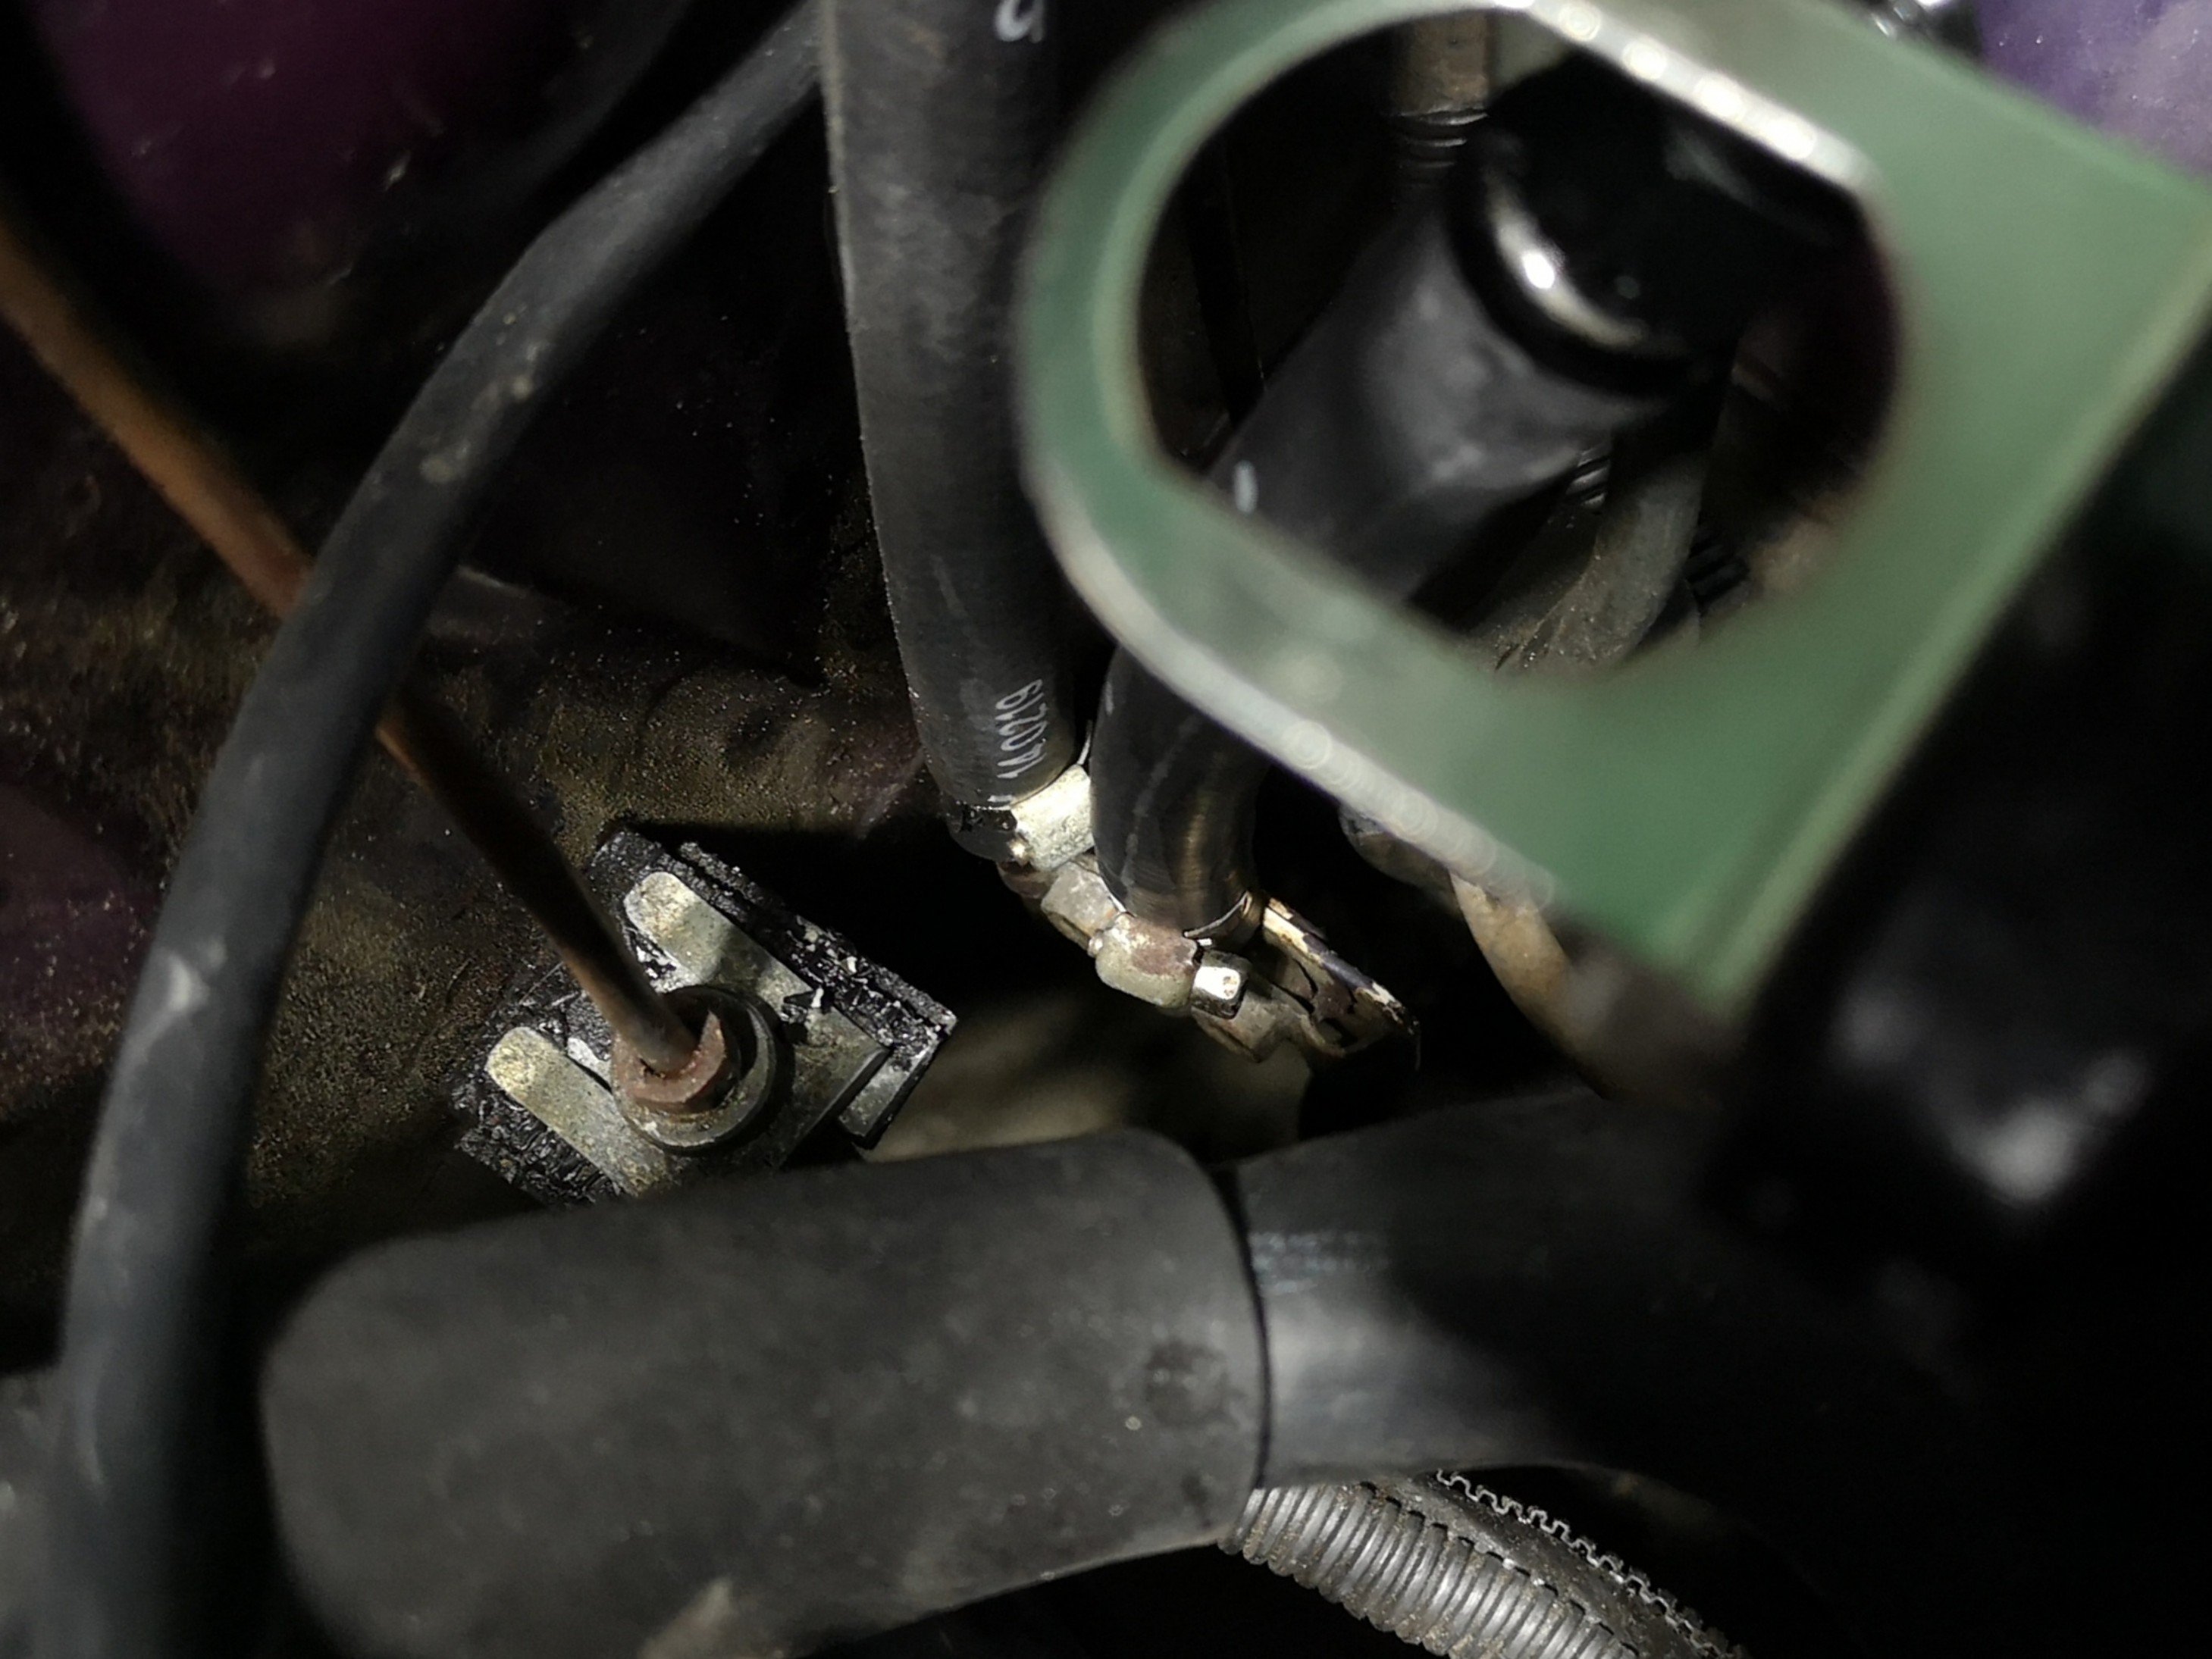
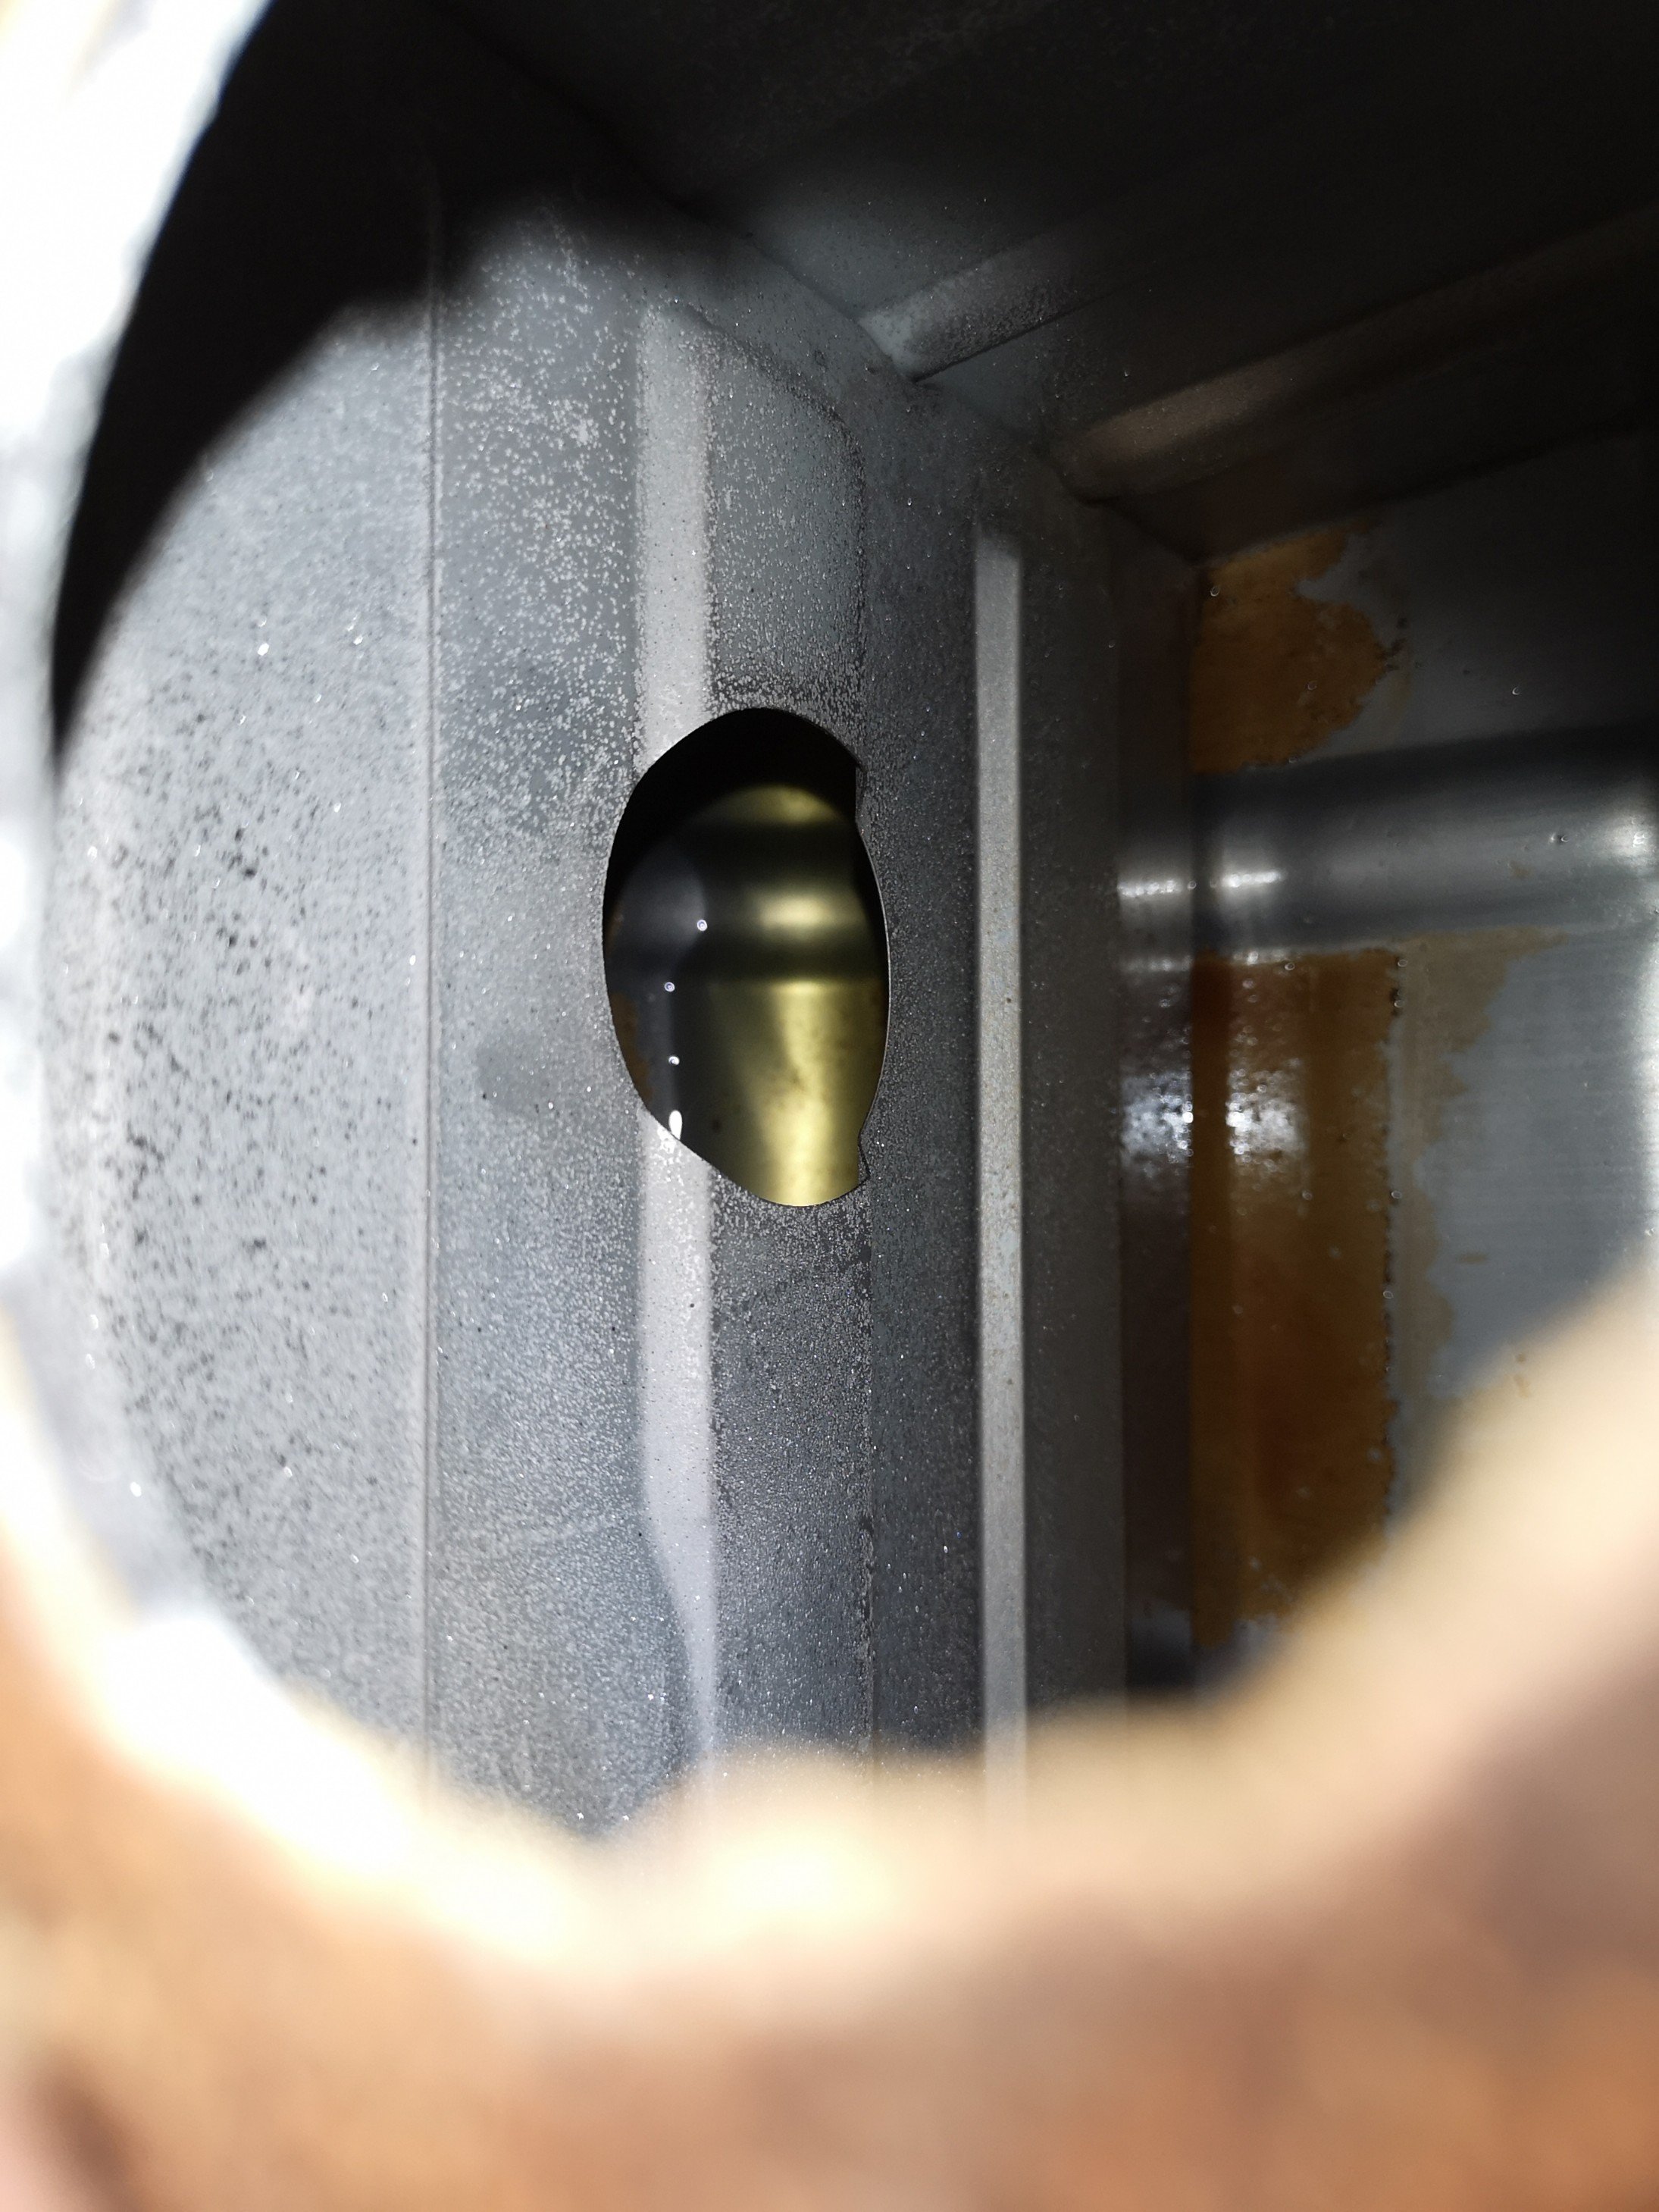
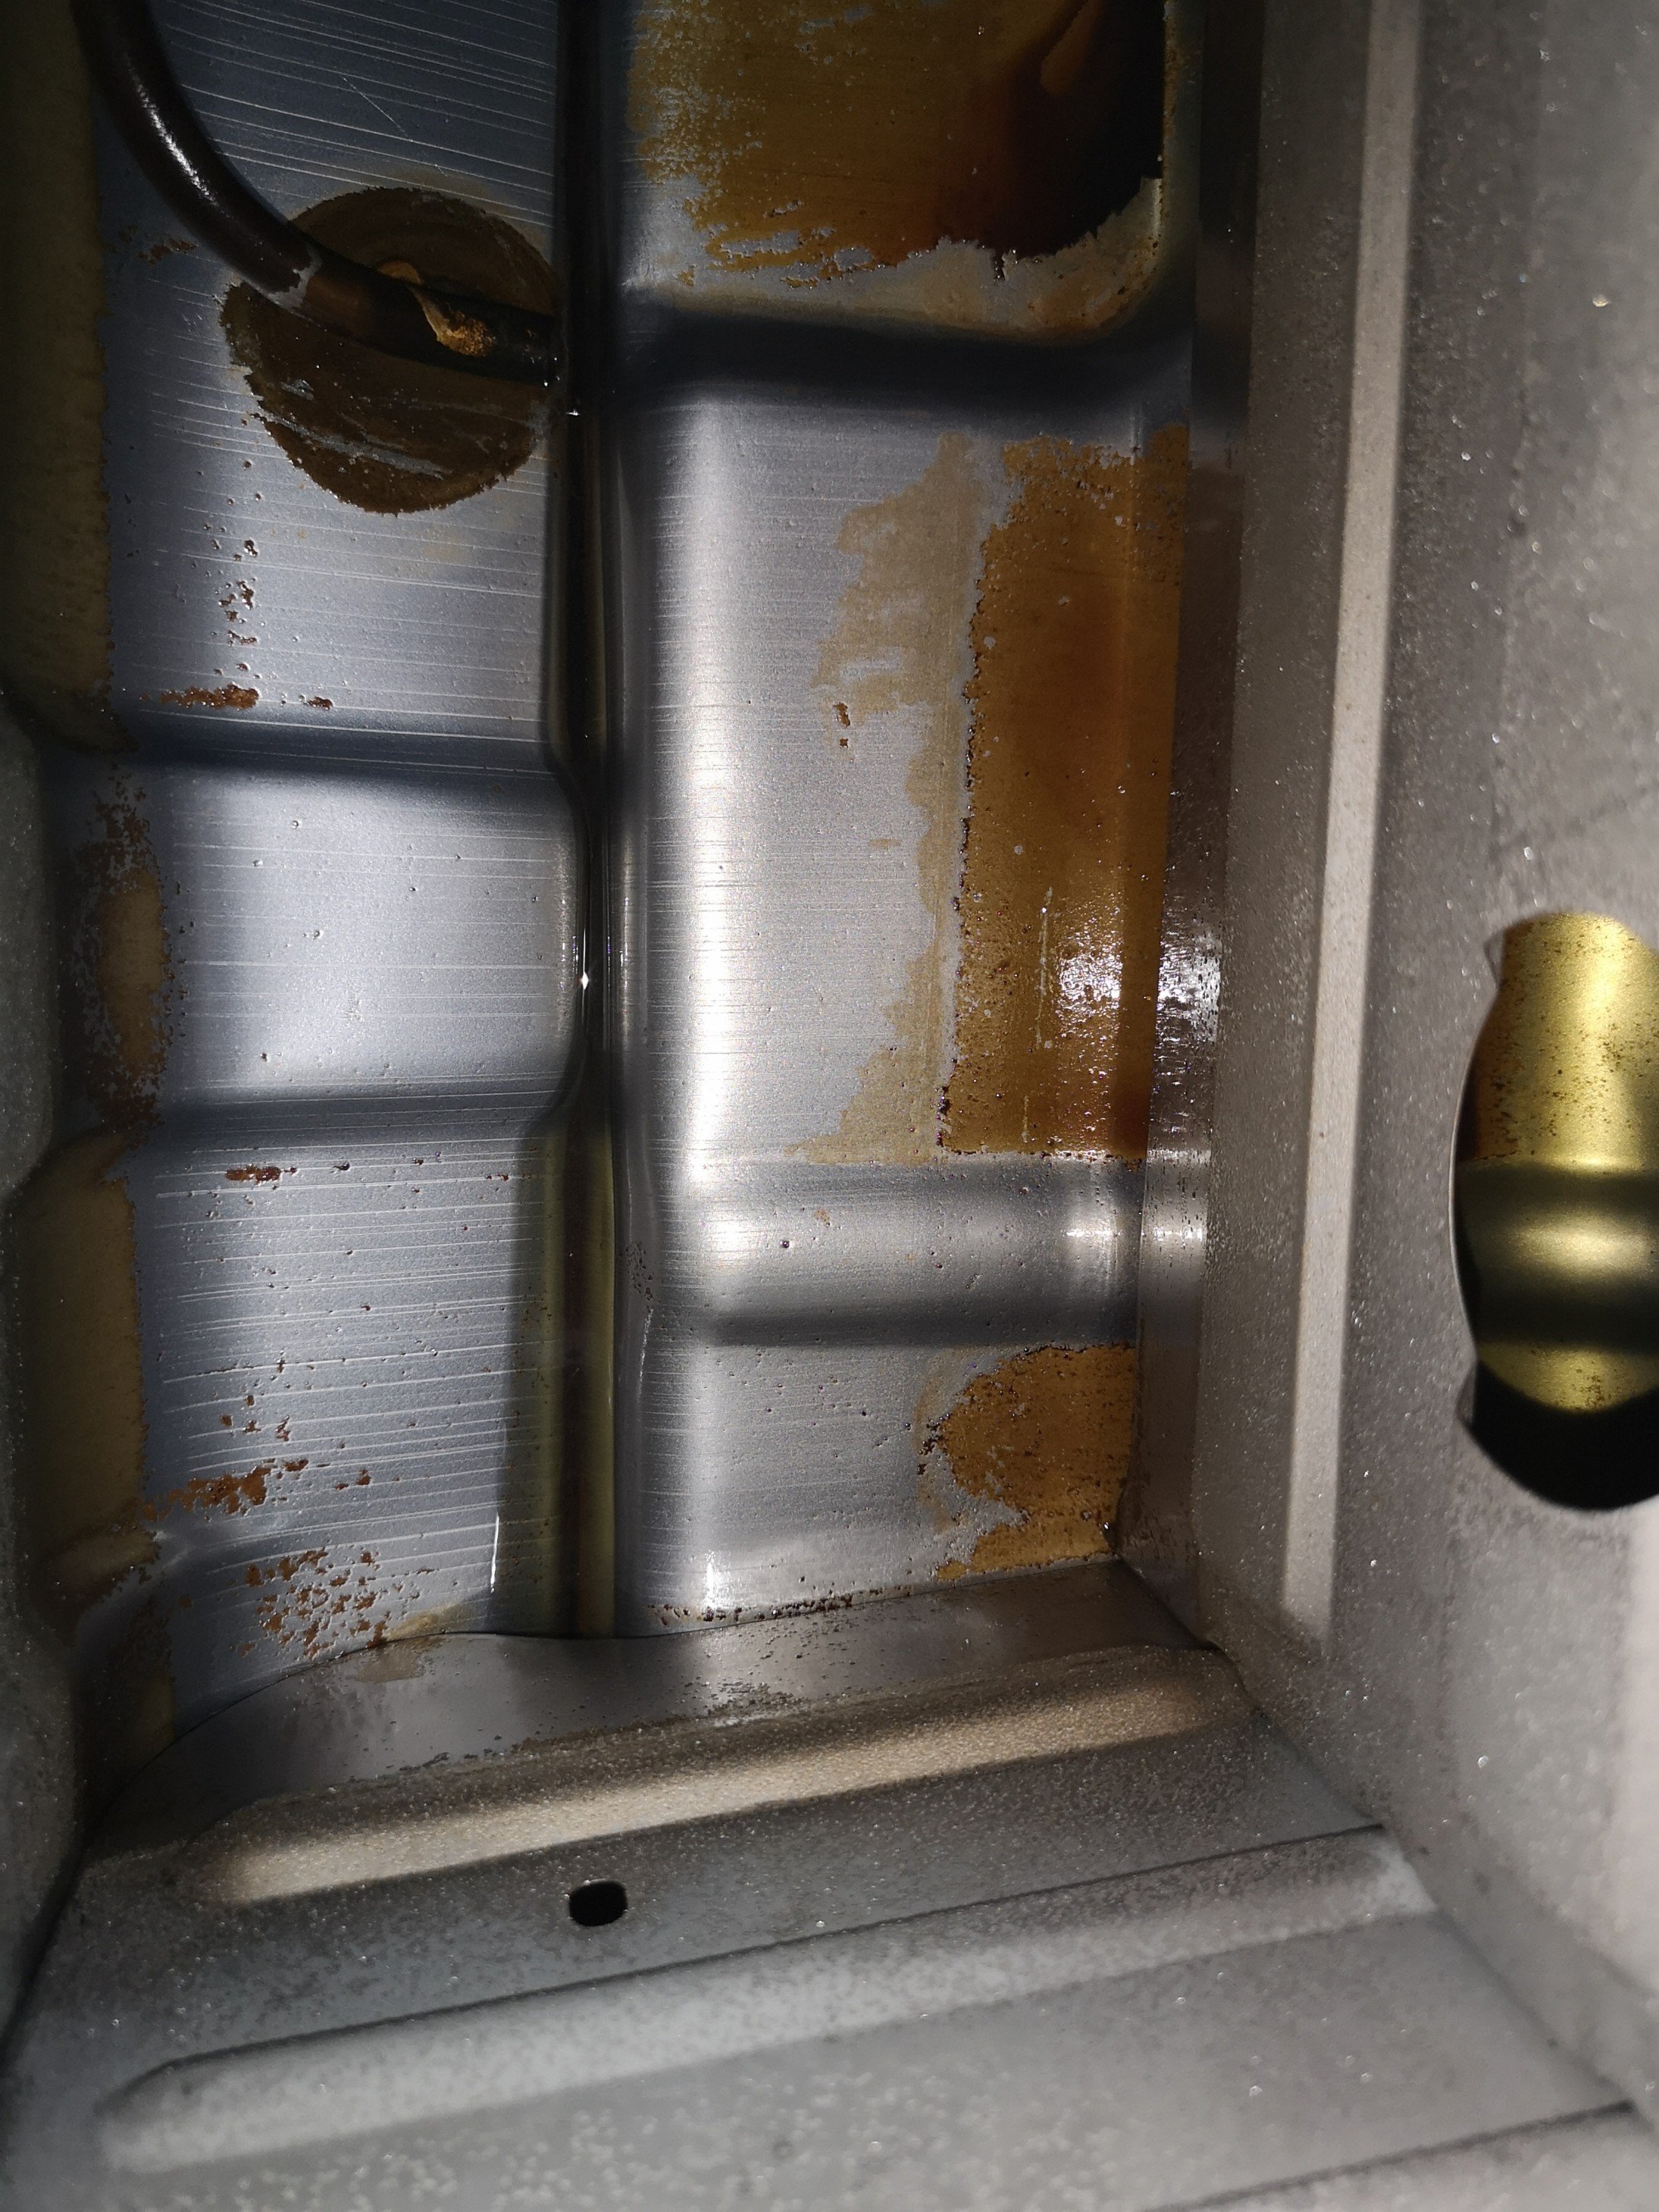
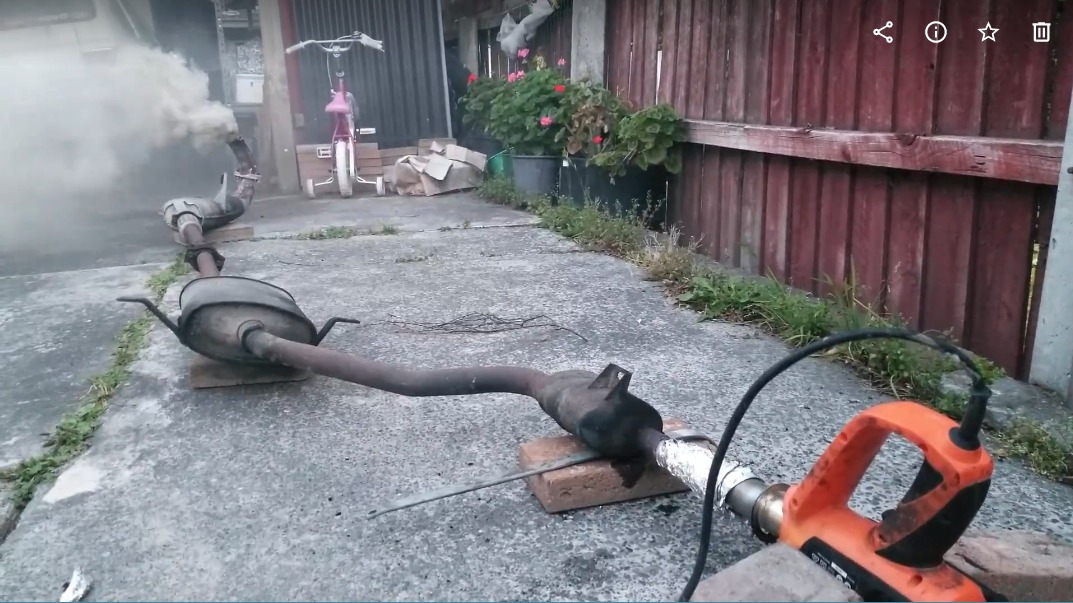
finished up the water pipe that goes under the manifold. it had to be modified to clear the superdupercharger manifold. 2019-12-09_08-34-58 by sheepers, on Flickr once i got that finished i thought it would be a good idea to rig up a pressure tester and test all the welds. 2019-12-09_08-34-45 by sheepers, on Flickr the only bit that leaked was the one bit i hadn't touched at all. the chem wash the block went through at the engine builder must have dissolved the schmutz holding it on. it was this plate. ive glued it back on now, but apart from that everything else is sealed up. 2019-12-09_08-34-36 by sheepers, on Flickr now i can put the manifold on for final. one step closer to a finished motor.................8 points
-
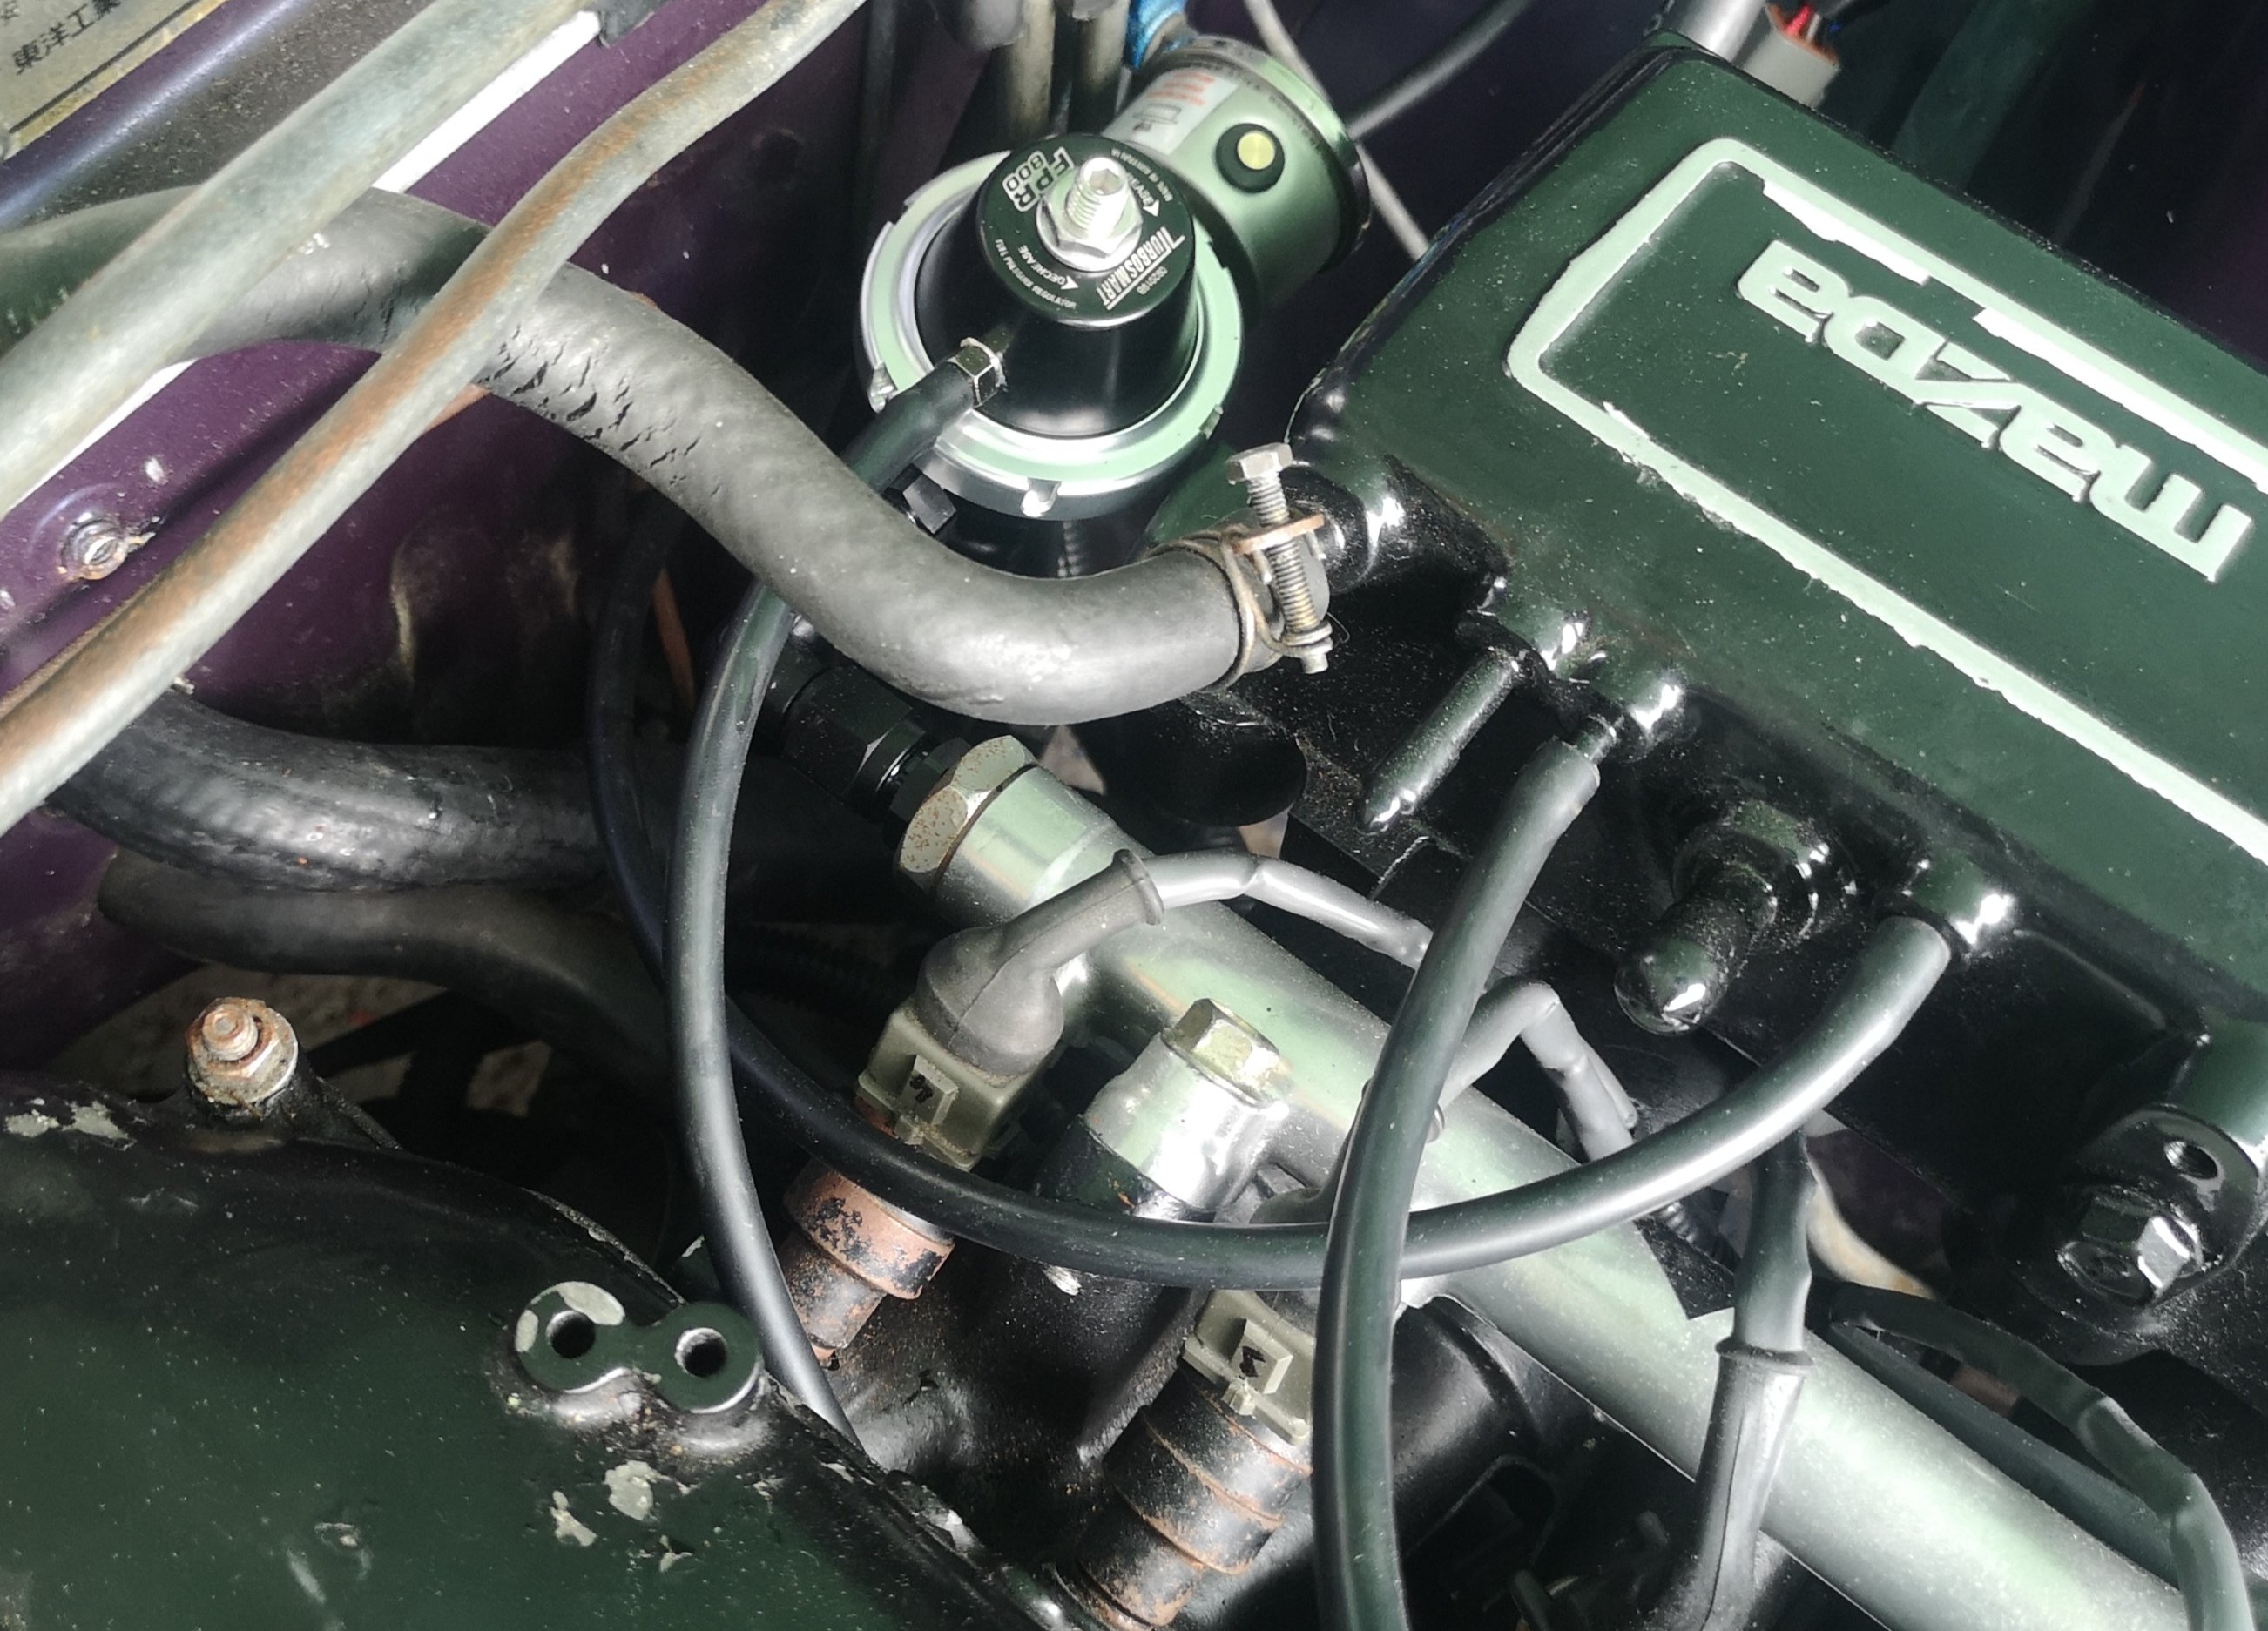
In other news, got a couple of other fittings to plumb up the fpr, Shows the proximity of the return line in relation to the fpr mount.. Worlds shortest bit of hose, And all together, also put a 45 degree barb on the outlet to bend the hose so when the engine rocks is not jamming straight up into the fpr.. Started her up after I put the tank back in tonight and its definitely seems better, not surging like it was before. Readjusted the pressure to 40psi at idle, so hopefully I can take her for a drive.. Really need to get an O2 sorted, maybe I need to get my hands on an innovate..
 8 points
 -
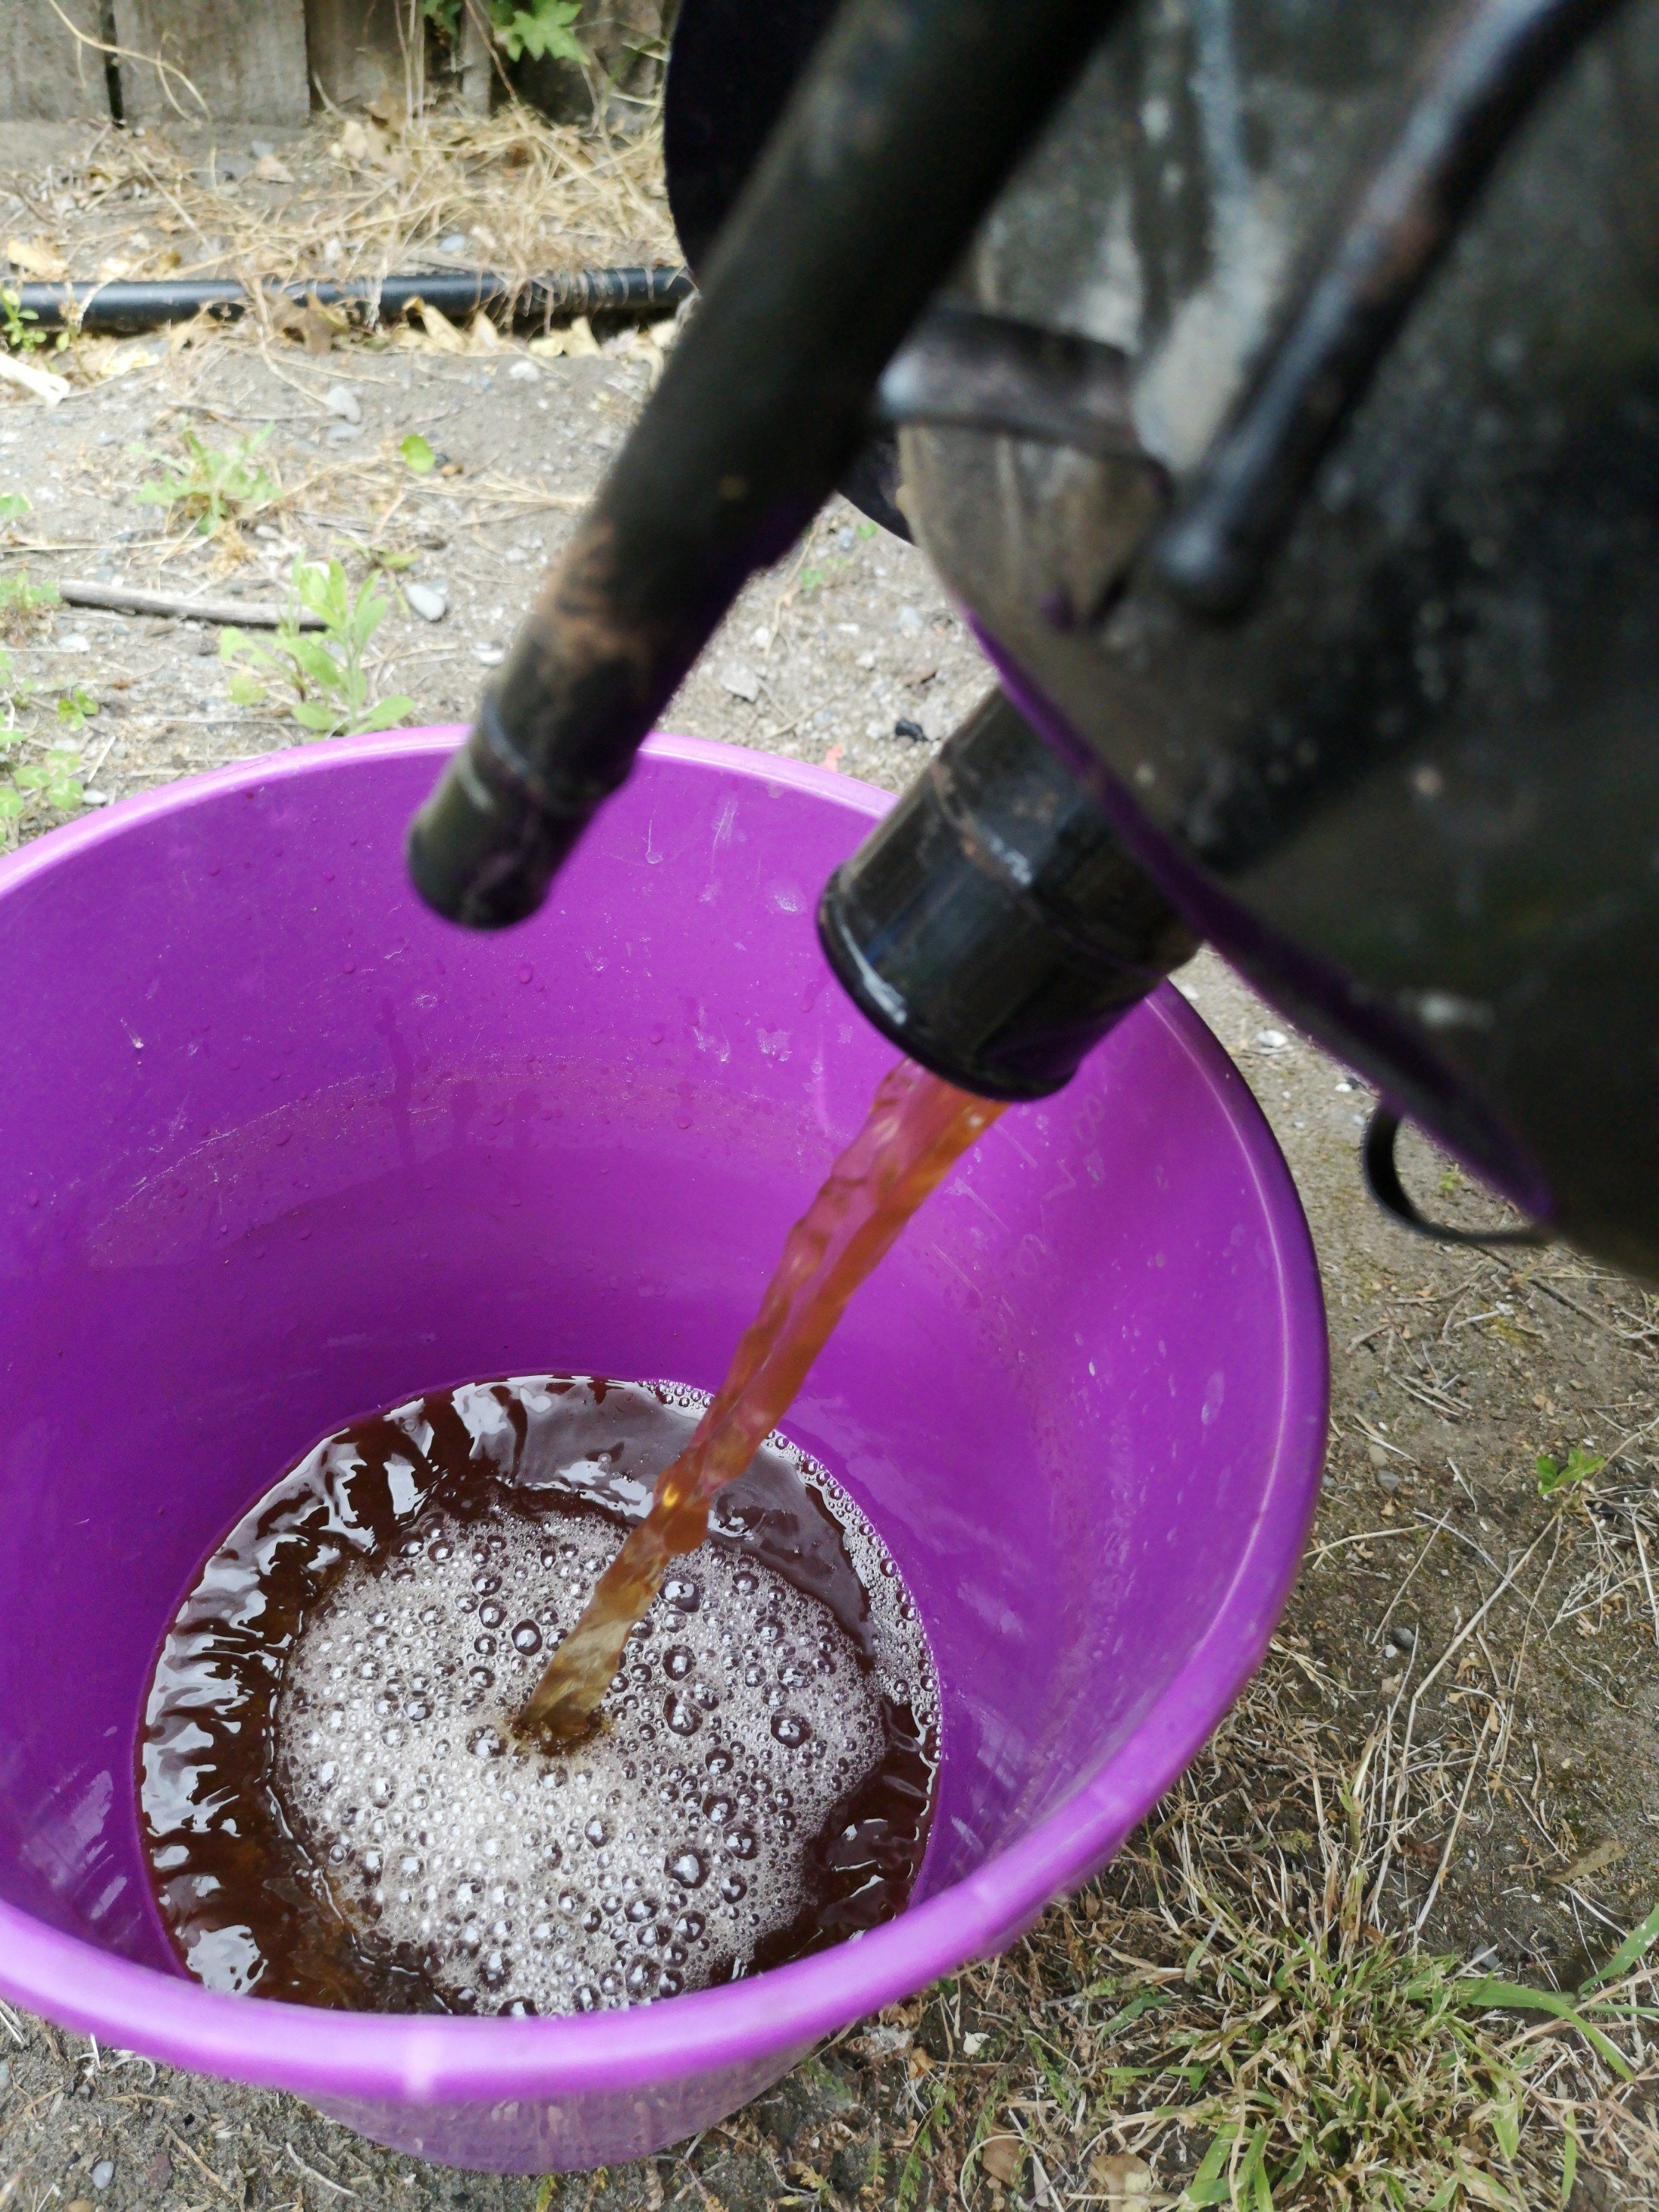
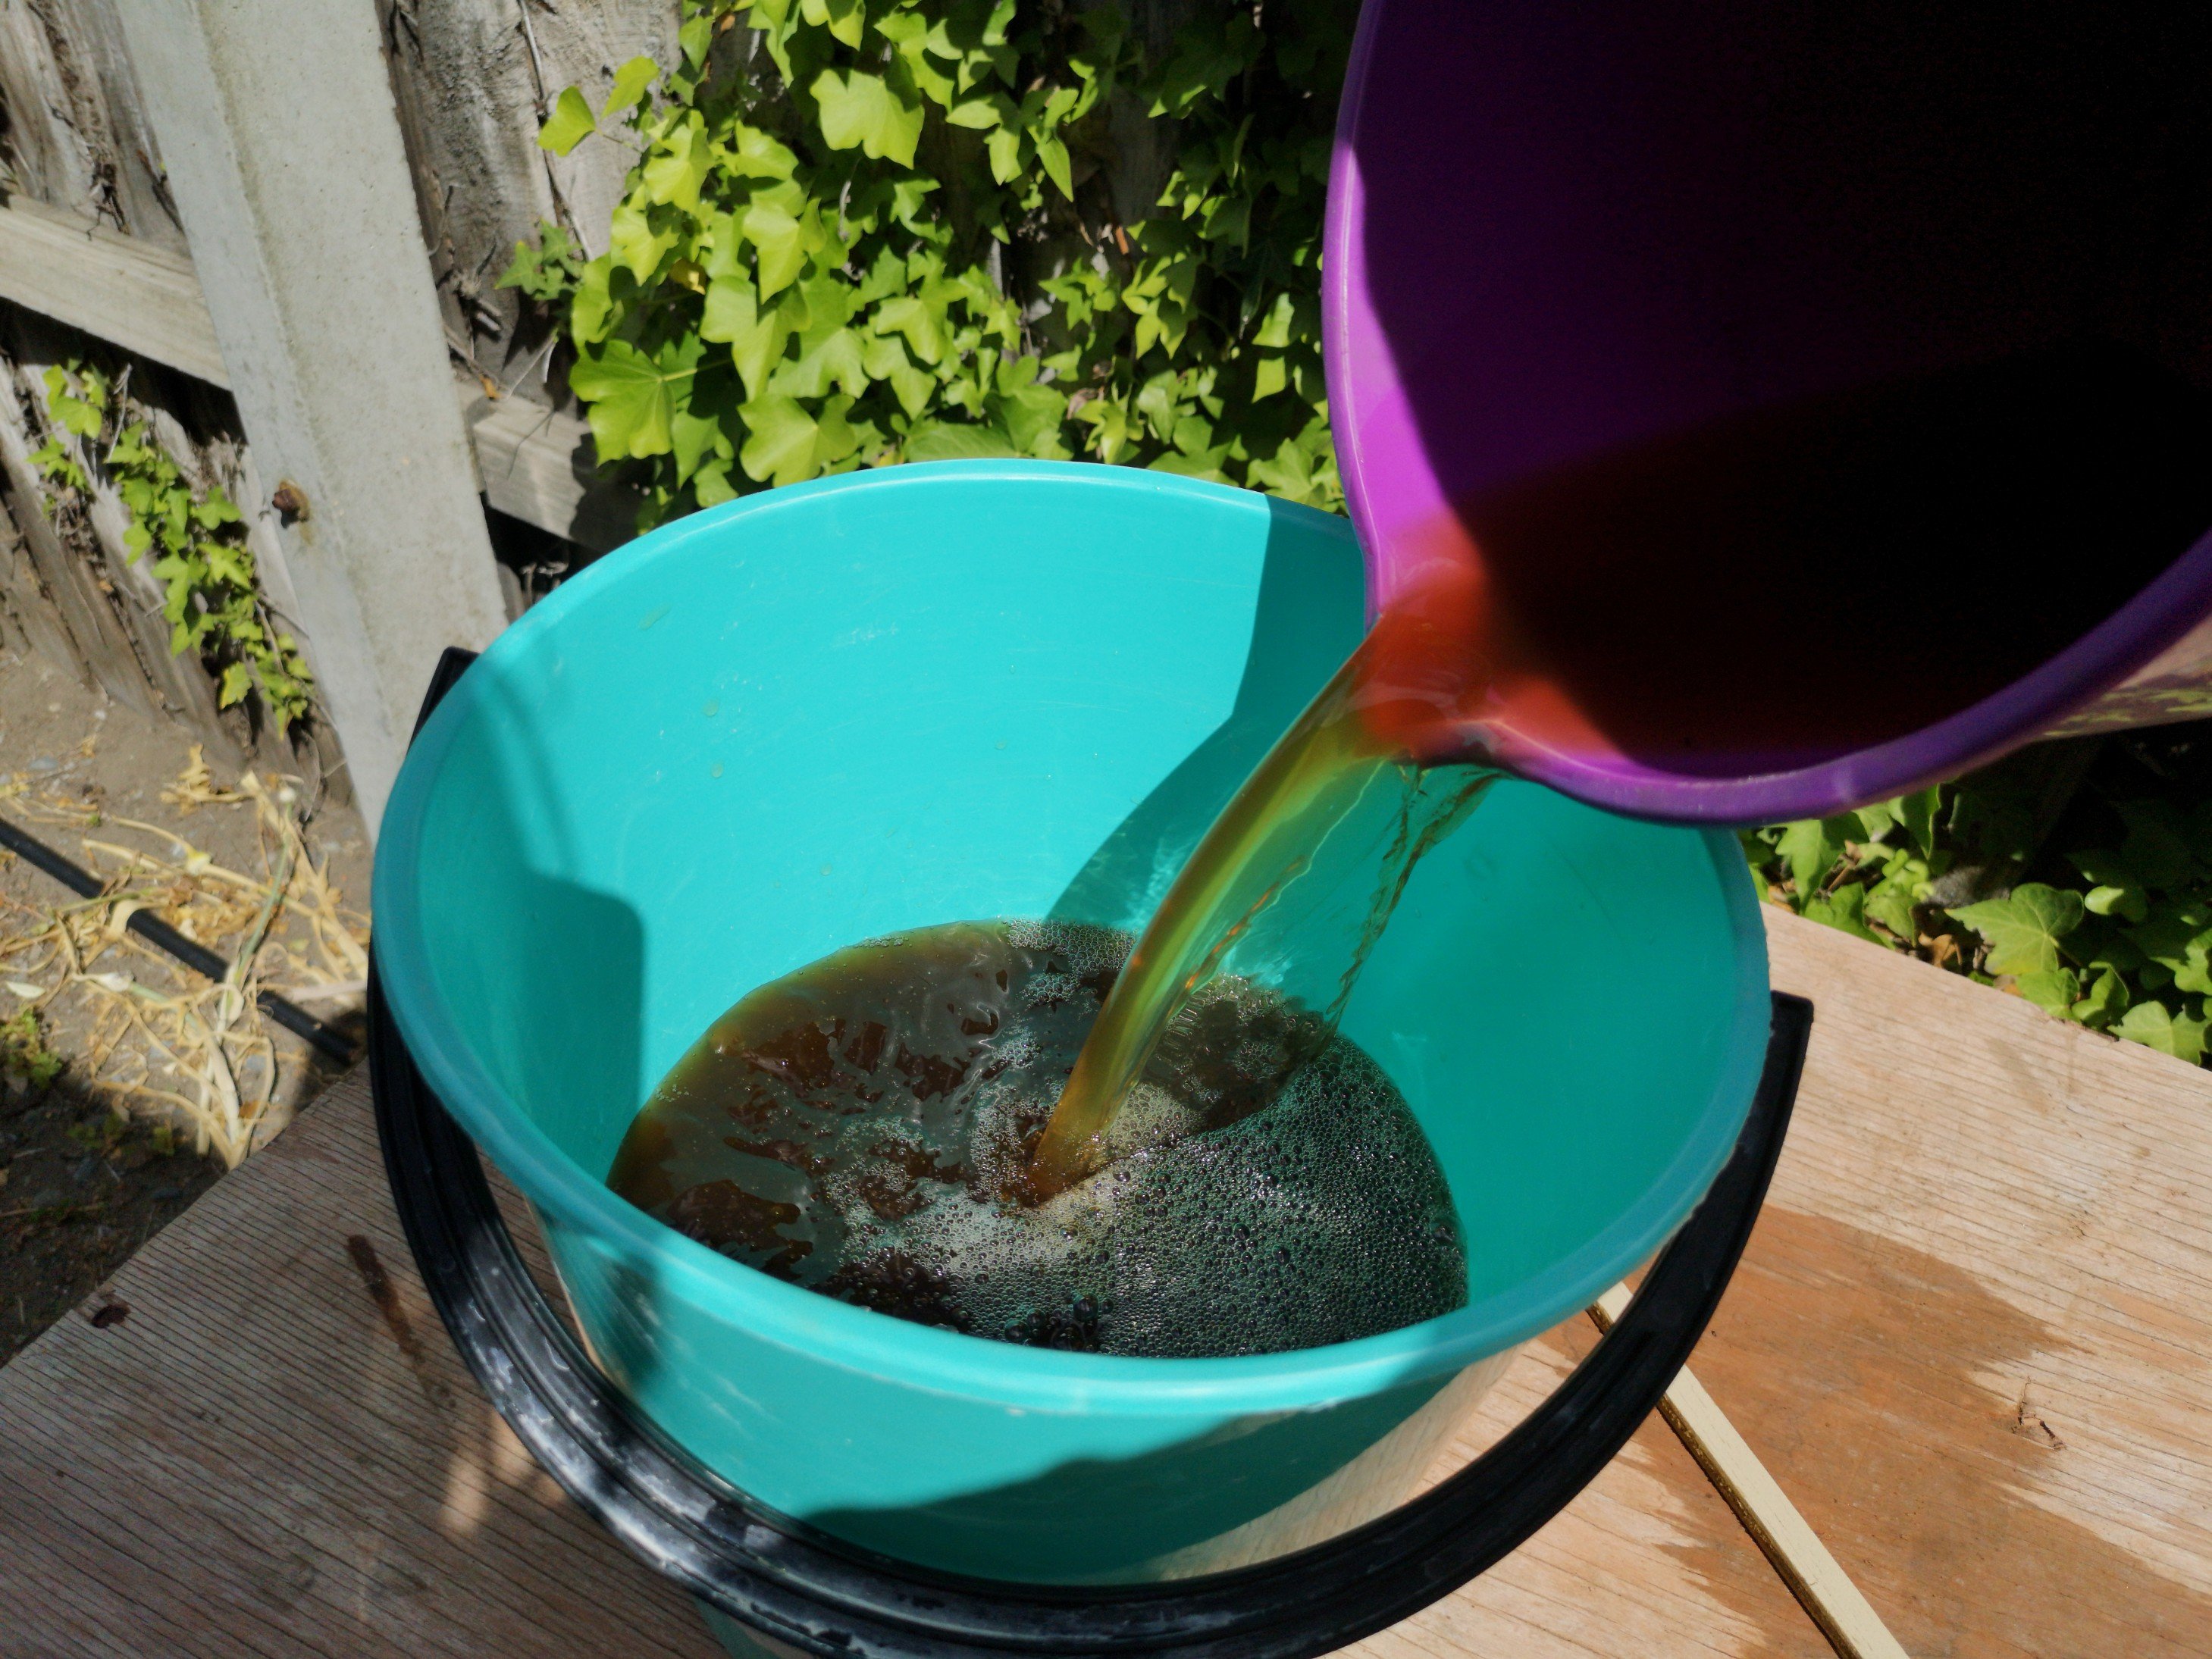
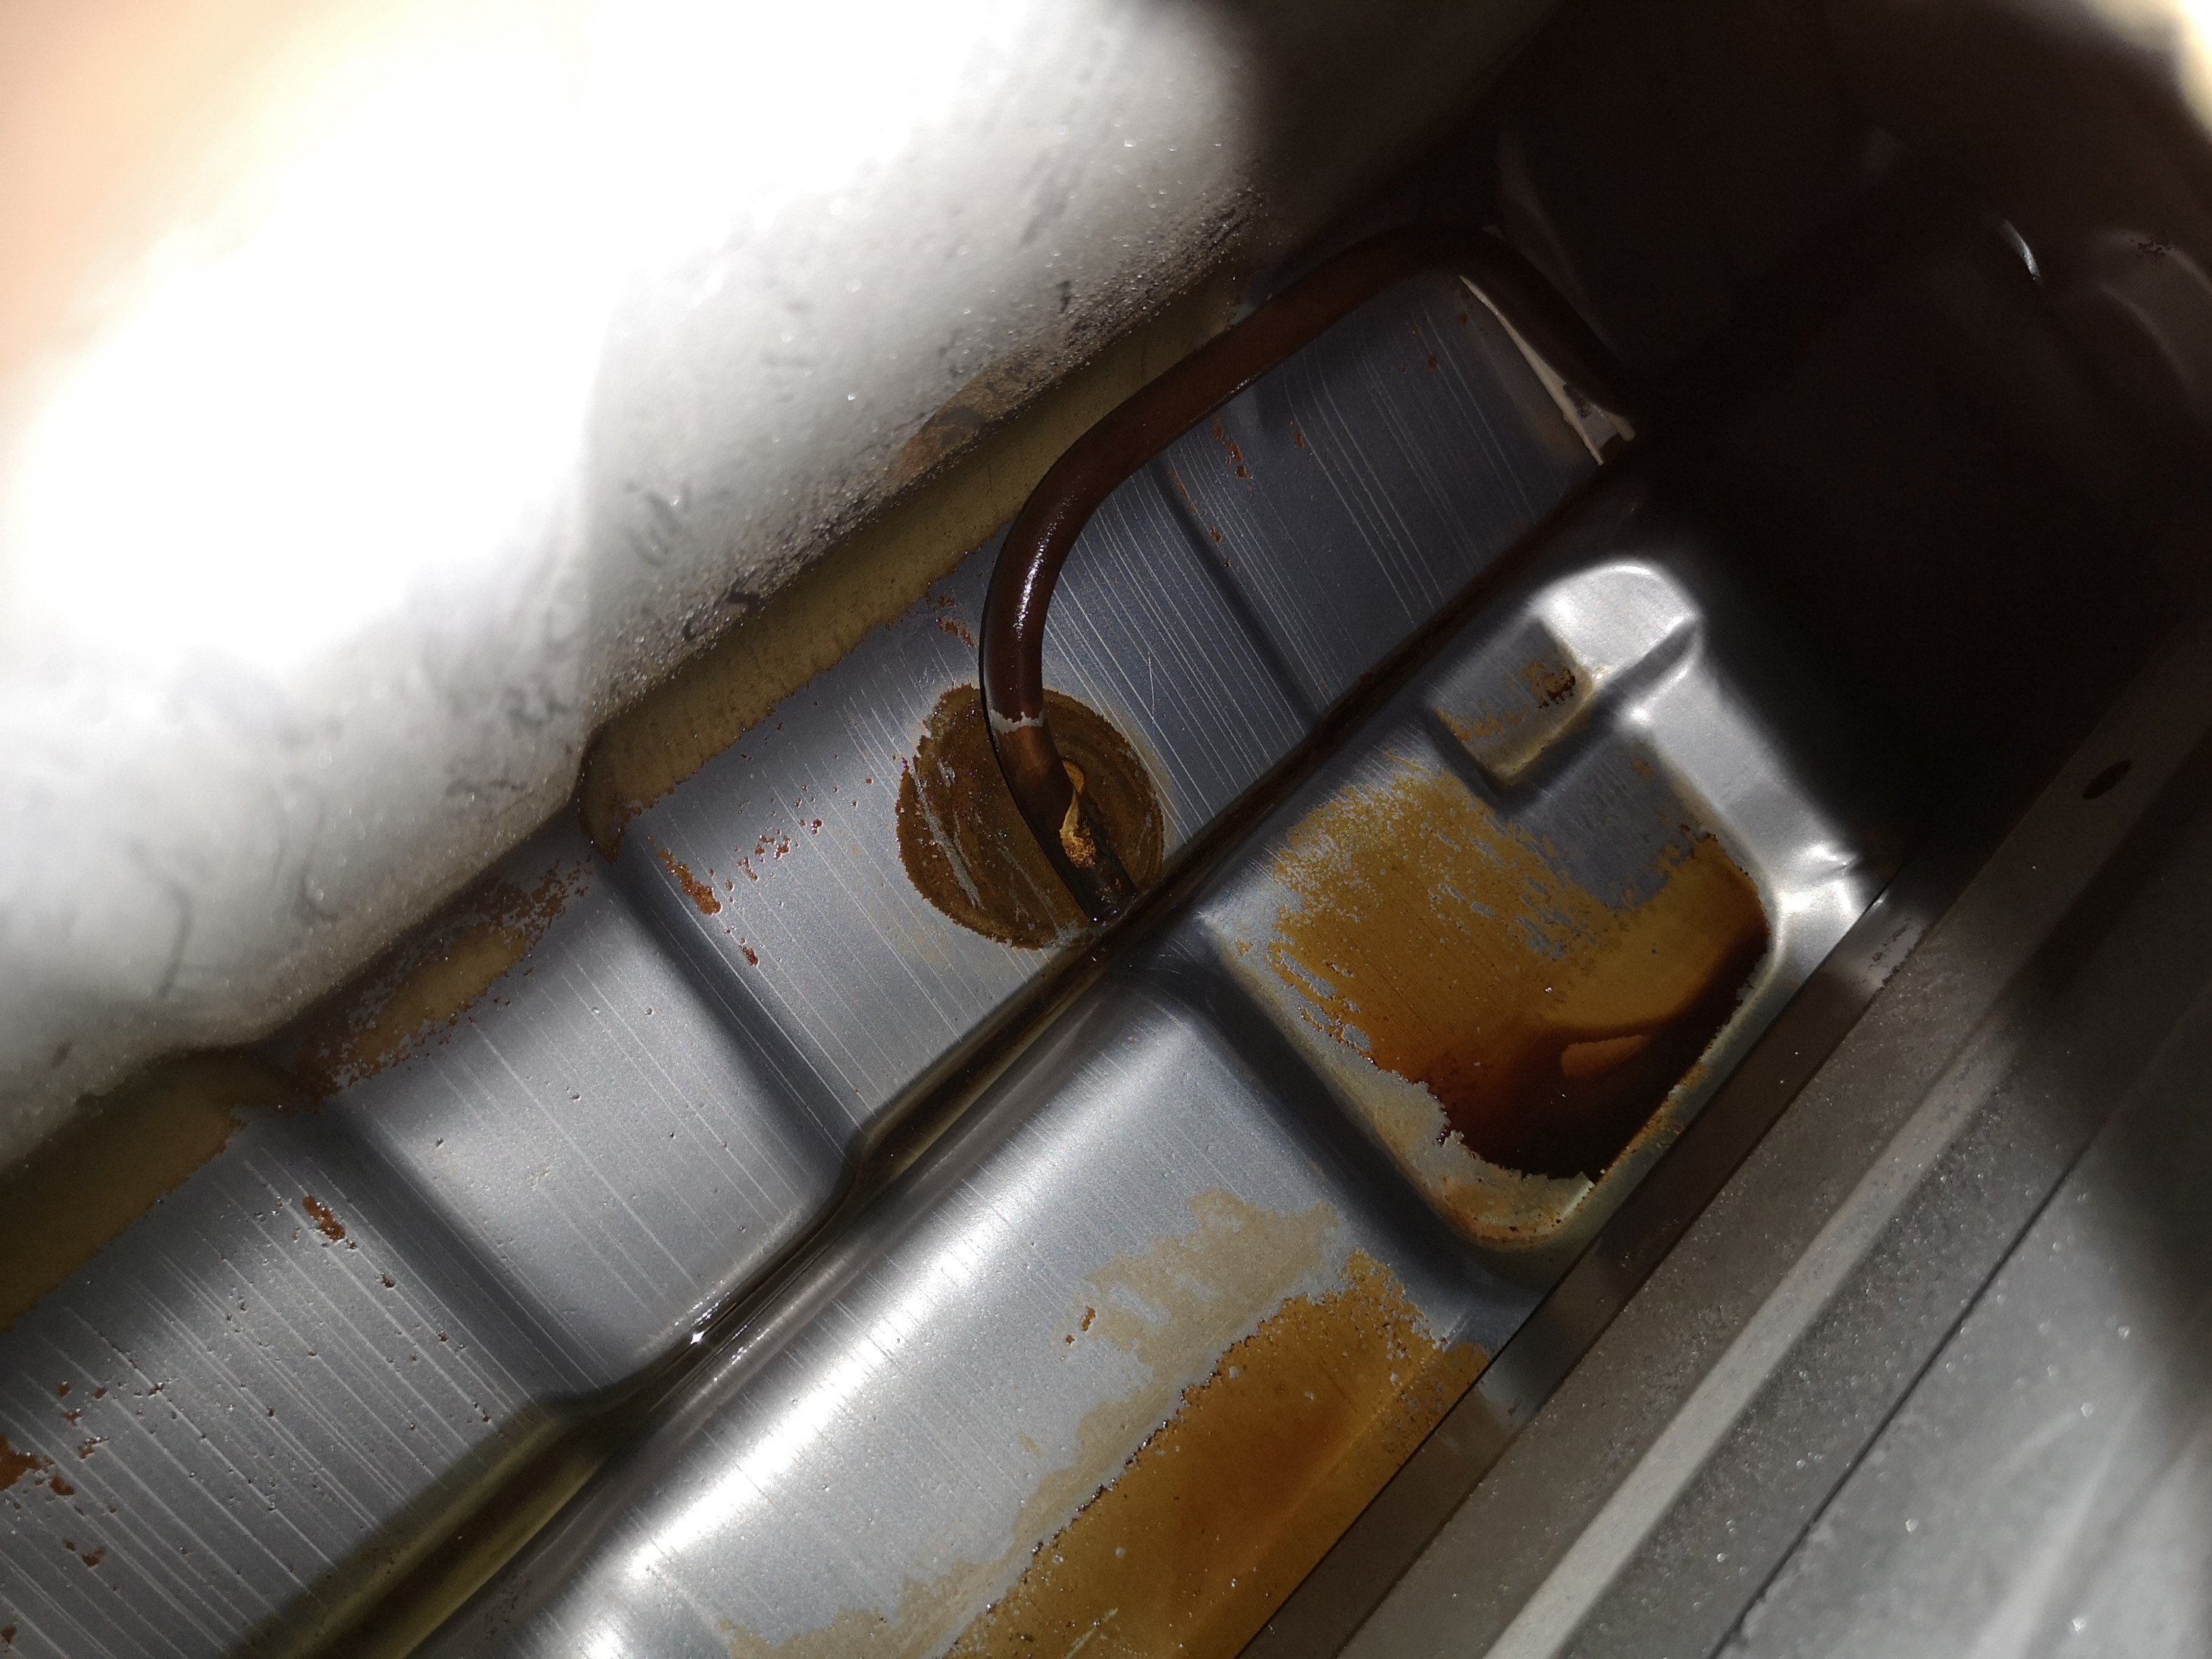
This shit has been the bane of my life for the last 5 years, clogging everything up. Read today online that the best way to get rid of varnish is with caustic soda, so off to miter 10 I went and bought 500g of sodium hydroxide. Put it in with 7 ish liters of water.. Neck minute.. Beer anyone? That was extremely satisfying. Why the fuck I didn't do this all those years ago I'll never know but the results speak for themselves.
8 points
-
So, thanks to an @ajg193 referral, and @kyteler for posting the link over in the discussion thread, this happened: Then last friday, this also happened: That's new-ish to Chch, has an 850cc Dai il3 transplant, and the owner stopped to say hello.
6 points
-
This thing got a good dose of mud and dust during Te Urewera Undertaking a couple of weekends ago. It performed great and didn't miss a beat over the whole 550km distance! Only issues to report were the rack failing on Day 1 due to too much weight bearing onto the rear guard. It bent rack far enough that the rear wheel caught the numberplate and folded it upwards (folding the guard in half at the same time). The guard pulled straight (enough) and my tools rode in the service wagon for the rest of the event. Notice the relocated number plate too. Hah. The other issue was on day 3 when my fuel can (now strapped to the seat) came loose and blocked my exhaust! It happened just after going through a ford, so I was looking for wet spark components. The plug, coil etc were all dry as a bone and it wasn't until a few minutes later that I noticed the fuel can was blocking the pipe. It was super close to burning through and could have turned me into a fireball . Such a great way to spend a few days and I'm already hanging out for the next one! It's given me some inspiration to start working on the blue MX again, so I'll start chipping away on that over summer.
6 points
-
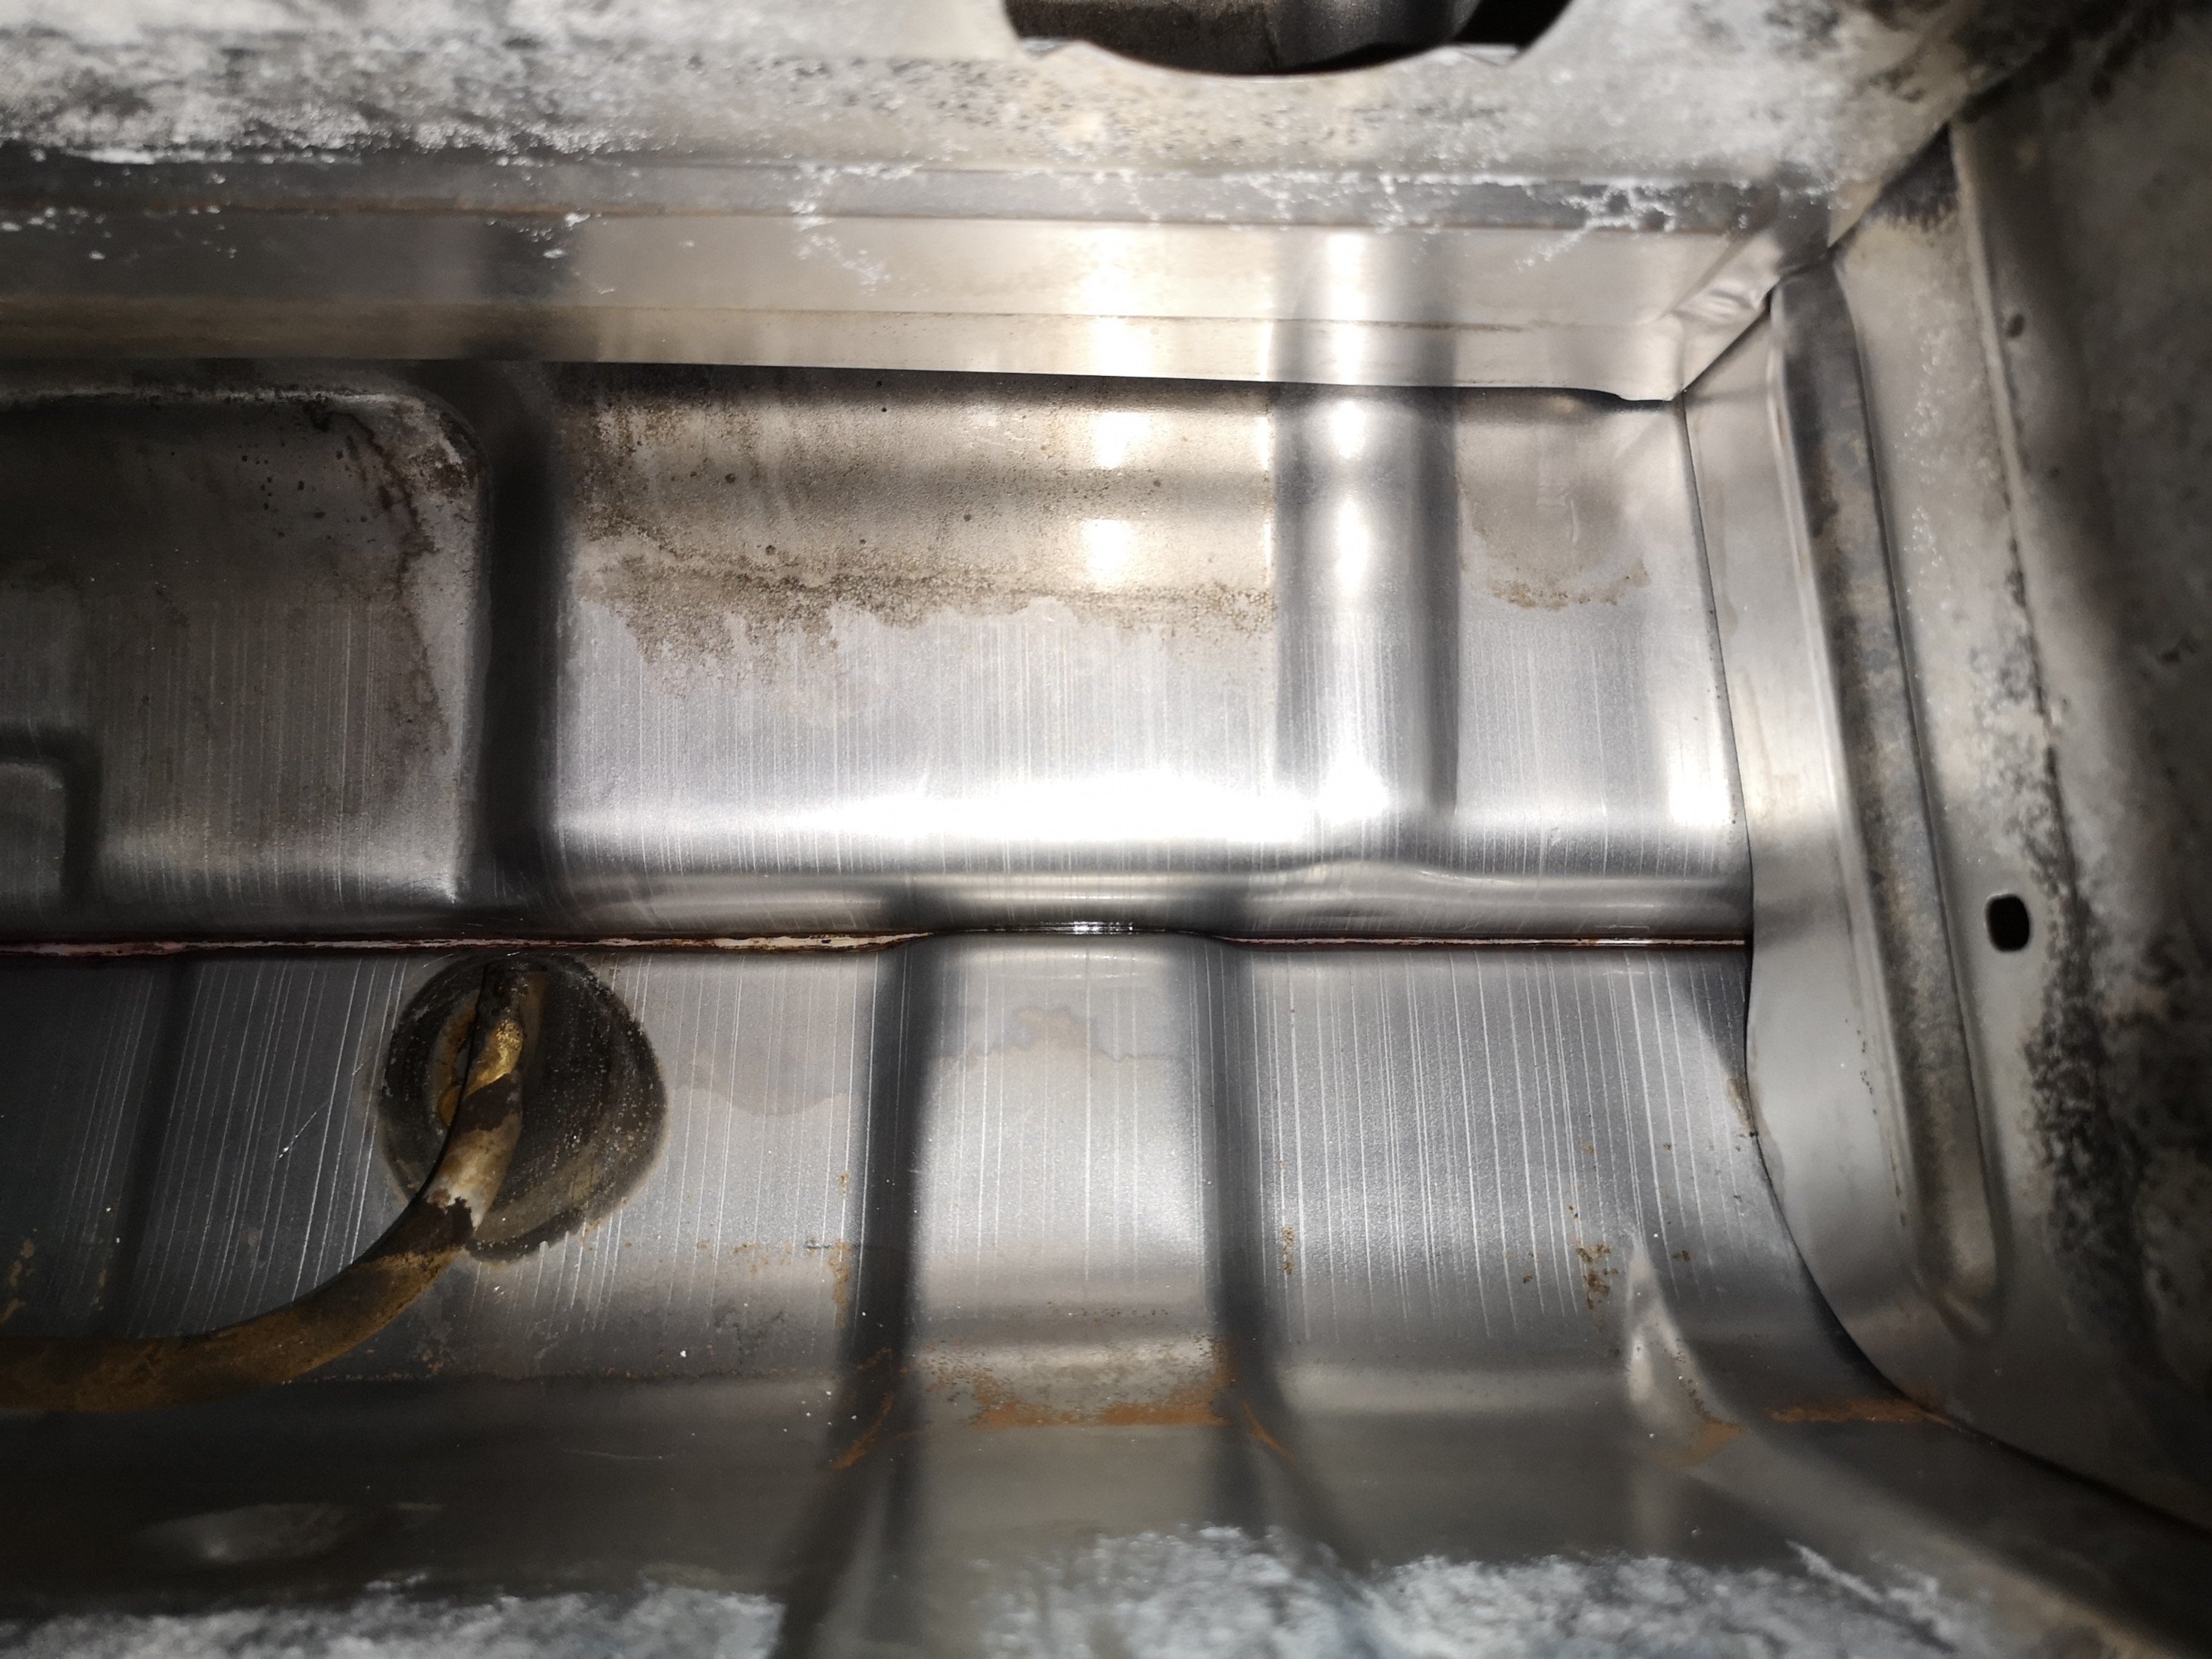
Nice and clean.. Gave it a rinse out with detergent and plenty of water, the half a litre of meths to get all the water out, let it sit in the sun for everything to evaporate while I had a beer.. Still a bit of the white oxide around but I'm not so worried about that, hopefully now I can have some trouble free motoring instead of stopping (sometimes every 5 km) to try and get rid of a blockage..
6 points
-
The second one...5 points
-
It’s been over a year since I have done anything with this and it’s still the same lol. 2 Door GT is off to paint shortly so this is next in the queue. Trying to decide what engine to use in it. I have a 140BHP Precrossflow with all the good gear and a Lotus Twincam which I really want to put into something. Lotus engine is a bit more work as battery goes in the boot etc.Body and interior will be all original Ermine White with Black Trim.5 points
-
Yea so I have modded that solenoid setup cos there was an extra pipe leading from the inlet straight to the outlet, but into a separate spot in the outlet banjo that was separated by an oring. The solenoid when it was unpowered would let fuel flow directly back to the outlet. Fuck the complication, I sealed off that pipe, removed the o ring that separates the banjo so now the outlet is 100% the outlet. I'll time it up tomorrow as I have the tool, go through everything else with a fine tooth comb, then see what goodness arrives.4 points
-
My Vruzend kit arrived so had a play with it. I bought used batteries so had to clean up the old spot welds on the terminal ends with a dremel grinder. Then just systematically assembled the kit. I just used body weight and bits of wood to seat them in the holders... And when all clicked together and locking screws installed you add the parallel strips... Then a figure 8 pattern to series them up... And the other side similarly, but offset. Had to take care not to short anything out cos there's a bit of potential there when series'd up... And still got the BMS to hook up... Looks straight forward enough but still have some connectors to arrive before I start soldering things up. Also pretty keen to cover exposed bus, but not bad effort for the day after crate day...4 points
-
So we did a shuffle on the weekend Yeah I acquired a Blue one that's been shed stored since 1997, figured it was the second Best one I have so deserved a shed spot and OFC the Wifes Datsun too now to start piling boxes on all of them!4 points
-
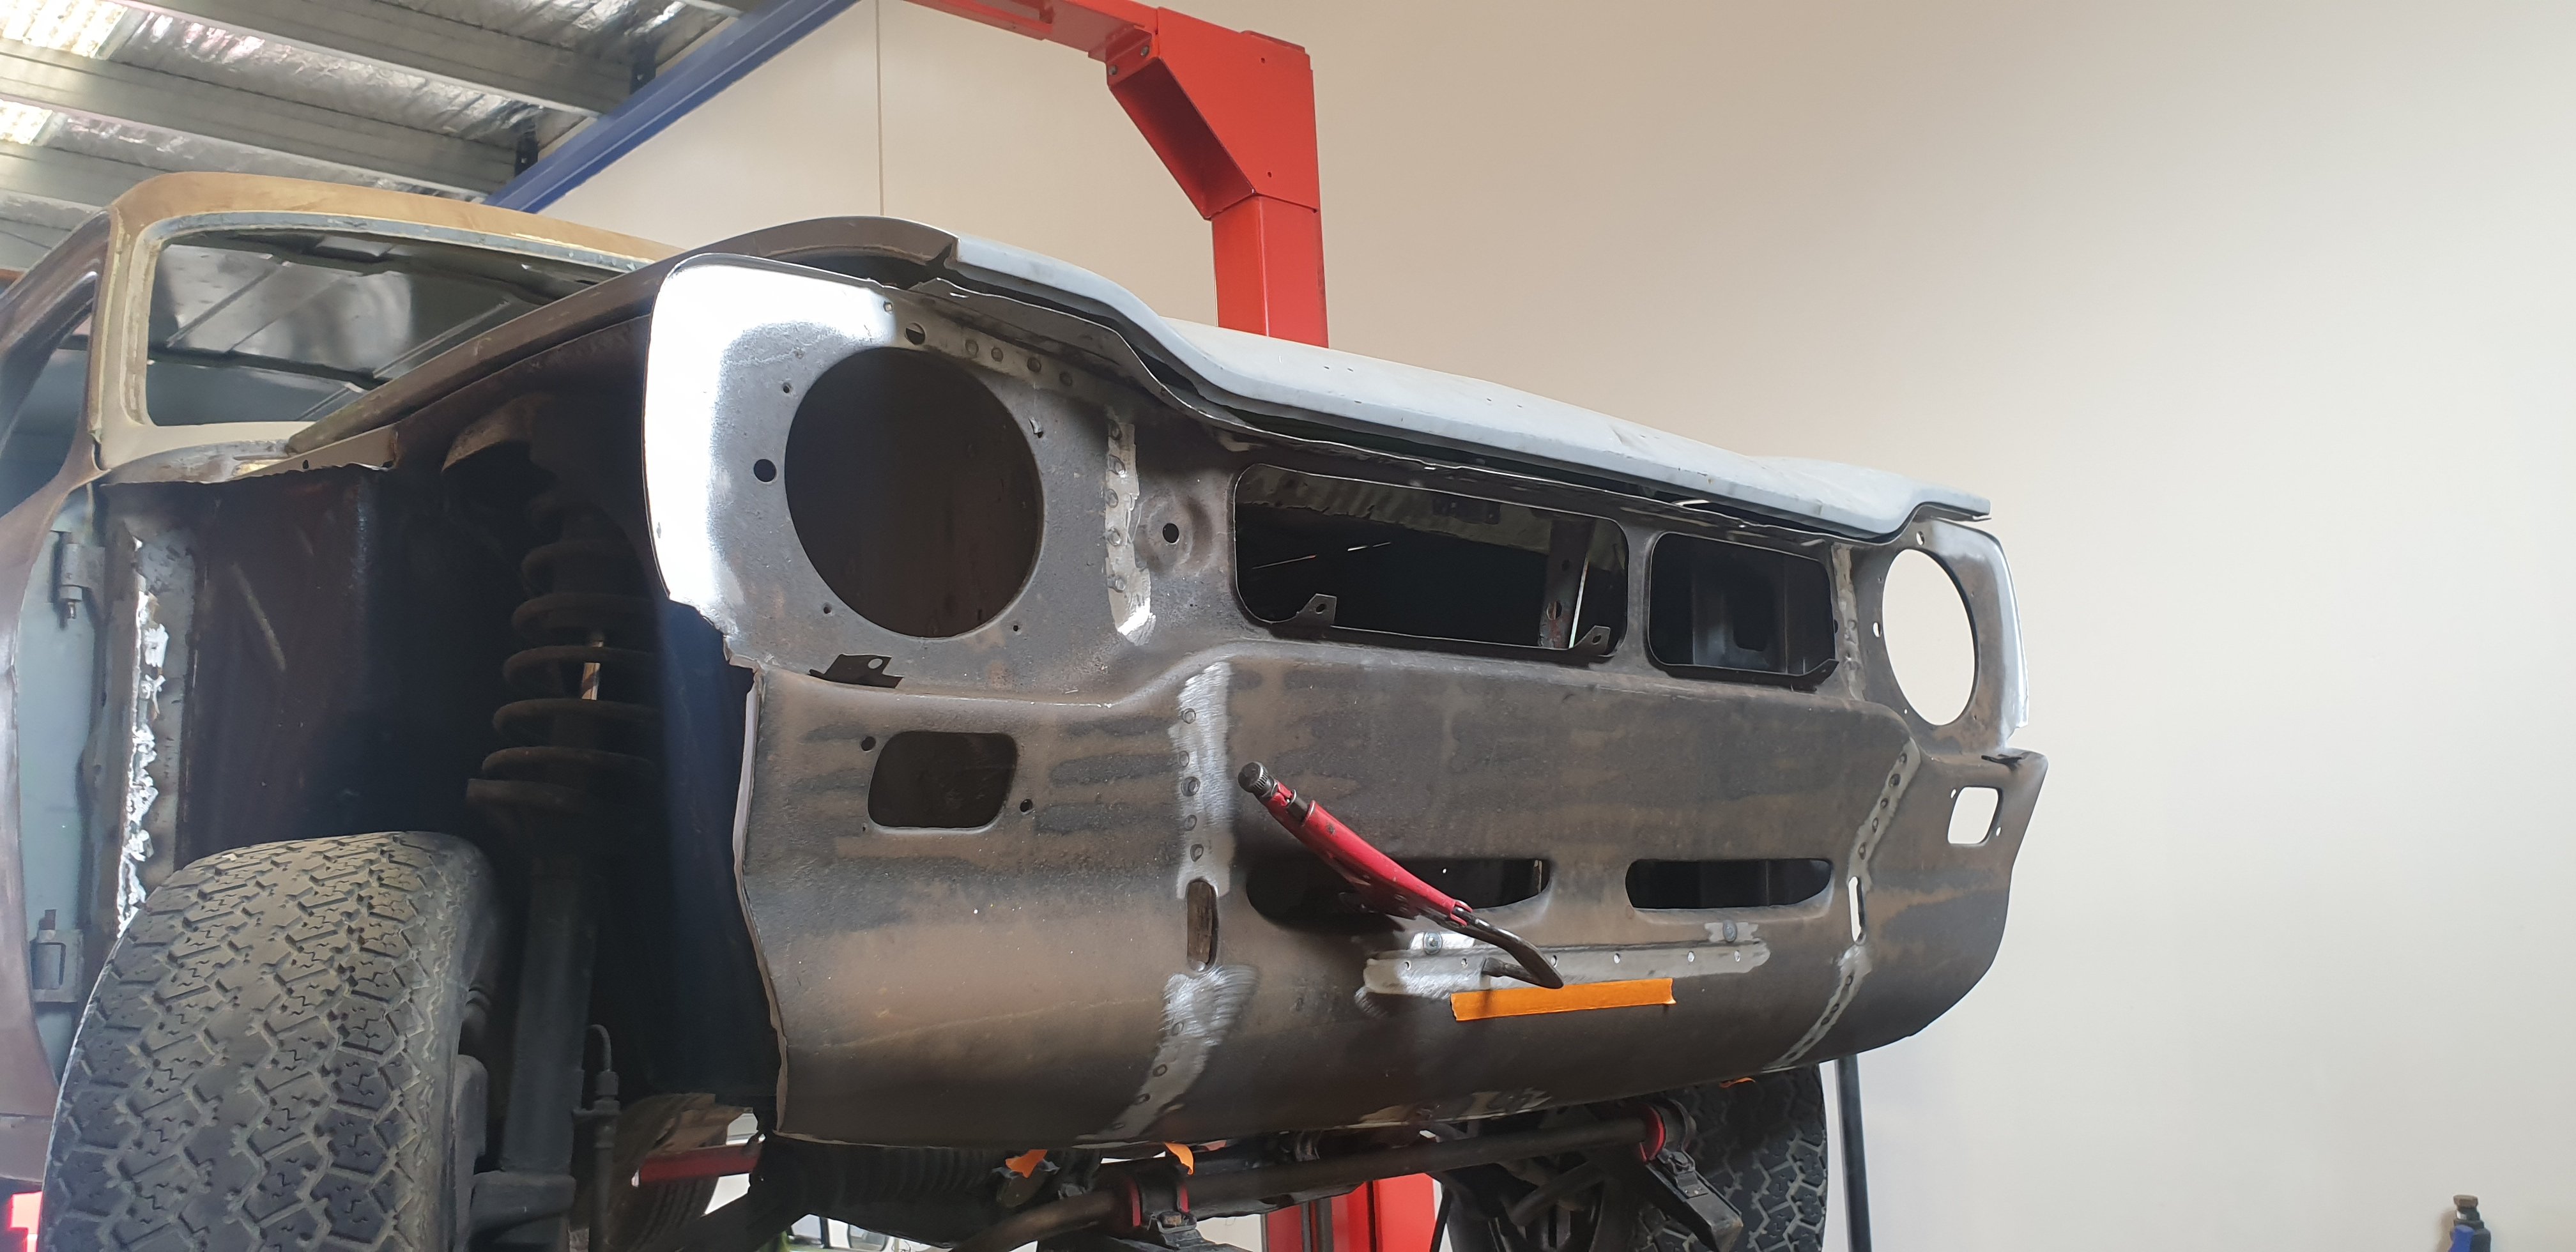
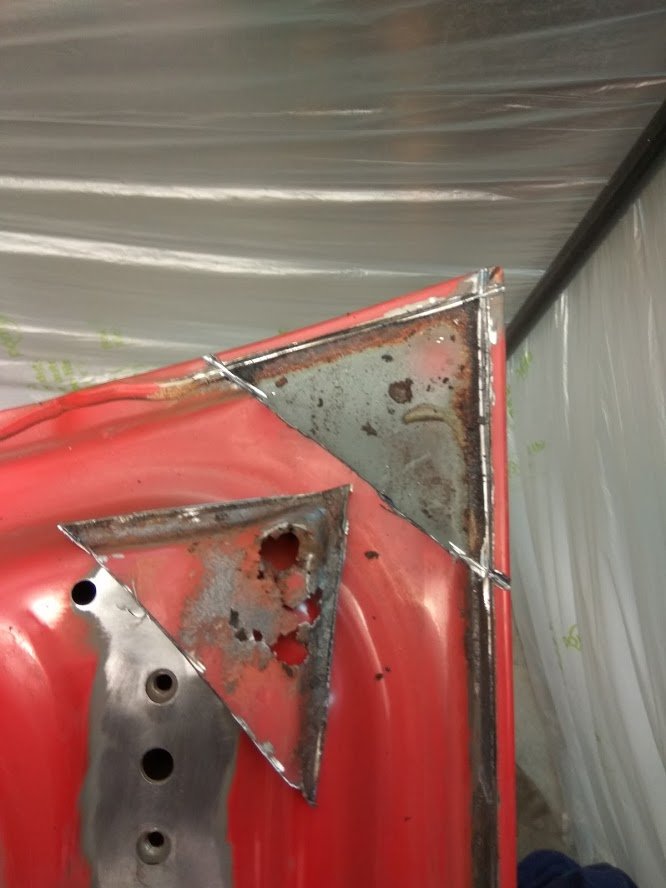
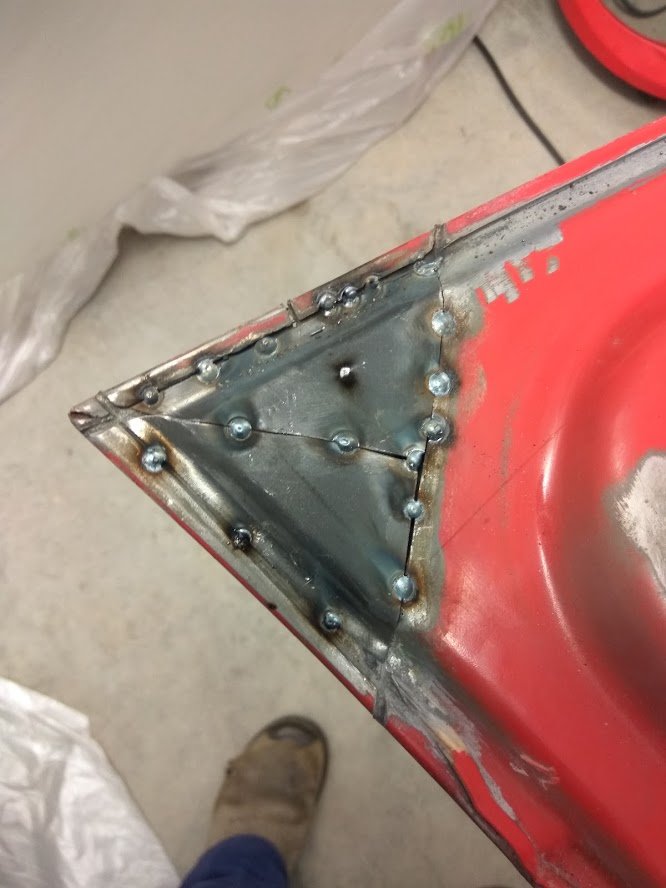
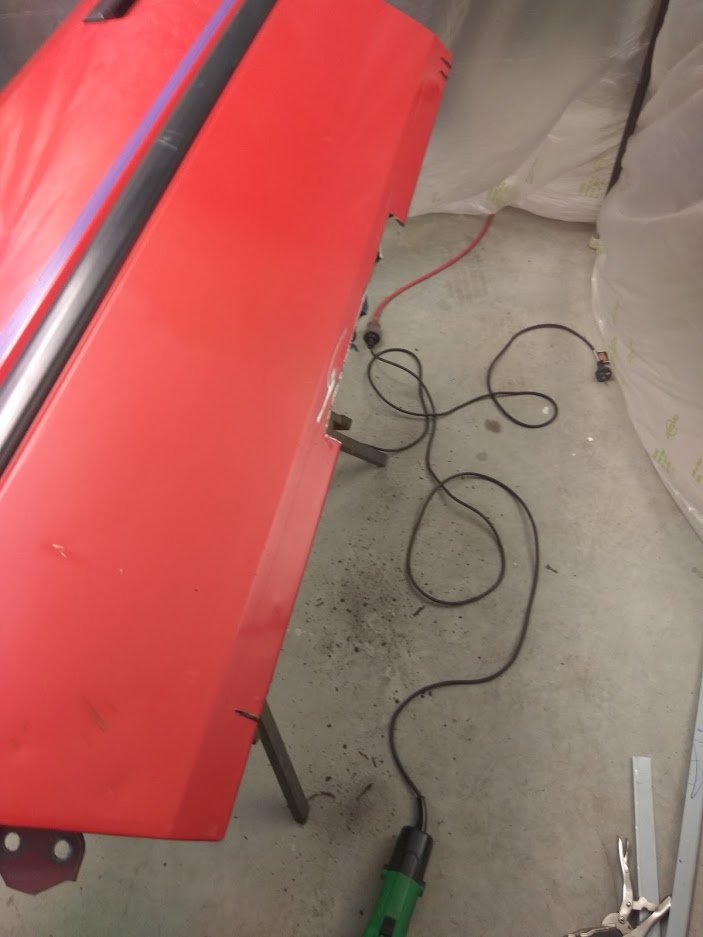
New radiator support panels and lower crossmember in. Rust repairs done and new front panel all spot welded on. Happy days !
4 points
-
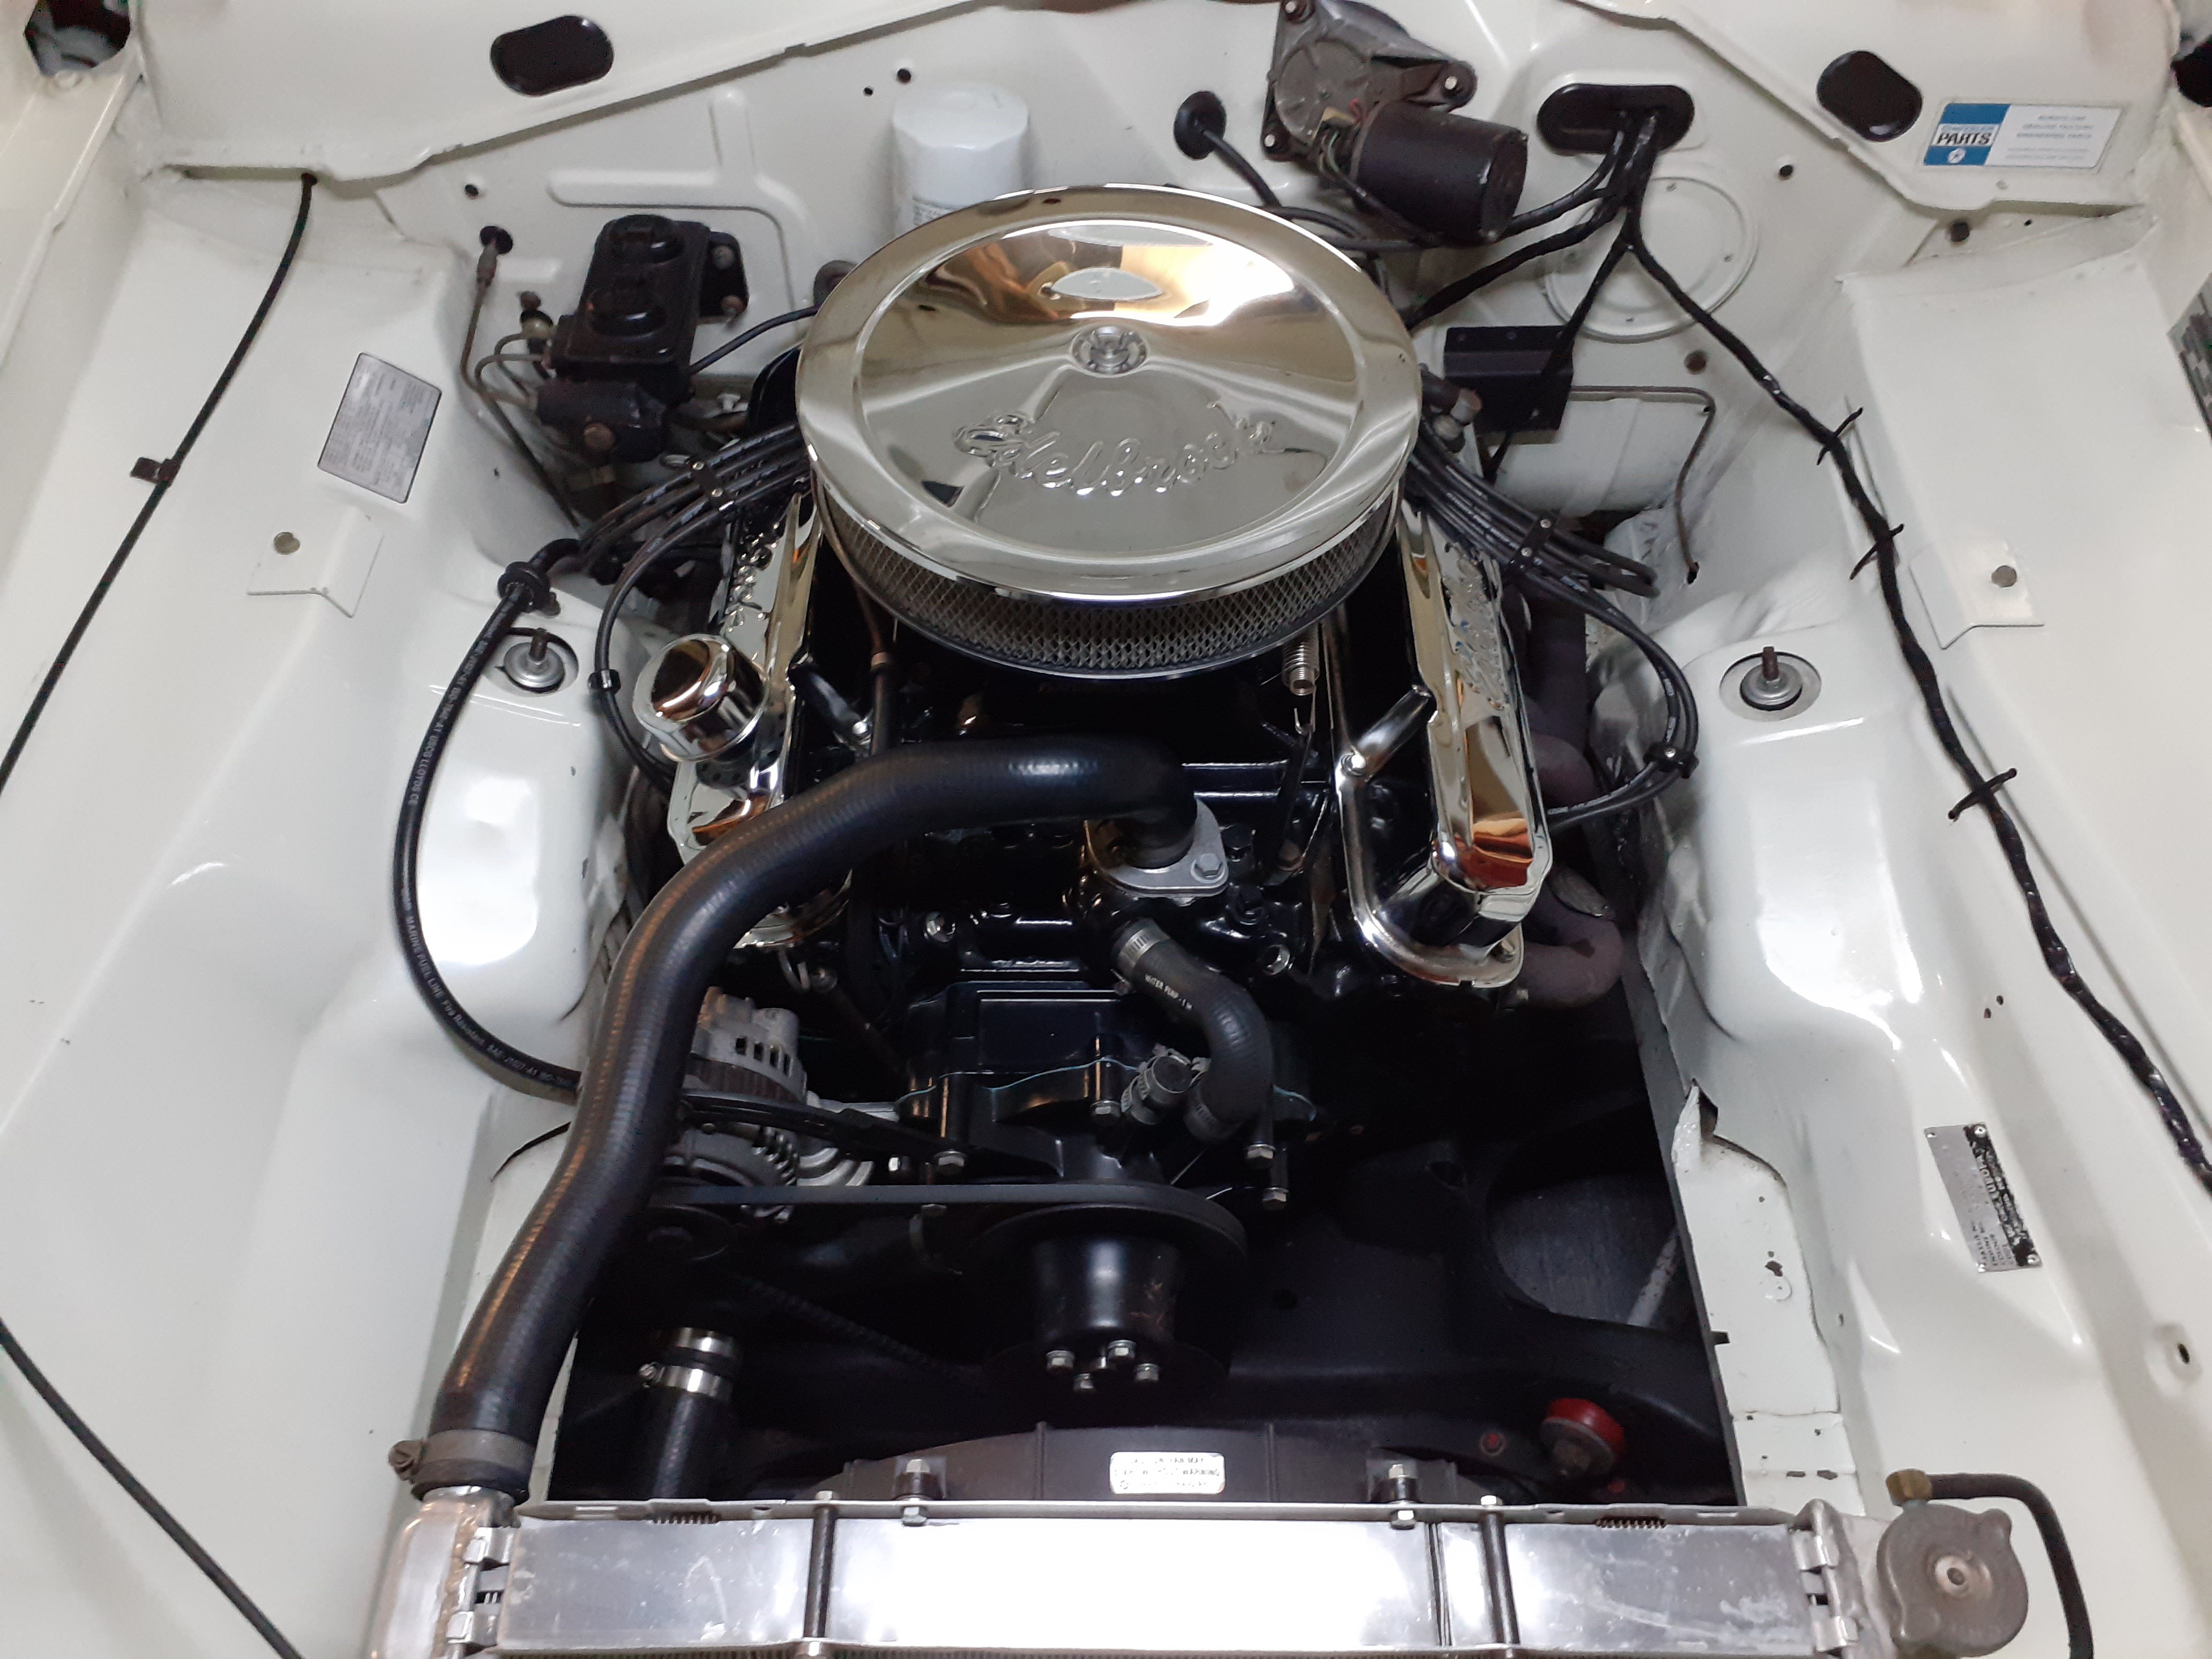
Sigh, It seems like my life is a never-ending cycle of messing with KJet fuel pressures. But hopefully, this will help My quality German made KJetronic pressure testing setup arrived. Huge thanks to MissingParts on eBay, as this is some proper quality gear, and for less than I paid for the other setup. Nicely crimped ends, with quality rubber and fabric braided hoses The seller has a great sense of humour. "For oldtimer cars" I hooked the new setup up, which was a lot easier with the banjo fittings, rather than the generic screw fittings Now it was time to confirm the readings from the old gauge. Previously the cold control pressure was stone dead on the gauge, at near enough zero psi. This gauge, not so much. We want cold pressure here, near the green line (depending on ambient temp), otherwise it's too lean when cold So, what about the system pressure, which wouldn't go over 5bar, no matter how thick of a shim I fitted? Off the gauge; over 6bar And we want that at 5-5.5bar, on this green line. Too high and the control pressure will be too high also. Well damn. No wonder it still wasn't happy. I pulled the two additional shims out, and we dropped to 5bar system pressure. Better, but not perfect. I knocked the adjustment on the WUR to get the control pressure down to the required half bar, but the car wasn't running right. The next step was to step back, reset everything and presume that everything I had done with the old gauge was buggered. Because the system pressure was a tad low I wanted to add my small extra shim and see how that increased pressure (i carefully measured it when I made it, to add 0.5bar). Hah, perfect! I found this amazing step by step guide, which I followed and it worked perfectly. Big thanks to the author of that. The first step was to make my WUR adjustable. This is so that if I knock the pressure adjustment down too far I can use a nut to pull the pin back out, instead of having to remove and disassemble it to tap the pin back out by hand. I drilled and tapped the pin to M5x0.8 and using a screw, nut and washer, made it adjustable. The guide that I used is here. The basics of the mod are that you screw the screw in tight (or Loctite it in so it cant turn) and then tighten the nut down to pull the pin out of the body. To push it back down you wind the nut completely out, against the head of the screw and then use a punch and hammer to tap the screw/pin down again. It would be a lot easier to use if the screw didn't have a flange as there is limited space when mounted on the car, but its what I had on hand. With the WUR apart again I replaced the O-Ring for the diaphragm and flipped the thin metal diaphragm to the other side to even up any wear. Following the guide, I found that my initial pressure with no springs/strip was OK, and the pressure could be increased to the correct level by hand. Good. The next test had me checking the heater works, which when holding it in my hand with power applied, I could confirm it did get warm to the touch. Good. Next was to test the pseudo-warm pressure by reassembling the WUR with the springs, but without the heater/strip. This applies pressure to the mexican hat and diaphram, to emulate the warm pressure. This should be 3.5bar or HIGHER. I had just under 3bar. Not enough. This is where I had to get creative and work out how to adjust this. On other WUR, there is an adjustment screw under a brass cap on the base. You drill through that cap, and there is a hex screw to raise or lower the platform the springs sit on. I tried drilling what I thought was the cap, but turns out the base for my platform is actually a pin pressed into the housing. Its the recessed circle with a hole drilled in it. So, with callipers in hand, I tested/measured to see if I could use a hammer and punch to also adjust that like you do the cold pressure pin. Sure enough, some careful whacks of the adjustment tool, and I had raised the platform, thus increasing pressure on the springs. 4bar is perfect. I fully reassembled the WUR, heater/strip and all, and reinstalled on the car to test/adjust the cold pressure. I got this easily down to a solid 0.7bar (within the margin of error for the ambient temps, I didn't want to mess around too much getting it lower) I connected the heater and watched as the pressure slowly increased. The heater and strip were working perfectly. I got it near the required 2.9bar, but it was still a tad low with the engine running at temp, so I used the one last adjustment available; tapping the main circular unit on the WUR down. This is the part that the two fuel hoses bolt onto. This is also pressed into the body, and like the other two adjustments can be carefully tapped down with a punch. This takes very little to increase the pressure, but be very careful not to punch it down too far or the WUR had to come completely apart again to tap it back out. I alternated tapping the punch on both sides, where the arrows are pointing. This resulted in a nice 2.9bar when warm. Excellent. After some tweaking of the idle and CO screws, the results were immediate and obvious. The car ran and idled better than ever, including idling under 2000rpm for the first time. I set the idle to about 1000rpm, which is higher than factory spec, but it felt happier there than the 800-900rpm recommended. http://youtu.be/3VVylMr5BVI The only thing left to do was to put on my big boy pants and try taking it for a run. The last time it was on the road it constantly tried to die on me and left me blocking intersections. Not ideal, and no wonder I was nervous. This time, it started and was driving perfectly. It was pulling strong and felt good... until the hesitation kicked in again at high RPM under load. The exact same issue as before I rebuilt the Kjet system. I came home with mixed emotion. The car ran and drove well unless I got on the throttle. Kind of a win, but also a fail. Mrs Petrol and I were discussing the issue and she reminded me that her old Alto used to buck and hesitate if the fuel was too low... Surely that's not the issue? Nooooo If you look at the design of the tanks, the feed to the pump is at the front of the tanks, toward the front of the car. It's possible that under acceleration the little fuel in the tanks was sloshing away from the outlet and starving the pump. Maybe. The orange arrow is pointing to the fuel outlet on that tank, the other is on the other tank in the same location. Well, I guess I limp the car to the gas station and chuck some gas in and see what happens. Well, what does happen is that if you don't have both fuel caps open when you try to put any fuel in the tanks it all comes rushing back out and pukes down the side of the car and onto the ground. Oops. I added 20L to each tank, at great expense, and guess what, my Wife was right (like usual), the hesitation is completely gone, and it will happily rev out to redline under WOT. Amazing. The sound and feel of the car is crazy. It's so loud, but makes a great noise. You sit so low, but the car feels big. Even when it's not moving everyone is breaking their necks to see what it is. It's not a car for the shy. It does leave me wondering a little, if I had just filled the tanks when I first got the car, would it all have been OK anyway? The main issue I had before I rebuilt it all was that hesitation issue. In saying that, it's starting, running and driving better than it ever has since I got it, so the work was well worth it regardless. I'm stoked. Still some things to tidy, but it is almost ready to go for a WOF check.4 points
-
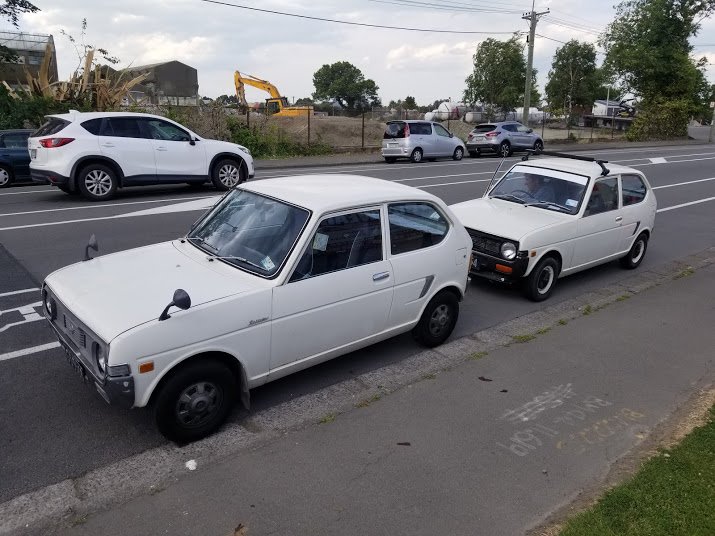
I definitely have a problem. This one is an Aus assembled but JDM Diamante 30R-SE wagon, so full spec with sunroof, leather, driver's airbag, ABS brakes. It's a higher trim grade than my 30R-S sedan but being Australian assembled it only has a SOHC engine, not as fancy climate control etc etc. It was cheap, and is another oddball so yeah.... had to have it.3 points
-
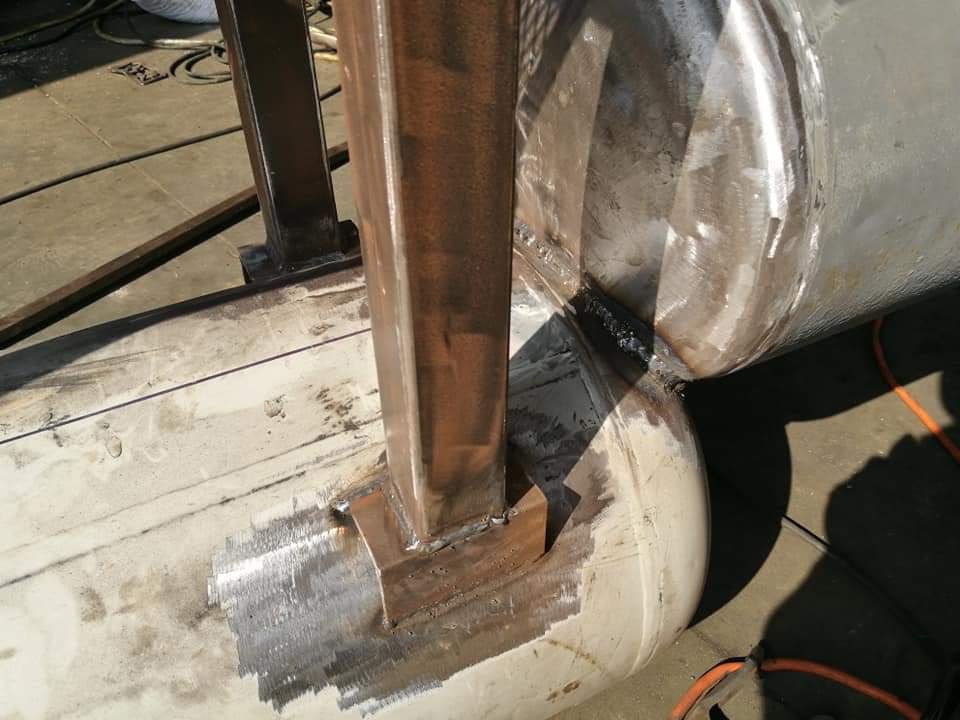
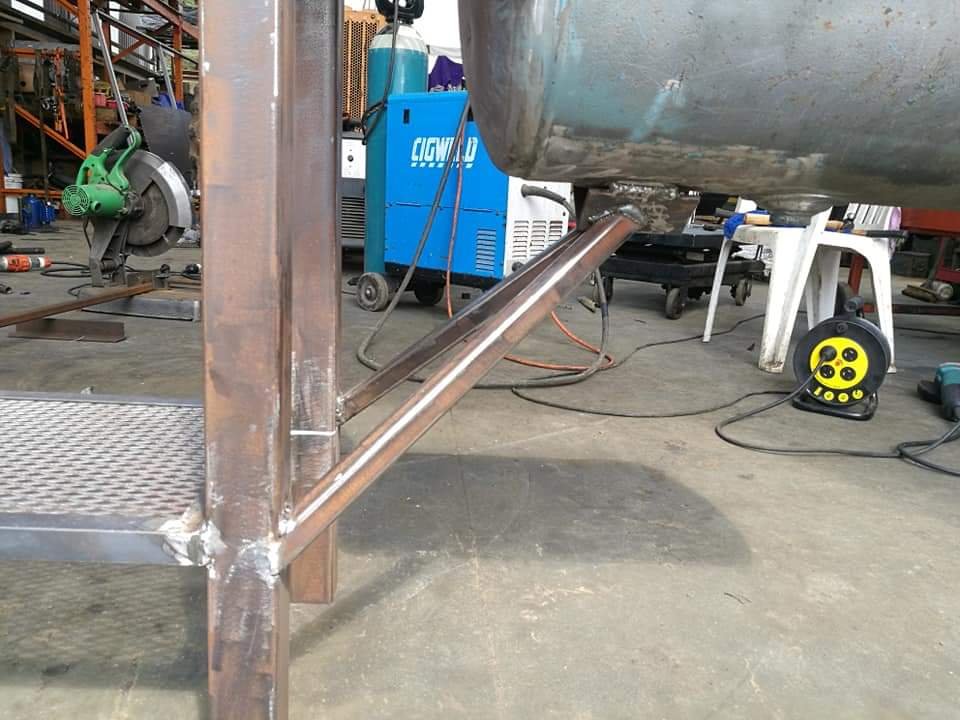
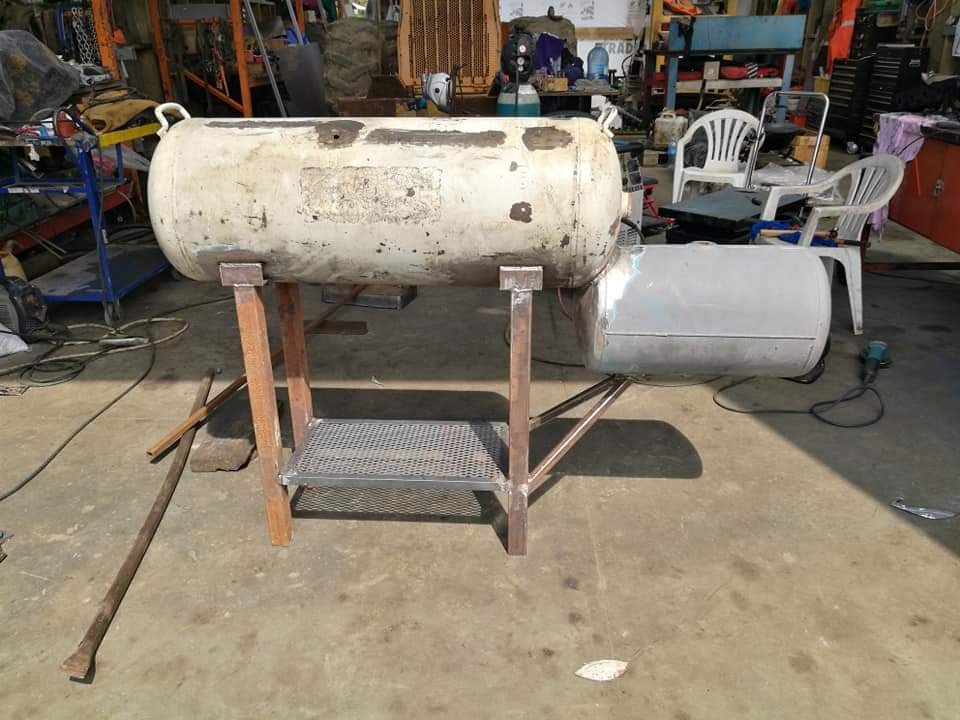
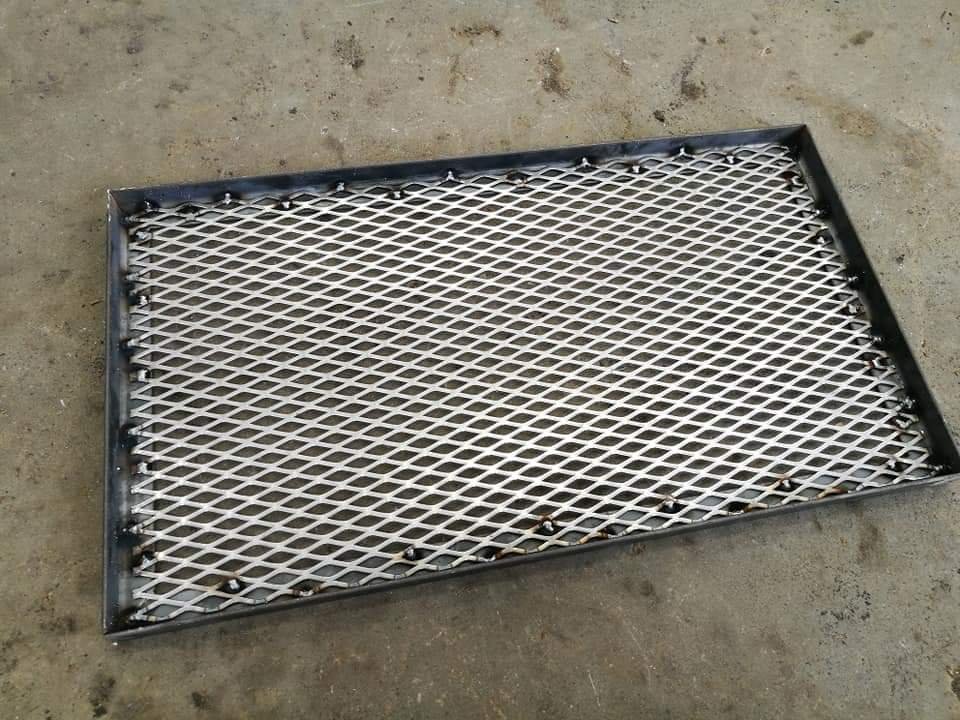
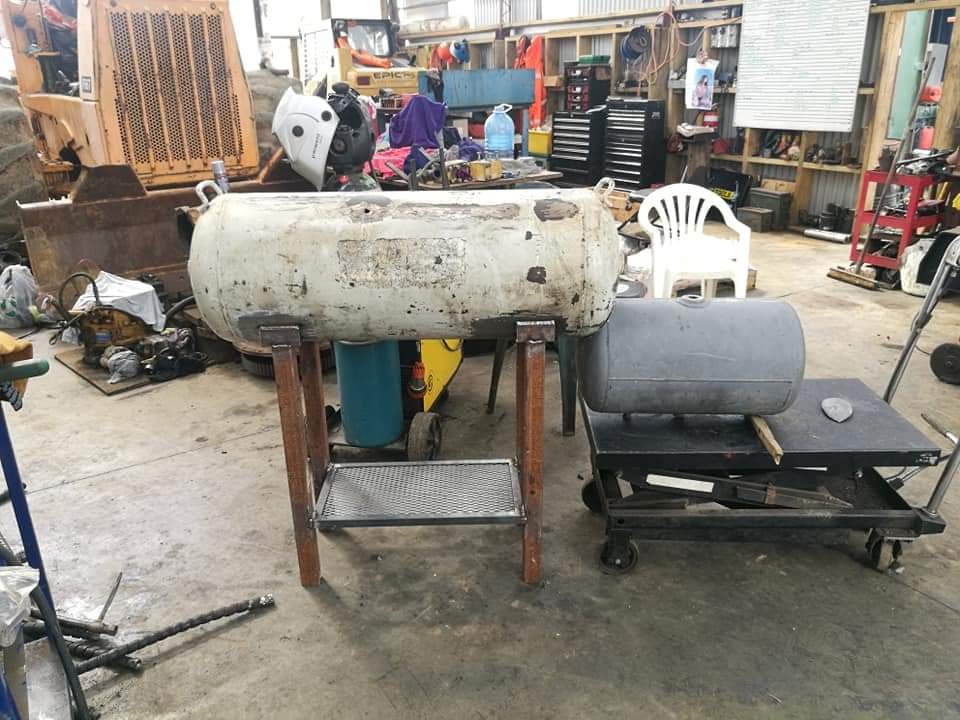
Yesterday morning I grabbed another roll of wire then tried to get my welding on, the bloody mig stopped working (bad contact on the feeder wire plug) so ended up having to use our old backup welder. The under side was the closest so had to fill a little which I'm not too happy about but it looks ok and is hidden. I also cut some support legs out of 20(or 25)x5. Had to piss around with getting the angles right so it sits relatively even. Mated these to angle and stitched them together. Pretty happy with how it looks and sits. It's heavy as, maybe a bit over 60kg as it sits atm. I think the tanks are around 3mm. I'll weld in a foot brace to the front legs to give it a bit more weight opposite to the Fire box and help with lateral movement (it's pretty stable as it is however).
3 points
-
Two tyres the same size make a good bit of difference3 points
-
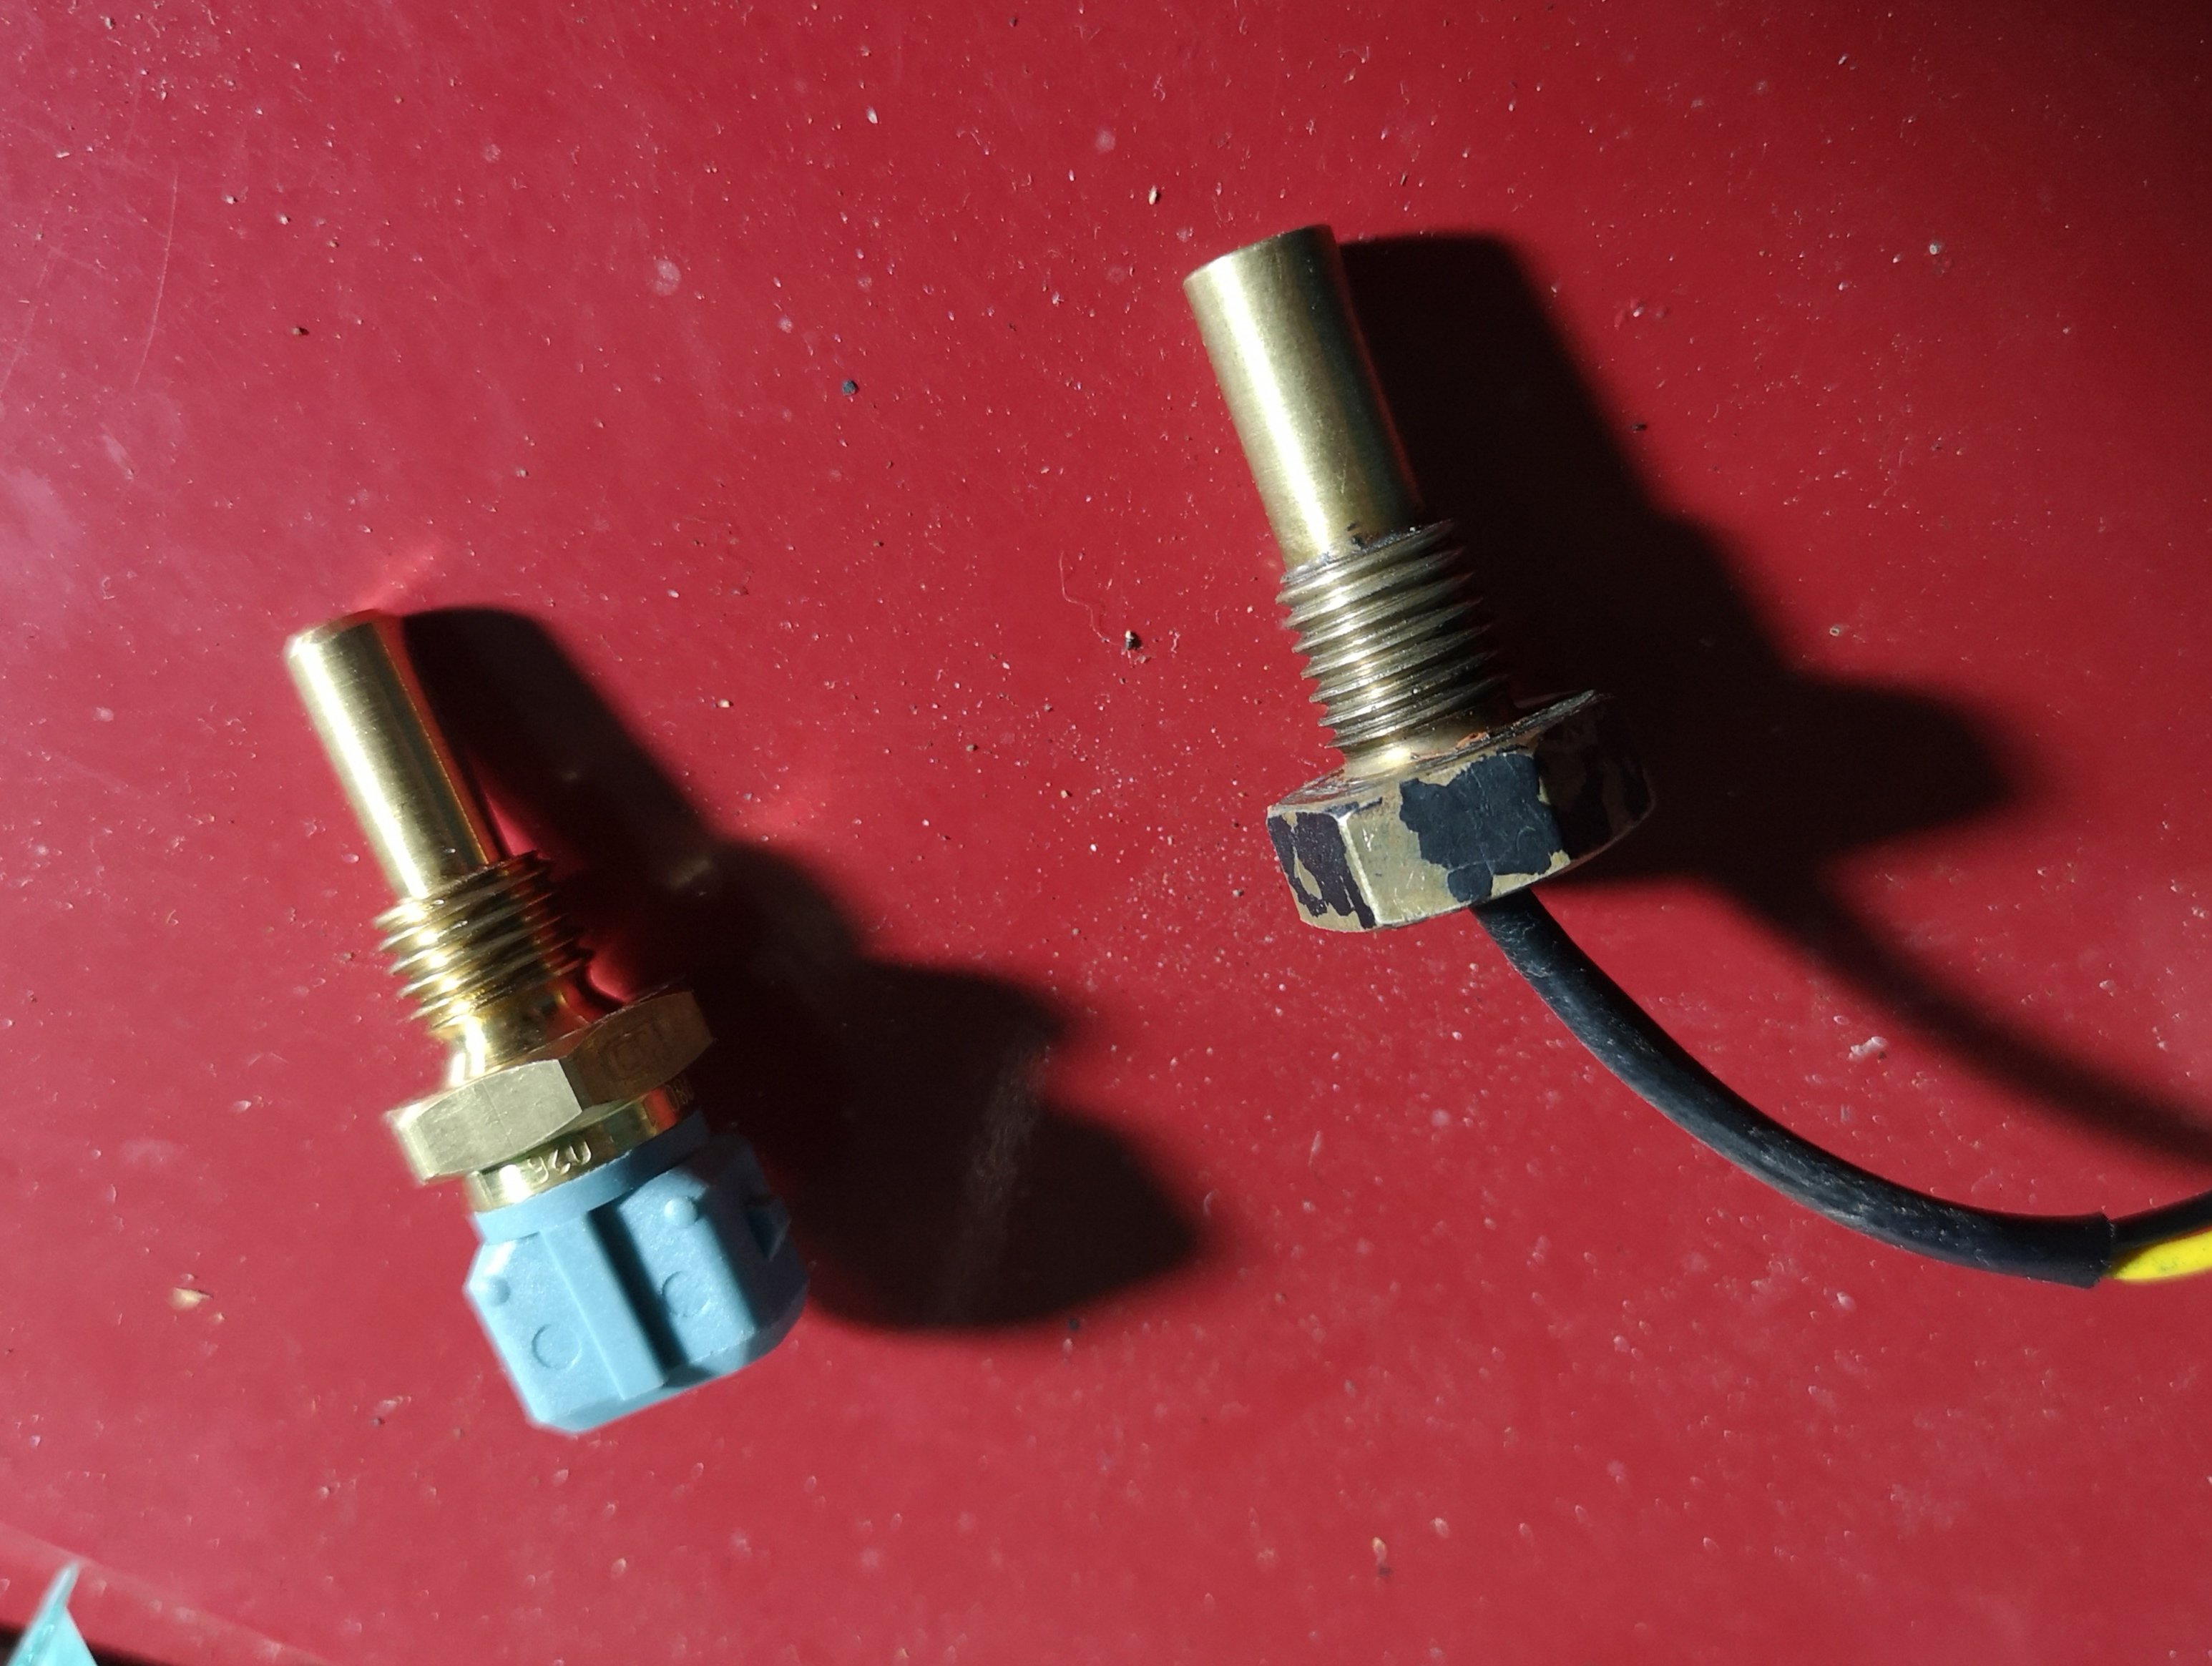
Also got the proper NTC sender.. The one I had was a PTC sender which was only used in the very early G1's which explains the problem.. This was set up for the first time in about 1997 on the cheapest link at the time which I assume was an lemv1. They switched to NTC after that.. Anyway, temp reads properly now. Got a new 40 amp relay but even that sticks on after I switch the ignition off although tapping this one solves the problem. Did try to get a 50 amp but repco/supercrap = shit selection. Might just go all out and get a 100 amp. Plumbed up the fpr last night, she's pretty tight in there so might have to reassess the plumbing as the outlet sits directly over the tank return line, which means a straight hose that puts pressure on the fittings /fpr mount when the engine rocks.. Doesn't hold pressure for very long so somethings amiss there.. Set it to run about 38psi, got no idea what they run at factory as I can't find any info at all on the egi MA.. Cunt Also managed to take her for her maiden drive today, Went really well.. Then didn't. Developed another fuel related issue with the pump somehow sucking air out of the tank, also now that the pumps cycling more fuel it's pulling more shit out of the tank. Went hard for about 100m then started missing/surging and eventually dying.. Typical. After sitting there trying to get the pump to prime I realised the vacuum line for the brakes was off and sucking a fair amount of air. Made fuck all difference once I reconnected it although I was able to limp home. Have one of those glass fuel bowls plumbed up just after the tank so I can see what's going on.. Looks like a fucking sodastream. All teething problems I guess but at least the pumps now not overheating..
3 points
-
If anyone is after a cost effective Dial Gauge, I picked one of these up today and its shockingly decent for the price. Has a certificate of NZ calibration, and has a decent heft to it, doesnt look or feel cheap. https://www.saecowilson.co.nz/#/Product/info/M339A Same with the magnetic base, better built than the price lets on https://www.saecowilson.co.nz/#/Product/info/M3292 points
-
Gonna try out the Rose and Crown carpark from this month. Meet at 7:00pm on Tuesday the 17th.2 points
-
Picked up a pine dowel for the lid handles and got some macrocarpa lengths off the olds for the bench. Cut these all down to size, then with help from the other half we sanded them back and threw some linseed oil stain on them. Sanded to 240grit and chamfered the edges. First coat of oil and pieces side by side to show the different stages. 3 layers deep (on the rark). Some sweet colour and nice grain out of the Mac. Should look pretty sweet once it's all fitted up. This is where I'm at right now. The next stage with be the lids/doors then the main chamber baffles. Will see how we go anyway. If anyone has any ideas please let me know, just making it up as I go. Cheers, Tai
2 points
-
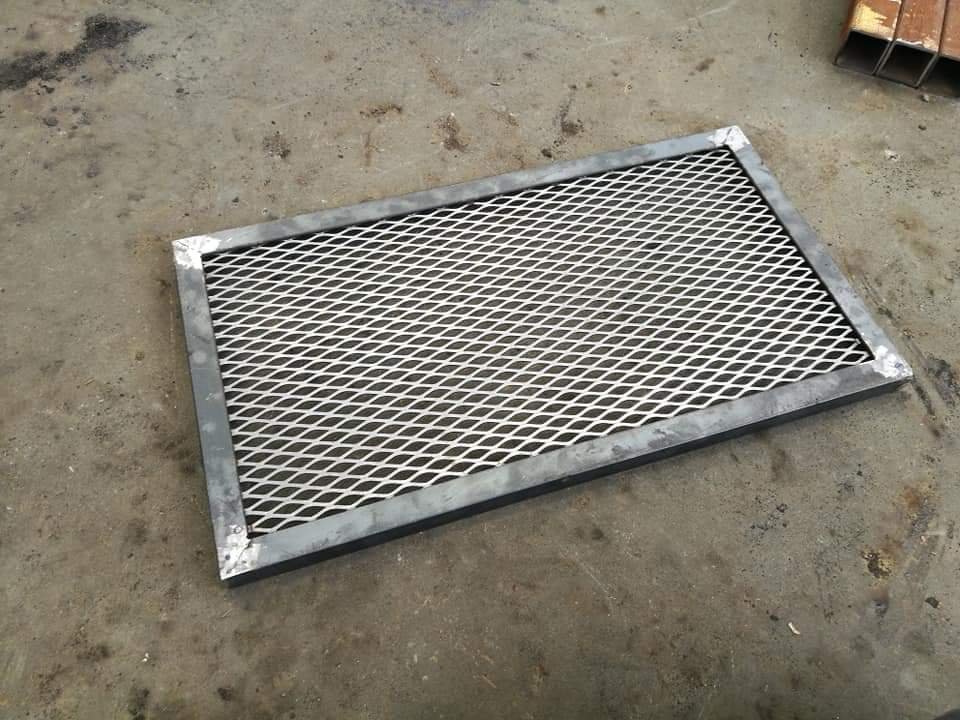
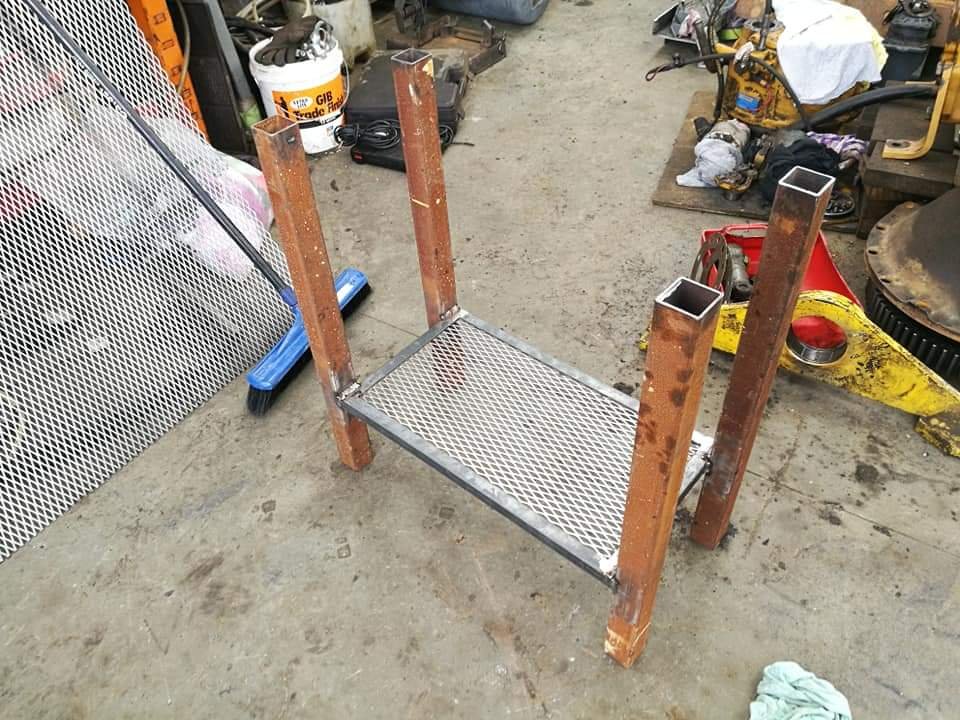
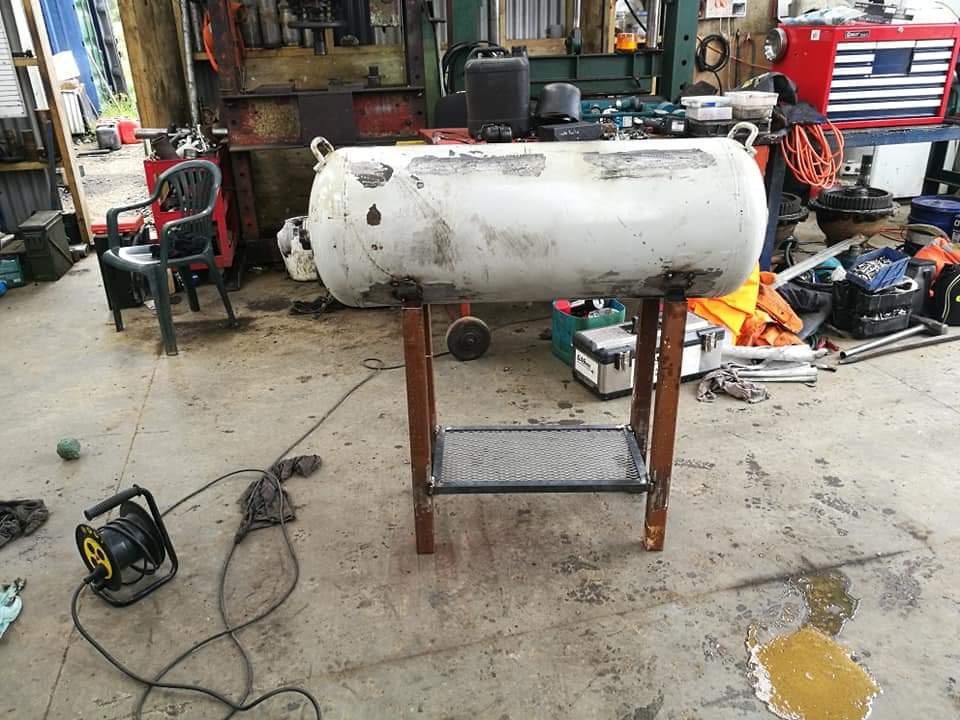
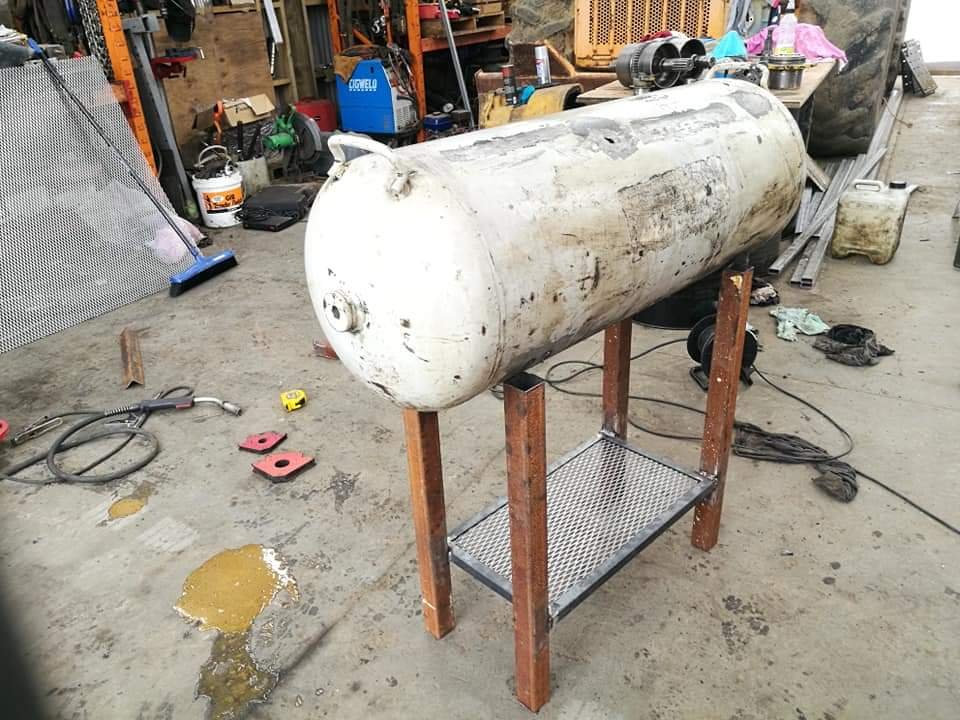
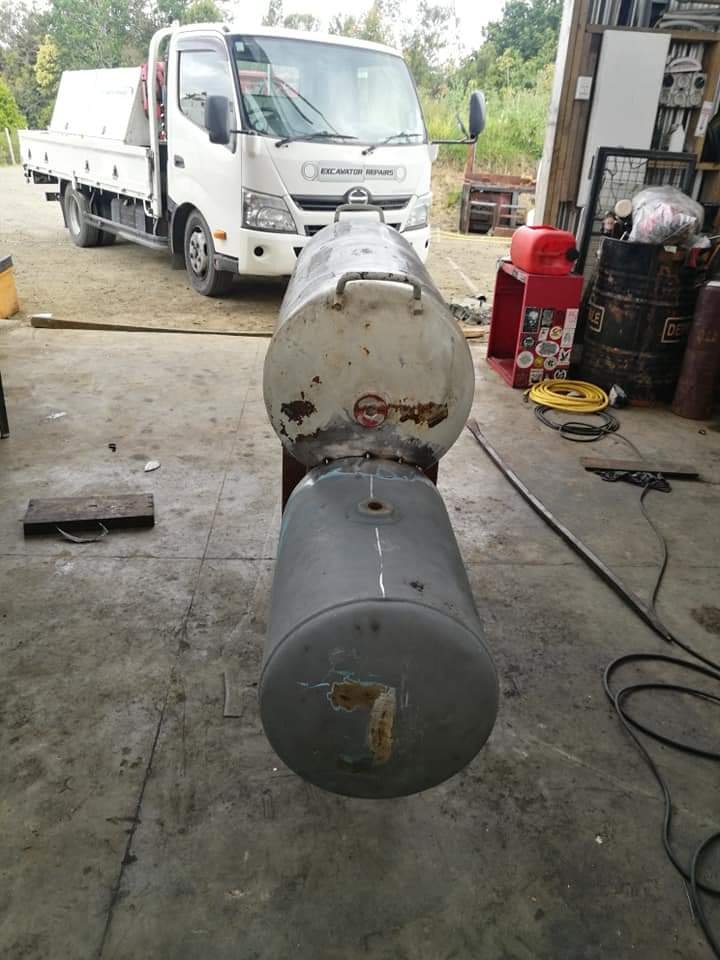
Decided I'd make a lower shelf and fix legs to it to try and keep everything relatively square and act as a frame to sit the tank on. Used 25x3 angle and 3mm expanded mesh (mesh was pretty pricey as I had to buy it in a 2400 x 1200 sheet). I just tacked the mesh on the underside. It should be strong enough but I may weld a support brace across the middle for peace of mind. And the legs welded on. Then the compressor mocked up. I also chopped the legs 150 so it sits at a better height (I think about 750) so it's at around waist height.
2 points
-
Big news! I ran over a screw: This meant I had to get a new tyre, so I asked the shop to check the balancing of all my new wheels at the same time. They were all out of balance. With them balanced, vibration on the motorway is finally OK. Then the Jag was due for a WOF, but its handbrake had stopped working. This was a bit annoying after the expense of the rear disc replacements. I took the car to the local one-man-band Jaguar Barry who'd been too busy to replace the discs for me last year. He repeated that only certain handbrake pads could be trusted, but he also basically said that the Jag handbrake is a marginal arrangement. It needs to be set up correctly and used carefully to avoid ripping the pads out. My handbrake cable was rusty, causing a lot of friction and making the handbrake heavy to apply and tricky to release. Barry has sorted it now though. WOF obtained (after a second new tyre). Unfortunately this handbrake drama took a while and meant that my Jag was not available for New Plymboes, so I took my company car. Not only was this not exactly 'limited' personal use, the manner in which I got busted wasn't the best - by some extreme fluke, I overtook my company's human resources lady on the wrong side of the road. Soooo.. I took the Jag on a work trip around the Waikato to make up for it. Although the car feels fine around town and has plenty of grip, at open road speeds it still feels sketchy. Not only is there tramlining from the lower-profile tyres, there's the (excessive) rear steering effect that Jaguar built into the rear suspension. Also, there's this: Whether because my car's a 'sports' variant or because someone already modified it, the steering rack mounts are packed out with these rubber bumpers on the outer side. This looks like it should limit movement of the rack, but I think I'll try new rack mountings anyway. Finally, because of that screw in my tyre, I'm now guilty of violating this rule: On the idle issue, I did a compression test. Ignore the oil on the last two plugs. The compressions are only a bit uneven, but they're all much too high (meant to be 160-170psi). Faulty gauge? Carbon buildup? Just lucky? This ain't no technological breakdown, Oh no... This is the road... ...to Hell!
2 points
-
Watch in HD. (may still be processing)2 points
-
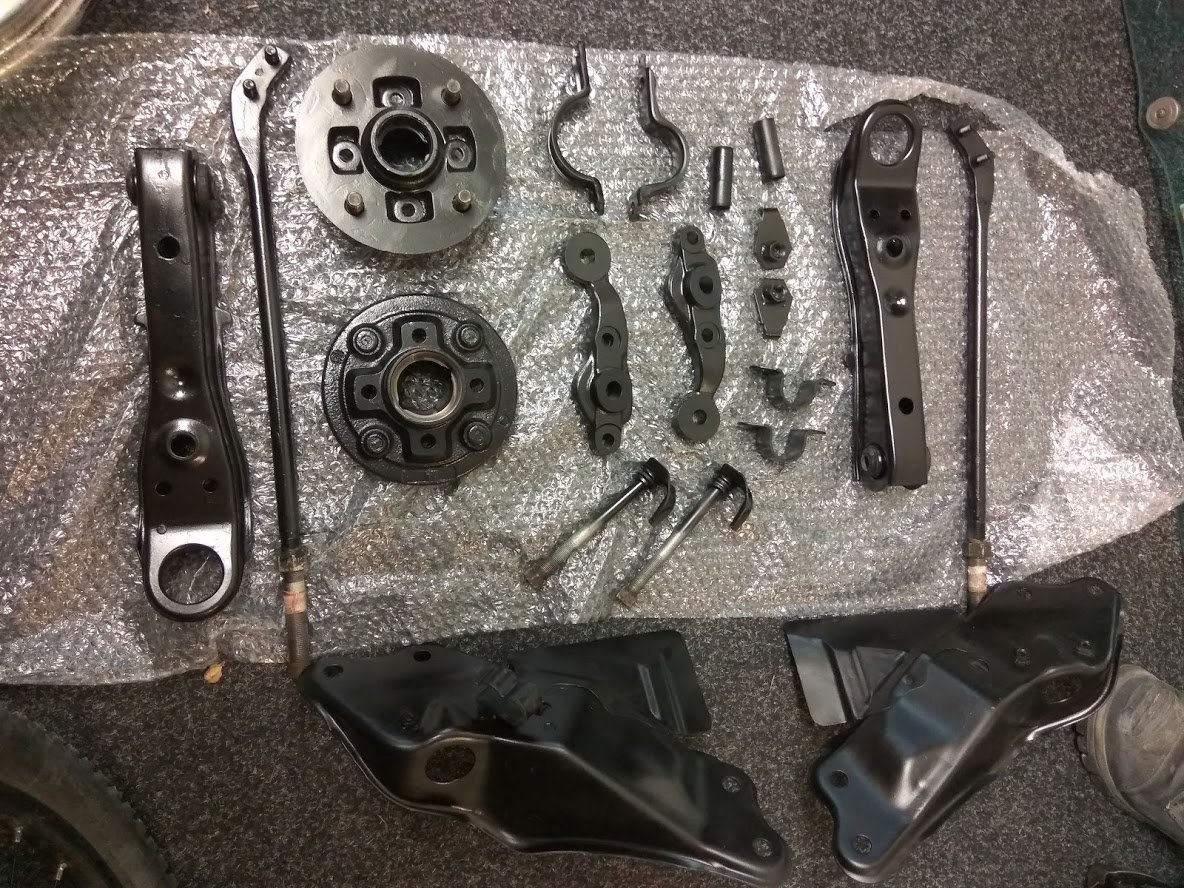
So I have managed to find an awesome friendly panelbeater to carry out the rust repairs. Any panels I can't buy he is fabricating.
2 points
-
Ha Left it till the last minute before drag day, finally got around to getting some 50 thou shorter pushrods 5 years later. Put them in tonight but a bit late for road testing and waking up all the neighbors, but it did start, and didn't rattle Also rock auto to the rescue again, got a distributor with a vac advance so in another 5 years I might get around to putting it in
2 points
-
rebuilding power steering pumps. ive done a few of these now and had great success with all of them. you might do it a different way, whatever, this is how i do it. firstly, take a picture of each stage of the disassembly, there are many subtle differences to the orientations and alignments that will fuck the whole thing up if you put it back together wrong so take pictures as you go. the pump off my UZ was really fucked, lots of really bad scoring on both the stater plates and the rotor, but the inside diameter of the eccentric ring was good so it could be fixed without to much drama. 2019-12-03_09-20-52 by sheepers, on Flickr 2019-12-02_06-38-54 by sheepers, on Flickr so, how to do? you need a good flat two sided stone. not one that has been used to sharpen chisels or knives but a flat one. i have one i only use for this type of work so i know its flat. you're going to be trying to polish the plates to within 0.01mm over the surface so the stone needs to be good. also so good cutting oil will help no end. the other thing you really need is a micrometer, for two reasons, obviously to measure the parts as you go, and the other reason is that the mic can give you a really good feel for where things aren't parallel or where the high spots are. once you give it a try you'll see what i mean. 2019-12-02_12-07-21 by sheepers, on Flickr so, mic all your parts and write down what each one measures. (this picture shows after stoning so there are two measurements but more on that later) 2019-12-02_06-28-53 by sheepers, on Flickr polish the parts on the stone using circular motion or a figure of eight motion (don't do long strokes along the stone because you'll grind the surface out of flat and its very hard to get it back) and rotate the every couple of passes so your pushing on a different part of the plate. use the mic to measure the plate and make sure its still flat and both sides are still parallel. keep going until the plate is smooth. i couldn't get the last deep score out of this plate so it will just have to live like this, its not to bad but these deformations allow oil pressure to get between the side plates and the rotor pushing them apart and you loose line pressure. 2019-12-02_12-07-14 by sheepers, on Flickr in the above picture you can see the scratch marks from the rough side of the stone. once you've got the scoring out and they are flat and parallel you can give them a polish on the smooth side of the stone. this serves two purposes, they need to be smooth so they work well and dont score again in service and it gives you a second chance to check your work. 2019-12-02_12-07-28 by sheepers, on Flickr you can see on the rotor the area to the right is not flat, that only showed up after smooth polishing. i had to go back and re-do it to get it flat. this meant that i had to remove 0.04mm from the rotor. because of that it meant that the vanes were to wide so i had to stone them too. to check that the vanes had correct clearance in the rotor i used the mic. in the two pictures you can see i set the mic on the rotor, then inserted a vane, i was easily able to move the vane in and out confirming the measurement. 2019-12-02_12-07-54 by sheepers, on Flickr 2019-12-02_12-08-02 by sheepers, on Flickr once i had the rotor flat and the vanes 0.01mm thinner that the rotor i needed to address the eccentric stater plate. this sets the spacing of the whole assembly and because i had removed so much material from the rotor there was now too much clearance between the rotor and the side plates. this pic shows the "after fixing the rotor fuckup" measurements. 2019-12-02_06-29-11 by sheepers, on Flickr you can see the initial clearance was about 0.04mm and i have removed 0.04 from the rotor so i had to remove the same from the stator plate (i didnt write down the final measurement for the eccentric plate in the picture so it still says 15.03 but i actually polished it to 15.00 to keep the 0.04mm clearance). so, once thats all done the rest is simple, new o rings, new seal and a new bearing (which cost the grand total of 38$) and the pump is good as new. hope this helps you in future, like i say, theres more than one way of fucking a cat but this is how i do it.2 points
-
I had said I would provide a BBW BBQ for Skope classic, and I heard that the other BBQ suppliers weren't gonna be there. Oh noes, can't starve the bros! I had a spare BBQ 'cause basically I couldn't drive a gas tap, but it wouldn't fit in the car, because Daihatsu: So, applying tungsten tipped skill saw, added lowness (I carefully checked the safety instructions, this wasn't contra-indicated): Slamaque! (Kei car wheels for scale). This fit in the rear seat, fed the small OS team, and will get more tidied up later.1 point
-
Yer damn google video links don't work sir1 point
-
Holy shit was that your one? I watched the vid a couple of days go and had fun spotting CHCH landmarks. Port hills looked scary as fuck in that.1 point
-
Have you seen that 1600GLS down here on the tard? Two k and de-reg. Dreaming!1 point
-
Ouch.1 point
-
Dude, this is going perfect so far! I have a big air receiver tank sitting there to do similar. Will you be going reverse flow? the fb bbq collective page seems to agree that thats the best way to get nice even temps across the cooking chamber. Also, hot plate on top of the fire box? I did some amazing beef cheeks 3 days ago. delicious.1 point
-
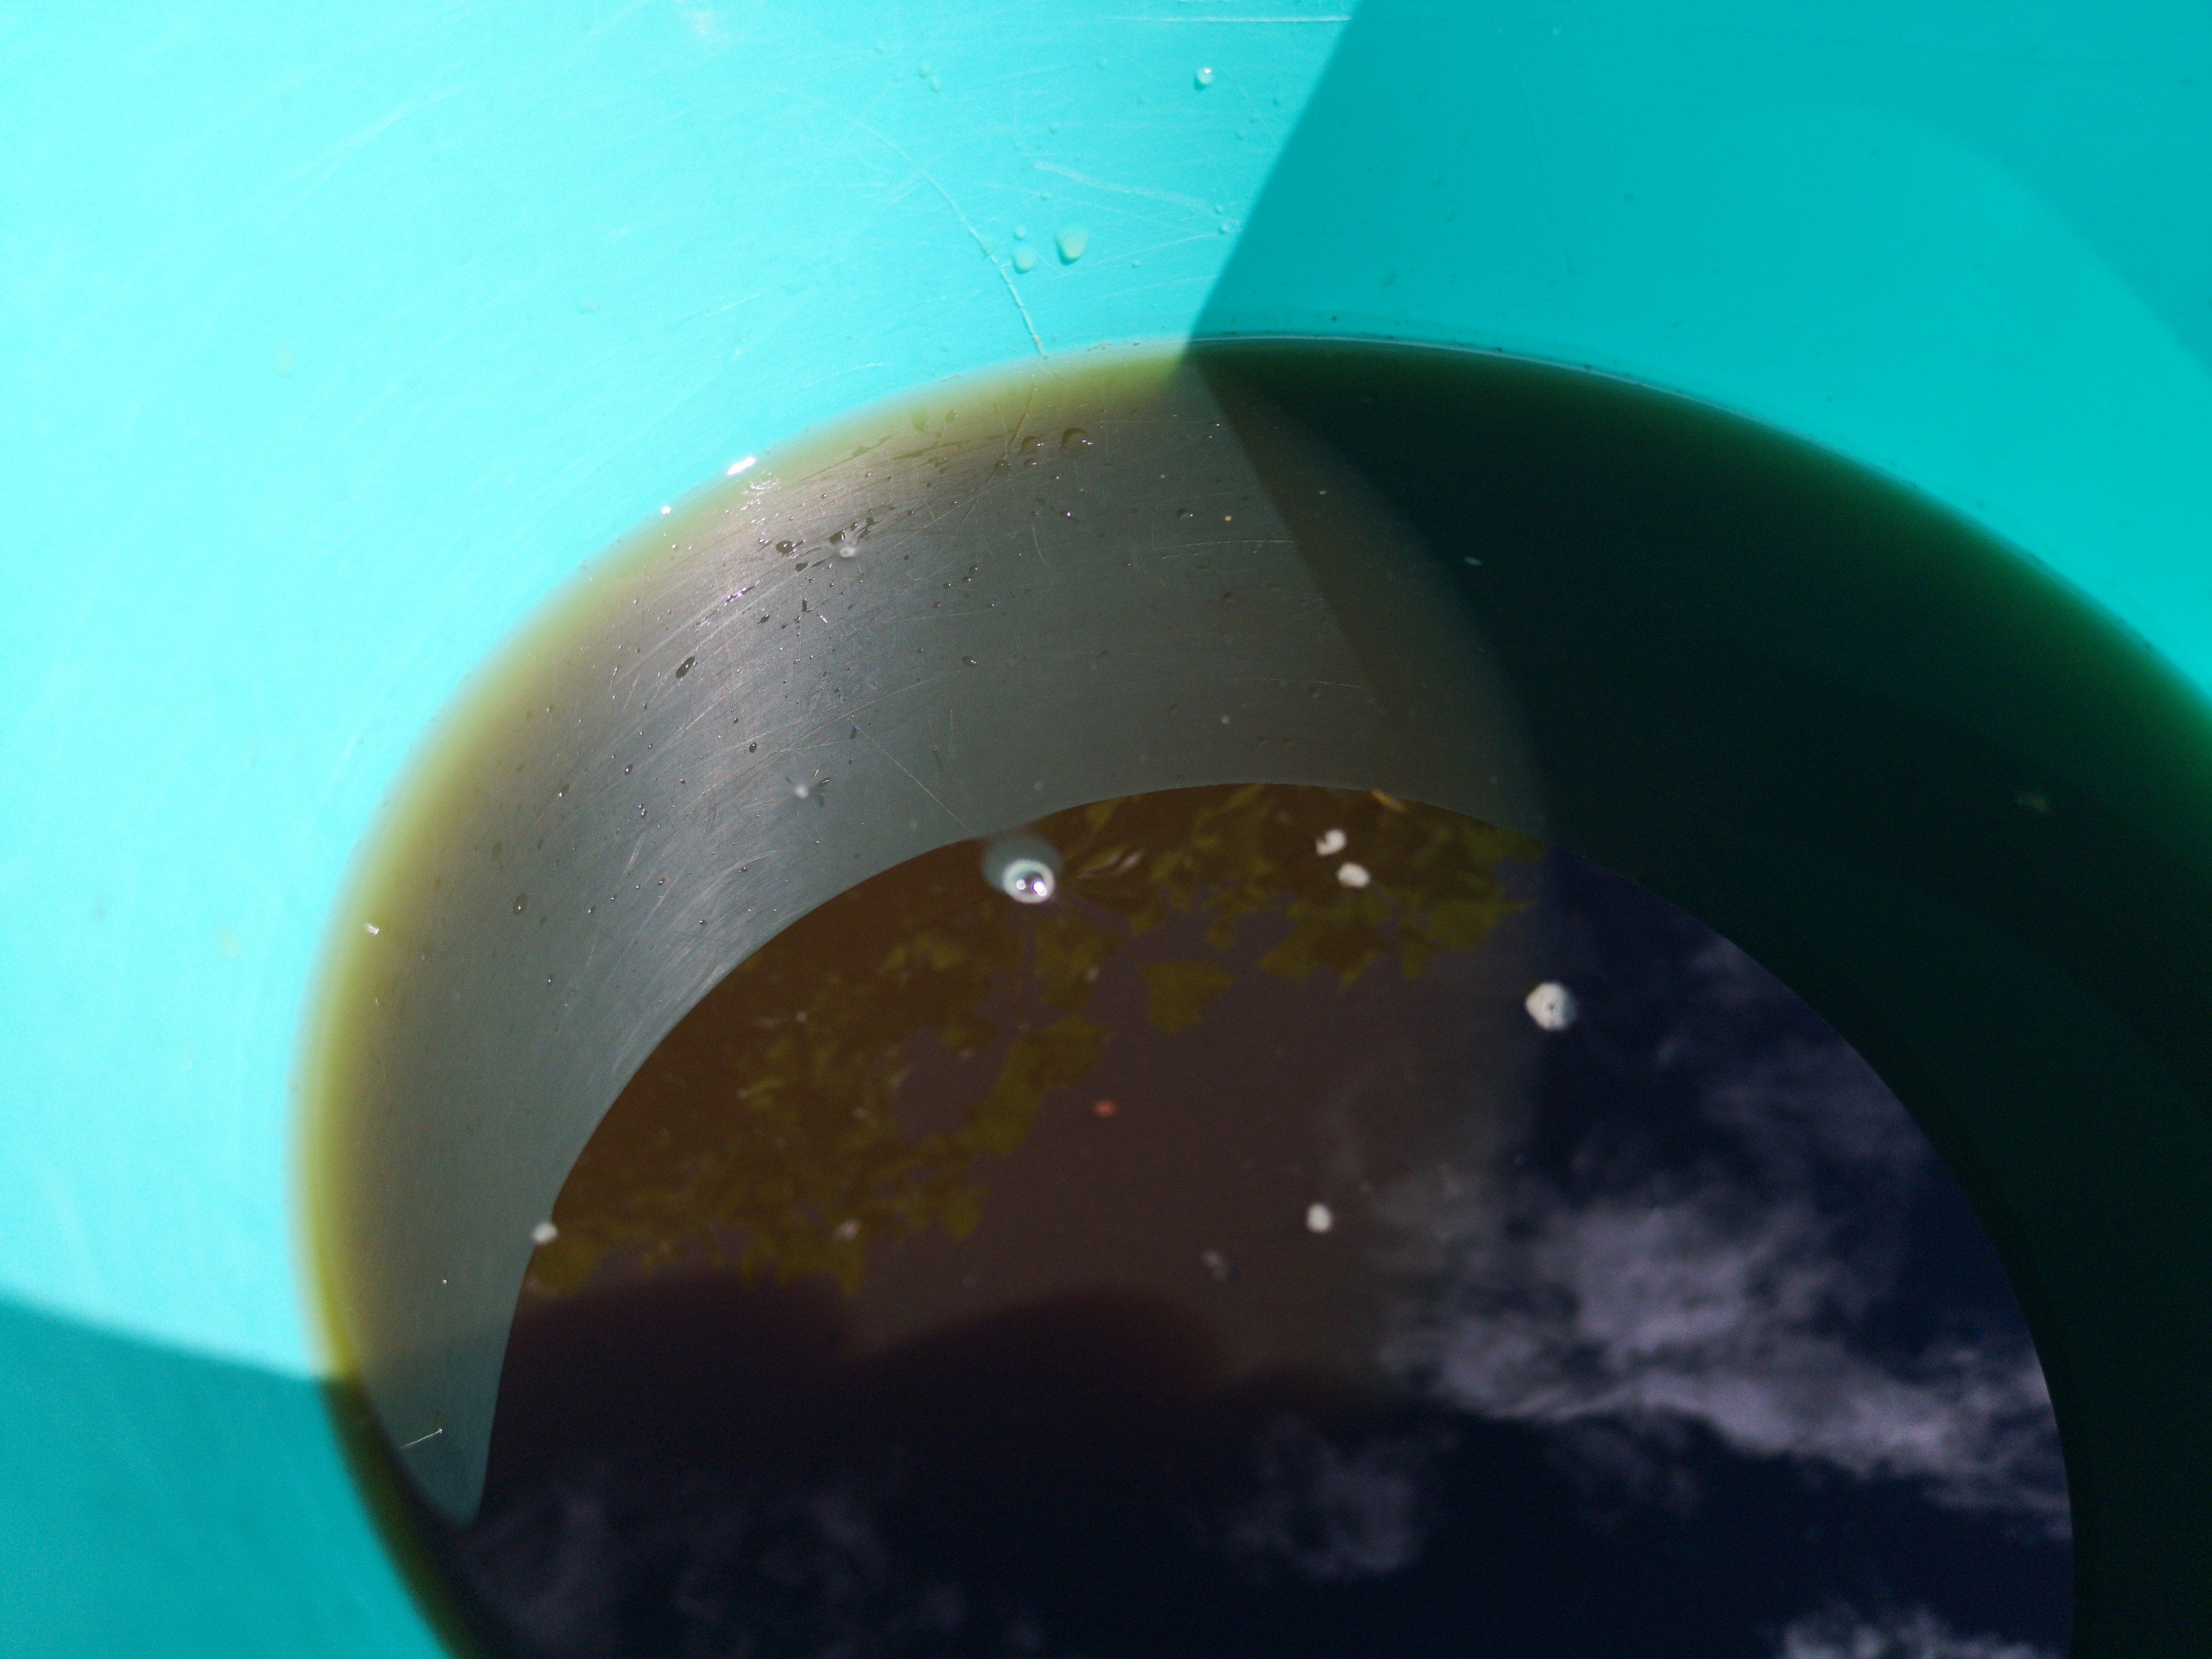
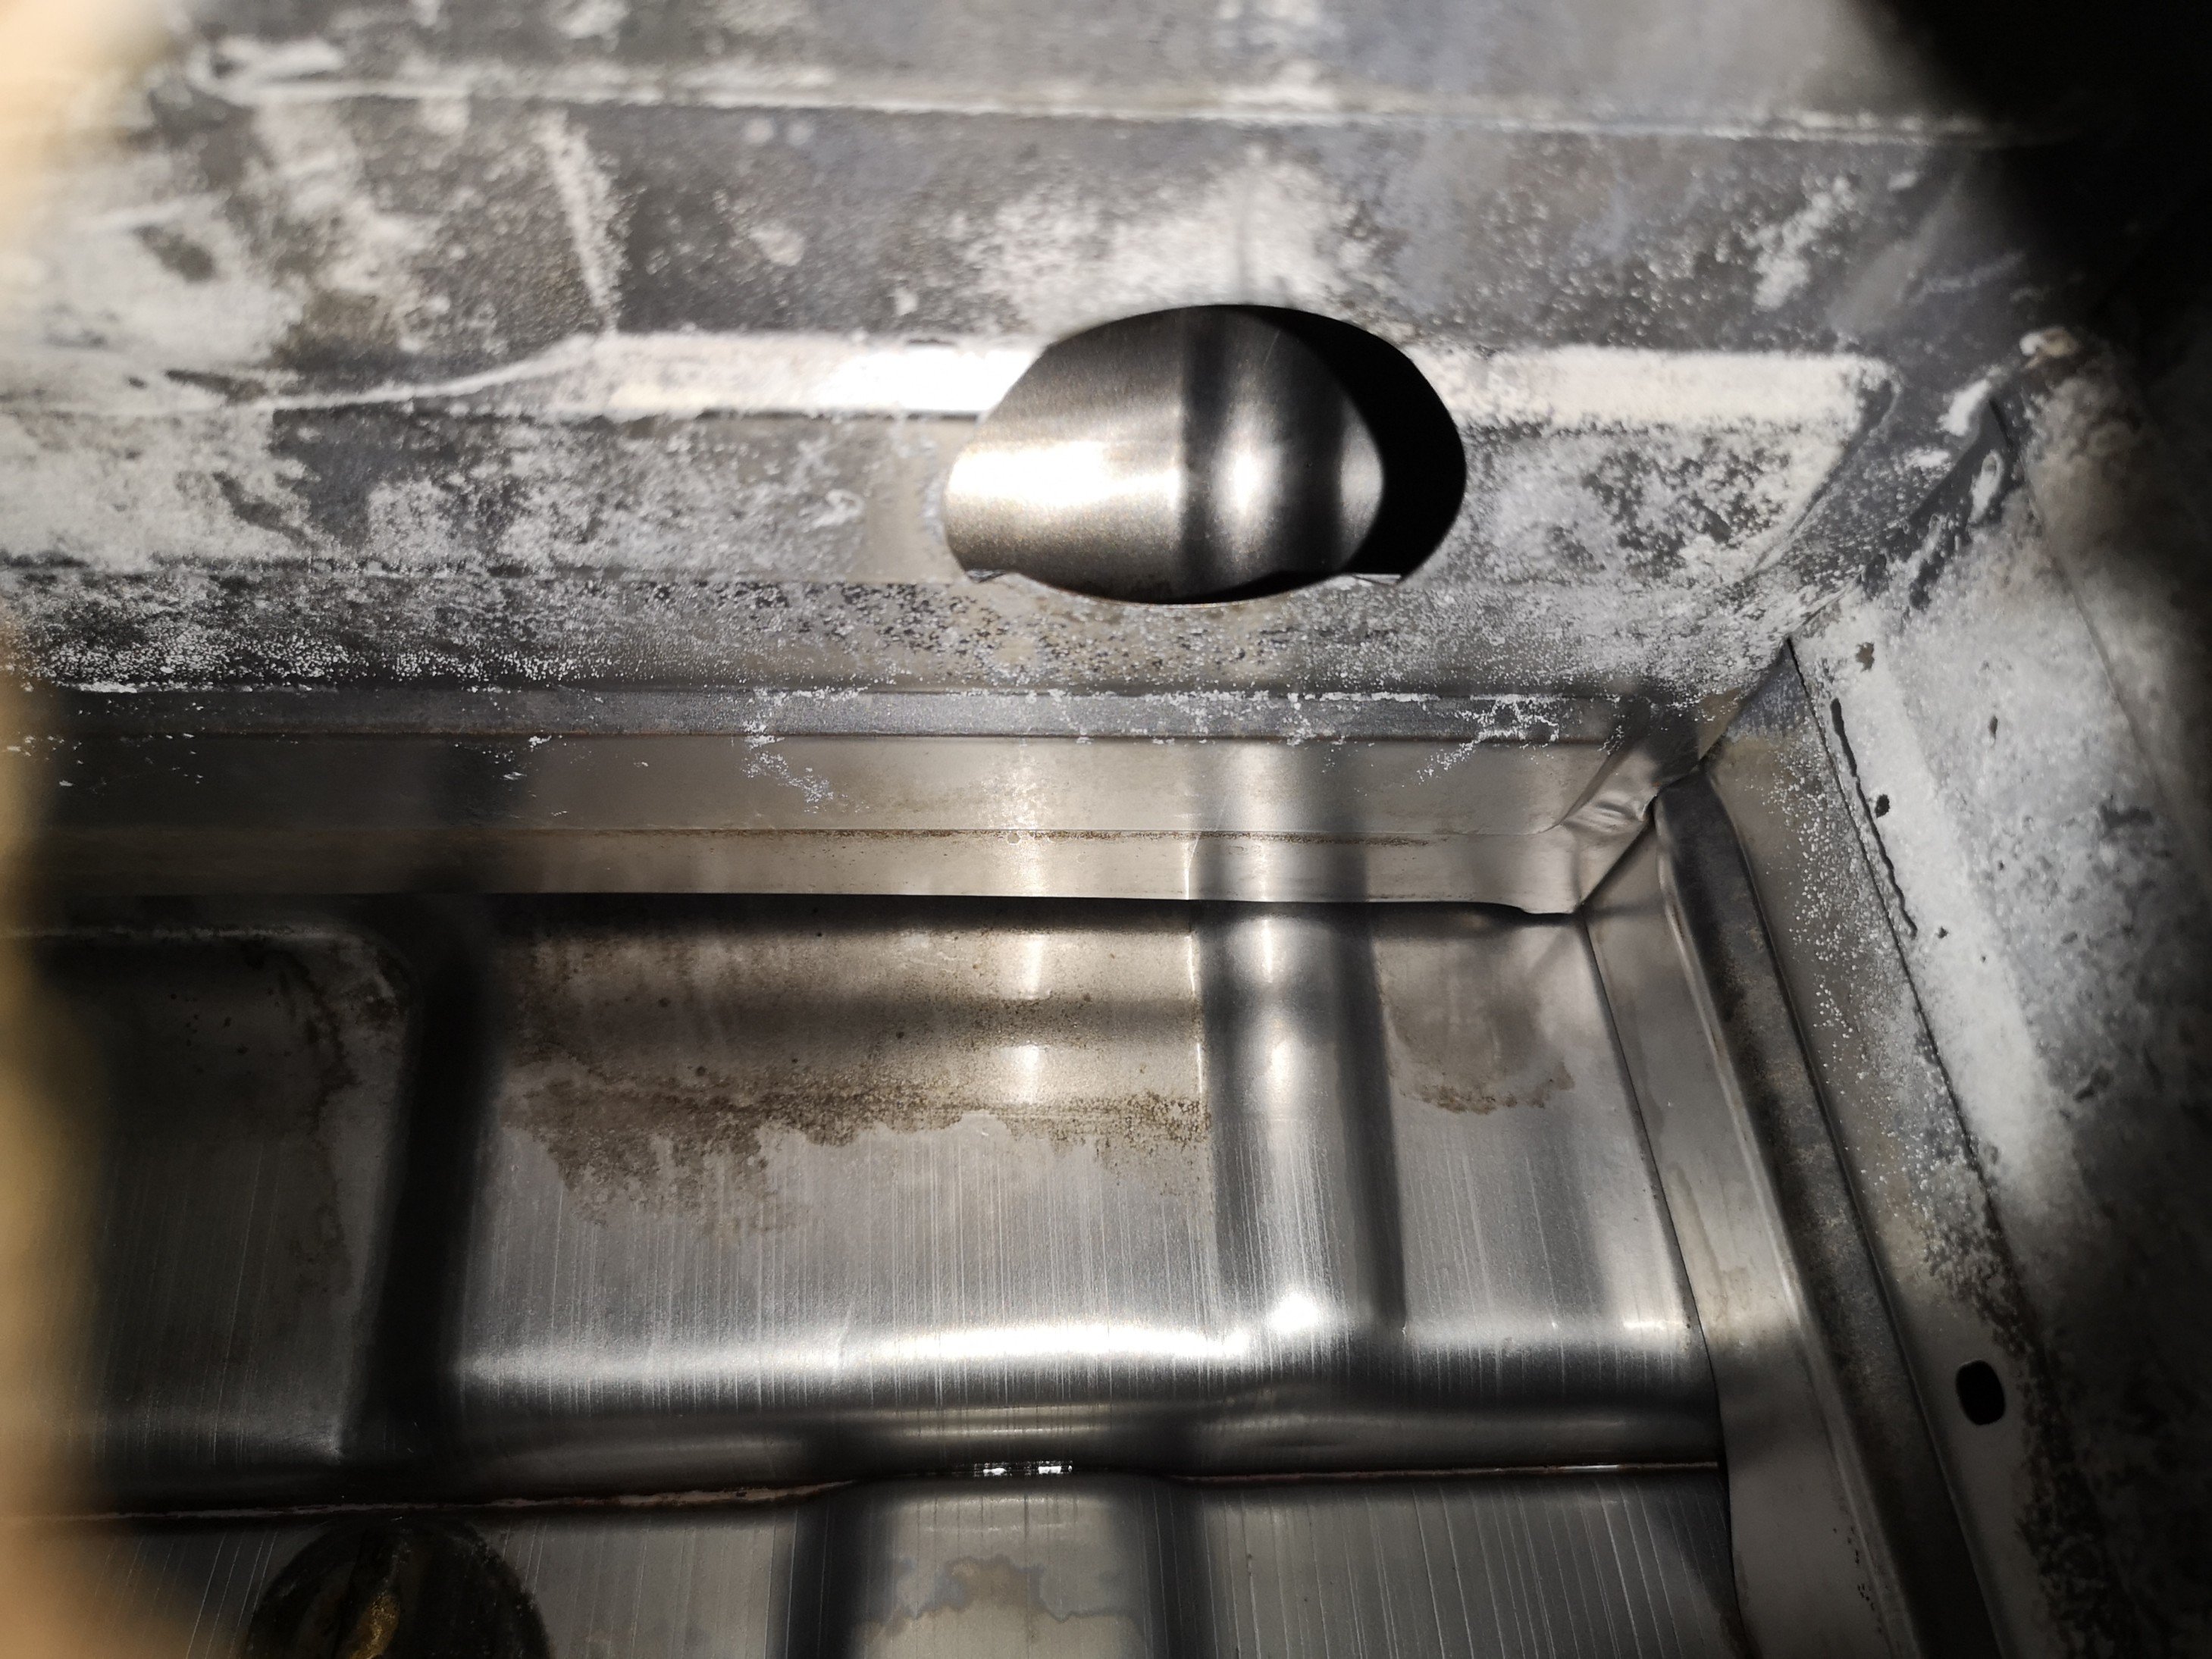
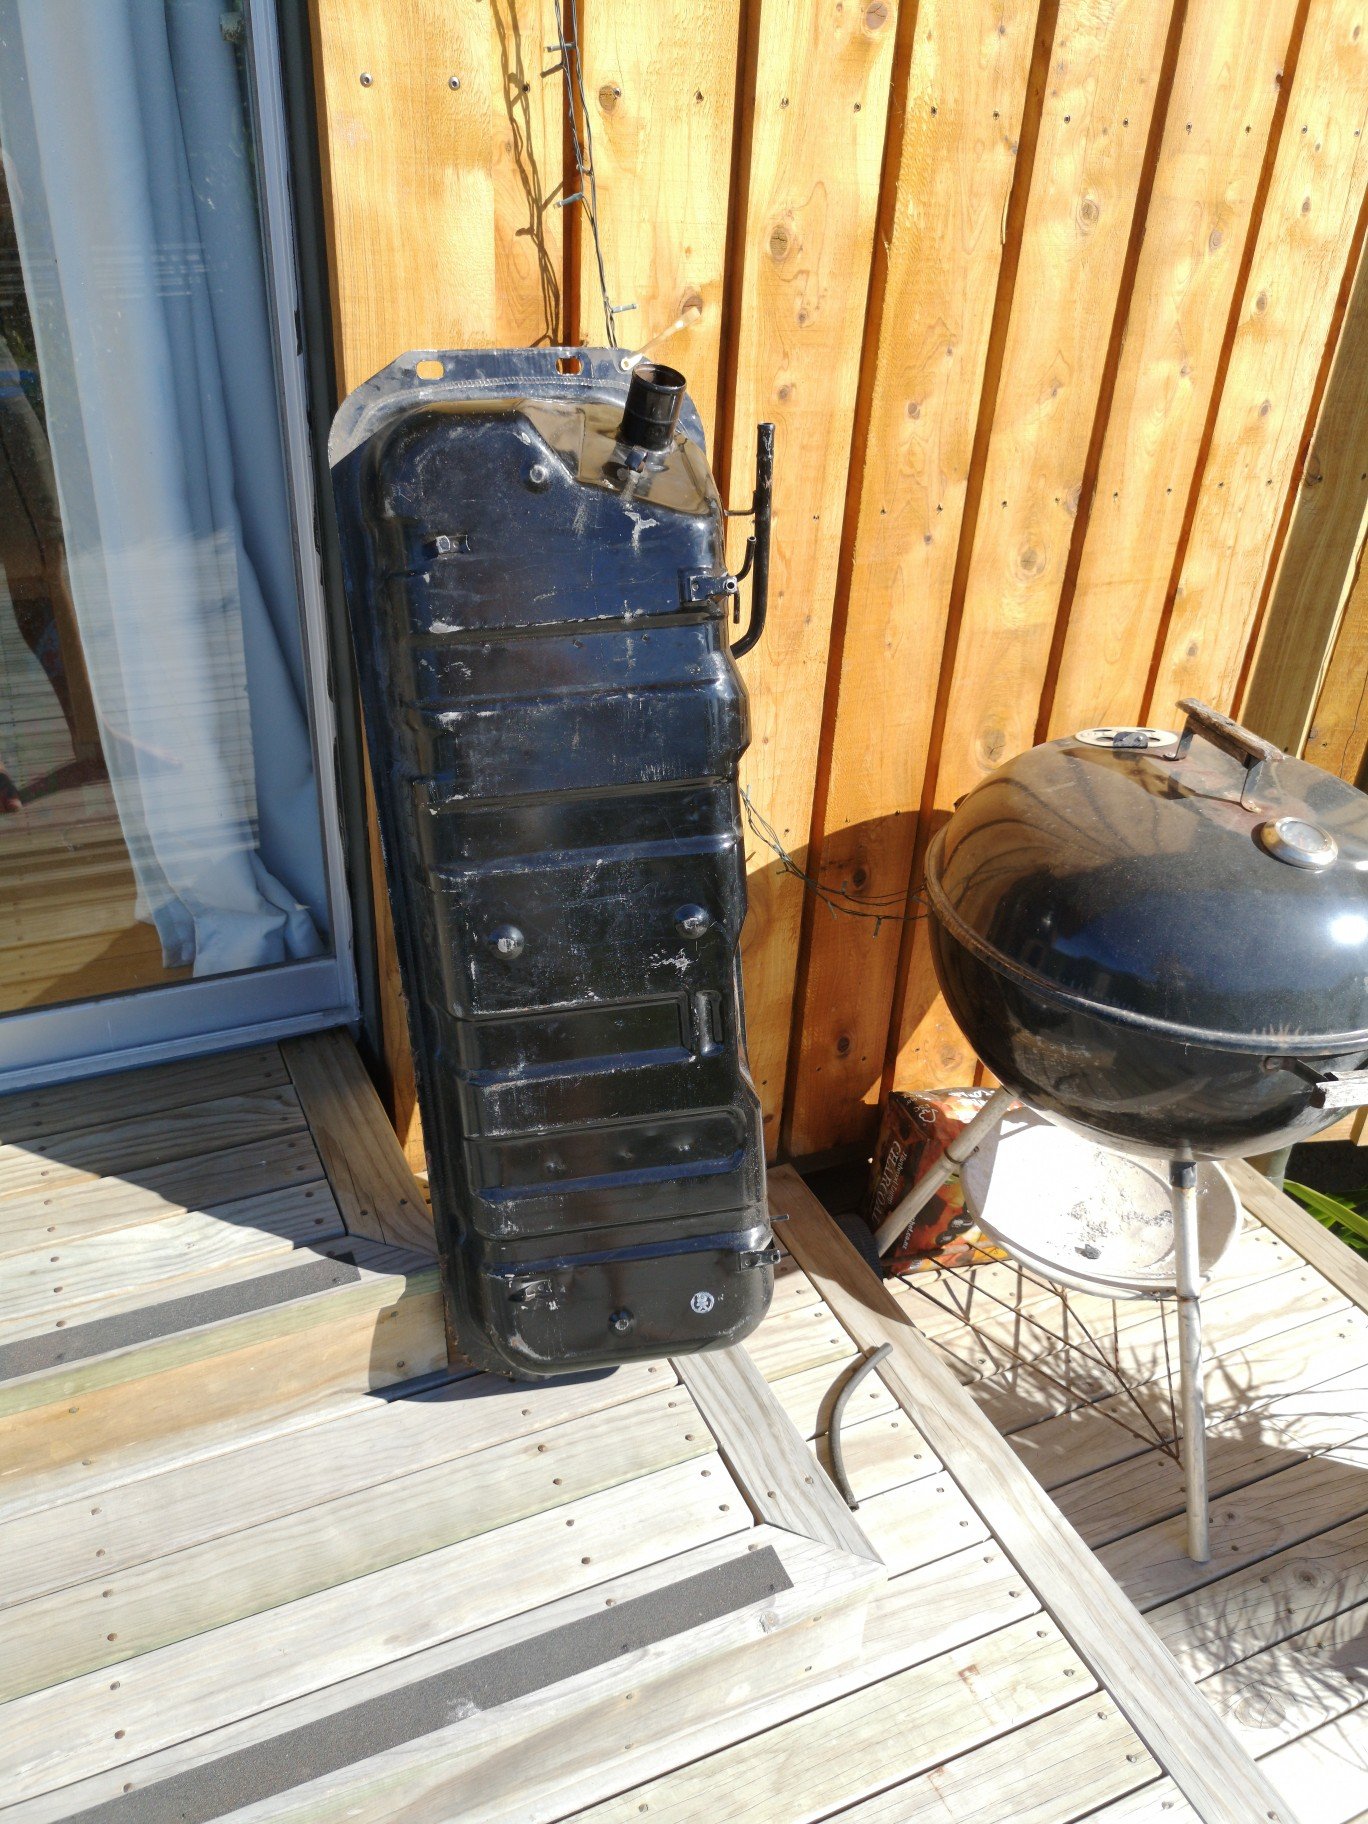
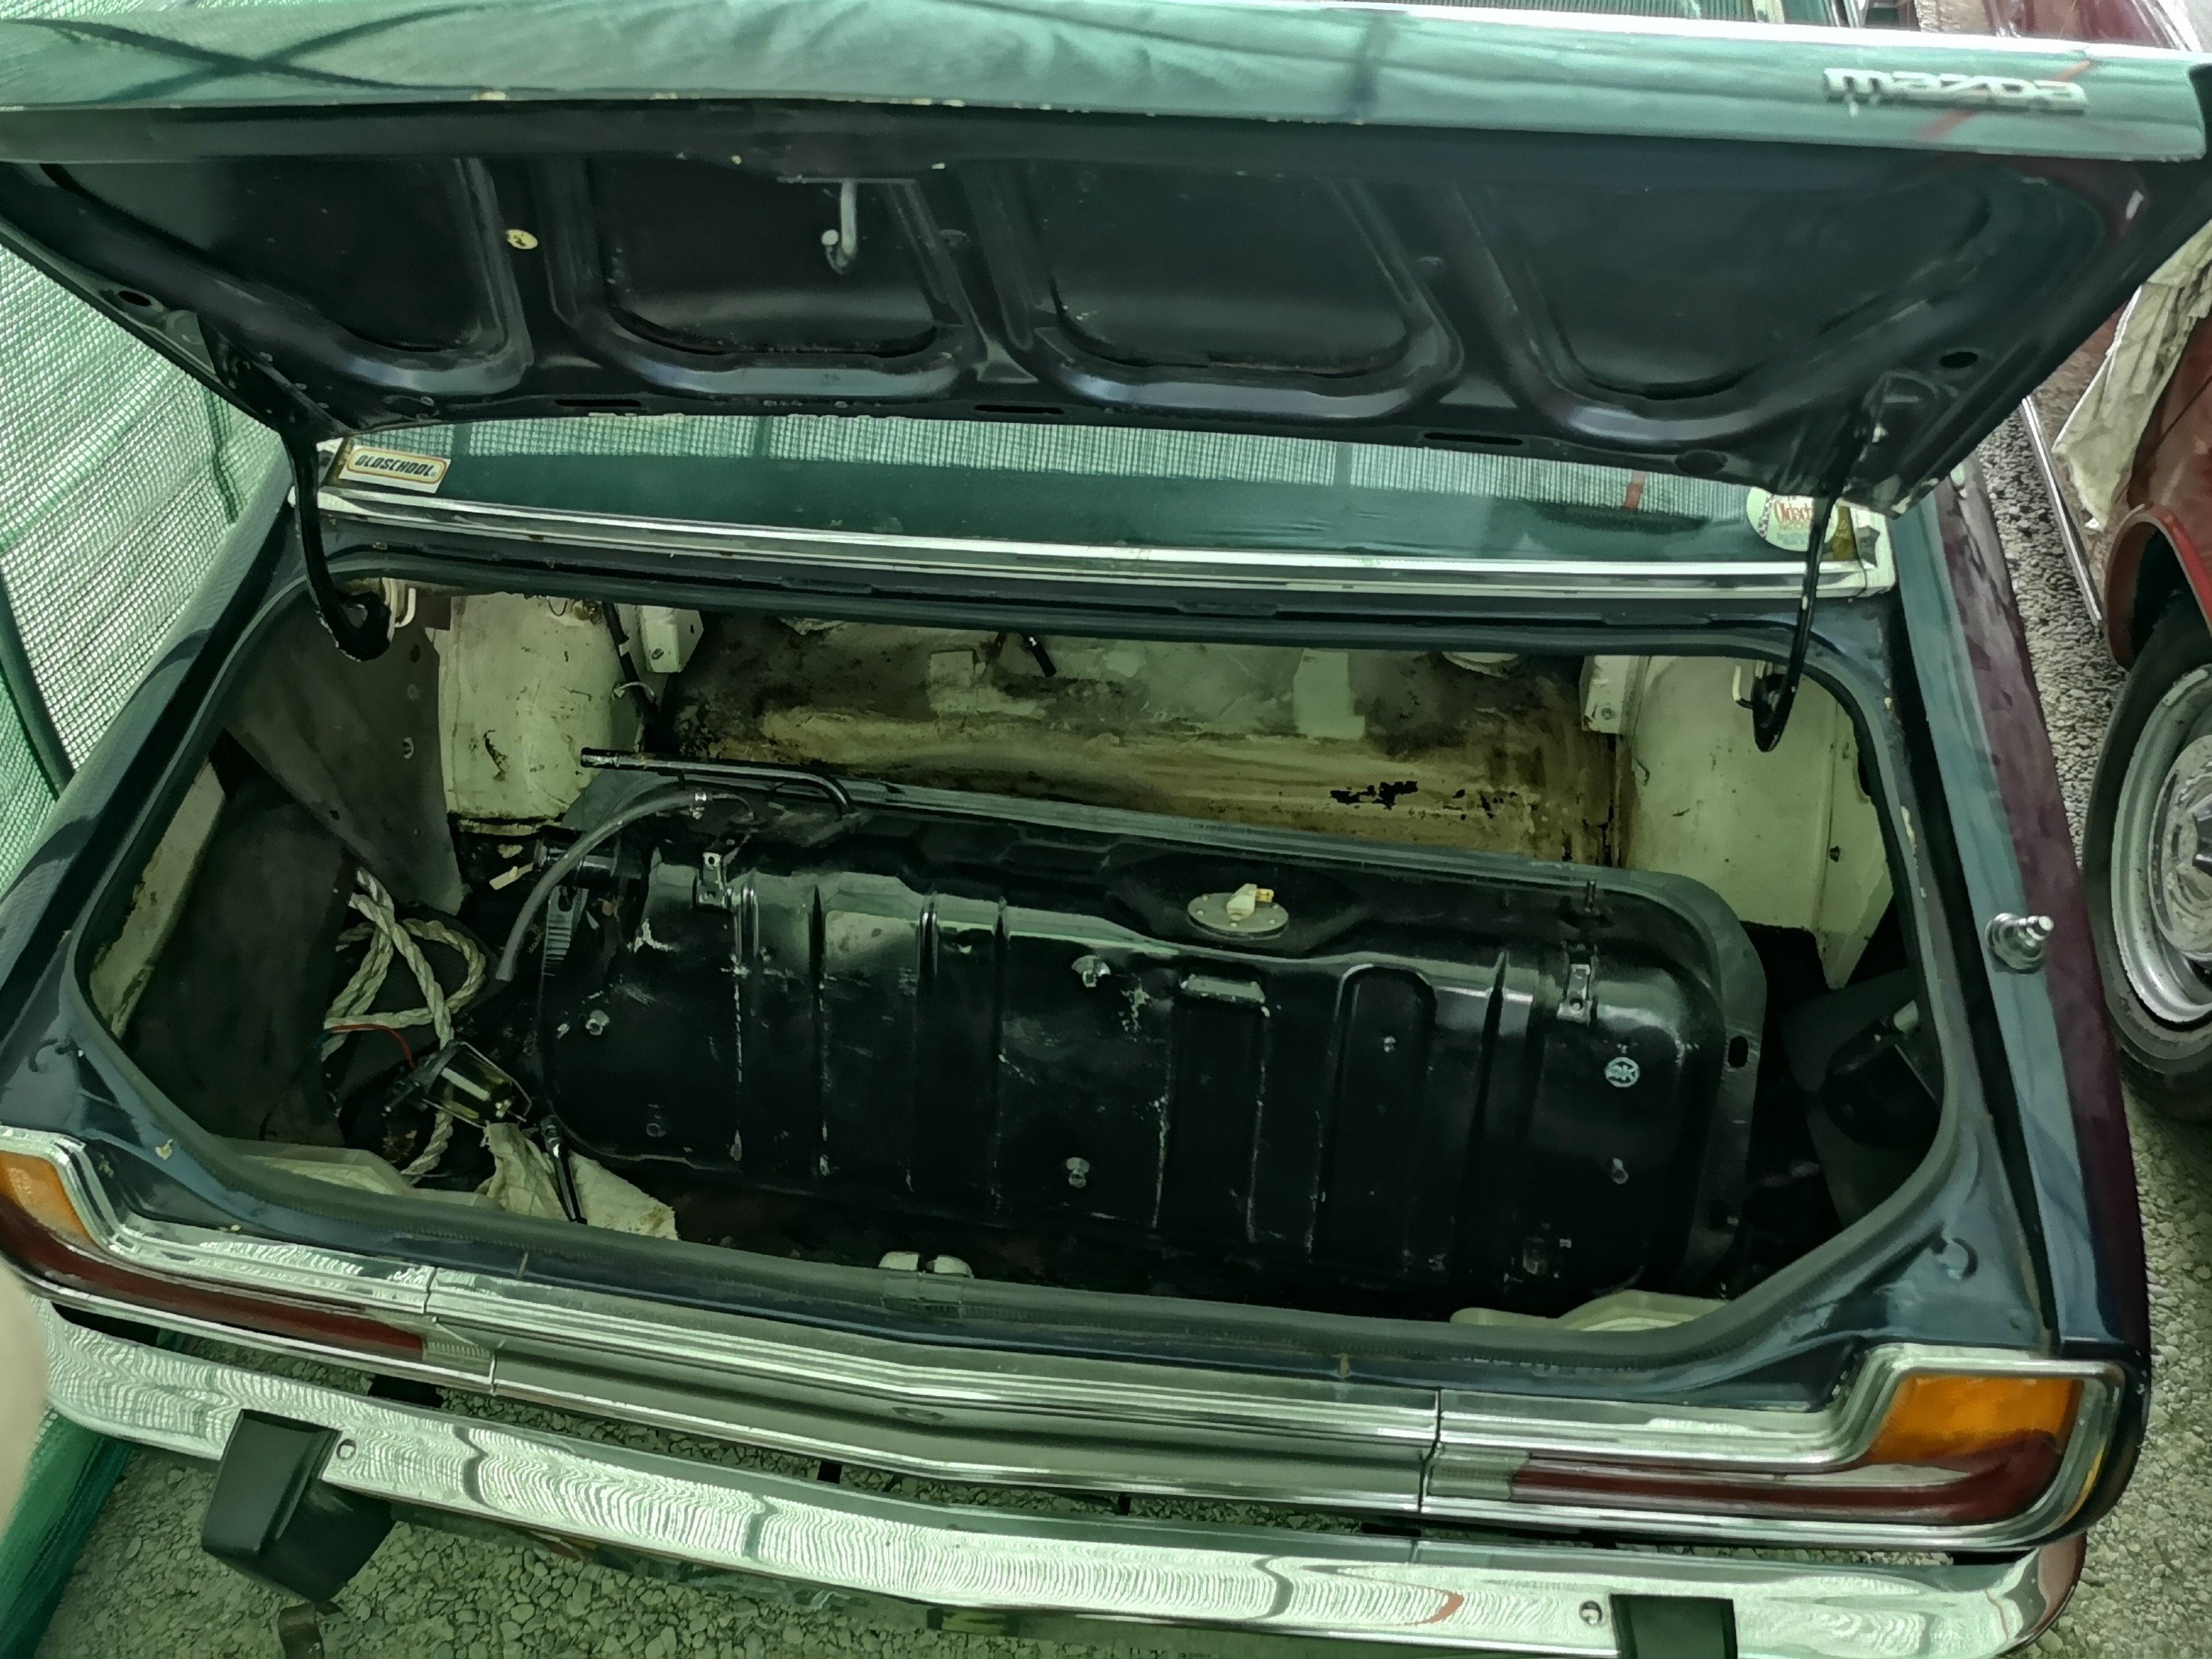
Had a total guts full of that gas tank, so pulled it out.. Prick.. Pulled out the sender which had a bit of white oxide on it, As did the tank, but more importantly.. Varnish..
1 point
-
I have plastic sleeves that fit both of these. Can recommend 4 wheeled drift toys.
1 point
-
Shit yeah. Next weeks looking a bit more summery, might attempt a wof even for mine1 point
-
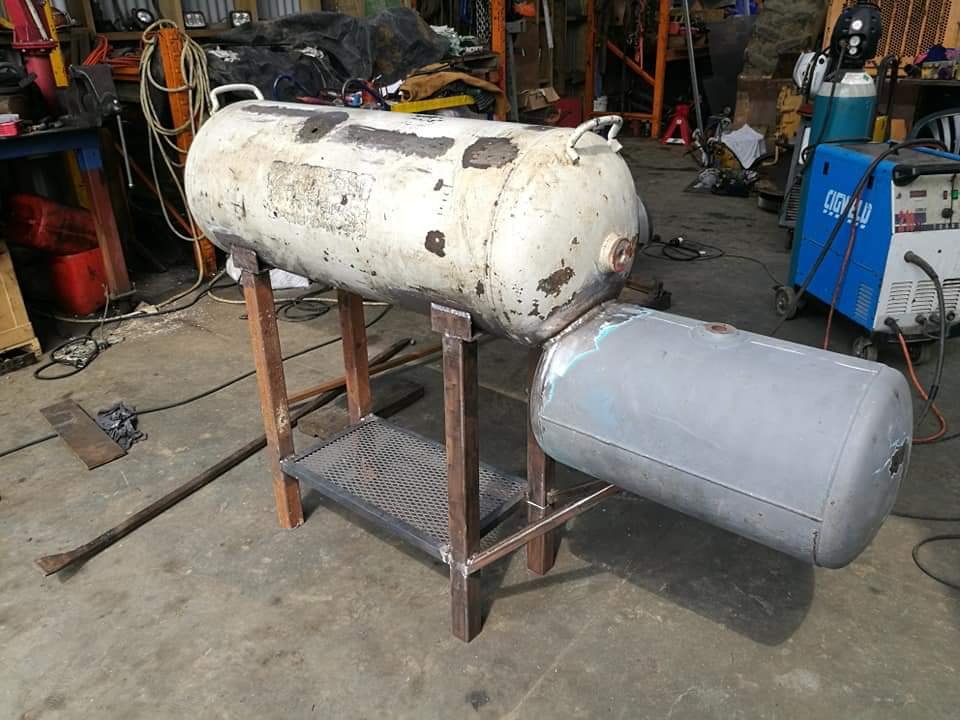
Cut out the top left section of the Fire box. There's probably an easier way of doing of this but I have had minimal fabrication/engineering guidance and have mostly learnt as I go, across the last few years through work. I just did rough marking then cut it bit by bit until it was close enough. I cut a hole in the main chamber approx 30mm smaller than the Fire box cut out and ran a flapper wheel around the hard to reach areas (didn't take any pics sorry). I then tacked it in place and the bloody welder ran out of wire!
1 point
-
So a frustrating day. I took the cab off again for best access and jury rigged the starter, glows and power to the pump and started methodically fucking with things. I can't swap out the no top solenoid stuff from my other pump as the thread is the wrong size. I may have to spend some time definitely finding out what this does. First I checked everything was the same without the cab on and my nasty starter hack, it was. Then I checked there was no dumbfuckery with the pump or lines or solenoids or glows, not obviously. Then I swapped out the injectors for a spare set I had, and rebled everything, this was slightly better. Then I marked the pump position and rotated it around a bit to see if that made a difference. It sort of did, but only enough to get it staggering along at very low revs for 5 or 10 seconds or so, and this worked only with me pumping the throttle continuously. Then I ran out of battery. It still feels like it is not getting enough fuel, but it phuts pretty well when bleeding it and after a while some diesel made it to the exhaust outlet. A bit frustrating, hopefully I haven't fucked up something inside the engine.. Also I am super glad I swapped the injectors cos when I took the intake off to do this I found this in number 4 inlet; Feel free to ridicule me. I need to feel exactly how much of a cunt I am. Anyway I am charging the batteries overnight, we will have another lash tomorrow after work.1 point
-
This x 1000000!1 point
-
Yeah top work Callum. Had a special screening last night in Speedcucks territory. Then did some more Lifan skids1 point
-
Basically clocked life now.
1 point
-
Use the whole 2nd gen l200 arm setup?1 point
-
Still fixing rust, waiting to get my CO2 cylinder back before I can continue with that side of things. Enough rust in this thread so will keep that progress to a minimum. Bit of boot rust to sort, one corner example. Tacked up, have since finished this ready for primer/fill/paint. Doors are next, had some sheet folded up to have a nice straight bottom edge on the doors. Was going to patch it in sections, but it would take longer and i'd likely have ended up with an averagely not straight edge. Before: With new section clamped in place, no gas = no metal gluing. Etch primed some bits with Zinc-It, then black Zinc-It on top. It's not as good as epoxy primer and a top coat. But all the parts are sound enough that I just wanted to tidy them up, will last for years anyway. Plus some parts like hub faces, steering knuckles, I don't want thick paint layers on. I don't spray the epoxy, so brushing on doesn't really suit. Bits: I need to knuckle down and get rust sorted by the end of the holiday (funnily enough that's what I said about a year ago...). I have most of the parts needed now, just need to paint the engine cross-member and get that installed back in. Then I can reinstall all of the front end, sway bar, steering rack etc. All bushes up front have been redone. Pressed in new ball joints this week, wheel bearings are next. The brake disc bolts to the rear of the hub, so I need to have the brakes all finished first, as I don't want to take the hub off once bearings are in. Still a huge list of things to do. Snookered myself with the brakes as I can't roll the car on 13's up front anymore with the discs installed. Can't roll it without them either as it will mean the hub is installed with no brakes and will have to come to bits again. On the hunt for a pair of 15's to get me rolling. Wheels aren't finished being polished yet. But if I can get them done by xmas I will hopefully get some tyres thrown on and have it moving again. Anyway, a smaller teaser to finish off 2019.
1 point
-
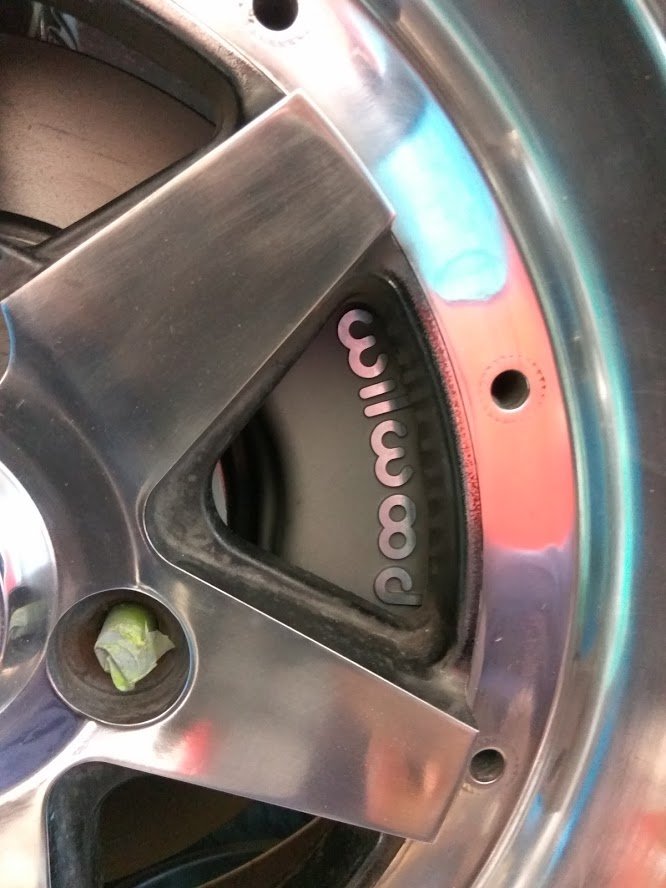
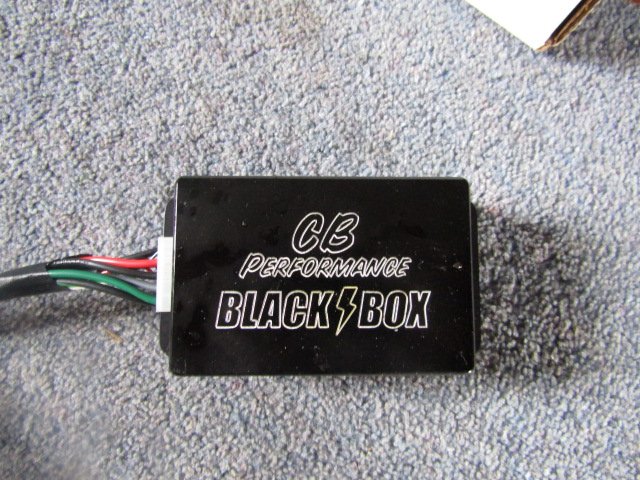
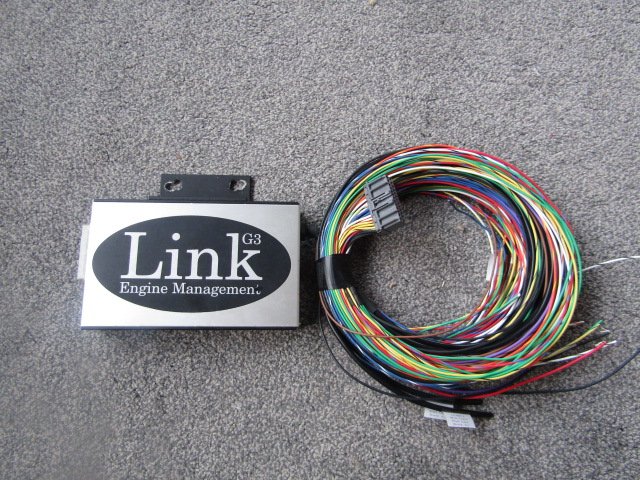
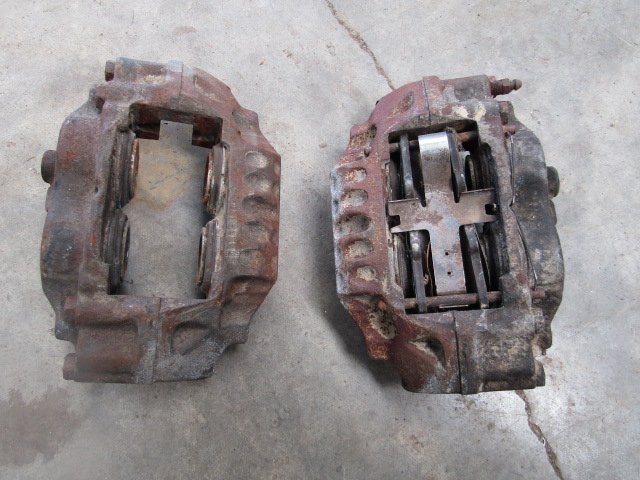
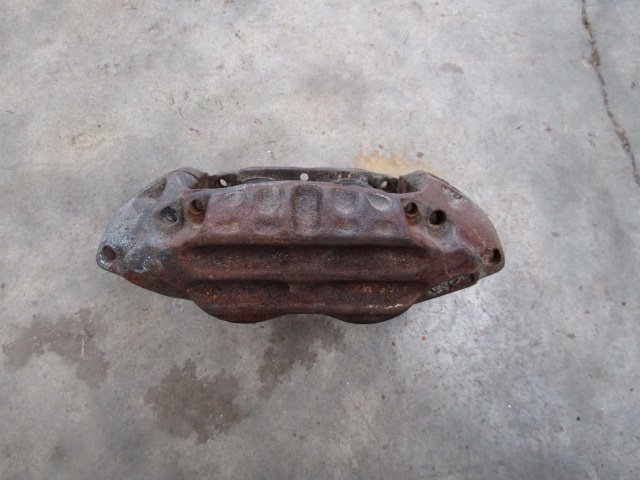
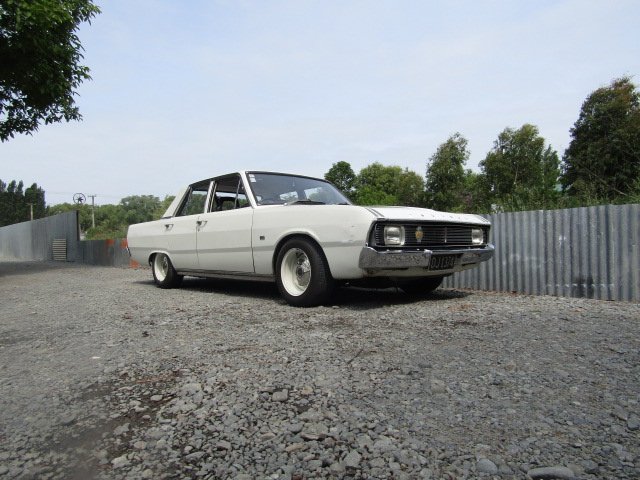
Wow, what a mess this thread is. Anyway. I washed this the other day so it seemed like a good time for an update. Things I have done. . . Replaced the safety valve in the fuel tank, inadvertently inhaled quite a bit of LPG and felt quite dizzy for a few minutes. Would not trade again. The new safety valve did solve the cutting out issue so that was nice. Fitted this CB Performance black box timing control unit. But it turned out to be a bit of a dick and wouldn't work as I hoped so out it came, in went a stock distributor to get it going. This Link G3 has been purchased and will be wired over Christmas with a view to getting it tuned early next year. Other things I have done include fitting a set of LN??? Hilux 4 piston calipers to the front of the Valiant. As mentioned on OS previously they take the same pads as R32 GTR skyline but skyline pads were $400 trade vs good Bendix pads at $40. Regardless of pad choice they fitted nicely with minor modification, clear my 14 inch steels, I even managed to reuse my VG brake hoses, bled up nicely, and have made a great improvement to the cars braking. I did a few other things , ordered a new boot rubber and a couple of rubber ends to hold the sun visor up, re routed the exhaust a little as it was banging on the drive shaft loop (cert guys wrecking the hobby) etc etc. Nothing exciting. Drove to Hanmer this September via Kaikoura and the inland scenic route, back to Christchurch and all over the Port Hills. Did a couple of circular engine load tests, fun was had by all. looking forward to getting the tuning sorted so I can cut the bottoms off the rear quarters and attend to the rust there and get the dented front guards sorted. I've only had the car 15 years so no rush there. Obligatory washed car photo. Happy days
1 point
-
Finally found a front disc brake set up and a few handy spares, hopefully strip it this week, fingers crossed the 5 speed is in good condition.
1 point
-
Hmhmmm.. Was a blown fuse to the pump..... she's alive Got no o2 sensor at the moment so I'll let it run on the base map for now and just adjust a couple of things1 point
-
Click the link to make Prius/Leaf owners shudder (video): https://photos.app.goo.gl/uRc2eN1EWPMey9Jp7
1 point
-
Not me but my dad. He spends rather a lot of time in his shed.1 point
-
Well yeah, Bosch K-Jetronic.... I now understand why it's so widely hated. This will be a rather large post, as this covers about 6 weeks of work. The TVR has been out of commission for a while now, since the running issue was getting worse to the point it wasn't able to make it down the road anymore. The last update regarding the engine saw me remove the plenum and injectors to test them. This lead to the discovery that the flow was there, but the pattern was rubbish, so new injectors were sourced. New Bosch injectors for the cologne are big money, and I'm trying to sort this issue for minimal cost (within reason). There is a lot of discussion online about using Mercedes injectors in various KJet powered cars (mainly VW), and it all seems good, and the injectors are much cheaper. I found one single blog post on a foreign website, that once translated confirmed that the Merc injectors do indeed work on the Cologne V6. Good enough for me. The injectors in question are Bosch part number 0437502047, and I also got new seals, Febi 034133557E. I sourced both from FCP Euro. The Bosch boxes made me laugh. MECHANIC ONLY! You can see the obvious difference here. The new injectors are shorter, both in the overall length, but also in the hex part at the top. I can now confirm that these do indeed fit, and if you check the link to the other blog above, you can see that the injector does stick out into the intake tract less, but won't be an issue (and some say is better for intake flow). You can see the shorter hex here These are the plastic retainers. These sit on top of the O-ring, and appear to be what actually holds the injector into the manifold, by the metal retainer pushing down on the plastic retainer, which pressed down on the O-ring. The tapered face visible in the first photo is what sits against the O-ring. Due to the replacement injectors having a shorter hex, you cannot fit the retainer and O-ring, and then still have space to tighten the injector pipe. I found it easiest to slip the plastic retainer, O-ring and metal retainer on, leave them at the bottom of the injector, and then fit and tighten the pipe on the car. Once tight, then you slip the retainer and O-ring up into place. So that finally solves the mystery of the injector seal. It's a normal KJet O-ring, with a plastic retainer on it. With the new injectors sorted, they all got refitted into the manifold and secured with the metal retainer and screw. Next was to remove and clean the fuel distributor. This is the big weird thing on top of the air box, which feeds all the injectors. This has a plunger inside it, which the sensor plate presses up on as it opens. This plunger is known to get sticky when cars are left sitting. Mine was slow to return, and wasn't moving as free as it should. Carefully crack off all of the banjo fittings, including the feed and return on the side, and then remove the banjo bolts. Take care to collect all the copper washers, as there will be two on each banjo fitting. With the fuel lines disconnected this gives access to the three flat head screws that secure the unit to the air filter housing. Remove these screws. Now the distributor can be CAREFULLY removed. Make sure to slip a hand under it and stop the plunger from dropping right out. If it falls out and gets damaged, the whole distributor is a write-off! You can see the plunger in the center of the unit. With the unit on the bench you can turn it over and let the plunger slip out. If it doesn't freely drop out, it may need some compressed air in the top fuel fitting to push it out. Mine dropped out OK. Be VERY careful handling the plunger, and keep it very clean. I cleaned the plunger and its cylinder in the main unit, and sprayed and soaked all fuel ports with carb and brake cleaner. In the injector outlets there are individual filter baskets. I used a long, thin screw to gently screw into them, and then a sharp pull freed them They all had some traces of dirt on them, but nothing major. I soaked them in brake clean overnight and then refitted them The regulator was the last part to clean and overhaul. This resides on the side and is a 5/8" hex. I ordered a replacement seal kit from Delorean GO as they use the same part in their Kjet setup. The regulator kit is PN 102807A and I also got a new seal for between the fuel distributor and airbox, PN 102855 I used a small pick to remove the old seals, and replaced them with the new green ones. The old ones looked in good shape, I wonder if they had been replaced recently to try and fix the issue? Be careful handling the regulator too, just above the o-ring in the below photo are two very small shims. These set the fuel pressure, so don't lose them! You can add or subtract shims to increase or decrease system pressure. I also did the o-ring on the regulator piston, but no photo of that. That's about all I could do with the distributor without splitting it, and that is a risky job that could result in further damage or leaks. The next part to clean out was the (incorrectly named) Warm Up Regulator. This is the main control pressure regulator (the one above only controls the system pressure), and controls how rich or lean the engine runs. It has two bolts holding it down, two fuel banjo fittings, a power connector, and a vacuum hose. Mine was pretty grotty. A lot of parts on the engine have been badly painted grey, which is flaking off and being ugly. I'll deal with that another time. I could see some dirt in the inlet mesh already, so not a good start. There isn't a lot to break on these, but take care taking it apart. Opening it up is easy; there are four screws on the bottom, which when removed will split the two halves. There are a few things of interest inside the top half Orange Arrow - Adjustment pin for COLD pressure Green Arrow - Heater element Blue Arrow - Bimetallic Strip Red Arrow - "Mexican Hat" and pin Bascially, when the engine is cold it needs a richer mixture, like a choke on a carb. A LOWER control pressure will give this result. The springs in the bottom half press on the mexican hat, which pushes on the pin, which then places pressure on the diaphragm via a little cup. This force is countered by the bimetallic strip, which pushes down on the mexican hat when cold, reducing the internal restriction. Of course you couldn't run that rich all the time, so to lean it out when warm, the WUR is warmed by both engine ambient heat, and by a 12v heating element. This heat causes the bimetallic strip to slowly bow upwards, which releases pressure against the mexican hat, allowing it to rise up and towards the diaphragm, creating an internal restriction, raising the control pressure, and leaning the mixture. The cold pressure is set by adjusting how much the bimetallic strip pushes down on the mexican hat when cold. This is done by moving the adjustment pin up and down.... with a hammer and punch. Anyway, to continue disassembly you need to remove the clip that retains the heater connector. A large screwdriver to lever it out does the trick And then remove the 10mm nut from the bimetallic strip and remove it. Take note of the washer placement This is the fuel unit containing the cup and diaphragm. I have removed two of the screws already. The cup is in the middle, filled with grease (to lubricate and retain the pin) CAREFULLY remove the disk and diaphragm. Don't damage the diaphragm as its hard to get a replacement (although there are some rebuild kits on eBay now which may work). Removing these gives you access to the o-ring and fuel ports. One of them has a very fine five-layer mesh filter in it. Internet wisdom says to clean it, but not to remove it as it can cause issues with pressures if you do (reduces restriction). I hosed it from inside out with brake clean, and got a whole heap of what I can only describe as a fine sand from it. There was heaps. After much testing, I eventually went back and actually threw the disassembled top half into my ultrasonic cleaner, which seemed to clean the filter out well. I tested it by shining a light through it, and there were some big differences in how much light came through. There was almost no light passing through at first, before cleaning. Cool moody shot from that night I refit the distributor and WUR, and refit the fuel pipes I also plumbed in the fuel pressure testing kit, between the fuel distributor and WUR. The system pressure was a little low, it should be over 5BAR But the cold control pressure was crazy. It should be about 0.5BAR, not 3.6BAR! Keep in mind this is after only cleaning, but without any adjustments. No wonder the car was leaning out hard. Remember, higher pressure is a leaner mixture. This triggered the next couple of weeks messing with the system trying to iron out the pressures. I tried many things, including running the WUR naked, with no internals And setting the pressure with the adjustment pin, located here Then it all started to turn to custard, and the system pressure was low at about 4BAR, and wouldn't come up even with additional shims in the regulator. This lead to buying a replacement fuel pump. The old pump is pretty easy to remove. Four bolts hold the mount to the car, two hoses, and two wires need to be removed. I clamped the feed hose as the tanks had fuel in them now and set about removing the pump Pump on the bench The pump has an inlet filter in it, and this is what came out of that filter. It's not rust, which is good, but almost looks like fluff, some organic matter (bits of leaf?) and a lump of metal, which kinda looks like lead or solder. I might get a pre-pump filter. The new pump is bigger and slightly longer, but otherwise a direct replacement. I couldn't reuse the sleeve from the old pump, but reused the rubber insulator The old pump was a Bosch 0580464125. A good pump, but mine wasn't having a good time anymore. The replacement is a generic pump which met the required criteria (high flow, and up to 8BAR pressure). The new pump sounds nicer, but the system pressure hasn't changed much at all. I tried adding a whopping great washer as a shim on the regulator and finally got 5BAR pressure, but I'm sure that isn't right. I have had the WUR open so many times now that I can open it in about 30 seconds for adjustment, but I'm still getting weird results. Right now, the system pressure is around 5BAR with the extra shims. The cold control pressure should be about 0.5BAR (as that's what I dropped it down to after resetting the pin) but either it's very slow to rise on the gauge, or doesn't rise at all now. Warm pressure is about 2BAR, 0.9BAR too low. The new pump can obviously do the pressure, but its either being restricted or bled off somewhere. There are no leaks, and the fuel filter was replaced when I got the car (although I do now wonder about it after the pump packing a sad). Anyway, I reassembled the intake today, and removed the pressure tester And fired the car into life. It had some issues at first, but tweaking the mixture screw sorted that out and it idled OK, albeit a bit lumpy and revved on about 5 cylinders. The more I ran the car, the more it was happy to pick up all the cylinders and rev again. I set the idle by ear, and so far I have taken it for a dodgy run back and forth along my road, which it seemed OK. I haven't been brave enough to take it further yet as I might take a support car with me just in case it dies in the middle of the road again. I still want to know what the pressures are doing, but I suspect there is an issue with my pressure tester. Either that or I have a weird issue in my KJet system. I'm trying to source a second testing setup now to compare and see what happens. If I can set the pressures correctly, in theory I should be able to get a nice happy running car. Fingers crossed. Oh, it wouldn't be my car if it didn't spill some coolant. Thankfully I believe this is just from me overfilling the radiator, as it was from the overflow. Looks like it'll need a flush at some point too.1 point
-
Lovely thread mate, I’ve got sane colour combo 1973 LHD1 point
-
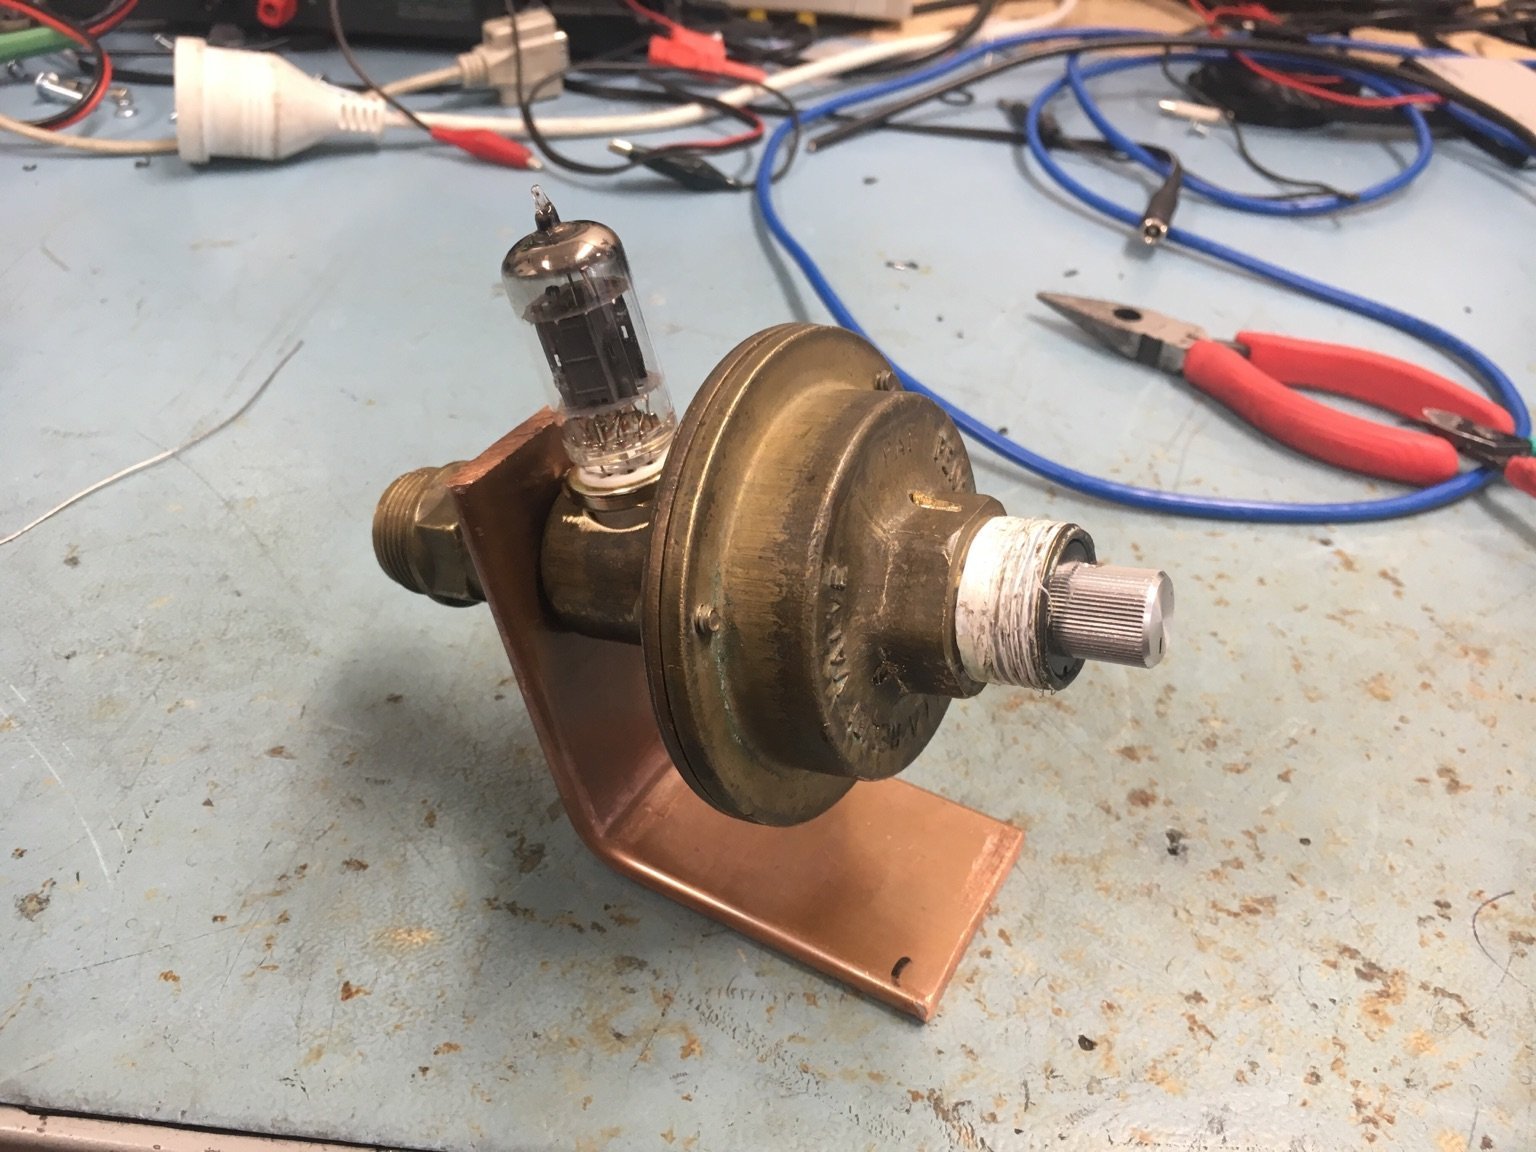
Beginnings of an Oldschool Steampunk noise box. First up: The oscillator (courtesy of valve via @h4nd)
1 point


This leaderboard is set to Auckland/GMT+12:00