
Leaderboard


Popular Content
Showing content with the highest reputation on 04/13/19 in all areas
-
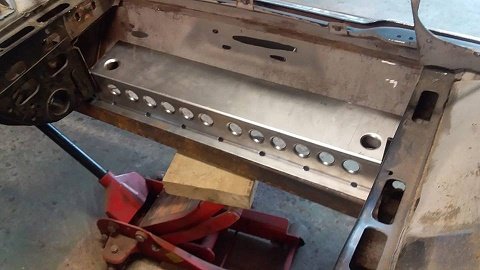
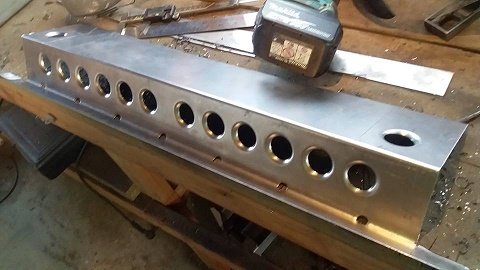
A bit more progress. I bought some Vitara seats from the wreckers, these are the same frame as the ones I put into my bus so I know they can sit pretty low once you start cutting and shutting. They are a bit more supportive than the Dyna seat, and they have the added benefit of being a pair, not a single. Banana for scale; I removed the bar that runs along the back of the seats, this allows the seats to recline into a far more comfortable position. It will go back in when the seats are installed and I know how much clearance it will need. I will need to split that engine cover lengthways and add another hinge and latch. This means I can still get into the rad space without removing the passenger seat. This shouldn't be a drama. I also checked the bump steer situation last weekend, first with the factory setup, then with the new arrangement. The new setup turned out pretty shit as my positioning of the new steering box did not put the tierod exactly in line with the factory setup. This was due to some geometry that I had to guess at a few weeks ago, but when I moved the box up 25mm this made a huge difference, it is now slightly better than the factory setup which is a big relief. The brakes look pretty new with minimal disc wear so that is good. About there is where things have stalled as my back went out pretty badly and I spent a couple of nights in hospital. I'm home now and itching to do stuff but I should probably take it easy for a while. I am going to have to get serious about losing my belly as I am sure that would make a huge difference to the situation. Fat old fuck that I am.11 points
-
Well Xmas break was a bust, ended up finding more and more rust to fix. Not that I care, I knew it was an 80's Toyota from day one. Just means the goal posts are shifted as to when it will be legal. Hoping to have it sorted for Nats. Have been slowly chipping away at it, slowly filling a container will rusty bits of car. My shrinker / stretcher has been pretty useful, makes creating curved sections much easier. Anyway, some pics of some of the repairs. No point posting the photos of all repairs, as ain't no one got time for that. Still have a many repairs to do, just need to pull finger as paint drying outside is going to be a pain come winter. This update is basically just showing my rust repairs, which is all i've done on the car since last update. Making a new rain gutter section for bottom of A-pillar. Decent surface rust that got 2-3 layers deep in some areas. Replaced with single piece. Boot latch, seal traps water above the latch. Rusted out of my other car too, so out it came. Finished section, with boot frame pieces also cut. Doesn't look pretty, but it's all welded up now, and solid as fuck, so whatever works. Drivers side boot above tail light area, other side had similar repairs. Not much was left original, I just had to replace it a section at a time, to keep the original shape as best I could. Passenger side boot hinge area Drivers side boot hinge area, or at least what was left after removing the "structural" rubber seal. This took a bit of planning, as I had to make a section that didn't exist. Just imagine someone getting frustrated and spending hours on the stretcher/shrinker having not much luck. A lot of this area is 2-3 layers thick and attaches to supports underneath. I'll have to tidy the underside up later. Not many progress pics of this bit, no time for pics when frustrated. Transfer the curve on to paper, then put folded sections into stretcher/shrinker to curve to shape to form half the gutter. And just like that it was done, so simple.... Random repair found above tail light, viewed from boot floor.. Mayte, just tack some sheet on and fold it under, no one will ever see it. There is perhaps 5% of the original boot seal area left, it has all been cut out in sections and replaced. Was just going to replace the worst bits, but the further I got into it, the further I realised the whole lot was beyond a wire wheel and paint job. So that is some of the repairs, but certainly not all of them. Need to tidy up a lot of the welds ready for epoxy primer. So will be doing that over the next month, with the intention of having it all sealed up ready for filler and paint. In between repairs i'm doing my homework on what parts i'll need to get it back on the road. Bit of a boring update, but rust gonna rust.
 9 points
 -
painted the boot. its not great tbh, got a couple of runs in it but its only a boot i suppose.... 2019-04-13_06-22-45 by sheepers, on Flickr 2019-04-13_06-22-53 by sheepers, on Flickr i also painted the dash. it was looking a bit shit and the sliver edging was all fucked so i had a go at masking the edges and using some chrome spray paint to bring it back to life. it came out super awesomeo! im really happy with it. the chrome isnt "chrome" as it was but its pretty close. sure looks way better than it did. im giving it a turbo win out of ten. 2019-04-13_06-22-37 by sheepers, on Flickr8 points
-
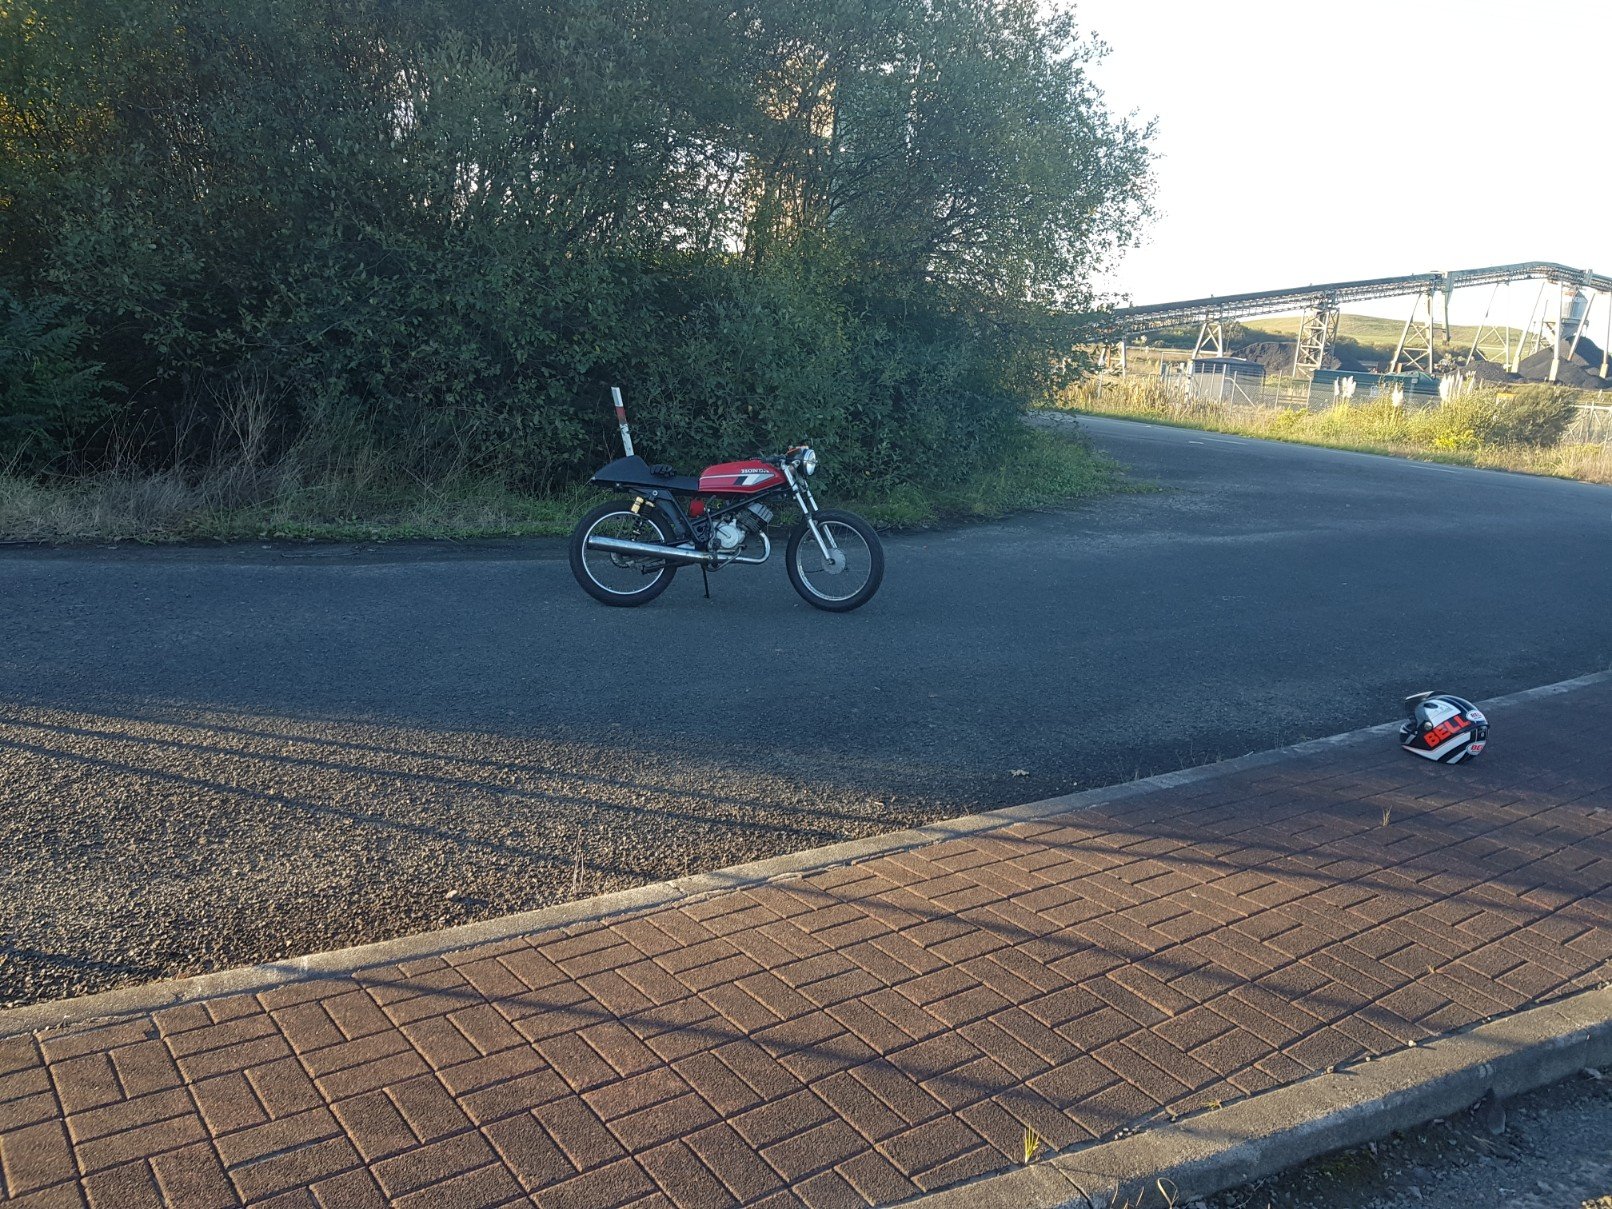
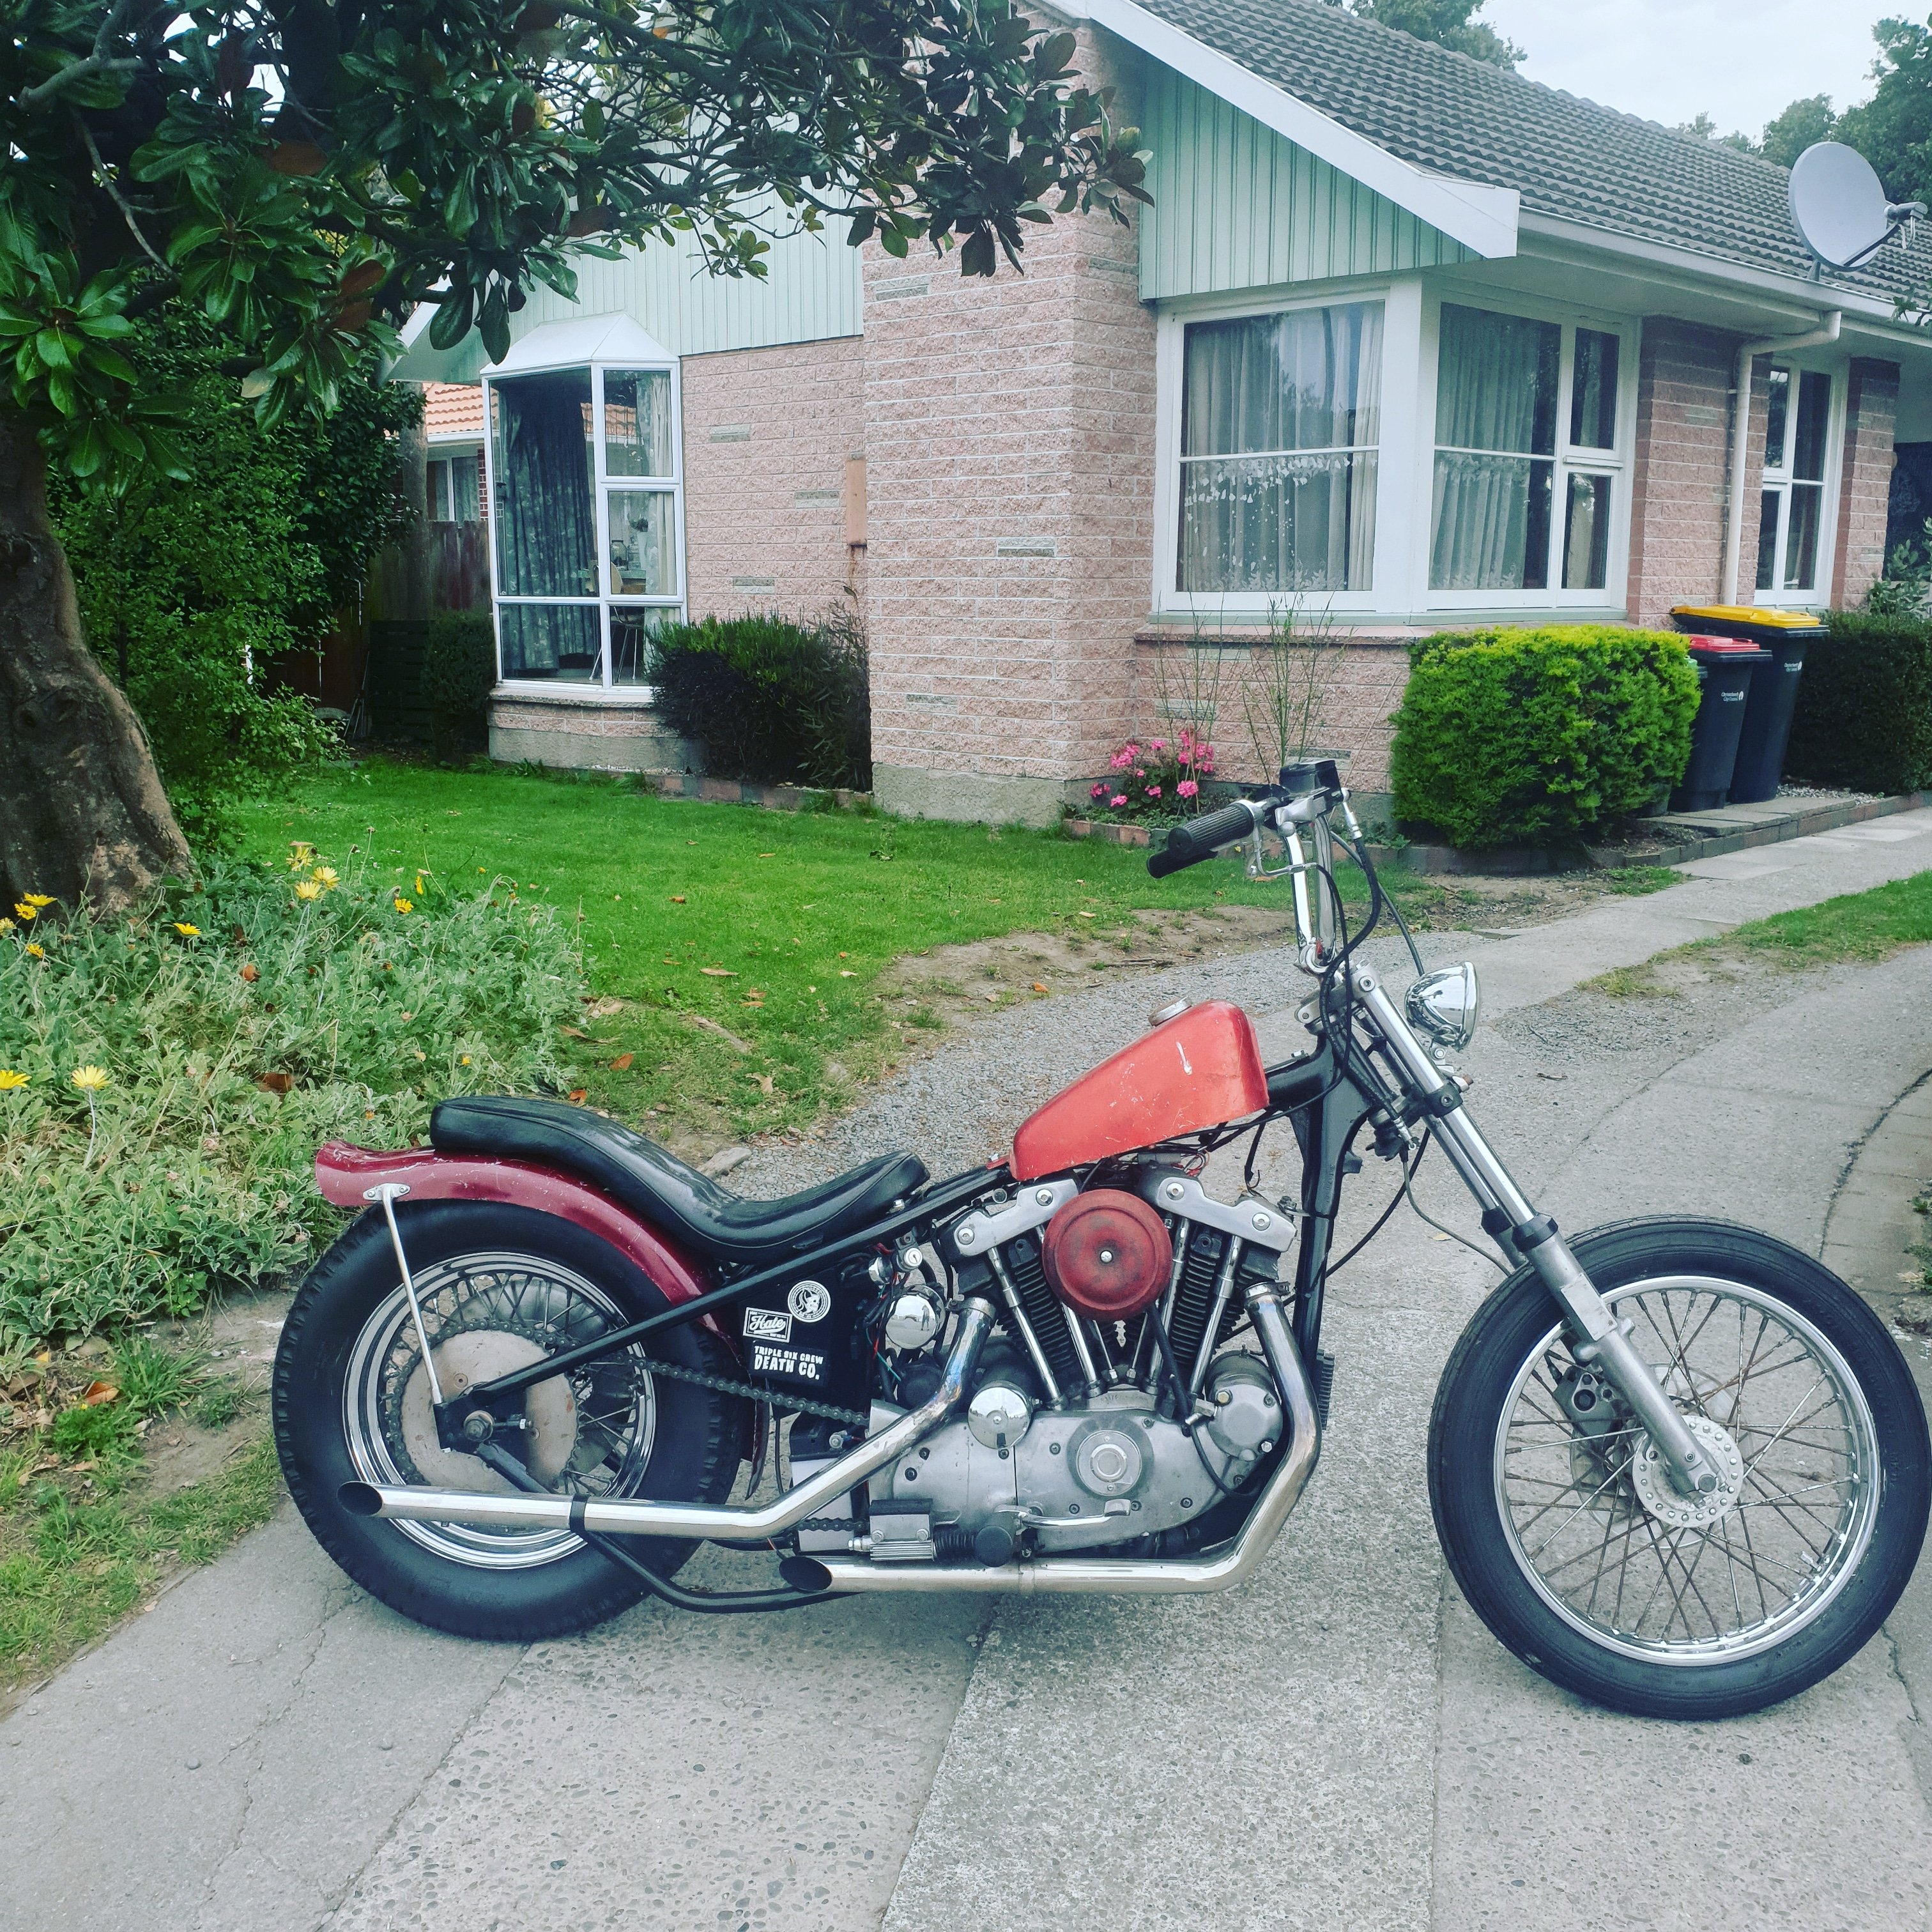
This thing is still going, done 250km on it since doing wiring and stuff- everything still works! Nearly sold it- wife didn't want me to because i love riding it so much but I wanted the money for beetle etc etc. Glad i didnt!!!
5 points
-
It was time to show some love and fit the mono shock. Could have made a better bracket Thinking of fitting this. any pro's and con's? Dont quite line up4 points
-
Looks like i-force has pooped itself and all my images are gone. Bummer. Anyway, drove out of the garage for the first time in who knows how long to give it a bit of a rinse and rearrange the garage. Got a real ratrod vibe going on here. Out and about 1 by Thomas Addison, on Flickr Out and about 2 by Thomas Addison, on Flickr Pretty much done with stripping now, just finishing up the underside of the bonnet. This is the first thing I will paint, get some practice in with the paint gun on a big area that doesn't matter much. I've also been buying things. Found a single NOS fender mirror. These are usually astronomically priced for a pair, on the rare occasion they turn up at all. This one was surprisingly cheap and is super mint. There's one slight scuff on the side which I think will probably polish off completely. Nice. NOS mirror by Thomas Addison, on Flickr Got a cool gear knob to match my kitty cat headlights. Gear stick by Thomas Addison, on Flickr And lastly some 70s galant hubcaps. Really tidy and shiney. One has some curb scuffage, but no big deal. They came up on TM pretty cheap and I thought they make for another nice nanna spec wheel option. My current thinking is to have these, widen some steel wheels with the little centre caps and trim rings I have now and get a set of 14 inch japanese, period appropriate mags, as wide as poss without flaring the guards hubcaps by Thomas Addison, on Flickr3 points
-
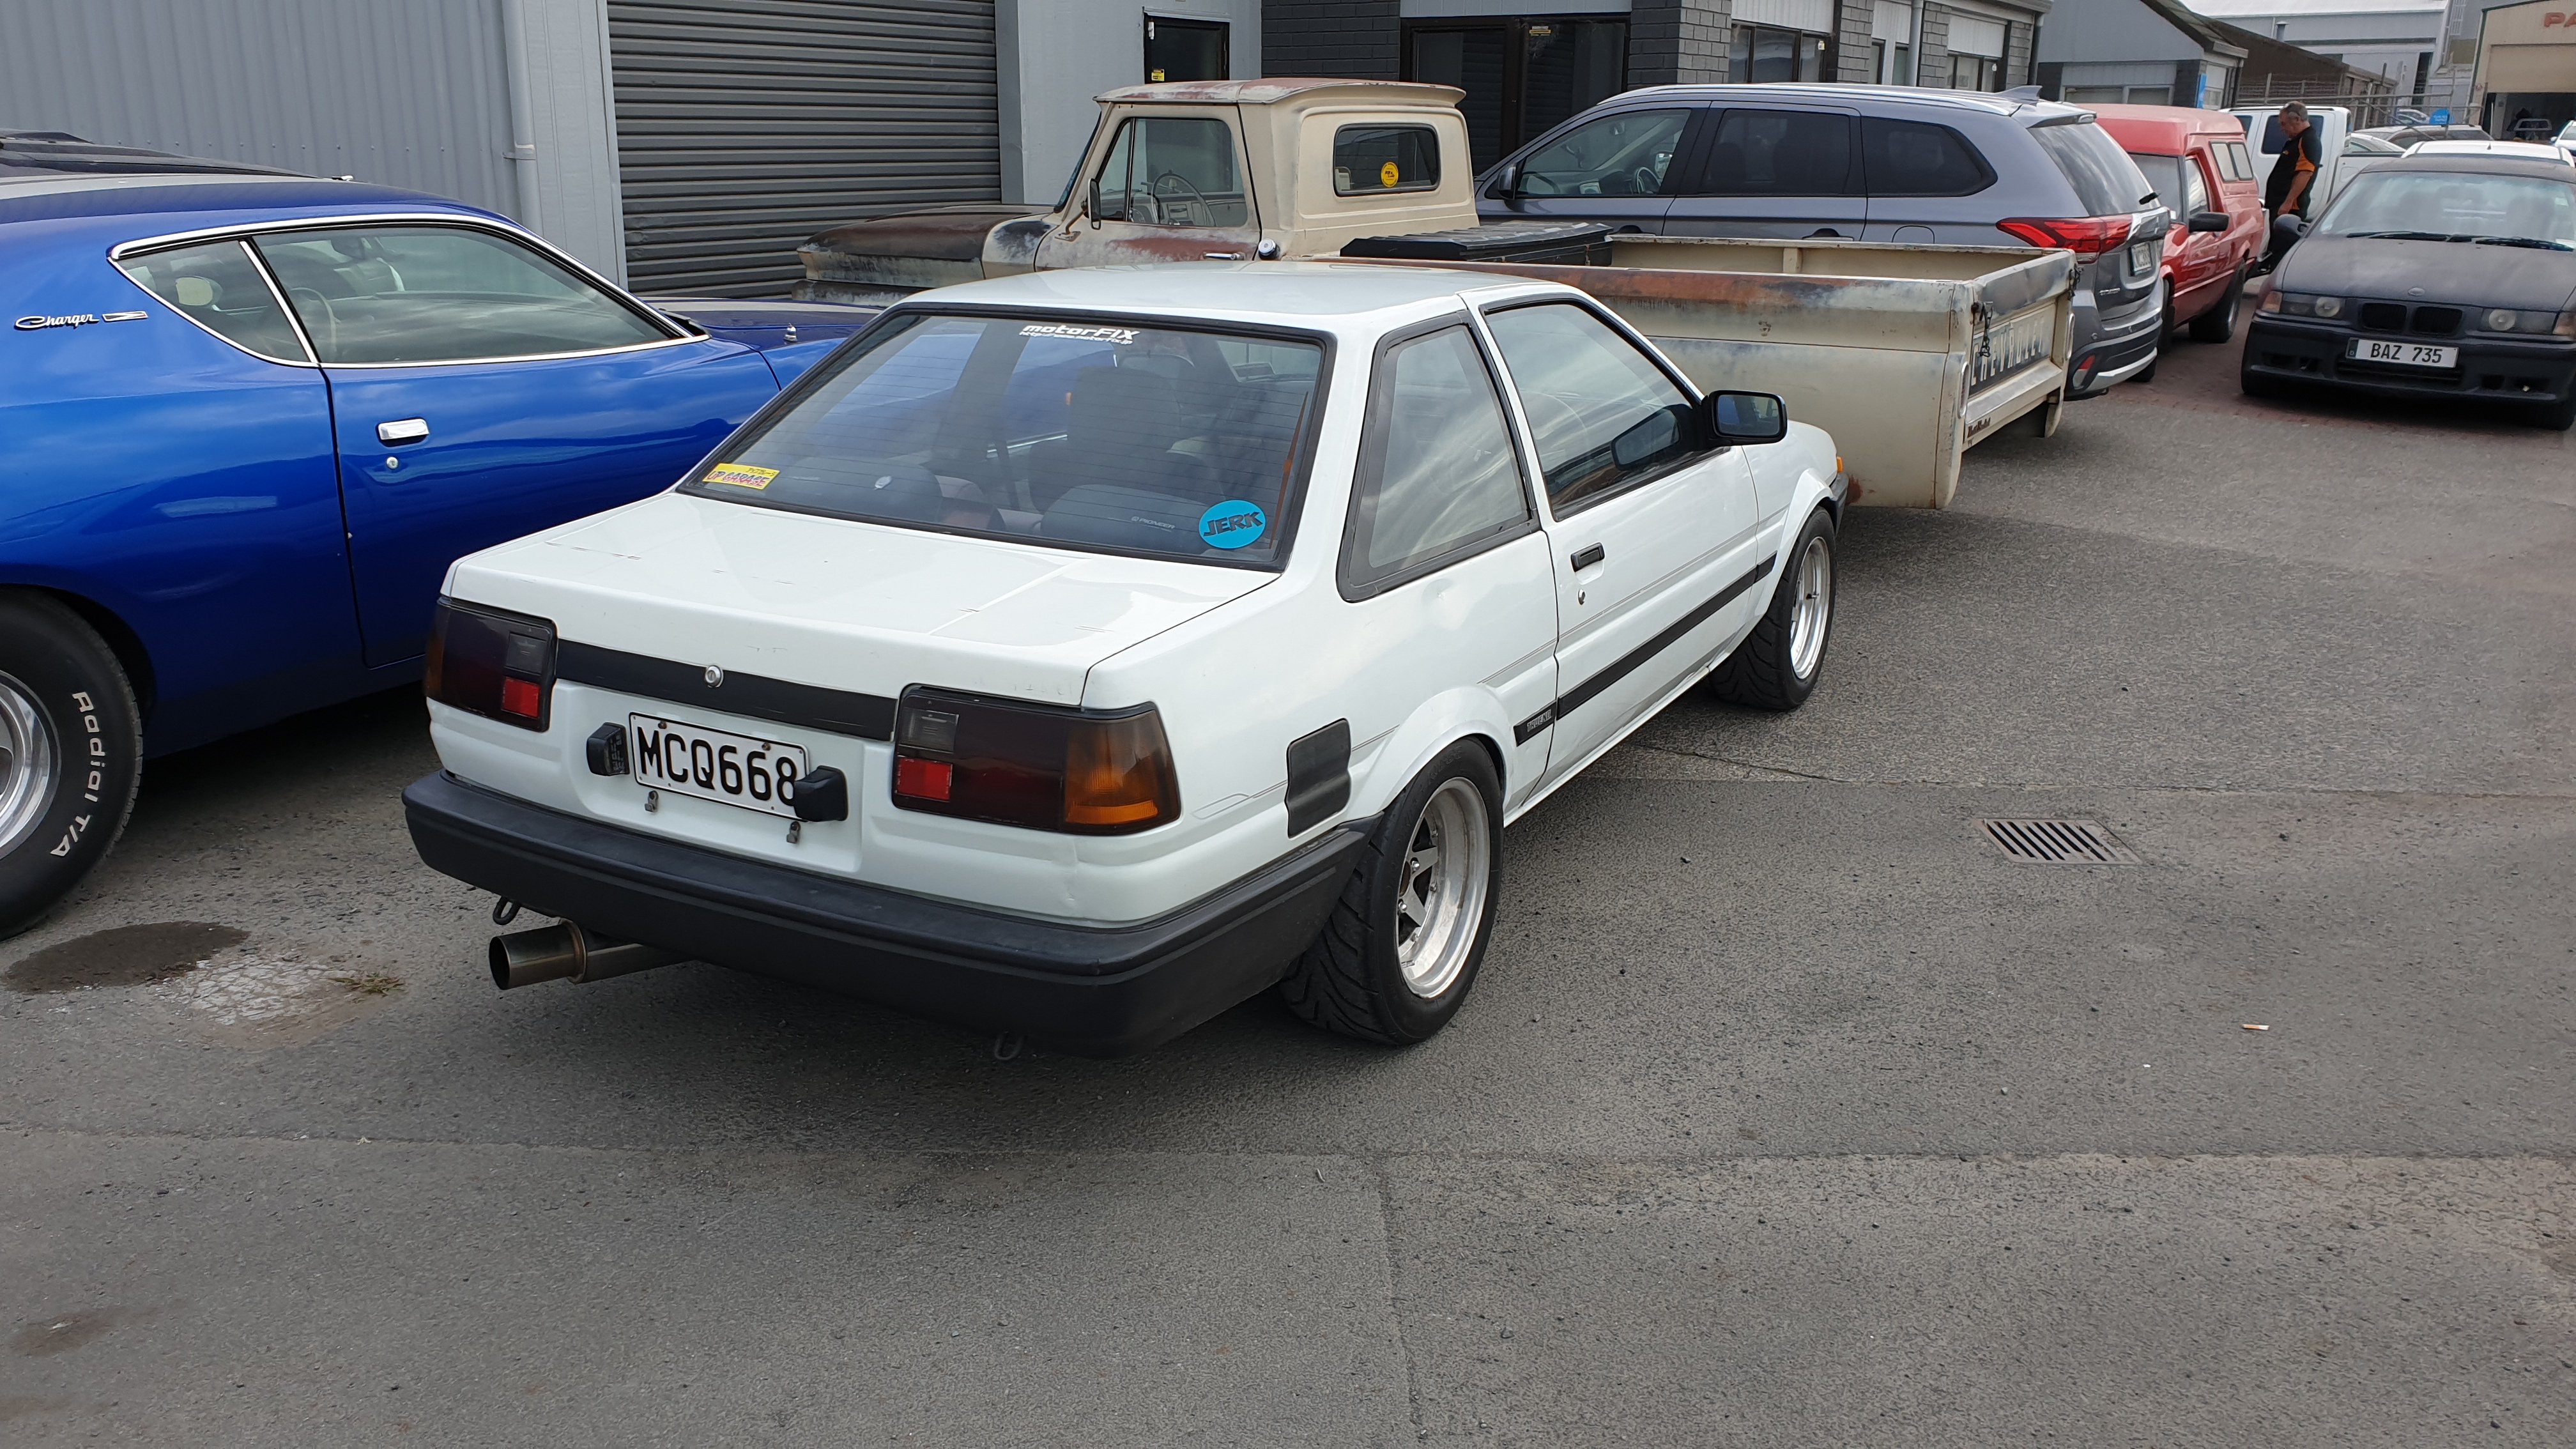
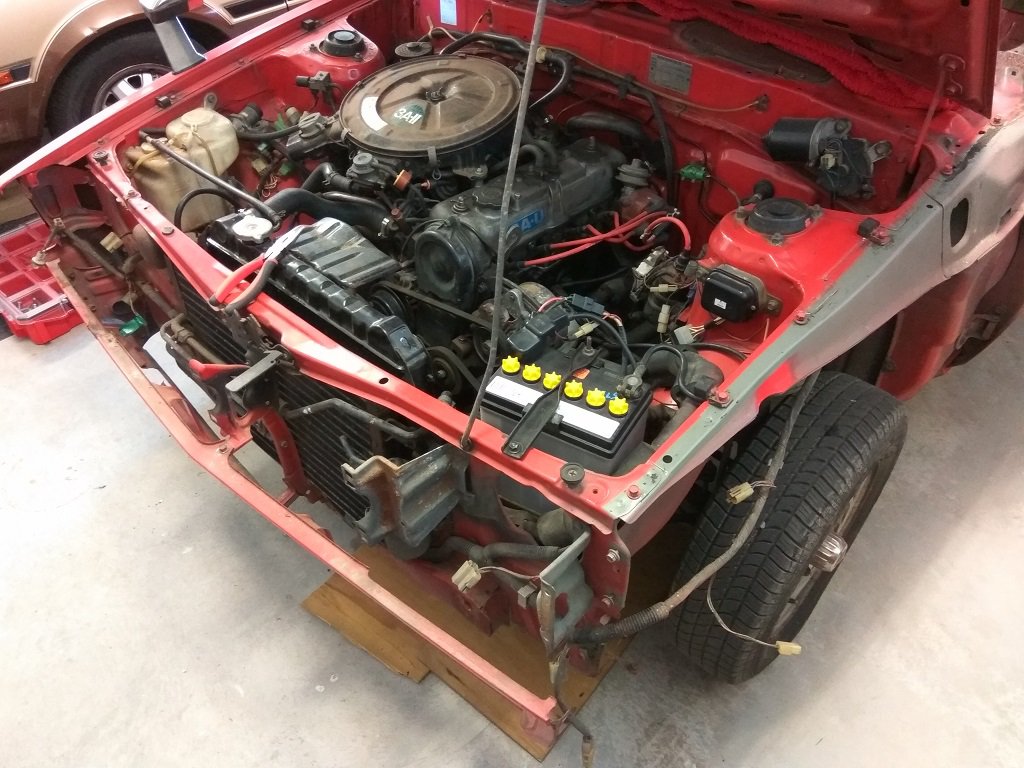
So things didn't exactly go to plan with Cert. Long story short, the rules have changed around suspension. To pass with the Cressida struts and custom knuckles the car would have to pass a bump steer swing check. After failing twice I made the call to switch back to Ae86 front struts and OEM knuckles. Pulled the trigger on some Wilwood front brakes too. So finally after a couple of months of fluffing about the car is finally legal! It looks like iforce hosting has died so I'll go back and update all my photos at some stage. Anyway time to go smash some doorts to celebrate.
3 points
-
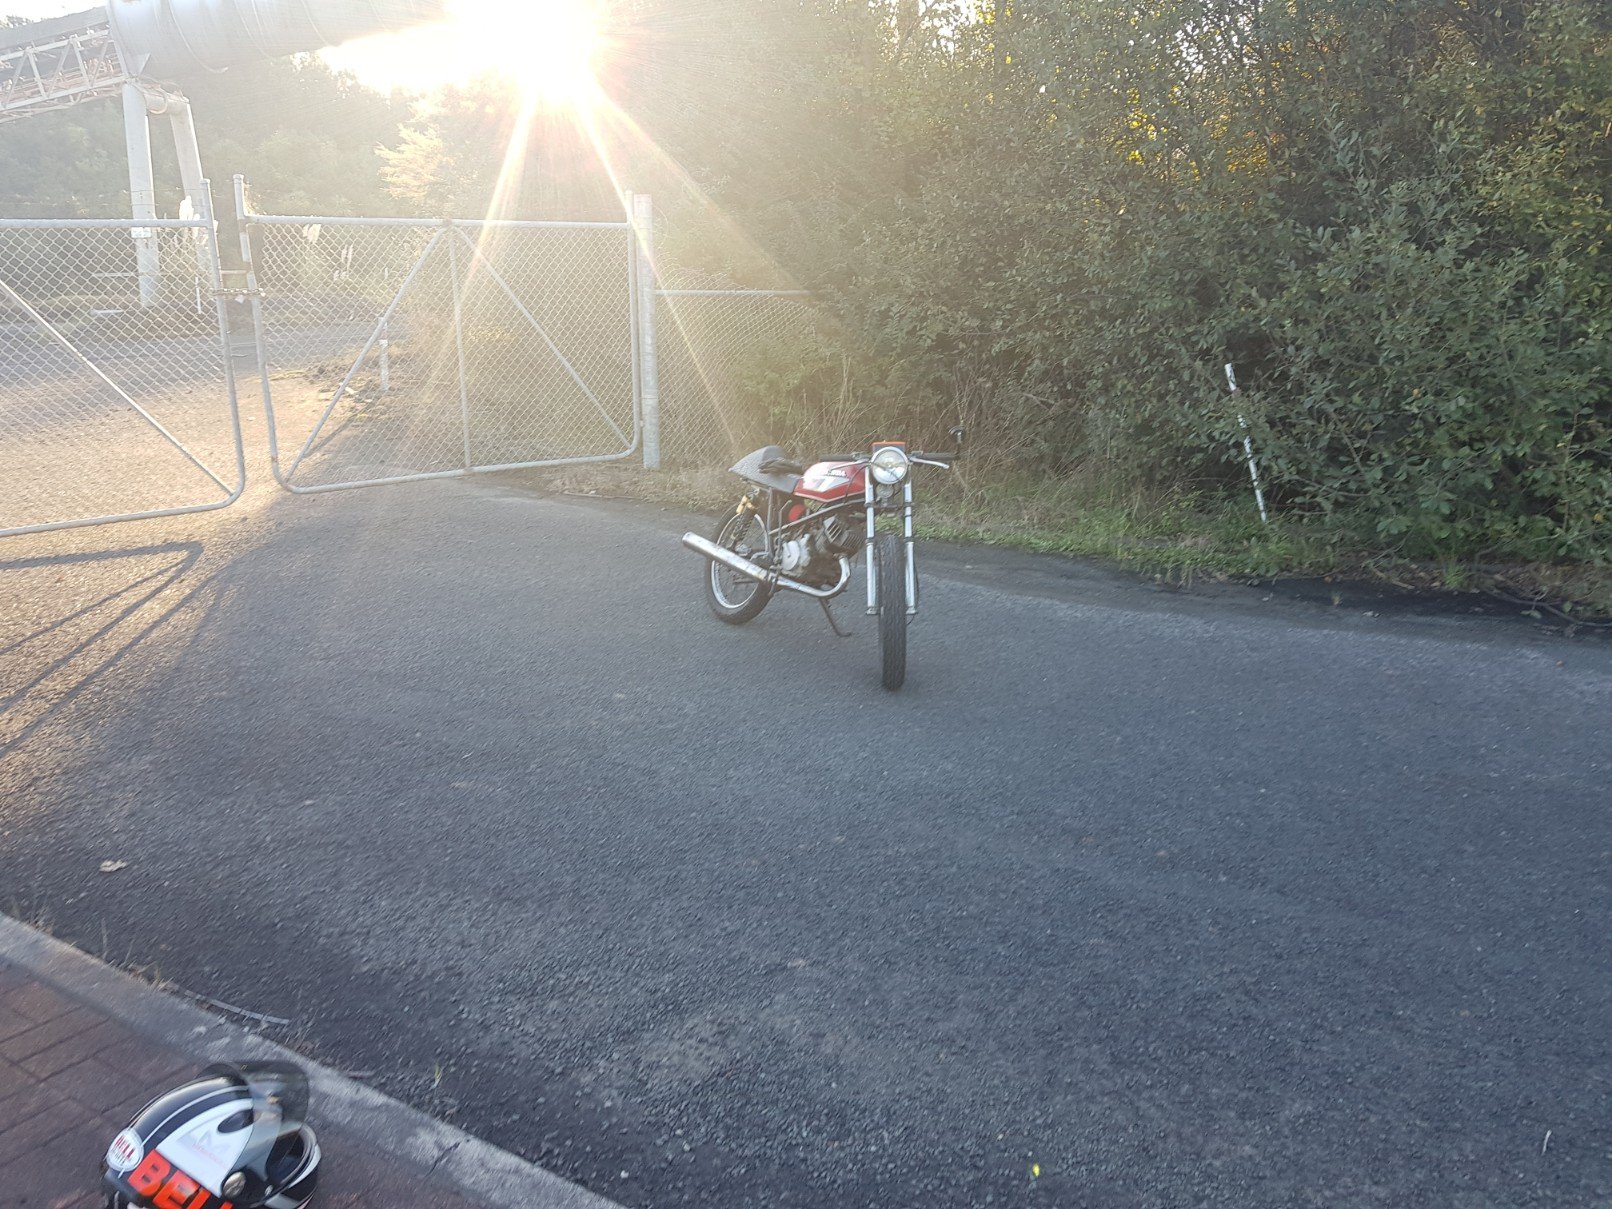
Small capacity bikes are stupidly fun, can either idle everywhere on a big capacity sports bike, or race like fuck on a wee shitter...2 points
-
Certs booked - 6th of May. Are you meant to feel this nervous? it should be fine, its not a massive list of mods and its not making huge power. anxious and excited at the same time, this has been a long time coming. nearly 10 years of ownership, i initially bought this car as something to learn on.
2 points
-
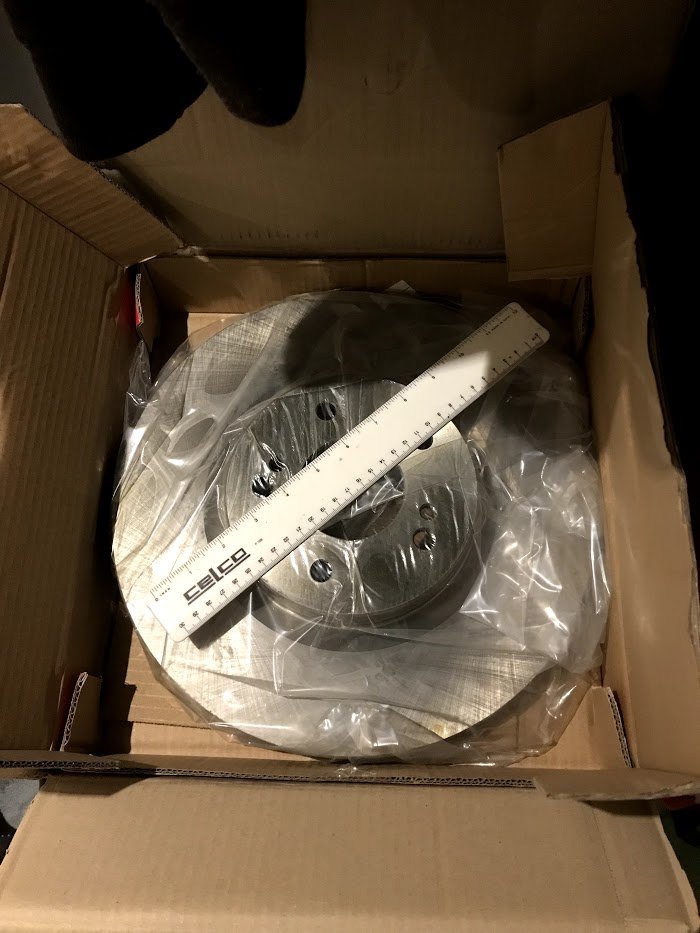
Well they are definitely big óle dinner plates
2 points
-
some more trimming and i think i have the base plate done.
2 points
-
This was the stuff I was looking at, unsure how well it wears, though would be reasonably painless to re do every 12-18months if you had to I guess, possibly similar maintenance if i was to polish and clear coat anyway2 points
-
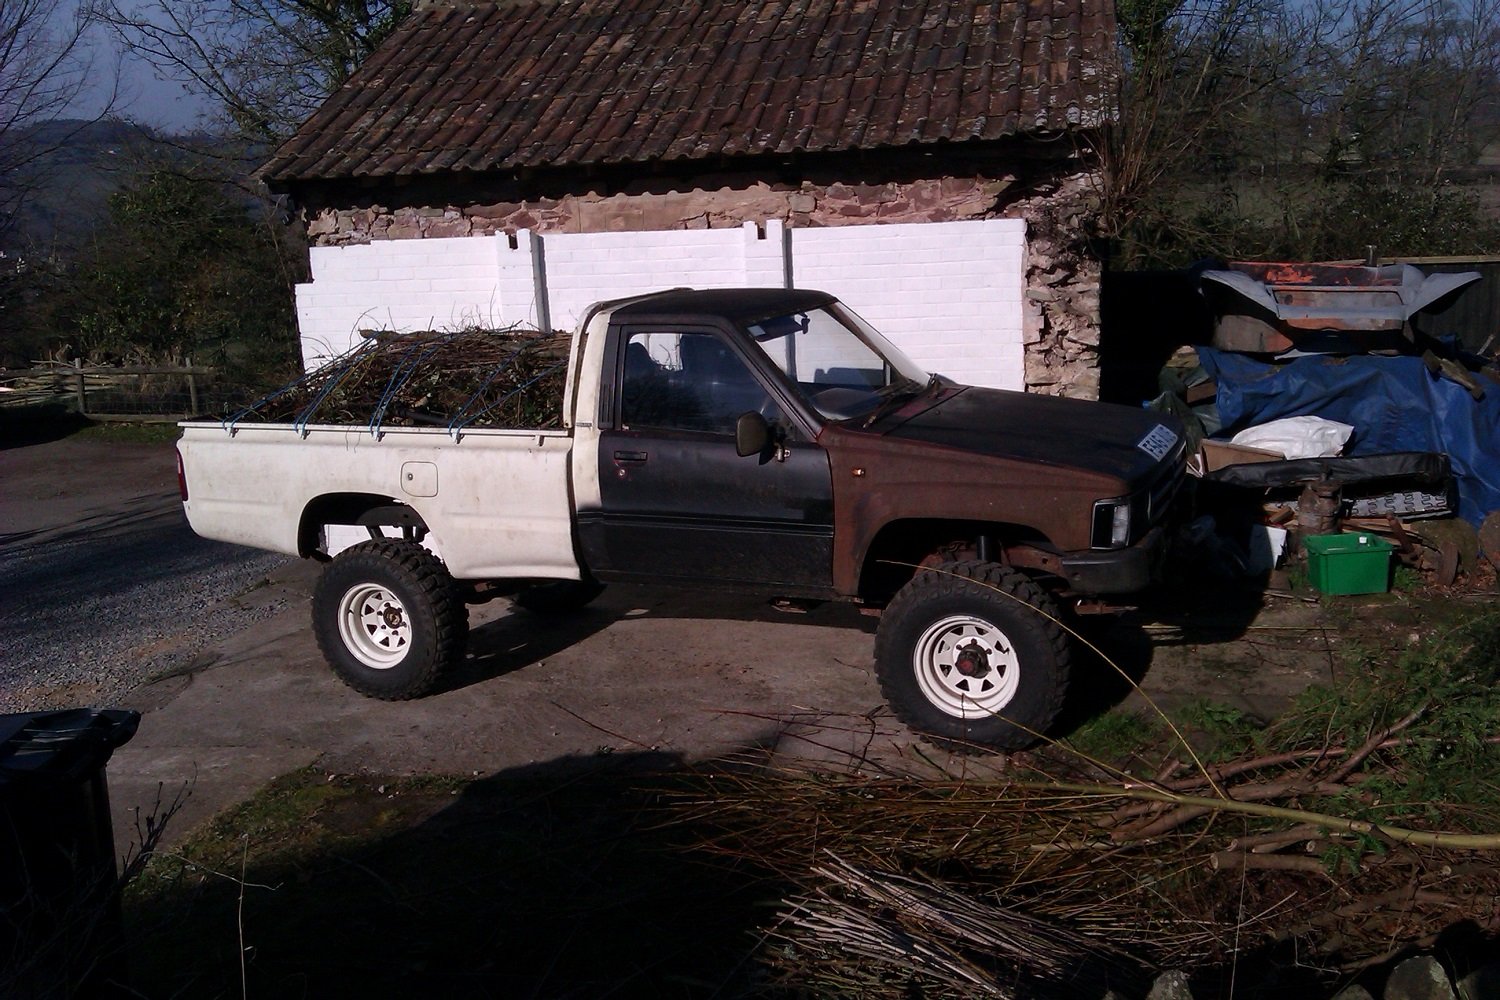
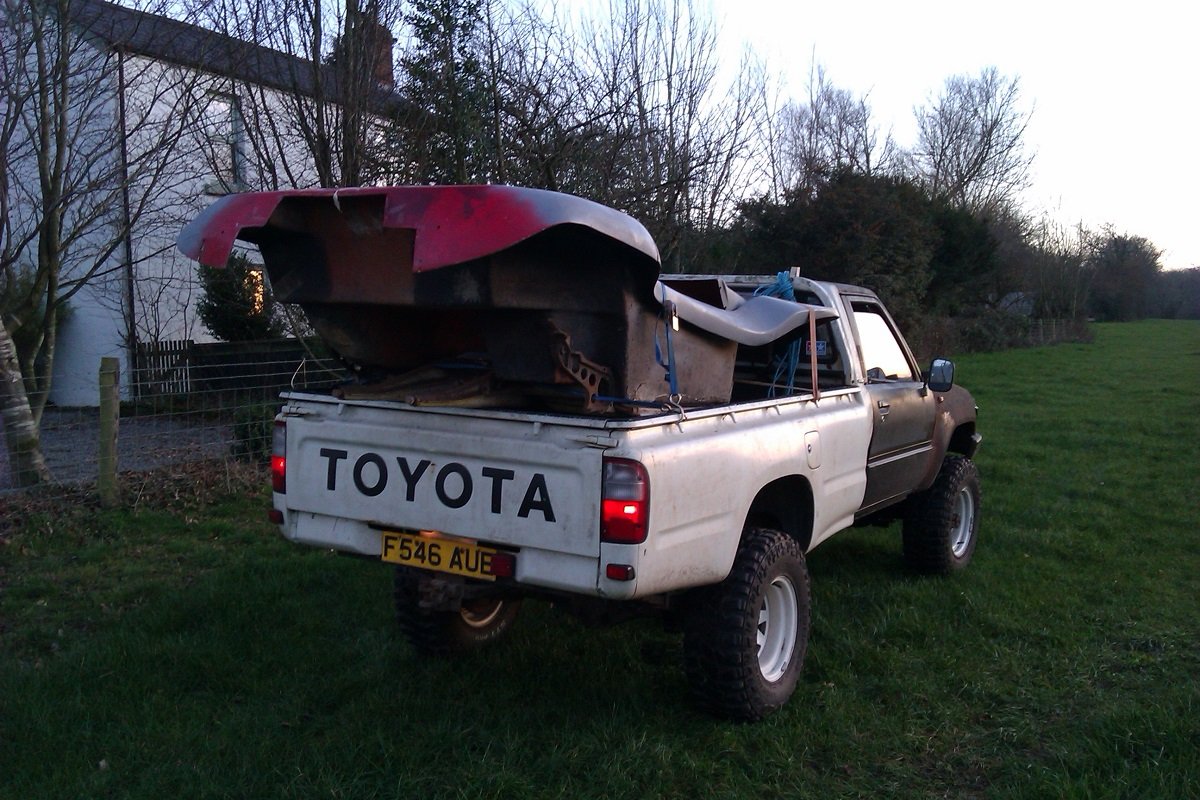
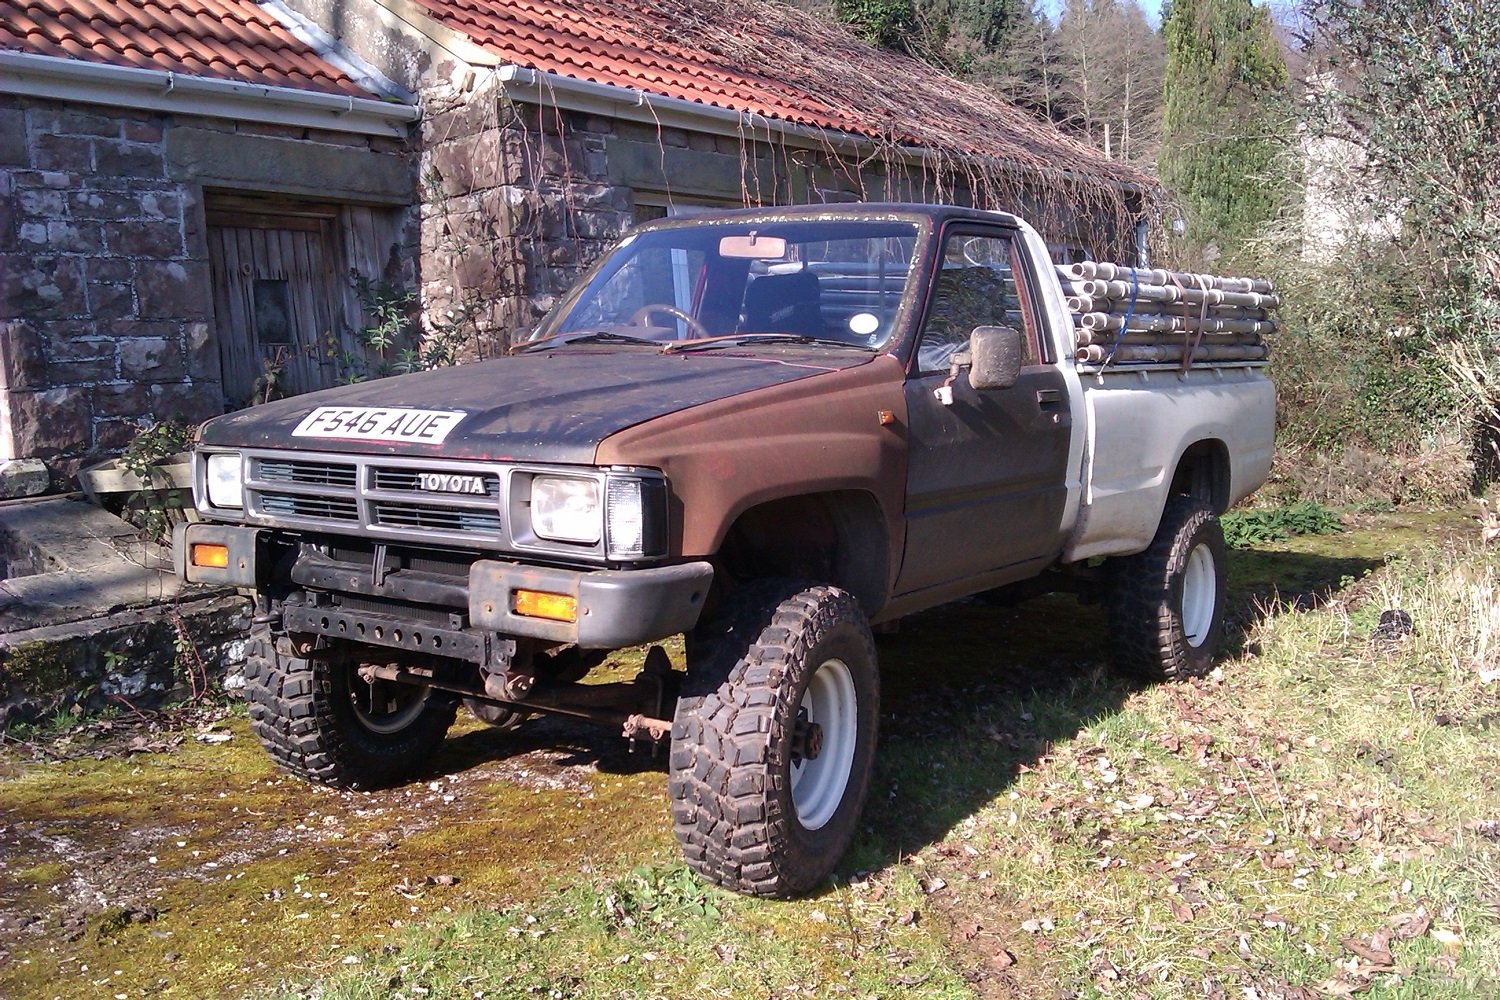
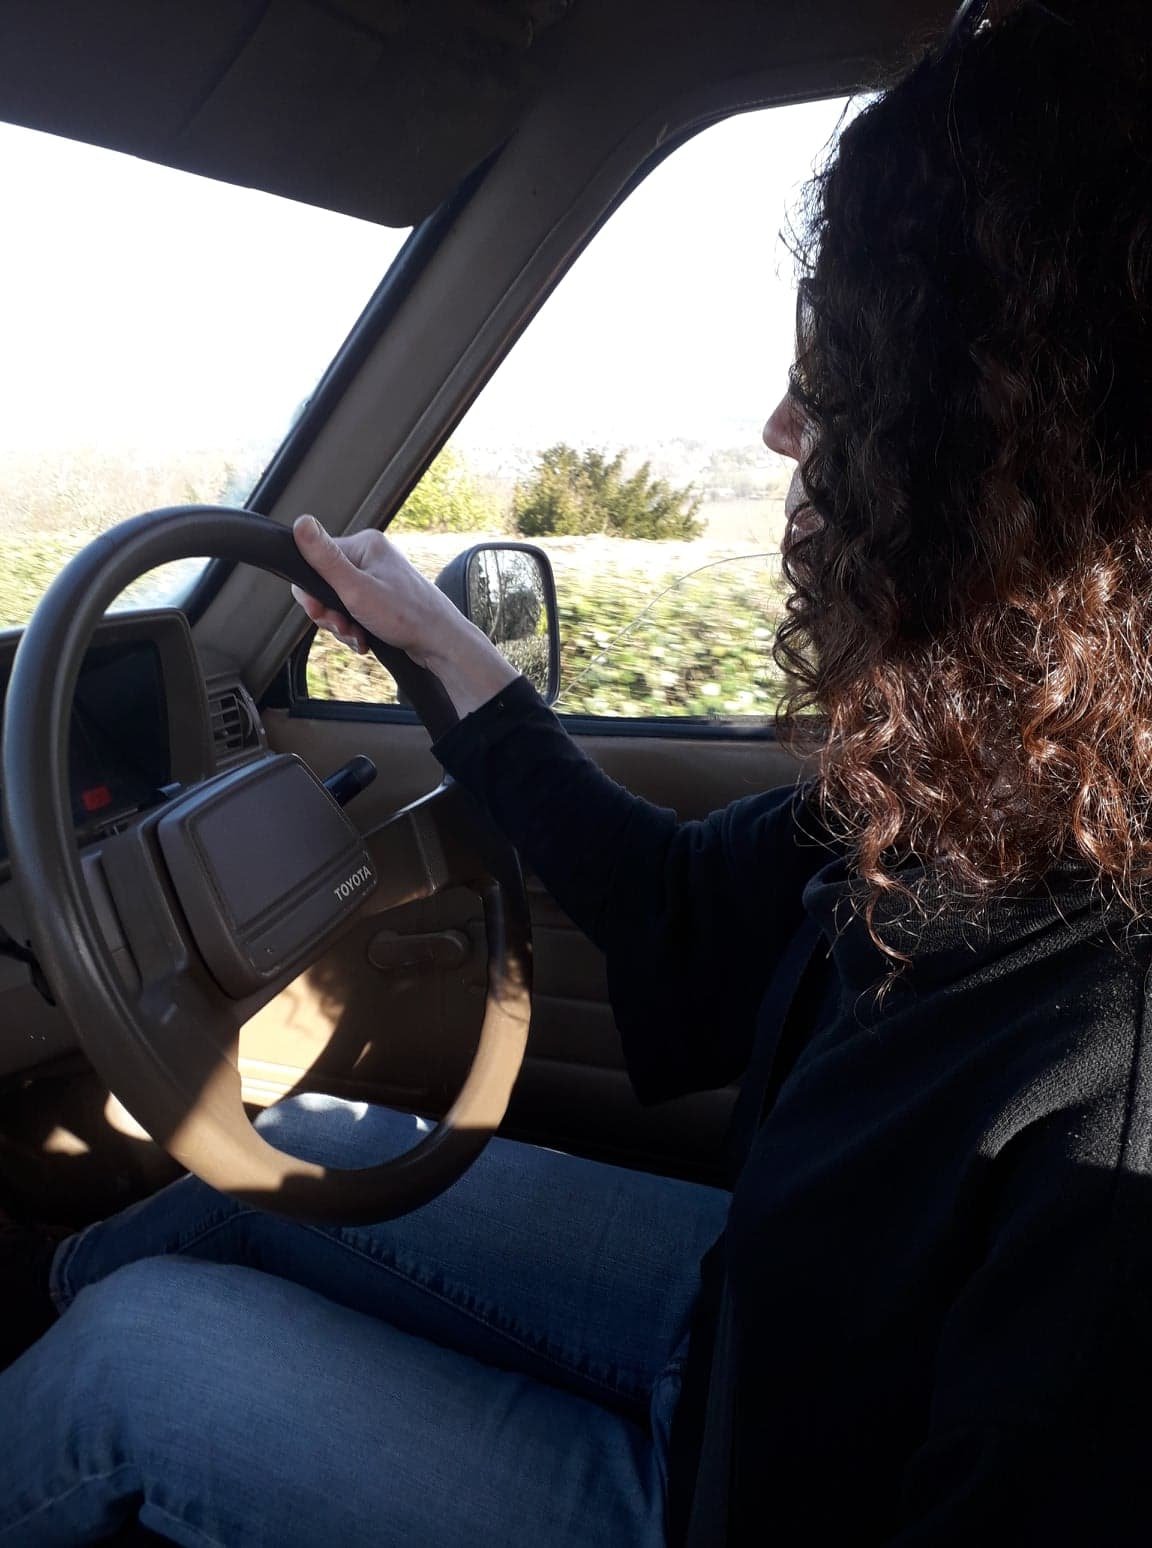
As reported elsewhere it passed its test. Whilst not with flying colours, it was good enough. Or maybe he just wanted rid of me. It's been a week now and I've done about 350 miles, the only casualty has been the alternator and P/S belts which have worn due to rusty pulleys. I'll have to have at them with the emery paper. I have no idea how I survived the last ten years without a pickup, it's been so useful this week. I know we had the L200, but that was only half a pickup really and had a lid on it most of the time. Mrs Shuzz drove it for a few miles and declared it "alright, but a bit slow". Blardy hooligans. Update when the weather gets good enough for painting it. Anyway, pics.
2 points
-
I have collected my 5th Tru-Test after selling my other 4 over the past few years. Couldn't help myself to another, seen how they're so fun! This is a pretty nice, straight original ish bike. Handlebars have been changed to the ones you currently see on there but dare I say it, I think they look pretty cool. It has a fairly worn Briggs And Stratton 3HP. Bought it not running but after I slapped in a spare coil and wound out the carb it goes hard. Clutch was the first thing to be replaced. Since it was a twin shoe it would bite horribly and give a very rough ride. Swapped it for an equally buggered 3 shoe clutch and it goes far better. I need the engine for a rota-hoe so it will be coming off soon. I have a 5HP Briggs to take its place. Once I get rid of some projects I will restore it. Plan is powdercoat metallic blue, white fenders, with a few oldschool touches here and there. Updates to come when I either break it, pull it apart, or come up with new ideas. chur
1 point
-
I got this off Zac a few years ago, it's been sitting in storage but I'm getting the bits together so I can assemble it then it'll get sold. I bought some 0.5mm oversize NA (9:1) pistons and bearings from Rockauto. The block was bored by North Canterbury Engine Reconditioners to suit the pistons, he also decked the block and polished the crank for me. I'm converting an Evo 3 head to use the cam and crank trigger setups that some of the other 4G63s ran, I bought new sensors also from Rockauto. I've welded up the injector holes on an Evo 4 inlet manifold so I can use it with the Evo 3 head and have the throttle body facing the correct way. Still need to get lots of other bits, oil pump, sump, turbo and manifold, flywheel and clutch etc etc.1 point
-
Have heard possible issues from ultrasonic cleaning carbs, it can dry out the felt seals on the throttle and choke shafts and create a air leak maybe try soaking them with oil or grease? To stop air getting in?1 point
-
This is looking a lot better looking at the timetable and map. Will be taking the little red Mazda along. Can’t be f’ed organising to take all three. Anyone else displaying a car?1 point
-
the nissan plug in links ive done, s15 etc. have had plenty of spare io's on them on the factory loom. plus you can buy and expansion loom/plug for them was talking link specific in my previous post btw1 point
-
to be honest its the bog and sanding i hate the most...dont mind the rust..love the fab....hate the the fuller sanding shit...love the final paint prep and love the painting.....hate the buffing lol1 point
-
Preaching to the choir here mate. It's transitioning back to the rust that's the killer.1 point
-
thankd man... I wanted to do all the rust work before i start on fab work... but it has to be done and its a welcome brake from rust1 point
-
Those dimpled holes look stellar man! You've done a fantastic job on that whole area.1 point
-
Shit me, that is impressive.1 point
-
Yeah it depends, sometimes if it something like a powerfc then it'll have specific things to work with specific OEM parts. For example you can use a 1ZZFE ECU on a redtop beams 3SGE engine, but you need to use the 1ZZ coilpacks or it doesnt work. As the return signal from the coilpacks is different. No such problem on a Link or Haltech etc, but again, sometimes they have bespoke options like the BEAN protocol thing to make the fuel gauge etc work in the Altezza plug and play. (A feature that the wire in ECUs dont have, so people actually bodge these into other Toyotas that would otherwise benefit from a wire in) TL;DR: It's a lot of work for not much benefit unless its a special case.1 point
-
I guess it'll depend on their trigger (cam crank etc) inputs and if you can change stuff. If its a link I guess you can change stuff1 point
-
no reason why you couldn't. can all be reconfigured in software1 point
-
Nah. Yeah, nah. Decided on orange' it'll go with my intended paint job. Maybe folks'll think it's got a Hemi in it, as long as it's not running or moving. Liking the turd skid plate idea tho.1 point
-
Is there a thread Barry can’t infect with his high spring attitude?1 point
-
Hello. Quite possibly a mechanic job in Porirua. If your interested, let me know your phone number and I'll pass it on1 point
-
pic I had on file, can't remember how exactly they fit to engine but seem solid enough...1 point
-
Been having tons of adventures in the wagon. Won a few more awards. Best 8 Cylinder at 4 and rotary jamboree And my favourite, the "What the ?" award from the Automania festival. Pretty much sums up the wagon You put a V8 in what??? So, back to my adventures and what not. I decided on the spark plug cover look I liked the most so I went with just the plain black covers. It worked quite well because I had heaps more people asking what the engine is, so I guess it fools them just enough without the V8 FOUR CAM 32 badge on it Before my trips I figured I would find a new brake pedal pad, I found it a hoot that it is a dodge truck part! Looking sweet, I will have to get another for the clutch at some stage, they are both the same pad So with the engine sorted and the brake pedal sussed I went for a cruise down to feilding for the 4 and rotary jamboree. I stayed at a sweet little B&B just outside of town. Got to Manfeild on Saturday for the track day, super excited because it is the only track in NZ that I haven't done a track day on, so I can tick every track in NZ off my bucket list now. Got out on track then on the first lap disaster stuck!!! The track had been used for field days the weekend before so it was super dirty, and the car in front of my chucked up a rock, smashing my windscreen!!! I drove the rest of the lap with my hazards on and my head out the window. When I got back to the pits I gave my friend Jared (A.K.A @JoKer) a ring and got him to bring me a spare windscreen over from Dannevirke. While he was making his way over I drove down to the local glass place and got them to swap the windscreen over. I got some funny looks cruising down the main road of feilding with a busted windscreen in a V8 Avenger, it was only about 1km from the track so I just drove with my head out the windows. Made it back to the track with the new windscreen just in time for the afternoon session. As a thank you, I took Jared for a cruise around the track. It was quite a blast My favourite picture of the wagon out on the track Out on the track I had a bit of a lean backfire off throttle so I pulled the car off the track early and set it up in the show and shine, After the show and shine I found the problem was the idle adjustment screws on the back right pair of throttle bodies had vibrated up so those throttle bodies weren't closing fully, fixed it in the car park. On the way back home I stopped in at Horopito, AKA Smash Palace to get me some wagon parts. They have a few Avengers there, 2 wagons and 4 or 5 saloons. Got me a good haul of parts, got some rear bumper brackets to replace the ones I had to borrow from the 75 Avenger when I swapped to the NOS Hillman bumper on the wagon. Got me a tow bar because there is nothing cooler than a V8 Avenger wagon towing stuff, am I right?? And also a pedal box for a friend, and a new door card. Got back home and gave the bumper brackets a good sand blast Then painted them with black zinc paint The next weekend I went off to @Ned house warming down in Taupo, So I figured I would camp out in the wagon on his front lawn. I am really digging the wagon for camping. The bed mode is really comfy, so I think I might do that more often rather than staying at hotels. On the way back up I meet up with the Hillman Humber club and we did a run out to a truck museum. Pretty good turn out. We had 3 Avengers there!! Then the weekend after that I had the Automania festival!! I entered my wagon in the indoor show. I figured I should actually get a photo with the bonnet down as 99% of the time it will have it's bonnet up, because V8! I went with a nice little in car display of some of my old Avenger sales brochures. I especially like the one on the back of the drivers seat because it has all the original prices hand written and a dealers stamp on the front, it must have been kept all these years by someone who was thinking of buying one, it's either 1979 or 1980 so it's from the exact era of my wagon, and even has the van pricing on it, and that you only needed 30% deposit, rather than the 60% deposit you needed for a normal car or wagon. I also entered my 1975 Avenger in the outdoor show. It was raining all day so my poor little Avenger Panther felt very unloved while it's younger brother sat warm and dry inside (Can you tell I have a favourite child at the moment?)1 point
-
Don't know about what's available near you but my work has a special lathe set up for machining the face of wheels. On something like those I'd get blasted, a coat of black paint down between the spokes ( don't worry about getting paint on the faces, it gets machined off), get the faces machined and then a good clear coat on top.1 point
-
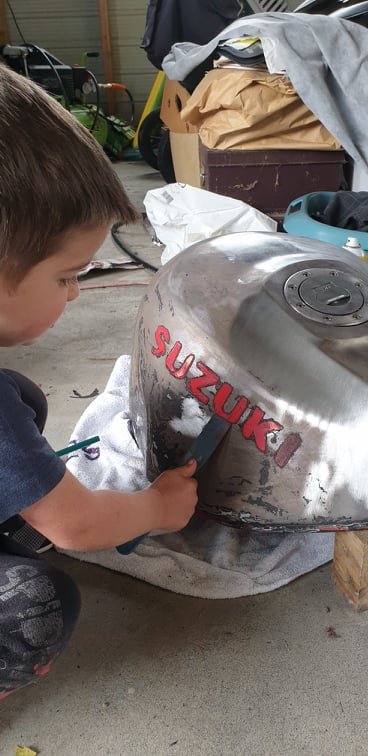
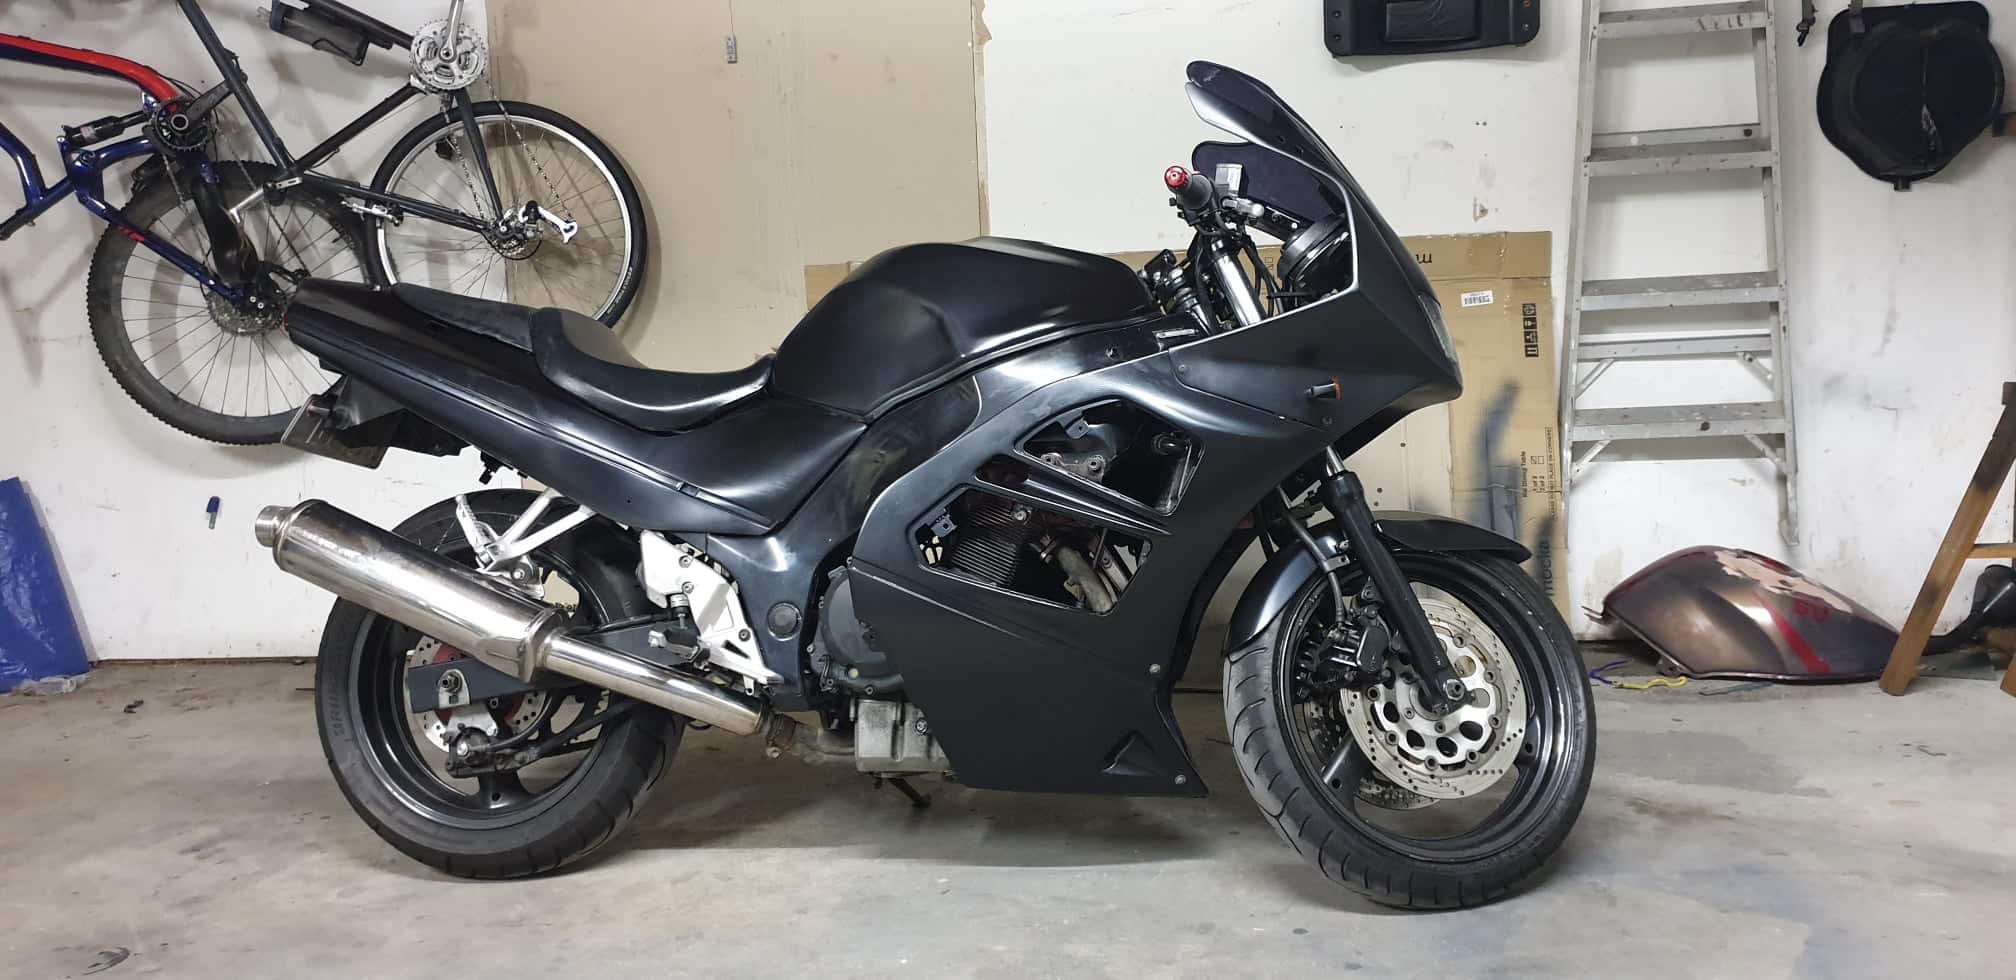
So, had it confirmed that the SV650 Speed sensor works, so have tracked one down. Expecting that to arrive this week sometime. In the meantime, i got on with the bodywork. Had a helper when stripping the tank: Got a coat of frame colour on just for now, still a number of imperfections that need to be sorted on the fairings and one small dent on the tank, but going to take my time and just rock it like this for a while. Just need to organise mirrors and i'll be good for a WoF.
1 point
-
So last Saturday i headed out to the v-dub shoppe to make a start on my engine. Paul was kind enough to work late and help me out. This is my engine and everything that is ment to go with it. inc the two boxes on the floor. I get all the bitch type jobs, clean this, clean that, and yeah clean that as well. so start with cleaning the crank. a little scotch in the cleaning tub and then we rinse it off with hot water. want to know why we use hot water? well hot water evaporates and doesn't leave any residue and wont rust. unlike cold water. now that that's done onto the casing. his has been machined out to fit the larger barrels and pistons to make it a 1776 so yeah lets crack it open see how many peaces of raw material i can find. oh hello. this stuff has gone everywhere. see if you can spot the peace tucked away here. that little peace of silver on the oil pick up is what you are looking for, well now that they are all cleaned up out side to wash these down with cold water. cause these are not steel and they wont rust away. hey presto we looking good now. 1st things 1st. dizzy gear in. i didn't snap a photo of this but here is one off the net. with that lubed up and in place the dizzy goes in over top. while i was putting that in Paul was putting the bearings in and making sure they lined up and marking them to make our life easier for when the crank slides in. i have also slid on 6 little rubber gaskets over the main bolts. bearing 1st. cam gear next, with some heat slid on over and sitting in place with its key way in next is distributor drive gear. my key way was a little lose, luckily we were in the right place and a few steps to the left was a container with a bunch of them in, found one that fitted better. some heat on this and on it went. bearings for the rods and on they go now. no photo of this stage my hands fill and doing other things but lets drop that on in in she goes and lined up Pauls pink dots and dropped the cam in as well.so far the only things out of the old engine are the gear peaces on the crank and the dizzy, even the dizzy drive was in a pile of other parts to the left of me that Paul just pulled out of old stuff. The rods and cam are from another purchase of parts i ended up with including the bearings and all the gaskets.Next Paul swears at his employees for leaving his gasket goo with out a lid and we put some goo on the casing and he drops the other side of the block on. finds some nuts that should come with the casing and he torques them up. its bloody handy having a store room the size he has, off i went find myself some lock nuts, re stock the draw in the engine build section. they get thrown at the engine and torqued up but to a smaller amount. sump on and well bake to the store room to find some dome nuts for the sump plug and the mesh for in side that, and a stud kit for the fuel pump, oil pump and a few other things. actually here is a photo of the kit, thanks google ahh while this was up side down we also dropped these in. which i learnt the other day is a duel pressure relief, vw casings come out duel and single, only early ones come out single. ended up watching a YouTube video of how it works and where they are. if you want to learn here is the video i watched it was a pretty good Saturday learning and building the new engine. last night i headed in and done some more work. removed all the head studs while Paul was on the phone and cleaned them up, he then came down and gave me some shit about how i didn't get the fly wheel and shims ready for him, few seconds later he had them, he worked out the end float and put some shims in allowing some small amount of thou. he was also trying to calculate out loud and man that shit was confusing as fuck to me. with that all sorted i now have the fly wheel and we are off to get skimmed and it has a really nasty lip where the rear main seal would usually sit so ill take that to geophfey and get him to take the lip off that. all in all shes been a great few days so far.1 point
-
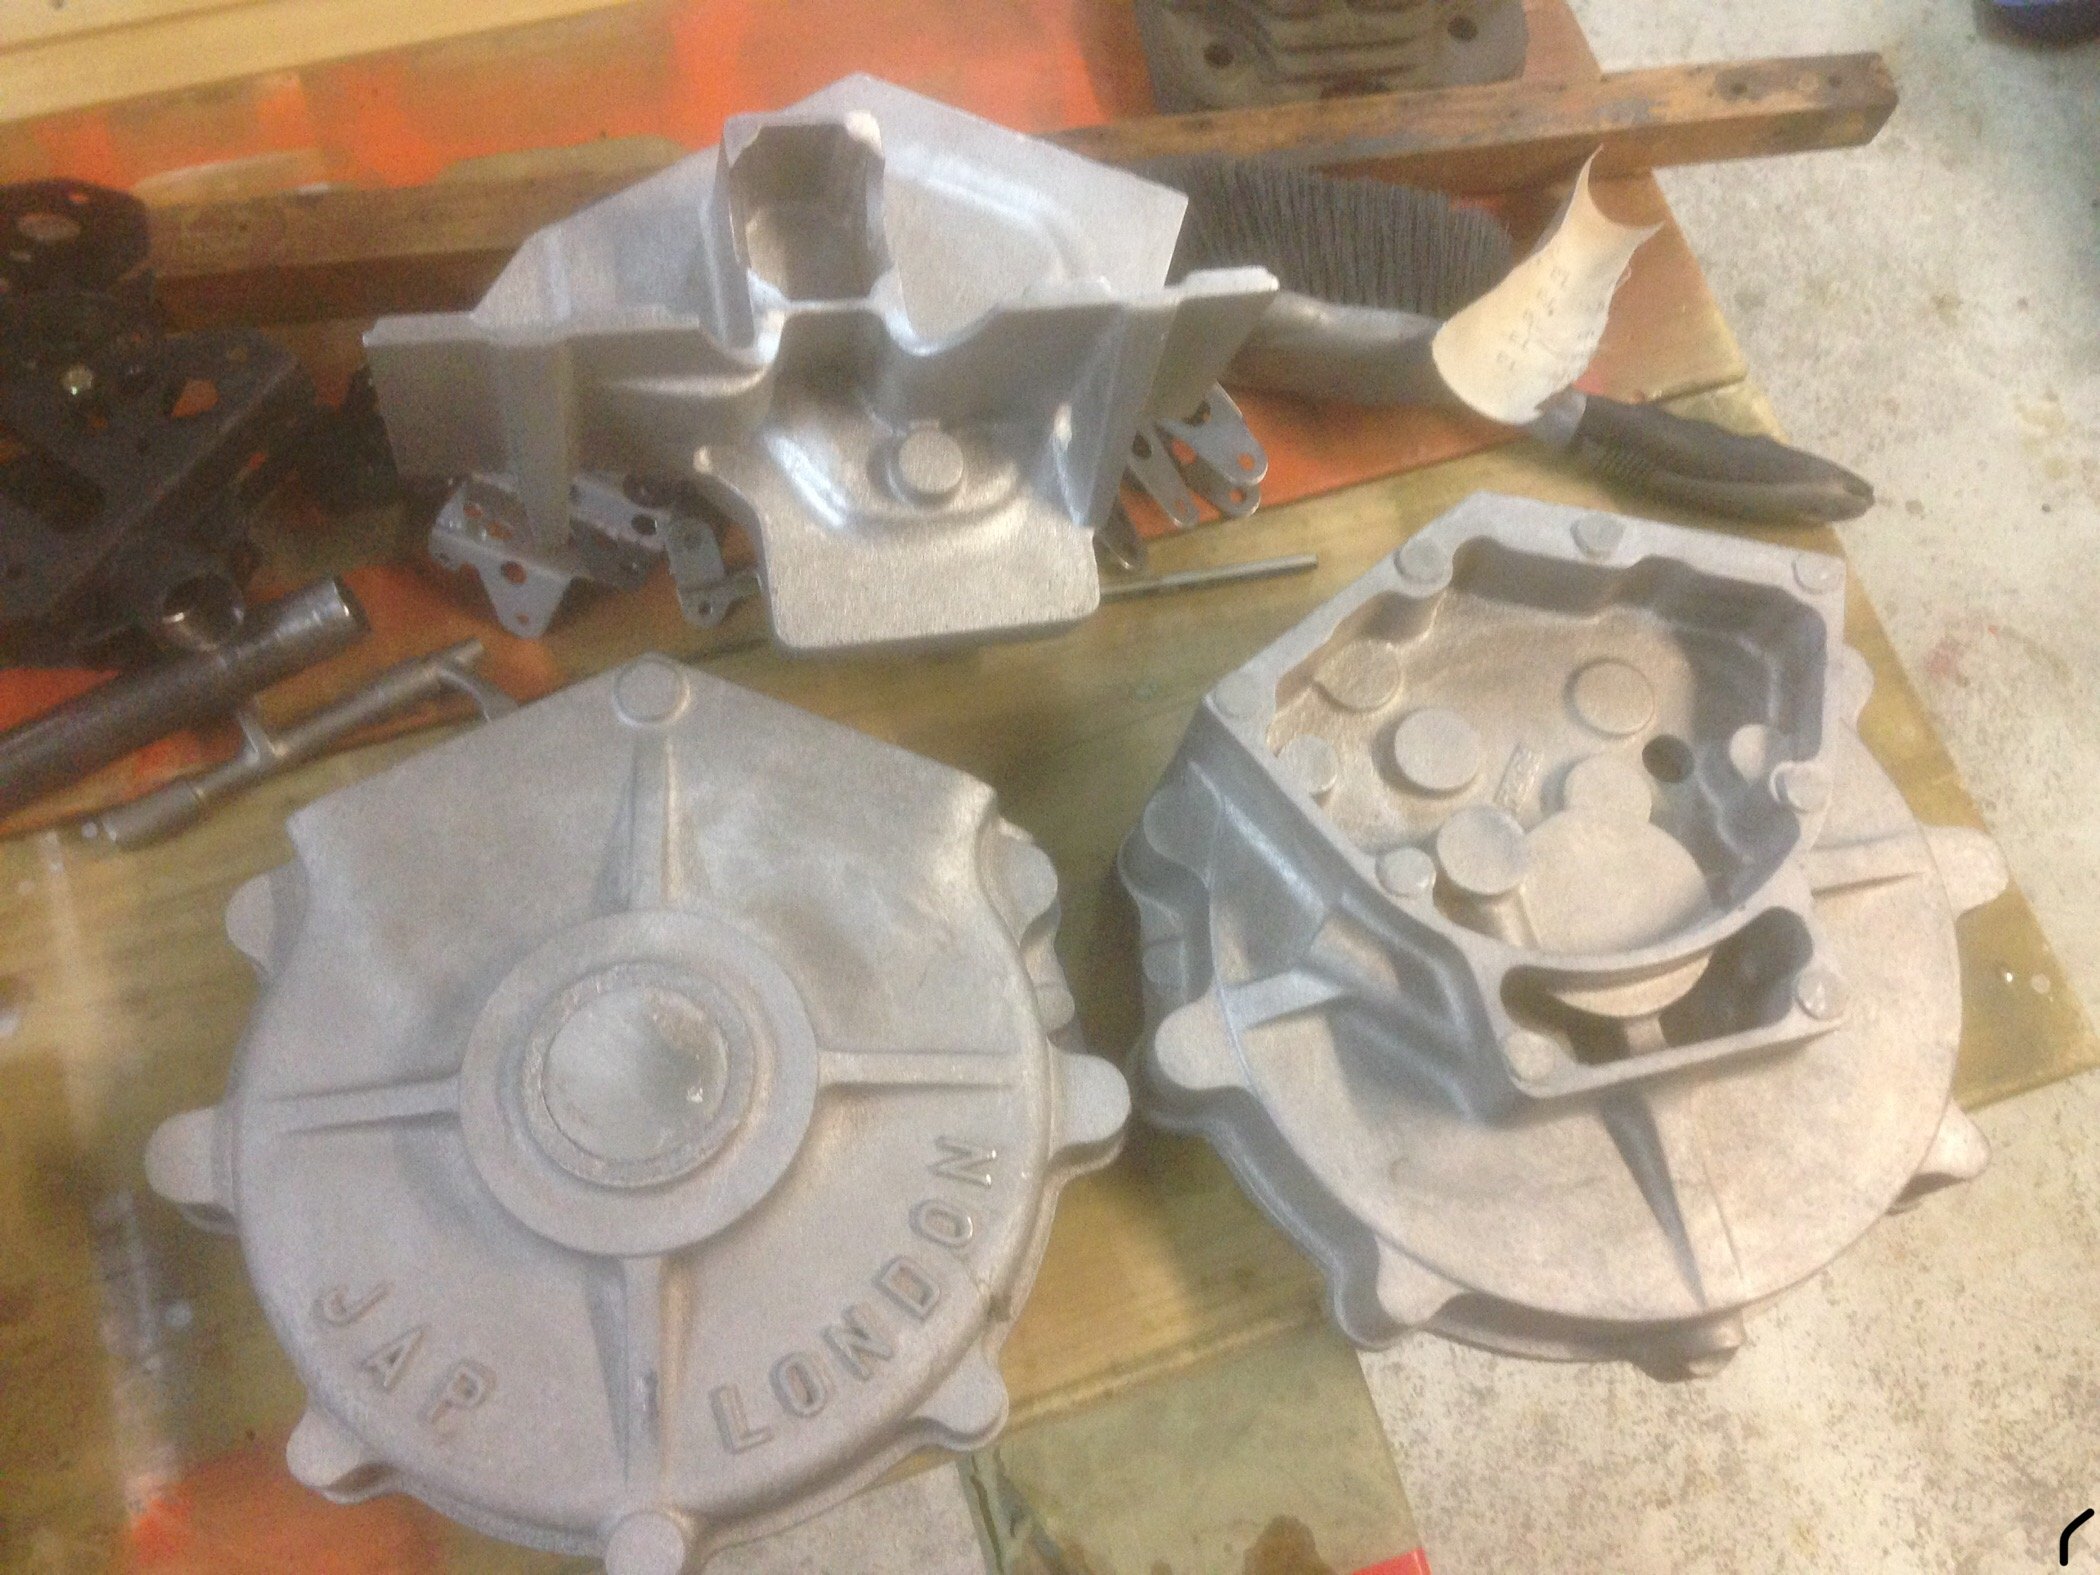
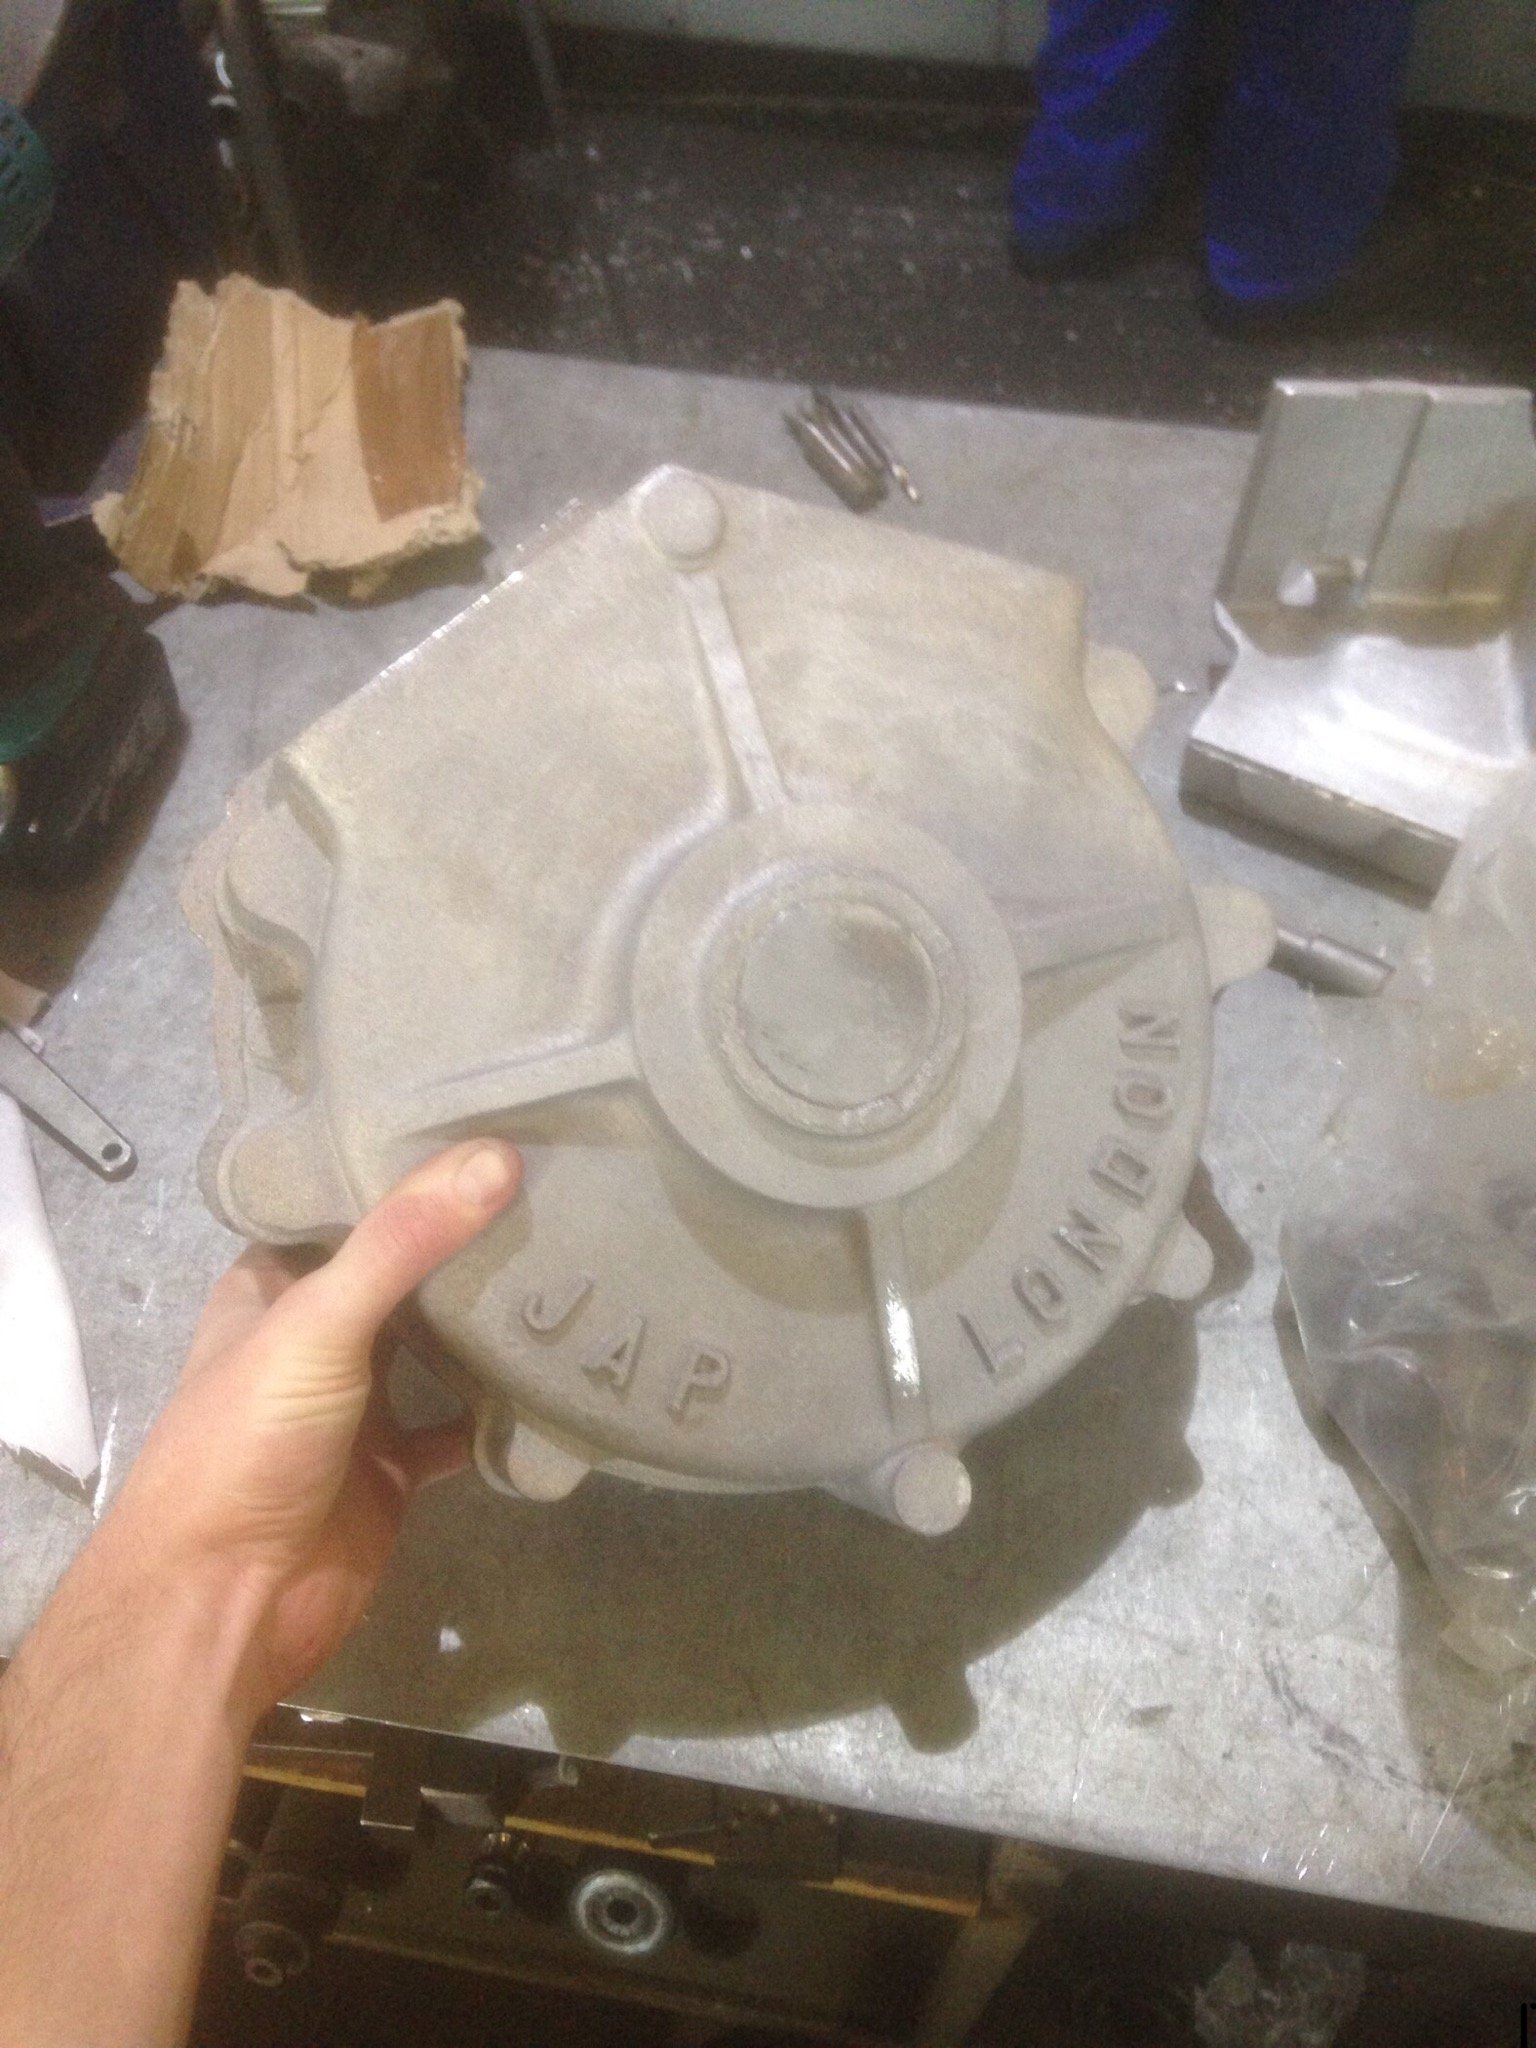
Nice cardboard box arrived from the UK. JAP V twin engine kit set, some assembly required..... Should keep me busy for a bit.
1 point
-
So have managed to progress with this some more! Got it all back from painter Doors all on lined up not perfect but will wait till front guards are on Fitted all new door rubbers and window guides Got the motor In Swapped over the end T piece of the steering collumn to the shorter power steering one from a ms110 And fitted it back in car Found out the auto and manual pedal boxes are the same manual just has a mount for pedal so I just removed the clutch pedal and refitted as this will be auto. Painted the brake booster and fitted the new Nissan pajero brake master. That's all for now! Exciting times1 point
-
i gave the center console a tidy up and a coat of paint. 2019-04-07_11-14-14 by sheepers, on Flickr then i climbed into the boot and started prepping it for paint. managed to get it ready without to much back pain so i decided to try and paint it. 2019-04-07_11-14-36 by sheepers, on Flickr came out really good so now i can put some seam sealer in the gaps and sand it all up ready for some colour.1 point
-
Seat mounts done this morning Pushed it put of the garage for a fresh perspective
1 point
-
Still better then dizzycrabs1 point
-
Been up to heaps more adventures in the wagon. Went down to Leadfoot Festival. There was a sweet Cortina wagon there. My wagon always gets mistaken for a Cortina so I couldn't help but take a photo of the two, what do you think? I can see why some people get confused, especially with how rare the Avenger wagons are. Went camping at Wagnats in the wagon so did a last minute run to the camping store with the roof racks on The funnest thing happened while I was at the mall. Somebody left a flyer for Seniors morning tea at the movies, along with her business card for a seniors taxi service. I found this freaking hilarious because I was going for that sleeper look. She probably thought I was an old grandpa going up to do my weekly shop in my old Avenger wagon with roof racks. I checked the whole car park and there wasn't any other flyers so I totally fooled her with the sleeper wagon Packed up the back of the wagon for camping. Tons of room for everything. Set up my camp site. The bed mode worked awesomely and just brought a little sun shade to go over the back of the tailgate. Brought a spare wall for a tent that I could use as curtains to keep the car cool. So many cool wagons The camp ground was by a big river. Had so much fun, camped out for 5 days. You can see the wagons in the top left of the photo. On the way back I got to test the "Service Due Soon" warning on my dash. It pops up after 4,500km. Once it goes over 5,000km then it will change to say "Service Immediately" Next up it was time to do a bit more engine bay cleanup. I know what you are going to say, the engine bay already looks tidy as but I still wasn't 100% happy so I pulled off the rocker covers so I could vapour blast them. The inside of the rocker covers have baffles on them which needed to be removed. With the baffles and seals removed they were ready to vapour blast The old baffles where riveted in so I had to grind them off and tap the rocker so we could screw the baffles back in. While the rocker covers were away I could do a bit more work on the car. Brought a New Old Stock Hillman bumper. One last look at the old Chrysler bumper vs the Hillman bumper. You can't really see how much smaller the hillman one is in photos but IRL the Hillman one looks tiny. Removed the old bumper. It was a bit of a pain with all the fuel system and exhaust in the way New bumper looks amazing!! Got the rocker covers back from the vapour blasters. They look amazing Screwed in the baffles using heaps of Loctite Put the rockers back on and the engine is looking super sweet Also at the same time I finally got that dent removed from the bonnet, and I painted the bonnet pins body colour, what do you guys think? at first I was unsure but it has grown on me. Also got the dent on the engine bay repaired, fulled in a few more holes and repainted the engine bay. Took the car out to the Brit and Euro show. It was a good day, hung out with the Hillman Humber club. On the way back, getting on to the motorway they have these traffic light, straight in to a 100kph zone, so you start side by side like a little drag strip, lined up beside a modern 911 turbo from the show and was neck and neck with it. Still amazed how quick the little wagon is. Lastly I got some new tinted windows. Looks pretty sweet now, they aren't as dark as they look in photos.1 point
-
This thing is running sweet now. No good. This years plans are, just got a new windscreen washer, multi speed wiper motor (fast slow and delay) to modern it a bit. Need to get some bodywork, rust repair done and seal it up as it spends too much time uncovered. Last but not least, accidentally bought a crate lsa motor have acc drive and loom/ecu/tcm on the way. Will use existing box/diff. Should be another 100hp or so but mega more torque for sideways/circle work and 12s. So I'll be selling the ls3 with loom,ecu,tcm, pedal, power steering, alt, ac compressor... or buying a jetboat. I hate boats but I like fast. Also planning on getting back into the beetle this winter, need to get this at least running1 point
-
Epic! Nice work dude. Gonna do some kinda cut down front guard? I know heaps don't run them but I reckon they make the bike. Keen to see this thing in person!1 point
-
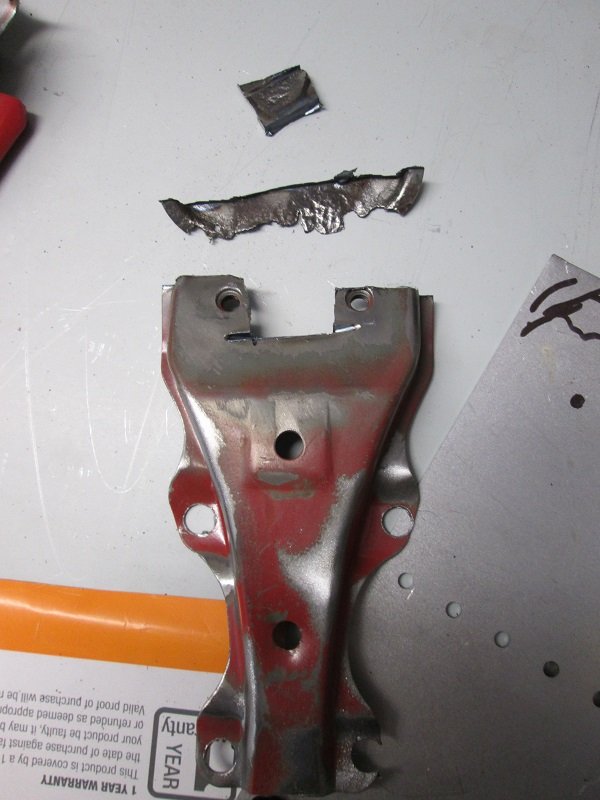
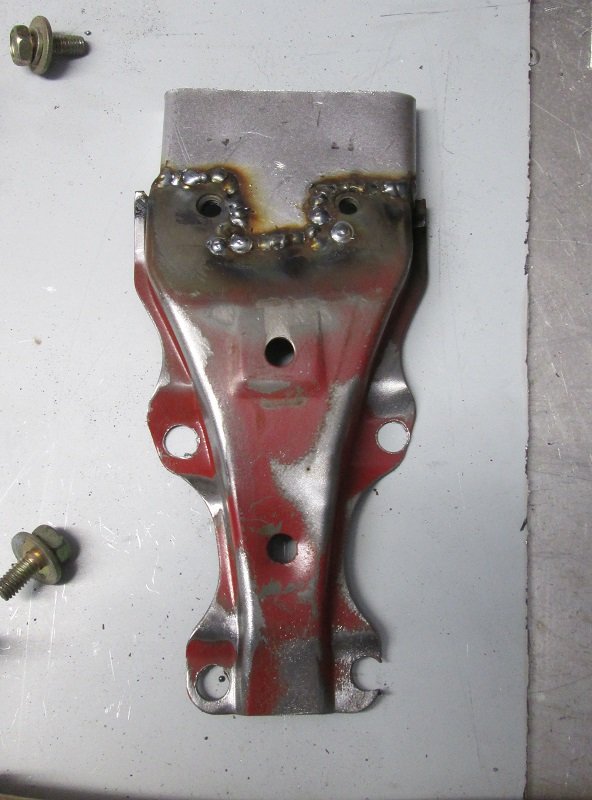
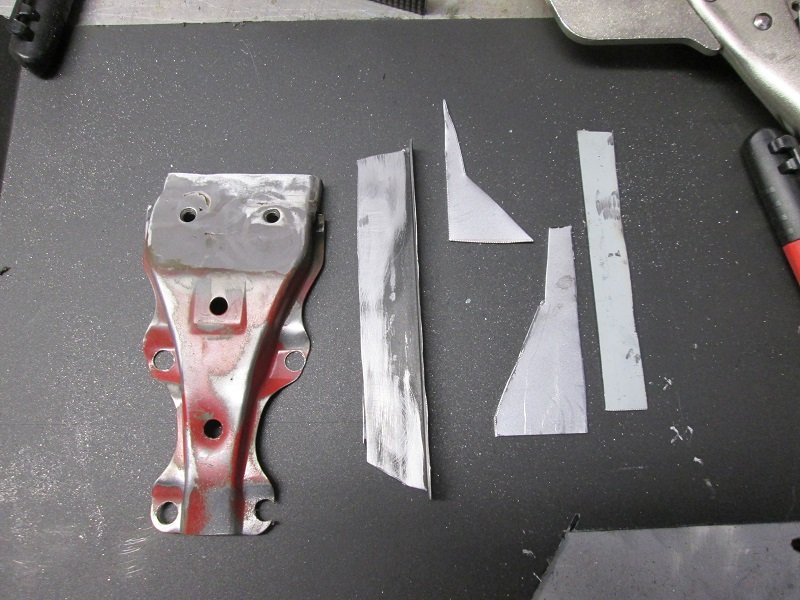
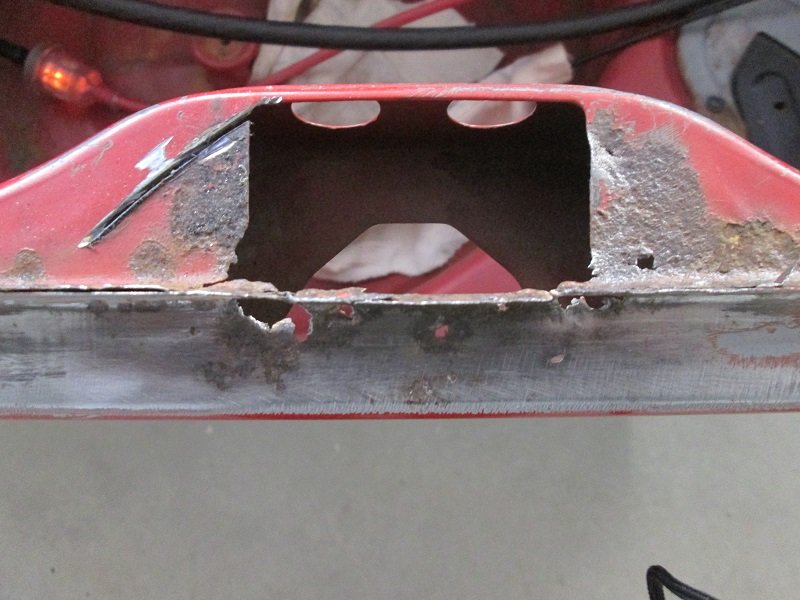
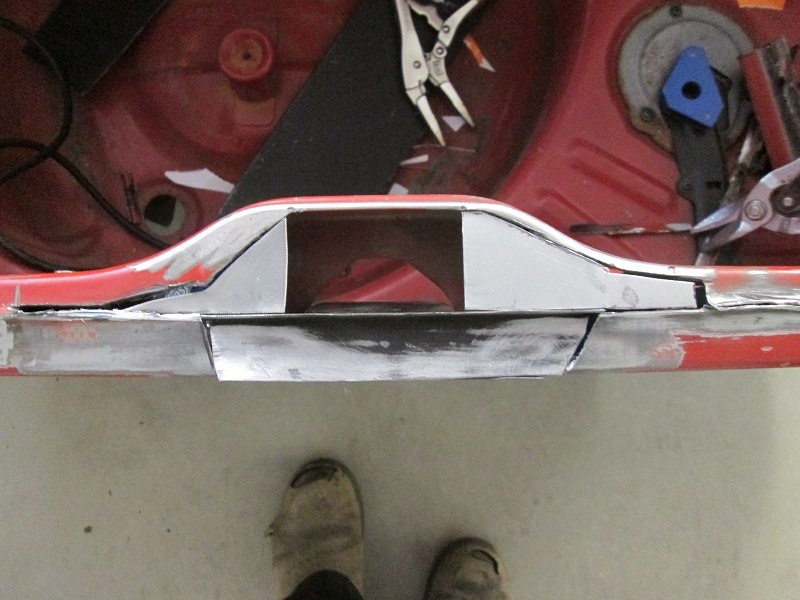
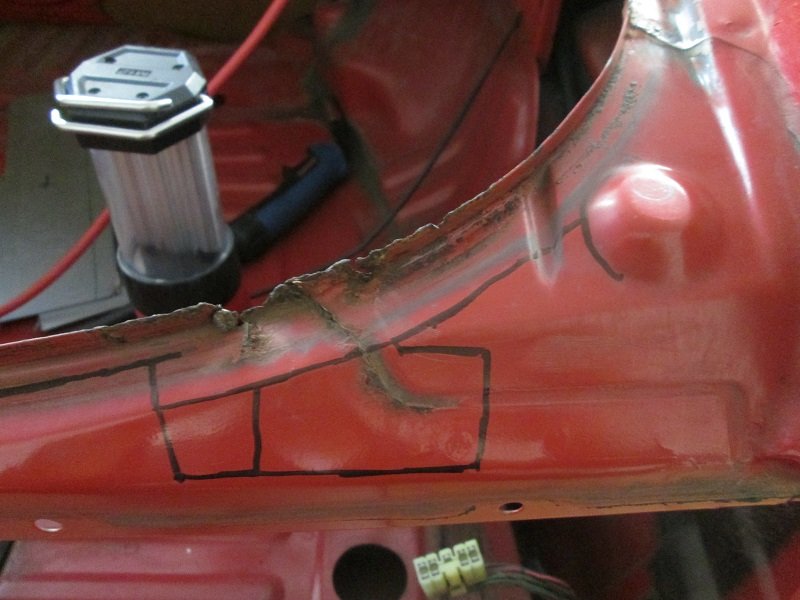
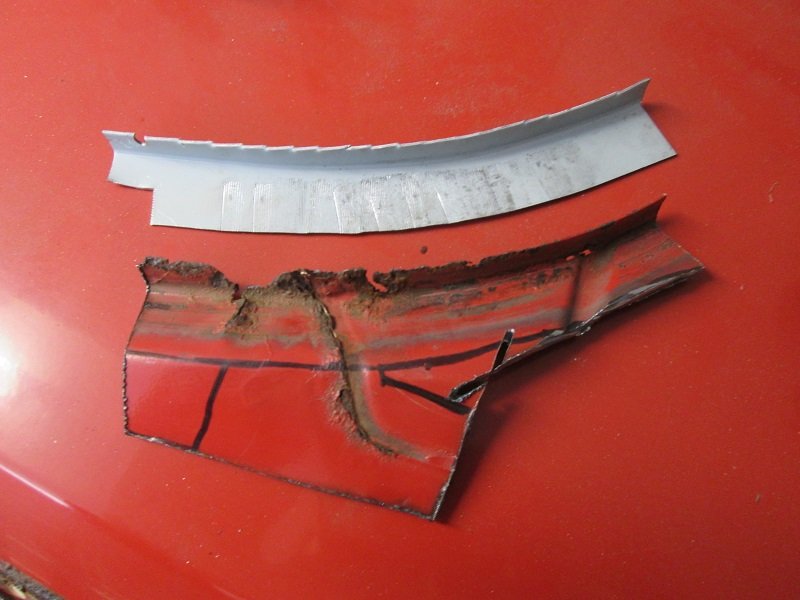
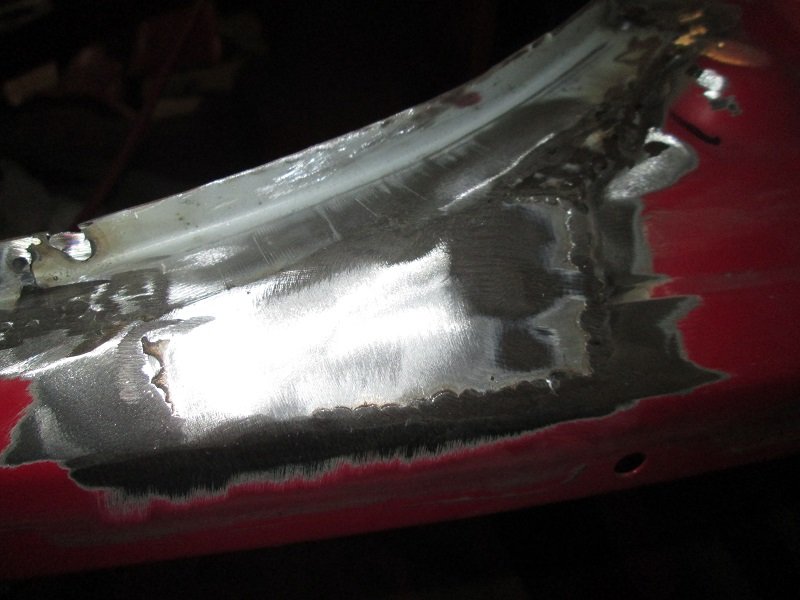
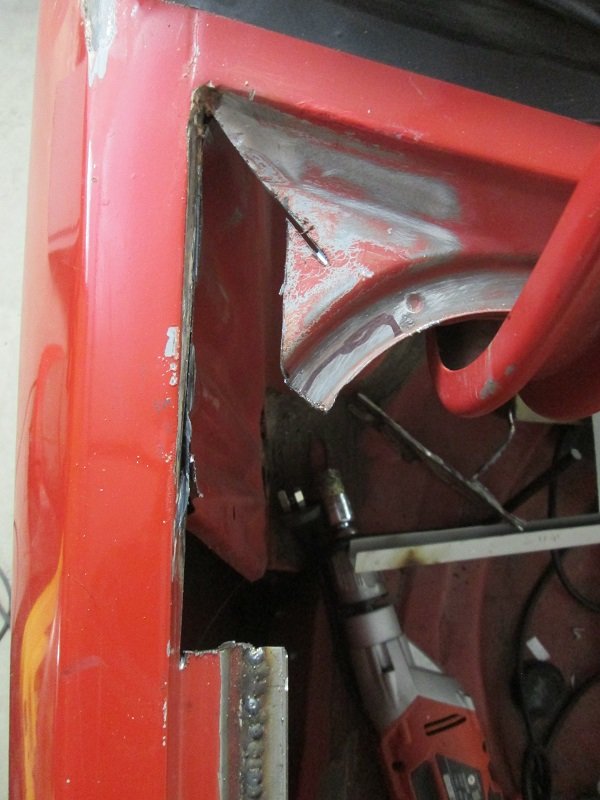
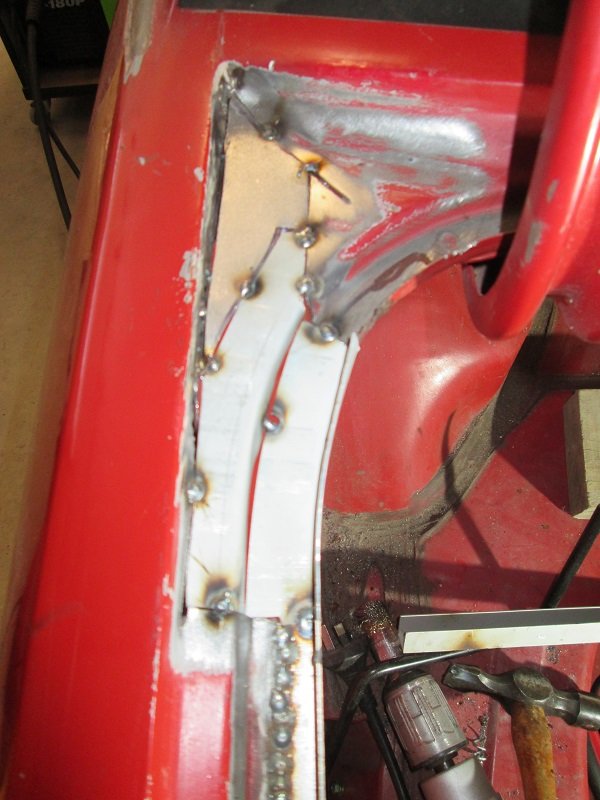
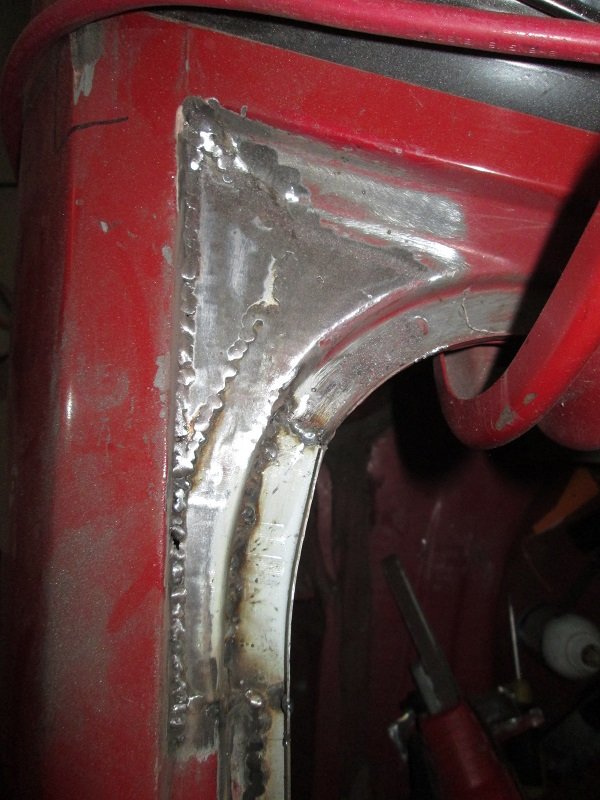
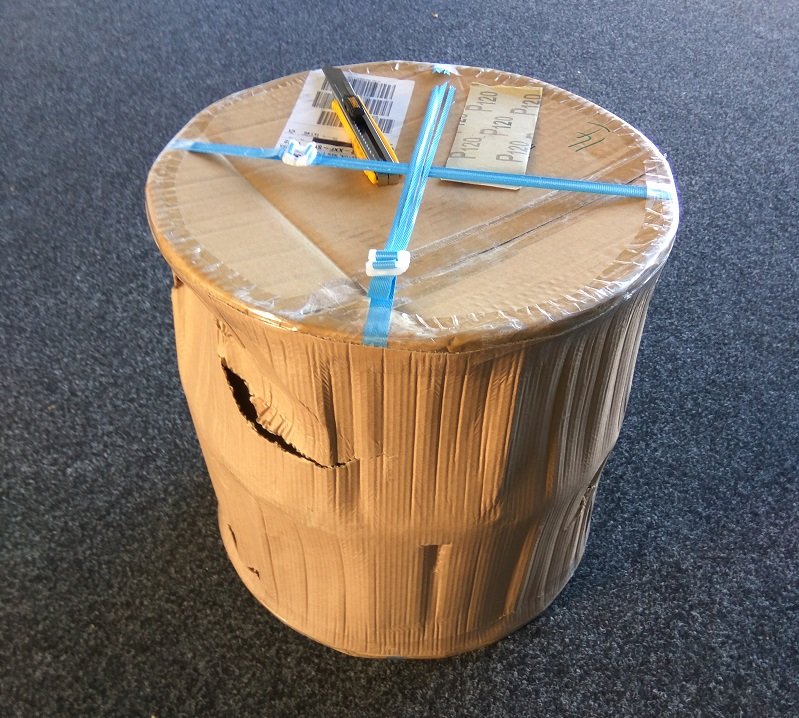
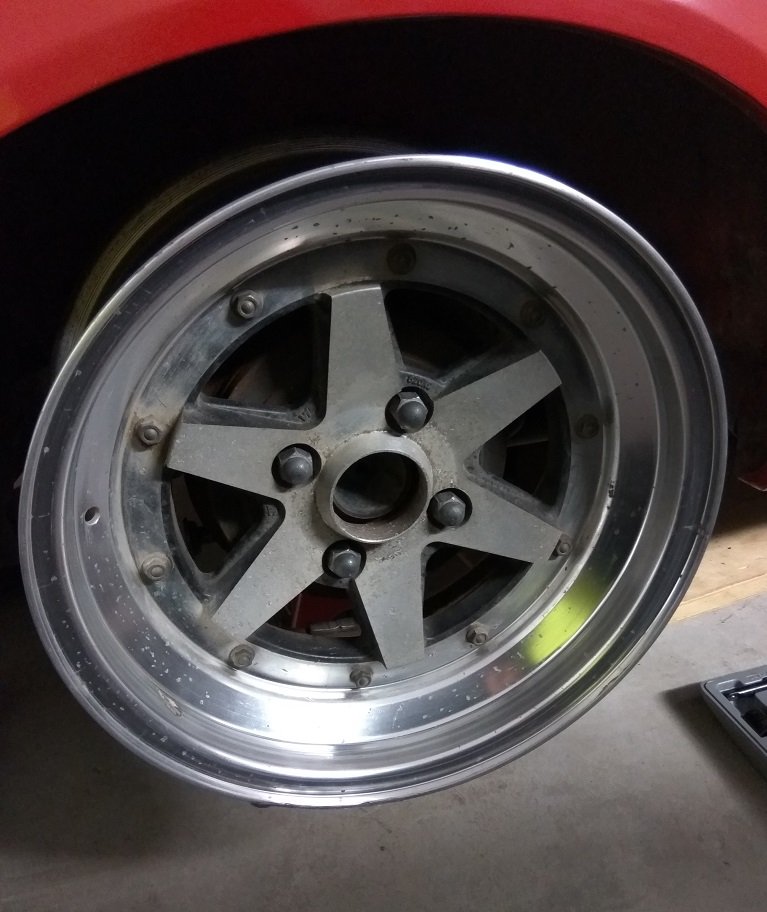
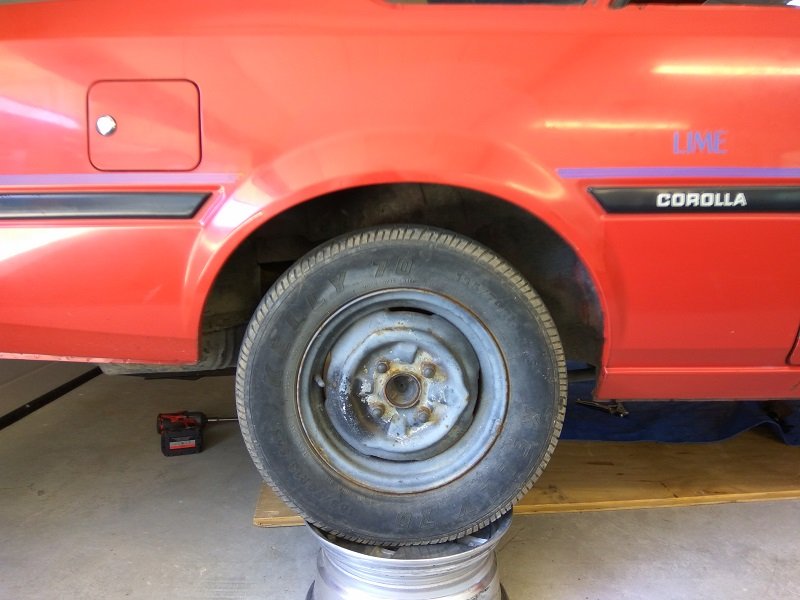
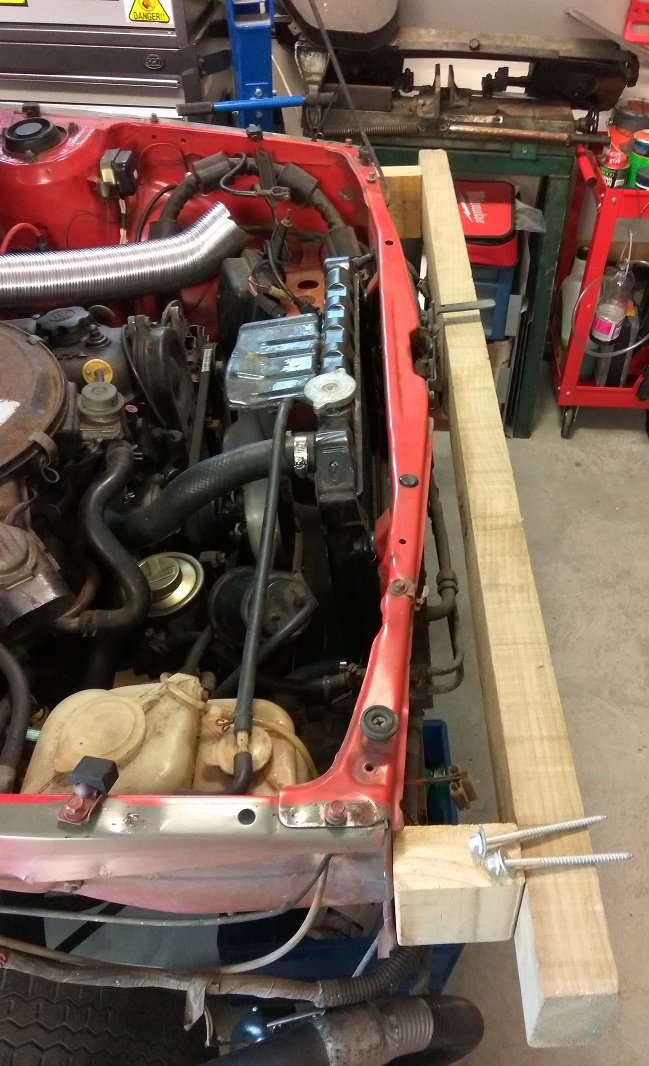
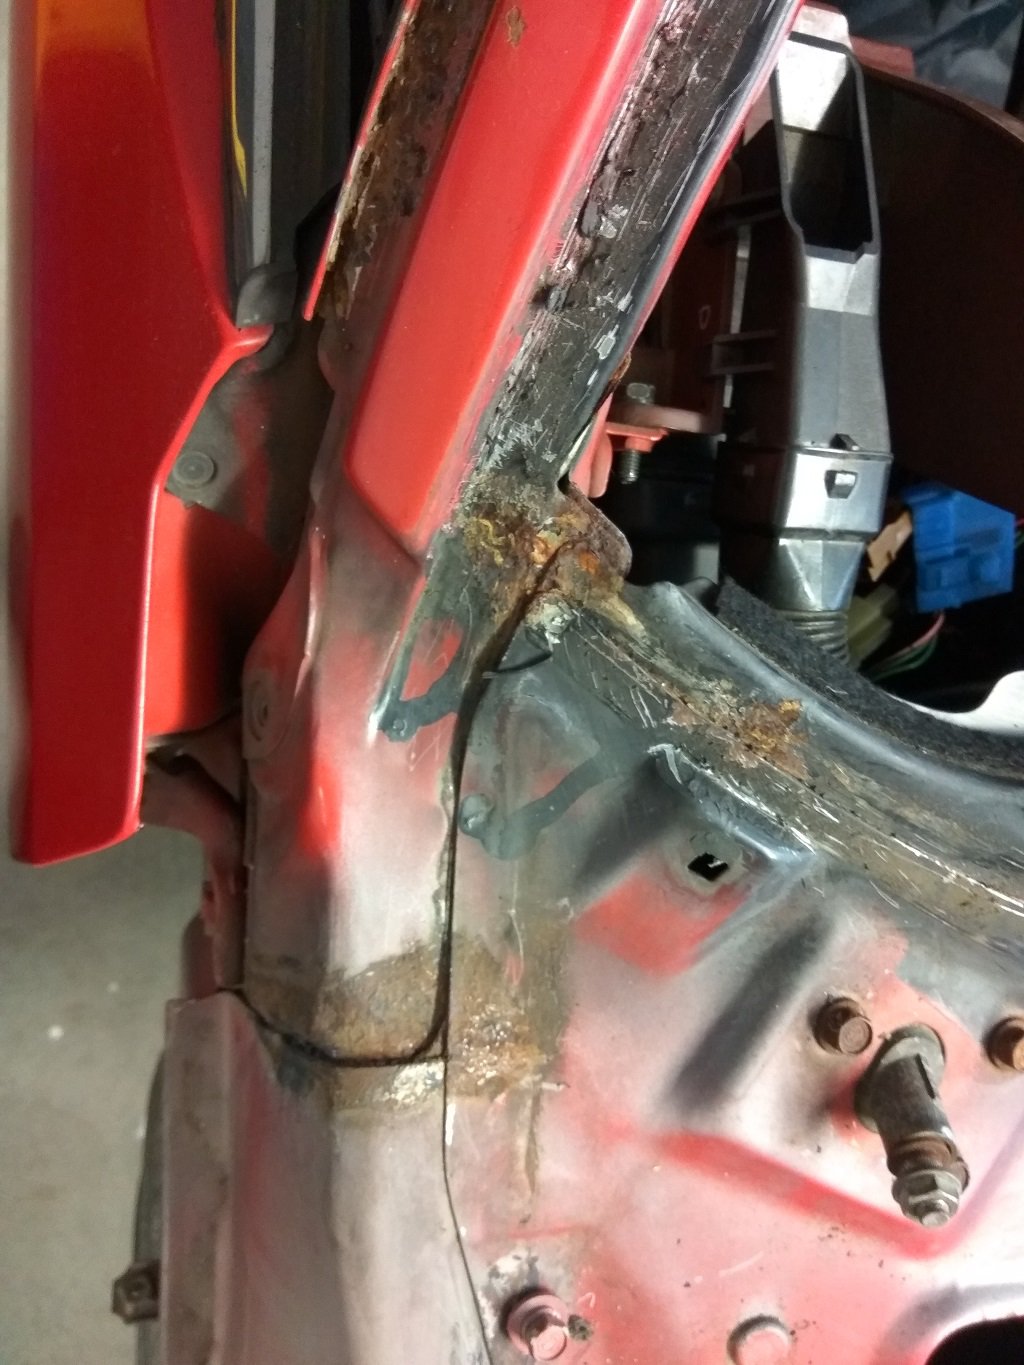
Haven't done bugger all on this recently. Had been trying to source some cert happy 14" wheels, but that didn't happen. Wheels held the build up a little bit as I needed them to start working out other things that will happen later. Anyway, some pics of the limited progress since last update. "Built" a frame to straighten out the headlight area of the front. Didn't take too long with a handful of long tek screws, to get it much closer to the right shape. Happy enough with the results, so that will get a primer / paint later on. Amazingly complicated alignment tool: Previous to that I had removed the rusty A pillar section shown earlier. Before, with the two layers removed. After, with one section made up, i'll make the top section when I have this one welded in and epoxy primered up. Then weld that over the top, epoxy, paint. Meanwhile, this turned up, with a friend another day. And unwrapped Wheel specs: SSR XR-4 Longchamps, 15x7-1(x2) and 15x7+11(x2). Lost count of the hours spent browsing Yahoo to find a set or even a pair that matched the offsets I measured I wanted. Well worth the time in the end, but it did drive me half insane, finally finding some, only to be outbid by twice my budget. Nothing super wide or dished, but they will sit well on the car I feel, and I can wrap them in damn good tyres. Similar dish on the rear to my 14x7.5-1, but with 10 times the number of tyres available, an easy choice in the end. I also removed some unnecessary weight from the rear of the car, to help sort the ride height. Shocks and springs, overrated. Before: After: I will be home alone for the whole Xmas break, so will be aiming to get the car completely back together (for now) with all of the rust cut out and replaced with new steel. Epoxied up and some red spray cans to tidy up the repairs. Then I can start the next stage which will get quite expensive, rather quickly. Until then, let me know what i've done wrong here.
1 point
-
So after 3 and a half months of waiting I finally got my wheels from Performance Wheels in Australia!! What do you guys think? So back to the start of the week. Finally got the call that my wheels had arrived so I went picked them up in the wagon All shiny and new. The fronts are closest to the camera The fronts are 15x7 ET+6 And the rear are 15x8 ET-9. I could go deeper, like an ET-25 but I would have to get it in a forged wheel which are really expensive, not sure if it's worth it. Test fitting the rims, everything clears and the offsets are spot on. Testing the fronts with some rubber on And the rears with rubber on Also had a bit of bad luck and a bit of good luck a couple of weeks ago. Bad luck in that the rag joint in the steering column catastrophically failed and I lost all steering, the column completely separated from the rack. And good luck that it happened while I was parking the car, and not driving down the road. I am thinking it was just caused by an inferior part. I brought it new from my local rootes group parts guy but it has no reinforcements, just plain cheap rubber. So I waterjet cut on out of much better rubber, so even if it does fail then it won't fail catastrophically because the reinforcements should keep it held together long enough for me to pull over. The long term fix is going to be to build a new column with 2 universals and no rag joints but that is going to take a little while to engineer. Also found that under some high torque situations, mostly parking or slow speed corners that the rag joint was flexing and bolt on the rag joint in the middle of the above photo was riding up and over the bolt on the column, making a clunky feeling so I replaced it with a button head. Discussion1 point
-
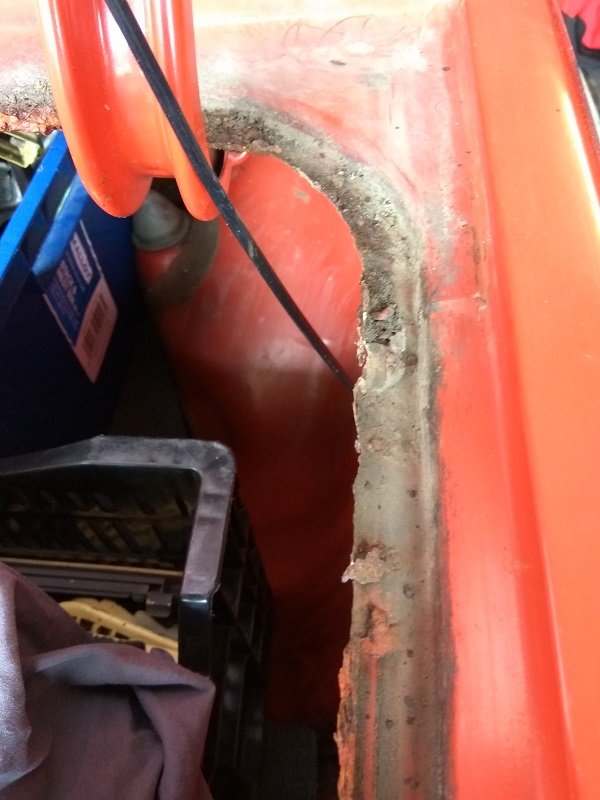
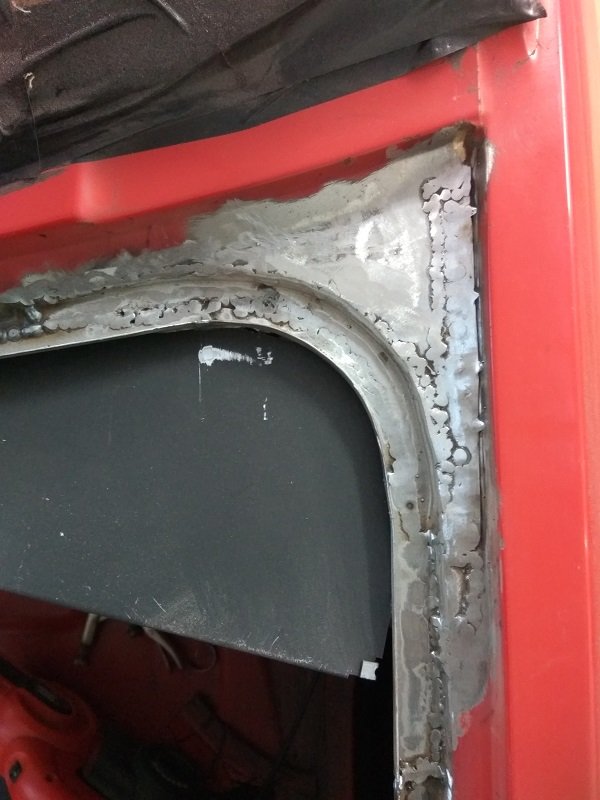
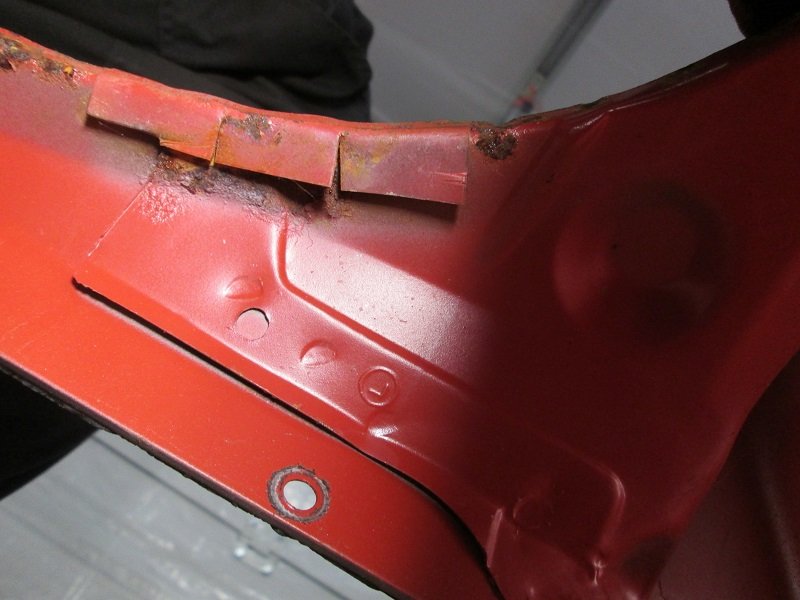
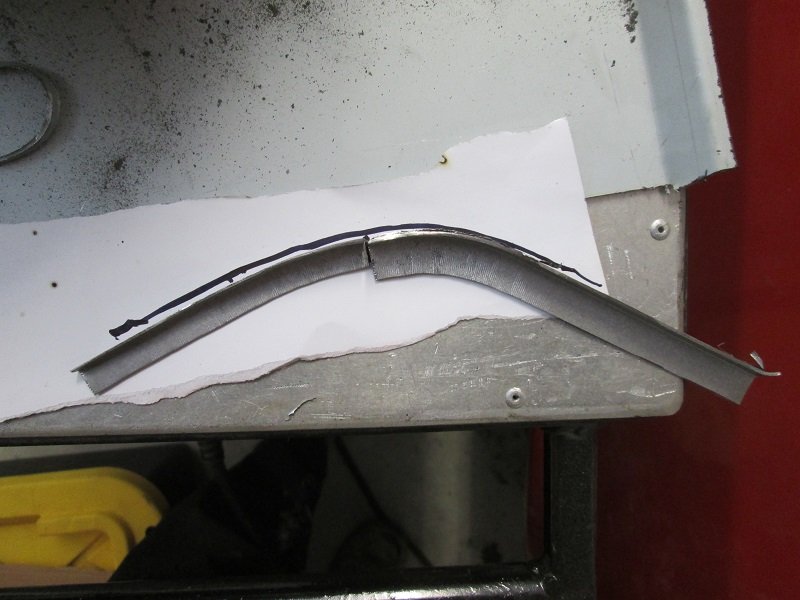
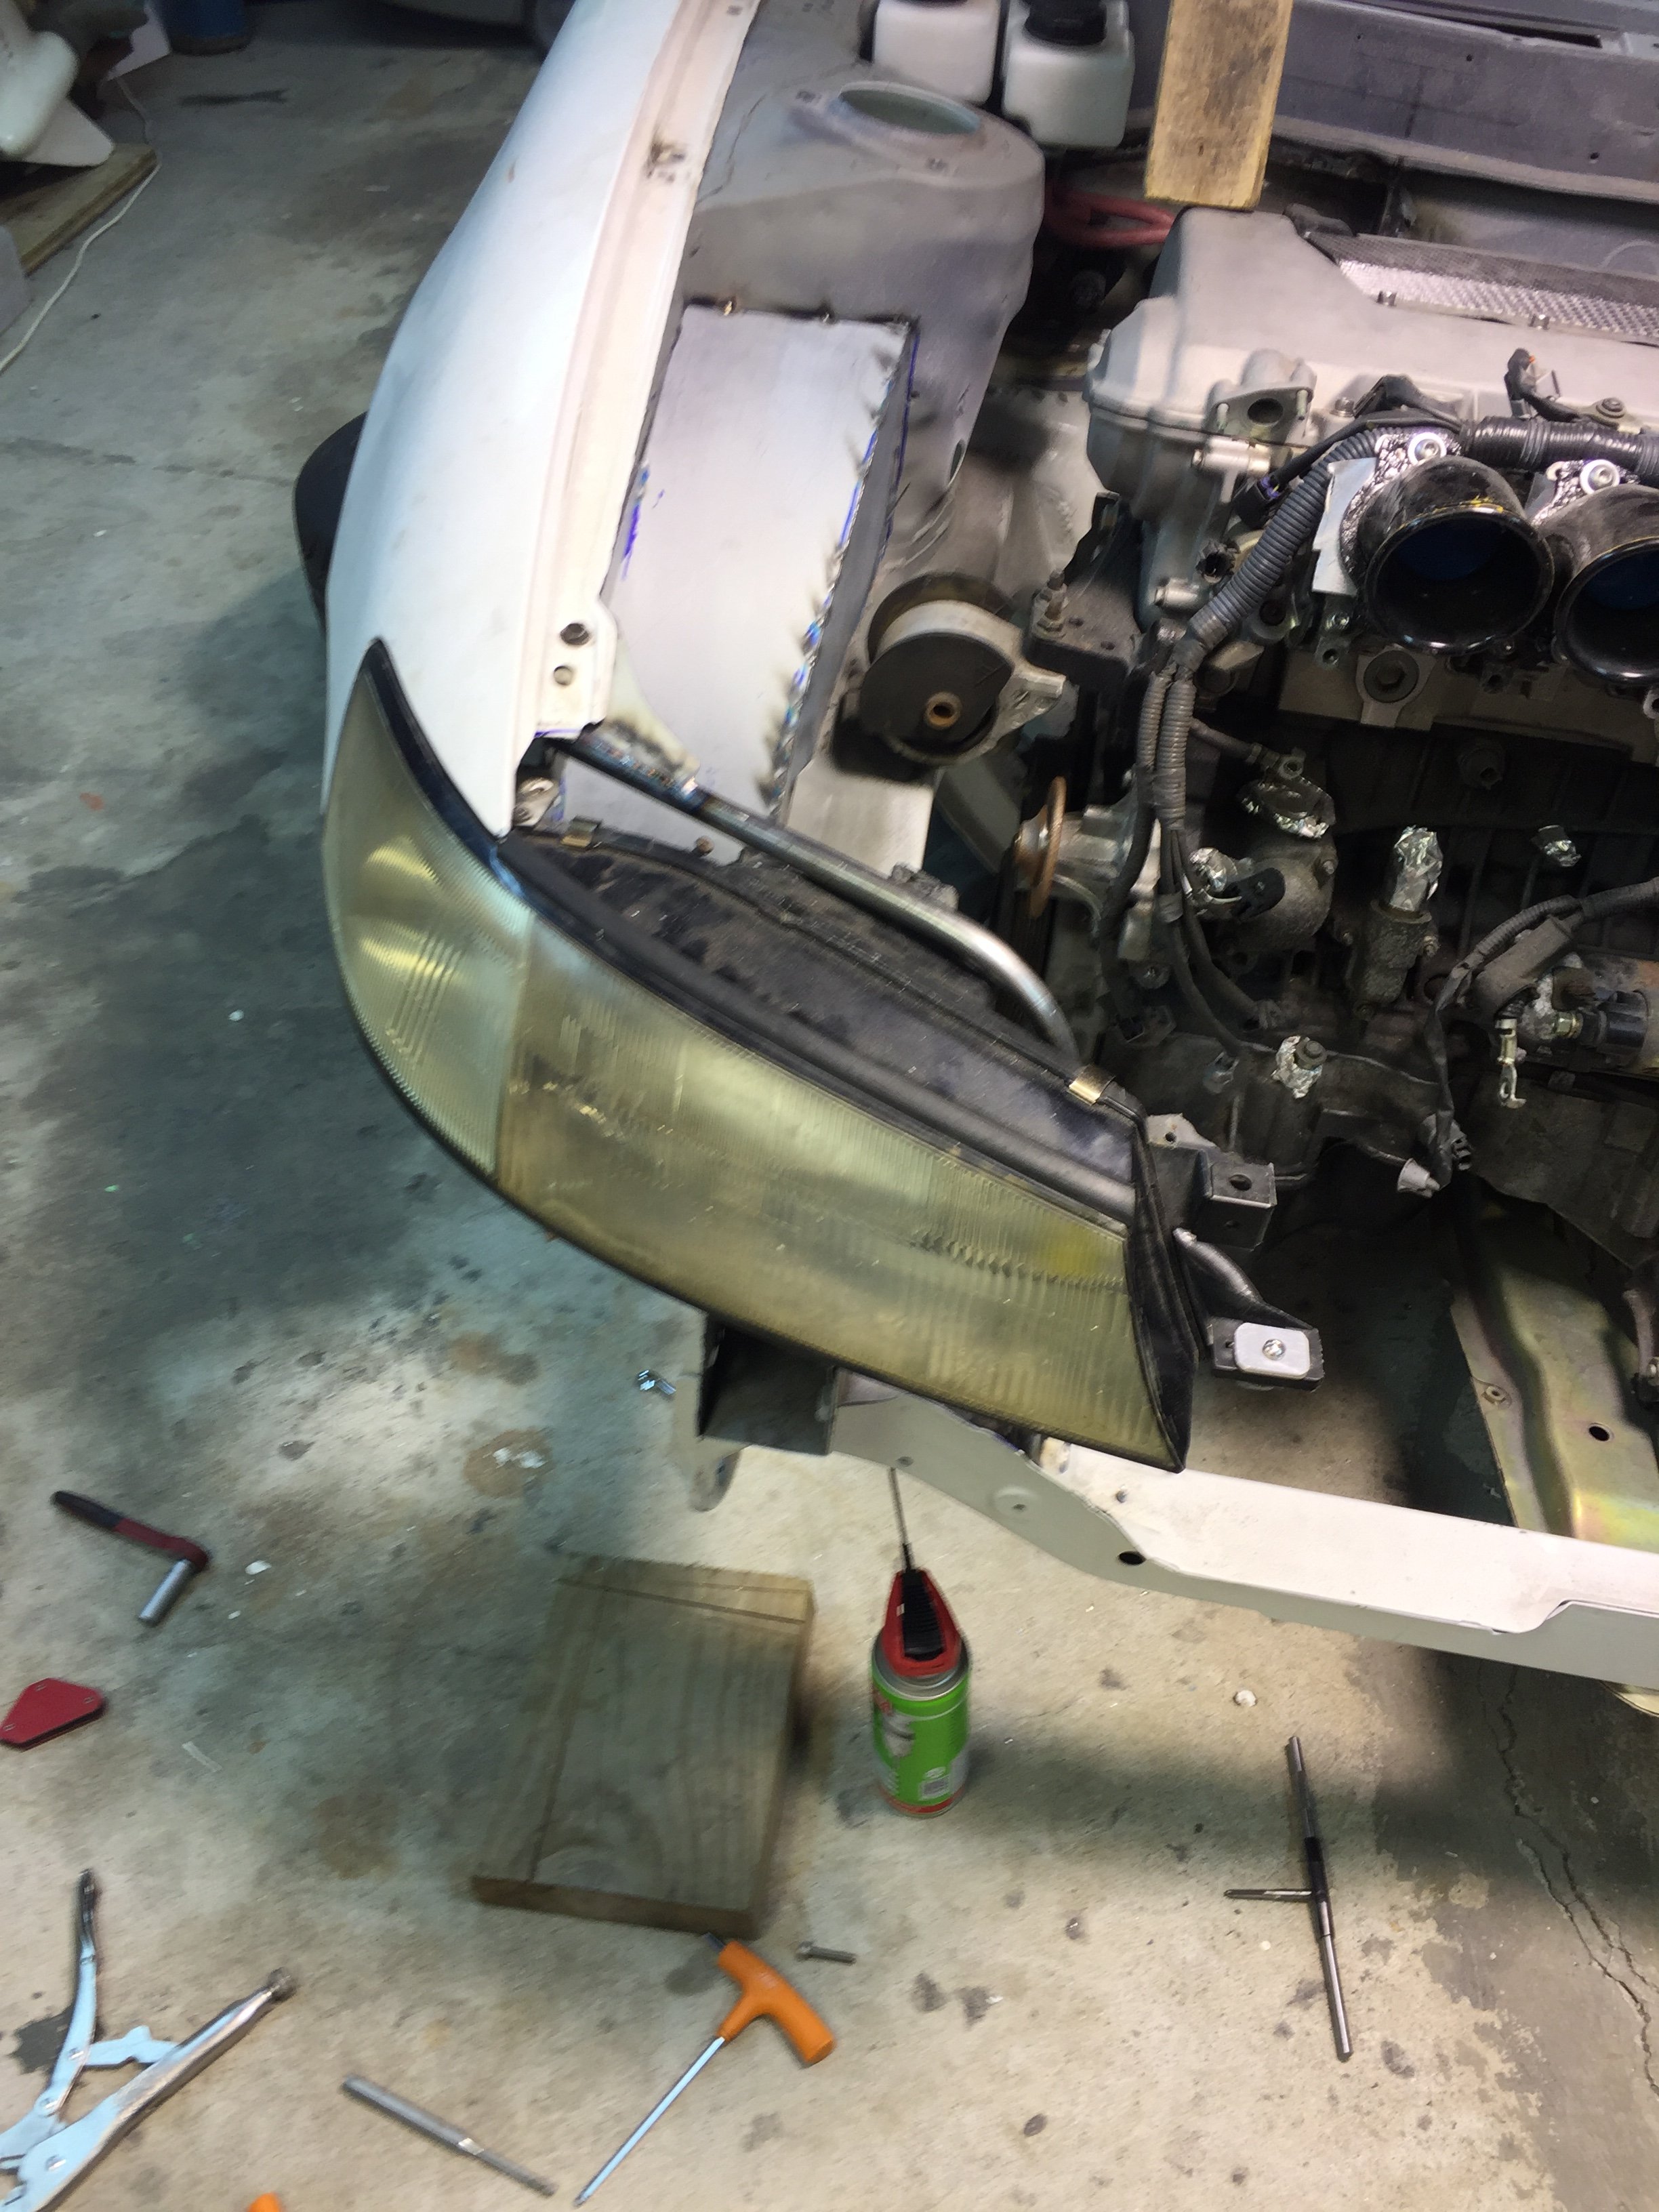
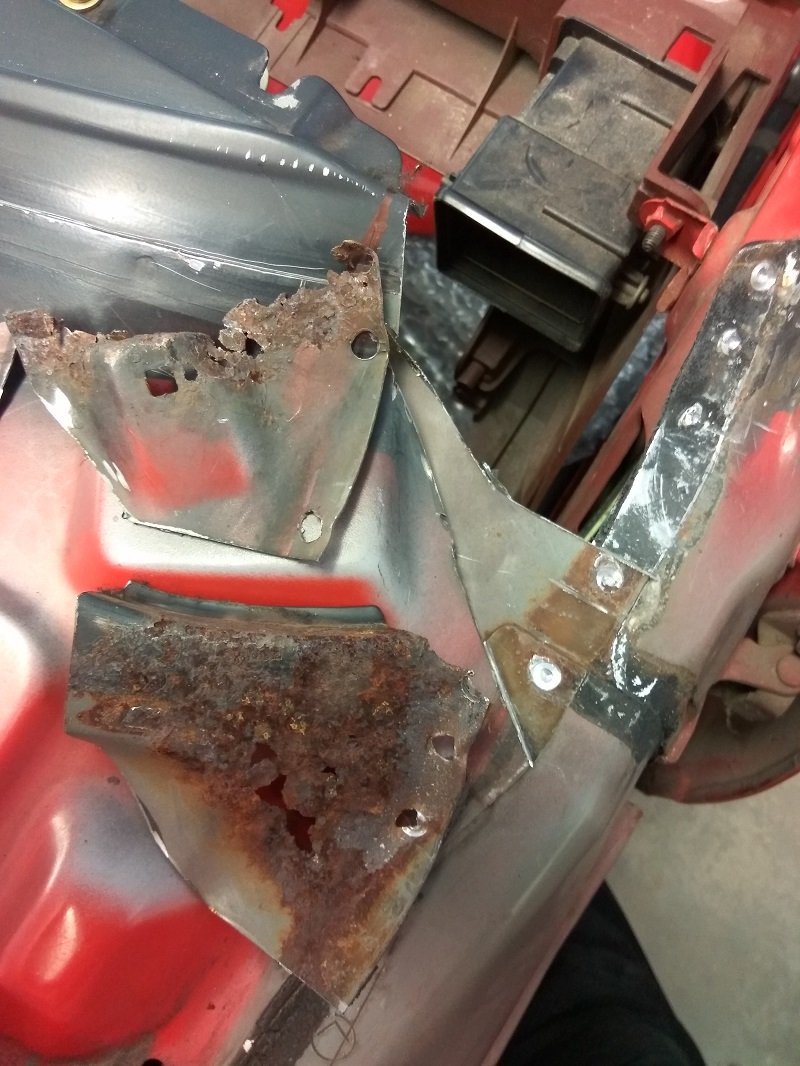
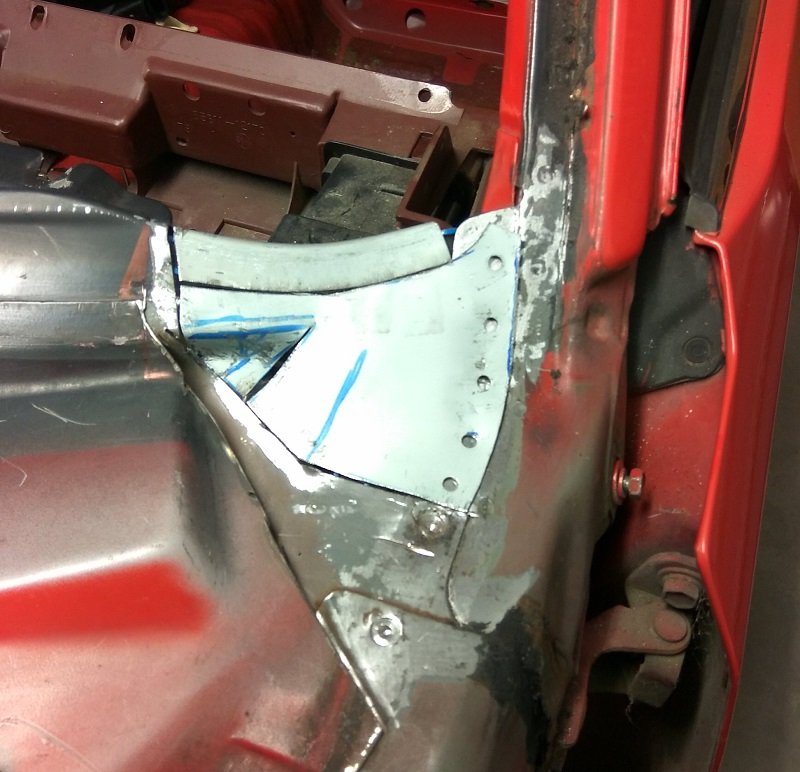
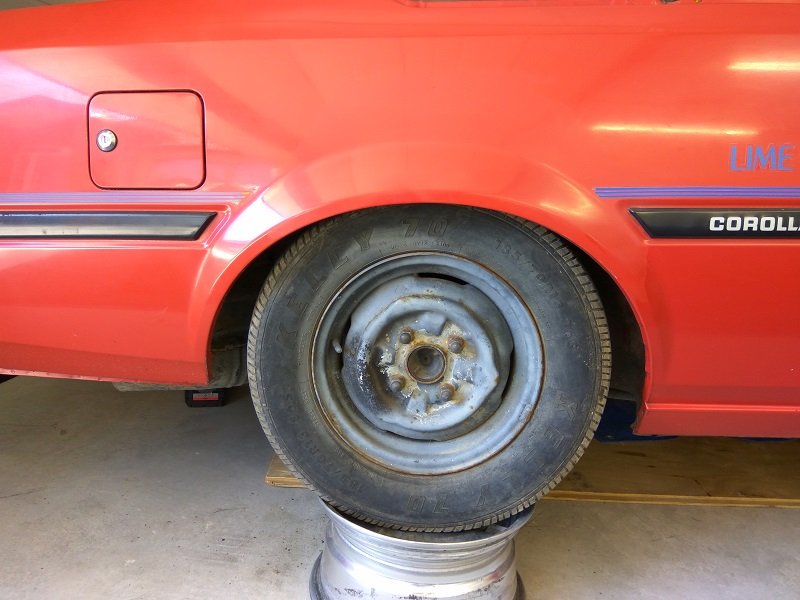
Small update, before a bit of a break to get stuck in and fix rust / procrastinate as per usual. After discovering the rust on passenger side winscreen base, the next job was to remove the guards to see what was lurking. Nothing too bad which is good. Pics. Someone got a bit generous with he seam sealer gun by the looks. All has since been removed, this side seems sound in the join. Drivers side will need some surgery. Drivers side, I don't really want to start cutting this (bottom bit of rust), but if the rust has got into the seam then I will probably need to do something. Along with the window frame rust that will get chopped out and replaced. All glue / sealant removed from the guard areas, pretty clean. Will give it a coat of something before refitting at later stage. Will also underseal the wheel arches at some stage. Need to find my spare set of springs so I can makita one way the ones in car for future planning on height. Last pic, just a boring one (the others were totally exciting, right?). Highlighted section has been pushed in a tad, headlight bracket is rather bent. So i'll fix that when I can work out the best way to straighten it. Anyone got ideas? Not sure if easier to pull it out, or push from within engine bay. Either way i'll probably have to make up a steel frame braced to car and work from that. So that is it for now, i've been cleaning the jizz off the windscreen frame which has been frustrating. Trying to get one job done at a time, so won't be updating until I have some decent progress to show. Choice, suggestions, smack talk and all that here: Also, thank fuck the forum saves your unsubmitted posts, I just closed this tab and thought i'd lost everything. Thankfully all the boring details were still here!
1 point
-
I have to cover work so no dice from me.0 points


This leaderboard is set to Auckland/GMT+12:00