
Leaderboard


Popular Content
Showing content with the highest reputation on 08/03/15 in all areas
-
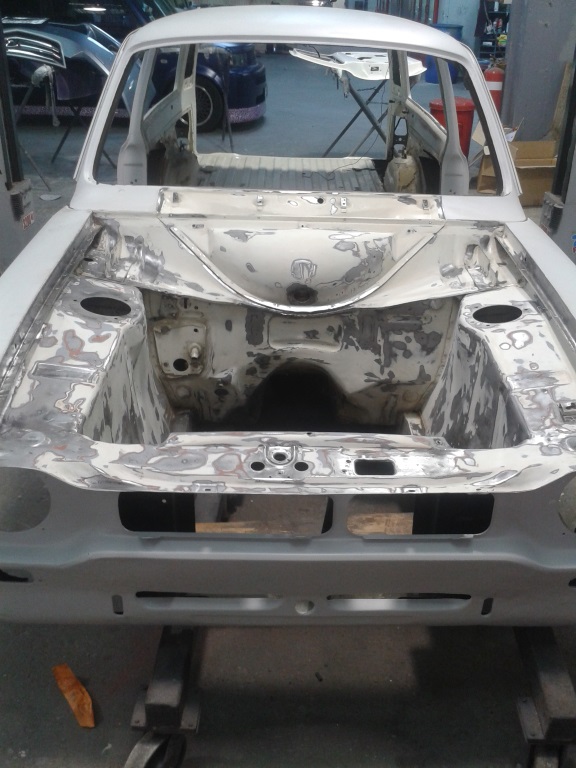
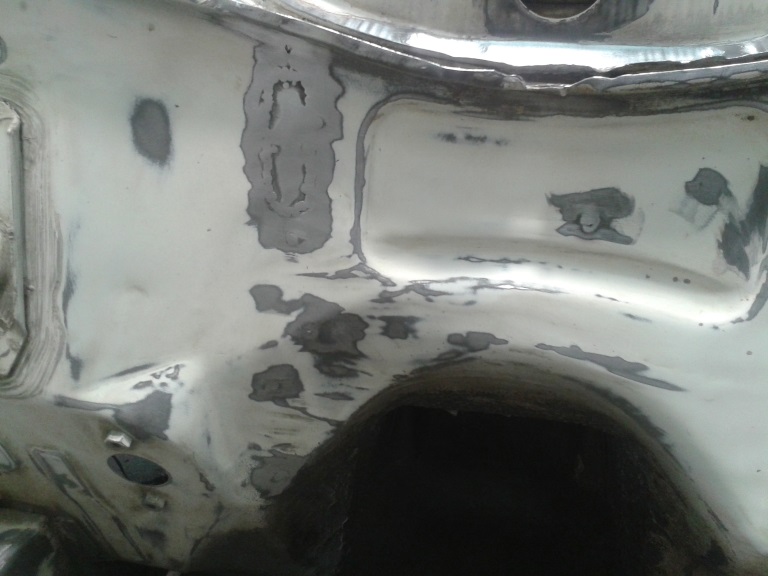
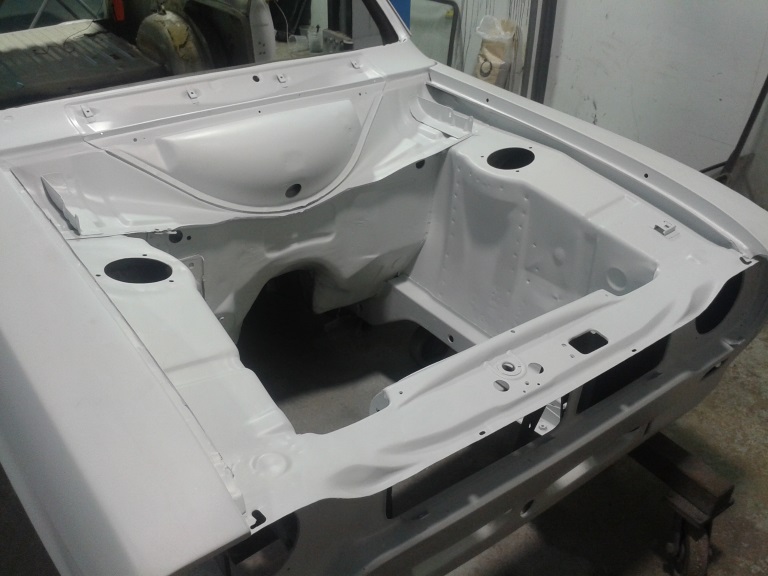
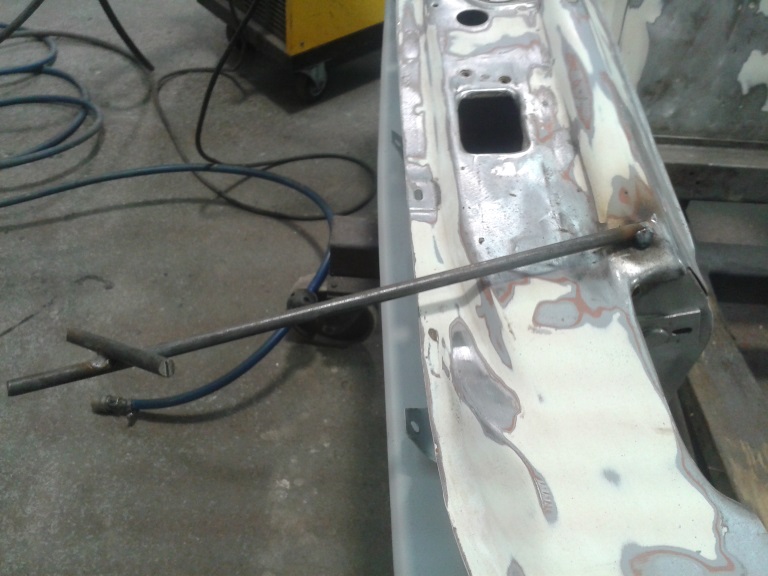
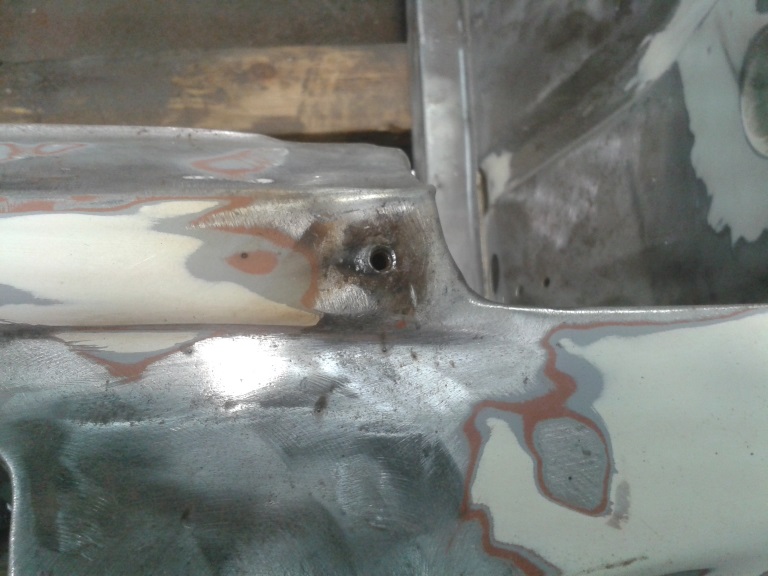
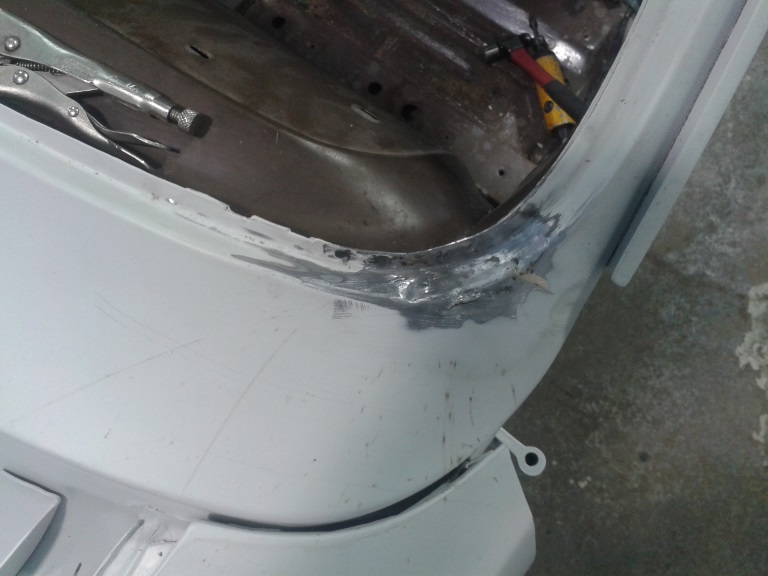
Photo time now I have showered off a heap of rust dust and grinding dust. Im pretty happy with how far I got today. First off, a photo of some of the patina I would really like to keep. I would like to treat the rusty scrapes and surface rust with something that keeps the colour but stops it getting worse? All the rust neutralisers I know of turn the rust black which wont look so good. Ideas? Clear coating it is an option. It doesnt have to last for ages because after a while Im sure I'll want to paint it but for at least first year or so would be good. I was going to remove the windscreen to avoid getting grinding sparks marking the glass on the inside. But I didnt. Three reasons; the rubber will disintegrate and I dont want to fork out $100 for new stuff right now, the glass is scratched already so might as well wait till later when the car is insured and then has a random stone hit it...., I like the moss. It adds character. I took on the worst area, the passenger floor and inner sill, which is also the area which dealt with first because it will put some strength back into the shell. The steel on these HB Vivas is actually quite good quality and quite thick. It certainly knocks cut off discs down quickly. I picked my way out to good steel and chopped away. First off this bit.. I am not really fussed about trying to piece this back together the way it was from the factory. If its strong and lasts Im happy. But I want to keep things like the channels in the floor because it will leak and they do help let water out. Plus they keep the flat bits of steel from being wobbly. So I whipped up a jig the right size and hammered the channels into the steel.. Now the nasty bit. The inner sill was beyond patching. But I am very very lucky that the top of the sill is rust free and solid which meant I could happily chop out this lot and not have the door aperture move on me. Also helped by the fact that Vivas have nice substantial chassis rails too. Not that the inner sill, or what was left, was doing much. It pretty much fell out. Next job was to cut out what I needed from the spare sill/floor pan I had been given. I think its about here that we should give a few seconds silence for the little Viva that sacrificed its life for this part. Not my choice- it was chopped up by a man in christchurch who insists that every Viva he kills makes his worth more. But at least I got something from it. Poor viva. The piece I required was cut out.. Then heatgun and scrape the underseal off.. Followed by lots of chopping, measuring, trimming, measuring and finally in place ready to be welded. Which is about where I finished off today. My bin of rust is filling up.. Tomorrow I'll weld that bit in place and start on the outer sill and sill ends. I'd love to put it up on the hoist to do that but then I think I would be risking things moving out of place. So I'll continue kneeling on my 5 layers of carpet off cuts and persevere.19 points
-
Ok so I have started cracking into this today. Just having a coffee/rust break. I have done all the welding on Sams Celica and Hannah has left me for a few weeks for the lovely grey sky days of the UK summer. So while there is a gap between jobs coming in and my meals simply consist of toast, cheese on toast, cheese on toast with salami (my favourite, takes a bit more prep but worth it) or cereal this means I have ample time to chop out rust. The aim of the game with this wagon is to get it safe and road legal as cheaply as possible with no effort at all to tart it up. (Mainly because I am broke and it would also be a crying shame to lose any of that patina that has been carefully encouraged by years of nurturing from previous owners. I just want it to be a turn key hack wagon. I have spoken to my wof man and warned him that one hellish eyesore of a manky old Viva wagon will be heading his way in the near future. I have told him I want to push the boundaries of what non structural rust I can get away with and be legal/safe. His cars have rust so he understands anyway Photos of mess tonight. Back to grinding and welding...12 points
-
I let the car sit outside yesterday. It rained heavily. Thanks to the gaping holes in the floor it didn't end up like a bathtub. I towed it into the shed too with the Mrs steering it. She has described it as a beautiful piece of shit.8 points
-
Have continued to strip this thing down, unfortunately most of the surprises have not been good ones. Not too many photos tho. All the interior, bumpers and lights are off, and a coat of rust kill on the floor, and and ive got the tailgate off and dissasembled and a tarp over the back end- will sort out a few holes to get into the swing of things and see how we go from there. I took a load of interior parts etc up to the storage unit just before, so i will be able to get it into the garage and start filling holes. Tidied up all the front chrome and lights so they are ready to go back on, pretty happy with how everything cleaned up Put new tyres on the original rims but thought id better have a motivational first: Check out where the hubs are presently thats actually the present ride hight, so a looong way to go yet! And in other news, the Ive been put in touch with a guy in wellington with a Wagon and he has pretty much everything I think i might need as far as non-consumable parts go, might even be able to wrangle a parts (sedan) car if its not just as bad in all the places i need rust cuts.8 points
-
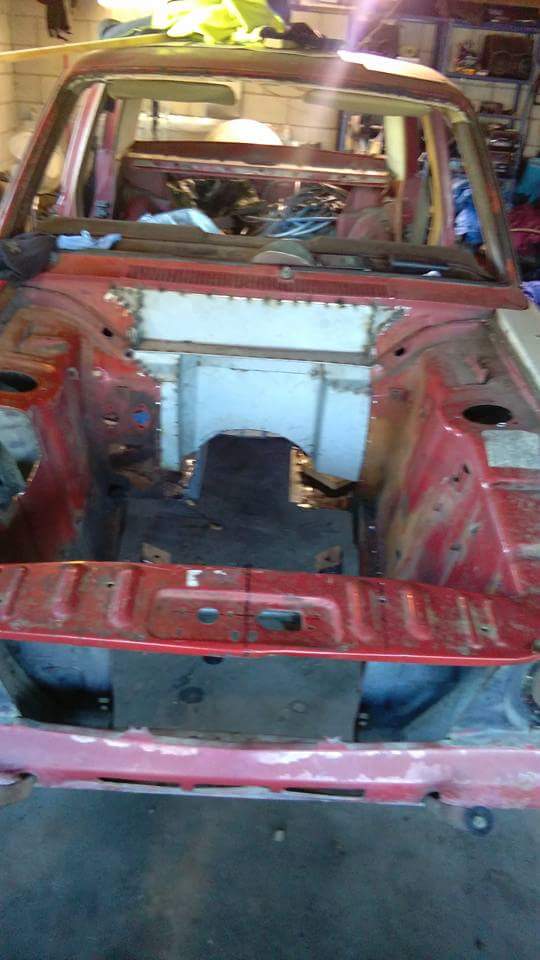
Last of the long overdue updates, some work on the engine bay. There was a broken off bolt at the front of the engine bay, it had been there for as long as I could remember I thought about just cutting it off and welding over it but I thought I'd be mega angry and past Matt if it turned out I wanted to used the hole further down the track so I welded a rod to it so I could wind it out. Success one extracted broken thread from a bolt. I finished feathering some edges and sanding off anymore signs of rust I could find, the engine bay then recieved a metal prep Followed by a couple coats of epoxy primer
 6 points
 -
Got the mounts onto the diff housing for the shocks and brake lines over the weekend, would have had the diff assembled and back in the car but ripped the gasket for the diff head so will order another one and try and have it in by the end of the week. Also got most of the bits for the new crossmember made, just a few more things to do on that and I will weld it up I also got the last couple of dimensions that I needed for the steering arms so I have finished off the design of them And I have a guy at work who will 3D print them for me so I can get them mocked up in the car and check the bump steer before I get them machined. Not sure how long that will be, I am hoping to have them this week. Then I can see if I do understand this whole steering geometry thing.....6 points
-
Certifier came and looked at this last week and said everything looked good. His only suggestion was to box the whole chassis because of the engine upgrade. Finished the top airbag mounts in the front end. Fitted together quite nicely. Just need to get the lower airbag plates laser cut, then drill some holes for the bags and the front suspension should pretty much be done for now.5 points
-
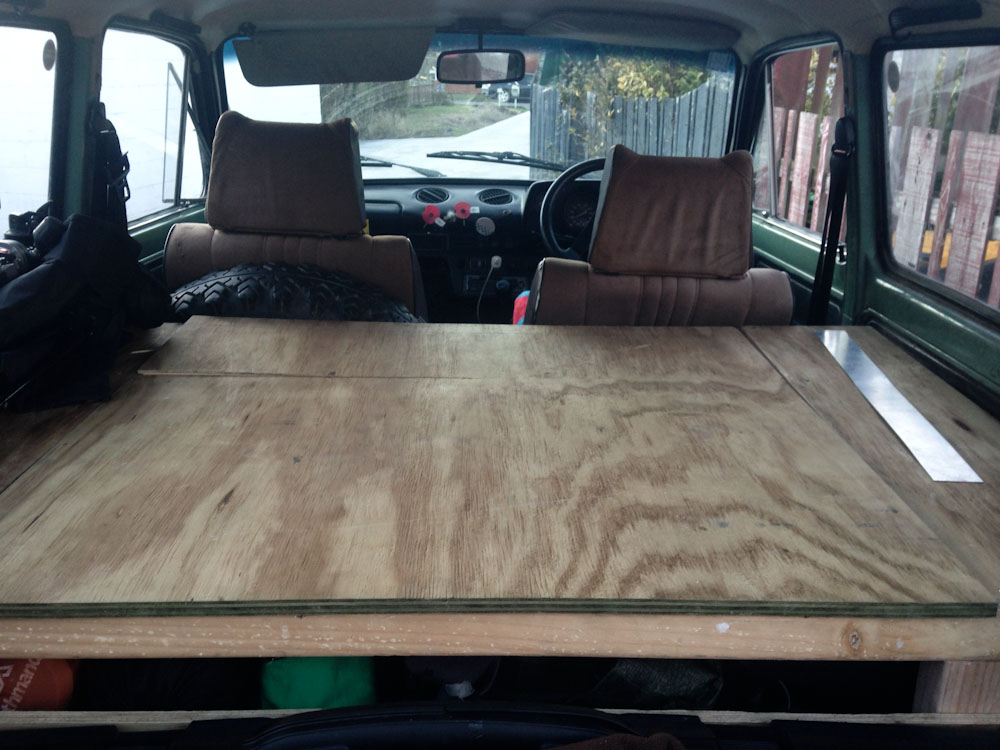
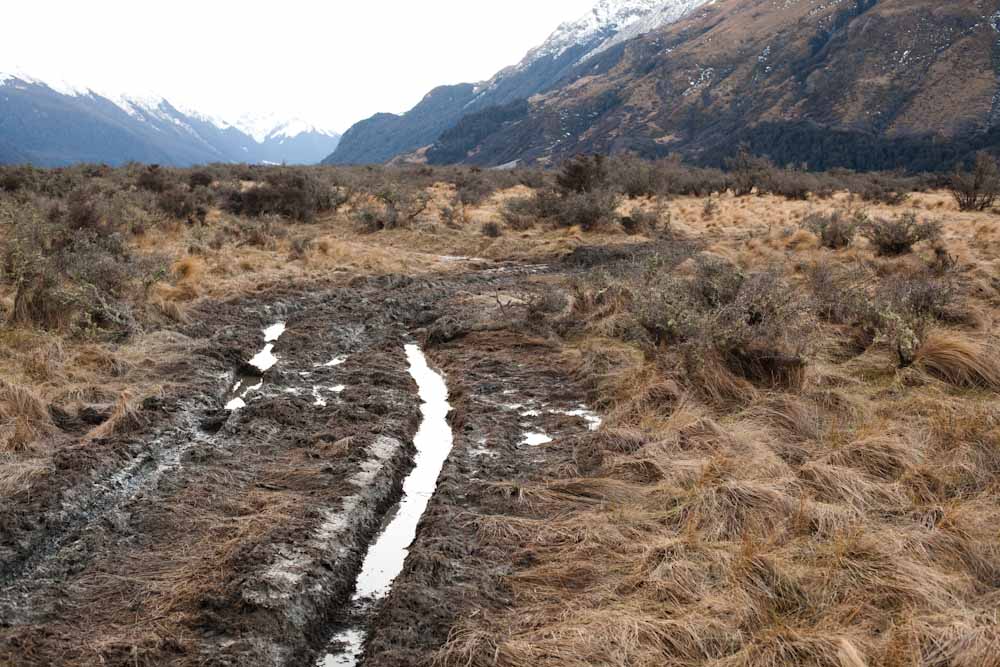
Well got the wof and celebrated with a big drive up the Hopkins, for those of you not familiar with the south island you head to lake Ohau, drive past the skifield turn off and from there the road turns to a track with vehicle access almost all the way to the main devide, its a great spot, our plan was for a spot of hunting but the weather played against us, snow to the valley floor and a nasty southerly, we made it to the ridgeline but the temps didn't allow us to hang out too long! For the trip I finished off a longstanding mission, a plywood platform in the back to keep my gear organised, also has a compartment for the second battery to calm my fear of returning from a mission in the hills to a flat battery! not quite wired up yet but its there with jumper leads attached if needed! This mudhole claimed the niva, with armfulls of river stones and my high lift I managed to dig myself out, all alone because the plan was to meet a mate up there late in the evening, I made the call to drive out and wait for him, saving further troubles and of course we both drove back in without incident! I also had the first test of the light bar, its the best thing ever for night trips, perfect view of the dark track ahead. Happy Niva Stoked as I replaced the bald tyre with another mud grip, going cheap could have been a disaster! I was pleasantly surprised with the performance of the engine, in low first she happily idled across rough sections and had enough poke to get off the idle and climb out of creekbeds. Back in the city she's been dormant but I take her out to the farm now and then, until last week I left her to warm up and got distracted by a phone call, with a change of plans she never left the house and sat for a few days, when I tried to start her up again, no dice, not a pop, thinking it would be the points I pulled out the distributor and gave it a tickle but still no life, checking the plugs they had a solid layer of carbon! idiot! so quickly stealing the 2105 plugs she roared into life, lesson learnt, choke is wholesale pouring in fuel and should only be used to start, not idle!
4 points
-
head set, water pump, cam belt and tensioners. all genuine toyota thanks to Mark at Manawtu Toyota. i need to figure out what coils I'm going to use then i can make some mounting brackets for them. i need to make a few more bits but i might get excited and take the motor out soon. Untitled by sheepers, on Flickr4 points
-
The floorpans are a mix of filing cabinet sides and part of a fridge.4 points
-
Two weeks of MK2's Part 1: To start the wild ride, I accidentally won an auction for SSR Mk2s. I was sure that I would be outbid, and placed the bid as a reminder to myself about the auction, but sure enough after 10,000,000,000 refreshes nobody outbid me and suddenly I owned these awesome wheels... in Japan. With a huge thanks to Jesse Streeter we discussed the cheapest option of around an 8 week delivery so while I was thinking of clever ways to hide their arrival through employing Karl, these sneaky sneakers were on their way for an earlier 6 week delivery. Down low, too slow Found some neat centre caps, and spent a few hours cleaning them up and snapping the rusty bolts out of the wheels. Part two: After 3.5 years (and many assignments relating to marketing motorsport events in NZ) I got to take place in Davidson Graduation Mk2. The super special thank you must go to Rodney for flying down to see me walk briskly across Aotea stage. RX3, Mk2 graduation, Mk2 wheels, Ari Catenen Part three: Really was no better way to celebrate leaving education then to go to Japan, for my Mk2 visit. rot808 and I are off on our Asian Adventure, hopefully finding our way to all the RX3 brothers and cousins. To be continued... Pics will be on my flickr (8:08 Photography) https://www.flickr.com/photos/motoreligion or instagram (theamyable)4 points
-
So what's everyones plans? When are you leaving? What ferry are you catching? Do you have space for other peoples? Do you need a ride? You know, general road trip plans. If any. So far, I have Thursday and Friday off work.3 points
-
So I went to make the down pipe form the turbo and ran into a wee bit of a problem..... Not much room. So I had to take the motor and box out and will now have to fast track the making of the steering .just so I know where the exhaust will run. On a plus side it means I can make the cross member and also I managed to take the motor and box out from the top like you would with a normal car so that made me happy. Also new gasket set turned up and managed to get my hands on some 1ggze dizzys and 7mgte coil pack , igniter ,plug leads. Pulled the motor down to the long block and gave it a Clean.
3 points
-
Really hope the grill has some how managed to survive. It will be hung in the shed for eternity with an A1 photo next to it of the KE in her prime. Not a wall feature I want to have many of. One is enough. I have an AE86 and a KE20 to get up and running so definitely not giving up. Both will feature A class anti thief proof systeming.3 points
-
scored some parts off an early super saloon in the weekend,what was left of it!! some black interior trim to finish it off and these sick badges i love the detail in the badge,i also have the side pillar ones but theyll need fixing as there tarnished i now have a wee collection of fuel flaps,all but one are cracked,standard,deluxe and super saloon and a ms55 deluxe badge i could put on my spare flap3 points
-
So today I bought this: It's an MGB Roadster. It's also very rusty and features some of the most extensive bodged repairs I have ever seen. Bear in mind that this car passed a WoF in 2007: It was very cheap though. I'll brace the body and pull some of the sections back into line and then start replacing/repairing the sills, floorpans, guards, bonnet, boot floor, rear valence panel, front valence panel, bulkhead, doors etc etc etc etc. Pros: Wire wheels, Should run with a few basic repairs and some fettling Cons: EVERYTHING else.3 points
-
Ute diff is now in. Drive shaft getting made over the next couple of weeks. Will start the search for a fuel cell, then look at getting the engine rebuilt!3 points
-
see you at Hamner, should finish it in time!3 points
-
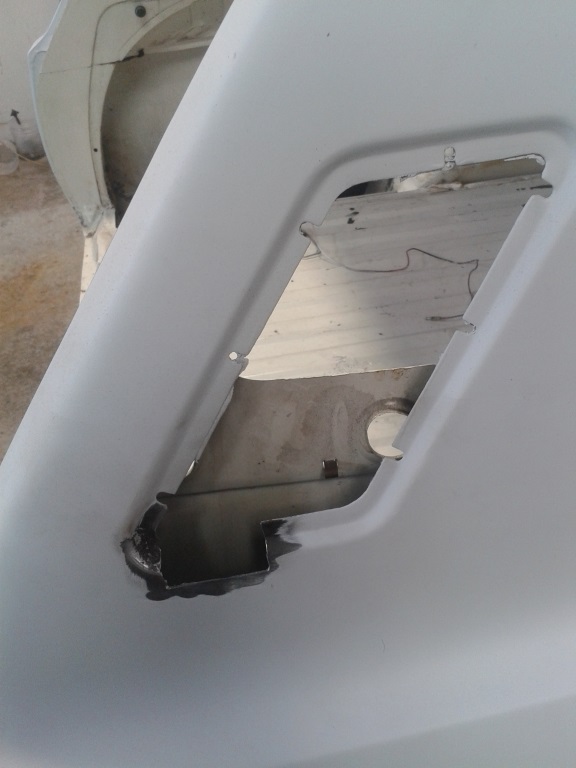
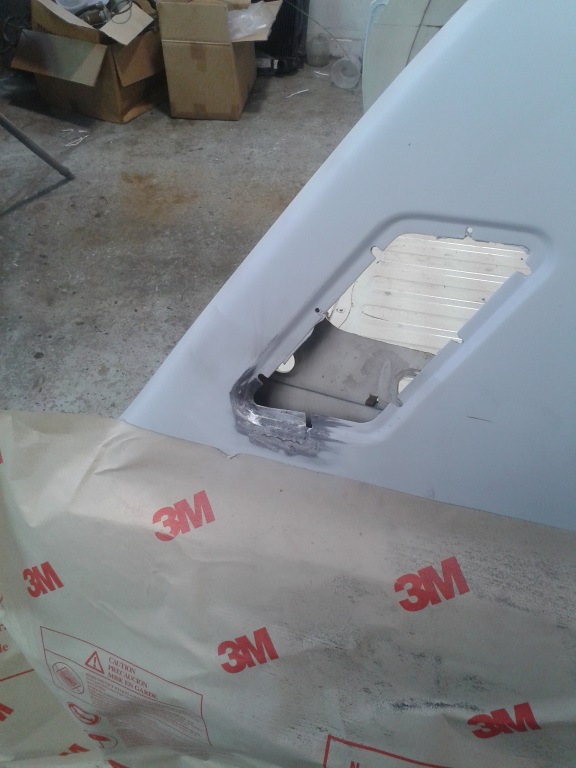
Well now... a little update. Its started to rain here in normally sunny old nelson and I didn't like seeing the wagon out there filling with water due to no doors (although the fist sized holes in the sills let the water out..) My brother was over this evening so while extra hands were about we pushed the little wagon into the shed where Hannah has been spending a few hours here and there doing her wagon thing. I felt like I was missing out.. not helped by Hannah now giving me grief that I dont actually own a wagon. She claims its just a mere hatchback. Not fair! Once inside I emptied it out. There was a spare tailgate (or hatch......) and the doors off a white car. The tailhatchgate is actaully the original item. Not sure why it was swapped over but luckily its much better rust wise. Still rusty but not terminal. Then I set to picking out all the various bits that old cars collect. So far I found some money as usual...Im now up to 7c. So car now only owes me $599.93 I also found various tiny plastic toys, a key ring clip, a bicycle combination lock - missing the chain, a eraser and a tow ball. Quite a score... The fella I bought the car from cut up another Viva a while back. I managed to score a complete floor plan half along with the sill for the rusty(er) side. It will be bloody handy and will make the repair job so much quicker! The worse of the sills.. The floor/sill for transplant.. Now some might say "why bother trying to rescue such a rusty old car" and my answer would be...well just look at the interior. Check out the mint dash for example... The doors need to be put in place before I start bracing and chopping things up. Not so easy when they were removed by simply chopping through the pins. Vivas dont use bolt on hinges! This I have only just learned. They are instead welded in place and the only way to remove the doors is to 'carefully' hammer the pins out. So I have some rusted in pins to deal with. Fun times. Tomorrow I will have a go at starting the awesome 1200cc power plant. Hopefully fit the doors so it can go back outside and dealwith rain a bit easier and I can sleep easy.3 points
-
I picked some old bakelite magneto telephones recently, I had heard you can quite easily hook them up and have a closed circuit telephone line, turns out it is pretty easy. What better way for the wife to let me know it's dinner time while I am working in the garage, with the gentle chime of bells awoken from their slumber by a hand cranked magneto, aaahhhh technology. Party line party times One of the phones I got was the phone in the scoreboard at Athletic Park. There seems to be some slight variation between the telephones, mostly in the wiring, they usually have a diagram stuck inside which is handy. All the mags look like they are from the same manufacturer, I had to swap one from a front crank unit into a side crank one, just had to change over some brackets. As far as connecting them together, each phone should have 4 wires, positive, negative, line 1 and line 2. These are just connected to the same on the other phone, positive to positive, negative to negative etc. They will now be able to ring each other by cranking the handles. To get the voice circuit working a battery can be connected to each phone, 3-6v seems to be enough, I have a little AA battery holder on each which is connected to the positive and negative terminals. All hooked up and working again Next step is to run some wire to the garage and swap one of the cases to a nicer one for the house, should fit in quite nice as the house was built in the late '20s2 points
-
Wow. This thread reminds me why I've always been drawn to old shit. You obviously have lots of smarts about these modern machines Zac. I would be holding my head, and rocking back and forth in the corner by now......2 points
-
filled my first few holes, only 999 to go... bit of a bugger to weld due to all the fish oil and/or waxoyl all through it but its in good nick for a 50 year old tail gate so glad its in there. Also my plan to 'keep the patina' got overridden (on this panel) by my inability to stop picking scabs. woops!2 points
-
With a normal M/C larger bore means less brake system psi for the same pedal pressure - since the piston is larger (more square inches). The basic physics will be the same for a remote, which means you will get less 'boost' for the same pedal effort. The bigger bore of the MGB one is 25% less area, so the same drop in boost. If it's easy to swap you could stick it in and see how it goes.2 points
-
Thank you, it's not progressing as quickly as I would like it to though haha. We did think about the bag mounts being parallel, they were off by about 5-10mm I think. Wasn't enough angle to worry about.2 points
-
Im heading into onehunga on wednesday for my sitesafe. Can transport items ( not a whole fkn couch tho) up to orewa or my place whangaparaoa Or am in parnell tomorow2 points
-
I'm giving away the gaskets so I'm not travelling to Orewa to do so We'll see what Lumby comes back with2 points
-
Oh I do love avocado with cheese and bacon! Yes. I may well have to purchase some. Here is the bread and salami. I would usually use Vogels or Burgen but have recently discovered the delights of the in house country multi seed at New world (I dont shop at countdown or pac n save because I am middle class). This bread lends itself well to COT offering a larger surface area and nice texture. The Salami is my favourite- Verkerks lean peperoni- 92% meat and far less fat than normal salami offering great taste! (plus is healthier so I get to live longer and eat more) In action... (like almost live in action as i am eating this delight right now) I have also got a fondness for oven fries. These coupled with some saveloys are right up there in the allowable zone on the 'time it takes to cook vs time it takes to eat' scale. Back to that car.. I dont want to lose any of this patina.. Before starting and grinding I almost took the windscreen out. But there is no way the parished rubber will survive plus I like the moss. The screen is pretty scratched but will get a wof easy. So it stays for now. Once the car is insured it might possibly get hit by a stone sometime..ya never know eh. Then I can get a new screen and rubber. For now I will fill any gaps and accept it will most likely leak. Its British so actually it will leak.2 points
-
Plastic pistons? Wtf?2 points
-
Possibly peel casing leather and leave it at a location? Or you can dump it, i can always find something somehow.2 points
-
I still have the SU HIF turbo carb I bought off you as a spare for the 12a turbo. Possibly a bit small in throat size... (plus I am eying it up for my Viva wagon as thinking of doing a huckery turbo setup on the 1200)2 points
-
right, update time. basically moved house so now have a garage and a place to work on the bike, has been a bit of a mission getting settled in, but been worth it, the garage first off had to remove the carbs etc from the side of the engine, all the wiring, hoses, foot rests seat tank etc, so i could unbolt the engine and pull it from the frame, not a too hard of a job, the chain was stuck pretty solid to the front sprocket next up was to pull the heads which was super easy, next was barrels. not so easy. managed to pull the right hand one no bother, the rings and piston were in pretty good nick, and if it was cast iron bores i'd have been happy with the barrel as well, the left hand cylinder wasn't going anywhere, so left it for a time until i could get to the nut on the crankshaft and try and brute force it out. pull the clutch side case, a combo of black sludge and water came out to reval the mess that is the clutch, all new friction and steel plates are going to be needed pulled the basket and all the associated cogs etc, a bit of rust on some, but easily save-able. then into the rotary valve, everything is nicely marked so you can't really cock up the timing if you pay a wee bit of attention rinse and repeat on the oil pump side. you probably noticed the alternator is out, that fucker is also seized solid and will also need new bearings. yep much the same so that pretty much it. i did get the other piston out. piston is pretty much done for, and rings are poked, but i sort of thought it was always going to be the case. crank is feeling really good, so hopefully i dont have to spend $800 usd on a new crankshaft, its probably going to cost me around that for all the bearings, pistons, rings, seals, gaskets, etc etc tomorrow night hopefully split the cases.... may be2 points
-
Yeah, just the bits I've mentioned above for the moment. None of it can hurt, hopefully I'll find something interesting along the way. I think I've found the two dud control solenoids which are throwing codes. I'm pretty sure they wouldn't have been causing any of the problems with idling and fuel usage, but they need to be fixed nonetheless. There are two valves in the black solenoid box (only on series 7 and 8's) that measure open circuit, and do nothing when given 12v. This black solenoid manifold/rack thing actually looks like it comes apart, but suspect I'll have to make up some sort of tool/jig to sort it. The individual valves within all look like they're the same part. I've bid on another one from trademe with an eye to opening it up and hoping it has at least two good solenoids in it. Should learn how to open them, and get some spares, without fucking the original one from the car. Maybe I should recondition a bunch, make up an adaptor harness and sell them to the yanks for a massive profit? hah. Back to uni tomorrow, more work on FSAE car, and I have a report to write also, so will have to halt the fun for a few days . Alex, sort me some carbs? .2 points
-
To the british the chassis and body are as consumable as oil2 points
-
Was indeed another nice meet and a good day out. However it didn't start too well for some. Check out Tonys face here... When he discovered his Fiat X19 did this at the Motueka Repco carpark before even heading off to Nelson.. which left this.. But he jumped into another car and still came along for the day! Some of the cars on the way there.. That little stylish duck...2 points
-
IMG_8854 by GuyWithAviators, on Flickr Testing it's off road capabilities.2 points
-
Not been updating this much but its all pretty standard stuff. cleaning parts, polishing parts, replacing parts, sourcing better replacements etc. Got the dash retrimmed a while back and fitted it today. not 100% happy with it. it has a heat shrink mark in the d/s corner and glue overspray on the other side. not a massive issue but fuck you pay retail for something you want a nice job done. i could've done it myself better but lesson learned. it looks better than before though. got a carpet kit ordered this week so i'll be stoked to get that in and get the floor covered. it'll give a huge moral boost i reckon. me and the missus want to do the Kaikoura hop on 20th sept. 7 weeks from now minus a week for a holiday we've got. eep. Give me some love and a kick up the arse to " Git 'er dun" please. Joe. Discussion. //oldschool.co.nz/index.php?/topic/46071-mighty-joes-english-duo-cortina-67-triumph-74/2 points
-
Sally said that ben guy is a bad influence on you (and me)2 points
-
Small update. Lowered the back of the car a while back by a notch. Sits much better now, much more even. Today, after many, many hours of sanding and spending a few hours polishing today, I finished my intake manifold: Will try put it on within the next week. More to come. Also, my front tyres are almost bald.2 points
-
Well she is still cruising around in this most weekends at netball, at heaps of car shows and the odd trip to the shops. I still havent gotten around to sorting out a nicer push pole or a gear lever and the lake pipes are still sitting in the garage somewhere too! She loves cruising around in it and her typical driving style is one foot on the wheel, kicking back and people watching. Few things to note if you are going to make one. Be prepared to be stopped constantly to be asked "where did you buy that from?" or "so cute, can I take a photo?" Because it is so low to the ground my daughter sometimes gets bored and decides she wants to pick up random crap of the ground or drag her hands through the dirt. Watch out in crowds, retards wont notice it despite being bright pink and could end up tripping over it and sitting on your child. Castor wheels are not that flash on rough ground. She rattles like a bitch sometimes. Might try to rubber mount the front castor but most places we take it are nice and smooth. Women think it is the cutest thing ever and flock to it, Dad's usually look very jealous and grandparents ask if she is wearing her seat belt or has she got a drivers licence. Few shots out and about Greeting Dodgy Uncle Hayhole and Auntie Laura on his trip to Australia Spotted at car shows:2 points
-
Ooooh this little beasty now resides at home. Ready for tinkering/fixing. I towed it over from my olds place in Blenheim yesterday. Big thanks to Mum and Dad for use of their good 'ol V6 Vitara. It was fully loaded up with all mums crap for her Kaiteriteri holiday plus car and trailer yet still cruised away happily. So its sitting here in the sun looking a bit sad. Hopefully it will remain sunny because it has no doors and I wouldn't want it to get rusty(ier). Last night after we unloaded the van from a load of other car bits and stuff also stored in Blenheim I went and sat in the Viva contemplating its future. The more I looked about at its totally fucked tatty interior and scabby exterior the more I thought this would be cool to just try and get legal. Its rego on hold (with ugly white plates so I just need to get it to a warrantable standard. Apparently the engine is a runner but that I shall wait to see. I dont want a made up Rat look. I want that proper 'on a shoestring budget just scrape through a wof' look. Later on in life I can go hard with a tidy up and re-power. Really very keen on fitting a GM Saab lump in place. But not now. If the engine is toast then my plans would involve a Datsun engine and box. A friend in Chch, Donutz, has converted many an HB and Chevettes with Datsun A series engines. They pretty much bolt straight in and look stock, go really well and run cheap as. He has never had a problem with wofs. With this in my mind I need to ask some questions. I would like a 5 speed box with over driven 5th gear. But I dont know if the A series ever came with 5 speed boxes and if not then do the 5 speed boxes from other Datsuns bolt onto an A series? If not then what needs modifying? If possible its the A15 I would like the most- for all that extra torque... What would be a fair price to pay for a engine and box?2 points
-
Well, the bug bit again. I guess you could also call this thread "I lost my marbles and imported another shitty old car from Japan! Ask me (almost) anything!" Originally I wasn't planning on buying another AW11 for a couple of years... if at all. After owning five of them over the course of the last ten years and getting sick of repairing botch jobs on hacked-up local examples I firmly told myself not to bother anymore unless it was a truly tidy one, which meant most likely having to import one from Japan. Then a series of fortunate events including a career change, the sale of my Mazdaspeed Axela to a family member earlier this year (which freed up garage space and capital), and a strong dollar to yen ratio at the time all led me to engage Ewan from Stacked to check out a few nice looking AW11s on my behalf. Yeah, I'll admit that six months after selling my last AW11 the itch inevitably came back, so I'd been keeping a surreptitious eye on the car sites over in Japan for the last year to see what the market was like! After a few hits and misses I settled on a midnight blue hardtop from a yard near Tokyo called Marumi Auto which had low kms, very little rust, one careful owner, and had been quite well looked after. It wasn't cheap, and blue was never my first choice of colour (I was angling for either a Sherwood tone, white/grey, or white/gold example this time), but for the price nothing in NZ came close in terms of quality and condition, and after owning my last one the colour eventually grew on me. By some stroke of luck, this particular one had been specced with the much more aesthetically pleasing black interior instead of the default eye-watering blue that 99% of the midnight blue cars had! It arrived at Stacked's yard in Osaka around mid-May, having made its way across the country from Tokyo on a transporter, and Ewan made arrangements to load it on a RORO carrier departing in late May. Around the end of June the export certificate and some other documentation arrived, followed by a notification from Stacked's NZ based customs brokers in Tauranga that the car would be arriving on 11th July. The AW11 then spent the next week and a half on the wharf while Customs, MPI, MAF, and Land Transport NZ all poked around and carried out their various inspections in the name of bureaucracy. I was heartened by the fact that during the border check the car wasn't flagged for rust issues nor underbody damage! Then, finally, once all the Is were dotted, Ts crossed, and palms greased in the form of invoices paid, the car left the wharf on a transporter headed to North Shore Compliance and spent a few days there before I drove it a short distance up the road to the panelbeater where it now currently sits, and will undergo further inspection to pass a Repair Cert. Compliance revealed that the left rear quarter had been subject to a minor impact in the past (20 years ago or thereabouts), and because you could still buy replacement TGP panels at the time the entire section had simply been replaced. There are no marks to indicate the chassis had to undergo straightening, there isn't any cancer creeping in around the seams, and all the spot welds look good - but there are a couple of areas where surface rust has started bubbling (the join around the left hand tail light, for example) that will need to be cleaned up once the repair certifier completes his check. I've had very limited time to spend foaming over the car because of other commitments, so it was a nice surprise today to discover that it already sports a set of incredibly rare TRD lowering springs. I'd bid on some in Japan as the car was making its way over here and just barely lost the auction, so had been feeling a bit despondent about ever finding another set. So where to from here? I'm not all that interested in making the AW11 stupidly fast, but will eventually perform a few judicious tasks such as sprucing up the suspension further, now that I know it has TRD springs (some good Bilstein struts and a rear swaybar would be nice), adding a LSD, fitting a set of extractors I did manage to win ex-Japan, transplanting a few bolt-on bits I'd hung onto after selling the first '80S KID, and tidying up all of the little interior and exterior blemishes I come across. May even pull my Buddyclub P-1s out of storage, paint them a nice shade of bronze, and fit them to the car, and also hit up Yahoo Japan for any oddball accessories such as driving lights and roofracks that might pop up. Still undecided whether I want to go for a full period-1980s look similar to what I'm planning to do with squid (my Skyline sedan) but overall I'm hoping for a nice "clean-slate" build - not concourse spec but tastefully tidy and done up without a hundred things wrong or fucked with! Stay tuned for more. Discuss: //oldschool.co.nz/index.php?/topic/49412-80s-kid-part-ii-eds-aw11-sc-chit-chat/1 point
-
Never skinned a couch before1 point
-
More rust repairs and just plain hole repairs in one case. The last photo is of two holes I beleave a previous panel beater made and used to leaver out the guard a bit but only ever bogged over them so I patched them properly.
1 point
-
Man this is terrible, good work.1 point
-
Tunnel being finished off. Spot welded inside mount on for max flushNess. Pretty stoked with how the seat mounts turned out seat sits so low it's literally less than 5mm between the bottom of the seat and the floor.. Laser cut some seat mounts. I've got a spare set anybody want some to suit a racetech seat?? Getting some motivation for low. Subframe are currently being sandblasted and yellow zinc coated. Also just bought some white paint so we get to paint the underside before it goes back on its wheels.. Fuck load of work to do before move to the tron in a few weeks..1 point
-
Untitled by sheepers, on Flickr1 point
-
I thought I would post some more details about the suspension and steering setup that I have used in case anyone is interested. When I started this project I read all I could on what was the best way to go about getting discs onto the front and the popular choice in the UK is to use MK2 Cortina stuff as the geometry is supposed to line up pretty closely to the Anglia. There are some downsides though, if you use the MK2 struts then you need to also use the MK2 steering arms and the MK2 TCA's and with it all fitted (which it does pretty easily) you end up with quite a lot of positive camber on the front wheels, I corrected this by going to adjustable camber plates on the top and at the same time converting the struts to coilovers (the MK2 springs are too big to fit into the Anglia strut towers anyway so at very least you have to go for a smaller diameter spring) the next issue is that the MK2 steering arms are a bit longer then the Anglia ones and this reduces the steering lock quite a bit, makes turning the car round in the drive by hand a pain in the ass that's for sure! The solution in the UK is to buy some custom fabricated steering arms from a company called Milton who specialize in Anglia parts however I couldn't get a straight answer from anyone as to whether or not they would actually be up to NZ certification standards (the guy I spoke to at Milton actually told me that he didn't think that they would be ok) and so in the end I figured it was worth buying some and seeing for myself if they would pass. When I got them it became pretty obvious that they weren't going to pass so I took them to the local cert guy to check and also to figure out what the best solution was going to be. What I decided to do was to get some machined out of solid which would then be acceptable, only problem then was that according to the hot rod manual custom steering arms need to be 16mm thick and at 16mm the tie rod ends wouldn't have enough length on them so given that the car is so light we decided to send a drawing off to LVVTA with the thickness at 12mm and included one of the Milton arms as a reference for what I was planning and see what they said. They came back a week or so ago and said that they wanted them to be 16mm thick but I could counterbore the hole where the tie rod mounts to allow me to use the Anglia tie rods, however I thought it was worth a call to Graeme at Enford and he put me onto some Zephyr tie rod ends that have the same thread on the body as the Anglia ones but are conveniently 4mm longer. So the plan is to machine up some custom arms that put the steering arm length back to the same as the Anglia ones, change the outer tie rod ends for the Zephyr ones and that should be all sorted. Just to make sure that I hadn't missed anything I also modelled up the front end geometry in Solidworks so I could check the ackerman as well so now they are good to go. I have a CNC machinist lined up so hopefully I will have a shiny new set of steering arms in the next couple of weeks. Anyway here are some pics This is the modified MK2 Cortina struts, I had the camber plates machined at work I have already posted pics of the TCA's and with the camber adjusted almost as far in as it will go I can get the front wheels aligned (no massive negative camber for me though...) and here is a comparison pic of the steering arms, the Anglia one is at the bottom then the MK2 Cortina one in the middle and the Milton arm at the top and here are a couple of shots of the Milton arm Interestingly in the first pic you can see that the Tig weld has cracked almost completely through, I don't think that this weld was ever intended to do anything other than hold the pieces together while the bottom is welded but it isn't a good look. So that's about it really, hopefully this is of some use if anyone is thinking about running MK2 Cortina suspension in their Anglia. In other news I got some more work done on my car today but it was dark by the time I got finished so didn't get any pics, I will take some tomorrow1 point
-
Are you positive? Also, lookin forward to next meet1 point


This leaderboard is set to Auckland/GMT+12:00