
Leaderboard


Popular Content
Showing content with the highest reputation on 09/10/19 in all areas
-
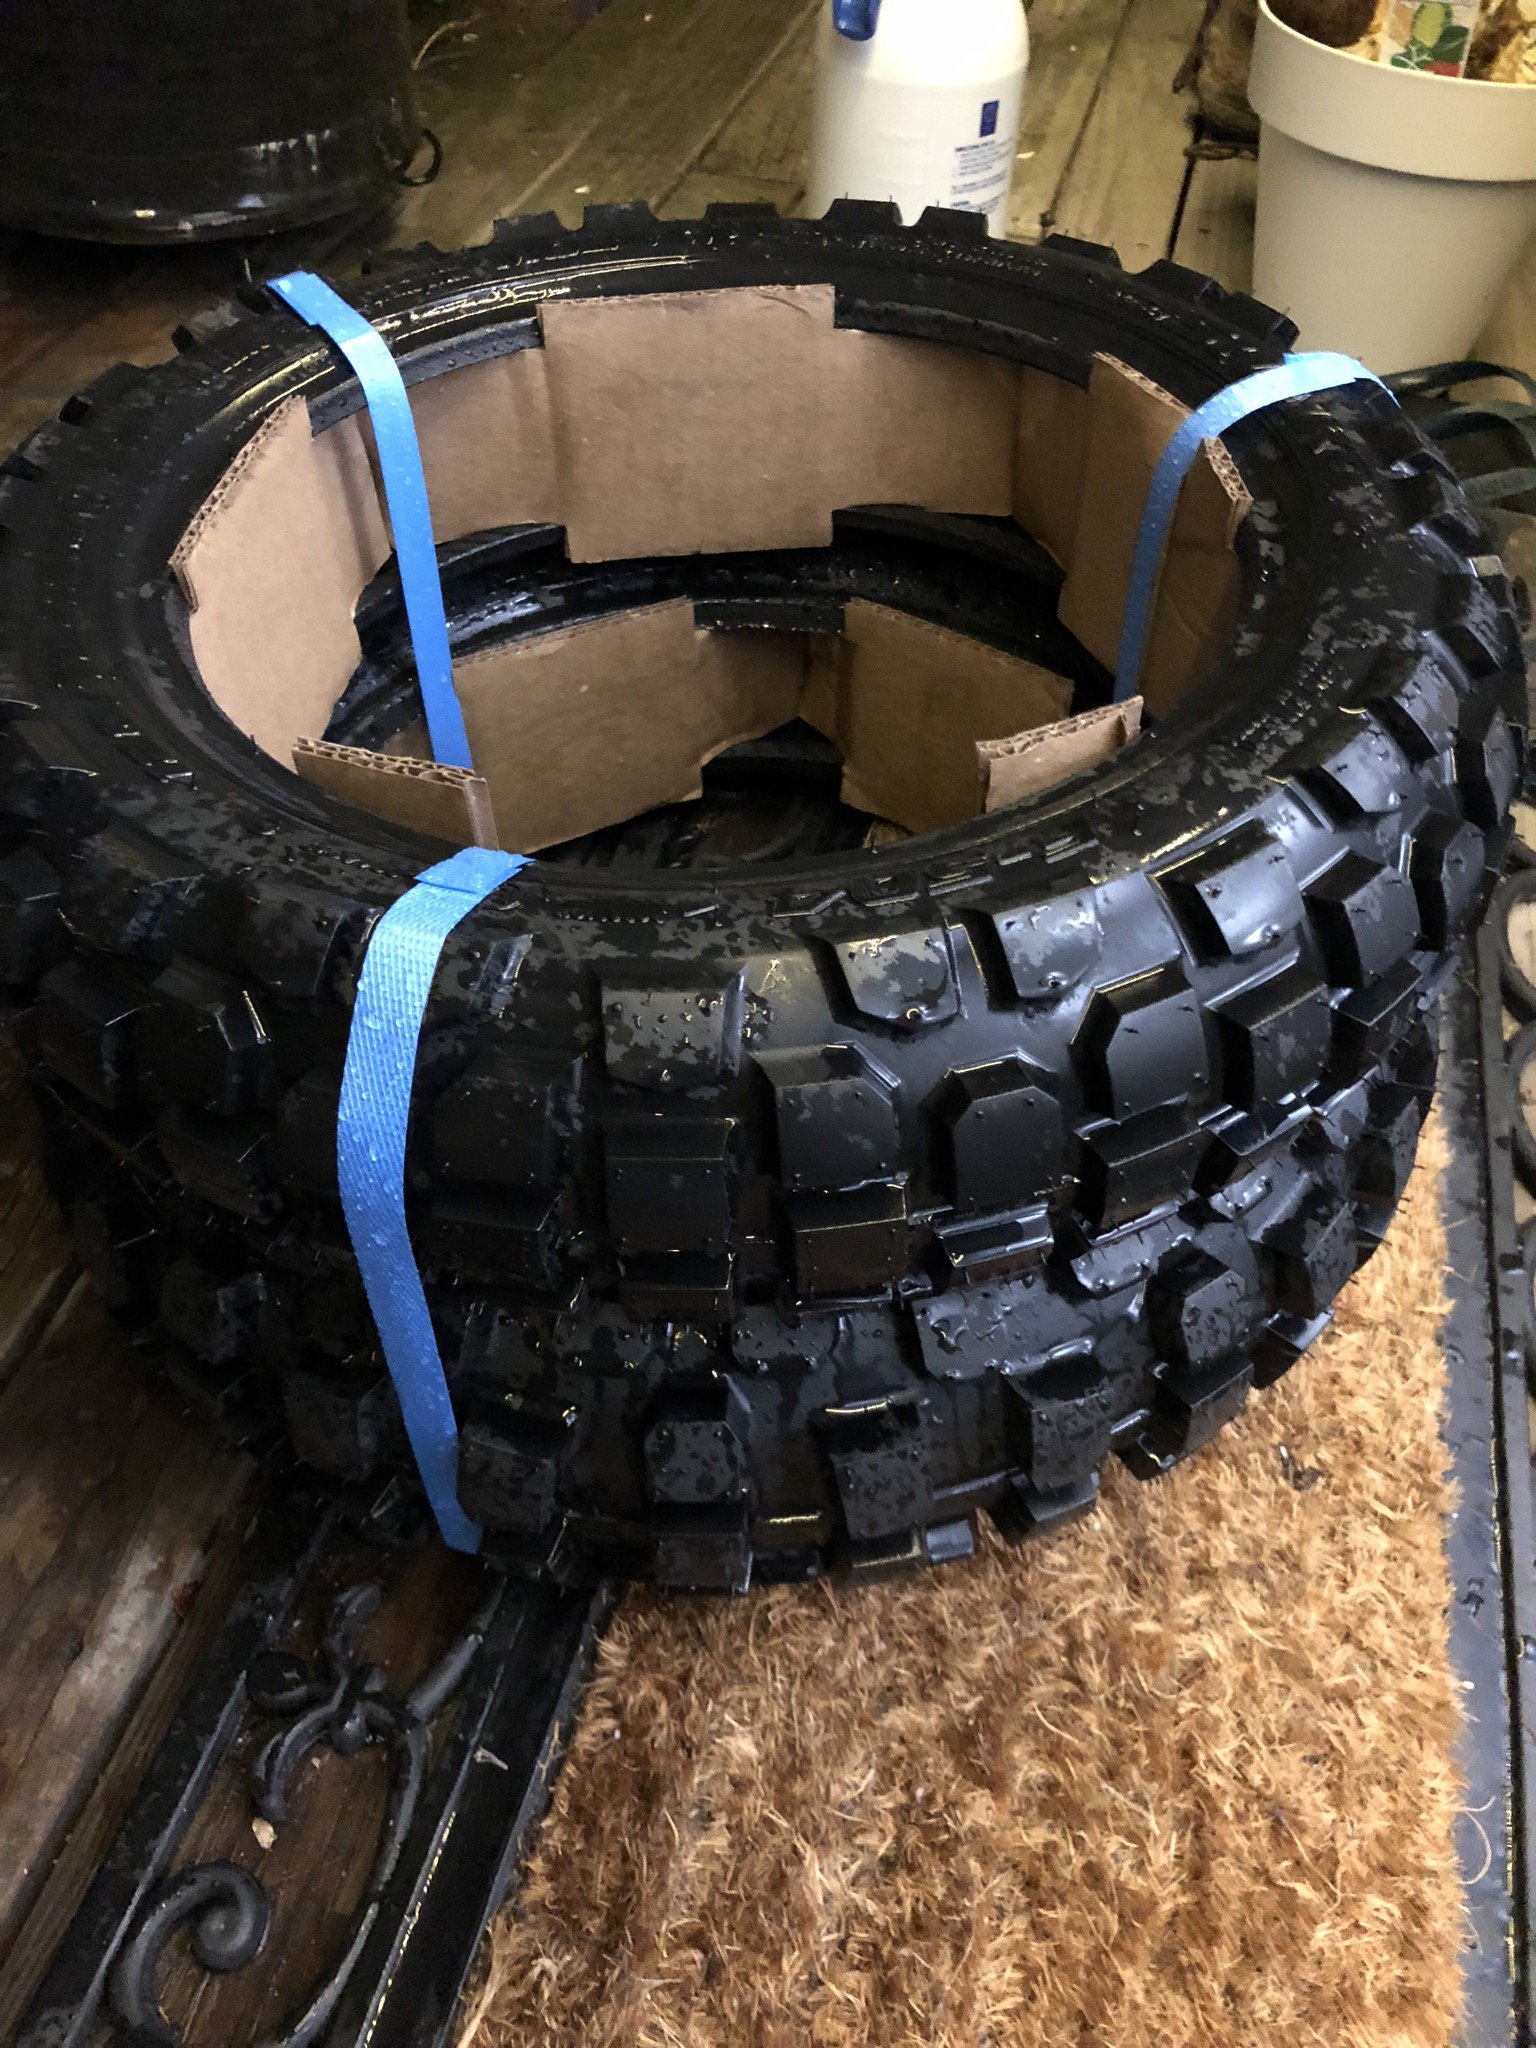
new street magic tyres arrived, wonder how much worse road riding will be shinko mobber 504 and 505
 13 points
 -
Resurrection Session 1: Missing sparks in cylinder number 6. Diagnosis = bad lead. Researched and found that VL Commodore RB motors have the right length. Not perfect, but close enough. Found bargain. Purchased. Fitted. Next went for a drive to diagnose further problems. Broke down. Pulled fuel line off crab and noted no fuel coming through. Luckily a strong and powerful rescue car turned up to help with a Jerry can that was rigged direct to the carburetor to return home. This worked fine until the Jerry can ran out. Ran the last 200 metres on brake-kleen sprayed directly into the carb whilst perched on the guard. Diagnosed fuel blockage in tank and now dead electric pump. Cleaned out tank and gave it a paint. Will now try sourcing a new pump and nylon lines.13 points
-
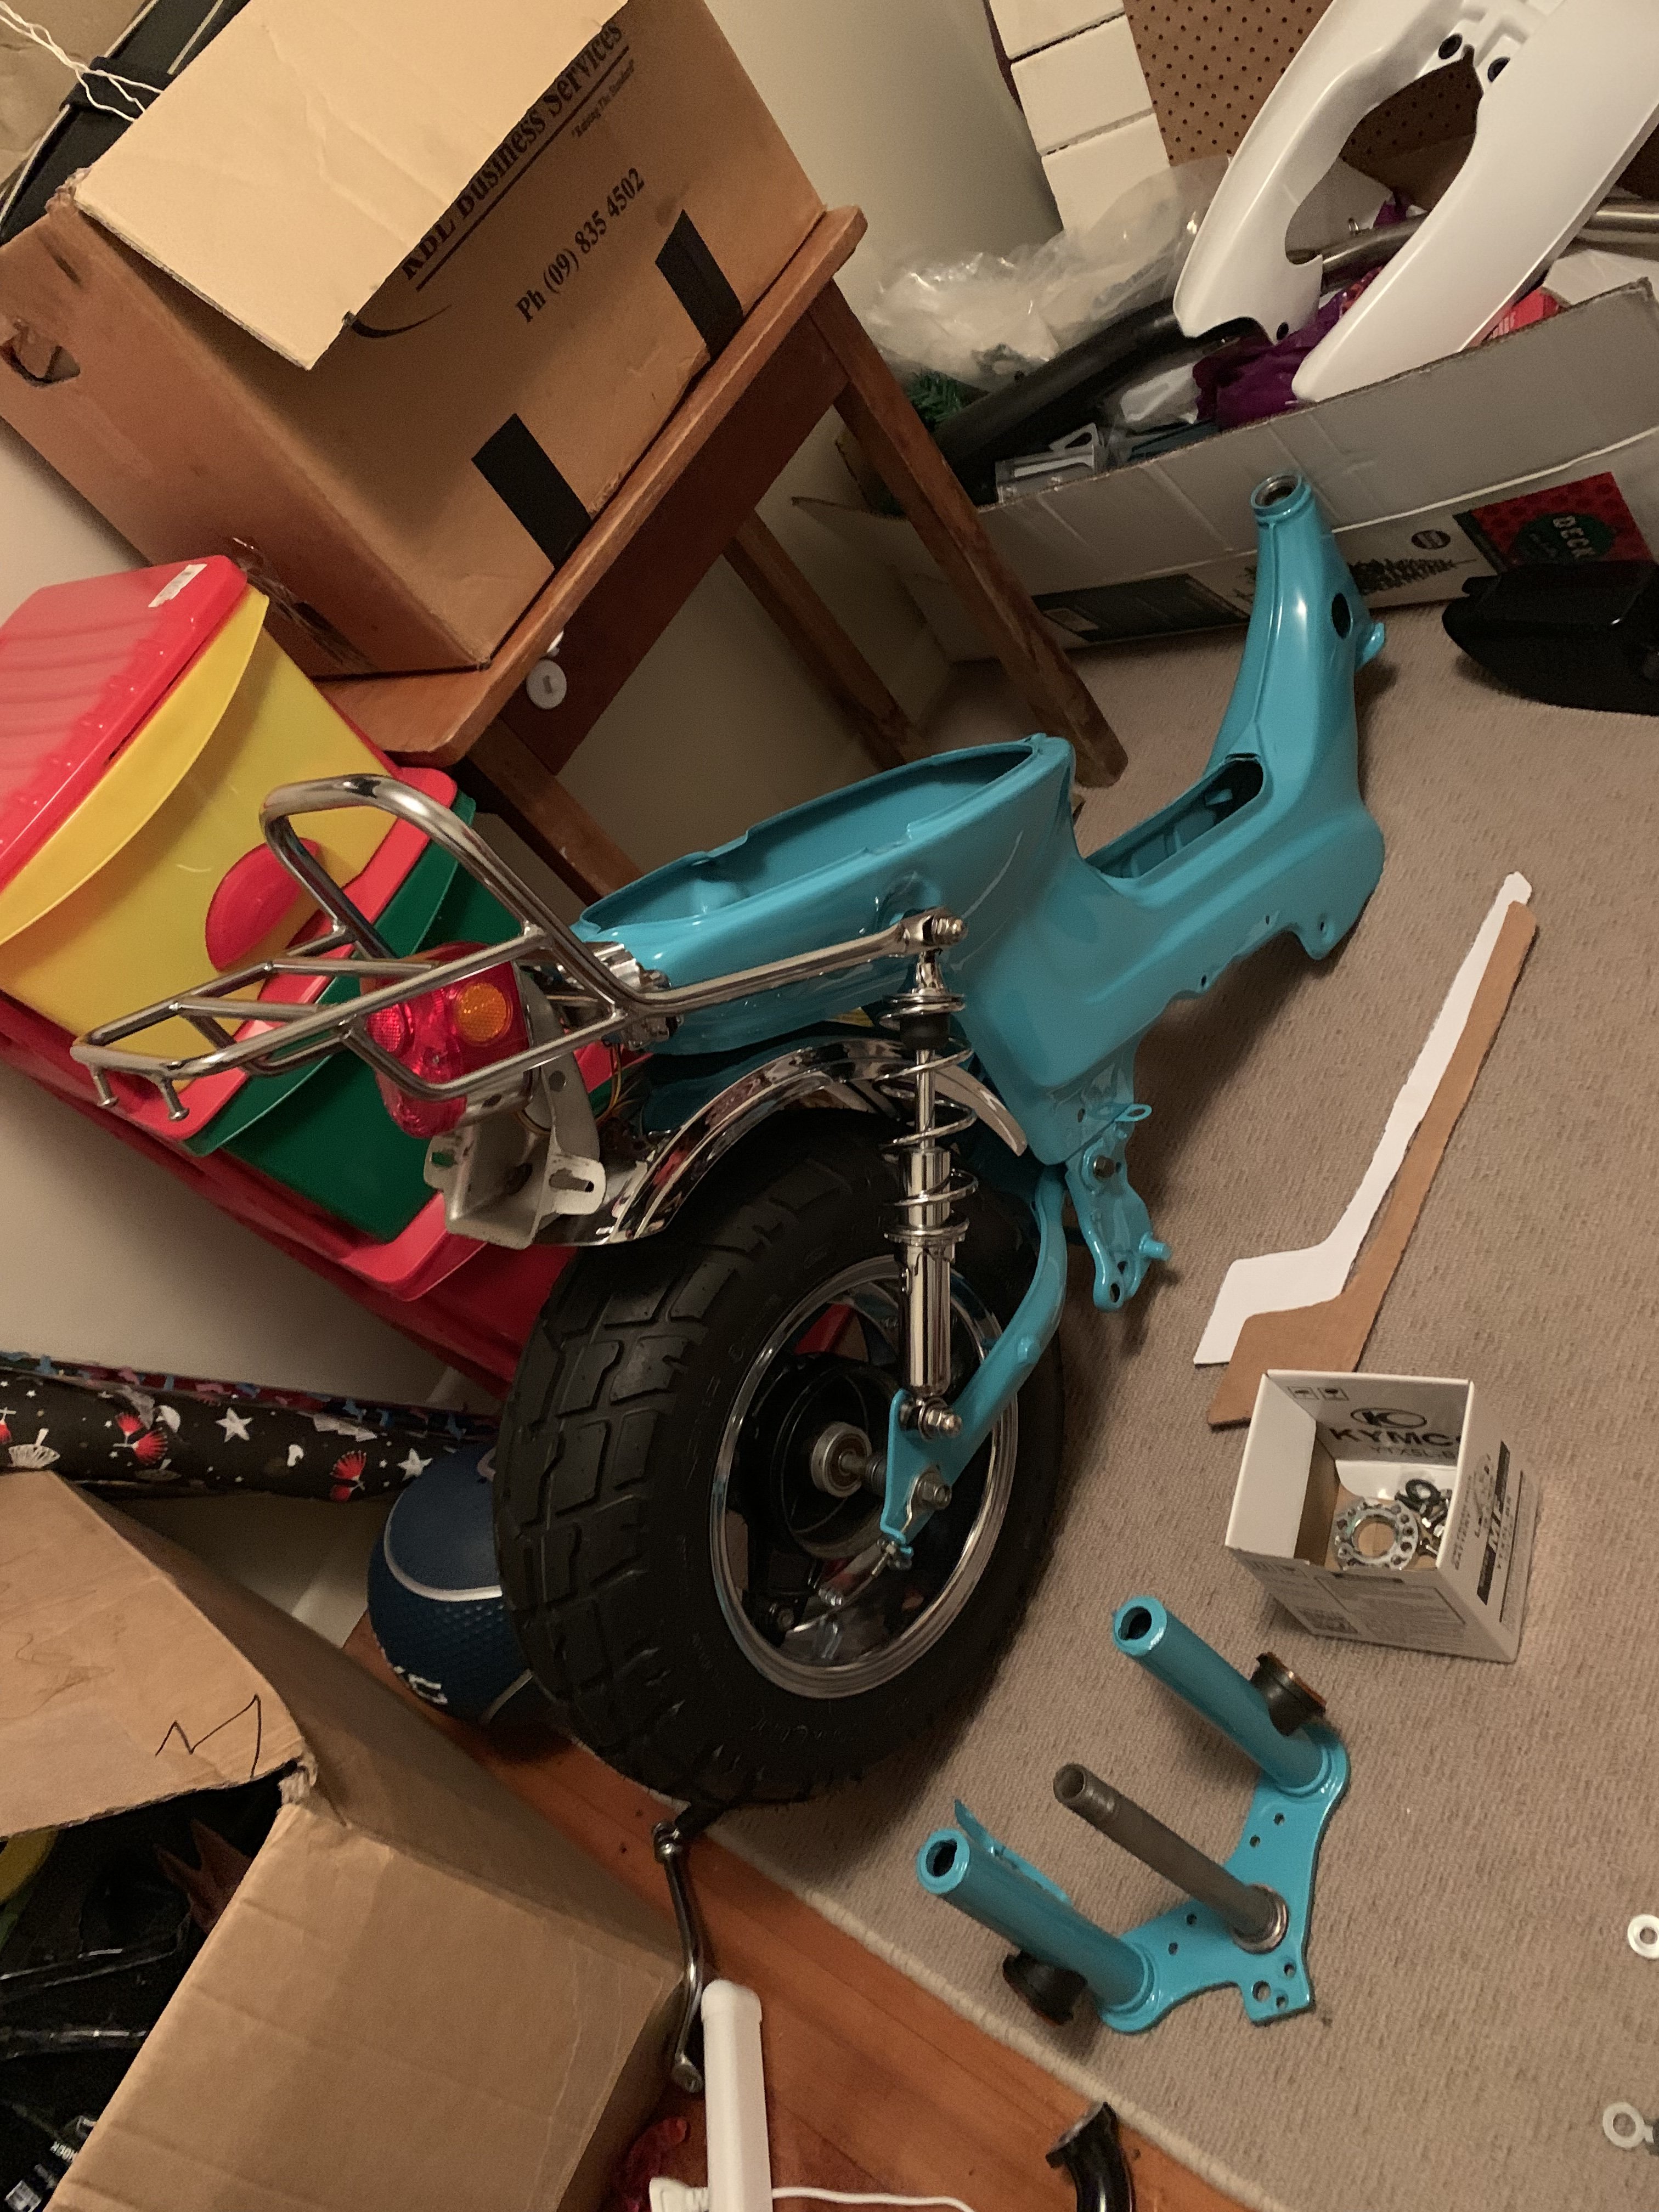
Decided the Chaly was too big. I am readyyyyyy.6 points
-
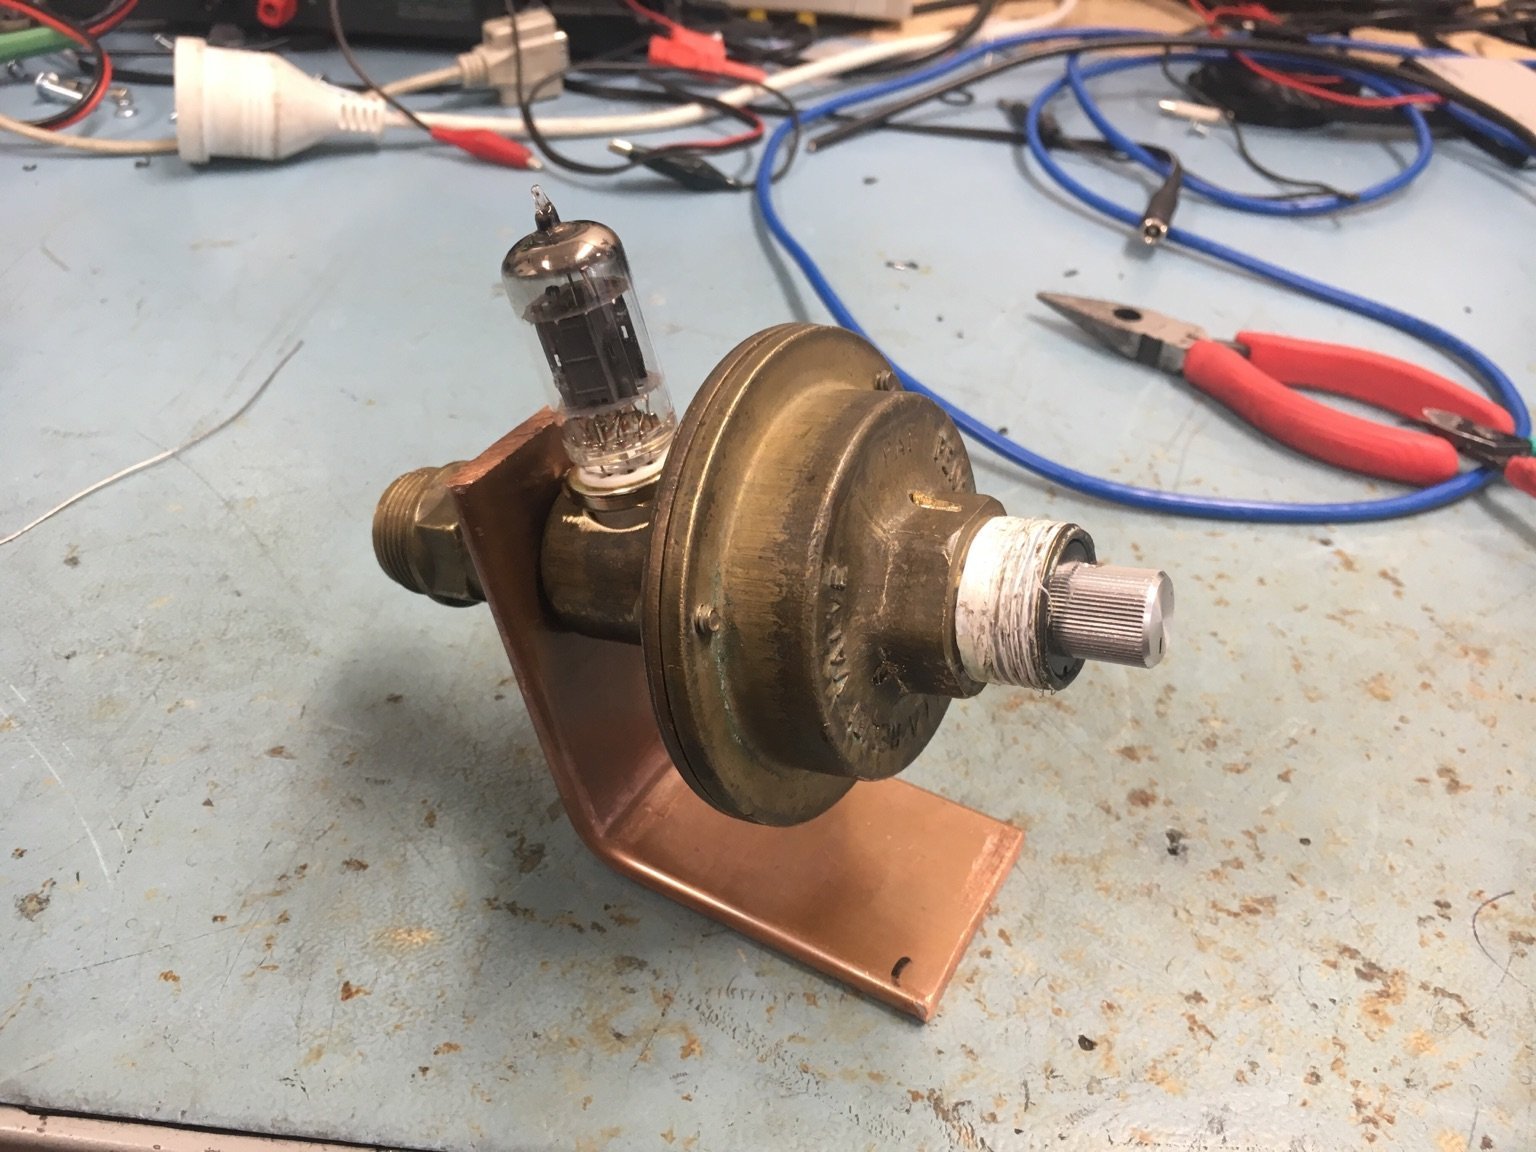
Beginnings of an Oldschool Steampunk noise box. First up: The oscillator (courtesy of valve via @h4nd)
5 points
-
On the same level as a classic @Shakotom spec ‘I won’t buy anymore bikes’ claim.5 points
-
I feel like it’s in the same camp as @MopedNZ‘ claim of ‘I’ll ride a FA50 to ChCh Nats’ puhuhuh5 points
-
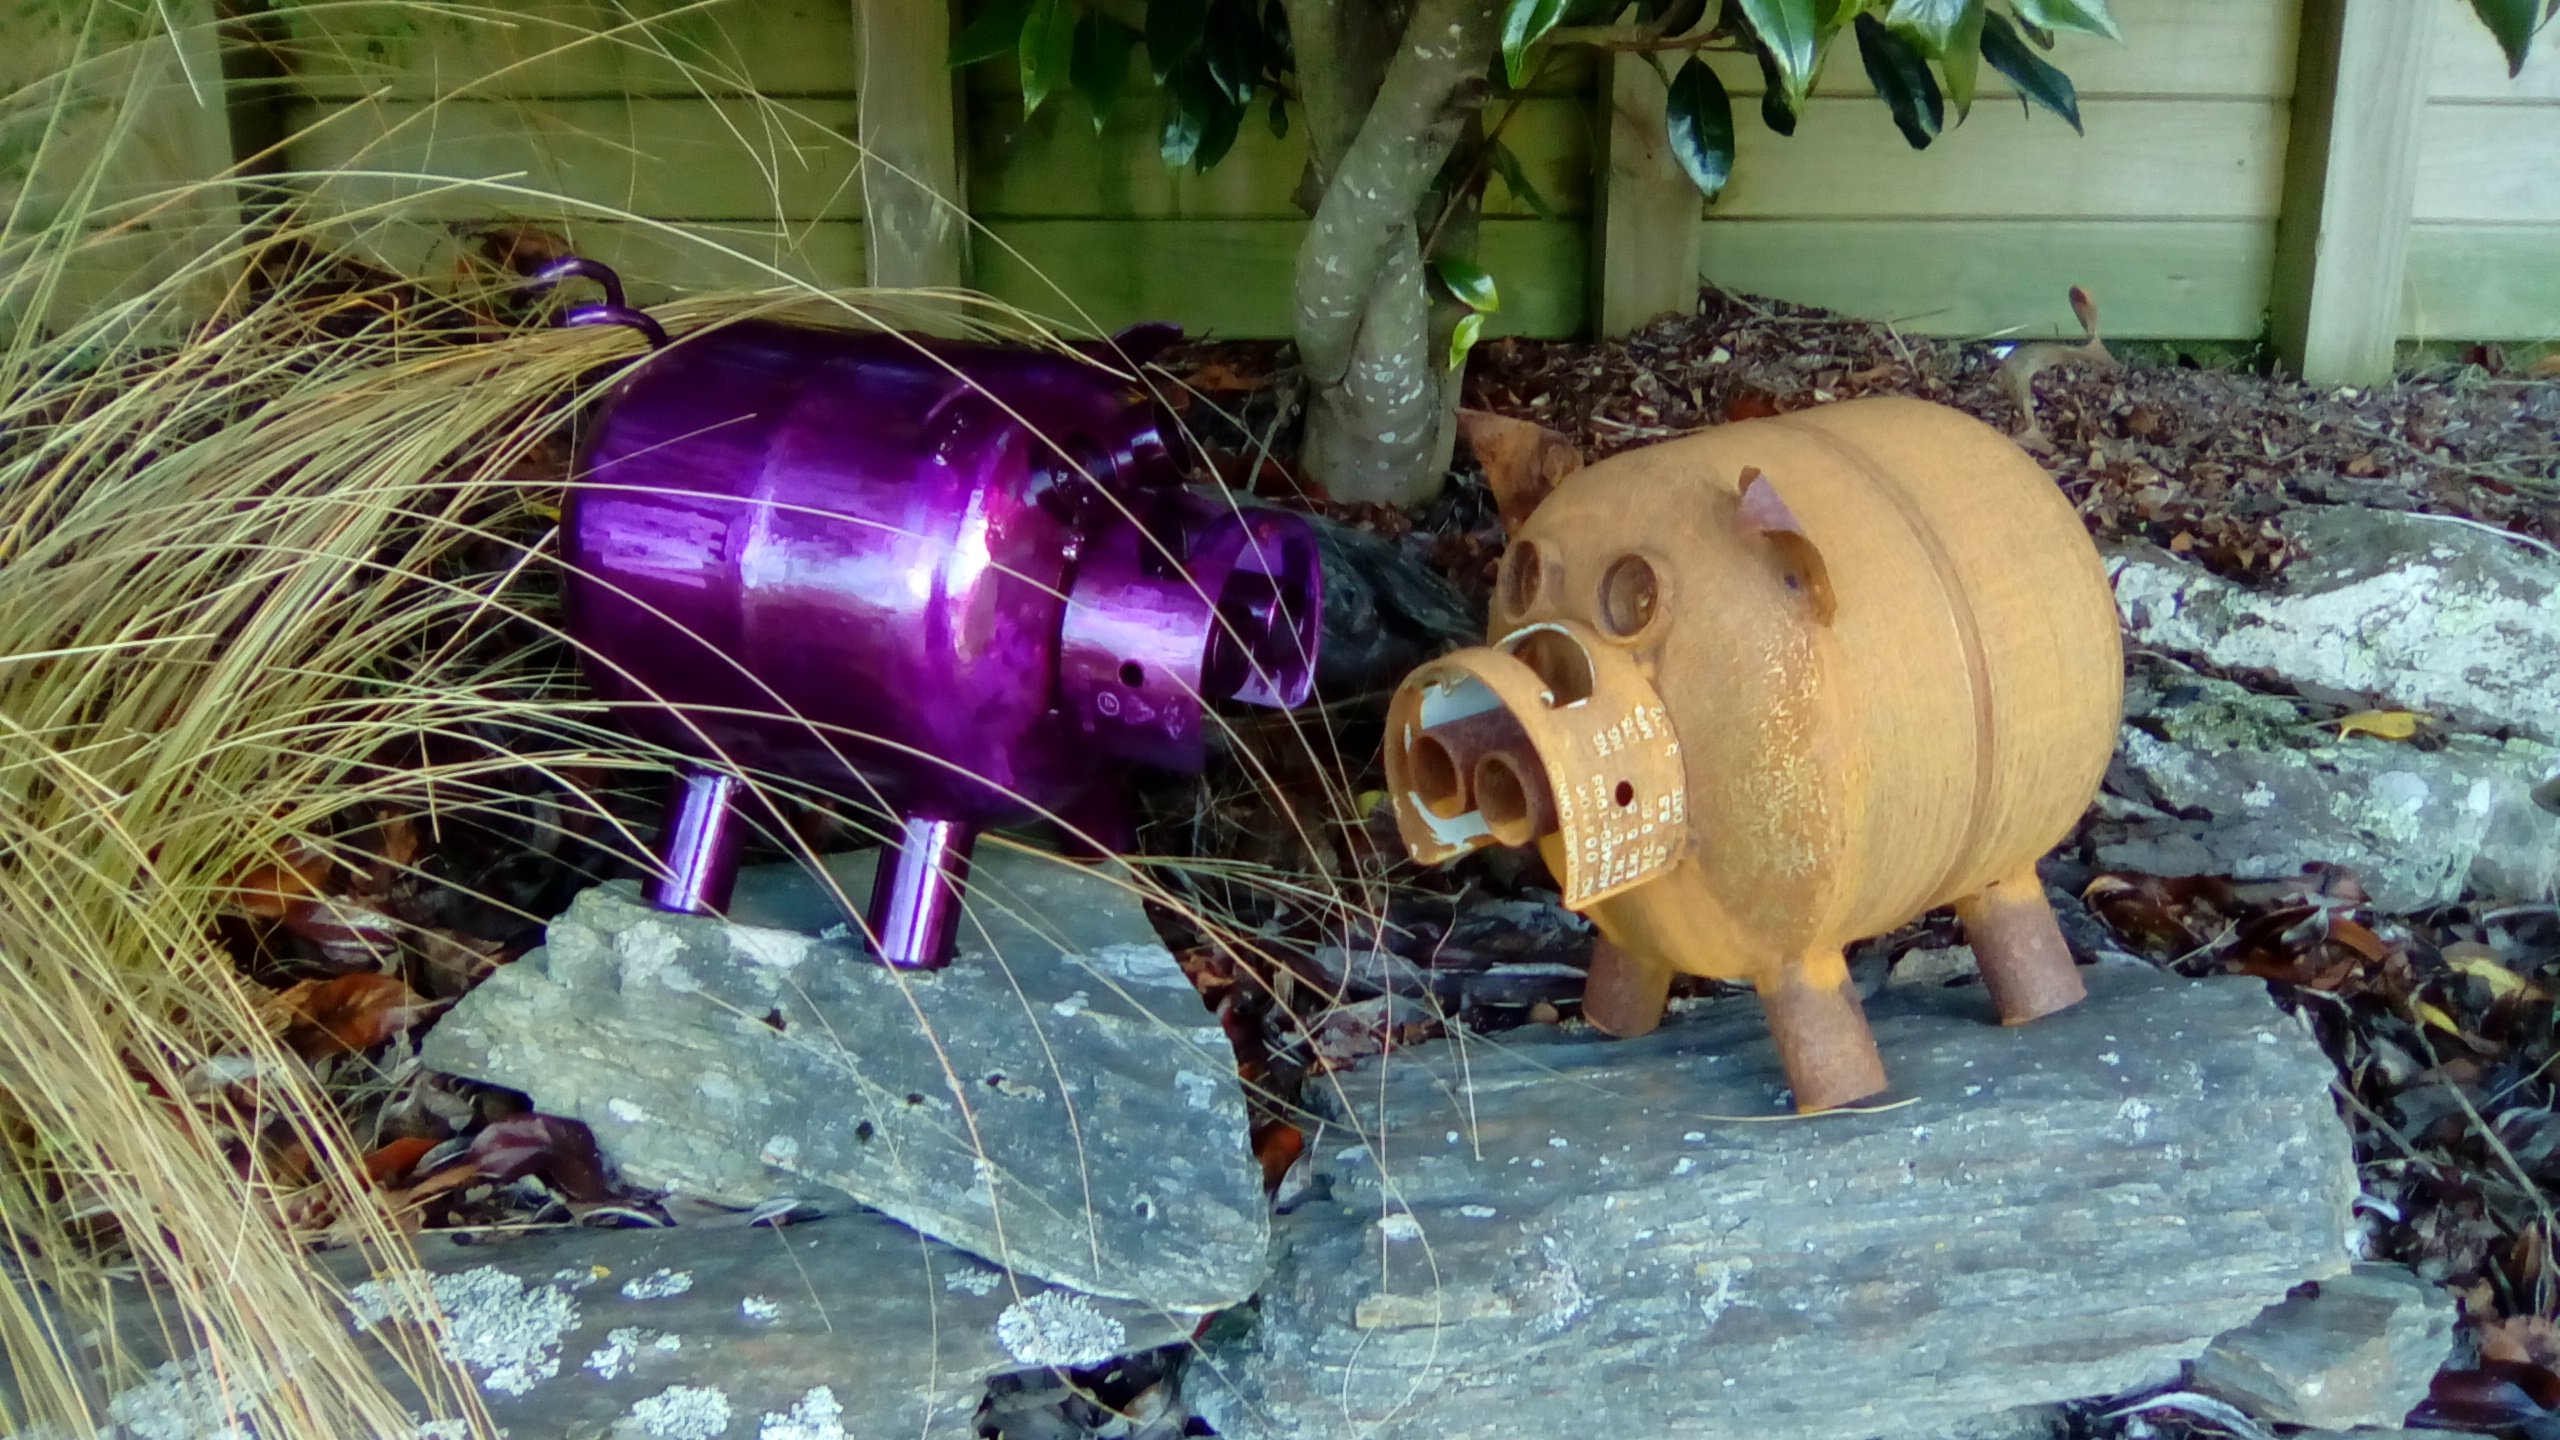
I removed the valve and left it upside down out side for about six months before I used it . i did drain the big bottles when I made a cannon, don’t get the dye or smelly stuff on ya or you will stink for weeks. then lots of hot soapy water and store upside down, lpg heavy than air etc5 points
-
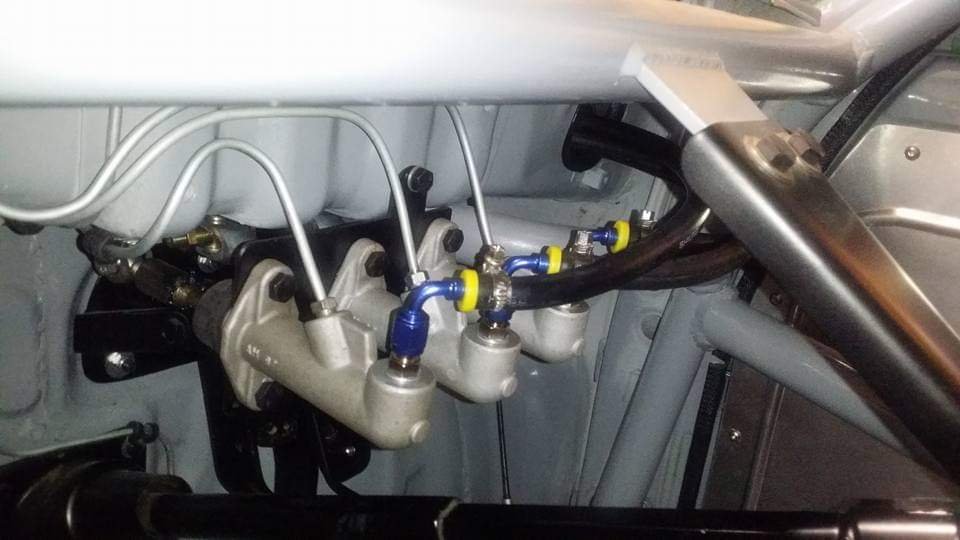
Since I'm still waiting on the pressure testing kit to arrive, I got impatient and did some more testing. I wanted to remove the injectors and see if any of them were leaking and what the spray pattern is. The intake plenum needs to come off. before this can be removed though, the coolant block on the front needs to be unbolted. Unbolting this saves disconnecting the coolant hoses. All the other hoses got removed, and the 7th injector was removed from the plenum. The plenum is held down with eight long bolts that go into the inlet manifold. Just a note, these bolts aren't sealed off from the inside of the plenum, so will need sealant on them upon reassembly. With everything disconnected and unbolted, the plenum just lifts off Removing the injectors is fairly simple. The clamp on the pipes (which goes above, below and between the pipes), as visible in the lower Lh corner of the above photo, has to be removed to allow enough slack in the pipes, but otherwise its a case of removing the single bolt per injector, and then pulling it free from the manifold. They are meant to be sealed in, but mine came out suspiciously easily. The rubber collar is weird. I presume/hope there is a normal O-Ring under it, as that is what all the parts manuals say it should have, and there seems to be no part for that rubber collar. I'll have to carefully remove and reuse the collar. All the injectors look pretty rough, but I guess thats what 39 years of sitting in the intake looks like. The ends all look clean enough, with no obvious buildup. I did note that cylinder 6 was very wet upon removal, and a couple of others were damp. The engine has been off and cold for about a week, with no pressure in the lines. Testing them isnt rocket surgery, just pop them all into jars, fire up the pump and see if they produce any fuel (which they all did to some degree), which indicates either the fuel plunger is letting excess fuel through, or the injectors are leaking. Further investigations show its probably a 50:50 on leaking or adjustment causing it. With the pump running, lift the sensor plate in the AFM to its stop and observe the flow and pattern from the injectors. All mine seem to flow roughly the same, but the flow pattern out of all of them appeared to be rubbish, with minimal misting and heading off in all directions. That's good, it confirms that buying a whole set of replacement injectors was the right decision! One other thing that has been bugging me, was the sensor plate in the AFM. This is meant to be a finely calibrated instrument, but I think someone has mucked with mine before. You can see in the above photo that it looks like the sensor plate (the disk in the middle of the cone) is sitting high with a gap under it. Well, it is. From the below diagram, you can see the sensor plate sits at the bottom of a cone. As air comes in from the filter at the bottom, it comes in under the plate and a combination of that air coming in, and engine vacuum in the intake, lifts the plate to allow air into the intake. Lifting the plate also lifts the fuel plunger, increasing fuel flow. The plate should be set to a specific height, which is more or less with the highest point of the plate flush with the lip at the bottom of the cone (before where it tapers outwards again, under the plate). Mine was clearly sitting a lot higher than that. Not to mention the other issue... The plate was off-centre. I even thought the plate was too big to fit through the opening, but it was just because it was off-centre. I carefully backed off the center bolt, and centered the plate (this should be done with feeler gauges, but I did it by eye this time) Now it fits through the opening It was still sitting too high though There is a spring under the plate that sets the height. The manual says to adjust it with pliers, but I'm damned if I can bend the thing. I'll keep at it and see if I can tweak it. The other thing I noticed is that you can hear and feel the plunger moving when you manipulate the sensor plate. I'm not sure how normal it is, but my plunger seems very slow to return to the zero position. It doesn't seem to bind and it moves smoothly, it's just slow to return. I'll be removing and cleaning this in the future anyway. So that's where I'm at. I'm waiting for a set of new injectors to arrive, and I need to remove the fuel distributor and WUR to clean them out. I'm planning on setting everything up from zero since I have no idea what's been done to this by previous bodgers.5 points
-
Headlight for tails would be great! And use the high beams for the stop lights. #tailgatersgetfucked.........4 points
-
Genuine lol4 points
-
4 points
-
Put this shit in a storage shed two years ago. Dragged it into 'current projects' shed last night. #barnfind
4 points
-
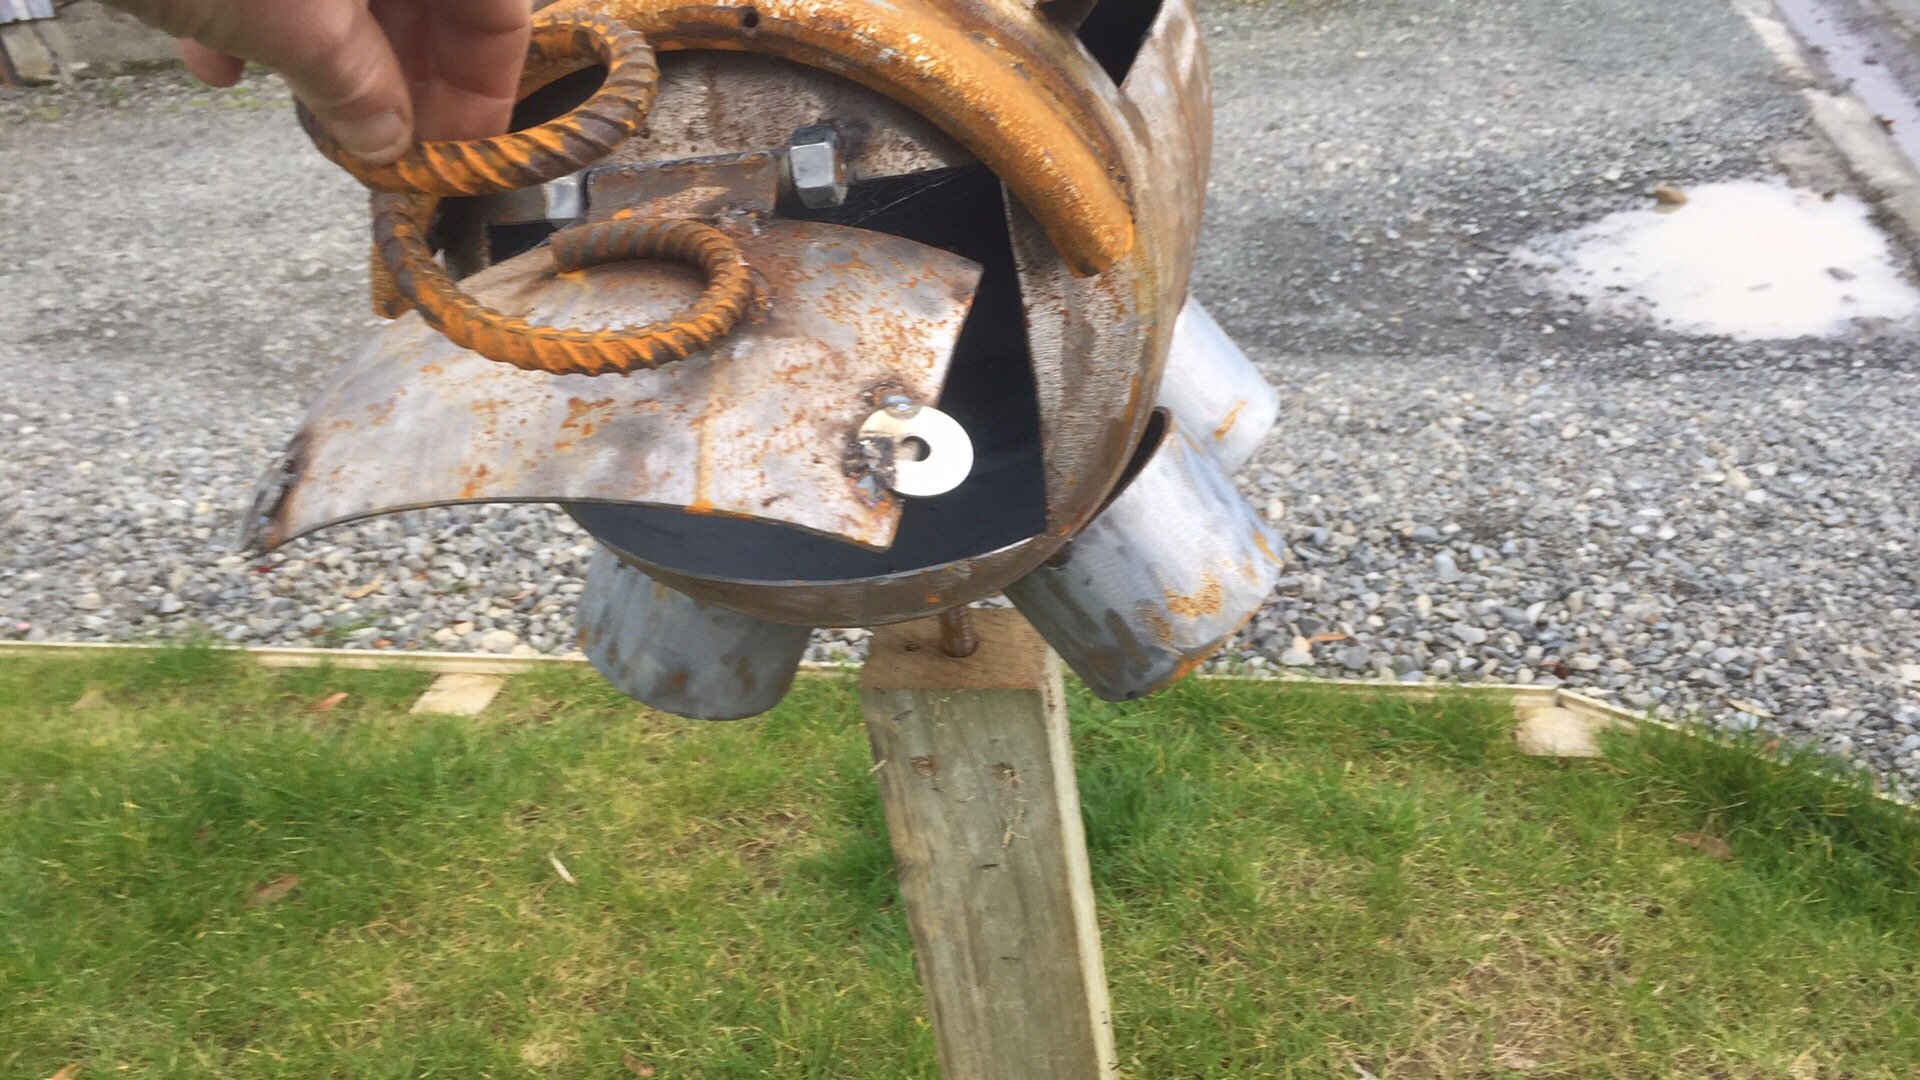
I just fill mine with water and leave them for a day. Empty them out and cut/ weld away. Some of my pigs. They are quite cool to watch as they weather. The rusty one took about 8 weeks to get a nice even coat.
3 points
-
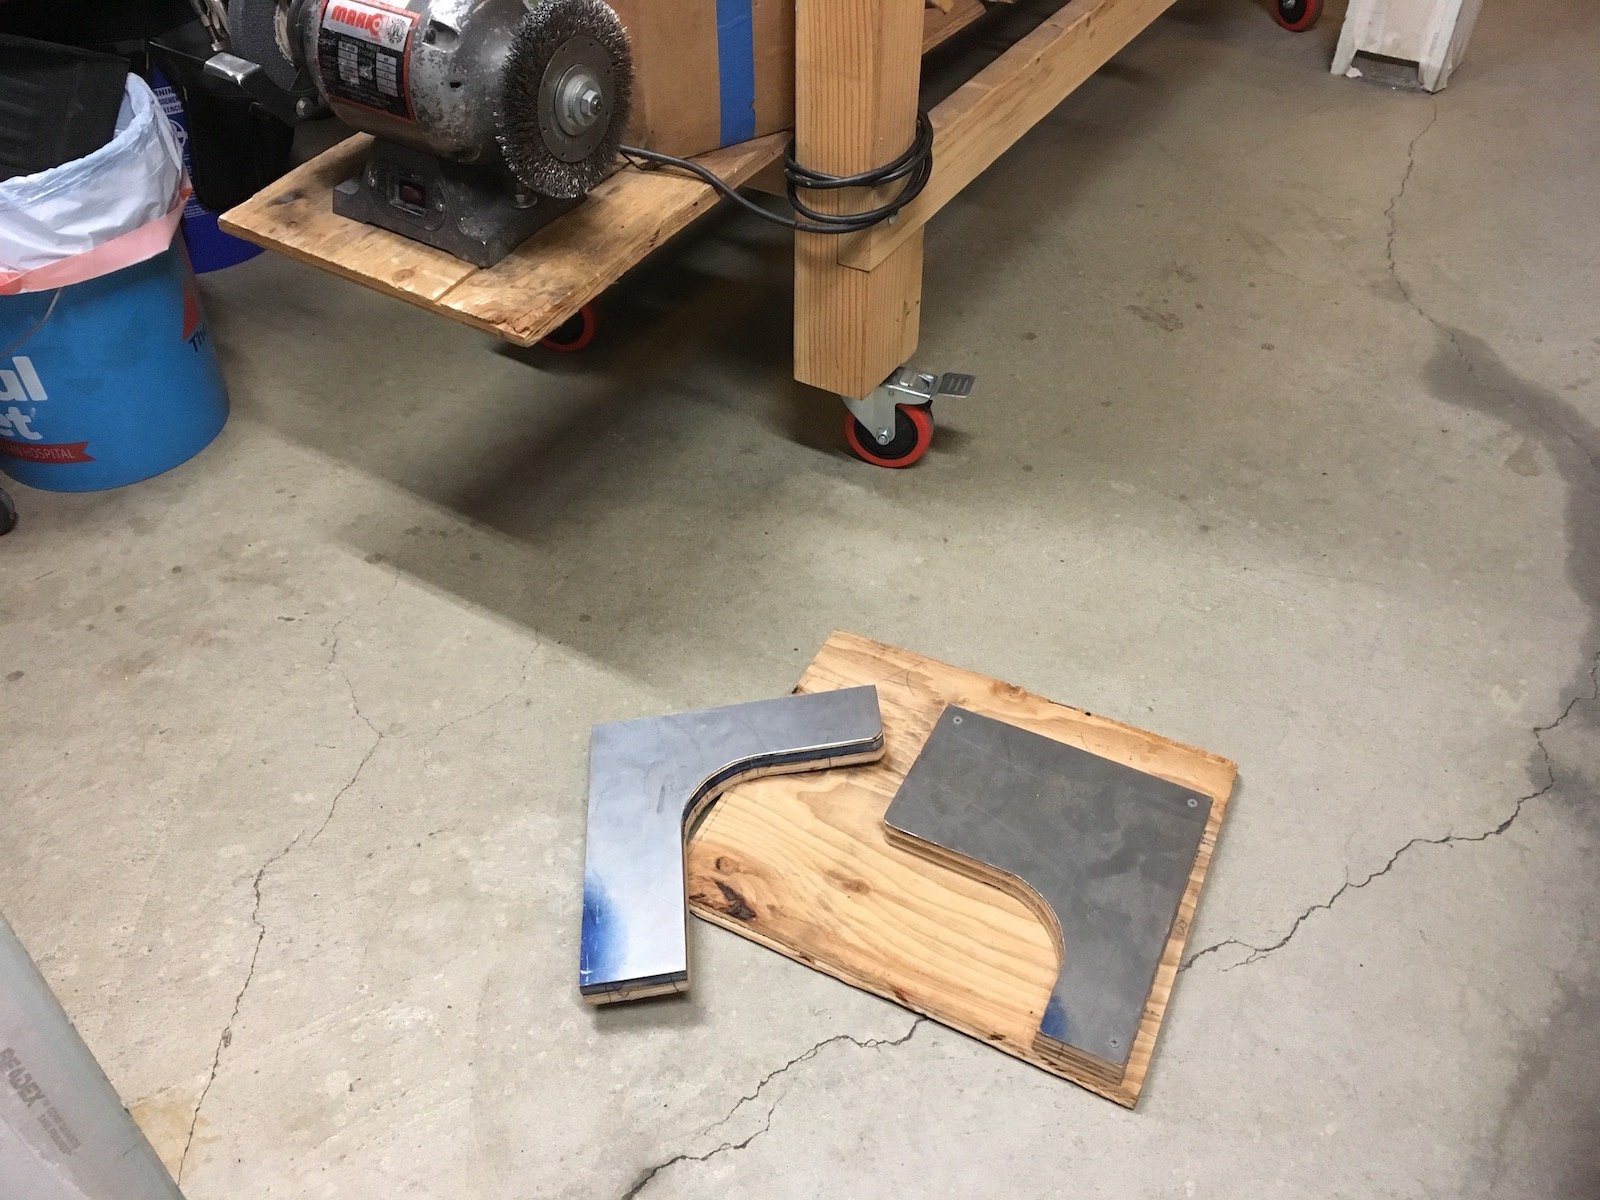
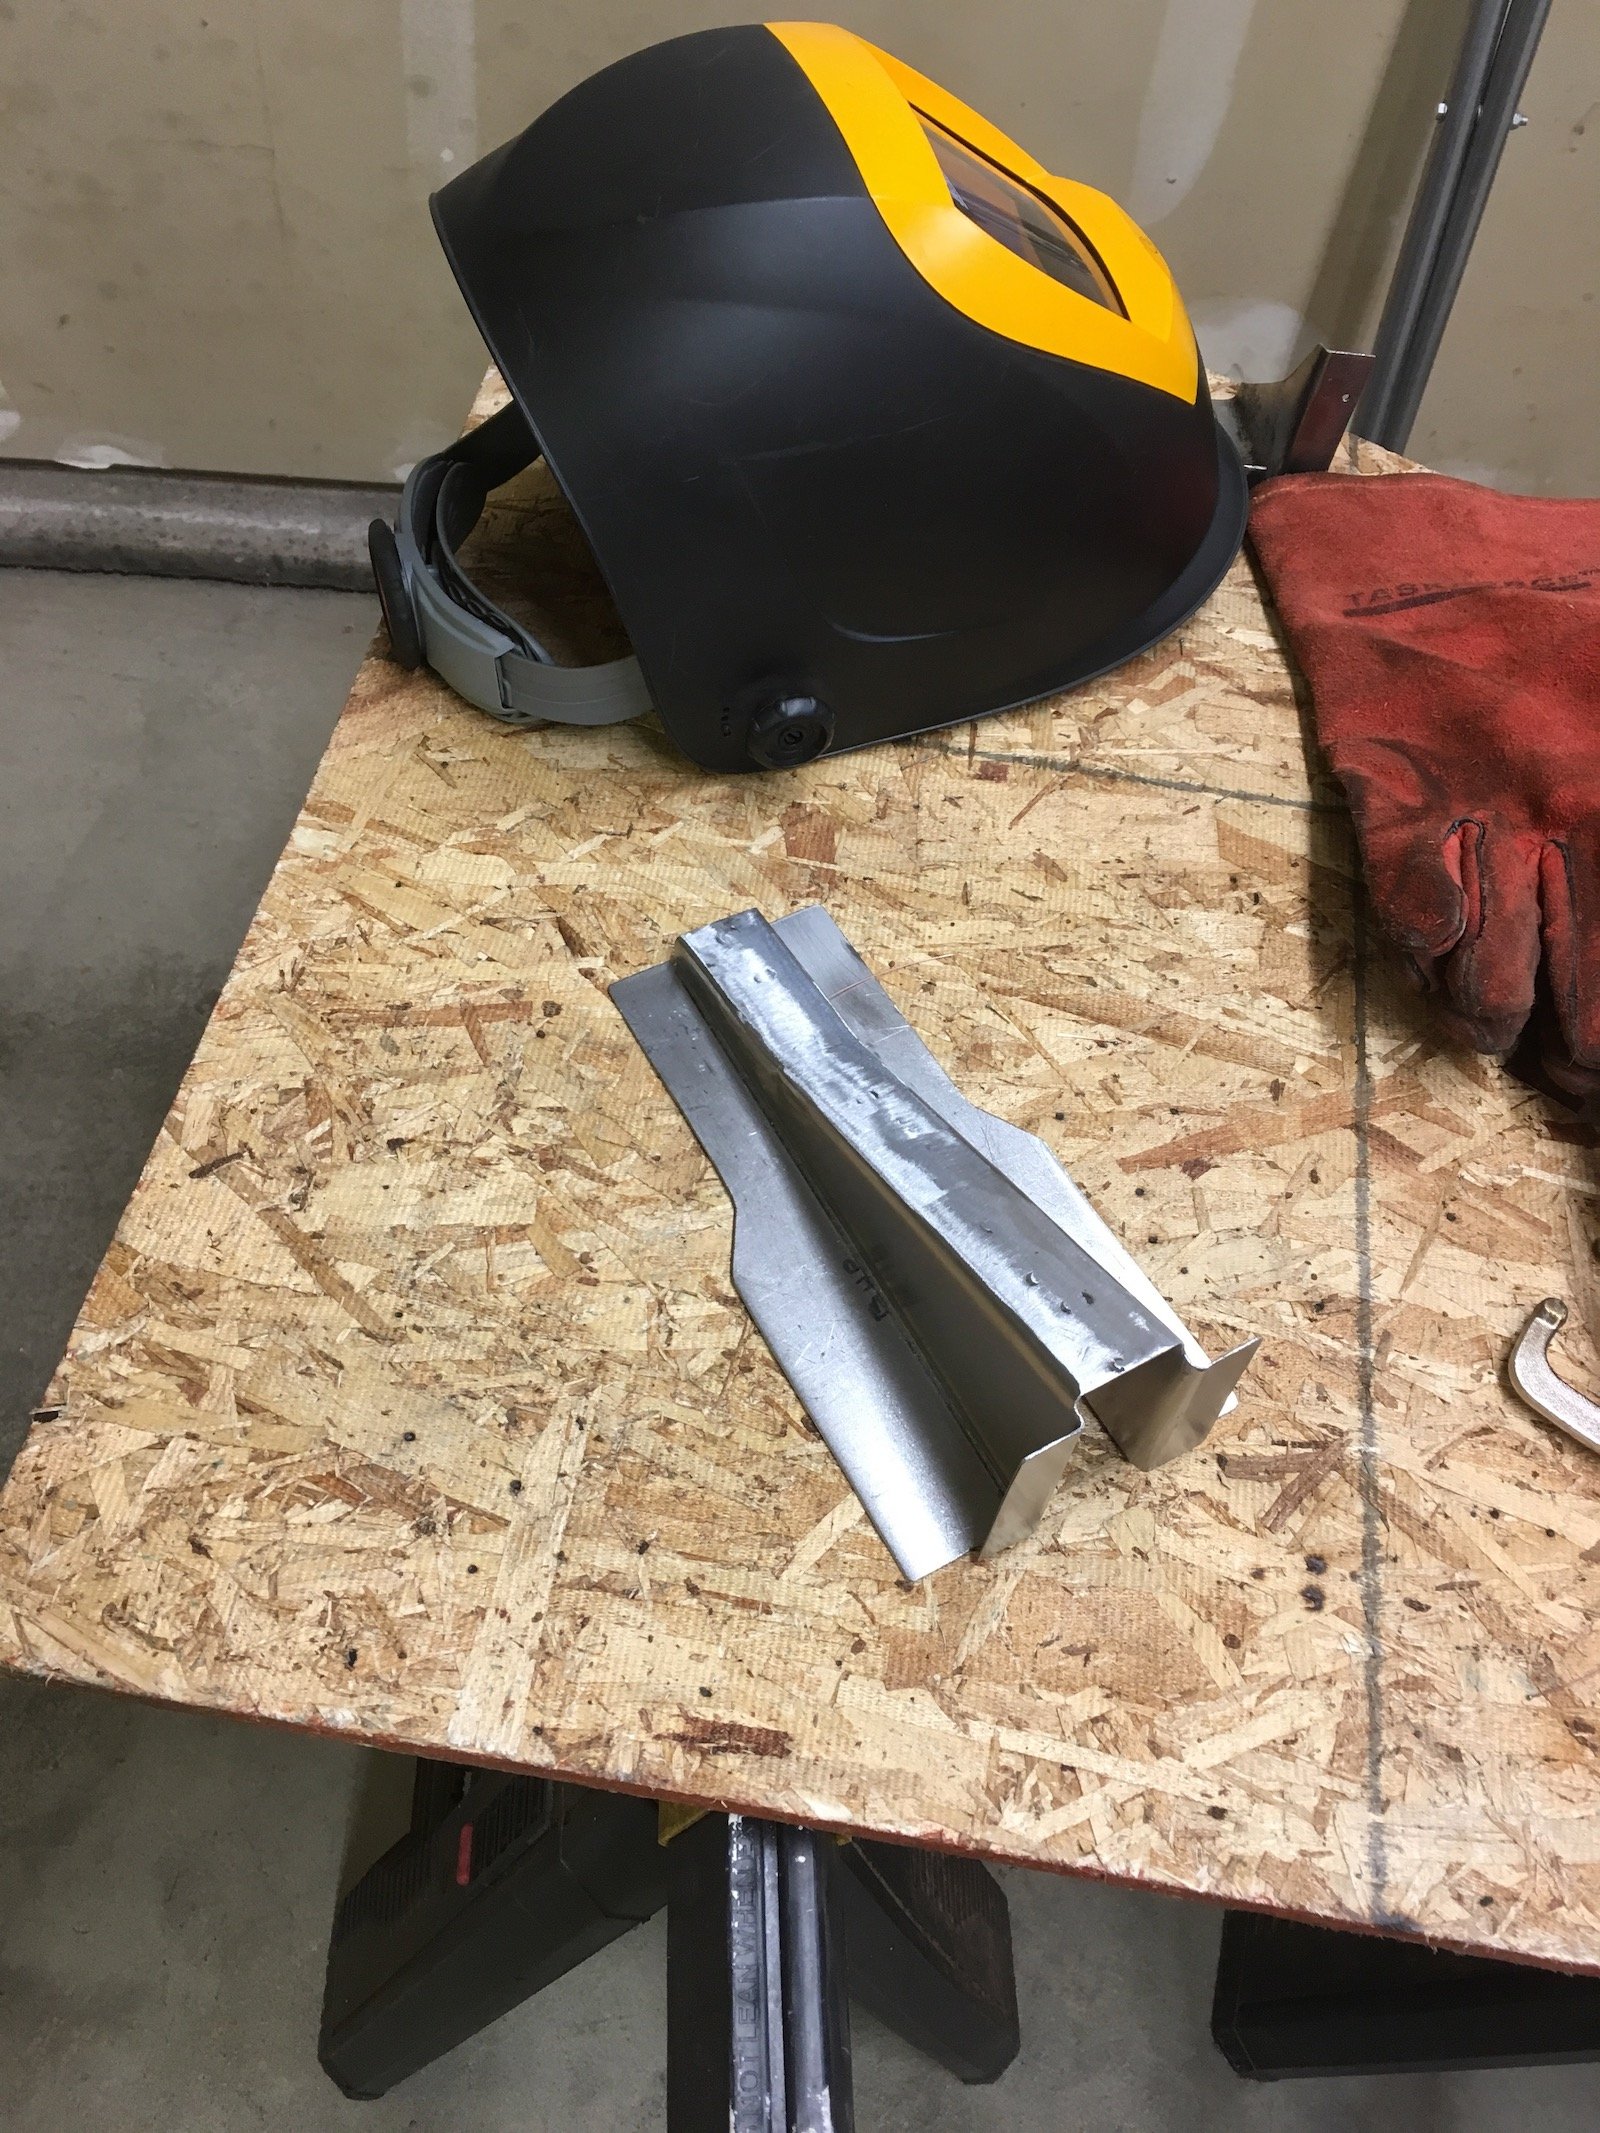
@tortron Thanks for the suggestion. I've been working on dies intermittently last couple of weeks. So far made something like this. Only part way there. Need to figure out a way to guide them together during the form operation and prevent lateral spread. More on the dies later, I've been slowed down somewhat by making a bunch of replacement underfloor supporting brackets out of heavy 16 and 18 gauge sheet. One example. Two separate bent up pieces. Then butt welded down the middle
3 points
-
Honda City support vehicle plz3 points
-
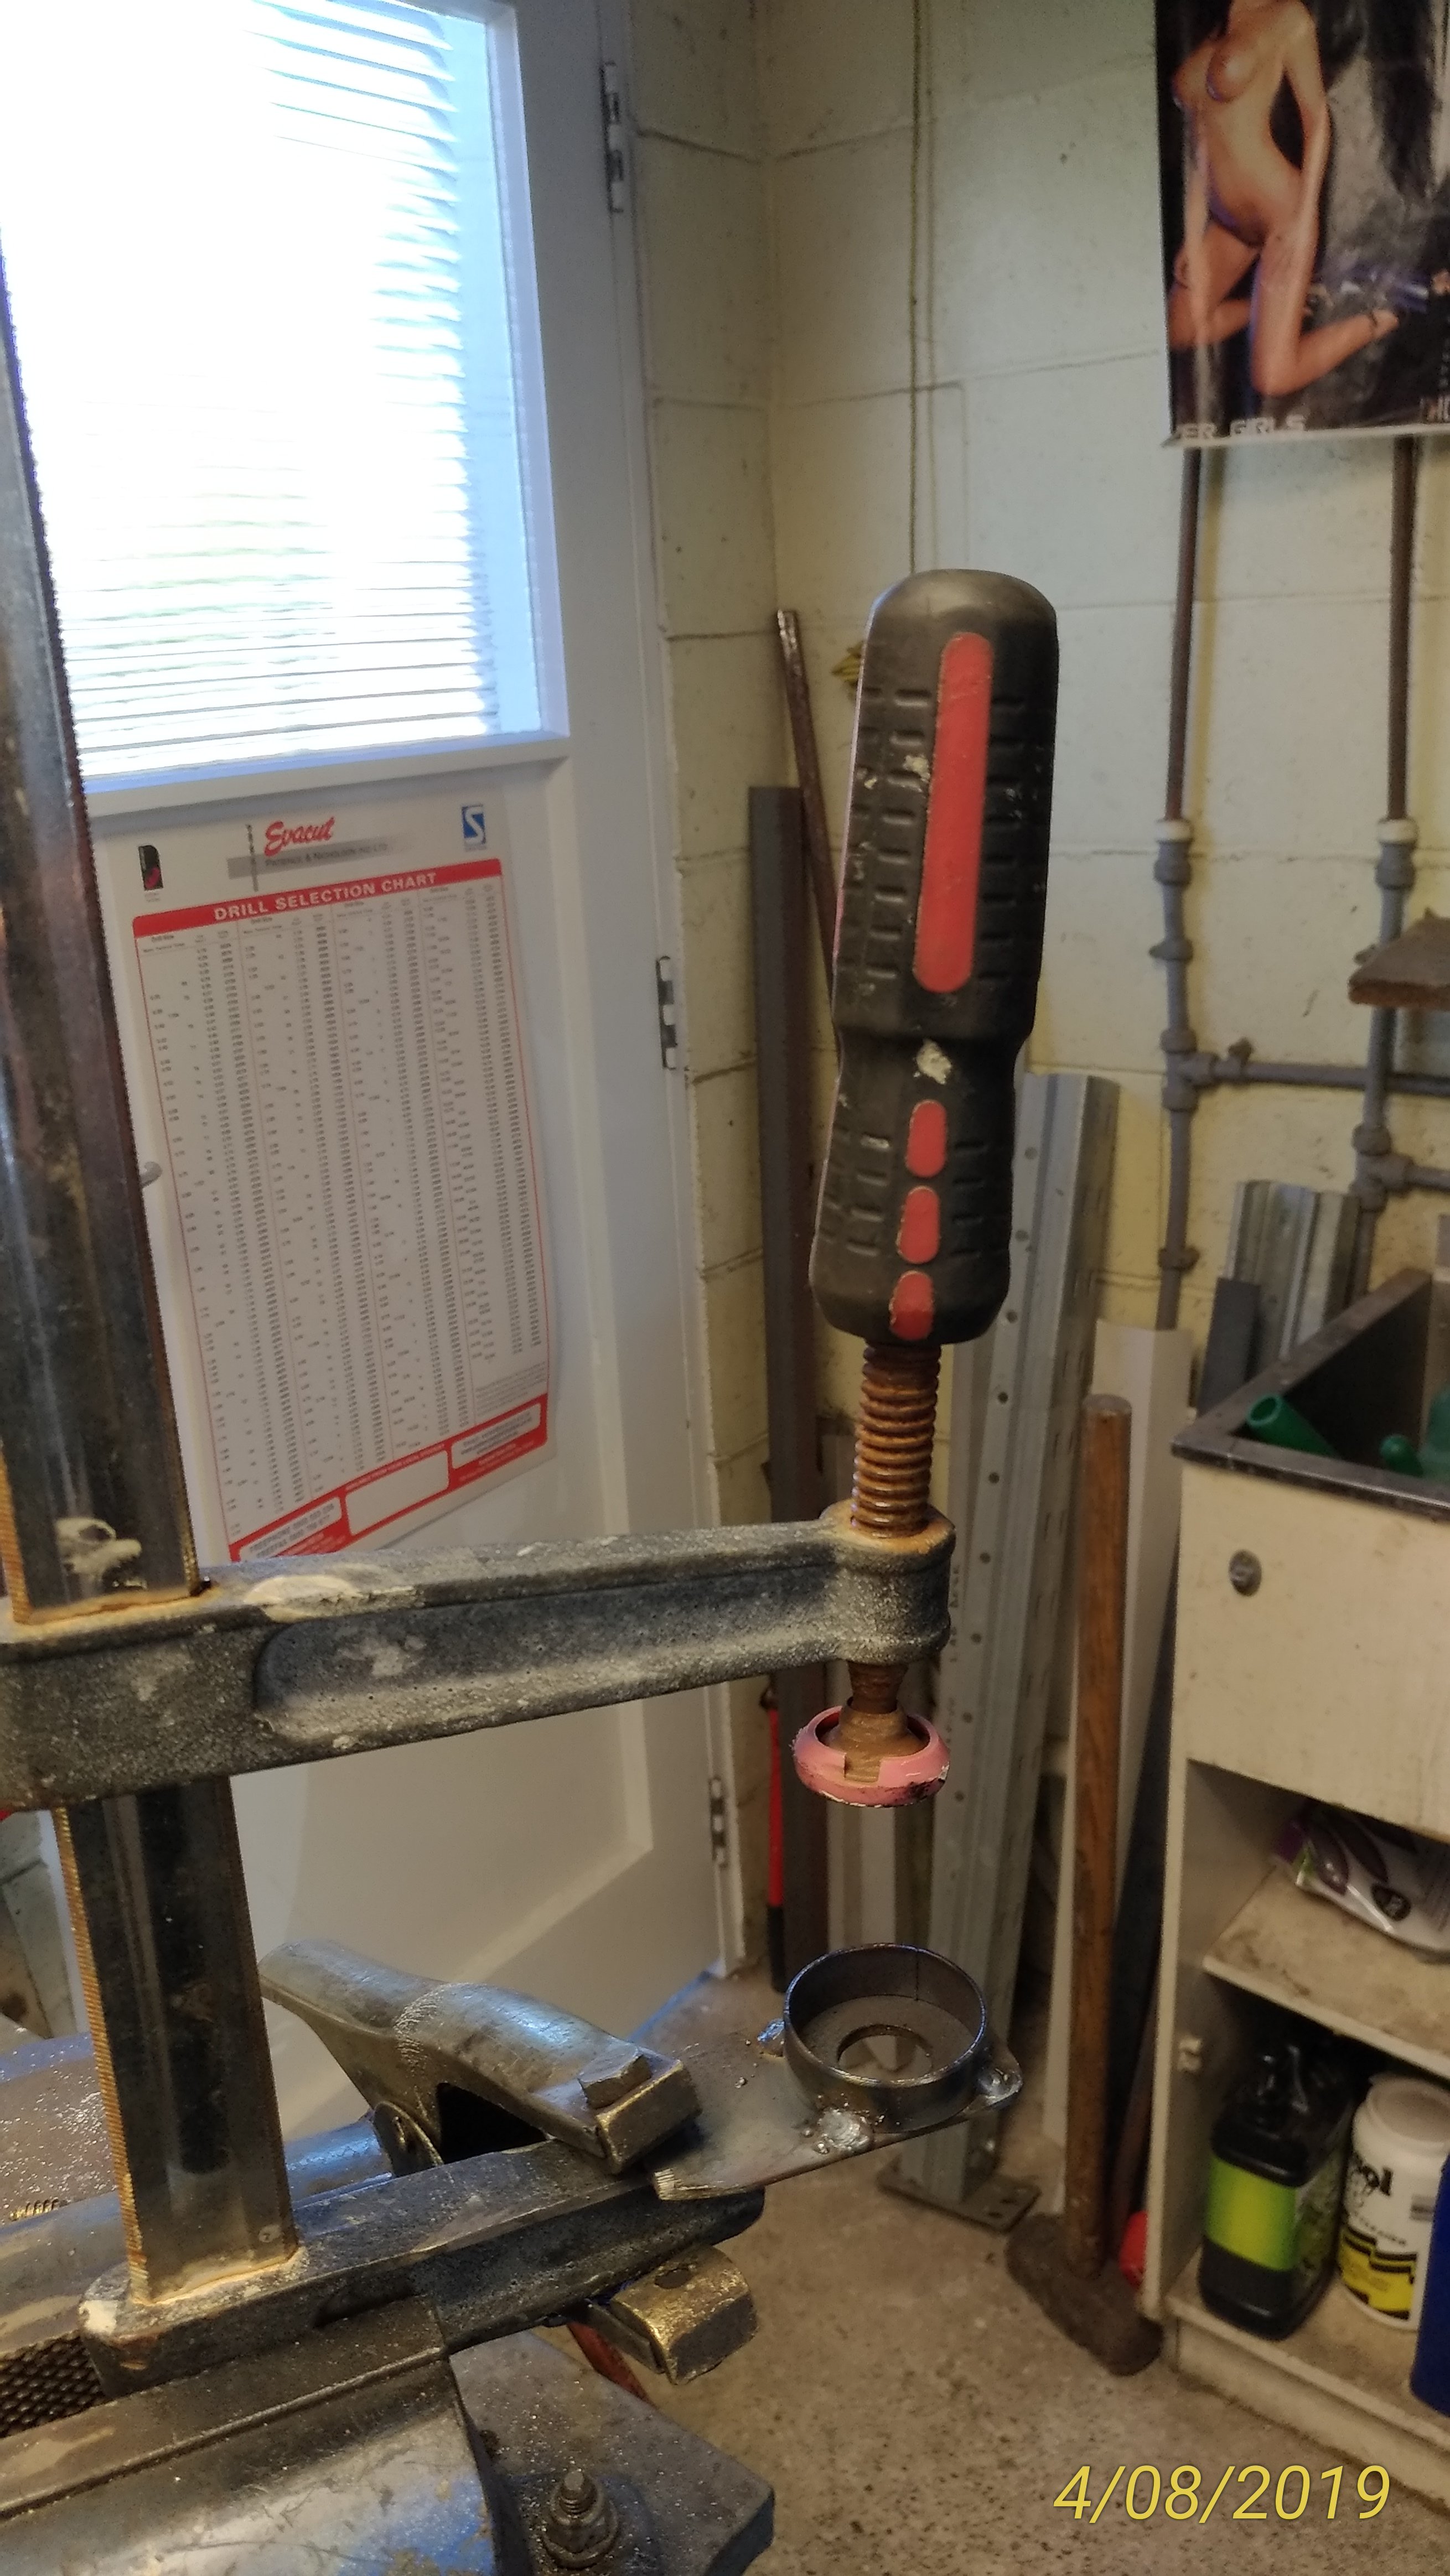
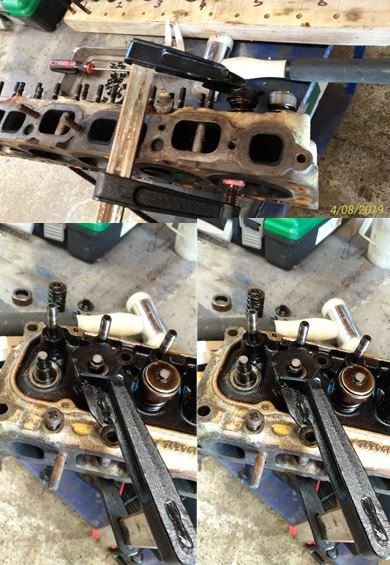
Time to strip the head down. Suddenly I realised I’d lent my valve spring compressor to that guy we all know who never has his own tools (and we always forget his name), who never returns tools……….grrrrrrr! As I’ve said before, combining the lack of an appropriate tool with a good mig welder and the obligatory collection of scrap steel under the work bench is the mother of many a good man-cave invention. Found an old screw Clamp…a bit of cutting and welding. A lick of paint…….. And the custom (i.e. beer, bullshit & bad manners) “Oldschool Holden Valve Spring Compressor” makes its debut.
3 points
-
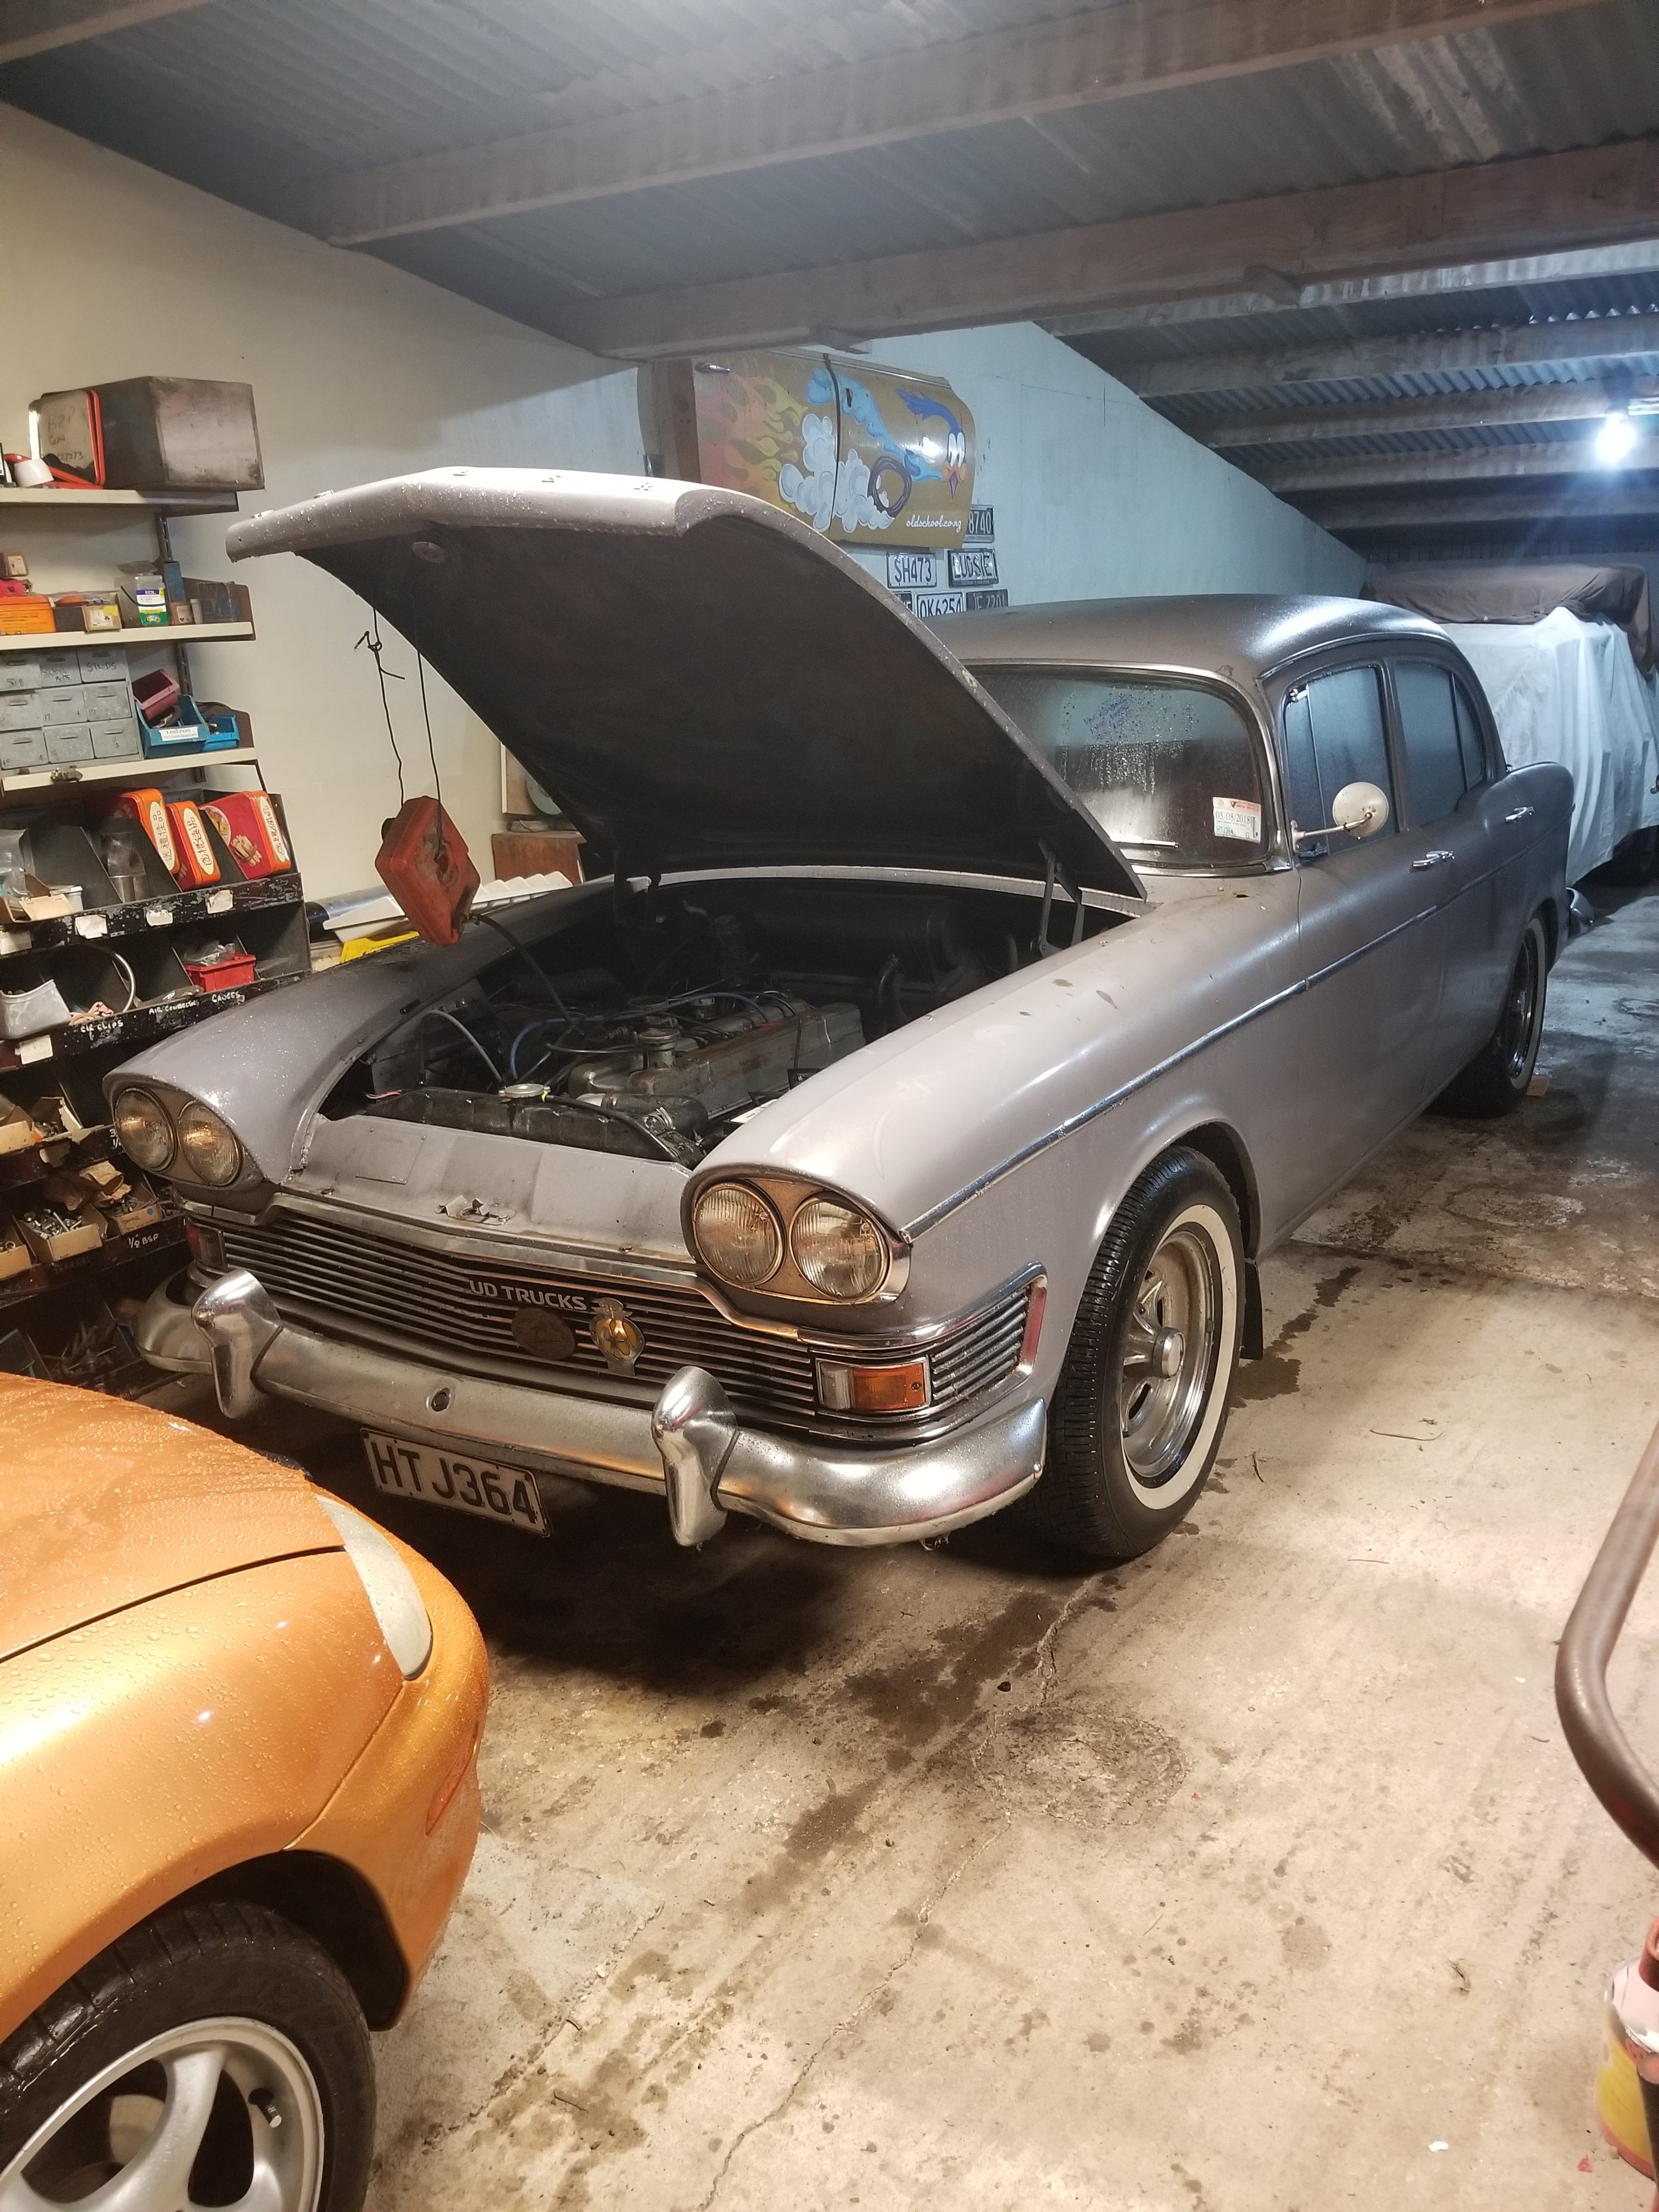
Since selling off my other projects and dedicating most of my available time to this barge I figure it deserves a project log. Nobody wanted this, it was for sale on TM for aaaggeess until I thought to see if the seller wanted a ute. Thankfully, the answer was yes, and a deal was made to swap cars later that night. However, arriving to collect this, the bonnet refused to open, the exhaust was half falling off, the tires were low, and she ran on 5, but I had to have it. The deal was done and it chugged along to the nearest gas station on as many cylinders as it could, where no visible issues were present. Air in the tires, and a quick window clean saw us headed over the harbor bridge back home wondering if we'd even make it. Sure enough we made it back late that night. First thing out was the huge "fart cannon" muffler, and since it's my only functioning vehicle, I used it for the following two days until the warrant expired on Friday, and then went and got a fresh WOF on the Saturday. First Order of business was to clean it, and investigate the misfire. After a week of diagnosis I finally found the issue - the wires inside injector plug 2 didn't reach the injector after that was sorted it was relatively smooth (but far from quiet) sailing. At this point it looked like this : Although that didn't last long. Pulled the window tints due to not enjoying having window tints. Replaced weird wrong 5 stud spare wheel with a 4 stud one. Power steering pump seal quit life and shat oil across the entire engine bay, fan assisted. Replaced pump. Gearbox rear seal and sump pan gasket, rubber trans lines, along with the engine front main seal thought it would be fun to leak lots and drain the entire gearbox overnight. Lifter tick got annoying Removed whole engine and gearbox with pleasure Installed 1G-E and auto from later model cressida = success Problems = solved Problems left to solve = shitloads lots2 points
-
@Tumeke I've just asked a fellow speedcock (aka the dude callum is referring to) to see if he's got any left. Will keep you posted2 points
-
2 points
-
If wanted to spend the best part of 5k on an adventure bike set up it wouldn’t be on some shitty small Honda. Ah fuck wait. Dagnabbit.2 points
-
That about sums it up. I think he was pissed with people asking him on his auction if it was a YT, he'd convinced himself it wasn't and was sticking to his guns!2 points
-
A guy i know fills them with soapy water for an hour or 2 & drains it. Soap binds the gas like it's an oil.2 points
-
Success! The 1G SOHC crankshaft and connecting rods have, and will work perfectly in my twin cam block. Need to find time to get my block sent away to dipping. I'll be taking the head in to get refreshed sometime next week, I've had it quoted up. I'm currently waiting on the cheap and probably shit really good value complete gasket set from Aliexpress. Cringe all you like, I've heard good things and it includes every gasket + seal required On the body side of things, I really need to get into the rust spots that are forming under the paint. I'm expecting some lovely filler work when I go digging rust out, shes had a repaint at some point in the past. Hopefully it doesn't become a huge nightmare and I can keep repairs small and neat. The bonnet has rusted out on the inside, but I have a basically new, perfect bonnet that needs to be painted and put on someday. It would be really neat to have the stickers in the engine bay and under the bonnet reproduced so I can put them on after the engine bay gets it's respray. As far as ride height etc goes this is awful to ride in. If it weren't for the comfy seats I'd be seeing a physiotherapist by this point. The rear springs have had some meat removed and it has really short and stiff Mitsubishi springs to keep everything tight but it jumps over bumps, bounces over every little thing in the road. Suspension + springs etc is certainly not my strong point so any advice on making it a little comfier to ride around in would be awesome. I thought X73 king springs may be the solution, but I'm not sure they'll fit. I had even brainstormed the idea of fitting the IRS rear end but really haven't put thought into that. I don't really have the coin for S13 front coilovers at this point in time. That's all for now, I'll update the thread when I rip into it and start changing things (again). Grabbed some pics out on a weekend cruise.2 points
-
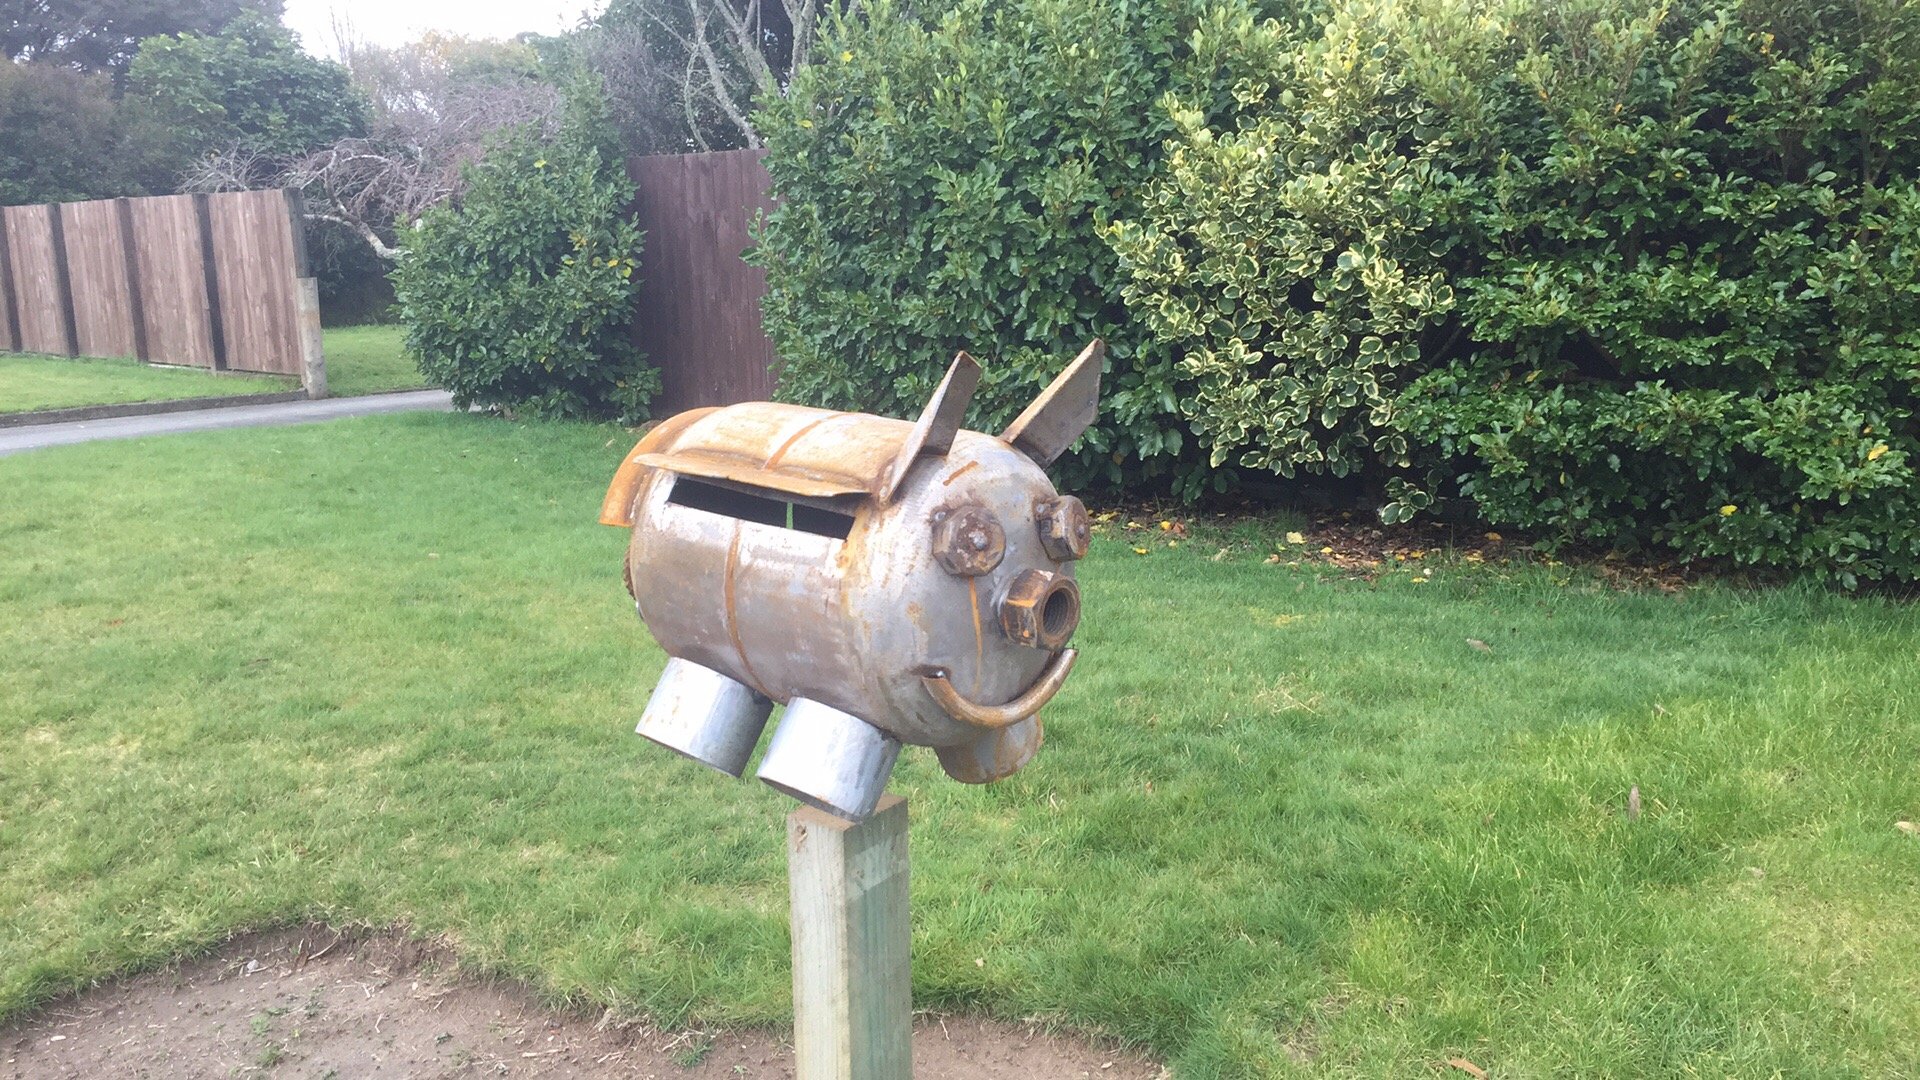
My boy loves checking the mail box every day so I surprised him with this. he thinks the coolest part it taking letters out of the arse. should rust up good.
2 points
-
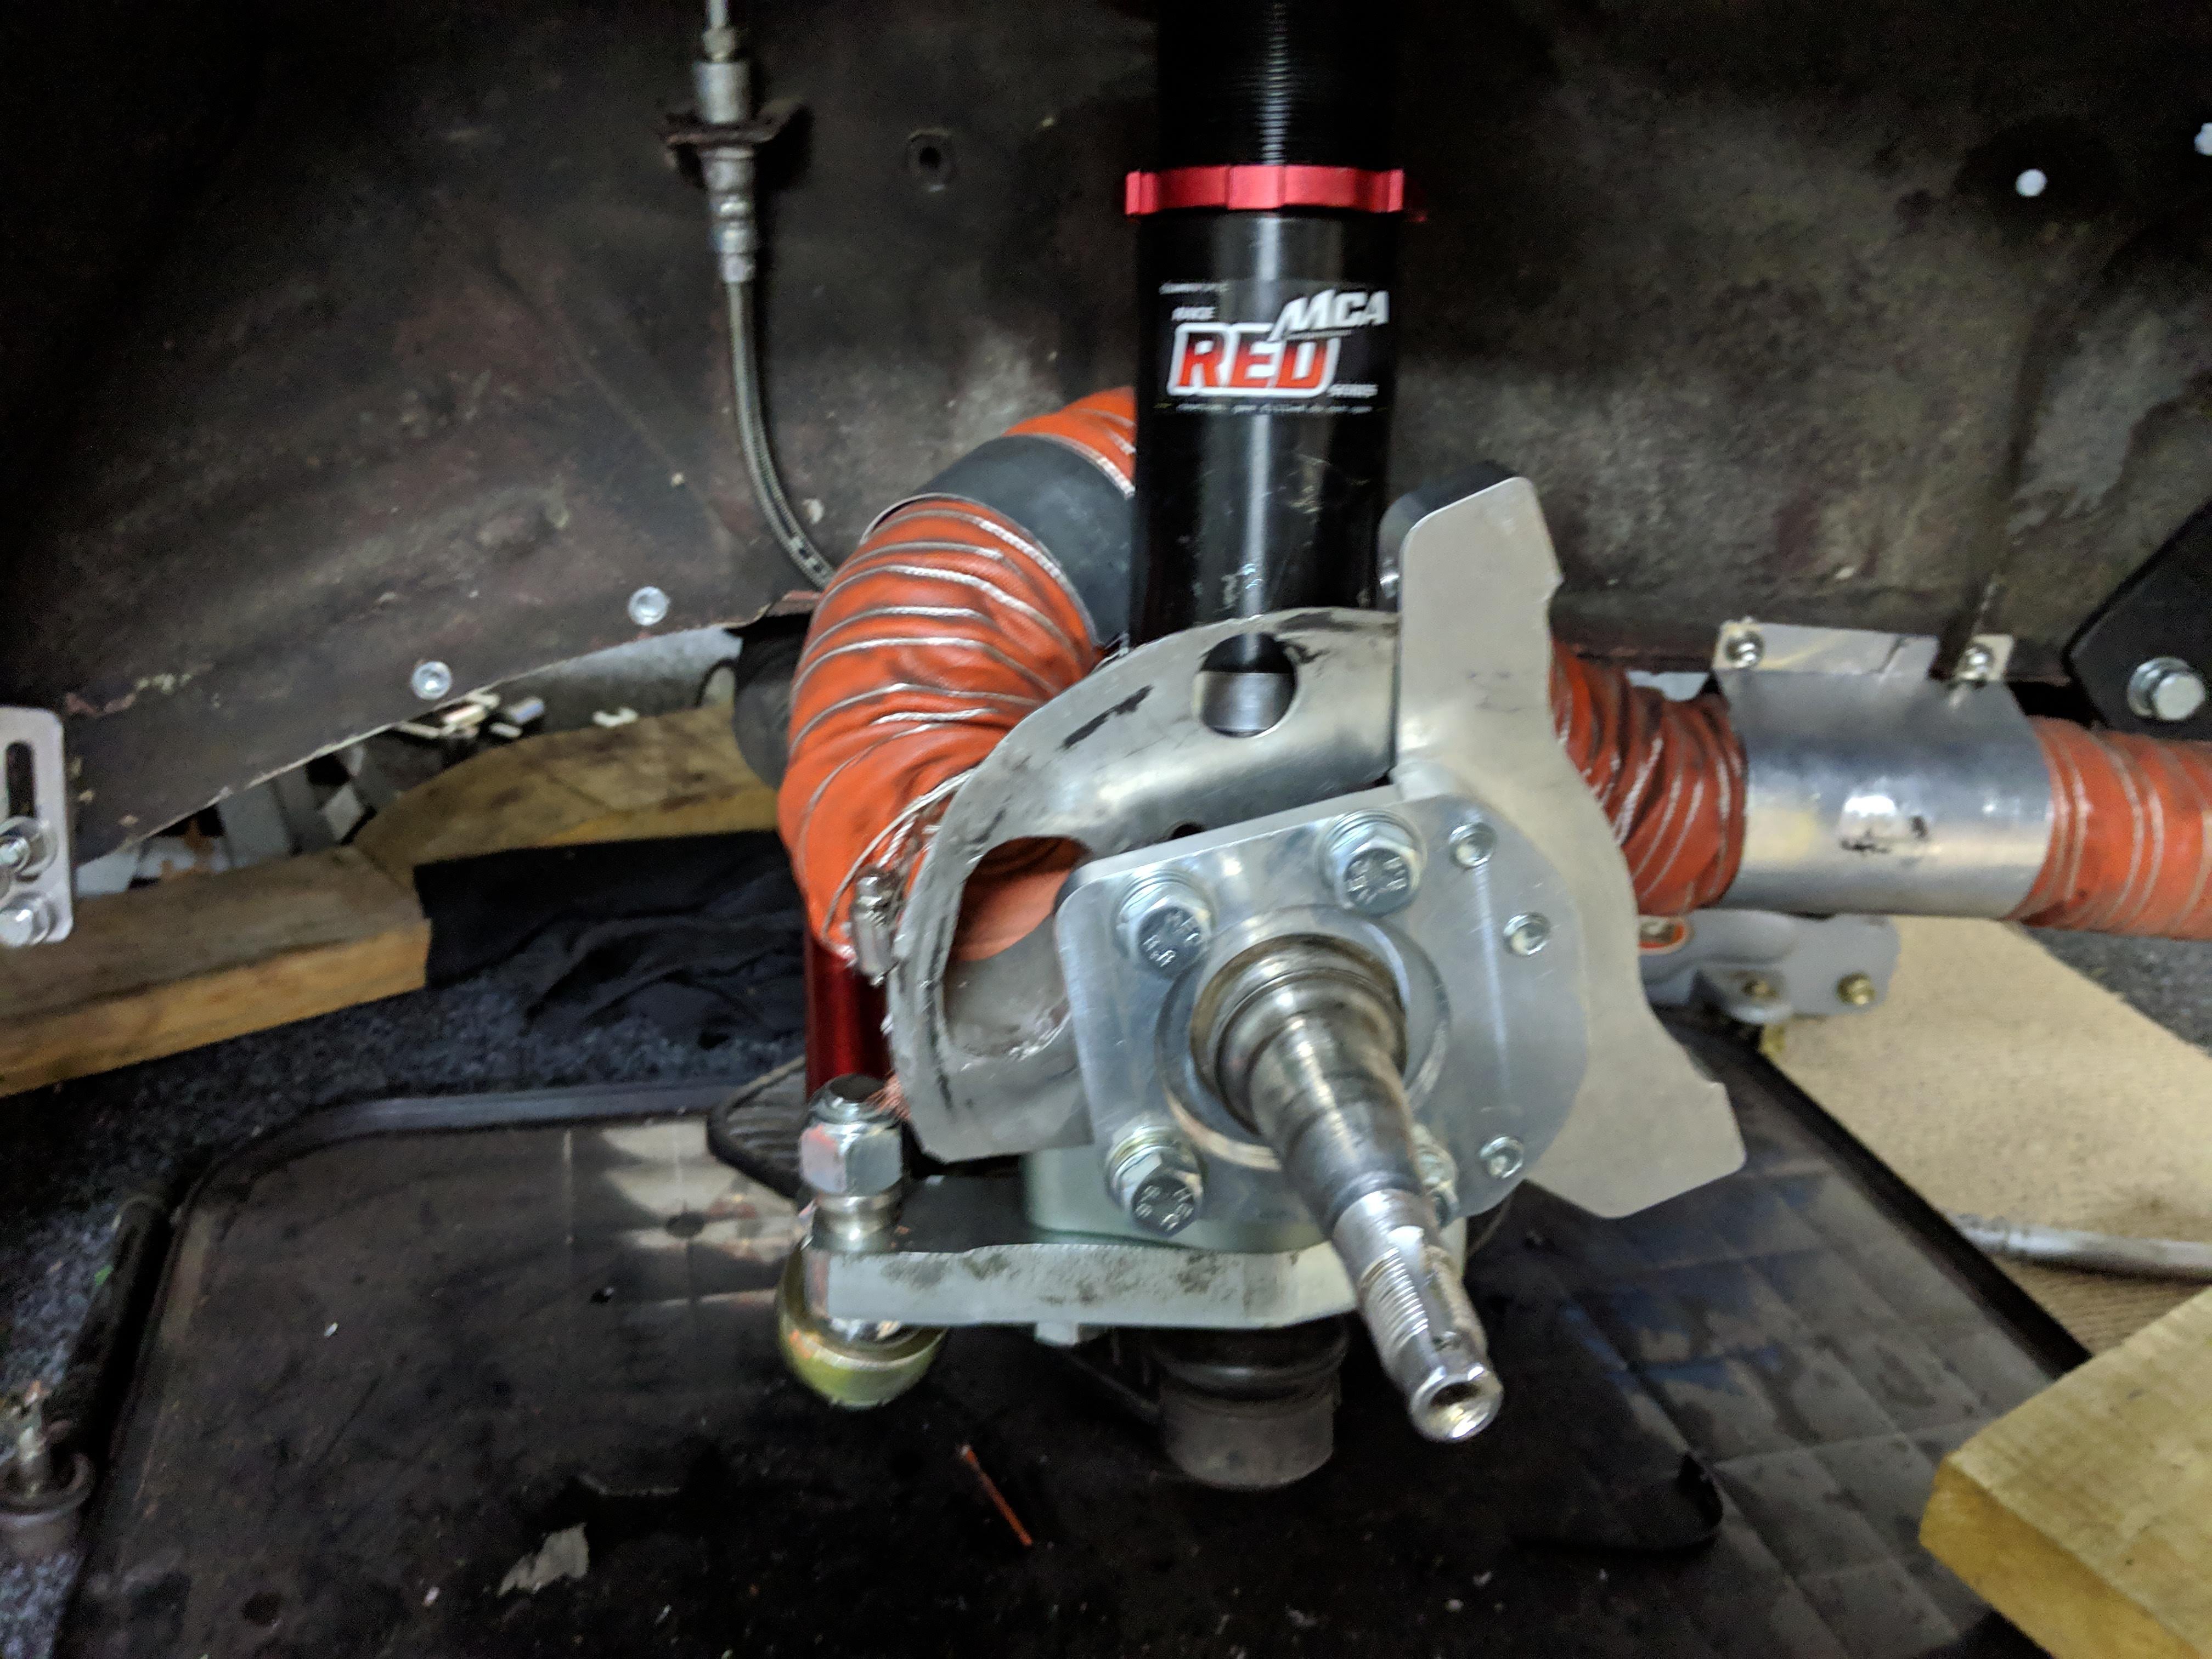
So in the vein of do it once do it properly. I chose a set of custom MCA Reds all round. Here they are fitted up with the brake mounting kit and cooling I adapted to fit. I went with T3 AE86 steering arms and used the T3 Adapter bushings from the standard Starlet Lower Control arms. A set of MRP RCA's finish it all off. The T3 steering arms are shit to be honest, they are far to heavy, far to large, and just over built all round, and I only got them as I couldn't get AE86 PS arms in time. Of course with 13 inch rims there was no way i could fit the steering arms on the outer hole, so I had to chop that hole off and move them in, just means slightly heavier steering, but more responsive which i'm fine with. However with the RCA's the angle of the steering rack ends meant the ball joint (or whatever it's called) hit the steering arm, so we had to do a fair big of clearancing to give a free range of motion. Of course I only got this all sorted just in time for a shakedown on the Friday before the new racing season started on the Sunday, nothing like leaving it to the last minute. Shakedown didn't go well either as I couldn't get the front/rear bias sorted, and flat spotted a set of front tyres. So Saturday I removed my original in line bias valve (supposedly can lock on when high fast pressure applied) I got out to the club day with a new pedal box, suspension and brakes. Took me a wee while to get comfortable with the car... They had discounted the entry fee, so there was a pretty big turn out of cars, which was good. First race I had a fairly good battle with what i believe was a WRX Second race I took advantage of a bit of carnage on the first corner to get a gap to an Integra which was faster then me and managed to hold him off. Handicap race for the last one, a lot of faster cars coming through (mainly porsches), got overtaken while behind traffic, then managed to get it back a few laps later when he got stuck behind traffic. Overall was a weird day with the wind, everyone was a second or two off their normal times, best I did was a 1.37:000 flat. Suspension was a lot more complaint with the bumps, still getting used to the grip, and the brakes were amazing, pedal box with the throttle pedal was a lot better for position.
2 points
-
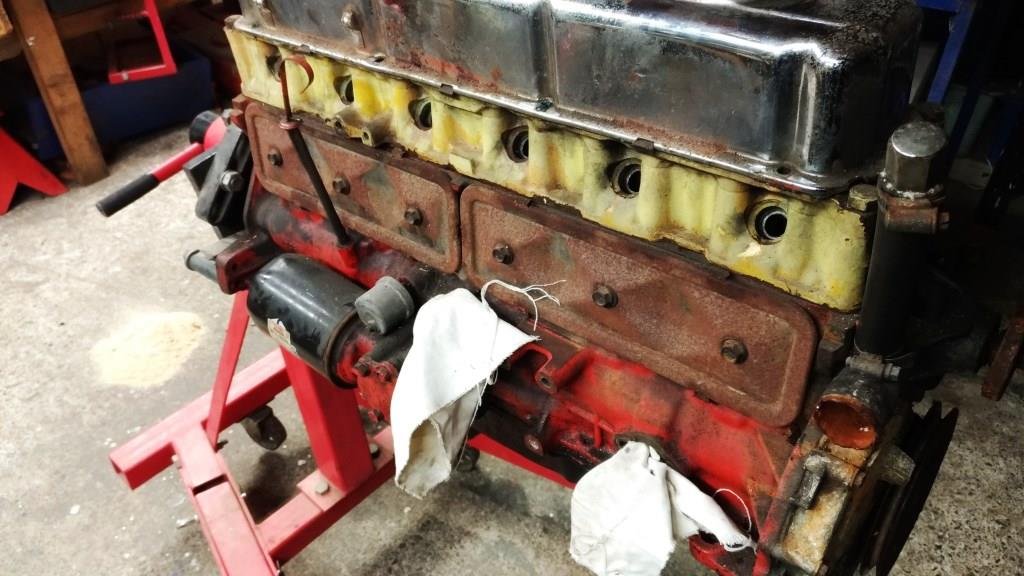
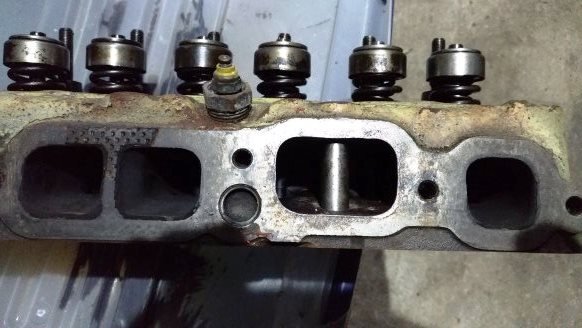
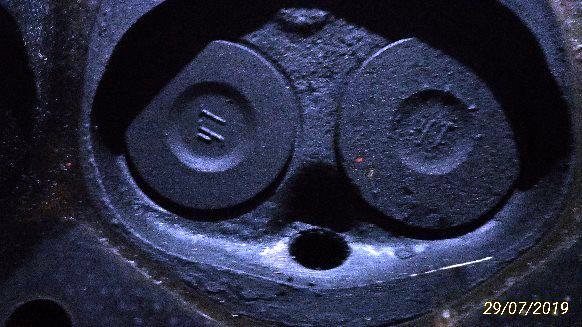
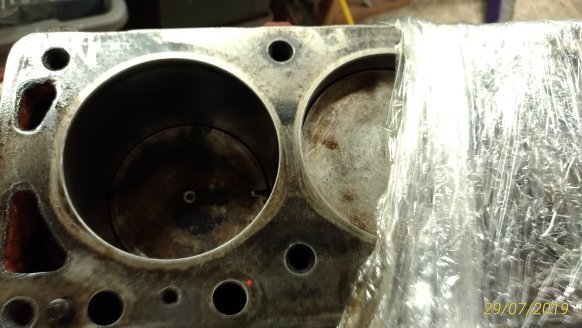
I’d been keeping any eye on a bloke in Whangerai who had been trying to sell a 186 on TM while doing his damndest to scare off any potential buyer by abusing anyone who had the audacity to ask a question on his auction. God I love those grumpy old traders! He was insisting that someone had painted the standard head yellow and refused to post any pictures of the inlet ports. After some months of his relisting I finally put the poor deluded old sod out of his misery by buying it for $300. An early 2-hour drive had me rolling down his driveway at 8 am in the morning, one look at the inlet ports confirmed it had at least a stage 2 Yellow Terra head. When I suggested that as an honest principled rogue, I felt a moral obligation to throw a little more coin in the pot he started accusing me of being a ‘lying young upstart that was talking through a hole in his f***ing head’. As I beat a hasty retreat up the driveway waiting for him to set the dogs on me (with the booty in the back of the van) I had to admit that at 63 years of age, despite the verbal tirade it was great to be called ‘young’ – ya gotta love those grumpy old guys! Couldn’t wait for to to get the head off but work pressure had me waiting for the weekend. As I said in the 1st post of this thread ‘sometimes you just get lucky’ - I stuck it in the engine stand, flipped its lid off and discovered a rather virgin stage 3 Yella Terra covered with the type of carbon that only prolonged over rich running can ever produce. Double valve springs and classic 70’s inlet porting. And just relish in the vintage YT valves! Once cleaned up the flat top 30 thou over pistons felt firm in the bore so Rigamortice and I made the call that we’ll clean up the head, sort out the appropriate sump/pickup combo and see how it runs.
2 points
-
As mentioned previously, I'm having some running issues and I need to try and work out what it is. The issue has been getting worse the more I run and drive the car. It previously only happened under load at about 4000rpm, where the engine would fall on its face and cut out like you had turned the key off. If you kept the throttle steady it would recover with a surge as the revs dropped, but as soon as it got up to about 4k again, it would cut out. When stationary, and not under load, it will happily rev to its 6k redline. It's a very annoying issue. I had a couple of suspicions of what it could be, but I needed to do some testing to narrow it down. My first suspicion was that I must be losing spark, as the engine cuts so abruptly and I felt that if it were fuel it would kinda stutter out. The first thing I noticed was that the replacement coil the previous owner had fitted was a Bosch GT40. This is a 12v coil, and from what I have discovered, widely known to have issues with electronic ignitions. Now, the ignition system on my car is both a ballasted system and electronic. A ballasted system runs a resistor on the power feed to the coil, dropping the voltage, meaning the coil doesn't see 12v. So I was already running the coil under voltage. After testing and confirming the resistor was still in place, I removed this coil and refitted the original Ford coil that came with the car. Changing this resulted to a smoother idle (maybe, but probably a placebo), but the engine still cut out. The next thing was to check the lead positions, cap and rotor. I note that the cap and rotor have been replaced, and the old ones were with the car. The old cap is stuffed, but the old rotor looked OK, so I swapped that in after a quick clean. No change. Next was to confirm if I did lose spark or not. The only way I could think of was by thinking out of the box and using my timing light... So I connected it up, and strapped it to the wiper so I could see it when driving. Sure enough, when the engine cut, the light was still flashing away happily. That indicates I have spark (although, not if I have a good strong spark, but some spark is better than none). So this points me down a different path. I have air, and I have spark. Could it be fuel after all? I posted up on a few forums asking for help, and got some great tips on where to start looking. One of the easiest to do was to check the sensor plate in the AFM was clean. This plate is hinged, and lifts up with airflow as it gets sucked into the engine, which in turn pushes a plunger up and down to control fuel flow. Well, although the top looked reasonably clean, the underside was filthy (probably thanks to the incorrect air filter that was fitted) I gave this a thorough clean and made sure it was spotless. This made no change, but its good to know its clean now. I also, once again, checked the intake tube and boot for splits or cracks, but none found. All vacuum lines (all two or three of them) were checked, all OK. One thing that makes me suspect its possibly fuel, is the state of the new plugs I fitted. Even after a couple of runs around the block, a couple look almost unused. Maybe lean? From 1 to 6 in order. This is leaving a couple of possibilities, ones that I cannot test without further equipment. First is an intake manifold leak or the likes. Today my smoke machine arrived, so I could test this. It's just a cheapie, but makes a good amount of smoke, and has a pump to actually blow it out under pressure. After a quick test, I modified it to work how I needed it to. I salvaged a cap from a CRC rust convertor can, drilled a hole in it, glued some hose into it, and glued the cap onto the front of the smoke machine (as it just has a big nozzle on the front normally, for maximum smoke dispersion in da clubz) This hose then goes into a rubber glove with a finger cut off it. I find using one of these seals the intake pipe nicely with the wrist of the glove, but doesn't crush the rubber hose. I don't know if it's good or bad, but smoke testing the intake shows there are no intake or vacuum leaks. I tested with the throttle open and closed, to check the intake hose for leaks as well as the plenum/manifold, but nothing, not even a weep. So what left? Well, two things really. I need to test the fuel pressures of the system, but because the fuel fittings use banjo bolts and hard lines instead of rubber hoses, I can't use my existing pressure testing kit. I have a new kit on the way, which has all the fittings I need to connect into the KJetronic system. This will tell me if there is an issue with the Warm Up Regulator or the main pressure regulator. The whole system relies on having the correct pressures, so even a few PSI difference can make it all turn to custard. The other thing I need to do, once I have tested the pressures, is to remove the fuel distributor and injectors. I need to see if the plunger in the fuel distributor is clean and moving freely, or if it's sticky. I also need to check the flow and spray pattern from the injectors. It's possible either, or both, of these things are causing an issue. My main theory at the moment is a sticking fuel plunger, which is causing the engine to starve of fuel when it demands more. The worst thing you can do with a KJet system is to leave old fuel in it and not run the car regularly. This car has been off the road for years, and I don't know when it was last started and run, or how old the fuel in the system was. KJet runs at such fine tolerances that even a slight gum or varnish on a component can make it upset. I'm determined to work this issue out and get the KJet working properly as it's a cool system, and one I haven't worked with before. I have everything I need to convert to EFI and Speeduino, but I'm trying hard to resist that urge. Now we wait. Once the pressure test kit arrives, Its game on.2 points
-
Cert rules for lights. https://lvvta.org.nz/documents/standards/LVVTA_STD_Lighting_Equipment.pdf1 point
-
^^^I saw a bit of speedway riding too1 point
-
I had those on my last years crapcycle They worked ok, I never even died once Had enough grip to bottom the side stand bracket cornering a couple of times1 point
-
1 point
-
Nice. Will probably look at getting some in but no time frame at present. October 11th is when the supplier says they may have another lot coming in but it's not 100% guaranteed. Will keep my eyes peeled.1 point
-
Love an aggressive Shinko! Nice work. Got a Shinko SR426 on the rear of my Chaly. Not as wounding but it should tackle the terrain nicely.
1 point
-
A dumb question - Can I use headlamps for taillamps if I use reb bulbs? Cheers1 point
-
Wait, the guy was offended you wanted to pay more for it???1 point
-
So currently this is at work in storage while i sort the stuff that keeps breaking and work out of town. Anyway did some more turbo stuff, So i took a punt thinking surely if i move the spring from one side of the diaphragm in the actuator to the other side it will move under pressure instead of vacuum. Sure enough it does but now how the hell do i seal it?? Im thinking of using 2.5" triclover flanges to remake the can so i can crack it open to change springs easily as this one might not be quite right now its getting a different signal.
1 point
-
Also, there is a new spartan wideband which is using a new sensor called the LSU-ADV which supposedly has 7ms response time AKA its bloody fast canbus as well so no ground offset errors. Want want want https://www.14point7.com/products/spartan-3-adv1 point
-
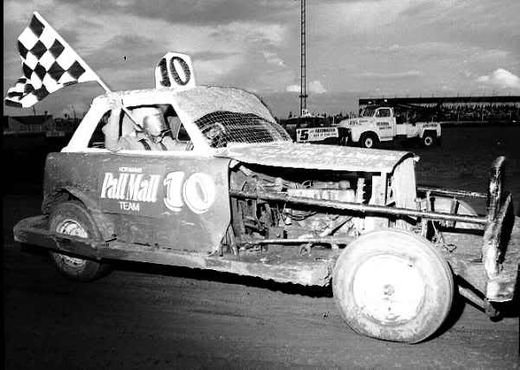
First stockcar. Only pic I have of it. At that stage it was the oldest standard stock racing in the country. This pic was in 2005. It was built in 1967. Powered by E31 Pacer 245 Hemi. Had a habit of heat seizing. when she was "new"
1 point
-
Humour mostly1 point
-
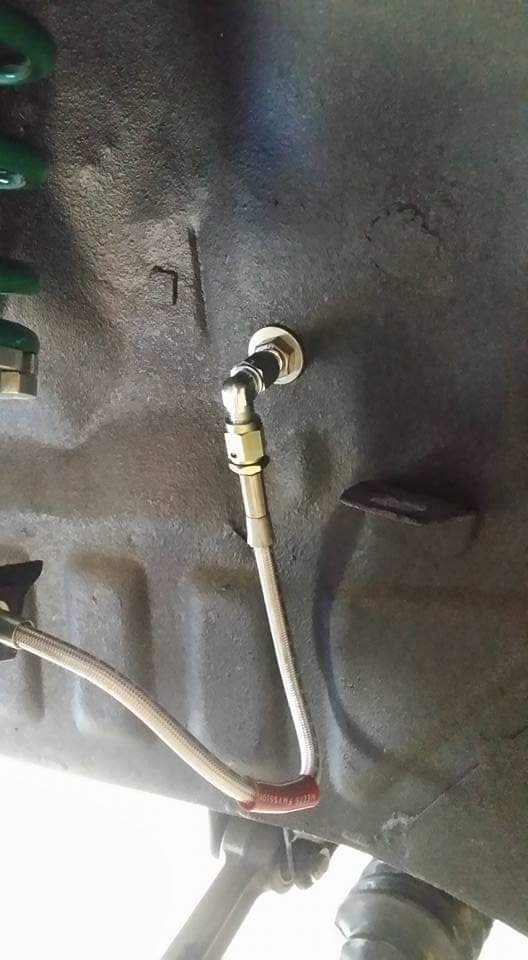
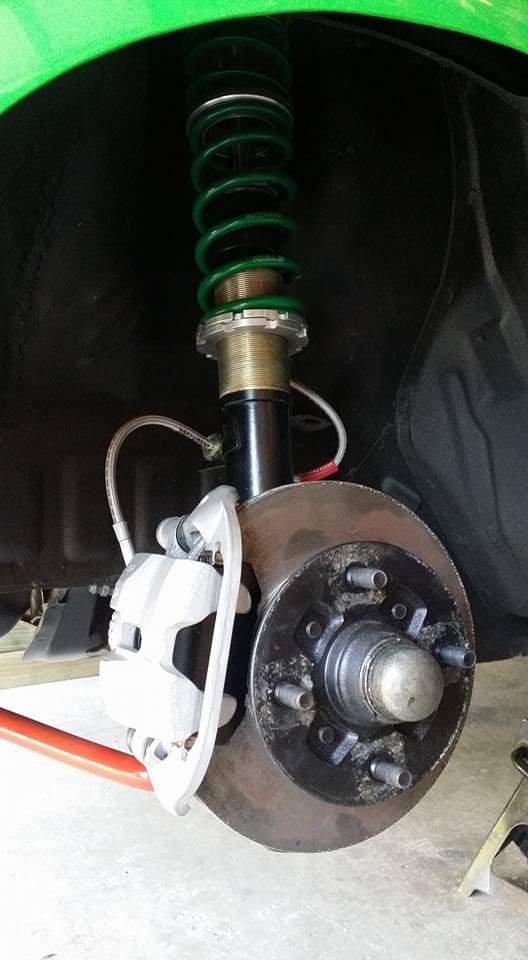
Next thing was to sort brake lines, front calipers and coilovers. The car came with a home made pedal box with a balance bar it works ok I think it needs a but of strengthening, under hard braking it flexes the fire wall. The other thing with was the master cylinders they used where cheap Chinese trailer cylinders that couldn't stop sucking in air so I changed them out for willwood cylinders. With the brake lines I wanted them hidden as much as possible so most of the plumbing is on the inside of the firewall. It looked good you will just have to trust me as I dont have to many photos. The only place in engine bay is about 100mm section on top of chassis rails. I used right angle bulk head fittings to keep it nice and tidy. Then braided lines to rebuilt AE86 front brake calipers. The struts are ae86 with autolign built coilovers with 4kg tein springs and keepers on top and monroe shocks valved to suit spring rates. Other bits on the coilovers are T3 camber plates up top and at the bottom (not actually part of the coilovers but it this let's you use 86 strut in the kp) T3 starlet to AE86 collar thing that slips over starlet ball joint and T3 RCA. I currently have the T3 knuckle in the car and I'm using the the second hole currently in the hope to achieve more steering lock now I have another set of modified Ae86 knuckles to chuck in the car (but that's going to far into the future). Note: I'm also running a apjs lock spacer.
1 point
-
Duke Blackwood asked me to post this photo up as his phone was flat last night. He was having a go at repairing the utterly fucked fairings and found that someone has glued old pill packets across the back of some holes to bog over the front!
1 point
-
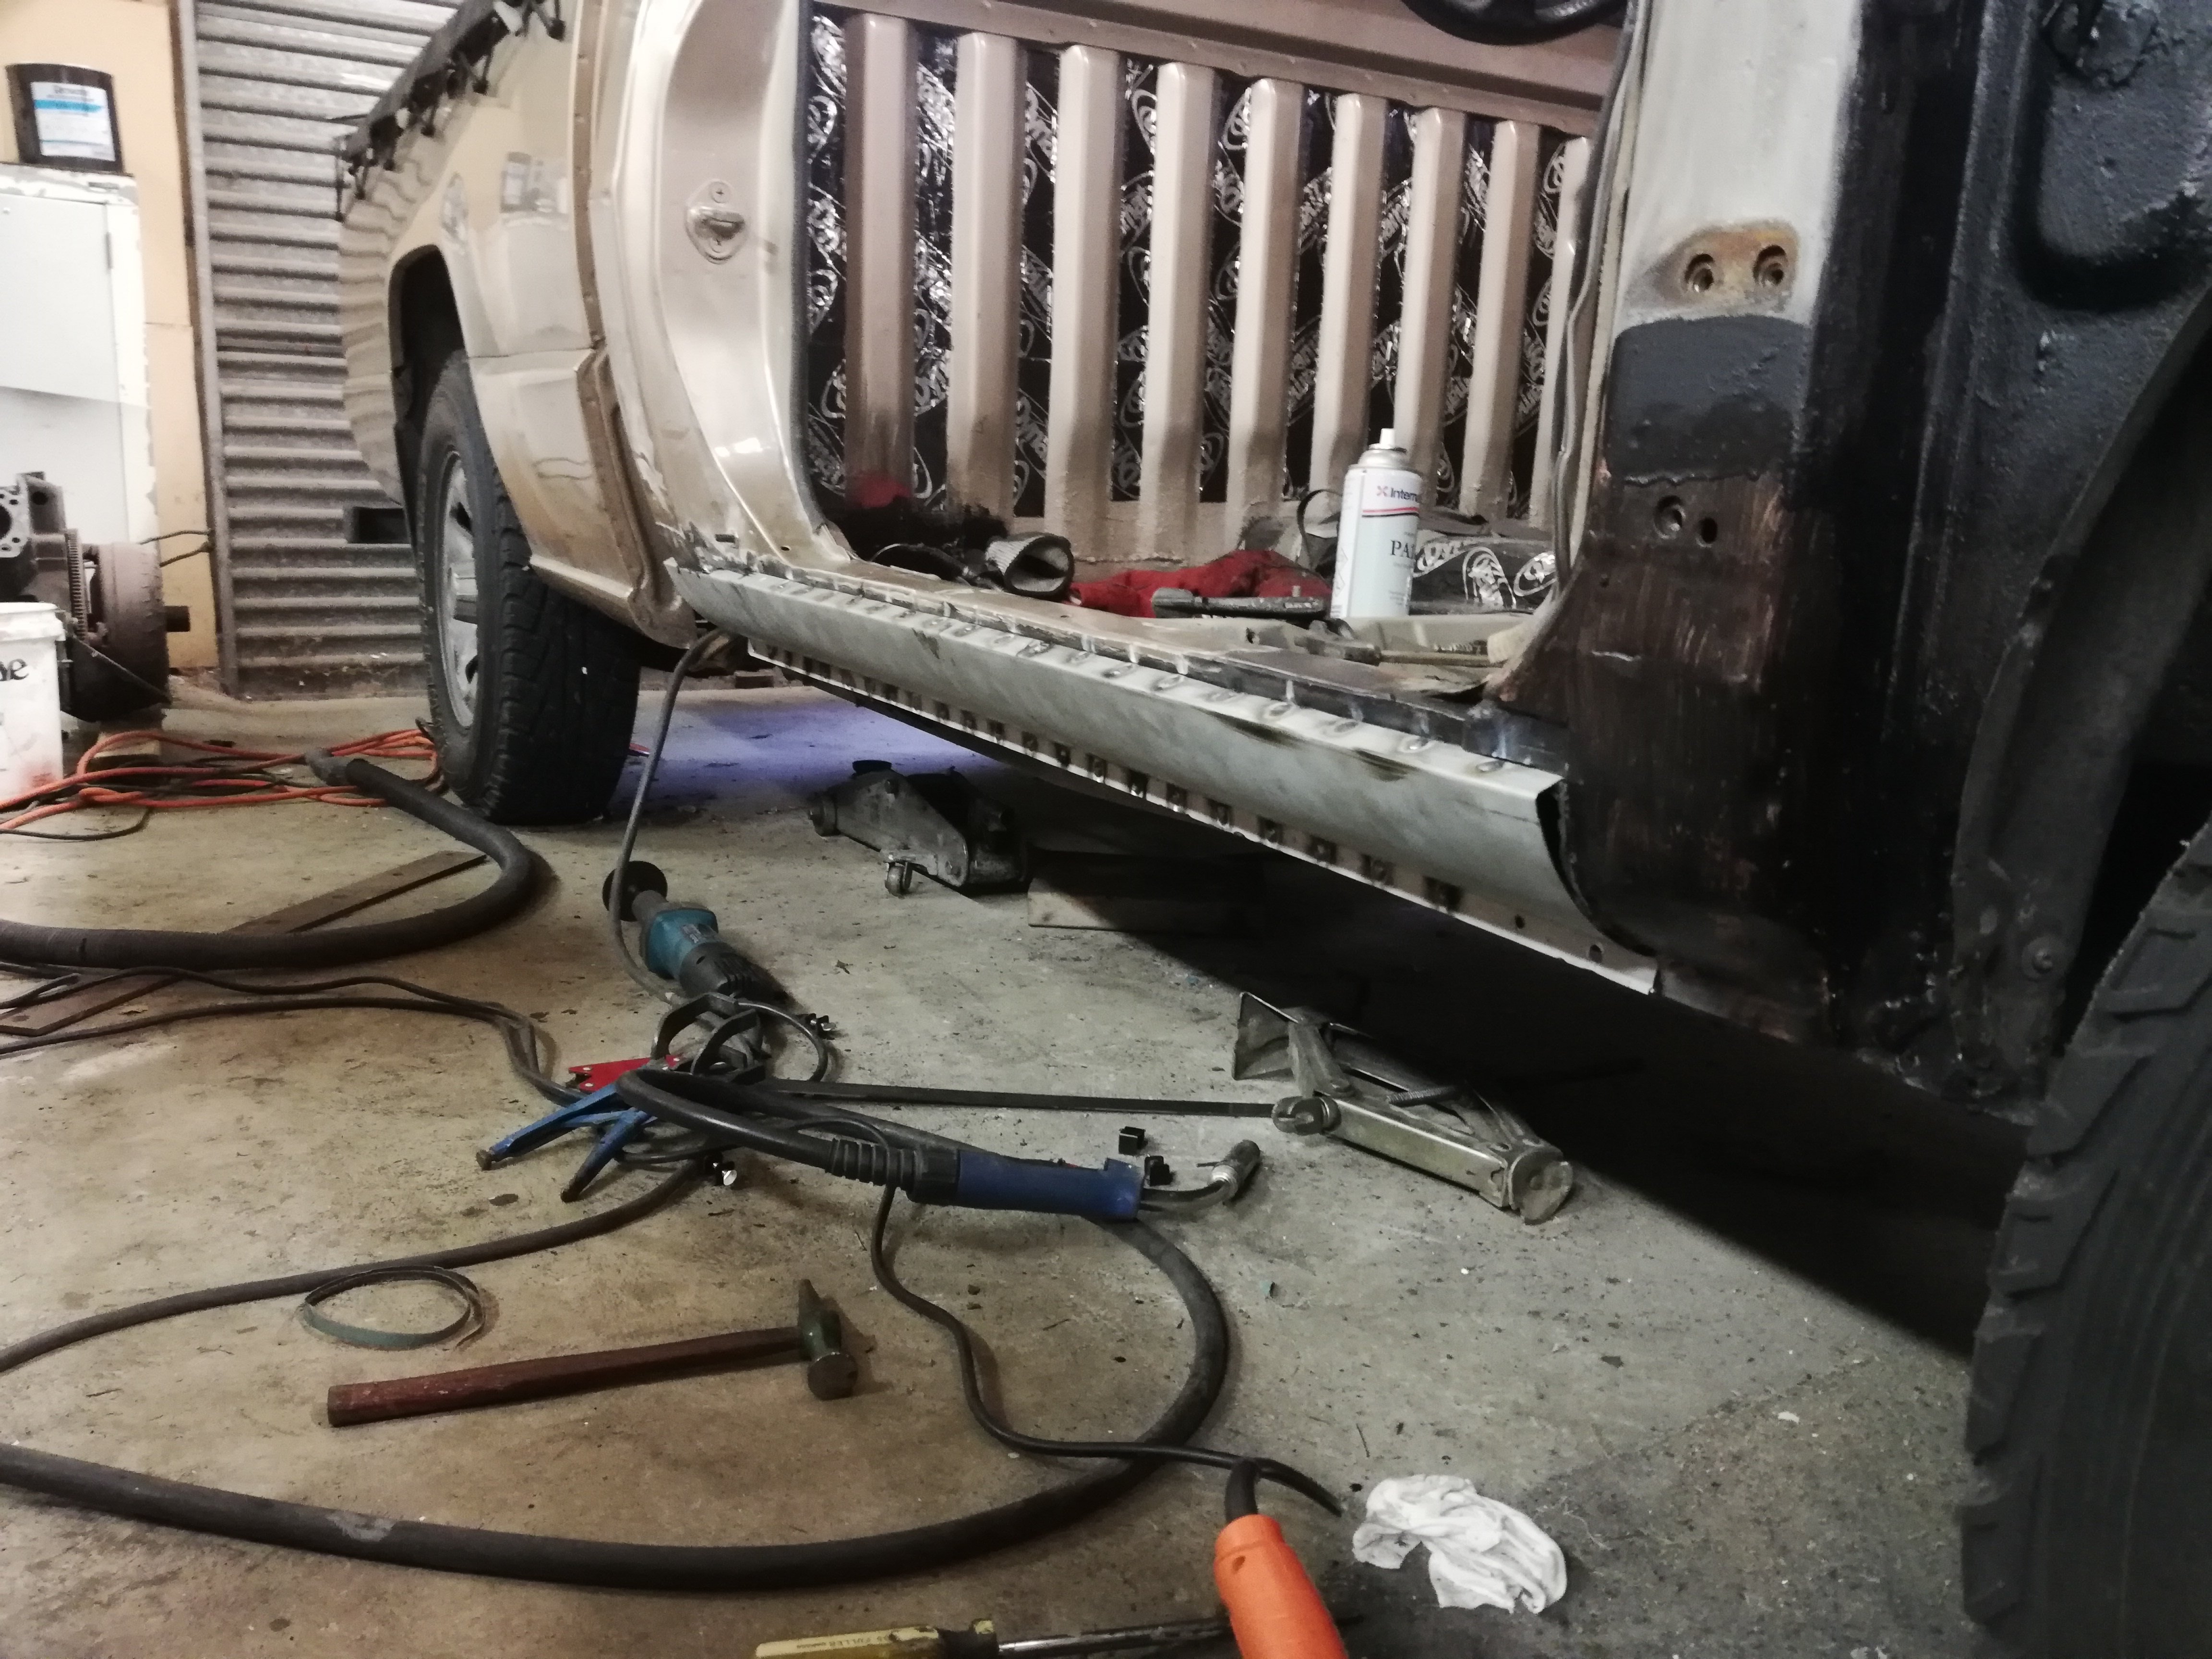
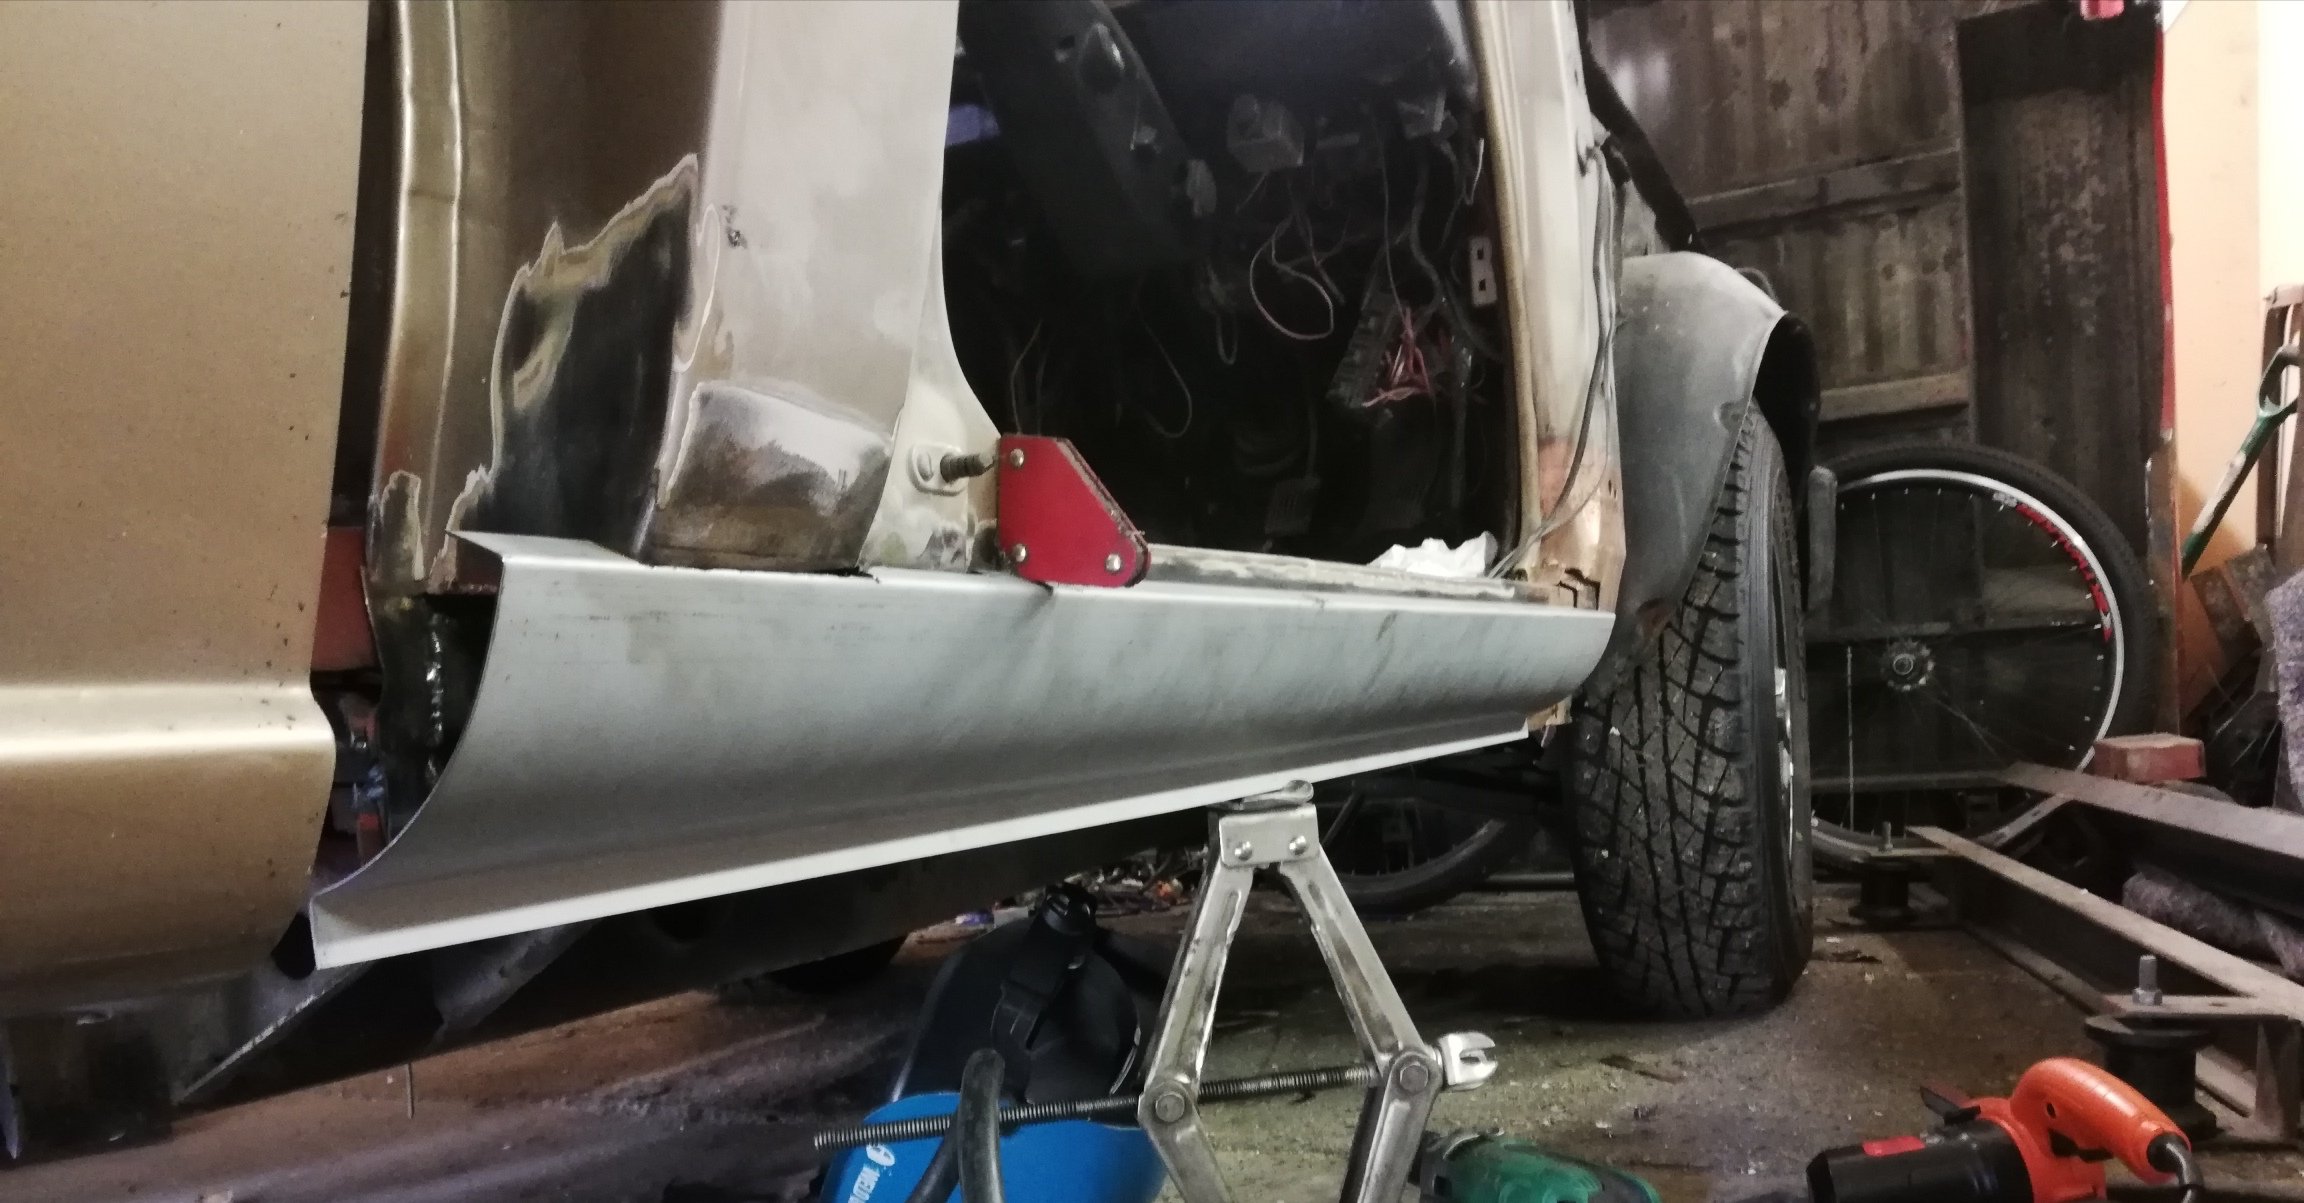
I can't get no satisfaction Except some times I do Was at a bit of a loss as to how to line the new sill up. Luckily A series engine components came to save the day. Looking at the step/scuff panel part of the door frame, it looked pretty squashed. Must have been stood in a few times. The section right in the middle where the seat frame mount is attached was unbent. So I used a rocker shaft from a 1098 Morris minor to reshape it. This must have worked because when I then set the top lip of the new sill where the old one was, the bottom of the inner sill also lined up (it was well out before) Needs another day to make a rear cab corner and join in the front of sill to the bit behind the guard
1 point
-
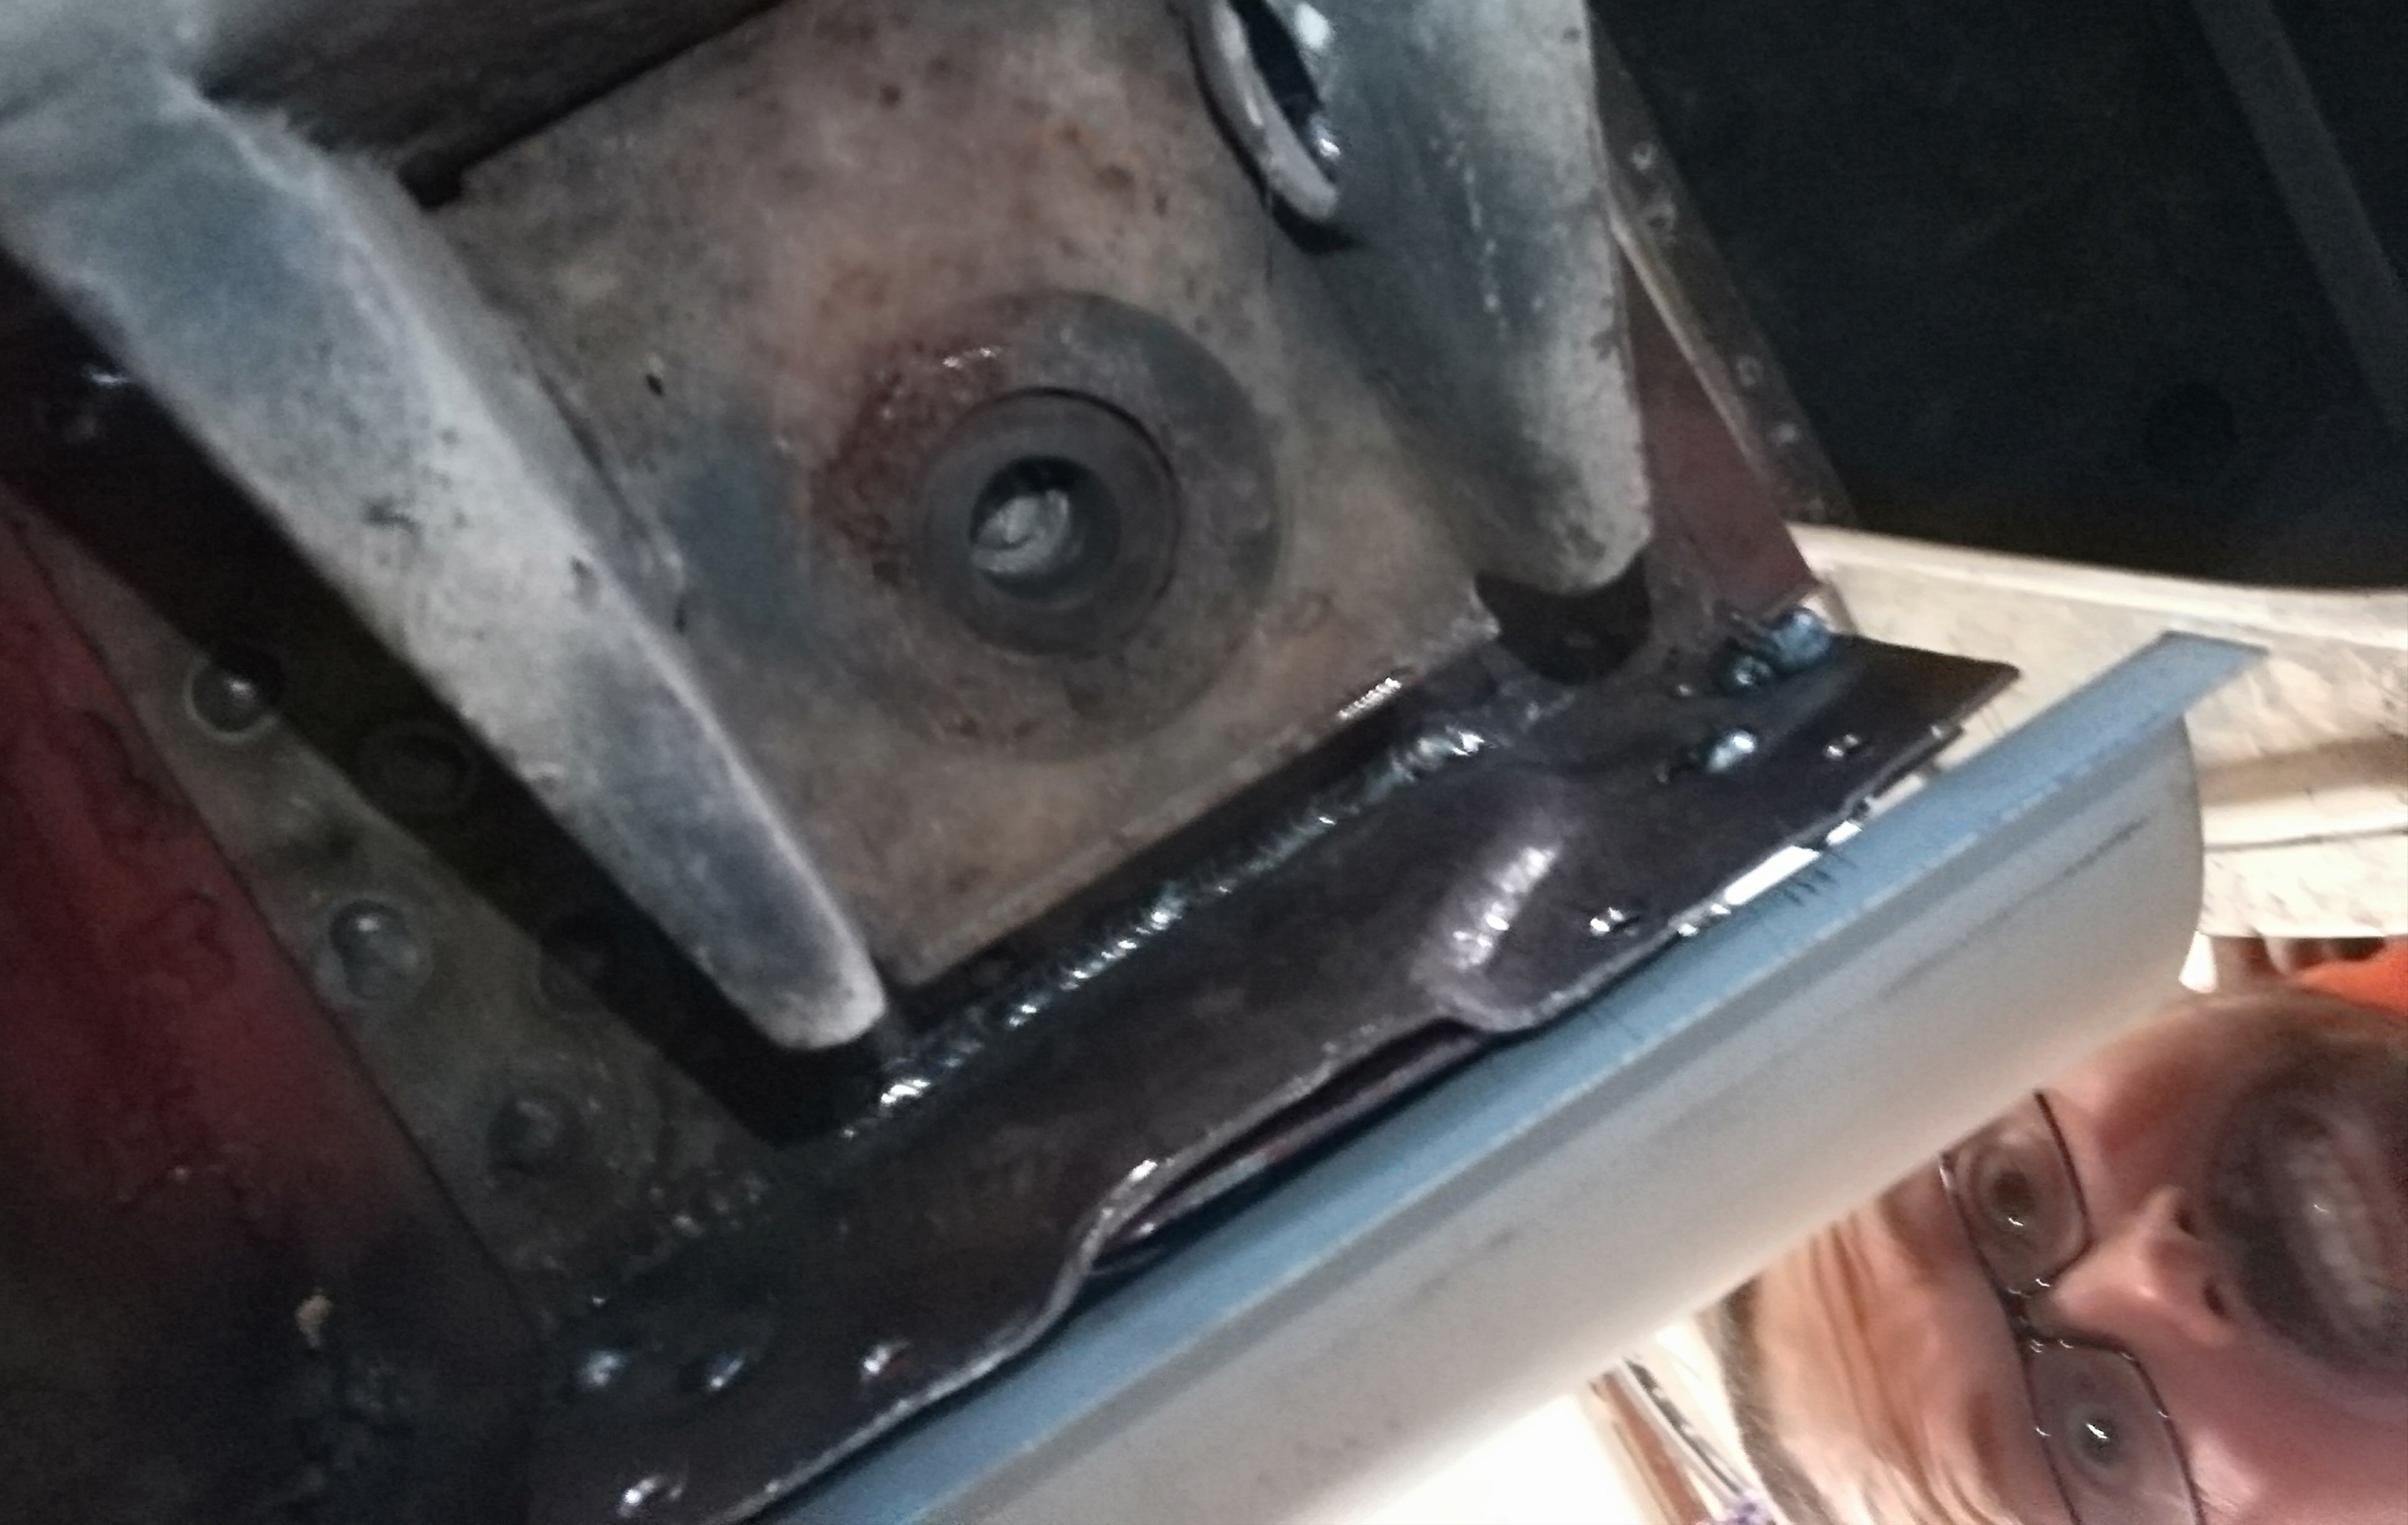
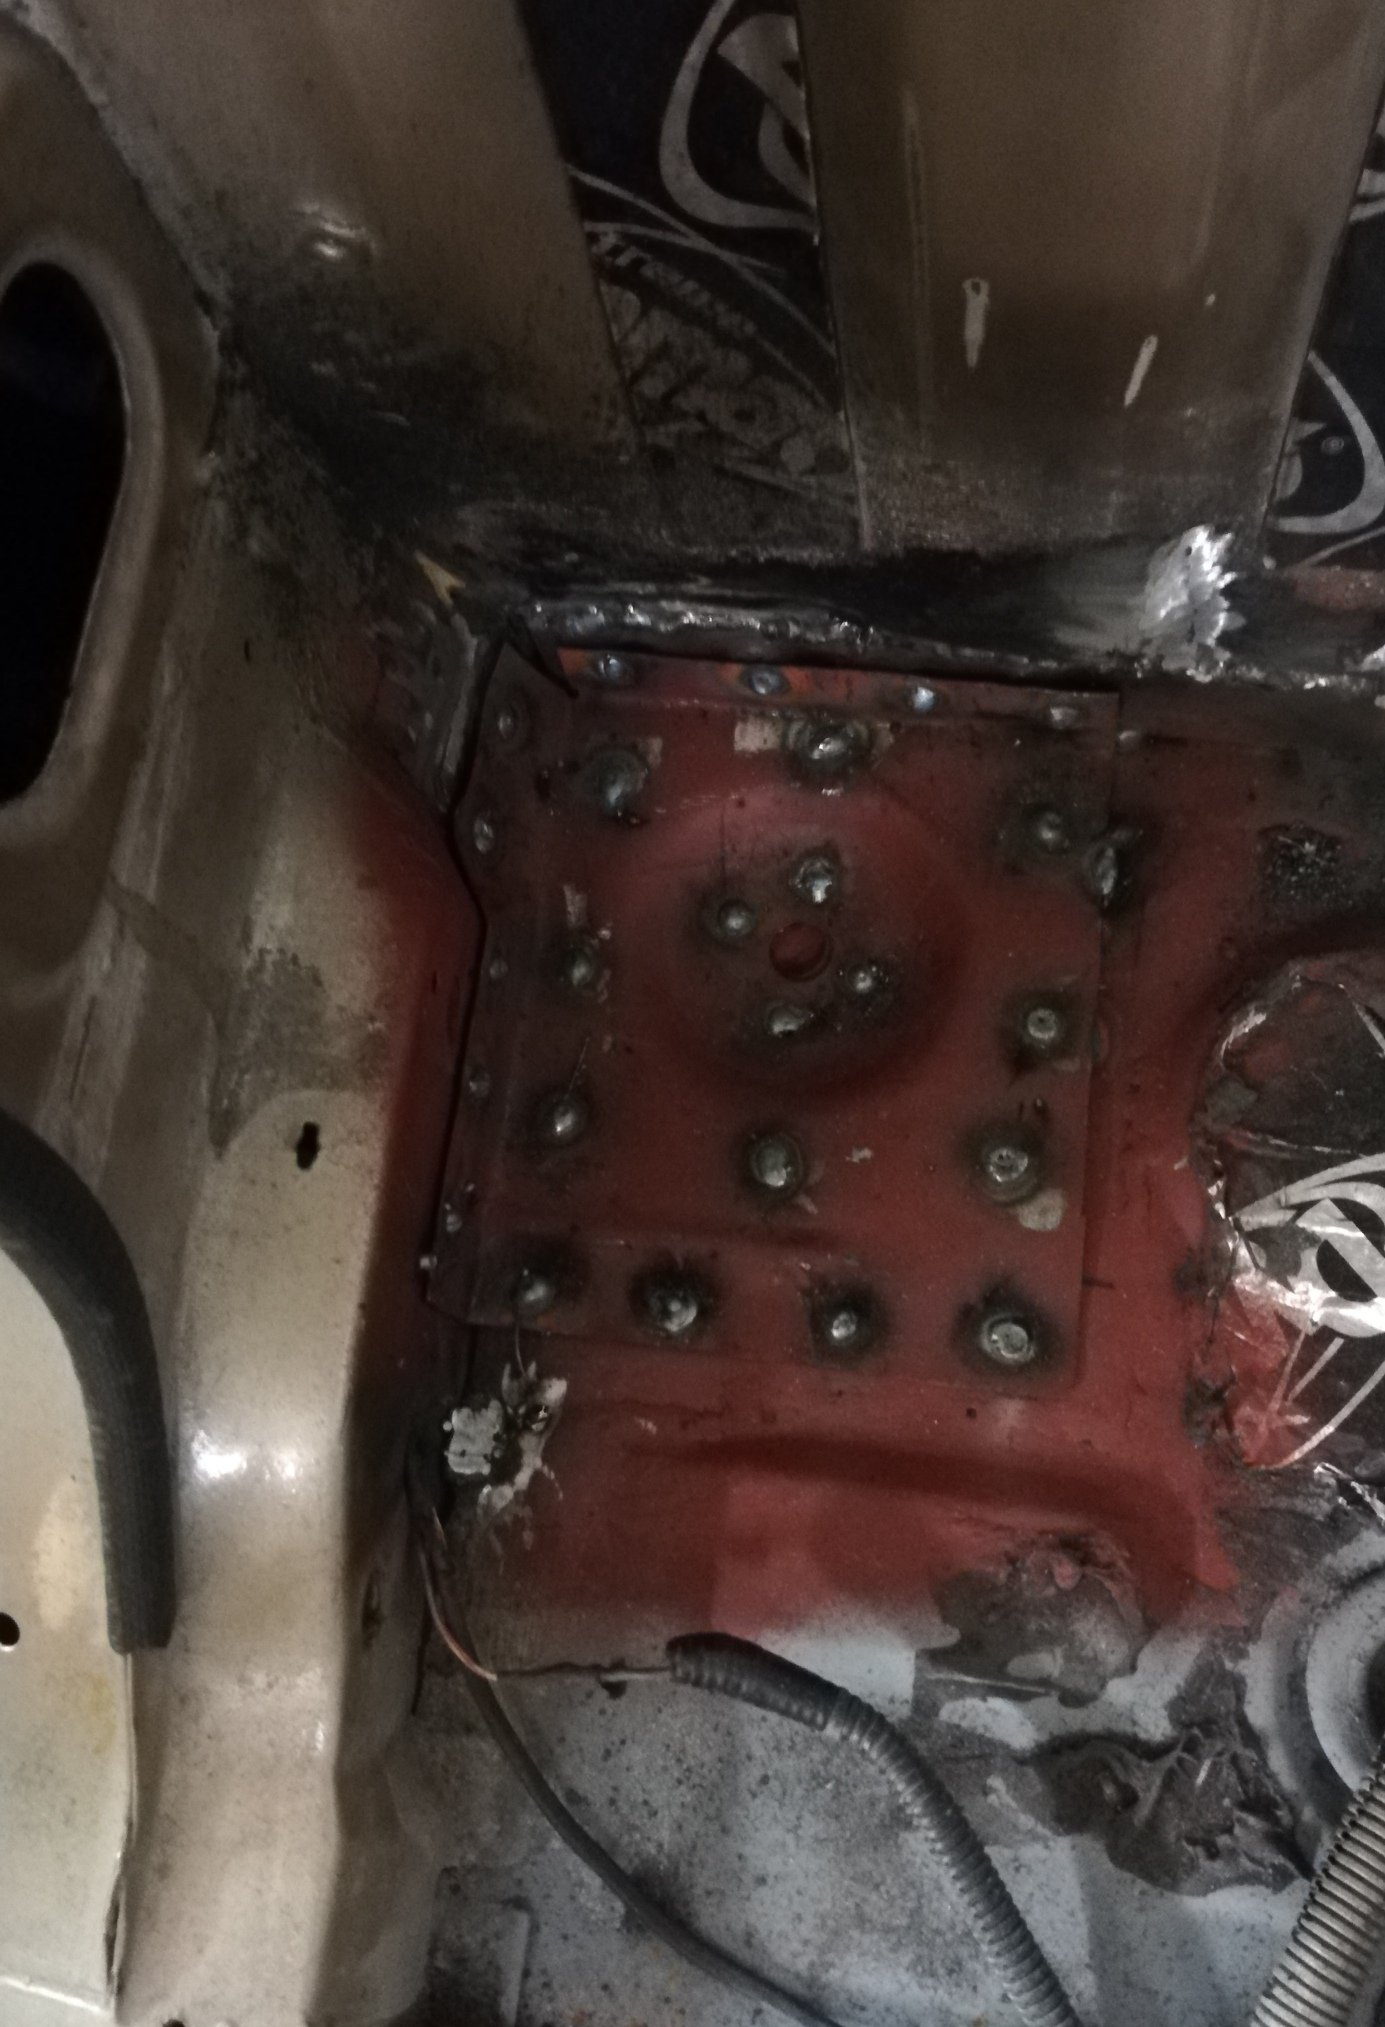
Ok ok What a balls of a job Floor is in Inner sill is in Cab back patch is in Inner cab mount plate is in Outer cab mount is in New sill getting trimmed to fit Not sure if I need an inside sill bracket like what was shown gas axed above, doesn't exist in my parts book.
1 point
-
So much freaking tar everywhere I want to weld
1 point
-
So many "Oh, HoW dOeS iT gEt OvEr SpEeD bUmPs?!?" comments on the Hoonigan Instagram post. As if bags don't exist/it would be that low if it wasn't bagged. Also a few "seen one, seen 'em all" comments, which if they are from 'Murica they may have seen a few, but I highly doubt they are done to the awesome standard this one is. Source: TL:DR: Love this truck. People say dumb stuff on the internet.1 point
-
I also decided to vent it through the bonnet. This had a positive impact on air intake temperature dropping it by at least 10 degrees, which gave a noticeable boost in power. Got cut down a bit... The whole unit drops on to some pins and then has some clips at the top, so possible to remove in under a min.
1 point
-
Pointless update: On the way to Nat's I noticed a pretty bad brake judder at highway speeds and thought I should 'prolly do something about it. Diagnosis by default was warped disc etc, however, to eliminate this I pulled the handbrake (Gentle, Mavis...) at highway speed and got vibration. So, we have rear brake issues. Upon a bit of inspection, it appears the design of the Buick mag had a slightly different dish than the original steels, so it was clamping down on the drum outer rather than standard lug grabbing points. Two options to remedy - pull of drums and machine down high points - which would be nice If i had a mill - and due to the high points being the outer balance points (and balanced by drilling) I didn't want to hit them with an angle grinder in case it made the balancing worse. The easy way out was to get a 3mm alloy spacer. RAGE (Rough as Guts Engineering services) at your service Ma'am. Of course, easy is relative - the one's on the tard didn't fit the prescribed 5x127mm (5x5") so I modified some others I had lying around. Joined the Humber club a while ago although hadn't done any events with them until a couple of Sunday's ago an opportunity came up to do a drive to Manawhai via SH16. This fitted in quite well after Caffeine & Classics and I was already over the bridge so thought why not. By default I was certainly the whipper snapper of the group by a couple of decades minimum - however great sharns all round. The trip north was best described as tortoiselike, maxing out at a heady 80km on the downhills with a constant cloud of blue smoke on the over-run from all parties. Lush. Had lunch and a cup of tea at the museum then visited a beach and did skids. (One of the previous things didn't happen) My favourite new Barry was Mavis (Ann Dimoline) who owns 9. Have a read about her here. The current compendium, each nicknamed by Ann, reads: 1965 Humber Sceptre Mark I (Opo); 1966 Humber Sceptre Mark II (Pearl); 1961 Hillman Minx 111b station wagon (Chanel); 1962 Humber 80 111b station wagon (Toto); 1963 Hillman Super Minx saloon Mark II (BT); 1966 Singer Gazelle Series 6 Auto (Tommy); 1954 Humber 10 MK 7A (Babe); and 1974 Commer pop-top camper (George). What an absolute battler. Anne to the left with her Humber 80 Wags named Toto I bless the rains down in Africa - Gonna take some time to do the things we never had and collection of swarming Barrys. A fave to be sure - what a great wag - and a daily too - loaded with tools for Robertybob Handyman services. Otherwise no updates right now, however I have a couple of subtle upgrades in the pipeline, however a few other projects on the boil means they may be in warmer weather. Otherwise long may she continue being a workhorse and doing what car's are meant to be doing - driving and stuff. Yesterday delivering latest 'investments' to storage for even more future work. Peace y'all.1 point
-
Nats Update: Drove Car. Rolled Guards Met GCs Did a skids Did a skids again and runded over a cone Went to the Warehouse Trained. Parked. Good trip. Would trade again. A+1 point
-
so i had a old hospital bed kicking around at my folks for about 8 years so though i would put it to good use stripped it down and turned into into a motorbike stand. this is version 1.0 still want to lower it more so its easy to get on and off so will use some smaller castors and mount them up higher. hopefully have some at work and need some with a lock. dont like the ugly brace for the front wheel but made it all in a hurry1 point
-
Should look good when the etch lines fill with oil1 point


This leaderboard is set to Auckland/GMT+12:00