
Leaderboard


Popular Content
Showing content with the highest reputation on 09/06/17 in all areas
-
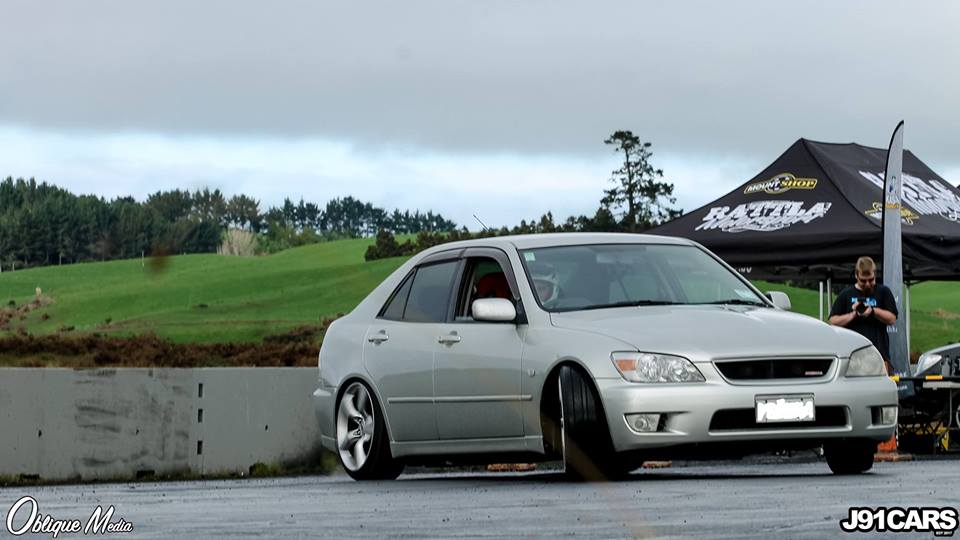
A Beat-iful day today, cleaned out the tank and fuel level sender, the sender was caked in corrosion so I disassembled it and cleaned up the tiny contacts. Bunged it all back together with the new filter and seems to be all good now. Also, if you have the carb off one of these at any point, bin the carb mount bolt on the inner side and replace it with a stud and nut. You'll need about 35mm of thread sticking out, you can just cut the head of a 50mm M6 bolt then loctite it in. It just makes it easier to get the carb off instead of having to inch it off due to the bolt hitting the inlet. After putting it all back together, double checking the oil pump and carb settings it was still bogging even though it should all be stock ( @Raizer any thoughts?) It was revving nice on the stand so I thought I'd put the 7.5g rollers in just to see what happens and it was 100% better. I haven't been able to confirm what the stock roller weights should be, it came with 11g rollers and the manual doesn't mention roller weights, only wear parameters. Took it for a hoon around the neighbourhood and it went like a champ, slow starting on the steeper hills but once the revs got up and I hit VTACS it was all on, can feel the powerband come on at about 8000rpm and thankfully the brakes worked fine (hadn't even looked at them haha). Pretty happy with it considering it cost me $65 (initially haha) Next step will be getting a new plate. @classic scoot @Herbamaster @earthcubed We should organise a Beat meet sometime, would be good to see some others up close.11 points
-
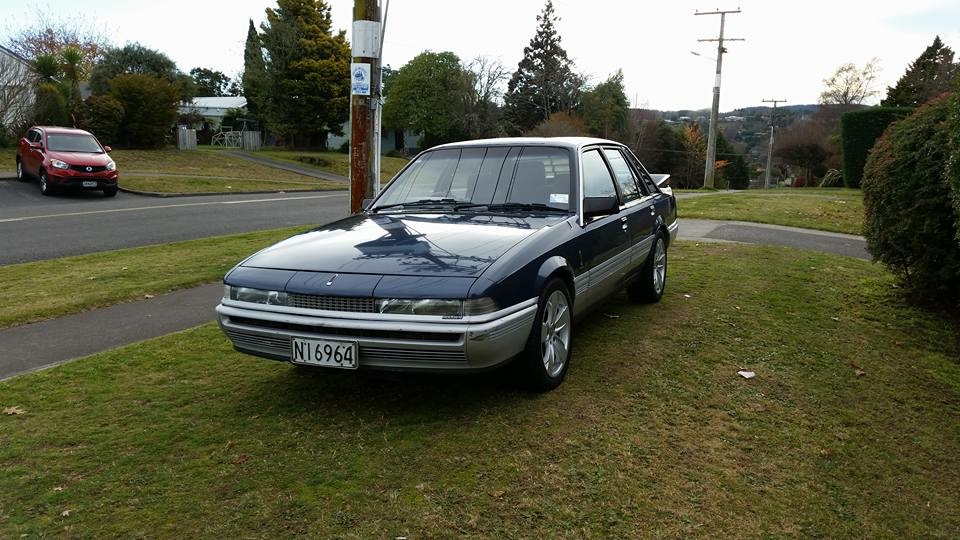
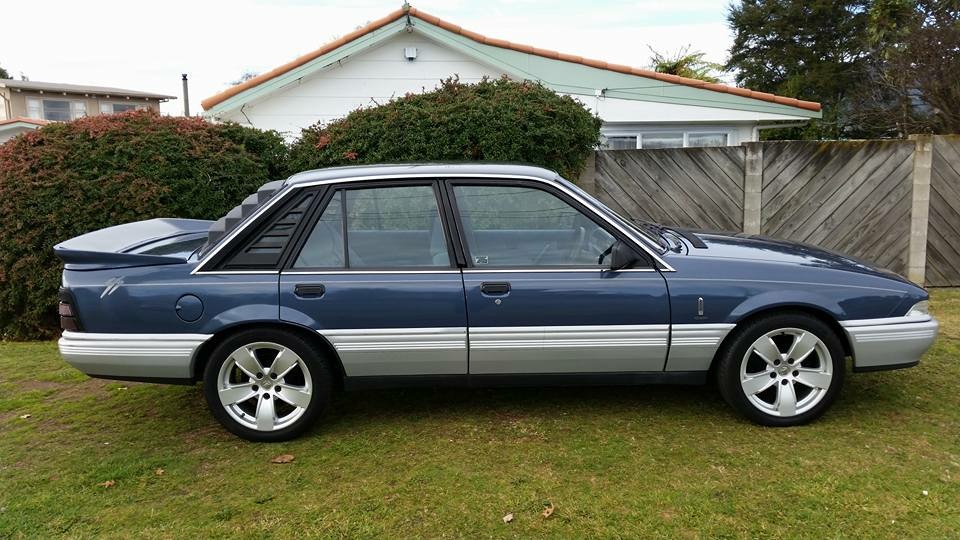
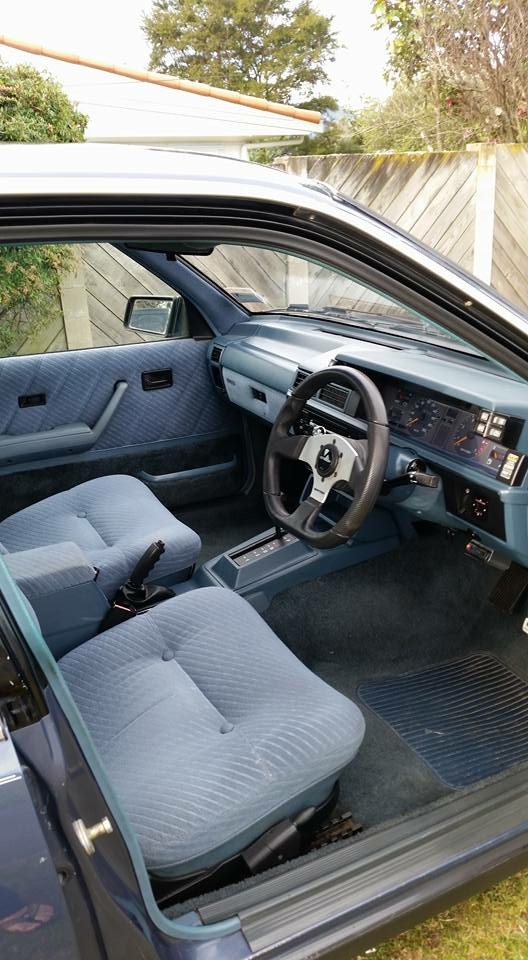
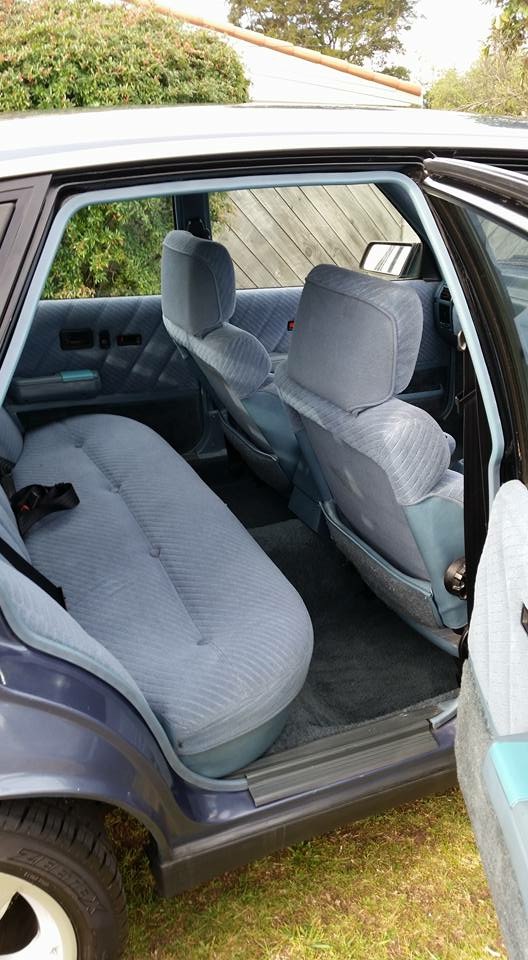
Having sold my last VL to fund taking the Belair to the next level, I had told myself that once the Belair was done I would get another first gen Commy as there was lots of things I wanted to take the Royale too but sold it before I had a chance. While I had actually been looking for a VK, noting of any worth was out there, it was all over priced rusty shitboxes, or it sold before I had a chance to look at it. And then I thought to myself, my old mate Jimmy has a nice VL Calais that's gathering dust, maybe I'll see if he is interested in selling it, turns out he was, and he was happy to sell it to me at a very good price. it's genuine V8 Calais, 150km on the clock, one previous owner (before my mate) who had had it for 18 years and was a mechanic who did a fair bit of work to it. It's got: ACL flat top pistons Crane "group a" camshaft 1.6 ratio roller rockers Double row timing chain with adjustable sprockets Big valve cylinder heads Port matched manifolds Brock VK SS Electronic dizzy Rebuilt Rochester four barrrel carb Holley fuel pump an reg PAcemaker headers with 2.5" exhaust, backed up by a built Trimatic with extra clutches, a shift kit and 2400rpm torque converter. Hardest part is that I have to wait until the 16th to pick it up.
 10 points
 -
Things are looking good.Surgery was required & the firewall was cut up a lil bit. This has meant the engine could be brought back a bit whats solved a raft of issues. Clearances for PS rack hose connections solved. It was right up against the sump. But now we have ample room. Able to bring the engine into the center more. Its now only slightly offset by about 20mil. Engine mounts will work way better. Able to get the carbs to the ideal flat positioning as it was on a bit of an angle. Positioning for bracing to join the two sides of the rails will be better. Being able to go under the engine in a bolt in set up. How the trans will sit along with the two piece drive shaft will be way better and pretty much flat whilst not having to modify the floor pan other than maybe slightly at the very front. The distributor will be hidden more. I wanted wires out of sight as much as possible so this suits me. Being a pertronix unit I shouldn't need to get to it much but if needs be will still be able to with out to much hassles. Weight and center of gravity move a bit more back behind the front wheels instead of over them. better clearances for sump. Doing all this means we may have a heap of room up front. Not what I really want but we will have to wait and see how it all looks with the alt, PS pump, radiator and fans. the custom fan shroud I was envisioning may need to be bigger than I was thinking to help fill the gap. Time will tell. once I have the panels on & rad in.Speaking of the radiator. i have decided to keep the original Hudson radiator. Its getting re-cored by a local shop Timaru Radiator Repairs. Russell the guy in charge is a top man and been bloody helpful with some great input. Gave options for different cores etc for the old four core copper rad that included different row spacing etc.Since the tanks are off etc im getting him to do a few other modifications. moving the bottom outlet to the other side to match the Nailheads inlet then shifting the radiators top inlet to the center to match the Nailheads centrally mounted thermostat. Thinking of using a flexy hose to give it that vintage look you see in all the old 50's and 60s mags. Plus the ribbing will go with the fins on the engine.Since its not a great idea to have the filler at the same point as the inlet due to pressure etc im getting it moved to one side on the top but im also getting a dummy one added to the opposite side. This is merely to please my OCD nature. when im standing with the hood up looking down at the engine I want to see the top hose running center rad to center engine then two caps to add balance on either side. My train of thought was with just the one to one side it would be a bit lopsided for the look im after. The dummy will also have a dummy overflow pipe just to keep it symmetrical. OCD much? /twitchA slight notching is needed on the chassis rail above for the steering arm.The engine mounts minus the side supports shown. Along with PS hose clearance. Once the trans is lifted slightly and bolted up it will get the carbs flat along with increasing clearances around the racks hose fittings & rocker covers. Hard to tell from that photo but its looking like very little if any modifications will be required to the floor pan. Will pop it in soon to have a look. Should still be nice and tucked up even at air out.A look at the old Hudson rad and where everything is being shifted to.8 points
-
5 points
-
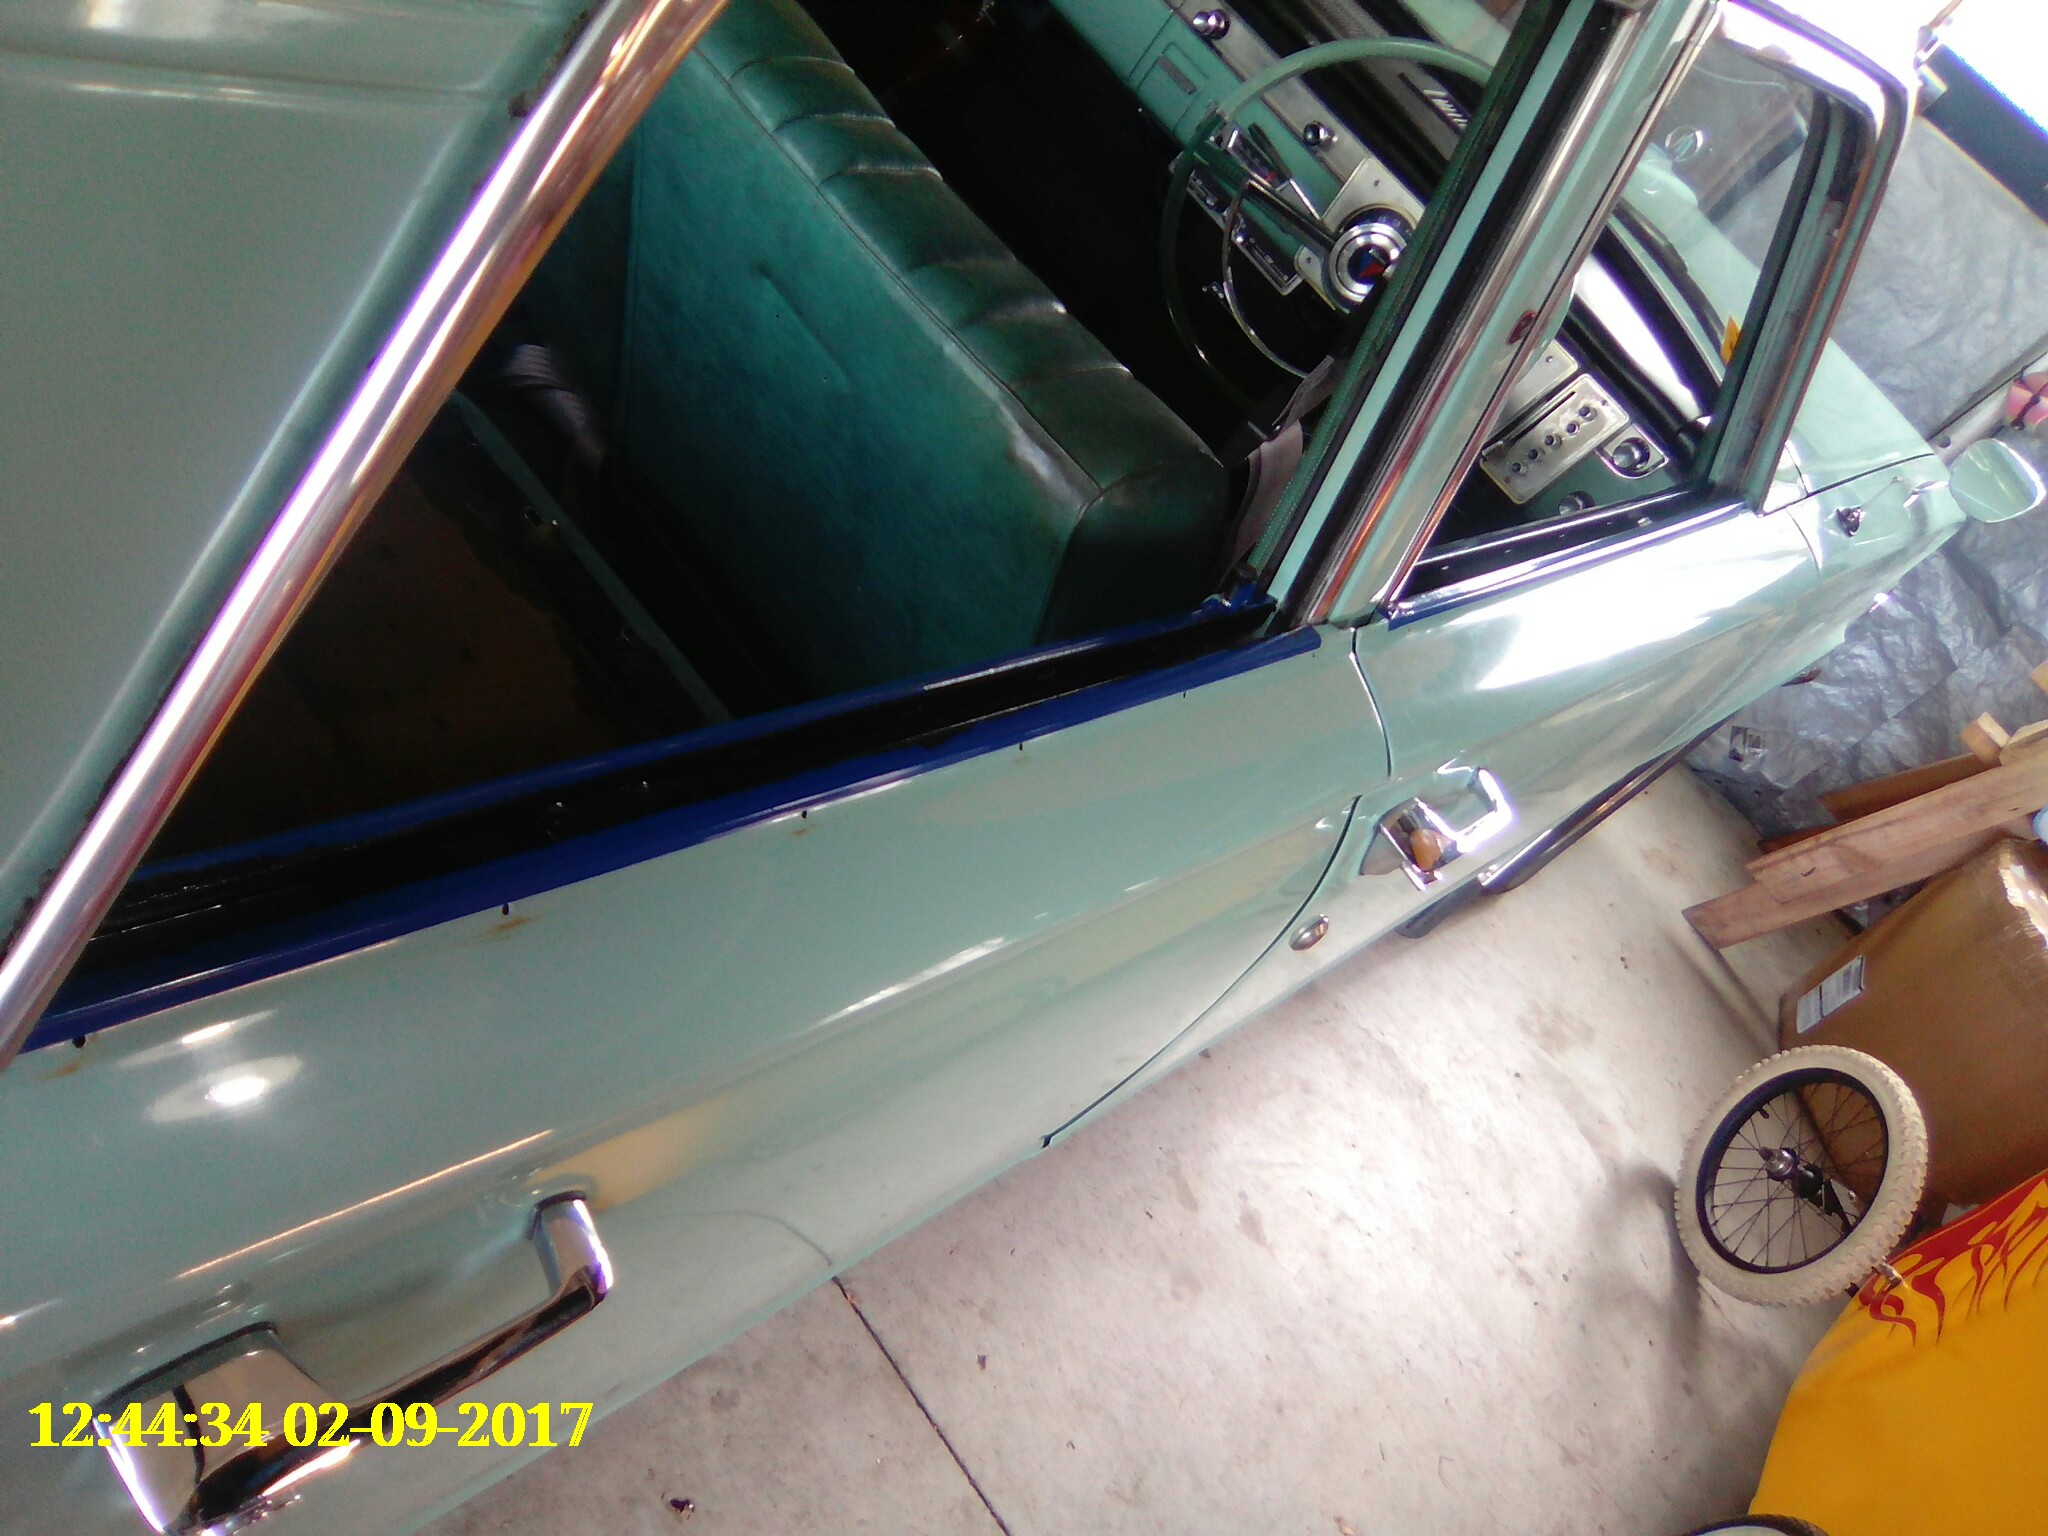
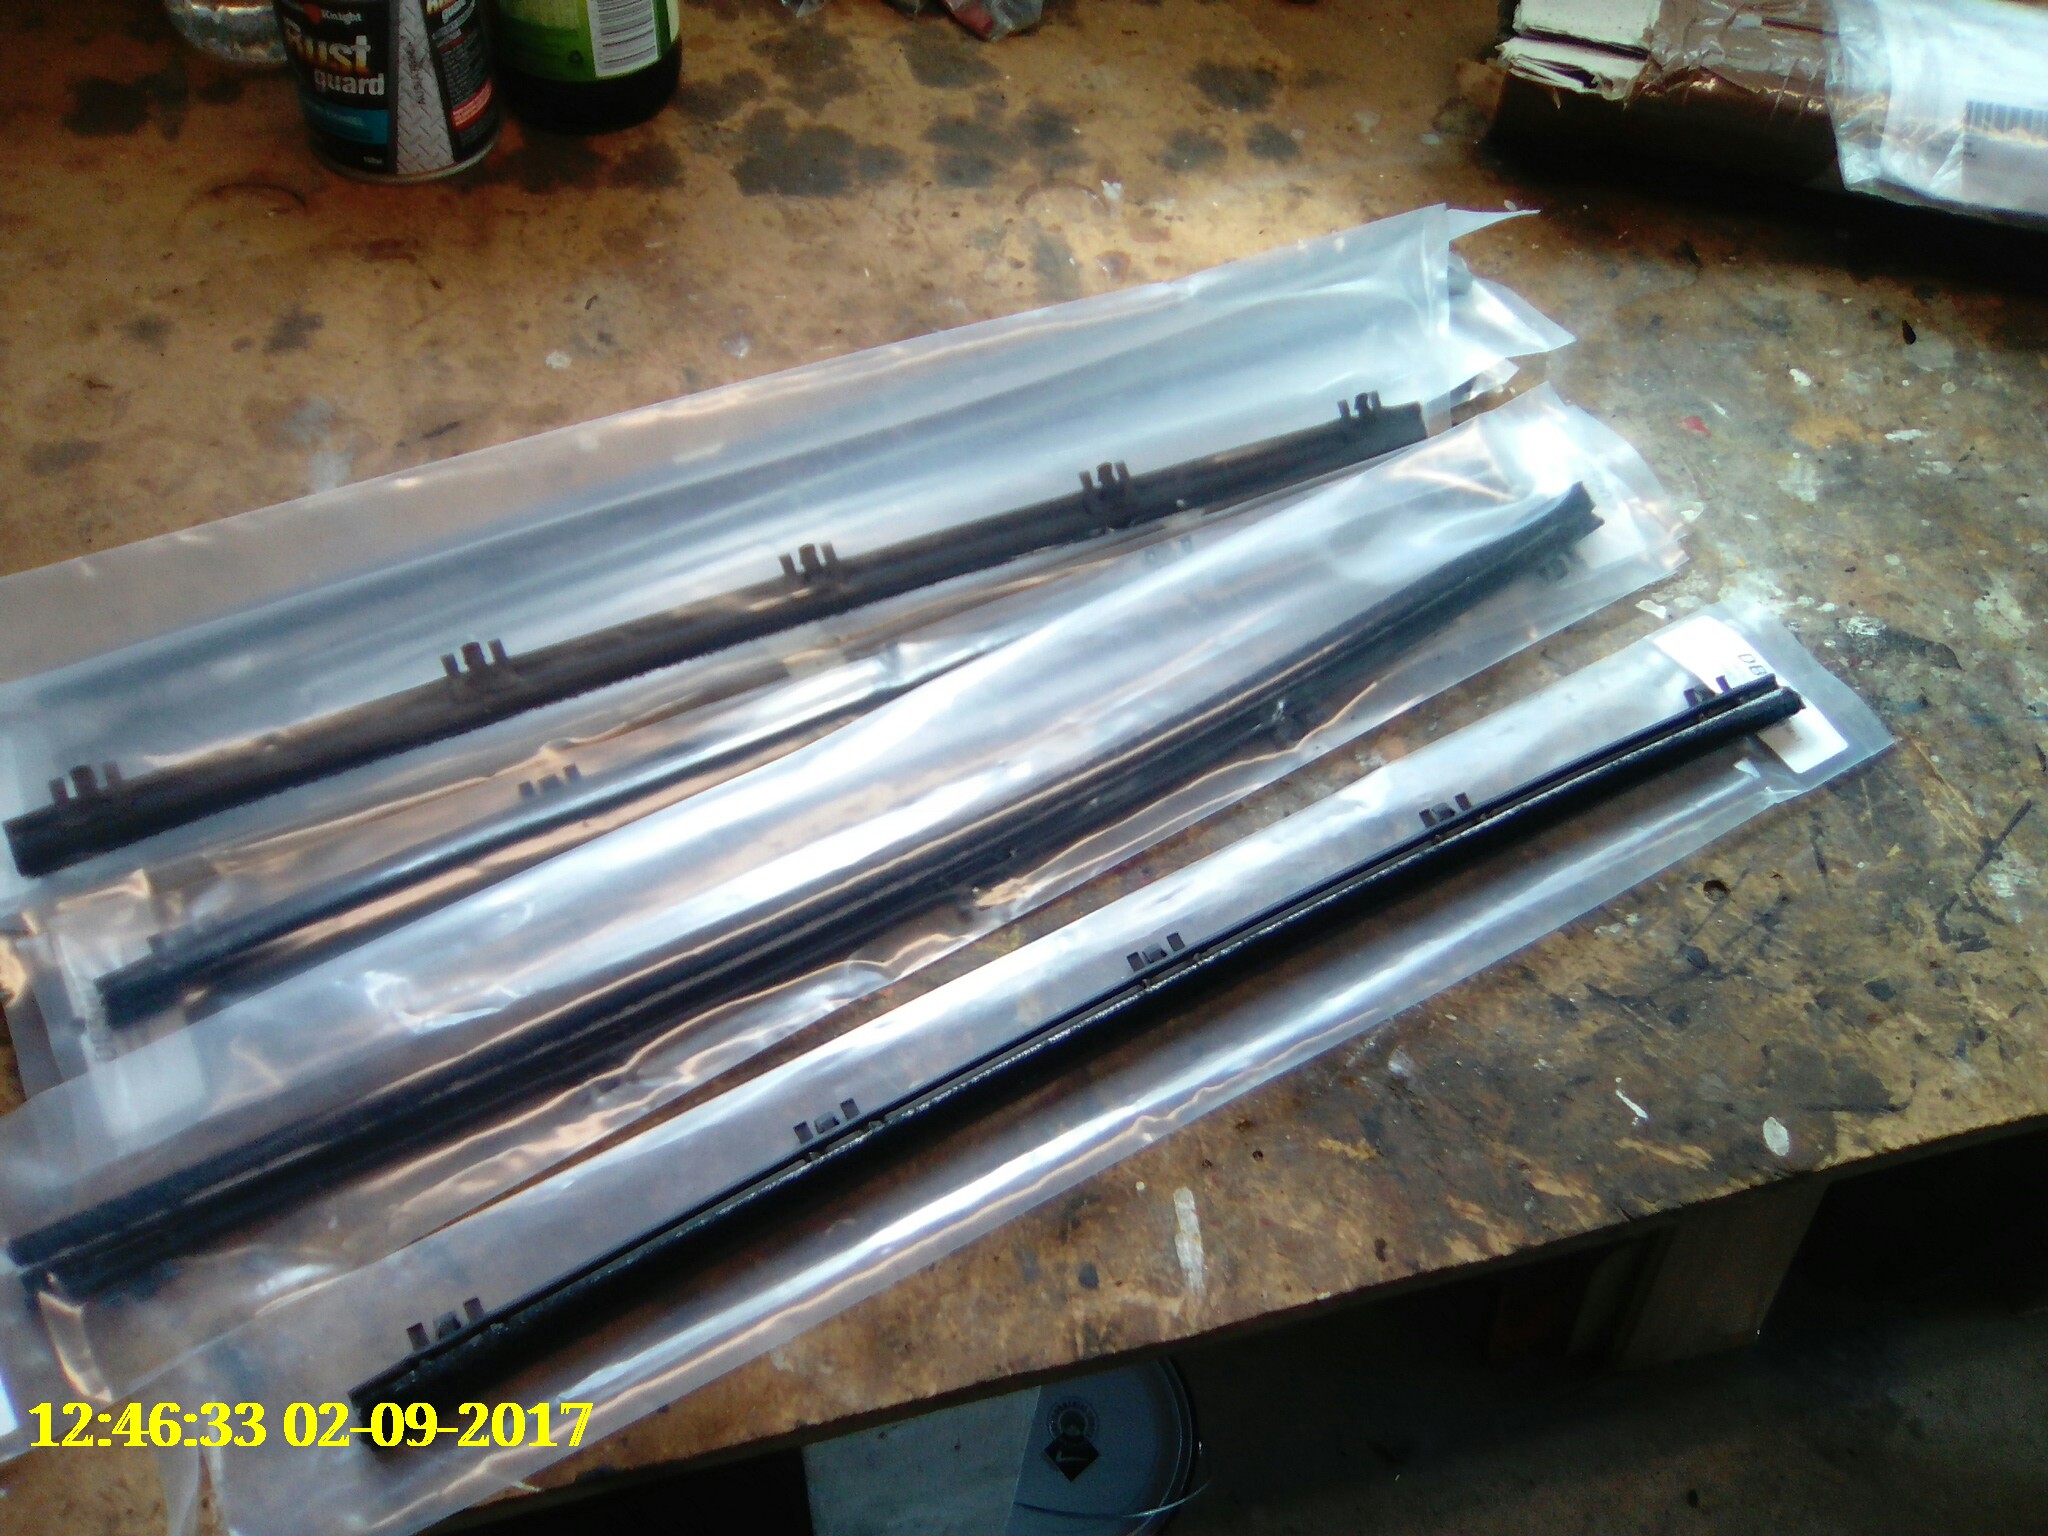
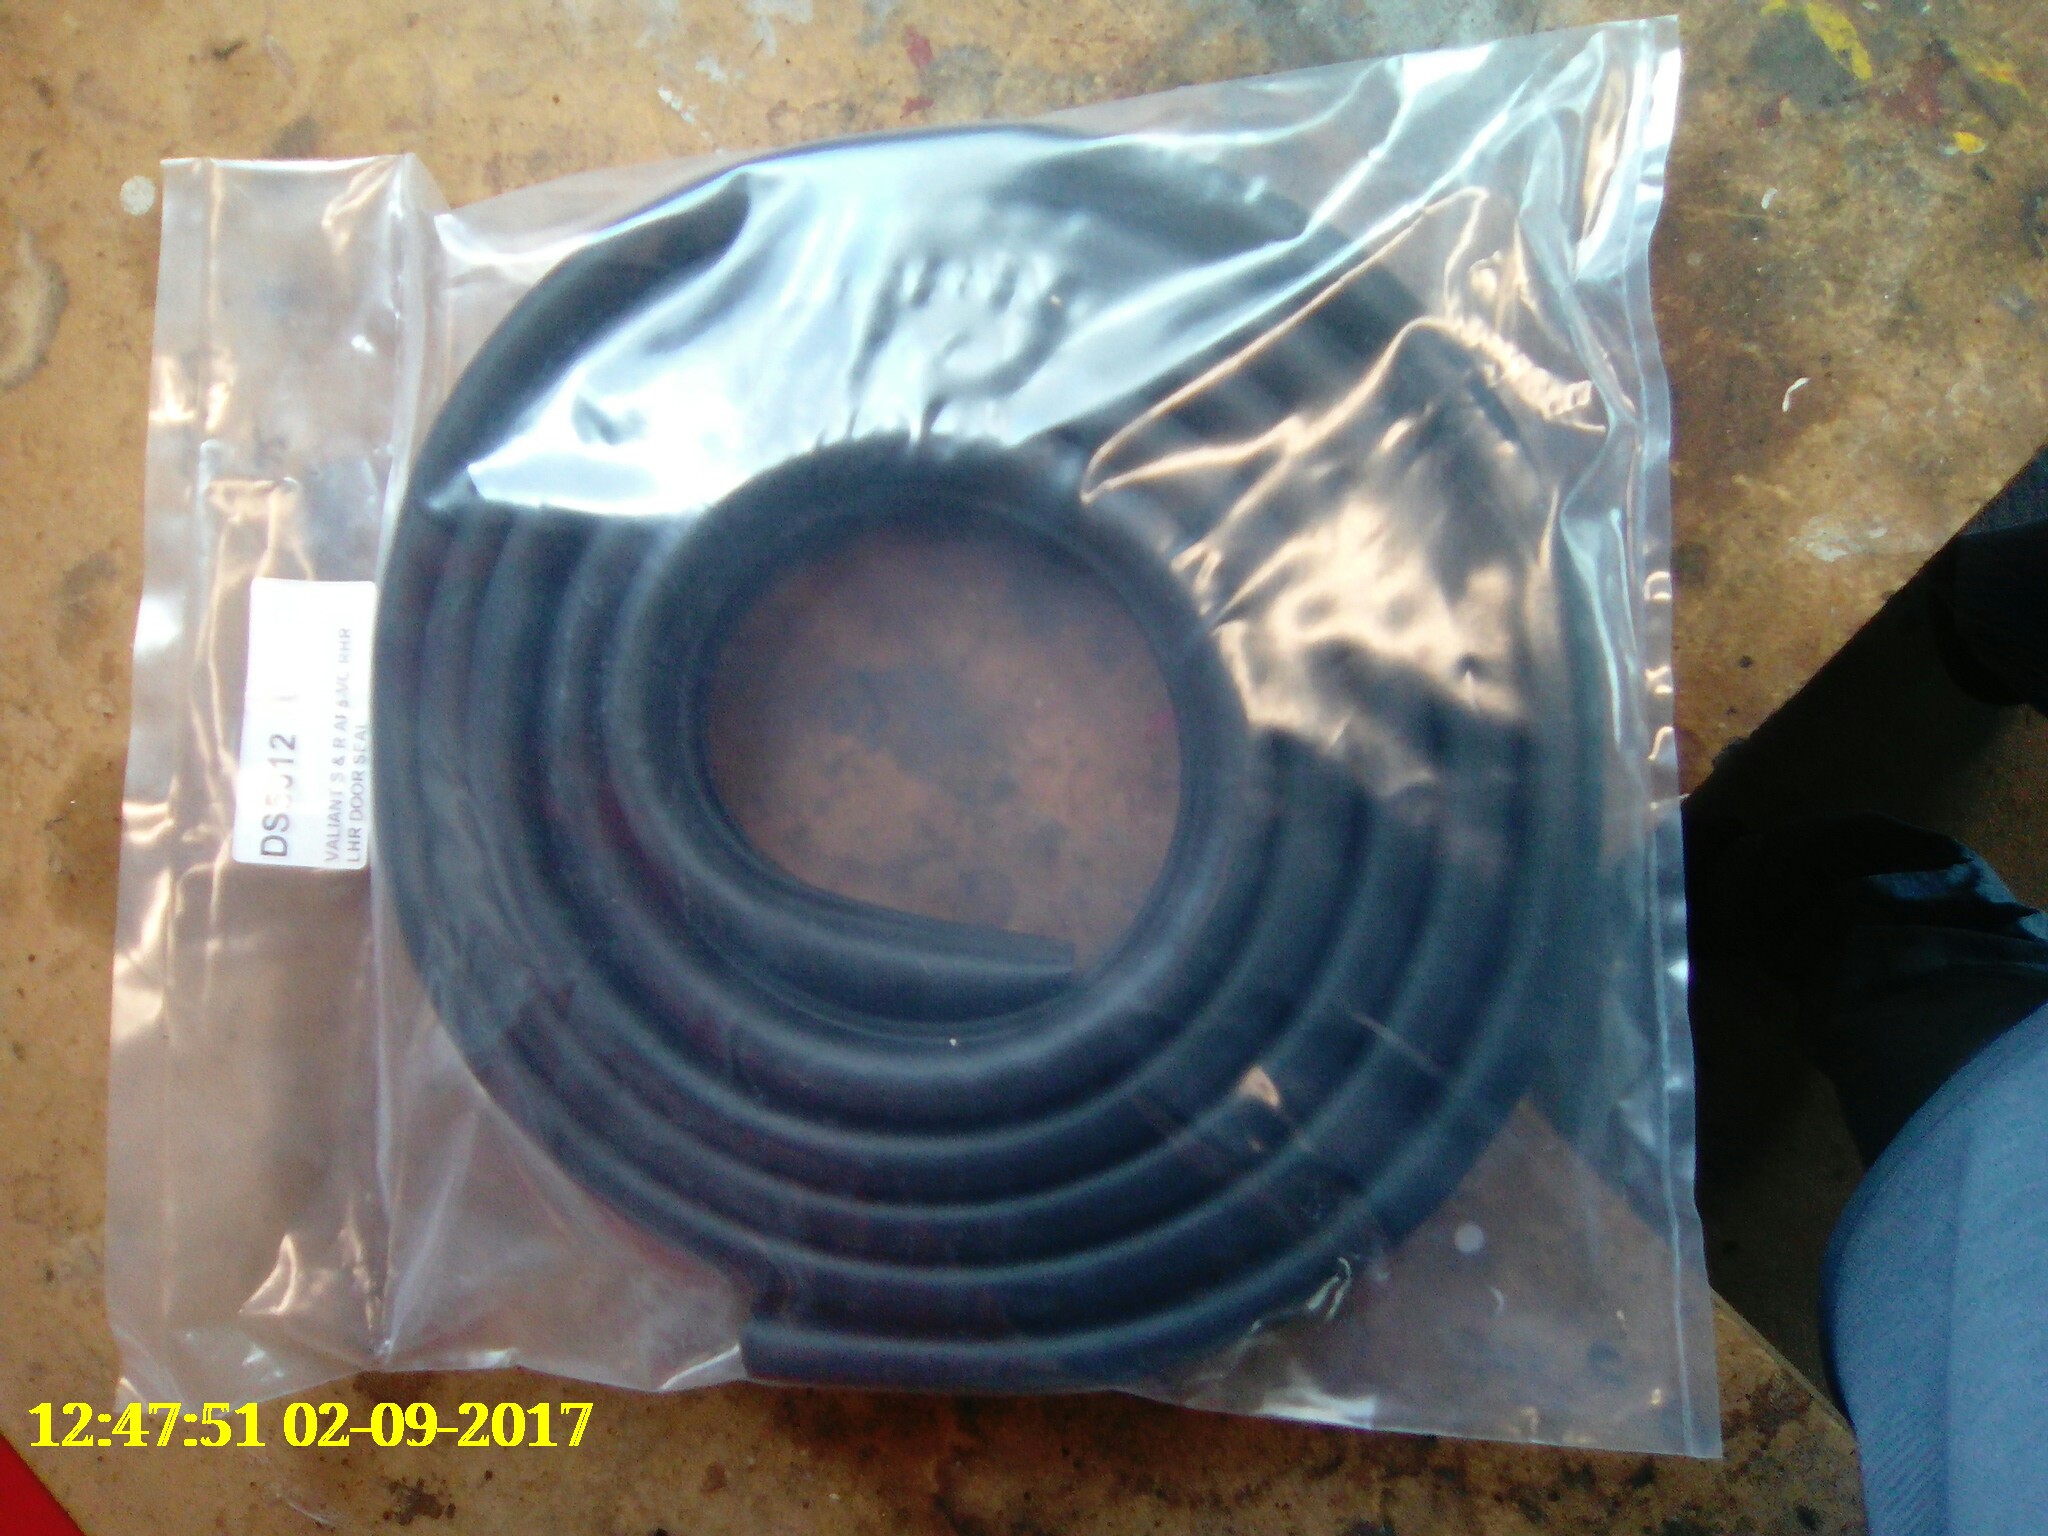
The car is back from the painter and it feels like I am on the home stretch now. New weather belts and door seals have arrived from Australia. There was a little light surface rusting in the area where the weather belts fit into the tops of the doors so I carefully cleaned it up and gave it a couple of coats of paint for protection. Before After I also started fiddling around with the exterior door trims. I will install the trims with a combination of original and new trim clips as appropriate for each piece of trim. Getting all the clips installed in the correct position is actually kind of tricky so some patience will be required.
4 points
-
Accommodation for the two nights is looking a bit like this, unless anyone/everyone has severe objections. These places should be able to accommodate about 20 of us if it comes to it. Night 1 - 24th November - Te Araroa 3 bed backpacker cabins, 4 available $27/pp BYO linen and I assume pillow 4 bed private cabins (maybe 7 available) $55 for two plus $30/pp after that up to four, or $115/ for four unsure if linen provided in private cabins. I haven't made any bookings here. Chat amongst yourselves about what configuration suits you best and book yourselves accordingly PLZ. Te Araroa Holiday Park State Highway 35 Te Araroa Eastern North Island New Zealand 3852 Phone/fax: 06 864 4873 Email bill.martin@xtra.co.nz http://www.teararoaholidaypark.nz/ Night 2 - 25th Nov - Gisborne We are looking at staying at the Gisborne YHA. They have a variety of options available, pretty cheap. It'll be up to the individuals or groups of you to book what you need etc. (06) 867 3269 So it's not critical everyone stays in the same place, feel free to do what suits you best, but it will make it slightly easier to round everyone up and get going if we're all in the same place or nearby. So to summarize 24th November, book your own shit 25th November, book your own shit4 points
-
Booked 24th for myself @Shakotom and @GuyWithAviators. Private cabin. No sneak ins. Keen as for Marae styles the next night. Leave approved for 24th. Sadly it's for 2016. If anyone has a time machine, that'd be great.
3 points
-
Sadly, we bought it from a deceased estate. We are not entirely sure who built it, but would not be surprised if the chap who last owned it did. We had the pleasure of meeting him late last year, but sadly him and his wife passed away within a week of each other at the beginning of this year We had been told by an old friend of his that he would take it to A&P shows etc and drive it around, but we do not know the specific reason he built it. It is extremely unusual! And being what we guess you could call 4WD is just legendary Our plan is to most likely strip it, blast it, repair anything that may need attention, paint it, reassemble it, and use it weekly on our little block. Oh so much to do before December!3 points
-
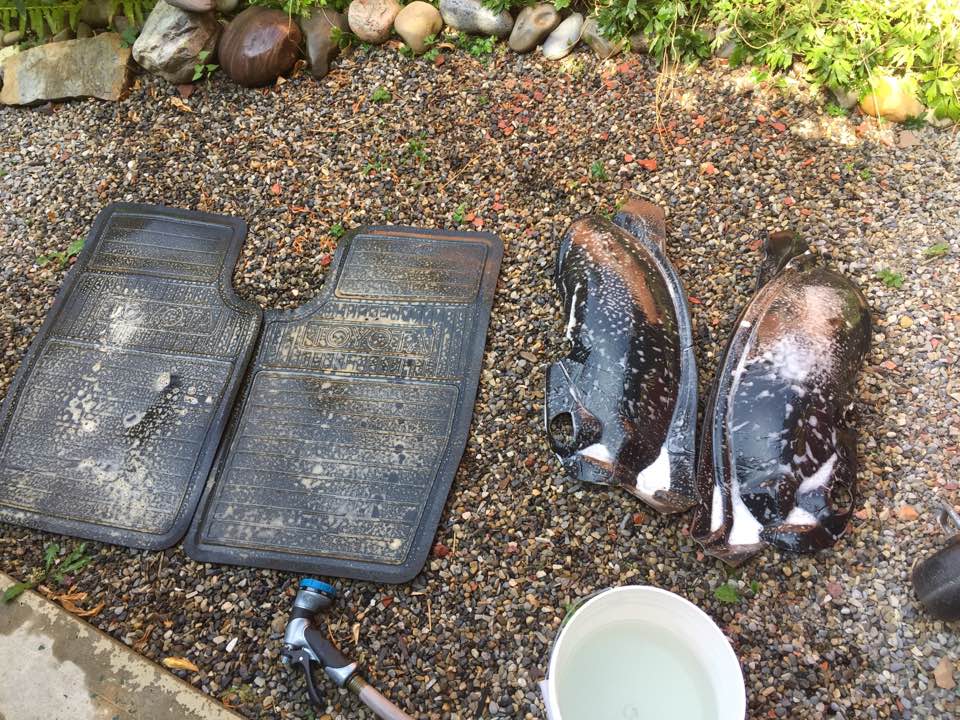
wow, it's been awhile since I had an update to post. Life has got in the way of the car too much. I'm trying to switch careers and work out life, plus sleep train the little one, but I managed to find some time this past weekend to work on the car. First off, I found one of my local auto wreckers happened to have an '82 Corolla listed in their yard, which is like hens teeth up here. I decided I needed to go check it out and see if I could score any parts off it. The car was really really rough and nothing was really salvageable on the exterior of the vehicle. The inside held a nice little haul. Someone had removed the transmission from the car and in doing so, damaged some interior parts, but they were salvageable. I picked up a damaged center console (needs to be plastic welded back together), a black e-brake handle, new fuse box cover (mine I had to repair previously), black window cranks... Toyota branded rubber floor mats, interior fender trim pieces in black, and a set of rear marker lenses that were mint. The best part..$40! I also got around to start working on my wheels I picked up. I spent about 30 minutes straigtening the one wheel that was slightly bent. I forgot to take a picture of it before the repair, but it had a nice bend in the rear lip. I used a propane torch to heat the wheel up for about 10 minutes, then used a 2x4 and a mini-sledge hammer to get the bend out, then used a body hammer to bend the lip back straight. It's still a bit rough, but i'll take care of it when I get around to refinishing them. I also gave the faces of the wheels a good clean, they are in better shape than I expected. I probably won't have any updates for awhile because I have a super busy 2 months a head of me, including flying 3200km across the country to go write a test for a new job, which may require me to move that 3200km, but I'll see if I can post updates as I have them.
3 points
-
Also had my $5 Aliexpress Tachometer turn up so I mounted that this evening to assist with tuning/see how many RPM I'm pulling with this de restricted CDI/measure the tachyness of this plastic heap Sits just above to storage compartment in a spot that gives the least obstruction for access. also note Speed light that will come on above 40kmh. Ricey
3 points
-
Hey Guys, I rented the track for my birthday in September and my associates that drift have all bailed on me, unfortunately I cannot cancel my day however I can move it to October 21st. To give back to Oldschool for all the meets, Drags, BBQs, and good yarns over the last 8 years I have been a member, I would like to offer you guys a relaxed as day to come and have a bash, do some skids, enjoy a BBQ and get some basic pointers down at Meremere. This will be a super relaxed day, doing cone work in the large open area. The greener you are the better. I dont care what care you bring, could be new, could be old, just has to do a skid. NOTES: Car must have, seat belts and windows, you must have a helmet, extinguisher isnt required but recomended. Track rules, Hit the Armco you pay for it, Do a burnout or skid on the yellow lines or return road $1000 fine, doing standstills $1000 fine Gates open at 8am, Driver breifing at 9am, driving by 9:05am. Lunch at 12, closed track until 12:30 Pack up at 4pm, gates closed and locked up by 5pm Entry $130 Final Payment Date October 13th leave a message below, PM me, text me 021 794 705 if you are interested. If you are a Joe Manji Superstar, and want to just slalom up the track all day YOU WILL BE BORED as I want to give everyone who has never had a go at drifting, doing a doughnut, doing a figure 8 seat time to get comfortable and enjoy themselves.
2 points
-
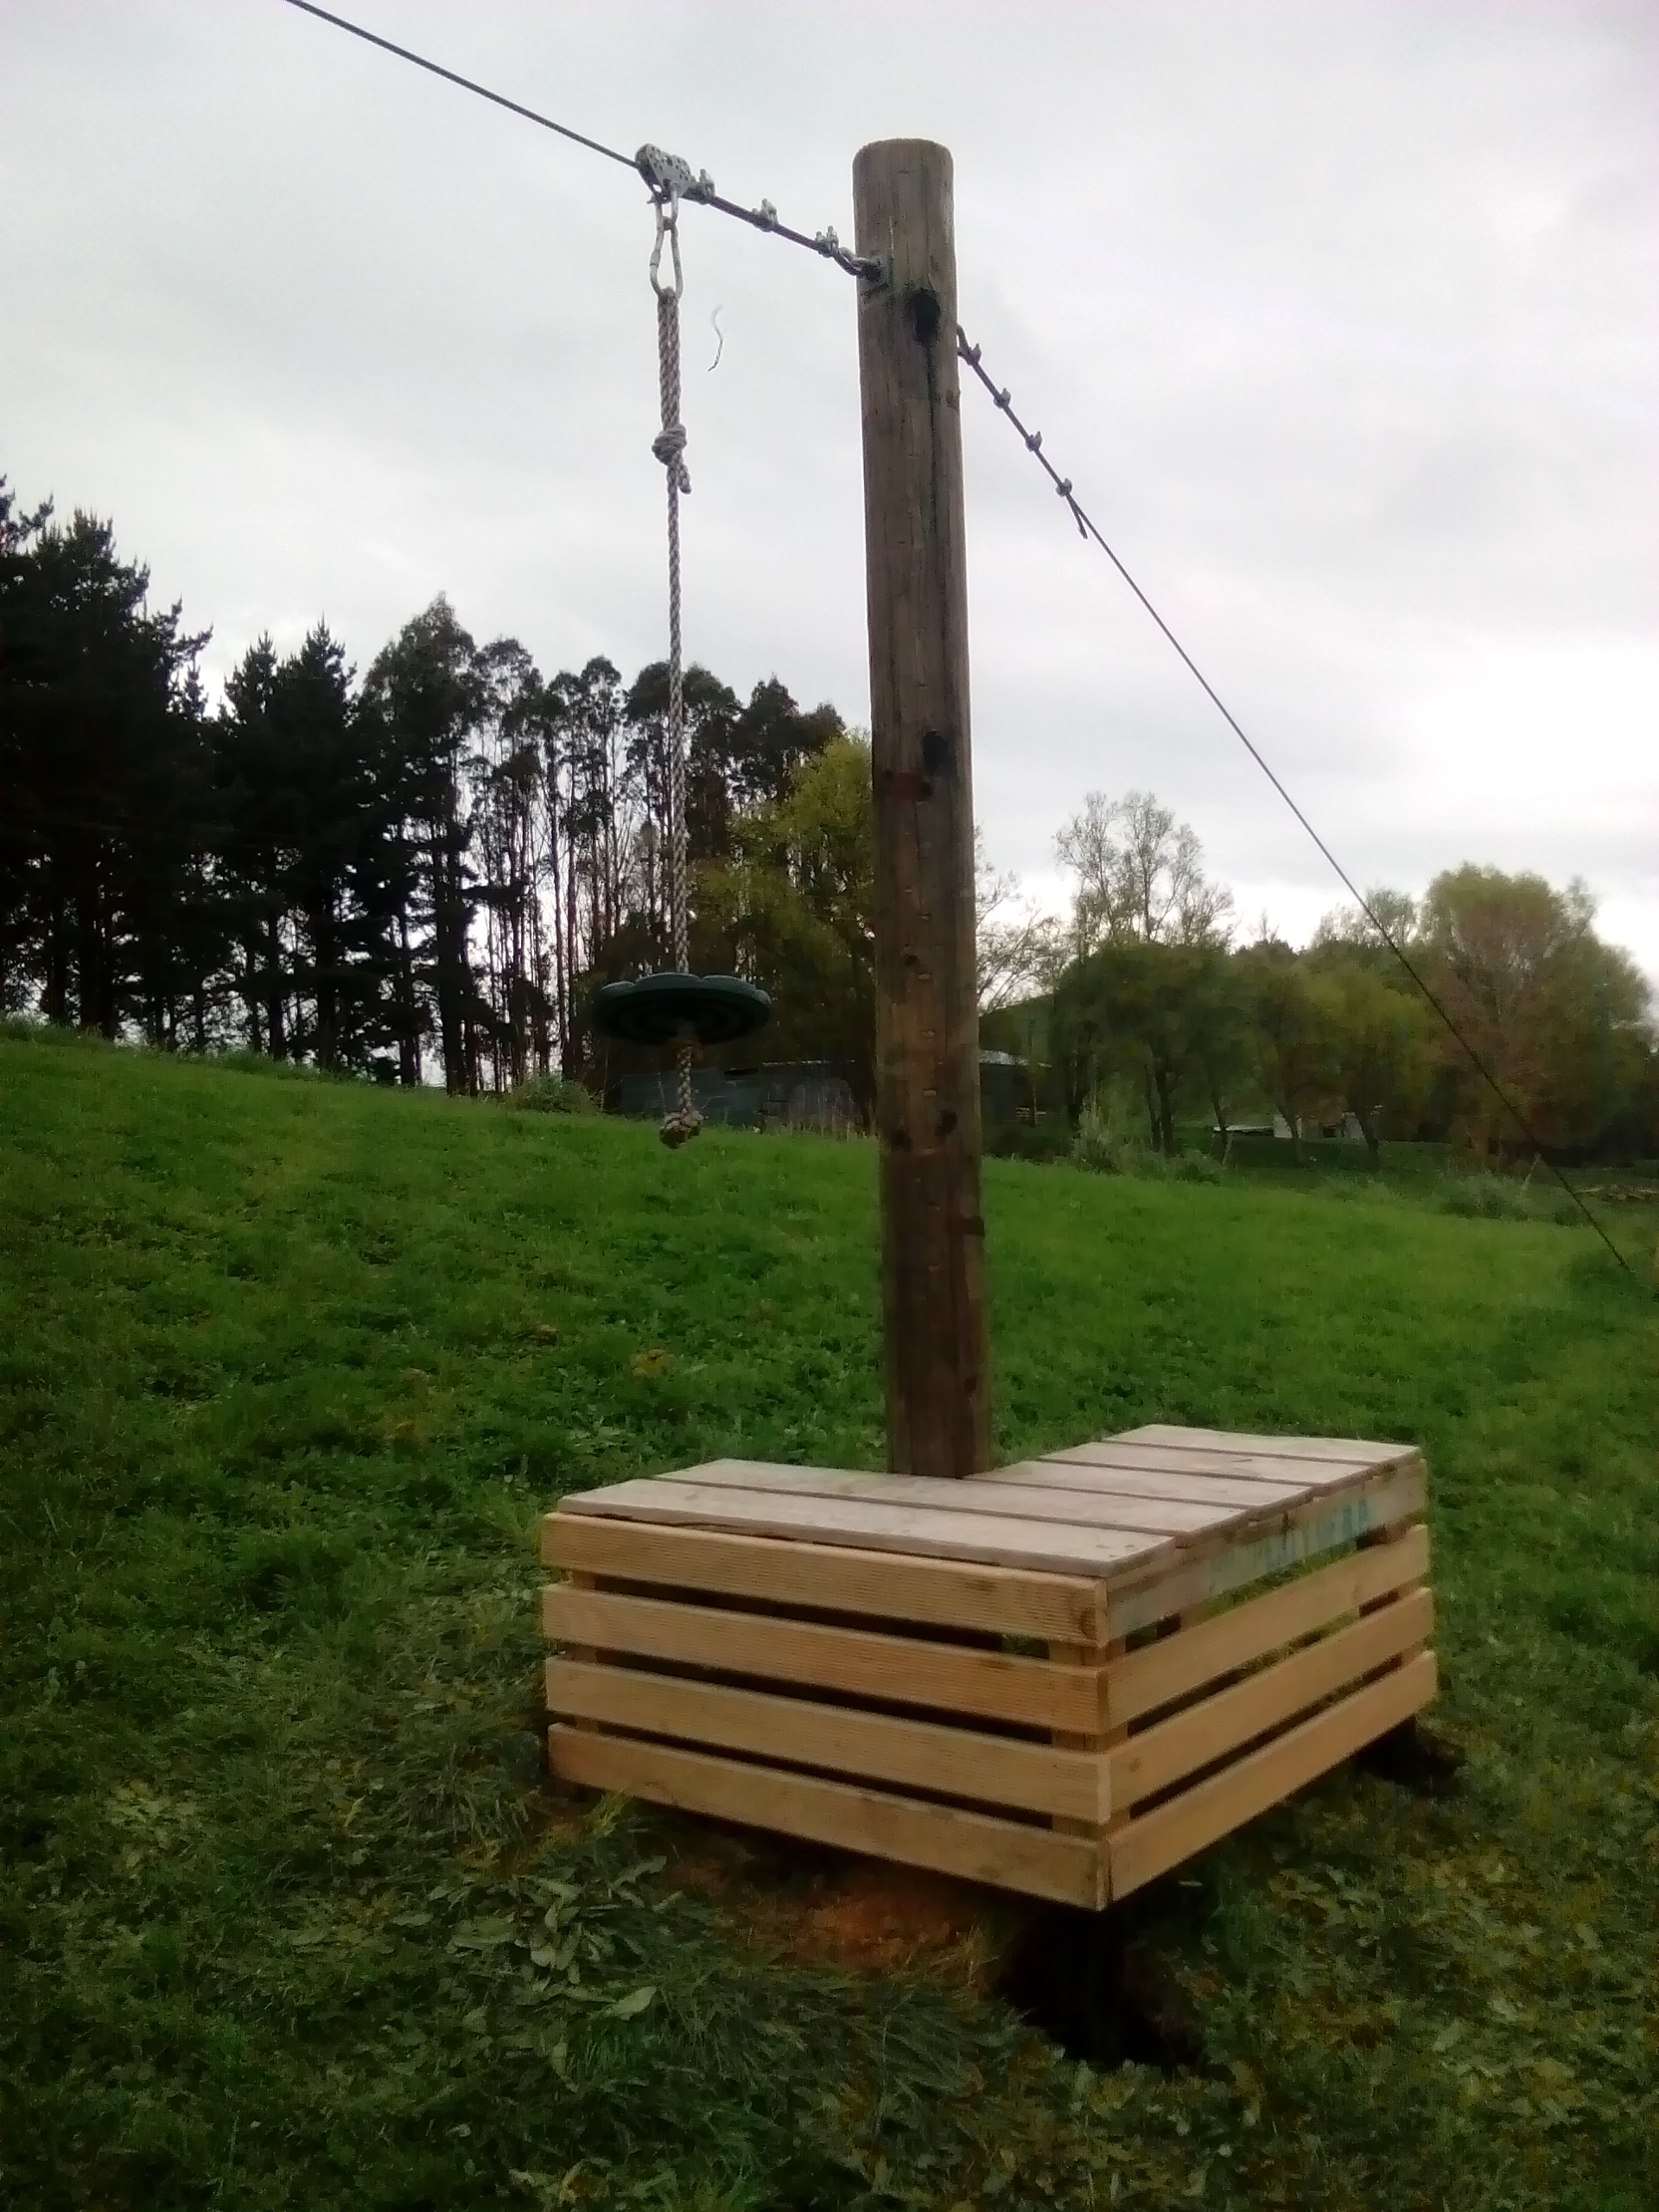
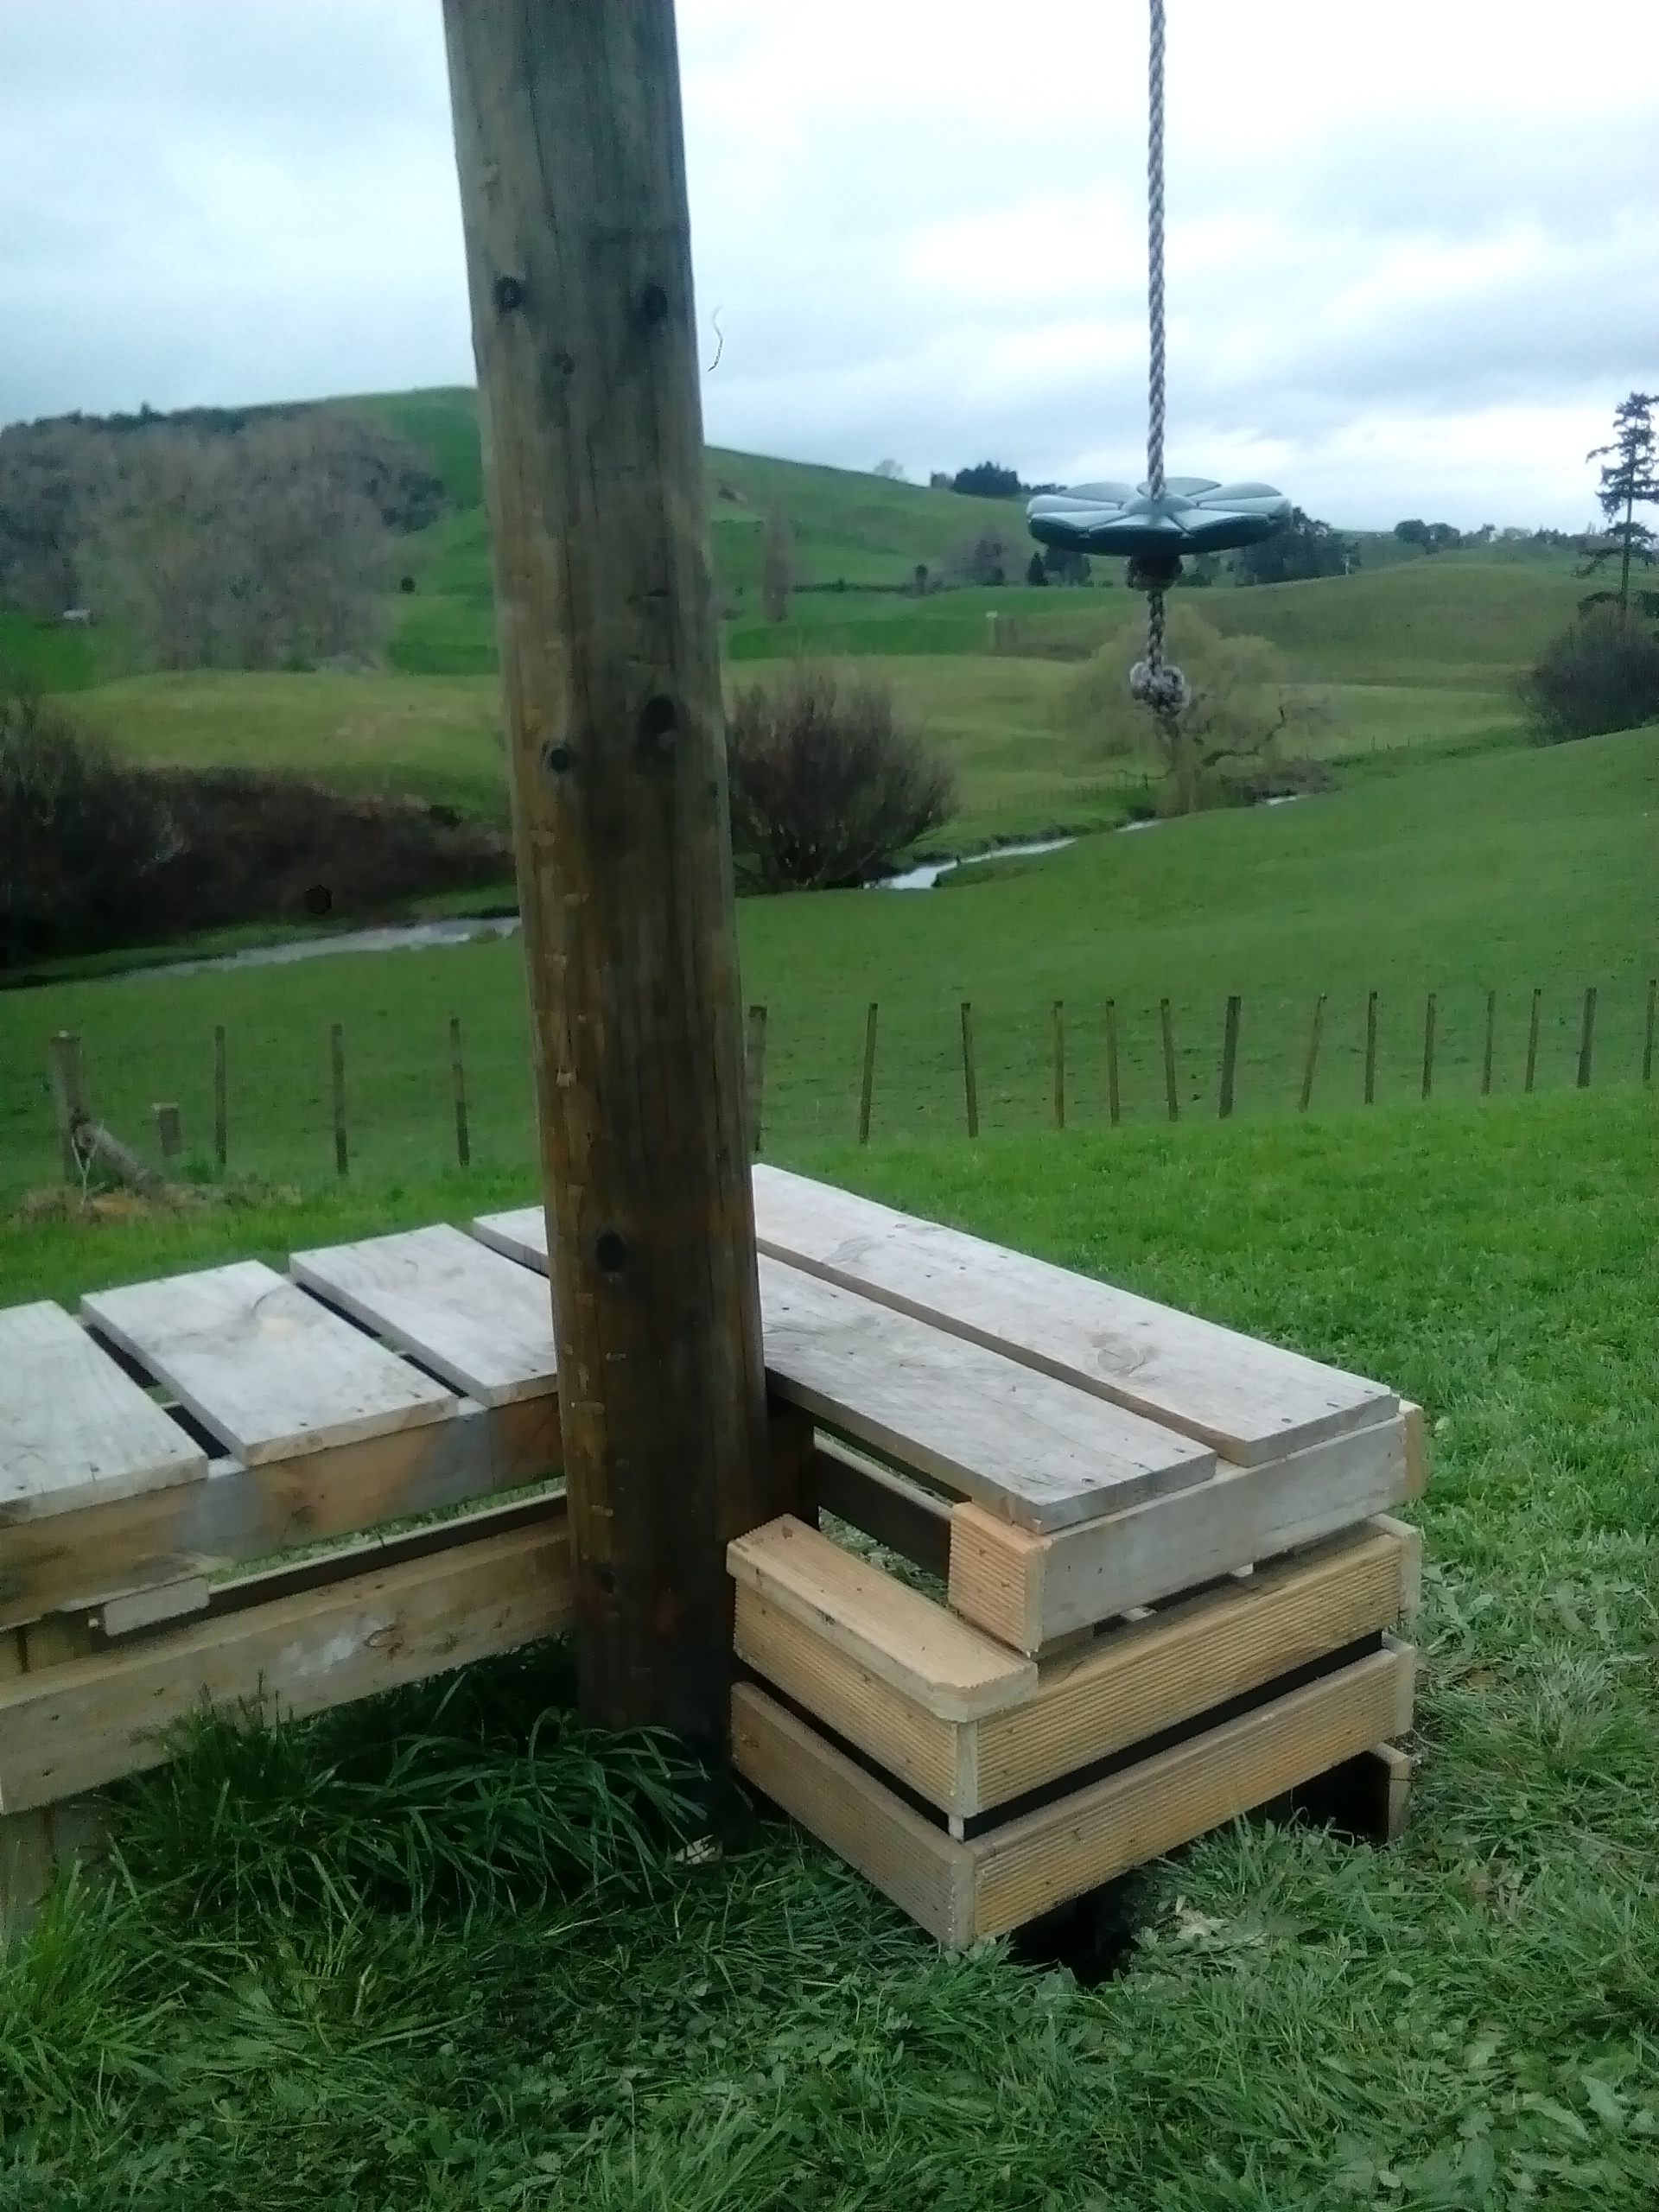
The flying fox had one of those temporary fixes that kind of gets normalised. See the kids were too short to get onto the seat, so I chucked a couple old hilux rims under it...9 months later... So, considering I didn't want to invest a fortune in building this, an old pallet, some decking offcuts, 4m of rough sawn timber and a couple bags of quickcrete were all it took (about $35 total cost). Much better than the doggy old wheels. Kj
2 points
-
I could be wrong but I think wings and wheels is a new event this year so will be interesting to see what its like.2 points
-
I was expecting a small rocket launchpad2 points
-
Painted the cam covers a nice semi-gloss black I have a W58 on the way, adapter kit from SQEngineering and also trying to sort out a clutch setup too. As it is more a daily driver I would like a Puk clutch type but with springs otherwise will be super bad in town conditions.2 points
-
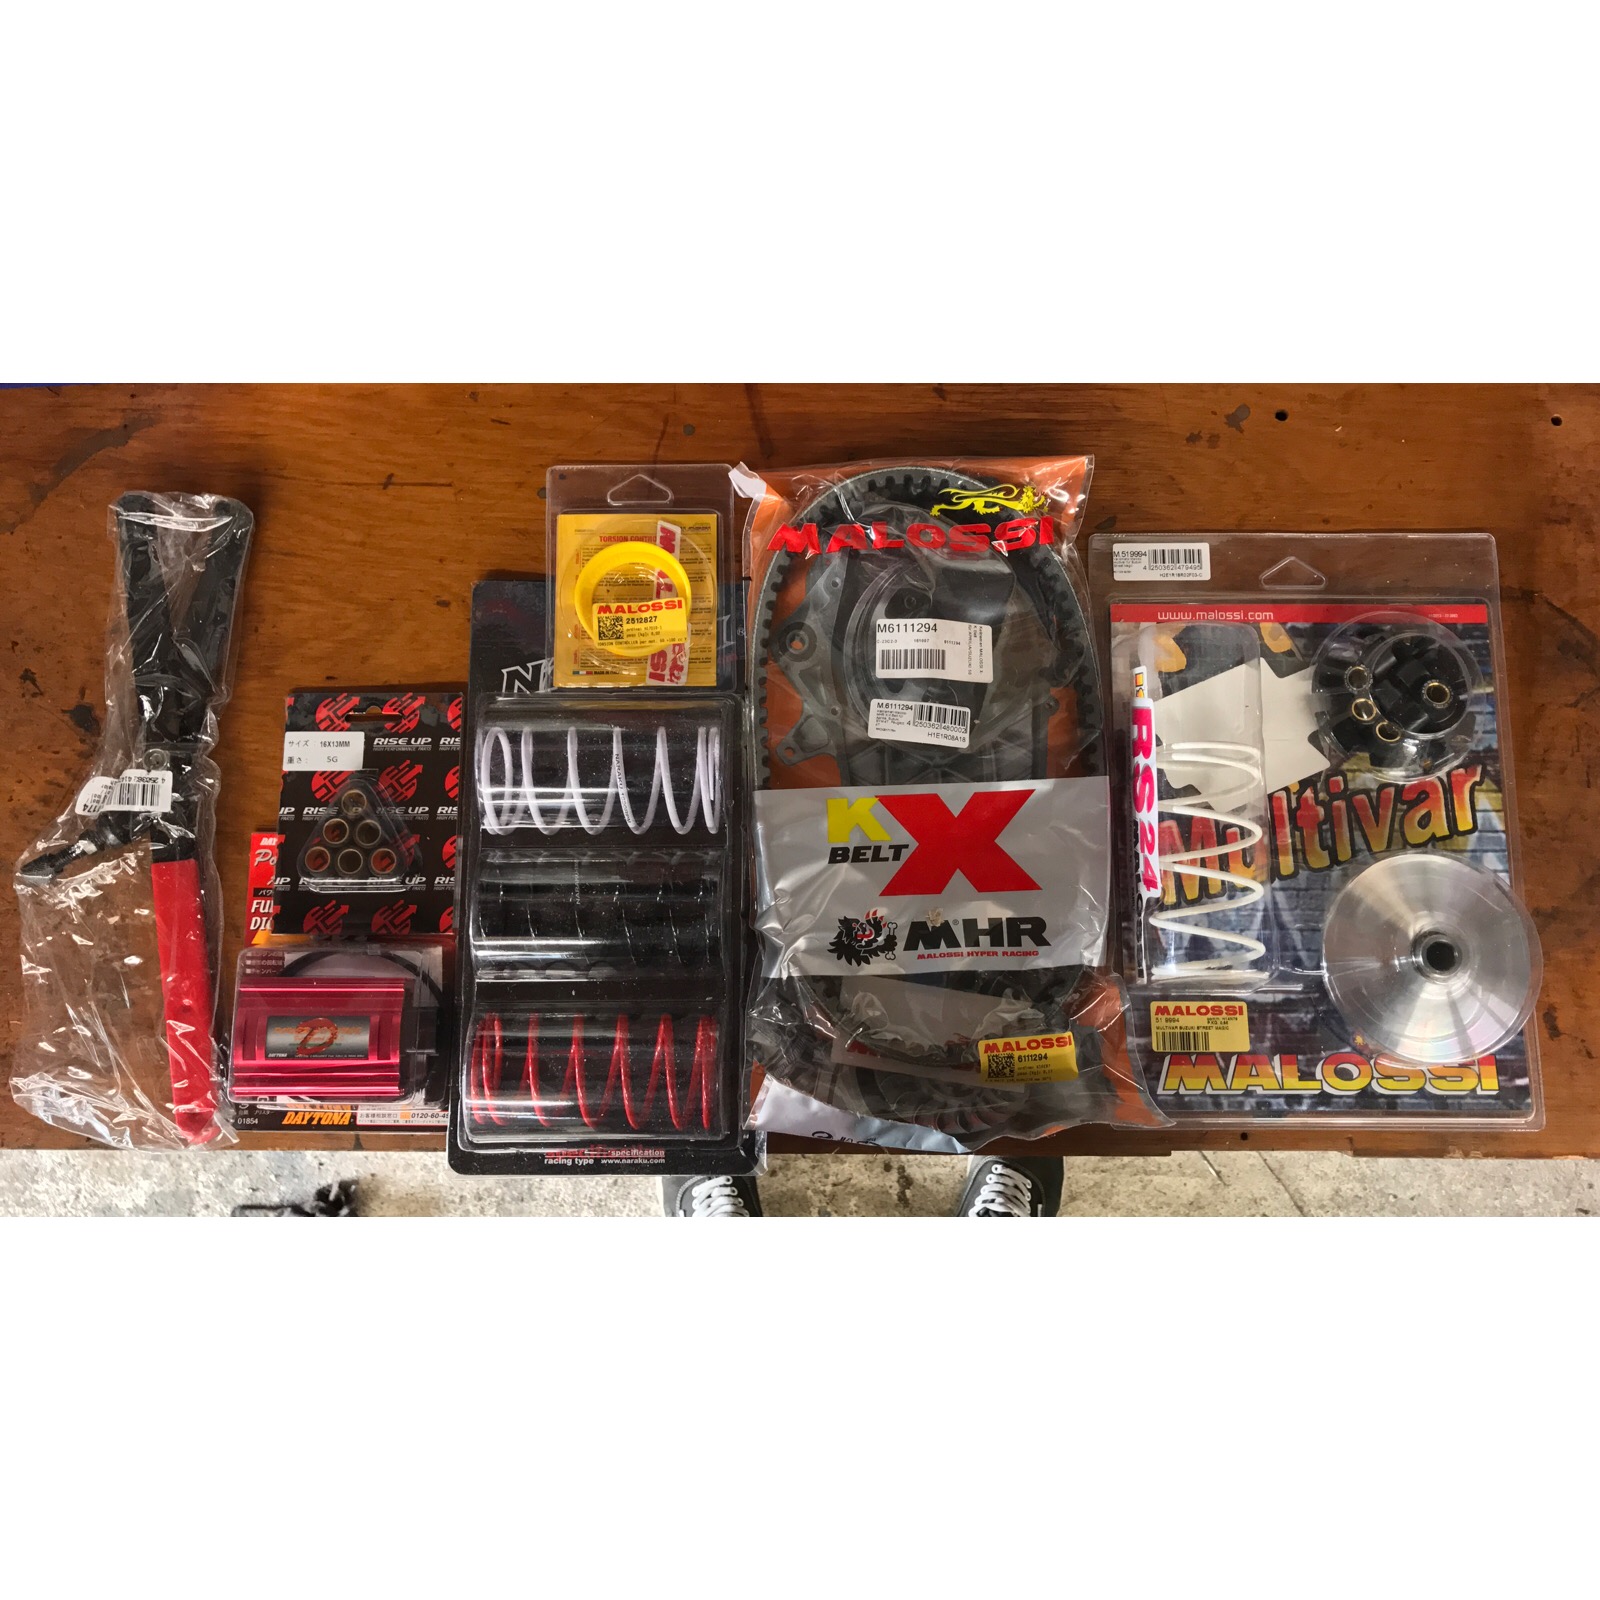
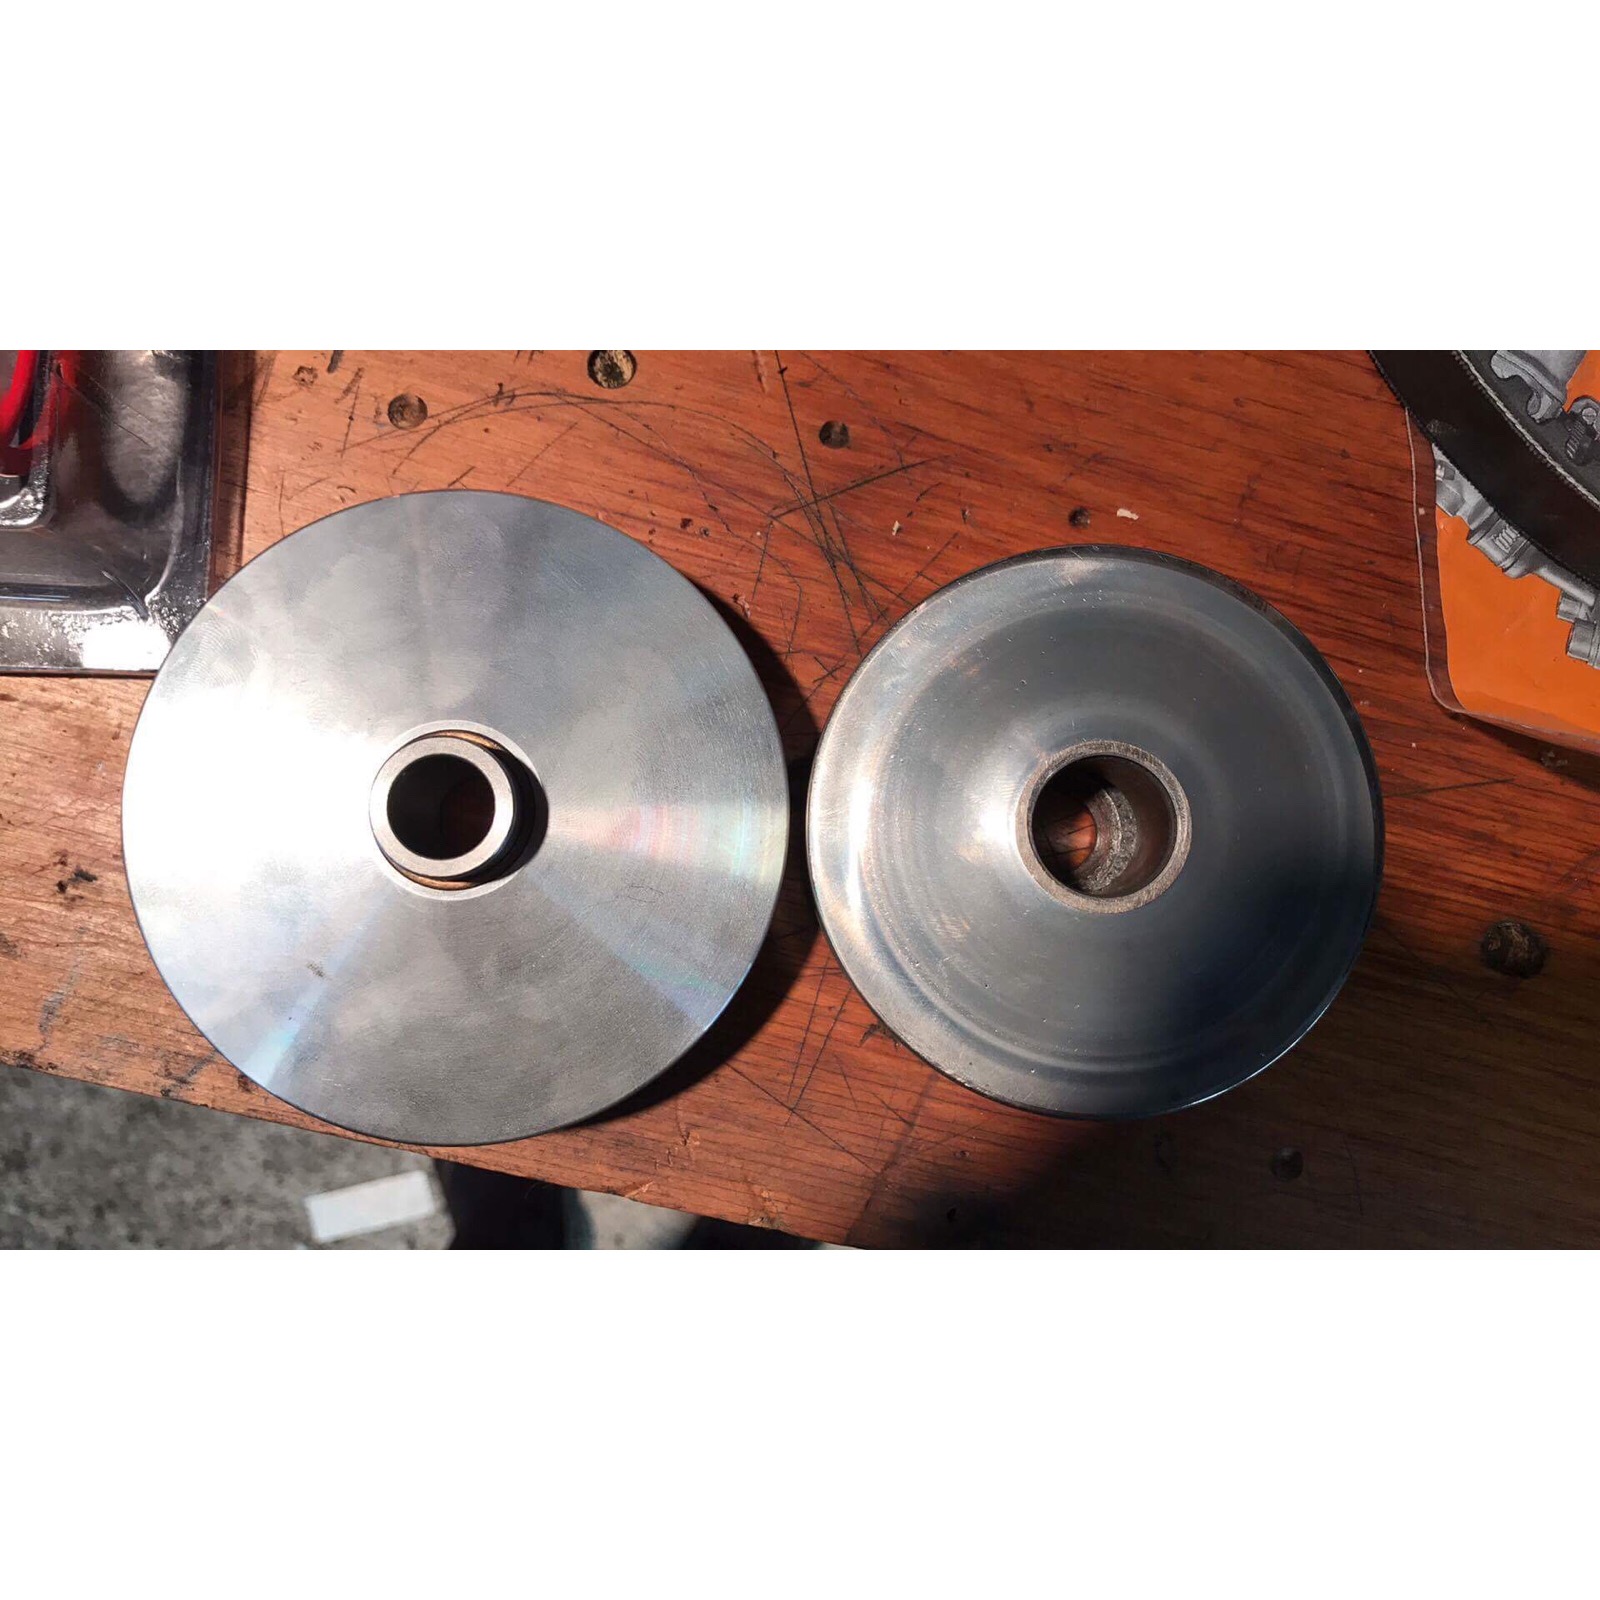
YAY PARTS! ended up with Aftermarket CDI, High speed variator pulley, a torsion controller,an assortment of torque springs/weights and an incorrect drive belt. there is a decent difference in size between the new variator and the old one. This should increase too end speed
2 points
-
So after getting it legal i decided that it needed to sit a little bit lower. To do so i sent the rear springs off to Chamberlians (If that is how you spell it) and get them compressed by 52mm (transferring to 65mm at the wheel.) The fronts we were told we could just cut and they would still be captive which was true. it sat a little bit lower but i still would've liked for it to be slightly lower. This is the perfect height as it doesn't rub what so ever and only catches on the front guard corner on the center of the tyre when at a certain angle. heres how it sits: We then took it for a run to ensure it was all going well for the Kaikoura Hop, taking it to the Amberly RocknWheels meet and the Kustom Car Club Breakfast. It preformed amazingly and got alot of attention for being a different and rareish car.2 points
-
Redone the gusset on the front end because I wasn't happy with how it looked, should be much stronger now. Made a start on the handbrake linkage thing. Used some $2.50 block bearings from aliexpress, as I was not keen on paying over $100 for two in NZ that weren't even the right size (needed 12mm ID ones and apparently 12mm is a very uncommon bearing size) so would of had to sleeve 20mm ones to fit. The china ones seem decent enough for what they're being used for. My dad had an aluminium air bag tank that he was planning on using for another car, but it fits this perfectly apart from the mounts being on the back instead of the bottom. So might buy it off him, cut off the mounts and re-weld them in the correct place. Made up some more plates for seat belt mounts, this time for the floor. The retractor bolts onto the back and then the lap belt bolts on to the part sticking out. Also has a doubler plate underneath the floor with some captive nuts. Stripped everything off the doors to see if they needed any repairs. Yes they did. This is the worst of the two. Was hidden under a rubber seal and the strip that holds it in place. Left side door isn't as bad but still needs some patches as there was a few rust holes. Found some on the outside skin which is a bit annoying, but the patch shouldn't be too visible anyway. My parents are heading off to America soon so I made up a list of all the parts I need. Everything is so cheap but it adds up quickly. Hopefully it will all fit in their suitcases.2 points
-
No, I just assumed we were posting unnecessary things in inappropriate places so went along with it.2 points
-
Nah fail, it was better but no full secondary's. Pissed about with it all afternoon but never got there. I noticed the dizzy wasn't advancing so I put mine in, tweaked the feet of the secondary's so it's just about touching the primary's actuator. pulled the diaphragms off and they checked out, put back on with some sealant on the gaskets. I though maybe the airbox might affect the vacuum situation so I also sliced the bottom of the air box, pushed it down to where it cleared the bonnet and filled the gap with panel steel. Didn't get to test drive it but didn't seem to change with free revving on the spot. A keen mate decided I needed mirrors so went and scored a few from some wrecked Cedrics, I made a pair from the best of them, cleaned up well. Stoked with the look, sedans look best with rectangles as opposed to round sporty ones. were now cooking up some 13" wheels so I can utilise the golf shocks and lowering springs I got a few months ago. likely have to reset the leaves too but it needs to come down. I like the current wheels but they..aren't 13s2 points
-
I even won a prize, for something?2 points
-
So Recently brought a land rover thought I would upload a few progress photos
1 point
-
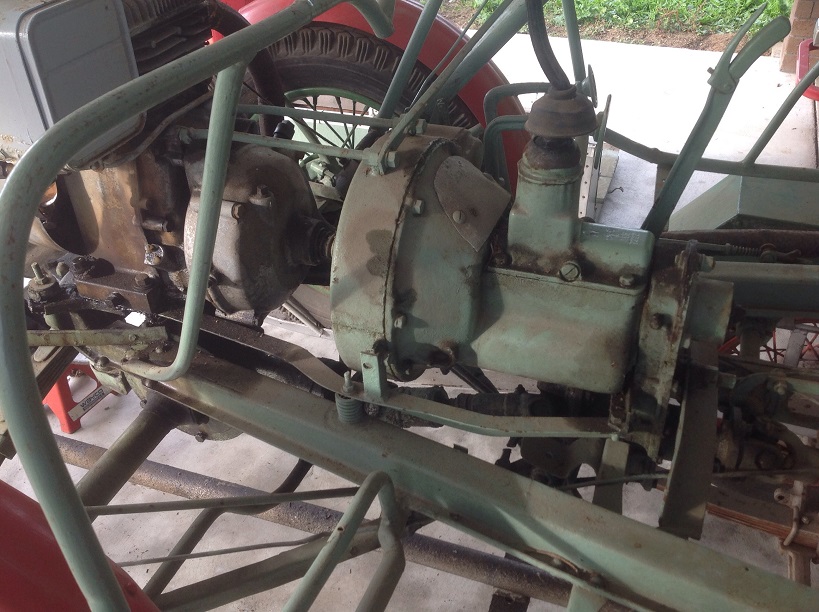
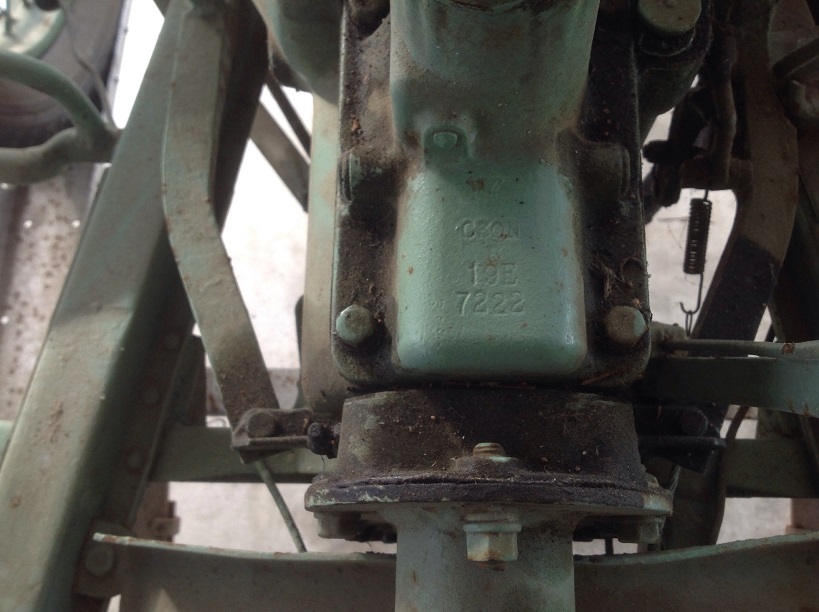
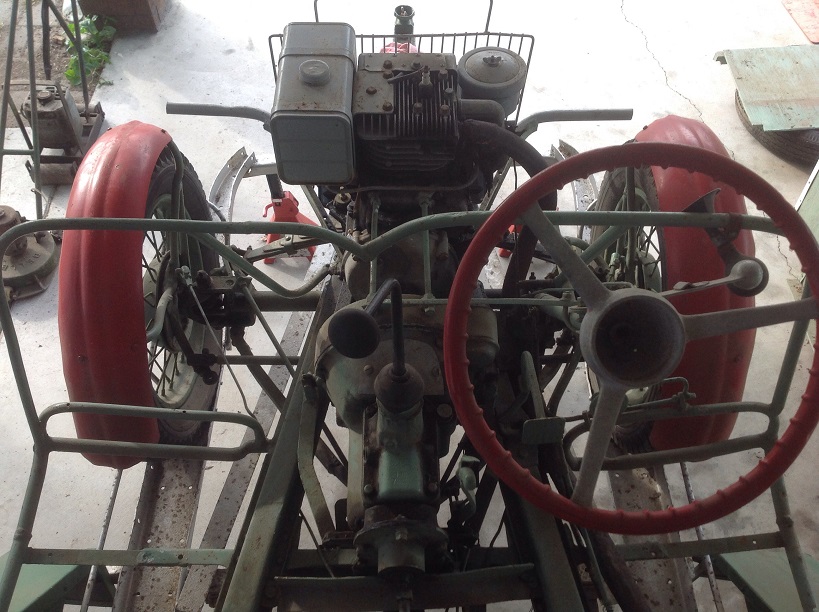
Hello there. We are hoping someone may be able to identify our gearbox. We have been told the chassis is an Austin Seven but have no idea if the gearbox is specific to the chassis, and cannot seem to find any pictures of one the same online. It also appears to have a transfercase(?) on the rear to provide power to both diffs. Yes, it has both front and rear diffs! Even though we are trying to identify the gearbox, we would also like to identify the Briggs & Stratton engine model it is powered by. We cannot seem to see any numbers what so ever on the engine. Many thanks
1 point
-
I would make the trip up for a swap meet. The hoarder in me says I need more bits1 point
-
Slow progress! I need to get more time to spend on this thing. Doesn't help another one I had stashed at my parents place in Canterbury has also turned up. Back to Red. Brakes are all on, little spongy still. Might need another crack at bleeding. I borrowed a polisher and got to work last Sunday. First time I have ever polished a car ha! Pretty amazed how the old paint came out. It's still shit, falling off in places and different colours in places but it has a sweet shine to it now! Makes me feel much better about the project. Also removed the vinyl on the C pillar. Last owner put it on to make it look like a later model. Super freaked out to what I might find behind the vinyl but I was pleasantly surprised. Paint is slightly different shade to the rest... Looking at getting the original radiator rebuilt for it. It has had a few patches and repairs and some of the corner folds are leaking. Brad from Auto Radiators in Grey Lynn blew my mind with his radiator knowledge. Priced it at around $950. Ouch. I kinda want to do it, I kinda don't....1 point
-
Bog = lean normally, normally with a moooaww noise if really lean like if you tried running with no air filter. 11g is 4t territory for rollers imo, my Gyro came with a couple NOS sets of Honda rollers one set is 8g and the part number cross references with 2t Gyro and some Dio models etc and the other set are 11g and match up to 4t.1 point
-
Oi, don't tell the kids it's not. We were counting down and making rocket noises for hours yesterday.1 point
-
I'm considering entering the Wings and Wheels show but it all depends on how much snow is left up the hill. I didn't go last year so I don't actually know what it's like.1 point
-
this is excellent filth1 point
-
Good work Son, get back to those Bogan roots. I went to school with a lad who had a very tidy VL Calais with 308 and Trimatic. Even had the lush maroon interior. I'm pretty sure I asked to buy it off him almost every week but I still think about that car every time I see another and wonder where it is now and in what sort of condition.1 point
-
I won't be able to afford to bring my car up to the drag day but I'm hoping to come up as a volunteer so I'll see you there!1 point
-
I Beat it for a little bit today, had some funny business going on in the tank in that it would seem to run out of gas when still half full. I had already replaced the fuel tap way back when I first got it running, which was a piss around as it uses a vacuum tap with a M14x1.0 thread which was hard to find. Manual taps were a no go as it is all hidden up behind the sidecover. (Here is the one I bought http://www.ebay.com/itm/Benzinhahn-CPI-Keeway-Generic-ATU-Explorer-Longjia-2Takt-50ccm-Roller-M14X1-/161821009433?hash=item25ad48a619:g:7ZkAAOSwHmhV8HDh) Anyhoo, when I replaced the tap I couldn't get the filter out so just left it, I finally pulled it out today. It was good and stuck so I had to thead an M8 bolt into it then slide hammer the fucker out and of course it was all varnished up and fuel could only get in through the hole on the very top. The replacement is a bit different but will still work, noice. I don't think I put a picture up of my heater vents installed yet.1 point
-
Boaty McBoatface. I like jet boats. Down here everyone uses jet ski motors (cause easy) but the V8 ones on full song sound sooooooooooo awesome.1 point
-
Got a gas set? Heat those studs up to red hot and were they are bolted into manifold and unscrew with vice grips. Try it you will like it.1 point
-
Cheers guys. Will definitely be picking some brains. I still have a bit of gear to accumulate and plan on practicing on some junk first. Plan is to just chip away, while still keeping it on the road, but things might change depending on what surprises I find.1 point
-
I'd link to grunta's too, but his photos are all dead/pb'd1 point
-
Yeah sure. Why not. Might attept to replace some rust with steel too. Any advice or links to "Make your wag less rusty for beginners" appreciated.1 point
-
ohhh what so your telling me those fresh panel and paint kingswoods in matty b are not as mint as they always say??? trade me has been telling me lies this hole time1 point
-
As per the suggestion from Adoom I jacked the back end up onto axle stands, started it, clanged it into gear, gave it some revs, clutch in and slammed on the brakes. Ping! Clutch freed off! Smiles and much punching of air. Removed stands, pumped up flat front tyre and took it for a spin up the drive. All good. Parked it inside and wiped all the pine tree pollen off making it look concours mint... Rang my friendly garage and its booked in for a WOF. Meanwhile the new engine has now got new crank seals. I looked down the inlet ports (all two of them..) and the valves look a bit oily and mucky. Because I have a spare head gasket set to suit this engine I think it makes sense to give it a look over. Because I like to treat people to fun things I think I'll get Hannah to pop the head off, strip it down and give it all a good cleanup. She can re-grind the valves in. This is an early engine without valve stem seals but a friend who knows these engines well said they used to slide an O-ring over each inlet stem and it serves to stop too much oil running down the stem? Seems legit? Anyone heard of this? Answers on the back of a pie packet please and post to Bodgit and Scarper race engines, Marahau. Once back together it can get a coat of fresh paint and it'll pretty much be a fully re-conned race motor. Took the exhaust manifold off because its studs look like future anguish in waiting. I shall deal to them while its out. I don't see them coming out in one piece....1 point
-
I got a quick bit of welding done last night before work. Not much but it's progress.1 point
-
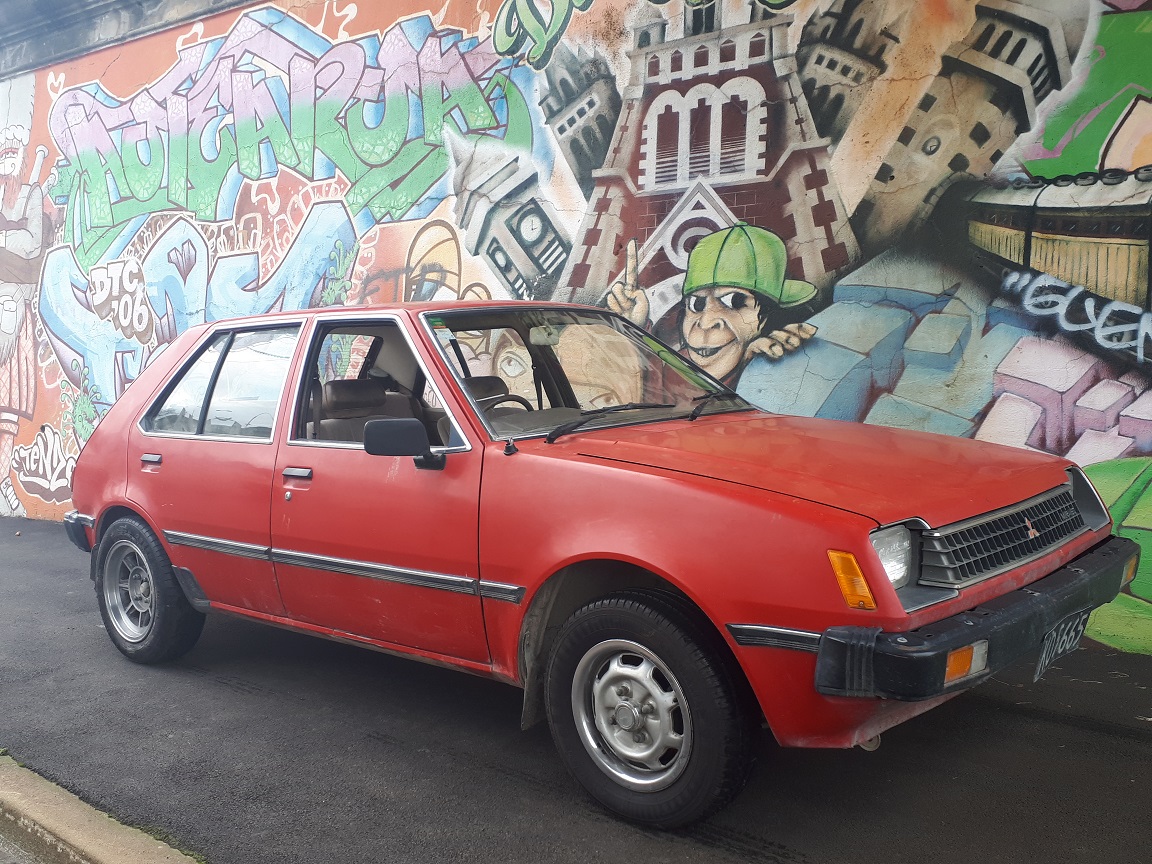
Been enjoying driving this wee thing around until my friend neighbour f**ked up reversing out of his drive. Nice big dent in the drivers door and no longer able to open from the outside with the door handle. On the plus side he missed the pillars and insurance is sorting it. Bought a parts Mirage that popped up on facebook as it had three things I wanted. Went to pick up the new one (Named clifford due to it being red and having the 'big' 1200cc motor) from Oamaru. Was told that it ran fine and the tyres were wofable, as with all facebook sales. Rock up to swap a set of wheels for it and the gearbox is noisy and tyres aren't very flash. Ran it through for a wof as four years out was too long for me to risk driving home and need to get three tyres, secure a sun visor and two pedals pads. So I now have two bloody wee Mirages. Clifford is supershift and it is very fun to drive using all eight gears. Novelty lasts for a couple of weeks then you get over it.
1 point
-
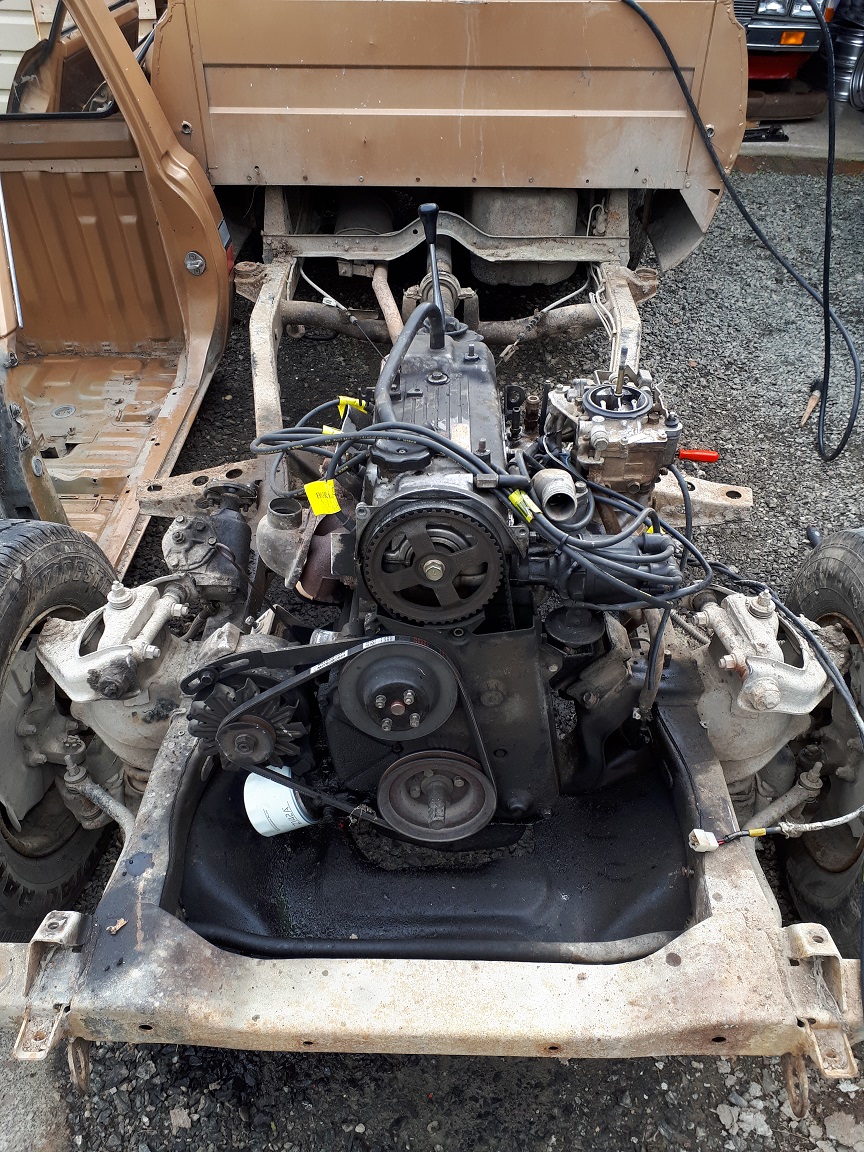
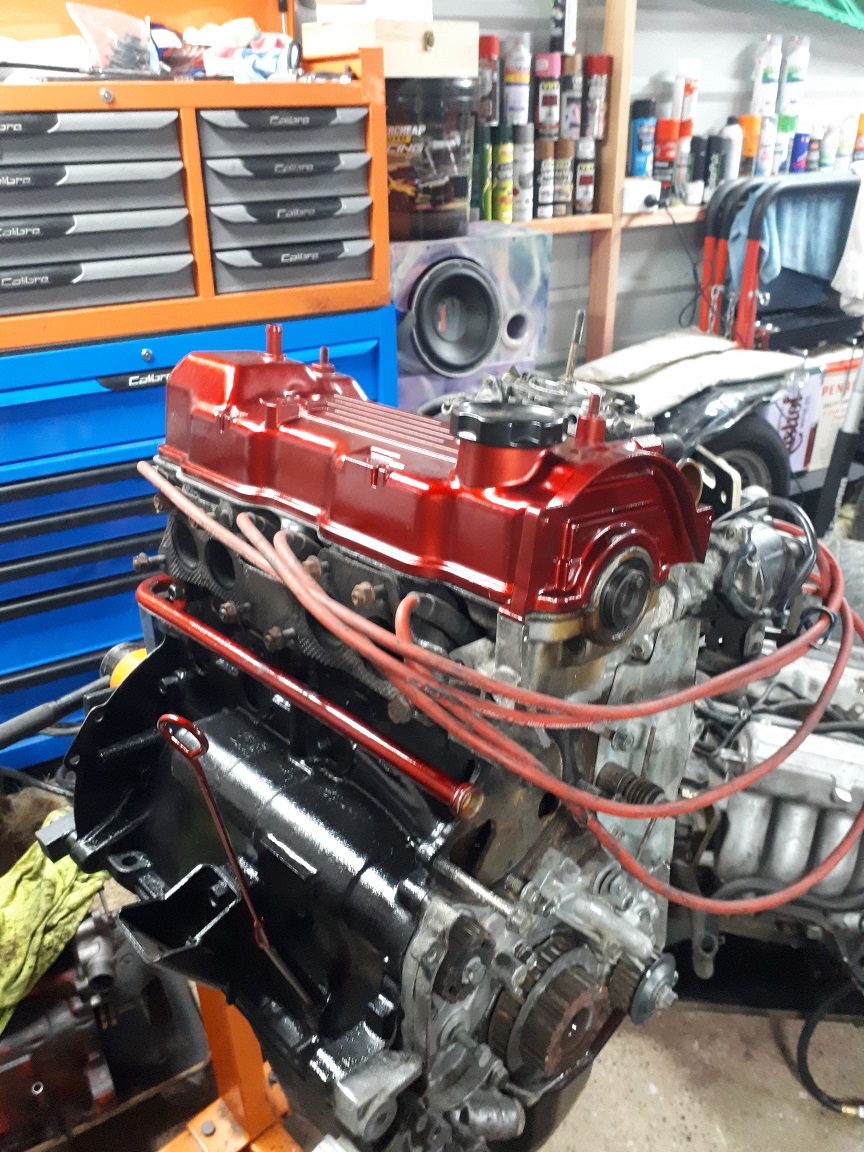
Progress has been slow over winter. I've been trying to find new front guards for her as the ones on there have speed holes. Have successfully acquired motor to drop in. Its a 4G63, nothing special but should run nicely. Came with a parts ute for my ute wrapped around it. Makes it much easier to remove a motor with no body in the way. Ripped it out and starting stripping the cambelt off to be replaced and to start to paint it up. Will look similar to my utes motor just going to use a metallic orange instead of the red.
1 point
-
After taking the engine/box in and out a good 20 times i think ive got the position sussed..not the happiest but im almost ready to throw a match at it so it can stay there. My issue was that basically the engine needs to sit lower as the driveshaft interferes with the hand brake whilst the engine is level, but i cant do that or else the sump almost hits the rack + i cbf'd making new mounts. so i tilted the engine back more but i found the dizzy was hitting the firewall, i also found the shifter hit the center brace when engaging 1st/3rd/5th. Cut both out sorted. next was the x-member i noticed wasnt going to work, then the trumpet was fouling the booster fff$$#!@#!! in too deep now, added a spacer to one of the mounts so trumpet isnt fouling, cut hole in firewall, completely chopped off the center of the brace now, i can use my factory x-member along with the ones i made...shouldve got that ae85.. next step is to make a few spacers for the x-member then on to making up the new top half of the tunnel..with my greeat fab skills this is going to be funn1 point
-
oh and I'm wanting steels as this is going to be no on road queen, going to be used for its intended purpose off road, thinking about a pair of truetrac lockers1 point
-
Now for the expensive part! All happening around 2 months before the next scooter rally. Nothing like a deadline to get stuff done... Frame stripped, some extra support welded on known weak points and then off to HPC This was the start of a lot of online shopping and spending money at HPCoatings... Also sleepless nights trying to decided on colour ways for it. I went for a strange old Alfa Romeo GTV colour called Yellow Ochre or AR112. Still a bit unsure as to why I chose this colour after all, oh well it is certainly different. Pretty sure the paint shop also tinted it a bit differently... Panels stripped ready for the paint to go down Expensive bits coming in thick and fast, new big block engine casings, fancy front shocks, digital speedo with fuel sensor, rev counter and cylinder head temp sensor, 30mm Mikuni TMX carb. Time for the engine build. I couldn't have done this with out the help of my mates. A mate Ben spent many late nights helping me out with this build and has an amazing attention to detail when it comes to building anything, especially 2strokes! Great workshop too... I went a bit overboard on this but aim was to make a fast reliable scoot. I went with a kit AFrayspeed TS1 225 kit, mild porting, high comp cylinder head, larger crank, clubman exhaust, AF touring clutch with race springs etc. Side casing going together New 52mm crank installed Parts coming back from the painter in my interesting new colour... To top off my indecisive paint choice I went with this slate blue colour for the rest of the components... Front end going together, disc brake and the new shocks Engine closed up and in the frame Glove box, long range tank, carb and rear guard going on All new cabling and electrics BGM clubman exhaust fitted Rob's bike also getting a TS1 kit and a bunch of go fast bits at the same time. I think all four from the team had their bikes in pieces at this stage First ride! Jetting not 100% but it went awesome! Off to get dyno'd shortly. Scooter rally was only a few days away. What better way to break in a new 2-stroke than 1600km at full throttle? To be continued...1 point
-
Some paint was applied, then I was away for work for a couple of weeks. Roof needs more clear and some finish sanding. Tailgate has reached the 'good enough' stage now I think.1 point
-
Nothing too exciting has happened, just lots of little things, hence why there hasn't been many updates, but I thought I'd better do one before I get too many more photos. Rust killed and painted the back of the dash today. I'm tempted to weld it in to the cab but I know that I will regret it when I need to fit the wiper motor, heater etc behind it. Pressed the holes in on the airbag tray, looks heaps better! Needed to weld some box section behind it as it warped quite abit. I'm thinking I might paint it with some black crinkle paint. Had the certifier come and have a look at how to mount the seat belts, since the upper back of the cab is a thin double skin. Came to the conclusion that we needed to slide in and weld some plates in behind the skin and door frame. Hard to see in the photos but the inner skin has quite a weird shape to it; curves out and then back in and around to the rear window. It also slants down at an angle, so that's where these brackets come in. Took awhile to figure out how to make them as I started off trying to shape them to fit the curved profile but that was a fail, then realised that they could just be flat plate at the two angles. Drilled some holes, hoped they were in the right place. The plates fit through a gap up by the headlining. I could only just fit my hand in there, caused a lot of pain trying to get them fitting right. They were perfectly in the right place so plug welded them in. Also another two plugs above and below the nut. Scored a handbrake for a few dollars from the vintage car club Cleaned it up and cut some holes in the floor Because the dash has been swapped from LHD to RHD there wasn't any holes in the firewall for the support brackets. Instead of drilling holes and having some horrible looking threads and nuts sticking through, I made up a mount and shorted the bracket to suit. Need to do the same on the other side now. Welded in the cowl vent pivot/gutter thing as well. Gave it all some decent coats of paint so hopefully it doesn't rust again. Put the rubber seal in but it's too thick and hard so the vent sits a little high, will have to sort a new seal one day.1 point
-
The dash now has all the rust fixed, really happy with how it turned out. Took maybe close to 10 hours to just weld it all up though. Should only need bog in a few places, the rest a few coats of primer will fill nicely.1 point
-
Made some brackets to mount the valves. For some reason the holes ended up too far out so had to slot them a little. They're held in with countersunk screws so it's all still flush underneath (not that anyone will be able to see underneath anyway haha). Played around a bit with the location for a while and decided this was the best. Wasn't really enough room for the compressor to fit in between. Will mount a compressor on each side of the bed, just above the exhaust area. Back to fitting and fixing the rust in the dash now. Cut out the good/un-butchered section of the dash that some idiot tried fitting a commodore cluster in. Glad to finally throw this shit out! Pic for motivation1 point


.thumb.jpg.b5491dbec1053270a4d99ed376fc2c36.jpg)


This leaderboard is set to Auckland/GMT+12:00