
Leaderboard


Popular Content
Showing content with the highest reputation on 04/18/17 in all areas
-
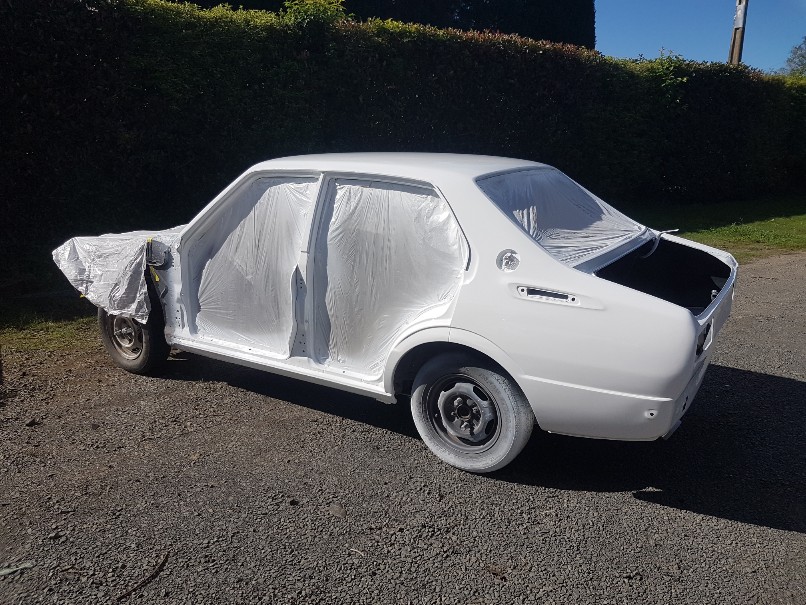
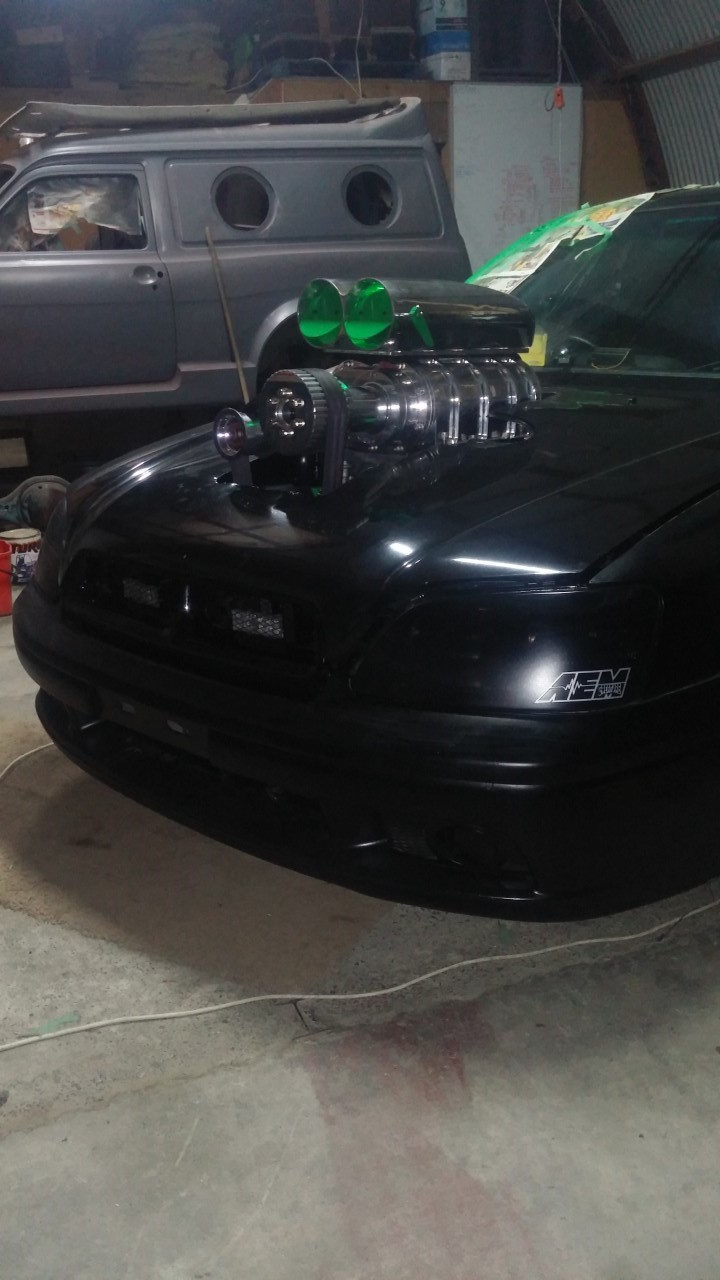
I was waiting for the long weekend to cross some bigger jobs off the list and managed to! - Put good dash pad in - Cleaned and painted instrument cluster - Cleaned and rust killed floors and etch painted, sealed up screw holes and seams, rubber bungs in - Cleaned and painted glovebox hinge panel (left as much as I could of the factory sticker with key info and tyre pressure/fuel chart) - Made covers for the rear wheel arches, lower B pillars and exposed parts of the floor the carpet does not cover with some patterned plastic sheet - Painted dash top and the area under the rear screen which are visible. - New carpets - Vinyl died seats. Don't know how long it will last but we will see. The cans sprayed too narrow so I emptied them into spray gun and got a great even application. - Put stereo in properly - Epoxy glued splits in the centre console - Factory accelator pedal back on Still need to make a shifter boot and pick up another demister vent from a mate.17 points
-
The constant here, is Beams. If we banned the Beams 3S, then clearly no requirement for driveshaft loops11 points
-
Fuggin' chequebook builders.7 points
-
a hole got dug. 2017-04-18_04-22-56 by sheepers, on Flickr exposing the main stormwater/sewer line 2017-04-18_04-22-47 by sheepers, on Flickr 2017-04-18_04-22-38 by sheepers, on Flickr then they stuck this thing in the hole to stop the sides falling in 2017-04-18_04-21-59 by sheepers, on Flickr 2017-04-18_04-21-40 by sheepers, on Flickr then the diggers had a nap for the night. 2017-04-18_04-21-30 by sheepers, on Flickr 2017-04-18_04-21-21 by sheepers, on Flickr6 points
-
Six months of wof all used up. Had a good four months use out of it. Had next to zero issues in that time. I had to swap out fuel filter when it starting running like a bag of dicks after getting fuel in Hahei and had some tyres fitted in Auckland after the tread disappeared. That's it! According to the speedo I've put 6000kms on it in that time (I'd say it's closer to 5000 though). I took it to Leadfoot and then to Rotary Reunion in February. At some stage soon I'll put some new shocks in the front and lose some height. I've got some clips sitting in Sydney to put the sill trims on and yeah I'm fairly happy with it currently. Pics Courtesy of Snoozin Courtesy of MichaelJFox And a pic of the daily cos it's too new and boring for a thread. JZX110W with a 1JZ-faeces, 18x9/10 work emotions and BC BR series adjustable coilovers.6 points
-
6 points
-
Just a small update. Been putting the car back together. Gave all the windows a good clean, got them looking crystal clear. They did have tints on them but they were quite rough, so decided to pull them off and clean up the glass. Also been doing more upholstery, almost completed the seats, but ran out of material and thread. I tried covering the dash in vinyl but gave up. Iv glued up the cracks and put a textured finish on it, and then painted it, its come up good.
 5 points
 -
So i had some issue with the car intermittently dying. I traced it to the PTU (Coil igniter) which from what I have read on line can be a pain in the ass as they supposedly fail quite often. I have a few spares lying around so switched out the one that was causing the problem. Lots of guys online relocate off the engine to a location with less heat and vibration so I did the same. Was just a simple job or extending some wiring and making a quick bracket to mount it. I decide to put it up in the nose as there is plenty of room and its easy to get at. Next up was the front bumper. The lower lip in my bumper was badly cracked and pretty worse for wear. I picked up a fiberglass front lip to try and tidy things up a bit. I used a strong flexible glue to bond the lip to the factory bumper, there was lots of trimming to the old lip to get the new part to fit. Screws helped hold the lip in place while the glue went off The F/G lip was obviously designed for a TT bumper not my NA one so it was too long, I had to cut around 25mm from each end and then re fiberglass new ends to get it to fit ok. Once the glue was hardened i used expanding foam to add some strength between what was left of the old lip and the new F/G one. It looks like a disaster before I trimmed away the excess, the foam makes things a lot more rigid. Then was a case of sanding. priming and painting. I have just used satin black at this stage as the whole bumper needs a respray in the future. Turned out OK. I added some steel brackets to mount the front of the lip back to the body, it is held on pretty well now. Fun times...4 points
-
tell ya, its been nice having this back on the ground, its been some time. Would seem on the test drive most of the stuff I went to sort out with the gearbox is all takin care of, shifts good, no clutch shudder etc Super nice having the dash all back together too. Given long weekend it seemed like the best opportunity to get this into work and on a hoist. Main goal was just to complete the exhaust, which after a few convos with my work mates, convinced me going under diff would be the best option as A) easy. B ) actually fuck all of fuck all room on top of the diff Personally I hate under diff exhaust, but I will let it fly on this one, as I truely am not sure I could have made an over diff work. SO yeah, besides a few simple things, which off the top of my head is put a second set of nuts on top of the front struts, then this should be cert ready. I know it will need a wheel alignment for the cert, but going to leave this till i know everything is good under there. So, current plan is call up tomorrow and book it in, probably for next week, think he is usally over this way on a Thrusday, so a week and a few days. Anyway, none exciting pics IMG_5549 by Allan Ainsworth, on Flickr IMG_5587 by Allan Ainsworth, on Flickr IMG_5586 by Allan Ainsworth, on Flickr IMG_5588 by Allan Ainsworth, on Flickr4 points
-
just to be clear im not building the new house. once the smashing is finished that's about it for my involvement. im making the steel portal and some SS flashings but thats all. ill help out where i can but it wont be much. speaking of smash, front of house removed. after i took this photo we cleaned up and put all the timber into away and generally made things clear for the digger which is turning up Tuesday 2017-04-16_03-00-05 by sheepers, on Flickr 2017-04-16_02-59-42 by sheepers, on Flickr4 points
-
Well. Cert is booked for may the 3rd. This should be interesting. Giz me a bit of time to sort the few things it needs hopefully for a wof also. Pink sticker life is hard. Hardcore that is.3 points
-
Finished the last of the ply yesterday and screwed the rest off, can't see this house moving much in a quake, so many layers.. Paints all finished thanks again to family, then I fucked around in the afternoon clearing everything for the sander, Fillets came up great, I then had a crack at the bathroom vanity, Cut a hole.. goddam oaks hard, chewed a blade or half way through. Also smells remarkably similar to Rimu which also fucks metal things.. Trial fit, had to enlarge the hole slightly with a 40g flap disc still just burns it off.. Two more hole for the taps, And voilà.. not to shabby, Just need to adjust the drawers somewhat.. Sanded the top back a bit as it was a little messy and the two halves of the top didn't really line up properly, not sure whether to oil it or put it back like it was. Checked on the floor sanding progress today, guy doesn't fuck around.. floors all leveled with the filler on already.. also bought some carpet this evening, shit isn't cheap, 6k between the floors and carpet! Should look ok tho..3 points
-
That's why we banned the 1100 Kent with extractors. Driveshaft twisting torque.3 points
-
Done the floor patch, just need to do the bit up the side and then there's a few little patches of rust, where the top of the guards bolt to the cab on both sides and a pin hole in the rear cab corner. That'll hopefully be all the rust in the cab done, then I can start on the transmission tunnel.3 points
-
So, Guypie's pic shows the name on the back. In one of the older threads it was mentioned that the Trudgeon business (painting and decorating) still exists in Ashburton I got a reply from Greg Trudgeon that the car was owned by Mr Russell Johnson who used to work for the business, and that the sign writing was a bit of joke as he had been with them for 30 years (has died since). Based on the modern papers i have the car was sold by Mr Johnson in 1979. Cool story bro.3 points
-
I've loved to piss and moan about how I think these are annoying and a stupid idea. But after having a driveshaft fail at 80ish kph on the weekend, Oh boy am I glad I had these loops fitted! My brake and fuel lines would have taken a hammering if not for these - They are a good idea, even in my case where all factory parts were used within factory power levels.2 points
-
so. I thought we should do a weekend meet since we haven't done one in forever..... next meet Sunday the 30th2 points
-
I think your car is safe for the next 10 years then2 points
-
Dont think this car is old enough for the main forum, 1989??? So I decided to get another project to muck around with to stop me pulling things apart on the 280Z plus Craig is building lots of cool shit and I am jealous. Requirements were it had to be Nissan, be cheap, have 4 seats (the 280Z is not overly family friendly) and be cheap. I have always liked the old Z32 300zx's so decided to go down that path, they are a love it or hate it car but Im cool with that. Upsides of the Z32 are obviously you can pick them up for next to nothing these days, there are lots of spare parts available for them and they are quite a lot of car for the money. The downside is they are are a bitch to work on due to engine layout/space restrictions, you have to pull the engine to change the washer fluid. Plan for this thing is just a fun budget build, use cheap or second hand parts where possible, take to the odd track day and drive it. So knowing it was probably a stupid idea i started looking around and found cheap semi tidy 2+2 NA manual in Christchurch. So site unseen, Craig and I jumped on a plane flew down, met the guy at the airport, dropped some cash on the thing and road tripped it back to Aucks which was mint. When we picked it up Mean trip home The car has over 200K Kms on it and leaked oil from every seal imaginable, interior was filthy and it had an horrific pitstop special exhaust system that was stupidly loud and totally shit. Good points were body was fairly tidy, came on some rough 18x9.5s, gearbox felt ok and car drove pretty sweet. At home with the 280 When i got it home the first thing that needed attention was the bio-hazard of an interior. It was disgusting, the drivers seat was torn and the dash was lifting around the windscreen air vent which I believe is fairly common. Every old 300zx has a torn drivers seat which looks crap, i wanted to keep the seats as they are cool 90s retro with motors in them so decided to re skin the drivers seat. I found a tidy passenger seat online then proceeded to strip it down and swap the skin over to the original drivers seat. This was a mission that took forever, I dont recommend. Spare passenger seat I found after ripping it to pieces lots of scrubbing out years of filth, ended up with two fairly tidy seats with no rips etc. They are still wet in this pic One non torn drivers seat back in the car Rest of the interior got a full on scrub down, it was unreal how much crud came out of everything. I also pulled out the dash and glued down the area that was lifting around the air vent. Another job I did was to tidy up the vinyl trim on the rear quarter panel interior trims that were torn. Next job was address the ride height. The car was rocking full on 4x4 spec stock suspension which had to go. Cheapest option I found was some dodgy ebay style coil overs, yep they are probably made from recycled watties baked bean cans but they were cheap so they were in. Threw them in and adjusted height to something that looked more respectable There is still scope to go lower but looks better for now The car came on a set of 18x9.5 +15ET china spec Cosmis wheels. They were were in a pretty sad state with some curbing and stone chips etc. In an ideal world I should replace them with something decent but thats not happening so decided to tidy them up as best I could. You have to be a mogul when you are racing modern...WTF Spent a fair but of time sanding down all the chips and marks. Then sprayed gloss black to hide the evidence. They look 100 times better than they did so they are staying for now. Need to change the wheel nuts to something non chrome Old mate Craig had a super legit set of Defi gauges gathering dust on his shelf so i stole them, hacked up the center console and made them fit. Gauges are worth more than the whole car, cheers bro! Next thing to address is the engine. The tired VG30DE had to go, it was leaking oil real bad and is slow. I had initially thought of throwing in a RB25 for something different but by chance ended up getting hold of a supposedly low km VG30DETT twin turbo motor for super cheap from the Mrs uncle who randomly had it sitting around in his shed. Fitting a VG30DETT into a NA Z32 is meant to be relatively straight forward, you can use the NA loom etc. My car is factory manual, the NA and TT gearbox internals are identical but the TT version has a slightly larger bell housing, the internet told me it should all fit somehow... The turbo engine had been sitting in his shed for years so was looking a little worse for wear. It turned over freely so figured I would take a chance on it. This was how it looked when i got it home. I also tracked down a complete stock intercooler plumbing kit I gave it a good de-grease and waterblast then started stripping things off to tidy it up a bit. I didnt know anything about VGs so was going to be interesting. I ordered a timing belt kit, water pump and rocker cover gasket kit from the states. Then proceeded to pull things off, clean, sand, prime, paint, refit, repeat... Fitted new timing belt, idlers, water pump, thermostat etc Painted up the timing covers so they look a but different, every VG i have seen has the stock black covers. The stock T25 turbos looked in fairly good condition, no large amounts of shaft play and rotated nice and freely I ordered a set of dump pipes from ebay in the states, they were ridiculously cheap and seem OK. Painted the water inlet and outlet pipes black just to mix things up from the normal alloy finish most are Pulled the injectors and replaced the o-rings and pintle caps Painted the fuel rail gloss black Nissan engineers were on acid back in the 90s and decided to try and include lots of crazy technology into the VG engine. The engine has an exhaust recycling system to reduce emissions on startup. It is known to fail over time so I deleted it and welded up the pipe on the manifold. I also removed the PCV plumbing and welded up the ports on the rocker cover. I will be using an external oil breather tank. I also deleted all the additional water cooling lines that run under the plenum. Again these apparently begin to leak over time and arent needed. I stripped down and painted the plenum exoxy gloss black to match the rest of the engine colors. Also painted up the heat shields and other small bits, waste of time really as you will never see any of it. The factory NA engine mounts from my old engine were shot, they had cracked right through. I found some cheap nolathane ones online, I made some alloy heat shields for them as some threads online said the nolathane mounts can fail due to heat. Also replaced the rear main seal while everything was apart I reused the flywheel from the old NA engine, it is smaller than the one that comes with the TT motor but it fits with my gearbox so had no option there. NA VGs use the same clutch layout as RBs so I fitted a heavy duty Clutch Industries RB25DET clutch. Out came the tired old DE, getting at some of the plugs was a real bitch. You really need to be the size of a leprechaun to work on these engines. removed the gearbox and its 20+ years of grime Used degreaser and oven cleaner to clean it up as best I could Engine and gearbox mated up, ready to go in car In goes the DETT Boom Factory twin turbo cars have a stock external oil cooler, NA versions dont so raided Craigs parts bin again. Added a few AN fittings and sorted. I was going to used the stock intecoolers that I scored but ended up buying a dirt cheap ebay split front mount cooler for some stupid reason. I think it is a copy of the Greddy version? It is a tight fit, had to cut away some of the plastic bumper support to make room Then I made up a set of cooler pipes to fit by cutting up the stock ones I had, combined with some silicone joiners it worked out pretty sweet My car came with a china spec Greddy copy twin mushroom intake pipe I needed to fit an oil breather tank somewhere in the engine bay so decided to run with a small batter setup and combine that with a breather. Knocked up with this disaster Painted up and installed Will do the job Next job was to make up an exhaust. The dump pipes i bought off ebay included mid pipes so i was one third of the way there. Picked up a bunch of 2.5 inch bends and mufflers etc Started piecing it all together, just tacked in place to suss out the layout Went with a crossover section and two small mid resonators Once i had the layout sorted welded it all up and painted. Fitted the NA loom up to the motor. Some of the old coil plugs were broken so replaced them with new ones. I had to relocate the lower radiator mounts as the TT radiator is narrower and thicker than the NA version. I had one small issue with one of the loom grounds resulting in no power to the coils but once I sorted that the engine fired up nicely which was awesome. Used a consult cable to make sure everything was working as it should. Adjusted CAS to match engine timing to ecu timing. Oil pressure seems good, temp OK and idles nice and smooth so fingers crossed. I am waiting on a few small parts to arrive, alloy radiator as the factory one I have is a bit sketchy, factory fan shroud and radiator top mounting brackets. I have taken for a few drives up and down the road an everything seems OK so far. Car is only on wastegate boost at this stage (7psi) but I have a profec boost controller installed so will have a play with that and turn it up a bit. Washed it for the first time in forever, was such a mint weekend 280 got a clean also Next step is tidy a few small things and get a new warrant for it. Then I will fit a wide band to it and may have a play with the ECU using Nistune software or romulator. I will need to upgrade the injectors at some stage and it will need a bigger fuel pump also. Fun times2 points
-
This is tomorrow night. Just a reminder for @xsspeed in particular2 points
-
Want a Skyline?2 points
-
I pulled a front spring right before Nats to see if a Makita drop would work, but no-go. The lower spring pan is a bolt-on so could possibly be lowered that way, but I was out of time. I've now removed the upper tailgate and glass (those little screws were holding the glass in place) The tailgate is from the previous model, so this lock isn't needed on this car It's a little rusty but way way better than the original one for the car.2 points
-
Got another Q also, it can be jammed in this thread too. 1943 Karrier superpoise, has an hq front subframe and a very nice cab & chassis. Is declared for 350/th350/9", but has 253/trimatic/bw78. Actually drives really nicely, but realistically it will probably be easier/cheaper to return it to 350ci etc than cert it as is. All i've done so far to it is rig up a choke, jam an air filter on it and swap out the plugs, just for ease of starting/moving round the property etc. Will probably tart up the body and interior and when circumstances allow, hand it over to a shop for full drivetrain conversion.
2 points
-
I'm super impressed. That's a big project. ive recently brought my first house. So far I've made an iron gate to contain my dogs. my wife is a kitchen designer, so there's big plans there, but I'm worried about how much effort will go into repainting a bedroom... top marks for commitment as always. ill keep watching with eager anticipation and soak up the inspiration and colateral motivation like I do with all your projects. keep doing what you do. thanks, drunk Jeff.2 points
-
Rhona and i did more smash. drain layer is coming Tuesday to repair sewer line which runs under the new house. he wanted the front of the house gone so it wouldn't fall on him. can do. tomorrow im having a day off to cook and eat pork belly but sunday should see the rest of the front of the house gone. 2017-04-14_03-38-57 by sheepers, on Flickr 2017-04-14_03-39-23 by sheepers, on Flickr 2017-04-14_03-39-34 by sheepers, on Flickr2 points
-
2 points
-
Waste of timber doing that. It wooden go very fast2 points
-
Mine at a slightly higher speed, driveshaft was a pretzel. Very glad for loop...
2 points
-
If one were to do that would the resultant vehicle bear the identity of the chassis donor or the body donor? Or does it not matter and whichever one has live plates is the winner?1 point
-
That reminds me I should enter it in my phone as a reminder. Thankyou kind sir! Along with a reminder to bring that speedo and that book for my brotha Neal.1 point
-
Yup bring skyline. Or RX1 point
-
right got the speedo all hooked up, bike is running pretty good although runs out of gas at high sustained revs because of the stupid floats, ordered a set of plastic ones out of the states to replace the shit foam ones that sink, fucken bing and their stupid ideas, took the bike for a mot (wof) on friday and it went through no bother, heres a shit video of a wee thrash, had to hold the camera in my mouth so... ill keep ya posted, have also front mudguard to go on at some point. and a leaky fork seal (gayest job on a bike)1 point
-
Also OS Nats trip. I bought a roof rack from Seedy Al that didn't exactly fit either way, so I made it fit with a cut and shut. Drove to work in the rain. Made it to the top of the Rimukatas no worries. Needed an oil topup (hadn't checked it for a while, oops) Met a cousin.1 point
-
1 point
-
So not too much has been happening whilst I spent money on safety gear, Purchased a new Sabelt 3 layer FIA suit , Second hand hans sport 2 and a omp helmet and a headset for the intercom. However I had been looking for some cheap 15s and a something to protect the engine bay area. Some honda type r wheels popped up on facebook so nabbed them and a mate was selling a 6mm alloy bash plate that was on his runix race car so ventured to palmy today and picked the wheels up in levin on the way. With the larger front brakes the track gets pushed out 6mm so the new rims fit perfect on the front but the tyres are rubbing on the strut body on the back so have to run some 5mm spacers to clear they will be for gravel tyres only anyway as cheap second hand ones only come in 15 or 13 inch. My mate also gave me a big bit of underbody plastic as he doesn't need it now his car is track only. Now I haven't done nothing in between updates 63Ragtop saw a momo benetton steering wheel at a tip shop and posted it in spam knowing mine was really rough I asked him to get it for me and send it down. Now I never thought to look to see if my old wheel was legit and I never had the horn center on it as who would copy anything so ugly its cool but turns out it was a fake! I also installed one of these gizmos that gives me launch control and rev limiter easy to install and works really well and is easy to change1 point
-
Hey, my only experience is with Mikuni SBN's but don't be afraid of doing it, carbs aren't as scary as they seem. The first time you do one it takes awhile but the next time you can do one in 20min. You'll know a bunch more afterwards too. Buy JIS screwdrivers, you'll end up stripping the screw heads if you don't get these. I have some Vessel brand ones that are quite good, got them in the states but I think my friend ordered some from here https://ronenright.co.nz.1 point
-
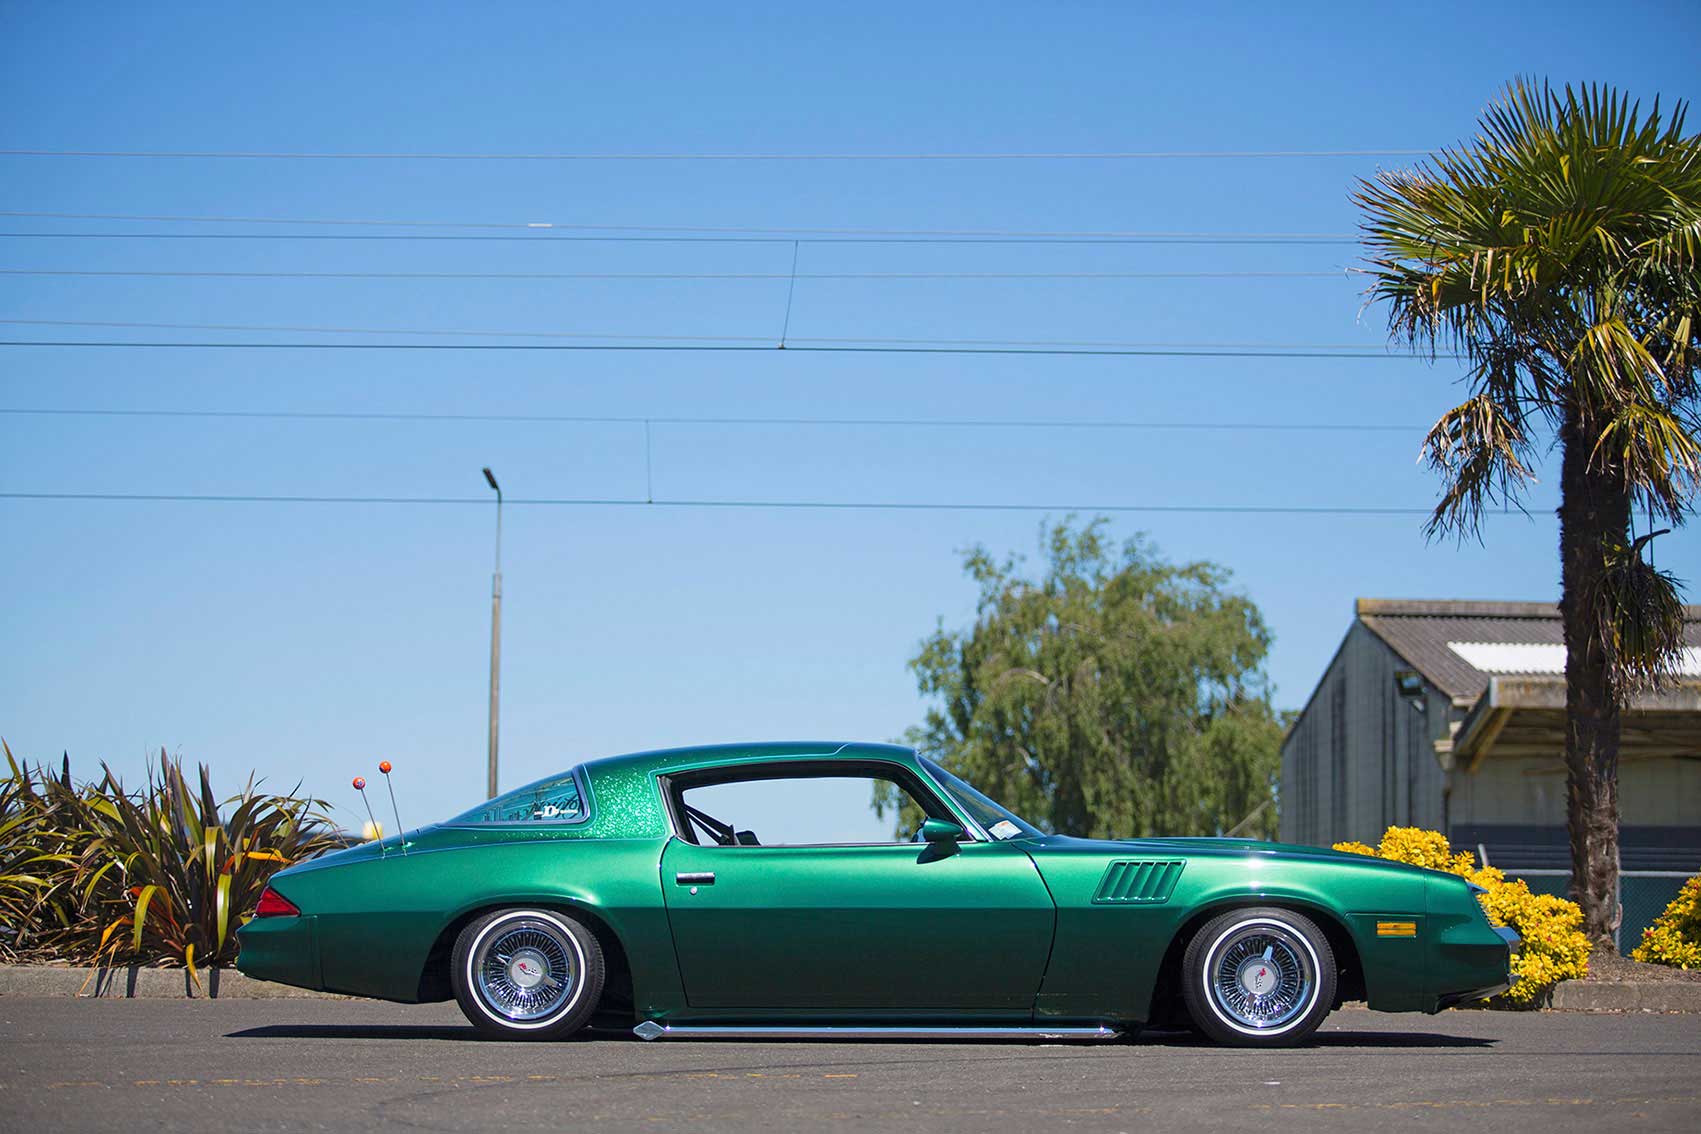
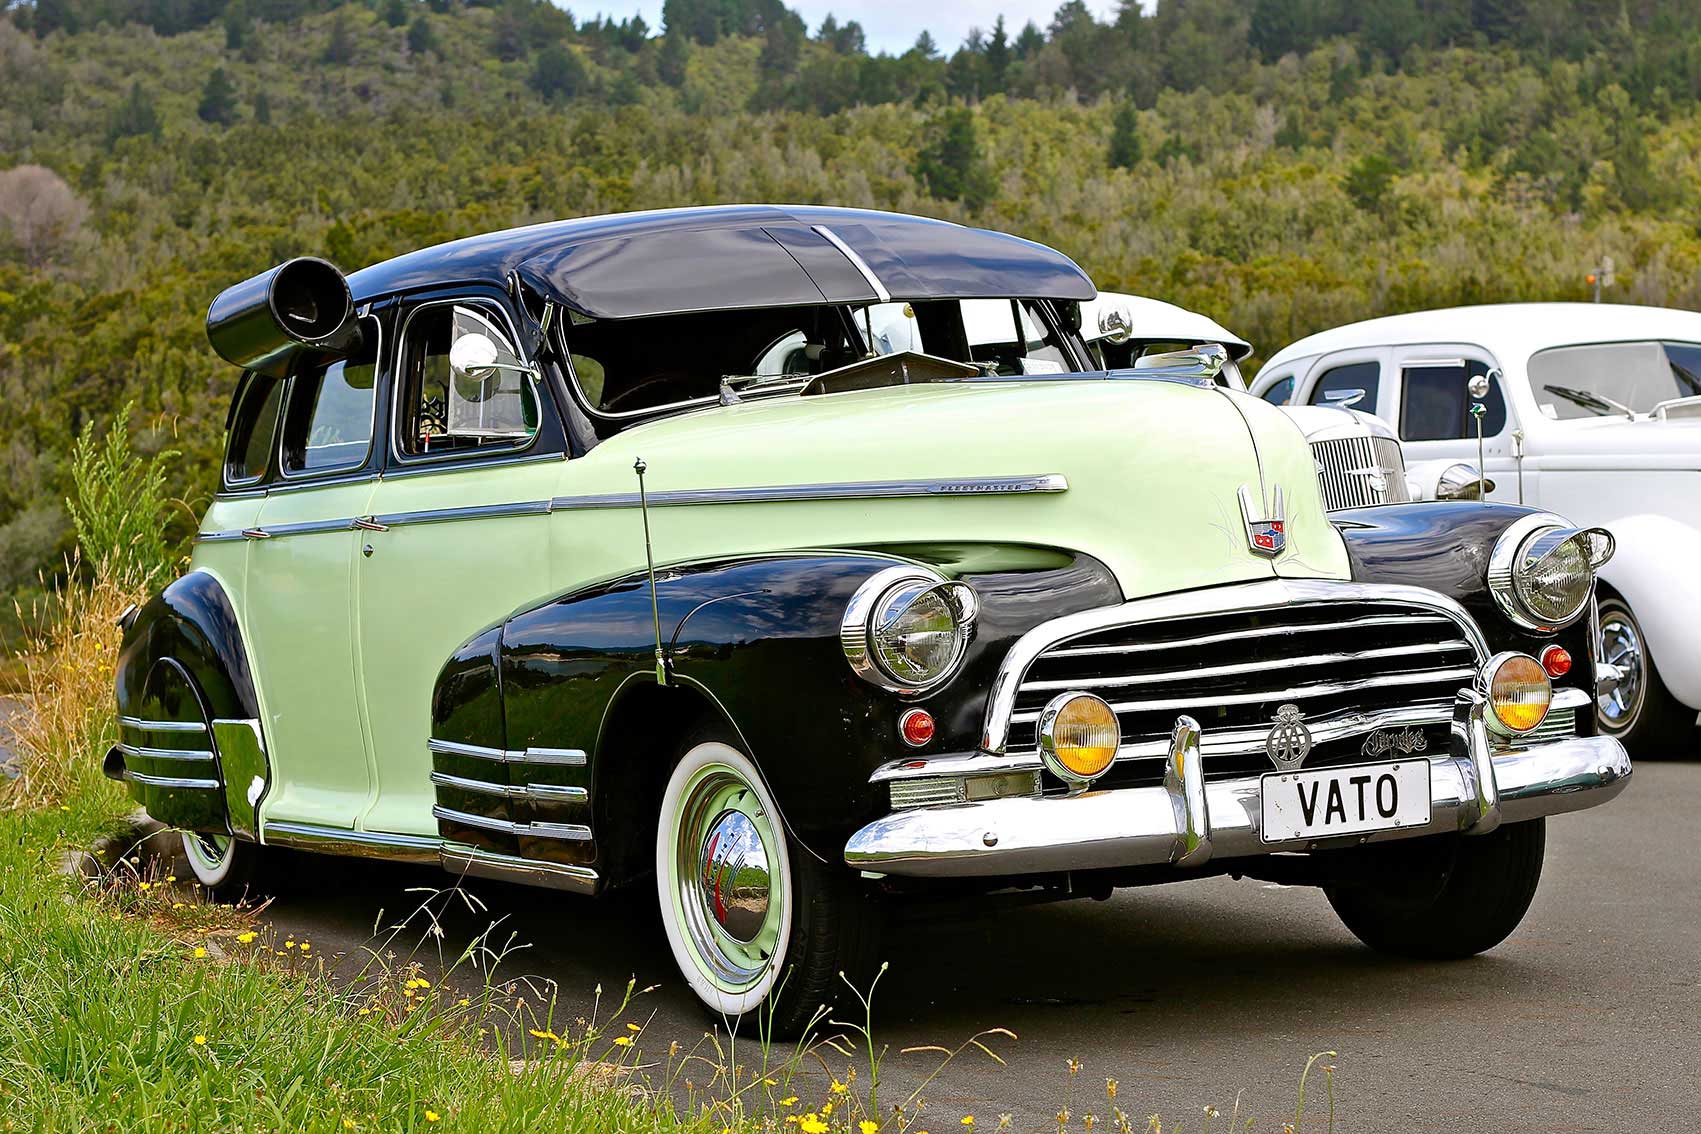
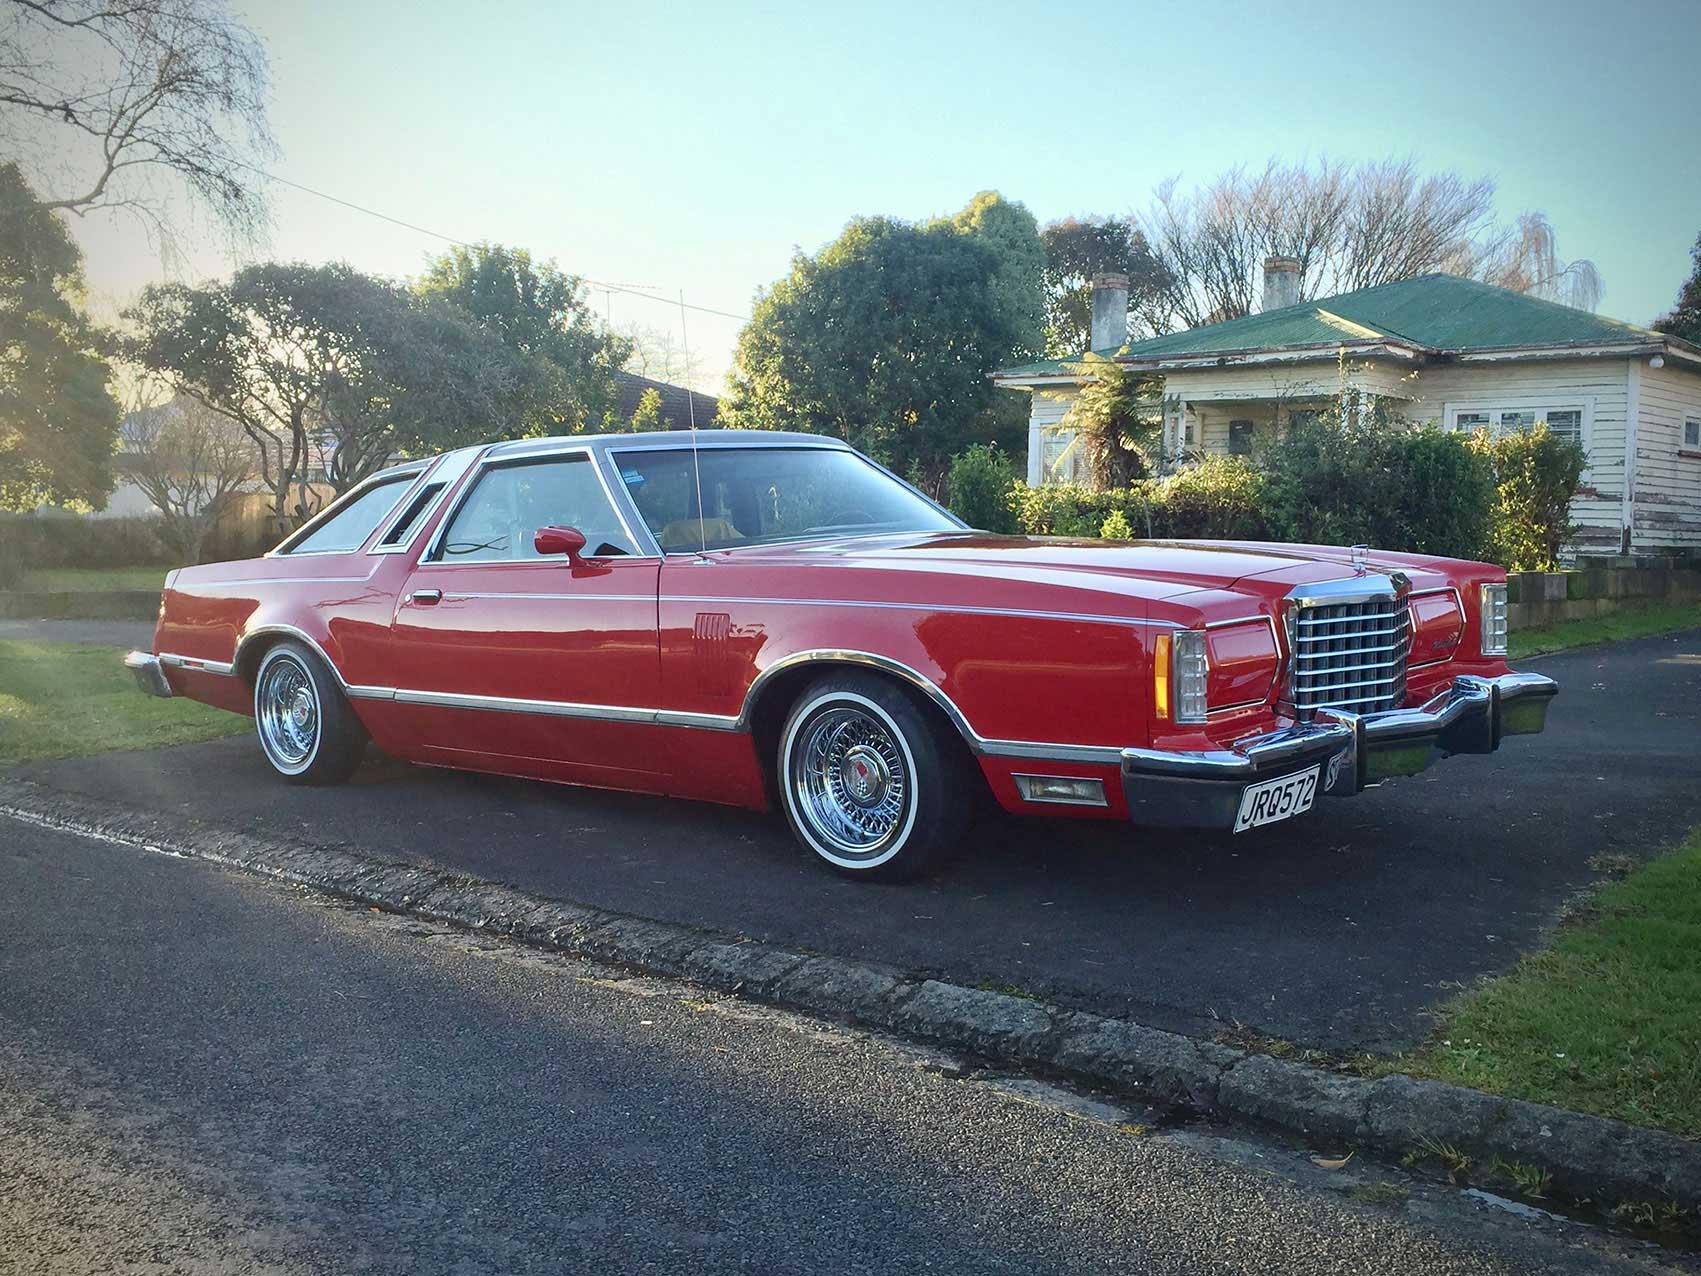
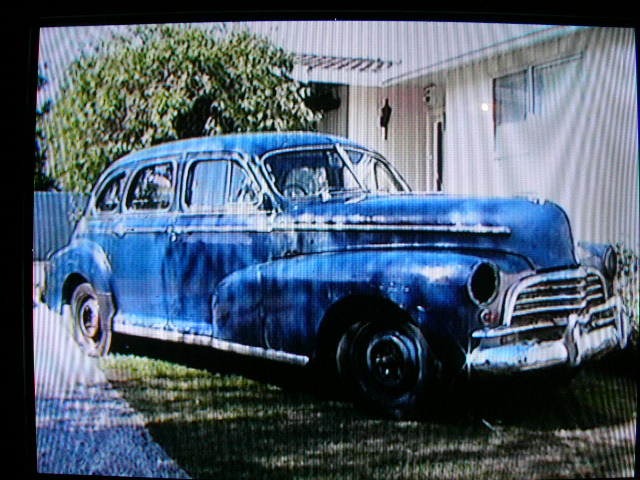
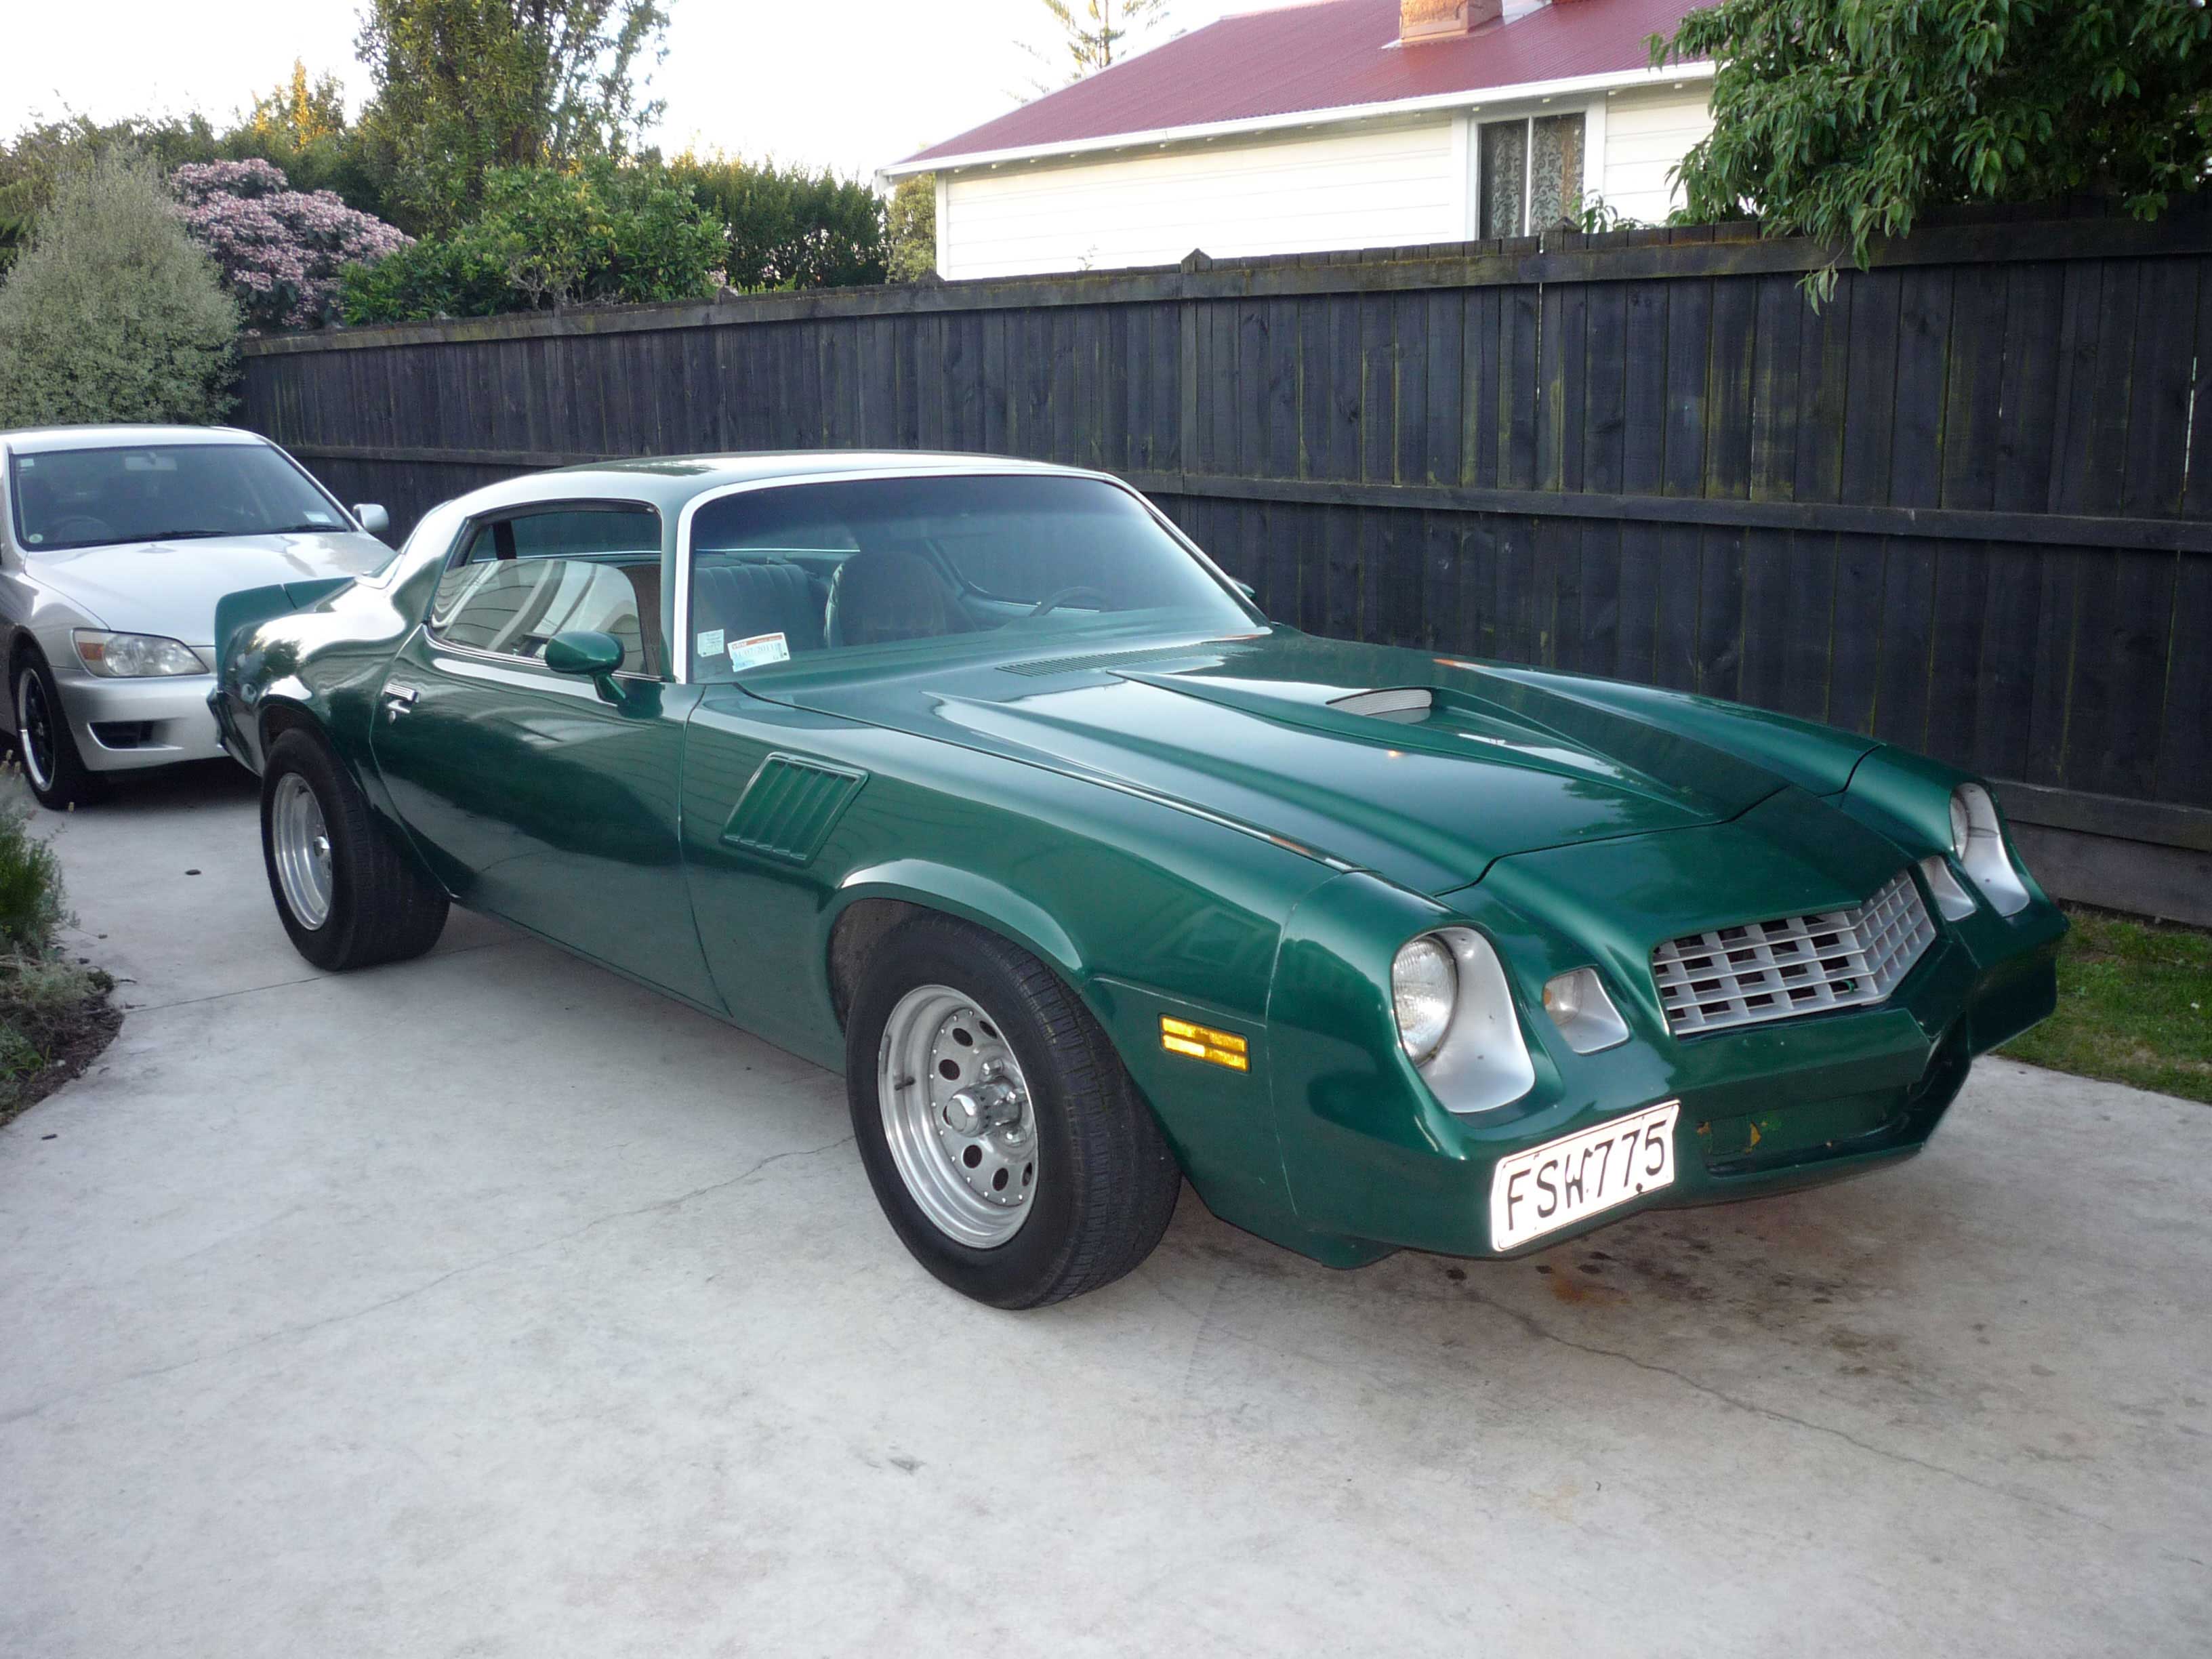
So some have asked to see pics of some of my other cars. You've probably seen 1 or 2 of them around no doubt. I've had the 46 Chevy Fleetmaster for the last 14 years or so. Its an ever evolving project. Love this thing. Recently converted to 5 stud using 55 hubs for the front and changing out the dif to a Nova dif. Doing this I converted it to open drive using a converter on the end of the original gearbox. Now its geared up to cruise a lot nicer on the open road. It still runs the original 216 dipper, never misses a beat: Then my 78 Camaro. This build has been a real eye opener haha: And the most recent other than the Corvair is the 77 Thunderbird Town Landau. Its fully specd with, from what I can gather, every factory option it can have, down to the fake luggage straps. We picked this up in Wanaka and did an epic roadtrip back to Hamilton. Loved it. The cars real tidy with 49k OG miles on the clock, been in the country since 81. Slowly putting my touch on it: Those are the current cars I have. Don't get me wrong, I don't have a lot of money haha I've put a lot of time into these and a lot of help from friends and family. Also my crazy obsession doesn't help. Sometimes its a curse haha
1 point
-
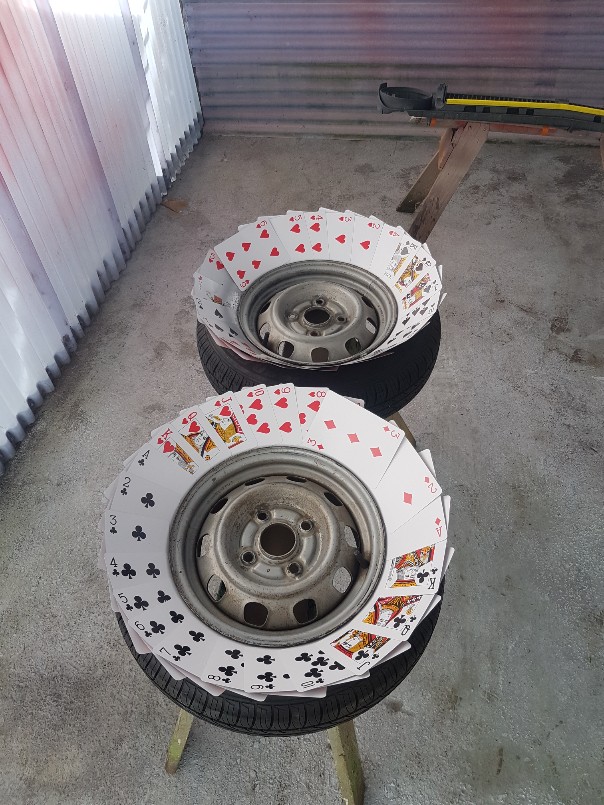
So finally got the body painted. Now the fun part of putting it all back together. Also picked up some factory 13" rims , that I'm painting black, and putting on that white walls. Found the fastest way to Mask up wheels for paint is using cards.
1 point
-
So head is taking a big longer than initially planned as a sensor on the CNC that was being used to port the head died so next week sometime I am expecting to receive the head so can finally piece it all together! Today to make me feel like things were still progressing I bolted up the flywheel... yeah. Exciting... I also made sure I put the sandwich plate on too as I have done it a couple of times where I bolted on the gearbox/flywheel/clutch to find I forgot to do it and have also seen a couple of others do it too Socket makes a great flywheel stopper too. Think the flywheel is 3.8kg's. Probably not ideal for a street car, but this won't be a daily so will still be fun when I get it out on the occasions. After driving the new spiggot bearing into place I thought it would be best to actually see how much contact was made on the input shaft. I just put vivid on the end of the shaft, slipped the box on and gave it a few rotations Looks like I drove the bearing in a bit too much... I whipped everything off and pulled the bearing out a bit. No need to recheck now, a few mm would have done the job I have chosen to go with SSR MK2 feet too. If you know of any, let me know! Thinking of going 8J in the rear and 6.5J in the front Mingling //oldschool.co.nz/index.php?/topic/52401-pbaines-1971-toyota-corolla-ke25/&page=21 point
-
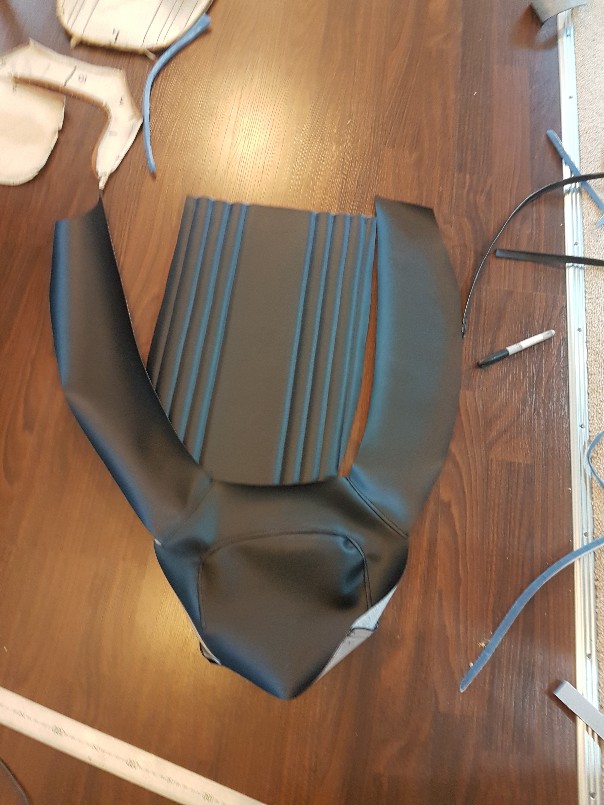
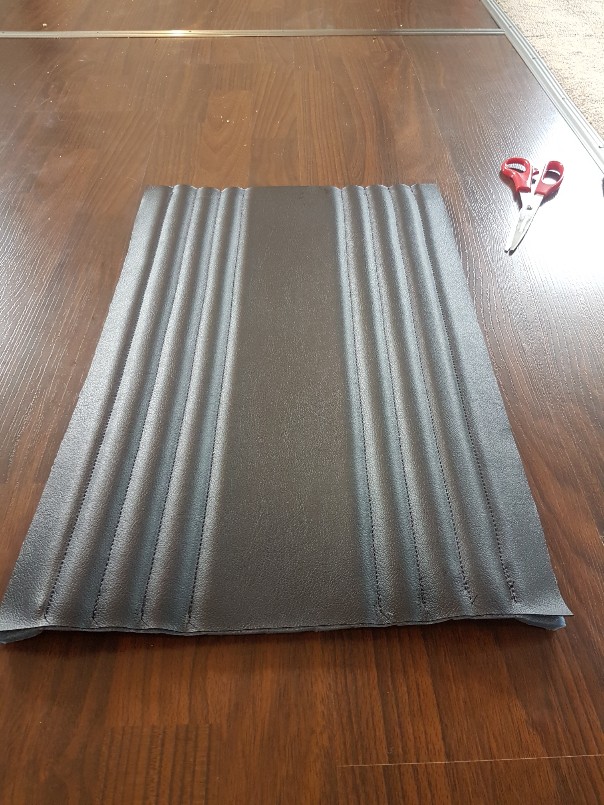
Here's a Bit more pictures of the sewing. It's quite hard as the machine is super quick and i can't slow it done anymore. There's no room for mistakes haha. Un stitched the old covers and traced them onto the new vinyl. Got them sewn up along with some pleats and piping.
1 point
-
Manged to squeeze in a panhard rod today. may need a few tweaks, but should work. Will leave it half finished till get the coilovers mounted, to make sure everything works together bit hectic under there, yep.1 point
-
Swords. Make swords.1 point
-
Because Chris is so useless at updates heres a few pics of this cars progress.
1 point
-
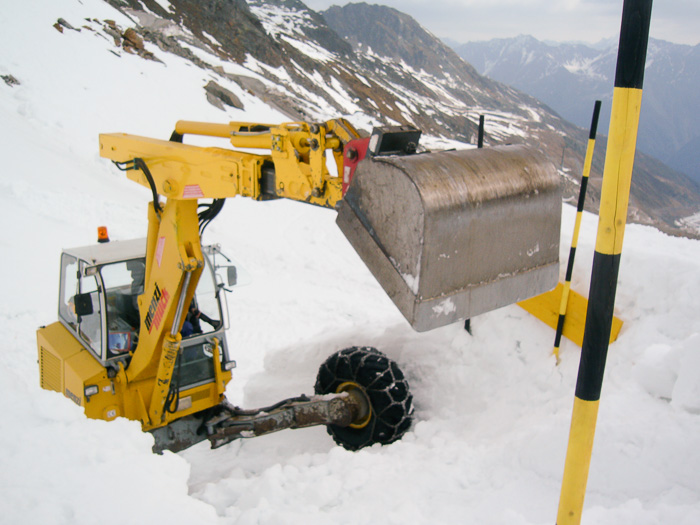
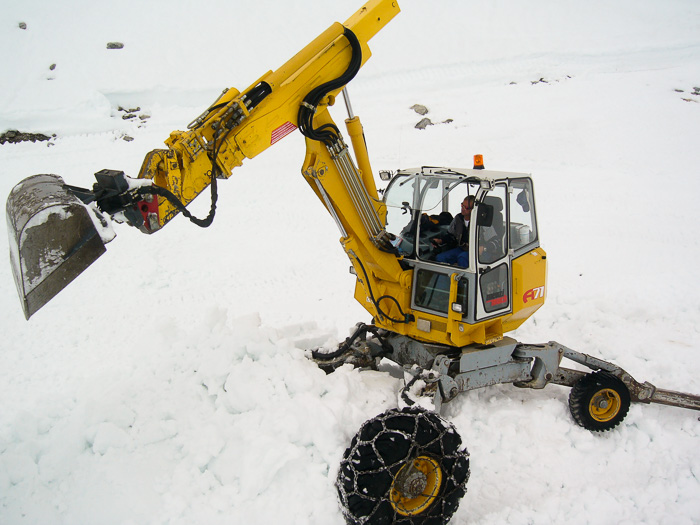
So cool! I never knew any made it over here. have worked with them a bunch in Europe, just the ticket for snow at odd angles. It was pretty much the secret allowing us to build this thing
1 point
-
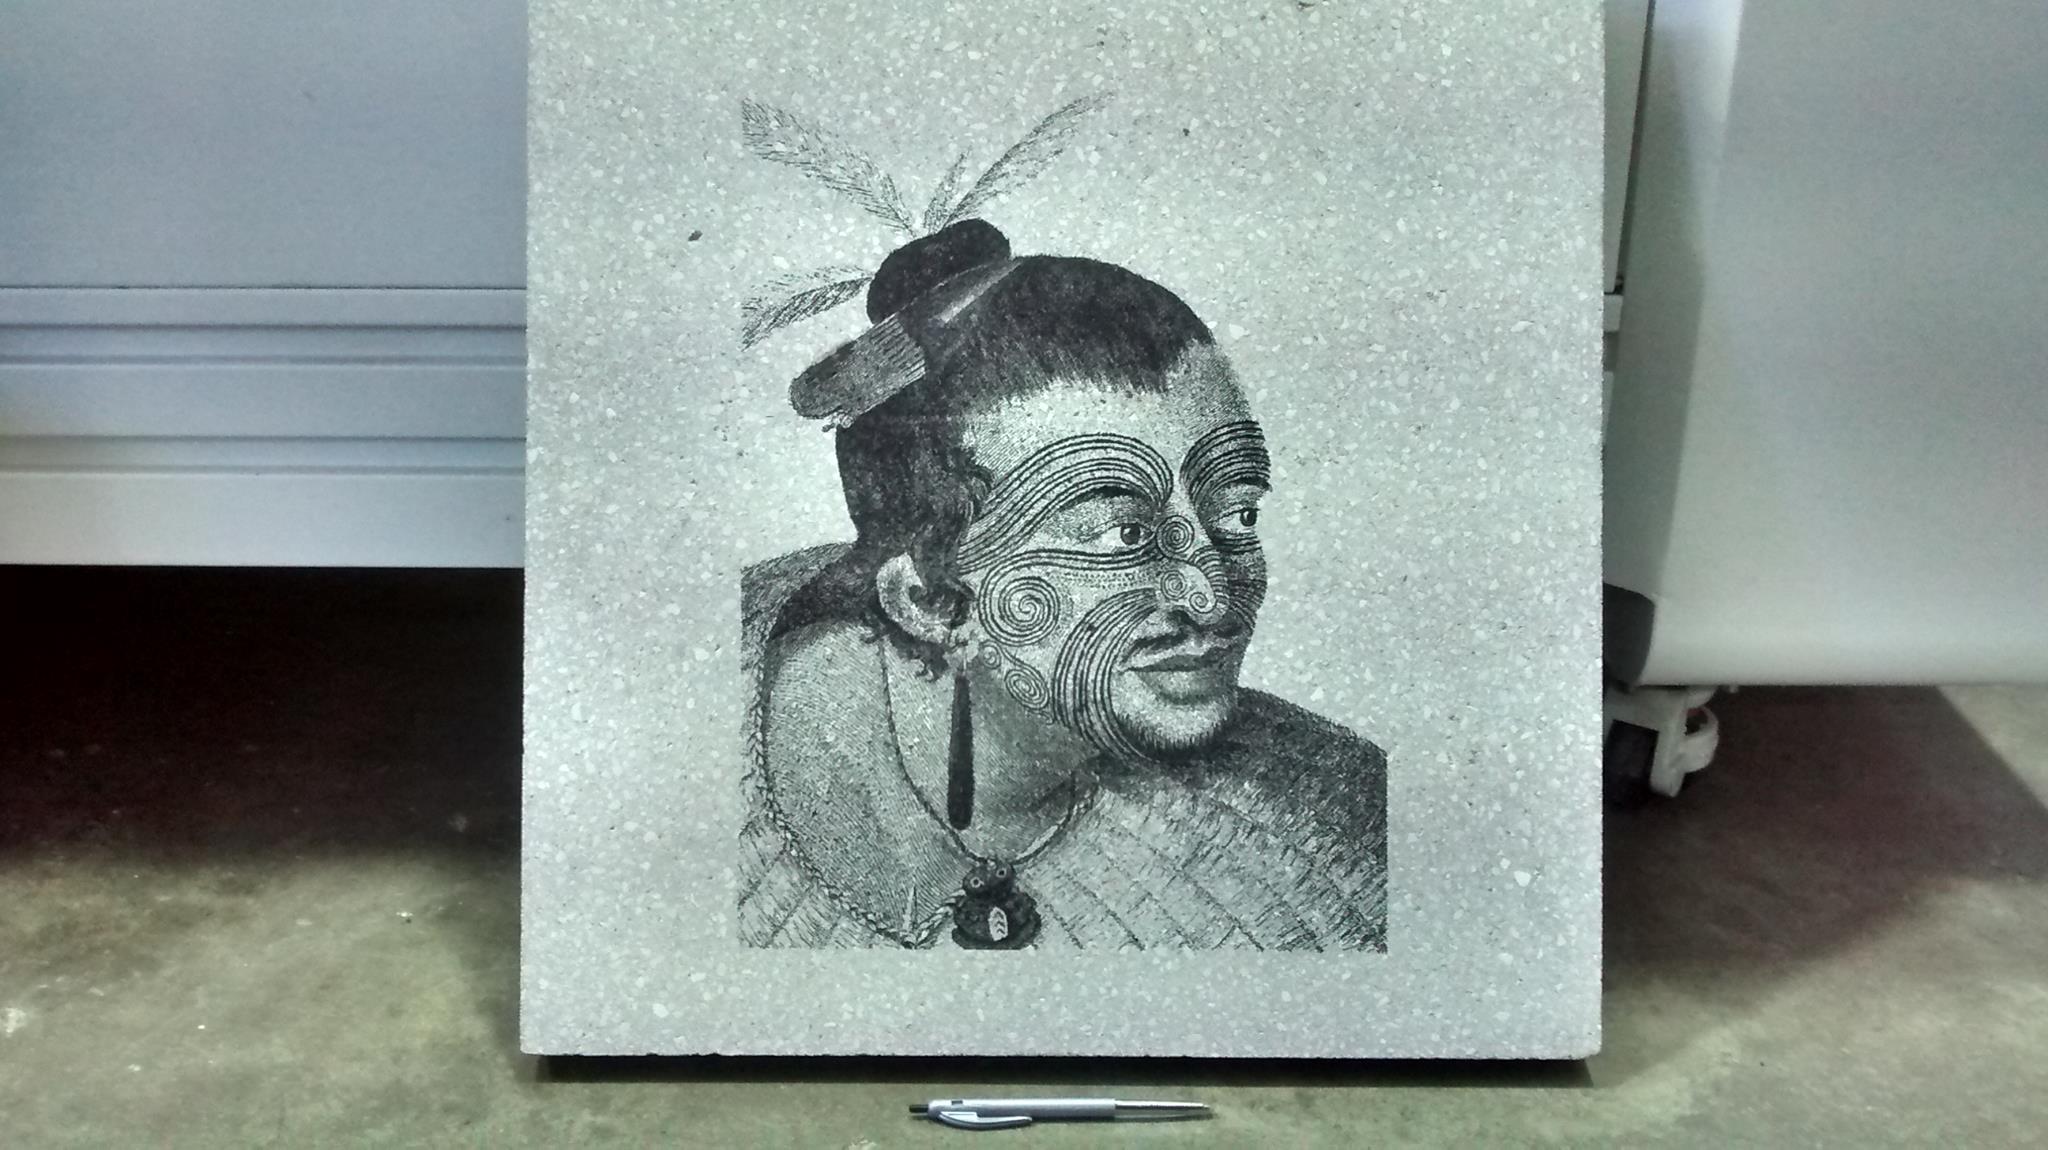
After much experimentation we've worked out how to laser etch into concrete pavers....much easier than sand blasting! We've got interest from some town planners up north, really need to get this in front of planners in Christchurch for their urban rebuild.
1 point
-
I built a sound bar for under the tv now just have to mount it to the wall. Made out of old rimu came up alright.1 point
-
Can u be my dad?. Oldschool community1 point
-
Long time no post. Popped a turbo at Toyota Fest earlier this year. No major damage to anything apart from one of the turbos. I always knew it would pop one sometime so no major stress, it was running about 10-11psi every time I drove it. I had a single turbo manifold lying around that I had purchased a few years back knowing I would need it one day. Max along with Simon and Robbie from SURFAB all took turns in doing the conversion for me. The manifold was a bit rugged so required a skim and some welding magic to make it acceptable. A gen 2 RB25 turbo was acquired and modified to fit the engine bay etc. A sweet downpipe was created. Plenty of little modifcations to the turbo, oil and water system etc were made and she was ready to go. Fired it up and had white smoke galore. Found out this turbo is ball bearing and needed an oil restrictor, installed that and it made things better. Have been boosting it around on 10psi and it feels like a completely different car. Feels more responsive, more torquey and pulls much nicer through all the gears. Very happy. Tested Air Fuel and it was running healthy with the factory fuel system, not leaning out. Only problem is the white smoke issue has not completely gone away, after lots of reading and discussions the consensus is the turbo is poked, most likely a rear oil seal. Oil is seeping into the exhaust and burning on the hot exhaust creating the white smoke. Next... Turbo is now on its way to Steve Murch for a Holset recore. He can use the modified housing etc I have, replace the core. Deletes the water system and sends it back. The factory turbo is ceramic wheel so I was always limited with boost and the very real possibility of it letting go and taking a quick trip through my engine. New turbo should be no smoke, more reliable, allow more boost and just generally be more awesome. Should get it back in about 2 weeks. Also had a noisy diff, ended up yoloing it and getting a new TRD 2 way centre put in. gomaxgo did a full rebuild on it for me and set it all up properly. Cant believe how awesome it bites compared to the rinsed out factory LSD. Thats about it for now, will put up some more pics etc when the turbo is back on again. Here are some photos of various changes: Completed Engine Bay Turbo before shipping to Steve Murch Down pipe etc. LSD love Recent Shot from OS Hamner Meet with a cheeky Bubblegoose in the window1 point
-
All of the wiring is now finally working, other than the horn which had to be relocated because of the front end. But that will soon be connected too. Other than that we have fixed the dent in the front fender until I find another fender:1 point


This leaderboard is set to Auckland/GMT+12:00