
Leaderboard


Popular Content
Showing content with the highest reputation on 07/04/16 in all areas
-
16 points
-
This sentence requires some amending: Alright alright, so maybe this doesnt make much sense compared to turbo or supercharger or whatever. And maybe some pessimistic people will say "Carrying both fuel and oxidizer in an old car is an idiotic idea and you're going to blow up" Well guess what? Lots of other things have carried both fuel and oxidizer on board without major issues. The Messerschmidt 163 Komet carried Hydrogen Peroxide as an oxidizer. It featured an impressively low rate of dissolving its pilots (less than 1 in 10) which was better than any other rocket powered aircraft in service at time (none, therefore it was the best) The Challenger spacecraft flew NINE successful missions with both on board, before having a minor fuel/oxidizer interaction issue on the 10th: Also lets stop and consider that the titanic didnt carry an oxidizer on board, and yet it killed way more people than both the Komet Challenger combined... And didnt even do anything cool like shoot down bombers or fly around the planet. 0% success rate! As you can see from the above evidence, Nitrous is not only highly entertaining, but also has only a very limited probability of causing your vehicle to explode. It's far from a certainty!14 points
-
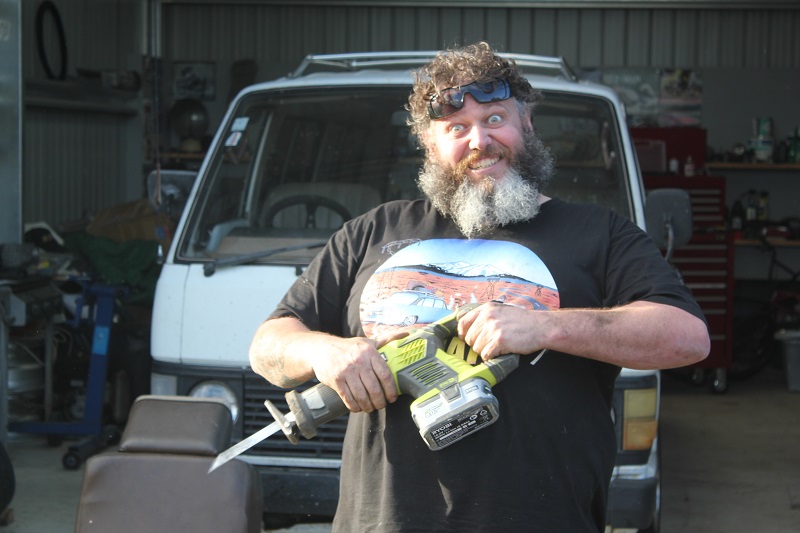
Did a little photoshoot6 points
-
Have been trying a few more things with this engine. with more fairly disappointing results. / kinda boring update Firstly i brought some bigger cams, since going from the stock cams to kelford 193-b was quite a big improvement. have gone next step bigger with 193-c cams I initially installed them to the factory marks. which resulted in big loss in power everywhere. except the last 500rpm or so. ended up with the exhaust retarded 10degrees and the inlet advanced 20degrees. Which gained back most of the losses. but still slightly less power everywhere except right up top, over the smaller cams. Then I started to pull some of the car apart so could dial wheel the cams, to see if they were ground slightly off or anything. as was initially too lazy to do this. Got a bit carried away and pulled the head off and did some more port work, both on inlet and exhaust side. got my china on a copied some pictures of Hasselgren's work, who built atlantic 4age's back in the day. Back together with the cams dialed as they were, maybe some minor gains from the port work. nothing really measurable but definitely not a loss. But it turns out when i dial wheeled the cams, the inlet was way off. 20degrees retarded, which is 1 whole tooth on the cam wheel. Kelfords had managed to grind the cam 20 degrees off. So the whole time i thought it was running 20degrees advance, it was actually dialed to their recommended settings. No big drama, skipped the cambelt a tooth to regain the adjustment on the camgears. Dialed in 10degrees advance on the inlet. along with the 10retard on the exhaust cam. which just happens to be the same settings i was running the old 193-b cams at. After all that, some not bad gains through the midrange. but almost nothing up top over the smaller cams. something its restricting it making anymore peak power. ive pretty much tried everything bolt-on wise, so pointing the finger at head flow, larger valves maybe required to go any further Pink lines are old cams. Can see the rpm plot, the green (new cam) line starts to pull away slightly. plus its using more injector d/c for same fuel ratio. Indicates some gains. This is the top row of fuel map. bottom grey-ish line is old cams. top grey one is new cams. green line is different length trumpets on new cams. ignore anything below 4000rpm. Can see how gains are very minimal up top. Tbh is going the best it ever has. but not giving up just yet.. Oh and the light toda flywheel is awesome. revs so fast in lower gear now4 points
-
Just a quick little update. After having completed a fair bit of rust repairs to Sams latest Datsun acquisition I moved the Viva back onto the hoist. It was nice to see an emptier workshop with plenty of room to swing a fluffy cat. Not that I would. But I could. If I had to. Spot Hannah’s triumph waiting for attention… While I had a bit of time to spare that evening and was in a cutty, weldy sort of mood I decided to sort out the new battery position. Having removed the ugly old tray from the inner wing in the engine bay. Into the boot we go just like in Viva one. But this time I want to have it mounted below the floor level to maximise the amount of luggage/bike/bails of hay space in the back of this little wagon. Luckily there is a nice area of nothing just to the left of the fuel tank. I decided to take that nothing and turn it into something. Like a battery box. This area here… ..had this box here… ..slotted through the newly cut hole in the floor like so… ..creating a tucked away place to hide the battery… With that done I filled in a couple of tiny holes and stood back happily admiring my Viva wagon that is now pretty much rot free. Yay. I celebrated by hoovering out all the grinding dust and neutralising the surface rust. The following day Hannah pushed the car out into the sun and painted it with epoxy primer. It looks much neater but I forgot to take a photo. You’ll see it soon. Back to engine bay. I finished sanding back the filler primer to a level I was happy with. Its turned out pretty good and should be a good enough base now for the top coat finish. I’ll leave the car out in the sun to warm it up before expertly applying my spray bombs for a professional orange peel finsh. Next job was to fix the tailgate (hatch..) and its turned out to be more solid than I first thought. I’m still not sure why the car came with a far rustier black one fitted. I figure it was purely because they original one might have suffered a broken window so someone just swapped in another tailgate rather than swap the window. Luckily the this original coloured one is the more solid one so I’ll just swap out the window and refit it once fixed. To start with Hannah spent some time sanding and scraping off all the flakey crusty bits so I knew what needed fixing. This was the worst bit here.. ..which I cut out and repaired the inner skin.. Then I folded up a new outer. It was cold in the shed tonight so I have been wearing my best hobo fingerless mits. I forgot the fingerless bit when I pressed against the repair panel and preceded to tack it in place along with welding my finger. I smelt the burning flesh before my cold brain registered the pain from my now not so cold finger… I finished welding it in and that was it for tonight. The warm housetruck beckoned. I few more little thing rusty bits remain on the tailgate and then I’ll fix the frilly bits on both door. I’ve also been investigating the engine and I’ve removed the inlet manifold to but and weld so I can tidy up the ugly breather hose routing etc. But for now its back to the fireplace and cup of tea.3 points
-
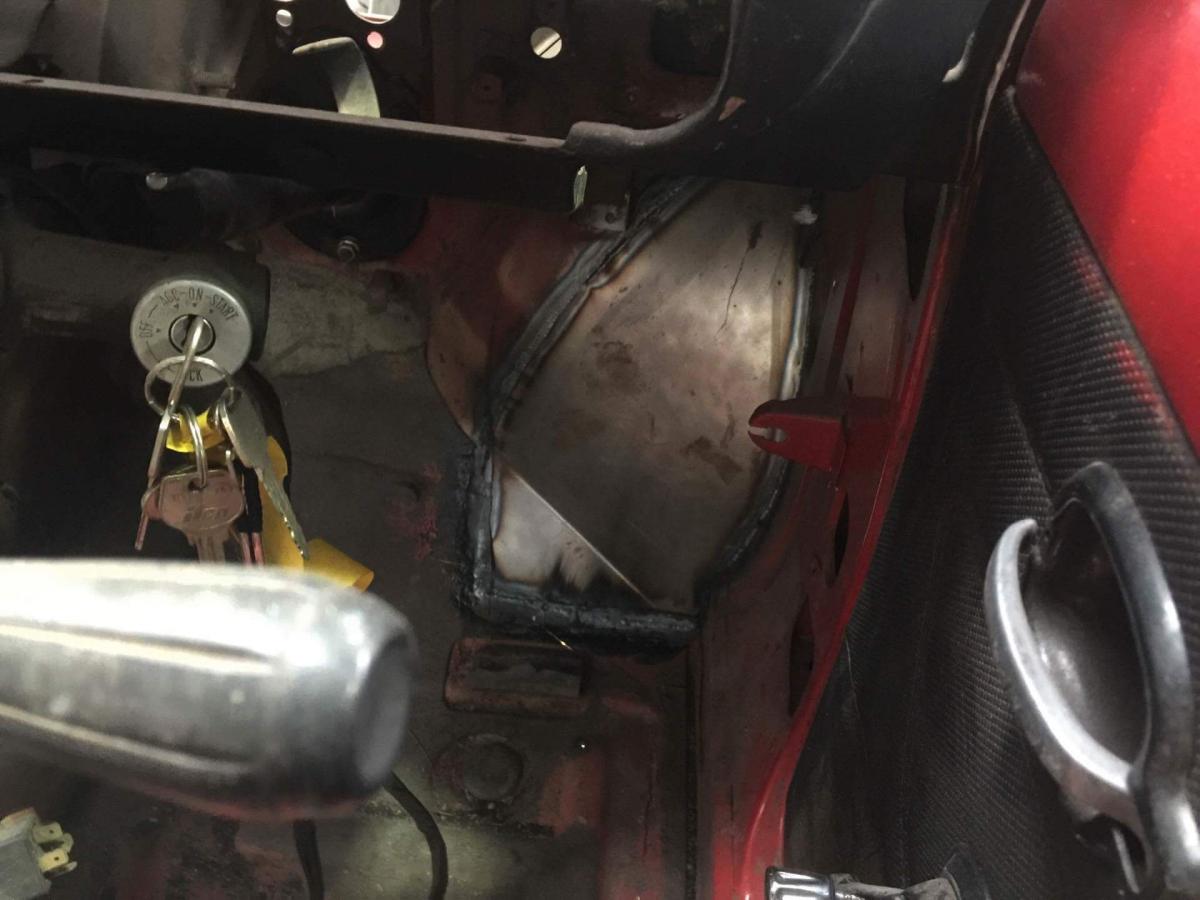
Sheeeeeeeeeeeeeeeet. Build thread almost off the second page. Must mean I have been super lazy........ heh Anyway, I decided the inner guards offended my eyes, so scuffed them down, and resprayed with rattle cans in satin black, in my make shift bake booth. worked a treat! would say that also came down to the previous black paint smoothing everything out. Also acquired the engine covers I were missing, Huge thanks To Toy-mota And beaver for hooking me up. makes me happy. Then came the time I thought I might try power up the ECU and see if my engine check light was working. It wasn't. fuck. traced some wires and checked powers. found when I had my relays plugged in, power to switch the ECU was dropping to 6V. hmmm....... fuck it, at this point I bit the bullet and did what I had been trying to avoid, moving the relays and extending the wires so it didn't look like a bunch of shit under the dash. Glad I did, looks so much better under there, and now my glove box fits without hitting the relays. rad. Also, connected one of the spare wires I had run over to the drivers side, to the ignition switch, instead of pulling switch power off A random circuit under the dash. Turned key, heard relays click, engine light came on. Success. So atleast I now know It should run when The intake manifold goes on. Which I painted today, and will fit tomorrow. So its getting there. Maybe not as quick as I need tho as all these changes are taking up more and more time. Plus I spent the weekend over in Masterton pulling apart a commodore with KK him self. Was fun3 points
-
Scratch the above with the inner guard work. GC Alan of Motorelite just sent some snaps as he's changed the guard work. Looks a lot better with new setup and more room for the pedal assembly (running the original clutch and brake pedals but and fd accelerator pedal) but still allows wheel clearance. Here's some pics of each side...
 3 points
 -
Orange you glad you got that done. ...this is still one of my favourite OS related photos... (it's 5years ago maaaate)3 points
-
I survived man camp 16. Stage two, make this thing look cool. seat, zorst etc free upload pictures3 points
-
Okey, so the replacement window that came out of the Green car doesn't have a demister grid. The Green one must be poverty spec. I bought a demister kit online and applied it to the glass (it was terrible, and looks terrible, lets hope it functions better than it looks). The nice people at www.basisnz.co.nz sold me a length of rubber seal and chrome filler strip that was hopefully the same profile as the old stuff. http://www.basisnz.co.nz/Products/Window-rubber-seals/Rear-screen-seal/SEAL-(218-076) For anyone looking to do the same I needed 4meters of part #217.007(chrome strip) and #218.076(straight rubber) Basis were excellent to deal with, and very helpful in selecting the correct rubber and sending a sample etc. Sample rubber looks like this. The problem I faced was that there is a near 90degree corner to get around, and corner sections for the rubber weren't available. Did some testing with glue and wound up using Loctite 401 to glue the corners back together. This was an awful job, and the outcome is a bit average, but I was very impressed with the glue. So got chopping, needed to be pretty sharp, I used 6 or 7 blades. Not super flash, but OK Put the rope around, and with helpful Welsh assistant plopped it in the hole and pulled seal in with rope. Fitted the chrome strip, that was quite awful to do also, and looks a bit shit. Yet to know if its going to leak or not, the glued corners held up OK when putting the glass in, but got a bit knocked around. Overall it looks a bit crummy if you look too closely. But much of the car is like that. Still need to find something suitable for a boot lid seal. One step at a time. Talk shit about this Orange scumbag here //oldschool.co.nz/index.php?/topic/22150-waimaks-gsr/page-19 Also, if anyone knows of any of these coupes kicking around I'd be keen for some more parts/cars. Taillights specifically at this point.3 points
-
Cheers KY I just made a little video clip,2 points
-
Took possession of my new donk the other weekend. Acquired this as part of the deal I did on the Hemi engine. It was on TM under Listing #: 1095158136 This will work way better for me than the other motor ... simpler, cheaper and should not break my ching ching gearbox. Bring back the old days I say ... 4BBL's, 4 speeds and 4.11 geared arse ends.2 points
-
Nah subframe on efs is in two parts, engine bolts to both parts and also the chassis, out the top is easiest. If you think you have no room try a Shuttle with B18c in it, that is a tight fit2 points
-
amazeballs mid engined nsx powered dc2 integra. https://nzhondas.com/topic/163189-speed-science-project-x-nsx-mid-mount-dc2update-4716/?page=42 points
-
2 points
-
I believe that the South Auckland Triumph Car Club will be in attendance. After much deliberation over a strong brew of PG Tips and a plate of lamingtons, new member Richard has received dispensation for his outlandish suspension.2 points
-
i have a nitrous related sharn a guy i know was tuning a wet system 'still rich, ill jet it down' 'still rich , ill jet it down' 'still rich, ill jet it down' 'oh look the bottle is off, ill turn that on' 'bang nunga nunga'2 points
-
There's not much to show lately gentle readers. The last couple of weekends have been spent digging between raindrops, but I've had a great deal of help with the digging, and also the portage of building materials up to the site. Rightly or wrongly I figured it was a good idea to place some drainage on the uphill side of the cabin floor. That took all day yesterday, but it's pretty much done now. Digging into rock sucks TBH, but there's enough clay to cause a likely problem so the sleeved drain got installed. Sorry about the bad photo. Night time and damp cellphone But the REALLY good news is that the dig out for the deck is done as of tonight. I still need to do lots of digging for the deck plies, retaining wall and roof posts, but the back of this bitch are broke. Two million kisses to the dear friend who did the bulk of the work. It was a good symbiotic relationship2 points
-
Made an arduino based carb balancer using an aliexpress pressure differential sensor, took all of 5 minutes to balance the dells Bar graph just tracks left or right depending on the pressure differential between the two inlets which are hooked up to the carb throats.2 points
-
Hoping to have it in primer or potentially painted by next weekend (fingers crossed), then we're onto assembly! Here's a picture of the wheels for good measure. Tai.2 points
-
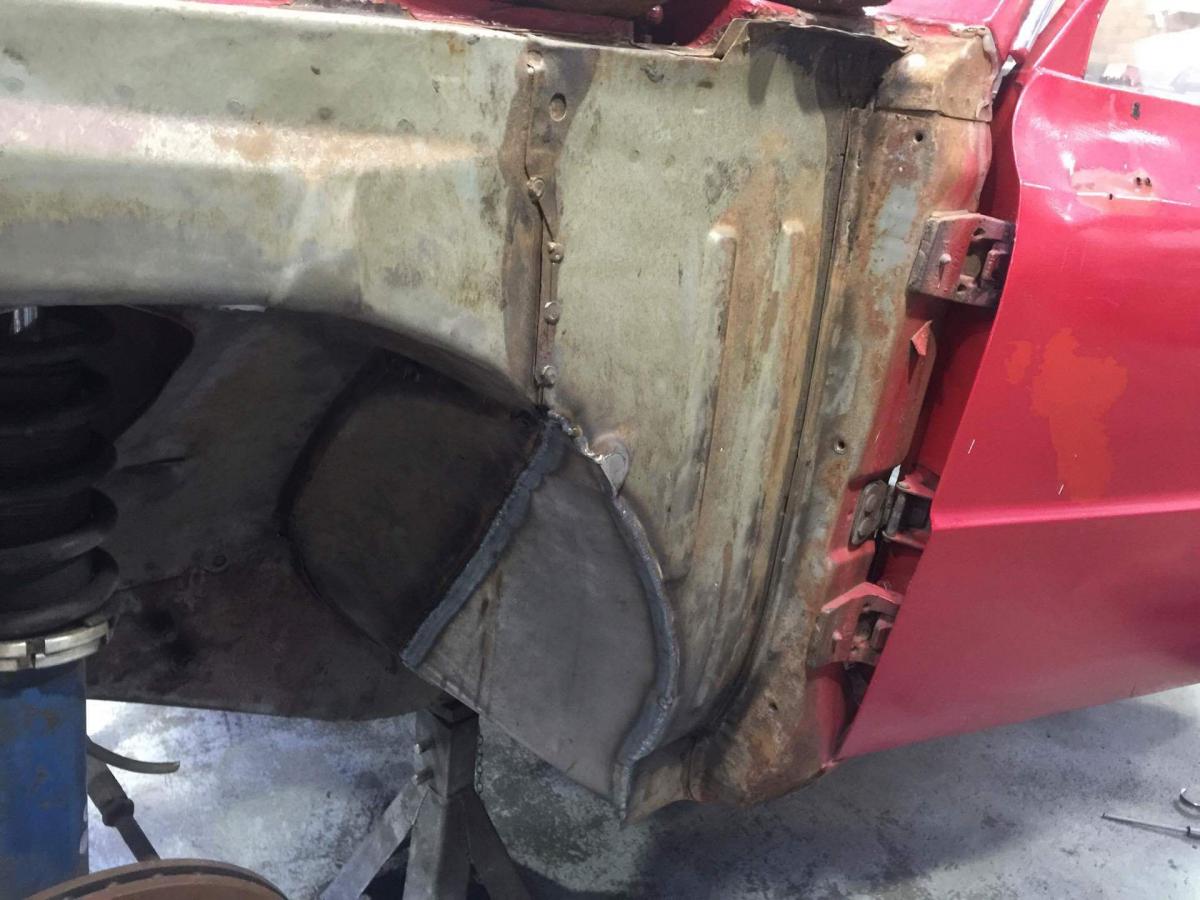
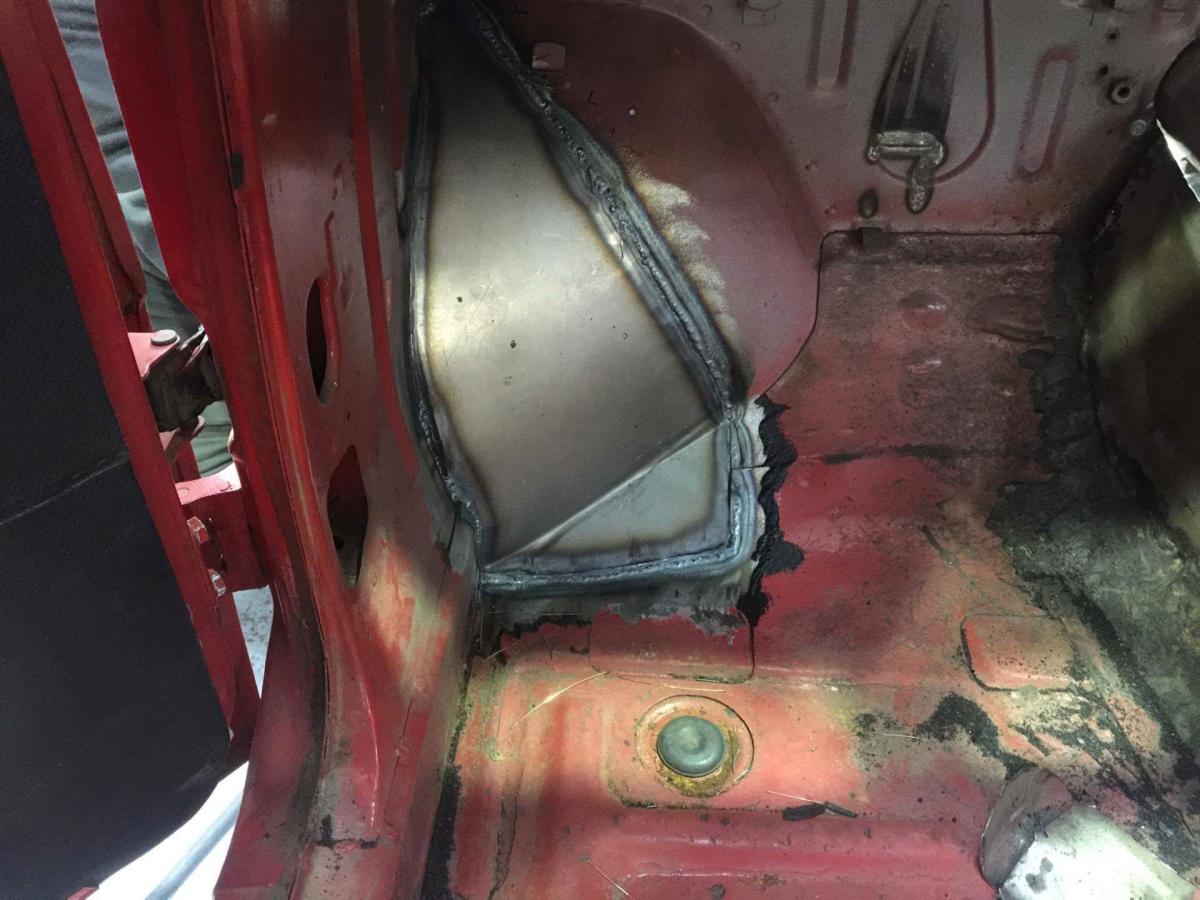
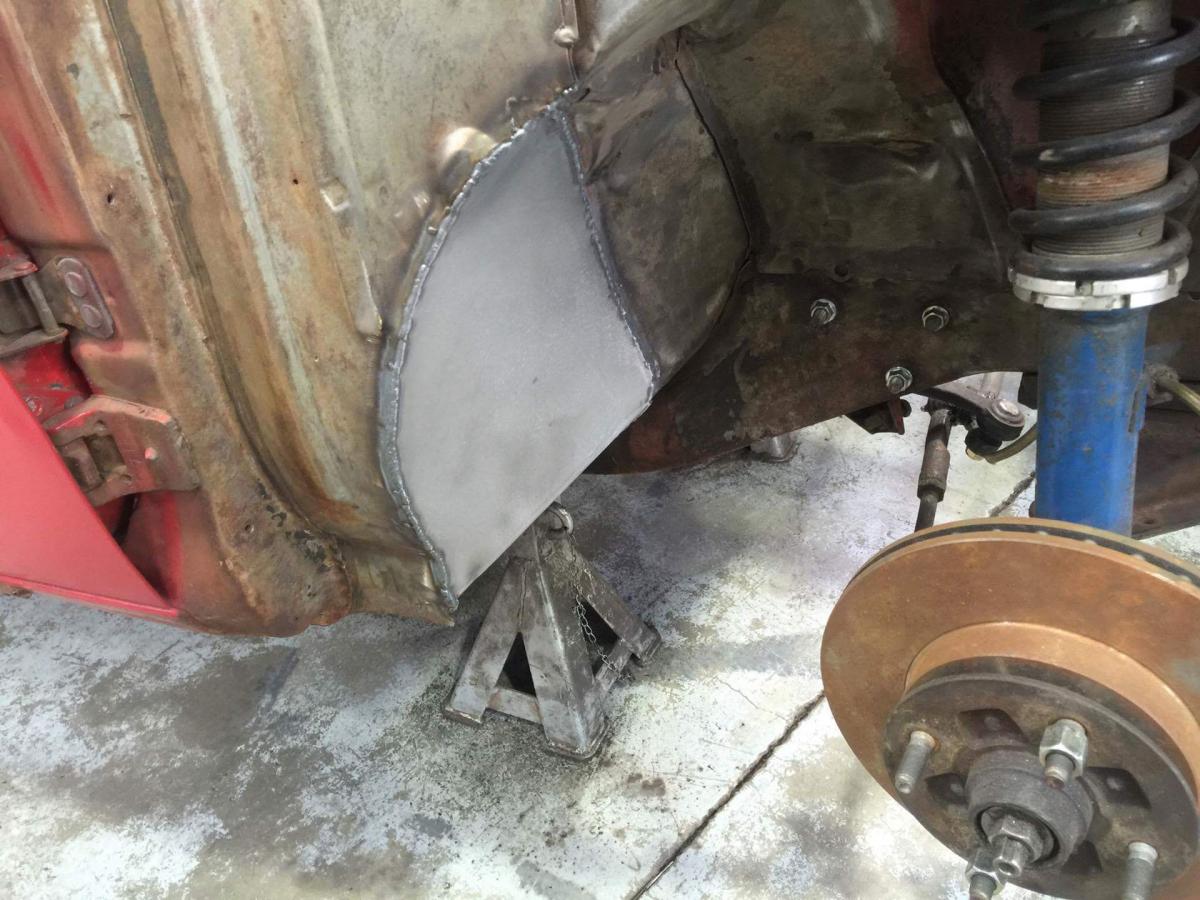
Went and checked up on the progress on the old Mazda. Here's how it's currently sitting.. More fab work has been carried out in the engine bay and front inner wheel wells for clearance and to tidy up the bay in prep for paint. The chassis rails have been capped off and the firewall/trans tunnel has been smoothed out. More plates will be welded in across the top side sections to tidy things up and further reinforce it.2 points
-
So a while ago I made a pretty ballsy decision to buy Rhys's (Rhyscar) daily/racecar AE101 basically unseen and drive it just under 1000 kms home. Thankfully things worked quite well and I flew up, bought it and drove it back Queen's birthday weekend. Many thanks to Rhys who offered to pick me up from the airport, gave me a bunch of spares with it as well as info for setting it up/racing and was generally just an all round GC! It was an eventful weekend to say the least though! Featuring a successful Tinder date, two speeding tickets and probably the most uncomfortable drive I've ever done... 8kg springs all round, bugger all suspension travel and the 2 1/2" exhaust left me deafened and crippled when I finally rolled into Wellington about 7 hours after leaving Hamilton. Thankfully I had a mates place to crash at who kindly moved his girlfriend's Peugeot 306 convertible out on the street where it belongs and let me chuck the Levin in the garage for the night Anywho made it all the way home to Christchurch the next day without any issues which was great as I had no tools whatsoever on me! The plan with this thing was to buy something where most of the work had been done and I could just get out there and drive it rather than having something that sits in the garage 11.9 months a year, had to be road legal as I don't have access to a trailer. Rhys has done a pretty sweet job of setting this thing up, current specs are roughly as follows: 1995 AE101 Levin GT Apex Chassis 20v Blacktop 4AGE (A/C removed) 16 row oil cooler and remote filter Honda Civic radiator HKS extractors 2 1/2" stainless exhaust 50mm trumpets Exedy heavy duty clutch GTZ twin pot brakes with Hawk pads Cusco rear swaybar Tein Super Street coilovers Camber plates Relocated lightweight battery Raised shifter Stripped interior with sound deadening removed 16x8s with Achilles ATRs for the road 15x8s with well used Nitto NT01s for the track No real plans to change any of the above, just race it/break it/fix it!1 point
-
The Auckland Monthly Meet! Wednesday 20th July Second-to-last Wednesday of every month 7:30pm onward A chance to catch up with fellow club members, talk some shit and eat some lush foodstuffs. Burgerfuel, Mexicali Fresh, Ajadz, Subway, Doolan Brothers etc. corner of Robert St and Hurst St, Ellerslie See map. The DEAL$: FREE Drink with Burger and Chips Purchase (From the COKE range , excluding mini burgers) FIRST MEET?? If you are new to these meets here are a few points that may help; Most people usually show up between 7:00pm and 8pm ish. We roll down to get burgers and whatever else is available whenever we're hungry. We sit around either at Burgerfuel or back up top in the carpark and continue the yarns. Remember its always a casual affair, a place to yarn to mates and make new ones. An Oldschool car is not required at all, but if you've got one on the road then bring it and show it off!! Doesn't need to be flash or special. And to be honest, many of us drive our boring modern daily drivers there anyway. MOST OF THESE ARE COMMON SENSE. WE WILL PROVIDE A FEW GENTLE REMINDERS WITH THE NEW RULES BUT REPEAT OFFENDERS MAY BE ASKED TO LEAVE. RULES AND THE BORING STUFF!! Basically these are in place so we have a fun and friendly meet and leave the carpark clean and tidy like we were never there. Take your rubbish away with you or put it in a bin, Use the public bins downstairs not the private ones belonging to the business up top Smokers please don't dispose of your butts on the ground! Please limit the ALCOHOL consumption. Its a public place and the Police/security regularly stop in and we don't want want anyone getting in trouble, We also don't want people leaving empties around. You are welcome to invite a few mates, but please note you are 100% responsible for their behaviour If you belong to other clubs and feel they might be keen to come check out our meet then that's cool but please see BDA780, Threeonthetree or 73crownwagon for permission before inviting them. NO Skids or Reckless/Dangerous driving Please leave a space near the fenced off area clear for the cleaners and don't block them in if they are there. Park in a proper carpark! If its full then just use a bit of common sense and try not to park to many people in. Newschool cars please park to one side and be prepared to move if we get short on space. I have had to ask Newer cars to move and park elsewhere and will continue to do so. The old cars get first preference for parking. Don't be offended if you're asked to move your newer car to make space for something old. If its raining and we have to park downstairs then new cars park upstairs or out of the way. The covered carpark is very small and needs to be OS only, If you have any suggestions or input for the meets then PM BDA780 , Threeonthetree or 73crownwagon Thanks!!1 point
-
If you can get a detachable boss kit easy enough why not machine up an adapter and bolt on a triumph 2.5 steering wheel good condition ones are easy to find as everyone swaps them for smaller wheels. I say bolt on as they run 6 bolts 2 per spoke.1 point
-
It's a fucking sweet looking little shit-kicker. Will look even better with a noisy straight pipe on it that kicks out just before the rear tyre like. Good work young hooligan, you've done yourself proud once again.1 point
-
made some improvements with the suspension. i bought some lush YSS shocks from tardme for my GP125, so i used the old shocks on this thing. so much stiffer, and about 10mm longer so more clearance between tyre and seat base. a lot less floaty than the standard shocks, a much stiffer ride. good times1 point
-
Cheers Rusty, that's a good run done for a noob like myself to follow. The PPG shop also quoted the "mack daddy" system which included a epoxy primer, 200 bucks more than the Wattyl stuff so you must get what you pay for. I'm out in West Auckland, Te Atatu. I've gone back and forth so many time between a rattle can job and fake patina, but the under side needs proper paint so i might as well paint the whole thing. I 'll just be stripping the bug with a grinder and sander so will need something I can do in stages. thanks again guys!1 point
-
Anything in South Akl should require special dispensation for NOT having altered suspension.1 point
-
Super custom calipers wont go onto hilux hubs without an adapter. Supercustom 280mm disks and Nissan 4 pots are a bolt on option but you may run into issues with caliper wheel clearance1 point
-
Wow, such kind words, thank you! Really appreciate it, especially considering that there are so many insanely talented people on this forum, I'm amazed at the work being done here. To be honest I feel like there is still a lot I could be doing better. This is my second large (large for me) car project and I'm trying to improve from last time. Even a simple manual and re-power swap like mine can get so involved as I'm sure you know; Just trying to catch up on neglected/overdue maintenance is a big enough challenge in most cases. If I was more sensible I should have avoided spending all that money on the ITB adapter. But its all for fun and learning, always can improve. Plus ITB's are too cool to deny. Anyway thanks again.1 point
-
Such neat firewood stacking....1 point
-
pretty happy got given these for the crown the other day
1 point
-
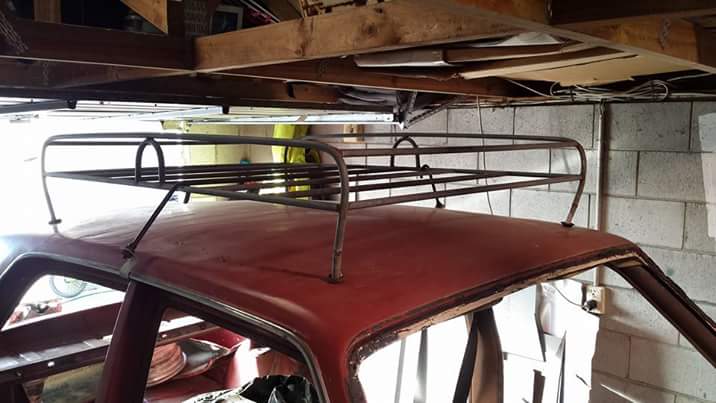
Fucking boom. Added 20hp by fitting a roof rack
1 point
-
Dohc zc's are good fun in a Shuttle! As SiRge said we pretty much did the swap on my one in a weekend. It took a while to sort all the nigly shit (we did manual conversion at the same time) and in all honesty I never got it sorted 100% No ABS or A/C in my one so can't help there. I miss my Shuttle1 point
-
yeah your dead right torton, factory reg takes like 3 revolutions to do the full window travel haha flyingbrick- that does sound good it would just be somehow adapting the reg into the door to suit turned out my old boy has the exact kit i was looking at for his 36 ford i dragged it out and had a look and it would be pretty easy to adapt into the door it looks like it is the way forward. its made by EZ wiring1 point
-
Air cleaner fixing leaves a bit to to be desired esp if one of the bolts comes loose and ends up down the carby! I'm going to drill the head of each one so I can thread a piece of through so that will sort that issue
1 point
-
Oh yeah. I took this thing to nats a few months ago. Pics by CDL.1 point
-
Design approval is all drawn up,just waiting for the LVVTA to come back with a plan.This weekend ive mounted the powersteer unit,but that wasnt without its own dramas.After abit of internet research i needed the ms112 steering column just for the end 'T' piece as the steering box is longer on the power model. Abit of a walk through for people who may want to do the conversion If your lucky enough to get a whole ms112,get the steering column,pump,steering box and lines. 1.take out the column from the ms6* .it needs to be completely stripped down,now is a good time to repack the steering bearings with grease (word of caution,the bottom bearing has about 40 small ball bearings,whack it out to hard the balls go everywhere ). 2.removing the ms112 end 'T' piece is alot easier,just undo the end circlip and pull it out 3. the two end 'T' pieces that attach to the steering box from the column.ms65 is alot longer 4.now put the end 'T' piece into the ms65 shaft.this is quite fiddly . 5.when fitting the steering unit the bottom arms need to be swaped over.the arms are on a tapered spline and will need to be pressed off,i used my works 50ton press but a small shop press should do it.also note the location were the arms were facing as the steering unit doesn't rotate 360. pretty much it,i think next time ill take photos of the process but any questions im more than happy to help. better pic for thread,a bunch of rusty crowns 2x ms65s and a crushed ms751 point
-
1 point
-
got given this window from a ms55 wagon but I hope it fits my coupe cheers (toy mota) matt
1 point
-
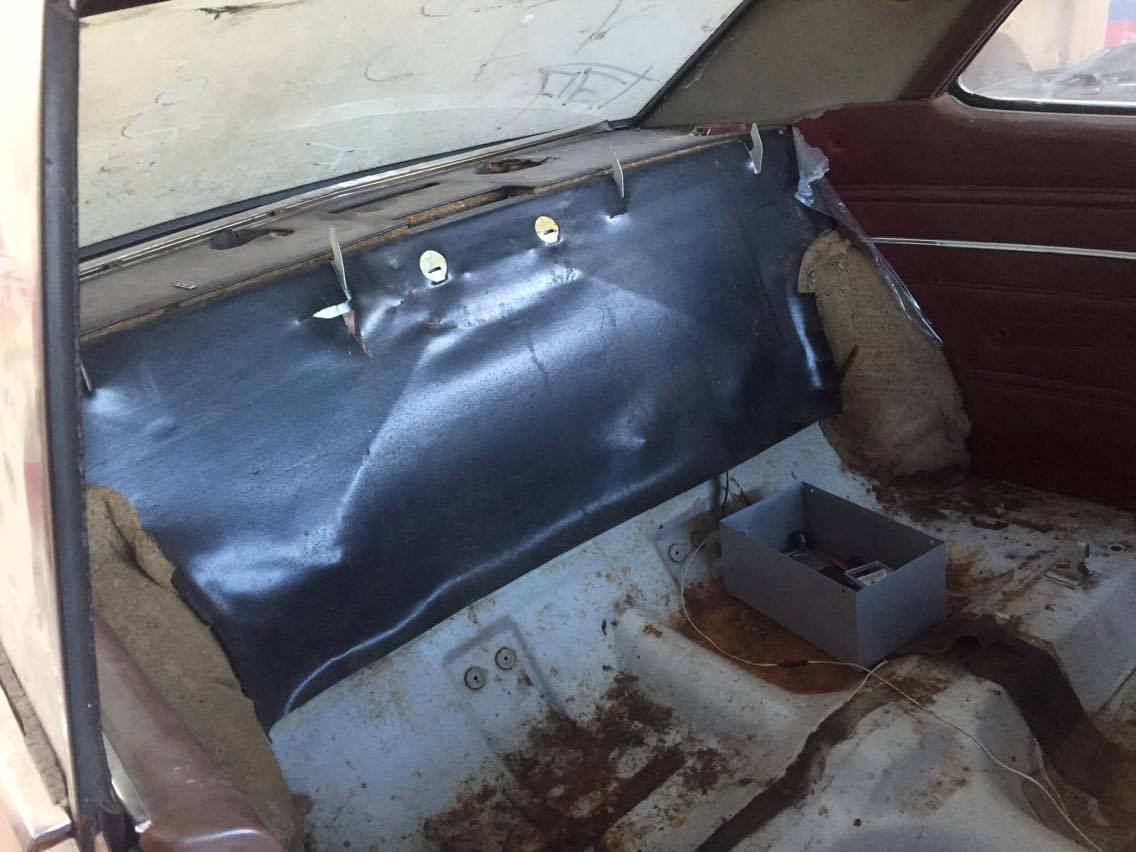
Not a lot to talk about but I have taken some pretty pictures of neatness caused by previously manky areas being covered in one uniform colour. Painting I believe. I have continued to avoid painting anything outside of the engine bay in order to keep the ‘pulled from a field’ look. However Hannah has painted the floor. This I approve of as it keeps it from getting worse plus when the time comes to tidy up and modify the wiring I have a nice tidy place to do it from. Some photos for proof… The floor surface rust was first neutralised.. The following day with the car wheeled out into the sunshine we both set to work. Hannah painted the floor with an epoxy primer while I covered the engine bay surfaces in a high build spray putty. I was expecting it to be yellow but instead it turned out to be almost exactly the same colour that I had painted my Rx3 in. Oh the memories… When the sun disappeared the car was rolled back inside and I sanded back the spray putty. Its come up pretty smooth. Way nicer than I had ever planned for this car so that will do then. Next dry sunny day it will get a topcoat. Hannah wire brushed a load of other engine bay bits and Ive now readied them for some paint. Then reassembly can start. The only rust work left to do is the hatch/tailgate and I also need to make and fit a battery box under the boot floor. We are both keen on getting this car on the road but its still only getting little bits here and there around paying jobs. Evening work has not really happened as much as planned. The shed is too cold/truck too warm to stay out late. Its just so enticing to go inside and have cups of tea with a fluffy cat in front of the fire. I shall try to improve my efforts….1 point
-
New coilpacks and plugs fitted, awesome. Old coilpacks on the left, new coilpacks on the right: The top of the coilpacks are filled with a cooling fluid (which frigging stinks if you ever cut one open) So the new design has more cooling fluid in the top by the looks, and flatter plug design which is a bit of a pain. However near the bottom of the coilpack the new one is also ribbed for my blocks pleasure, I think this is so if you have an oil leak down into a spark plug well, it holds the oil up instead of falling down around the spark plug. Good idea I guess. So new coilpacks fitted, idle seems nicer and car's running well but the bloody ticking/knocking noise is still there! With some help once more from the DIYEFI thread, found it seems to be happening on the verge of VVTI starting to engage. Then, thinking about it, the VVTI pulley is whats probably been making that rattle at idle thats been driving me nuts for god knows how long! Decided to bit the bullet and buy a brand new pulley, no point in mucking around with second hand stuff that's gonna do the same thing. I got the pulley installed, and then also found that my previous pulley was jamming at a minimum of 12 degrees advance, this new one now goes right down to zero. Which could possibly mean a little extra top end power, awesome. It's been a crazy expensive last few months though, the new tires were exciting but the rest has been on replacements or consumables or fixups, rather than fun stuff. I bought a brass bush for the gearbox shifter as well, I think the plastic one in mine is starting to wear a bit. Hopefully this might help a bit to prevent accidentally shifting out of the gate when trying to get 2nd gear (Going into the void where reverse exists!) Not too long till some Taupo trackdays, hopefully some of this effort pays off and I have some fun and reliable days at the track.1 point
-
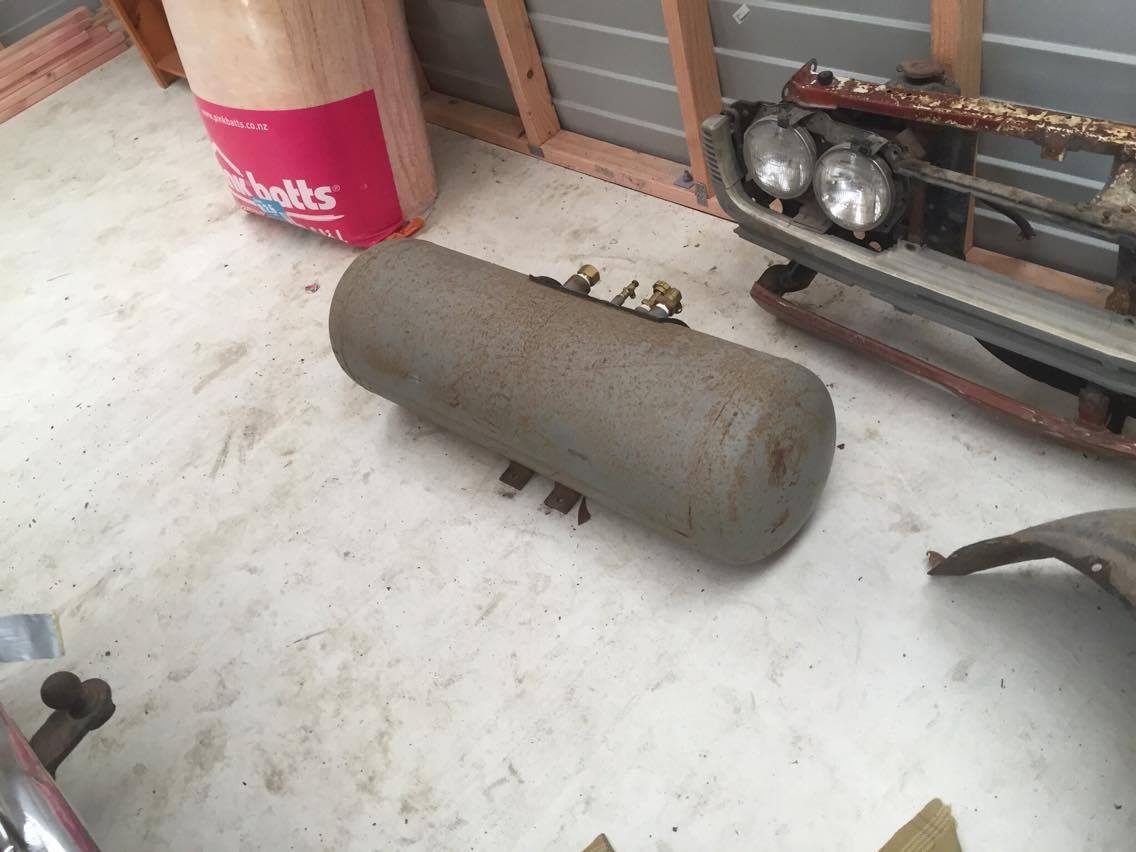
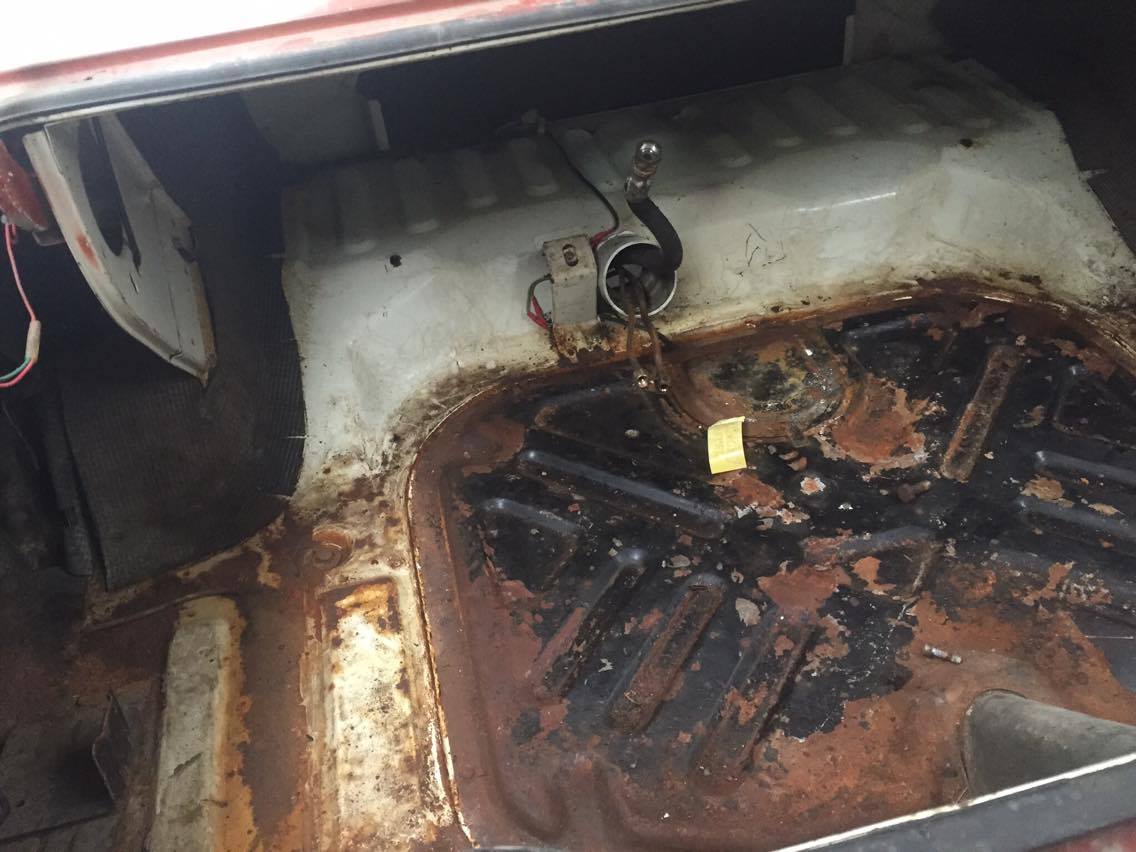
so its looking a bit sad now. got the dirty lpg tank out and tail lights ect . floors don't look in to bad a shape after the carpet being removed. got to the body bolts and took them out and still doesn't want to come of the chassis
1 point
-
Remove bootlid, apply tape and yellowpages I have no idea what I'm doing. STAY AWAY RUST.1 point
-
So I've had a bit of a nerd-on regarding fuel economy etc recently, Was reading about that guy that whale tailed his civic (which looks utterly rediculous) However he now gets 2.8l per 100km What the fuck!! I didnt even think that it would be possible to improve by that much. I want to keep this car looking standard, but there's some low hanging fruit in the aero department because the front of a the car, from underneath, is a frigging mess. Gonna have some side sections sealing off radiator entry so it uses the fan less. Then try get a flat tray underneath the front of the radiator area and a short distance behind it too. Might be worth a few KPH at the far end of the straight at Hampton. Found this cool excel sheet, will give this a go before and after and see if there's any difference. Not expecting miracles but I do think there will be at least some quantifiable change for the better by attempting reducing drag a little. If not, as usual, will chuck it in the bin. www.iwilltry.org/b/wp-content/uploads/2010/05/Drag_Coefficient.xls Made a start on some side panels for radiator, just corflute for starters. Will check with pressure sensor for before/after and see if it makes any difference. "When you've got carbon fibre taste, but a real estate sign budget"1 point
-
Yawn update. Drive this thing every weekend basically rain or shine. Rain is lols. Made burger meet (in the rain as above), went to caffeine & classics etc Got new rear tyres and found one of the rear wheels is buckled hence the slight motorway wobbles I've had so going to drop both in to Arrow Wheels soon to get sorted. 4th & 5th are pretty noisy but not notchy or anything so just keeping an eye out for a w57/58 to have as a replacement if/when this lets go. Changed the blocks out today for 38mm (had 50mm's) just to get some more clearance in the rear, makes it nicer to cruise now, can hit bumps without worrying about peeling tread off in the arches. Carpark picture shows height as it sits now. Still haven't done the fuel sender or wipers. Will get to that lol. Pretty sure the tune has been locked so can't do launch control or anything without starting from scratch. Might do this as the valve springs were shimmed super tight because it was dropping valves due to harsh limiter and I think this has been changed now so could go to smaller shims so the motors not so noisy.1 point
-
First race and ran a best Lap 1:46.6 and a few within a second of this. Qualifying I ran best 1:51 and was a little disappointed and I dropped a little from the tires afterwards as working it out and also tried to work out the brake bias, still a bit unsure so will do some testing in the garage. R1 I launched from near the back and it went sideways grabbed 2nd and went more sideways, I was snaking up the middle until I caught up with the main pack of cars and then about half lap I tried an overtake before the carousal and pushed it a little harder through the previous corner and hit the marbles off-line and spun out, 2nd lesson. R2 saw a less sideways start but still a bit sideways and I caught up to an inside car but soon after found myself drifting back and eventually, My exhaust had came very loose at the collector and was like a tractor so never went out for R3 as not much room under there and called it a day. Happy with R1 but need some work on the brakes and a few other things. This the lap data after I spun around in and then the next was my fastest. Timing said 1:46.69 (Track Addict 1:46.65) http://vid53.photobucket.com/albums/g52/kiwigraham/Starezza/Untitled_zpst4za2g38.mp41 point
-
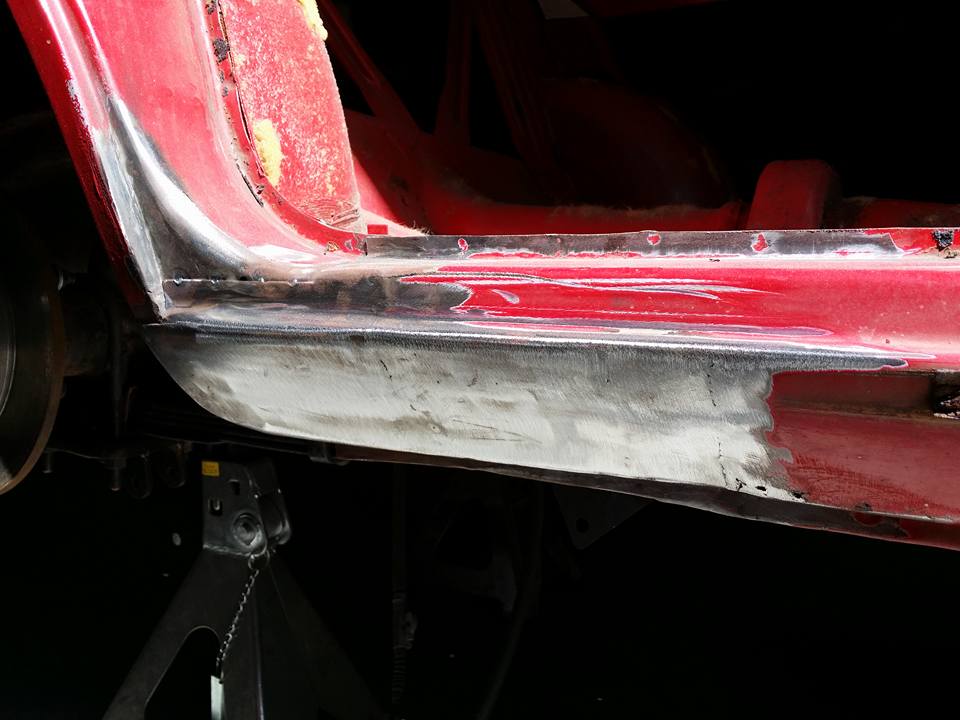
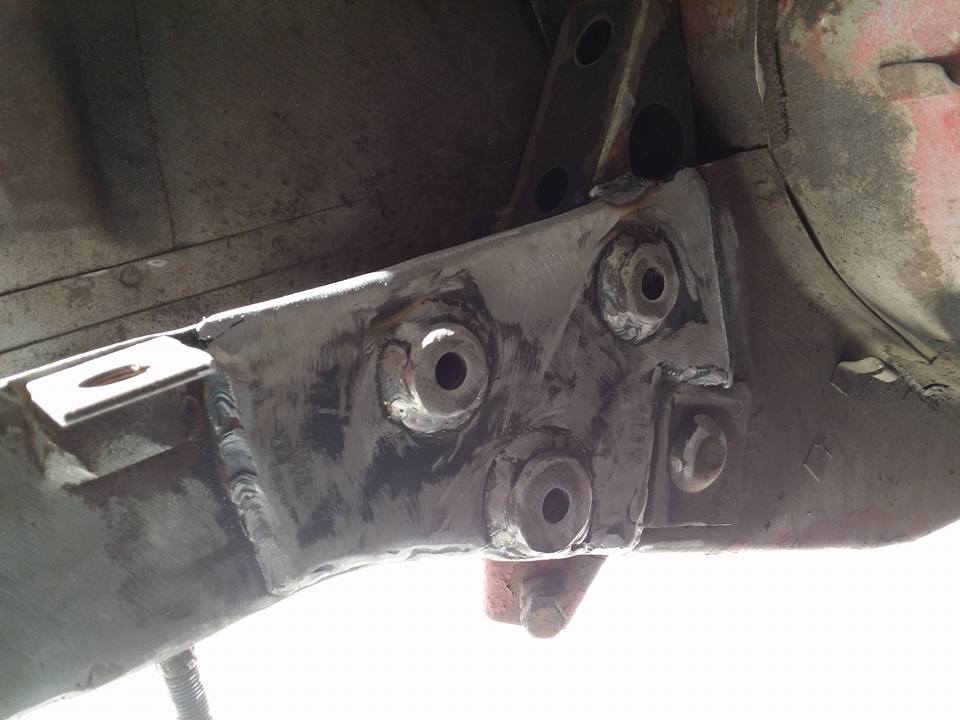
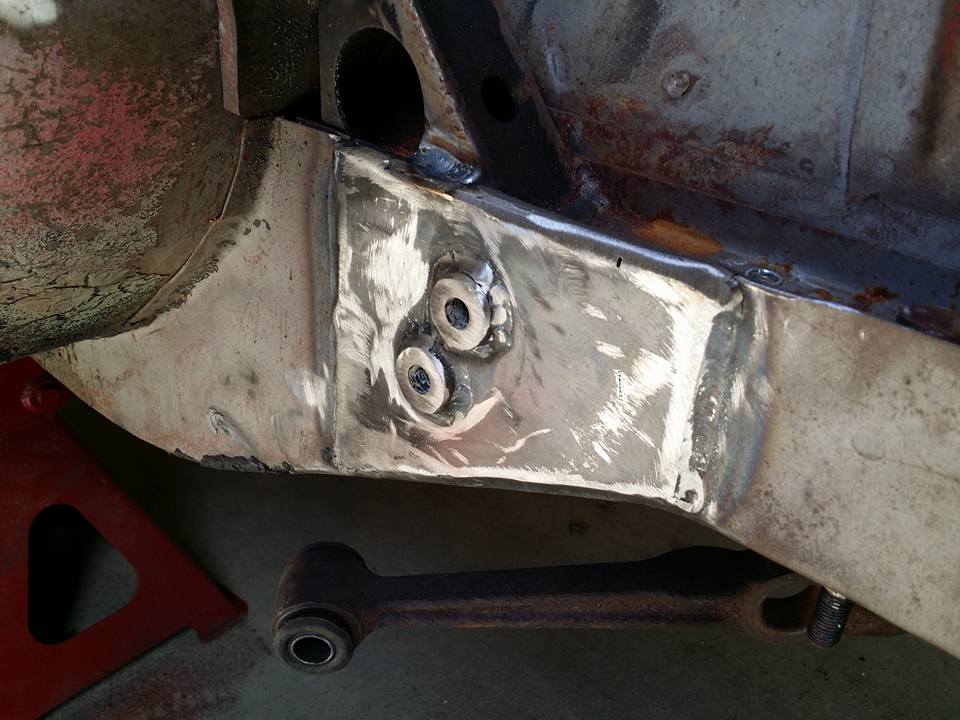
Time for another update. Rust work is pretty much all done. Here are some progress pics of the sill work And here are the reinforced mounts for the steering setup
1 point
-
Still nothing happening here. dug it out of the shed again and took it to another drift day a week or so ago. Brother got some pictures Got bored and drove with my mind for a bit It had another oil explosion. too much high rpm and it starts to throw oil out the breather and fill the catch can. which is usually ok, if i make sure the catch can is empty at the start of the day. but must have been extra aggressive on the rpm this time. once it fills right up, its all bad as it cant breath. it turns into a syphon and oils the engine bay. It has an oversized turbo oil return in the sump, from when the bottom end was in the ae85. so im thinking i will make a setup that drains back to the sump.1 point


This leaderboard is set to Auckland/GMT+12:00