
Leaderboard


Popular Content
Showing content with the highest reputation on 11/26/15 in all areas
-
wow, so much tired, so much great though... so not very interesting things first, i mounted the wideband the other day and sacrificed some of my finger in the process Wiring was well underway Monday night and put a big dent into it anyway. Most the sensors had wires on them pretty quick. The tefzel is nice and small and awesome, but a little harder to work with. The stripping of the cable is a bit harder. The insulation is quite hard and slippery, but with good crimpers, life is good really. I normally just post photos with a description, but i might waffle on a bit more because it might interest 1 or 2 other people. Photo skimmers can just ignore text To do my wiring, i made a 'golden sample' of how much wire i needed from the firewall hole to the ECU (ECU is further than fuse box, so if it reaches ECU it can reach fuse box) and then i would just havce to measure the length needed for the sensor wires to the hole in the firewall and add the length of the golden sample. I started by soldering all the sensor plugs to new leads and making the ignition lead for the ignitor/coil/tacho feed etc. I knew i was going to run the TPS, IAT, IAC, CLT and Fuel pressure all together, so i put a bit of small braid on the plug end of all of them and then some bigged braid over the whole lot before feeding it through the firewall hole. Then the rest was the same, but some leads didnt get bundled up and just ran small braid over the whole line. While i wired stuff, Cam was trying to make the microsquirt rookie gave him behave. The board was well toast and the VR conditioning hardware on the board was toast. i had no idea what that above statement meant a year ago, so let me waffle on again and expand. You guys let me know if i can stop with the waffle in the discussion thread... VR is a variable reluctance sensor. It basically creates a voltage when a tooth comes near it and the voltage goes away again when the tooth goes away. This is how the ECU knows where the engine is. The problem is that VR sensors use AC, and the ECU needs to get its information in DC, so you have some conditioning circuitry that converts it. What they use is a zero crossing detector. When the tooth passes the sensor, the voltage first goes up, and then goes down. When it goes down, it actually goes to negative volts. The point where it goes negative is the point you want to detect wit the zero crossing detection circuit (where it crosses zero volts, aka ground) this is what it looks like and here we have cam spinning a spare dizzy by hand, with it connected to the circuit he made up this is what the 'workbench' looked like at the time and here you can see the VR sensor AC signal in yellow, and the nice square DC signal in blue sorry about the shit photo here so i put a smile on my phase and went back to wiring while cam figured out why it was quite buggy and kept failing and freezing once he actually pu the signal into the ECU... Got some wire coming into the cabin! finally! and pretty braided wire in the engine bay some early morning sun from the next day. Engine bay wiring was done, ready to tackle the inside wiring! it's not actually THAT many wires... thing with was ~35 wires? i labled them all with a label maker that prints on heat shrink! so so good this wiring shouldnt change, but for fault finding, this is def the way to go i think! Cam asked a couple times "did you plug xyz sensor in the right place, it doesnt work...?" and if i hadnt labeled them, i'd be shit out of luck if i tried to trace it... Its a label maker me and cam went 1/2s in. Its a DYMO Rhino 4200 for those interested. Theres one on trademe for $629, but america has them for $60 here. We even got ours on a 1/2 off sale or something? cost like $40 NZ at the time plkus shipping. The problem is the heat shrink isnt cheap. ~$65 for 1.5 meters. Plug is going on! I actually had an issue with the plug, and thats that when i ran 2 or 3 cables into the crimp terminal ,it wasnt too happy about the connector closing. The connector had a little clip plate that slides off, and lets you put the pins in place. Once they are all in place, you clip it back in and it locks the pins. If the pins arent seated right, the clippy in bit wont clip back in, so i extended a bunch of the double and tipple cables by an inch or so and plugged them all in with a single wire in the crimp terminals and was sweet. Made the wiring much more yuck though because the lengths werent all the same anymore and tangled a few things when i plugged everything in for the second time. Meh. Then it was time to see if it would work! tested a few sensors and it all failed. Turns out the 5V signal for the MAP, TPS and fuel pressure wasnt working so we jumper wired that on the ECU too. Tested some more and we had spark and could hear injectors and fuel pump control worked, wideband worked, idle control didnt, IAT didnt, battery voltage measurement didnt, god knows what else didnt, but this did; so after that, we threw all the rubbish on the floor and drove it to monthly meet! Cam lives 20-30 min from the monthly meet, and only 2 streets from the motorway. before we left we noticed the car was mega rich, so cam leaned it out a bit and after a little tinkering realised the ECU was adding HEAPS more fuel because it though the battery was low, so the injectors would need more on time to deliver the fuel, but the battery voltage was fine, so it over fueled. Disabled that, and off we went! Its running ok, but not fantastic, but we get it 200 meters down the road until it starts to cough and splutter... great! car dies so we have a look around for why. Cam on the laptop and me IRL. ignitor was roasting hot! not good. cam looked around trying to see why for a while and i grabbed the IR temp measurement tool and a good 5 min after turniong off the car, it was still at 100 deg! so that sure did get hot! Turns out the battery voltage thing wasnt disabled for the dwell adjust and the ecu was over dwelling by like 1000000000%. Cam hit some keys and off we went. Idle was hard to control and was still running silly, but a choice had to be made 100m down the road; do we go on the motorway or not? go big or go home right? lets motorway it! Problem is that that entire stretch of motorway is being widened and there is no shoulder to pull over on if the car died and it was 7pm, and there is still plenty of traffic at that time having to cross the city. Car made it though, in 1 piece and after burger boes made it all the way home to Cams again too! Some pics Navneal took18 points
-
A couple of my good mates and I gave the underneath of the bonnet a lovely paisley pattern. Love it or hate it, personally i reckon it looks awesome - complements the green rocker cover and the gold really pops. Now to tidy up the support members....6 points
-
6 points
-
I took some pictures. They are not very good.5 points
-
Hey Ed lets go take some pics of the AW in front of that 80s Tron looking council building in Manukau some time.5 points
-
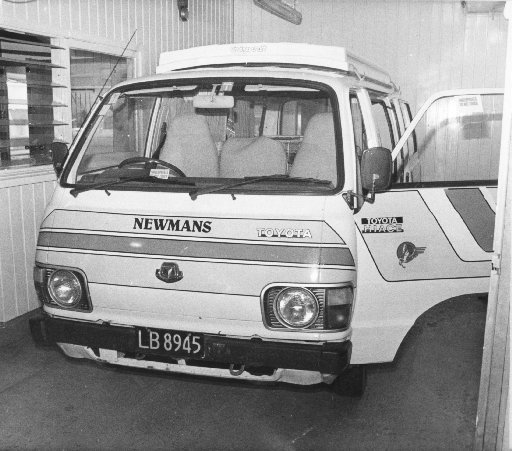
Pictured is the Newmans Toyota Hiace camper used by the french bombers of the rainbow warrior. uncanny and only 5 places difference in plate numbers!
 5 points
 -
Slow progress Put some switches on the dash that do aboslutly nothing. Started on mounting the radiator and making an exhust Also started making a seat out of copper. Petrol can that i aquired that will hopefully sit on a small roof rack and gravity feed the engine. Parts to hopefully turn into a rear axle5 points
-
http://www.yellowbullet.com/forum/showthread.php?t=12733304 points
-
Will do a decent post in the morning, running on 3.5 hours sleep ATM and ready for a shower and bed, but i just got back from Auckland monthly meet and i drove there in an EFI KP so sweet!4 points
-
can we call it Tristian?3 points
-
That seat is perfect man3 points
-
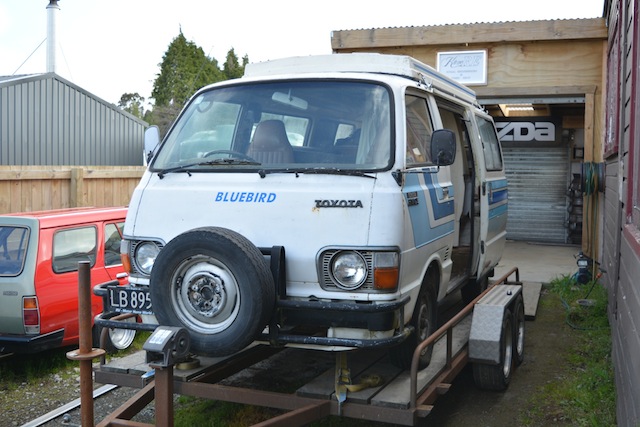
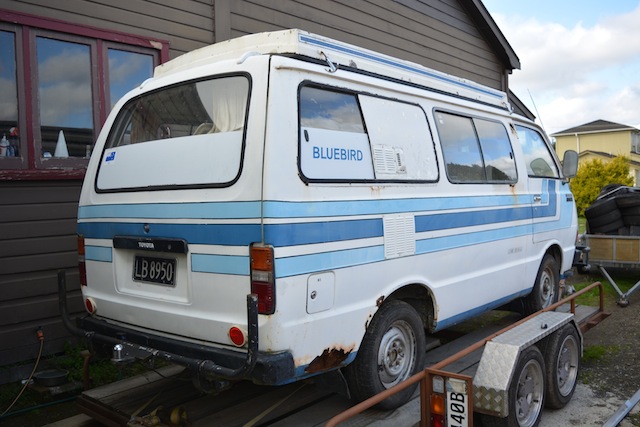
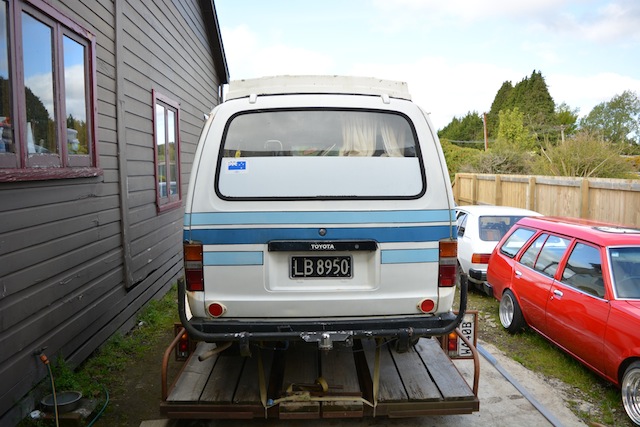
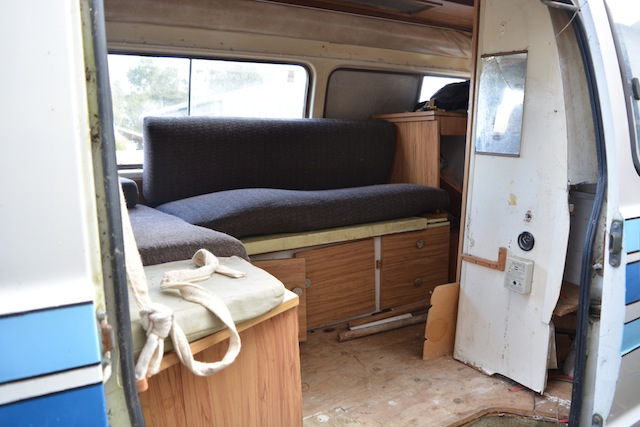
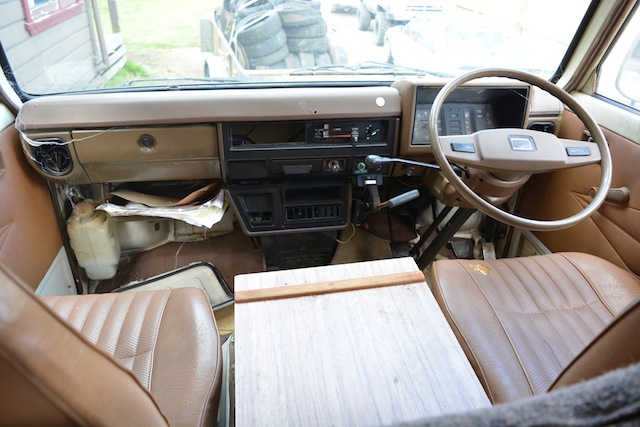
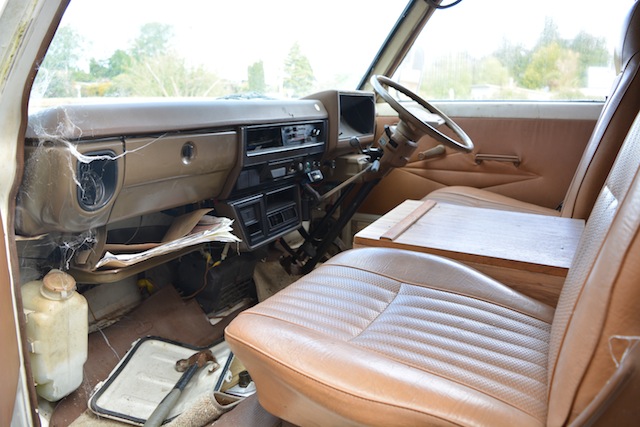
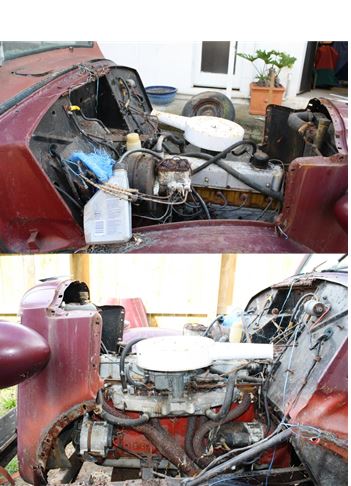
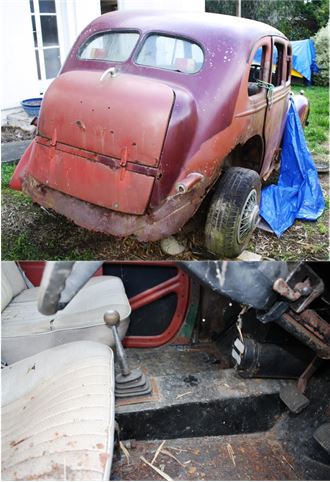
Discussion thread //oldschool.co.nz/index.php?/topic/50845-oftensideways-83-family-camper-discussion/ Hey guys, So i've been hanging around the forums a fair bit still but have been real slack on any form of contribution. Theres been no lack of projects in the shed to be fair (many of the drifting variety), but I find myself changing between so many that i never felt i could really document them very well or when I thought I should I had already made a decent start and thought it was to late. ANYWAY, now we have two young boys i felt a fitting project was in order. we'd love to spend a bit of time traveling around the place taking family holidays when we can. A new van just wasn't going to cut it and it turned out a guy I know through a customer of mine happened to have the perfect thing parked up on there lawn heading no where fast! He assured me it was running perfect when parked but they had no use for it. I turned up to have a good look over it, covered in tree leaves and grime but the potential was there! Turns out the rego has lapsed so for $400 we loaded it up and hauled it away to store untill now. The camper needs its fair share of work, plenty of rust to fix but very little appears to be structural, get the motor sorted, the brakes and suspension up to scratch. The inside is all there but isn't going to suit our needs so I will have to redo the entire rear section, we need a good sized bed, secure points to strap the kids car seats in and most likely an arrangement in the front seats for a small child to sleep. The stripes WILL stay. The pop top is the sweetest thing i've ever seen. I've also aquired a crashed 3sge altezza so that motor may make its way into the bay, Let me know your thoughts. The most important part of any project, picures
2 points
-
How much pressure do you want? Give your stock one a love tap with a hammer to squash the spring up a bit for some more psi.2 points
-
That pic was taken moments before Rusti and I realised we were ruining it.........2 points
-
EGT's are EGT's - the difference is where the source of the heat is. Maybe my terminology is less than perfect. By internal I meant the source of the heat is created inside the combustion chamber and external meant the source of the heat is created outside the combustion chamber (namely - inside the exhaust port and downpipe) I think I adequately explained HOW those high EGT's are created in my post. To me 720 is a fairly average EGT - if you want to make power then the by product is high EGT so I'm not afraid of them as long as my motor doesn't constantly sit in the high end of the spectrum.. 900 would be my safe (soft) limit and 1200 is my absolute limit that I would rarely want to encounter and even then only for brief encounters. Much like I hate seeing the needle touch the red on my water temp gauge but it happens occasionally. 900c EGT is the equivalent of just above half way on the cooling temp gauge and I have no issues veering into that zone every now and then if I'm giving it a hard time. However I have junked at least one diesel motor by running excessive boost and fuel so maybe I push the limit a bit hard. But by fuck it was a fun and fast car. If you think I am talking bullshit then you don't have to listen to what I have to say nor do anything of what I say - you have a choice.2 points
-
Are these about the right price? Is there an equivalent from the states? http://www.trademe.co.nz/Browse/Listing.aspx?id=9881252892 points
-
something not 25mm off the ground you mean?! for those interested Ill post a picture of the Newman's Hiace the Rainbow Warrior bombers used as told by Zebra Dude in the build thread (I cant seem to do it here)2 points
-
ANOTHER EXCITING UPDATE ON THIS STUNNING SPORTS UTILITY! First of all, its too legit, too legit to quit! Also, went to the local wrecker and got some trinkets! It now features all of the advertised blower fan speeds! The wizards coils on the right were bung, so purchased the updated magic block on the left, and then made it fit with the help of my die grinder! (I spaced it back a bit after the pic to stop the fire wall sound deadening catching to fires) I also got some of the missing interior trims while I was at it!!!!!!! THEN!!!!, I put a central locking kit in it, and it even works! I was impressed with the Fezza, but the binary code just sealed the deal. BACK DOORS WERE A LITTLE TIGHT!!! I also fixed the water temp gauge, put a new thermostat and plugs in it, got the cold start to work, got it to idle at the correct RPM, fixed the hot/cold air selector thing, put some big ass speakers in the original dash holes (the left one is slightly in the glove box, lewlz) annnnnnnnnnnnnnnnnnnnnnnnd that's about it. I also shouted myself one of these for xmas, Now I can dial up some poosts/blow it up!!!!. I will slap the wide band in and have a nose, make sure its not leaning out under poosts, and also set the fuel pressure regulator, as it runs rich as Bill Gates down low/at idle. Mate.2 points
-
Mate, I brought a couple of HSS cutters from off TM. I had familiarized myself with Diametrical Pitch's ummmm lingo and stuff and read that DP24 was the DP used by most (all) of the OEM's who's axles I sought to cut new splines into. I learned my first lesson about HSS vs Induction hardened hard shit. You mentioned this above, lol! Where the fuck were you sentra when I was cutting my teeth into this new venture? So after finding out how much the tool resharpening pricks wanted to redo my cutters - it was onto the net to see what others were doing who did resplining on a more regular basis. I saw a commercially available indexable one that was cost prohibitive to me but sowed the seed to make me my own. I think I cut this one out of some 12mm plate or something. It might be 10 - dunno. Turned up a collar thingy and pressed/welded them together. Trued it up in the lathe and beveled the edges to 90 degree's included. I drew it up in TurboCAD (don't laugh - I love it and I am self taught to do cool 2D shit) and cut it out on the table. Had to do all of this twice because I was not as good as I thought i was. Fucked it up the first time but the second time round I stopped at the point i fucked it up and paid a machine shop to complete it. They indexed the tungsten cutter pockets/seats and cut the internal keyway in the collar. They got 3 of the cutters spot on but one of them stands a thou or 2 proud of the others. I have marked this one and use it to touch off. Judicious use of DTI and adherence to my own established procedures has seen me do quite a few axles for cunts. I have a biggish (for home use) old Horizontal Mill dedicated/setup to do just axles. They are worth nothing more than scrap value in today's market thanks to CNC. I fucking love them, the big old grunters, lol. That's my story bro.. My name is axle ... Bigblockpoweredstickcarsthatdontshine2 points
-
Hi Oldschool, I would like to introduce you all to Jezza! I bought this beautiful girl earlier in the year but up until now I have had too many other commitments to get her running and legal. She is fairly factory - 250ci, 3speed on the tree, only real changes were installing bucket seats and sound system. I am an Auckland uni student through the year but I do research for the uni (Optical Coherence Tomography on in vivo tissue differentiation) over the summer and I am enjoying all the extra time I have. As of ~1 week ago Jezza become fully warranted and registered and only needed a little bit of welding which I was pretty stoked about. She we be driven the f*ck out of over summer. I don't know any people that share my interest, and to be honest I know stuff all about cars but I am always keen to learn. If you see me around please say hi and if anyone needs a hand I am pretty good at being gopher/toolboy. PS I swear the front number plate is legit and defo not plastic Discussion: //oldschool.co.nz/index.php?/topic/50930-fluoros-74-xa-falcoon/2 points
-
Please get well soon. We're here for you.2 points
-
oh hai there, this thing still in my shed, and although i haven't really been that involved or focused on finishing i have been doing other things, house stuff, 2 dailys to sort out, basically i have been occupied with valid reasons for this to not be done yet. I have put it back together, and now towards the finish line. When i say put it back together i mean ive started to do this... So this is the back end, where i'l be making the fuel setup go. Before i put the surge setup back in it needs some paint etc... Also i got one of these when i re-jigged my mortgage, i know its a silly thing to have... so if you need to get your wheels swapped over for skids i will accept donations towards the silly purchase fund Hopefully I will see more action in the shed now, bought 6 x fluro lights with 3 bulbs so should be sweet to see after hours now. Thanks for reading...2 points
-
MOT decals and a flashing light on the trailer of this one would look fucking brilliant...2 points
-
this goes here, thanks kicker2 points
-
put the rest of the shit back together. couldn't find the third zaust manny gasket so i just used one of the old ones. drove it round the block and got it up to temp, got the bubbles out of the system and its didn't shit itself so I'm calling it done. 2015-11-14_04-37-01 by sheepers, on Flickr\\\\\ place your bets for how long it lasts.2 points
-
so i put some parts on! thought i'd share some of the steps for those who find this interesting and are unfamiliar with the process... so first of, you need to design a PCB on the computer, send it away and then PCBs show at your door 2 weeks later like so; Now we have a few options. I could throw dollars around and get a contract manufacturer to put the parts on. They charge about 20c per component to place (as a rough rule of thumb) and then there is a one of charge of ~1500 to get them to setup the machines etc. Very handy when you;re making hundreds/thousands of the same thing, but not when you have to make 1 board to make sure it works first! Option 2, you get friendsly with your soldering iron and you place all the parts one by one and solder them on with the soldering iron. This is how many DIY people do it at home, but this isnt the fastest and doesnt have a very good end result normally as nothing is on straight, and the solder leaves heaps of flux behind etc. Option 3, the option i went with, is spending a little more money, and the man making the PCBs will also make you a stencil. Normally these are grown (yes, grown, it's weird!) but the cheap option is laser cutting them out of thin stainless. What a stencil is, is where there are pads that need solder, they make a hole in the stencil so you can squeegee some solder paste over the top and it leaves solder where you want it, and not where you dont. The other option is using a solder paste dispenser, which is a little syringe driven by air to put some paste where you want it. anywho, solder paste is just that, a paste made of little tiny balls of solder, mixed with some flux. The flux makes it all stick together, and also helps the heat transfer around all the little balls of solder, and when you heat it, it all turns into real solder so after you put some solder on (hard to tell in the photos) we are ready to place some parts! and here is the first part placed! (brown-ish, slightly up from the middle) about an hour later, and all the little passives (caps, resistors etc) are placed! left = done, right = to-do hour 40, and all the bits are on! Notice the tweezers used to place the parts that board is about 65x90mm to give you some size ideas. So before you all ask "why place such small parts on a DIY board?! that seems way too hard!" well, those parts are actually quite big. They are 0805 SMD parts, which means they are 0.08 x 0.05 of an inch in size (2mmx1.25mm) which seems small, but these days people will use 0201 on a regular basis, and even though most get a machine to place them, some still do manual rework on them. Most contract manufacturers dont even have a machne capable of placing 0201s by machine and get done by hand. So 0201 is 1/20th the size on an 0805 the two circled parts are both just a resistor and do the exact same job, just a different size Now that the parts are placed, we get to heat up the whole board at once to reflow the solder and turn the solder paste into real solder and hold the components on properly This is done with a hot plate. Big aluminium plate that gets heated up to 200deg C and then you put the PCB on and solder paste turns into solder right in front of your eyes Sorry about the shit camera work, but heres a video in case you feel like seeing how it works Now just need to put the through hole parts on, and fix the solder bridges etc, and power it up and see if it blows up... (i hate that part... like starting an engine for the first time after a rebuild haha) edit! do they look similar? best thing yet though! it lights up! and the computer enumerates the serial port2 points
-
I approve of all efi conversions on old cars OMS, you know this. Even the worst programmable efi is better than carbs. Good jerb Ned, do a skid cunt.1 point
-
Looks like st215 caldina. Just looked at the gtt in my driveway haha.1 point
-
why is it that tappet settings change for different cams? personally I have had no luck with bigger tappet settings, as in they make a big racket that never seems to die away and when I set the tappets to factory settings they run sweet without issue1 point
-
It depends hugely on the brand and model of tyre1 point
-
Just get used to colour sanding.1 point
-
Gutted I missed this. Just walked in the door at home. NEXT MONTH! And Felix, thanks so much for that leg guards! I'm stoked as with them. Thanks so much1 point
-
After scoring an epic deal with my bunch of parts, I finally find a spare hour this evening after work to start tearing the mighty v50 back to her shell. Here's a few photos. Notice the horrible rattle can job slowly disappearing and letting the original paint shine through. Before: During: http:// After:1 point
-
Hey Zebradude, that sounds like a cool film to be apart of, i'm going to google said van and see what i come up with. EURON8 was yours the white with flowers Hiace that was on here a few years ago? I remember seeing it but forgot who owned it1 point
-
Epic! Good work sir sentra. Feel free to add more interesting machinist stuff on here. I do enjoy1 point
-
While doing the coil overs i also cleaned up the other components. reconditioned hubs with fresh paint and new bearings. Backing plates were blasted, acid dipped and powder coated (just a bit dusty), stripped calipers and painted them, on the hunt for a couple of pistons and maybe discs. Will see how she pulls up. Also need to get the fasteners zinc plated again. I would like to get the suspension and braking setup finished of soon so i can drop the car off of stands and mount the engine. Ill get all the fasteners dropped off this week hopefully and assemble it all as it is now and hunt down some steering arms when the funds allow it.1 point
-
10/10 yarn, come to nats.1 point
-
When You took delivery of this car this was the first thing that came to mind The P76 4.4l then again when you can come across all of those donor vehicles doing the rover 3.5 is a no brainer really1 point
-
Sentra bro, is that your shit in your shed or you bludging off your bosses back I was cutting splines (but 90's) in the shed the day before yesterday and took a couple of pics. WTF is an encoda?? That machine of yours moves the hell fast compared to mine, lol. My setup has stood the test of time though, is able to take over 2 inches through the bore and my homemade machinists jack will bend an axle. There is no downwards pressure on the dead center whatsoever - even when cutting. I dial in a measured amount of preload upwards on the jack during the setup and the cutting pressure cancels it out i have found. Made the cutter myself. 4 tips at around $90 - fuck! If Noah had a setup in the Ark - he'd have copied off mine, haha! I am not a machinist and have had no formal training whatsoever. But if you have a passion for something though ... it negates most of the formal training shit institutions stuff into ya. Hilux axle for a stockcar. Churr!1 point
-
How many do you need? Open home signs around my area use them. Can 'source' a few.1 point
-
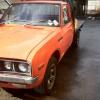
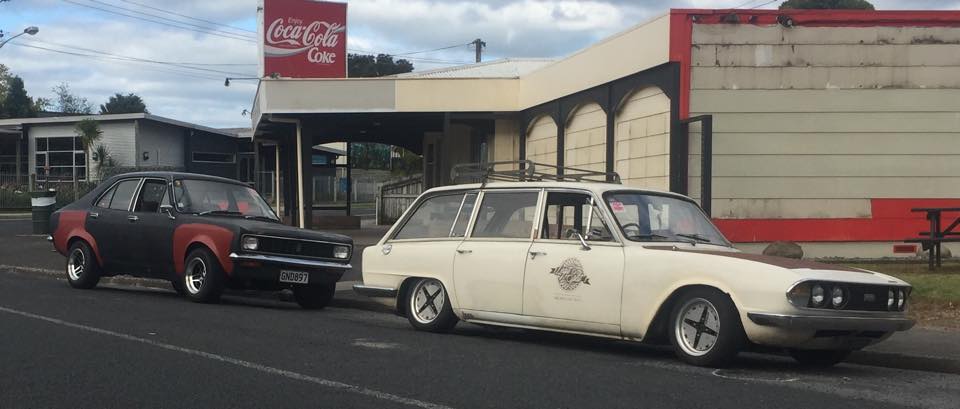
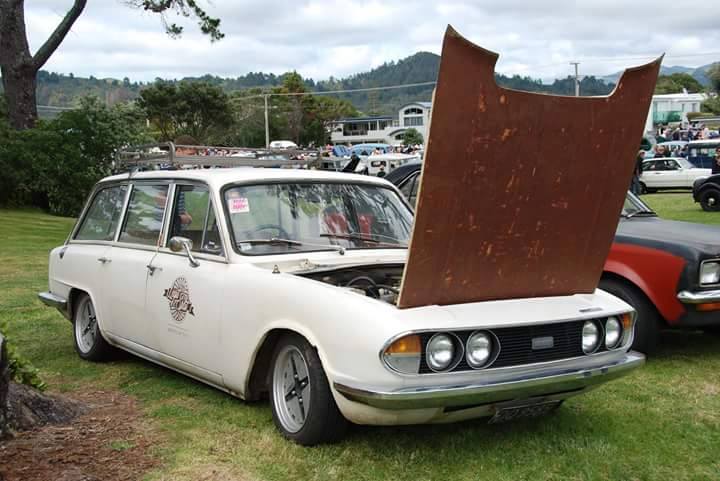
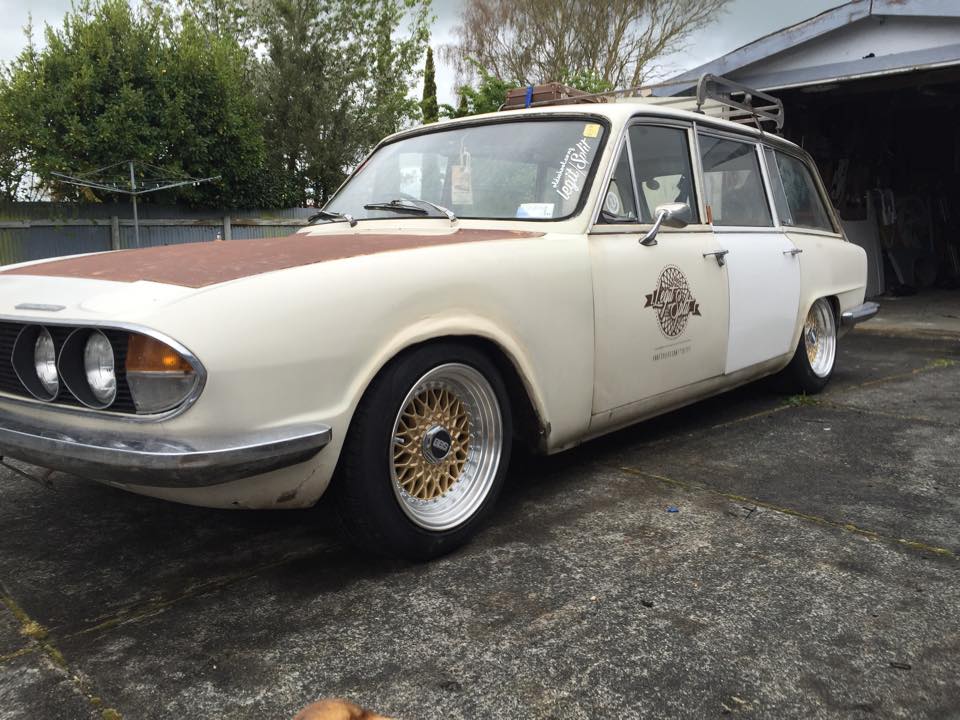
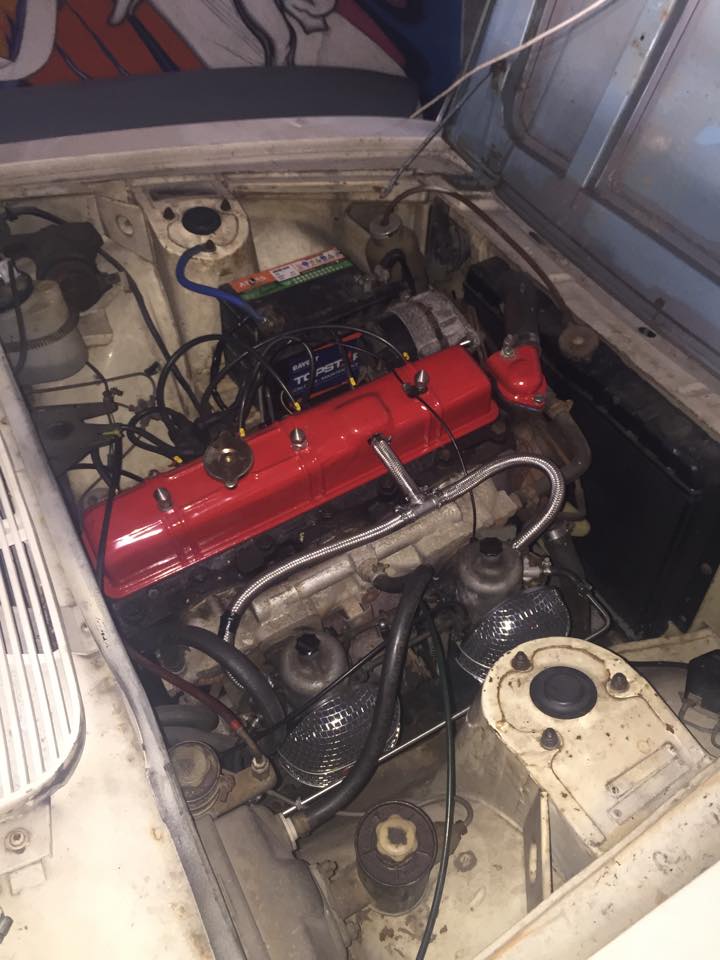
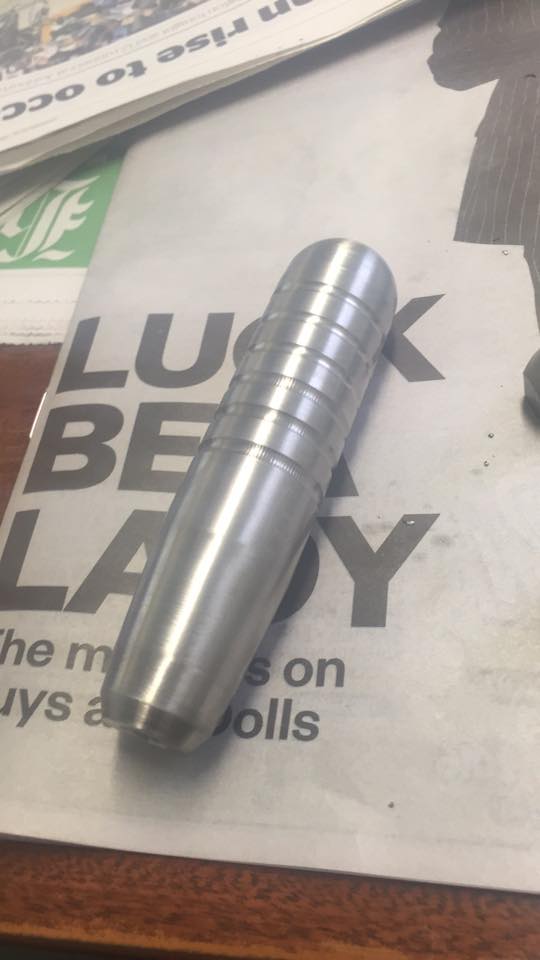
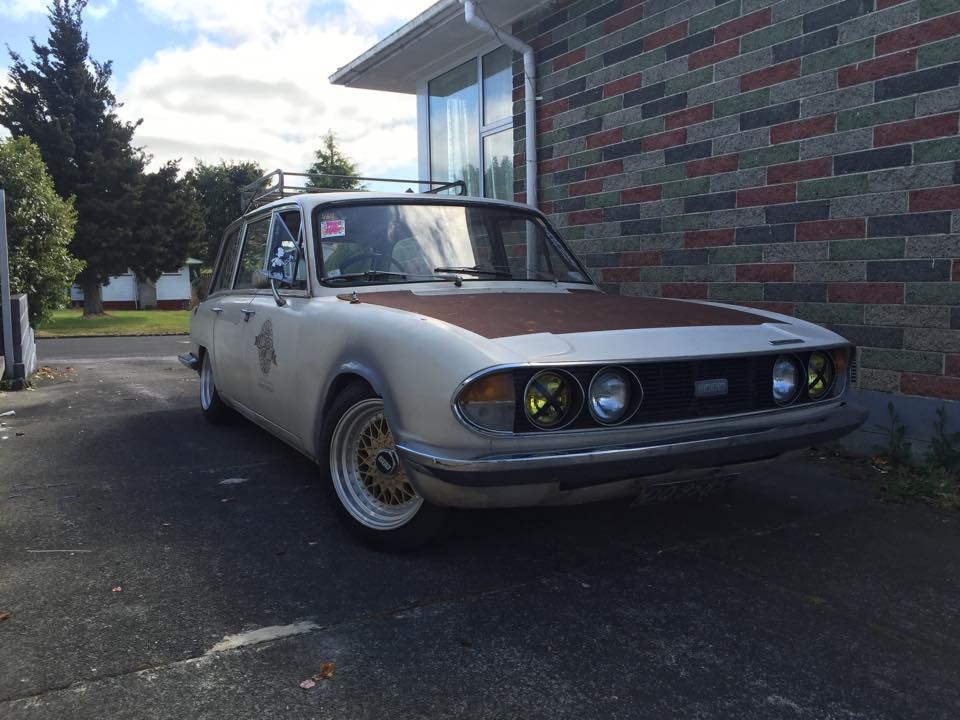
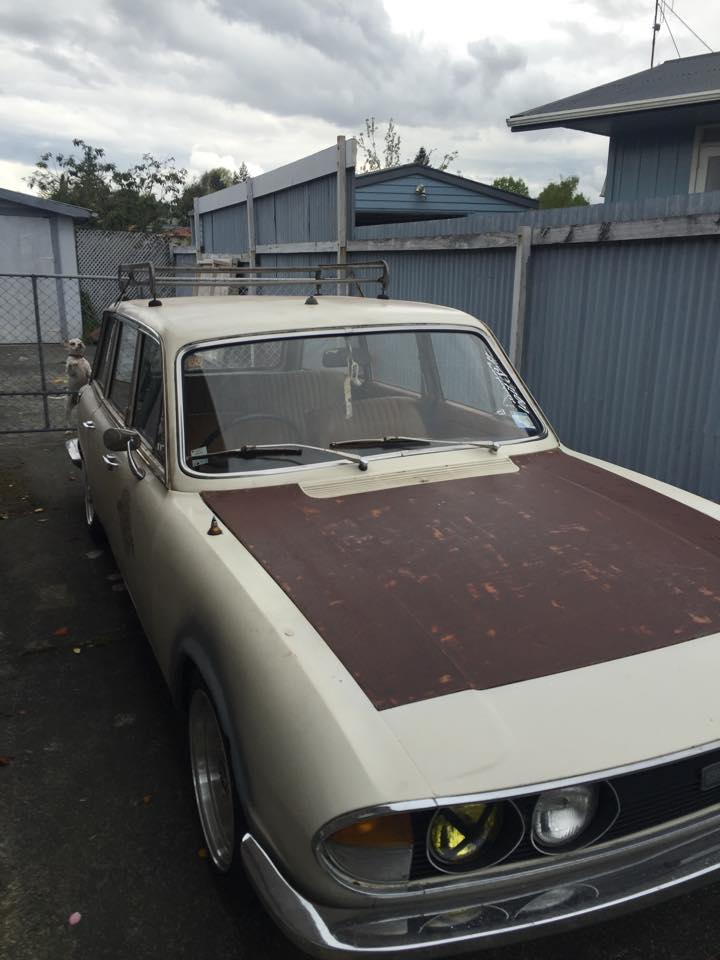
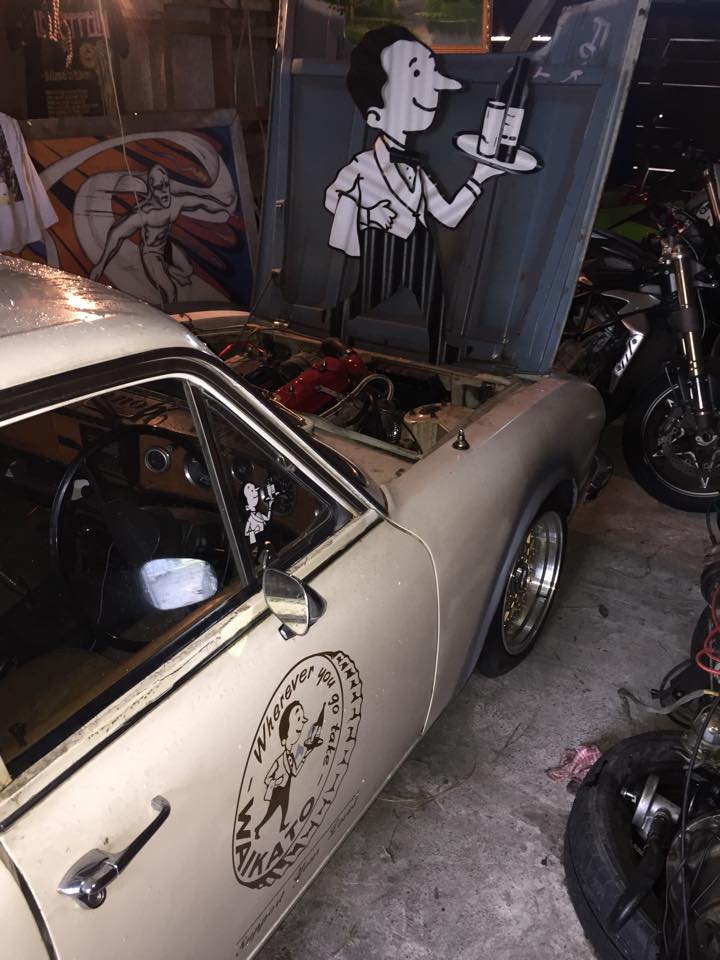
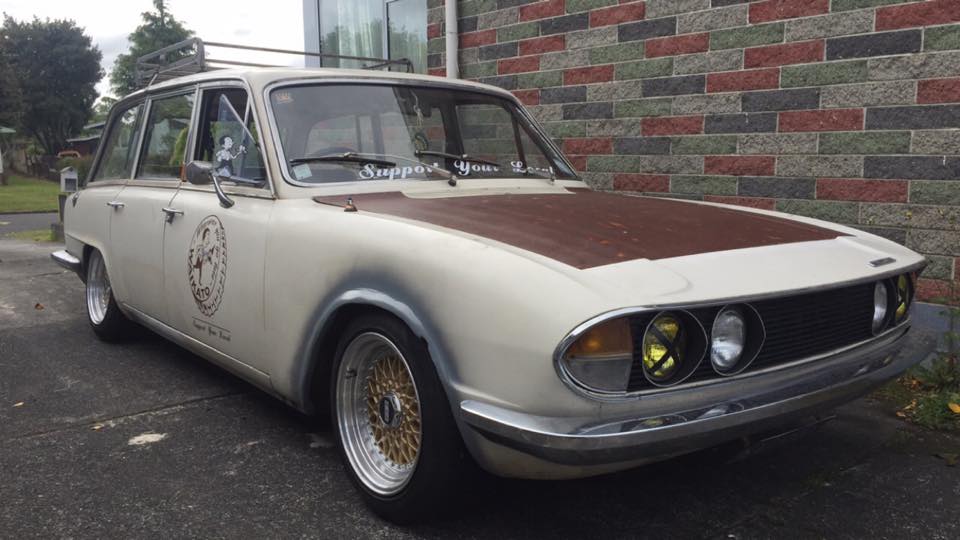
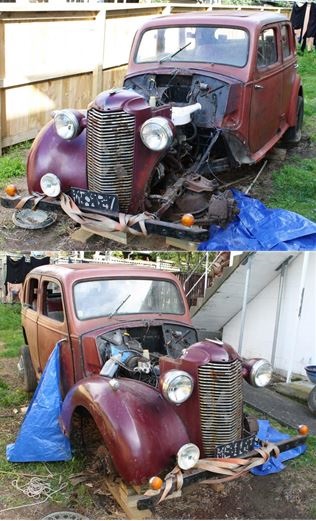
Okay so i'm sure you're all familiar with this car.... I saw it on Trademe a couple of months ago and it wasn't far from home so i decided i had to have it. Got in touch with Jake and set up a time to go and have a look. I jumped in my ute with a mate and we head over. Eventually found the place, checked out the wagon and a after a quick driving lesson and loading up a ute full of spare parts we were off back home. The thing was so low it looked cool as fuck. But when my mate who was following in my ute said that it was throwing sparks out the back, and when I couldn't back it out of my shed, I thought i'd better put in some slightly longer cutties... god damn practicality. Next thing I wanted to check out was the air filters because I couldn't feel any suction at all, and as I thought they were pretty dirty. Shot down to Repco and got the only air filter they had the were narrow enough to fit between the carb and the strut tower, and after much modification to the backing plate, I now had twin ram flows This made the wagon run pretty rough, and since I was planning to take it to Brits at the Beach that weekend i googled all sorts of carb balancing/tuning instructions and did the best I could to get it drivable. Also adjusting the timing was a big help. I got a new head unit and tidied up the speaker wiring in anticipation for by far the longest drive i had taken the triumph on. All set, off to Brits at the Beach with my mate in his '71 Avenger, walkie talkies in hand. Got there very slowly with no issues at all. Not everyone there was a fan of our cars but who cares right. Back home after the show and very quickly realised I needed some flashier mags. A bit of searching and found something i liked with in my budget. Unfortunately they're BBS reps which makes me look a bit silly having a sticker that says "fake splits can fuck off" mean while i was still playing with the mixture trying to get a better tune. A few trips out of town soon made me realize Im not a huge fan of exhaust fumes so I had a new exhaust made and a few hundred dollars later no more leaks. A slow day at home i decided i paint the rocker cover racing red. Jumped on the lathe at work and made a little shiny dildo shifter and a couple spikes to go the the rocker cover studs. Decided I wanted to tint the head lights yellow so I went ahead and did it, not every ones cup of tea I guess but its also not everyone's car. Desperately wanted the chrome surround on the front windscreen seal so I got a new rubber off Rimmer Bros (as well as some other parts) and took it to a guy in to get it changed. Made it look alot nicer I think. I got a little rev counter and put it where the not working clock was. Brought a sub woofer for a little more doof doof since the 6x9s in the back were blown. Did a rough repair on the speedo cable to get that up and running. Put in a new fuel level sensor because that thing didnt know which way was up (Still doesnt, if any one knows why please let me know) and set the valve clearances which were really far out on some of them (0.040")... No more ticks And at last my not so creative mind came up with a theme to replace Legit Splits. Being from the heart of the South Waikato... Waikato Draught it is "Support Your Local" Had some stickers made, stuck them on. And that pretty much brings us to now. Cars running Average - Good, looking alot like I want it to look, and with out a doubt keeping me busy and entertained. Next thing to do is shocks and springs because the shocks are fucked and theres no point putting in new ones if the springs are gonna fuck them up again. So Im currently in the process of sorting that out. Keep watching this space
1 point
-
Some of you know that I went and got engaged while overseas. We have chosen a date, booked a venue and my one priority was to be able to drive my own car for the wedding. So this has now put a date on things and means there is a busy year ahead. The steel around the window was in pretty bad shape. Previous repairs had buckled the roof and was an area of the car I was worried about but its looking pretty good now and I think I can say that the car is now rust free. I also asked if Kayne could change the way the engine mounts were so he modified the cross member to suit the JZ alloy and rubber mounts which looks really good So the car needs to be wired up and running. back for paint and then put thru cert, re-vin. All the repairs have been documented with heaps of photos and pretty sure the repair cert guy was involved during the project. //oldschool.co.nz/index.php?/topic/30893-crustys-jzx31/ This section was removed. Might have to keep it as a souvenir1 point
-
Not a super exciting update picture wise, but heres what happened over the weekend some cool dude (cam) made me a lush bracket to mount a new coil and little tiny igniter right onto the block, next to the dizzy. He painted it after and looks the business for sure! i made cam angry when i put the pretty new thing in the dirty old thing without cleaning it and making it look good while it was out i didnt take a photo of the end result because i threw my toys big time working on bloody hard line! getting hard line right is a PITA and i dont ever wanna do it again! but here's a token pic anyway... thats before final bend and flare on the end, and also before the return line was added. Put in new 5/16 steel hard lines for feed and return. Fuel system is now the pretty TTT made thing with 1/2" feed and 5/16 return with AN fittings. 1/2" goes through soft line and filter to the back end of a Bosch 044 (china) and comes out as 5/16, which then goes to hard line to the front of the car to another filter and through the standard fuel rail and reg with a new pressure sensor. From there back through the standard return line to the firewall, where we changed the hose to go to 5/16 again and runs through a new hard line back to the tank. we were worried about the 044 blowing the reg off the rail, or at least flowing much more than it would handle, and we'd have to slow the pump down somehow. Already thought up ideas of PWM controlling it to limit flow, or making a cool constant current supply to limit pressure, or extra reg... so thats why we installed the pressure sensor, so we could keep an eye on it. We finished the fuel system yesterday, put in some fuel, multimeter on the sensor and hooked the pump up to the battery and crossed our finders. Bloody works! no leaks, legit stable pressure (46.25PSI) so that was a very happy moment after messing around with it for so long and being worried about the dumb decision i made to buy a china 044 (not because china, but because 044 way over spec's a little 7K) after that we made a start on the wiring. Got supervised by Ed and by Houdini. More tonight and tomorrow and then maybe i'll be able to fire it up before burger boes on Wednesday!!! Some bad news though, wont be running it on my own hardware for the next little while, because the code (FreeEMS) isnt good enough to handle the factory trigger setup, so i'll have to write my own code to do that and there isnt enough time for that before burger boes, so going for a borrowed microsquirt to get it on the road and swap it over to my own thing later... good thing its the same pinout1 point
-
ruined it some more draw some lines cut that out move it over and put in a filler strip which i need to get and cut out the boot floor and spare wheel well which is rusty.1 point
-
Suddenly our son is 19 years old; the latest race car (135I BMW) doesn’t need me working on it every night and Sharon’s dropping none too subtle hints about cleaning up the back yard. Could it be time for a Rigamortice resurrection! With some trepidation I pulled off the obligatory blue Warehouse tarpaulin and surveyed the remains of a car that I’d bought 43 years ago…. It was obvious that the ravages of time and damage from the last accident had reduced my old ride Rigamortice to the stage where she needed one big resto job…….
1 point
-
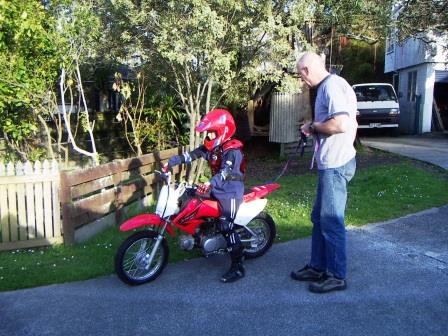
The next twenty plus years flew past quickly; I was busy with my job. Busy teaching someone to ride, (check out the 3 story tree hut in the background!)…. Busy building and co-driving race cars…. And busy playing music with these two wonderful degenerates…….! https://www.flickr.com/photos/in-the-pink/
1 point
-
Update time post nats 2015. The rush is over... Actually running up to the nats there was not really any rush. I was lucky this time round that there were no real jobs to do but for a quick clean and a few little tidy up things. Then it was just a case of biffing Kevin cat into the Viva and head off on the nats roadtrip,dropping him off at my parents place for his weeks holiday. Onwards to the ferry and slowly in a very chilled fashion we made our way north. I always love the part over the central plateau.. Then down off the plateau and into Taupo for late afternoon sarnies with a lake view. A few casualties on the way so far. Windscreen 4. Flies 0. That night we stayed at a free camp near Taupo where in the following morning we walked to a free hotpool/waterfall we had been told about by one of the other campers. Such a cool spot. Its a seriously hot waterfall down into some hotpools that then flow out into the river. As you swim out to the river the water slowly gets colder. Its pretty amazing standing under a hot waterfall!!!. It was not far along a walkway from the Huka falls which always impress.. The following day we continued north. On the way we passed this old bus. Poor old Seedy Al with a broken fanbelt. He did have a spare but that broke too! So we went on and got him a new belt then returned to them. Luckily at least it was not raining. As we got into the Coromandel area the roads got pretty darn choice. Found a pretty big Kauri tree.. We got to the Nats eventually and well- enough has been written about that. Just to say again it was bloody awesome as usual. What a cool location too. Great swimming river right in the campground. Many sweet drives over the weekend. However we sadly missed the big Oldschool group photo after waiting around with some others while Shane replaced a broken valve spring in his Ford ltd and straight afterwards on way back to groupshot area we sneaked a quick surf in on our bodyboards.. I will fast forward onto the Sunday where we finished with the nats we cruised to Hahei beach with a few of the others. I got to drive Bardies V12 bimmer 850 again. Wow- I love it. So smooth, so sexy sounding. I want a V12!!!! We all had a swim in the nice hot sunshine and then everyone left for their respective homeward journeys. Hannah and I were still on holiday having taken the week off so we drove over to Coromandel town to visit the driving creek railway. Its a really cool narrow gauge railway that an old bloke has built pretty much by himself over several decades starting with a small section he built to gain easier access to the potting clay on his land. We had been looking forward to this all week and luckily it was not too busy so we got a spot on the next train. Simply amazing as it climbs steadily up through the bush for about 20 minutes to a fantastic viewing platform. Well worth a visit! You can visit the website here.. http://www.drivingcreekrailway.co.nz/ Then we cruised on north up to Waikawau beach. This is such a sweet as beach and campsite. Very peaceful too because it was late summer and no holiday crowds. Over summer it swells to 1200 in peak seaon. There were 12 other people when we turned up. Lots of great gravel roads which are immense fun if you can see ahead. Sadly most are so tight and many blind coreners I took it pretty safe like because the locals certainly dont! We had many near collisions where they seem to just play Russian roulette as to if someone might be coming round the corner! On the Monday we tiki toured up the west coast and then back and up the east coast to the further most point on Coromandel peninsula. More amazing roads and stunning scenary. Love it. The Viva was going well and as it was now a weekday the roads were so much quieter. Port Jackson and Fletcher bay at the very top was very nice indeed and such a sweet road to get there- espeicially just north of Colville along the coast which is lined with huge Pohutikawa trees. Stunning. We headed back south taking the road we did in the nats to Waihi. I love that road! Wow!!! Such an awesome driving road made better when clear. Sadly it was never fully clear and just as I would be really getting into Id come round a corner and there would be another bloody Nissan Tilda!!! FFS - these Tildas seem to be made for one thing and that is driving slowly on perfect fast roads. Not really many safe places to pass on this road so often I would just pull over and let the cars pull away so I can then rag it again. We swam/body boarded at many beaches and the sea was very warm. No need at all for the wetsuits we had packed in the boot. Waihi was awesome and we bumped into who else but Sparkle! When we went to leave the beach car park the bootlid wouldn't close properly? Discovered this.. Broken boot hinge mount! Bugger. We went to the supermarket and while Hannah bought supplies I looked online on my phone for a classic friendly garage. Found one, went to ring them and just as I was about to ring spotted the building over the road from the carpark. Well how bloody handy!!! The owner was well cool and lent me the tools I needed to drill and rivet the bracket back in place. Sweet! Top bloke. Annoyingly a big chunk of paint was removed from the bodywork above the boot lid where the dropped lid had caught the edge That night we camped with Sparkles and Jo at a cool Doc campsite called Dickies flat. Wicked swimming hole there. Water so warm! The following day we drove to Tauranga for nothing other than to check it out. Never been to any of these places before so I was enjoying the whole 'new country' thing going on. Tauranga was bigger than I expected. Well from what we could see from the motorway as we cruised past Tauranga onto Mt Manganui. M M was not at all what I was expecting! I never realised it would be so busy and upmarket. Its like some Hawiian beach with massive hotel buildings. Nice beach. We didn't stay long though as a long drive today to get to Wellington. Anyway- a friends sister stayed a M M a few weeks before. They stayed at a campsite there and got fleeced to the tune of $50 each to park their little van on a spot of grass!!! Faaaark that. The trip south was a non event but for surprising some 'faster modern' cars by flying up the Kaimai hills? south of Tauranga. Glad for all the passing lanes because man them hills certainly slow the trucks down to a grind. I can see them hills also taking their toll on many old cars with dicky cooling systems eh. A stay near Upperhutt late that night and then went for a trash in a friends Lantis 2 litre JDM spc V6. Fun. Back on the ferry and stayed at my parents in Blenheim that night. Washed so much dirt from under the car from many gravel roads. Back home the next day and one more fill up of the tank had me out with my calculator for a final accurate reading of petrol usage. We managed to get 31.4 mpg which is not much worse than the 2.0 litre engine we did the last two nats with. Happy with that considering there was soooooooo much trashing of the little car. Only fault was one of the rubber seals between a rear stack and the plenum chamber giving up its seal and creating an annoying vacuum leak. Fixed on the first day with some epoxy putty. Otherwise just filled the tank and drive. However a few weeks later I had another fuel vapour buildup related explosion this time blowing the plenum chamber apart on the other side from last time. This was a huuuuuge bang! One bolt popped out from the lid with enough force to dent the bonnet! It happened right at start up after the car had sat a week and only an hour before we were to head off to our local Nelson area meet with a run planned that night. Bugger! So into the workshop I pushed the car- wondering if the sudden explosion created 'throttle opening' causing the cold engine to race from zero to 8000 rpm would have done any harm... The car sat inside for a couple of weeks Finally however, after driving either our slow old van or the almost as slow Sentra, I decided enough was enough and wanted my fast fun car back. So I set to not just fixing the bust plenum but making a better thicker stronger item. Plus check the injectors and see if or how bad they might be leaking. With the old lid removed I could smell strong petrol whiffs from one port in particular. Possibly the culprit? We had found a big pile of 5mm alloy plate on our land as we cleared it a few months ago. Perfect for what I wanted to build. This time I fully seam welded it. No more silly little barely penetrating plug welds! My welding improved heaps plus I learned a few tricks so really happy with the welds on the one. Should be goodunstrong. Pictures=1000 worlds etc etc... We have now got a nice old Colchester MK1 master lathe from 1960s. Works sweet. We had to give it a going over and strip down all the skirt, slides etc for a decent clean out of built up swarth. Hannah is enjoying having a lathe so any chance she has to use she takes it. Facing off some alloy tube for corner pieces. Then my turn. Chopped the teeth off an old worn holesaw, ground it sharp in the lathe and created a perfect sized hole punch to punch out gaskets from self adhesive foam. Once plenum was finished I took the injector rails off and we tested the injectors with a battery, switch, jam jars of equal size, an in tank pump sitting in a container of petrol. First to check were the ones out of the Viva. They all worked well and all pretty much matched in output. The spray patterns were even and consistent. We then tested the other three sets I have spare- none of which were very good. They all flowed about the same but quite spluttery and uneven in spray patterns. Then I re-rigged the first set and left it running at full pressure for quite a while, injectors closed. Kept going back and checking for leaks but nothing. So if one is dripping it must be as I feared- very slowly over the space of a week or so. I will add a dash mounted switch to my ecu feed and for first start up of the day I'll turn off the ECU, turn the engine over at WOT and clear the inlet tracts of any vapor buildup. OK- sort of a bit faffy but for a piece of mind I think its worth this extra few seconds of bother. Back to the new manifold which I was building. I thought id keep it in raw alloy finish but it just didn't look right so I painted it. Sadly it was not warm enough to really set off the wrinkle finish paint but still looks heaps better. I had a quick clean up of the throttle body because the butterfly has been sticking shut randomly and can make gentle pulling away tricky. Bolted it all back together on late Monday night and started the car up, after having removed the ecu fuse for a bit of clearing... Started fine and warmed up. Cinched down the bolts again the lids sealing foam settled and went to bed happy. Drove it to work the following day. Wow! Soooo much nicer to be back in my Viva! Hills are such a laugh again. Effortless giggly fun. The throttle body is still a little sticky so I need to look at that. Its butterfly closes fully without any stop screw and I think its just getting wedged ever so slightly into the alloy. Maybe I might fit some sort of stop with a screw adjustment and rely on that to set the idle rather than the stock idle bled screw. Also will fit that switch and have to tend to the little bolt head shaped dent on the bonnet Otherwise just enjoy the car for now and just tinker away with some little ideas- things like funky interior lighting and get around to fitting the intermittent wiper control kit I have bought.1 point
-
Pity I'm not tech savvy, or smart enough to keep up with this thread. I was day dreaming about steam engines one time, (I think it was after watching Thomas the tank engine at Karl's actually) And though thought occoured to me that if you had a steam engine, you could drive a turbo of some kind using the steam exhaust pulses. And thus cram more air into the fire box/combustion chamber. I mentioned it to my Dad, and he reckoned they used to discharge it into the smoke stack to create a venturi effect behind it to draw more air into the firebox. (He might actually be old enough to remember actual steam trains)1 point


.thumb.jpeg.384ff72c8d2b0ee0d34a7bdedb55bdcf.jpeg)


This leaderboard is set to Auckland/GMT+12:00