
Leaderboard


Popular Content
Showing content with the highest reputation on 11/09/15 in all areas
-
Old mate American Dan came around and did some great work while I was cursing other vehicles and getting sunburnt working in the driveway. getting to look serious now "Great Node of Justice" still a bunch more to do but most of the longer tricky ones out of the way.15 points
-
so, less than 24 hours ago i went on national TV and said my M "wouldn't die" Ha. HA HA HA HA HA HA HA HA HA HA HA HA HA HA HA 2015-11-07_08-27-55 by sheepers, on Flickr10 points
-
so, in an act of total and utter futility ill get the head planed and put a new gasket in it. ha haha ha…………………………………………………………………… ha.9 points
-
Spent the weekend at Cams working on the car. did this on Saturday and prepped the new 7K to put back in (theres 2 7Ks in this image followed by some fireworks show Then sunday, put new engine in the hole Fuel tank out, ready for EFI conversion didnt actually take any photos of stuff really so not much more to show and then the end of the day, stacked some cars in Cams garage KP is the first and only car to have been on the hoist, and this was the first time cam parked his precious 86 under another car on his hoist. Hope it's still standing! and then today, i received a nice box of bits from DigiKey. 988 little tiny capacitors and resistors etc, so ready for the PCBs to turn up!8 points
-
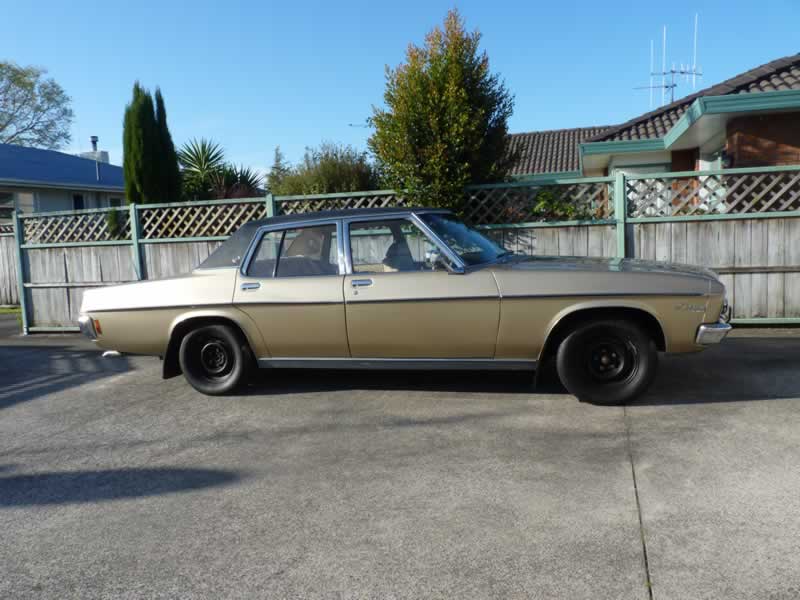
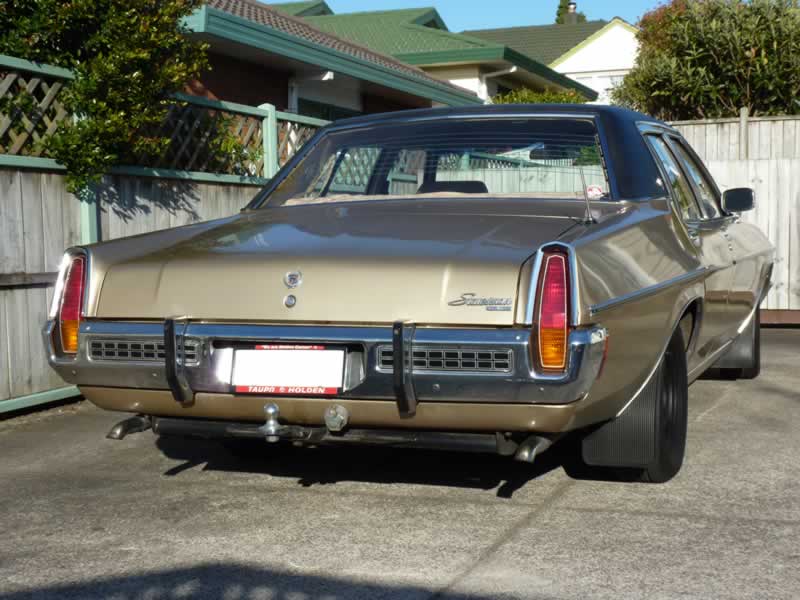
Hi, I am the buyer of the fifth mr2. Dark blue metallic, rough because it has been prepped for a respray. Reg and warrant, targa tops with good seals, but auto. Drove to Napier no probs, but before I left the auction site I noticed it was losing water round the water pump.
 7 points
 -
I started cutting out the rust and replacing that shit. Now I weld all day err day but have very little experience with panel work so let me know if you see something stupid Left side if windscreen before Patch 1 Patch 2 Patch 3 And patch 4 I killed the rust before each patch went on and have finished it off with an etch primer. Just needs a touch of spray filler before I paint. I then did the same with the left rear wheel arch Before. After. Basically the same to do on the opposite side, then alot of repair needed around the boot seal part. I've also realized that I'm totally not rich enough to bag it this time round. So that will have to wait. Chur7 points
-
HA HA HA HA HA HA HA HA HA HA HA HA HA HA HA HA HA HA HA HA HA HA HA HA HA HA HA HA HA HA HA HA HA HA HA HA HA HA HA HA HA HA HA HA HA HA HA HA HA HA HA HA HA HA HA HA HA HA HA HA HA HA HA HA HA HA HA HA HA HA HA HA HA HA HA HA HA HA HA HA HA HA HA HA HA HA HA HA HA HA HA HA HA HA HA HA HA HA HA HA HA HA HA HA HA HA HA HA HA HA HA HA HA HA HA HA HA HA HA HA HA HA HA HA HA HA HA HA HA HA HA HA HA HA HA HA HA HA HA HA HA HA HA HA HA HA HA HA HA HA HA HA HA HA HA HA HA HA HA HA HA HA HA HA HA HA HA HA HA HA HA HA HA HA HA HA HA HA HA HA HA HA HA HA HA HA HA HA HA HA HA HA HA HA HA HA HA HA HA HA HA HA HA HA HA HA HA HA HA HA HA HA HA HA HA HA HA HA HA HA HA HA HA HA HA HA HA HA HA HA HA HA HA HA HA HA HA HA HA HA HA HA HA HA HA HA HA HA HA HA HA HA HA HA HA HA HA HA HA HA HA HA HA HA HA HA HA HA HA HA HA HA HA HA HA HA HA HA HA HA HA HA HA HA HA HA HA HA HA HA HA HA HA HA HA HA HA HA HA HA HA HA HA HA HA HA HA HA HA HA HA HA HA HA HA HA HA HA HA HA HA HA HA HA HA HA HA HA HA HA HA HA HA HA HA HA HA HA HA HA HA HA HA HA HA HA HA HA HA HA HA HA HA HA HA HA HA HA HA HA HA HA HA HA HA HA HA HA HA HA HA HA HA HA HA HA HA HA HA HA HA HA HA HA HA HA HA HA HA HA HA HA HA HA HA HA HA HA HA HA HA HA HA HA HA HA HA HA HA HA HA HA HA HA HA HA HA HA HA HA HA HA HA HA HA HA HA HA HA HA HA HA HA HA HA HA HA HA HA HA HA HA HA HA HA HA HA HA HA HA HA HA HA HA HA HA HA HA HA HA HA HA HA HA HA HA HA HA HA HA HA HA HA HA HA HA HA HA HA HA HA HA HA HA HA HA HA HA HA HA HA HA HA HA HA HA HA HA HA HA HA HA HA HA HA HA HA HA HA HA HA HA HA HA HA HA HA HA HA HA HA HA HA HA HA HA HA HA HA HA HA HA HA HA HA HA HA HA HA HA HA HA HA HA HA HA HA HA HA HA HA HA HA HA HA HA HA HA HA HA HA HA HA HA HA HA HA HA HA HA HA HA HA HA HA HA HA HA HA HA HA HA HA HA HA HA HA HA HA HA HA HA HA HA HA HA HA HA HA HA HA HA HA HA HA HA HA HA HA HA HA HA HA HA HA HA HA HA HA HA HA HA HA HA HA HA HA HA HA HA HA HA HA HA HA HA HA HA HA HA HA HA HA HA HA HA HA HA HA HA HA HA HA HA HA HA HA HA HA HA HA HA HA HA HA HA HA HA HA HA HA HA HA HA HA HA HA HA HA HA HA HA HA HA HA HA HA HA HA HA HA HA HA HA HA HA HA HA HA HA HA HA HA HA HA HA HA HA HA HA HA HA HA HA HA HA HA HA HA HA HA HA HA HA HA HA HA HA HA HA HA HA HA HA HA HA HA HA HA HA HA HA HA HA HA HA HA HA HA HA HA HA HA HA HA HA HA HA HA HA HA HA HA HA HA HA HA HA HA HA HA HA HA HA HA HA HA HA HA HA HA HA HA HA HA HA HA HA HA HA HA HA HA HA HA HA HA HA HA HA HA HA HA HA HA HA HA HA HA HA HA HA HA HA HA HA HA HA HA HA HA HA HA HA HA HA HA HA HA HA HA HA HA HA HA HA HA HA HA HA HA HA HA HA HA HA HA HA HA HA HA HA HA HA HA HA HA HA HA HA HA HA HA HA HA HA HA HA HA HA HA HA HA HA HA HA HA HA HA HA HA HA HA HA HA HA HA HA HA HA HA HA HA HA HA HA HA HA HA HA HA HA HA HA HA HA HA HA HA HA HA HA HA HA HA HA HA HA HA HA HA HA HA HA HA HA HA HA HA HA HA HA HA HA HA HA HA HA HA HA HA HA HA HA HA HA HA HA HA HA HA HA HA HA HA HA HA HA HA HA HA HA HA HA HA HA HA HA HA HA HA HA HA HA HA HA HA HA HA HA HA HA HA HA HA HA HA HA HA HA HA HA HA HA HA HA HA HA HA HA HA HA HA HA HA HA HA HA HA HA HA HA HA HA HA HA HA HA HA HA HA HA HA HA HA HA HA HA HA HA HA HA HA HA HA HA HA HA HA HA HA HA HA HA HA HA HA HA HA HA HA HA HA HA HA HA HA HA HA HA HA HA HA HA HA HA HA HA HA HA HA HA HA HA HA HA HA HA HA HA HA HA HA HA HA HA HA HA HA HA HA HA HA HA HA HA HA HA HA HA HA HA HA HA HA HA HA HA HA HA HA HA HA HA HA HA HA HA HA HA HA HA HA HA HA HA HA HA HA HA HA HA HA HA HA HA HA HA HA HA HA HA HA HA HA HA HA HA HA HA HA HA HA HA HA HA HA HA HA HA HA HA HA HA HA HA HA HA HA HA HA HA HA HA HA HA HA HA HA HA HA HA HA HA HA HA HA HA HA HA HA HA HA HA HA HA HA HA HA HA HA HA HA HA HA HA HA HA HA HA HA HA HA HA HA HA HA HA HA HA HA HA HA HA HA HA HA HA HA HA HA HA HA HA HA HA HA HA HA HA HA HA HA HA HA HA HA HA HA HA HA HA HA HA HA HA HA HA HA HA HA HA HA HA HA HA HA HA HA HA HA HA HA HA HA HA HA HA HA HA HA HA HA HA HA HA HA HA HA HA HA HA HA HA HA HA HA HA HA HA HA HA HA HA HA HA HA HA HA HA HA HA HA HA HA HA HA HA HA HA HA HA HA HA HA HA HA HA HA HA HA HA HA HA HA HA HA HA HA HA HA HA HA HA HA HA HA HA HA HA HA HA HA HA HA HA HA HA HA HA HA HA HA HA HA HA HA HA HA HA HA HA HA HA HA HA HA HA HA HA HA HA HA HA HA HA HA HA HA HA HA HA HA HA HA HA HA HA HA HA HA HA HA HA HA HA HA HA HA HA HA HA HA HA HA HA HA HA HA HA HA HA HA HA HA HA HA HA HA HA HA HA HA HA HA HA HA HA HA HA HA HA HA HA HA HA HA HA HA HA HA HA HA HA HA HA HA HA HA HA HA HA HA HA HA HA HA HA HA HA HA HA HA HA HA HA HA HA HA HA HA HA HA HA HA HA HA HA HA HA HA HA HA HA HA HA HA HA HA HA HA HA HA HA HA HA HA HA HA HA HA HA HA HA HA HA HA HA HA HA 2015-11-09_08-01-39 by sheepers, on Flickr 2015-11-09_08-01-47 by sheepers, on Flickr 2015-11-09_08-32-01 by sheepers, on Flickr 2015-11-09_08-32-10 by sheepers, on Flickr 2015-11-09_08-32-19 by sheepers, on Flickr6 points
-
So i have been making a list of stuff to improve on this, fixing annoying things and stuff id been meaning to do for ages. last time i drove it down to my brothers place i got sick of it bouncing off the bumpstops all the time so i wound the front up slightly, that made a big difference to how it drives (surprise, durr) so i thought id make some more bumpstop clearance by a couple of easy mods to the lower arm. I bought a cotton reel engine mount that i can chop in half and make some new bumpstops out of, as the original ones are quite soft, already trimmed and are now a bit hammered. However after checking how much total travel it has, the upper balljoints bind if the bumpstop is any shorter than what they currently are anyway so flag that idea, ill just make the new bumpstops and leave it at that. Might be a job for later if i make new upper arms for the brown car with less balljoint angle, i might make 2 sets. other things were the torsion bars, i never got around to putting V8 bars in it even though i had a set sitting under the house, there are 2 different size bars for aussie valiants, .850" for 6 bunger sedans and .870" for V8/pacer/charger/utes. I never got around to this cause i thought they were going to be difficult to remove but it took about 5 minutes to remove them I also put new wheel bearings in. While it was on the hoist at a mates shop on saturday while i swapped wheels over yet again, i measured the difference in height of the steering drag link side to side, the left inner tie rod end is 15mm higher than the rh one. i knew it was a bit on the piss but had never worried about it and just assumed it was usual chrysler standard of workmanship, although looking at the idler arm, it may be that is either damaged or was made incorrectly as the bush isnt in the right place by the looks of it. While the torsion bars were out i thought id do a bump steer check to see how bad it was, expecting it to be less than impressive. So i made a cobbled together arrangement of wood i had laying around and came up with this. 23 mm of toe change over most of its travel, which is pretty yuck, but not a surprise. explains some of its behaviour which i have got used to/ignored. 20mm is regarded as a lot for an old car, more modern stuff, 10mm is a lot. i think there are 3 reasons why it sucks so much- 1- the idler arm issue, i will try to get the tie rod ends at the same height. one out of this car on the left 2- it needs a proper wheel alignment, last time i had it done i set it up roughly by winding the rear adjuster right in and the front one half way which resulted in a fair bit of negative camber, and probably heaps of caster. i was expecting the wheel alignment guy to set it up properly but these are difficult to do an alignment on so he just set the toe. The problem with too much caster or it being miles away from factory spec is it tips the steering arm down which can make the toe change problem worse. these are meant to have negative caster originally 3- its a valiant. not much i can do about that one...6 points
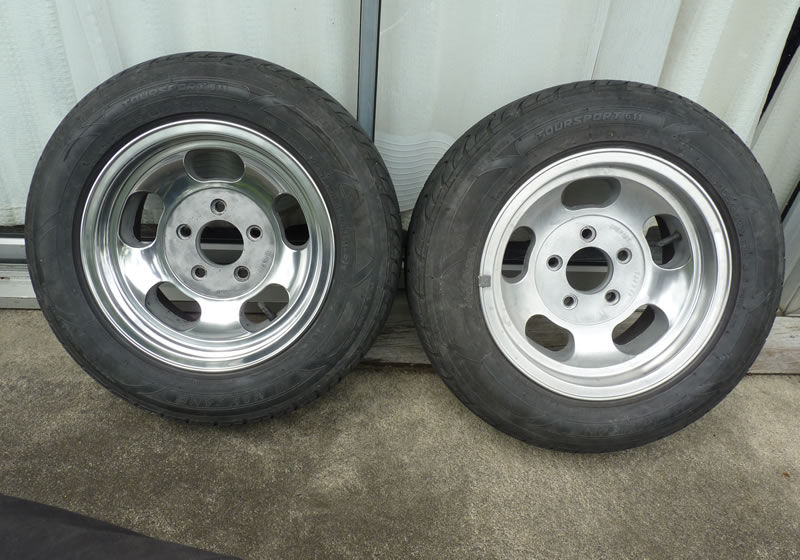
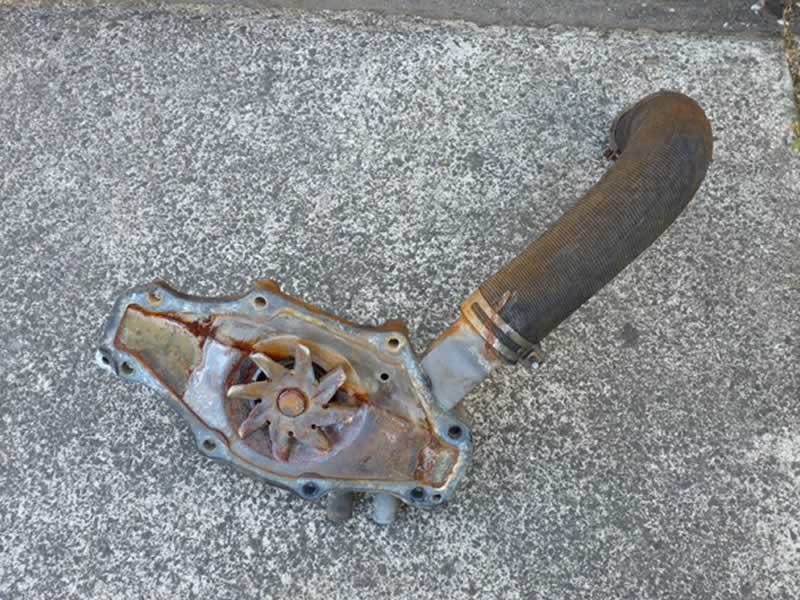
-
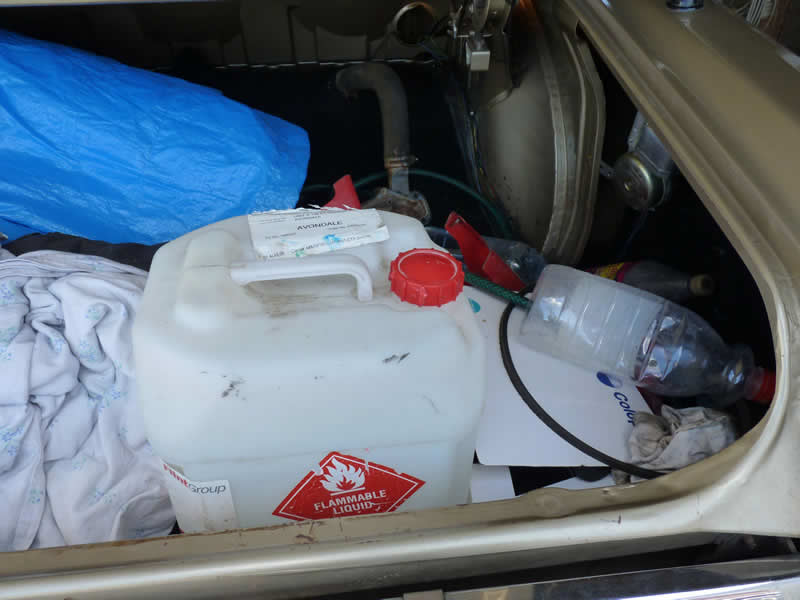
Doing little bits and pieces on the car the last few months. Did a compression test, 150psi on drivers side and 160psi on passengers side. Need to do it again though; as I removed all the spark plugs then did the test. Seems the correct way is to remove the plug from each cylinder to test and replace. Ohwell, learn something new. So I was told the passenger side is higher because I did that side last which meant the lifters sat to long... Still pretty happy with an engine that seems untouched since 1973 Changed the oil. Was thin as water and black. Replaced the oil filter and filled with cheap oil. Will change it again soon. Hopefully itll clean out some crap. Its already black after 700kms. Replaced the dizzy cap, rotor, all new leads, plugs and air filter. Seems to have made a difference in fuel economy. Polished up wheel trim and hubcaps. Looks near new, bar some of the surface rust and a few dents on the trim. Have left them off as don’t want to lose them. It doesn’t look too bad without them. before clean after clean Scored a set of second hand 7 and 8 inch tridents. In the middle of restoring them. Wet sanding, polish and repaint. 2 more to sand and polish, then repaint black I’m not looking forward to doing the last two, time consuming and hard on the fingers trying to remove as much scratches and dents as I can. But should be worth it with new centre caps and shiny new nuts 7s 8s Did my first long cruise to Tauranga and back cruising on 100km and some city driving, returned 12.3l / 100kms. Pretty happy with that. Car handled surprising well for a big thing. Cruised nicely at 100 up the Kaimais. Driving home through the gorge outside Waihi, it ate the corners like it was on rails for a 1.5 tonne tank. The two huge sway bars and what looks like reasonably new shocks probably helped. Removed the water pump to replace it, slight wear marks into the timing chain cover. It’ll live. So replaced the pump and decided to run the hose through the block, heater and radiator. Lots of rusty crap came out everywhere. Discovered there wasn’t a thermostat, so replaced it with the stock item from the book. Replaced all the belts along with top and bottom radiator hose. Cap looked like it needed replacing while at. Cranked it up.. And oh my, one of the belts squealed. Spent some time playing undo/redo the same bolts and belts over n over for a few hours. Damn Alt belt. Did it up as tight as I thought it should be so it doesn’t have a lot of tension on the bearings. At the end of the day I was ready to throw the tools at it as I couldn’t resolve it. Spoke to local mechanic, said I had to tighten the life out of it. And so I did. Seemed wrong to me, but did the trick. Took it for a test drive, sweet. Pulled into local mechanic who had a look, said it was ok, could be a little tighter! Anyways, thankfully the squeal was sorted! Labour weekend, decided to take it for a drive to Napier. Diff seemed to be leaking oil drips on the garage floor. Thought I best replace the gasket before I go. Climbed underneath and seems it was coming from the plug. So topped it up and tightened the plug. Hopefully that should do it. Atleast it saved me doing the gasket! Loaded the boot with a box full of tools, bottles of water, 20l container of gas, old hoses, ATF fluid. Better safe than sorry for a long trip on my own. plenty of room in that boot. Took the gas, as I wanted to see if it would make it to Napier from Auckland on 1 tank of gas. Either I was going to make it or run it dry. Don’t trust those fiddly gauges. Somewhere just before Taupo noticed the temp gauge creep up through the hills. Shouldn’t be doing that I thought, wondered what it would do through the Taupo/Napier hills. Plenty of water, she’ll be right. Hit the hills, and slowly the temp crept up to the red marks. Whacked the fan for the heater on and hoped to make all the hills. At least the temp dropped like a stone on the down hills. About 50km out from Napier, gauge was down to just over E for enough. Kept waiting for it to splutter. But seemed to keep going, so did a quick drive through marine parade etc before my destination. Preparing to leave for home, checked oil, used ½ litre. Pretty sure most of it is from a slight intake manifold leak. Doesn’t smoke at any time. No major leaks on the ground at any time from crank seals etc. Radiator took3 litres water. Took about 53l of gas to fill up, worked out at about 12.5l/100kms. So that should get me home. Hit the Napier/Taupo hills again. Fark, where’s all my gas going . I think I lost some out the rear going up the hills. Note to self “don’t fill to top if doing hills early” temp gauge shot up again to right on the red marks. Didn’t move further so wasn’t to bothered. The down hills and on to the Taupo flats, the temp gauge sat on the red. It only dropped a few times when slowing to pass through urban towns. Otherwise it stayed in the red all the way to Hamilton to where I stopped to catch up with people( I guess it was at peak operating temp) Filled the radiator with water, and tipped in the 20l of spare gas. Gas gauge was reading under a ¼, so I guess I must’ve lost some through the hills.. onward to Auckland at 9pm, good time to miss most of the labour day traffic. Temp gauge sat on ½ rest of the way home. An uneventful trip and drives awesome for a lounge suite on wheels. Gonna try a lower degree thermostat, go from 88C to 77C and see if that affects the temp. When it had no thermostat, it sat on ¼ and never moved past it up the Kaimais etc. The 88C was fine around town, idling etc. When it came to hills.. I got the angry red. Shouldn’t be the radiator, it looks to have been recored. That is about it for now, other things to do it and finish up the mags etc
5 points
-
After going back and forth over the filter I decided to go with a shorter one and keep it all under the bonnet so I ordered a 3.5" tall one. The big advantage of this for me at the moment is that I can just put the old bonnet back on without modifying it or having to repair and repaint the one that I have already cut, so I can spend the time finishing up some of the other jobs. New filter fitted and with the bonnet back on Now I figured it was time to get the roll cage fitted, I actually need this to pick up the upper seatbelt mount as the existing mount is too low for the race seats and the original seats don't fit anymore as the tunnel is so much wider (I was thinking of just fitting the old ones once again to try and speed things up and get it on the road) anyway there were some other options to get around the height of the seats but I was going to fit the cage anyway and that solves the problem. first up the main hoop, oh yeah and to complicate things a little more I decided to make the cage removable for later on if I want to do the interior etc. So after lots of measuring and cutting and trimming I got the main hoop in next up is the rear stays which are going to tie into the wheel tubs, these are a little tricky as they are curved and I didn't have a bender that would do 3mm, but I do have a shop press (one of those little ones from supercheap that I got on special) so I made this which goes in the press along with a bit of flat bar like this So now I can bend 3mm plate, it is going to take some time to get the curve to match so that is my job for the week4 points
-
Hey all..... Last couple of weeks have been real busy. Blocking then primering and more blocking and then I finally got the paint on the cortina. Its come up brillant and am so stoked. ive bought new screen rubbers should be here early next week and should have windows in by friday. So if all goes to plan ill have it home by saturday. Im looking foward to the fit up now and will keep posted the details. Theres no pics of the blocking because I wish to forget that part. Enjoy...4 points
-
Refit the 245?3 points
-
Oh boy that sure is a hilarious self burn3 points
-
Remember the hub is directly up against the drum face, so would be difficult/impossible to drill and tap Edit: The hub centre is the culprit, if you can rotate the drum a little back and forth within the free space around the studs (does that make sense?) then that ring definetly needs cleaning up. No two ways Edit Edit: I can see the mushrooming in your pic!3 points
-
If the brakes are backed off then the drum should come off without too much hassle. (I presume the drum rotates freely?) But if the locating hub is damaged then heat ain't going to do shit except make it worse by fucking up the drum, If the hub is damaged then push/whack the drum back on, then carefully file/grind off any burrs or ridges on the hub. Once the hub is clear of burrs then spray a dose of CRC around the locating hub and drum face. Also clamp off the brake hose on the side you have the drum off (or put the drum back on) and whack the brake pedal a few times to centralize the drum. Then give it a solid whack with a decent club hammer (a sledge may damage shit so be a bit careful with that) I would hit it about as hard as energetically hitting a nail in home - perhaps a little more but not running up and swinging spec.3 points
-
bring the heat3 points
-
handbrake off?3 points
-
So shit has been slow as usual, the odd job being knocked out here or there. Last month or so have been hitting it hard though. Don't have many pictures so you will all have to take my word for it. As per previous posts the boot was fucked so got a much better boot and slapped that on, no rust holes just some surface poos so I'm happy with that. My triple carbs idea turned to shit after I broke one carb and then the dog somehow pulled another off the bench and broke that. I brought a pretty good condition standard carb for this engine and threw it on. All new points, condenser, dizzy cap and plugs and all that along with the carb she purrs like a kitten. I have an issue with my clutch bearing, I think that's the world. It's brand new but was sitting for a few years and when I put my clutch pedal to the floor it squeals. Not happy about that. I have a feeling the forks on the piss but haven't investigated further. Also managed to find the elusive corner chrome bits, not photos with it on as yet as I need to make some more clips but I'm stoked with that. The bro mattybean came over today and helped with door rust, we got one door sorted now really only 2 to go, drivers is pretty mint already. Was a bit of a fuck up as I didnt have the right tools so we ripped a couple doors off and went back to his. He managed to multi task cooking a barbie to keep the girlfriends happy and also cut out rust and make patches without burning the food. Win win all round. My mrs wanted to sunbathe today but instead she went around and polished all the chrome on the car. Came out mint!! Overall, today was a good day. The mad rake going on. Mattybeans corona and my prince chilling in the sun. Matt bonnet up as we swapping some ignition shit over try to solve a miss. I'm sitting on the step having a refreshment break. Can kinda see the mrs through the car polishing the rear chrome. Discussions //oldschool.co.nz/index.php?/topic/36619-daves-prince-b200/page-23 points
-
Awesome day today at the Db drag racing Nelson. Those extra alternators did the trick. My new record 141.5db. Very Happy3 points
-
how long has that trench been unsealed for? Looks like a while going by how washed out the metal is/the weeds growing in it. Pity you don't have any roading connections to get it tidied up, and sealed. It would give me the shits to have that outside my place. Also, my condolences at you becoming a BMW owner. I guess you can't help bad luck........... At least your ones run I suppose. More than I can say for mine.3 points
-
Project 1.0 is slowly getting underway, after the 3 month escape to Asia... Part of this post I want to dedicate to one of the coolest dudes we met, Rtid. A mixture of instagram and facebook conversations utilising good old google translate meant that we roughly organised to meet at a cafe in Northern Thailand with him and his 808. He mentioned that there could be a few tourists and he wouldn't know who we were, but the fact that 1) he arrived in the 808 I pined over for months and 2) we were the only ones running away from our coffee to see it, meant we found each other pretty easy. I can say this is easily one of the coolest examples of an 808 I have ever seen, and it is a park everywhere, anywhere daily driver! Rtid is a hilarious and talented guy who many may know from his now famous art shirts, "RX3 or 808 Thailand", or the fact he basically runs Lampang Retro Car club. My favourite conversation was pointing to his fender mirrors, trying to explain I was in the market for some. Giving that making dinner plans for later took over 20 minutes, you can imagine how long it took to explain about mirrors. I finally find some Wi-Fi and show him a picture to which he delightfully exclaims "OH Celica ta22 mirrors! I have!" So I proudly own some very well travelled Celica fender mirrors, along with some of the rad shirts he designs. Yes the mirrors made it flawlessly through 6 more flights and numerous trains and buses in my bag, checked by a custom official at Narita airport who asked where from and was super excited when I mentioned they were for a Matsuda. This other part I want to dedicate a huge shout out to Paul Weir for dedicating huge amounts of time and effort into creating some wild wheels for the new style. For some reason I felt like the parts on the car should have a meaning, so this time the colour reflected the late 80's colour scheme Rod Millen ran for his Ashley Forest FC RX7 I told myself 2 years ago that once the car was done, I would never make it a project again. So now marks the beginning of the process to complete the car and hopefully after round 2, never make it a project again.3 points
-
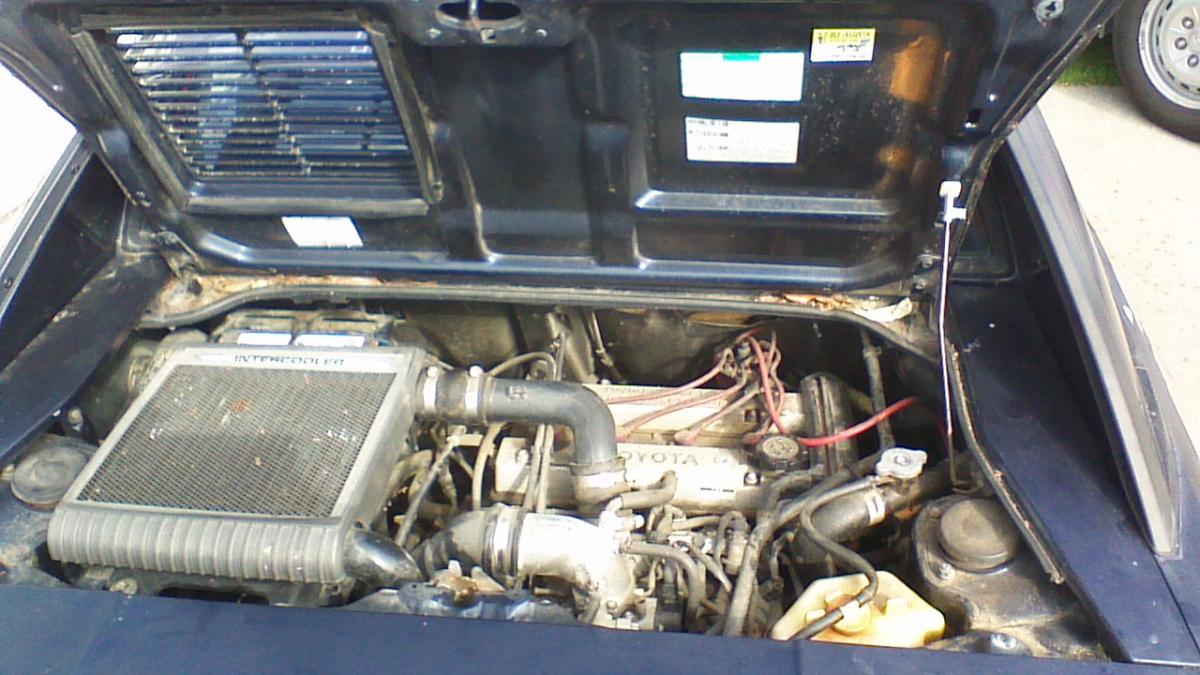
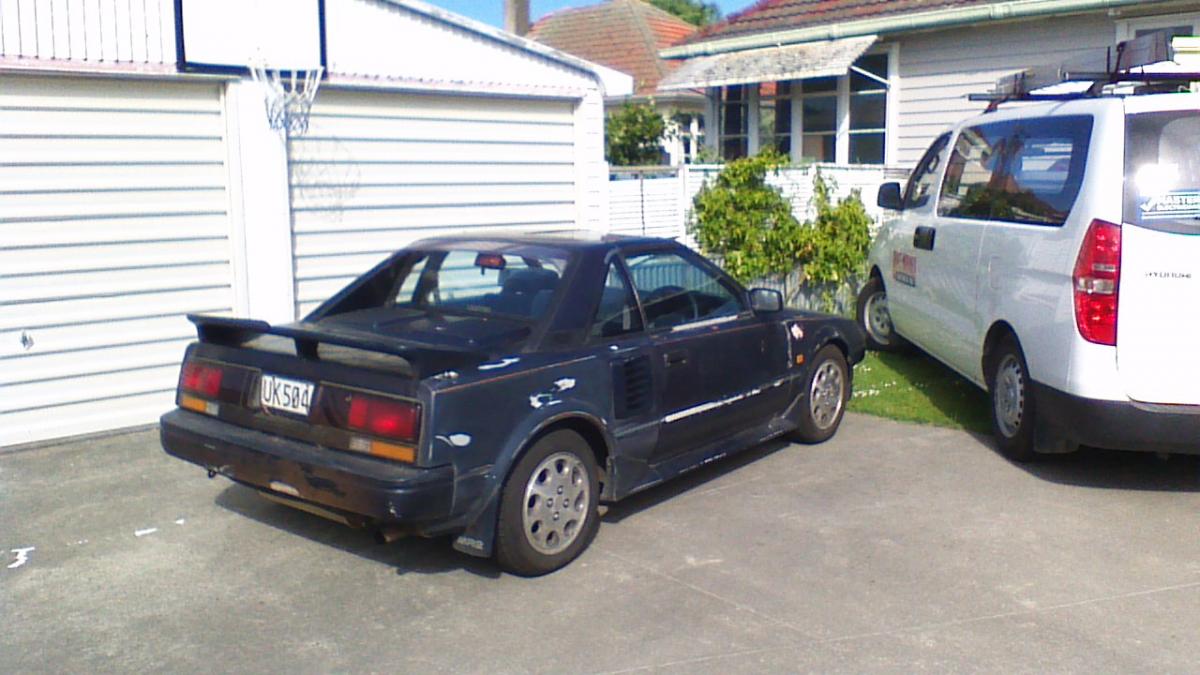
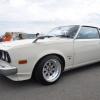
So that's a supercharged MR2 for 600 bucks? Farrkn nice work!!!!2 points
-
Some drums have two threaded holes that you can use. Screw bolts in and it pushes the drum off. I guess you could drill two holes, and thread it with a bottom tap and that could work. Kinda last resort stuff though.2 points
-
I feel for you. I have cam locking blocks and associated paraphernalia if you need such things. Doing the Vanos seals on my b28 woke it right up.2 points
-
ha yea, the studs do. my brain was stuck on wheel bolts that go into the drum.2 points
-
The wheel studs go through the drum from the axle, don't they? You may need to clean up the centre, maybe a file or something. Then some crc to aid lubrication etc2 points
-
Went vamping, new setup works a treat2 points
-
they are always a pain to get back in first off, check all the folds where the rods run through, good idea to repair and reinforce them now. the rods may have rusted a little and worn holes through the fabric then leave the whole lot in the sun, or inside a trashbag in a tub of warm water. then its just a case of putting it all back where it came from. i usually start at the back. slot both ends of the wire in, angled towards the back of the car, then pull it forwards to lock it in place. after sweating, getting crap from the roof in my eyes, and generally deciding to never work on a car again, i go around with a bluntened paint scraper/putty knife and push al lthe ends back up to where they need to be2 points
-
Lot 74 was one of those things I'll never forget. Was chatting to Bigfoot and Chris R about this whilst the bidding was going on, asking about costs for re-reg, as I was really interested in it but thought it'd go over budget; I'd looked over it the day before and it seemed solid. Bigfoot mentioned the 'on hold' writing in the windscreen, which I'd forgotten about, so I turned round to put up my hand to bid but the winning bidder was putting his bidding number up a few people in front and the auctioneer didn't see me, so it went for $500, which was a bargain; the whole camper interior was still in the back, etc. Anyway, I got home and saw my overly full driveway despite being one car down at the moment and thought that I'd probably dodged a bullet, in all honesty. Being amongst so many projects yesterday also made me realise that the junk I have isn't actually that bad.2 points
-
Installed the first thing from the parts car - the coolant reservour bottle strap still had the original italian transfer on it i put some clear coat over it to make it last a bit longer Then finished putting the engine bay back together (actually just scratching and fingermarking my new paint) most of the engine bay things were very oily and dusty but they came up a treat after a soak in the mystery solvent from the rusty can, some paint and an oil/grease up as required. rewrapped the loom with self amalgamating tape cleaned and greased the gear linkages painted brake booster and brakets, new brake master cylinder, cleaned reservours (will probably swap them to 124/125 style as the lids on these ones have a grotty rubber seal that will leak) Put in the giant MM coil from my 125 (snapped a terminal off the original one removing it) l still need to patch the loom to it; missing the factory air horns but this one came with instead and it works fine - they have a switch under the dash to swap between 'country' (the air horns) and 'town' horns (a standard piezo type in the wheel arch). pretty much ready to have the engine and box dropped back in but I have since taken off the brakes (look ok), and 60% unbolted the front suspension to pull it all out for a go over and refresh, and sort out a blind notch in the torsion bars2 points
-
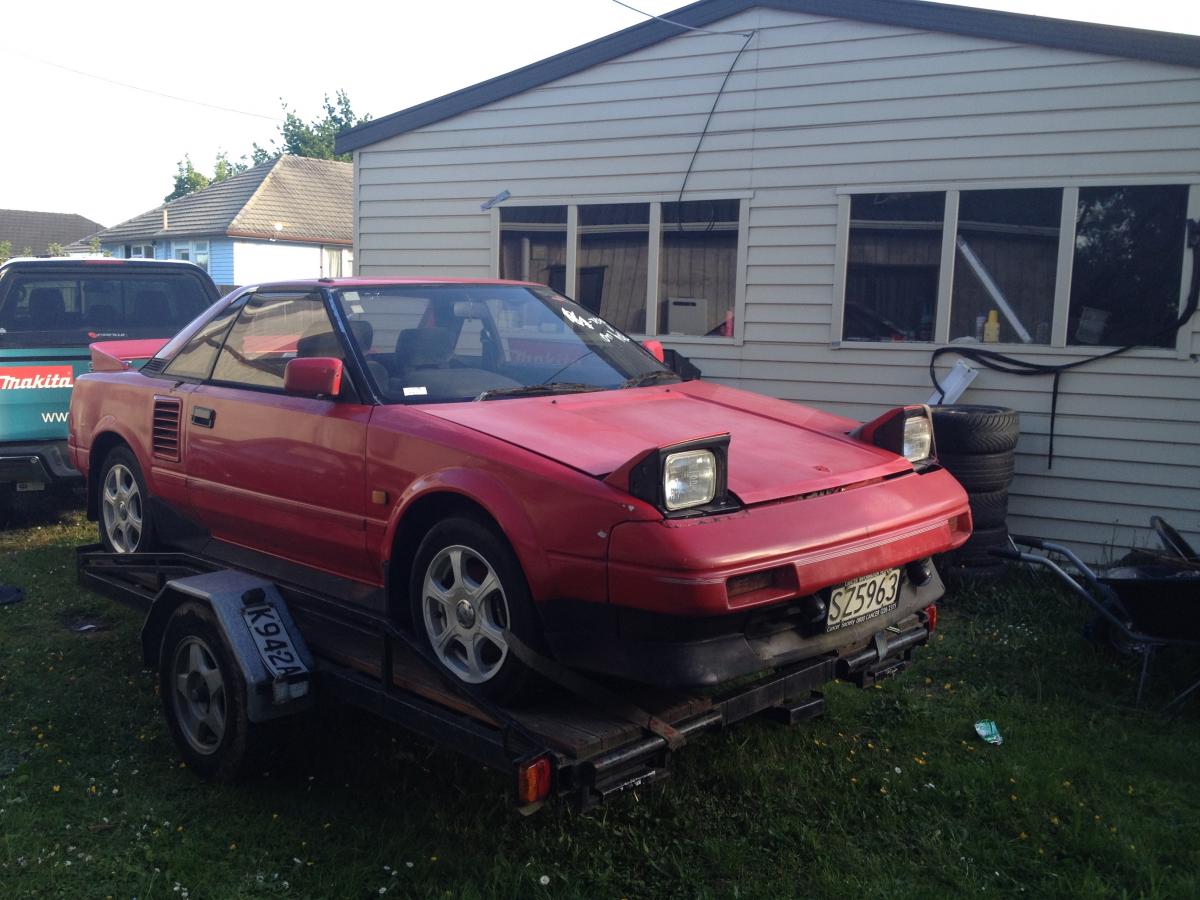
I bought the red AW11 (auto + on hold). Picked it up today, threw a battery in it and it runs! Lots of smoke and sounds lazy, but it goes. Time to do a few autocrosses in it before pulling it to bits .
2 points
-
today i finished welding the patches in the roof. 2015-11-08_03-54-03 by sheepers, on Flickr 2015-11-08_03-54-15 by sheepers, on Flickr 2015-11-08_03-54-56 by sheepers, on Flickr so thats it. the welding is on this car is done. milestone etc. the eagle eyed among you will have spotted that the sun roof is still a gaping hole. I'm kind of not counting that because although it still needs to be welded and ll be welding it, Peter is in charge for that bit and he'll do it when he gets a chance. i can't really dictate when it gets done so ill pretend its not happening or some shit. lets just say that all the welding (except of the rest of the welding) is done! excellent.2 points
-
I can tell you there's 6 cars that wont be back on the tard2 points
-
Picked up this 4V manifold and carb at the Southwards swap today. Carb has a 1964 factory tag. The car currently has a 2V manifold so I'll probably clean this up and swap it on sometime.2 points
-
Well, its about that time again 15 months in storage, I revived the old girl Tap the fuel pump a few times Fill with coolant Pop in my new electronic distributor And it fired right up, to a massive smoke screen as I burned off the Morey's in the cylinders Drove it around the house and everything seems fine. The car was moved and never put back on blocks, and a tarp put on it, so those marks will hopefully come out with a wash Il go get it and bring it back soon2 points
-
Bought one of these! I have been waiting for a while for a good hoist to come up for sale. Missed out on a few on TM as i was too slow, but this came up in taupo from a place that was downsizing so i grabbed it. 3.5T heshbon. in great condition. Its 10mm from the roof and just forward enough so the arse end of the car clears the roller door.2 points
-
Cruise control is working! Haha, this is so cool. If you set a speed, it deviates either way by less than 2kph max. It's a little jerky on the downhill, but I just need to tweak some settings a bit. I've never had cruise control before, so it's a bit of a surreal feeling, especially in a car that's 30 years old. Knock detection is setup and working as well too, this took a bit of fiddling to get right. I set it up so that it could pull out up to 20 degrees of timing if it wanted. With the idea that if at a certain load/rpm point it's pulled out 20 degrees and it's still reporting knock, then it obviously isnt knock! So I could adjust the thresholds up and down. Now I've got it pretty good, added in a bunch of ignition timing as per the reccomended settings but there were a few zones where I had to pull it back a degree or so to avoid knock. My previous best quarter mile time was 14.3 @ 150kph, there's now a few indications that it might reach 150kph in 13.5 seconds which could possibly mean a 1/4 mile time in the high high high 13s. 13.999999 still counts! haha. But it's all a load of shit talk until drag day! Might do 14.5s all day long or throw a rod out the block trying to catch up to KPR hahaha. I went for a run up north and back, currently getting ~7l per 100km while still aiming for a 14.7:1 AFR at cruising. Will try lean it out a bit, and fiddle with cam timing and see if it can get even better. Looking forward to attending a few OS events coming up! Especially the drag day, cant wait.2 points
-
Went and picked up this today Big thanks to Chris for ditching work to collect rusty cars using his own trailer and tow vehicle (also thanks Tara for takinmg the Grande Latte Barina to work today) It looks alright from afar but is far from good. Its missing quite a lot of the more valuable bits like: - engine - gearbox - brakes - steering box - diff head (and i need to return the axles) but it also contains many parts of value to me - i also have to take the axles back and pick up more stuff in a month or so to the PO who owns a 2300S Coupe that this was a parts car for - a set of good bumpers + not so good ones on the car - red interior in good condition + a extra set of carpets in red - spare wheel well cover in good condition + 2 in not so good condition - seat belts - a clutch adjusting nut - spare rear springs (for adjustment purposes) - good windscreen - ok doors - brake booster - spare lower tail gate + rusty one on the car - spare rear side windows - some useful rust cuts for the drivers side including (most) of the drivers floor - various other bits and bobs Including, and best of all - spare good upper tail gate + good one on car + a spare tail gate glass (!) - i pretty much bought this for the tail gate alone and to find it has spare glass (which i could have happily used) and an extra one as well is just crazy. Thats a veritable embarresment of riches! Based on the number of tail gates or parts thereof i now have, that suggests i possess the mortal remains of 4 of the 9 or 10 2300 Wagons imported into NZ. How did that escalate so quickly?2 points
-
wow... been a while! Used the car as my daily for 6 months earlier in the year and went fine. Now it's time to actually EFI it though... before drag day (i hope). So i figured, the best way to do that is the hardest way, and thats by designing my own ECU... All i have to design is the hardware, i'll be using FreeEMS to actually run it all, but their current hardware leaves a lot to be desired in my eyes. so let me introduce MicroEMS! a play on words between MicroSquirt and FreeEMS because i made it use the same connector and pinout as the microsquirt, so that if FreeEMS software or my hardware all turns to custard, i can just buy a microsquirt and plug it in a 3D render from the board design program; So i have actually just ordered 10 boards, and am trying to get my digikey account un-frozen so i can order the components for it as well and start building it in a week and a bits time I've been wanting to design an ECU for a LONG time and never really pushed through, but over the last few weeks i've put a lot of hours into designing something and going to finally give it a go. I shall keep you all updated2 points
-
Decided I liked BMW E36 coupes. So I bought this Rough body and interior, manual gearbox. Was supposed to be a 2.5 but its only a 2L. Bonus was the gearbox turned out to be a ZF manual from a 328i or M3 Then I bought this 2.5 Auto Motorsport. Body tidy although doesn't appear to have been washed in its life. M3 Style front end and M3 style mirrors. Came on Bilsten shocks with Eibach springs which handle awesome. Average interior and rooted roof lining. Then I aquired this because it was super cheap. (far left) 320i non motorsport with motorsport kit front and rear, BBS's with new tyres and immaculate roof lining. So yeah, plan is to put manual in the silver one and tidy up the black one to sell for proft. I wasn't happy with the brakes on the silver one, which although better than the other two seem to fade quickly. I've brought E46 328i rear brakes, going from the factory 280mm x 10mm solid rear rotor to a 300mm x22mm vented one. I'll be getting E46 330i front brakes to raise the factory 286mm x 22mm vented rotor to a 325mm x 25mm rotor. Will do braided lines and M3 master cylinder at the same time then save to get some slotted rotors and performance pads all around. Ideally I'd like to get the silver one stripped out and handling as good as possible then work on upping the power. Would be a fun car to do a few local gymkhanas or hillclimbs in on the cheap1 point
-
I would cut it to length and thread both ends, and make up a threaded sleeve that joins the two together, that way you dont need heat. Alternatively, welding a sleeve over the top of the joint would be my next option.1 point
-
Is this a vw from it? https://trademe.co.nz/9792091881 point
-
slide hammer bolt it to the wheel nuts1 point
-
With a sunny day like today I thought it high time I got cracking on with some easy stuff. Plugs and leads is something even I can do.. of course needed a bit of coffee to get the brain working. Yipes, this coil's seen some shit. Lucky I have another on the way. In typical Japanese fashion the engine bay is super dirty. I forgot to take an after but the bonnet is now significantly less lubricated. Installed new NGK leads and plugs. The lead to the coil was a bit long as you can see, just cable tied it out of the way of the radiator fan more than anything. I love how the leads are numbered for idiots like me! One of these things is not like the other haha. Who's good at reading plugs? How does it look? After I changed the plugs/leads it was running like a bag of dicks missing and shit so I took off the dizzy cap and the points were super corroded. Bit of sandpaper and it runs mean now but I've got another cap due to arrive any day now anyway. Also took a quick vid on Instagram, so much excitement and noise to get to speed limit. It's a real event! https://instagram.com/p/9uxtRrmbK4/?taken-by=mlracing_alex Tbh I'm just beaming cause I did a thing and it made a difference Discuss: //oldschool.co.nz/index.php?/topic/49704-mlracings-hakosuka/page-4#entry16095661 point
-
Engine sitting in hole now with gearbox attached. Very happy how it sits with plenty of clearance so far for headers, mounts, starter etc. Even the gear lever lines up (almost) with the hole in the tunnel. Pushed it outside with the engine and box in place and the front didn't drop much, indicating the V8 weights approx 50-60KG heavier than the I4 4 cylinder.1 point
-
I paid a bit extra with the tonner and bought a bulk lot of hq front end parts. 3 RUSTY hq guards (sold) two OK guards with monaro flutes welded in, one hq bonnet (will sell), one radiator support panel and two nose cones (one very rusty, sold) The plan has been to just fix the rust and leave the cosmetics until later...but then my cousin came over and offered to take them away and make them nice. Can't say no to that! I also bought this off trademe for $200.. Fiberglass and I should be able to cut that gay scoop off without much trouble.1 point
-
Since the car's been apart for friggen ages, and had a few big expenses that delayed buying a clutch for quite a while. I decided that it would be an awesome idea to rip the wiring loom out and tidy it up, as well as add a few extra bits. So first things first, holy moley after seperating out all of the circuits and straightening all of the wires (instead of bunched up in the way that suits a FWD celica, which my loom is from) the diameter of my loom has reduced dramatically! Decided to split the loom coming into the engine bay into two, so it's a lot easier to take off. So one half for all of the stuff on top of the motor and everything else down the intake side. So the new loom includes provisions for some extra bits: Clutch switch (For launch control) Brake switch (For cruise control) Cruise control switch A panel of switches for the dash to turn things off and on A second map sensor for datalogging/nerdy purposes E-throttle (this is friggen greedy on inputs and outputs! Got it setup running awesomely though) Knock sensor setup properly (woohoo!) Having the Link output a PWM for the speedo (more accurate than current setup) And some other junk I might have forgotten about, but sweet jesus with all of the extra stuff it's a behemoth of a thing! Takes up my whole lounge floor haha. I finally got a clutch, ended up with a full faced disc Exedy Heavy Duty setup. Hopefully lives up to it's namesake. Been doing the hard yards yesterday and today to get the motor back in with the clutch and gearbox fitted, wiring loom back on... Fired up first pop which was awesome! Still lots to do, (like fit a radiator and the whole front half of the car) but its a great milestone to reach. Just about blasted my eardrums out starting this thing up while the oxy sensor was unplugged! Need to calibrate it before plugging it in, but after 2 days of hard slog to get this far I'm happy to have a break for the rest of the night and get stuck in again tomorrow. Can noooooootttttt wait to drive this thing again! OS drags and summer trackdays just cant get here quick enough1 point
-
After seeing a post from SOHC earlier I was really keen to find some photos of the car in its original ownership by my Great-Grandparents. I've just been slowly working away at the interior. The dash is now bolted in. Just need to install the gauges and reconnect the choke cable. On Saturday I'll have a go at replacing the hand brake cables (front and rear). Hoping to then get a WOF and then come along to the Auckland meet on the 26th. A couple of photos from the late 70's when the car was in Wellington.1 point
-
Soooooo with my airbox intake thingy. All is well and good, but when the motor gets to 6000rpm, datalogs show that there is a 3kpa pressure drop at the inlet manifold all the way to 8000rpm. How much is 3kpa? About 0.4psi which doesnt sound huge, but when you're working with 14.7psi atmospheric pressure that's about 3% of air (and power?) being lost before it can even get a chance to get to the throttle body. 3% of 200hp is 6hp so wouldnt complain about a 'free' gain of half that much if I could halve the pressure drop. So my first thought was, why not go from the current 3" pipe to maybe 4". But then I thought, since I no longer have a MAF, why have any pipe size at all? I could have a bellmouth straight on the throttle body for max flow. Then have a big enclosure to feed it filtered air with minimal pressure drop. This would take up a lot more space than a normal intake though, So the first things first is see if it seems feasible for space. I took a photo of the motor as straight on as I could (If wanting to do this, stand back far and zoom in, to minimise perspective distortion) and drew a rough sketch in Cad to see if theres' about enough space for a bellmouth, some space around it and a panel filter. Seemed okay so I plonked the motor back in and started on some CAD (Cardboard Aided Design) to see how much space I've got: Then roughed something together in cardboard, this is the Rapid Brototyping stage: Then copied the dimensions to CAD: Then made version 2.0: Back to CAD, made it more roundy looking: Then started working on the second half of the airbox. So now I've got a pretty good idea of the maximum available area I can work with to make it any size smaller than this. (It's pretty big and gumby at the moment) At this point, I've got two options - I can keep the intake getting air from the big hole through the wheel well area and down to the front as per previous. Orrrr, there's a 91mm dia hole behind the headlight, I could get air from here and/or here: So time to head to Solidworks and try some stuff in the flow bench thingy. TWO INTAKE ENTER. ONE INTAKE LEAVE. I've set the airbox opening to be a source of atmospheric pressure air. And the throttle body area drawing in 170 grams/sec of air (As per datalogging from a few pages ago...) When I keep the airbox diameter really large, even with shitty bends. It keeps the pressure at 101kpa right to the bellmouth. (This graph shows velocity instead of pressure, but you will just have to take my word for it.) When I try a different (simpler/smaller) design that sucks are through the 91mm entrance hole in the front panel of the car... I lose 0.2kpa straight away. Which isnt much, but it just points towards the idea that bigger is better for everything pre throttle body. (Red is good, yellow is not so good, green is less good, and so on. Read the scale damnit) For experiment's sake I thought I'd see what happens when I run the "Big" airbox entrance on an airbox that's 10 meters long. Despite what you'd think it still stays 101kpa across the whole thing, right to the bellmouth. So it seems to indicate that the length of intake means bugger all compared to diameter. Even throwing some harsh 90 degree bends in there, the cross sectional area is so huge compared to the throttle body that there's effectively zero pressure drop. Aaannnnnnnnnddddd that's as far as I've gotten. But the plan from here is to make a cardboard model of the exact shape that I'd expect to build it. Then put it into CAD, then I've got the options of getting bits lasercut or whatever, to minimise the odds of cutting a finger off trying to build something properly. This whole thing might be a big waste of time and acheive nothing at all, but it's helping keep me sane through winter so that's always a good thing. But, I'm pretty confident in my ability to quantify a change for better or worse now. So even if it's a failure it's a win, because Coupe Life1 point
-
The LTD has been letting me know over the past year that it's time for some love and after breaking a valve spring at Nats I knew for sure that this was true. Iv parked her up and removed the shocks and springs to see how a airbag setup would look in full slam Rear ride height before... Rear ride height after ...[/url[url=http://s1372.photobucket.com/user/sidewaysickness/media/Mobile%20Uploads/20150703_161203_zps9s4vi5nq.jpg.html] I get the feeling it's time for a bare metal rebuild so watch this space1 point


This leaderboard is set to Auckland/GMT+12:00