
Leaderboard


Popular Content
Showing content with the highest reputation on 06/16/15 in all areas
-
Second hand value is tricky, but I'd say you could probably sell the headers.... .... .... .... .... For 1G13 points
-
Hey guys, pics of my recent build - datto 120y. running gear was sold as mini stock parts and I bought the bare shell and then later tracked down all running gear, interior etc. Had some rust which I fixed and after 18 or so months, went for its re - vin and passed. 12 days later drove it on its first proper drive from Wairarapa to Palmy for the Four & Rotarys Jamboree meet at Manfield //oldschool.co.nz/index.php?/topic/48815-120whys-75-datsun-120y/5 points
-
hello everyone, did a little bit more work. here. and here. Then I patched this thing up. and made it pretty. And then started opening up the front and A pillar. Still heaps to do, Drivers sides not as wasted as the other side, but still needs nearly the same amount of work to get rid of all the rust. cheers!5 points
-
Ever had that feeling where you know you shouldn't have started messing with something? I thought I'd give the cooling system a birthday as it looks all rusty and shitty inside and its running at just over half way on the temp gauge. climbing to 3/4 when under heavy load. Hotter than I would like. Then i pulled the fan assembly off the radiator. Lots of lovely black water came out. So I sent the radiator off to Motueka Radiators to have a good clean up. I thought I better locate the thermostat and see if that is part of the issue....couldn't find it.....Surely its not in that weird canister with hoses coming off it. Oh wait yes it is because Soviet Russia! I cleaned all the shit out, tested it, and it seems to open at about 88-90 degrees. So I'll roll with that for now. Bit hotter than I'd like though. And all the hose clamps are single use only! Similar design to CV boot clamps. Almost like you were never meant to take it apart. mmmm gunky Radiator came back all clean and like new...or so I thought So I cleaned up the engine bay, smashed it all back together and filled it with coolant as quickly as possible to attend this months Nelson meet in Takaka. Total disaster!!!! Jane and I made it 3/4 up the Takaka hill and noticed the temp gauge creeping up again. Then I noticed a green substance leaking onto my left foot from the heater core. Uh oh... So we pulled over, popped the bonnet and there was green water everywhere. Dobbie at the Radiator shop must have had one to many doobies that day and forgot to re solder the inlet pipe onto the radiator properly! So that was our trip over. We coasted back down the hill, topped up the water at the bottom and went home. Out with the radiator again. Ugh. Lada life.4 points
-
Goddammit I ended up adding a new shed to the tour. It has 450 cars and we will be having a guided tour by the eccentric resident curator! It's handily located on our way from one shed to another. And just to turn down the heat a notch, I would still like some more sheds to add to the tour roster. It doesn't have to be big, this is more of a social gathering anyway so anywhere with ample parking and/or interesting shed dwelling items will work.4 points
-
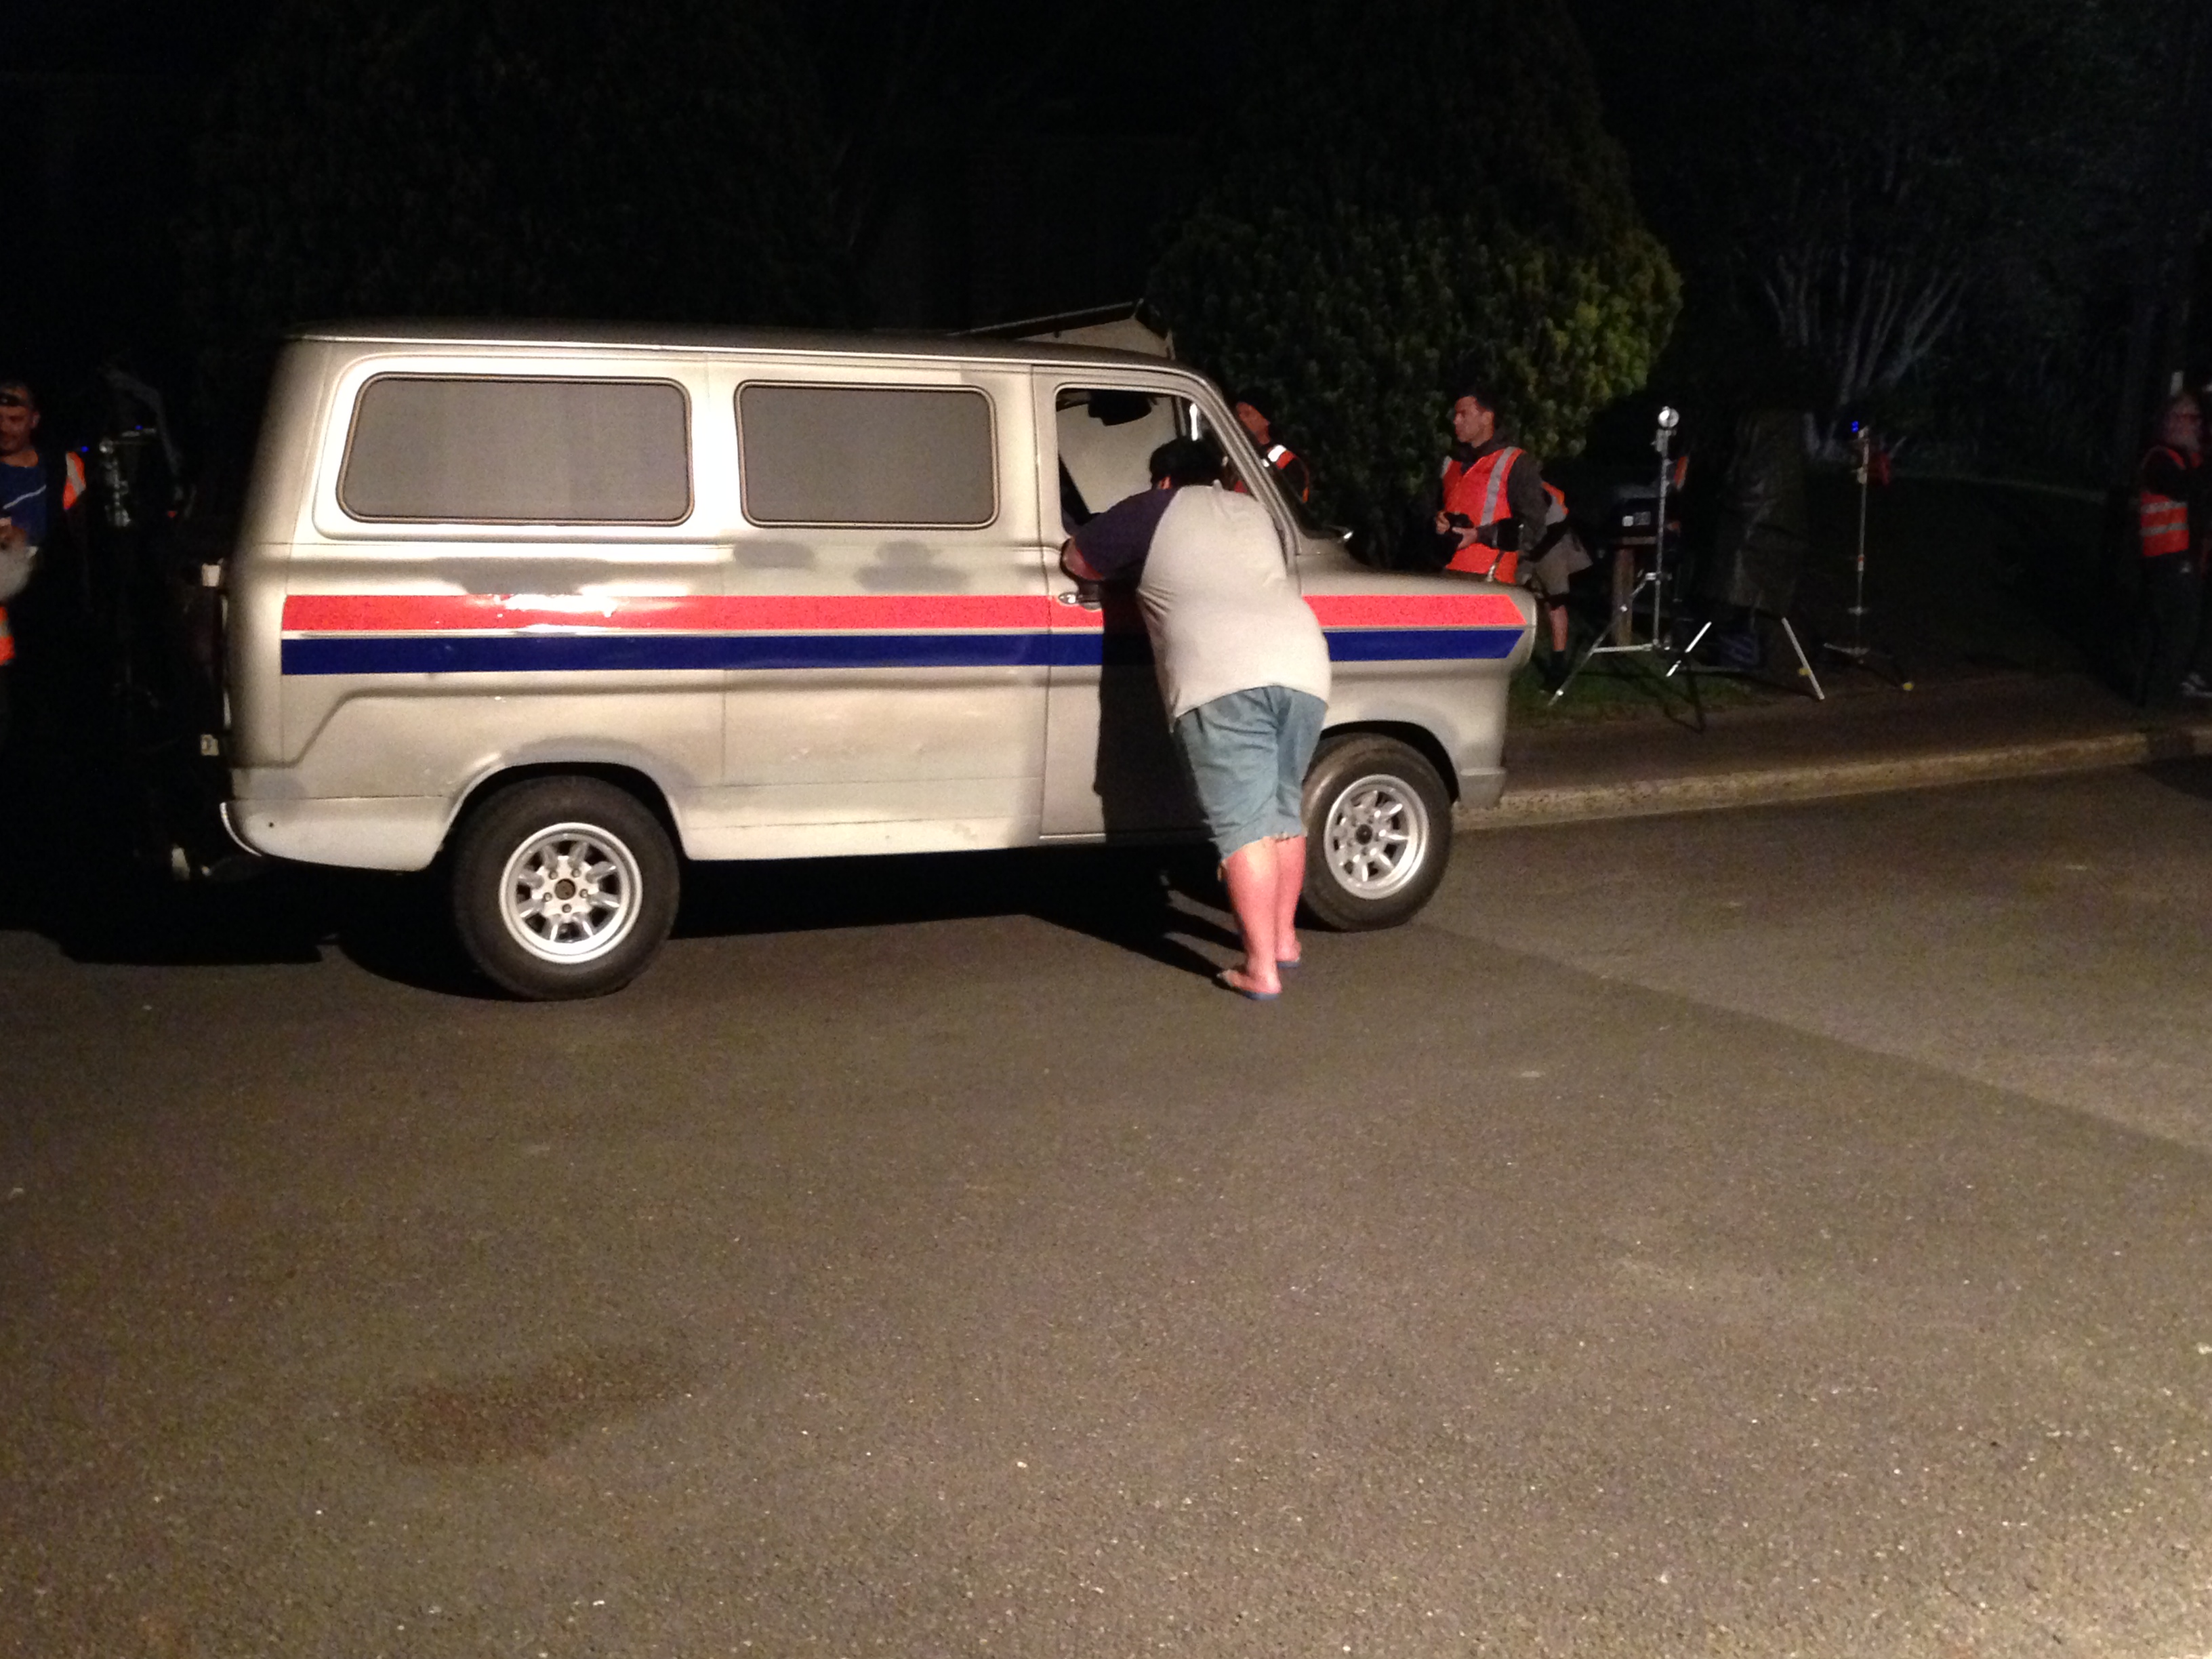
Lots more of the old silver Transit in last nights episode, my white Mk2 also features as the paddy wagon used in the "dawn raids" as well as Jackson's plumbers van which is the armoured cash van. A few pics from the set: http://www.tv3.co.nz/WESTSIDE-Season-1-Ep3/tabid/3692/articleID/114634/MCat/4513/Default.aspx
 4 points
 -
puns like that should be fukn ban worthy fuk omg3 points
-
My first meeting but I'm bringing the V8 E30, look forward to meeting some of you3 points
-
back up to wood pile pull dump tray pin floor it. automatic in-cabin control and everything3 points
-
tonight i got new bars and speedo put on! clubmans and a nice little speedo from modern motorcycle company. the mount on the speedo was not bendable at all (found out the hard way) so i mocked up a little mount for it to go on the left side. still have to tidy it up and get looking a bit nicer. also have a mount the ingnition into the other hole on the fork yoke, or could make a new one that holds both of them instead of two separate mounts. also have to wire up the speedo backlight. the joys of working at an indoor go karting place is that there is always shit lying round to use, and the boss man loves my bike so is always keen to help. really liking how its coming together. next i will cover the seat, a better taillight set up and perhaps a muffler to make myself a little less noticeable.. not that that's always a bad thing2 points
-
bought new shocks. shocks don't fit. story of my life. shocks came from rock auto in the states so will probably be a nightmare to fix its now stranded in the car park, doing its best impression of this edit. the car is on stands, i didnt install the wrong shocks leading to that. the issue can be seen here2 points
-
Maggie will come along for post exam hangs2 points
-
Oh, buggar. Finish the Merc then.2 points
-
i would say jzge at risk of being shunned by the straight pipe crew, my conversion has cost around 3k with 2k of that being w55, bellhousing, clutch, flywheel and x6 manual conversion so if you can source those parts cheap you will be laughing2 points
-
This wee bit here was one of the more difficult things I've had to do during this. It's in the boot on top of the wheel tub sealing against the outer quarter panel. There's one on the other side too. But it firewalls the boot over the tub and will prevent me having to fill all the holes up the c pillar , in the back of this photo and also won't need to seal off the area between the door and wheel tub inside the car so should save a bit of weight.2 points
-
Turbo manifold finished. Made a start on the exhaust. Got a blank plate made for the dizzy, came out quite nice in stainless. 1/4'' stainless tube for turbo oil feed with swagelok fittings. Took so long to get right I will probably have to run the waste gate outlet towards the front then down and back. Well that's the easiest option anyway Discussion: http://oldschool.co....uss-1ggte-ae85/2 points
-
So after 6 years of not owning an oldschool car I thought it was time I did something about that. I decided at the end of last year I'd try to buy a GT6. However, I wanted a Mk2 as I preferred the more 60s styling, the problem being these are stupidly rare. But luckily I managed to be the first to offer money for the one that briefly appeared on Trademe last weekend. I picked it up from Whakatane/Rotorua/Tauranga (its a long story) yesterday. Drive back went well other than the speedo doesn't work and the headlights are dangerously bad for the last two hours in the dark, Its a 1970 and has had quite a lot of money spent on mechanicals recently. It needs the interior redone and theres a small amount of rust in both rear guards and the drivers door. Given I bought it site unseen I was pleasantly surprised. Its reasonably standard though has a few upgrades like brand new Mikuni flatsides, electronic ignition, hotter cam, GAZ adjustable shocks etc. Goes well though it is rather loud at 100ks despite having overdrive. [/url] ] If you look closely in this photo you'll see a piece of wood holding the tailgate up. Its supposed to be held up by a torsion bar by the hinges but like most this isnt working anymore and they're no longer available. So it has gas struts except these are just as broken. It has the factory option rear seat. These are like hens teeth apparently and having now experienced it I can see why noone chose them. Single worst rear seat ever, theres no leg room, no shoulder room let alone head room and you have to climb over the back of the front seats as they dont go forward enough to go around them. Here is the rust in the rear guards. As you can see drivers side is the worst of the two though the passengers is worse than this photo makes it look. Plans are to do not much to it in the short term as my mortgage is looking a bit sick but medium term plans are to continue tidying it up.1 point
-
Long time no post. So I figure I better get back into it. Discussion thread: //oldschool.co.nz/index.php?/topic/48465-sams-lada-2104-wagon/ About a week ago I heard a rumor of a 2104 Wagon that may be for sale up Pigeon Valley, Wakefield. I've feinded after one of these for a long time so after a bit of research I tracked down the owners and secured the car. Here it is the night I picked it up Absolutely filthy dirty. I dont think it had ever been washed. However its got some big pluses. It has only done a genuine 62,000ks, it has never been around the clock. They only used it to go from the valley to Richmond and back weekly. Rarely would it go anywhere else. Although its dirty it is in very good condition inside and out. All the original Manuals are present as well as the original tool kit. So today I gave it a wash with CT18 and started to crack into cleaning the interior.....I hate cleaning dog hair off seats!!!! So this pic shows the only two dents on the car. One by the tail light. the other on the Right rear door. Not bad. Such a sweet interior. I love how the gearstick points away from you as they are designed to be LHD Still has the original tyres on the back. And Russian everywhere! So thats all for now. More to come soon1 point
-
1jz-fse is gross1 point
-
1jz is actually a 1jz-fse which has electronic throttle etc, would probably be a massive headache. Not looking to convert to manual at this point either, unless something really cheap comes up1 point
-
Some weight removal..1 point
-
Move the tank to rear of passenger compartment / boot / wherever you want. Weld in seat brackets to suit. Plumb tank and worry about the passenger seat later?1 point
-
No where the tank is in the pic is about where the body of the passenger will end up. Yes the car has springs out and is sitting on bump stops so should be plenty of clearance. I also should end up with a little bit more caster by the time I have the sway bar in properly so that will increase the clearance further.1 point
-
Is this container rusting hard won personal experience, or internet rumour becoming fact? I ask as I am also in need of 2 year storage for my Mk1 Escort and am a bit precious about her. As a lot can change in 2 years I was thinking for renting a place rather than mates shed. Are the storage places built from containers OK? Generally have roofs over etc that may help?1 point
-
A large Nissan dealership may keep it on display in their showroom for that period of time.1 point
-
pretty sure these are the ones your after in 25mm best to go into bunnings and have a look if you decide to go this route. http://www.bunnings.co.nz/cowdroy-replacement-wheel-arrow-2pk_p005186571 point
-
straight pipe crew, that must have greer in it1 point
-
Yeah, do a quick comp test and put the original engine back in with the new bits maybe. Wont cost you anything but time. If its done 280ks its probably already had a head gasket replaced by now haha.1 point
-
New bolstered seat. Current height, 3 days of ground clearance. But is warranted. Ready to sell And it runs mint. absolutely mint. I think i may have worked out the kinks! Not bad for some one who followed a very vague internet build guide. By vague i mean didn't even have the jet sizes or carb model info. You can spot the rear end of my new diesel too.....1 point
-
Ha-ha well it certainly slides smoothly! I found that I needed to heat the rollers up ever so slightly to pop them onto the nubbin thing on the mechs.1 point
-
Hey man, the eBay runner May or may not fit ive got some you can have if you want to try them as they didnt fit in my ta22 rails... I used a 25mm roller from bunnings. I threw out the packaging for them but I'll call into bunnings tomorrow after work and get a photo of the ones I used, they were $15-16 for a pair. I had to grind off the original roller pin and punch it out then used the existing hole that was left. I got a grinder with a cutting disk and cut a slot in the head of new roller pin so I could get a screw driver in there to lock up the nylock bolt on the back. Here's a pic of one and I'll post up some more pics/info tomorrow Untitled by matt postle, on Flickr Cheers Matt1 point
-
I've got a cramped single garage with a rusty q in it haha, and other stuff parked outside1 point
-
Pretty excited for this keen to see people's setups eat some sweet meat out of the bbq trailer n enjoy some yarns with people I have not met yet !! Win/win much excite1 point
-
Maybe try some museums / private collections and see if they want a sweet old unmolested Datsun in the mix?1 point
-
We could probably fit you into our shed at Matangi (near hamilton). We could shoehorn it in the corner where Yowzer's crown used to live. $17 per week.1 point
-
FUCK OLD SCHOOL IS AWESOME!1 point
-
If you get really pressed and don't mind driving it down south, I could tuck it in the back of my shed for you.1 point
-
Don't container it, unless you line it, or the container will sweat and rust your car to buggery!!! The you store places are $50 a week for a garage I think.1 point
-
it does nothing of any help unfortunately you should be able to tune out most of the jerkiness though. just mess around with the enrich settings. start with the numbers low and keep adding more till it drives better. its only going to work properly if the rest of the tune is good though1 point
-
Ok so it was a bit of an interesting weekend on the car, I had the cert man come round on Saturday to look at the work I had done and make sure it was going to be all good for me to put it back together. The result of that was kind of mixed really, basically he was happy with all the mods that I have done to the body and everything relating to mounting the motor so that was all pretty cool. There are a bunch of things relating to bits that I thought were finished that I am going to have to sort out though so that was a bit disappointing. The worst of it is that the hubs and axles that I had re-drilled to change the stud pattern aren't going to be any good, when they re-pitched the holes they have placed them right beside the old ones instead of going halfway between them so there isn't a lot of metal left between them. This is a bit of a piss off because rather then do it myself or get someone at work to do it I paid to have it done by people who do this sort of thing all the time. It is the same deal with the axles but they are a bit worse as there isn't enough room to space them like that as there are some other holes that get in the way. The other thing is the calliper mount that is welded to the diff has been mig welded instead of tig welded (I should have known that so can't blame anyone else for that one) and where it is welded to the end of the axle is actually a cast end so yeah I pretty much fucked that one up. So what it means now is that I am going to have to re-do the rear brake mounts (might do a bolt on arrangement this time) and figure out a plan for the axles, luckily I have been hoarding parts for a while and have spares..... Oh yeah, I also need to decide whether or not to go for a motorsport authority card as I would need it to run a cage and the harnesses and also to have the race seats in a fixed position rather then on adjustable rails, so I will have to make some enquiries this week and figure out what it is likely to cost So I guess the positive is that there is nothing stopping me from putting it back together so I thought I would get on with it. First job mount the radiator, all I had to do was drill 4 holes and trim a bit of sheet metal back along the top at the front. So out comes the grinder and I rip into it, the first thing I notice is that the metal seems pretty thick, I thought there was only 2 layers at this point but as I grind it back I see 3 and one of them seems pretty thick, then when I go to drill the holes I mark them out and when I go to centre punch the hole a big hunk of bog falls out. So I start stripping it all back and find a bunch of patches placed nicely over the top of rust holes then bogged up to make it look nice. Bugger, so both sides are pretty rotten and patched and it is all going to have to be cut out and fixed, there is some weirdness where the bonnet hinge attaches that I knew I was going to have to deal with at some stage, I just didn't think it was going to be so soon. And here was me thinking that I had run out of things to weld..... Anyway some pics Patch on the LHS Patch on the RHS Patch on the top and the damage and rust on the hinge mount And what needed to be removed At this stage I called it a day, it has been one of those weekends, not sure if it counts as progress as it seems like I have taken a backwards step. Looks like it might be time to put in another leave form......1 point
-
cut some stuff out, shifter bracket, console brackets, rear parcel shelf brace and seat mounts made an arrangement of box section to hopefully keep it straight when its on the rotisserie. it bolts to the seatbelt anchorages, door hinge mount and base of the rear pillar. i might add another one that goes across between the 21 point
-
While I was overseas last year I managed to find the time to do a quick bit of TradeMe browsing. Now I've always been a fan of American vehicles of the 40's, so when this Chevy popped up locally it caught my eye. I tried for a few days to contact the seller so I could send my brother to take a look but every day I received no reply and every day the trucks price dropped. Eventually I decided enough was enough and hit the buy now from my computer on the other side of the world. Almost immediately the owner emailed me and as luck would have it he owned a tow truck, so it delivered to my driveway, beating me home by three weeks. Here's a few pics of what greeted me when I arrived. Call me crazy over here //oldschool.co.nz/index.php?/topic/41876-di0ns-thrifted-thriftmaster/1 point
-
Ban from thread plz1 point
-
Not sure if I posted these wheels up before, but here they are. They're a Dunlop TE, 14x6.5j. Got them quite cheap off Trademe. They have an unsually big center in them for a 14" wheel, almost a like a 15" center with 14" shells, which I quite like because my SSR MK2's have a small center and you cant see any of the brakes behind them. Anyway, decided to widen these too. Here they are with the raw 3.5" shell from Gavin Bateman after drilling a new PCD through the lot. Had the lips and spokes polished, centers painted. Would love to have a full set of these!1 point
-
Finished trans tunnel and firewall: Goddamn the original steel in the floor was shit - kept blowing holes, no matter how low I set the MIG. Hence all the blobs of weld. When welding the new steel together, it was so refreshingly easy! Ah well - ugly but tough as fuck. Just bought a few parts from Ebay so waiting for that shit before I can mount the shifter etc. Gonna re-do engine mounts - make them bushing style mounts off chassis rail a la this:1 point
-
it's a case of who you know, and who you ask 'round these there parts' found a free 12v pump, just gotta remove also sourced 2 x 30mm ewe-rooters. one at 420mm-ish stroke the other 300mm ish stroke. $35 each just need to scab a diverter and control valve and could be in business.1 point
-
I rode one of these across the usa what a pig haha. Have yoy tried it on nz roads yet? The most i could get out of it was 100mph before the panniers tried to fly away and the windvisor started to flex was neat hitting fireflys at night and having glowing guts all over me tho i recall mine had a dodgy headlight and fuel gauge, so maybe electrics are poo on trse edit: hell its for sale and in hamilton. You tempt me too much. Missus wont let me have cruisers tho she only.likes sports bikes haha Tho i wouldnt mind strapping a blower to this and being a nucience around hillcrest again.1 point
-
well i like to see you finish this by years end, and i promise to have my car done as well1 point
-
and whats behind sill number 2?? ah yes rust. chop chop!!1 point
-
This is the cage it's getting.. It won't have 3 back stays though just 2 as the tub is in the way of the bottom 3rd one. And it won't have the brace between the main hoop as I'll be putting a crossmember through there made of sheetmetal to tie 4 link boxes and tunnel to the outer panels just behind b pillar.
1 point


This leaderboard is set to Auckland/GMT+12:00