
Leaderboard


Popular Content
Showing content with the highest reputation on 06/03/15 in all areas
-
Long time no update, ive still been working on the car here and there, lost motivation for a bit while i was waiting on parts, got shit loads of photos so ill have to look through them to find the ones that look like ive achieved something haha.. Anyway tank filler needed sorting, i bought a flexi fuel hose, filler neck and roll over valve from the uk, got here in under a week. then worked out the angles. IMG_2291 by matt postle, on Flickr got a 90 degree stainless bend along with a bit of 6mm stainless plate and cnc'd it to suit the old fuel filler. IMG_2349 by matt postle, on Flickr took the photo before it was bolted down as i still had to drill the hole in the tank for the toll over valve. Also baught some an fittings for the tank, block off caps along with an an10-an6 fitting so i can run braided hose to the fuel pump. The fuel level sender was also reading backwards to it was saying empty when it should have been reading full and vice versa, i switch the wiring between positive and earth but didnt make a difference so in the end i rotated the sender 180 degrees then bend the bit of stainless wire that hold the float and that worked a treat. IMG_2442 by matt postle, on Flickr Next up i noticed that the diff head had bugger all cleance with the tunnel at the back where the rear seat is fitted (about 20mm) so i cut a hole.. IMG_2308 by matt postle, on Flickr IMG_2326 by matt postle, on Flickr IMG_2309 by matt postle, on Flickr then realised i probably would pass cert with a hole where the back seat should be so i bent up a bit of steel, was a bit of a mission as i only had a vice, angle grinder and hammer.. IMG_2330 by matt postle, on Flickr IMG_2335 by matt postle, on Flickr bent it up to fit.. IMG_2359 by matt postle, on Flickr IMG_2357 by matt postle, on Flickr spot welded it into position then borrowed an oxy acetyline torch to warm it up and gammer it around the contours of the existing floor pane/tunnel IMG_2428 by matt postle, on Flickr IMG_2424 by matt postle, on Flickr etch primed and under sealed.. good as new! well nearly, its not pretty but the seat and diff head/drive shaft will hide most of it.. IMG_2450 by matt postle, on Flickr IMG_2443 by matt postle, on Flickr ive also spent alot of time checking out the wiring etc, had to rewire the tail lights from scratch to suit the pre facelift flat tail lights, i also had a real mission trying to find the plug for the reverse lights.. checked all the plugs and wiring under the dash etc, ended up hooking a battery unto the reverse light wiring at the tail lights and tried to trace it with a volt metre, it turned out the plug was in the engine bay hidden right under the brake booster where the engine loom comes out the firewall.. anyway my tail light wiring came up sweet! Reverse lights by matt postle, on Flickr Ill have to upload some more photos and get onto some more updates tomorrow. Cheers Matt //oldschool.co.nz/index.php?/topic/38745-matt-spitfires-ta22-daily-driver-buildresto/page-57 points
-
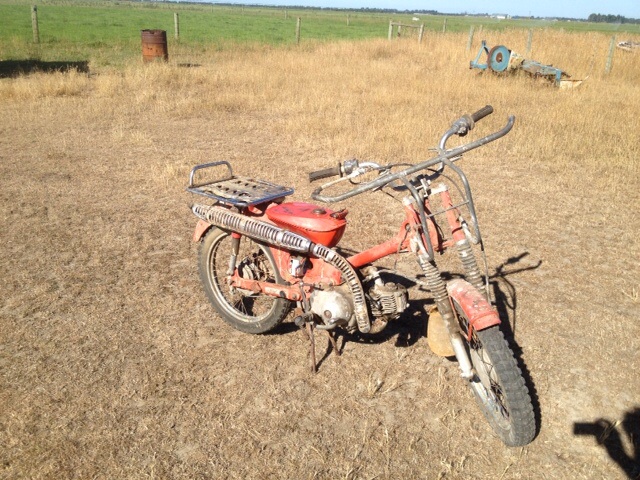
So about 9 years ago I decided to buy this offroader. Me and my mate would spend hours driving it around a paddock track, seeing who could scare each other the most. It has a 1800 boxer motor on a combi 4 speed gearbox. Here are some photos of when I brought it.6 points
-
ok up dates with cambered rear end is in ,this rear end takes 3 litres of lsd oil and weighs 25kilos lighter than the other F series with big axles and bearings with the brakes .have now fitted the dry sump tank ,finished of the rear 1/2 fuel line from the tank to fire wall,.. finished the rear brake lines to the rear end etc have also done the radiatoras well5 points
-
Yesterday the windows went in. All that's left to happen is the roller door, which is going in on Saturday. Then it's all complete and we've just got to wait for signoff to start using it. Unfortunately there a couple of things to get done before that can happen. So we're probably looking at 2 weeks ish. Glass and stuff! Closeup glass and stuff. Also lots of mess.5 points
-
Grant from GT Refinishers asked if I would have my car in his stand for the 4nR nationals, engine was back in and going through the running in process so I figured why not. Turns out the judges deemed it worthy enough to award me the Best Toyota trophy. Here's few photos from the 4 and Rotary Show and Shine With the car back home, and the running in process almost done after a couple open days at Pukekohe, I decided there was a few things I was gonna change before it went for its final tune. Picked up a new steering wheel (obviously doesnt effect the tune but trying to keep a constant timeline happening) to replace the bent 330mm wheel. 330mm always felt a little too small so went with a 350mm dia 90mm offset wheel from Velo so its all matchy matchy with the harnesses. Bought a new G4+ Atom ECU and NZEFI wiring kit/bracket. While there was nothing wrong with the G1 ECU, figured it was time for some new technology and now was the time to do it seeing as I will need to retune the engine since the rebuild. Got a 2.5bar MAP sensor, Bosch IAT sensor and a boost control solenoid also. The NZEFI mounting bracket is a neat bit of kit, Id say its worth paying the extra few dollars to have all the relays and fuses already wired, sensor wires twisted and labeled, makes the installation that much neater and easier. I really wanted to go for a full Mil-Spec loom with all the fancy Autosport connectors and Raychem DR-25 heat shrink, but after pricing up a few of the items, it was going to cost me what I spent on the ECU alone... So went for Mil-Spec "inspired" loom instead, seeing as none of the automotive plugs Id be using for injectors, coils etc arent up to MIL spec anyway. Put an order through Jaycar for a few metres of each size of their heatshrink (seems to be the better stuff without breaking the bank), along with some switches and crimping pliers. Coolant temp sensors, Injectors, TPS, IAT sensor all done, with just the CAS and coil wiring that need to be finished off to complete the engine bay side of things. Also picked up some 1NZFE coils to replace the dated distributor setup. Purchased a bunch of Deutsch connectors for various things, mostly so I didnt have to cut and solder old plugs back on etc, and to make the engine and chassis loom independent of each other, something that always bugged me was not being able to remove a section of wiring without having to remove everything. DT 4 way connector terminated to the CAS and trigger wiring. Also in the picture are the sensor grounds and oil pressure sender which makes the engine side of things complete minus the coil wiring which I was still waiting for connectors to finish. Moving to the interior, it has been looking like a bit of a mess lately with wires going everywhere. Here are a few more of the Deutsch connectors on the chassis side of the engine loom. You can see one of the mating connectors in the background. These have the fuel pump/fan wiring, dash sensors, boost switch, ECU supply etc going through them. Got this neat little switch from Jaycar, illuminates red when switched on. This will be used for activating the boost control solenoid to switch between high and low boost. There was already a switch mounted there so I used that hole rather drill another, I think it was originally for the fuel pump when I first brought the car. Also when I bought the car a few years back now, it had an Isolation switch mounted in the dash like this pretty much. I removed it when I re-routed the power wiring because it wasnt installed properly, so alot of the electrics still worked with it off... Ended up putting it back in, as I can have my main battery wire attached to one side, with the starter, alternator and chassis power wires on the other terminal so it should work as it suppose to, and eliminates the use for a distribution block to feed power where it needs to go. Tidied up the battery wiring a little with some heat shrink instead of the split corrugated tubing. The coil pack plate and distributor blanking cap arrived, spent a few minutes and got those installed. Got all the wiring done for the ECU, but I left it disconnected and started to check through all the chassis wiring making sure all my lights and wipers etc still worked. I did have an issue where the head lights have been intermittent and I have had no dash lights aswell. Started at the headlights working my way back checking all the components, and after several hours of fault finding I had found nothing out of the ordinary and I was only left with the switch on the dash to check. Grabbed the light switch out of my brothers Notchback and plugged it in mine... Sure enough everything worked as it should. So pulled my light switch apart to find some broken solder joints, easy fix with the soldering iron, was pretty stoked to have all that working again! Started running the G4+ Atom through the configuration. The ECU has a feature to test all your circuits to make sure they work before the first start up, so went through that and seems my wiring was spot on as the fuel pump, fan, injectors, coil packs, boost solenoid etc all works perfectly. So with the new ECU all wired up and working, but still yet to start the engine, there was a couple more things I decided I could do before the tune... My brother had decided he would turbo his Notchback Levin, I figured he could have my old turbo manifold and Ill fabricate a new one for myself. As usual, started to take some pictures at the beginning, got involved and forgot to take any more. Here is the start of the merge collector after the first cut on each tube. After that, I tacked a pair of the tubes together as above, and made another cut, then tacked the pairs together to form the merge collector. This one has a nice shallow angle for a smooth merge into the turbo. Several hours later I had 3 runners tacked up, all equal length, with just cylinder 1 to finish. Looking back at this now, I should have had the runners enter the collector in firing order, but it was going to be a little more difficult having to overlap runners and still clear everything, and I really liked the almost symetrical look. Anybody done any back to back testing with merge collectors to see if entering the collector in firing order matters or not? Anyway, I've positioned the turbo in a better place with this manifold. I originally made the first manifold for the T25 turbo, but with the T28 being a little bit bigger it ended up sitting up higher and closer to the strut tower than I wanted, so I have dropped it down about 45mm, moved it forwards and away from the strut tower 20mm. Finished off tacking up the last runner, machined up a new flange as that one on the manifold I basically just use for setting up so I can tack and cut as I need to without worrying about cutting into the flange with the grinder etc. Same deal as the last one with the 30 to 35mm port taper and a 1mm recess which makes locating the runners concentric with the ports a lot easier. Added a 2 braces between the runners and collector, aswell as the wastegate port and flange and then finished in the same high temp flat black Dulux paint. Seems to be the best paint out of all the VHT and other "high temp" paints I have used. Got the turbo bolted on with new studs and lock nuts, but something I had been fearing for a while had finally become a reality... There are 3 bolts and 2 studs which seal the exhaust manifold to the head, and since Ive owned the car, 2 of the holes/threads in the head have been a little iffy and Ive always taken extra care to do them up. When bolting this new manifold up, they've finally given up and wiped the thread out completely, which was gut wrenching. Purchased a Helicoil kit from Trade Tools, they're not cheap as I found out, but everything worked out perfectly in the end. Was pretty stoked! With the manifold and turbo now bolted up for good, I made the wastegate pipe. Ended up being pretty funky! Fabbed up a new down pipe, pretty much the same as the old one which my brother is going to be using, just a few different bojangles as I cut and rewelded a section of the down pipe to make room for the wastegate pipe. Machined up an o2 bung, welded it onto the bottom of the down pipe, and said cut and welded section. That basically wraps up the exhaust side of things, just need to make a few changes to the intercooler piping on the turbo side.4 points
-
Think ill just run the Renthal bars that it came with, There abit stuffed tho, so have been looking for a replacement bar. They'll let the bike down I reckon, But I do like the bar itself, shape and size, maybe abit narrower4 points
-
Haha, I cocked that one up. I must have read the calendar wrong. Date is now confirmed as the 11th of July4 points
-
Duel? The dialog and plot is so deep...3 points
-
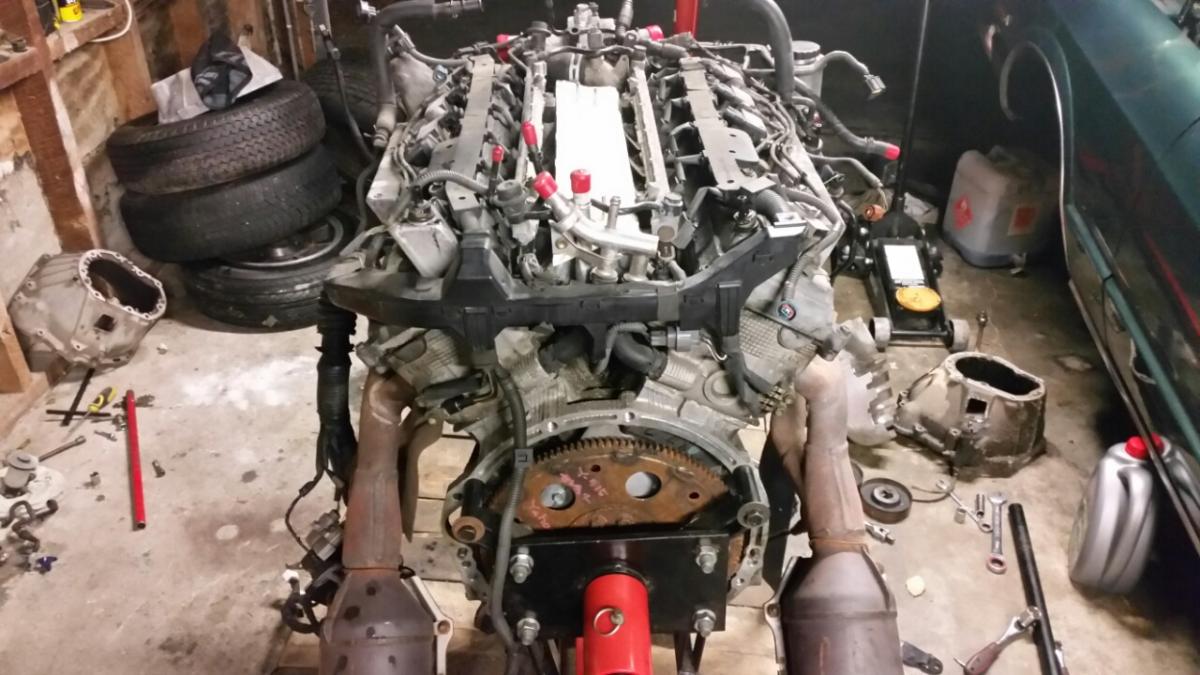
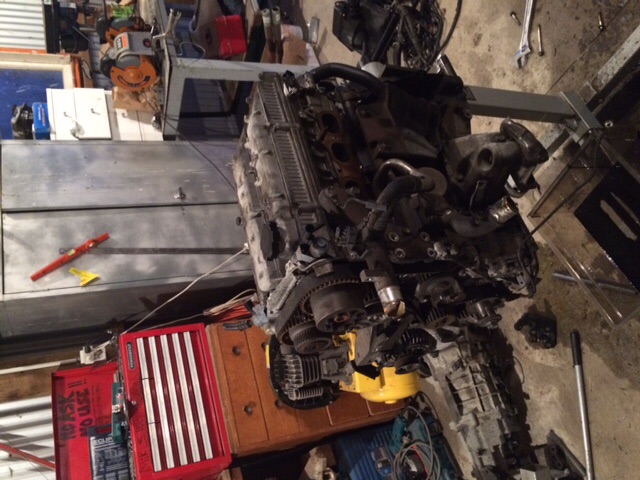
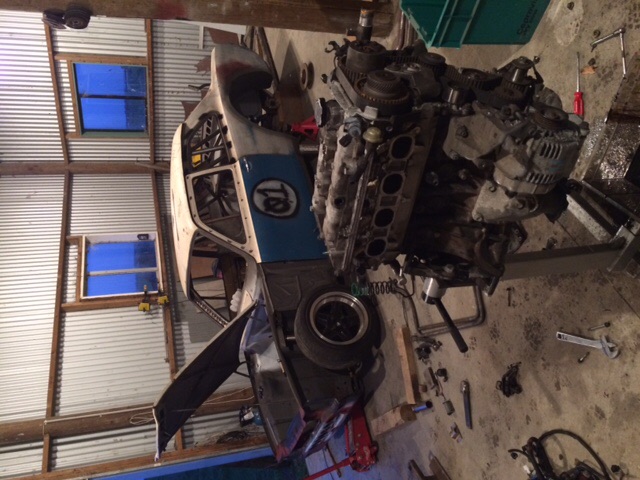
Started pulling the intake and a few other bit off last night. Starting to look a bit better now. Nice size engine once the layers are pulled back. Also in the process of mateing a 1JZ belhousing as its a very close fit. If it does Ill get a JZ to W55 bellhousing and run a W55. Not ideal gearbox but it will do. I have 2 in the shed and will be easier to fit in the tunnel. Next step is to pull the M series out of the sedan and sit her in place. If it fits with the stock intake ill look at leaving it stock, but if not ill have to look into building the custom intake. Looking forward to it.
 3 points
 -
I think this car was a single seater and was converted to a double as it is very snug. There were two bars on either side of roll cage that you would bang you head on. Had them moved out about 100mm at one end,made a big difference. Also found some adjustable shocks at the recycle centre one day ($5 for both) , front now has hard and soft with the flick of a switch. Spent a lot of weekends with friends and the kids testing it out. Made an old high chair with foam around it so my girls could go in it. This is the only car of mine I let my sister drive. Then I joint the offroader club and started going on there practice drives in the forest. AWESOME FUN !!!!2 points
-
Oh man, that smurf jizz made my poopy old w55 run so smooth.2 points
-
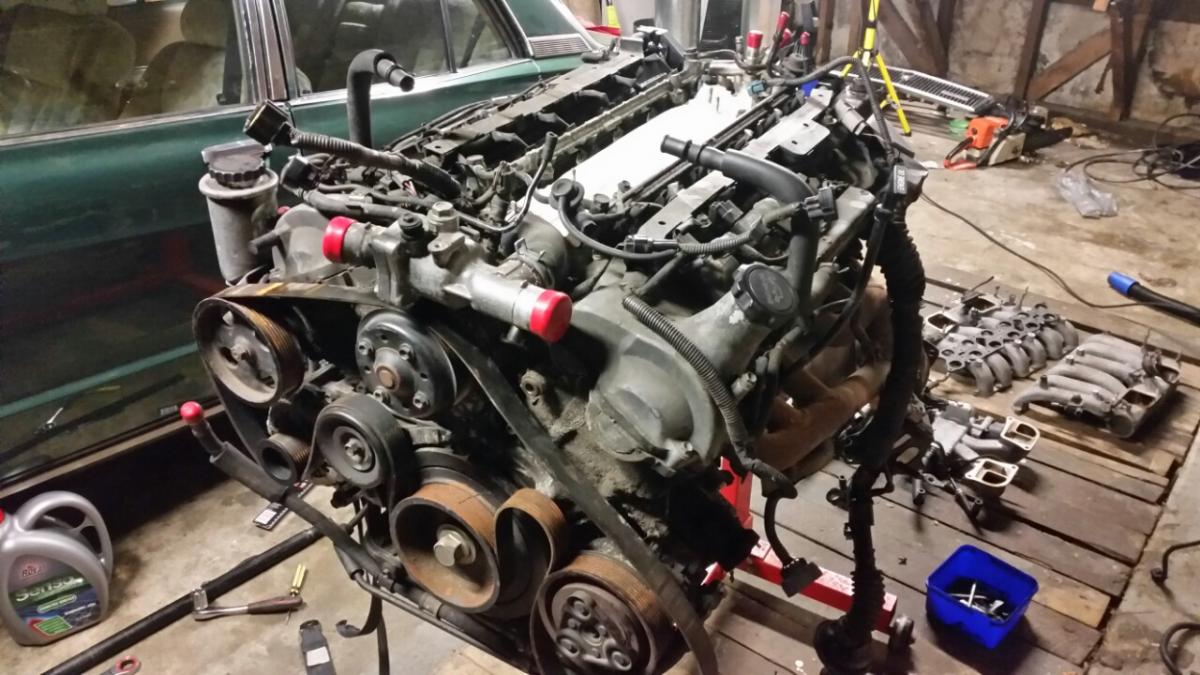
Started taking all the unneeded bit off the new engine.
2 points
-
Got all the panels back on . Just need to paint bootlid hinges before putting that on . Will muck around with the dash n try get that in this week n try run a new cable from starter motor to ignition / switch . Also need to finish accelerator set up n bleed brakes . Put radiator in so I can go for a drive up the road Anyhow after a good garage clean this is how it sitz. Pics of everything ! Until next time... Thanks for looking2 points
-
More progress, I have repaired the rusted out corner, I ended up taking out a bit more steel to find something solid and there were 3 different sections that meet in that corner and all 3 were pretty much done so it took a bit longer to fix but it is all sorted now. Then it was on to sorting the gearbox mounts, I think I may have mentioned previously that I am using the Anglia gearbox mount which almost bolted straight up to the rx7 gearbox, the hole centers were only a few mm out so I slotted the holes in the mount and it bolted straight on, then when I was setting up the position of the motor and gearbox I found that I could use 2 of the 4 mount holes so to do the other 2 I Cut a section out of the floor so I could get down into the chassis rails and then made up some mounts that were the same as the existing Anglia ones I just need to weld some nuts to them and then I can put them inside the chassis rails and weld the floor section back in. I also started modifying the handbrake mount to allow it to sit 150mm further back, I have to trim it to fit the tunnel as the area it sits now is a bit narrower then where it was sitting. The good news is that I am almost done with the little bits and pieces now so I will soon be able to start putting it all back together.2 points
-
My engine exploded! IMG_40302 points
-
I had to notch the radiator support panel slightly to get some clearance between the radiator and underside of the bonnet. IMG_2044 by postlematt, on Flickr fitted the NOS celica badge to the rear filler panel and blacked it out along with the tail light sarrounds. IMG_2034 by postlematt, on Flickr IMG_2039 by postlematt, on Flickr also resprayed the under seal and primed the engine bay. IMG_2068 by postlematt, on Flickr figured i do a test spray with the new paint. IMG_2073 by postlematt, on Flickr dont think it turned out too bad at all, exactly the colour i was hoping for! IMG_2092 by postlematt, on Flickr2 points
-
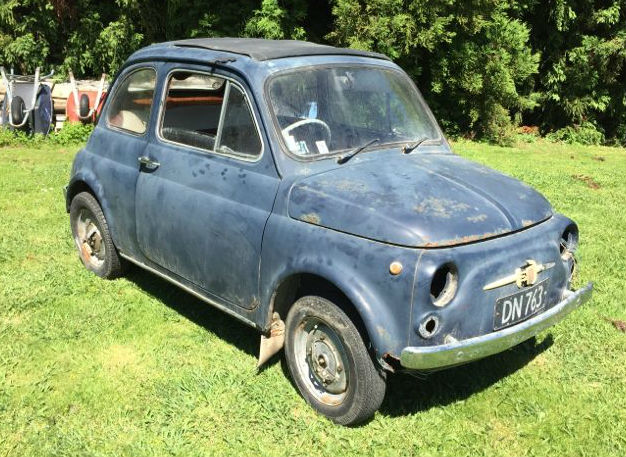
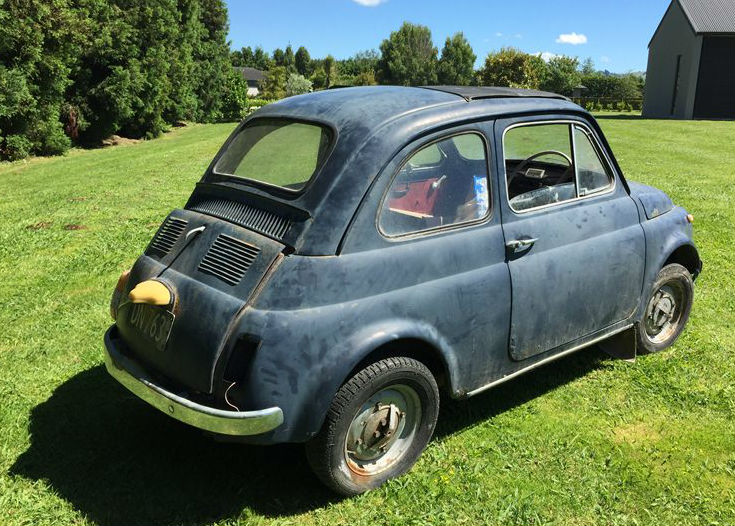
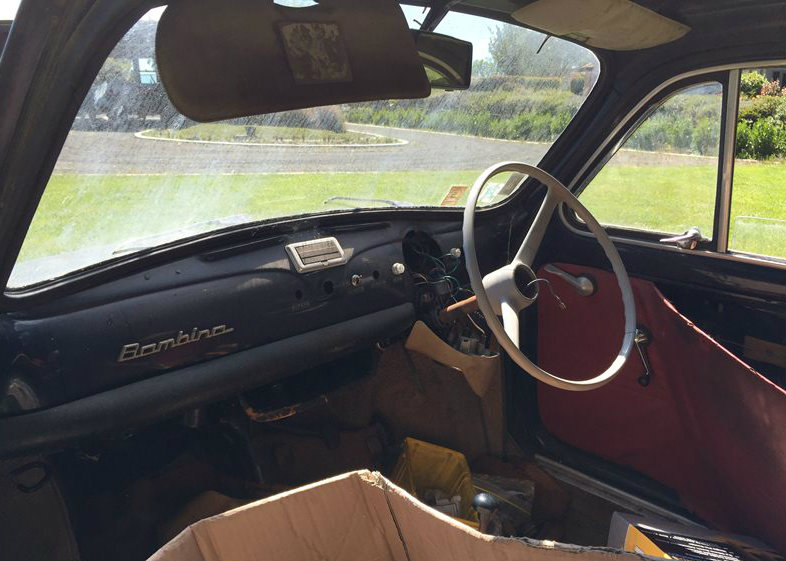
So I sold my other Italian pile of more modern rust got this much older thing! The only problem is, it is in Cambridge and I am in Canterbury so it may me a case of FSR Discussion thread here //oldschool.co.nz/index.php?/topic/46209-mo999s-1966-fiat-500f-discussion/ What have I done?!
1 point
-
So after coming back from Canada i decided i need a vehicle to go up the mountain snowboarding and summertime road tripping/camping.so i hunted down a bj61 from my home town.its a Japanese import and was used over there as a tsunami warning truck with a large air compressor in the boot and a siren mounted to the roof,when it arrived in nz all the gear was sadly removed,and a lady bought the truck to use for towing horses round,she had owned this for 25 years,allways garaged and was well maintained,aparnlty has never been four wheeling.So now i use it currently as a daily,fixing up all the little bits it needs.i have found a small rust hole in the rear quarter panel and it has rusty rear chassis so that will need some attention.The plan in summer is just to fold the rear seats down and make up a false floor with a bed and tour round.some specs factory A/C power steer rear heater retro Mitsubishi car air conditioning roof mounted sunvisor monsoon shields 235,000kms as always im after parts if anyone knows of trucks laying around. cheers1 point
-
this is my new bus .its had a full respray inside and out .slowly staring to put bits back in1 point
-
brought this today... been off the road since 2007... sanded it back and etch primed it. chucked some spare doors on it, will bolt them up tomorrow. also, i drove it off the truck and the rego is on hold... spent about 2 hours on it so far, more progress tomorrow if the rain stays away.1 point
-
Got the rest of the bottom plate off the heater channel. some funking looking whiteish decay in there. small batch on the rear of the sill, was all pin holed. Larger patch up front. I think I've got making those little dents down now. And next on the list. this fucking mess!1 point
-
Man, I haven't seen Good Bye Pork Pie in ages.1 point
-
Use a roller to get a more uniform cover?1 point
-
nice! so subaru leone/early legacy watercooled engine? cute sister1 point
-
CLEAN FILL WANTED MUST DELIVER NO TIME WASTERS1 point
-
Fucking radical! GO GO SIGNOFF!1 point
-
Not really looking at the NA/NB stuff. Purely looking at the NC 5 speed 'box for feasibility to match the Duratec. Failing this I'll just wait it out for a Sierra box to match with the Zetec I have in the garage.1 point
-
7 at burger fuel?1 point
-
So after a day of diagnosing, we've worked out it has weak as piss spark and is in need of a little bit of tlc so I'll do all the electrical bits and pieces involved with the ignition and see where we go from there, I'm extremely lucky my brother in law is an auto sparky I'd hate to have to actually pay someone for their time with this, thanks for the input lads I'll keep you posted as to how I get on1 point
-
ok its up. see you guys at the Valley inn on the 21st1 point
-
No hidden message there man, joking! ie. you will have so much space with a tidy shed that something should be done with it1 point
-
will attend if its on the 11th. my shed is not suitable due to access for a bunch of cars would be a problem, and theres not much to see anyway.1 point
-
I probably should get better at updating this, it's been nearly two years. 20150502_160641 Currently this is how it looks, but it's soon gonna change again. It's geting new flares, a front air dam, and possibly rear ducktail spoiler 20141016_120907 20141016_122152 Been about a year since I painted it, pretty much got a bare bog respray. IMG_20140421_1605561 point
-
Check if you're getting a good spark at any of the leads. Check if you have fuel in the glass fuel filter on side of block with dizzy on it. Check your points, condenser and timing. Will be something simple. Trumps will only stop running if the put a conrod through the block. Hah.1 point
-
Hahaha this is something i would do to you and after me moving your car and fucking with you. I wouldn't expect any less from you haha. I payed 50 for my window but they were after 100 each side for the rear windows which I didn't see worth that much. But if your after a part you usually pay what your after for it. I will be back to buy more stuff of them as no one else really has the parts.1 point
-
4age powered god winch1 point
-
Another drawing, I like this one better as it's a lot cleaner. Made from 20mm aluminium or stainless tube to allow all cables to be placed inside it with a 100mm aluminium/stainless tube for fuel and pump housing. Yet to decide where to mount electronics and the mini propane tank Concept is that the sub frame has rubber lined guides that fit over the existing frame and the whole thing clamps onto the 25mm adjustable seat stalk, so it shouldn't take more than a minute to remove, aiming for the "strap on a jetpack" design. In theory, the tank should give me about 8 minutes at full noise, 10-15 minutes at 2/3.1 point
-
This ^ 1)Fabricate manifold 2)Install aftermarket ecu, 3)Tune in tps vs rpm If you can all 3 of above, sweet. But if you have to start paying someone to do stuff, it will get pretty expensive for what you get out of it. other than the 3 points above, the rest isn't much drama.1 point
-
IM BASICALLY SHEEPERS1 point
-
Update for next weekends coming run to takaka is .. we parking up out the back of wholemeal cafe. Lunch there. Then a possible run out to a local museum or out to Bainham store. This is to be confirmed. For me next Saturday will be all about driving the hill and food at that cafe which never ever let's me down. Anything else is a bonus.1 point
-
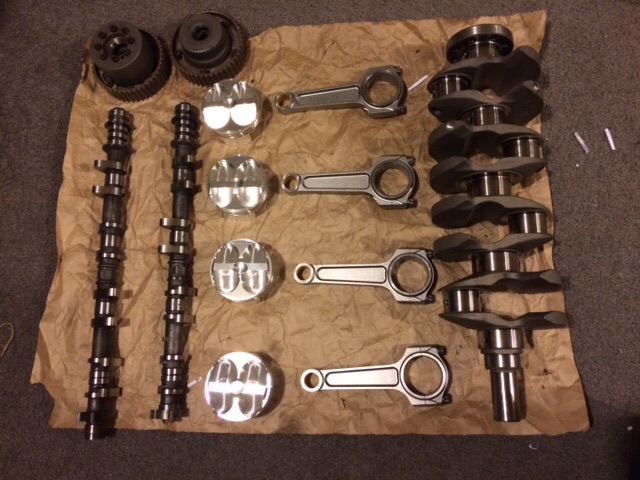
So a few posts back I made a comment about the engine sounding a bit noisy. So after pulling it down this is what we found. All four top shells on the rod bearings were like that. Not incredibly worn, but enough to open up the clearances and make some noise. So the rebuild began, I let the guys at GER take care of that for me. We went with .5mm O/S 4AGZE pistons, MRP forged H-Beam rods, ACL Race main and big end bearings, ARP main, head and rod bolts, 1mm MLS Toda head gasket and Toda valve springs, tidied up the intake and exhaust ports a little. I hopefully have a fairly solid and reliable engine now On to the head work I did. Didnt go crazy with it, basically cleaned up the factory casting/machining misalignment and flaws. Before: You can see the misalignment between the casting for the actual port and where the valve seat/guide have been machined here on the intake port, probably about a 1.5mm step you can see there. Exhaust ports were a lot better, apart from the port floor radius into the valve seat being very sharp, almost a bottle neck. Little bit hard to see due to the carbon residue and angle Also noticed after poking around the head and having a bit of a look, that there were a lot of burrs and casting flaws around the valve train area, and majority of them would fall off if you gave them a scratch with your finger nail leaving small pieces of metal to fall back into the sump. So I deburred the lot, didnt want to run the risk of that happening. Intake and exhaust port bowls done, as well as removing the shroud around the valve seats in the combustion chamber. Only did the valve bowl area for the intake and left the rest of the port as is. Exhaust port I polished as much as I could, although couldnt quite get in around the valve guide. The guys at GER had the block and head ready to pick up. ARP head studs in, Toda 1 MLS head gasket Was messing around with valve cover colours1 point
-
It's been a while. Haven't done much to the car. But.. I did this..
1 point
-
The NA and NB boxes have a good pad on the back you can use to mount off. I have a NA motor, box, cut loom, and mega squirt here If you're interested in making a deal. The project I brought it for has had it's chance.1 point
-
All back together, did a skid, skid felt good, job done1 point
-
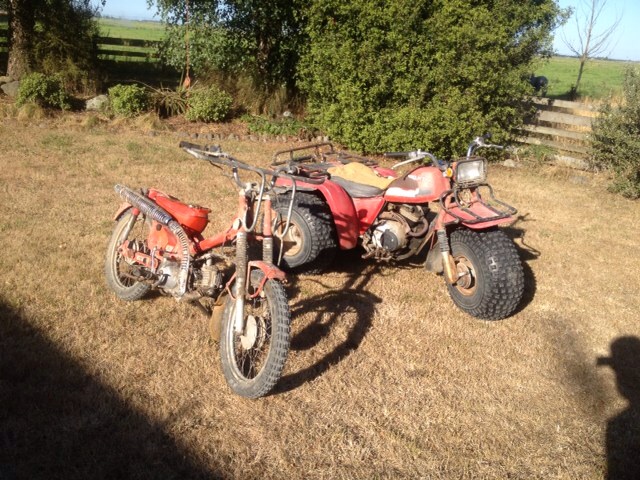
About 15 years ago I bought this for $100. Then the gbox crapped out so I pulled the engine and box out and got it repaired but when i put it back together I couldn't remember how the wiring was supposed to go so couldn't get it running. Fast forward to yesterday. Dragged it out of the shed to see if I'm less of a muppet than I was back then. Found a wiring diagram online and sorted the wires out. Chucked in a new battery and some gas and she fired up straight away. Got some tape out to repair the seat. And removed the jungle gym off the front. Parked up next to my $50 3 wheeler.
1 point
-
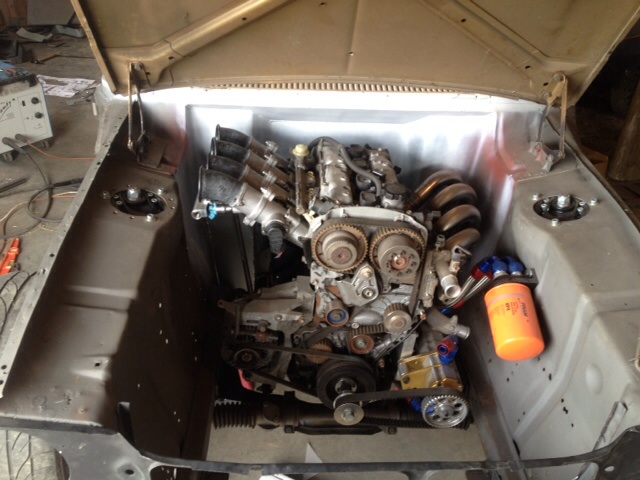
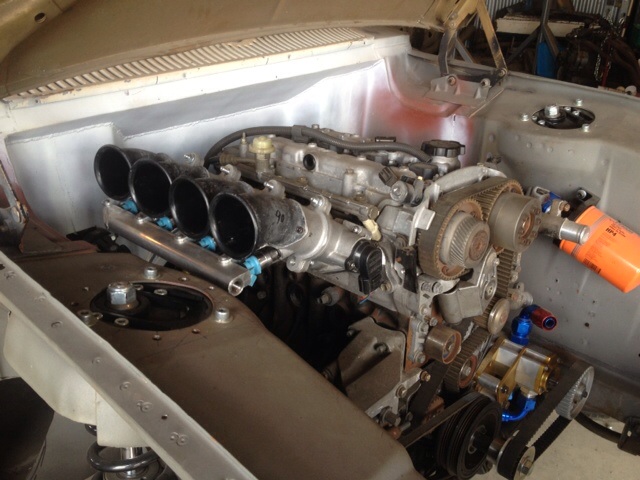
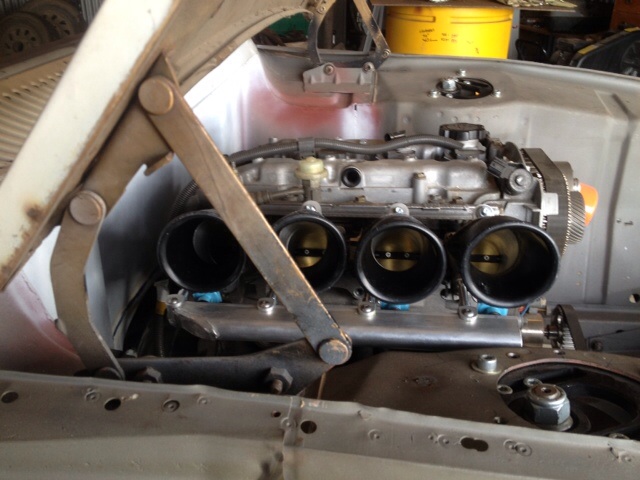
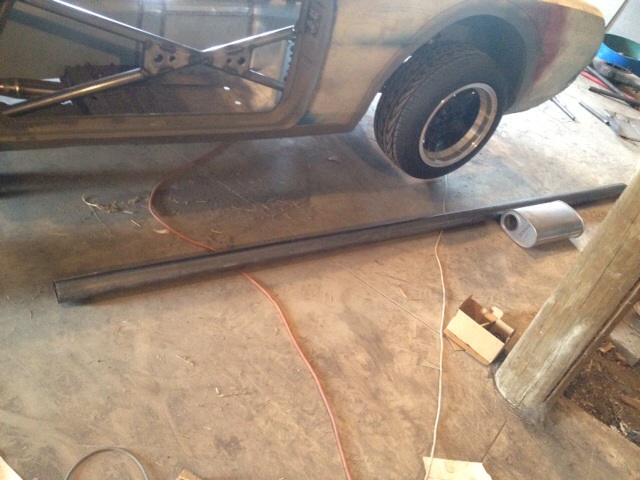
I am very excite. Airbox doesn't fit unfortunately but you win some, you lose some. Will sort that another day. For now, while stationary.. Open trumpets. It's all Glenn's stuff.. Manifold, 50mm throttles, 2 stage, ram tubes and 1000cc sards for outboard injection. Real pleased with them, good shit. Then I went and bought some exhaust stuff. 3" tube with glass pack offset-centre muffler. I will be chopping the floor and adding a tunnel to keep the exhaust above the chassis rail. This means I should be able to run a straight pipe under the diff into the muffler then out the back. We'll see when I get it under there, hopefully get it in with no turns.
1 point
-
Tonight I got most of the fidly interior bits sussed back on. Rubbers, handles etc. Tomorrow night Im hoping to get the bumpers an lights ect on and reall see what this bad boy is going to look like. Until then here is the guard with a 1200 sand and quick polish.1 point
-
1 point
-
Found my solution half the price of the moss kit. about 170 bucks landed in nz doubt i could be assed making it for that money http://www.goodparts...p?categoryID=13 Uploaded with ImageShack.us1 point
-
Air shocks work well. I have had them on all my trumps. You can't do much to alter the camber, like spacing out the outer mounts to body etc, without starting to induce a shift to positive camber when the car rails through a bend at high speed.... Itll then get very loose.1 point


.thumb.png.46e518f714cdc319554c389f990e75a4.png)


This leaderboard is set to Auckland/GMT+12:00