
Leaderboard


Popular Content
Showing content with the highest reputation on 04/20/24 in all areas
-
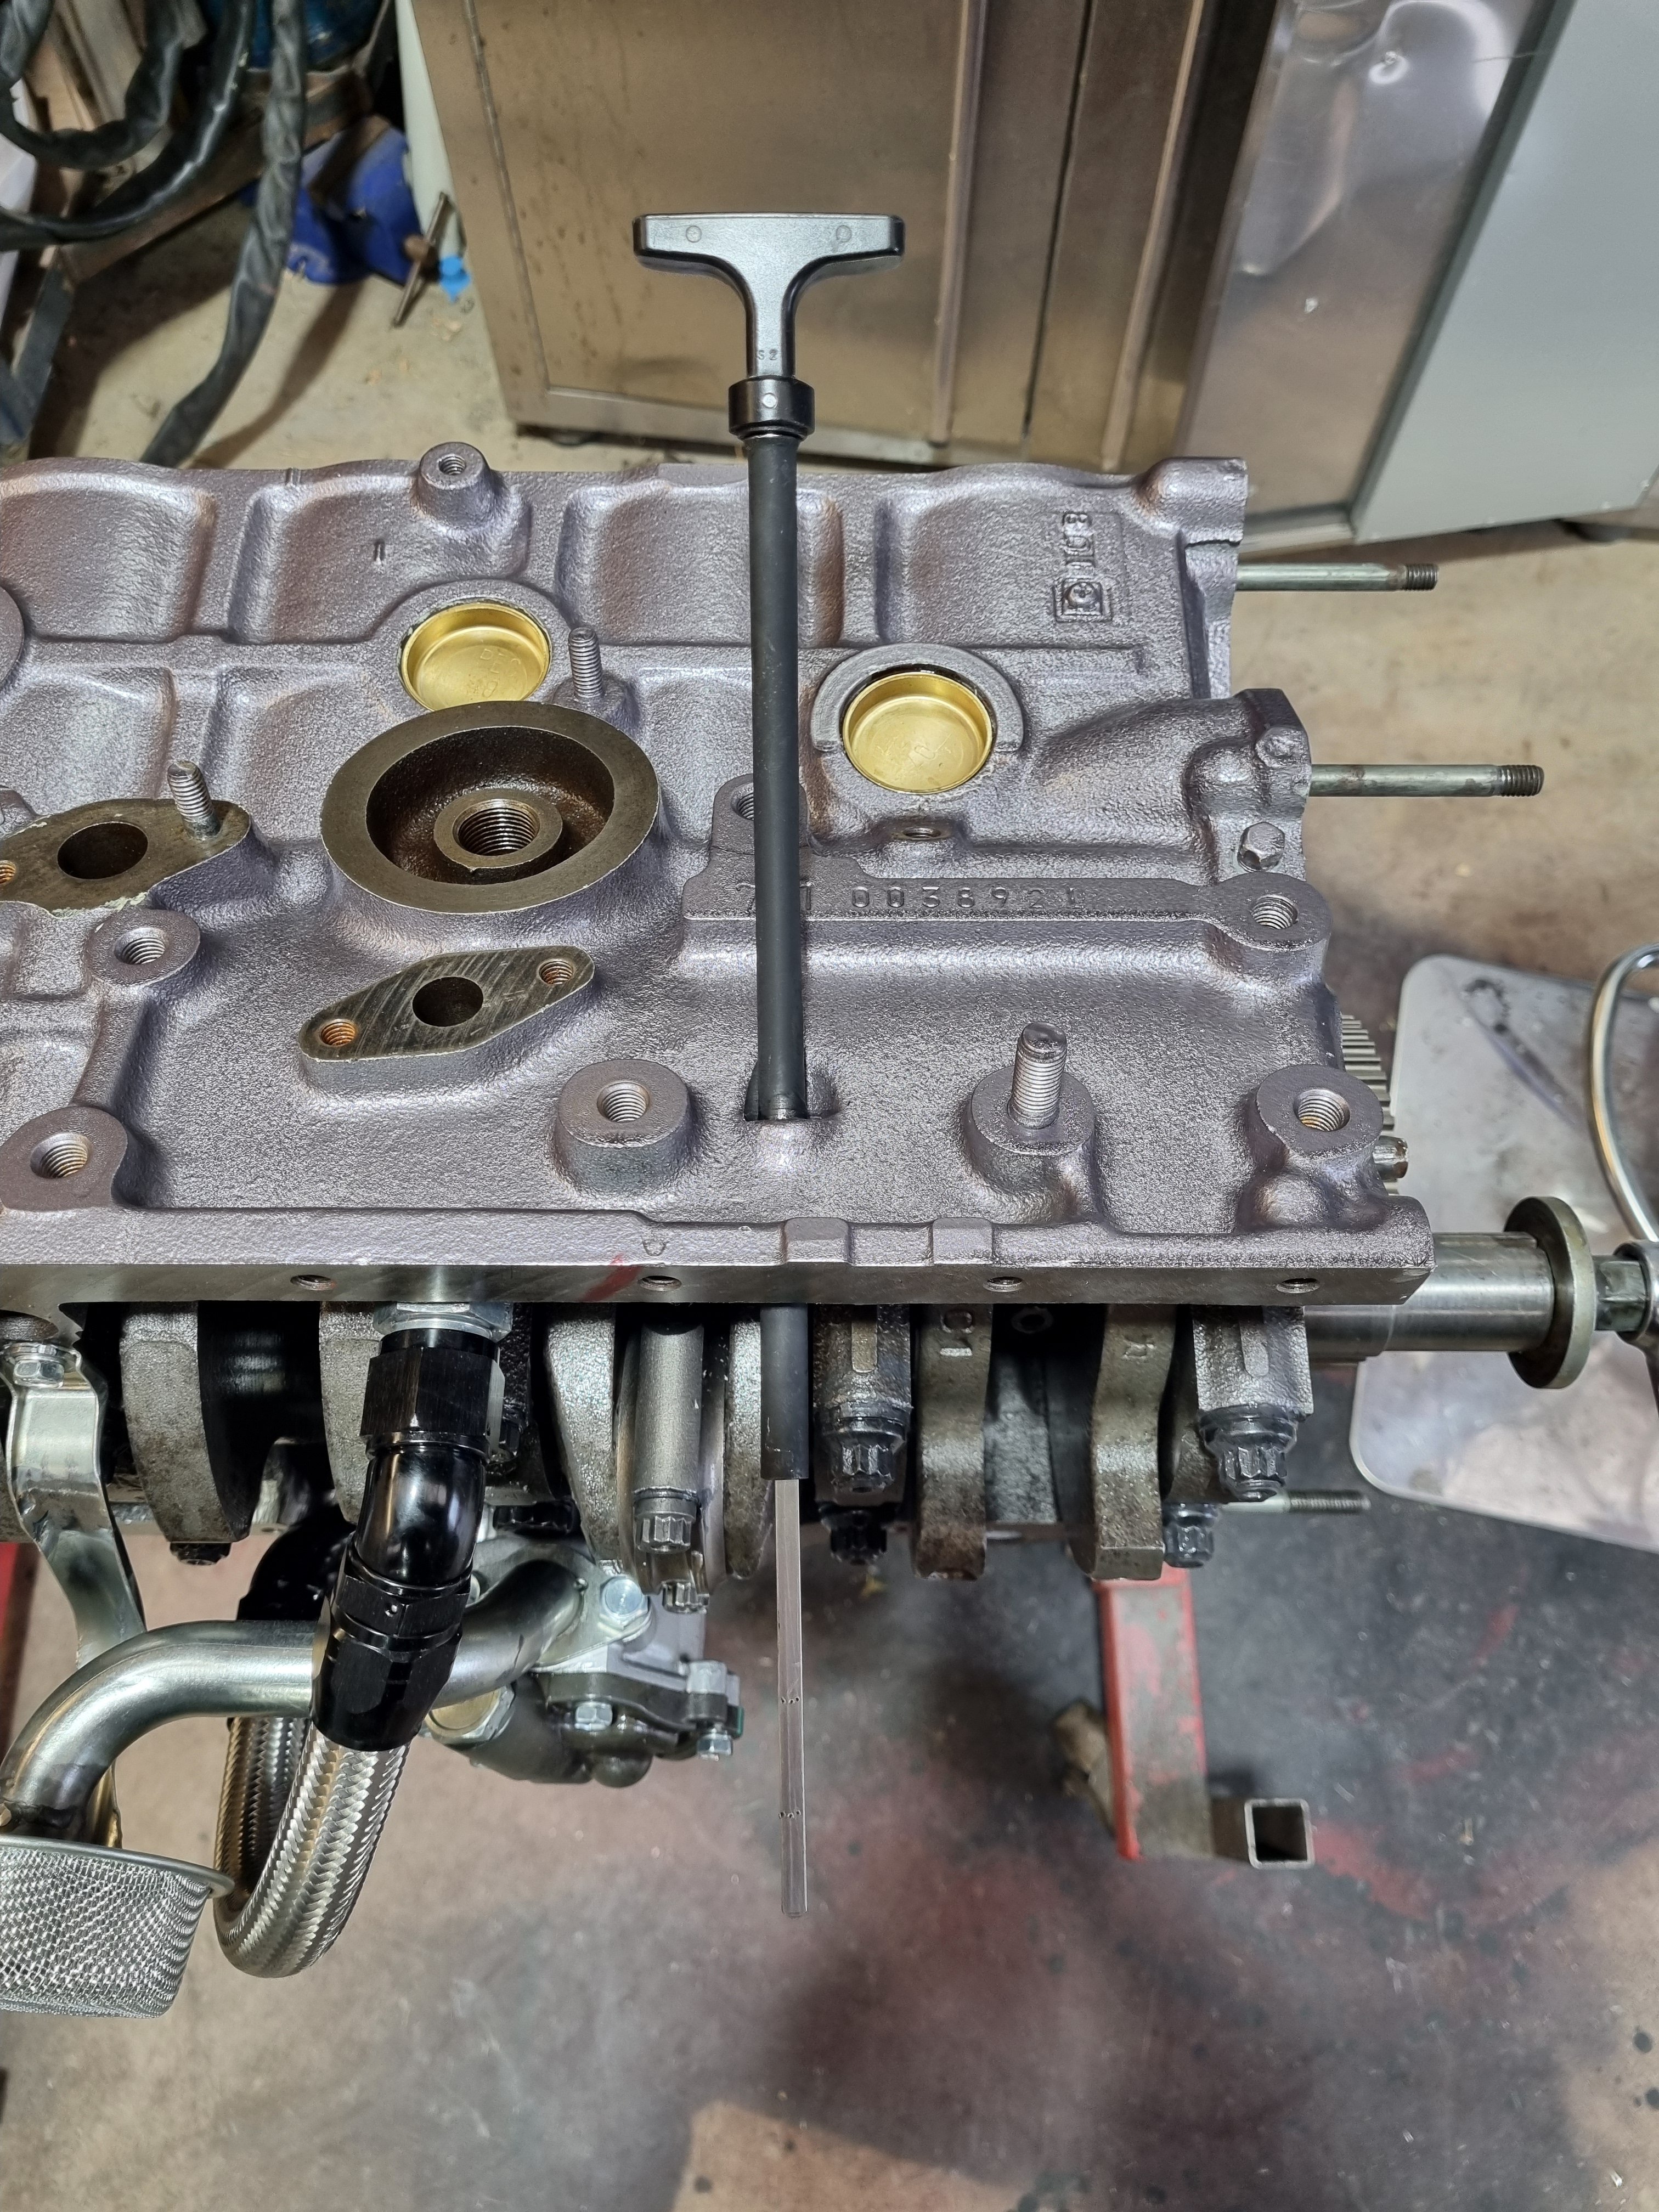
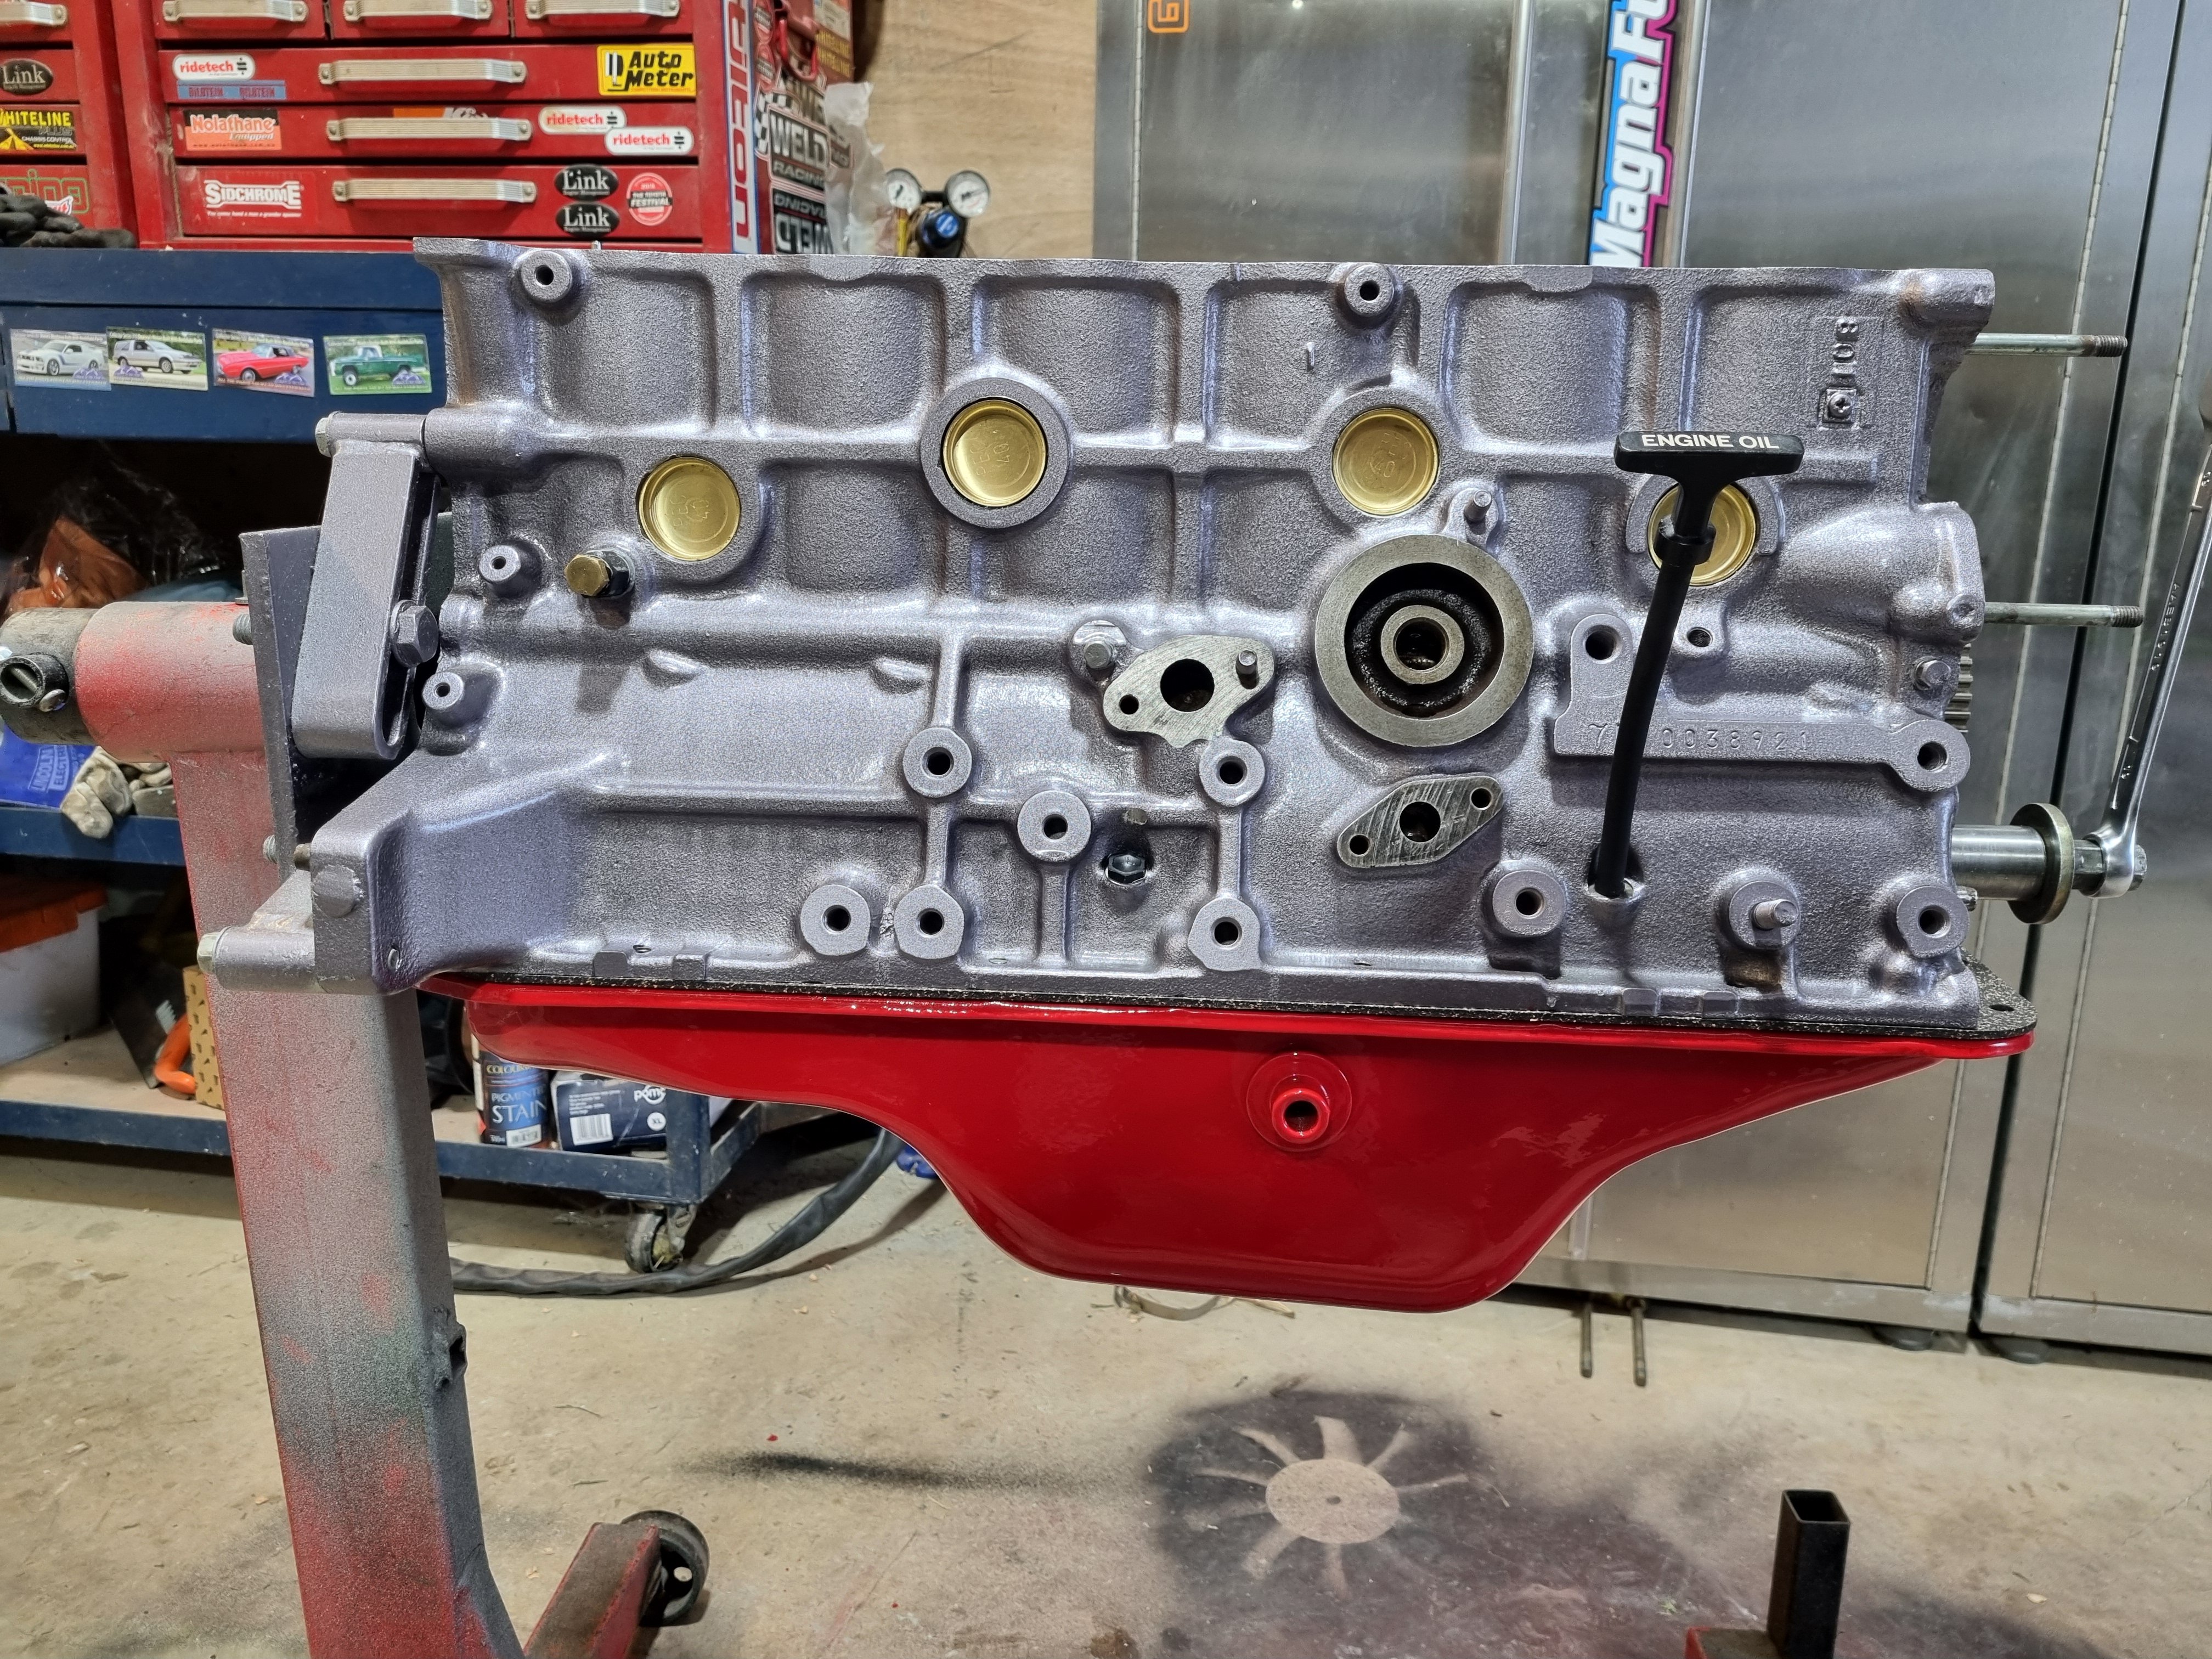
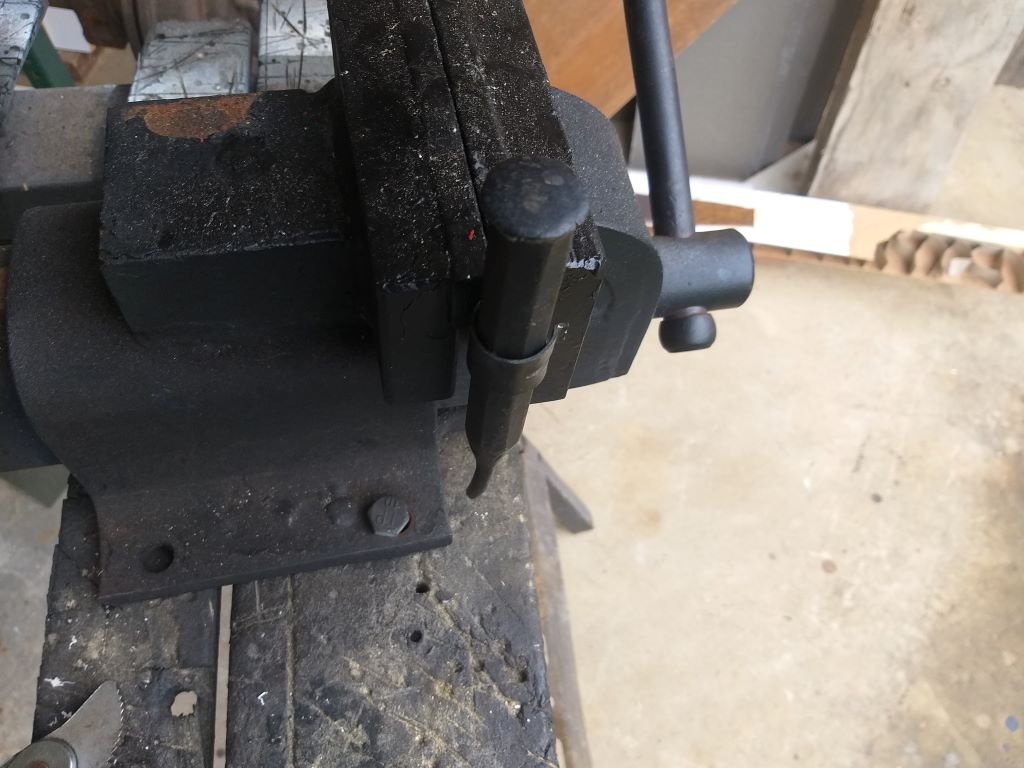
Dipstick. I didn't have one with the engine parts and I had to move the location. The 7M Dipstick location is right where the 4M engine mount goes so I had to drill another hole in the block. No drama the boss is cast into the block, just had to drill it. Then I set about modifying a jz Dipstick tube to work. I drilled the hole to big for the jz tube so I had to weld it to build it up then machine it to size. I fluked the size and got it perfect, its a good tap in fit. I cut the stick to length and used the 4m in the crown to get the oil level marks right. Then I put the sump on, probably not for the final time but it's on.
 15 points
 -
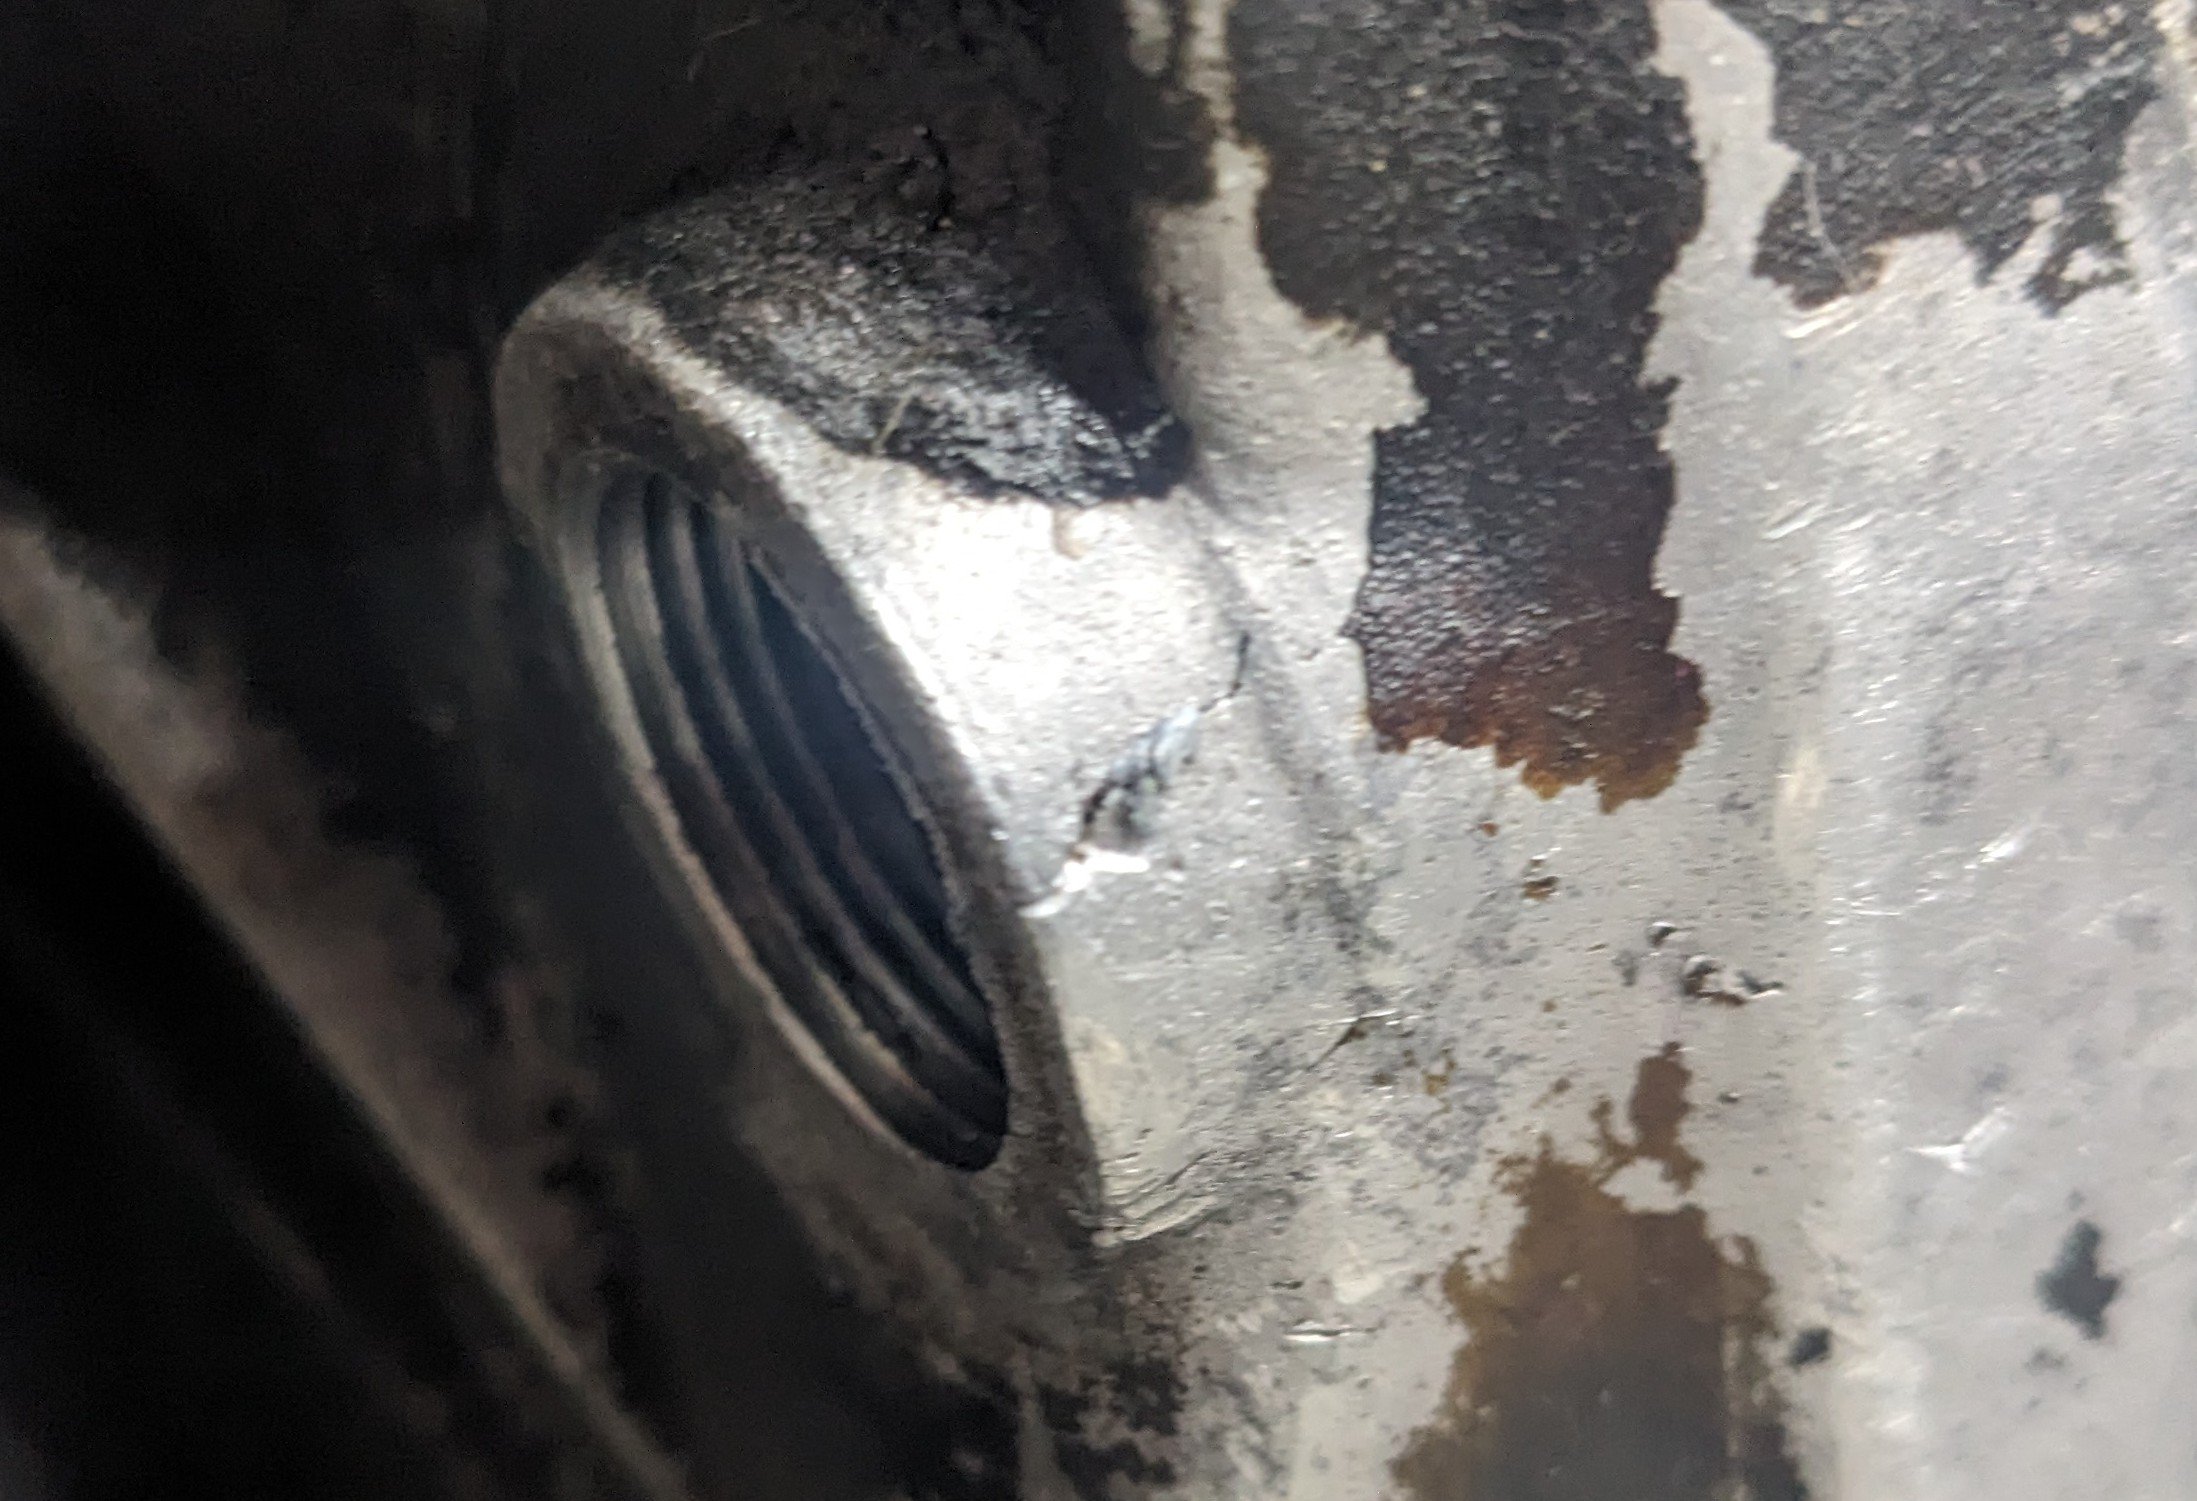
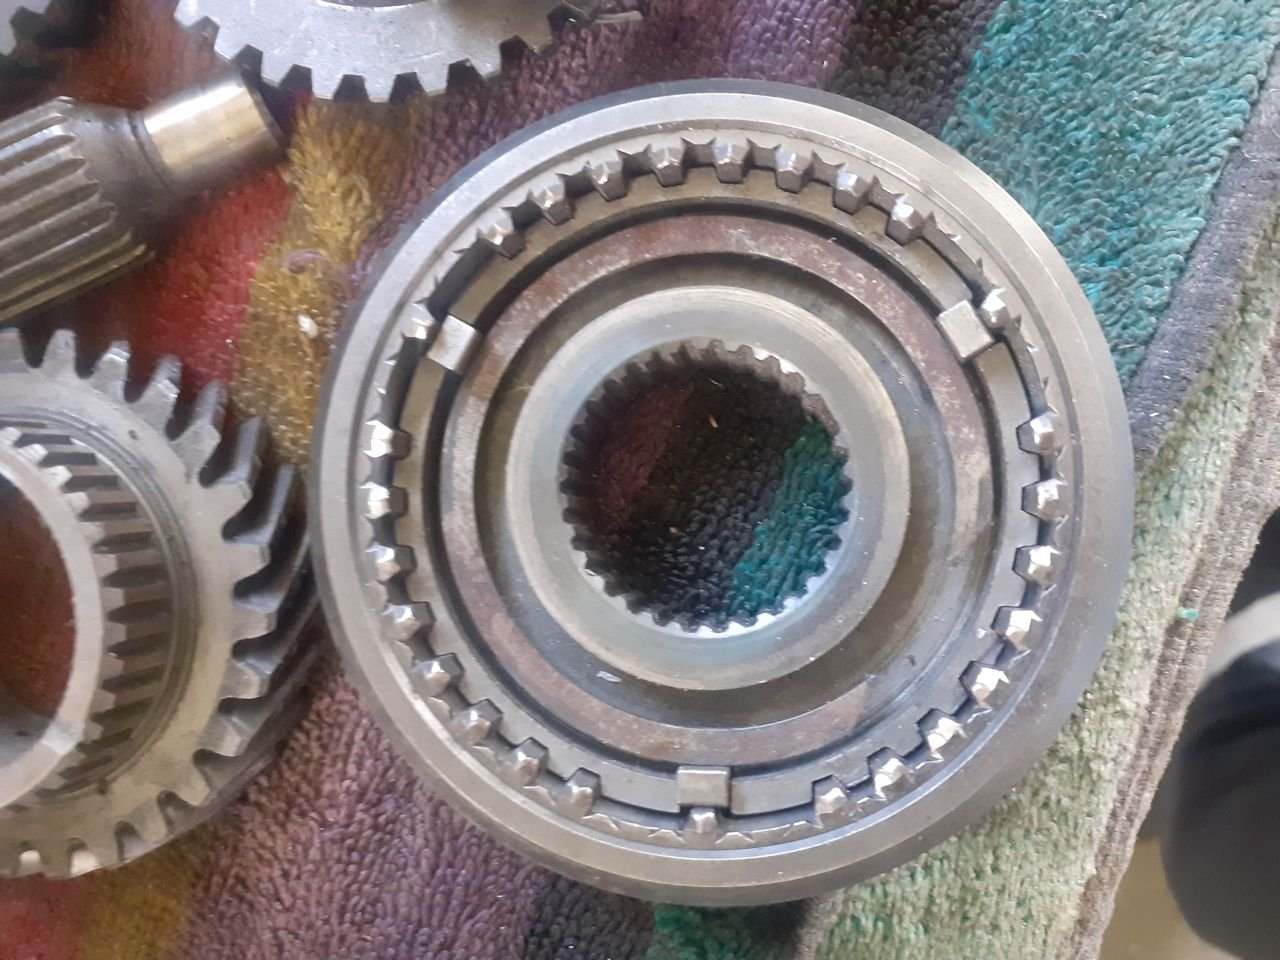
I did a thing. First I went to visit @yoeddynz who kindly welded the crack up. I also got a preview of exciting Imp developments.... When I got home I had a look to see what that plug thread was. Interestingly it appeared to be an M22x1.5 parallel thread, which meant a tapered plug made very little sense. And it just so happened that I had an M22x1.5 tap and some threaded rod. So I messed around for a while to get this; I put some pretty mega threadlocker on the insert, so it shouldn't go anywhere. Now the fucked shaft. It was pretty obvious that the broken bit wasnt a new development, and that the box had basically been working ok like that, so I did the obvious thing and just put it back together with the broken bit back in place, retained by the gear and the retaining nut. It feels fine. I figure that worst case I lose 5th at some point, by which time I will have a new box to go in. I will lift an optimistic pint to that notion tonight....
12 points
-
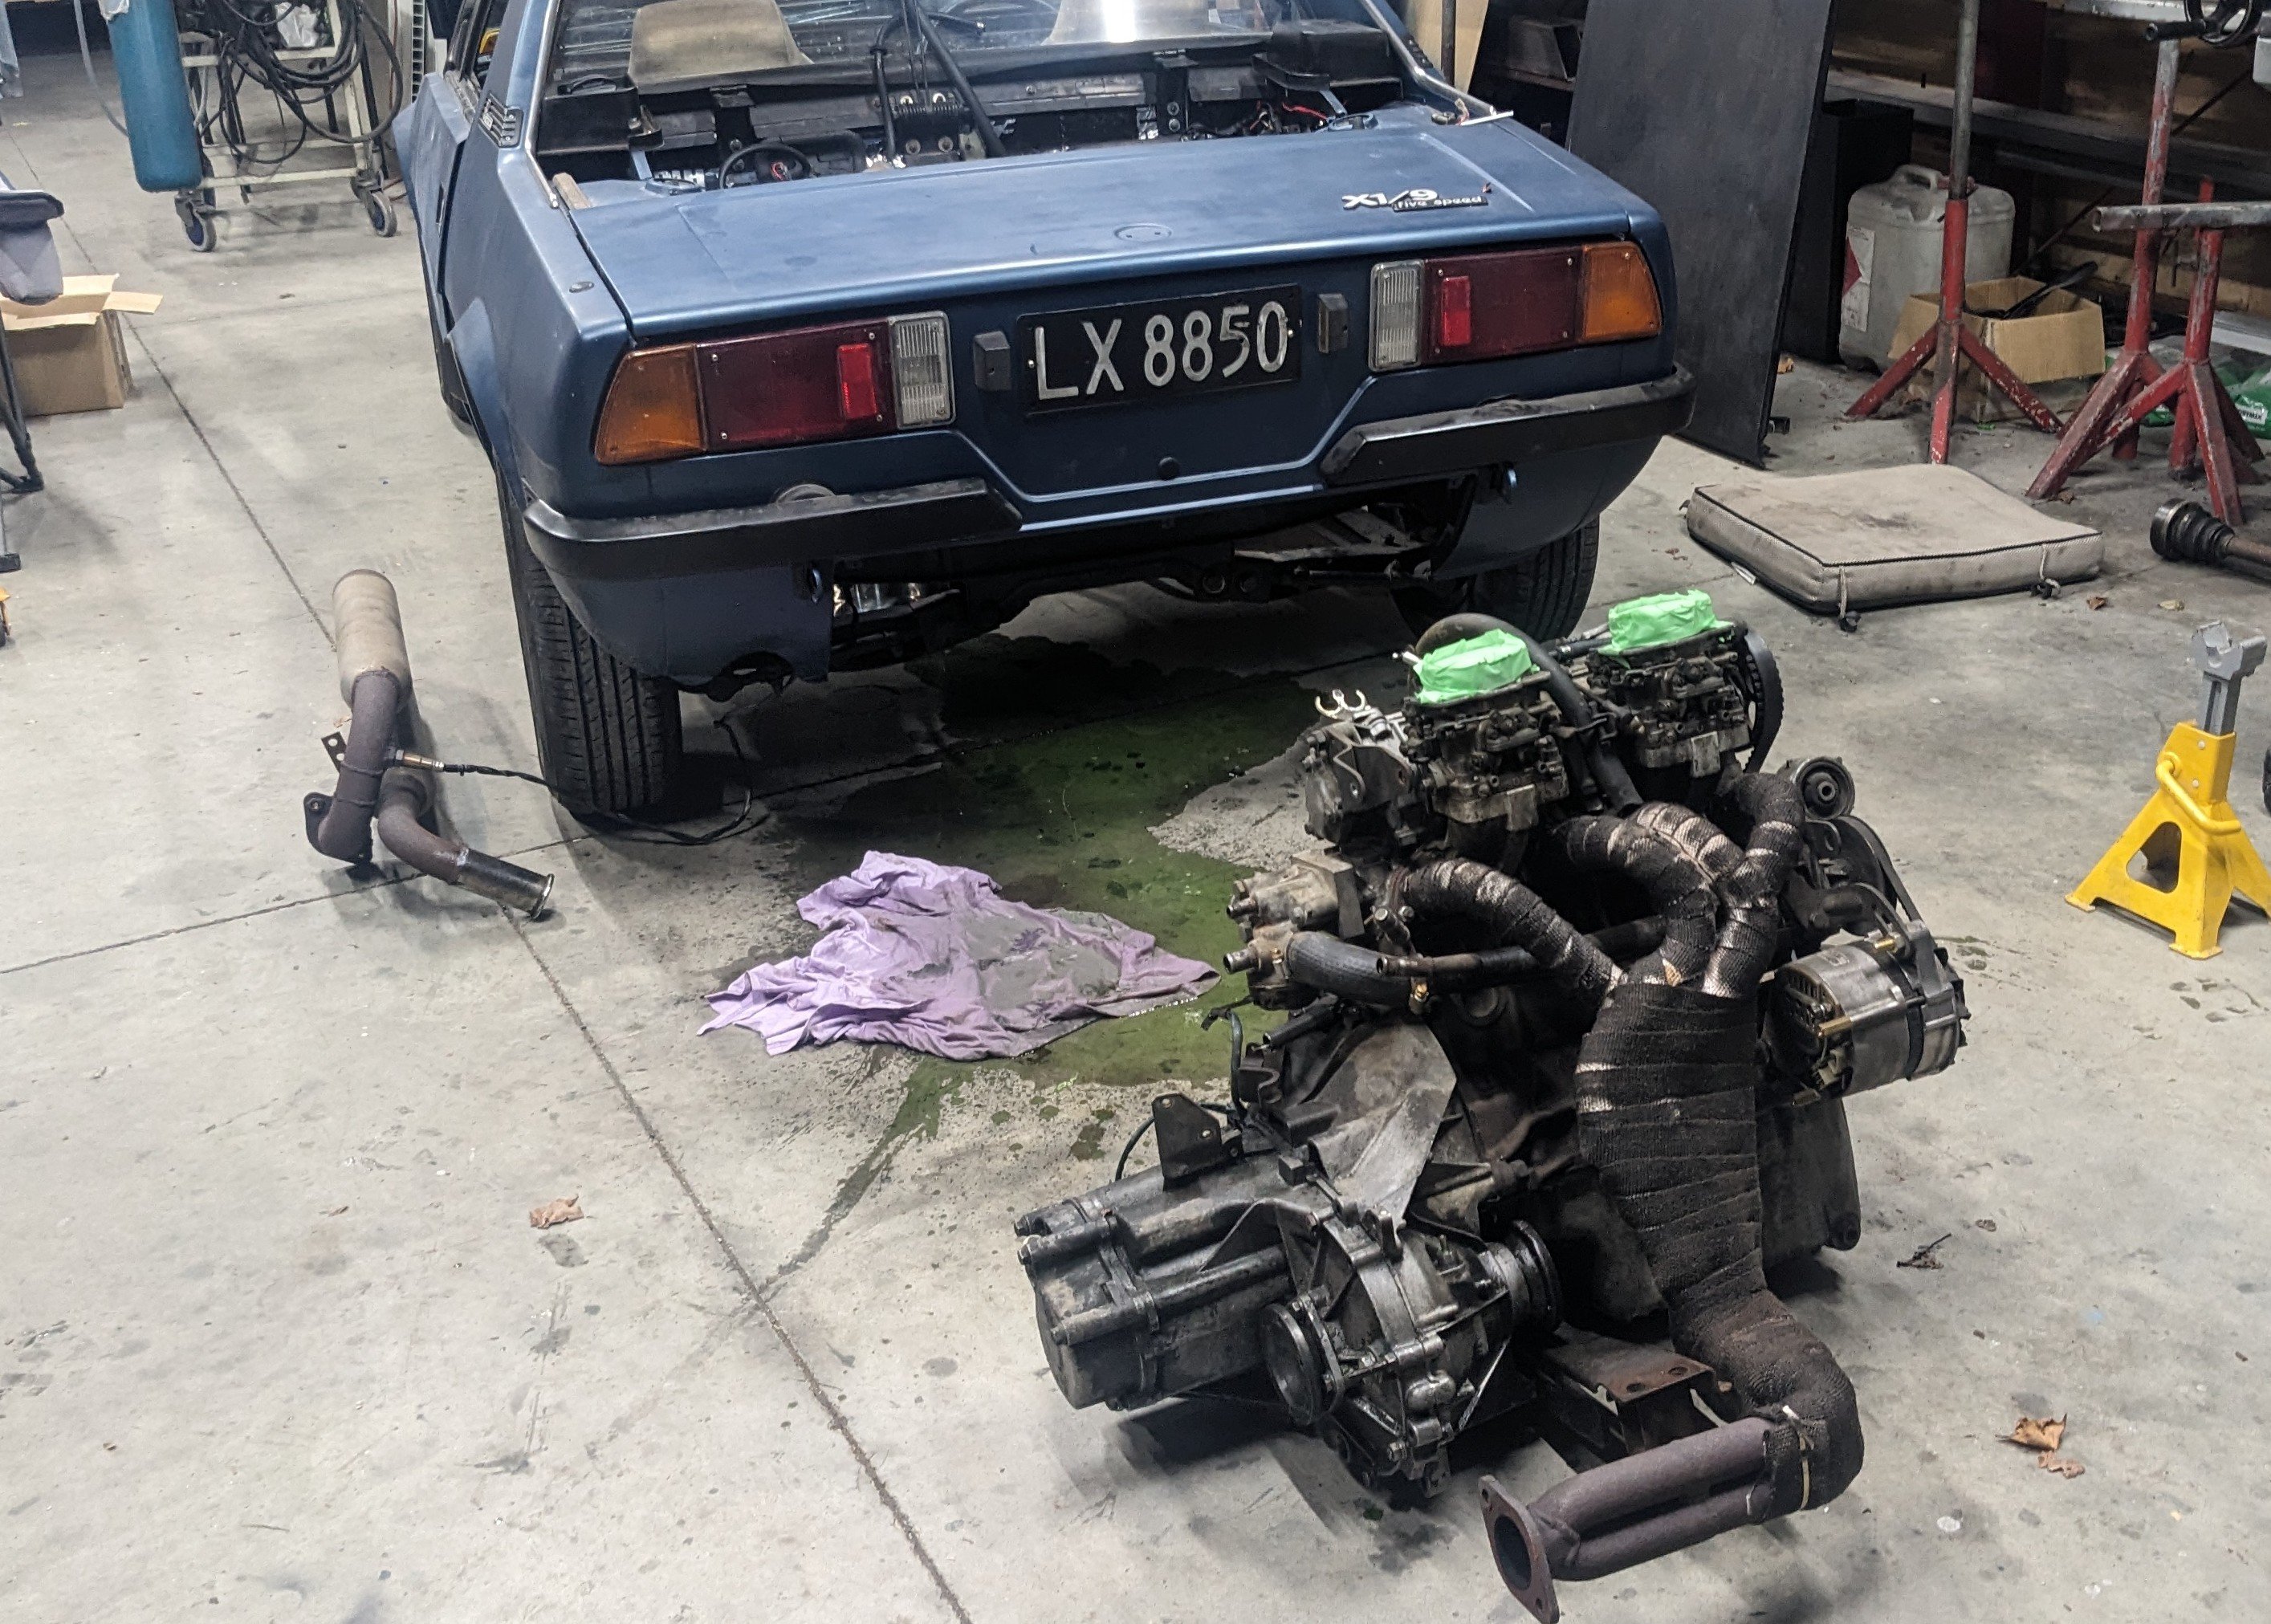
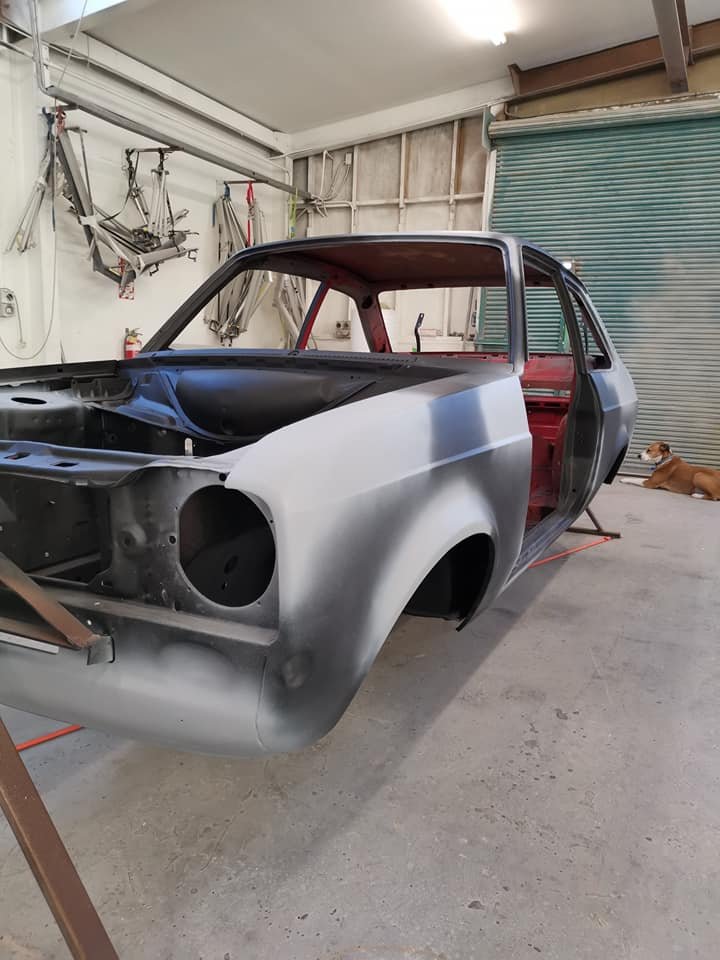
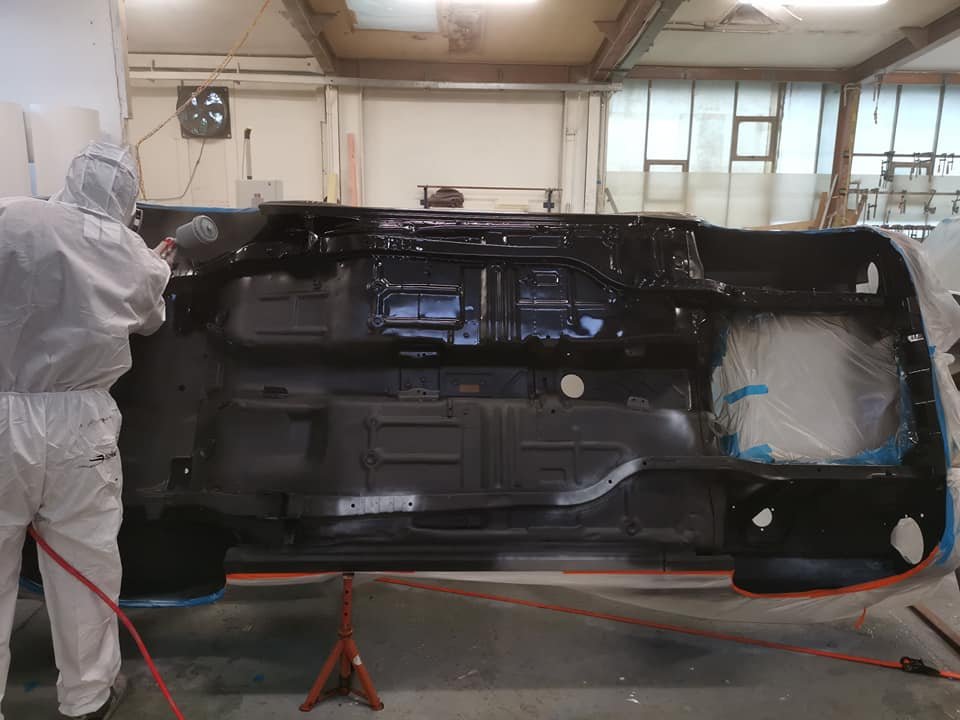
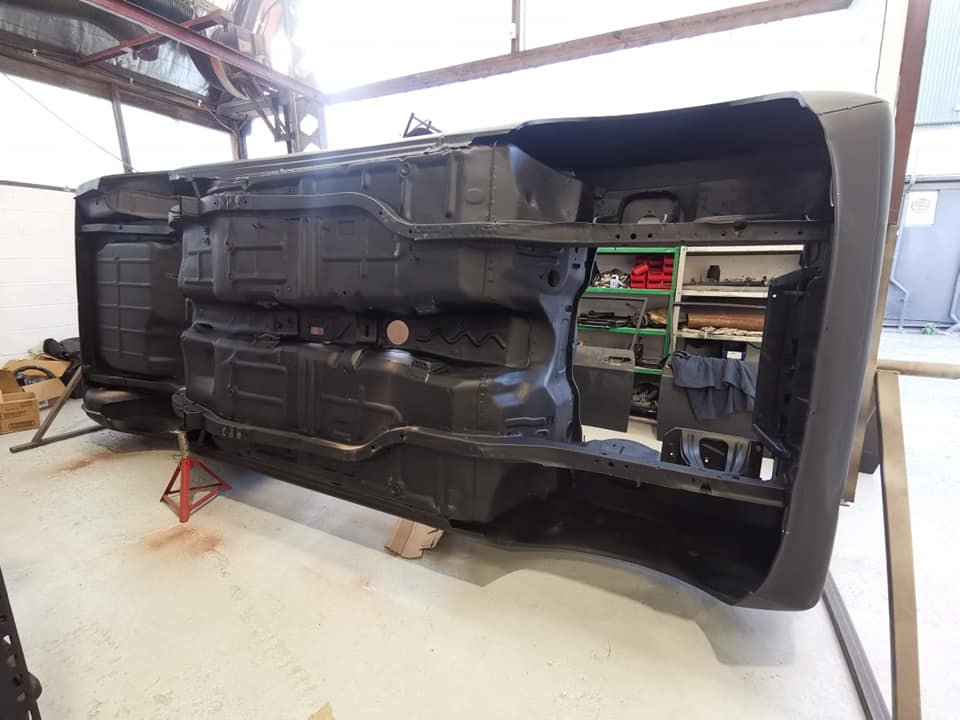
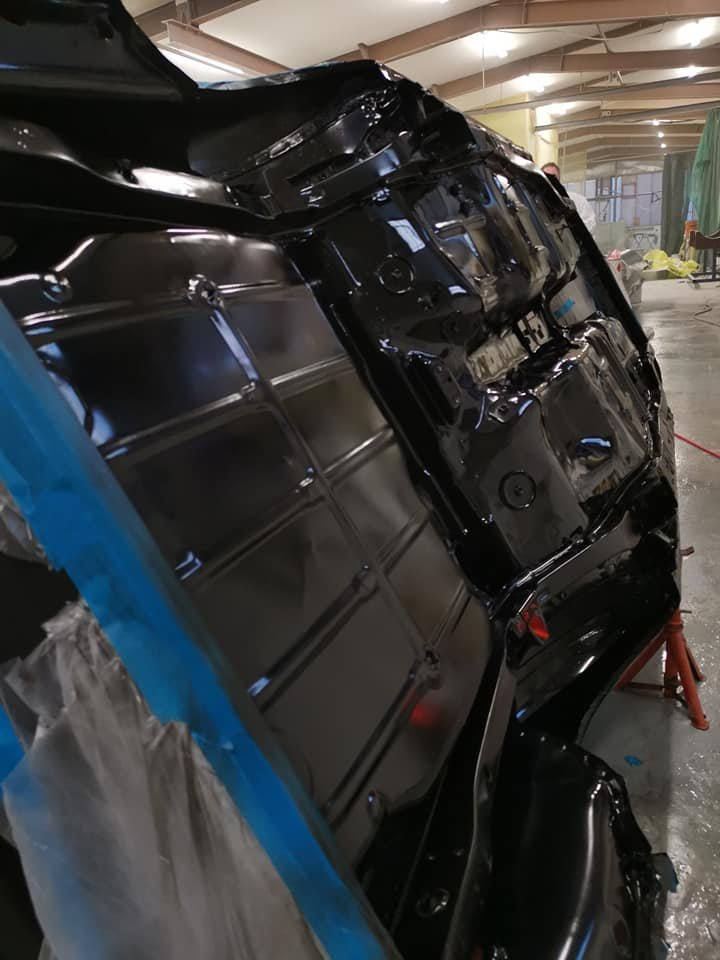
As per the title this next stage of building the exhaust silencer/muffler/back box/ take your pick has taken much more time and effort than I had always expected. I started by taking the blue imp apart. To Woolf valley garage I went.... ..where I removed (rusty mild steel) exhaust, bumper and rear valance.. Popped it onto rusty imp shell... Now I knew exactly how much room I have to play with. Whatever I was going to build had to work with several things. I wanted the box to be mounted higher than the existing one behind the Datsun engine as I was sick of scraping it on steep driveway exits. It had to be built completely of stainless steel, no exceptions. No more corrosion. It had to look tidy and fit within the bumper line, tailpipes excluded. The tailpipes were to be twin centre exit. I had a very specific look in mind and they have to be just right. It had to be quiet enough and yet still sound sporty. This last one is tricky and will most likely need modifications to get right hence the last design point... It has to be modular, easy enough to disassemble and repack with sound deadening (most likely glass fibre) Now I knew the size I could build it to I started by making some flanges. This so I can unbolt the flexible sections between the V clamps and the box. Made to suit the 44mm tube as per the tube off the V clamps. Lifted the big folder we'd made onto the bench top and folded up some 1.2mm stainless. Although heftier than I could have used I've gone with this thickness to helped avoid the tinny sound thin stainless boxes can make. I wanted perforated stainless tube but couldn't find any within NZ. Got some perforated sheet instead - again 1.2... Which I cut strips from and formed up into tubes as such... Welded... Now I had the start of a box and some tube. I could sit down and nut out a design. I have had some basic ideas for ages on how it might look inside but it was really good to sit down and see how it might work. Drew some ideas up.. Nutted out something I think would work well and be easy enough to change if need be. Time to commit. I had to cut some blue steel. First actual act of modification to the imp in my quest to plonk a flat six in it. Now I could double check box sizing and weld the flanges in place. Folded up the second box side.. Complete with captive nuts to suit a lid.. Tail pipe time. I almost went with twin 2" exits but they were just a tad too big. Settled on twin 45mm. Tacked them to yet another stainless pair of flanges to work with the modular design aspect. Happy with the look I then fully welded them on the inside. The flanges will be sealed with a soft copper gasket. Happy I had the look right I cut the centre top from the box, created a recessed bit and carefully welded in the second threaded flange. So now I have inlets and outlets where I want them and just have to connect the dots. Ideally a nice long a route to dampen sound while keeping it as smooth flowing as possible. Plus, as per original brief, it has to allow for easy disassembly and re-packing. There was quite a bit of head scratching with this bit of the build but eventually I sorted a design out. I cut various bit of sheet and put big holes in them with a nice brand new holesaw set. Made little boxes with more big holes... Shaped bits like a heart...(#putmyheartandsoulintoit.....) Welded the ends onto the main box, curved in bit to help with flow and also hide the external bobbin mounts from view a little. Now I had a collection of parts that would come together and form a london underground of tubeways for the exhaust gases to follow. I was pretty happy with the layout for its potential silencing effect. However I now wondered if it might just end up being a touch too quiet and restrictive. Luckily I had come up with an idea early on where I could add some valves. Quite a little bit of extra work involved but the more I'd thought about it the more I was convinced it could work well. With this in mind I had built the middle chamber width to allow for some valves and made sure they could be removed to fit said valves in place. I cut some 44mm holes in the middle chamber lids and made some to valves to suit... Whipped up a little press form to create brackets.. Valves mounted. Underside of lids have the heart halves which help direct flow from one tube back too the next, or up and out through the open valves.. Valve shafts stick out through back of box. Sealing will be by a combination of spring loaded fibre and silicone washers. Now for an exciting point in life that every shed 'Barry' looks forward to. Emptying out those boxes of little random fittings that have been stashed away 'just in case you might need them'... Such fun! I selected my (stainless!!!) treats and scribbled on some alloy. Made lots of alloy swarf.. Ended up with these levers. Pinch bolted to the shafts along with added grub screws. The short length of threaded rod will be changed for a long length of stainless rod, actuation method from within the car yet undecided. Possibly a 12volt door lock motor etc or maybe mechanically with a bicycle cable. Recessed the backs to allow for seals.. So yeah. Lots of parts! Compulsory photo of thing exploded into many bits... All together now with some arrows. Remember each side is just a mirror of the other side (there is a small cross over hole in the centre plate that separates the sides) Valve closed... Valve open... I think it'll be quite a difference in sound and look forward to hearing it. Valves can be seen in action in this very exciting video... So It's pretty much complete except for the mount points which I'll do once I've got some bobbins from engineering shop along with seals. The lid will be sealed by running a bead of silicone which I'll let set before clamping the lid down. Oh I weighed it too. I was worried it might end up quite hefty but it will be only about 6.4 kg once all the bolts are in/packed with fibreglass.. The box will be painted satin/matt black leaving the tailpipes shiny. Silencer mounted in place... View from above showing plenty of room for the valve linkages in place. I ended up cutting a tiny bit more of the valance away so there's room for a stainless heatshield. I then covered the valance with some masking tape to help prevent it getting too scratched while I put back in some internal strengthening and capping it all off. I'll also be adding mount areas for the bobbins. I'll remove the engine next and add in the big multi-pin connector to the engine loom. Then I'll be seriously very close to removing the Datsun engine and cutting out the under seat area just as I have on this rusty shell. Wow!!11 points
-
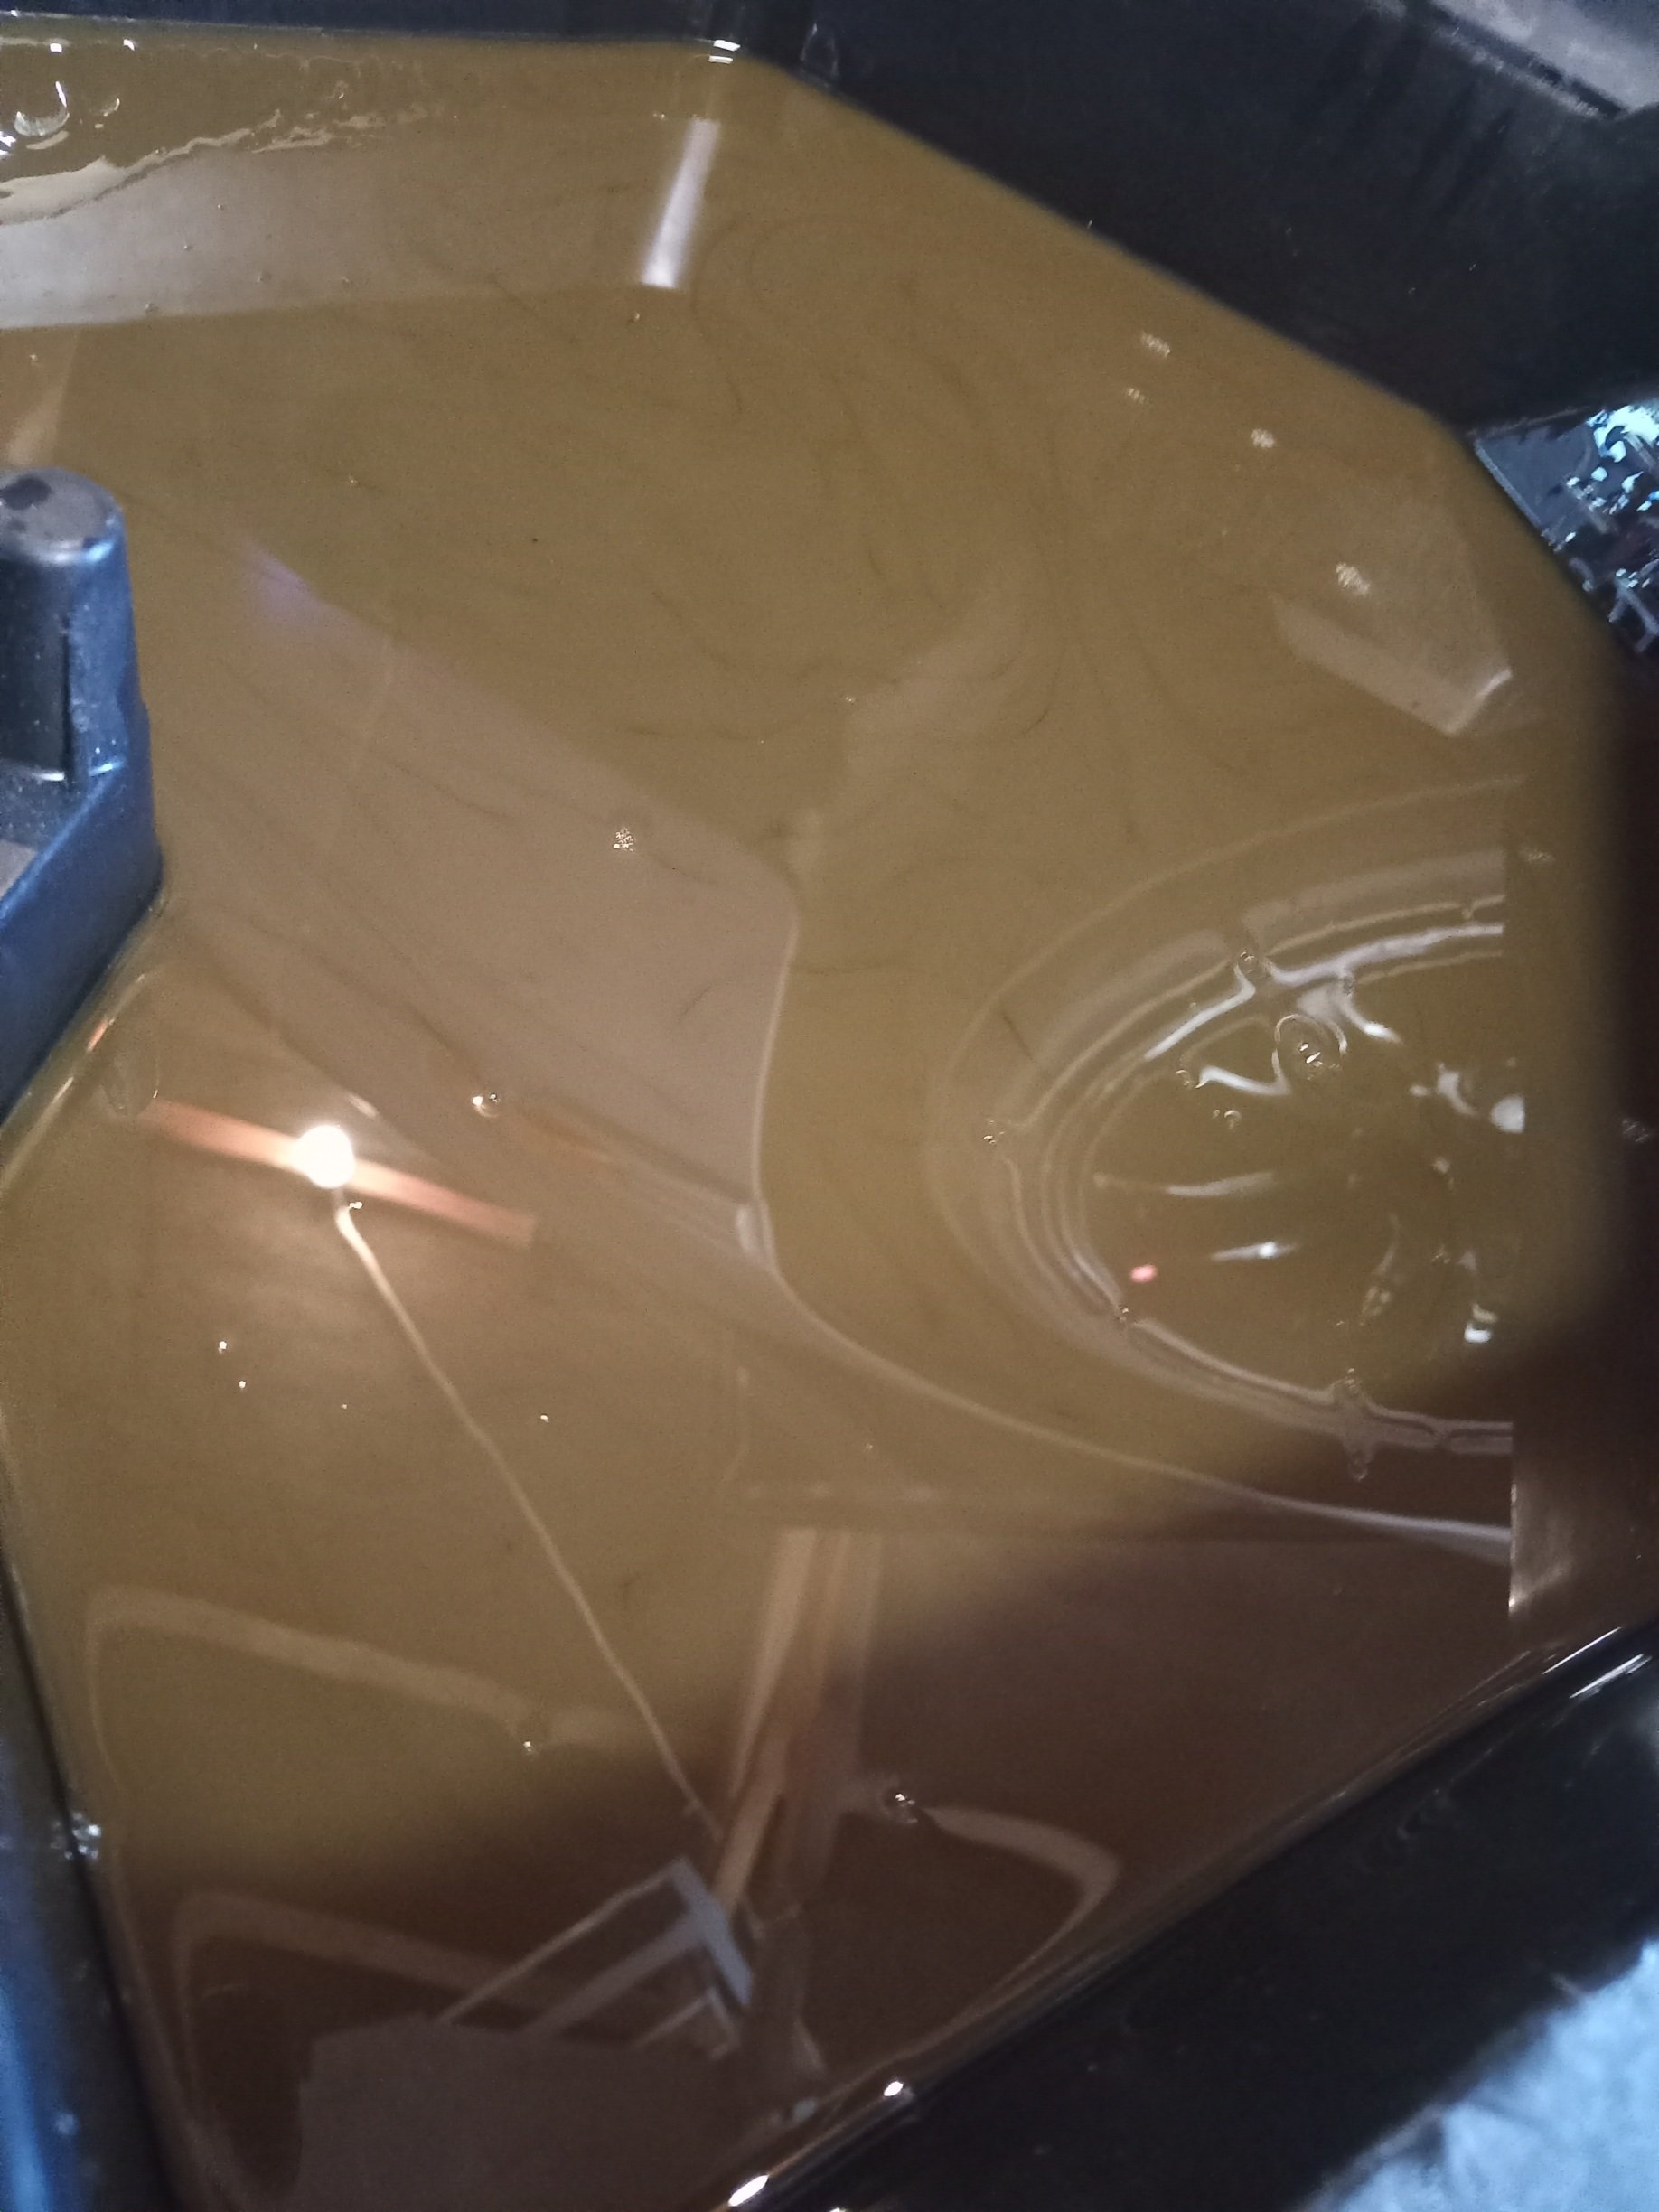
Well this ran with a misfire upon entering boost since i got it, now its really started being undriveable, i checked tps, coils, all the things that could cause that miss and came up with nothing definitive, it always smoked a bit but i thought this was as a result of being rotary and then i noticed the oil looked cloudy on the dipstick, changed it for fresh oil and filter.. The oil looked like this after 10min run time and smells kinda like coolant, time to rebuild, im guessing a water seal let go or something... I should be sad about this or something but im actually looking forward how a rotary engine looks inside, especially a 'worked' one.
10 points
-
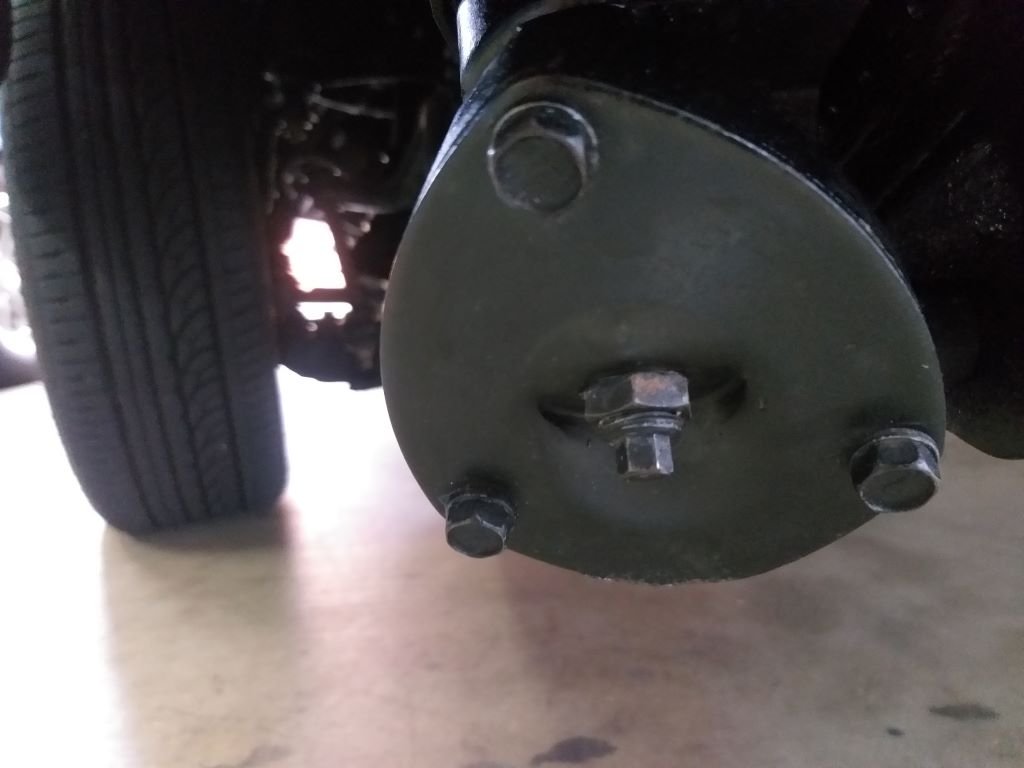
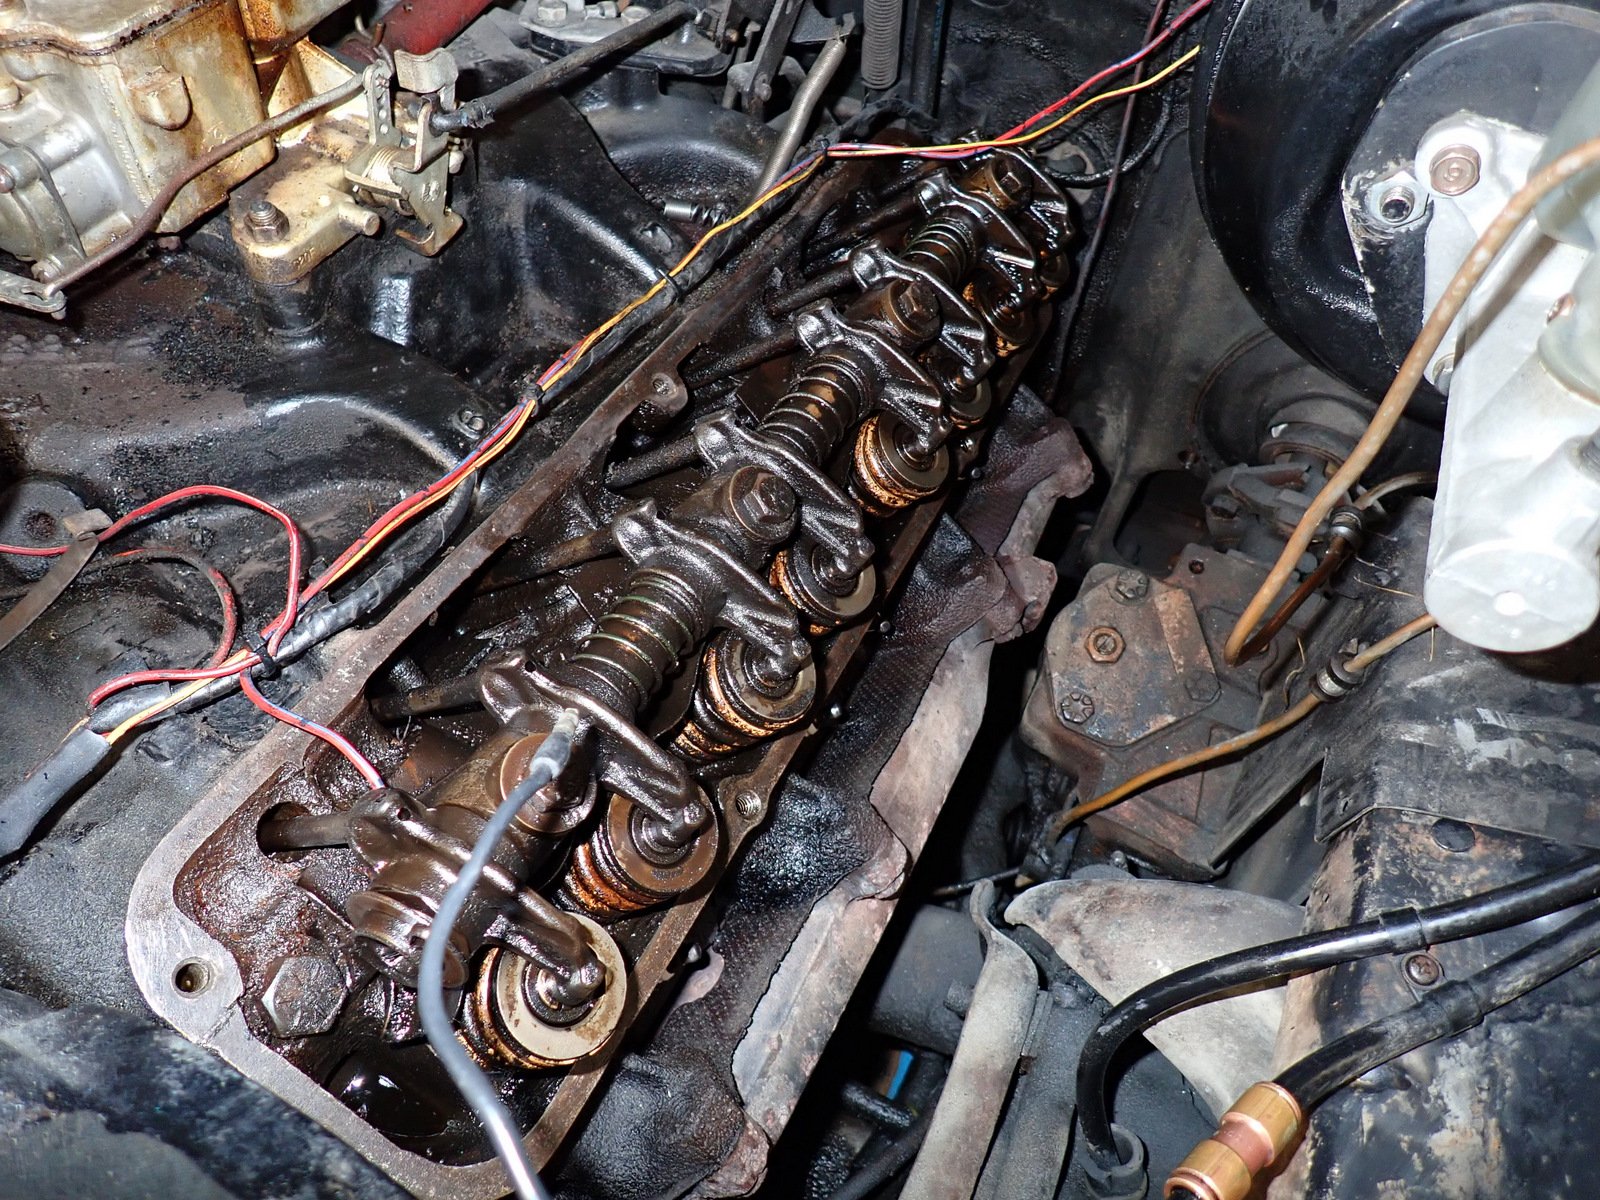
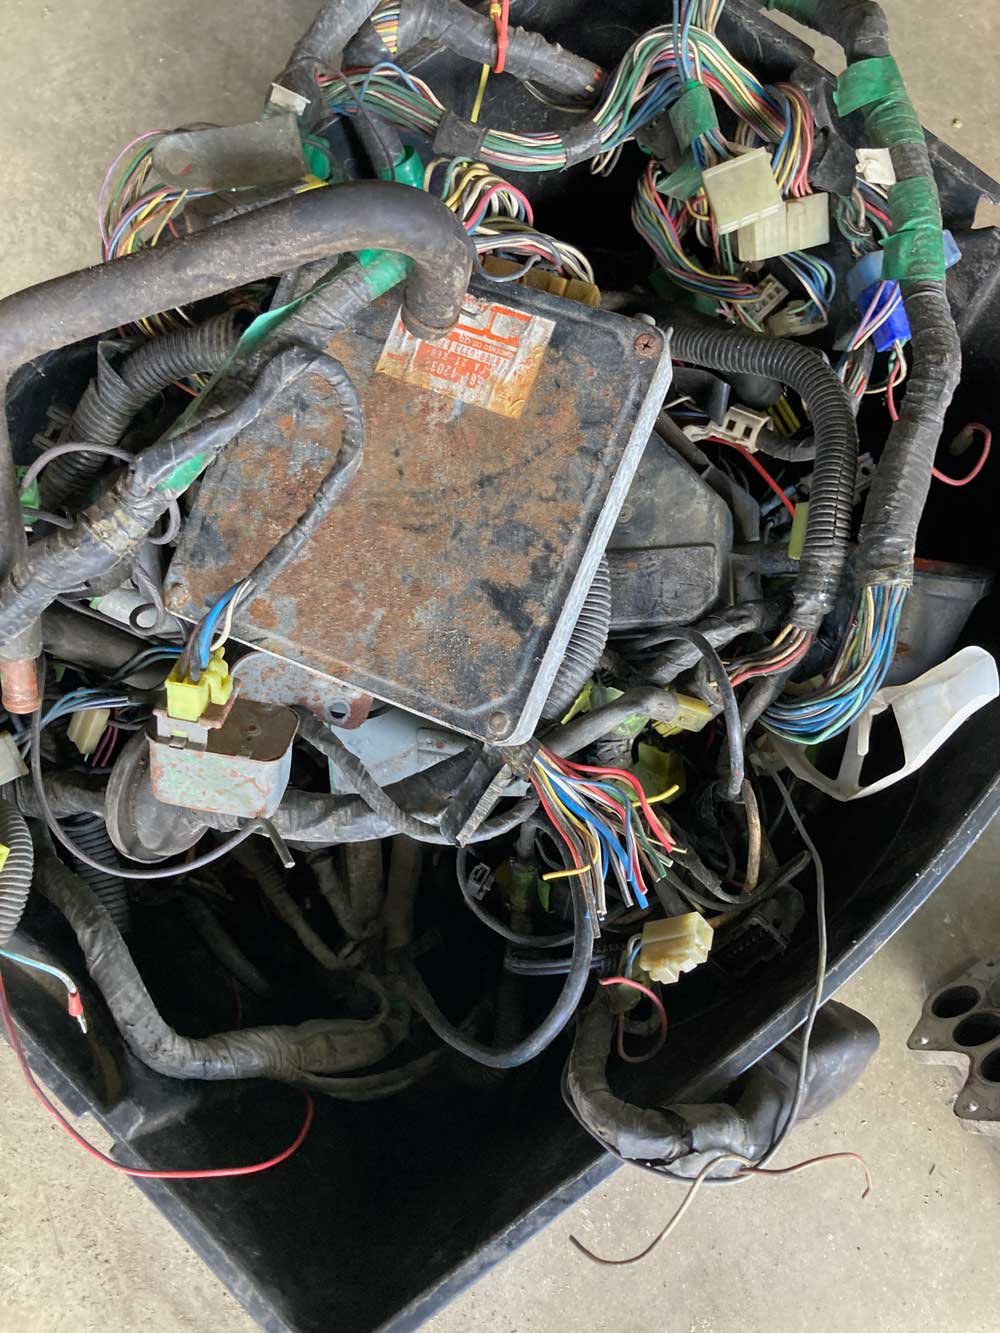
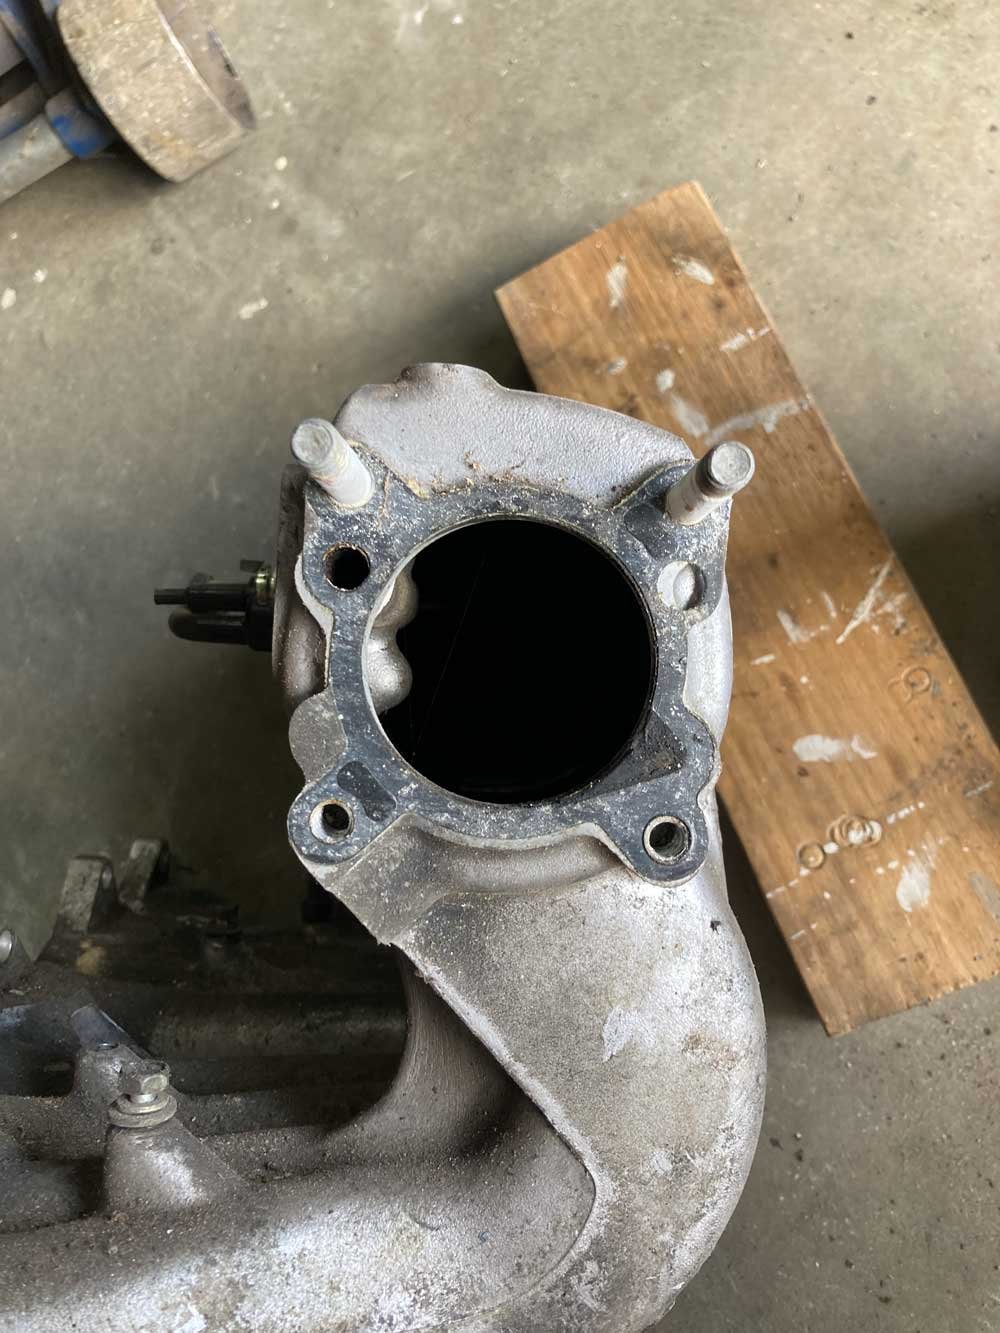
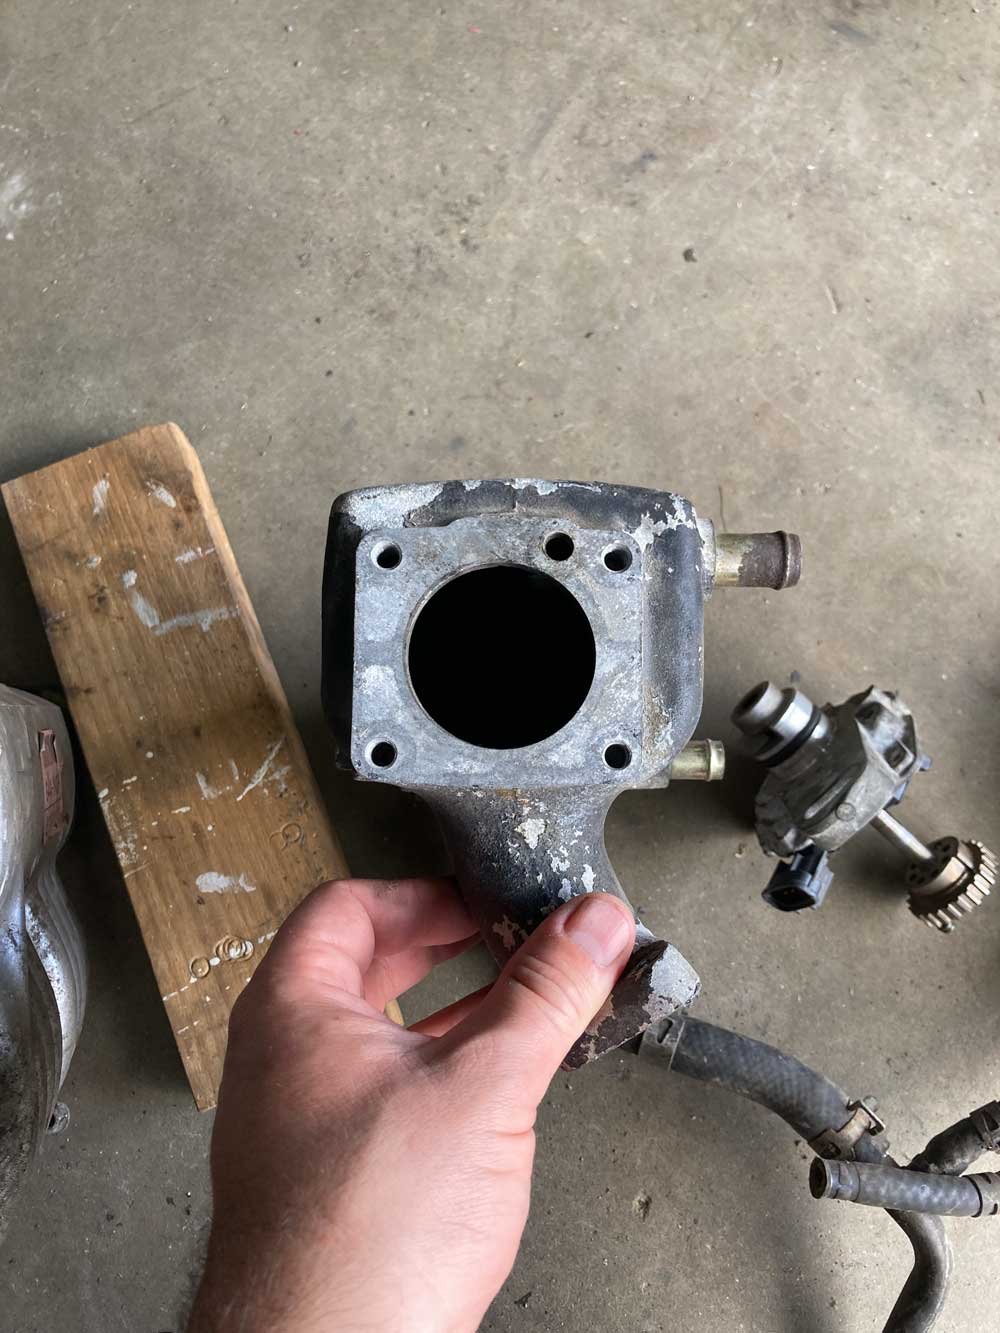
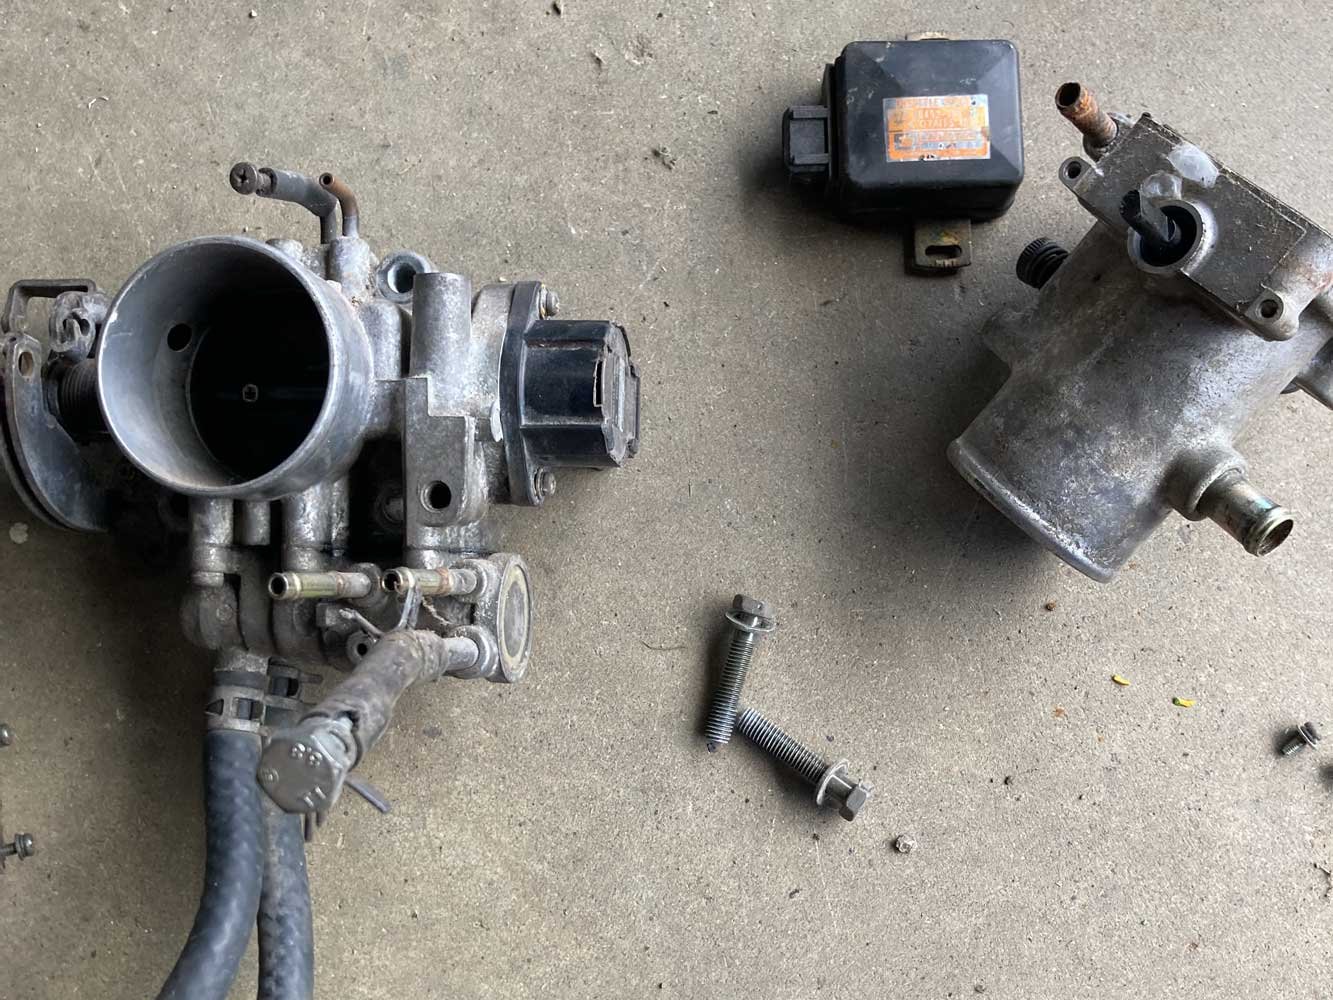
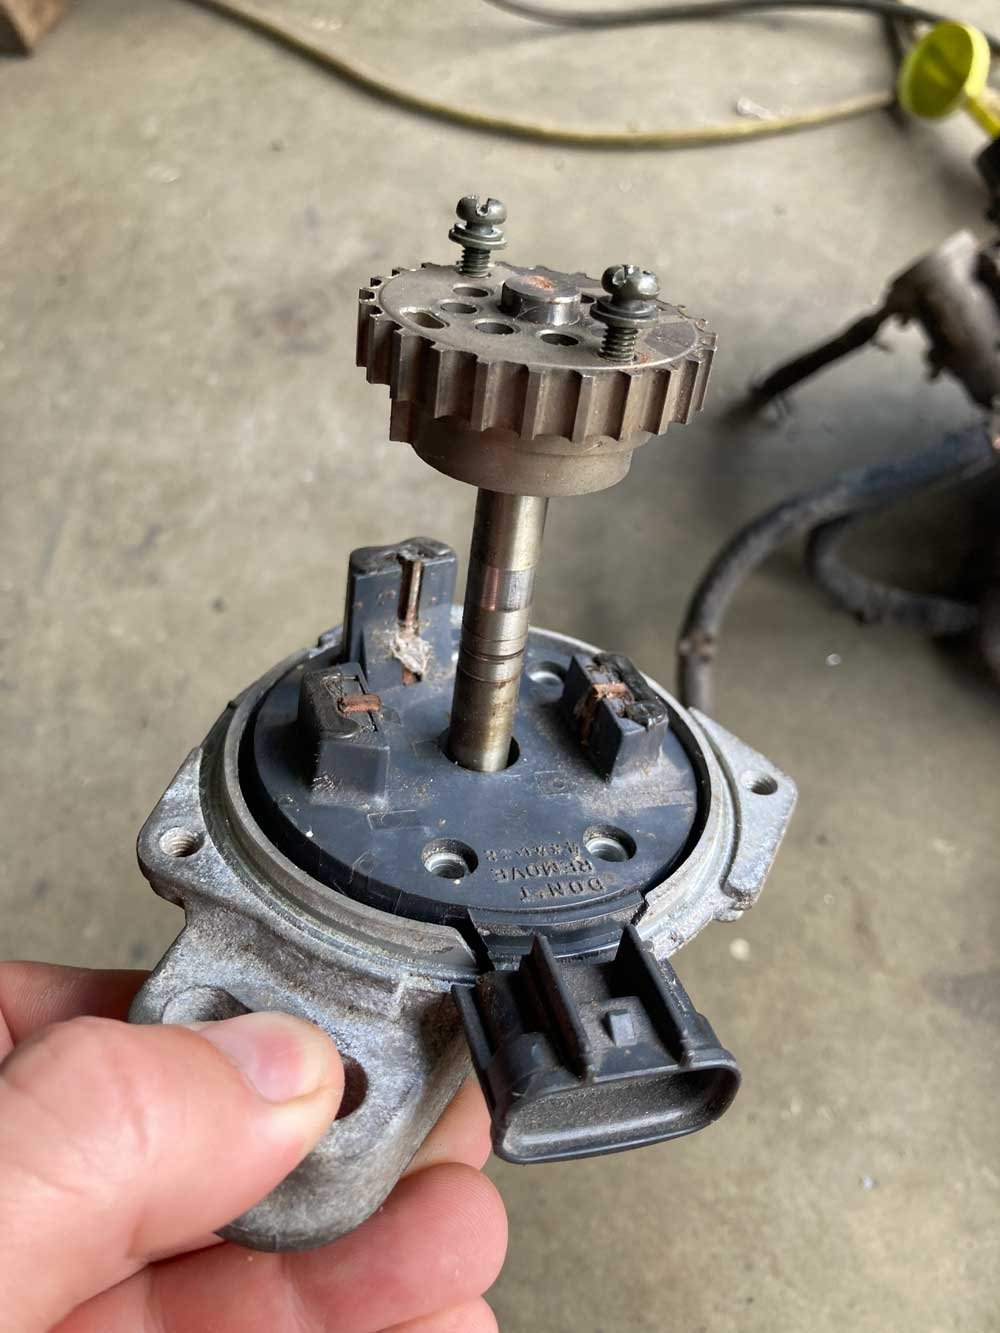
Triggers for the ecu. I couldn't use the stock 5M dizzy because it sits exactly where number 1 throttle needs to be. So after a bit of indecision and fucking around I decided to run a crank angle sensor off the front pulley. I machined the inside of the pulley to an accurate size then I made a boss to press into the pulley. The pulley is cast so I can't weld anything to it. She's a fucking tight fit in the pulley so it ain't going no place. By pressing this hub into the inside is not affected by the rubber isolation layer which can cause erratic triggering. I'll laser cut a trigger wheel and use it to accurately drill 4 mounting holes. Then all I have to do is mount the sensor off the front of the motor somehow.
8 points
-
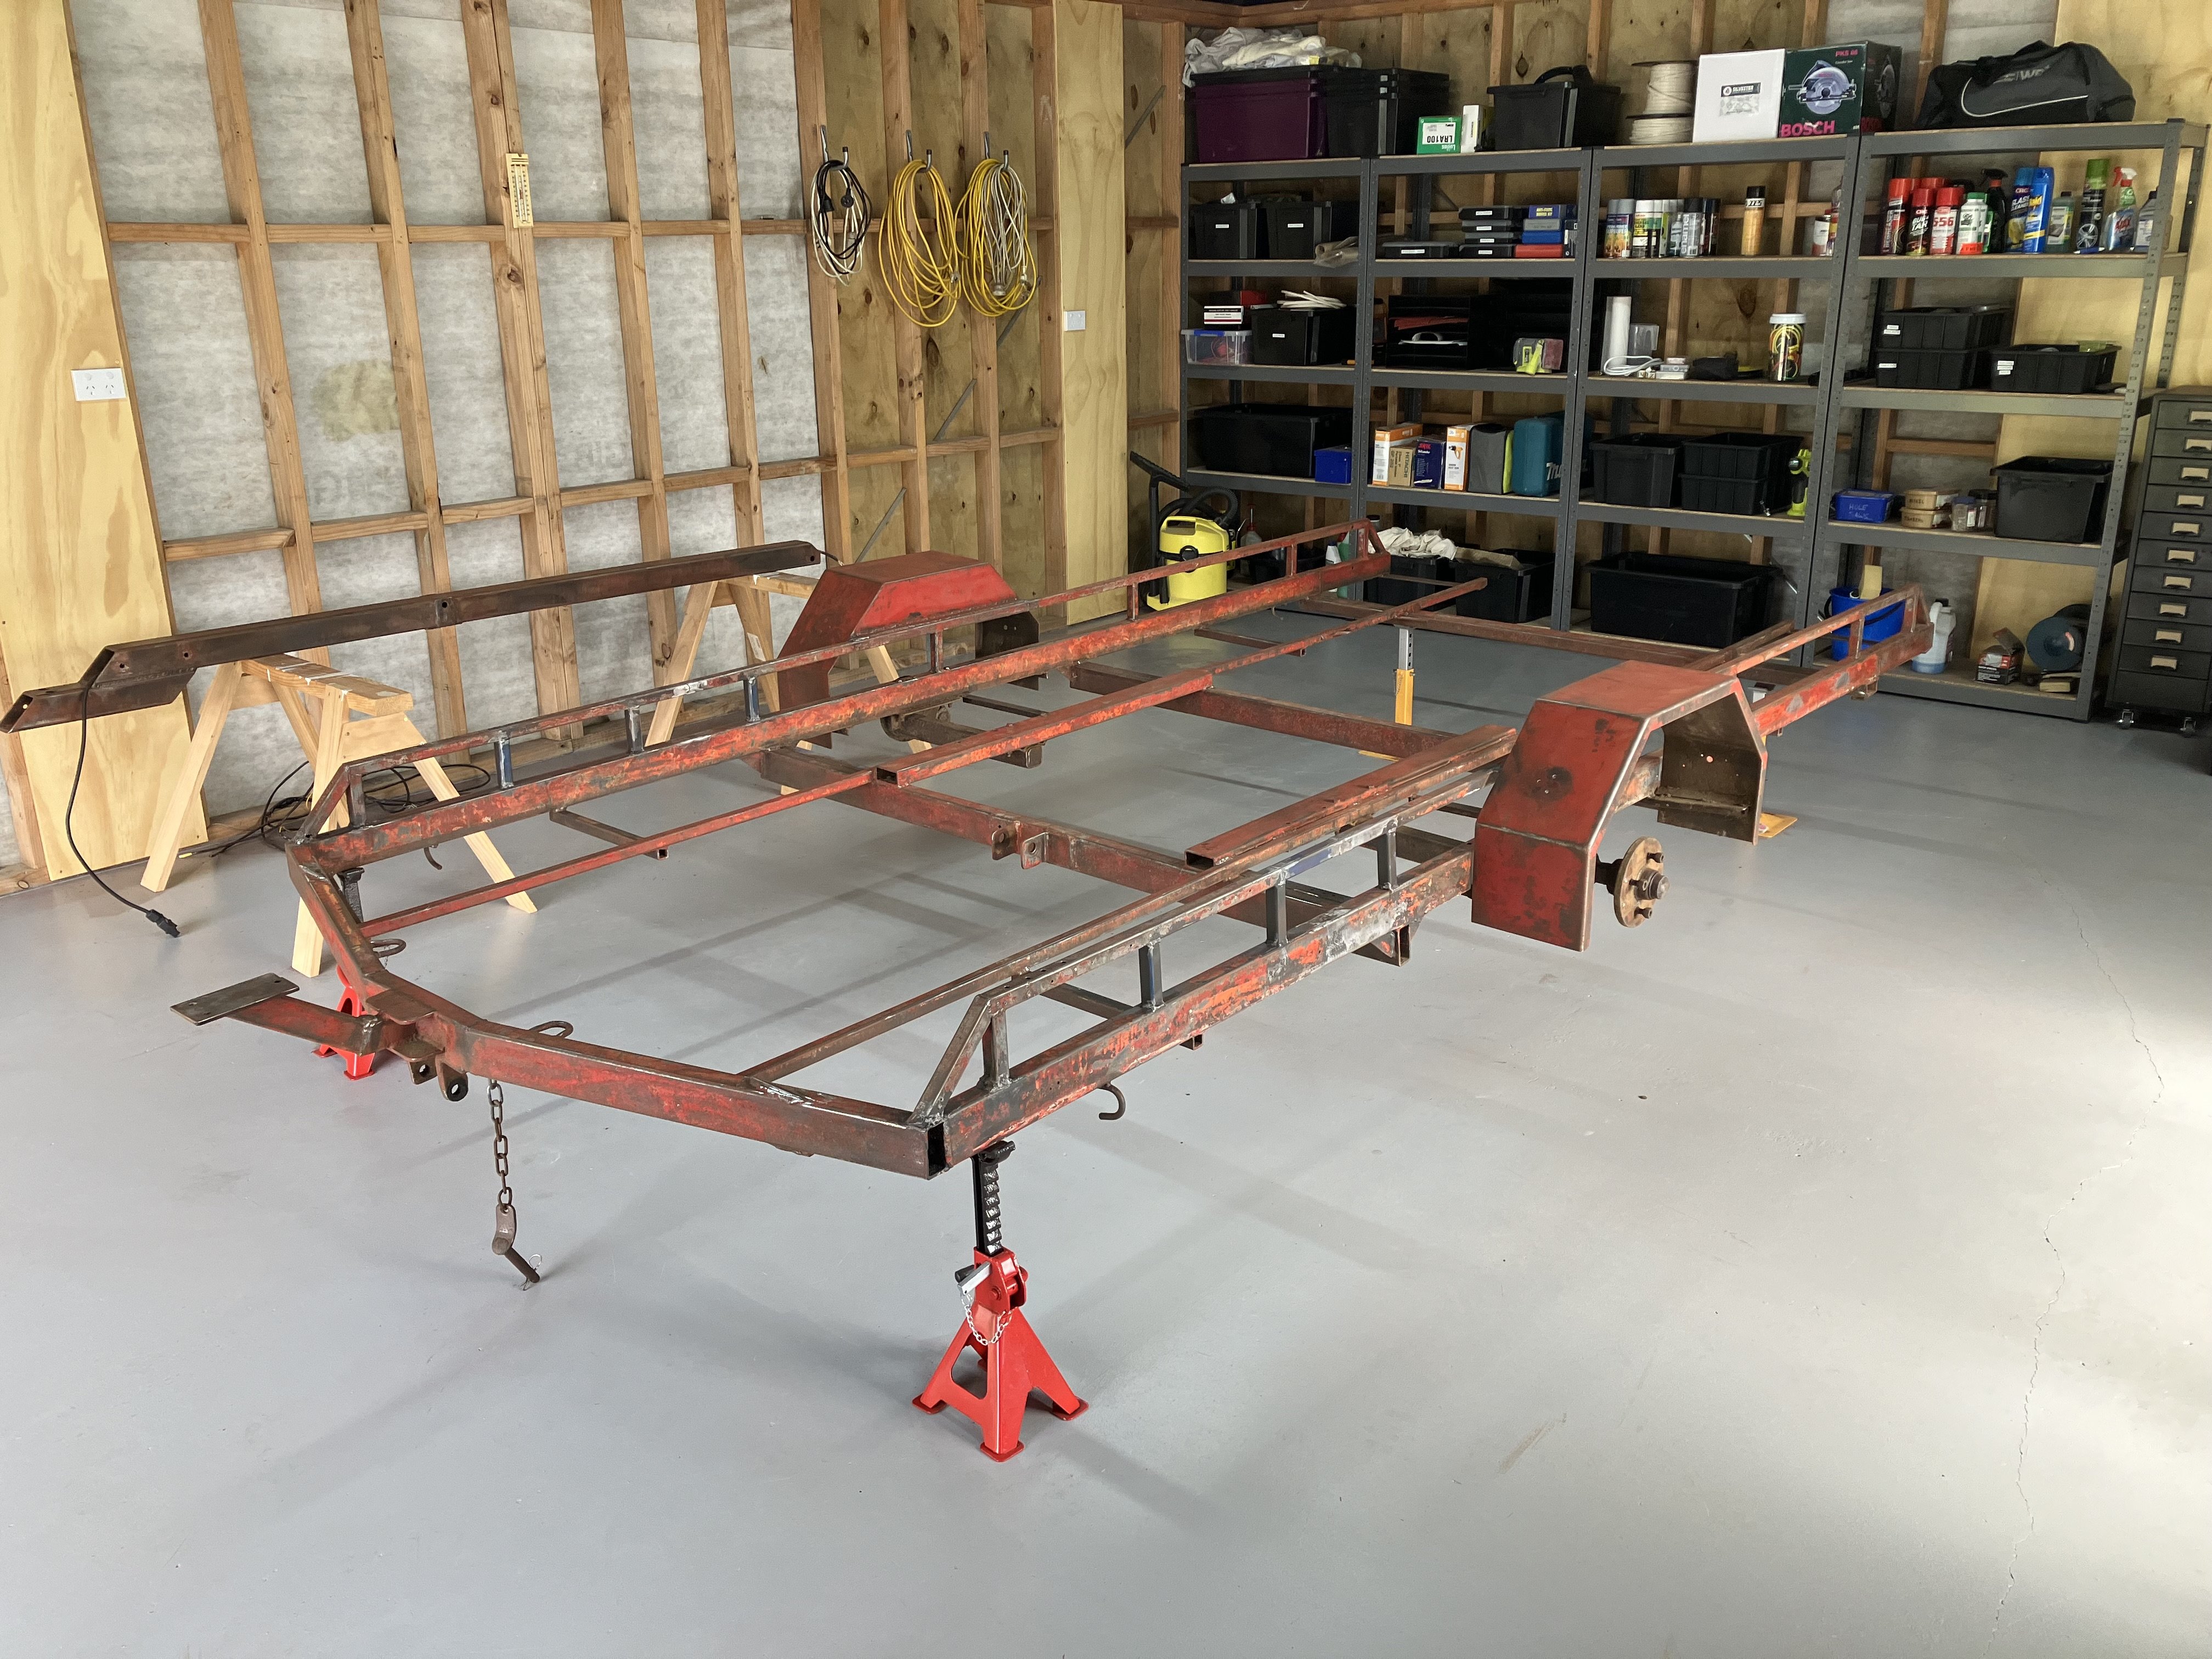
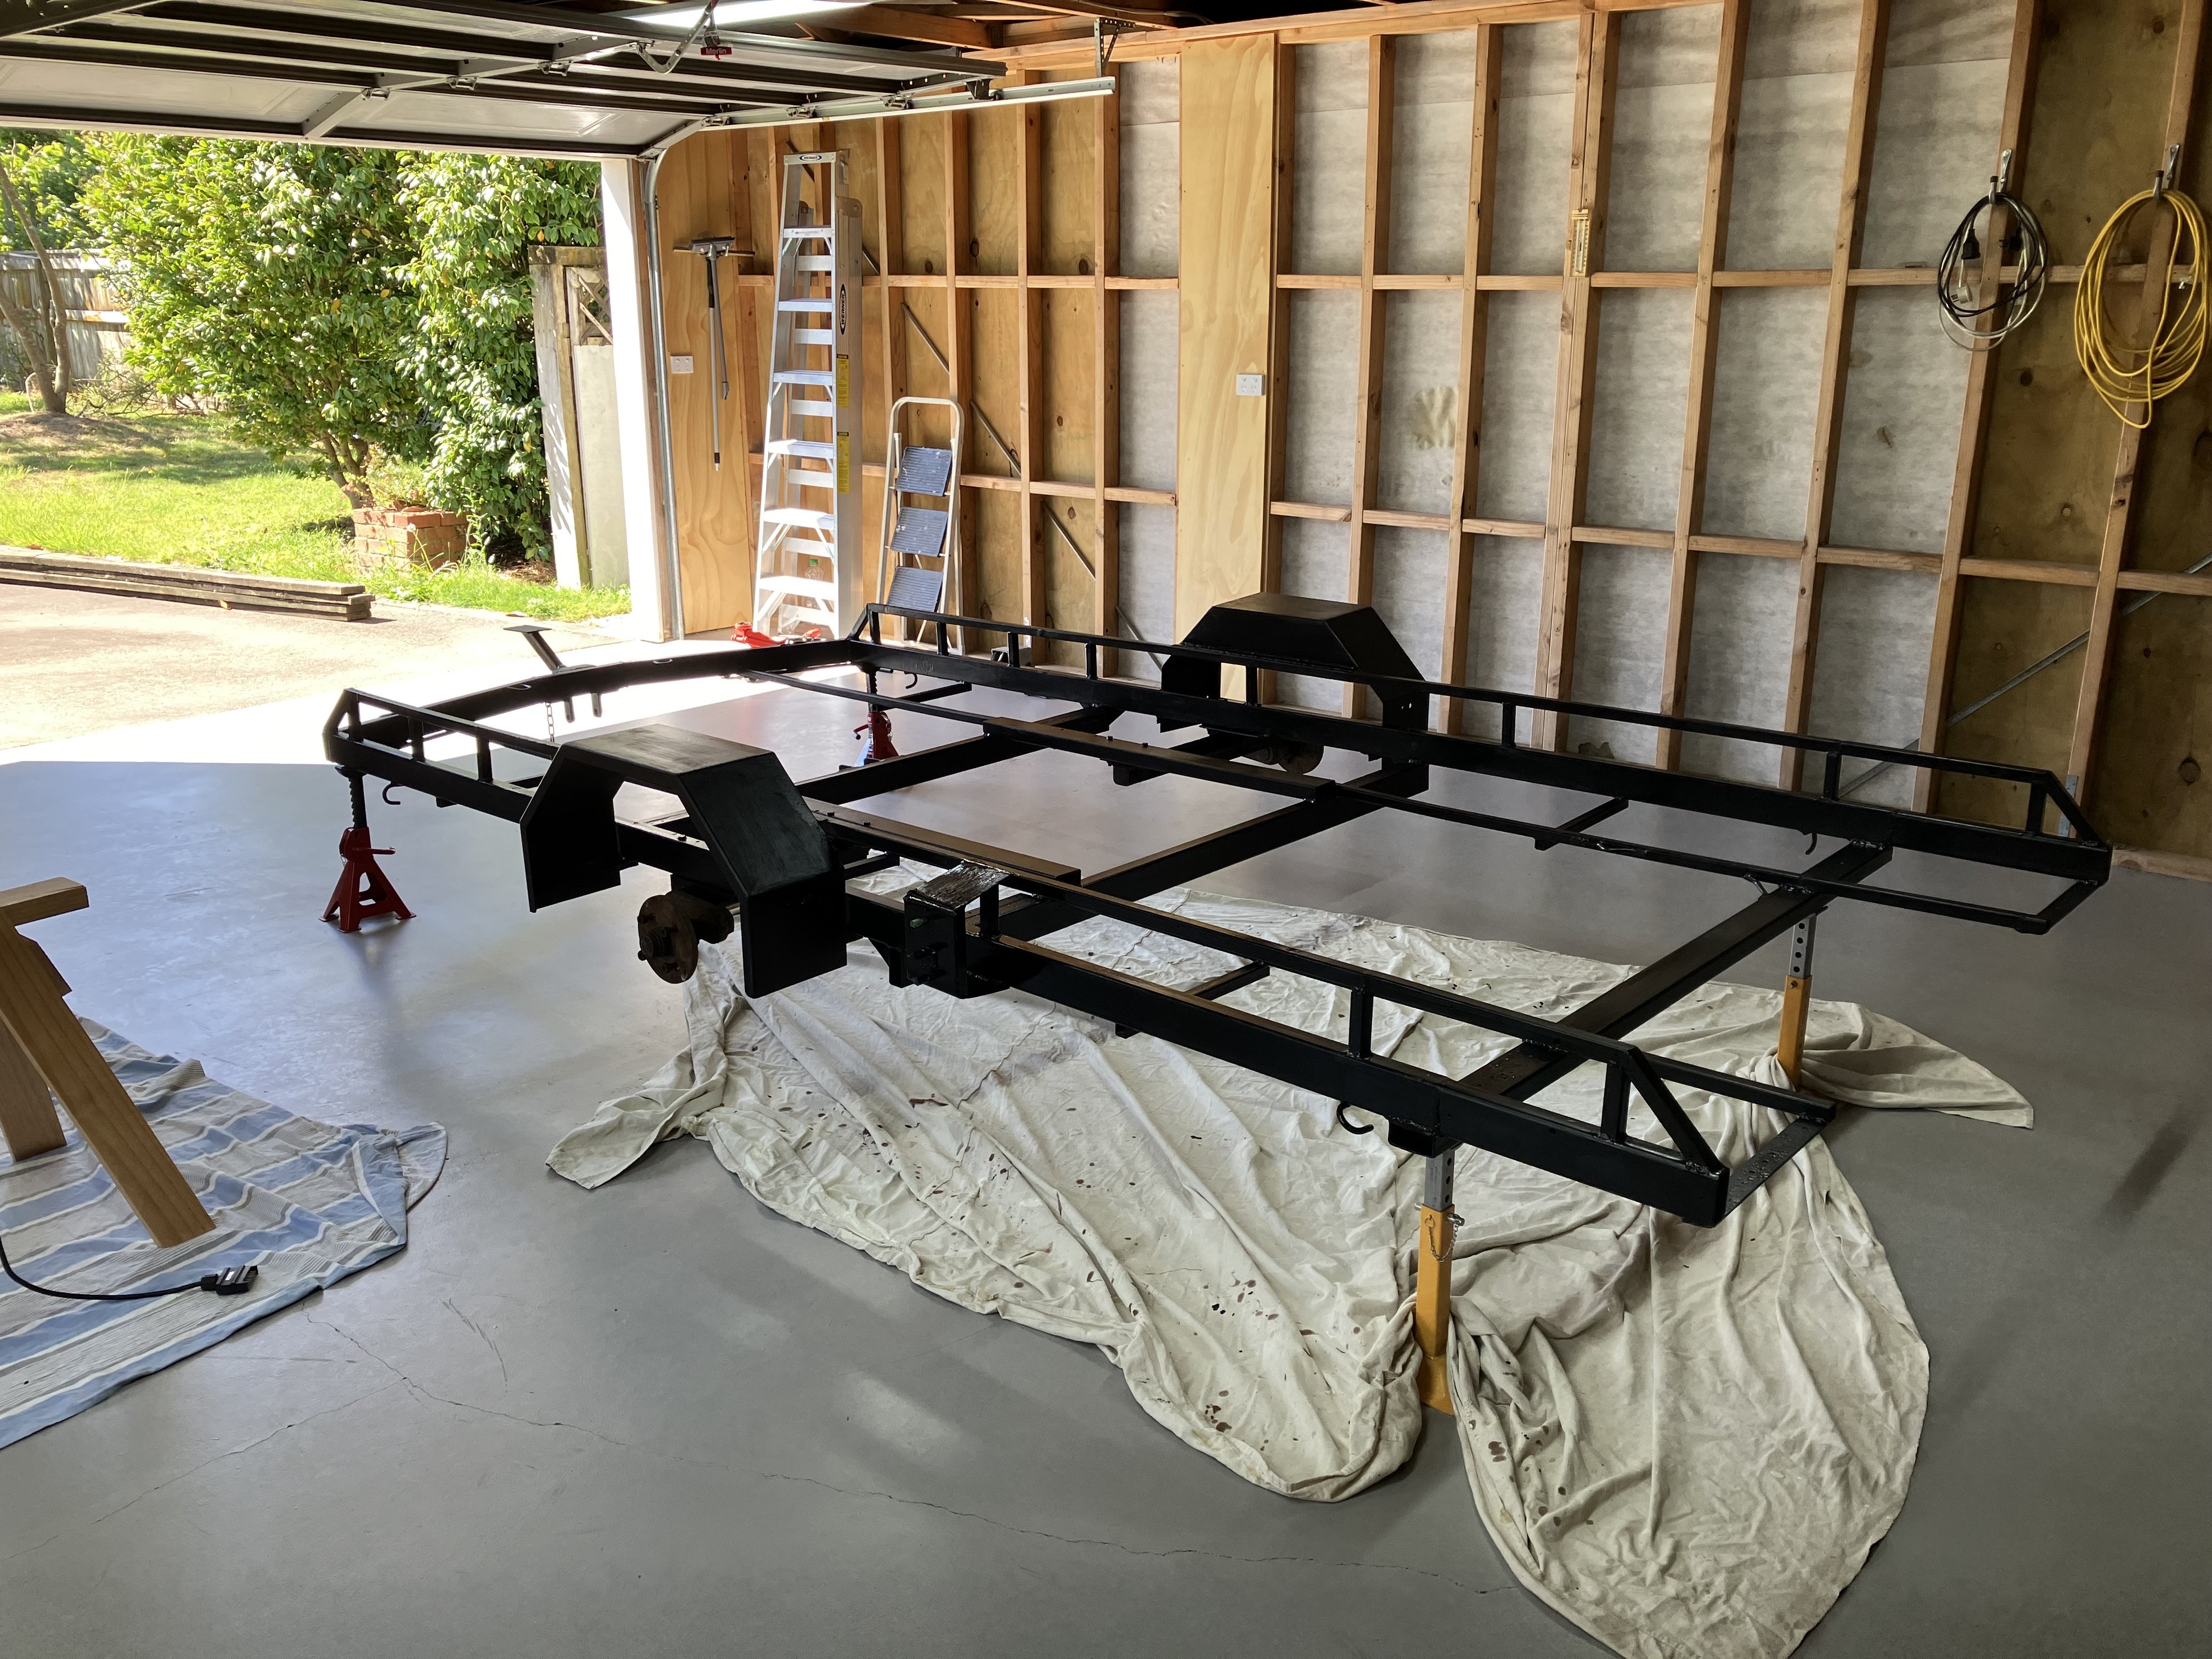
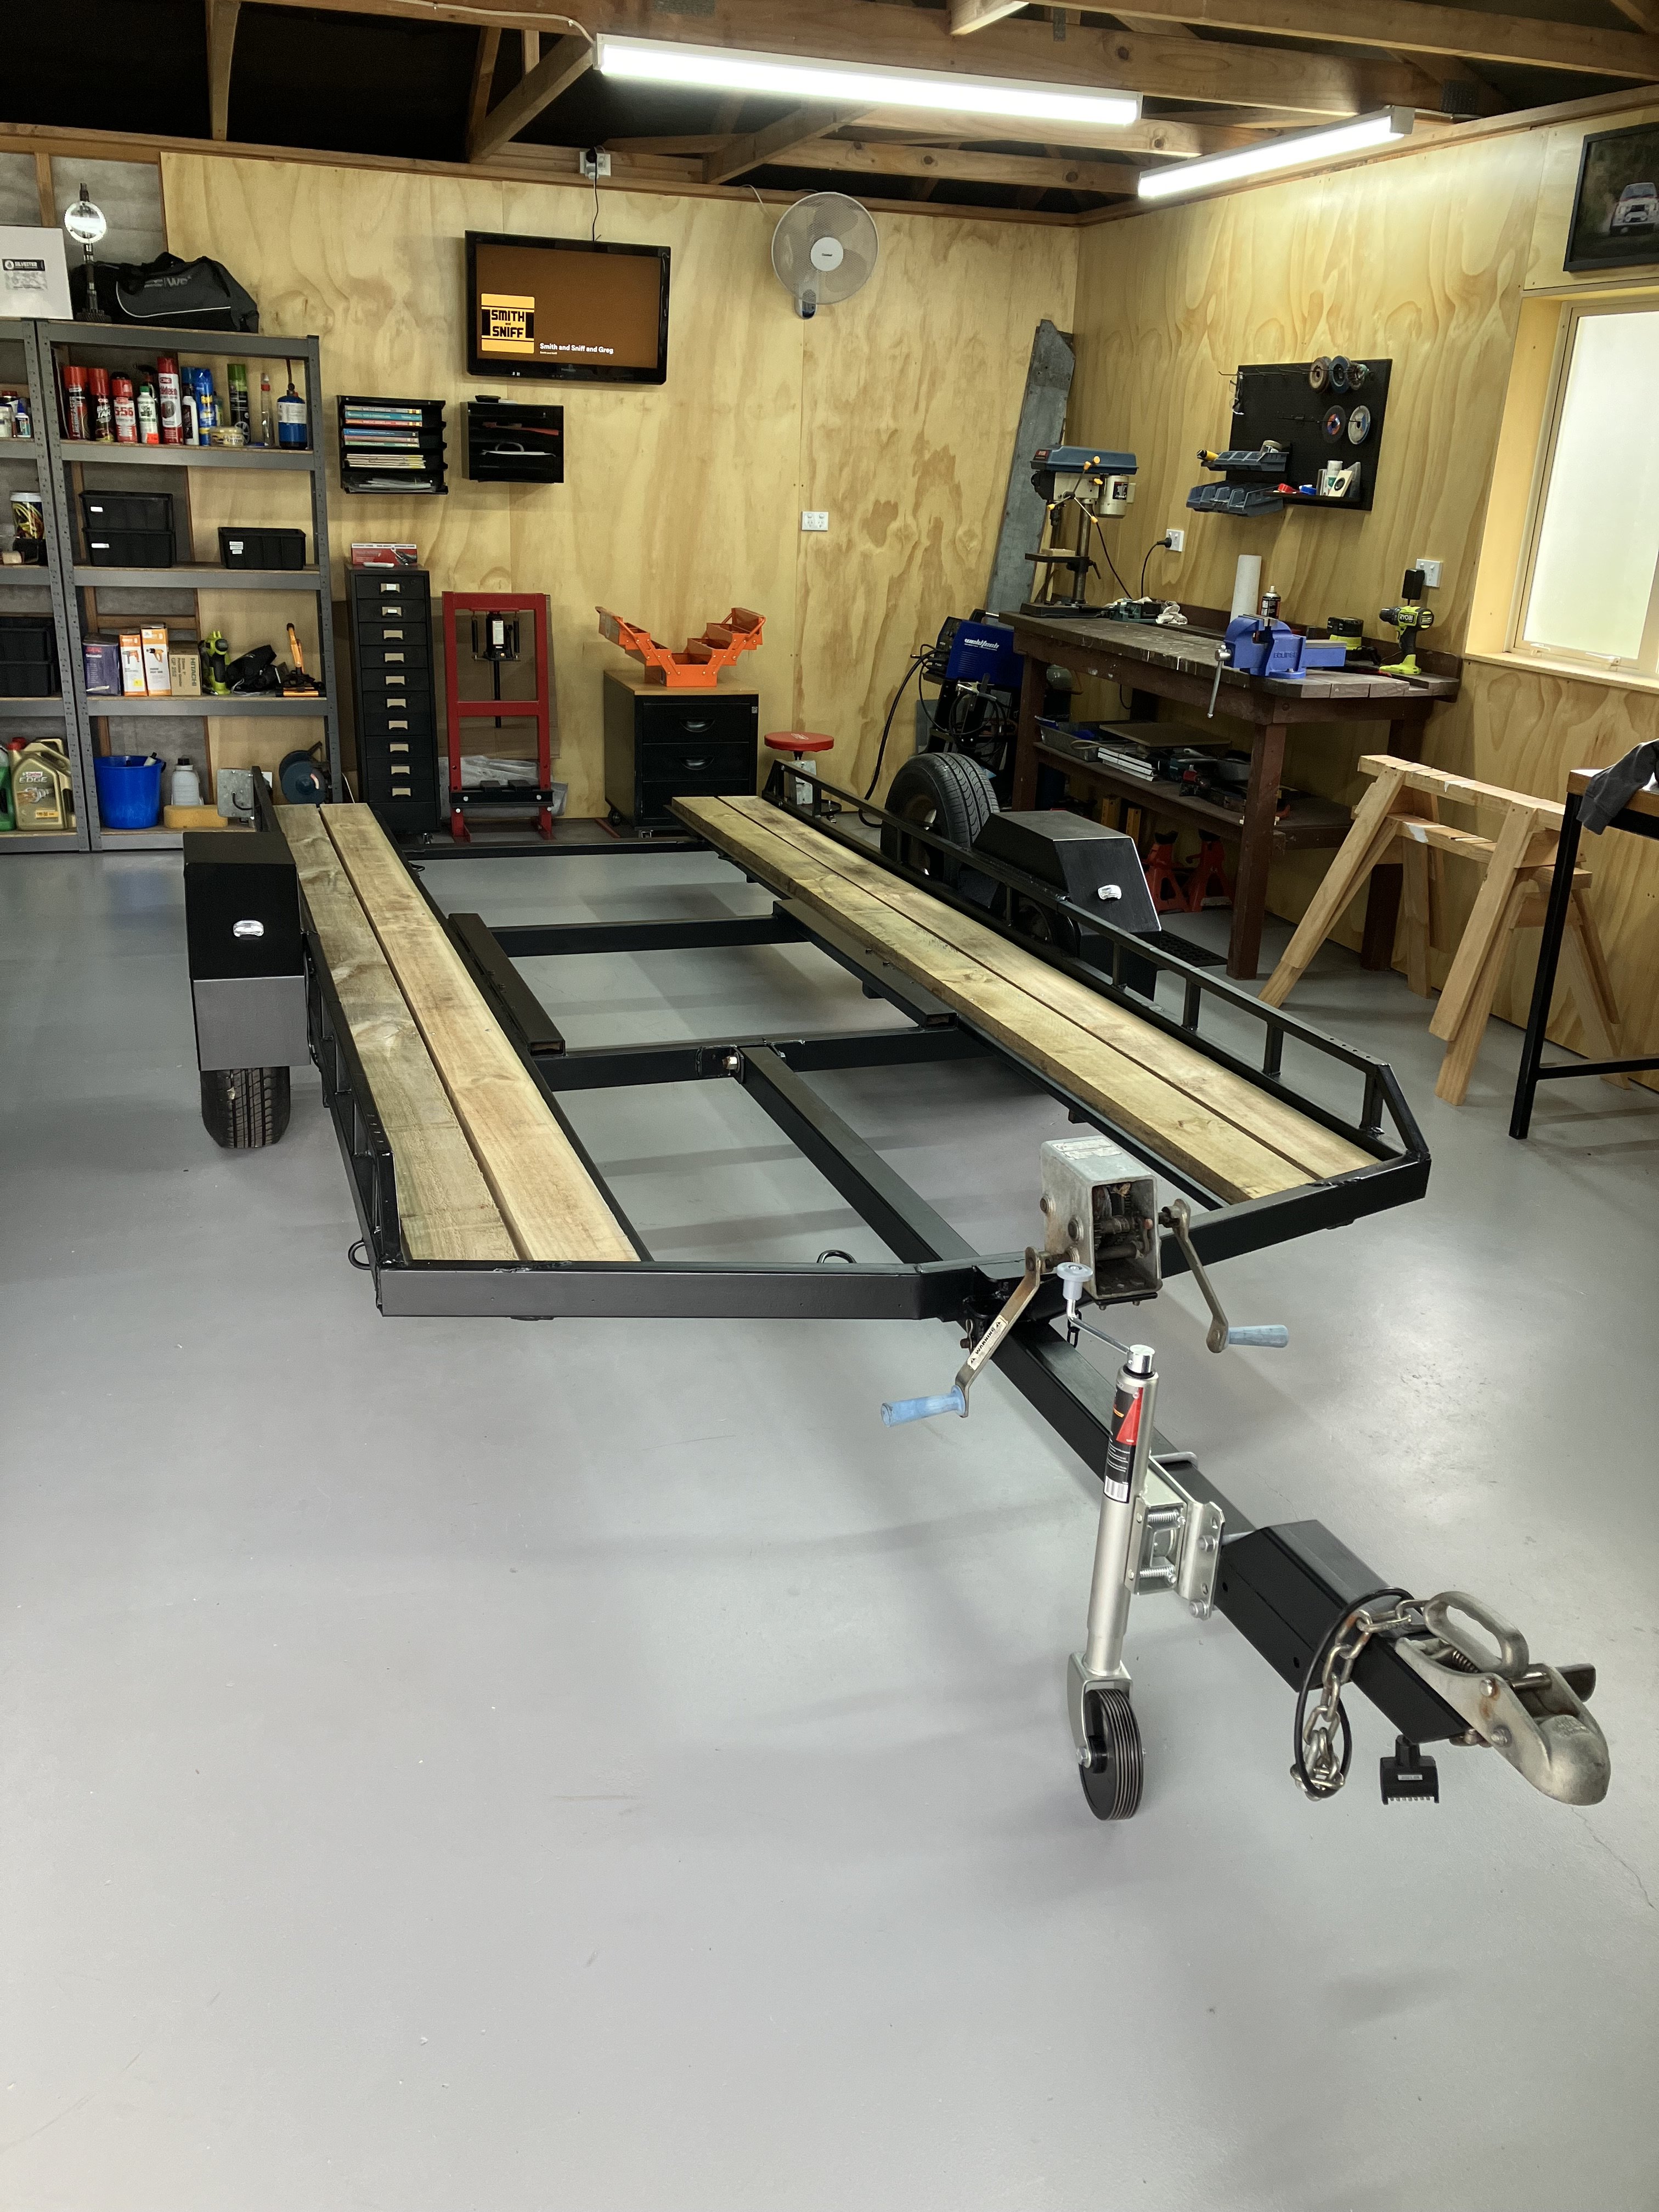
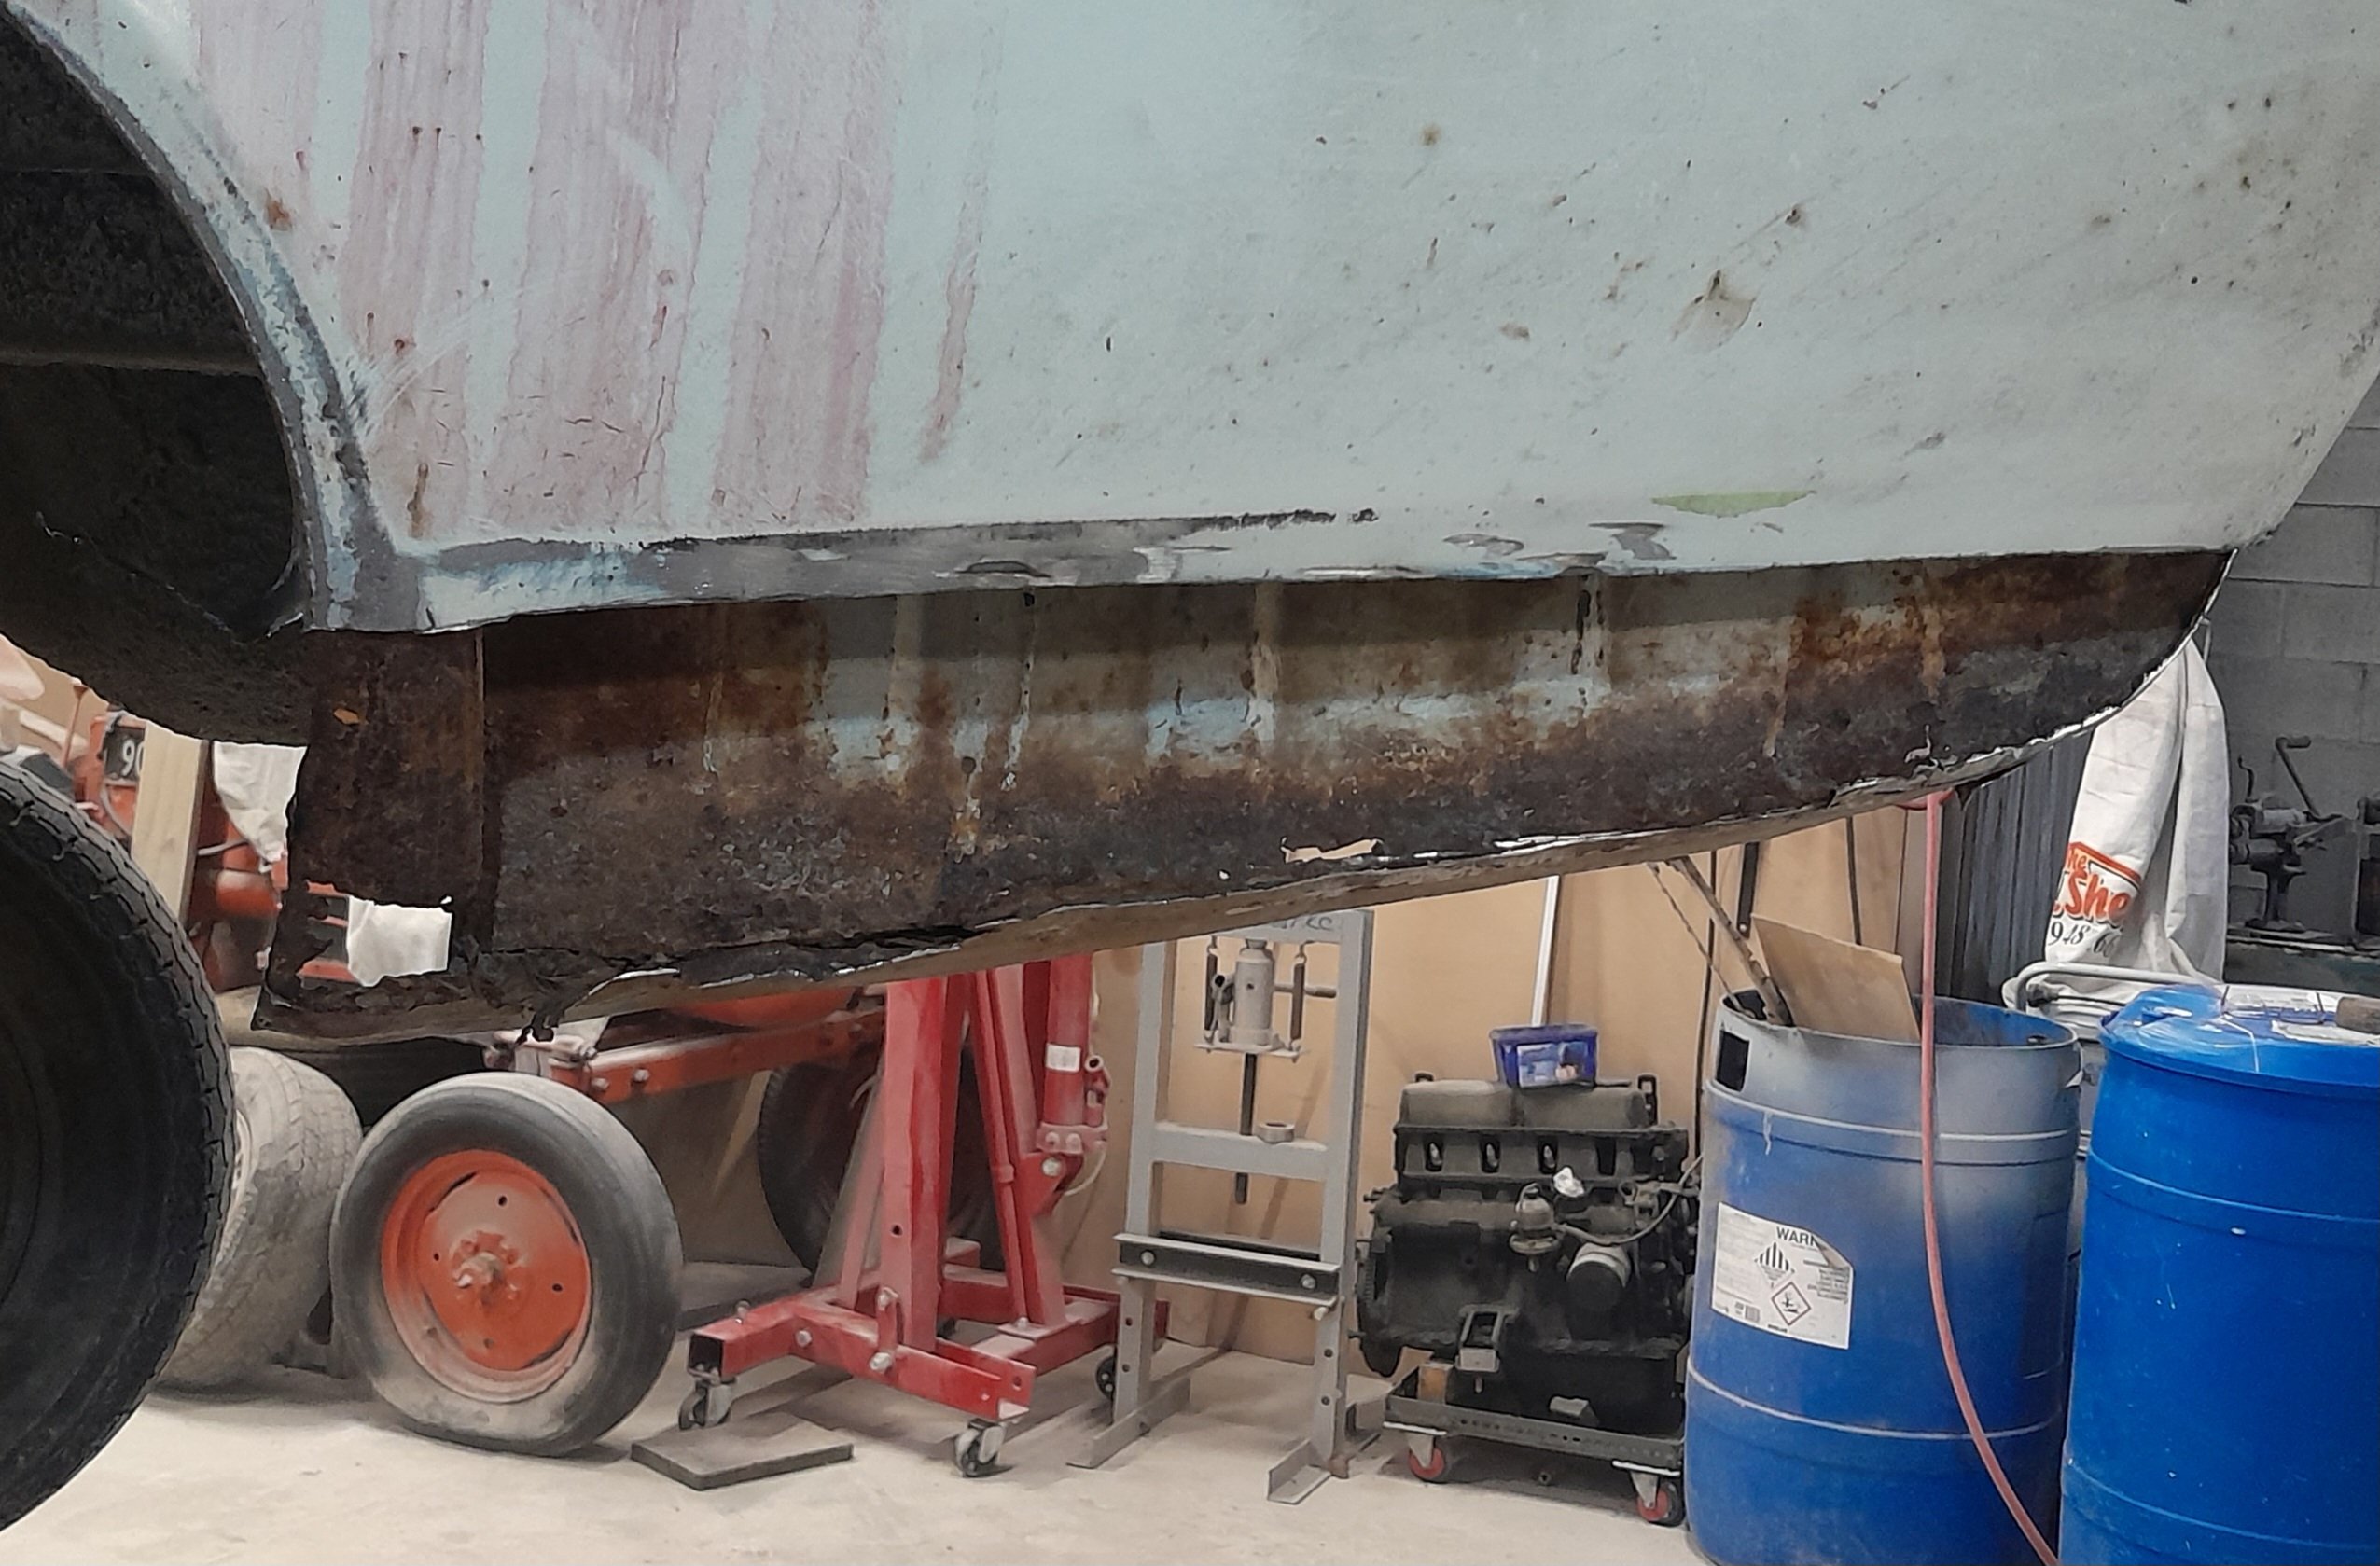
This is kind of random project thread worthy. So I’ve owned this old single axle car transporter for over 20 years (apart from a short period where a mate owned it, then I bought it back). In about 2005 I gave it a rough wire brush and painted it tractor red and put a new timber deck on it (necessitated by a mates Fiat 131R almost falling through the rotten old deck). I’ve been meaning to give it a refurb for ages, but it kept passing wofs and just looked like shit. It progressively got worse until @azzurro borrowed it and it had some structural failures where the spare wheel mounted (coincidentally while also towing a Fiat on it). He kindly patched it up before returning it but it needed attention. After moving back up north I decided it was time to tackle it and strip it right down and give it a birthday. Fix a few bad welds. Paint, new electrics, new deck etc. Anyway. After a few solid weekends of work it’s just like a new one. P.S. if you want to buy it, hit me up. It’s only small (suit Viva, 1200, Escort, Starlet etc).
7 points
-
*girly screams of excitement * just got these through
6 points
-
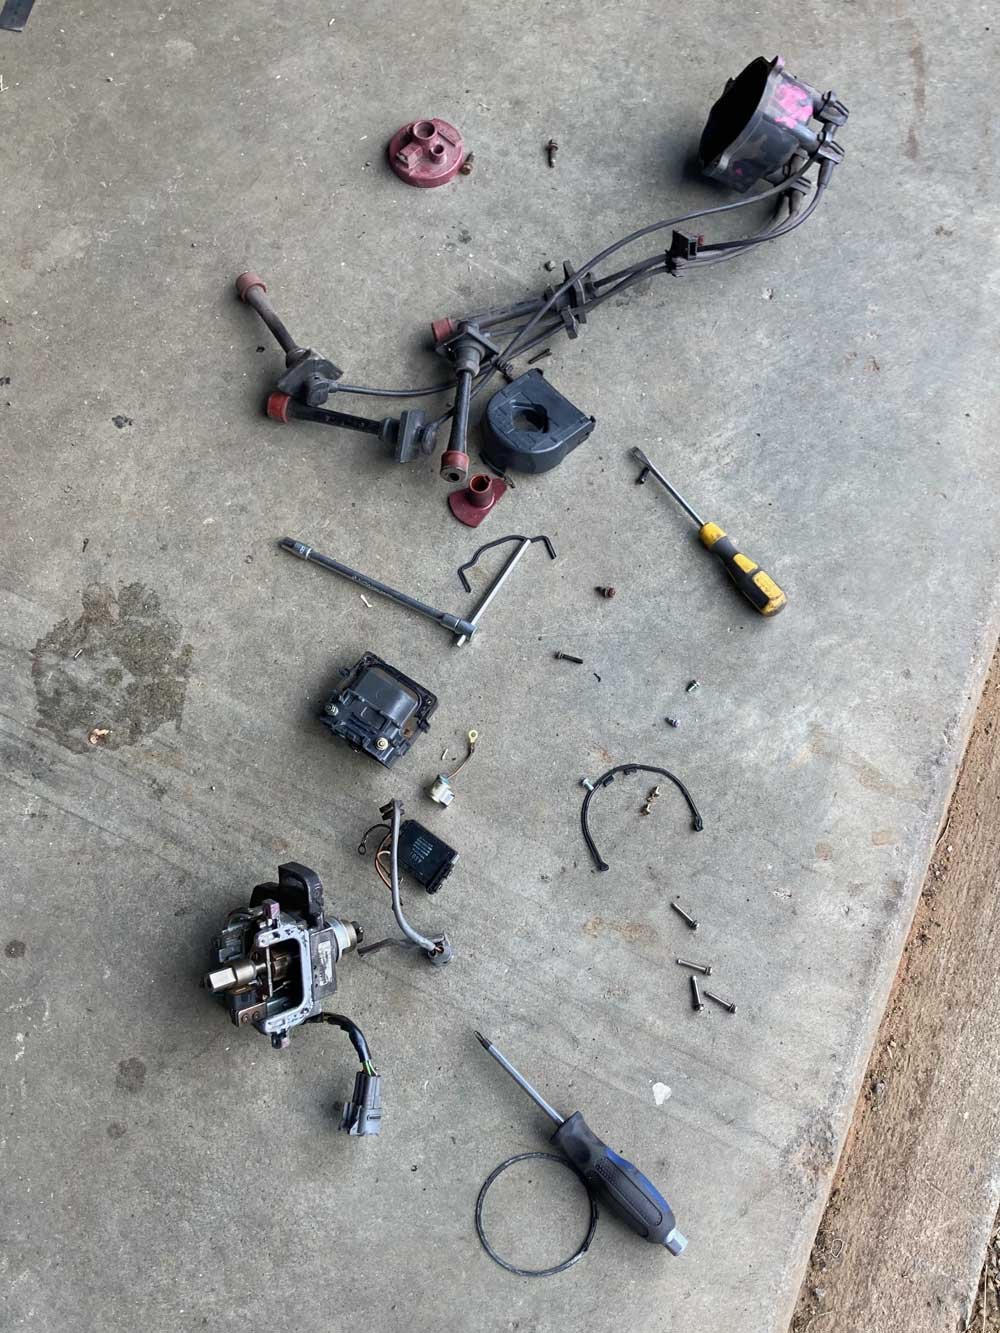
I ended up pulling the whole loom out to check things on the bench. It took a few hours to figure things out, I had made a few mistakes. Since I have pullup resistors on all of the cam angle sensors, the 5v supply on that loom plug splits 4 ways and joins to the signals. However I'd swapped the 5v supply wire with one of the 5v/DI signals on one half of the plug. So looking with a multimeter it still showed the correct amount of resistance on that DI, but, it was the wrong way around. Then I also found a broken wire at the plug end of one of the other DIs. Then I also found one of the pins in one of the plug halves was pushing back out when you put the plug together. So replaced the plug. I've got all of them responding on/off when holding steel against the sensors. While I was there I also changed the supply to 8v instead, hopefully less chance of trigger errors. Hopefully it'll all work okay now.5 points
-
One of the multitude of reasons this car never gets any closer to be finished is my never ending flow of side projects and half arsed ideas filling up the carshed and not leaving enough room for the car! Rainy boring day so perfect for a shed tidying session. Got sidetracked making one of my kids a wand first up (see never ending projects comment above), but got a solid effort in this afternoon so far. Have been putting up with this behemoth being in the way everwhere for years now, never wanted the box anyway so today it got cut up for the burn pile. So much more space efficient now. Lots of things along those lines and now i can see a car sized open floored area again! Will cut open another burning drum tomorrow and get rid of all the scrap timber that has accumulated in the back shed. Then continue the relocation from hoardingsshed 1 to hoardings shed 2..... of 4. Then to tow/push/shunt the car out of its lawn divots!
5 points
-
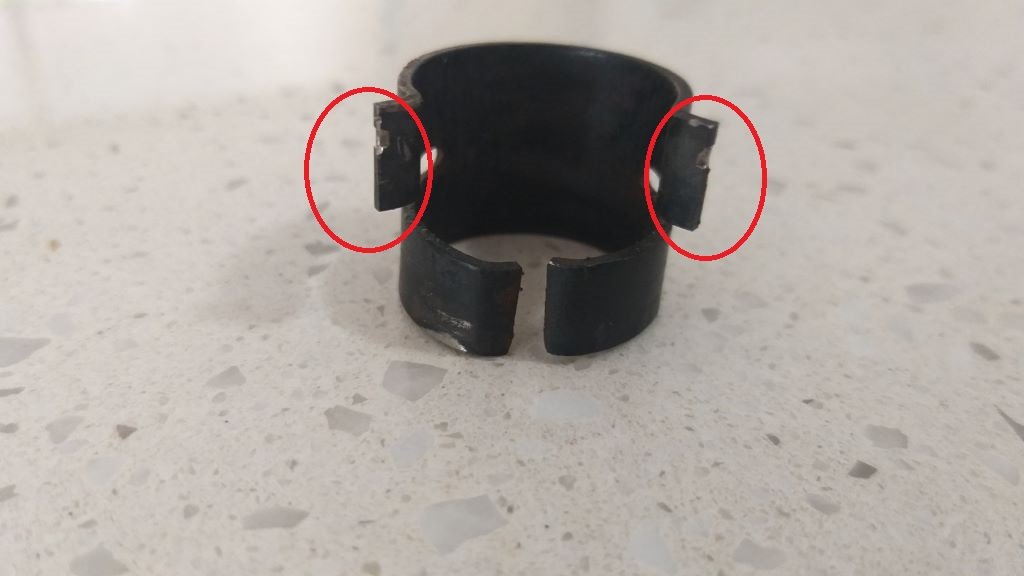
Over the last few weeks, I've noticed a steadily increasing stiffer steering and during last night's burger cruise it felt particularly bad. Figured I'd do a bit of fault finding today. First step was to remove the intermediate steering shaft to determine whether the issue was on the steering rack end or the column end. With the intermediate shaft out I fired up the engine and waited the few seconds for the Astra pump to come online. What a relief it was to find out that the issue is not on the rack/pump side of things. So turned my attention to the angled steering gearbox and the steering shaft itself. Pulled out the angled gearbox for a closer look. Popped the cover off to check the lubricant level. Turns out it uses grease - or at least mine is filled with grease. I'm hoping that is factory and not some previous owner's bodge job. Anyone know ? Anyway, I neglected to take a photo, but it looked like some of the grease had shifted leaving the top half of one of the gears dry. The grease looked to be clean and still in good condition, so I just topped up the level and fitted the cover plate back on. At the same time I spent a bit of time fine tuning the little adjusting thingy till I got the mechanism turning smoothly: While I had the angle box out, I pulled off the steering wheel and dropped the shaft so that I could grease the upper and lower bushes. They were pretty dry. With the steering wheel off I figured I'd tackle another annoying little issue. For a good while the indicator self cancelling feature on left turns hasn't been working. Works perfect on right turns though. Really aggravating as I keep forgetting to manually cancel the flashers and also pretty unsafe. Anyhoo, I took a closer look at the mechanism and it was visibly okay. There are two little "ears" on a spring steel collar that press fits over the inner steering shaft. Looks like so: Each little "ear" engages with a double ended lever attached to the indicator mechanism. One of the "ears" isn't visible due to the angle of my photo, but I've marked up where it is supposed to be. With a visible inspection not showing anything untoward I enlisted Mr's Flash's help to watch what was going on while I turned the steering shaft from below. Turns out the little "ear" on left turns was not triggering the self-cancelling lever. Pulled it out the collar for a closer look. Both "ears" are showing signs of wear with noticeably more wear on the left one. Thought I'd try and give it a tweak, so clamped the offending "ear" in my vice: Chucked an appropriately sized punch down the centre of the collar to maintain its shape: Then gave it a little bit of loving with a hammer. Popped it back on the column for another test and ... success! With the self-cancelling issue sorted I reassembled the steering and dropped the van back on its front wheels for a quick steering test. Nice and light once again. Loaded up my ratchet with the appropriately sized socket and headed out for a road test and also to re-centralise the steering wheel. It took a few goes until I got the steering wheel perfect, but I'm happy that things are now back to normal. Thanks for looking.
5 points
-
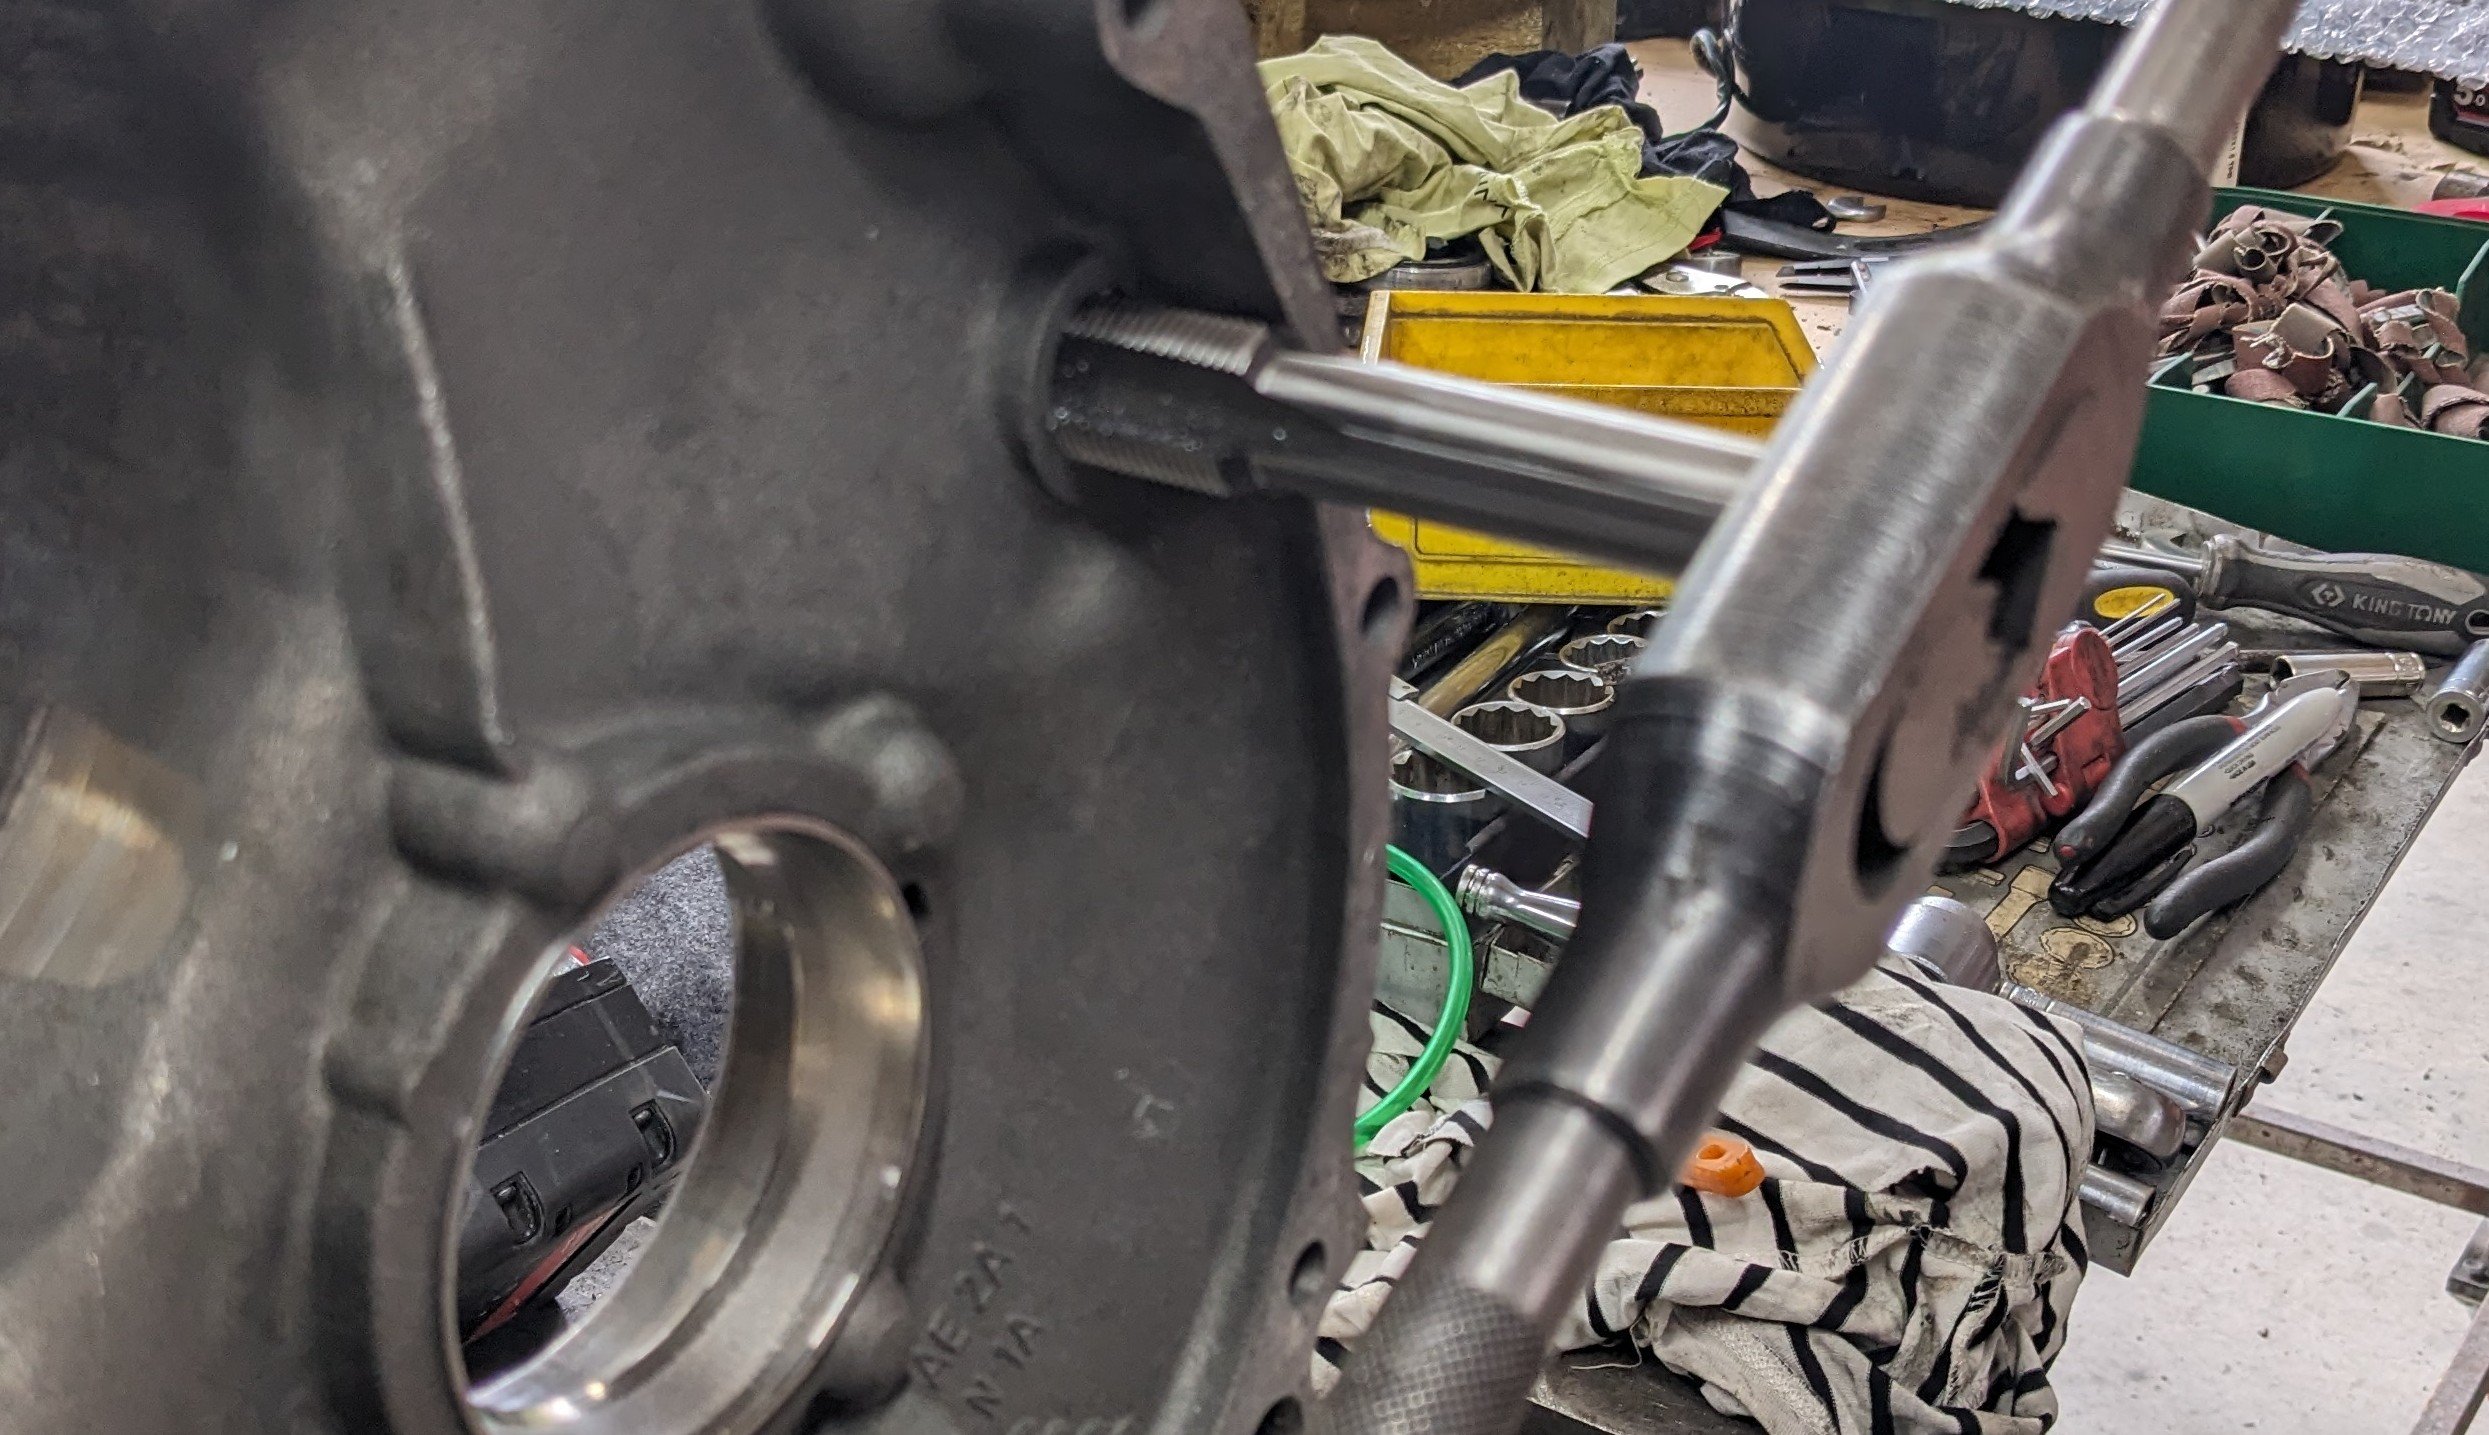
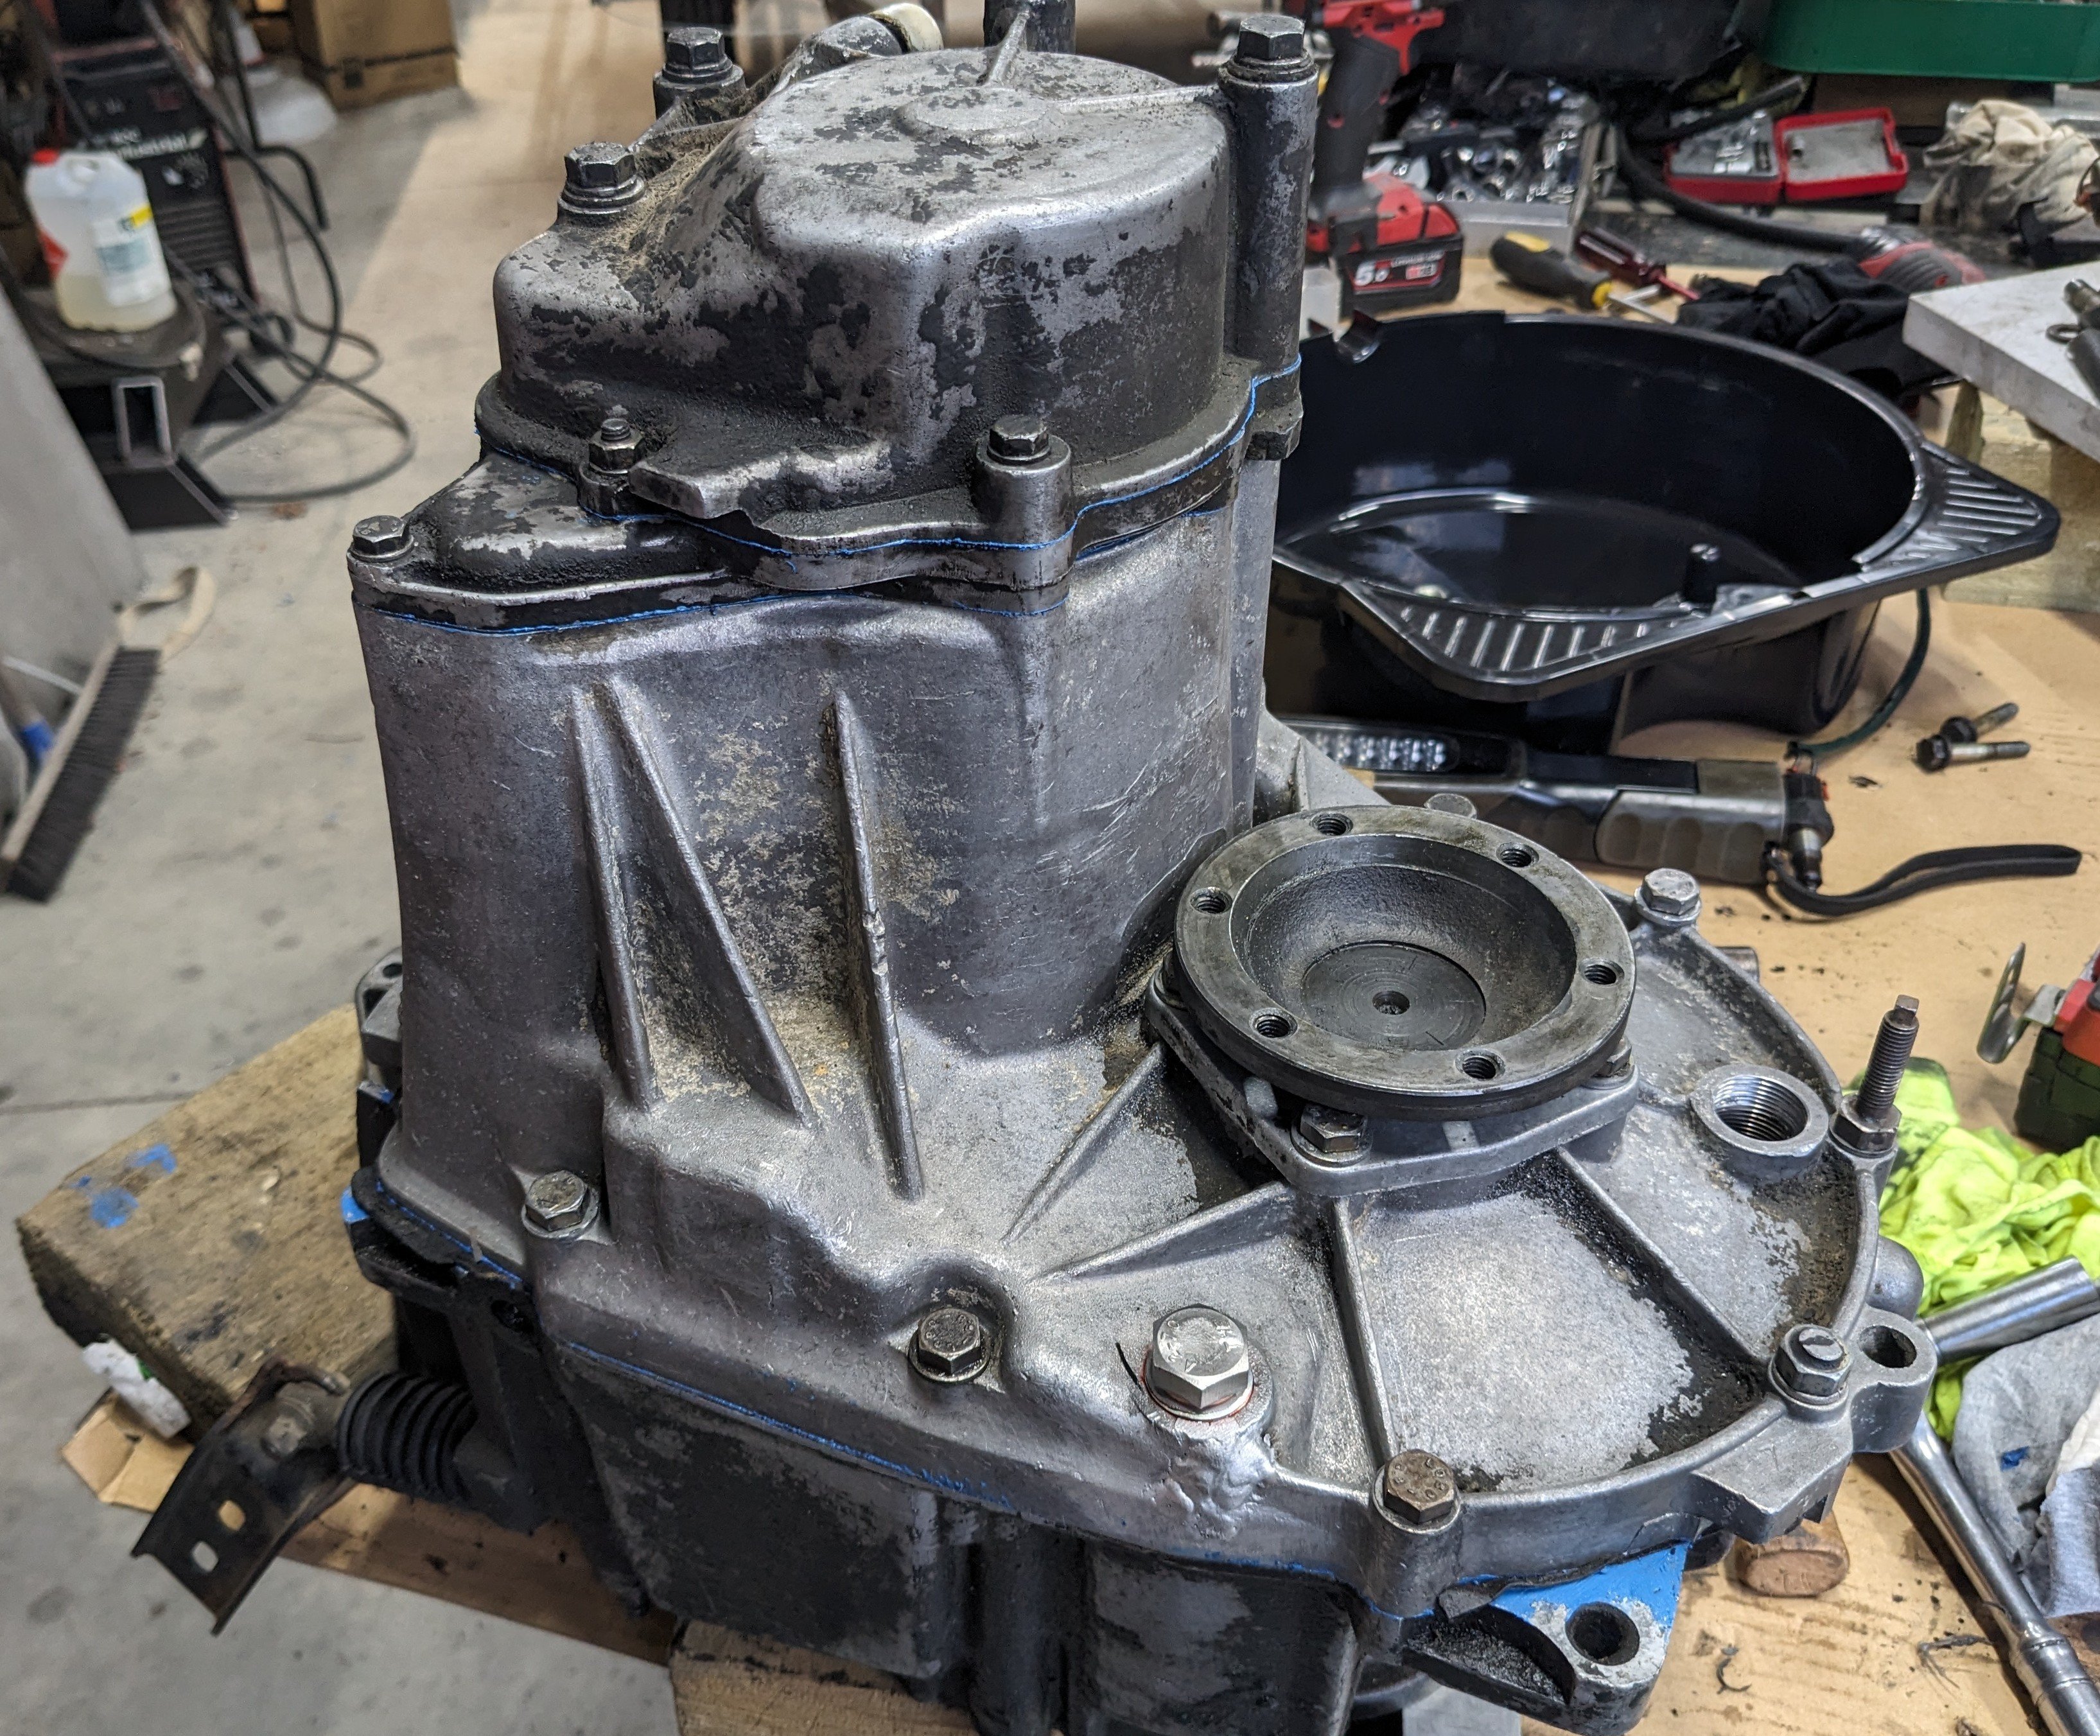
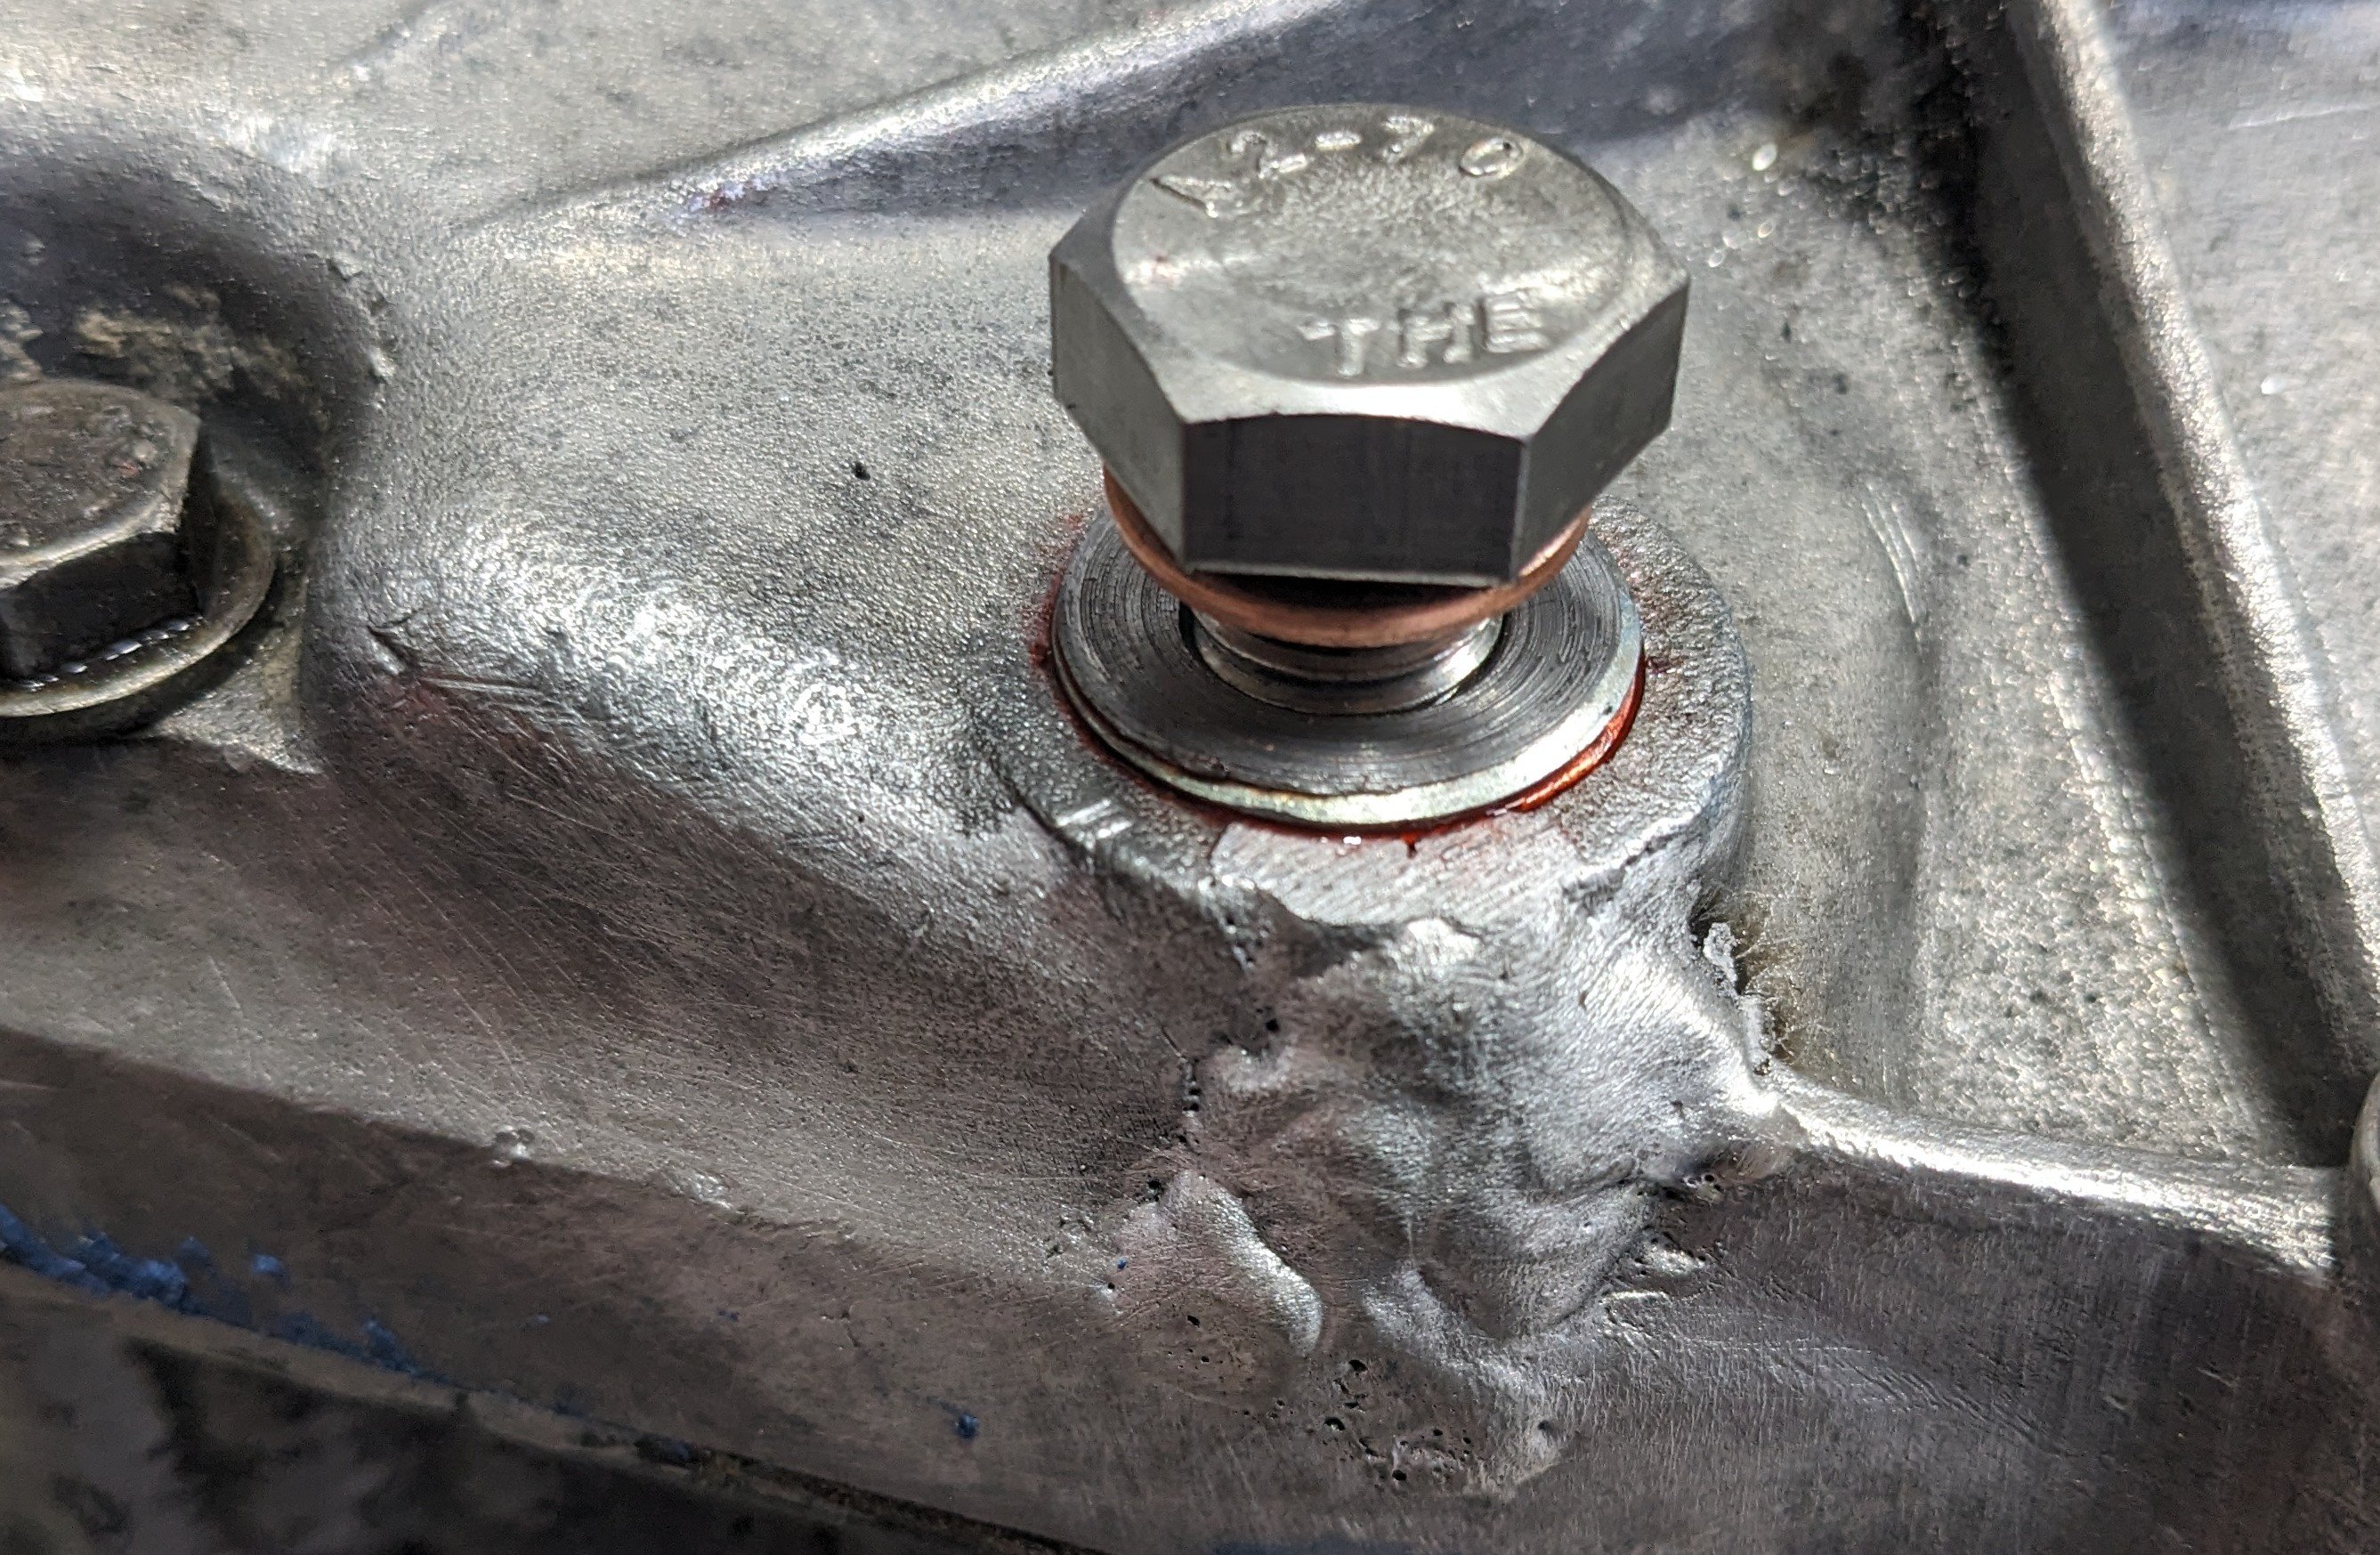
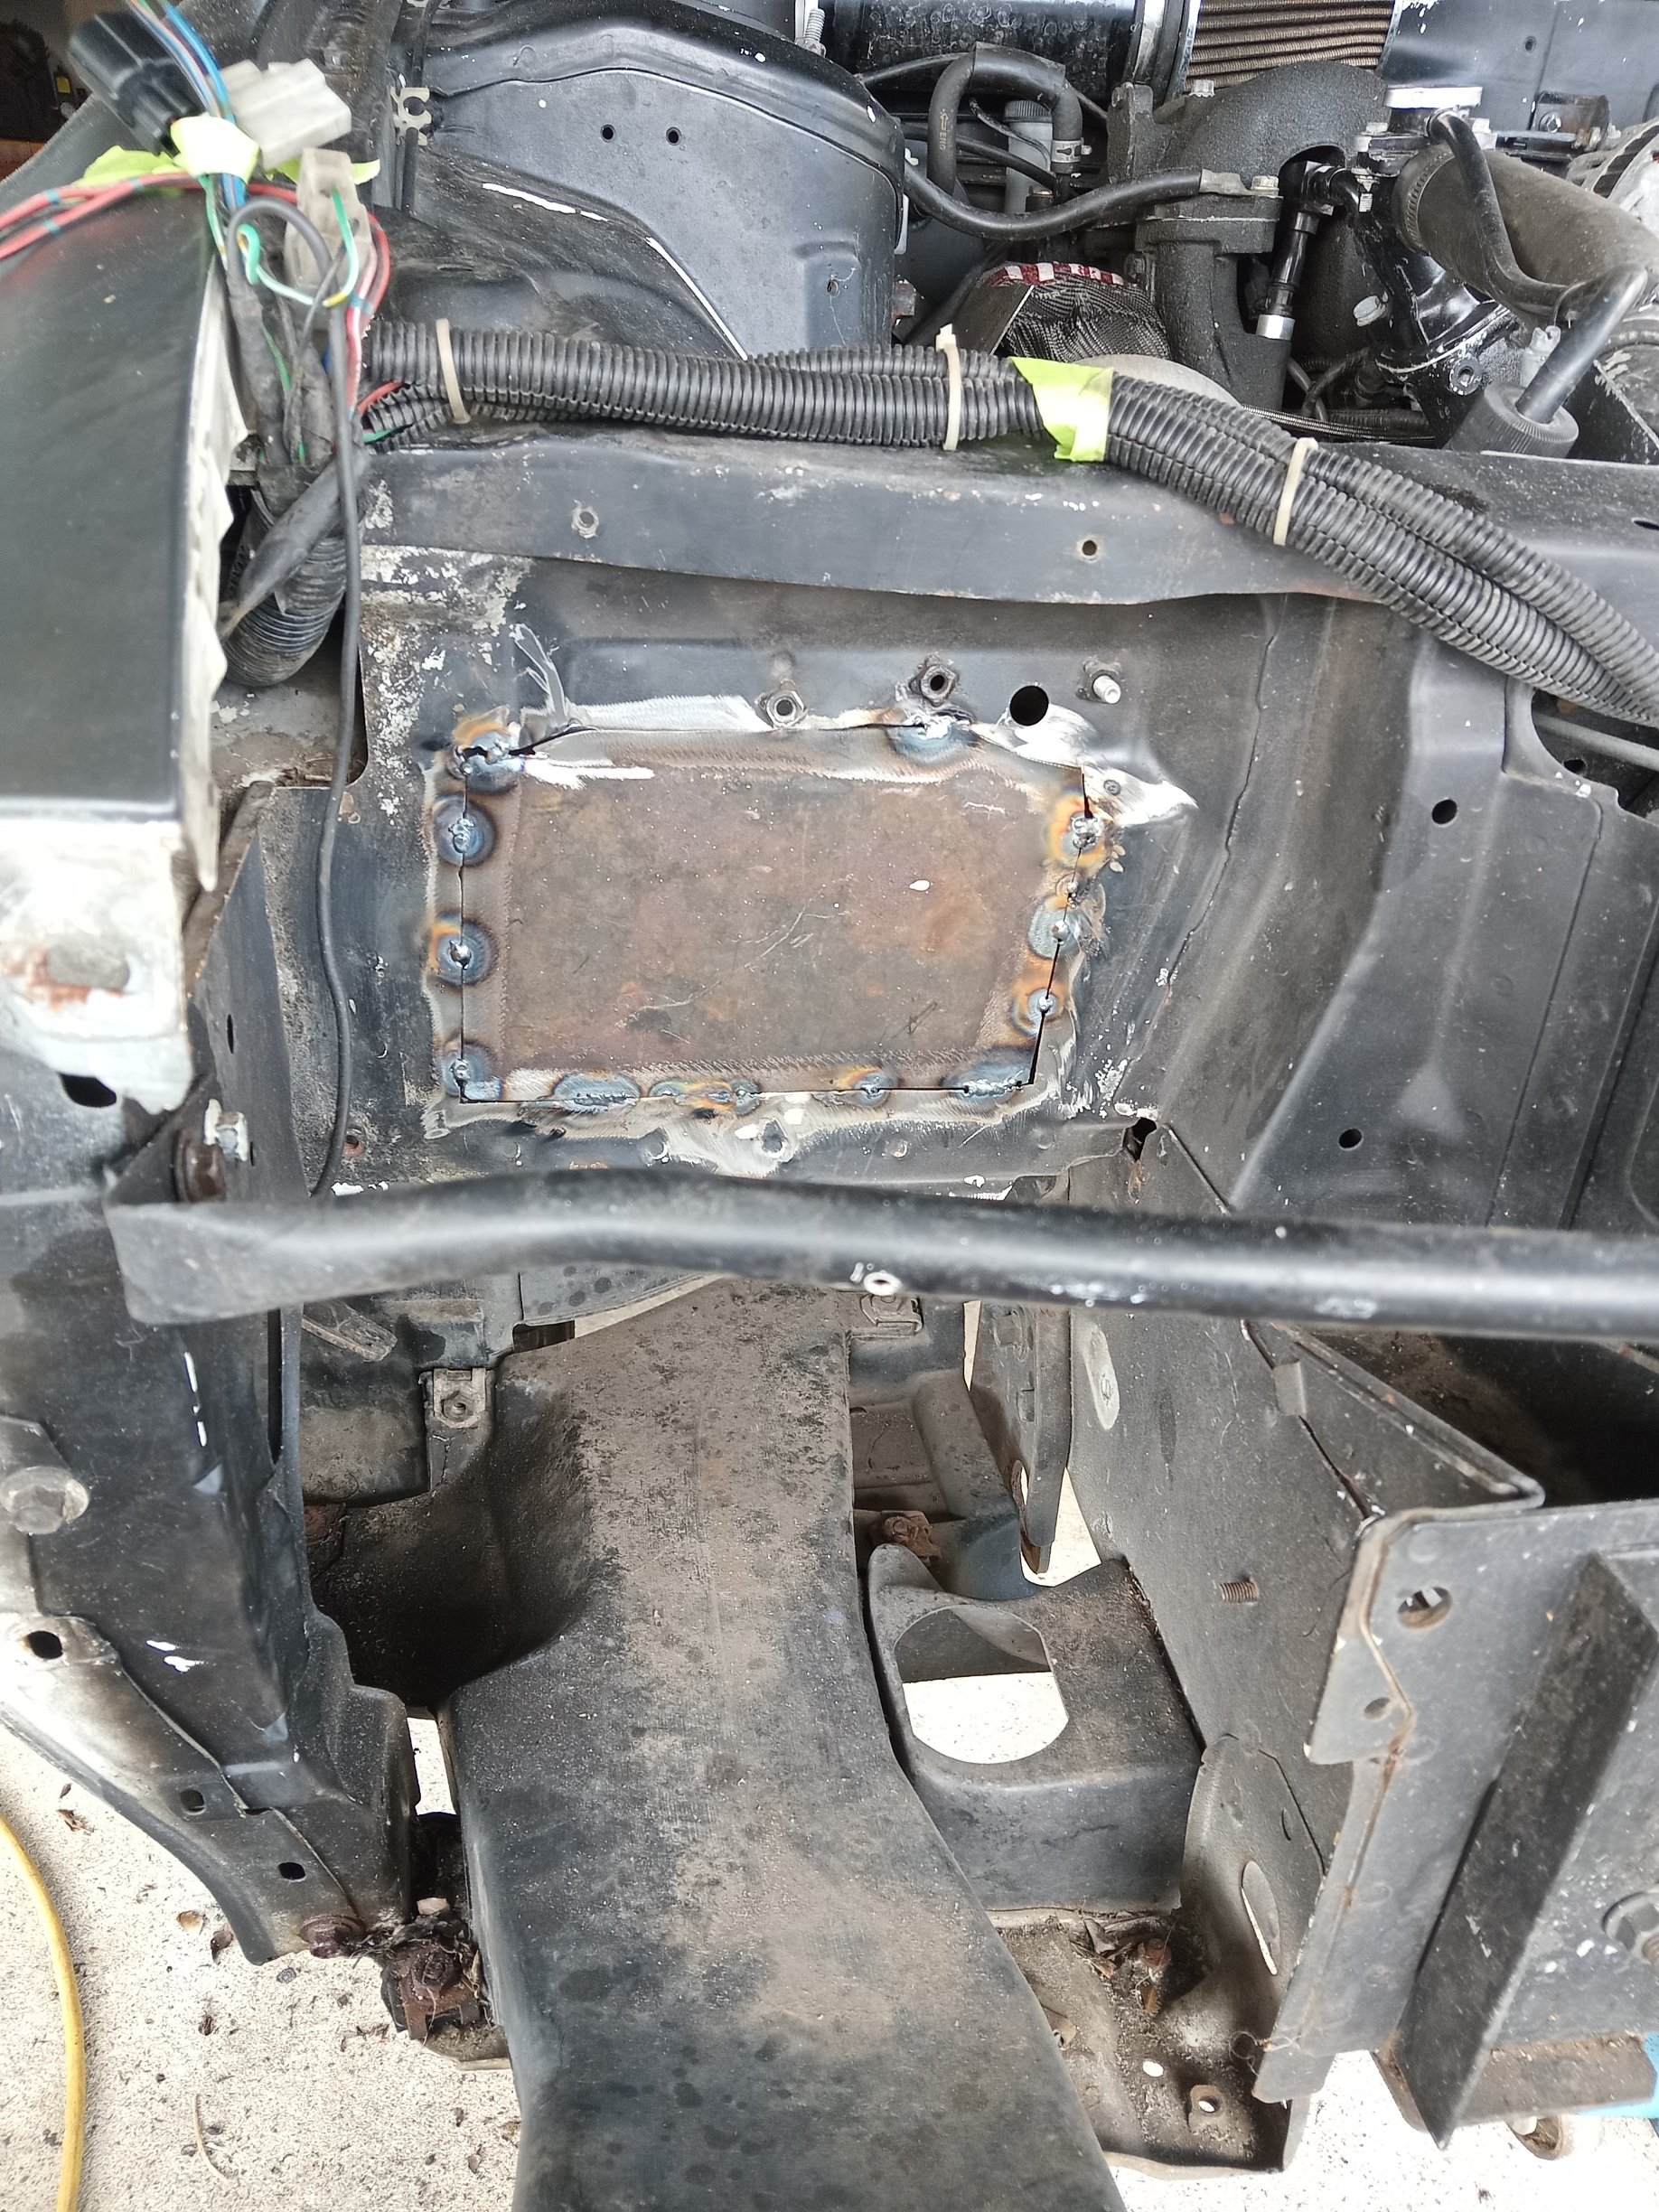
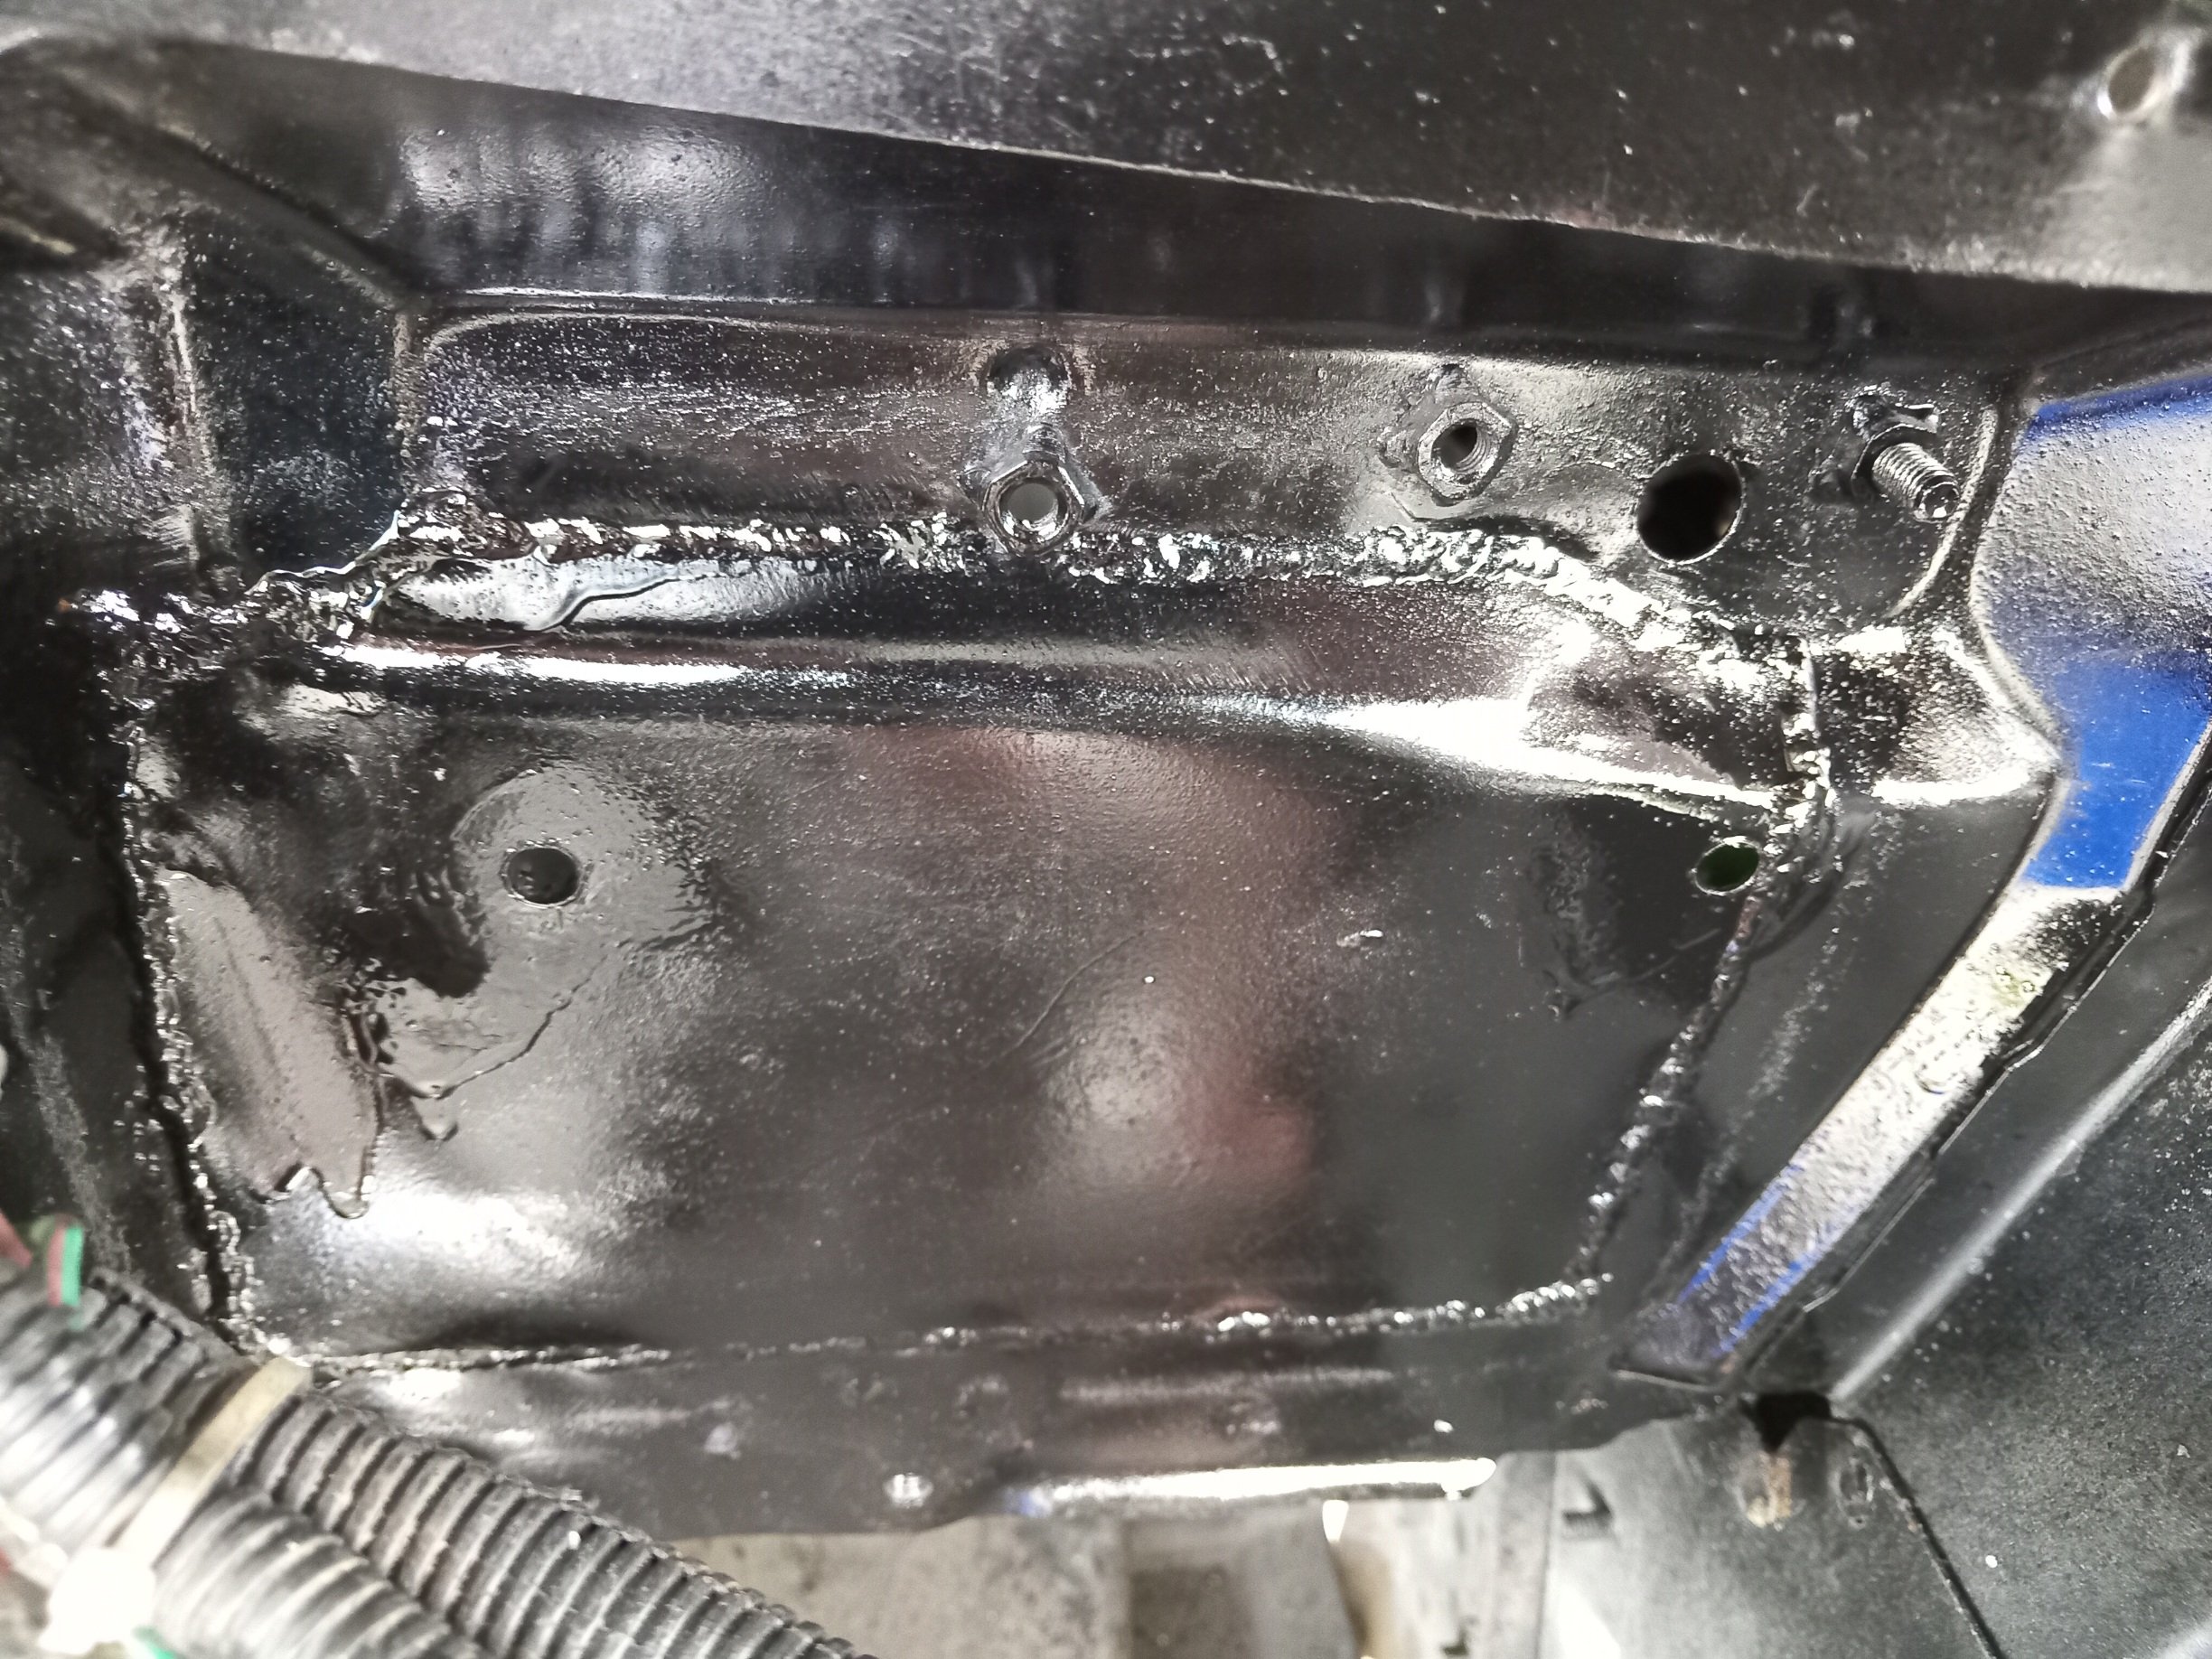
The bits I need for that Wof have arrived, the wheel bearing might be a mission, but we will see. In the meantime I have been hoovering/relearning what I need to know about DCNF carbs and have had some useful and enlightening conversations, some of which can be found in my DCNF thread.. I also decided to replace the expensive oil in the tranny with fresh expensive oil. Mostly cos I drained it all out to put a bit of sealant on the drain plug as it was dripping a tad. When it came out it was kindof murky which I guess is the new oil washing out and interacting with the old. So I did that and it resulted in a pretty significant drip from the drain plug regardless of my sealing efforts. I did a wee bit of investigation, which has had this slightly annoying result; I have a spare box which I stripped enough to get that housing off, pretty much for practice but to see if I could just use that. But unfortunately they are different. This might mean enlisting @yoeddynz in some dirty welding duties if I cant find someone slightly closer. If it welds ok I will tap it out with a parallel thread rather than taper and machine a flat face so it can use a washer for sealing.
5 points
-
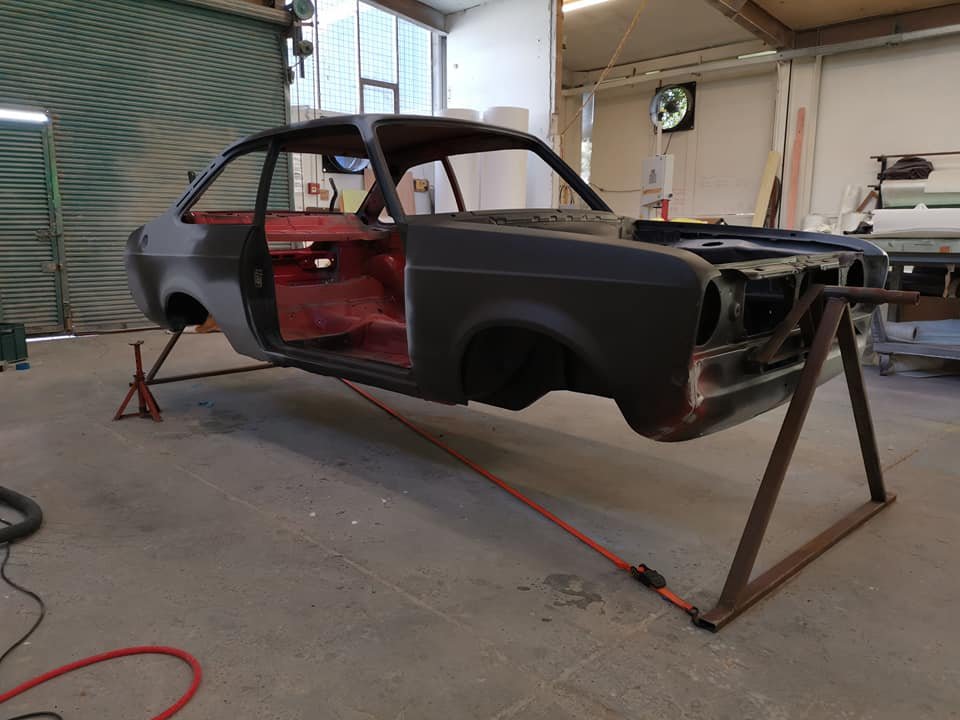
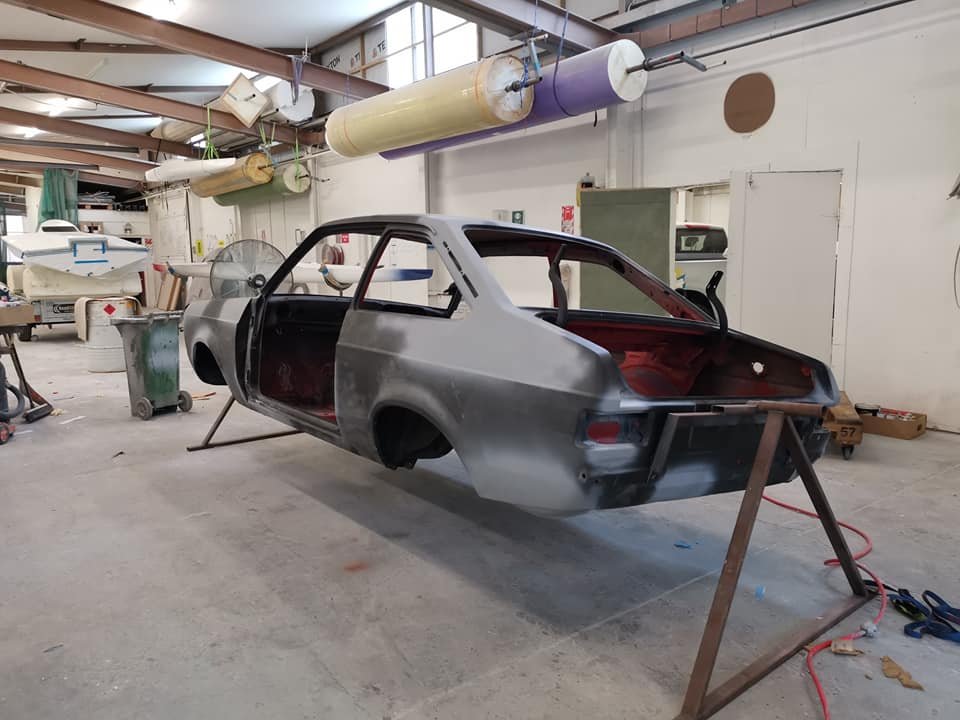
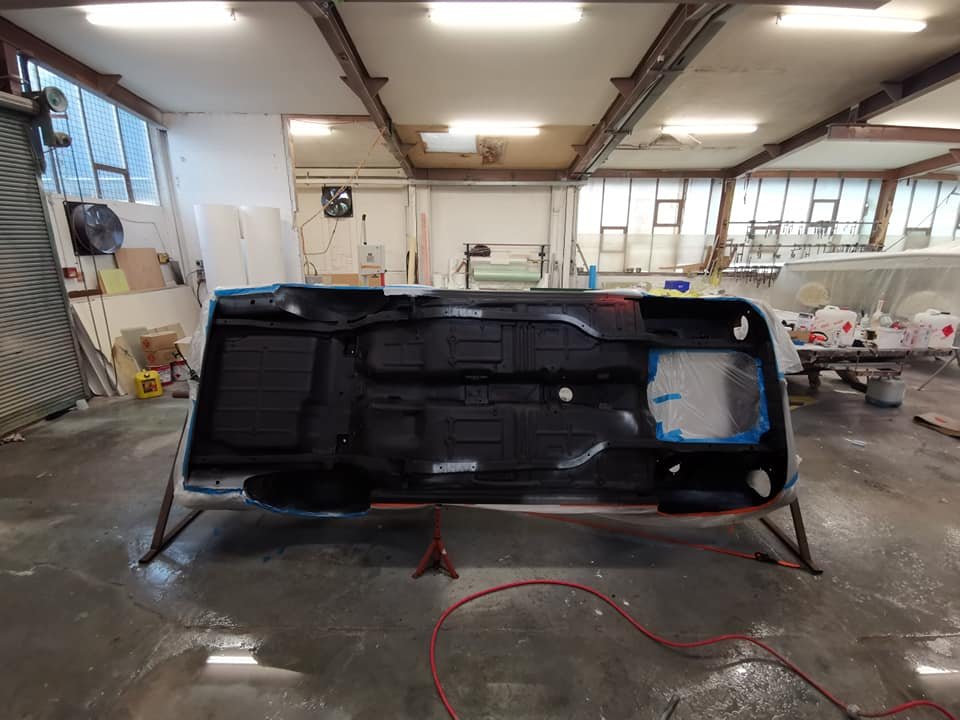
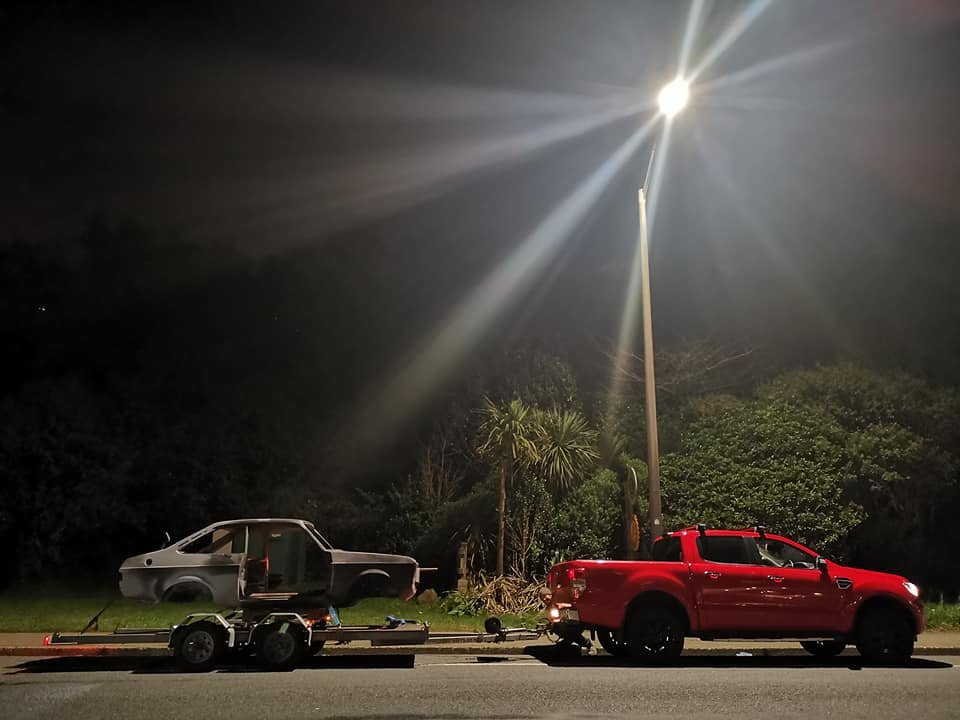
Chop time
4 points
-
4 points
-
Ive been making good progress on getting everything wired into the fusebox and controlled by ECU rather than hardwired. I bought 2x 500mm coby hotdog mufflers which are currently just sitting pushed over the ends of the pipes on each bank. Quieter than just open manifolds but should be better once welded. Have wired up ECT, wideband, fuel pressure sensor. The motor was still idling really high (like 4200rpm...) with fully closed throttles, even after setting everything to fully closed. I couldnt figure out why until I noticed that my 2x lower intake manifolds dont quite cover the edge of the circular holes which must be an idle air bypass. It was only by a smidge, so gooed the gap with some silicone and solved that problem. My current issue is that the cam angle triggers arent being picked up properly. This motor uses hall effect sensors on the cam angle sensors, and the voltage they output is too low for this ECU to register correctly. So pullup resistors are needed, which I have wired in. But stilk not working it seems. Some people have suggested wiring them to the 8v power supply rather than 5v supply, and this boosts the output voltage. But this stuffs up my loom a bit, as the 5v supply on that plug branches to a few other things as well as the triggers. So, another annoying problem, but not insurmountable. Just soaking up more time on little bits and pieces than expected. But thats always the way I guess!
4 points
-
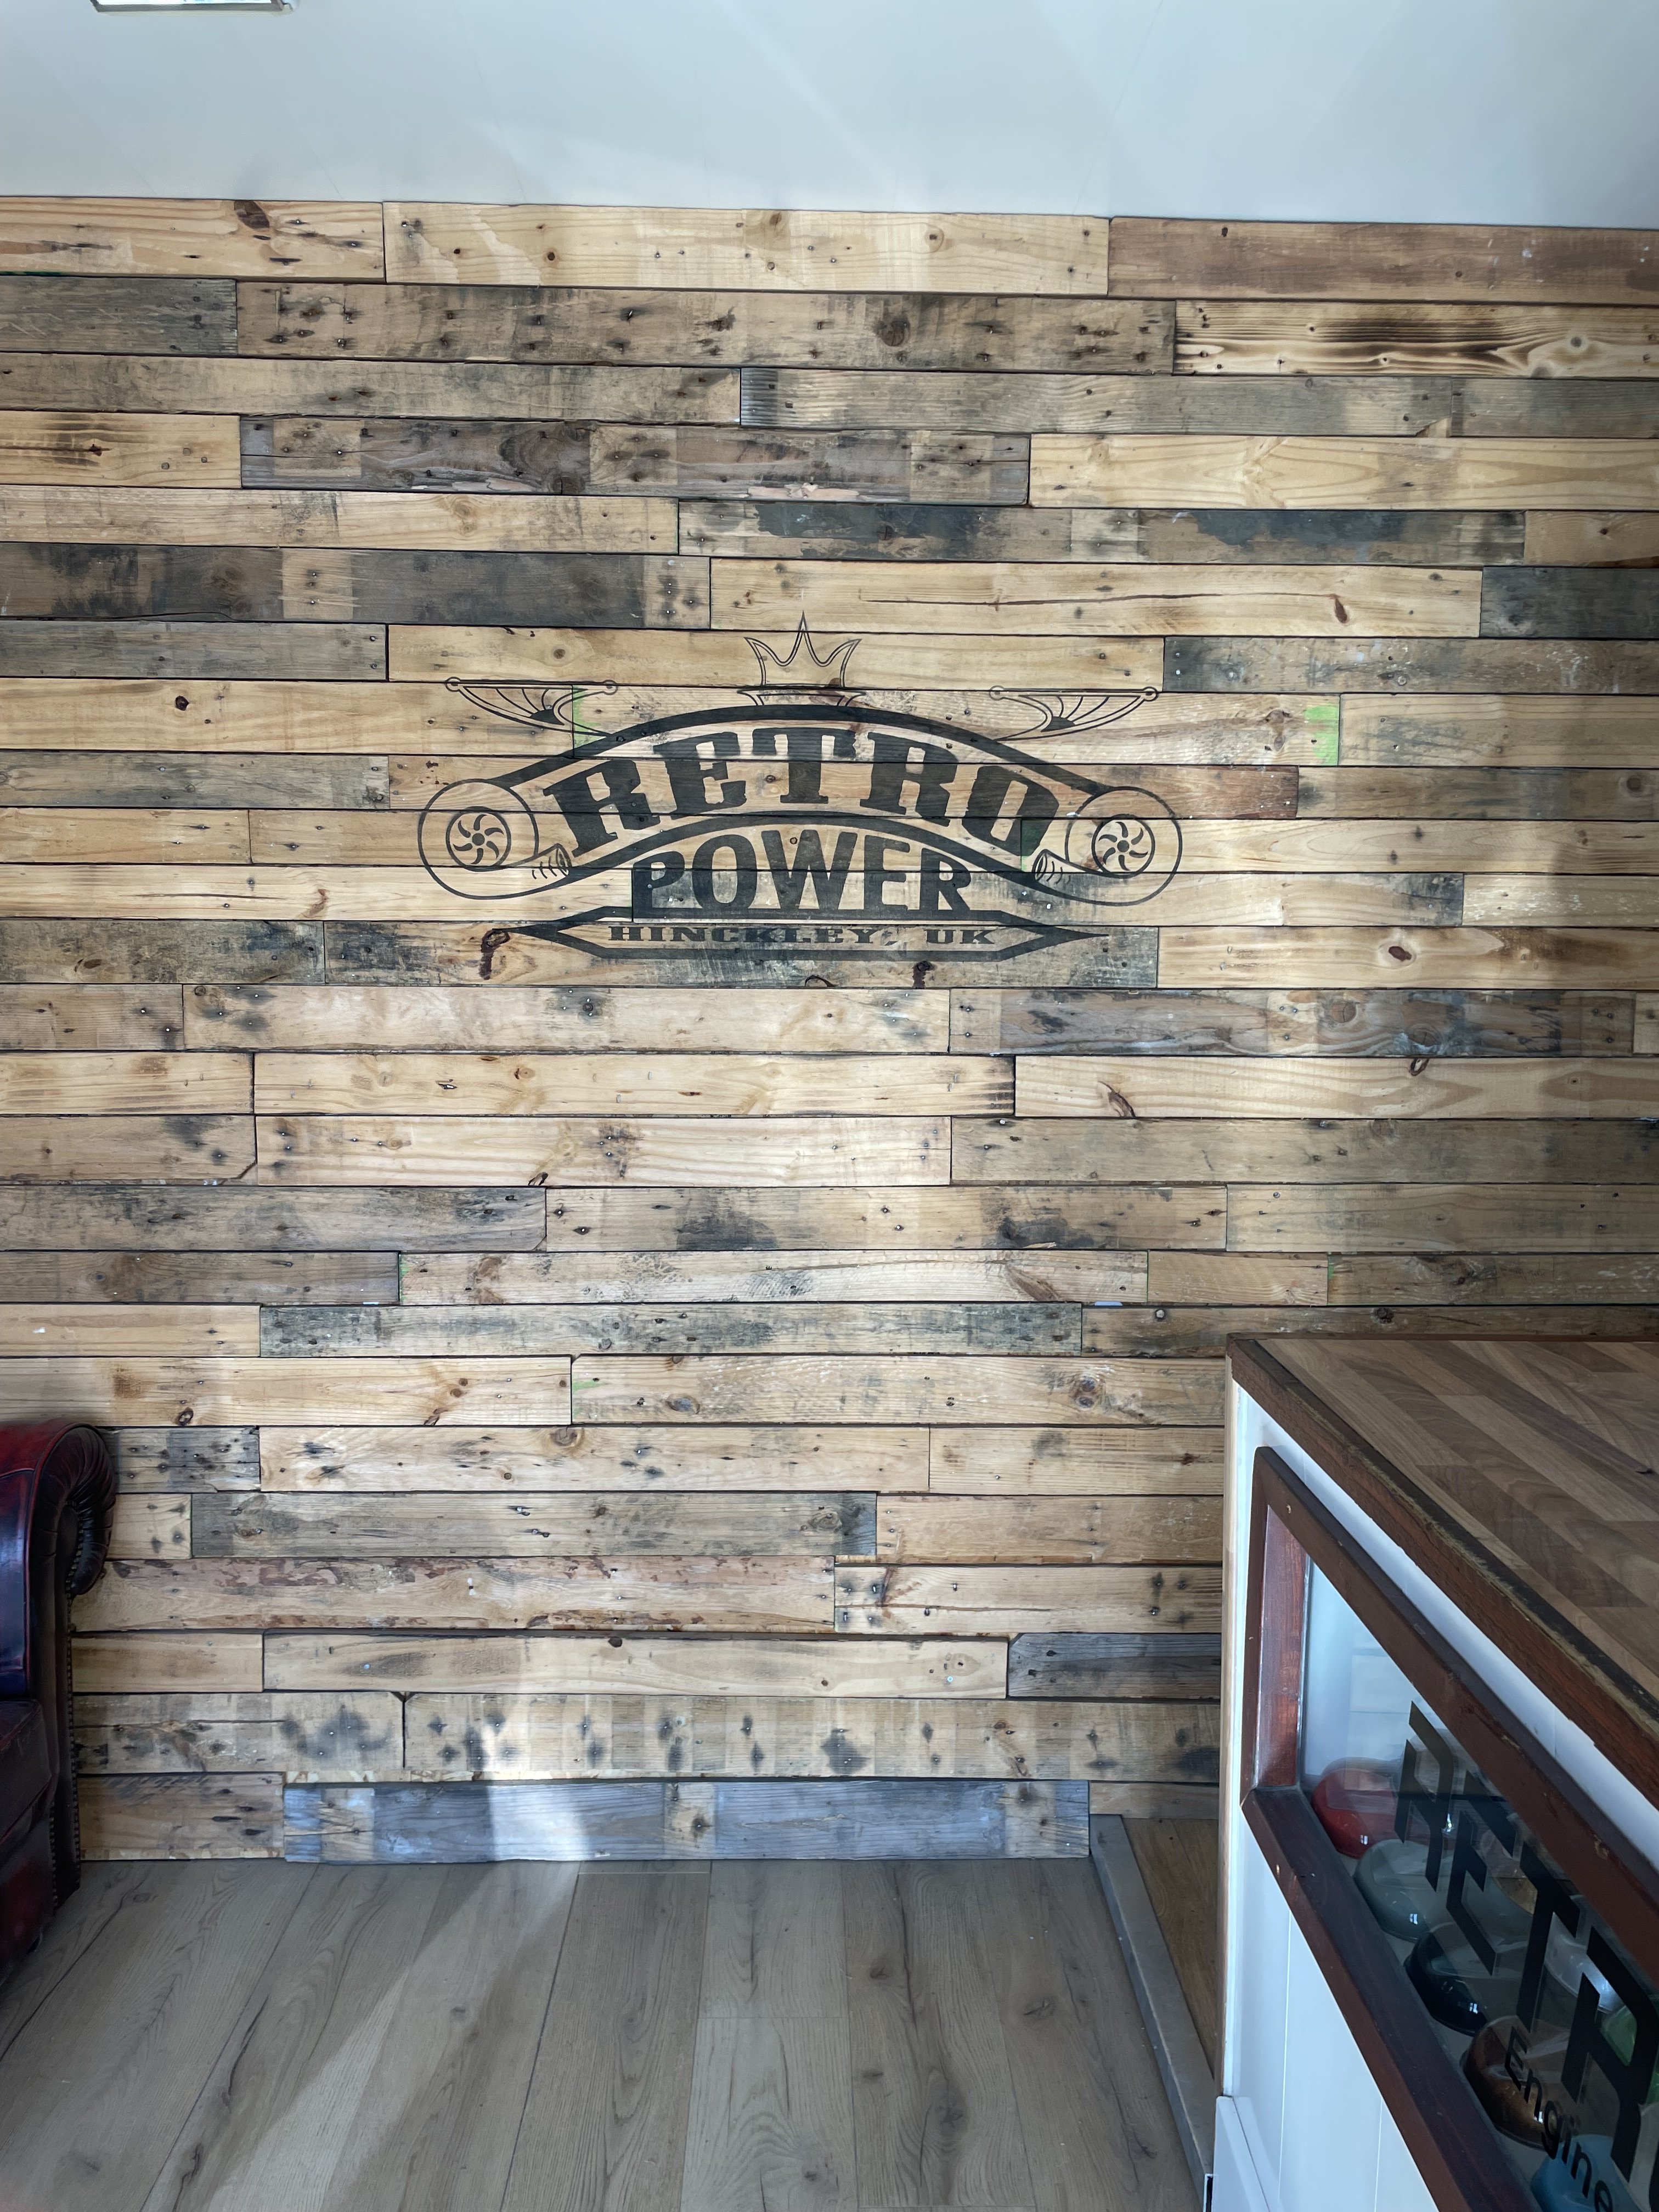
Stoked to have met the Retropower team this week - the cars are unreal in the flesh.
3 points
-
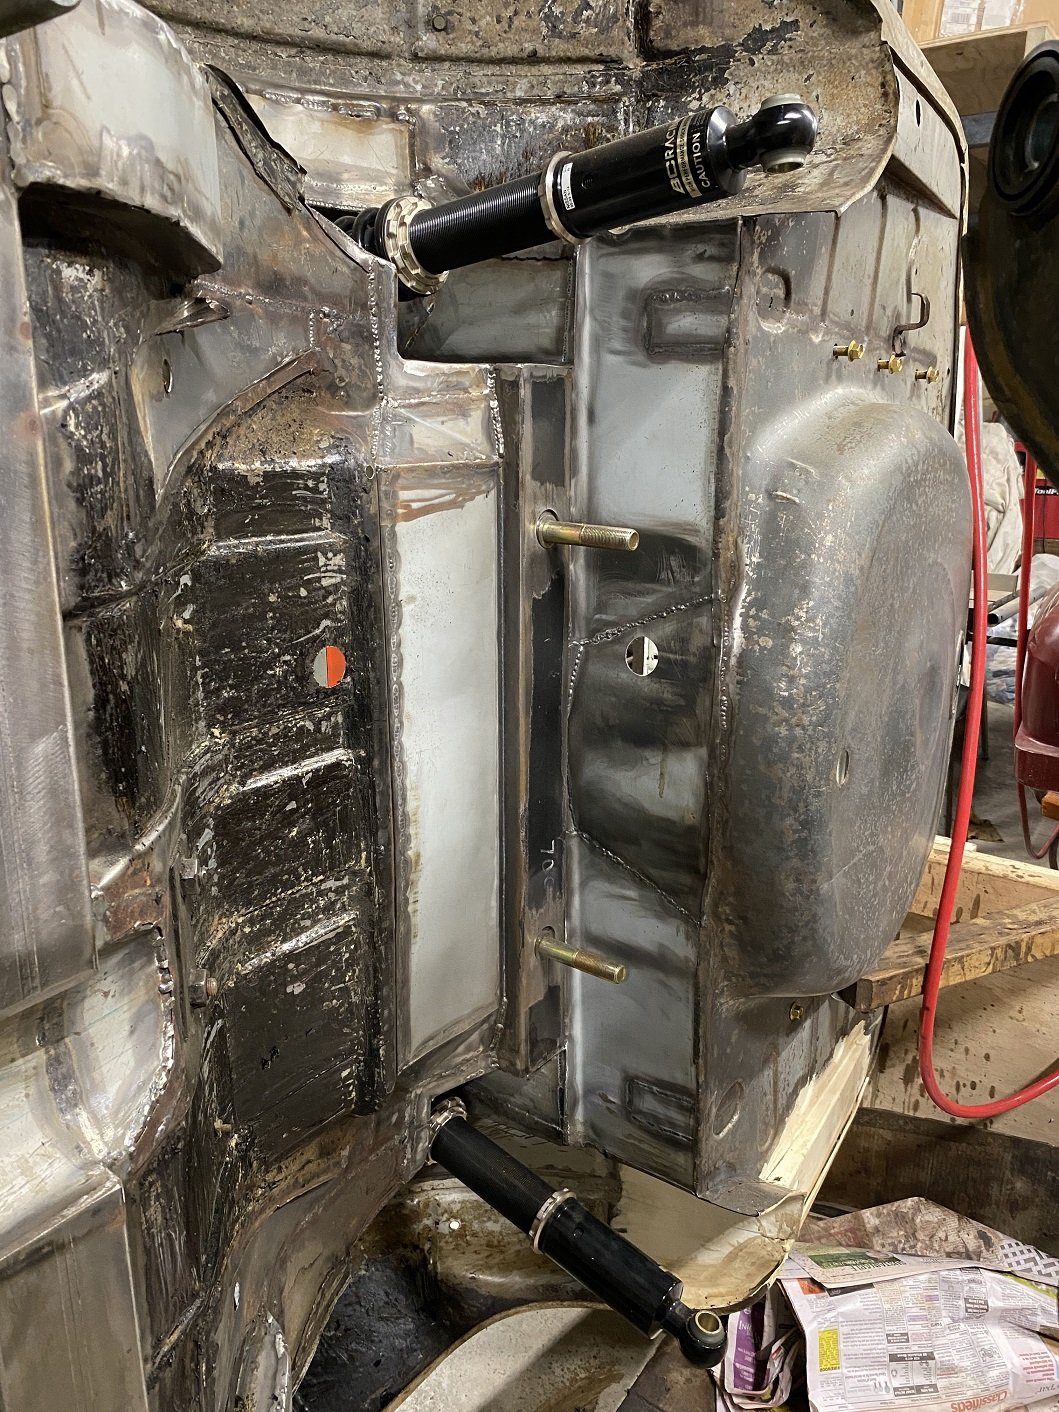
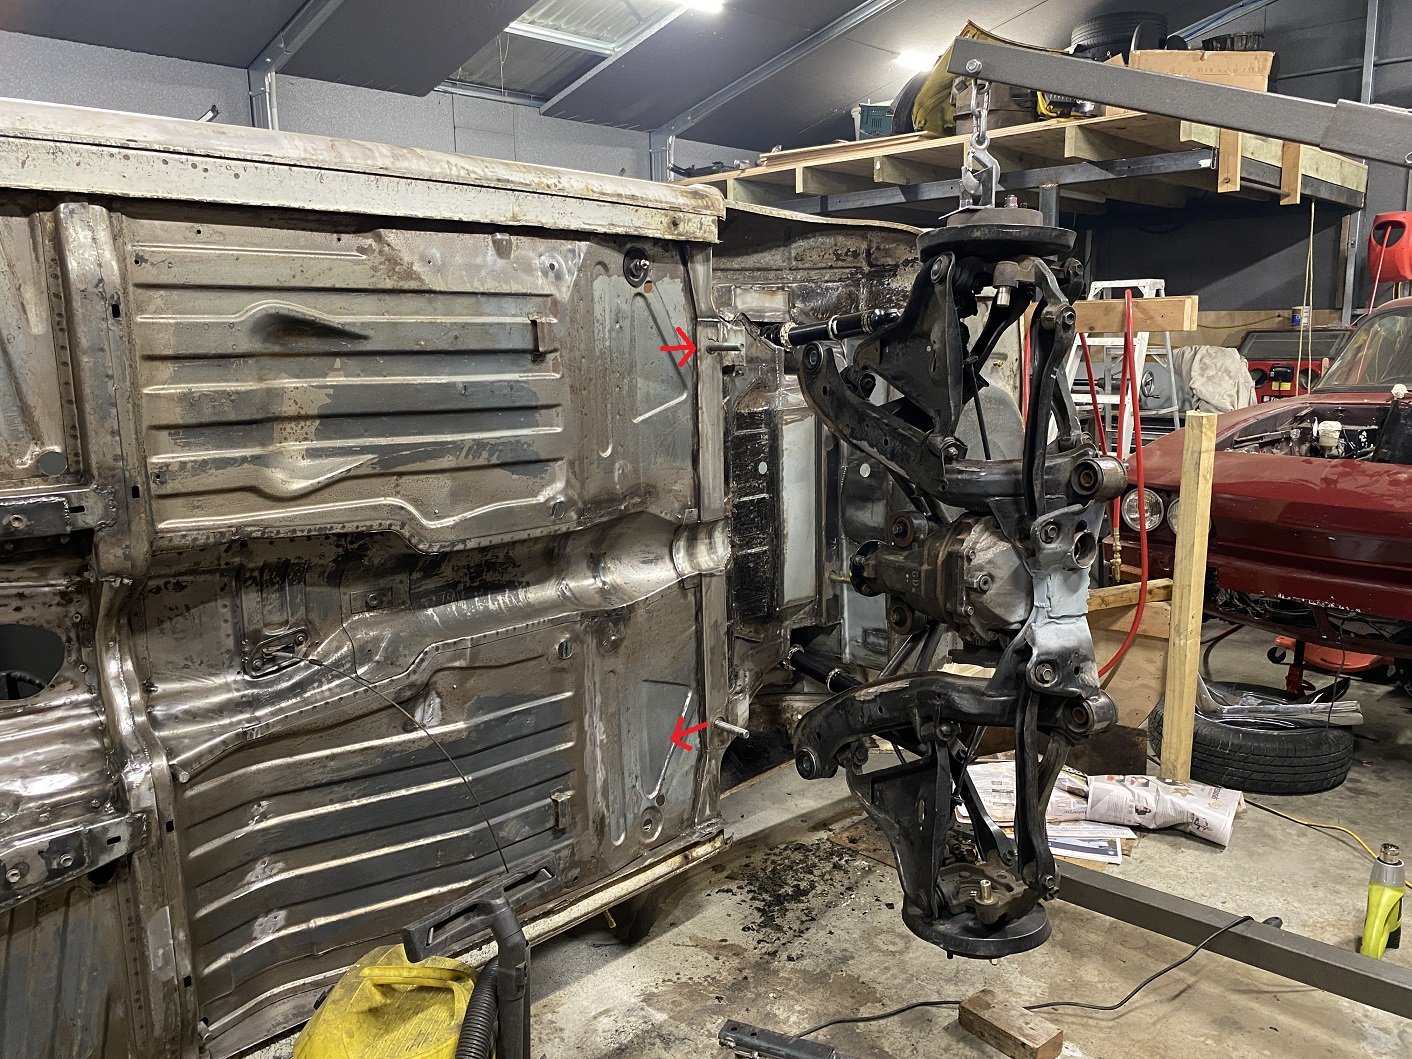
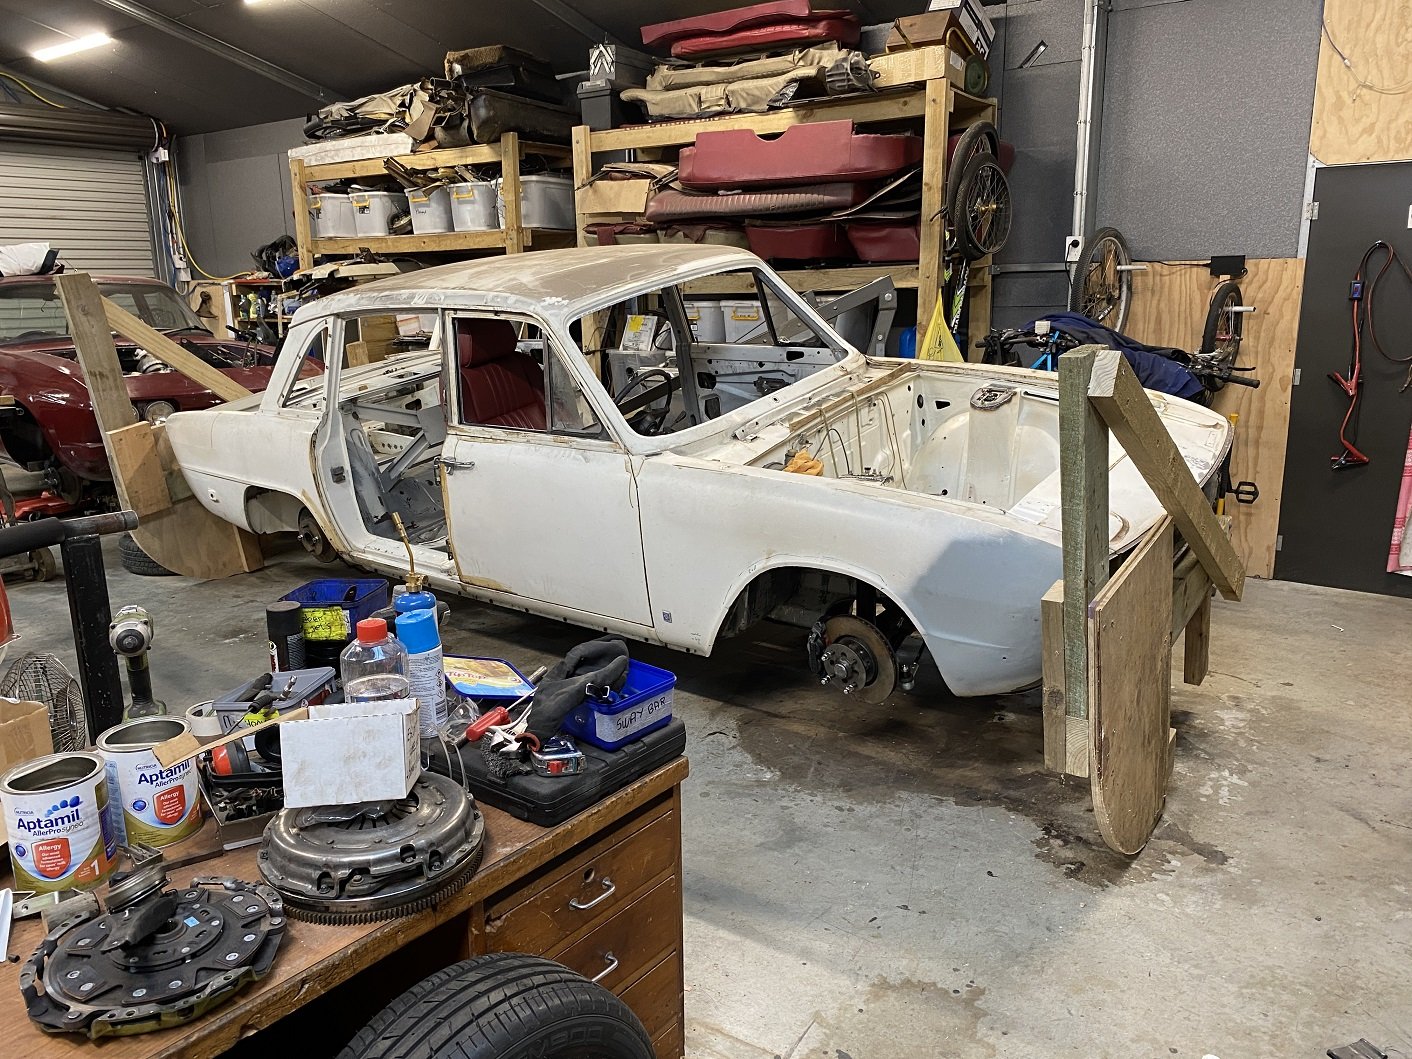
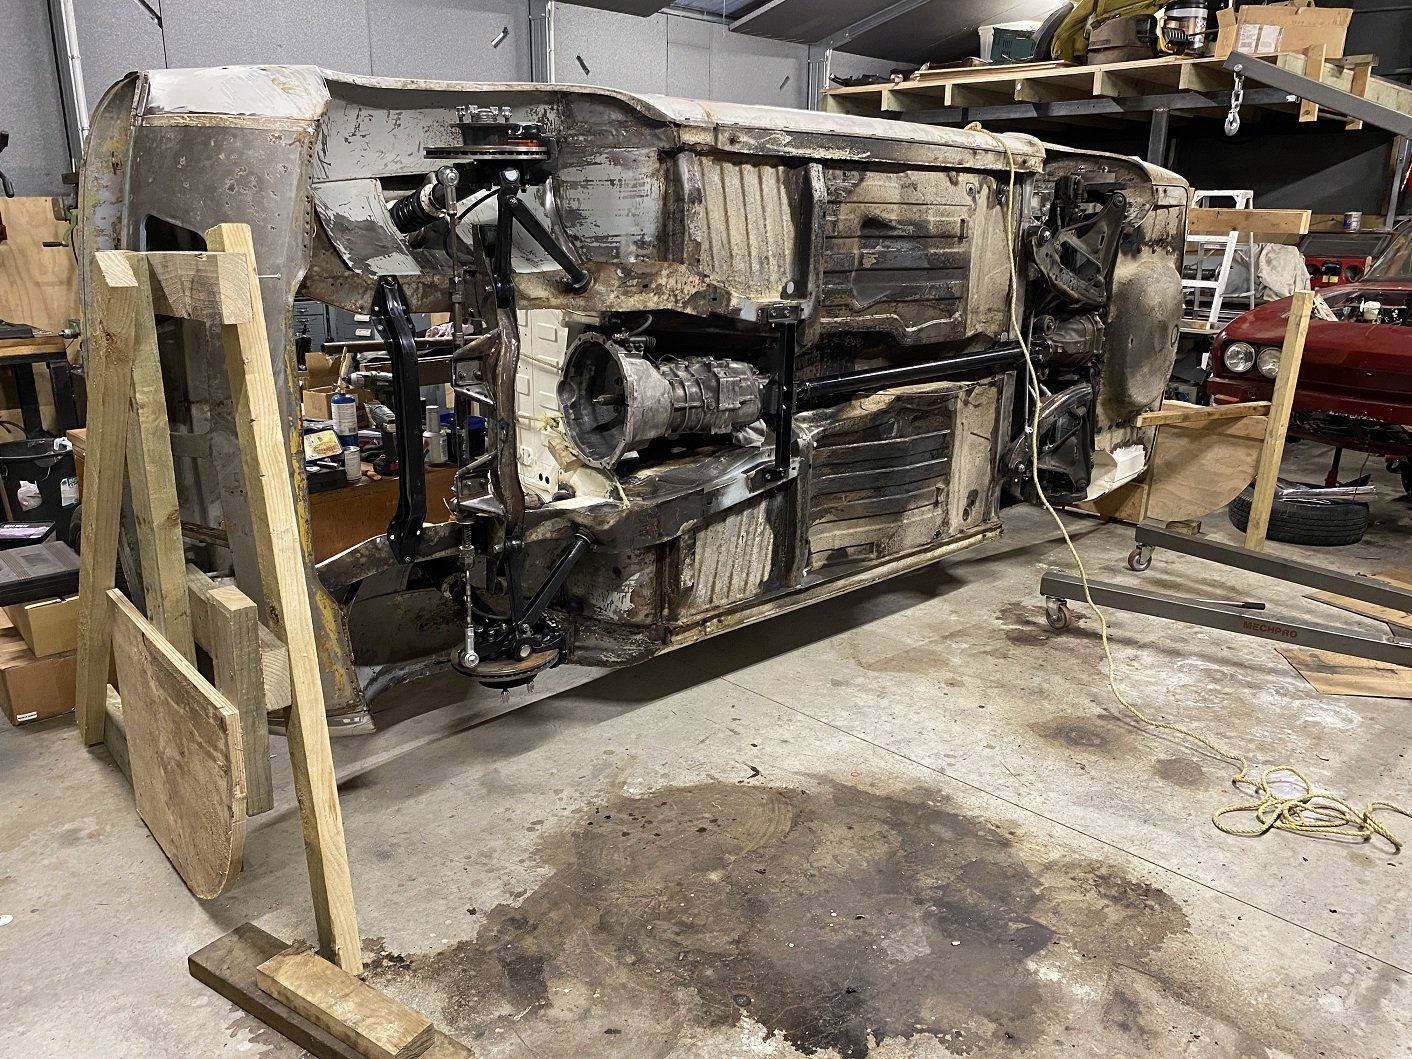
I lifted the rear subframe off. Feels like one of those photos showing off the big fish I caught... With the car like this it made it really easy to measure between the front and rear lower ball joints to find the wheelbase on the drivers side was longer than the passenger side. I suspect it's because I built the alignment jig for the two front mounts on the yellow car, not this one. I had oversized the holes that the studs come through to allow some wiggle room, but I need to take a further 4mm off both sides. Once I can get it on a wheel alignment machine to make sure it's straight the studs will get welded in solid. I've started cleaning off the last of the underseal. I've got to also remove the remains of the original spring seat reinforcement.
3 points
-
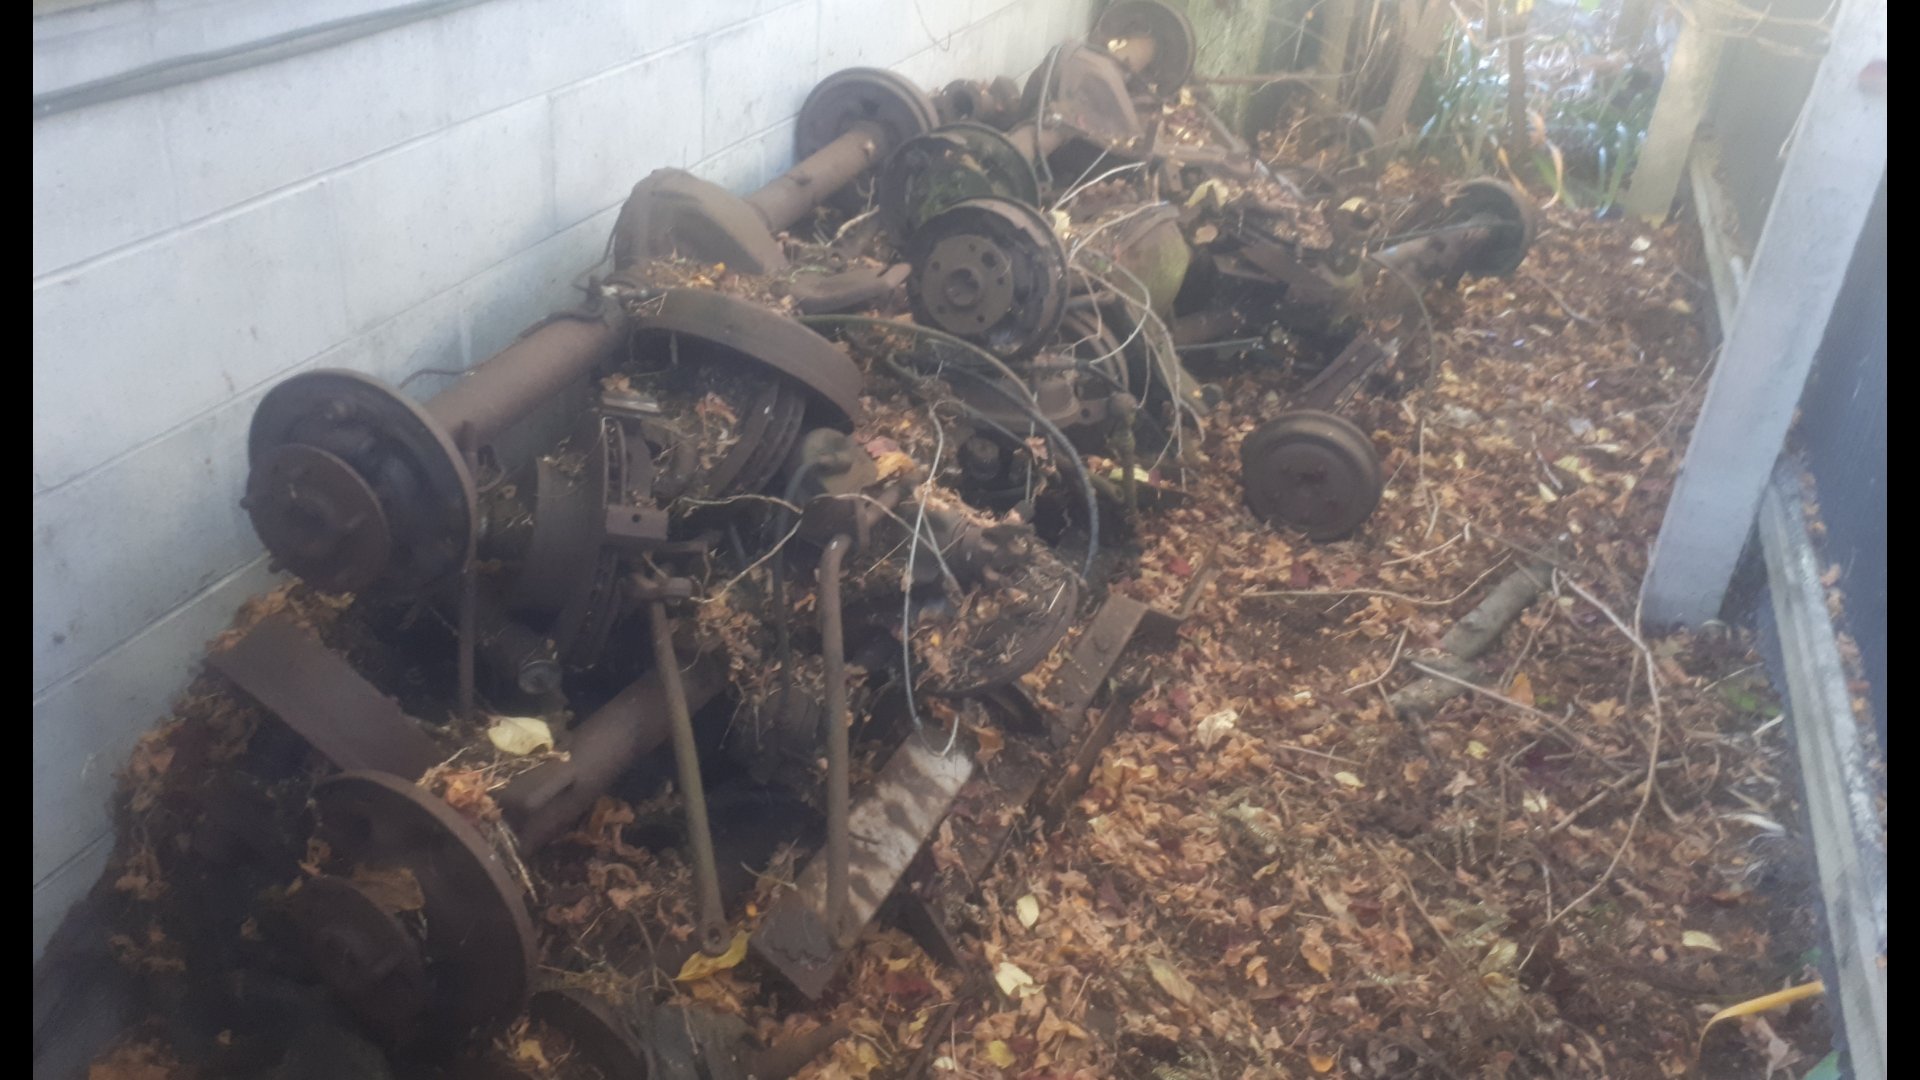
Believe it or not i worked on this today. I went over to mums to sell a valiant diff to a rooster off marketplace. While i was there i set about refitting the copper radiator. With a view to giving the block a good flush before fitting the purdy new rad. I got that in. But decided there wasnt enough day left for the actual flush. (We spent ages digging through my pile of diffs, turns out i have three spare VG diffs) I went to start the old bitch up, cos i havent heard it run for ages. But the fuel pump didnt seem to be able to fill the fuel filter. So i gave up on that too. Ill take an electric pump over some time, and finish what i started today. Pic of the pile of diffs for thread.
2 points
-
"Compared to conventional type bolts, torque to yield bolts offer the engine manufacturer a number of advantages including; greater flexibility of design, reductions in component costs, more accurate assembly and reliability of seal. Engines designed utilising torque to yield (TTY) head bolts require fewer head bolts to achieve the desired clamping loads than those using conventional bolts. With fewer bolts the engine manufacturer has more flexibility in cylinder head and block design as well as reducing the cost of the engine."2 points
-
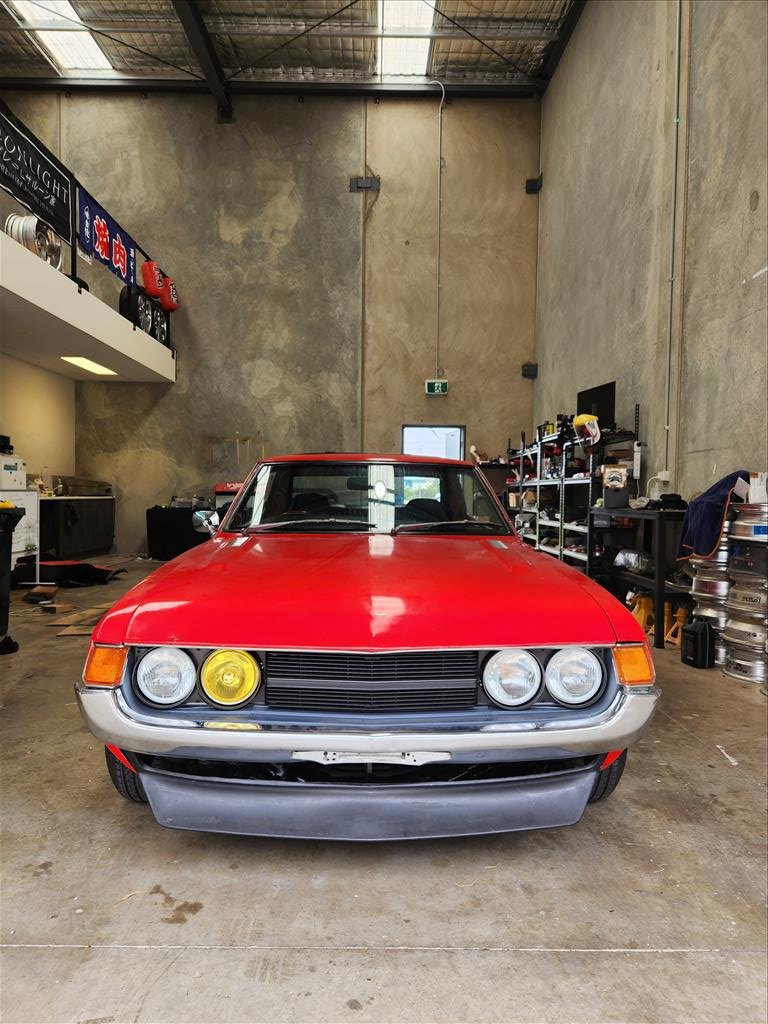
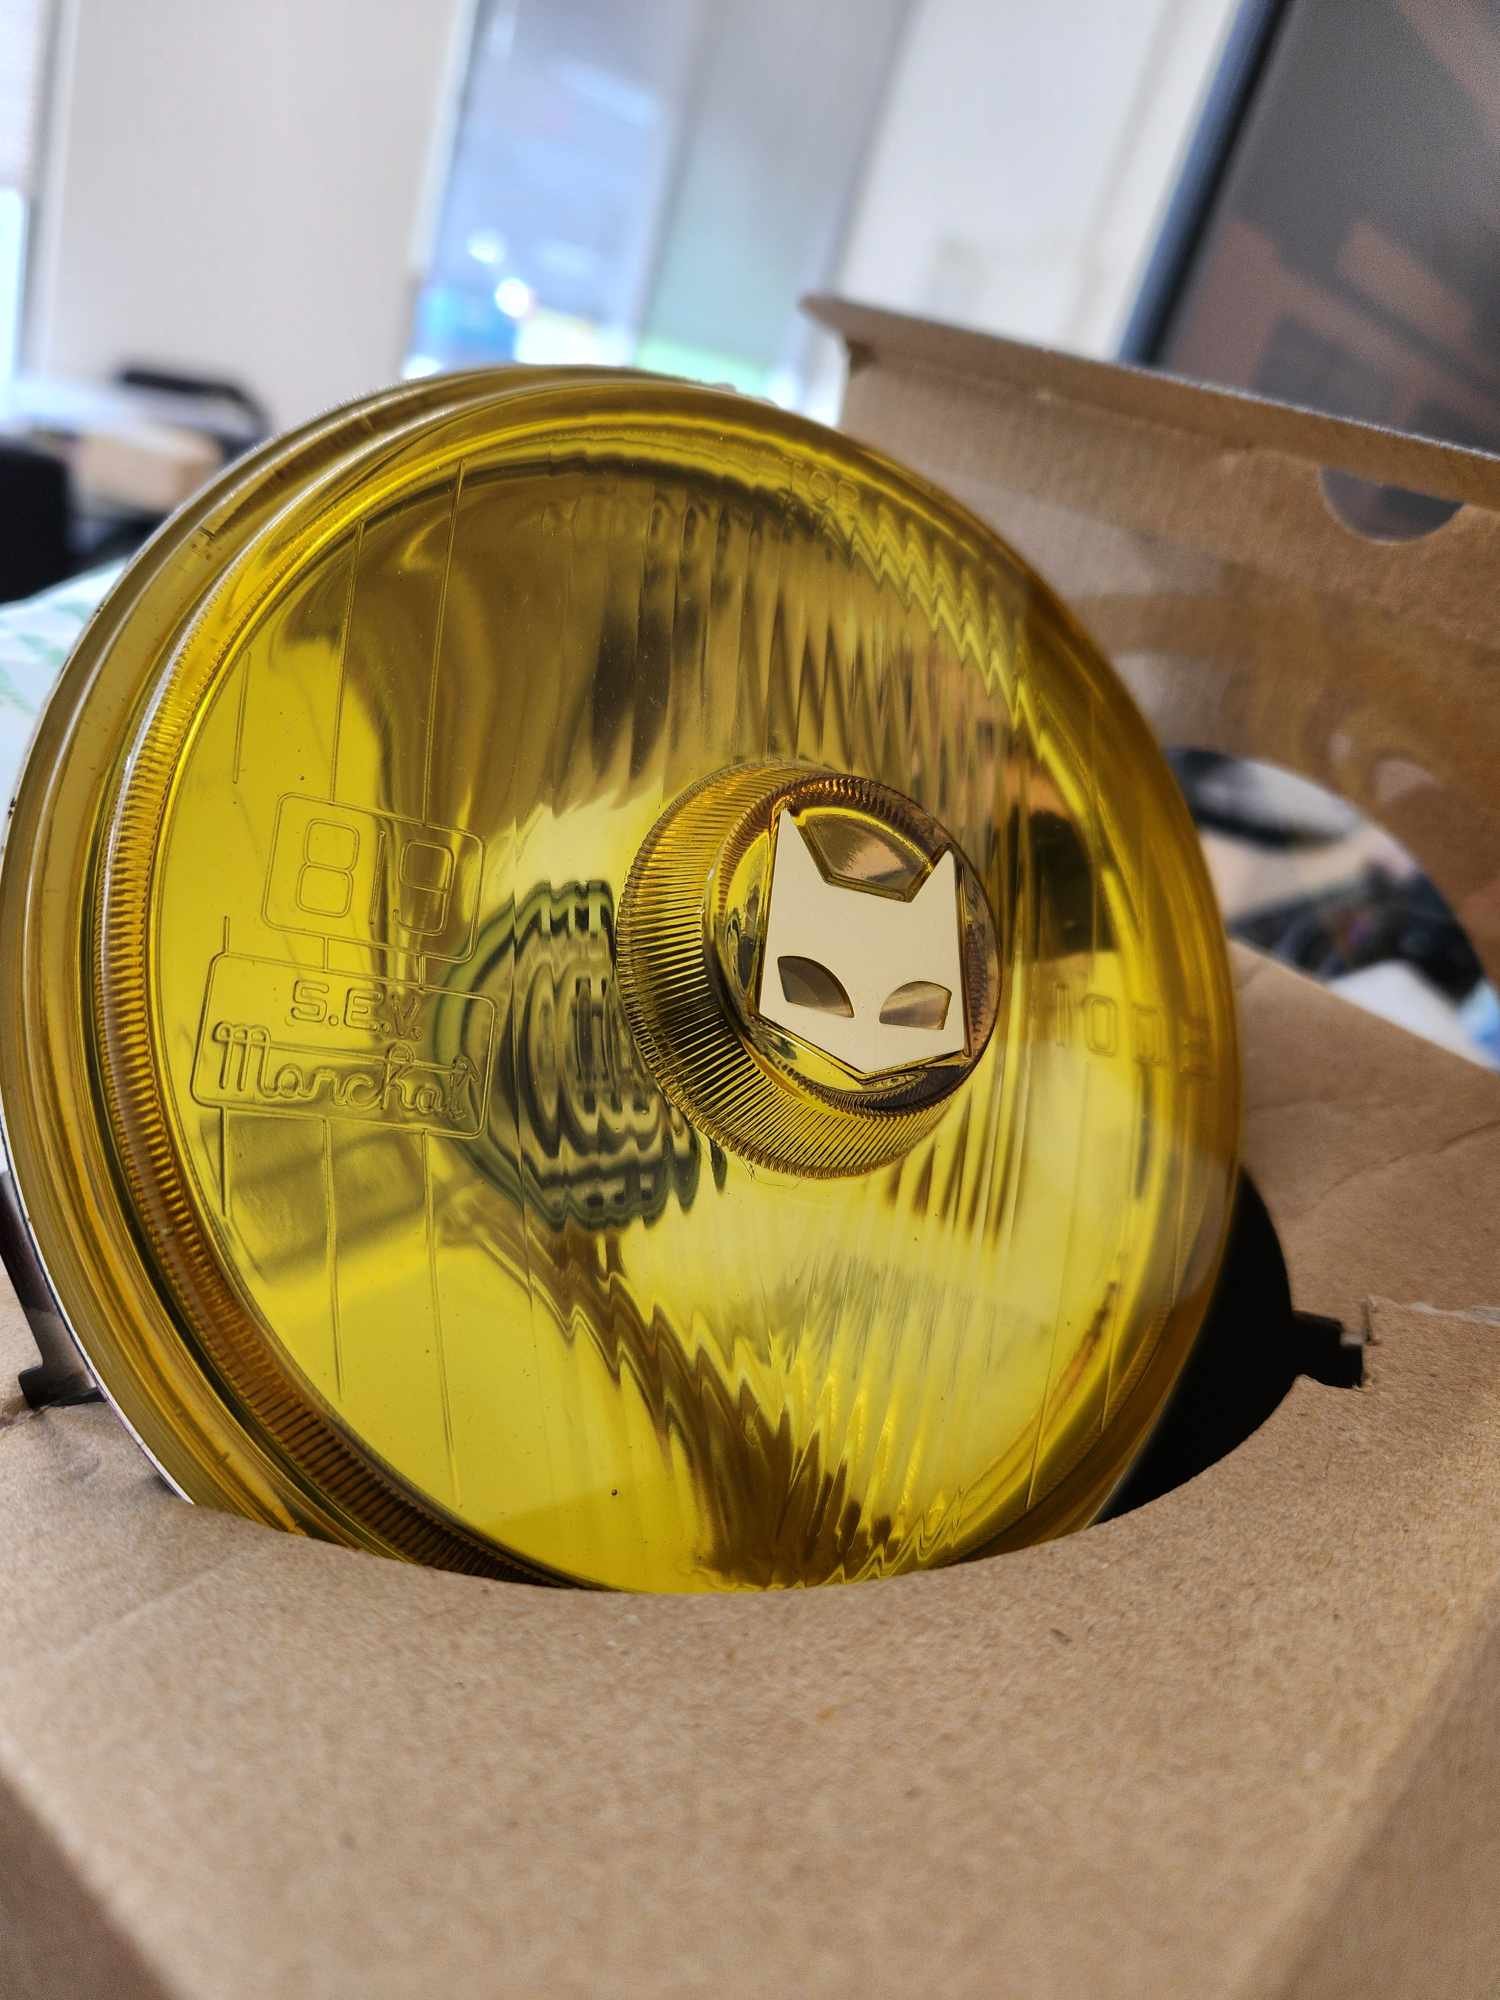
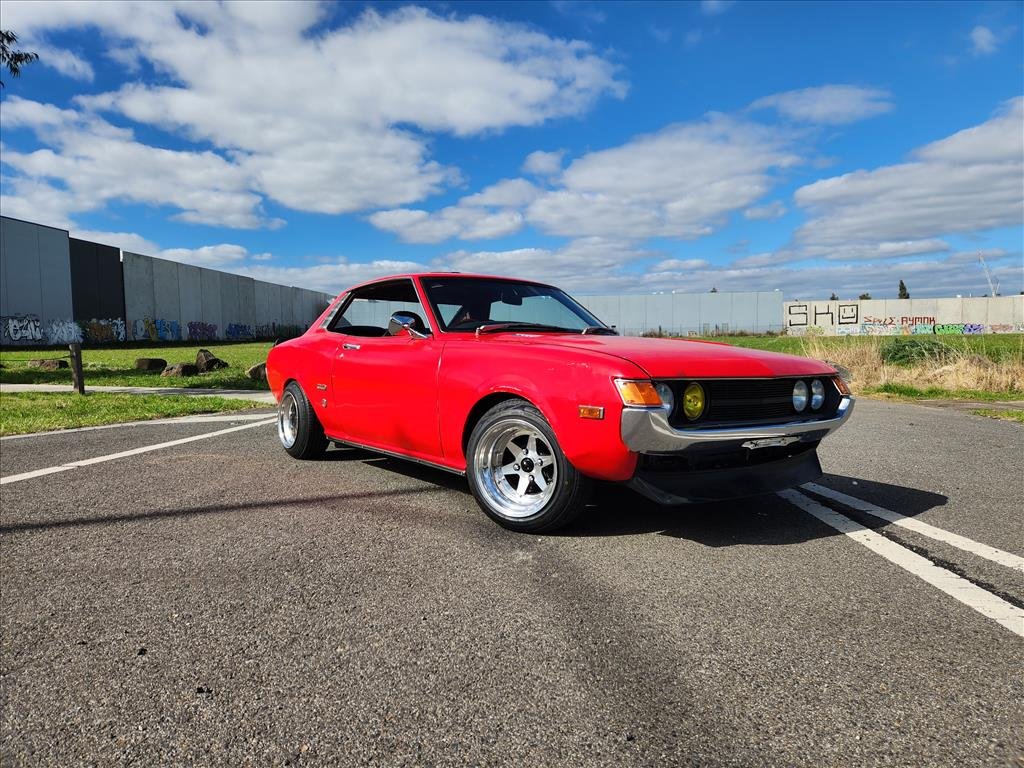
Not too much done today, but I did get a replacement headlight for the one I broke ages ago when I was fitting the others. It was not actually intentionally meant to be a blank space. SEV Marchal! I always liked the look of yellow and of course the sweet cat logo. I will just run one, a little bit of style perhaps. Plugged it in and it works fine so that was easy. Although I need to figure out why the passenger outer light turns off when the high beams are on. Not super high on my list of priorities seeing as it's unlikely to ever be used anyway. I finished putting undercoat on the driver side so installed the side metal trims just using some screws. Not the best but it's what I could find that fits. Gotta fuck with the dick you got. Not sure they will stay in there securely so I'll have to keep an eye on it. When I was out taking these photos just down the road some guy gave us a toot and a thumbs up on the way past and I was only out there for about 2 mins! Unfortunately (but probably not unexpected) my front demister blower isn't working. I can't remember if it ever worked but I might look at trying to get that going again as it could come in handy. The rear demister I'm fairly sure is totally cooked but that's not such an issue as the front.
2 points
-
yeah i figured its a club liability caveat i just thought it would be funny to call the friendliest group of people i know fascists. Foaming for this event though. Have made a plan to deliver my Suzuki Swift GTI to my bush block so i can bring that instead of the boring CRV2 points
-
hmm I've found a manual too and it doesn't say replace, but the torque figure is 20NM plus 180 degrees, isn't that a hallmark of torque to yield bolts?2 points
-
Also Registered2 points
-
DIdn't say they have to be current?2 points
-
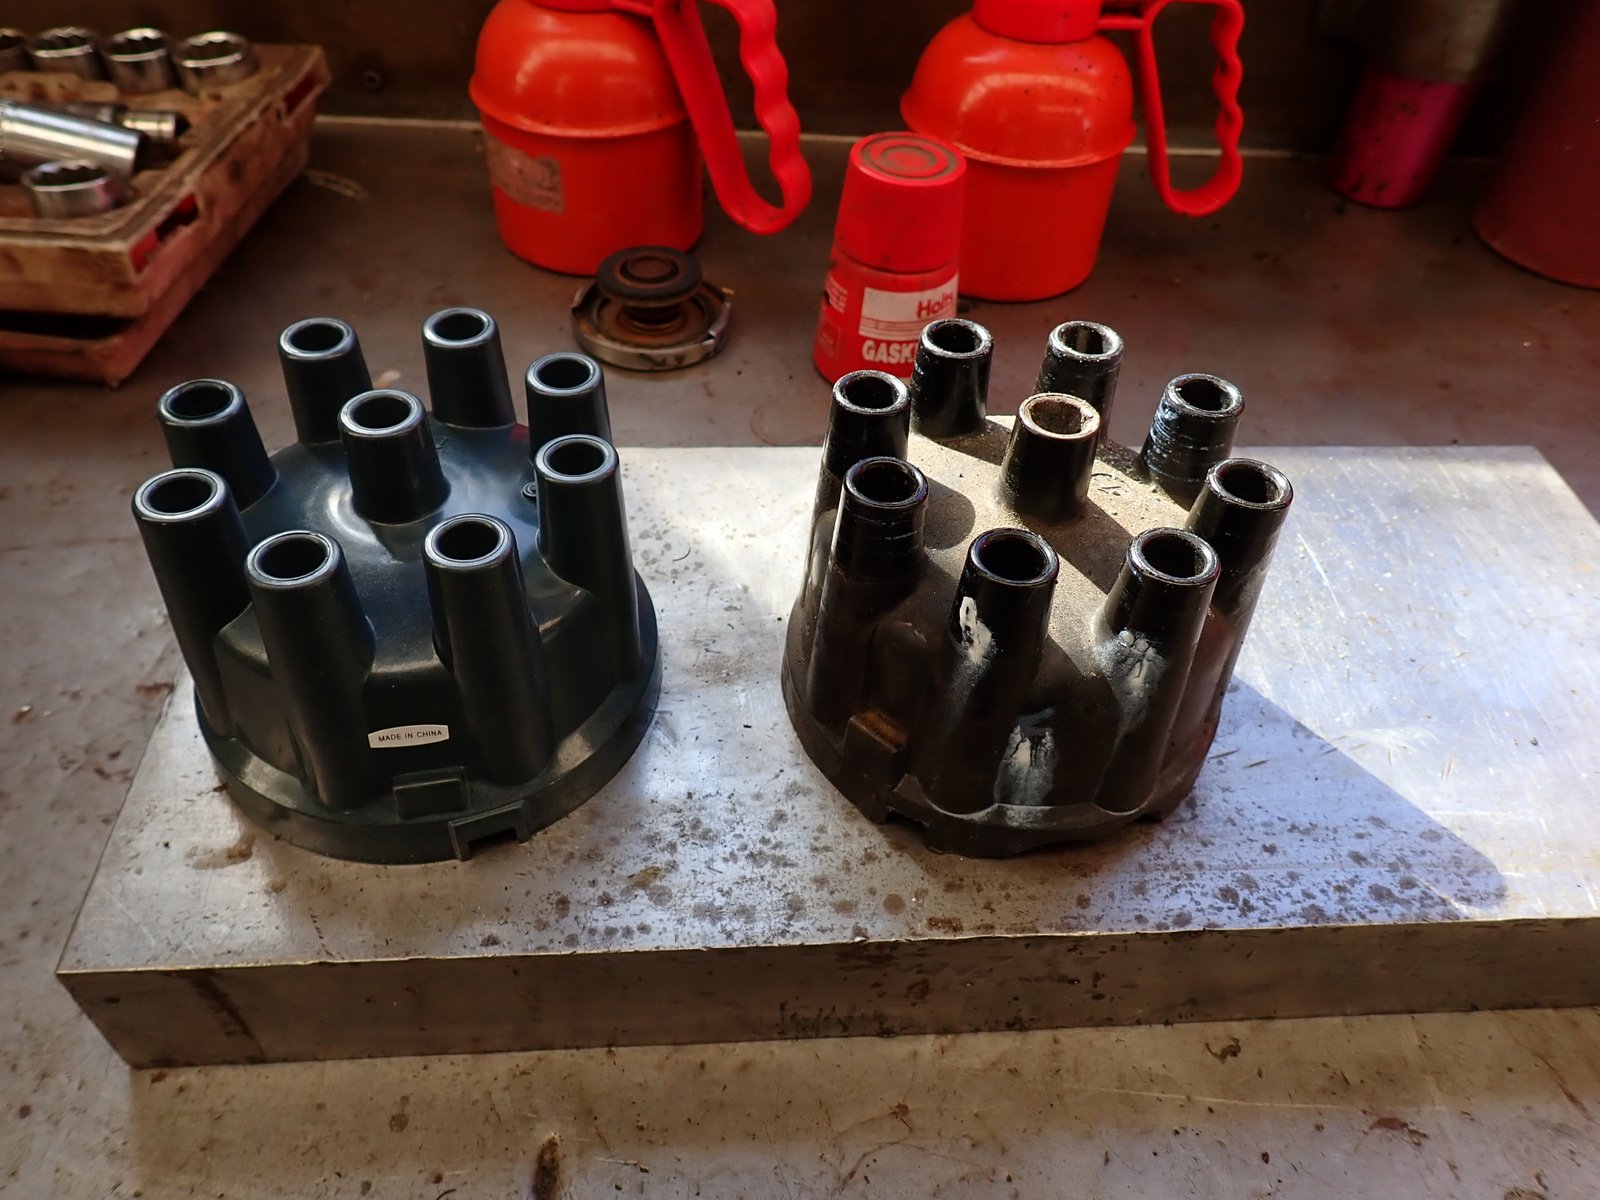
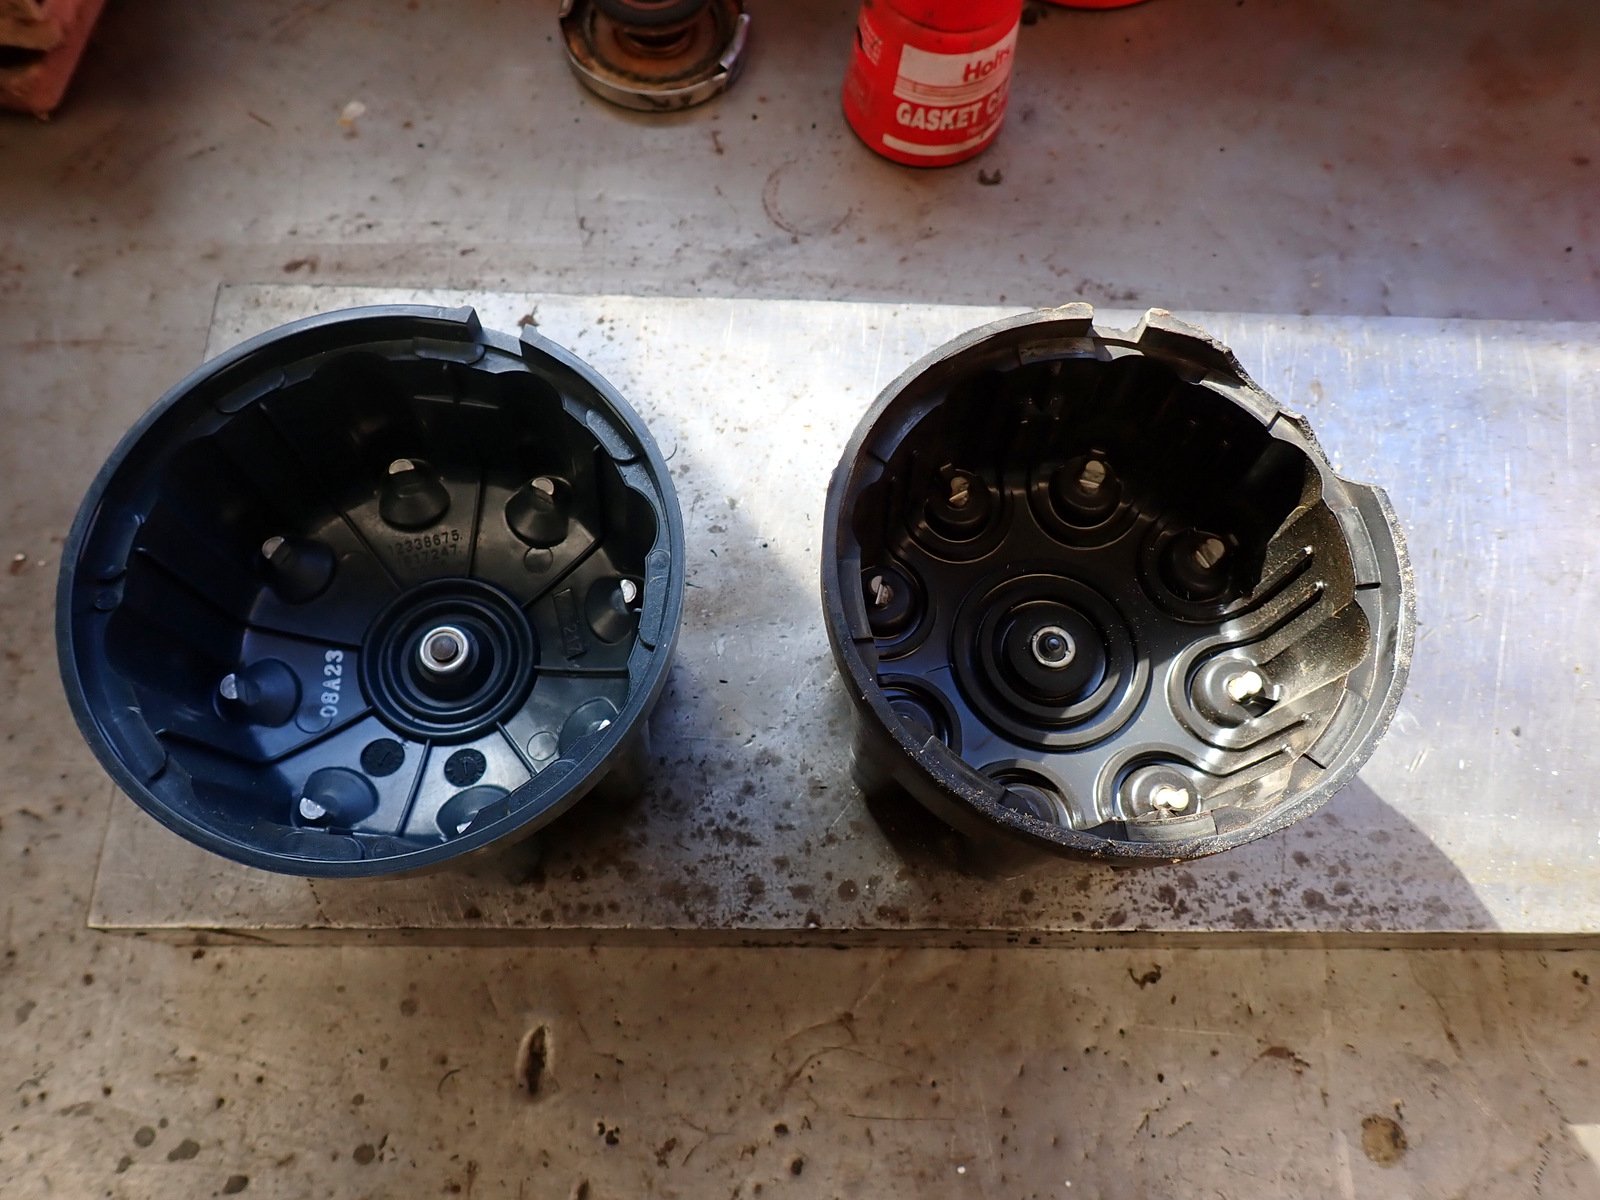
Pulled the leaking valve cover, misplaced gasket would be why it was so bad Nothing to see here. Ever get the feeling that your new parts (on the left) aren't as good as the old parts? I think I'll hang on to the old cap, even though it's a bit damaged. Might see if there is a more $$$ option on Rockauto next time I order.
2 points
-
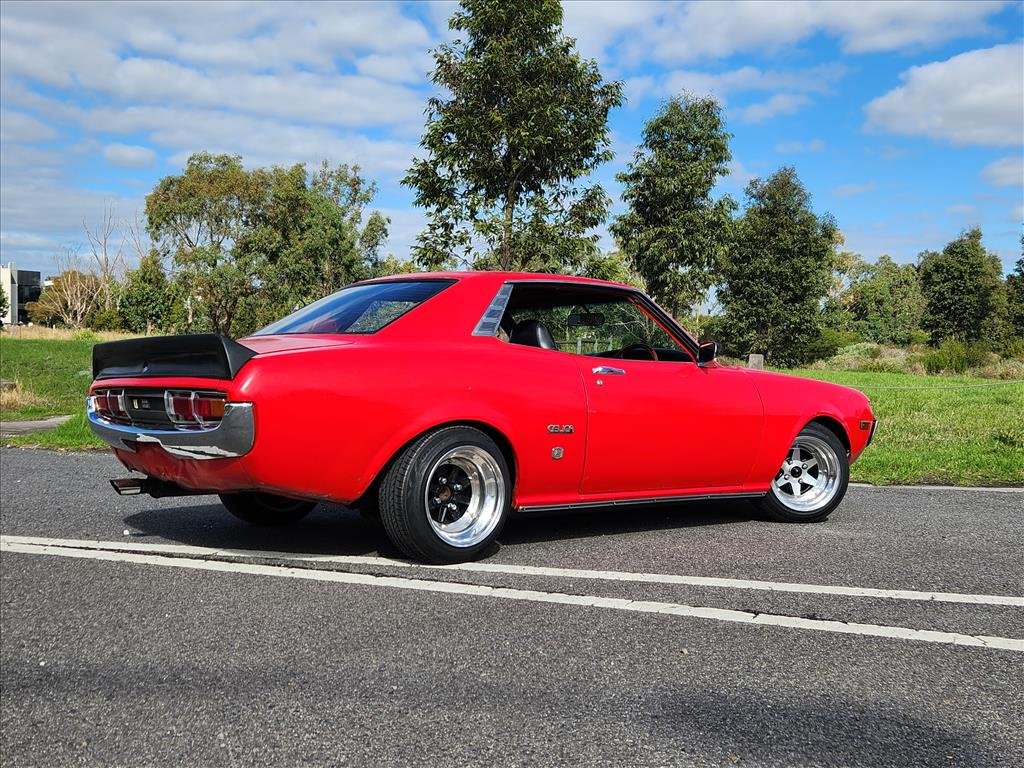
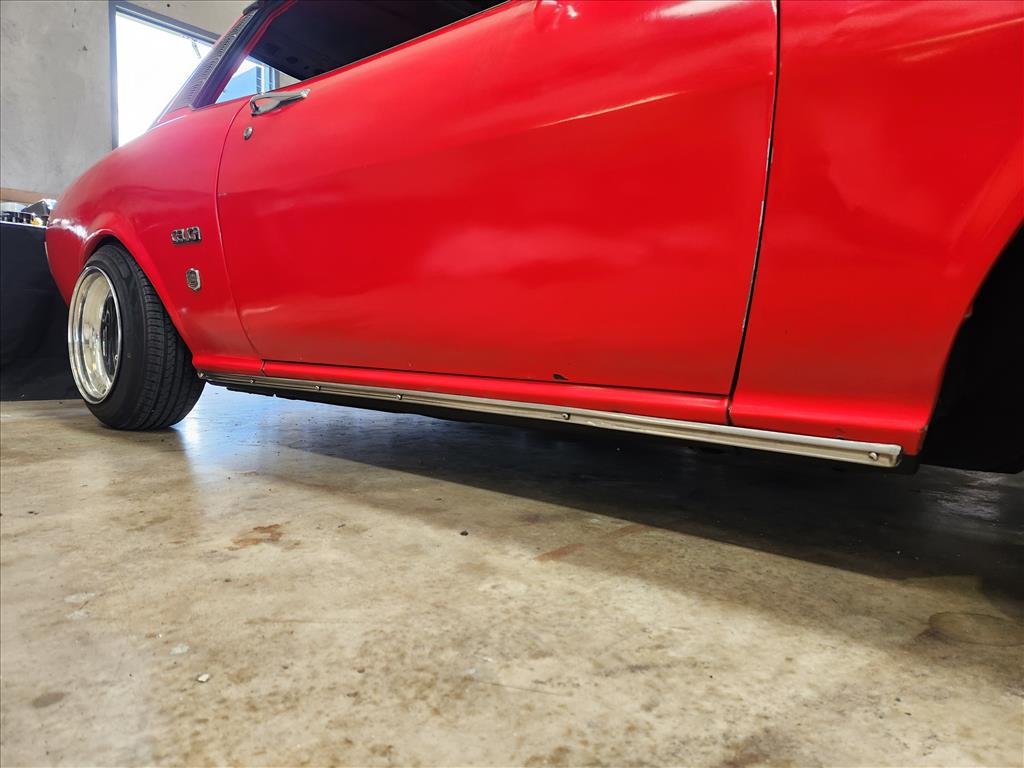
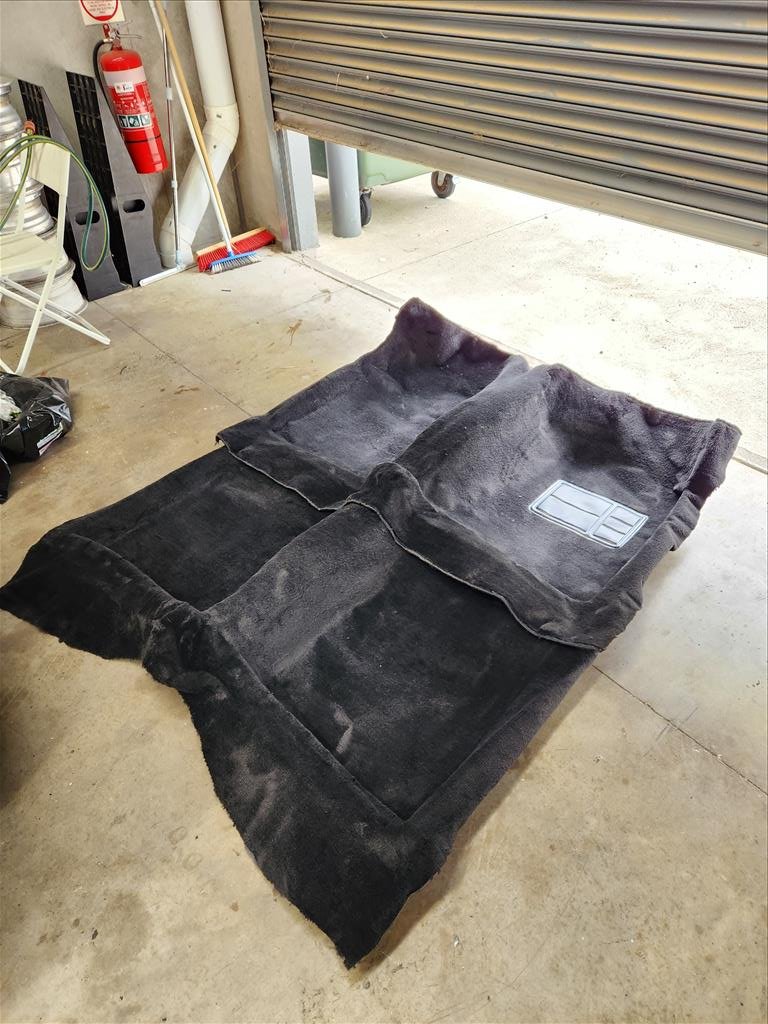
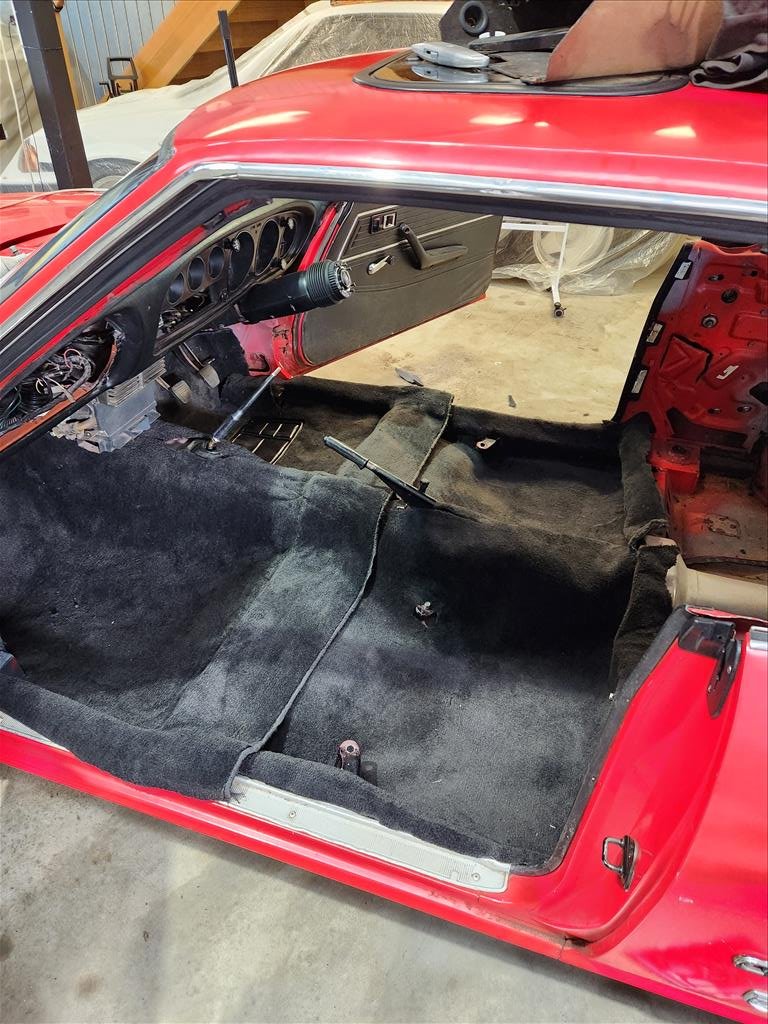
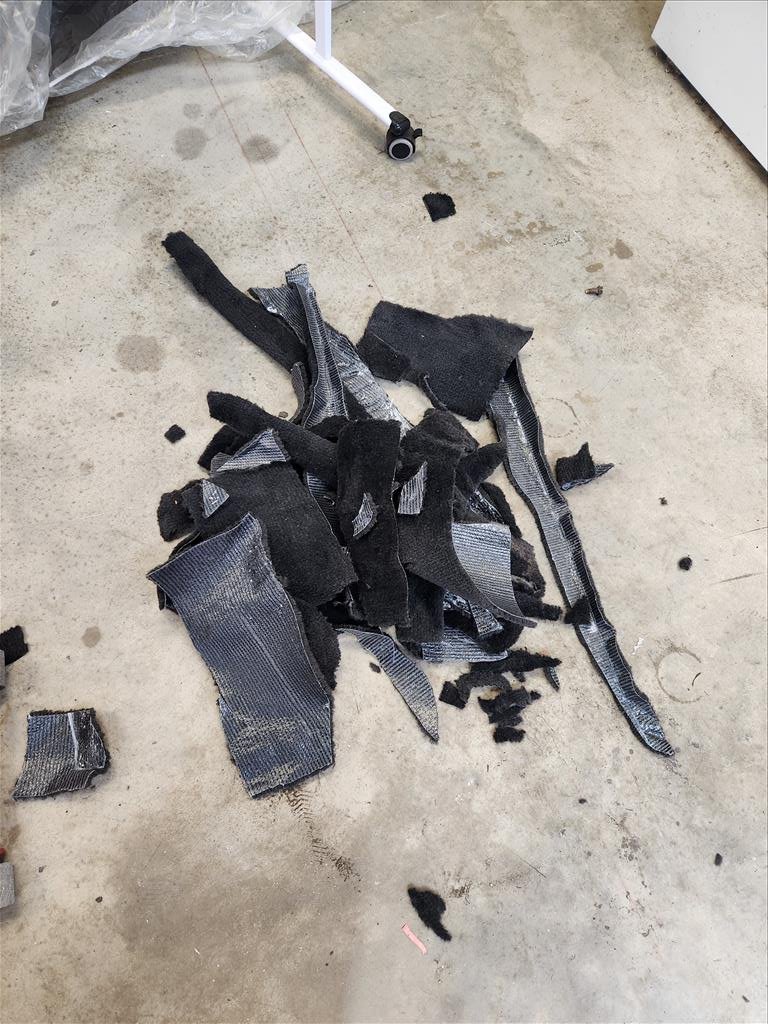
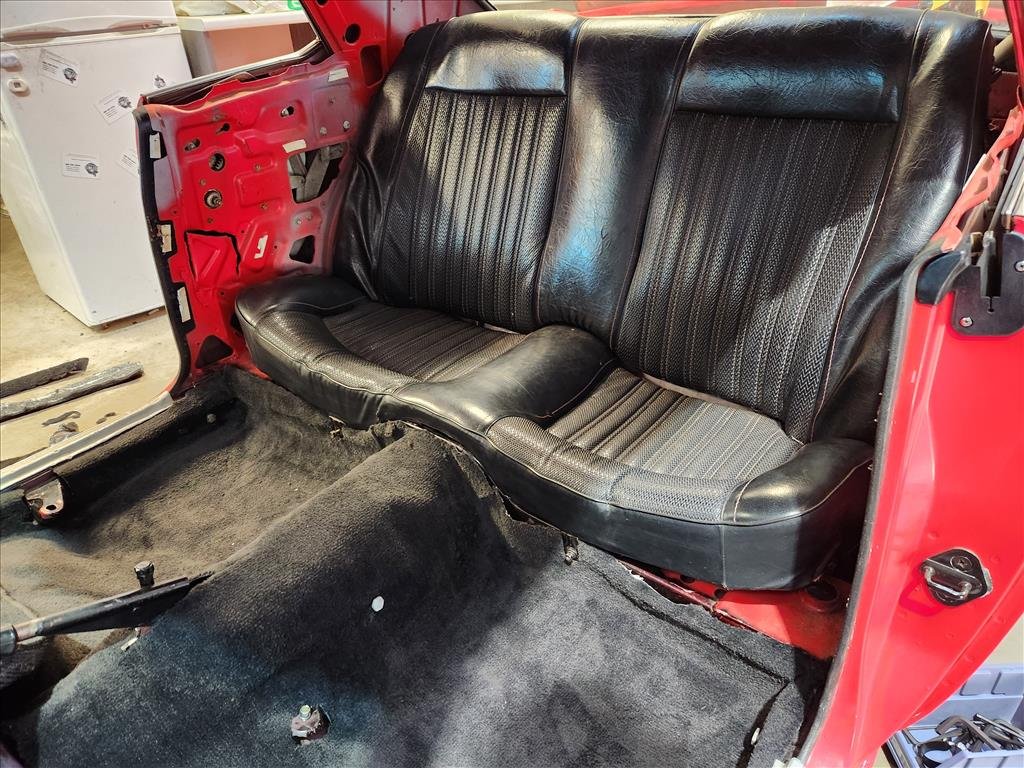
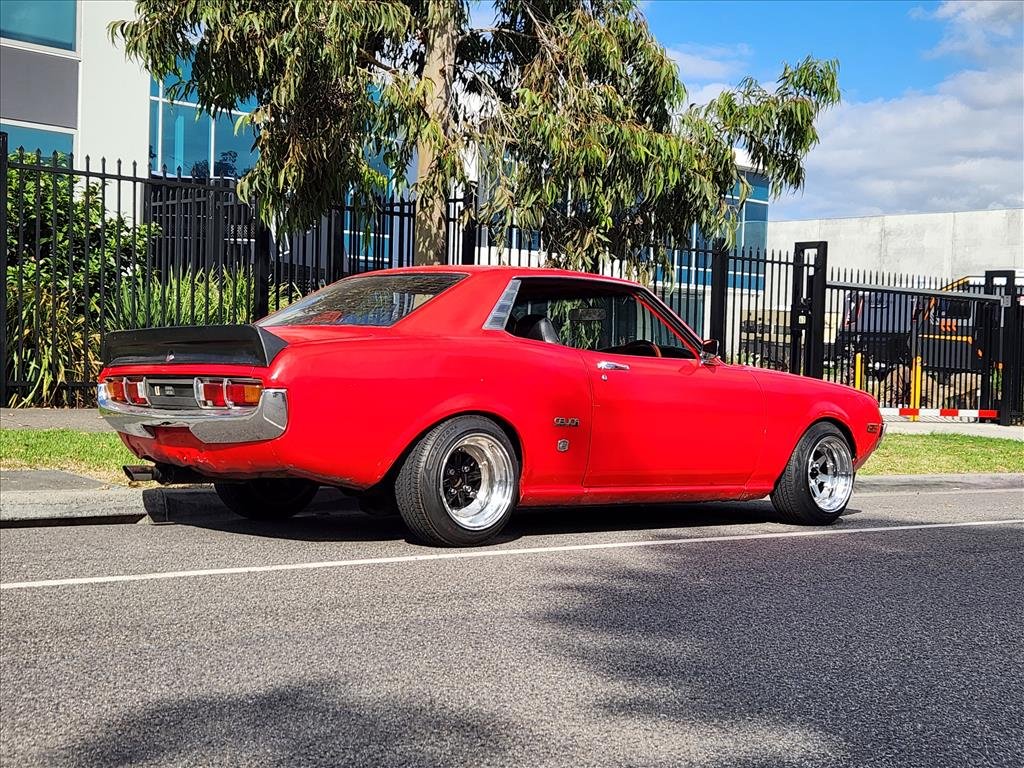
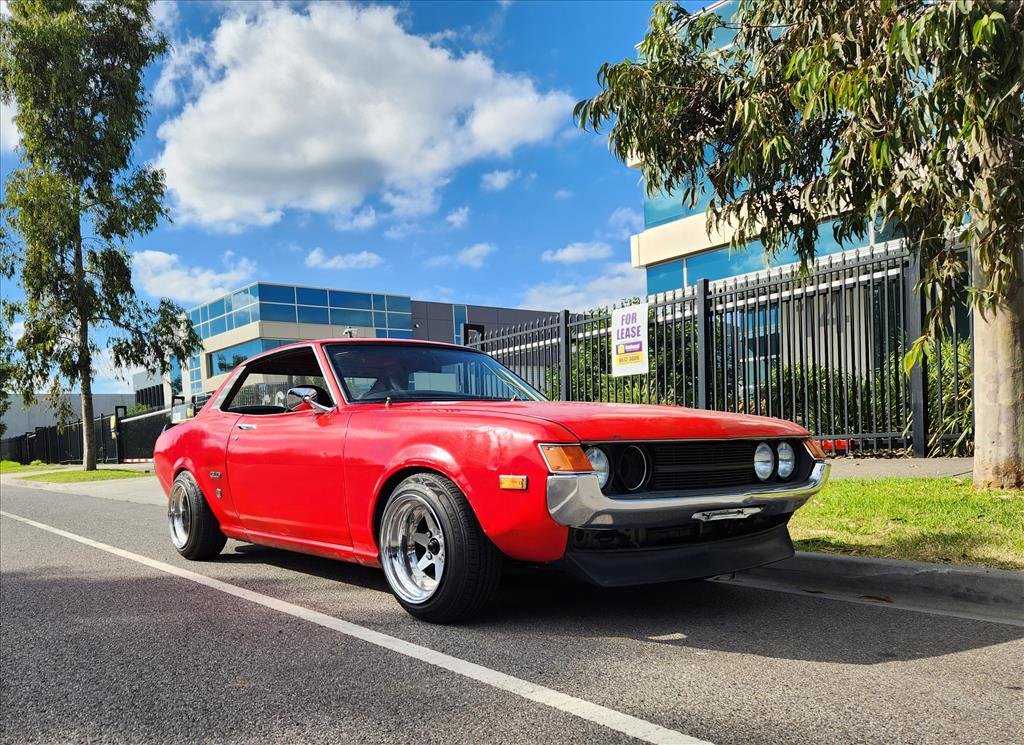
Aftermarket carpet sucks. I learnt this the hard way I suppose. The Celica carpet was already aftermarket by the time I got it and it was super old, dirty and chopped to hell. In my attempt to try and freshen up the interior this year I decided to get one of those moulded carpets. I quickly realised I'm not made for an upholstery career. They say you should start from the rear and move forwards when fitting them up. The problem I quickly found was that these are not quite right for this car. Research suggests that they are in fact moulded off TA23 not TA22, a small but important difference. TA22 did not even have carpet like this from the factory, more like glorified floor mats. My cutting skills are terrible as I was getting annoyed by this point, and the blades were getting blunt. I initially wanted to wrap it under the seat base however the seat sits directly on the body with no room to move so that was not possible. Additionally the roll cage mounts in the rear are in the way of the seat bottom which is why its curved up on each end. I'm not sure what the OEM TA22 carpet looks like but I believe there are some clips that it can use to hold up, but I've not actually seen any factory standard TA22 carpets in person before to compare it. I'll paint the floor black and the rear around the seats so it is less noticeable but yeah, disappointed with my efforts on that one. Another thing about the TA23 vs TA22 is the TA23 side rocker sill things are designed for the edge of the carpet to go underneath and bolt down, TA22 are not. That means more rough cuts along the side edges too. As you can see, lots of bits cut off. Anyway I got the front kind of fitted up as best as possible (remember those fucking blocks in the way) and installed the seats back. I'll need to replace these as it turns out as there is some damage on both of them (more than just superficial and foam). Then I got her fired up and went for a burn and I didn't care about the carpet at all. The fuel is probably 2 years old by now and it still worked mint. Sadly I don't have a phone mount but the sounds on song were excellent. The panhard rod I put in stopped any rubbing that I could tell and actually the car handled surprisingly well. It goes, stops and turns just like it should. Good car.
2 points
-
Bit of a bitter sweet update. After the last monthly meet the 2l decided to run a bearing on the way home leave me stranded on the side of the motorway. I managed to source a gamble na 1600 motor of a friend so whipped that in and after the legend himself @RUNAMUCK worked his wizardry swapping out the dizzy and timing the motor up I was back in business again . Have taken it for a wee drive around the block and the motor seems to be happy enough. Old water pump was shot so picked up another and slammed it in. Oil change and some new plugs and hopefully it's smooth sailing from here on in I also put some guard mirrors on it. Damn they're useless but they look the part
2 points
-
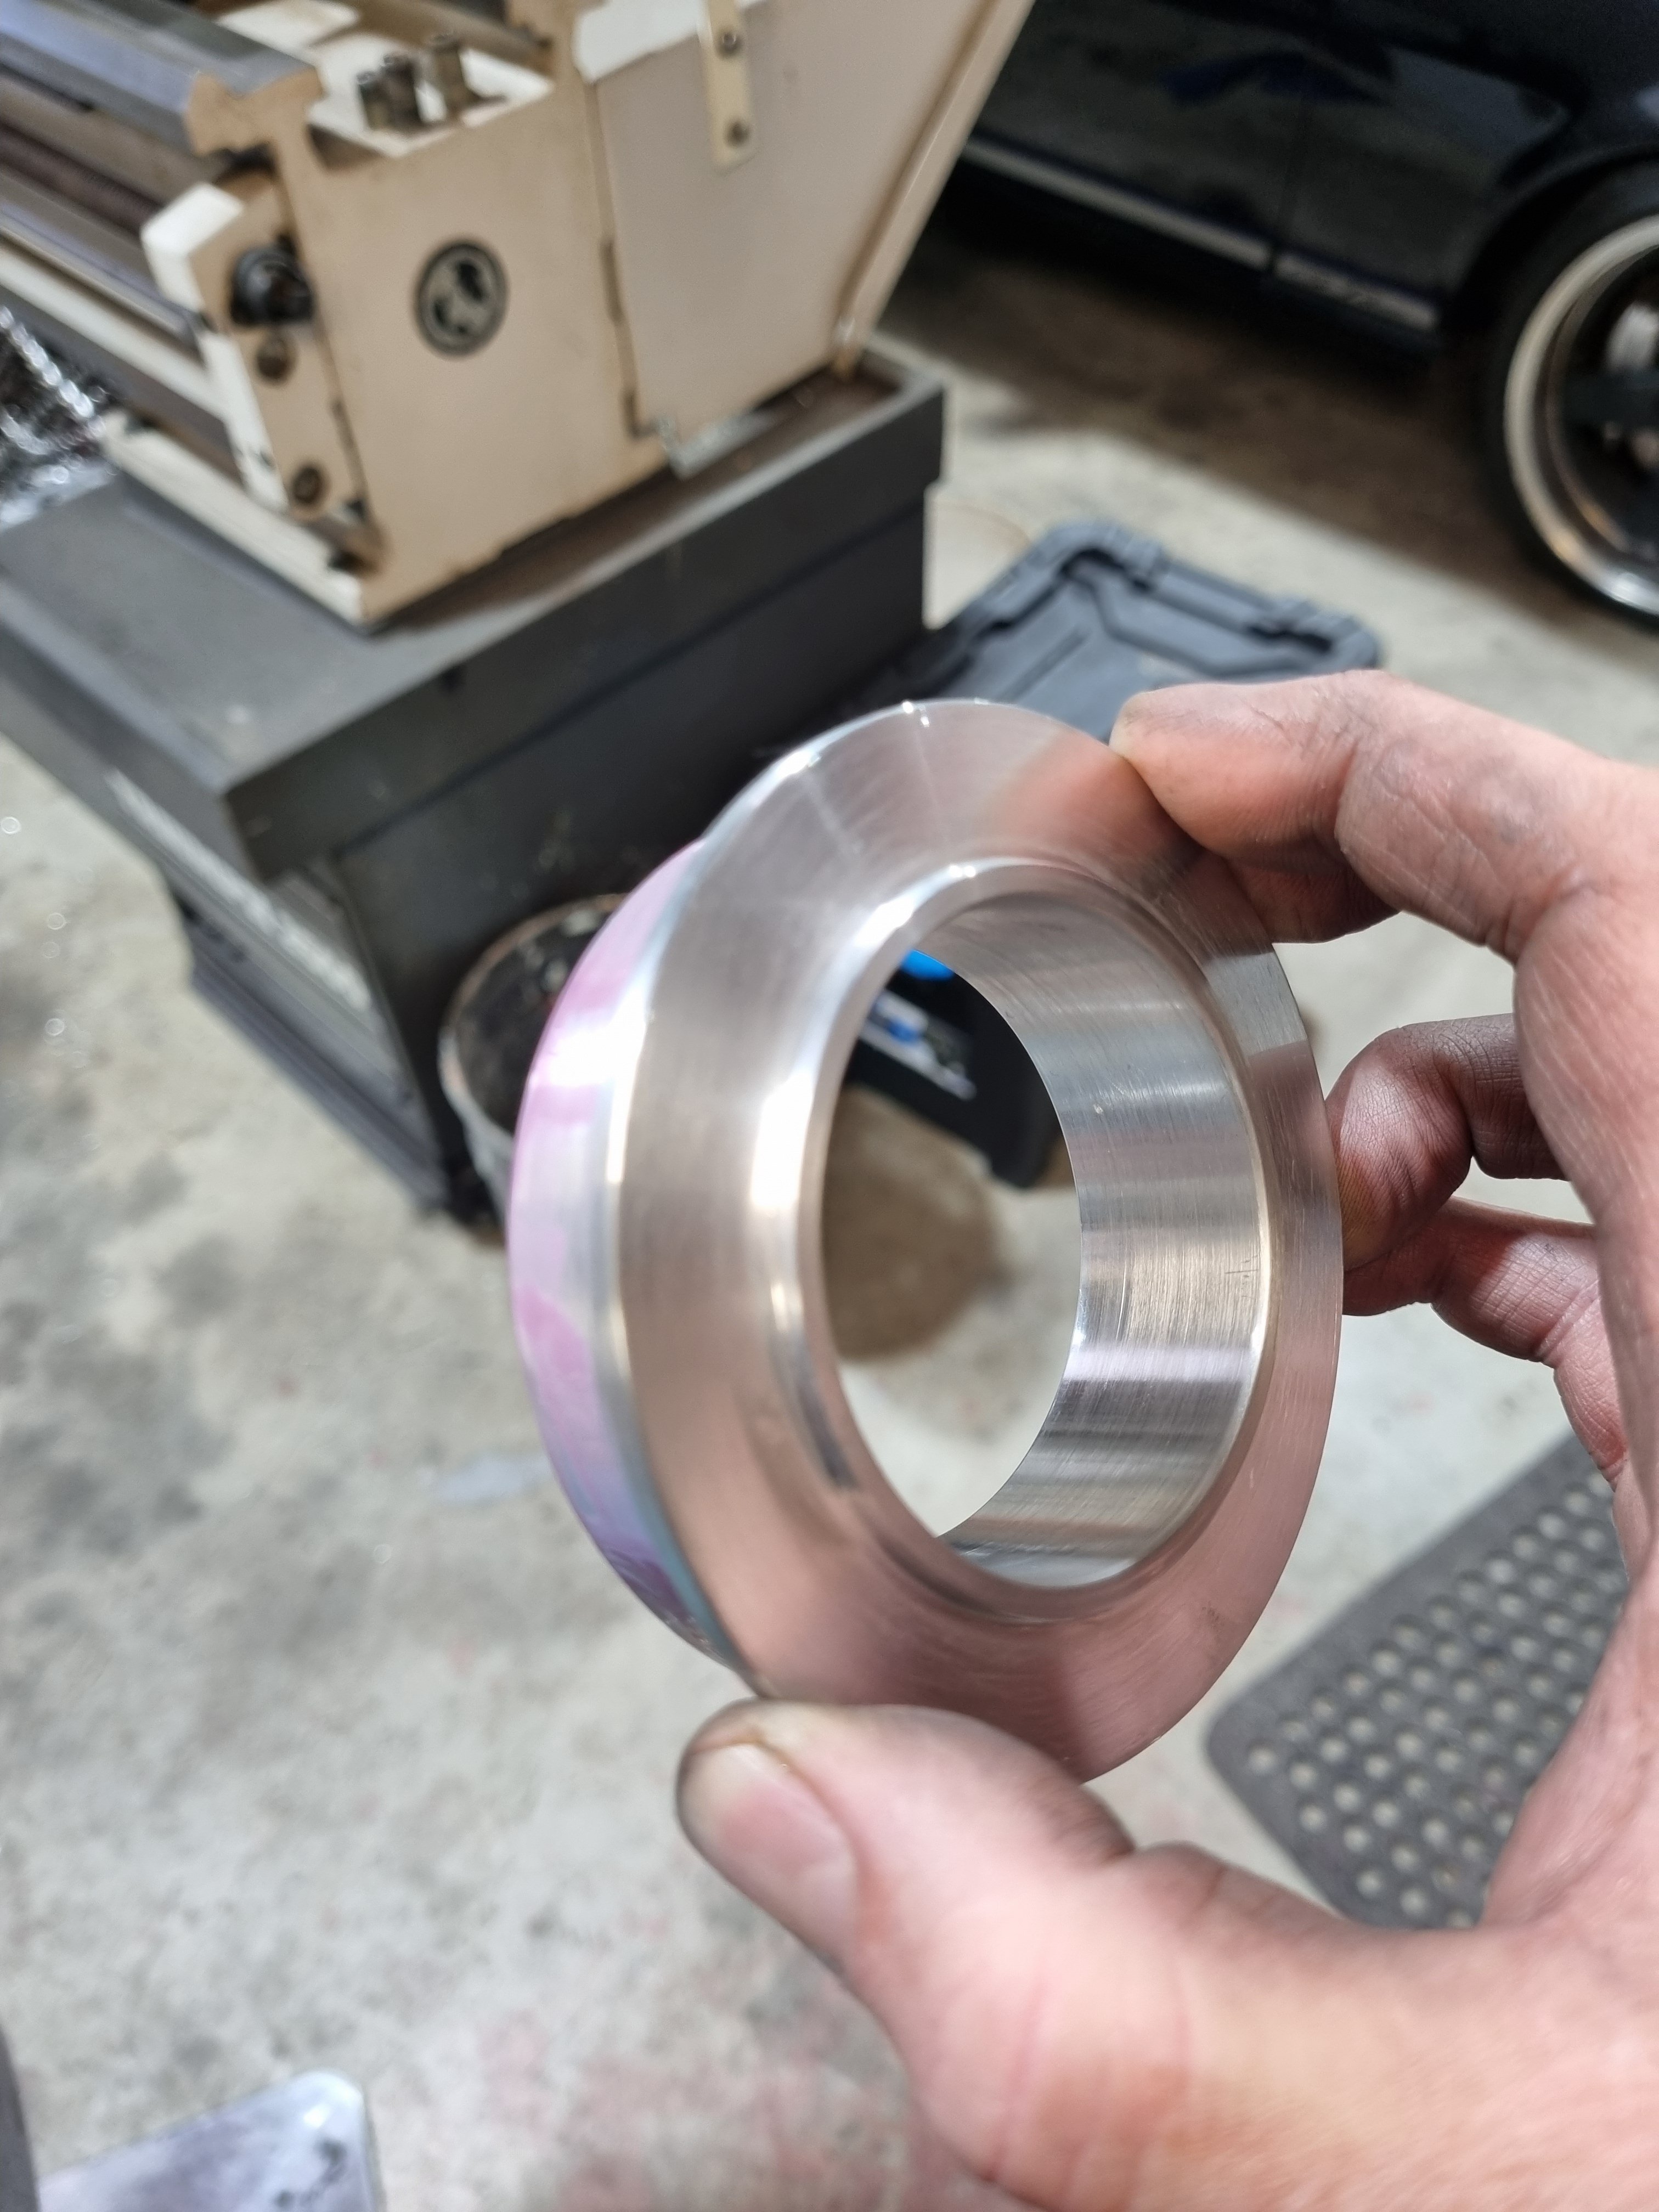
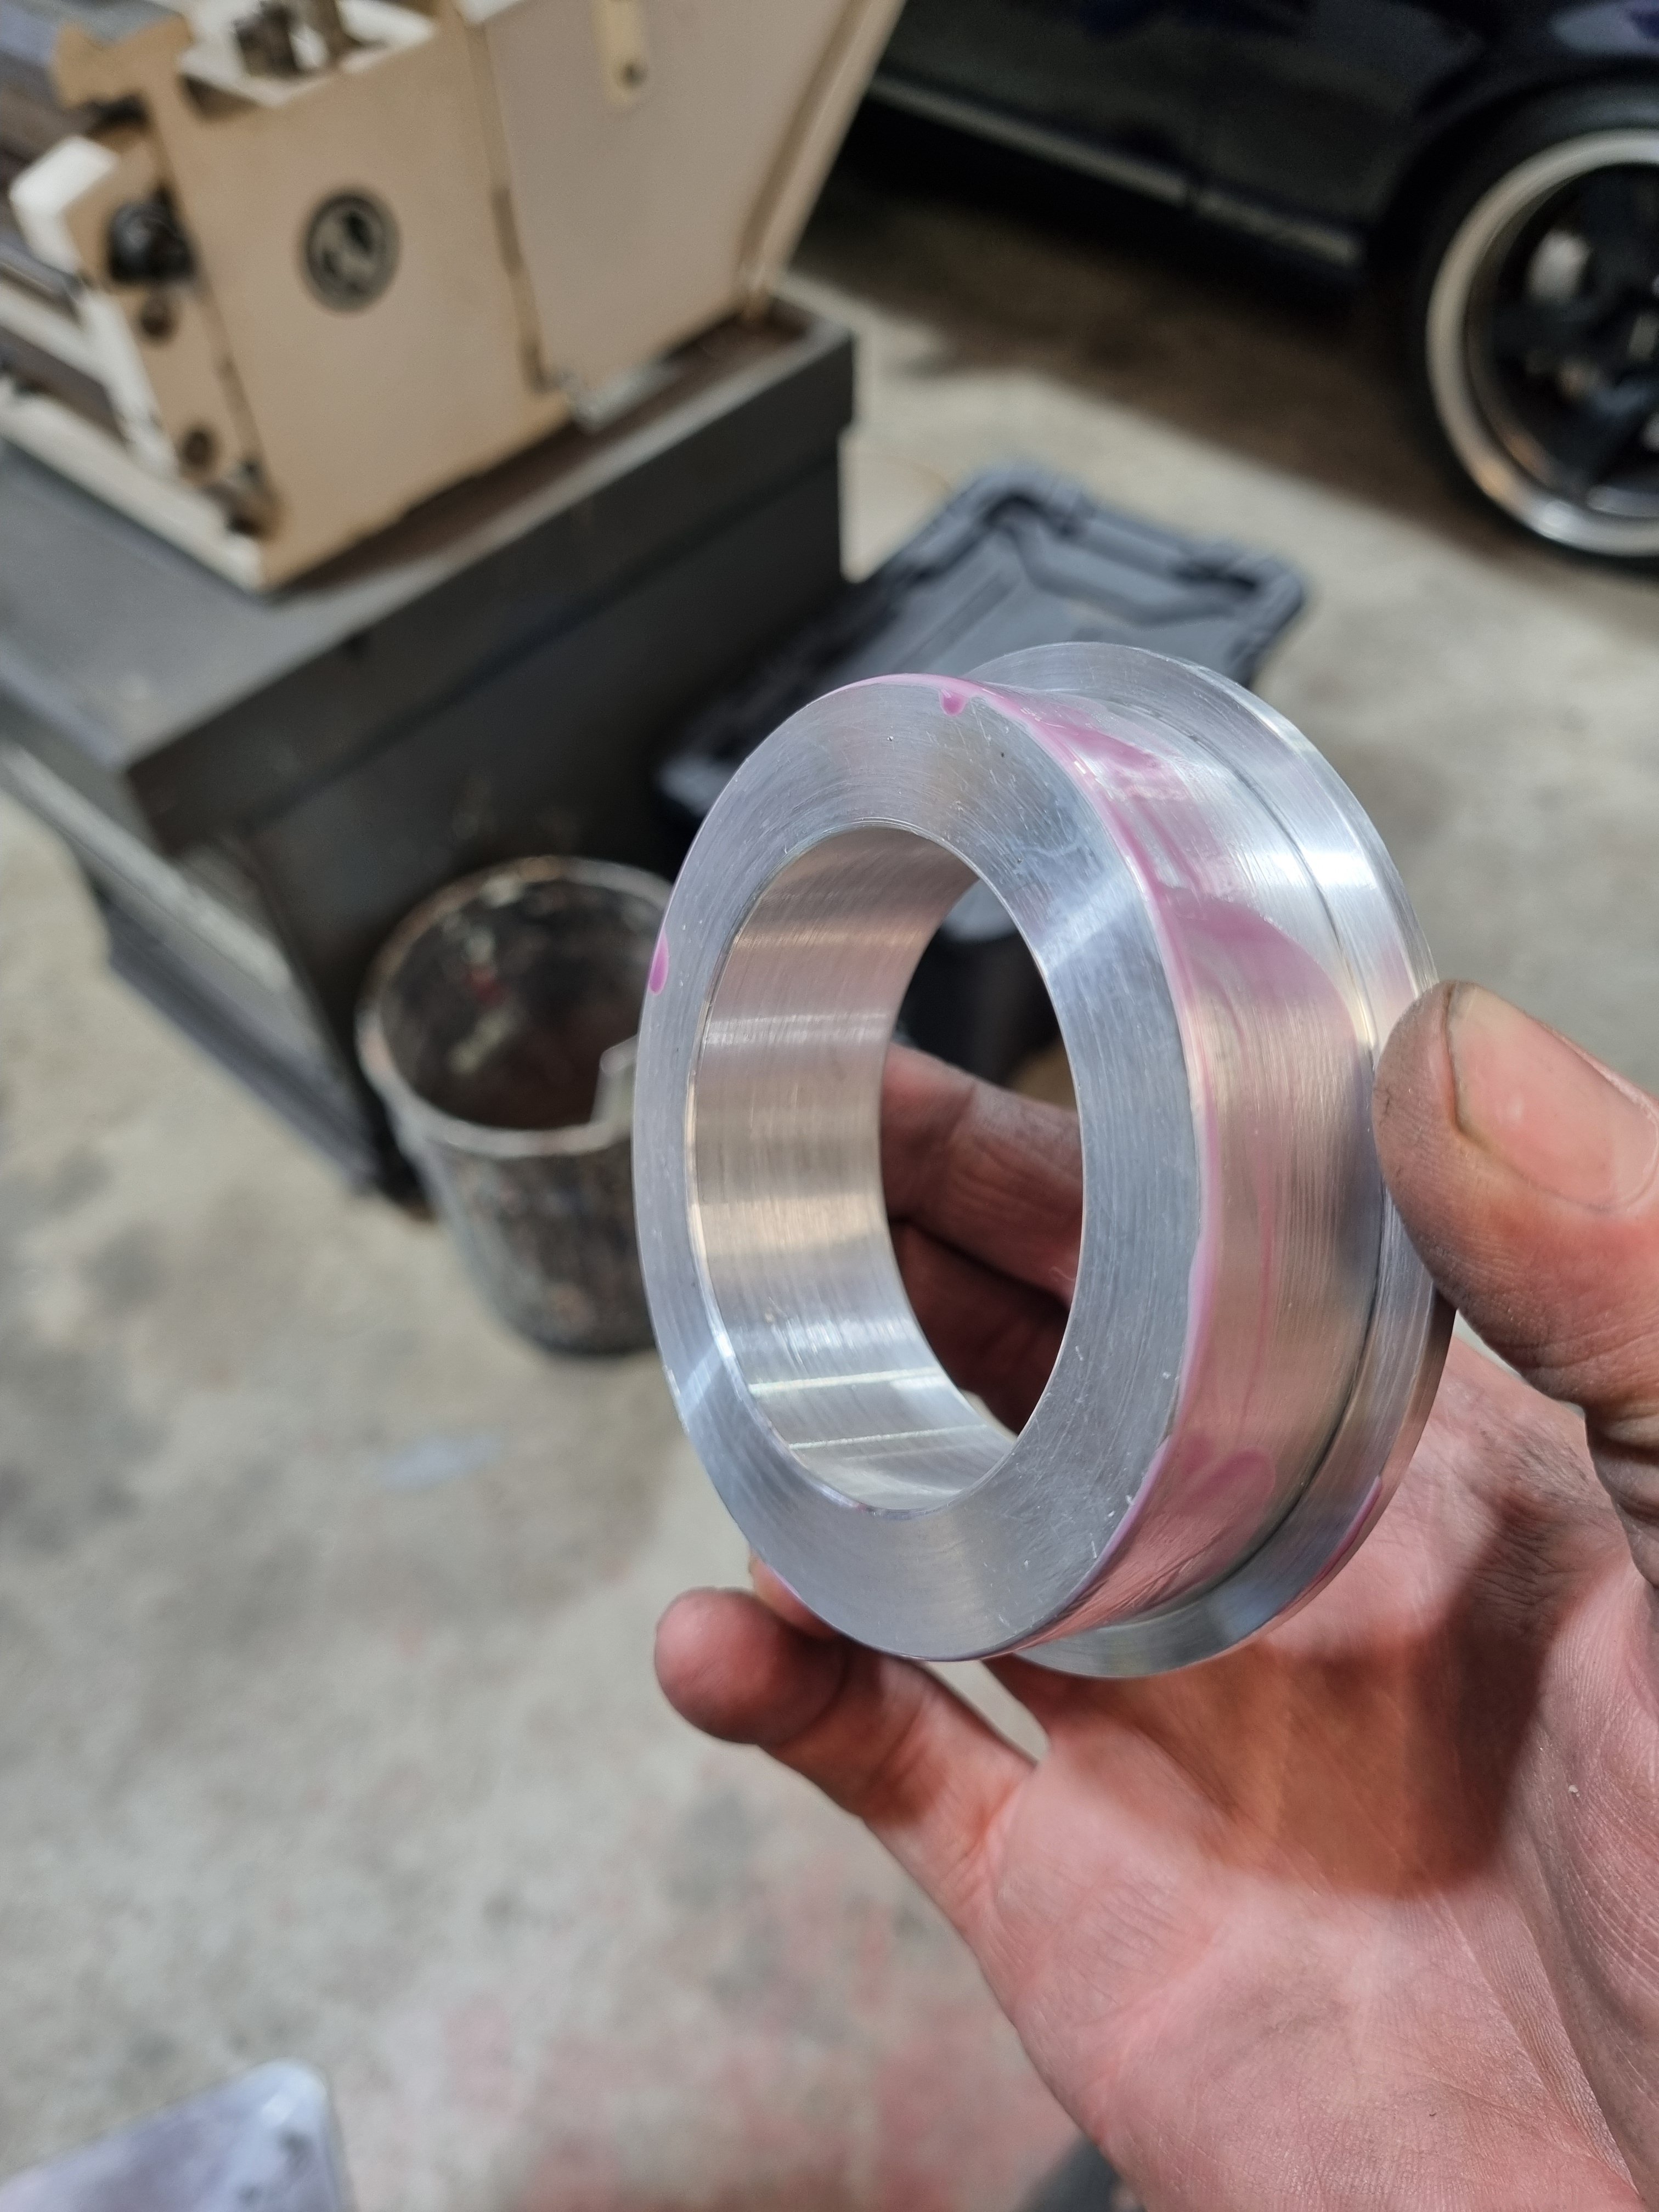
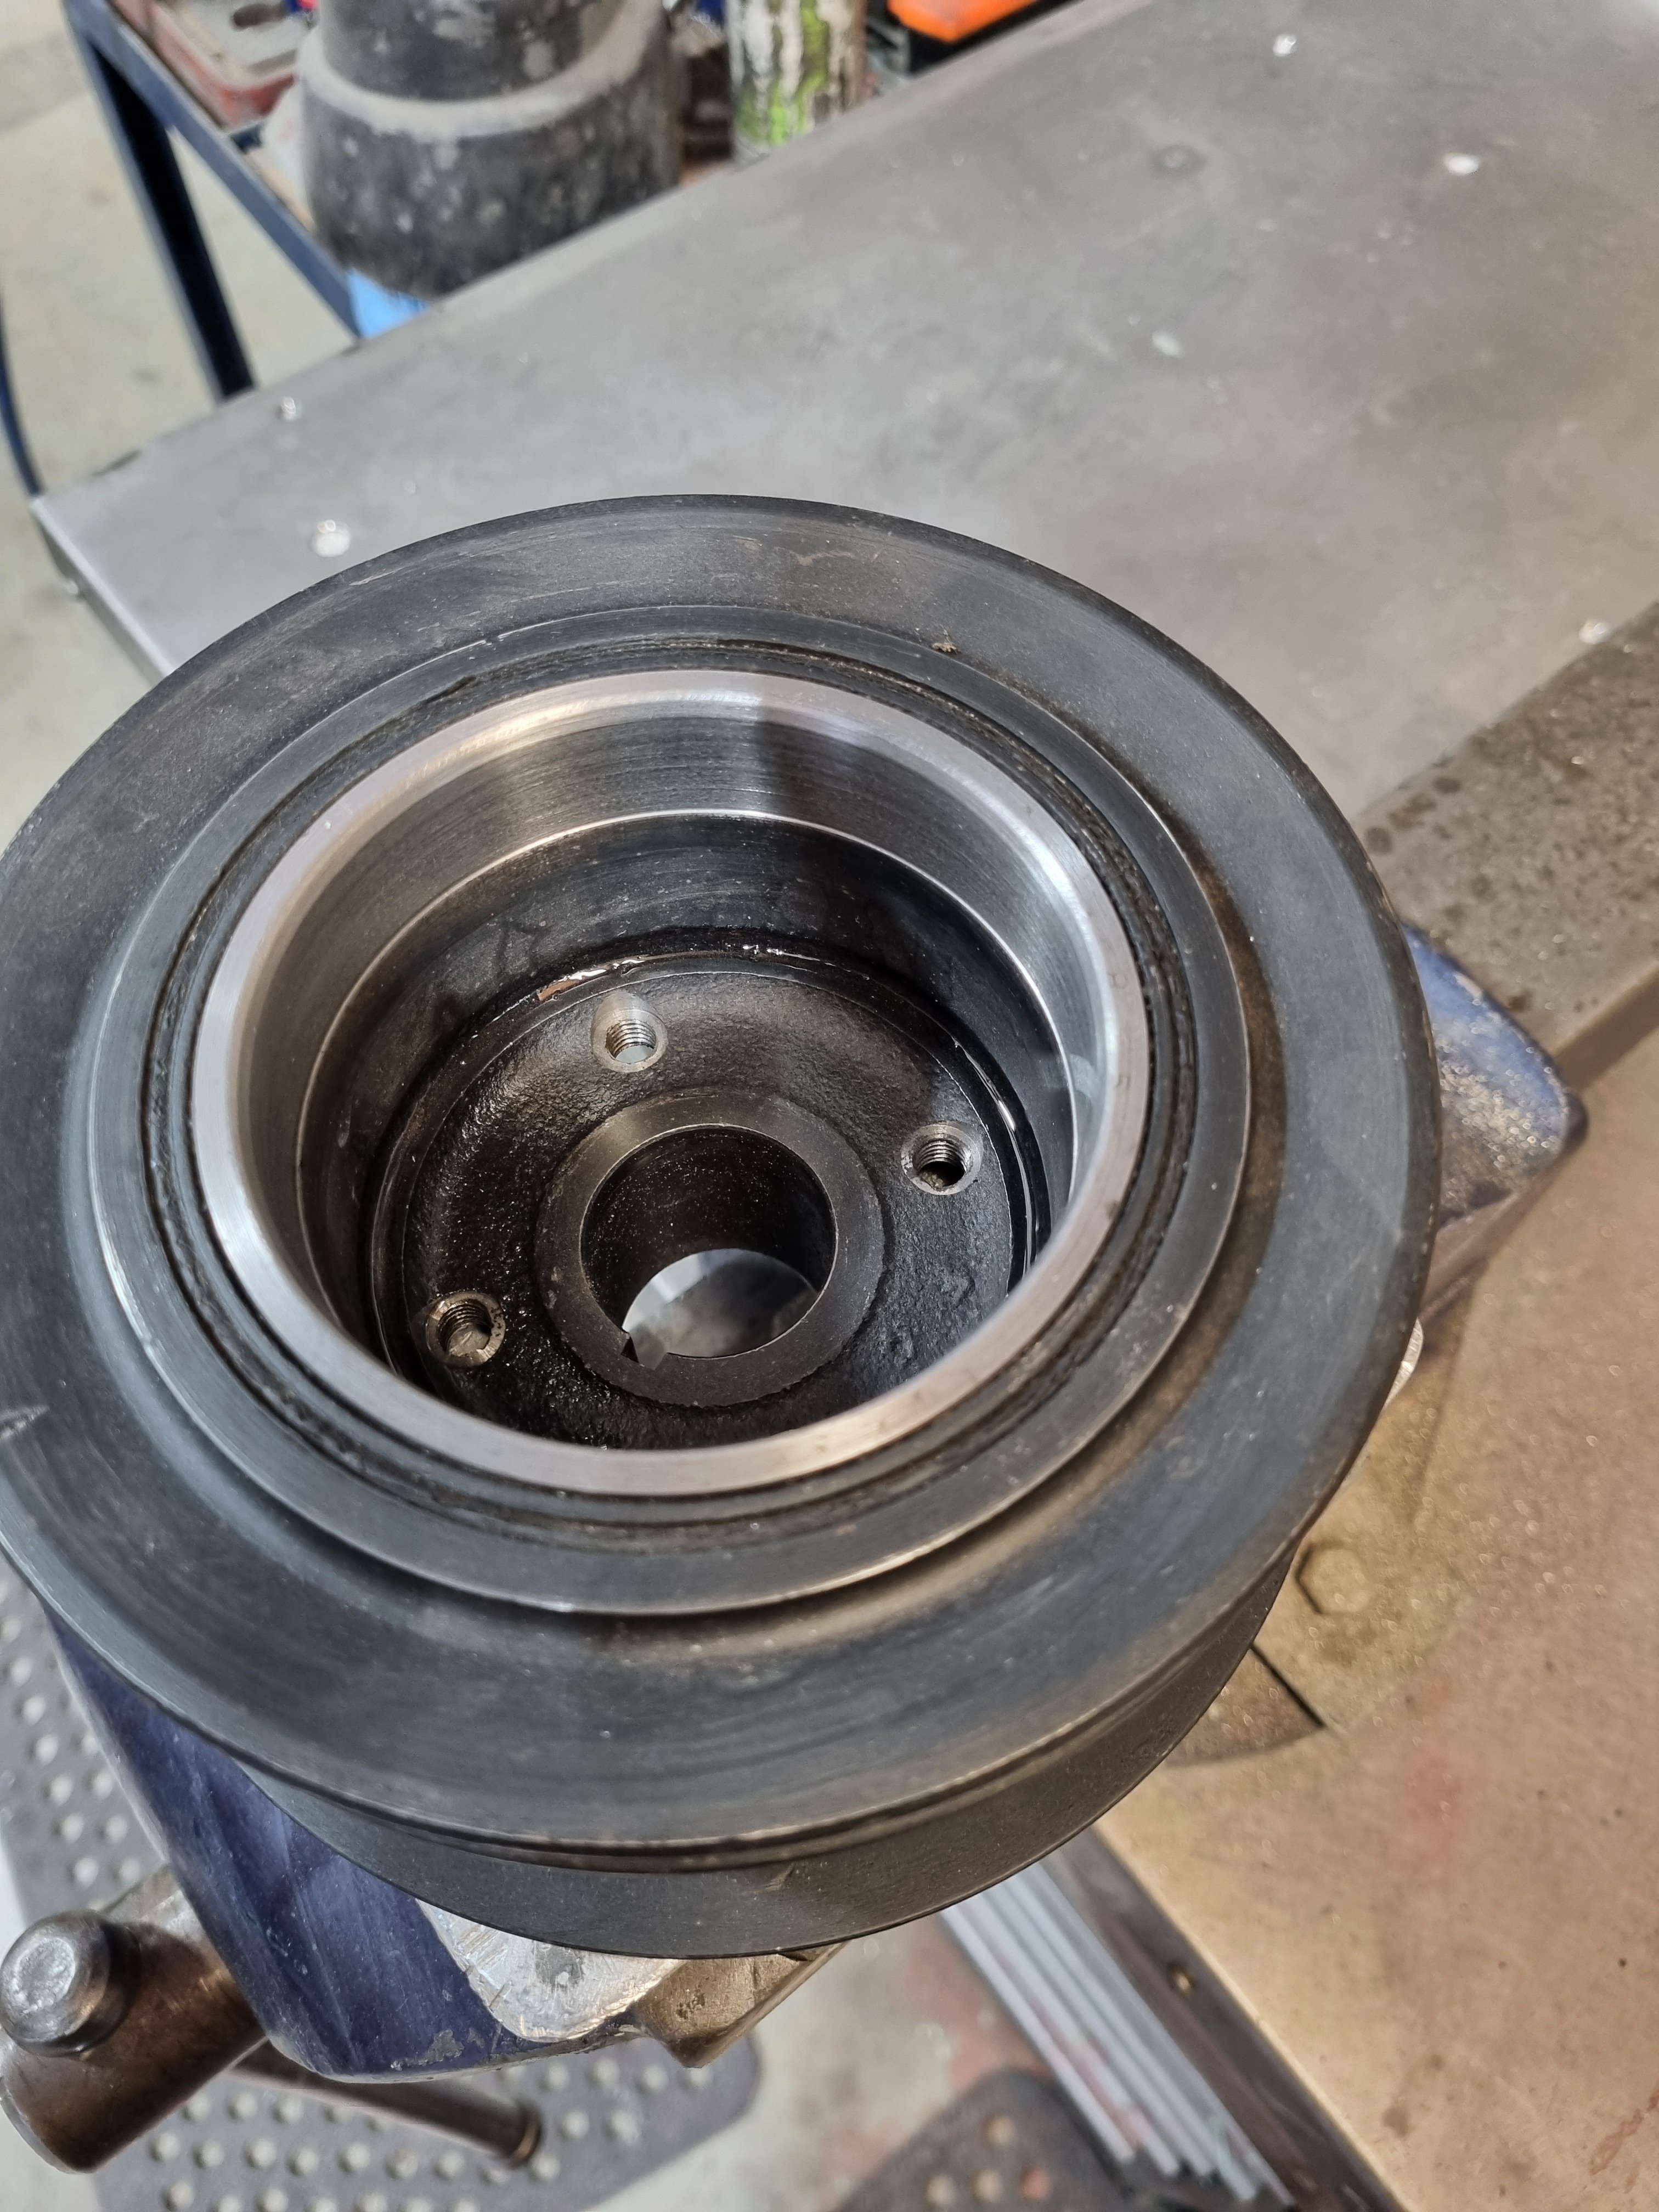
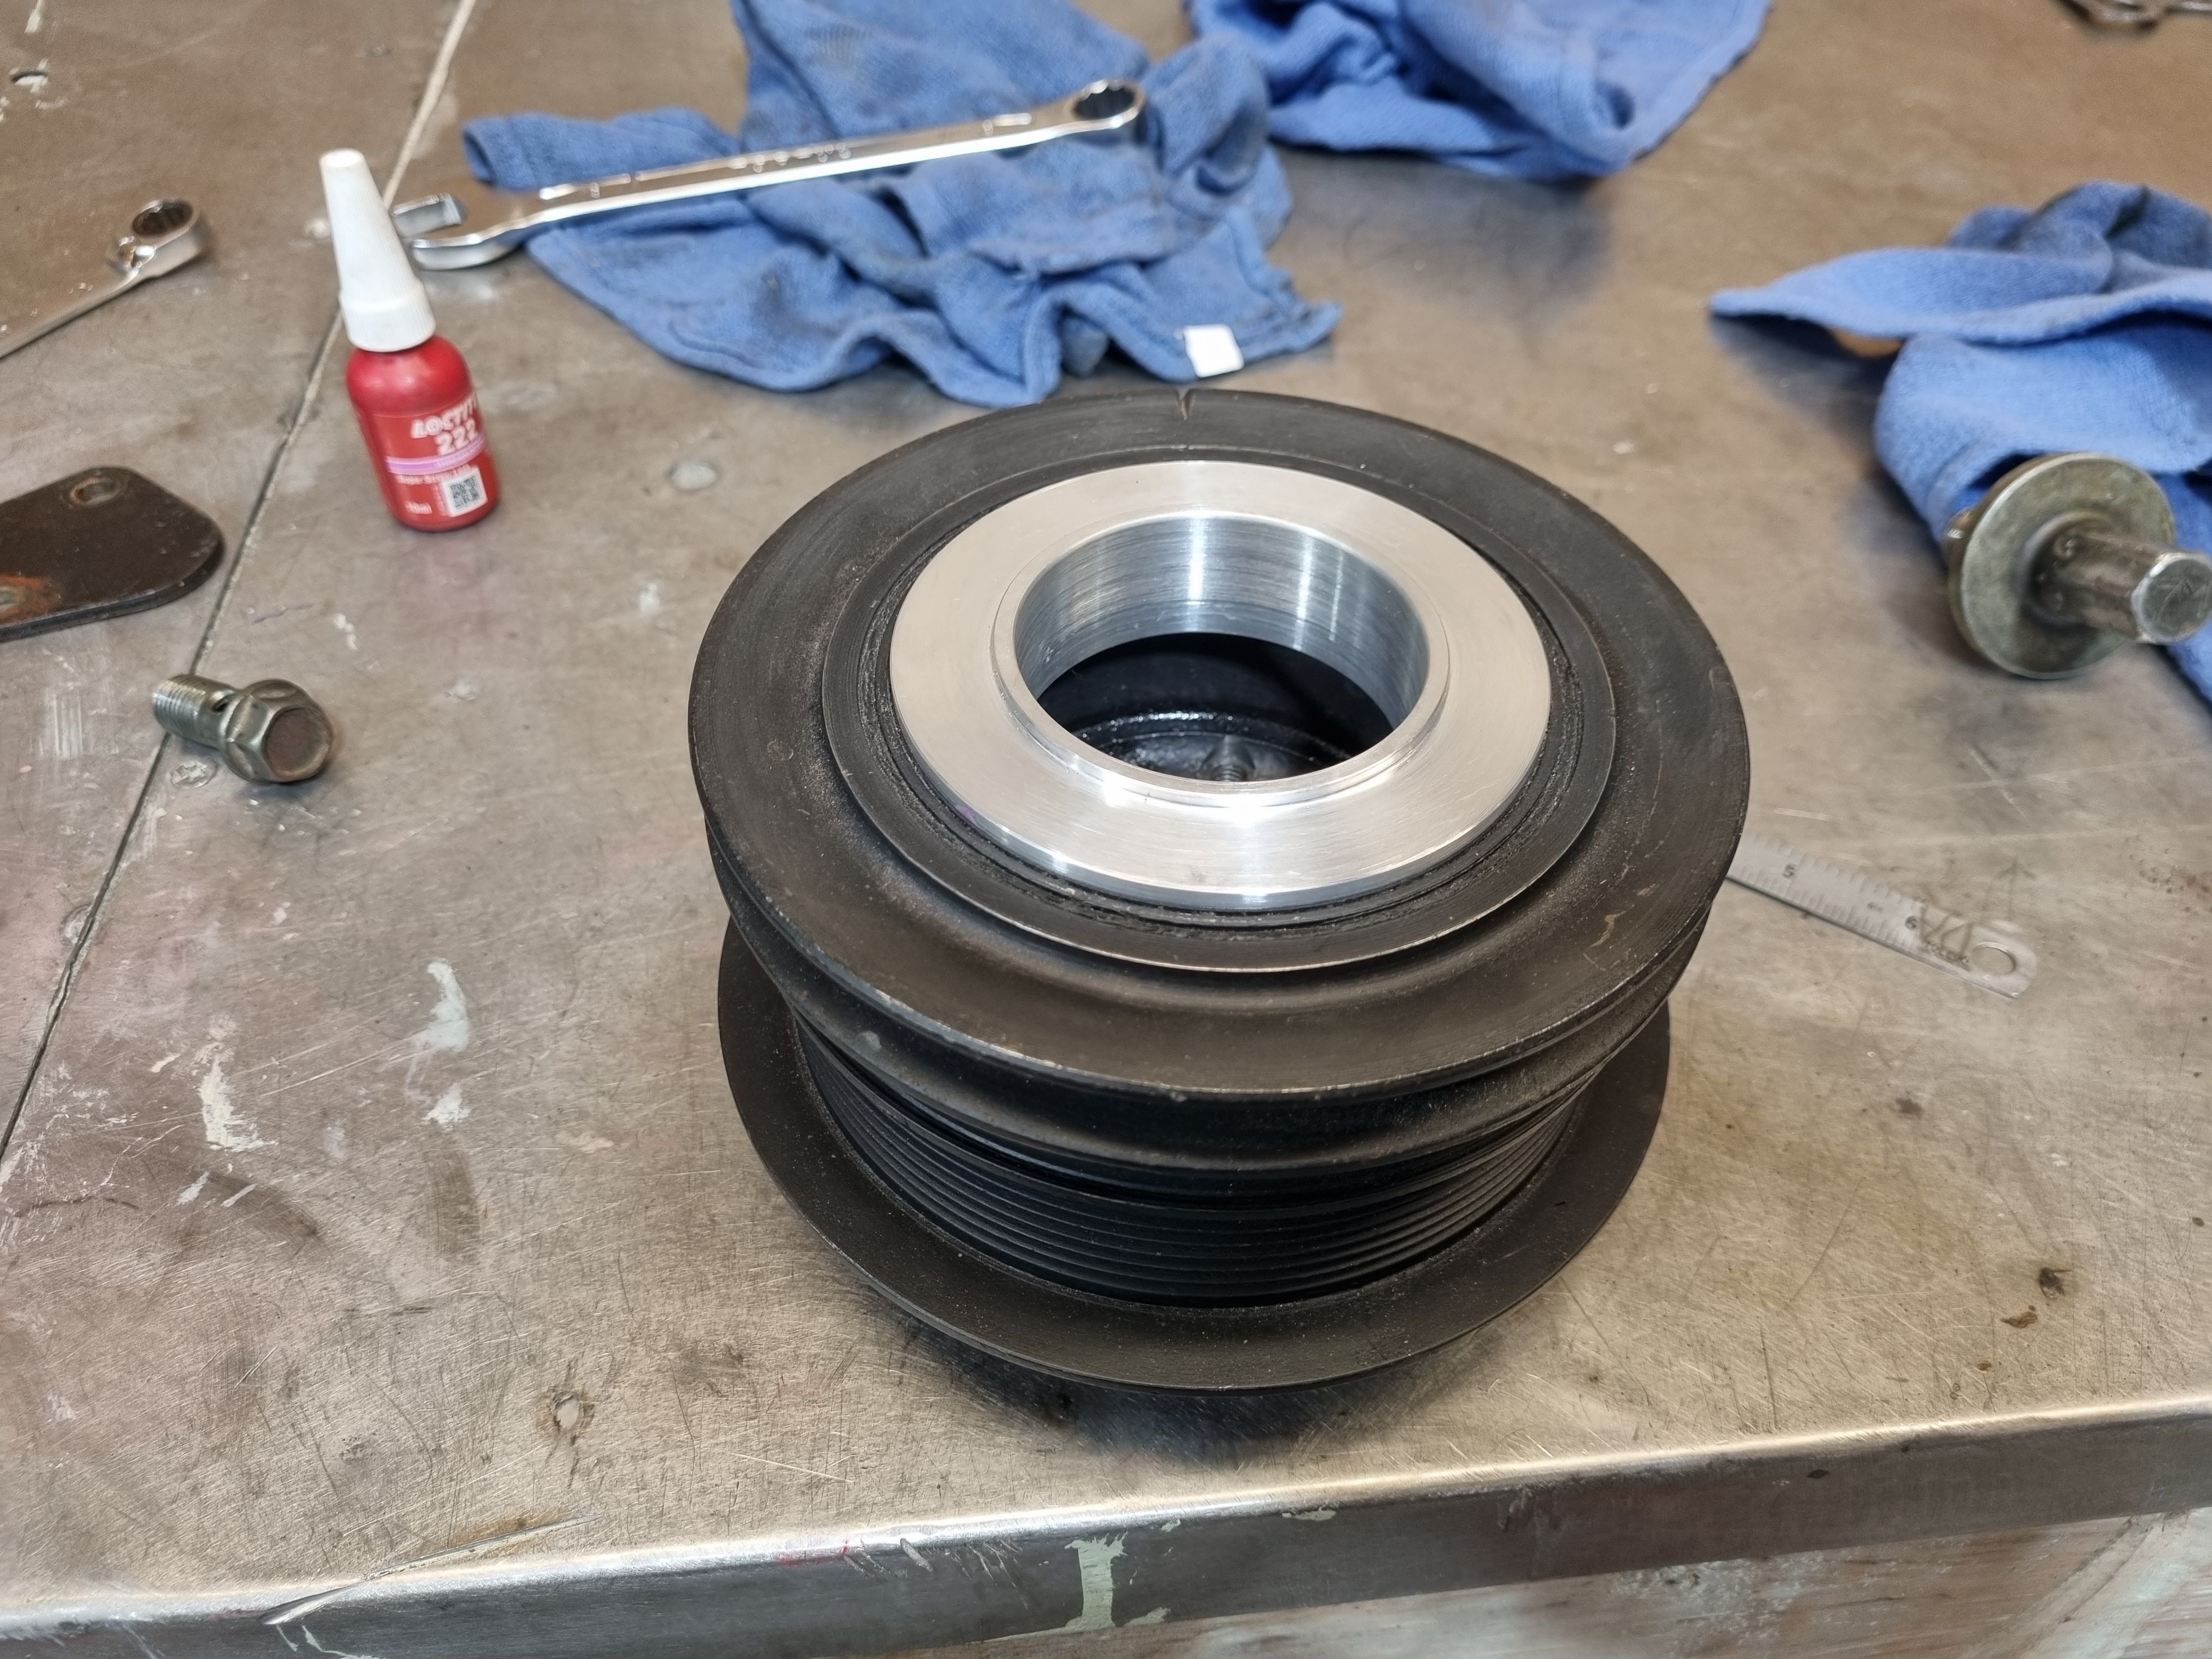
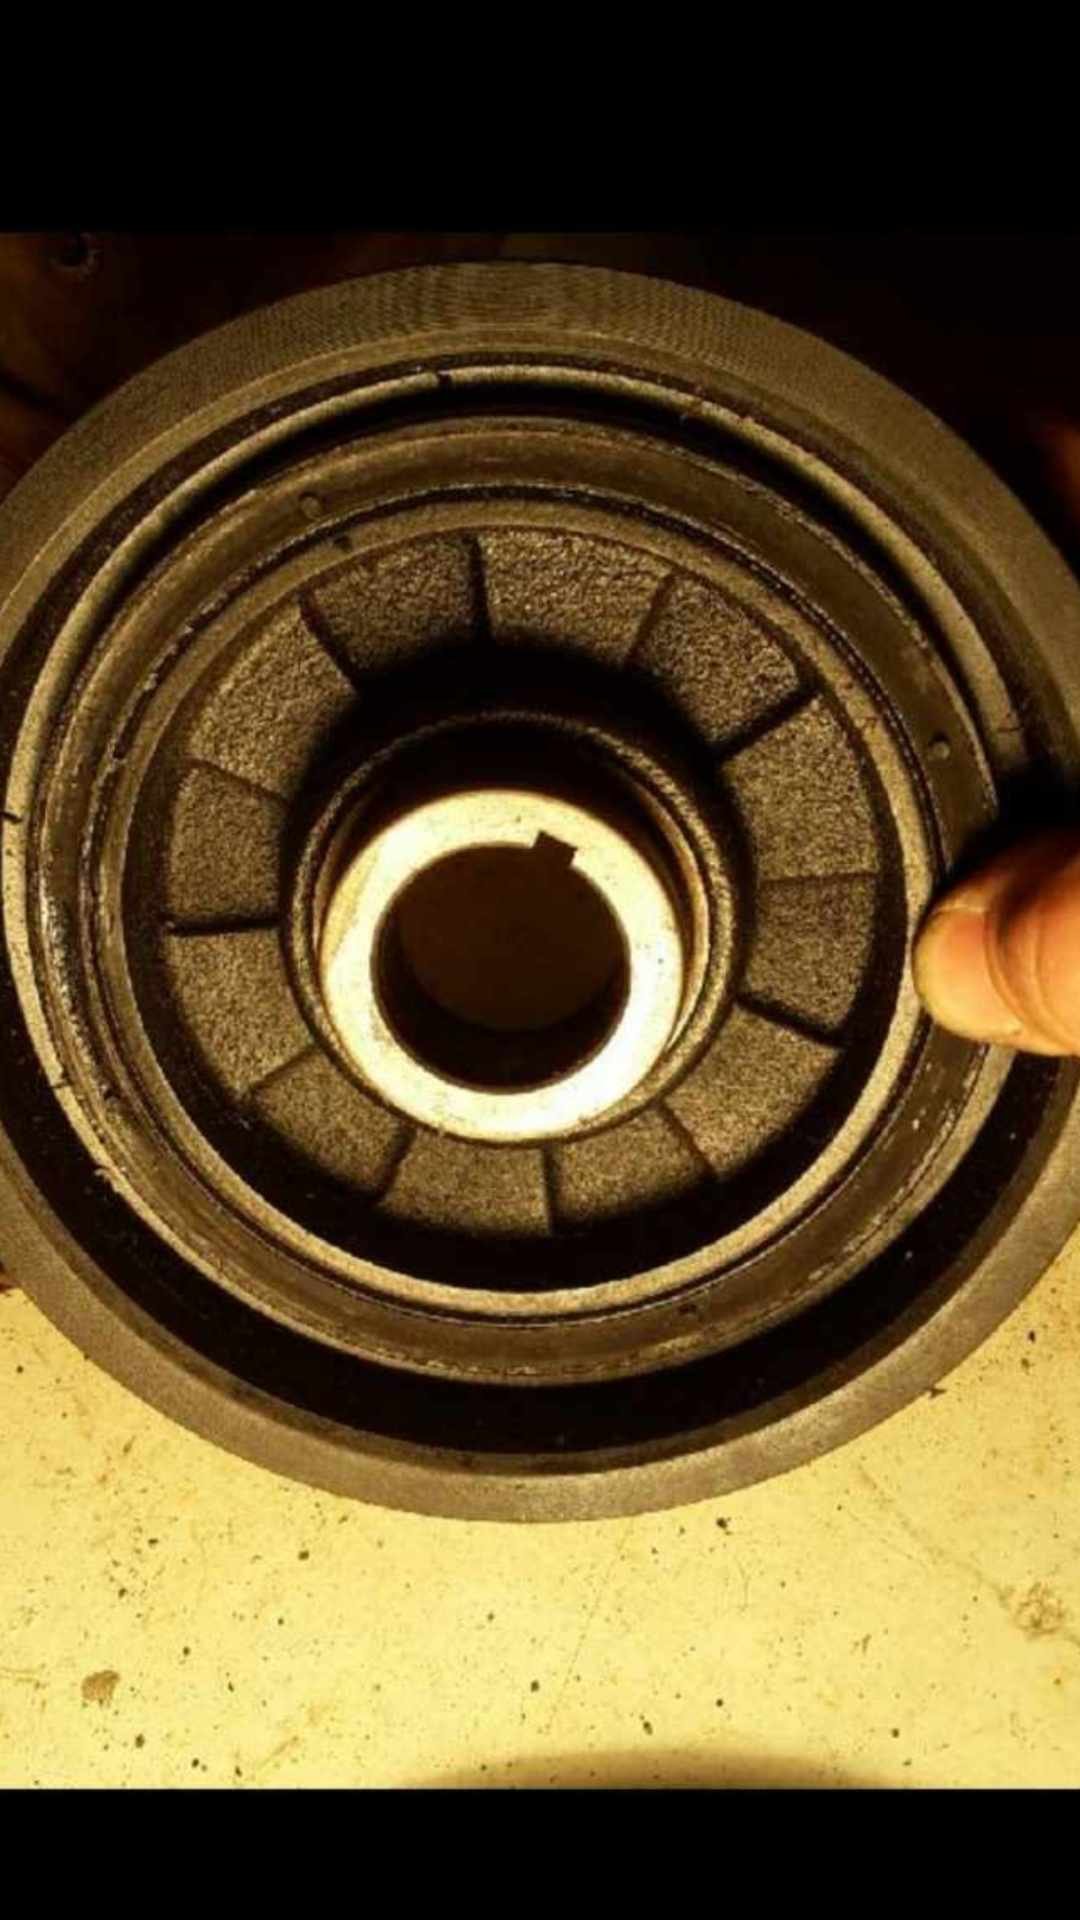
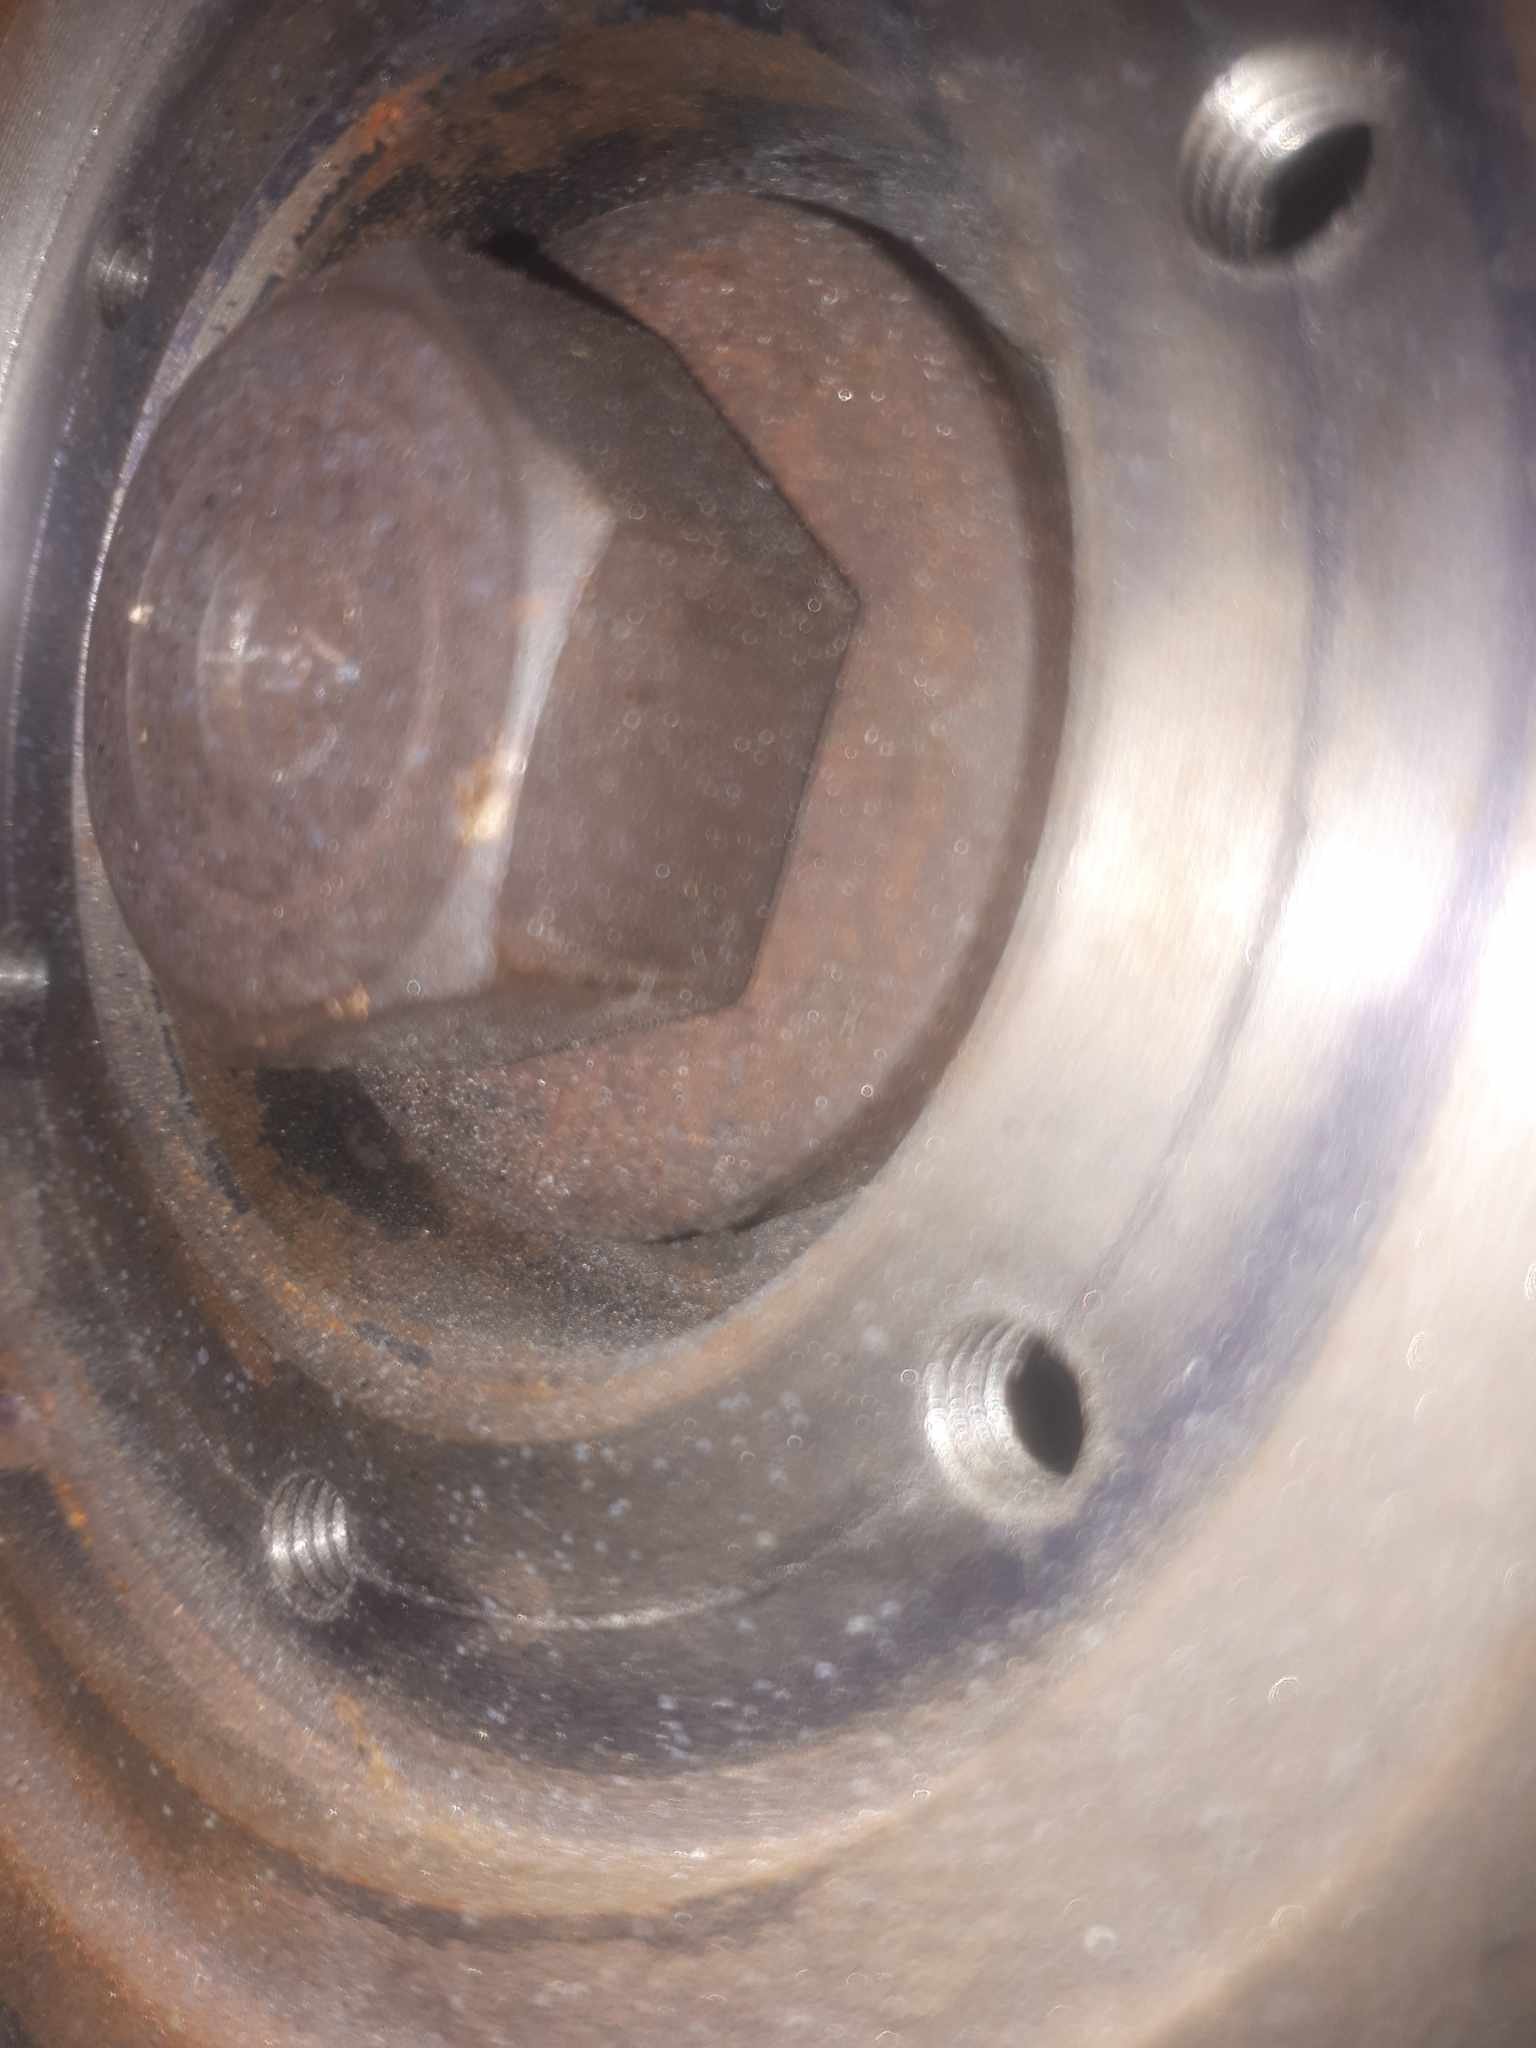
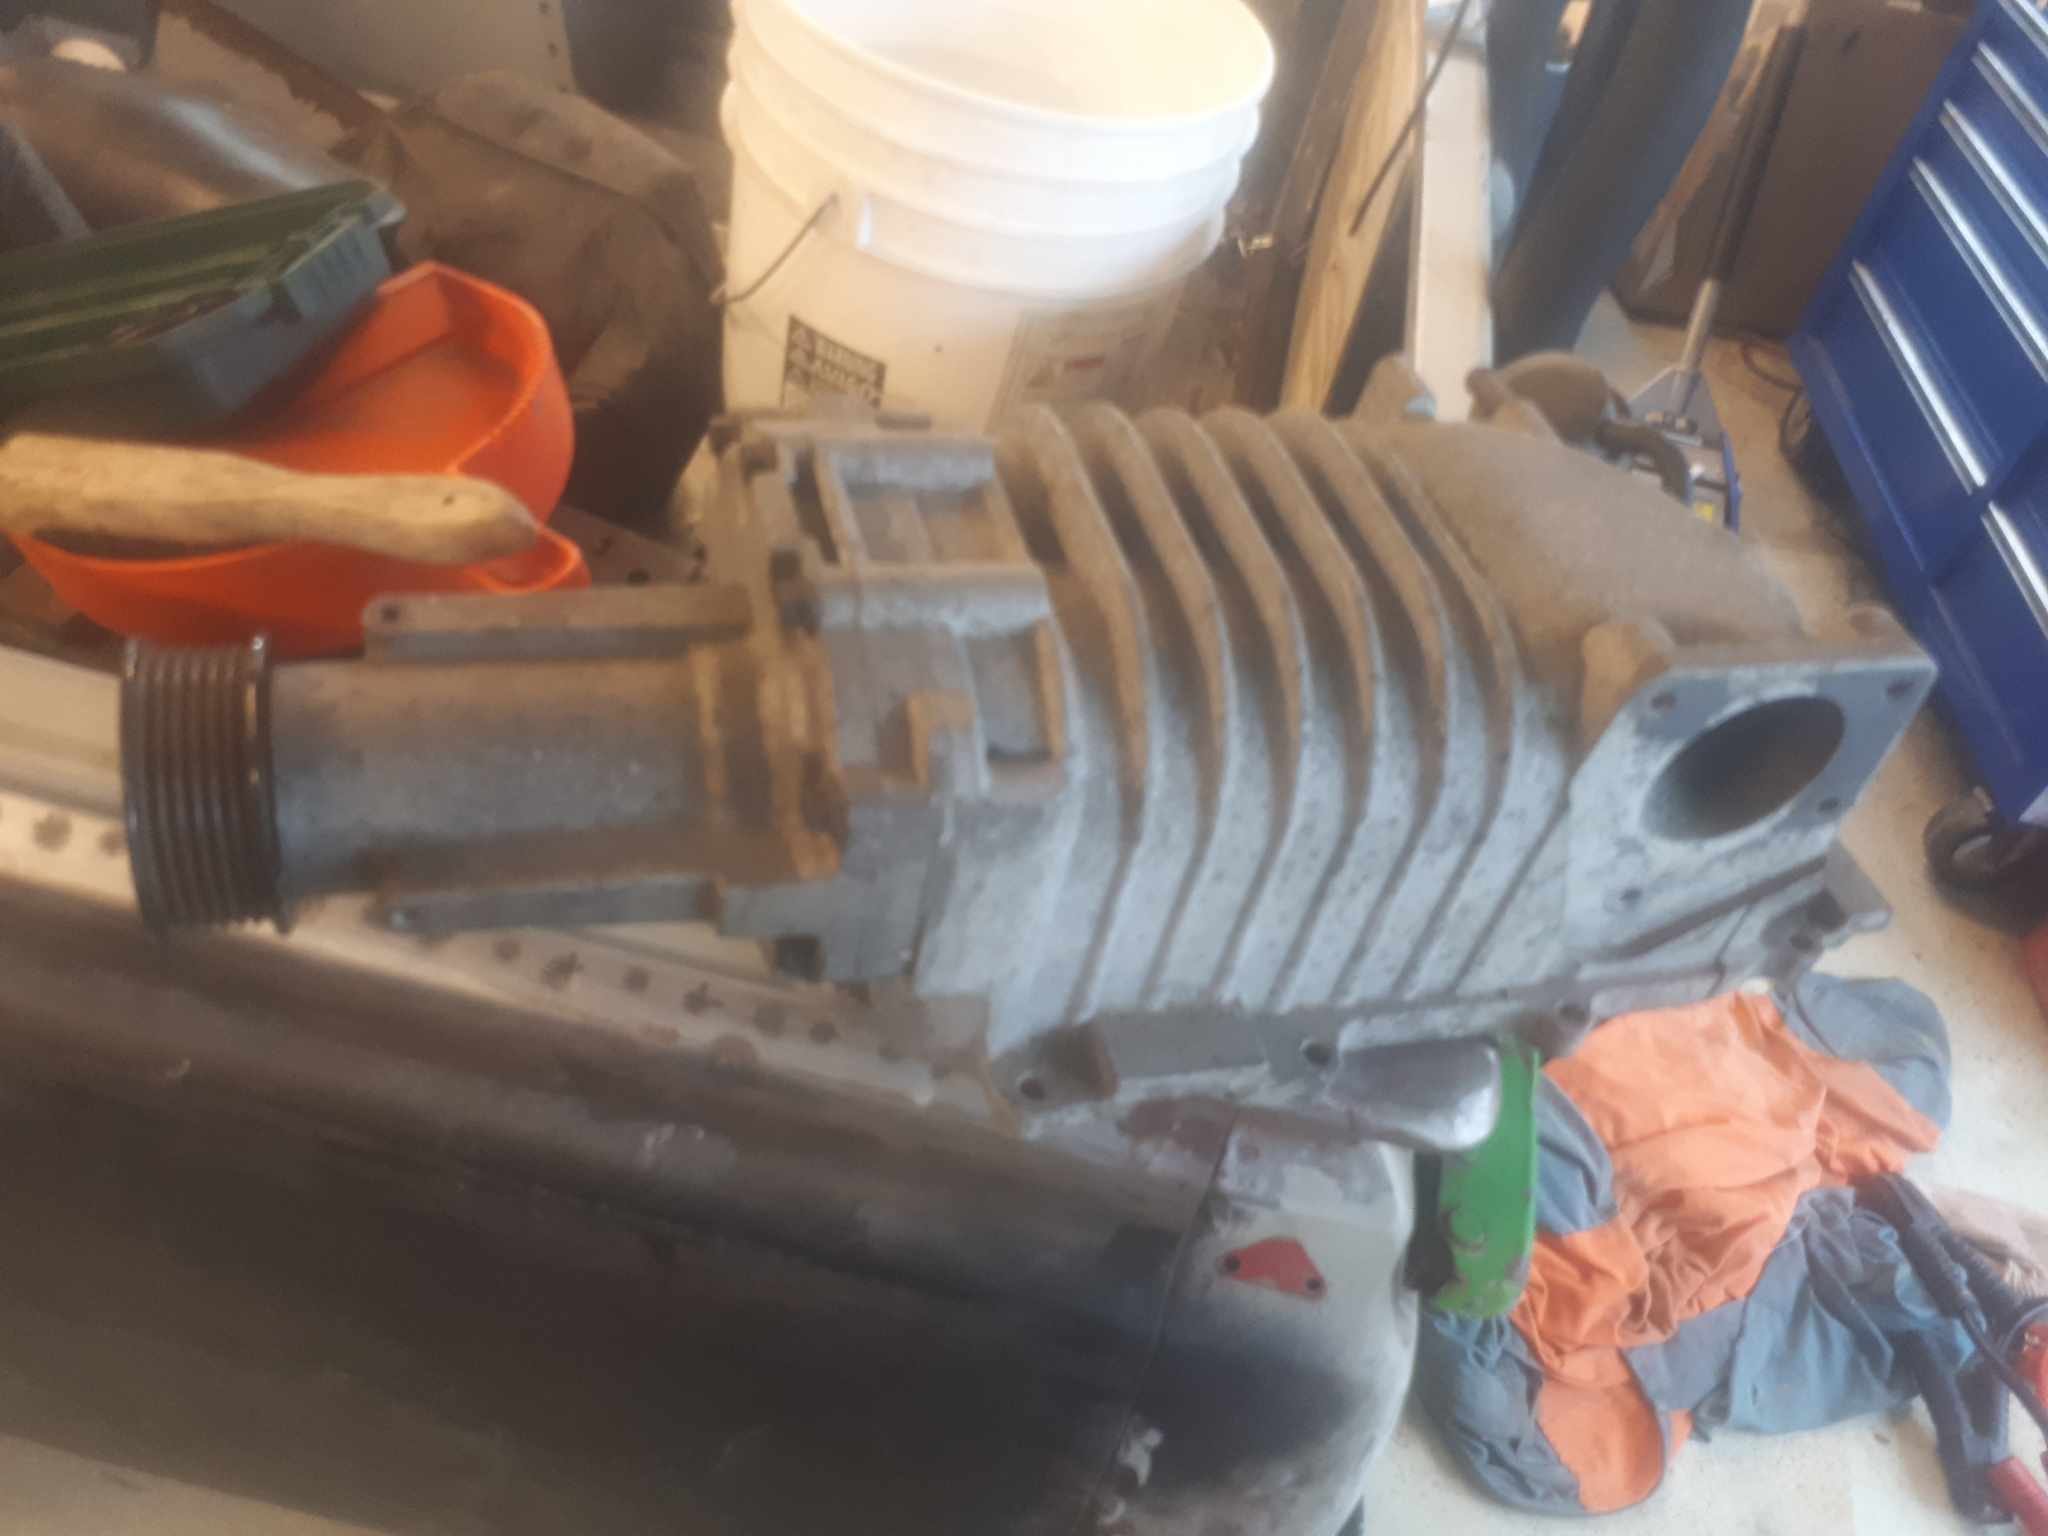
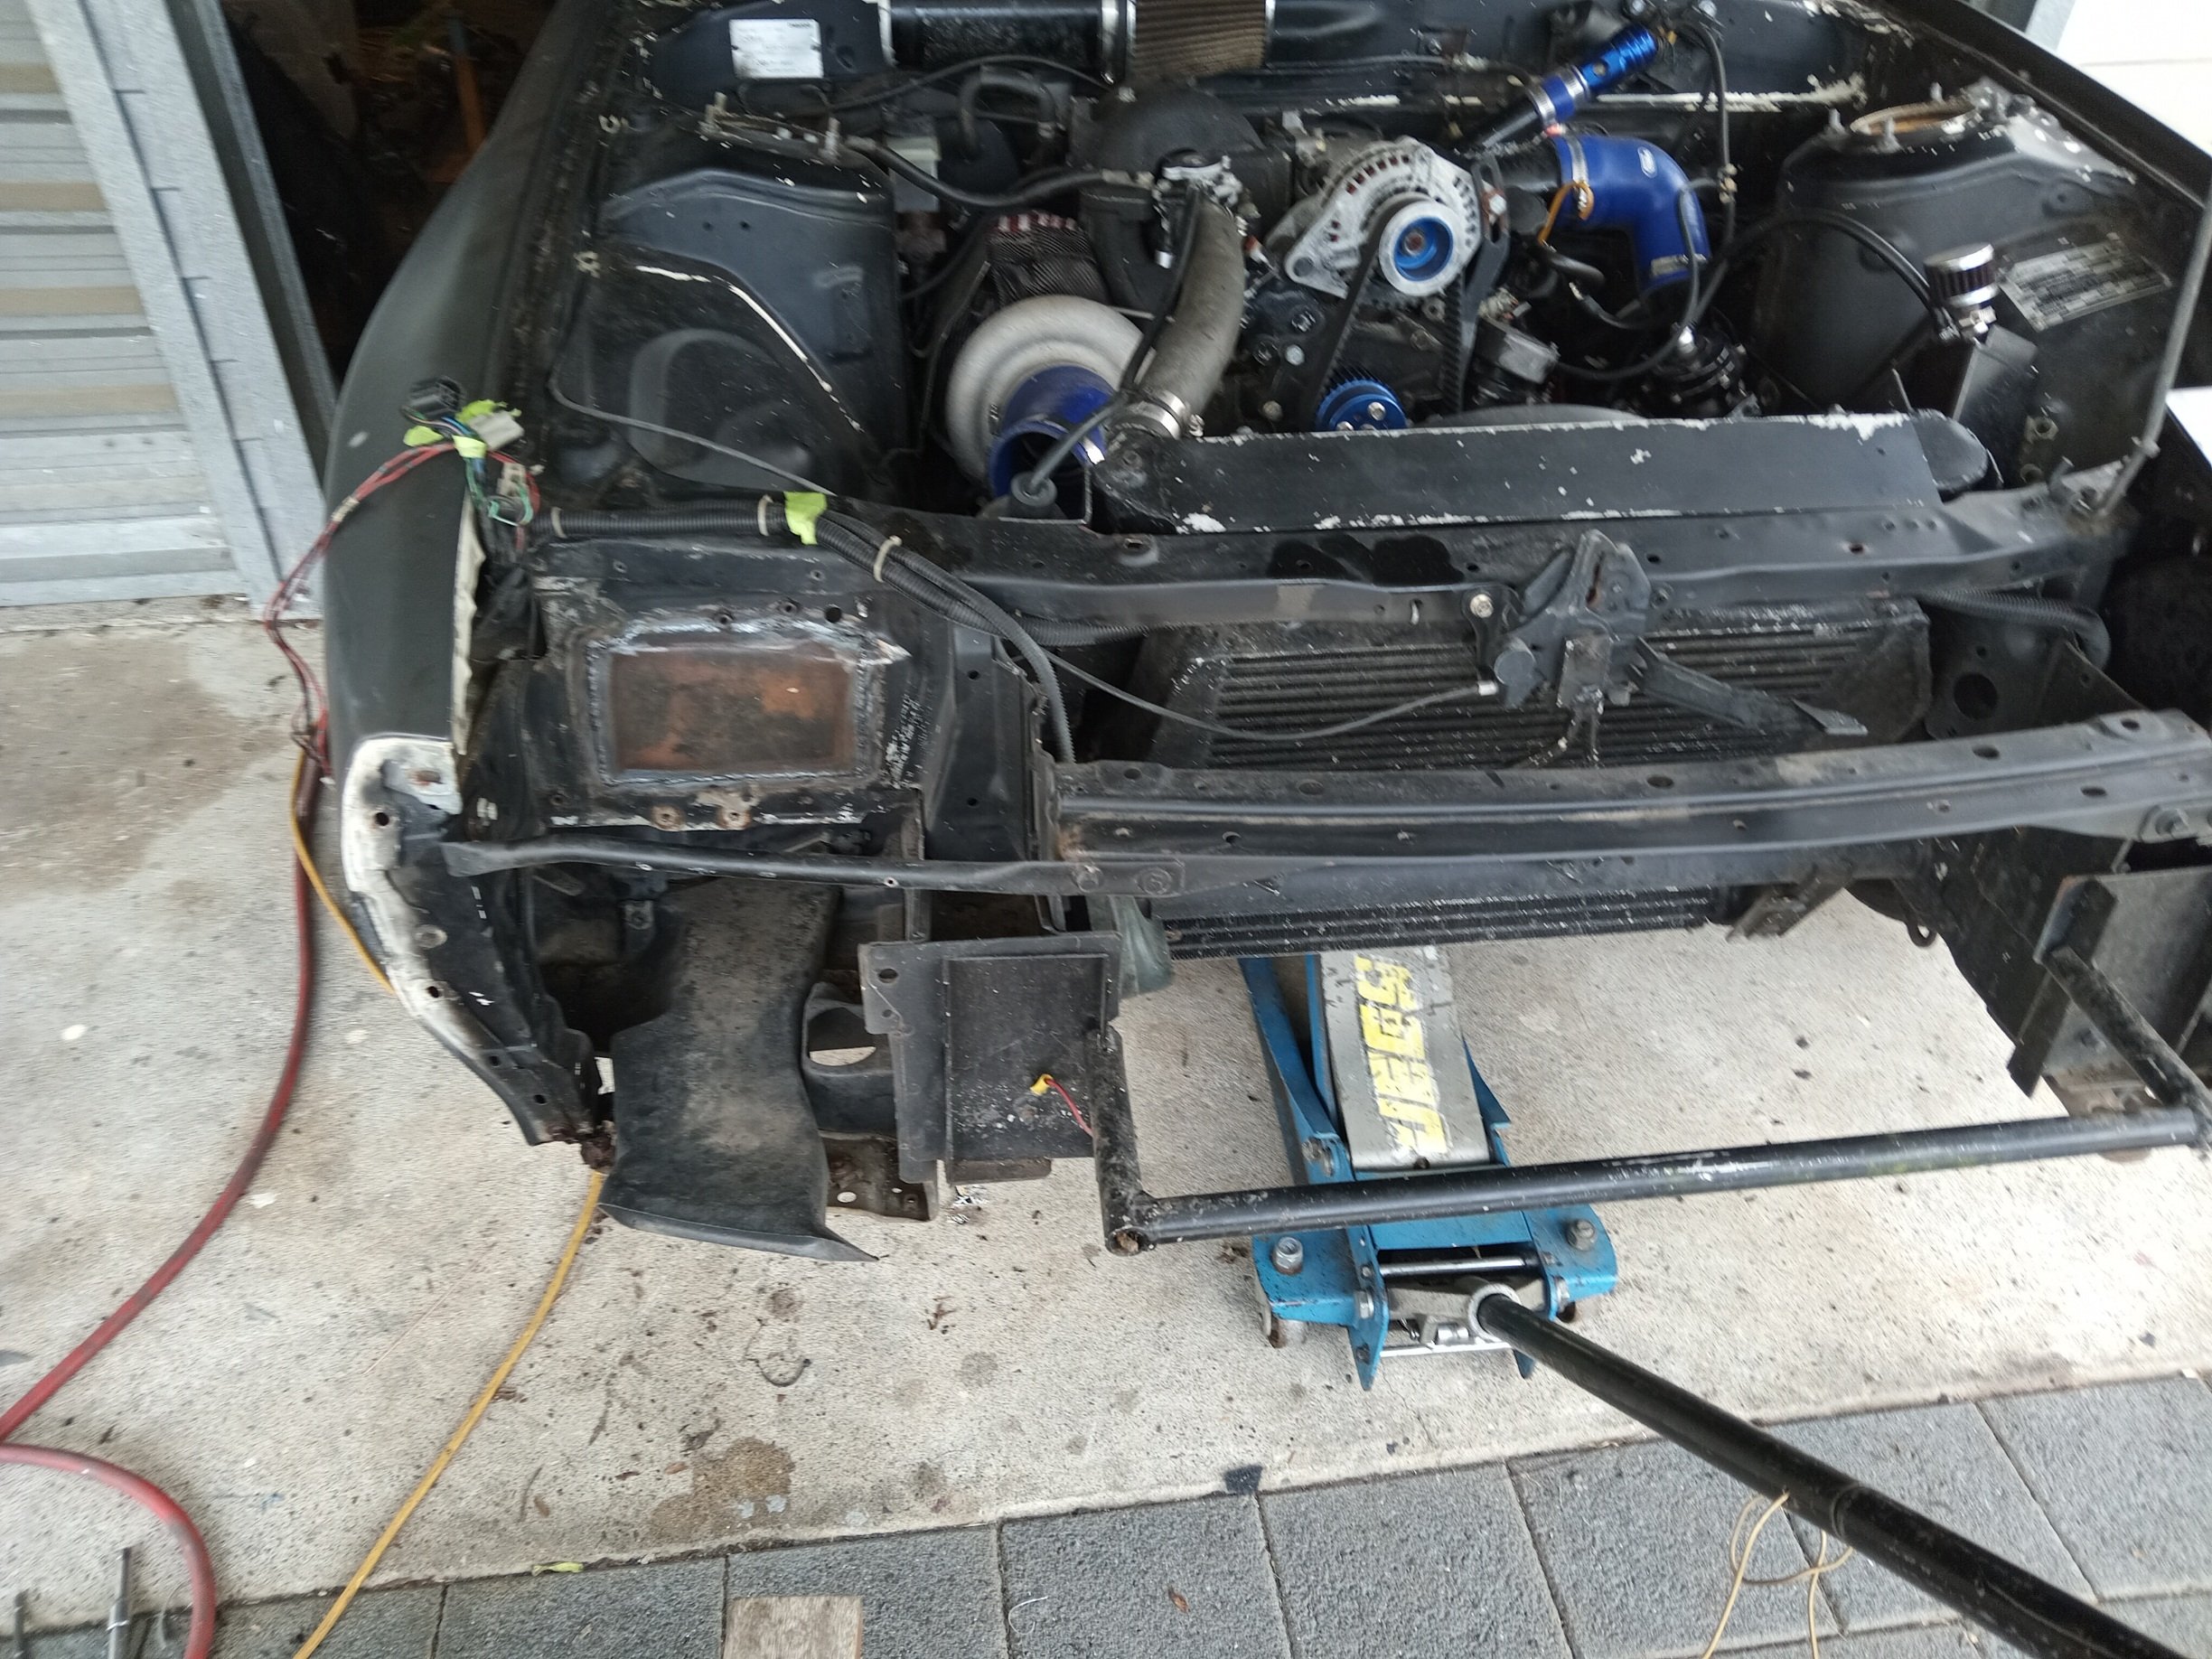
PNot an update as such, more a musing/potential future upgrade. Upon procuring the engine, id noted the front crank seal had been leaking. I whipped the crank pulley off, and much like the pinion seal on the diff, the seal journal was quite rutted/cut into. A speedy sleeve put this back to new. While i had the crank pulley off, i noticed an interesting shape was present. So i figured while it was off, it would be a travesty not to machine off the power steering pump pulley, (these are attached to the main hub, not the dampered pulleys that drive the water pump/alternator/AC) A nice spigot was machined on, and some holes drilled and tapped to correspond with those nice bosses. This is very hard to photograph in the car. Quite a while ago, the old boy picked up an Eaton M62 supercharger off Ebay. It came off a USDM nissan frontier truck, with the nissan VG33ER. (The larger version of the single can VG30 which were once common here) i basically told him, i was commandeering it. And back when @Vintage Grumblewas a cool kid, he had some SR20det injectors which he kindly gifted to me. So in the unlikely event 5his wreck ever sees the road, it wont be too big of a stretch to turn the wick up.
2 points
-
Took it for a WOF, WOF not achieved. However there was nothing show stoppy in there. A wheel bearing with too much play, a steering tie rod end, and the right rear brake had a lot of fluid around. This one was a little weird when we first bled it, it wasnt passing fluid initially but then it came free. It might be the handbrake adjustment playing up. It might just be all the fluid used during bleeding, anyway I'll have a looksee. And the low beams were not working, but I am pretty sure its the switch playing up. So overall nothing bad or even unexpected. And just look at that awesome wedgyness;
2 points
-
I used epotec 408 on some panel repairs to the Defender cos its all I had a the time and its still sticking. Think @nzstato had some fancy aluminium primer for his?1 point
-
Probably the front Iron has cracked by the water jacket. It’s a common weak point from casting. That was the cause of my first rebuild.1 point
-
Sovereign citizen Sungai? Take a chance, you might get away with it. I towed a rusty trailer from Whangarei to Bluff in '94 without getting pulled up.1 point
-
registered and will pay shortly. "all cars must have a wof and reg" feels a bit fascist1 point
-
Autopilot stuff. Gave it a lot of thought and decided that the main use I have for an autopilot is keeping us vaguely on course in light winds while I go make a cup of tea or steer the boat with the engine on which is boring if you have to do it for more than 5 minutes. The fancy expensive autopilots can be trusted to probably not kill you if you go down below to get some sleep while sailing through the night across the middle of the Atlantic. They react to wind gusts better and manage rolling nasty sea states under sail without getting confused as easily. Even then, some of the long distance sailors just carry 2 or 3 of the crappy cheap ones and throw them over the side when they stop working. Since I don't plan on doing long passages - and in challenging conditions I'd rather be steering myself or have another meat bag driving....I bought a cheap crappy autopilot second hand. The big brother to the one on Nice Try - the Raymarine ST2000+ Principle of operation is simple. The built in compass keeps track of your heading. When activated, it tries to maintain that heading by extending or retracting the ram to move the tiller and turn the boat. The bigger the boat, the more force you might need to use so the gruntier the autopilot needs to be. The ST2000 has a brass recirculating ball drive for the ram rather than a plastic nut on an acme screw as found on the ST1000. It also seems to have some bigger fets driving a slightly bigger motor? Not quite an apples to apples comparison since the ST1000 I have is from 1999 and the ST2000 is from 2012. Still rips my undies how simple these things are inside. Autohelm designs it then Raytheon buys them out and milks the design for a few decades. Minimal changes in nearly 30 years of production. No limit switches or position feedback. No conformal coatings on the board, glass reinforcement in the plastic or silastic schmoo on the connectors. AvE would be disgusted. Will install it maybe next week and see how it goes.1 point
-
FIRST START! Turns out I'd bought a rotary thinking it was a 4AGE with the idle its currently got. Huge milestone and it doesnt make any metallic noises so thats a bonus. Its basically an unopened engine thats been sitting for god knows how long in some garage in Wellsford. Now has some extra bits bolted to it an a new ECU so Im surprised it did run okay for the 10 seconds it was on. Cant post a video unfortunately/ Now onto sorting everything else I've neglected. Theres a leak on the return line fuel fitting to sort, I probably need to extend a fuel hose down inside the tank so the fuel isnt aerating as it goes back into the tank. I need to track down the sick vacuum leak. Body side wiring to do, not all the gauge cluster works atm. Clutch fork retaining clips (due to some photo found, I did this already! woohoo), some oil in the gearbox is probably wise. Carpet seems to hide a multitude of sins...
1 point
-
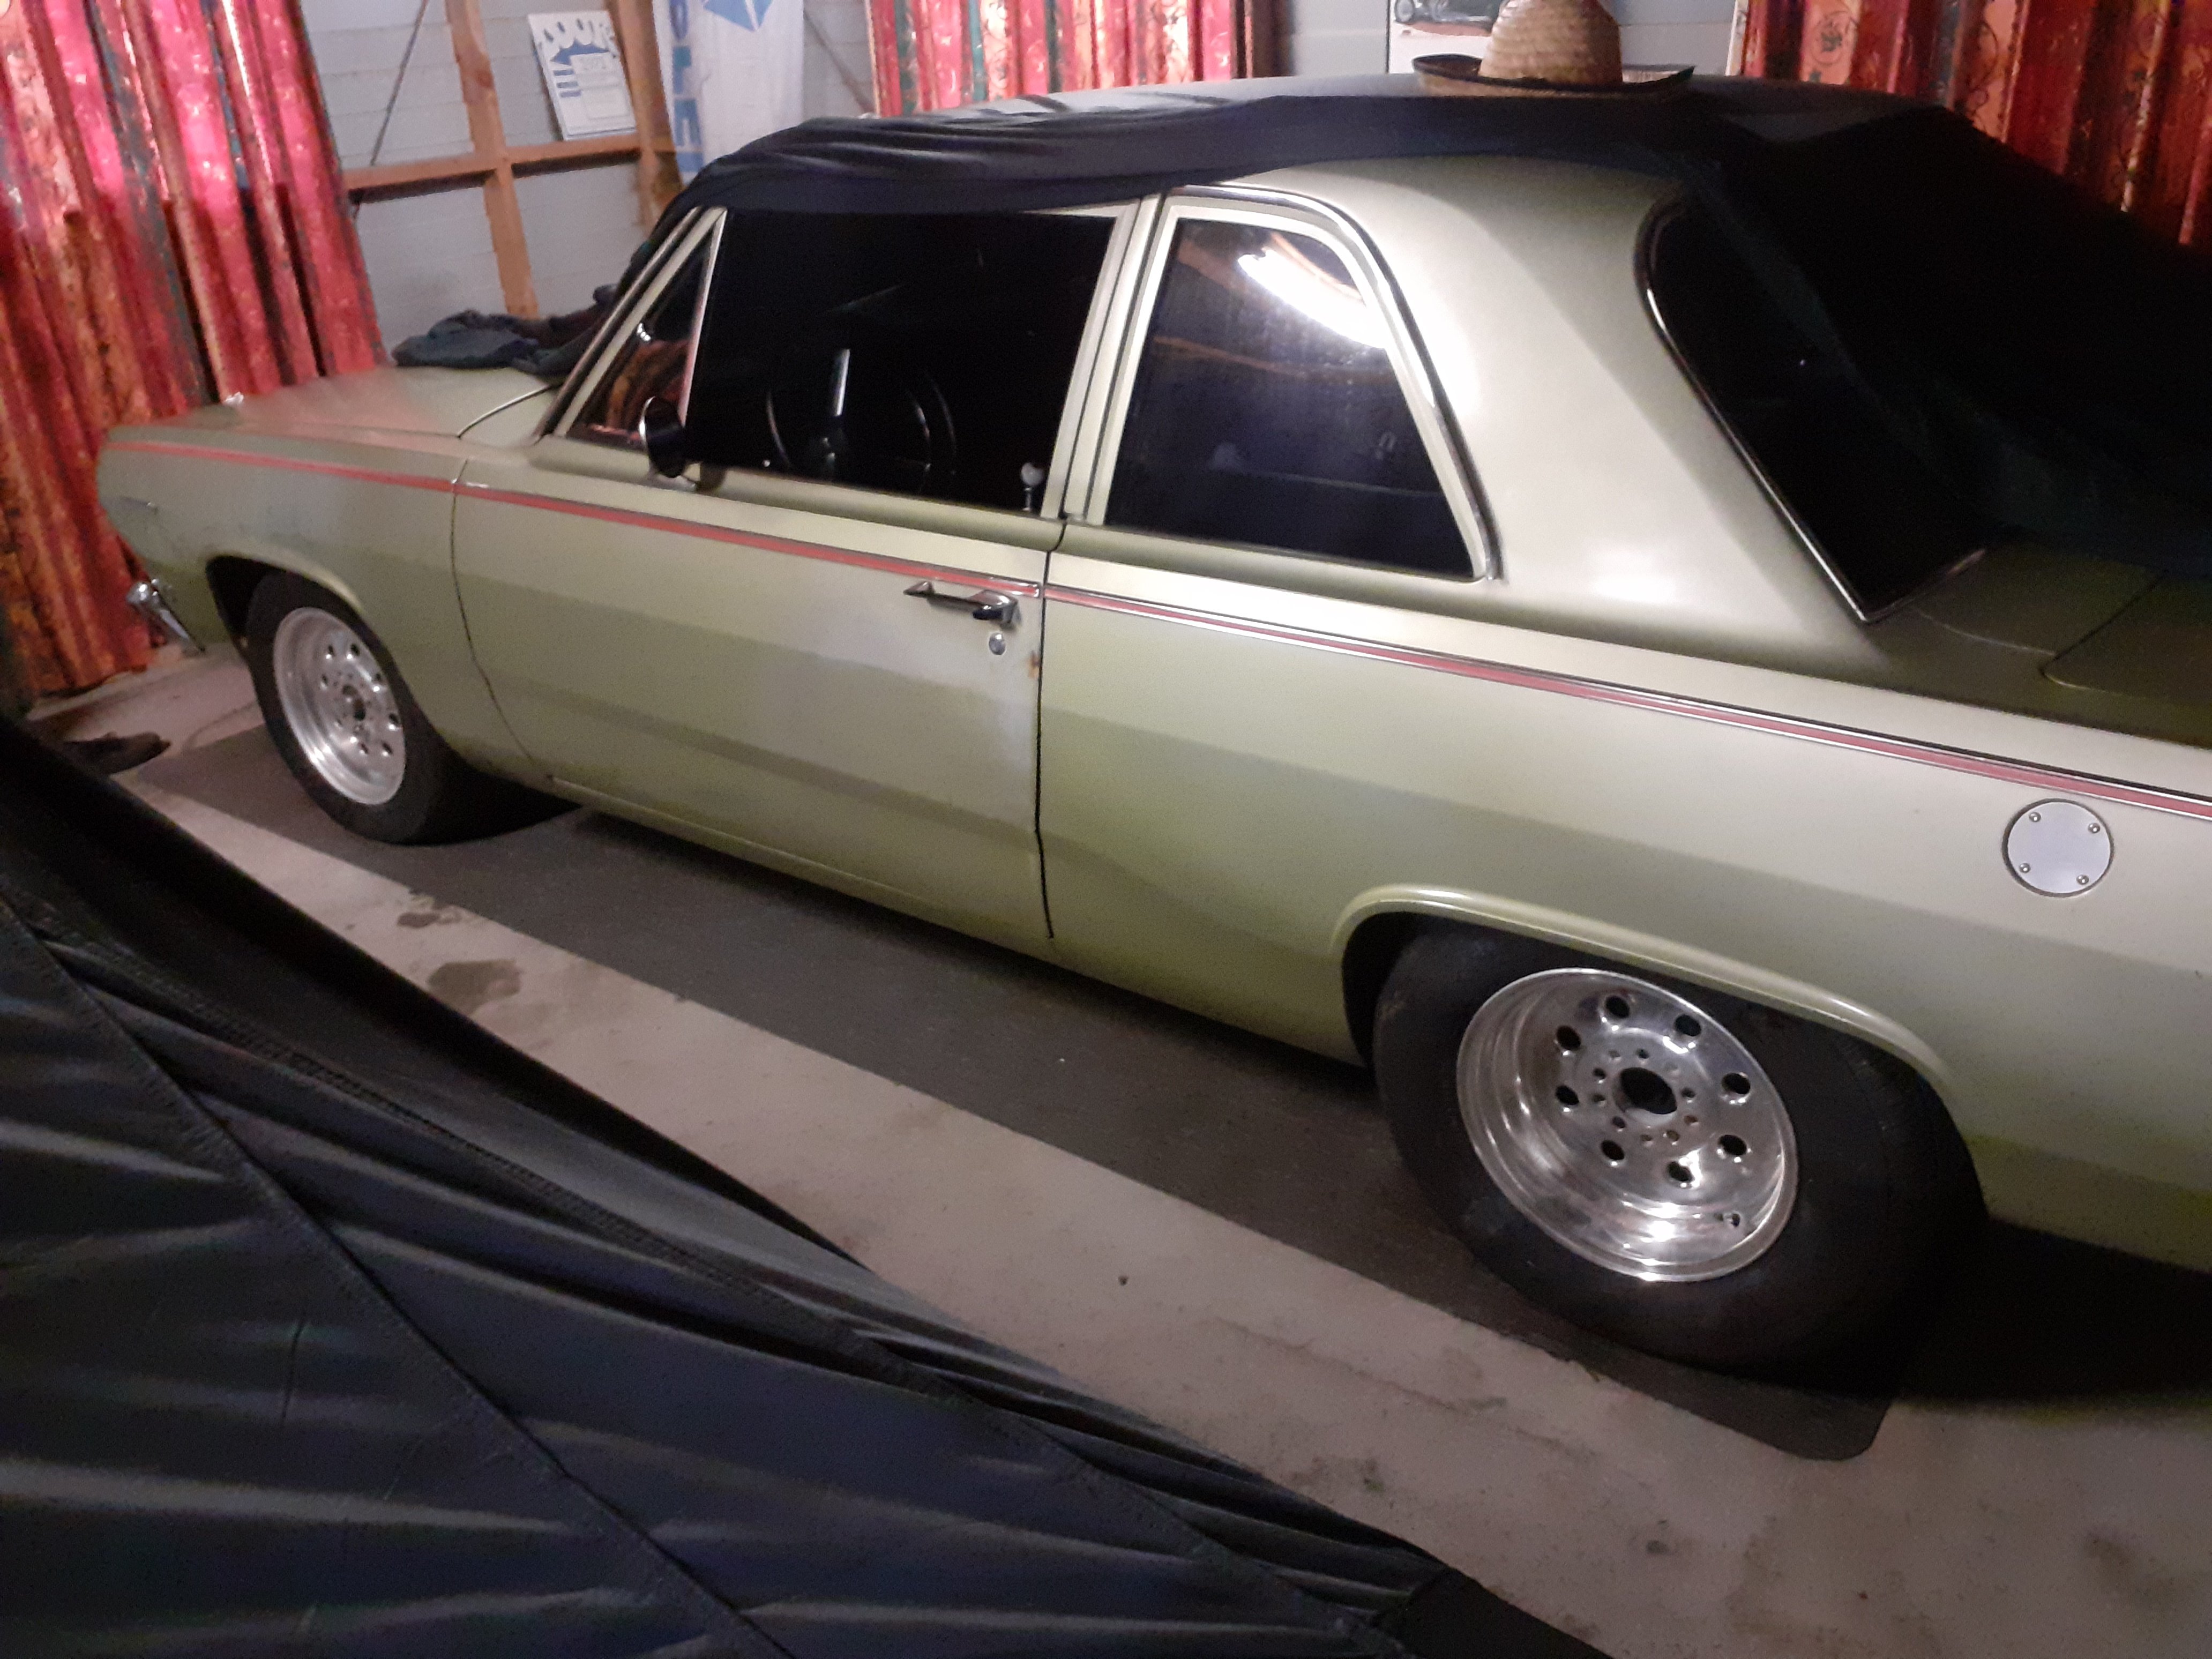
It’s been awhile since I built a hot rod. my last one was a ford pop that was chopped 3 inches and channelled 4 inches running a 302 Cleveland. i ran it in black primer for awhile and sold it to a guy in Aussie who painted and upholstered it.
1 point
-
I tagged everyone who voted yes. The relentless badgering of everyone else will commence shortly.1 point
-
So because I have a big job to finish at the moment and am under immense time pressure, I got distracted and had a fiddle in the shed after staying up late last night doing research. This is my 2TG pile. First I had a fiddle with throttle bodies and TPSs. On the left is a TVIS Redtop 4age throttle body and on the right is the 2tg one. The 4age has a potentiometer TPS vs the switch type of the 2TG The 4age inlet manifold is on the left, and the 2TG one is on the right. The bolts are the same width apart, but the 2TG ones have a smaller spacing vertically. There is also a 10mm difference in size between the two TB holes. The nerd that can't weld alloy in me has been working out how to design a bolt-on adapter plate to bolt the 4age throttle to the 2TG inlet, but the logical option is probably to make a weld-on plate that the 4age throttle bolts to. We looked into switching the TPS over, but swapping the whole throttle seems to be less fiddly and results in a bigger throttle, and bigger is better right? The next little mission was trigger wheels. We searched through the shed for old Toyota distributors and found an AE101 5AFE one and a Blacktop 4AGE one. I pulled them both apart and decided the 4AGE one on the right was a simpler setup, but will take them both to Max and see what he thinks. I've read about how ideally you want to run your trigger on the crank due to distributor slop etc, but this seems a whole lot less ugly. Hopefully, we can drop these guts into the 2TG distributor and get a cam and crank signal off it. It will be easy right? (This is what people say when they come to me for website things that don't turn out to be easy). I've found this discussion https://speeduino.com/forum/viewtopic.php?t=495&start=100 that relates to a 3SGTE that seems to use the same style of trigger wheels.
1 point
-
Used a D shackle and a pin from a door hinge out of a 1930s bungalow. Will attach it with a bit of sink plug chain or something sonic doesn't get lost
1 point
-
Bout that time again
1 point
-
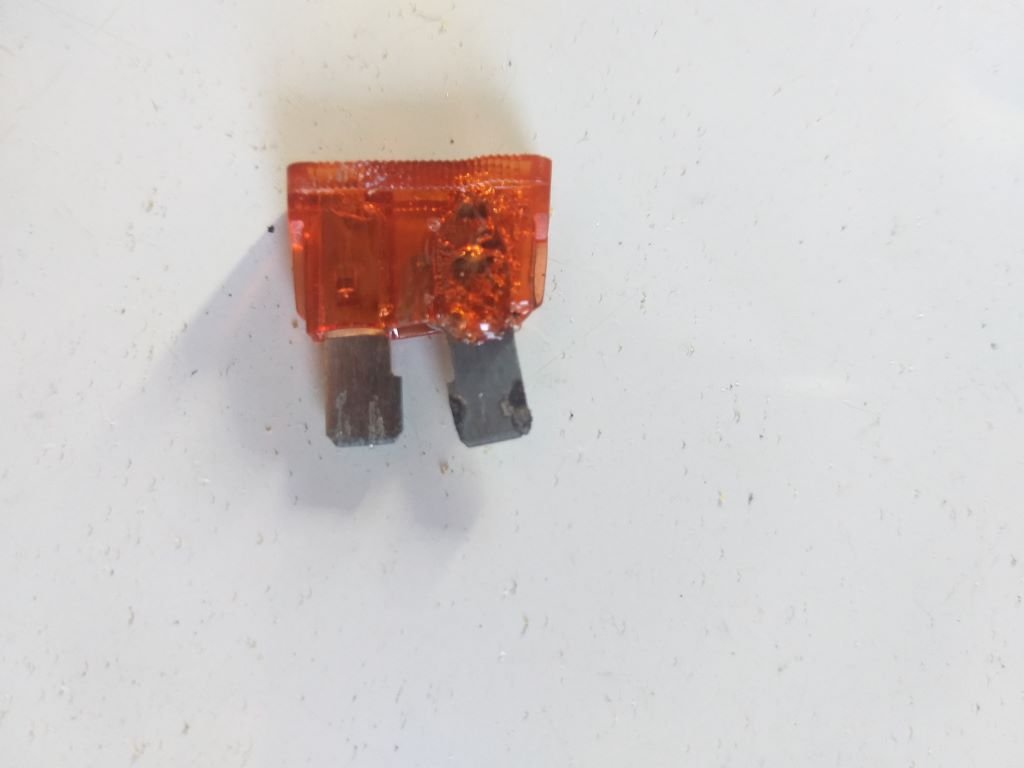
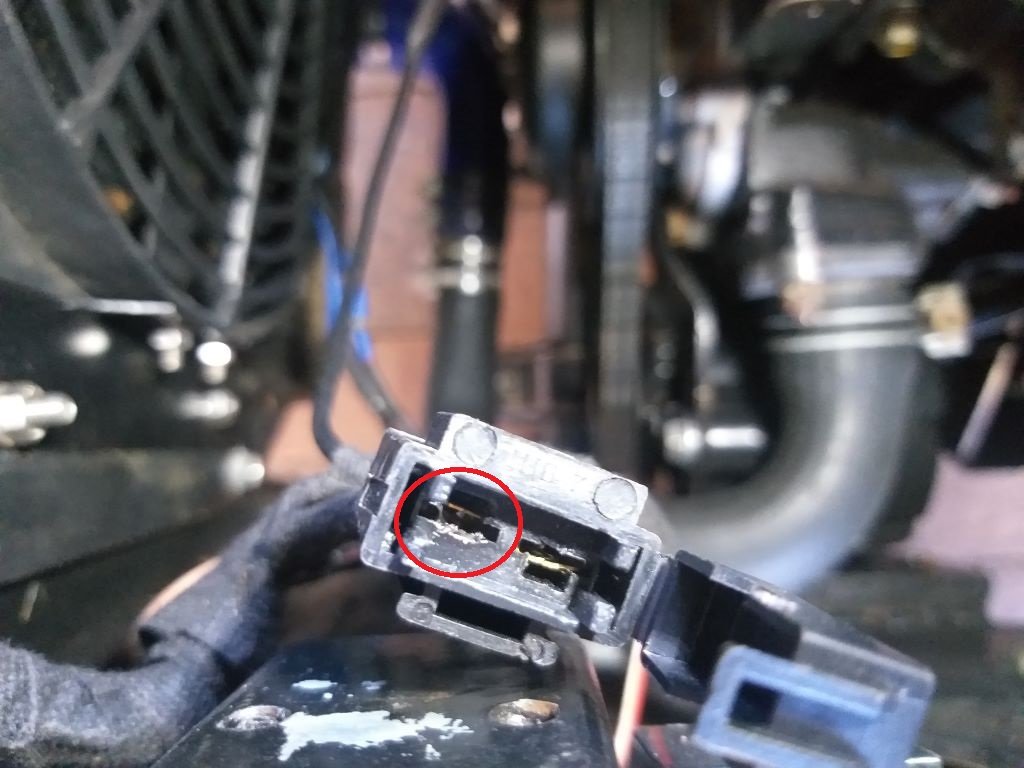
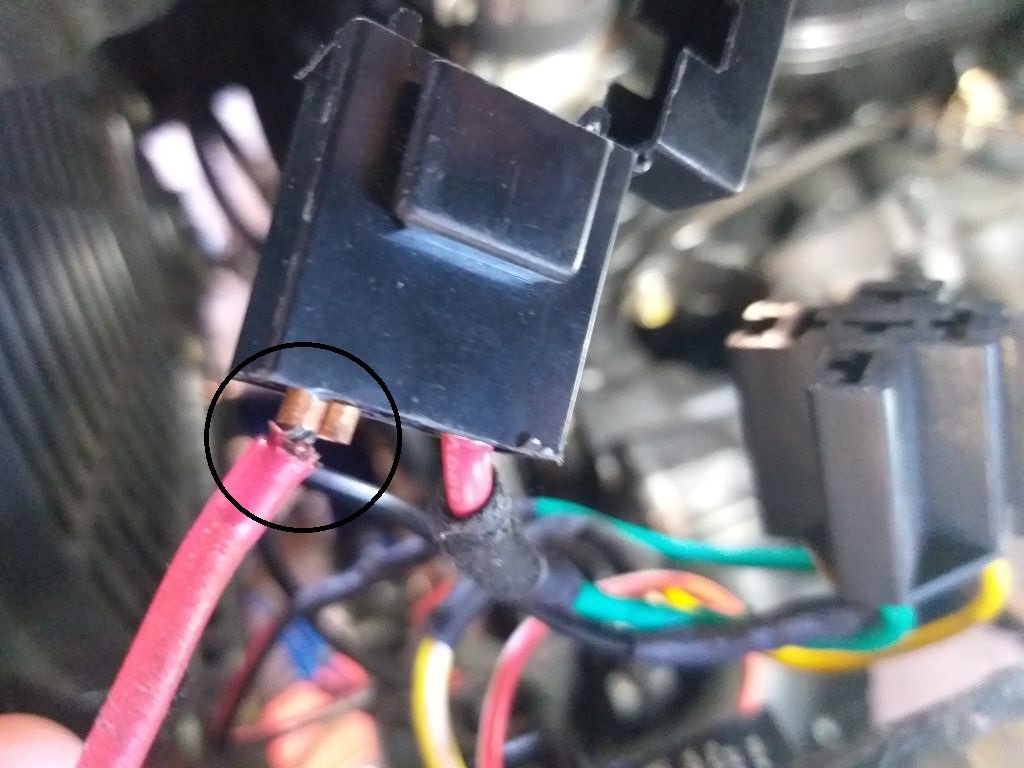
Last week we headed off on a supply run in the pouring rain and as we got into town, I noticed the temp creeping up above normal. Quickly pulled over and switched off and when I cycled the ignition key to the aux setting I noticed no noise coming from the thermo fan. WTF. Checked the under dash fuse panel and the fuse for the thermo fan relay exciter wire was still good. Lifted the engine cover lid to get a closer look at the inline fuse on the relay power feed. Bloody fuse wouldn't come out. Grabbed a pair of longnose pliers from my tool kit and gave the fuse a bloody good yank and out she came. Yikes, definite signs of overheating, but the fuse itself was still intact. Fuse holder looked decidedly shabby too. Looking at the back of the fuse holder and I could immediately tell that the input wire on the connector had dropped. Managed to push the connector back into the housing and with a working fan we were back on the road again. Fast forward to today and I figured I'd best do a proper fix. Luckily, I had one of those fairly robust auto reset trip switches in stock, so I've mounted that in the battery box and have run a new relay power feed directly from the battery. The relay trigger wire is still ignition switch activated via a separate fuse from the under dash fuse panel. Longer term I need to replace the crappy thermo fan with a decent Spal unit as the cheapies sure do suck up the amps.
1 point
-
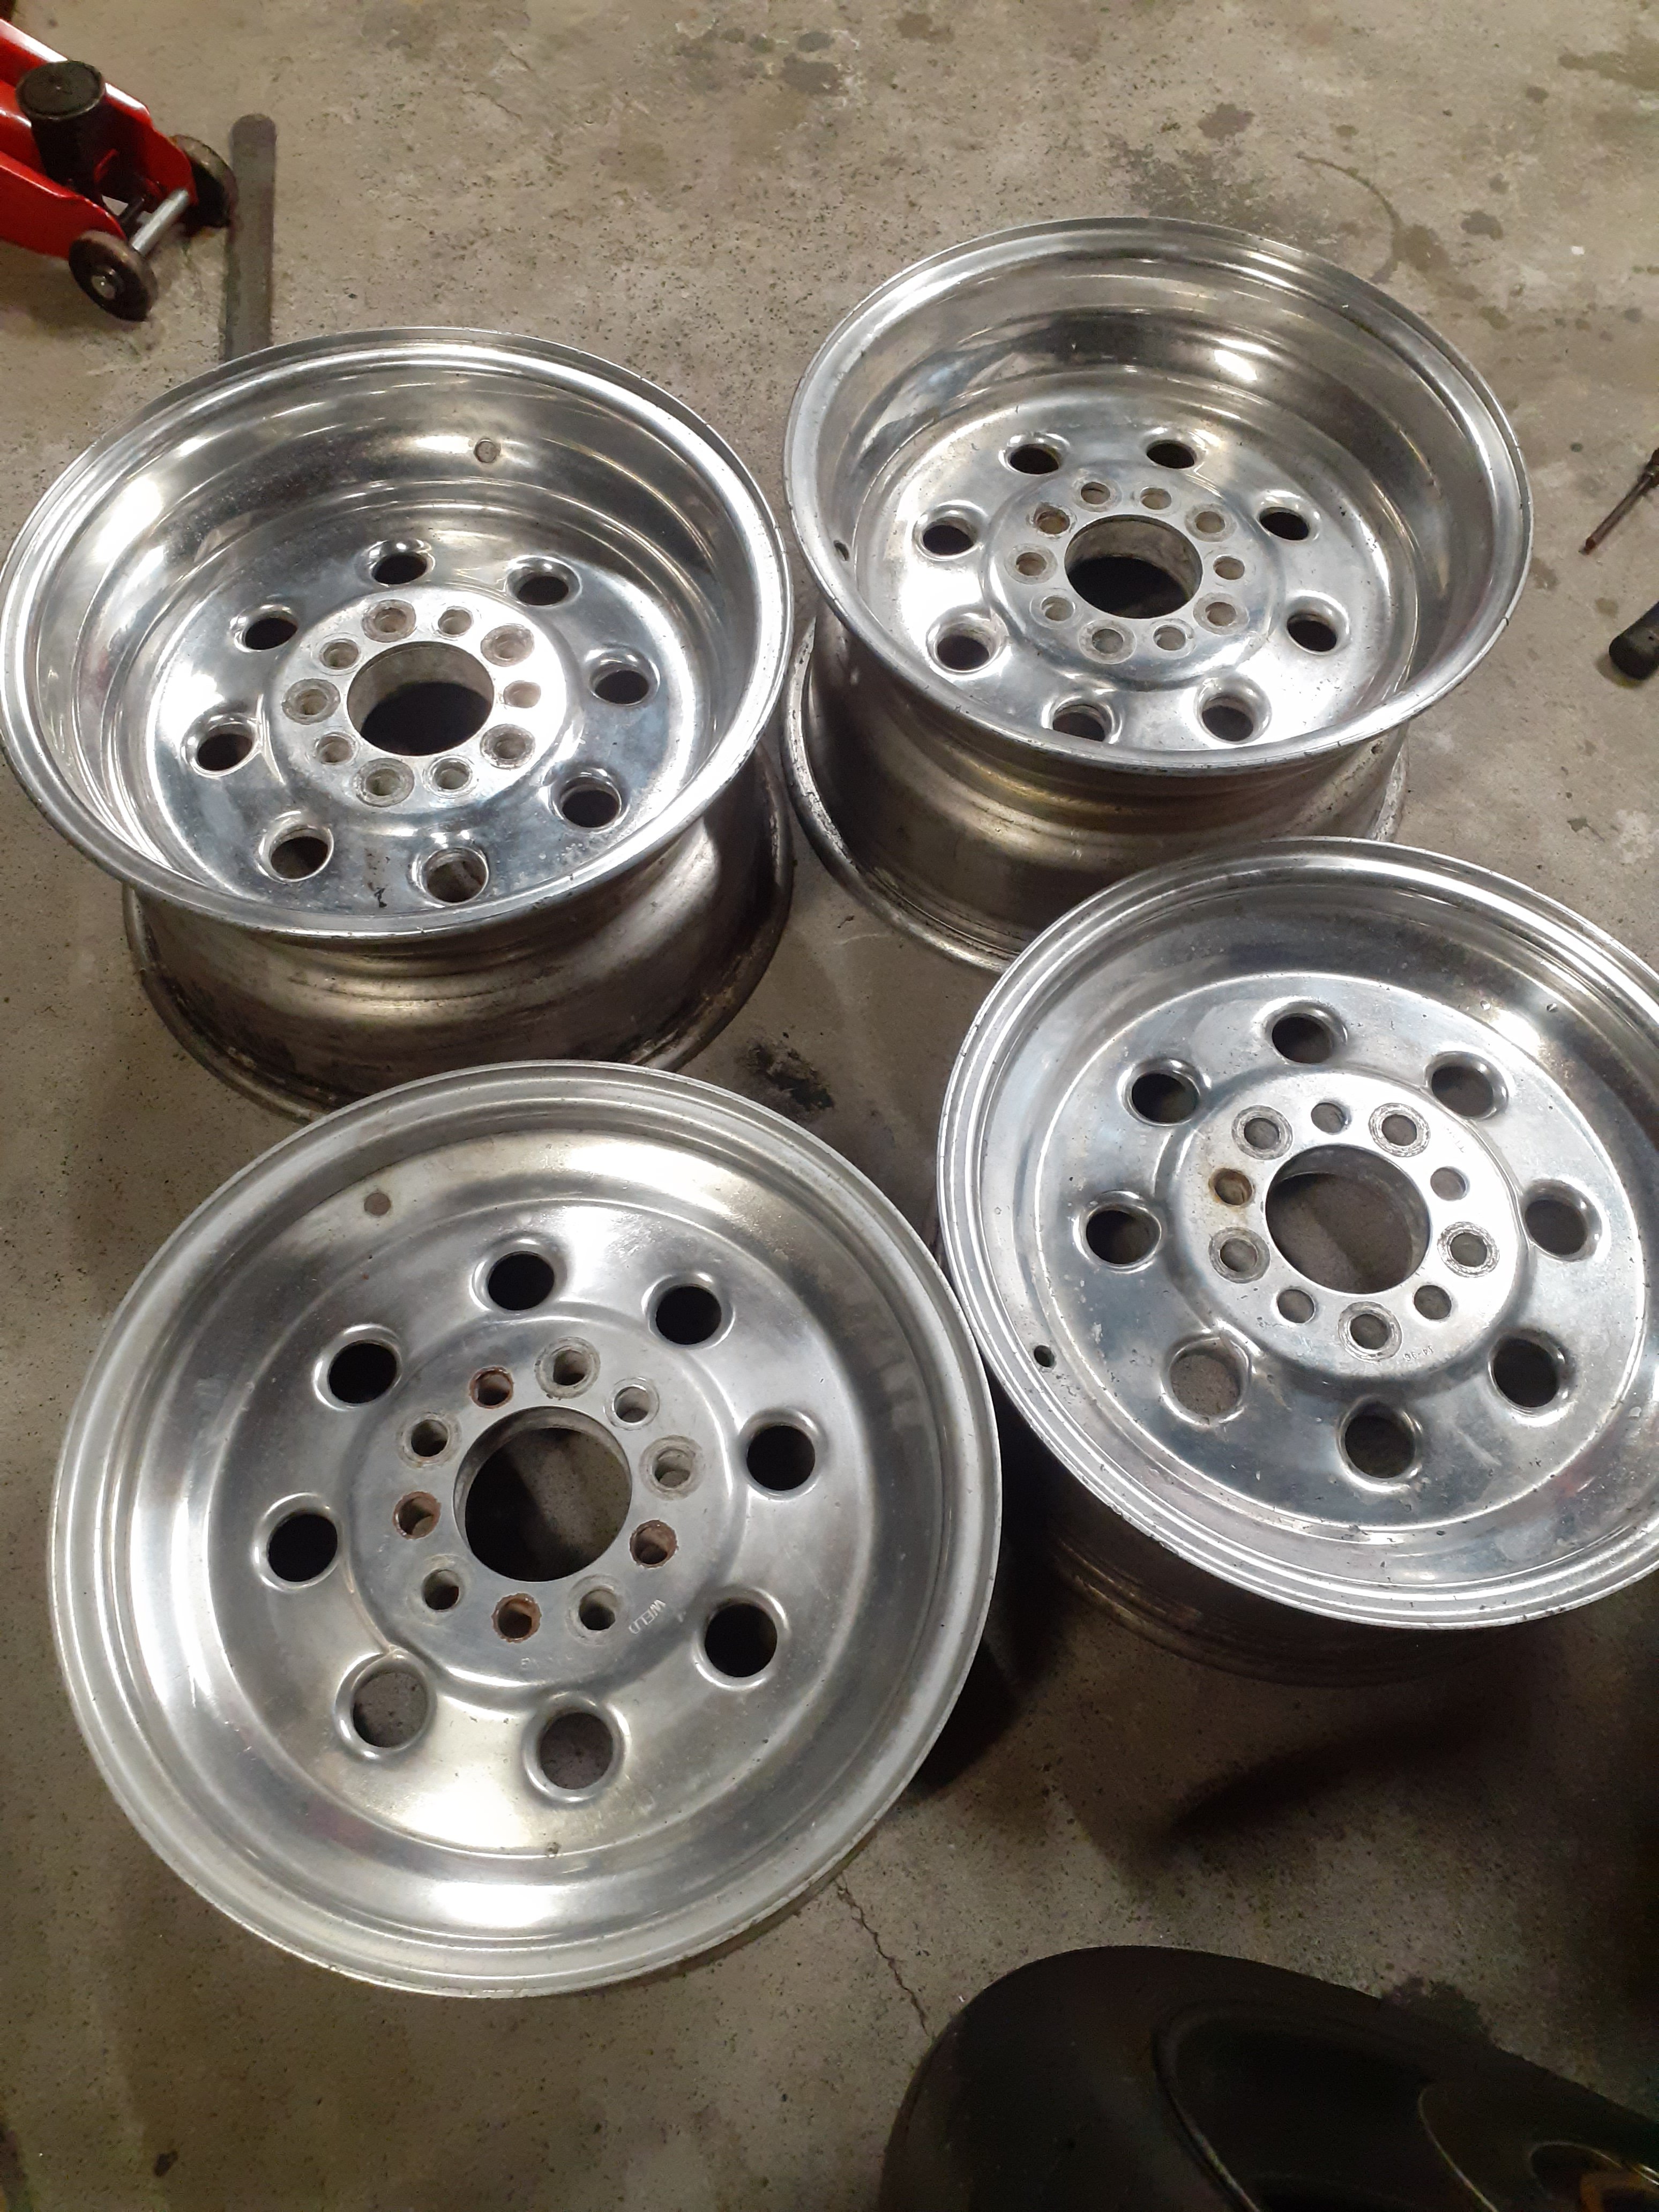
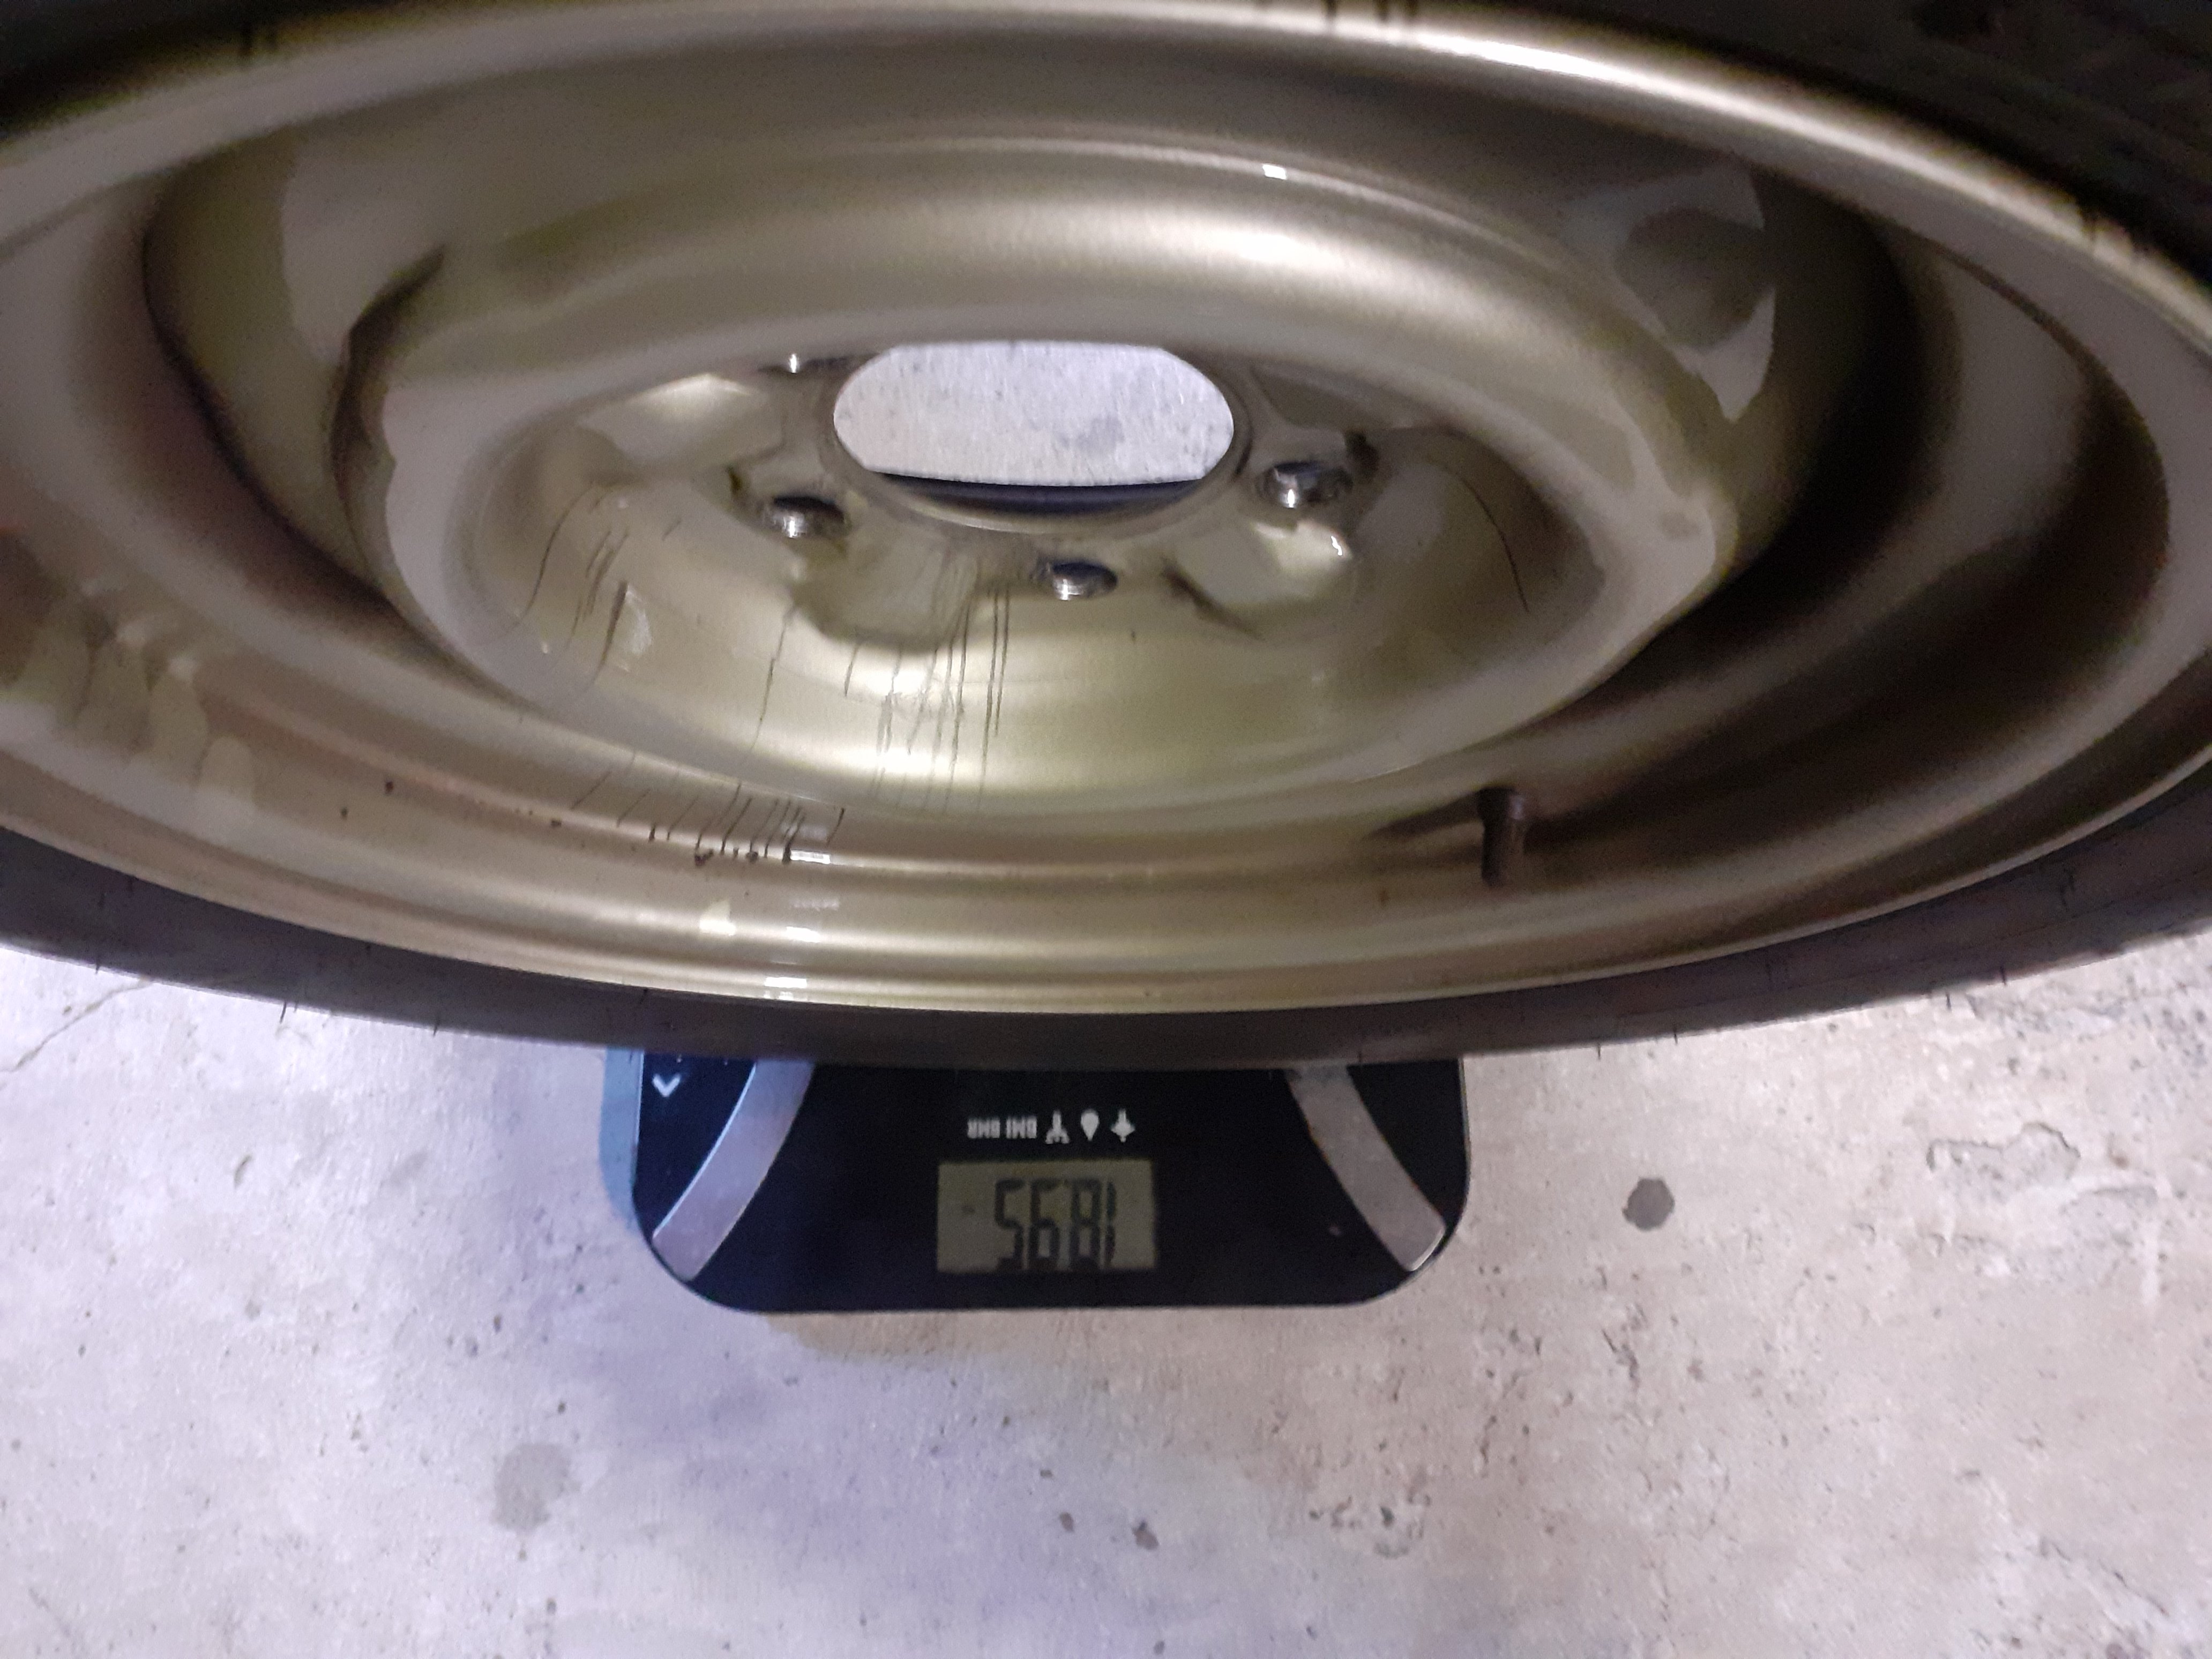
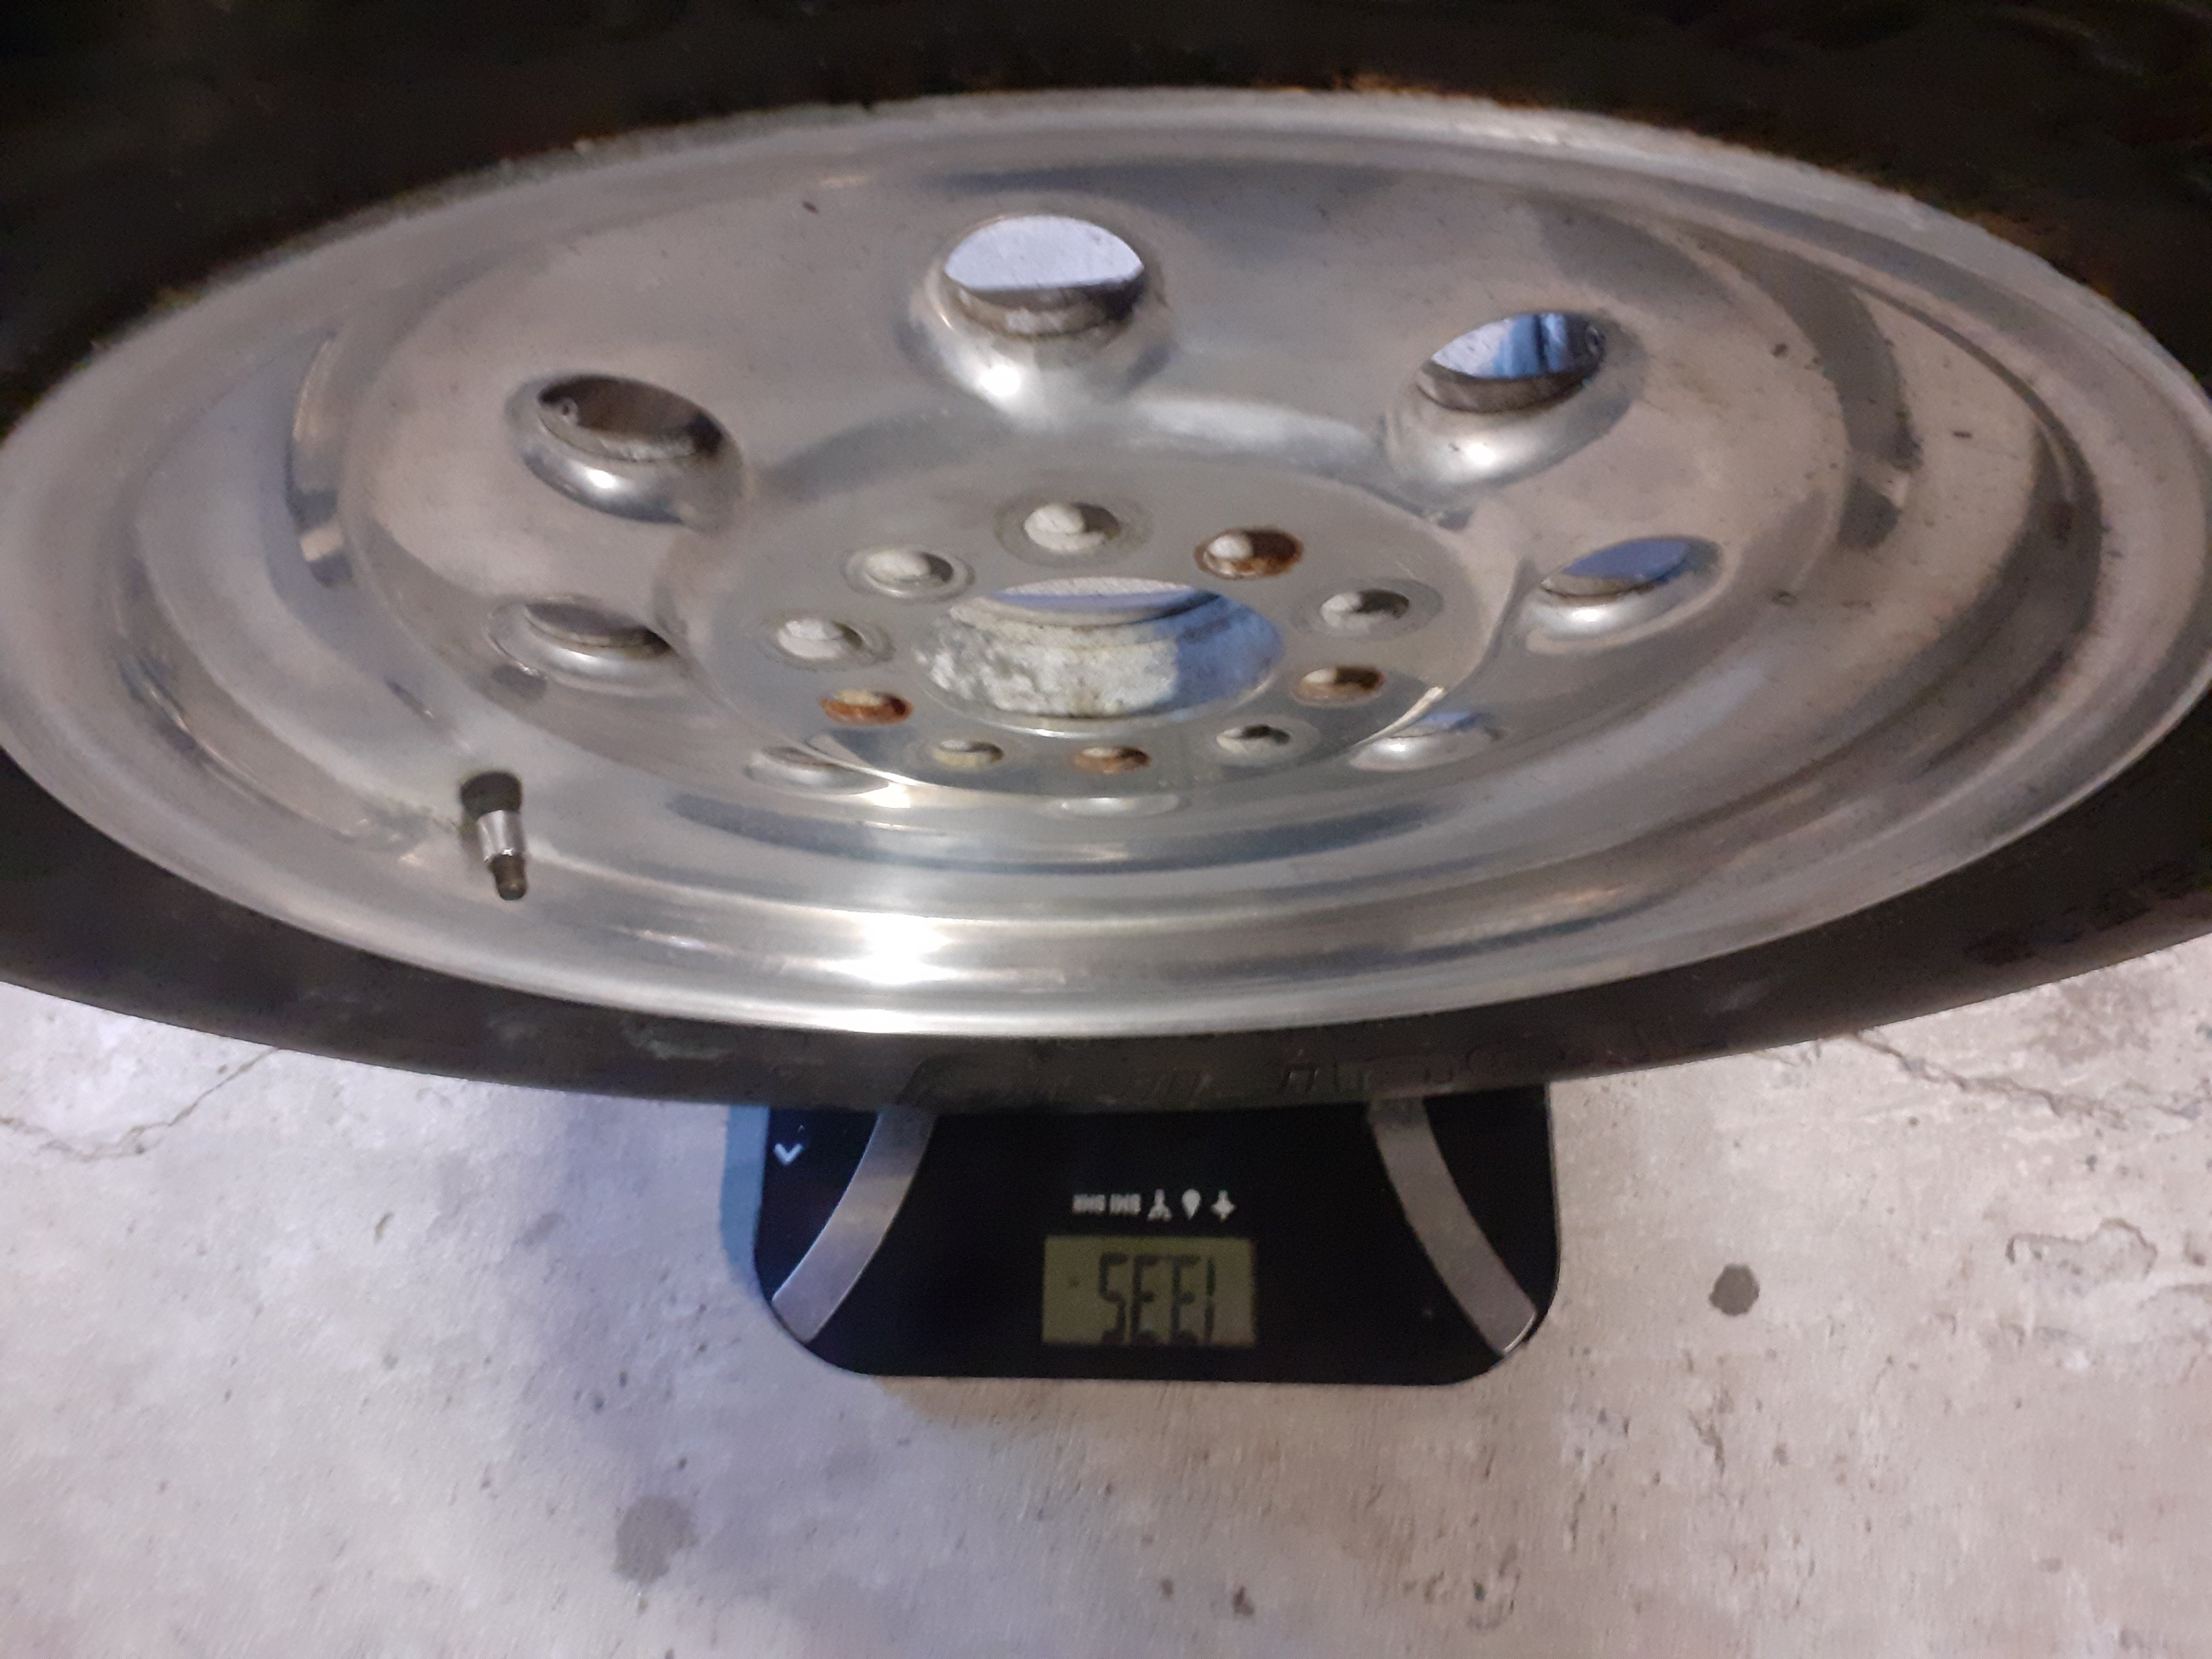
The steel wheels on it are very heavy. When it did its quickest time it had some very light cragar super tricks on the front. They were popular in the 70s but the internet reckons there's not many around these days because they were prone to failure. I bought them ages ago from a guy who took them off his car because they made creaking noises when doing tight turns, they were very cheap. They weigh as much as a bag of chips and are a bit sketchy, also the tyres were right on the limit speed rating and load rating wise. Plus I had to run a 5mm spacer which I did not like. I only did 2x passes with them on and didn't like it So I've had my eye out for a second set of wheels suitable for drag racing Being an impressionable teenager in the 90s who read street machine magazine a lot I've always wanted a set of weld draglites. They don't come up often second hand, I found a set a while ago but they were not wide enough. You can still buy them new but they are pricey Picked these up today, 15x5 and 15x8. Tried them on then got the tyres off, they are very fucked. They need a polish but should tidy up well Anybody know a good polishing place in south auckland?
1 point
-
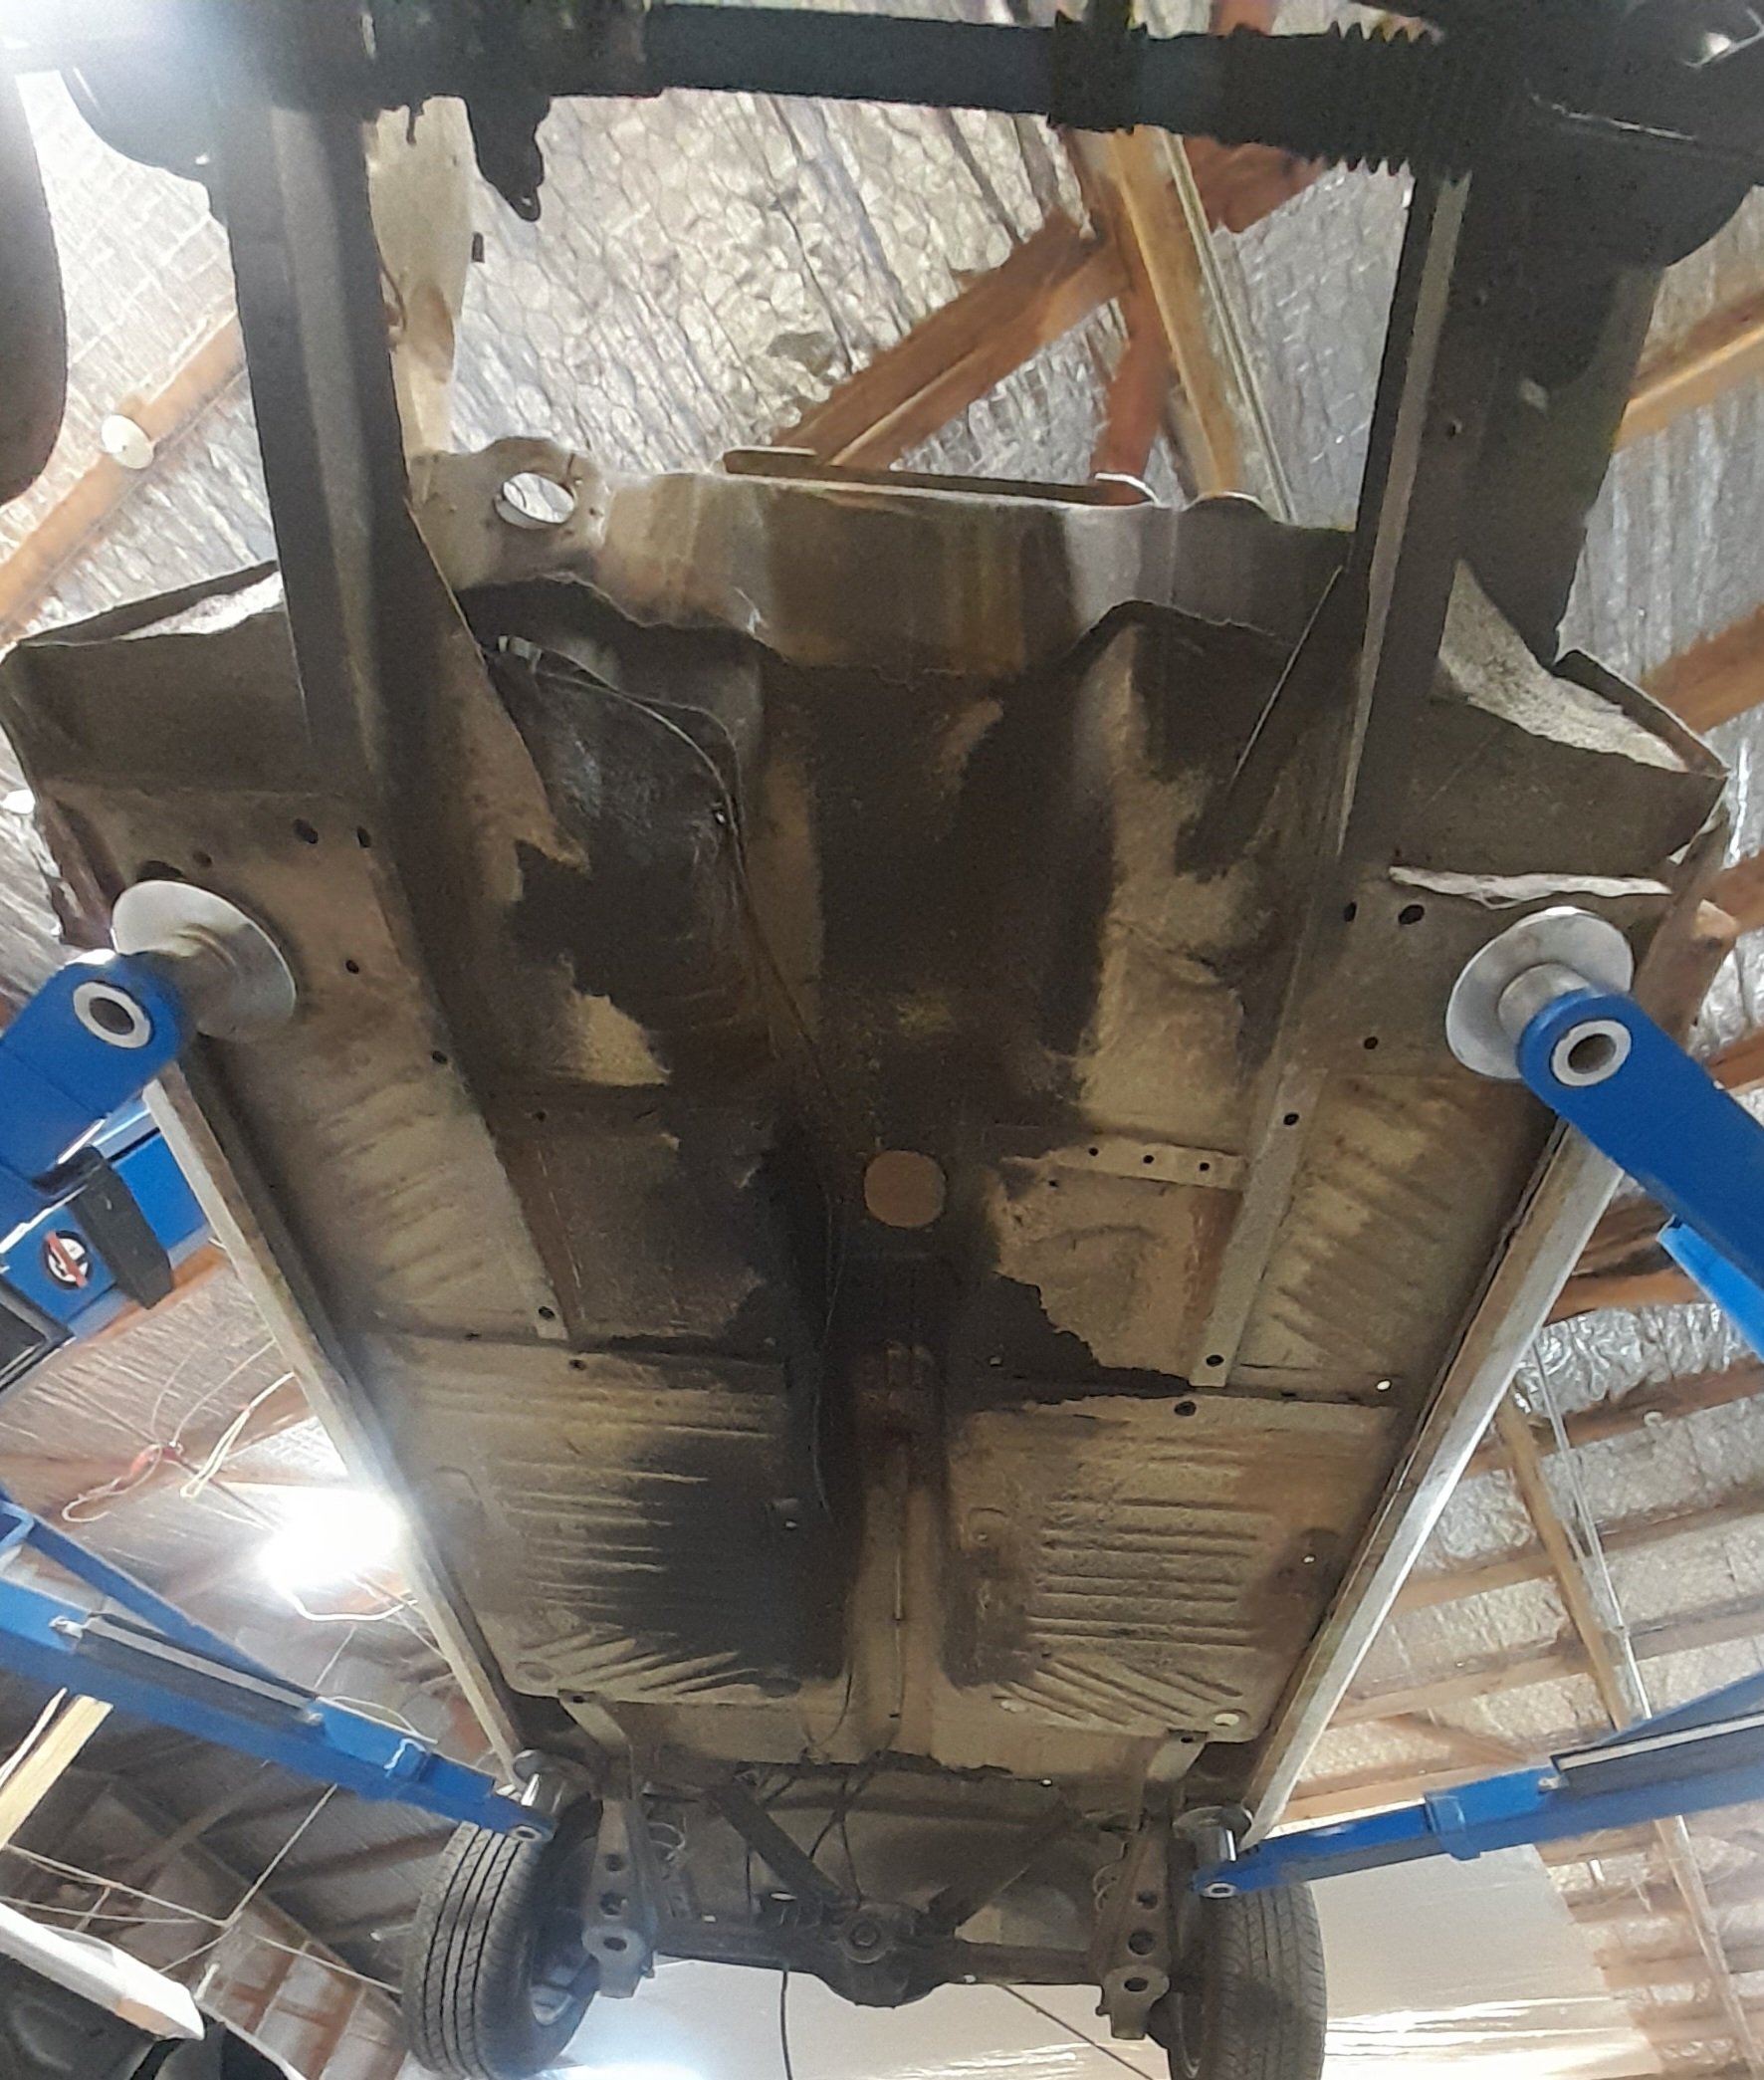
Up in the air tonight...... rotisserie? Or spot blast ? Most of the underside is pretty good
1 point
-
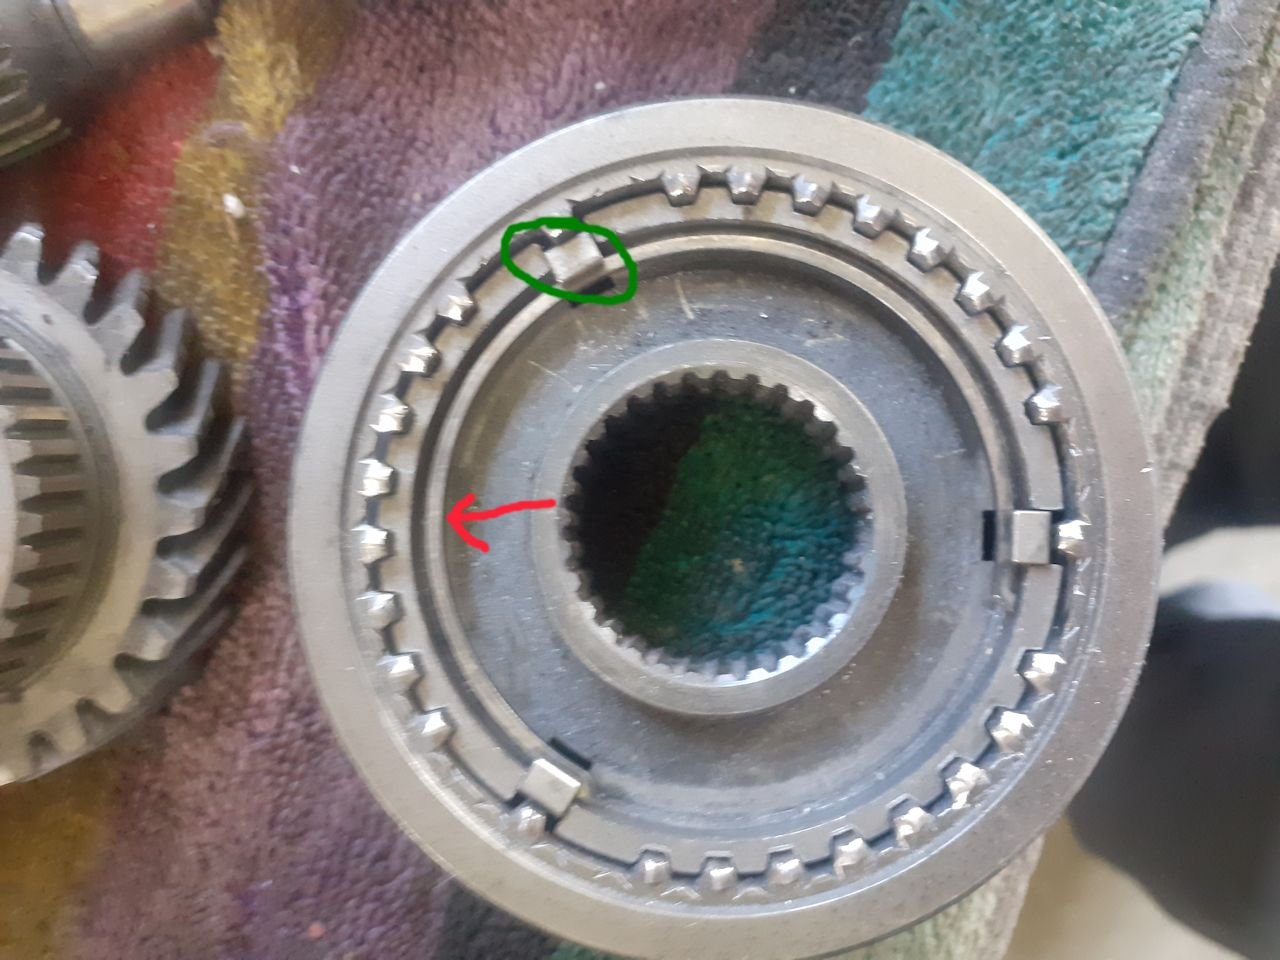
Some years later, seems i have a solution. if it doesn't break; I ended up making the gearbox better replacing a lot of parts, but was never amazing at high rpm. had to shift pretty slow so didn't grind. recently tried some thinner mt-lv redline oil, in an attempt to get the syncro's to grip some more. Yeah it made it worse over the castrol vmx. After sifting through the internet and finding not much other than the old grind some teeth off the synchro. Found a comment saying something along the lines of; "putting double springs in the selector may help with high rpm changes" The spring being what red arrow is pointing at below. Yeah you cant put 2 in there, but some have a coil spring the sits in the middle of the hub so maybe that's what they meant. After looking how it actually works, rather than just replacing parts. The spring presses up against the little keys in green. they have a raised section that sits in a recess in the selector hub(outer part) Now when you go to change gears the selector hub pushes the 3 keys up against synchro ring, which pushes the synchro ring onto the cone, slowing the gearbox down. Until you put enough pressure on the shifter/selector hub, the selector hub cams over the keys and selects the gear. So having a stronger spring on the keys will put more force on the synchro ring before it trys to select the gear. which means it should slow the gearbox down more before it tries to change gears, cool. Will it work who knows. sifting though my pile of gearbox parts I found some bearing retainer spring clips that would work for 1/2 gears. 3rd/4th found some that would work out of some hilux front hubs I dont have any pictures of what it looked like once i modified it them. but ground them down to similar shape as the factor ones as above, just thicker, so more spring pressure. I ground a few teeth off some of the synchro rings also, but i dont this would have changed things much. All this went into my spare t50, with the best selection of 2nd hand junk i could find. So worse base than the one in the car. Result. It amazingly works, can throw it through the gears at 10k easy, haven't been super rough with it yet, but changing pretty fast no crunches, changes nice. only side effect, is its a bit more notchy selecting gears, but not terrible at all. I even used the same oil that come out of the gearbox in the car, for a fair test.
1 point
-
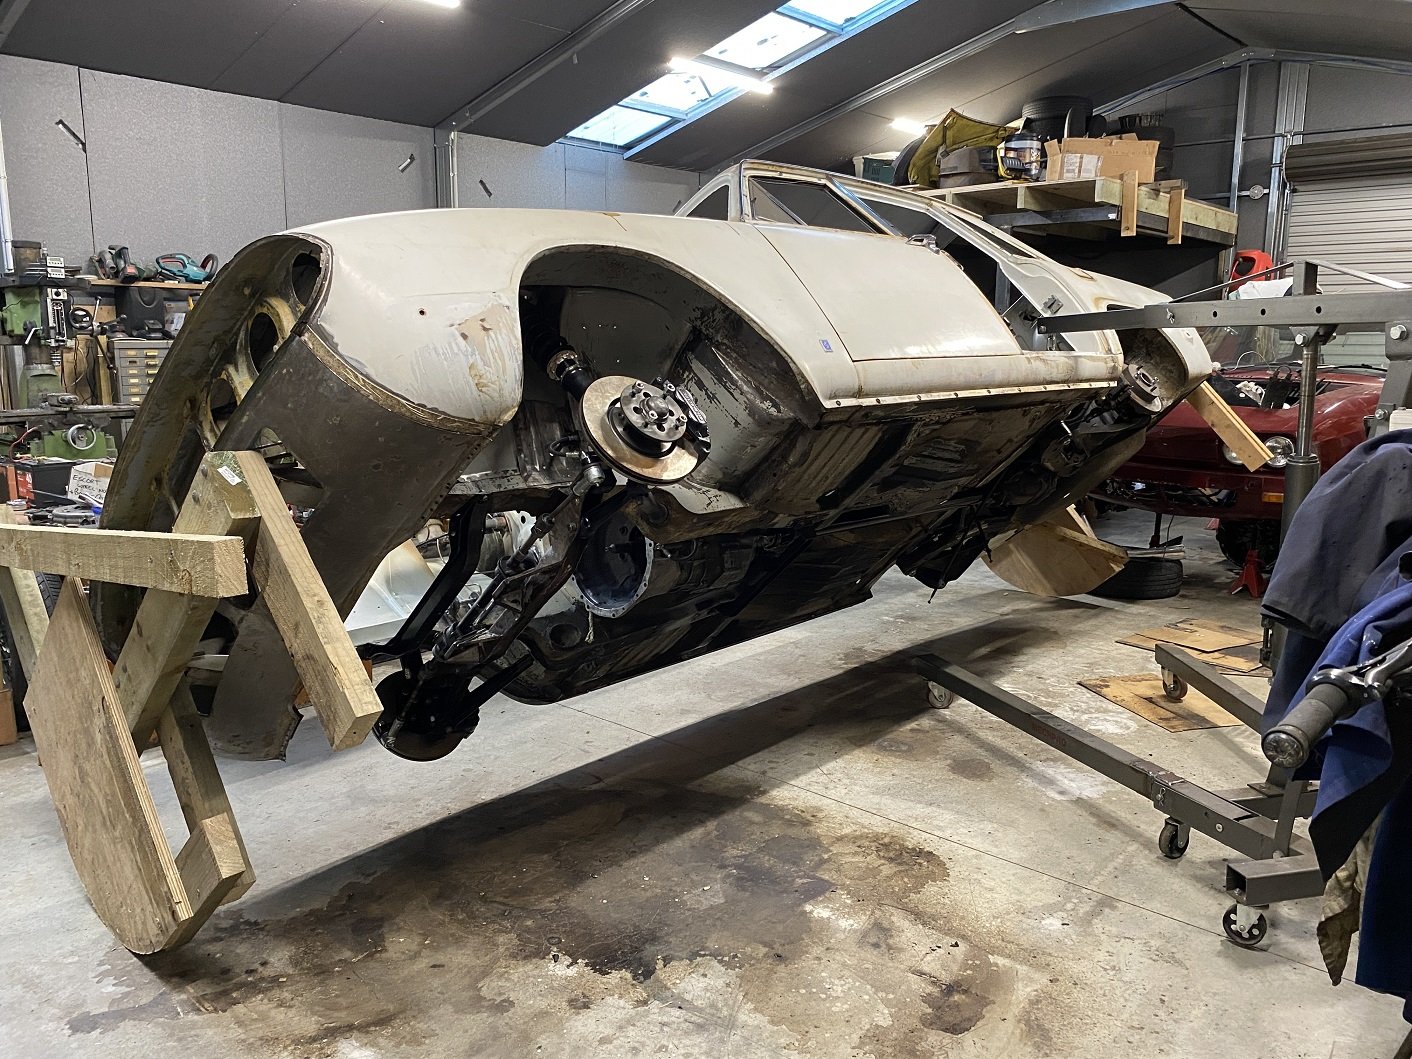
This make some things easier.... I bolted the don't-fall-on-me props on so they can't accidentally be knocked out. It's a bit bottom heavy with all the suspension still attached so it does want to come back down.
1 point
-
Nearly have all the loom sorted/removed in engine bay..not yet found the wire for the factory dash boost gauge..grrr. Anyways pic of latest parts precurement. Trick NZEFI coil set, spendy injectors which don't match my colour scheme in any way, fuel line AN fittings & braided hose set, Spal puller fan, lightened flywheel, Cusco numberplate relocate just cos was getting their brake booster shocktower mount (YT vids says it makes a better pedal feel) , OEM heater line cis less hassle clean my one with corroded outlets and this match colour scheme, turbo oil feed line and Works Bell short boss kit...need a second kmart bin..
1 point
-
Wiper switch turned up today. All 5 points select solidly, they are pretty bulletproof so no further testing will be done until i fit it and it doesn't work. And that could be years away.1 point
-
On the other side of the dorito box i put in a new fuel filter, new plugs, lots of black stuff in old filter... Lifted the front up 20mm to bring it back to cert height, removed some spacers that would be illegal? And replaced the front brake pad hardware as one was missing, and the kit came with the car...
1 point
-
Got rid of the .. in my opinion... ugly lights and put originals back on, someone had cut a big old hole in one side to feed air to pod filter, taking with it the headlight mounting holes, i tig welded a plate back in..
1 point
-
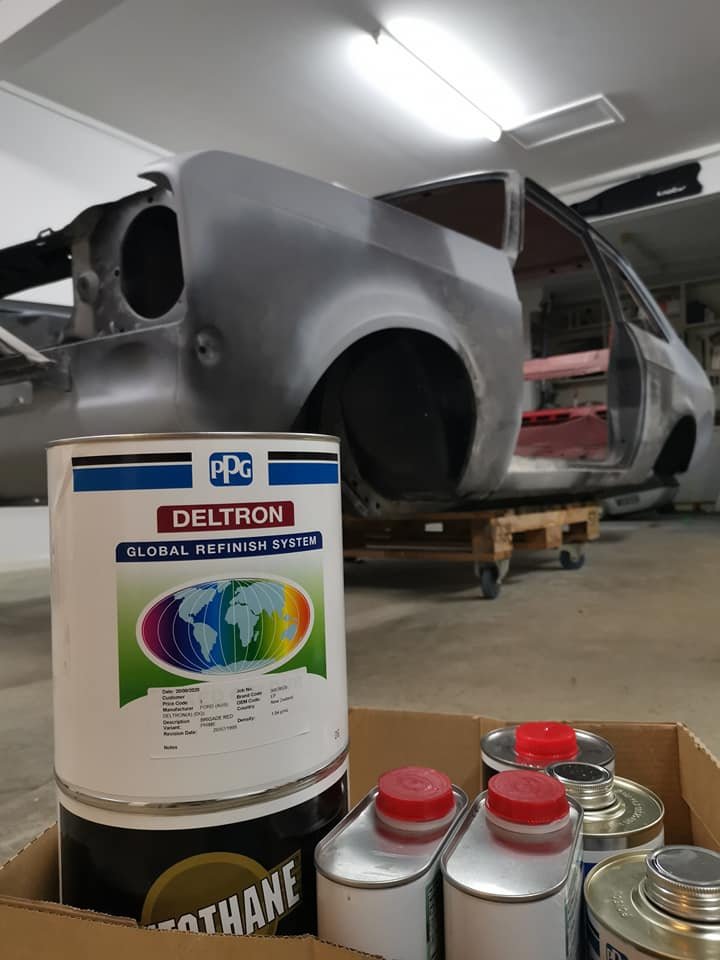
The next bit was sorting the paint and dealing to the underside. Good ol Brigade Red was actually a pain to get correct but well worth the effort. Thanks to the budget rotisserie it made life much easier. We managed to prime and paint the underside over a long weekend. Once this was done the car came back home where it sat for some time. As we went into lock downs, I got busy on the panel beating. With only the bonnet and boot lid under my belt previously, I did what I thought was right and it came up pretty bloody well.
1 point
-
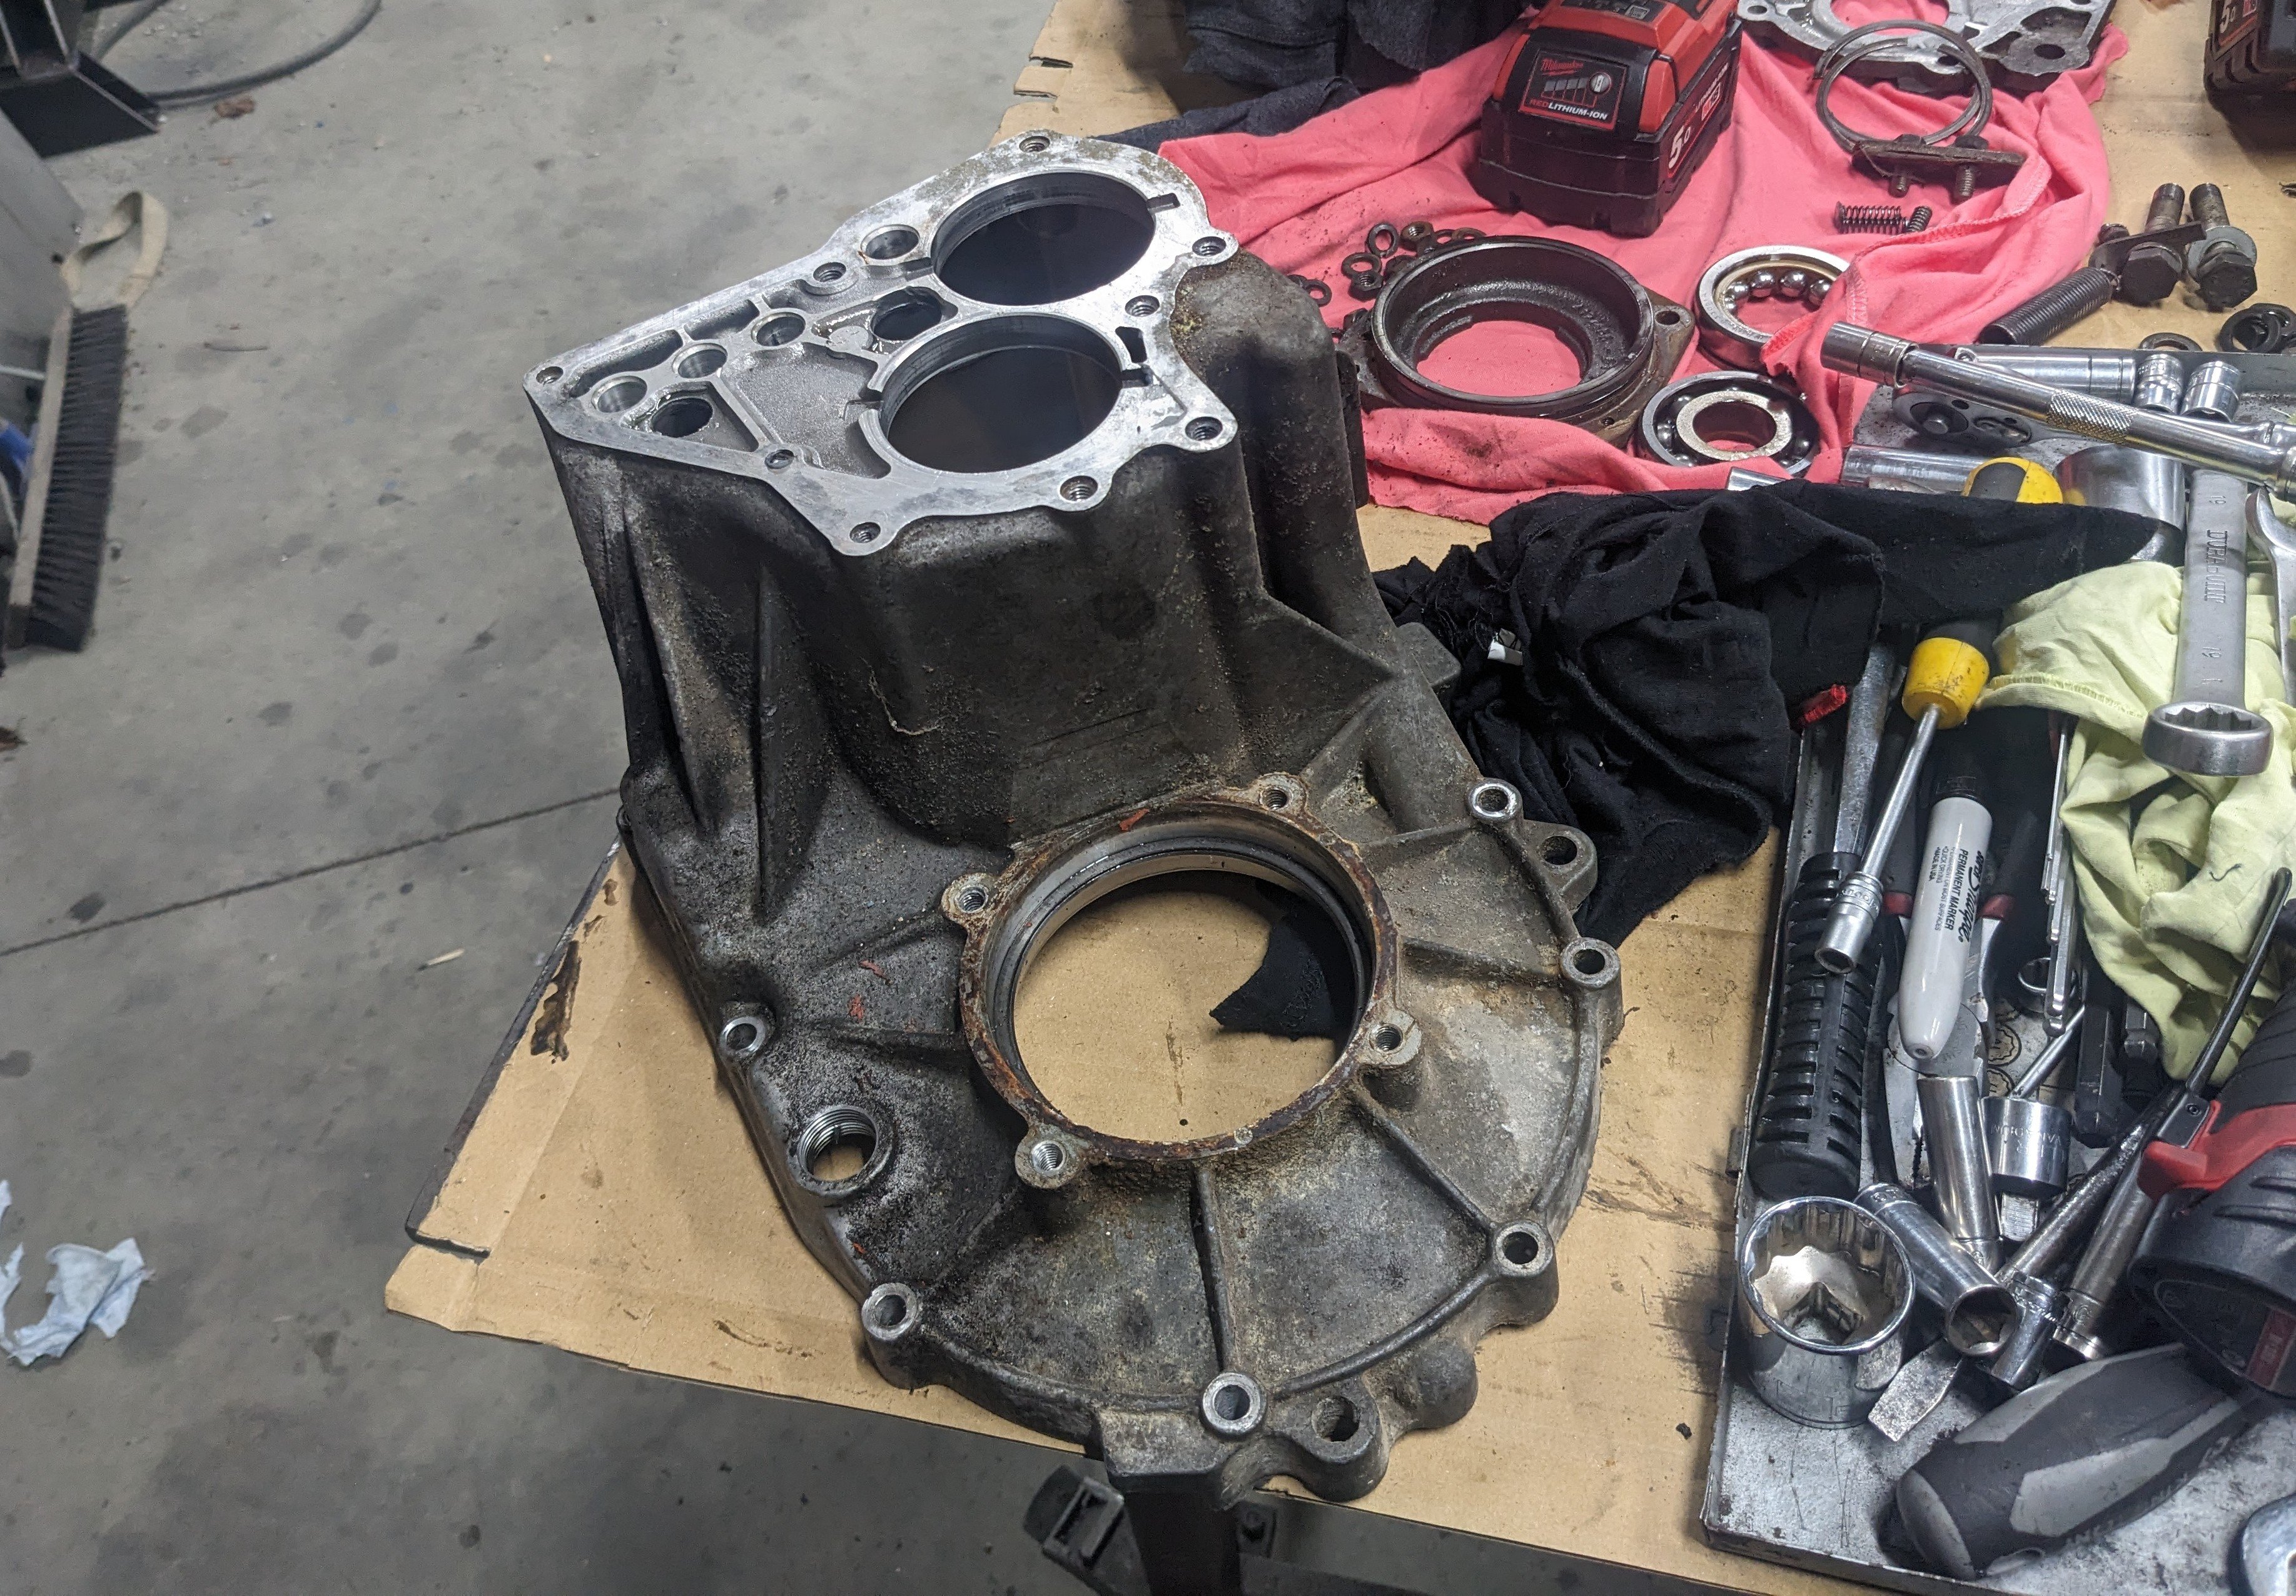
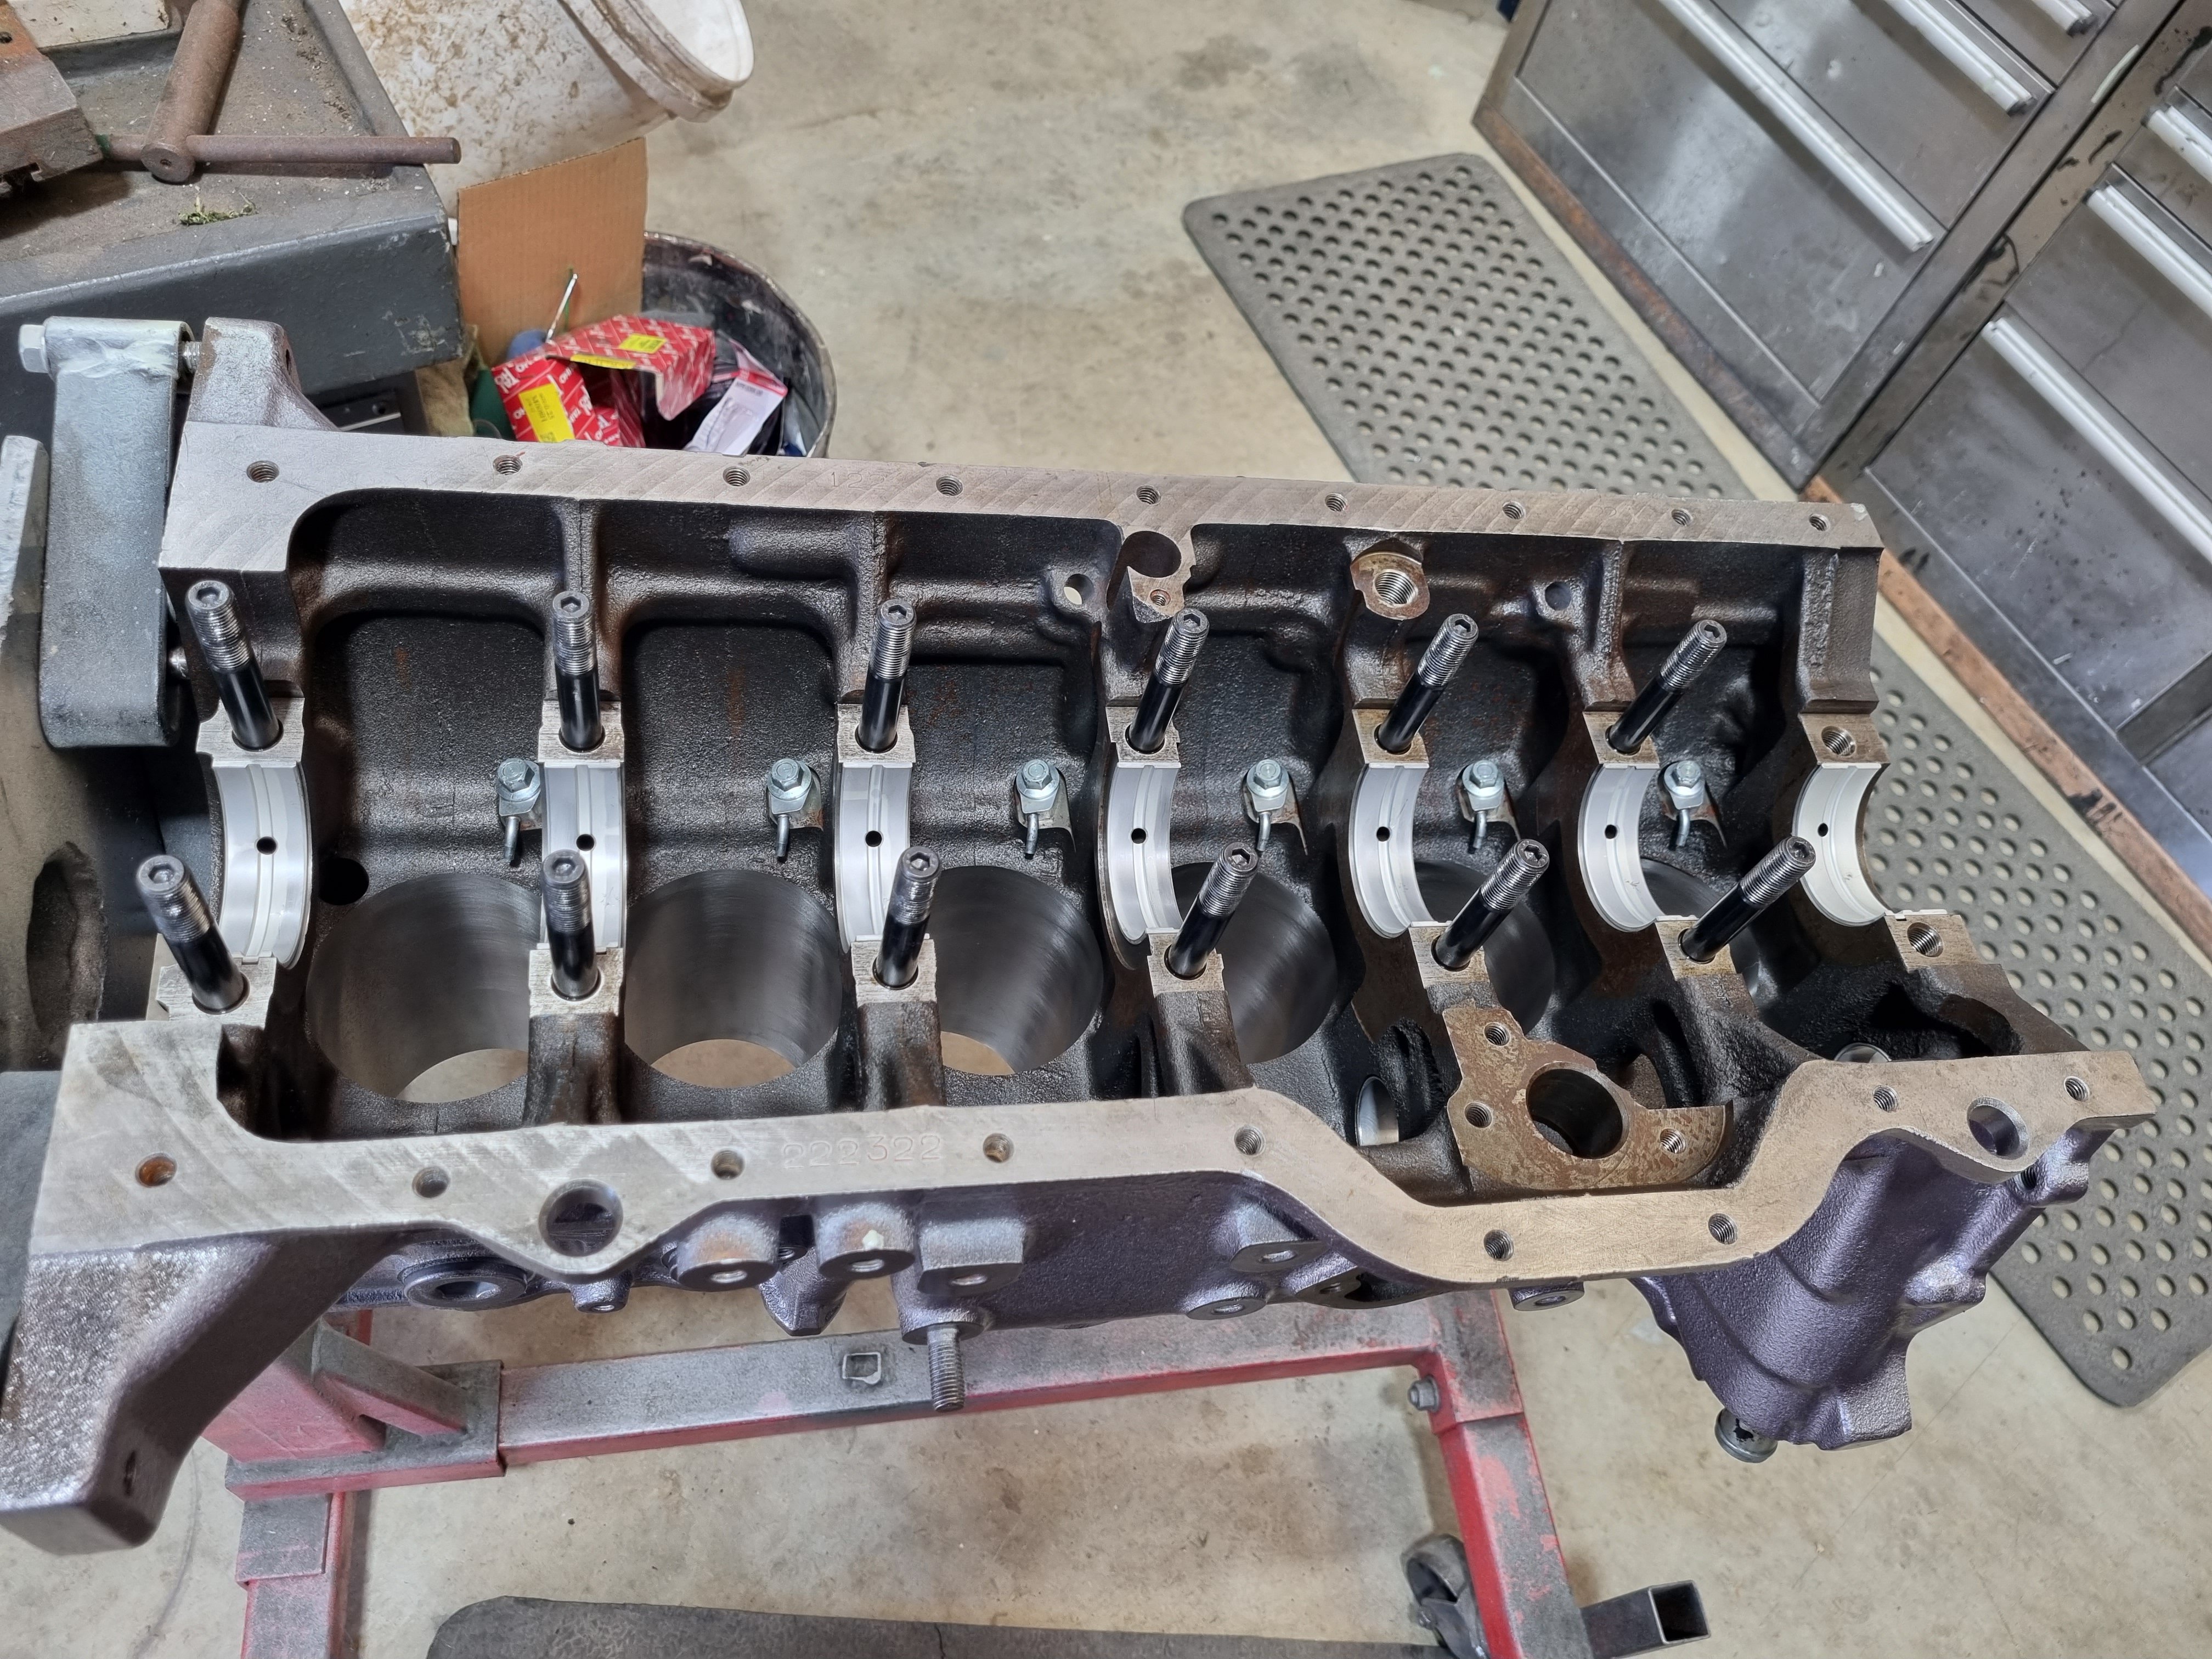
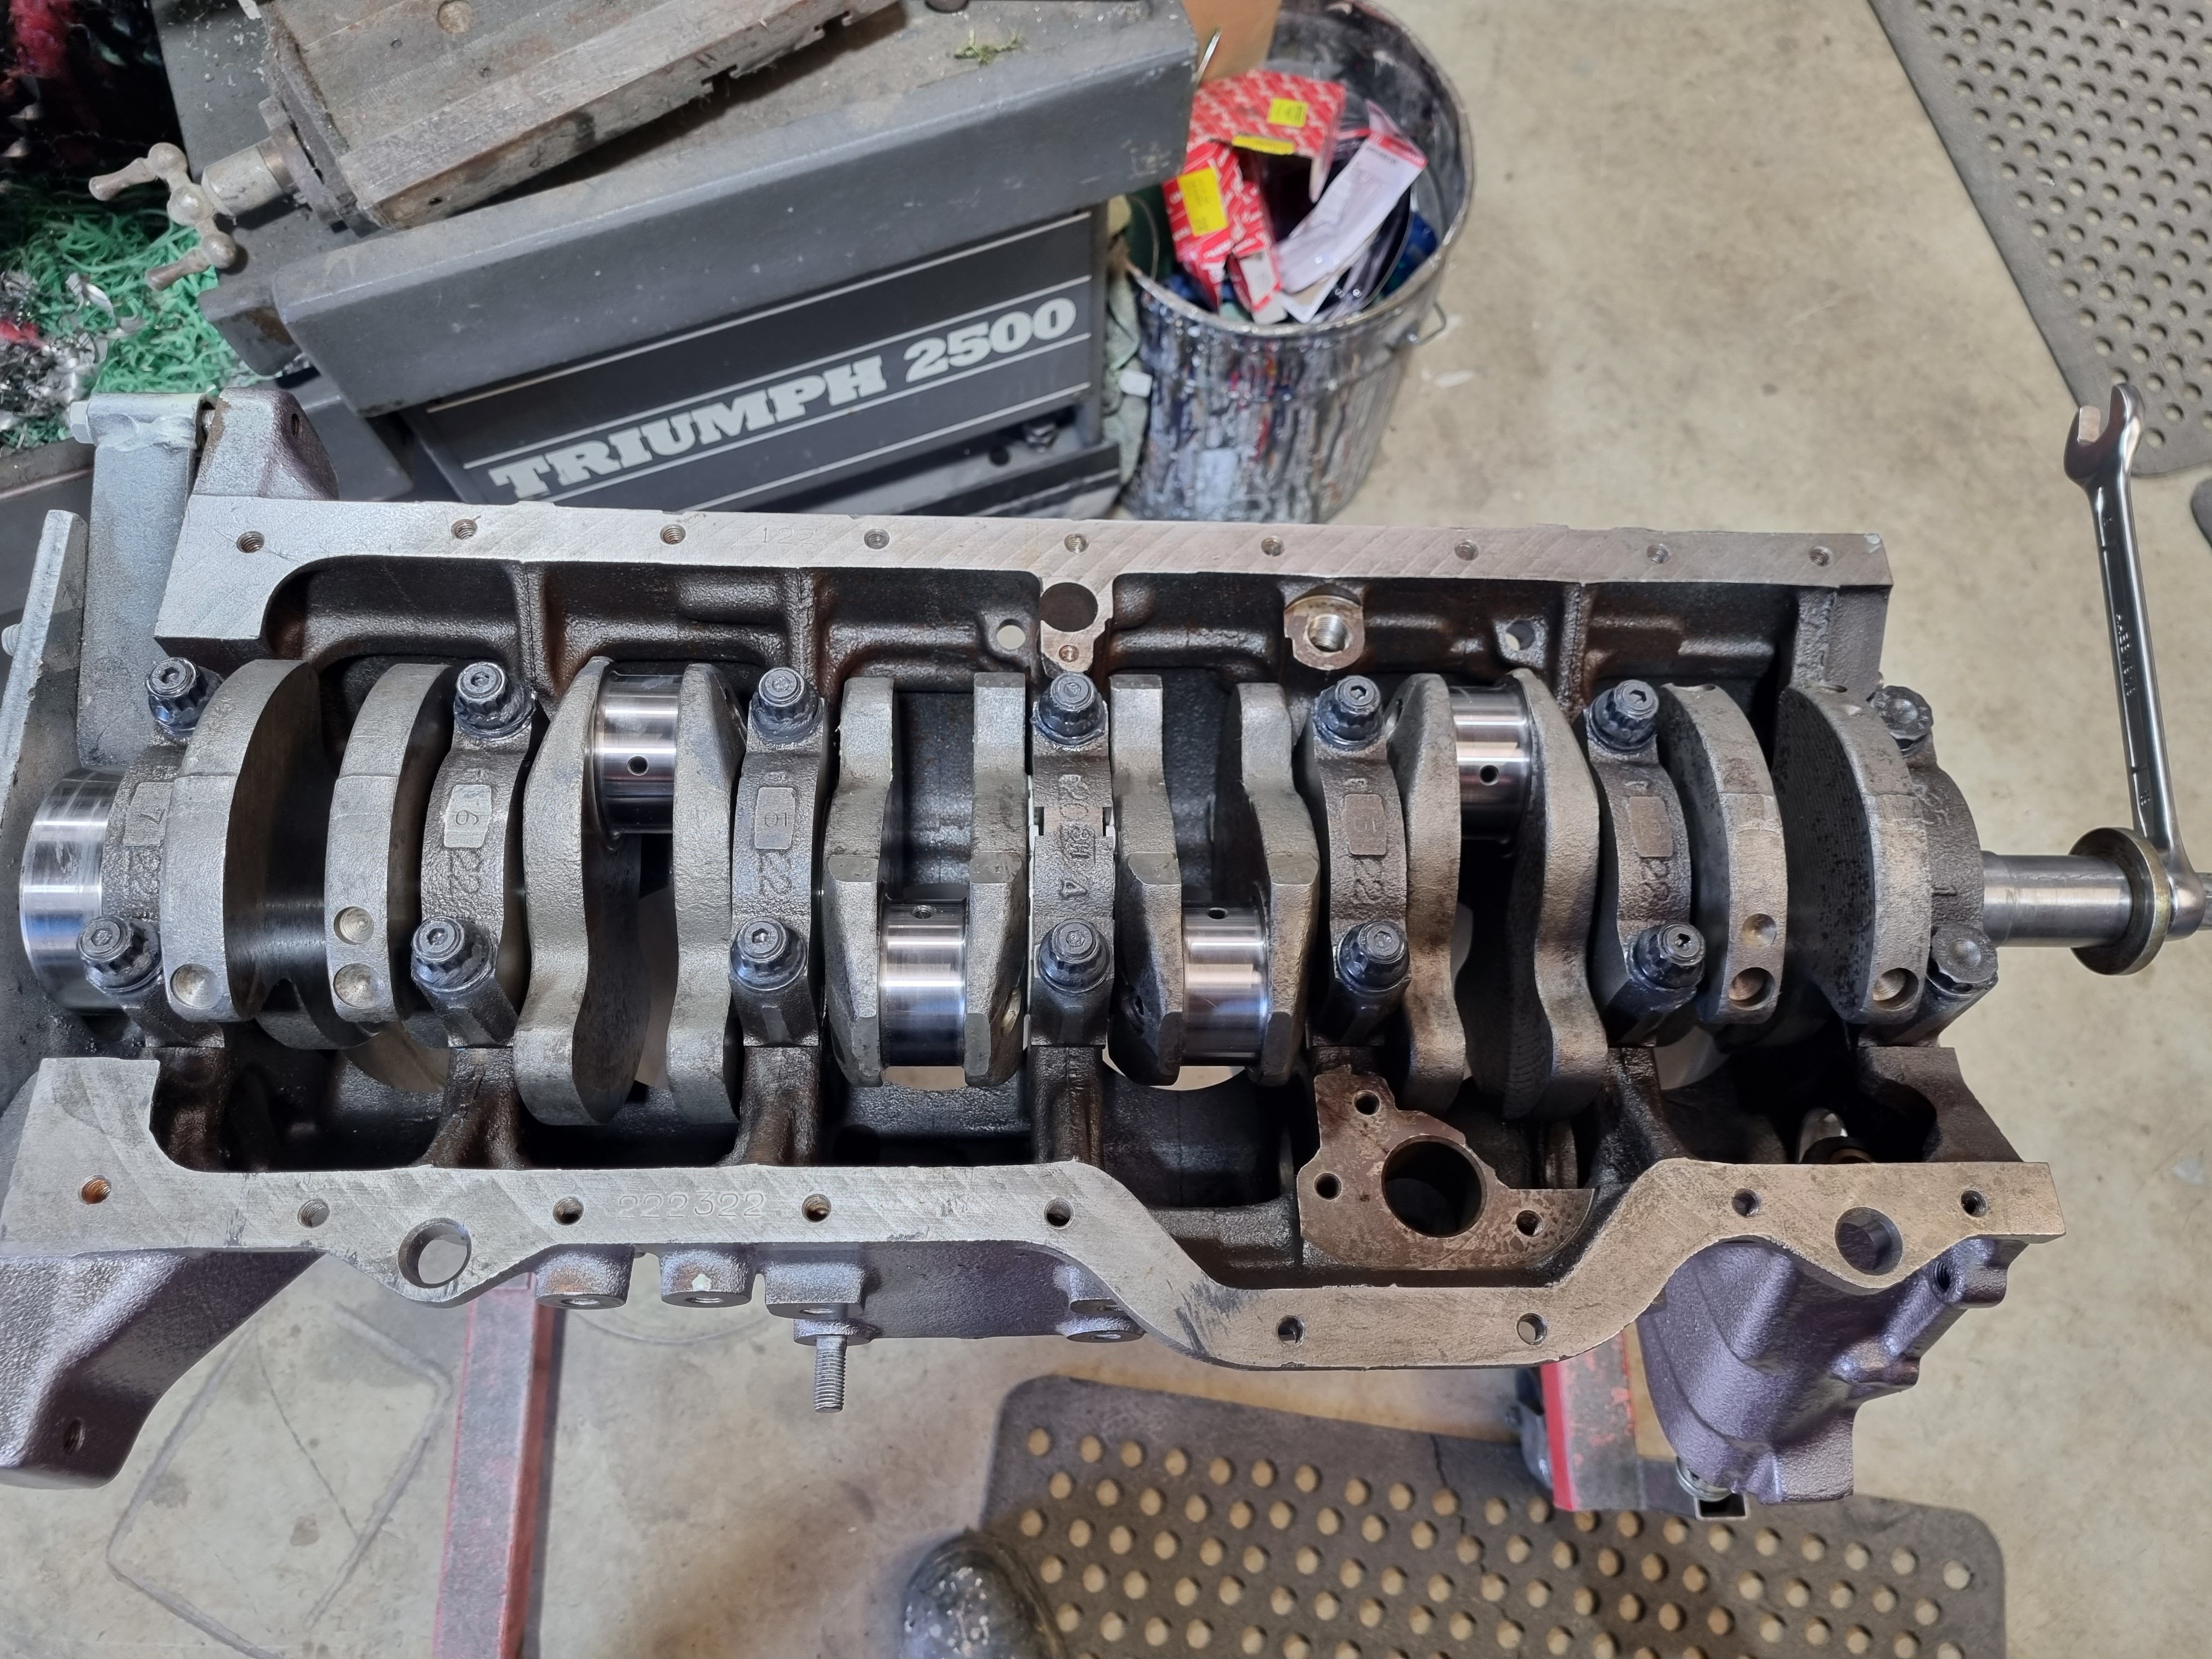
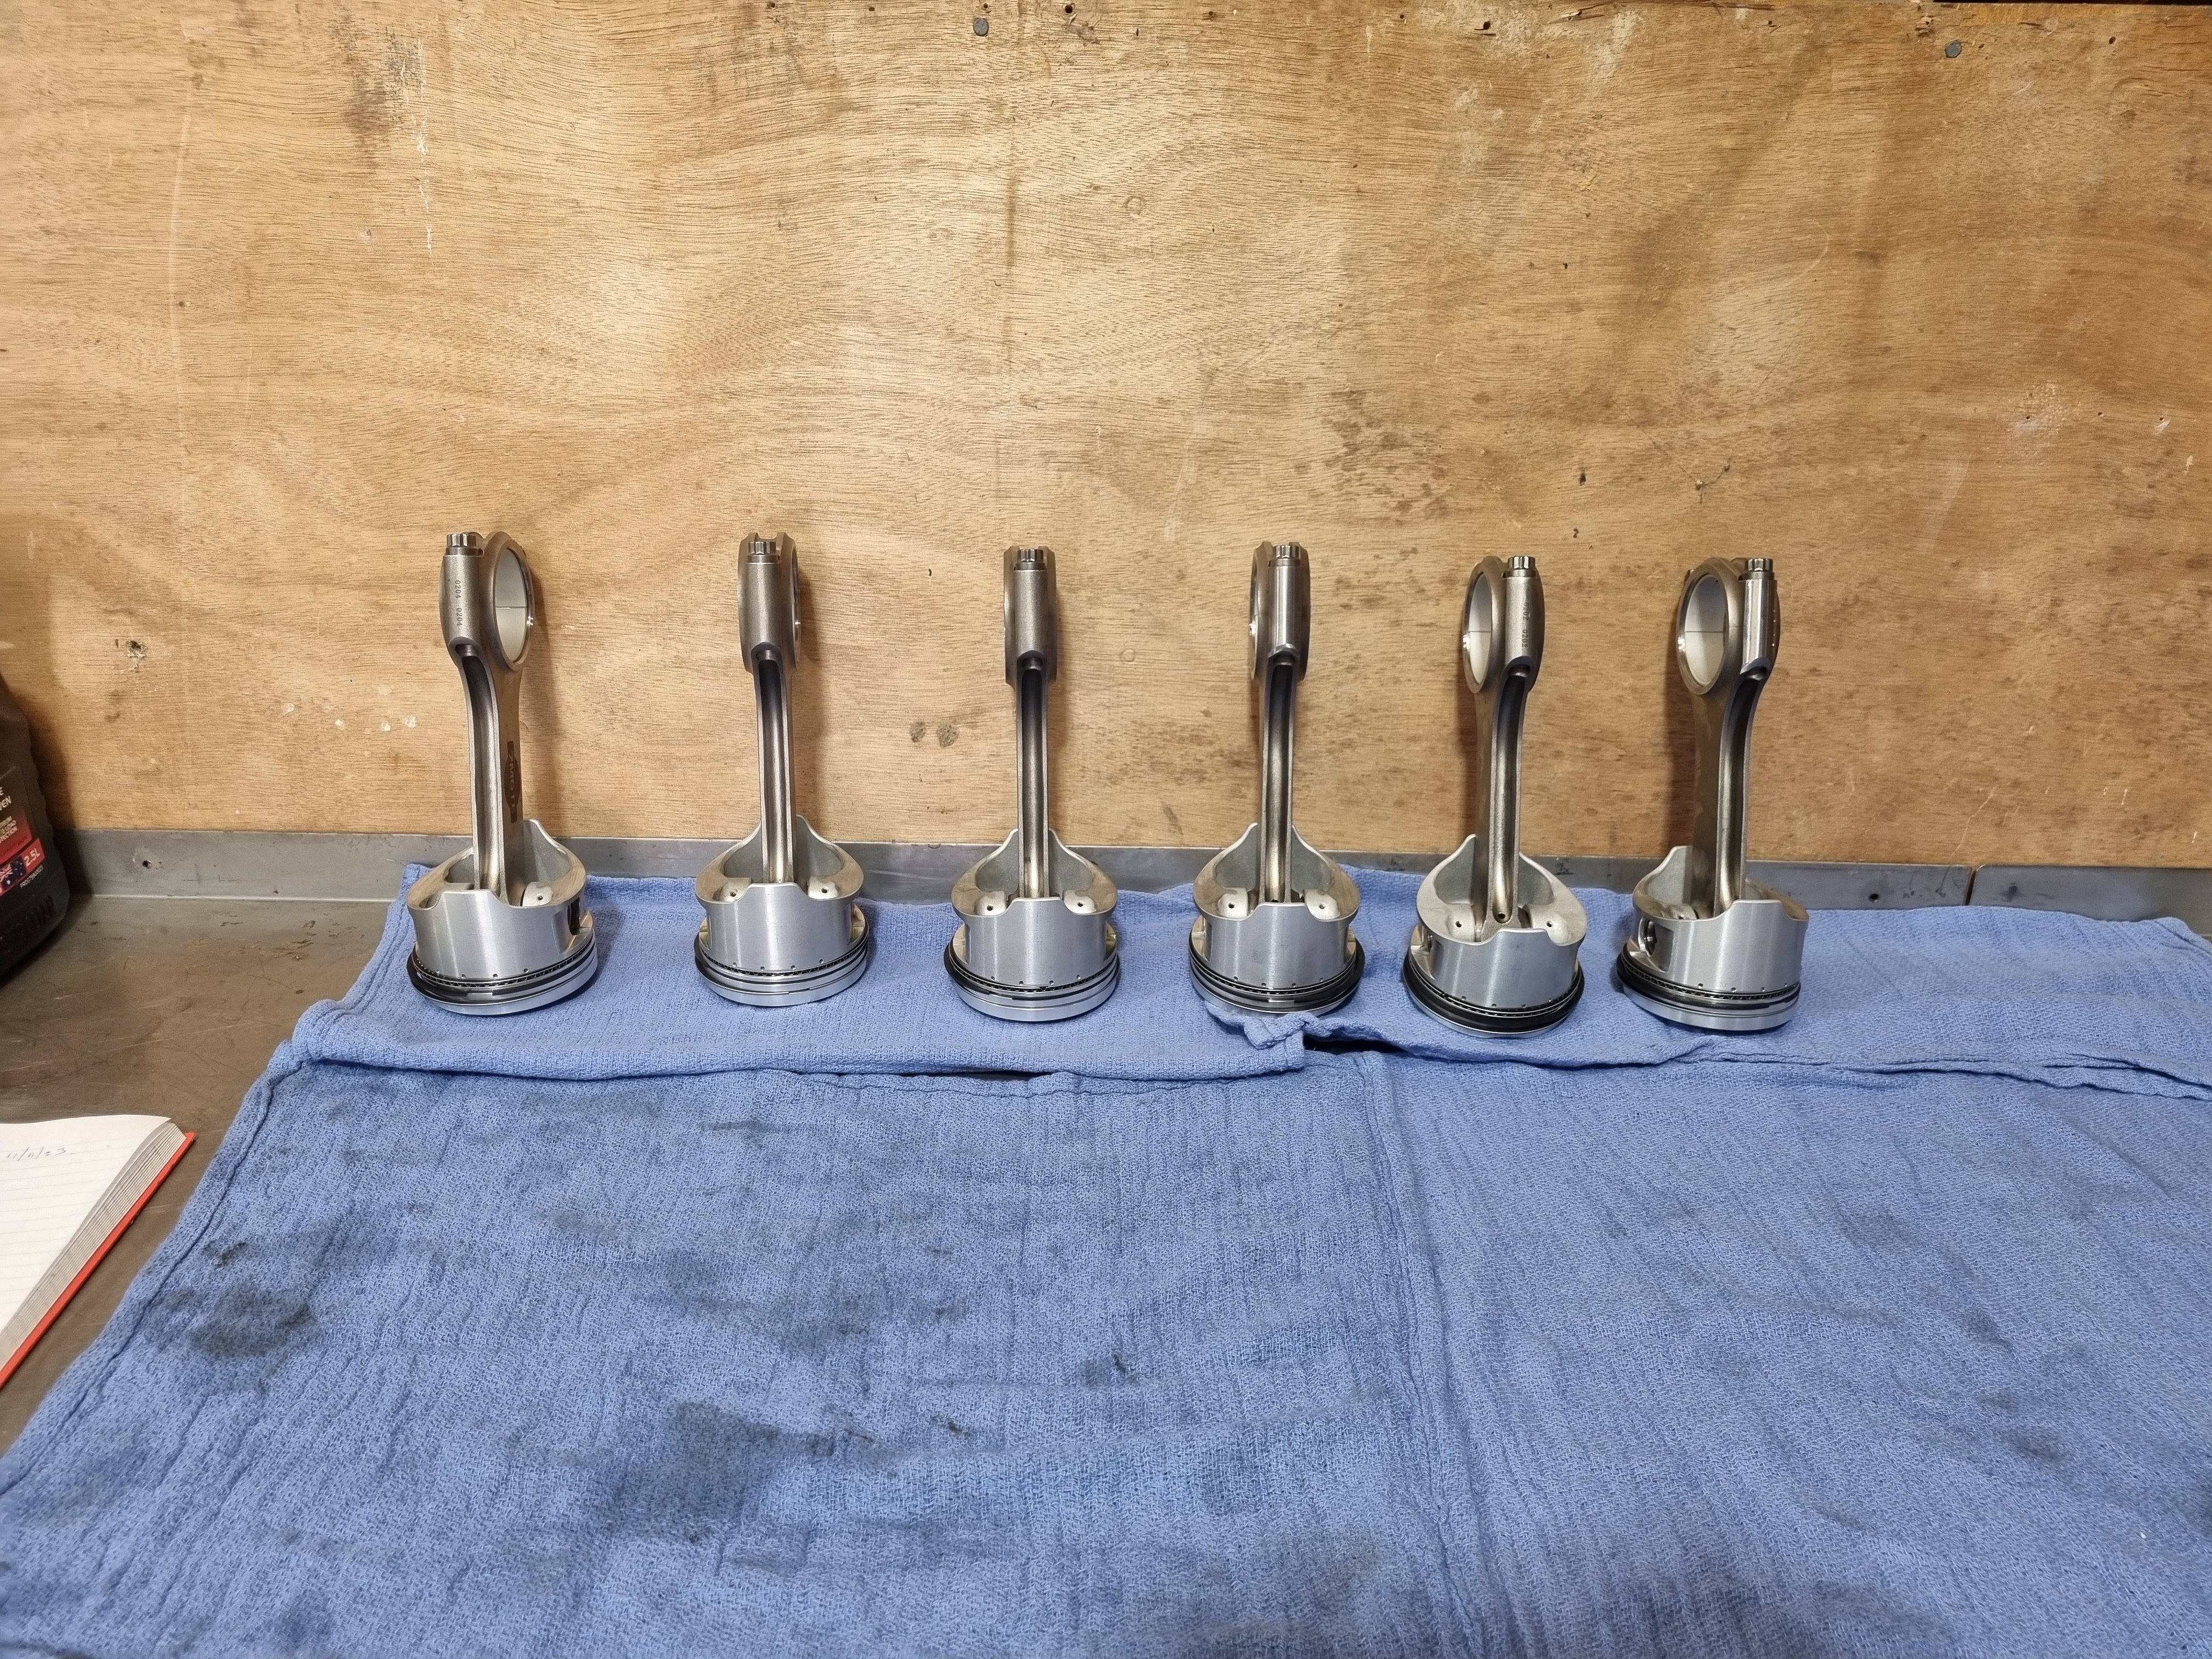
the hive mind decided that I should use the squirters, so in they went. Then I put in the crank and torqued it all up. It still spins which is a bonus. I also got all the pistons and rings assembled. Turns out when you buy expensive pistons made for a specific size bore the rings come with the right gaps. I checked every single one and they're all perfect.
1 point


This leaderboard is set to Auckland/GMT+12:00