
Leaderboard


Popular Content
Showing content with the highest reputation on 04/09/24 in all areas
-
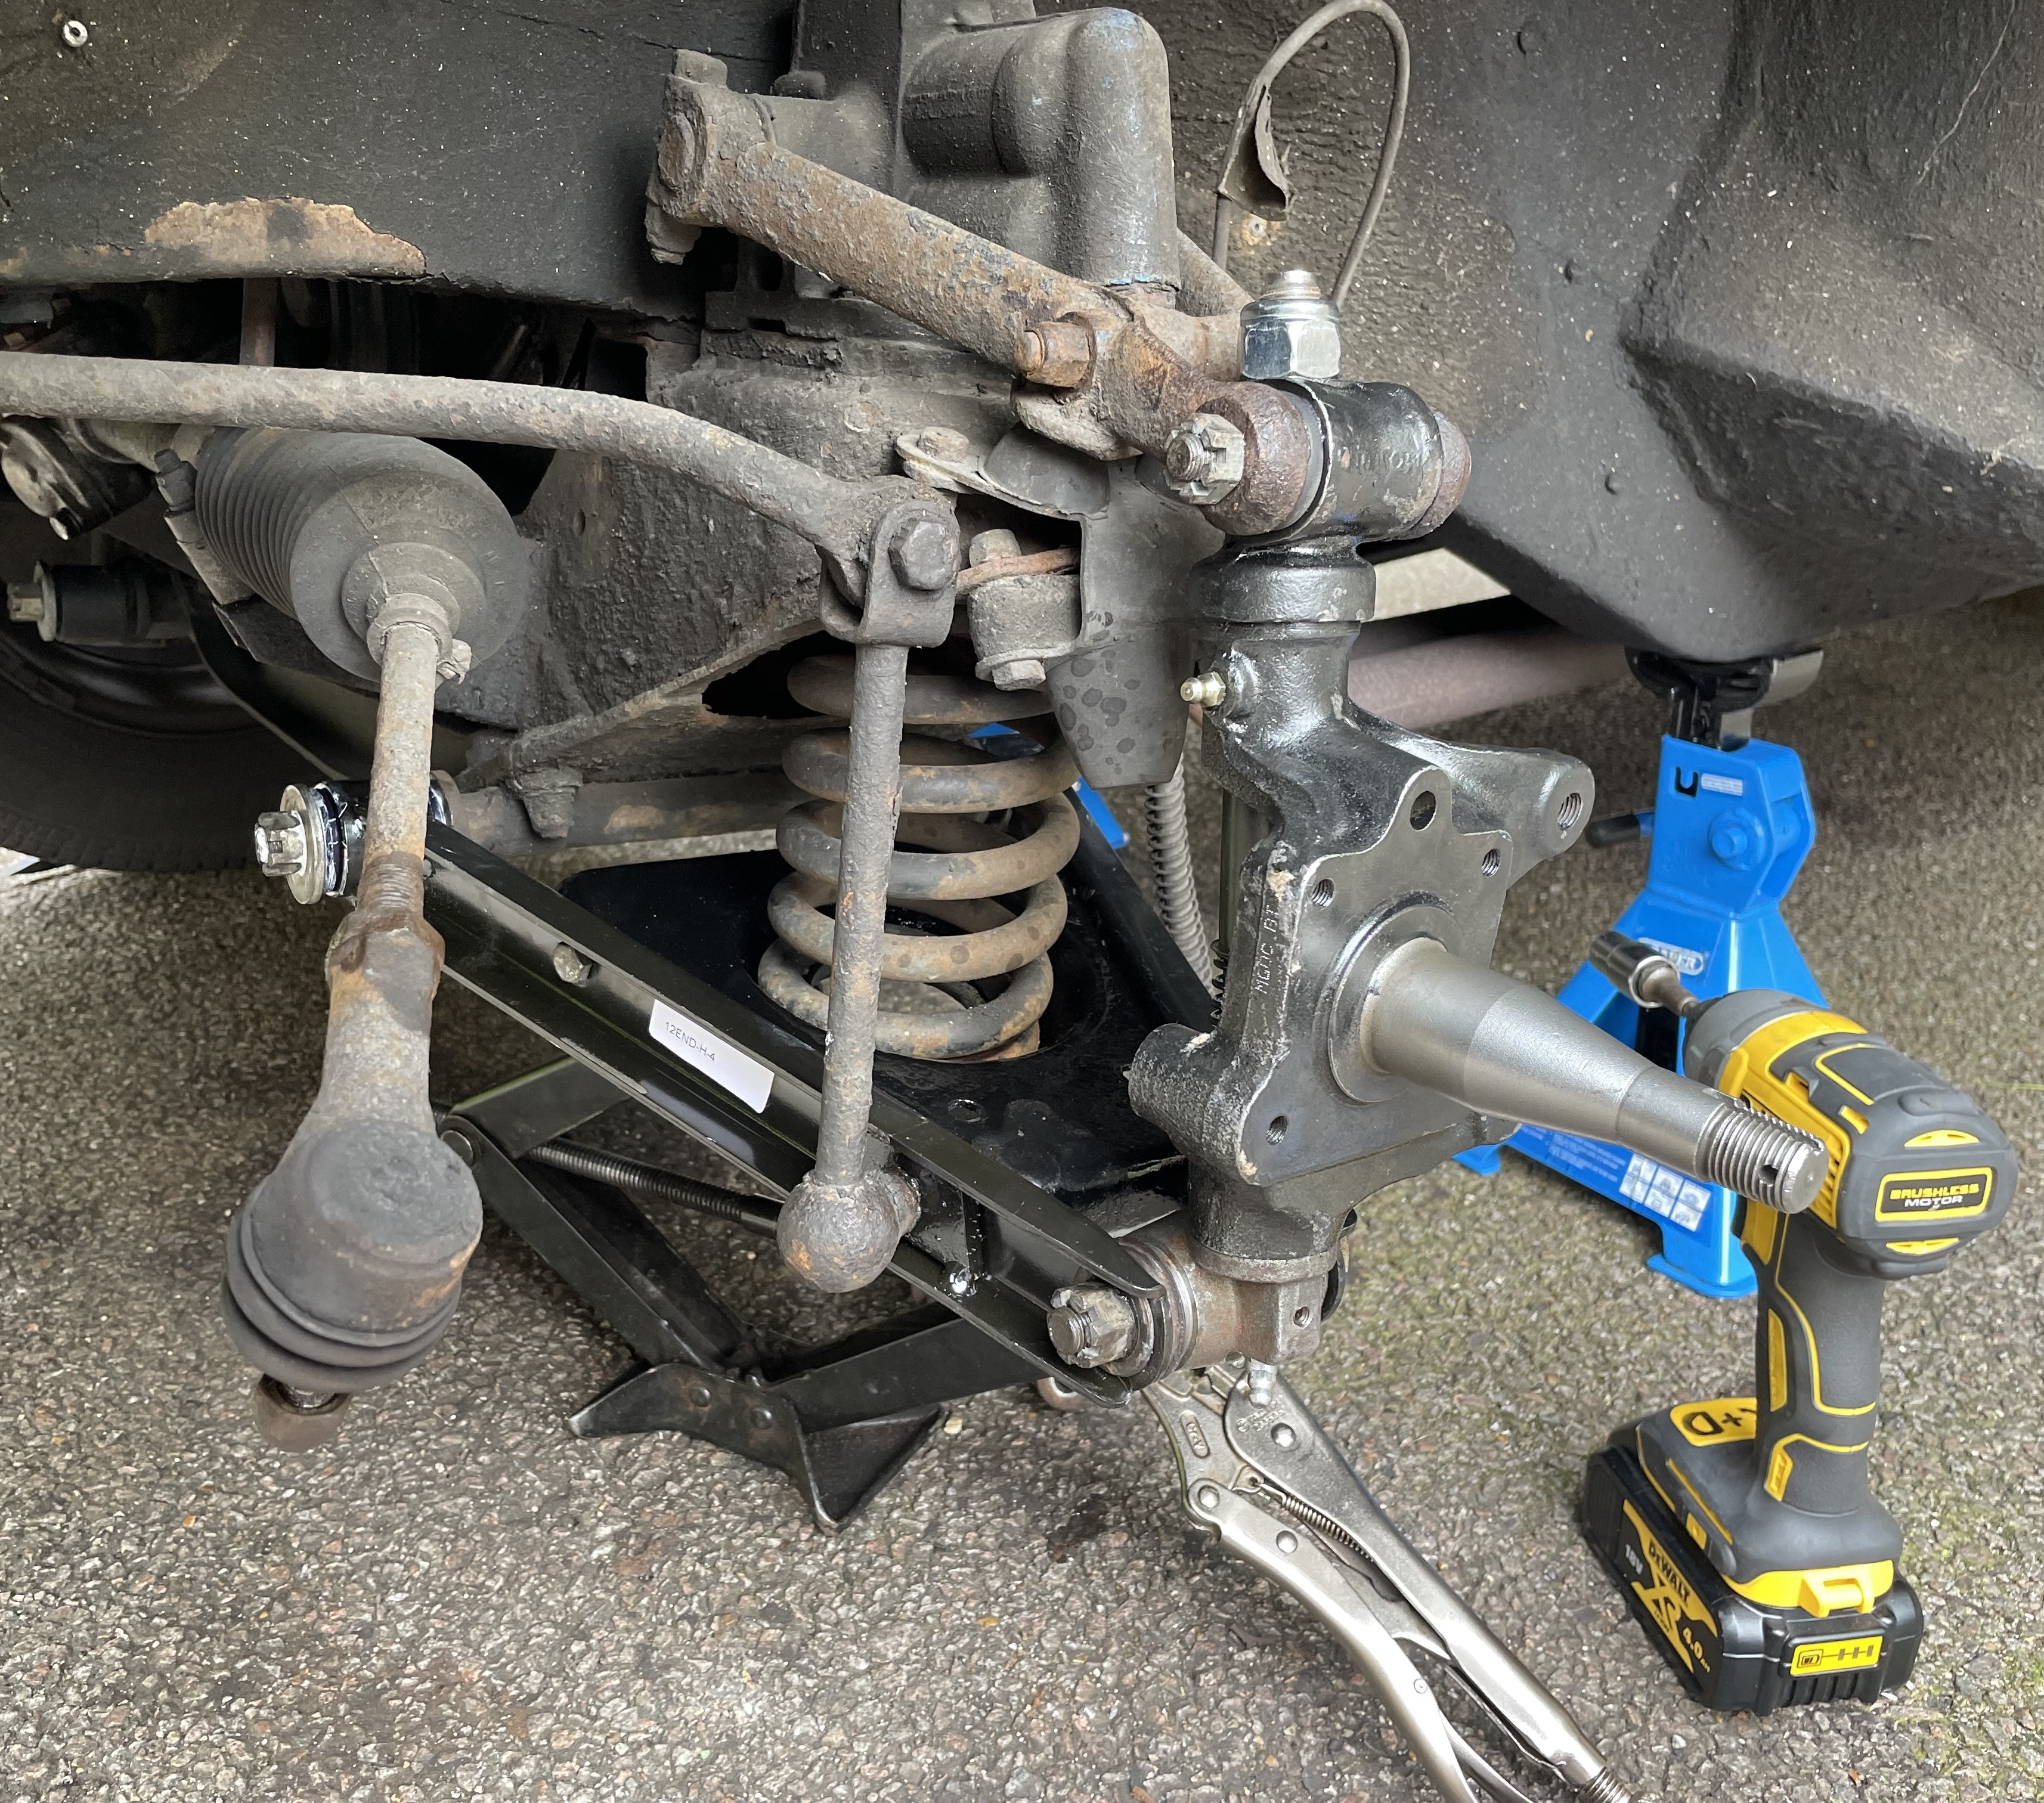
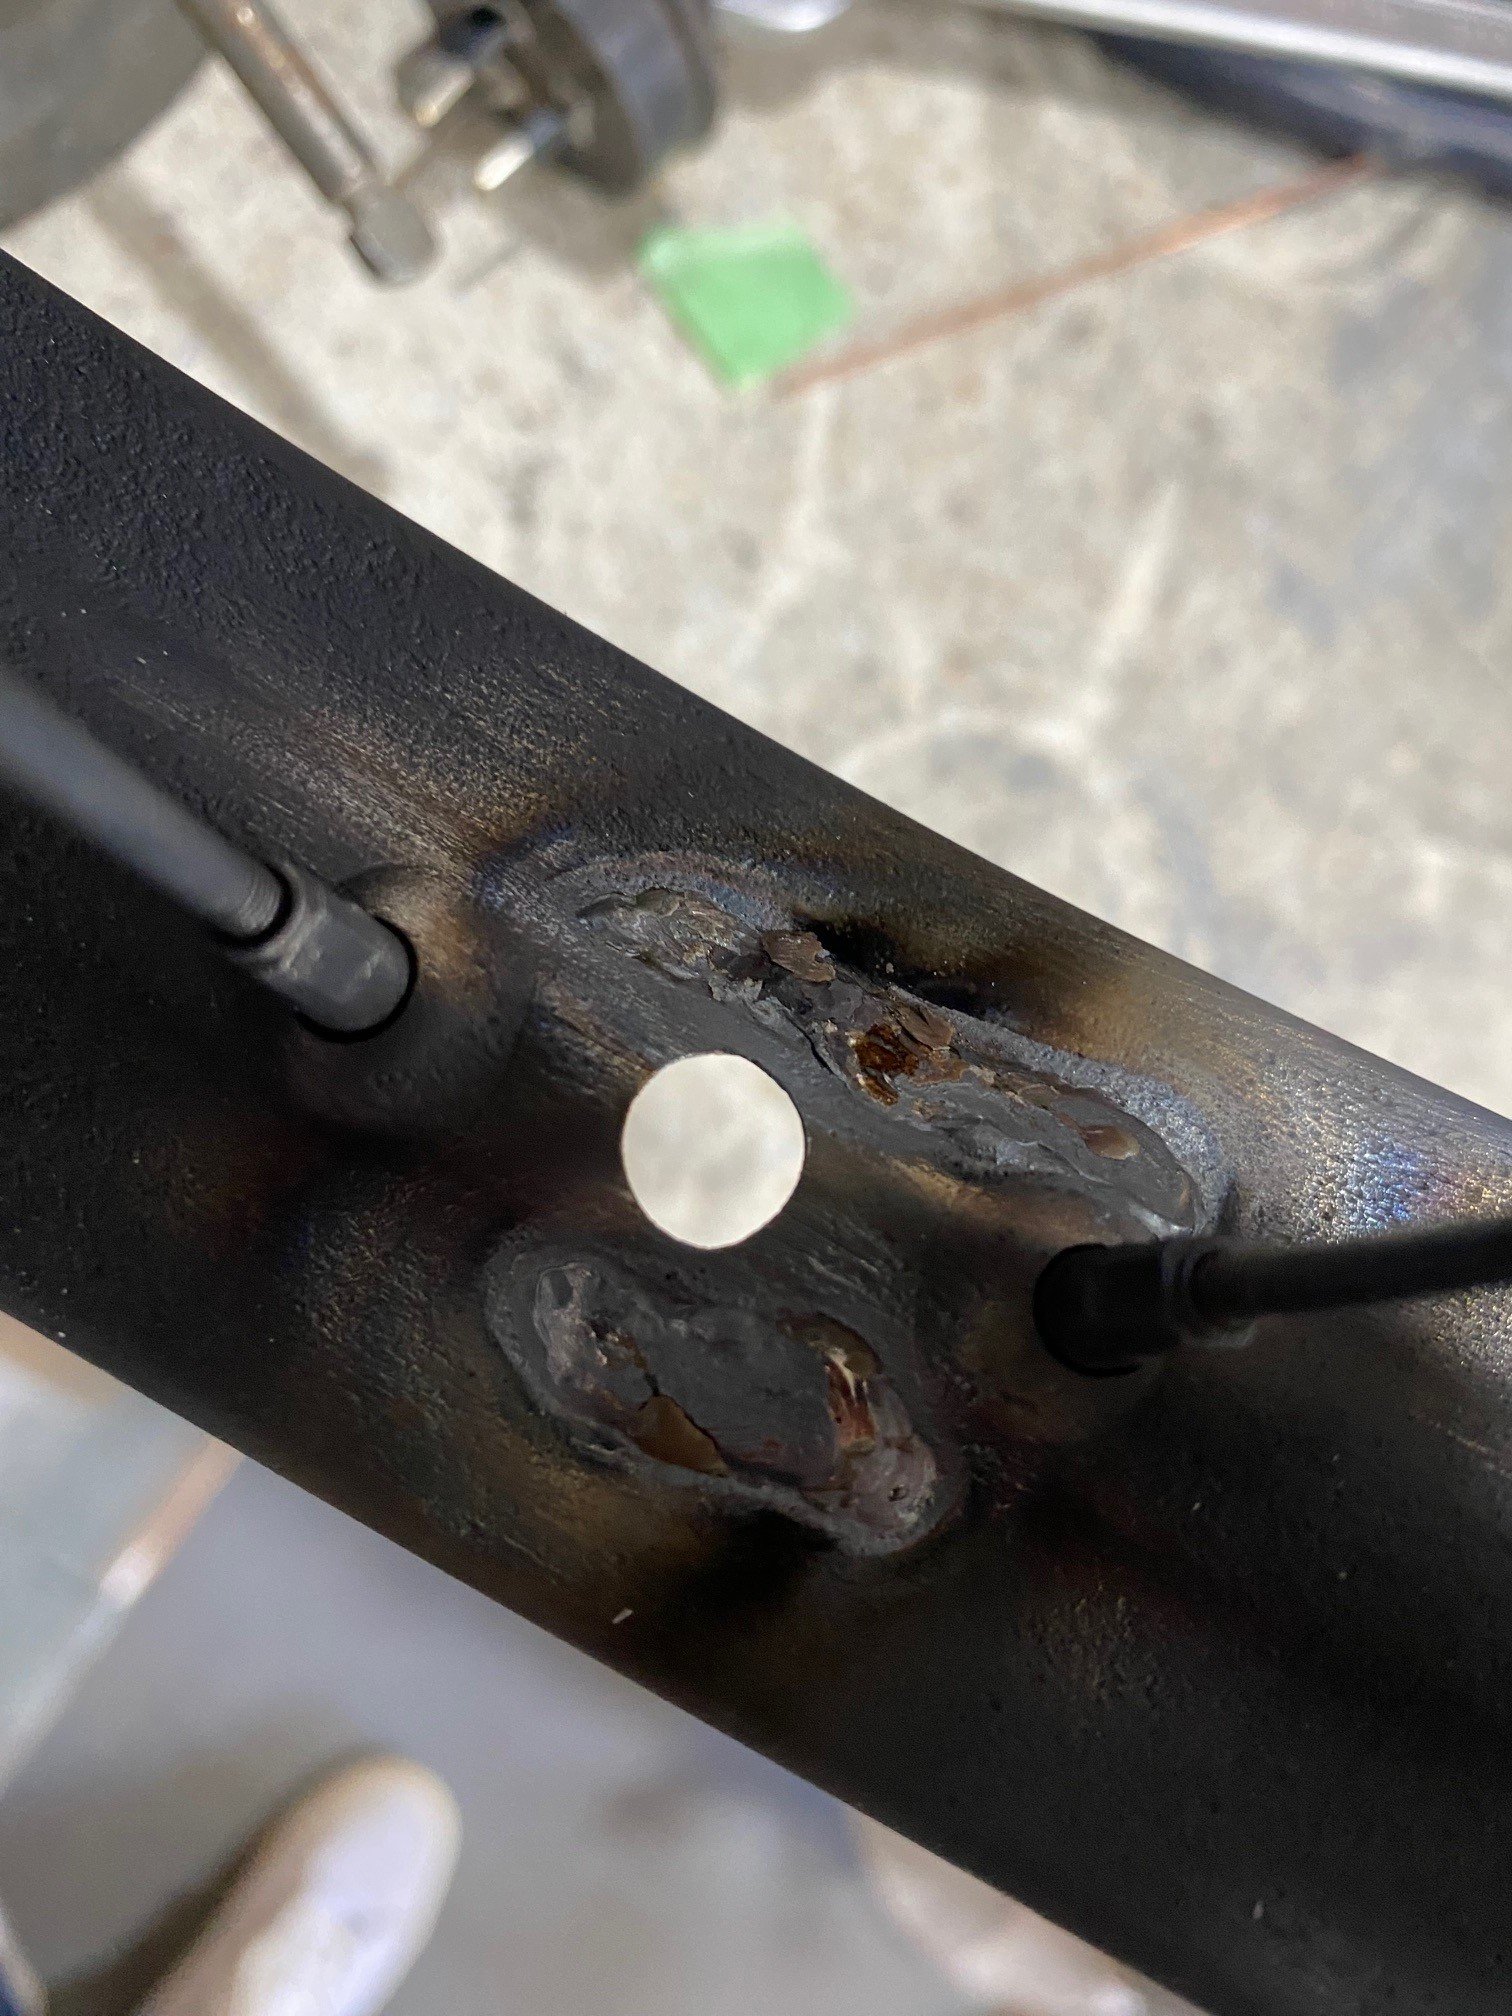
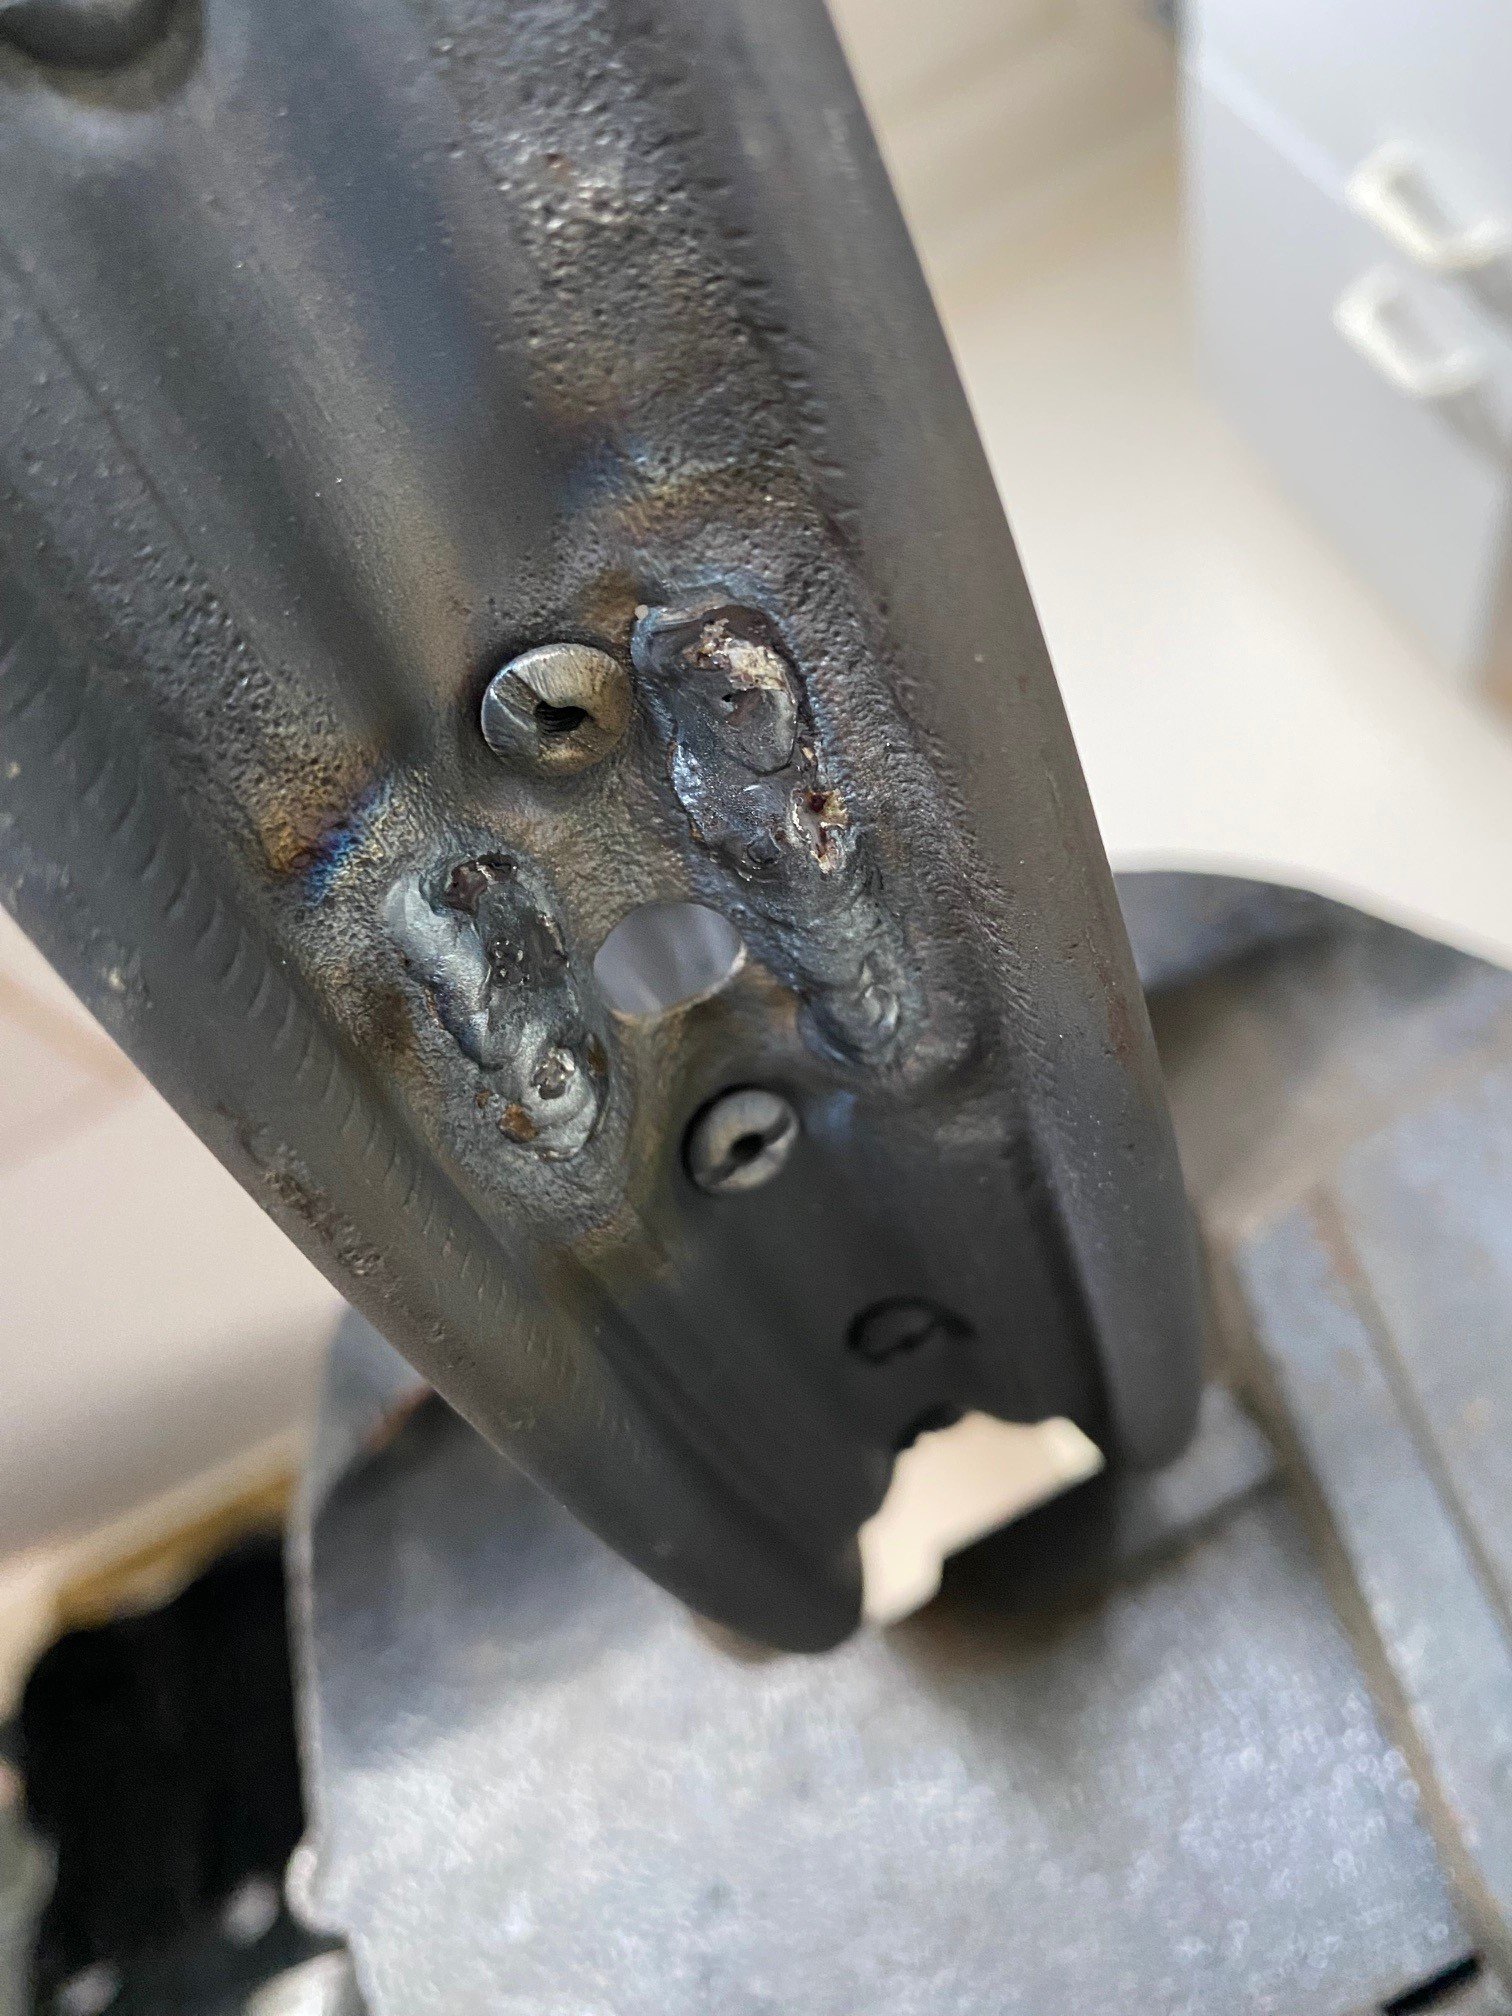
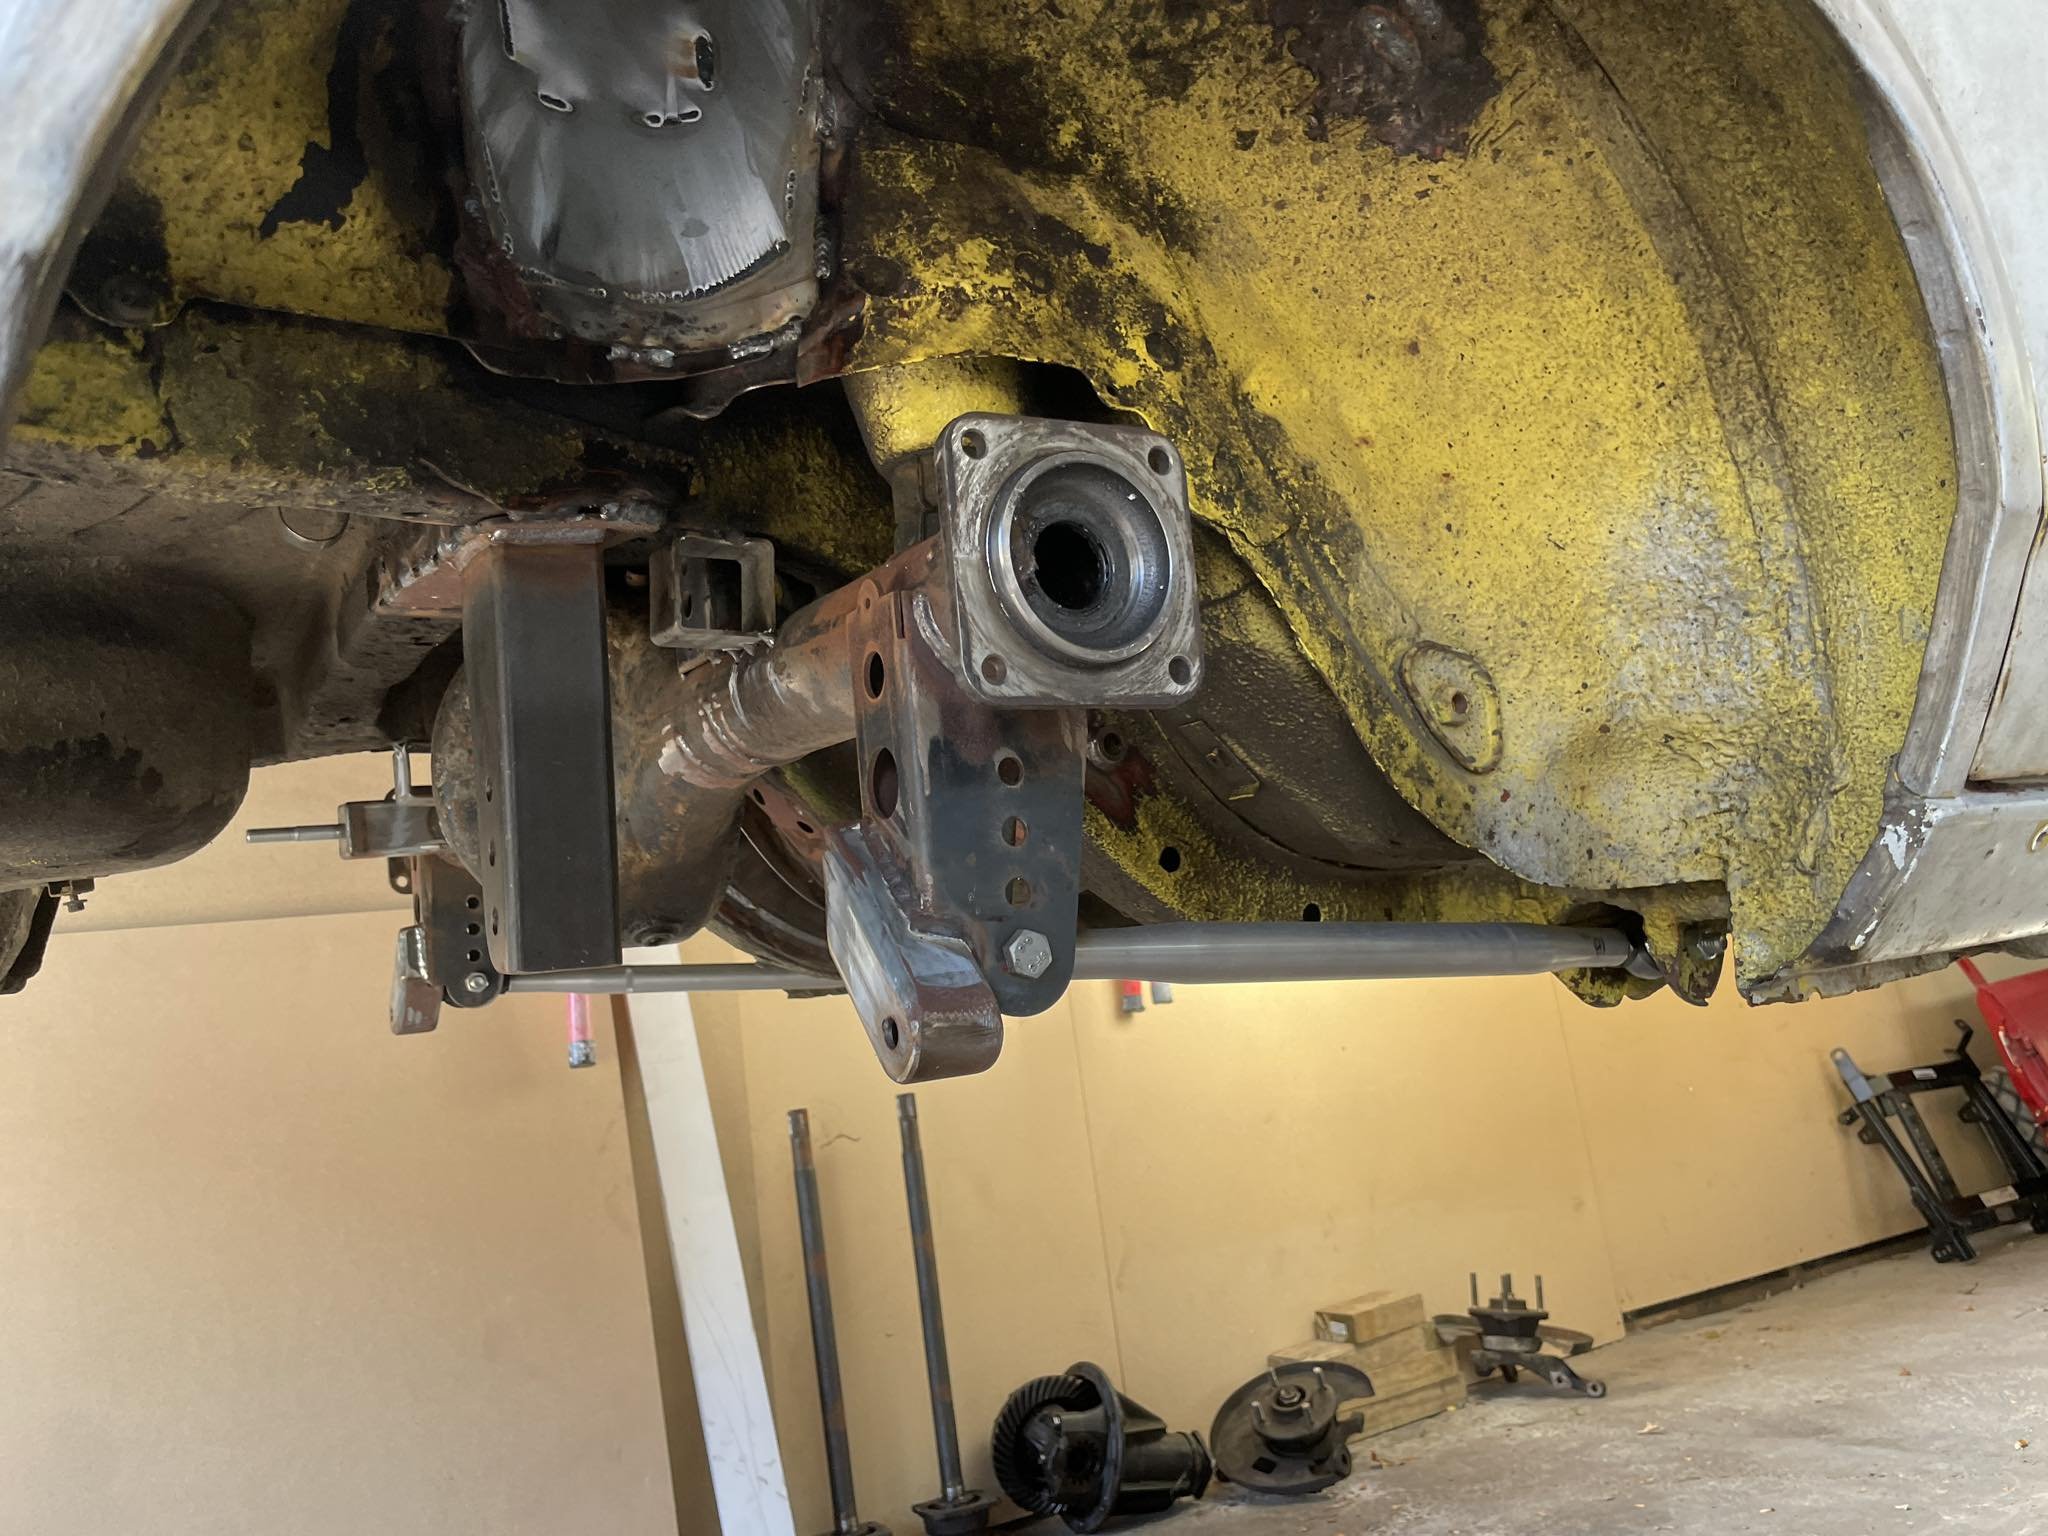
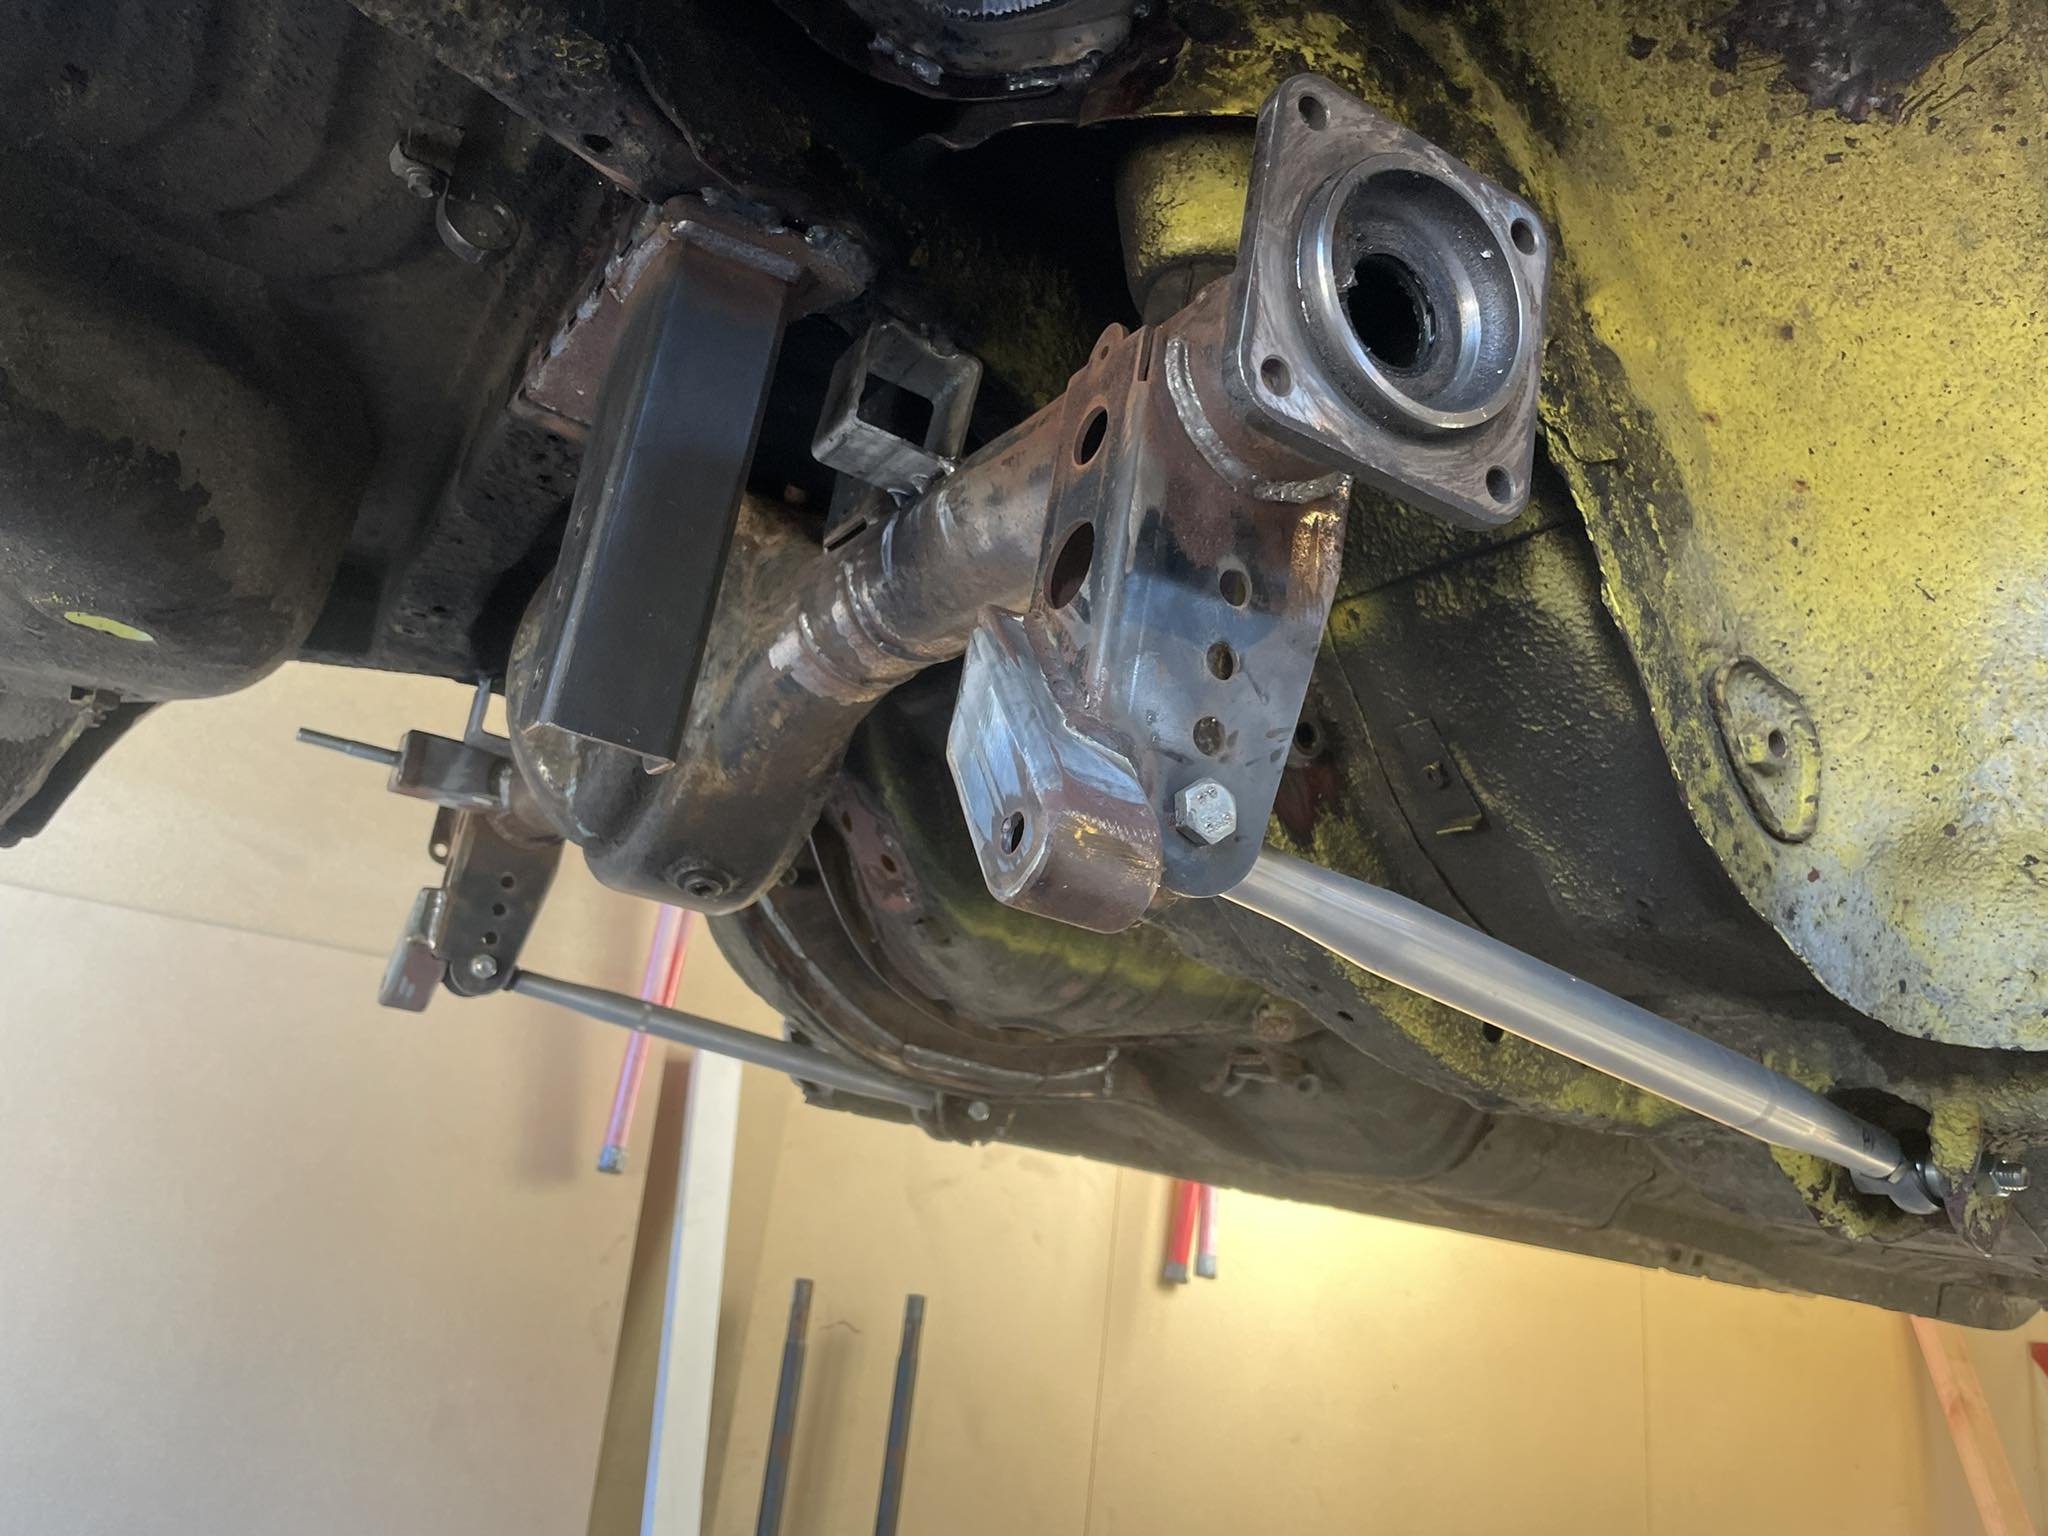
Another thing I had been wanting for a while but was hesitant to buy due to cost finally came on sale, so I snapped it up. Since my car was a track toy in Japan it came with some goodies still attached, one of which was the Cusco front swaybar. This apparently takes the swaybar from the standard 18mm up to 20mm, which Cusco claims is "ratio with standard 138%", whatever that means. Either way, it's stiffer. The bar is so dirty it's hard to see, but it's definitely thicc and blue. I suspect this, along with my blown rear shocks and wrong rear springs, worked together to cause the handling at the last track to day just be straight up hostile. The car would not rotate, it was all over the place, and really wanted to push on in corners. Since I've fixed the shocks and springs now, the one thing left to do to balance the handling was to fit a rear swaybar. The car originally had one when it was in Japan, but it went missing at some point before I got it (likely before it left Japan). The Alto Works apparently has a standard rear swaybar integrated into the rear beam, but I haven't seen how big this is, I suspect tiny. I've been watching the auctions for ages now trying to catch a bargain on a used bar, since they weren't cheap new. I had no luck, but by chance I was having a nosy over on RHDJapan and noticed the exact bar I was looking for was on sale, so jumped at the chance. So, here is my new Cusco 16mm rear swaybar. It's both easy to fit and a real pain. The bolts that hold the end plates to the rear beam have to go under the lower spring pads. Trying to lever the pad up with a trim tool with one hand, whilst using the other hand to push the bolt through, is not my idea of fun It also makes it hard to get the hex key into the bolt to stop it from turning as you tighten the nut. In hindsight, I would probably drop the rear shocks off and lower the rear beam until there is no pressure on the spring and just lift the pads up. I got there in the end though, and the bar fits nicely. As soon as I started the car I noticed a rather large issue; the pipe before the rear muffler was knocking on the swaybar end plate, badly. Doing some research, it seems this is a common thing and the first thing to try is flipping the exhaust hanger. I pushed the car up a ramp on one side to give me some extra clearance Mine started on the stock side, albeit it had been raised up above the normal height (possibly for clearance when the car was lowered) Zero clearance I undid the bolt holding the hanger in place and moved the hanger to the other side of the bracket. I then reinstalled the bolt down into the stock hole, which has the captive nut (the visible nut is just a locking nut the previous owner used to secure it to the upper hole, which doesn't have a captive nut) This gave me ample clearance As a bonus, the exhaust is no longer obscured behind the rear bumper As opposed to A quick drive shows that the exhaust is no longer rattling its little head off, so that's a success. I haven't had a decent chance on the twisty roads to test the new swaybar, but already the car seems to corner flatter and feels more confident in corners. I'll take it to work later in the week and hit some twisties and see how it feels. Since the car was already in the garage I took the chance to do a couple of other changes. One was to replace the rear engine mount with a newer genuine part, and a Silkroad insert. The standard Type 1 mounts are known to be softer than the later mounts, so the new part alone should help tighten it up and fitting the inserts should improve it further, without the harshness of solid mounts. New genuine mount, and inserts The inserts fill these gaps Like so. I slathered them in rubber grease and used a mallet to hammer them into the mount. The inserts are a flexible polyurethane. Interestingly the inserts stick out on both sides of the mount Here's the old mount in place. I first tried to remove the bolt that goes through the small end of the mount and soon realised that no, it doesn't fit The solution was to take the bracket off the gearbox There's a little plastic cover over the hole in the subframe the big end of the mount lives in. This is held in place with a clip on each end, obscured by the swaybar I don't know if it's because of the bigger swaybar, or if it's an issue with the stock one too, but there was no way the mount would slip out passed the bar. I ended up having to undo both swaybar links, and unbolt one end of the D bushes that mount the bar to the subframe, so I could lift the bar up high enough to slip the mount out It turns out the previous owner had given stiffening the stock mount a go at some point. He had slipped some rubber sheets into the gaps and then slathered the whole thing in.. something. Glue maybe? It didn't really help, there was heaps of movement in the mount I slipped the new improved mount in, bolted it all back into place and reinstalled the swaybar. Since the links were off, and I had new ones (because I had previously noticed that the old ones were stuffed), I replaced those too. Unfortunately the nut on one of them was stuck and someone had stripped out the hex in the balljoint (not me) So out came the spinny death wheel, which made quick work of it. And the new links went in with no issue. I did have to source a new nut from my stash though, as genuine links don't come with new nuts (!). With everything tightened up, and the wheels back on, it was test drive time. Immediately you could notice the mount was stiffer. At startup and idle there is a noticeable vibration in the cabin. Not horrible (like my Integra with solid mounts), but it's there and causes a couple of small rattles. Once the revs are above idle though, the vibration is gone, and boy does the mount make a difference. There is no backlash in the engine coming off throttle, and gear changes are even more direct (they were already bliss). Everything just feels more solid. I'll live with the vibration, it's just part of having a road going little track toy, but A+ definitely worth doing so far. Finally, one last small change. I finally got the courage to add a third stage to the boost controller. I know from information about what the previous owner did, that the car used to have three settings programmed by CADCARS on the boost controller before it was exported, "comfort mode" - 14.5psi, "circuit mode" - 18psi and "mountain pass mode" - 21psi. Stock boost is 8psi, and that could be achieved by turning the boost controller "off". I've had it set so A is stock 8psi, B is 14.5psi and C wasn't set. Since I was confident the car was happy on 14.5psi, and knowing it previously ran up to 21psi without issue (I'm not going to push it that far), I finally set C to 18psi and holy moly, I thought 14psi was fun! Accelerating through the gears to 100kph is pretty rapid, but the real fun is around town, where you can just rip around like a madman, whilst still under the speed limit. Coming out of corners, second gear, 18psi, with the LSD gripping like crazy, whilst doing 45kph, leaves you with a massive grin. AFRs seem happy, although intake temp does climb pretty quickly, indicating the little spooly boi is getting pretty close to its limits for not just making heat. Thankfully the massive Greddy intercooler recovers quickly and the temps drop back as soon as you're off boost. Right, I think that's about it for now... *opens Yahoo Auctions Japan*9 points
-
7 points
-
Also, the courier brought my birthday present today: And I just got home from an extended lunch break cos the weather is mint today... I'm fucking fizzing. Can't wait to start putting it back together!
 5 points
 -
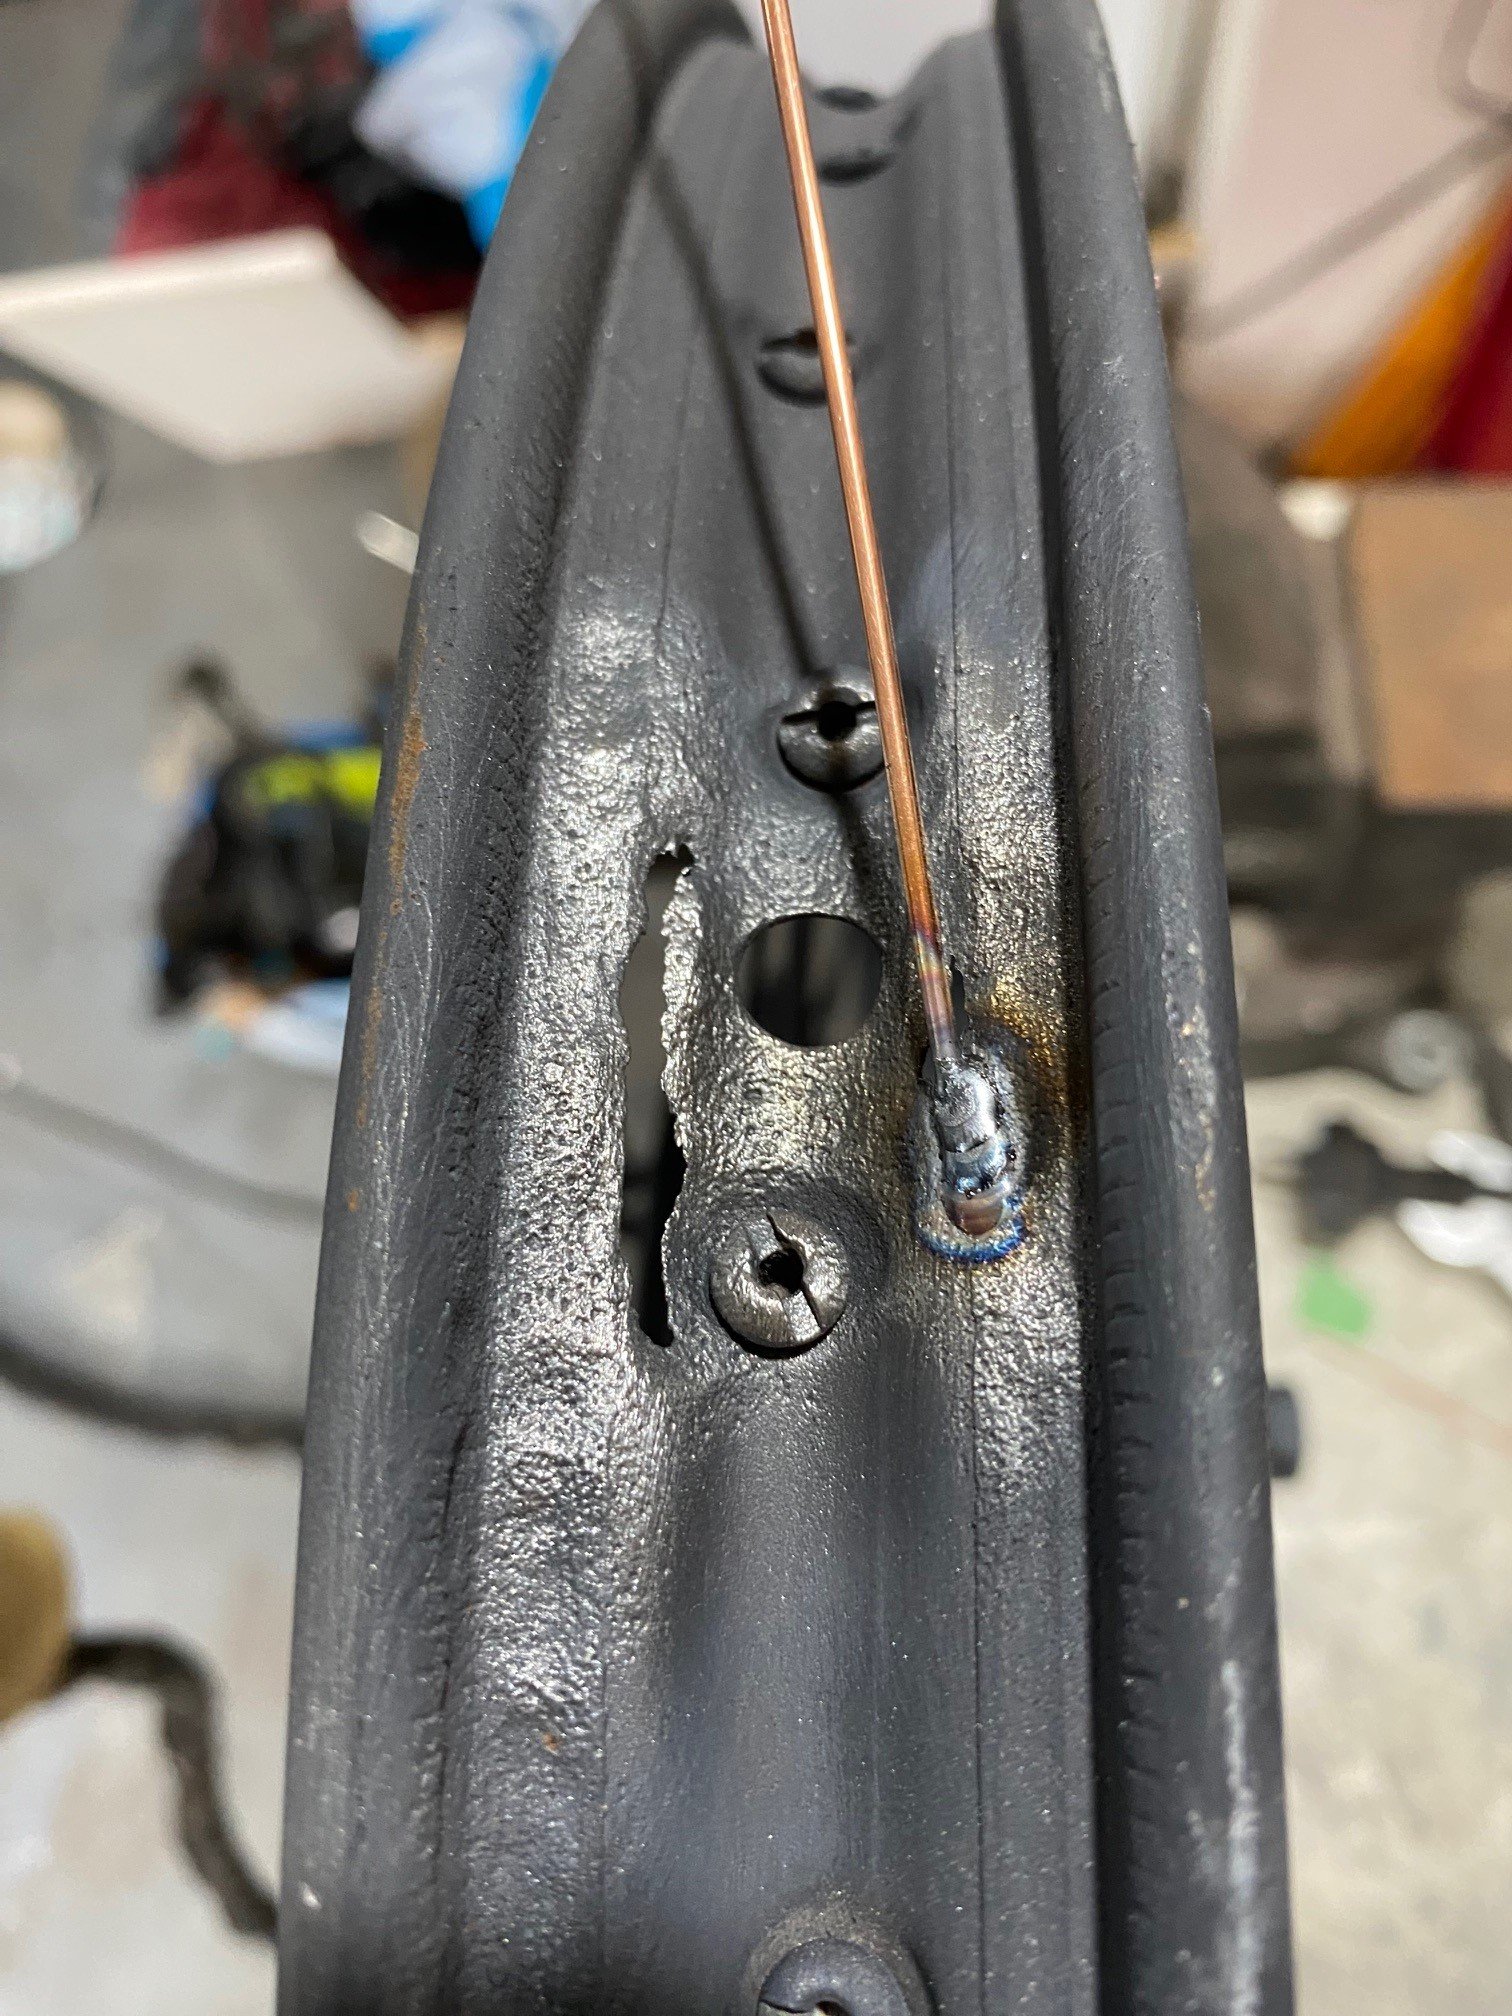
There was a rust hole in one of the rims around the stem hole, so I welded it up. I was really quite chuffed with myself for A) Not blowing the hole through into the stem hole. b) Not welding the spoke nipple to the rim. Paint is progressing, but no photos yet. Not flash, but it will do.
5 points
-
Took it for a WOF, WOF not achieved. However there was nothing show stoppy in there. A wheel bearing with too much play, a steering tie rod end, and the right rear brake had a lot of fluid around. This one was a little weird when we first bled it, it wasnt passing fluid initially but then it came free. It might be the handbrake adjustment playing up. It might just be all the fluid used during bleeding, anyway I'll have a looksee. And the low beams were not working, but I am pretty sure its the switch playing up. So overall nothing bad or even unexpected. And just look at that awesome wedgyness;
5 points
-
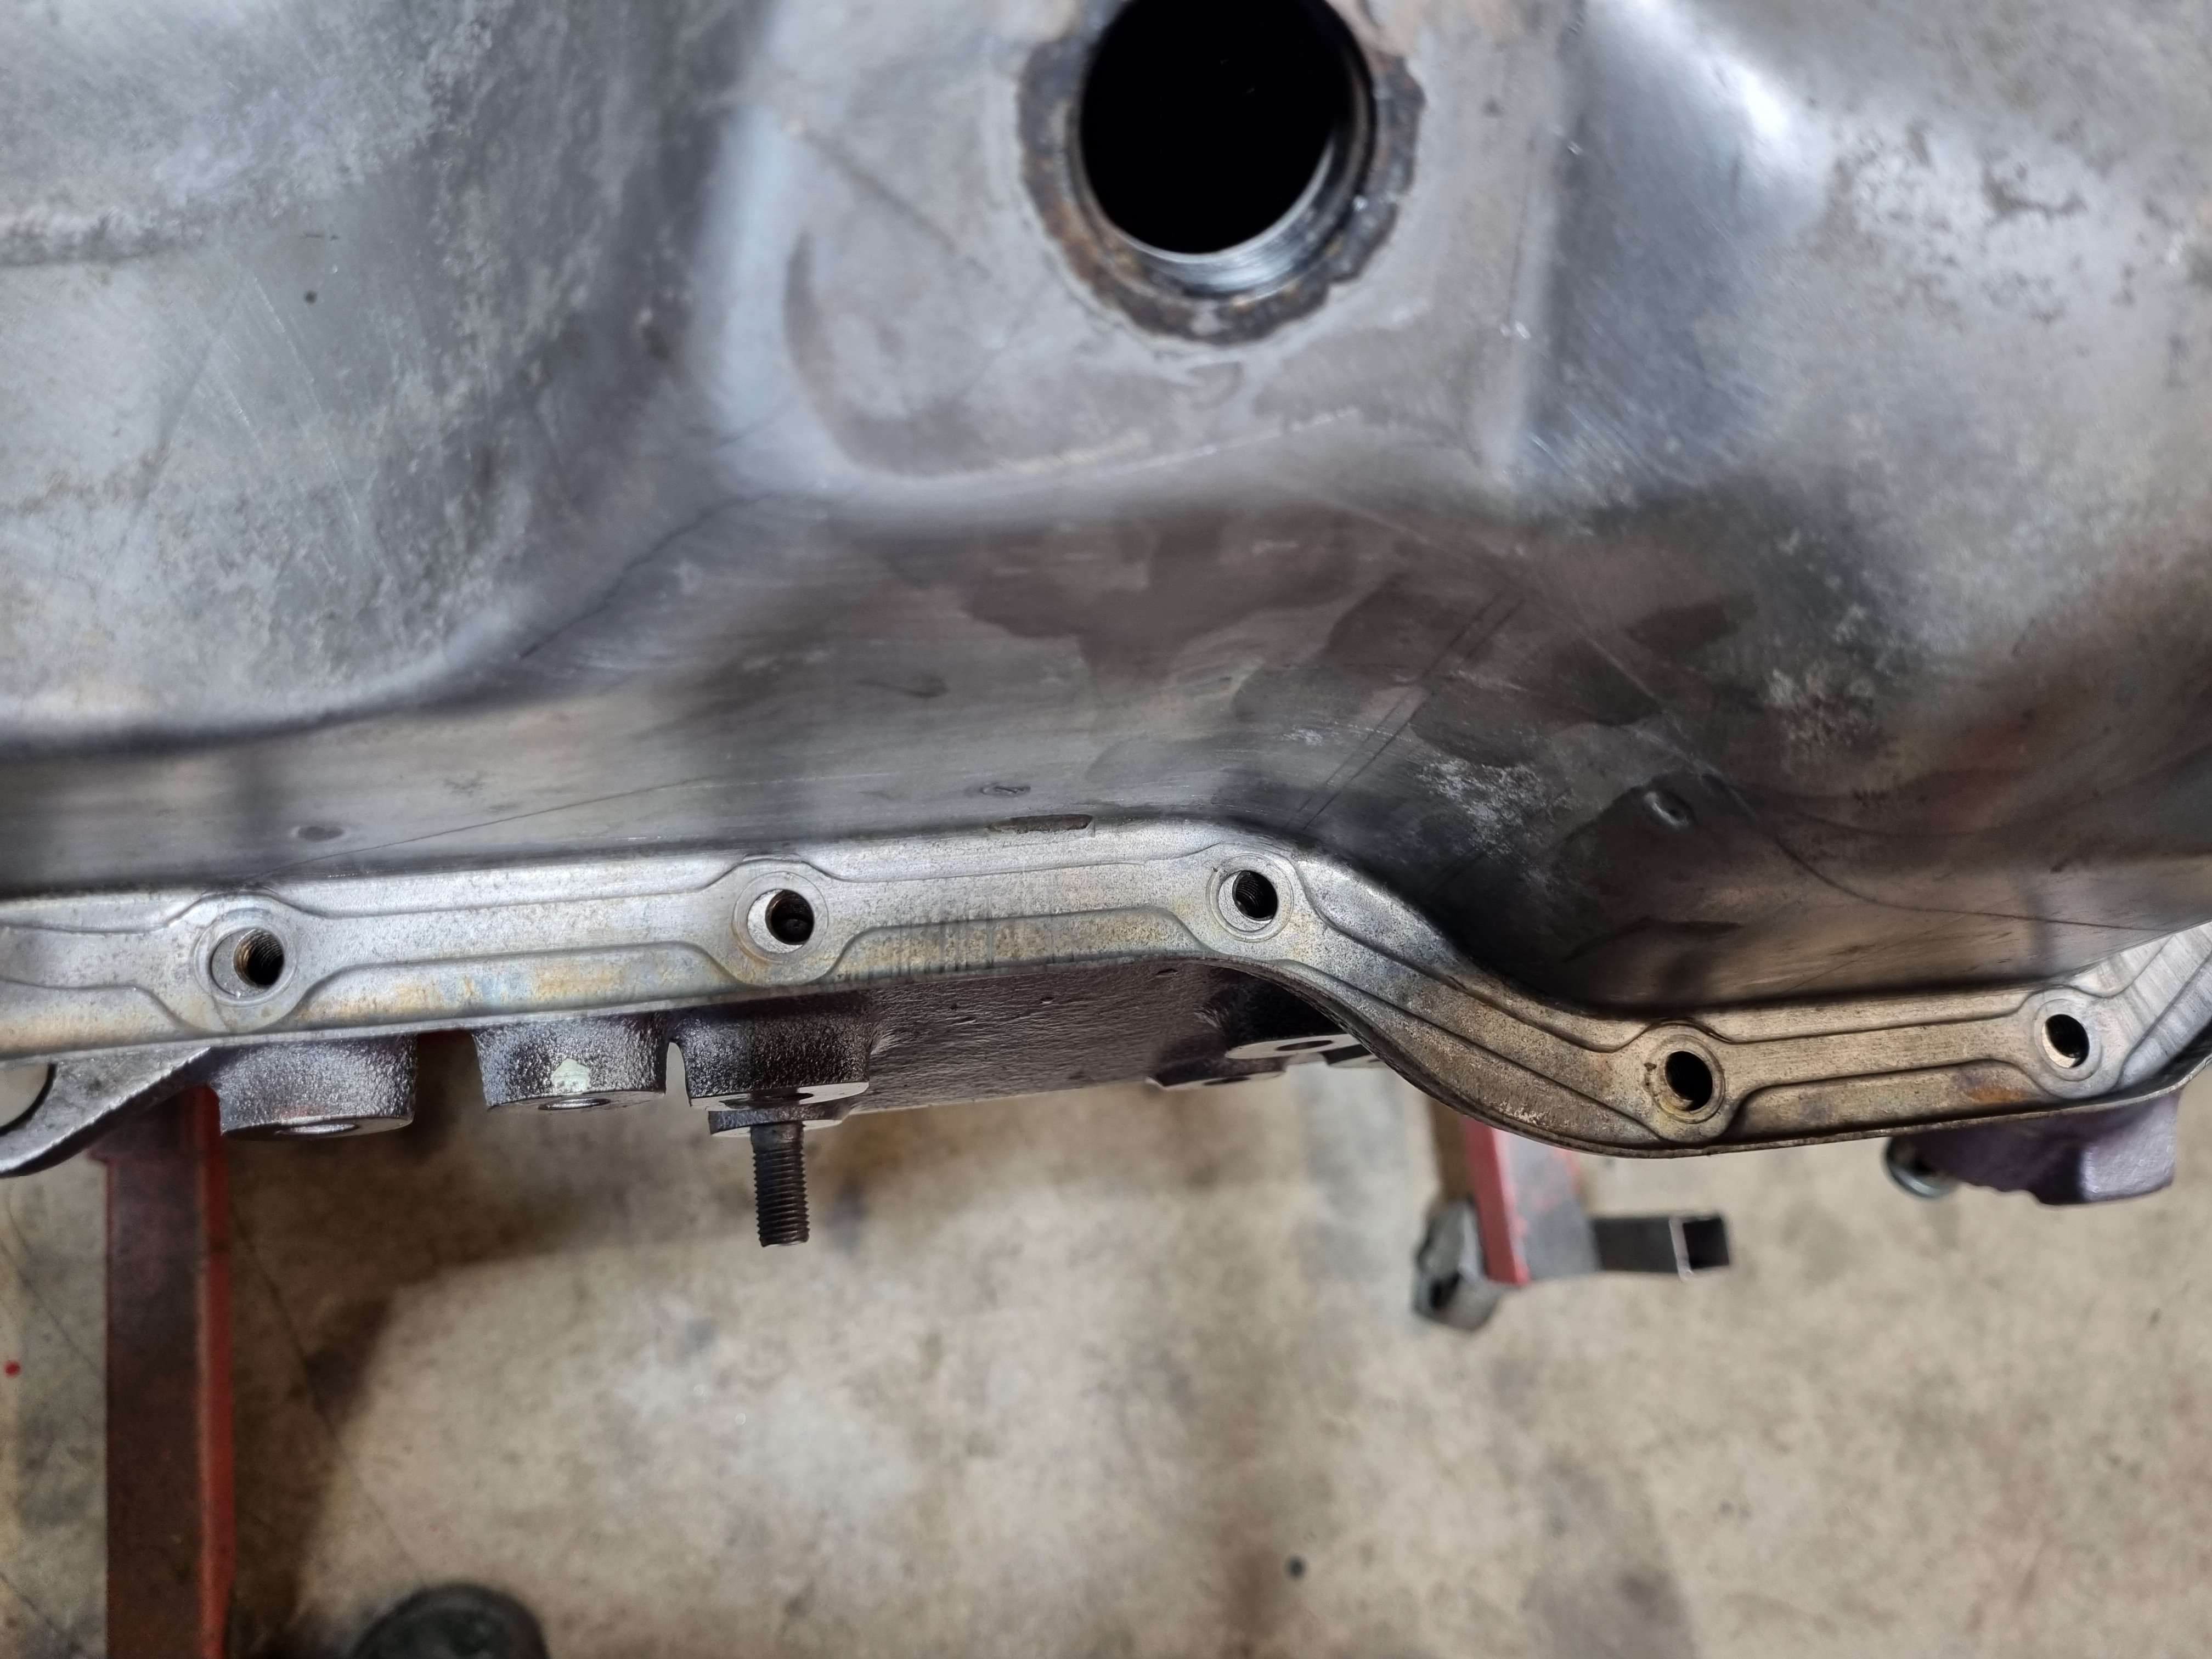
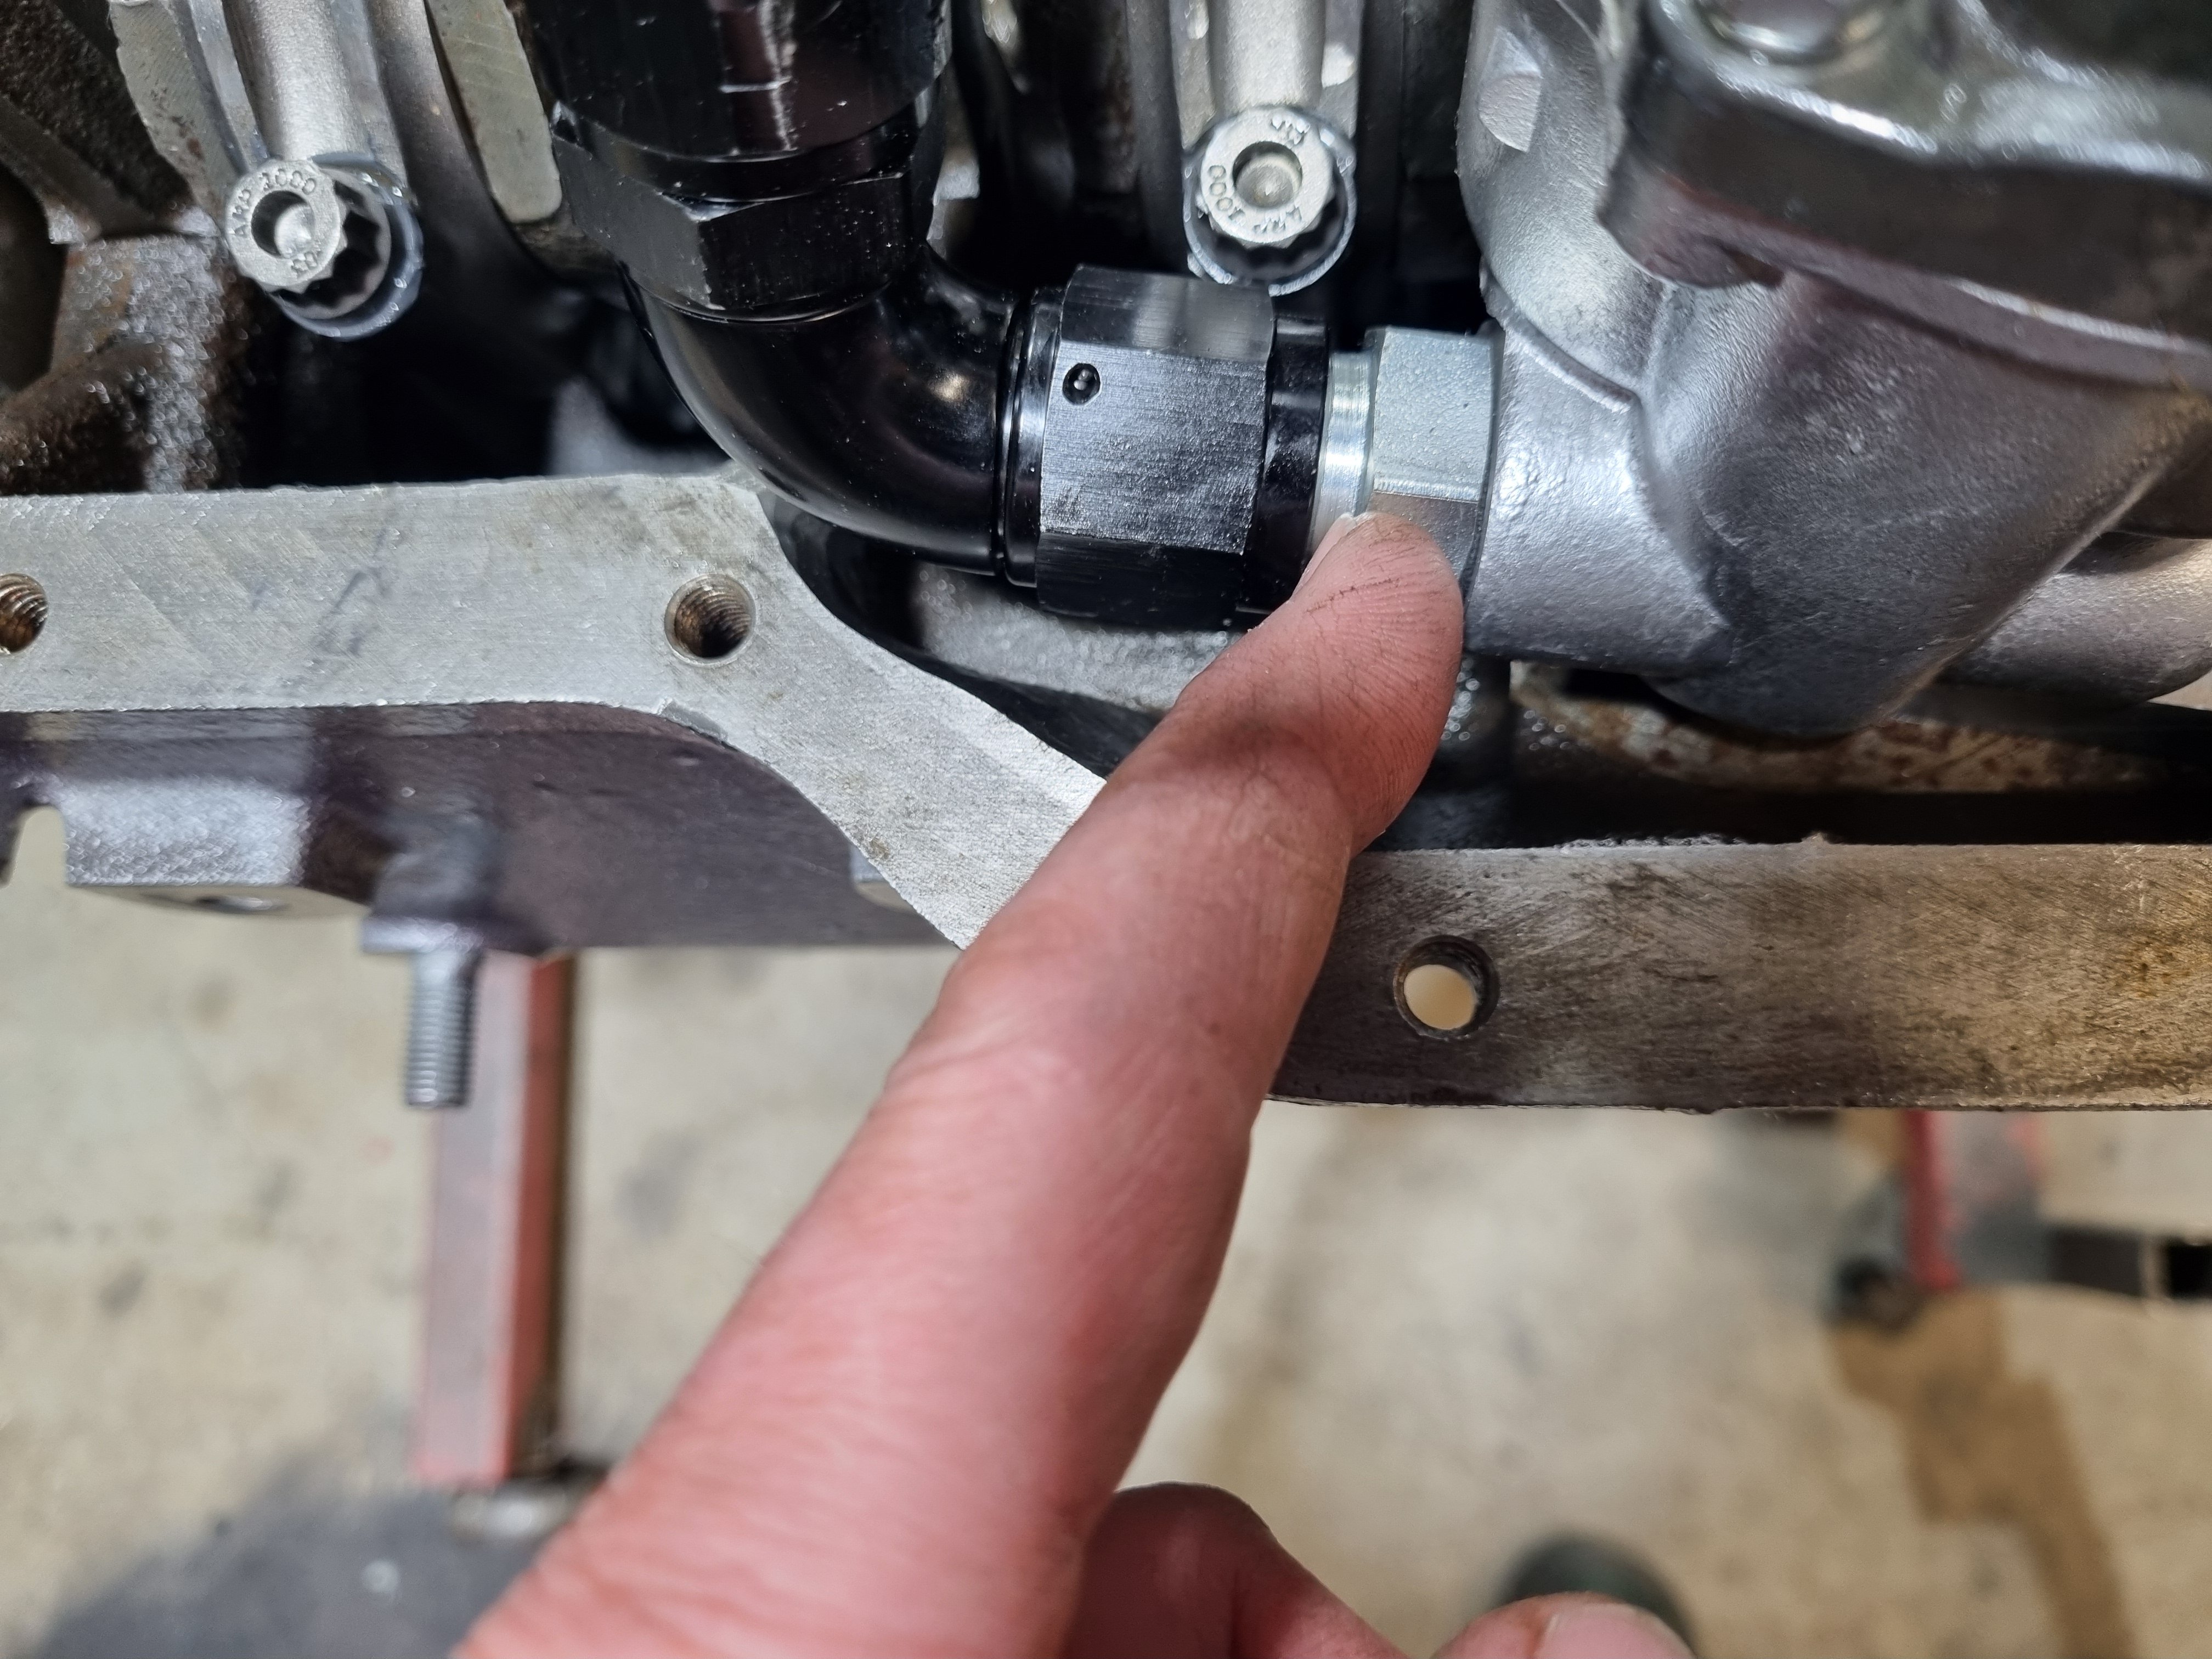
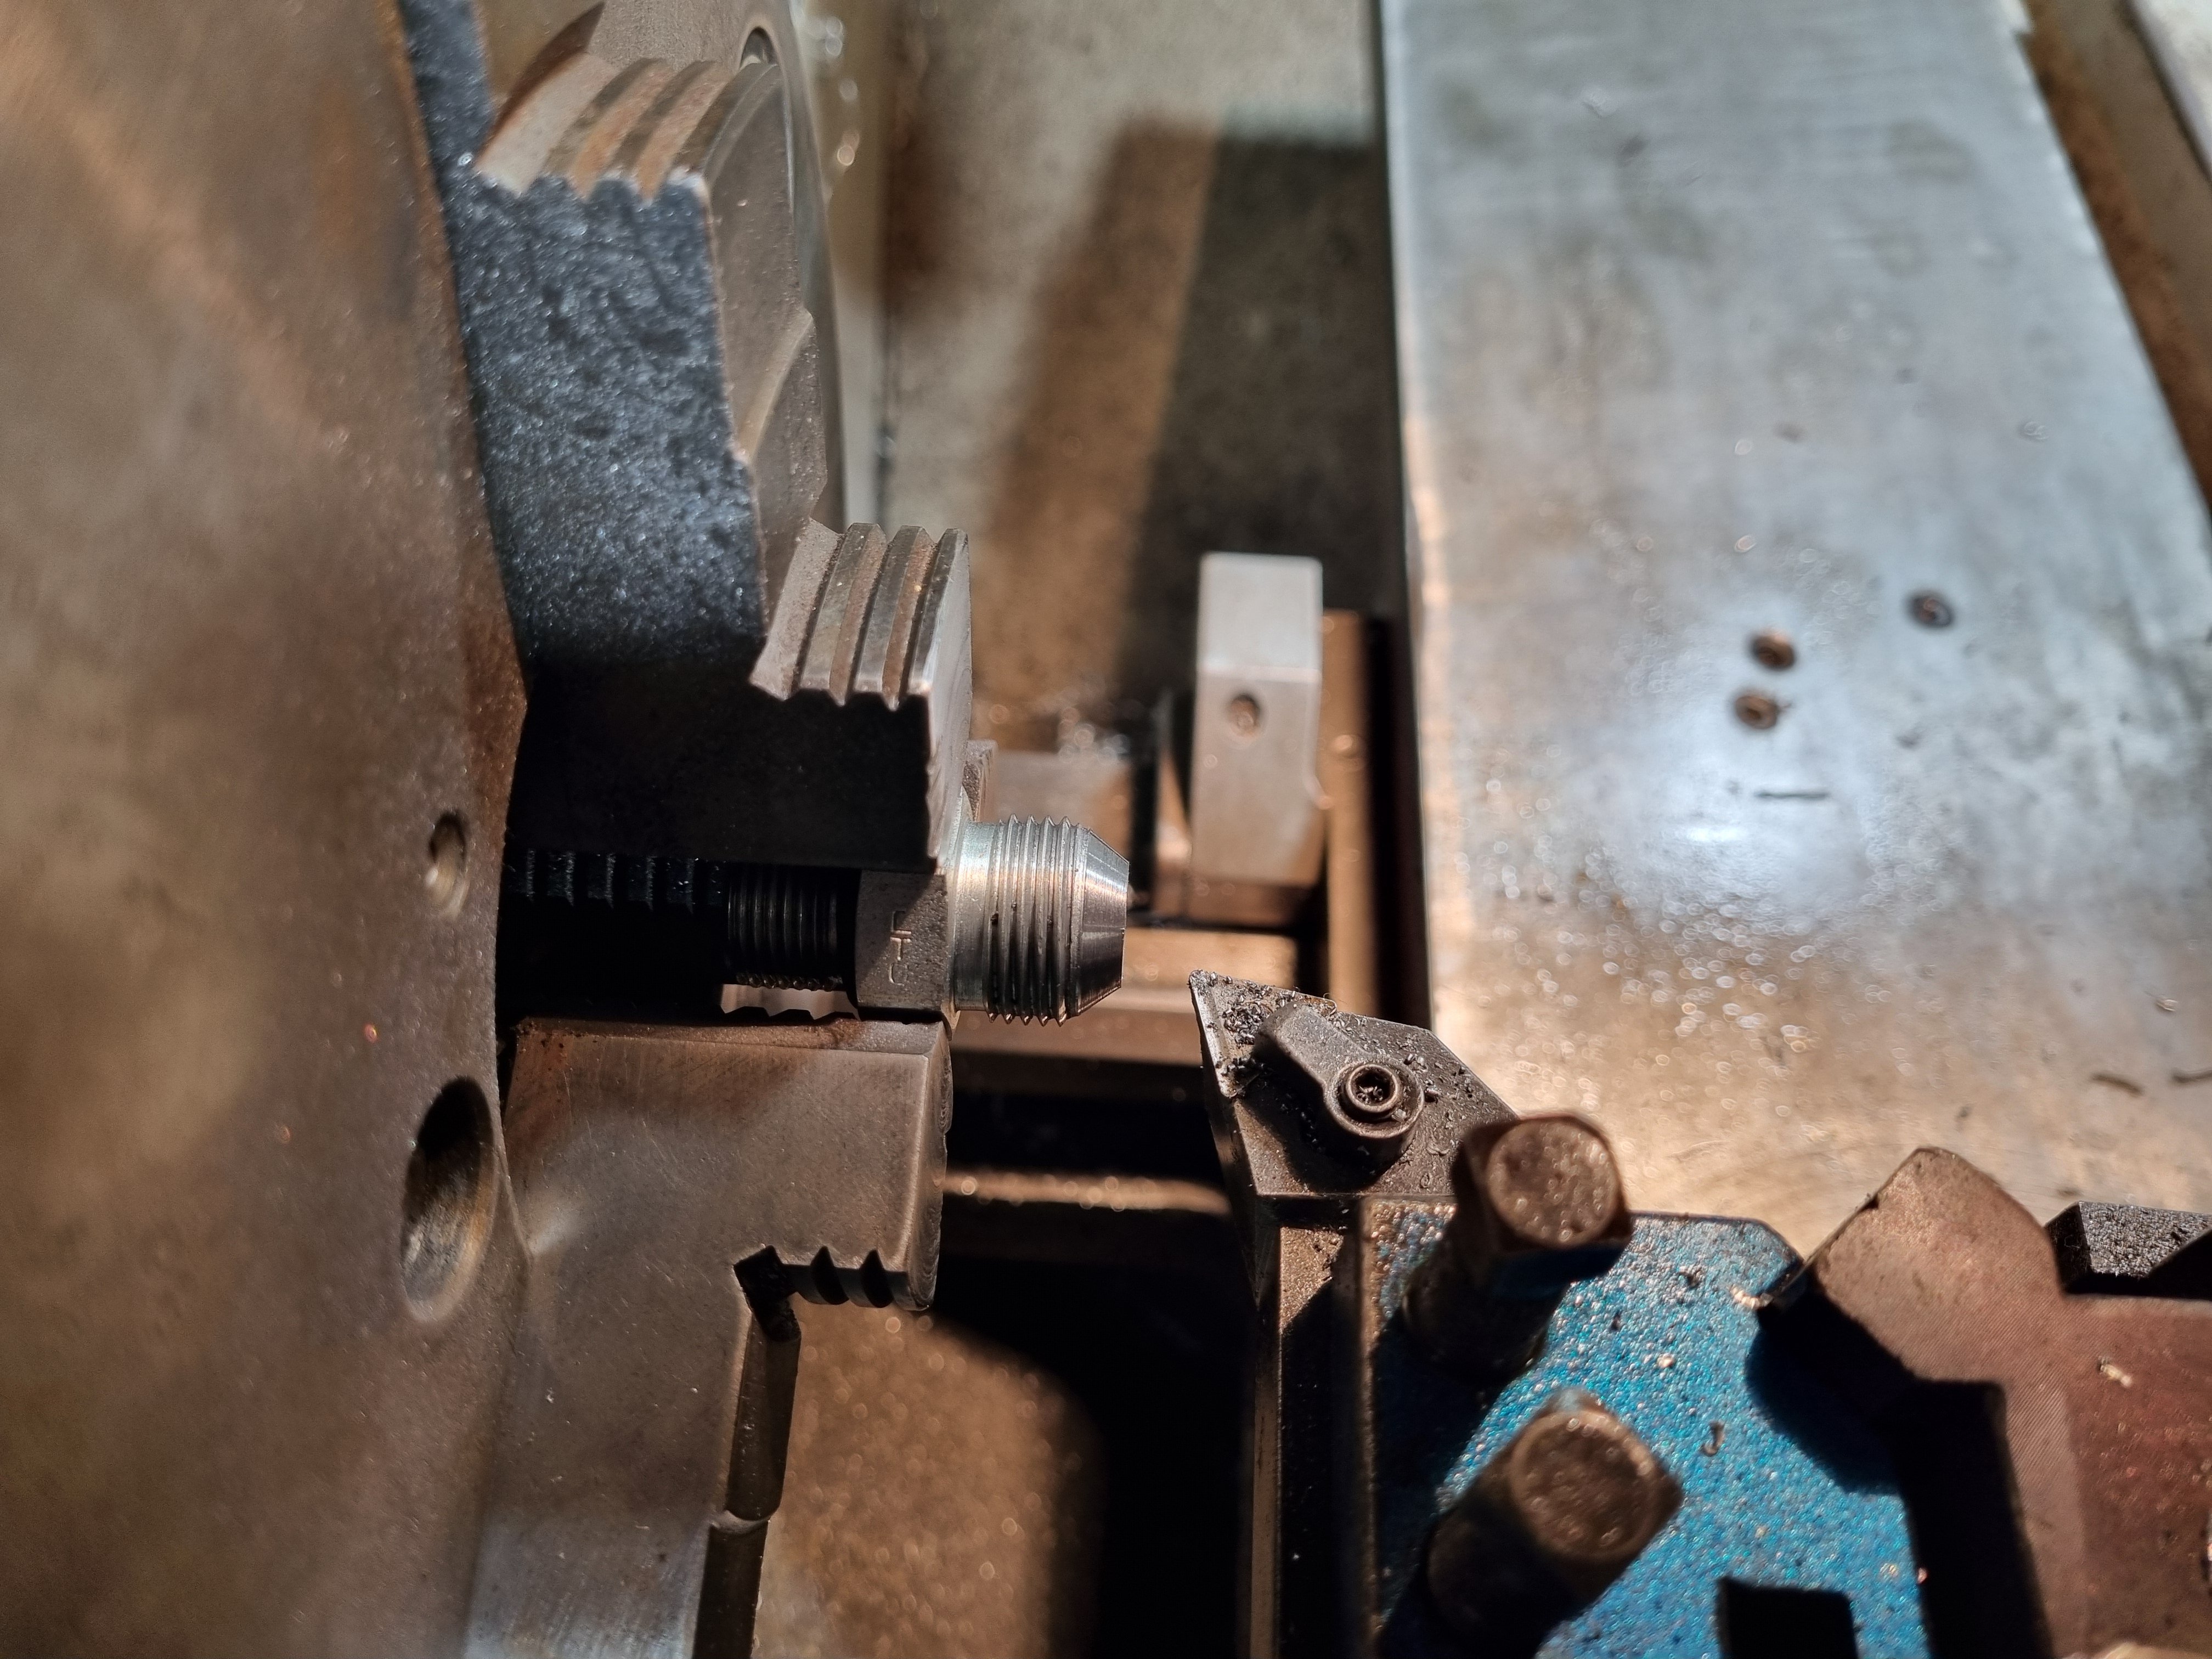
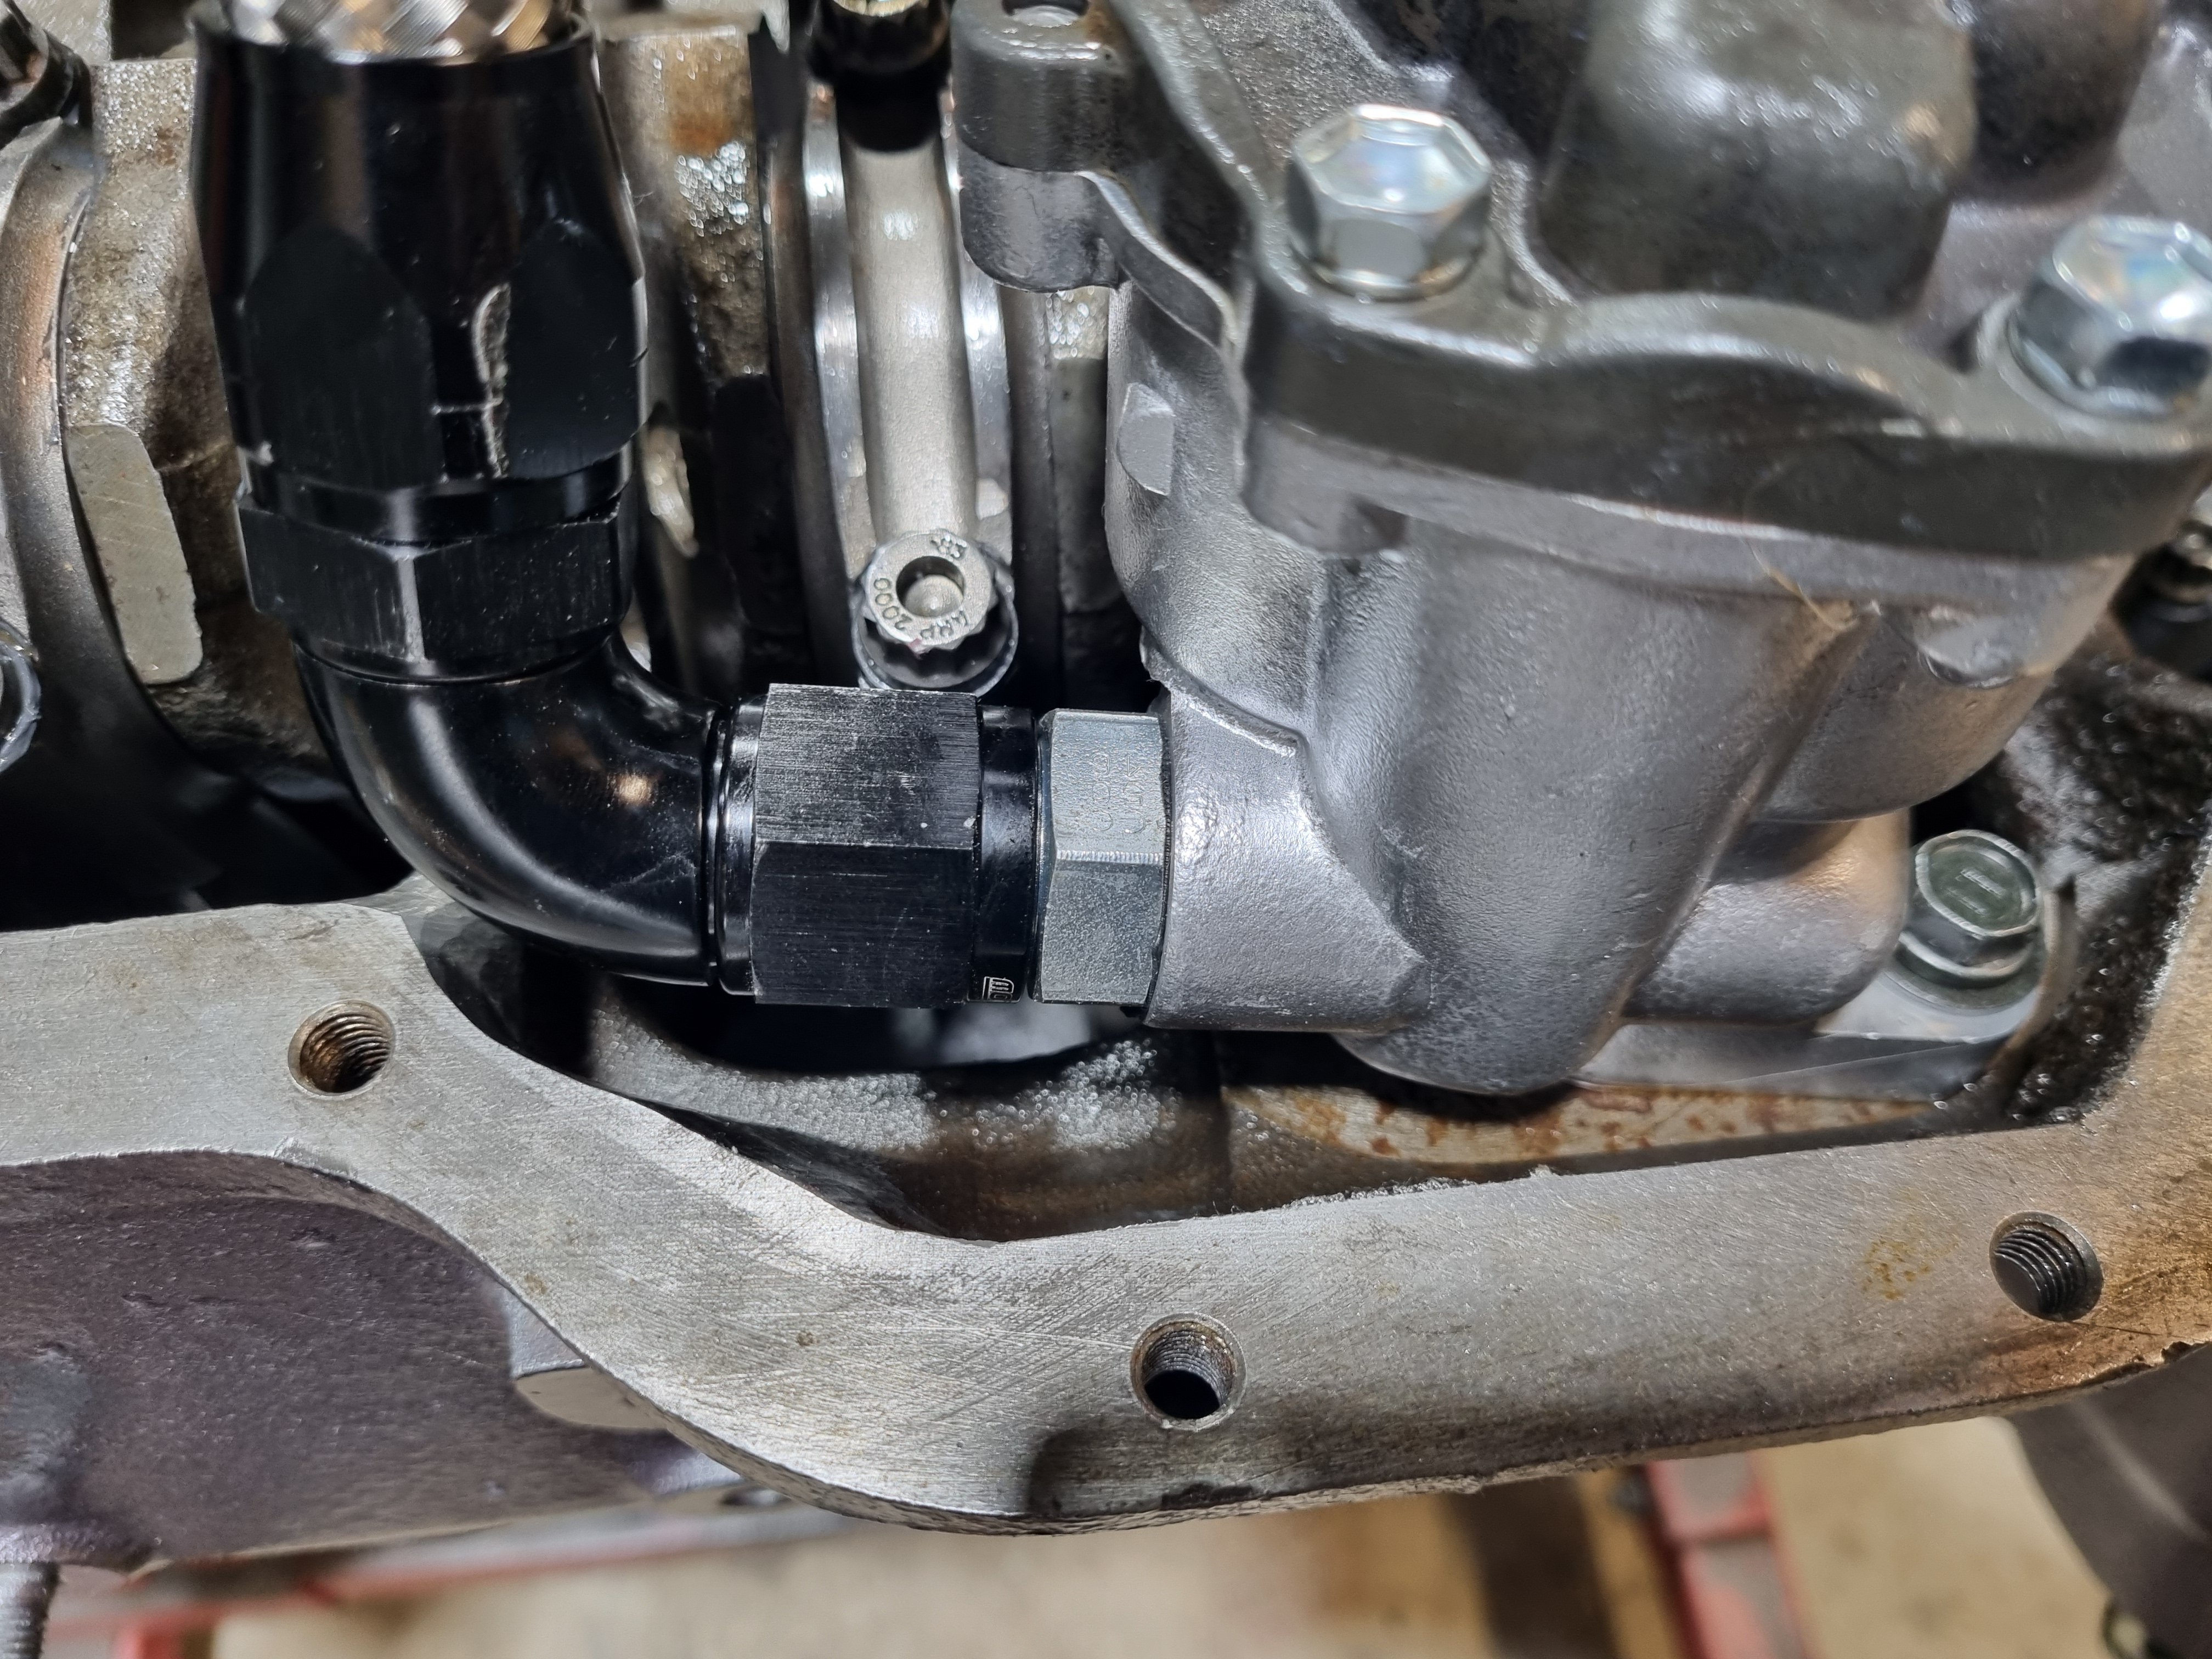
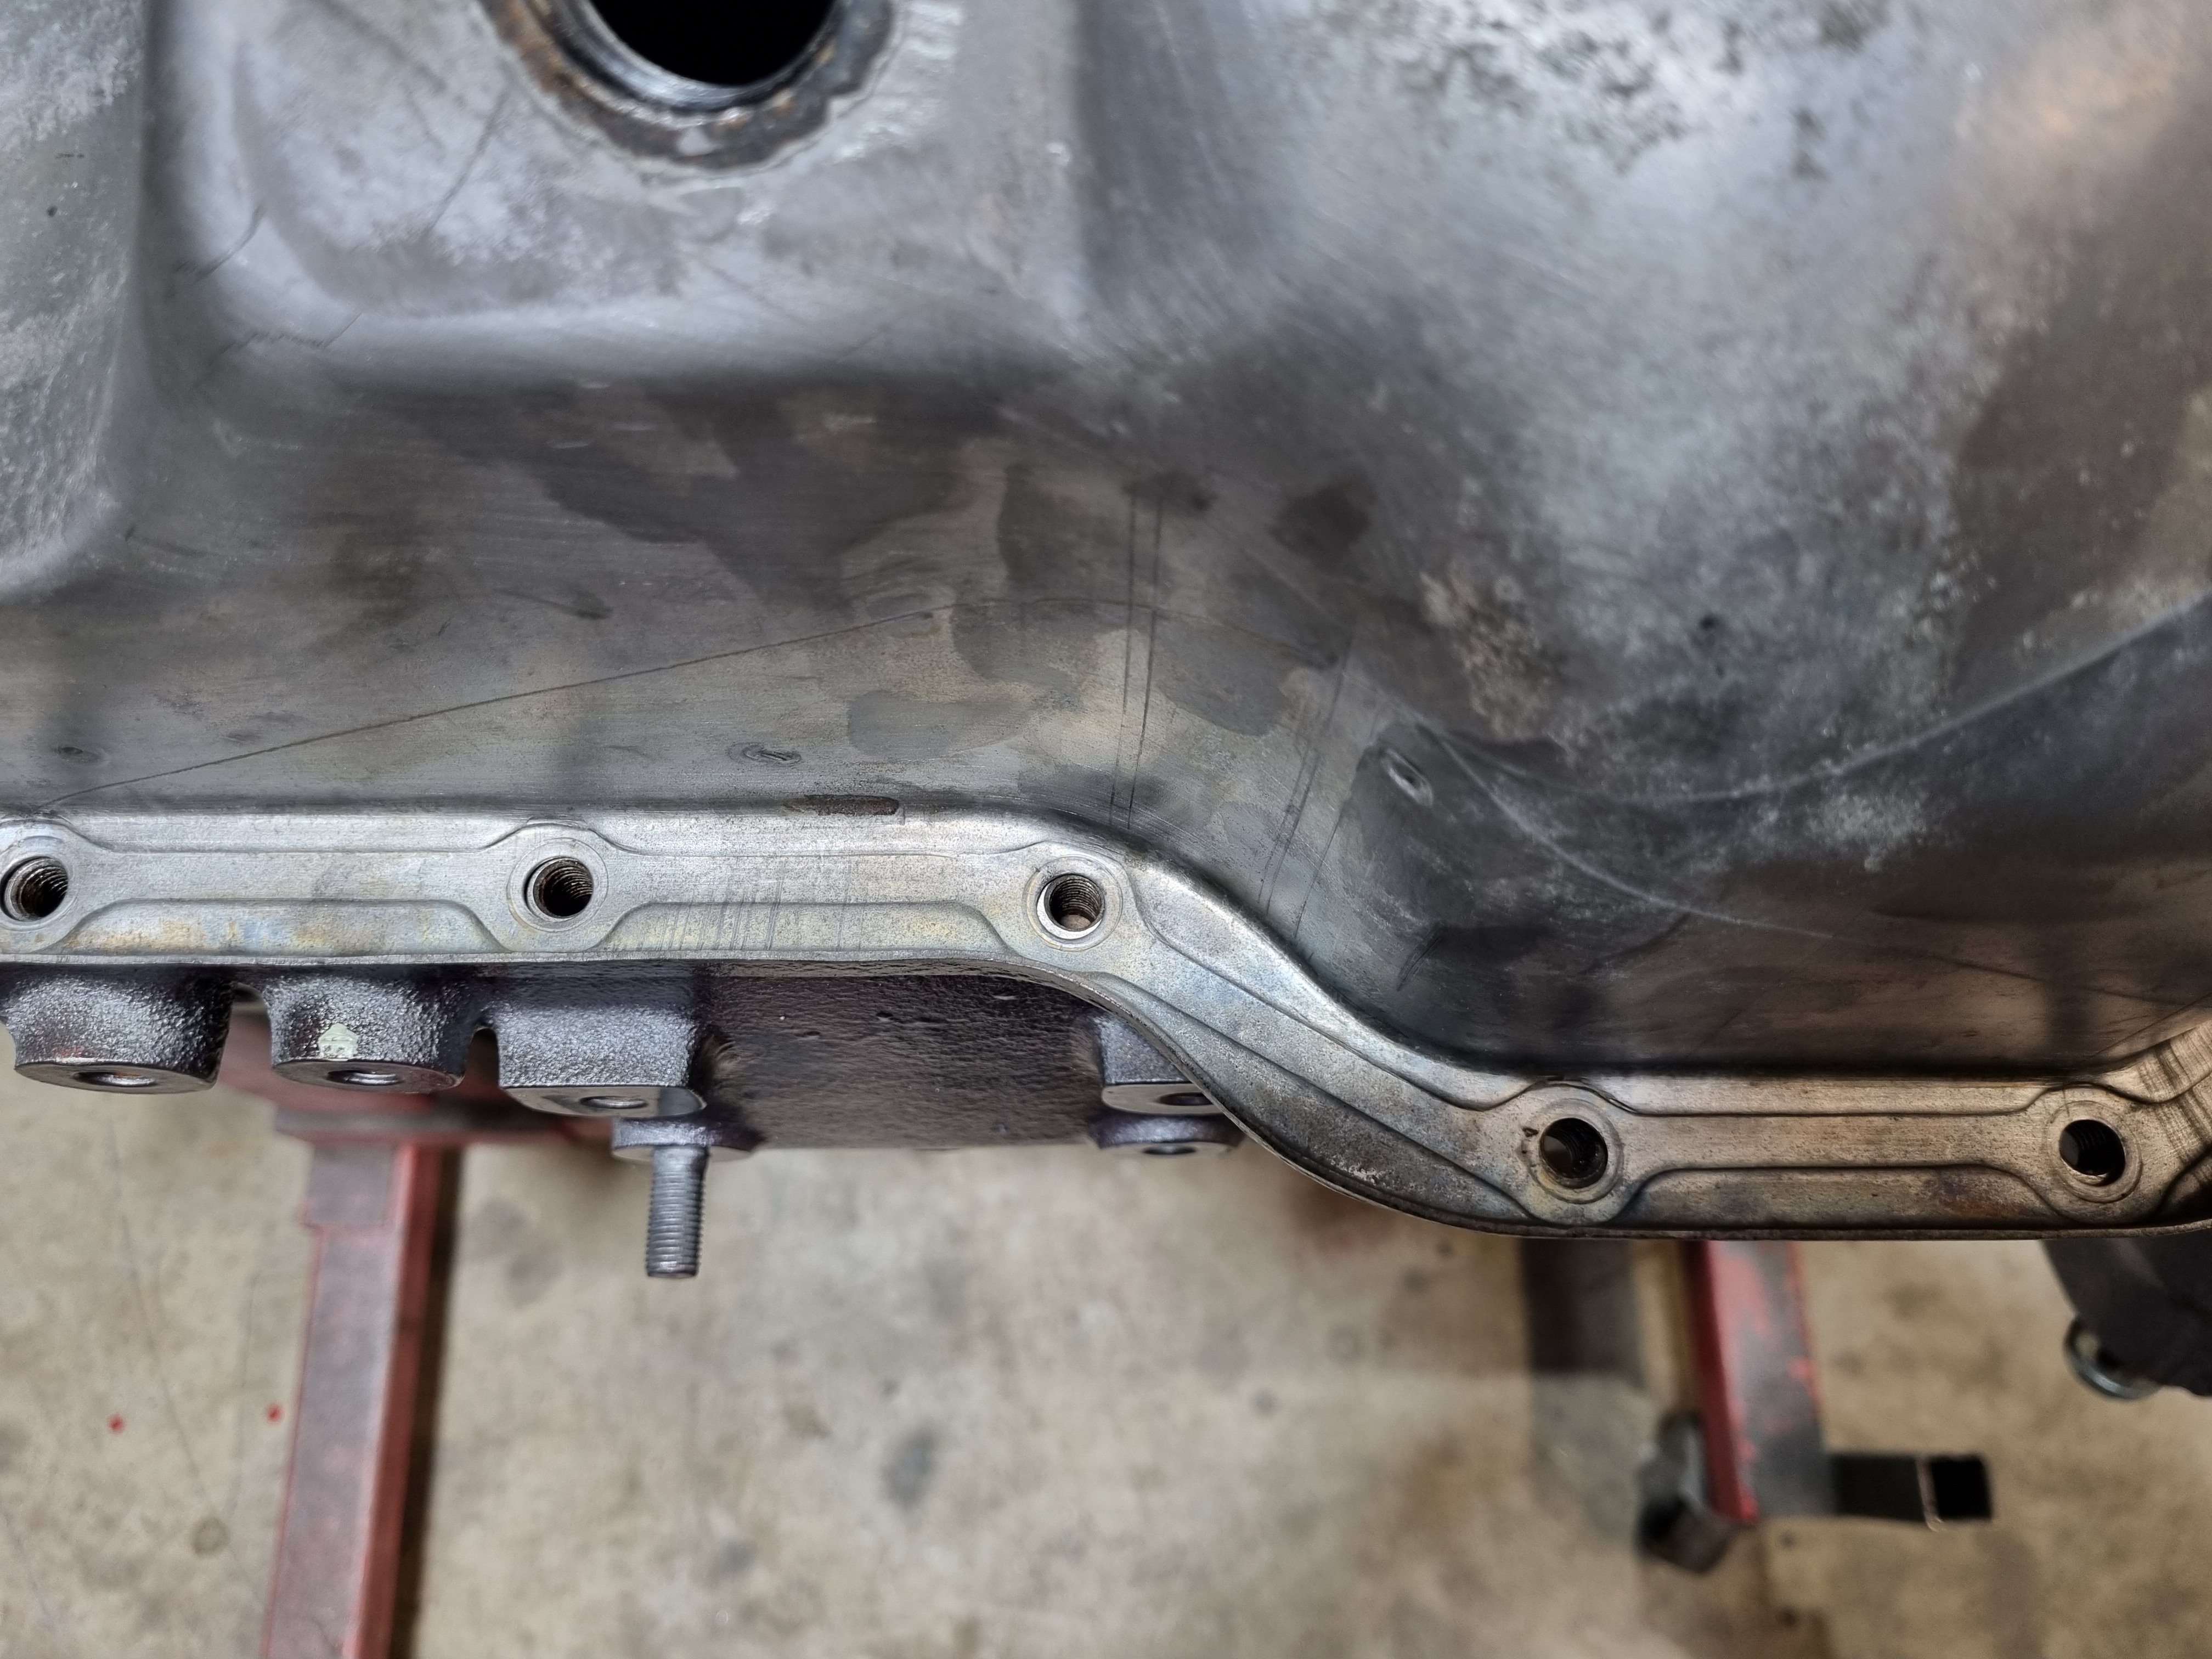
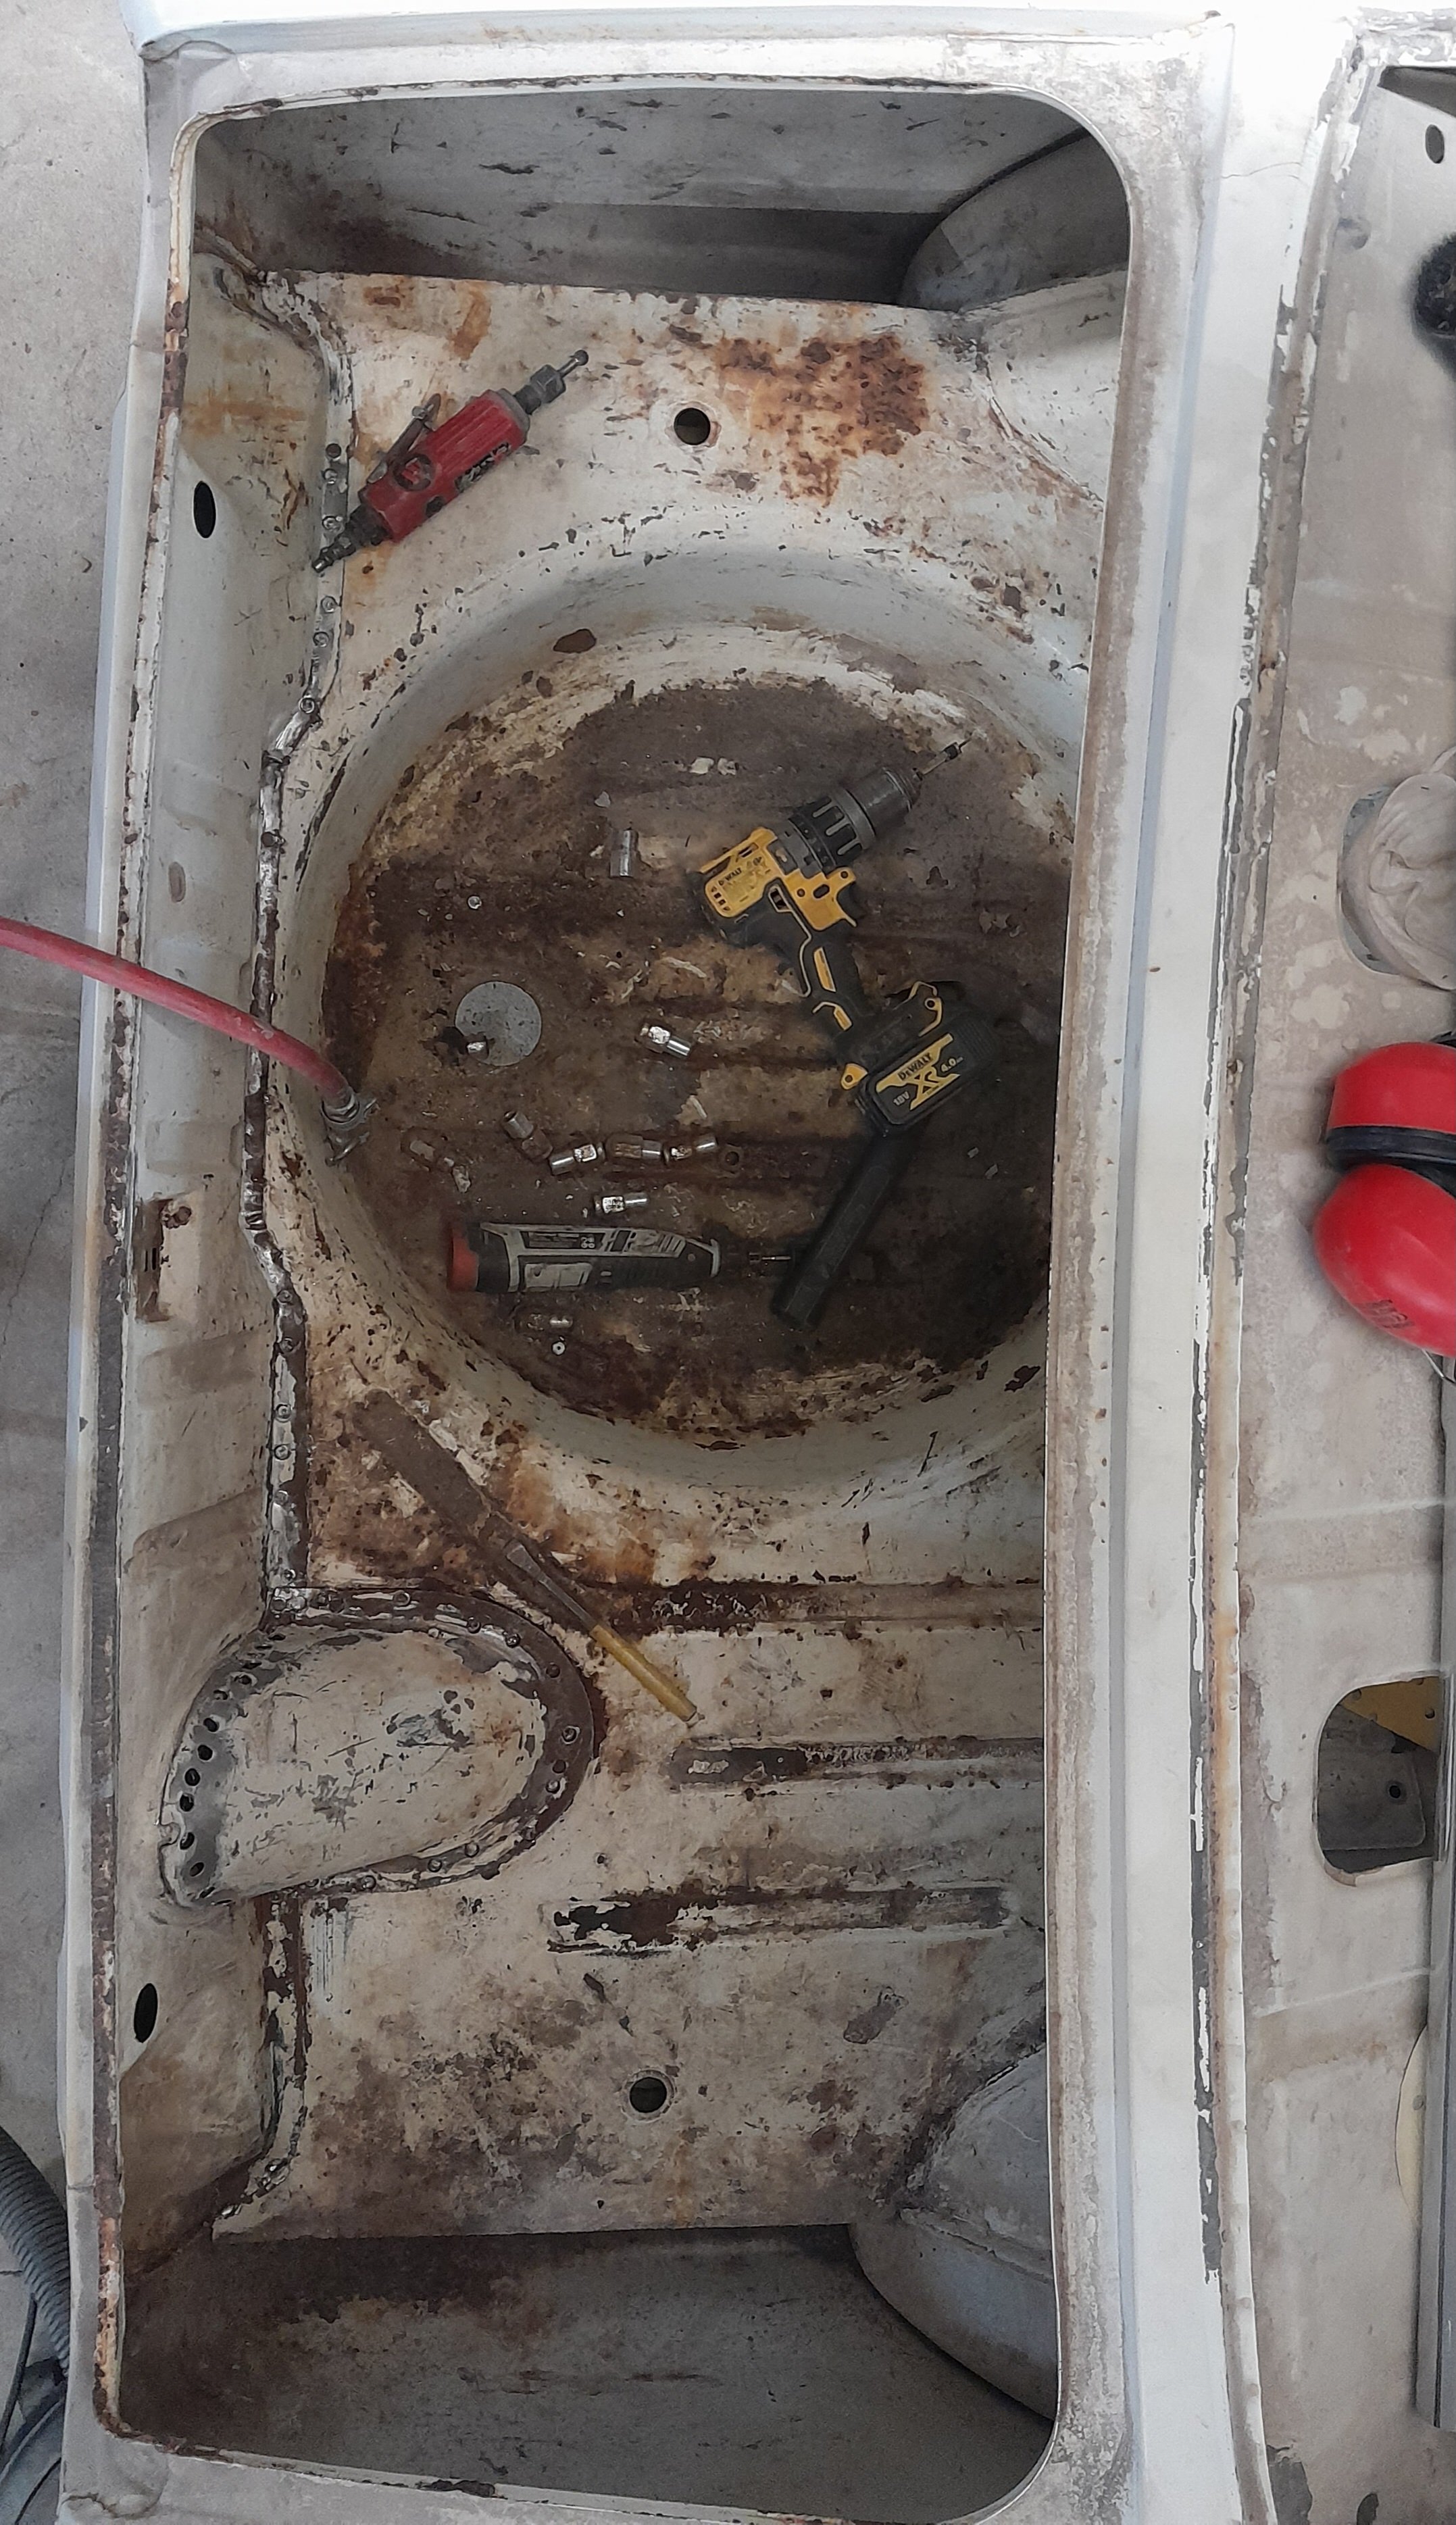
Sump. After a bit of soaking in evapo-rust it is now the cleanest 4M sump pan on the planet. It doesn't fit thanks to the dash 10 oil feed pipe. Is was fucking close though so I thought if I machined the fitting down as tight as I could get it so there was only a tiny gap between the boss and the nut the sump might clear. It didn't. Like you could do up the sump bolts and it would work but it's still touching the pipe so I'll have to do something else
4 points
-
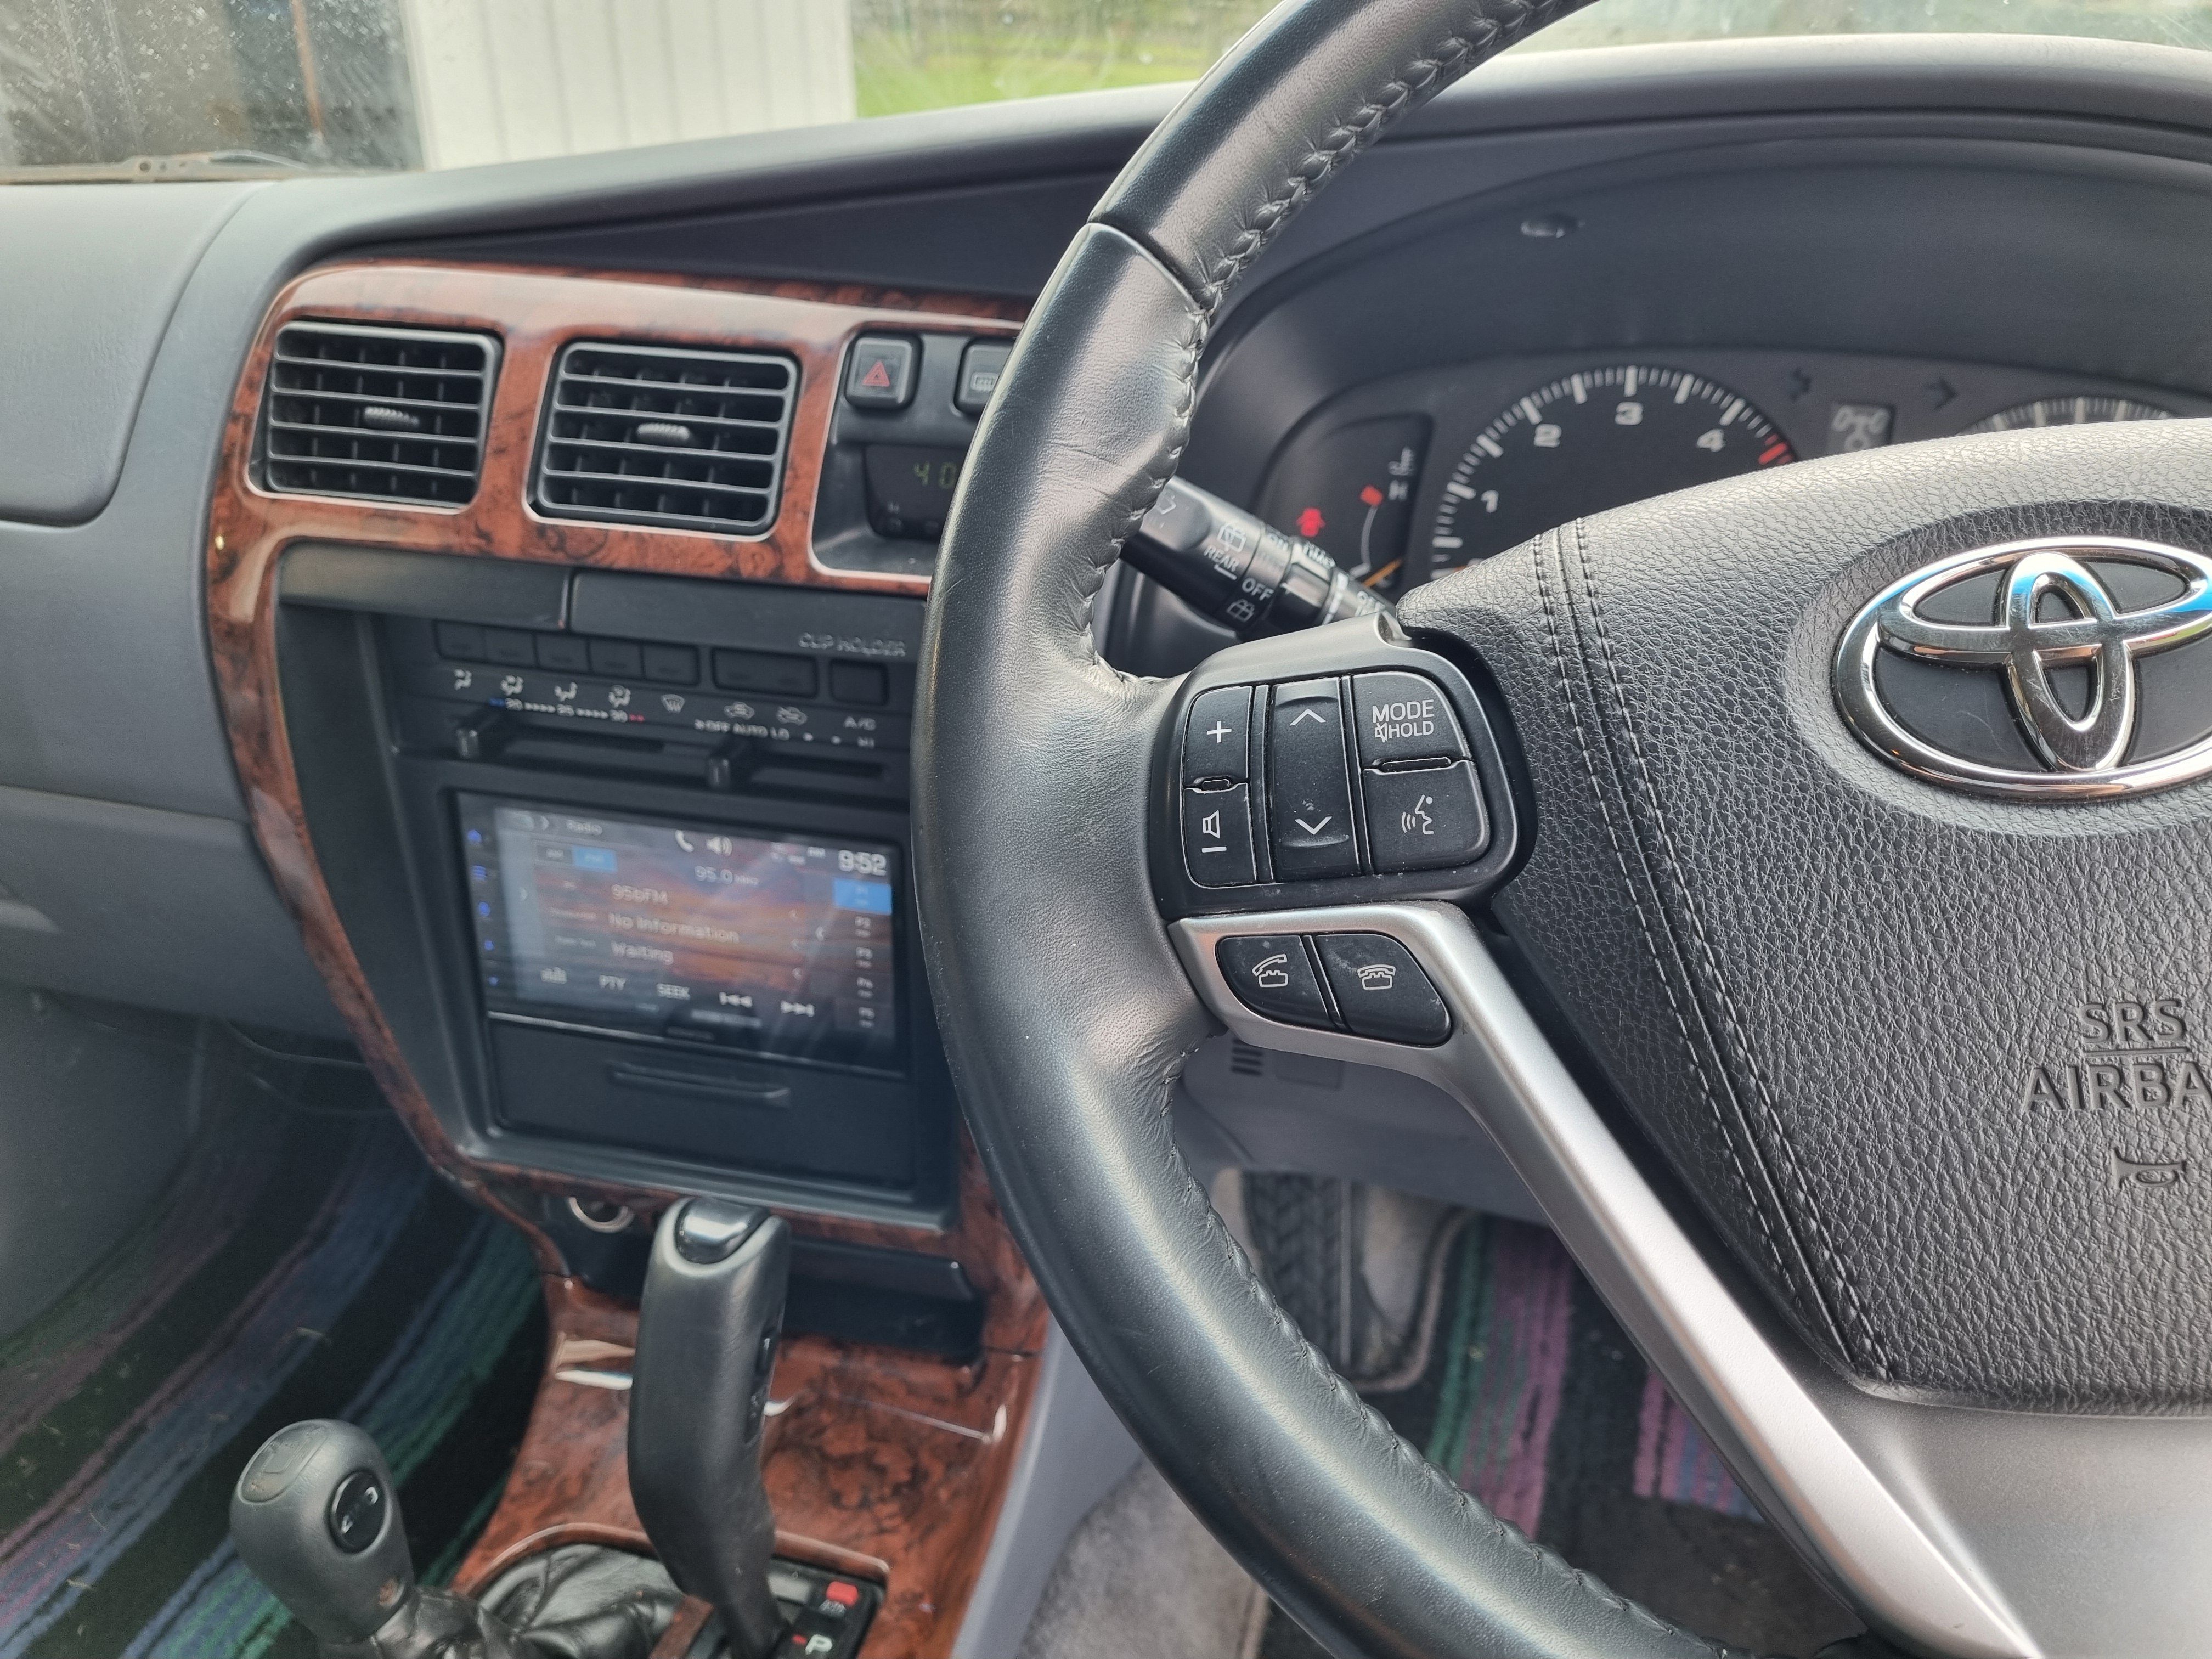
Steering wheel controls all wired and working. Everything on the left of the wheel works as it should. Right side is for dash and whatnot so there is nothing to connect they to. Fucking stoked.
4 points
-
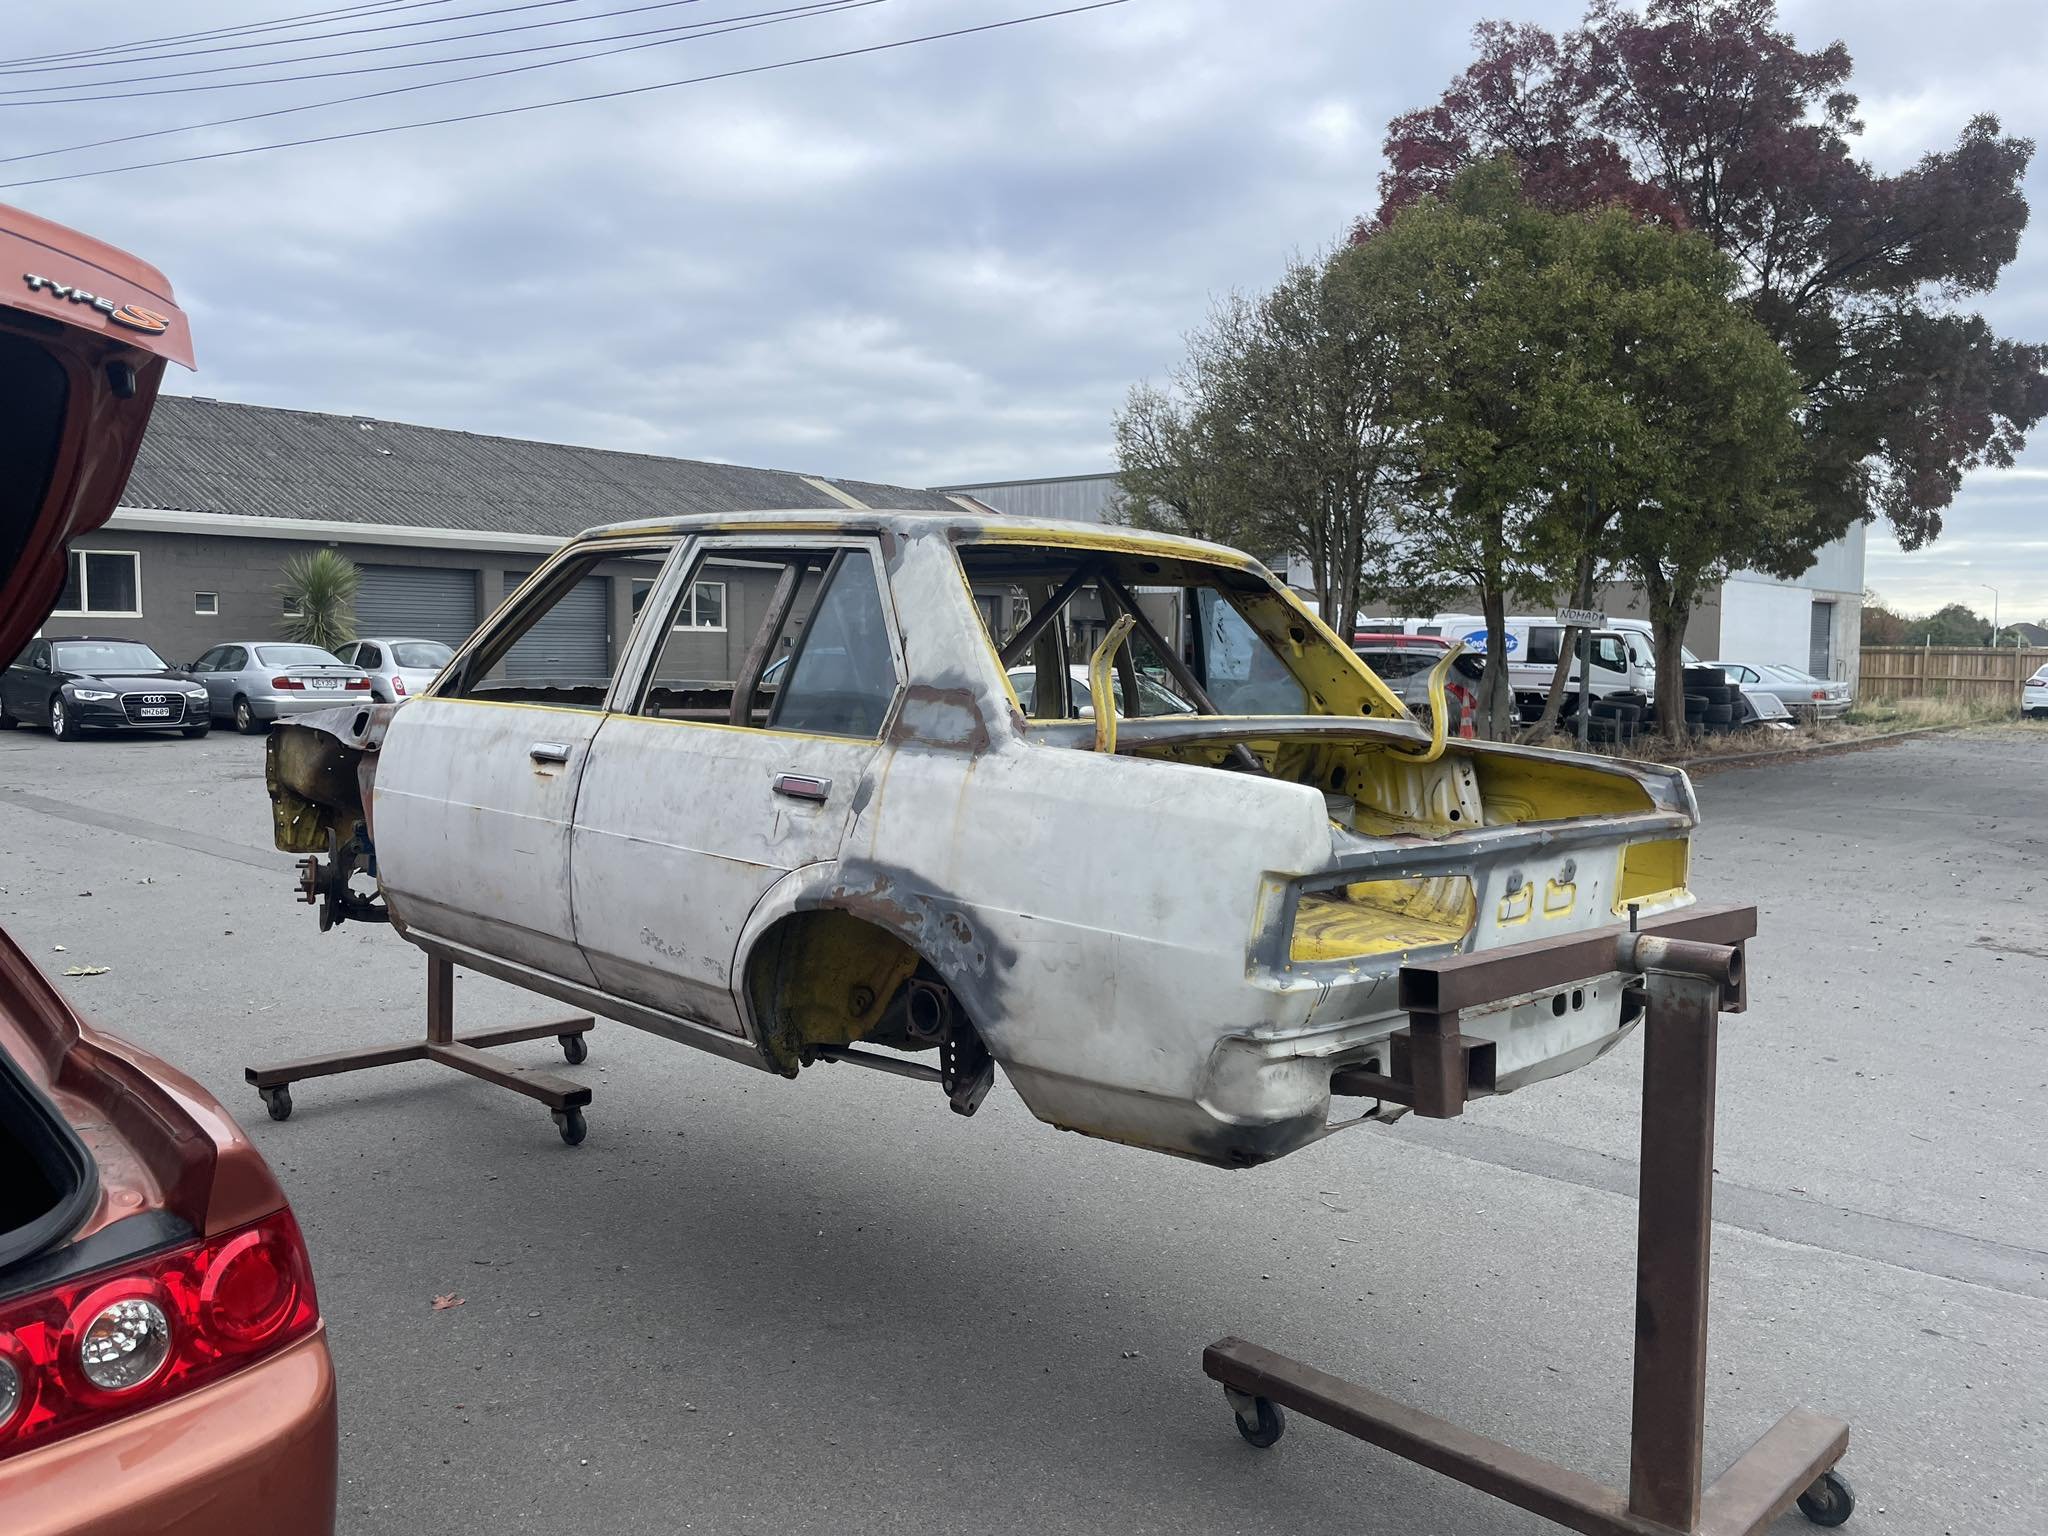
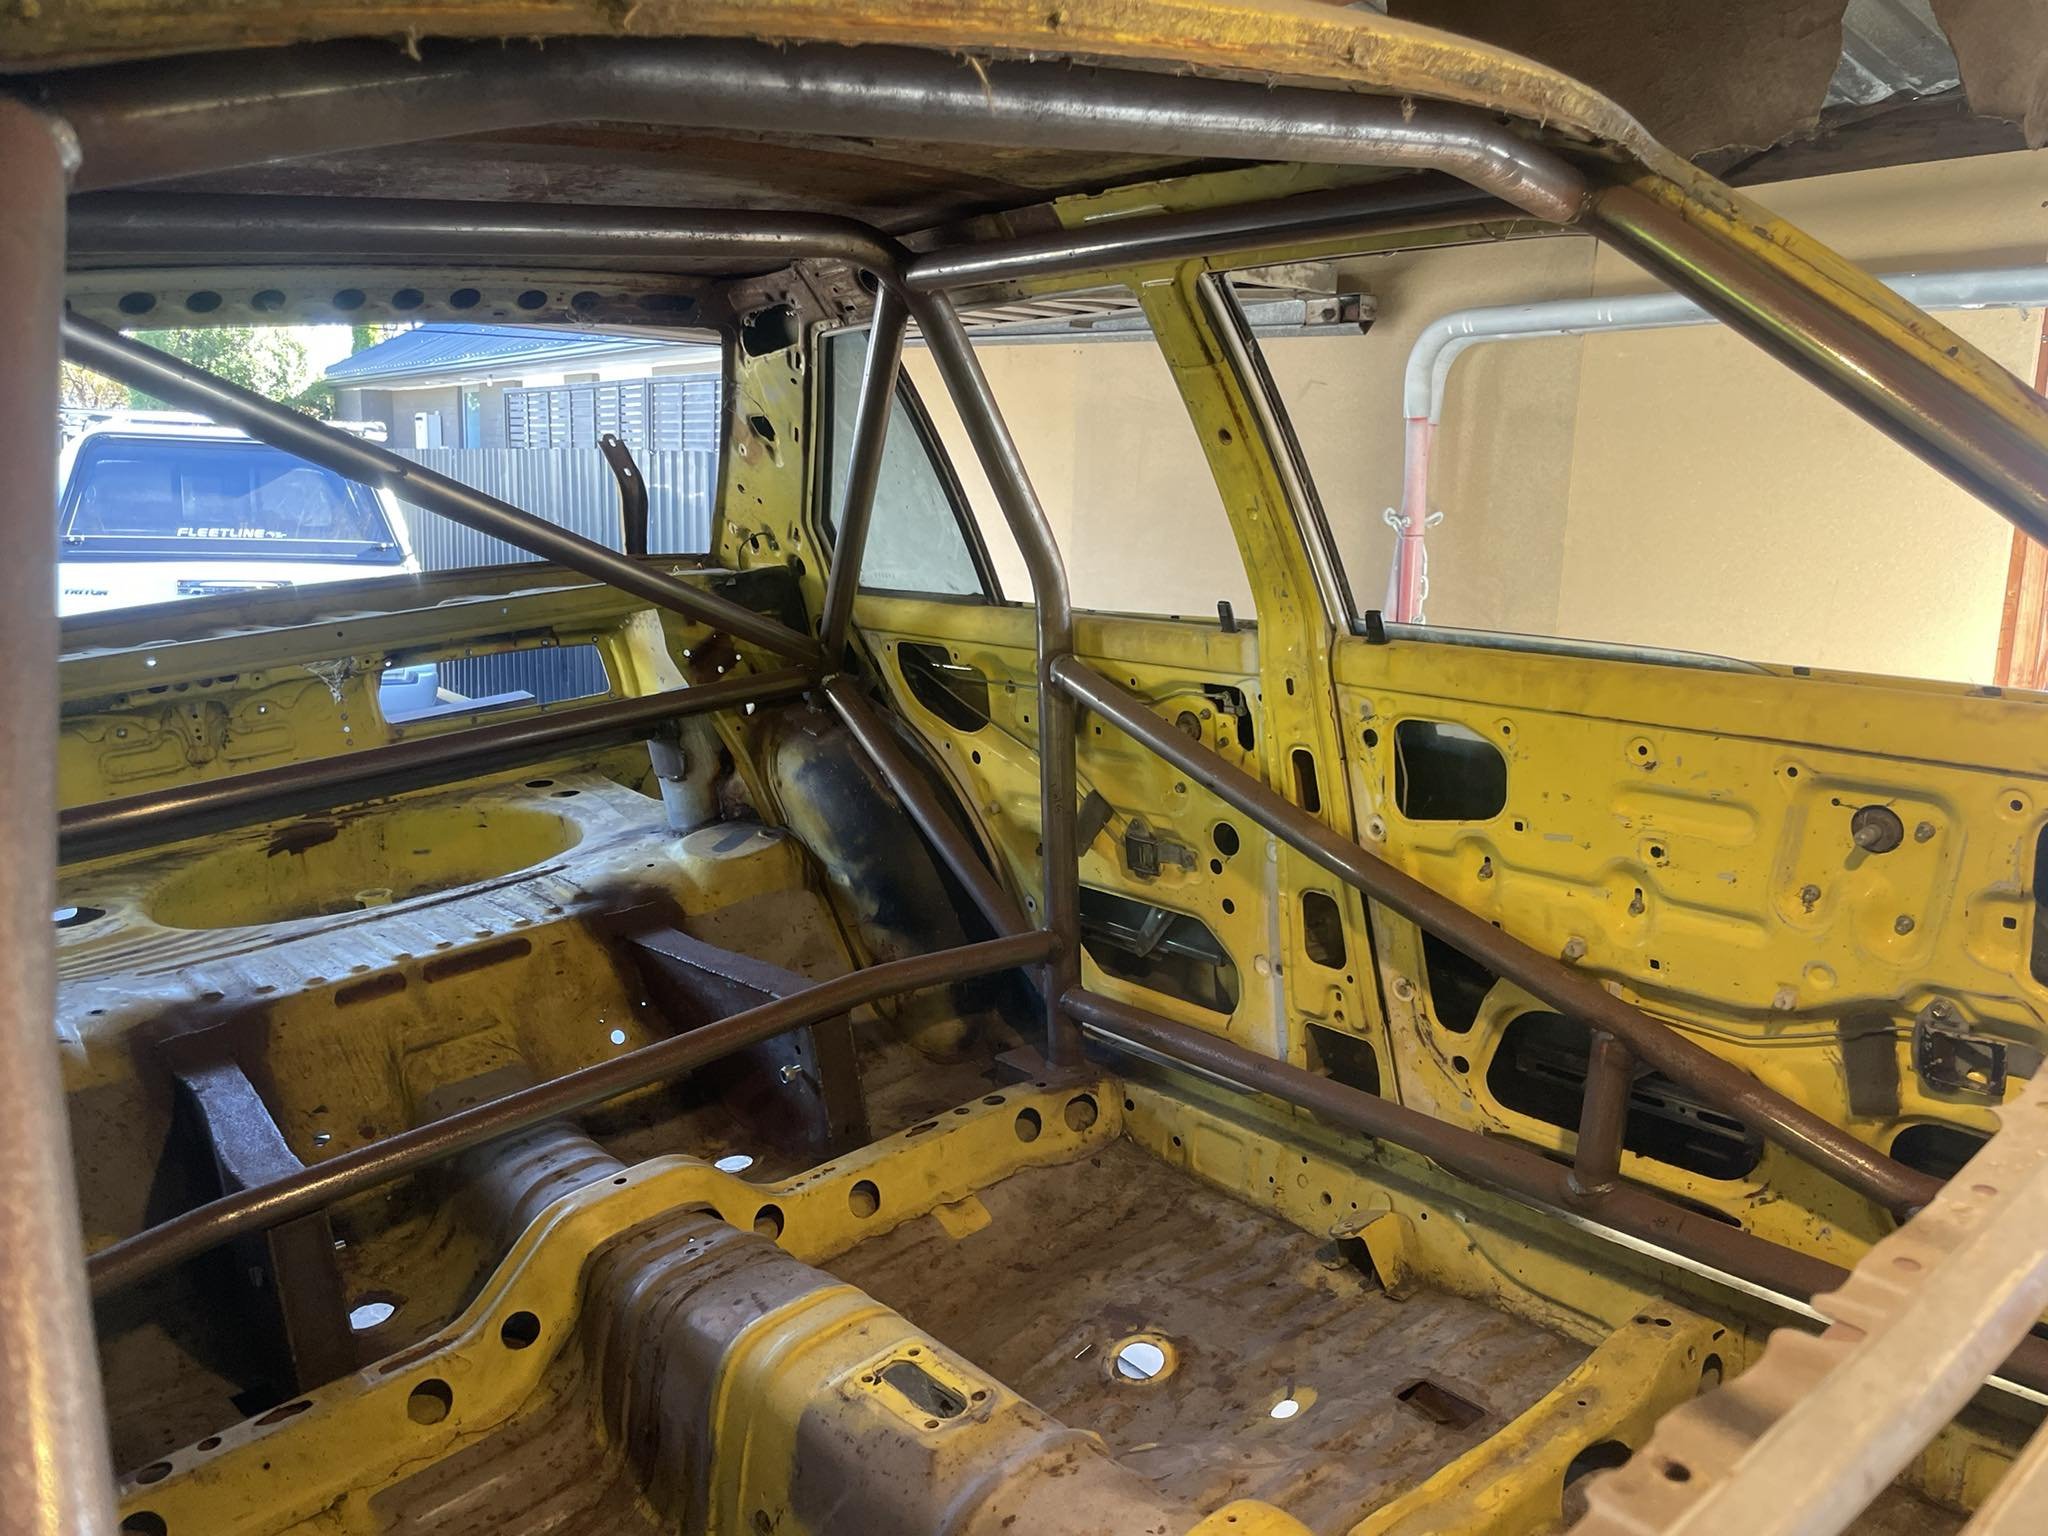
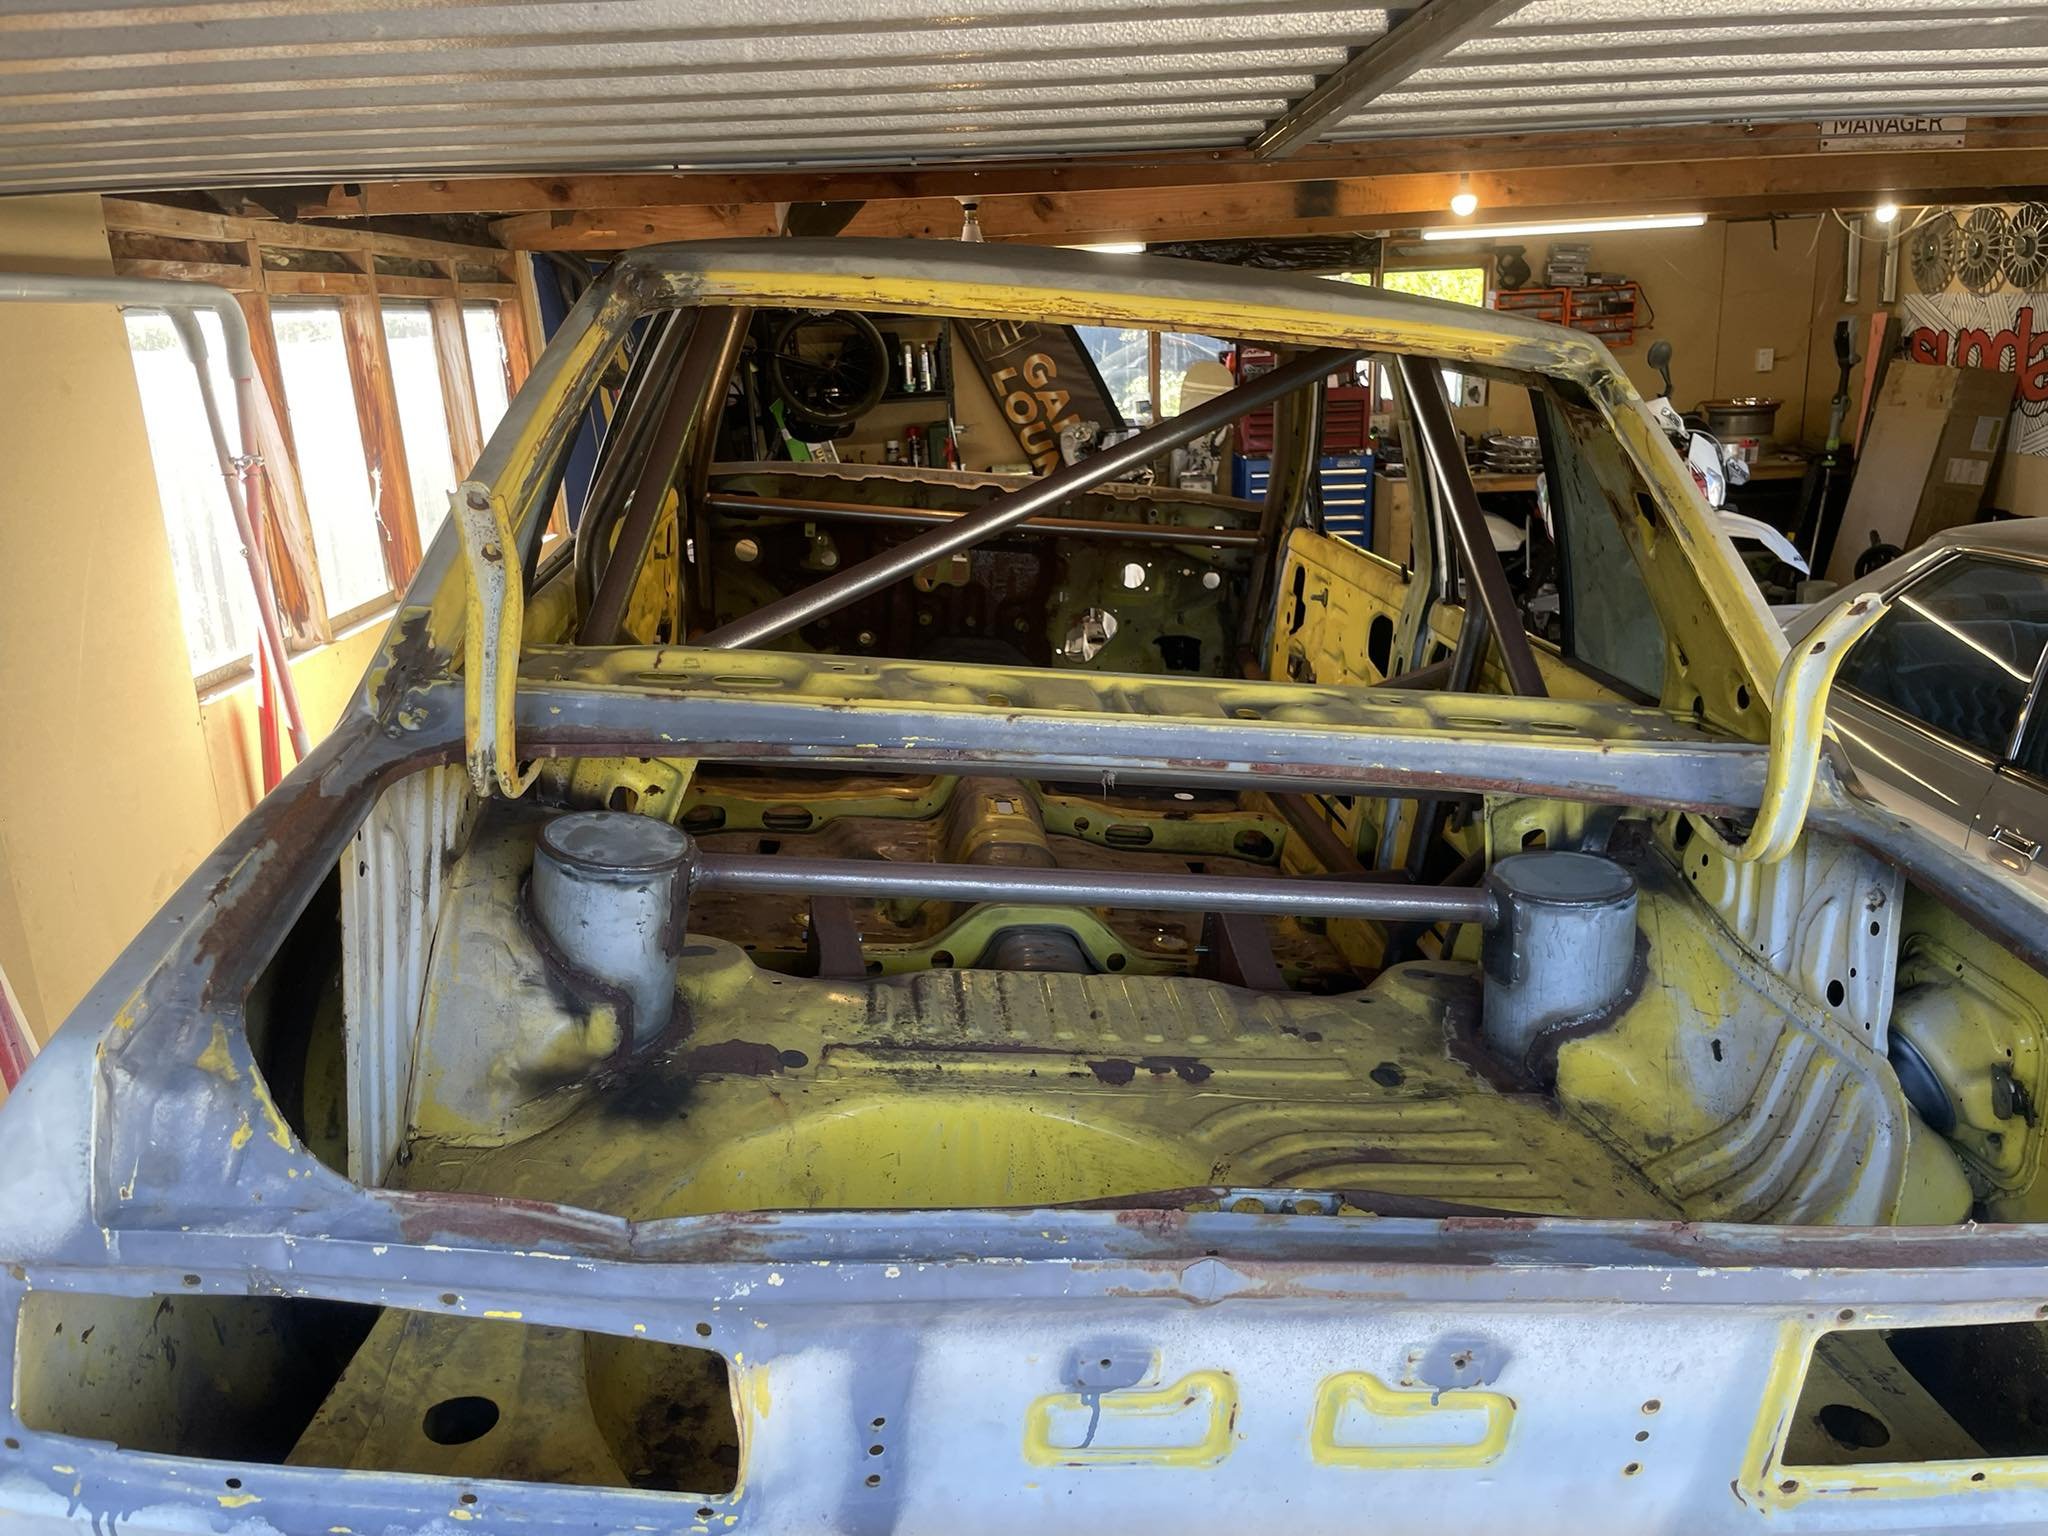
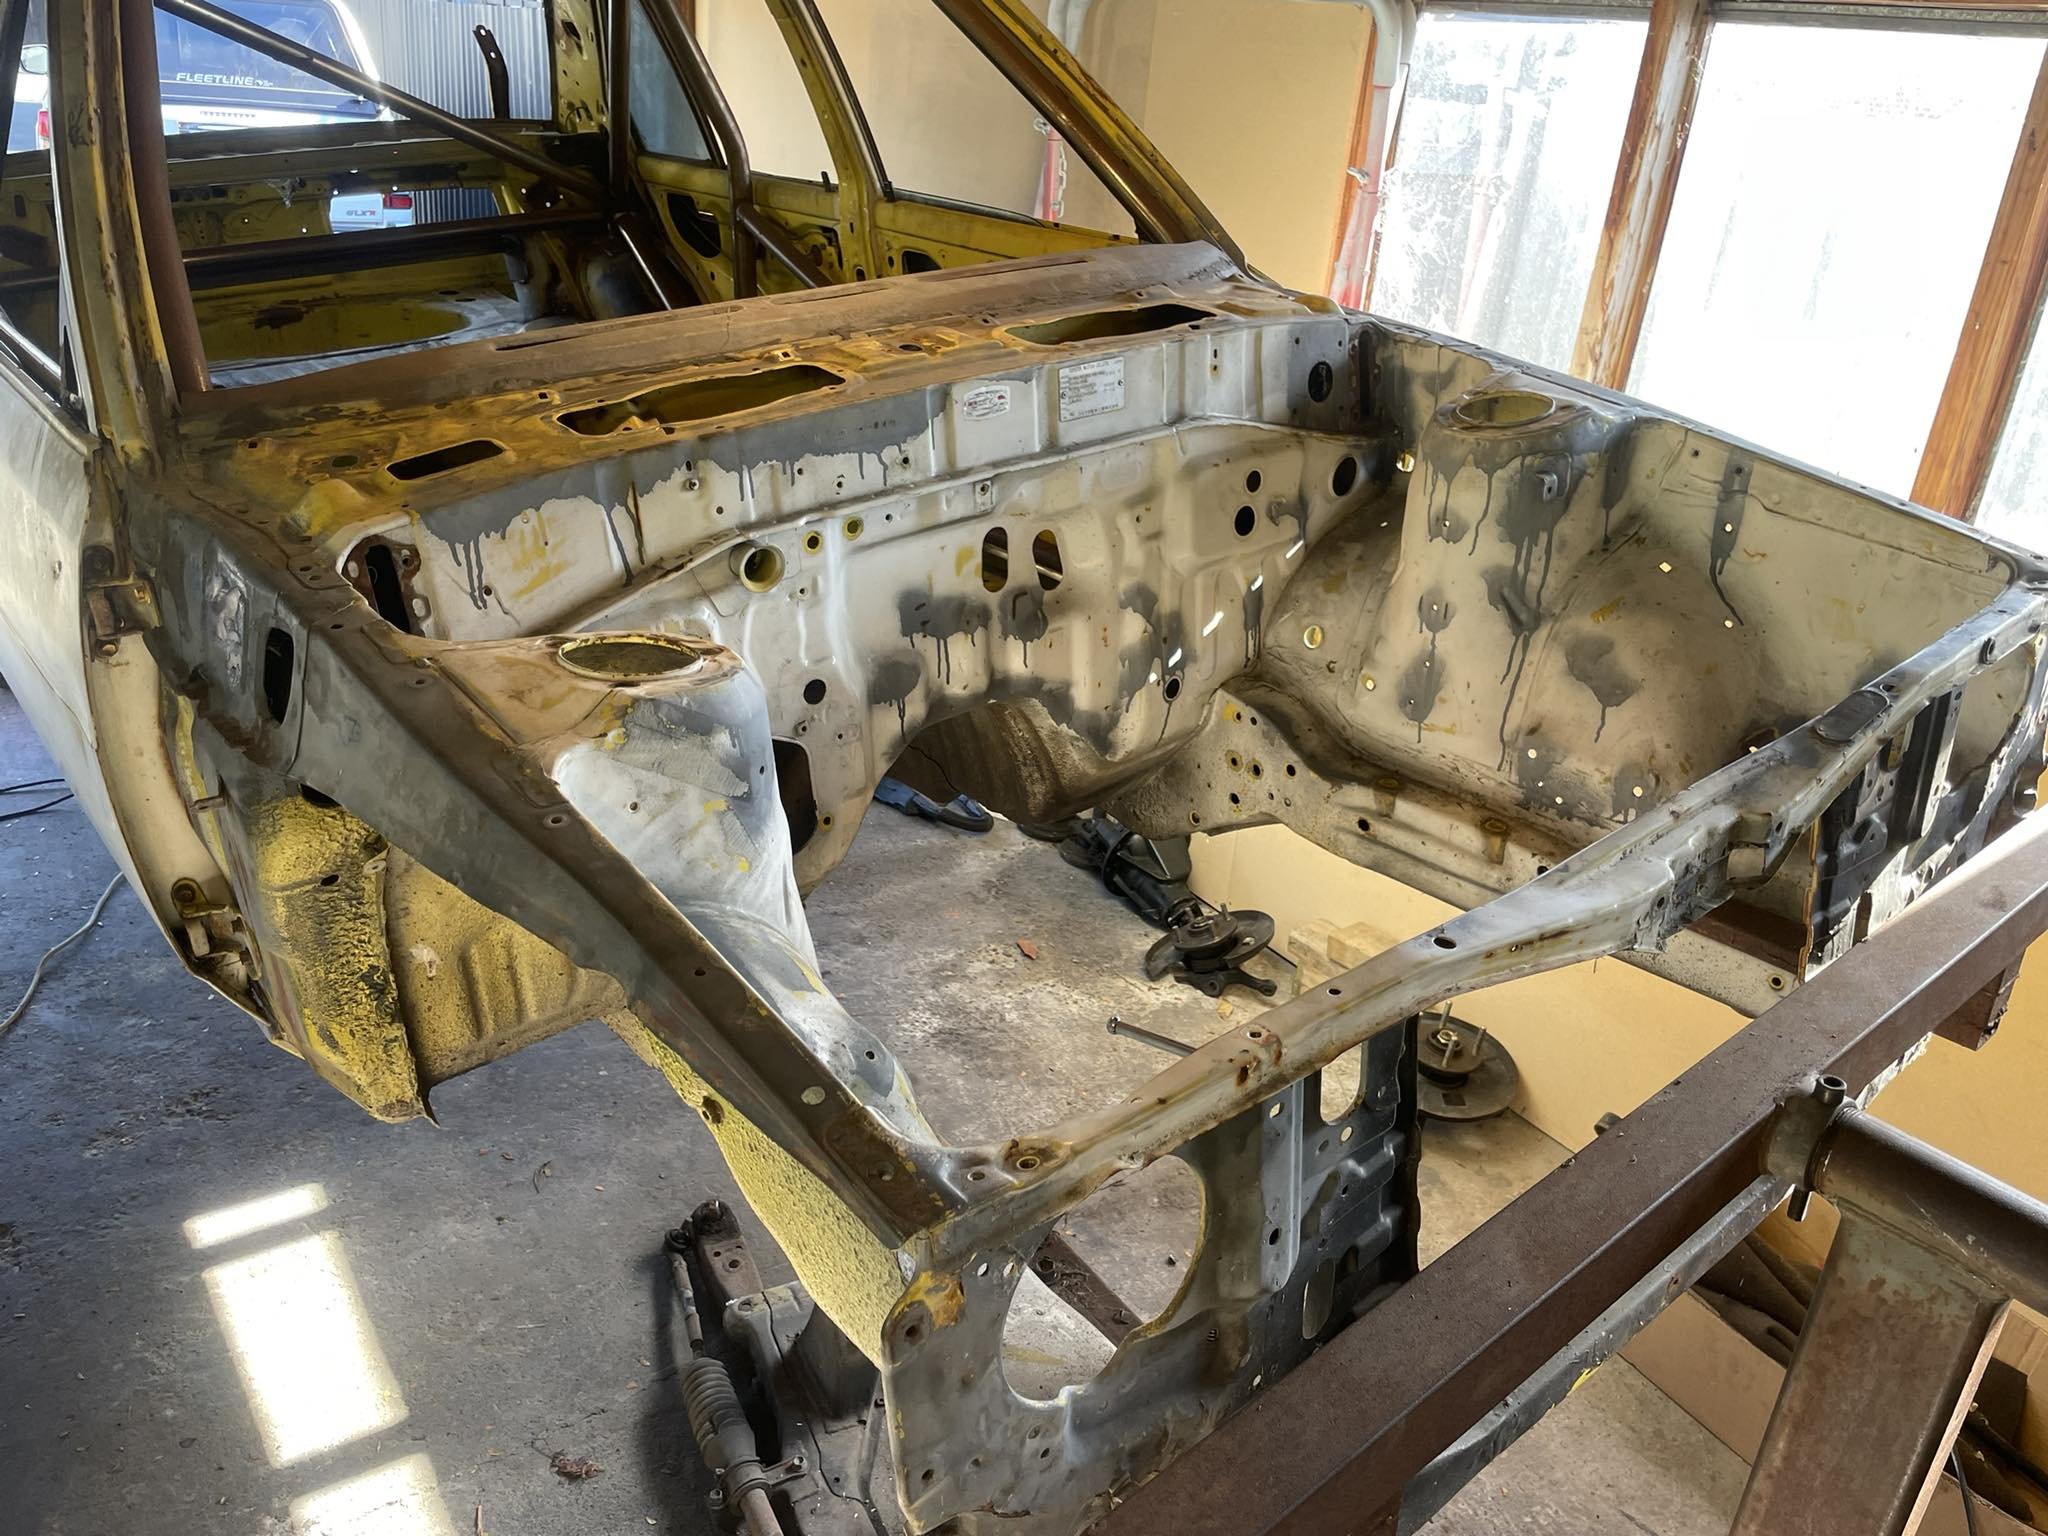
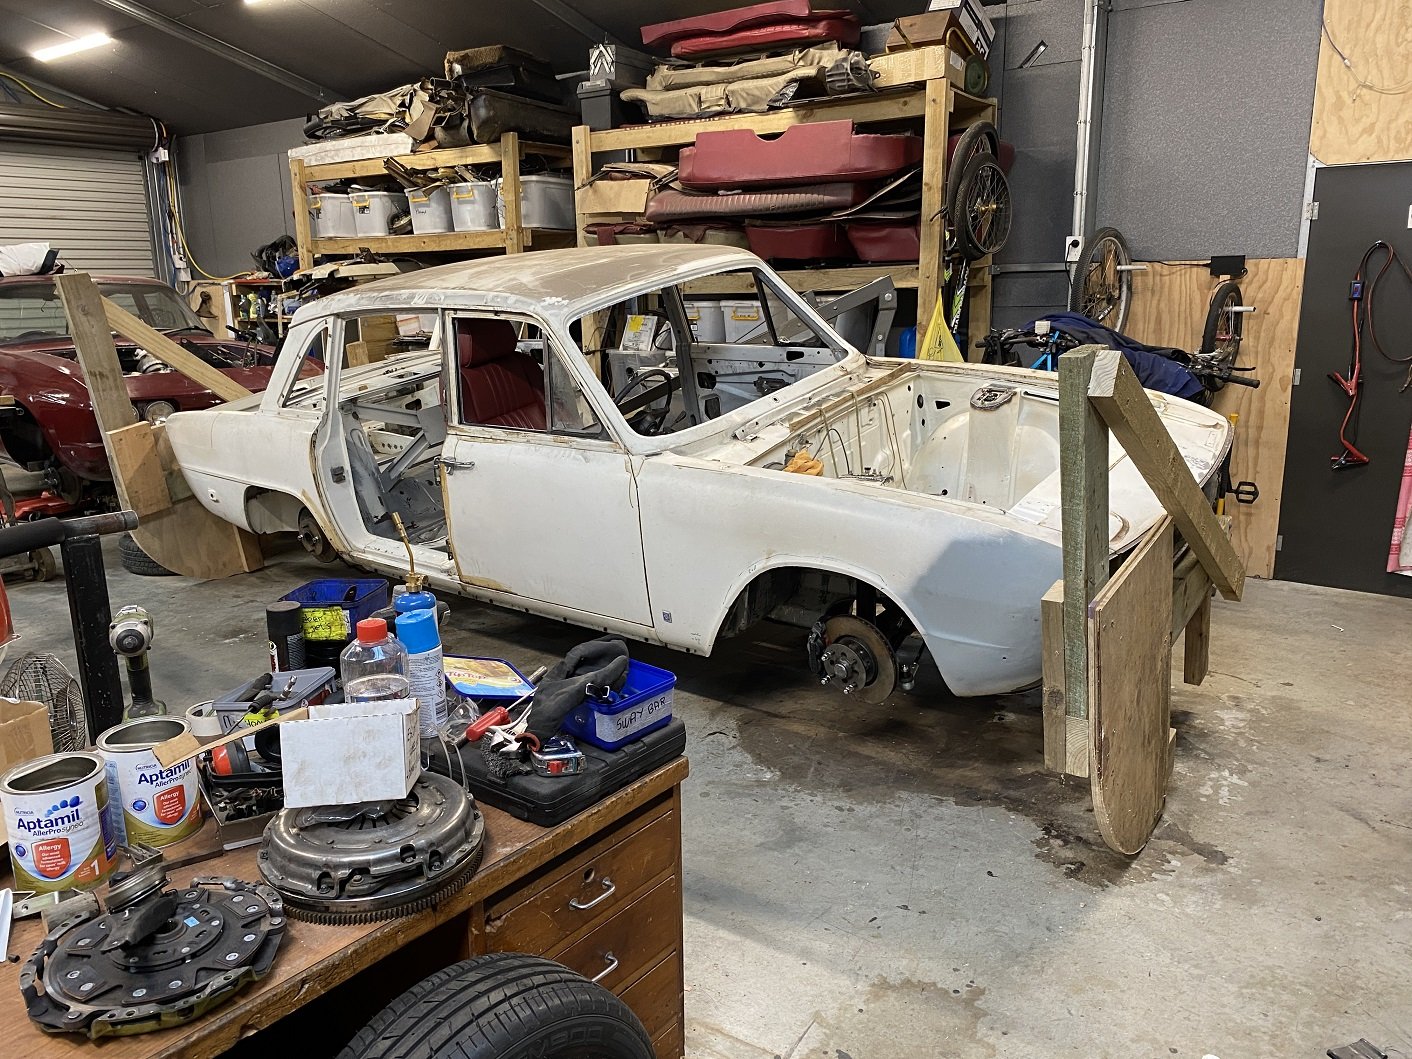
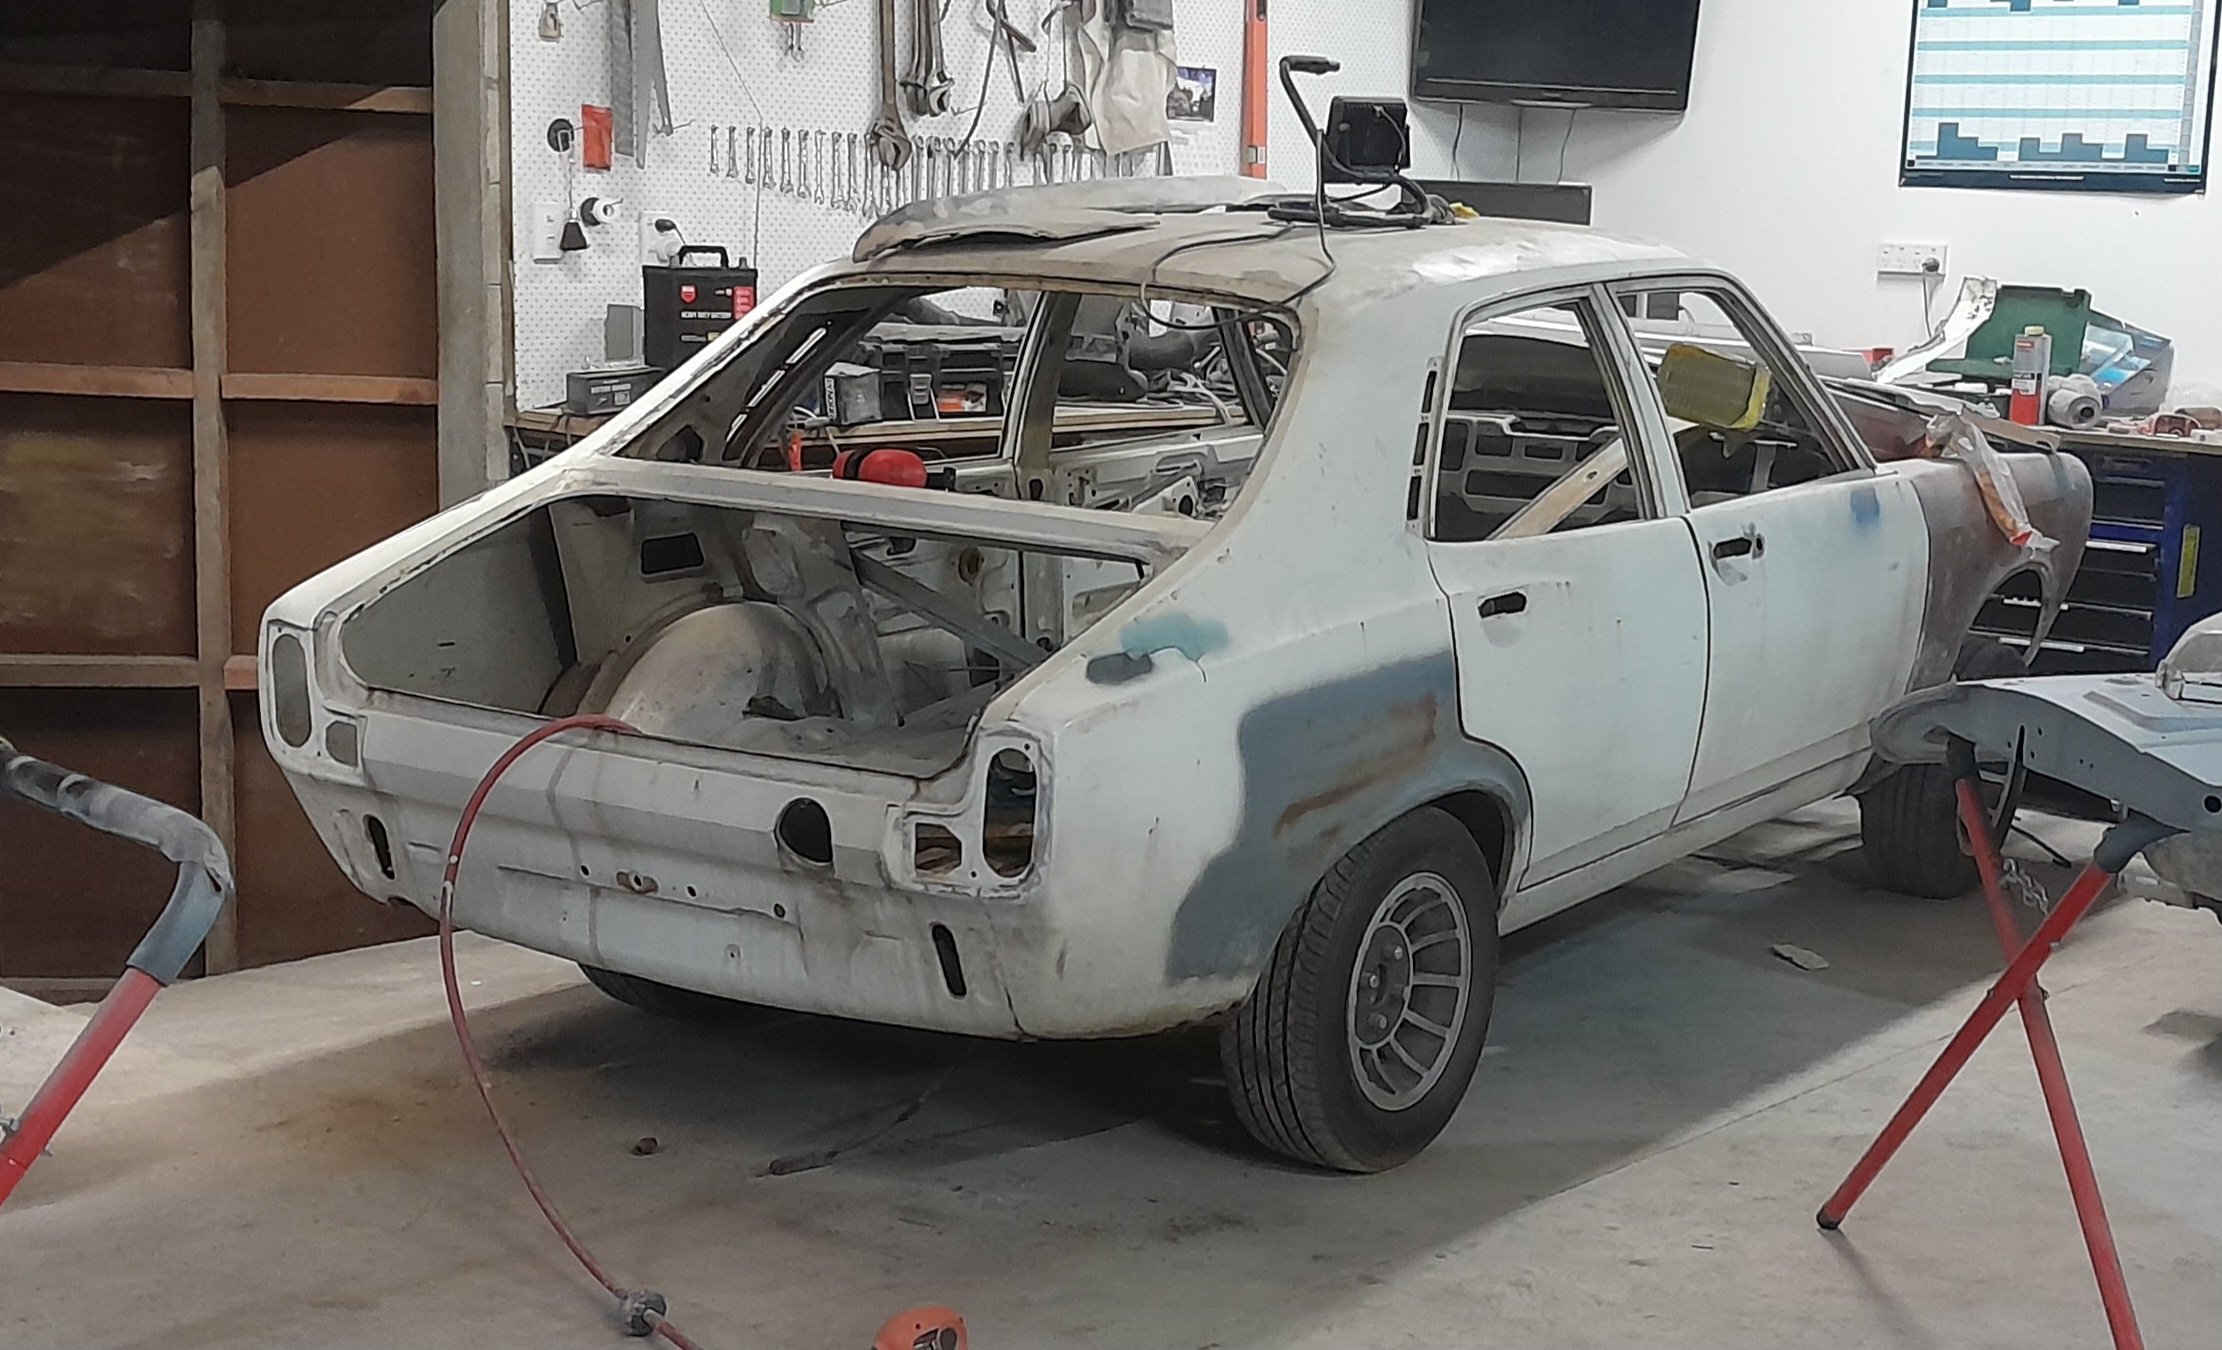
so after getting rid of my ae85 levin because i made it too nice to bash about at the track i was on the lookout for a suitable car to buy/build to have some fun in, bonus of this car is its also rego on hold if i get that way inclined. This popped on on market place for sale, the previous owner had JB Fab here build a 6 point cage and equal length 4 link setup with a b1600 diff, photos below how i got the car. It came with a lot of spares and all the parts needed to put a rolling body together really. i got it home yesterday and started attacking some dodgy spots with a wire wheel to see what i'm dealing with rust wise, didn't find too many surprises only a couple of bad spots that need patches. Removed everything that was bolted on, it had Silvia front suspension which i will be getting rid of and i have ae86 coilovers and knuckles to replace this. before i got this car i had already purchased an engine mount and j160 adaptor kit from Niteparts for 2zz. looking into diff options for the b1600 diff, i've seen a bit online about what heads fit into the b1600 setup. Ideally i would like a nice 2 way diff for this, I saw that potentially fc3s nuggets bolt in? i have a 4.9 Ratio at the moment which is perfect. current plan of attack is: - Rust patches. - wirewheel and re undercoat the underside. - Doors and front end to panel beater for a quick panel and paint. - Weld up all the unnecessary holes in the engine bay. - Mockup j160/2zz combo and start headers and itb setup. - Sort rear brake setup on the diff. - Powedercoat/Zinc everything to make it nice Discussion - Discussion
4 points
-
Voted! Gives me motivation to get the statesman legal. Shit I may even update the thread!3 points
-
Yeah that works out great, I will most probably start with using 185/60/13 semi slicks all round for now, means I can keep it stock body and until I decide what o want to do. Deff don’t want to end up running 10” wheels, you can still buy 200/540/13 tires brand new for not bad money which is an option later down the track.3 points
-
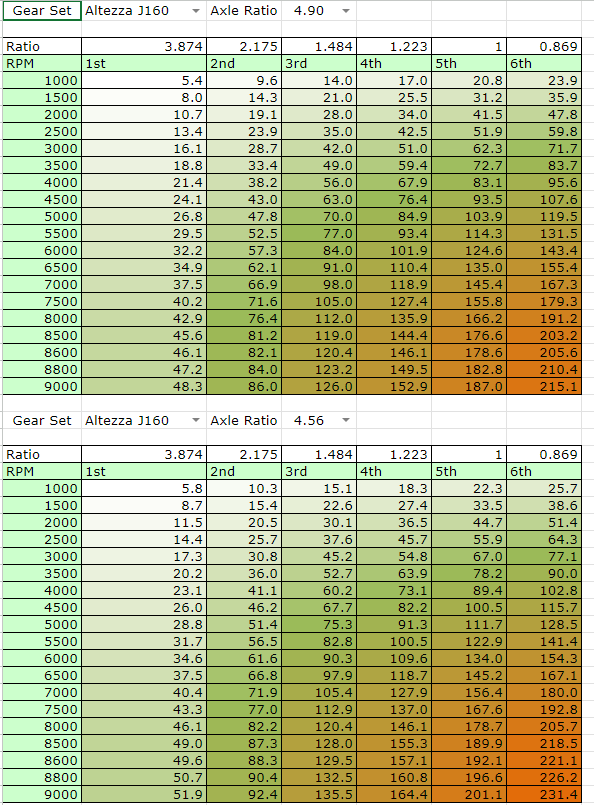
Here's the info you need from @Hyperblade's thread. J160 with TRS slicks looks like it'll be OK as long as you rev it to 9000.
3 points
-
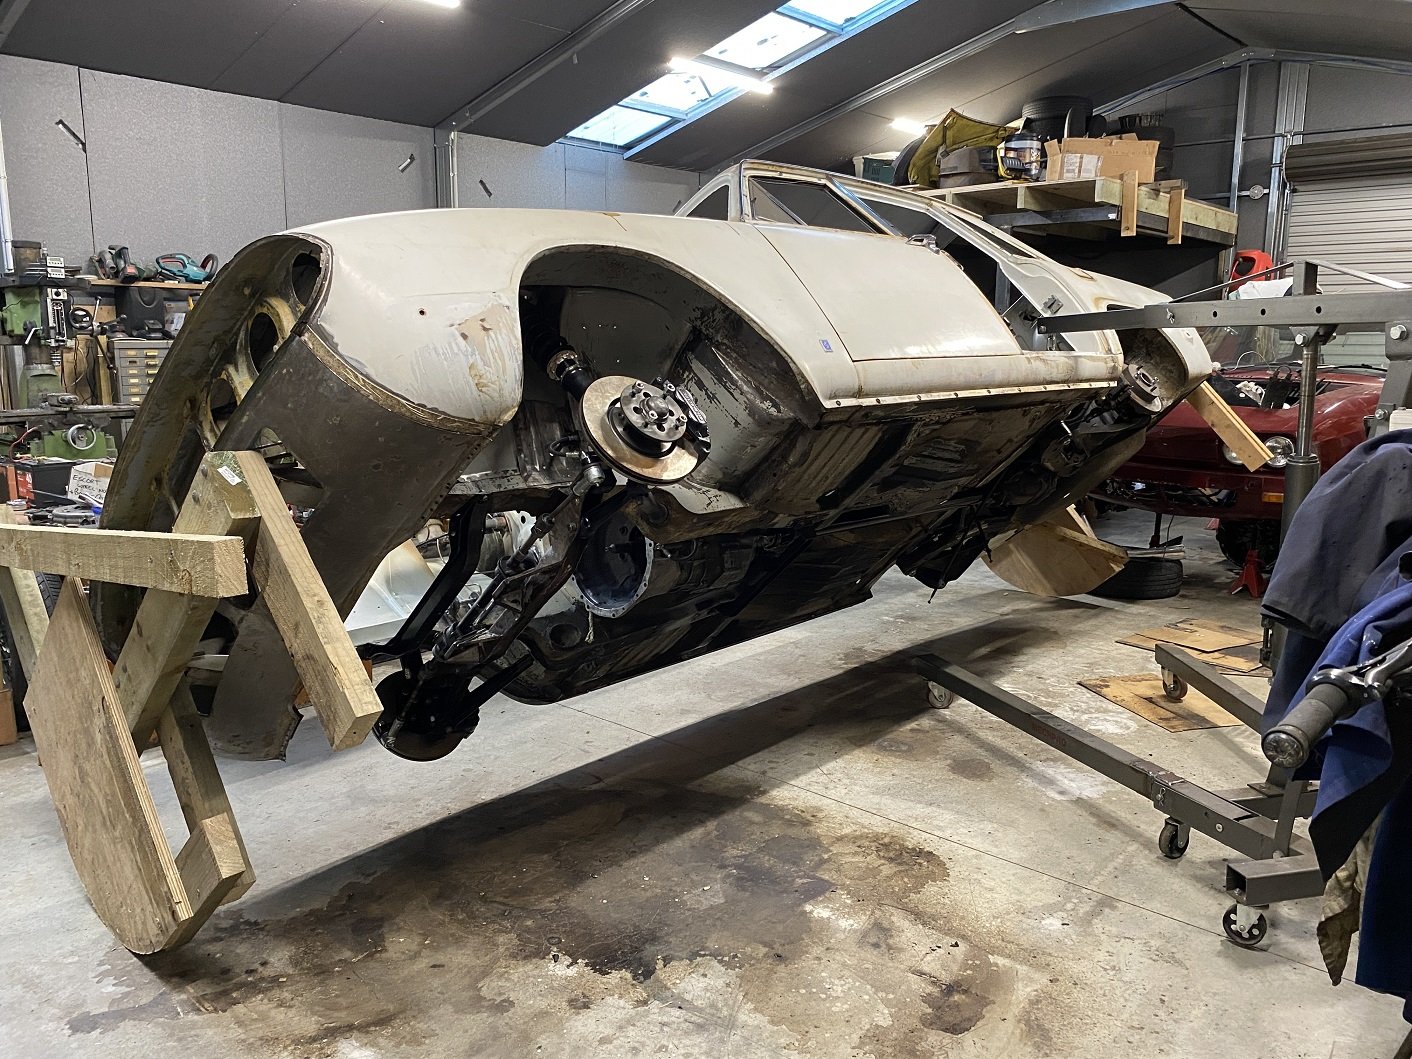
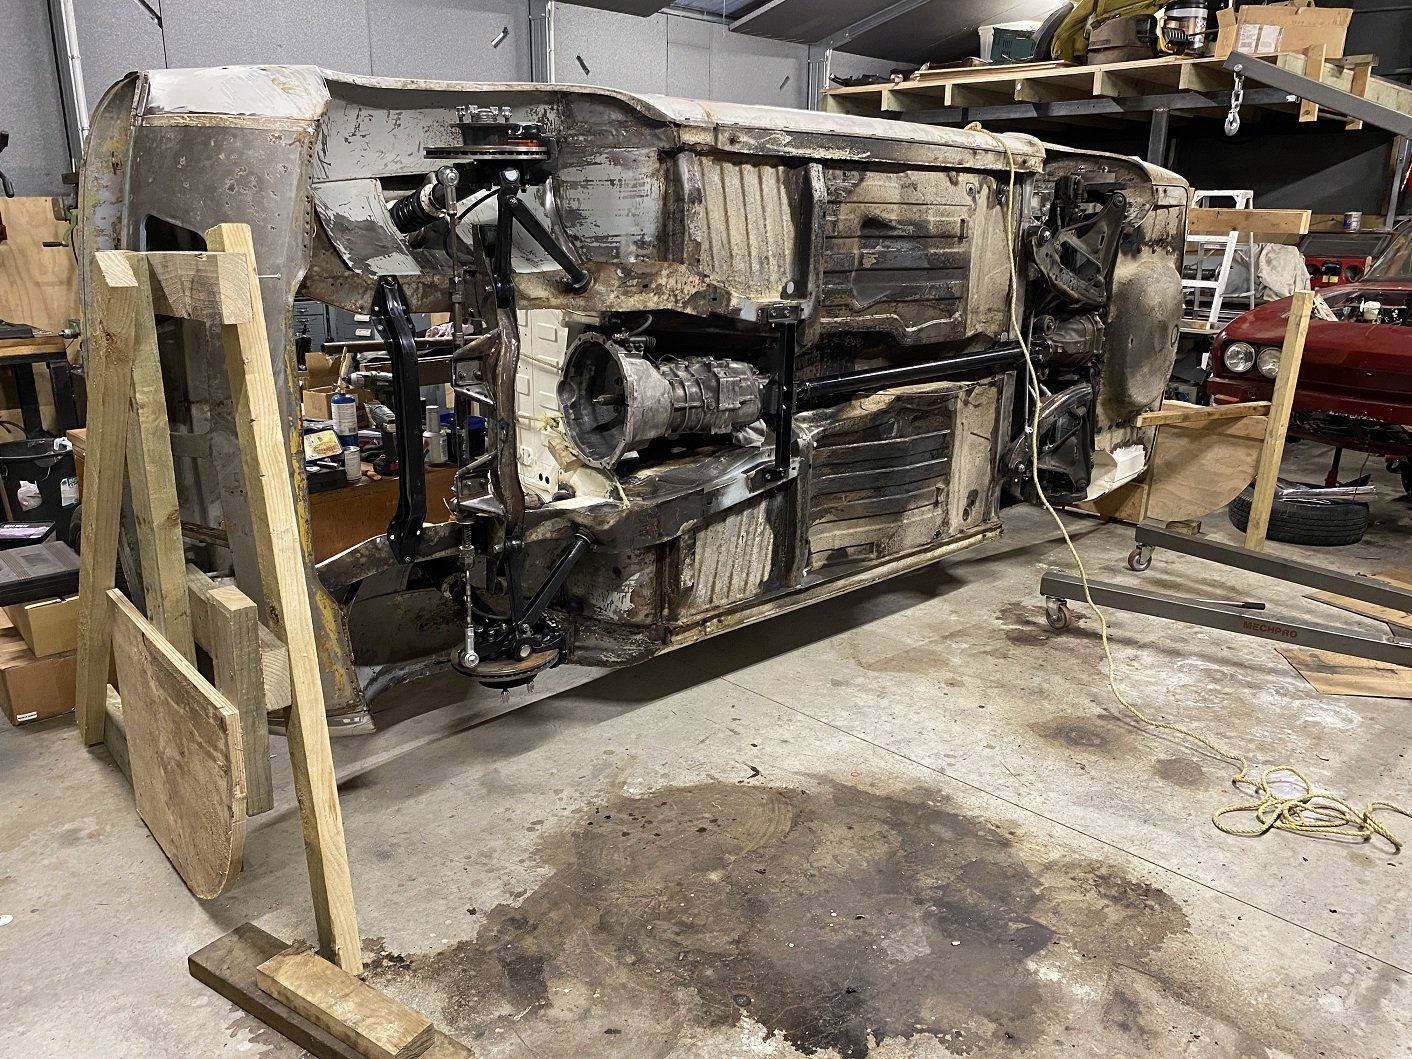
This make some things easier.... I bolted the don't-fall-on-me props on so they can't accidentally be knocked out. It's a bit bottom heavy with all the suspension still attached so it does want to come back down.
3 points
-
Old compressor vs New compressor
3 points
-
So the most important question is.... What are you gonna make the controls on the right hand side do?2 points
-
It sounds like you need to run 13’s2 points
-
I might have to get a "Not flash, but it will do" sticker made up for the bike, it seems to be a theme2 points
-
Oh man with 9000rpms that will work out perfect! 13" wheels FTW. With 17's I need to go for a 5.3 diff!2 points
-
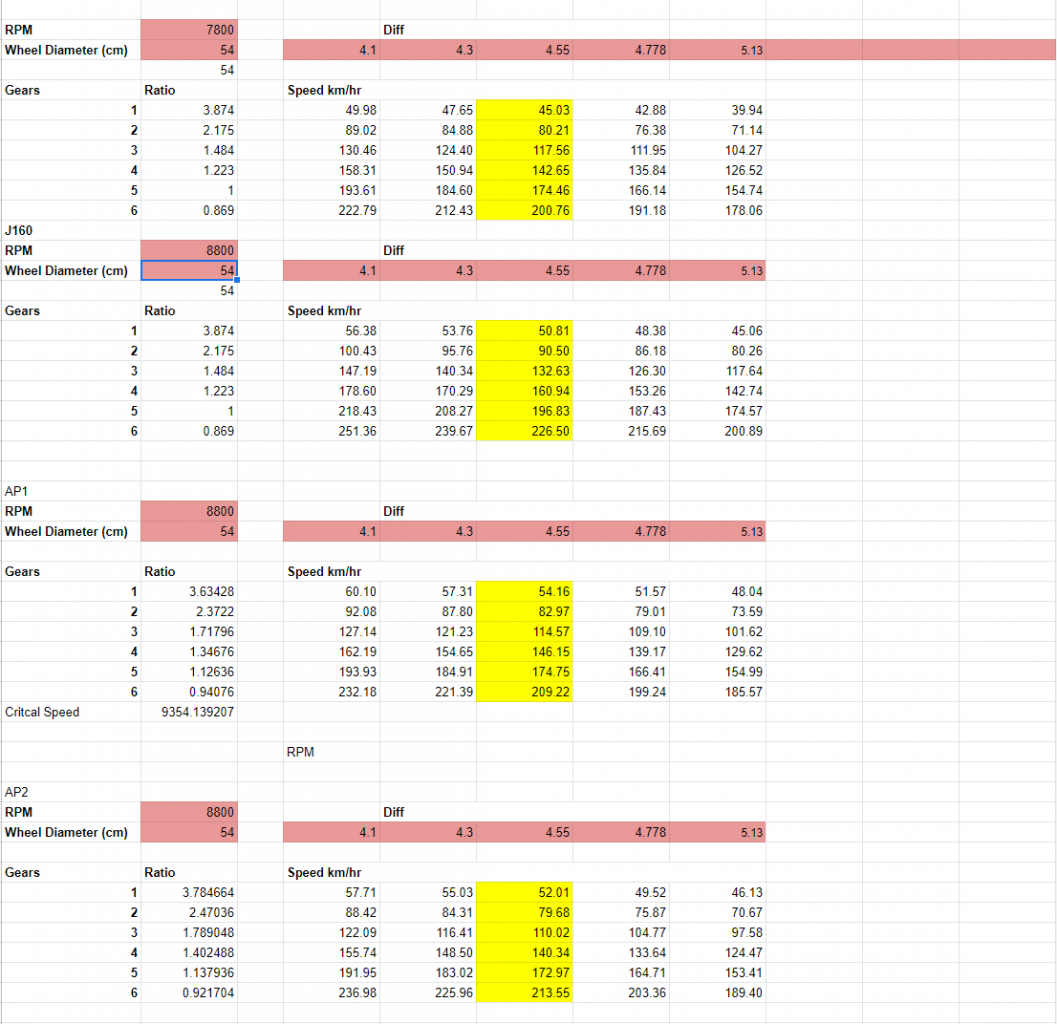
So the only TRS tyres you can still get secondhand from the series are the old rears, (now the new fronts) which need 10" wide rim, so most cars require substantial modification to run them. Those charts were based off the smaller TRS slicks that runs on 8" wide wheels. so you need to think carefully about what tyres your going to run, it may be that 15" might be the more economical option (even though I don't like the look of them on old cars) For grip, you will be wanting to aim for 185 - 200kph at the end of the straight which should be doable with your weight and power. I went with 2nd-6th gears which meant launching in 2nd and using 3rd for hairpin 4-5 everywhere else then 6th for straight. But the alternative (and much nicer if you street drive) is to use 1-5th which can be beneficial for N/A cars as not using overdrive 6th. Here's some diff/speeds (based on 54cm trs tyres) to give you an idea of where it would sit You have lots of revs available which gives you a few options (let me know if you want me to calculate any other options).
2 points
-
Thought I'd better do a post before the thread falls off the page. Slogging along. Paint tomorrow, then camo, decals & my usual laying on of filth & cargo.2 points
-
I remember reading about them as a kid and being "whoa" at 2l turbo 4wd in a hatch Never had much to do with them apart from fixing one for a tight arse car dealer customer we had, it was a fill in job for when work was slow so it ended up taking 4 or 5 months , it broke a ring land so the car dealer supplied 1x second hand piston. Did it with the engine in place, getting the head/intake manifold off counts as one of the worst jobs I ever did Also due to the fact it took so long just doing bits here and there, when I started it I'd forgotten I'd removed the oil filter. It was on the hoist, fired up, pissed oil everywhere, I reached in the window to turn the key off but it had a turbo timer down by the console so I had to do a panic dive in the window to turn it off, the boss thought that was quite funny seeing me with my legs sticking out the window2 points
-
Hello, Maybe it's just my age, and to do with the cars that I learned about when I grew up. However I seem to be stuck in thinking of all of the motors from the 90s or early 200s as the "golden era"? Where anything before that was a bit primitive, and anything much after that is too modernized and hard to do anything with. So only things from around this time are good. Legendary little rippers such as the 4AGE, 4G63, 2JZ, 1UZ, 13B, LS1... Gotta love em! Cheap, plentiful, great potential, great aftermarket support, and so on. However a lot of these older motors are getting hard to source, expensive, and a bit less fun when it costs 10x what it used to. However I feel like there are some good modern options which are slept on. So, what are some cool modern engines that should have some potential for swapping into shitty old cars? @shrike noted a few cool options in a recent project thread. I figure it's a worthy topic of it's own, going into some more detail on each type of motor. I will write a few posts below that I've seen some success with, with some different engines and pros/cons. In my mind what made those older engines great, was a combination of few factors -Easy to make power in factory form. -Good modding capability. -Good aftermarket support. -Plentiful engines / not too expensive. Now to be fair I am Toyota biased, not because I think these motors are best, it's just what I know about from top of my head. Feel free to spam other alternatives if you know of something cool! First up Toyota 2ARFXE engine This is a 2.5 litre 4 cylinder engine with a 90mm bore and 99mm stroke. This is normally found in a hybrid car like a Camry. There is a non hybrid version too (2ARFE) Think of it as a slightly less good Toyota version of a K24 I guess. Why consider it? It uses all of the Toyota hybrid engine tricks, for good economy - that are good for power too when modified. High compression ratio, huge ports, big standard cams, somewhat bolts to a 3SGE gearbox (Easier for FWD than RWD though) There's currently one on Trademe for under $900. How does it go? These motors have a really big factory intake cam, and this can fit on the exhaust side too. So you buy a 2nd one and fit it on the exhaust side for a cheap and easy upgrade. Then retime the cams away from atkinson cycle, and you make big stacks of power with some basic bolt on mods. This guy was making 270whp with an NA motor with 2x factory intake cams fitted. Pretty awesome! It somewhat bolts up to a 3SGE bellhousing pattern, which works well for transverse engine swaps. Downsides are that it's a fairly tall engine, some people have had to cut their bonnet to fit in smaller RWD cars. Okay so that's cool for a low budget throw together, but does the aftermarket support scale up? How about a full $$$ turbo build? As this motor was common in america, there's heaps of stuff available. Papadakis racing made a 1000hp variant.1 point
-
After looking around the net and discovering not a whole heap of info in the same place thought I would start this as a placeholder. Both for myself and for anyone looking at using this drive-train going forward as these cars get older Few write ups on what to use in the US but not really much for Australia/New Zealand Ozhonda seems to be dead, and NZhonda doesn't have much activity either and its hard to search I started looking into this as I am wanting to drop a K24A3 into my AE111, and with my E series AWD gearbox (wide gears) potentially not an option (TBC) as the transfer case may be too big I started looking into the CRV drivetrain There are kits for DSG conversion etc as well but I am specifically going to be talking about Manual gearboxes Ok so tech dump All the K series fitted cars manual gear boxes the gears etc seem to be interchangeable, the AWD diff is the main difference as it has the Transfer gear on it There is also guides on how to convert the 5speed to a 6speed (https://www.youtube.com/watch?v=_VR-zCT0I54) FWD LSD can be used if spaced and Transfer gear is added, but specific AWD LSD's can be brought Factory gearboxes are meant to be 400-600hp capable but start to break at that power, there is upgraded gearset/syncro/hubsliders etc options to do 800hp and then dog box options above that Lots of Billet options too CRV shafts and CVs are small so may need upgrading as well Transfer gear ratios are 0.434 for the Manual and 0.393 for the Auto, the transfer case is the same between the two (transfer gear on the diff is the same between auto and manual, difference is the gear it connects too in the transfer case I had to look up the part numbers to confirm this) Factory CRV rear diff is 2.529 Ratio (USA) for reference the rear GT4 Celica (7.1" or 6.7" T series?) diff is 2.928 Below info, note this is USA sourced info and the CRV final drive is conflicting to other sources I need to find out what the OZ/NZ rear diffs and gearbox final drive ratios are so will update once I know, I would say New Zealand ratios would be JDM cars but will look for NZ delivered details Edit Australian Ratios 2007 CRV (http://m.australiancar.reviews/_pdfs/Honda_CRV_RE4_Specifications_200702.pdf) 2011 is listed as the same Manual Transmission Synchronised 6-Speed Forward - 1 Reverse Gear Ratios 1st 3.642 2nd 1.88 3rd 1.212 4th 0.972 5th 0.78 6th 0.659 Reverse 3.583 Final Reduction Ratio 5.333 The Factory CRV is not all time AWD and doesn't have a center diff, it runs a viscous coupling, the factory one has overheating issues if run all the time and is designed for an 80/20 power split Note the GT4 Celica uses a center diff in the transfer case that is viscous but is designed for a 50/50 spilt The Rear CRV diff is not designed to be run all the time and mods (pinning) are required to make it reliable, you can get different viscous couplings to change how it runs or remove it and run AWD all the time. The viscous coupling helps to manage the different wheel speed between the front and the rear The issue with running it all the time is the front and rear ratios don't match and as its not a proper diff will cause binding (there are kits to swap phantom diffs etc in) but typically the best bet is to swap to a real LSD type diff Final Drive Transfer Gear Transfer Ratio Rear Diff Ratio Difference 4.389 0.434 0.904 2.529 4.355 0.0342 4.562 0.434 0.904 2.529 4.526 0.0355 4.764 0.434 0.904 2.529 4.727 0.0371 5.062 0.434 0.904 2.529 5.023 0.0394 Some people adjust tyres etc to fix this, or just live with it, if I wanted to use my GT4 rear diff I could either get a new rear diff ratio (Crown/Pinon) made at a ratio that lines everything up or a new Transfer gear made at the correct ratio (0.3778) or I could get my mounts remade and go to different drive shafts etc Using an Auto Transfer Gear in a manual gearbox would make it worse Final Drive Transfer Gear Transfer Ratio Rear Diff Ratio Difference 4.389 0.393 0.904 2.529 3.943 0.4456 4.562 0.393 0.904 2.529 4.099 0.4631 4.764 0.393 0.904 2.529 4.280 0.4836 5.062 0.393 0.904 2.529 4.548 0.5139 Using the GT4 Rear diff ratio is horrible Auto Transfer Final Drive Transfer Gear Transfer Ratio Rear Diff Ratio Difference 4.389 0.393 0.904 2.928 4.566 0.1766 4.562 0.393 0.904 2.928 4.746 0.1836 4.764 0.393 0.904 2.928 4.956 0.1917 5.062 0.393 0.904 2.928 5.266 0.2037 Manual Final Drive Transfer Gear Transfer Ratio Rear Diff Ratio Difference 4.389 0.434 0.904 2.928 5.042 0.6529 4.562 0.434 0.904 2.928 5.241 0.6786 4.764 0.434 0.904 2.928 5.473 0.7087 5.062 0.434 0.904 2.928 5.815 0.7530 Custom Transfer case Gear (or get a custom rear diff ratio of 2.549) Final Drive Transfer Gear Transfer Ratio Rear Diff Ratio Difference 4.389 0.3778 0.904 2.928 4.389 0.0000 4.562 0.3778 0.904 2.928 4.562 0.0000 4.764 0.3778 0.904 2.928 4.764 0.0000 5.062 0.3778 0.904 2.928 5.062 0.0000 Diffs with factory ratio to match the CRV are 2002 Jag X type Dana 35 BMW 2.56" 2014 Kia Sorento 2.0 (but has electric valve) Feel free to add anything if anyone has any more knowledge Good video on K series box rebuild for 800hp https://youtu.be/ABcZQhperYQ?si=DROL4nfoHEFEFczC1 point
-
Pie dispenser controls I'd wager. He's gonna machine one up on the lathe that mainlines minninchee's directly from his roof tent to his face hole.1 point
-
I have a strokers shirt somewhere with the logo 'not just good, but good enough'1 point
-
Surely, you could persuade the side of the sump out a little to give bit more clearance on that pickup fitting. looks like it only needs a 3 -5mm knock with a block of wood when warmed. or are you concerned about it being too thin already and cracking around the flange corner? edite: probably wrong fred also.1 point
-
Apparently you can use LT parts on them like manifolds and lop 2 cylinders off. vvt sounds extra cool for a push rod donk. Saw a cranky one pop up on insty sounded fierce!1 point
-
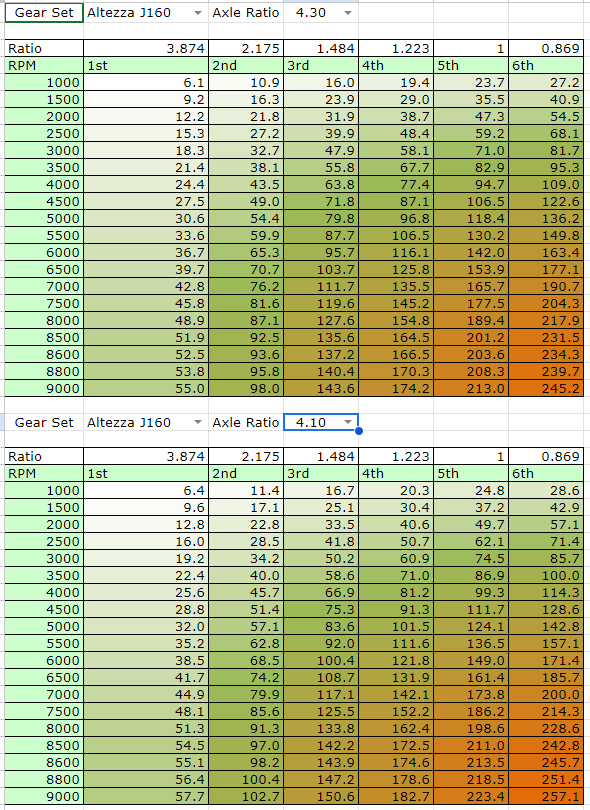
GM 4.3 Liter V6 EcoTec3 LV3 Engine keen to slip one of these into my commodore when the 500000k ecotec dies under the turbo. Not seen any for sale yet. Displacement: 4301 cc (262 ci) Engine Orientation: Longitudinal Compression ratio: 11.0:1 Valve configuration: Overhead valves Valves per cylinder: 2 Assembly site: Tonawanda, New York and Ramos, Mexico Valve lifters: Hydraulic roller Firing order: 1 – 6 – 5 – 4 – 3 – 2 Bore x Stroke: 99.6 x 92mm Fuel system: Spark Ignition Direct Injection (SIDI) Fuel type: Regular unleaded and E85 Maximum Engine Speed: 5800 RPM Emissions controls Evaporative Emissions Bin 4 emissions Returnless fuel system Horsepower hp (kw) Chevrolet Silverado and GMC Sierra: 285 hp (213 kw) @ 5300 RPM SAE Certified Chevrolet Silverado and GMC Sierra: 297 hp (221 kW) @ 5300 RPM SAE Certified – E85 Torque lb.-ft. (Nm) Chevrolet Silverado and GMC Sierra: 305 lb.-ft (413 Nm) @ 3900 RPM SAE Certified Chevrolet Silverado and GMC Sierra: 330 lb-ft (447 Nm) @ 3900 RPM SAE Certified – E85 Materials Block: Cast Aluminum Cylinder head: Cast Aluminum Intake manifold: Composite Exhaust manifold: Cast Nodular Iron Main bearing caps: Powder Metal Crankshaft: Forged Steel Camshaft: Billet Steel Connecting rods: Powder Metal Additional features Active Fuel Management (AFM) Variable Valve Timing (VVT) E85 Flex Fuel Electronic throttle control Extended life accessory drive belt Extended life coolant Extended life spark plugs Oil Life Monitor System Dexos 5W30 Dual-pressure control and variable displacement oil pump 58x crank timing
1 point
-
Sorry haven't tinkered with them beyond normal servicing really. One day I might think about building a racing mower.... Won't be using Briggs though haha1 point
-
Damn, that's me out1 point
-
4.9 will be relatively short with 13" slicks. Ruapuna's straight is long - @Hyperblade can probably chime in here with the Starlet's diff ratio, RPM and 6th gear ratio to give you a better idea.1 point
-
This is 1 million percent about cool people getting together. Old cars are just a bonus.1 point
-
Sidetrack to your build and sorry/not sorry. But the biggest tragedy with the 2ZZ was that they made the 1ZZ and 2ZZ completely different engines. They were trying to make a competitor to the B18C but totally missed the point in that regard. Like how good is the B18C, on account of that even the peasant versions can be awesome, with just different cams and so on. Can you imagine if every single turd car out there with a 1ZZ, had 2ZZ potential? Would be incredible! But instead we have zillions of 1ZZ turds and very few of the cool motors around.1 point
-
VR6+T is a very common mod, and there's shitloads of material online about it, plus a wad of aftermarket bits. The engine itself has been around forever in various configurations - 2.8 12V, 2.8/3.2/3.6 24V. Yes, they're heavy but as mentioned, they've got a lot of meat in the block. 15° angle between bore center-lines, so they run a conventional inline-6 crank and firing order... Add to that the asymmetric port length between cylinders (inlets are on one side of the head, exhausts on the other) and they sound absolutely awesome. 1000hp+ is achievable - Just spend 30 seconds on YouTube looking for VR6 Turbo Mk1 and Mk2 Golf conversions...1 point
-
When I took my 1NZ with cams etc for a WOF with the standard intake manifold on. You could not have believed it was the same engine. Holy crap, it turned into a slug haha. Totally choked out by ~5000ish rpm. If the 2ZR was similarly designed, it would be a night and day difference with some bolt on mods. However yes - I must concede that some motors like 1NZ and 2ZR do in fact totally suck in factory form.1 point
-
1NZFXE I think we've covered this one well enough - but definitely earns a mention. It's a pity that available aftermarket cams max out at 264 deg / 9.5mm lift. As I think this motor would give a lot of older 1600cc motors a run for it's money if bigger cams were available. Wins the prestigious Goez hard 4 wat it iz award.1 point
-
In typical Alex fashion I started a job without having all the bits to complete it. That mess I posted yesterday got covered up today with new underseal but I ran out so only have the one side done so far. I've just sat the trim on there loosely with some incorrectly sized screws but you can get the idea. I think it turned out pretty good. The trims looked pretty nasty after years of sitting around so I hit them with a bit of scotch pad to get rid of the muck and surface rust. That'll do.
1 point
-
Yea the brakes. I ordered the whole shebang, good old Brian at The Italian Job hasnt invoiced me yet so no idea what the damage is, but fuck it it needed to happen really. I pulled all the calipers and gave them a cursory clean up; The rears had a bit of pitting but not so much that I thought it worth replacing, I may order some pistons anyway for just in case. This is the worst of it; Then the bits didnt arrive til Saturday morning, but it was exciting when they did; I had already decided to spend some time giving the truck some new oil and filters, so I cracked on with that. After I drained the oil I did get distracted by that Honda S800, which ended up being a bad plan as when I got back I missed the quite important service stage where you put the sump plug back in before washing out the engine with 10 liters of pristine Delo 400MGX and dumping it onto the garage floor Fuckety fuck fuck. And fuck. Anyway after I had flagellated myself for a while I cleaned things up then went back to the X, at each corner replacing the seals and discs etc and bolting it all back together; Then today I enlisted the wife to help bleed the brakes, which I had to do many times as a lot of quite ugly fluid kept coming out. After that I took it for a gentle test drive which was pretty meh, then I bled them again and they came up mint. So hopefully a wof this week maybe....1 point
-
Shrike thats all great and everything, but... Have you considered a 2ZZ?1 point
-
Yeah guess they are now. Probably means that I am too haha1 point
-
But....... cos I'd hate myself & & I'm a pedantic fucking perfectionist I'm chopping the arse off it. Rust in the seams has to be dealt to, then I guess sand/beadblast the damage
1 point
-
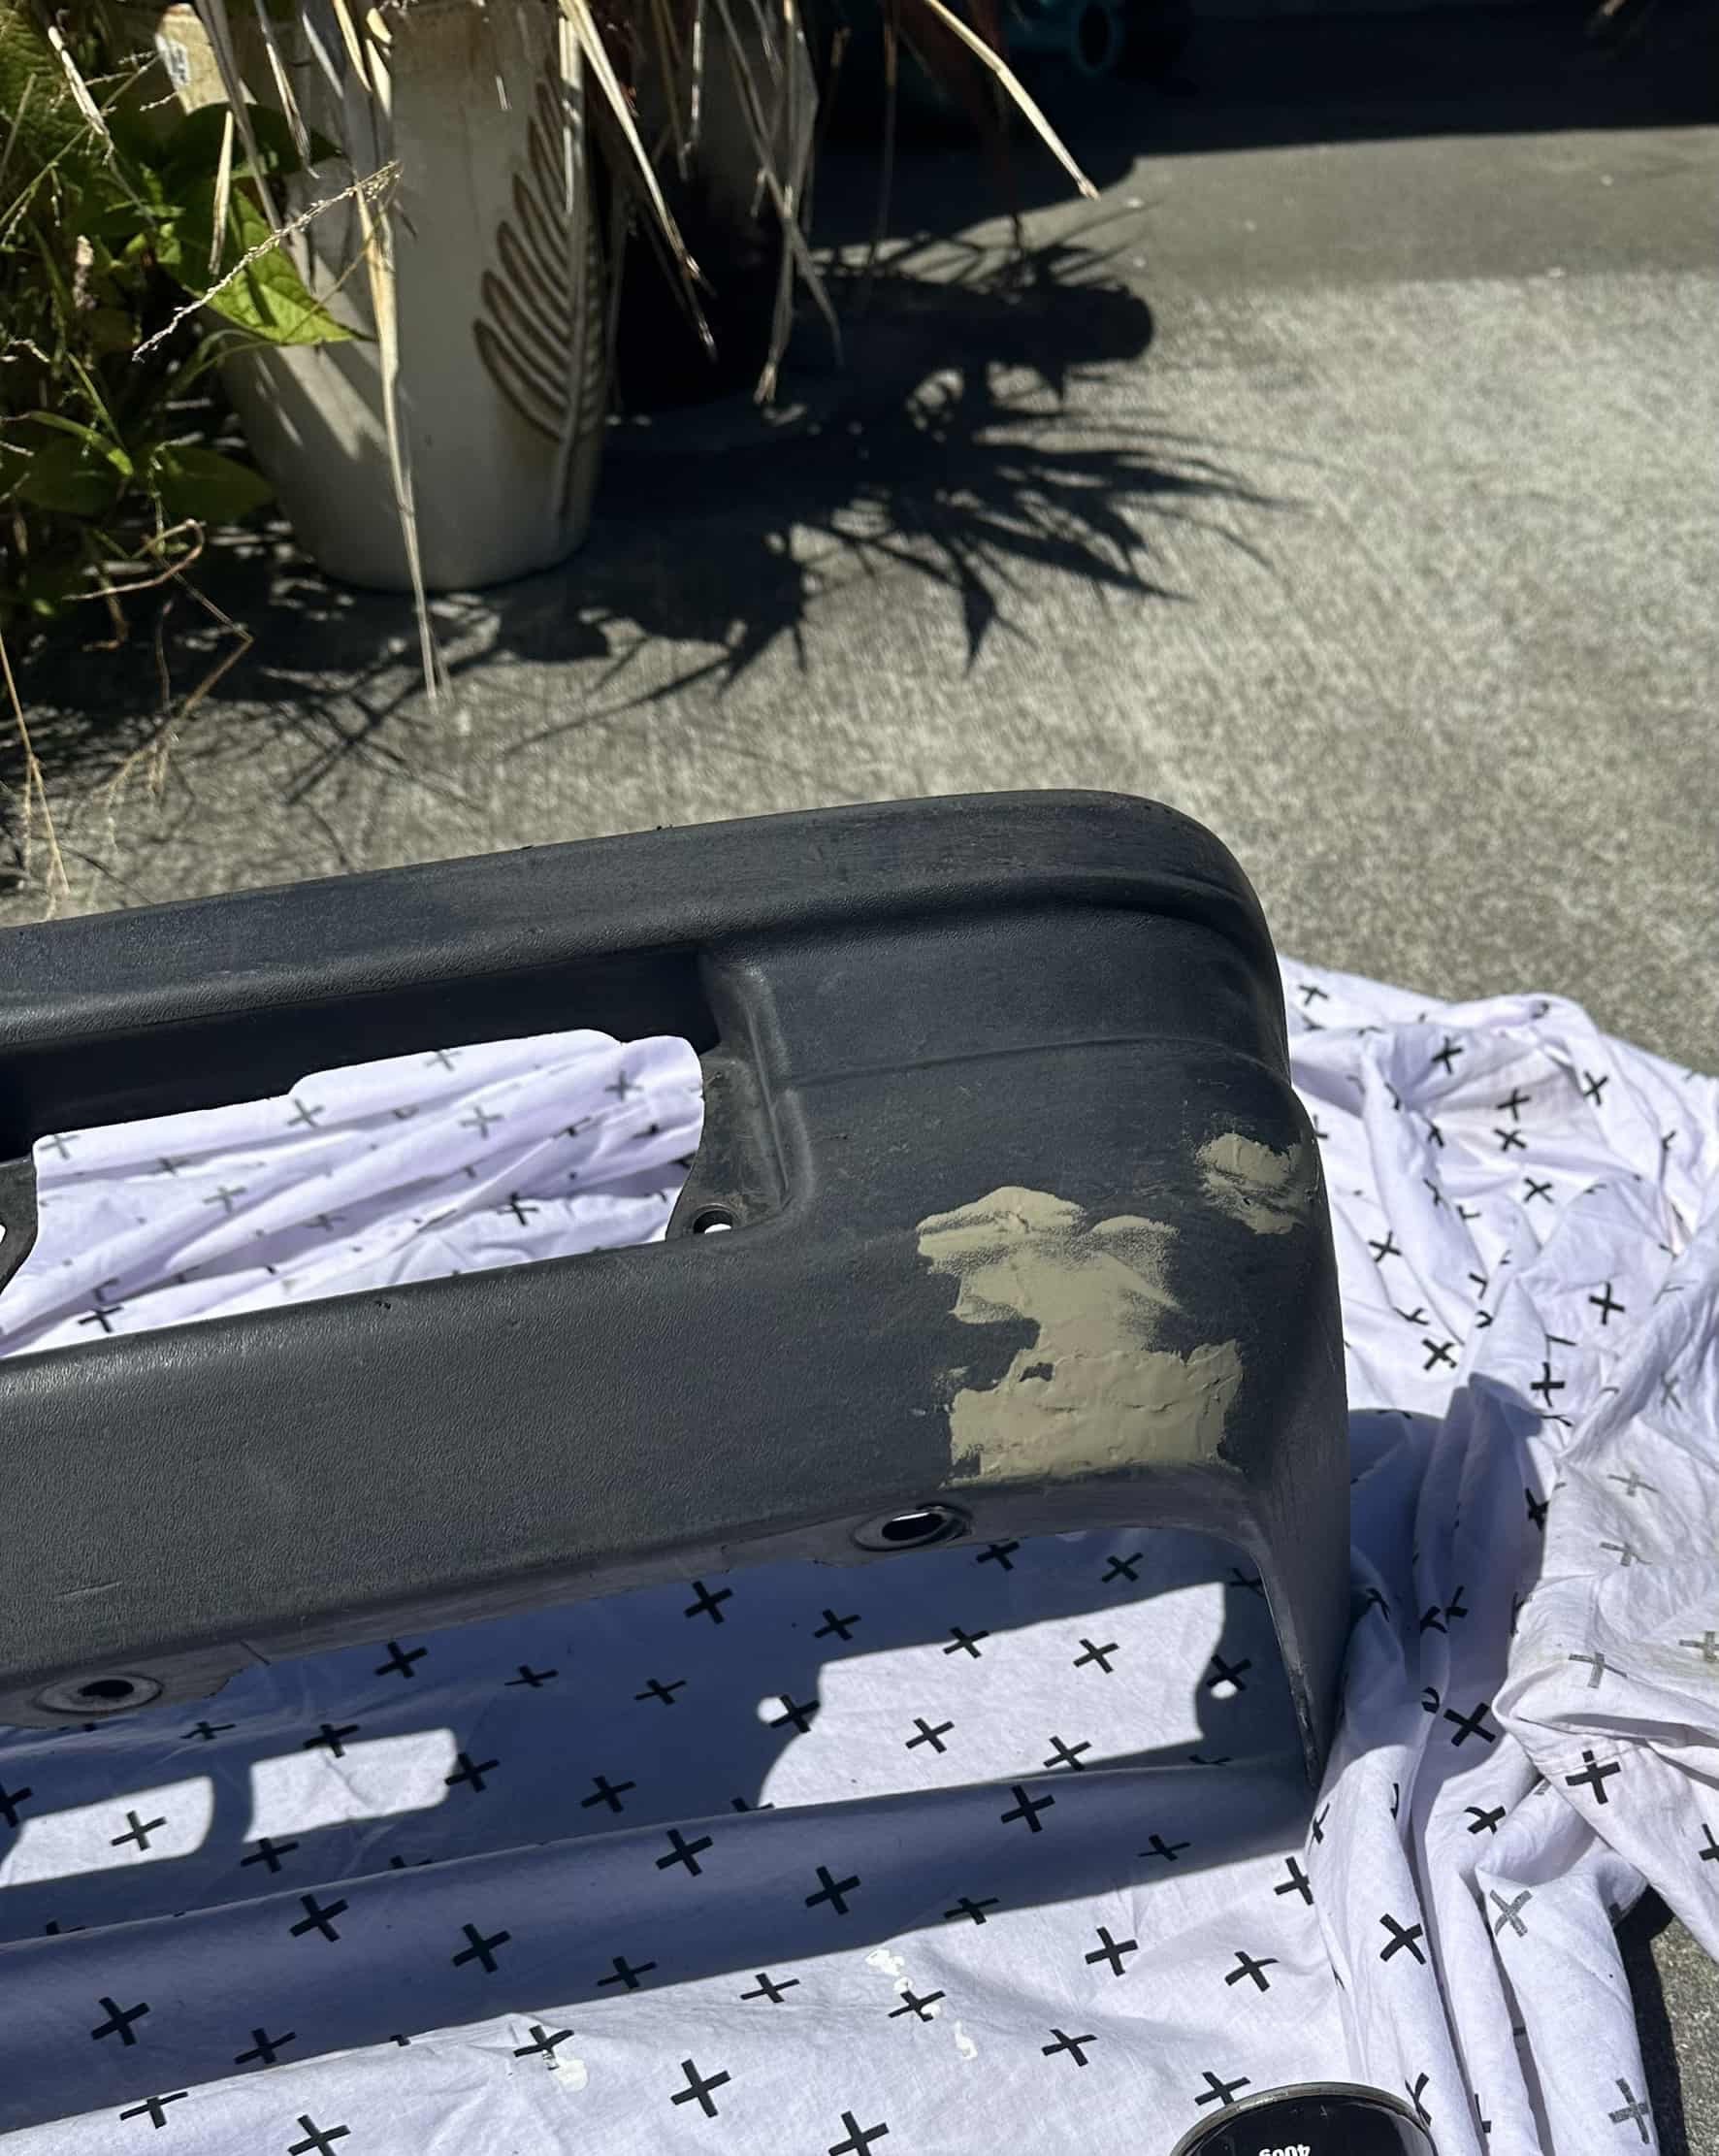
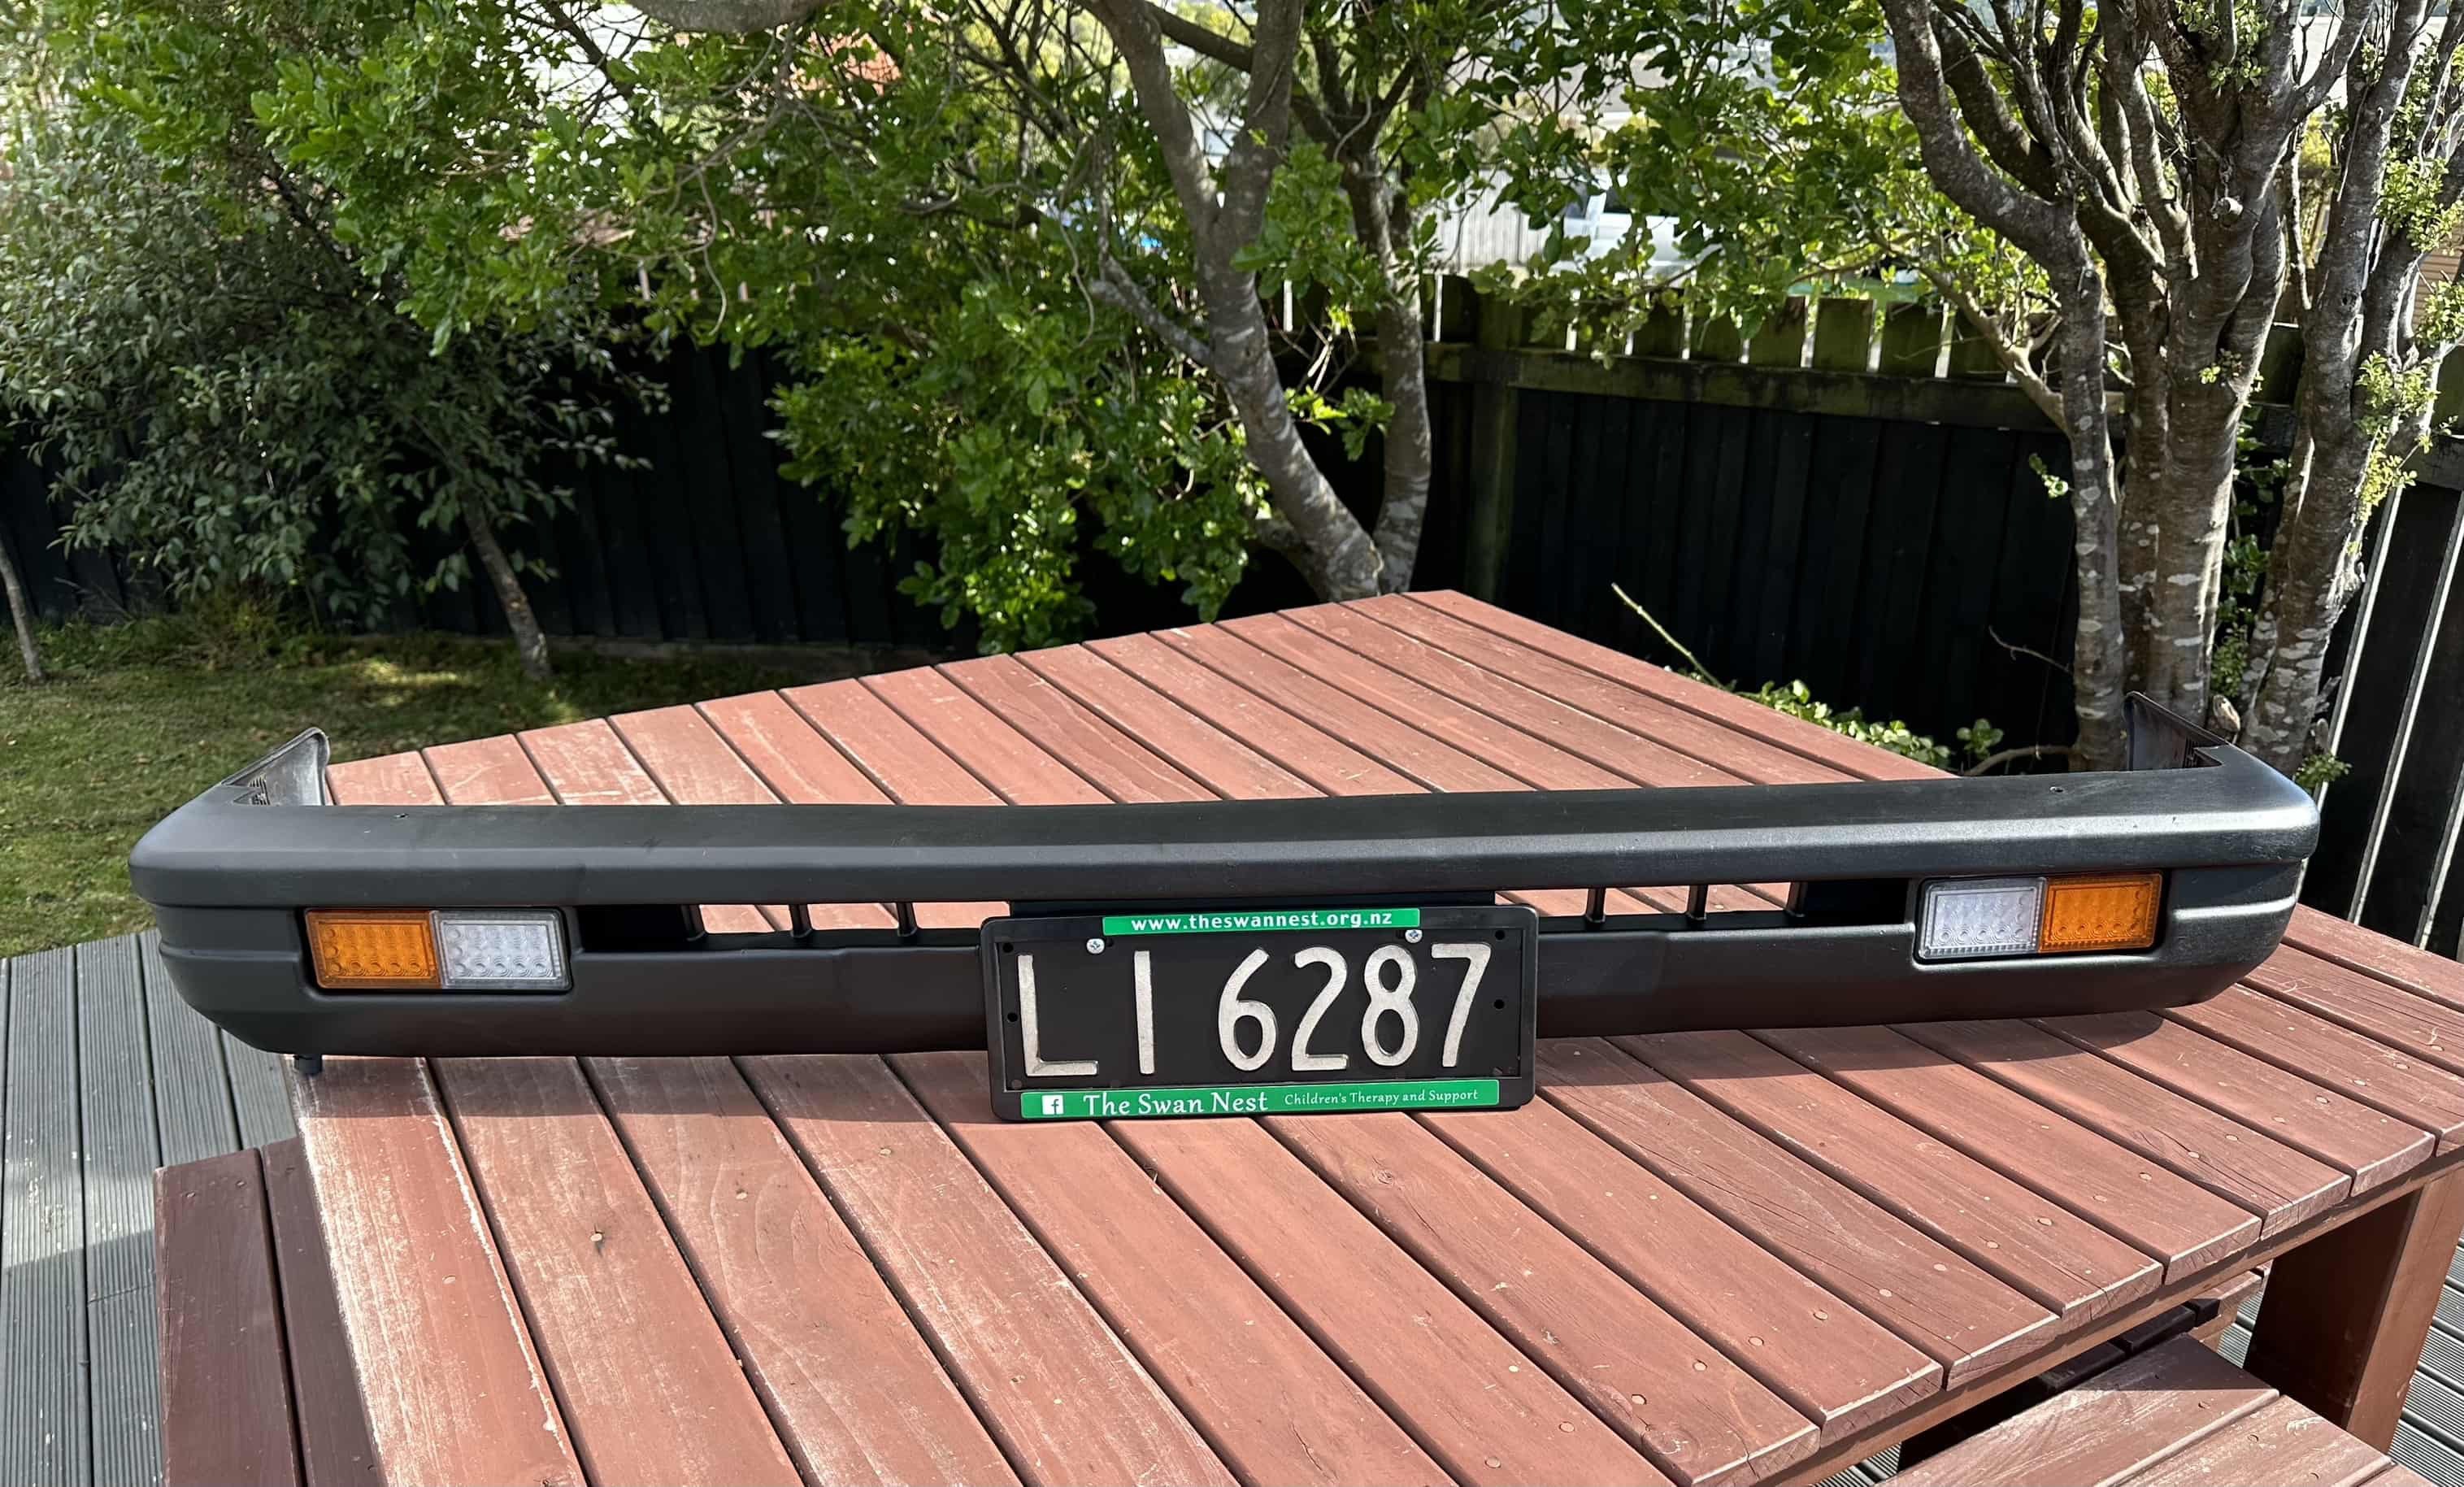
Front bumper restoration complete. After giving the bumper a good clean, firstly with a water blaster then scrubbing with a brush and some warm soapy water, I needed to fill in some of the larger scraps and scratches left by the previous owners touch parking attempts. After some sanding and a quick clean with grease and wax remover it was time for a spray with bumper paint, 4 coats later and it was looking pretty good. I also took the time to paint the headlight surrounds, grill, number plate lights and grill. Now all reassembled with freshly painted number plates and LED indicators and DRLs The finished product
1 point
-
incoming old man sharn, in about 1998 a mate of mine was working for urgent couriers in AK and for some fucked up reason that only coke filled courier company execs can answer urgent couriers bought a GTIR and gave it to my mate as his courier car. it was branded and all that but he drove it all day every day. it took me for quite a few rips in it and fuck me was that thing fast. when your bench mark was a 4M powered shitbox the gtir was light years faster. why did they think that was a good idea? fuck knows but it gave a bunch of mid 20s jokers a new understanding of what a turbo car was.1 point
-
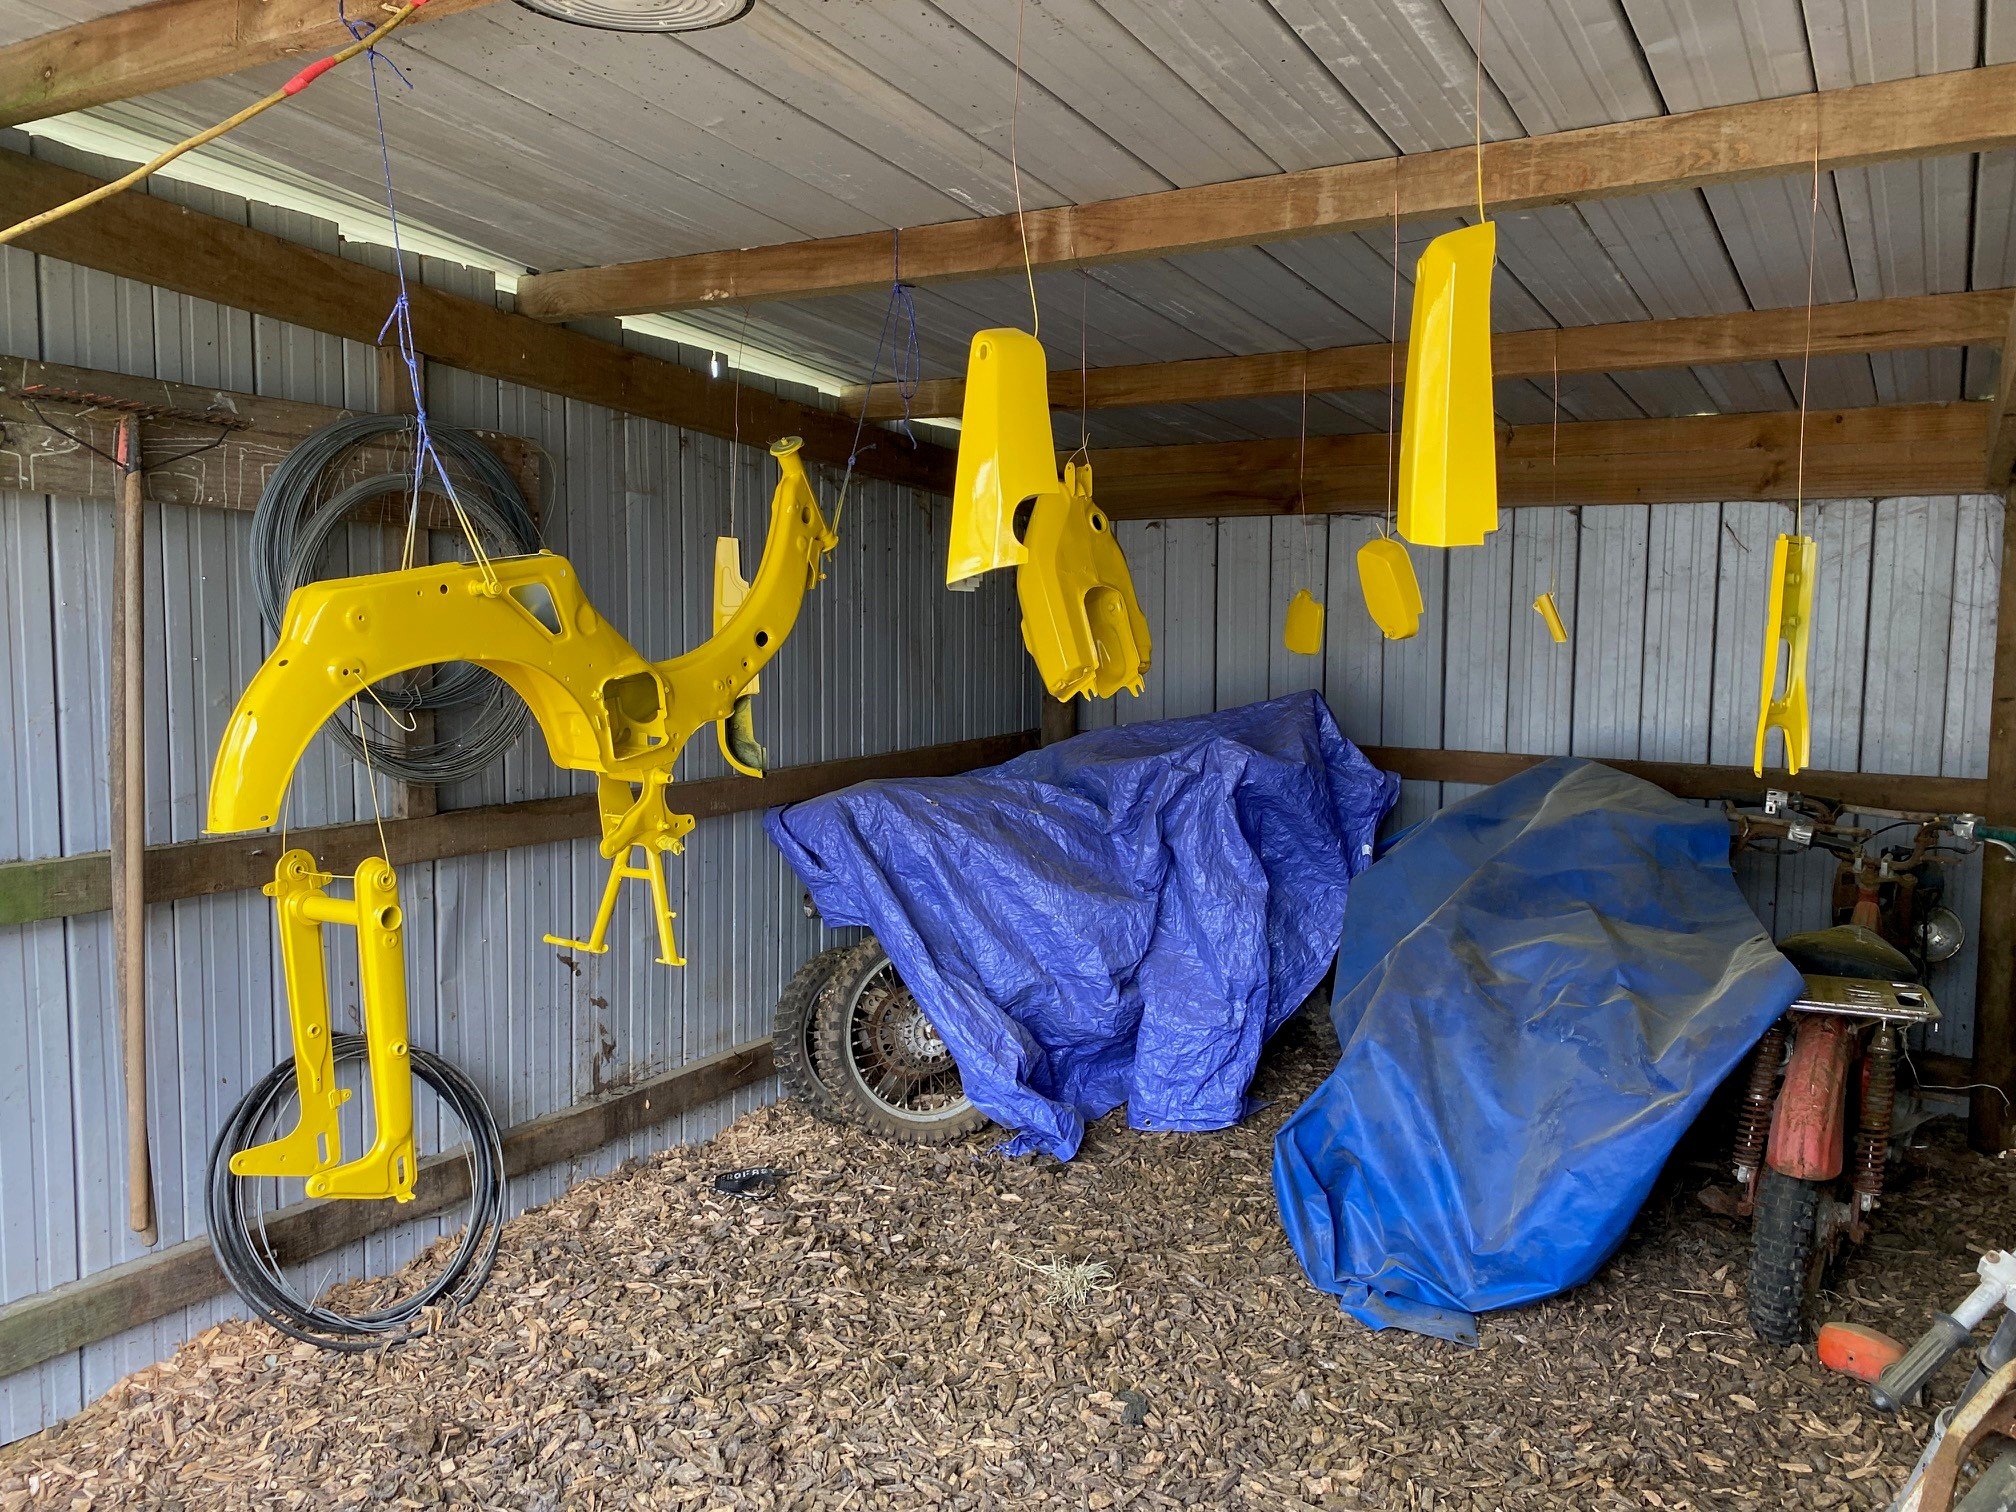
I finally managed to find make time to lay down some primer. Now its sanding time I suppose The eagle eyed viewer may notice that painting it with the center stand installed is a bit of an odd thing to do. This is because the mounting shaft is bent, so the installation is permanent. I guess that also means it will be colour matched to the frame, also an odd thing to do...
1 point
-
Wiper switch turned up today. All 5 points select solidly, they are pretty bulletproof so no further testing will be done until i fit it and it doesn't work. And that could be years away.1 point
-
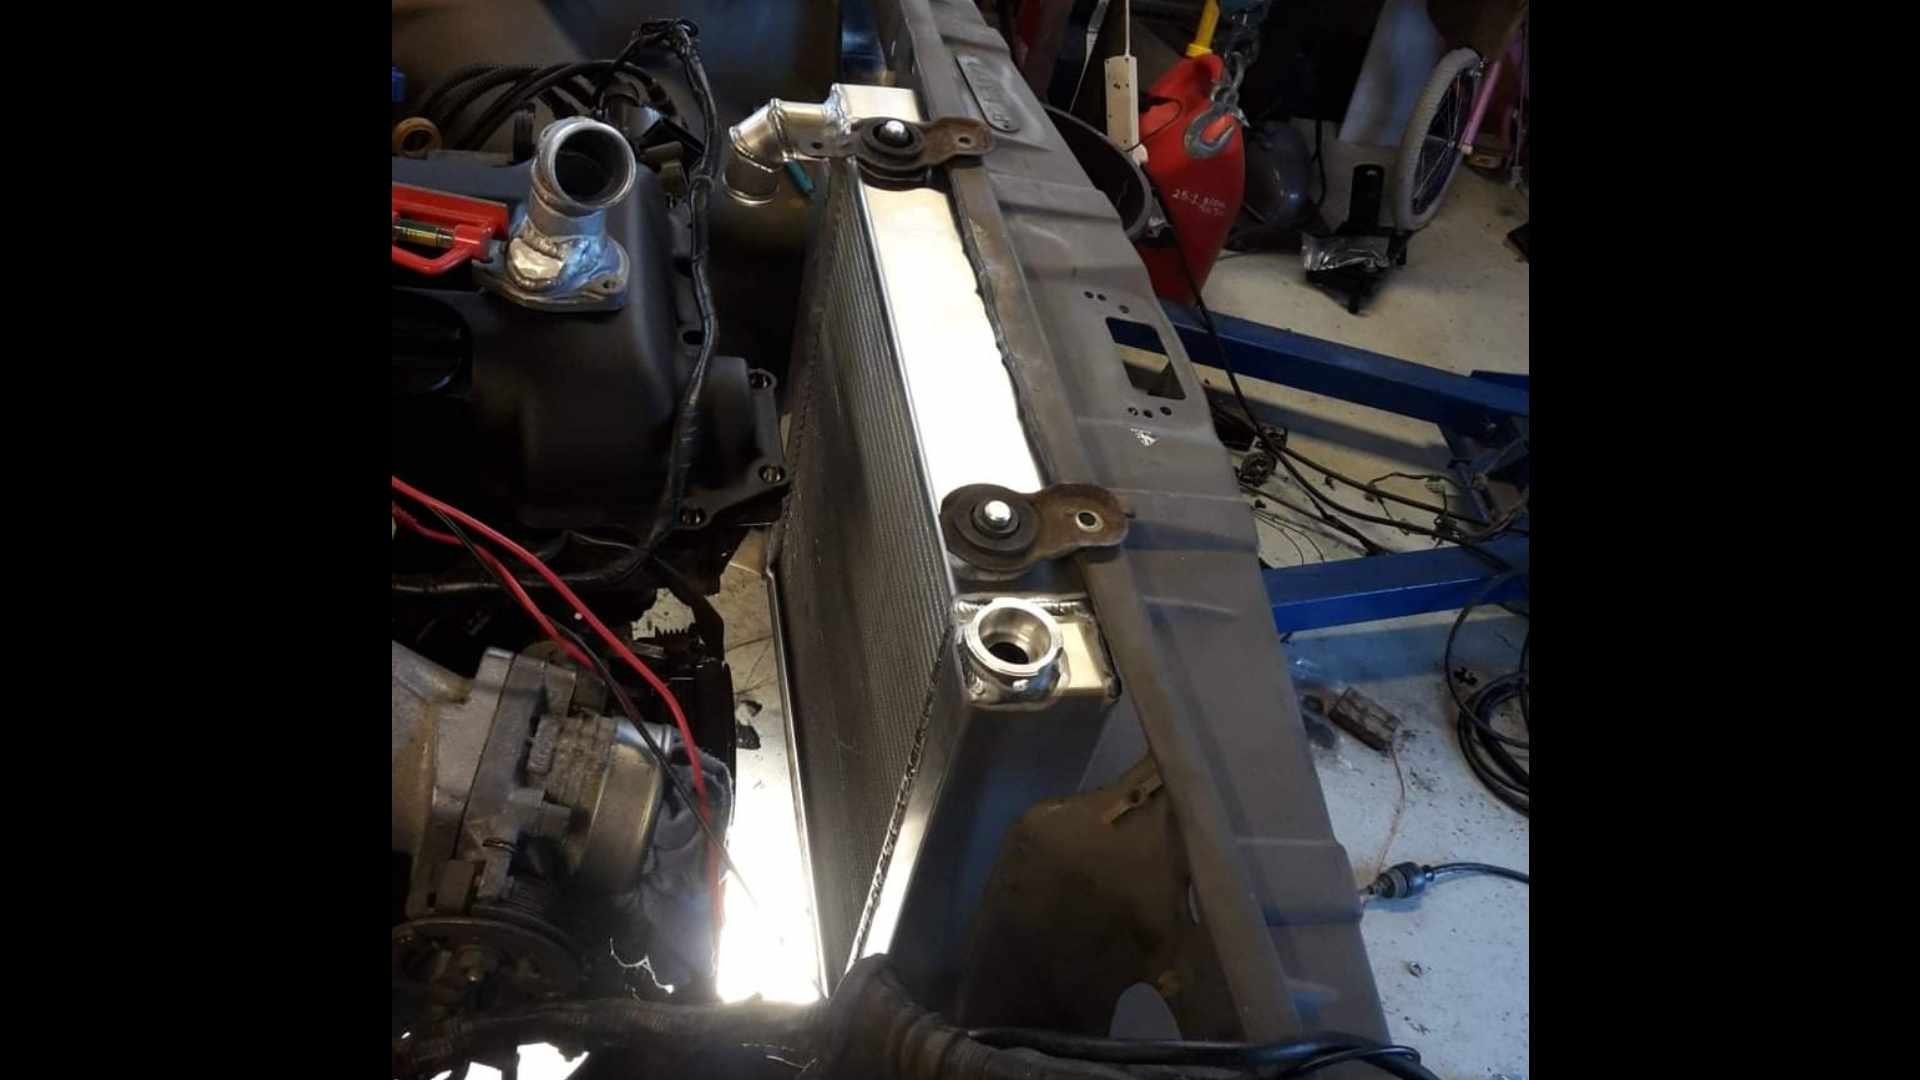
The donor front/radiator support panel came from a farm ute, which had had an L16 repower. Some butcher had gas cut the radiator supporr panel out so they could fit the larger L16 radiator. I tidied this up as best i could (not very well) and got a mate to make me a custom Aluminum radiator to fit in the space i had.
1 point
-
Package from Japan! Hehe Hehehe Hehehehehe1 point
-
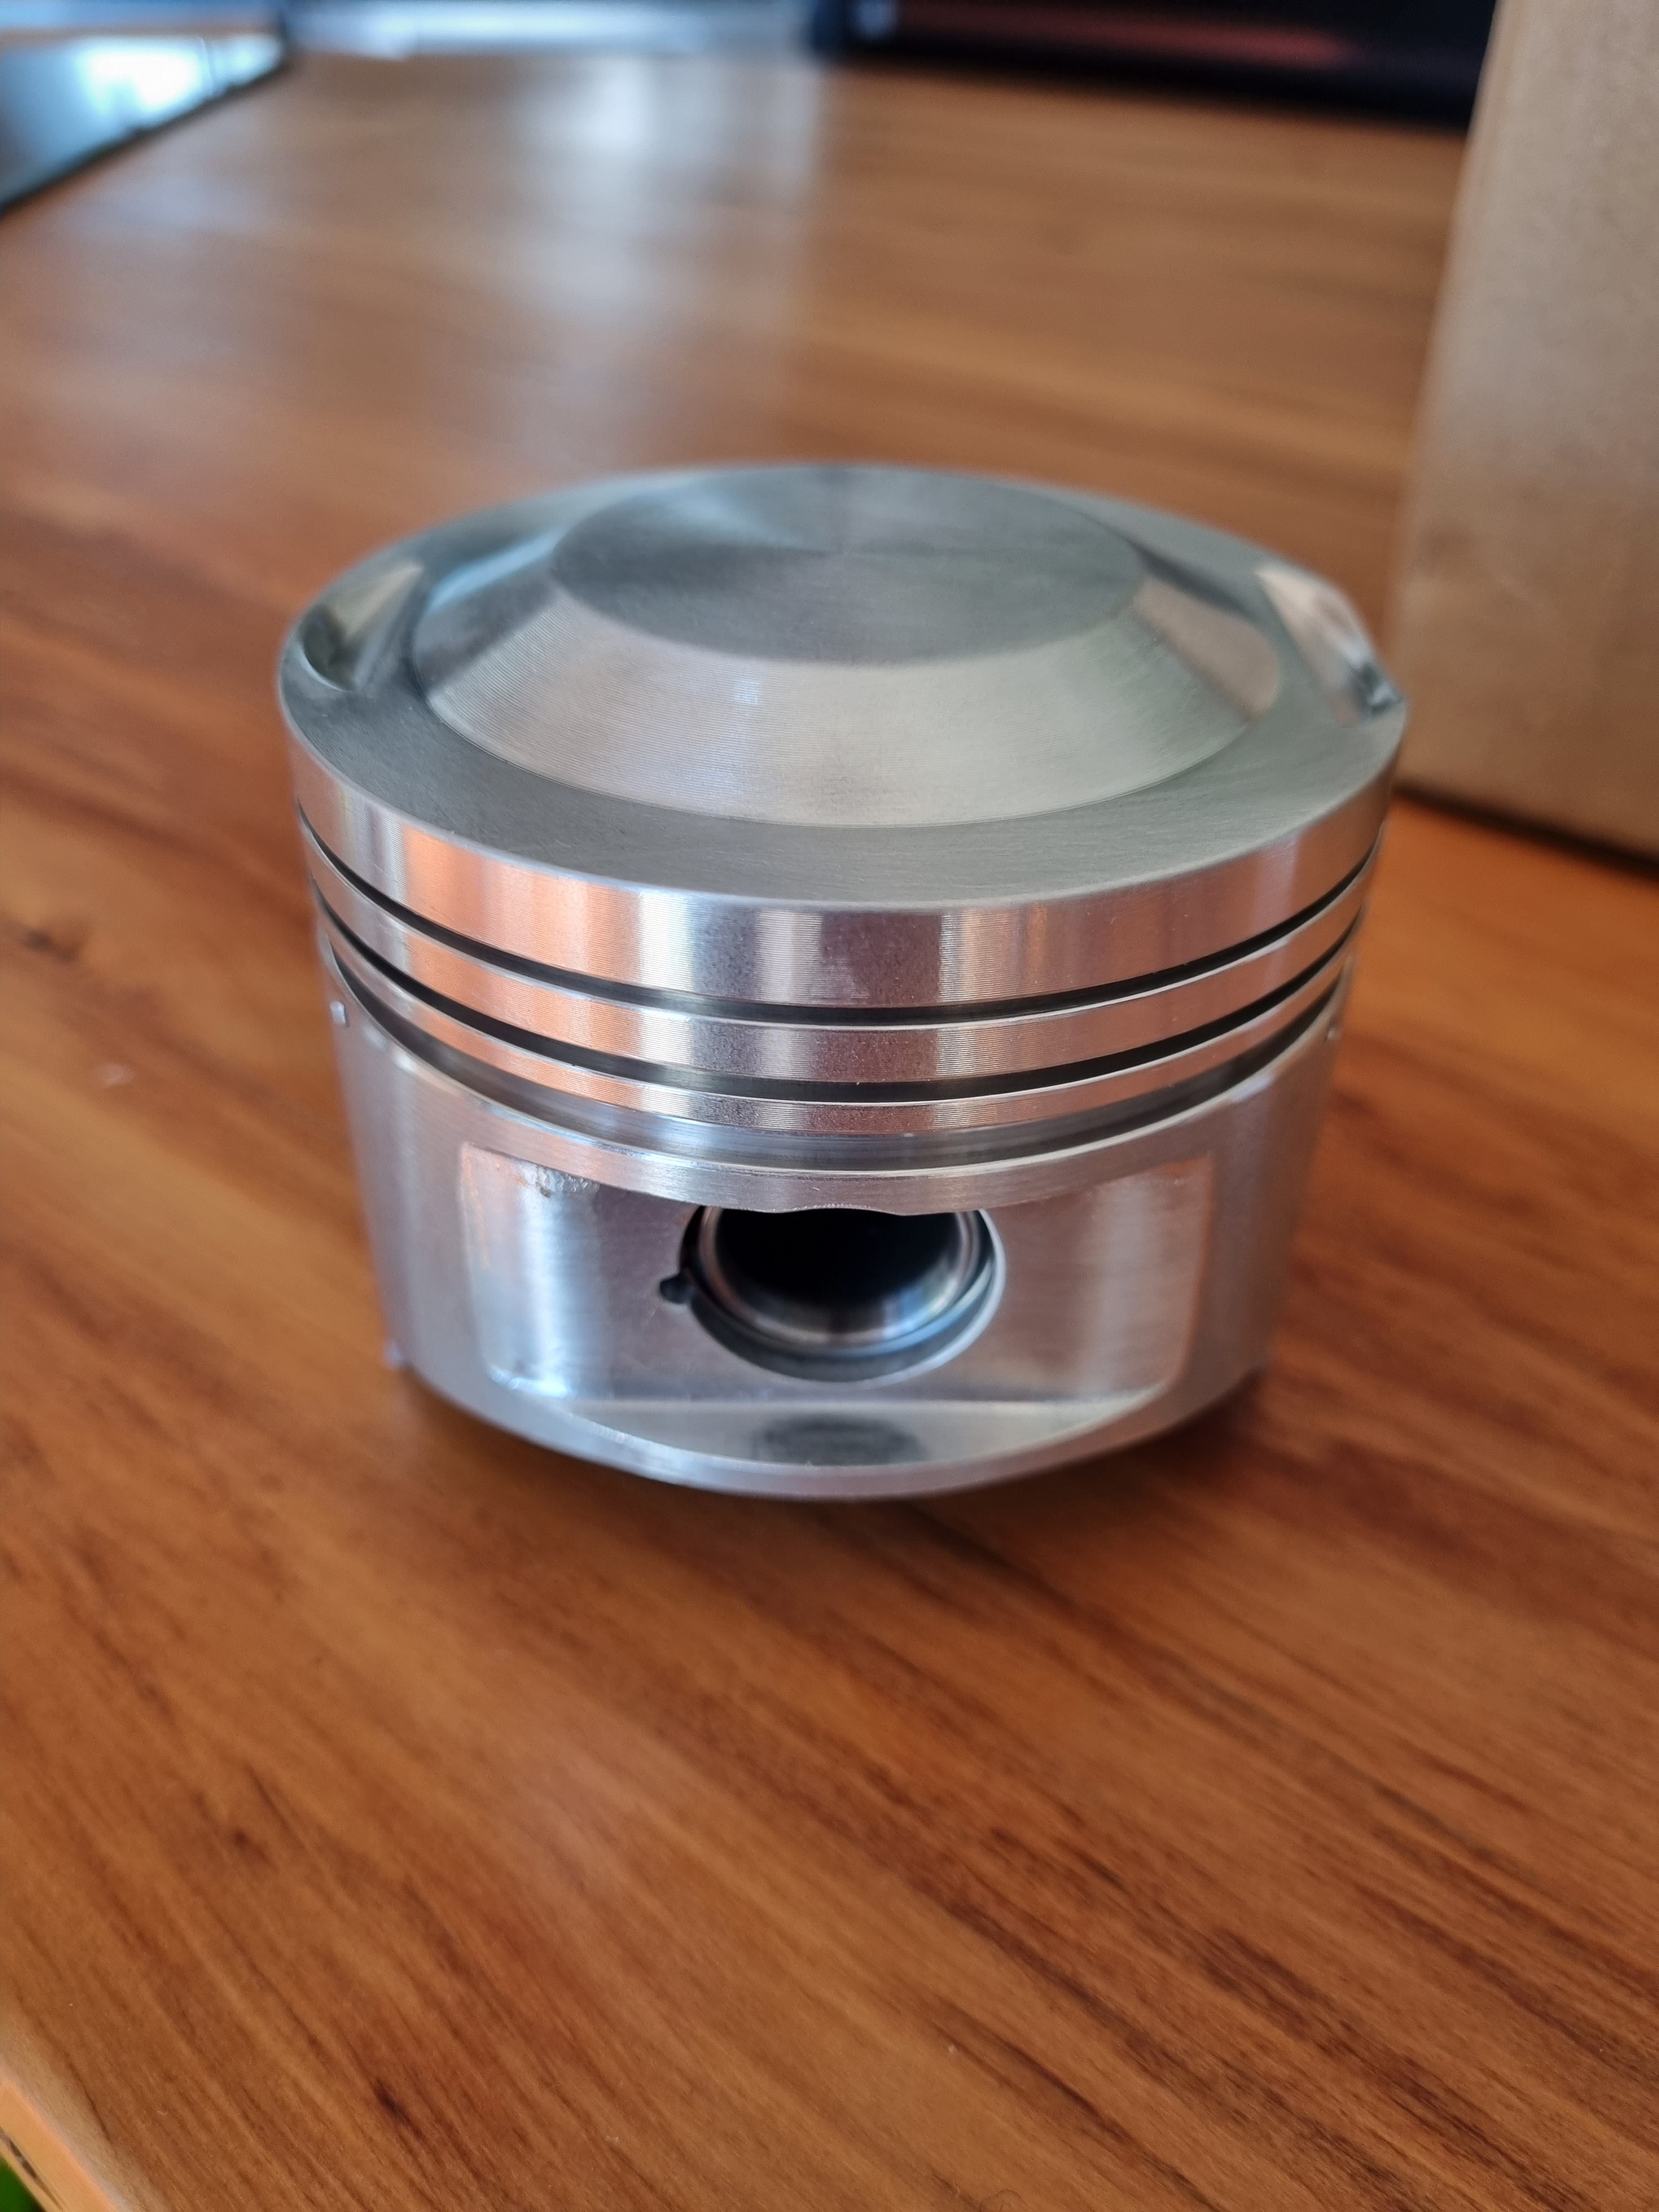
It's only taken special pistons in Melbourne 7 months to make a set of pistons for this.
1 point
-
Every paint shop in nz will have Toyota codes, for a small amount it will be around $100 I think it was about 80 for 500ml of matched lacquer in cream And about $240 for 2L of matched basecoat in fancy metallic with all the pearl in it. Most places have Toyota white for cheap, might not be that white1 point
-
Barbs and hose clamps will work fine. You really should have some line between the compressor and water trap to let the air cool down and the water condense.1 point


This leaderboard is set to Auckland/GMT+12:00