
Leaderboard


Popular Content
Showing content with the highest reputation on 09/18/20 in all areas
-
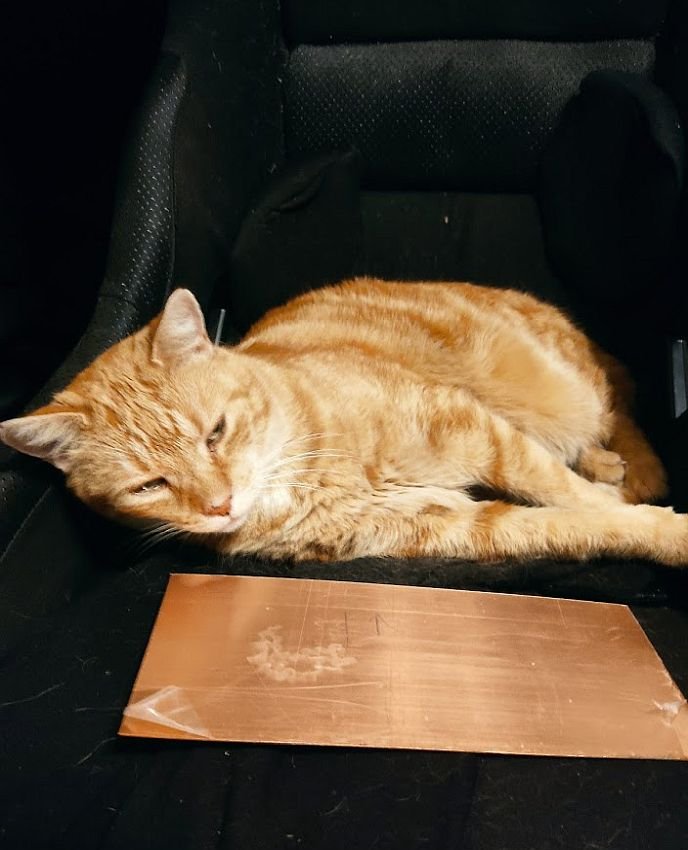
Another 2 done. Worked well. I think 4 paper weights is enough for now. Time to move on to something big! For reference of where it goes. Houses cam gearing.10 points
-
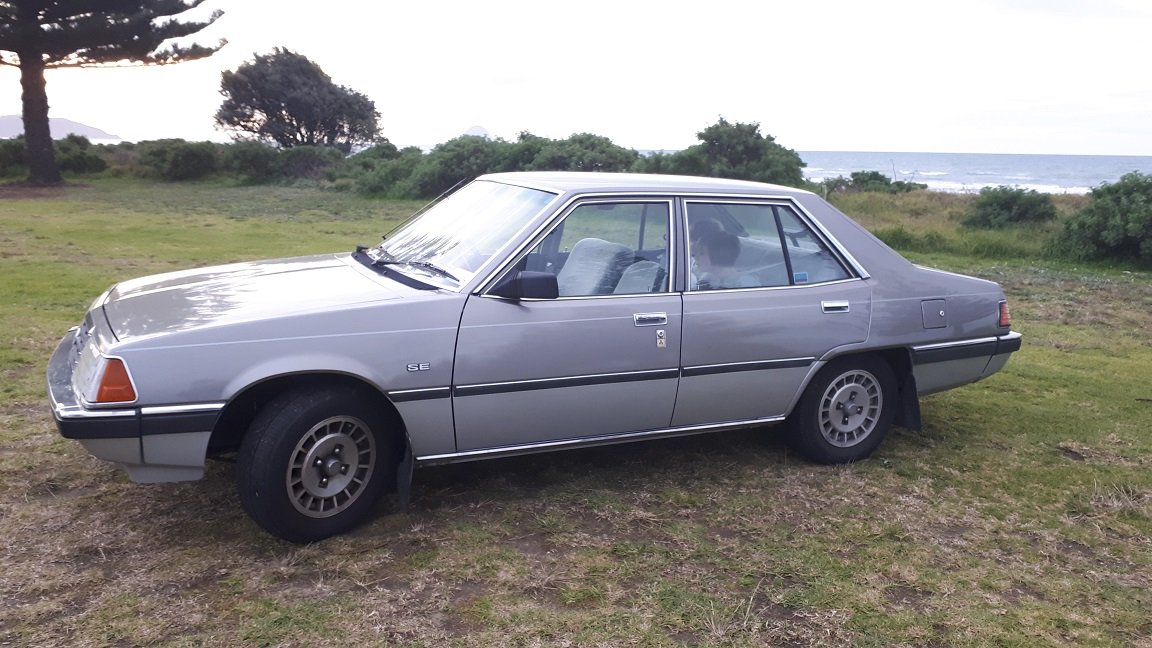
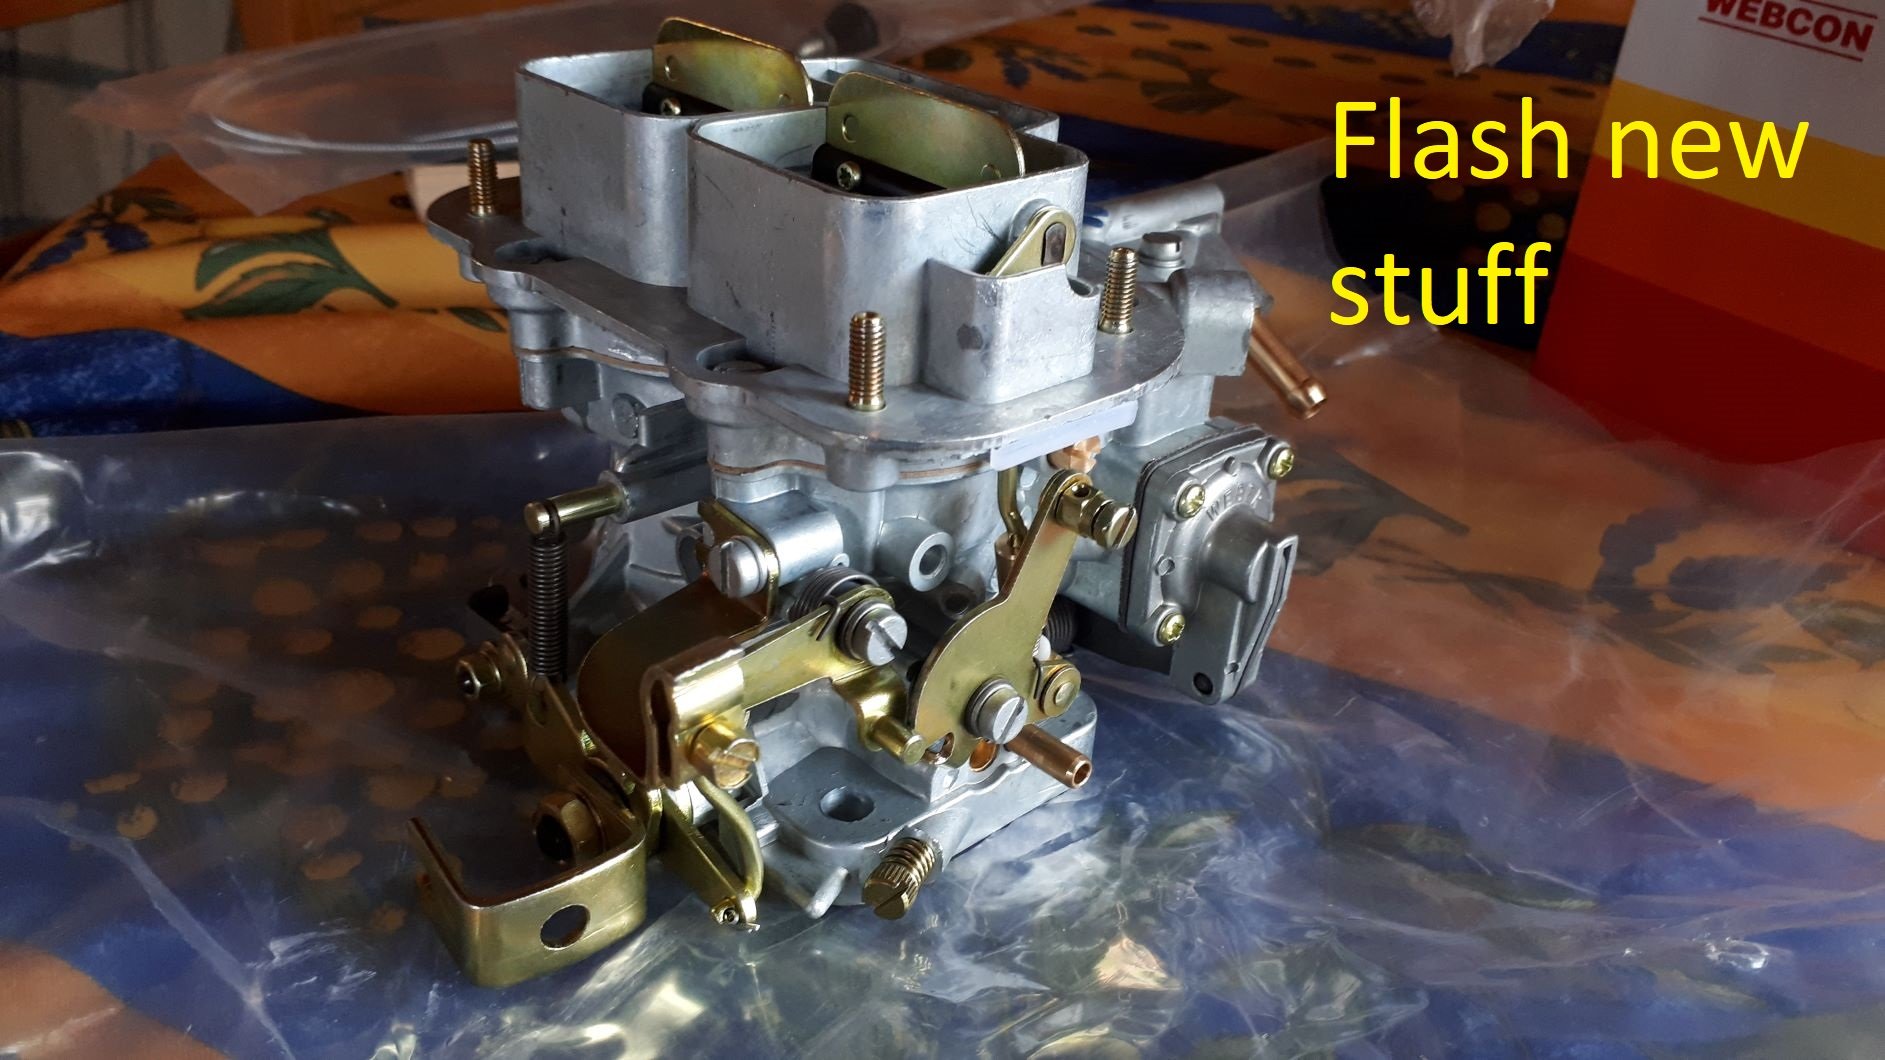
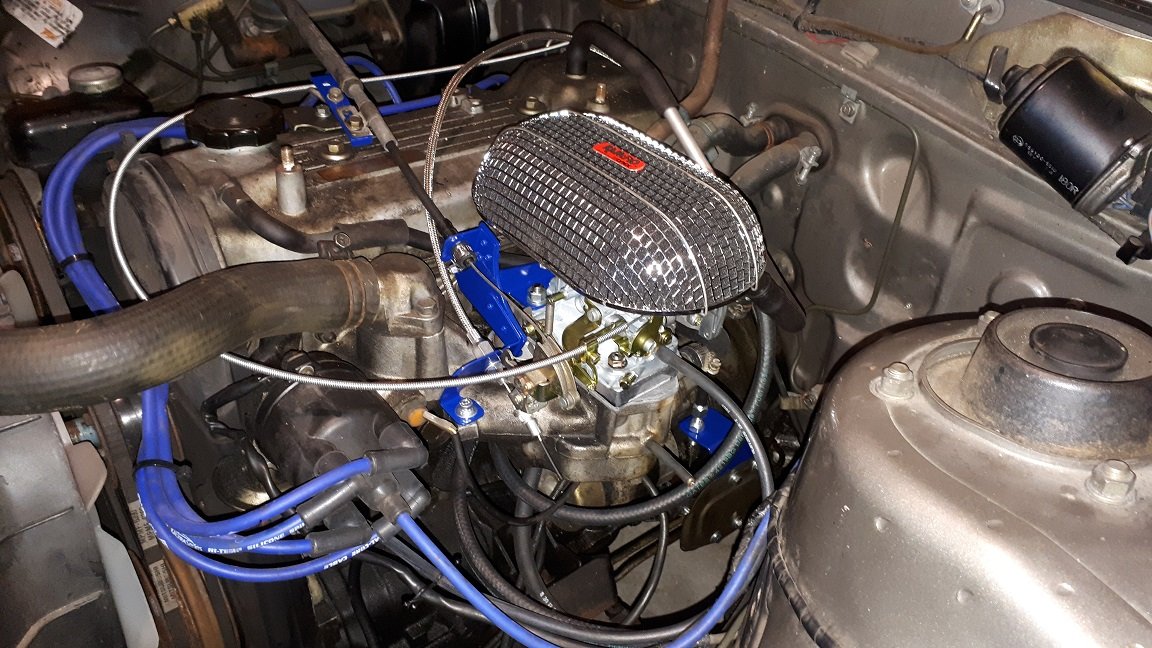
Well I haven't been very good at keeping you all up to date with what's going on in my shed lately so I thought I should try a little harder and share this with you. A few weeks ago I spotted this 1982 Sigma SE on the side of the road in Ohope and decided that it had to be mine. It ran like crap, but it is very tidy and most importantly is rust free. I have been busy working on getting it running properly. The car was on LPG for many years and the factory carb was pretty much useless. I have fixed this problem by installing a 32/36 Weber and she runs sweet now. Photos and details to follow. Discuss the project and/or mock me for my ridiculous life choices here
 9 points
 -
Been a long time no update but anyway thanks to Stu and Sheepers and Nick the Sparky this is where we are at. Weird. Went pretty smoothly, it's spooging a bit of oil out the breathers on the top but I guess once it's run in that'll settle down or it'll just keep doing it cos 4AG life. I have 5 forward gears, a clutch that works and some brakes so with a few hours checking things and tidying up small jobs there's nothing stopping me from going for a wee drive. Oh the thermostat doesn't seem to be opening but that's not really a big deal to sort out hopefully, it might just be old and stuck, or new and stuck, as the case is.9 points
-
So yeah I don't really update this at all, not much has happened since my last post in 2017. Had to use Google to find this build thread because OS search sucks. For the first time in over 5 years this is now living in the same house where I live. Amazing. I might even use it over summer. It doesn't fit down my driveway though so I'll have to make a small ramp to avoid it getting bellied. Was a three plank job to get it down today when it arrived. I might do some stuff to it as well. Check back in 2023.
8 points
-
I've started collecting and making parts for this POS, to convert the rear to independent suspension, upgrade the front to the braked hubs, and get long travel shocks all round. Bits for the spool/centre drive thing, new taper lock sprocket, front disc off a CB250, and a flex plate and starter from a MAZDA 3. Also a 30mm shaft and bearings for it to live on, I got some MX5 axles and hubs too. The axles are quite small and light, and have a flanged end, so perfect for this, The chunk of hollow bar is to make new hubs, as the MX5 hubs are too big to fit in the quad bike rims. So I machined up some hubs that use the MX5 bearings, and will make doofers to connect to the suspension arms. I also made some adapters to go from the MX5 4x100 pcd to Yamahas ATV 115x4 pcd. I found some I had started making (can't remember what for?) out of 6mm plate, so hopefully they are strong enough, I also got a few 16 and 20mm rod ends for the front end, as that's how the barracuda hubs attach, Still lots to do, but slowly chipping away at it.7 points
-
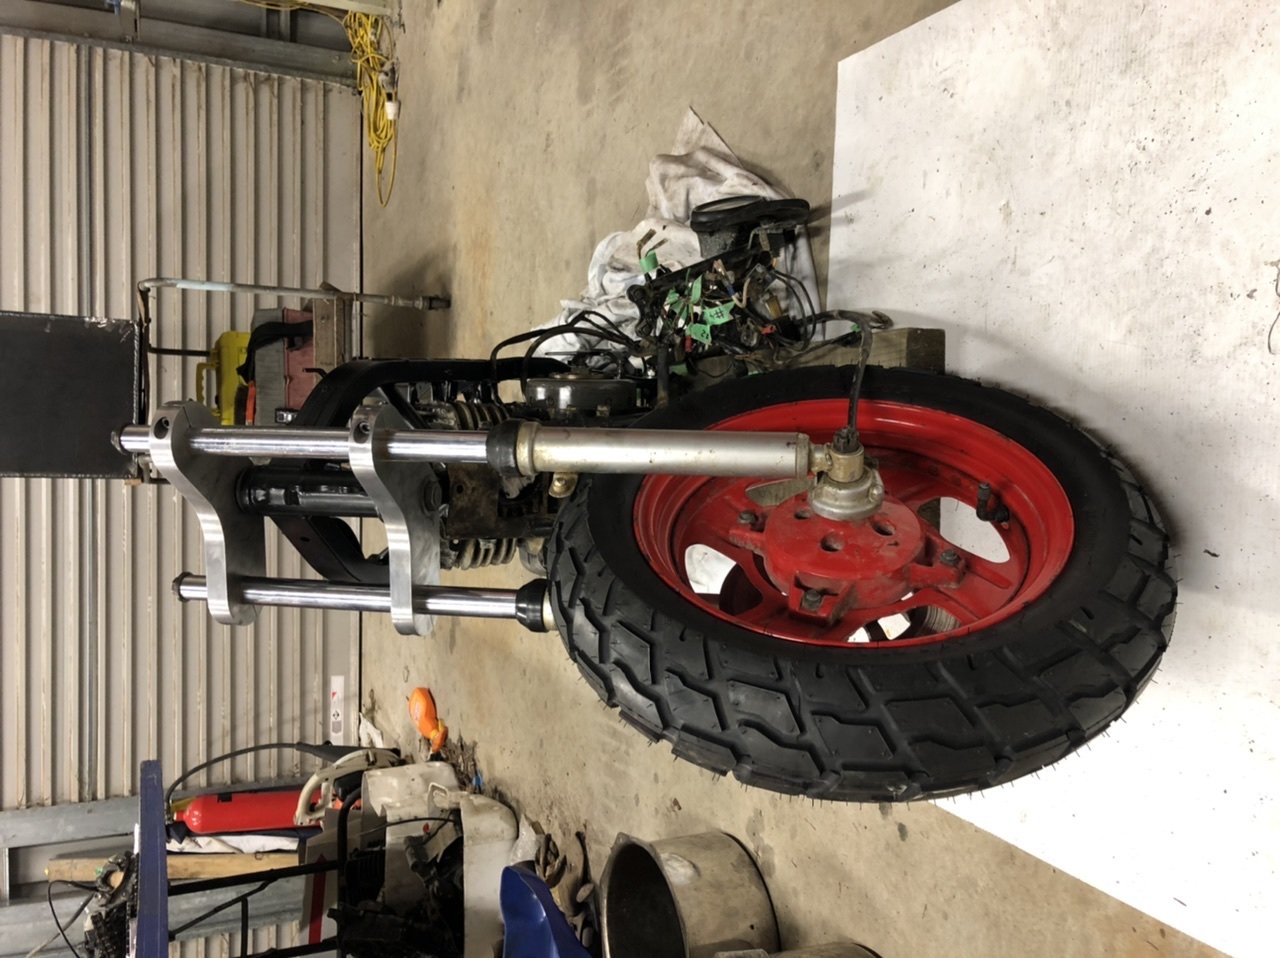
Yeah its pretty big. Banana for scale. Also mm for scale. Its about 1020mm long. About 700mm tall7 points
-
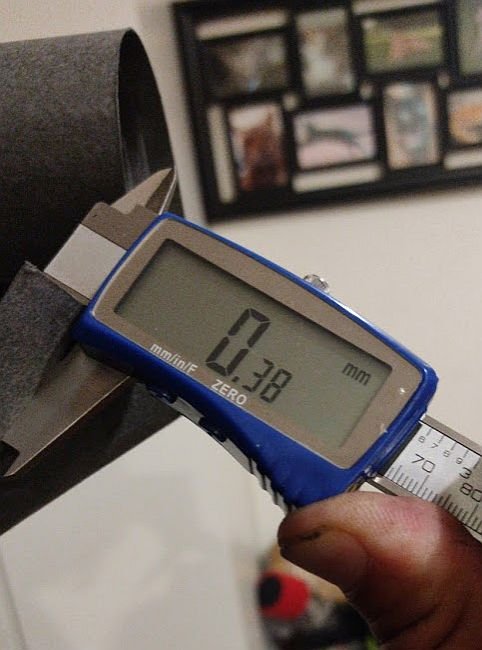
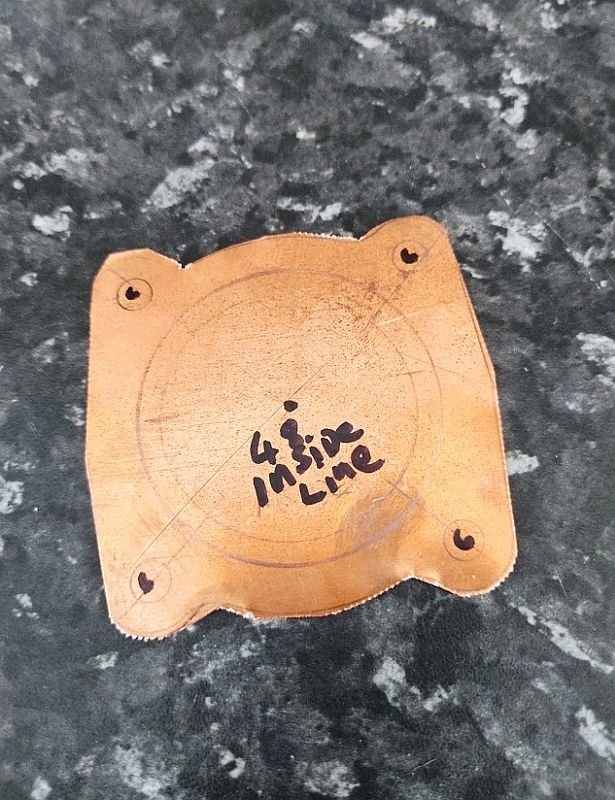
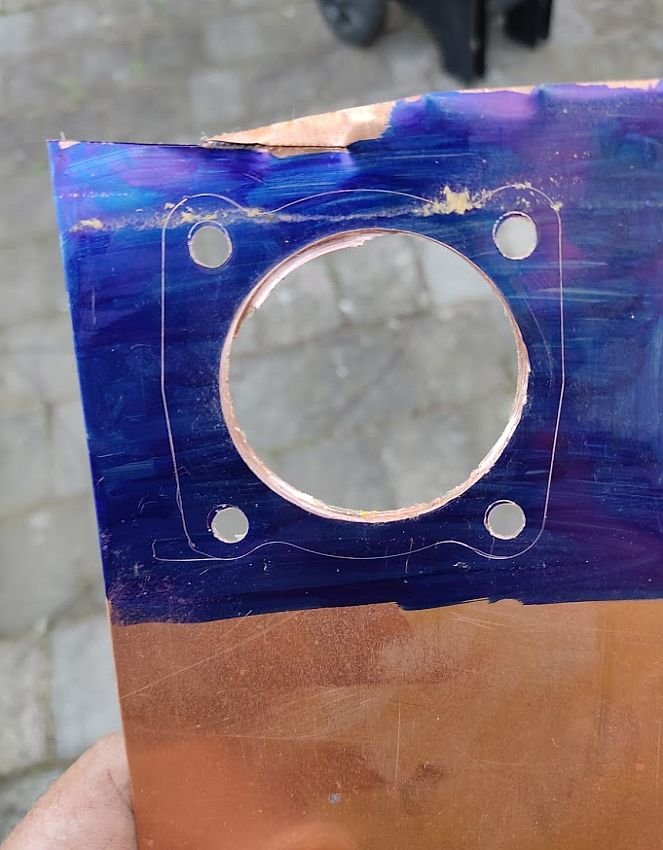
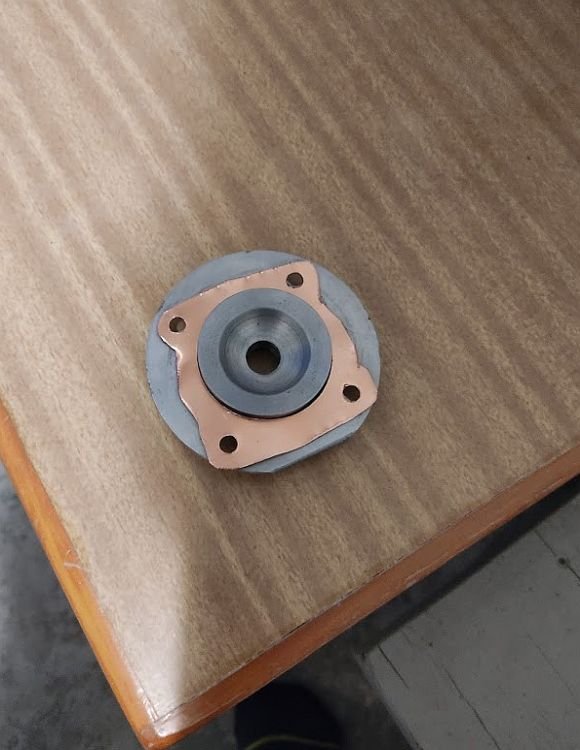
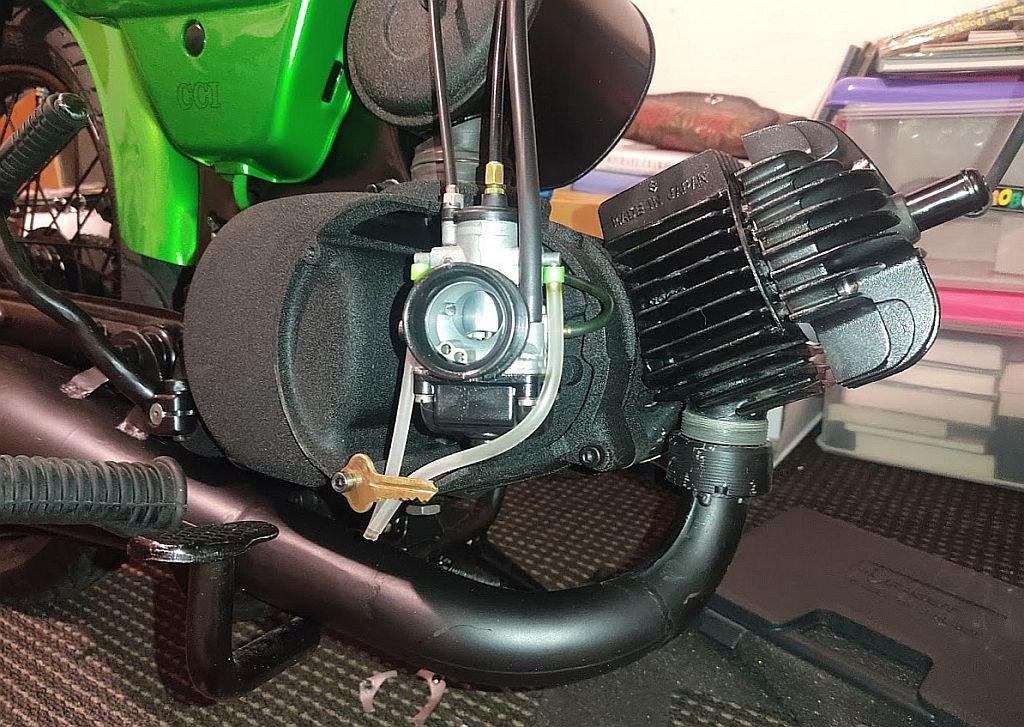
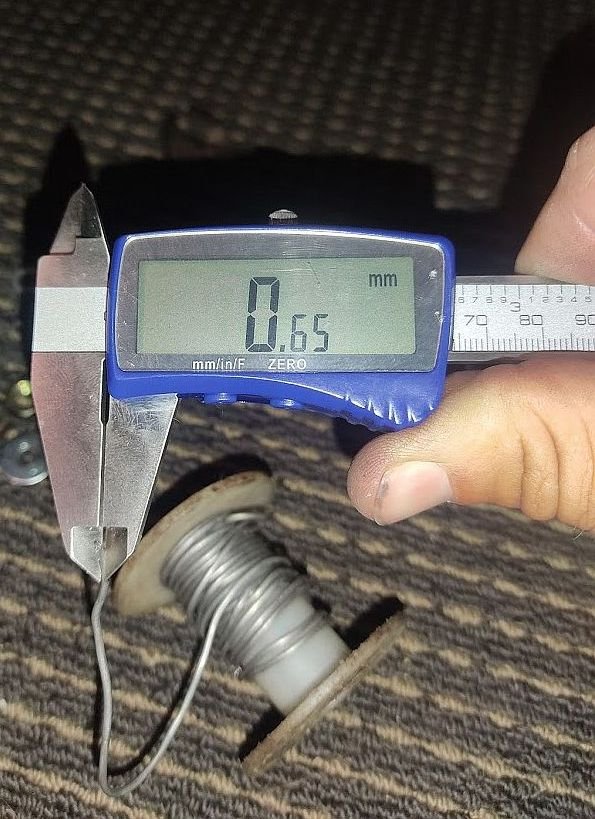
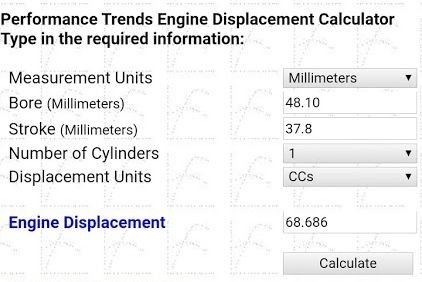
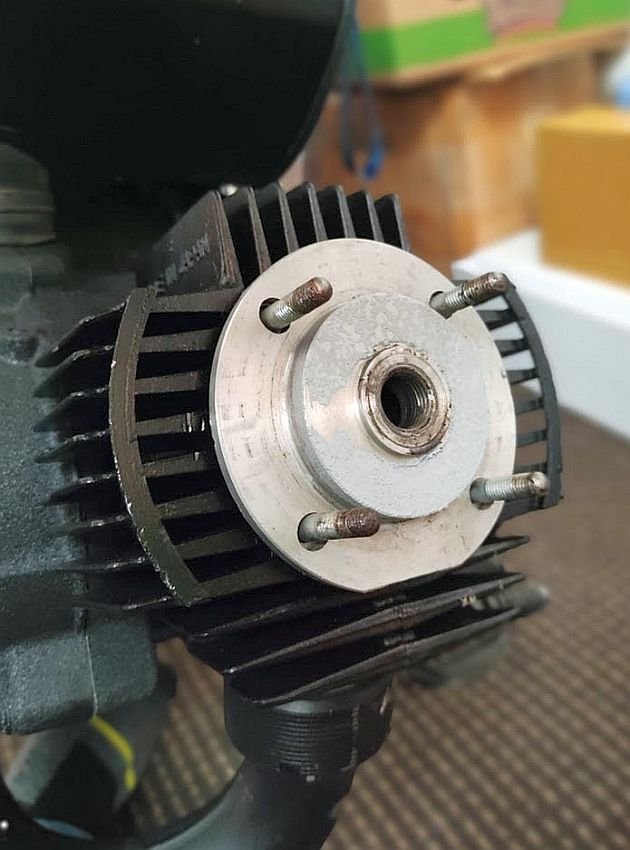
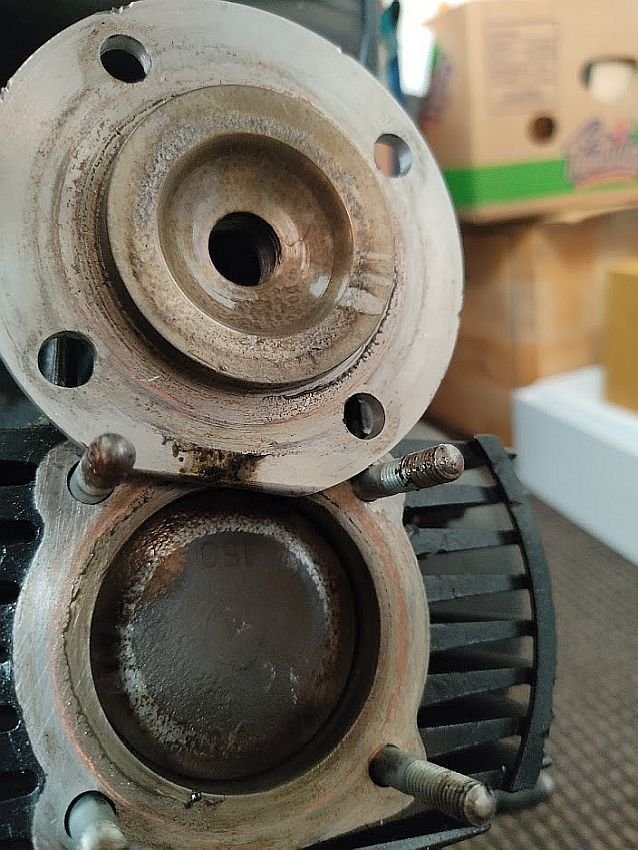
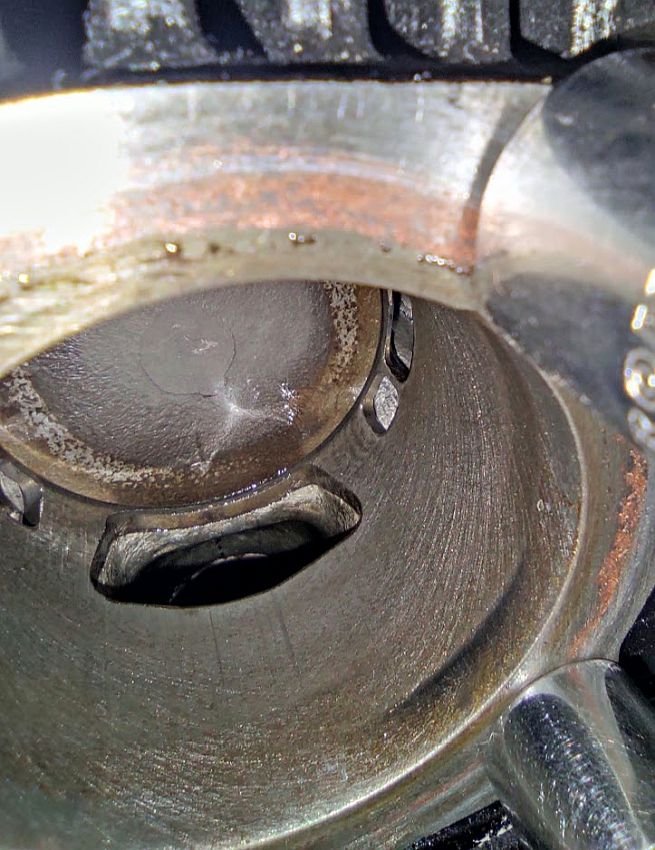
Genuine Suzuki base gasket I removed measured up at bang on .50, found a roll of .40 paper I had kicking about and squashed a bit and got this .50 - .12 = .38, couldn't have gone better if I'd planned it! Cut a gasket, then played with shimming the head to find exactly what thickness I needed gasket wise .75 was indeed about right giving a squish of bang on .65 Scrounged up an off-cut of copper, measures at .76 Spent a while marking out a gasket, took my time trimming it the best I could with snips Then promptly fucked it cutting the inside, attempt 2 or 3 went a lot better, not great but good enough for now. Next time I think I'll just bite the bullet and get one waterjet cut!! Test fit gave a squish of .67, I annealed the gasket with a MAPP torch, wanged it back on and torqued it up, checked squish and got .64, mint! Not so mint was dropping a nut while the head was off and it falling into the cylinder, the piston was at BDC so it went right down the exhaust port and is now in the expansion chamber ha. Oh yeah, and I finally measured up and ran the numbers 68.68cc of fury!
7 points
-
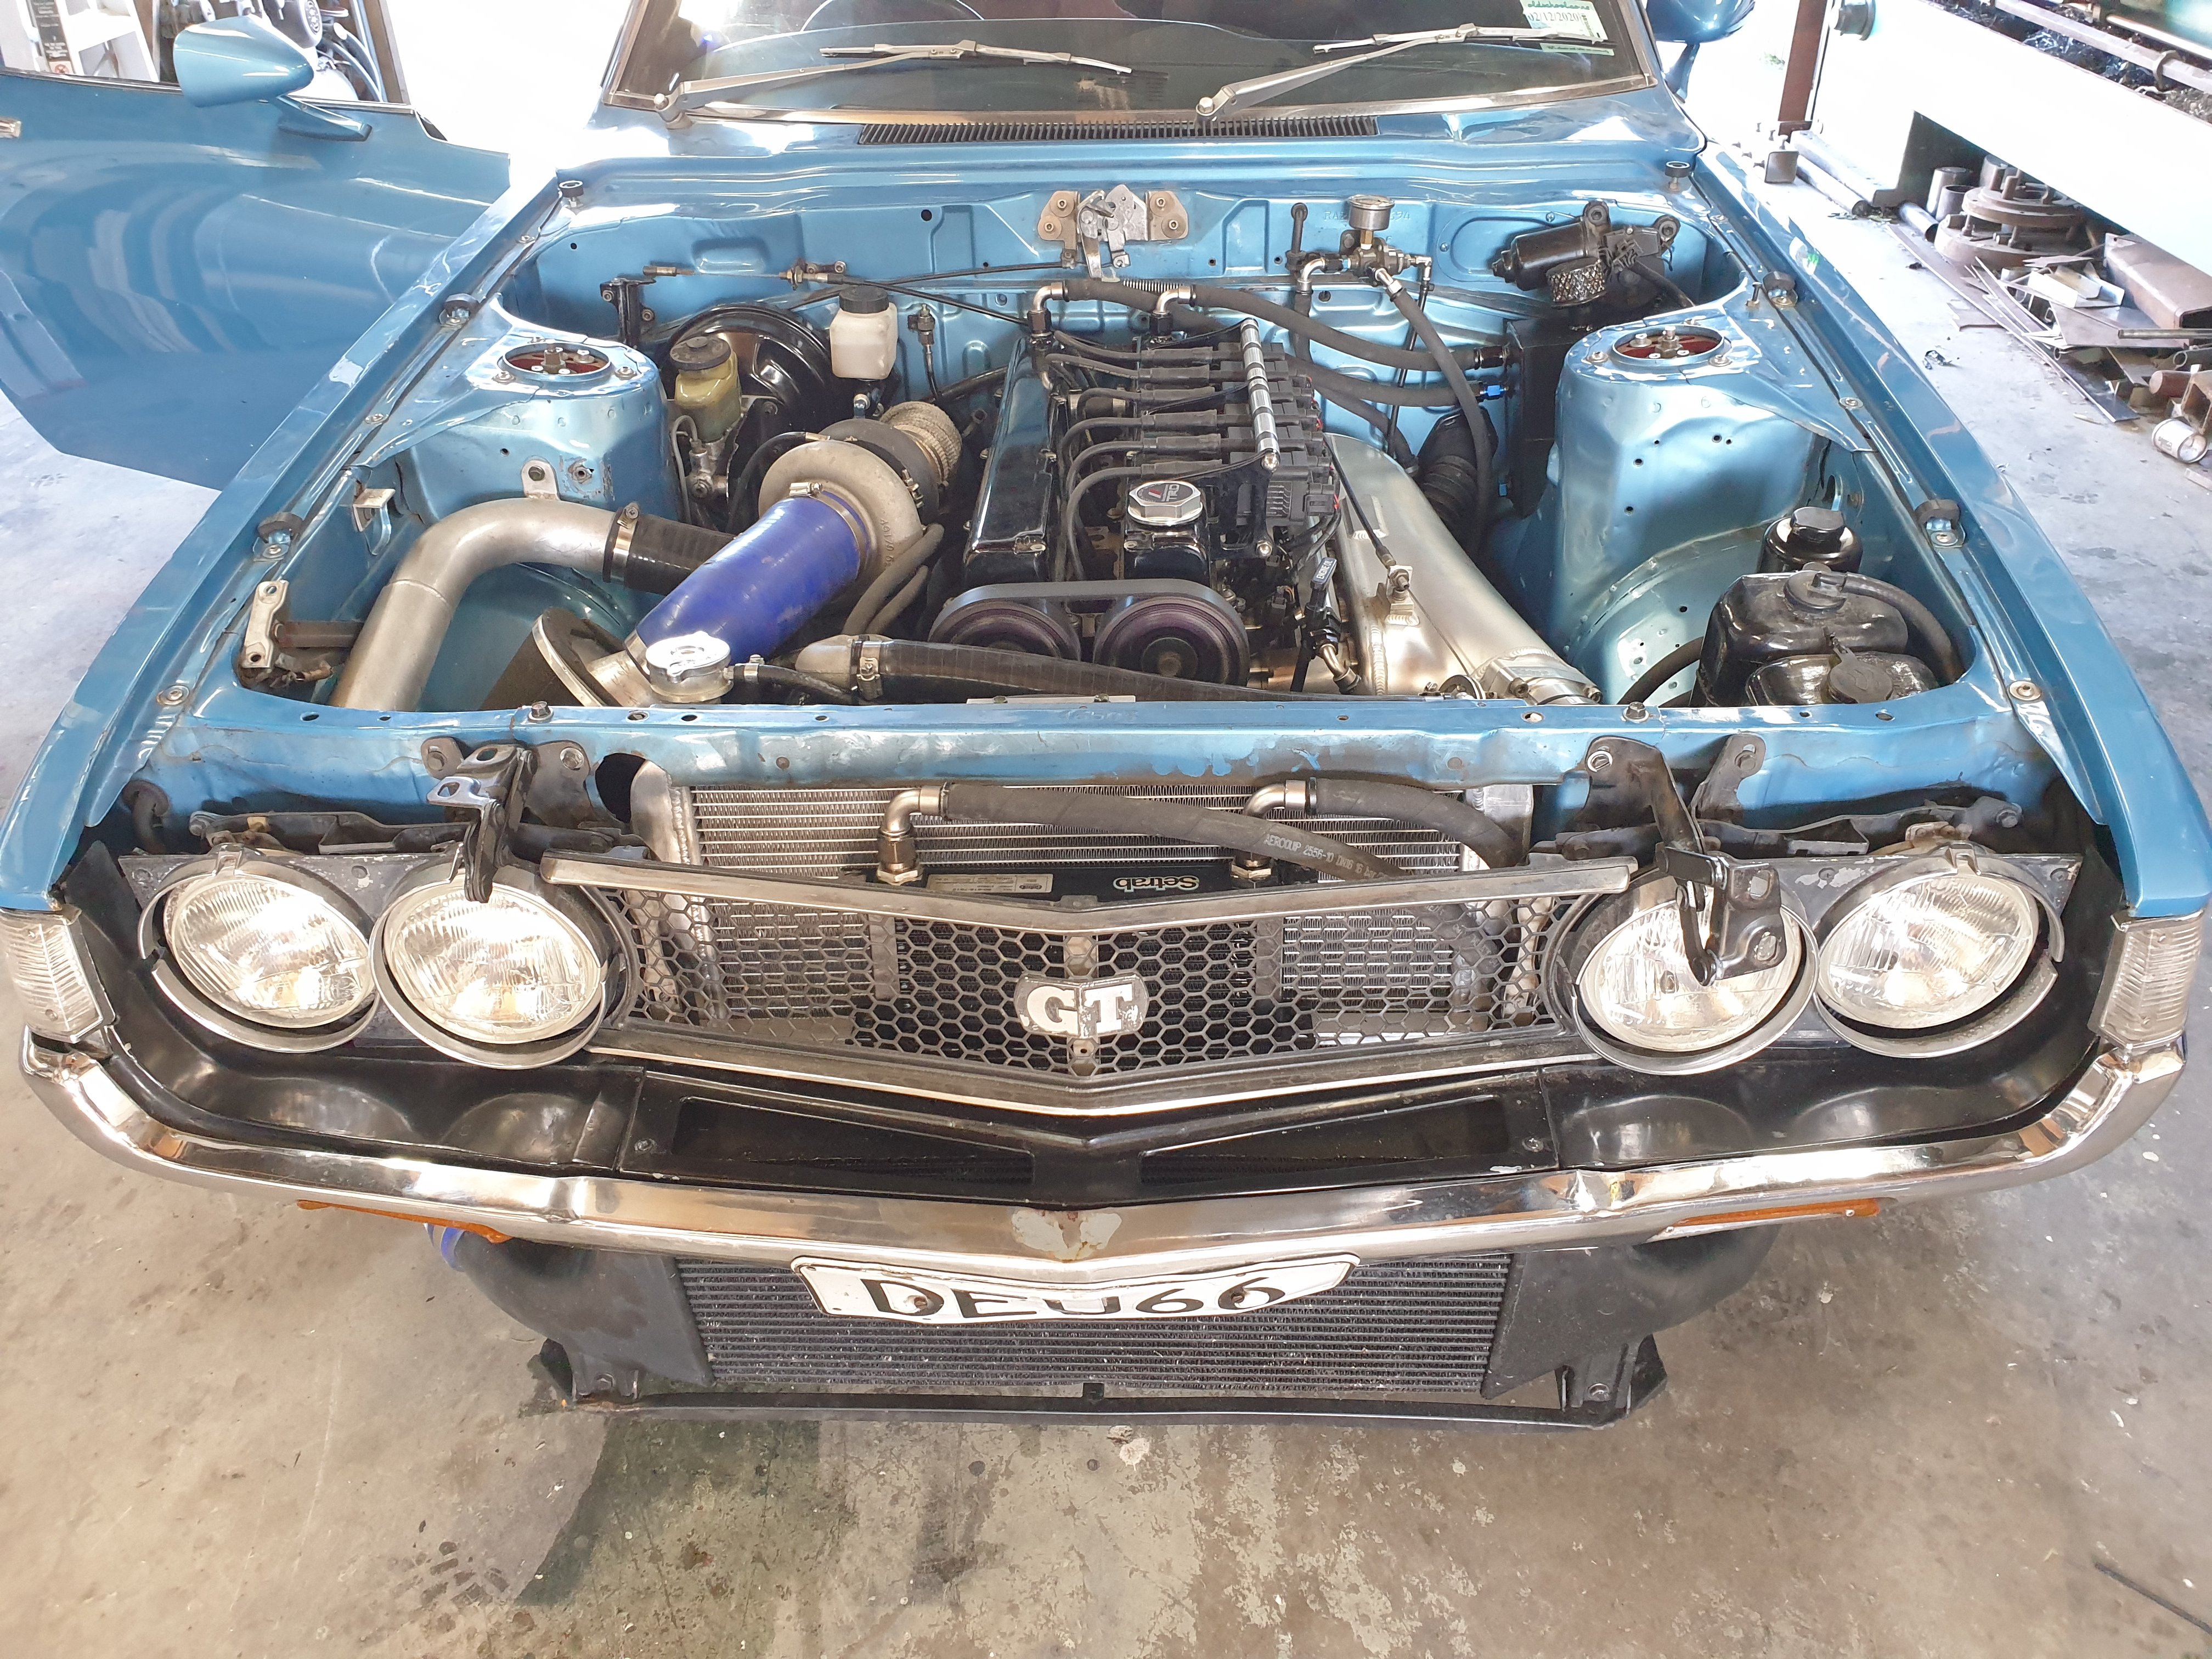
Discussion thread Hey team.Thought I’d spark up a project thread for old bluey Has been in storage for years.Last Wof reg in 2014. Got it back home now as I’ve built a shed.There must’ve been a rat living in the engine bay rat shit everywhere. Cleaned all that out and degreased motor. Has a fuel issue .I can get it running if I poor petrol down the carb Otherwise it doesn’t start.Decided I should pull the fuel tank out drain and clean it and check the pickup for blockage That means pulling the rear AC shit out to remove the tank what a mission Current plan is to get it running and drive able Get as low as possible on some old school rims WOF and Reg. There is rust around sunroof and rear windscreen which will need fixing
5 points
-
Found these and thought of your beastie. Just needs more exo (no, no it doesn't)5 points
-
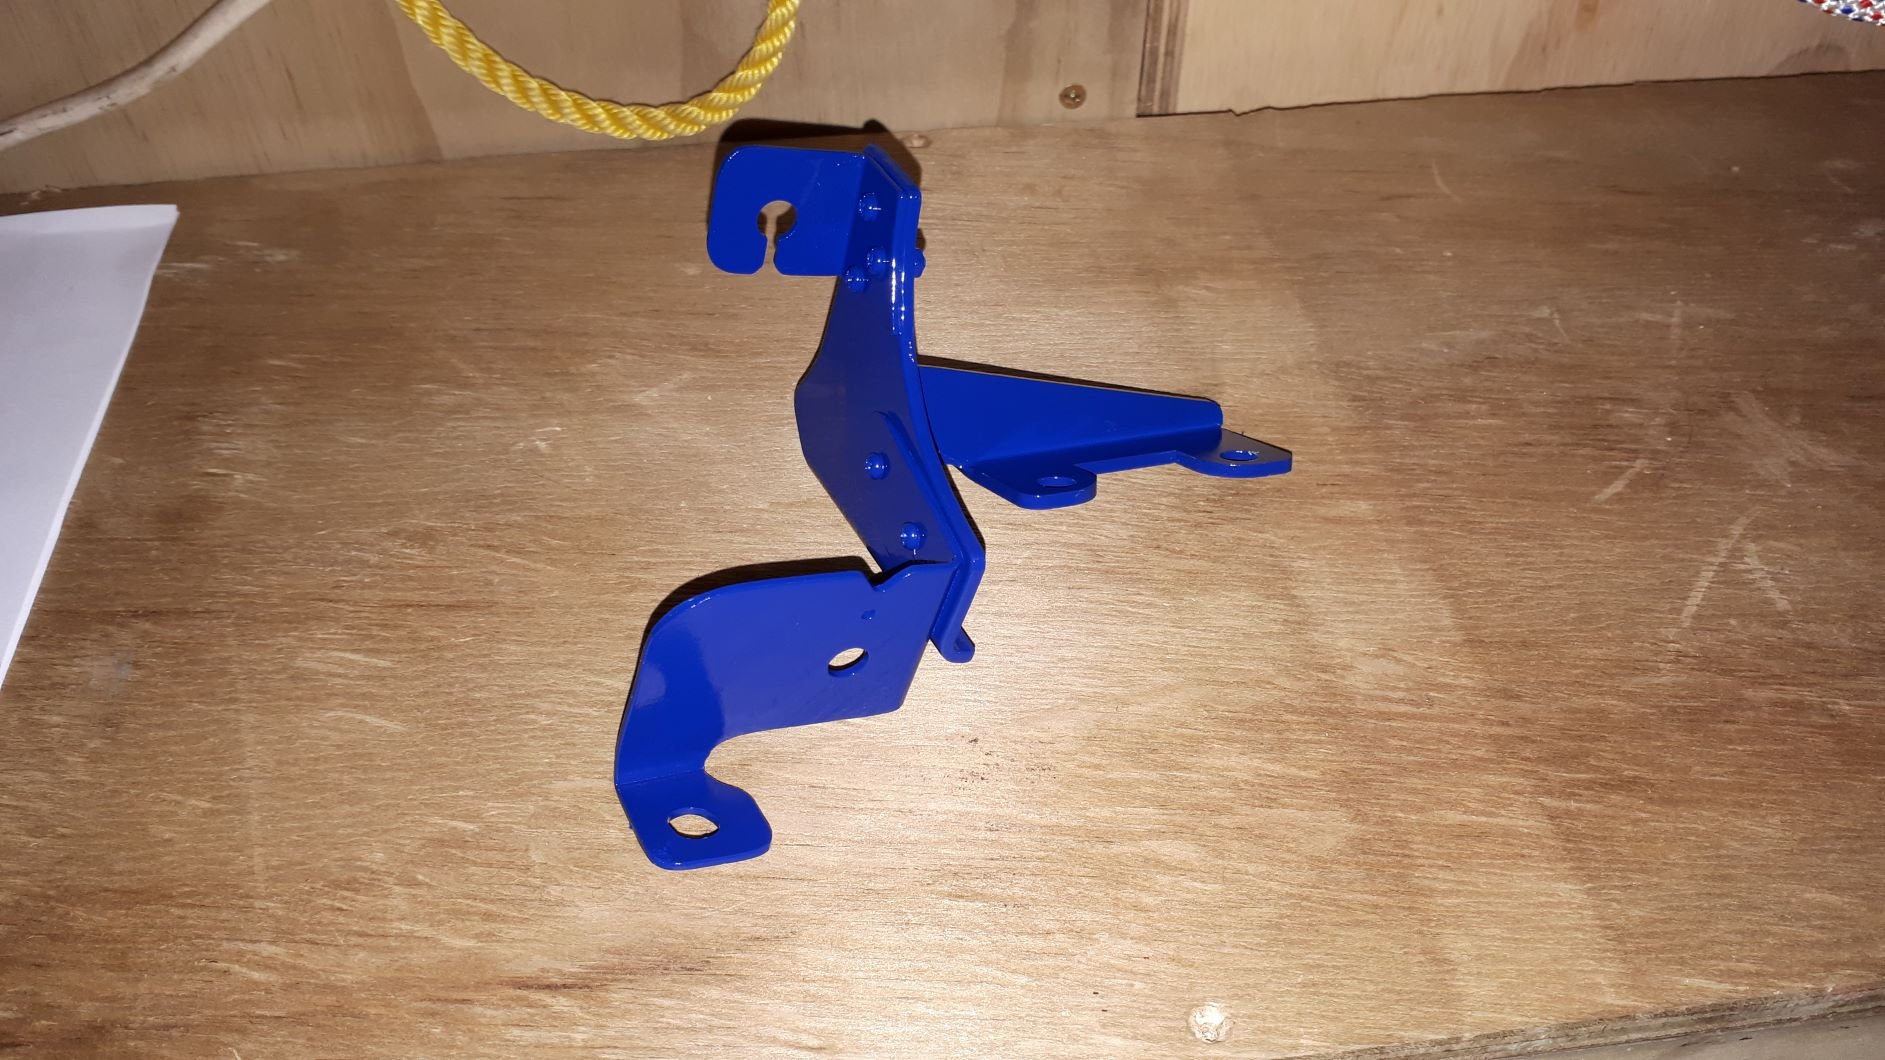
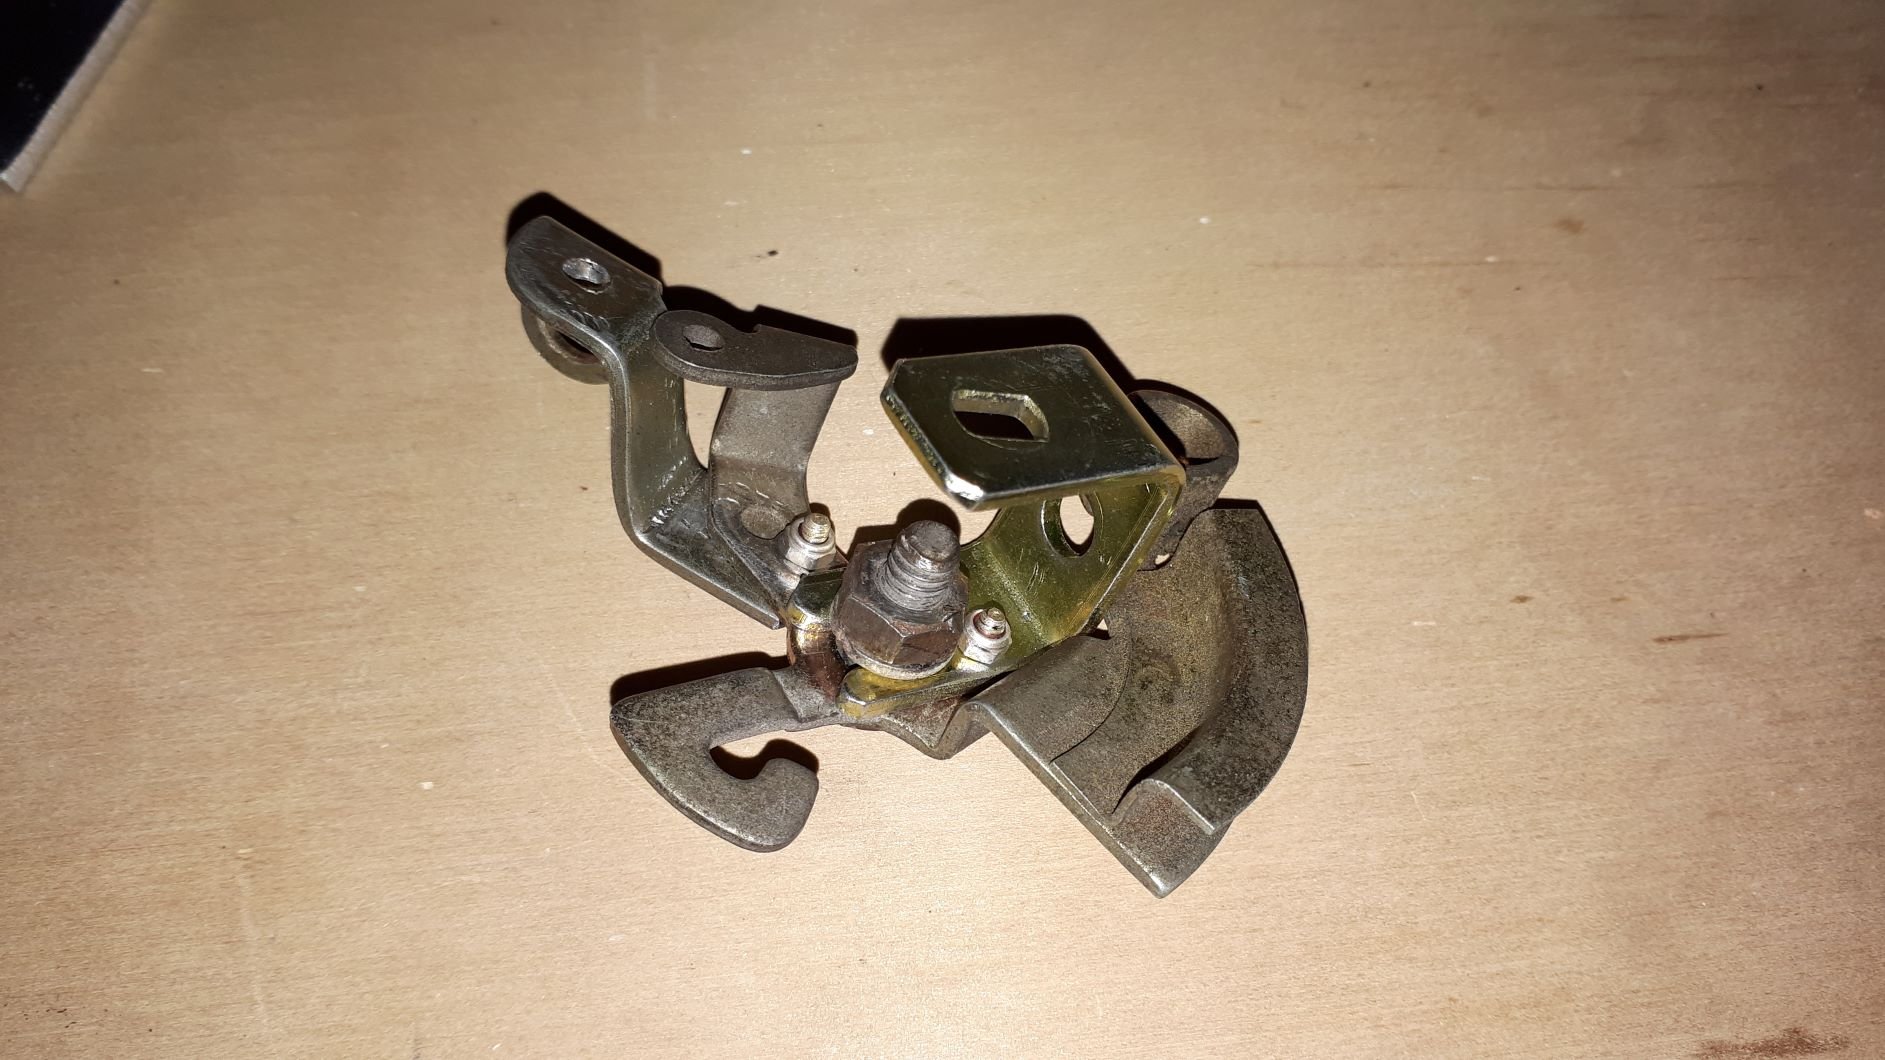
The throttle cable bracket took some figuring out but I got it all working with the factory cable.
4 points
-
And today the bulkhead connector has arrived. So stoked to have this piece of gear.4 points
-
I finally got the spindle running, as expected it was me being a dumbass about the VFD setup parameters. Although for some reason it is only getting speed control from the potentiometer on the VFD. I am ok with this though as it will allow me to experiment with speeds and feeds. I also trammed the spindle to cut straight and flat, good enough to be able to face the table anyways. I also did a hard out calibration of the X and Y axis so it would cut accurately. I also made up a longer control cable for the big servo, that was stressful. This means everything is nicely tucked away in the cable trays now. Next is to buy a cutter and face that table... Then I'll design a vac table and make it. After that it's all cash money.4 points
-
3 points
-
I managed to rework the throttle cable hardware from the original carb so it would work with the Weber. It was a little fiddly but ended up working very well.
3 points
-
Oh I bought an air one off Ali yonks ago too, and have been filing by hand like a chump. Forgot I had it....3 points
-
So update time again so this doesnt go stale. Wiring mockup done. Took exception to the placement of the IAT sensor so have fixed that. Location couldnt be any better than this. Power distribution has also arrived so now the biggest hurdle is having time to put into this. Bulkhead connector should arrive tomorrow so I can start to get the engine harness finished. Really looking forward to see it done.3 points
-
I'll bring the Sierra. Which technically means I'll be walking from about Woolston.2 points
-
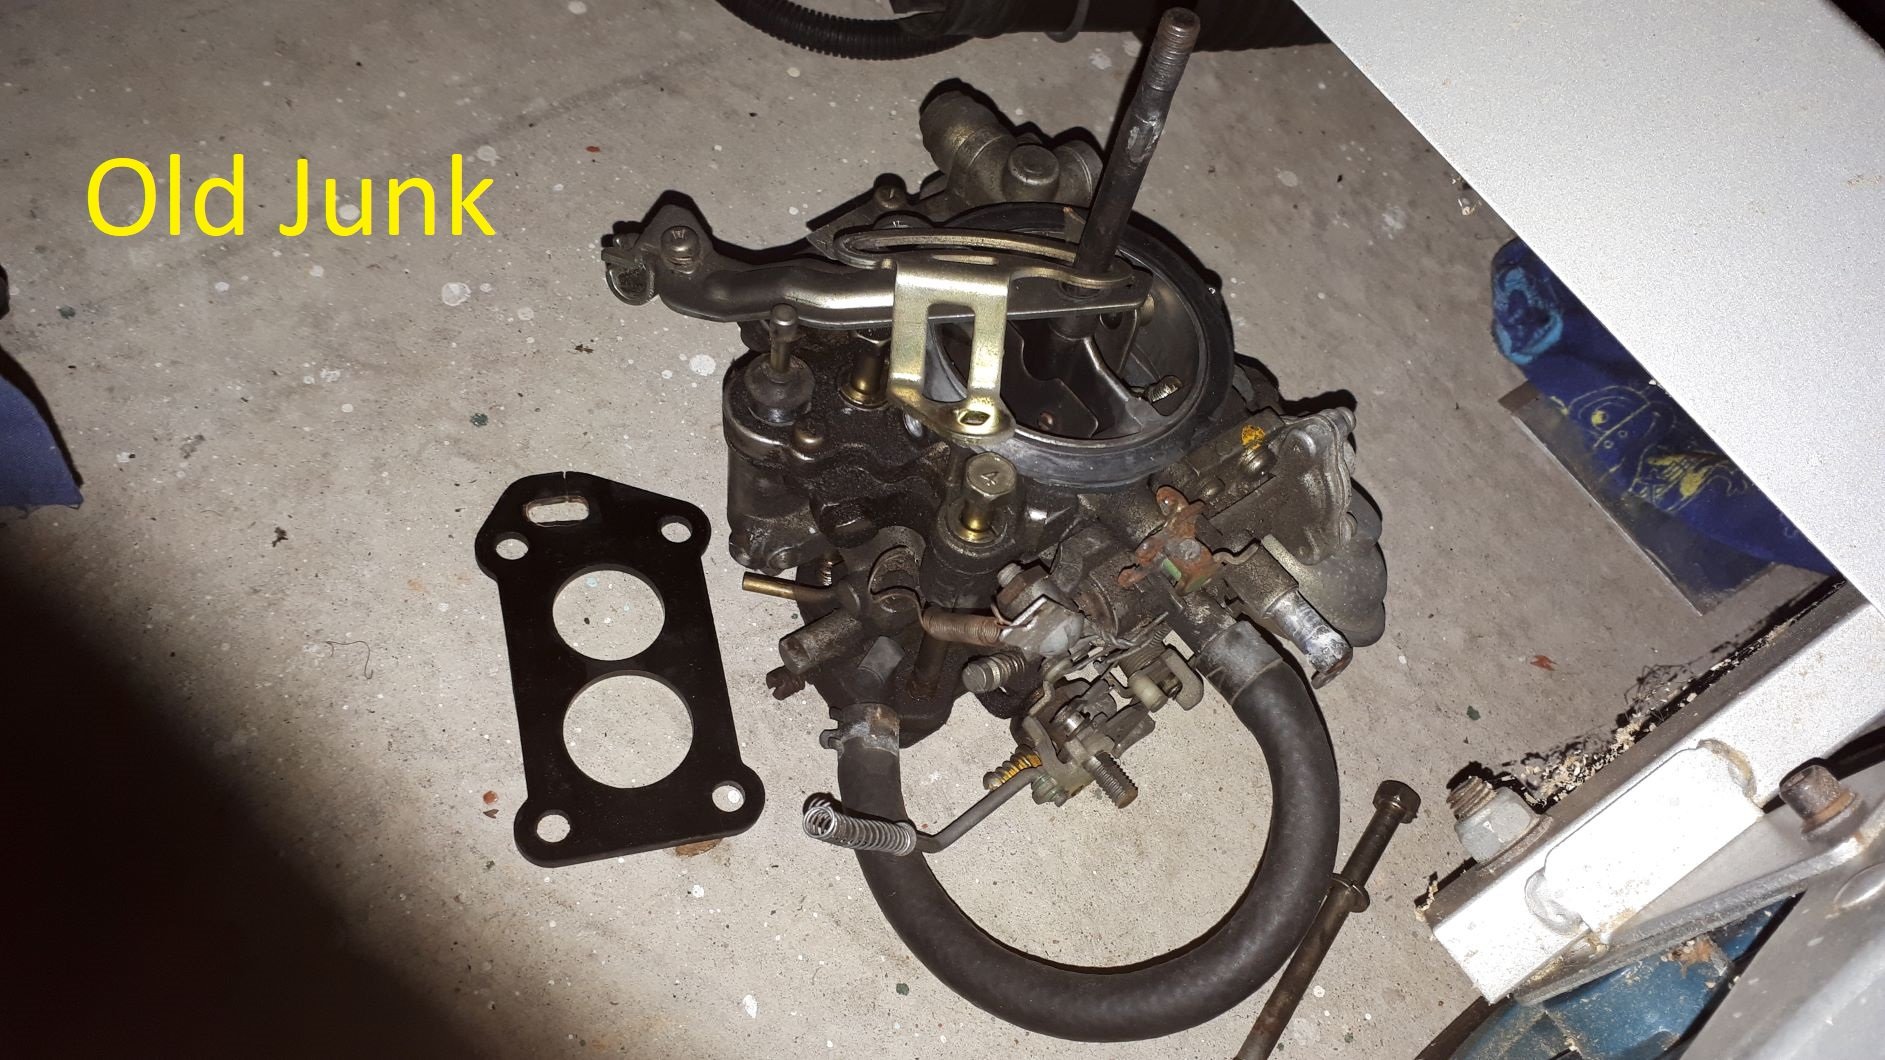
The first task was to replace the factory carb. I pulled the plugs and it was obviously running super lean and on top of this i am sure that the vacuum secondaries weren't working. I couldn't find a rebuild kit for it so replacement seemed like the best option. I went for a 32/36 Weber because I have had good results with Weber's in the past and I find they are easy to configure and tune for different applications.
2 points
-
So... Is that a suggestion or a straight up declaration?...2 points
-
Great meet last night! The location was super sweet and it was cool to head to the pub for a brew afterwards. Stoked to hang with everyone for my final OS meet as a Hamilton resident. Sounds like the owners of Mizoni were very happy to have us too .2 points
-
I roll a pneumatic aliexpress one daily paid $25 for it and put 3M belts on it. Is identical to the ones being sold from the local autolink for $150, like identical identical. Good belts is key 3M are easy to get but have had good luck through pps.2 points
-
Want me to find and bring a tredia for burn pile activities?2 points
-
I'll probably sink a dobro with you that day Darryl. (Only so I can lambast you for your terrible car choices Edit, my mrs will.be away then, so things could get out of hand/meet.at my place2 points
-
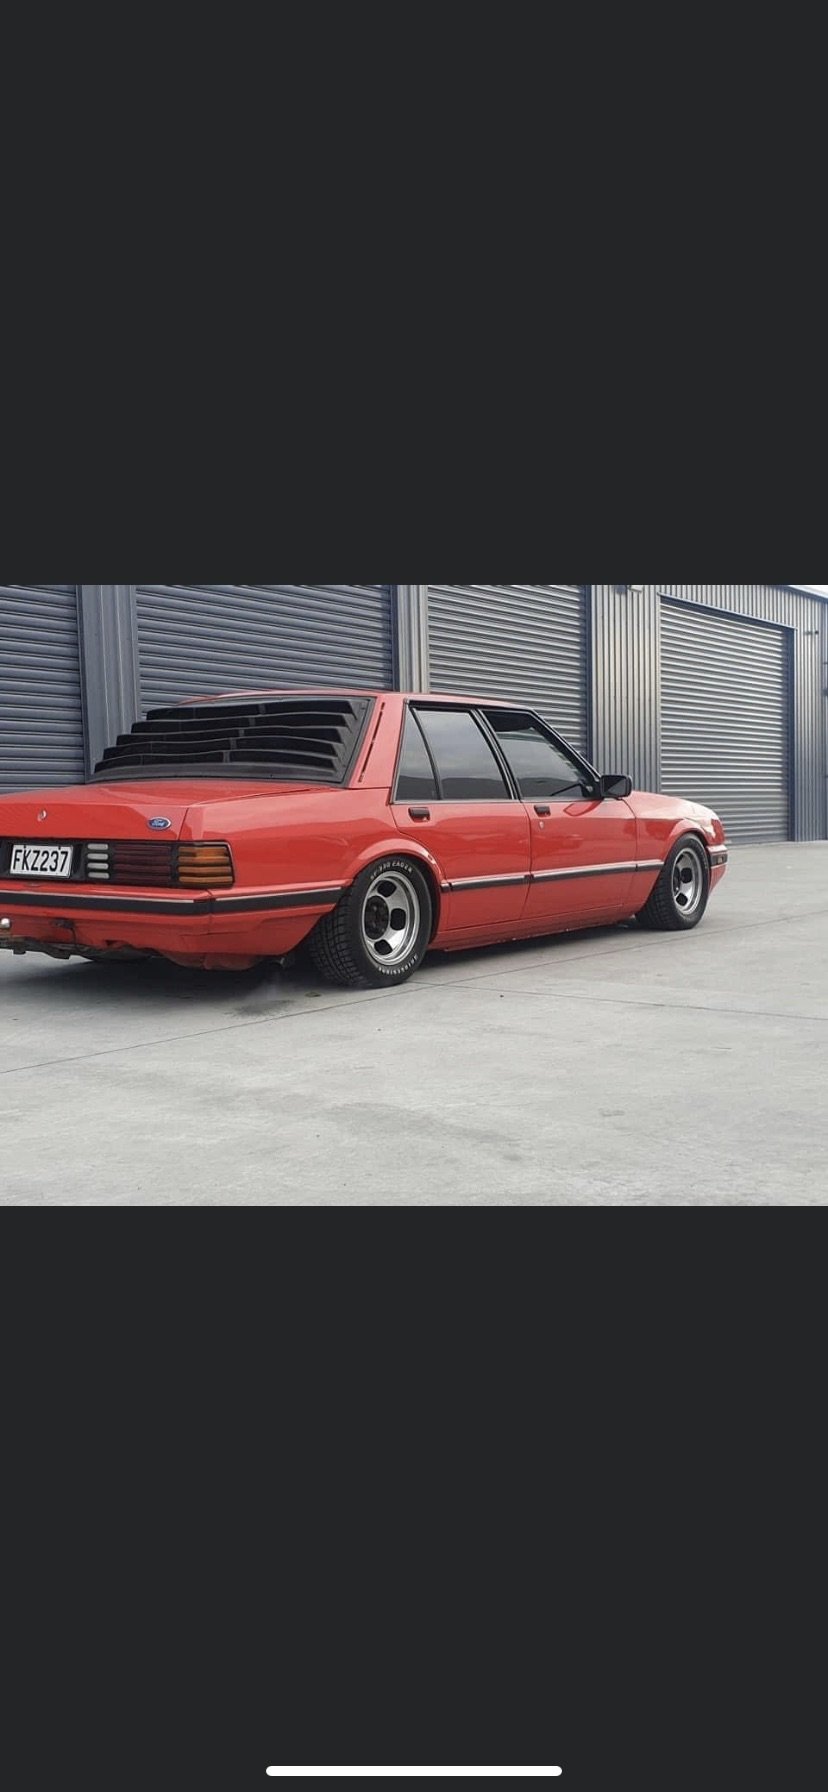
Love the old school stance on the old XF This is how I want to set up my crown but on blacked out 12 slots and eagers
2 points
-
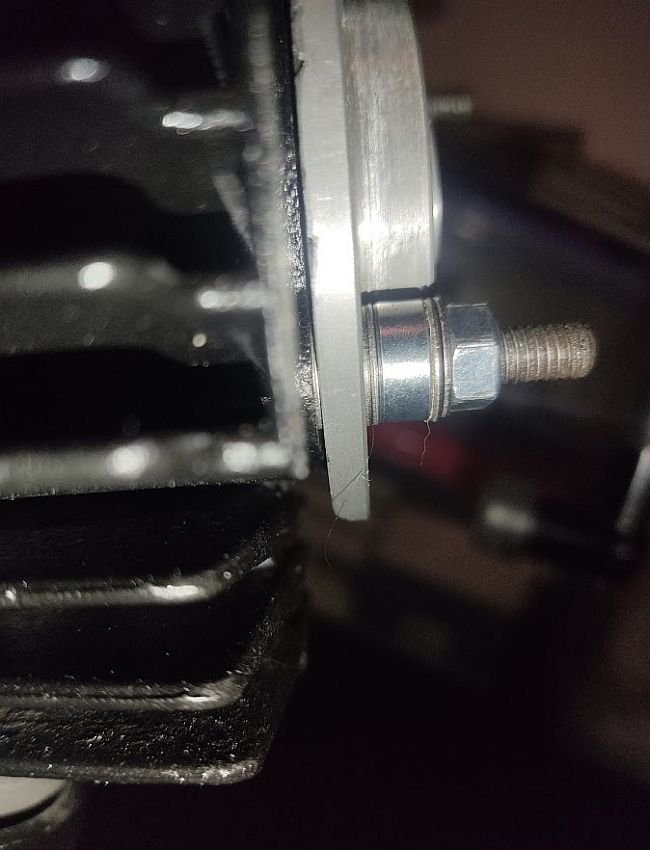
OFF WITH HER HEAD! Pretty obviously been tapping away! Did a measure up, base gasket could really be .12mm thinner for perfect flow, need to get hold of some .75 copper sheet to make a head gasket from to space the combustion insert up. All in all, not too bad, could have gone real bad real fast at the RPM I was pulling yesterday!
2 points
-
put the motor back in. did some wiring tidy up and some other shit to. put a new core in the radiator because it had a leaking tube. that was a cunt of a job. then i went to fill it up with water and the heater core tubes were cracked. not surprised really, ive never had the heater out of this car in the 20 years ive had it and the brass tubes get a fucking workout everytime i take the motor out what with getting the hoses on and off. so out with the heater box and repair the core. the tubes themselves were all out of shape and deformed so i was able to reshape them back to round and tidy them up so thats good. it'd be nice to get this thing back on the road some time soon, this clutch replacement has taken fucking ages. 2020-08-24_09-04-40 by sheepers, on Flickr 2020-09-08_07-43-55 by sheepers, on Flickr 2020-09-08_07-44-09 by sheepers, on Flickr 2020-09-08_07-44-16 by sheepers, on Flickr 2020-09-08_07-44-25 by sheepers, on Flickr 2020-09-08_07-44-32 by sheepers, on Flickr2 points
-
Well it worked pretty good! Only real defects are on the face with machine allowance. The volume of the chill block didnt really seem to matter so I think going forward I'll size them to at least 100% of the volume that needs chilling.2 points
-
Yeh nah the motor didn't like the breathers going into the plenum, which is odd, because that seems to be how they are on the bike? I've run the breather tube high up the roll cage, to try keep it out of the smut, will do some research and try find a solution. Anyways, the deck of the trailer is pretty much done, so got some goodies to carry on with, My original plans went out the window, it is going to be sprung now, and I'll have little fold up ramps rather than a tilting deck. Made the spring hangers today, clamped the shit out of them to avoid warping, The deck is made from 40mm wide RHS, and the spring components are 50mm wide, so welded them to 50x5 angle, which will get welded to the deck. Should strengthen it up a bit too. Hope to get the draw bar on next week, and then figure out the axle width and location. Regards, VG.2 points
-
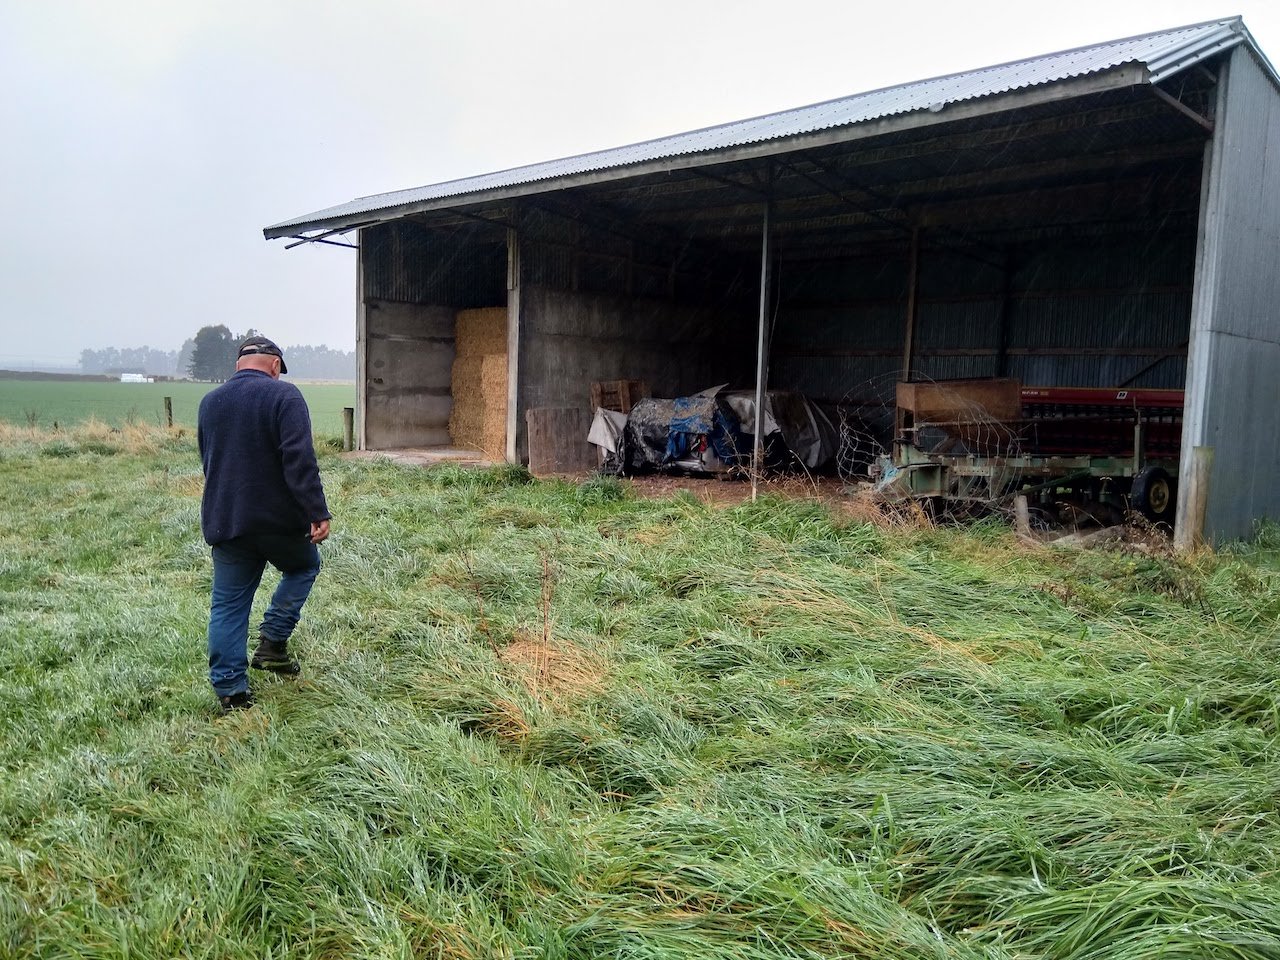
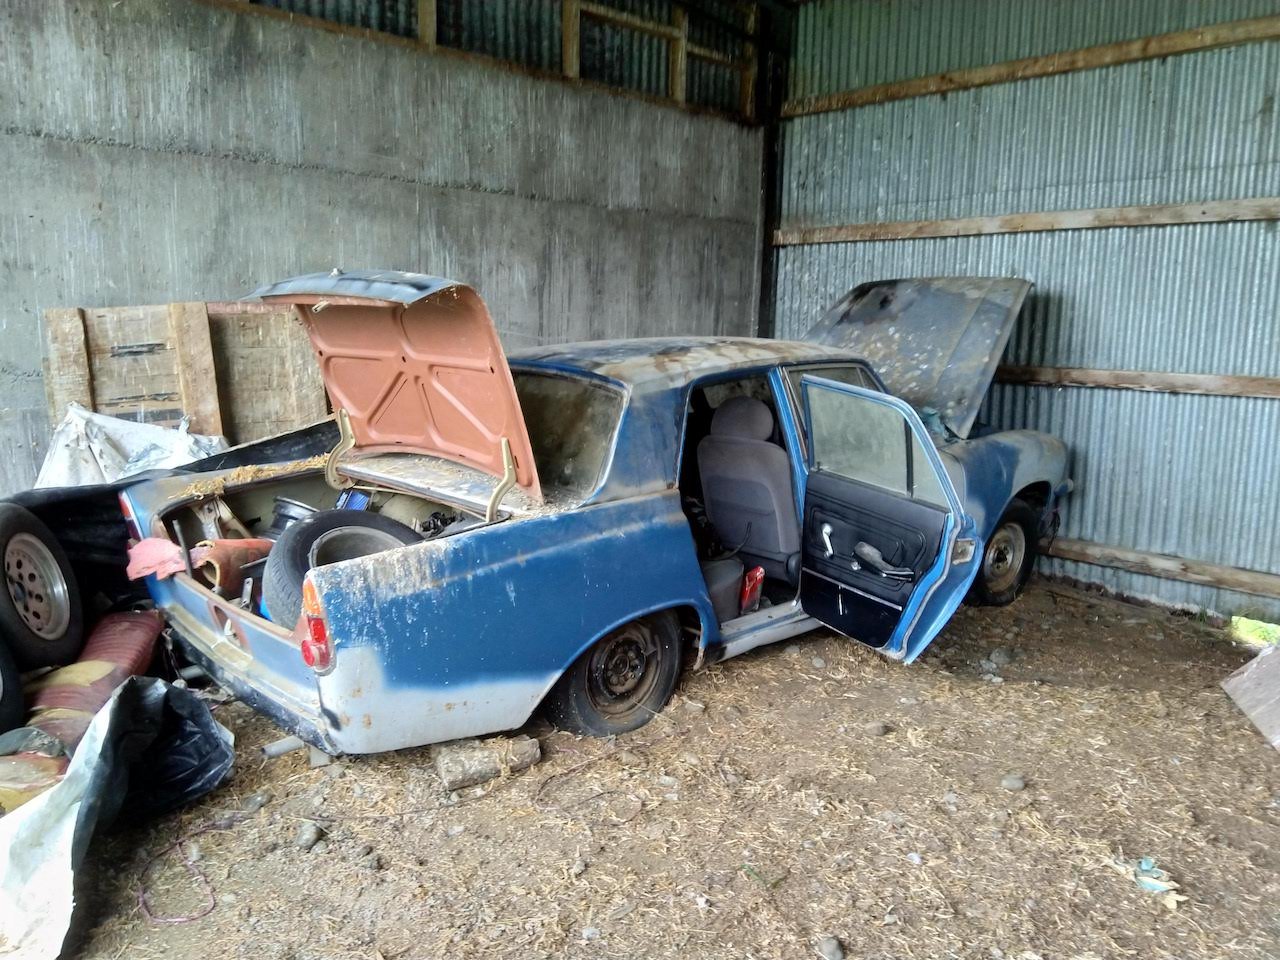
Found myself a new project. Car was last on the road in 1993, then the registration went dead but the rego is still in the system. Previous owner bought the car around '98 with plans of putting a 302 into it. A few years later he took the car to a panelbeater to get some rust fixed and bodywork done. The bill came back a lot more then expected so the car got mothballed to a hay shed. A mk4 zodiac came up a few years later that had already had a certified V8 conversion so he snapped that up and the mk3 stayed in the shed. The car only had minor rust (guards, doors, boot etc) to begin with, there was no damage to the chassis or sills. A bit of minor rust has come back since then, but a sweet barn find. The car was in Methven and had a heap of spares with it. It was pretty heavy towing back. It came with the engine pulled apart and a heap of heads, manifolds and bits. The guy that sold it to me knows someone with a mk2 motor that ran when pulled out, so I will snap that up. Long term plans for it once revinned will be some slam, wide steels and eventually an engine swap to a V8 or a barra. Am I best to get a repair certifier to come and look at it so I can get the rust signed off before I strip it back and paint? I'm thinking that might be easier while everything is pulled apart rather than taking through revin in primer, then pulling everything back apart to paint. Any ideas on how hard this would be and cost? Discuss here:
1 point
-
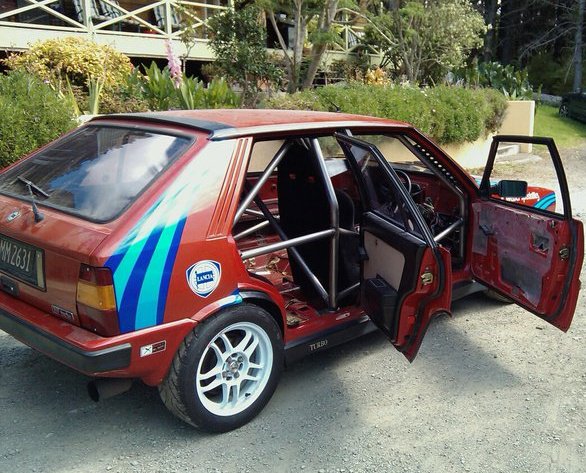
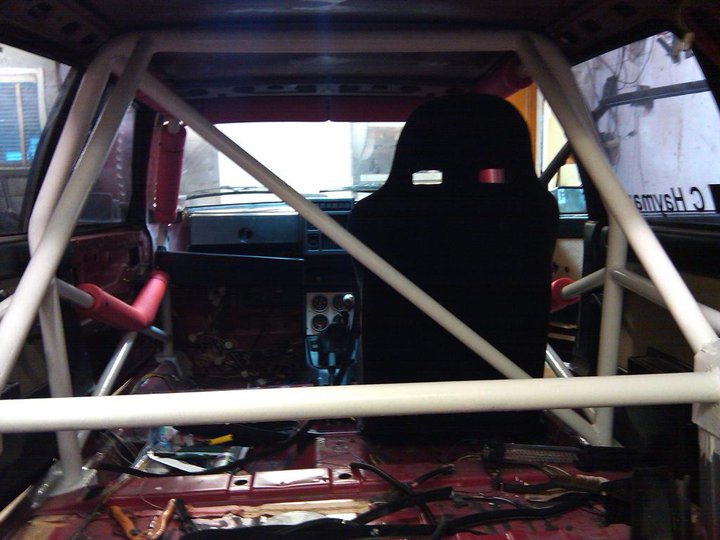
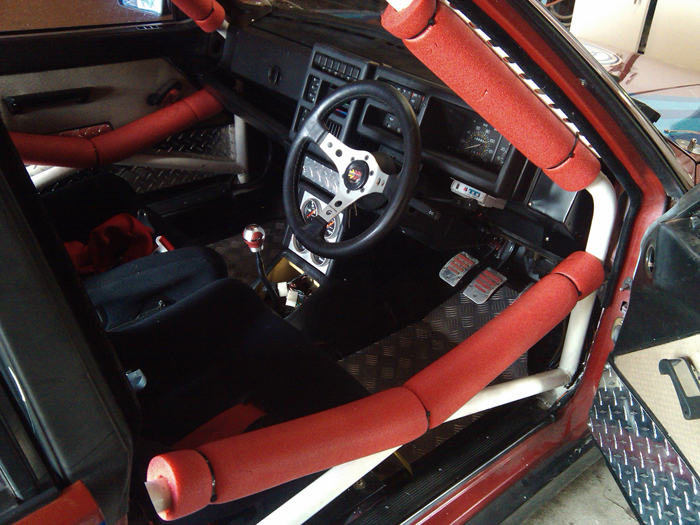
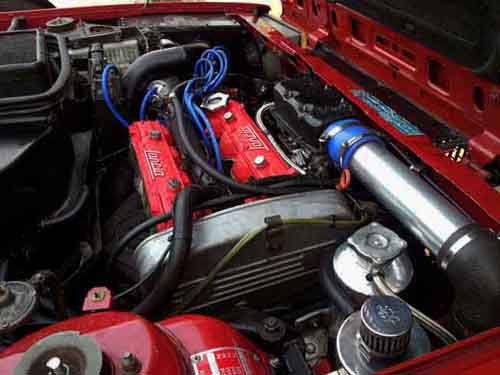
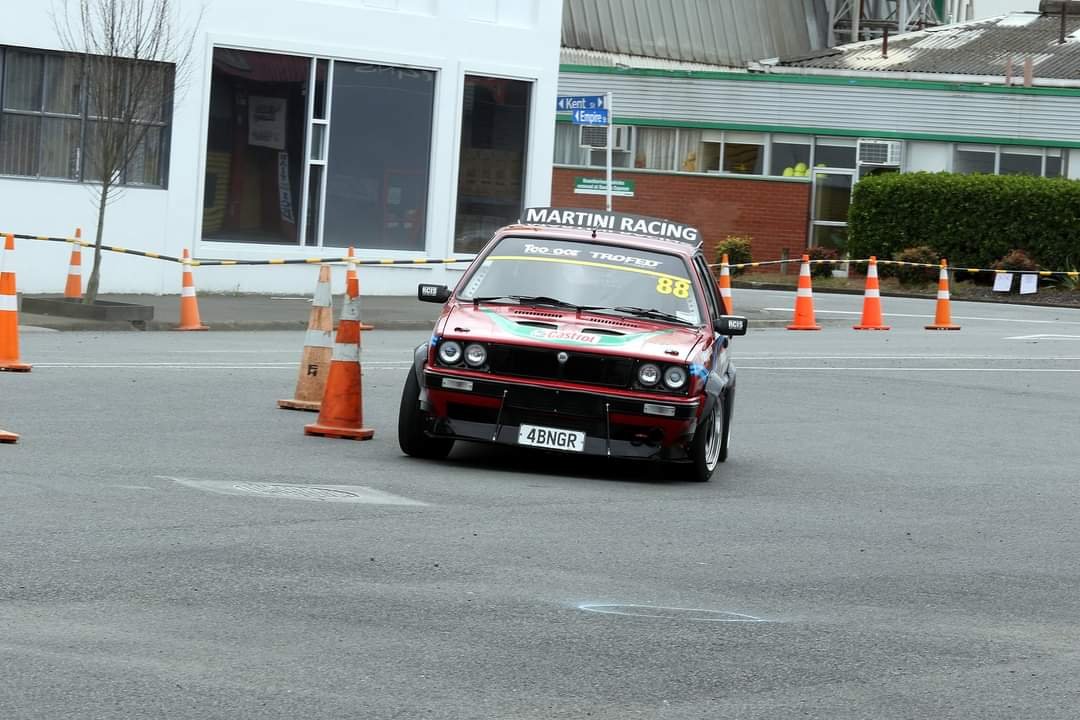
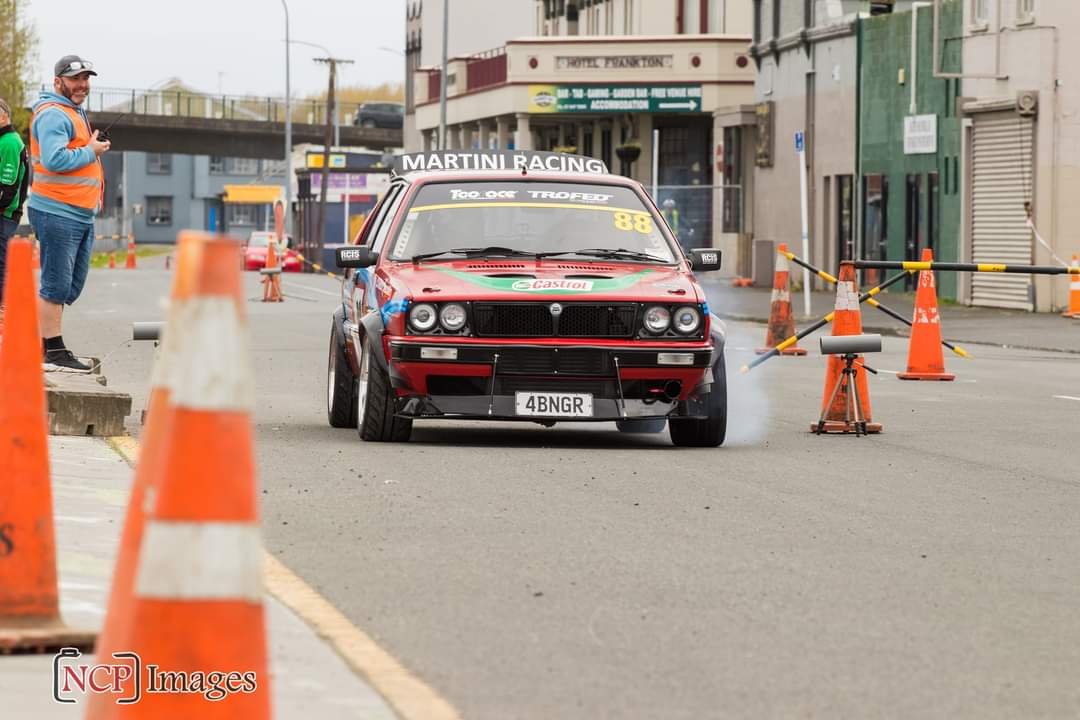
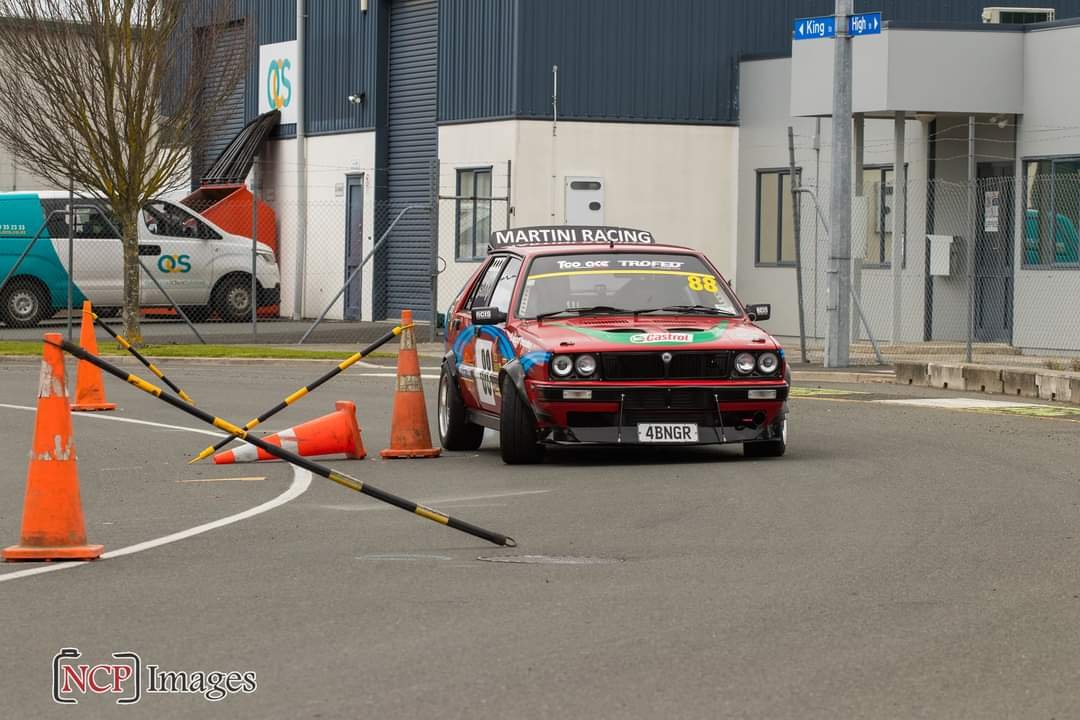
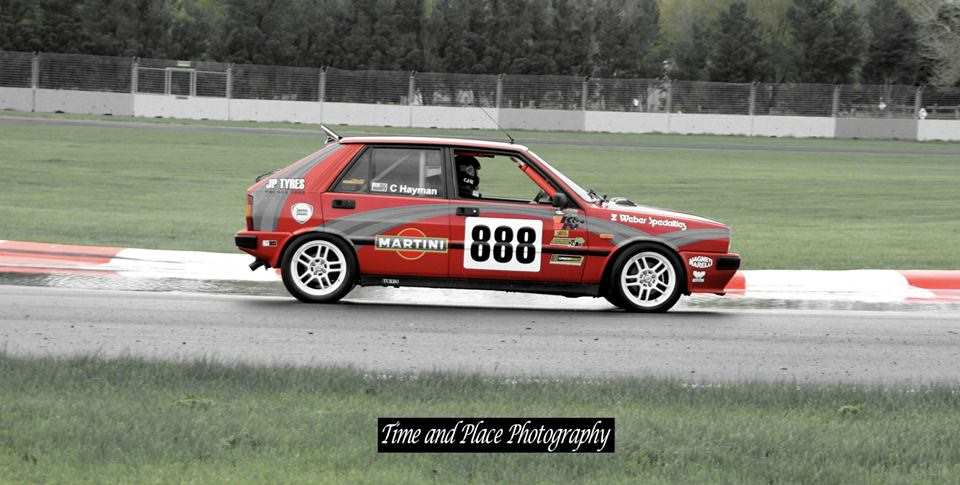
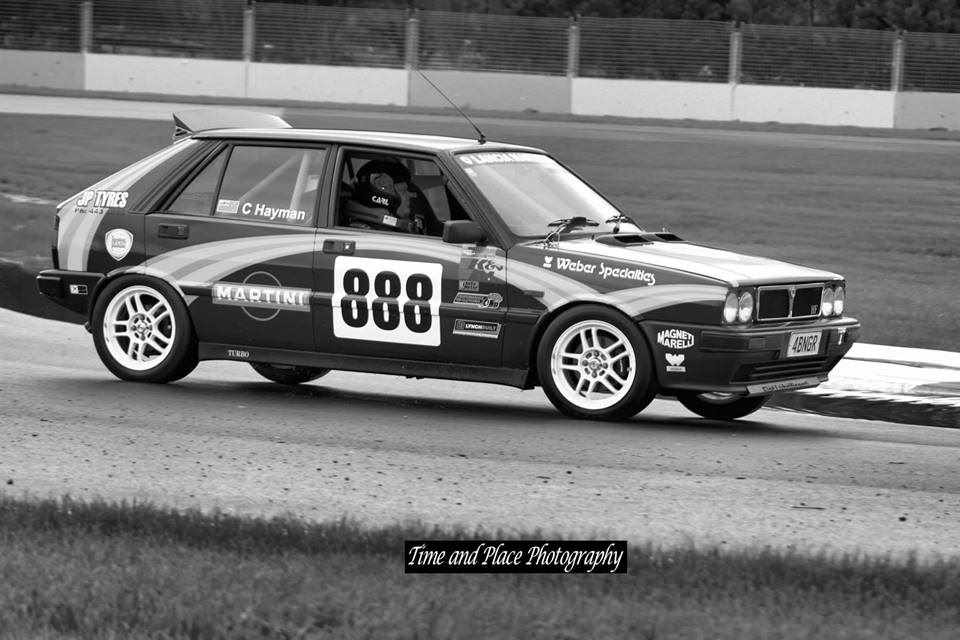
Hey guys, My project is a 1985 Lancia Delta HF Turbo. Purchased about 3 years ago as a stock-standard 130 flywheel hp front wheel drive carb turbo HF, i proceeded over the first year to rollcage it, have the suspension built, and upgrade the brakes. I then spent a year hillclimbing/street sprint/circuit racing it - then decided to opt for more power. Its now about 80% complete with a Fiat Croma 2 litre 8 valve injected turbo, same engine effectively as the Integrale but without balance shafts (the Group A cars never ran balance shafts in the block). Turbo is T28 from GTIR, bigger cams from N/A engine, bigger throttle body and manifold, front mount intercooler, 440cc evo injectors, Group A chip, Delta GTie gearbox, ARP rodbolts with new bearings, gated sump, HKS blow off valve, carbon-kevlar custom clutch with shot-peened lighter flywheel. Im hoping for roughly 200 - 220 wheel hp @ 950 - 980kgs when i turn the key.
1 point
-
I'll park my car right at the end of the drive to keep everyone on the road.1 point
-
Two tone is sweet!1 point
-
And here it is installed on the car
1 point
-
8 = Holden 12 = 8 Cylinder Premier or LS Monaro 69 = Sedan 9 = ??? (if this is an HQ then it might be a Q) N7 = Assembly Plant (might have been New Zealand?) 09568 = Vehicle sequence number (off the production line)1 point
-
one time it bit me in the ass and the master was a cunt to remove, so i always do now1 point
-
Vid isnt the greatest and my dad didn't learn to hold it landscape but here is a quick blat up the Taieri river. You can only go ~6km up the gorge and it quickly goes from placid to some heavy lifts to completely un boatable - didn't go as far to show those parts.1 point
-
So rust all repaired and on to fitting everything back together, a much more fun job. Rear diff painted, and new brake lines run. With the diff moved back, brake line won't reach chassis, so moved it to exit internally (all lines will be running inside the car) New feed and return lines run through to cabin from surge tank, using hardlines for as much as possible due to cost/weight savings. Tapped the head for the water fitting and blanked it off as I don't need it for my setup, saved 120g by chopping it in half...1 point
-
Got her out on Sunday for a quick Autocross. Absolutely hopeless to be fair, cones very tight together meant having to drive it off boost as on boost it would pull away from the cones and sledge, and then when the course opened, it was 1st/2nd/3rd gear wheelspin and then hard on brakes to get around the next cone. A hell of a lot of fun though. Since the last post, the low volume cert was completed, authority card complete, motorsport license renewed, WOF & Reg updated, so fully road legal now. Also i now have sitting at home a Quaife limited slip diff, and Winmax race pads front and rear to go in.
1 point
-
All back together now. Had a turbo shit off a time getting the heater hoses back on because some idiot stuffed a huge motor right in the way. New clutch (remember that, the reason we pulled it apart in the first place) is really good, it's a tiny bit grabby at take off but it's not really bedded in at all so I don't know if this will get better or worse. Also i have connected the boost control pipes around the wrong way so it's free boosting up to about 30psi. Easy fix that. I drove it to work.
1 point
-
Got my label printer all sorted and some clear to go over the top. Wiring dreams coming true. That semi pro look hopefully, will be working on the front sections of wiring next.1 point
-
Righto. Turns out that the leak around the power steering pump was just leftover juice from the 14,387 times I evacuated it to fix leaks. A bit of a wipedown and it appears solid. I went through a few things with cert man, one of which was a discussion about seatbelts. I think it was @KKtrips in the cert thread that told me that as a scratch built it needed reels all round. This seemed straightforward at the time so I dropped some coin and bought 4x as the fronts were a little manky anyway and I figured presentation and a clear commitment to doing it right is going to be of value in the very near future. The fronts went on with some minor shenanigans around the stalk mounts, but no drama. The rears turned out a bit problematic. Because they were fixed belts there were only three mount points and no great place to mount the reel. So after a bit of mocking up and getting the concept approved by the advisory peeps I cracked on. 1. The beginning with all the seam sealer scraped out. Both the horizontal and side wall skins are doubled up with no way to get in there short of cutting holes, so a doubling plate would have been difficult. 2. A bit of angly stuff that could be welded in place and hold a captive nut 3. An extra bit of stuff that ties it in to the existing mount for extra lovings 4. Sorting some ugly on the other side before making a mirrored replica of the previous mount. 5. Plug welding the back skin to replace the factory spot welds 6. Weld all around, paint with poverty spec Toyota white from a rattle can and assemble. Looks good. Just some minor painting and reassembly of the airbox and it is time to ship it off....1 point
-
Finished up those flares tonight, the back ones are surprisingly hard to get a pic of in the shed light. I am pretty pleased with them, there were a lot of constraints to work within, but they came up good. I have also sorted the wiper mech, reassembled the dash and fixed the clutch hose. Tomorrow I'll get some more stuff to remake the mud flaps and have yet another go at stopping the power steering pump from leaking. Again. It's really minimal but the wof guy mentioned that it should be sorted.1 point
-
Putting the sand in the freezer before adding the catalyst has given me a good 15-20minutes work time (instead of 5!) Did the outer mould today with 30kg of sand no issues.1 point
-
goes without saying really but ive driven the crap out of this, drove it to work every day, supermarket, all that shit. anywho the clutch slave shit itself which tbh isnt that big of a surprise. the pedal pressure on the clutch was immense, the whole fire wall flexed so much the brake master hit the strut tower. the clutch that was in it was the highest pressure 250mm exceedy clutch you can buy. and it had started slipping. so Richard gave me a hand (because i dropped an engine on one of mine) and we took the JZ out to replace clutch slave and clutch. im just going to replace the seals in the clutch slave because fuck you cardwells you thieving bunch of cunts. and im replacing the old clutch with a twin disk OS Giken unit which requires less force on the spring tines but has double the clamping pressure. its a sprung center unit and fingers crossed its actually drivable on the street. consensus is that it will be fine once i get the hang of it so thats good with me. ill do a few other things while the motor is out because why the fuck not and then ill chuck it back together. then do a skid i would expect. 2020-07-25_03-40-31 by sheepers, on Flickr 2020-07-25_03-40-21 by sheepers, on Flickr 2020-07-25_03-40-04 by sheepers, on Flickr 2020-07-25_03-39-53 by sheepers, on Flickr1 point
-
I emailed them about the price drop after I bought it and they are giving me the difference as a voucher. Great service. I’ll use it to get some more belts.1 point
-
Ive got a cheap pneumatic one that I can't remember where I got it from, probably trademe. Used the shit out of it and it works mint. It's a 10mm wide belt one I get my belts from PPS and they are legit. I dunno what I paid for belts last time I bought some but it would have been less than any bunnings/supercheap type place. You can buy online from PPS, their stuff is really good quality and usually cheaper.1 point
-
I find Roloc Sanders are also a lot better for finishing and getting that sweet "ground" finish the pros leave.......1 point
-
I know they're spendy but 3m belts last like 10000000 times longer than the cheapies so are worth it1 point
-
Due to it not running well last outing, I whipped the carbs off, and they were full of sand. Turns out the drain/vent tubes on the carbs must be able to suck? I assume on the motorbike they went to the air box? I think I'll put some pneumatic spec air filter/exhaust/silencer things on there, just to keep shit out. Like this, After cleaning the carbs it was running tumeke again. We took it up to some paddocks in the whops and had a hoon. At the end of the day I drove it back out to the main road (about a 10 min drive at 90kmh) to see what it's like as a daily. Its doing about 7g rpms at 90, which is quite loud, and also my whole left leg went numb/dead, and I couldn't feel the clutch pedal, so not great as a daily. The only issue we had was bashing a bit of a hole in the exhaust (lowest point) which will be an easy fix. Usual shitty vid:1 point
-
And last but not least, a couple of pics at Pukekohe with the 1.6 carb engine (which i had ported and polished, tweaked the boost, modified the carb, and was running 140hp @ the front treads)
1 point


.thumb.jpeg.384ff72c8d2b0ee0d34a7bdedb55bdcf.jpeg)


.thumb.jpeg.e0a4bff61111e0c8c7396950fcc94da1.jpeg)

This leaderboard is set to Auckland/GMT+12:00