
Leaderboard


Popular Content
Showing content with the highest reputation on 05/02/20 in Posts
-
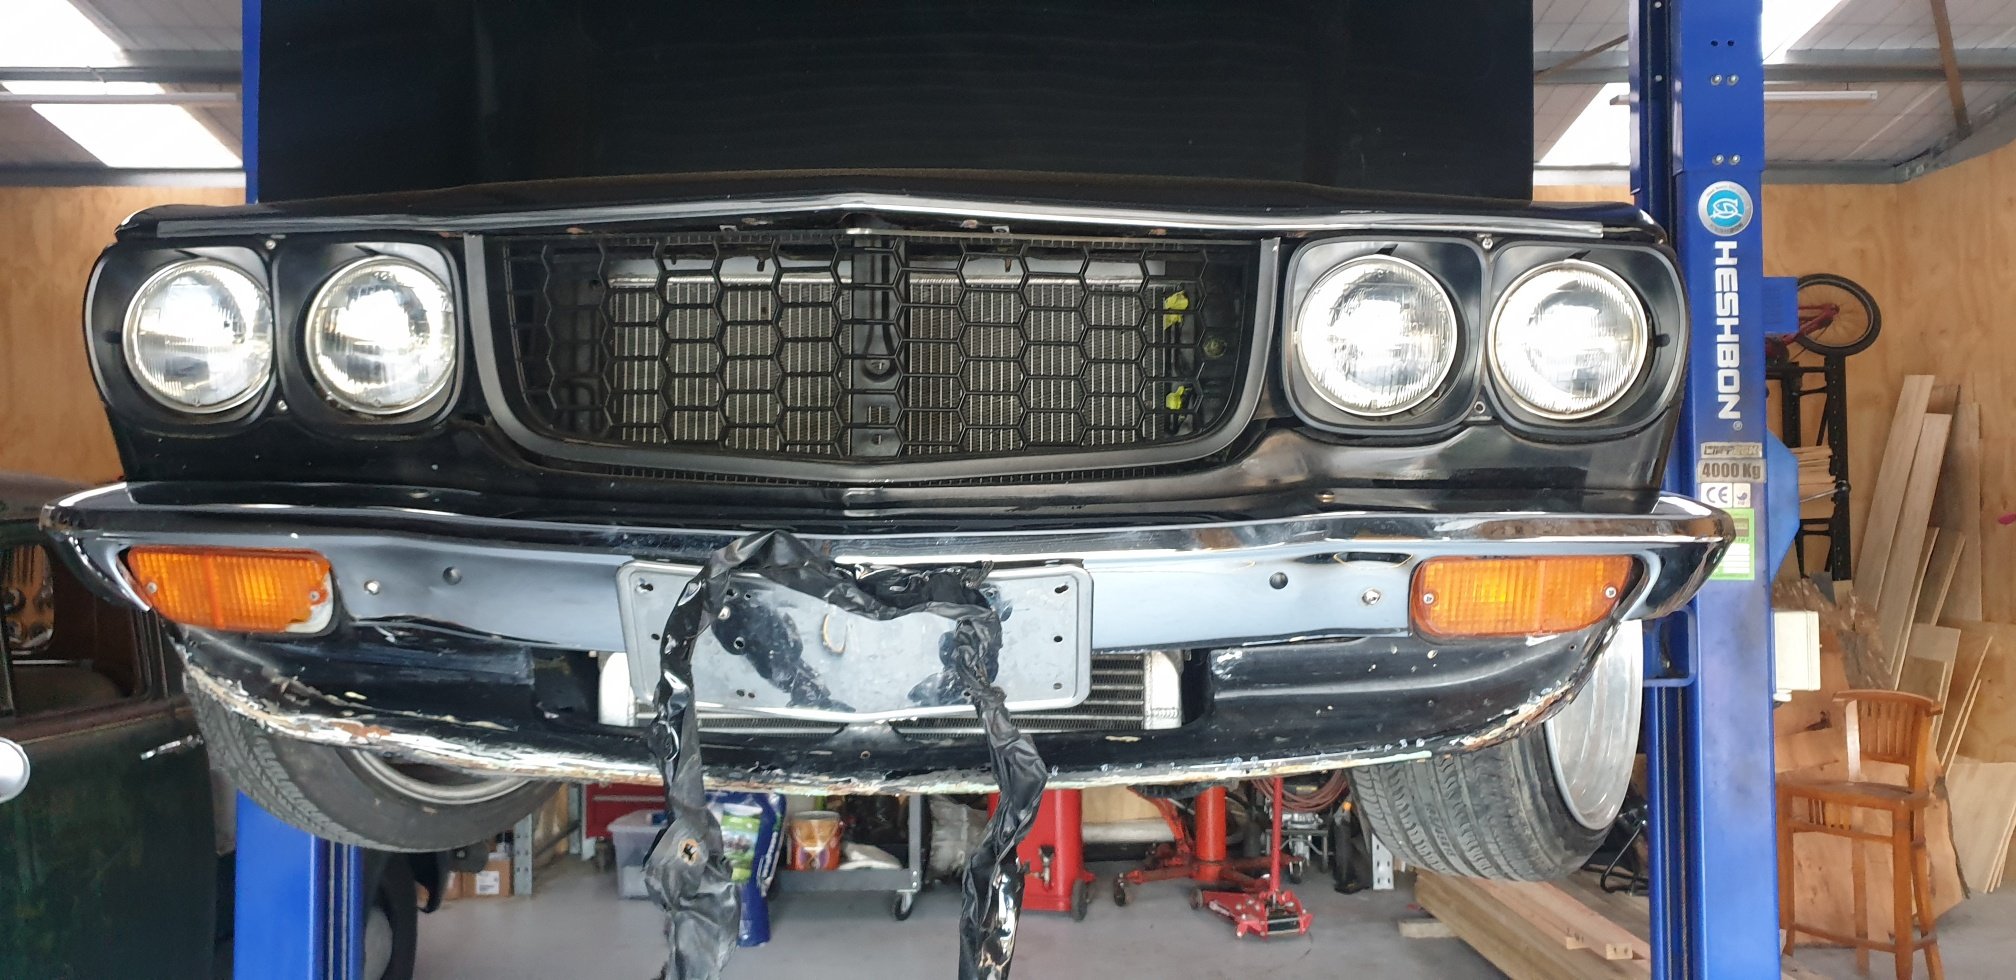
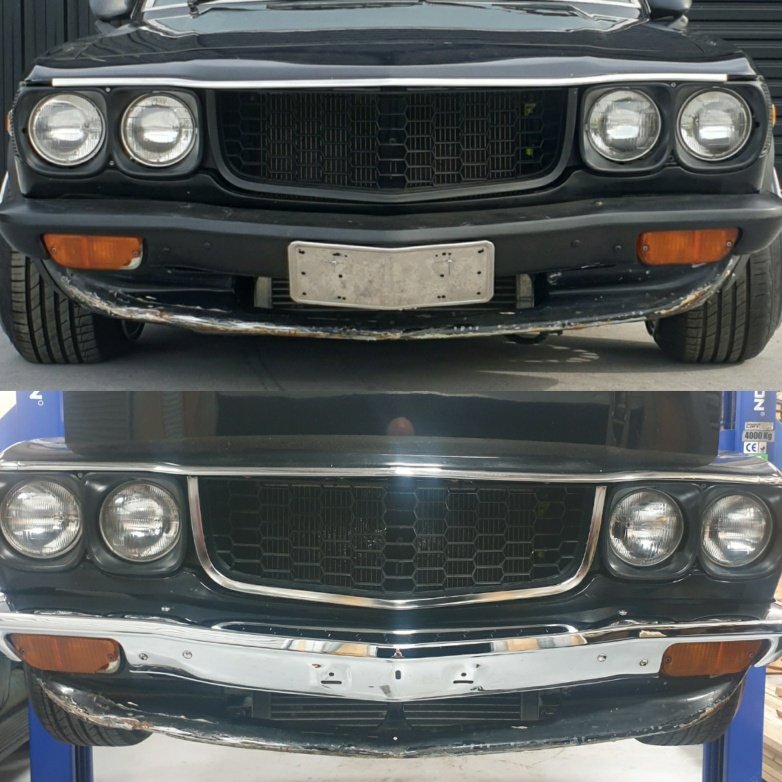
So when i got the car the front and rear bumpers and the grill surround trim were plastidipped black. Not really my thing got to have chrome on a old school car. Managed to peel it all off to reveal very tidy and mint chrome which was a relief. Couple of before and after shots, very happy with the outcome.
 15 points
 -
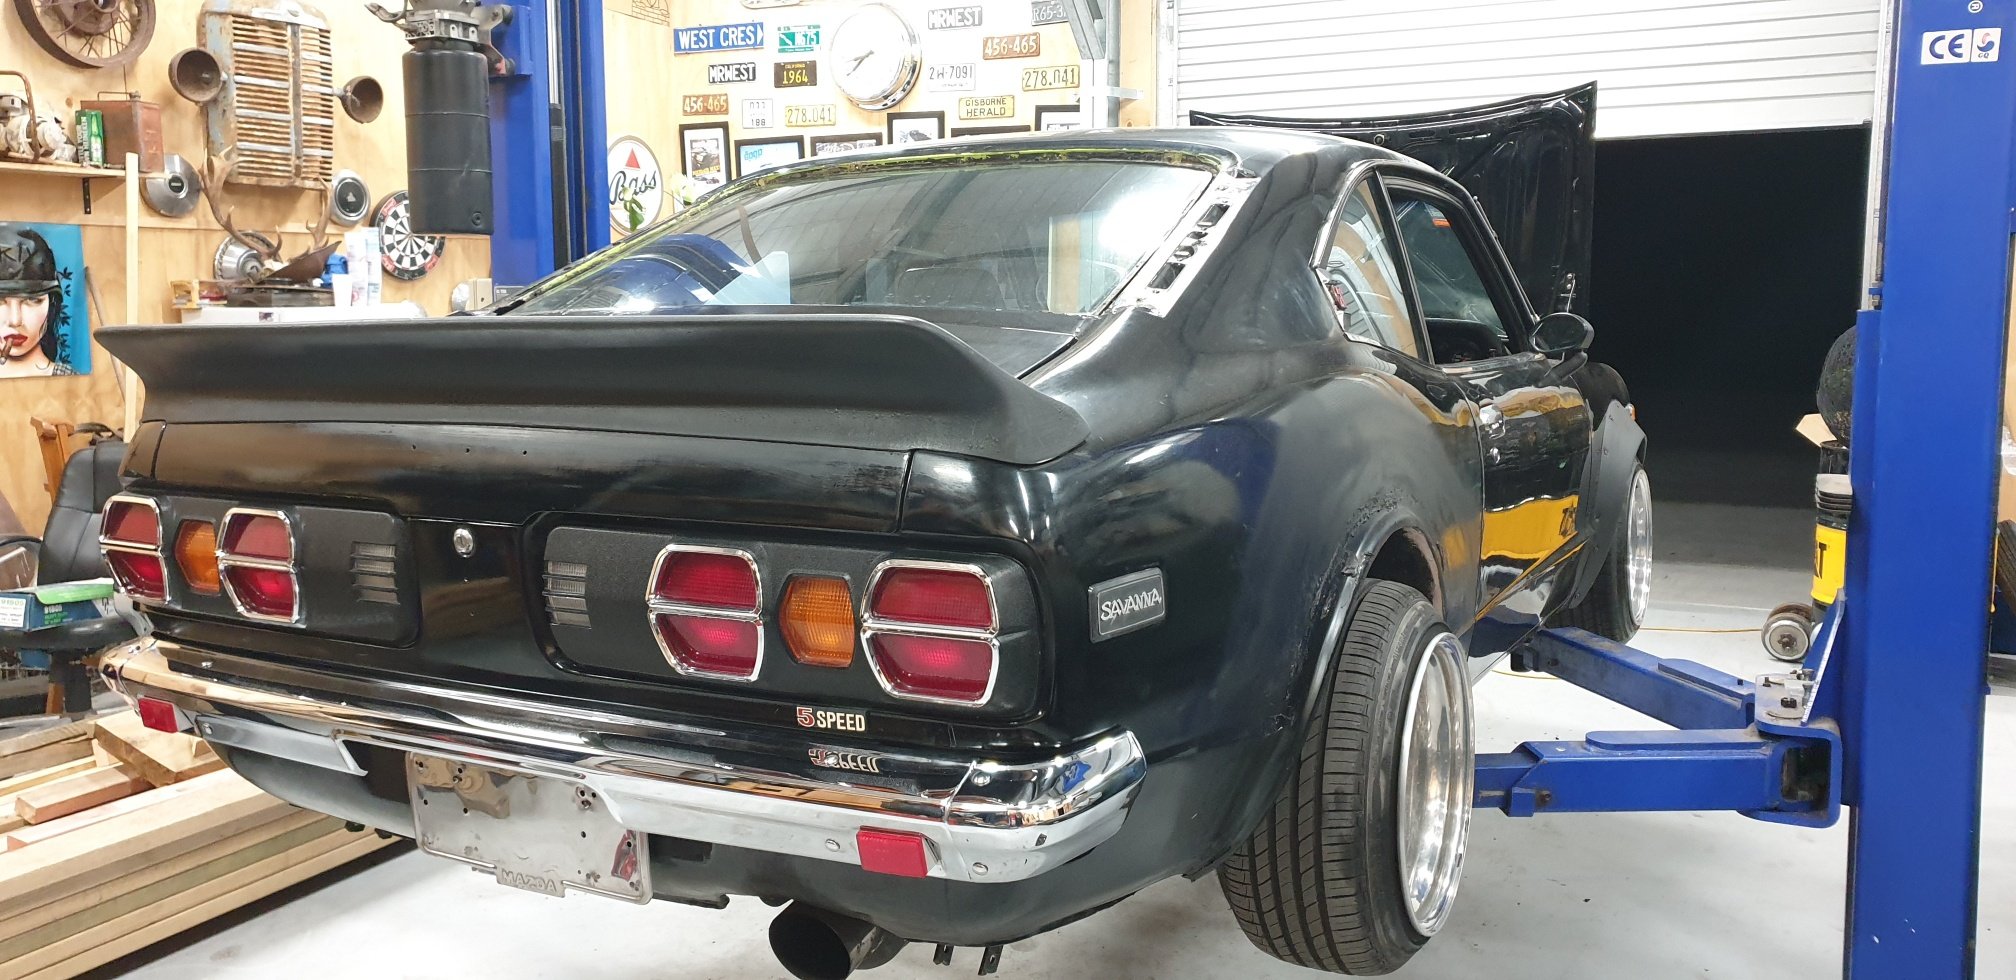
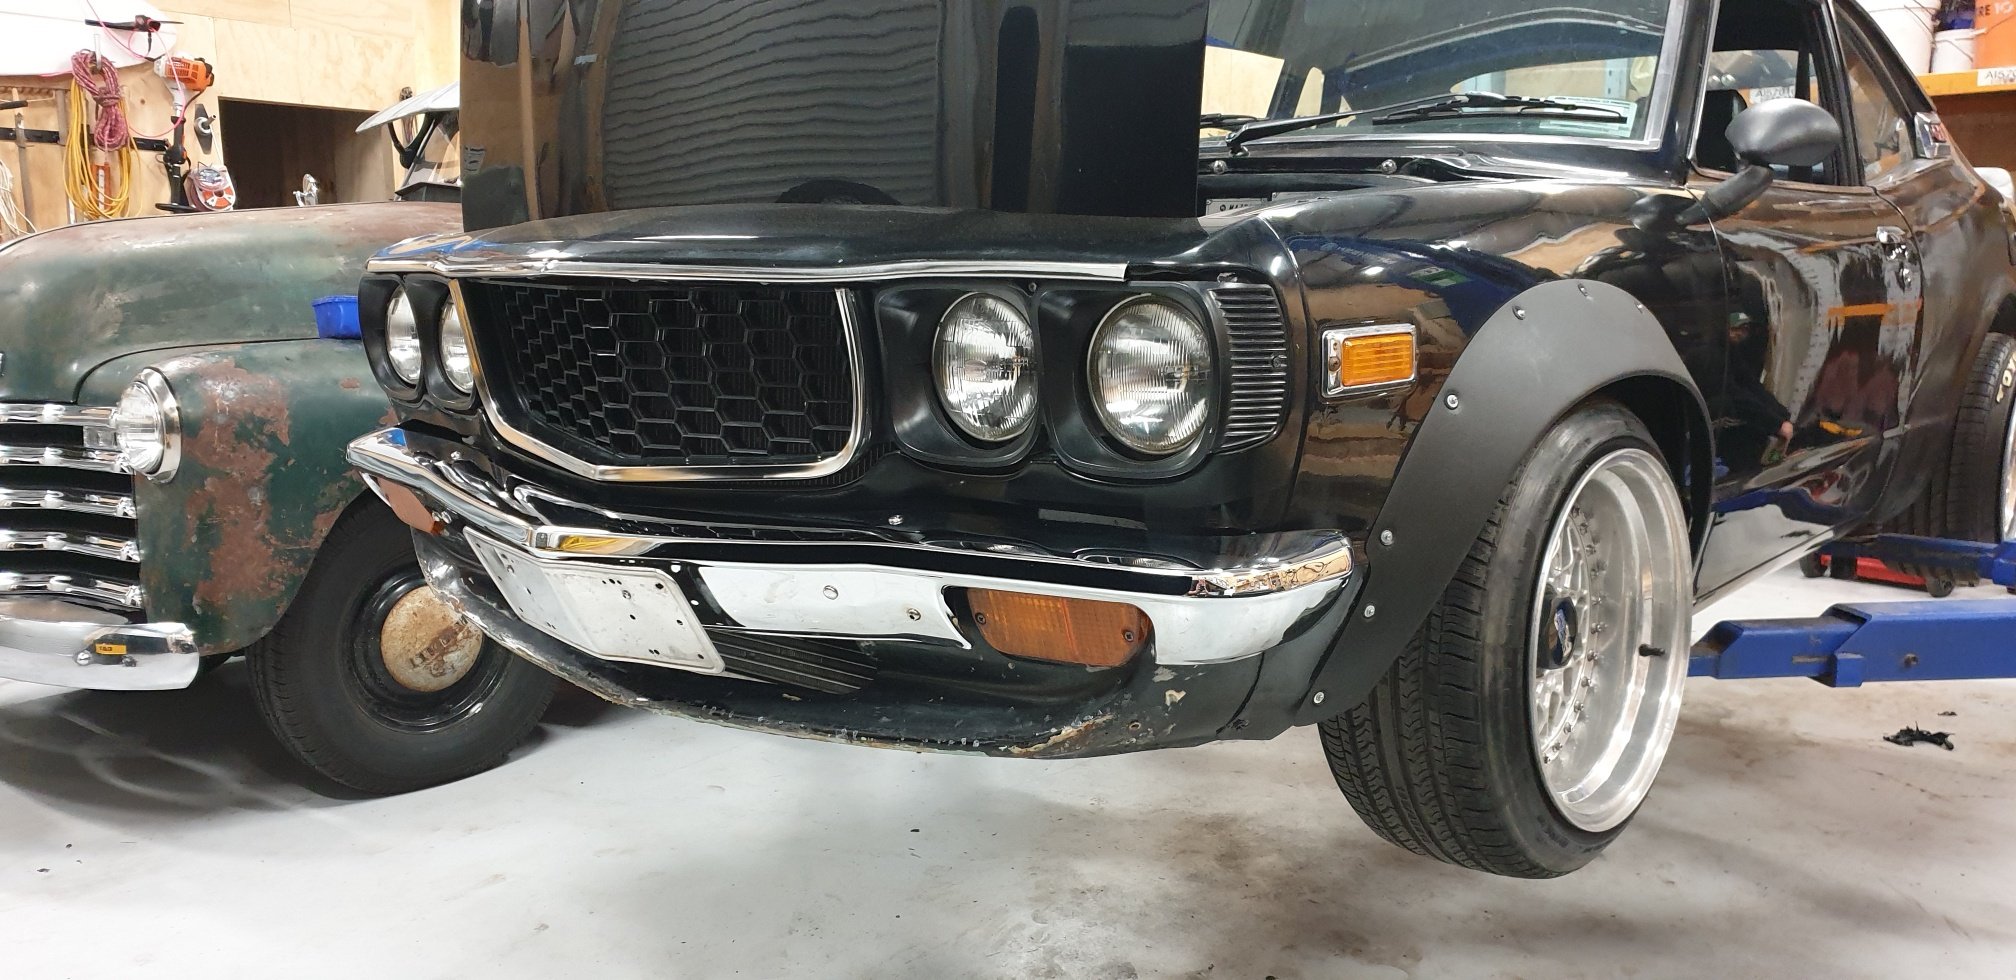
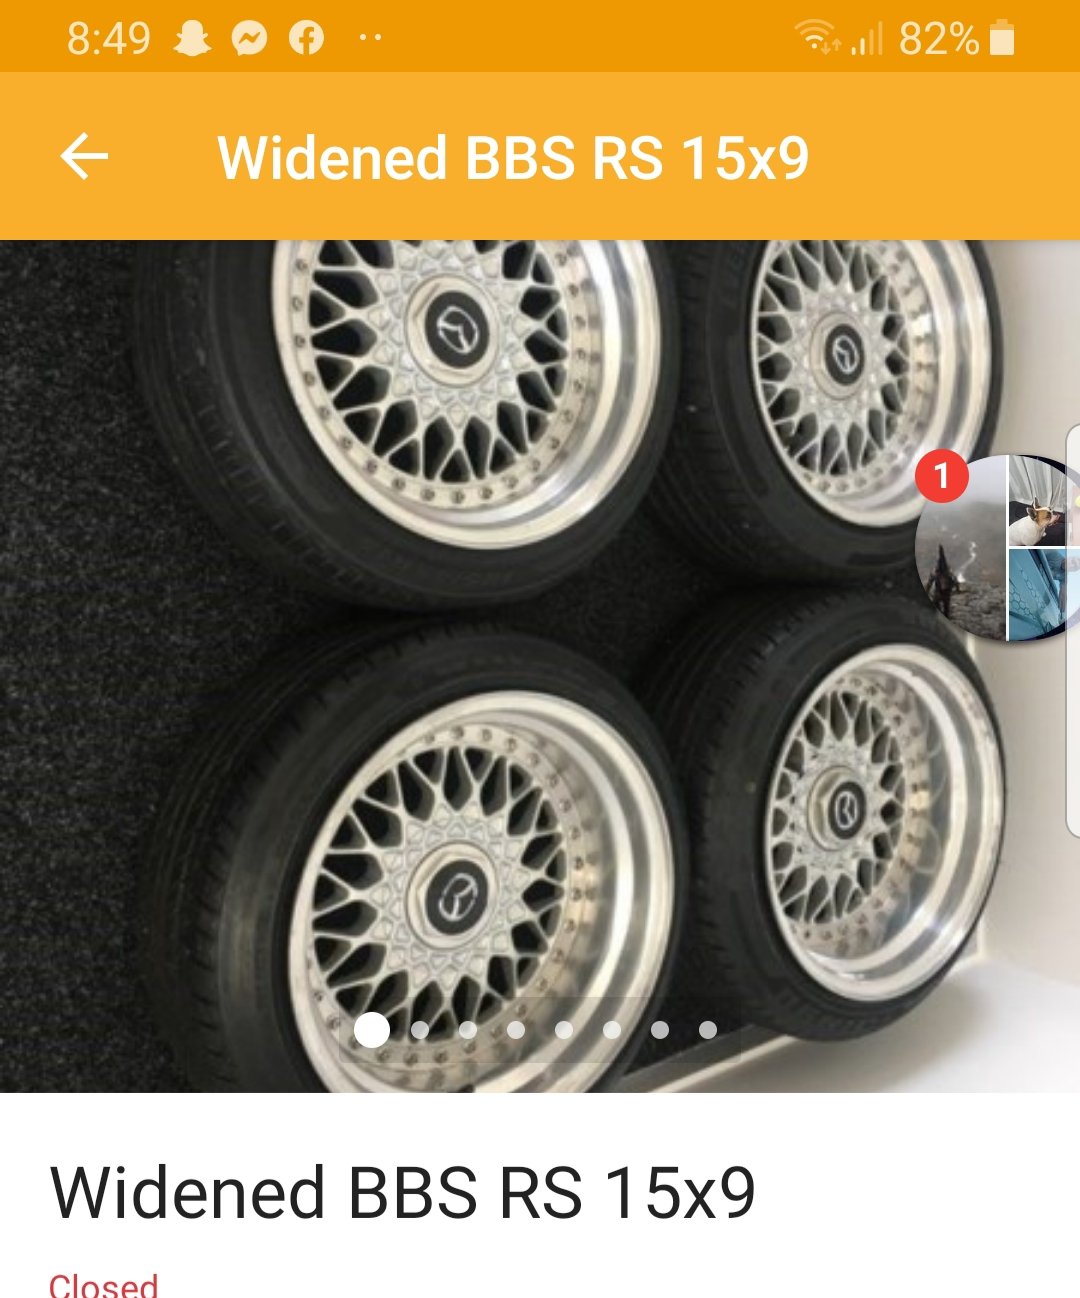
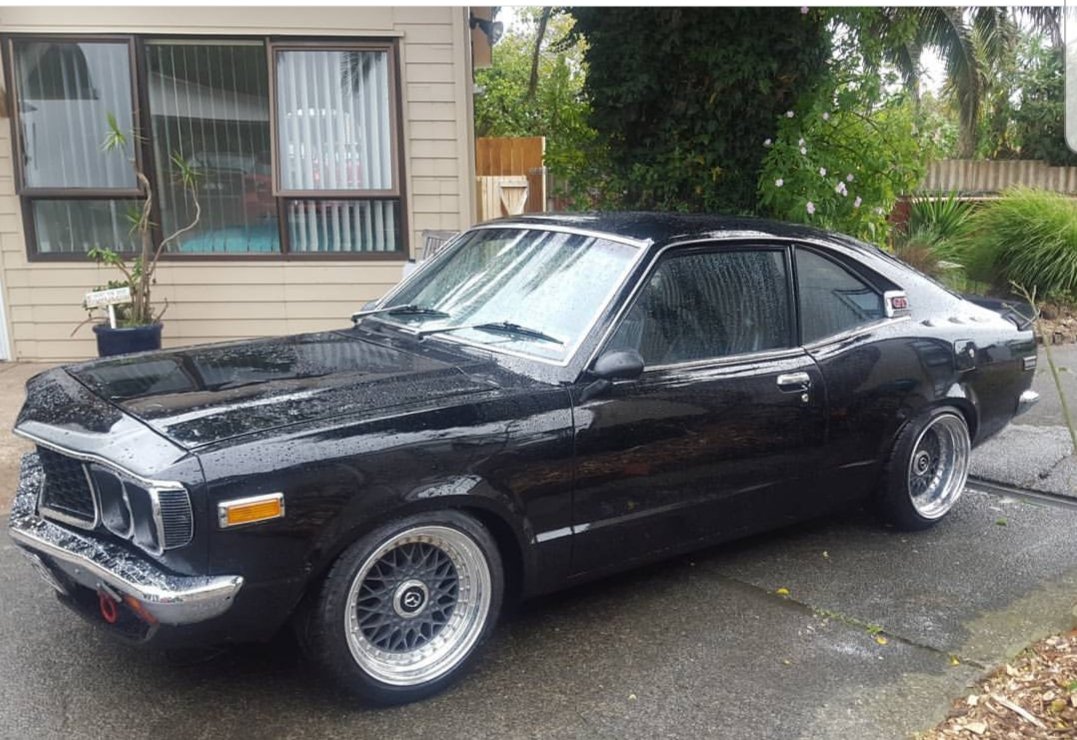
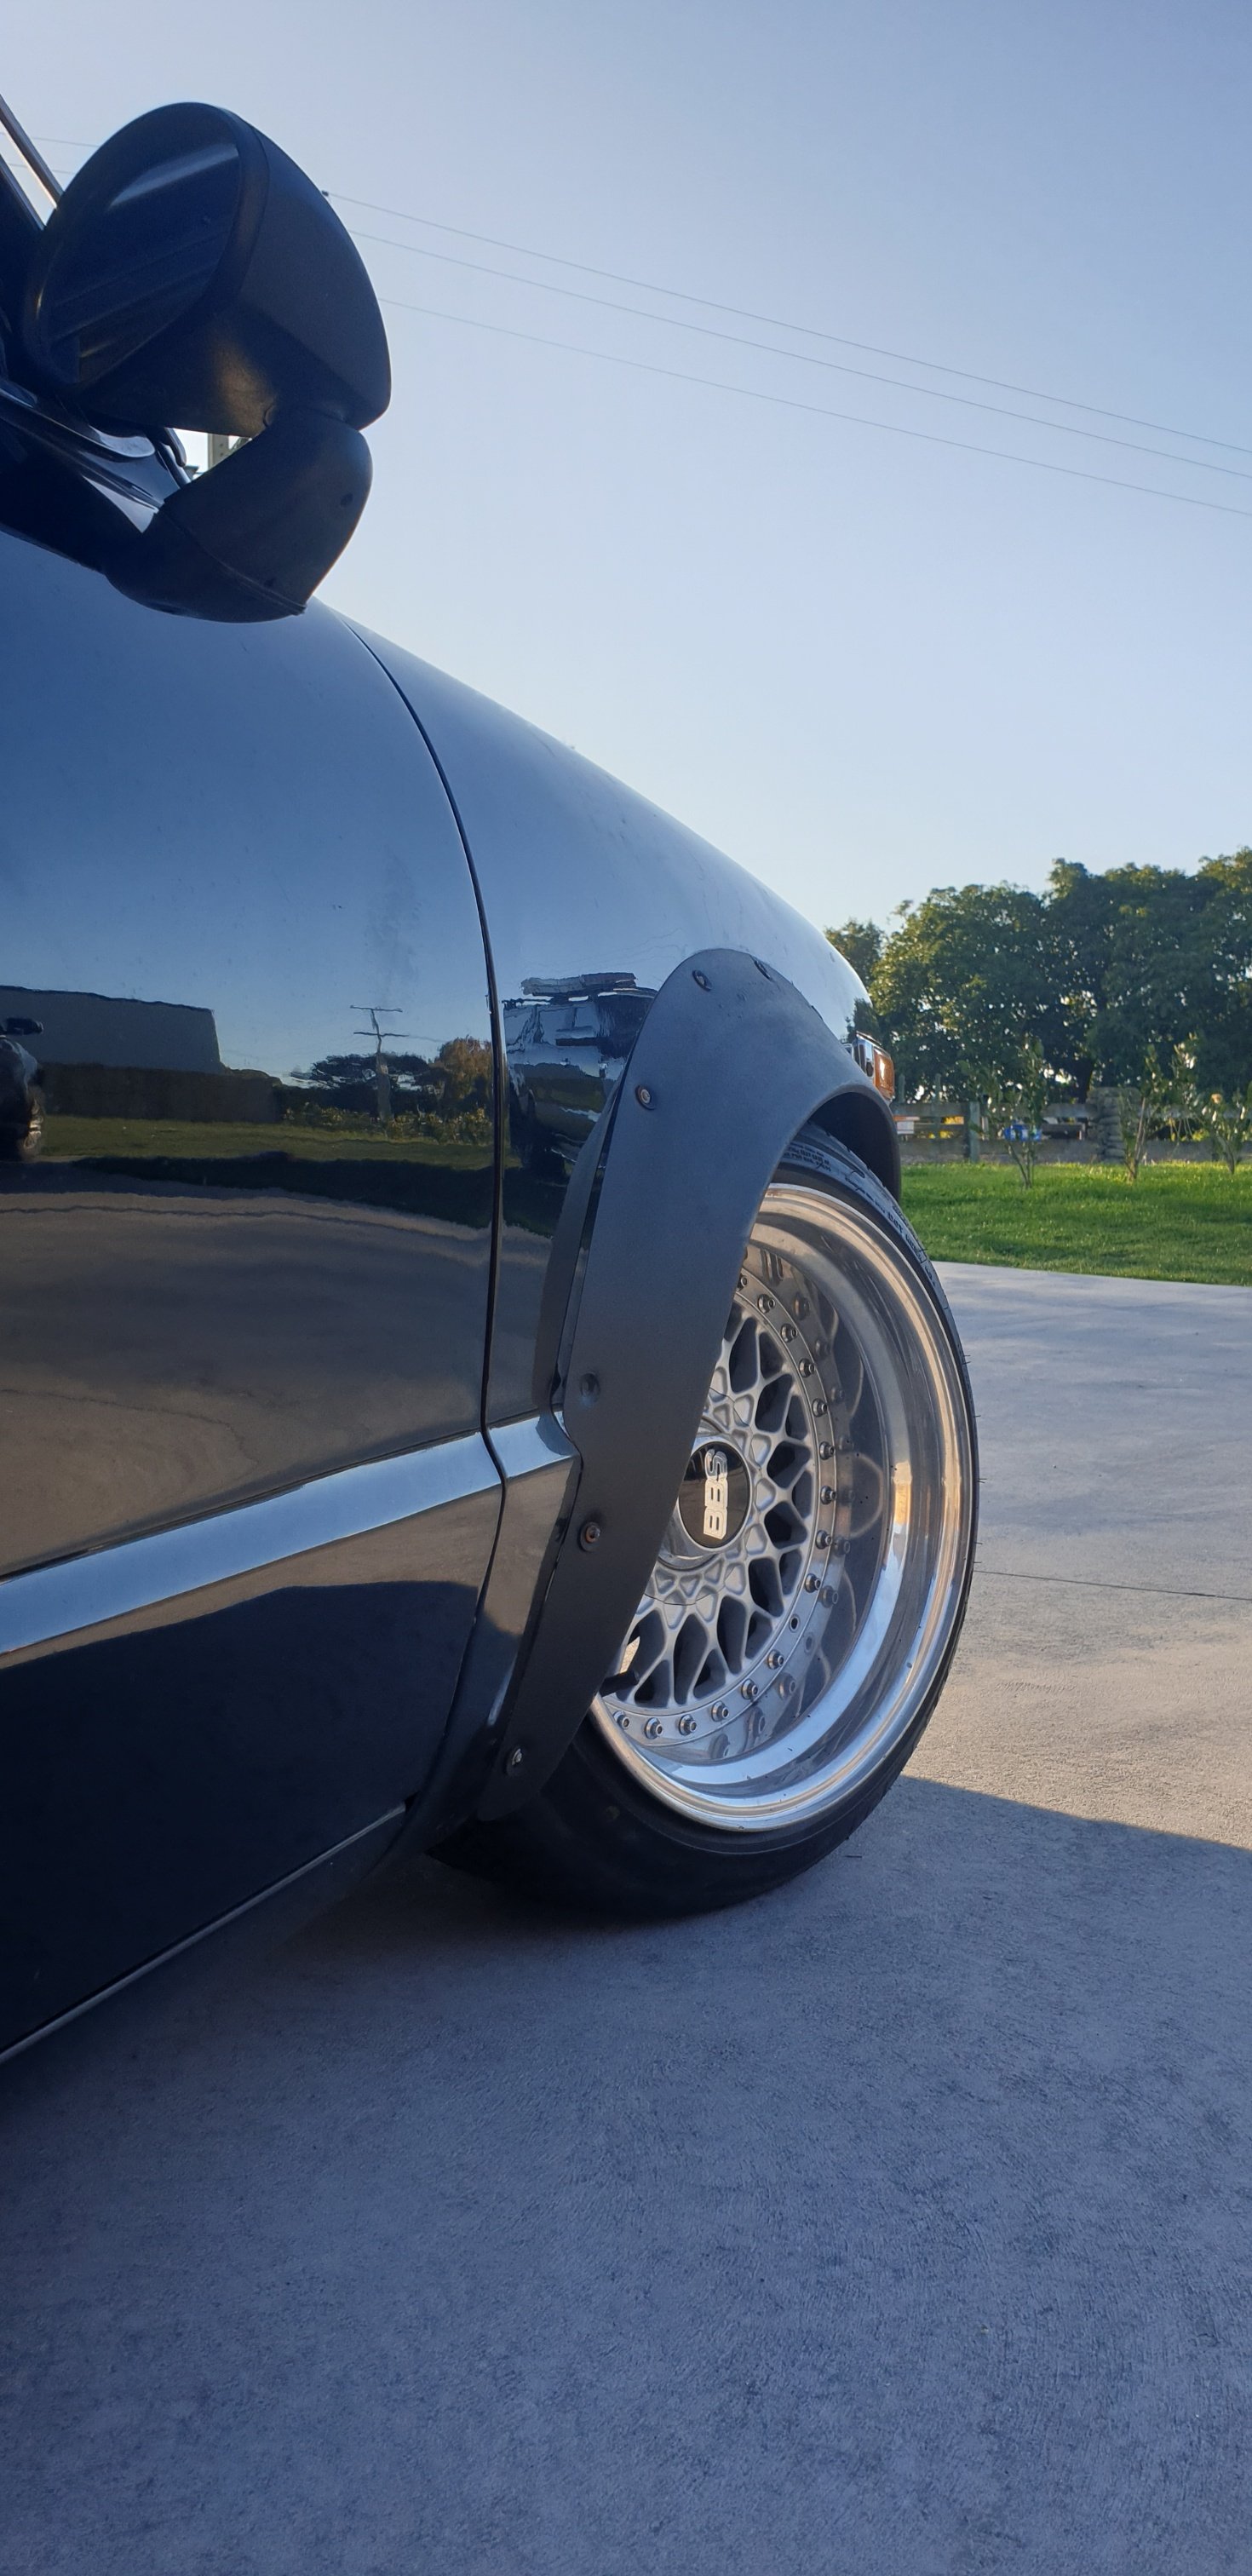
Tonights up date. So the car came on 15 x 10 on the front and 15 x11 on the rear, which are ultra wide especially when they had super streteched 195 & 205 on them. I was a bit on the fence about running them as to make them look semi decent needed alot wider tire on it which could of been tricky space wise. Was browsing trademe for lips to relip them slightly narrower if some lips popped up, ended up finding a set of 15 x 8 & 15 x 9 BBS RS on trademe with Mazda stud pattern. So went and grabbed them , turns out they were the wheels that used to be on this car before it had the flares. Have put the 9s on the front and put the 10 off the front onto the back. Will switch tyres around to run a 205 on the front and get some 225/40 or similar for the 10 on the back.
10 points
-
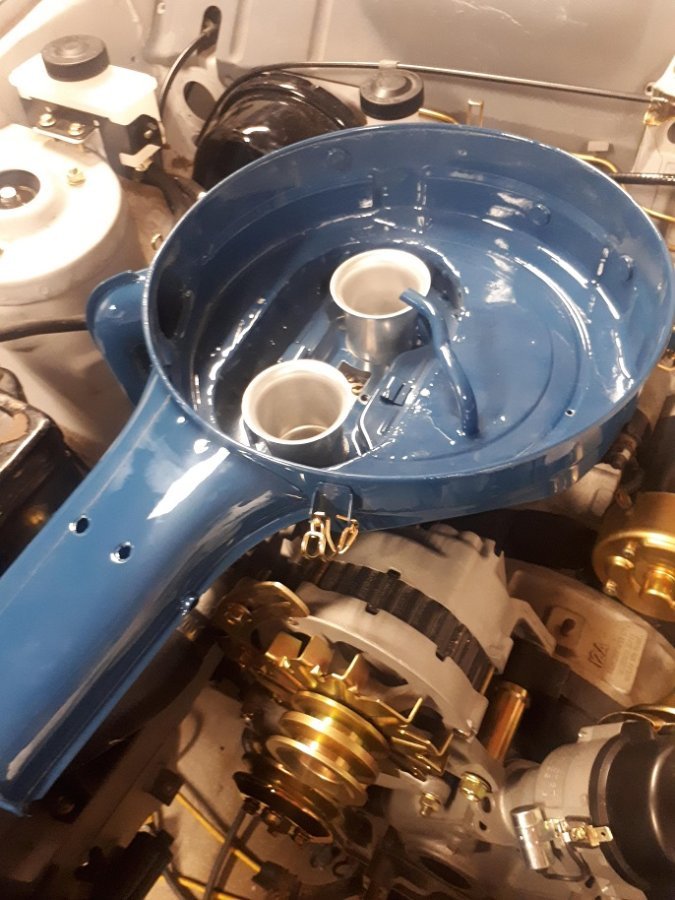
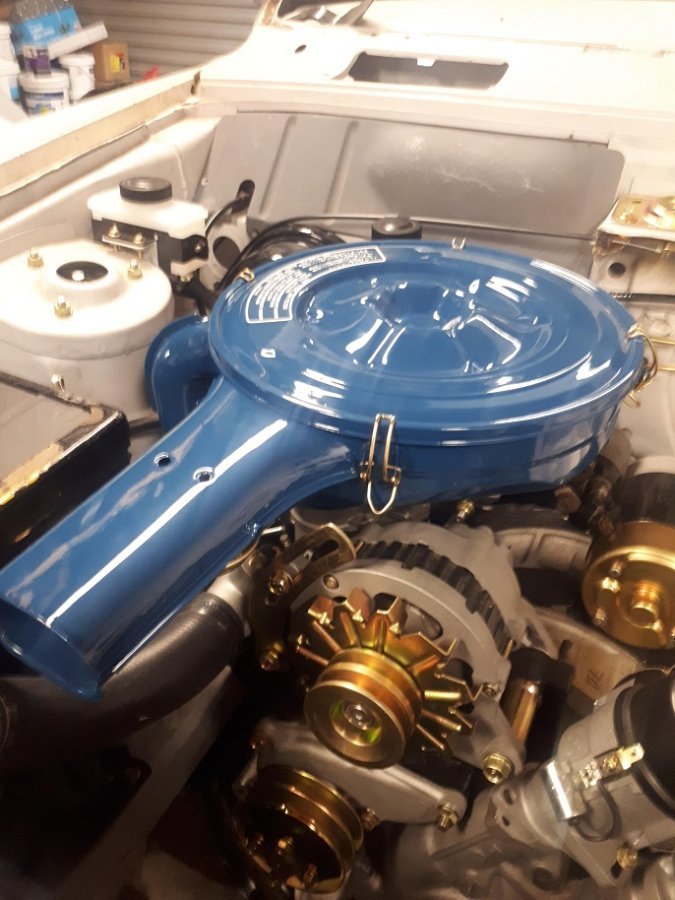
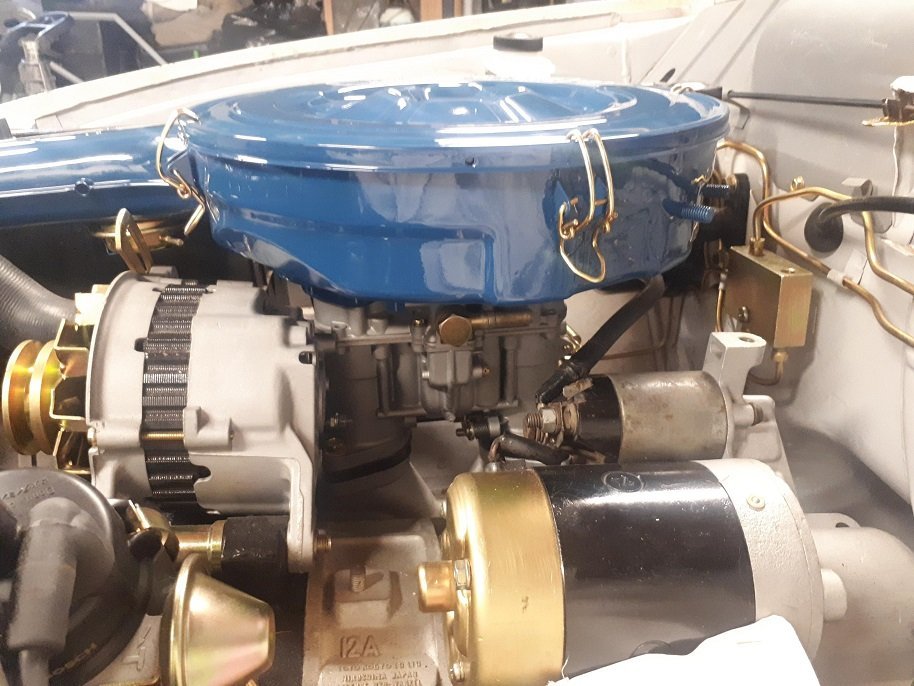
G'day. 6 weekly update... A few little things are going to get done thanks to lock down boredom/family avoidance. Engine bay needs a bit of a tidy. It's mostly just dirt but the cam cover & air cleaner look a bit shit. Had the big debate about polishing the cam cover or going wrunkle funnish. Black wrinkle won and was ordered but I thought I'd just mess about with some 3000 grit & a bit of Autosol coz it was a nice day. Looks OK for not too much bother, may just go with it. Sprayed the air cleaner though. Yes, not orange. After about an hour it was starting to crinkle up quite nicely Went out later and it was looking ace. No pics/ it was dark. Sooo..... What's it going to be for the cam cover ? Not sure, I'll choose in the morning /Prace bets now.9 points
-
Have you considered a MX5 motor? They make about 120 hp stock. Are ultra reliable. Already rwd. Have a nice 5 speed box as stock. Can be purchased for sub 1000 dollars. Could be wired with a stock ecu. The days of buying a rusty 5 speed Datsun Sunny for not much are long gone.8 points
-
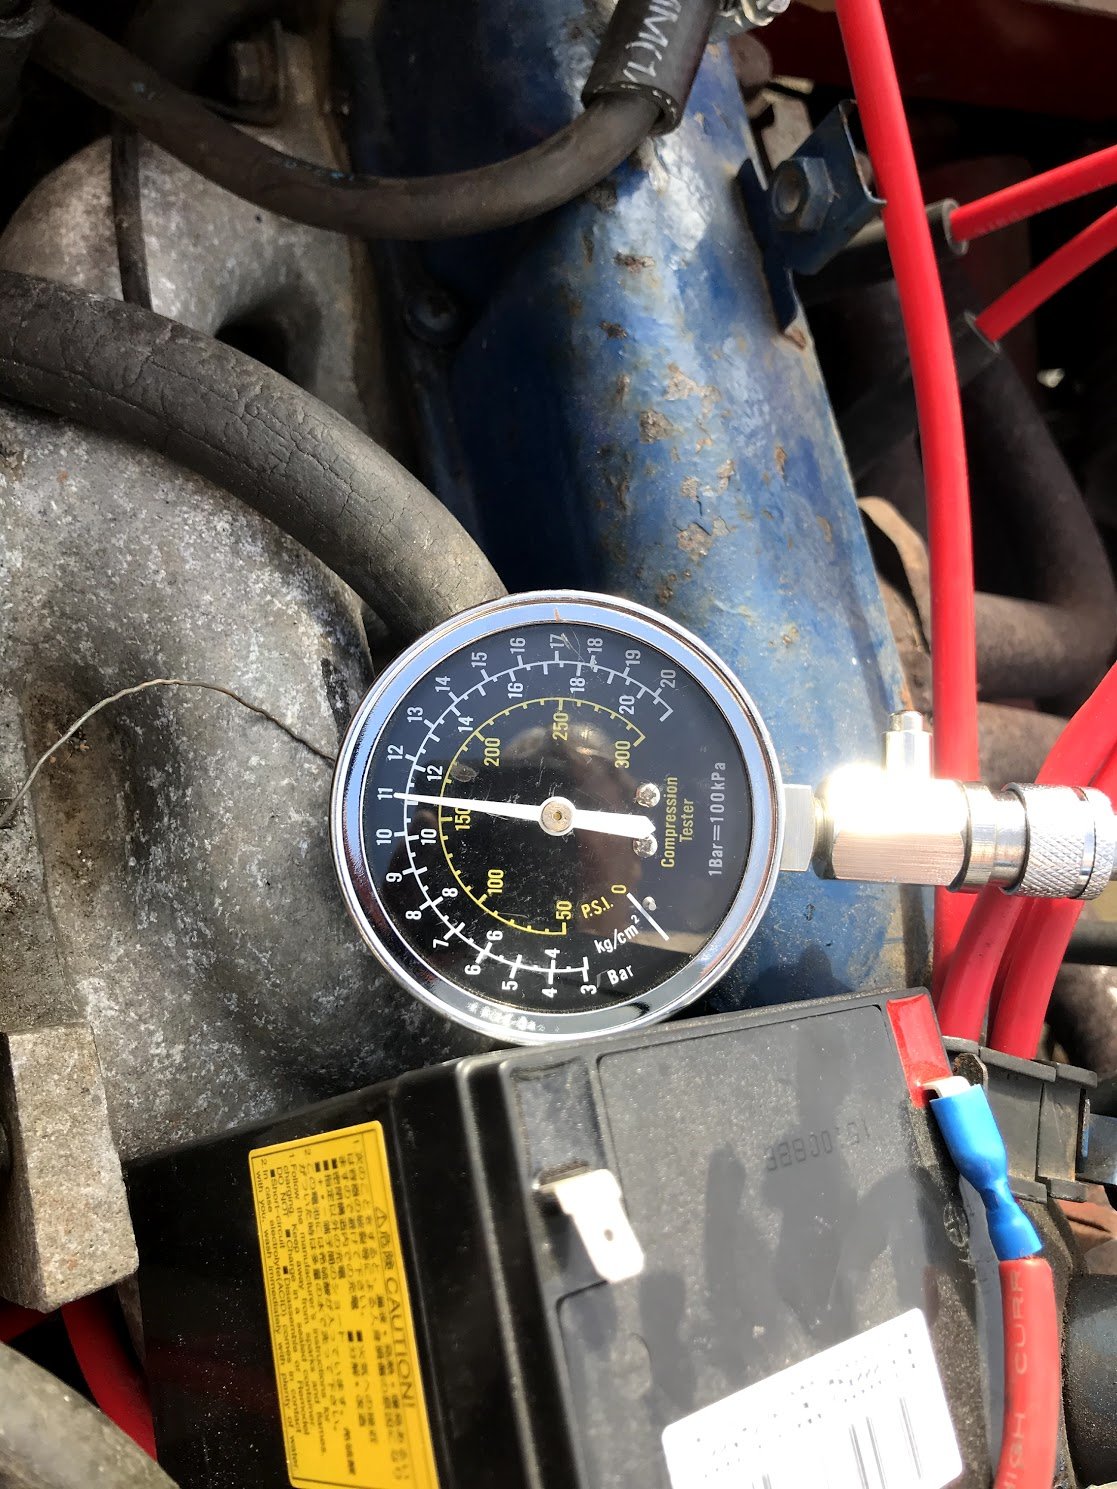
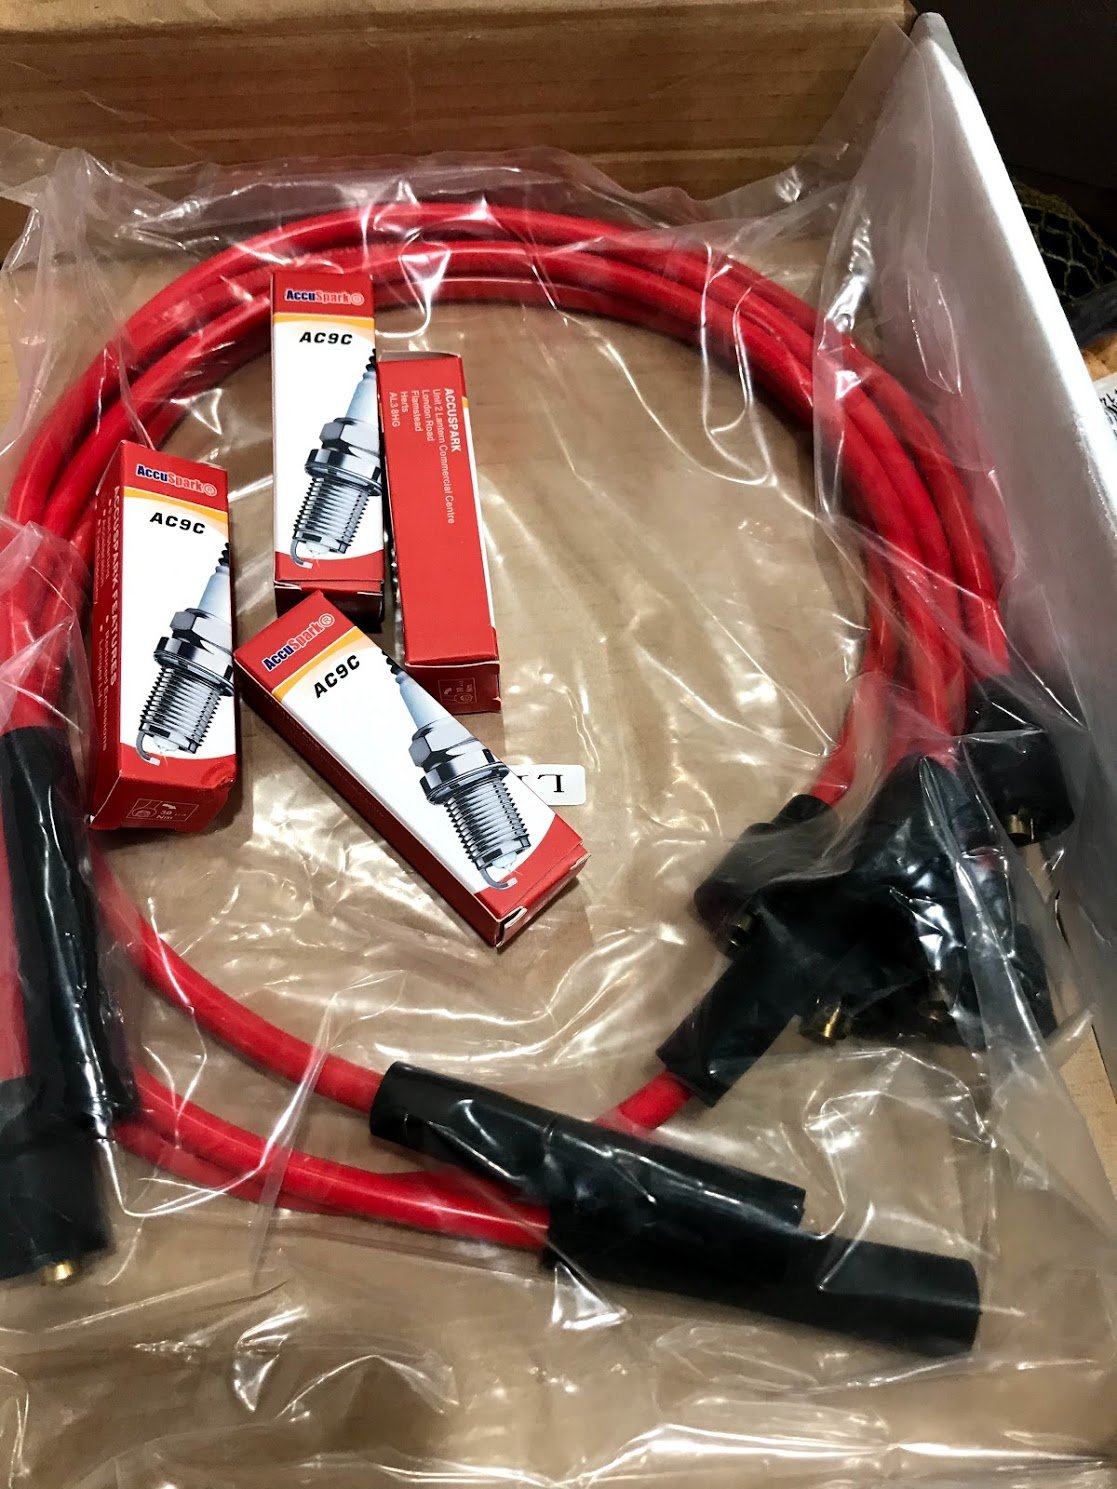
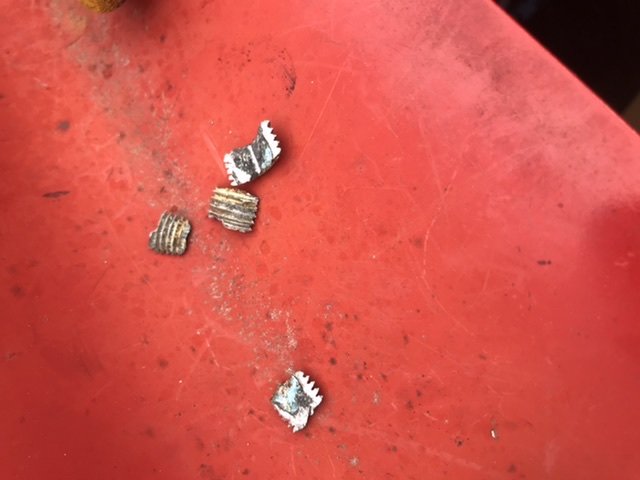
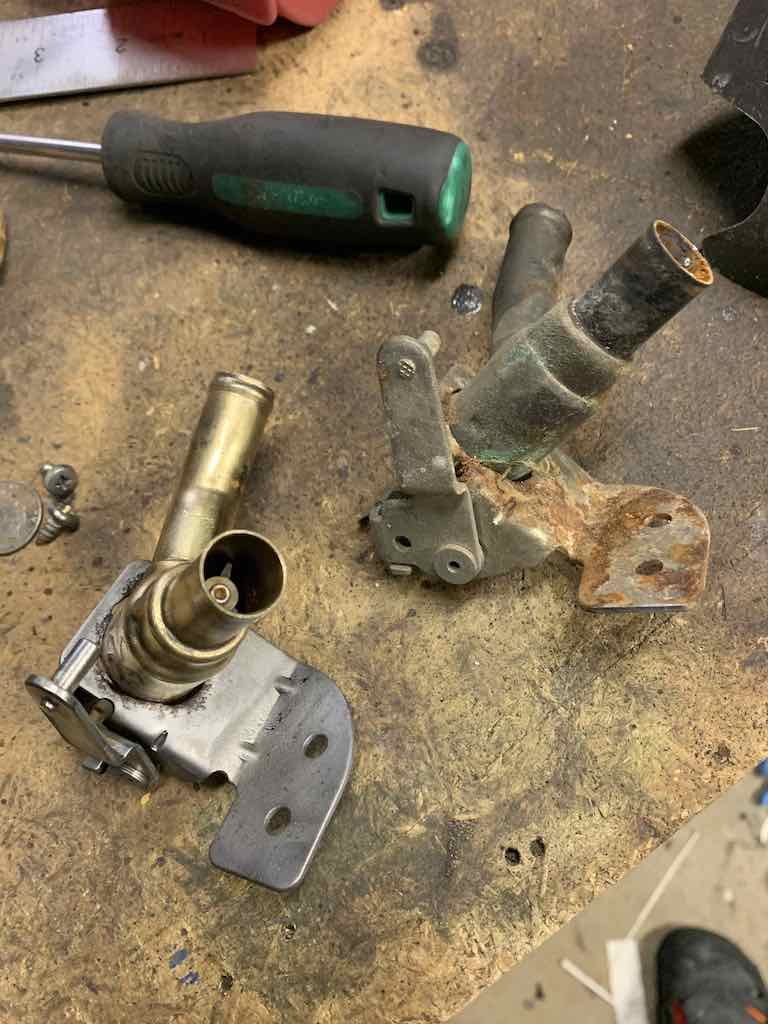
SUCCESS!!! This isn't the first start, I'd got it running about 10min earlier. It didn't even smoke at all. Let it get a bit warmer (no radiator hoses) and did a compression test now its an even 165psi on all four?! The engine wants to live! Need to make up some hoses from what I have laying around but one problem is this fitting snapped off so I need to try cut it out: New plugs and leads that brought it back to life. Plus I set up an external fuel tank thing which helped.
6 points
-
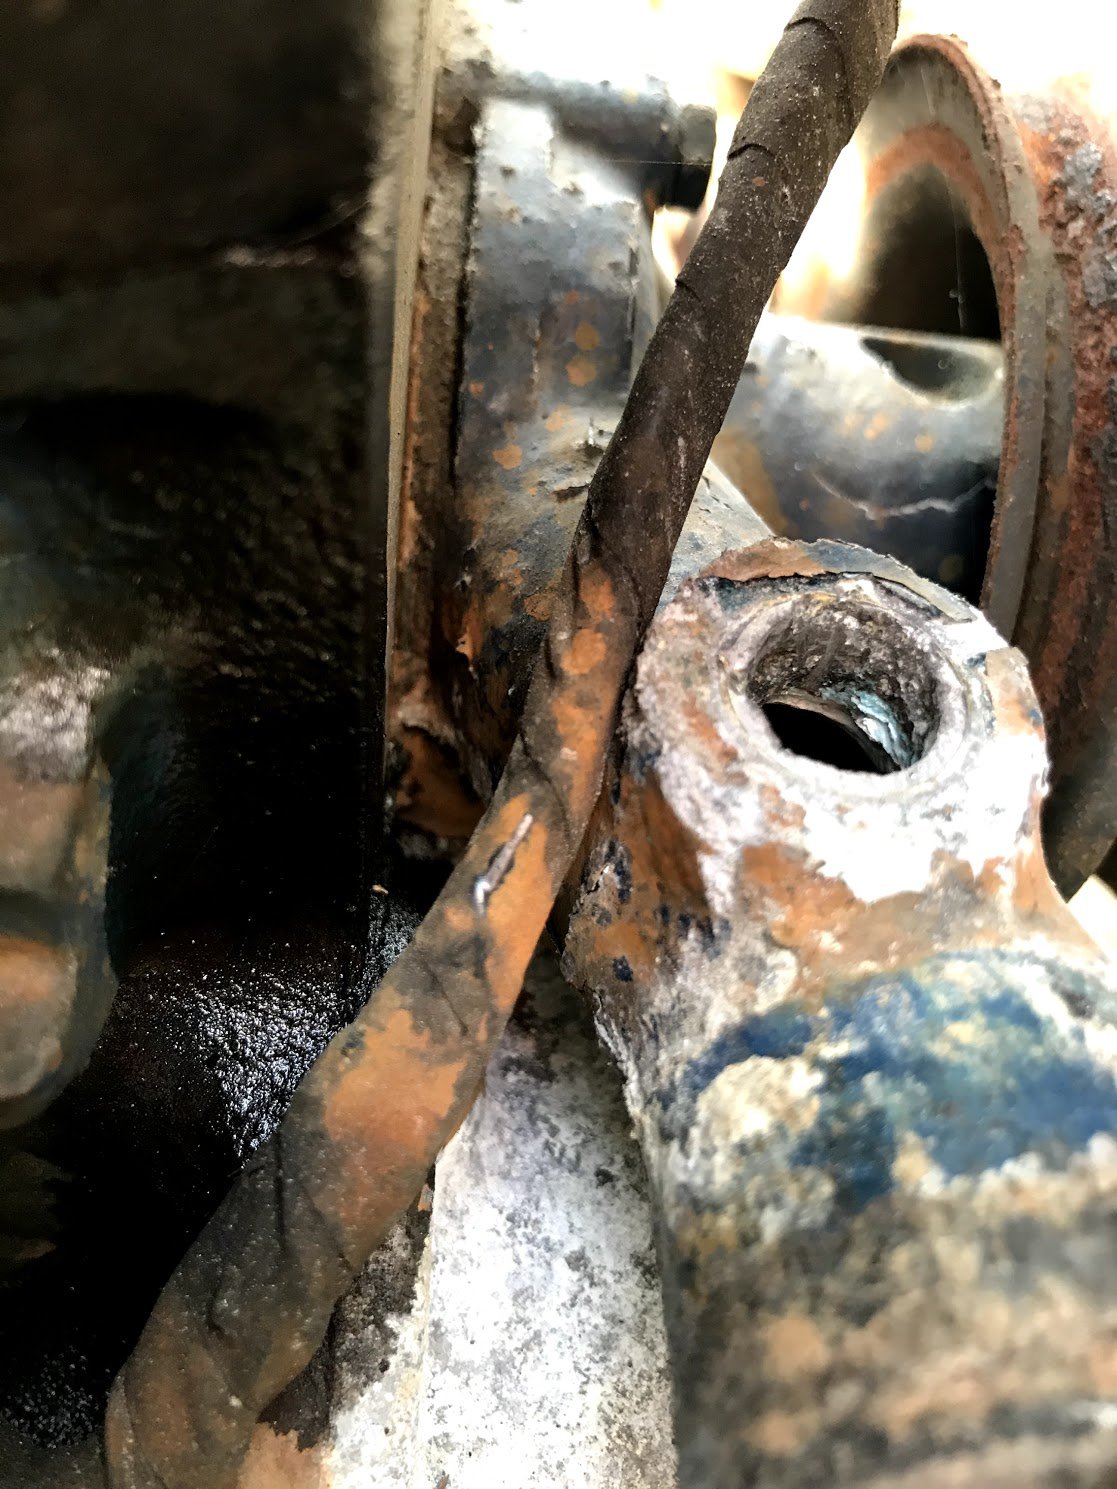
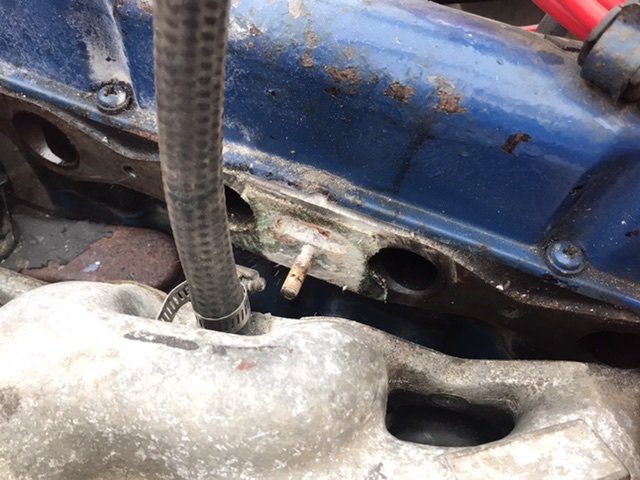
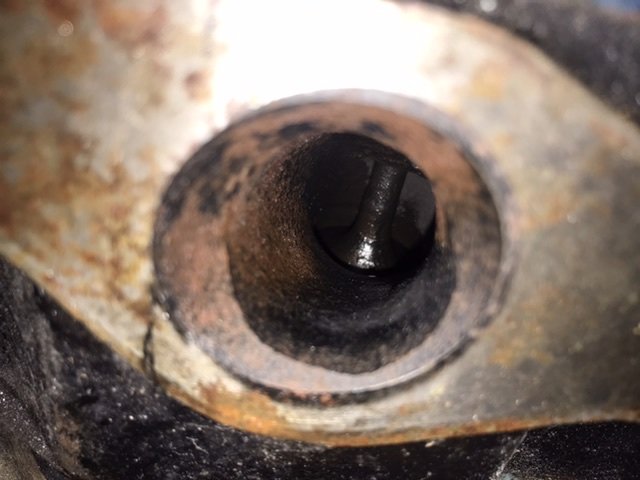
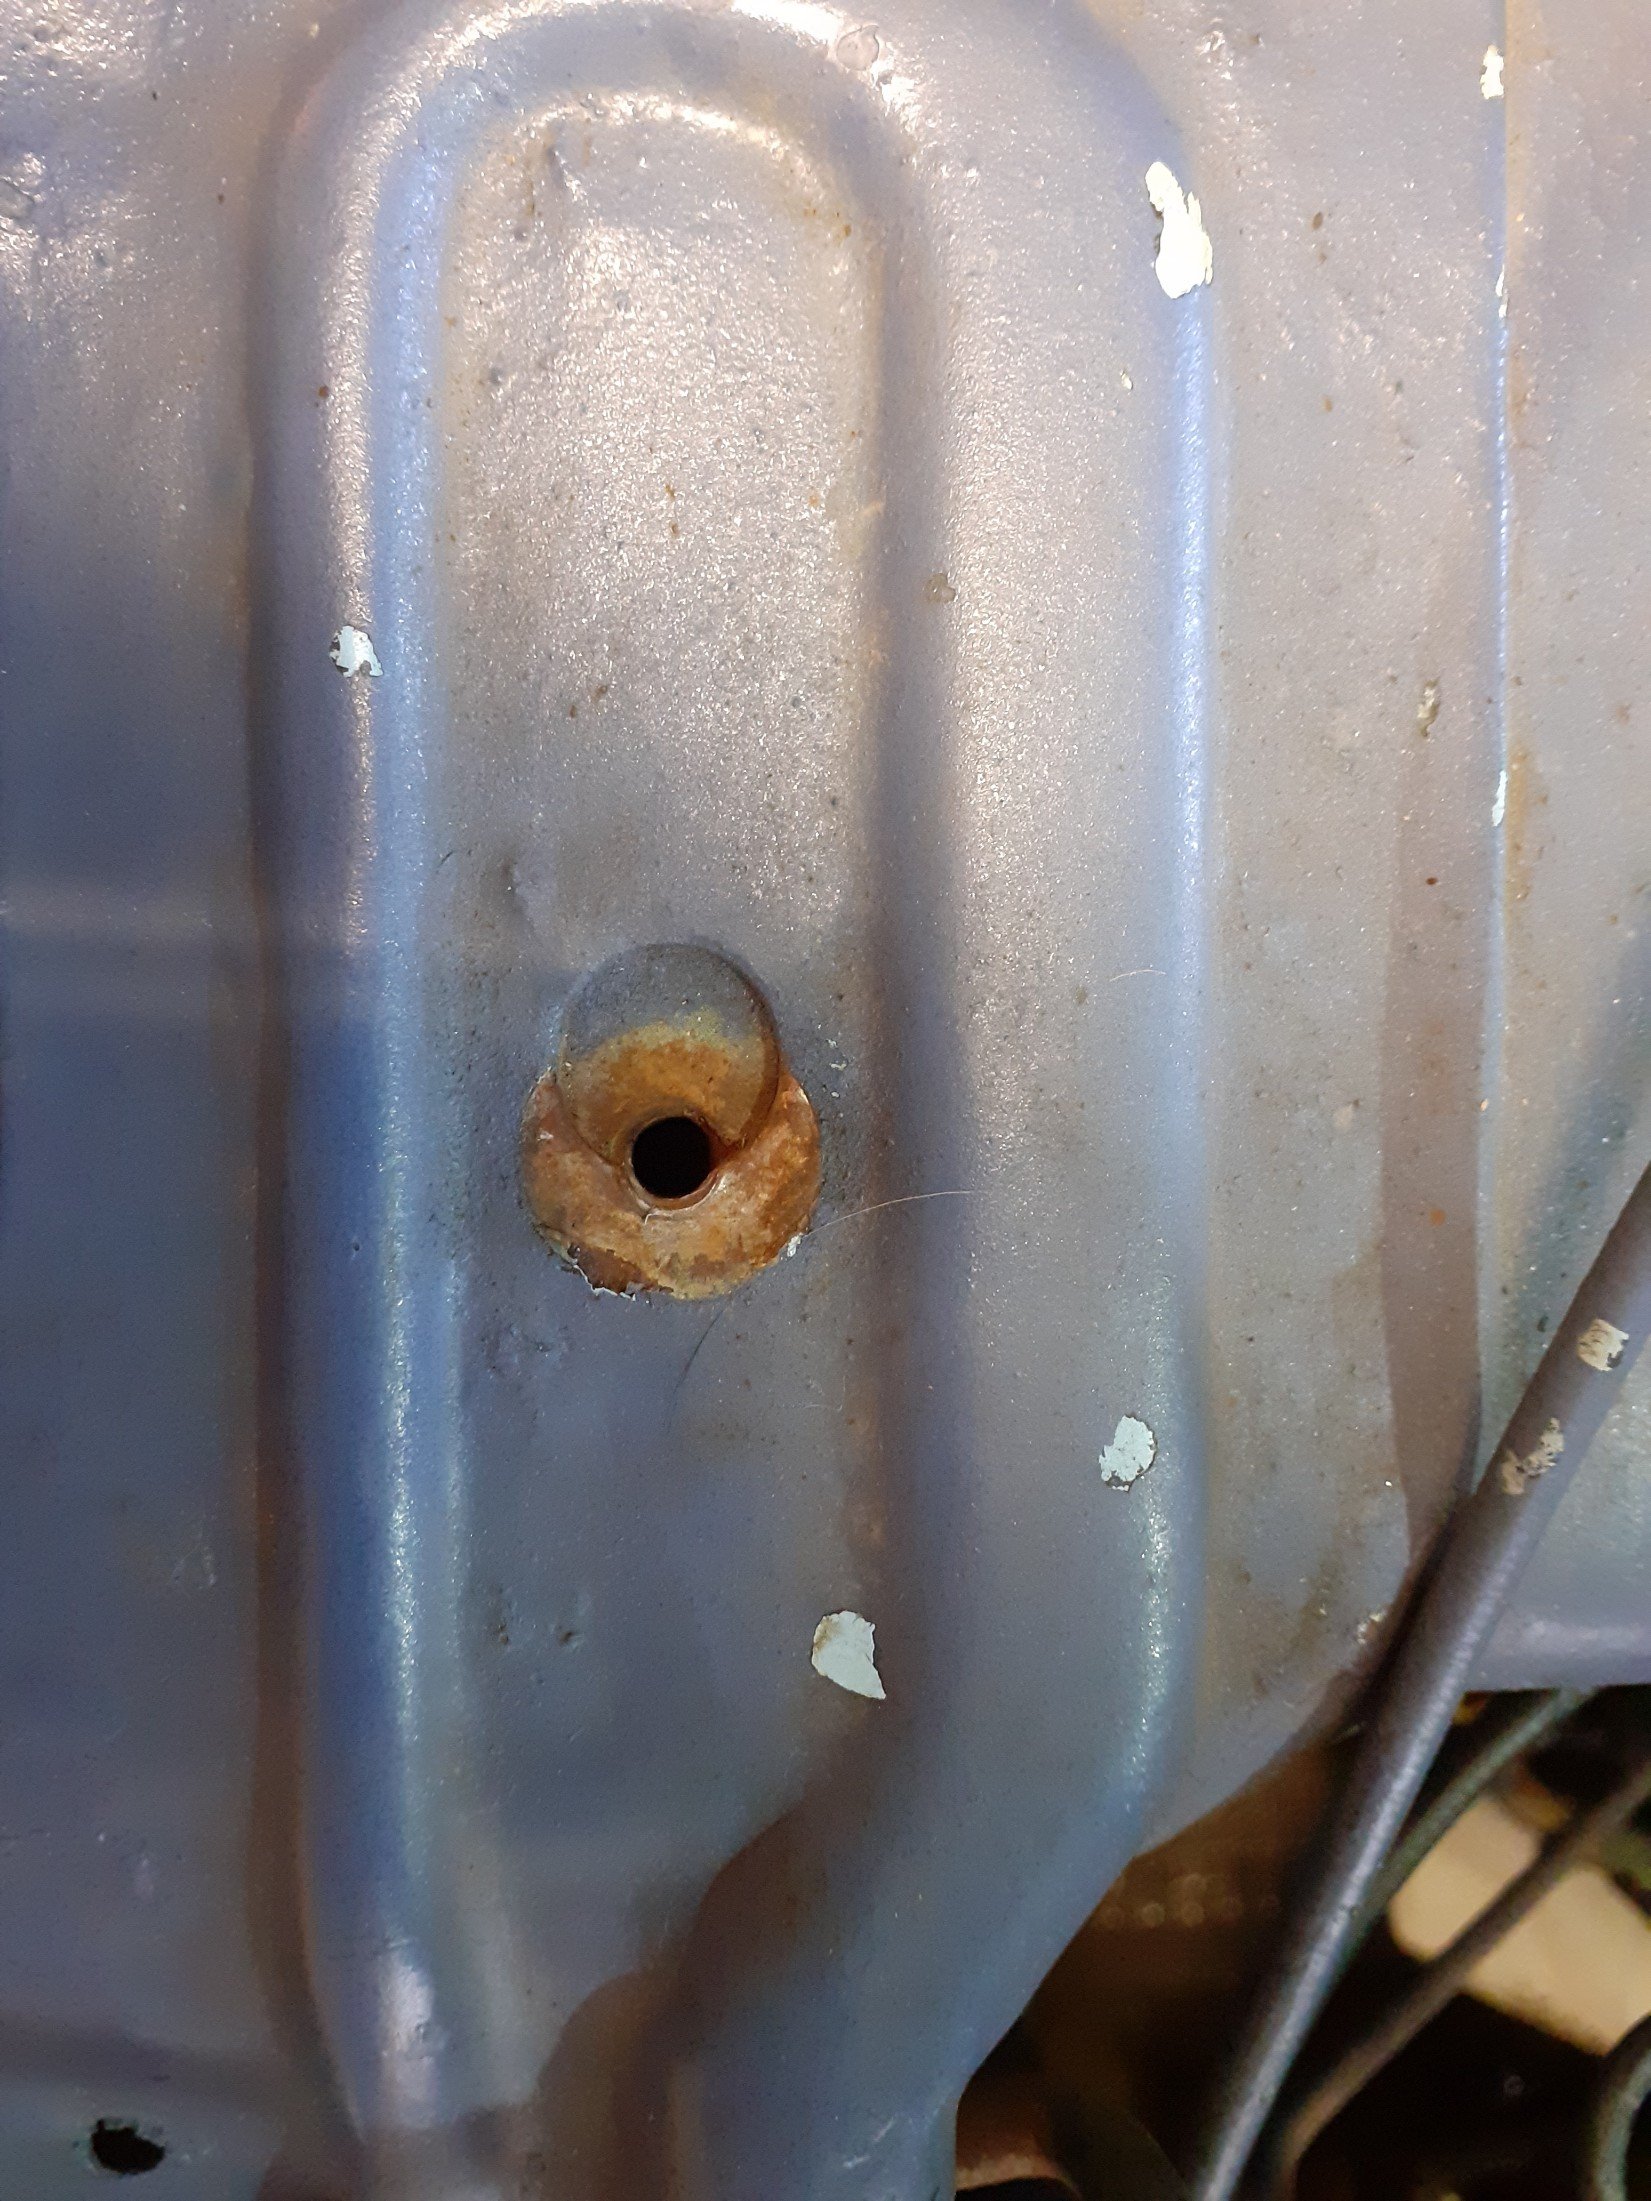
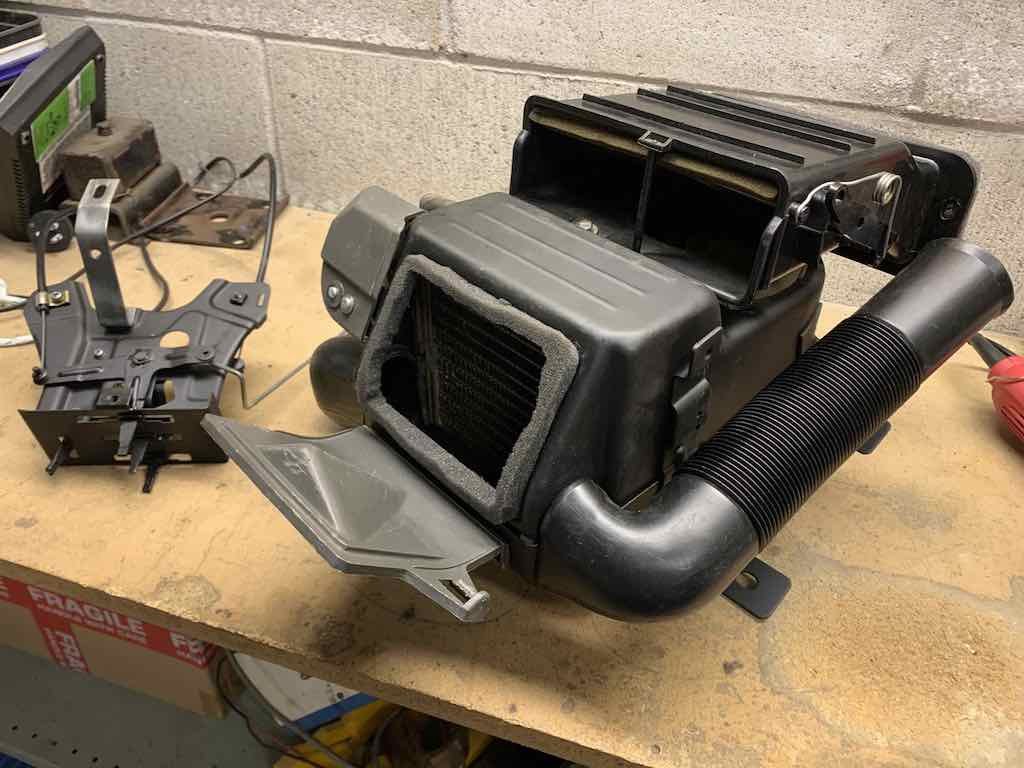
The plan today was to make up some temporary radiator hoses to get it running. Managed to hack out the broken fitting, will buy a new water pump anyway but wanted to do some testing today. Hacked: I then found a fitting that worked, put some rtv in it since the threads were damaged. Again, just temporary. I was going to block off the hose since it is just for the heater But thought I should loop it to the other end. Pulled off the hose from the intake manifold and found it was completely blocked with white powder. It was rock solid, had to drill it out. Ended up having to take the intake manifold off and found it was blocked in the head too. I must be some kind of long term reaction with the brass fitting? That oval recess above the stud in the centre is meant to be open and is blocked with more white powder. This stuff came out easy though. Can now see into the head with no blockage. Need to buy a new intake manifold gasket now. Checked out the intake ports and they look like they could really do with some basic porting. It’s not even uniformly round lol. I’ll compare the gasket to the intake port and manifold runners to see.
5 points
-
After thinking about the rear brakes and asking some questions I decided that drums are going to be just fine, mainly because the wheel cylinders are about $45 each and by the time I did the rear disc conversion I figure I was going to be another $500 - $700 into it. The money insanity has to stop somewhere. BnT had the wheel cylinders in stock so 2 hours on Thursday night saw them swapped over and brakes bled up again, all good so far. No doubt there will be some adjustments once the car is driving.Have to touch up the paint on the diff as brake fluid managed to go all over the place, lucky its only aerosol can black. I also picked up the new battery and re-terminated battery leads Tuesday. Put all that in today and finished off more of the wiring. I stand back and look at it and think that it could be much tidier, and them I remind myself this is not a show car and it is all practical. The instrument cluster and fuel pump/sender unit went to Robinson's on Thursday. They use a crowd in Auzzie to supply modified resistor cars for the sender. Hopefully they have one on the shelf and it will be here in a week or so. Once I have that back the fuel tank can be painted and go in. I'm not keen on painting until the pump is in, bound to scratch it otherwise.. The list is getting much shorter.4 points
-
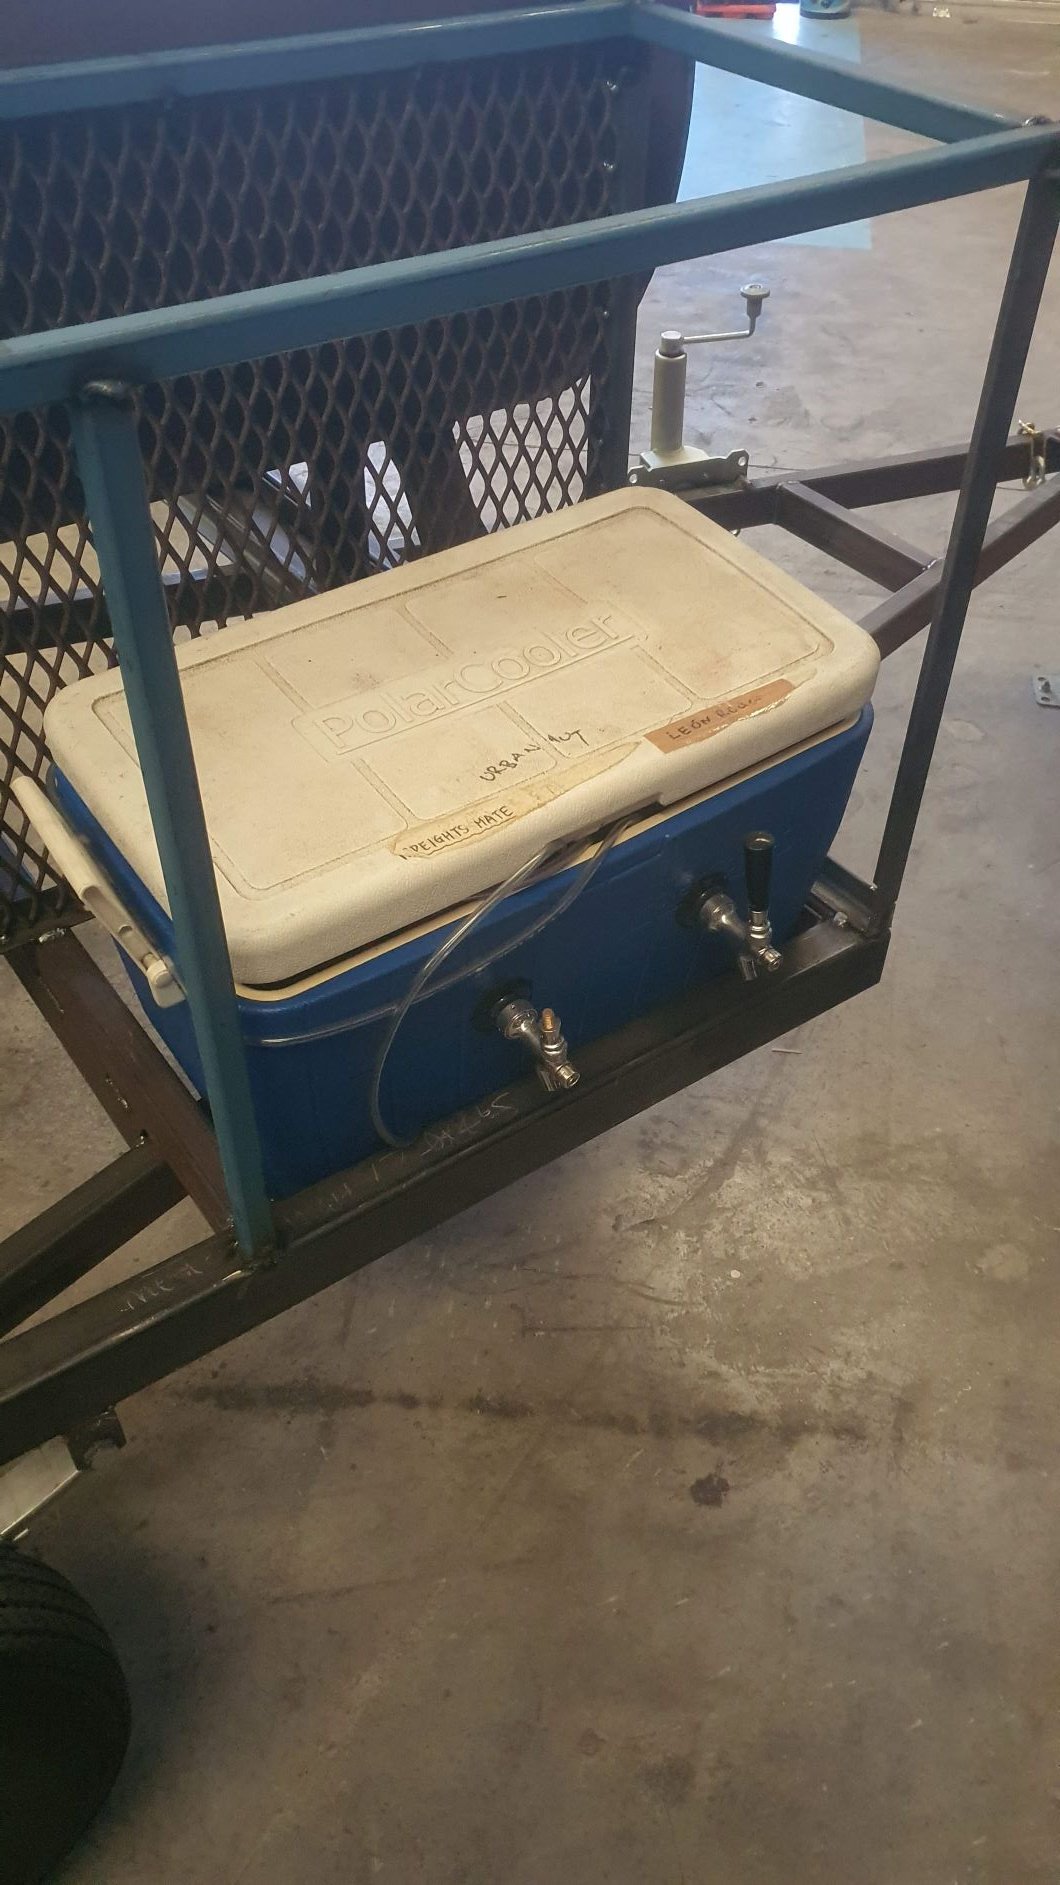
Got the vent sorted, used the old handbrake handle from the Chev as the open/closer. Framed up the wood box, back bit for wood, front for other stuff. Planning on stripping my jockey box and putting beer tap into the box, lining with ply and timber.
4 points
-
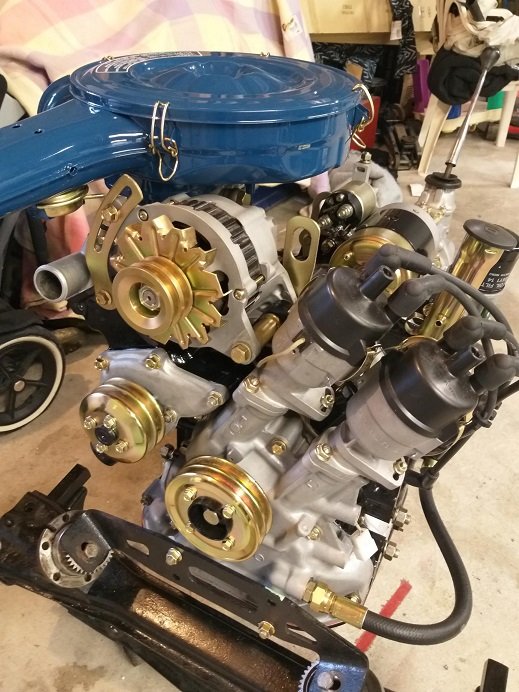
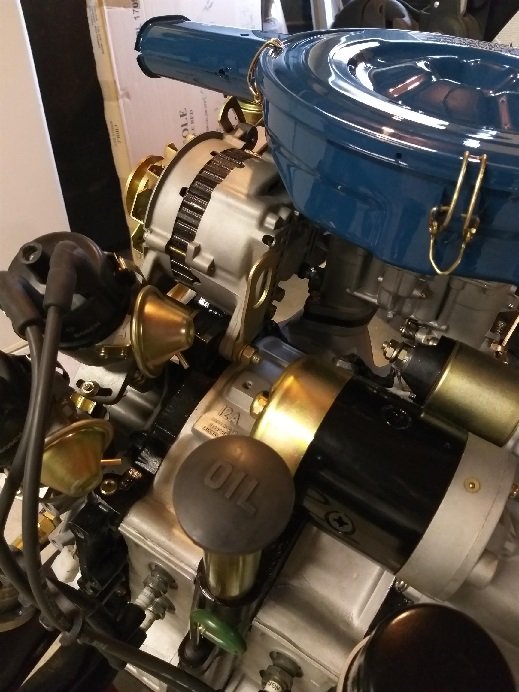
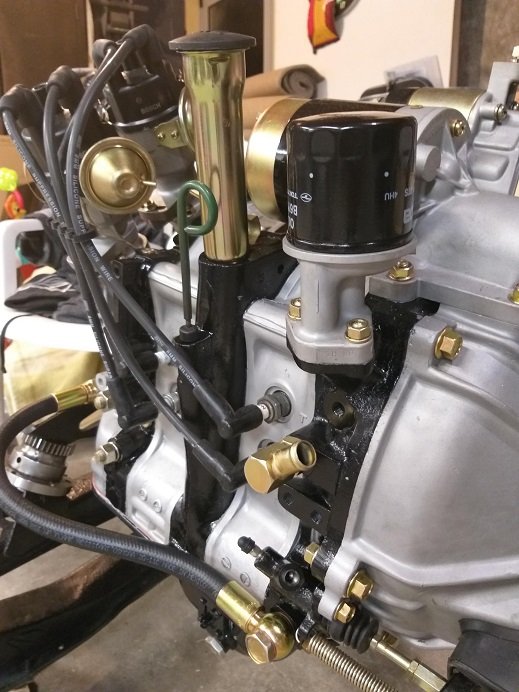
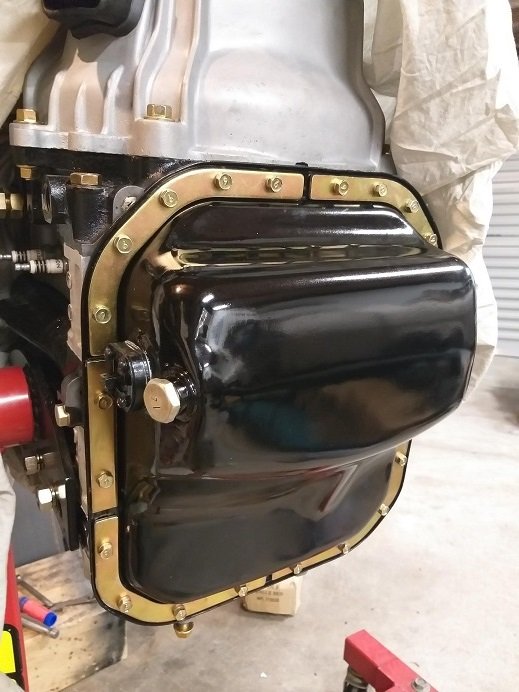
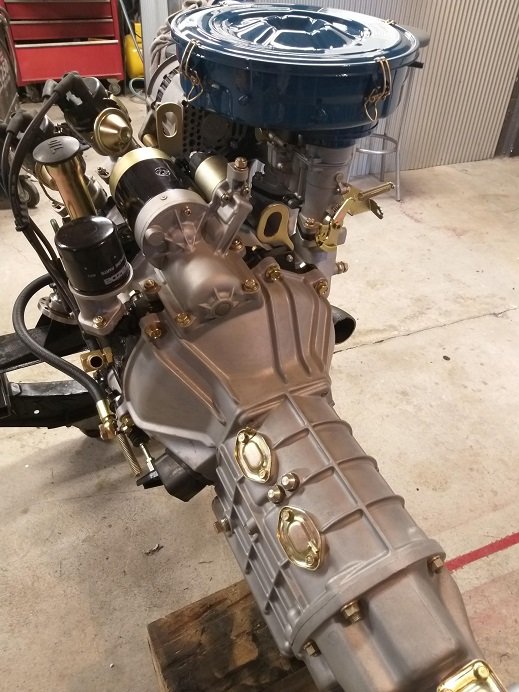
Cleaned up some engine parts, brake booster, battery tray, rejetted the idle jets, new gasket for the oil pump, removed and cleaned up the swaybar mounts. I assembled and put the new waterpump on the engine but forgot to put the alternator tensioner on! Removed the assembly and in doing so I had to destroy the new gasket. Happy to know the vnt copper gasket spray works very well. All put back together and assembled the rest of the motor for a start up. Unfortunately it wouldn't catch on any cylinders and a couple of back fires through the carbs. The only thing that has changed is I've leaned out the pilot jets from a 35 to a 32 and adjusted the fuel screws. Will check these and any potential vaccum leaks tomorrow. Have since cleaned up a few more cables. Good old British workmanship. Bonnet stay/post should have been centered.
4 points
-
Then slapped together a "rough and ready" wooden jig that will hopefully hold everything in position while a mate of mine glues it together for me.
4 points
-
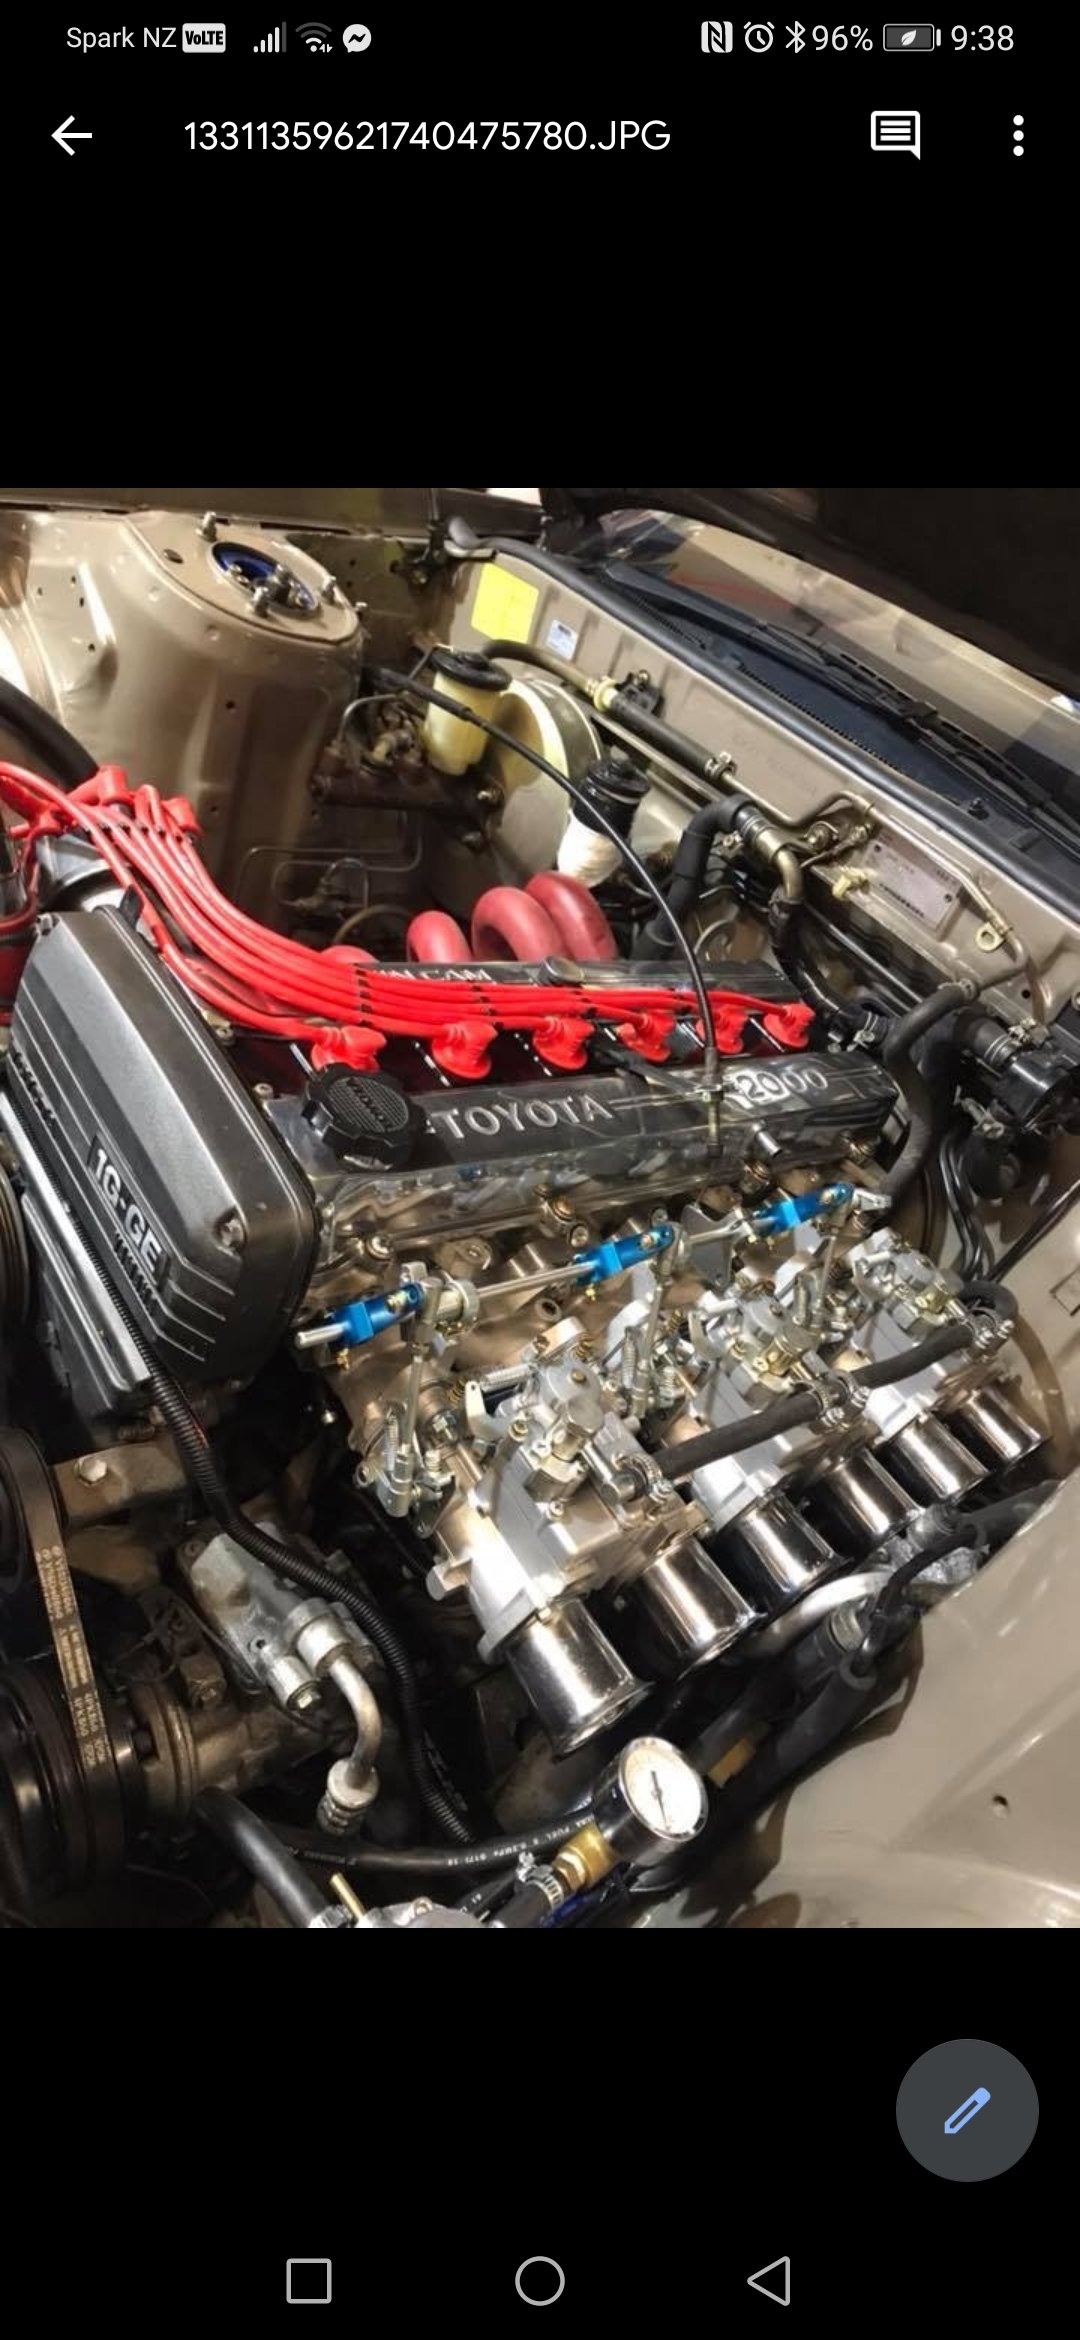
Spent much of the last week measuring and thinking about the manifold for the Carb Conversion. Think I have that sorted, so will try to get some more progress this week on getting one made. I have a spare 1ggte head that turned up this week which has been useful to just look over. Had a manifold flange quickly drawn up so I could figure some small details out. This was for my original plan which was to use two 4age Weber manifolds (easy to buy) and have a conversion flange on the head. Am leaning away from this at the moment. Also attached is the one picture that kicked off the carb idea.
3 points
-
People like to say a product is shit, but as it's an aftermarket product, you also have to take into consideration as to how it's installed. For example if it is solid mounted to the bulkhead with no electrical isolation and they're running mediocre earths and a 10:1 antifreeze ratio, then it's not the radiators fault it shat itself. Not to say Fenix is or isn't shit, but if it's cheap, chances are so is the install. And the people who have no issues probably aren't as vocal.3 points
-
Sorry if I come across as negative, but it was generally a pretty miserable experience doing the conversation to end up with such a shit product that only just works.3 points
-
You pretty much called out the weld quality on day one #Nostradamus3 points
-
*not for off road use like those warehouse bikes!3 points
-
Been having a play with new Nextion screen and Teensy 4.0. Both of which are remarkably quicker than older stuff I was using. (But was still good) This time around instead of using all of the premade features you can use in the screen GUI designer thing. Which are a bit limited and inflexible. I'm gonna make as many features as I can by "hand" so I started with an XY graph that's rescalable. So to draw a graph on the screen you just need to specify where it is on the screen, how big it is, and which variables are on the X and Y axis. Then it looks up a table for that particular variable which shows what its min and max values should be. Then rescales everything to suit the size that the graph ends up being. Benefit of doing it this way, is I can just manually add items to the screen in realtime and save the layout. As well as being able to change which values its showing on X and Y axis, I can just save the settings to eeprom. Rather than needing to do it via a combination of the screen GUI program and updating arduino code to match it. Zillions of hours left to go though. haha. But most of the canbus code and my ignition trim code will be directly portable over to the Teensy 4.0 so that's good. And then as per post in the EFI thread I made a little engine simulator thing, that will send/recieve canbus signals exactly how my ECU would. So I can use it as a simulator for testing my screen without having to go to the car to confirm.3 points
-
It's always been motivated, time's running out. Every spare weekend has been out there, it's just too far to go do a bit after work. House was supposed to change hands start of April, that's on hold. Build was supposed to start mid April, but that's having issues with the consent. Back at work now, and I need building supplies anyway. I think I'll have to wait until after level 3 to get stuff, bunnings/m10 is just too useless to buy online.3 points
-
Here is my new borderline oldschool mode of transportation. Admin please feel free to move it if it doesn’t fit the “oldschool” criteria (maybe too much plastic perhaps). But anyway, previous to this (after my 74 Camaro) I had picked up a 47 Chev coupe, but struggled to get into it so did a deal with a guy and swapped it for this (much to my partner’s disgust). I always enjoy having a car that’s actually on the road that I can enjoy and tinker away with. I’ll probably end up getting another project, but in the meantime this thing is kinda fun. I have plans to personalise it a bit more to my needs.. some I’ve done, and some I’ll get round to it when funds allow, but in the mean time this is her:
2 points
-
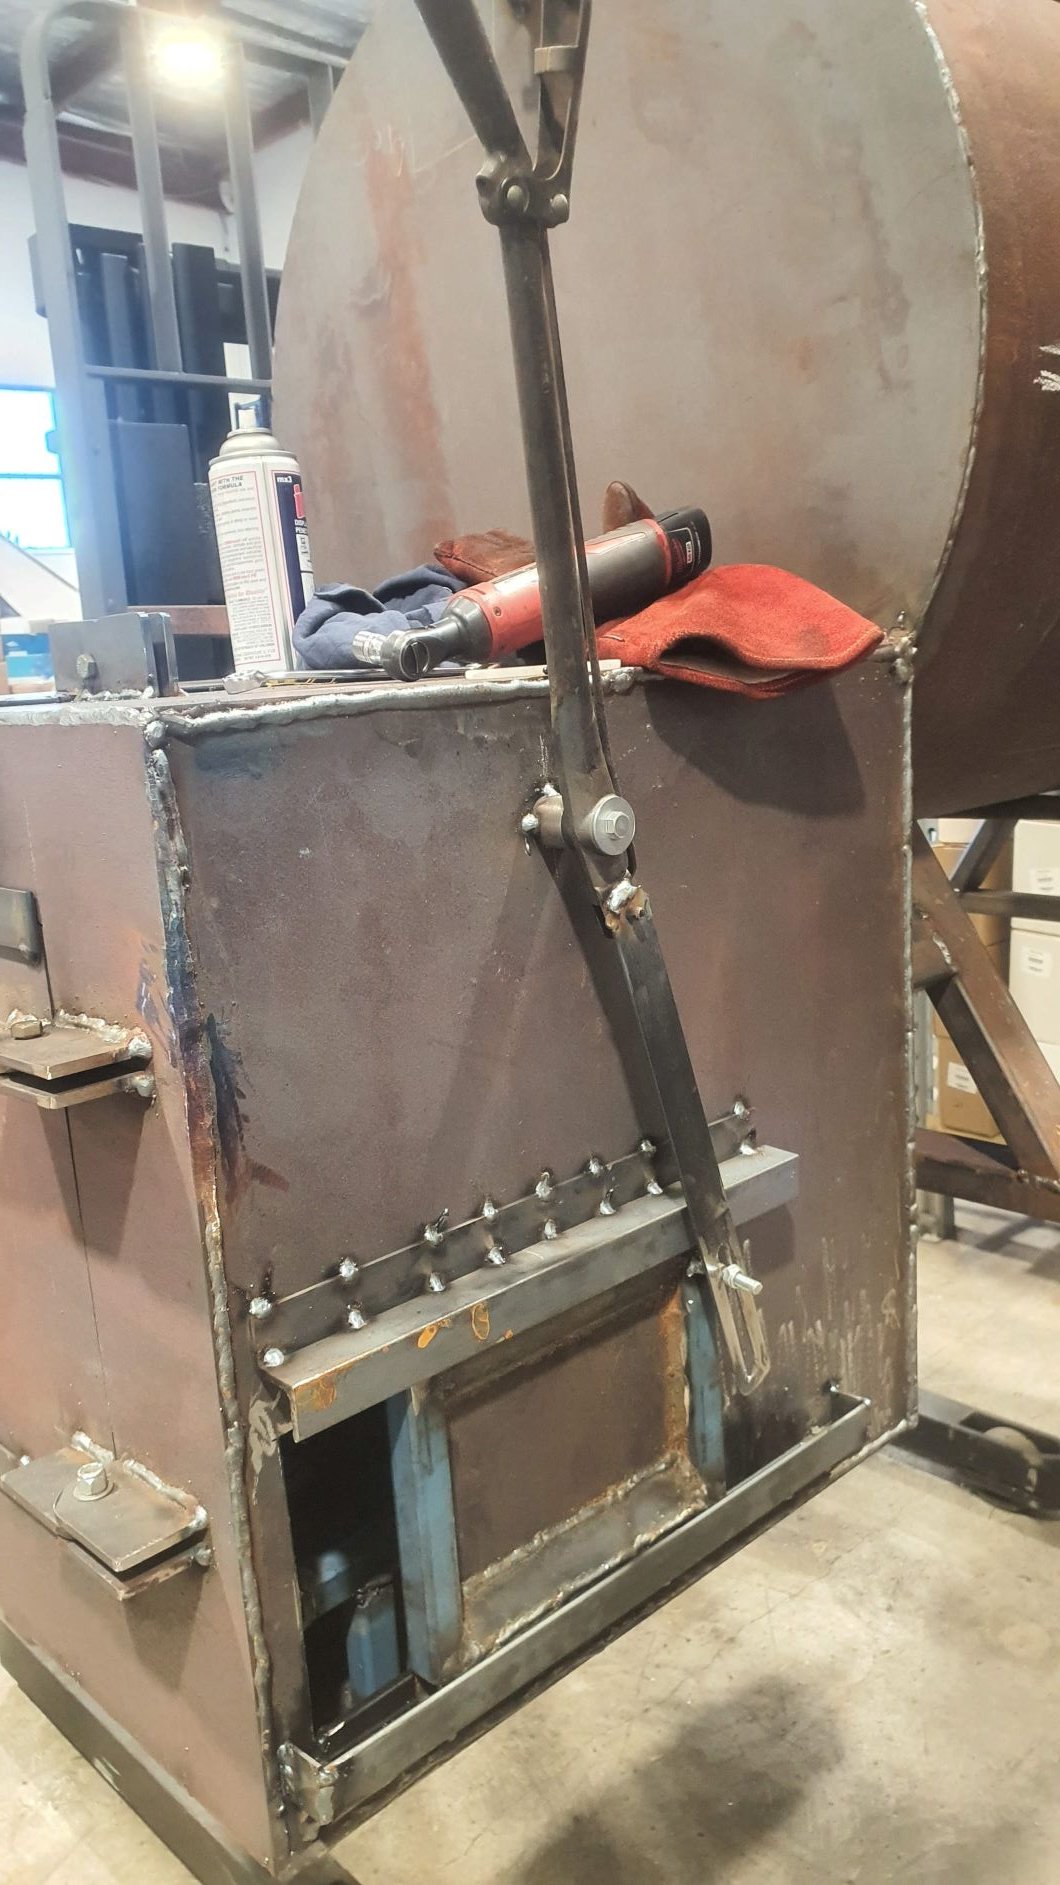
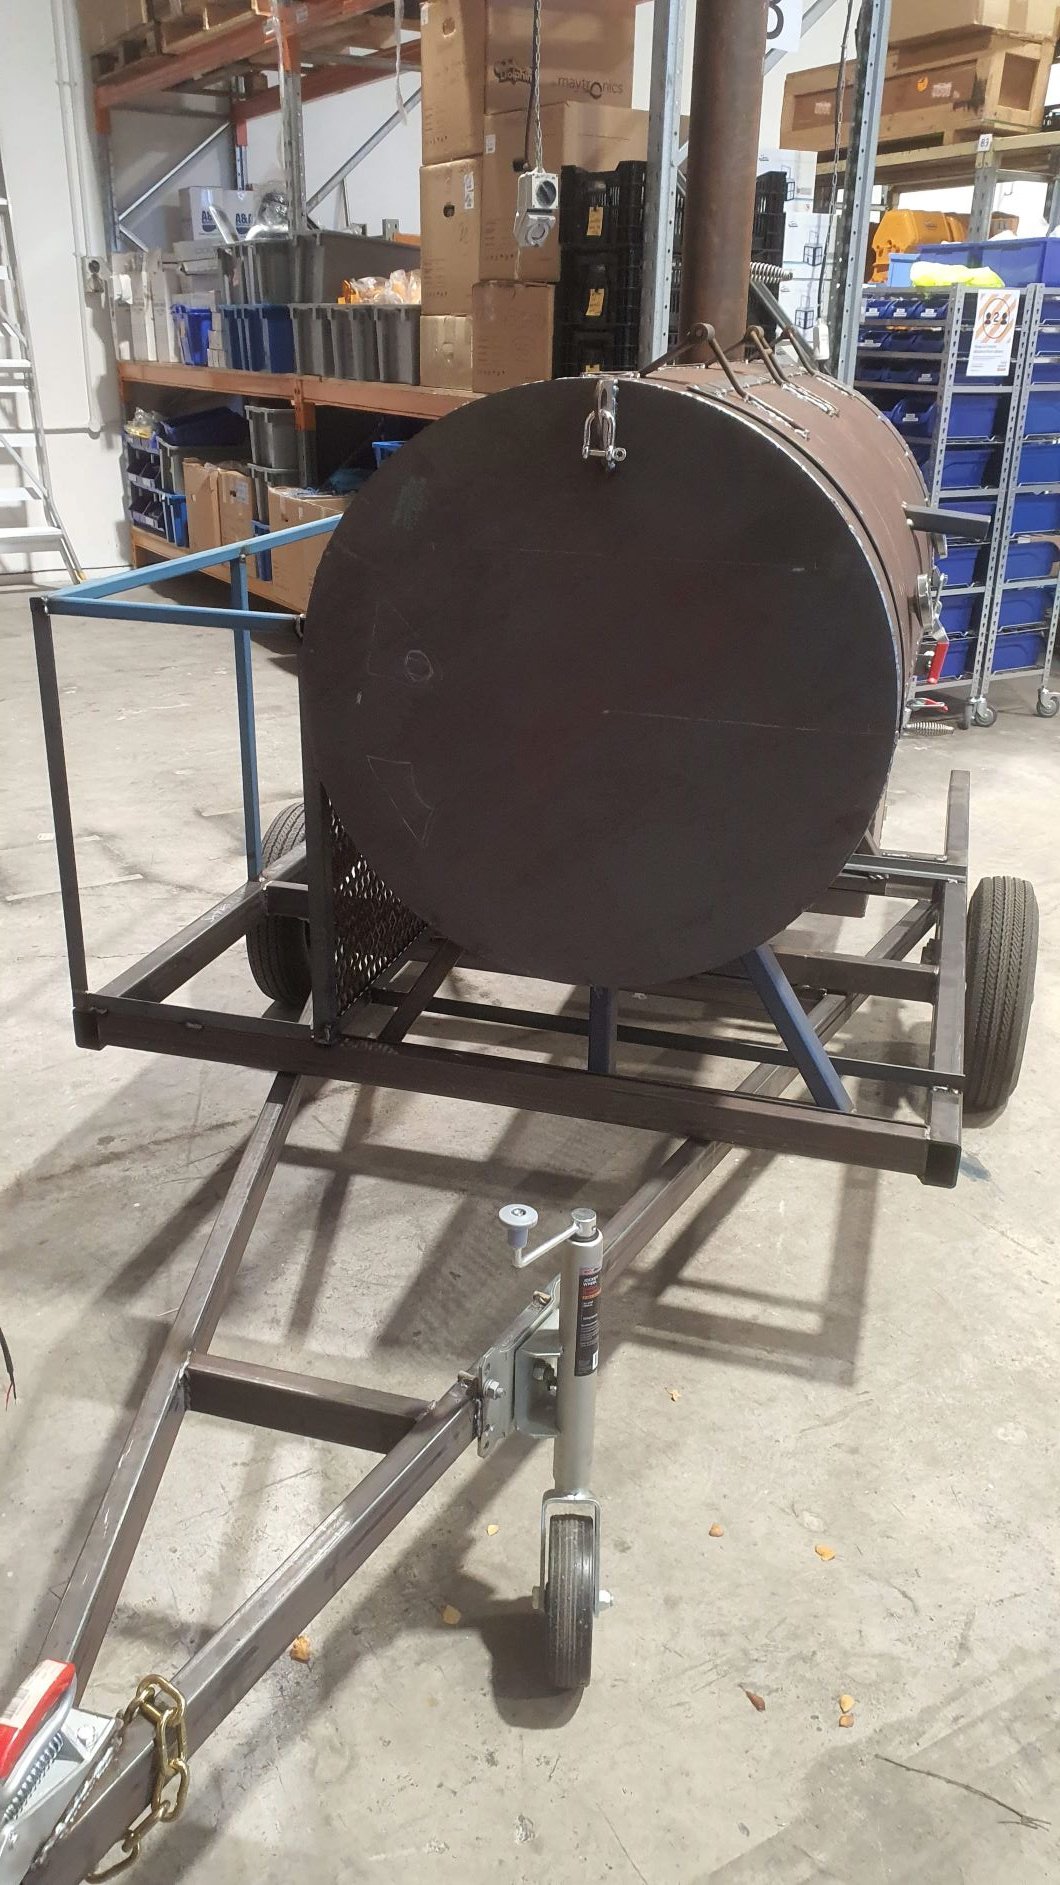
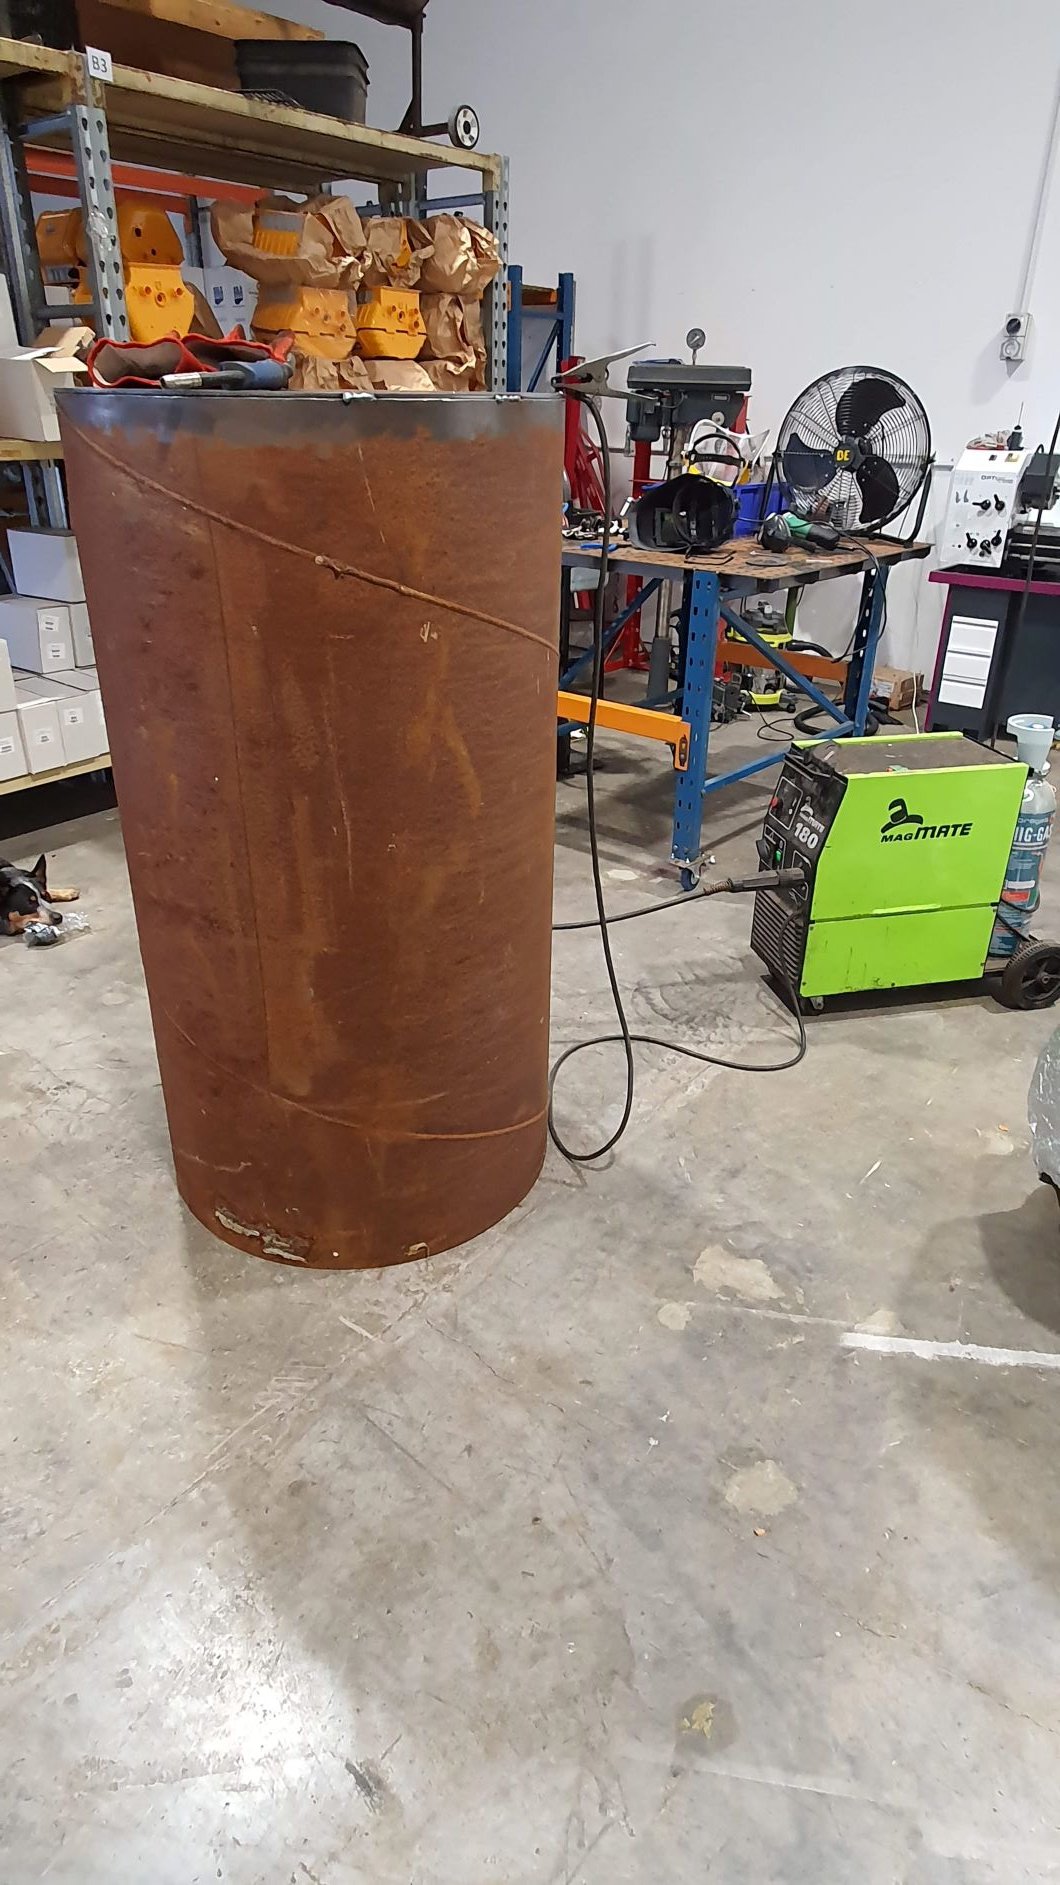
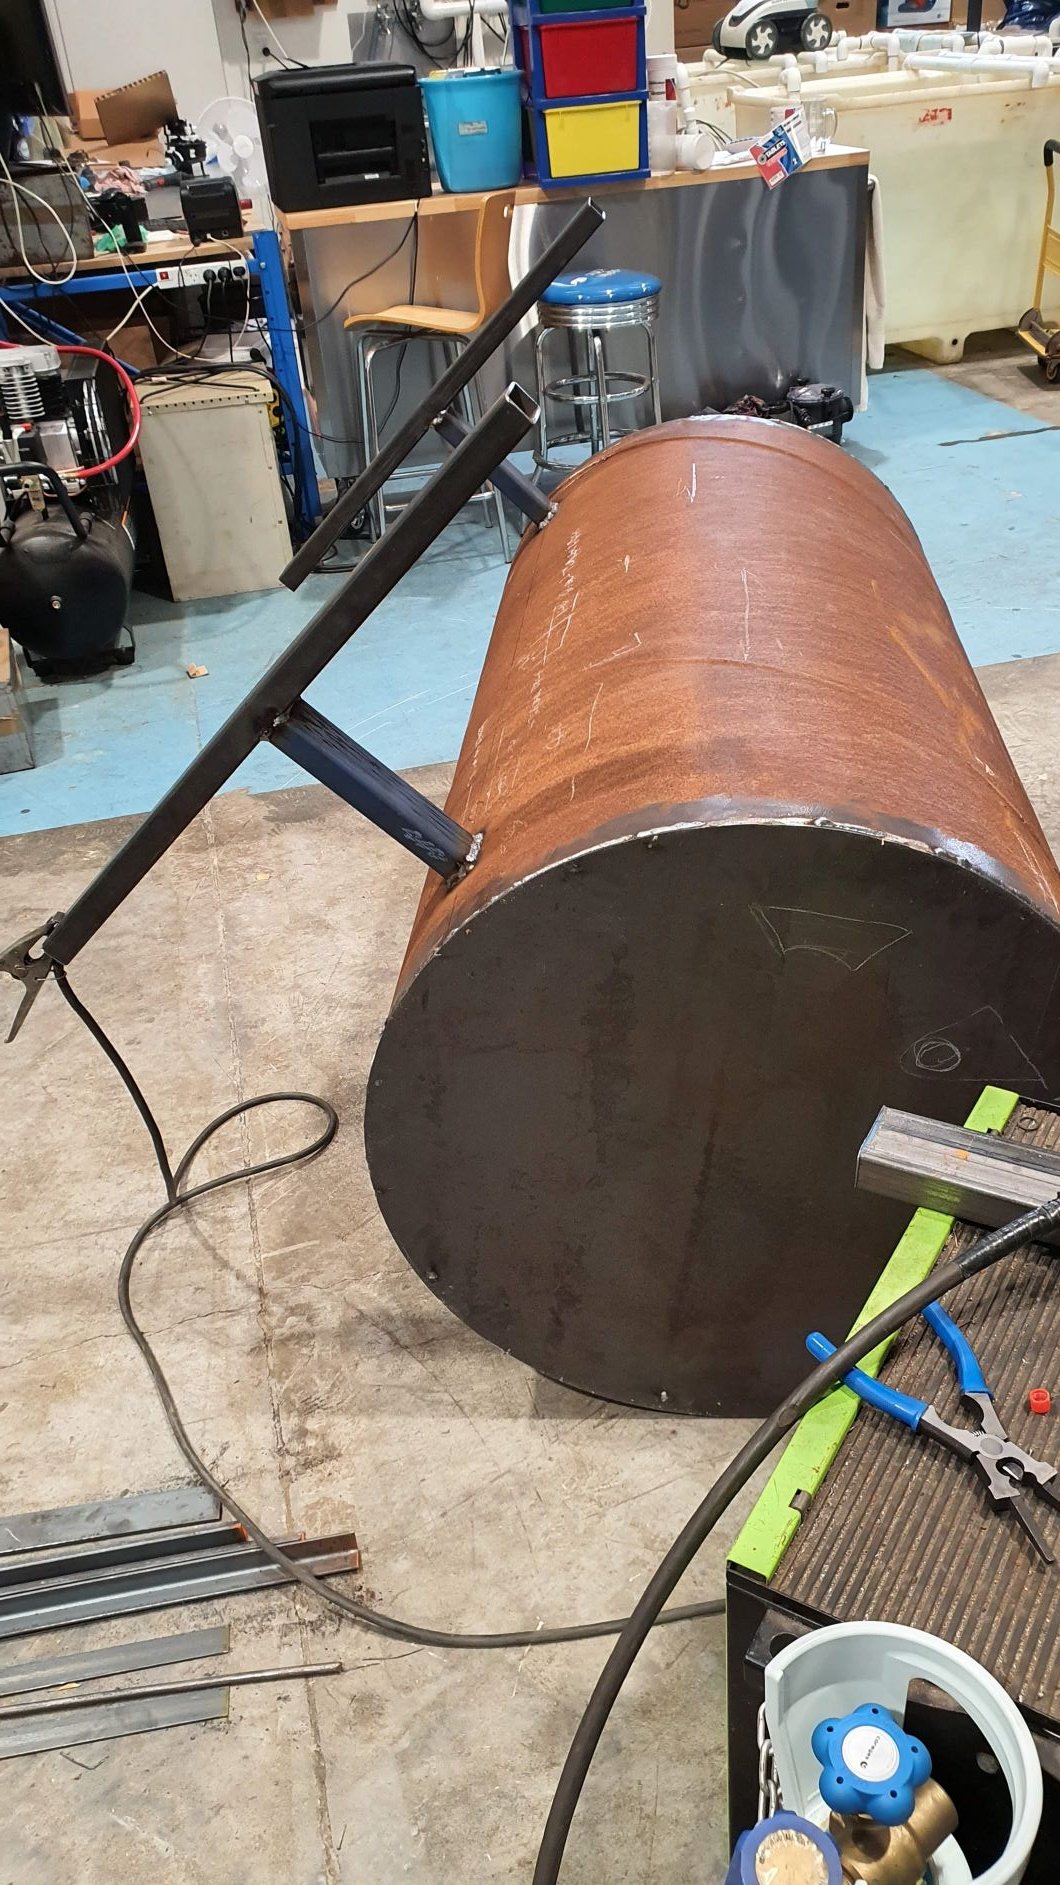
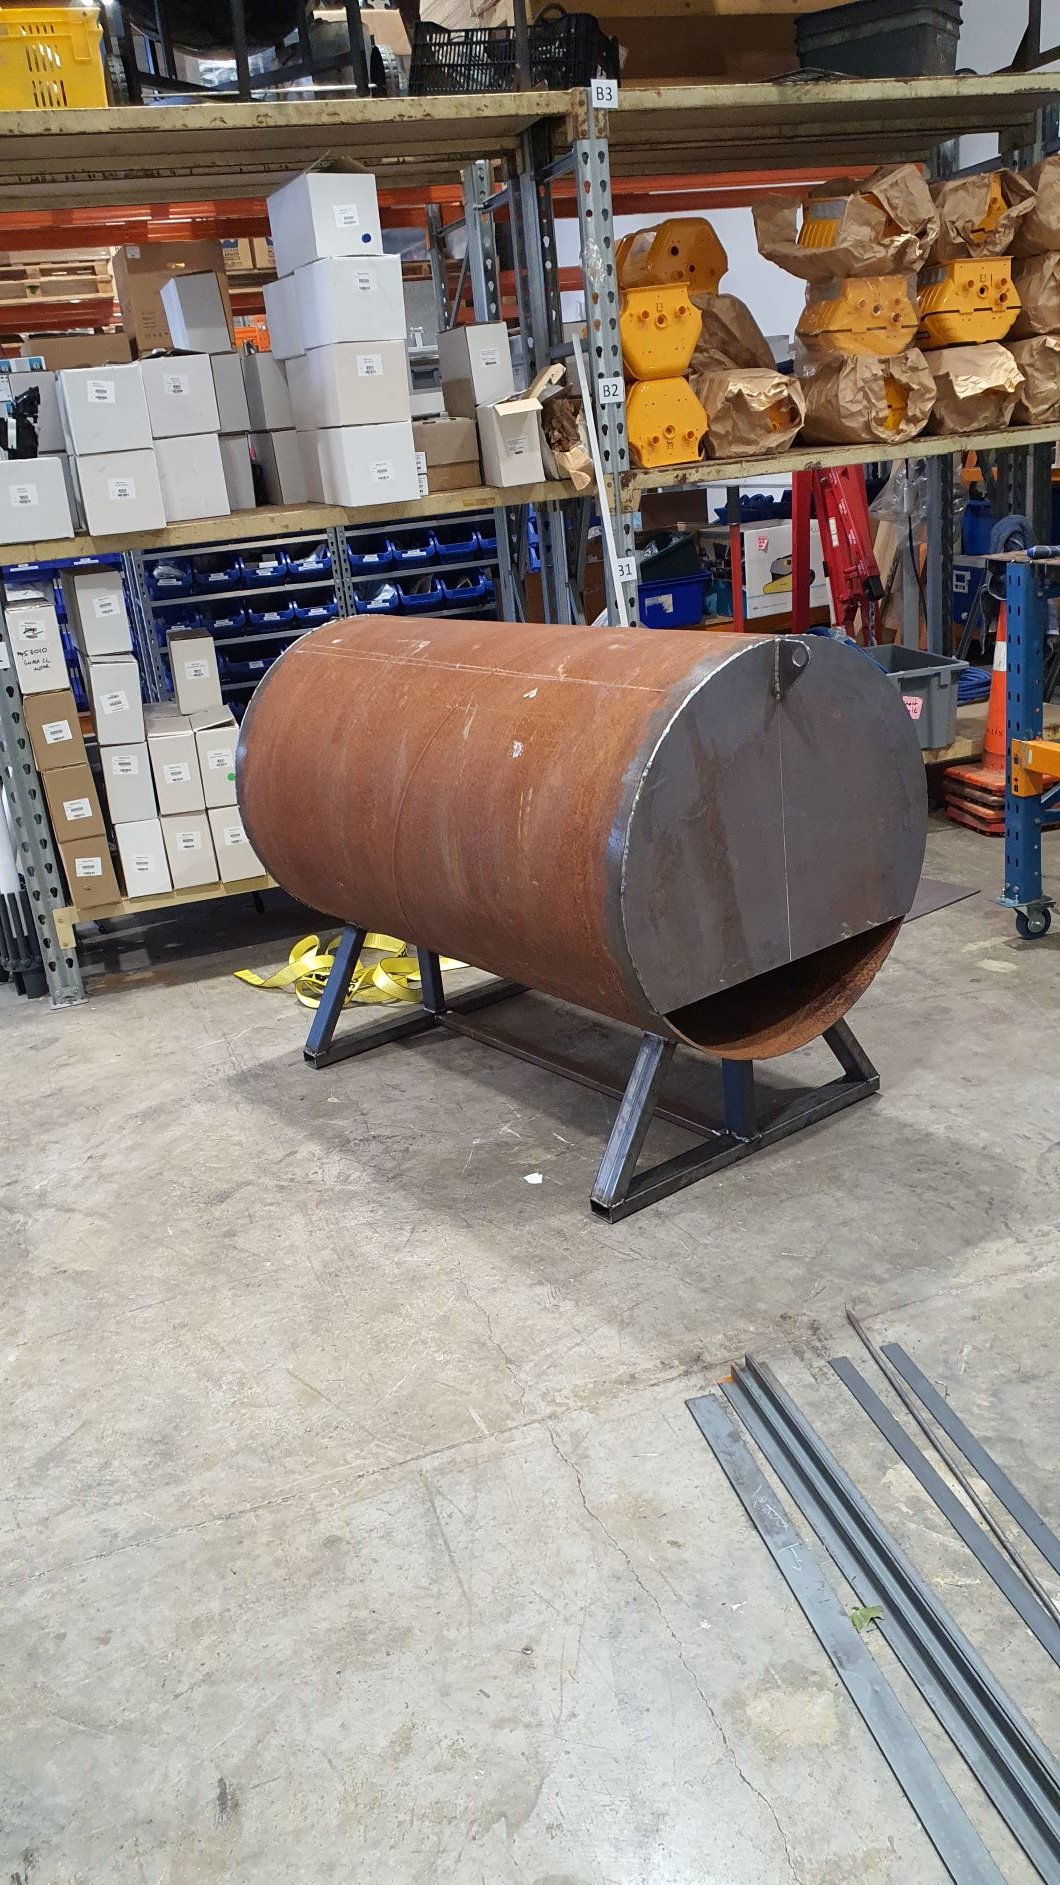
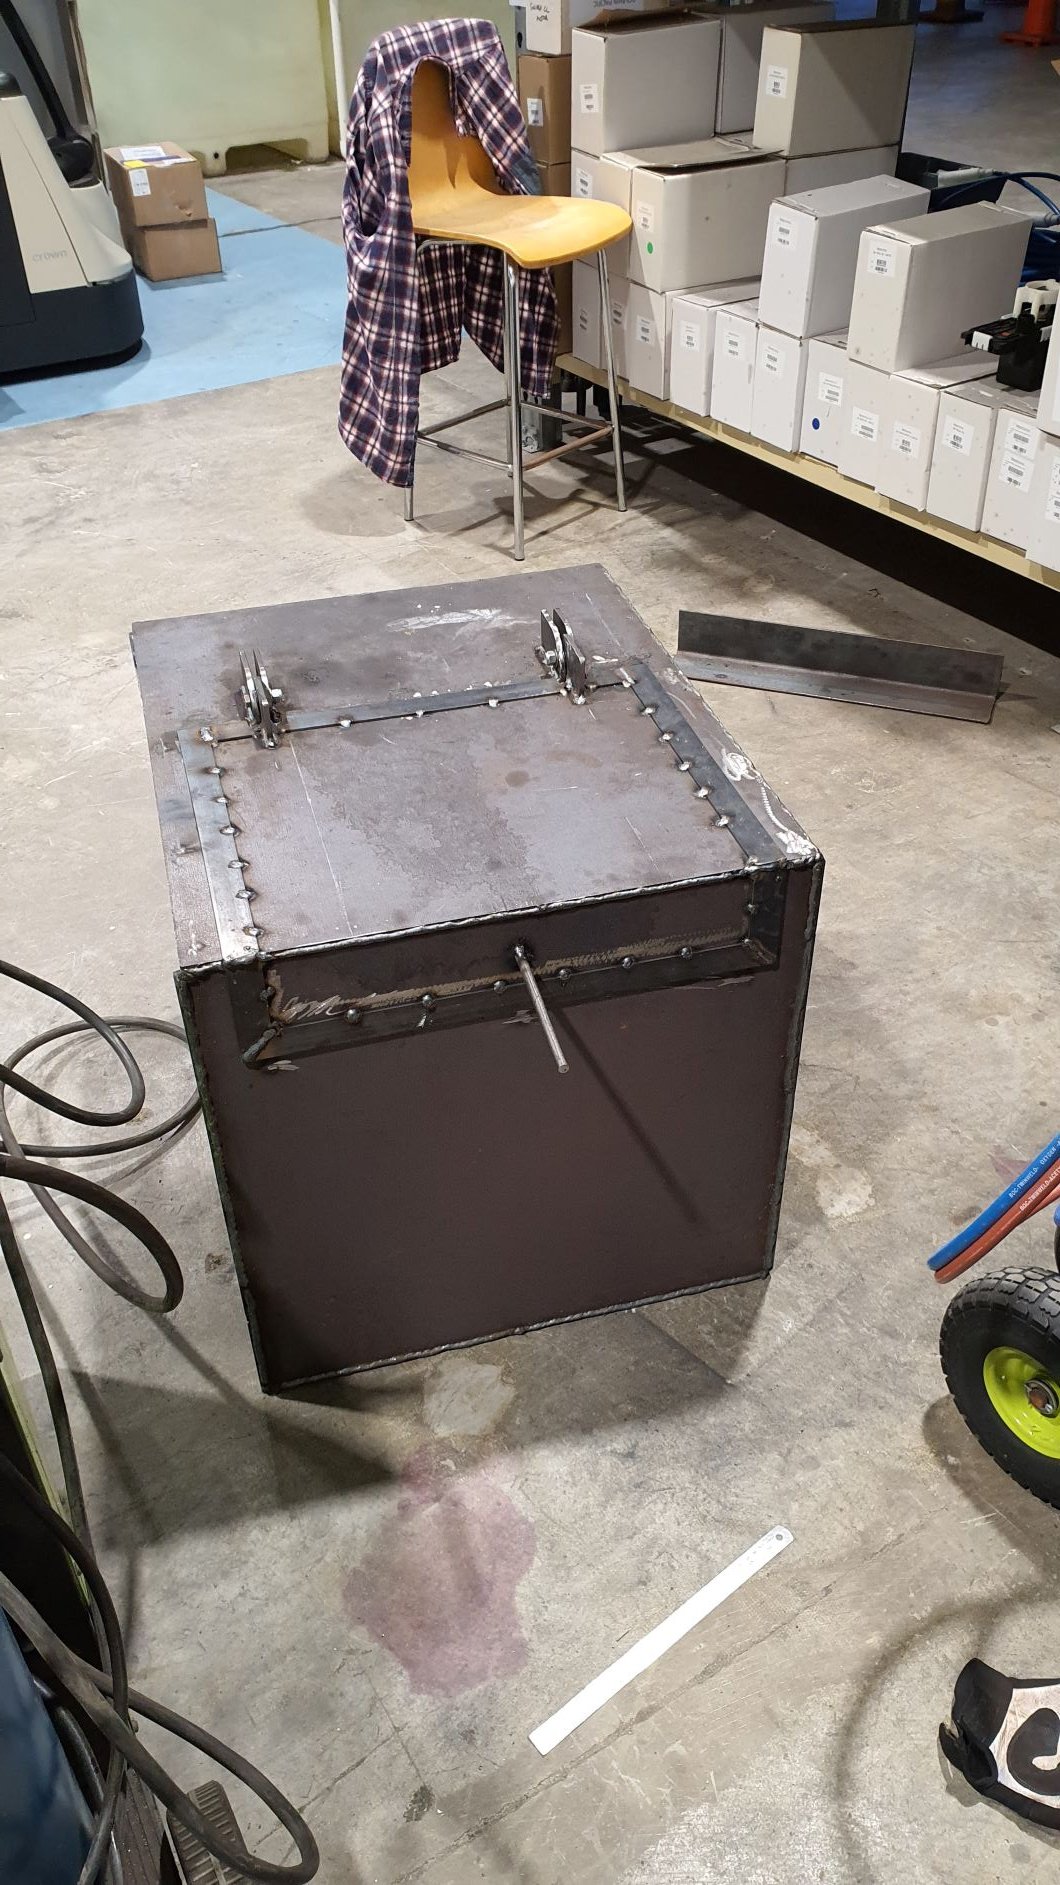
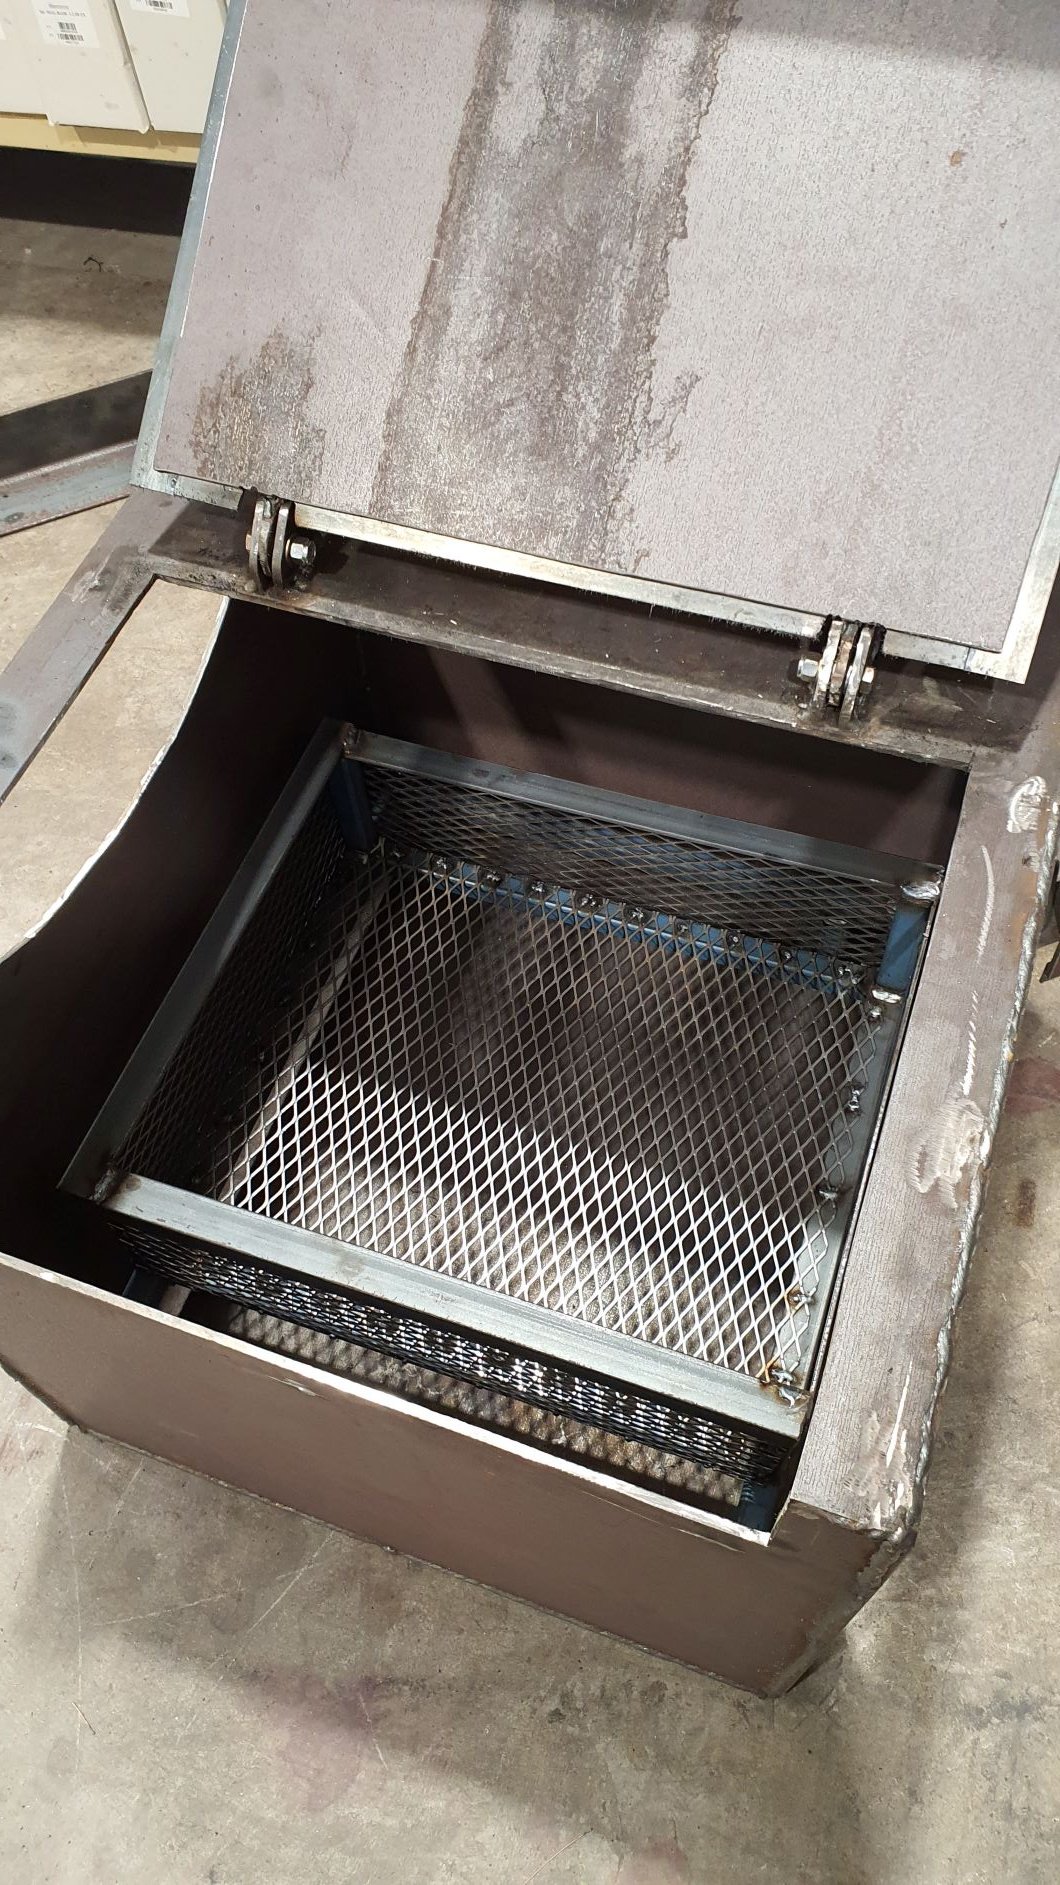
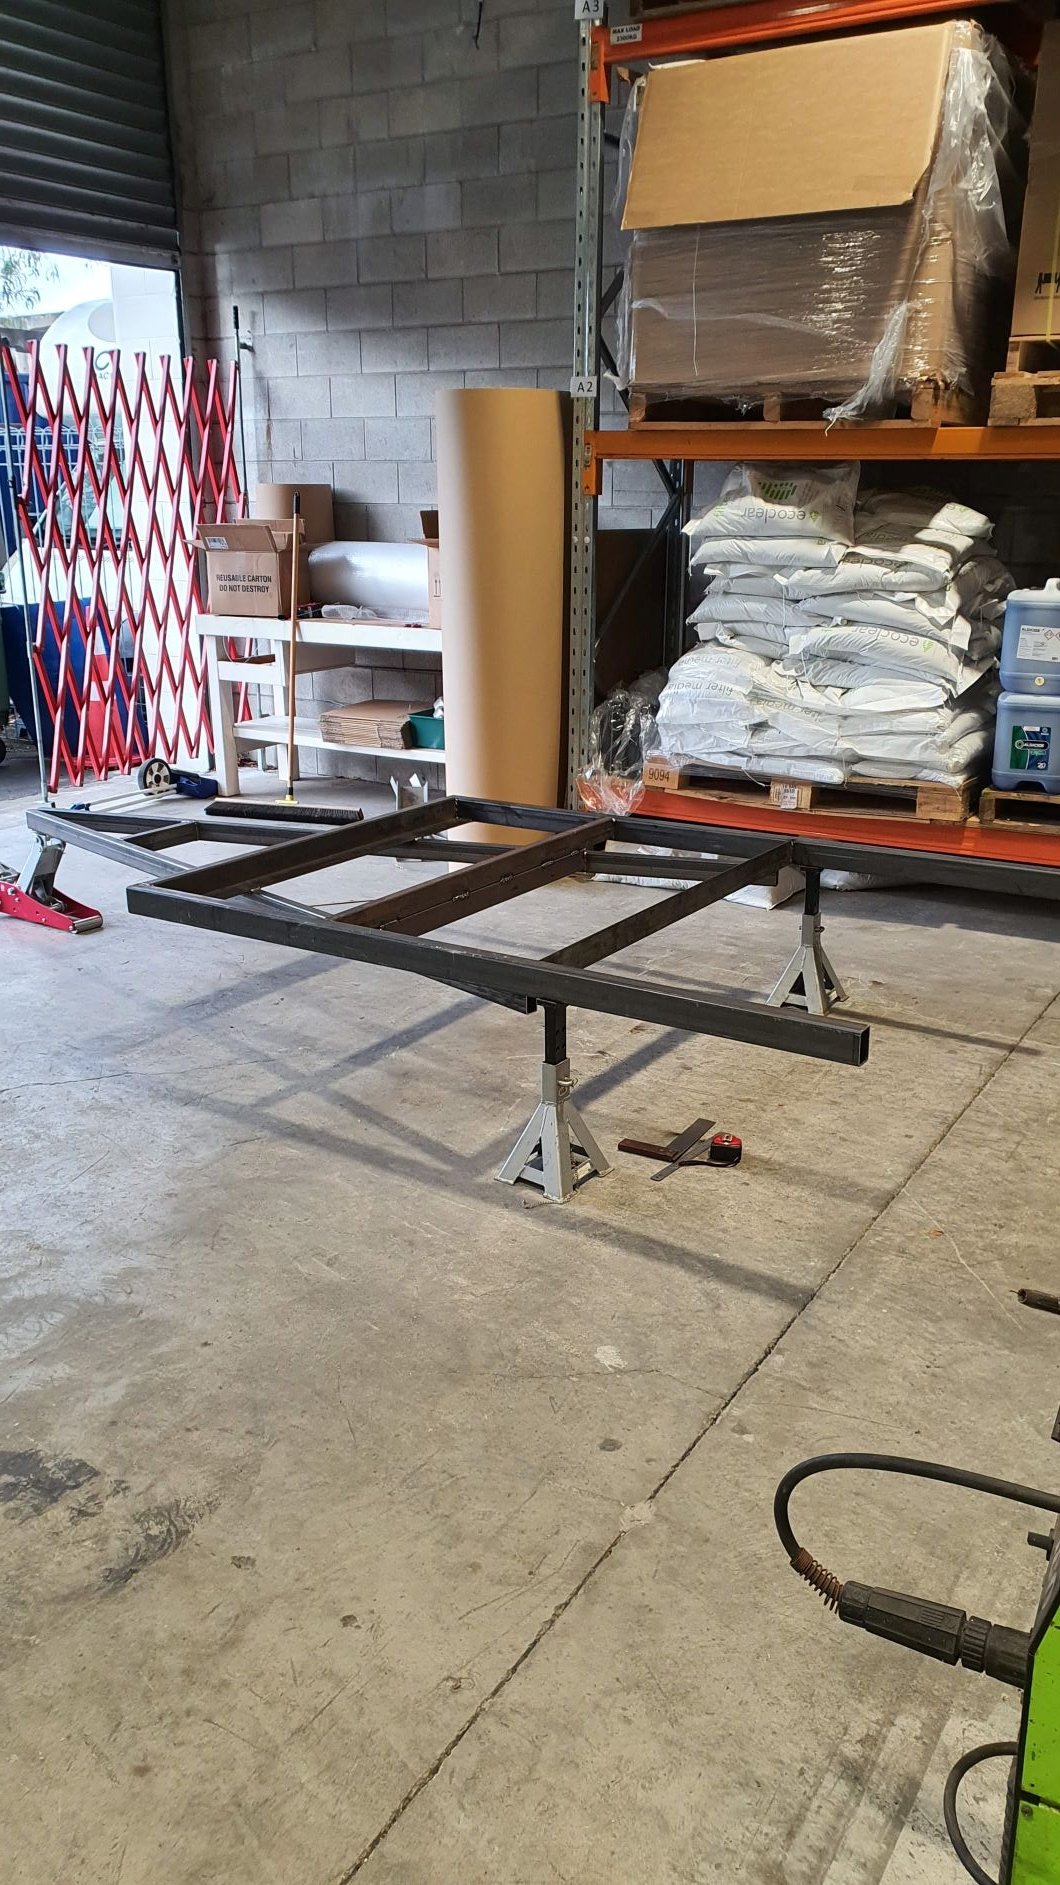
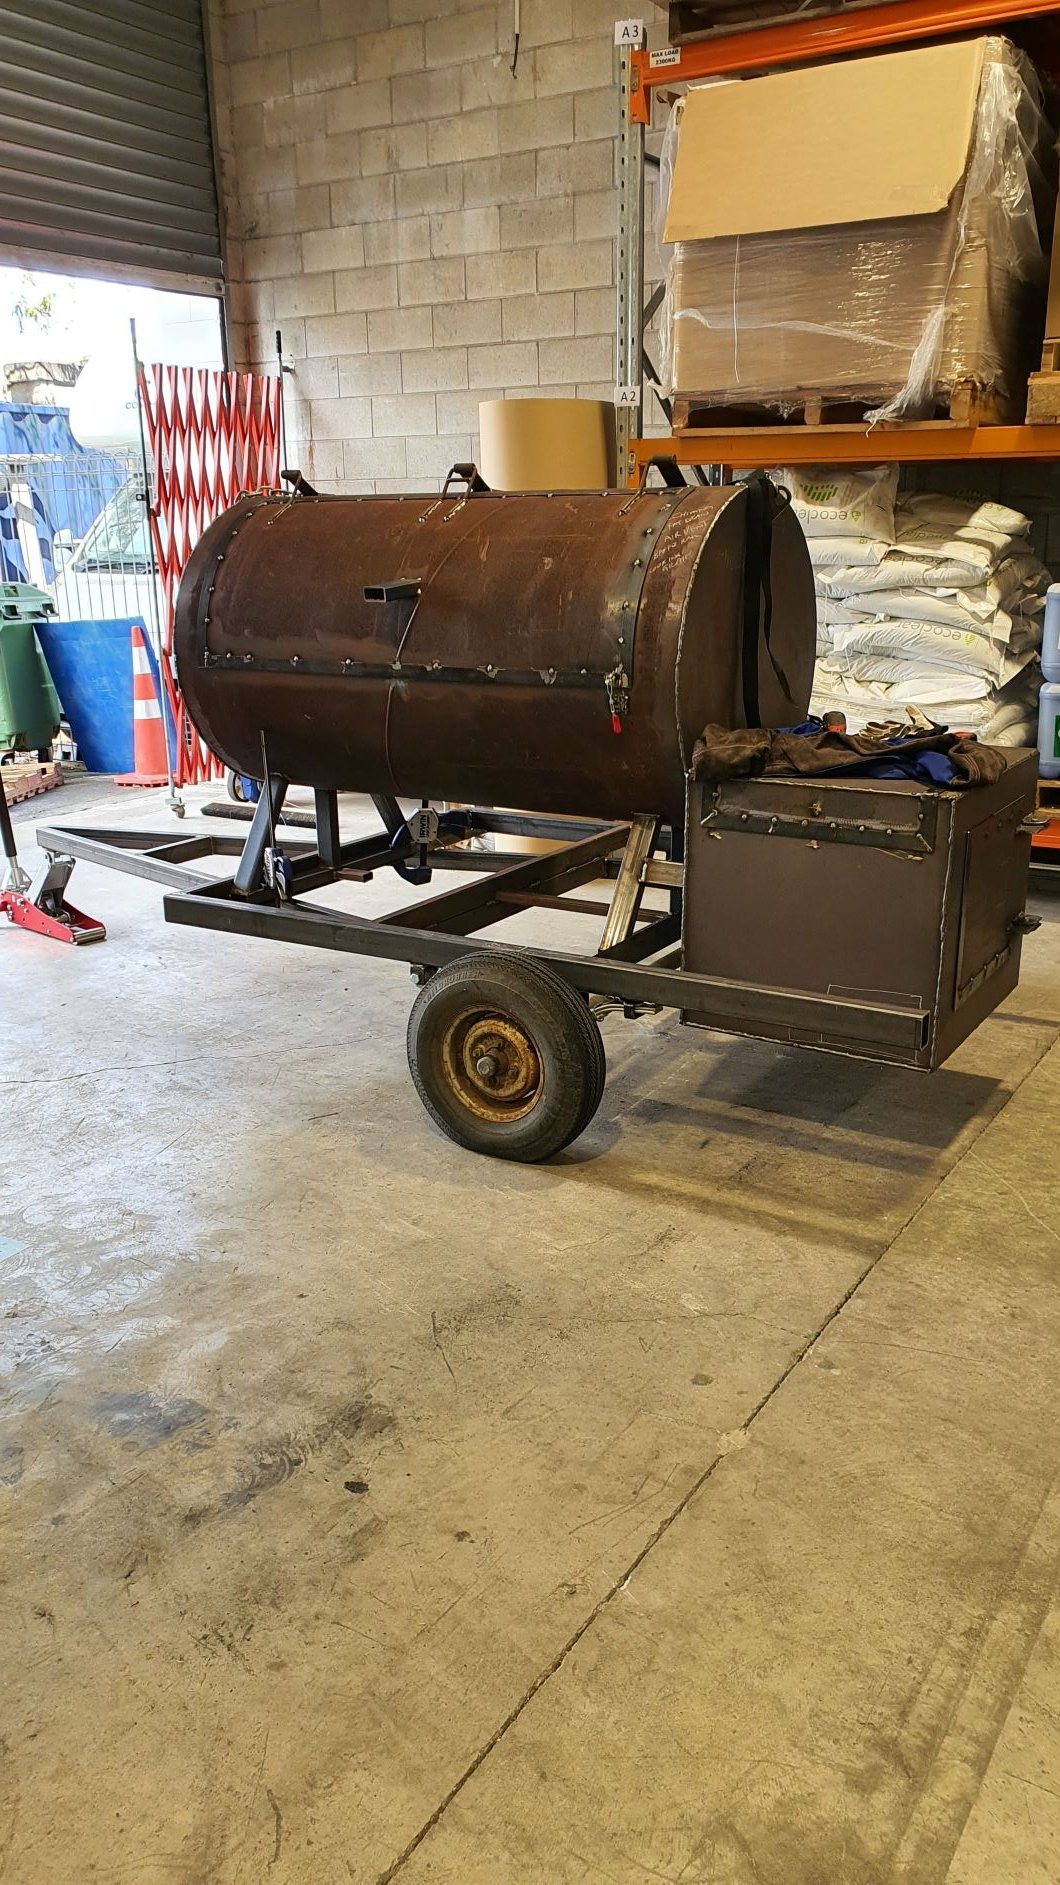
This all started with some reading over Christmas and my general obsession with smoking meat and eating it. Started looking for a bit of steel pipe, ended up with a bit 800 dia x 1500 long. I had some ends and some bits for the fire box water jet cut. All 6mm steel so it weighs a bit, good thermal mass i hope ! . Legs, in retrospect maybe 100mm too long, but it was back of a ciggy packet maths so she'll be right Opening is where the fire box joins on, it will be a reverse flow set up. I used an online calculator for all the sizing, so I hope it draws well and gets some decent heat into it. Firebox is 600 x 600 x 700, all in 6mm, including the main BBQ it weighs in at close to 400kgs. Made a log basket for the fire box. Still have to put a cooking grate in the top of the box for the sear ups. And still need to put the air vent into it, or just open the door. See the outlet from the firebox on the LHS of that photo. I bought a trailer cheap of TM and then decided not to use it barring the axle, so made this to put the smoker on
2 points
-
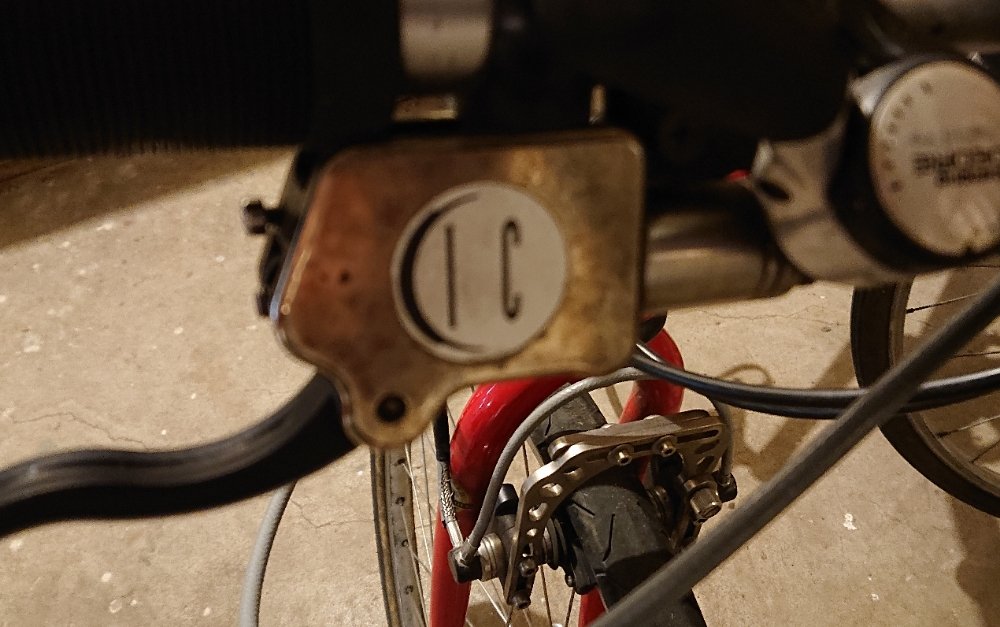
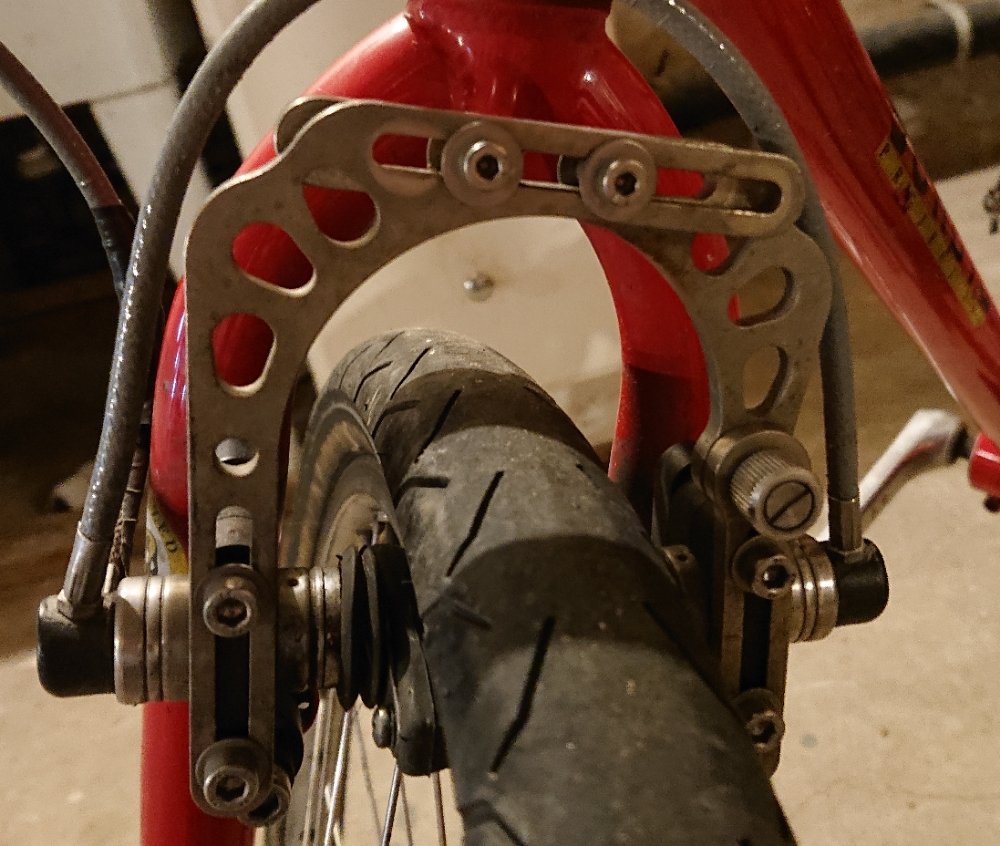
I just bought a tandem. It's basically an early 90s mountain bike with an extra seat and crank. It's got hydraulic rim brakes which need a bit of a tickle. I'd like to keep them if they're not too much trouble, but if they're not worth it I'll chuck some V brakes on. Anyone know anything about them?
2 points
-
@rusty360 those numbers mean fuck all in the real world, it can easily be drawing double that current.2 points
-
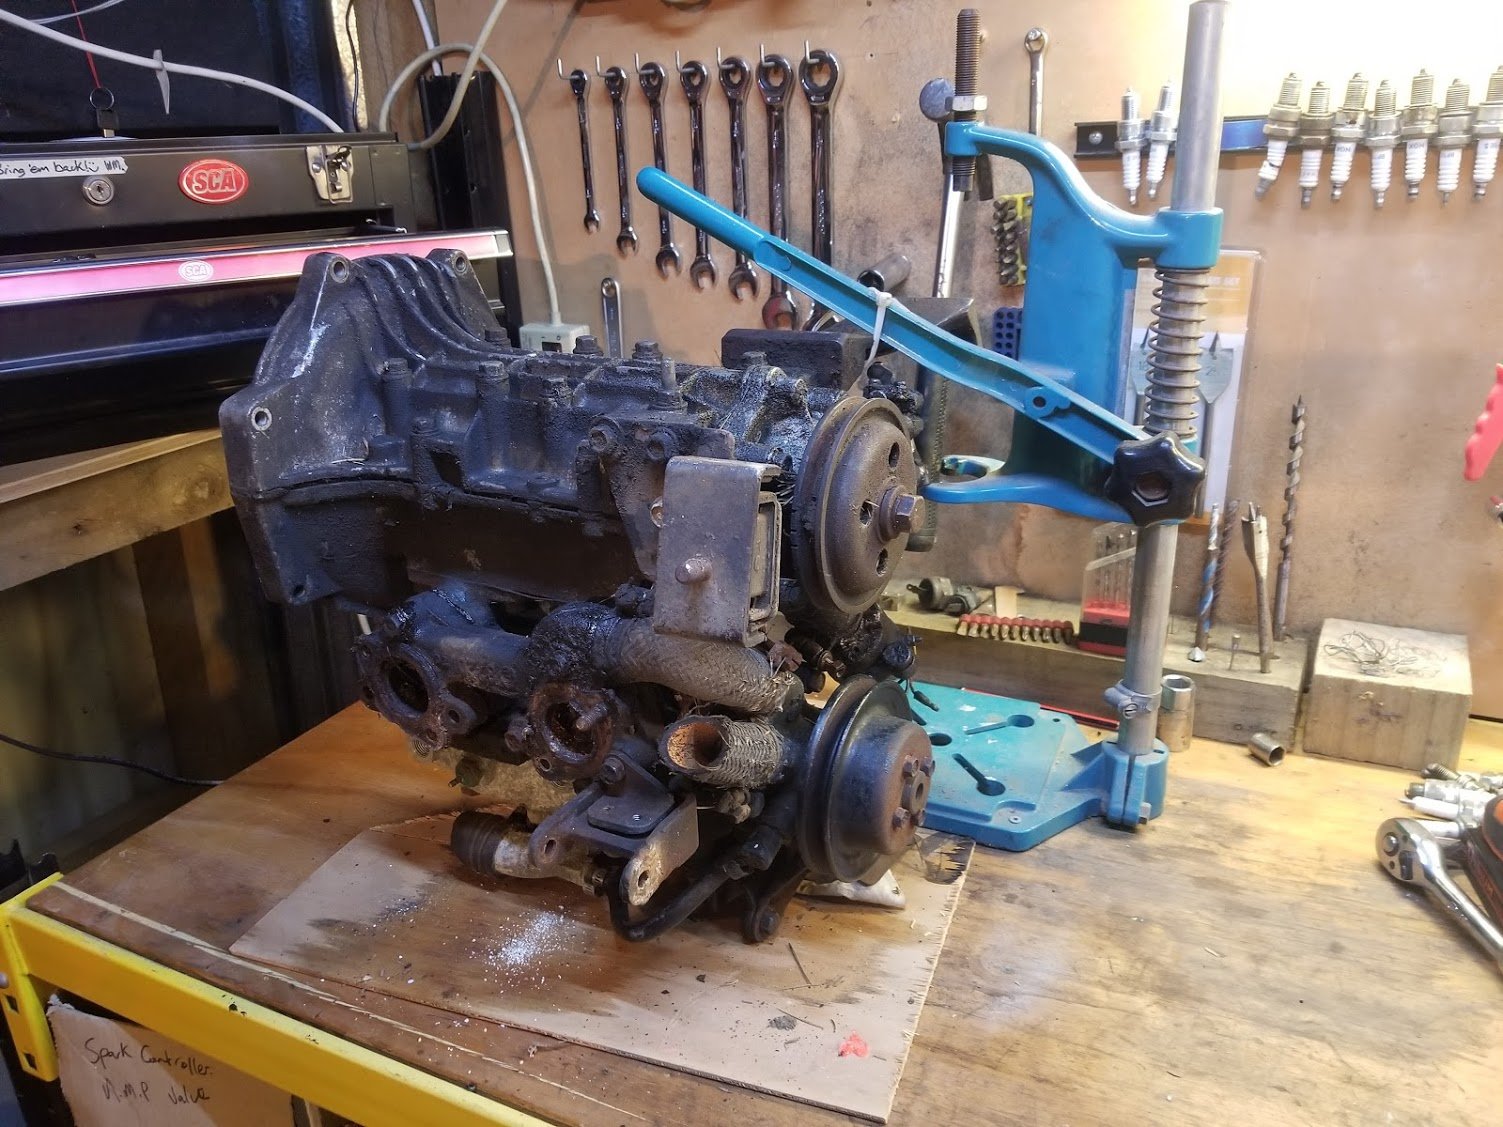
I've been chipping away at that corroded boat anchor motor. Bits of it were OK (starter fine, alt could be ok) but the carbs had inhaled water for years, so lots of the motor is junk. I was quite interested in getting the distributor assy off it (have disassembled most of it) but I think the cog / gear wheel at the bottom of the shaft may be corroded solid. I haven't been able to split the engine cases to see in there, even with all the bolts out. I may just give up on it soon. I had hoped to have a spare to match the spare engine I have.2 points
-
Not that it will prob worry you but I'd say the frame, shaft size will be different on a single phase motor vs 3 phase. 3 phase power would be good, so much 3 phase gear out there that's normally a heaps better price that single phase.2 points
-
Yeah lets blame the coolant for the oil leaks eh. I'll looking in to that thanks.2 points
-
Yeah, makes sense. Good to think out loud sometimes and see what comes back. Thanks2 points
-
Keep in mind it's easy enough for us to wire is VSD, but there's a fair bit of fucking about with limit switches etc.2 points
-
Yes I've done exactly this about 12 months ago. It's less painful to sell your hoist and get a new hydraulic one. However if you really want to make it work, you'll need a 3kw cap start cap run motor and to replace your contactors with atleast 16A versions.2 points
-
We have a 9" grinder that is 2.8kw single phase, soft start tho Edit*. Ling/2 points
-
So I think Suzuki is Gona give me a 2020 model Can't even get 12 months out of a frame
2 points
-
Your serial port is way slower than your math conversions you'll be fine. Even with floats. Plus the wideband probably doesnt have a very high update rate anyway. Still, using decimal is way better there Also, roman, its 0-1023, not 1024 BTW2 points
-
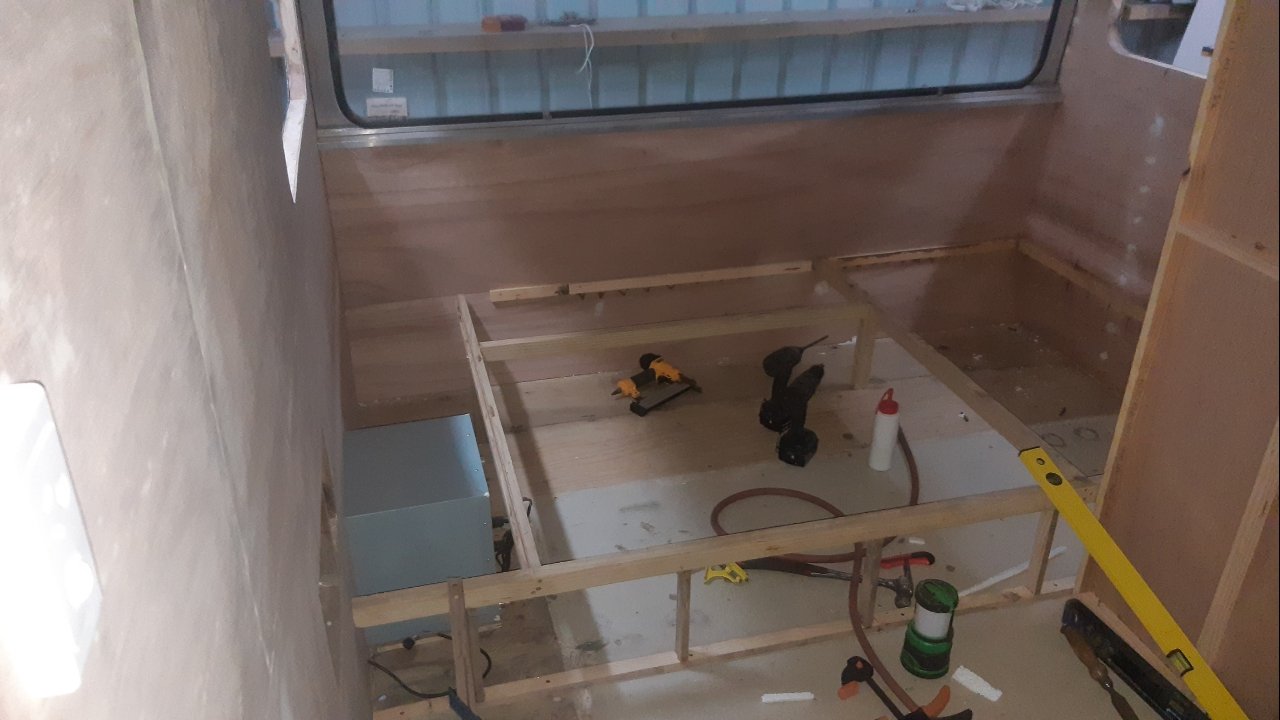
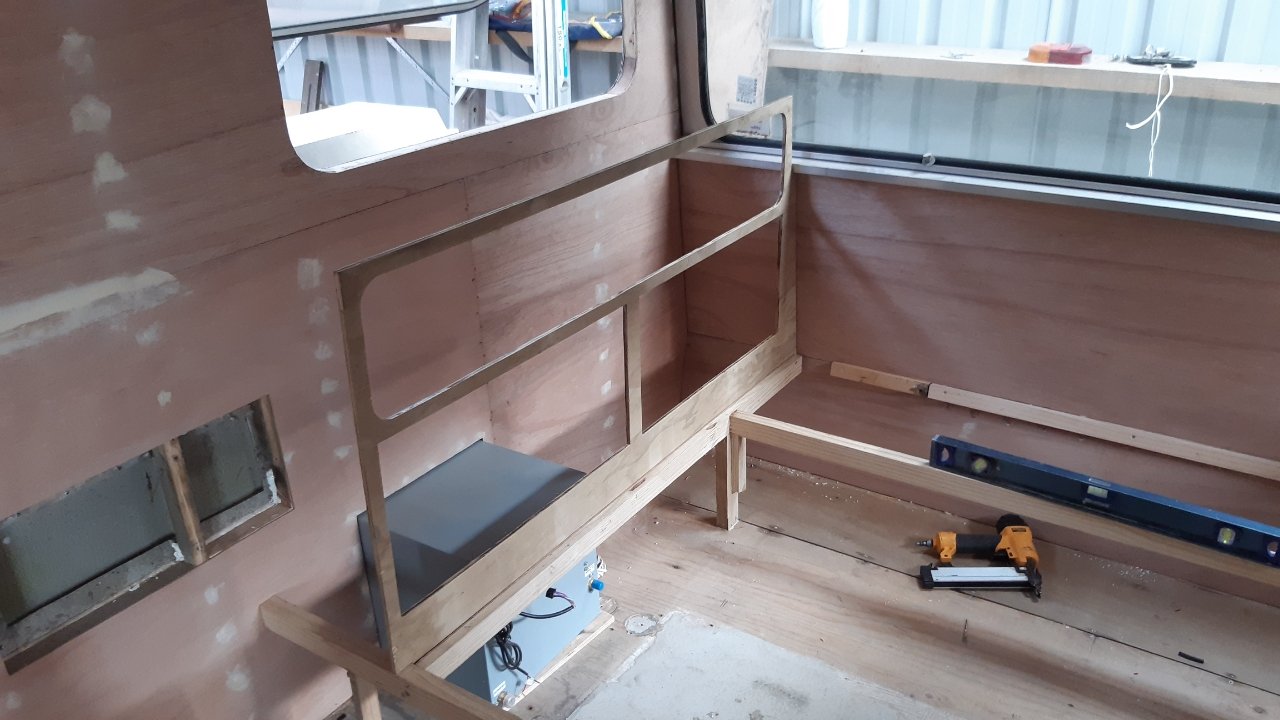
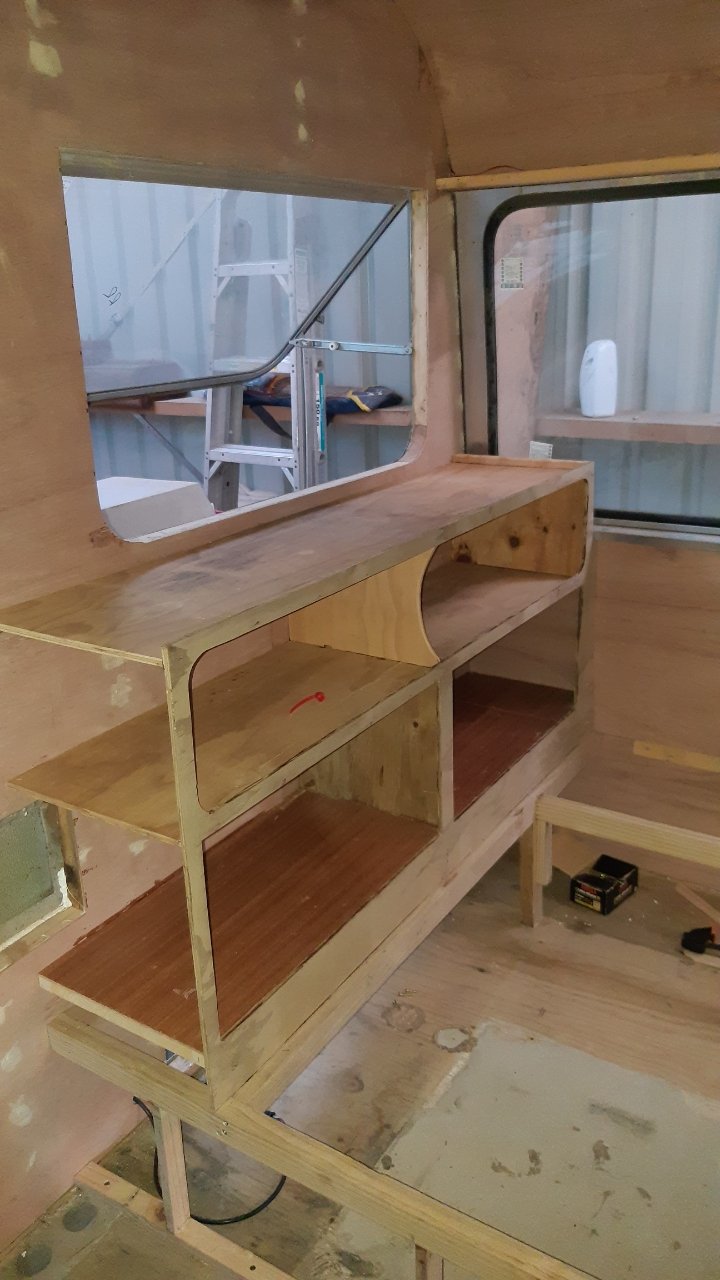
Planning out the kitchen. Didn't have any paper, but I did manage to find some baking paper. Making the bed base in the back Headboard and storage. The bottom holes are going to be cupboards And this is where we're up to. Hey, thanks
2 points
-
And here she is in all her glory!
2 points
-
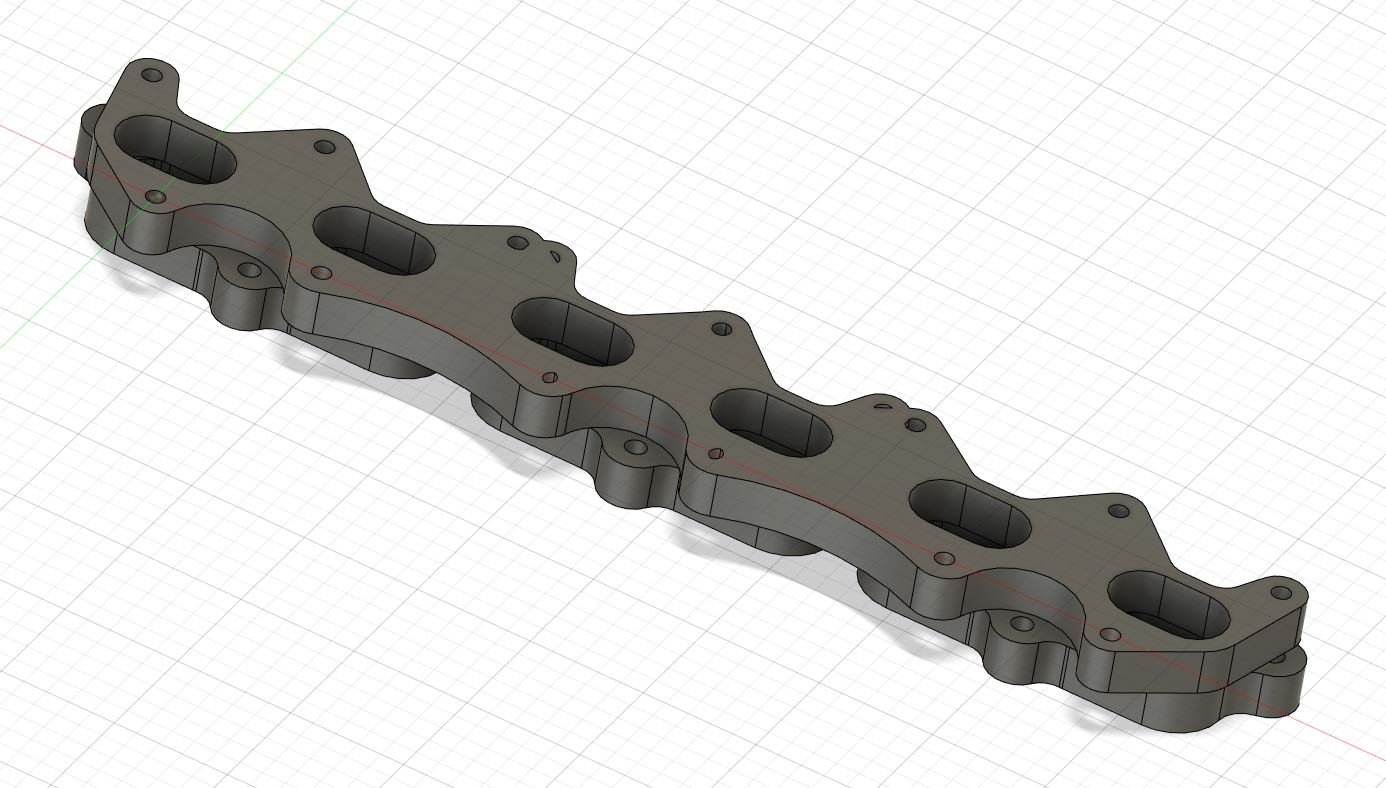
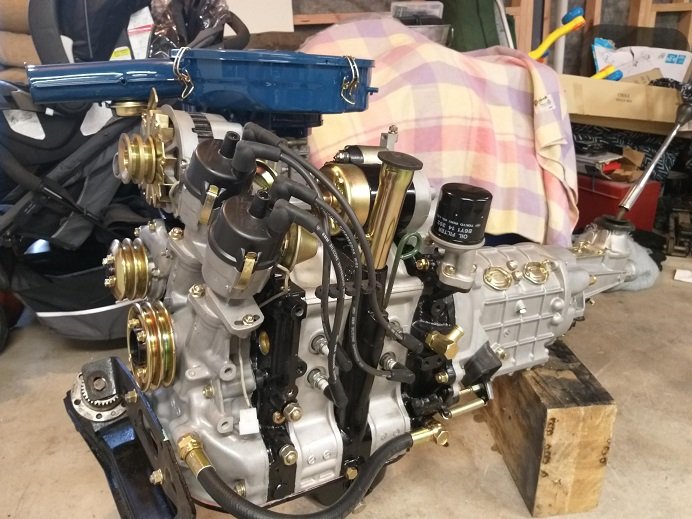
Kei car engine stand:
2 points
-
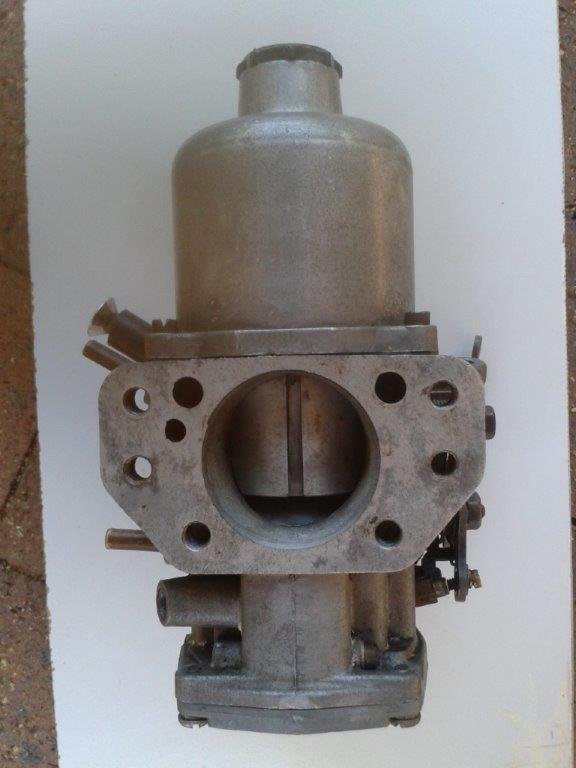
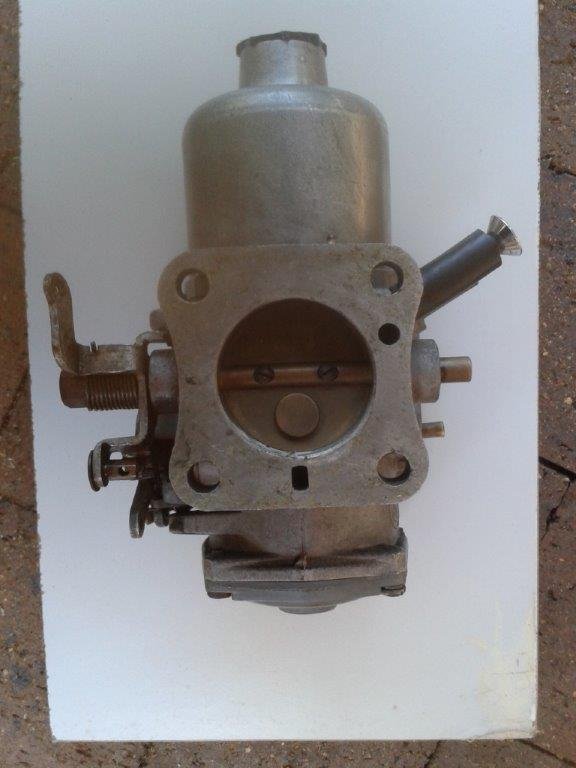
Late last week the courier arrived with the SU carbie that I scored for a decent price off a guy in New South Wales. It's a HIF 44 so should do the trick. So thanks to everyone who nudged me in this direction.
2 points
-
Thanks, awesome info. There's a thumb screw on the right side of the brace to release it. None on the rear though. There's no branding anywhere that I can see, but they look well made so maybe very early Magura. Neither are leaking so I guess I should be able to get them working OK. Looks like it originally had a cantilever on the front and a Ubrake on the rear. I'll have a play in the weekend (still Friday here in murica) and take a couple of pictures.1 point
-
Aluminium will be fine, I ran one of those fenix radiators in my evo for a decade or so with no issues, the drain bung was sub par in my opinion, so I would suggest finding a friendly aluminium welder to weld an An fitting onto the drain port and fit a cap.1 point
-
Good job getting it going, nice to see the compression come up again. Should be good to go!1 point
-
Milestone today. both my girls went solo. Pretty brave of the wee one, she can't hold it up as legs are too short...1 point
-
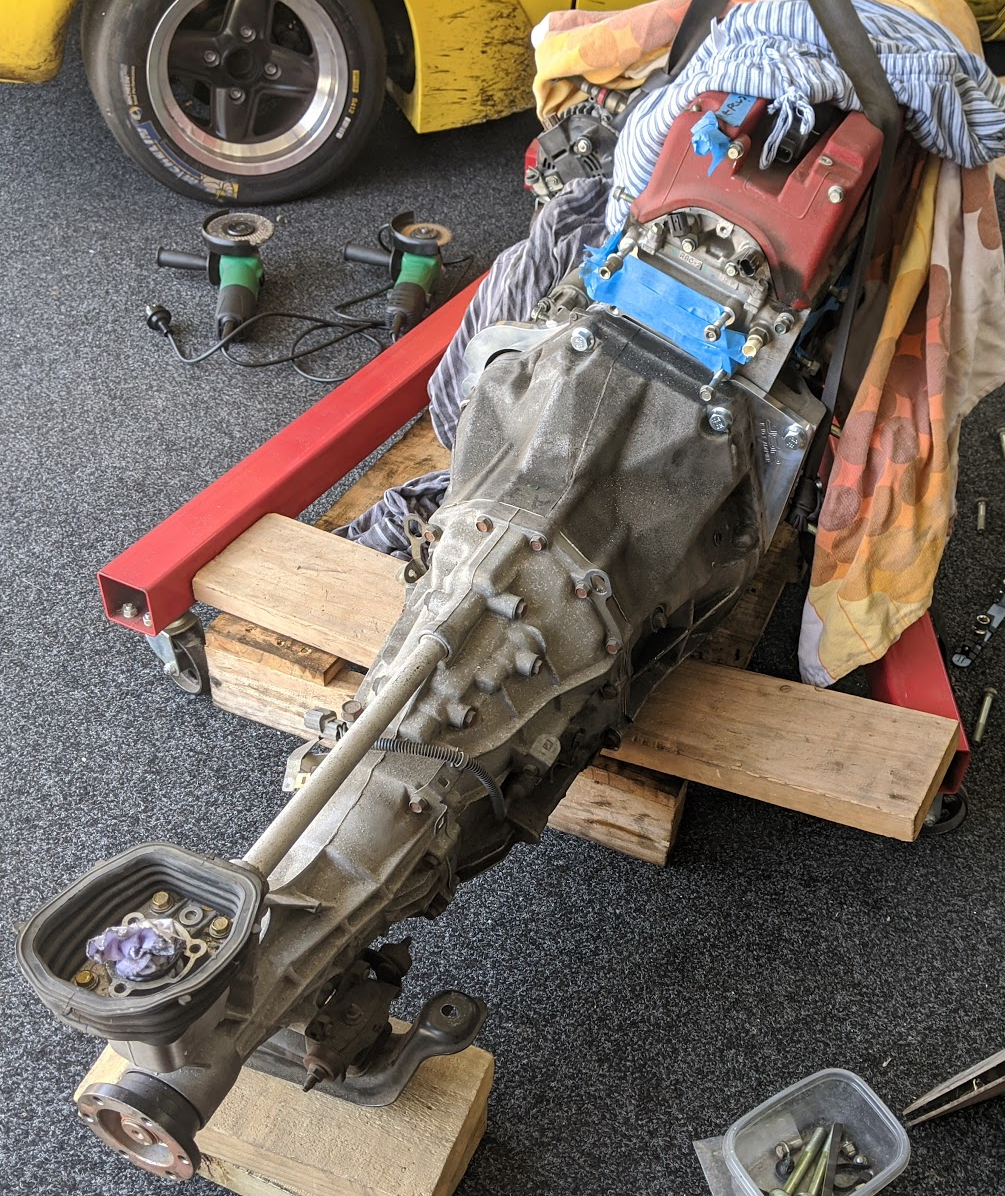
Now that's what I'm doing, however if you wanted to run it over the cross member you might consider the following kit from K Miata. https://kmiata.com/collections/kmiata-swap-parts/products/k-series-miata-oiling-solution Or a Ktuned Steel Oil Pan and chop it up. https://www.speedscience.co.nz/products/k-tuned-steel-oil-pan-k-series Or a Moroso Pan https://www.speedscience.co.nz/products/moroso-baffle-sump-w-trap-doors-k-series-incl-k-swap However be very careful as the standard cast aluminium oil pan has the bottom 2 bolts for the gearbox. And also this massive brace back to the bottom of the very solid pan. Replacing the pan with one of the above means you can't bolt the gearbox at one of it's highest stress points, i.e it want's to separate right at that point. Basically your going to fuck your main bearings with the forces on it. So that's out for me, if I need to I will cut up the existing pan. In terms of baffling, I have some pics of a Spoon K20 sump baffle, and @Roman did a great write up on improving the BEAMS sump to match the TRD version which I saved, so a combination of both should work out well. Main thing is stopping the oil freely going up the oil chain under braking. Here's a standard sump, which is just a dumb design:1 point
-
Next up was the oiling. The K20a from the Accord Euro R runs balance shafts off the oil pump in the sump. These are to reduce vibration at lower revs, the Integra and Civic versions don't have these so it's safe to remove them (or just buy an Integra/Civic engine to begin with...). The downside is they take up a huge amount of space in the sump, they sap power(supposedly about 9whp) and they weigh 5.3kg alone! So it's a win to remove them all round. Luckily you can raid the Honda parts bin, so the standard thing to do is to buy an Civic FD2 kit to replace them, it comes with a new oil pump, oil chain, oil chain guide and windage plate. So many stores sell these kits as the K24 engines also have them, so it's a pretty easy change. One thing is that the K20a oil pumps are known to not be great over 9000rpm, so a lot of stores are now porting the oil pumps which frees up a little bit of power and makes them safe to 10,000 rpm. I ended up going with one of these kits as it ended up cheaper than a stock kit, one thing to note is the K24 engines and the Euro R version of the K20a need the housing of the oil pump modified for clearancing, it's nothing major and the kit i brought already had it done. I brought the kit from kmodperformance with it being the K24a2 version which bolted straight up. https://www.kmodperformance.com/collections/bottom-end-engine-parts/products/kmod-oil-pump-kit?variant=9987006988324 Now that frees up a lot of space! Now a few might be wondering how i'm going to fit it in the car even with that sump. The plan is to put the steering rack on the front of the engine cross member (escort like) narrow the cross member and position the engine entirely behind the cross member or as far back as we can get it. There are a few challenges with this as I have a roll cage bar going through the dash, so would like to not have to alter that and it may put the gear lever quite a wee way back, but will deal with that later. It has some big advantages however, obviously the position is great from a weight balance point of view, but it also allows me to run escort style anti dive bars (tied from bottom arms BACK to chassis), which make a huge difference in braking. Yes there is going to be a lot of chopping.1 point
-
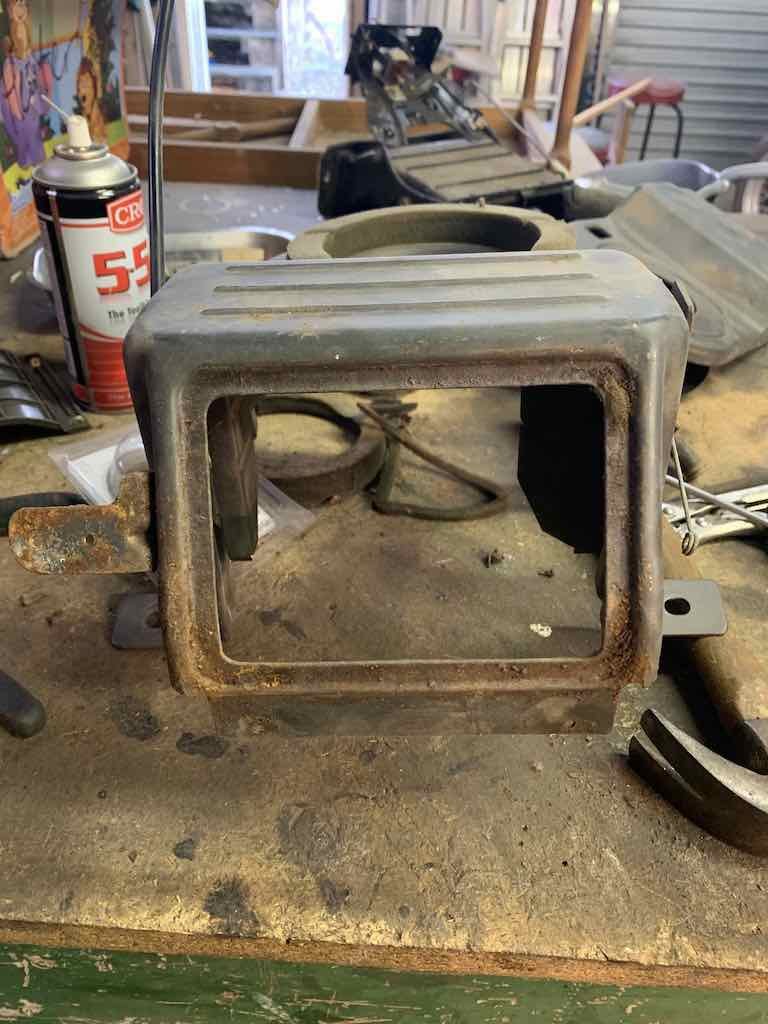
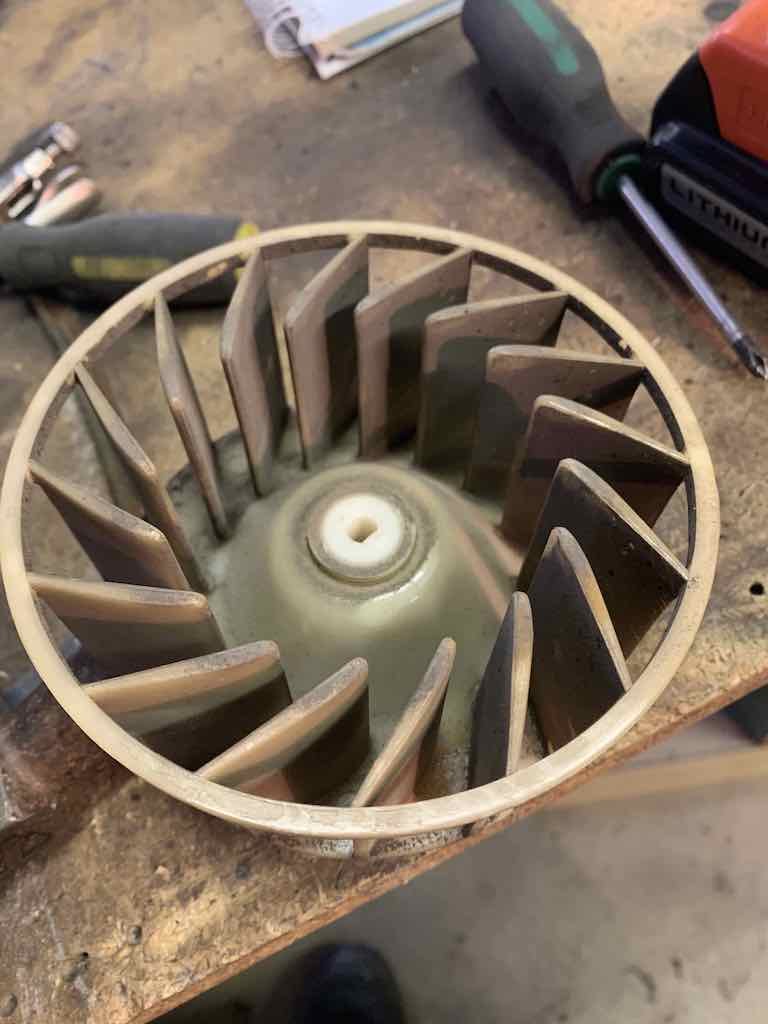
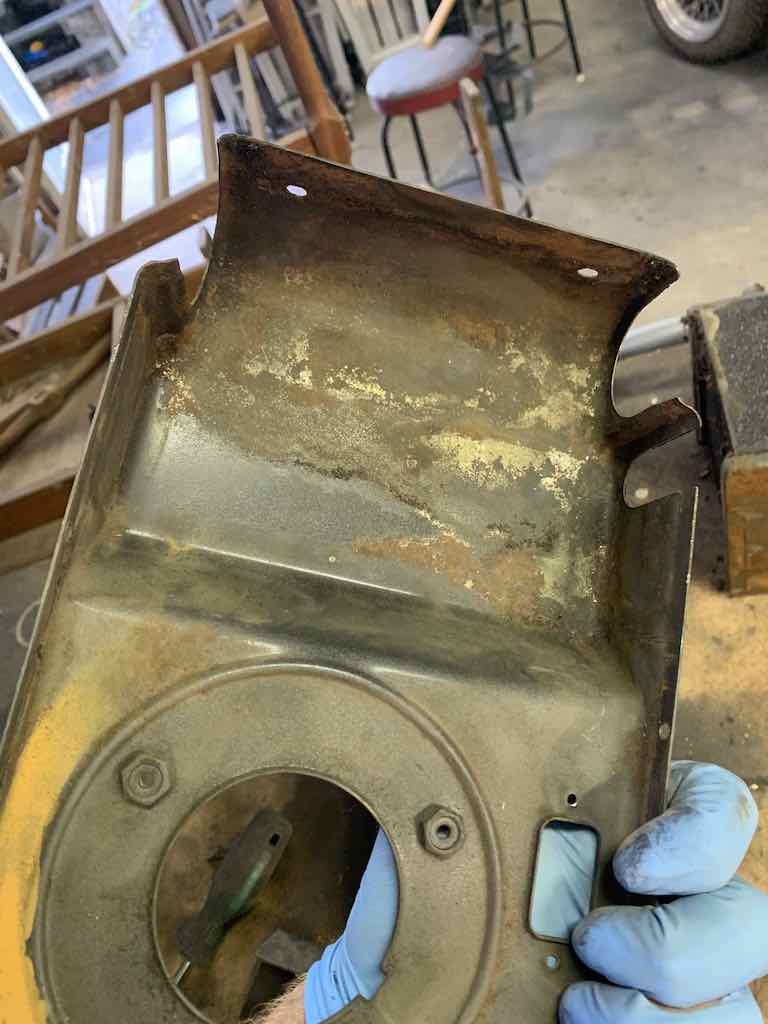
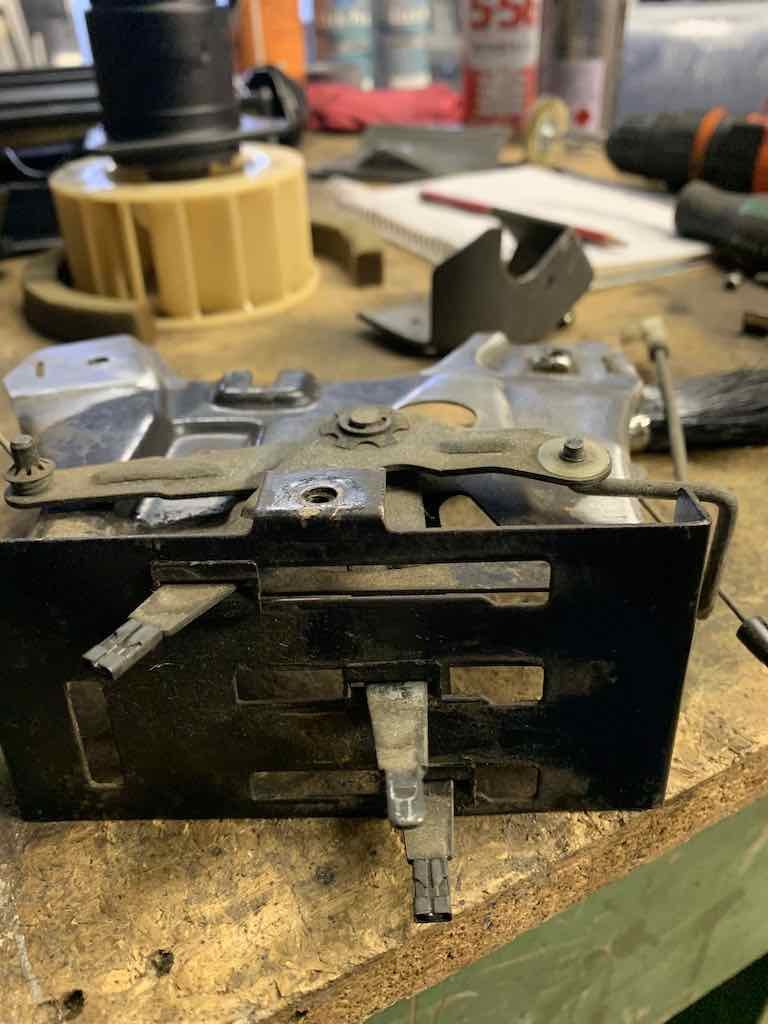
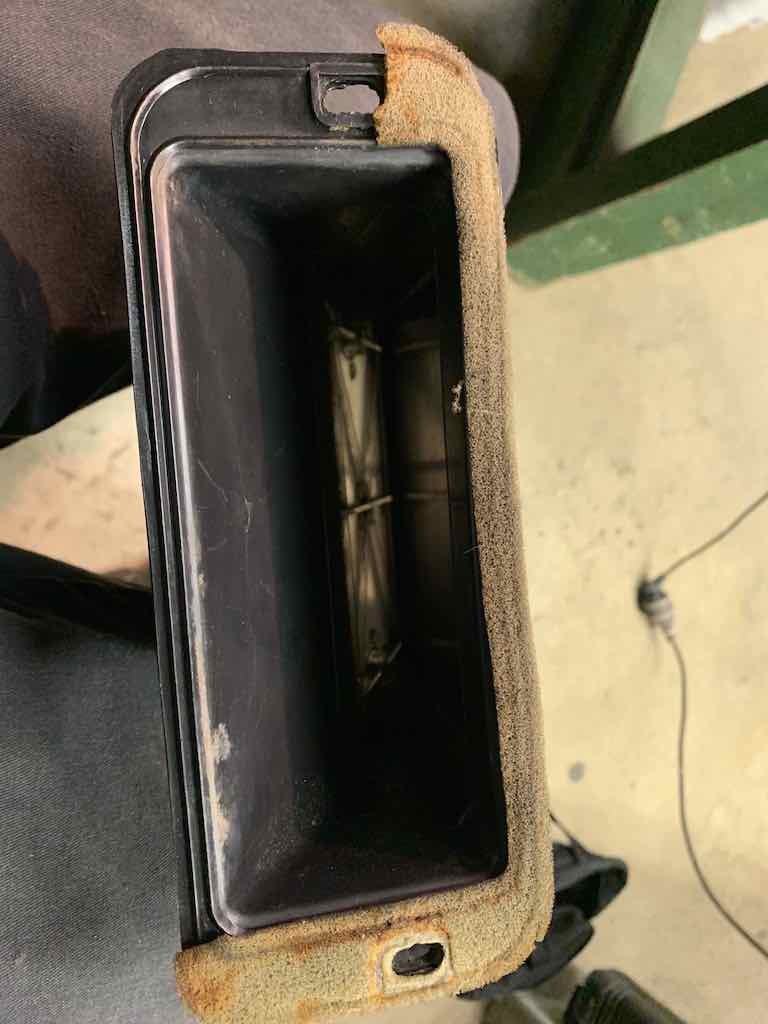
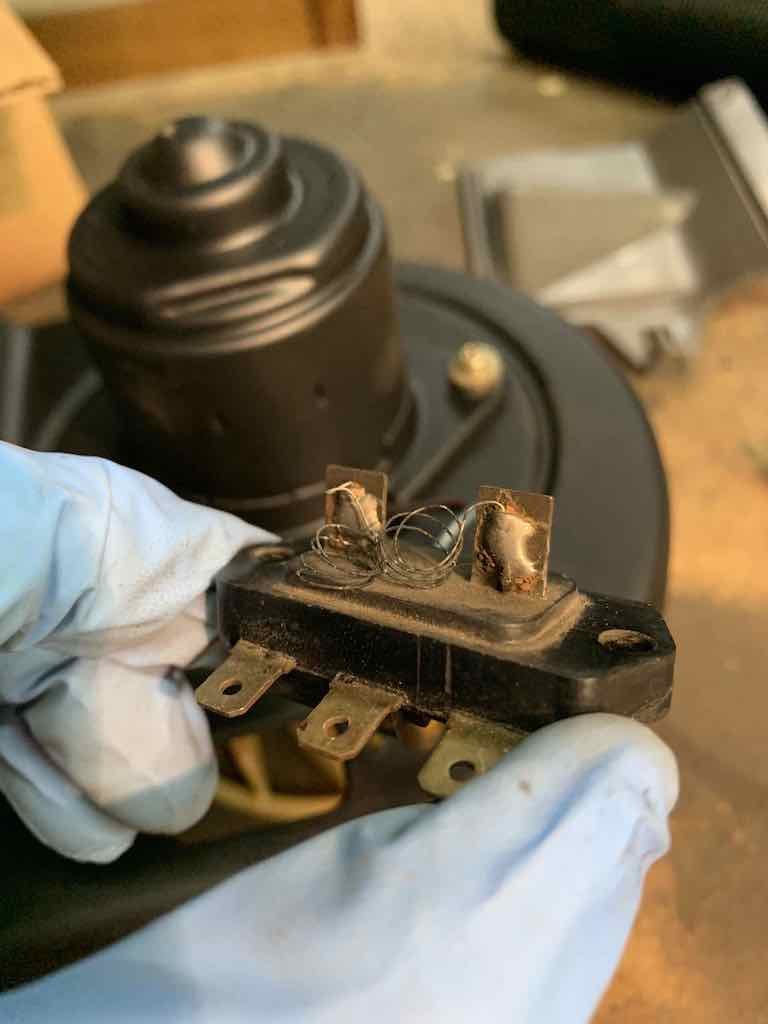
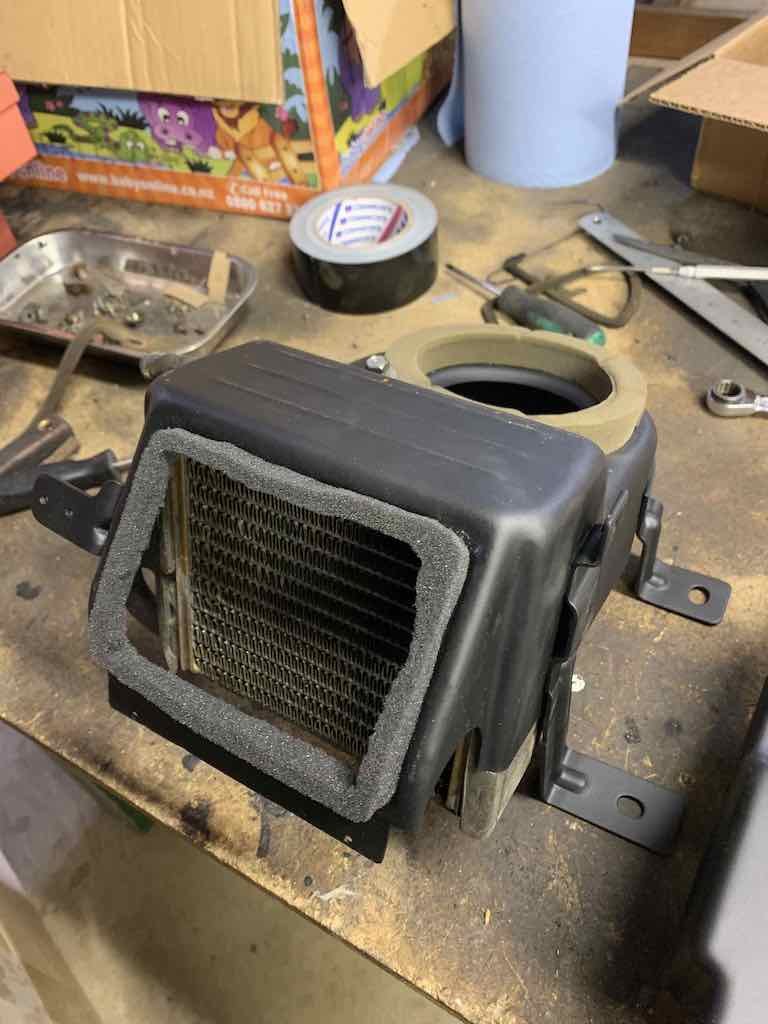
The bonnet had blown open and bent the back corners and mounts, and had a few small dents. The skin was removed from the frame and it's all getting straightened out. In the mean time I started cleaning up the heater box so I had something productive to do.... Rust, filth, munted foam gaskets, blown fuse/thermostat? (will check with sparky)......and core cleaned and tested for leaks. Stripped, painted, new foam courtesy of packing foam from computer box and all ready for eventual fitment
1 point
-
Massive progress today, painted the sump and water pump. Painted sump twice actually, as dropped it on the scody garage carpet just after finishing the top coat. There were some swears...1 point
-
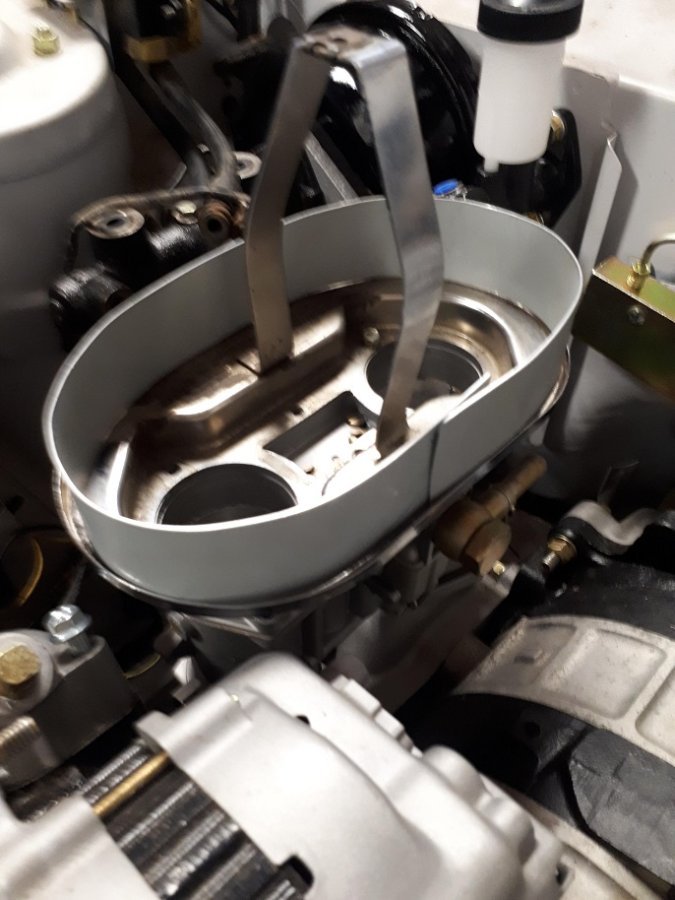
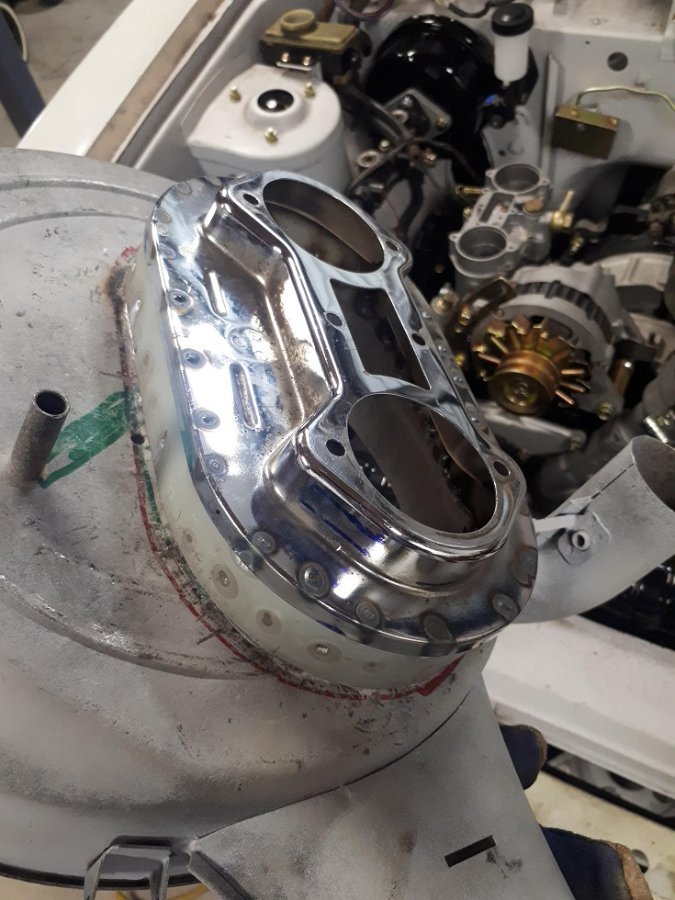
This would probably be my favourite part of the build, the plan was always to look mostly original, so when opening the bonnet i didn't want a shiny K&N filter sitting on the Weber IDA The solution was to modify an original air-cleaner to suit, it sits at exactly the same position as it would with a 4 barrel, so now when opening the bonnet at first glance you would think its unmodified.
1 point
-
Got the booster rebuilt, bought all new brake and clutch components, made up new hard-lines and had them plated, new reservoirs etc. Not pictured, basically all components have been sourced new for the bay, all that's really left to do is modify lower radiator hose 1 heater hose, and make up a wiring loom. Found an original rx2 radiator and had it re-cored and up-rated to 3 core system, have 2x electric thermo fans instead of the clutch type fan for extra cooling
1 point
-
If it were me, unless you knew the current engine was a write off, I would persist on getting it running as low cost as possible (borrow a coil, get some cheap leads, clean the plugs etc) and then assess where you are at. If the engine is OK, it would allow you to focus on other things that are needed to get the car driving again, instead of messing with an engine swap that would more than likely stall the project dead in the water.1 point
-
Teaser: Now interestingly enough a certain someone @Roman had some interesting comments on this engine in 2007 on another forum. and than went onto have a long discussion about the merits vs the BEAMS
1 point
-
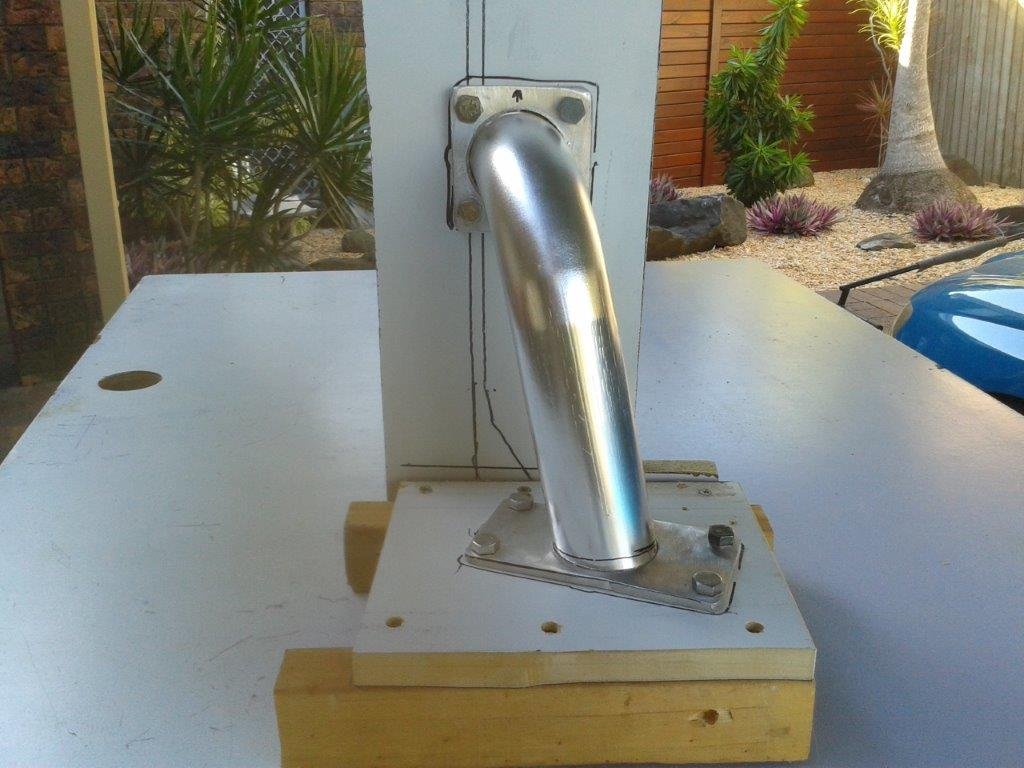
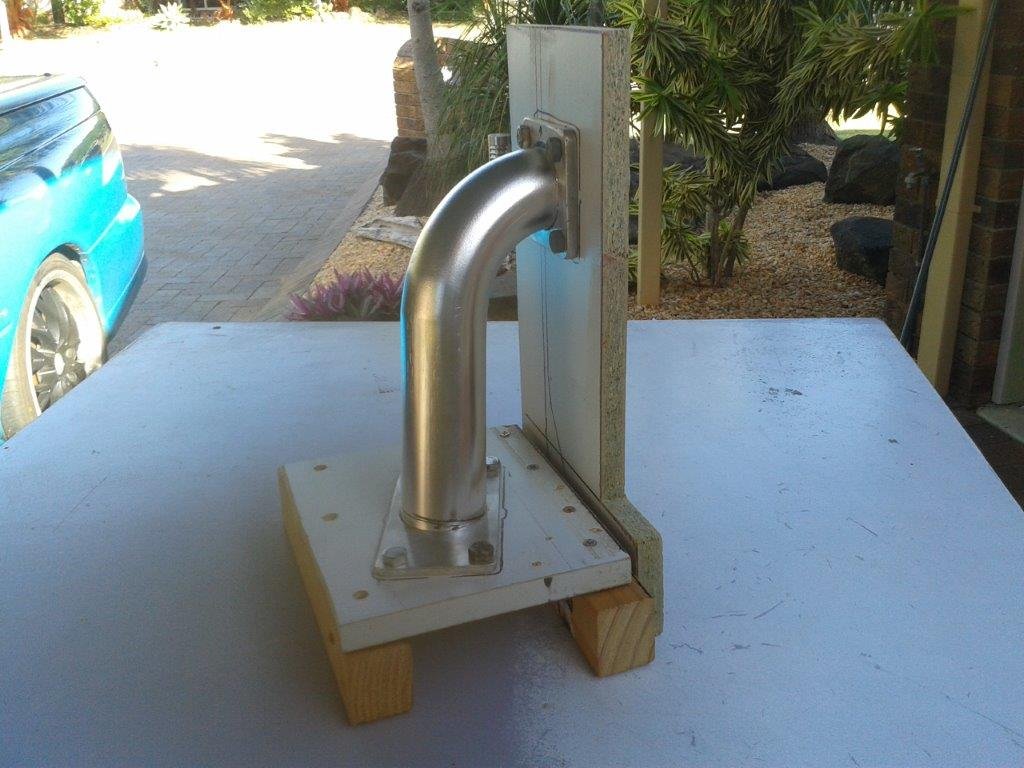
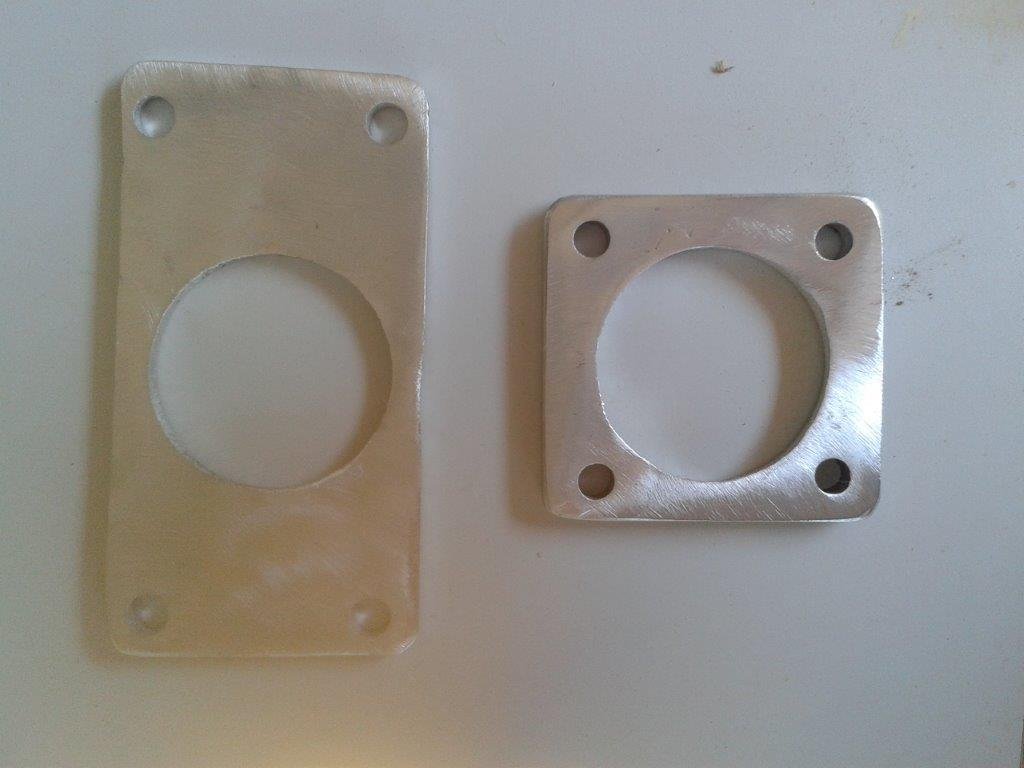
Sadly the diameter of the bull bar tube is on the small side and will choke the poor SU, so I'll need to find a 2 inch bend somewhere else, but the plate was just about wide enough to make the biggest flange. Started off by making a few mock ups out of an old bit of plywood and then armed with only a drill, a small angle grinder and a few files I set to work. First step was to grind off the existing welds until I was back to a flat plate. Next I drilled what felt like a million and one holes which I then enlarged until I was able to break out a bit of plate to reveal a very rough set of centre holes. I'm too embarrassed to show you what the interim steps looked like, but a bit of work with my files and some sand paper and I called them done. A bit rough and ready, but they will do. Now to rustle up a 2 inch bend.
1 point
-
Thanks for that, now i have a spare one!1 point
-
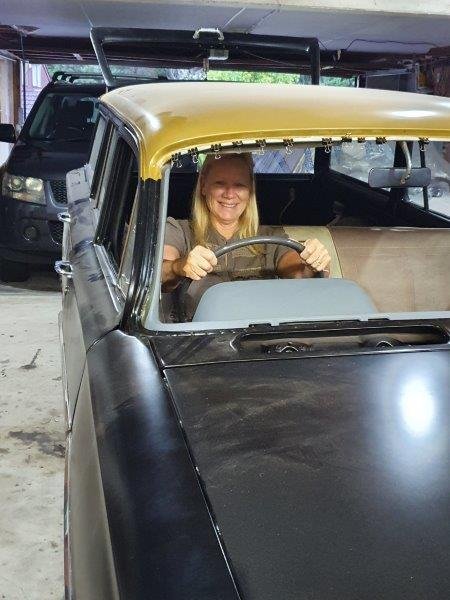
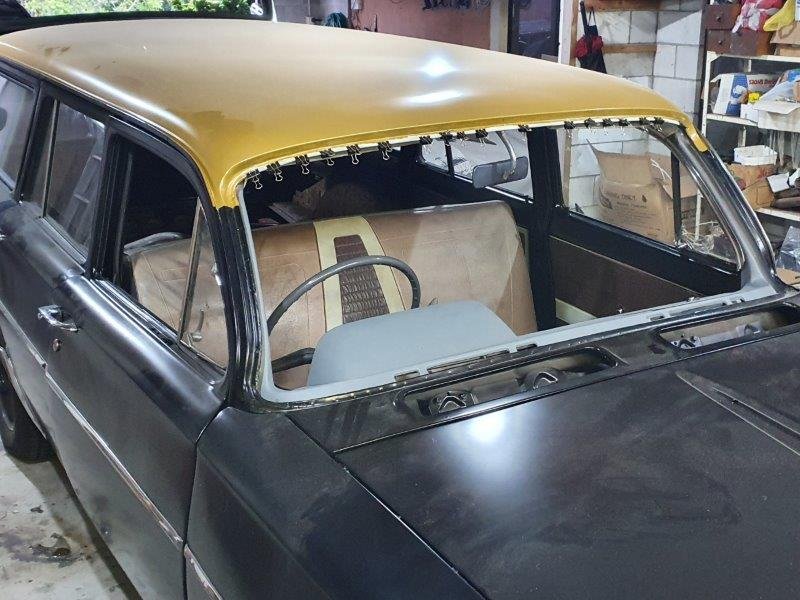
With the wiring in the car pretty much done I put the front seat in. I need to check that the ECU missed the seat - Yes. Then there was the gauges that I had mounted under the edge of the dash board, I was worried that they would take out my left knee - again no problem, can see them as well, volt meter is not in line of site but that is not really important. I got into fitting seat belts until I ran out of bolts. When I was at Zebra wreckers a while ago I get a bunch of the factory low profile bolts which are going to the floor mounts. The ones under the back seat will use normal 7/16 UNF bolts. Here is my wife pretending to go for a cruise With the big steering wheel and 185 front tires the steering is not very heavy, should be fine when driving around. The column shift is fine, can only get Park, R, N, D, 3. I'm not worried about the extra gears. The neutral lock out switch on the torana column is fine, I adjusted it up a while ago.
1 point
-
chur I'll pass it on to @Avenga though not sure where he is at moment1 point


This leaderboard is set to Auckland/GMT+12:00