
Leaderboard


Popular Content
Showing content with the highest reputation on 07/08/19 in all areas
-
Drove it to work. It did not blow headgasket
 18 points
 -
So as promised.. A follow up post to show some initial investigation into the car. On the way back up to Auckland from Nelson, I began to think about ALL the places this thing would be rusting that I couldn't see. Like many, I prod around window seals, crevices and all sorts of places I should probably ignore on the car... But alas, I found some quite soon. Having had a X81 MARK II Hardtop, I know that window seals provide a prominent area for water accumulation and subsequently allow rust to develop. Makes sense, so I knew the Crown had the potential for rust here. From the pics, you can see there is a little rust but regardless, it needs to be attended to. I pulled all trims off gently, broke nothing and got it down to a ready-to-repair state. A+. I cleaned the area up and this is how it sits now. Its both sides from inspection and I've yet to do the other. I've got a good panel beater who's essentially told me to bring it to him when I'm ready... sweet. I do need to find a pair of front door rubber rails which screw to the body. The ones on the car are so long gone (pic attached). Any leads on a pair of these NZ-side would be appreciated, YAJ/croooober/Mbok etc are dry. I kept going and removed the lower screen trim to reveal.... NO rust north of some surface rust. Yay, I'll take that for now. The car failed a WOF on front wheel bearings and rotors being pitted. I tackled the wheel bearings that day as I grabbed a pair from Repco. When I took the hub apart, the hub bolts were on finger tight, so I'm not sure if the bearings were properly stuffed or it failed on a loose hub bolt, whatever though. I need to grab new brake rotors too as these are far too thin to skim apparently. I was going to leave putting the new bearings in until after I get the new brakes. I take it the hub and rotor can be separated from one another? I haven't encountered a setup such as this before. Some cleaning up of trims happened after all of this. The door rubber was brought back to life and all ready to go back on.. I'll autosol when it comes time, I assume thats a good way to bring these back to 100% But yeah, that's it for now. I may keep up with the minuscule updates, I may not. Until my JZXs sell, it will be quiet sailing.. After that, I've got plenty of plans for it which I'll be able to bankroll.8 points
-
So plan is - twin 45mm (or 1 3/4") for most of the length, which matches the existing twin pipe from the manifold to the Y that is a muffler shop replacement that i will keep a very small part of, - into a single 57mm (or 2 1/4") pipe to match the existing rear muffler, that i cribbed from bits from the Croma Turbo i wrecked This was way more expensive than i thought, especially as a bought a nice new welder to do it with. Even my man-math was struggling. After watching some youtube and doing some actual math i started with making the new Y section from which everything else will be built from. and went forwards from there. The Y is right at the back of the floor pan and actually has a kick up towards the diff. Shiny stuff to the ex croma over the diff section And painted with some BBQ paint Pretty flash for a driveway job! Ended up using only the first 50cm or so of the old secondaries but turned out nice in the end. Shit is tight getting in and out. This is the new front section against the old part, the new Y joint ends adjacent to the white bit on old pipe so ive extended the primaries by like 2 meters. Unfortunately didnt take any photos of the whole thing as the rear half was installed so i could ensure the front half lined up Buttoned it all up just before dark and its surprisingly quiet, probably because i was used to the old blowing exhaust, but has a proper FIat rasp at around 2000 rpm or stabbing the throttle and seems to free rev a wee bit better. Tightening it all up properly means it now has no leaks, but it rattles on the cross member, i want to put a support off the gear box and I remembered that i forgot to weld in a O2 sensor bug so another couple evenings tweaking and upside down welding before a road test and butt dyno.8 points
-
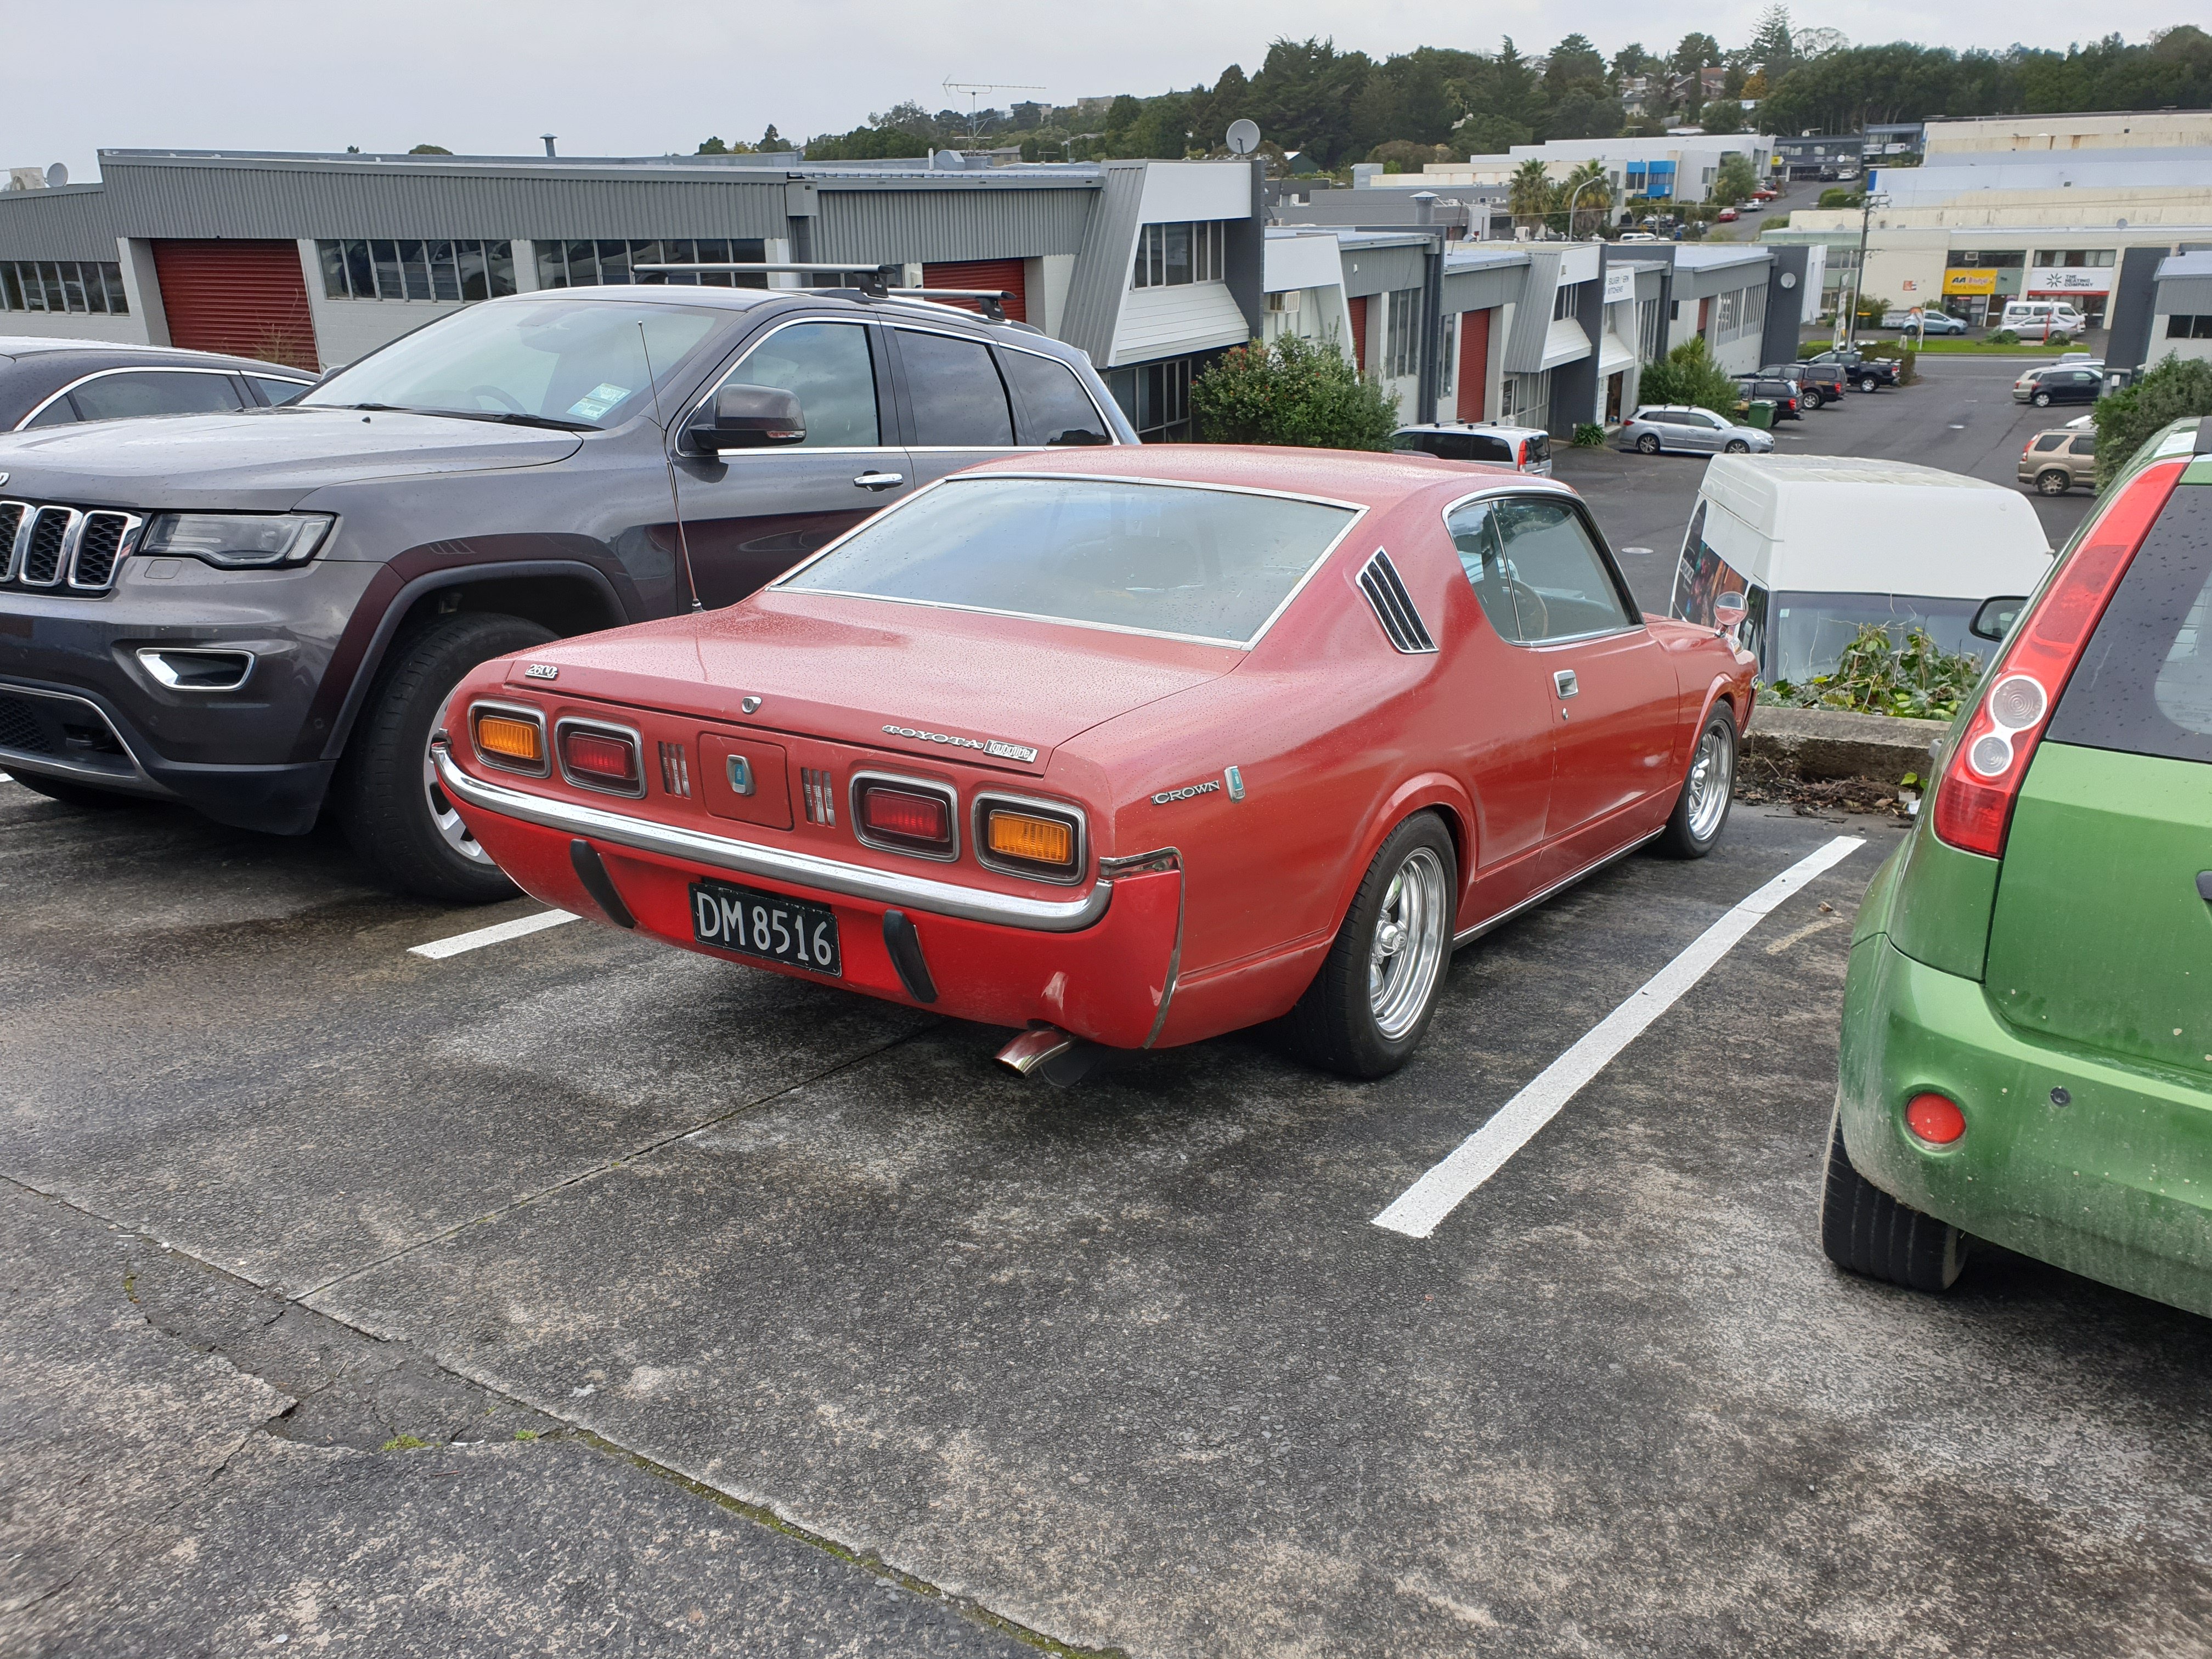
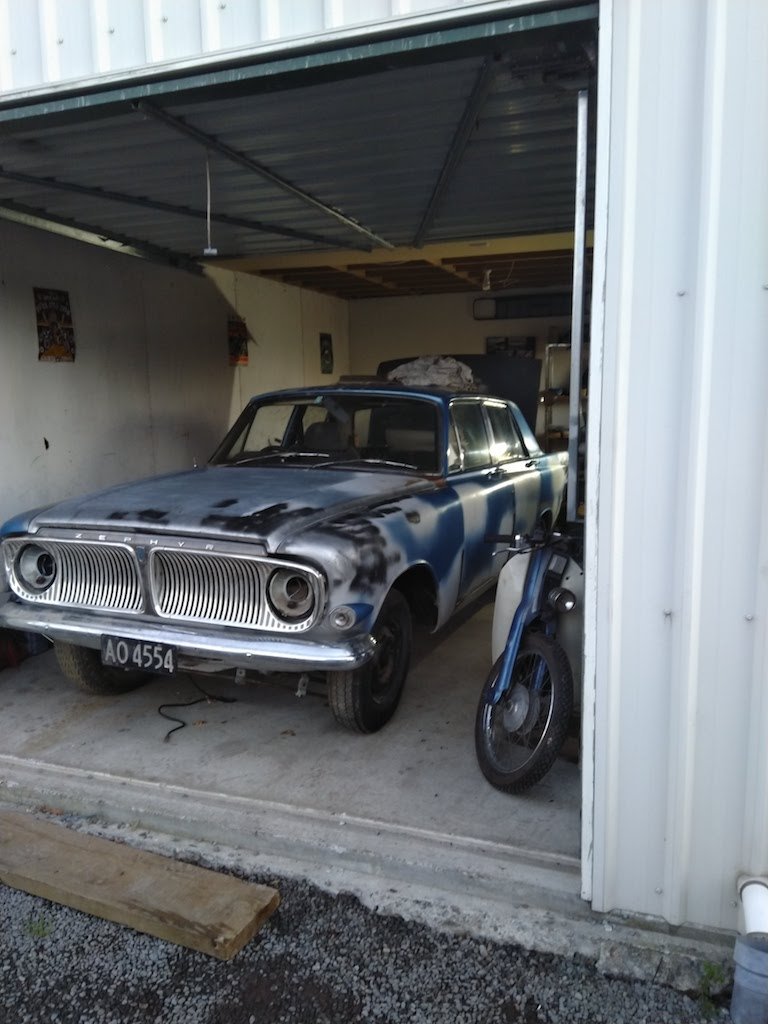
Whaddup OS! Foremost, it's been a while.. Since my last old(ish) car, I've been pretty absent from OSNZ due to new car life. Turns out that new car life is actually not what I had hoped and JZXs aren't really my thing. I'll skip the sentimental shit so tl;dr, I wanted an old car again for the last year or so. Two years of JZX ownership was cool, but I was fiending for a 1G-G again.. Well around a month ago, I began looking for a GX61 as thats what I've always wanted. It's a shame that I'm a picky bastard as limiting myself to factory twincam24 models (yikes) meant that I was unlikely to find what I wanted easily. I had a few leads to follow and quickly learnt that what I wanted in the GX61 scene was going to cost me quite a bit. Acknowledging that, a couple of weeks ago I opened up to this idea: What if, instead of getting something familiar and "dream car tier", I wing it and get something completely new. So putting this into practice, I decided to view a Y30 Gloria hardtop located in Dunedin. Some of you may know the car. It came up a week before the hand-in date for my thesis, so I chucked a deposit on it (oops) and booked flights for the day after uni finished for me. From pics and description, I thought I knew what to expect. Well Saturday morning came around and Zeb picked us up from Dunedin airport. The mini-tour of Dunedin was great and it was a pretty good way to fill in the morning before Y30 viewing. We drove past where the Y30 was located before viewing for a quick sneak peak.. Well it was apparent right then that it wasn't what I was expecting. For the money I was looking at paying, it was too much work to get it to a good 'base' type spot. It was this point when I realised that I'd be doing my South Island trip via bus or rental instead of in my own old car. Pretty sad, but I remembered I had a back up. An MS112 Crown hardtop in 033 white located in Nelson. To keep it short, it belonged to OS user: Slacker_Sam and from the pictures, it appeared just what I was after: Clean & Tidy; 80s; sedan body. To summarise, I managed to coordinate the trip to Nelson where I'd view and then buy if it was right. Turns out it was what I was after as I was heading to Picton in it later that evening. The trip back home wasn't completely without fault. A suspected dicky alternator killed the battery 45 mins before ferry boarding. Bluebridge moved us to the next ferry for free and a replacement battery had the Crown roaring again. In the North Island, Google Maps directed us through the Tararua Forrest Park via Akatarawa Road.. Holy shit, what a road.. The poor 5M felt it and developed that 'hot' smell that M series seem to produce. These fucking things have the thermal stability of an RBMK-1000 in heat... A coolant drip in two places which I was aware of in the South Island was likely the culprit, however I was loaded up with some extra water and i banged on a couple of extra clamps to put my mind at ease. I kept my eyes on the temp gauge like a hawk despite its potential inaccuracy. Thankfully the road didn't induce a 5-MRBMK meltdown and we made it back to nice open roads where the M could bask in cool fast moving air. Other notable moments include: The AC belt lunched itself on Desert Road, however, I brought tools with me including a socket set which allowed me to remove the belt in a minute and keep on our way; The trans began slipping from Taupo onward. I felt it earlier but its here where it became pretty clear. As of now, I'd say the trans needs attention. I'll flush it and see what that yields, but my sparse knowledge of torque converter automatics leads me to believe its likely lunched. Not an issue though as I'll later explain.. For now, here are some pics: Some things pertinent to the car which I really enjoy: It's untouched. No shitty headunit, no "mods", NOTHING. It has a towbar and some Bridgestone Texas alloys which I consider a cool bonus; Blue interior. 033 white and blue interior go together perfectly; OEM floor mats, need I say more; Dealer sticker and plate frame, a WOF sticker from 1997 and some ancient JAF sticker on the door; Blue glass all around. There is more, but I really don't want to ramble more than I am. I'll make a new post outlining my first impressions and initial "going over" of some bits. Discuss here: https://oldschool.co.nz/index.php?/topic/60957-michaels-ms112-crown-hardtop-discussion/7 points
-
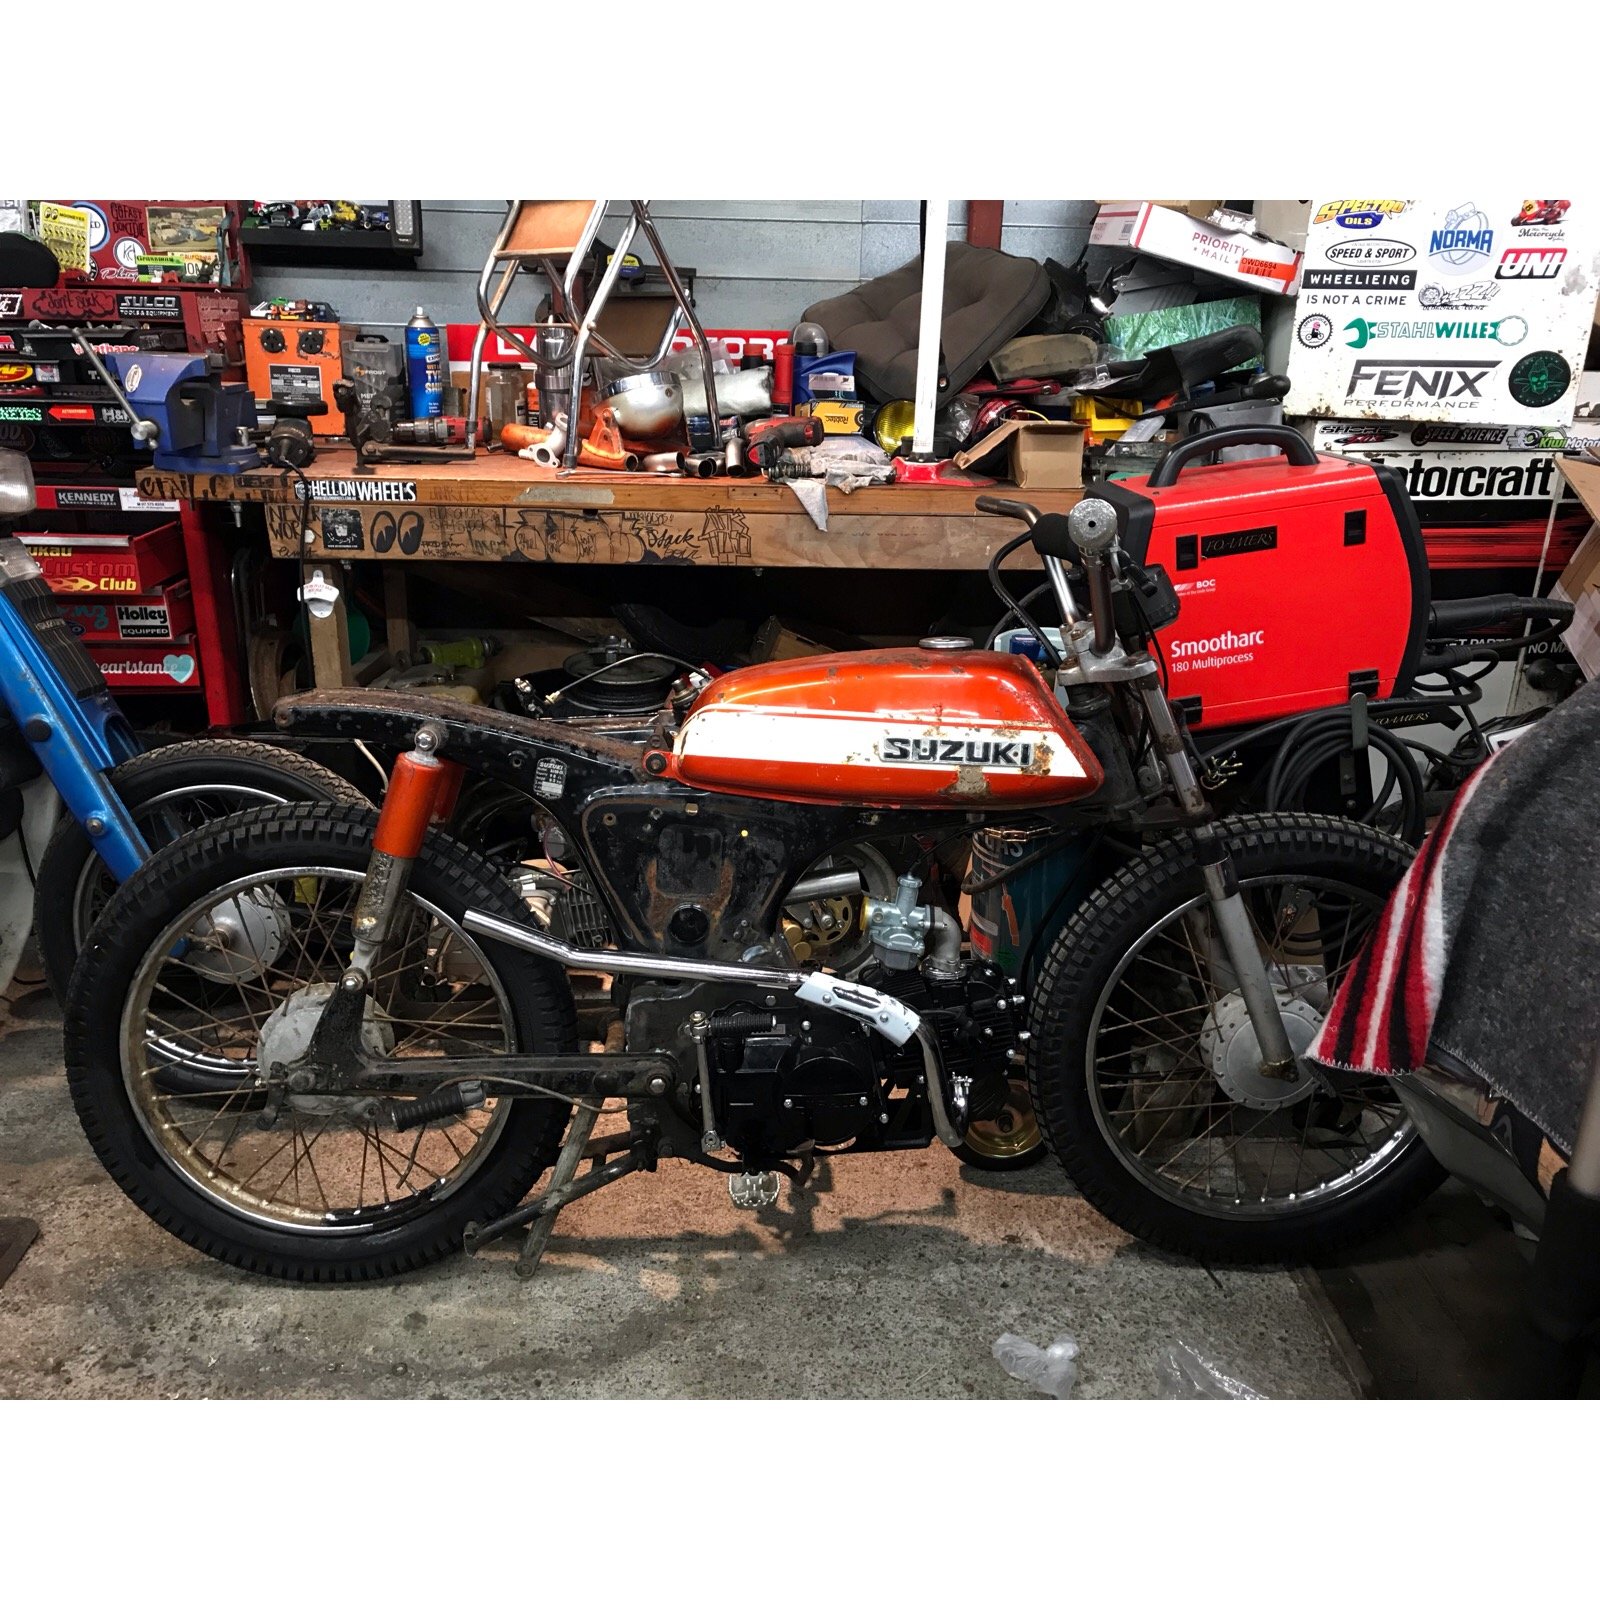
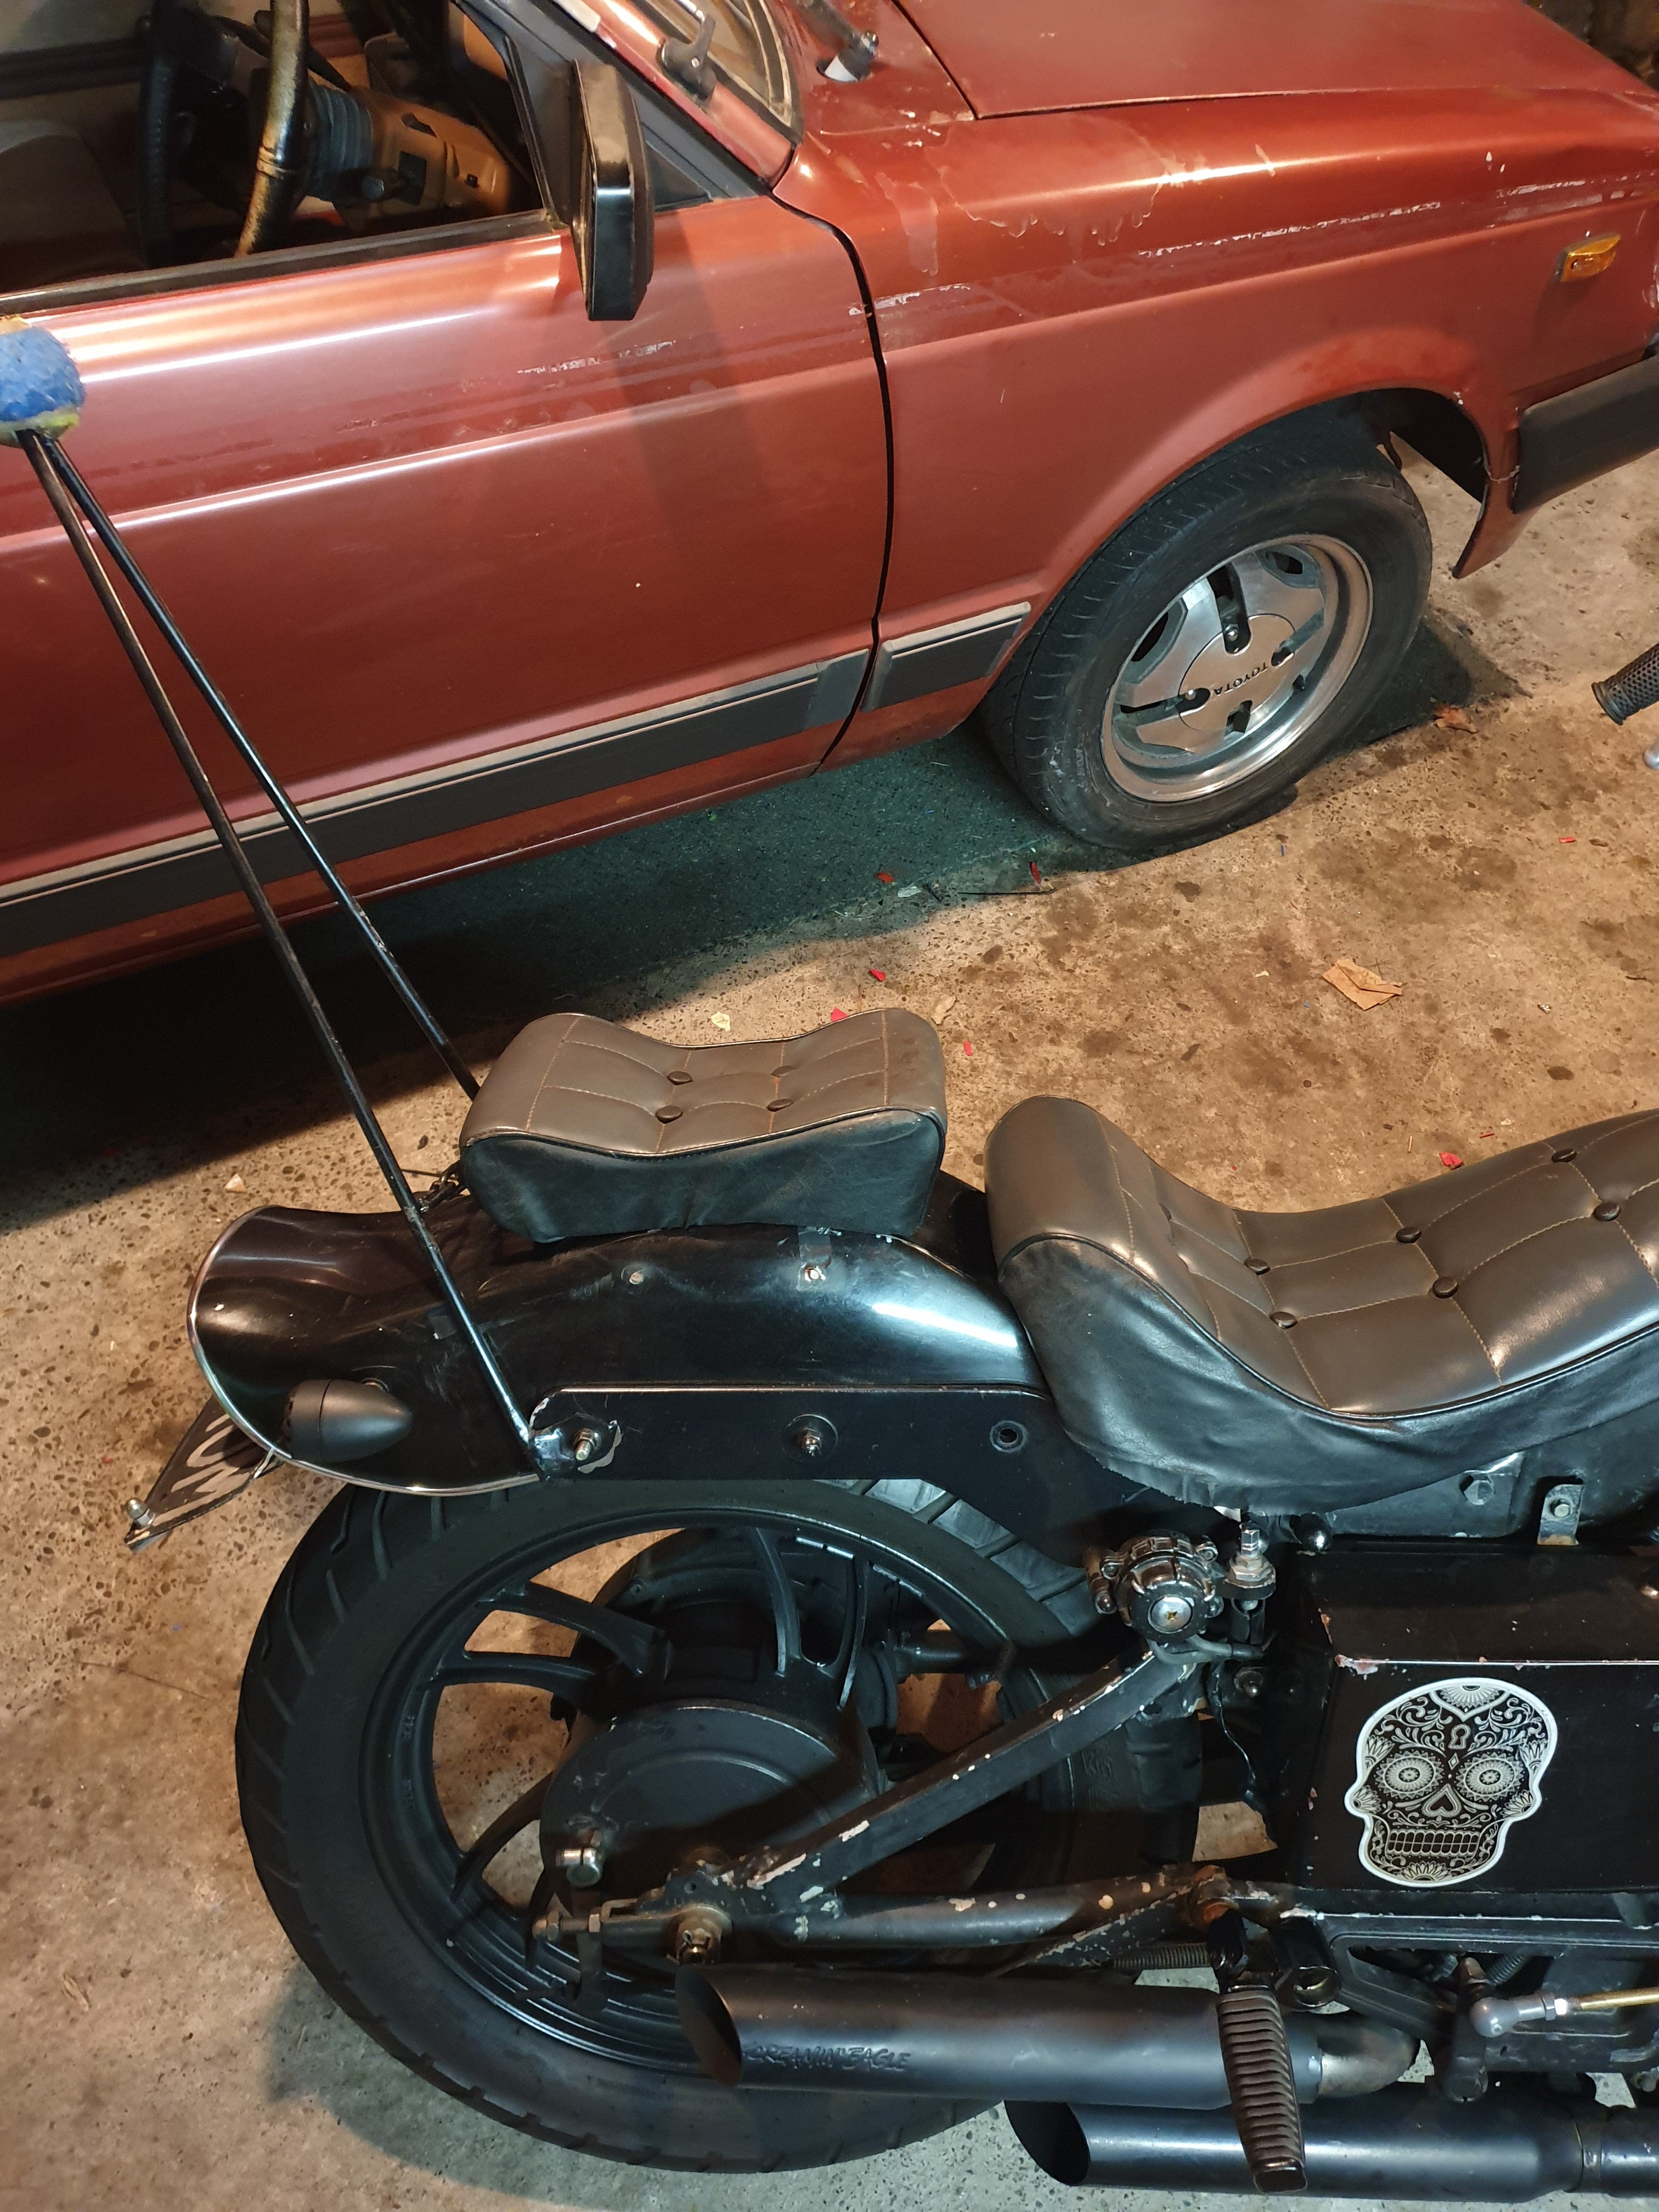
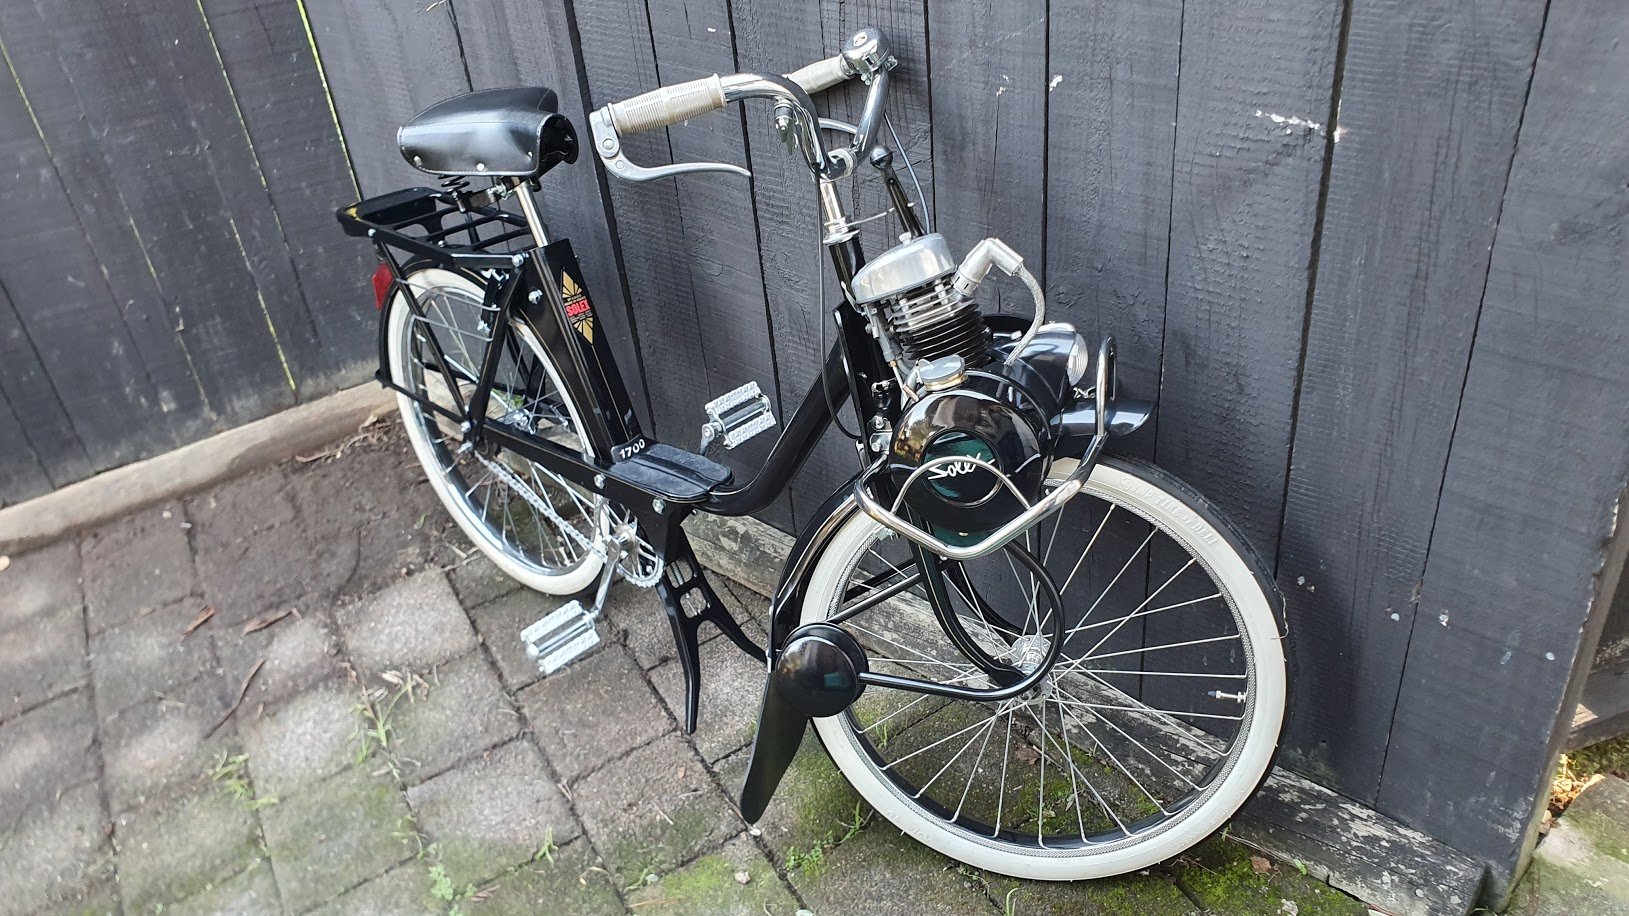
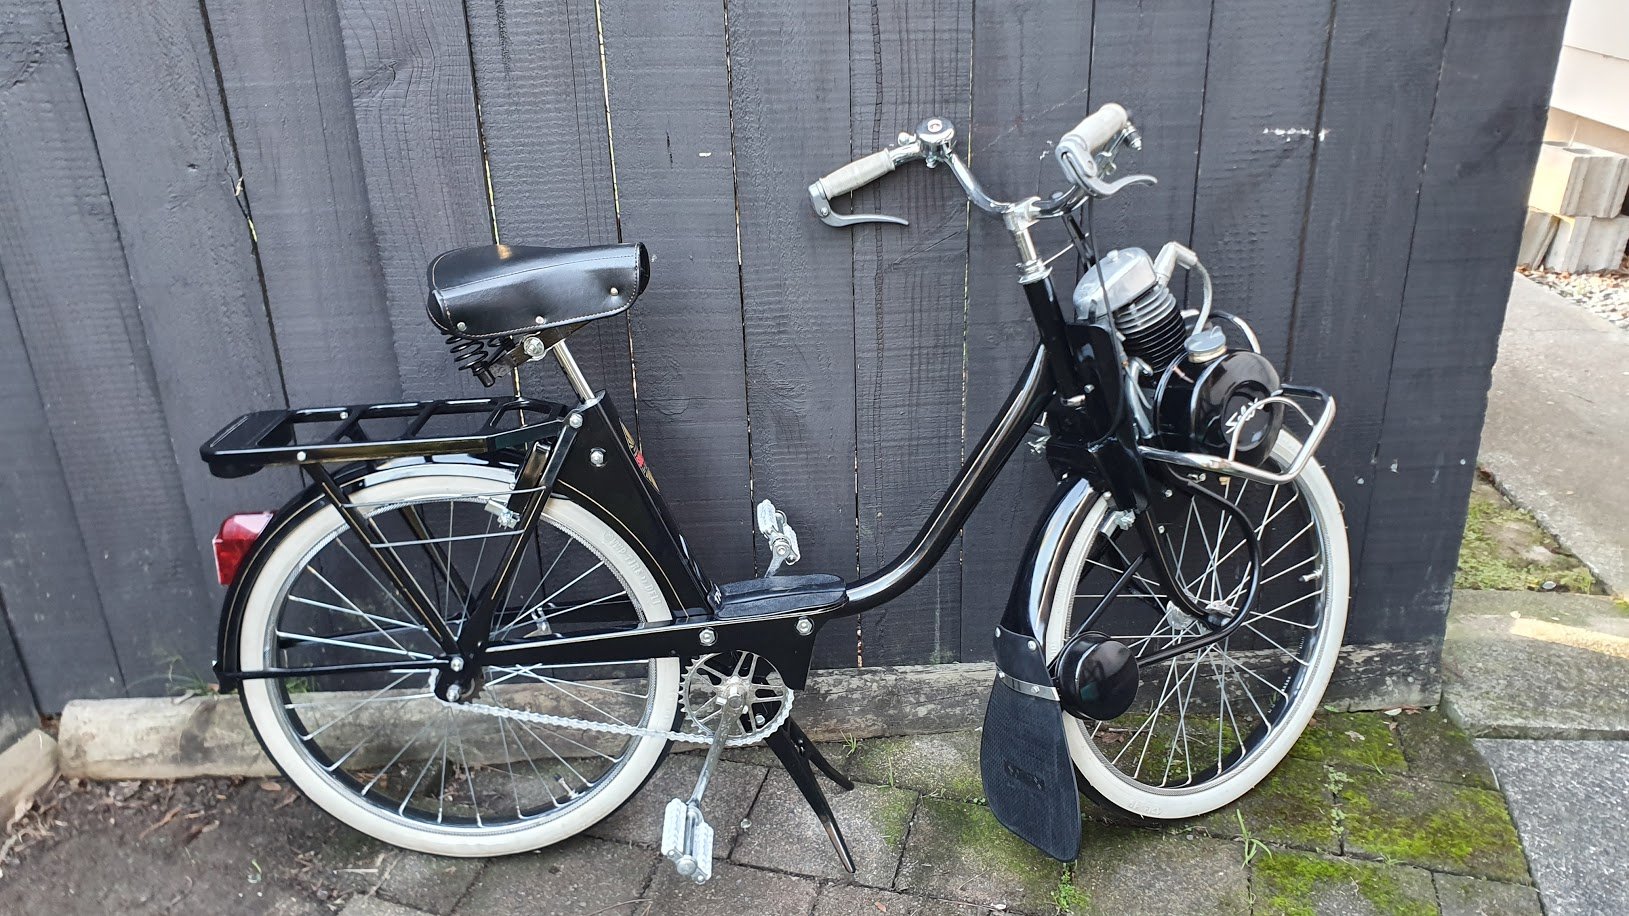
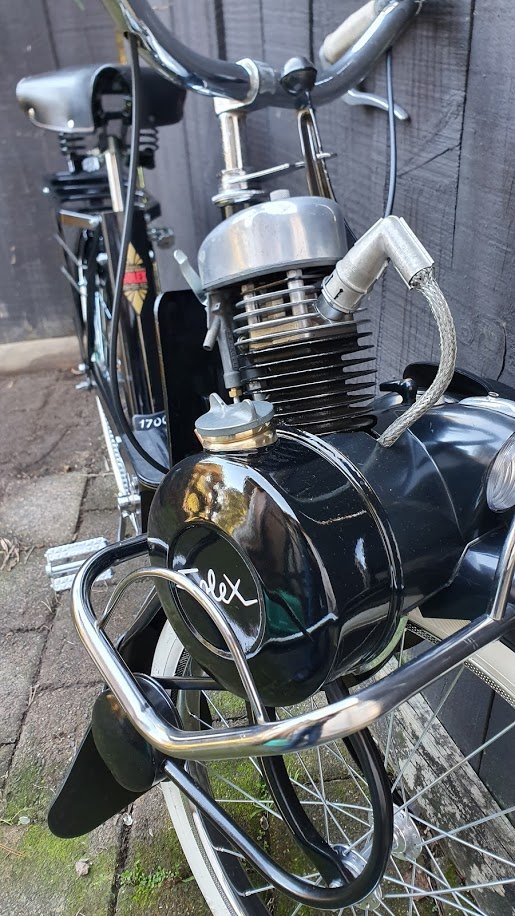
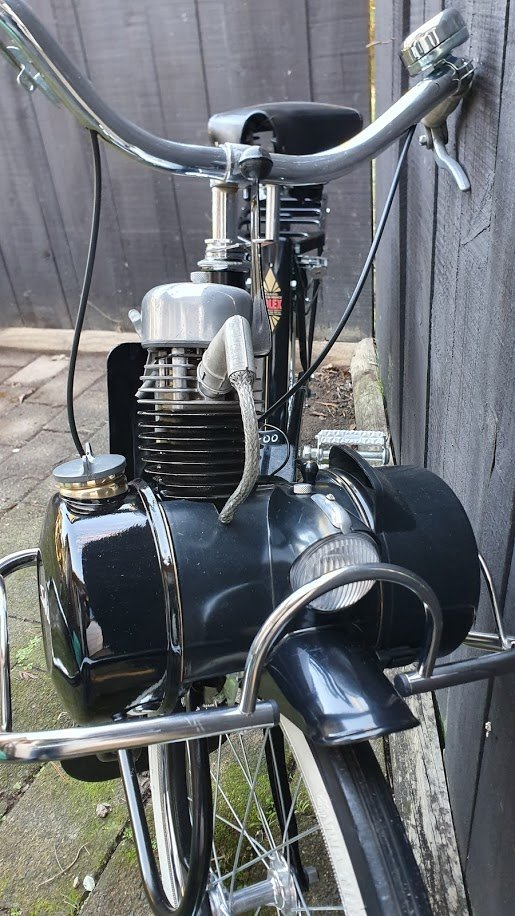
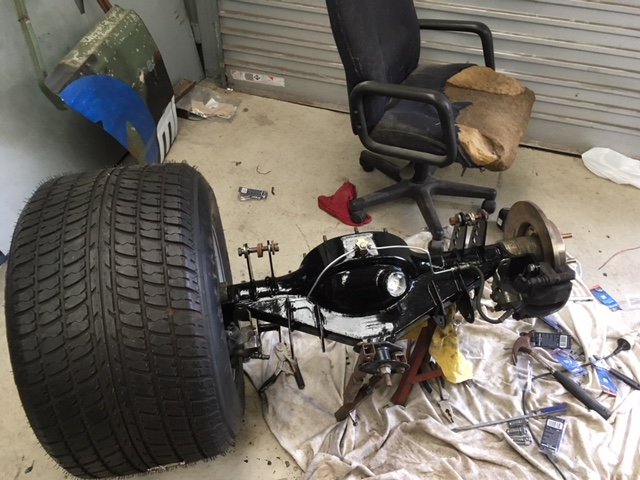
I’ve got this underway. Suzuki A50 feat Lifan 125
6 points
-
I made this just for this thread. Some Highly enriched original content.. enjoy5 points
-
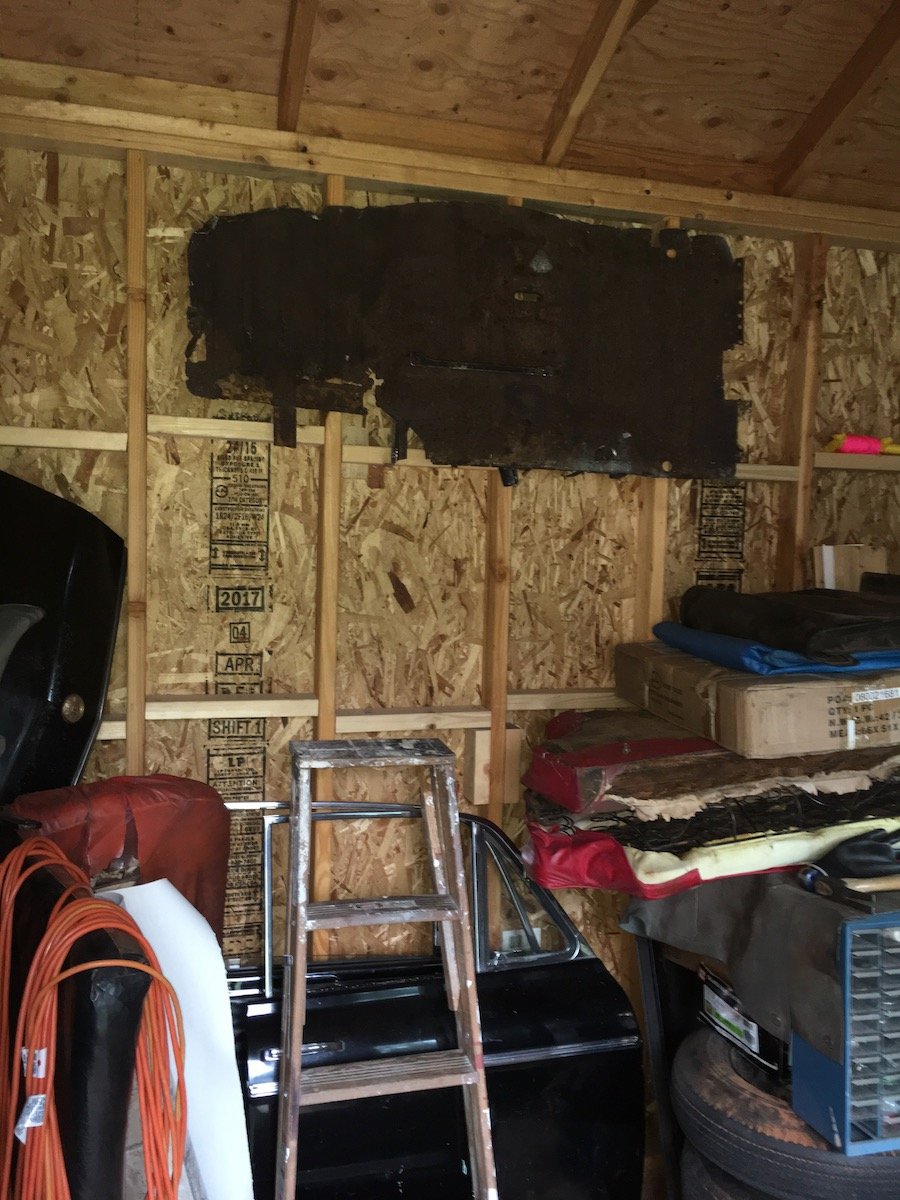
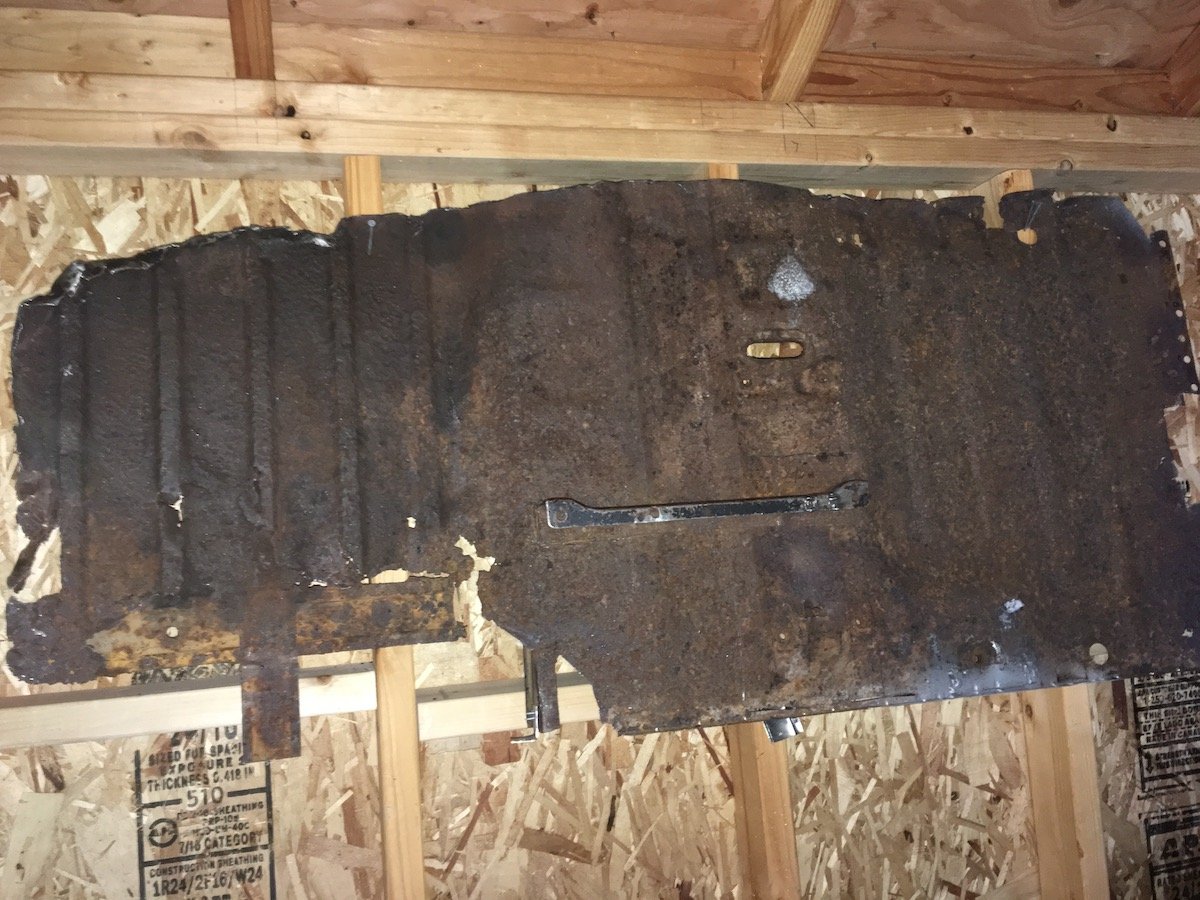
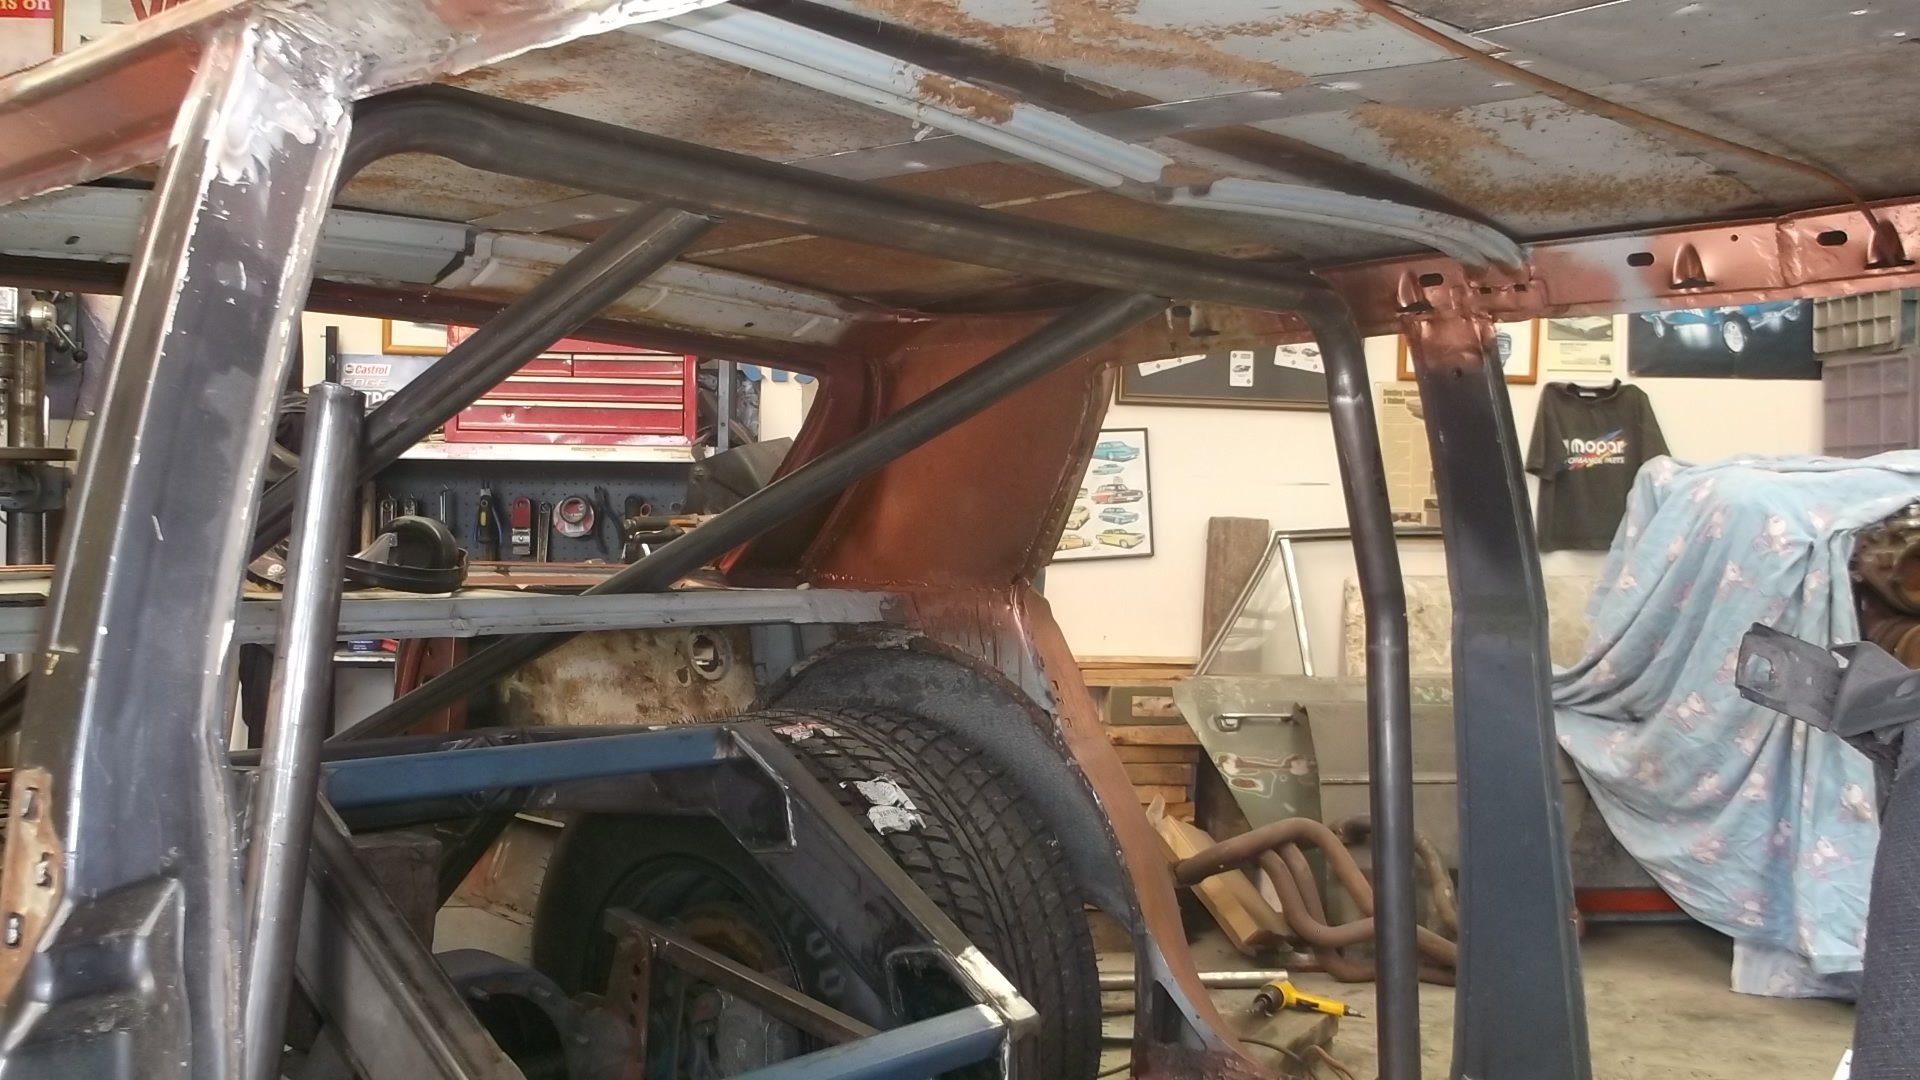
Hung some new wall art in my storage shed today. It's the remains of a '61 Bluebird left floorpan. There is a practical reason for temporary wall hanging it. I was just going set it on edge in storage so I could salvage a few items off it later but it began folding over from its own weight. Plus, it was generating all kinds of crud such as; dirt clods, large rust flakes, under sealant, and greasy blobs anytime it got touched. Just had to get it out of my garage and isolate it. My "wall art" came from here. I'm hoping to make a few more posts soon to cover the last couple of months other work activities that led up to this "epic" event. Making the trans/driveshaft tunnel solid, investigating door hinges, finessing various fitments and preparing the fender and other bare steel sheet metal for epoxy primer. Discussion: https://oldschool.co.nz/index.php?/topic/60267-marts-pl310-61-datsun-bluebird-sedan/
5 points
-
I glued the carb on yesterday and plumbed fuel up. Next up is figure out wiring and try start it5 points
-
Ideal bike-TS with some sorta 2T big block shoehorned into it(Work in progress) Backup bike-PW80 with lift kit and some additions for road worthiness Backup MKII-The ever reliable mudbug RookieDave mode- WR"49"cc4 points
-
GT40R stands for Resistor (not Racing), so it probably blew because it had too much voltage going into it if you dont have a resistor installed (and your measure of the power at the coil was = to battery voltage, right - ie not with engine/alternator running whcih would be 14V+ so 12v when running would imply some resistance) The R is added to older cars because of voltage drop when cranking with older battery tech, so the coil still works, tricky bit is that it is UN-resisted when cranking (getting all the volts avalaible) but needs to be resisted when its not cranking/alternator is spinning else it blows up If you going to get another coil go with an unresisted set up (ie GT40, no R)4 points
-
finally adjusted the clutch pedal properly relative to the master cylinder, the various adjusting nuts are very high under the dash and not made for human hands. Yay. However in doing so i broke the light switch out of the column, with my head. This is the third? time ive done this, the car cam with no end of hacks to get around the broken one it had, i got this off another 2300 nut as his spare, and it broke in the box on the way home, you can see the lump of JB weld on the front indicator To be fair they are pretty weak design relative to the spring and ball bearing they act against, and with the plastic being so old they just bust out. ITs also a special snowflake* because it spaces the column change ball and the outer steering column, so we must make do. (* for Eg found this NoS one http://www.epocacar.com/shop/en/internal/8933-devio-luci-fiat-2300-s-13-fili-nos.html for 213EUROs and its not even the one in my ca, its the one in the book ) Good ol JB Weld, (other epoxies are available), tricky to get them 'moulded' without slopping it down into the guts as well, but the old tape dams and several thin layers did the trick The 'ear' had also fallen off the indicator switch end, my boy donated one of his 20 sided dice to the fix Took the opportunity to clean and grease all the mechanisms including the gear lever control centre operational4 points
-
painted the hood lining and associated trim bits today. the pictures are all shit but you get the idea. the black came out really well and it looks mint now. 2019-07-07_01-17-51 by sheepers, on Flickr 2019-07-07_01-18-00 by sheepers, on Flickr 2019-07-07_01-17-25 by sheepers, on Flickr 2019-07-07_01-17-35 by sheepers, on Flickr4 points
-
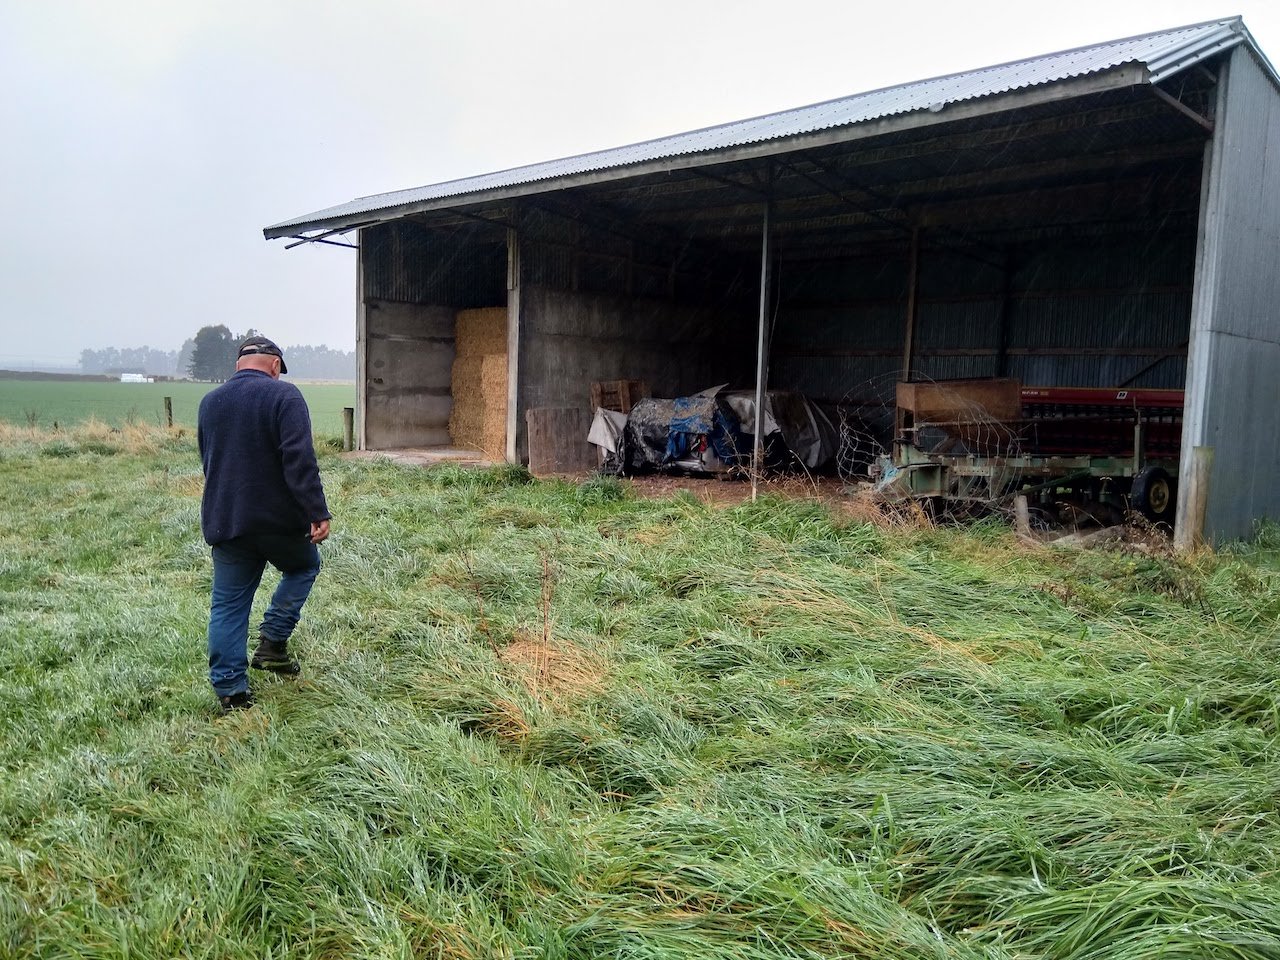
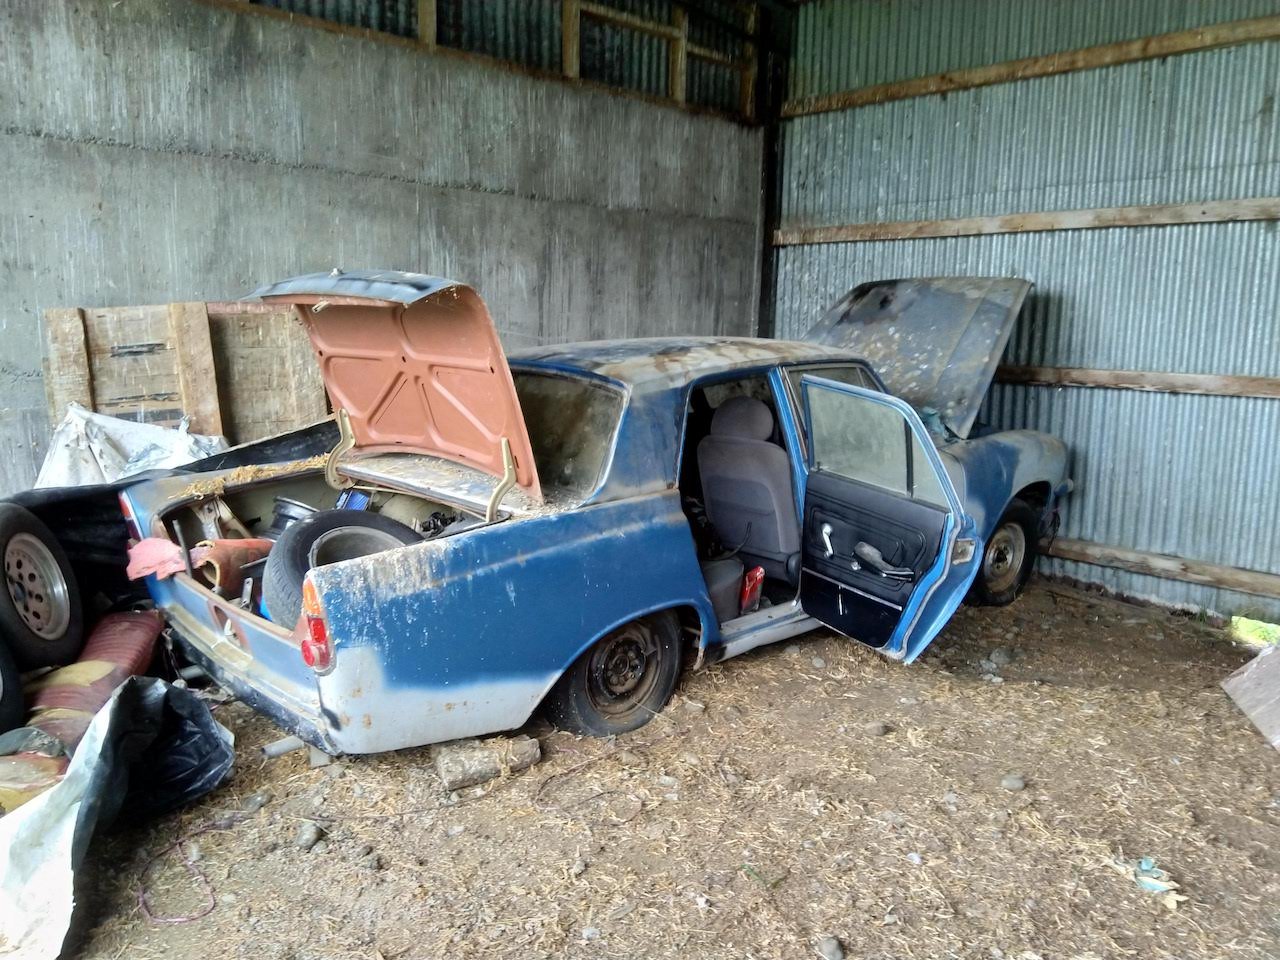
Found myself a new project. Car was last on the road in 1993, then the registration went dead but the rego is still in the system. Previous owner bought the car around '98 with plans of putting a 302 into it. A few years later he took the car to a panelbeater to get some rust fixed and bodywork done. The bill came back a lot more then expected so the car got mothballed to a hay shed. A mk4 zodiac came up a few years later that had already had a certified V8 conversion so he snapped that up and the mk3 stayed in the shed. The car only had minor rust (guards, doors, boot etc) to begin with, there was no damage to the chassis or sills. A bit of minor rust has come back since then, but a sweet barn find. The car was in Methven and had a heap of spares with it. It was pretty heavy towing back. It came with the engine pulled apart and a heap of heads, manifolds and bits. The guy that sold it to me knows someone with a mk2 motor that ran when pulled out, so I will snap that up. Long term plans for it once revinned will be some slam, wide steels and eventually an engine swap to a V8 or a barra. Am I best to get a repair certifier to come and look at it so I can get the rust signed off before I strip it back and paint? I'm thinking that might be easier while everything is pulled apart rather than taking through revin in primer, then pulling everything back apart to paint. Any ideas on how hard this would be and cost? Discuss here:
3 points
-
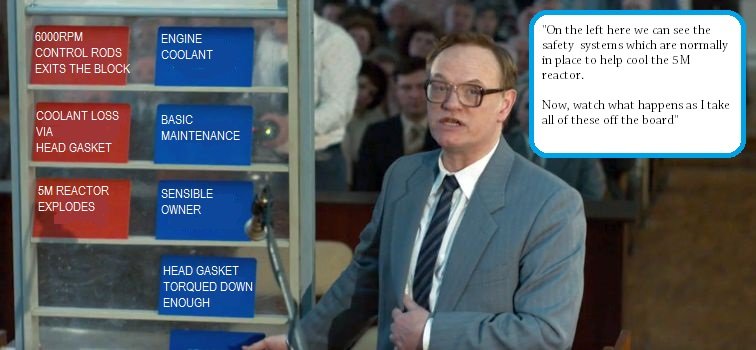
"At the Toyota meet in Geneva you told us that it was user negligence that caused the failure." "The Toyota Warranty department pressured me to lie" *crowd gasps* "Although the users were highly irresponsible, ultimately the cause of failure was the graphite material on the tip of the gasket. When the waterpump speed falls below 500rpm, as per their test, any increase in con rod speed with blow the graphite into the exhaust and an unstoppable thermal reaction begins." "So turning the heater on would not help cool the engine, as per protocol?" "It would turn the heater core coolant straight into an explosive gas further destroying the gasket" *crowd gasps* "Order! Order! Please continue. Why was it designed this way?" "Same as everything else on a 5M-E! To save money! Every other company use higher torque on the bolts and a multi layer steel gasket!" *crowd gasps*3 points
-
A couple of years back I bought a YSR50 with a TS185 engine transplant, half complete, from an estate garage sale; it may be the best value purchase of my life. I haven't touched it, never got it running. After reading about the upcoming Urewera Undertaking, I knew it was time. The factory YSR frame is only rated for 65kgs and I weigh more than that... I'm also looking at a horsepower increase of something like 240%... and I should probably make some kind of concession for the gravel. So there's a bit to be done. Step one, amalgamate the looms and achieve stable idle voltage. Step B, celebratory burnout. Watch this space.
3 points
-
By the coil "blew" i guess you don't mean like this. /ling3 points
-
yeah trusty old vespa. no changes at all. hold up i might spend large and get some new heavy duty shocks. just going to be racing clint the hole time. @Beaver hows your project coming along?3 points
-
I'll kick this off by answering the obvious: "What are you going to do to it" Well.. First: 1. Low down. This thread is a gem and I'm referring to it for my up-'n'-coming slam life. If you view the thread and want to tell me "that won't get you that slammed", be sure to remember I'll likely be on 14's with 50 profile tyres which should yield some extra free slam. 2. Wheels. I'm thinking some of the following: Rays Volk Racing 370, Super Volks, MK-Is etc 3. Late model front end & tail lights. This will turn my simple MS112 Crown into a "demon (oni) Crown". This nickname fits the facelifted car and I LOVE the look. I recently noticed that this car looks a LOT like a 61 Cresta which was my ideal car. Cool huh 4. MS110 sourced digital dash. This is a BIG want3 points
-
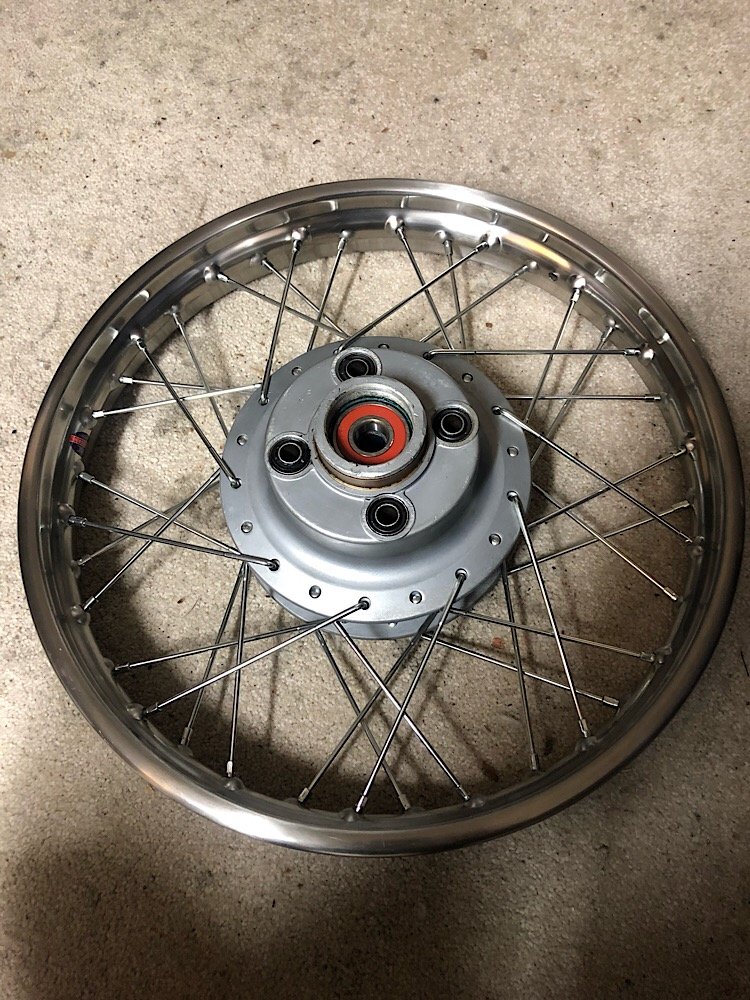
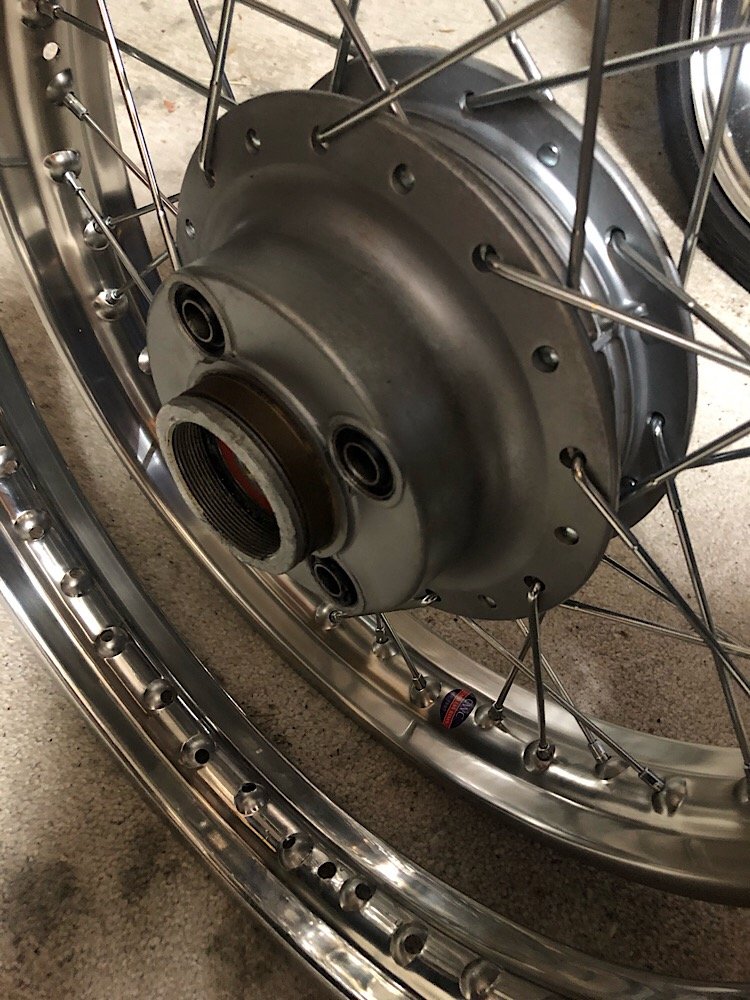
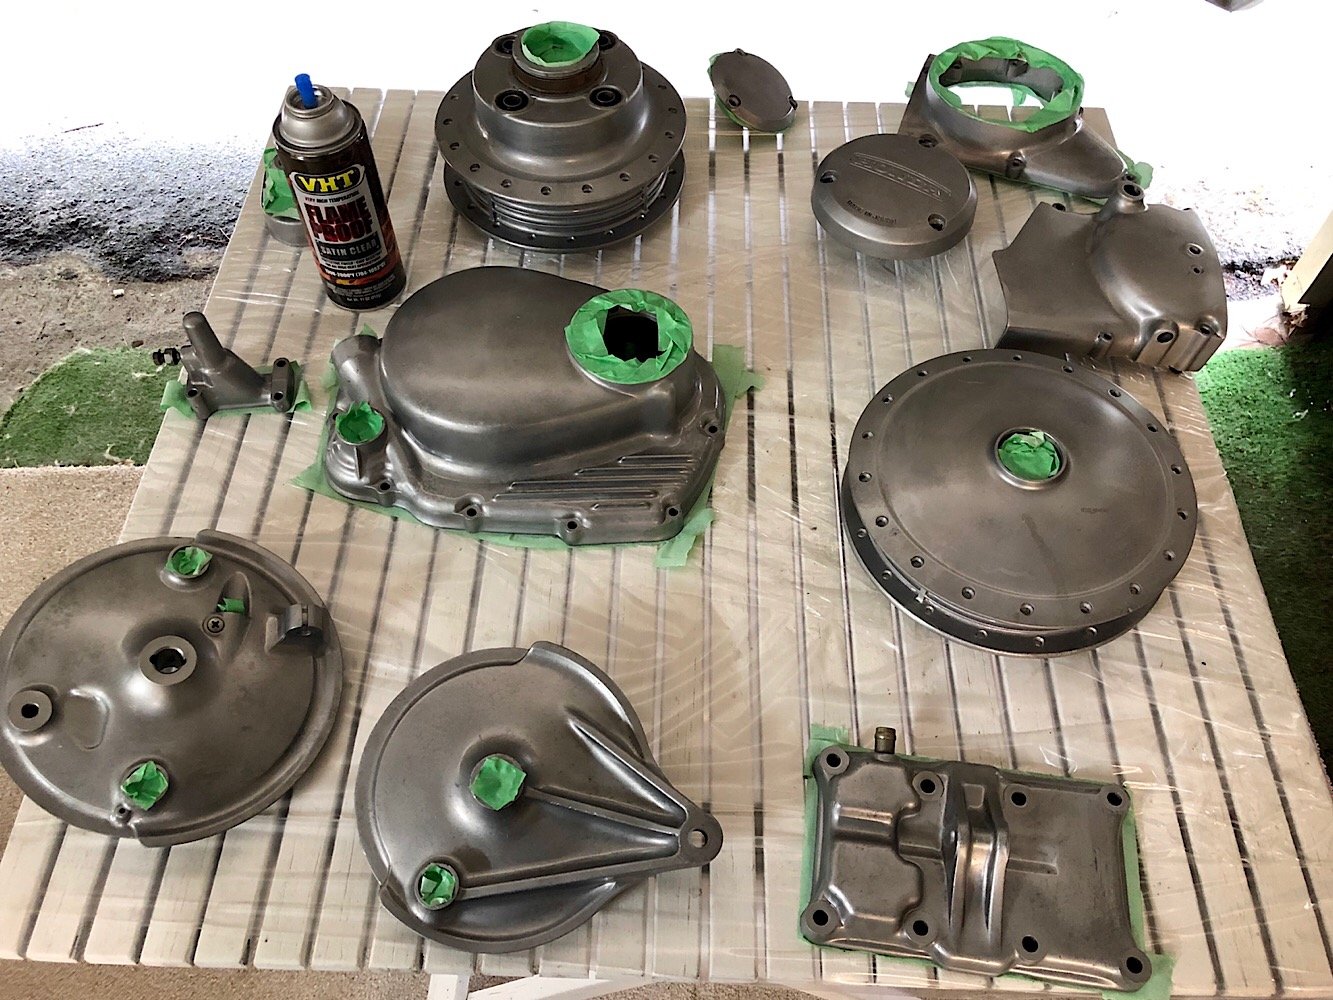
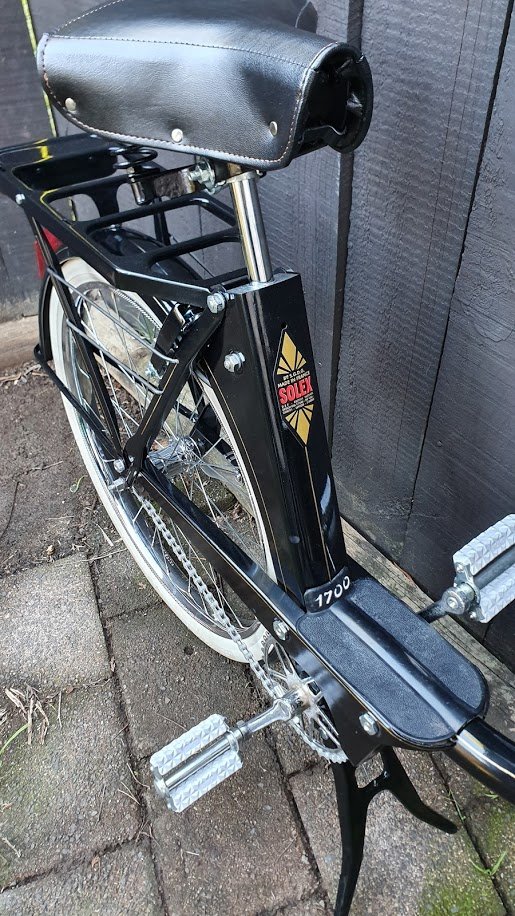
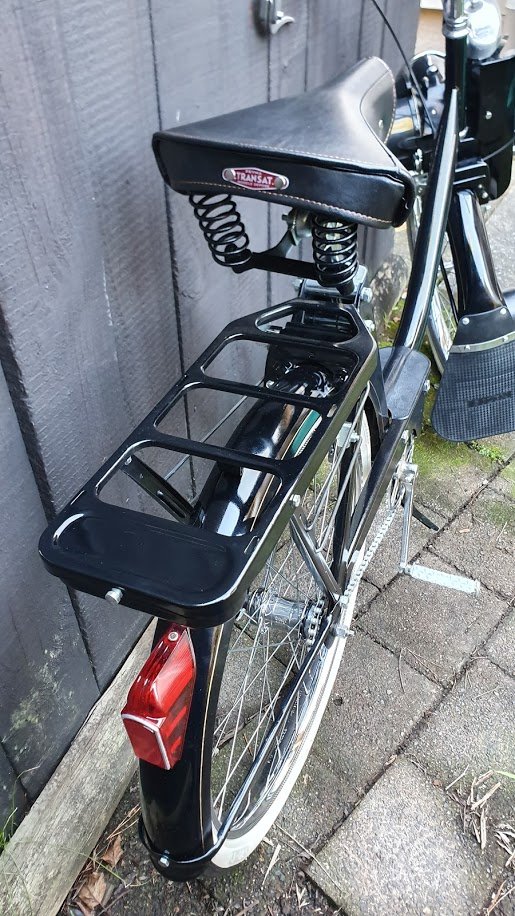
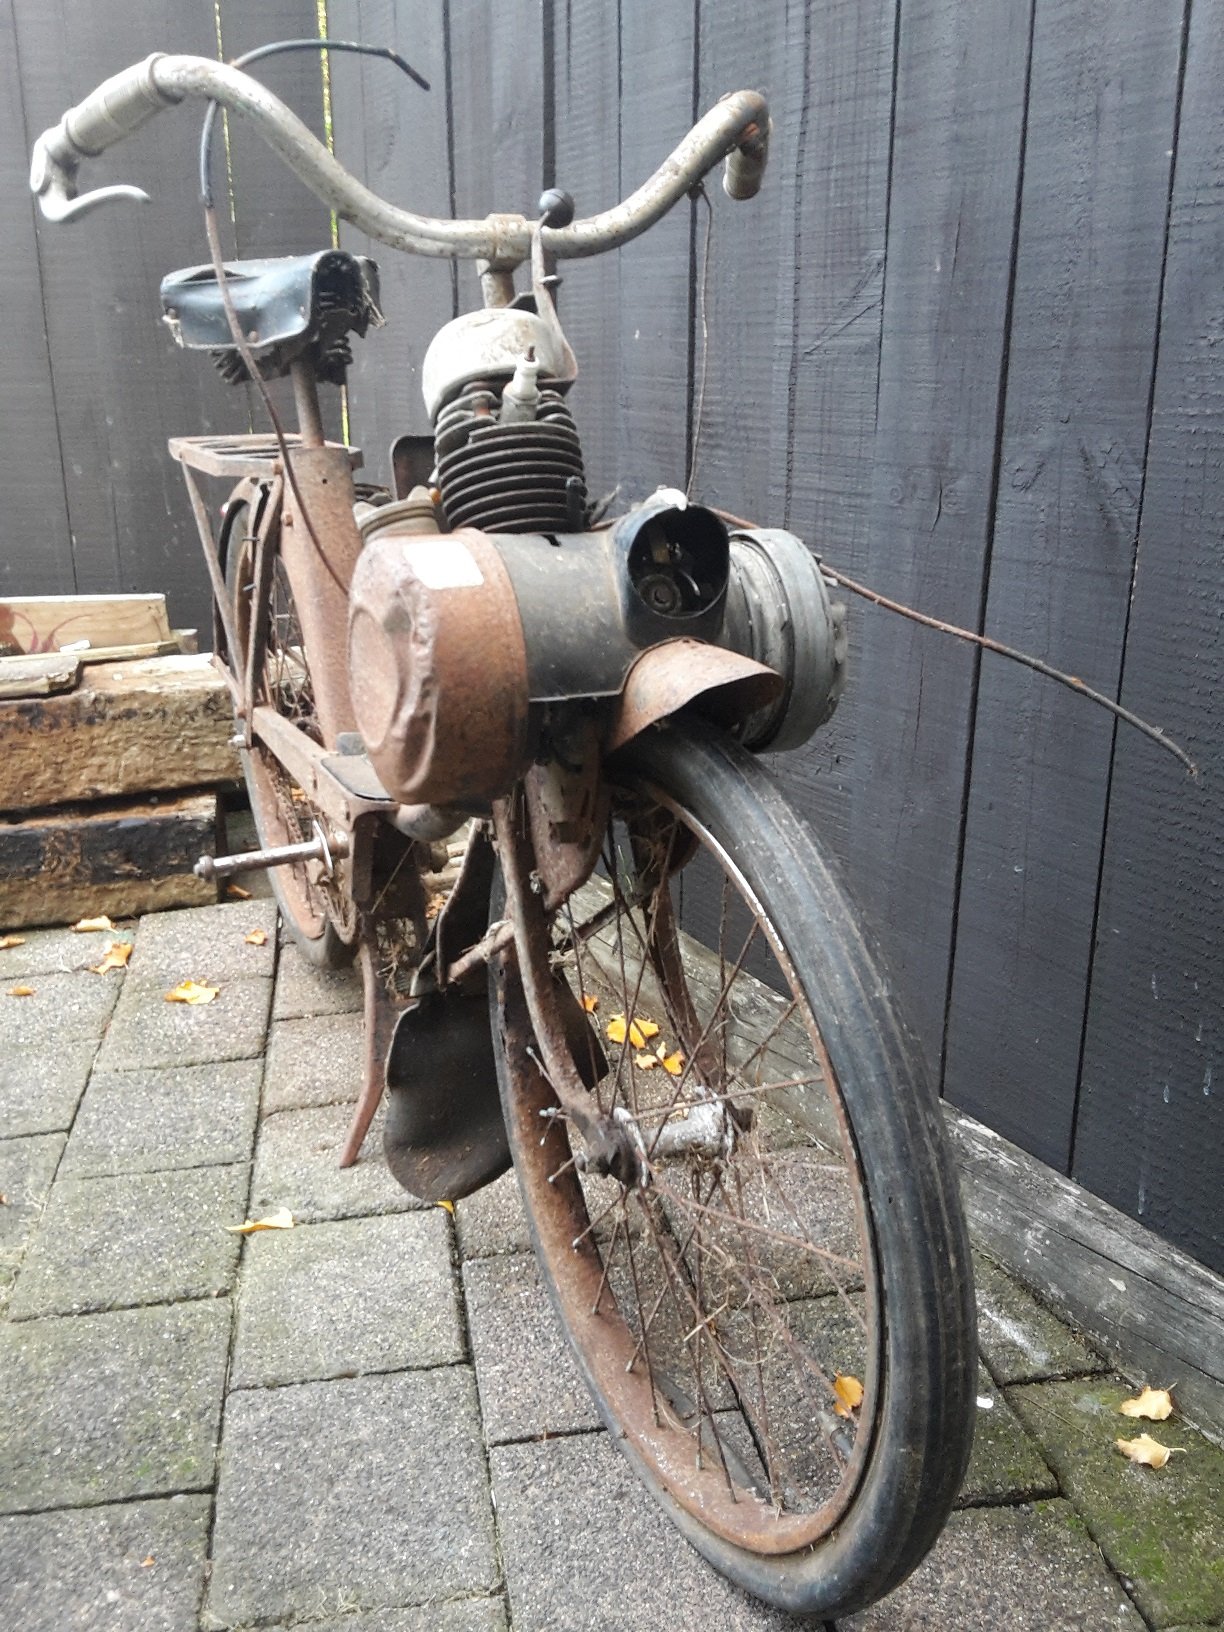
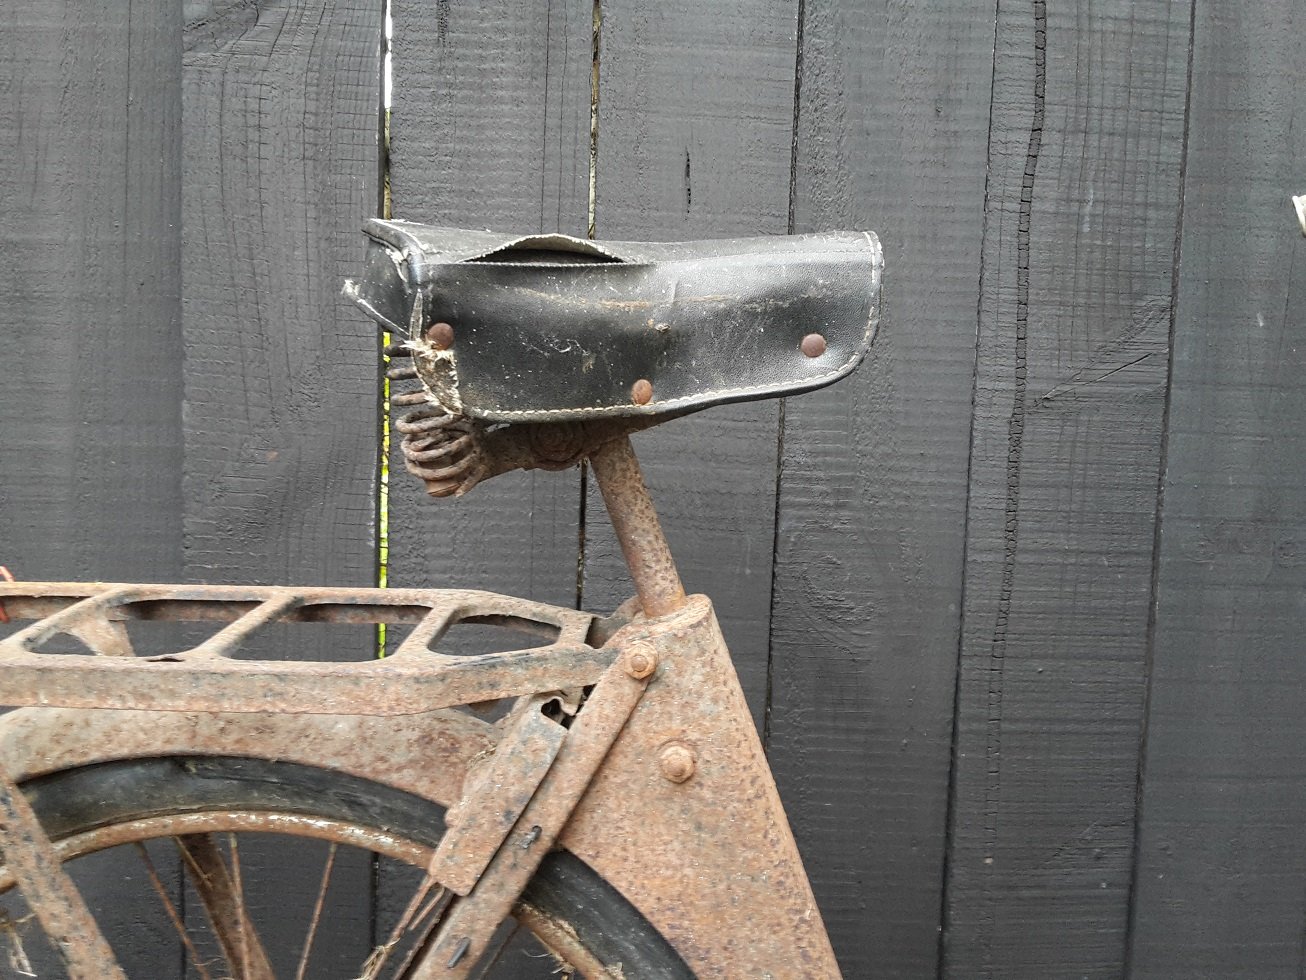
Rim’s arrived from Birmingham, England this week. Stainless steel WM2 and WM3, one size wider than factory. Got stuck into lacing them up to the hubs, stoked with how they turned out. Cycle Treads did the final truing and torquing of the spokes. Going to run a 3 inch wide tyre on the front and a 4 on the back. Gave all the vapour blasted parts a couple coats of VHT satin clear to keep them looking crisp. Also added all new wheel bearing to the hubs, stripped the front forks and cleaned them up. Added genuine Honda fork seals and fresh oil ready to go. Motor is still waiting for the pistons which is on the way and the frame is down at the engineers getting the hoop welded in fully.
3 points
-
Prety stoked found this old seat pillion in shed (i have alota crap) It came as a 2 piece with the seat thats on it now.. was actually joint togever. I had to cut them apart. Along time ago. But moved house and lost.. Sooo cut out half the foam to match the riders seat. Also found some pegs aswell so black they have gone.. Made a mount underneath to bolt on. So comes on and off but i like the sorta dorky 70s vibe. After all thats the goal havnt sit on it yet. As she leans over haaard out. Gota have some one holding up the bike but stoked. And also put some carpet in my other project my kp starlet so bizzy day all round.
2 points
-
Not great; not terrible
2 points
-
Finding manual pedals amd centre consol/gearbox shifter is the hardest part of manualing these cars2 points
-
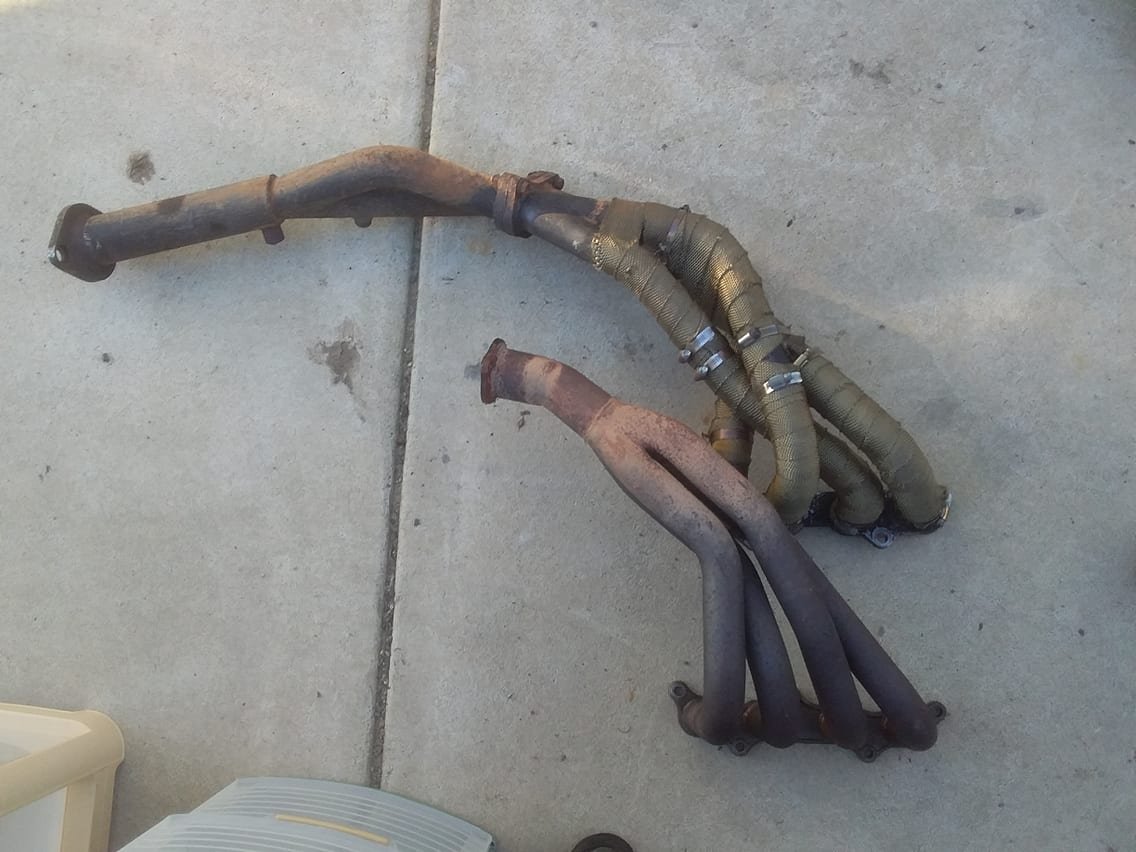
Last* Wof fix job, the exhaust is chuffing (again) Lots of holes around the Y joiner Ive been here before And i wasnt the first rest of it not much better, ive cobbled this together with left overs and junk, and the rest is squashed and crunchy. . Time for something better The Abarth 2300S exhaust (second from bottom) is long twin pipe to a single over the diff then back into a twin tip. I6s apparently like having a long separation between the 2 groups of 3 cylinders, so lets do that too.2 points
-
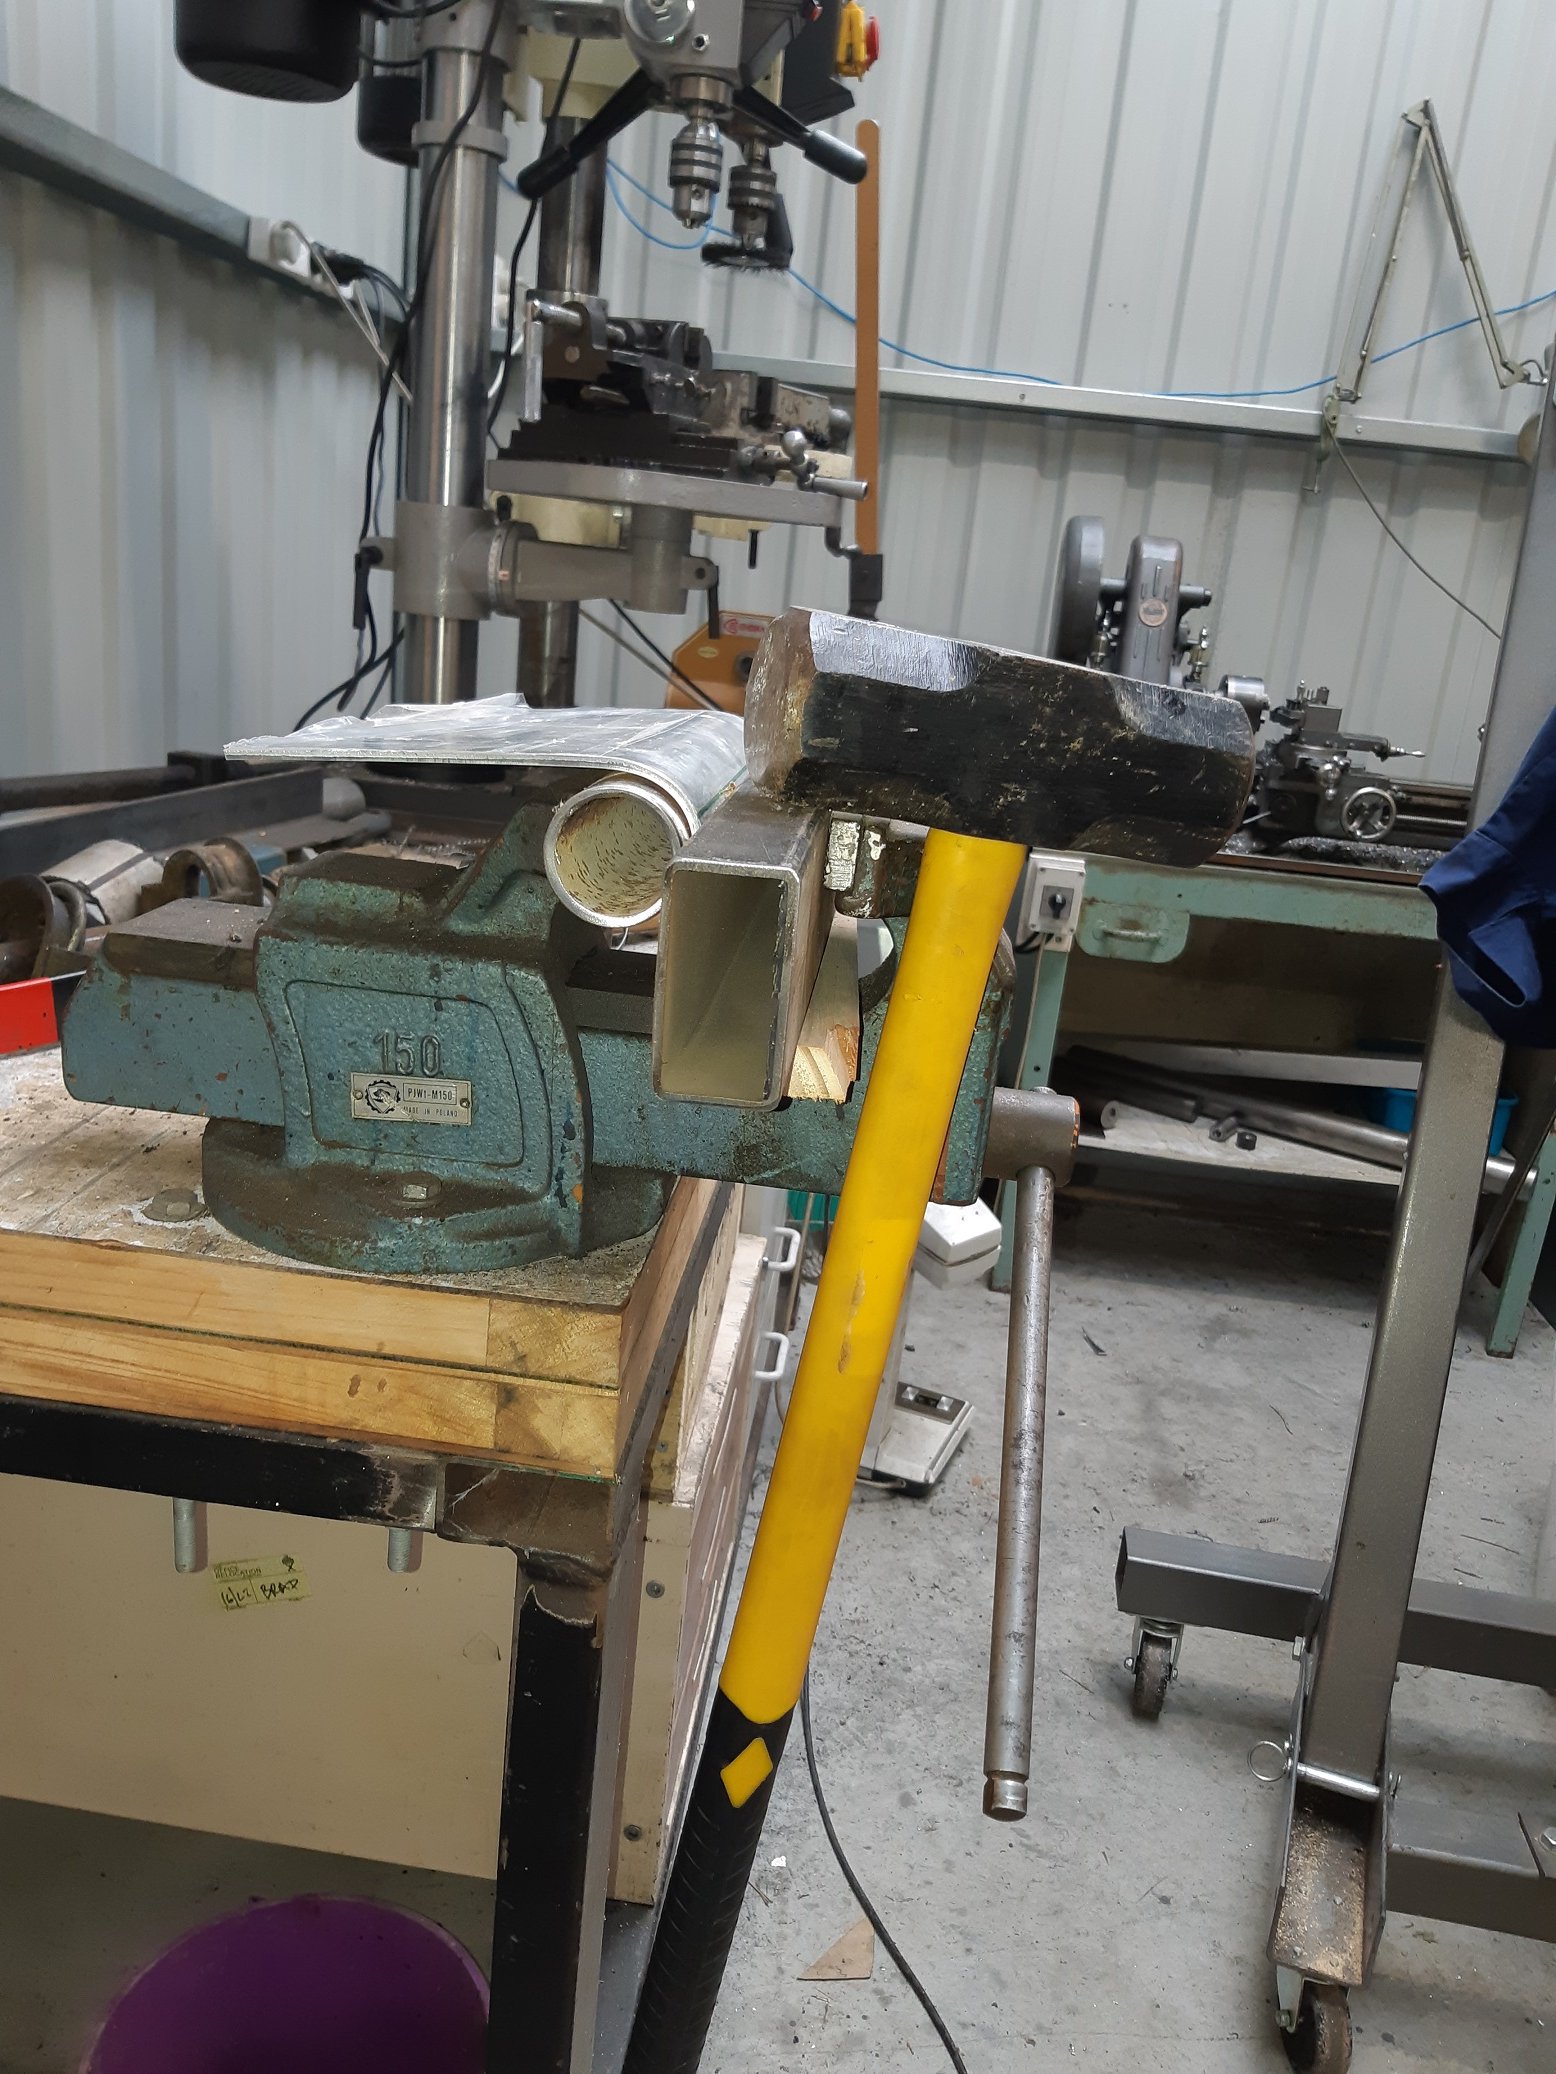
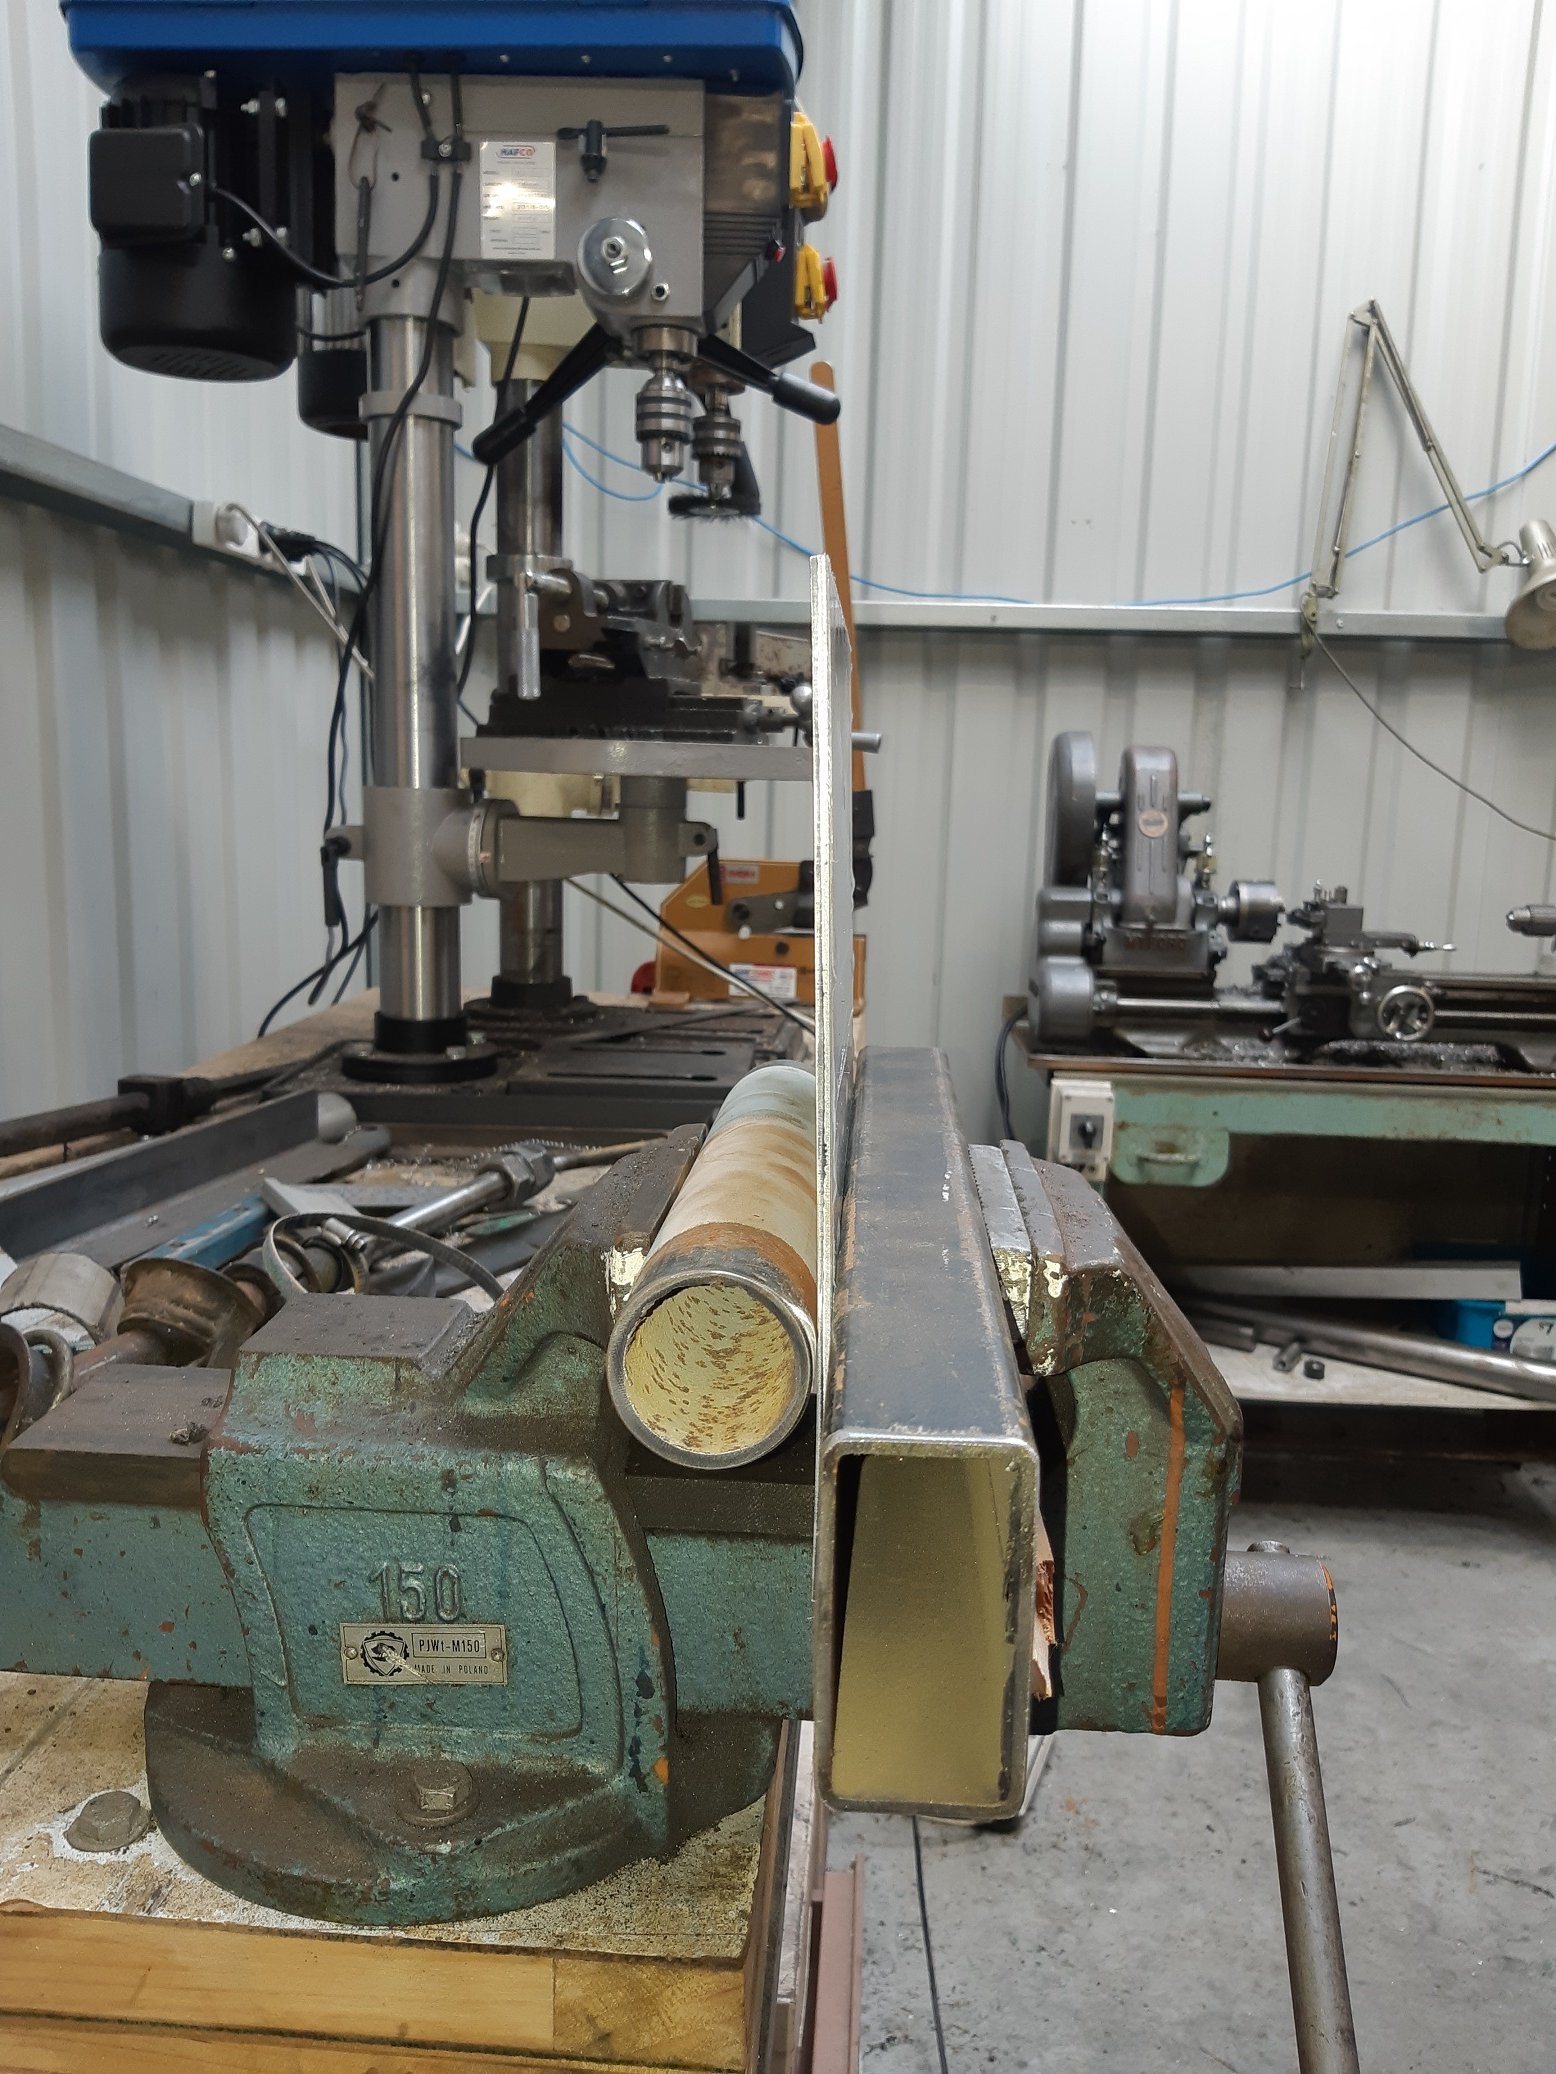
How to put a curve in a 4mm thick aluminium sheet to fill the hole you cut in the sump. Get a random bit of thick wall rusty pipe about the right diameter. Wrap it in card so you don't mash rust into the aluminium. Then, using another bit of square section, clamp it in the vice along the bend line. Put a big bit of wood against it and hit it with a mallet. Pick the wood up off the floor and put it back. Hit it again. Pick the wood up off the floor and put it back. Hit it as hard as you can. Pick the wood up off the floor and put it back. Wail on it like a crazy person. Each time, picking the wood up off the floor and put it back. Observe how much it HASN'T FUCKING MOVED AT ALL. Switch to sledge hammer, hit it literally five times. Done.
2 points
-
so yea. legal as. and now that is legal again it time to start doing all the illegal mods to it that i want to do. first up was installing an adjustable brake bias valve because i wasnt happy with how the brakes were before and im going to be putting a disk brake diff in it soon and ill need it for that. second was installing a smaller steering wheel. 2019-07-06_05-04-31 by sheepers, on Flickr then it was time to lower the front a bit because i wasn't happy with how it looked so the front springs got a mikita haircut. now its sitting much better. 2019-07-06_05-04-40 by sheepers, on Flickr 2019-07-06_05-04-49 by sheepers, on Flickr 2019-07-06_05-04-58 by sheepers, on Fl next will be painting the hood lining i think. its a fucked grey/mostly stained colour now so i think ill dye it black.2 points
-
Car passed cert today - awaiting Cert plate. You beauty2 points
-
"You didn't see coolant on the driveway because it's not there!" "Perhaps you saw water from the AC?" This could go on forever. Parallels between nuclear reactors and M series are too good lmao Side note, I'll be sure to pour sand and boron on my M when it blows up1 point
-
The terminology has always been confusing. A 'ballasted coil' is one that needs to be run with an external ballast where as a 'non ballasted coil' is one that has an internal ballast. As a quick rule of thumb the primary winding on an average 'non-ballasted' coil is around 3 ohms while a ballasted one should be approx. 1.5 ohms.1 point
-
Had a lol at the rbmk joke1 point
-
@CorollaGT maybe?1 point
-
Just a opinion but the 5MGE with the lock-up auto go sweet as, wouldn't look past it to just get this thing lush as fuck and rolling around. Easier to slam dunk a auto 5MG and build a simple skid plate than manualise this thing tidily.1 point
-
Cool car. We've got an MS112 with a lunched engine. In that pale blue sort of colour. Still not sure what motor we'll put back in. But it's too nice to scrap so it's in limbo for the moment. Not busting your balls but just a funny observation - You couldnt find your dream car, so you end up with one that from factory was more expensive and higher specc'd instead! (Well chassis that is, not trim level) It's funny how the second hand market can work. That digidash is rad. In any case - look forward to seeing how this pans out! It's amazing how much more modern that facelift version white car you posted looks. Could easily be something from the early 90s.1 point
-
Have done a 7mge swap into old man's ms112 coupe. Bolt in swap. Wiring is a bit of a trick but is doable The 7mge gives plenty of up and go. Will easily wind out past the tonne1 point
-
It's pretty sweet huh. Funnily enough, one of the things that I pined for most in a Twincam GX61 is the digi dash. It looks like this.. Notice how it's nearly identical? haha I picked the perfect Crown for me I reckon..1 point
-
I believe the resister wire is pink, or pink/white trace1 point
-
Yeah mate super stoked with how it’s turned out. it is super dark though so I’d definitely recommend picking up a pot of clear and mixing it for the added coats. And get 3-4 bottles of turps straight jap black super thick for the first coat then sand it to get the grain. then clear and jap black mixes to get it to where you want is the go. heres some photos of it with the chairs I’ve just finish staining, still needs a finishing coat, witch will be clear thats thinned down a lot so it self levels and releases bubbles easy
1 point
-
Vespa. Have fitted some tyres that will be mildly better in dirt& gravel, already got a cargo rack and bag sorted, and have got a fuel can that fits in the space between my feet.1 point
-
Goooood ol adventure NBC again for me. But without panniers this time. Them big ol boxes too heavy, made gravel riding grotesque.1 point
-
If you like a sloppy mess1 point
-
and DONE (almost)
1 point
-
Why are the starlet itb's in this thread? Because the the inlet manifold on the hilux sucks. Not power wise, it seems to work good. but it vibrates, cracks and the big plenum doesn't work with what im trying to do. stalls out easy and any kind of cam setup other than factory, even cam timing changes on stock cams makes it a whole lot worse. wont idle on all cylinders and stalls real easy. not ideal for 4wding itb's will solve the big plenum issue, also will be able to isolate the plenum from the engine with some short silicone joiners. to solve any vibration issues. So had those bellmouths in above picture from another project, recycling; extended them by welding some thick wall tube onto the bottom machined a taper into them to suit the 52mm throttles and slightly adjusted the bellmouth so has bit more of an elliptical shape. machined some of the excess off them. could have taken whole lot more off but was over it by this stage. will probably test them on the starlet before welding them into plenum1 point
-
diff and rear wheels,and rool bar and rear legs in
1 point
-
Fab mates had a baby 6 weeks ago then been on a corse so the legs got put on the back burner for a while. 30x75 box tube. 110 degree angle. i was planning on doing them square but he talked me into an angle and I’m happy he did. i wanted something with a large foot area so it’s easy to slide around and with a large surface area won’t fuck the carpet. still needs another coat of clear and I do the bar stools and dinning chairs in the same stain excuse the mess we’re redoing our laundry atm so there’s shit every were. hopefully get onto the coffee table soon when funds replenish from reno’s. If anyone needs any electrical work done let me know
1 point
-
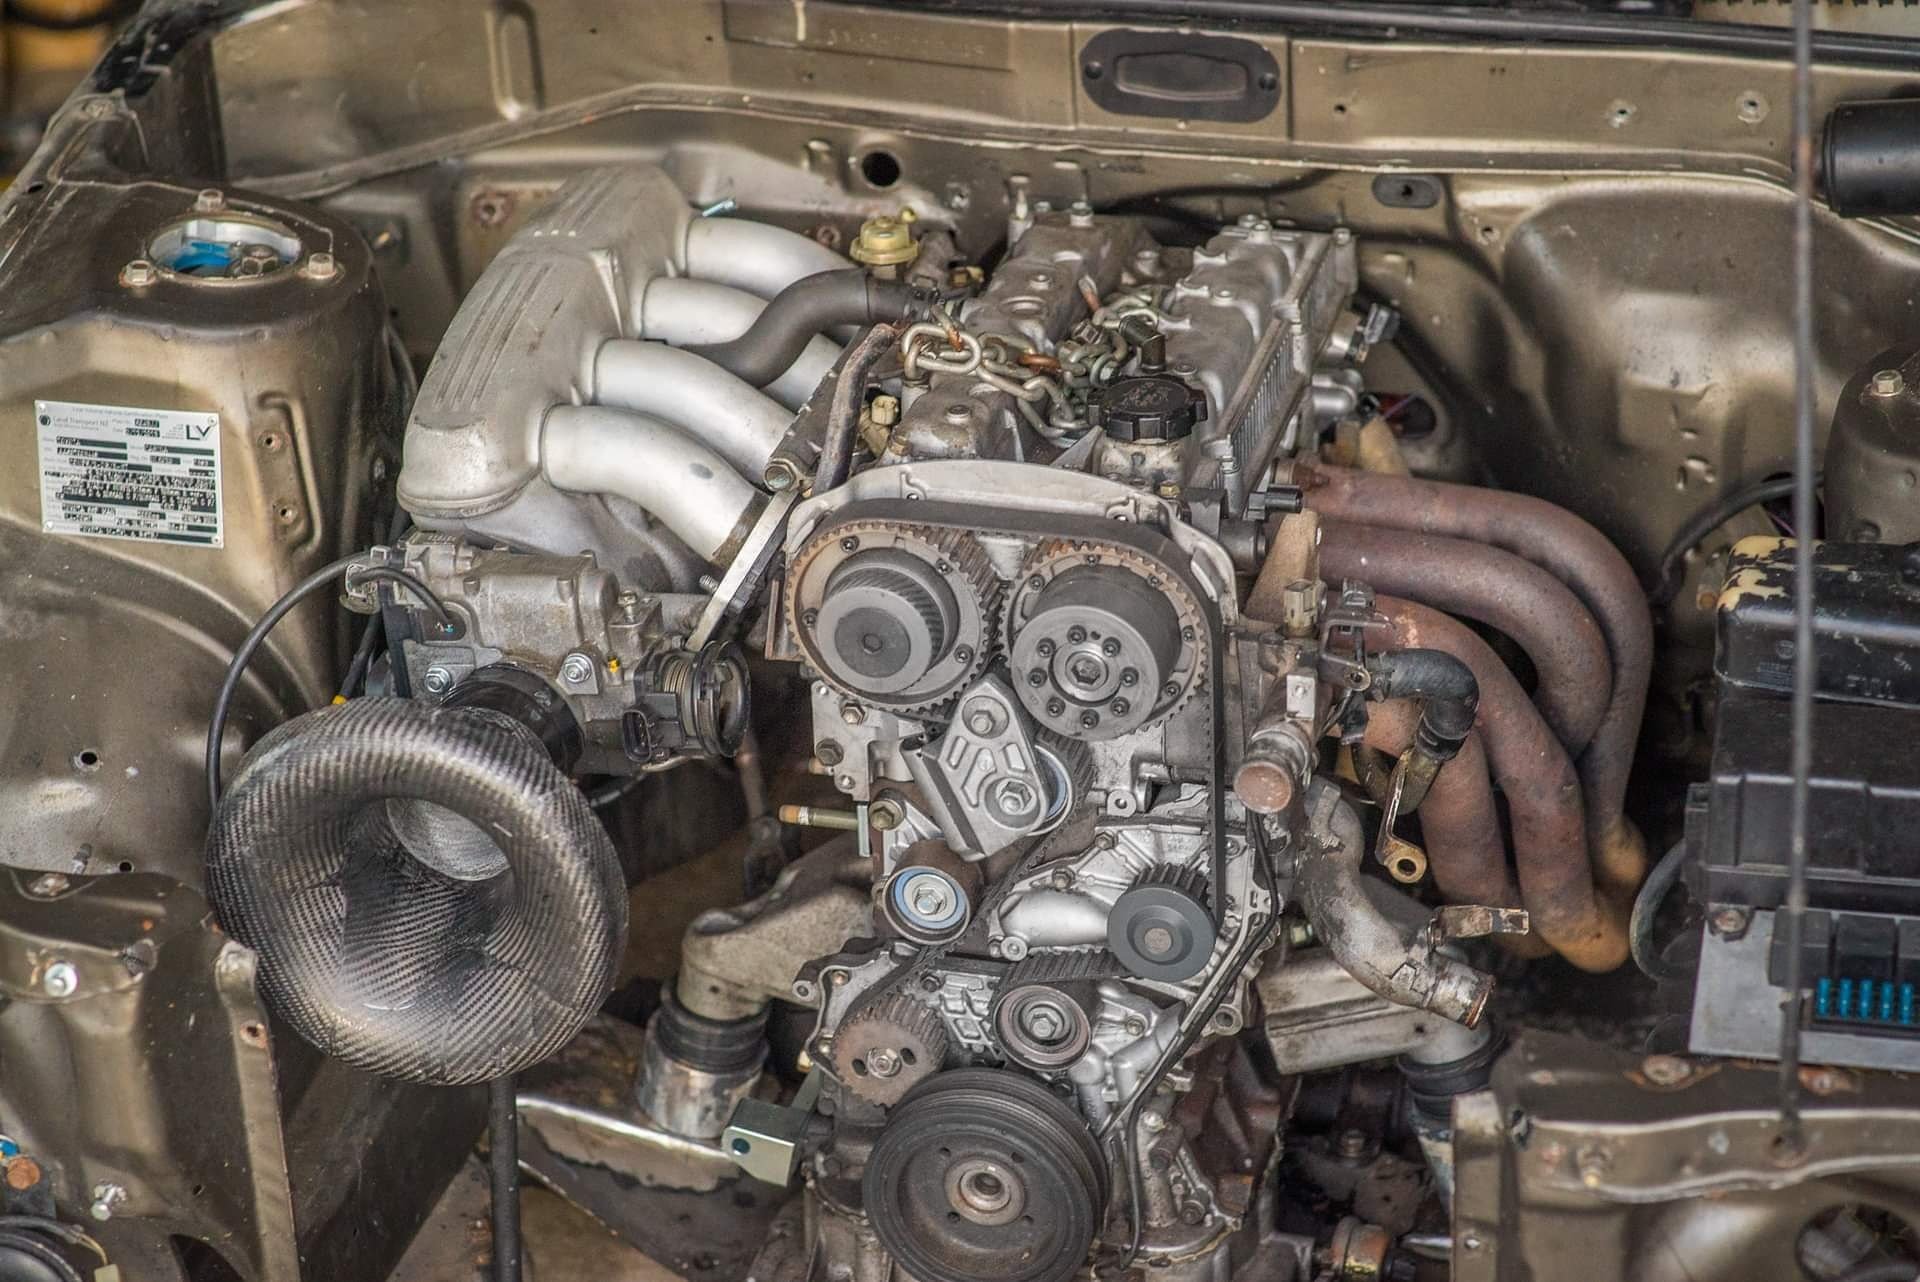
Ramble #3: Since forever, I've always had this exhaust manifold on which is a copy of the HKS 4-2-1. Altezza manifolds sit super bloody low when swapped into different cars, so fitting the likes of the beautiful TRD pipes is problematic. With the HKS pipes, the 4-2 section finishes right down by the firewall, which meant I (by which I mean someone competent, Denham) could cut the 2-1 pipes and reangle them to suit. I've always wanted to see how a 4-1 manifold would respond in comparison but I've always thought there's no chance of making them fit, and it would be difficult to modify. But since I'm currently redoing the engine mounts, I could tip the engine over to suit fitting factory Altezza options, and then I'd have more things to play with. So had a look around and I found a shitty looking second hand FGK 4-1 manifold. The FGK site says that over the factory manifold, dyno back to back swap to standard. It gains 7hp and more torque at a lower rpm. When I went and picked it up, I chortled at how bloody tiny it is! It's only 7kg and has really neat cast flanges which dont have any material where it doenst need to be. Ideal. The HKS 4-2-1 vs the FGK 4-1: The 4-1 isnt even as long as the 4-2 section on the HKS one haha. So I can have a nice transitioning bend to the under the car part, rather than my 2-1 section which has been chopped and angled about 10 degrees maybe, right by the flange. probably not ideal. The weight difference is massive though! I'm going to design my mounts etc so that I can fit both. So I can do some comparative nerding and see whats best. I'm thinking that perhaps with exhaust side VVTI now, some of the downsides of a 4-1 design (narrow high powerband) can be mitigated a little by moving the cam around. It will be interesting to see if any improvements to the powerband from the exhaust, happens because of better cylinder clearing of exhaust gas, or other mechanisms... If it's better clearing residual gas, and allowing more fresh air in, then I'll be able to quantify the differences in powerband from each simply by looking at which gives higher airflow numbers at full throttle, via the MAF sensor. I've never had any changes to the exhaust side while I've had this ECU so it'll be interesting to look at what changes. (or not)
1 point
-
Since then? Not a lot has happened. Just the monthly drive out to the local car show. My daughter is nearly one year old now, and family has taken up most of my time - which has been very enjoyable. I’ve driven only 1500 kms since she was born! Future plans for the RX7 at the moment are unclear. But it’s no worry having it wait in the garage for now.1 point
-
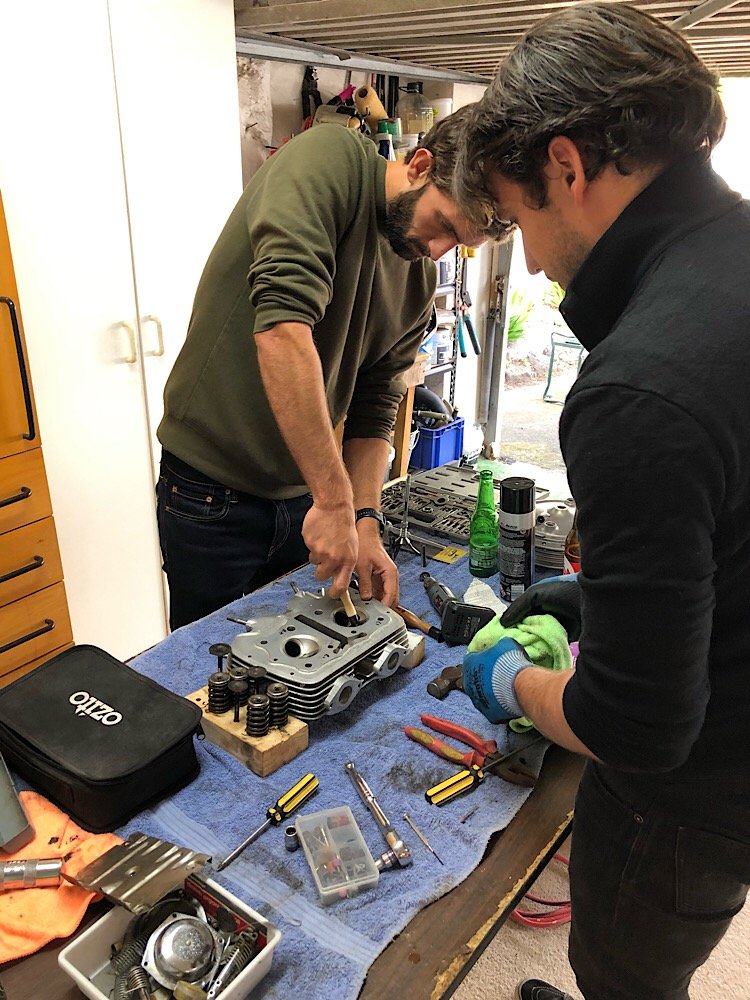
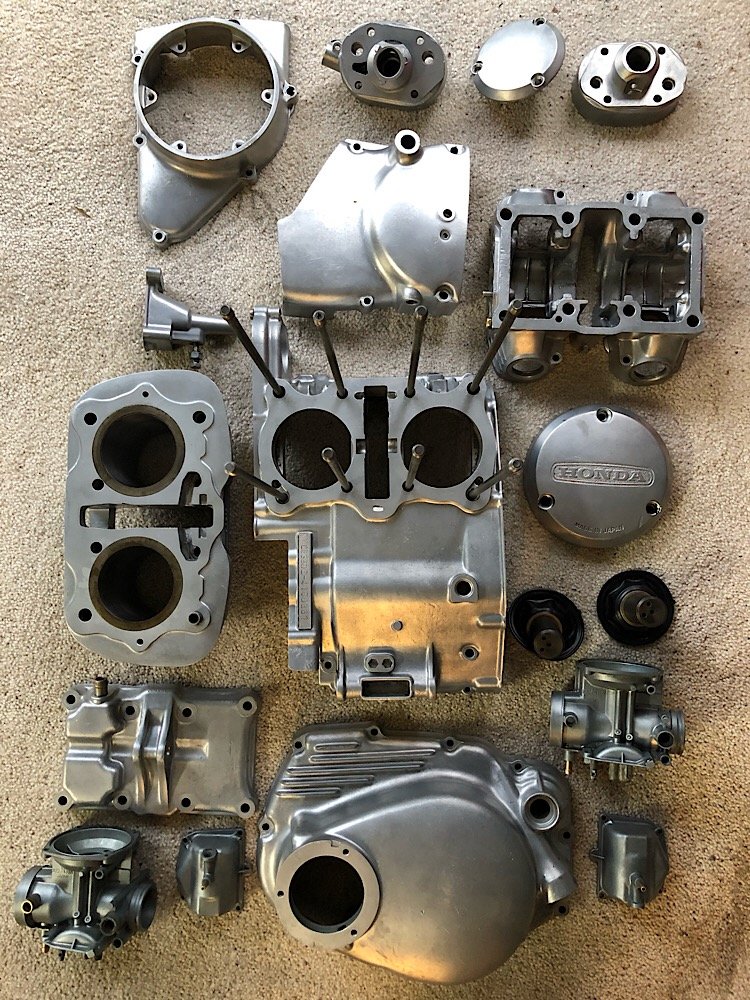
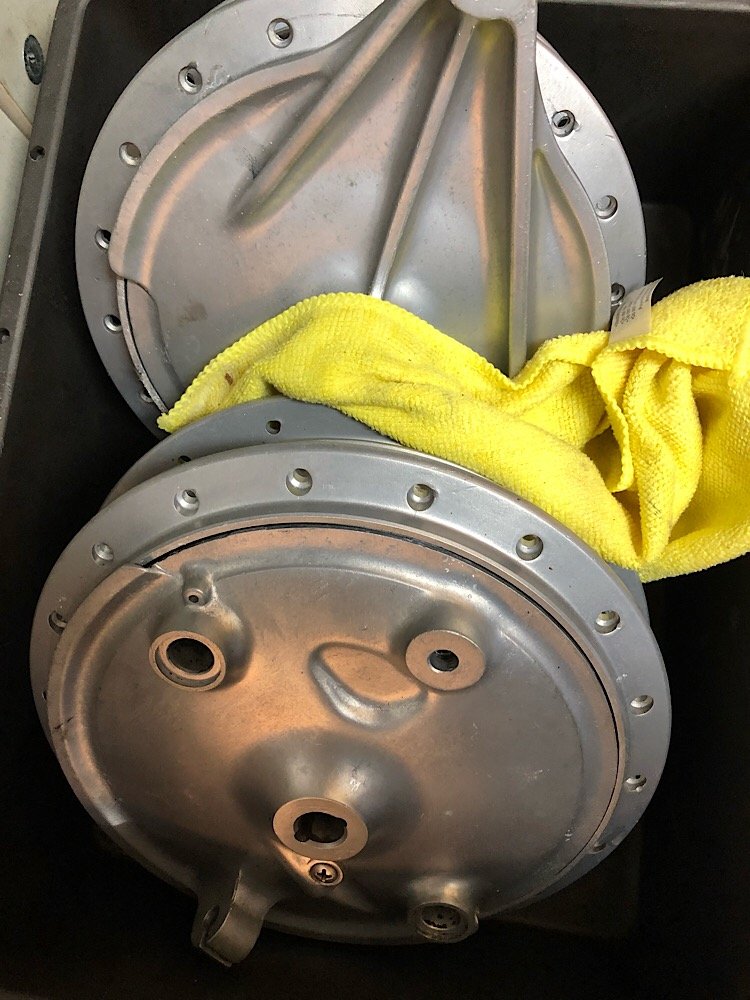
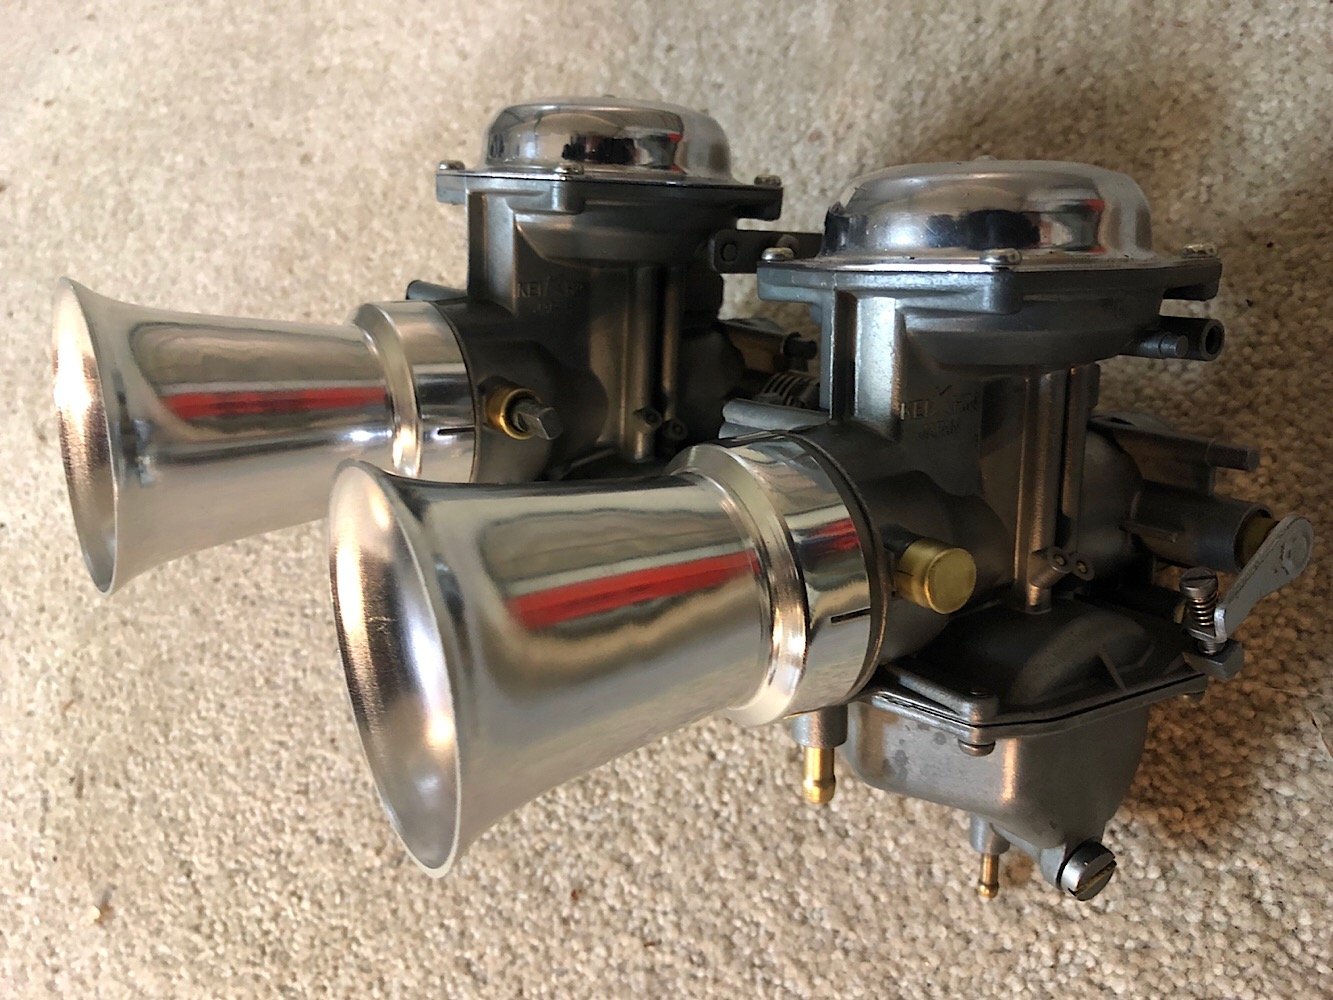
Work continues.... Got the motor back and it’s looking mint! Thanks @Mr Vapour!! Chopped the rear end to fit the rear hoop, just need to smooth off round where the steel pressed frame meets the tube steel. An order from 4 into 1 arrived which meant we could crack on with the carbs. Wicked rebuild kit which literally had everything, even included larger jets for the trumpets. Also made a start on the motor, had the bros round help lap the valves and reassemble the head. The lower casing had a oil pan fitted in the bottom which weirdly had two screws and three rivets holding it in. Had to drill out the rivets to remove it and clean the sump properly. Then drilled the holes and tapped a thread in each to add proper screws in.
1 point
-
We're not worthy!!! If I didnt need a job then id see if you needed someone to sweep up sand just to see such great work. I have seen another thread about casting an ali head but this just goes up another level with iron to make it that bit harder. Great work and good to see it being done in NZ. Thank you for sharing.1 point
-
Im pretty good with motors/machine work/figuring shit out and im pretty sure I only grasp about 25% of what youve achieved there.. You sir, are what the world needs more of.1 point
-
Thanks. Im a design/development engineer but Ive spent my life making stuff. My job gives me some pretty cool toys like 3D scanners and 3D printing. Havnt done patterns before but Google and a few books tell you a lot!1 point


.thumb.jpeg.e0a4bff61111e0c8c7396950fcc94da1.jpeg)


.thumb.jpeg.384ff72c8d2b0ee0d34a7bdedb55bdcf.jpeg)


This leaderboard is set to Auckland/GMT+12:00