
Leaderboard


Popular Content
Showing content with the highest reputation on 04/23/19 in Posts
-
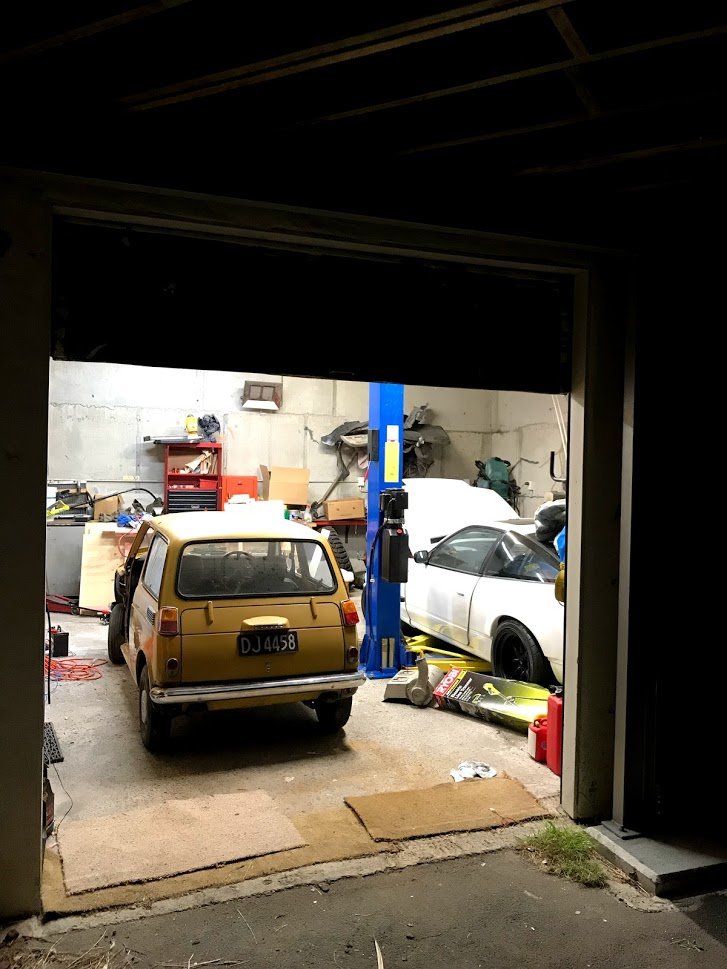
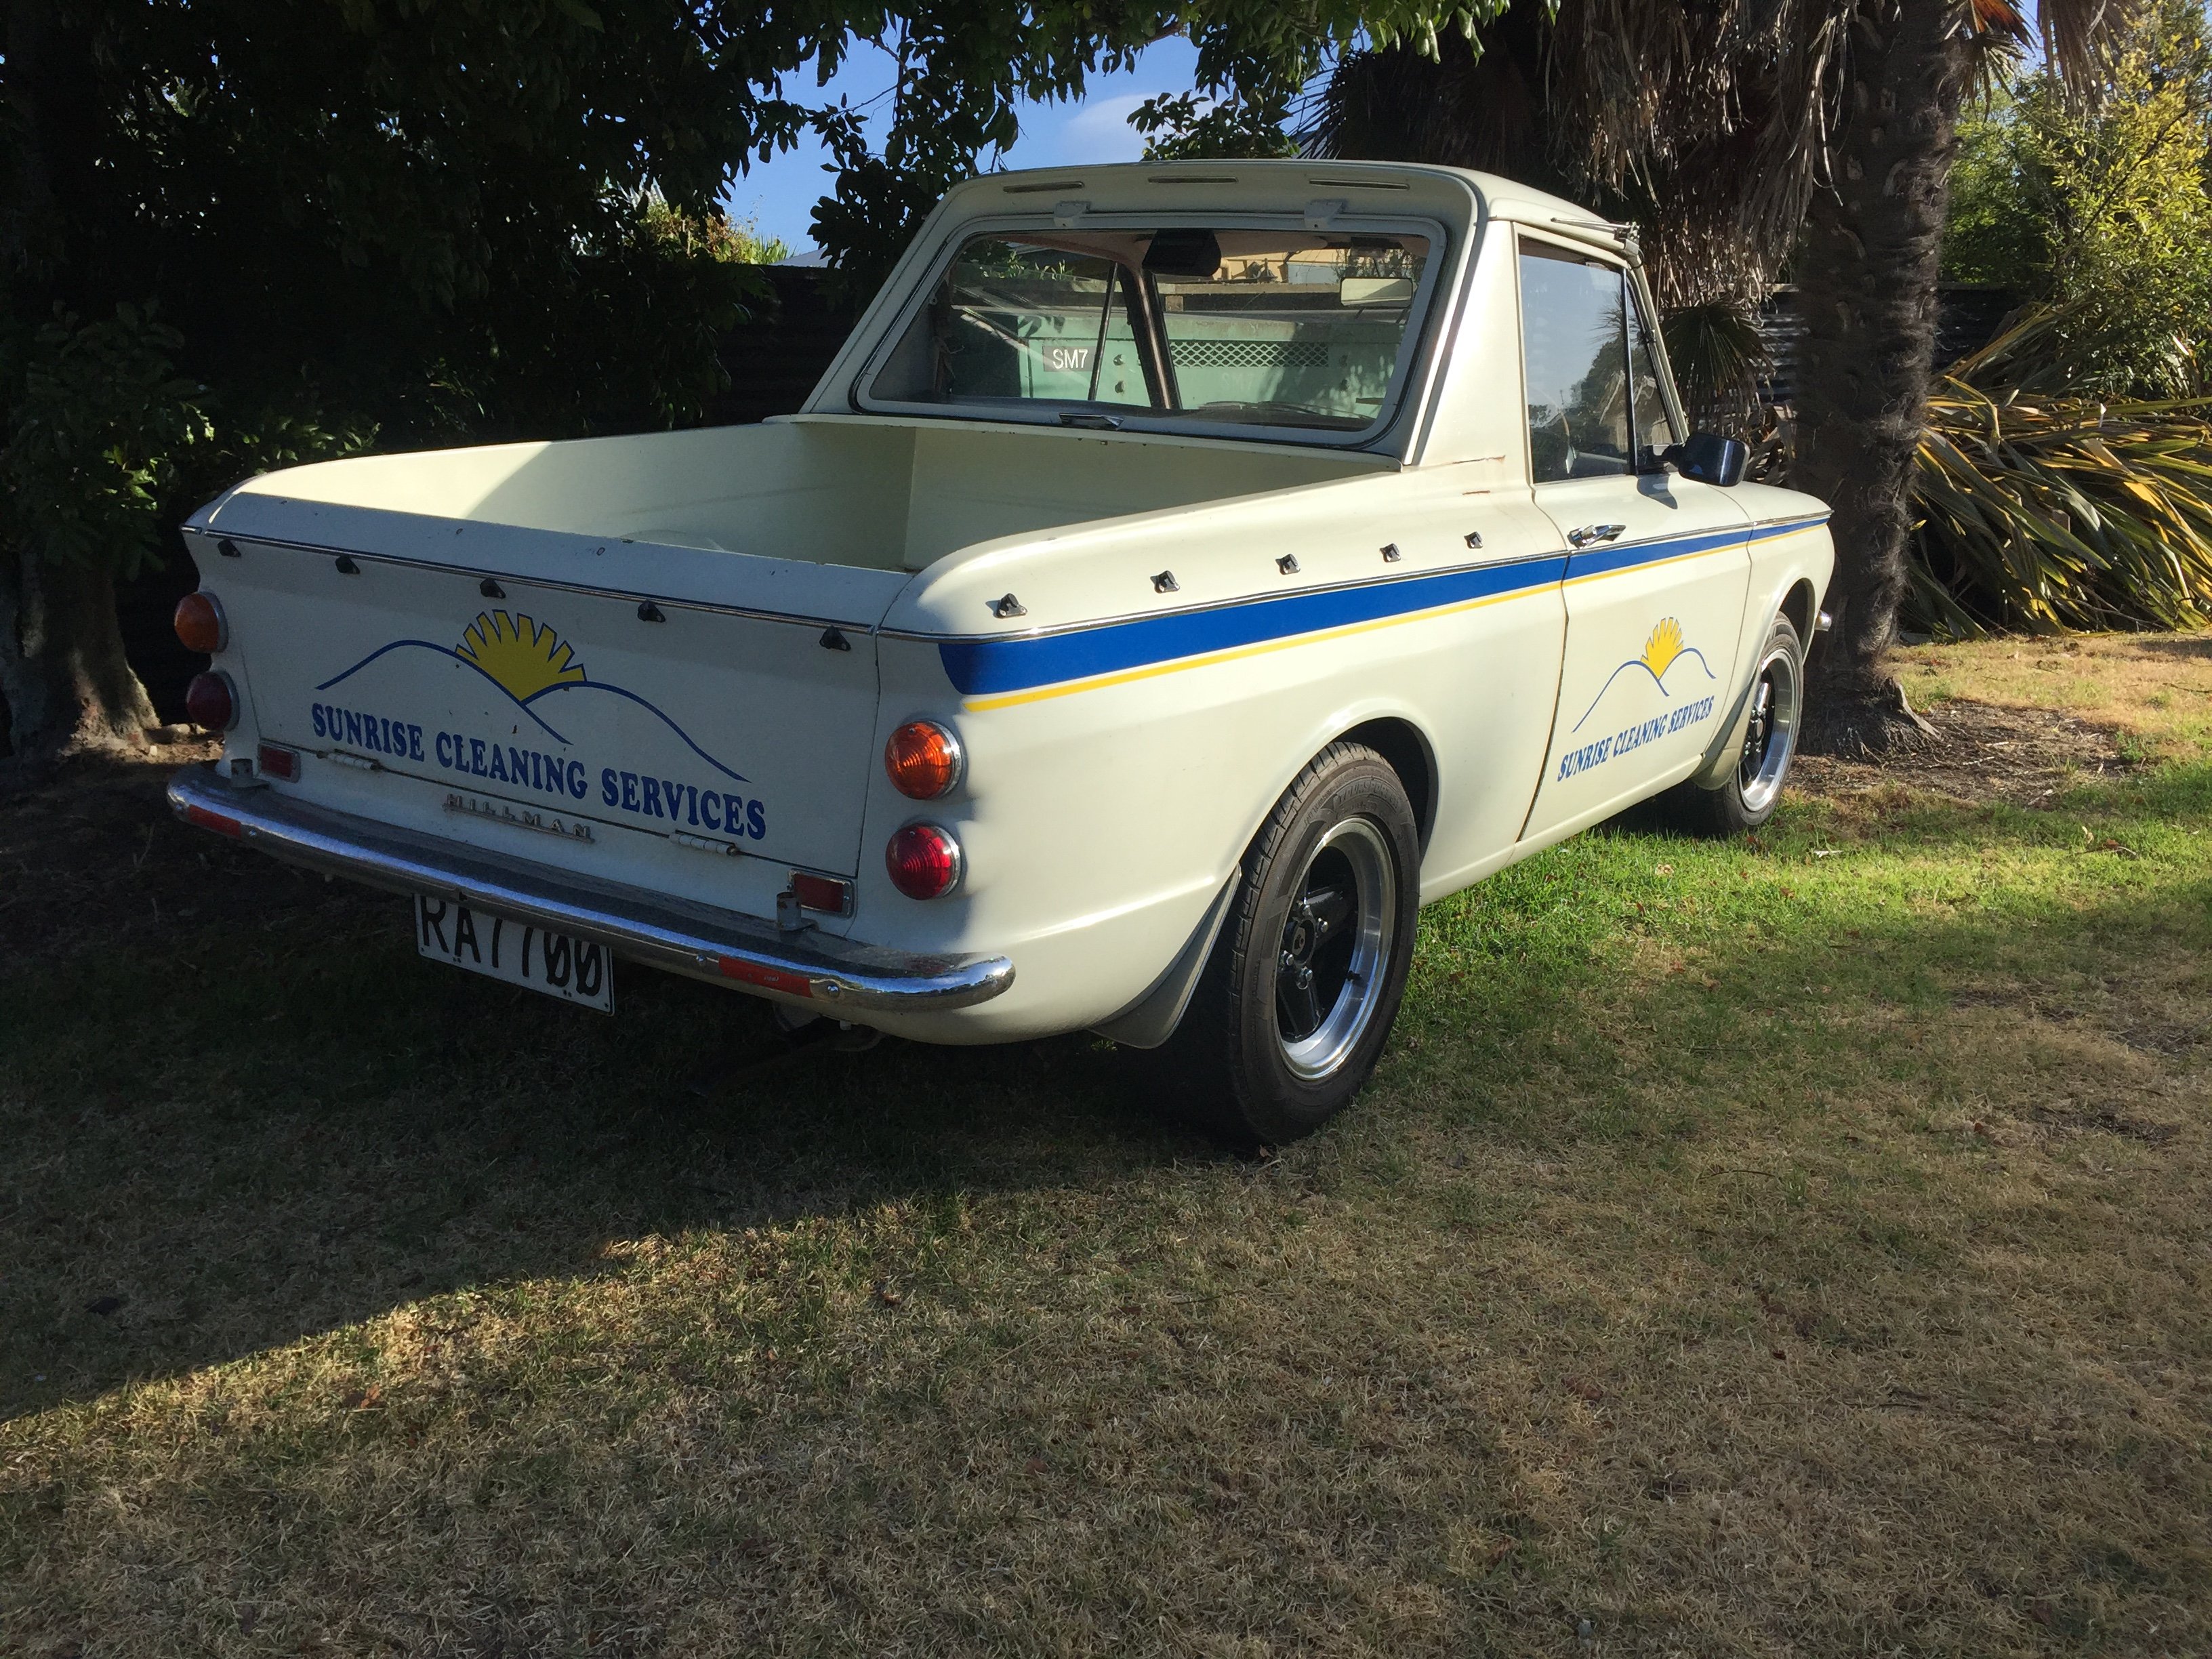
Hi Finished putting interior in bar some of dash. Then cleaned, polished and put all the external door handles and locks on and lubed it all up I wanted to finish off all re assembling the brakes I want to see if bleeding them helps with moving car around it feels like brakes are semi on/not sitting correctly it's all new and never been bled. Will get some brake fluid as I forgot it today and give it a go tomorrow. Brought abit of stuff for the motor to freshen it up Needed to make some new breather hoses for gas tank they had been cut. I cleaned up the tank I got from chch. It came up pretty good I also had a look at the inside with my camera All is good. Bella thinks the interior is pretty lush Gave the tank a coat of paint and re undersealed the bottom side. It was a good afternoon to do it too! Fitted the fuel tank with new breather hoses. Connected up fuel lines with existing ones. Fitted the rear lights and fuel filler cap - unfortunately its cracked at hinges so doesnt quite line up with tail light surrounds. Will look for another. That's all for now Cheers7 points
-
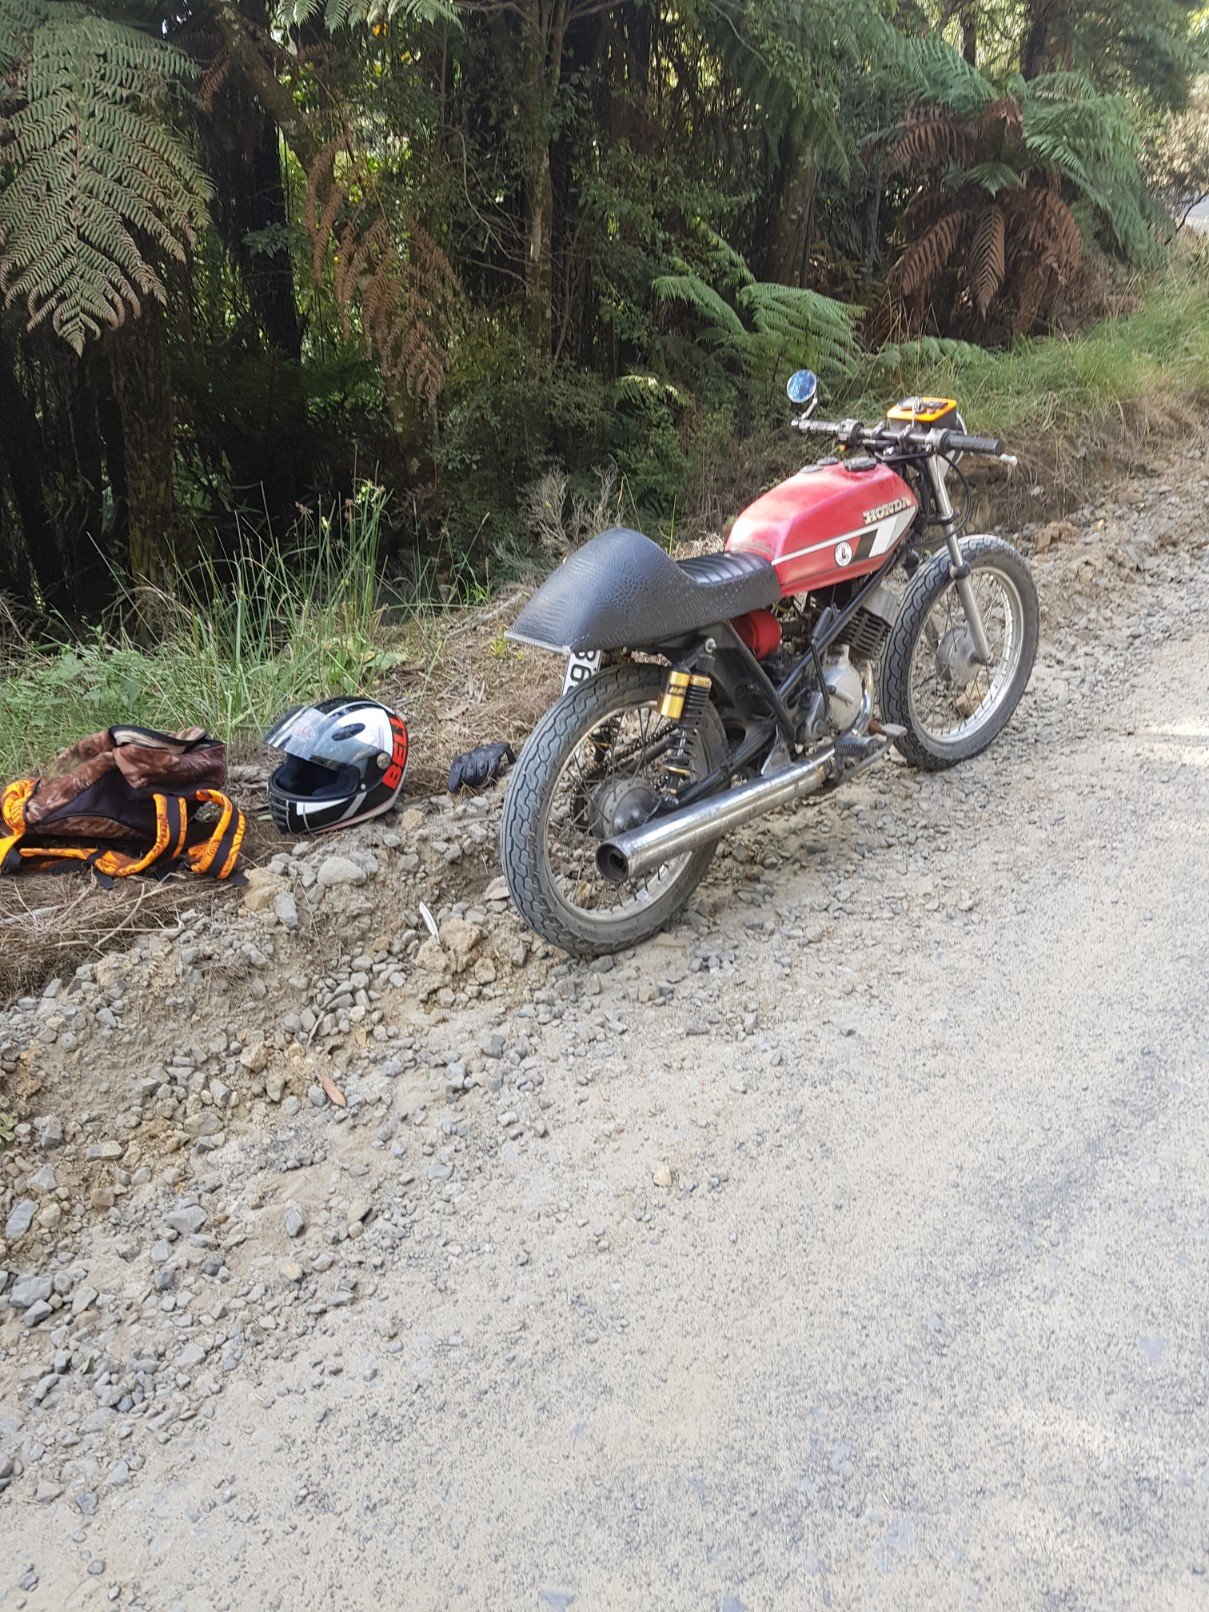
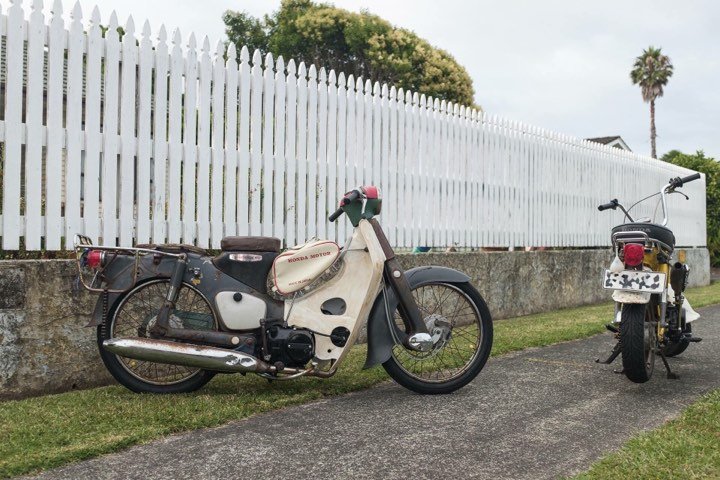
Had another good ride on this over the weekend- super fun offroad on steep grassy/dirt tracks etc and approximately 150km covered between hamilton, raglan and kawhia. Only thing that's average is the four speed gearbox during steep climbs (EG, @64valiant driveway), Could probably try harder but it drops too far out of the power band when changing into second so you bog down and have to go back to first.. I hear the 5 and 6 speed boxes (mb50 and cr80) are a great thing and i need to try find one. The best thing about this bike is that its actually usable to cover relatively large distances and 90% of the time you aren't holding up traffic- EG between hamilton and raglan cars were the limiting factor both ways.
 6 points
 -
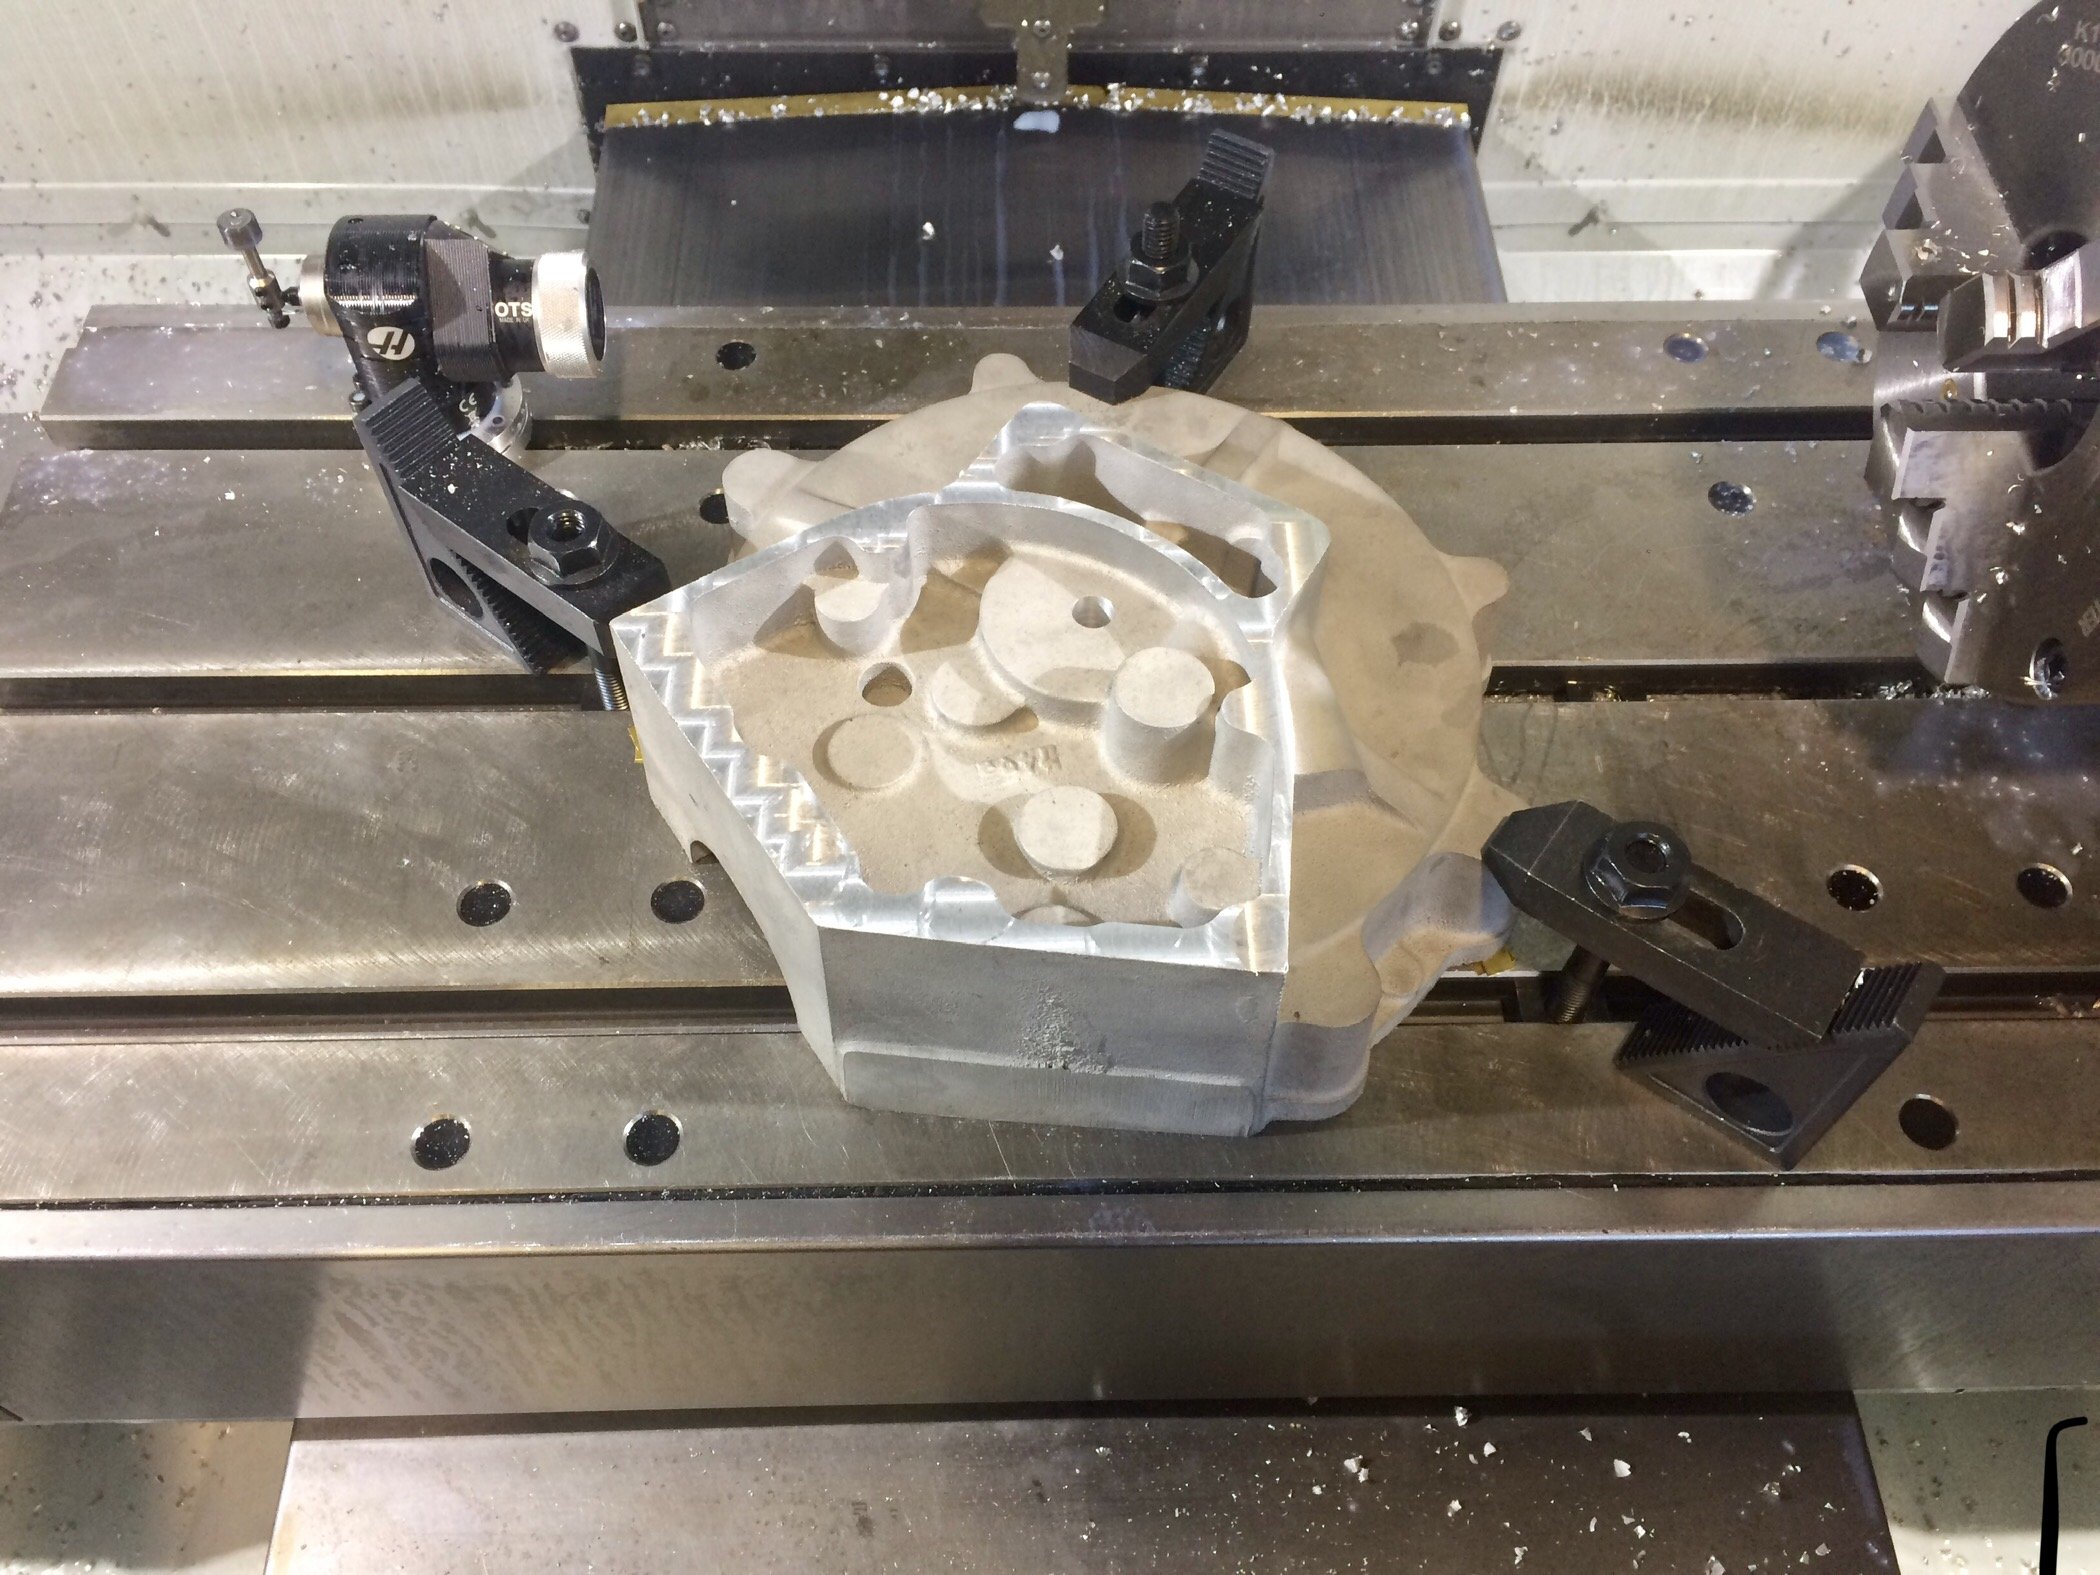
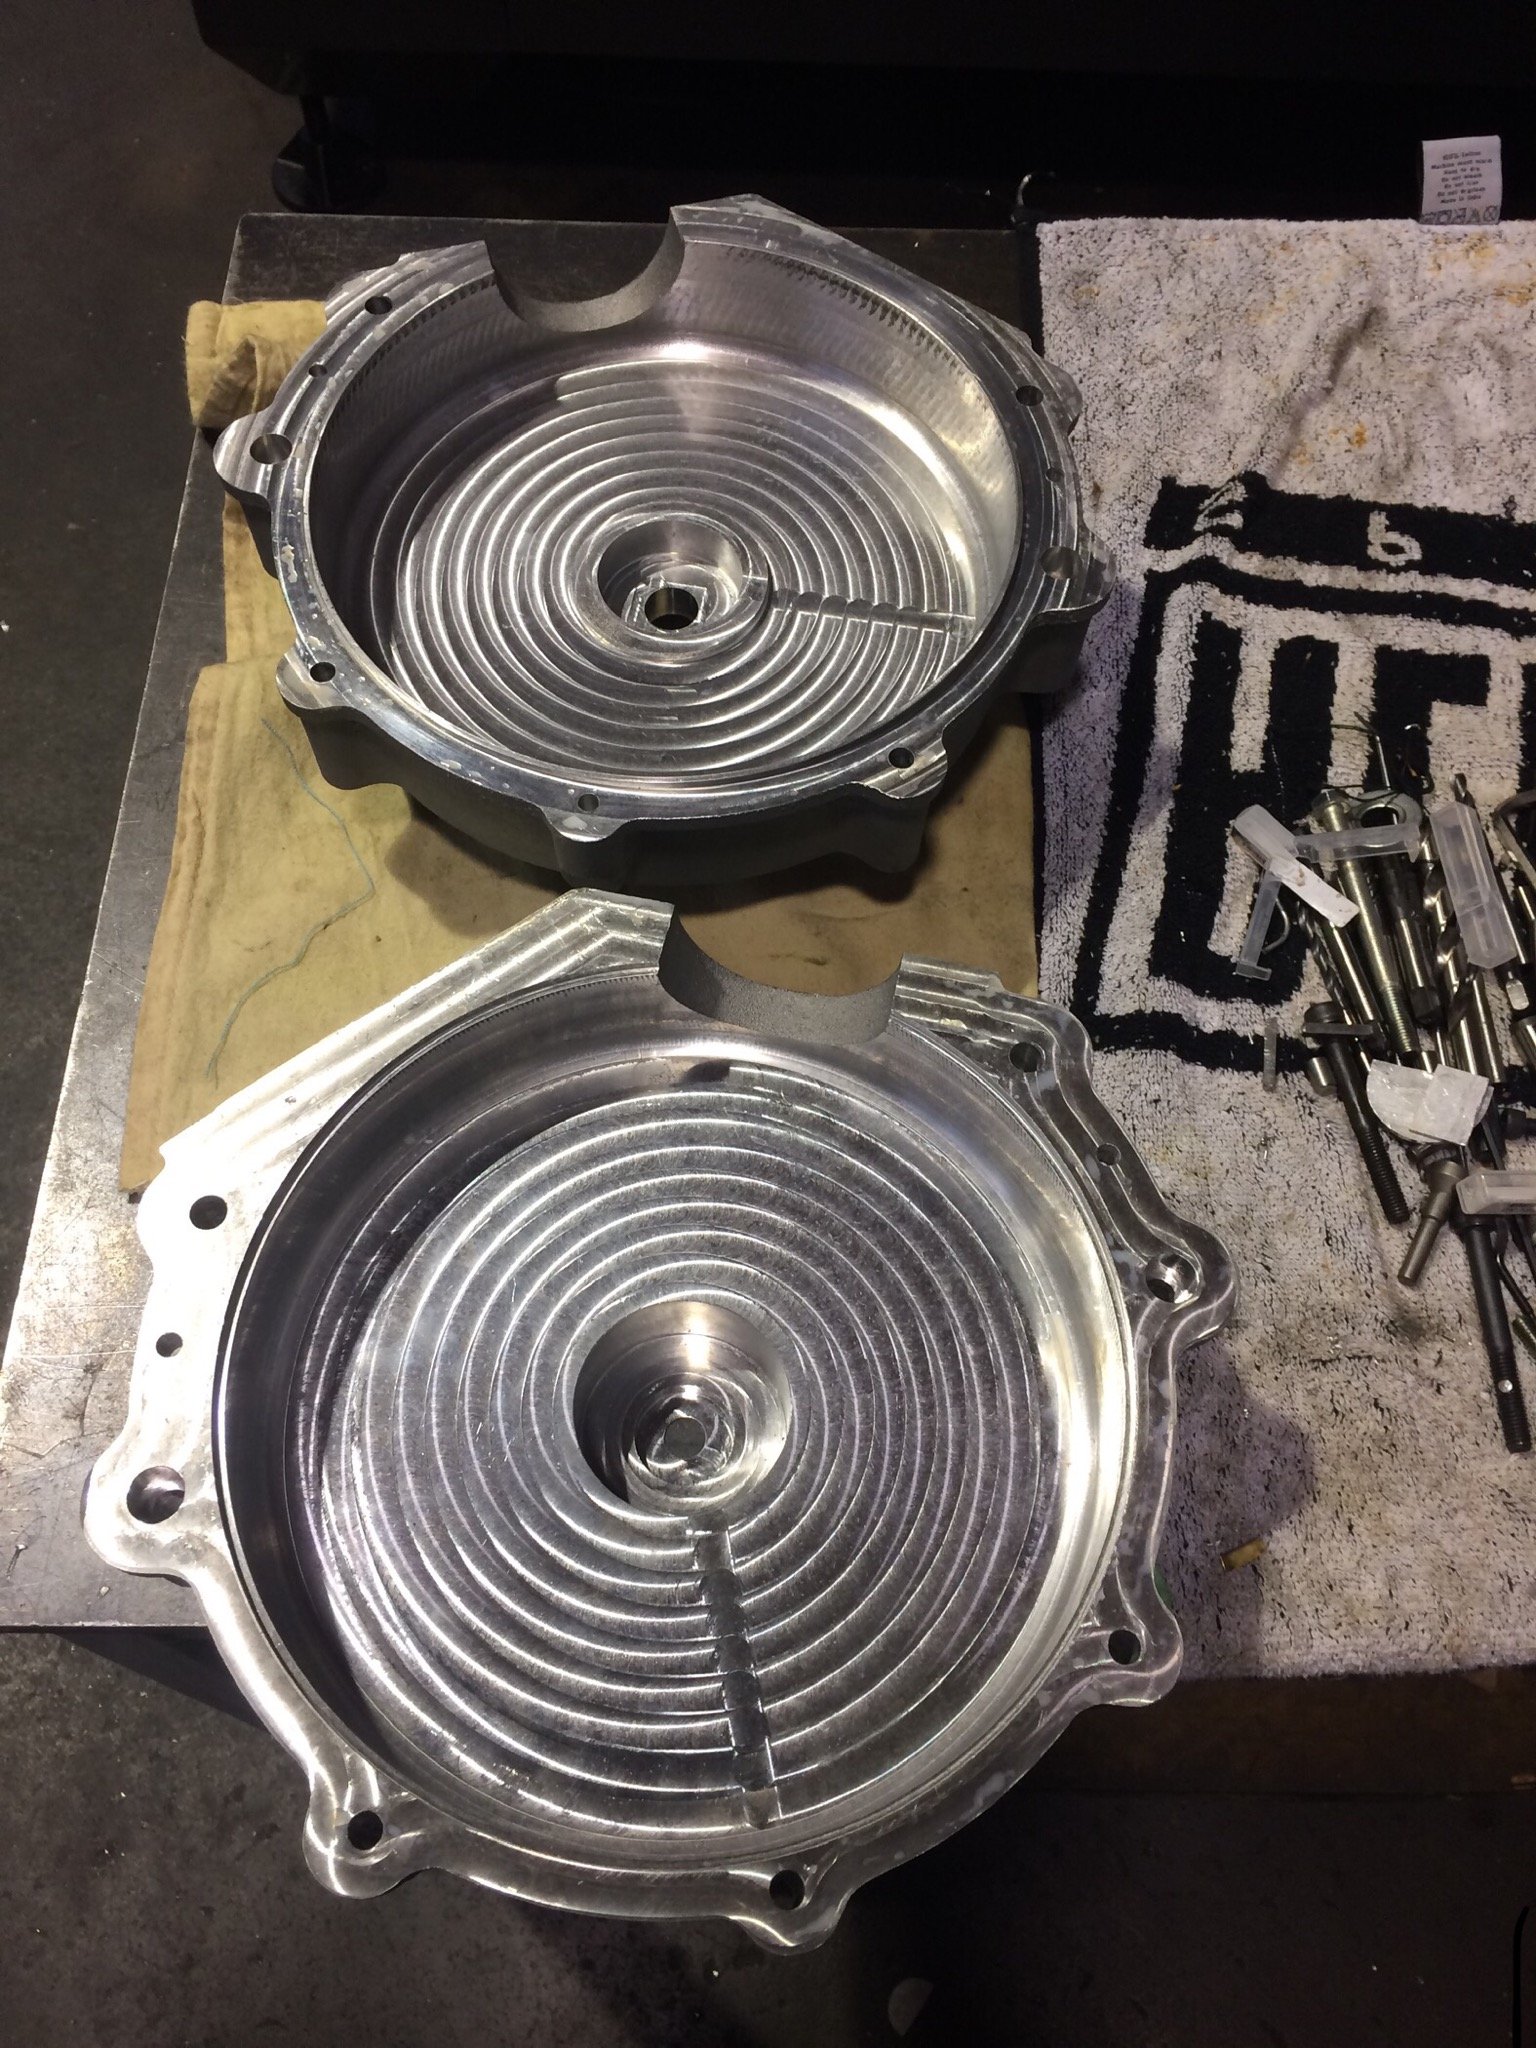
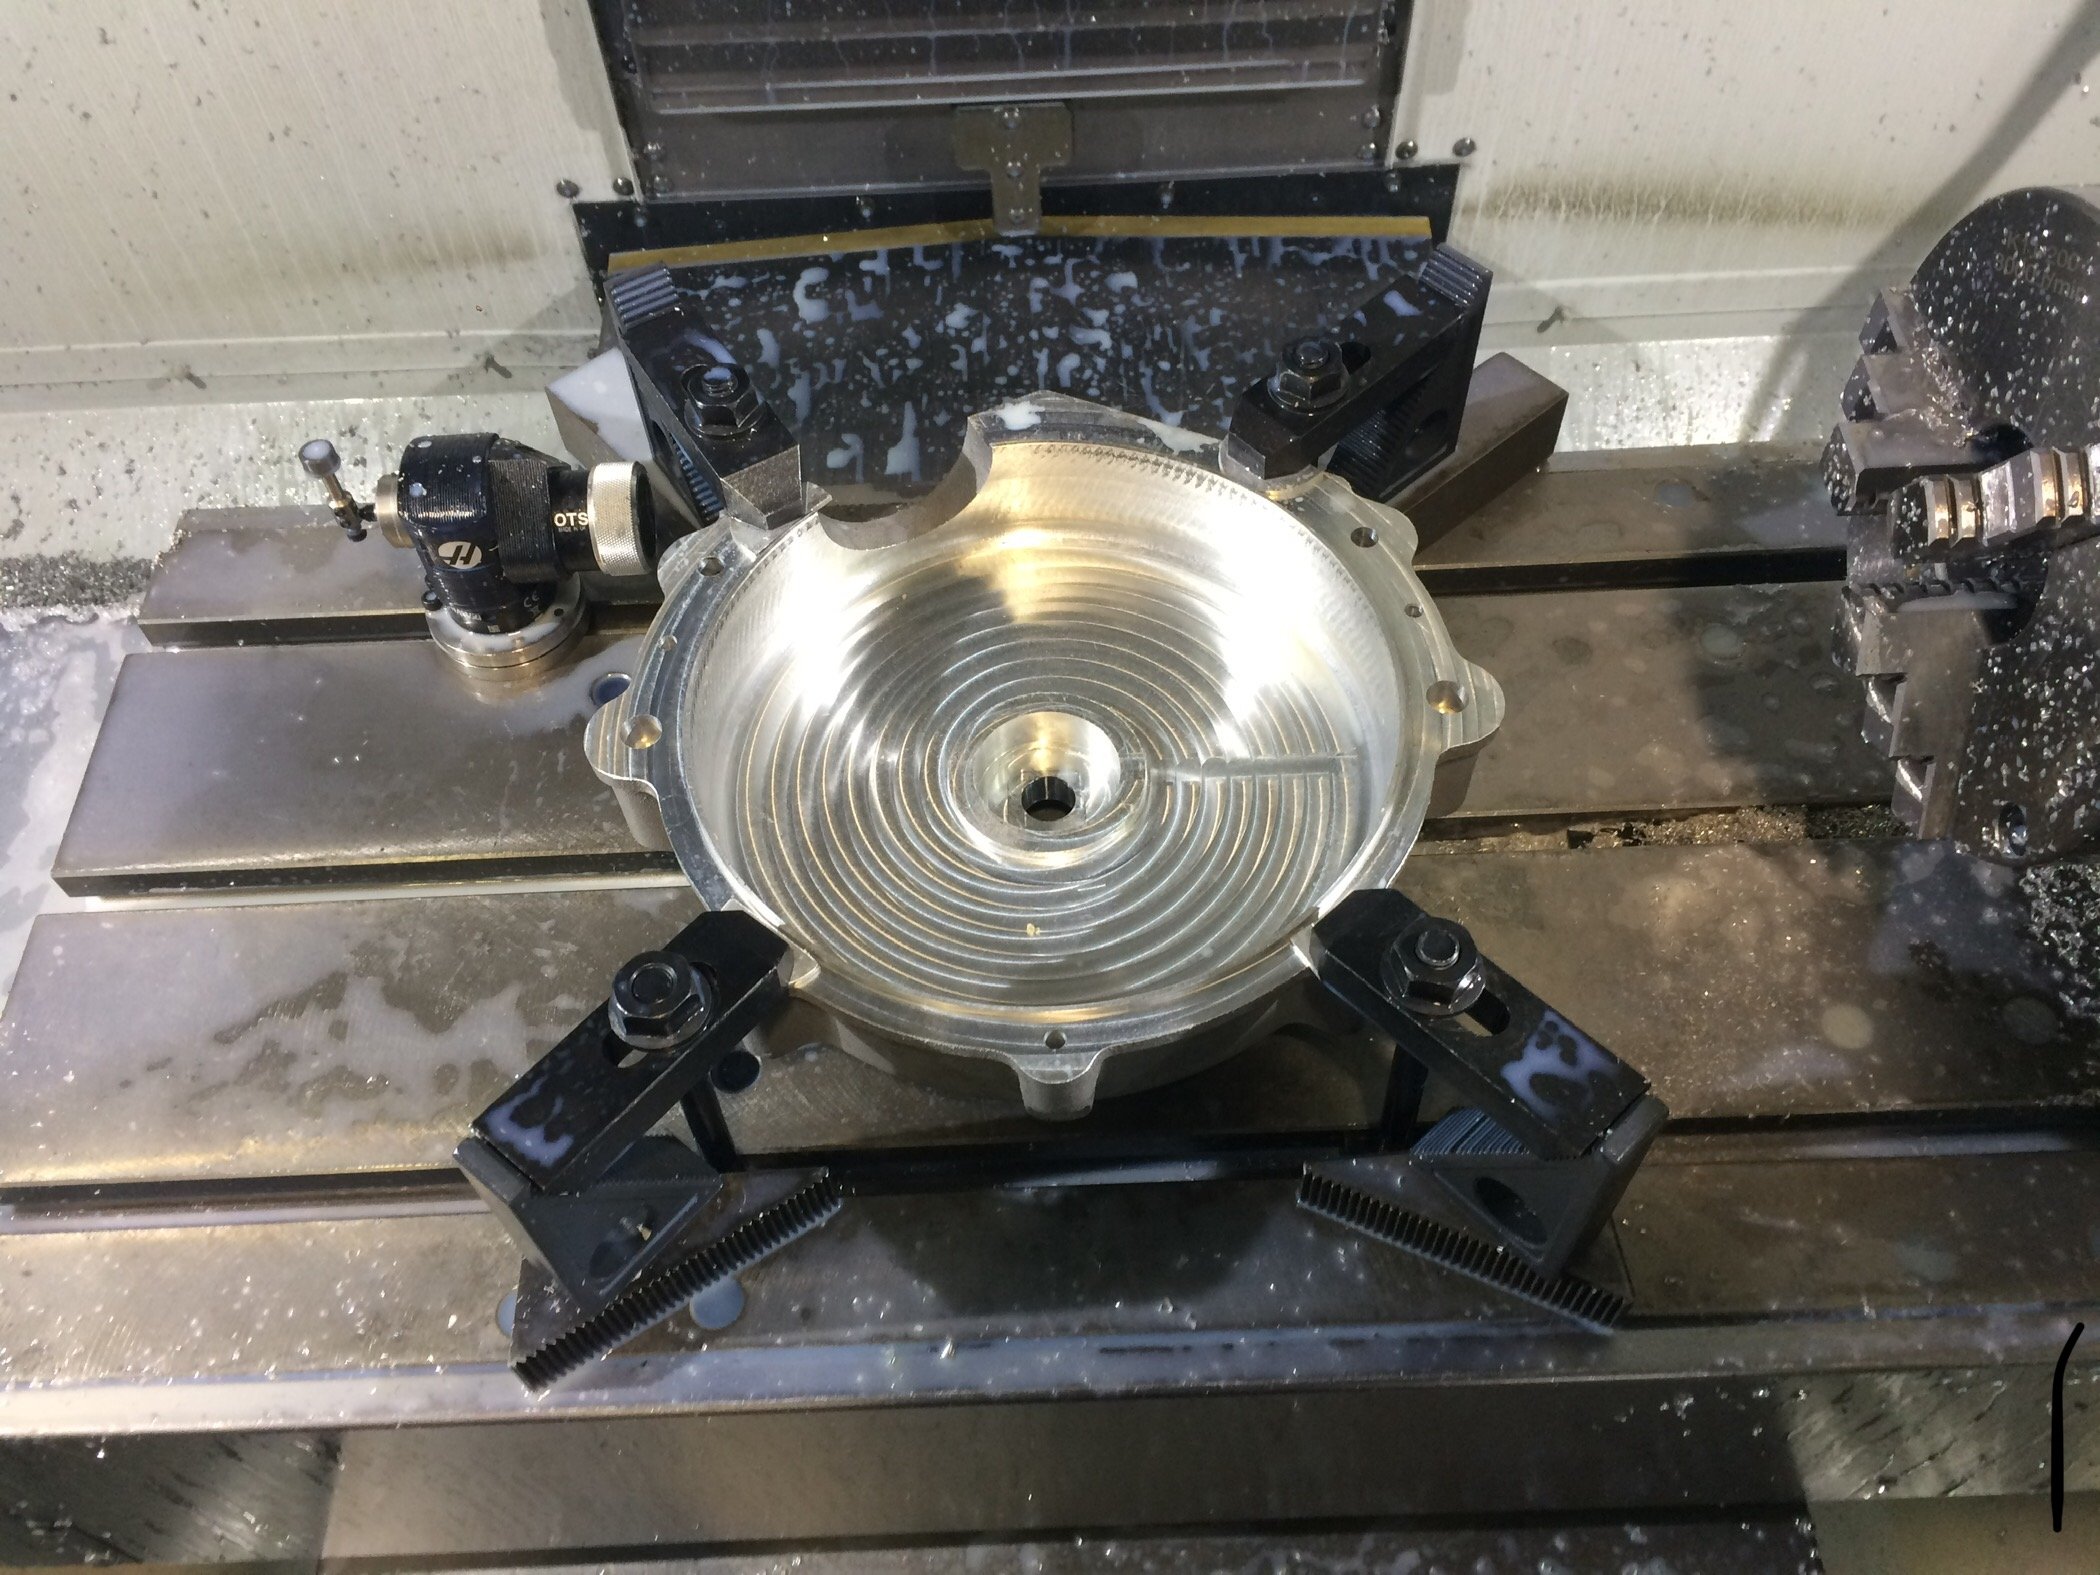
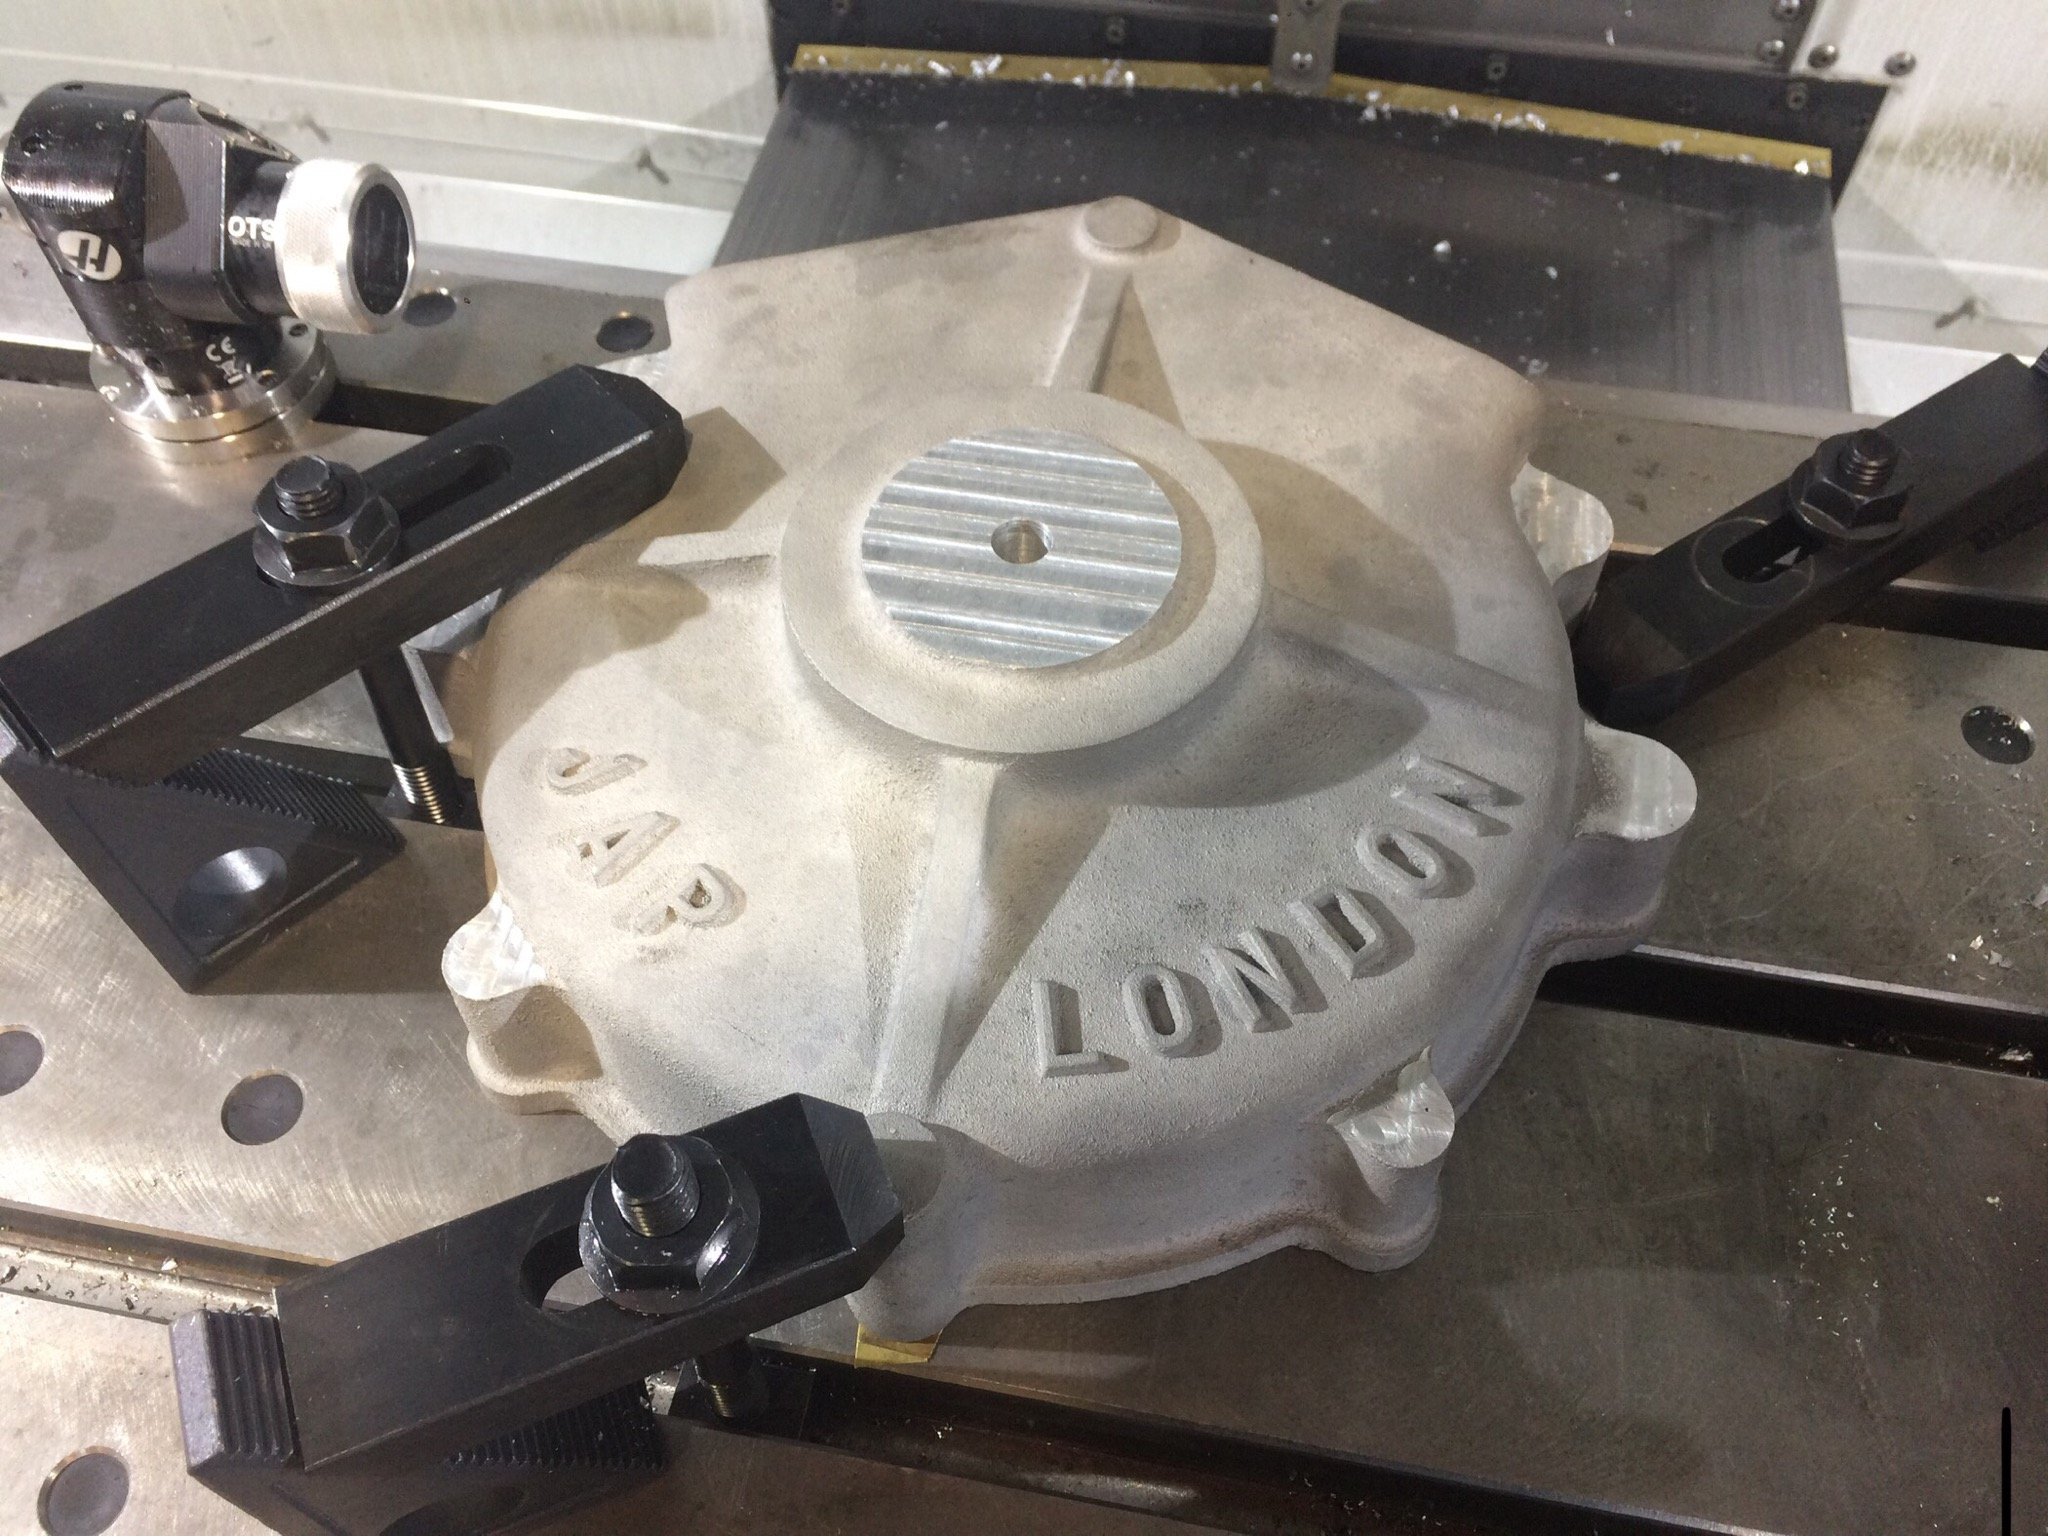
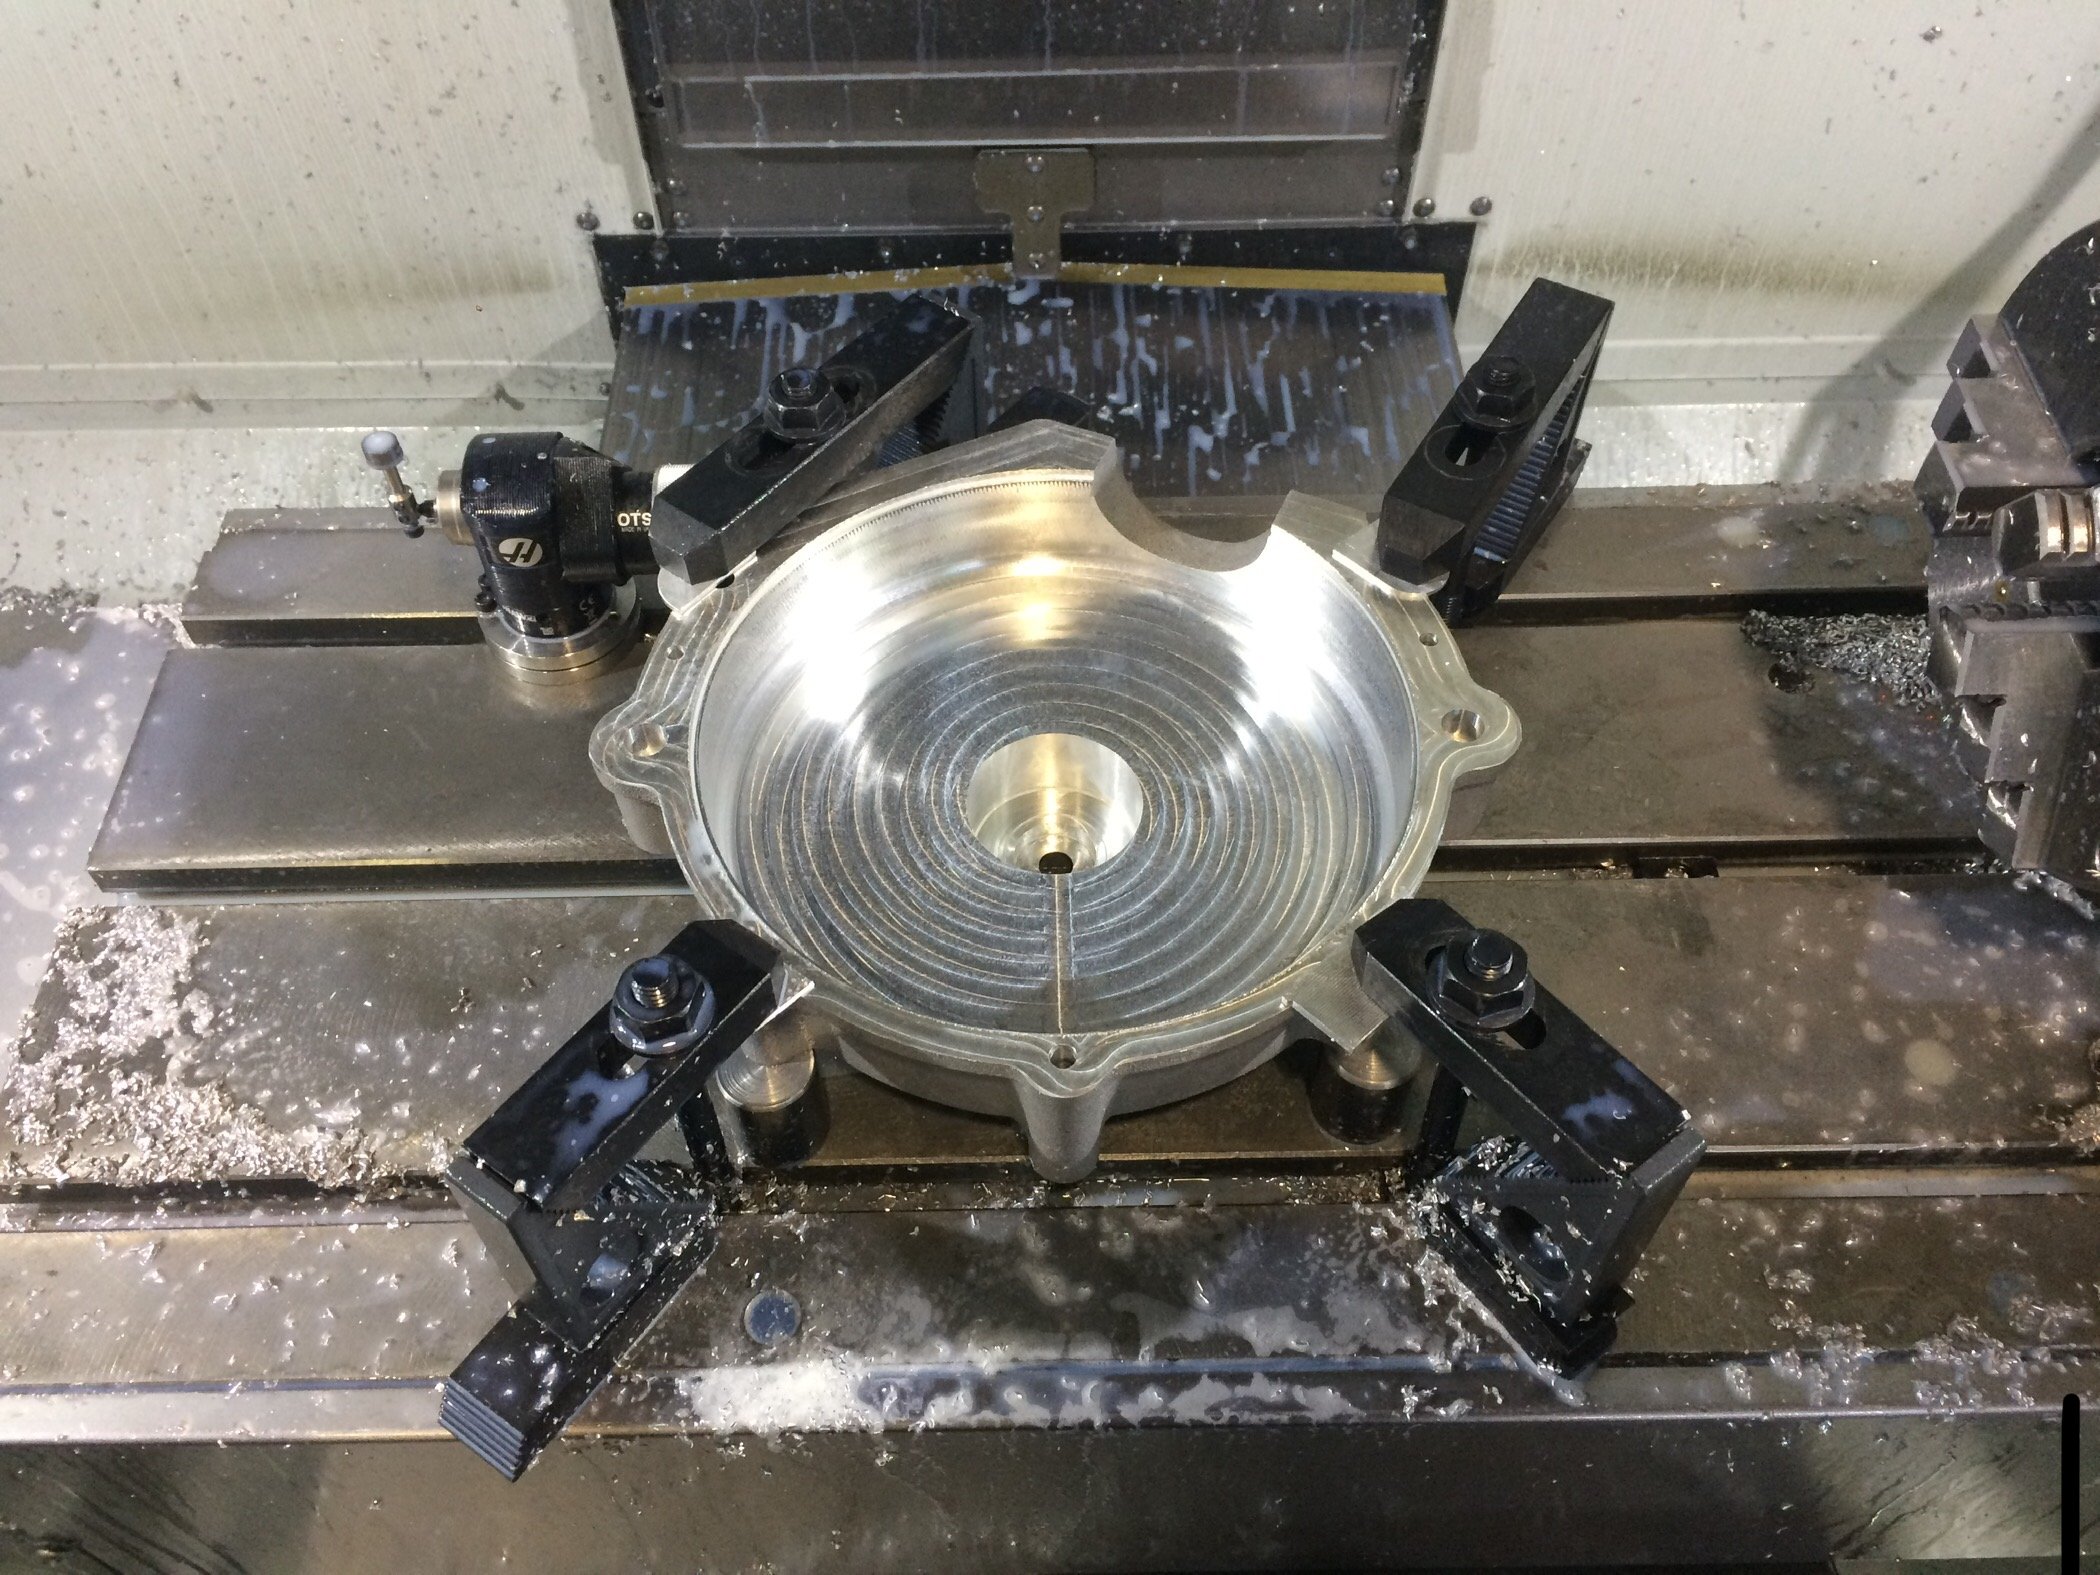
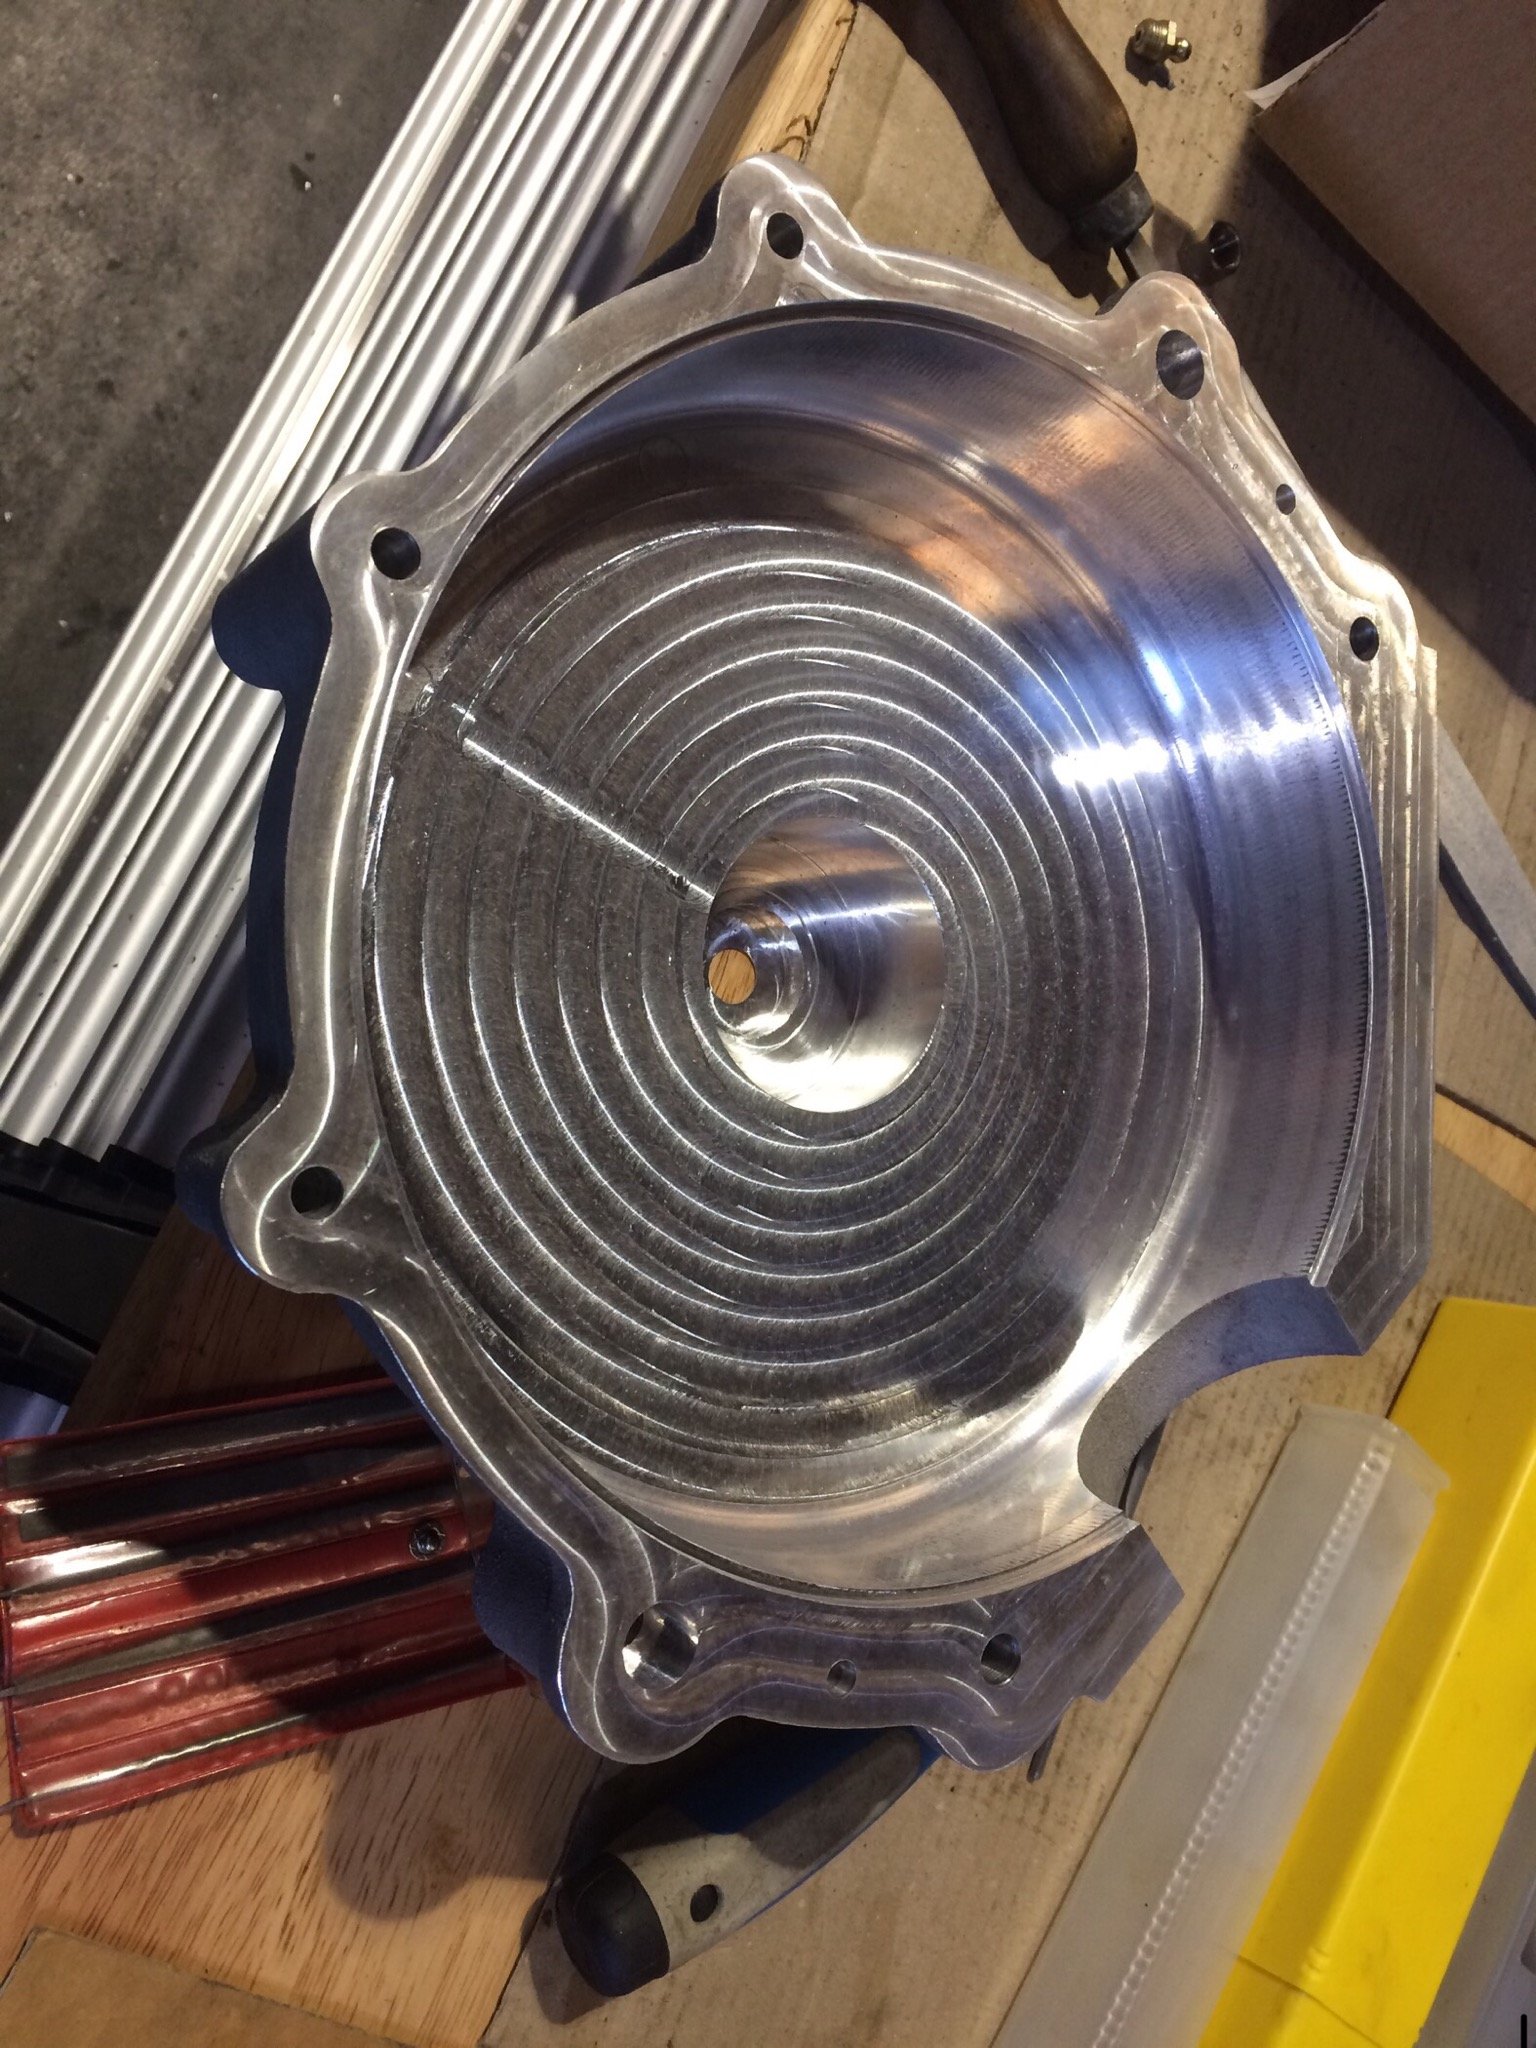
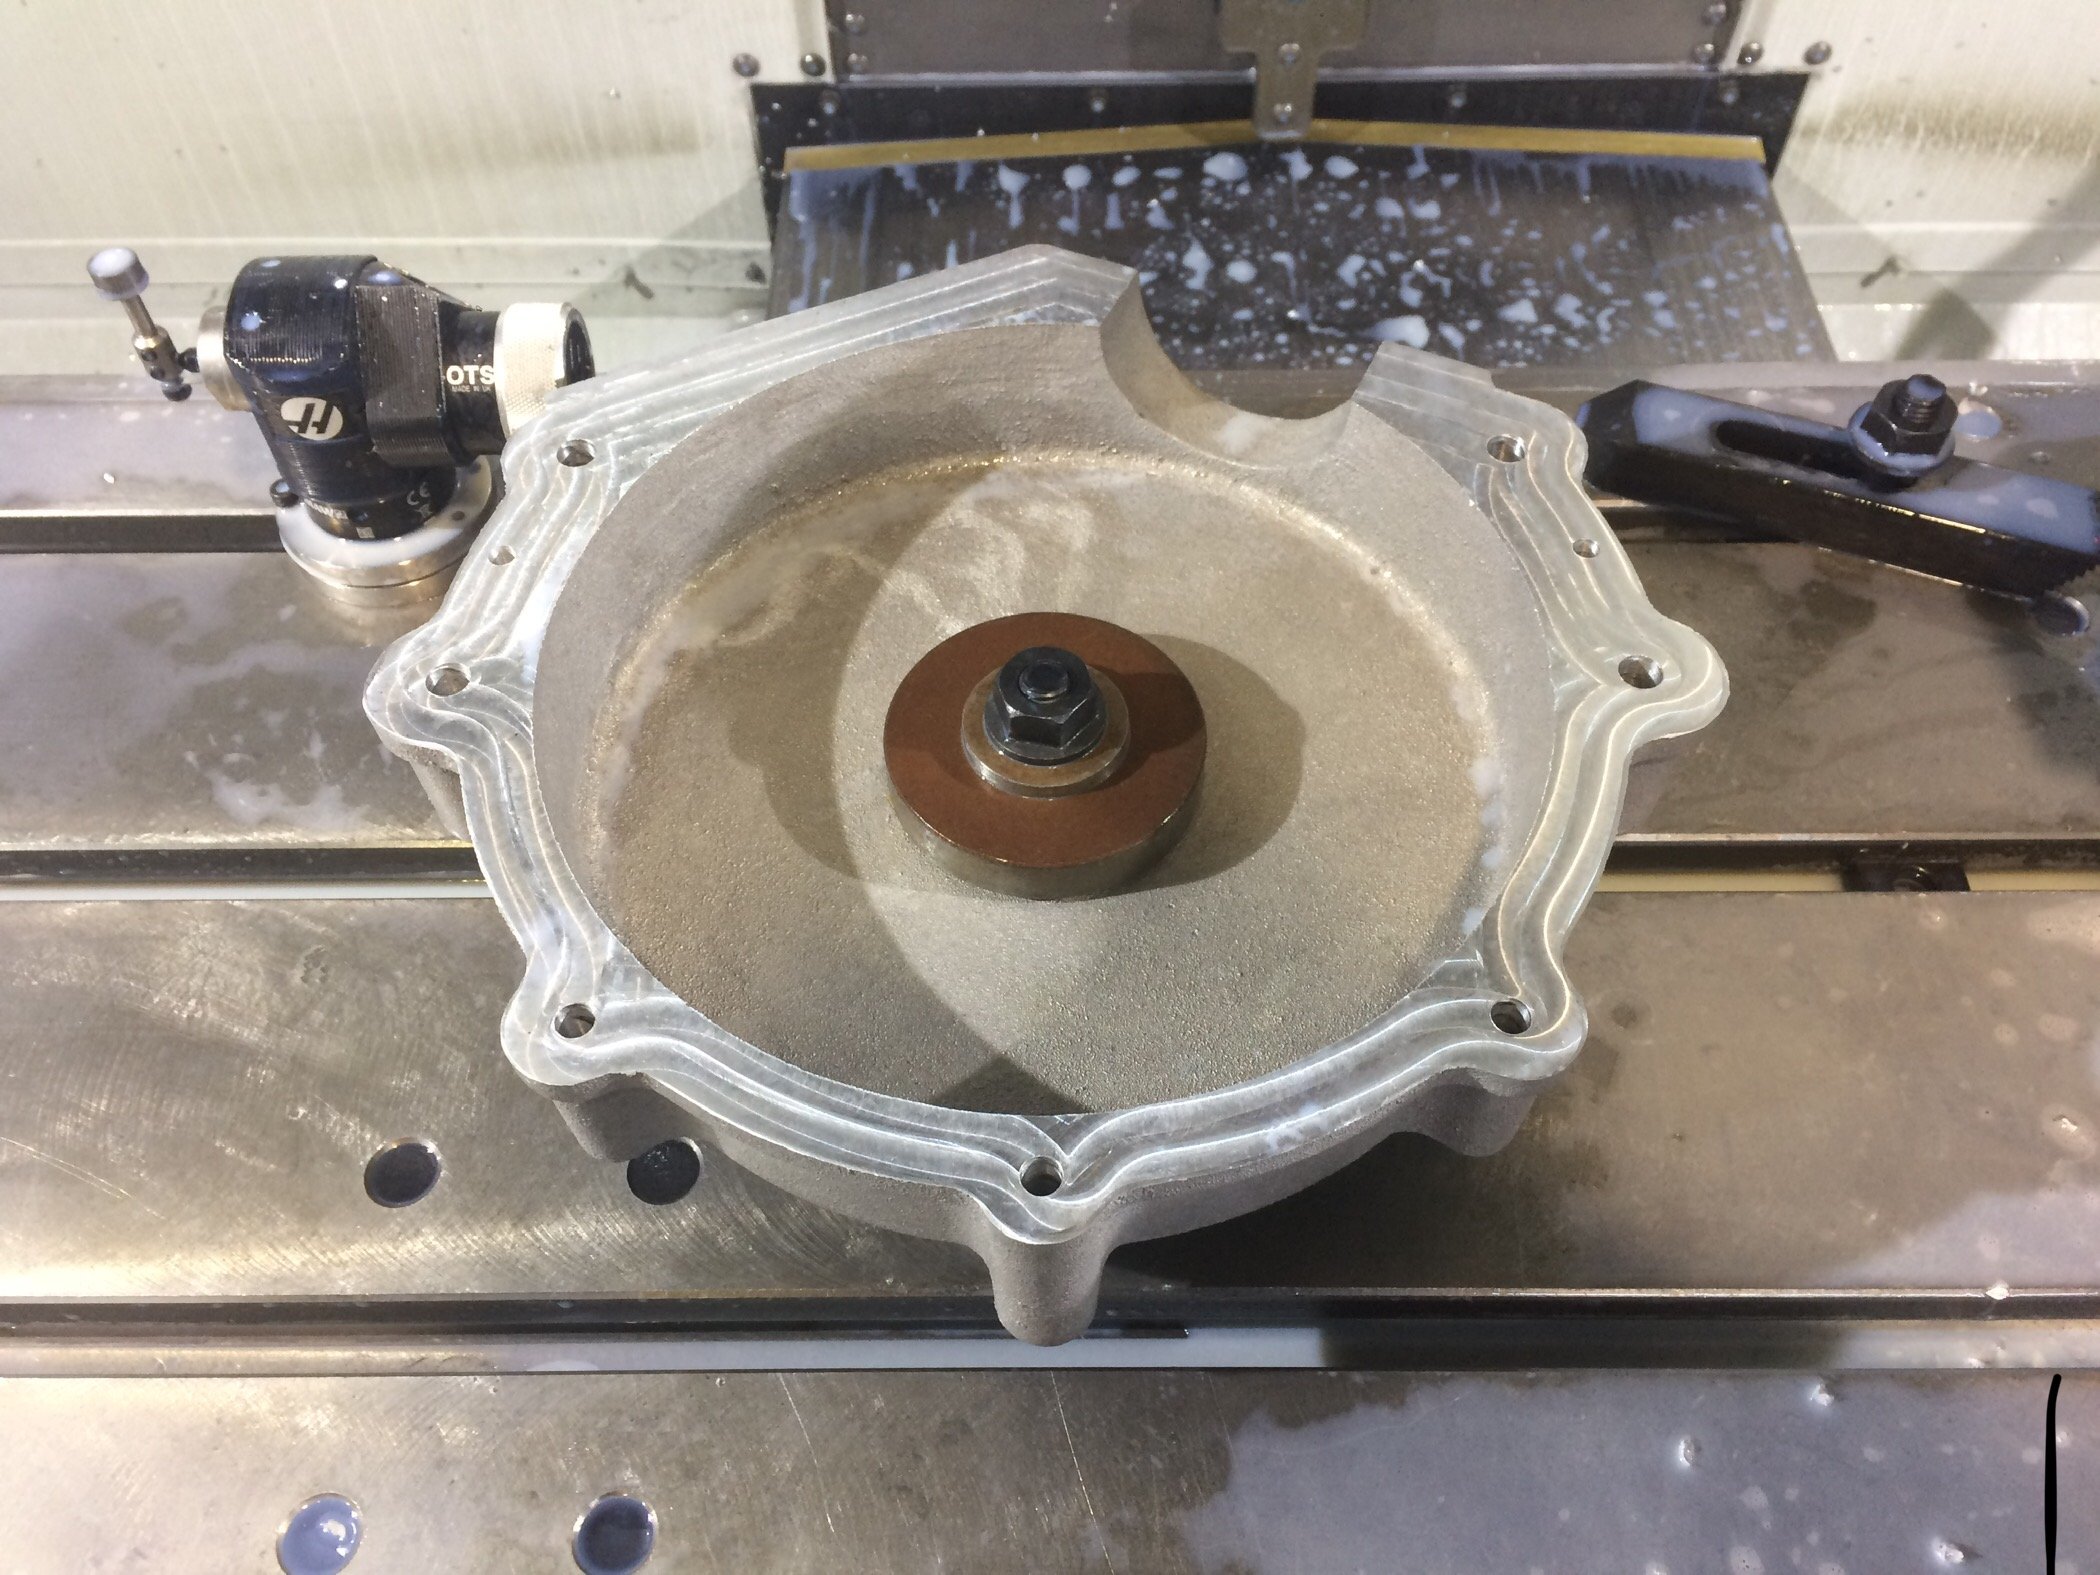
Cheers mate, na I think I will be doing some flicking through the Wiseco piston catalogue when it gets to that stage... Wow awesome, would of been great working at Mcintosh. I think I saw that engine run a few years ago when I was visiting Ken. Were the Hemmings heads original upgrade parts for sidevalve engines? I take it the guy with KTOR on the floor would never part with it? I’ll be making my own flywheels with press fits throughout, will get a 1.5” dia drive mainshaft with the bearings in have. A bit better that the original..... Have got the timing side case machined to the same stage now. Facing the timing cover mating surface as first reference. Flipped over and same stuff done as first half Internal features finished on both half’s. And with a couple of bolts holding it together. Next job get the timing cover bolted on
6 points
-
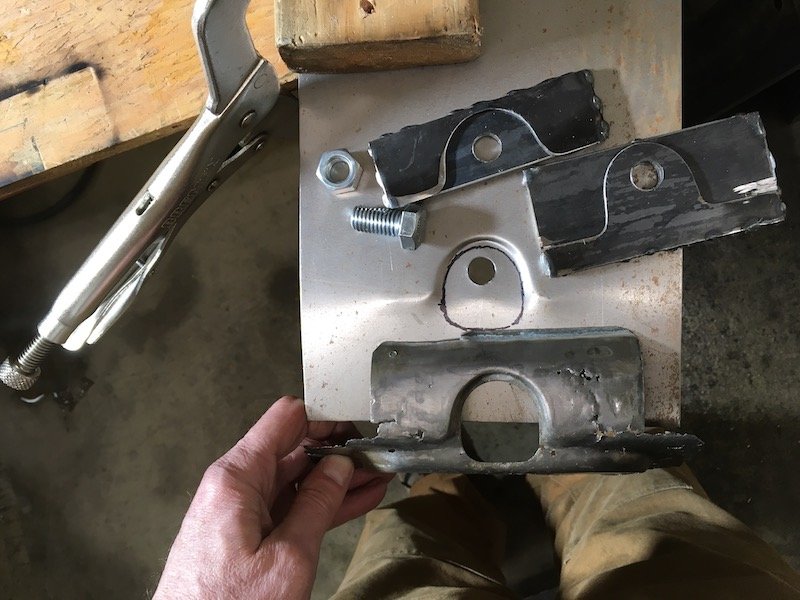
Alrighty, cert check has been done and I've got a list. Nothing too bad, maybe some will be a little annoying to sort out. - Front bump stops missing - need to find BC ones I guess. - Spring washers on the brake caliper brackets (only came with normal washers) - easy - Caster arms don't have a brand and have play in rose joint - will get some hardrace ones after confirming with cert man. - Spring washers on engine mount brackets (again, only supplied with normal washers) - easy enough bit hard to get to some of them though. - Engine mounts need spring washers (not supplied with them) - seems to be a theme here but I may need longer bolts to do this. - Gearbox mount nylocks don't have enough thread showing on the studs. - Was worried about this one, will have to see if I can fit longer studs or maybe bolts if it works. - More spring washers on drive shaft loop bolts (think he means a couple that arent the floor mount part). - easy. - Seat bolts need spring washers - easy...pretty sure the passenger one which is standard, never had any. - easy except maybe the two studs for seatbelt buckles which might not be long enough due to thickness of the seat mount base steel. - Drivers seat buckle not easy to access next to bucket seat. This one might be difficult, because it mounts to a stud. Unless it is acceptable to mount it to an extension bar (will have to ask cert man). Maybe it's an option to make a raised tab on the race seat base? It is made of 5mm steel.... this is an annoying one. Maybe even moving the seat over a bit. - Need to see proof of welds on rear quarters. Will see if the photos are ok from before it was painted. - maybe easy. - Calibrate speedo - should be easy. So over all, I need to throw a fist full of spring washers at everything that looks like a bolt.5 points
-
Update - all items on the list are done apart from adjusting the hand brake and moving the rear hard brake line up a tad on the diff. I fired the coupe up today and idled it for 20min the drove it up and down the road to get some heat into it. I wanted to monitor the temp and ensure the fan is doing its job and that the rad isn’t spitting any fluid. Pretty sure some neighbours applauded when I turned it off. That just made me turn it right back on. Cert recheck 14th May and toad test. Here are are some pics from today
5 points
-
This worked perfectly. I was a bit worried that he would snap the top off the steering column as he said he was really trying hard to unscrew it. But a wiggle back and forth and a bit of pulling and it came off! Thanks for the quick replies guys. Love you long time.
4 points
-
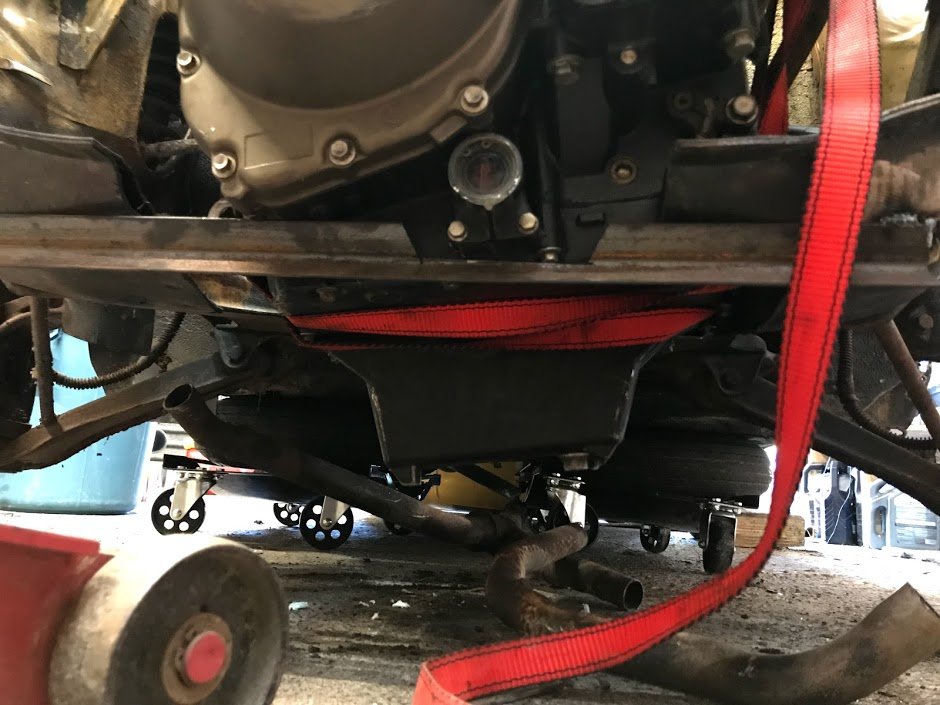
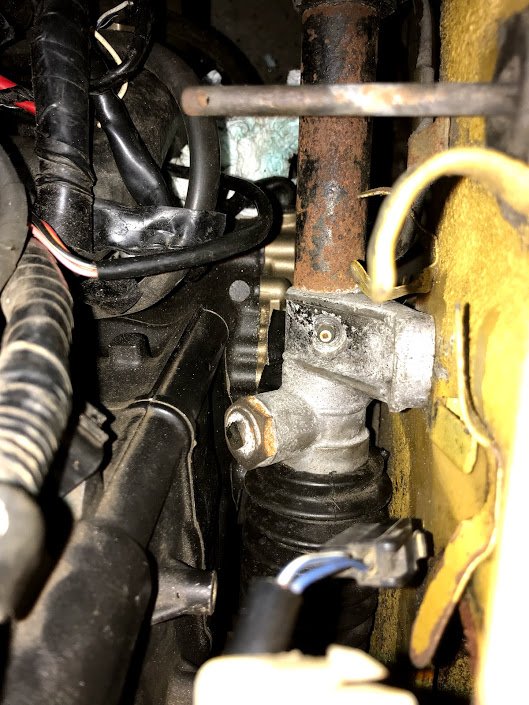
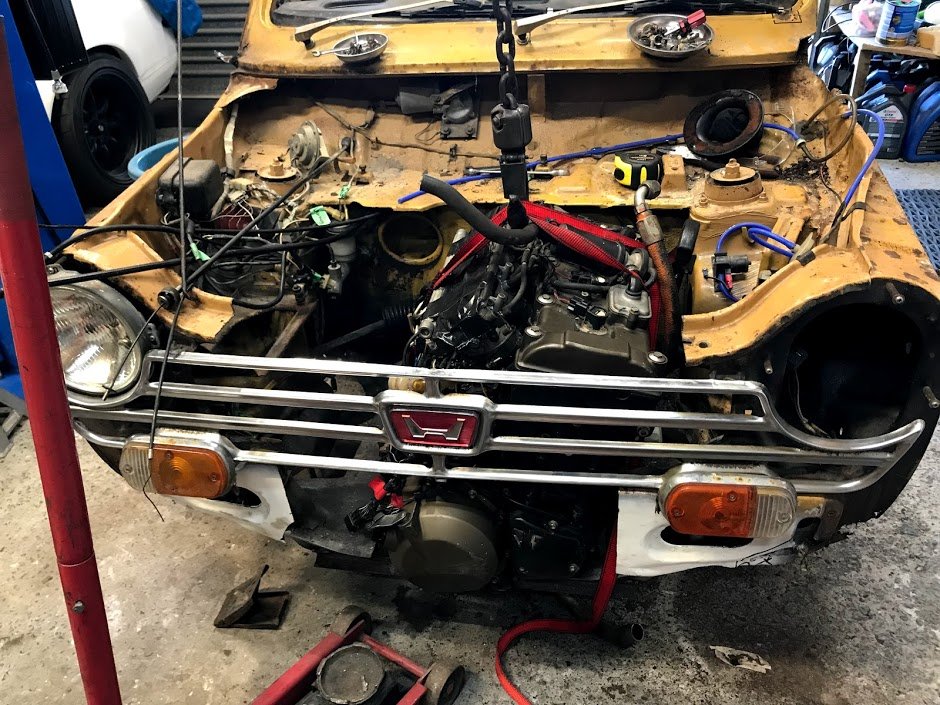
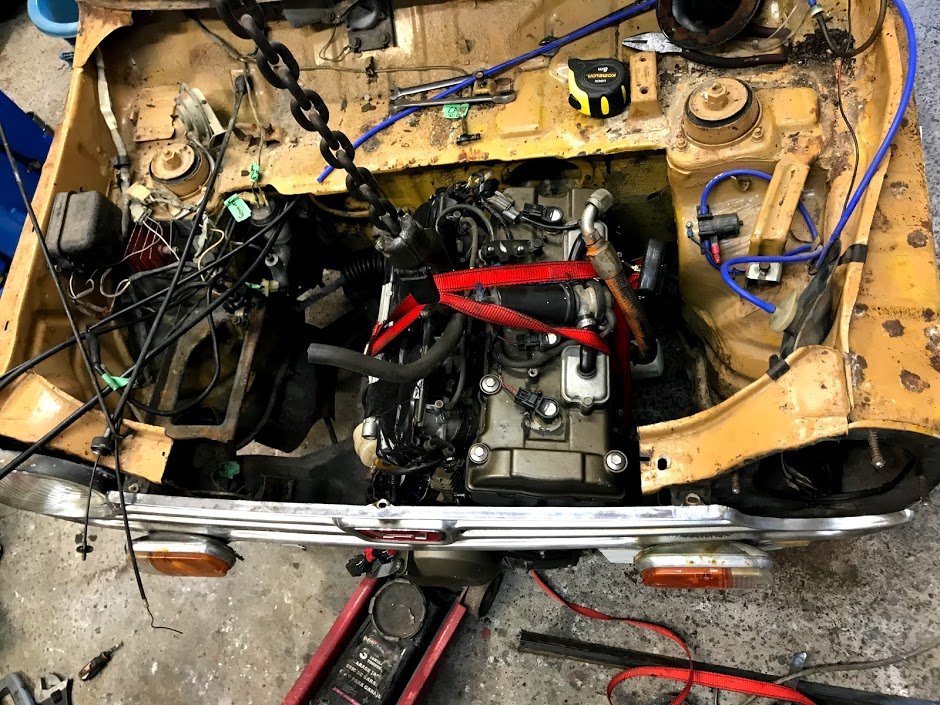
Its been a while since the last update but i have been chipping away at this project. I finished the weldathon on that bus and it was picked up the next day. The owner is really happy with my work and it turns out he has quite a collection of classics. He now wants to bring me some of the cars, including a mk1 mini cooper, for some rust work. Cool! While the bus was taking up space I had been sneaking in some work on the wee Imp. I fitted the engine up to the transaxle, weighing the engine first. 87kg with the flywheel in place. Not too bad at all. Not super light like the standard Imp all alloy unit however I have moved so much stuff to the front that it should still be well balanced. I do love the idea of an all alloy Nissan cg13 twink from a K11 Micra- however that would require a full re-certification. I prefer the idea of a Goldwing engine engine more! I digress. So anyway- I had slung the engine in place using a lump of timber and a ratchet strap. Worked fine. Then started making new engine mounts and cross member. I was not happy with the state or look of the old one and knew it could be far better. Not really a lot to say about making fabricating it all- the usual story of lining the engine up exactly central and building things to connect. I wanted to make sure that the exhaust manifold and starter could be easily removed without touching the cradle. I probably over built it with extra bracing (I even ended up adding extra gussets just before painting it, because ocd paranoia) but all up it still only weighed in at around 7-8kg. In photos. I didn't take many as work progressed on this bit really quickly.. Clearance under the car was still really good, considering how low the sump looks from the back. I think an optical illusion due to the rear panel not being in place. Then painted in black epoxy.. Next up was the exhaust. The manifold that came fitted was running really close to the drive shaft! Enough that it would contact when the car was lifted off the ground. There was quite a bit of damage, dents, poor welds and other bits that needed attention so I chopped it all back and carefully shortened the bottom pipes then systematically pieced it back together. I required quite a bit of forward thinking because the access to weld to pipes all the way round was really tight. No photos of work though as I was so immersed in the process I forgot to take some. Really happy with the result though. Fits perfectly, cleaner runs and still equal length (as if a Datsun A12 with a carb the size of a small cup would care. But hey, every little helps ) Later on I painted it and then wrapped the upper pipes to ward off heat from the inlet and coolant pipe. I know some dont like heat wrap but I think its great! Its worked well on my last several car builds. Luckily I live in a dry enough area to get away with it and not worry about potential corrosion. With that sorted I moved onto the rest of the system. I have always had a picture in my mind of what I wanted it to look like and I wanted it to be rear slung with a side exit to avoid the car filling with exhaust fumes. Apparantly these early Imps with the roof vents can suffer from fumes being pulled into the car by the vacuum. I also had a rough idea on how I would build my own silencer and there wasnt anything available that fitted my ideas with a price I liked. I had built one for the Mazda Rx3 and it worked well. Money is tight (I'm too tight..), time is plenty and I love making things so I started building. Using the pipe from the original straight through muffler.. Then fabricating my silencer using some ideas I nicked from Google along with extensive coffee fueled airflow thinking in my mind. I have no idea on what it will sound like but it was a fun process and looks neat. The stainless pads worked well in my last muffler along with some glass matting I got from the neighbour. I'll report back In photos... I had a pipe bent to 90 degrees and added mount points to the muffler so it slings up under the rear valance. I made a stainless heat shield to deflect heat away from paint and bottom pulley. You'll see that later. I have yet to decide on the length of the exhaust tip, cut it and then weld it on to finish. Then the inlet. Because the Datsun engine sits flat in this Imp, unlike the rear sloping angle in its usual Datsun 1200 home, the carb is not level. I chopped off the mounting face and milled the manifold at angle to suit. Then I welded it back in place. Carb is now level. I filled in an unused vac hole, cut off the extra unused lugs and gave the whole thing a clean up till it was nice and smooth. While I was playing with alloy I made a new alternator bracket... and had to rebuild a very corroded thermostat outlet. it was knackered... I was given a better spare by a nice fella with a Datsun 1200 ute but it pointed upwards. My outlet, most likely from a van, points down and suits the pipework routing I wanted to do. So I had to fix it. I found a suitable piece of alloy pipe on an old scooter handle I had rescued from the local scrap metal pile at the dump... Much better! Then onto the pipe work in the back... Just a case of sussing out a neat route to suit my tastes, remain easy to work on and remove and allowing for a potential Davies Craig electric water pump just in case the Datsun pump is not up to the task (and also because I do rather fancy the geekiness of the little display unit not to mention how much better it could work) With the pipes sorted I replaced the transaxle output seals because well, for $20 it made sense to do them now. I machined up a stepped tool to make sure they went in straight and to the correct depth. New seals.. Then mounted the brand new BMW couplings I bought from Rockauto. I had to make some spacers to suit as they are narrower then the stock Rotoflex couplings. With the car on the ground the driveshafts sit almost bang on parallel to the ground which is good for their longevity. I didn't fancy reusing the red Nolathane couplings that came with the race car because whilst strong in shear and rotation they didn't have much flex in and out which would impose quite large stress on the transaxle casing as the rear suspension went through its motion I felt. I then did some fun little jobs (but its all fun really..) like cleaning and painting the starter and alternator... I dug out my old art oil paints and mixed up a suitable orange to paint the inside of a very faded rear indicator lens. It'll do for now but I do look forward to locating and buying some better ones when I go to Blighty in July! Then began the wiring! Like all my other previous car projects, I enjoy this part immensely. I love the challenge of hiding as much of the wires away, re-configuring the circuits to suit add ons or just to make them better. In the case of the Imp, which has no fuses fitted at all (until the later mk3 Imps came along) this was an essential item to address. It also has a terrible dash wiring layout whereby you have to unplug everything to remove the instruments. Almost everything seems to run off just one piddly feed wire coming from the key. I'll sort that lot out with some plugs. Add in some relays for the lights, fan. Wires for a potential electric pump, sound system, high stop lamp (I have a neat idea floating about in my head for that) and making sure its future proof because later on I would like to inject this engine. I have also added in a tail to attach a trailer plug to. Because that will be a thing So I had two extra looms going spare which I pulled apart. I now had a large amount of extra wires for my project. Wiring isn't the most exciting thing to take photos of. I have now finished the engine bay wiring and I'm pretty happy with it. Now I've refitted the rear valance panel and exhaust and can lower the car down and start on the interior wiring. I'll be making a removable fuse box/relay unit and fit it under the dash if all goes well. Some photos of where I'm at now...log burner in use as the nights get colder. Sofa wheeled over to middle of workshop for max stereo imaging whilst I drink beer and play with wires... Wires hanging from engine bay.. Engine bay completed (missing hose clip noted..) but for an over flow tank from header tank to fit. I will build a better two part tank in the future I think. Exhaust tip length yet to be decided and cut. Note stainless heat shield. Bumper also to go back on, with bottom mounted rego plate.4 points
-
Thanks @tortron and @Sambo for getting this diff for me, legends. I picked it up from @Adoom ‘s place on Sunday and parked it behind the Honda. Will get back into this once I’ve hopefully got the 200sx certified. Either I’ll need to shorten it and/or use some wide Mini miglia flares with fwd offset wheels. But the 2.9 diff was the major and it’s a good size diff that’ll actually fit under there.
3 points
-
I think the Hemmings heads and barrels were an update for SV engines, the original Hemmings barrels on this engine had been bored too much and the front one blew off just above the flange and did a bit of damage to the frame. The guy with the KTOR motor has just had a frame made for it, Steve Raffels on the north shore made the frame, that guy who use to own Henderson hire built Morgans and aJAP engine from scratch, I gess you know him?3 points
-
Sorry I’ve been a bit quiet, been busy with mrs car, change of work, wee motorbikes and then lazy. i did do the H165 diff swap! My boss went away for 3 weeks and left me his car so I took the opportunity to sort it then. No great pics but after I cleaned it up I hit it with some black zinc and then spare 2k black my flat mate was using. black zinced the springs and bolts and brackets and shit, swapped the shoes and cylinders etc over, cut the old shock mounts off and welded to new diff, swapped the hose mount to opposite side, tidied and swapped hard lines and handbrake cables and made a small bracket to move the cable mount about 50mm across. Cbf cutting it off and rewelding and painting again. had to shorten and balance driveshaft using the larger rear flange off Ute to suit the new diff. Also scored a factory style output seal for the box with the the steel shell through a supplier at work. i don’t like the new ratio ill keep an eye out for a different head I guess. Have spent ages adjusting the brakes and starting to get somewhere. Then a yarn cam up of a NOS roof skin in a blokes shed roof. calls were made and it showed up a few weeks later. Was damaged in transit yonks ago and the guy tucked it away for a rainy day. well everyone knows my roof is fucked from a fire way before bart and I had this so it’s forever changing shape and now the bog has cracked. Time to re-roof it. Now because it’s a datsun, of course the cunt was rusty despite never touching a car and being dry its entire life.. It had a few dings and scrapes but most hammered out well, the rest will be done when it’s stuck to the car so I have some rigidity. i buzzed it All back and wire wheeled the Deep bits and hit it with 2K epoxy etch to seal away the baddies. The inside was much better so just got rust converted after wheeling. sorry to the neighbourhood for 90 minutes of this bitch singing on the panel stand, very harmonious for a Good Friday. so yeah, dunno when I’ll attach it now. Means I should do new rubbers and change to a better screen, a real headlining at the same time too. $3 points
-
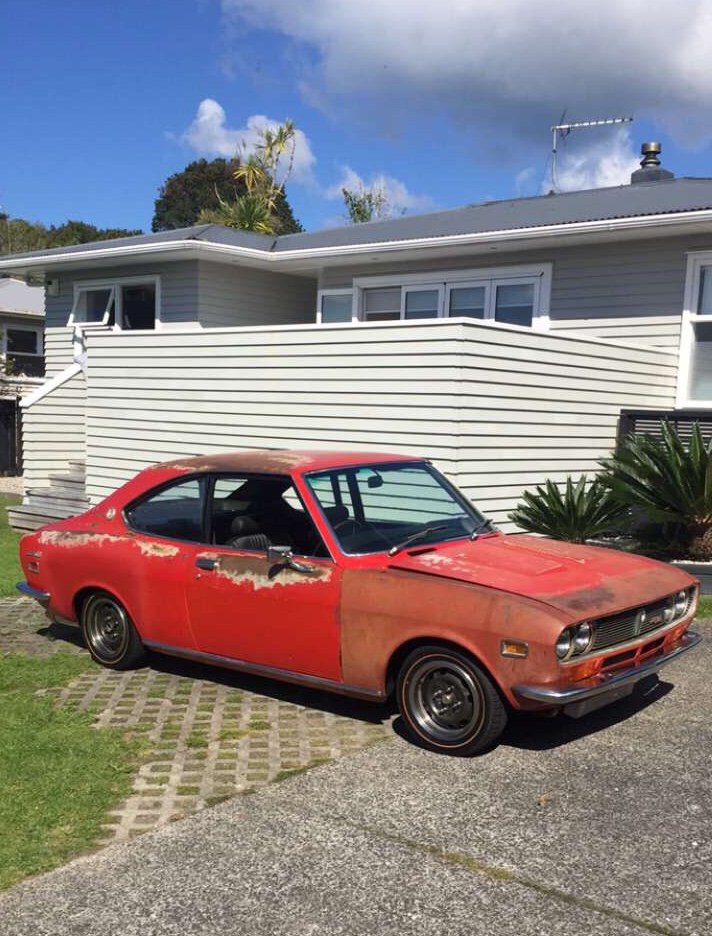
did a bit more. i gave the patches i put in a bit of a tidy up and made the whole car red. i got some rattle cans matched and just used them. i fucked up a bit on the passengers side around the wheel arch and didn't cover the primer enough so now its showing after i gave it a polish. ill blaze some more paint on that bit and call it good. i started trying to polish the paint to see if it would come up ok. it didn't. its better i suppose but the paint is pretty fucked. anywho, ive only done one side. ill paint the whole car at some point but i was kind of hoping it would come up a bit better. 2019-04-21_12-54-05 by sheepers, on Flickr 2019-04-21_12-54-20 by sheepers, on Flickr3 points
-
Puller should do it or put the nut back on a couple turns and pull on the wheel2 points
-
Awesome! Since you have a CNC there you could totally put an o-ring groove on one of those mating faces and use rubber cord rather than a regular gasket.. Would be hardly noticeable once assembled and would be an easy foolproof way of ensuring no leaks and easy assembly/disassembly.2 points
-
Installed the carbs today. She's really coming together. Not to much to do now Purchase and install M-Unit + finish wiring. Fabricate a number plate bracket and rear indicator mounts. Install tachometer blanking plug. Maybe purchase new tires (I'm wanting something dual sport). Fill with oil, set points and timing and start her up!
2 points
-
Got the drivers seat in and sitting nice and snug. The steering wheel is about 40mm higher than factory with my steering setup etc, but I am a maxi frame size so the more legroom the better, and where the seat is placed is super comfy for me, with all the controls nicely to hand and heaps of legroom. Unfortunately this meant a wee bit of a hole. Firstly I welded in a brace to replace the bit of probably important body mount stuff that I had to clearance. There is a whole lot of weld through primer on the back of that. Then I fashioned another bit of sheet metal to fill the gap. There is a bit more welding to do on the inside by the engine but I will do this when the cab is off next. The same deal also has to happen with the removable cover, that will be tomorrows job. Unfortunately the steering pump could do with being still a bit lower to clear everything, plus the seat belt mount frame thing that holds the socket and sits behind the cover will need a bit of loving too. I looked at the passenger side seat as well, this will need a bit of clearancing but all on the engine cover, not the body. That's next on the list probly.2 points
-
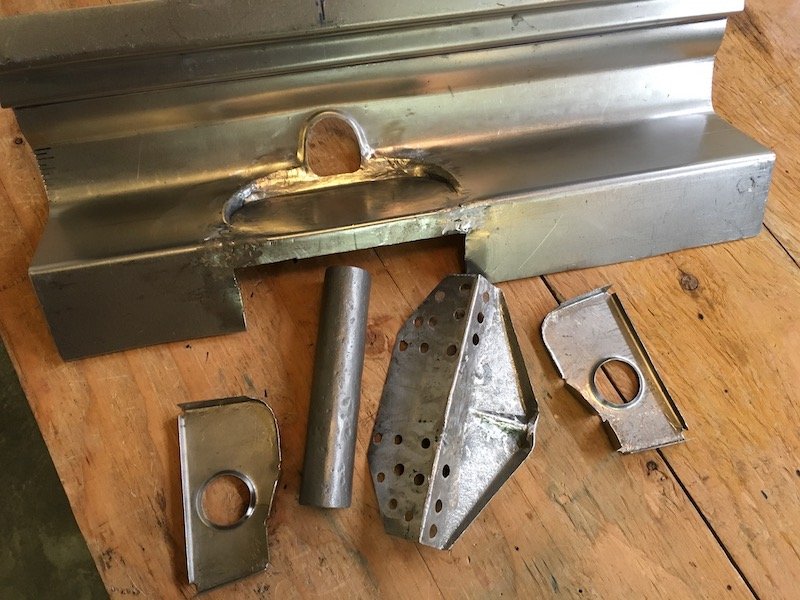
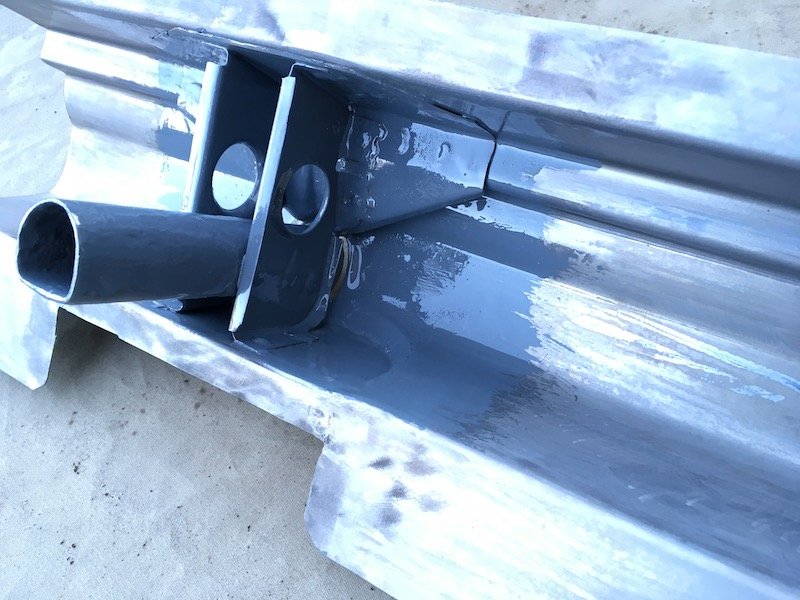
Build of the lifting jack structure Original outer sill panel where the lifting jack pipe was Inside the sill are the remnants of the jack bits Made a forming die to recreate the indented outer shape, test looked good on scrap piece so went ahead Simple as sandwich the panel and tighten the bolt Looks not too bad! Closer examination. The extra metal around the bolt hole gets trimmed out to match original. The lower pop out section (to left) is welded on and then cut off. Wrong position darn it ;( Straight on view after trimming Moving on to recreate the inner vertical stiffening brackets. Takes a bit of imagination since only about half of the originals remained Bits getting ready for weld Checking bits out for fit Sand blasted the original pipe free of rust Now really ready for weld Welded and checking results for fit against inner sill Coated with POR 15 for future rust protection. Turns out this coating can catch fire real easy and sustain flames. Next are the three outer sill segments to be welded together. I've kept a lot of extra flange widths, top and bottom, to resist warping. These flanges gets trimmed back to about 1/2 inch. Discussion: https://oldschool.co.nz/index.php?/topic/60267-marts-pl310-61-datsun-bluebird-sedan/
2 points
-
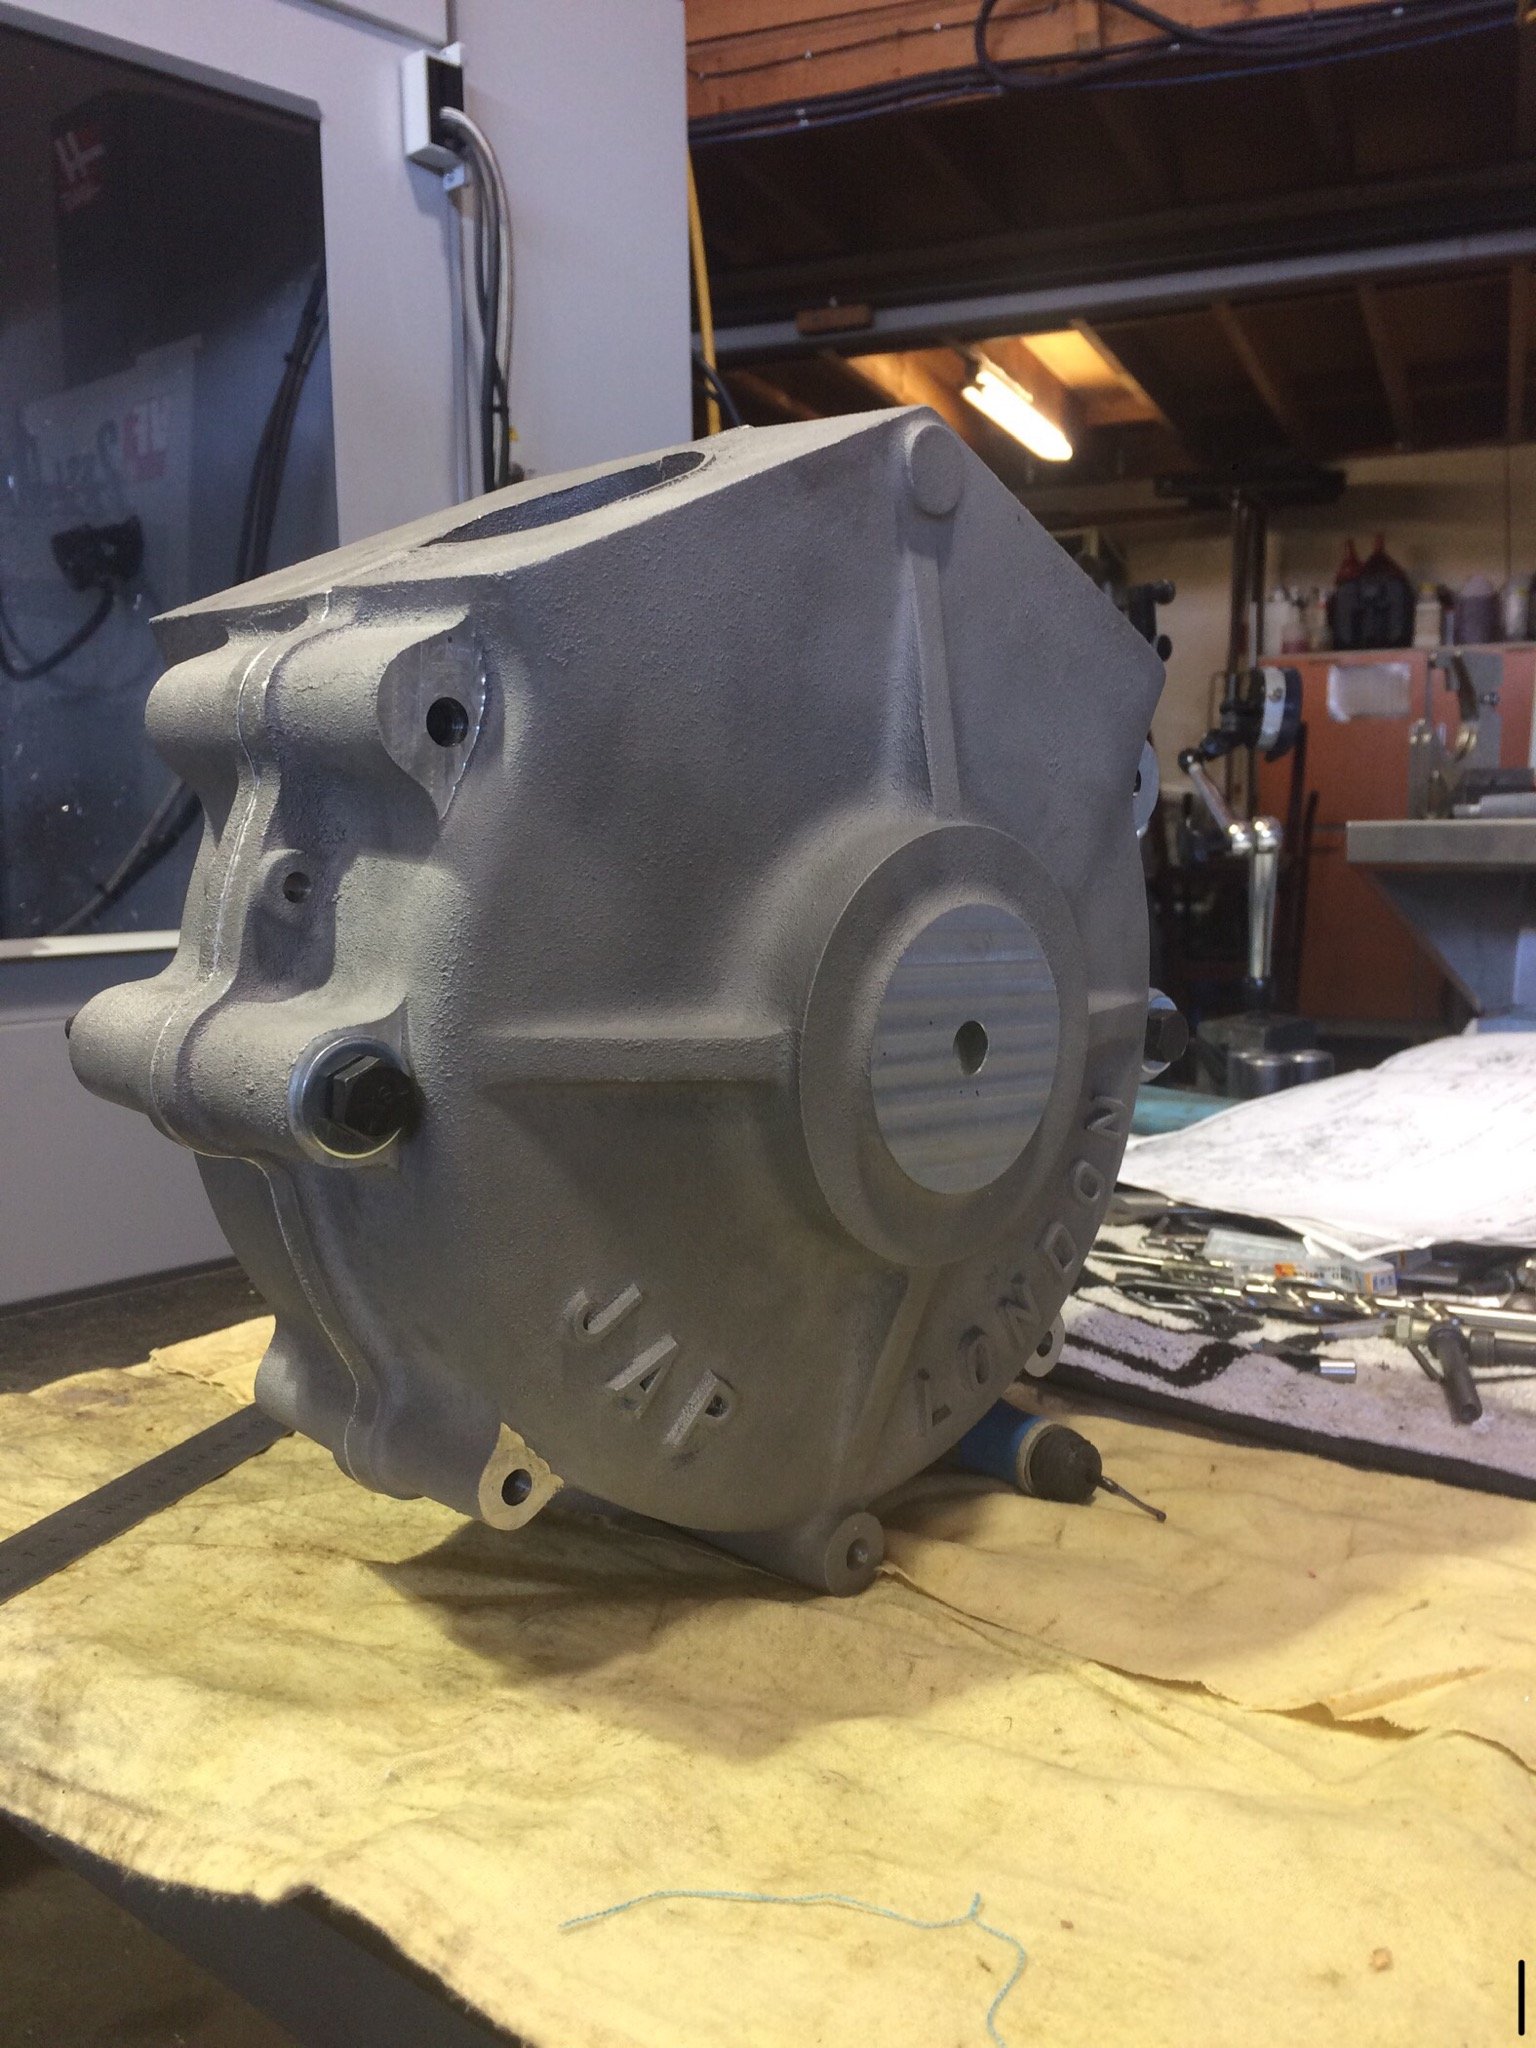
Did you ever see the engine run SOHC? A bit of info on this engine. It’s a 1930 JAP JTOR long stroke racing model of 1000cc. They were used in racing 3 wheel Morgan’s and Brough Superior motorcycles. These v twins are very rare these days and are worth a large amount of money. Lucky a place in the UK has reproduced some accurate castings for anyone mad enough to try make their own. I will be changing a few things with this one to try and get a bit more capacity and power out of it. Made a start on machining the drive side crankcase half. Bearing boss faced off to become the first reference surface Flipped over, mating surface faced and holes drilled. Now clamped down with spacer blocks to machine inner surface and bearing bore Inner features finished Next up timing side
2 points
-
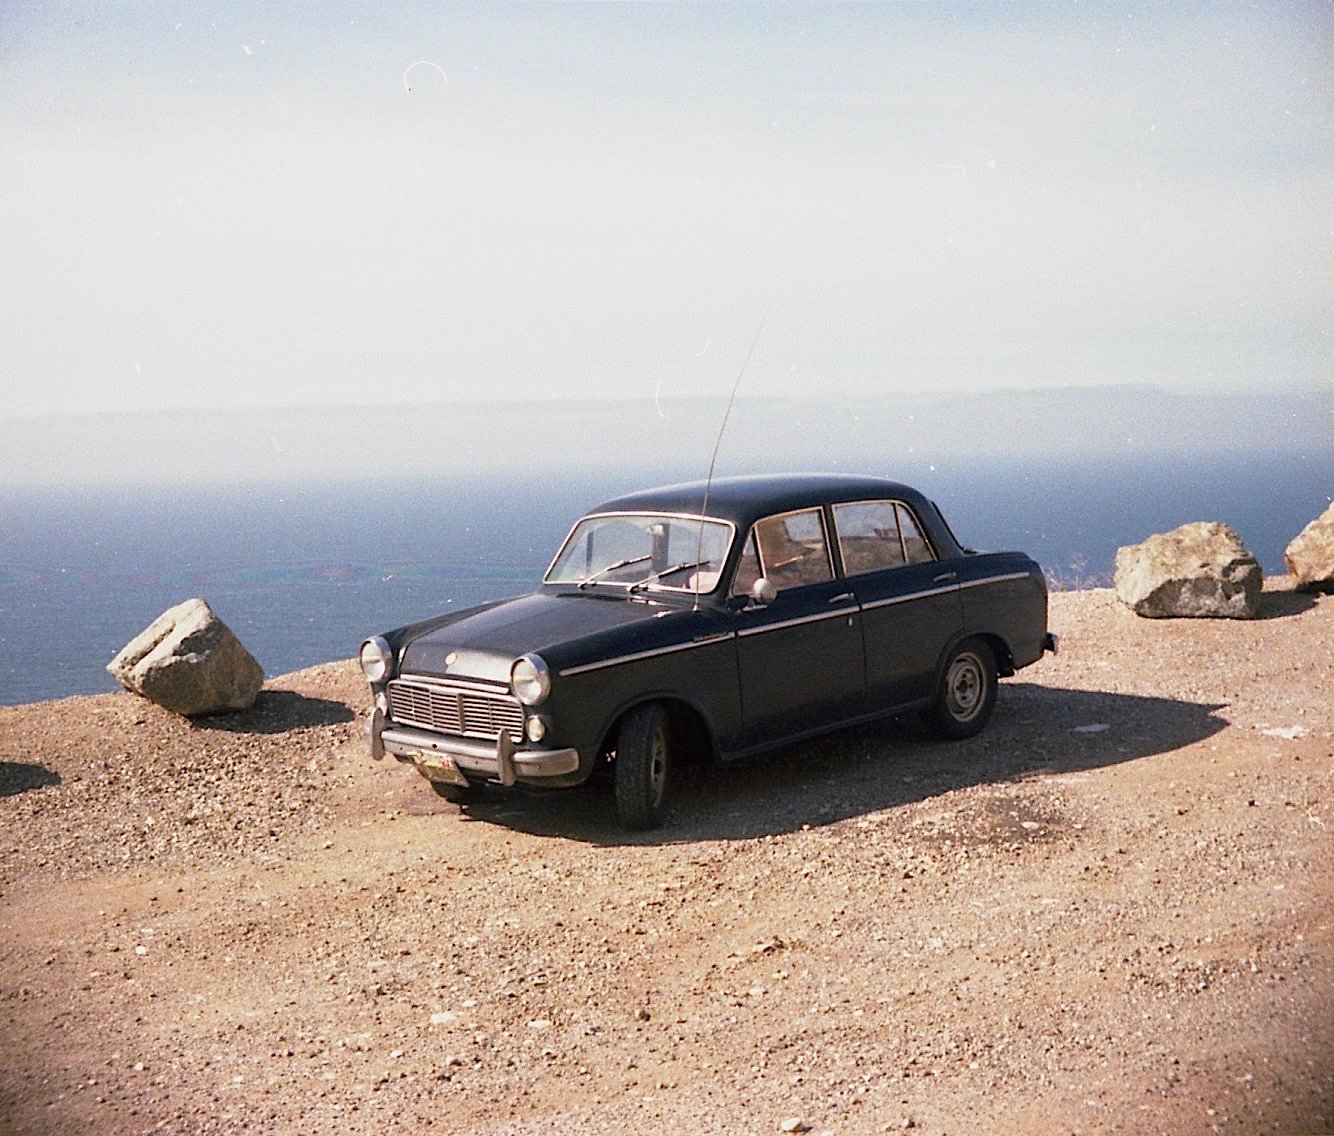
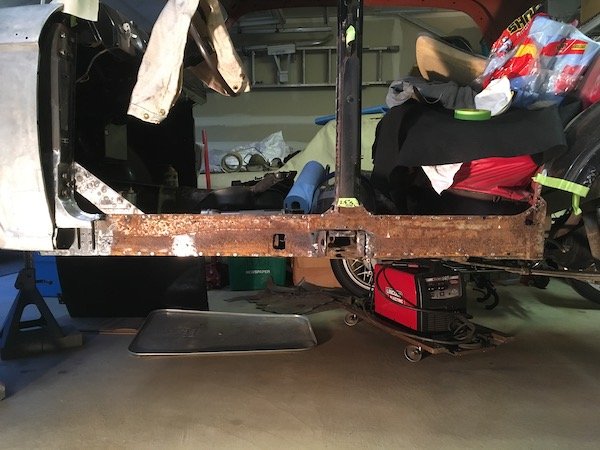
61 Datsun Bluebird PL310 De-Rustification Project. Build: https://oldschool.co.nz/index.php?/topic/60264-marts-pl310-61-datsun-bluebird-sedan/ A brief history of the Bluebird. It has a tortured past, mostly before I owned it. Yet it still runs but with a rather rusty floor and sills. Based on the evidence provided by the body damages, towing bills, and other repair bills that were obtained when my sister bought the car in Seattle, in late summer 1974, here is what I surmise happened along the way to present time. Early time period. Prior owners are suspect 60's era hippies that drove the car off road through the rain forest along the Washington state coast as evidenced by various underbody impacts against the floor braces and sills. You know, low speed dents from small stumps, rocks, etc. From the late 60’s to early 70’s? The car was T-boned on the right front door and fender as evidenced by new replacement panels and still damaged “A” pillar. 1973. Records supplied with the car showed a complete overhaul of the transmission due to popping out of high gear complaints. A worn 2- 3 shift fork and other items were to blame. Later that same year, the car was rolled onto its top and yet was still driven after rescue from the tow yard and only replacement of the windshield. 1974. My sister wanted a cheap car to get from Seattle to Los Angeles and bought the Bluebird in spite of its now beat up state and damage history. Before embarking on the trip to LA, I volunteered to help smooth over at least a dozen or more small dents with hammer, dolly and filler. I couldn’t do much for the roof then but it was not too bad overall. The front inner and lower fender structure and skin had already begun to make a significant rust hole that was then covered over with fiberglass. I also replaced a slipping clutch disk. Off she and Bluebird went to LA. 1975. I bought the Bluebird and drove it from LA to Seattle. No problems. 1975 to 1979. I used the Bluebird for mainly cross Washington state trips over the mountain passes. I bought a parts car, an ivory white 62 PL311, 60 hp model, from the wrecking yard to supply spares as even then it was getting difficult to source parts. Almost all of the spares car is long gone now. In early 1979, I drove the Bluebird to LA and back with no problems. Pic. Coast cliffside pullout photo on California Hwy 1 near Big Sur. 1979. 1979, summer. I bought a 71 Datsun 510 2-door replacement car. I kept the Bluebird as a second car. 1979 to 1985. Storage and neglect. I was working out of state for 18 months. The Bluebird began to deteriorate in outdoor storage and only rare driving. 1986. Took the Bluebird out of storage and began some work to “tune up” the roof. The previous repairs from 10 years ago had begun to blister and peel under the cover of a plastic weave tarp due to rain and sun. So I took the front and back glass out and cleaned the roof panel completely back to bare metal and worked it a lot smoother. At this time the rubber glass seals were ruined from rot and could not be reinstalled. This led to little movement of the car thereafter. 1987 to 2004. Bluebird is stored in my garage and only rare maintenance work is done to keep the brake slave cylinders from rusting solid. The fuel pump diaphragm goes bad and floods the engine crankcase with gasoline. Had to convert to a cheap electric pump to keep it moveable. The floor and sill rust progressed even when in dry storage. It is insidious rust that begins on the inside of the sills and under the vinyl floor covers. Above the floor the car has remained very rust free. Even in dry storage, rust does not stop in those places that became damp in the beginning from trapped moisture. More on that topic later! 2016 to 2017. Finally finished the redo of the roof and painted it with ivory white by having the spare and installed 62 PL311 car door jamb scanned. Going for the two tone look eventually. 2018 to 2019. Having removed the doors, interior, hood and trunk lids for the long delayed roof painting in 2017, the long hidden floor rust was now visible and really bad. The sills were also deemed so rust perforated and weakened that I would not consider removing the rotted floor until the sills are reproduced and welded in. And the remaining original left side fender was rotted out along with the bottom of the ‘A’ pillar. That all had to be fixed first and is now done but I could still use a right side ‘A’ pillar or else make it from scratch. Then the rear dog leg or ‘C’ pillar and adjacent side of rear seat floor rot out had to be made structurally sound so the new sill could be welded to solid metal. More all new metal fabrication fun. Anyway it goes on and on bit by bit. Maybe I can still salvage the top of the trans tunnel part of the floor but that’s about it, everything else related to the floor has to be cut out and tossed. No parts are available and all has to be fabricated from sheet stock. It is going to take a while. A few hours during the work week and same on the weekends are all that I can do. It may still be a few years before completion. One odd discovery. A previous owner had stuffed copious newspapers between the floor and underneath the vinyl floor covering. The barely legible dates read February 1967. Why would anyone do that on a then six year old car? I guess the newspapers made for a good sponge to hold water and keep the floor nice and moist to really speed up the rust process!
1 point
-
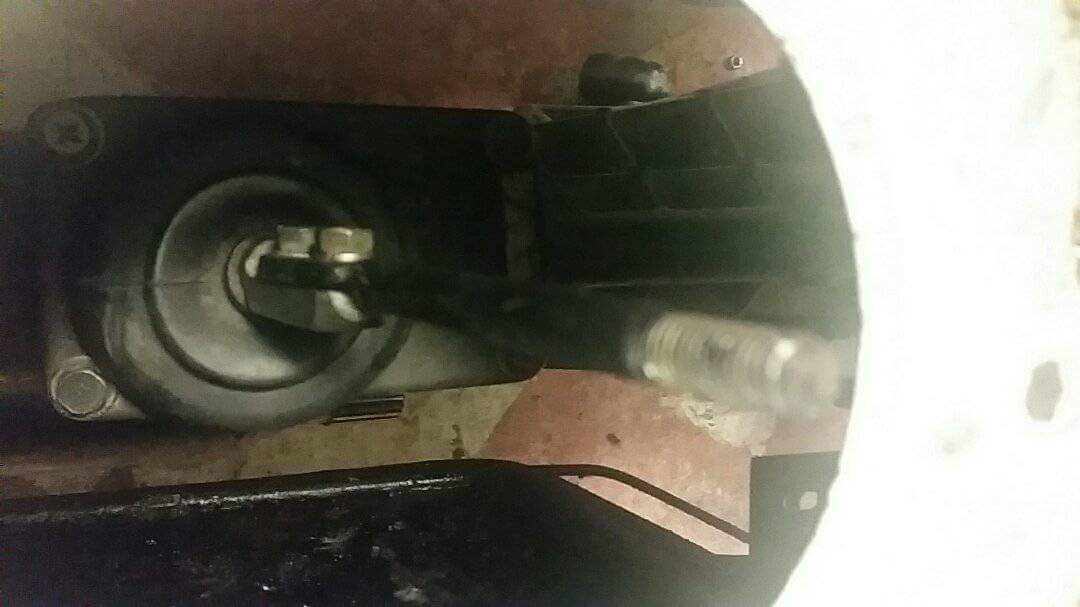
I doubt this gland would be rated for fuel1 point
-
this stops is clocking you in the face when it lets go & yeah try that "and or" wail on it like getting an axle out (if you hate the old wheel) or hit it softly if you do like it a little1 point
-
Oh wow. I just saw this thread now. You have an EF8 sir too! I'm such an oxygen theif for still not putting that tenner through. I just need to remember when I'm at a computer. Pretty rare car now.1 point
-
When I was there no one locked anything. My mates mate was drunk and on cardboard. He took someone's car. He got caught. And he got the third degree from everybody. (Not sure if he was the first arrest of the new millenia, or if it was my mates uncle for being drunk in charge of a horse. (I only heard about it days later cos I'd pushed the boat out pretty far myself) My mate told me people will drive their cas to the car dump and leave them there. Keys in the ignition, and still with the battery in. Some good scavenging by the sound. But when shits fucked, it's FUCKED.1 point
-
Like the fresh angle bro, but.... Would that tail light fit in the rear fenders kick up?1 point
-
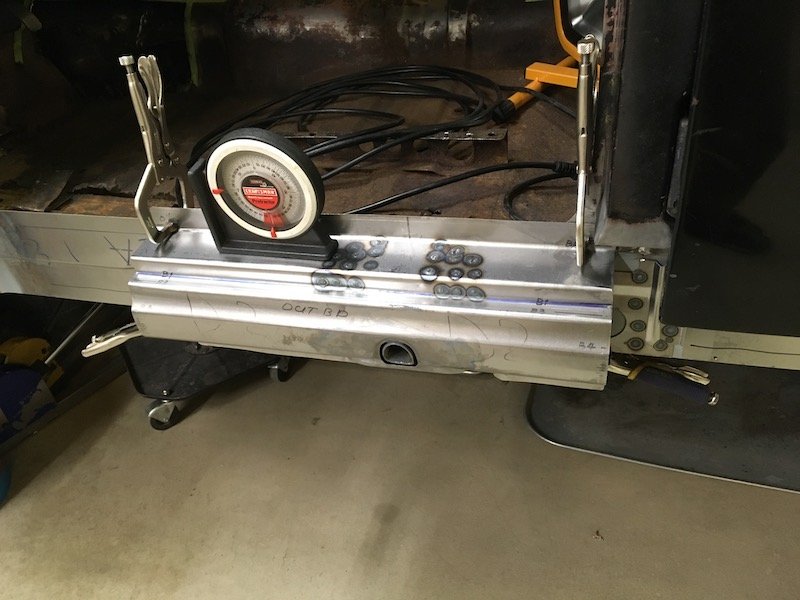
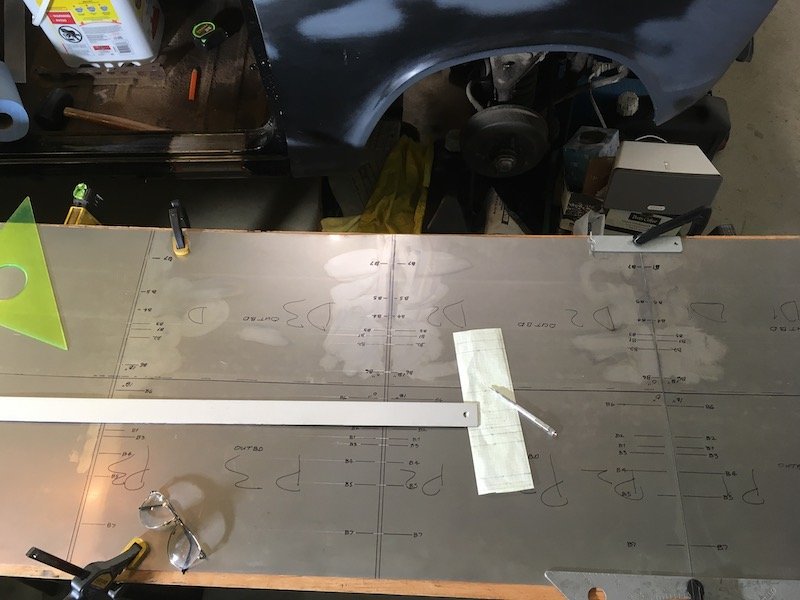
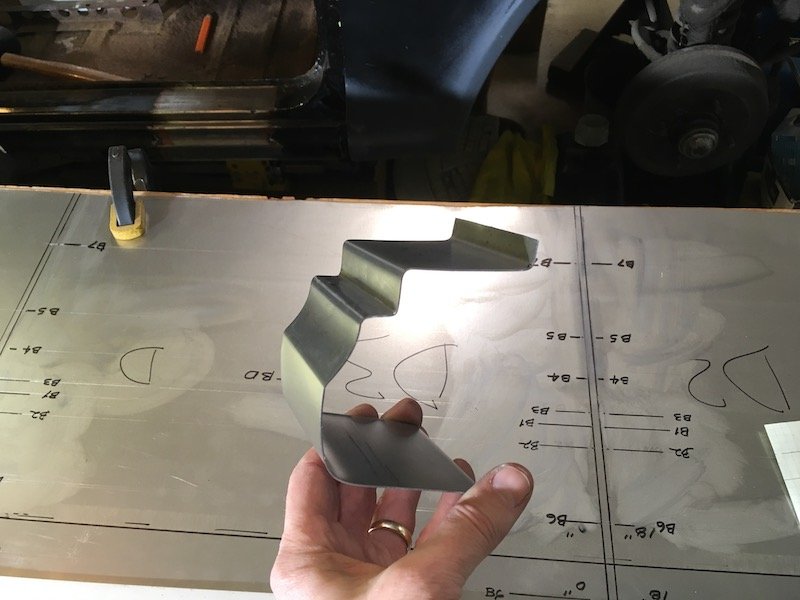
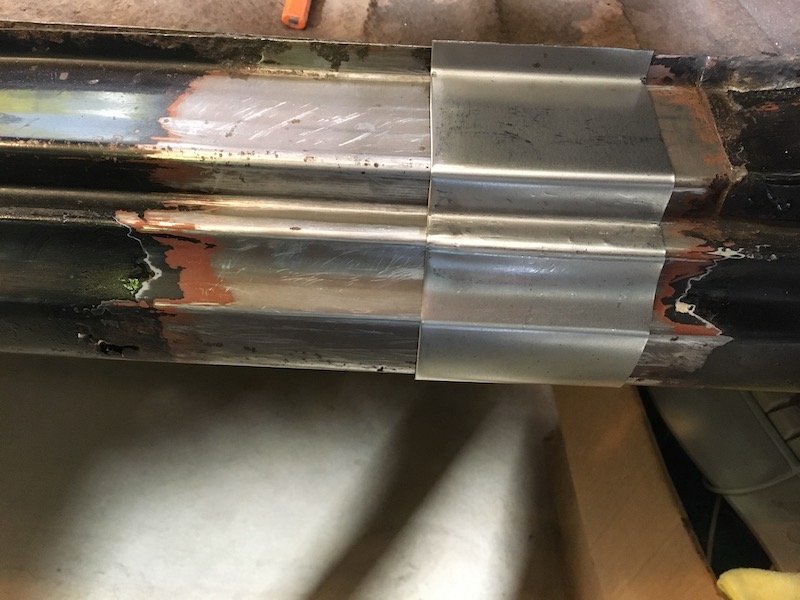
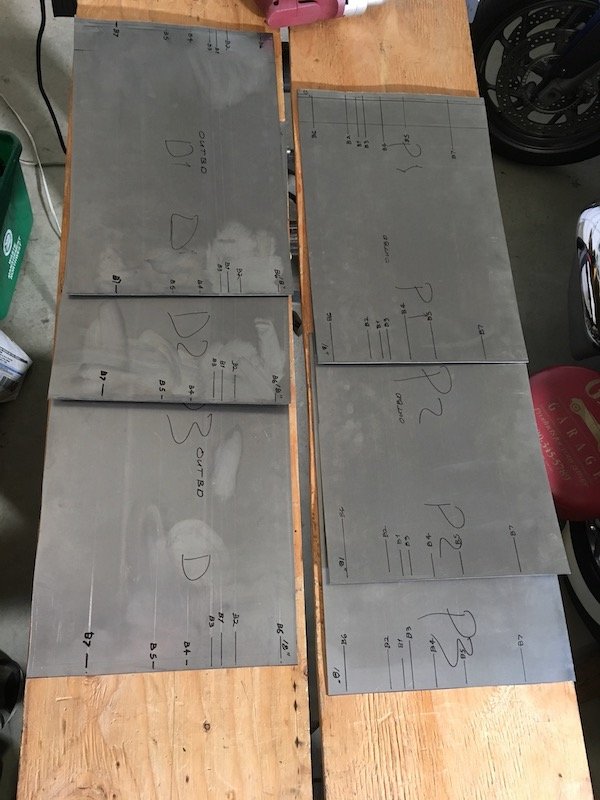
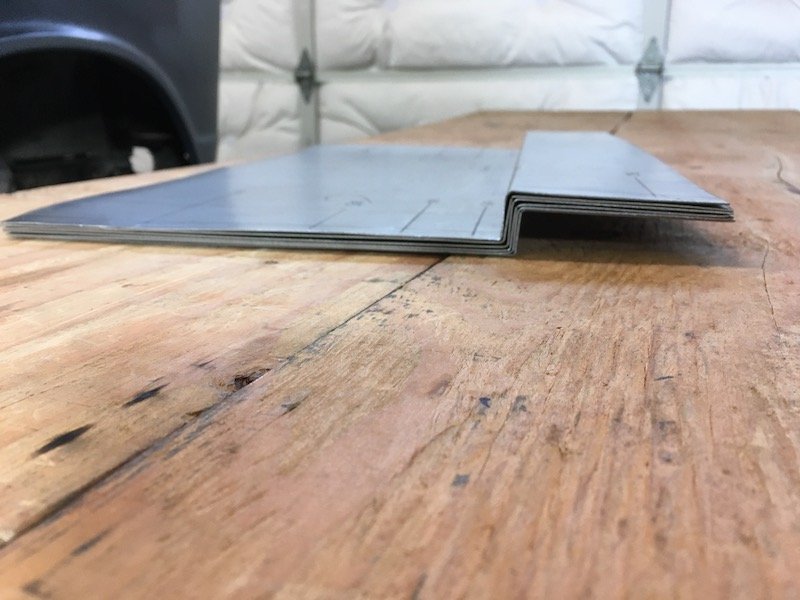
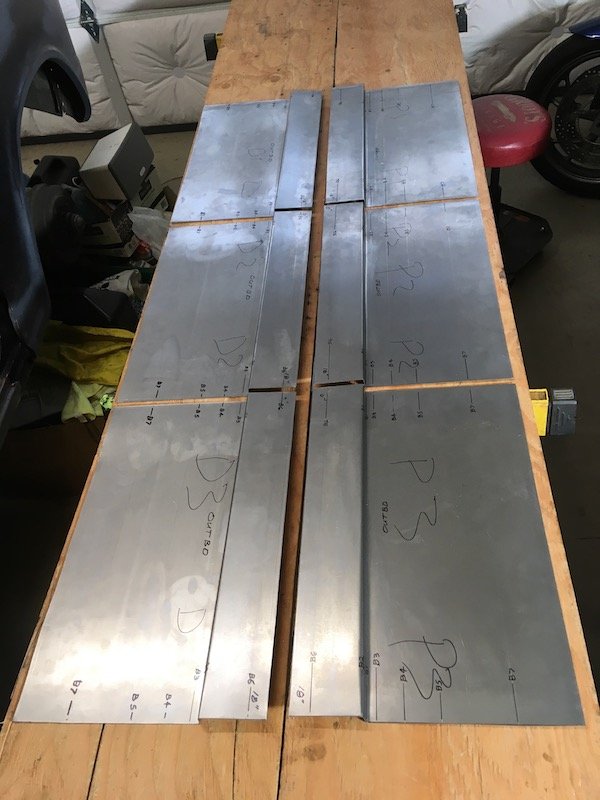
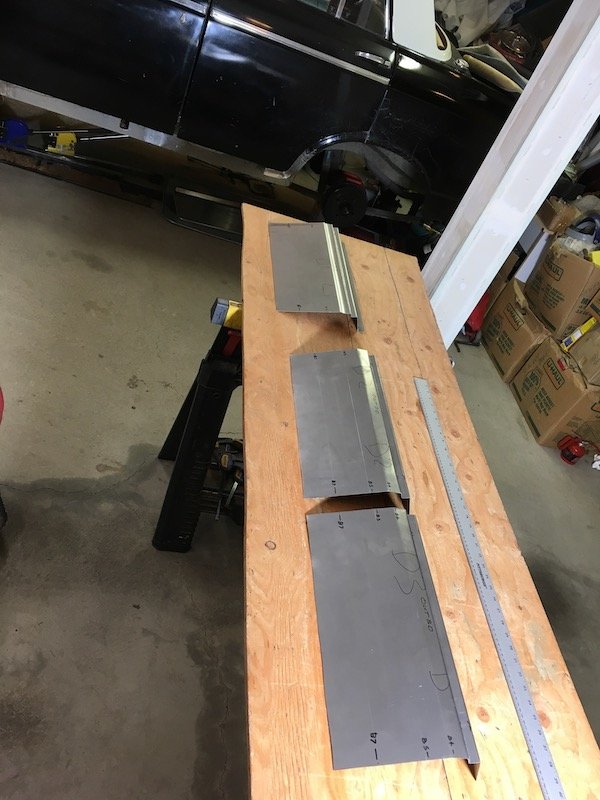
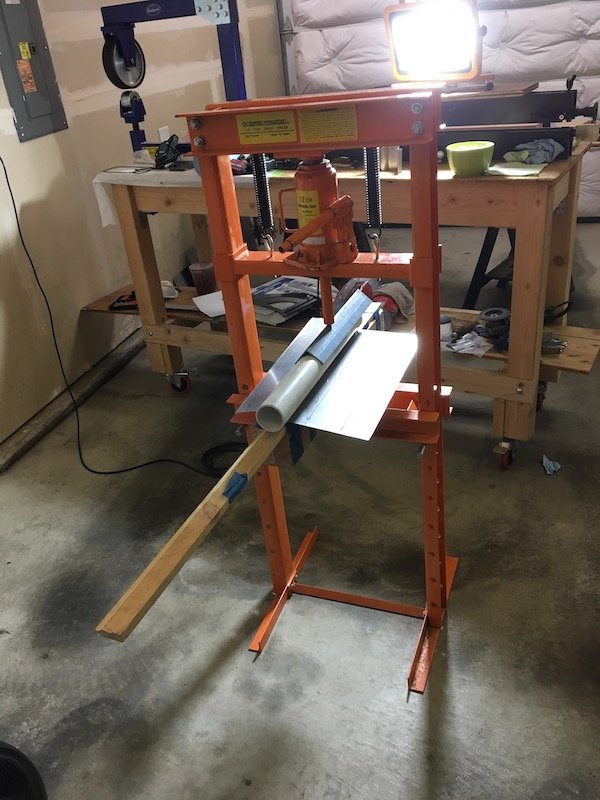
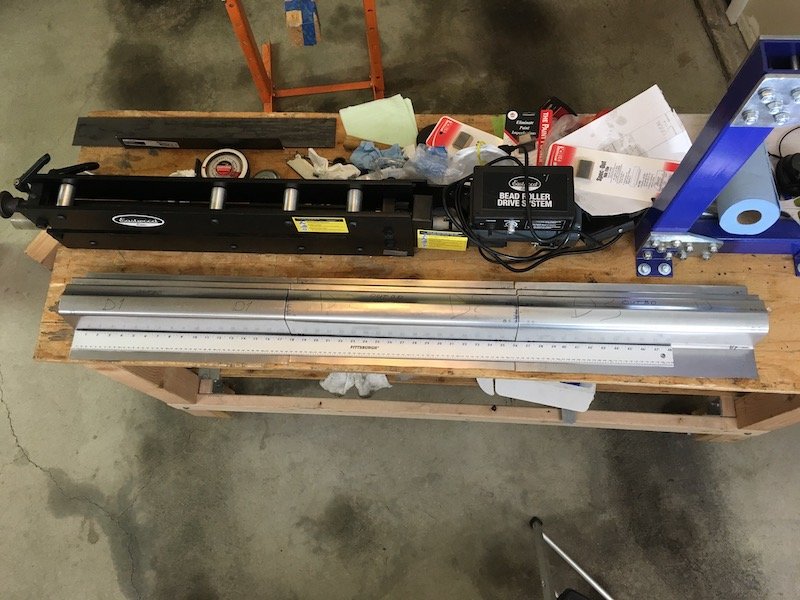
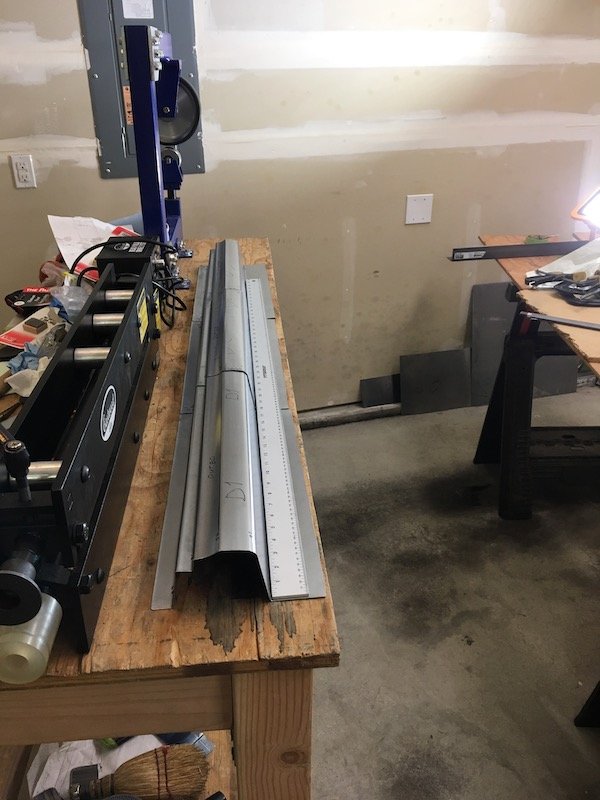
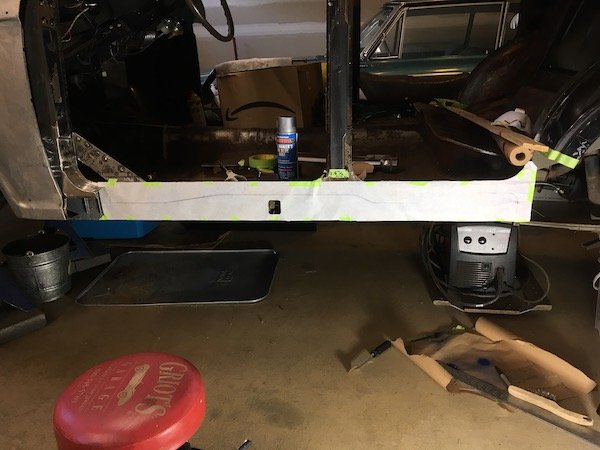
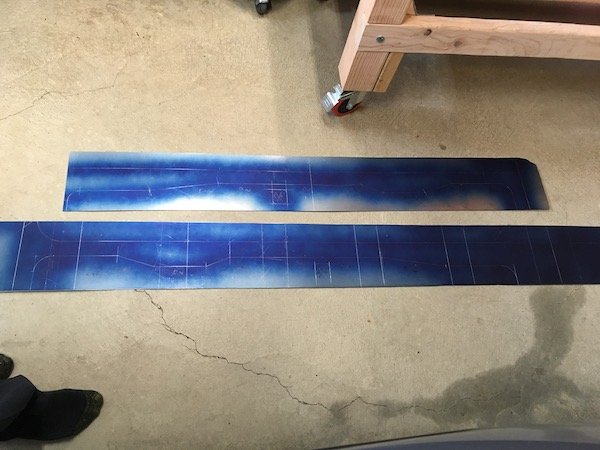
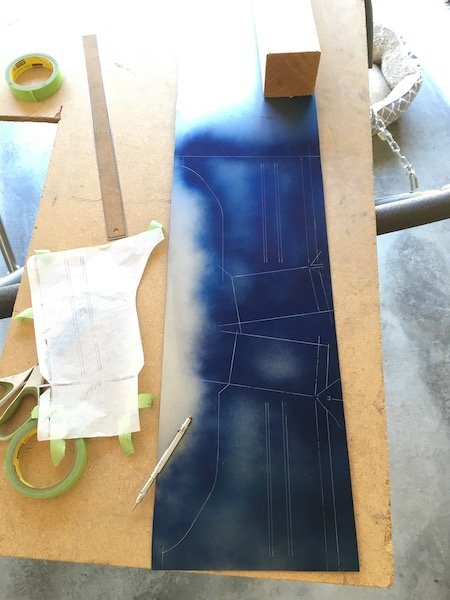
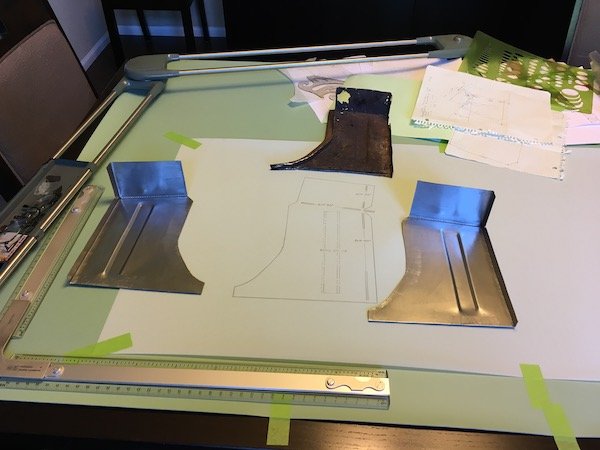
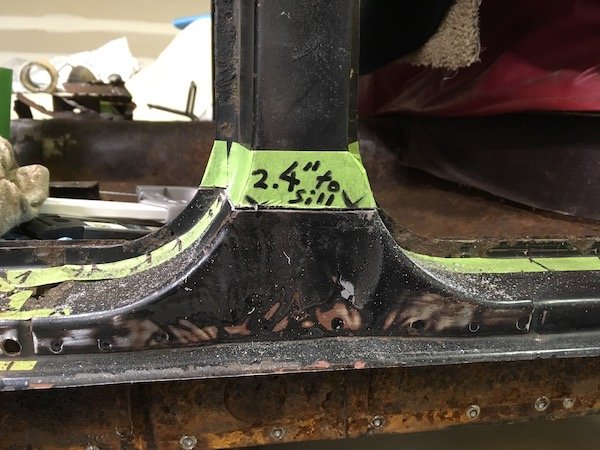
I got a little out of sequence. I should back up a little and show the making of the three outer sill segments that began about six months ago. Three segments because the metal folder tool only can do a 20 inch length maximum whereas I need about 54 inches total length. I also need to make offset bends. So there are a lot of challenges to make the sill. Makes it all the more interesting to have a go at it. Anyway, I have run into difficulties in duplicating the exact profile but it's good enough for usable parts on the left side. Maybe the technique can be improved upon for the right side. On the righthand side of the car I carefully measured and made a card template of the least rust damaged profile. Then began experimenting with and adjusting the seven bend line locations to figure out a way to make a sill. This is unlike a usual and simple sill that just wraps under the door more or less. The Bluebird has several visible body lines and a concave shape in-between. Plus there is the side of sill penetration for the jack lifting structure shown previously. This Bluebird outer sill is made of 20g sheet. Layout of bend lines The prototype profile Fits like a glove on sanitized right hand side Cut out six 18 inch long panels of 20g for left and right (D for driver's side or left, P for passenger side or right). Bend lines are marked more sharply by scribe marks so I can get good alignment when it comes to joining the segments together. B1 and B3 bends are offset bends and very close. This proves to be a problem Made the offset 3/4 inch bends for all panels (B1 and B2). Not perfectly uniform but close enough So far so good! As mentioned above, now I start having a problem at bend 3. This needed to be a tight offset bend from B1 at just over 1/2 width. The folder will only do 5/8 minimum (yet it was advertised as capable of 1/2 inch offset). Not good. I have to start compensating by moving the other bend lines to keep the visible body lines on target. The plan is to adjust the pillar bottoms to fit the adjusted sill profile, at least on the left side. I'd like a better plan for right side to get the true profile so I can leave the pillars unaltered. I'm considering having the folder plate milled down to get a true 1/2 inch offset bend, but that still leaves me with three separate segments to weld together. Either that or start over and make the whole thing as one hand formed piece by hammer forming each bend over a solid 90 degree edge of some sort. That might be wishful thinking. My crude setup for making the concave curvature between bends 3 and 4 Sandwich the sheet between plastic pipe, angle iron and squash it Checked out the fit of a couple of segments relative to the doors and the lower edge. Checked out as good. Three completed sill left side segments lined up on the rollaway workbench. Decent alignment of three segments. Looks like I can make it work when it comes time to join them End profile view of three outer sill segments all in line, just for kicks Discussion: https://oldschool.co.nz/index.php?/topic/60267-marts-pl310-61-datsun-bluebird-sedan/
1 point
-
Drinking too much piss isn't all that bad. You get to hang out with your mates, talk shit and occasionally come up with the odd good idea. So when your first world problems begin to get you down...I look towards alcoholism to solve them. Problem: Fucking gopeds everywhere, I'm sick of tripping over them!!! Ah yes, I have alcohol- therefore I have a solution! And just like that, all your problems go away once alcohol is involved... Boom!!!
1 point
-
Cheery Jonny - glad someone thinks it’s cool apart from me haha. Ive tried to keep it honest as I can but a bit of a NA sleeper too. Hotwire regret...perhaps Im just loving the steelies at the moment. I ventured past another speed bump in my street today and no scrapage. I’m looking forward to the slightly higher profile tyres soon to allow me another cm of clearance. Might be taking it to hamptons next weekend if the weather is fine as it’s the caffeine and classics track day. Get some seat time in it and maybe, just maybe get it in 5th for the first time
1 point
-
Chatham Island's Nissan population just increased by one.
1 point
-
You're a cork tile m8, turbo time?1 point
-
1 point
-
New taillight mount that not intergrates the indicators
1 point
-
So got a bit distracted with local rotary travel and a rotary storage workshop. First things first, I priced up materials for re-upholstery and bought some tools and foam before realising nobody would just do a stitch job basically wanted all or nothing. So we went to Stephen's old mate who offered a completely mind-boggling irresistible cash price job, so took him up on that offer. He even had the exact fabric. Got the rears back already and they needed completely re-doing due to the heat damage cracking the top piece and subsequently shrinking the fabric elsewhere. So meanwhile we've been busy fiddling around stripping it out completely of wiring, brake lines, and most of the underseal except that one spot over the tunnel that you leave until last and when last comes you go 'why on earth did I leave the worst bit til last' so you just never ever touch it again... someone want a job?? Mostly it's in great condition, although once we finally ground off the welds holding the guards to the body (first WTF moment) we found the RHS front had significant damage as bad as to completely crumple the crush tube and crease the engine bay. The damage is a bit of a financial set-back and obviously means a bigger job for compliance, so it did then require blasting and prep to be repaired. Bonus find this time round, a charming ring down in the door panel over the lock. As things go, I had it set up and masked off to blast myself, and then the compressor died. So after looking around I found C.A. Levien in Henderson to give the underneath, inner guards, engine bay, windscreen channels, and rear quarter rust patches a blast. Yes, everything except the great patina and heinous tagging. (my least favourite side, with BB gun dents and what appears to be acid damage). Even the sandblasters they thought it was hilarious to save the patina, but they made such a huge improvement on the car it actually looks purposeful now. Highly recommended, they even stored it away in it's own shed. The rear quarters were only 5% worse than expected, the underneath is absolutely fantastic, and the weird panel under rear windscreen that was mysteriously primer is happily not bog and is solid steel. Kyle was kind enough to take and send me some pictures of the process too: So after a year of ownership it was transported off again on Monday to it's new temporary home. Thankfully we found an old school repairer who will be able to save it without us finding a new front cut. From what I understand, he will cut from firewall and slowly pull the front back into original shape, beating out the creases. While it's there I may gain the fucks needed to finish off the underseal and chuck some durepox over it but probably won't. He'll also be teaching me a mix of painting and airbrushing to get the touched quarters back to their patina best. And I'll pull apart the twin dizzy to see what the options are. That's all for now folks.1 point
-
Drivers door complete and only the boot lid to go and body work finished. Still trial fitting parts etc and once done it is off for the final blast and prime then off to paint.
1 point
-
So have managed to progress with this some more! Got it all back from painter Doors all on lined up not perfect but will wait till front guards are on Fitted all new door rubbers and window guides Got the motor In Swapped over the end T piece of the steering collumn to the shorter power steering one from a ms110 And fitted it back in car Found out the auto and manual pedal boxes are the same manual just has a mount for pedal so I just removed the clutch pedal and refitted as this will be auto. Painted the brake booster and fitted the new Nissan pajero brake master. That's all for now! Exciting times1 point
-
Update for those interested Repair Cert PASS Compliance and WOF all PASSED apart from the below 2 points - tighten hand brake cable - fix slight leak in return line to gas tank brass fitting Cert Clint did the cert on Friday and I’ve attached the list. I just need to work through that list and take it back for the brake road test. I also need the old old owner from USA to email that he sold me the car - I keep in touch so that won’t be an issue. Now to work through the list and get this sled legal. Am I happy? Yes, the answer is YES!
1 point
-
I collected the crx gearbox today and spent a few hours in the garage. I ground away my welding sins ready for sons thick paint. It's not perfect or straight but it's as good as I can get it. Refitted gearbox While the car is jacked up I figured I should probably install the new thermal intake gasket. I'm skeptical as to much difference it'll make but I've got the Bluetooth data logging so I can keep a eye on it. Refitted the exhaust manifold and test fitted the radiator. It's a squeeze but it clears which is a improvement on before. The lower support is a tad lower than before but that gives me a bit of adjustment for a extra few mm between the rad and manifold. I plan to either get a half size rad or 'tuck' the radiator. By tuck I mean measure up one that'll fit where the ac condenser would usually sit I need to do a spanner check on the stuff I've done today and refit the front crossmember along with replace the cv grease and boots.1 point
-
Compliance and WOF today. Dealer plated FTW spat some fluid on the way down - shite rad cap. Swapped it out as I had 2 with me in case haha. Gagging for a tune.
1 point
-
Since 'finishing' it in Janurary, Ive put close to 1000 trouble free km on it. Theres a few things I need to sort (raise foot pegs and replace the brake pedal as its rubbed through from dragging while cornering) but overall Im pretty happy with it. Its turned out pretty much the way I envisioned it. However, I have a couple of plans for changes to be made. Id like to sort the carb issues with its original motor and get that back in, A few asthetic refinements and as I get more confident with welding maybe some wilder bars... But theres a couple of other projects under way in the shed so stay tuned
1 point
-
The shuttle was surging and running like shit. I suspected the fuel pump was on its way out so I whipped it out. All gunked up with dried fuel sadness. Luckily the tank doesn't seem to be rusty enough to need lots of work to clean it out. I thought I'd finally attack the new to me headers for the crx as they had some surface rust and peeling paint. Quick once over with the flap disc and a squirt of paint and they are presentable The crx rad support was pretty bent and buckled which pushed the rad into the manifold so that needed fixing. I had kept a nose cut off one of the shuttles I've wrecked so drilled out all the spot welds. A quick check to see how close the shuttle stuff is to the crx. Carefully cut the fucked mount out Some carefully trained seagulls later and its in. Bonus now the bottom of the t bracket actually lines up with the bolt hole. The gearbox should be ready this week so I'll chuck it in soon. Might give the rest of the exhaust a quick squirt of paint too as it's mild steel. I also chucked some non fucked headlights on too as the other ones were all yellow and the brackets were butchered on or broken1 point
-
It's also not unheard of for cars to sit around for a year or 2 on the lot before being sold and then registered as that year instead of their build year. I reckon you could just about convince the NZTA that it's all just a big misunderstanding/they probably don't even care. This sounds like a lot of effort for a car nobody really likes?1 point
-
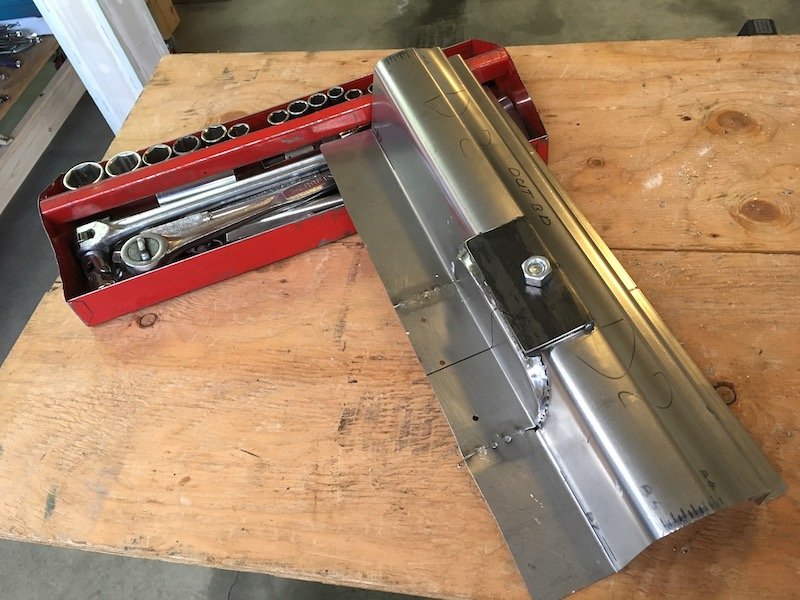
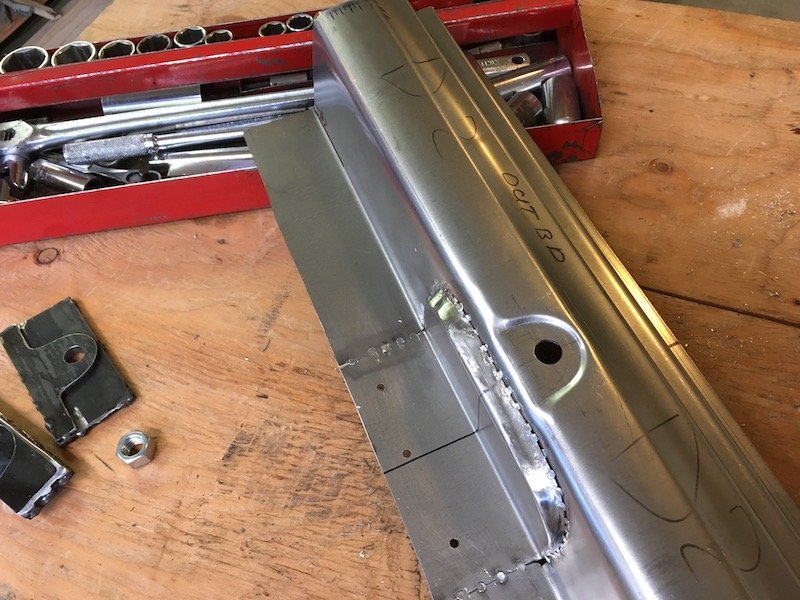
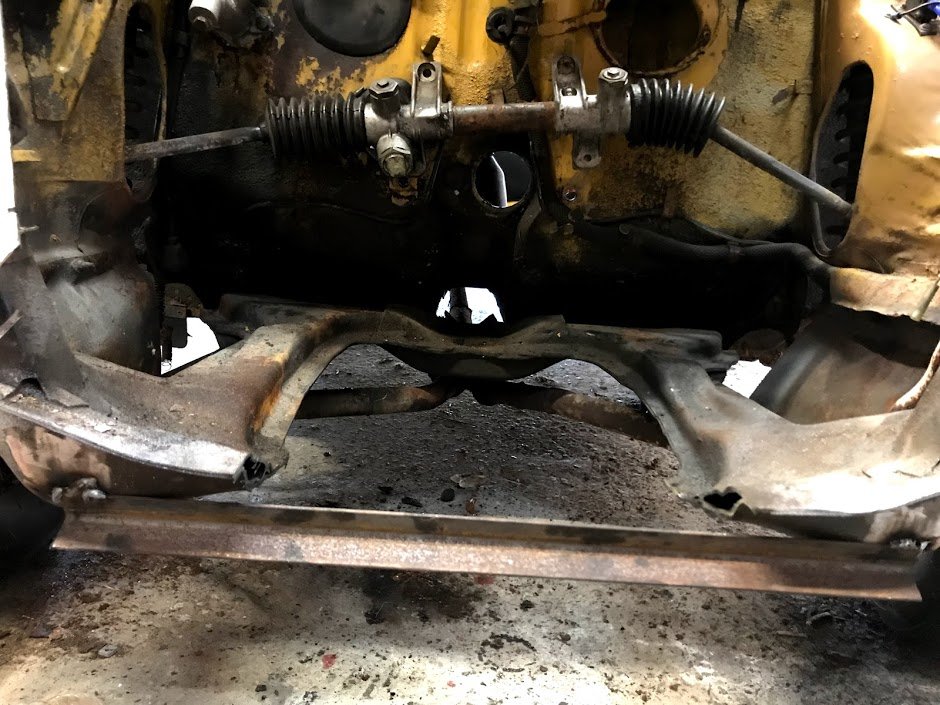
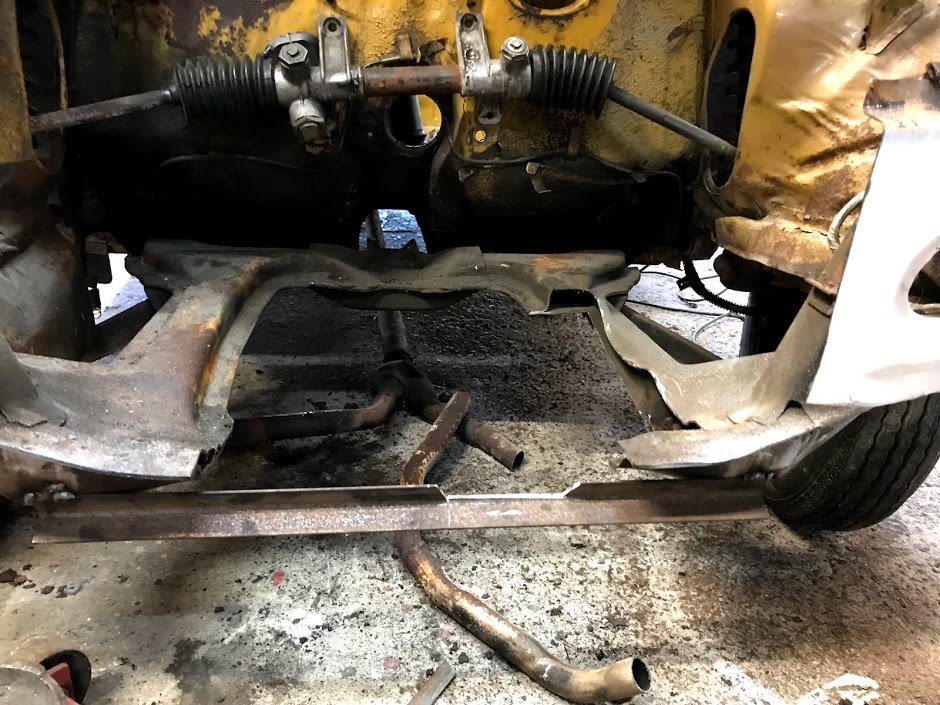
Well no turning back now, I've started cutting the subframe of which I'll make up new sections once I've finalised the position etc. I thought I might be able to keep part of the front section but it all had to go, to stop it from moving I welded on a bit of angle steel. This dropped it down nicely but the angle steel needed a notch cut out for the oil level sight, it still needed to move over to the passenger side too. So more cutting. Looking much better, the oil filter sandwich plate is resting on the subframe now so the engine isn't level yet but far better and is about 10cm further to the passenger side. This is as far back as it can go without cutting the firewall, but it is within 20mm of the closest protrusion from the steering rack. I also bit the bullet and cut the tab off the stator cover which is the oilfeed because it was almost impossible to get it to fit around the steering rack. This is a magnesium casting, so I cut it slowly and manually. Didn't burn down the house. Plan is to block the original feed then tap into the casing and have an oilfeed that way. No reason it shouldn't work, but if it doesn't I can just get another casing. They seem to be easy to get, I guess because they get damaged when riders drop their bikes. It's sitting much better in the engine bay now, I will try get it a bit further over because I'm worried about draiveshaft UJ angles. But for now it fits behind the grill! The front clutch cover was always going to stick out, I'm not sure what I'll do here but at least clutch changes will be easy access....
1 point
-
Time to get this out of the little garage at the bottom of the property, the house is built into a hill so the back section is multiple levels. There is a 'grass driveway' to get up, I thought it would be fine since it hasn't rained for a while. Nope. 27hp grass skids and the best I could get to was 3/4" of the way up, it doesn't look steep but it is: Oh and it started fine after sitting for ages. Look at it, majestic: It got dark so I gave up and got the Safari lined up to winch it up. Top of the hill with winch rope leading down to it: My view watching it drive itself up the hill: Let it idle outside, not sure why...the engine is coming out anyway. My boy wanted to know how to write my name with his chalk, but only the last 3 letters. Cool. In the garage with the other car I should really be working on.
1 point
-
What are you going to do with your other Imps Alex?..............
1 point
-
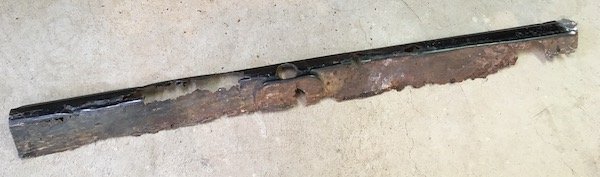
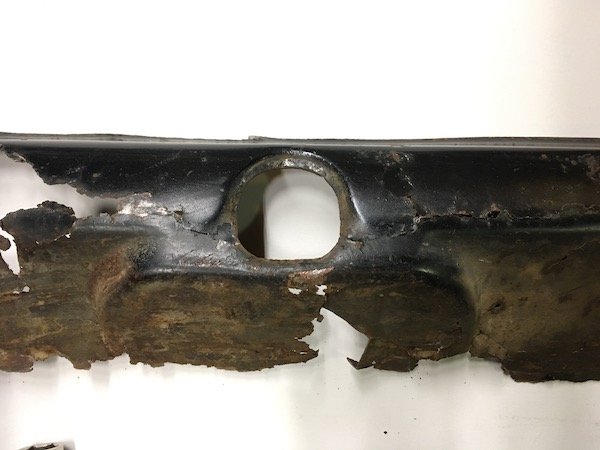
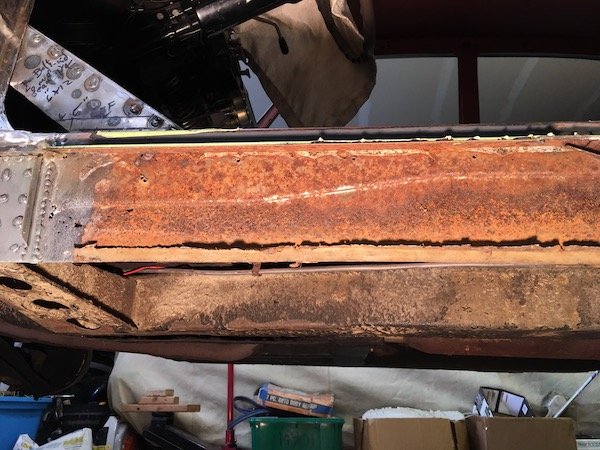
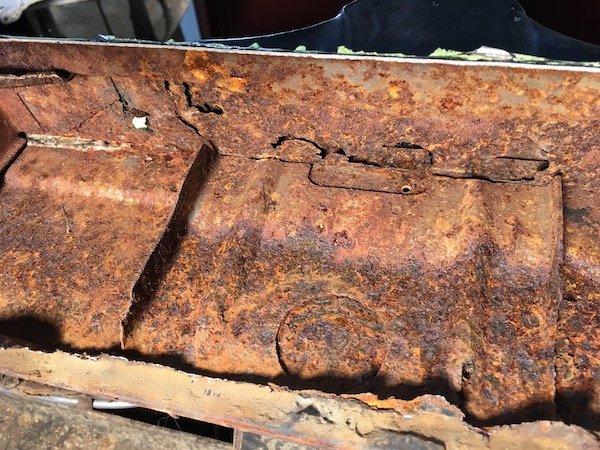
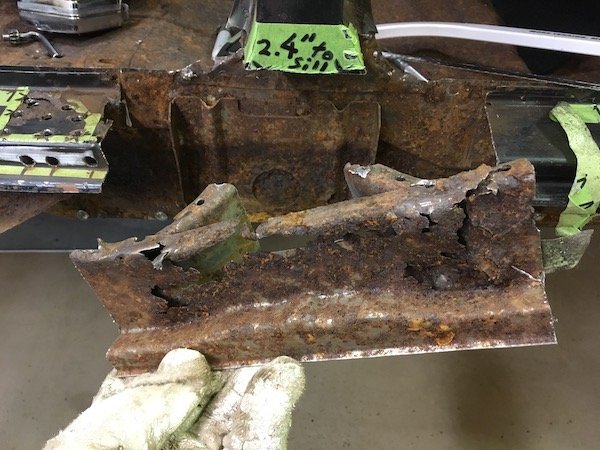
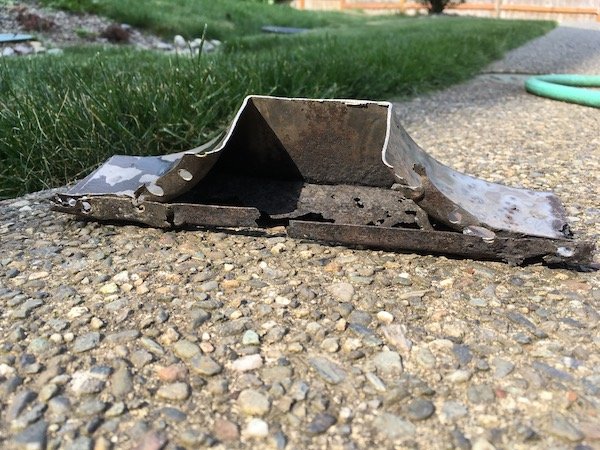
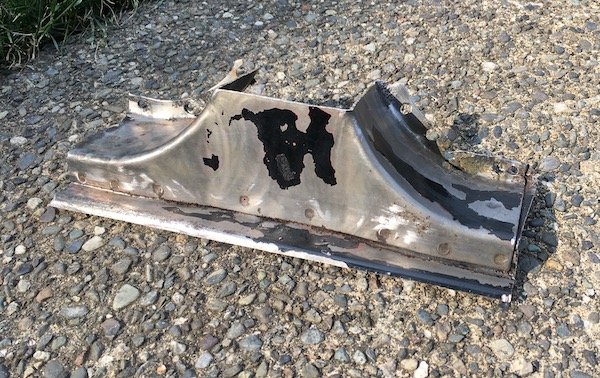
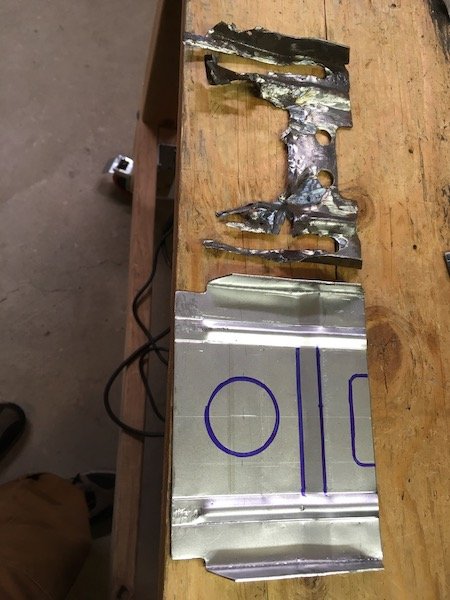
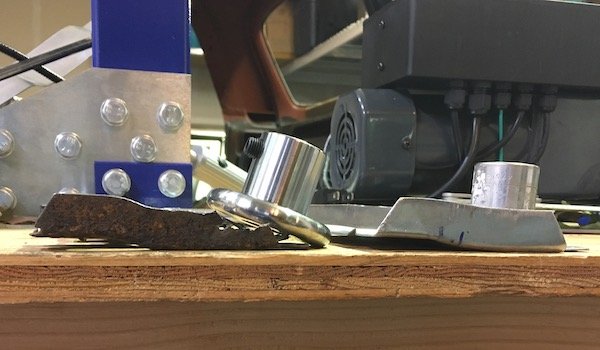
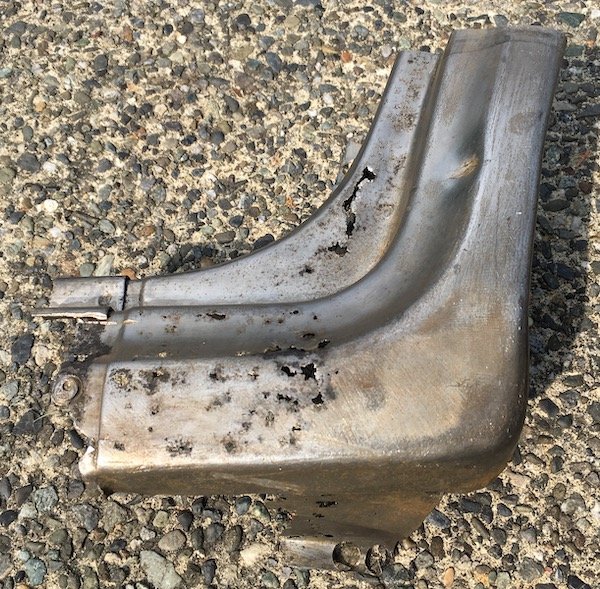
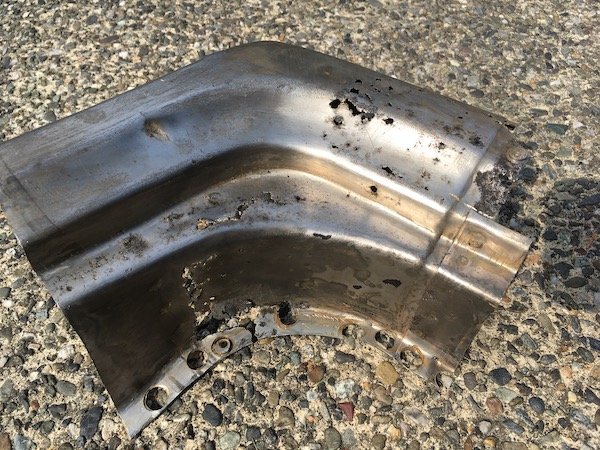
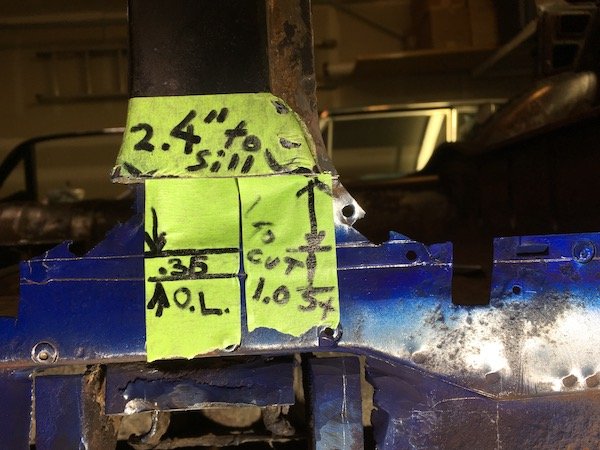
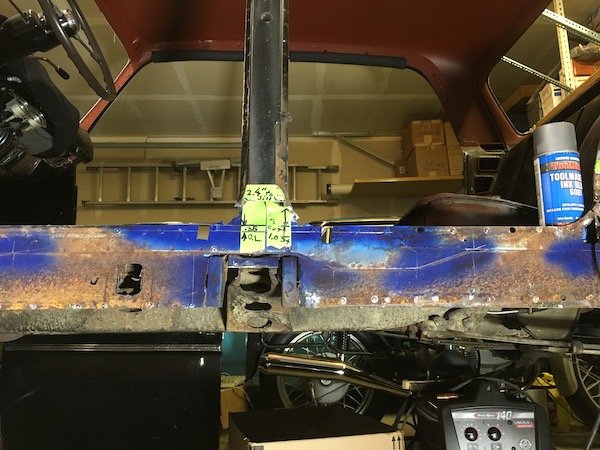
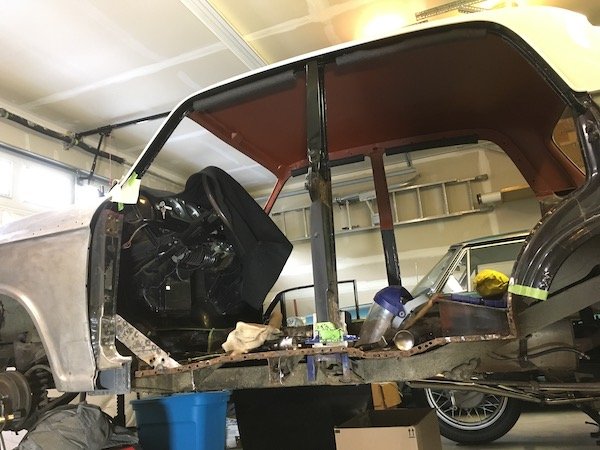
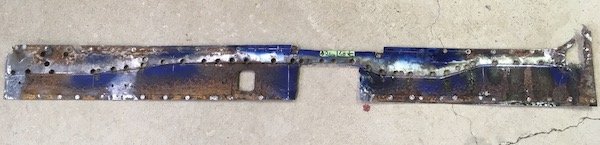
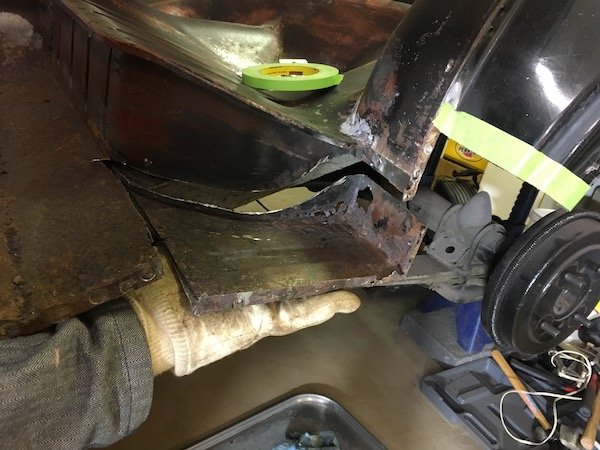
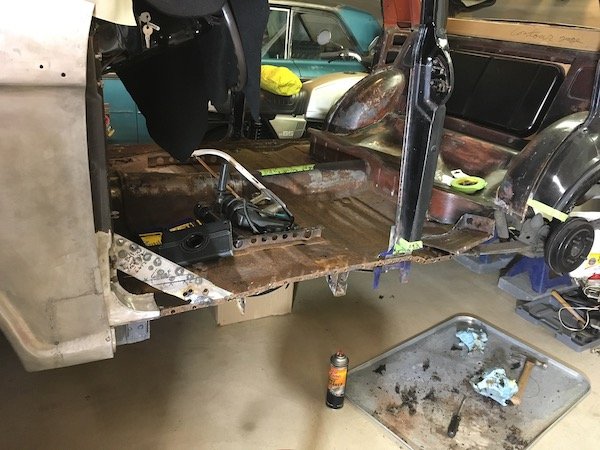
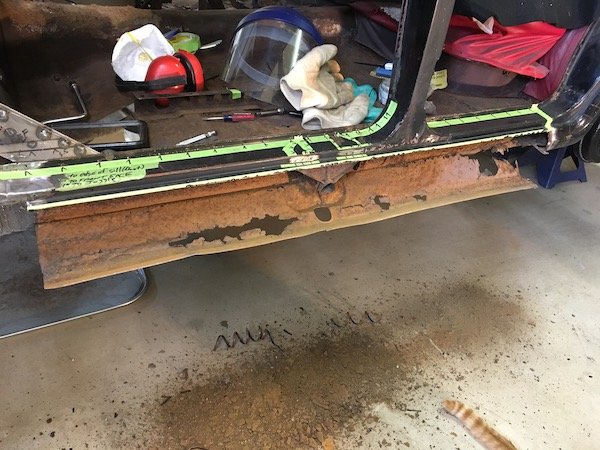
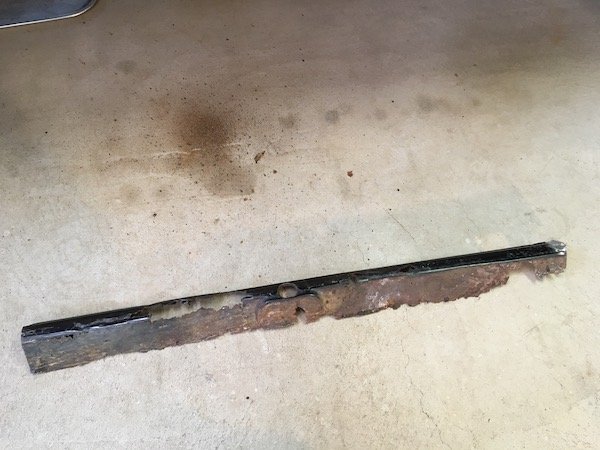
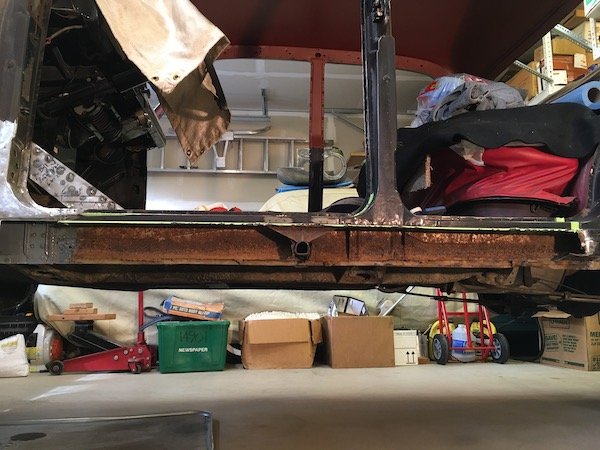
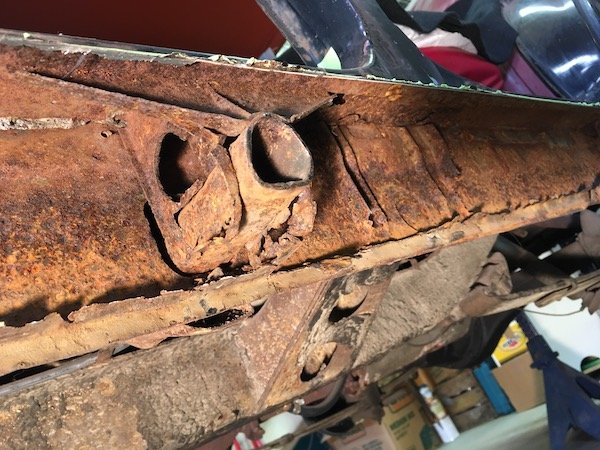
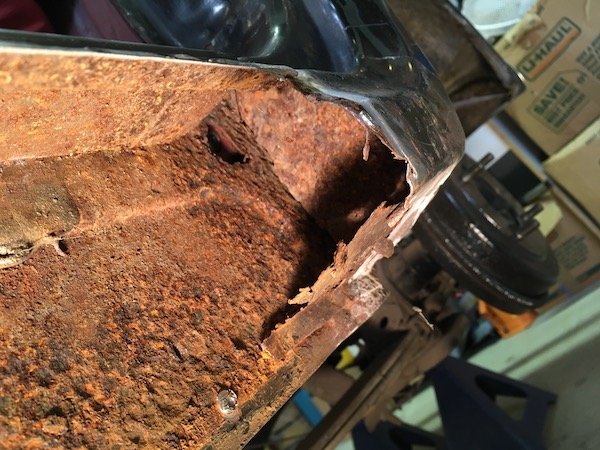
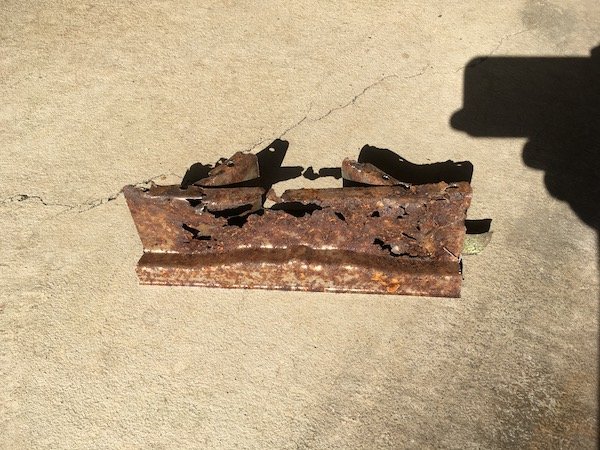
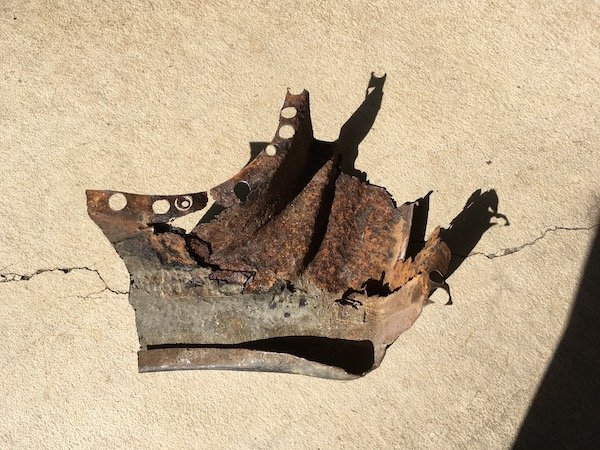
Removal of more rusted metal from the 61 Datsun Bluebird left hand side outer and inner sill, 'B' pillar, 'C' pillar and side of seat pan. A huge hole in the car structure is the end result. This gets very ugly and you may want to look away if at all squeamish. No need to panic! Almost of this is going to be replaced with new steel, but it is a very slow step-by-step process to make these parts from scratch. There is nothing here you can just go to your computer and order or even find in good condition in an auto wrecking yard. It is a heck of a learning process that will be applied to the so far untouched right side of the car. I get started by using electric metal shears, slicing and splaying open the outer sill for internal rust inspection and to understand what details are inside with respect to the side of body lifting point. I had hoped at least the upper sill and inner would be salvageable so I cut a relatively clean line against a tape edge at the body line. The outer sill immediately swung open at the lower pinch weld and then just falls off. Notice the slightly bumped out area below the body lift penetration point. This will be duplicated in the new steel panels later even though I may never use the factory lift jack tool. I do still have the jack but it is worn, unstable and deemed unworthy for safe use. It would either lose grip internally and slide downward suddenly, or the small base plate could kick out at the ground and punch the upper shaft end against the door and make a big dent. Maybe the old lift jack can be repaired and improved or maybe not. Sheet metal form detail of outer sill lift jacking point Eventually, the rusty inner sill is to be separated at the left next to the new 16g steel from the previous 'A' pillar repair and new metal lapped in at the back side of the gusset shown. If you look closely, you see the fuel line and wire to the electric pump. That line is soon removed to avoid a fire hazard. Moving further aft, we see the reinforcing structure around the lift pipe, or what remains of it anyhow. And behind that what I call the joggled gusset. This upper gusset, the near one with the three ribs, is heavy gage steel and salvageable. I thought incorrectly, that to remove the upper part of the sill, that the upper gusset would have to be separated first from the pipe. Actually the top of the pipe is not welded to the upper gusset at the notched contact point. Only the side brackets are welded to the pipe and they are weak enough to just pull apart from the pipe. I could have just lifted the upper sill right off once the regular pinch welds were drilled out. The salvaged lift pipe gusset plate. I ended up with a lot of holes from spot weld drill outs that will be used for plug welding later on. This is the joggled gusset plate that is on the opposite side of the inner sill with respect to the body mount bracket on the other side. This gusset is deemed too badly cratered and rotted and will be reproduced. I cut it out before removing the inner sill by cutting around the perimeter after a futile attempt to search out and drill out all the spot welds. Things aren't looking to good above at the base of the 'B' pillar. Lots of otherwise hidden rust damage. I'm going to cut 'B' pillar base off and repair. The damage and repairs needed to the now cut off 'B' pillar is shown in the light. I subject the 'B' pillar to an electrolysis bath to remove bulk rust and identify the salvageable sections. A lot of it is still good and will be cleaned up and reused. Portions near the pinch weld are bad and the flat horizontal section deep inside is shot. Outward facing sections are perfectly good. Jumping ahead here a little bit since I did not have a good pic of the freshly removed gusset plate. As you can see, it was total destruction to remove it. A real light show with all the flying sparks! Shown above is the newly made replacement. The joggle or step was made under force from a hydraulic press and an opposing stack of offset steel bars. The aft end inside the sill is heavily cratered and holed. Thus I go to the extreme of cutting off the 'C' pillar, aka dog leg, for complete repair as the hidden damage inside is total rust out which will otherwise just continue. Where there would be an end of sill block off plate in the far back is really just rust powder stuck to the asphalt undercoat. At the lower pinch weld, the flange of the outer sill moves upward leaving just the inner sill plate poking down about a half inch. Why? Just looks a bit odd. Probably to match and fit the slight difference in contours at the 'C' pillar. The now cut-off dog leg ('C' pillar base). About 60 percent or more is perforated or too thin to reuse. This part proves difficult to reproduce. It is still not quite right after patching it up section-by-section off the car. I tried, and will tweak it a bit more now that it is welded back on the car. I might do it differently when I go to work on the right side of the car now that I know which areas should be cut out. The now fully exposed inner sill plate. This was a bit of fun. Before drilling the spot welds and removal, I cover all the step contours with blue machinist paint and scribe on the metal the intersection points to permit accurate measurement of the sill. The inner sill steps out about a tenth of an inch where the flange of the floor is butted against it for nested fit. In addition to recording measurements prior to removal of the inner sill, I make a paper overlay as a secondary backup to sometimes flawed note taking. I've also made a full size drawing on mylar as yet a third method to help reproduce the part. Key measurements at the 'B' pillar overlap (O.L) and inner sill. It's starting to look pretty messy and getting worse soon. Inner sill is drilled of the spot weld connections to the floor flanges and removed. The underfloor brackets are cut off at their flanges because these brackets are severely beat up from impact damages. The bracket for the body mount is planned for reuse, if it is good, so the flanges are left intact. Not reusable! As final act, the side of rear seat floor pan is cut out. Is there a name for this thing? This proves to be a relatively easy and fun part to reproduce because of the straight bends and box shape. Just a little challenging to butt weld into the side of the seat pan later on. A rust hole big enough for a mouse to climb through. And they did, sometime stockpiling grass seed and such here and there. And now the huge ugly hole in the car! A preview of making new parts and closing this chasm up. Making left and right hand parts where possible. I'll probably focus on the inner sill next post. More later.
1 point
-
The left side Bluebird rust damage survey. Right side is about the same except much less damage to the front fender and more damage to the 'A' pillar or post. Starting with the left front fender and working back to the rear dog leg and side of rear seat floor. And a then preview of the right side.
1 point
-
did a bit more. cut open the sill to have a look at the inner piece which was a bit rusty so i cut it out and made a new bit. 2019-01-05_03-17-08 by sheepers, on Flickr 2019-01-05_03-17-43 by sheepers, on Flickr then it was on to making a new outer skin. i cut the whole bottom off and just made one patch to make life easier. i made the arch lip and welded it on first, then stitched it all in. 2019-01-05_03-17-29 by sheepers, on Flickr 2019-01-05_03-17-52 by sheepers, on Flickr 2019-01-05_03-17-58 by sheepers, on Flickr still got a few little bits to do but its nearly finished. tomorrow is my 45th birthday so im not sure if ill work on it tomorrow or not.1 point
-
Funny you should post that up Joe...I was just reading about it this morning. What a little weapon.. http://www.imps4ever.info/specials/v8/feck.html1 point
-
Final update, i said it was a long week brought a power stering set up off trademe for about $200 when picking it up the guy asked if there was anything else i needed as he said he has some more spares... so yea i got a fue more... cars!
1 point
-
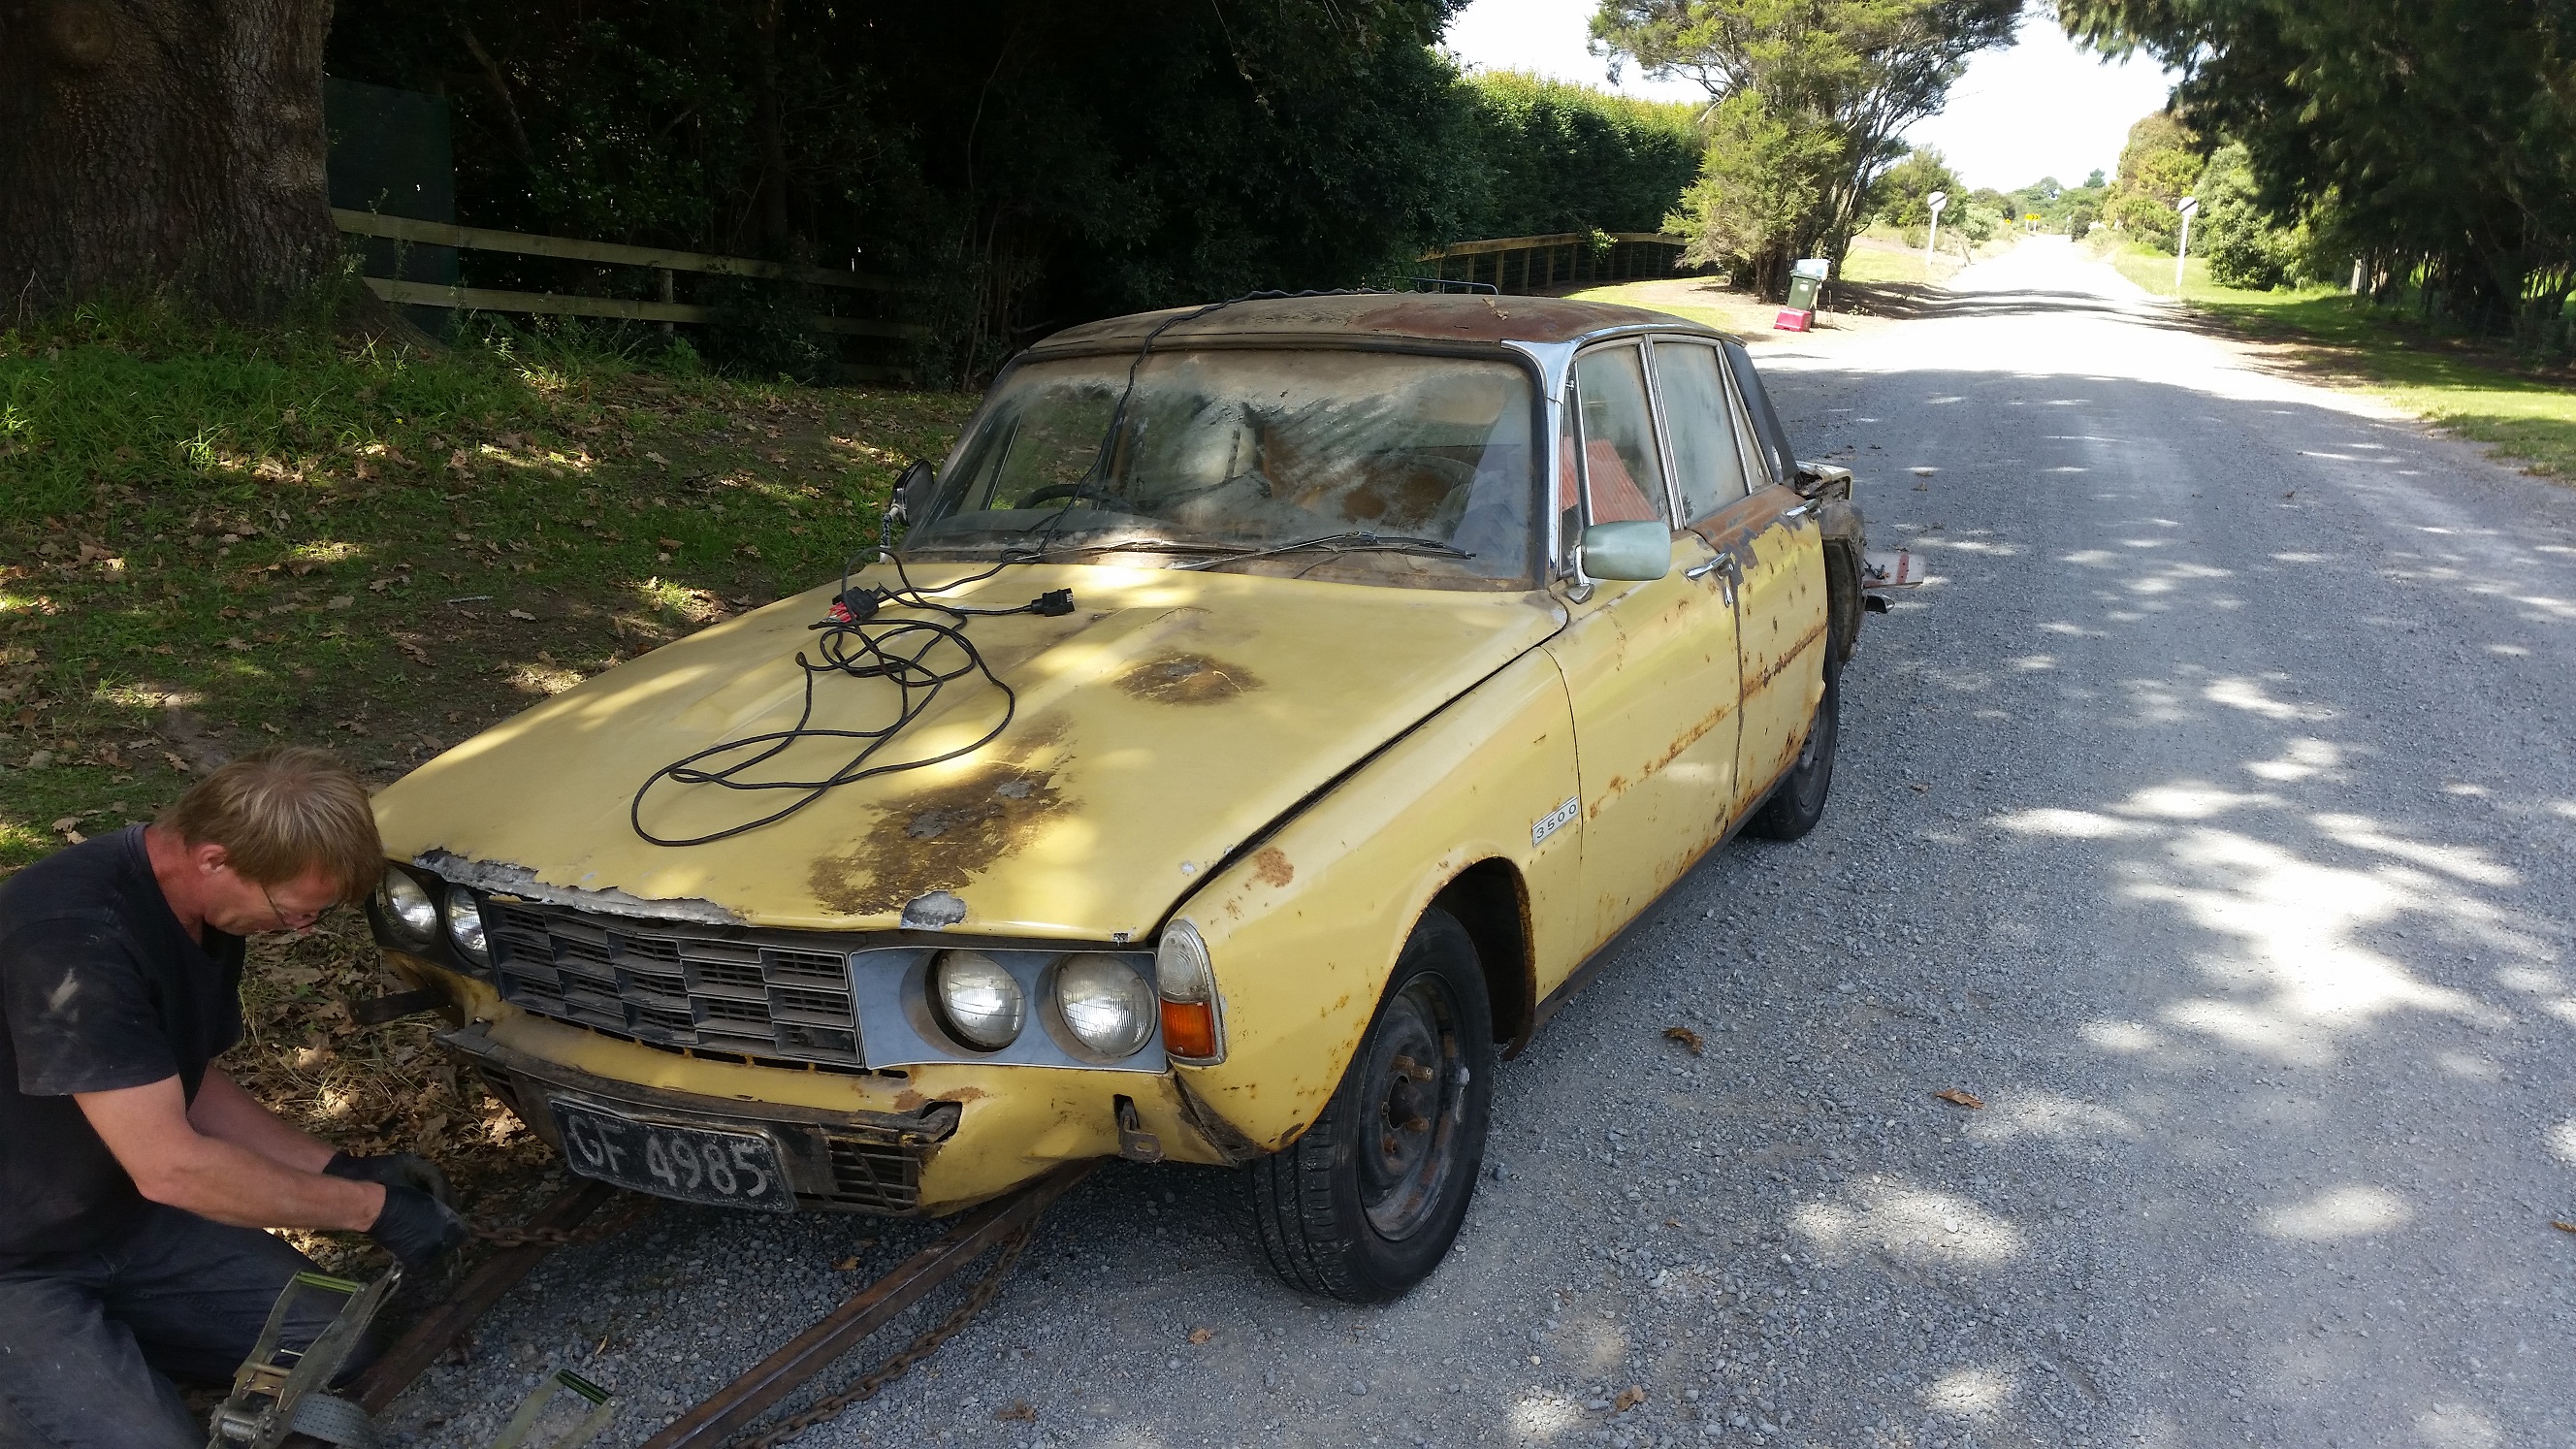
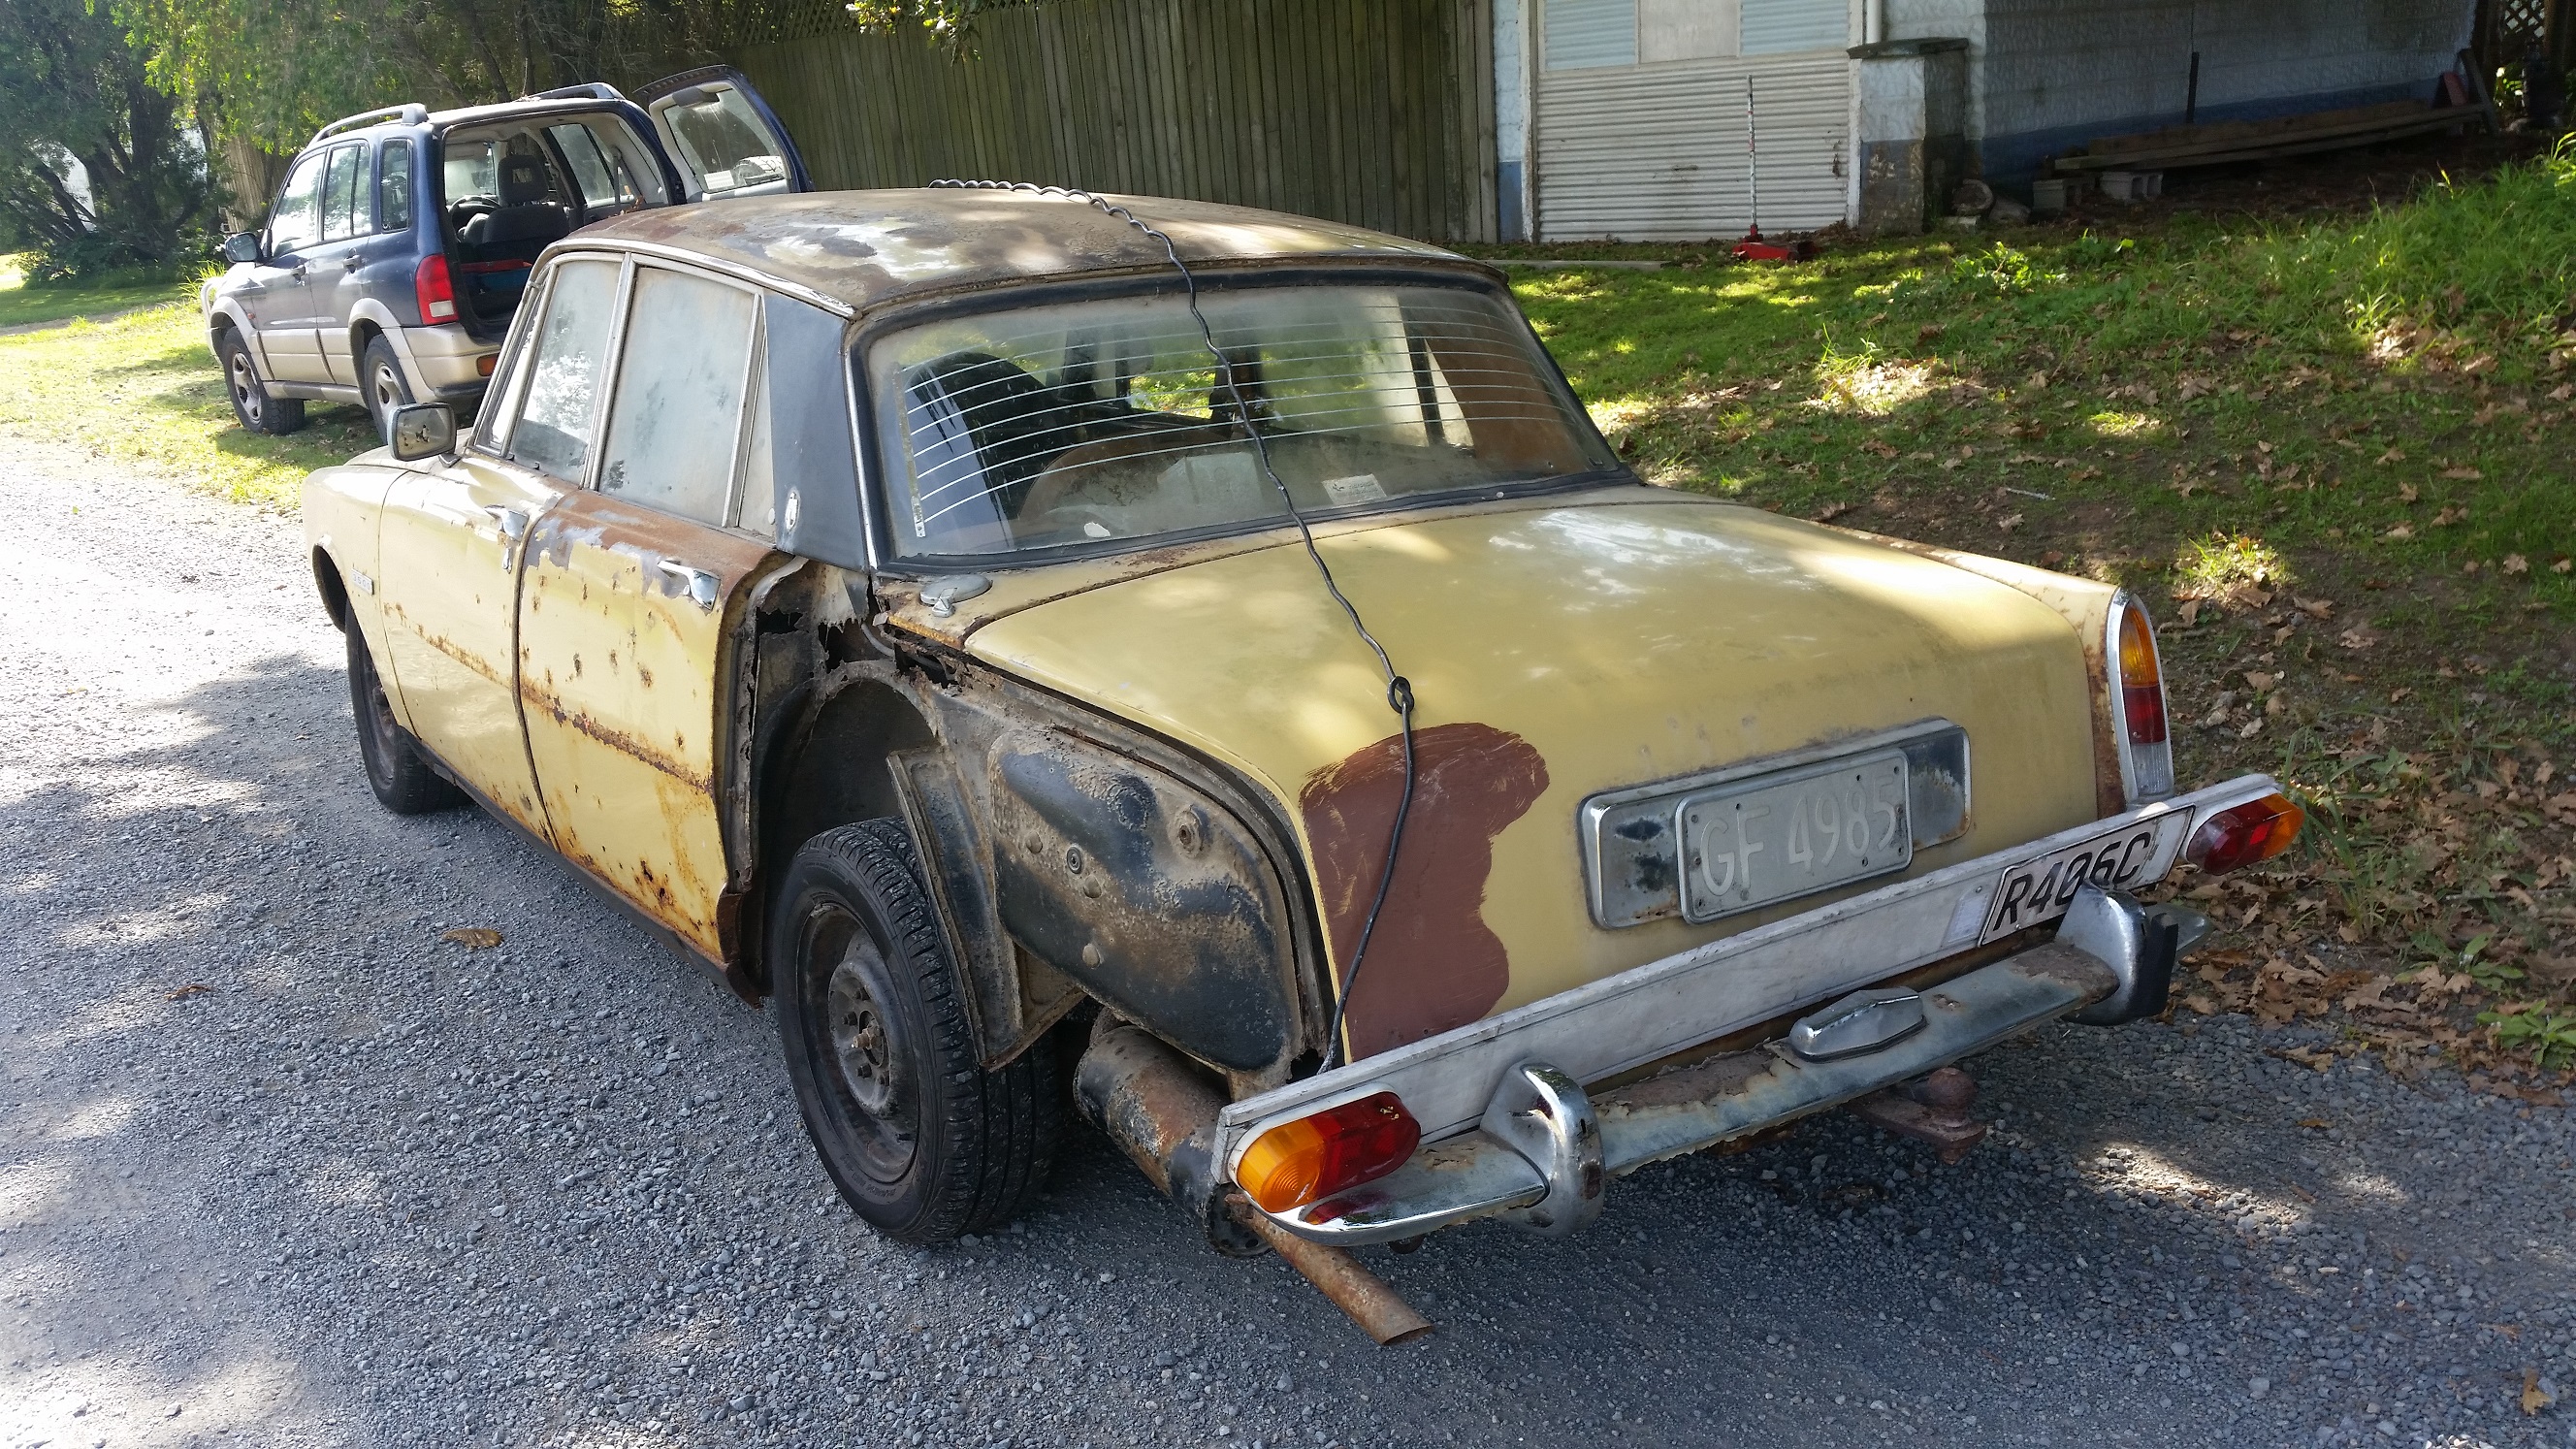
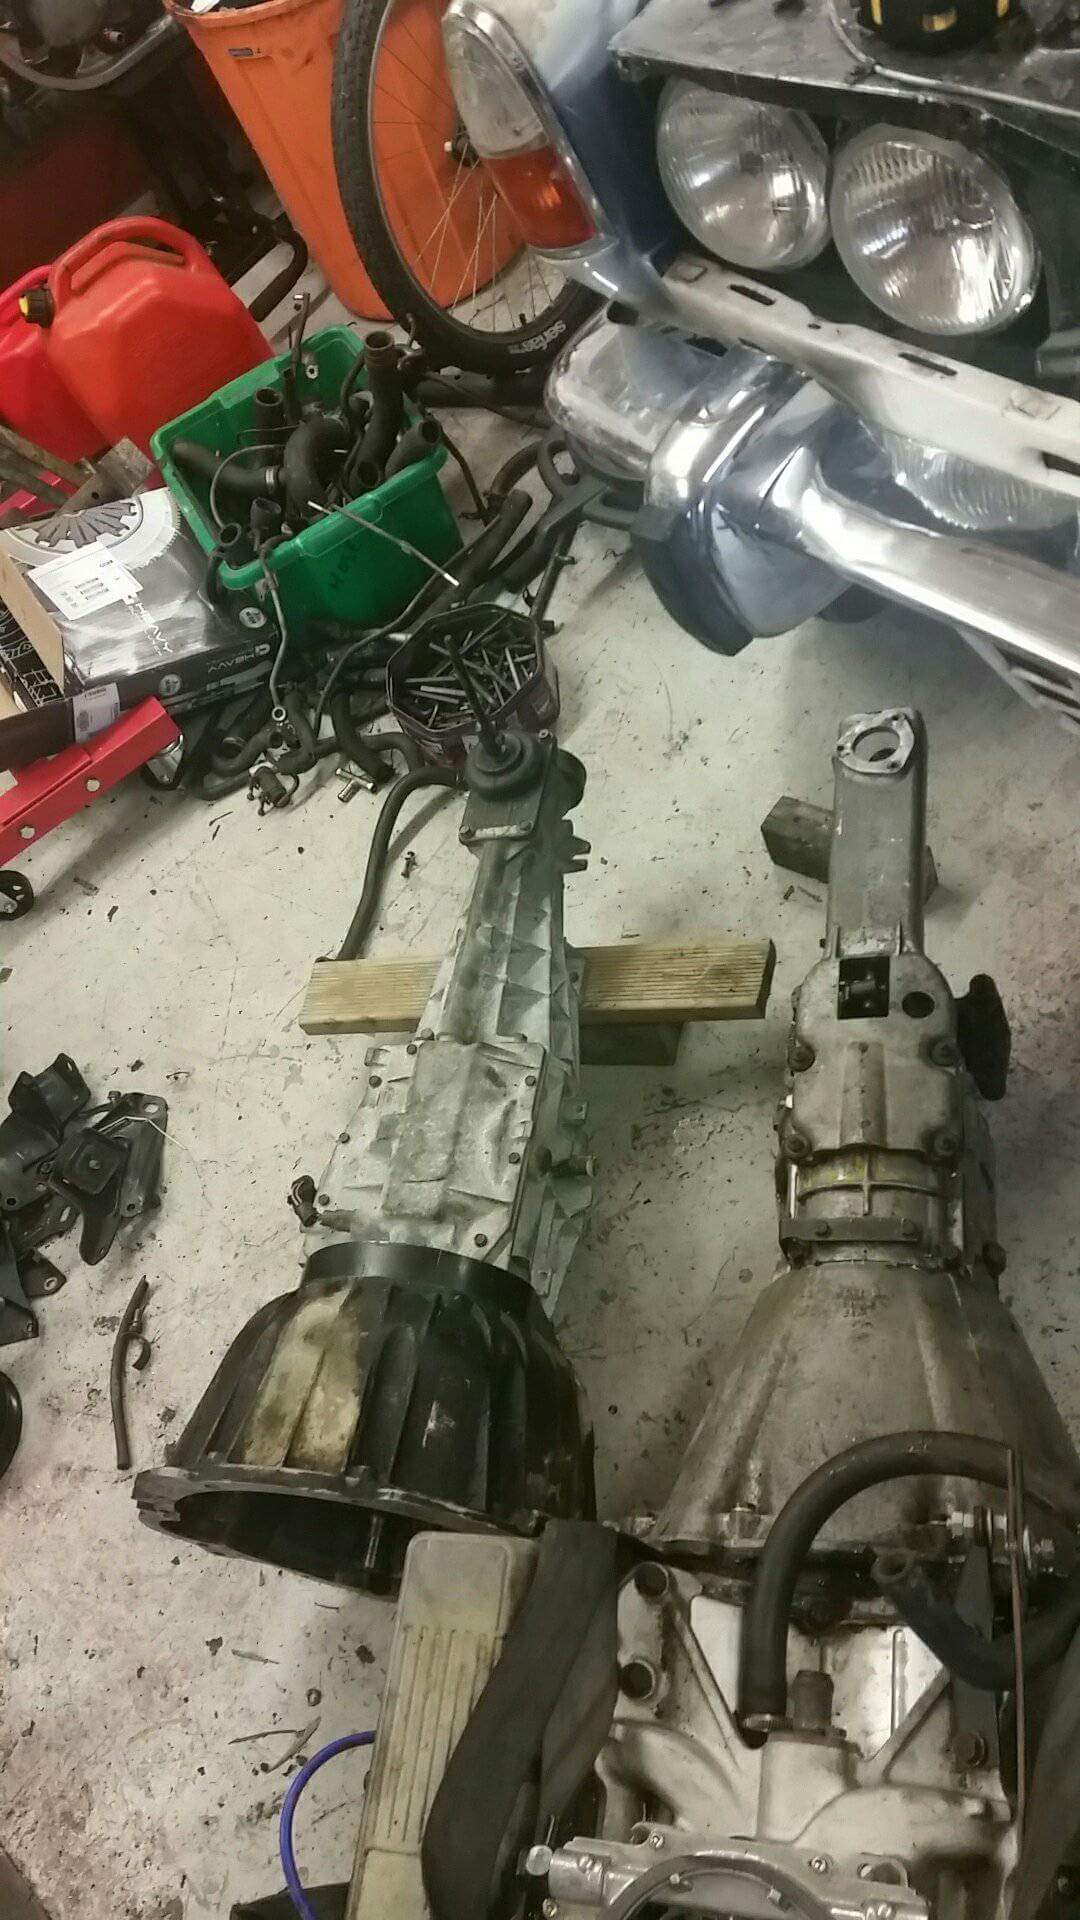
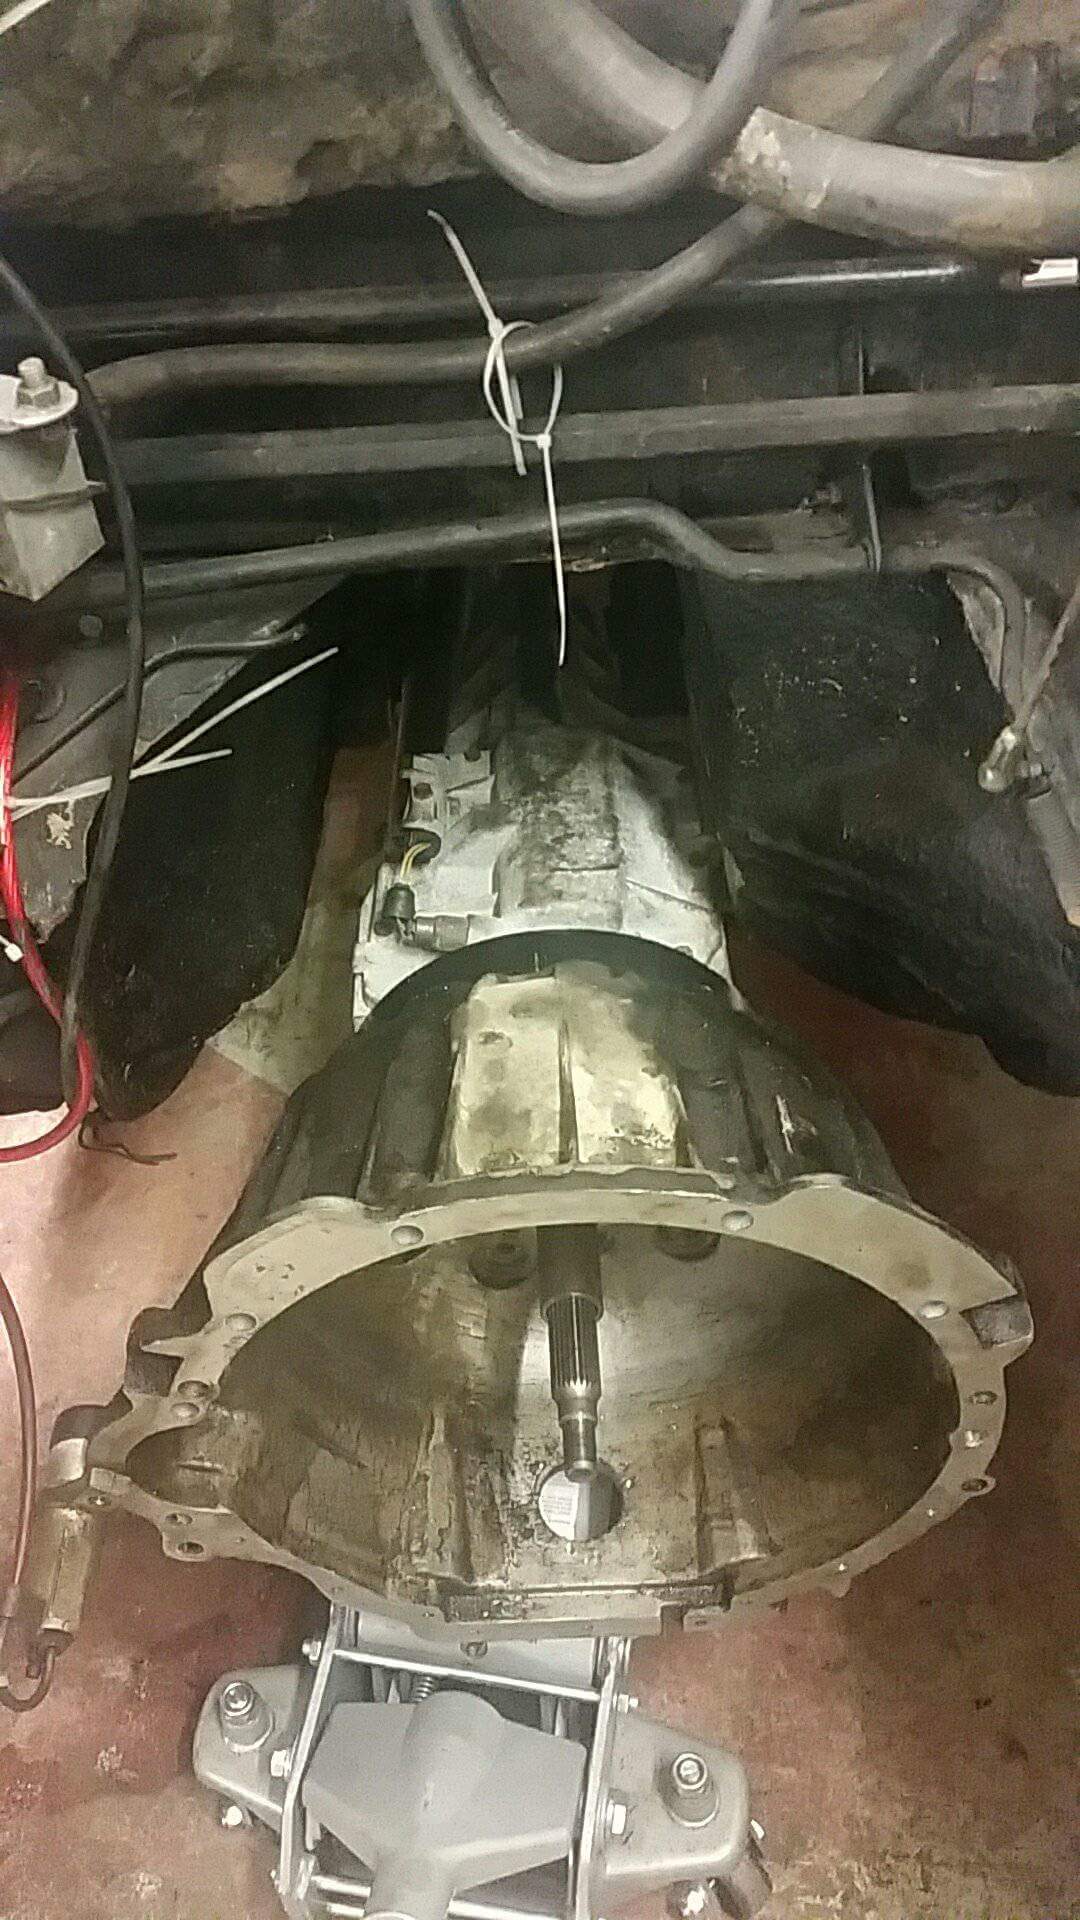
Right got a 5 speed. .. out of a nissan z31 3ltwin turbo. Auto bell housing fitted with a custom plate and now test fitting time. Well it's close nothing a little grinding won't fix... yes I'm trying to keep the rover floor as stock as possible
1 point
-
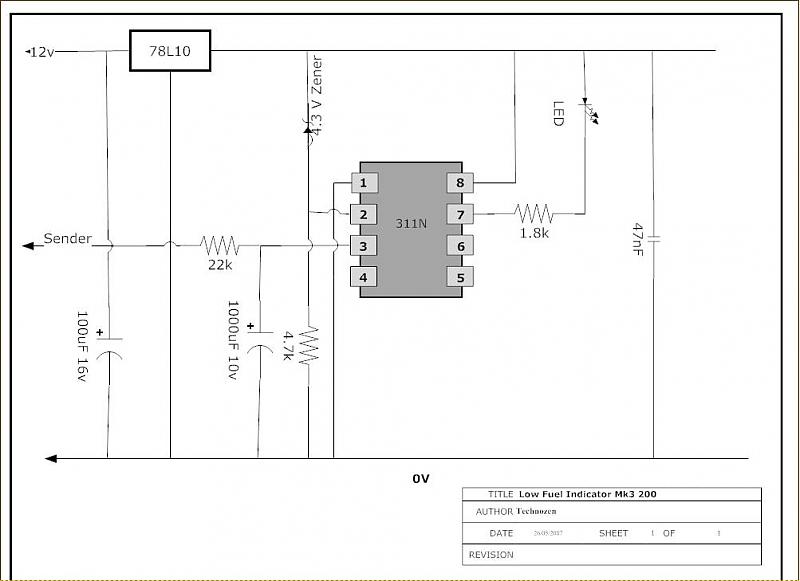
Hey M8 im currently making up some of these, and you just select a zener diode to match your low fuel voltage (diagram is missing an earth from chip pin 4) have a bunch of extra components if you like
1 point


.jpeg.ef59de6afbbf6f31315a91380539a132.jpeg)


This leaderboard is set to Auckland/GMT+12:00