
Leaderboard


Popular Content
Showing content with the highest reputation on 07/06/16 in all areas
-
9 points
-
Thought i had better do a lol MS paint jobbie of my vision Maybe a sweet rack at the front of the roof too?5 points
-
A small update this time. I am swapping my tail lights for facelift ones. One of the issues associated with this is that the boot release lock is located behind the tail lights. Due to the different design of the lights the original lock is not usable if you install the newer facelift lights. Of course you can simply put in a facelift lock but then your original key won't work obviously. I thought I would try to re-pin the facelift lock using the pins/wafers from my original lock. To do this I went to a junk yard and found a facelift boot lock. Here are two pics showing the lock with facelift and pre-facelift lights. Pre-facelift: Facelift (Note that the lock now needs to protude much further because the light is now over it): Old lock on left, facelight on right (Tail piece actuator has already been removed from old lock in this pic): In order to remove the barrel the front cover must be removed: C clip holding actuator must also be removed: Now the barrel can be removed, to do so insert the key and pull it out (doesn't have to be the exact key for the lock): Original lock has a cover which was too difficult to remove with damaging, perhaps replacement cover can be found but I wont be using this lock anymore: Original on left, facelift on right (Note: facelift lock uses 7 pins while original uses 6 but still have the slot for 7th, at least on mine): Key in original lock, notice that all the pins are pulled down into the core (flush) allowing it to spin in the barrel: Alternatively the same key placed in the facelift lock, see how one pin is not pulled down all the way. This prevents the core form rotating in the barrel: Pic showing how key is inserted in pins/wafers: Pins/wafers and springs removed from both locks, as mentioned before the original lock had 6 pins while facelift has 7: Here are the pins/wafers from my original lock fitted to the facelift lock, make sure to remove the spring from any slot that is not being used or else it could come loose and jam everything. Cleaned everything up too. It works! Oh and why all this effort? Here are the original pre-facelift tail lights (sorry for shitty pics): And now the facelift ones:5 points
-
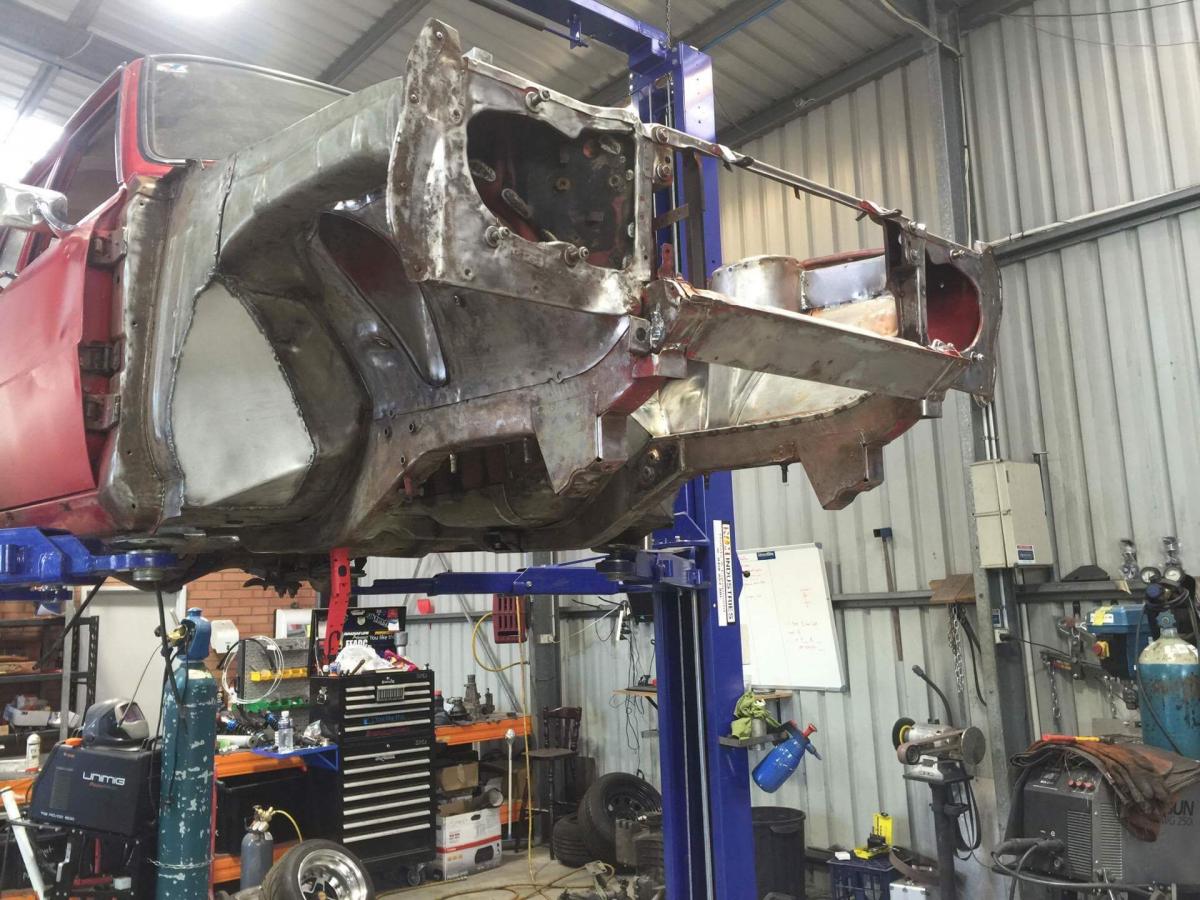
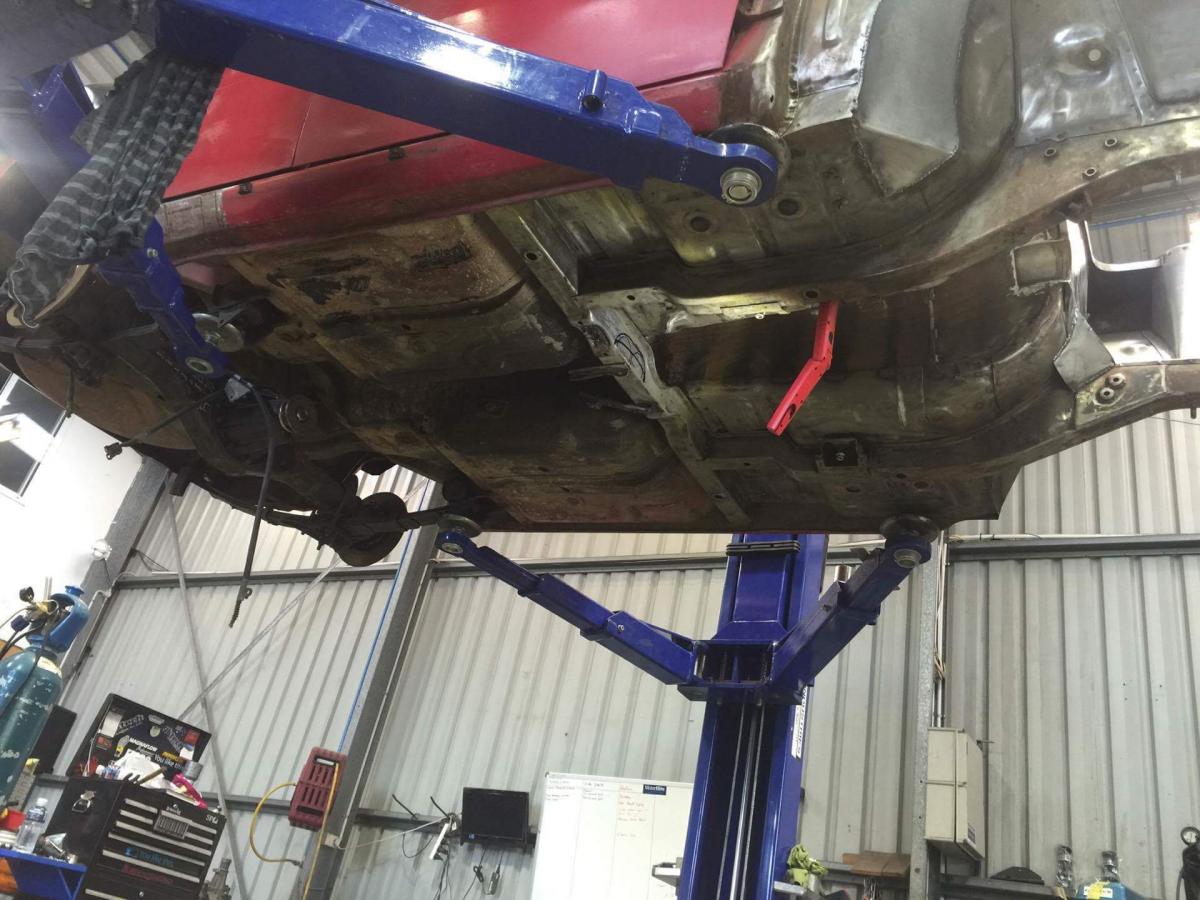
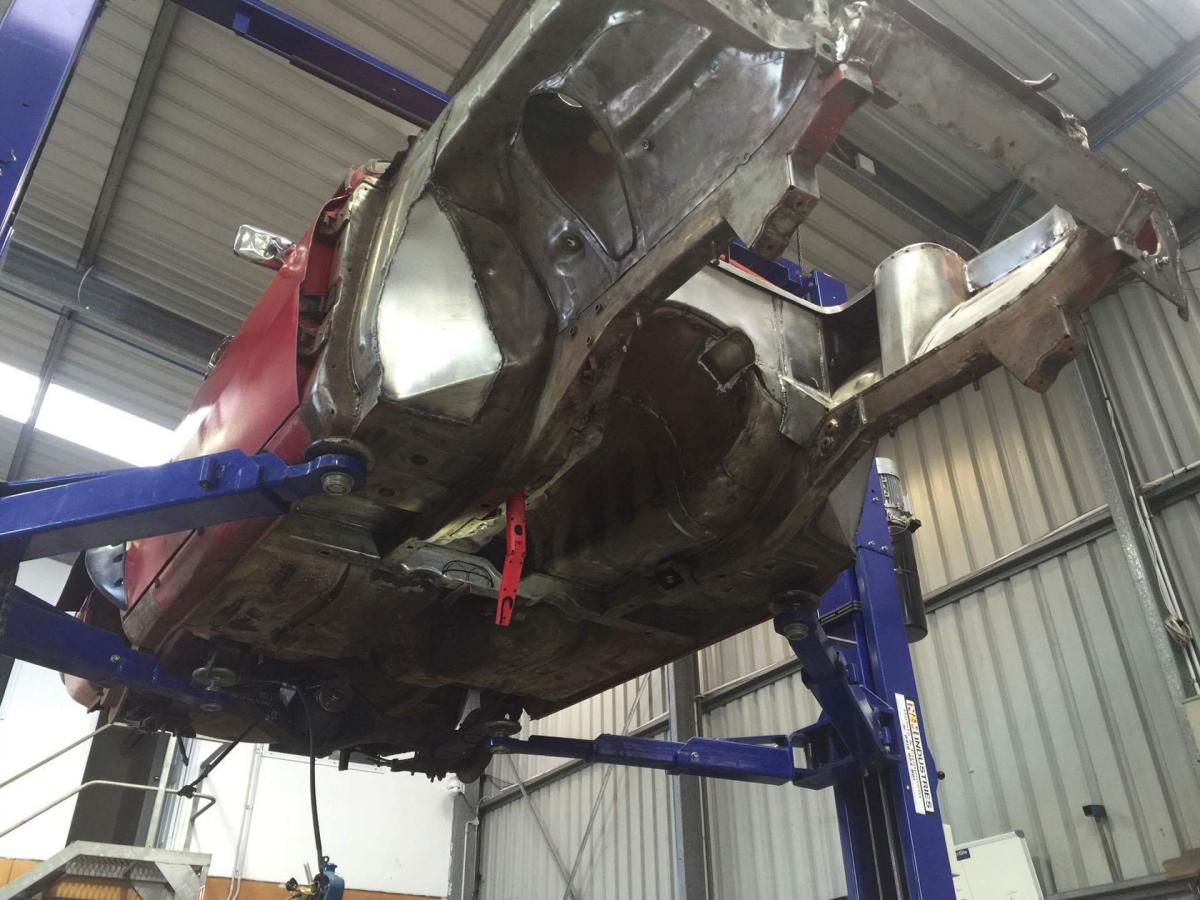
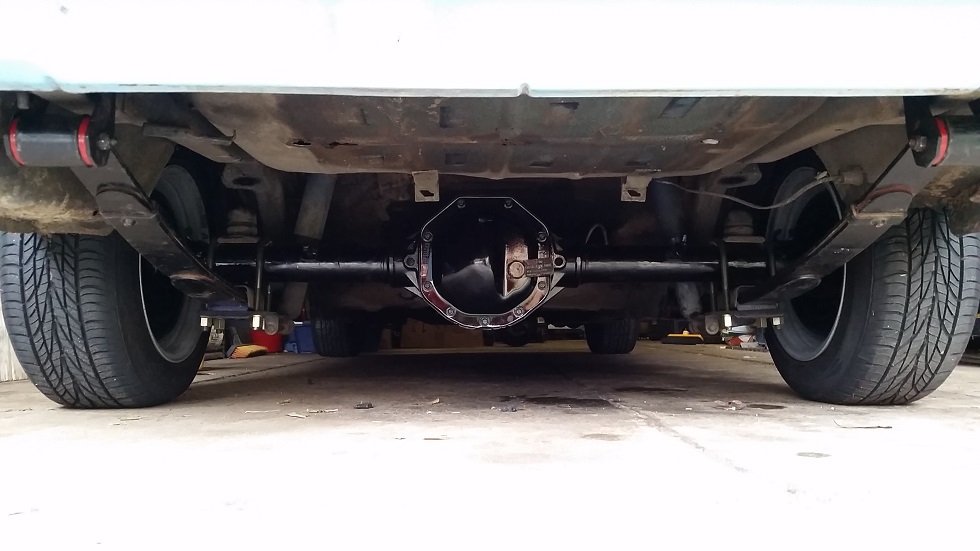
Some pics of the under carriage... Probably going to just strip back the whole under carriage, treat and underseal then paint the original red. Luckily tax return is due here in Aus so will cash out on the Mazda. Cheers, Tai
 4 points
 -
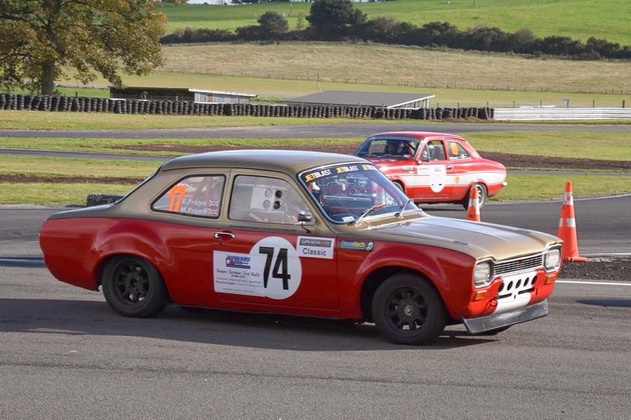
So a while ago I made a pretty ballsy decision to buy Rhys's (Rhyscar) daily/racecar AE101 basically unseen and drive it just under 1000 kms home. Thankfully things worked quite well and I flew up, bought it and drove it back Queen's birthday weekend. Many thanks to Rhys who offered to pick me up from the airport, gave me a bunch of spares with it as well as info for setting it up/racing and was generally just an all round GC! It was an eventful weekend to say the least though! Featuring a successful Tinder date, two speeding tickets and probably the most uncomfortable drive I've ever done... 8kg springs all round, bugger all suspension travel and the 2 1/2" exhaust left me deafened and crippled when I finally rolled into Wellington about 7 hours after leaving Hamilton. Thankfully I had a mates place to crash at who kindly moved his girlfriend's Peugeot 306 convertible out on the street where it belongs and let me chuck the Levin in the garage for the night Anywho made it all the way home to Christchurch the next day without any issues which was great as I had no tools whatsoever on me! The plan with this thing was to buy something where most of the work had been done and I could just get out there and drive it rather than having something that sits in the garage 11.9 months a year, had to be road legal as I don't have access to a trailer. Rhys has done a pretty sweet job of setting this thing up, current specs are roughly as follows: 1995 AE101 Levin GT Apex Chassis 20v Blacktop 4AGE (A/C removed) 16 row oil cooler and remote filter Honda Civic radiator HKS extractors 2 1/2" stainless exhaust 50mm trumpets Exedy heavy duty clutch GTZ twin pot brakes with Hawk pads Cusco rear swaybar Tein Super Street coilovers Camber plates Relocated lightweight battery Raised shifter Stripped interior with sound deadening removed 16x8s with Achilles ATRs for the road 15x8s with well used Nitto NT01s for the track No real plans to change any of the above, just race it/break it/fix it!3 points
-
Quick update accompanied by some smaverage iPhone pics. New vs old: Got them in, a few nuts to tighten in super cramped places (just the usual) and a couple of mods to get to the new manifold to fit. Now just have to plumb in the fuel, connect throttle and choke, connect up rest of the exhaust (but not before a cheeky drive with just the manifold). Then give them a tune - anyone have any tips for this?3 points
-
Here's a peak of the now flash paint job in my engine bay. Show's off my mighty rattle can paint job skills.... I might sand out a couple of dribbles that occurred and lay on a few more coats but even as is I'm pretty happy with it considering I was originally intending not to paint anything at all.3 points
-
So picked up the donor CT last night, fair to say the seller was a bit........ odd. There was a mixup over what bike I'd bought, and he led me through town in the dark then back to his lair in between bouts of abuse - thought I'd have to text my mate the address so's they could find my head. Anyways, survived and got it home, and its up there as the best $26 I've spent on a pile of rust... Yeah it has some serious rot - looks like it's laid in a hedge for some time so the tinware's pretty much fucked, and the rear wheel is locked so took a bit of shoving to shift it, BUT, it kicks over ok, seems to have compression and the oil looks clean enough... Plus it has the battery cover (normally missing) and a good plastic downtube cover, and it has the ignition switch, key and helmet lock, and the seat pan may be ok. Best thing is, after I dislodged the battery cover (rusty screw) it had a FULL tool kit in the bag underneath - Woohoo... Really want to rip into it to see if the frame/motor are salvageable for a special, but as I need a new project like another hole in my arse I'll chuck this under a tarp till I have some space and time to deal with it properly. Doesn't stop me squirelling parts for the orange roughy though (already bought a cable set and brake shoes). I was going to paint the plastics period grey cos it looks cool, but I may just fit them as is to make a fully functional but ratty looking machine, (wife's had me doing house reno stuff so a bit over sanding and painting at the moment). Also nudging my cobber hard to get one himself for rally giggles, shouldn't be too hard, he's got 9 on his watchlist...3 points
-
To be fair belgrove has no sweet roads to it. Straight through from wow. What if we meet at belgrove, then those that want to can go for a cruise after? Say spooners, kohatu, tapawera then mot down the mot valley?2 points
-
I prefer some different numbers, i like high 15's low 16's in the cruise at very low load and low 12's at full load. ( turbocharged applications) Idle number is pretty well irrelevant, I have seen a big variation on what idles well on relatively similar engines. Horses for courses though I guess.. You probably need a bit more engine info for us to really assist.2 points
-
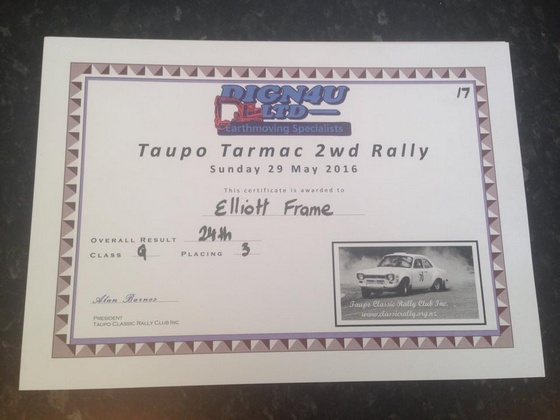
Certificates and a shout out to Uniscreen for my paid entry into the next Taupo Rally in August Thanks to Alan and the crew at The Taupo Classic Rally Club for running such a fun event and for the action shot below
2 points
-
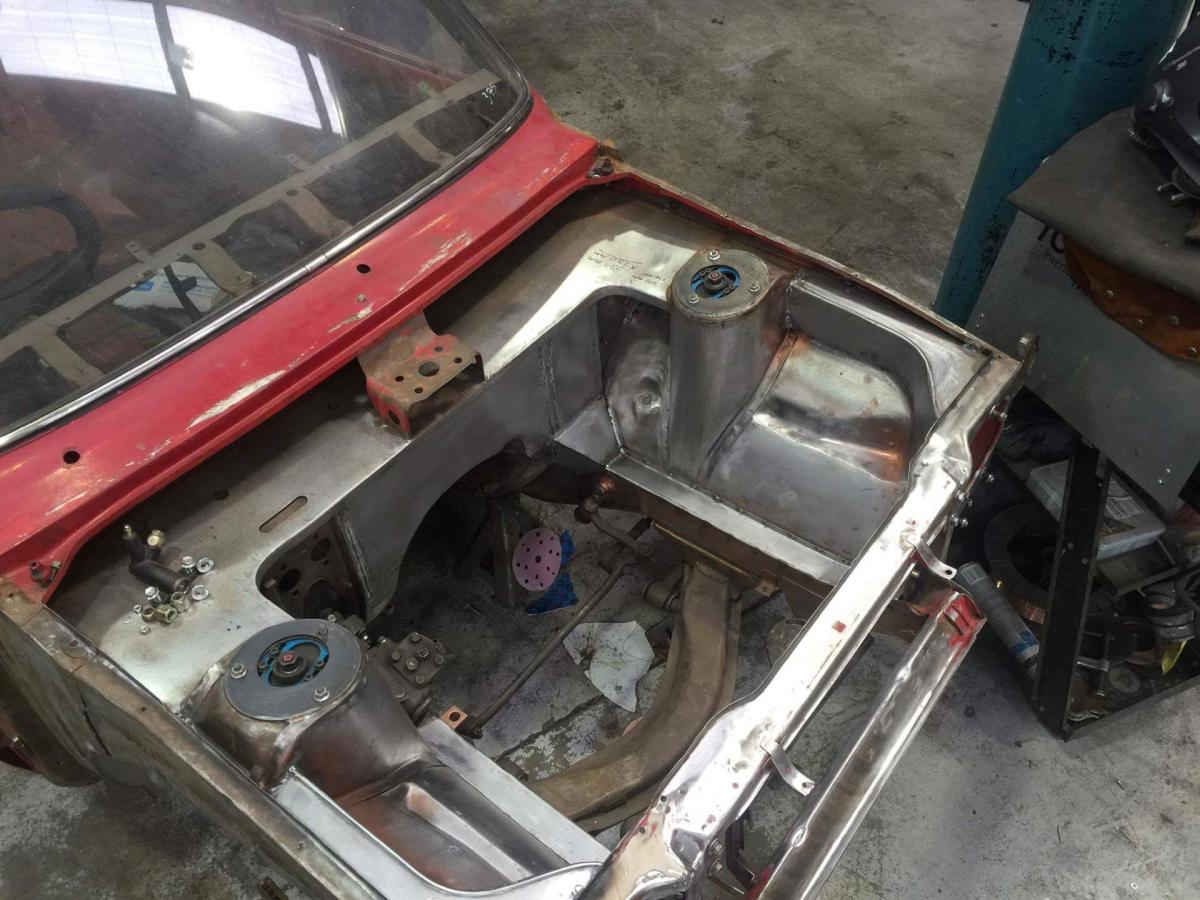
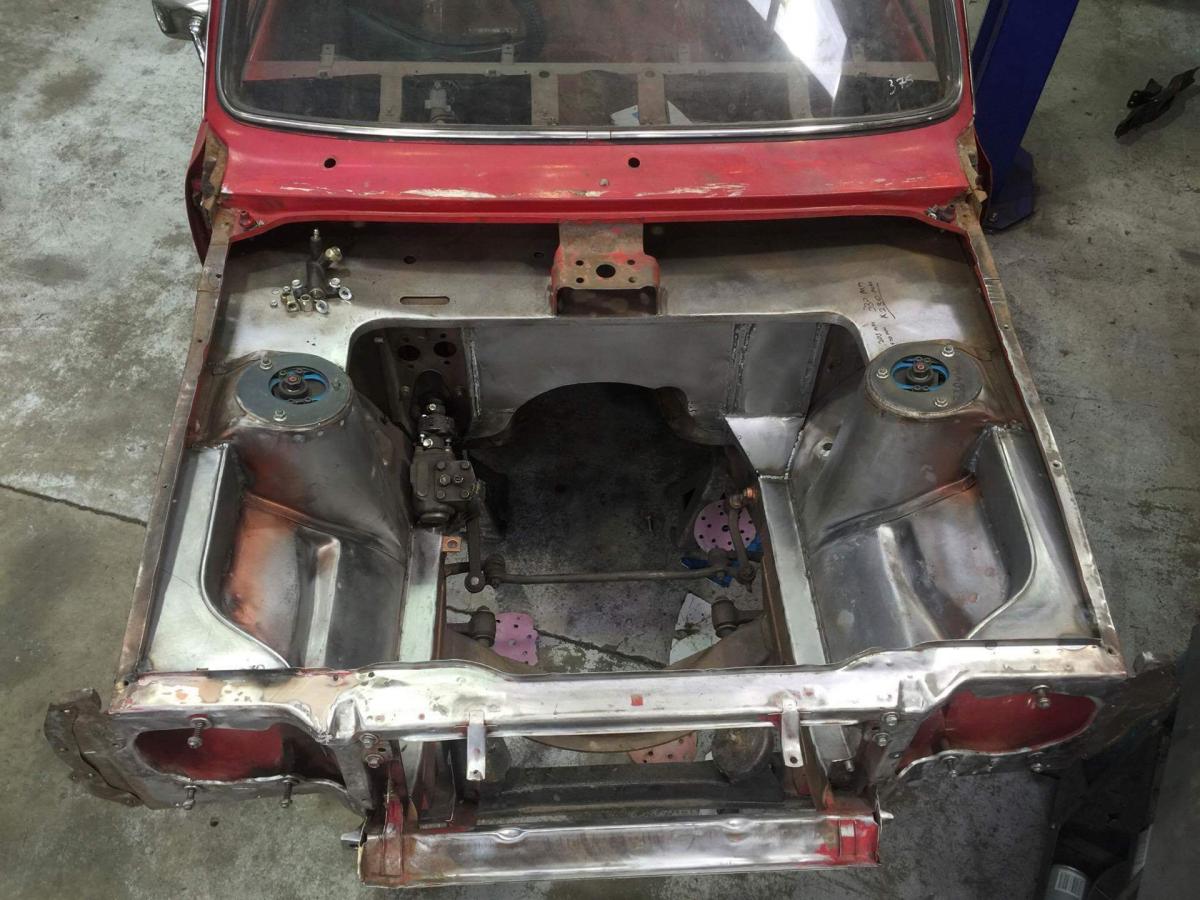
More fab work... Top engine bay channels/rails(?) have been plated up to delete the factory 'creases' and reinforce it further. Chassis rail gusset had been capped off and bay and underside from the rear of the transmission forward has been stripped. Will be in primer/filler primer tomorrow hopefully
2 points
-
Things are moving along steadily. I got my diff back yesterday (how big are the 28 spline axles!) We installed it today along with the king springs, new bushes etc. Next will be the fuel system and sorting out the rear brakes & handbrake. Fuel system is GRP4 alloy tank- 100 micron filter- Holley Blue lift pump- Proflow swirl pot- Bosch 044 pump, 3/8 Gates Barricade EFI hose, 40 micron filter, 4 x Siemens 630cc injectors, Turbosmart FPR800 fuel reg, back to swirl pot. It will be suitable for E85 but will do the initial tune on 98
2 points
-
Just a quick little update. After having completed a fair bit of rust repairs to Sams latest Datsun acquisition I moved the Viva back onto the hoist. It was nice to see an emptier workshop with plenty of room to swing a fluffy cat. Not that I would. But I could. If I had to. Spot Hannah’s triumph waiting for attention… While I had a bit of time to spare that evening and was in a cutty, weldy sort of mood I decided to sort out the new battery position. Having removed the ugly old tray from the inner wing in the engine bay. Into the boot we go just like in Viva one. But this time I want to have it mounted below the floor level to maximise the amount of luggage/bike/bails of hay space in the back of this little wagon. Luckily there is a nice area of nothing just to the left of the fuel tank. I decided to take that nothing and turn it into something. Like a battery box. This area here… ..had this box here… ..slotted through the newly cut hole in the floor like so… ..creating a tucked away place to hide the battery… With that done I filled in a couple of tiny holes and stood back happily admiring my Viva wagon that is now pretty much rot free. Yay. I celebrated by hoovering out all the grinding dust and neutralising the surface rust. The following day Hannah pushed the car out into the sun and painted it with epoxy primer. It looks much neater but I forgot to take a photo. You’ll see it soon. Back to engine bay. I finished sanding back the filler primer to a level I was happy with. Its turned out pretty good and should be a good enough base now for the top coat finish. I’ll leave the car out in the sun to warm it up before expertly applying my spray bombs for a professional orange peel finsh. Next job was to fix the tailgate (hatch..) and its turned out to be more solid than I first thought. I’m still not sure why the car came with a far rustier black one fitted. I figure it was purely because they original one might have suffered a broken window so someone just swapped in another tailgate rather than swap the window. Luckily the this original coloured one is the more solid one so I’ll just swap out the window and refit it once fixed. To start with Hannah spent some time sanding and scraping off all the flakey crusty bits so I knew what needed fixing. This was the worst bit here.. ..which I cut out and repaired the inner skin.. Then I folded up a new outer. It was cold in the shed tonight so I have been wearing my best hobo fingerless mits. I forgot the fingerless bit when I pressed against the repair panel and preceded to tack it in place along with welding my finger. I smelt the burning flesh before my cold brain registered the pain from my now not so cold finger… I finished welding it in and that was it for tonight. The warm housetruck beckoned. I few more little thing rusty bits remain on the tailgate and then I’ll fix the frilly bits on both door. I’ve also been investigating the engine and I’ve removed the inlet manifold to but and weld so I can tidy up the ugly breather hose routing etc. But for now its back to the fireplace and cup of tea.2 points
-
Took possession of my new donk the other weekend. Acquired this as part of the deal I did on the Hemi engine. It was on TM under Listing #: 1095158136 This will work way better for me than the other motor ... simpler, cheaper and should not break my ching ching gearbox. Bring back the old days I say ... 4BBL's, 4 speeds and 4.11 geared arse ends.2 points
-
Borrowed a workmates Gopro and managed to video a few of the Autocross runs before it ran out of battery. Here's one of the better of the bunch (plz ignore my terrible lines, early braking and just general poor driving. I have much to learn!)2 points
-
Have done some stuff since I got it, new front engine mount, flushed the coolant, tidied up some wiring, chucked my clear indicators on that I nicked from my daily before I sold it and just generally fixed a few things. Entered a Motorkhana last Saturday at Ruapuna which while it was pretty much only first gear and reverse was still super fun. Probably need to tighten up the handbrake if I do another one as it pretty much had no bite, there were a couple of Minis entered who were absolutely killing it with some really tight turns around the cones. Can't remember how I placed but it wasn't that great, I was the only first timer there though. Didn't bother chucking the semi-slicks on as it wouldn't of been worth warming up the tyres for 1 minuteish runs. Quite luckily it turned out there was a full day Autocross on the Sunday so entered that as well. It rained pretty much all night so when I got out there the track was super wet, it dried up early in the afternoon but then the rain kicked back in again. Ended up still being an awesome day, had heaps of fun and I'm pretty sure my driving improved massively between the first run and the last one. We did 5 different courses and 2 runs of each, placed 18th out of about 27 which was alright but it's fair to say this car has way more potential than I currently have skill! Still, thought it went pretty well for my first time on a track. Nearly had a spin early in the day (pretty weird feeling having the rear end of a FWD break out on you! ). Some photos from the day (credit Chris Maxwell): The car went pretty well, only a couple of issues really. Leaking a bit of coolant where a hose meets the block (suspect it's slightly too big so just tightened the fuck out of the hose clamp) and struggled to get it in gear on a couple of downshifts (think the clutch had little air in the lines so bled it but also I probably need to work on my rev matching). Sweet shot of the Levin with a mates 500hp R33 in front: Next event will probably be a track day at Ruapuna in two weeks then another down at Levels the following weekend, exciting stuff!2 points
-
This sentence requires some amending: Alright alright, so maybe this doesnt make much sense compared to turbo or supercharger or whatever. And maybe some pessimistic people will say "Carrying both fuel and oxidizer in an old car is an idiotic idea and you're going to blow up" Well guess what? Lots of other things have carried both fuel and oxidizer on board without major issues. The Messerschmidt 163 Komet carried Hydrogen Peroxide as an oxidizer. It featured an impressively low rate of dissolving its pilots (less than 1 in 10) which was better than any other rocket powered aircraft in service at time (none, therefore it was the best) The Challenger spacecraft flew NINE successful missions with both on board, before having a minor fuel/oxidizer interaction issue on the 10th: Also lets stop and consider that the titanic didnt carry an oxidizer on board, and yet it killed way more people than both the Komet Challenger combined... And didnt even do anything cool like shoot down bombers or fly around the planet. 0% success rate! As you can see from the above evidence, Nitrous is not only highly entertaining, but also has only a very limited probability of causing your vehicle to explode. It's far from a certainty!2 points
-
Good job on the twin SU's, not sure whats with that centre pipe connecting the carbs together, it looks wrong for the vacuum pickup point for the advance? As far as tuning all the info is on the SU website http://sucarb.co.uk/technical-hs-type-carburetter-tuning-multi (yes they still make them!) lots of good stuff there. Cheers - Have fun1 point
-
just this;1 point
-
ok this is cool. Don't do this though, k?1 point
-
Started the tank cleaning process, just used marine clean so far with a chain in the tank. Rinsed out several times, even reheated the cleaner on the stove to reuse it. Man that stuff is caustic, my gloves broke and I'm regretting not replacing them. Hands now have cancer. Should I try to get more of that rusty scale off before I start with the metal ready? Stripped back the rear half of the bike to repaint the frame under years of battery acid leakage. Took me way too long to get the tail piece off. No more acid drippage with this little beauty1 point
-
Door Card Clean Up Managed to get hold of some RS2000 door cards a while ago that have been sitting in the shed. They had a chrome strip on them but the chrome had all come off, but were in otherwise good condition. Masked them up and gave them a coat with some satin plastic paint then got stuck into them with some armourall vinyl cleaner and they've come up great. Original Condition: Masked Up: Painted: Ready to Go:1 point
-
Bit of rust in the door... All gone Forming right/rear panel1 point
-
New Bits New Wiring Loom New Loom has finally arrived from the UK. Took a while to get made up and get here, but the end result looks great. Will probably still need a few mods as I go but I'm very happy with the result. Inner Door Bits Have everything I need for the doors now. Combination of new speakers from Hyper, some NOS bits off ebay, and some clips and things from uncle Ali. Burton Order Also finally got my latest Burton Power order with a few nice new bits1 point
-
Underseal Clean Up The underside of the car was sprayed with a bitumen based underseal a few years ago but it never set properly. It's fine under the guards but under the floors it was really wet to touch and looked pretty average. Made the call to strip it off and do it with a better quality product. I was going to leave under the guards with the old stuff, but looking at the new stuff now and how much better it is, I'm going to do the whole thing. Spent some time doing some research on a product that I'd be happy with and it's worked out really well. It's textured enough to make it look tidy, but goes on quite thin, really nice product to work with. Getting the old stuff off was a pretty terrible job, but a heatgun and a scraper has worked a treat, and although it takes a while was well worth the effort. Old Bitumen stuff: After 8ish hours of scraping: Masked up and ready to go: Product I went with: Finished Result (Haven't done outside chassis rails yet)1 point
-
Why not run a single big SU carb? A 2 inch off a jag or something similar they can also handle blow thru duties if you decide later on you wanted an intercooler in there. I ran a supercharger off a lancia volumex on a triumph 2 litre 6 cylinder with mechanical injection made some gorgeous sounds when it ran right which was about 70% of its short life as a skid hack.1 point
-
Both hands on the wheel please driver1 point
-
What happened?1 point
-
Iron out the wrinkles on your birthday suit and come show us that fancy piece of attire you talk so much about.1 point
-
oh and also you'll struggle to get the handbrake much tighter than that one is unfortunately. The ae series handbrakes are just poo's and never work that well. That is the best feeling handbrake I've ever been able to achieve! Worth a shot to adjust but set your expectations quite low1 point
-
This is a different car to that one! This is the accumulation of all the good ideas/learnings from my racecar Is same/better spec than what my racecar was before it went into the shed for the last 3-4yrs, bar cage and TRD diff. Great to see you out there! That coolant hose always weeped a bit but never had it drop enough to motivate me to fix it when at the track. Should have sorted it sorry. Get used to the rear stepping out thats when you know you're starting to find the limit. I'm always quite rough on the car in the corners on the first lap to get it to step out and heat the rear tyres, then you know where the track grip is at and can smooth the lines out from there to keep the rear in line. Best thing you can do it keep the throttle pinned and it'll pull you straight. Man that car sounds so good high in the revs!1 point
-
Just a 1600 crossflow with a bcf2 cam and a single sidedraft dellorto (twins when funds allow)1 point
-
Yeah not sure what the wof man would think of this handlebar mount debauchery but it looks rad! Here's a shameless self plug of my AX with the same bar mount get up and drag bars1 point
-
I'll bring some anti-freeze.1 point
-
I believe that the South Auckland Triumph Car Club will be in attendance. After much deliberation over a strong brew of PG Tips and a plate of lamingtons, new member Richard has received dispensation for his outlandish suspension.1 point
-
the lean burn edition1 point
-
OH BOY NOTHING FITS TOGETHER... But first: It looks okay for a start. I've had to drill some holes into the radiator support because the guy I bought the front end from already scrapped the car that he got it from. Although I am having doubts if that car was originally twin headlight too, seeing as the bonnet, which is in worse condition that I thought, is actually flat front. Anyways, lets get to the problem at hand. I've already had to mess around a bit to get all the guards and the valence to fit properly with each other but this takes the cake... You can't really see it from that angle but: And then now you can definitely see what is wrong: After all of my expert professional drilling, one headlight sticks out further than the other, by a fair bit. Right: Left: Upon closer inspection it looks like the left is an entire centimetre ahead of the right! So I'm not sure if the headlight is meant to stick out like that or if it is meant to be flush with the bonnet, because it seems like the right side (flush side) is bent back: While the left side is not: So maybe the twin front bonnet has a different curve at the front? I mean, otherwise I'm just gonna push it back a fair bit and hope for the best. Also I'm missing my middle connector for the grille, which is why it's not really lined up properly... Actually writing about it now makes it seem a lot less worse than what I thought it was, lol. If anyone has any twin front spares hit me up! Also, my driver side guard is fucked. Proper fucked, can't open the door.1 point
-
Have a read of this. //oldschool.co.nz/index.php?/topic/51396-wideband-sensors/1 point
-
Heaps of progress today; Weldy weldy Some 75x6 flat bar to tie in the horizontal and provide mounts for the seat frames, this size was chosen specifically because I had some in the steel rack... The passenger seatbelt stalk needed a mount that wasn't just a hole through 1.6mm steel. This is the bolted on engine cover.. the same thing was done factory on the drivers side engine cover so should be gold. Pretty much sorted interior wise. Next on the list is the bracing underneath to mount the other side of those chair brackets. This should be a nice wee lounge, I will set up some tables to go between the front and back seats on each side;1 point
-
I had many things laser cut and picked them up today; Shoulder mounts for the seatbelts, 8mm plate, should be enough. Being the geek I am (and having the 20k version of Solidworks with all the bells and whistles) I did some FEA to make sure they were ok, they are. I removed some windows so i could get a bit more weld on there, this was piss easy, about 6 screws each... There is a bit of surface scab in there, this will get rust killed before replacing the window. Bits like this I have expected to be way worse than they actually are. Then there is the 2x sets of these; That got made into these; Still the other one to do, but a bit of weldy weldy and I had this situation, which pleased me. Good.1 point
-
Went to BIke Summit. Loaded bikes and people in, on and around the car. Such a packhorse. 5 bikes, 3 sexy men and a sexy lady.1 point
-
I have been getting carried away with the second row seat mount design... Also I found a little man who does auto electrical stuff and now the charging issues are fixed, it was just a bung connector in the charging wire between the alternator and the battery. Stoked with that. There was an issue with the rear lights and the RH indicator, which turned out just to be blown bulbs - this was slightly embarrassing. Still, I am not an electricians arsehole and have never pretended to be...1 point
-
sohc, you should start a company making self tapping 15.5mm sparkplugs.1 point
-
So, today went alright. finished off my steelies, 8 and 9 inch. also my new cam turned up in the mail today. has higher lift and longer duration. will being getting ground once i sack up and get an aftermarket ECU and multipoint intake manifold, but for now it will do. still waiting to sell my rx7 to free up space in my shed as the galant is stored in my old mans back lawn which is not ideal to work on, especially when the jack just sinks into his lawn, ha!
1 point
-
Finally got my pedal box mounted courtesy of a day of being at home sick from work. Had to recces it slightly to get feet position right and give me some adjust ability in the seat so shorter people could drive it. I think it turned out pretty good. Today's mission is to get the dash bar tacked up in place and start working on mounting the dash/cutting it up. Also working towards mounting my new dash. I kept going round in my head trying to justify spending the money on a racepak or similar digital dash and I just couldn't bring myself to spend the money (the inner jew showing). So I started researching motorbike dashes and it turns out they are substantially better looking and more functional. Got this off a Honda VTR1000 Fireblade and with a few mods it should sit nicely above the steering wheel. Bonus is it revs to 9500RPM redline so should be perfect for the 2zz. Not sure about the 280km/h speedo though. definately won't be using all of that! I trimmed the rear section off so it can be flush mounted in a panel. Will figure out how to mount it once I've got a steering column to place it on.1 point
-
So after a long weekend i shoulve ripped into this,i planned to but nothing happened other than pushing it outside for a wash.I have been in touch with the certifier in chch and told him that i would like to notch out the cross member,he has told me to go through the LVVTAs design approval process.So this weekend il be drawing up pictures of what i want to do and hopefully they come through and say i can do it.I have fitted the ms112 swaybar which is slightly longer than a ms65 one but it has the bend in it i need to clear the engine,also 16mm spacers needed to be made for it to line up.1 point
-
so after having my windscreen smashed by a unknown source,i went to try get a new 1,turns out theres none around and il have to wait 3 months for one to turn up,sooooo i decided to get the carb rebuilt,and get a panel and paint,for the last 2 nights ive ripped into it,taking the chrome off and fixing the surface rust on the windscreen (only 1 tiny pinhole of rust),ordered new outer window rubbers and off to get a guard flarer next week,so all on at the moment, and the new addition to our toyota family,the miss's 1980 bugeye starlet discuss here //oldschool.co.nz/index.php?/topic/36351-toy-mota-1971-toyota-ms65-crown/ cheers1 point
-
Put it on exhaust side where battery is like barts setup. Have ur extractors made around it. Put battery in boot BAm1 point
-
I've NOT done it to a ford, but I've done it to my non crossflow datsun. All much of a muchness really. I have an adapter to fit a 32/36 weber to an S/C14 if you're interested? (I have the carb and a ramflo too)1 point


This leaderboard is set to Auckland/GMT+12:00