
Leaderboard


Popular Content
Showing content with the highest reputation on 12/16/15 in Posts
-
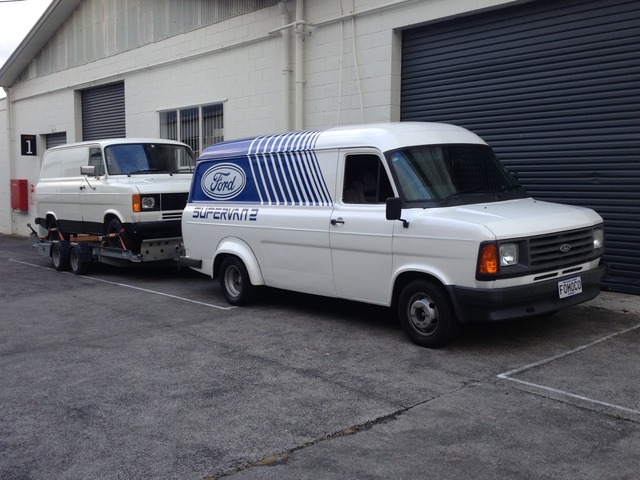
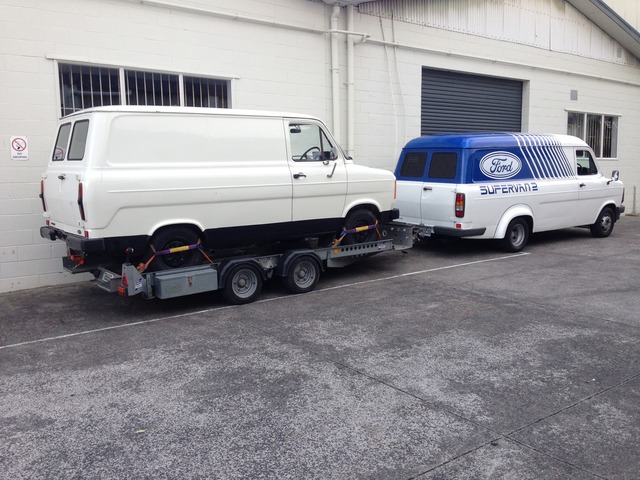
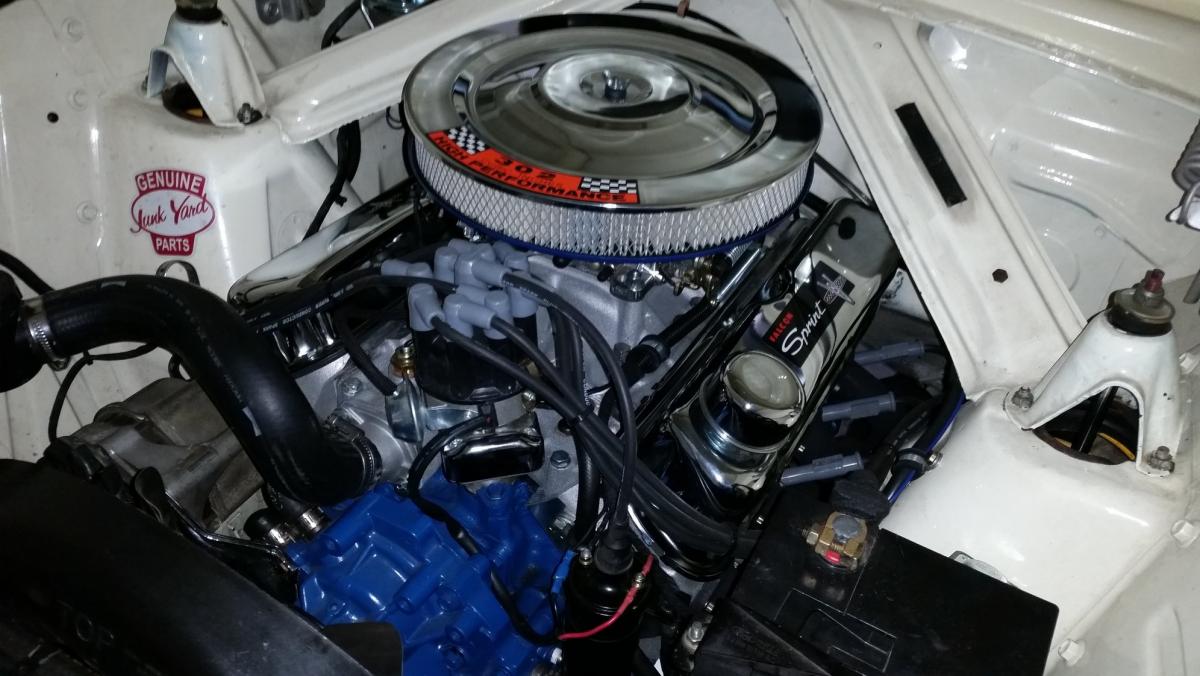
Well hopefully this is engine in for the last time but something tells me it won't be. But got powdercoated bits back today. Just sat in place because waiting on auto sparky and spark plug tube gaskets.10 points
-
thanks Mrs Neil for the photo IMG_3649 by Neal OnTheTree, on Flickr9 points
-
Set up the roof rack, looks pretty good but I might need to chop it more to make it a bit lower. Shifter is now higher than the roof courtesey of some free reo bar from work5 points
-
So! Fitted my louvreshades: Need to clean my windows. Also mocked up a nx1600 coupe digital instrument cluster on the parts car: They look like this: Which I think is pretty badass!5 points
-
A bit of a late update I had seen a full set of XYZ adjustable suspension to suit a Mitsubishi Cedia on Trademe. They were only $100 so I thought id chuck a hundy on em and if I won them ill install them on the Mrs car (Cedia wagon) A week rolls past and I won them for $100. So I pick them up and bring them to work and then I started getting Ideas. "I wonder how hard it would be to put the fronts in the Mirage?" I pulled a strut out of the Mirage and put one of the adjustable fronts in its place. I was blown away by the fact that the lower perch bolt holes were exactly the right spacing. The only difference was that the gap was 4mm wider and the XYZ use a 14mm bolt whereas the standard Mirage uses a 12mm bolt. I could have drilled out the 12mm hole to 14mm but I wanted to be able to revert back to standard suspension if needed. So I got a length of 2mm flat bar and cut 4 bits into shape. I also had some spacers made. 14mm OD and 12mm ID For the top of the adjustables I had some new camber plates made to suit These are the original camber plates on the XYZ And the new plates fitted So all that was left to do is bolt it all in the Mirage For the rear suspension I went with the 1 way adjustables I havent got a decent photo of how it sits at the moment but I am super happy with the ride height now. The front springs are a tad stiff so will look out for some softer springs. I have been using this car daily and I love it. It also appears that maori fullas like it too. Its a daily occurrence for some to yell "Chur bro" at me which is cool with me. Will upload a pic later4 points
-
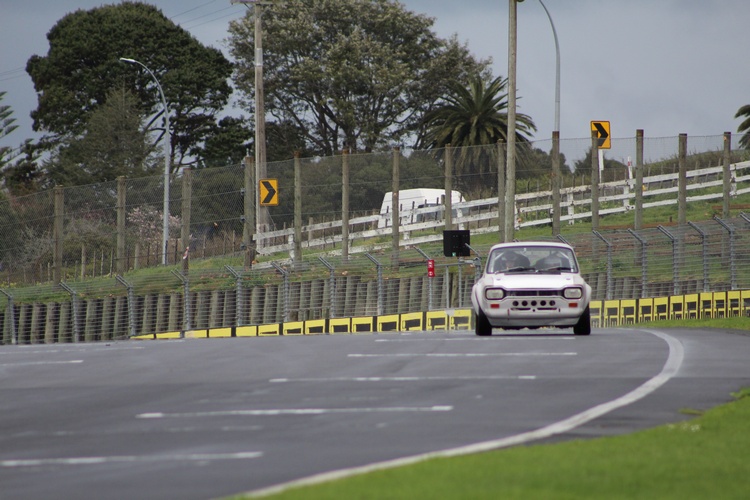
As you may or may not see in the video above there was oil on the cambelt. It was a bitter/sweet moment as I was wrapped that my wiring was good and the motor kinda ran, but theres an issue. This video was taken on the Monday before the OS Drag Day. At a quick glance it looked like one of the tensioner bearings was releasing oil/grease past its shield. So we gave up that night. I returned the next day and found a big pool of oil on the ground. There was a pinhole in a weld where the sump was modified. Unable to fix this in place, the motor had to come out. This was the Tuesday before the OS Drag Day. I was unable to work on it on the Tuesday or Wednesday due to work Christmas dinner and looking after kids. The Thursday before the OS Drag Day I had my good cousin Ants (owns the noisy VK Commodore) come round to help. He zapped and fitted the sump up, replaced a front caliper and fitted the motor back in the hole whilst I did the important stuff like fit the locked diff and fender mirrors. We fired it up again and still was spraying oil from somewhere on the front of the motor. I had the ol man help out on the Friday before the OS Drag Day and have one more crack. I bought some more oil seals (crank, oil pump and balance shaft). I say more because we had already replaced these during the cambelt replacement. As he started to unbolt items he found that on of the hydraulic tensioner bolts were loose. He bolted everything back up and sure enough, no more oil spray.....whoops. 9:30pm rolls around and he has the car running as best as he could. At this stage I havent even got it on the ground let alone taken it for a test drive. 10:00pm I take it for a drive around the carpark. I give it a mouthful in 1st gear and felt good. I get braver and hoon from 1st to 2nd and then it bogs and runs like balls! Like its in limp mode (no power, over fuelling) I then realise that I didnt hear the external wastegate open. I found that I didnt hook it up and the motor saw full boost which at this stage I think ive cooked the motor already...... 11:00pm I wash the car then load it on the trailer hoping that someone may be able to help me out at the strip. 12:00am Tow car home pissed off that I wont be racing. Managed to get home at 1:00am Saturday, the day of the OS Drag Day I dragged the car down to Meremere and try to start it to drive it off the trailer and it wouldnt start. We push it off and im thinking we should have kept it on. As I inspected the engine bay in daylight the problem was evident. An intercooler pipe had blown off. We clamped that back on and it fired up and ran good. Took it for a little test drive and all was ok. I managed to pass scruitineering and took it out on the strip to help dry it out which was a good opportunity to test it further. It was running great Photo credit - MichaelJFox I took it out for its first run and managed to get a 15.25 taken it somewhat easy 2nd run I ran a 14.39 - I was over the moon at this point. All I wanted was to get in the 14s. The car was running awesome. As the day went on the car performed very well. A massive contrast to how the car was running less than 12 hours prior. So all in all an awesome day. A lot of late nights payed off and I met the deadline. Many awesome people to thank Heres a vid of the fast time i managed Now to tidy it up and drive it over the summer4 points
-
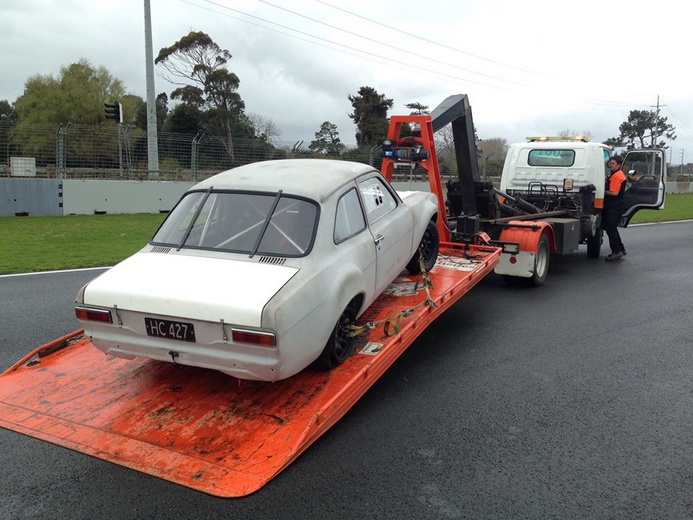
Too Much fun Until this happened Great first outing in the car , a few setup issues with the pedal box and then tyres that didnt want to stay on , but overall very happy
 4 points
 -
After much fluffing about i discovered a multitude of things wrong with the car. Every wheel was hand tight. Keep in mind i towed it from Ohaupo to Hamilton Struts were loose. Hence the clunking noise Front indicators now work because i put the relay where it shouldve been. I have high beam on the left light but not the right and have no wiring for the "gti double light" grill. Was told to hook them up as just fogs or high beam. Sorted a few nitty gritty bits here and there, eg window wiper motor is replaced. NUmber plate mounts are being soaked at the moment in cocacola. Cbf doing seats so i think greg should do them and ill buy him a pie.3 points
-
Do that and I'll be sure to gift it back to you and then make sure you get to unwrap your present and then eat it in front of everyone. Would be a bit stink puhuhuhuhu3 points
-
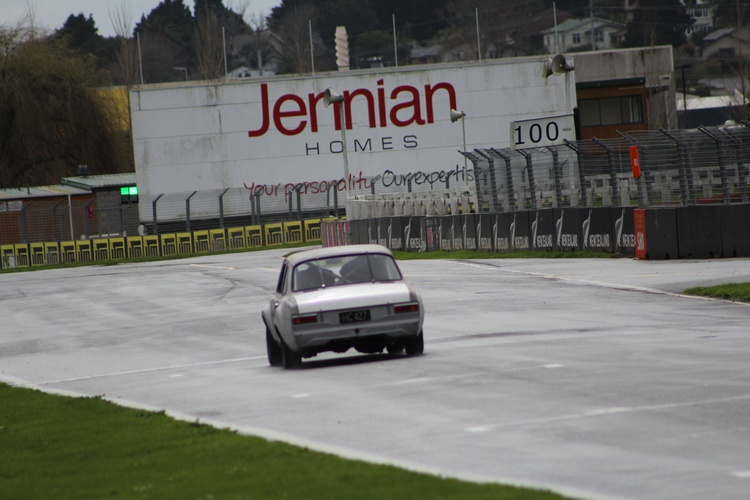
Ok, so i completed fitting the turbo, and got it running. FAIL. No matter what i tried, it was getting really bad compressor surge in top gear at high load and low revs. So i pulled it all out again, and refitted the original setup to get it running for drag day. I did swap the exhaust housing with my spare, as i found a tiny crack in the one i was using. For some reason this supposedly identical part seems to be boosting and running better than it did before!? Ah well. ran it on drag day, and overall pretty happy with the results. Run 12 passes all day, and the difference between my slowest pass and fastest pass were a mere 0.27 of a second. Also managed to win the DYO competition again this year too. Best run was 14.26s @ 102 MPH which bettered last years attempt at 14.4s. I guess lesson learnt, if it aint broke, dont fuck with it!3 points
-
A more "appropriate" load today, off to a TV shoot early tomorrow morning with another Mk2 in tow
3 points
-
So, i just wrote a massive yarn about this then my computer had a meltdown so heres a summery. I brought this off guypie while i was in hamilton for work. I did skids then pulled it apart. It is currently at the powdercoaters. plans are, wide wheels, exhaust, slam, take the loom out, eventually drop a 125cc in it, then ride it. Pics.. How i got it: How i want it to look:2 points
-
Done diddly fuck for a while, took her for a WOF after the brake work and she passed _b Adjusted the rear brakes and that's been about it lately, have been too busy being a company man at the moment. For the thread, here's a pic during a spin around town the other day. Such good fun to drive.2 points
-
I am bringing 3 presents. One isnt really a present, the second is only a present to a few people and even then its borderline and finally, something that is a bit lame but is extremely handy in the garage. Fizzing!2 points
-
i have spent the last thirty minutes exquisitely wrapping a present.2 points
-
Il be lateish, final inspection of new house. I have gift (badly) wrapped with duct tape and newspaper and a modern car (due to knee injury)2 points
-
my seat turned up today. 2015-12-16_04-09-50 by sheepers, on Flickr2 points
-
I feel like I am becoming the zebradude of mopeds.2 points
-
Yeh, apparently some other dude was going to buy it for vintage cart racing, but didn't show up, so I got it. He was a bit dark when he heard I cut it up. Bouns of old cart is low chromoly content, so easier for numpties like me to weld. Now that the utes done, I can get back to working on this.2 points
-
painted roof again. while its wet you can see in the gloss how the shape looks and I'm happy with it now so this will be the final coat of primer on the roof. if i get time after work tomorrow night I'm going to colour one of the door shuts. 2015-12-14_09-53-10 by sheepers, on Flickr2 points
-
Howdy Pard'ner A few more bits and pieces of progress: Powder Coated goodness. It's a nice feeling looking underneath and not thinking damn son, you nasty. Also replaced the front wheel bearings because yuck Had the front rotors skimmed. Looked like the pads have worn down at some point, I wonder what song they would play on an old record player. Also found an old WOF in the sun visor. Might be good proof for the plates? And the ones I know you're probably here for... All complete and ready for re-reg just waiting to hear from LTSA about the plates. Hasta la Vista, BABY Hoping to be ready to potentially take her to Nats if time off is approved2 points
-
Few more pics, Had to redesign the remote after the first run, Originally it was designed to be in the off position at 6oclock ,standby at 9, throttle from 9 to 4, but I kept accidentally shutting the engine off when throttling down. So I added a 2nd switch, the top switch is power and bottom one is standby/ run so the throttle is now adjustable on for the entire range of the rotary knob, all I need to to to shut down normally is turn the throttle to minimum and throw the4 bottom switch to standby which lets it stay powered for the cooling cycle. Here's a couple of pics of the unit on it's own, it's designed to be added to any healing cruiser and just uses the seat bolt to attach. and the final touch, the tank stickers ,thanks to Bangbug for printing these off last minute.2 points
-
So now another crown has found its way into the shed. A 1969 Toyota Crown MS53 wags.last registered in 1996 and possibly the last time it ran.This came from the same place as HORNDOG's MS51 coupe.It has been sitting in a shed for quite awhile which has kept it in not to bad condition but the bottom of everything has rusted away, ie doors,sills,guards and tailgate.Tailgate has the worst of the rust but nothing that carnt be fixed.The car is 98% complete all chrome is there and is in relatively good nick .Just missing both front headlight bezels,'custom' badges and rear crown badges.Interior is all there ,factory black ,front seats are buckets with the usual wear and tear.Dash pad has a large bubble in it and the rear dickie seat works.So i trailered the old girl back home behind the 60series cruiser only for it to have a melt down on the way home. The alternator ratted loose and it spat some coolant out of somewere but no split hoses.After a helping hand from a local she was fixed and made it back with out any extra issues. Specs: reg on hold!!! factory 2M replaced with a 4M-U factory 4spd manual on the floor disc brake up front 5 seater with a 2 seater dickie seat in the rear electric tailgate window that still goes,and would go better than most 90s cars windows boot full of crown parts for ms60s 1973-1974 Got her home,chucked in a battery,checked the electric window to see if it still goes and score it works!!!!! Cleaned all the ignition system changed the seized carb over for another and put some gas in her and she fired up purring nicely,just some timing and tappets to adjust.Clutch needs bleeding to see if i can get it rolling under its own power,brakes also need some attention. So no real plans for this as of yet,just get it to drive and stop.Wouldnt mind taking it to the Rangiora car show at the start of the year.The ms65 will be finished first before the wags gets some love This is the parts container that is full of mostly crown 60series crown parts (theres a little left but i took most of it) a few rt80 corona bits,rx30 cressida parts,datsun 260c towbar,taillights and gasket set.these are all for sale and need to go Discuss here-----> //oldschool.co.nz/index.php?/topic/51148-toymotas-1969-ms53-crown-wags-discussion/1 point
-
Give darren at revolution a call 09 8184739.1 point
-
I have 3 wrapped things in the car, but they are all for preassigned people... Navneal and brockzila are the lucky recipients of my gifts. Come find me!1 point
-
Nylon braided is sweet. I reckon it looks heaps better than stainless braid too1 point
-
haha what else do you have stashed....1 point
-
Also, what's the deal with AN- fittings? As best I can tell: Pros: -??? Cons: -Bulky and ugly, usually come in gross colours -Harder to take on/off than banjo bolts -Sometimes need two connections at a single end, so more things to potentially come undone -Need huge radius on hose bends -Risk of a hose slipping out? -Hard to know when they're tightened correctly / overtightened I guess they're the easiest option when you need a lot of custom lines, but ergh I hate the idea of using them. I've got them on my oil filter relocator currently. I'm pretty hesitant to use them for anything fuel related, especially on connections that need to be done up and undone a lot. However it looks like it might be the only option if I want an adjustable FPR.1 point
-
I really really like your end goal. Very cool/jealous1 point
-
I'll be outa town but you are welcome to use my slam bike if a shine haul happens.1 point
-
Bring kids. Someone brings Chees every month1 point
-
nice score! what are your plans for this? restore or rat it out? I had a chance to buy one of these from a local scooter mechanic but it needed too much work and parts were hard to source. do these have the two speed g box?1 point
-
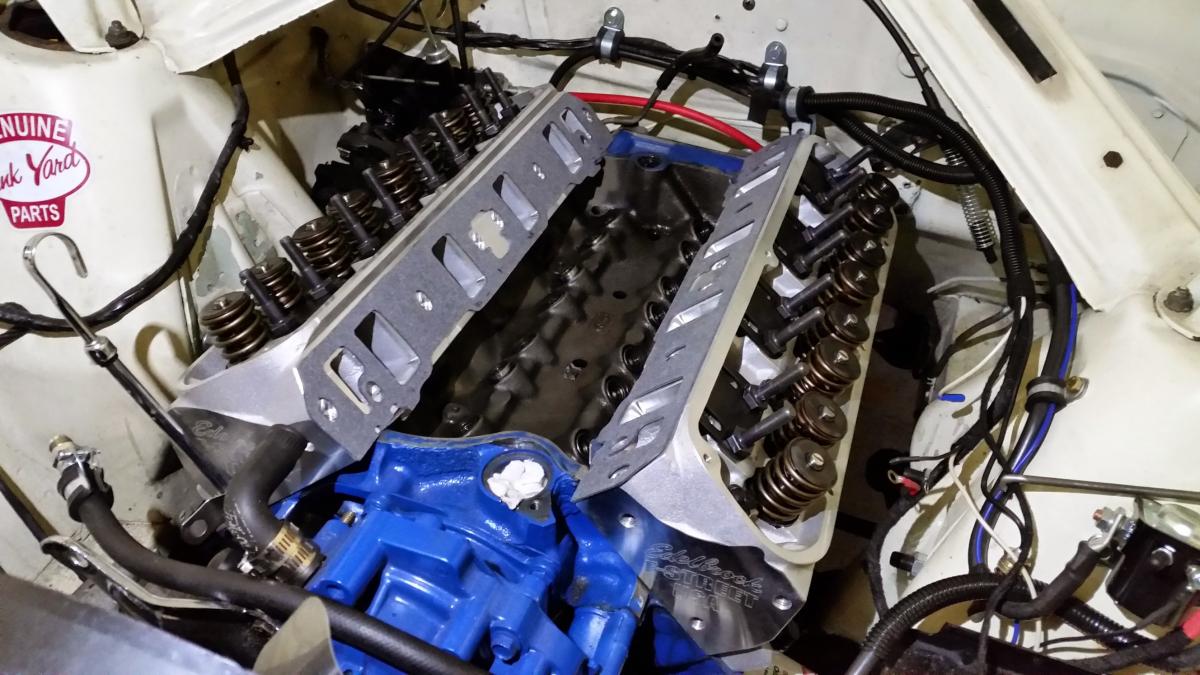
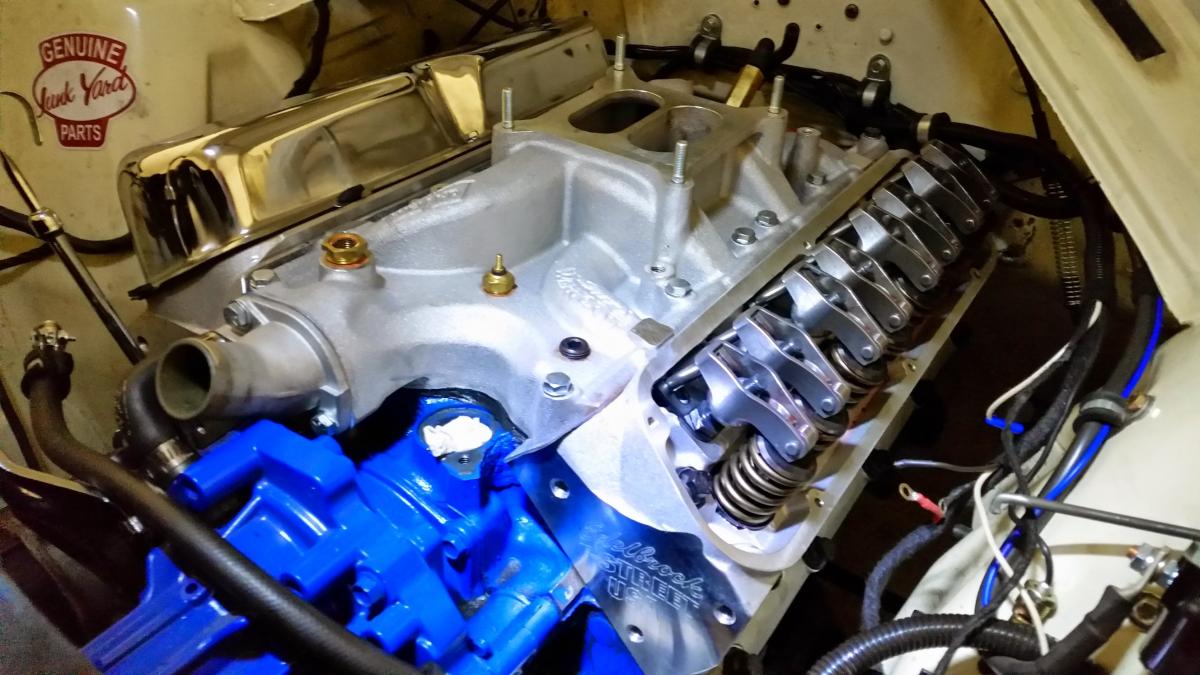
Wow, just realised I haven't updated my build thread in awhile, A lot has happened since April haha. Fitted my choice new E street heads Also fitted some new Comp Cams roller tip rockers All back together now = happy
1 point
-
Also picked these up from the sand blaster today and dropped to powdercoater.1 point
-
you say that (and you are probably right) but how cool is what he has achieved with what he has available in both practical and i-t skill and some kiwi ingenuity ? higher trap speed says his method is working and no amount of dyno time would solve his traction issues anyway . also pretty rare and very cool for him to document both his successes an failures as honestly as he does (most dyno shops dont do that either) disclaimer; I have never met Roman and personaly I prefer points , condensors and carbs1 point
-
i had a go at drag racing this just for a laugh. it actually did a skid but i don't have any photographic evidence of it….. it is slow but i was happy to break the difficult 20 second barrier. 2015-12-13_10-54-19 by sheepers, on Flickr1 point
-
Not that I do Christmas but if we are can you pair me with someone with a mk2 so I can give them something out of my overflowing pile of mk2 parts? That would be great.1 point
-
Can you bring this to kumeu hotrod show and park it with us at the OS area. Just so damn sweet!!!1 point
-
2015-12-05_01-56-19 by sheepers, on Flickr 2015-12-05_01-55-59 by sheepers, on Flickr 2015-12-05_01-55-44 by sheepers, on Flickr 2015-12-05_01-55-35 by sheepers, on Flickr 2015-12-05_01-55-28 by sheepers, on Flickr 2015-12-05_01-55-19 by sheepers, on Flickr 2015-12-05_01-55-03 by sheepers, on Flickr 2015-12-05_01-54-54 by sheepers, on Flickr1 point
-
seats. yay. the BMW seat is lush as fuck. its megga comfy and lush to sit in and its too high. the exhaust is approx 3mm away from the seat rail, it aint going any lower in the car but its just too high, the sun visor is now non functioning because I'm so high in the car that i literally can't see anything but bonnet if i put the visor right down, tis gay. so I've decided to pull the pin on the bimmer seats. i ordered a racetech seat instead. didn't know they were NZ made but when i found that out i was sold. i went and tried a couple out thanks to the nice people at Chicane racing something or other and ordered an RT4000W (the W probably stands for wide) which will take 3 weeks to make. so ill stick that in when it gets here. no idea what imma do with the passengers seat as this stage. my one will be like this but all black. in other news i got a wheel alignment done by the good people at racelign suspension and while it was there i asked them to see if they could see anything that needed attention suspension wise. Ian reckoned most things were good but the rear trailing arm bushes had a bit of movement. i thought about when they had last been replaced and it occurred to me that they had been in the car since 2001. so i bough some new ones and swapped them out. the old ones looked fine but with the new bushes holding the diff in place it feels much better in the back end. and thats all.1 point
-
Slow progress Put some switches on the dash that do aboslutly nothing. Started on mounting the radiator and making an exhust Also started making a seat out of copper. Petrol can that i aquired that will hopefully sit on a small roof rack and gravity feed the engine. Parts to hopefully turn into a rear axle1 point
-
MOOOOOOOOOOOOOOOOOOOOOOOOOOOOOOOOOOooooooooooooooooooooooooooooooooooooooooooooooooooooooooooooooooooooooooooooooooo1 point
-
May 2015 went drifting at Taupo, only difference since meremere was that I whacked in some T3 30mm RCA's which must have put a bit more tension on the castor arms as the auto steer was super responsive in comparison to the last outing, some new 165/55 xr611 nankangs in the back and also tightened up the handbrake. Unloaded in the morning running on 3 due to a dodgy injector wire, some GC with a soldering iron in his pocket came along to the rescue, drifted all morning till one of the wires came off it's lug for the efi relay solder guy to the rescue once again, skidded all day again till i chewed a drivers side brake hose due to rub on full lock drove down to repco 5 mins down the road to pick up two new ones, fitted and bled up then drifted for the rest of the day till I rain out of fuel. Since then I've managed to unlock 4.1 ratio locked centre on a nice sunday drive but have recently put in a 4.3 replacement. Going to enjoy a few more days this year then rip out the oem ecu, loom, intake mani and throw on my link g4 + ITBs for the new year and might expirment with my new 86 front susp and arms1 point
-
Awesome, the guards are the right shape and its the correct length to the wheel arches and the rear. Wellside here we come!!!1 point
-
Bump steer and camber measurements with the Toyota knuckles installed. It looks like the top balljoint really needs to come in from underneath to help the camber curve and a drop on the steering arm balljoint to reduce the bump steer. There is also scope to lift the steering rack 5 mm which will help.1 point
-
So, ever since I lowered the wagon ive never been happy with how the front sits. Theres an awful amount of guard gap but I cant go any lower with the standard struts without it resting on the bump stops. I needed to make "JUDDIES" or "JUSTIES" or how ever you young-ens say adjustable suspension. So, with a lot of research and referring to Seedy Als guide I decided to hack up a pair of Sigma struts. I purchased adjustable platforms and top hats from George Stocks. I also purchased a pair of SW20 (i think) rear inserts that were about 50mm shorter which meant I needed to cut the strut tube. Strut tube cut and ready to be welded back together A test fit to see how everything sits. With the different shaft size of the insert I couldnt use the factory top hat. I purchased some adjustable camber plates to suit. A little spacer was made to sit between the top spring perch and the top hat. The top spring perches didnt have a locating indent in them. I got a quote to have this machined fro $200! So I get my maori ingenuity on DONE Ordered some springs with keepers. And all fitted up I trial fitted one strut and found that the spring rate was way too aggressive. At the lowest setting the car was higher than before and was solid. I bought some more springs that have a friendlier spring rate So here are a bunch of pics showing the height before installing the new struts, new struts at max height and new struts at max low (actually could go down another 15mm) New struts - Max height New struts - Max low Measurements taken from top of arch to centre of stub axle Obligatory chassis rail comparison As it sits at max low, im sad to say, its too low. But, I can easily raise it to the perfect height. I had to use my roller blade wheels as the wheels I was using wont fit the new struts. Pics Thanks1 point
-
Toyota and mitsi parts turned up for the Mazda yesterday, sent on the 3rd from Japan, and arrived at my rural address on the 7th. Not quite overnight parts from Japan but pretty quick considering this time frame included a weekend...1 point
-
Knuckle progress, thanks to fletch here on old-school i have the loan of a tapered reamer so put it to work... I settled on 98rpm for the reaming speed. Then machined the outside taper and parted it off at the correct thickness. Knuckles now look like this, they have been on a bit of a diet..1 point
-
This car makes me want to throw up all over my shirt and nude bottom half1 point


.thumb.jpeg.384ff72c8d2b0ee0d34a7bdedb55bdcf.jpeg)


This leaderboard is set to Auckland/GMT+12:00