
Leaderboard


.thumb.jpeg.384ff72c8d2b0ee0d34a7bdedb55bdcf.jpeg)
Popular Content
Showing content with the highest reputation on 11/04/15 in all areas
-
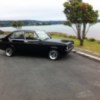
Got her done over the labour weekend. When I was washing it before starting a big piece of roof lifted off, so that took a solid days worth to fix. Also popped the dents from the rear passenger door that have always been there. Picked a few scabs I shouldn't have but I'm happy with how it looks now. It was a bit of a squeeze in the garage but it was good to have cover.13 points
-
Heaps and heaps of rad parts have been arriving lately, and I'll get around to that and Imma let myself finsh but today these: IMG_8241 by Richard Opie, on Flickr Enkei Dish, 13x7 -2 offset. IMG_8248 by Richard Opie, on Flickr They have a heap of clearance for the Wilwoods - they are in great shape as far as bends or kerb damage is concerned but are heavily oxidised. A blast and a polish will sort it... IMG_8251 by Richard Opie, on Flickr I think they're wonderful. Differentiated from the popular Cheviot or Aunger versions with it's raised area around the PCD versus the flat depression the usual Tridens have. IMG_8233 by Richard Opie, on Flickr Next, I'm going to remove the rear bumper. I've bought a tub of T-Bucket bog, will hopefully crack into that this weekend and next week I'll look out for a roll of camo fabric and drop my doorcards into Greg. Thanks for looking.10 points
-
Went and picked up this today Big thanks to Chris for ditching work to collect rusty cars using his own trailer and tow vehicle (also thanks Tara for takinmg the Grande Latte Barina to work today) It looks alright from afar but is far from good. Its missing quite a lot of the more valuable bits like: - engine - gearbox - brakes - steering box - diff head (and i need to return the axles) but it also contains many parts of value to me - i also have to take the axles back and pick up more stuff in a month or so to the PO who owns a 2300S Coupe that this was a parts car for - a set of good bumpers + not so good ones on the car - red interior in good condition + a extra set of carpets in red - spare wheel well cover in good condition + 2 in not so good condition - seat belts - a clutch adjusting nut - spare rear springs (for adjustment purposes) - good windscreen - ok doors - brake booster - spare lower tail gate + rusty one on the car - spare rear side windows - some useful rust cuts for the drivers side including (most) of the drivers floor - various other bits and bobs Including, and best of all - spare good upper tail gate + good one on car + a spare tail gate glass (!) - i pretty much bought this for the tail gate alone and to find it has spare glass (which i could have happily used) and an extra one as well is just crazy. Thats a veritable embarresment of riches! Based on the number of tail gates or parts thereof i now have, that suggests i possess the mortal remains of 4 of the 9 or 10 2300 Wagons imported into NZ. How did that escalate so quickly?10 points
-
I think I will attend my first os meet!!3 points
-
and now the outer is welded n. got to do the corners now. 2015-11-03_08-12-38 by sheepers, on Flickr 2015-11-03_08-12-48 by sheepers, on Flickr3 points
-
Nothing a supercharger won't fix2 points
-
bwarp your avatar makes you look mega like a meth head. So good yay for the beach indeeeeeed2 points
-
You could rig up some kind of oil feed for the exhaust manifold if you want smoke?2 points
-
Thanks Stu. Yeah it would have been nice especially with a turbo. Beggars can't be choosers though, fingers crossed the A15 will be up to the task. I'll run it with the choke on so you can imagine it's a diesel.2 points
-
Great news! The center console surround has been painted to match (although it looks weird in the pic) and has been installed with a new outer boot ex ozzy. I sourced the sheet metal blanking plate that rivets to the trans tunnel and an inner boot from my commy supplier in Nelson. The manual conversion is now 100% complete and looking stock as...................... Its the small things in life!2 points
-
So yeah, rode the hog, looked like this, no brakes throttle syringe fuel tank and all 20151001_094216_resized by Hayden Rowe, on Flickr good feeling to know its not completely stuffed motor wise 20151001_094230_resized by Hayden Rowe, on Flickr got the tail light all sorted 20151029_191852_resized by Hayden Rowe, on Flickr cut alot of meat out of it to get it to sit nice an low 20151029_191908_resized by Hayden Rowe, on Flickr 20151102_194728_resized by Hayden Rowe, on Flickr 20151102_194733_resized by Hayden Rowe, on Flickr battery box mounted, was abit of work involved in the the end, way more than i thought there was gonna be. 20151031_143400_resized by Hayden Rowe, on Flickr Grommet got the cable exit 20151031_143407_resized by Hayden Rowe, on Flickr got some new bars, same size/shape as the old Renthals...... 20151102_194522_resized by Hayden Rowe, on Flickr .......just not bent on one side, also got a brake light switch for the front brake lever 20151102_194536_resized by Hayden Rowe, on Flickr Wiring looks pretty tidy, bit hard to make out in the photo. Only the indicators to hook up then the back section is wired. 20151102_194659_resized by Hayden Rowe, on Flickr And everything is pretty well hidden looking from profile 20151102_194717_resized by Hayden Rowe, on Flickr and some random photos I had 20151003_175031_resized by Hayden Rowe, on Flickr 20151003_175024_resized by Hayden Rowe, on Flickr still finishing up the headlight/bar controls end of the wiring loom, List is slowly getting smaller.2 points
-
http://www.speedhunters.com/2015/10/project-kp61-saga-the-story-so-far/ So I've pretty much committed to completion by submitting this. It's the story of this car, abridged slightly. Will be updates every couple of months.2 points
-
picked up most of a 9" diff for it today, I was thinking about using a 28 spline BW or possibly an 8.8 out of an explorer, but this came up for $200. Its missing a few bolts, no axles, and it is way too wide, but narrowing was going to have to be done regardless of what diff I use, can get axles for 9'' easily, same with parts for the center, can get any ratio, etc. its huugemungus and weighs a million heavys, but should be strong enough for what im doing.2 points
-
Still plugging away at this, redoing stuff I'd already done. Exhaust and intake, redone. Hooked up the PCV valve, breather etc. Clutch cable redone. Broken bolts drilled out of the blade, all cleaned up and back together. Even got the steel work for the blade bolted to the chassis, and put the guards back on. I've measured up for a hydraulic tank so it can be started this week. Sorry about the poor photos.2 points
-
Sorry, but Fuck them.. does it actually say in the tenancy agreement you can't use the garage to work in?2 points
-
### Due to Photobucket being a pack of complete fuckwits, I've removed all the pic links to shorten Fred up a bit. ### So I got side tracked once again, with the offer of a go kart frame. I made it longer so myself and the GPX750 motor will fit in it. I've been fiddling with it on and off for a few months now. Any ways, pretty basic business, just the old road bike powered go kart lark. Annnnnnnnnnnnnnnnnnd that's about where i'm up to. Regards, VG.1 point
-
Hey you!!! Shhh just come. We have stickers The Auckland Monthly Meet! Wednesday 25 November 7:30pm onward A chance to catch up with fellow club members, talk some shit and eat some lush foodstuffs. Burgerfuel and Mexicali Fresh cnr of Robert St and Hurst St, Ellerslie See map. [/url] The DEAL$: FREE Drink with Burger and Chips Purchase (From the COKE range , excluding mini burgers) FIRST MEET??If you are new to these meets here are a few points that may help,Most people usually show up between 730 and 8 ish,We roll down to get burgers sometime around 8 / 8:15 ish. Or whenever you feel like really.We sit around either at burgerfuel or back up top and continue the yarns.Remember its always a casual affair , a place to yarn to mates and make new ones.An oldschool car is not required at all, of course if youve got one on the road then bring it and show it off!! Doesnt need to be flash or special.SOME OF THESE ARE NEW, MOST OF THESE ARE COMMON SENSE. WE WILL PROVIDE A FEW GENTLE REMINDERS WITH THE NEW RULES BUT REPEAT OFFENDERS MAY BE ASKED TO LEAVE. RULES AND THE BORING STUFF!! Basically these are in place so we have a fun and friendly meet and leave the carpark clean and tidy like we were never there. Take your rubbish away with you or put it in a bin, (Use the public bins downstairs not the private ones belonging to the business up top Smokers please don't dispose of your butts on the ground! Please limit the ALCOHOL consumption. Its a public place and the Police/security regularly stop in and we don't want want anyone getting in trouble, We also don't want people leaving empties around. You are welcome to invite a few mates, but please note you are 100% responsible for their behaviour If you belong to other clubs and feel they might be keen to come check out our meet then that's cool but please see BDA780, Threeonthetree or 73crownwagon for permission before inviting them. NO Skids or Reckless/Dangerous driving Please leave a space near the fenced off area clear for the cleaners and don't block them in if they are there. Park in a proper carpark! If its full then just use a bit of common sense and try not to park to many people in. Newschool cars please park to one side and be prepared to move if we get short on space. If its raining and we have to park downstairs then new cars park upstairs or out of the way. The covered carpark is very small and needs to be OS only, If you have any suggestions or input for the meets then PM BDA780 , Threeonthetree or 73crownwagon Thanks!!1 point
-
Hey guys, new to oldschool. Wondering if someone can help I recently brought Bevers/Connors/Jakes Triumph 2000 Estate. I’ve done a few little mods but the only thing that’s probably relevant to this problem is I put ramflo air filters on it and subsequently have been tinkering with the carb tuning. So I’m pretty sure it’ll just be the mixture but maybe something else has changed. When the cars cold it starts up with a flick of the key, no choke no throttle just fires up. whens its up to running temp however it’s a mission, I have to hold the key on, foot flat on the gas for anywhere from 10-30 seconds (choke makes no difference) I think the mixture is abit rich cause spark plugs are abit black but not really that bad I’ve been winding the mixture screw on the bottom of the carbs up 1 flat at a time trying to see if it makes a difference but its doesn’t seem to be. Any ideas would be great Thanks Dylan1 point
-
You love it, you bogan1 point
-
Bought some shit for this. Got some T3 RCAs but they sent me the wrong bolts so need to get some more. Knuckles are being made. A mate put me in touch with a guy who made me some solid subframe risers. Also finally got myself a decent seat. And have some 14x8 -12 MK2s on the way as the MK3s are going onto my Z12. Hope to have everything in by December for a drift day coming up.1 point
-
Carpet is so lush! Will be doing that for dailies but concrete or painted where car work is to be done. Clean up of anything is just so easy on painted surface.1 point
-
Yes it is Dave, yes it is. Lucky you have a motor that now runs.......1 point
-
Please do, with any luck it can meet my van1 point
-
Keen to bring the van If I ever get it going again.1 point
-
I worked on my car so I guess that means I'm coming1 point
-
Yeah if you think nightspeed is awesome, you're gonan be mind blown at OS dragday! Best drag day ever! Be there! //oldschool.co.nz/index.php?/topic/49828-oldschool-christmas-tree-drag-day-vol-3-december-12-meremere/ Now, some people may make a convincing argument along the lines of: At first this may seem like a convincing argument, but apon further inspection, you will find that.... Oh wait, what? Yes, why not both? I FUCKING LOVE DRAG RACING If you can only make one though, make it the OS day! I clicked Like on every post in this thread, so you all have to read my shitty story!1 point
-
Matt that link is friggin awesome dude!1 point
-
Just a solid rod down the left hand side probably. But doing a paddle shift set up is easy, you just need a thick cable with solid ends, kinda like a boat steering cable, so may look into doing it that way. The guy I got the cart off has a NSR250R powerd cart that makes like 40hp or something, and he strongly recommended doing a paddle set up, as taking a hand off the wheel can get a little tricky.1 point
-
Holy sheyit that's a big motor1 point
-
been a while since an update... For no better reason than I already have it, I've decided to fit a bigger turbo. It was built up for years ago, using a water cooled core as the early garrett/air-research nissan turbo's weren't. It's basically a T03 exhaust wheel (upgraded and cant remember the trim now) and 0.63 T03 housing, and a T04 inlet with a larger trim wheel. By today's standards its probably an old slug, but surely better than the original 30+ year old factory one i'm running now. original turbo is on the left, new on the right: and after removing the old turbo, trial fitting the new one. its sits extremely close to the engine mount bracket, but just clears it luckily. now i'll have to source some water feed lines to supply it with. i have somewhere to tap it into the engine, but i need to find a M14 X 1.5 mm banjo type fitting to connect to the turbo with.1 point
-
started on the other side. got the inner skin patched up and then attached the new drip rail. just got the outer to fit and weld up now. 2015-11-02_07-44-03 by sheepers, on Flickr 2015-11-02_08-32-20 by sheepers, on Flickr1 point
-
Fitted 1/4 bumpers to front1 point
-
It's my wedding anniversary that day, so what a day trip treat for the missus. If I can wrangle it (she does want an old camper van), I may see you there. Regardless, I should have Friday afternoon free, so will hop over for a look. If you have to pay to register, can we all share the same card for ultimate Dutchness?1 point
-
AAAAAnd after 7 years sitting in a shed the bitch has a wof as of 3 o'clock today....1 point
-
A lot has happened recently. We have put the motor back in after taking it out and repairing the head gasket. After doing so we put it back in and tried to start it, which was pretty sucsesful. Untill we started to drive it. One of the lifters was not oiling up and after a lot of investigation we found out that multiple wernt. And also after driving it up and down the road it was constantly backfiring which we nailed down a air leak which was confirmed after taking the gaskets between the supercharger and the intake manifold off. So now we have replaced the lifters and push roads and also the rockers. The pully is away getting re machined. And we are waiting on cork for a proper gasket. Hopefully soon we will have it ready but at this point it is staying in the garage.1 point
-
Another busy day. Got a new rain drip rail for the left rear window, very happy with how it turned out. Was going to cost 180 to get one made by APC in Aussie and get it shipped over. This one was folded by me at a mates metal shop, then trimmed and bent to shape. I've finished the rust repairs on both doors and hung them and got them as square as i can given the play in the hinges (any sources in NZ for new ones?) Fitted guards and started to move them around to get them lined up, and then fitted the front valance and started to square it up and make it look pretty. //oldschool.co.nz/index.php?/topic/43814-darryls-3rd-1200-coupe-discuss/1 point
-
pictureless, speculative update. I MAY have found a parts car for this thing, in auckland no less... complete less drivetrain (which is sweet) and rustfucked body (also sweet) Will update if I get it1 point
-
Yeah it was very cool to meet up with some of you OS guys st the swap meet! From what I heard Friday was the day to be there, lots of veteran and vintage motorcycle stuff that was all sold by Saturday. The ride details were: Day 1 was Arundel to Mt Somers, 25km. Day 2 was Erewhon to Mt Somers, 25km, We had an awesome tail wind and we probably had to only pedal 3km of that distance! Day 3 was Mt Somers to Rakaia 50km and the last day was Leeston to little river via a cycle trail around lake Ellesmere 50km. It was such an awesome event i can highly recommend it for anyone who is into old bicycles. Here are a few pics from the ride The 2 trailers with all the bikes loaded up Here are 2 of the 3 really nice Dursley Pedersen replicas that were on the ride Canturbury plains Re tyring a rear wheel on the side of the road after the tension wire through the center broke At the start of the cycle trail at Motukarara Chris having a go at swapmeet A shot with one of the sweet traction engines at swapmeet Rakaia Tavern Stack line up There are a heap more photos on the Oamaru ordinary cycle club FB page if anyone is interested too Time to get onto some of the other projects......1 point
-
Thanks for all the awesome comments guys! The place that we are staying at tonight in Rakaia has internet access so i can catch up on a few things. The ride is going extremely well so far and i am very pleased with how the bike is going, no problems yet and i think we have done a bit over 100km now. We went out to Erewhon station yesterday and had a good tour around which was cool. Tomorrow is the big day with a bit over 80km to do so i am looking foward to that. I have managed to master a few tricks now like no hands riding, peddle dismounts, coasting down a hill with legs over the bars and I am getting the hang of balancing on the thing stationary. Oh yes the newspaper article, The lies!!! its amazing what these reporters seem to be able to pull out of thin air haha although he did get most of the things i told him right. DIRTY6 yes that pic is of one of the 6 other penny farthing riders on the tour, there are also about 16 vintage safety bicycle aswell. Anyway thats my internet just about up, I will put some pics up of the ride next week when i get home.1 point
-
[click me]1 point
-
MAAYYYYYYTE. It's a Corvette motor. 350/350 and fuck-all else other than the high-rise and an Edelbrock carb with a 2" spacer for maximum air velocity. Having a fuel pump that wasn't 8psi would have been a better option but plenty to do before next year. Was a sweet, intense and tiring mission getting it sorted in time.1 point
-
4 $al€ H/Lu>< Goz h4rd 4 wut it iz1 point
-
This pic was taken to show what happened to the gauge. This would have occurred sometime after the last pic was taken of it pegging the dial. When i was putting it away the next morning I noticed the needle could not be seen on the gauge ... plus the gauge looked a little faded and shit. I peered into it trying to see what happened to the needle ... couldn't see nothing so pulled it apart. It must have got hot. The needle got toasted and all of the 'black' left the gauge face and turned into this reddy color. Don't leave these things in your shed together ... because they breed like little fricken Daleks.1 point
-
haha yeah the locker works sweet. has a bit of a mind of its own when all 4 are locked though burnout comp sounds good, but only if the burnout pad is fulled with mud. else spectators will end up with bits of gearbox and hubs stuck in there face1 point
-
Finished. Added some heavy iron to the exterior of the secondary pot in the form of scrap reo bar and offcuts from bulldozer tracks. Plonked a length of chain on top also. All this in an effort to increase the effective use of the heat this thing puts out. This cloak of iron on the outside is dense and emits heat for yonks after the flame has been extinguished. Tested it last night by running it for a few hours. It got toasty and passed its 'ready to be put into service' test. Opps - wrong pic. A mate gave me a temp gauge he pulled off a BBQ. Its a contact type but because it was an after thought on this beastie I just sat it on top of the chain links. Even with no contact - this bad little fucker pegged the dial, lol! The next trick will be the installation. I have decided to put it inside the shed. I have nutted out a basic refueling system and some safety provisions in my head. I'm in no rush and need to make room first. I've picked up some more LPG pots also in order to make a few to flick off on TM ... if I can get off my chuff.1 point
-
This is the first burn. You gotta turn your head sideways to look at the vid, lol! I am useless. The size, placement and amount of holes must just be about right. This ran very well 'straight out of the box' I used the same oil flow as I did for the big one. Also, this one seems to run hotter and with no tractor chuffing sounds. The paint didn't peel off the secondary pot on the big one like it has been doing on this one. I am planning on dressing this thing up with heavy iron in order to use the heat more efficiently ie a heat bank. http://vid528.photobucket.com/albums/dd329/race_hemi/P8150562.mp41 point
-
The dudes son dropped it off with the family tow truck this morning. I had the day off so right dug in. bleugh rust on the roof edge is actually not that bad put my finger through that spot above it tho engines all there, but sump has some big flatspots in it so may whip that off to check the oil pump is ok before trying to start it up. 1.5 sets of 'old' sparks from the 125 to replace the manky old champions that were just sitting in the holes. one has some gak (dried crc or some suck) in the thread so i need a tap to get a couple started - dont want to rush it and cross thread a spark plug. Filled the holes while i hosed it off anyway. Its both better and worse than i thought. Smells like rat piss tho, so ill pull the interior out tomorrow, It all needs to come out to fix the floor anyway and to get the wet sound deadening off. So I started on the boot, lots of wax oyl already there Still needs couple patches in the spare wheel well, and some work around the tail gate like any old wagon should. Gave the outside about 3 washes and its looking much cleaner. Front brakes are not seized and have what look like new pads (can see stamped writing on the backing and pad material, and unworn but surface rusty discs. Noice. Hope the rears are just as good. Also, some of the rear bumper is not rustly YAY1 point
-
got the top hose issue sorted by running a new hose under the intake pipe. no more temperature issues! after avoiding it for so long, decided to have a too-too with the tune in the computer. i got myself an innovate MTX wideband to monitor the exhaust (which i rate highly BTW), and installed using only the best quality insulation tape. i initially did a seat of the pants tune, using the hand set to set what "felt" best. the results were far from ideal, and i ended up with a flatspot in the load map once i hooked the laptop up so did it again, and smoothed the curve out. i ended up dialling quite a lot of fuel out right through the range, especially under vacuum. the vacuum AFR's are all now around 13.5 where they should be, but ive left the boost AFR's at around 11.5. they should be around 12. still a bit nervous about leaning it out under boost! the change was amazing, smoother, crisper and faster too. no more black spark plugs either... here's how it ended up after a weekend stuffing around getting it right. doesnt look much, but took a looong time to get right! so all in all, its running heaps better, and i still need to go through the ignition timing yet too. and to prove its not just a garage ornament, i took it to Caffeine and Classics on sunday too.1 point
-
i hope you use this thing for day-to-day household chores pete. getting the mail by running over it, reaching the top shelf by running over it, cleaning the lounge..1 point
-
Little more progress today. Dad did some shrinking on the guard after welding up the indicator holes. Grinding back some of the rust, around the windscreen. Its a bot of a pain in the ass. Prob happened at some stage when windscreen got replaced. Then we decided to do some modification to the vents. Before: After: Just gotta weld it in next week. I was wondering whats the legality's behind windscreen wipers. Could i weld of the drivers side and only have 1 doing the whole windscreen? Will take a bit of custom work, but to be honest i don't think ill drive this car in the rain once its done. Ill probably be to precious.1 point


.thumb.png.b2aee08688778d18bdc7b3e3c1852d9c.png)


This leaderboard is set to Auckland/GMT+12:00