
Leaderboard


Popular Content
Showing content with the highest reputation on 09/17/15 in Posts
-
Proof:12 points
-
Couldnt figure out how to load pic from phone, so computer it is. Lowered the forks. GN400 Build 09/16 14 by Hayden Rowe, on Flickr spacers on the seat removed and a 120/140mm space went in at the bottom end of the fork GN400 Build 09/16 13 by Hayden Rowe, on Flickr End result, super super soft, but didnt cut/firm up the springs, Im gonna add an air value to the tops of the forks to stiffen them up, will add photos of that happening later on GN400 Build 09/16 12 by Hayden Rowe, on Flickr Nice to have the bars back on though. been awhile! GN400 Build 09/16 11 by Hayden Rowe, on Flickr much less dorky ride height GN400 Build 09/16 10 by Hayden Rowe, on Flickr New muffler showed up GN400 Build 09/16 08 by Hayden Rowe, on Flickr stainless steel Lossa Engineering GN400 Build 09/16 07 by Hayden Rowe, on Flickr GN400 Build 09/16 06 by Hayden Rowe, on Flickr super nice build quality, saw these in a custom hog shop while i was over in ozzie for family xmas GN400 Build 09/16 05 by Hayden Rowe, on Flickr angle up?...... GN400 Build 09/16 04 by Hayden Rowe, on Flickr or flat? GN400 Build 09/16 03 by Hayden Rowe, on Flickr went with up and heat wrap. Welded on a mounting tap aswel, happy with how that worked out, really clean and easy to get on and off, in saying that its only a single. GN400 Build 09/16 01 by Hayden Rowe, on Flickr Really happy with the end result GN400 Build 09/16 02 by Hayden Rowe, on Flickr now onto bog life GN400 Build 09/16 09 by Hayden Rowe, on Flickr lce cake with hummus sand sand sand prime ice cake with hummus sand sand sand prime ice cake with hummus sand sand sand prime repeat. that is all8 points
-
been doing a wee bit of fettling. Brakes came up pooze at the rear on the brake rollers at work. LH side shoes were damp with old diff oil. rear diff breather has recently been off and cleaned out. there's the culprit! Wheel cylinders seem pretty new all round so just slammed some new rear shoes at it, gave brakes a bleed (have a weird brake holding delay issue now which may be master cylinder related) and chucked a new set of front seatbelts at it and looked at how much water the radiator is leaking. Few more jobs to do (two tyres are perished, and needs exhaust love and a couple of other bits and pieces) but I'm presenting it for revin tomorrow! Will definitely have a list of things to fix before it's legal but at least I'll have an idea of what I need to crack on with, and best for me: I'll have that 28 day deadline to get it sorted coz we all know I'm a procrastinator unless I've a looming deadline! che also, got a needless, weird, irrelevant plate off the tard to smack on it. If I can't have black plates it might as well have something ridiculous!7 points
-
Thought I should have a ramble on this topic. Have held various tickets including an Ali one so might just clarify a few things: 1. Aluminium MUST be cleaned prior to welding but the predominant reason for this is not to remove dust and dirt but to remove the oxide layer which forms on it naturally which is the reason it doesn't corrode. Cleaning can either be done with IPA or mechanically with a stainless wire brush. The wire brush should be kept in a zip lock bag or plastic container when it's not being used so it doesn't get contaminated. If the brush accidentally gets used on carbon steel then don't use it on Ali again. The reason Ali is almost always CNC router cut such as in Alloy boat production and not lasercut is because the CNC router leaves a nice clean freshly cut edge whereas the laser heavily oxidises the edge which would all need to be cleaned back again to weld. 2. AC balance - You can quite safely probably leave at 50% for what you're doing. This setting is all about how much penetration you get. Some info on why you need an AC Tig for Aluminium: A standard DC Tig for Stainless or mild runs DCEN which means your earth is positive and your electrode (The tungsten in the torch) is negative. When welding Aluminium the oxide layer requires a 'cleaning action' whilst welding which is only achieved if you switch the polarity to DCEP (Negative Earth, positive electrode) The problem with this is that running a positive electrode will melt your electrode away almost instantly hence the reason you have to cycle between polarities which is what AC does. It cycles between DCEN and DCEP so the DCEP part of the cycle achieves the desired cleaning action of the oxide layer while the DCEN part of the cycle prevents your tungsten getting hot enough to melt away. Some more info on AC Balance control: http://www.millerwelds.com/resources/articles/Understanding-AC-TIG-GTAW-Balance-Control/ 3. Tungsten grinding - Never grind from side on if you can avoid it, it tends to cause arc wander. Your grind marks should follow the same direction as the length of the Tungsten. For DC TIG (Stainless and Mild) grind to a sharp point. The length of the point should be twice the width of the tungsten you're using and the sharp tip knocked off ever so slightly. If you leave it super sharp at the point it can result in a small piece of tungsten melting off and falling into your weld which causes a tungsten inclusion and would fail an Xray test. If you don't knock the point of it's not a big deal, many people don't do this. For AC Tig (Alloy) grind the tip at a 45 degree angle but leave a flat spot on the end the same length as the angle section. There are numerous ways to 'ball' the tungsten but this is not at all critical, just grind as above and start welding. Having a clean tungsten is critical. If you contaminate it with the filler rod or in the weld pool you MUST regrind it. Gas Flow- TOO MUCH GAS WILL INTRODUCE POROSITY INTO YOUR WELD. More is not better. Should be roughly 8-10Lmin. A few other things: Use the correct cutting and grinding discs for Ali which won't contaminate the material and introduce contaminants into the weld. When finishing the weld don't back off the pedal too suddenly. Taper it back gently. Important for Ali or you get crater cracks which can spread down the length of your weld. Torch angle is important! NEVER EVER use brake cleaner or anything with chlorine to clean any metal prior to welding!!!!! It creates phosgene gas and can kill you very very quickly. If it doesn't kill you it'll FUCK you up and leave you with permanent health problems.5 points
-
OK sorry for more spam but Shane just sent over some more close up images with various repair stuff which is good and thorough. Engine had a strange miss which turned out to be a bung plug, replaced that with some random one and it worked. Compression appears to be a little low on one cylinder but the car still seems to run relatively well so when I get it I'll do plugs/leads/dizzy cap etc anyway as a precaution. Shane also has some MDI spark booster thing (you know those boxes you always see on old Jap cars to boost the spark) so he'll throw that in too. A few more pics.. Powerhouse! I'm actually happy that the numbers match on this and the body.. otherwise that could be a bit of a problem come time for VIN etc. Angry face! Interior is overall very clean, will need new centre console as that one looks banged up and not correct for the car (more holes for buttons and switches than my povo one has). Plus side, less things to go wrong in mine right? But this really got me excited.. https://vid.me/fhmd Annd they reckon we should have a booking for shipping next week so that's pretty exciting.4 points
-
mock up with your cock up goofy frame welded. ingredients here are bits of 3 bikes, perked/leftover tube, flymo bits, curtain rail and falcon leaf spring.4 points
-
ahhh something your kid will remember forever , the day dad and i started the cycle car for the first time!!! good dadding bro!4 points
-
Looking great mate . Nice amount of slam !2 points
-
Damn! it's getting steamy and dreamy in here. See youse this evening. (can always turn the bar stools upside down to allow more seating).2 points
-
2 points
-
Microwave or heat in oven and reuse again and again thats what we do at work on a hydrogen gas sample line to an analyser2 points
-
Shit long time no update. I still mess about with old bikes a quite a bit. here's a couple of photos of a bike that came to me under sad circumstances recently. It's a BSA Fittings, Speedy cycle. These were made in Christchurch by Speedy Cycles and are quite recognisable. I really like this bike, it's still in it's original finish even after 90 years. All Speedy cycles were Nickel plated and as far as I can tell heavily painted in red and green paint with what looks like white and black details. I have a feeling this style was sold like a GT bicycle rather than a racer. It's a bit battered, it has a bent frame, is very dirty, is missing it's correct rear wheel and hub, and the BSA chain adjusting cams are missing. I have everything to replace the missing parts and have started to strip the bike down to fix the frame and give it a good clean. Here's a couple of photos of a friends Track Speedy. BSA "Track" bridge. And the Speedy cycles chaps.2 points
-
You could register this under the Exempt Class A and it would be road legal.2 points
-
New carby installed - had to modify a couple of small things but it ran right out of the box and ran pretty good too. Genuinely so much more responsive and very consistent at idle compared to the Q-Jet. Things to do - tune it properly with the carb tune kit that came with it and adjust timing as it is a bit pingy now. - fit a right angle fuel inlet to clear the air filter base. - figure some way to mount the air filter as curiously there does not seem to be any thread down inside the regular hole in the middle of the carb. - adjust the throttle response as it is super snappy right now - probably just needs a lighter return spring. I drove it home tonight and off for WOF tomorrow. It sounds so much more rawkus than the video portrays but I know I'll be flayed without pics.2 points
-
2 points
-
Cool shot Shane got of the car with the seaside2 points
-
//oldschool.co.nz/index.php?/topic/49929-pbaines-1985-ae86-corolla-levin/ Well, I have bought myself an AE86 in from Japan. Always wanted a Sprinter Trueno but ended up with a Levin as it costs a lot more for the Trueno (probably 4-5k NZD) but to be honest, after getting this Levin here I am over the moon. As an AE86 always does, there's a bit of rust here and there. It does need a repair cert but the fella i'm dealing with is very helpful so should be good to work with him to get it all sorted. Engine is built to N1 spec, and goes like the clappers! Needs a new CW & P though, as it is massively high strung at the moment and I sit at around 4200rpm at 100k so definitely not ideal at all. As it was in Japan at Stacked (best guys to deal with, highly recommended. Was shipped via AutoHub which was 100% hassle free) THEN It was time to get it on the boat. But not after removing the side skirts and raising the suspension, with the greatest method of adding nuts as spacement. It was on the top of the list to go 'remedy' from the VINZ inspection too Lastly Here is the VINZ inspection sheet.1 point
-
I built my fist ever table for a friend last year, and quite enjoyed it, so I thought I'd build an outdoor table for home. I dunno anything about tables, but we live by the sea and I don't like rusty screws, so can't trust anything store bought not to contain inferior fasteners... off I went. I am retarded BTW, but you probably all know that already. First there was the timber. Some elm slabs and a ludicrous LVL post. I borrowed a mate's rail saw to attack the elm slabs. It was pretty choice.1 point
-
Im so bloody lazy Plan confirmed... Remove engine from black v50. Install into blue v50 with new barrell, piston and head, take old engine and semi assemble it and install into black v50, go to vtnz and register the blue v50 and "attempt" to register the black one but all I have is a frame number and no previous owner details. All going well il have two v50's all legit. PS the expansion pipe is soooo fucking loud its awesome hahah1 point
-
My old boss reckons PA10 is good for sealing tanks1 point
-
I've ordered a pit bike clutch lever with starter cut off switch, so that should do the job nicely for the rear brake. There is a few sellers on Aliexpress that will do scooter rear brake cables made to custom lengths for about $7US, so I'll order one as soon as I finalize that bars I'm going to use. Exhaust arrived at work this morning, first thing I did was cut out the restriction tube! Test fitted it Sure looks the part imo! But of course it's never that easy for me... Shouldn't be a major to get sorted out, I hope. Local radiator shop reckons worst case $50 to weld a hose barb onto my fuel tank, pressure test it then braze up all the leaks. I think he's underestimating just hole many holes I've managed to weld into it! But hopefully that will be done tomorrow. Thinking that even though there comfy, the bars are probably a little high, these might be a bit better http://www.trademe.co.nz/Browse/Listing.aspx?id=9482775501 point
-
friday 29th or sunday 31th? it's also the weekend before wagnats, may affect some peeps here.1 point
-
Dayem. Such a clean looking build!!1 point
-
Spiffing work champ.1 point
-
There is a distinguished gentlemans ride coming up on the 27th . Pm me for detail as qcr are meeting up earlier for a ride1 point
-
About $90 for a kit made for a 20l tank, about $20 to have my 4.5l tank hot dipped.That $70 would buy a lot of useful junk from Aliexpress!1 point
-
looking fucking rad man!!1 point
-
A reminder of details for tonight. Menu Meet at Brew'd Bar Island Bay at 7pm. I have reserved a table for Old School. Map1 point
-
Yes. Hot dipped zinc is good like that.1 point
-
My bet is the cheap reg/flow meter will be wrong. Also 8l/m is Fucken heaps, I used to weld on 4 or 5l/m Also you will never get the theoretical weld time out of a bottle due to stop start and variations in temp etc.1 point
-
I was thinking of certifiers1 point
-
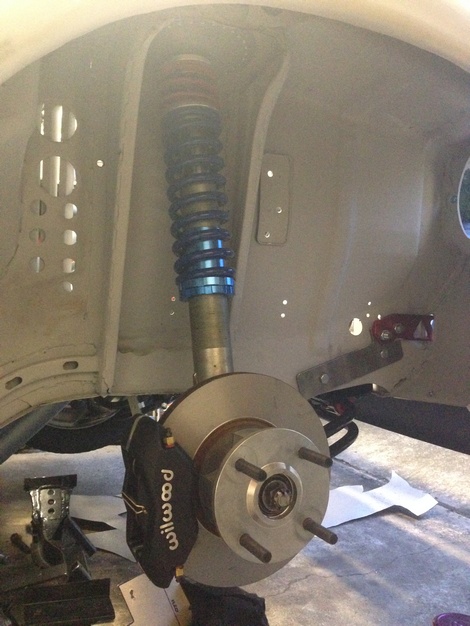
Fitted the wildwood 4pots and capri 2.8i vented discs also added some keeper springs Quickshift installed hydraulic handbrake and linelock arrived
 1 point
 -
this is brilliant man , the forks look perfect! great job~1 point
-
Honest all you guys doing panel work should have 2 part epoxy primer in your shed. Put it on every metal surface, inside and out, this is the only way.1 point
-
Apparently not so; it looks like only spacers or adapters are required to be wheel/hub-centric, i.e. there is no requirement for a wheel to have a hubcentric fit on the hub. "Rob July 19, 2015 at 10:31 pm I want to fit a set of wheels which are perfectly compatible in size, width & offset – however the centre bore size of the wheels is 57mm & the car has only 54mm centre hub size. Is that 3mm “gap” legal? Do I have to fit some sort of ring to fill in the gap? johnbrett July 20, 2015 at 1:39 pm Hi Rob- the wheel needs to be centered on the hub, but if there are no spacers fitted, the tapered wheel nuts center in the tapered holes in the wheels and serve that function. If spacers are fitted, this introduces bending loads on the wheel studs, so then a centering ring is needed. So the answer is- if there are no spacers fitted, a centering ring is not required. Hope this helps, John" (Copy and pasted from http://lowvolumevehicle.co.nz/2012/02/wheel-spacers-faqs/ ) Interesting debate, at this stage I'm erring towards turning up alloy "locator rings' if there's enough internal radius on the rims center bore to keep them in place.1 point
-
Already on top of that. I'll hit up PAC and see if they have any left over paint1 point
-
Bit of an update. Things not going as well as expected. Spare motor starts but only runs for 5 seconds then stops. Start it again and it goes for another 5 seconds then stops. Then it just winds over and over. Wait 5 minutes and it all starts over again. Spark good, fuel pressure good. Sometimes when it turns over it sounds like it was getting stuck. Decided to pull the head off. Hmmmm valves touching pistons. Timing is o.k. Getting head tested and will put back together with my original intake and see what happens. In the 5 seconds it did run my alternator lights were not turning off, found that the indicator panels lights I brought were LEDs. So hopefully if I change them for standards lamps that part should work.1 point
-
Depot has picked up the car today from Tottori Nice to get a couple of photos of it not from the seller. Discussion //oldschool.co.nz/index.php?/topic/49704-mlracings-hakosuka/1 point
-
Bump steer and camber measurements with the Toyota knuckles installed. It looks like the top balljoint really needs to come in from underneath to help the camber curve and a drop on the steering arm balljoint to reduce the bump steer. There is also scope to lift the steering rack 5 mm which will help.1 point
-
1 point
-
Check out this guy... gets himself promoted to area rep then jets out of here before his inaugural meet Jokes, cuz. Have fun in good ol' Murka.1 point
-
Episode 3 Well, I quite like the look of yellow headlights, spent ages trying to find one here or in Europe where they seem to be used a lot. No luck. Then I stumbled upon people using this I saw Supercheap sells the same line however only ever advertising red/blue/silver. I tried my luck today and found a can. Then did it Before; After 4 coats; I'm not 100% on the idea, I think it has a lot to do with the fact that the headlight is massive. Well it will do for DGR, will look at smaller options another day. Pic showing seat action (which still operates on factory hinges / clip) ;1 point
-
You're a brave, stupid, lucky man.1 point
-
Buying a house and becoming settled in has put a slight halt on progress, but anyway here's a couple of inconsequential additions to the car. With help from a mate, we got a direct line to Hayashi in Japan and ordered a set of center caps - 73mm center bore and 60mm height for any trainspotters out there. Finished off the wheels beautifully! IMG_1481 by Richard Opie, on Flickr IMG_1494 by Richard Opie, on Flickr Then I obtained a nametag for the car. Surprised it was still available, yeah I know they cost obscene amounts that can be used for actual useful/cool things but fuck it. IMG_1460 by Richard Opie, on Flickr IMG_1503 by Richard Opie, on Flickr Lastly, a bit of a keepsake from Hayashi, a 15x10" Street CR in 1:5 scale form, meaning it measures 3x2"... complete in a scale carton, with a scale Hayashi sticker to boot! IMG_1520 by Richard Opie, on Flickr Thanks for being nosy! I promise next update will incorporate some proper progress.1 point
-
off work crook. got super bored so whipped the roofracks off this piece. may *just* fit under my carport now. fingers crossed!1 point
-
Thank you for the encouragement everyone. Here's tonight's glueing and screwing efforts. There's lots of sanding still to come as I've made a few mistakes, but it's still better than watching TV1 point
-
No Tom, that is for rust repairs hahaha1 point
-
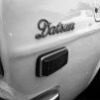
Some slightly better shots now that the sun isn't 420 blazin' Couple of close ups OS reppin' Nissan Prince Kyoto Sticker all up in thurrr.1 point


This leaderboard is set to Auckland/GMT+12:00