
Leaderboard


Popular Content
Showing content with the highest reputation on 04/16/15 in all areas
-
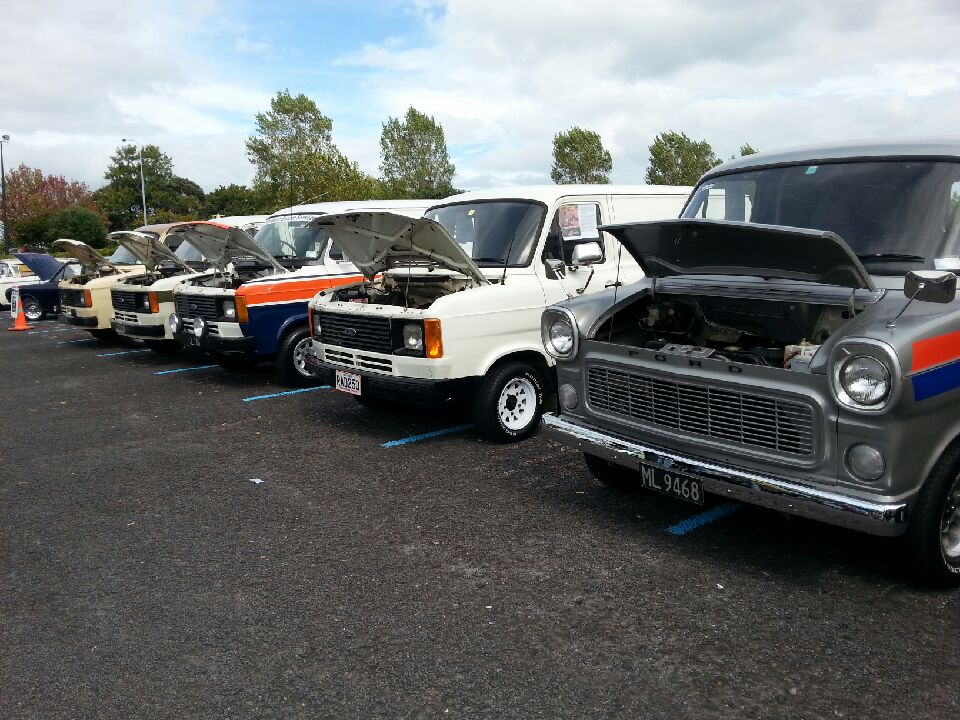
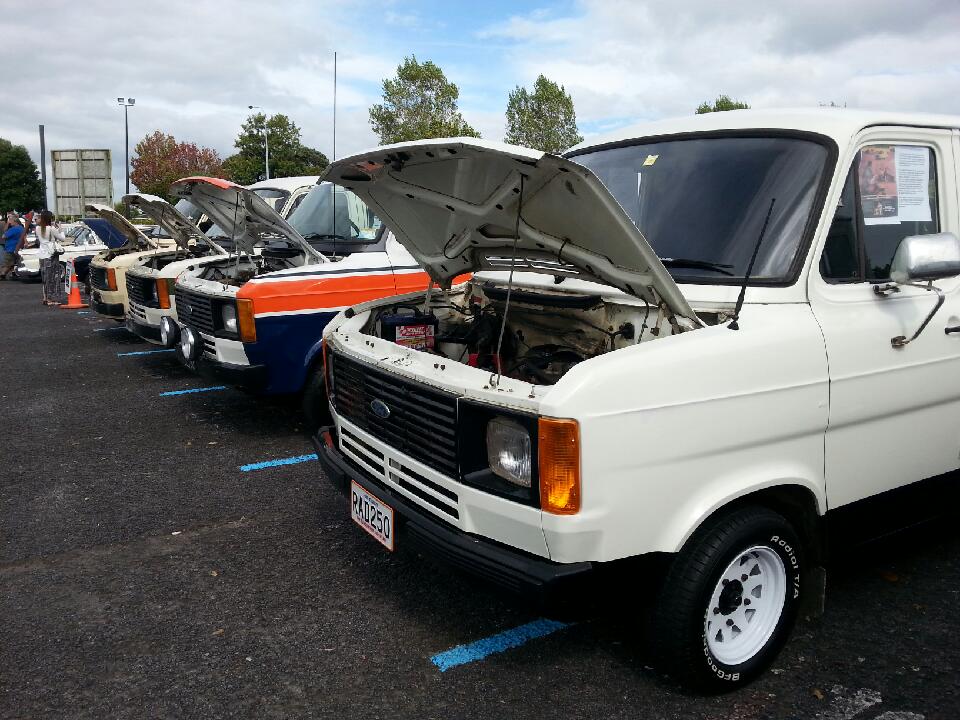
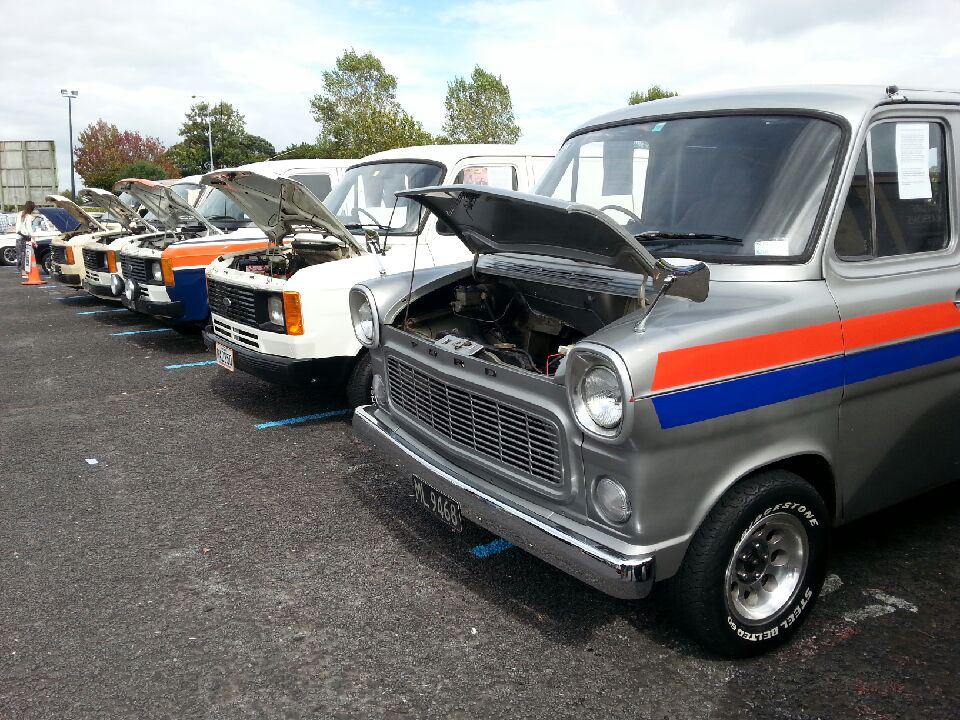
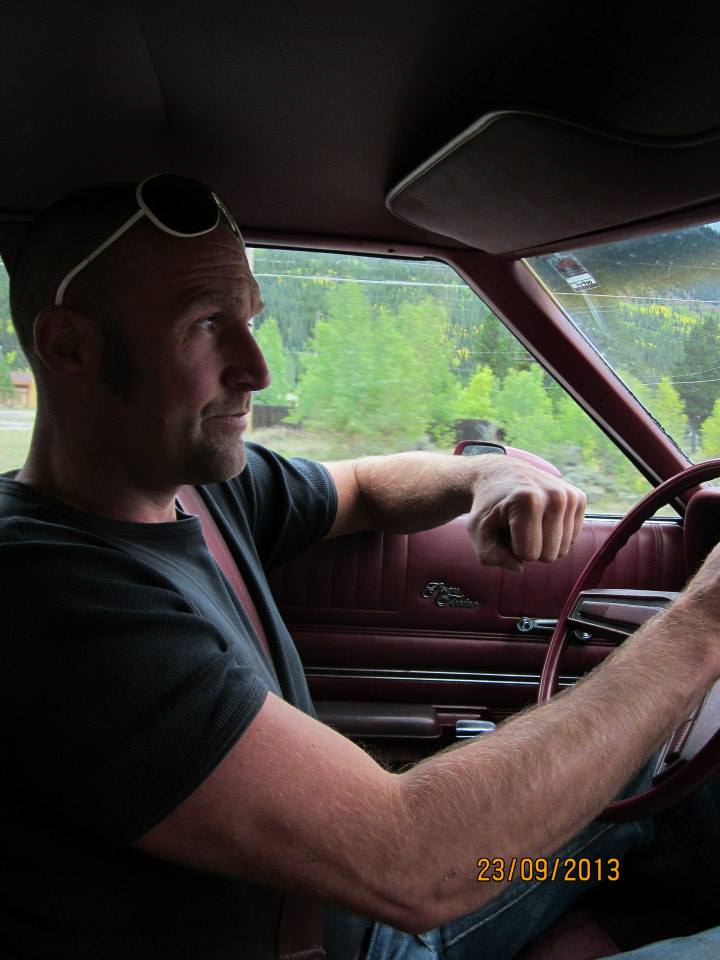
What's all this then... Mocking up the go-faster bits on a spare engine and going to plumb it all up, hopefully pretty seamlessly, in the corpse taxi over Anzac weekend. I believe it's an L20ET or similar setup, but my engine was once turbo when certed 20yrs ago. I've spent any spare time since Xmas converting to negative earth, cable clutch and putting an A12 and 4 speed into the mrs 65 Datsun 410. So with that finished I'm keen as to get some shit done on my car. Also ordered a new carpet and underlay set. Been drumming around with bare steel floor for too long. It's a lot Of floor, on snow tyres and a noisey diesel.7 points
-
5 points
-
Hi everyone, I recently acquired the car of my dreams and Greg (64Valiant) has told me to share it with you. I'm pretty new to forums but here we go: She's a 1972 Datsun 240z in off-white/cream. The previous owner had her since 1976. The Z was driving around 20 or so years ago, but has been parked up in a garage with a cover since around 1995. He passed away four years ago and the family decided to sell it through the Z Club to find an enthusiast to bring her back to glory. Luckily, I was the first serious buyer and the rest is history. NZ new car 85000 original miles I'm the third owner Interior is near mint (no cracks in the dash and factory radio still installed) Minimal rust (no such thing as a no-rust 240 haha) She runs but clutch won't engage, so is probably fused to the flywheel which should be interesting. The rego has lapsed and I'm trying to keep the black plates naturally, so anyone familiar with this process please shout out! Currently assessing what needs doing for Re-vin and looking at options after that. I will keep her mostly stock, only changing the suspension to something a bit stiffer and throwing on some 15 or 16" Minilites or Watanabes a bit later on in the piece. She's a real darling so I'm not going to deflower her with flares or an Airdam. I've probably forgotten something else important but I'm sure you'll all point it out. Looking forward to chatting and meeting everyone. Thanks for reading, -Reubin First fresh air for 20 odd years! Discussion Thread3 points
-
Extra bits of Charm: Original dealer's sticker in the rear window! Original petrol cap spill flap Came with the original papers and manual from dealer3 points
-
Because you can. Why would you put slide throttle on a smelly old Kent? C'mon meow Rookie, you know these answers. Don't make me come over there...3 points
-
SR1600 built some front struts a while back. Some bizzare frankenstein R31 HKS adjusties with RX3 stub axles welded to the bottom and 5 stud datsun hubs. WTF aye. Anyway I dodgied one on (by mixing and matching rx3 and rx2 bits to cobble up steering and a lower control arm that would fit) to see how she'd go, 3 inches lower at full extension is how it went. Verbal handshake and I'm the owner of a pair and even better no money has changed hands. Photo to come.3 points
-
I was getting concerned aboutthe way this build was going. But then i saw you do infact have a fluffy cat carry on sir3 points
-
After a great deal of research that involved a lot of websites the move towards living small began by accident. A local house truck (named, The Far Kea) caught our eye and we imagined that we could build such a thing. So..............we bought a 1987 1418 Hino, 330k Kms, 180 HP naturally aspirated, with lazy axle, 7.3 metre deck. We choose a truck as we wanted the ability to change locations as we saw fit, the truck also offers the ability to build in a more substantial manner without the limitations of on road weight. The truck choice has however limited dimensions, in particular 2.5m wide and 4.25m high. As is the way the enthusiasm of the start carried us through the steel work stage quickly…...... http:// pictures upload A rough plan was conceived using ply wood dimensions for frame spacing, it was decided to frame in 40x40x3. The existing condition of the deck was undulating between support steel work so it was decided that our framework would sit above the deck, 40 x 40 was used to create level surface for flooring. It was about this time that I stumbled on to the Old School website, very quickly I found a build thread that was so similar to what we were doing it was uncanny. It was a great source of inspiration and showed us that we could do this…….thanks Yoeddynz!! Since then he and I have chatted and he has encouraged me to document the build through the forum, so here goes, more soon.2 points
-
I got the hubs back from the platers, they did a great job. The place that did it was Electroless Coating Systems in Glenfield. I am planning on getting a few of the other bits done like the handle bars and the front brake mechanism if i decide to build it. I have also got my flights booked to Christchurch next month, my mate is picking me up and then we are driving to Oamaru and spending a few days there making the front and rear rims, the spokes and the backbones.2 points
-
2 points
-
Can control vct in a variety of ways. Such as a rpm activated switch or an arduino programmed to switch on at x rmp and off at x rpm etc. Lots of viable methods.2 points
-
So you're the bastard that beat me to those let me know if you don't end up using them I could still be keen to take them off your hands2 points
-
Began the exterior lining by applying a builders wrap, the stuff used was a little expensive but very wind proof. This meant staples held it in position easily without damage. The material is a reinforced synthetic breathable material. The only down side was its limited exposure time to UV etc, this meant that sections were dealt with rather than covering the whole structure first. Exterior cladding chosen is Alpine Shadow Line, the stuff is 12mm thick, grooved at 100mm, and spirit treated. One of the reasons for choosing this product was that it is made in NZ using plantation grown NZ radiata pine. A custom flashing was made to ensure rain water doesn't find its way under the flooring, I don/t want water getting trapped between the truck deck and internal flooring as it would just sit there. I began painting as soon as the ply had weathered for a couple of weeks, first coat to seal up the grain. Windows have not been considered as yet so no attempt to place or size them has been undertaken, the big thing is to get weather proof as soon as possible. Where sheet heights were greater than 2400mm I chose to join at the bottom of the sheet rather than the top.....much easier to work on, much easier to make sure its properly sealed up. Corner flashing's have been done using lite gauge galvanized angle.2 points
-
2 points
-
With the deck frame work finished I couldn't help myself. I had a volume of teak decking left over from my previous marine life that I had been saving for years. So arguing that it would make access easier to deck height I went ahead and fitted it. http:// image upload no limit The deck was through fastened on to thin foam that was adhered to the steel work, then plugged. http:// upload image Finished result, I have since fitted a light plywood cover to protect it during the balance of the build. http:// pic host2 points
-
so it got a wof and i applied more slam haha mate popped over after work i was like eh wona lower my car with me he said oh yea cant be that hard. grabbed a wild moose and smashed it out. before photo. after photo just a little bit more camber so this was just one spline on the outer. pretty happy with how it sits for now. once im in it (fat bastard) its lower again haha so with all the interior and passengers it will be lower again2 points
-
I finally got these bullet caps! Been on the cards for a loooong time, but sorted now. Cause I have no space between run and hub centres I have to have caps that nip up under the taper of the wheel nut. Looks cool and breaks up the solid feild of red.2 points
-
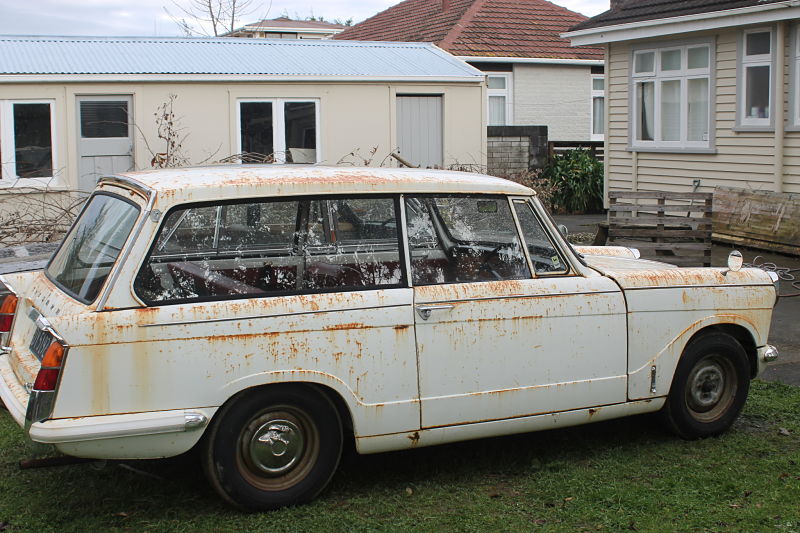
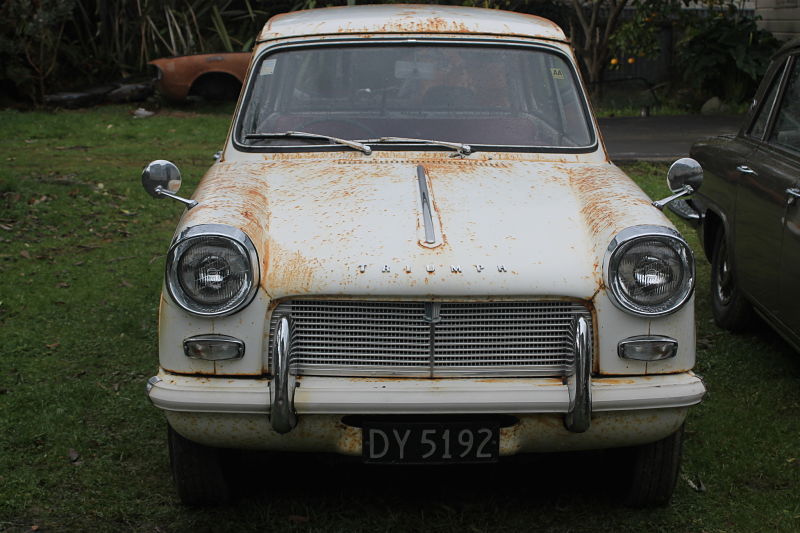
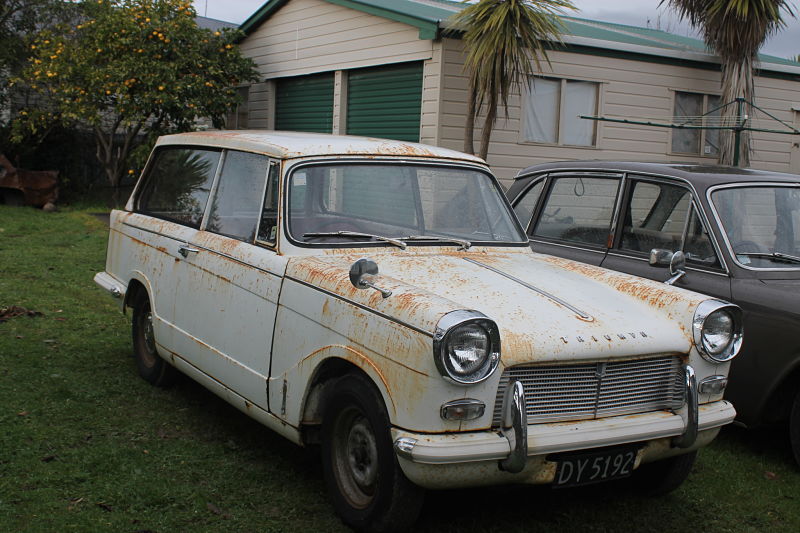
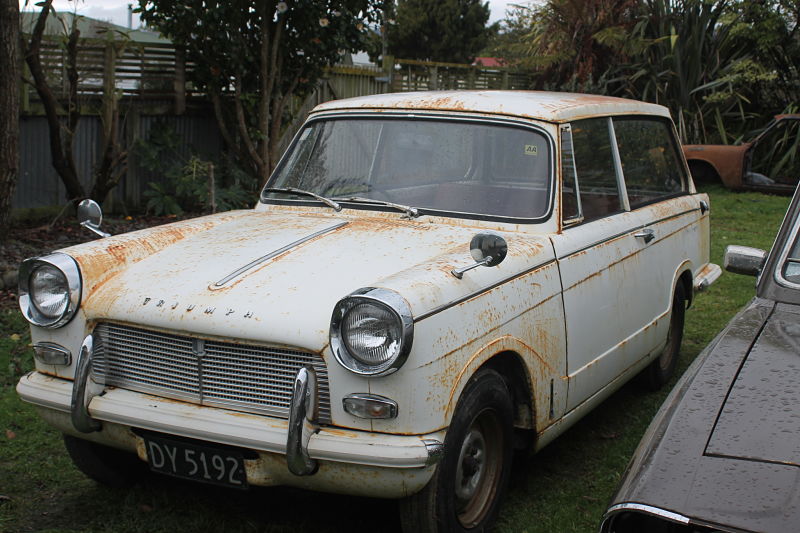
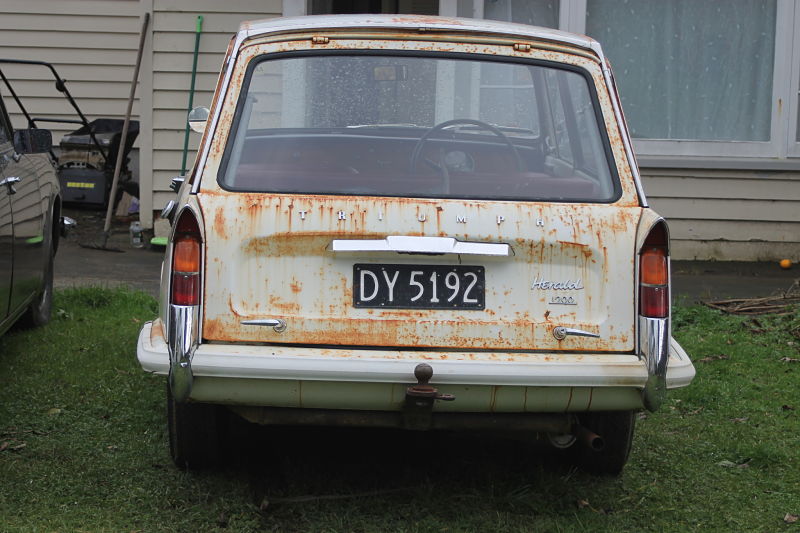
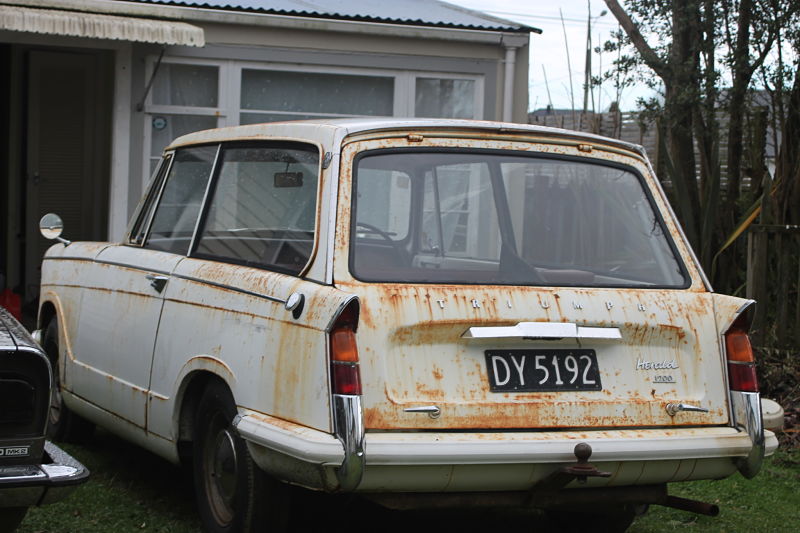
I have had this wagon for some time now. its a cool unique little car. its super solid no rust holes just surface, it runs and drives awesome and it has 70,000 genuine kms. I think its about time i give it a respray and get it all road worthy. once that is done i might keep it and have it as a sweet cruiser or sell it then purchase a triumph 2500 pi. i have wanted a pi for sometime now.
 1 point
 -
Do you mean give everyone else a burn???1 point
-
This bike shit's a little tricky. Its a bit high in the rear but at least the wheel isnt hitting the hoop1 point
-
Some more pictures
1 point
-
Nice score! My understanding is that it is only the barrels /pistons and heads that make a 250 = 350 bottom end is essentially the same (apart from primary gear and oil pump gear which is an easy swap.) Common as mod back in the day.1 point
-
Thanks man. Don't use screws, gottit. (Haha)1 point
-
If you drive a Viva, minds will be blown1 point
-
What about Vin tag rivets Cletus. I, erm, need to pull mine off to fix rust. Too.1 point
-
Next possibly exciting update will be us building our new toilet/shower block with composting toilet if anyone is interested? So far we have started digging out the bank and track to it. Gonna be a sweet place to take a dump!1 point
-
a couple more pics a friend sent me from Sunday's show:
1 point
-
Yes, in fact the supervision team consists of a senior fluff and a junior fluff, they both maintain an active interest in the project.........not!!1 point
-
Im just gonna subscribe so i dont miss out on anymore updates.1 point
-
IT'S OK GUYS, I BOUGHT MILLIONS OF PISS AND PAID ZERO DUTY.1 point
-
Avoid engine braking going down hills and blip the throttle on the over run often to keep the oil coming in. Also if you disconnect the autolube system and premix your oil/petrol it can cause them to run lean as the oil displaces the petrol.1 point
-
Thanks Guys, I guess it's better to be lucky than rich I've never won anything in my life, but I really wanted those wheels for the Torino so I'm totally stoked to win1 point
-
SOLVED! I found this photo I took. Look at that filth! But #3 has a "P" on it. The other set of caps has a "K". So my guess was wrong.1 point
-
That's a bit harsh Andrew, considering you didn't bother coming to last months meet because of a little cough.1 point
-
Just checking in to say this is rad, dispense with that silly Hilux and focus soley on RD's and 4AGE's. RD's are one of my favourite motorsickles.1 point
-
ignore the last photos. these ones are better1 point
-
I like to think of it as...My interests are far bigger than my shed. C\: Run "Shed Cycle" 10 Print "Shed clean and organised!!" 20 Print "start a project" 30 Print "stuff dumped in shed in a hurry" 40 Print "pull shed apart looking for stuff under the stuff dumped in a hurry" 50 Print "Shed in absolute chaos as I cant find anything, avoid shed as long as possible" 55 Print "Frustration building" 60 Print "Dump more stuff?" 70 input x 80 if X$ ="yes" then 60 90 Print" At breaking point yet?" 100 input z 110 if z$=yes then goto 130 120 Goto 60 130 Print "Clean up Shed, inorganic is in 6 months so stick it on oldschool " 140 Goto 10 ok so it's been 20 years since I programmed in basic...1 point
-
Man super excitingly, I just won a fully referbished set of wheels for The Torino too!!!!!!! And from Detroit Vintage Wheels no less!!!!! How Cool is that? https://www.facebook.com/detroit.vintage.wheels.giveaway?fref=photo1 point
-
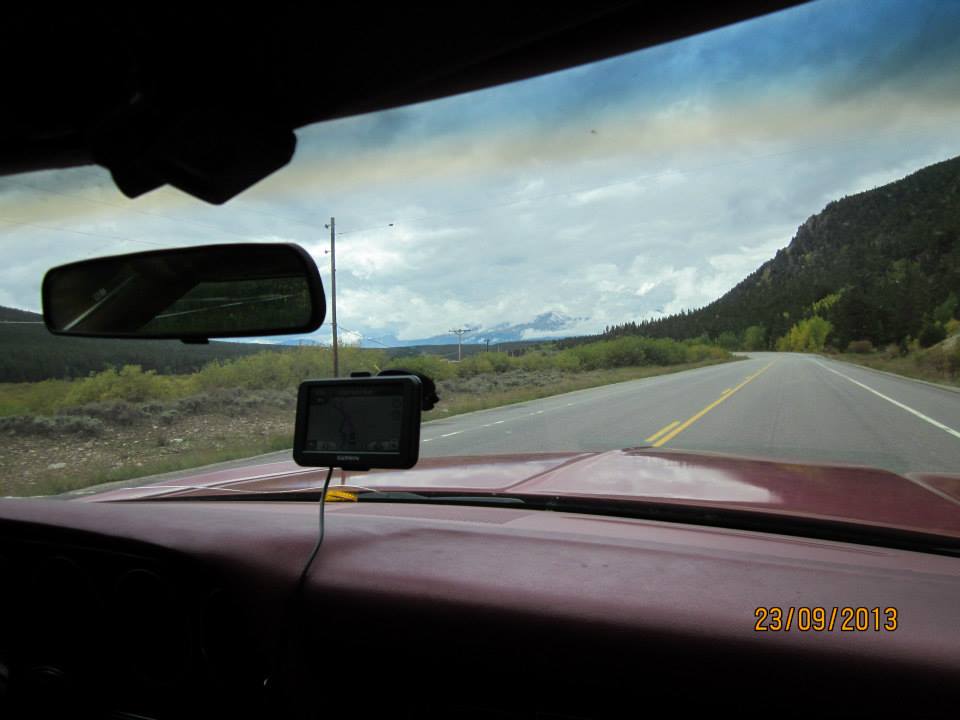
So early the next morning, large hangover in tow we set off for the sites of Aspen. I immediately pulled out of the Hotel and set off at a good pace. "AAAAAAAARRRGGGHHHH!!!!!!" shouts Watton "What? Whats up? calm down" "Arrrrggggggghhh!!!" "Are you having a heart attack?" "WRONG" "What? Whats Wrong" "WRONG SIDE OF THE ROAD!!!!!" "FAAAAARRRRRRKKKK!" I quickly swerved across the median and back to the correct side of the road, narrowly avoiding spinning out and sending a Geo Metro to the promised land. "Shit I said, maybe I should write something on the dash to stop that happening again?" "No just don't do it again" Watton said starting to fix himself a Gin and Tonic "bit early for that isn't it?" "There might not be a later, the way you drive. and anyway if you don't want one dont have one!" "Well I didn't say that! no need to be testy!" Soon we were winding our hay out of the scrub and up into the hills, the Torino muttering away and sucking down gas like Kim Dot Com at a cream bun festival. Aspen, as you might have heard was home to one of the greatest writers ever, father of Gonzo Journalism Hunter S Thompson, and after reading his novels for years, I was unsure quite what to expect, the scenary and some of the towns on the way there were giving no clues We eventually pulled into one of the many gas stations we would need to suck dry to complete our journey. "Thank god for that said Watton, we're out of Lemons and Limes" He went in to pay and get us some kind of food, when I say "some kind of food" thats exactly what I mean, food in America can in no way be confused with food everywhere else, it seemed to be made of either 1) Sugar to send you in to some kind of diabetic coma, where you become lazy and delireous as you try to keep your eyes open. 2) Caffine to send me straight to the moon and Back, I would begin to shake and then go off on super fast conversation with mostly myself, whilst driving fast and recklessly enough to watch Wattons fingers turn White as he gripped the dash. 3) Mystery Meat, I don't know what it is, the packaging doesnt know what it is, it sort of smells like meatish but tastes uncomfortably like a toasted slipper, and it has a sell by date 25 years from now. 4) Cardboard, no taste, no texture, no real colour, this will be the healthy option. 5) Man made brightly coloured e numbers, with things like Grape drink (contains no Grapes!) Space waffles (e221 e224 e443 e544 etc!) Aspestos puffs (I honestly dont know what they were made of) these were so disgusting even the Grape drink couldn't wash them down. Ok I lied about the name but that's what we called them! I was filling up the car with go juice. I was startled when the first flake of snow dropped onto my nose, oh oh! I thought franticly scanning the sky, we are in a rear wheel drive auto v8, with summer tyres and it looks like snow, this is in no way good. We both jumped back in the car, I looked at Watton now in the drivers seat and said. "I don't want to worry you, but its starting to snow, we dont really have any warm clothes, we are in a car blatently not designed for any wintery occurence, apart from the fact its Red and they will be able to find it easily to recover our bodies when the snow melts in Spring" "If you think thats bad" said Watton punching the Accelerator and fishtailing us out of the Gas station "They didn't even have any fucking Lemons either" (A grim and Lemonless Watton floors it to out run the aproaching storm!)
1 point
-
5 month search isn't that long. Just had to say that. Do what my brother did and get a 350z as well. Hahah. Mind you, he only got the 350Z because he got impatient waiting for the exact 370Z he wanted.1 point
-
heres a picture of the spoon i use and the hammer i use to hit it with. Untitled by sheepers-ra28, on Flickr Untitled by sheepers-ra28, on Flickr this is how i use the end to get up behind the surrounding panel. obviously its on the inside of the panel... Untitled by sheepers-ra28, on Flickr and this is the heavy end that i use once there is enough gap to get this between the two skins. ts got a nice curve to it so i can add a bit of concave shape to the arch. Untitled by sheepers-ra28, on Flickr this is the thin end and how i would be sitting it to do the crease at the top. Untitled by sheepers-ra28, on Flickr1 point
-
Nice pussy1 point
-
One more.
1 point
-
It is so I can weld a plate with a towball on it to carry their bikes or maybe an Fa50 type of thing in the future1 point
-
Phil probably measured it with cheeseburgers. You think this guy has internal mics sitting around? I would say if he did he wouldn't have asked us the question. its going into the machine shop anyway so get it measured, this doesn't seem very hard to me Tom? other option is to buy some gear to measure it properly. By the sounds he is sending it to grotty's so its going to steer him in the right direction.1 point
-
I have gone down the strip planking road. Cheers Skinner (Mutiny) for supplying, cutting and putting through the thicknesser some nice Rimu for me! He wouldnt even accept beers as payment.. G.C. So here is where I am at... The back part it removable and fits nice and tight Its going to be a slow process as I have to wait for the glue to dry between strips.. If I do a good enough job ill just put a clear layer of fiberglass over it and leave the wood showing. Plan B = bog, glass and paint.1 point
-
Maybe use a turbo Silvia as donor?1 point
-
Wow- its been a while since I wrote some stuff about dirt, gorse and sheds. So here I am. It has been a busy last few months sorting out many things. I have not been working much in this time, well not paid work that is. I have certainly been on my feet rushing about here and there trying to get stuff done in some sort of order so we can start getting a little business going. What we want to do more than anything is just build or fix things for people from the comfort and convenience of our own workshop charging a fair enough rate that will allow us to continue on with a pretty cruisy relaxed lifestyle out here. I am sure that is what most here on oldschool want though- most I have met so far have not been chasing silly big monies but instead want enough to play with old cars and shit. So that's us. With this in mind I had to continue on getting the shed up and once it was up I have been full on trying to set it up neatly in fashion I've always wanted before taking on any proper 'paid' work. Sam will attest to this...his Celica has been sitting here for ages while I get stuff unpacked and sorted away. I promise you Sam that I will soon remove all them big chunks of air from your/Janes car and replace them with steel. Phew- that was a big chunk of words. Here's a photo.. Yep- that's our workshop all pretty much finished. The very eagle eyed will spot a few flashings missing. I have to finish them plus fit a really awesome cat themed wind vane my parents gave us. But yeah, the shed is up and what a relief that is! Its been a few months of ups and downs mainly to do with the shed supplier being totally useless. But that's all over now and in the past. So moving on its all inside fitting out work now. First thing was to get a heap of plywood delivered and line it out. This instantly transformed the feel! its also going to help heaps as extra bracing although the shed feels solid as without it. After the ply was up I built was a place to sit with our coffee and ponder ideas in the sunshine. Using a variety of Rimu bits kicking about I made this bench.. More recently I have parked a little breville espresso machine on top- one that my parents threw out because it leaks badly. I'll put up with that for nice coffee in the workshop Now I am part German. Only an eighth but I think enough to make me get off just a little on organisation, ergonomics and efficiency. At times, often, this conflicts with my mums she'll be right kiwi hippy cruisy slant. Hannah is also a tidy freak so the workshop has to be as well organised as possible. Especially if we want people to come along to see us and be potential customers. I hate messy workshops! I hate spending ages looking for tools or stock when it should be in its place and easy to find. Especially if a good customer is paying for this time. Not on in my book. So for the last few weeks in between entertaining guests and trying to enjoy some of this summer after missing out on December and much of Jan to building the workshop etc I have been organising all of our stuff. We had to make several trips over to Blenheim to help my parents move house. While there each time we would bring back a load of stuff that was stored there. We also took down the little plywood shed we had built before we started building the housetruck. All this stuff ended up in a big pile on the workshop floor. This pile had me in hives with the general messyness. Plus we had to make the place a little bit tidy for the visit from the smoking tire crew. So I made some big shelves. Many of the boxes my parents had used to move house were a perfect size for these shelves but they were covered in print as they got them from macdonalds. I turned them all inside out and re-glued them. Now I had a load of neat matched brown boxes. Awesome! So I organised shit and stacked shelves.. I also built a big sturdy bench. Then I covered the top with a sheet of 4mm thick steel. Its great. Really happy with it. You can see to the right in the above image a big steel table. That was the frame we found in the scrub next to the drive. Its burly and has industrial grade castor wheels with grease nipples. It was an awesome find. So I cleaned it up and welded the other half of the sheet of steel to it. So a 2.4 m long heavy roll around workbench. You could put a car on it. So cool. I love it. My last thing to build was something ive had in mind for ages- well before building the shed. I always find storing paint cans, spray cans, screws, bolts etc, seldom used special tools- all the little things that clog up shelves and work tops getting in the way. So I wanted to get this stored out of sight and safe from errant grinding or welding sparks. I built this unit. Made use of spare Rimu offcuts for the door.. which opens to this.. Yeah Im pretty happy with that it must be said. Amazing how much stuff it holds and how clear it makes every where else. We have built another bench- a bit smaller and with a Rimu top. Its in what will be the bicycle area. That area will be sectioned off and solely for our many pushbikes and keeping them on the road (or on the dirt..) Last night Hannah started varnishing the bench tops and the doors. They already look so much better after ust one thinned down prime coat.. Once the building has been signed off we'll start doing the electrics. We'll do as much as we can but will have to get an electrician to connect our switch board to the main meter box and then test/sign the lot off. Already have local guy who is helpful as. Later in the year we can start building the mezzanine floor. This I am really looking forward to! Plus looking forward to painting the plywood and finishing off all the doorways/windows etc with some feature wood. Other things have been happening away from the shed. WE moved the long drop away from where it was - which was a bit too close to the truck to be healthy. Up the hill a bit and in the bush surrounded by big ferns. This involved digging a deep hole- as deep as I could reach. My brother came over and helped us carry the booth up the hill. Its now in a much nicer place to take a dump! I added a vent and sealed up all the gaps and now it draws nicely up out of the vent and smells nice. well in a composty long drop sort of way. We have also been having a go at creating a succulent garden/area. Big thanks to Andre for the Yukkas and many succulents. Its looking pretty good so far and hopefully they will thrive in the hot little valley here. We have called this garden 'the garden of tat' because a friend gave us a pretty awful wood look carving of a lady sitting next to a wolf. Once it was placed down we have started discovering other gems and friends/family have given us other terrible tasteless ornaments. Dad gave us the concrete cast boy climbing up a log which I accidently broke in half. But then glued together with no more nails.. So to finish off this rather long post here are of our 'garden of tat'1 point
-
Heres some tips for wheel spacers and adaptors, I get a lot of questions about them. Adaptors= bolt to the original hub and have another set of studs to bolt the wheel to Spacers= slip over the original studs the relevant rules are here- section 2.5 http://www.lvvta.org.nz/documents/standards/LVVTA_STD_Wheels_&_Tyres.pdf note the maximum size for adaptors is now 30mm here is an example of a wheel spacer done correctly- fits snugly on the center spigot and has a ring which locates the center of the wheel, has countersunk bolts to attach it to the hub, longer studs so the nuts go on far enough. This ones not so good, and its had bits cut off, not sure why. Tyre shops still sell these shitty things but they are not legal. Adaptors have a few traps, more so on the narrower ones- commonly available 15mm ones have a few issues, 20mm or bigger is not so bad. The problem is, to fit a wheel with a flat mounting face, usually means there isnt enough material under the nut attaching the adaptor to the hub (some end up loose because the nut bottoms out on the disc/hub face) or the nuts are too short, and dont meet the minimum thread engagement of 'same as thread diameter', like this another common problem- often the tapers are machined wrong so they dont match the nuts. probably over half of the adaptors I look at have this issue. see this pic, the nut only contacts right at the bottom, so eventually the nuts come loose or are loose when I check them. Cheap poor quality parts are another common one These wheel nuts are from the same set. Mismatched sizes, wrongly machined tapers, tapers not parallel with the thread or in center, and poor thread fit on the stud are common to find with these. If the nuts or studs are a black colour they are usually poor quality1 point


This leaderboard is set to Auckland/GMT+12:00