
Leaderboard


Popular Content
Showing content with the highest reputation on 04/01/24 in all areas
-
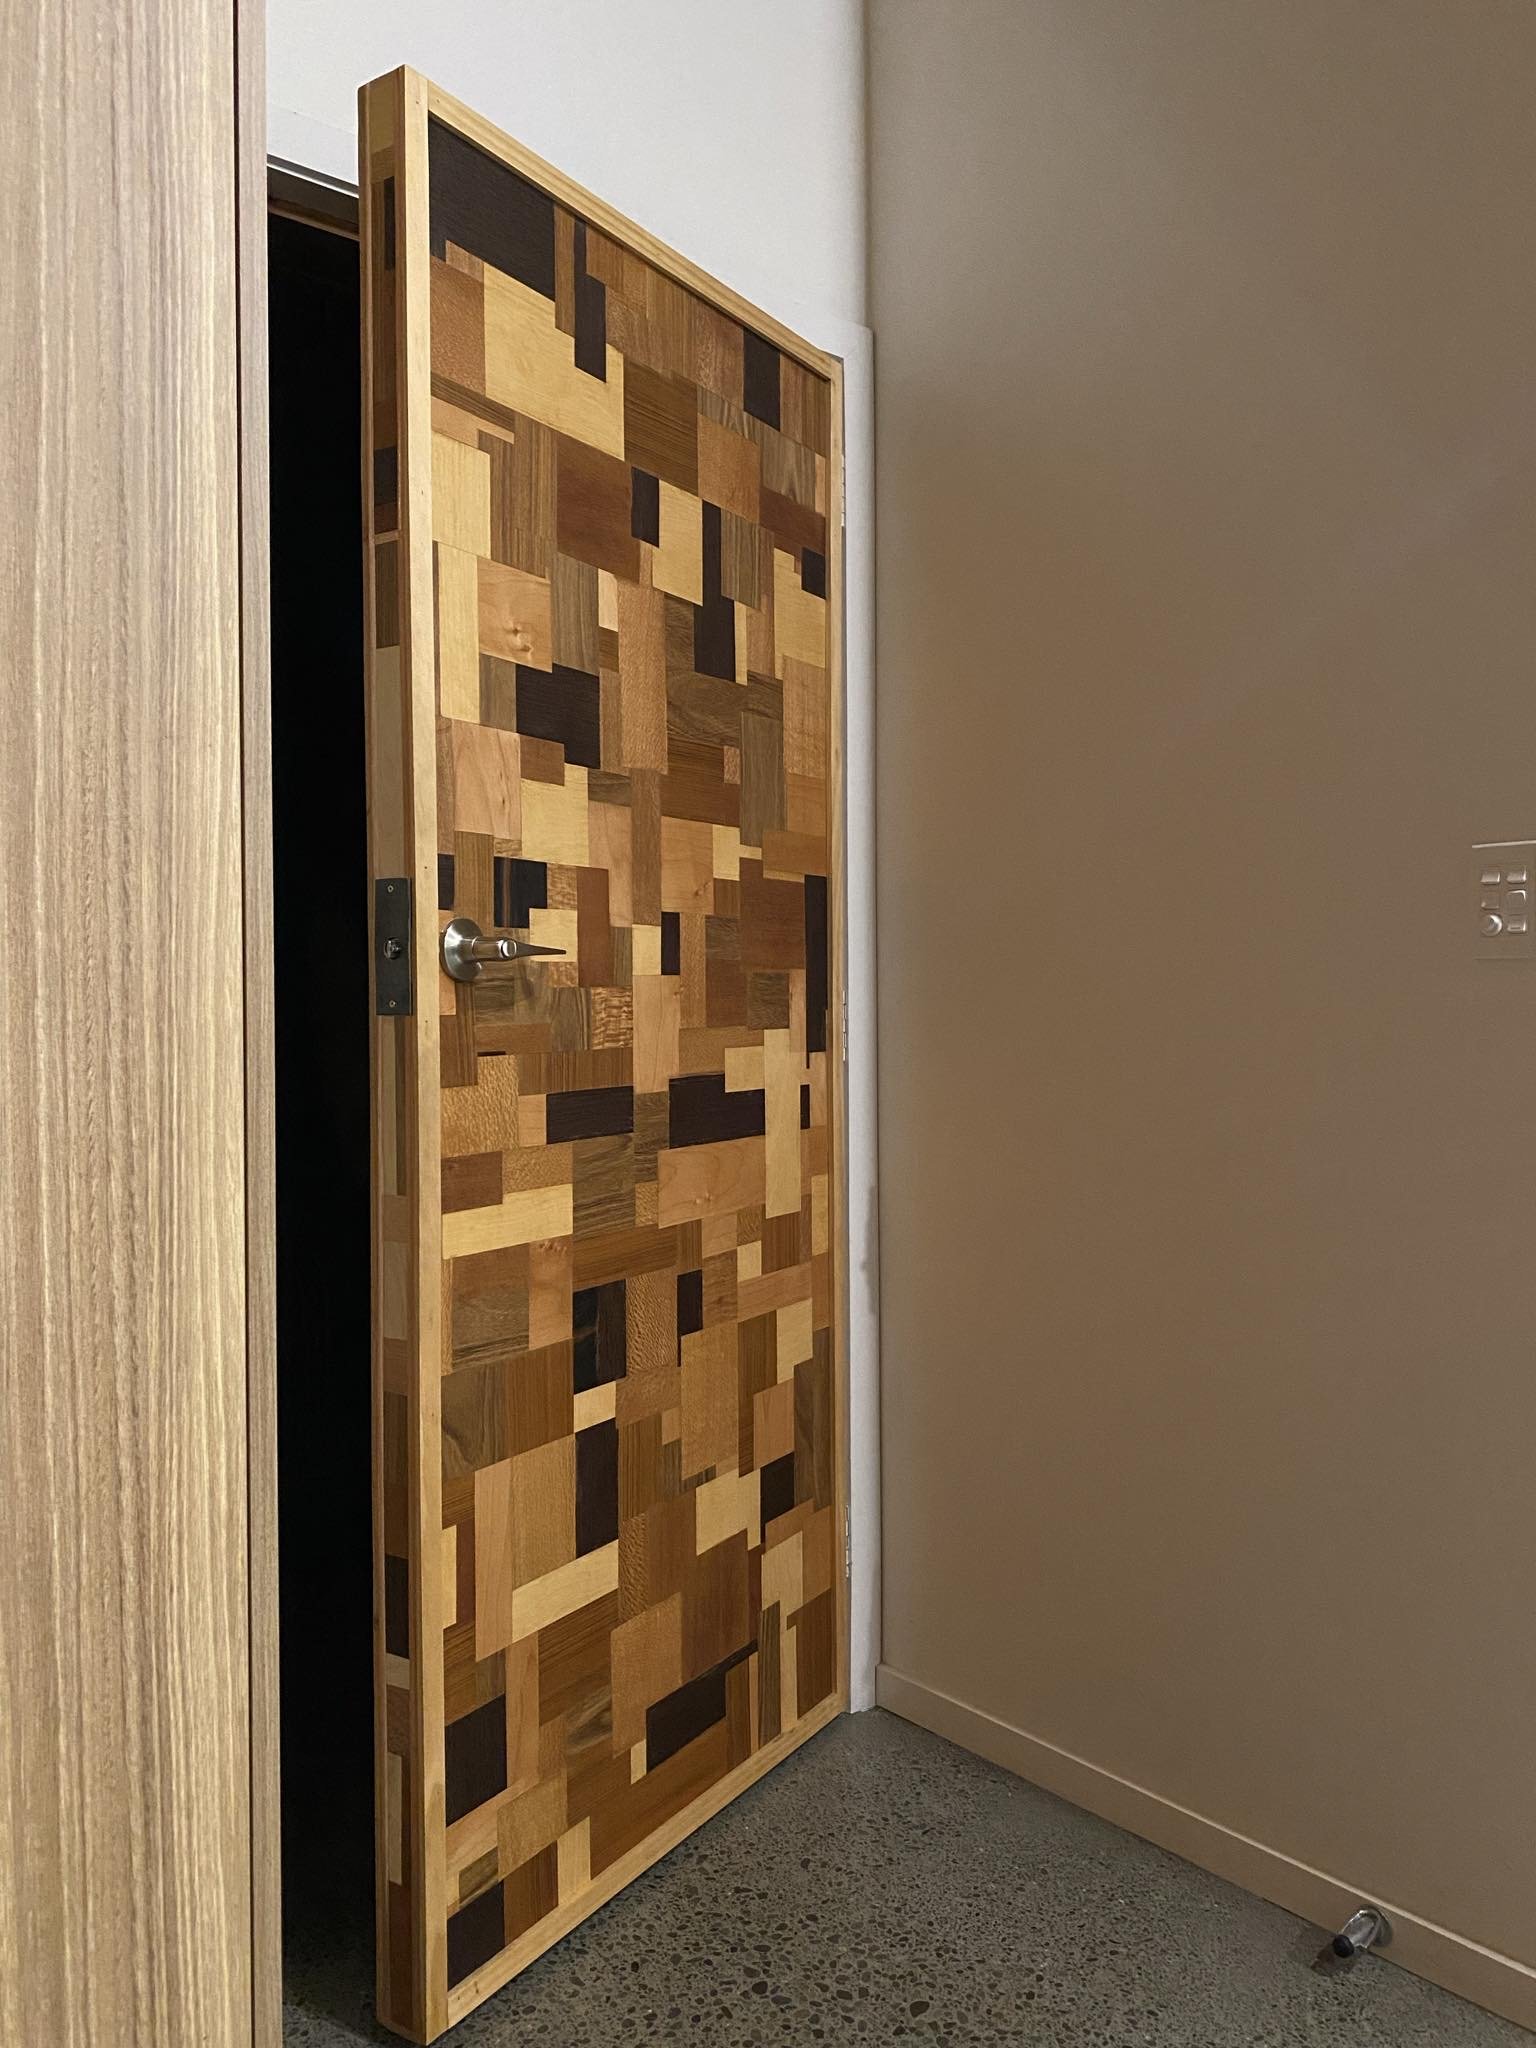
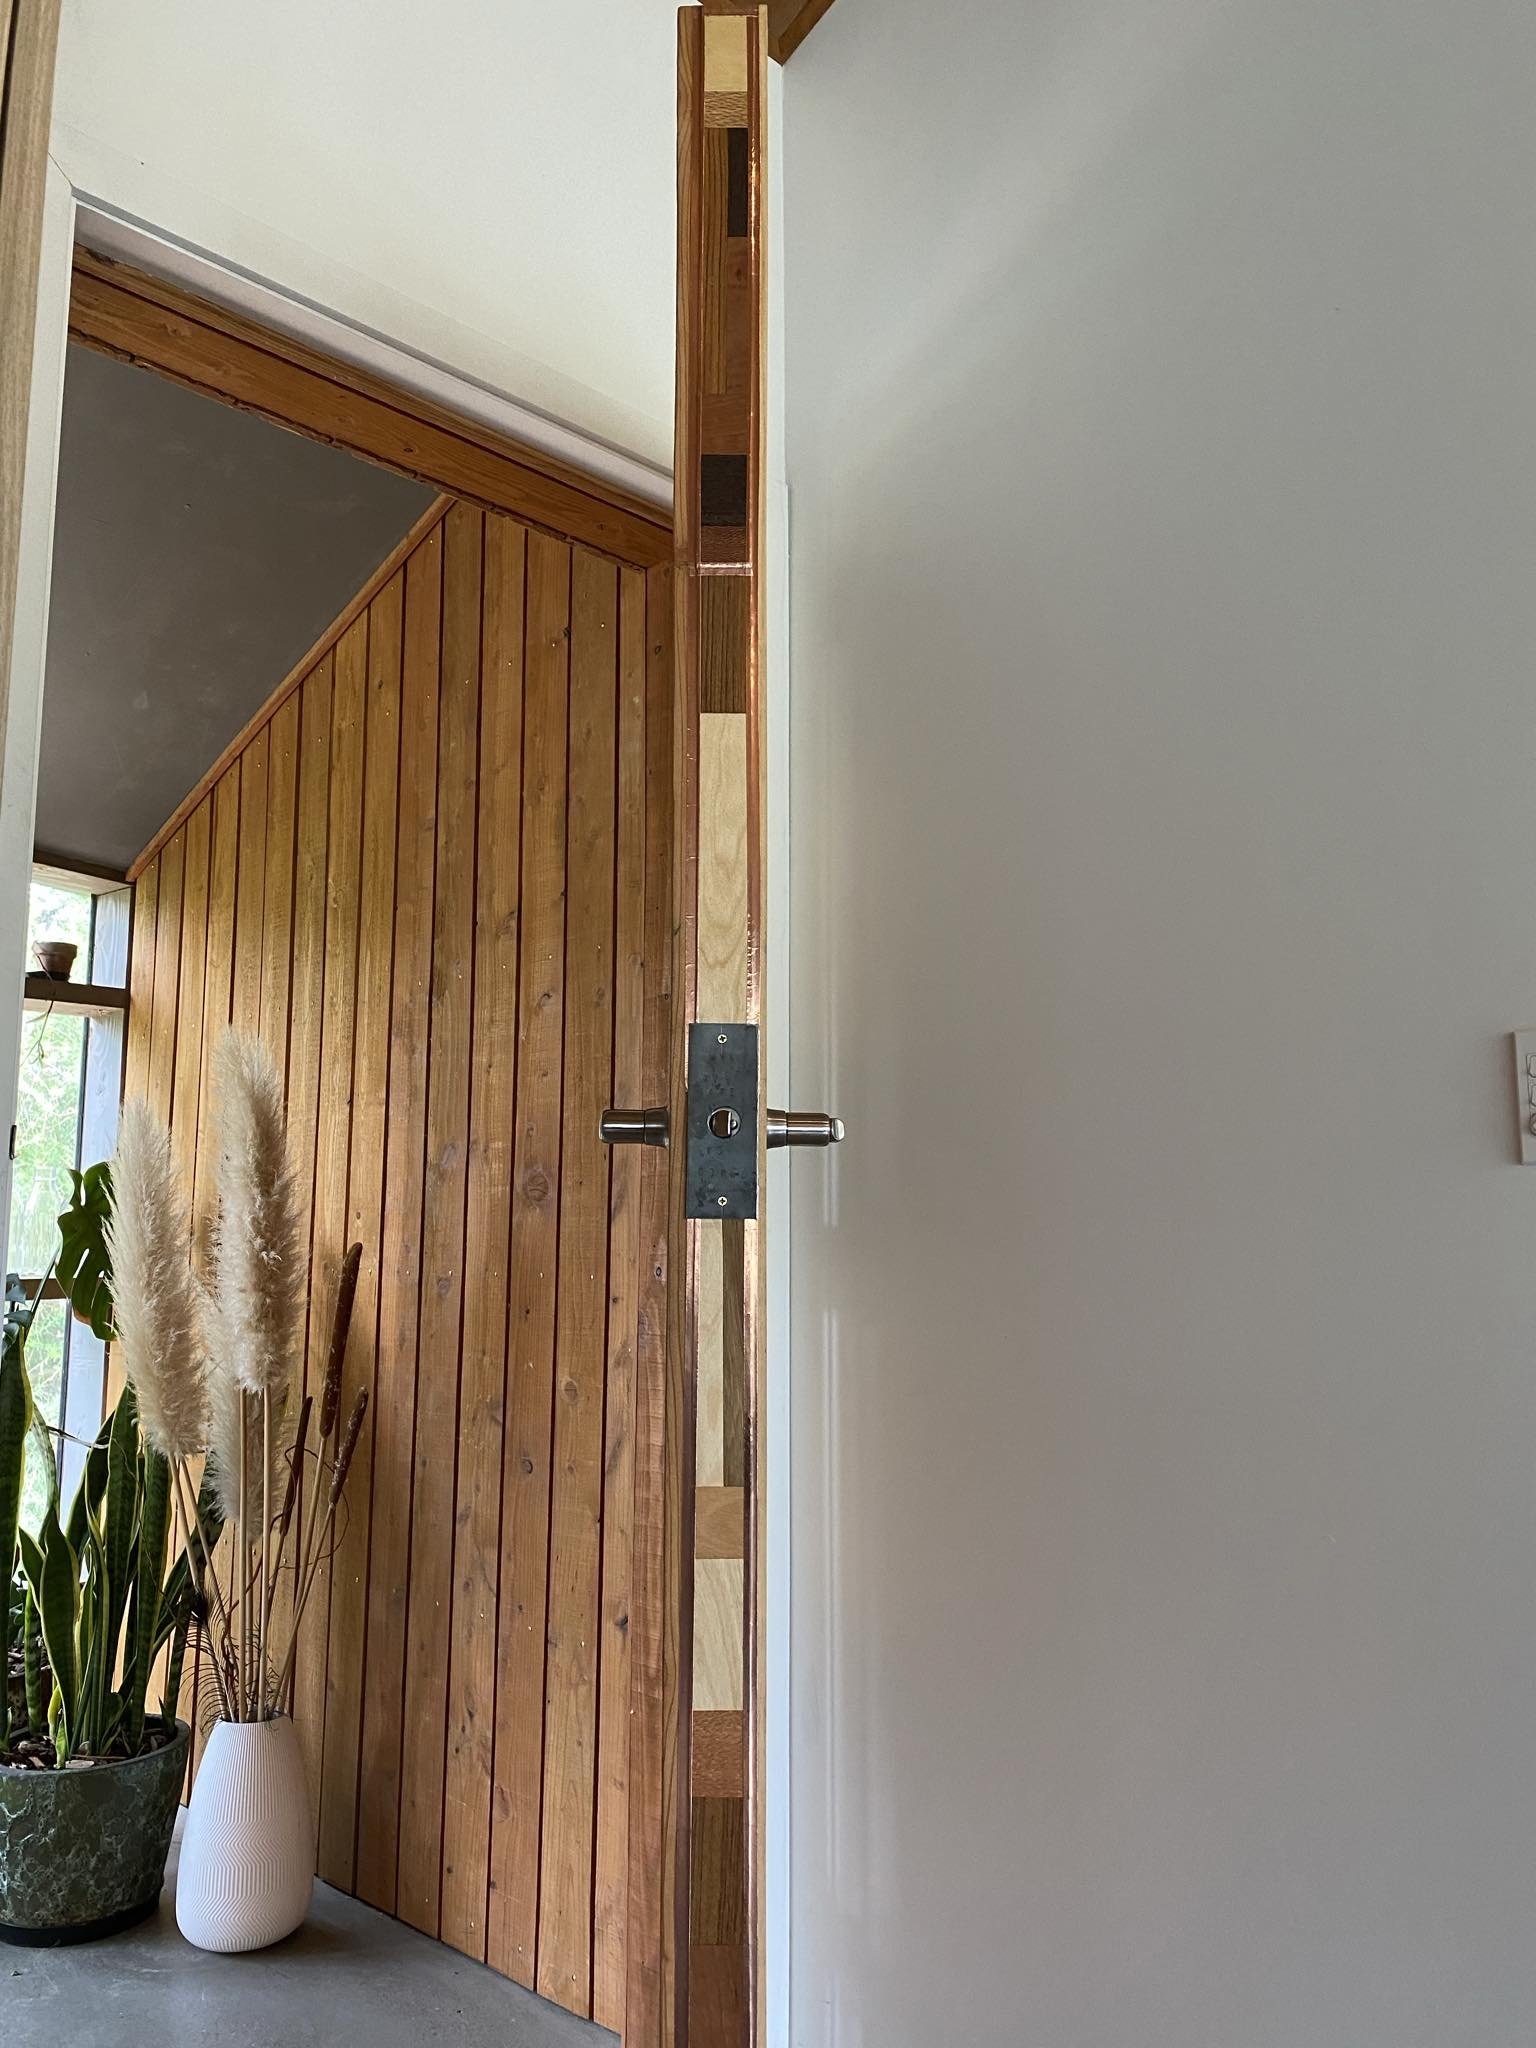
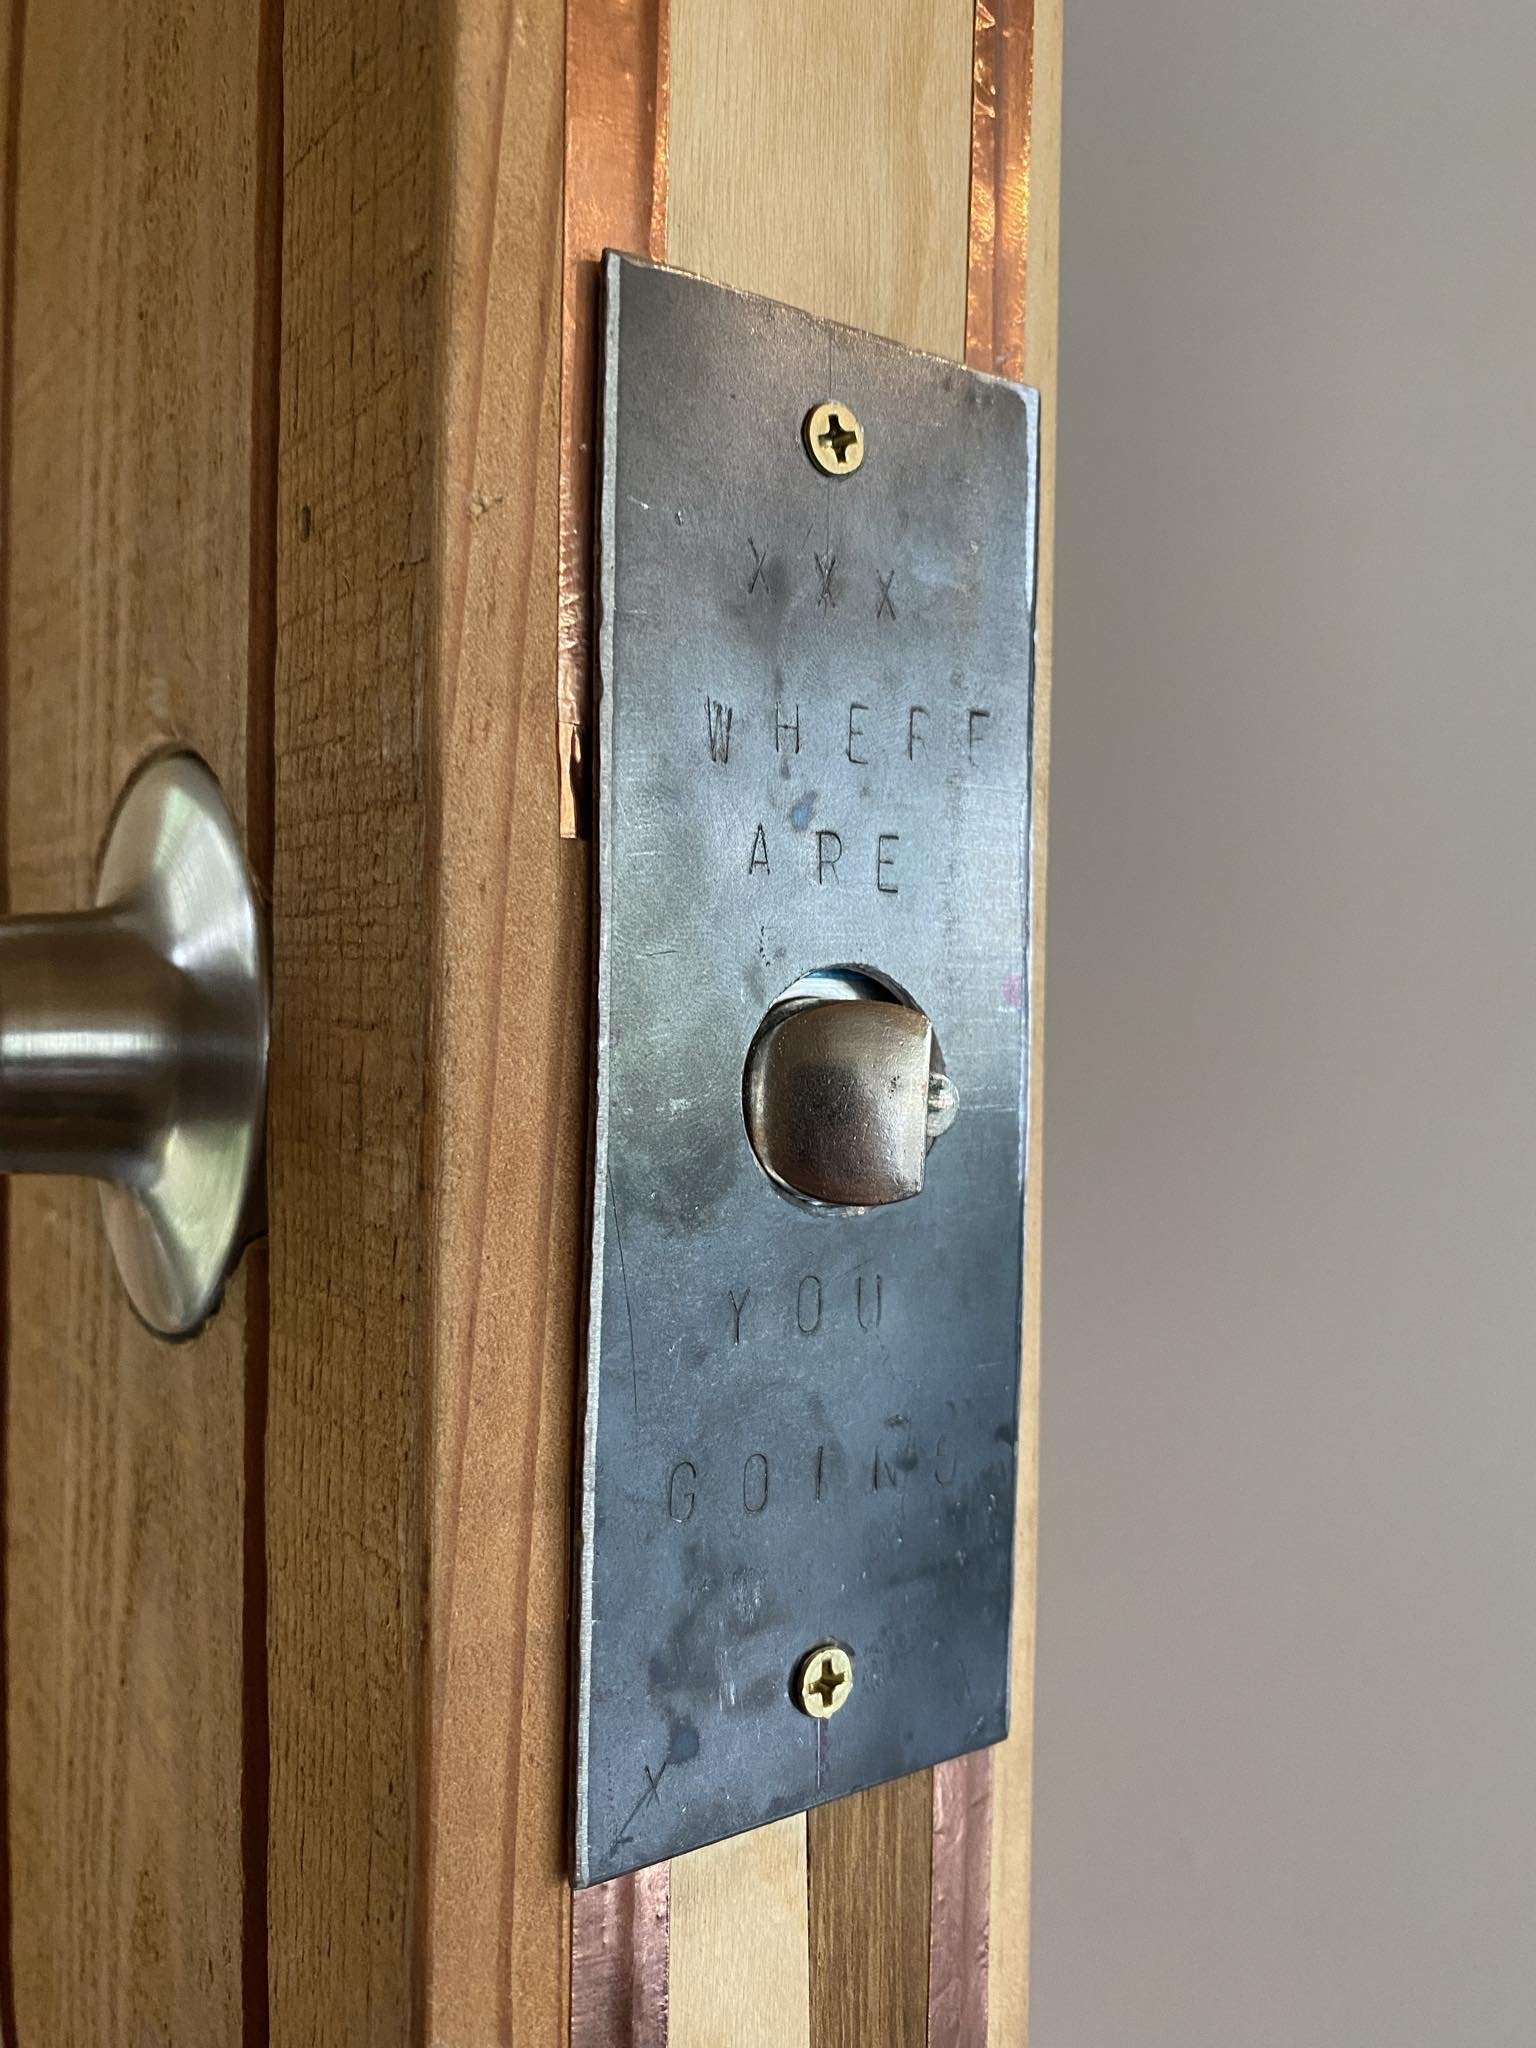
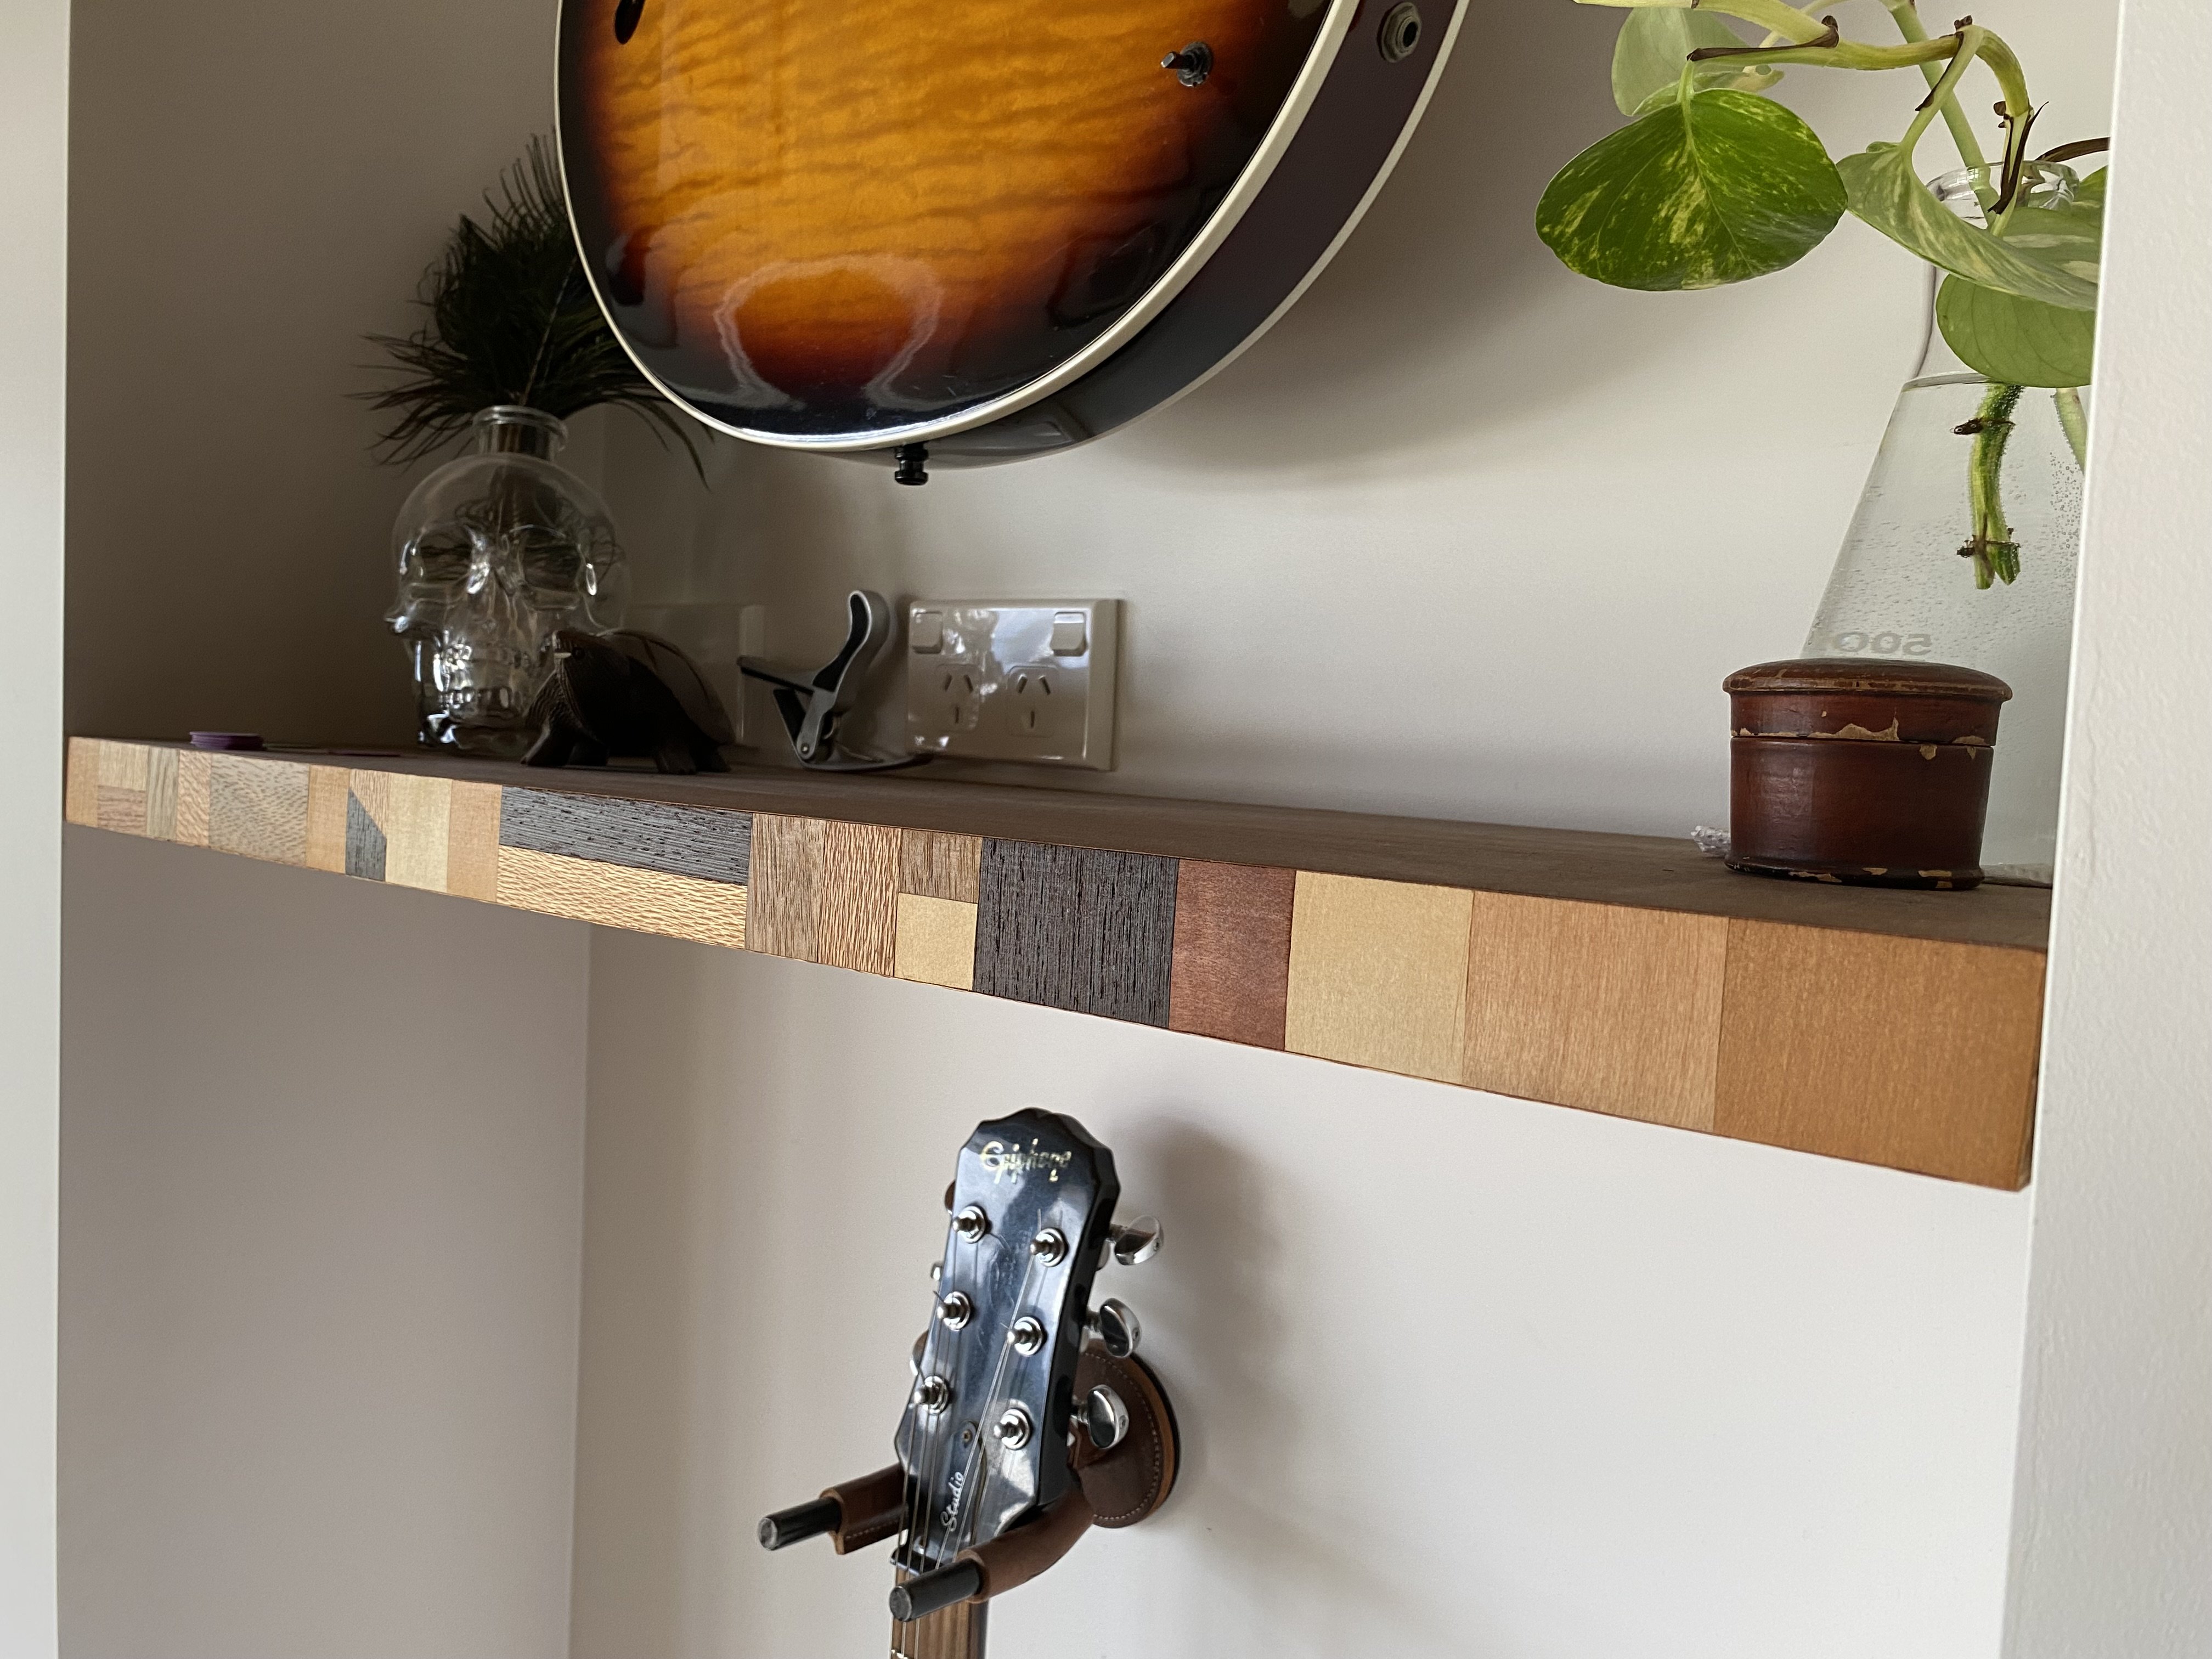
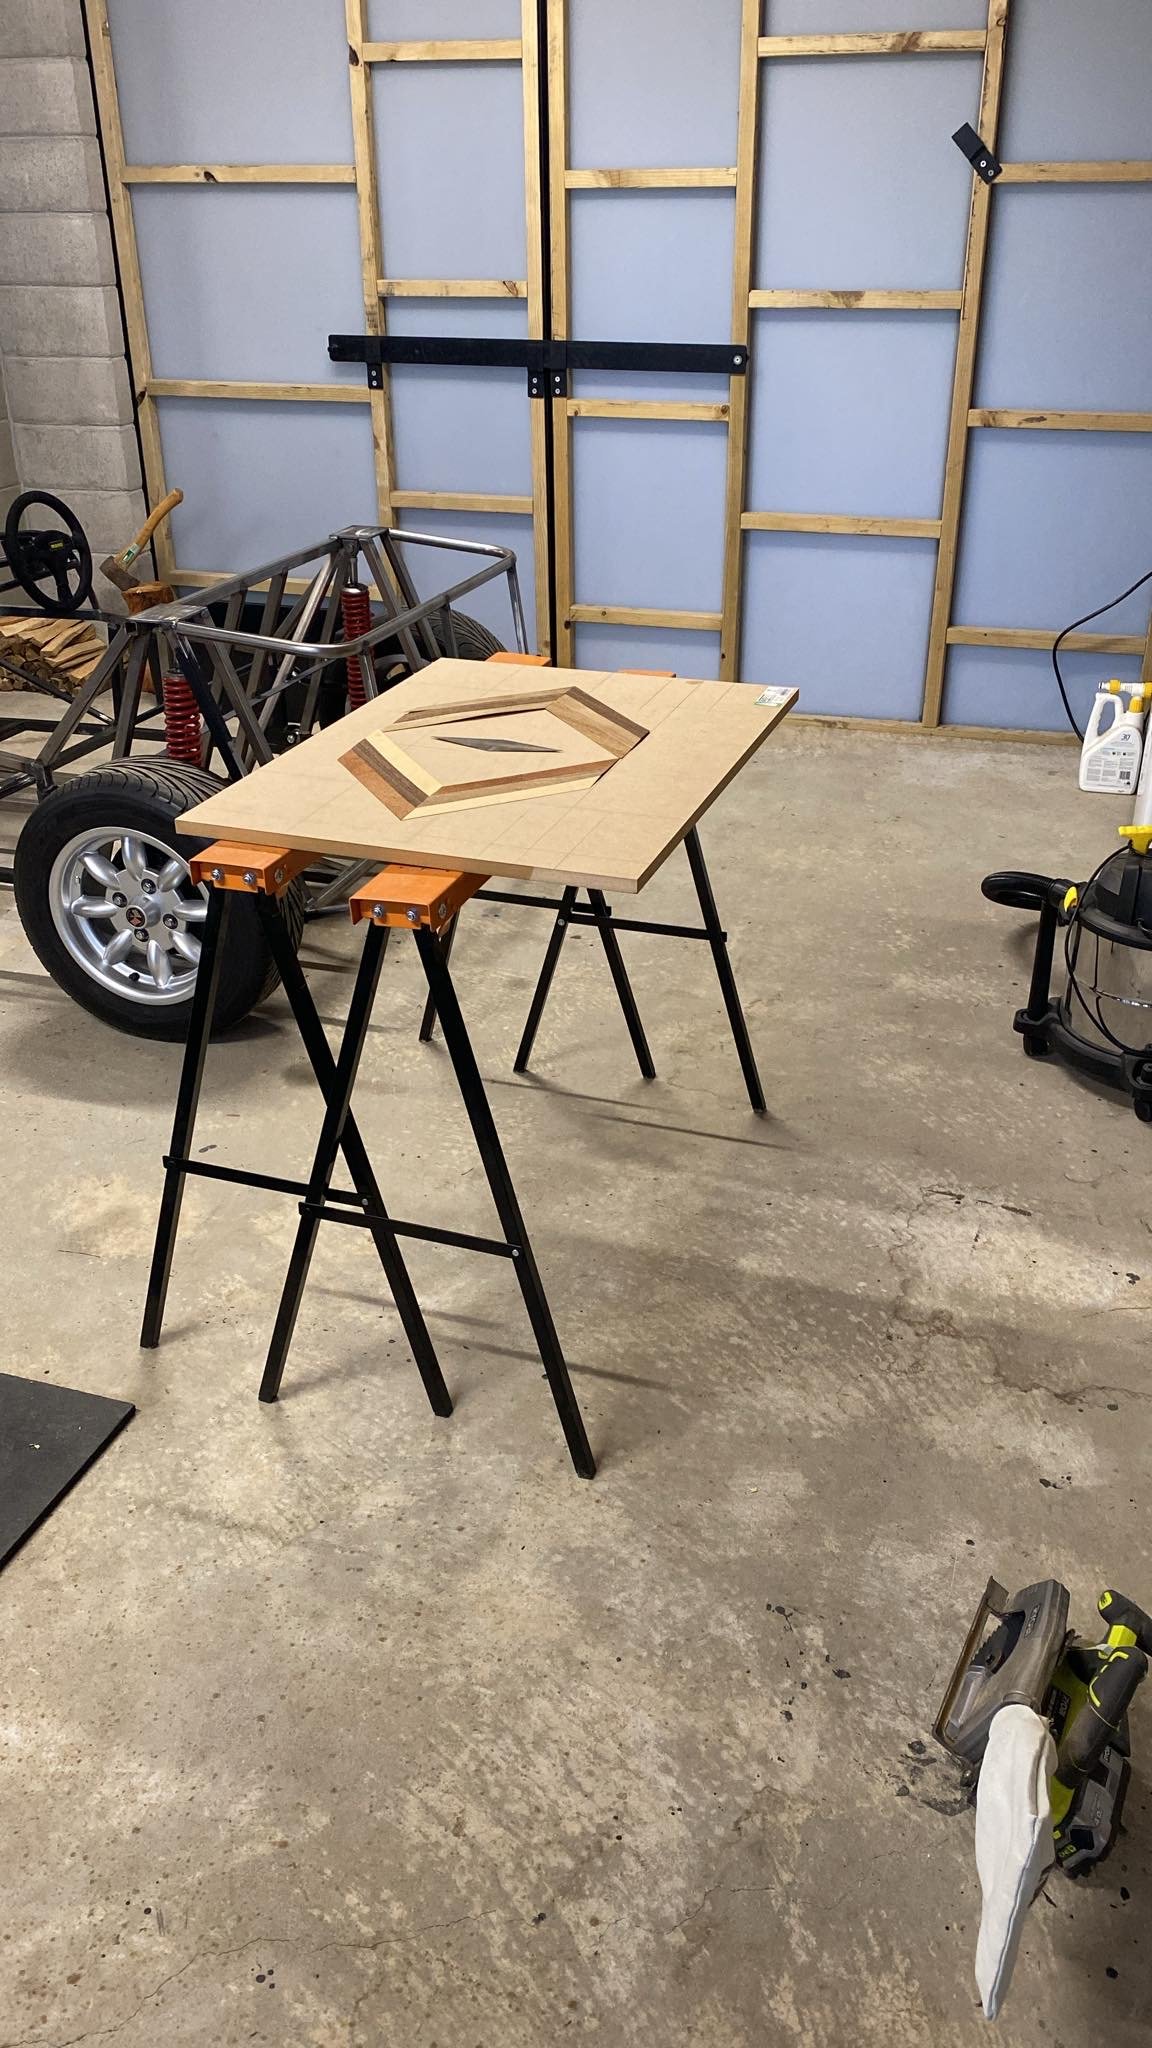
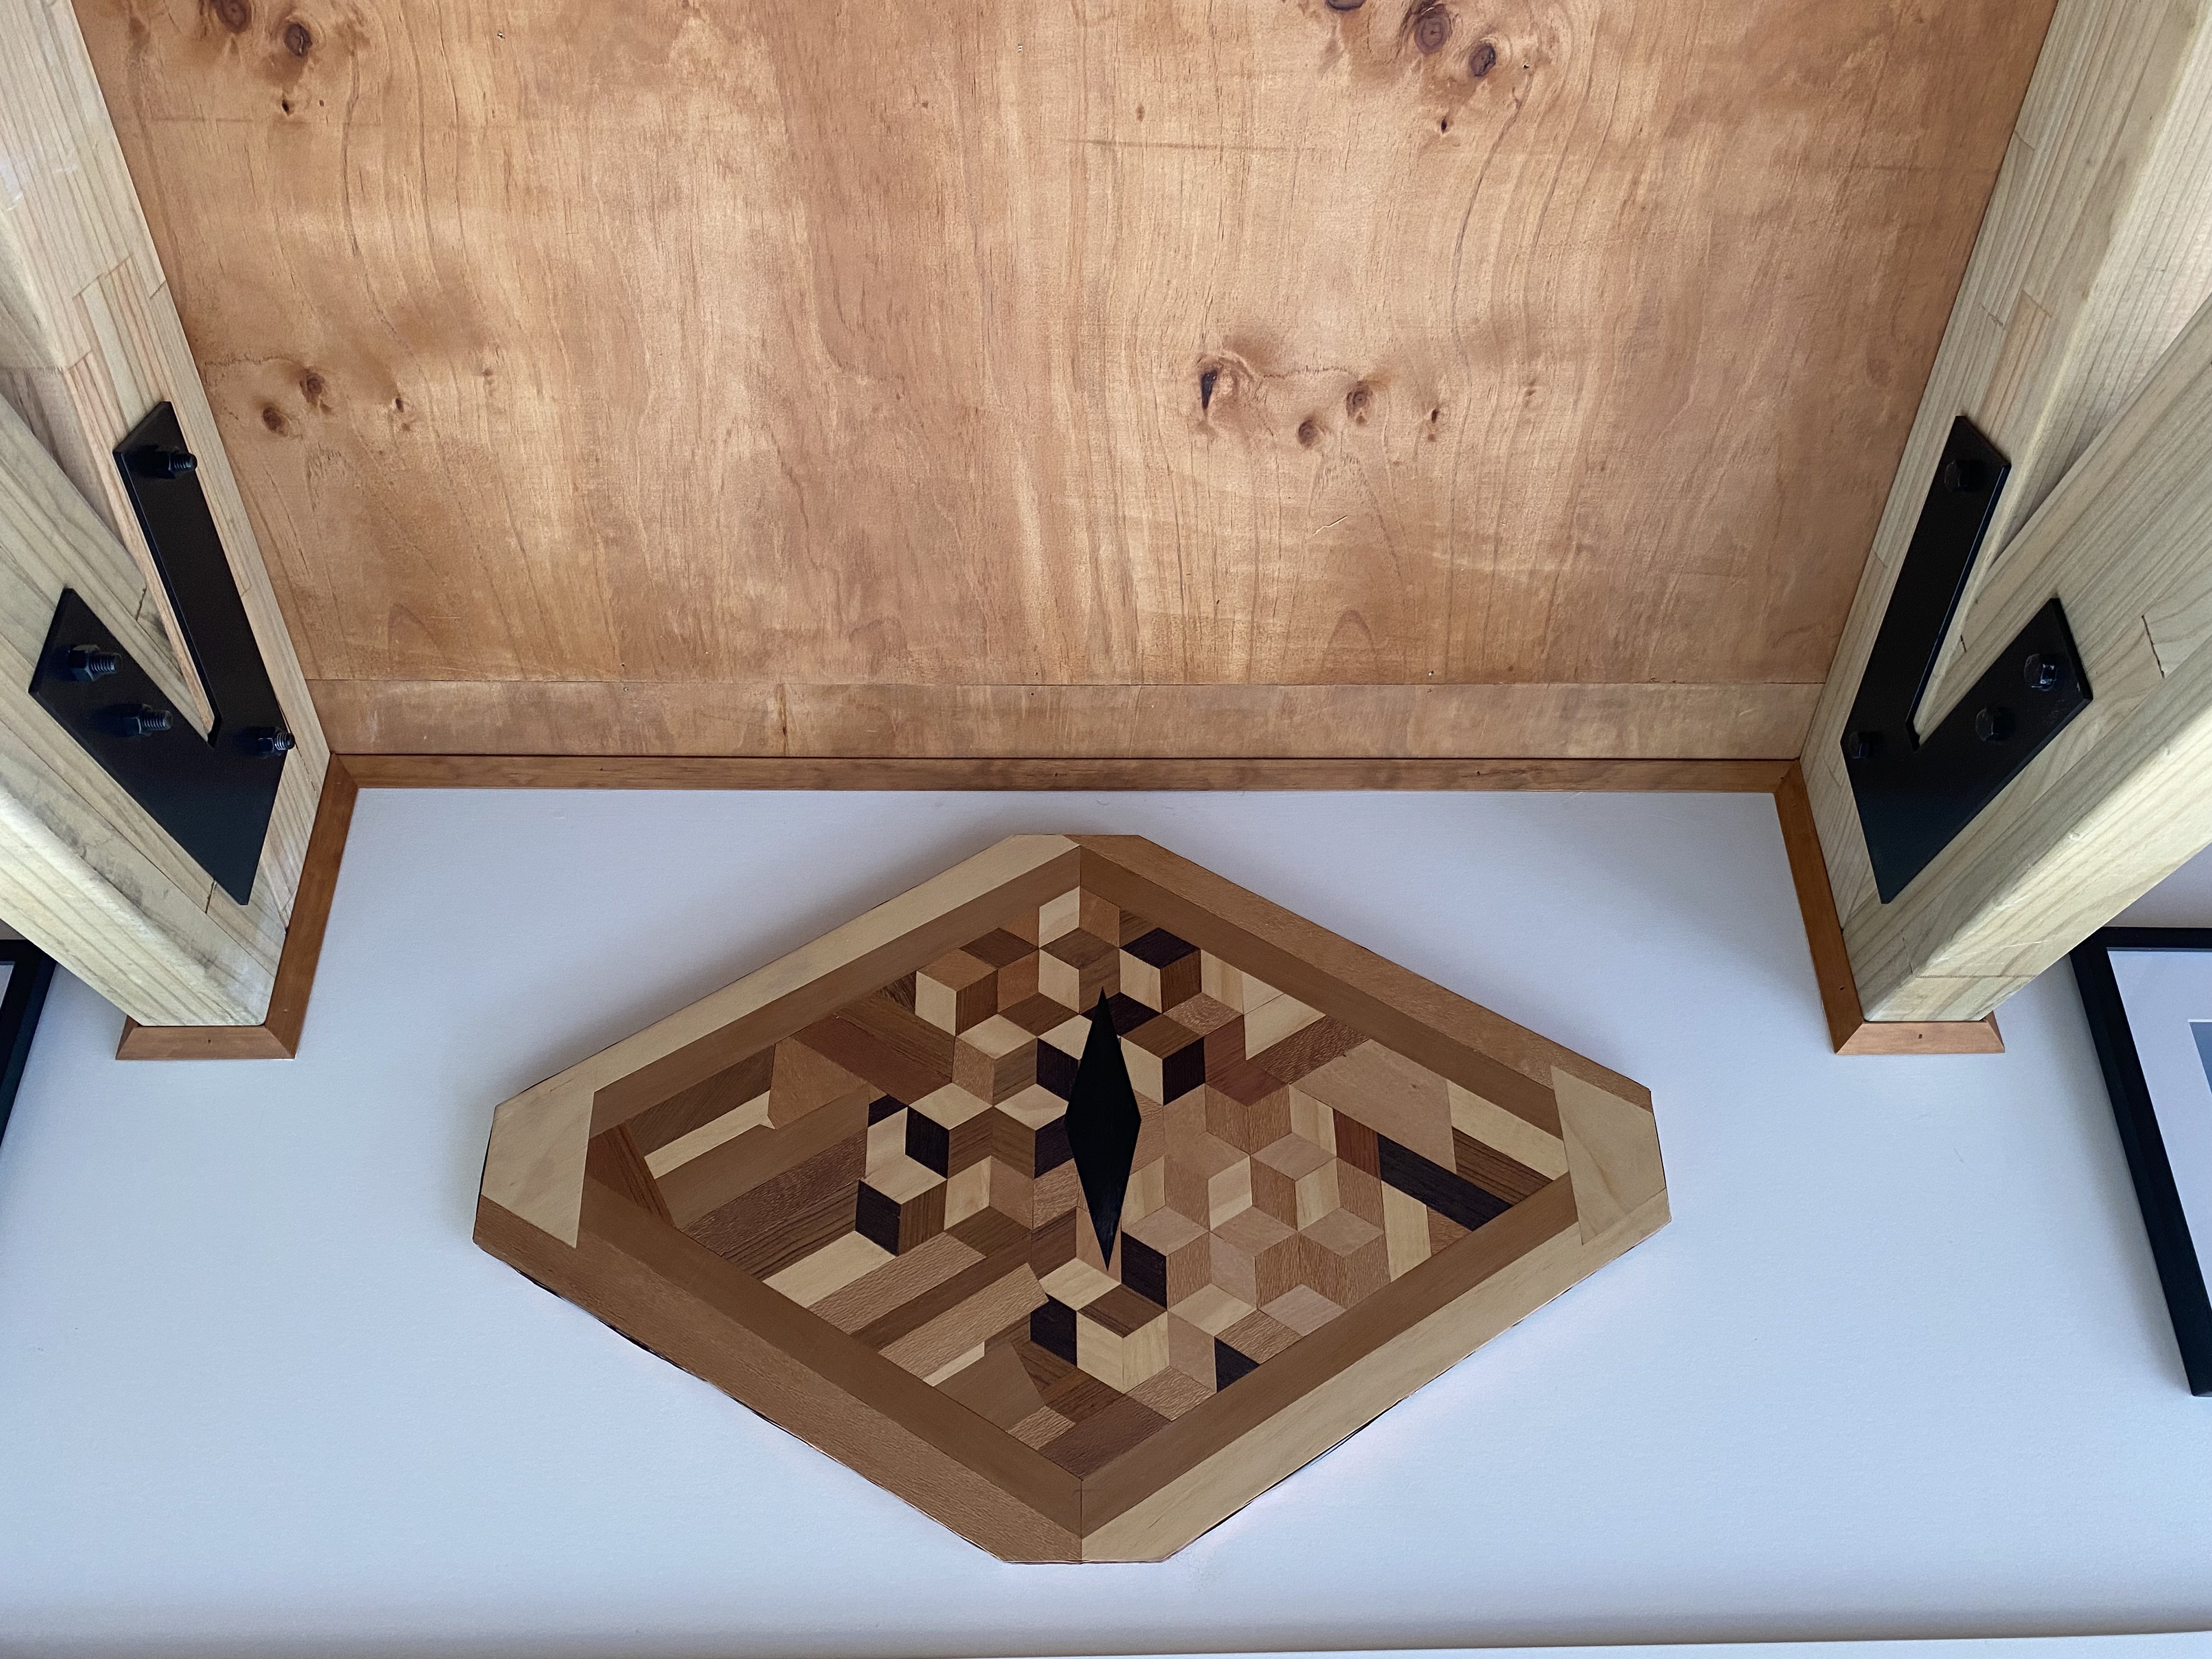
Few more recent veneer projects, I sanded and re oiled the door and made a pattern for the edge, as it annoyed me being plain when the door is open. Bit of copper tape to tidy up the edges. Because the door hardware needed to be adapted to fit with the larch cladding, the latch area was a bit ugly so I made a cover for it out of plate, complete with creepy stamp text Made a floating shelf out of 2 pieces of 18mm mdf glued together, then a patterned front edge/top and bottom. The purple piece is Totara, really beautiful when oiled. Tried out making some 3D cube designs, I wanted it to sort of look like a serpent eye, the pupil is made of ebony. I think I fucked with it too much and then cut the board down into a weird geometric shape, I wasn’t really happy with it initially but it’s growing on me. Enjoying learning more techniques and trying to get my joins neater
 17 points
 -
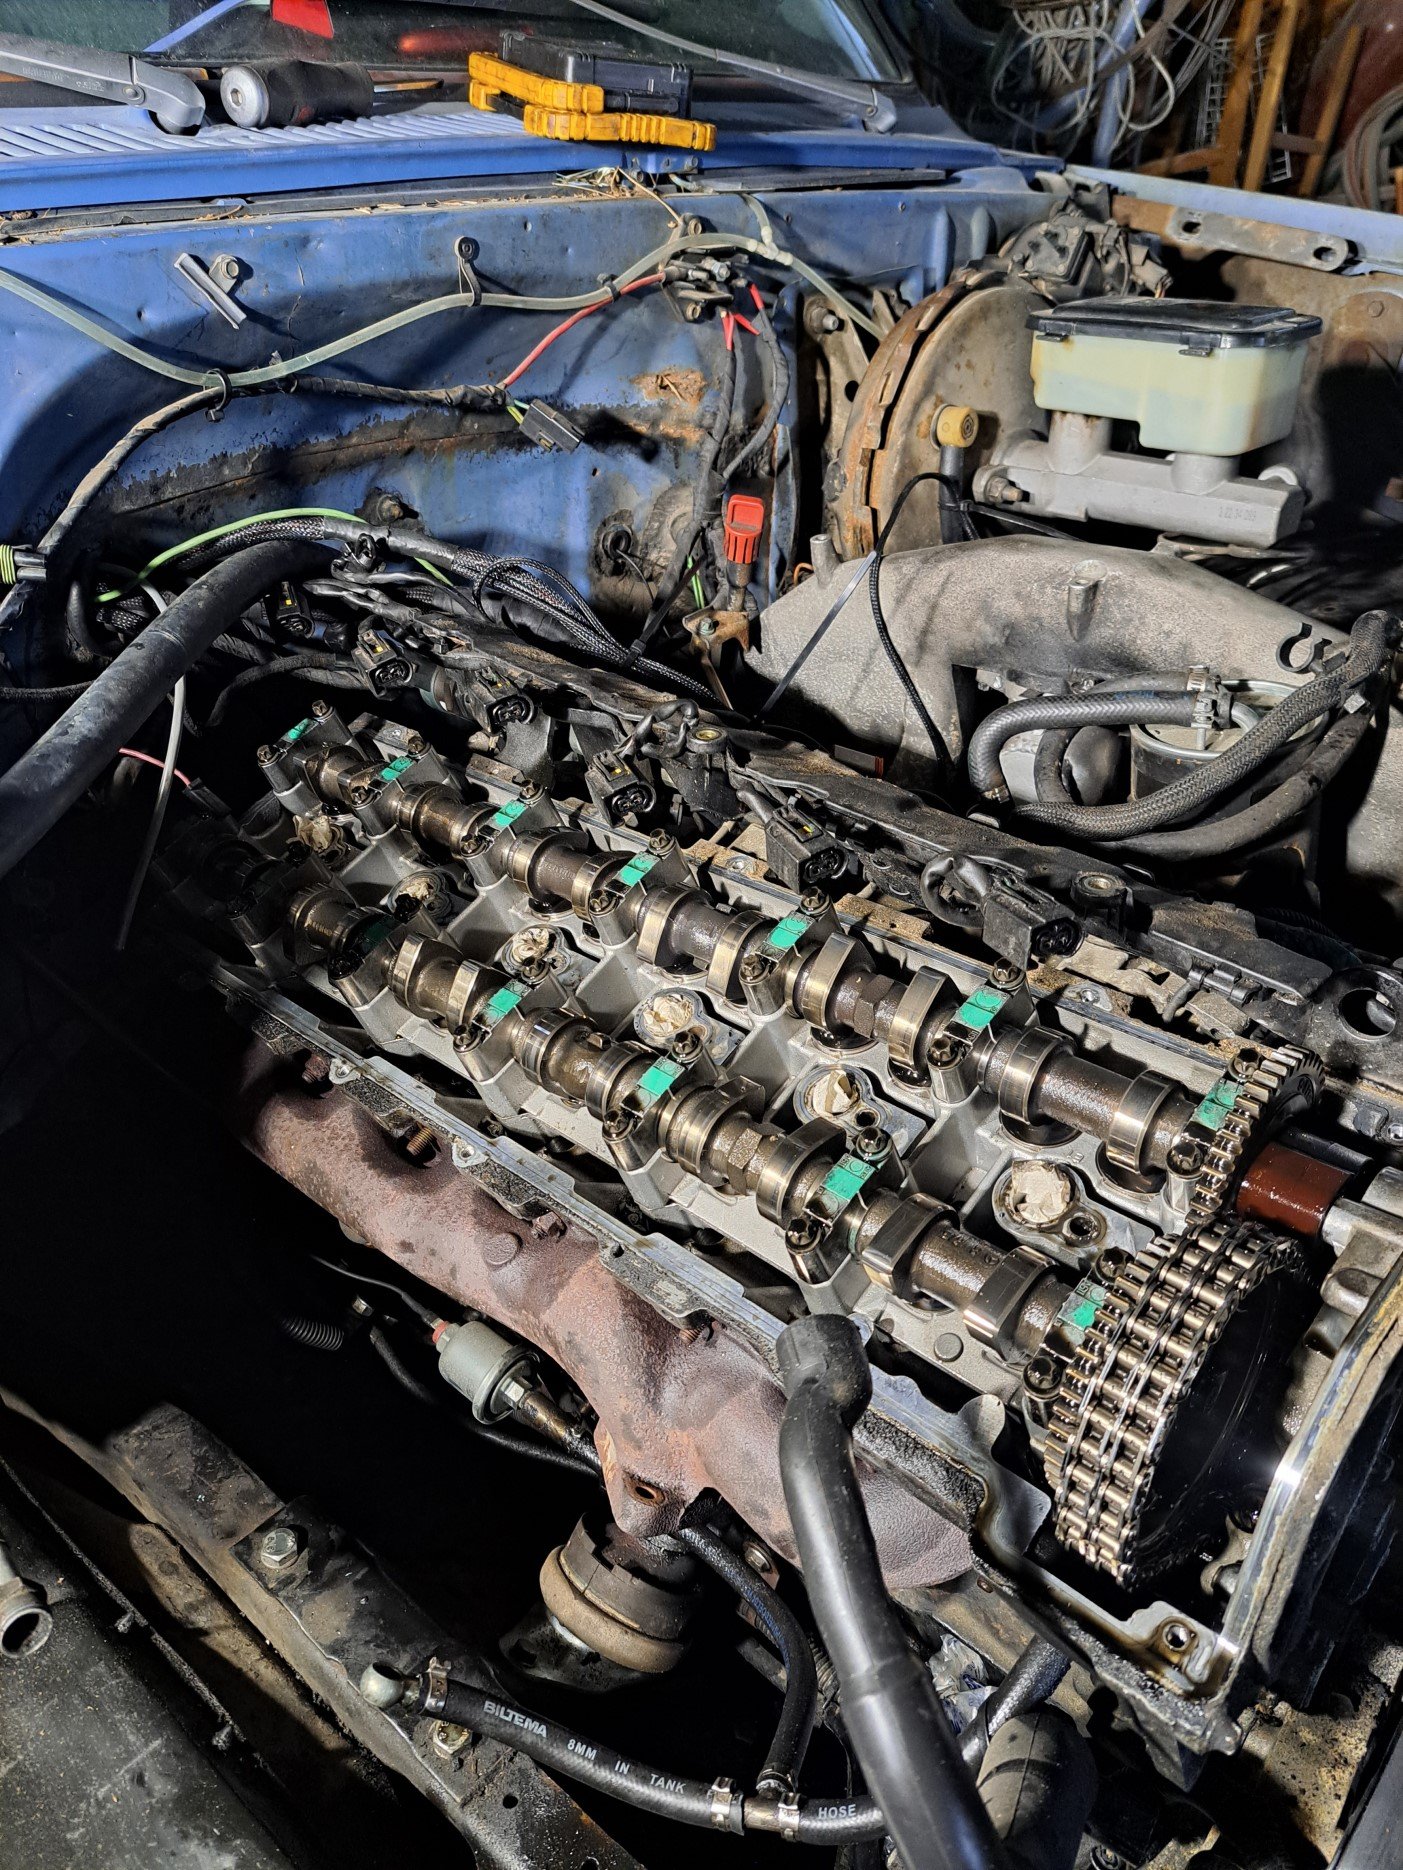
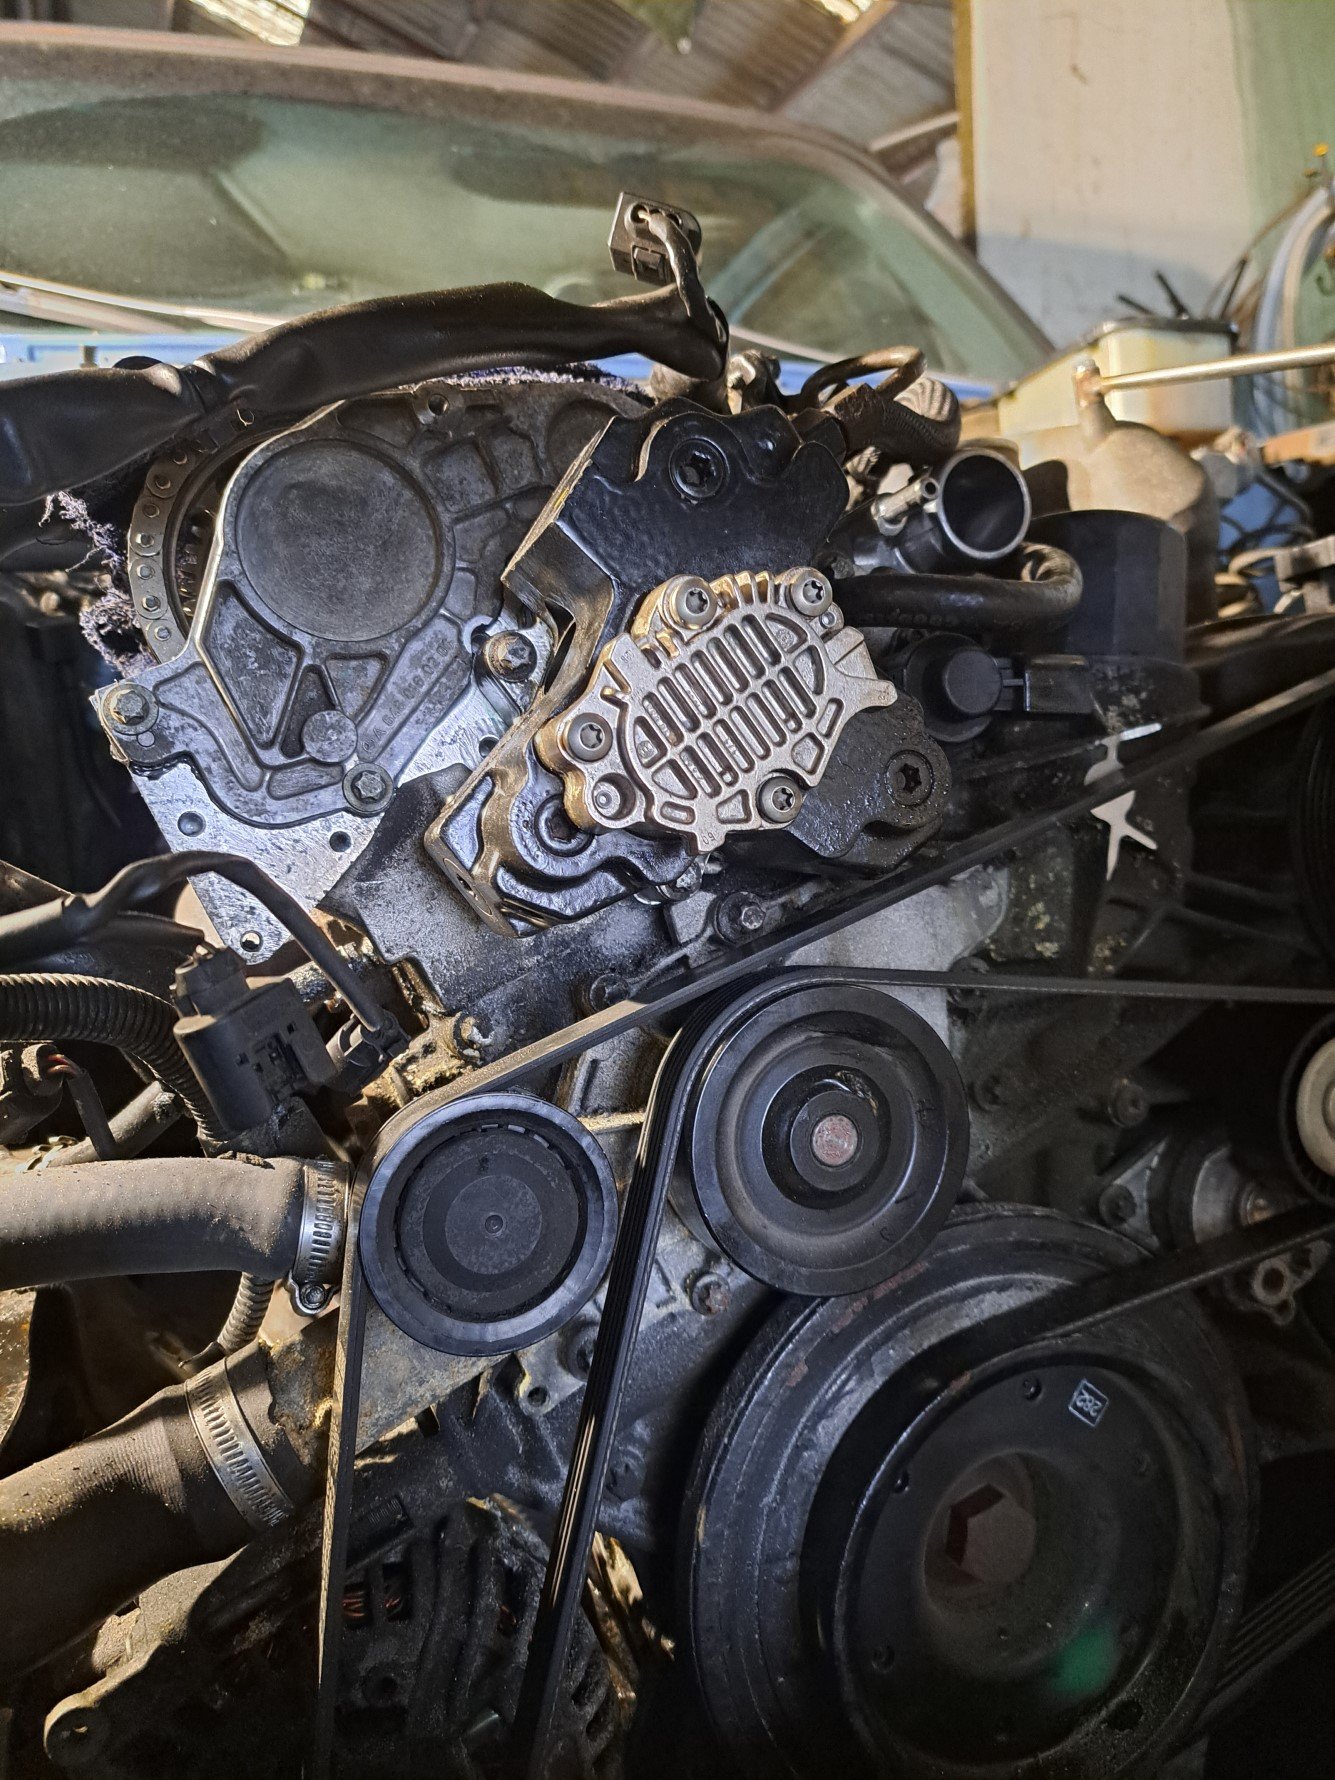
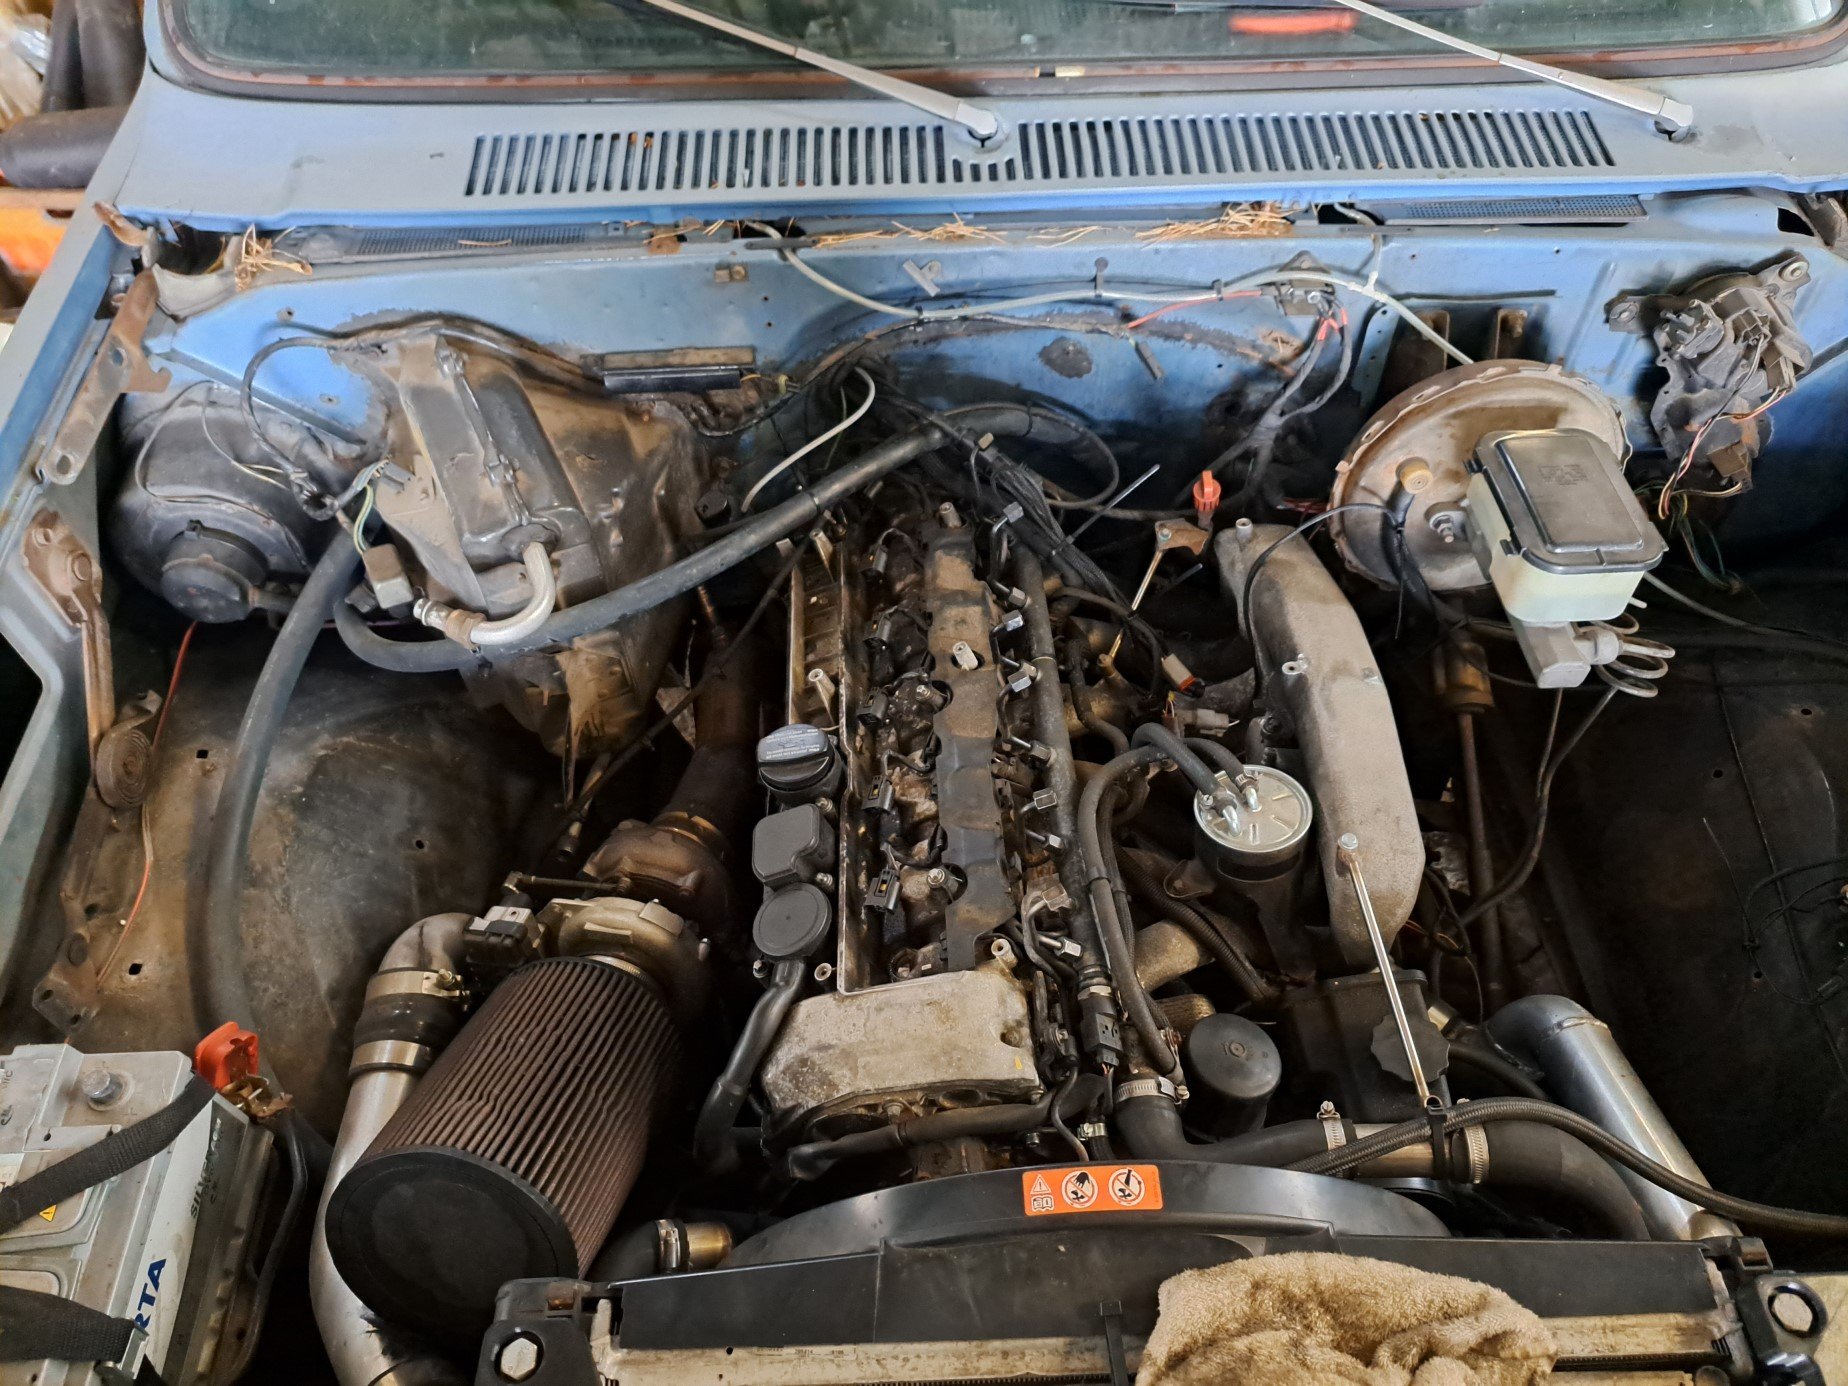
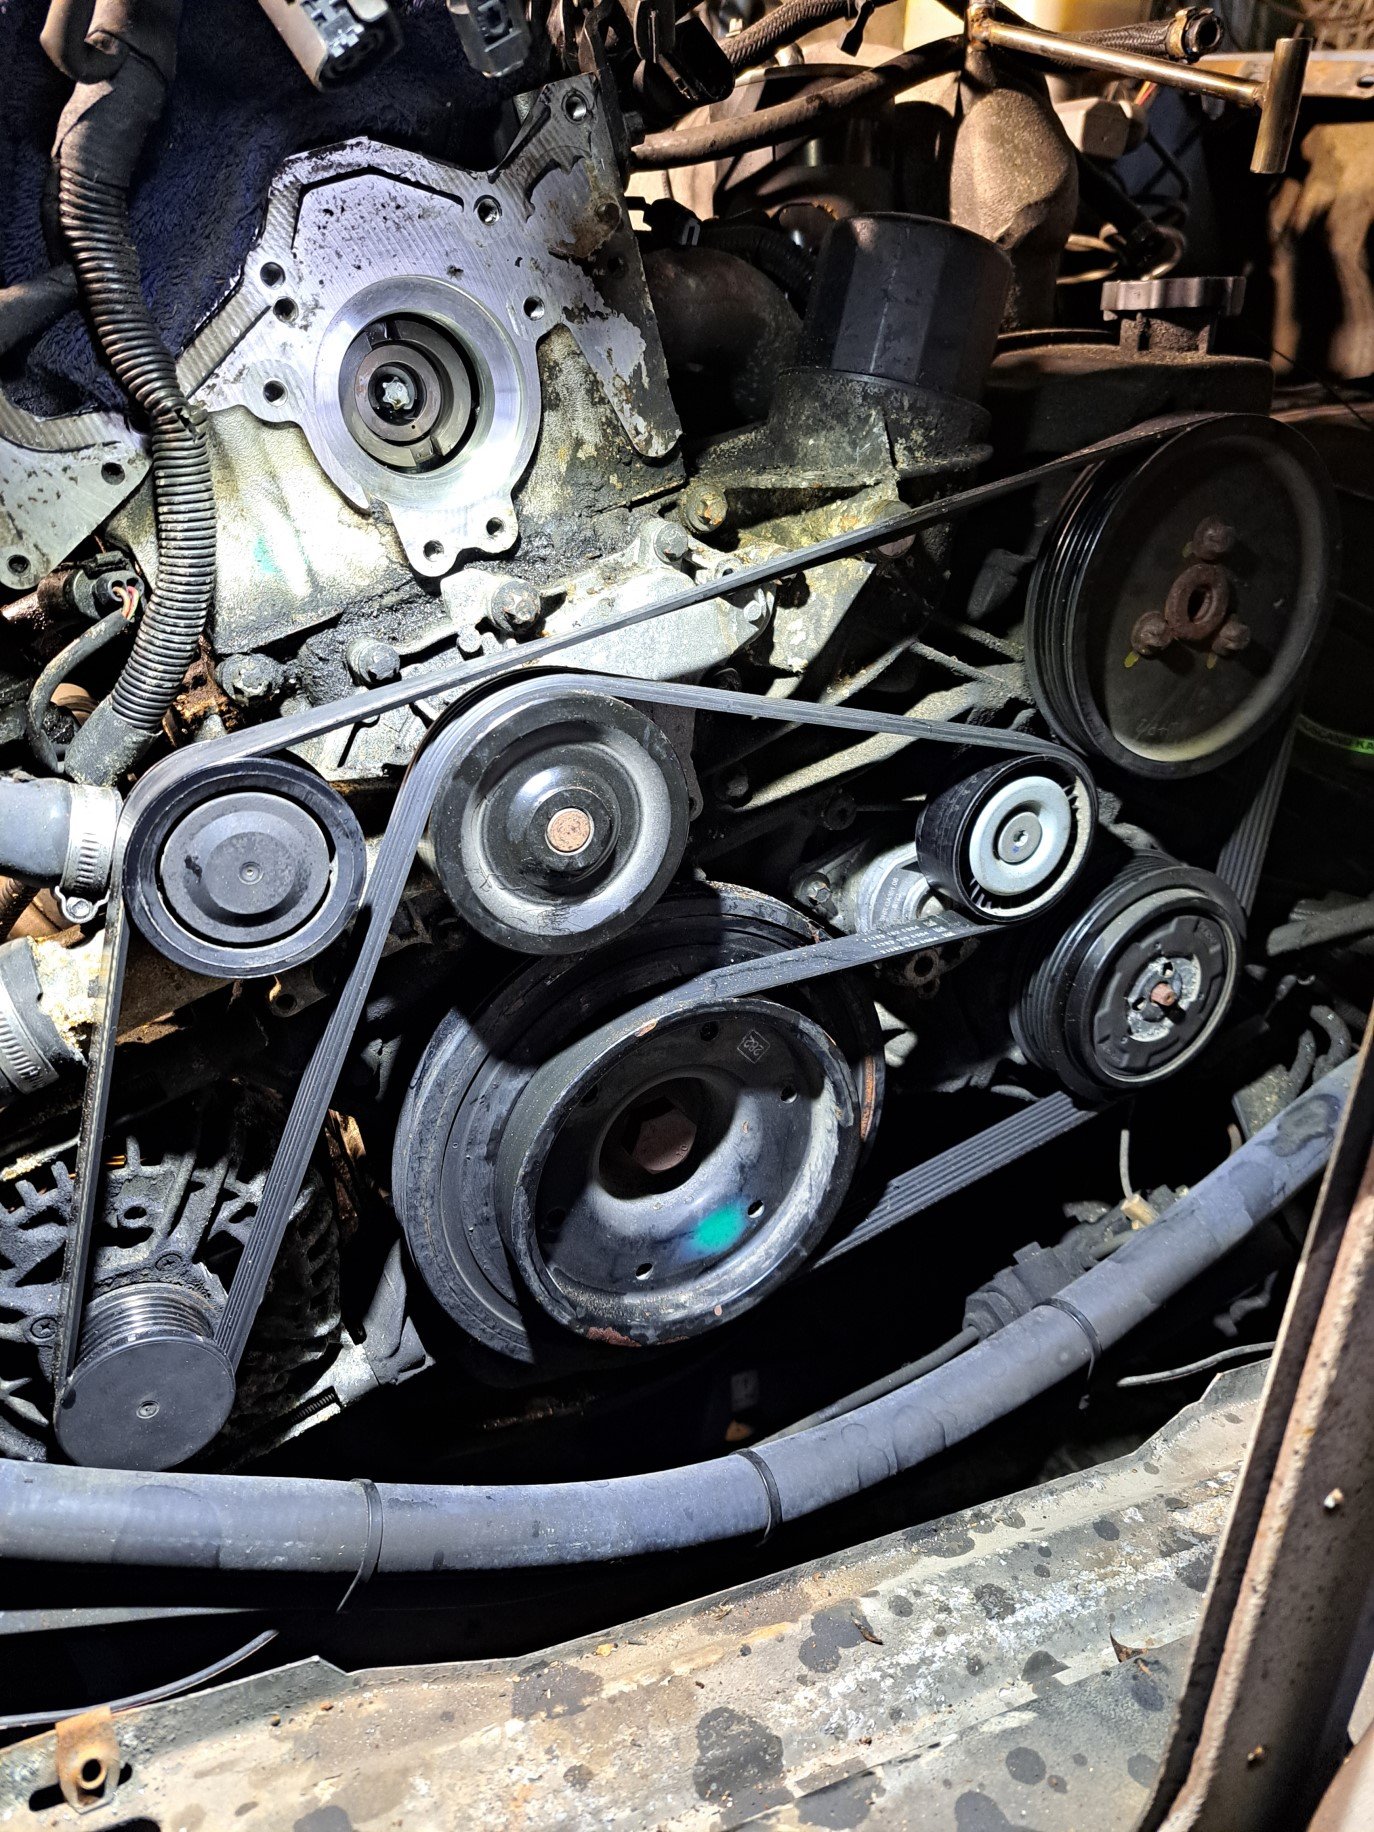
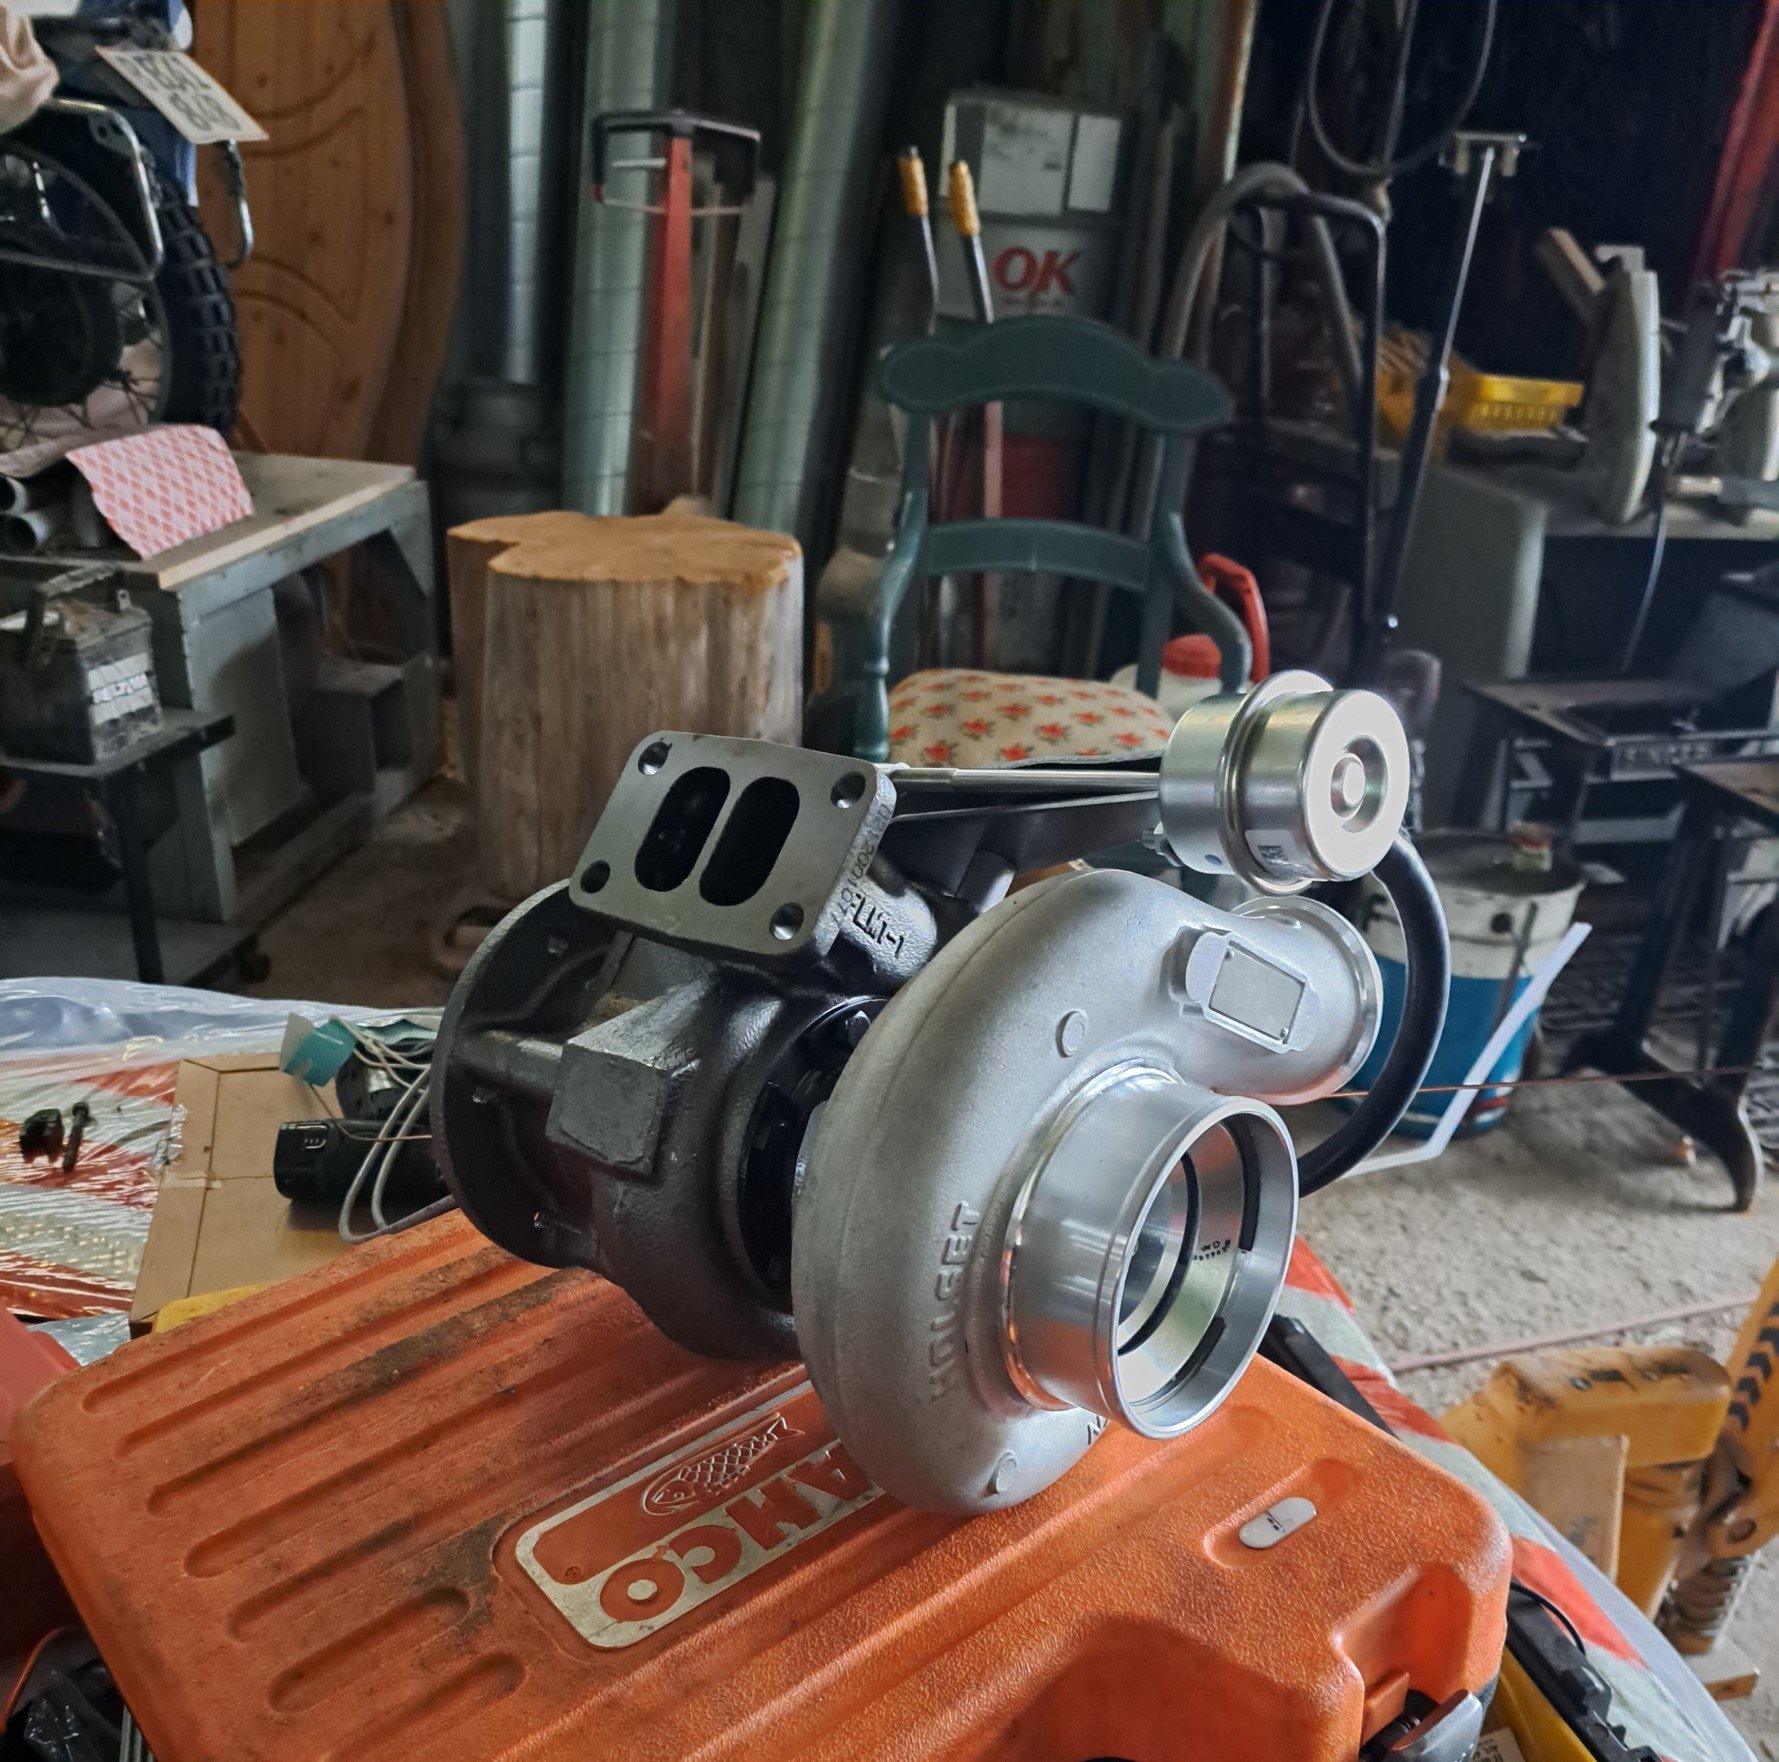
OK, so this is where the story of how my current situation came to be. I was pretty happy with how the truck ran, towed and hauled, but if we rewind to summer last year, I took one of my mates here to see the Malmo race day of the Swedish event StreetWeek, which is a drag and drive event run every year throughout different routes in Sweden. Anyway we floated the idea of participating, I threw it out there that we should use the truck, then I thought a bit more, decided I didnt really want to turn my daily into a drag car, then we ummed and arhhed about buying a 25.5 rolling chassis doing a sloppy LS and going for gold, but the rules to get modified cars street legal (requirement for running StreetWeek) here are dumb so we then put a pause on that idea, at that is bascally where we left it for 6 months. Anyway so I was just randomly doom scrolling Insta on a sunday night and there was a post about getting ready to sign up for StreetWeek on the coming Tuesday.. So I hit up old mate and said, shouldn't we just try and get a spot then figure out the rest after. Tuesday rolls around and I'm sitting at my computer like a Swifty trying to get a ticket, and low and behold we got one. So now this summer we are doing a drag and drive event that will take us some where 5 hours north of Stockholm. One issue though, the truck whilst a great daily does not a drag car make... Enter Phase 2. Basically to get 500 hp out of one of these things isnt too difficult. The formula is pretty tried and true: Big HPFP custom Injectors, and enough air to burn all that diesel effectively. So out came the Injectors to be sent to Diesel Mekken in Sweden, they should flow around 185mm3 @ 1400uS when I get them back. Next on the list was to remove all the things that we wont be using, and seeings as I already had the injectors out removing the rocker cover makes modifying the front cover for the 400cdi pump easier. The gasket was also leaking so it was a no brainer. This is what I found, notbad.jpg for 500,000km It is almost as if Mercedes themselves planned this, because the holes are all there to mount the bigger pump, just a matter of a bit of a trim on the front cover and everything bolts up. After removing one of the idler pulleys and trimming the oil filter and thermostat housings the everything is good to go. So all in all a win. Next on the list is building the new turbo manifold, it is going to be a compound setup with the HX40 over the stock GT2356, so hopefully I dont lose too much drivability.
13 points
-
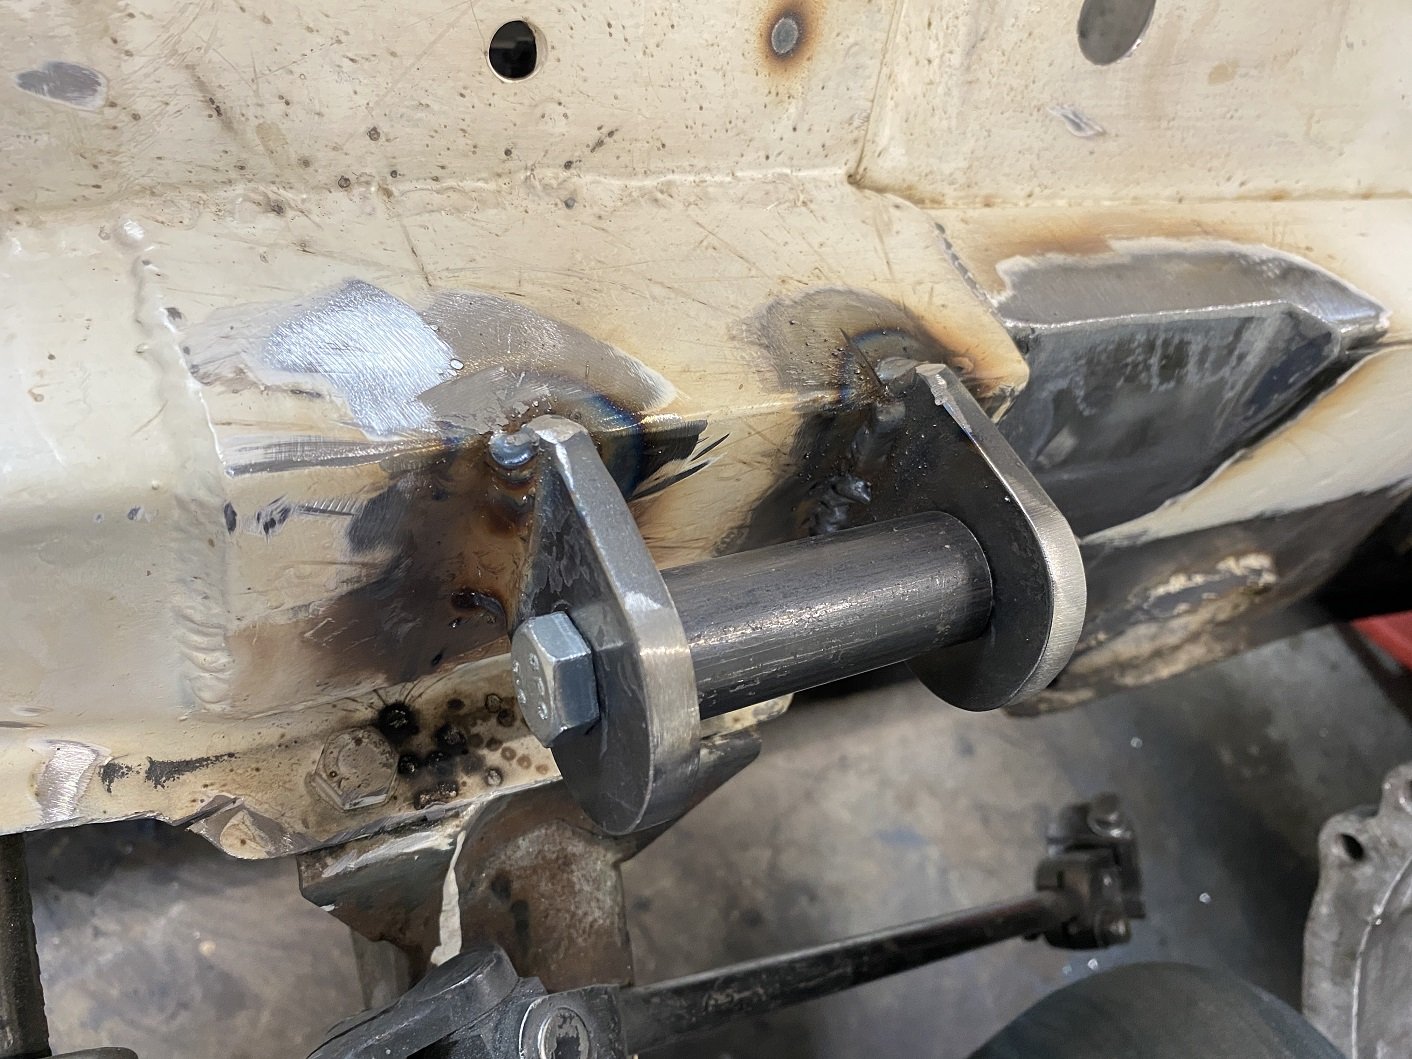
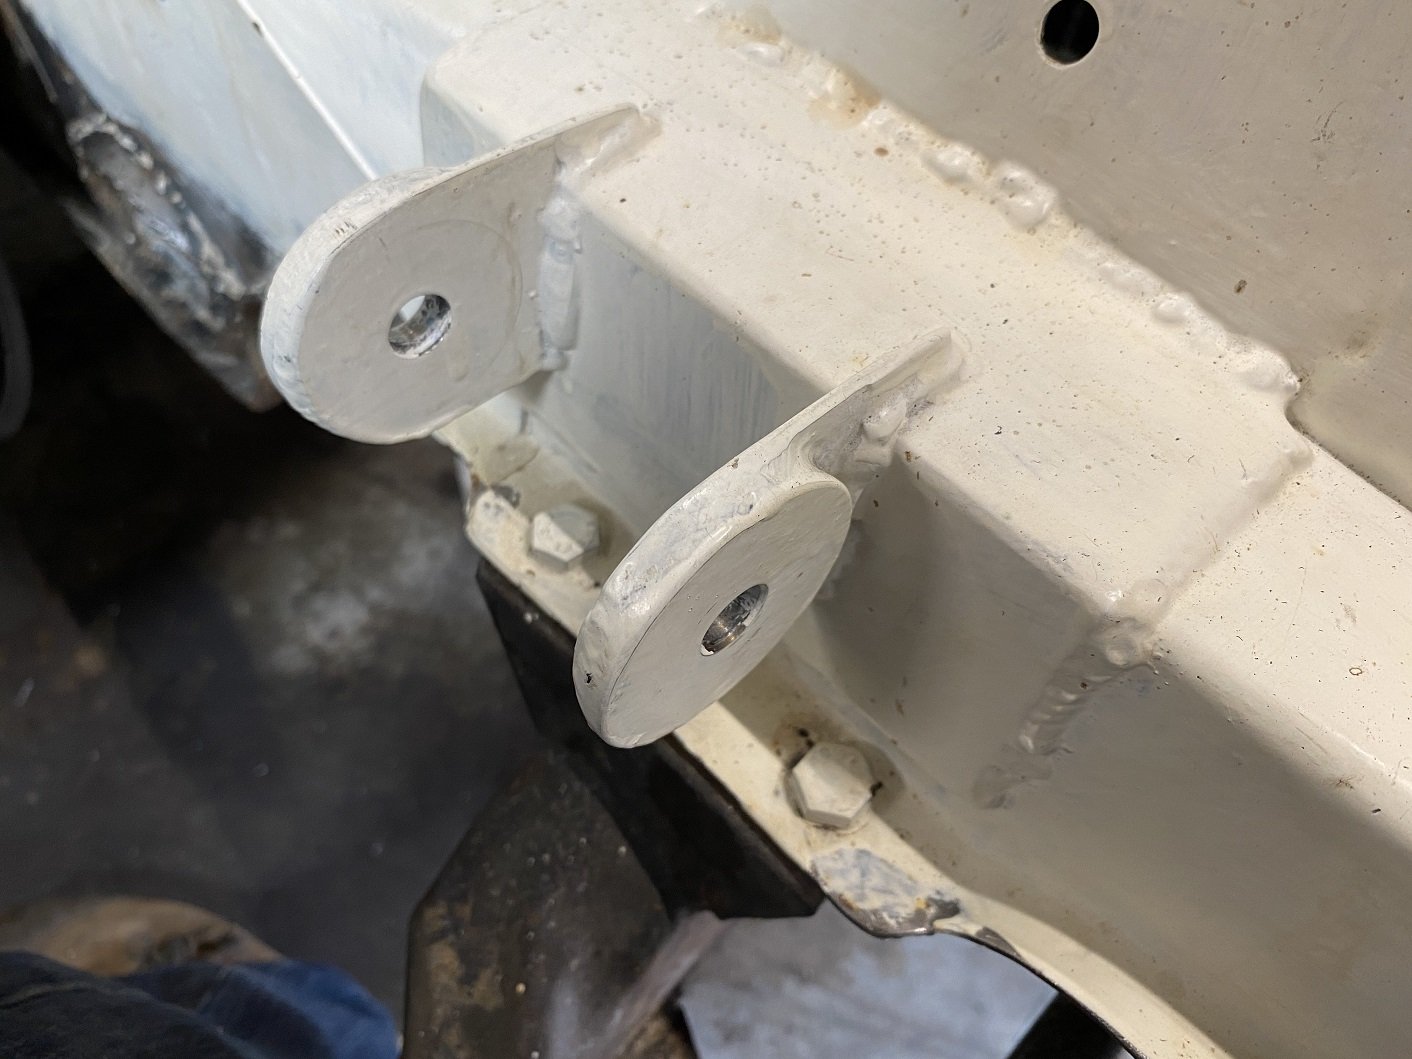
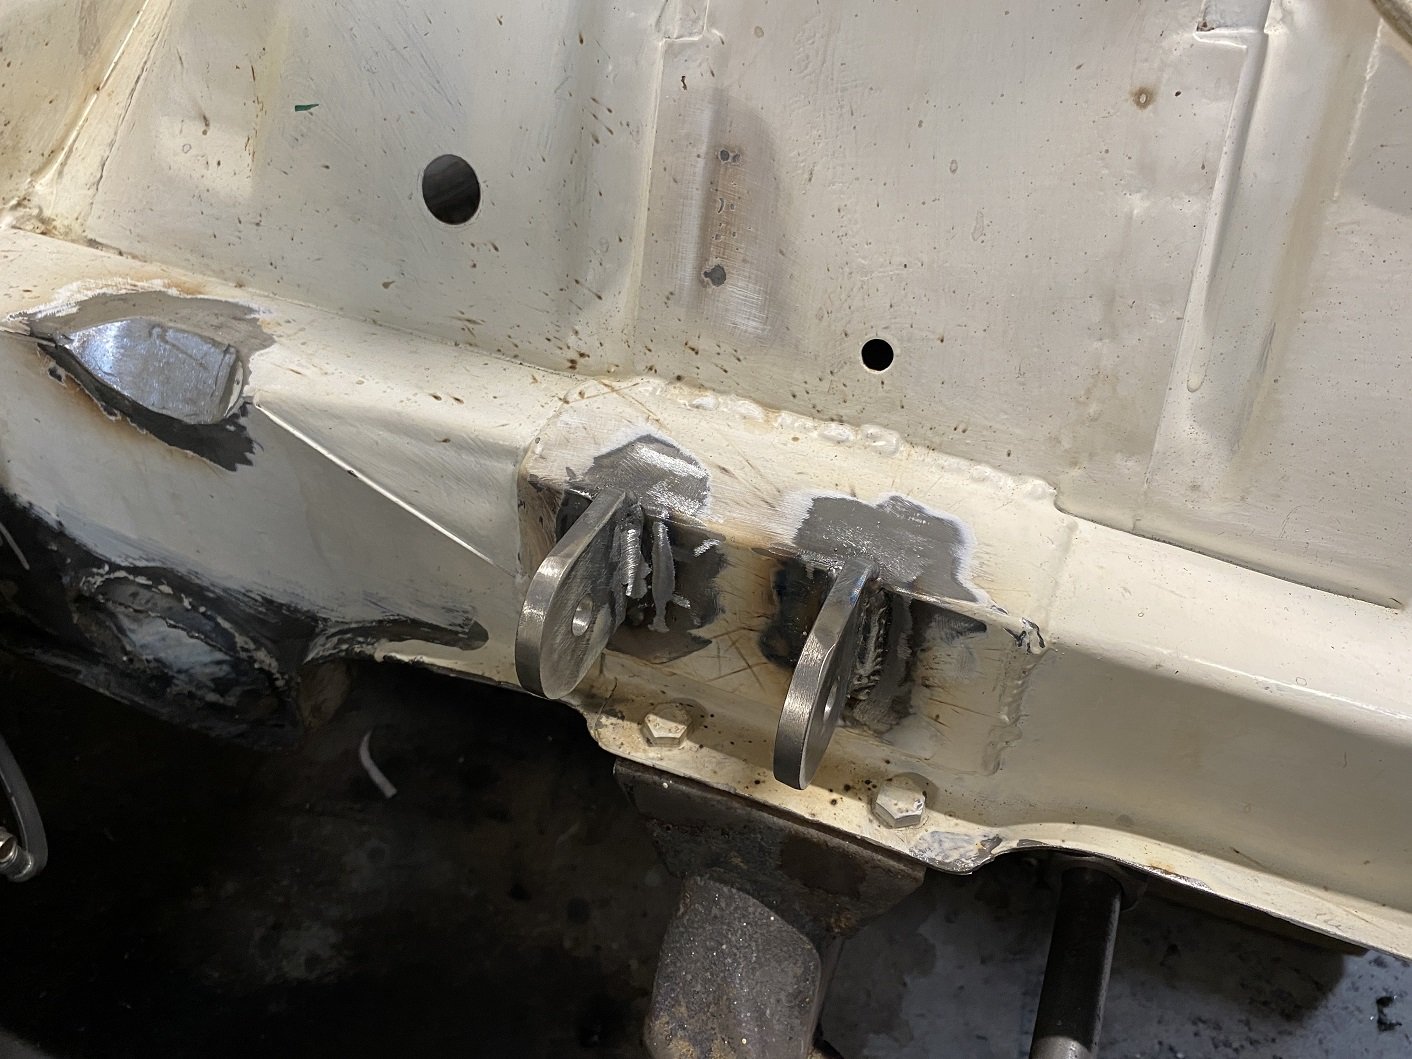
Engine mounts redone in thicker material as advised by the man. 8mm should do it. I machined up a spacer and did half at a time so I could use the original half to keep the alignment. But I also added a 4mm spacer when welding on the first new half to shift the engine back a tiny bit and give me just a little more clearance between the cross member and the sump. I hope that doesn't come back to bit me in the arse later. When welding in the second half of each mount I replaced the 4mm spacer with a fibre washer as a shim so it's not such an uber tight fit to get the bush/sleeve in there.
8 points
-
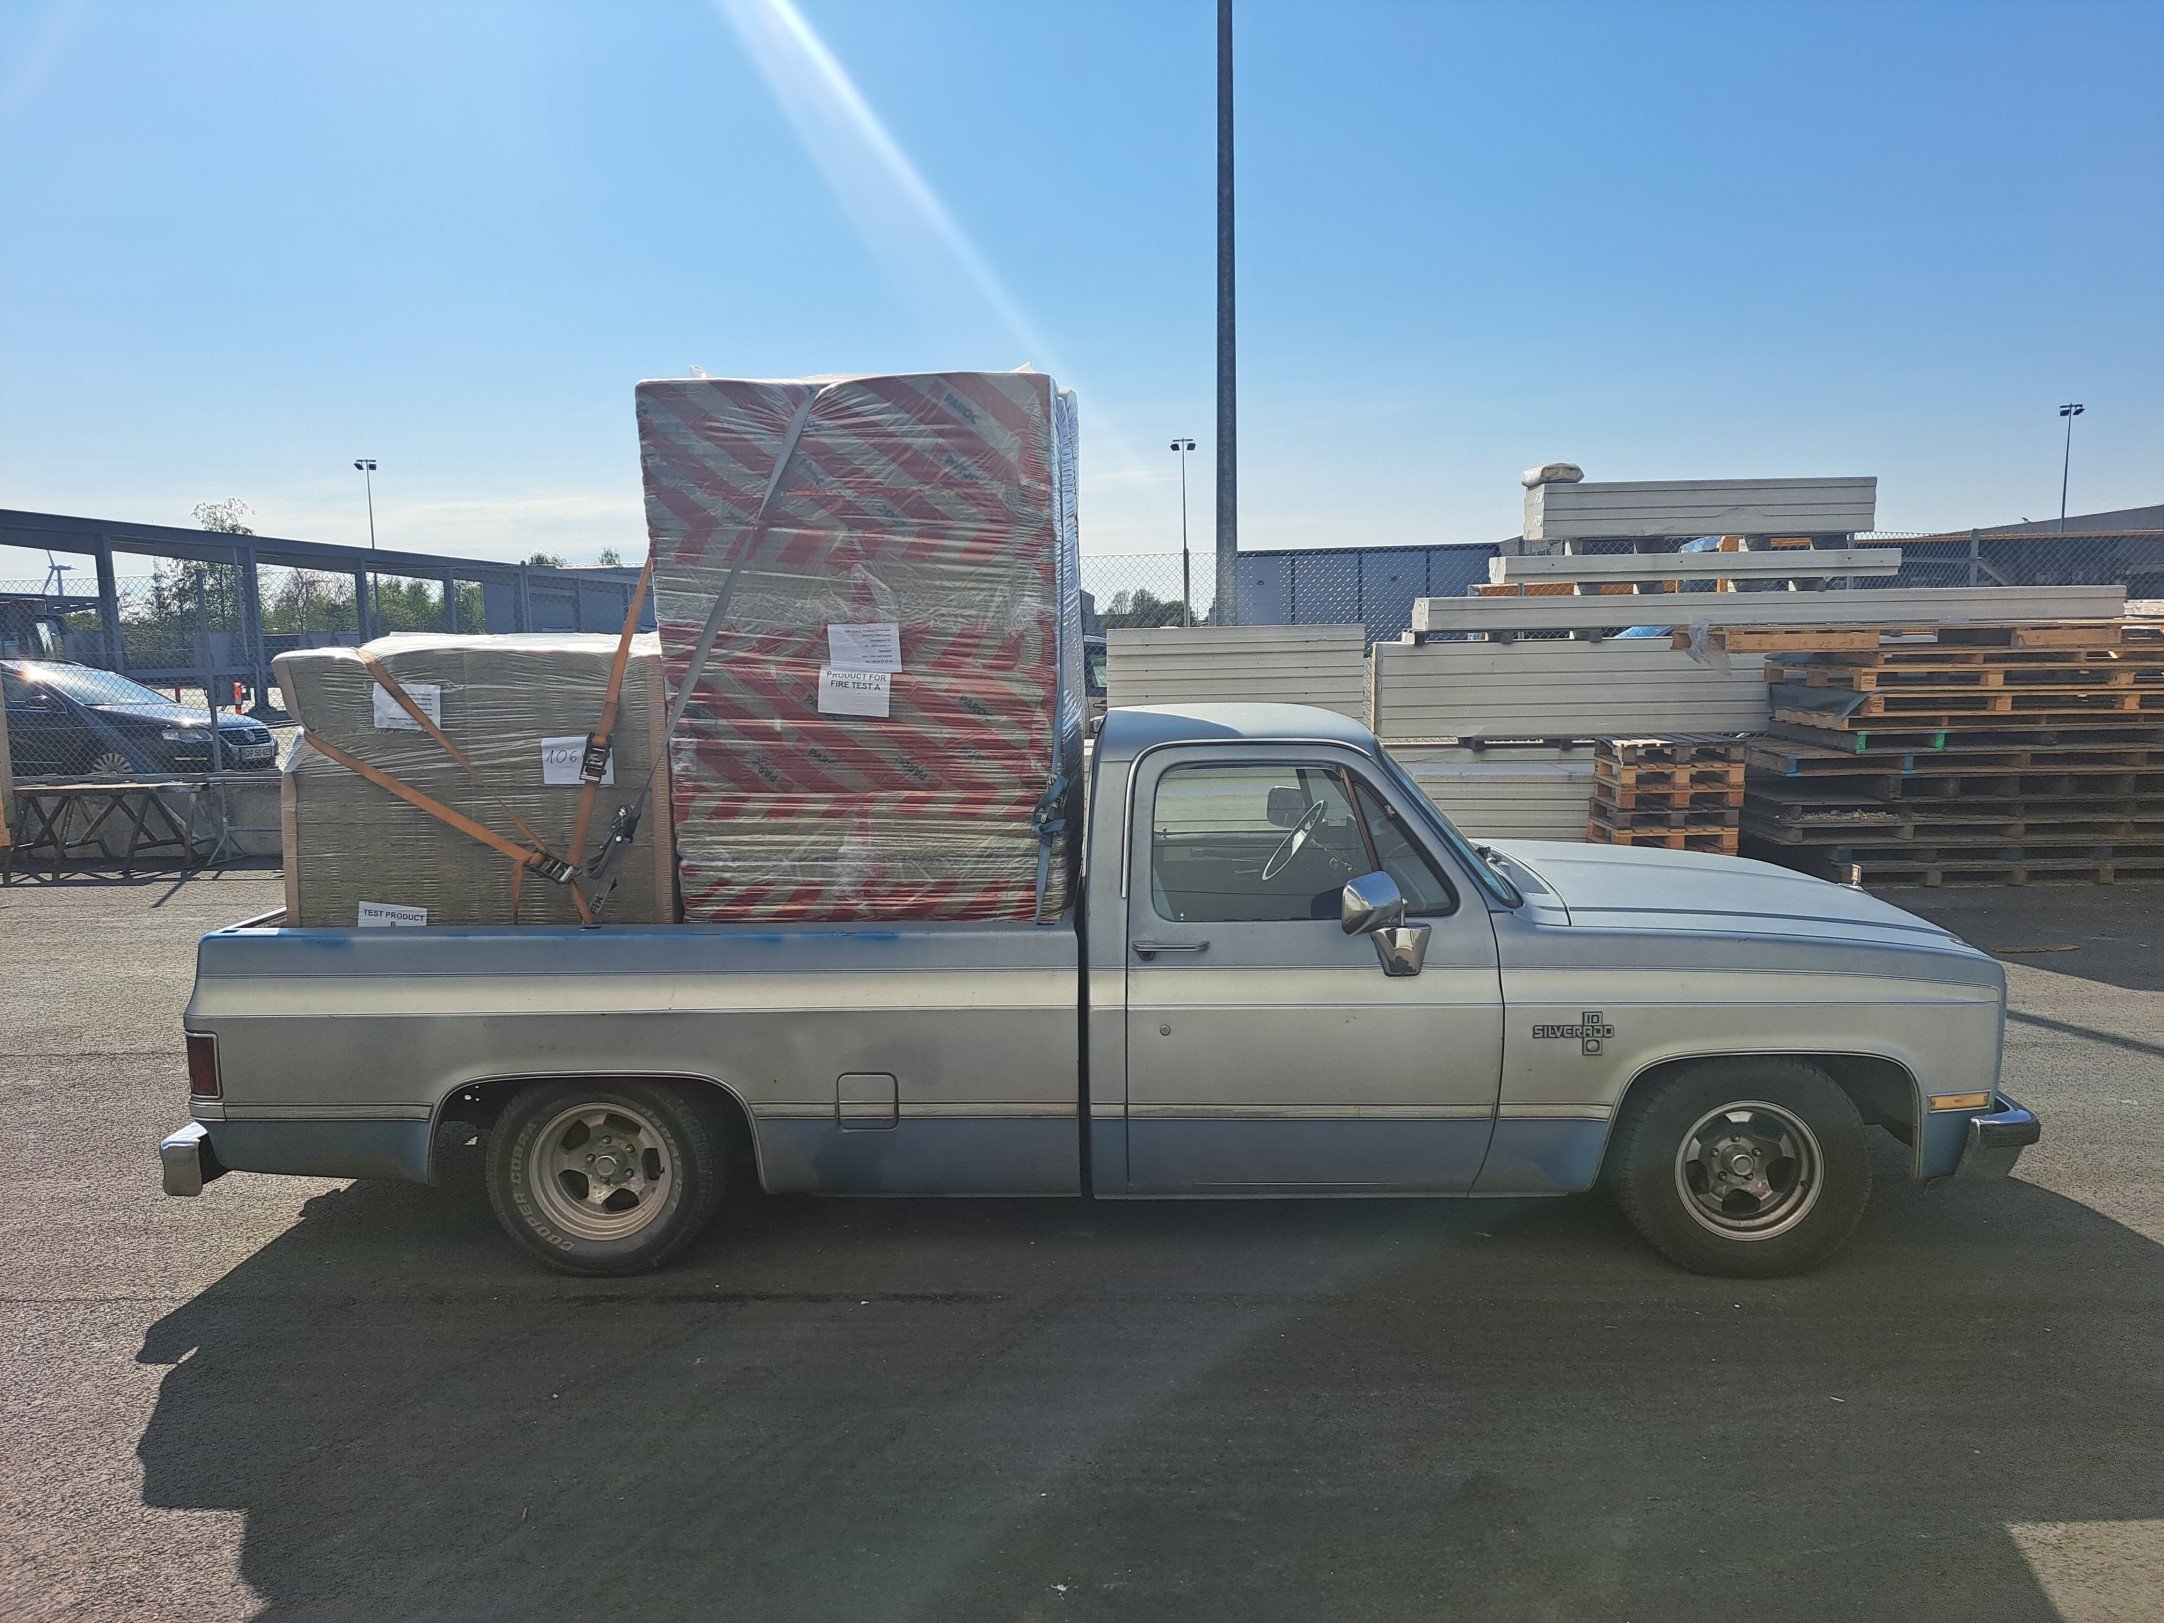
The wof this week is off the cards. I thought I had better check why the handbrake was so pathetic and discovered that both rear calipers were basically seized. I thought the brakes were not as good, now I know why. I may as well rebuild all the calipers and if my visa can take the punishment I might get new discs and pads as well, I might have to sell some shit So I to feel like I had achieved something I messed with wiring of the fuel sensing relay to try to make it work. @h4nd had given me a dose of RTFM so I reworked the wiring to suit, but now it doesn't work at all. I checked many things but no go. There is a good chance I toasted it when I wired it up wrong. I might just wire a normal relay up to and use the alternator as the signal wire. I also poo'd up the washer tank some more as it was still leaking, tomorrow morning may tell me some things; Then I decided to move the afr meter to somewhere where I could actually see it when driving. Basically lots of tinkering with shit and avoiding jobs around the house that I should be doing. Oh and yesterday I tuned/balanced the carbs a bit, hopefully it will run a little better. And also I noticed the gearbox drain plug was leaking.... Cool cool8 points
-
Okay listen up, Ive spoken to Tracey at the camp. Shes not opposed to the idea. We dont have an idea on costs yet. From 23/7 to 7/8 is off the table. (They are away) also they have bookings on 10/8. To make this a reality, concrete buy it is required. (I realise without a date, thats hard) but thats where we are.7 points
-
Easter Keg..Bunny might have trouble fitting in his basket.
7 points
-
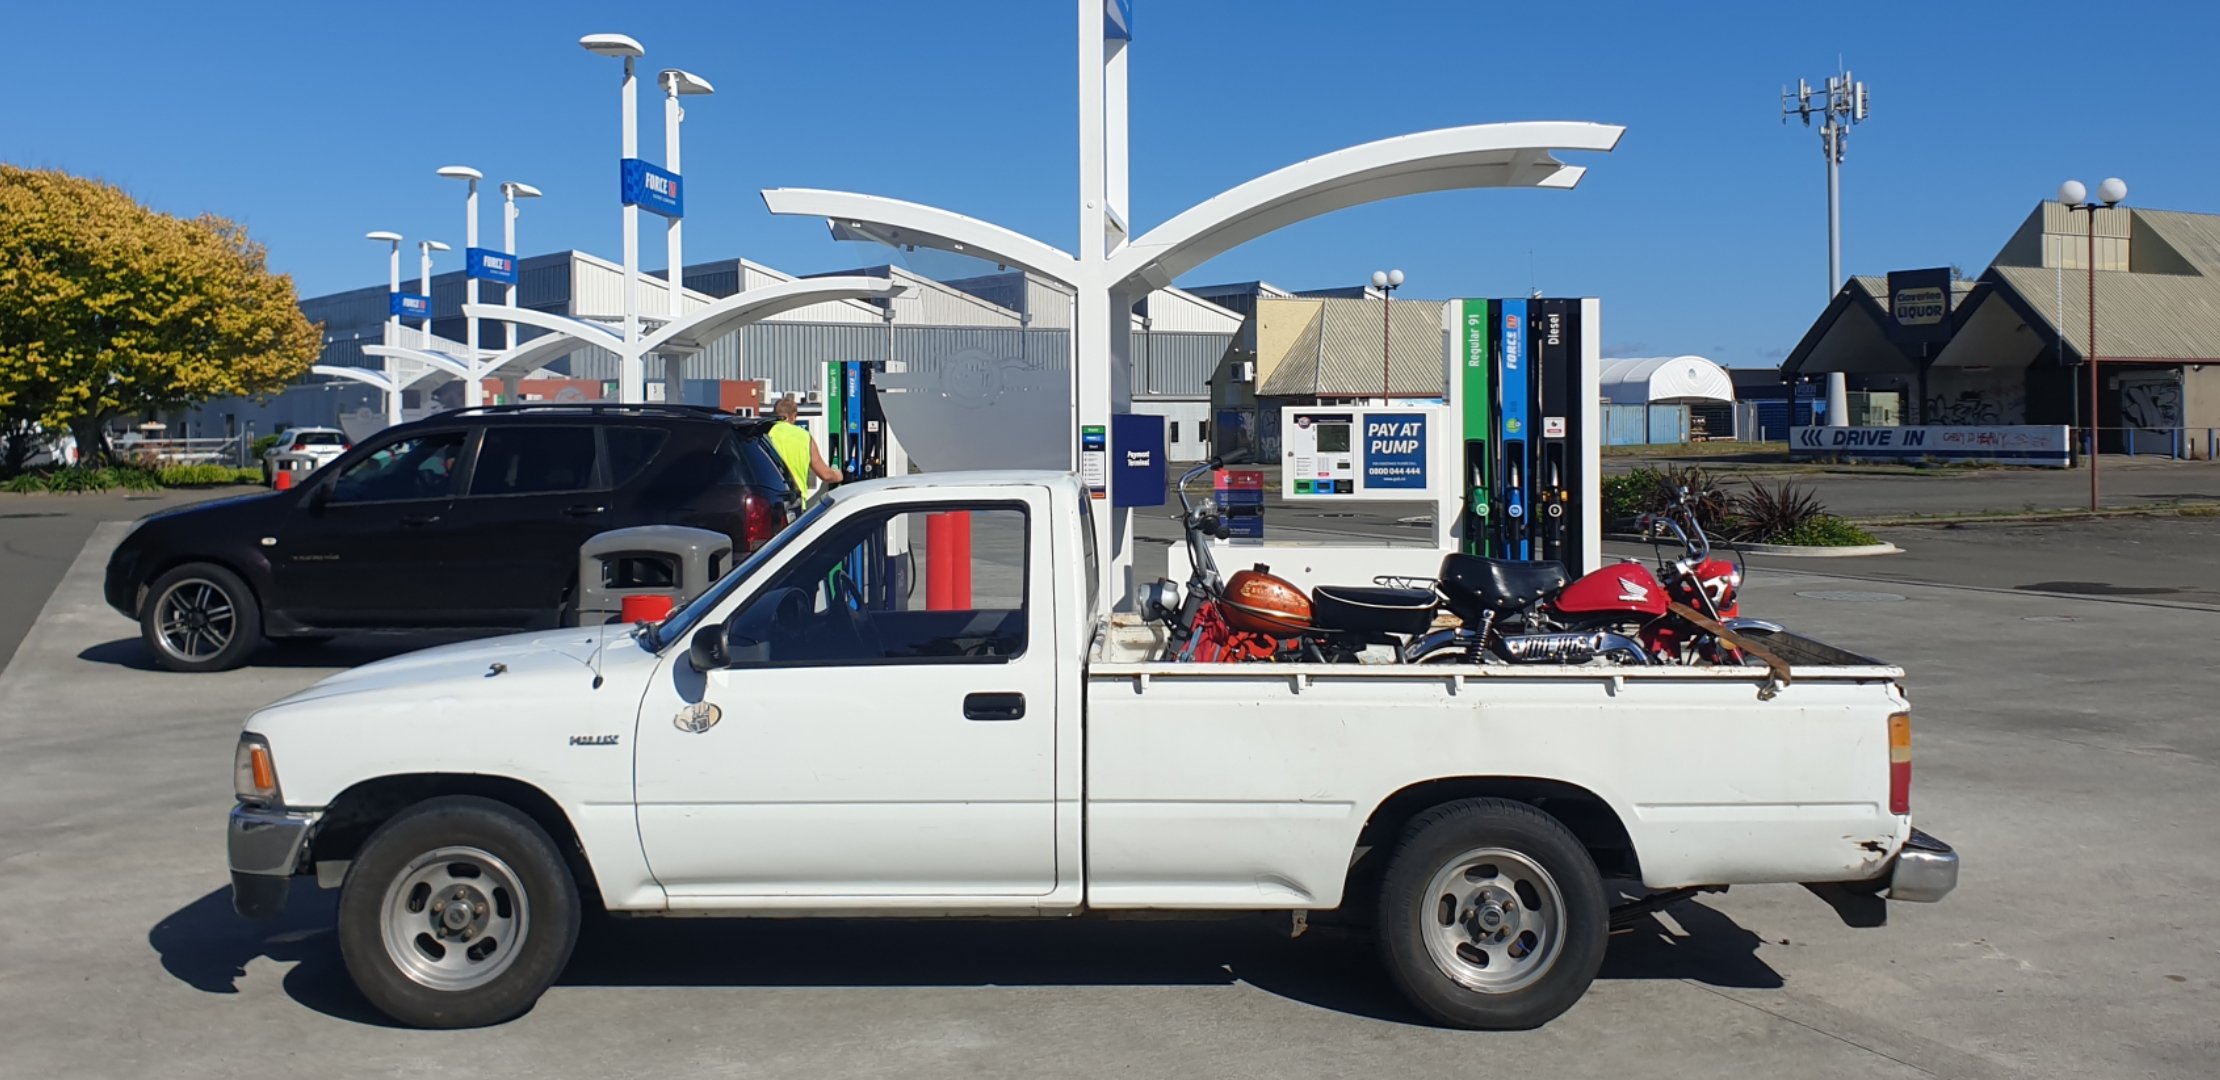
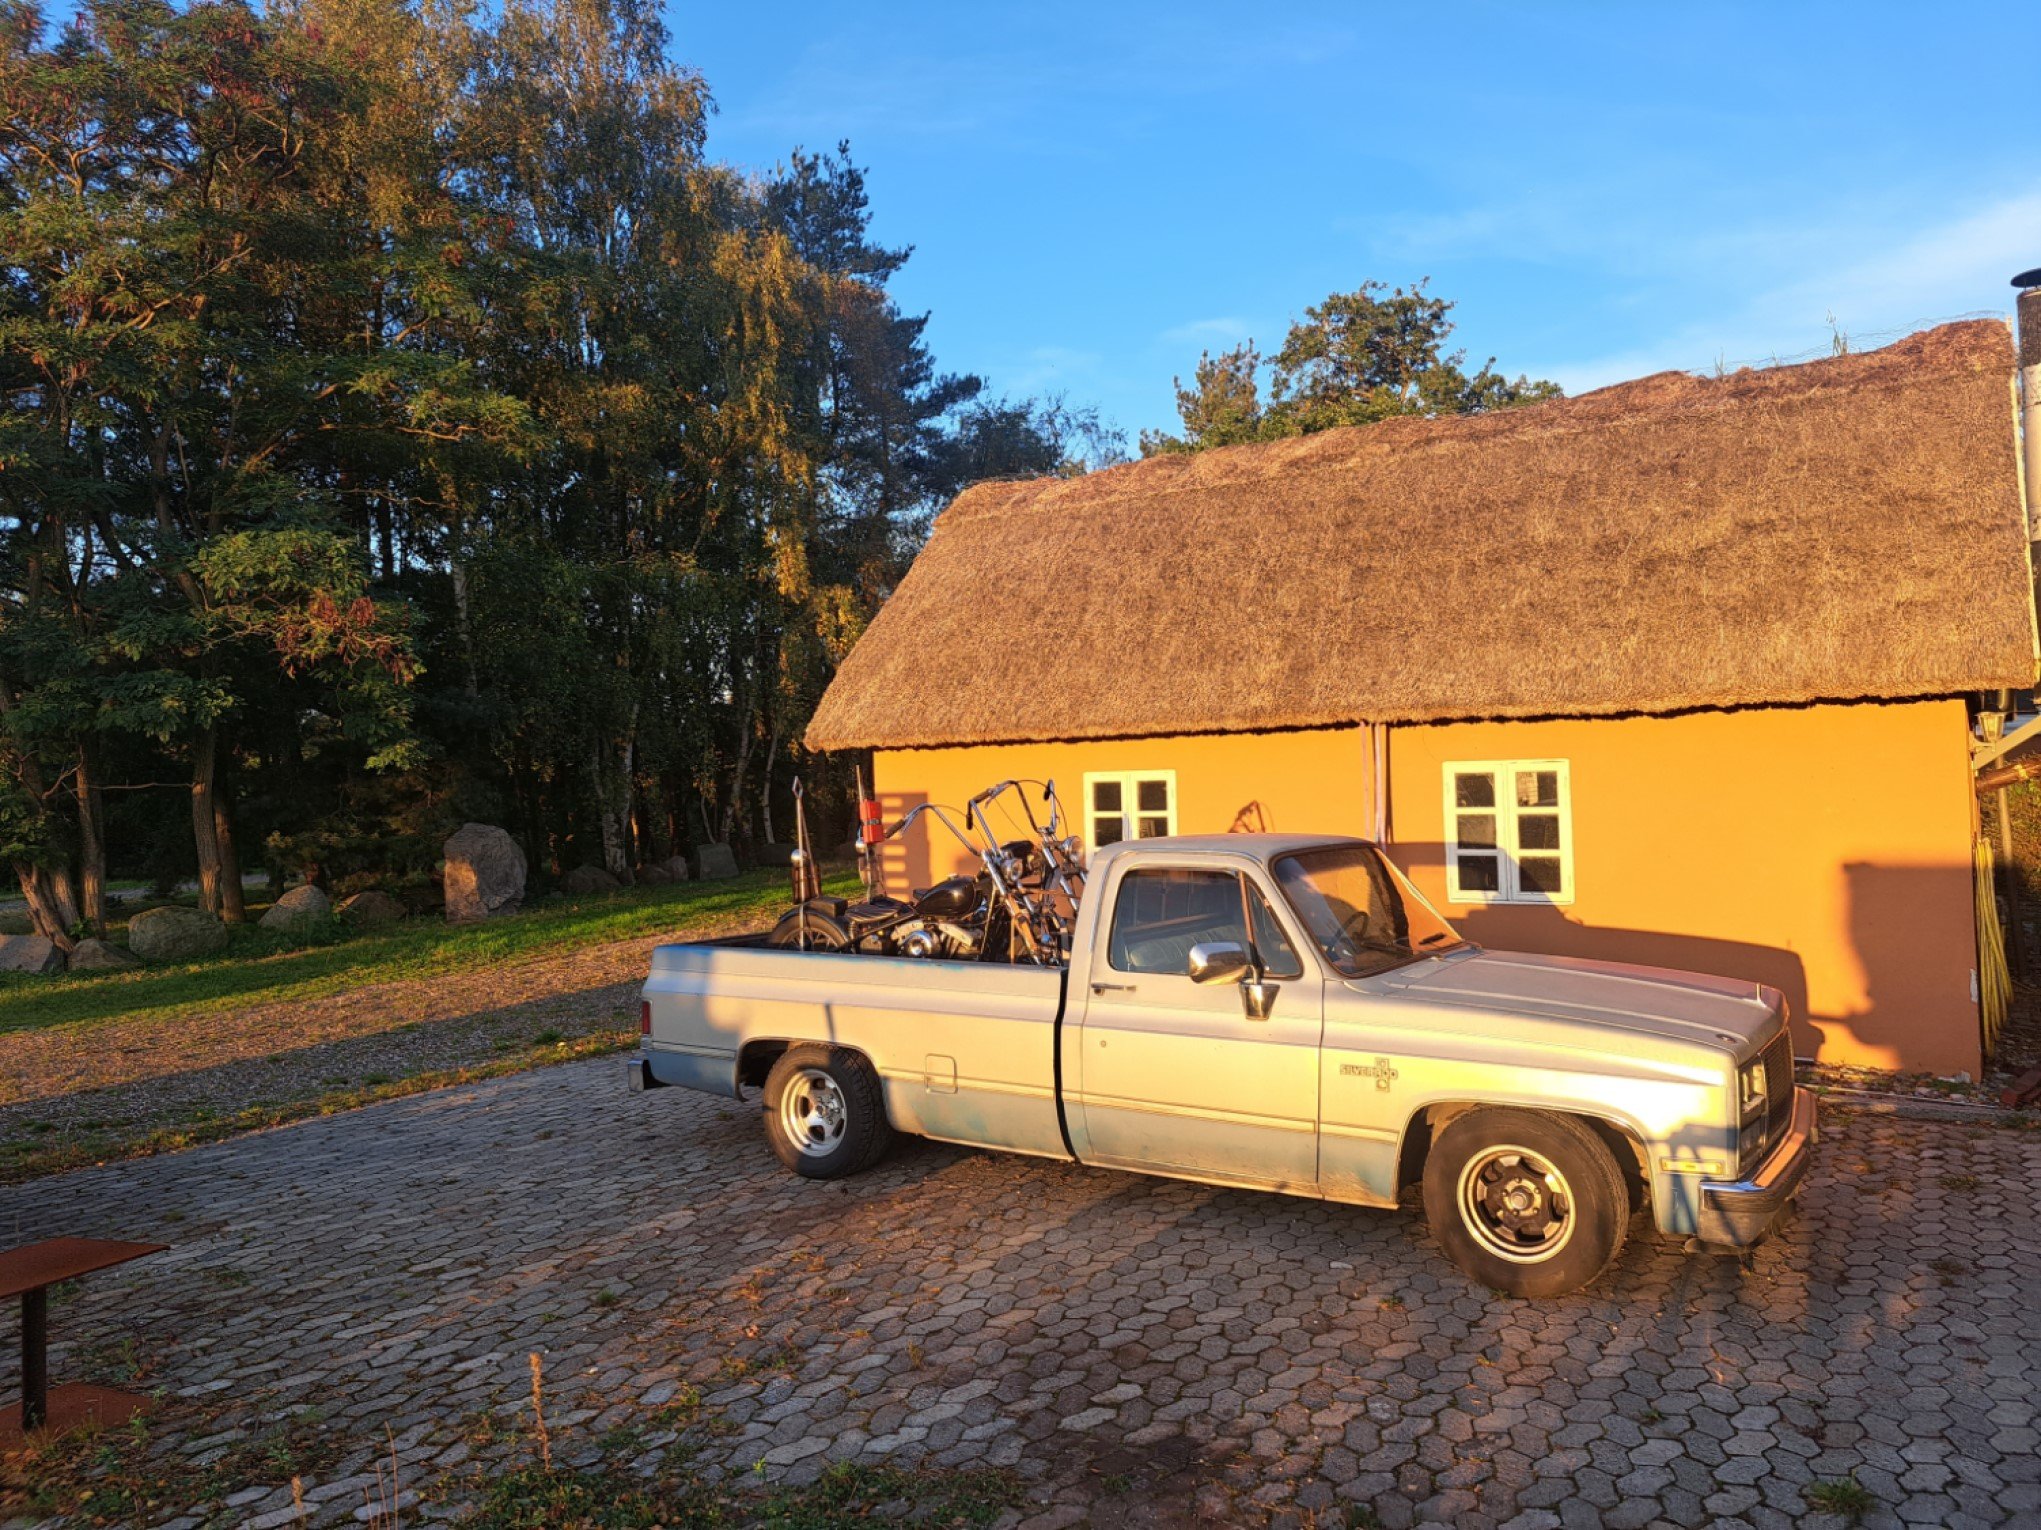
Ol mates had a oil change had a big weekend hauling bikes Next polish mags maby some fresh radiator fluid and fuel filters. Shes been solid as
4 points
-
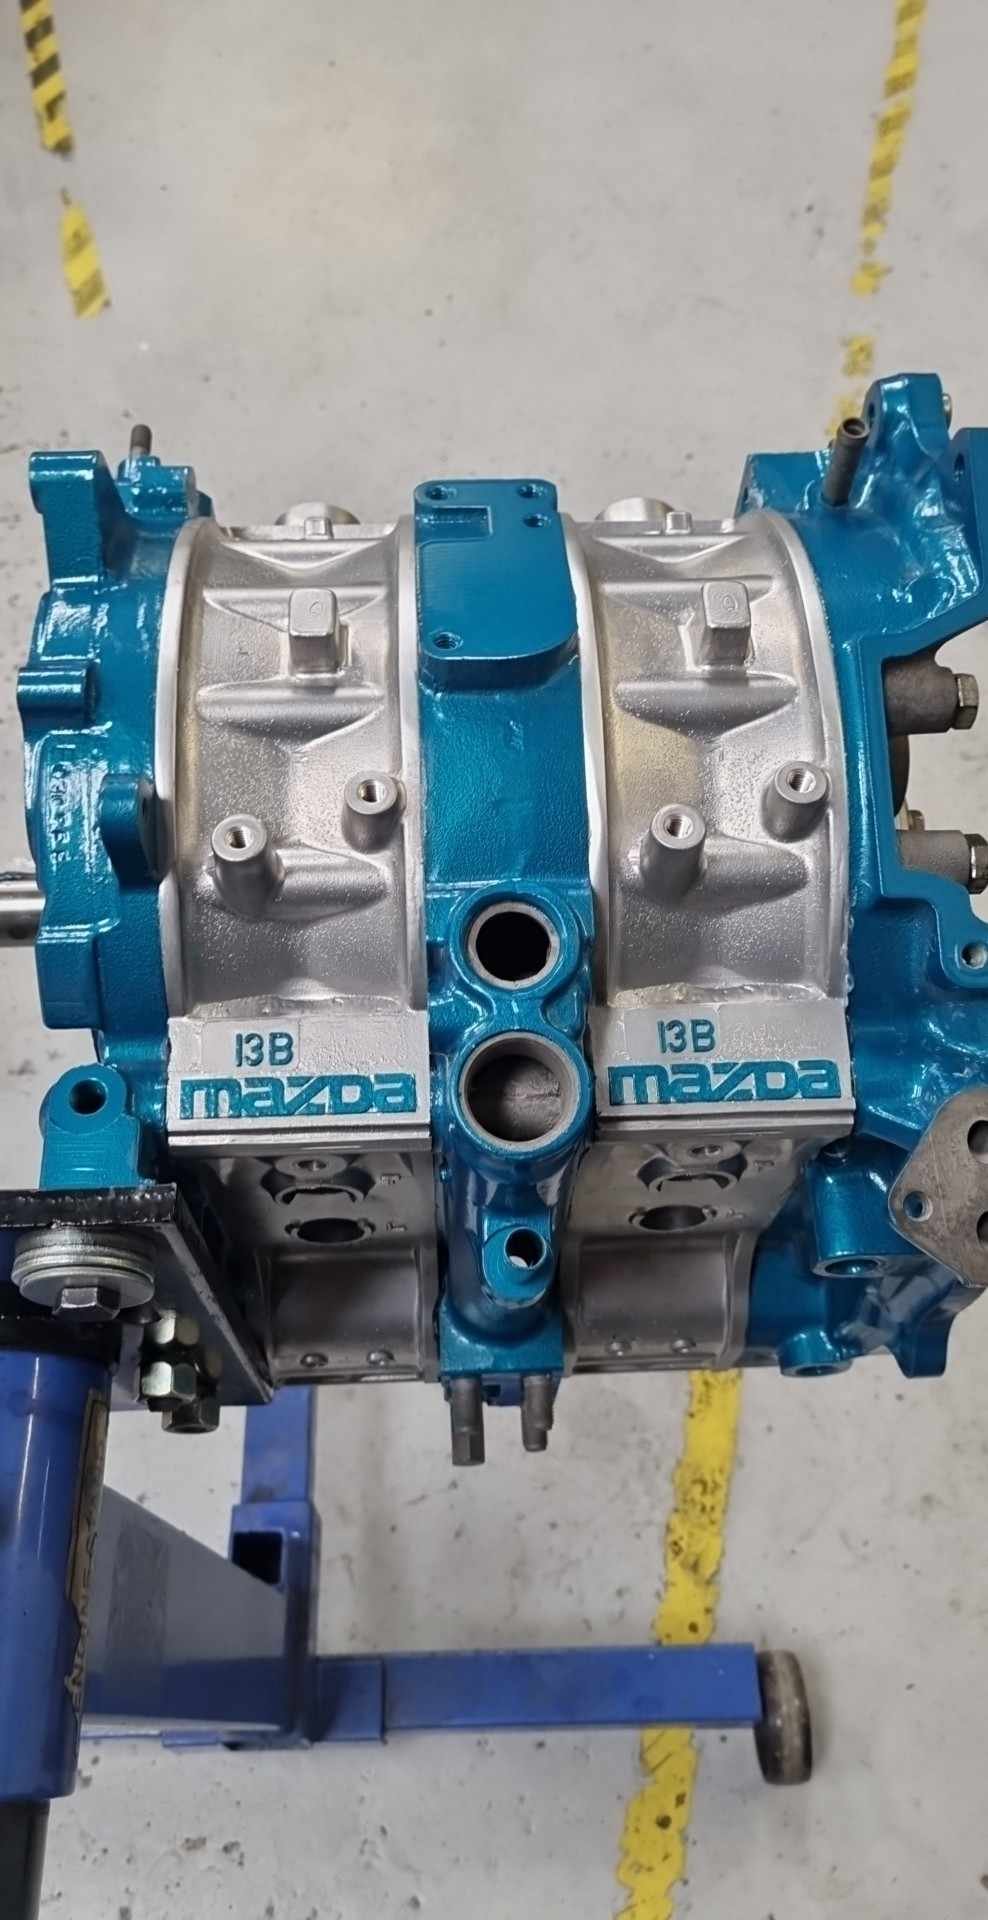
The size of the hotside assembly off the engine is quite considerable and looks mental when you pick it up and turn it around to check things out. I'm very happy with my driveway cobbling together on this occasion
4 points
-
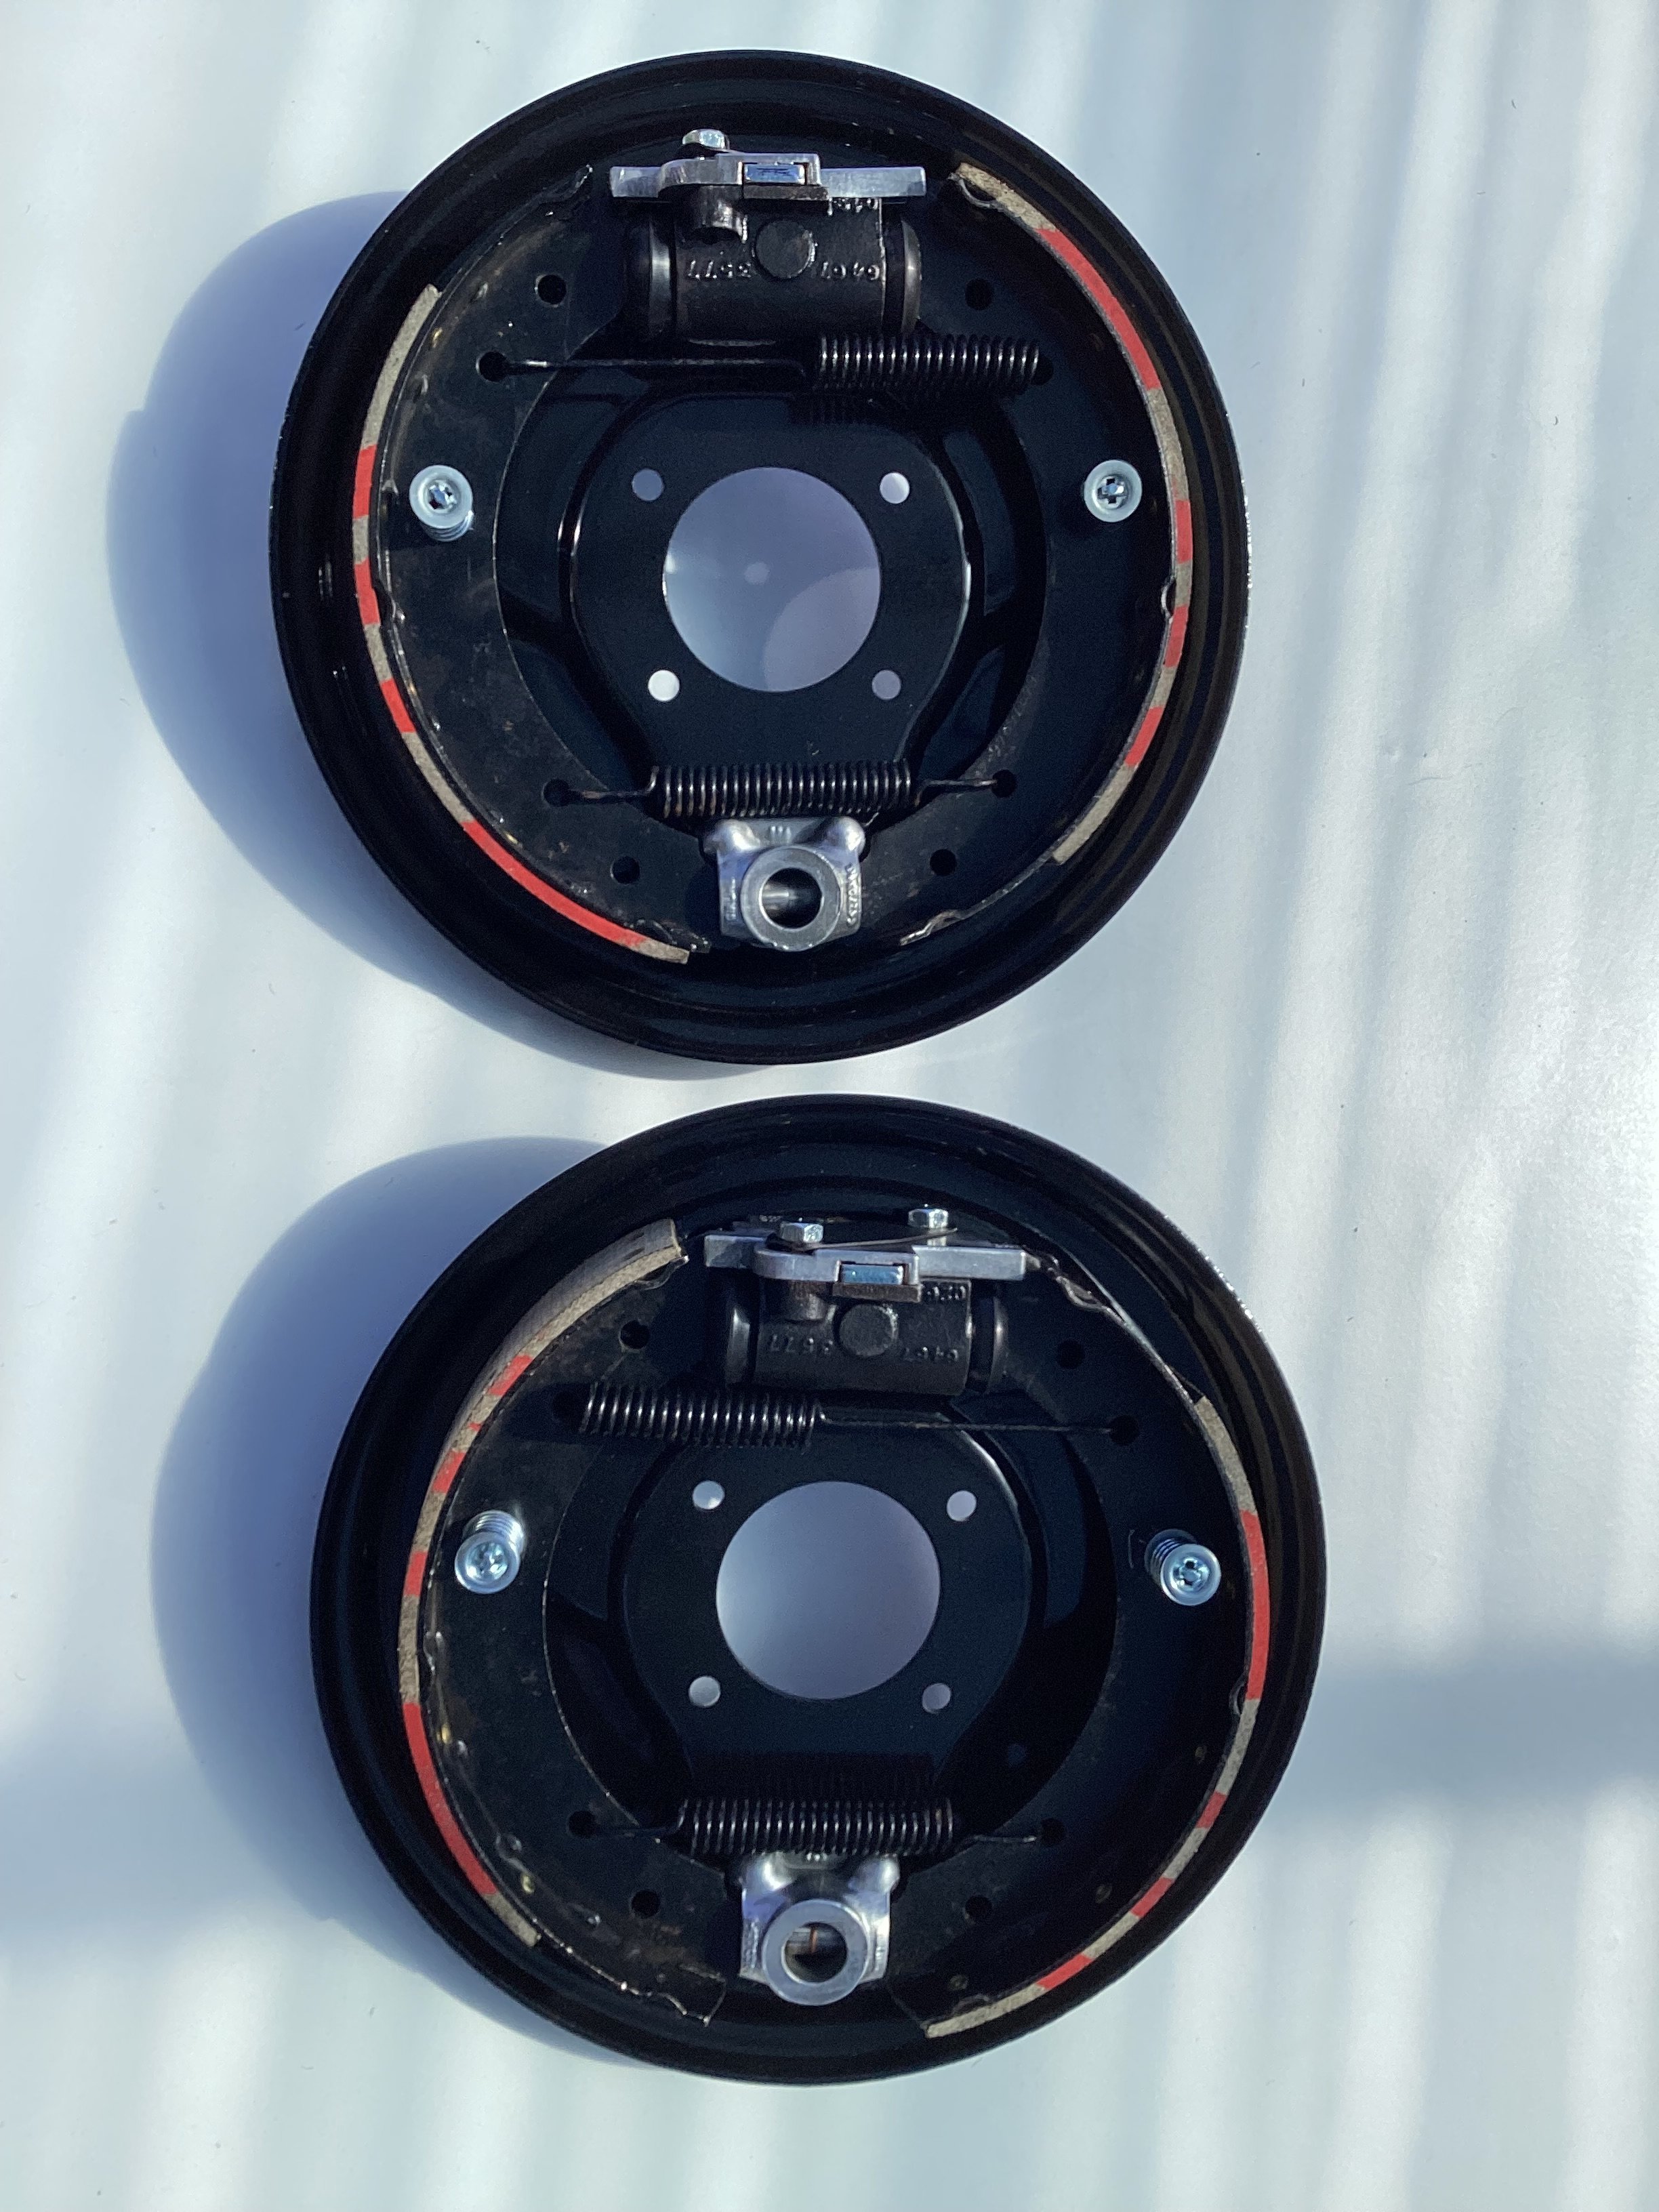
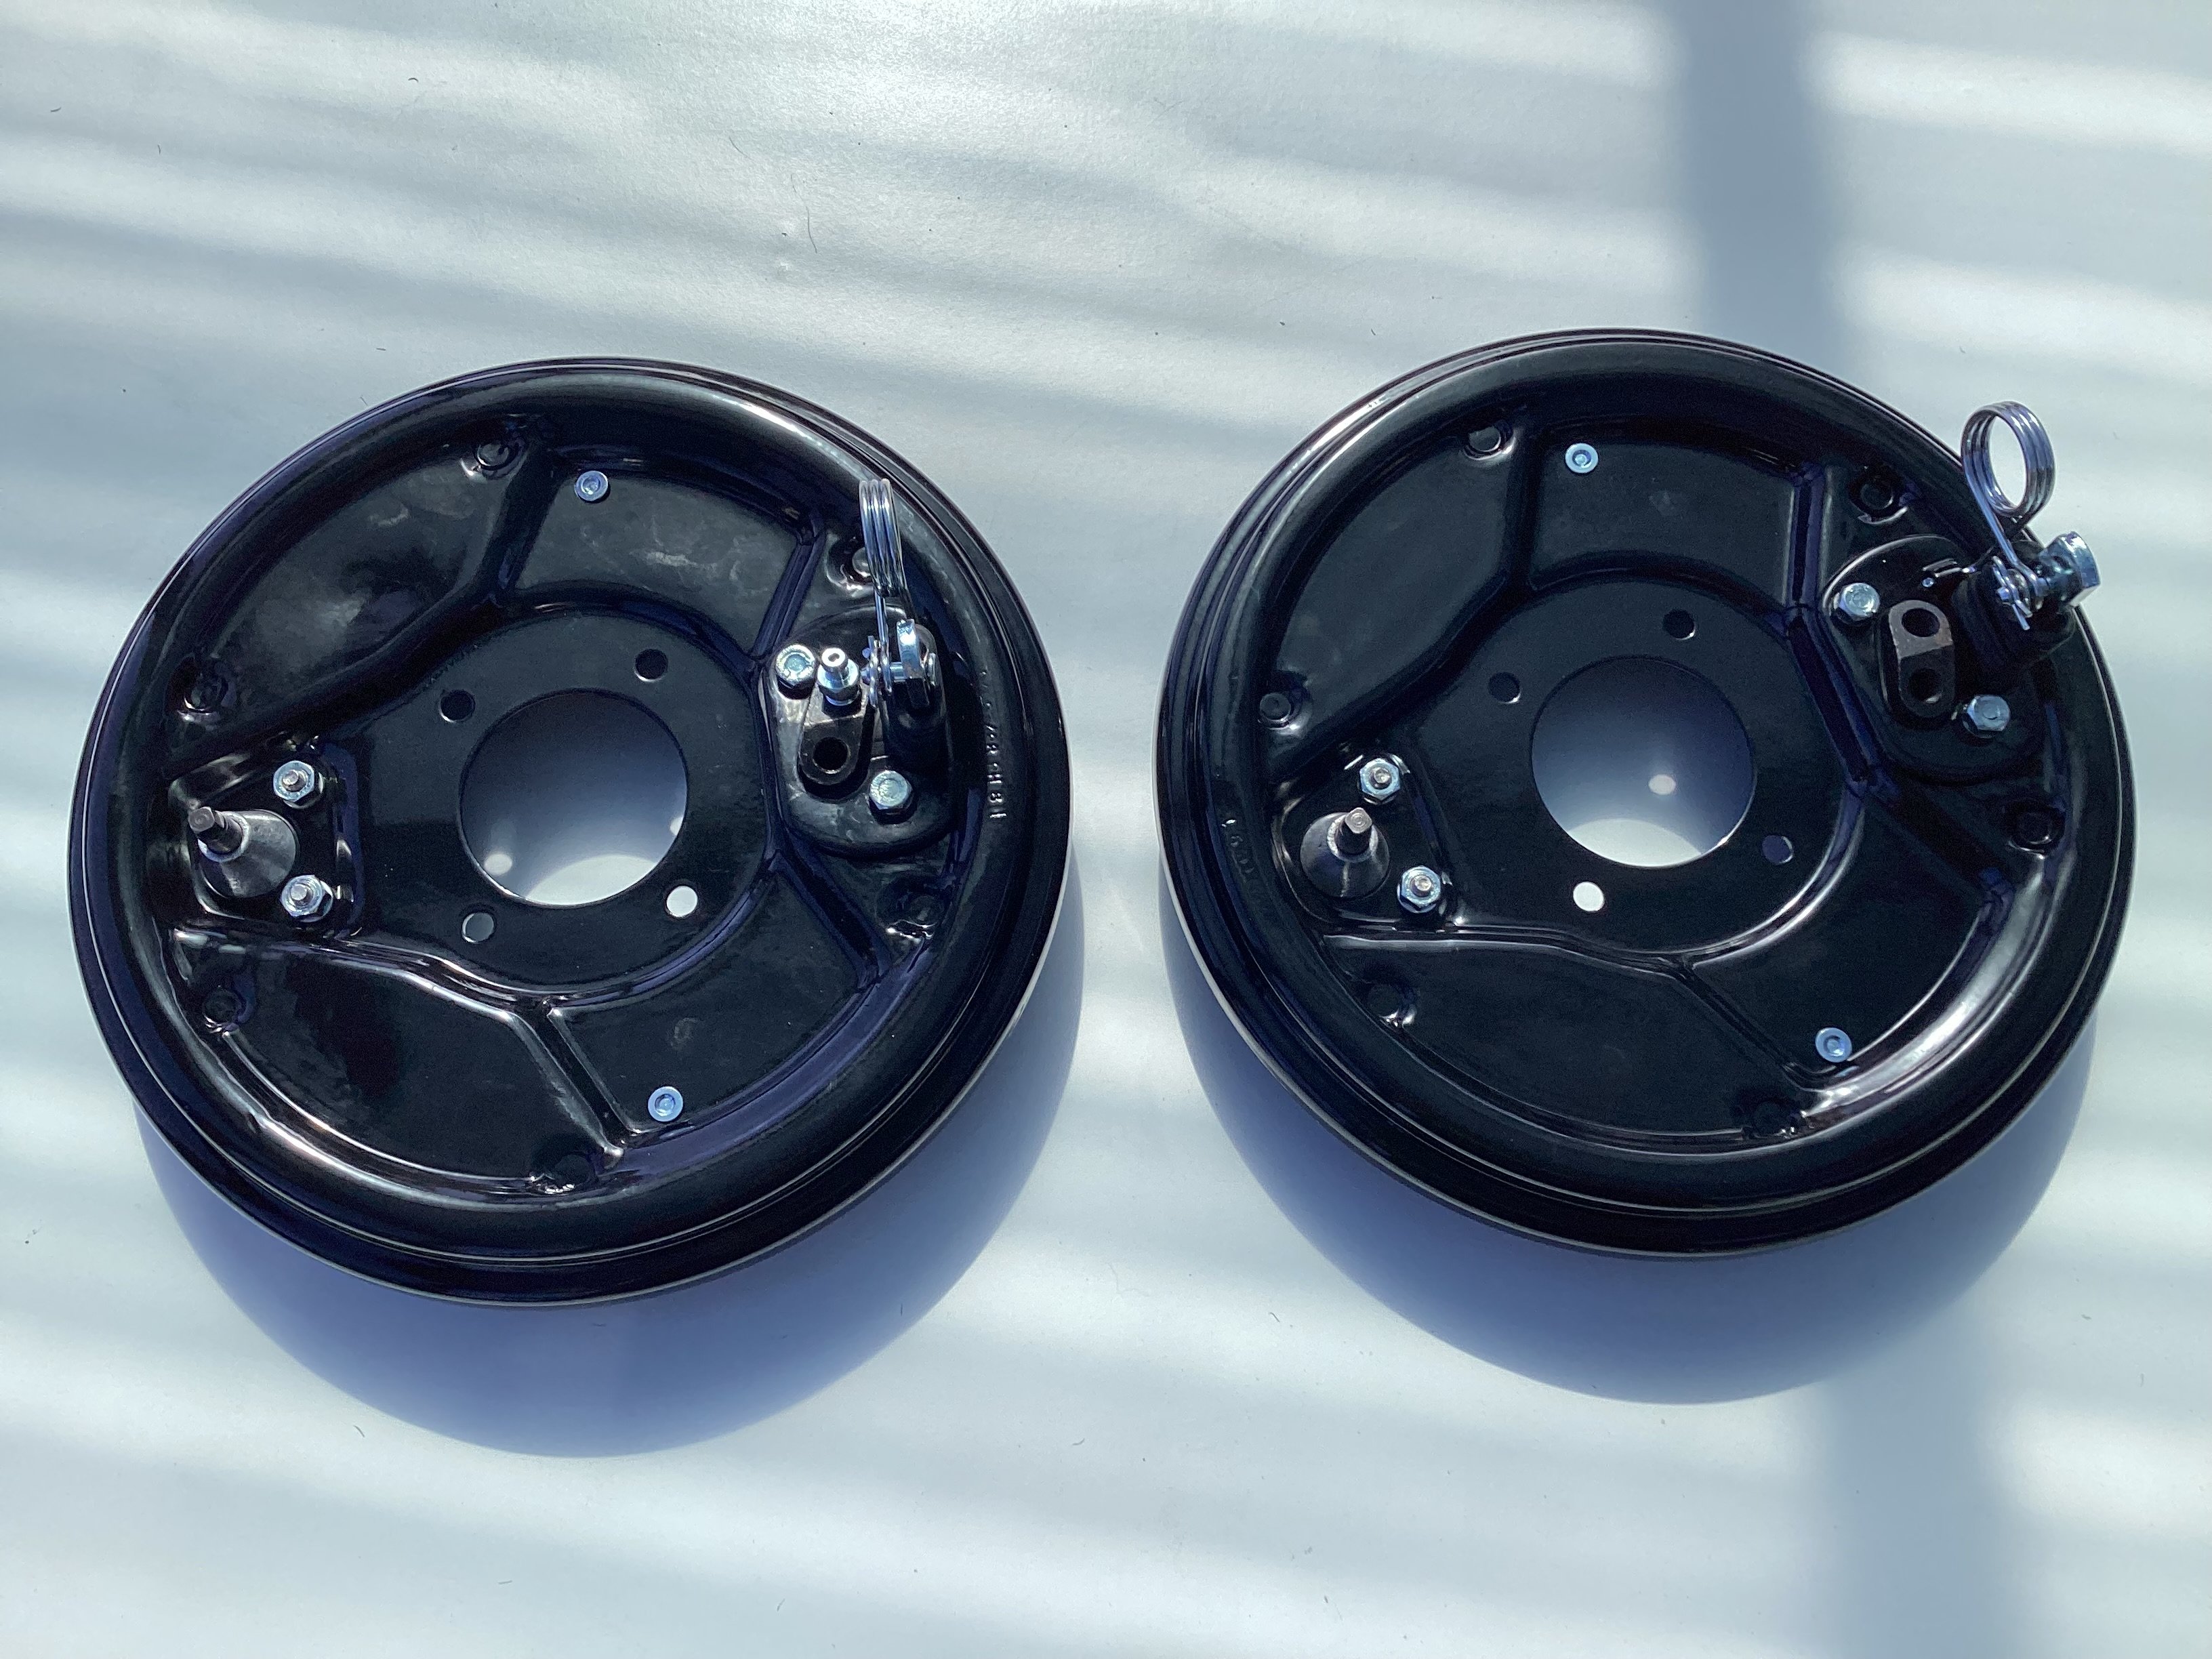
Back brakes done
4 points
-
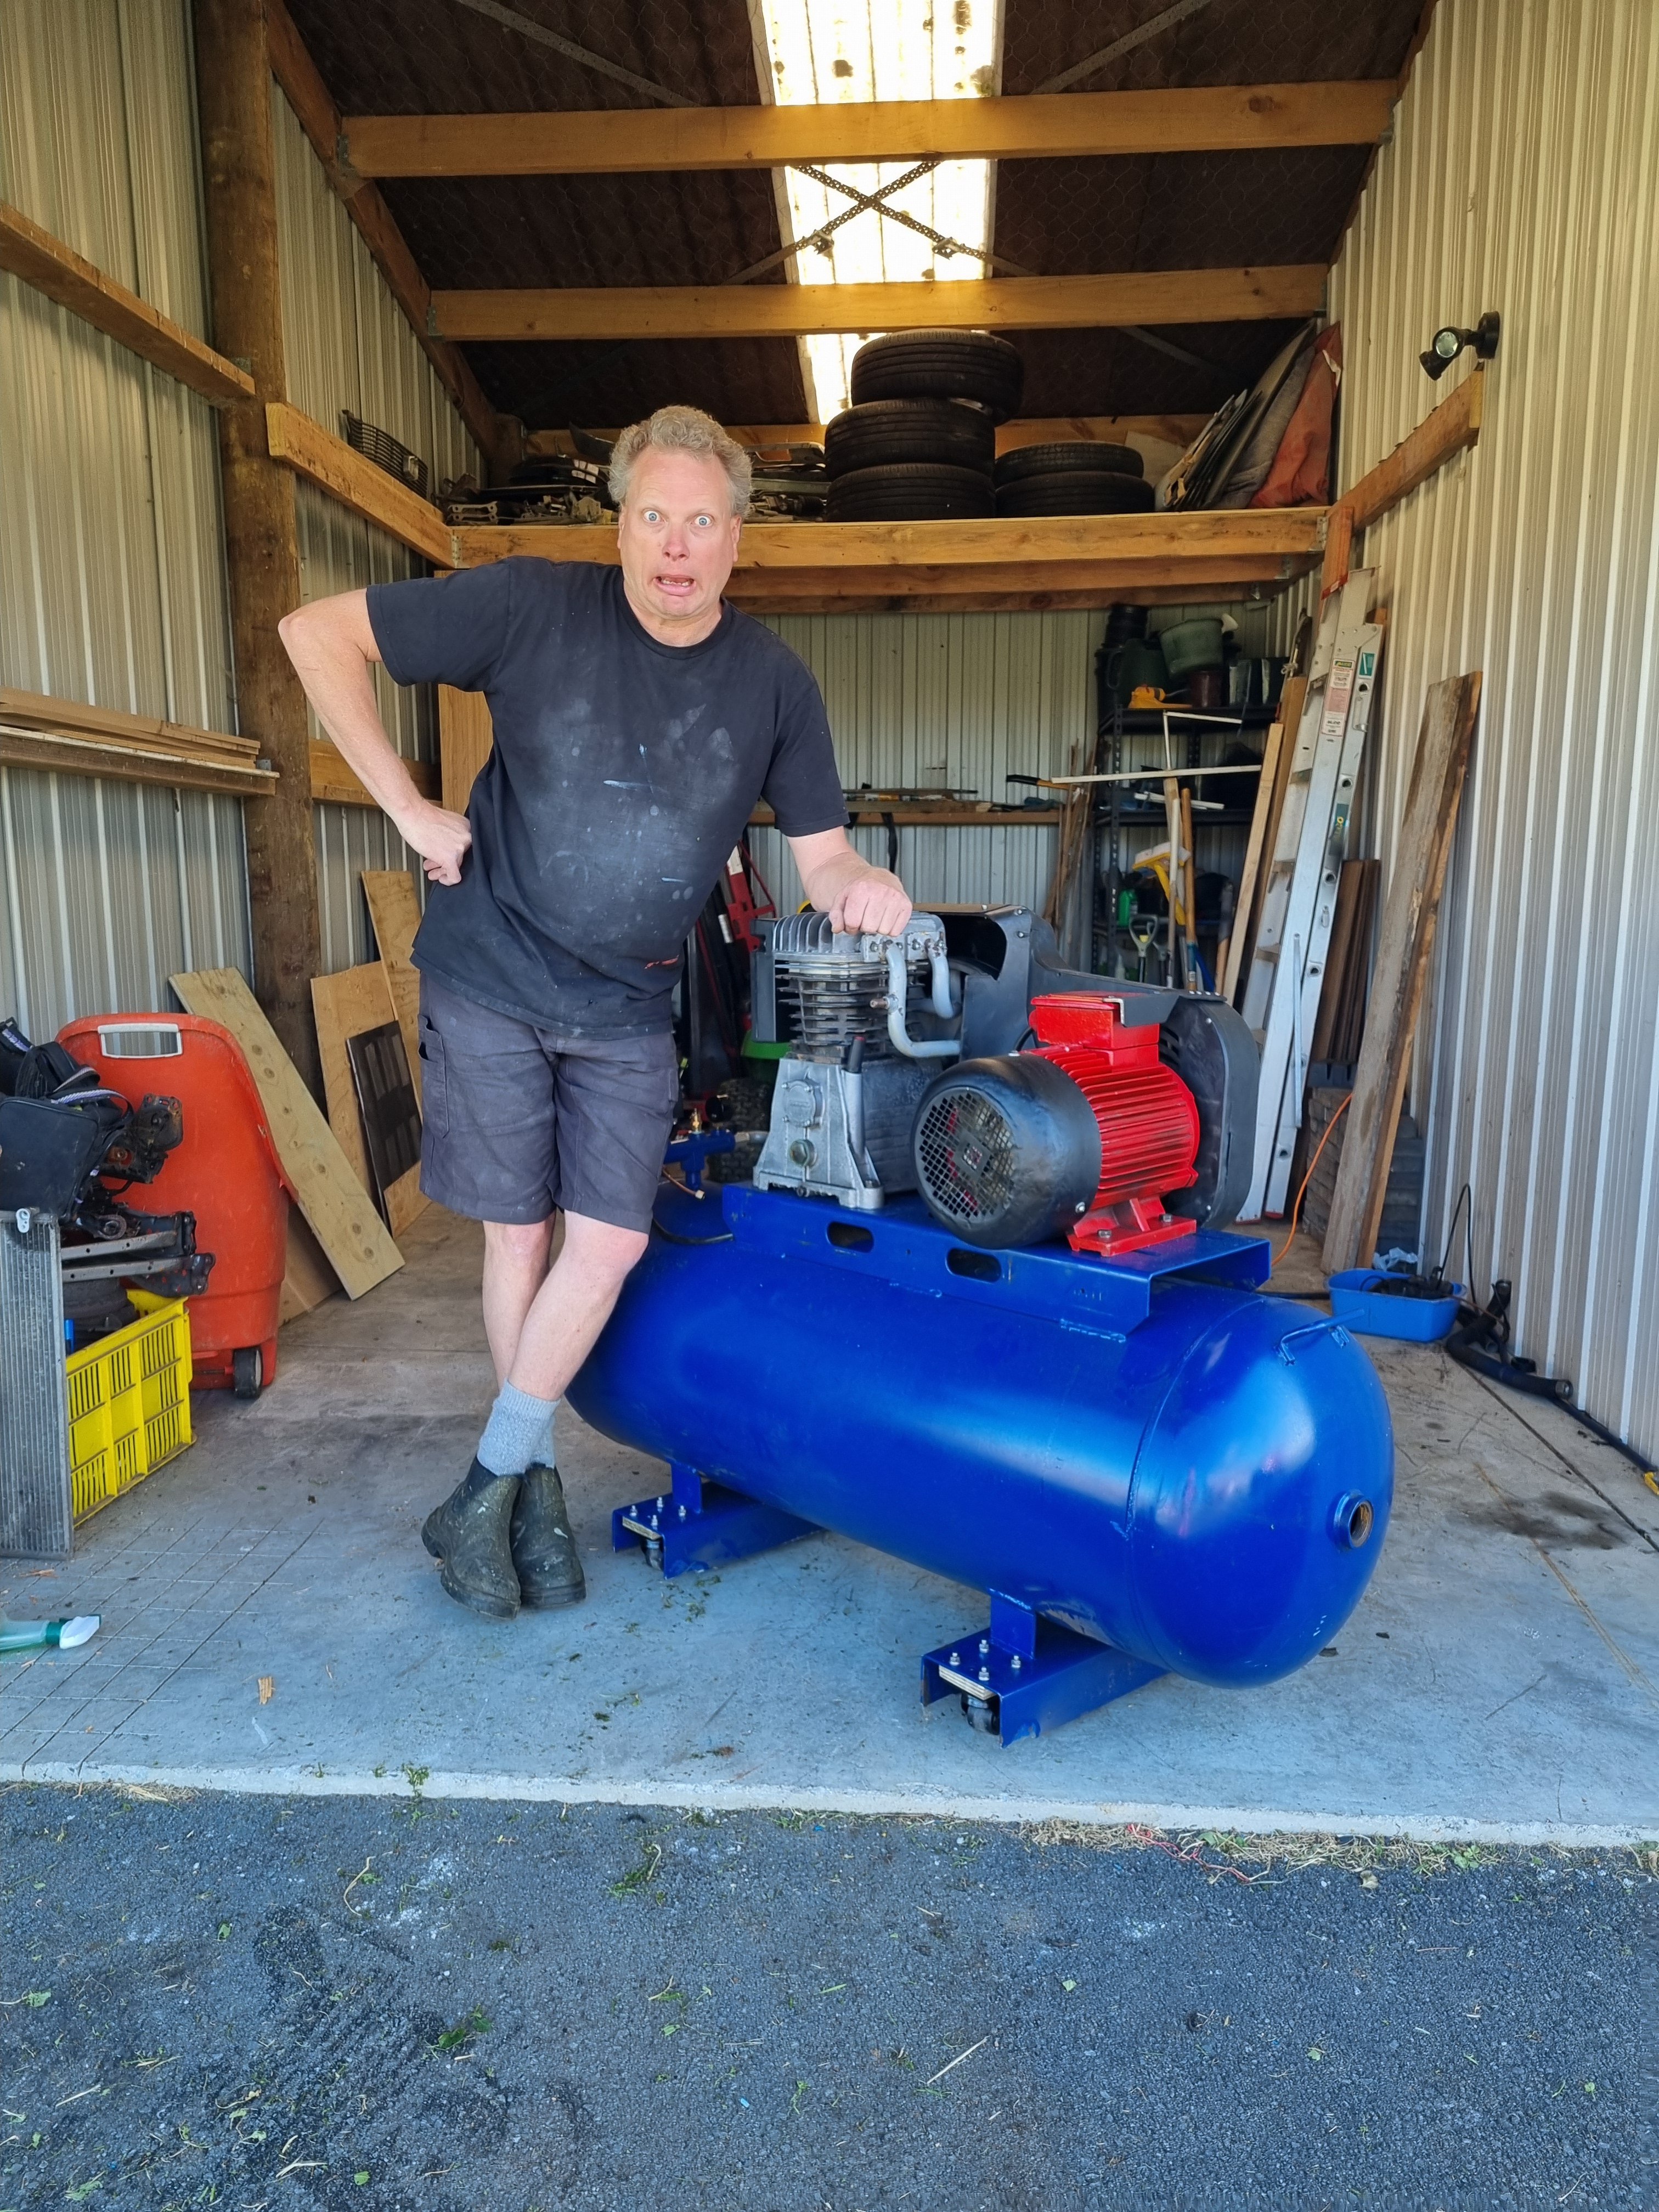
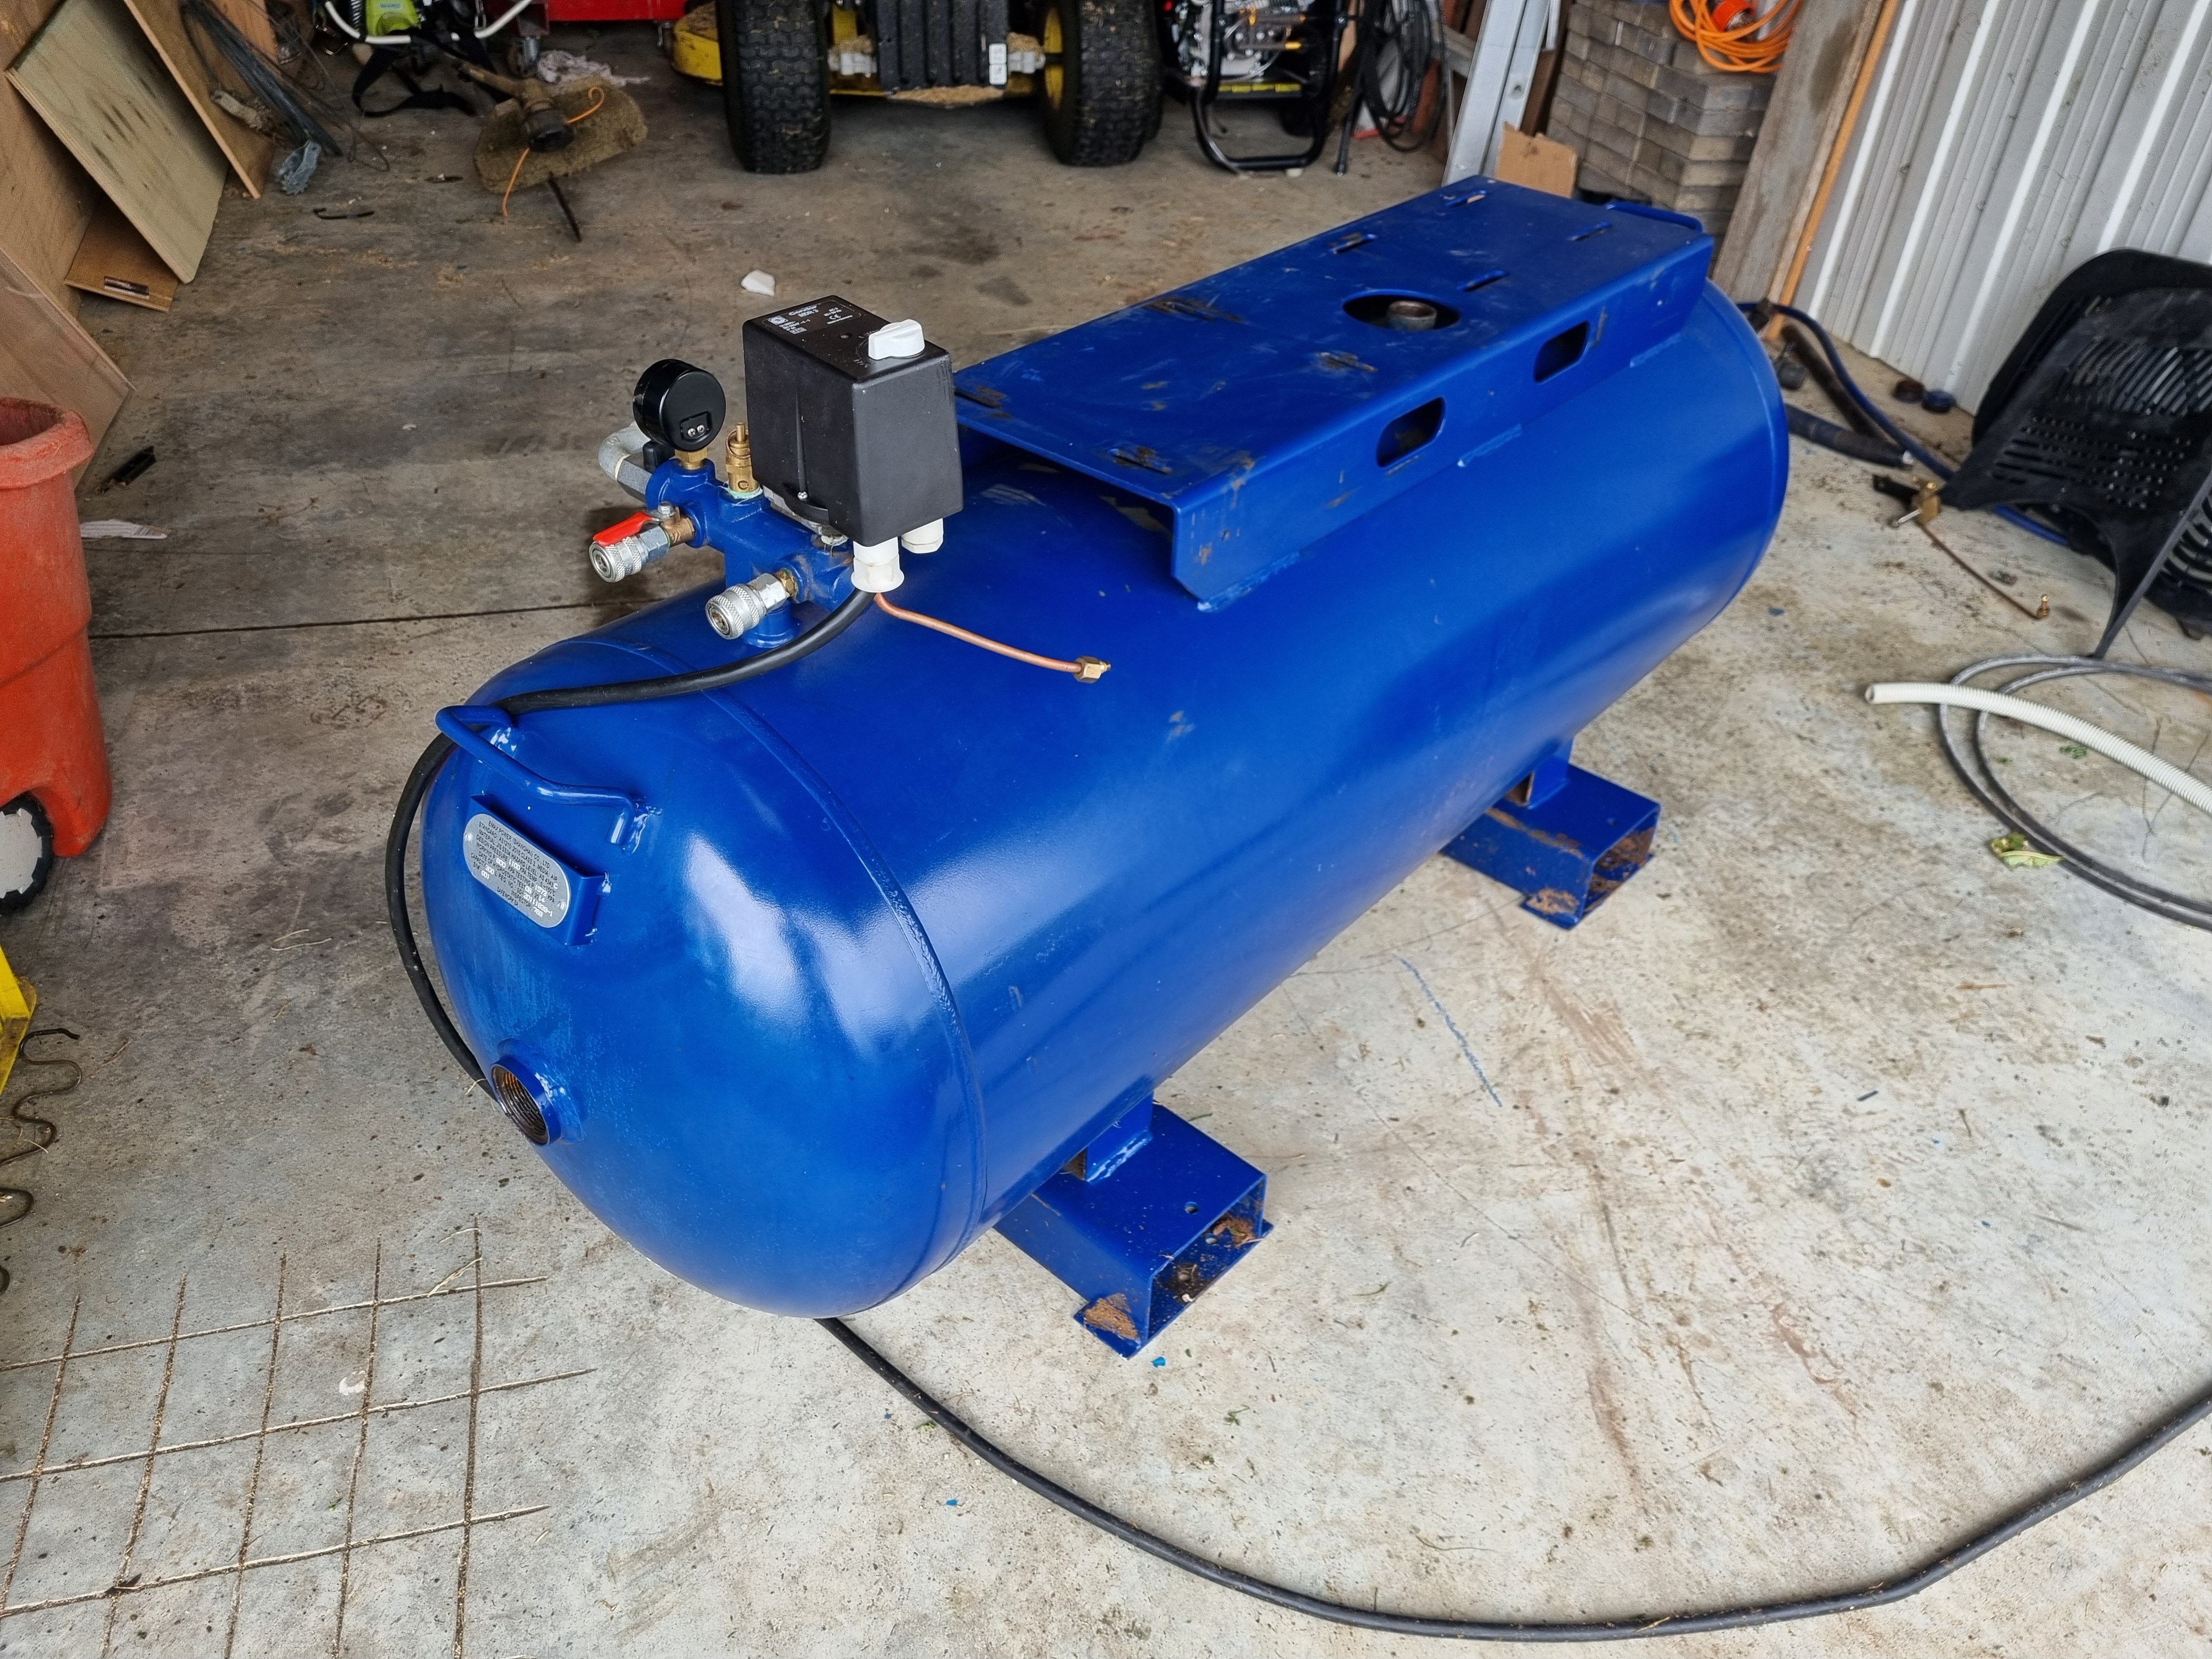
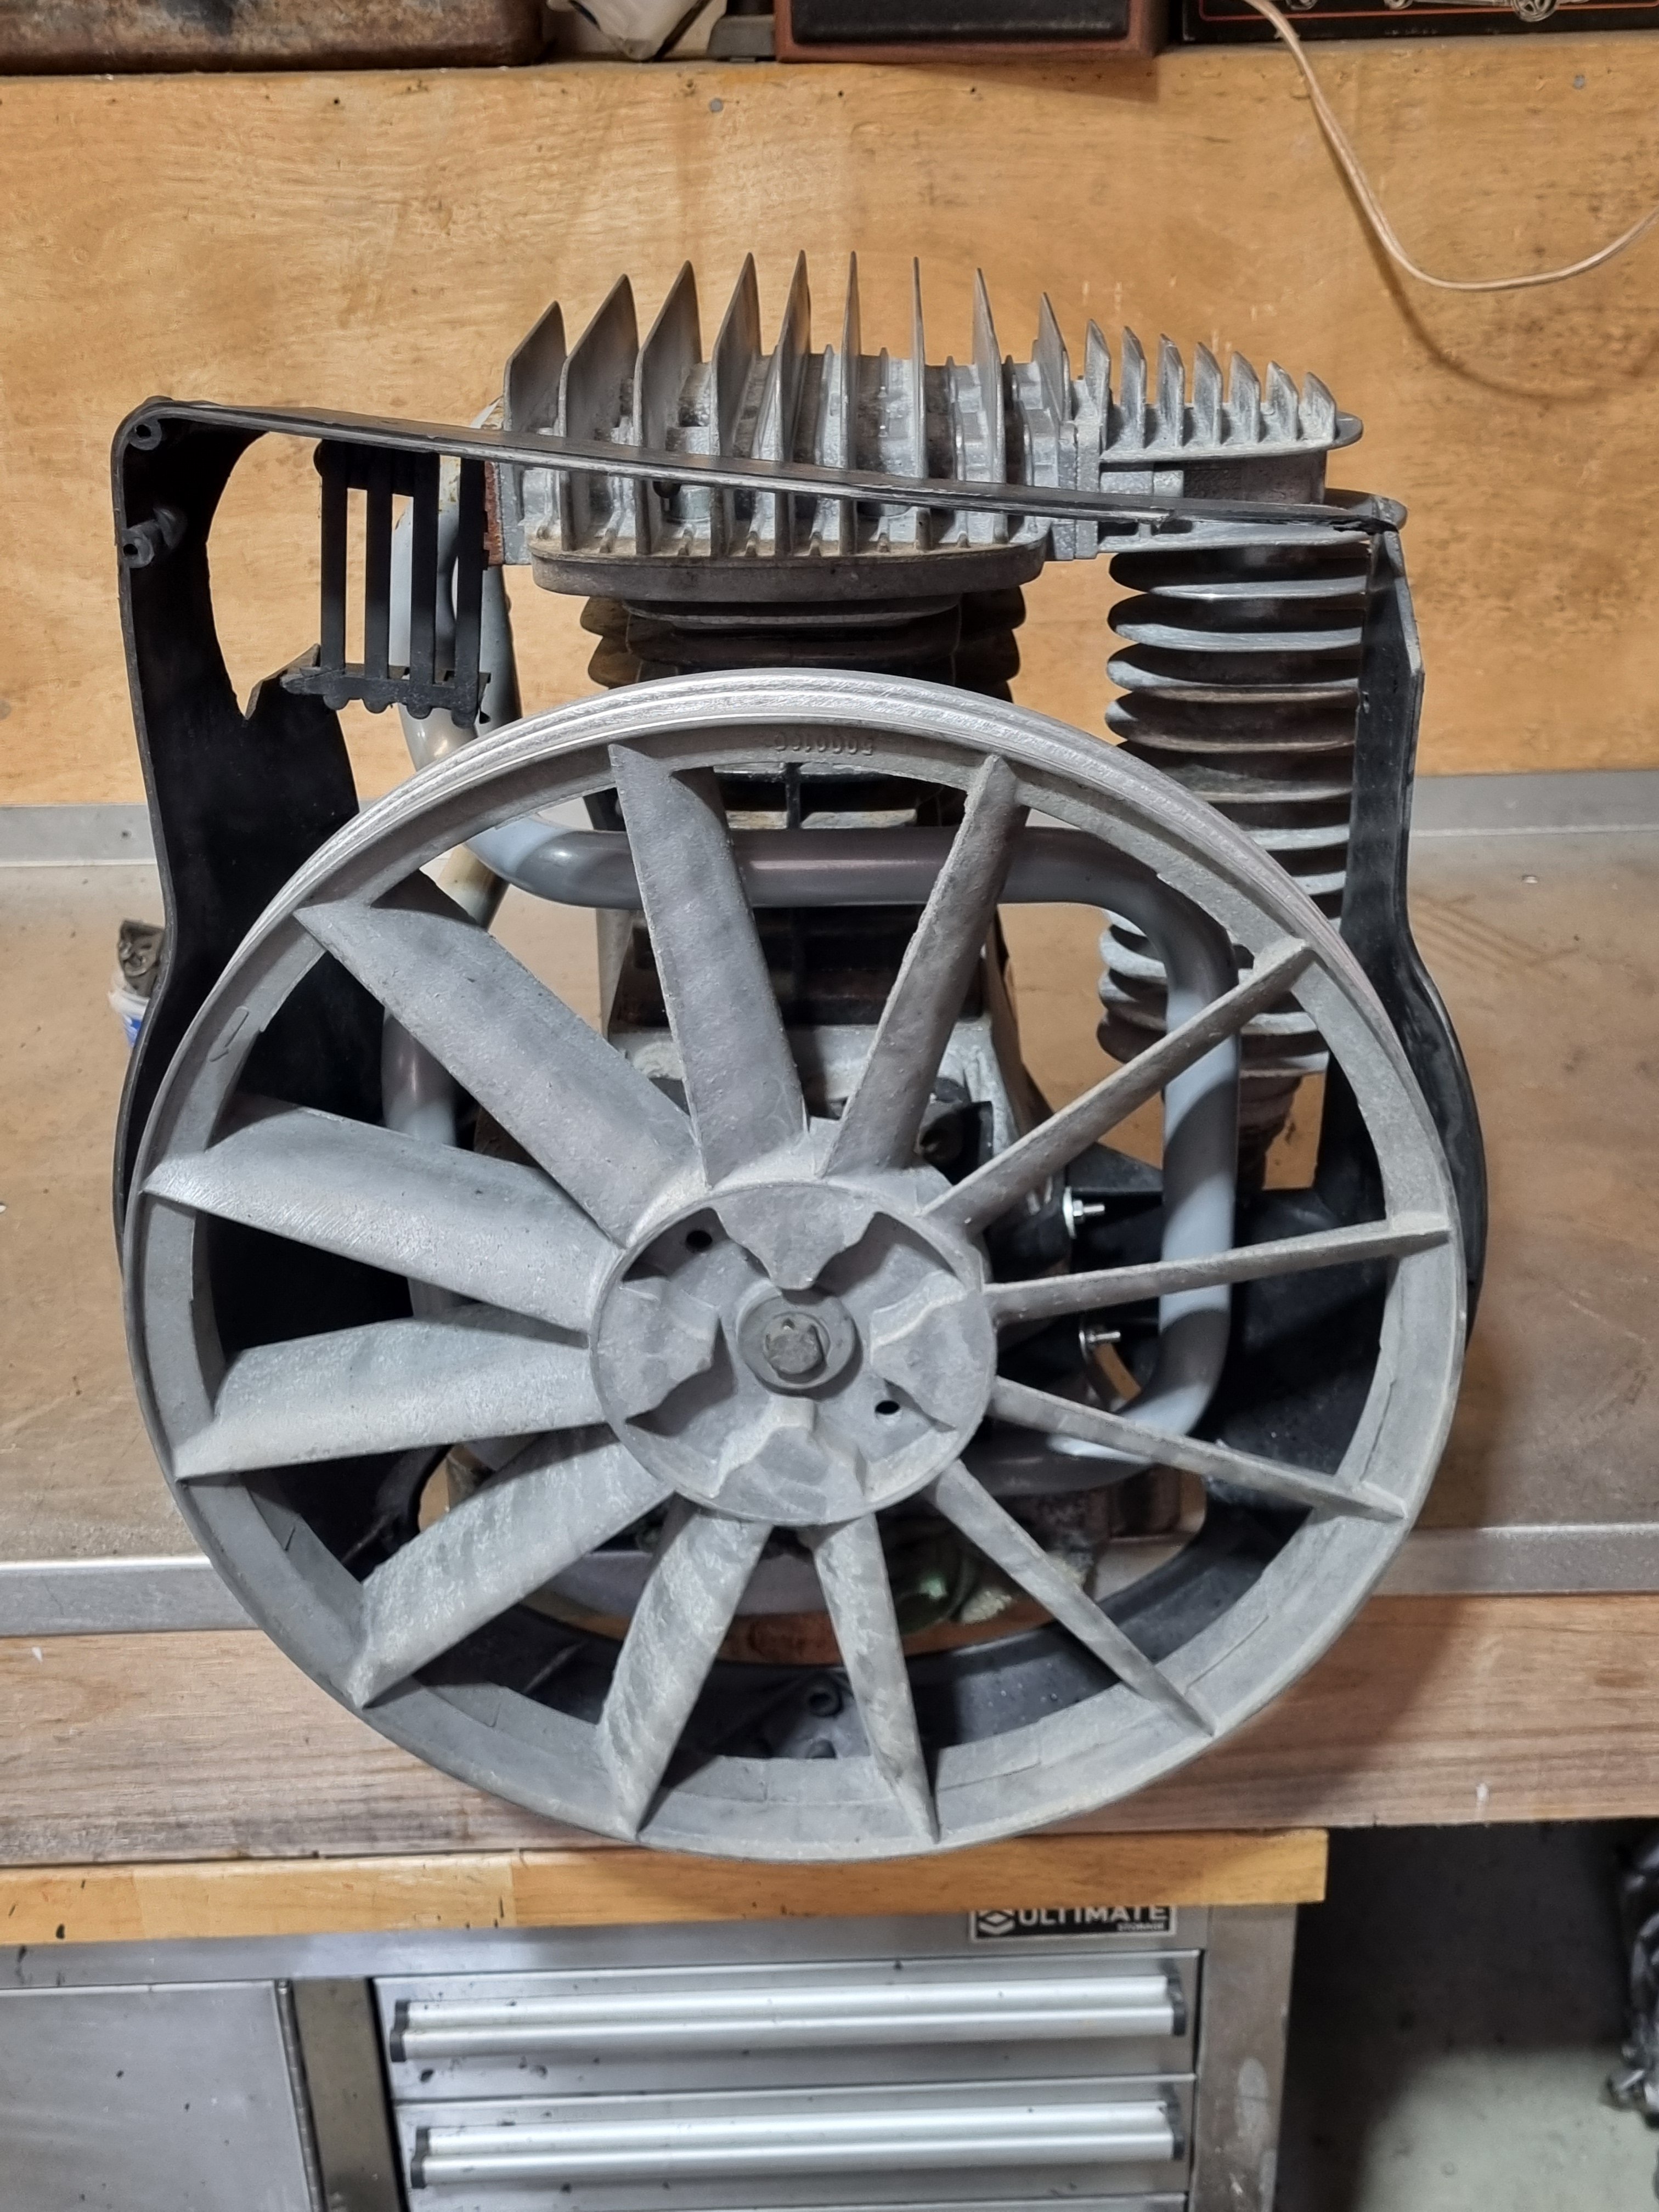
@cletus came over yesterday for a visit and remarked how the compressor looked bigger in real life than on the Internet so I commissioned this portrait with the hope of conveying the size of the compressor accurately.
4 points
-
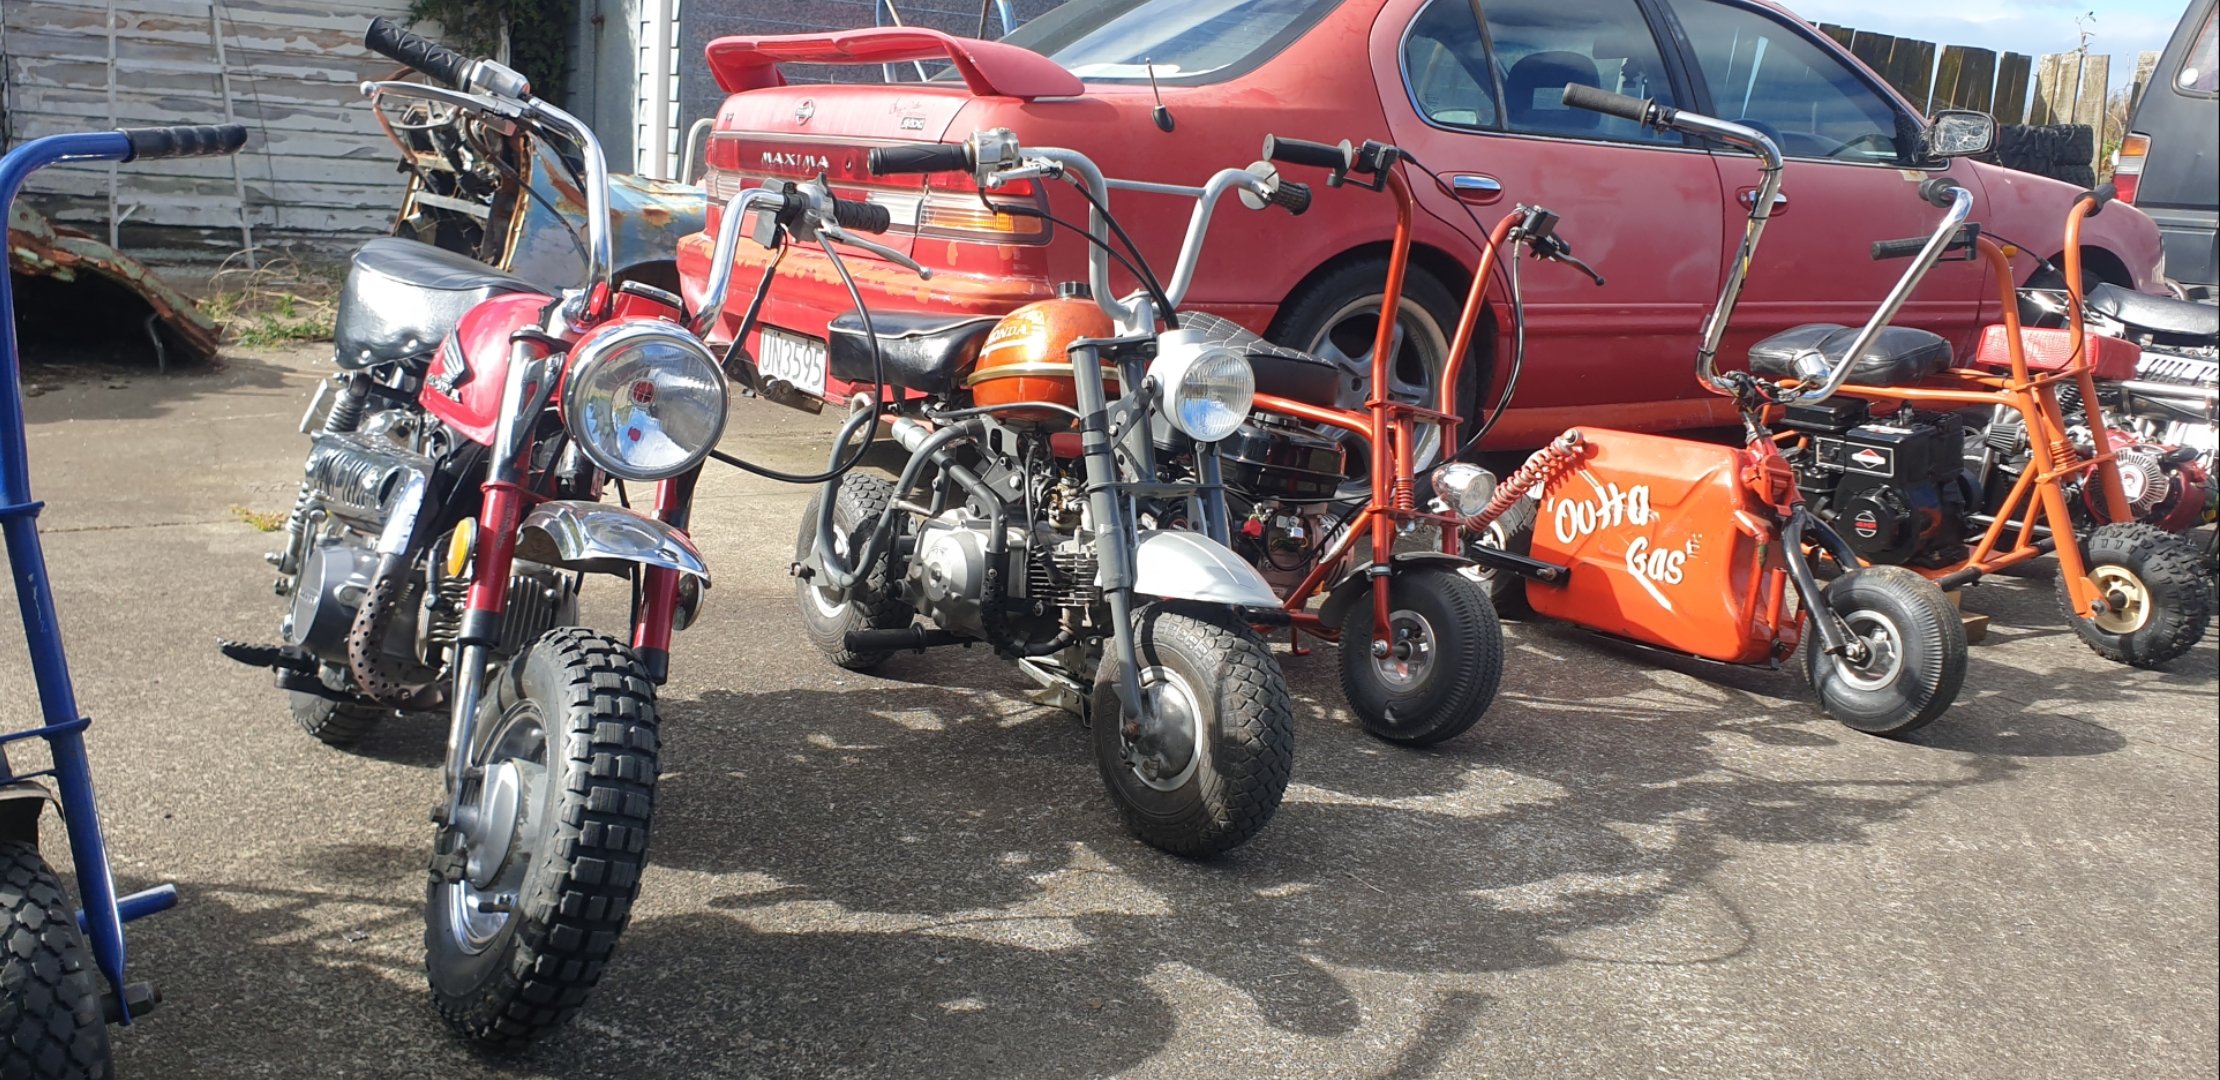
Took my Z50monkey 125 Outta gas jerry can mini bike And ol qa50 to a minibike meet over weekend all went awesome the monkeys were ridn alot over the weekend without issue verry happy.
3 points
-
Largely due to being lazy haven't actually done anything further with this other than occasionally use it. Be nice it it was manual but quite good for a average shitbox3 points
-
Systems check.....Dad you forgot to tighten up all the fuel fittings so now the garage smells of fuel. Managed to get the front straightened out a little bit, requires some metal hot glue gun action
3 points
-
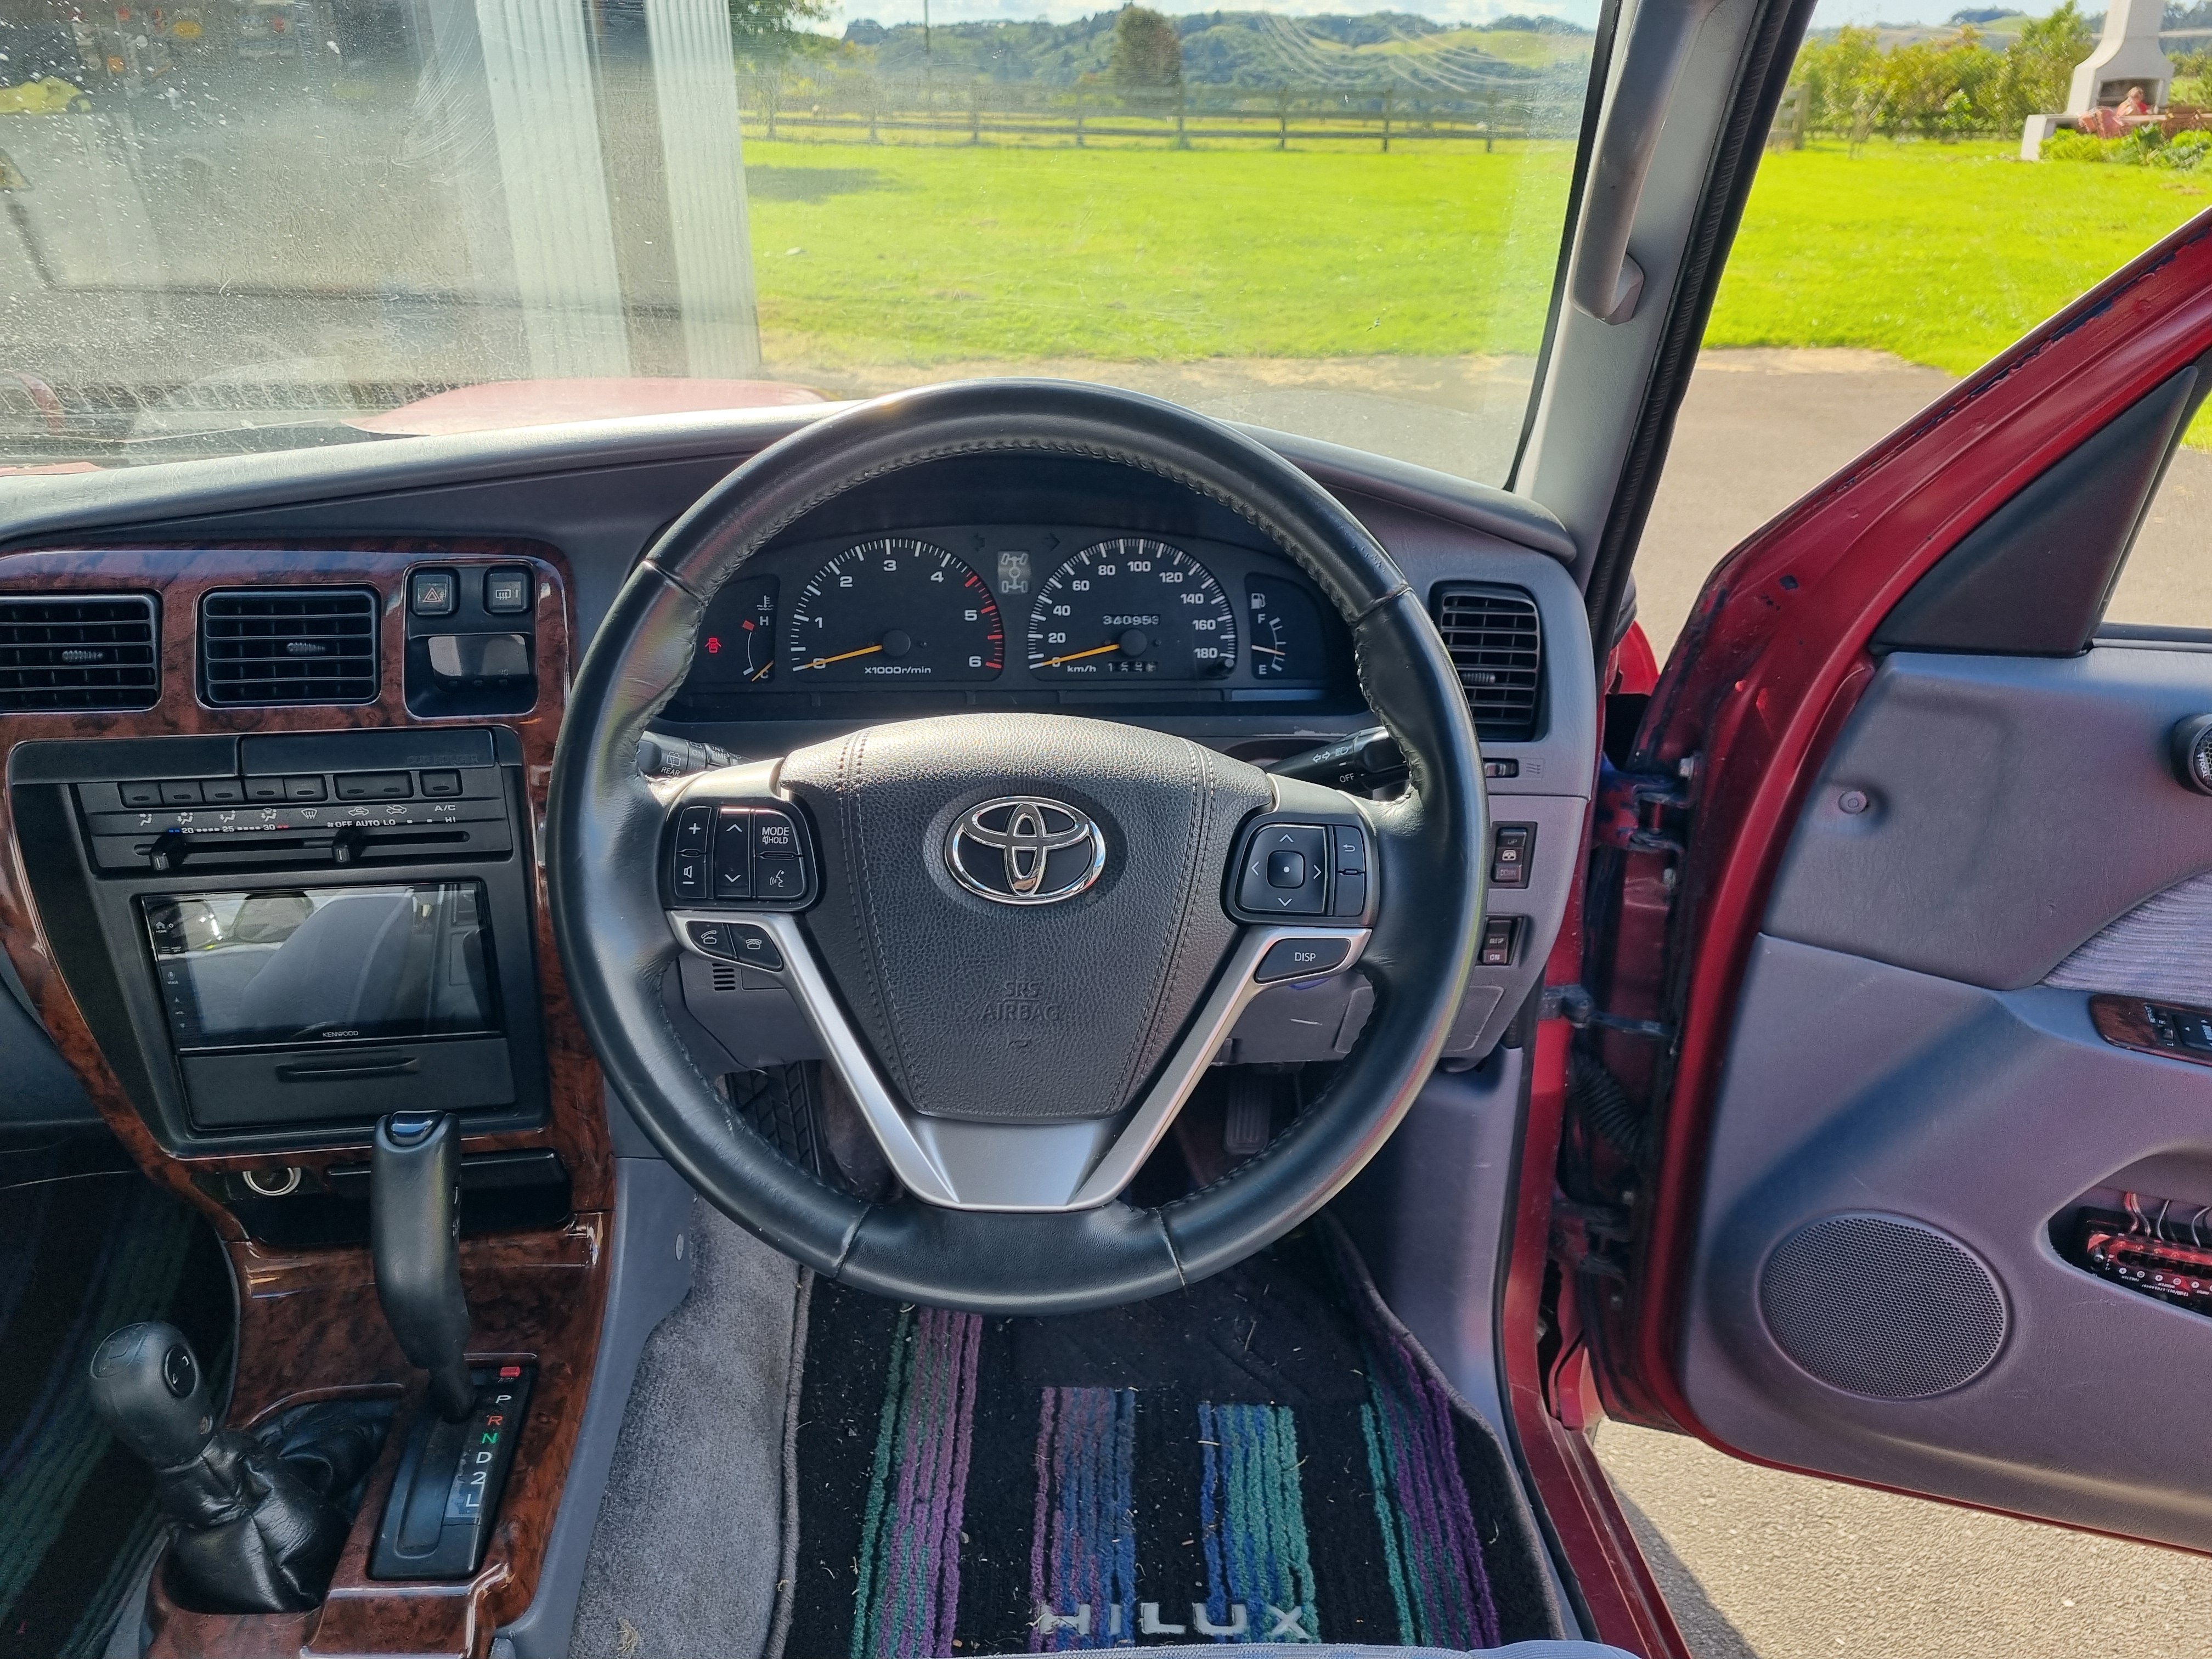
Nick the sparky gave me a hand and we got the right plugs for the air bag and figured out the steering wheel controls for the stereo. I've got to get the right connector to connect the radio to the steering wheel output but that shouldn't be too much of a drama. Once that's done I can program the radio and heypresto! Steering wheel controls that work.
3 points
-
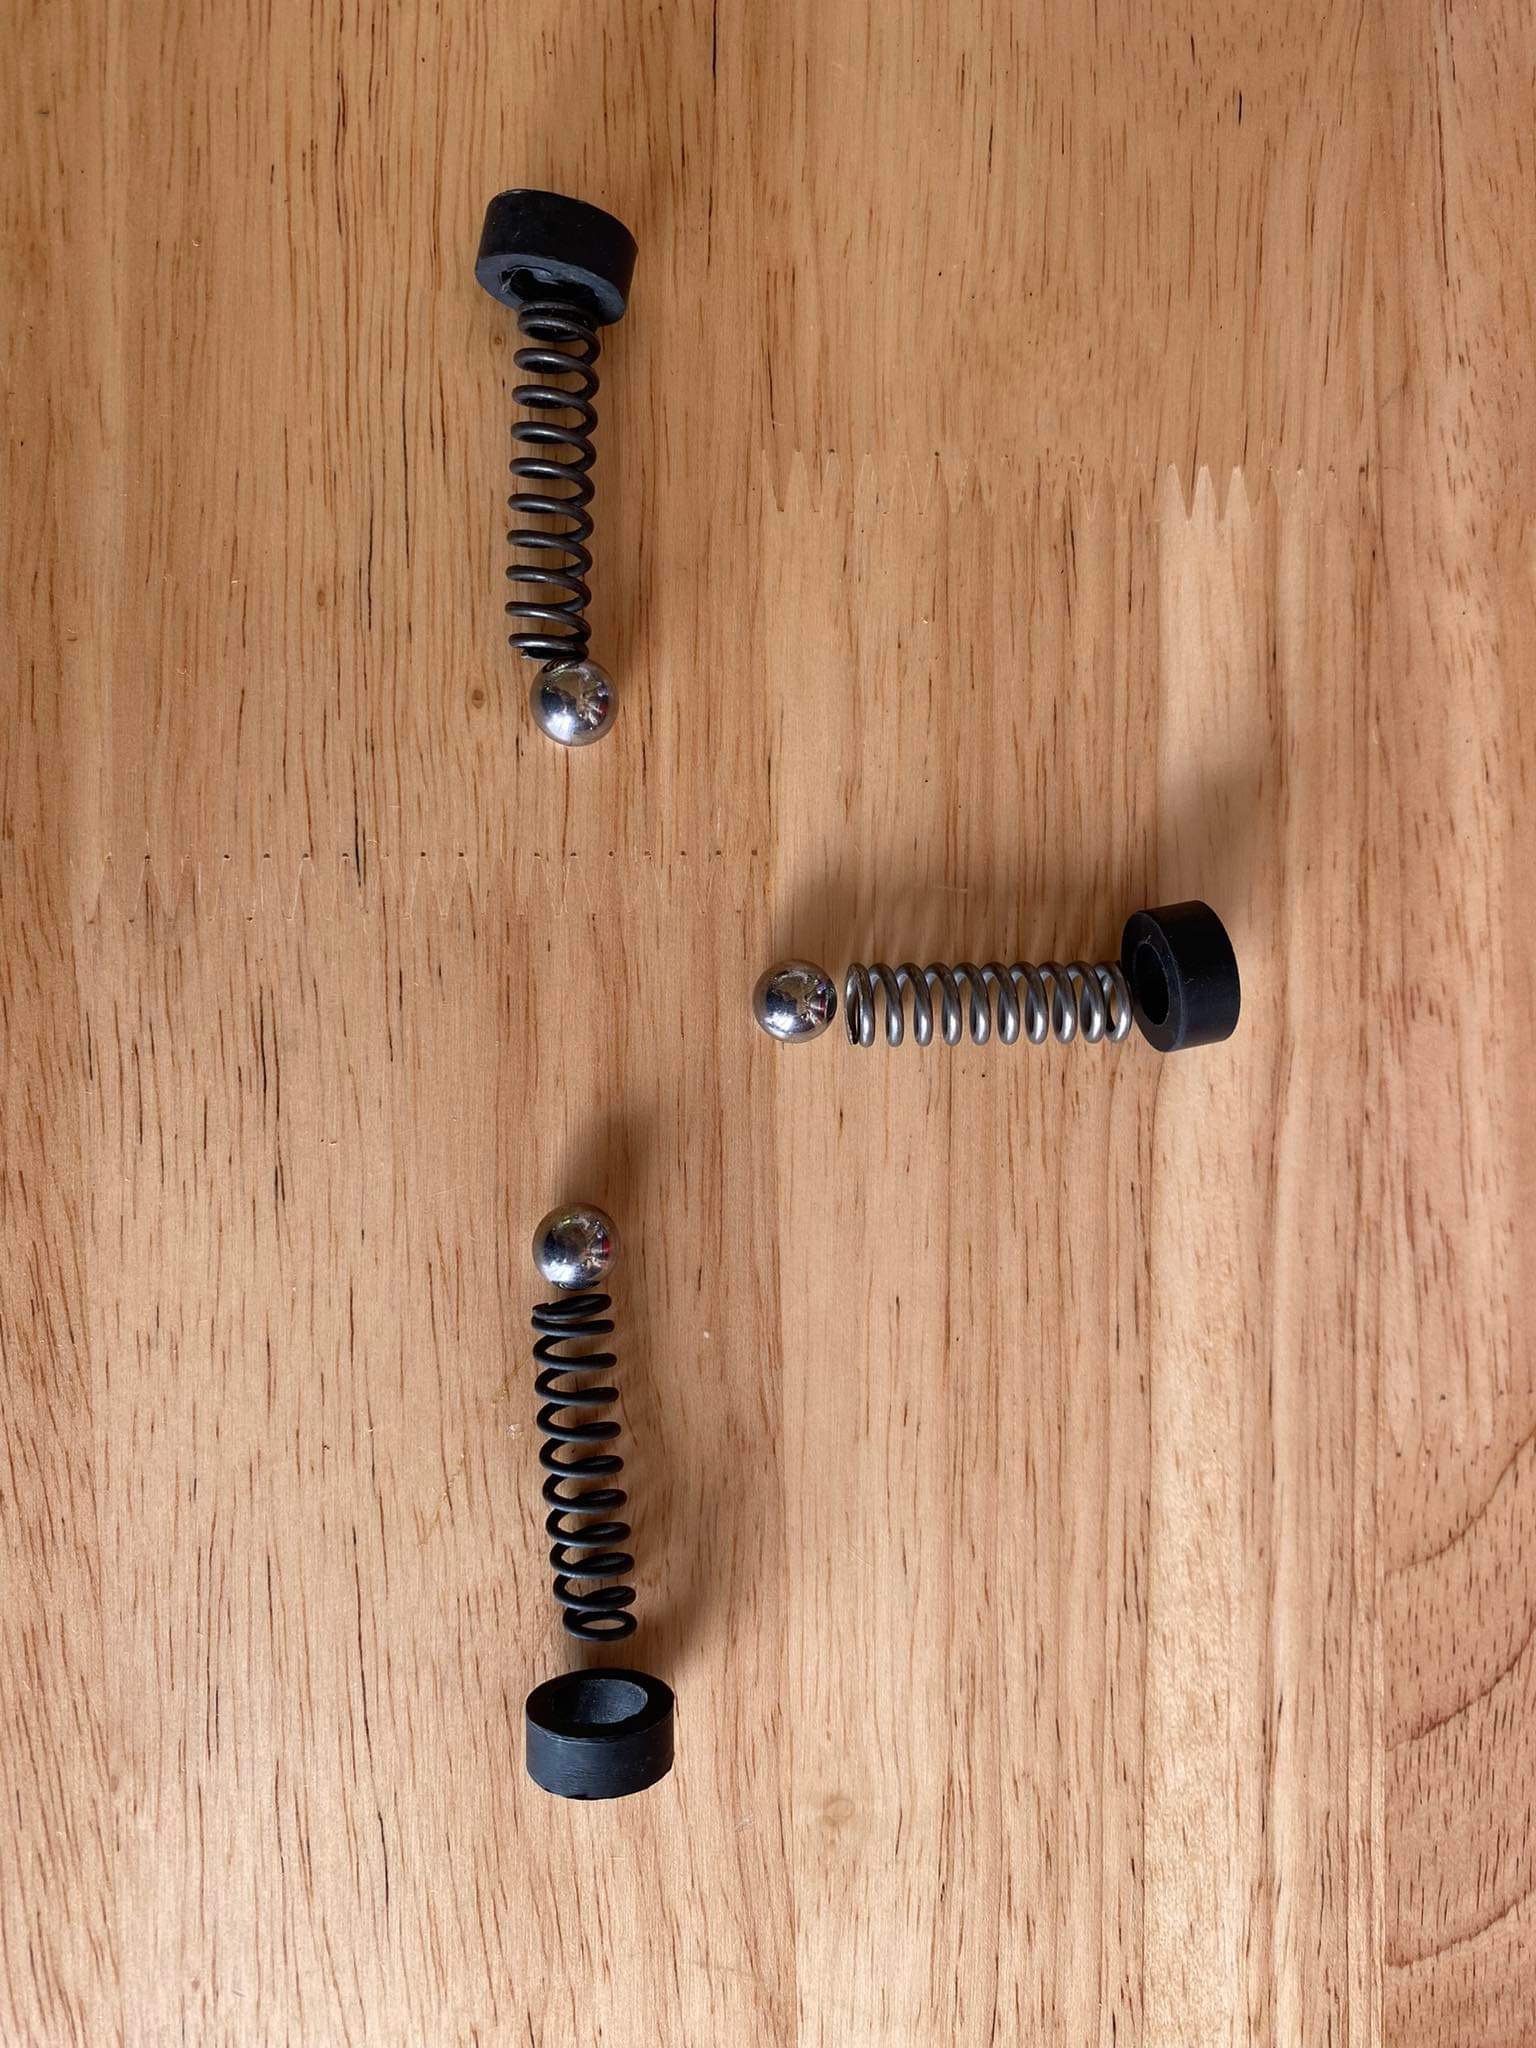
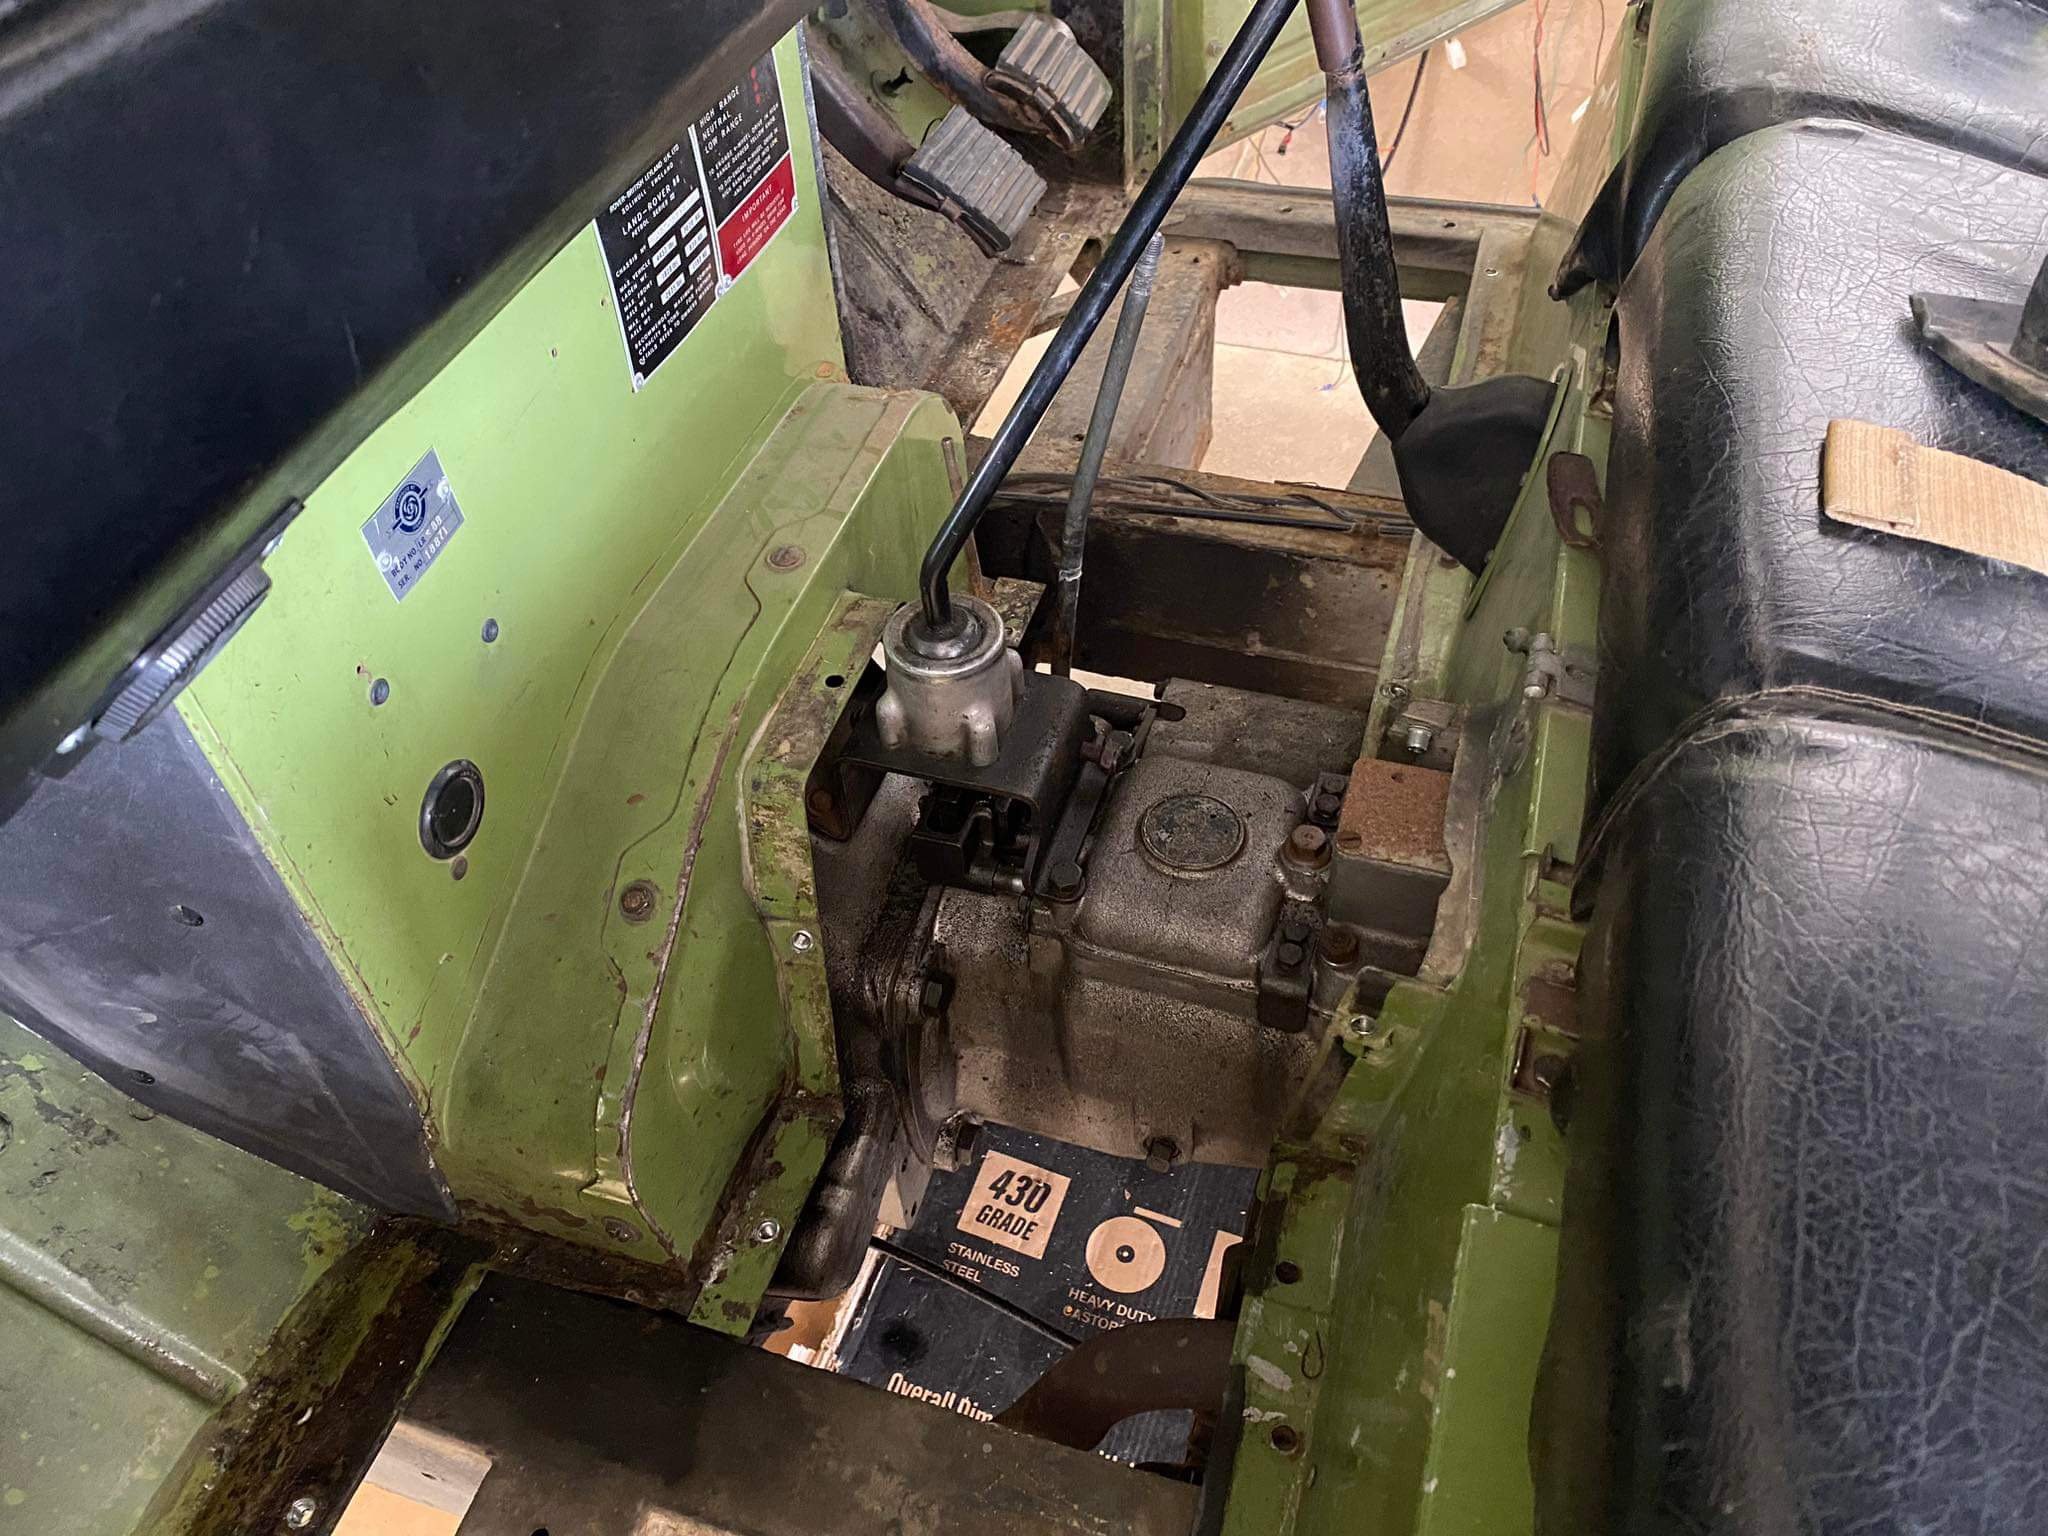
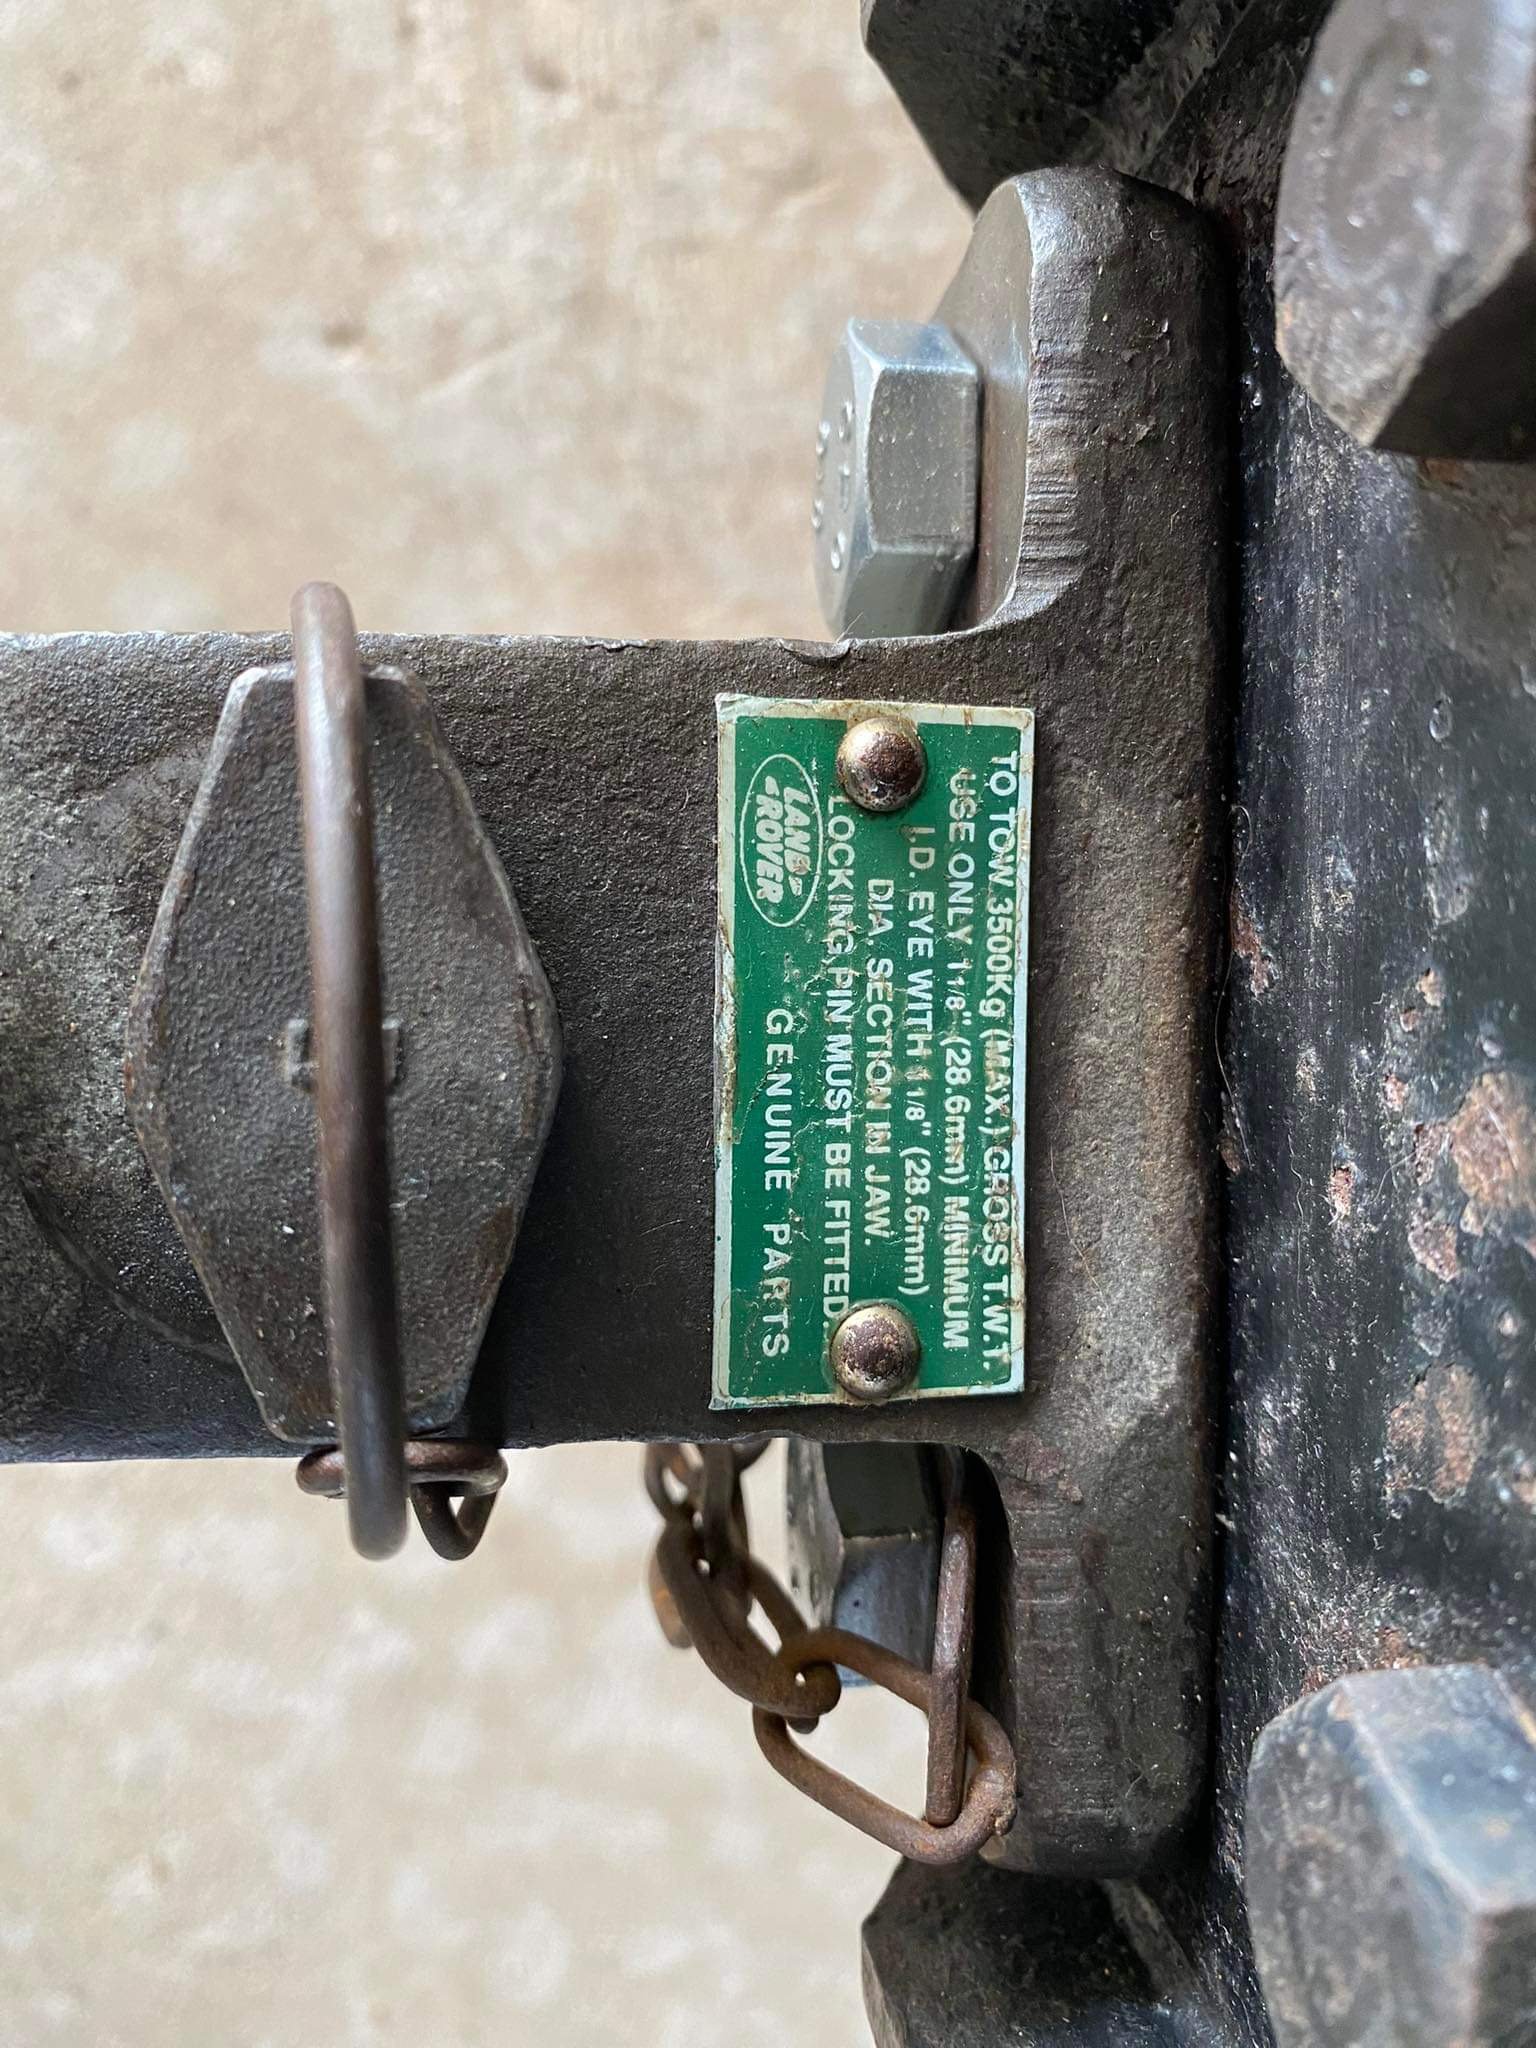
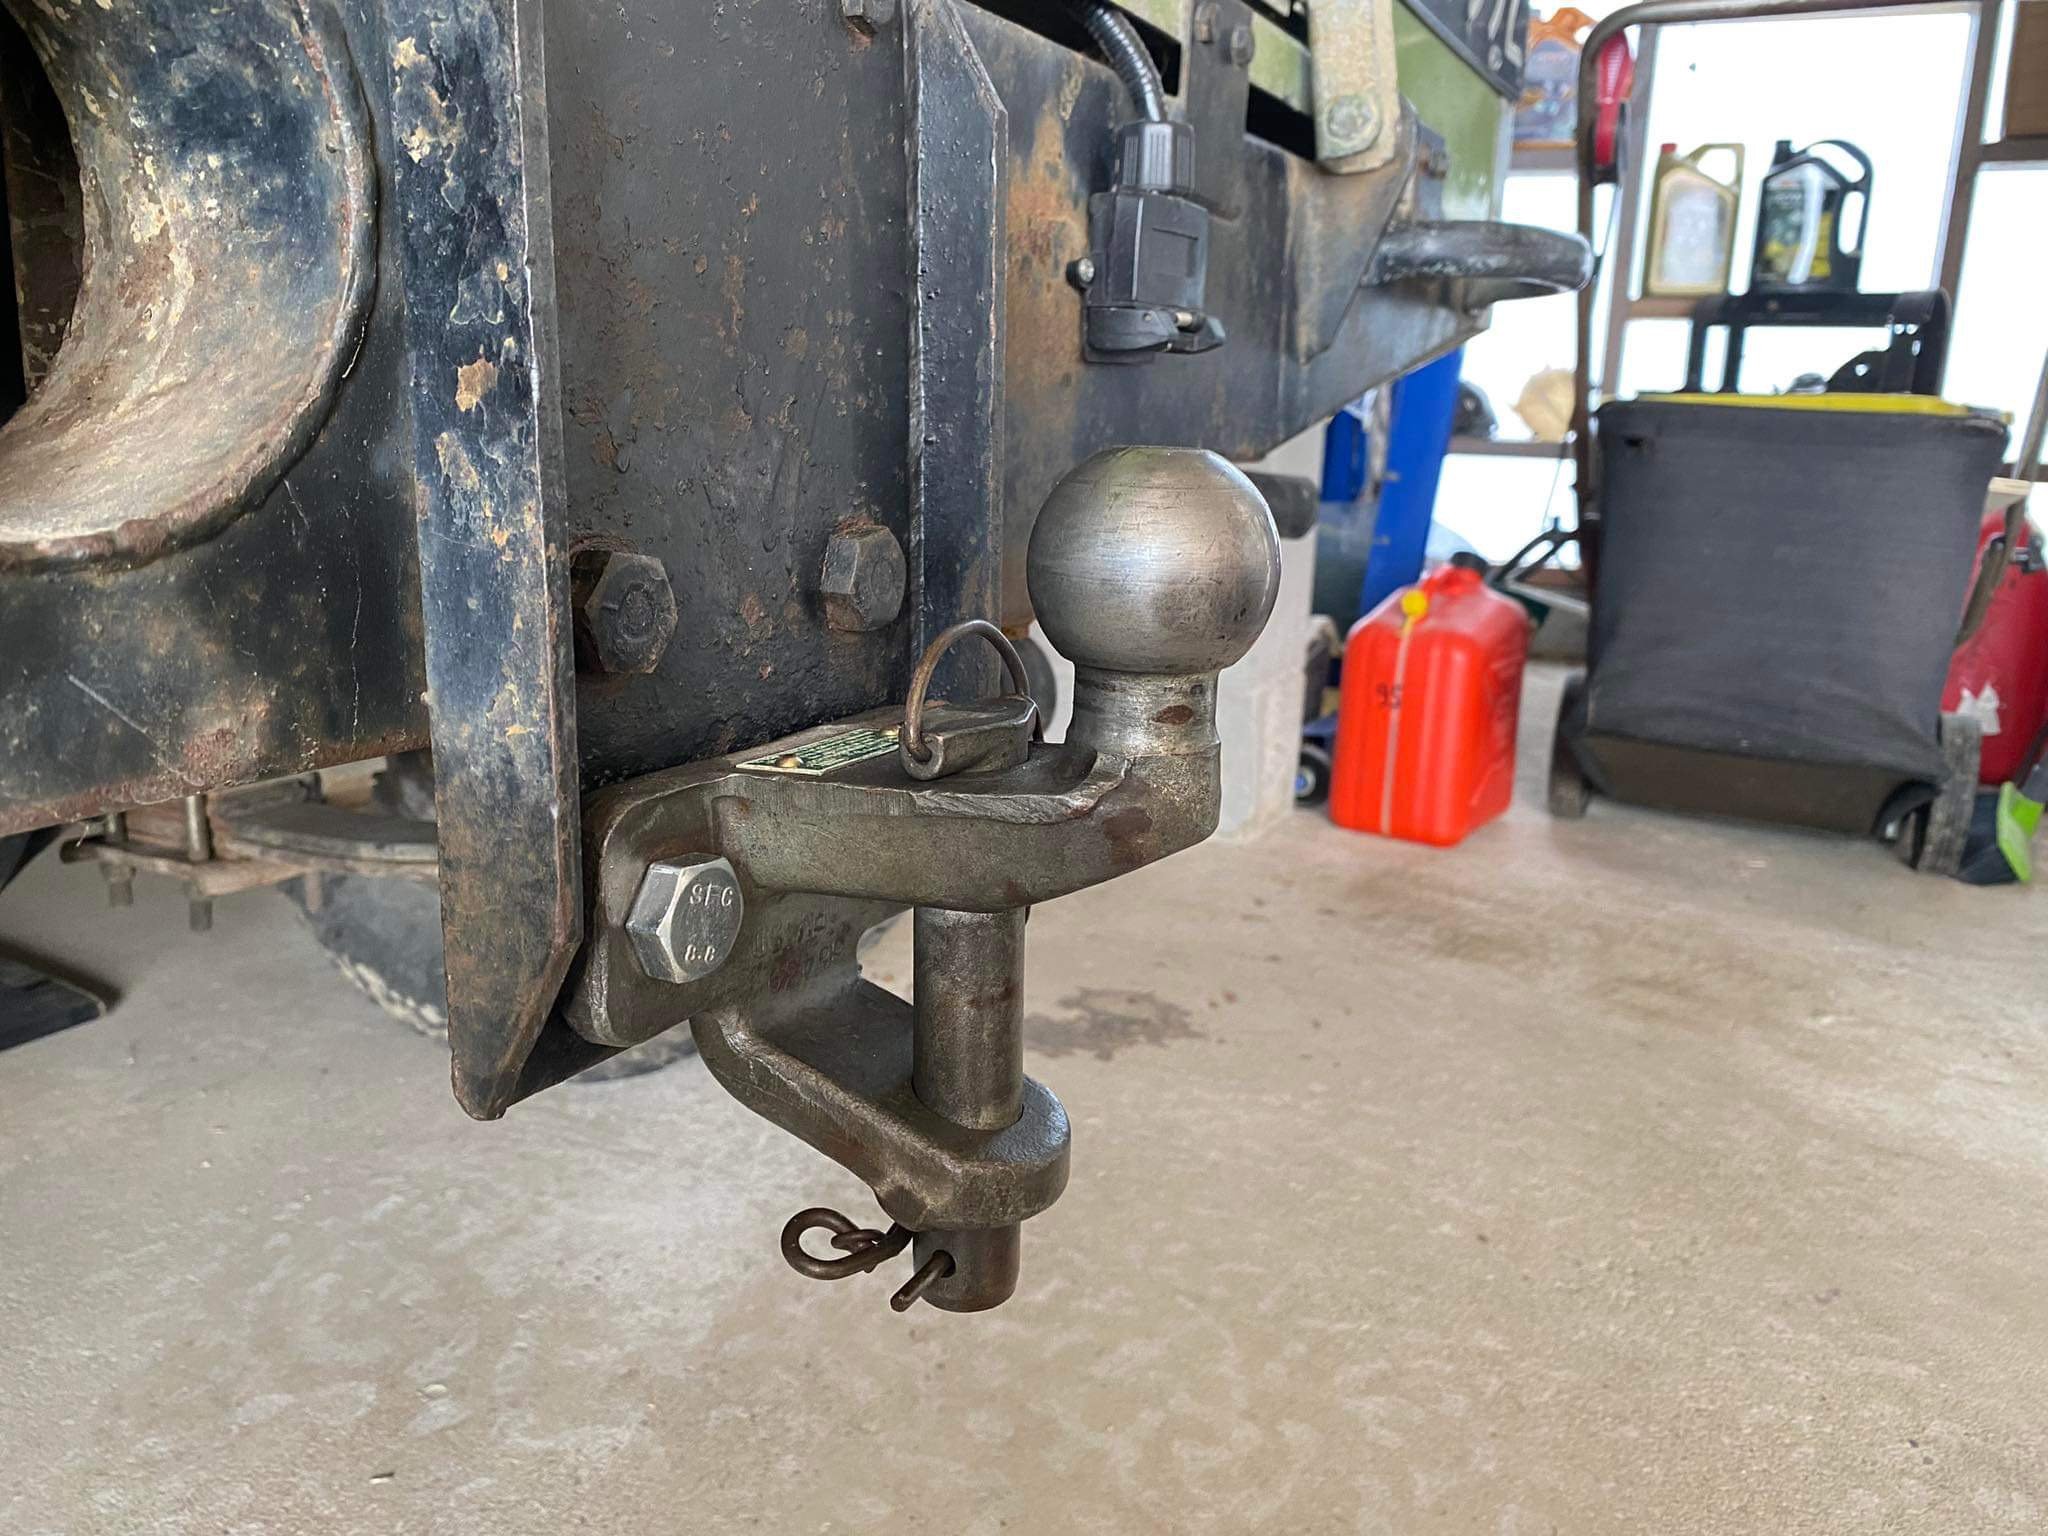
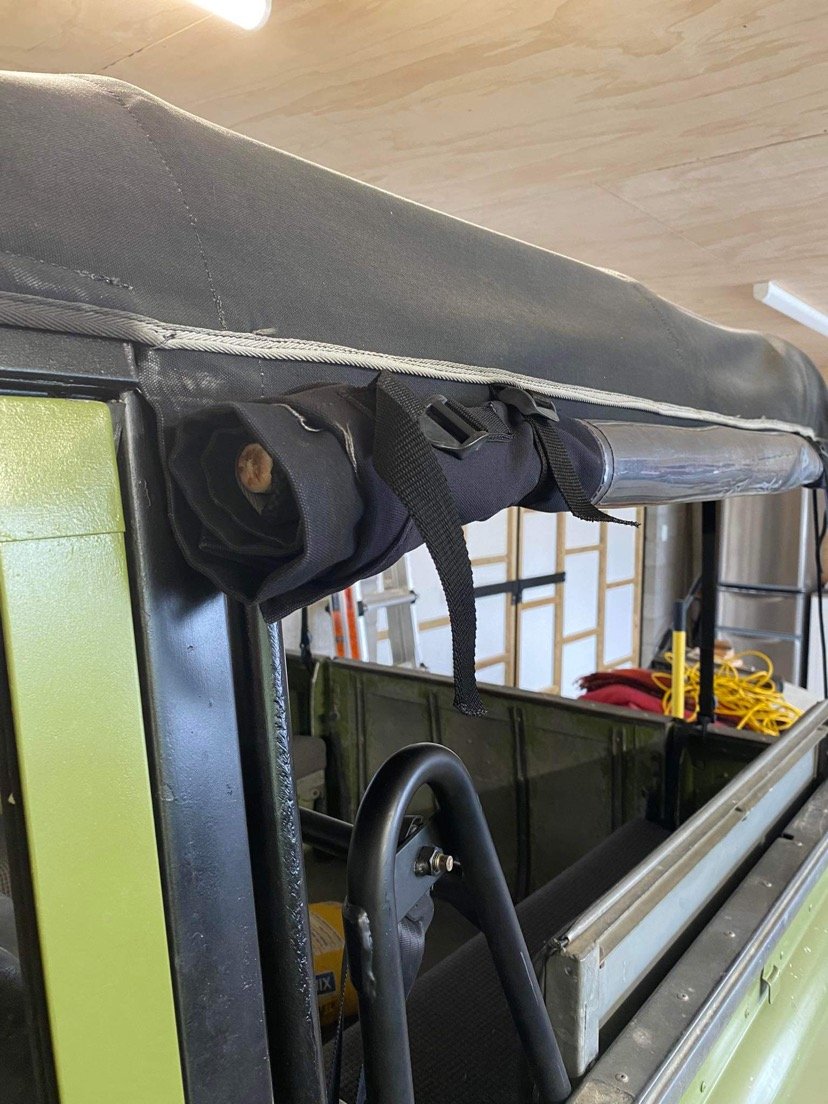
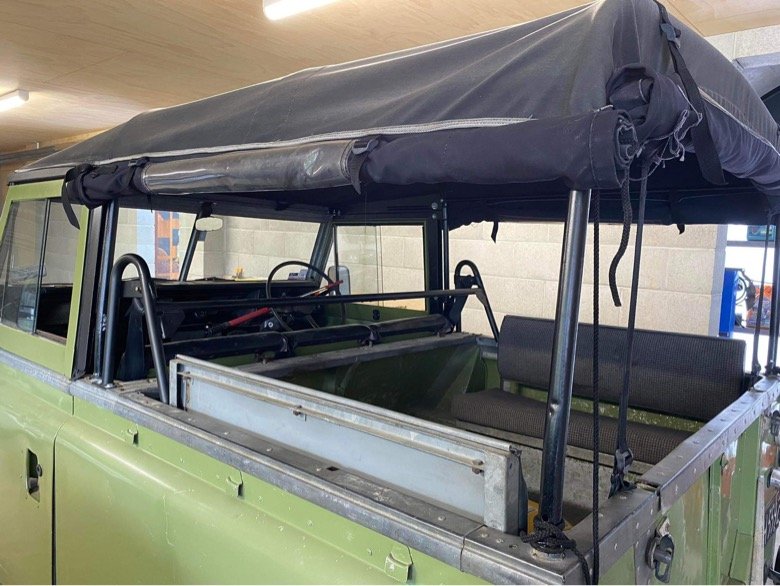
Pulled the floor and tunnel panels off to change the detent springs last weekend. Didn’t know what to expect or if the old ones would be in bits/not even there. But they were all present but a bit more compressed than the new set. Turns out I didn’t need 3 seals, the top one had a recess in the nut: Tightened the gear selector grub screw as it had backed out slightly. It’s no short shift kit but it’s certainly better. Scored a genuine Land Rover tow ball with hitch pin on the tard for 80 bucks. Old one may have become compromised using it to pull tree stumps out a few years ago… Saw a neat trick on Instagram to keep the soft top sides tidy when rolled up. 3 wooden broom handles slipped into the hem of the soft top.
3 points
-
Not trying to deter anyone from hanmer in any way shape or form. But since hanmer fizzled out a couple years back a wee group of us have rented a house at lake kaniere at the end of August and done a mini meet sorta thing there the last 2 or 3 years (pretty sure it's 3 lol) Just throwing it out there if we can't get the numbers for this or whatever, and anyone wants a back up option then others could rent some holiday houses around the area. Again, not trying to stand on any toes. Just providing a backup option.2 points
-
I agree that you probably need an etching primer first. Alloy doesn’t like paint without prep. Though I did use por15 on an alternator over ten years ago and it still looks great now. I used their cleaner etc . You can brush it on as it is self levelling.2 points
-
Now the exciting part bolting on shiny cool new stuff!
2 points
-
Turned key on this morning primed fuel system amazing no leaks! Continued on with the inlet manifold flip managed to get that all squared away of course a few things no longer fit like the lid for the plenum. A few bolts no longer lined up some did its seen a lot of welding. A bit of filing drilling and slotting of some holes and it all went together.
2 points
-
im about 90% done with setting up a full linuxcnc controller on a dedicated box. but just a cheap breakout board instead of fancy mesa cards like yours, my cutting speed and small table is forgiving enough to run happy within its limitations it seems. i just need to physically install limit switches so homing works and setup auto z probe and then actually learn how to operate the thing properly.2 points
-
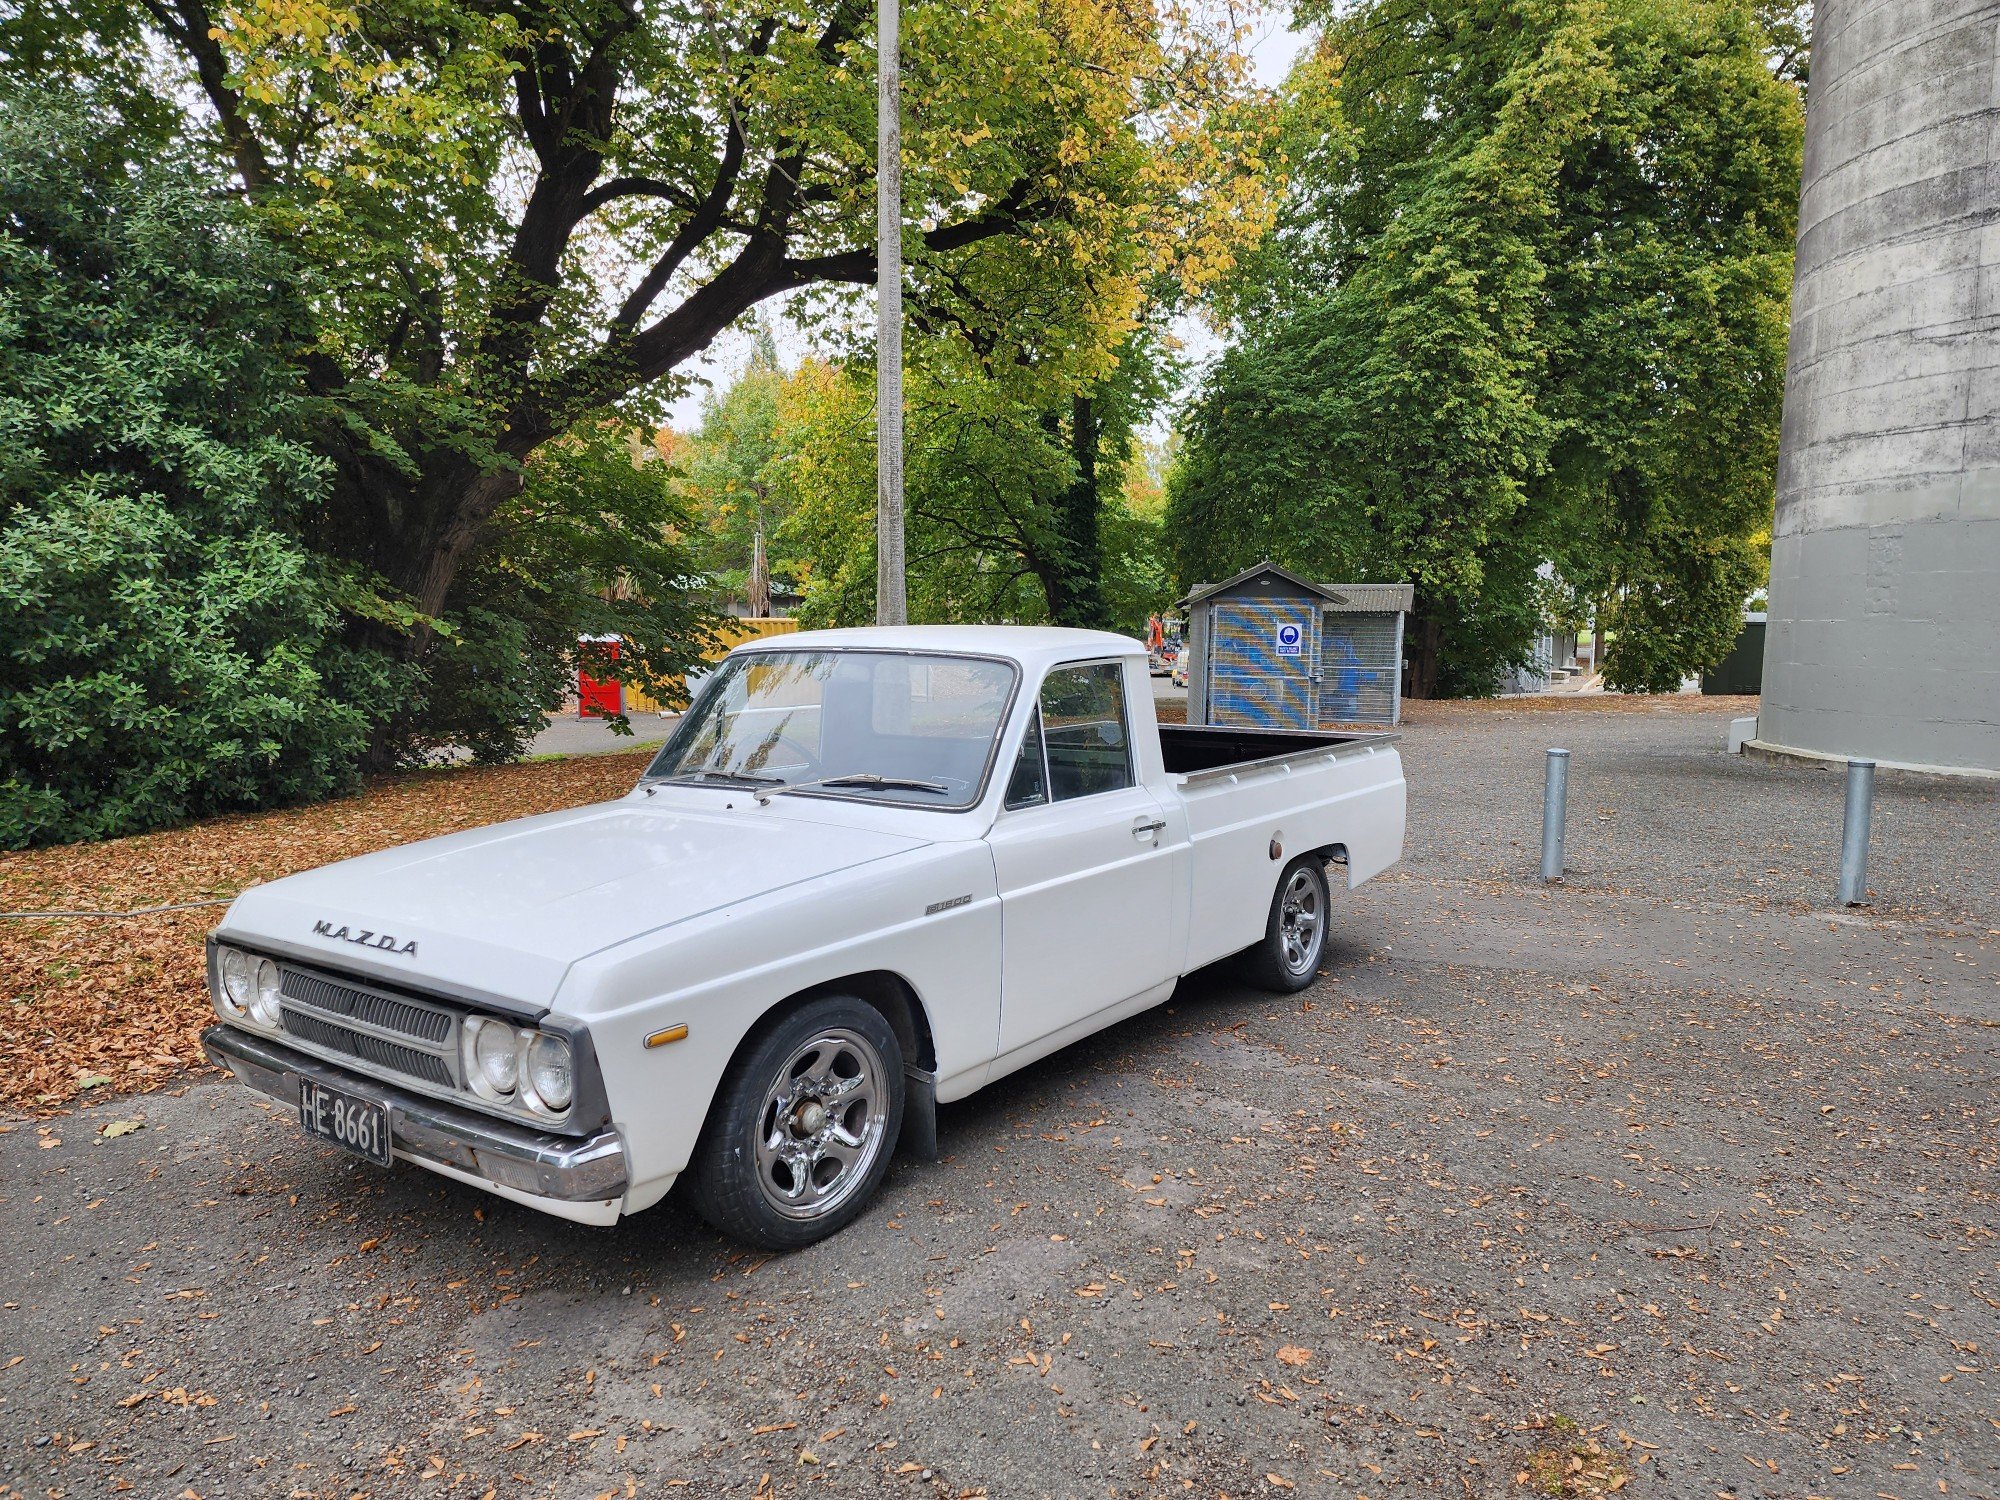
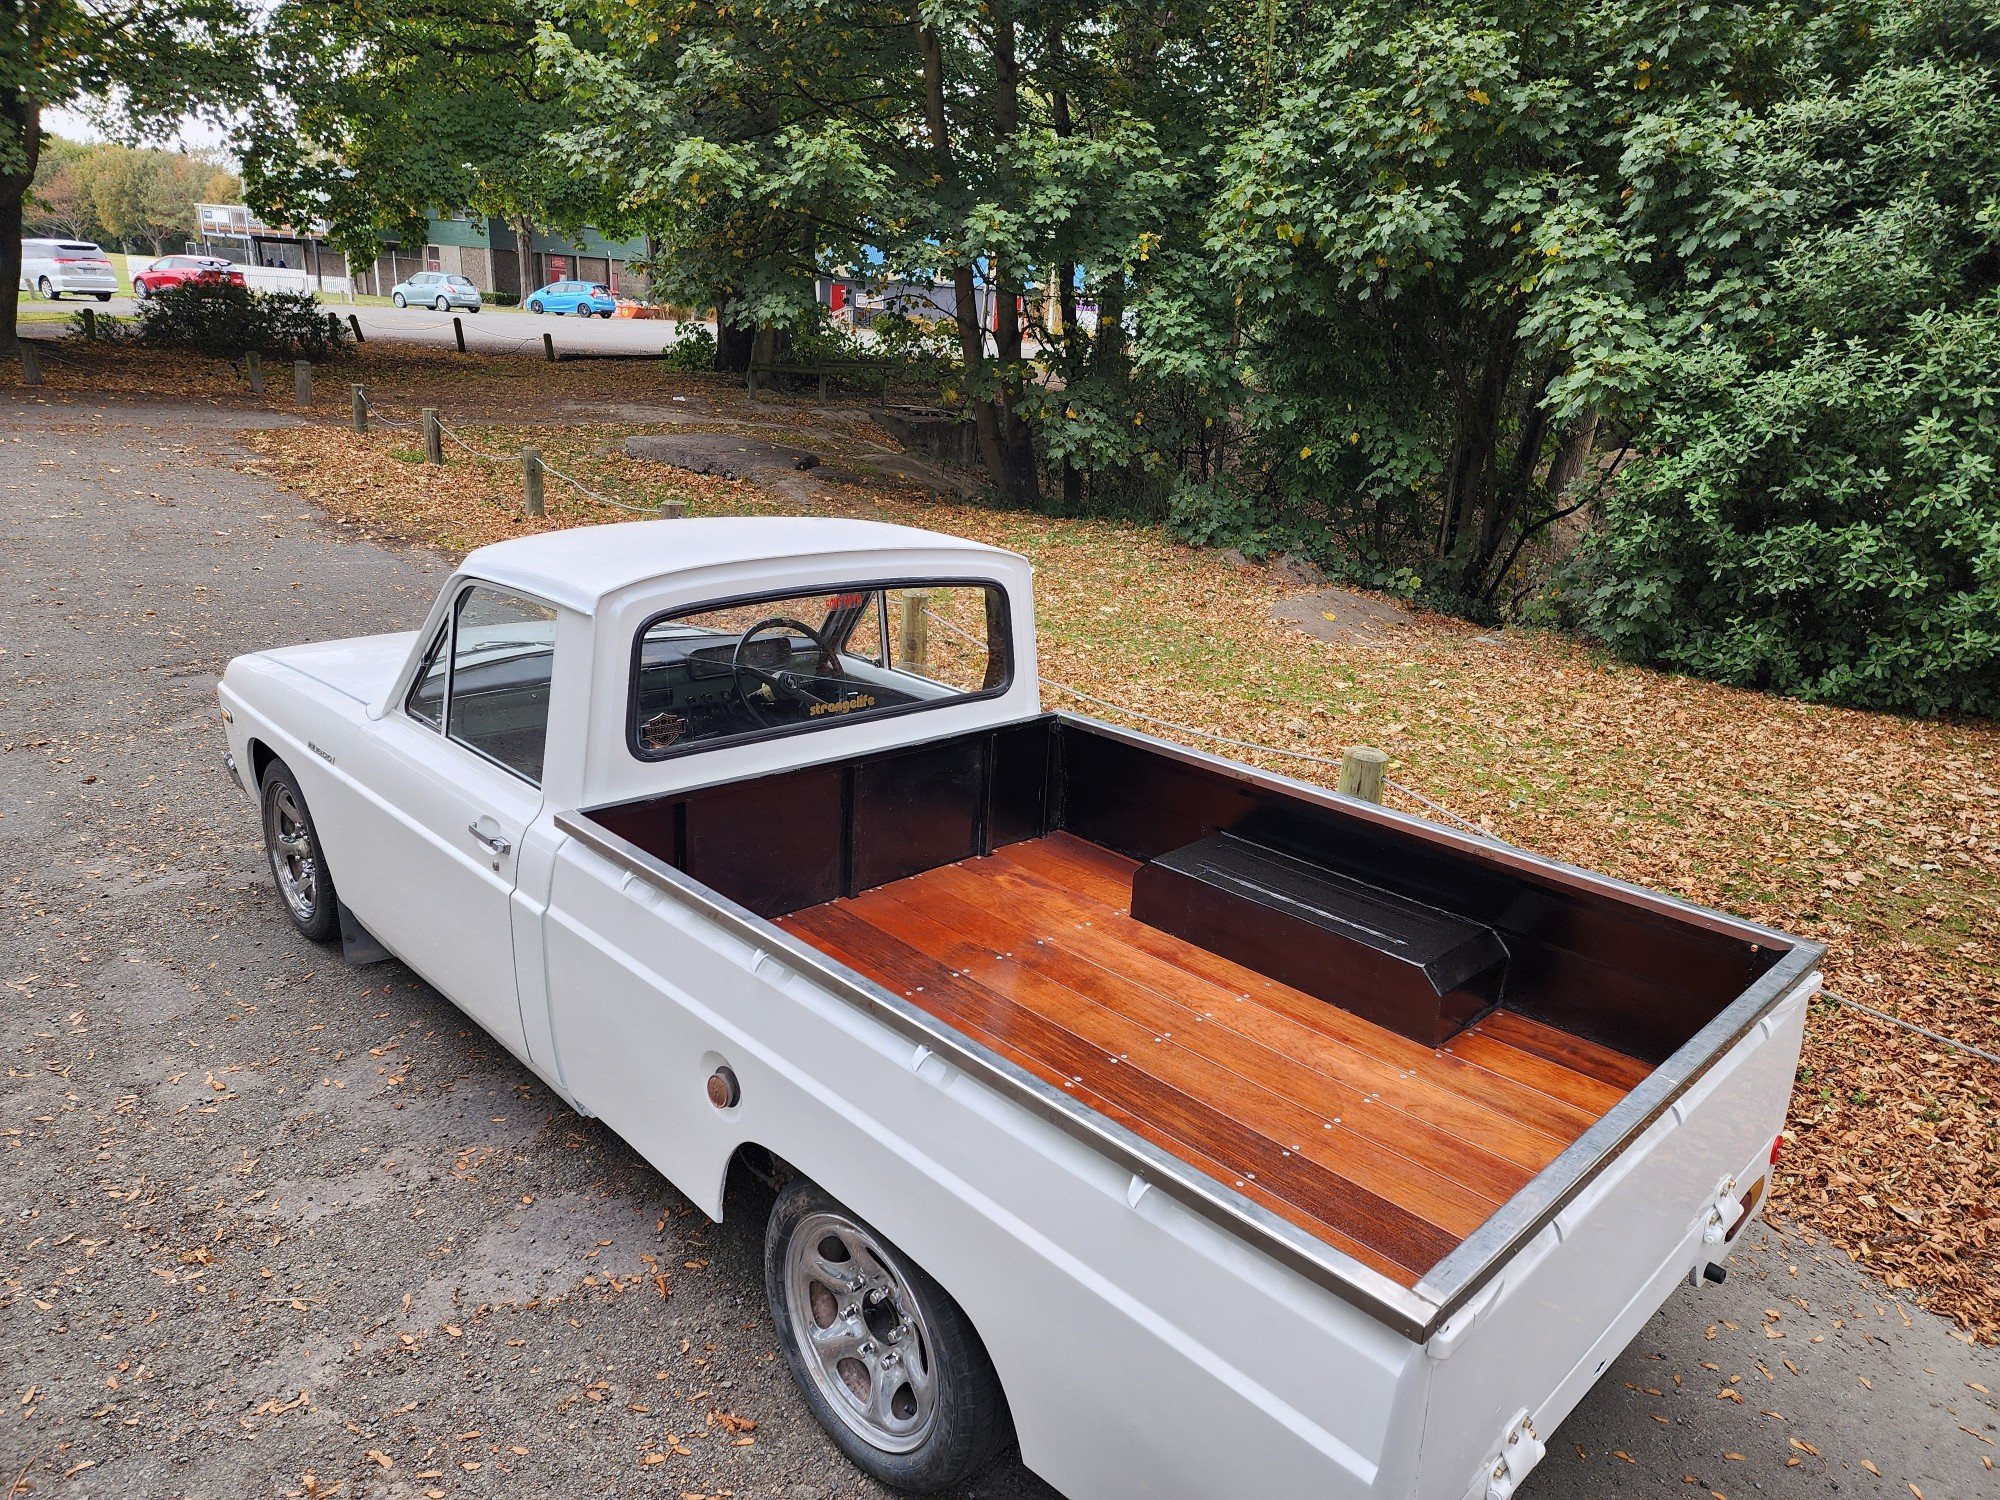
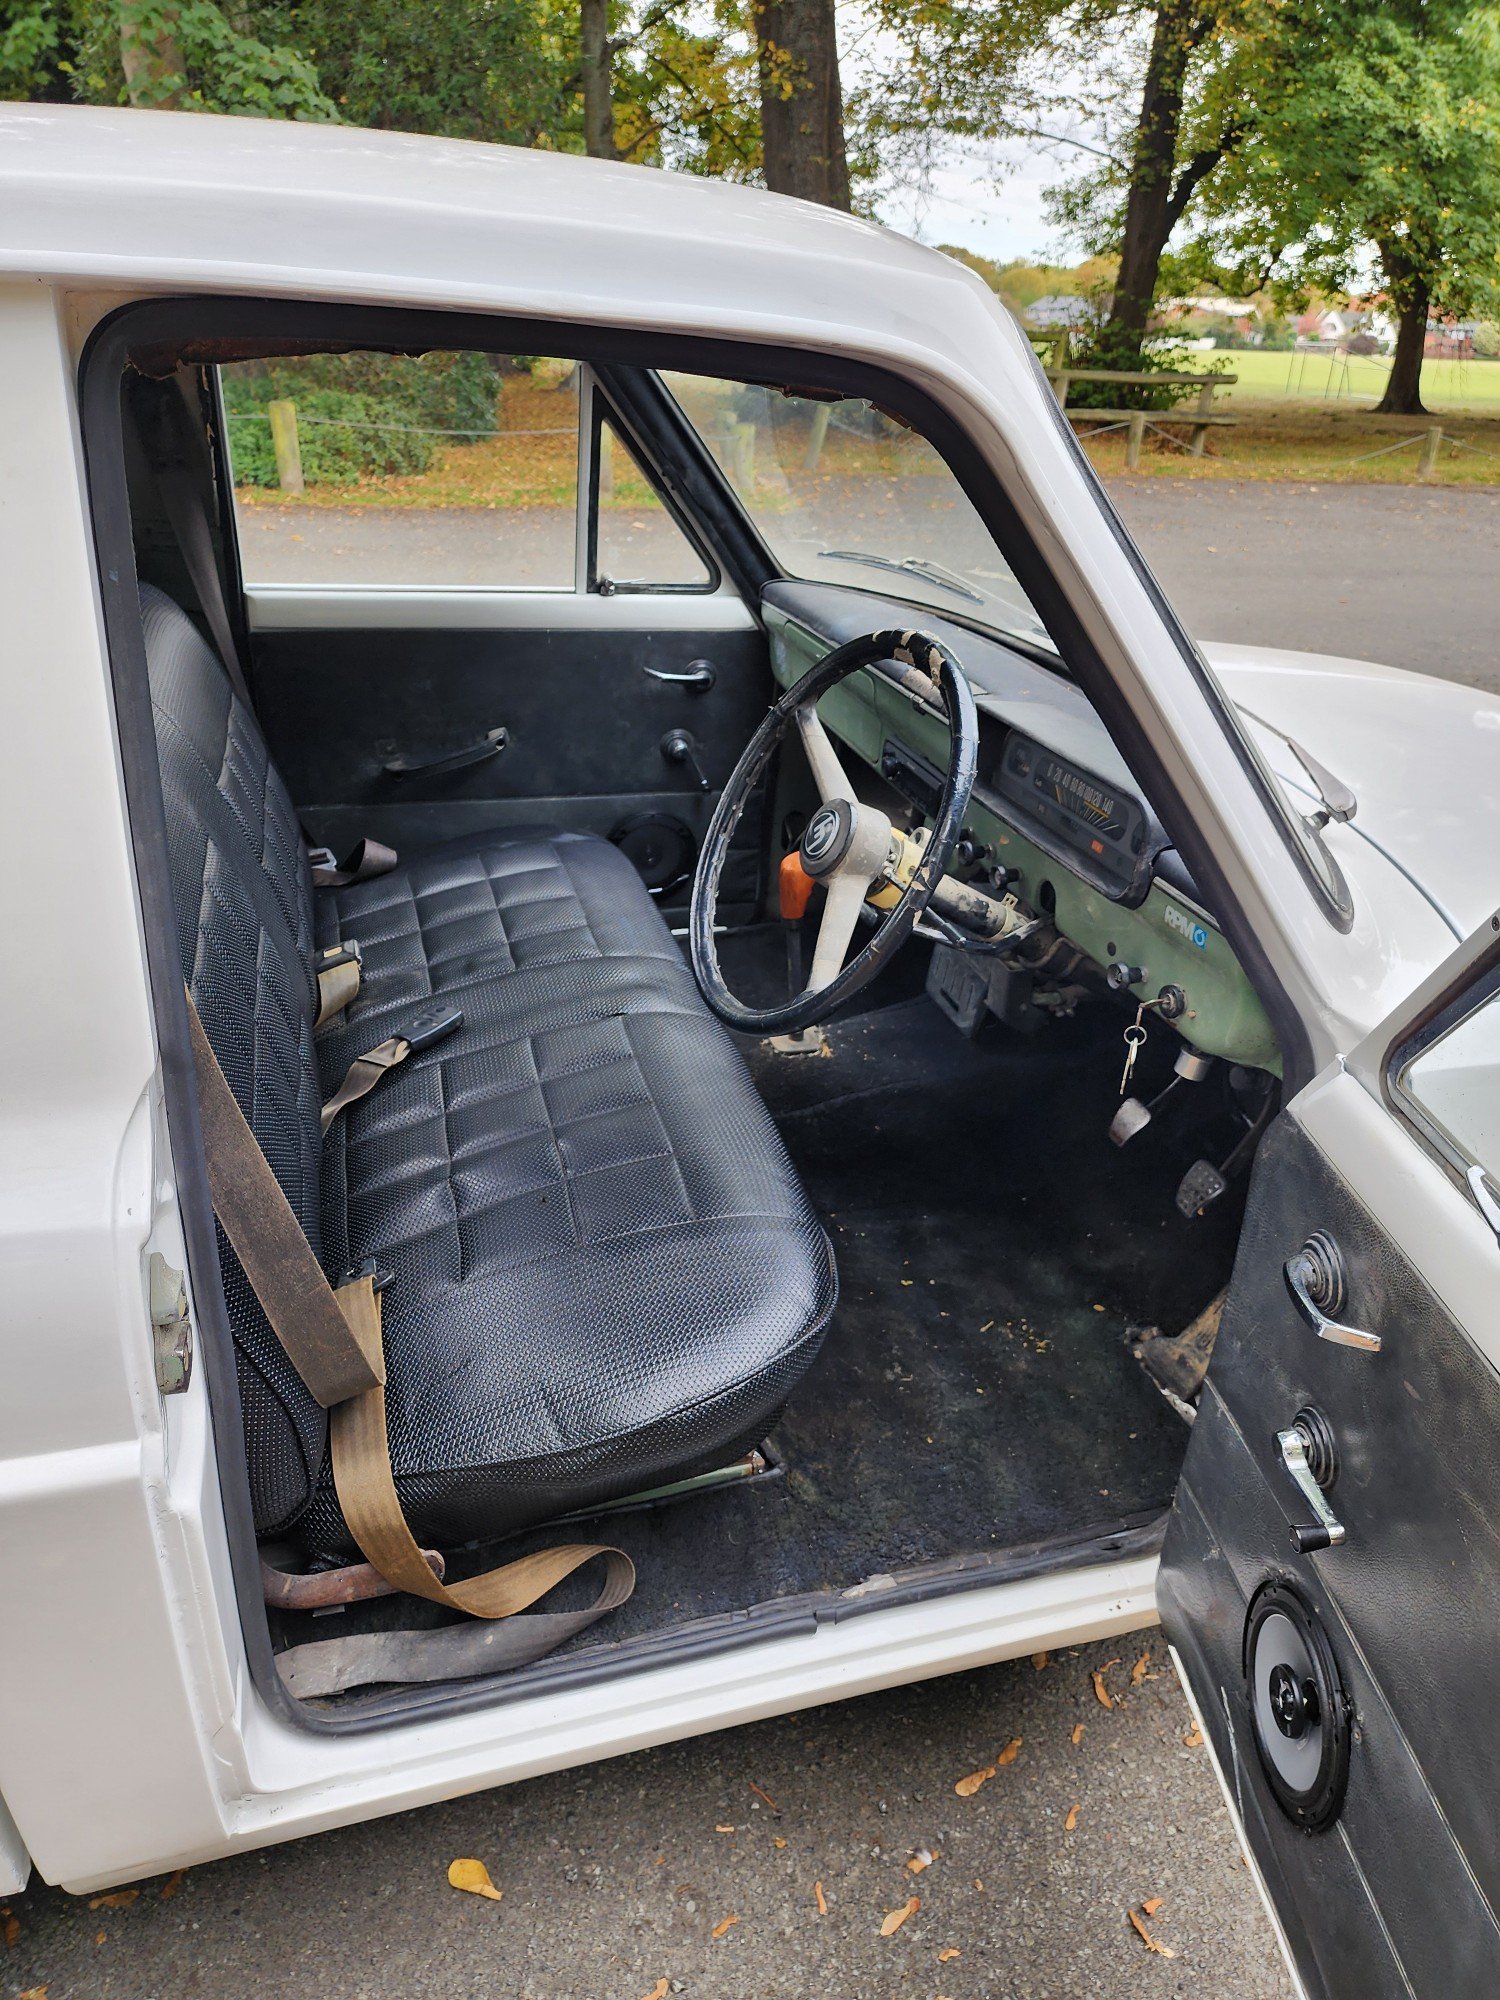
Yo, Long time no see, I figured that because im about to embark on phase 2 of this heap that I should probably make one of these. Anyway, I needed a new daily so I went shopping and found this sweet 82 long bed, I was after a long bed specifically as I needed/wanted it for my shop truck to haul choppers round with. The 350 had a sweet cam and gear drive so it sounded cool and had the requisite chop chop but the 4km/l fuel consumption meant that the daily part of the new car purchase didnt work quite so well. Luckily I had done my due diligence before the purchase and also bought a 2005 Mercedes Benz E320 cdi. Anyway @98cc hit me up and said he wanted to come visit so I put him to work and we pulled the 350 out and swung the OM648 in. Then at some point a @peteretep came and visited so we did some more work, anyway, I had a deadline, I made it, the truck got its maiden voyage with its new motor around Norway chasing a bunch of bikers, good times. Basically the rundown of the swap were: OM648 3.2l inline 6 diesel, the same one the Blacksmoke Racing dudes use. Baldurs Control Systems DID1 stand alone ECU 722.6 Mercedes 5 speed Auto with lockup OF Gear TCU 3 inch intercooler Built 10 Bolt with 30 spline axles, 9 inch housing ends and bearings, Eaton Trutrac and 3.08 gears. At this point it turned into my summertime daily and did truck things Then doing the usual facebook marketplace thing late at night I found a truck camper for sale, so of course I had to have that... At this point I found the limit of the 1/2 ton suspension so with the camper and the 6/8 drop that it has, so I had to do something, I made a bag over leaf setup in the back to help with load carrying capabillity. So about here is up to date, the engine swap is legit, it now gets 14 km/l and will happily cruise at 120 on the highway, because of the 8 foot bed it hauls all manner of things without asking, and does a skid. Discussion
2 points
-
The radiator situation is proving to be a bit of a headache as the available space is minimal thanks to the S/C electroclutch pulley taking up alot of space. where you would ususally plonk a nice thick rad for plenty of cooling. Did a bit of mocking up today with a couple of radiators I had kicking round its looking like a unit from a GA61 Supra will juuuust fit with a pusher fan on the front of the radiator. This one is pretty beat up and manky so will see if I can find an alloy option2 points
-
Beem working on this thing pretty flat out. Done a bunch of interior work and just rebuilt all the steering components. Everything feels a lot tighter now . Not too far away being ready for a warrant
2 points
-
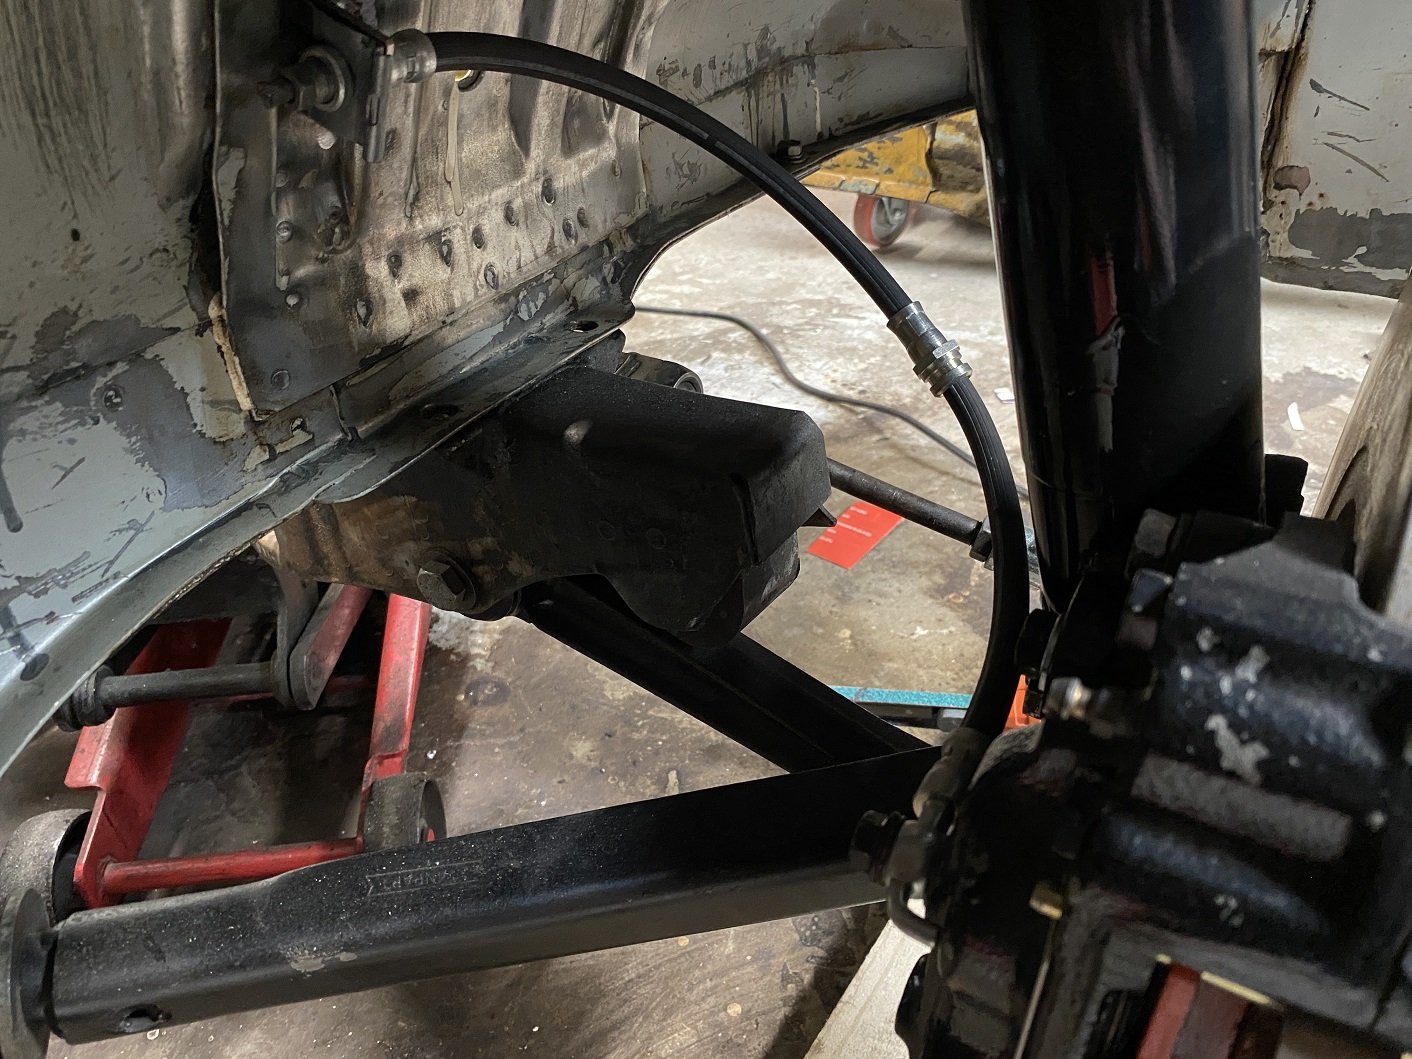
A clutch line. Bent by hand so not robot straight. I made it a little longer than required just in case I need to redo the flares. Hopefully having it go higher than the reservoir do not cause issues bleeding. The reservoir is just on a hose and bracket, so I could make it higher if I needed to. And the hose bracket I made. With the hose like this it keeps out of the way of the wheel and it doesn't get tight from lock to lock. The hardline originally went under the chassis rail, but it will be way too close to the exhaust, I'll run it through the inner wing.
2 points
-
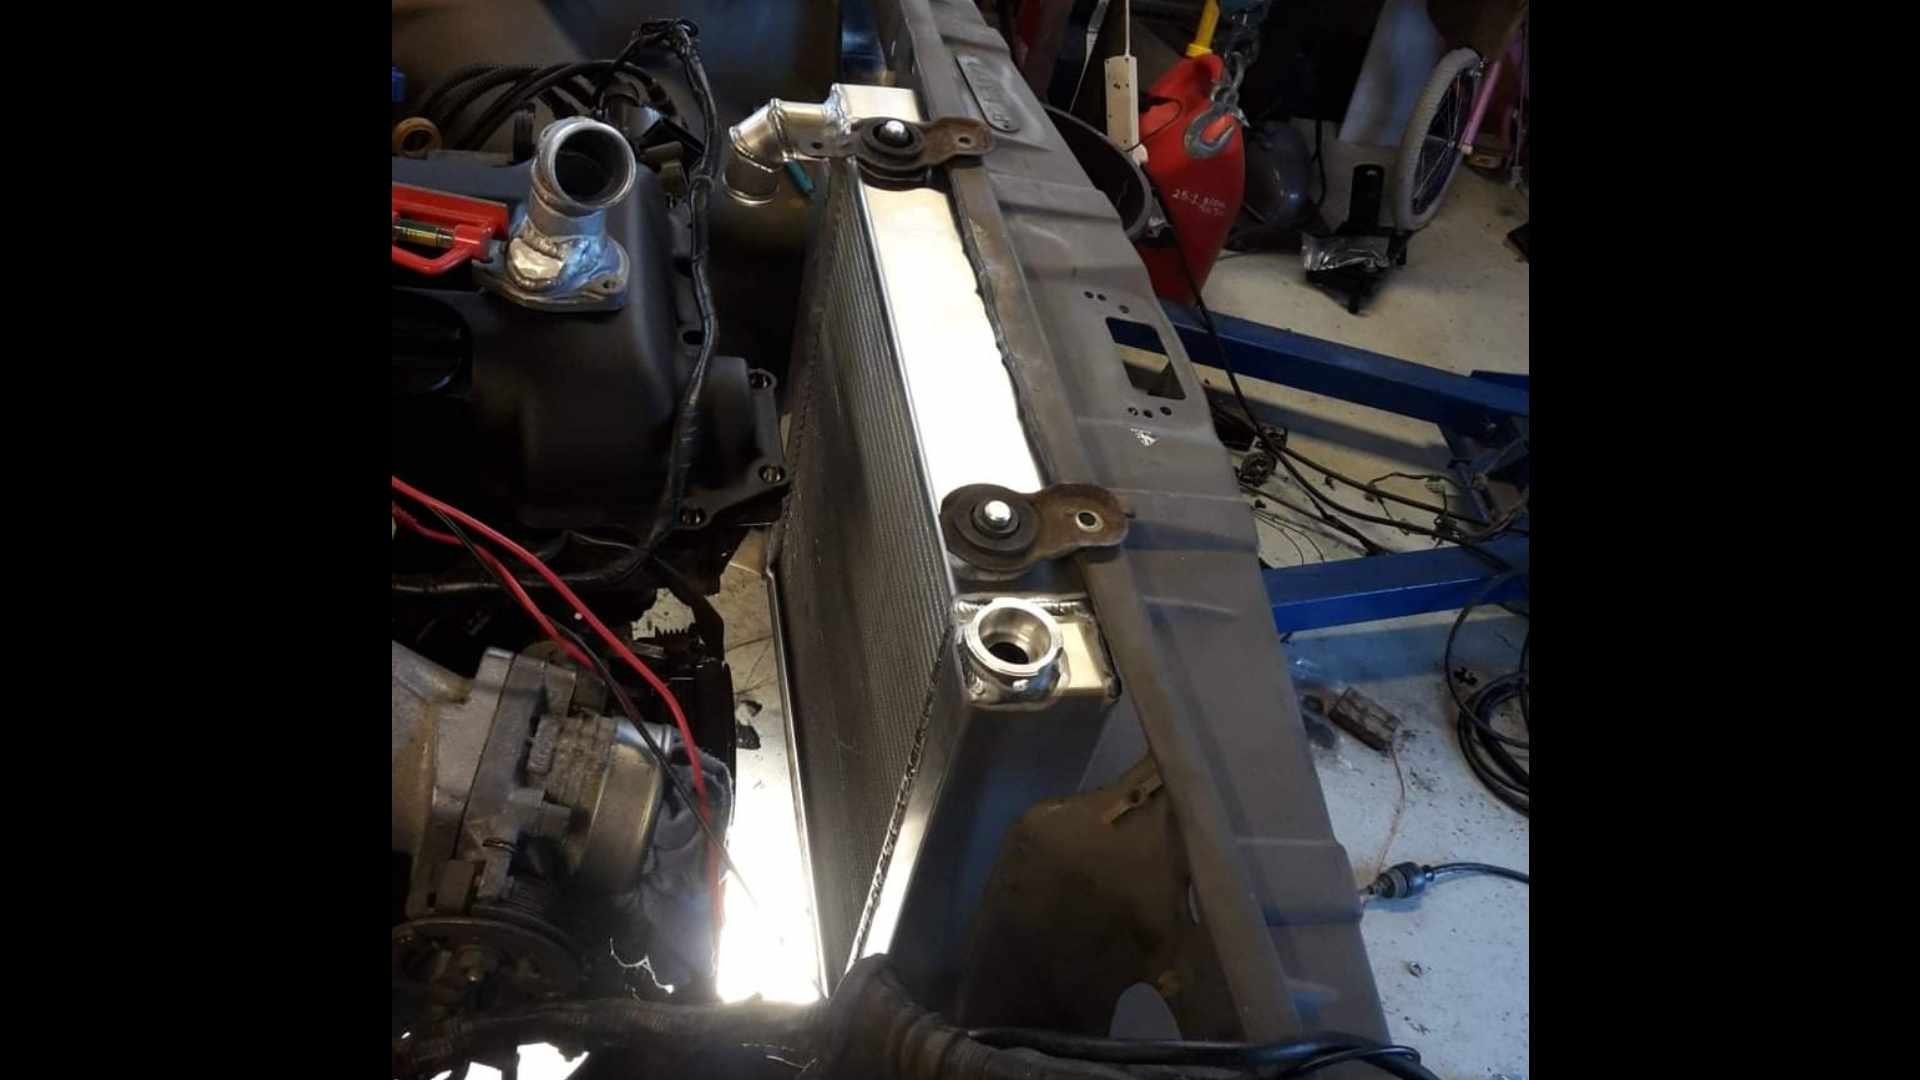
The donor front/radiator support panel came from a farm ute, which had had an L16 repower. Some butcher had gas cut the radiator supporr panel out so they could fit the larger L16 radiator. I tidied this up as best i could (not very well) and got a mate to make me a custom Aluminum radiator to fit in the space i had.
2 points
-
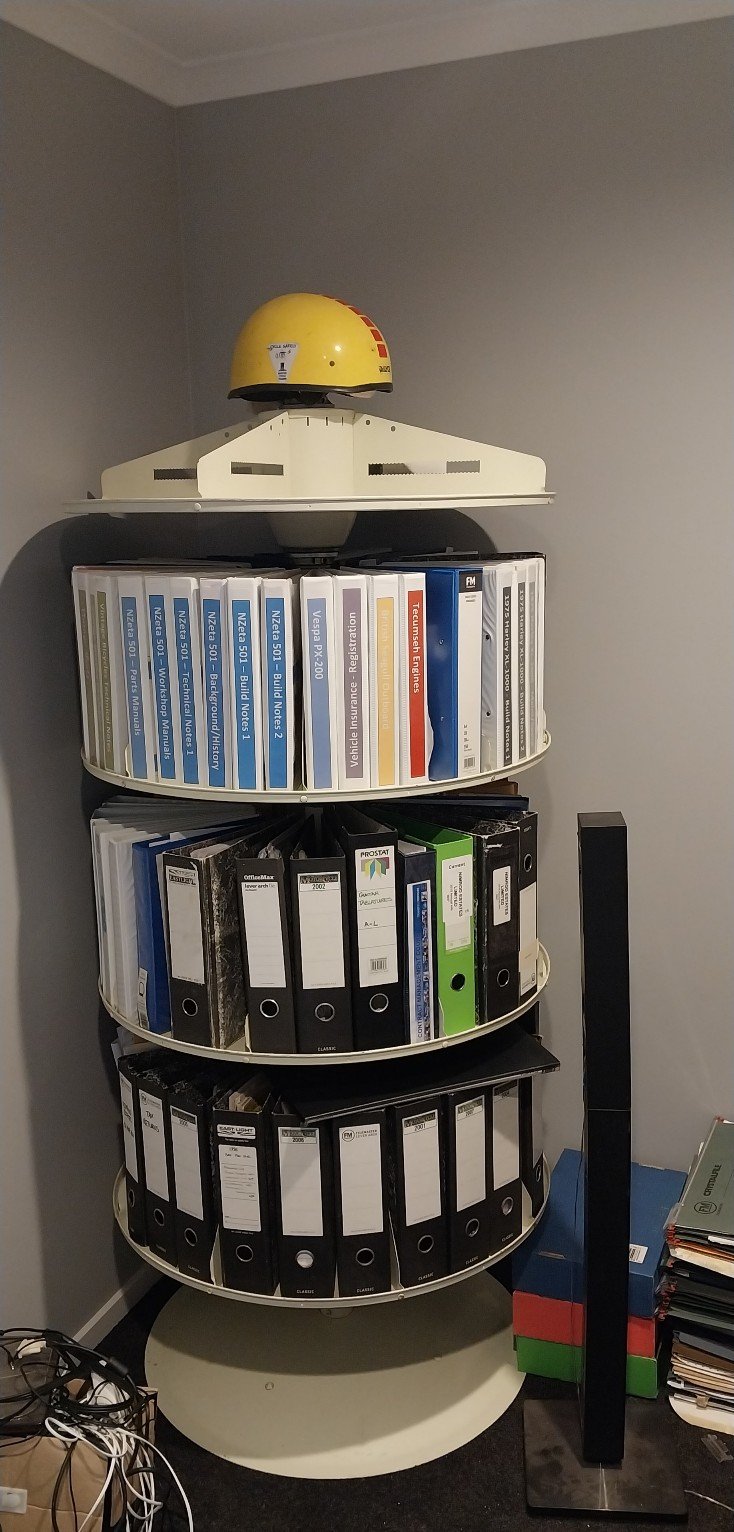
Legit thought that was bacon & egg pie... Sorting the garage/office, found an old rotating file thing at the tip shop for $20, pulled it apart, gave it a clean, greased bearings and assembled it inside. Shit it's heavy...
2 points
-
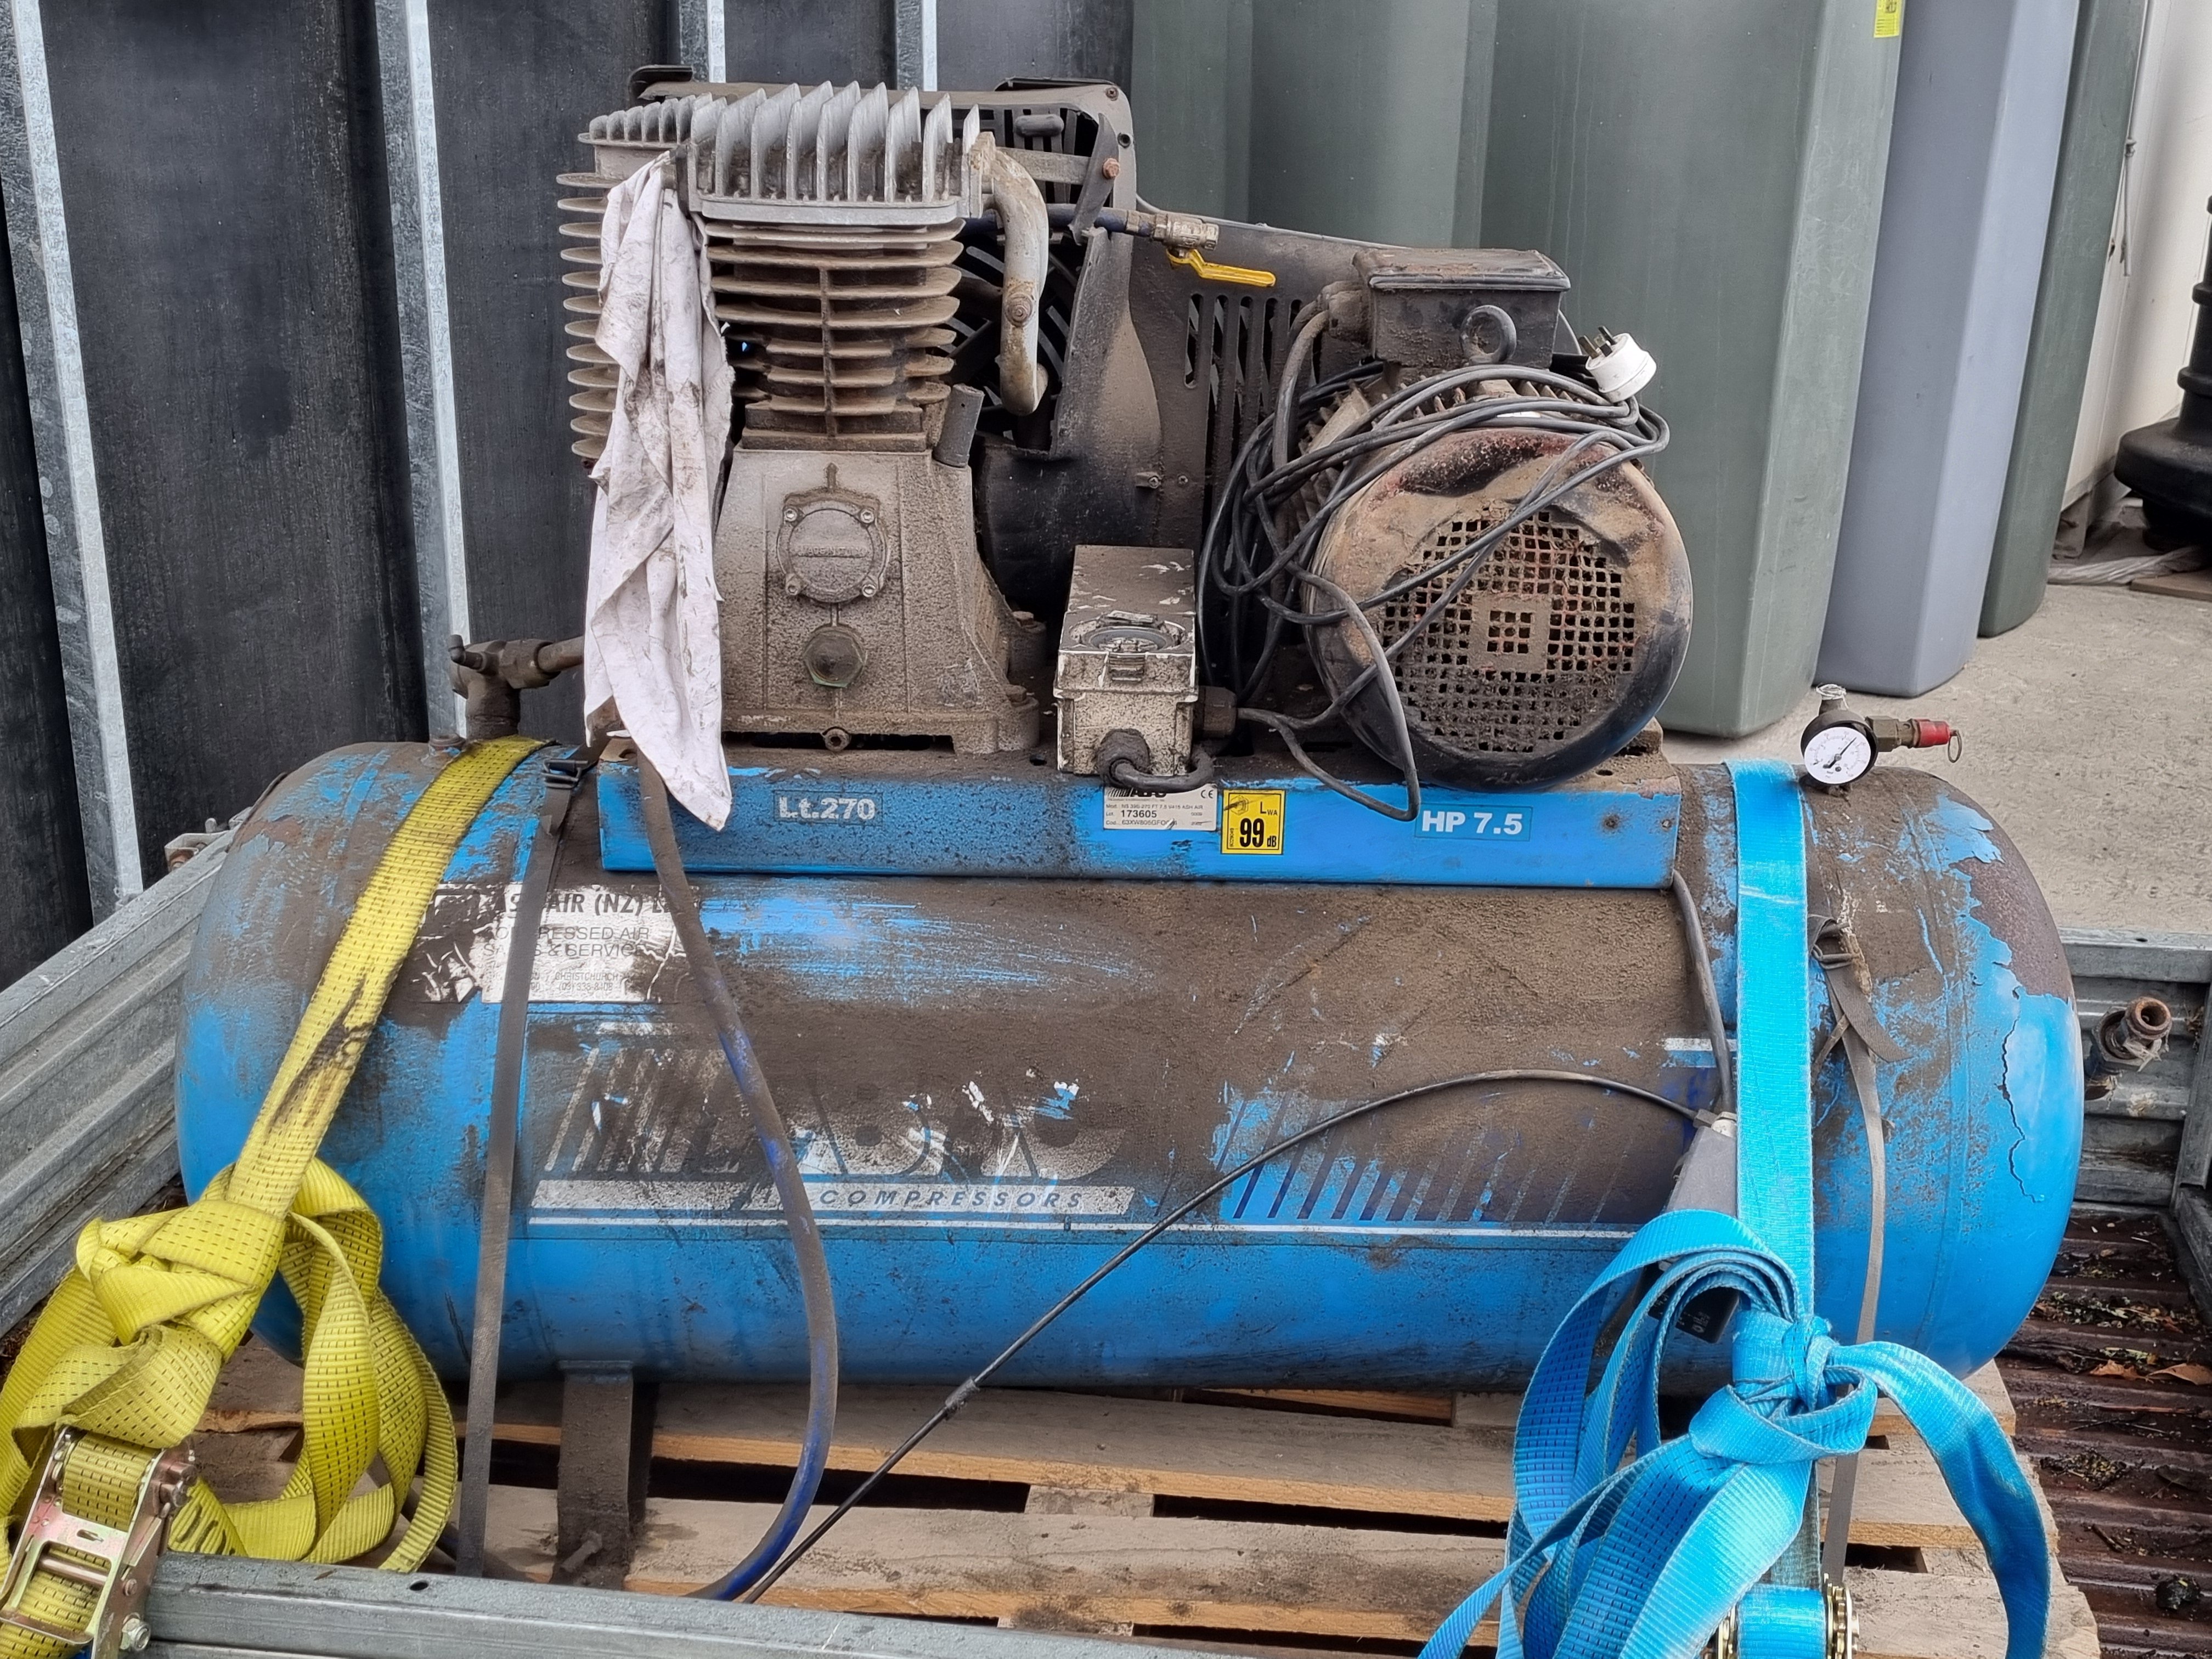
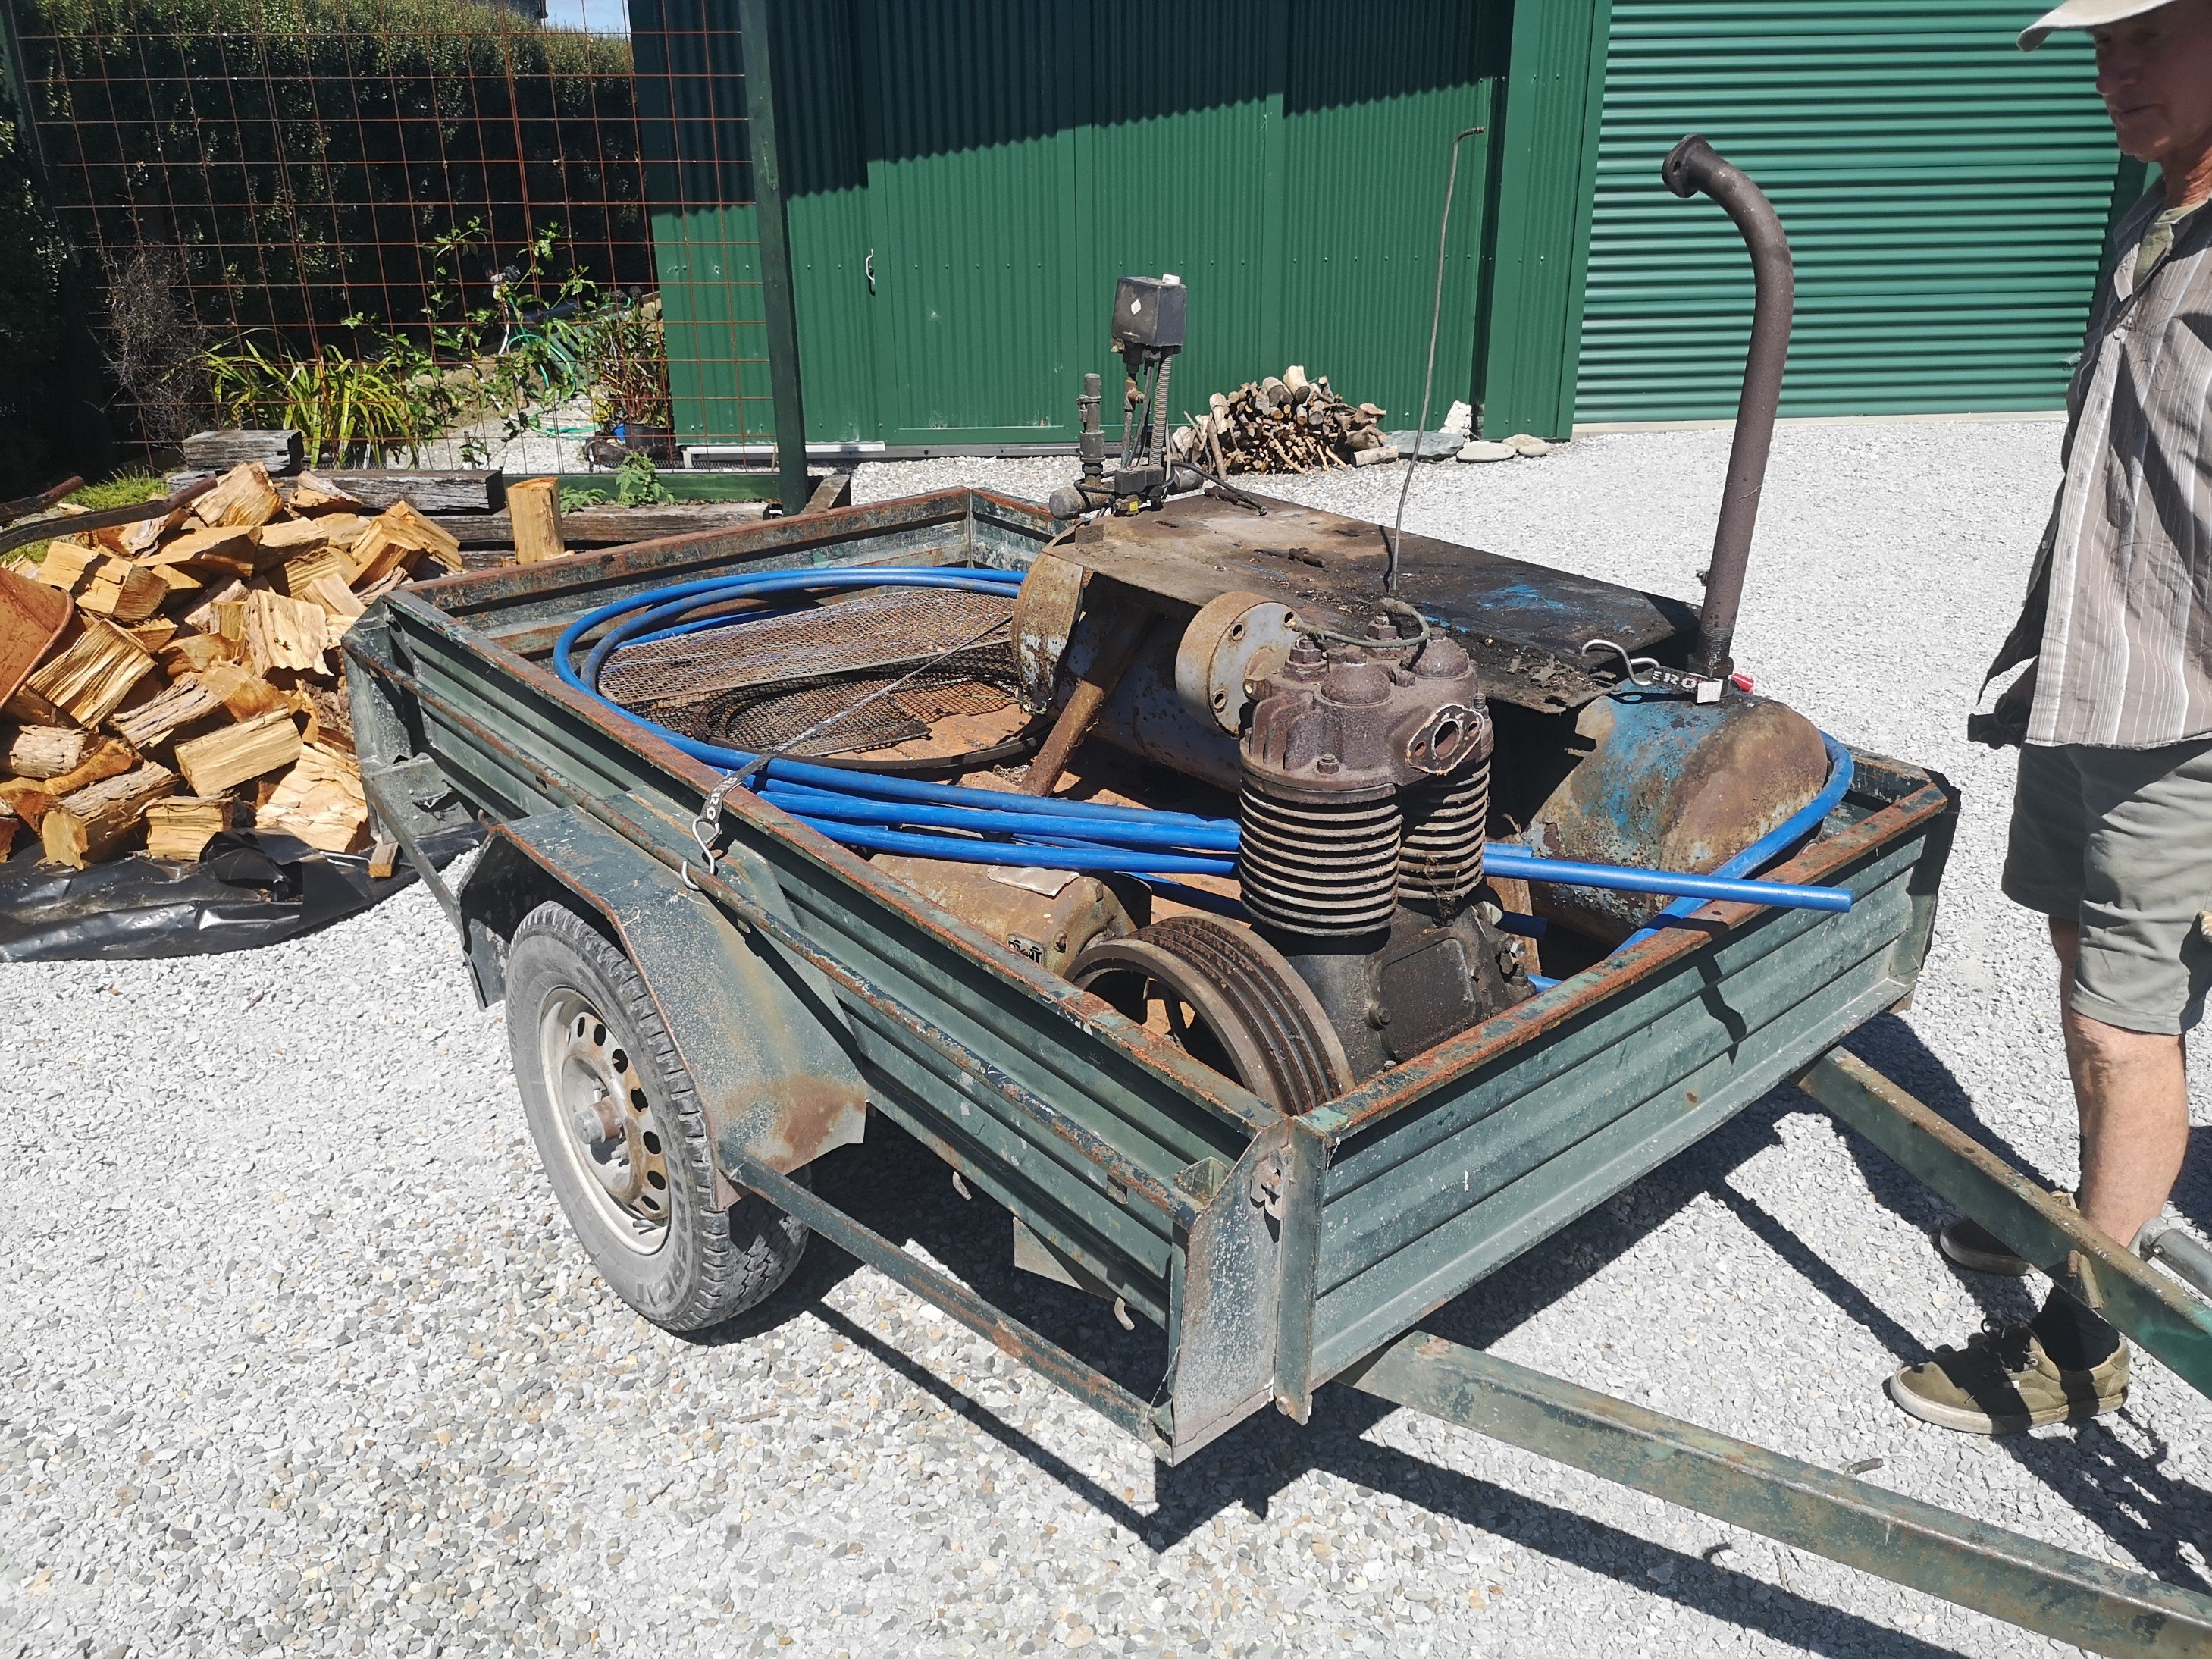
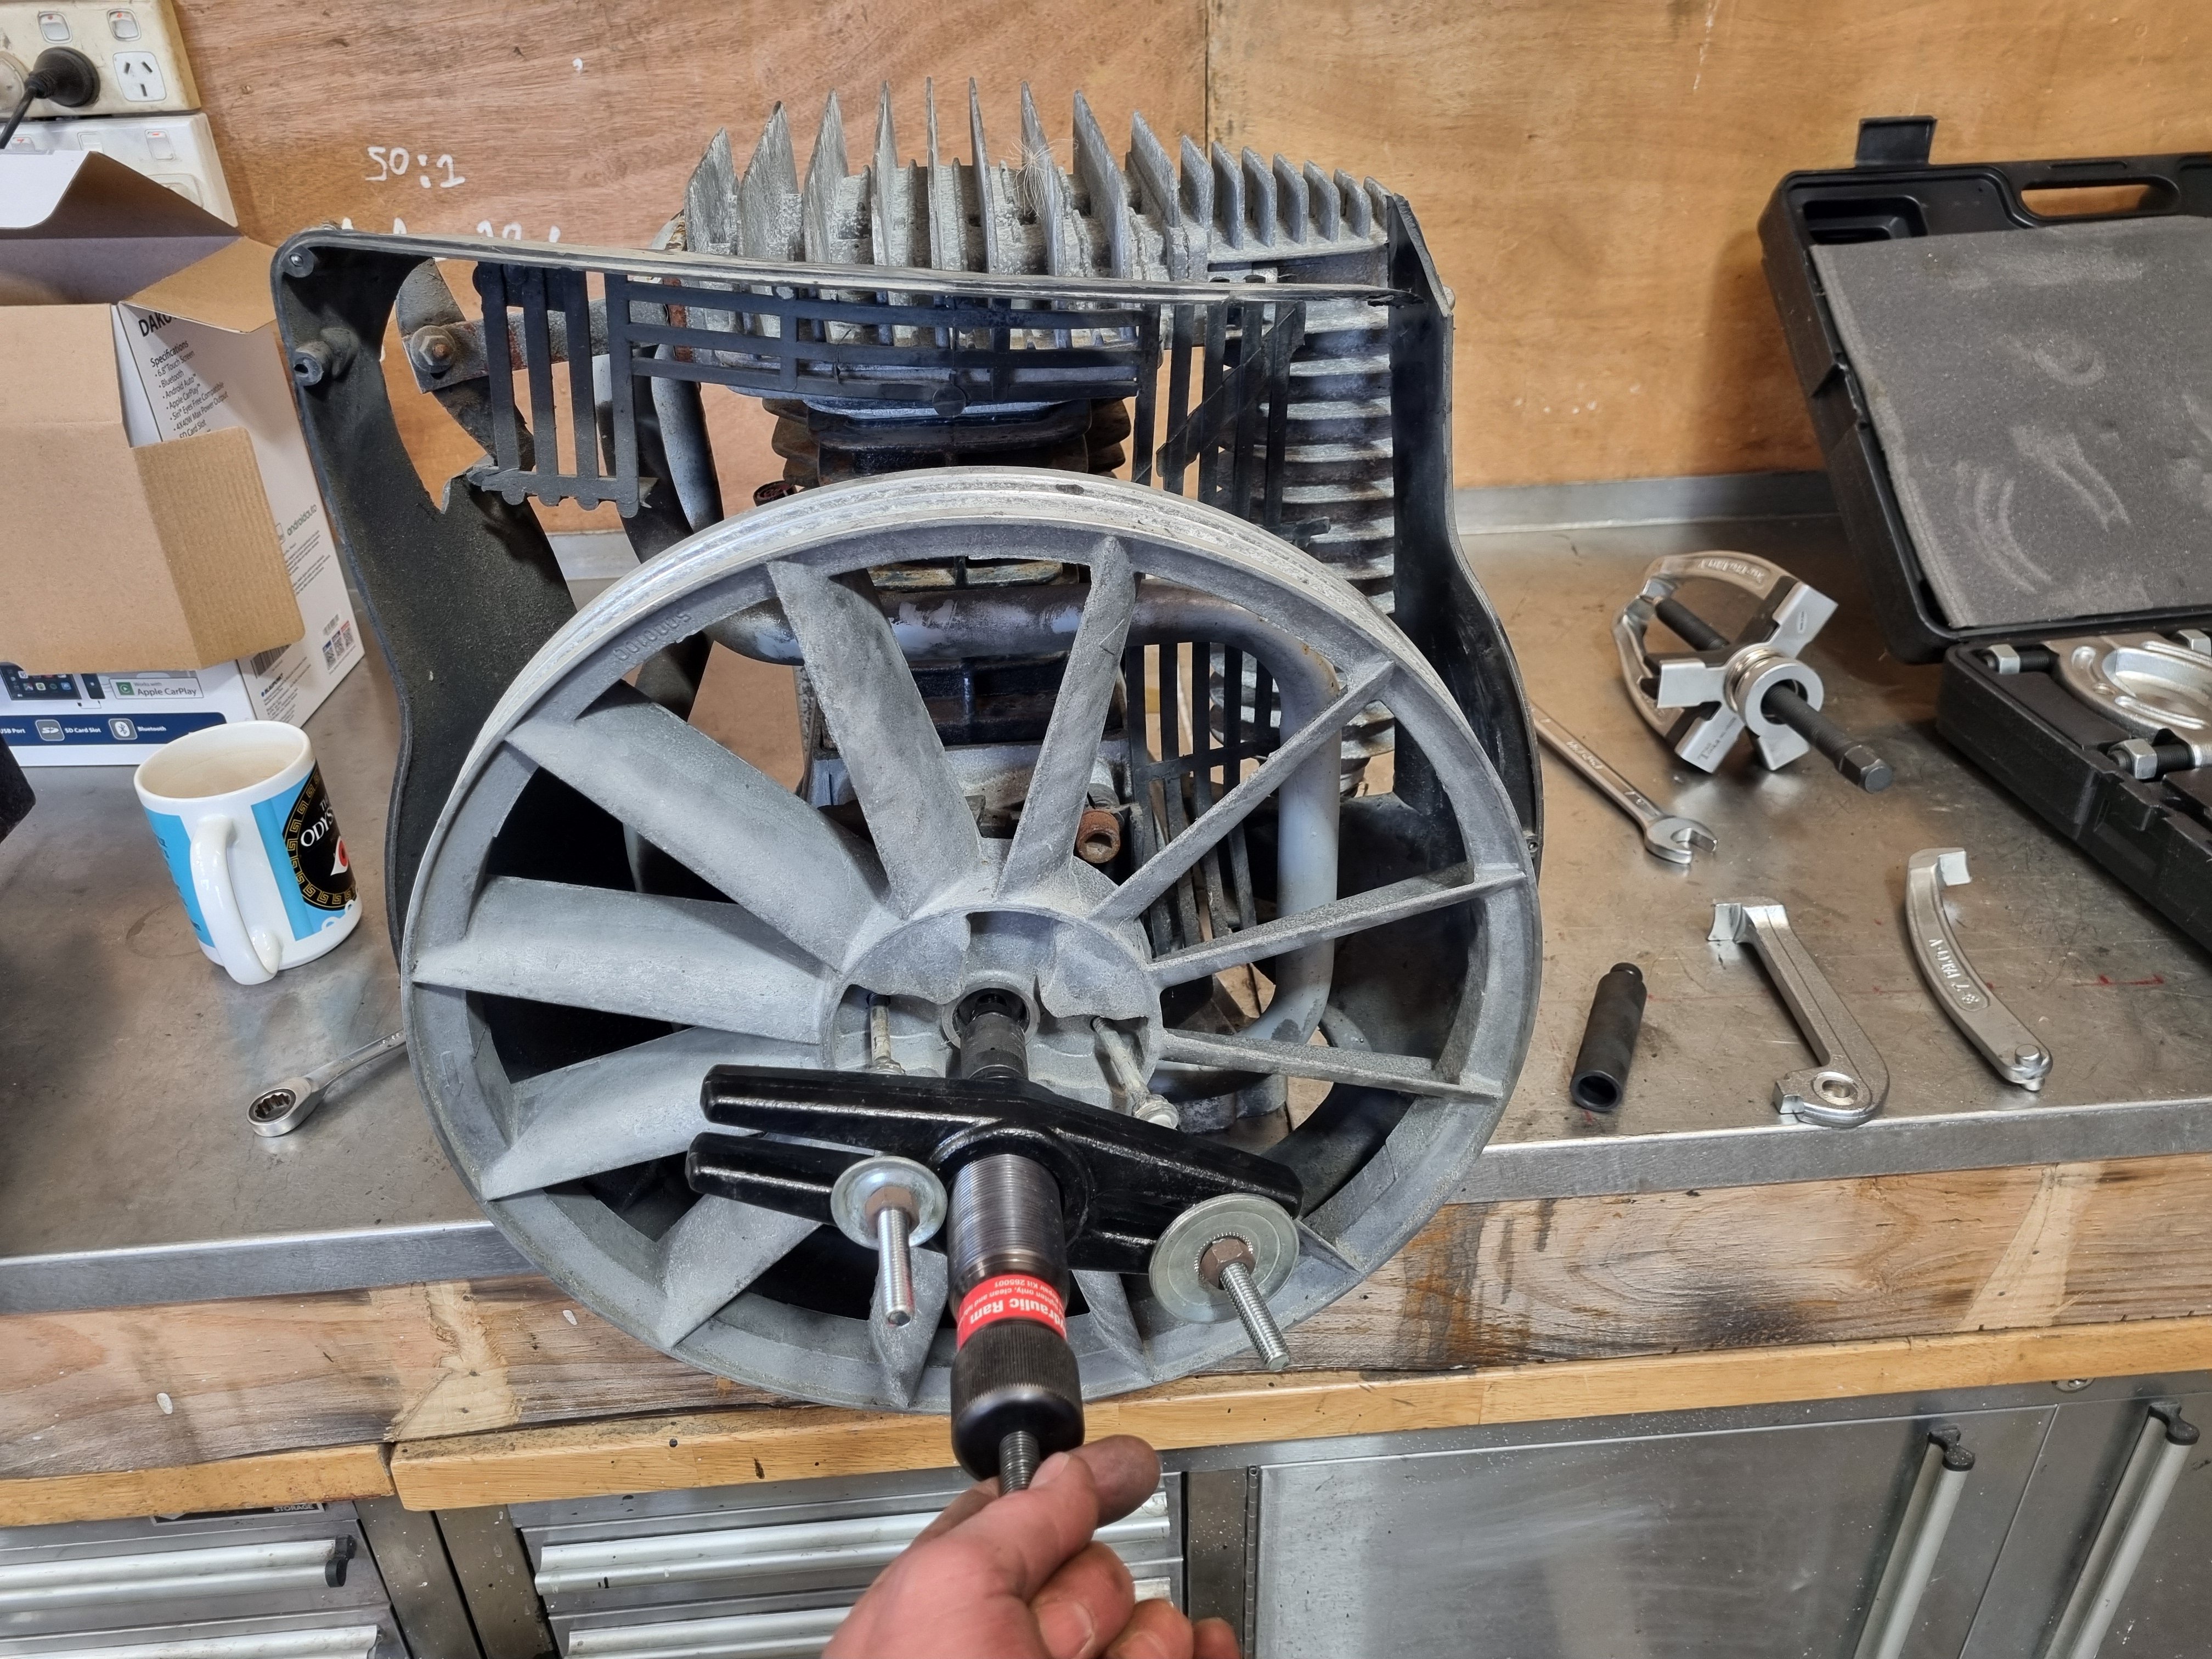
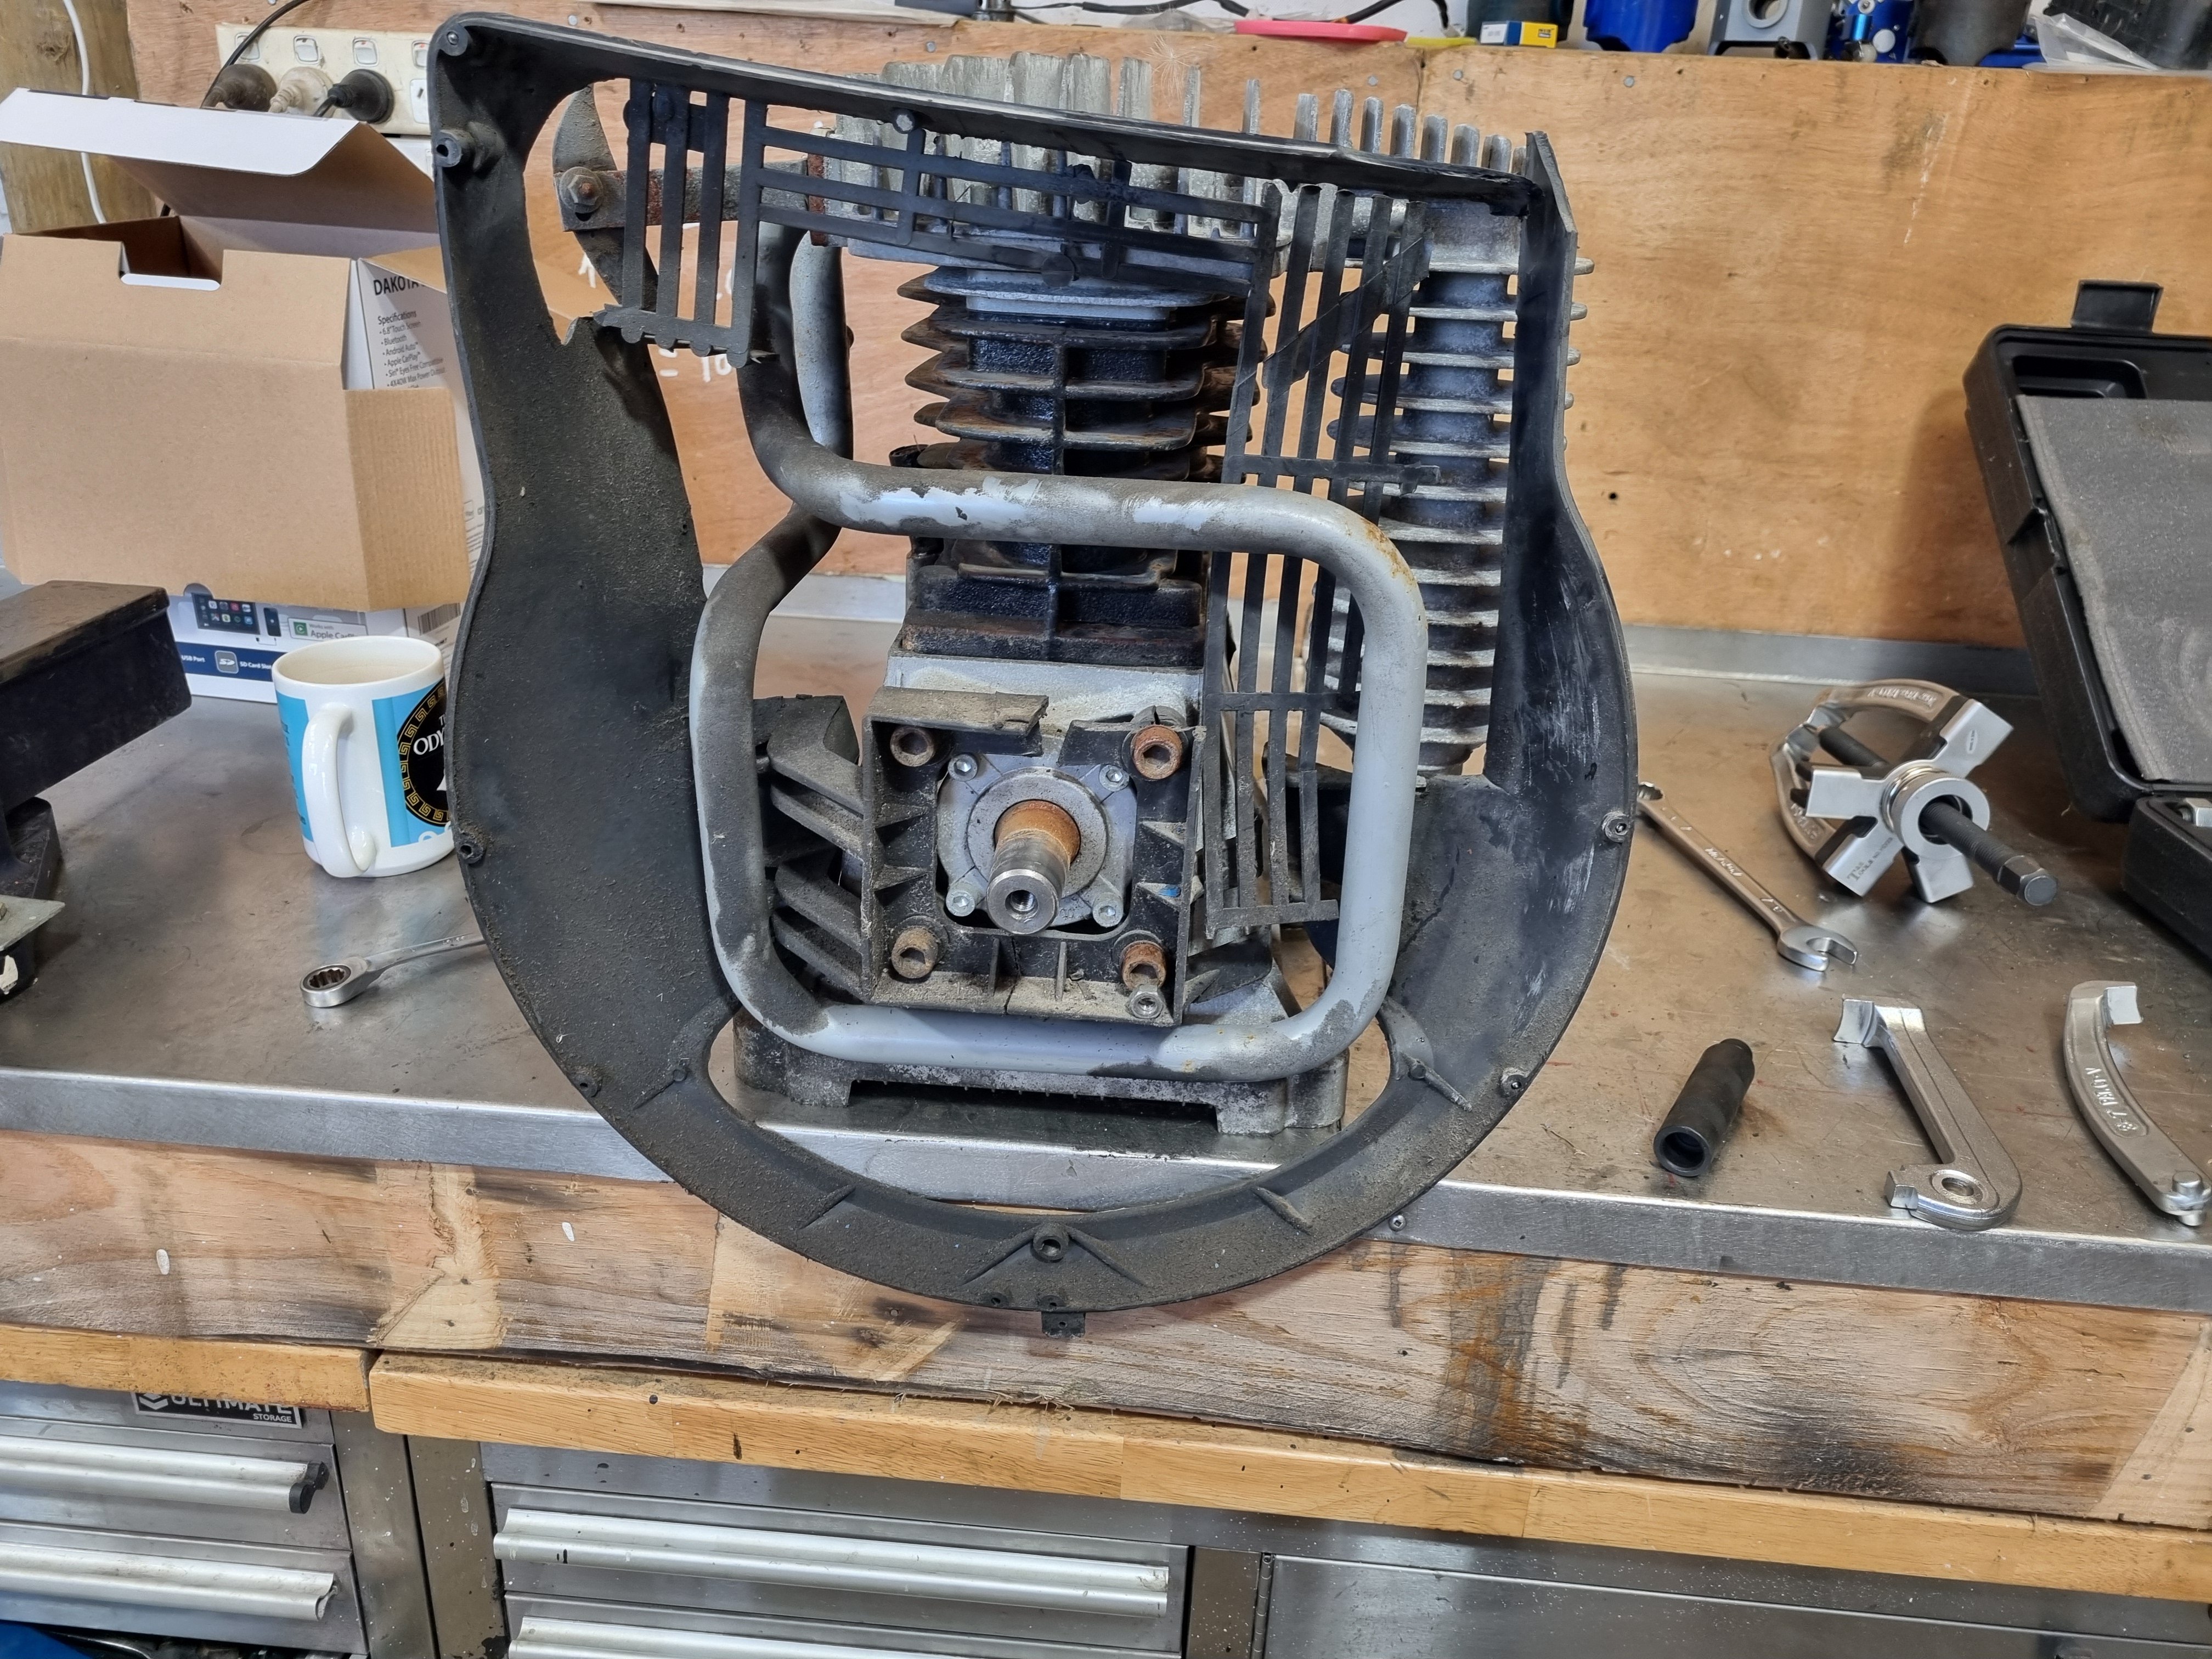
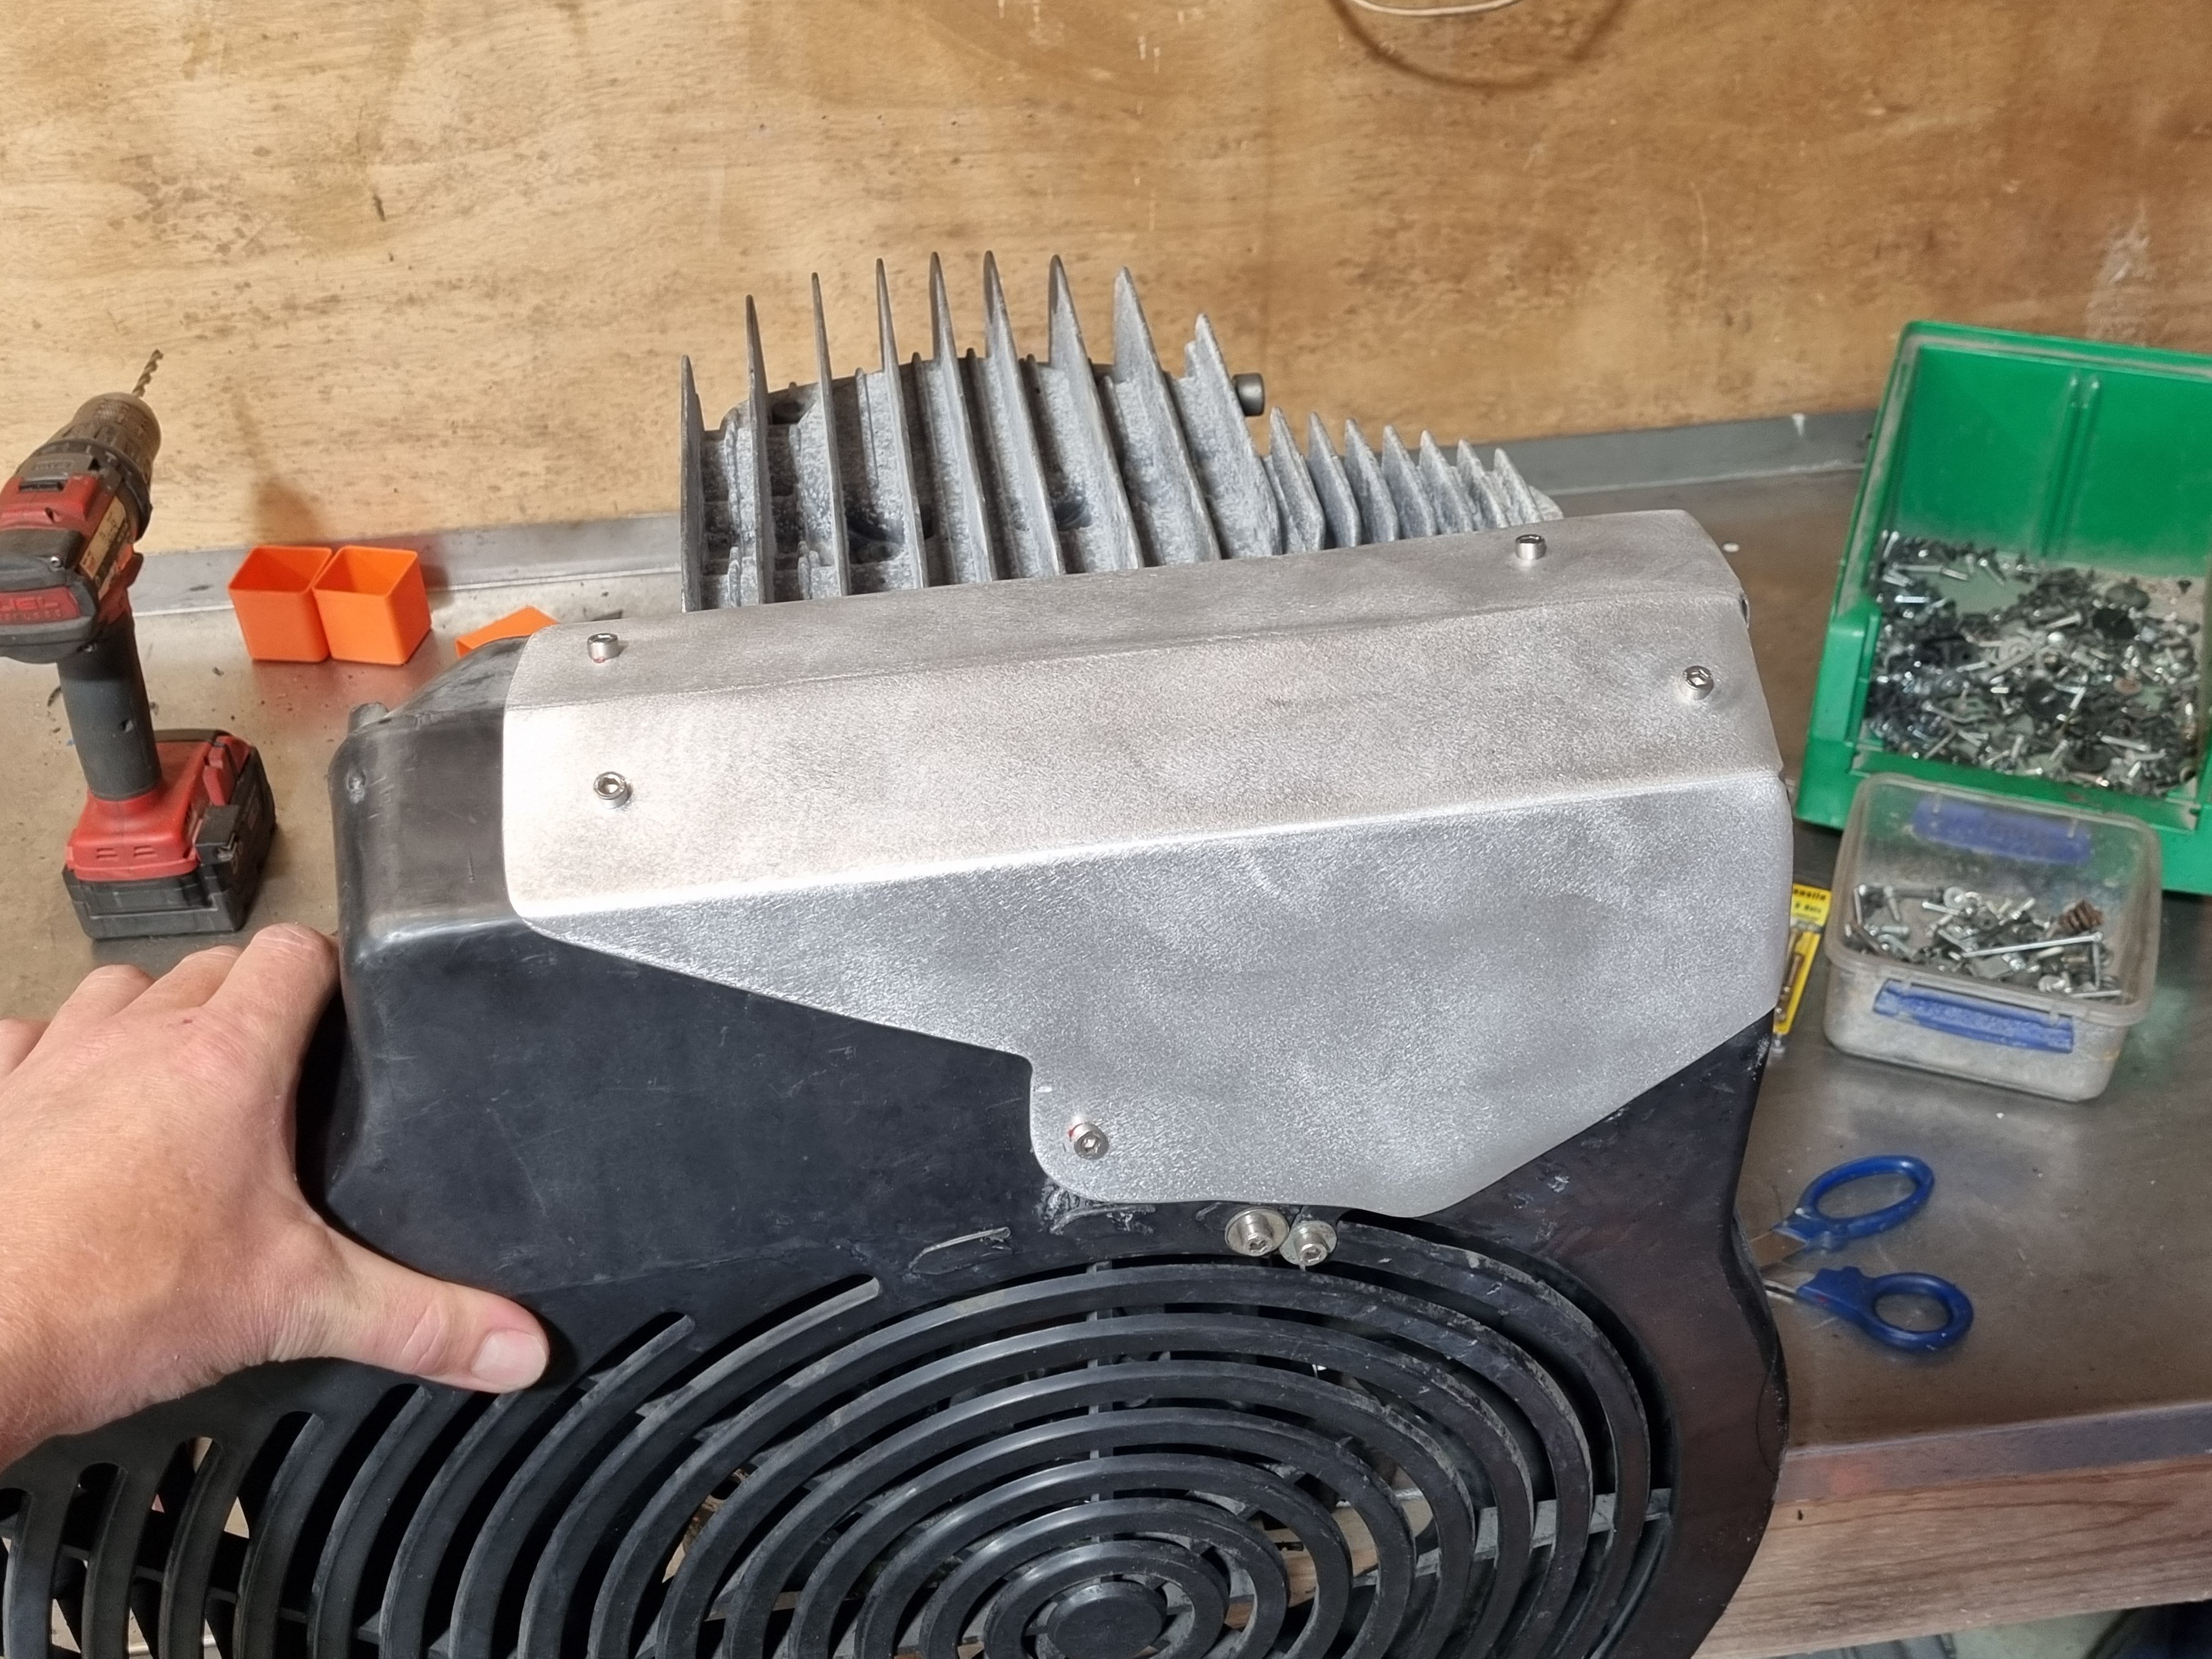
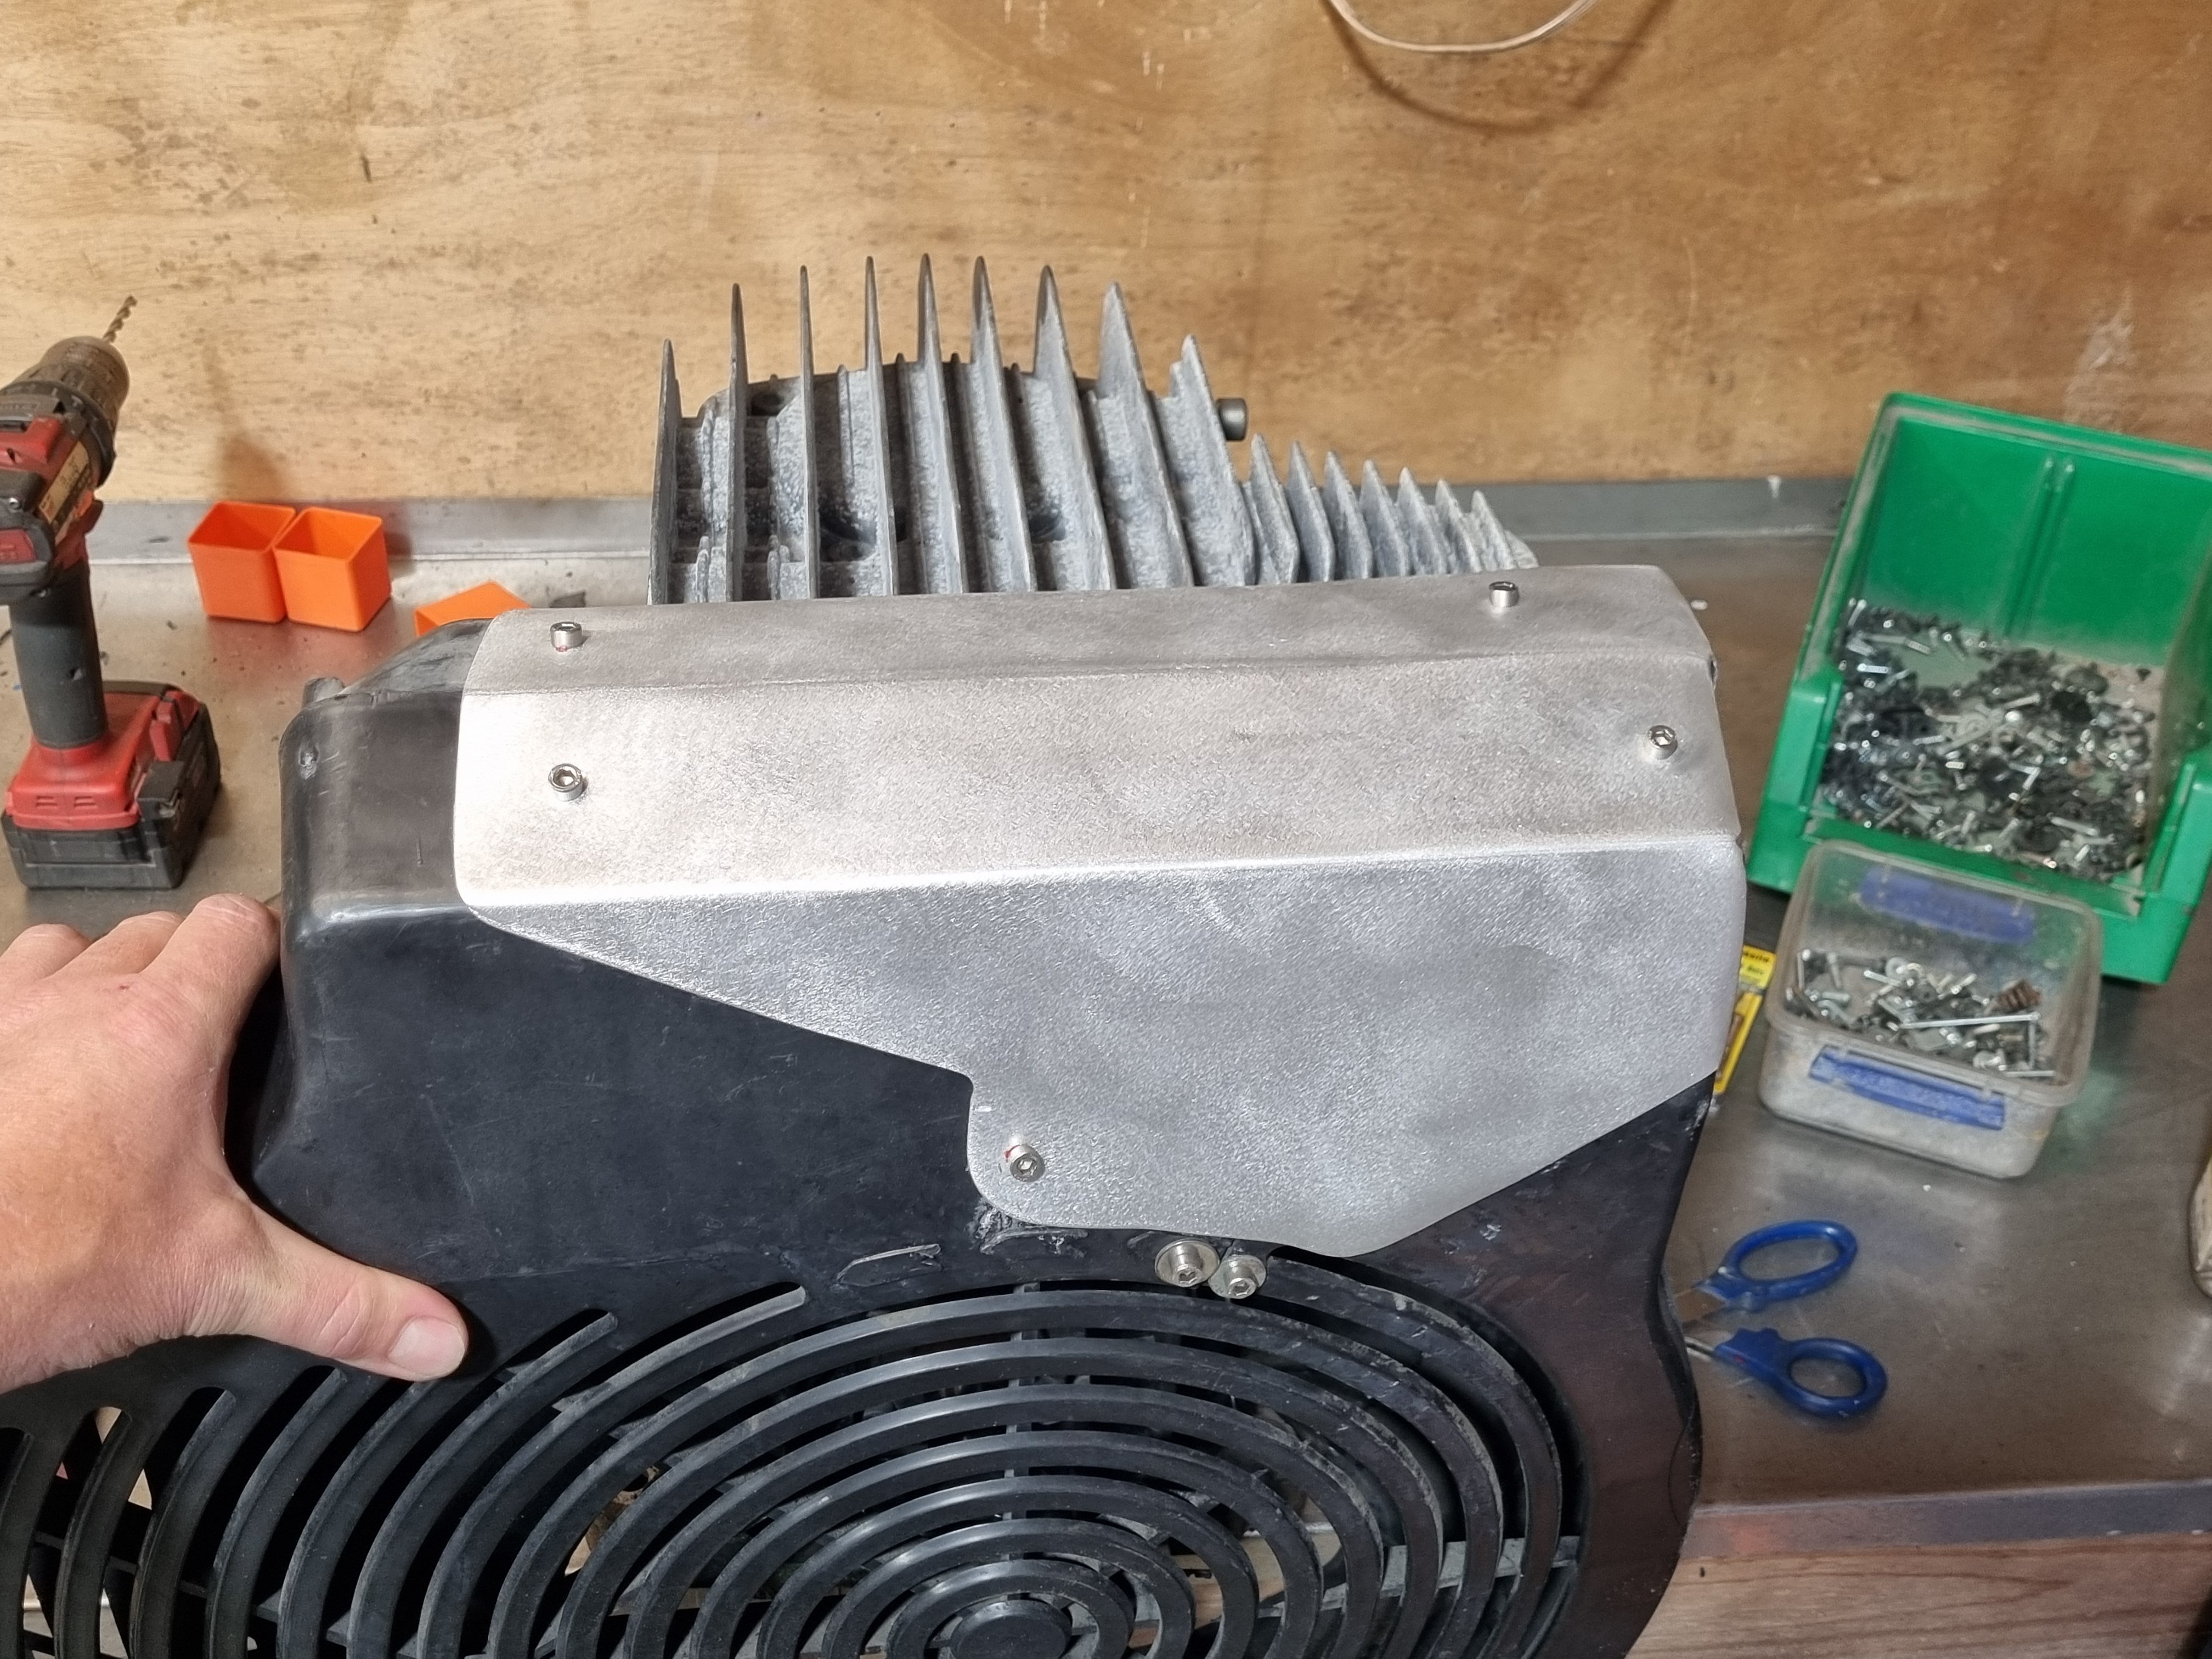
this is the old compressor from work. its been on a pallet kicked around from place to place for the last 10 years or so. its Italian, 44CFM 7HP 3 phase with a 270L tank. and because of that its fucked in many ways. the pressure switch is smashed off, the inlet filter is completely gone, the shroud around the belts is badly broken, the wiring for this thing is all up the shit also the electric motor shroud is all smashed in. it hasn't run in many years and when i picked it up from work it wouldn't even turn. i took it home, waterblasted it and pulled it to bits.
1 point
-
The last few months I've been looking through the USS Auctions in Japan, bid on a few TE27's. Funnily enough, I bid on one particular TE27 in October. Lost it to someone. The buyer must have been doing a buy and sell flip for some quick money as it came back up for auction the following weeks but with the reserve higher so I wasn't successful. Come the new year, they dropped down their reserve and I was able to nab it for a reasonable cost! The plan is to swap all of the good stuff out of the KE25 I have to it, and flick the KE25 off. If you're looking to purchase the KE25 project below get in touch. https://oldschool.co.nz/index.php?/topic/52400-pbaines-1971-toyota-corolla-ke25/ Photos from inspection. - Interior is average which is perfect because I have a great interior in my KE25 to get goods from - Underside has some rust, especially in the sills. But for a car this age, can you really be surprised? No stress to be honest. the rest of the car looks like a great base for a resto. More to come at a later date. 20231116_121909_copy_2000x1126 by phillipbaines, on Flickr 20231116_122016_copy_2000x1126 by phillipbaines, on Flickr 20231116_122315_copy_2000x1126 by phillipbaines, on Flickr 20231116_122314_copy_2000x1126 by phillipbaines, on Flickr 20231116_122304_copy_2000x1126 by phillipbaines, on Flickr 20231116_122300_copy_2000x1126 by phillipbaines, on Flickr 20231116_121947_copy_2000x1126 by phillipbaines, on Flickr 20231116_121940_copy_2000x1126 by phillipbaines, on Flickr 20231116_121939_copy_2000x1126 by phillipbaines, on Flickr 20231116_121912_copy_2000x1126 by phillipbaines, on Flickr 20231116_121910_copy_2000x1126 by phillipbaines, on Flickr 20231116_122104_copy_2000x1126 by phillipbaines, on Flickr 20231116_122103_copy_2000x1126 by phillipbaines, on Flickr 20231116_122100_copy_2000x1126 by phillipbaines, on Flickr 20231116_122057_copy_2000x1126 by phillipbaines, on Flickr 20231116_122046_copy_2000x1126 by phillipbaines, on Flickr 20231116_122029(0)_copy_2000x1126 by phillipbaines, on Flickr 20231116_122028_copy_2000x1126 by phillipbaines, on Flickr 20231116_122025_copy_2000x1126 by phillipbaines, on Flickr 20231116_122007_copy_2000x1126 by phillipbaines, on Flickr 20231116_122256_copy_2000x1126 by phillipbaines, on Flickr 20231116_122254_copy_2000x1126 by phillipbaines, on Flickr 20231116_122143_copy_2000x1126 by phillipbaines, on Flickr 20231116_122139_copy_2000x1126 by phillipbaines, on Flickr 20231116_122129_copy_2000x1126 by phillipbaines, on Flickr 20231116_122126_copy_2000x1126 by phillipbaines, on Flickr 20231116_122123_copy_2000x1126 by phillipbaines, on Flickr 20231116_122122_copy_2000x1126 by phillipbaines, on Flickr 20231116_122121_copy_2000x1126 by phillipbaines, on Flickr 20231116_122106_copy_2000x1126 by phillipbaines, on Flickr 20231116_122105_copy_2000x1126 by phillipbaines, on Flickr 20231116_122326_copy_2000x1126 by phillipbaines, on Flickr 20231116_122321_copy_2000x1126 by phillipbaines, on Flickr Discussion thread:1 point
-
Had to re engineer the throttle cable bracket so it clears the inlet pipe made that work with the grinder that's been in naughty corner after bumper support....... Spritz of paint it bolted on and the cables even work in their new position although very long I think I can hide this by sending them under manifold.
1 point
-
Hmm, I may have missed that and made some assumptions about it being essentially a relay with extra. Maybe I will revisit my wiring.... thanks.1 point
-
You'd spotted the little wiring clue hiding in an icon on that page?
1 point
-
Car has been delivered! Currently organising it to be stripped and off to panel/paint/repair cert so hopefully have some updates in the coming few months.1 point
-
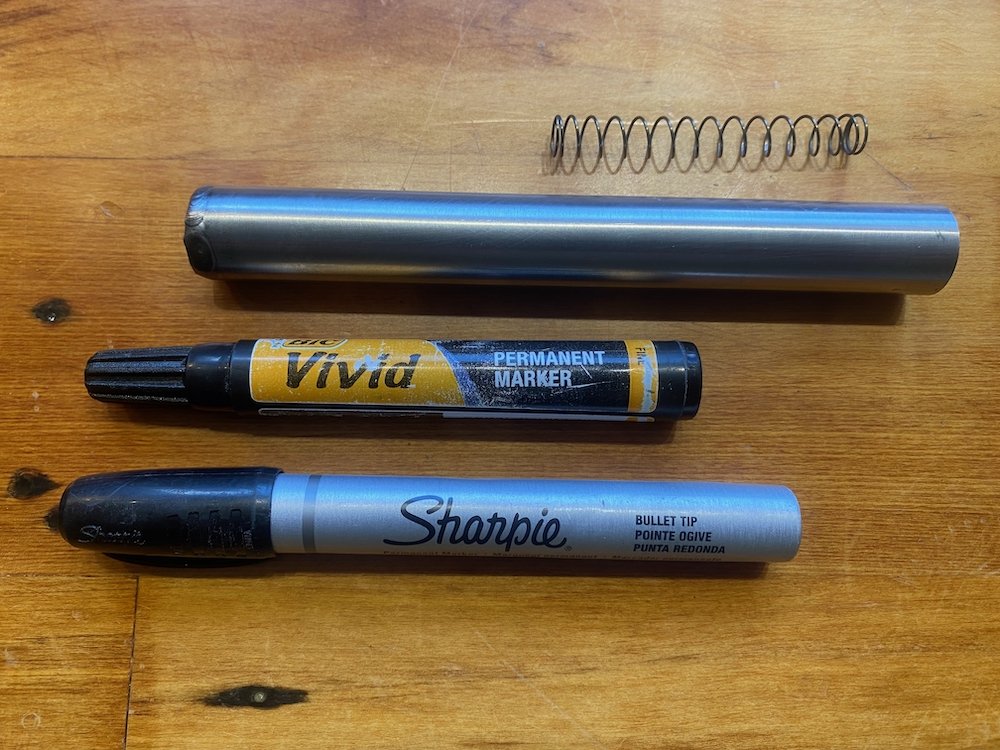
Had access to a large plotter table at my last job which was super handy for reverse engineering or taking prototypes from the computer to the real world, could print notes and datums to cardboard before cutting out for test fits or confirming bolt holes before longer/expensive processes. Today step one of bringing that capability home began, a vivid/sharpy holder for my cnc router. 3/4" mm seamless tube offcut has the same id as the markers, weld 1 stainless washer to the end completes the holder body, complex eh! All I needed was a suitable compression spring to ensure the marker holds a constant pressure without needing a perfect level bed. Awesomely, big green and big orange hold stocks of these things, sadly they are both closed today, buzzkill. Wanting to test NOW a full workshop search was initiated with a suitable donor found in an old BB gun, the slide spring happed to be 110% perfect for the job. Length is set to hold the two types of marker I usually have littering every corner.... Fitted up into a tool holder and good to go
1 point
-
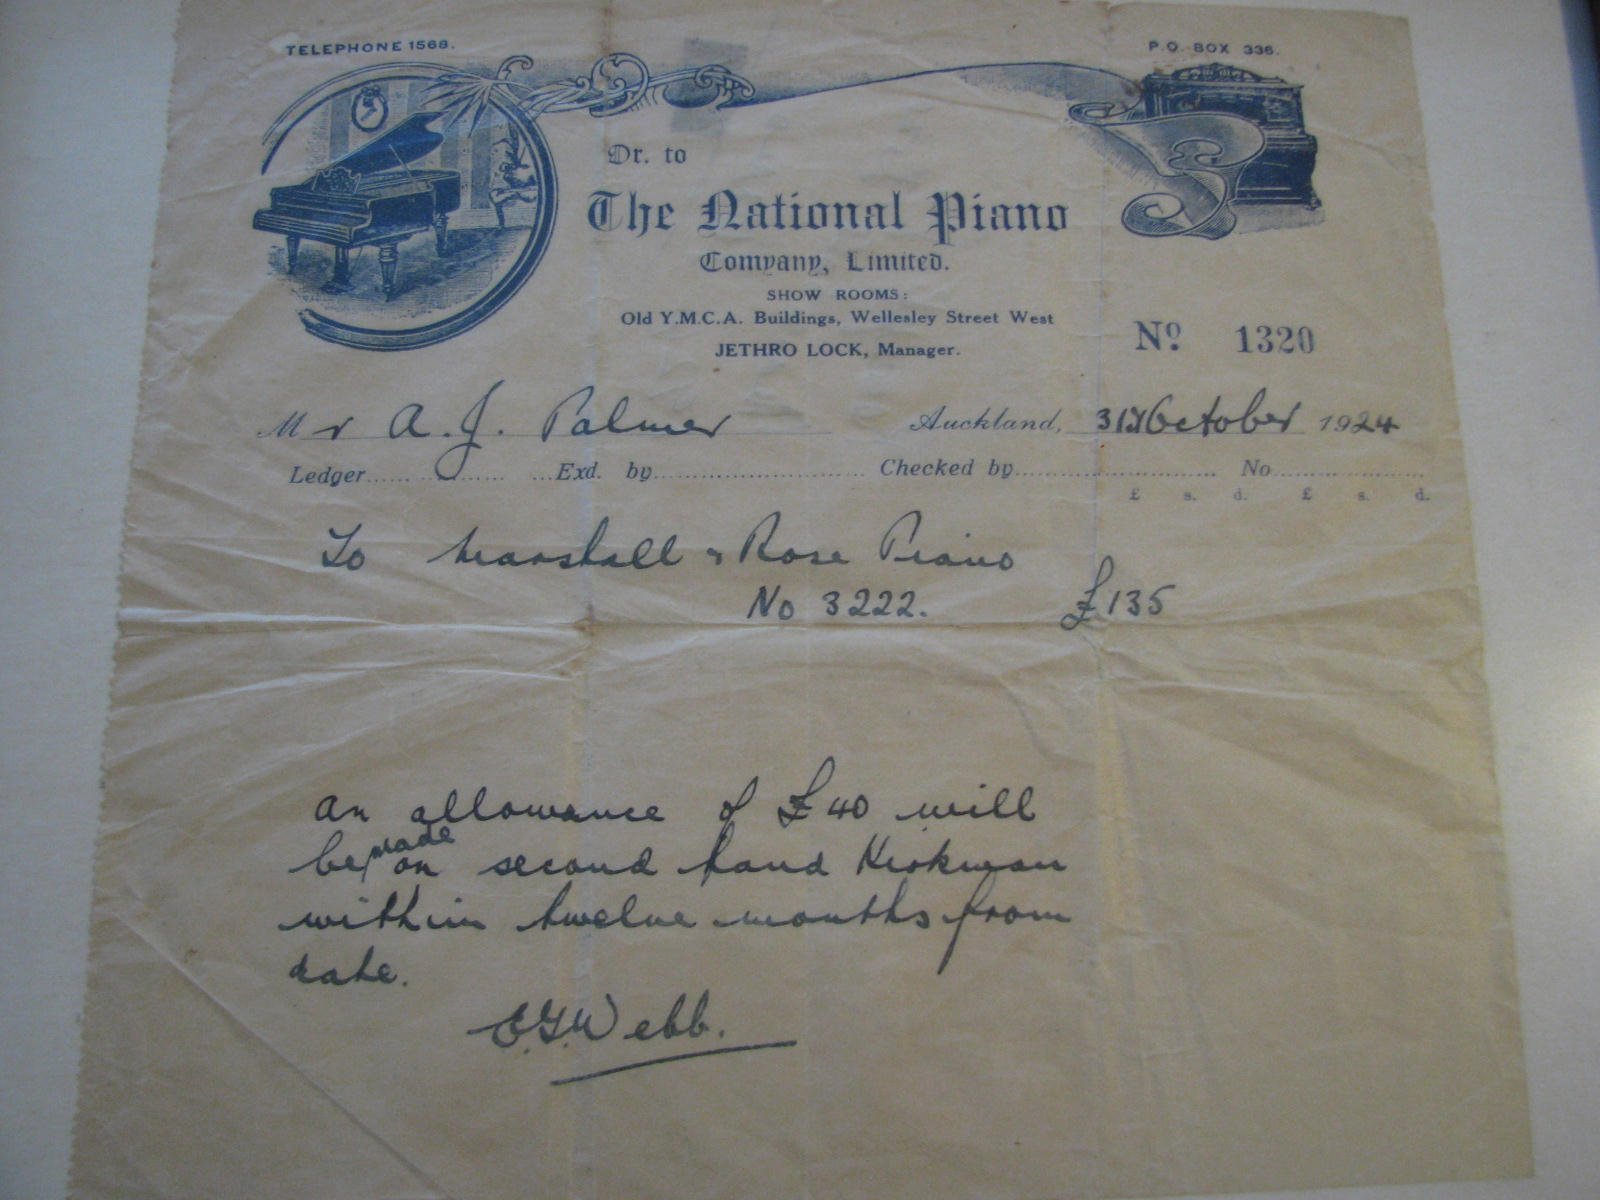
Uh-oh, it's time. This thread will be long and tedious and you probably shouldn't read it. Eventually there may be some videos but I need to bury them behind off-putting Barry stories. Four score and nineteen years ago, before the internet, computers, CDs, cassettes, before NZ switched to decimal currency, before TV, vinyl, WW2, the Great Depression, the popularisation of radio, before the majority of NZ families owned a car or even had electricity in the home, it was still the golden age of the piano. My great grandfather on my mother's side had just upgraded to a shiny new British piano (Japanese pianos weren't a thing yet, and German pianos had fallen out of favour in recent years for some reason). Somehow the receipt from that piano purchase survives to this day: More recently we also unearthed this photo of Great Granddad playing said piano: OK, so he's only "playing" the piano using a push-up pianola. These were a mechanical contraption that sat externally in front of the piano, somehow read scrolls of music via pneumatics and played the piano keys the same way a human would. A human was still required to power the device by pumping foot pedals, and then to take credit for the performance. They could also adjust things like volume and tempo on the fly via hand-operated sliders. Here's a random photo of a push-up pianola being used with a grand piano: When you think about it, this is a ridiculous amount of complexity, weight, cost, physical space, maintenance, effort etc just to reproduce music. Anyway, although using a pianola doesn't qualify one as a musician, my grandmother told me that Great Granddad would put a great deal of focus into adding expression via the pianola's levers. She recalled one instance where he finished a performance and heard applause coming from outside his window - someone walking down the street had stopped to listen. That's it, that's the highlight of the first part of this piano's life. From there, the piano's life was presumably pretty standard - a lot of sitting in the corner. My great grandfather had six children and the piano wound up with his youngest, my grandmother. Possibly the earliest memories of my life are of visiting my grandparents' house, where the piano sat in a back room down the hall. I would go down there, bash on the keys randomly, come up with a convoluted name for my amazing impromptu composition, then head to the front room where the adults would be talking and try to get their attention: "Did you hear that? It was called... um....um...." (invariably I had forgotten the name of my composition by then) The piano then passed to my parents while I was still young, possibly because my dad (who isn't from the piano's side of the family) showed some interest. Here's a top tip for any parents of young children: Tell the kid that if they go to bed early without any fuss like a good boy, their dad will play them a song on the piano as they fall asleep. This will mess them up for life. So I inherited the piano when I got my first house. Here it is at my place ten years ago, with a duvet jammed behind it: It's a Marshall & Rose upright, made in London in 1922 (best guess based on the serial number). That manufacturing date should have given it long enough to take a slow boat to NZ prior to its purchase here in '24. In car terms, you could liken this piano to something like a Rover P6 - an above-entry-level product, manufactured by a still-independent British company who would later be swallowed up by a conglomerate and produce less-unique products until the conglomerate went out of business for British reasons. Just as Rover would outsource the odd driveline component (a transmission here, an engine there), this piano uses a complete action assembly (the internal moving parts) from an outside supplier. The candleholders are aftermarket accessories which I added - basically they're the piano equivalent of fitting a roof rack and an external spare tyre to your P6 to make it look more 'classic car'. The piano's finished in burr walnut veneer hidden under darkened old varnish. Believe it or not I cannot find another exactly the same online. My plans for this thread are: to bore you all silly by rambling about piano stuff to document my project to record ten songs to celebrate the centenary of the piano's purchase. I've picked one song from every decade of the piano's existence (judge's decision is final and no correspondence will be entered into), and I plan to record one a month between January and October of 2024. Whether I find time to achieve this, let alone in video format, and whether I go through with making the results public, time will tell. The goal is that January will be the 1920s song, February the 1930s etc, and I will regret this very much.
1 point
-
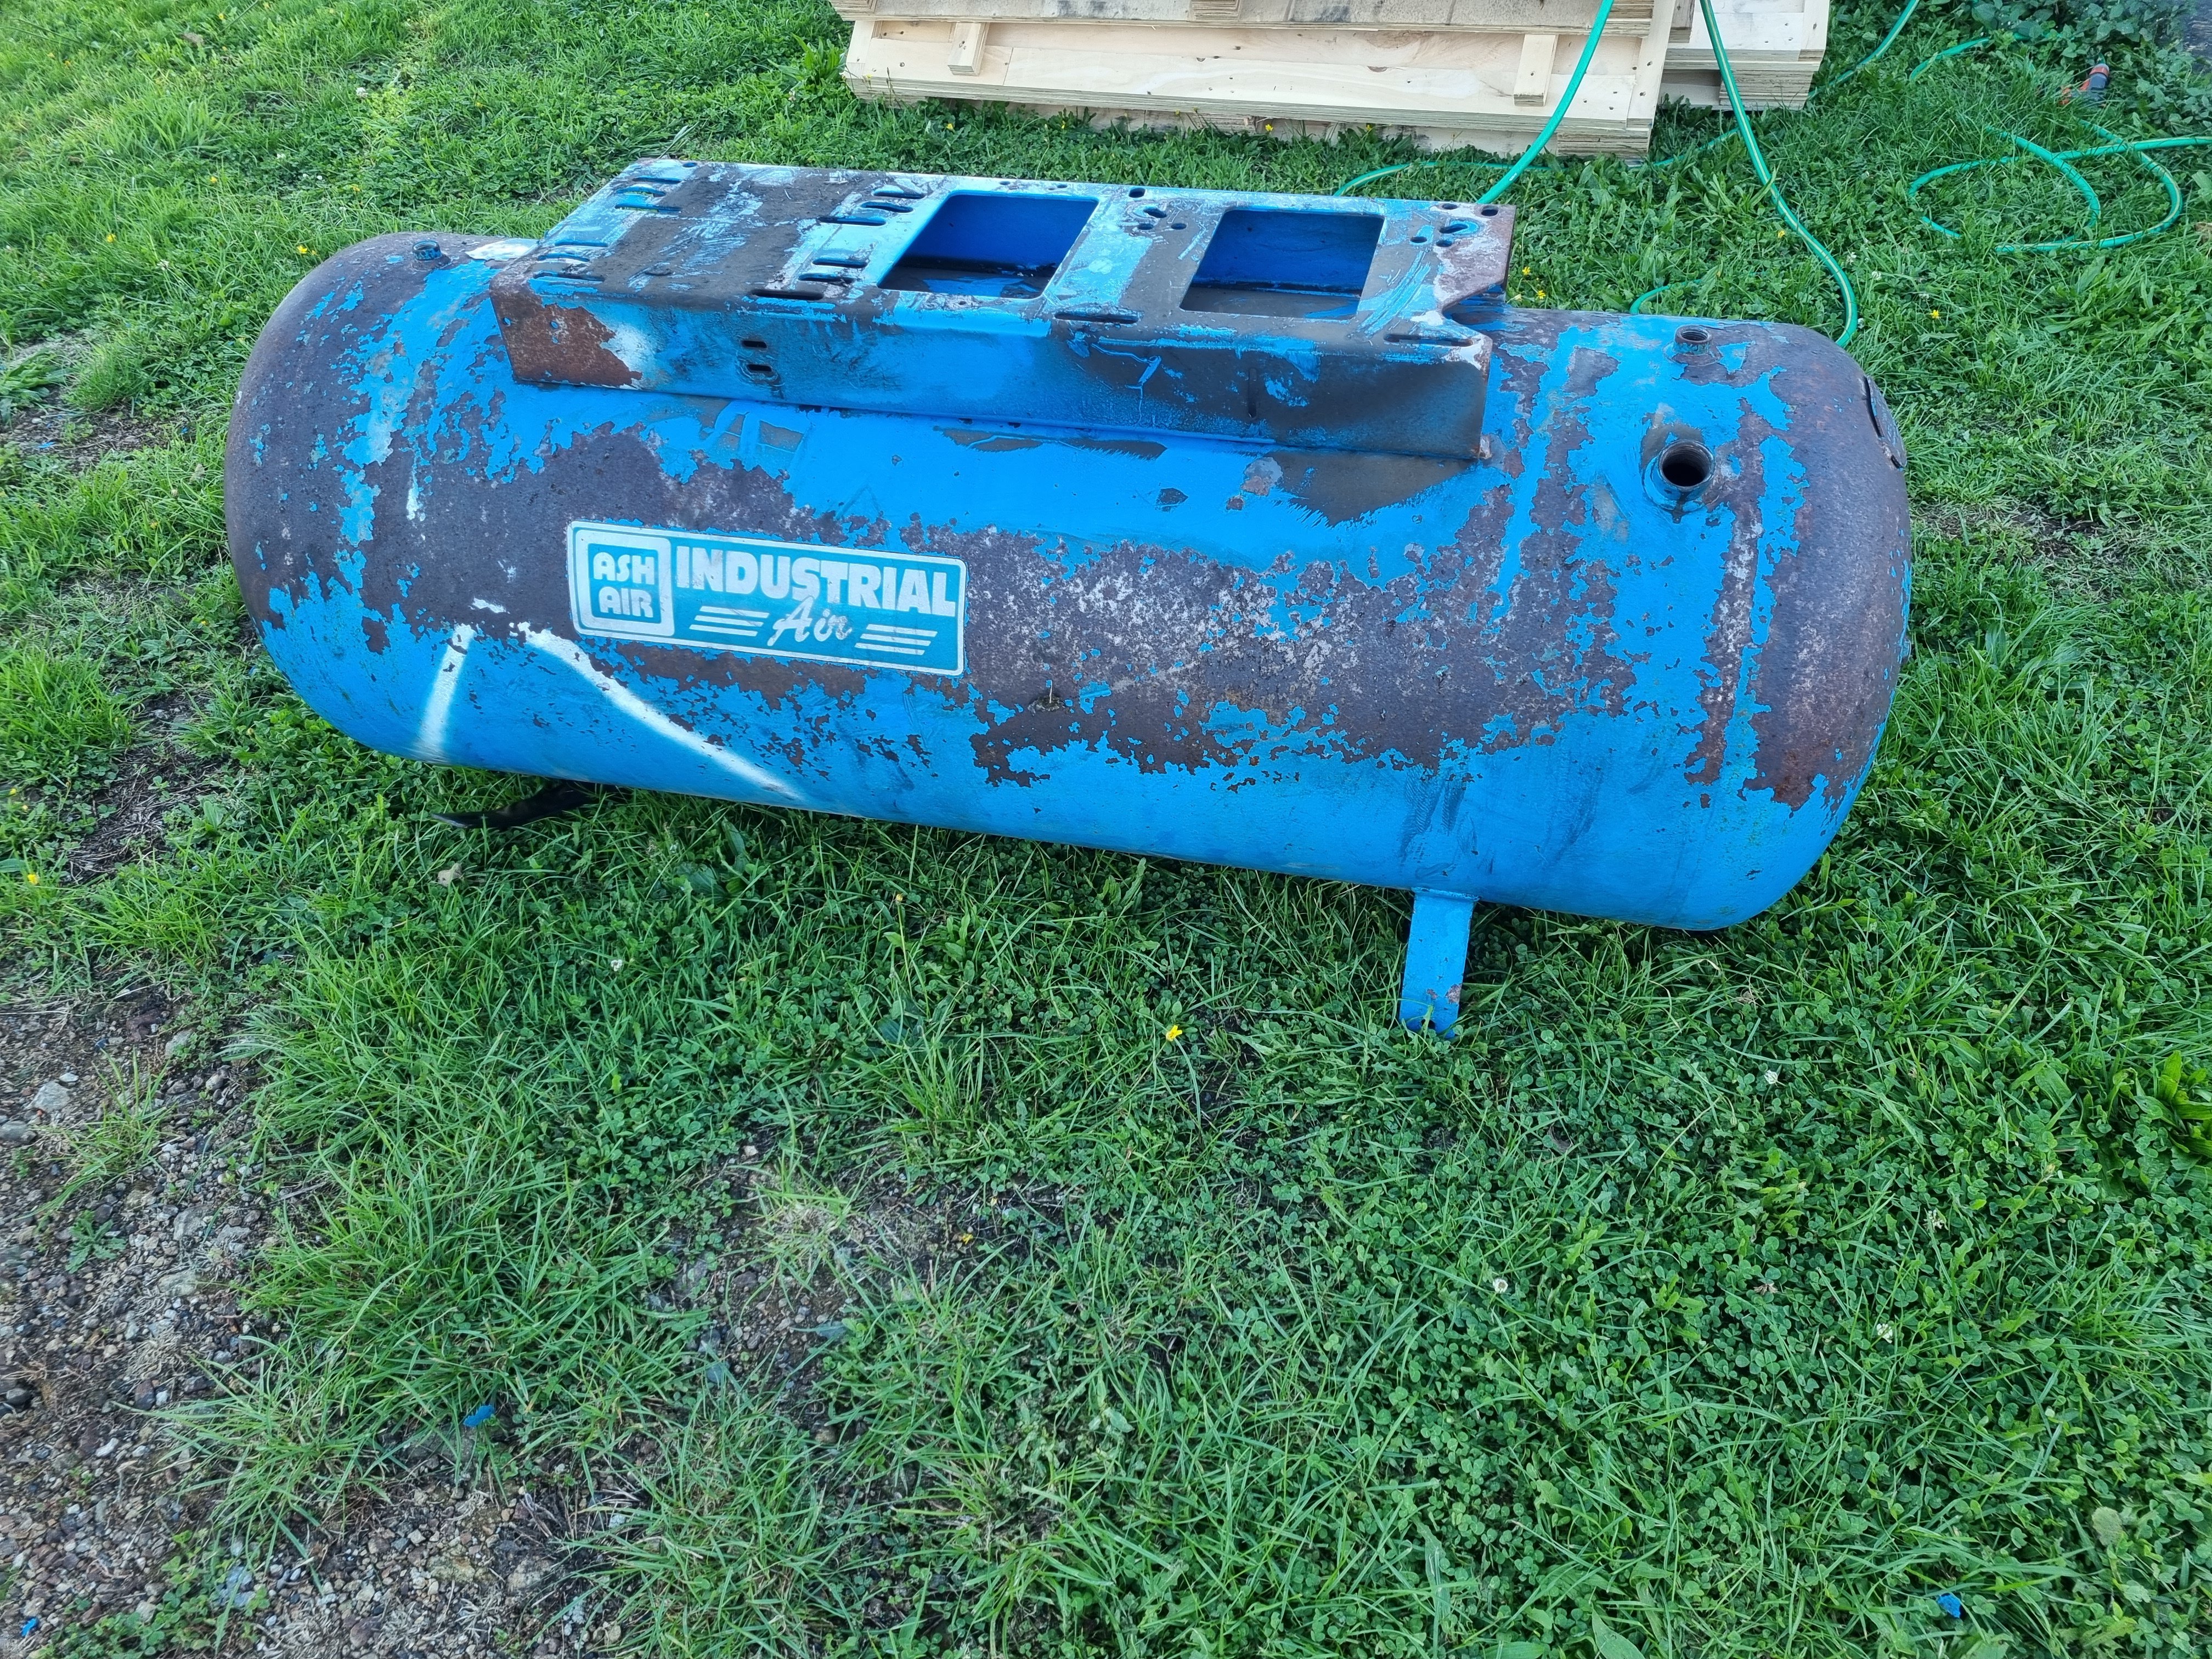
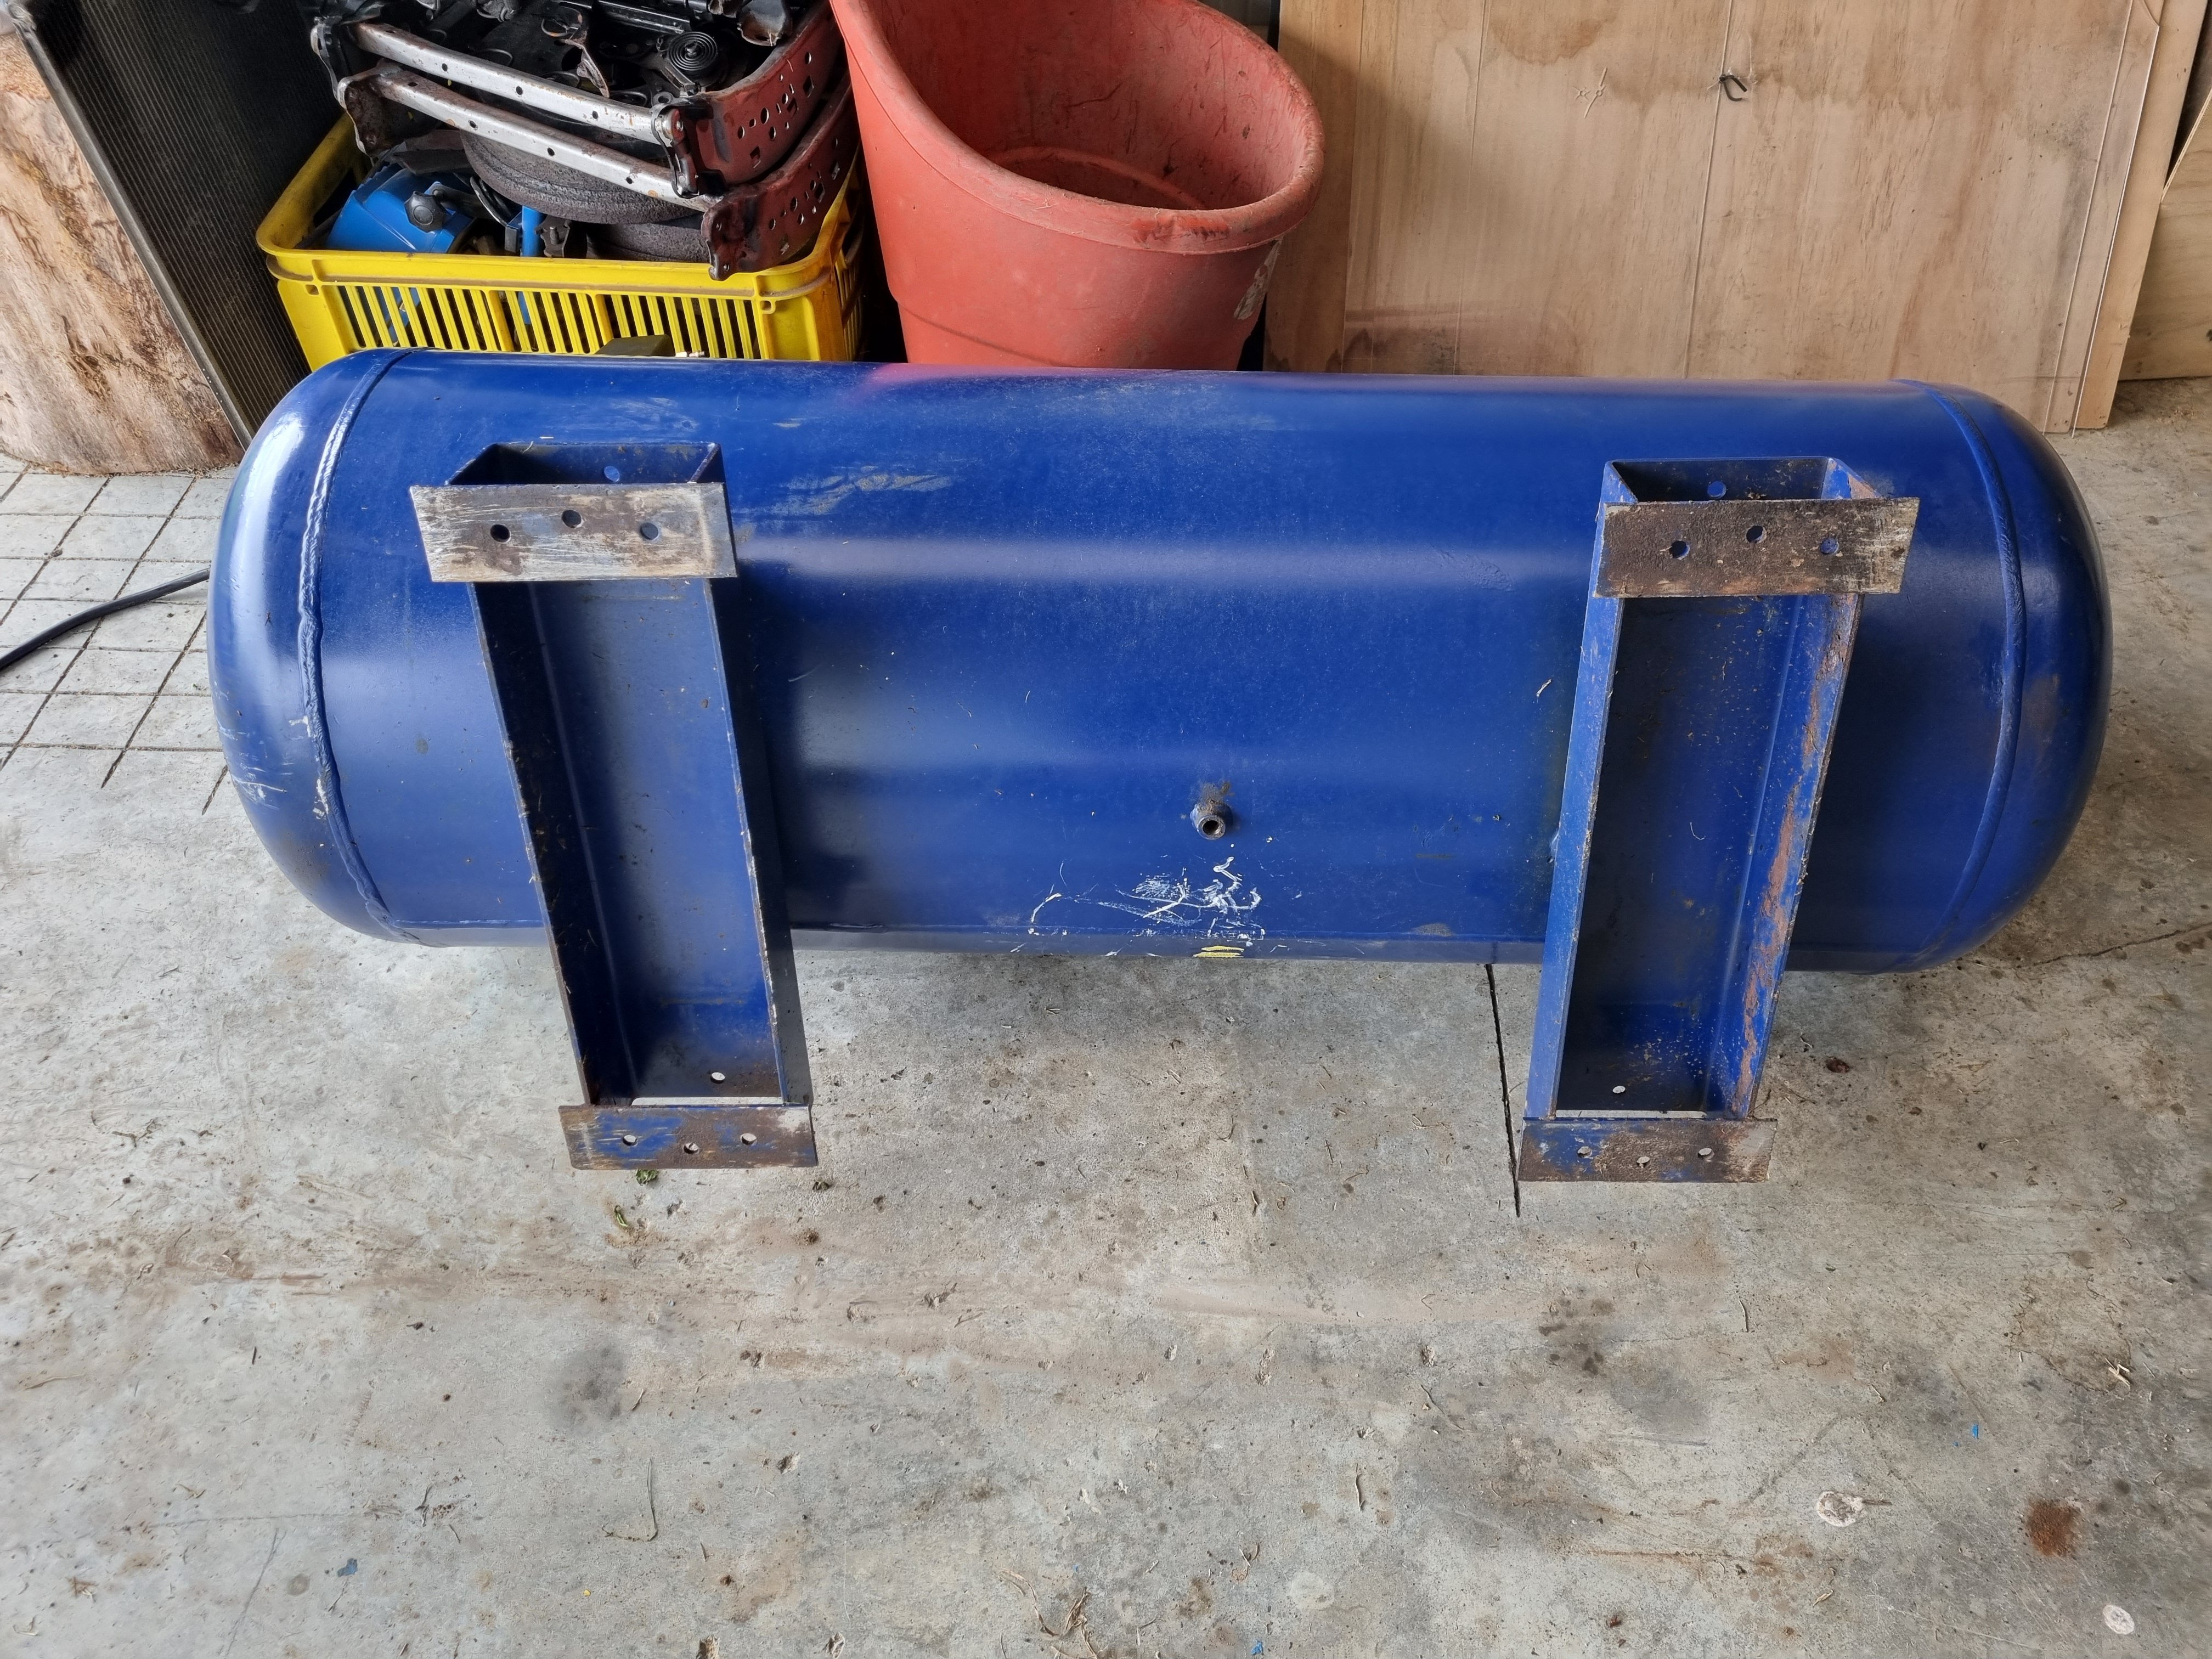
So I took the tank to get pressure tested and it had a crack where the motor plate is welded on. I decided to see what was available on the tard and a perfect (almost) tank was for sale for a price less than another pressure test and paint so I bought it. Is 300L, made in 2014 and comes with a pressure switch and some fittings I don't have. The only problem is the inlet port from the compressor to the tank is in the middle. I don't have a pipe long enough to plumb it. I need a new pipe for that, probably about 900 long. I'll try to mount everything into the tank today and get it running without the pipe. Let's see how far I get.
1 point
-
Or 4 strombergs on a v121 point
-
Nice... looks like a red dwarf.. At "some point in the future" I have this 10hp Broomwade to reco.. Think it was out of a mine
1 point
-
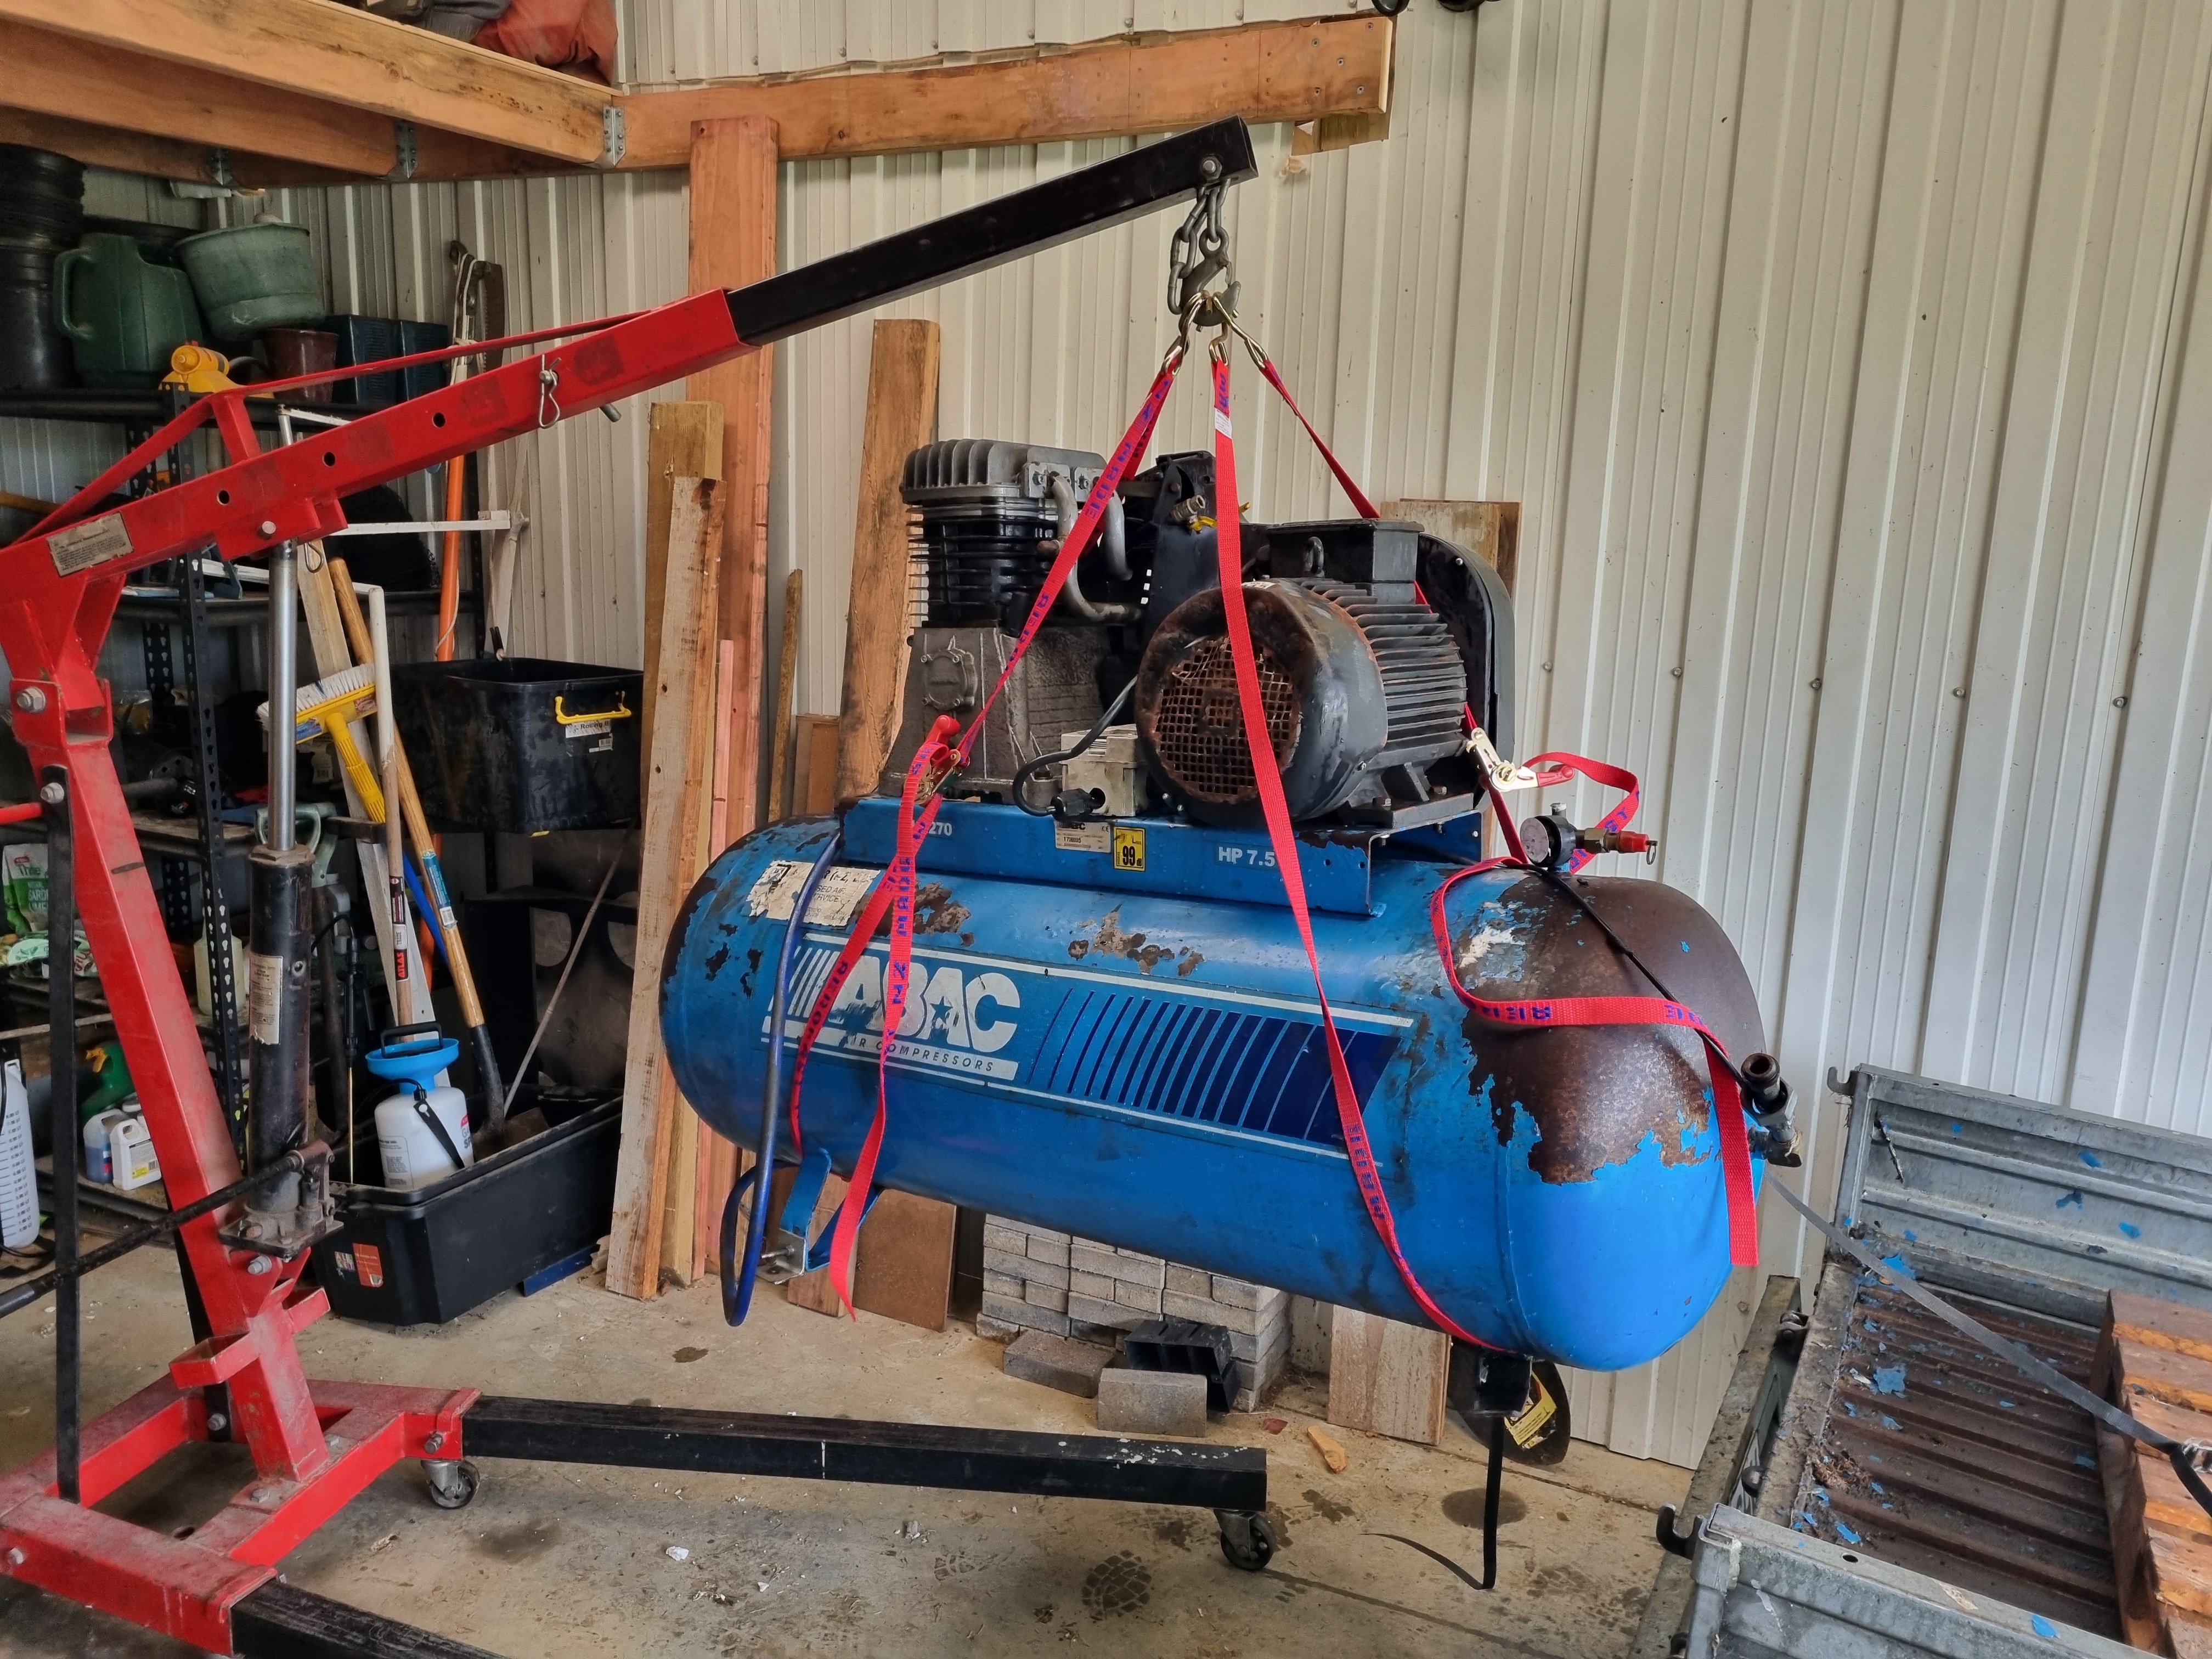
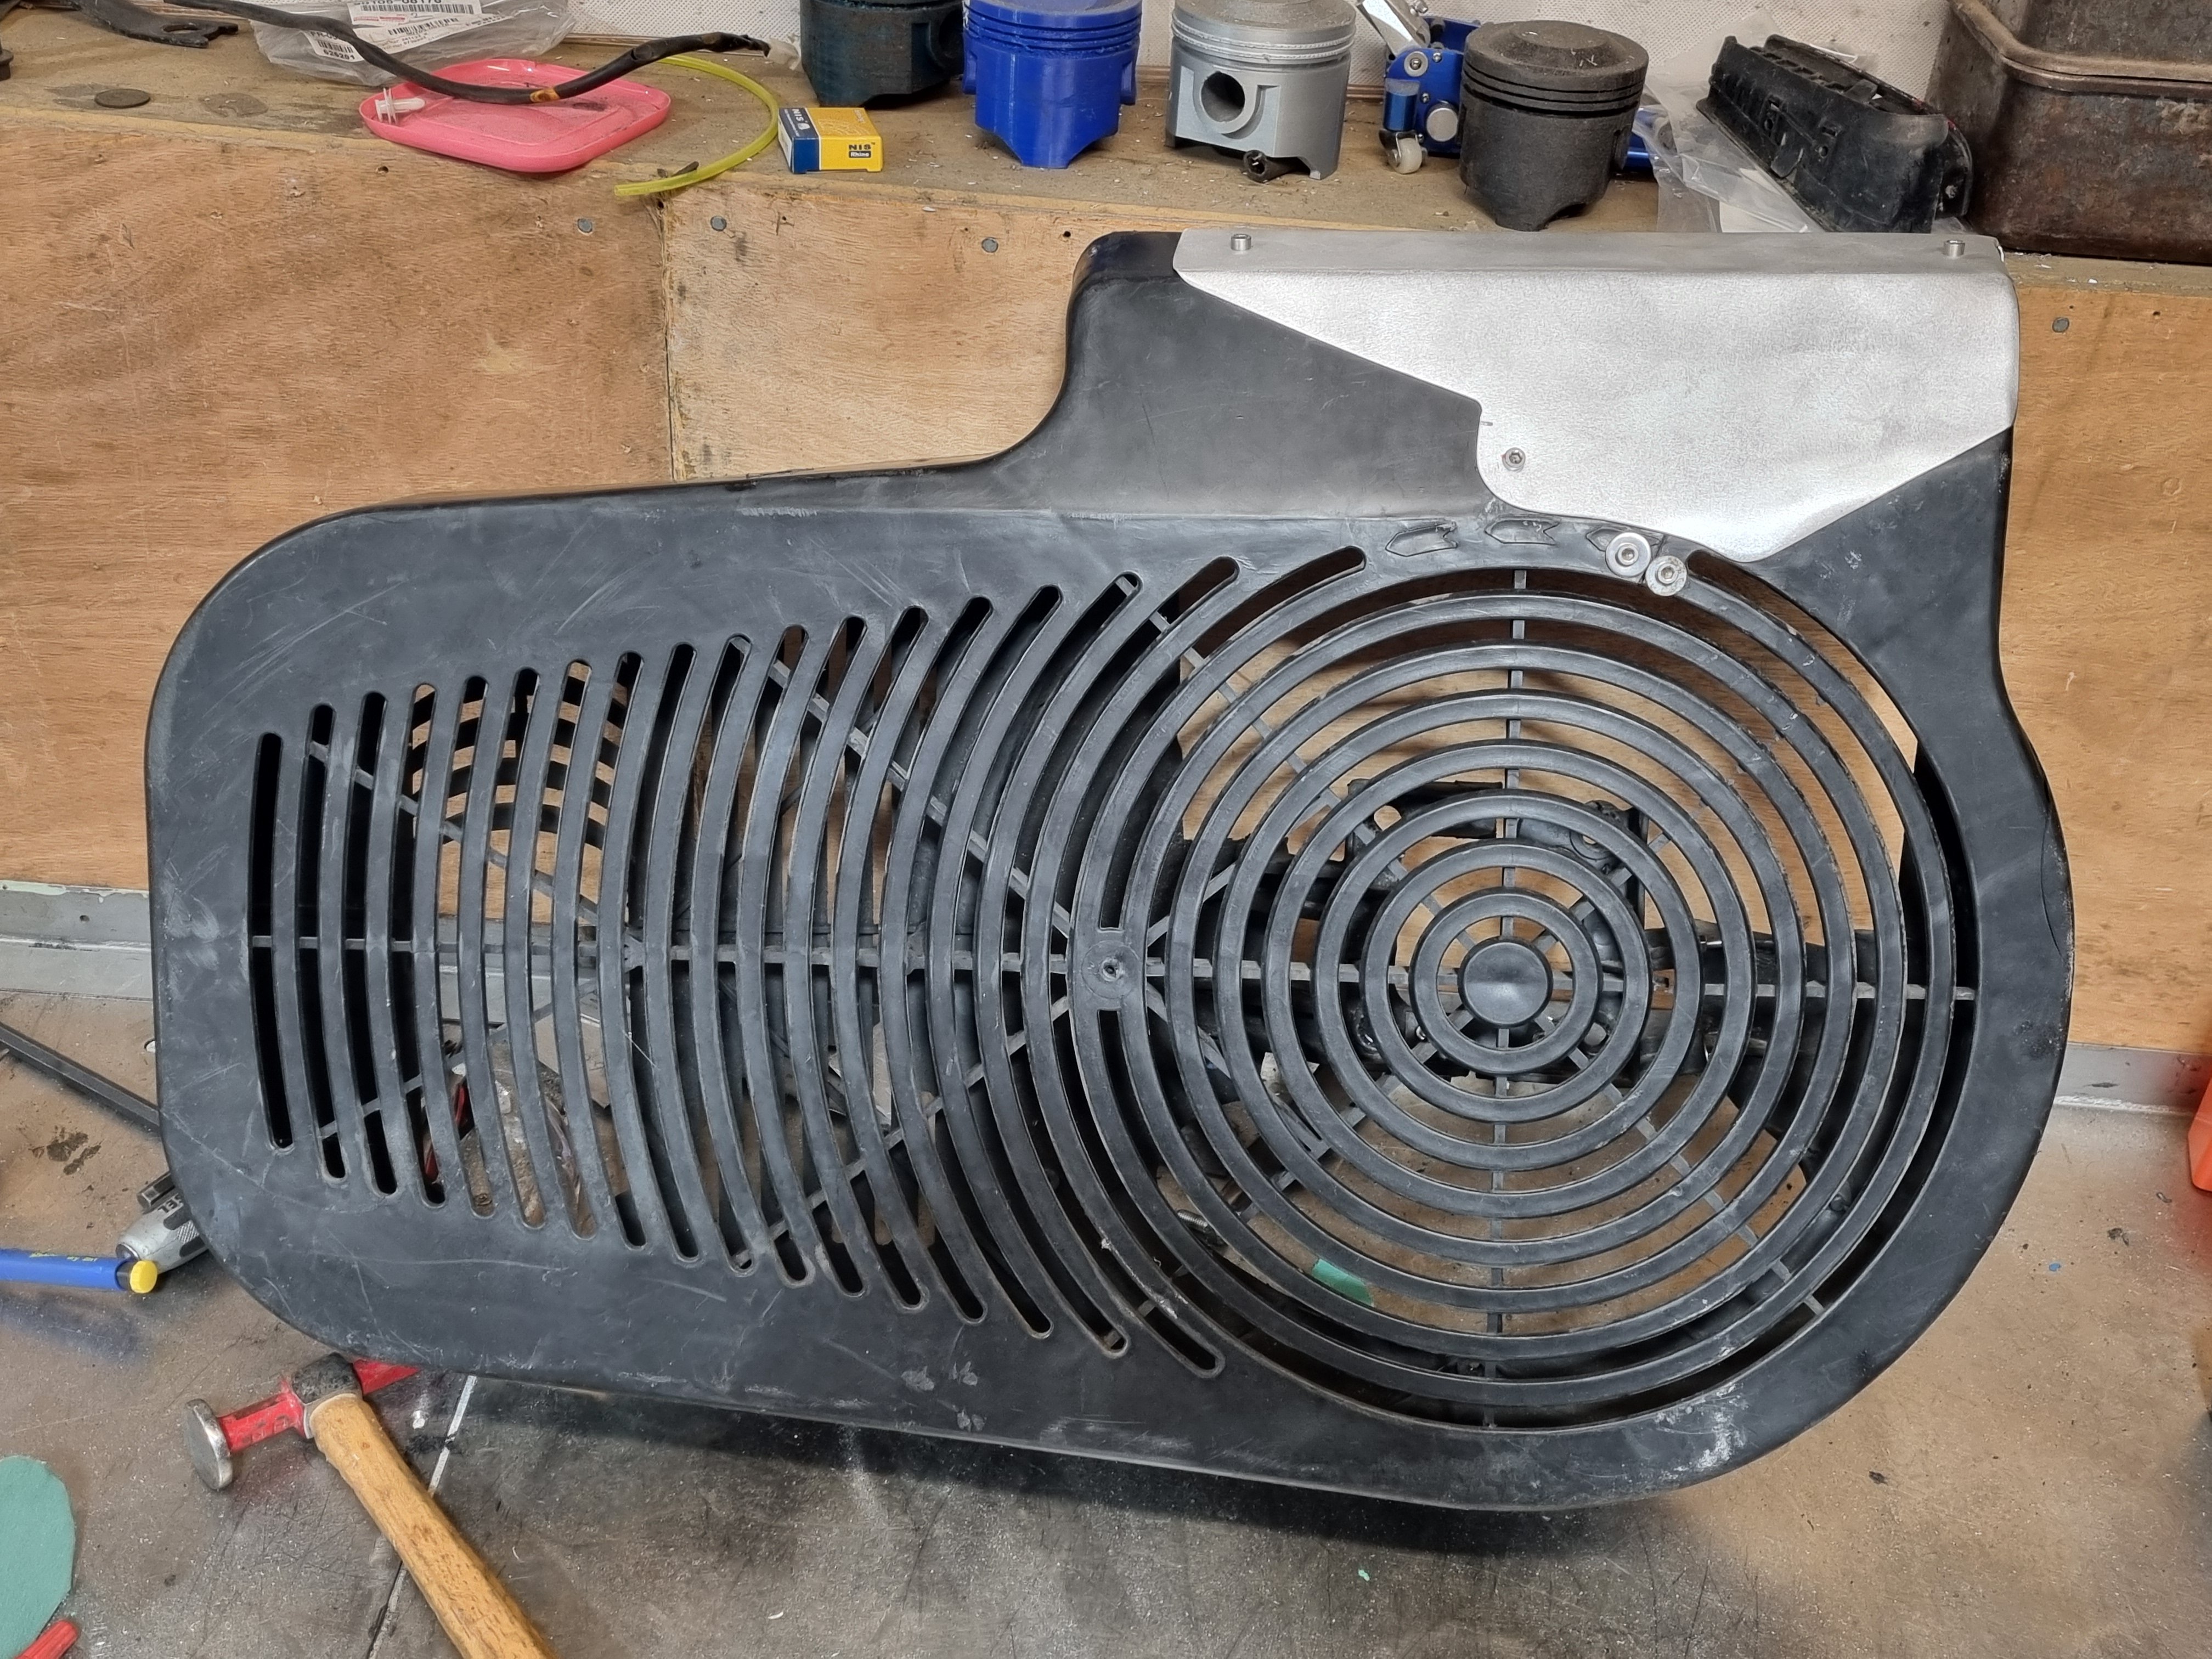
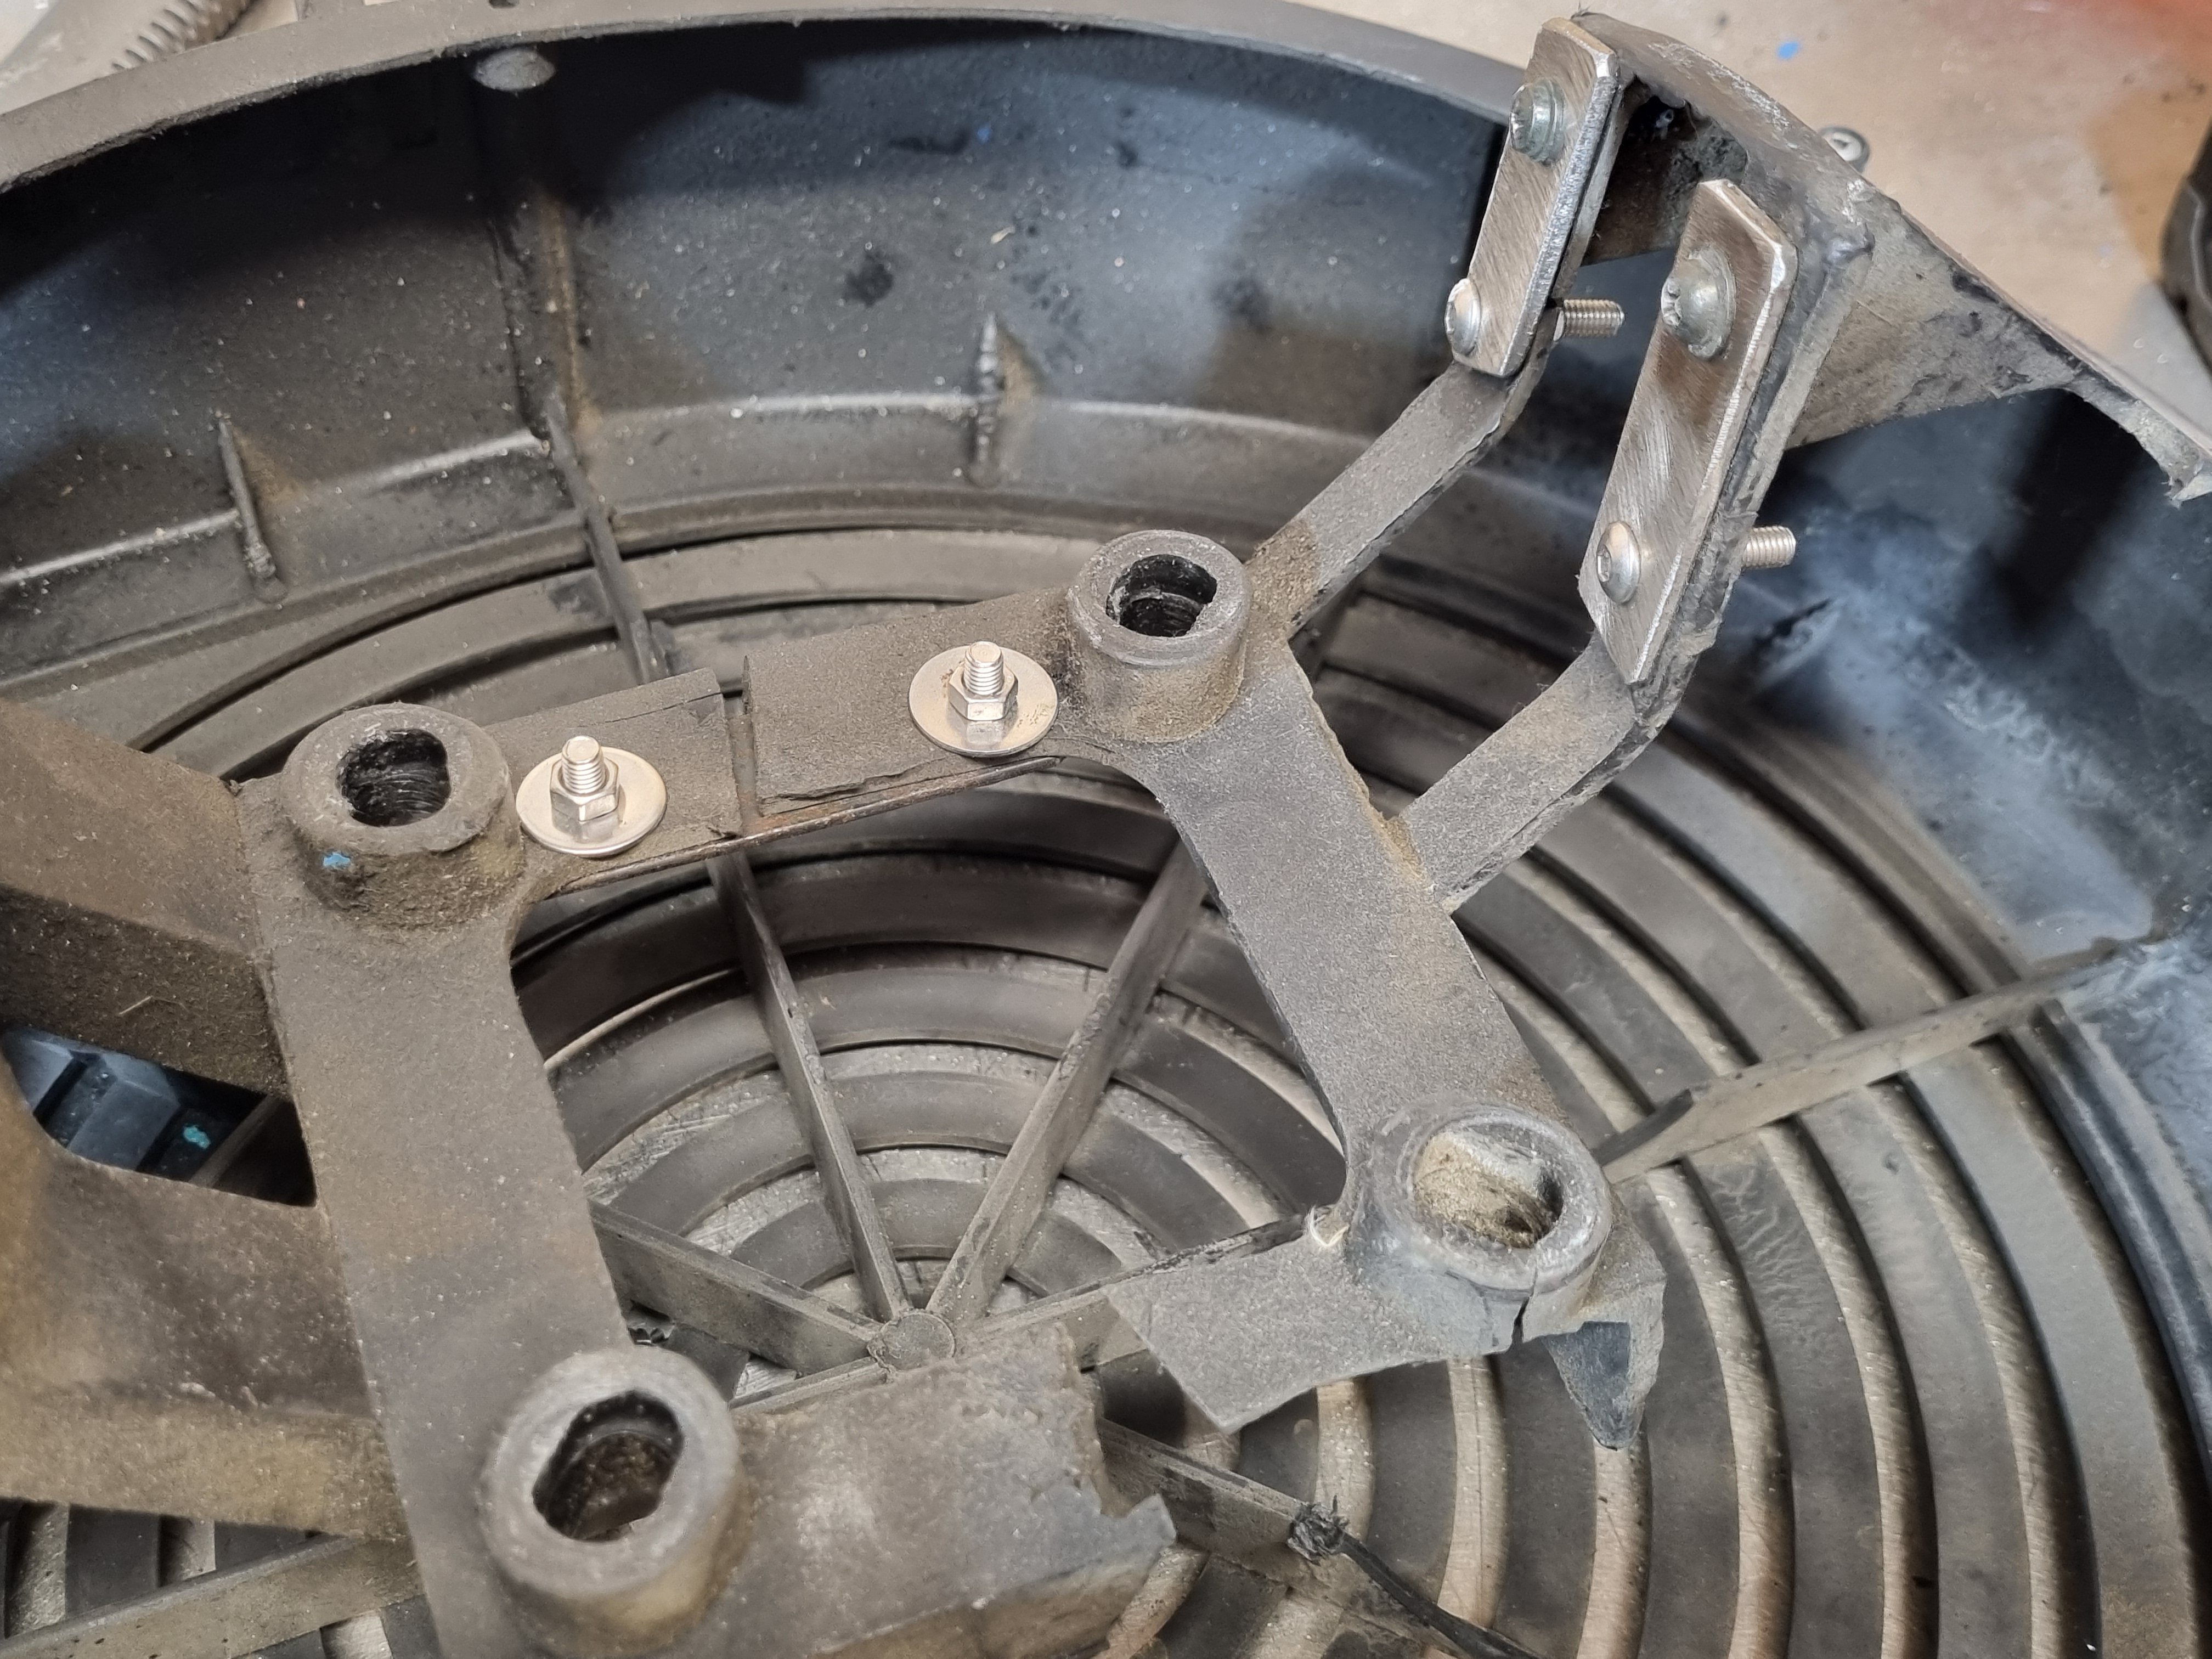
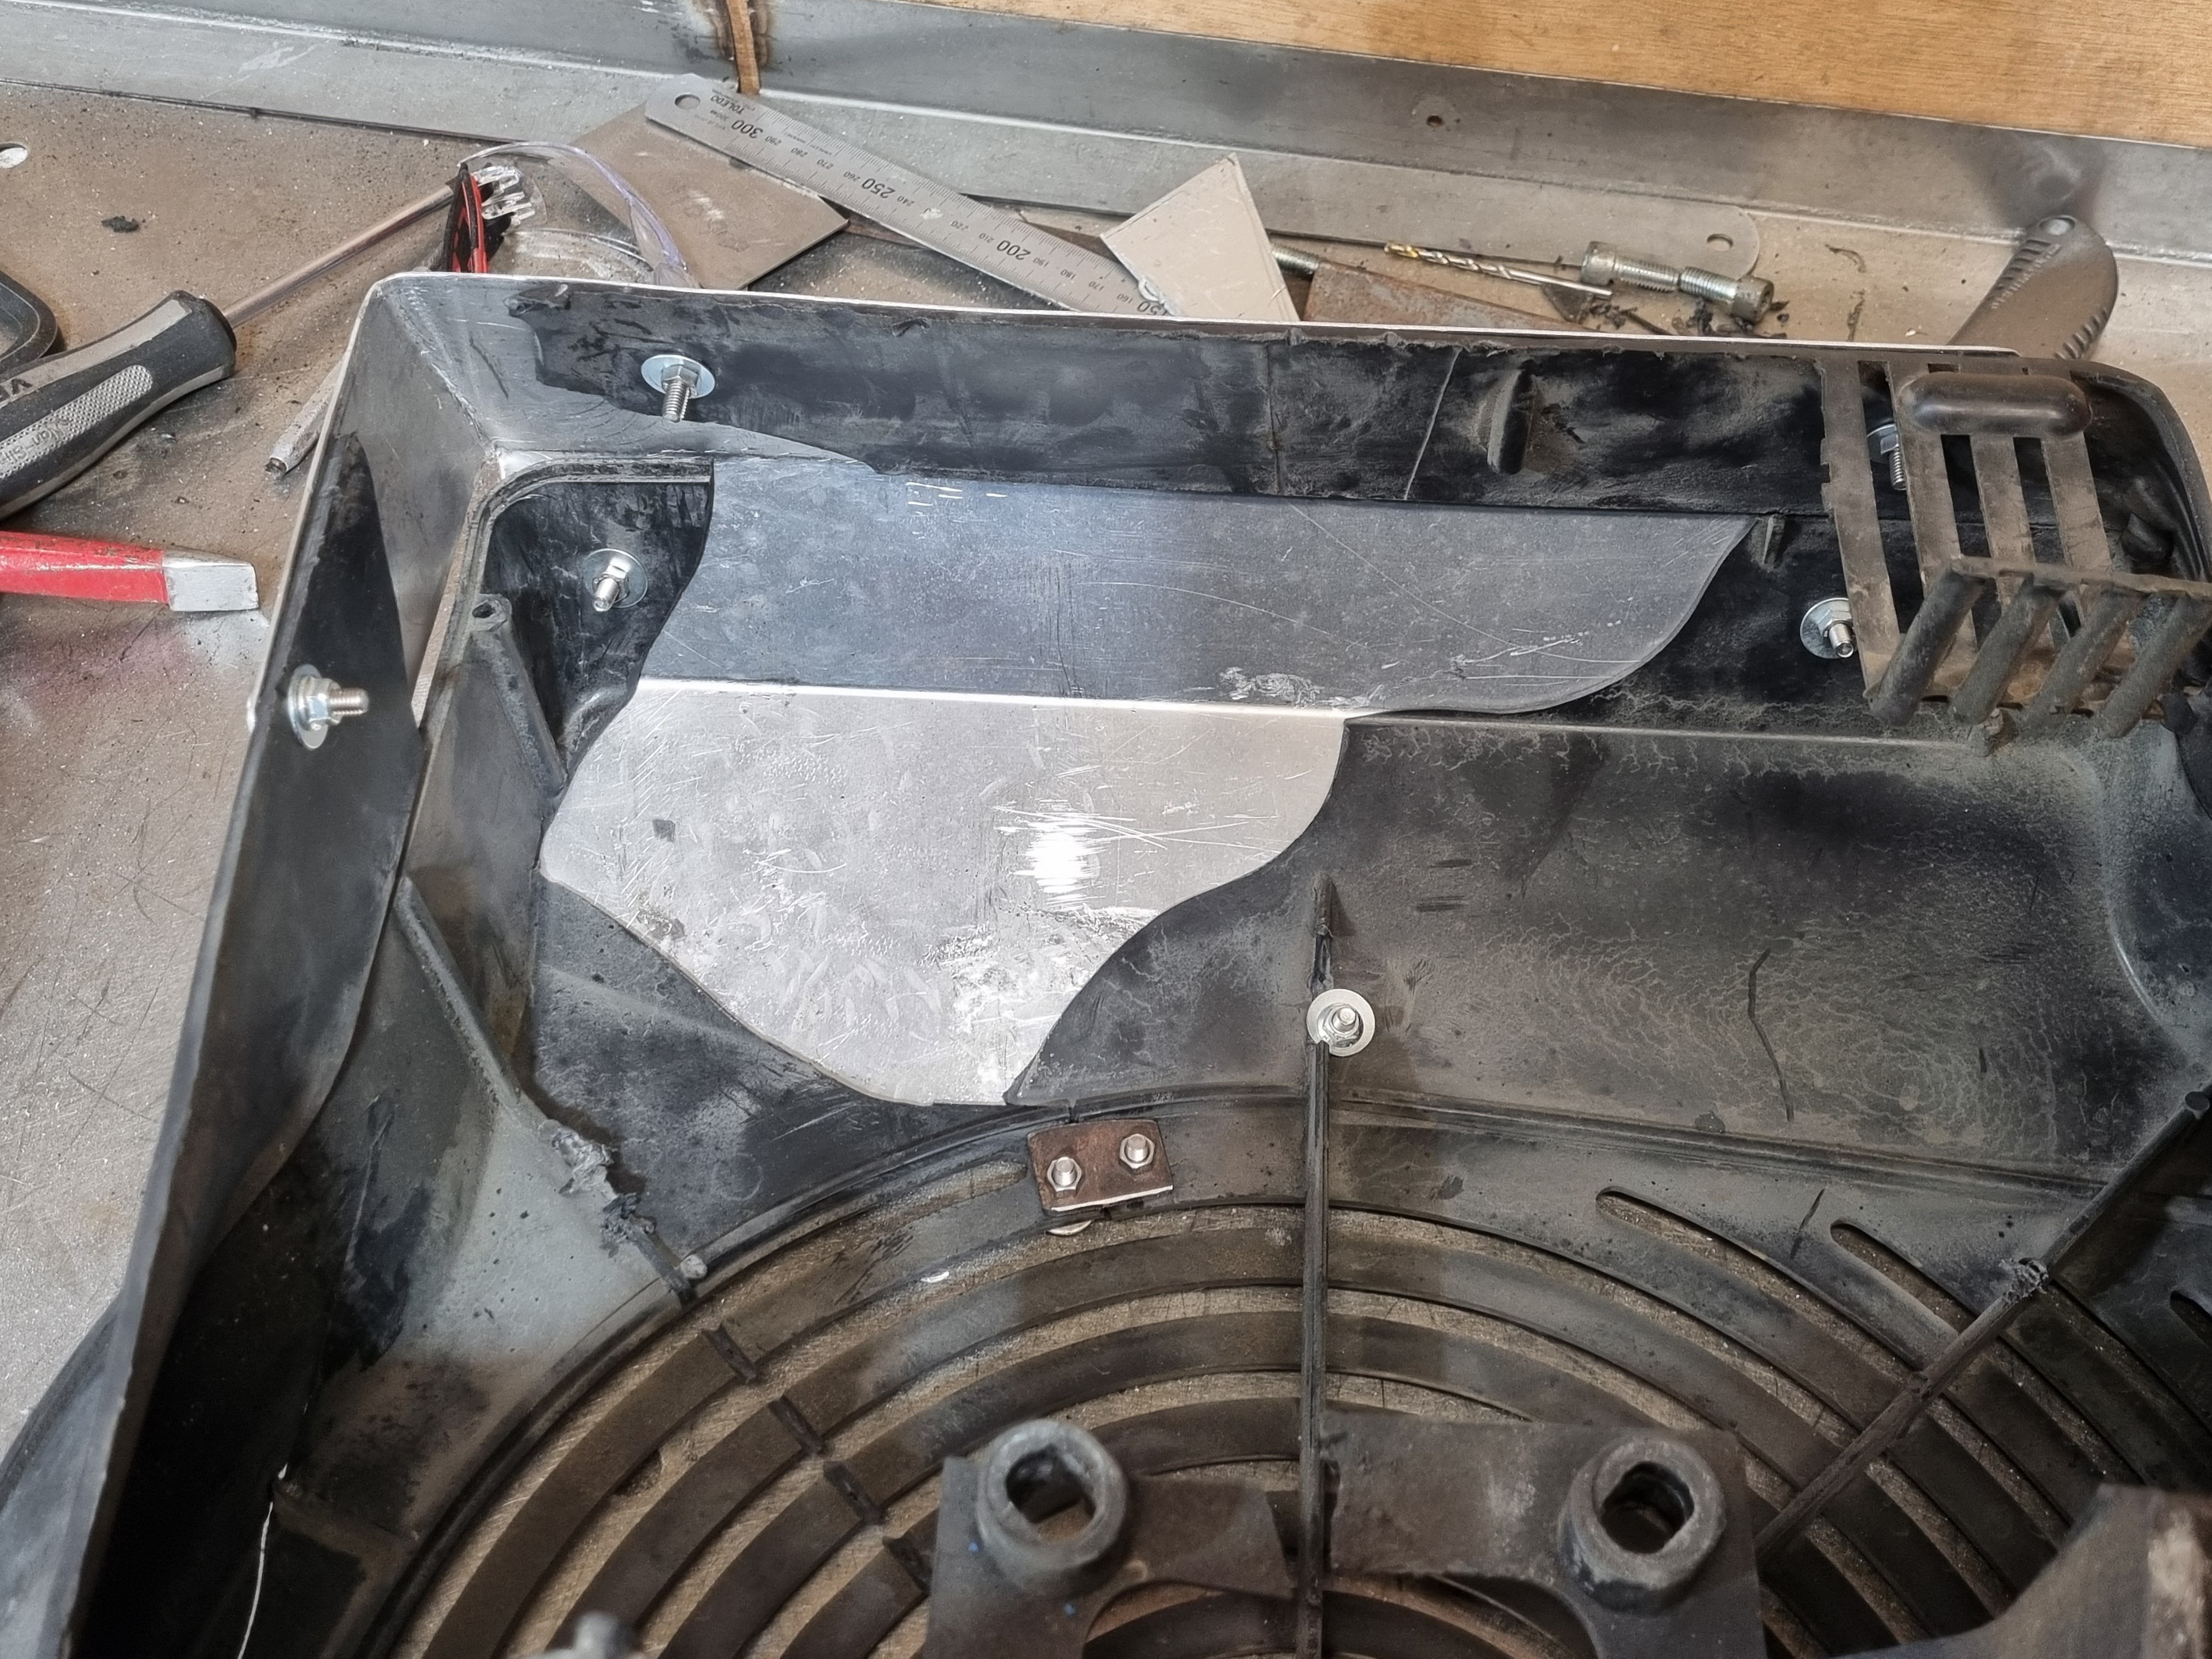
once id gotten the thing apart i had a look inside the tank and it wasn't great, it also wasn't terrible but yea. im sure there are many, many tanks being filled with compressed air every day that look way worse but still i wasn't keen on having it explode in my face. so i took the tank to get pressure tested. the joker said it was too rusty for him to certify but that's cool with me, i don't need any documentation, i just need to know its safe. so its at the testing place now. once its tested i will get the tank blasted and then ill paint it some colour, probably whatever colour i have enough of to do the job. then i had a go at fixing the belt shroud. i had to make a bunch of metal brackets to bridge all the breaks i could and bolt it all back together. I also had to make a big aluminium bit to fill in a huge piece that was missing completely. when its a whole unit its pretty strong, ill make a bracket to support the far end of it (the whole thing hangs off the 4 bolts around the crank spigot and thats it) once i put the thing back together on the tank.
1 point
-
A man named Bart, against advice, Bought a Datsun, not once but twice. His wife disapproved, The car hardly moved, Now it's rusting – not so nice.1 point
-
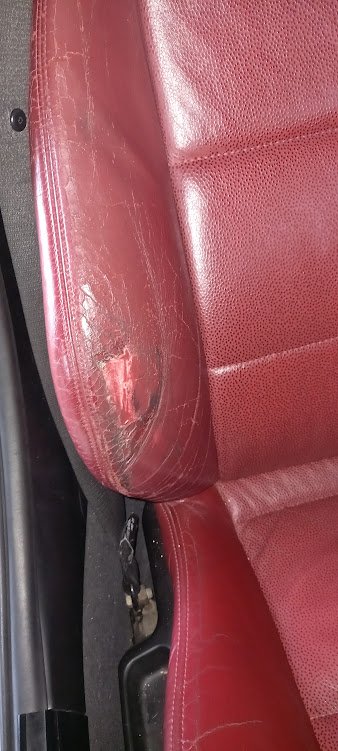
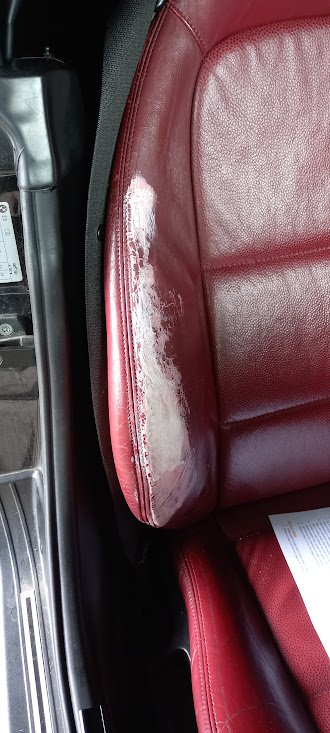
Got sidetracked getting the Integra a WOF and driving that recently but today decided to give fixing the leather on the drivers seat a crack. Initially it looked like this, I think mostly due to the seatbelt buckle always hanging there and getting squished when you get in Bought a leather repair kit off ebay for $50, which provides some filler paste which makes it look like this And then some dye which was pre made in BMW Taninrot and then some tints to fine tune it. This is it after 1 coat, it looks worse in the camera lighting but a pretty good match. Will give it another coat and maybe tint the dye a little lighter to give a better match Waaaaaay better now though
1 point
-
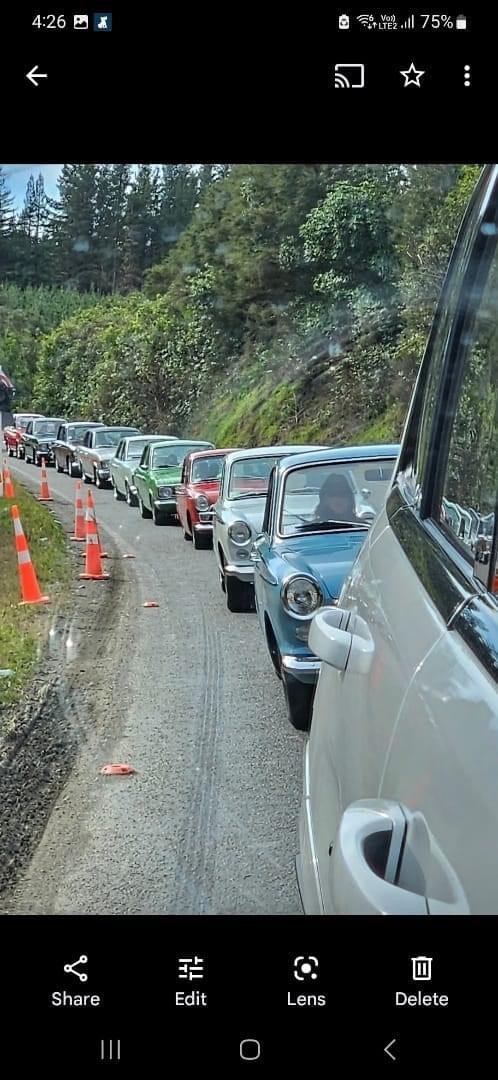
Quite possible he was with the Cortina club, a red Mk1 left a bit earlier than the rest of us. This was on the way to Napier on Saturday morning, the other green mk2 has a 2.3 duratec in it and the white mk1 has a super charged 302-.
1 point
-
Haha 6 years of nothing except putting the reg on hold and turning the motor over by hand every so often but plans are afoot so watch this space1 point
-
You have to admit it's a money grab though. One that they can do because if you don't pay it, your cars dead. You just have to hope if you lose yours, it's one that the locksmiths can sell and program for MUCH less. People shouldn't be held to ransom because of what they drive. That's my view anyway. It's not a problem for people with money. But plenty would be parking it up and taking the bus for the cost to replace a cheap remote for $$$. I don't know which brands / models locksmiths cover, but it's sure a mix of euro and not.1 point
-
Was talking to a mate yesterday about this sort of thing yesterday after he got quoted 3k or something stupid like that to replace a proximity key , I have come to the conclusion that if a car doesn't have a key you poke into the ignition then it's too new and I don't want to know about it. Even better Regards,your friend the cave man.
1 point
-
I always imagine that the CD's sent to LVVTA just get stored in some vast vault underground
1 point
-
He won't be able to poke that down in an engine bay to give us fail photos of slag included stick welded engine mounts made from panel steel and missing all but one fastener.1 point
-
A good friend of mine has a chromating bath for treating magnesium. He said he could sort my magnesium bellhousing for me. So after I blasted it as best I could he picked it up from me and worked his magic... Looks 100 times better and now its protected.
1 point
-
I just can't stop.... I have 2stroke oil for blood. It's in well used condition but I call it a long term rideable project. Everything on these costs $$ so i think I will enjoy it a bit before I do anything too much and the motor has only done about 250kms since a major rebuild
1 point
-
Procured tyres from PAP and fitted to rims 195/55/15r kingsomethings Hoped like fuck that the roofing silicon I used to seal the bands and center together worked and would hold air unlike my previous attempt So roofing silicon works good to seal rims Wound that shit down onto the bumpstops, needs moar low which means drop spindles/some other wizardry to achieve this. Flares will be ditched and guards rolled to hellathrush spec Ewww itchy and thats my story1 point


.thumb.jpg.570970b401ac8d26ce9af7c1bf2bd8cd.jpg)


.jpg.bc258127842df04078d5f8120d5dabf8.jpg)


This leaderboard is set to Auckland/GMT+12:00