
Leaderboard


Popular Content
Showing content with the highest reputation on 05/10/22 in all areas
-
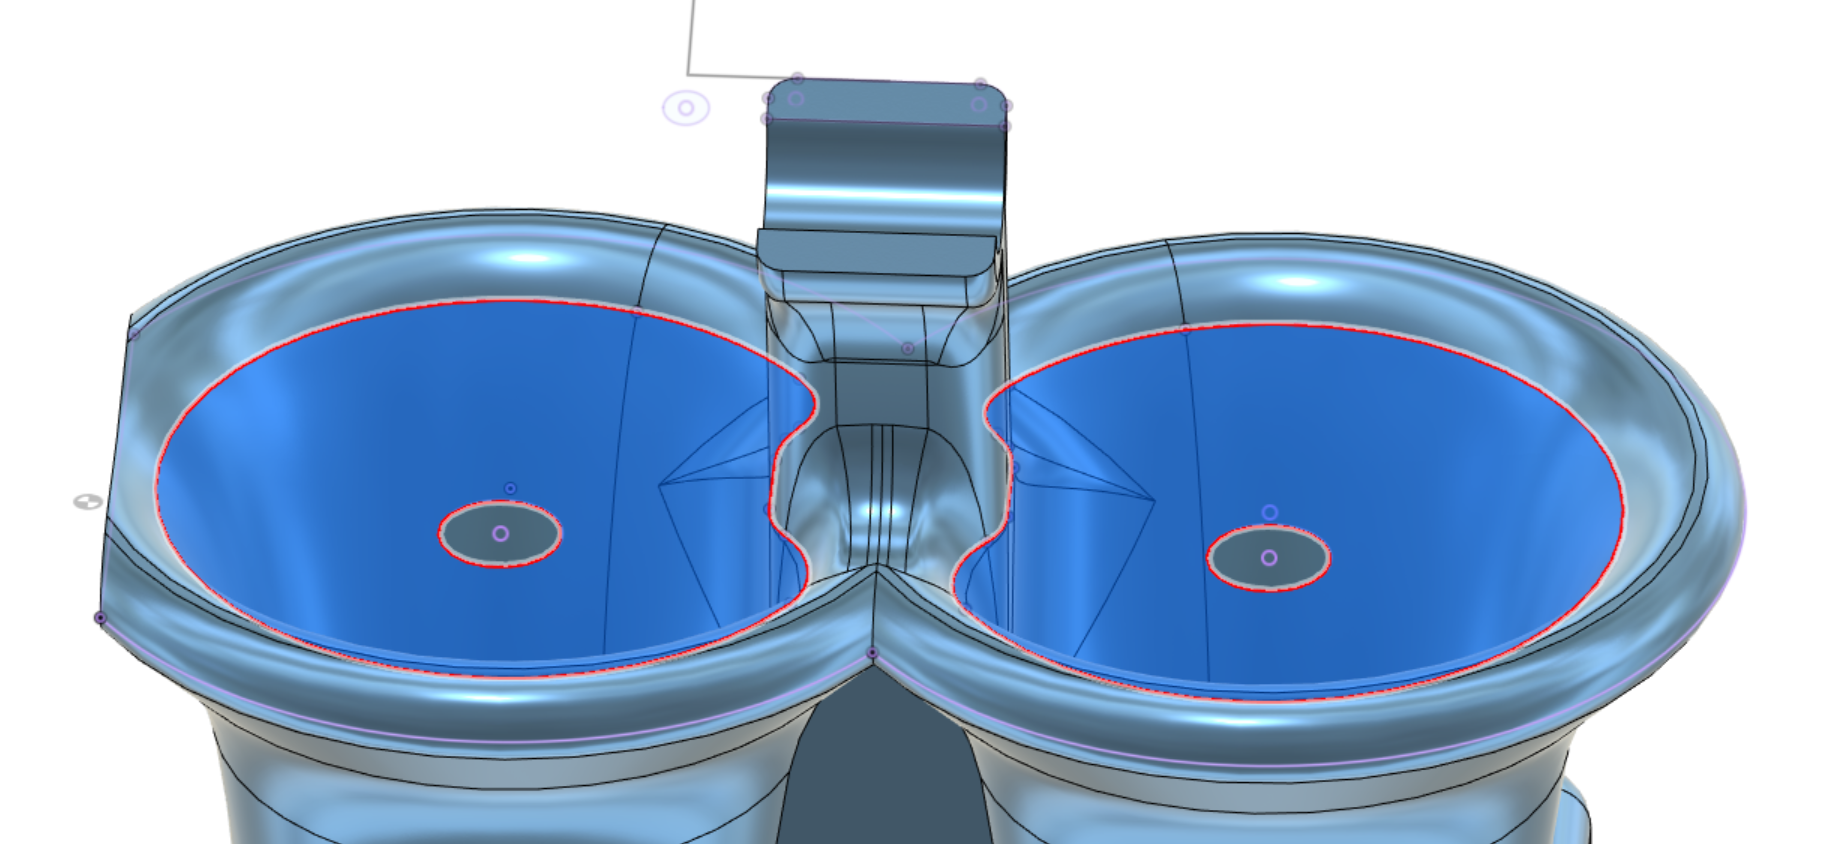
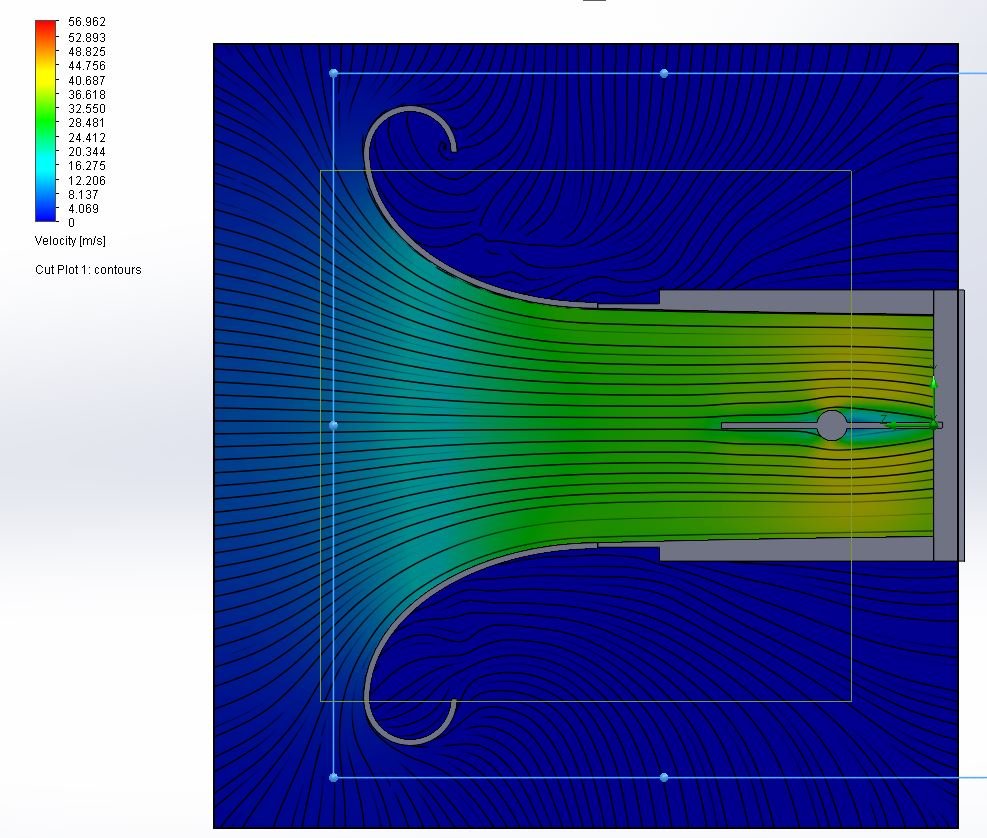
Version 2 underway. mounted 10mm lower and 5mm further into the runner. Then angling the injector about 5 degrees up I was curious how much the cross sectional area would be affected by having all this extra junk in the way. Taking a cut at what looks like the worst spot, and we've still got cross sectional area equivalent of a 74mm circle per runner. There's still way more bellmouth area than there was with the silvertop throttles.
 29 points
 -
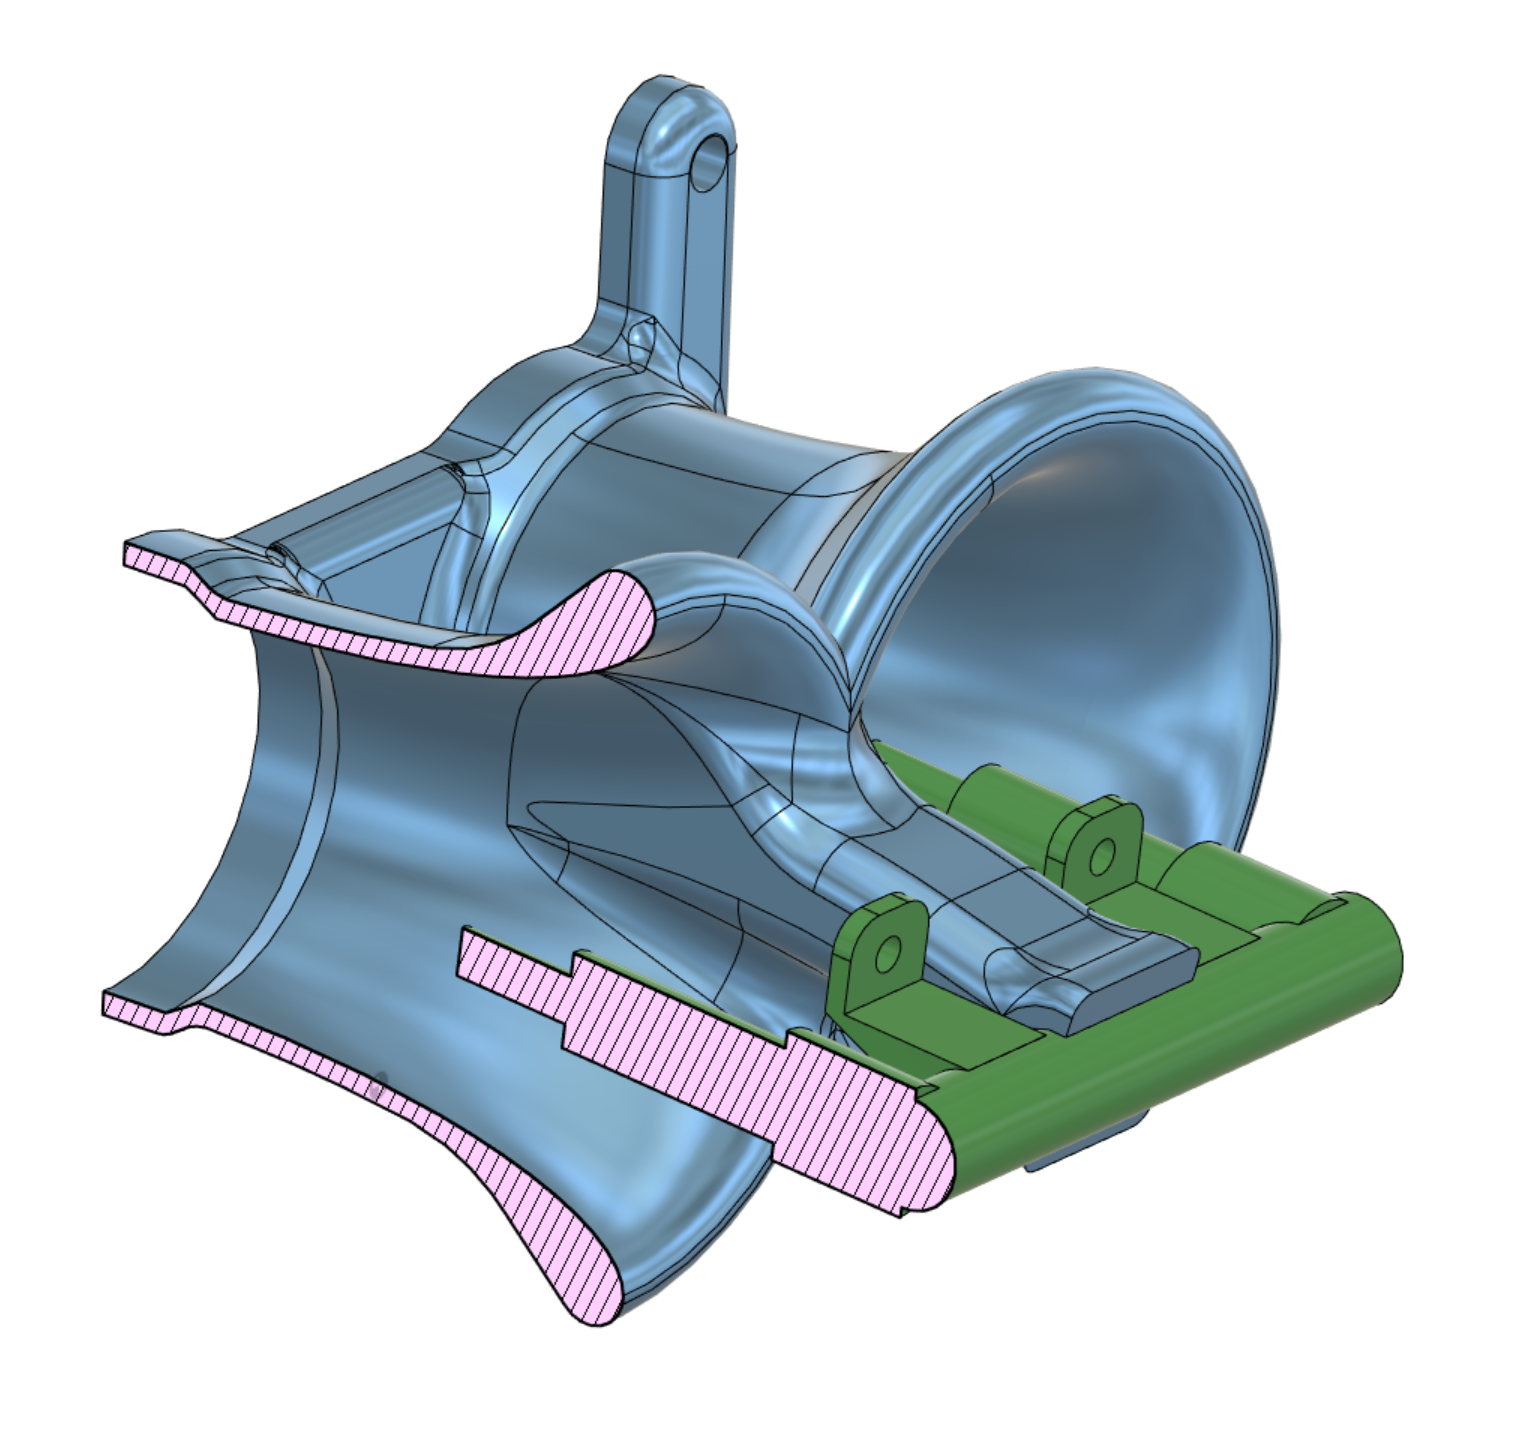
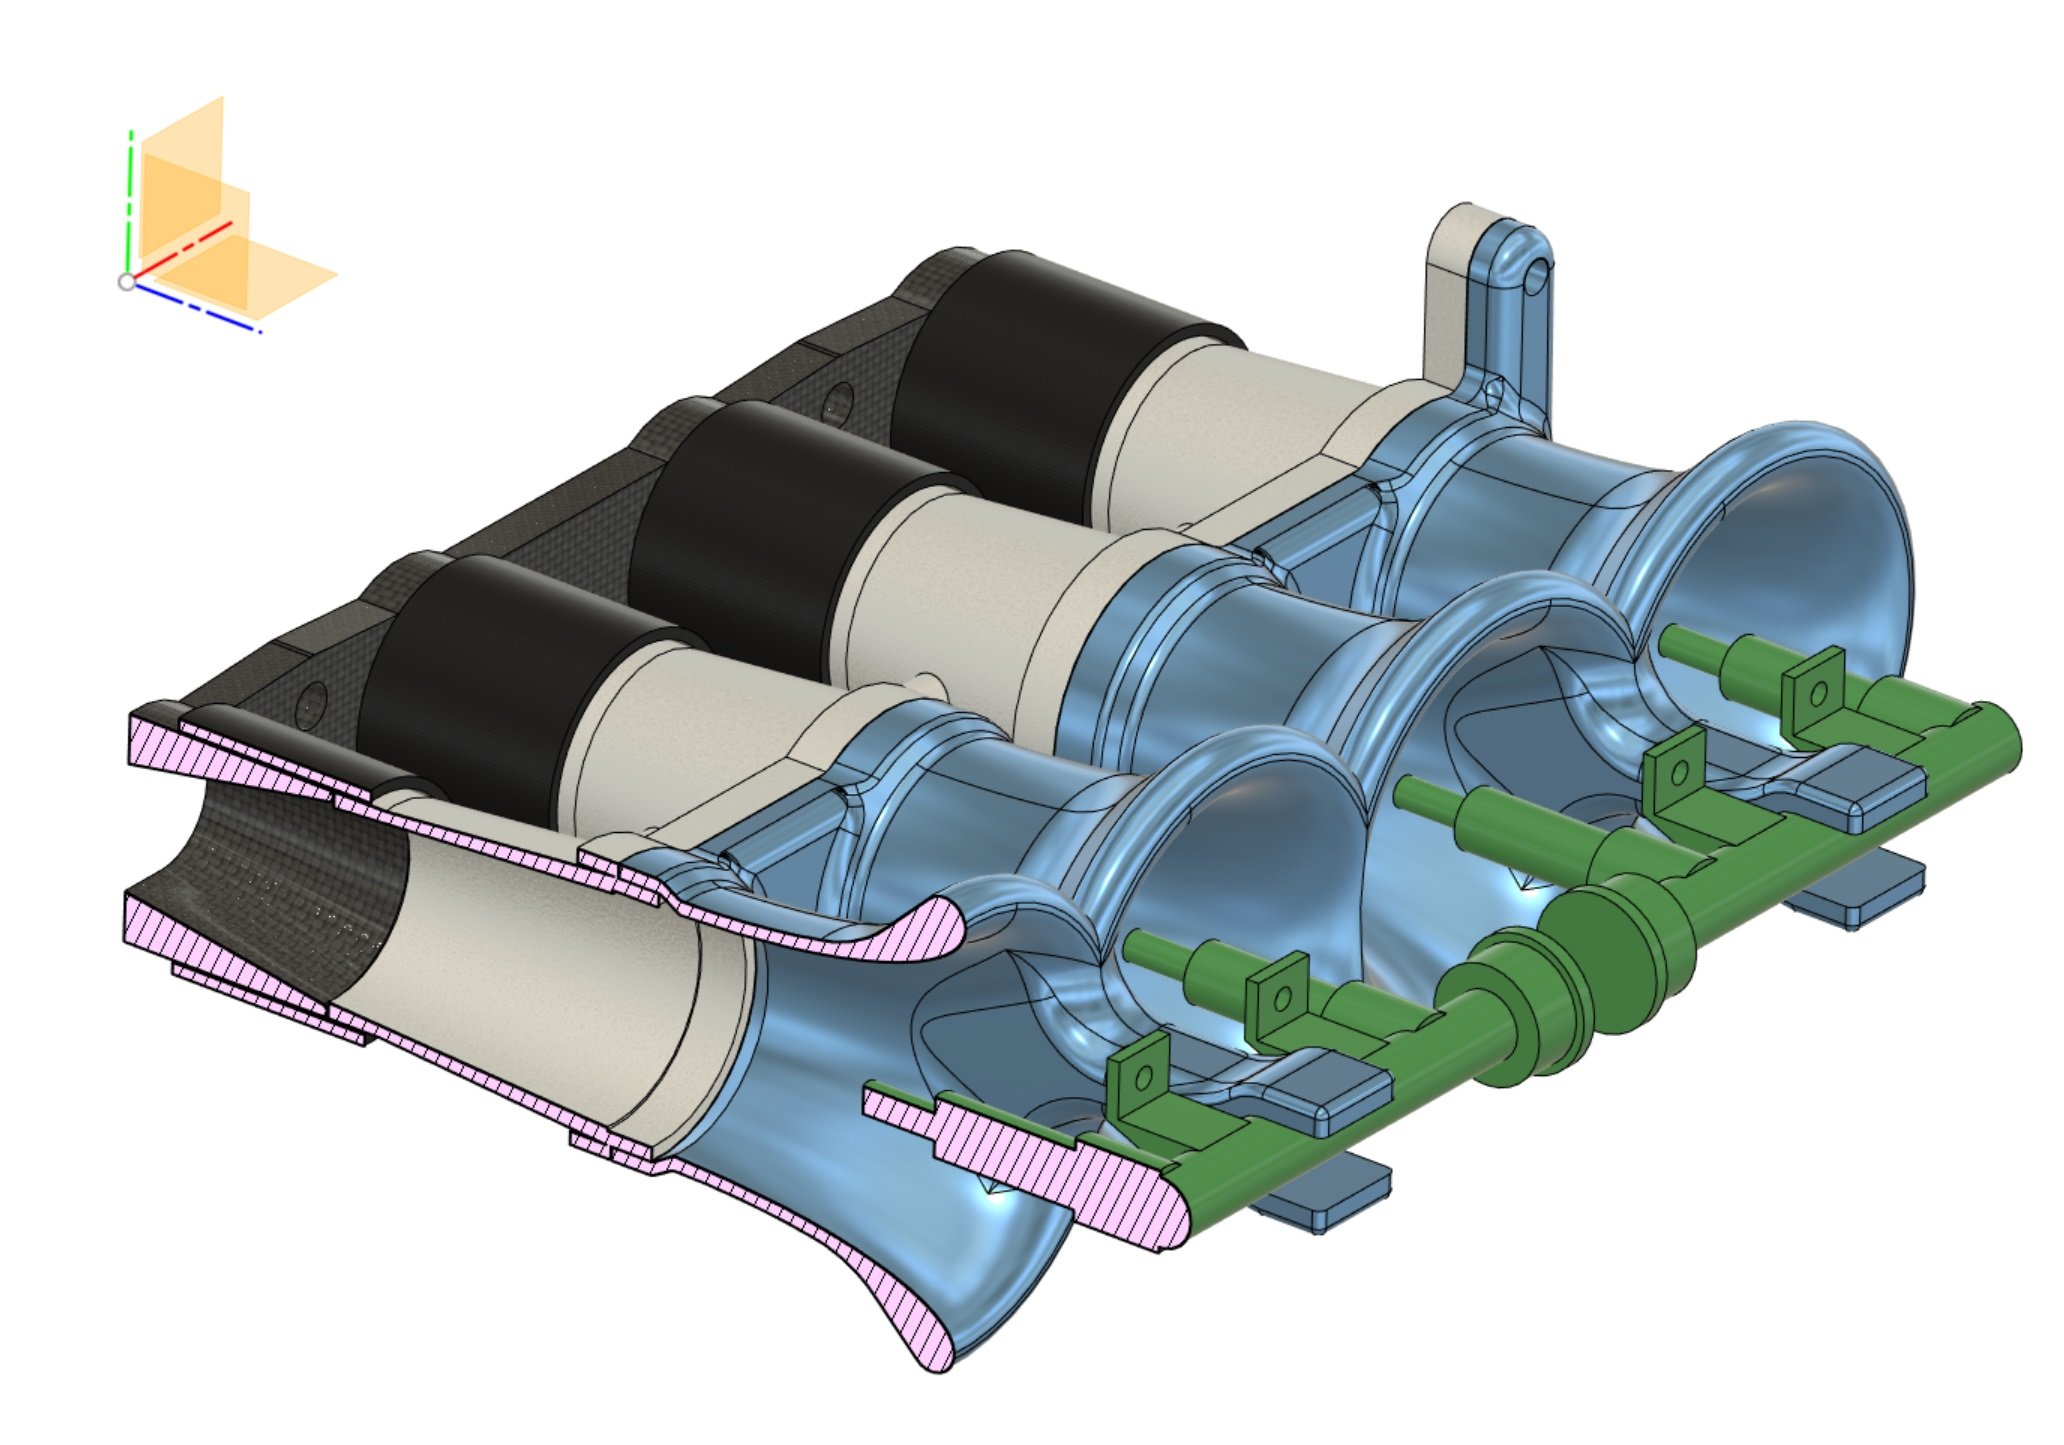
Injectors turned up so I made some progress on modelling up something to hold the 2nd rail. I've printed one half, unfortunately though this shape wont work as doing a clearance check shows the end of the fork thingy touches the bonnet slightly. But this is why printing is great. Once I see an actual model I find it easier to think of how to revise it to make it better. But otherwise looking okayish I guess The injectors could probably go further in if need be. But I think I'll just angle the bracket downwards and revise it a little to have more top side clearance. Maybe bring the injectors a smidge further in at the same time. For interest's sake (I've only got 4 injector plugs connected currently) I got the motor running with just the outboard injectors working. It actually idles fairly okay! I have to turn off the wideband fuel correction though, because the response time of the fuel reaching the cylinder is quite delayed. But for a full blown race car it would probably work alright. Once I finished playing around with this, I took the car out for a drive with just 100% running on the inner set of injectors. These are quite a bit smaller than the 450ish CC 2ZZ injectors, so the motor was reaching 96% duty cycle by 8500rpm. So a bit too small to run just on those. But I've got enough injector to do some back to back testing between innners and outers, and blending between a bit. I get the feeling that the factory inners usually point at the factory BMW port a little better than these ones do, so it might actually make sense to keep the factory port injectors. If so, I might try out the factory Prius injectors, which have I think a 12 or 16 hole pintle for super fine atomization. But only quite a small CC rating as well. So this might give some good fuel economy etc while having the secondaries for the bigger fuel requirements. Oooorrrr I might just end up sticking with 2ZZ injectors. See how it goes!
18 points
-
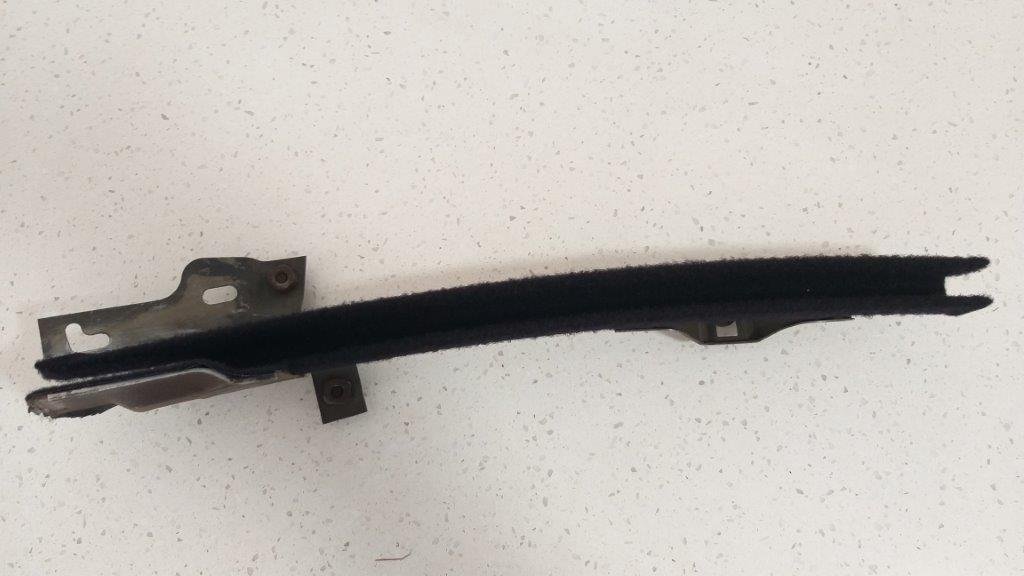
This morning I repeated the same exercise on the vertical window guide for the opposite side. Being the passenger one the felt was less stuffed but still looked well past it. Not that easy to photograph with my shitty phone, but you get the idea. I'm looking forward to tackling something different tomorrow. Ta for looking.
6 points
-
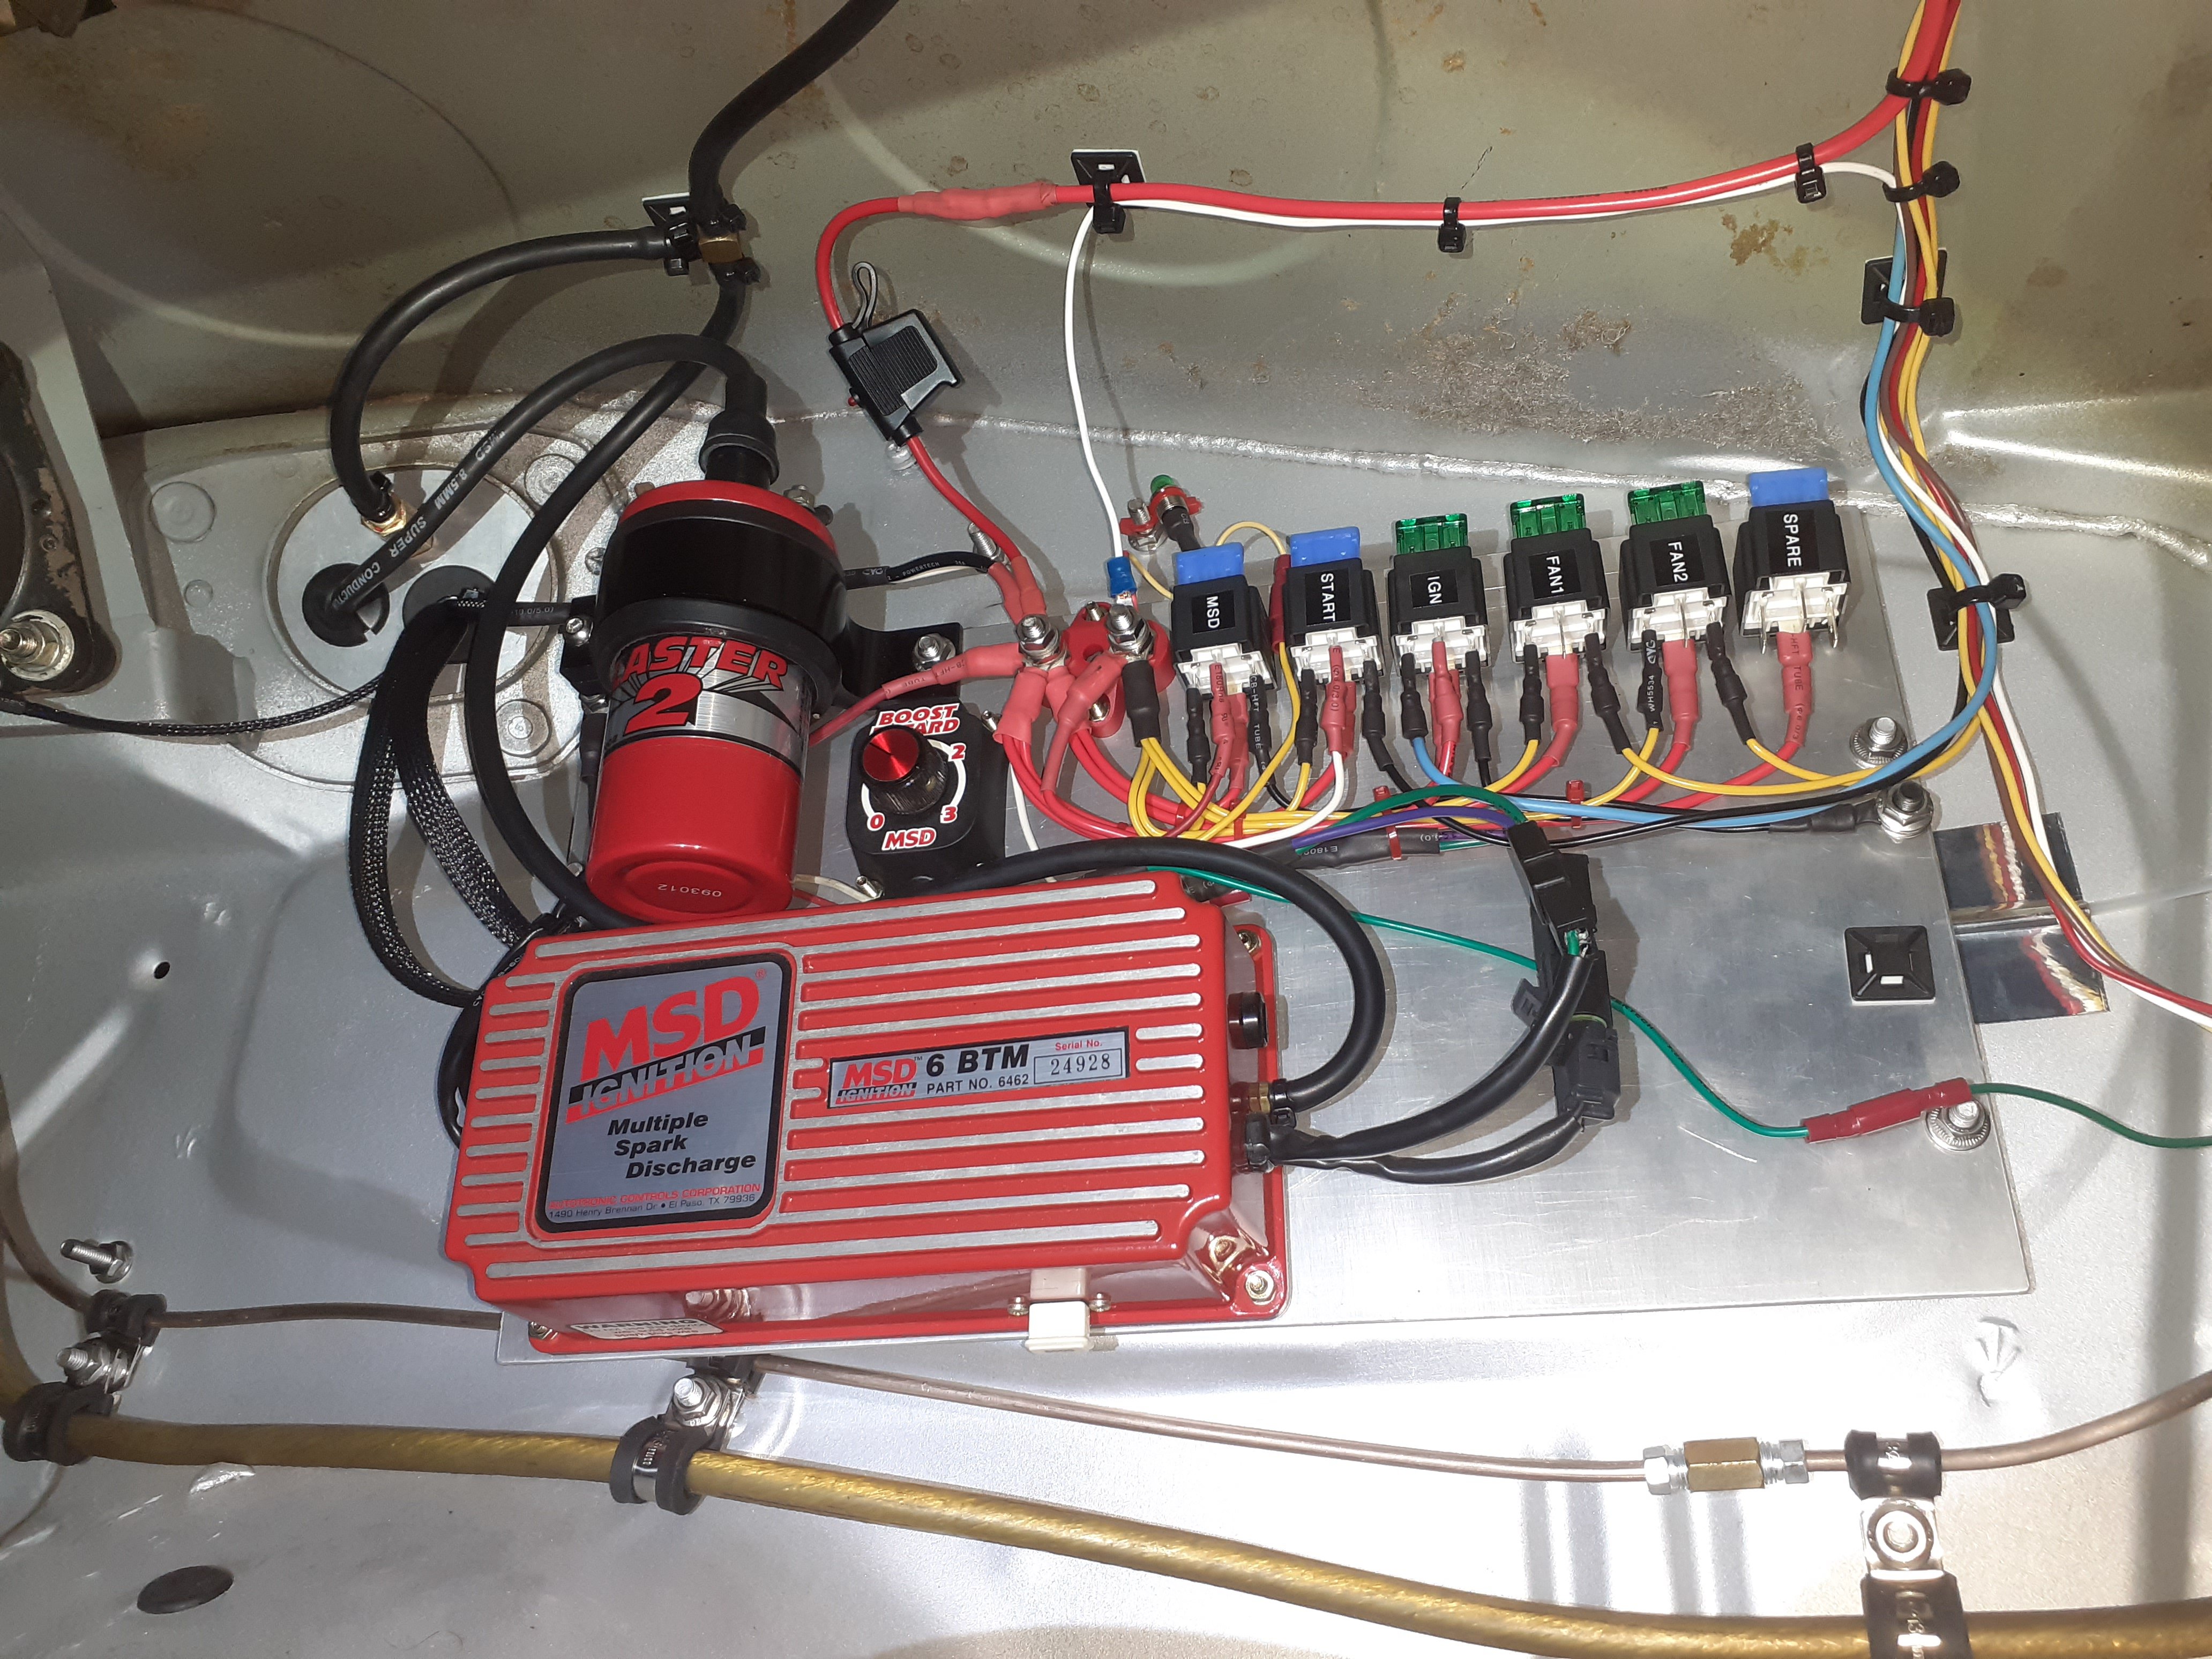
Doesnt look like I've done much but I've got 80% of the wiring sorted Everything I've wired so far works, and makes no smoke or sparks so I'd call that a success. And all the remaining wiring, I have a plan for, and know what goes where
6 points
-
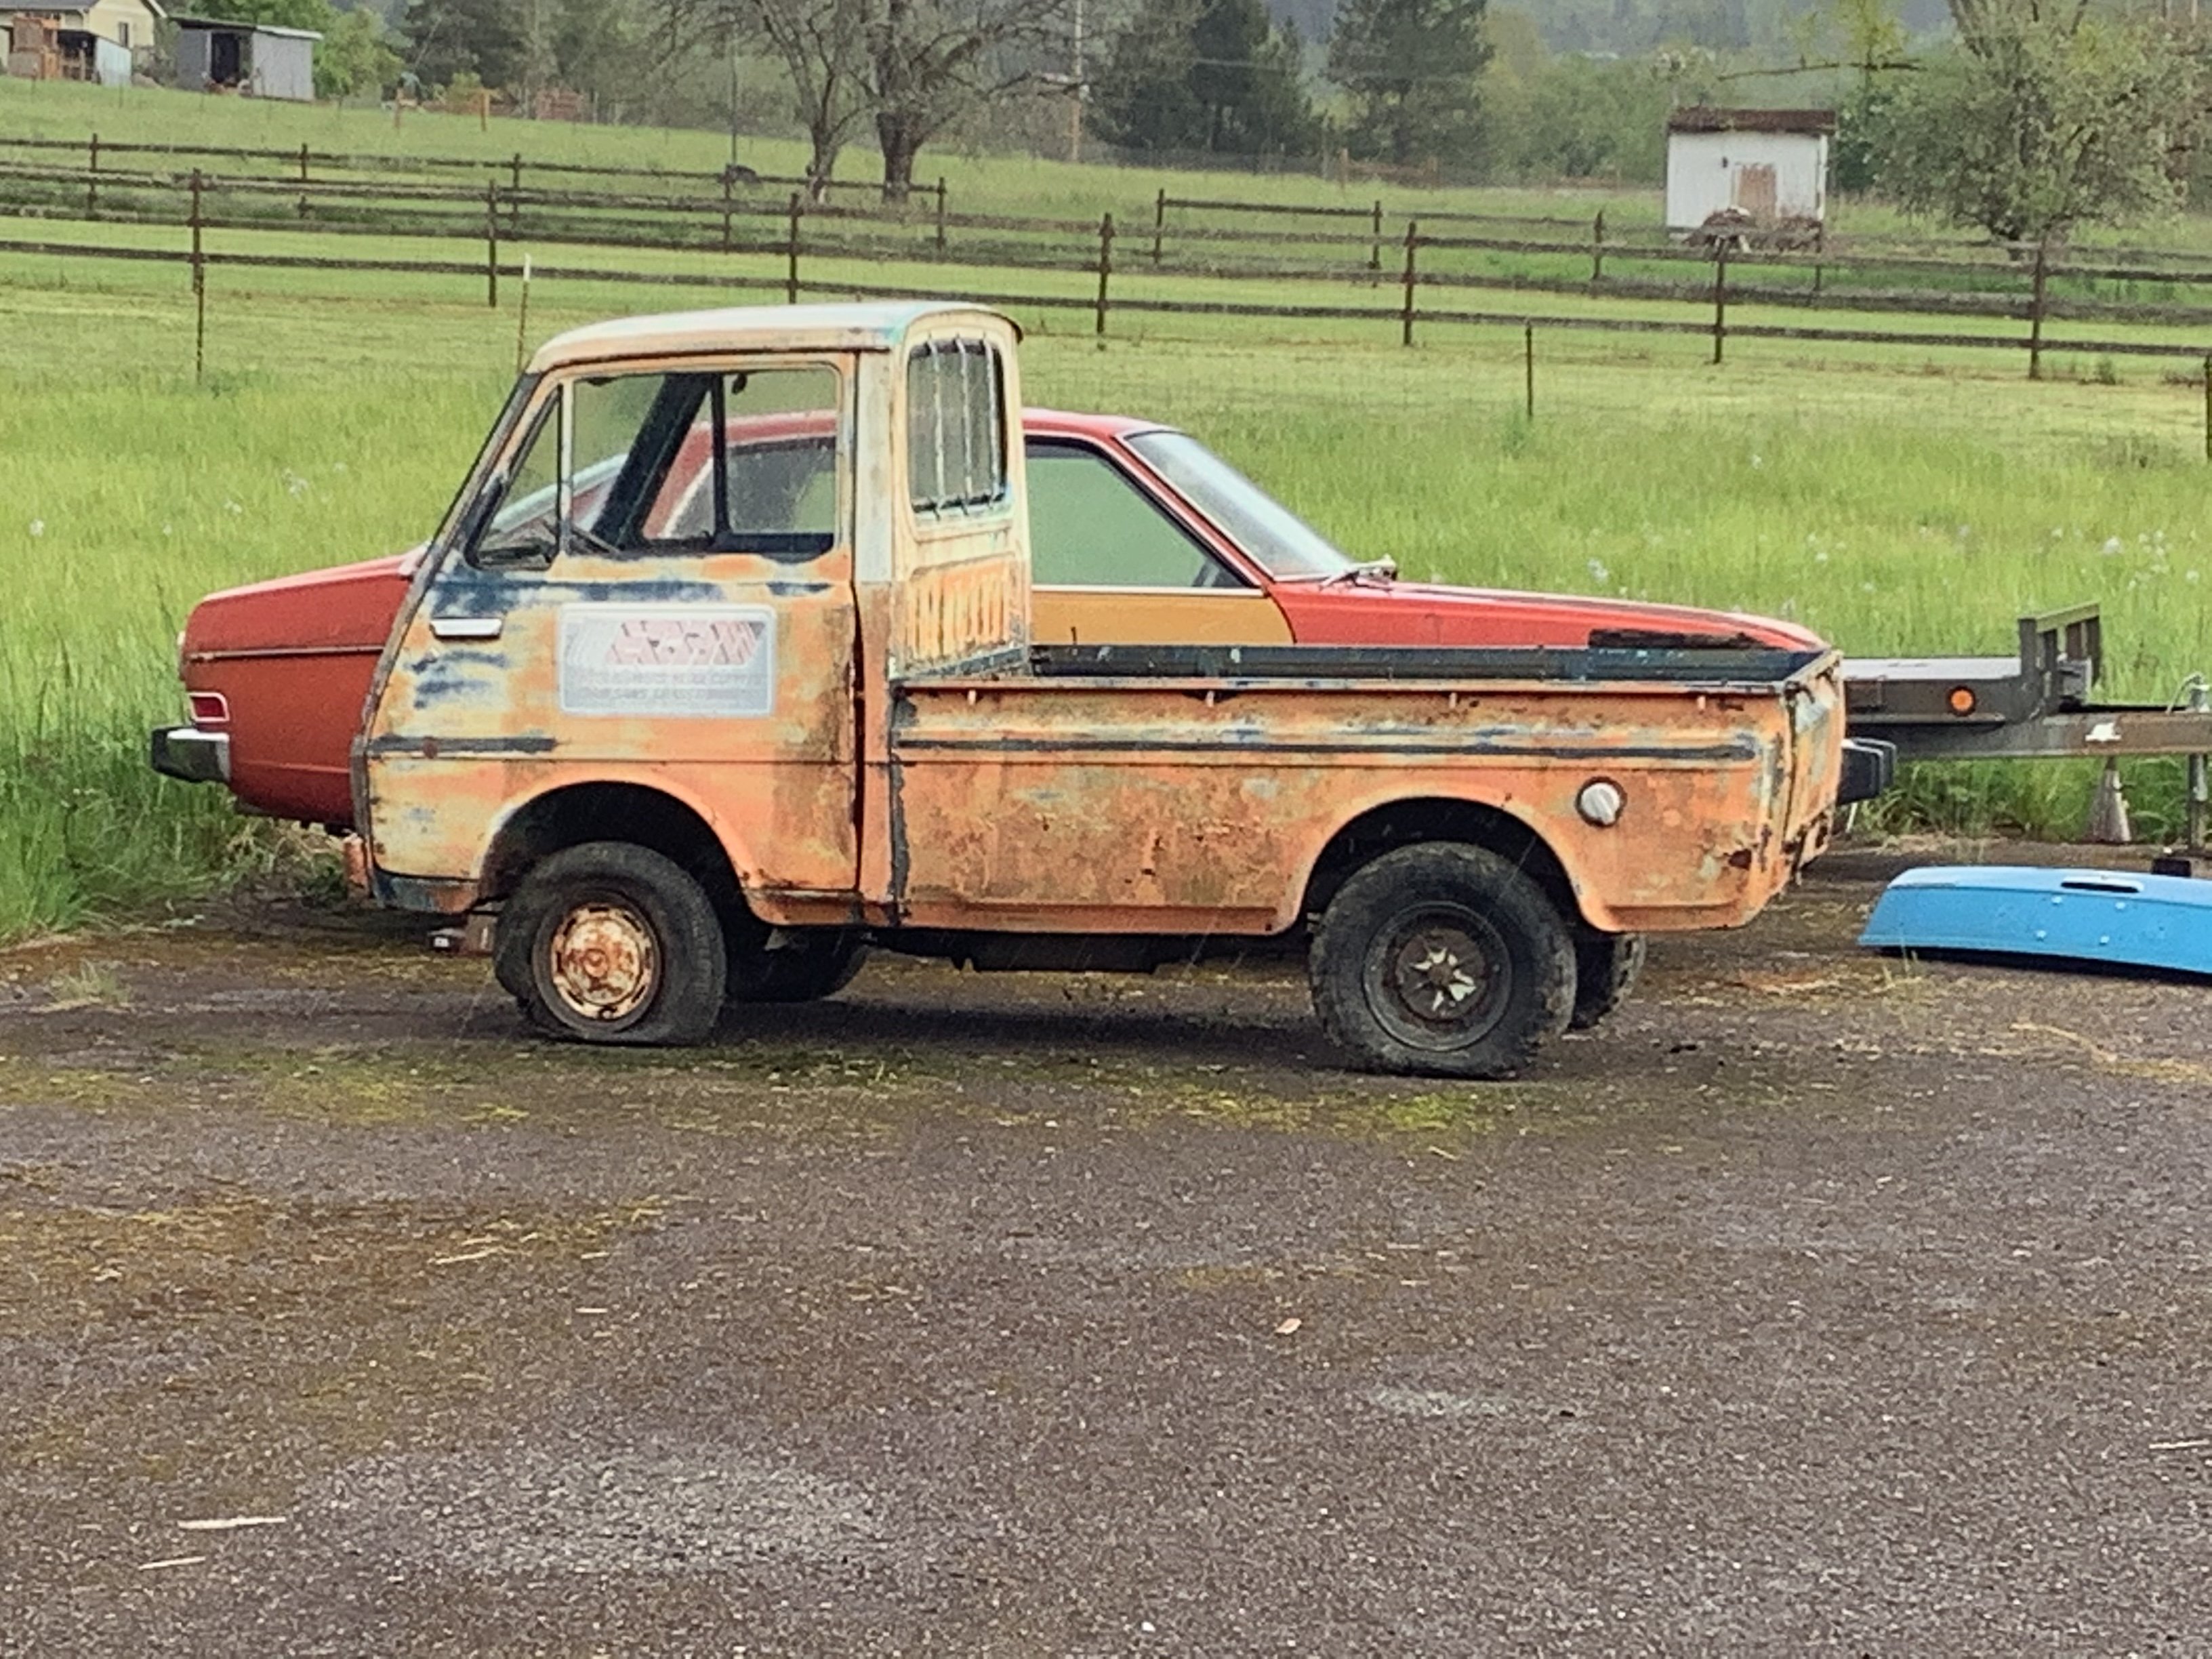
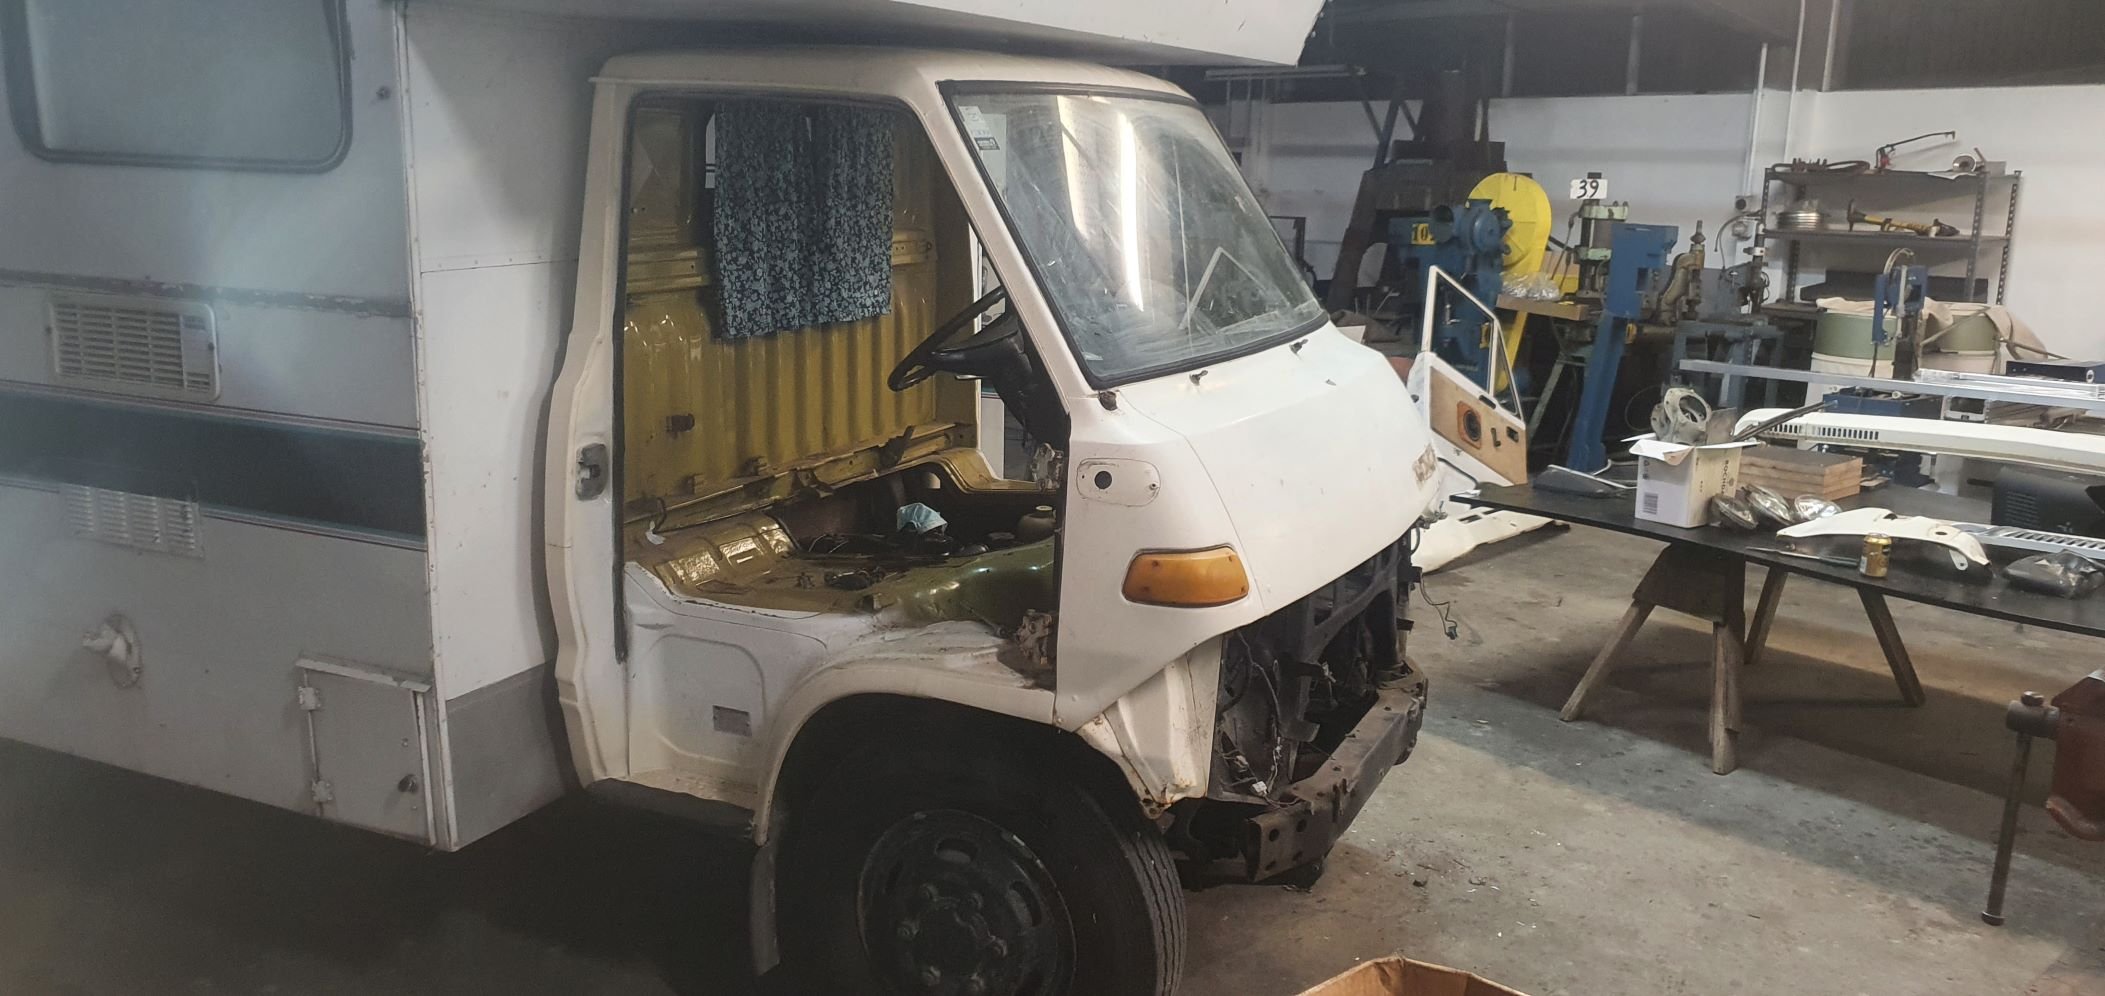
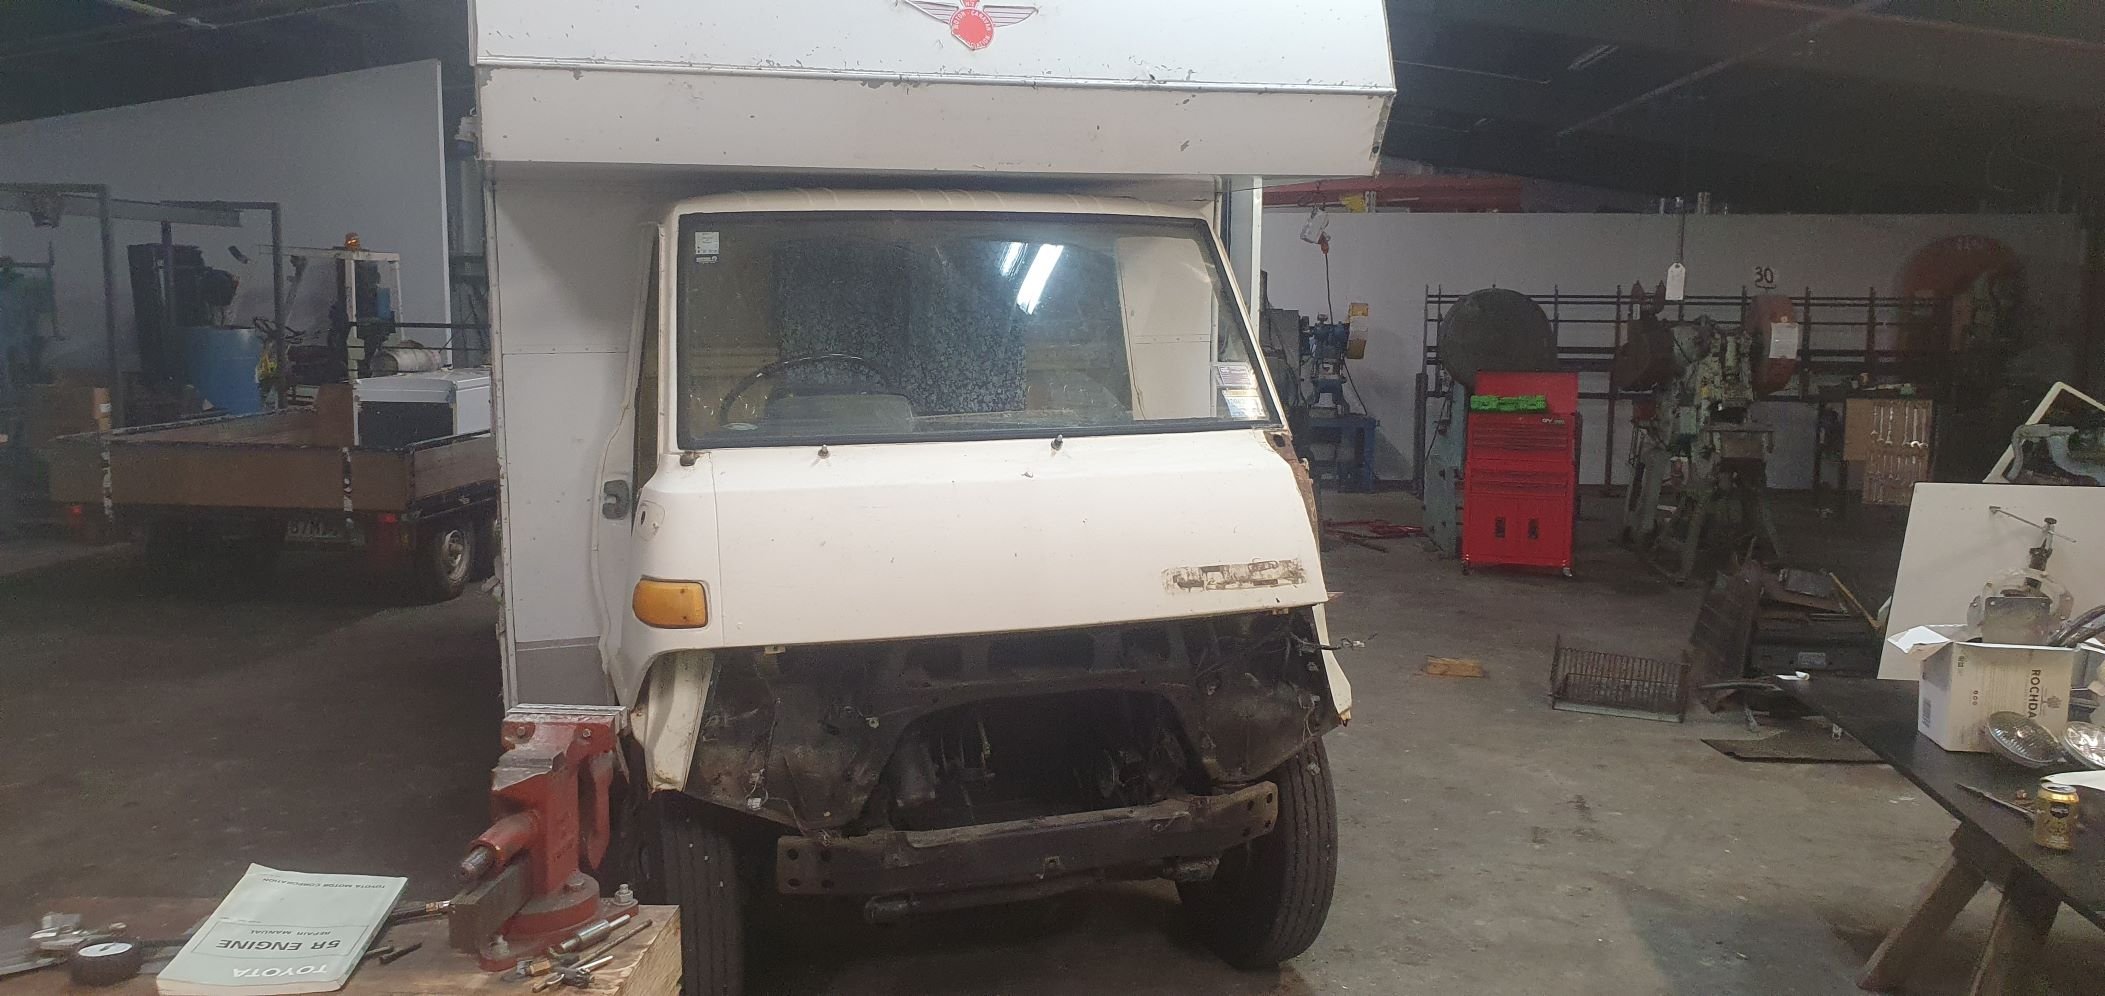
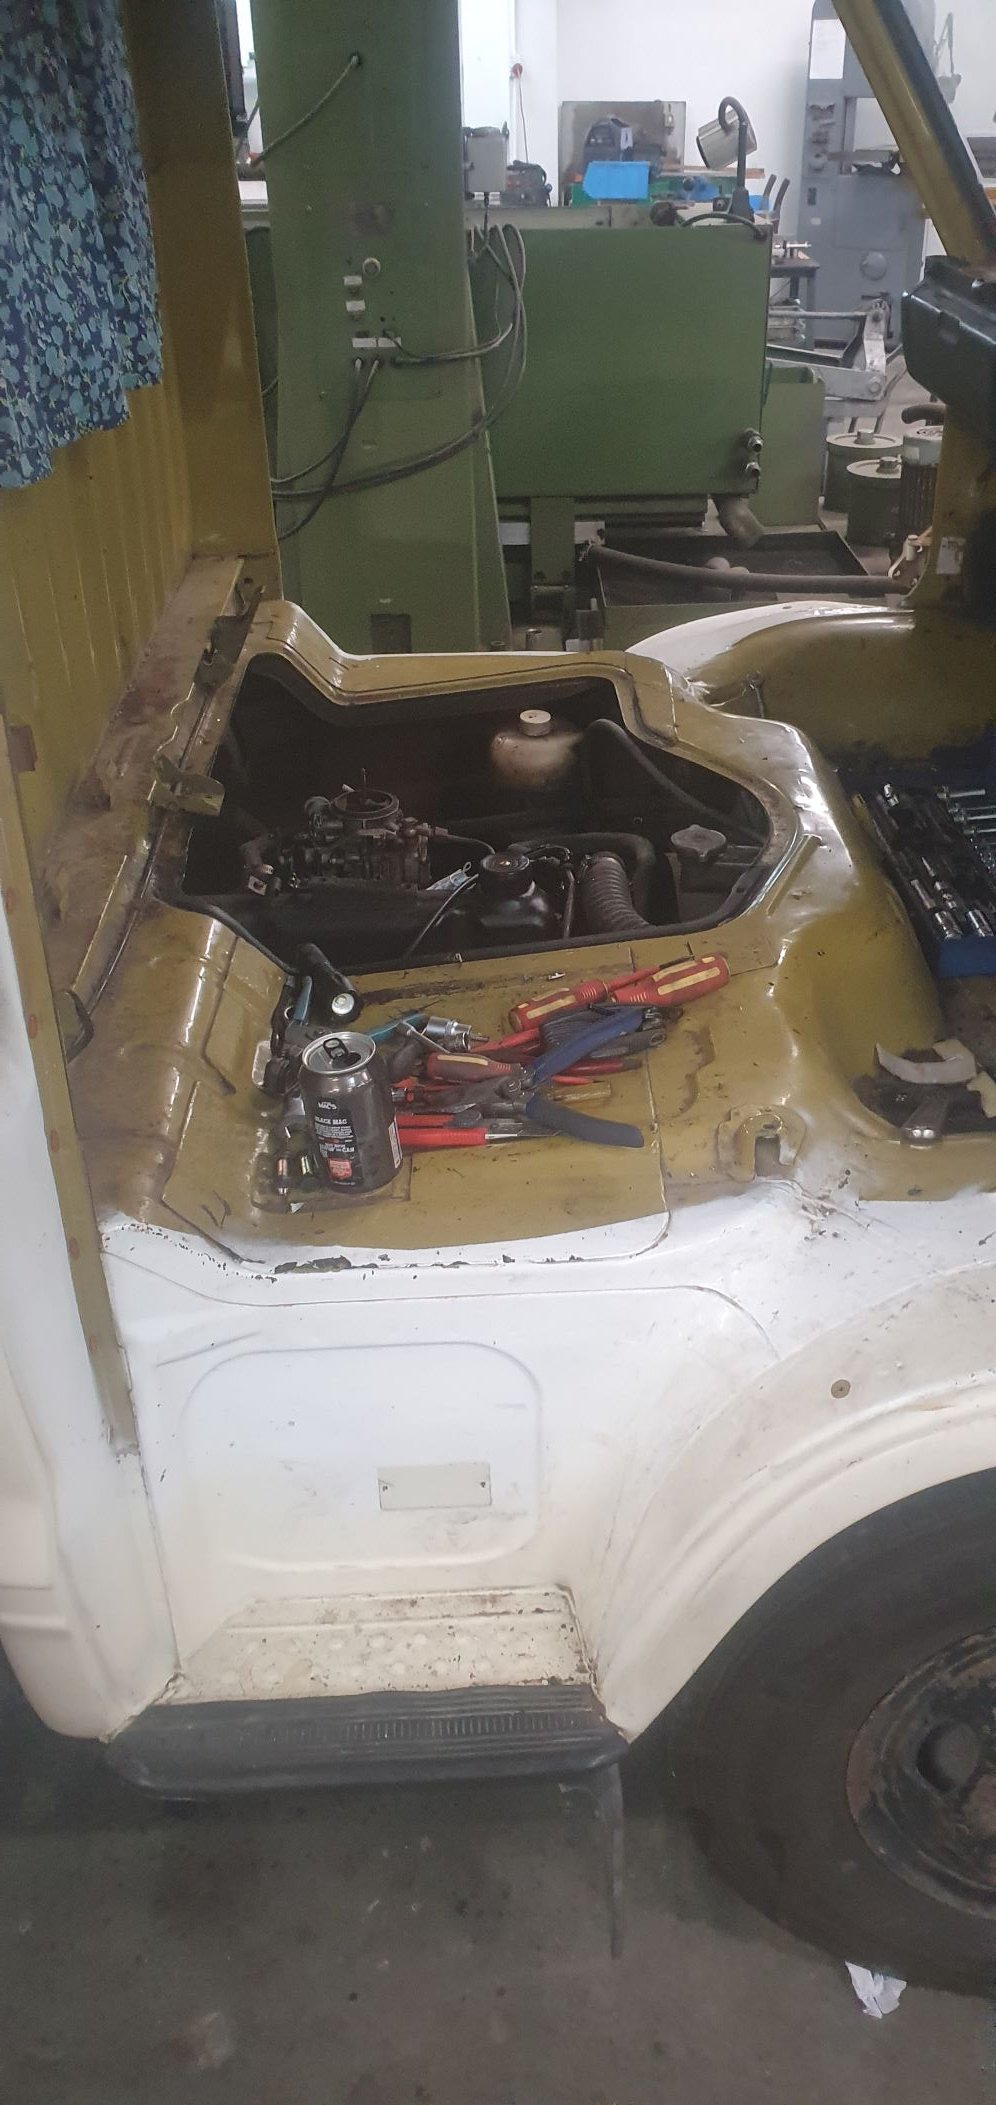
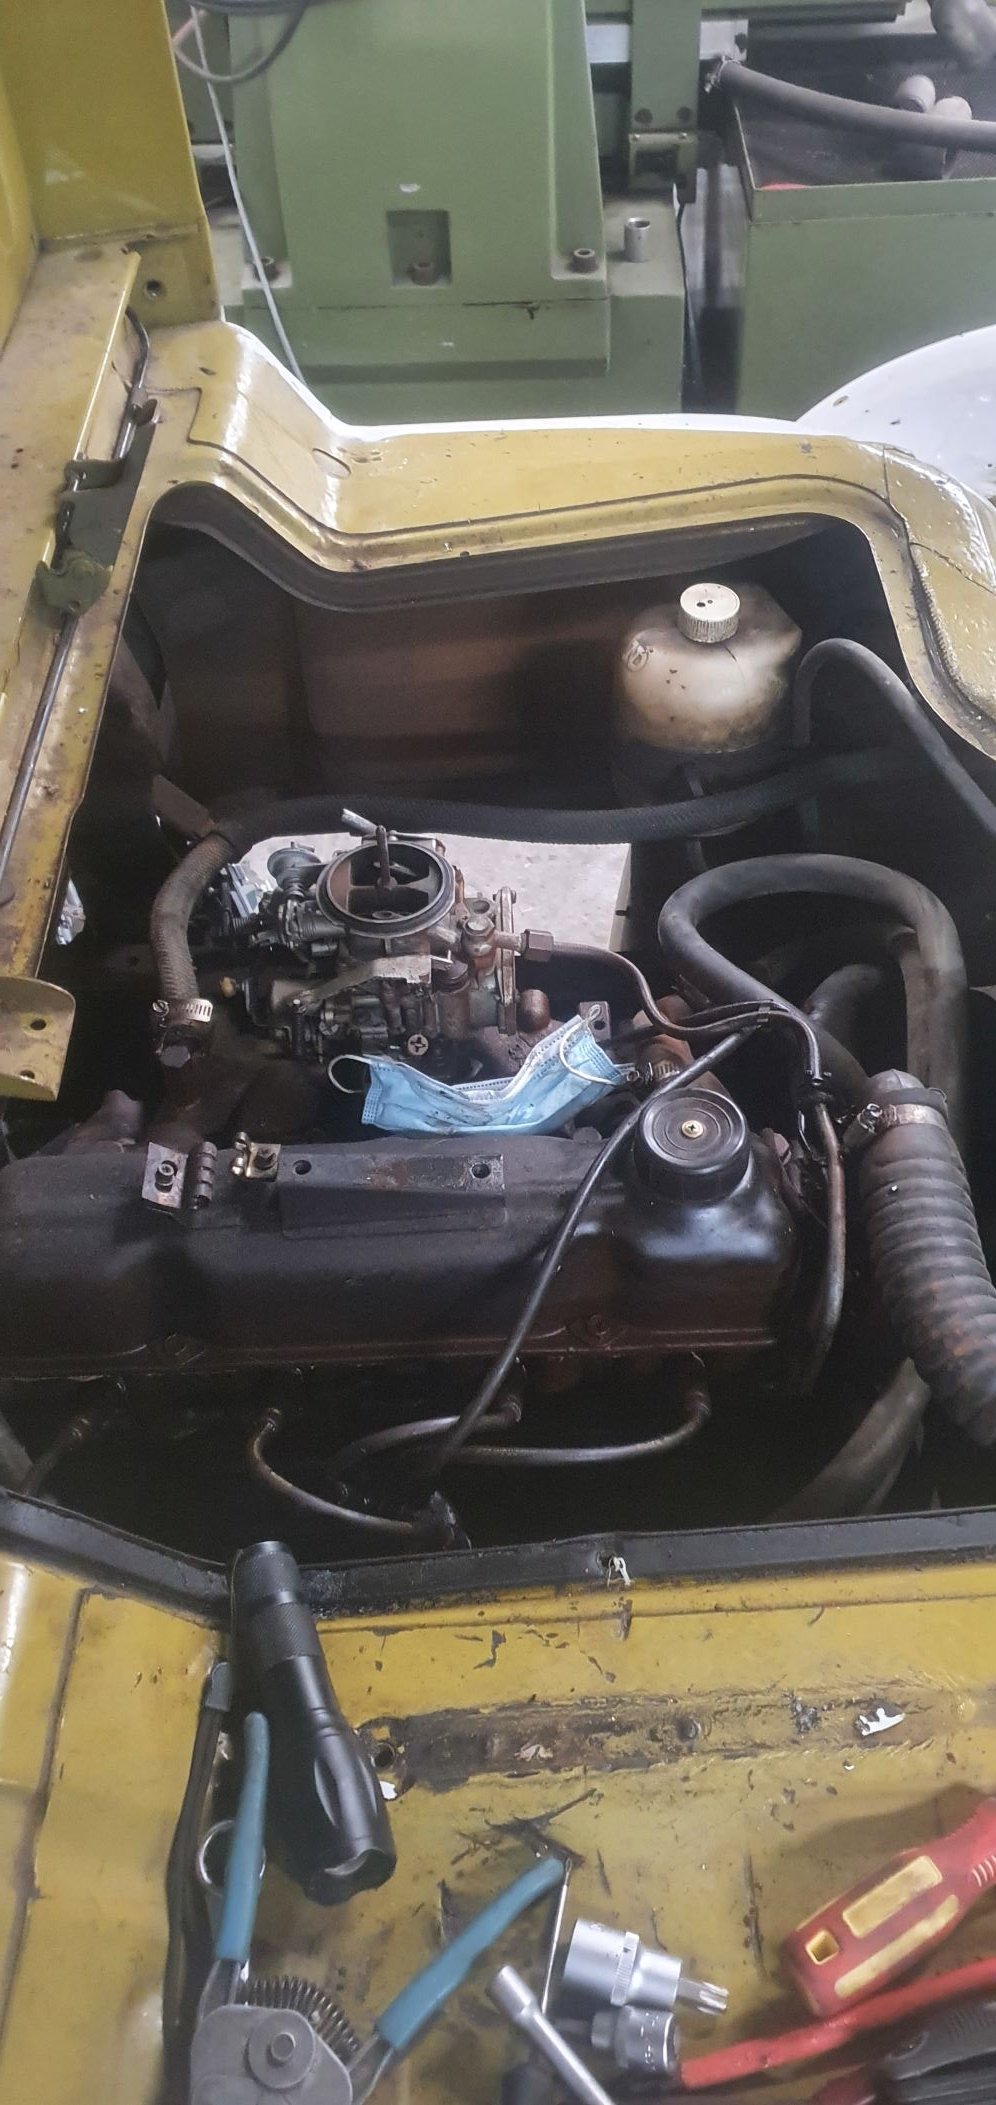
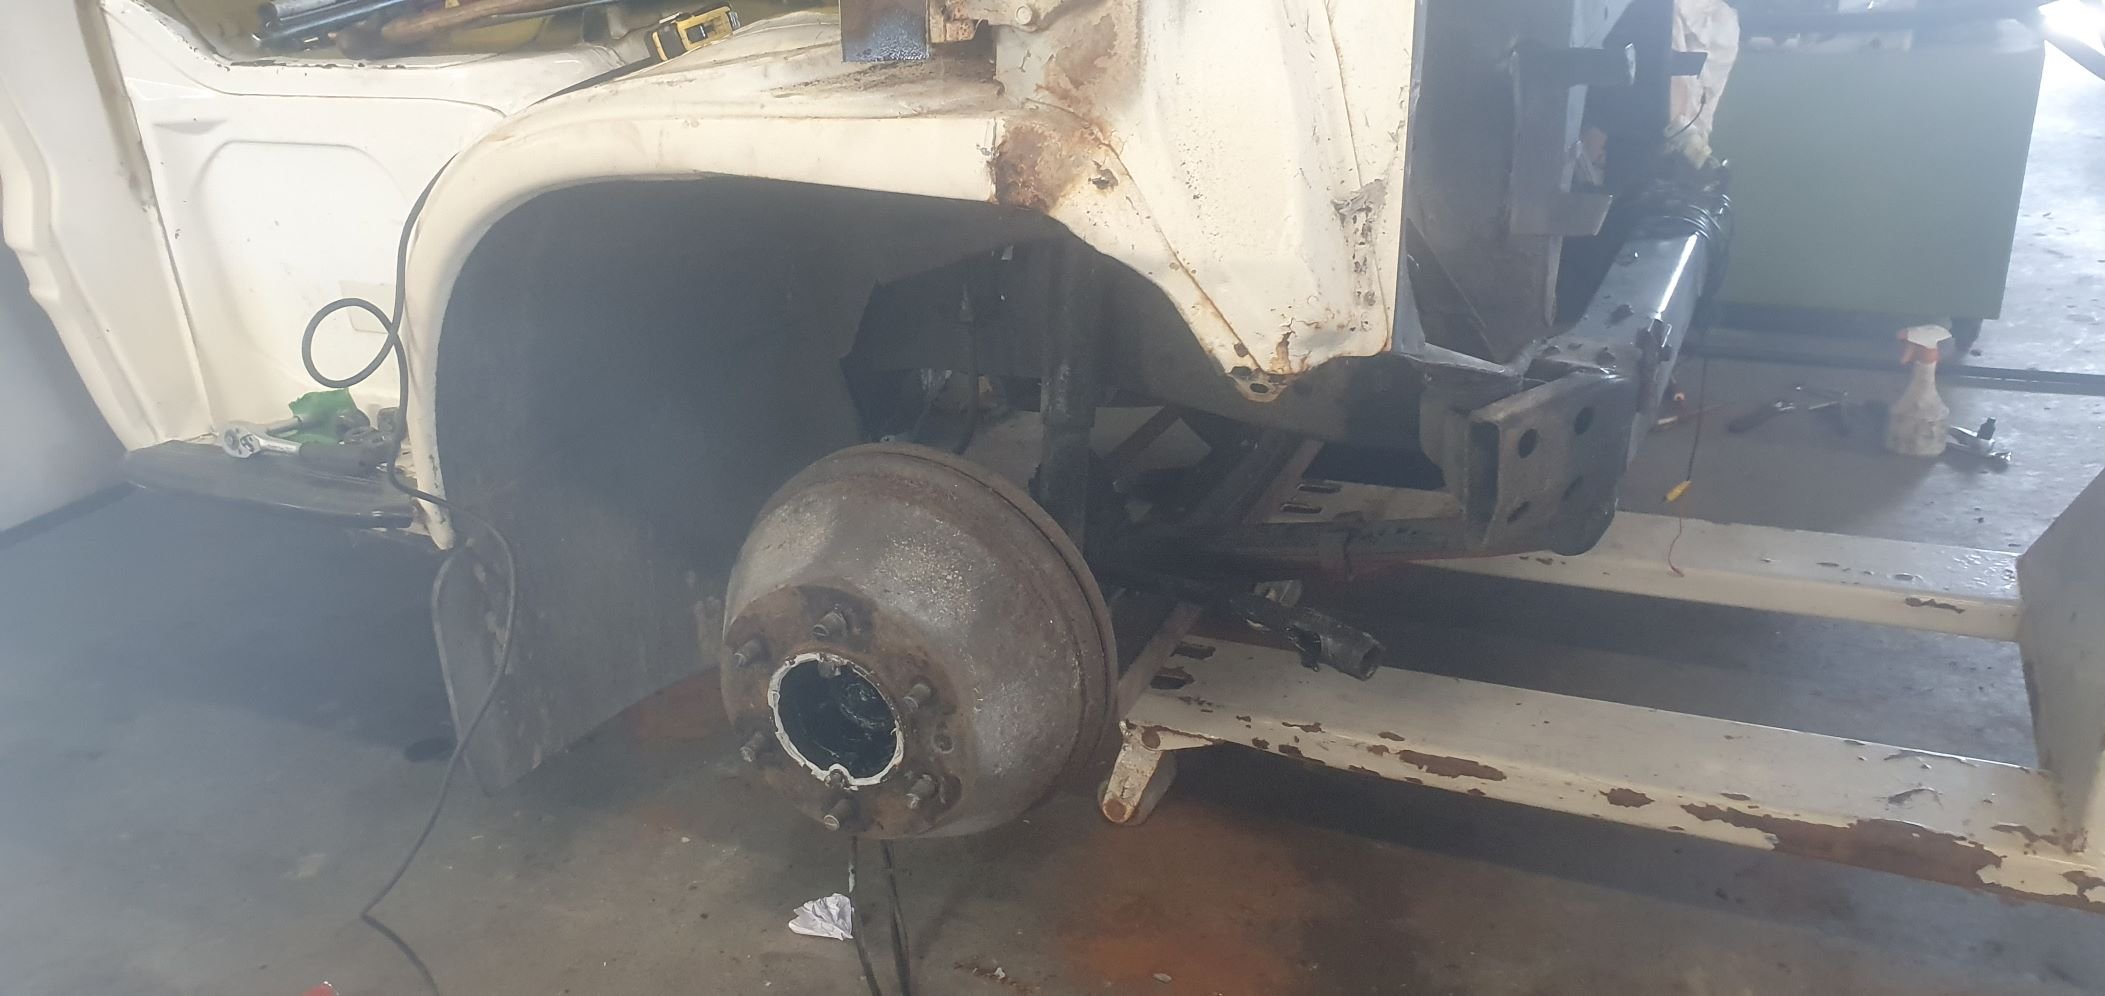
Impulse buy off FB marketplace over here in the states. I believe this to be a 67’ or 68’ S37. While searching for info I came across h4nd’s Fellow thread so joined up to ask some questions and he suggested I do a thread. Well, here we go. Truck is pretty damn complete but of course has rust issues. It’s pretty much the floorboards and bed floor, rest is not bad. Good glass. Supposedly *ran went parked* but that was who knows how many years ago. Doesn’t steer (sheared rag joint) doesn’t roll (tires shot) and doesn’t stop (hydraulics froze). I’ve got the brakes torn down and am in the process of rebuilding the system and tires are on the way. She’s a hot mess!
5 points
-
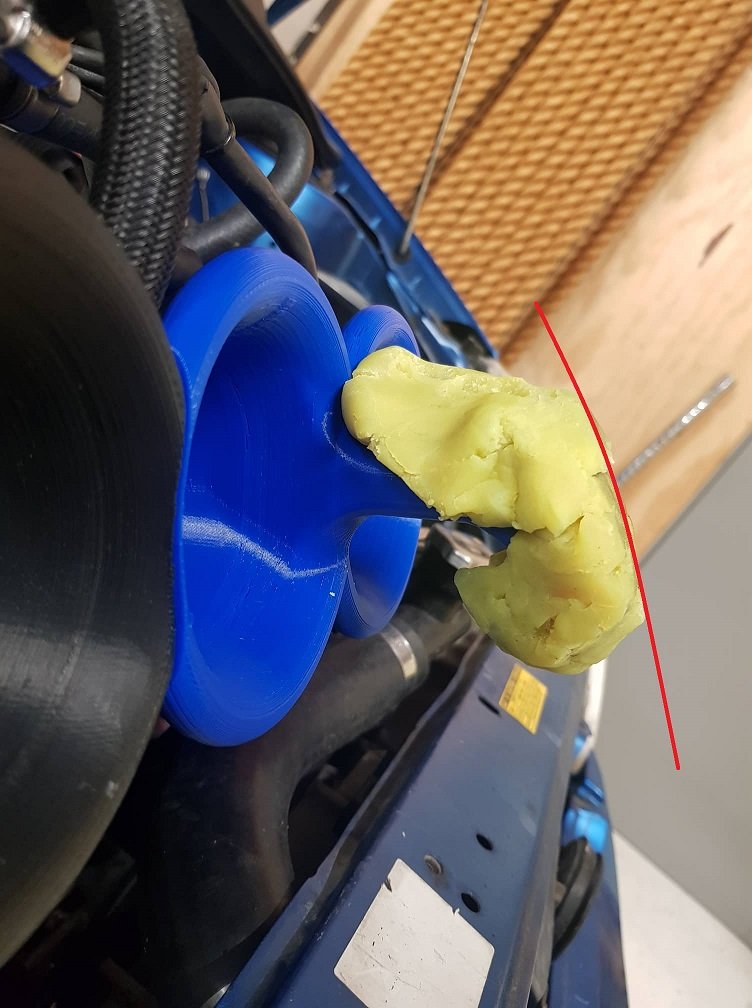
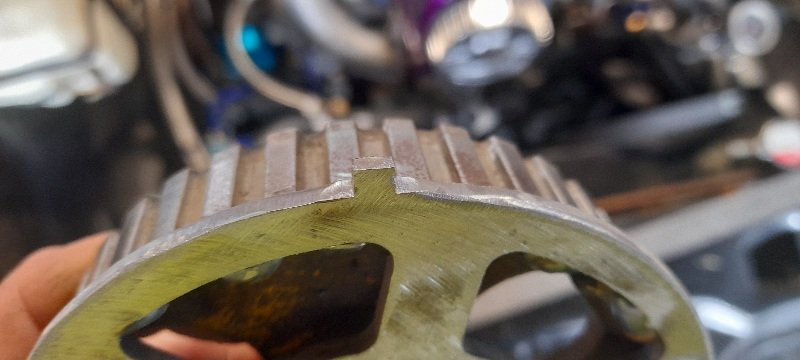
No idea, but I can do some back to back testing and find that out easy enough. Remember that most of the air comes from around the sides, not from straight ahead. Also the airspeed is (comparatively) incredibly low at the wide point of the bellmouth. Unrelated picture but you get the idea:
3 points
-
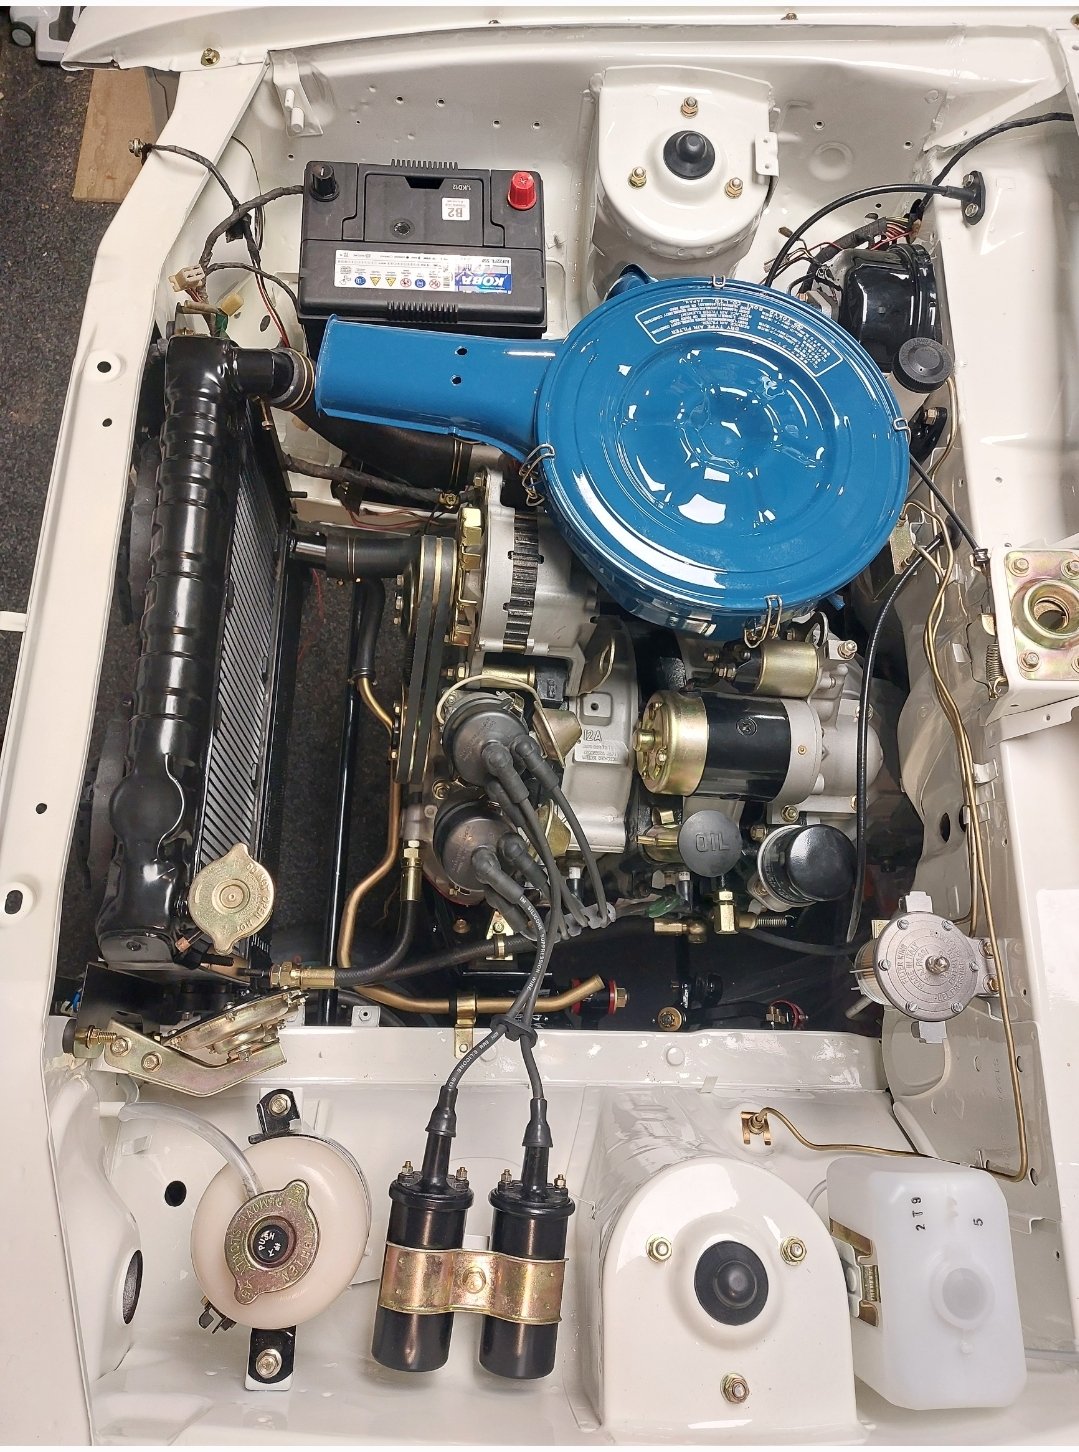
well I cut all the bar 1 tooth of the cam sensor..changed trigger 2 sync mode to CAM PULSE WINDOW and then just set that to 50° and she's now running both DRIECT SPARK and SEQUENTIAL INJECTION. she basically a modern engine now with classic pinto oil leeks.. haha not much else I can do till I make intercooler piping (and our postal service dictates when I get the stuff)... but even at idle the air coming out of the turbo is pretty significant. also set the water pump temp to 70° .. engine temp got up to 68° water pump kicked in...temp got to 71° fan kicked in and bought temp down to 65° in no time.... so I'm happy with the coolant system. RX2 70mm thick radiator, 14" fan in shroud ,electric waterpimp... on a side note ... heater was awesome within minutes. cheers
3 points
-
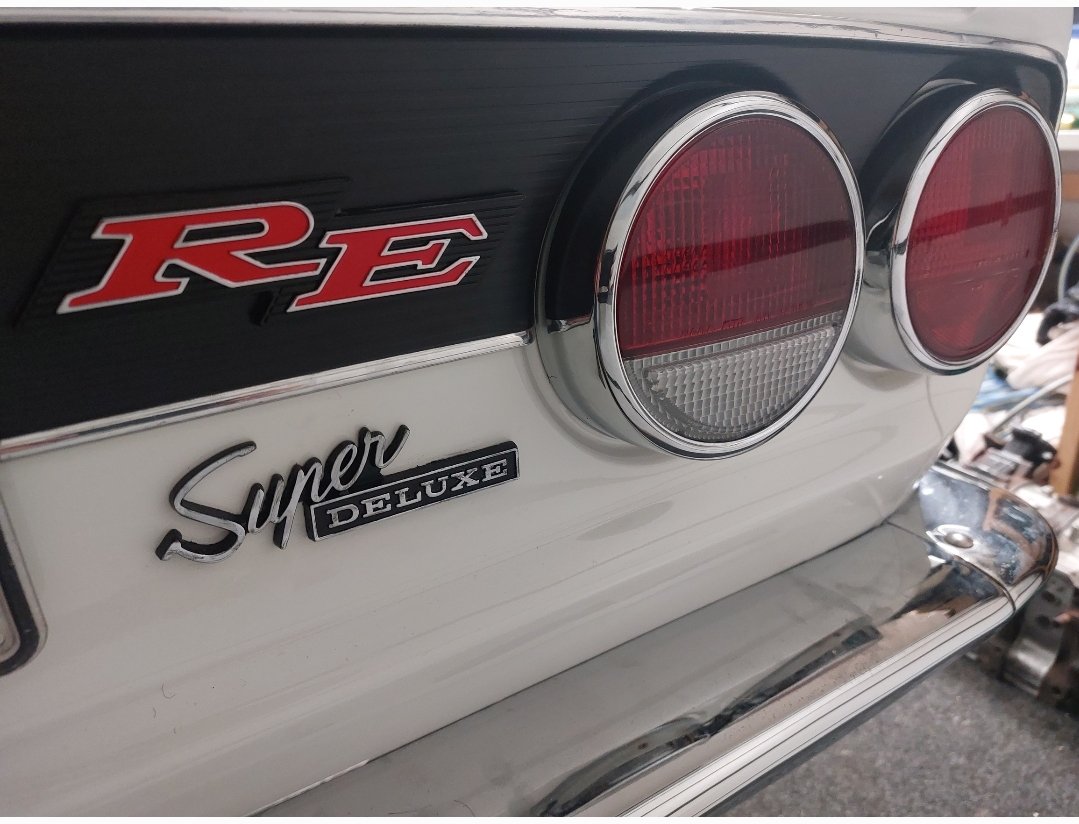
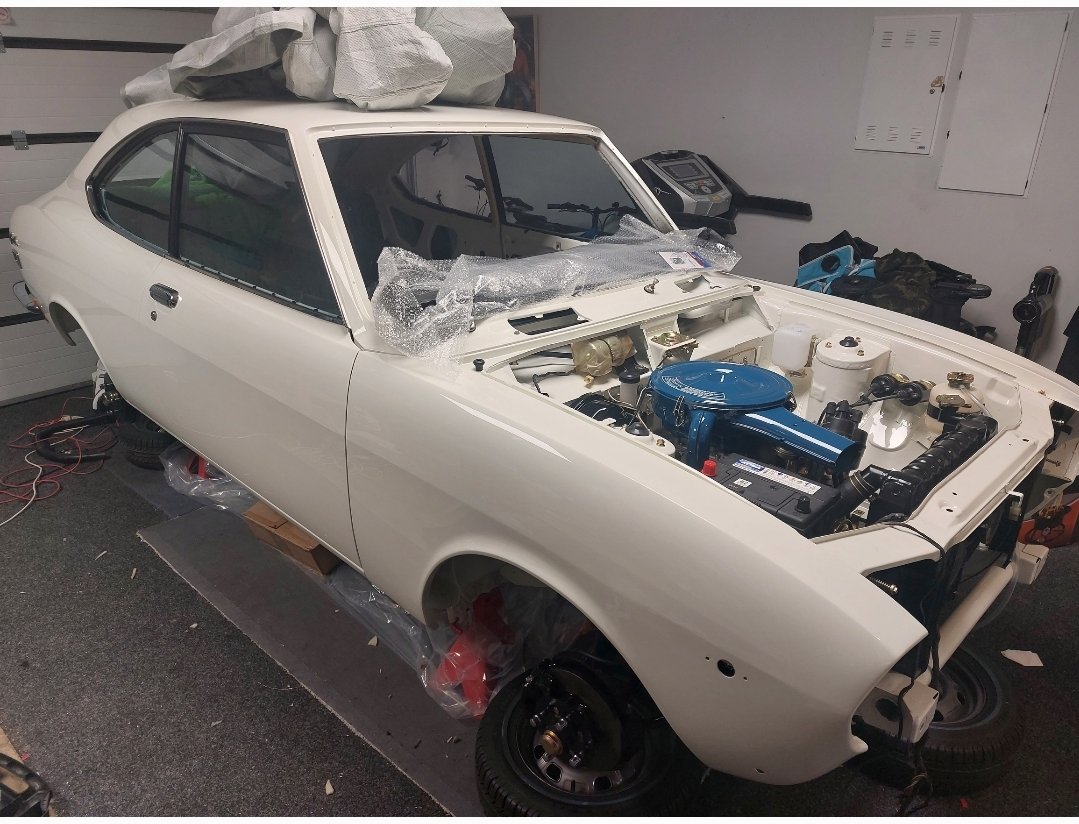
Engine bay well underway A few badges lights windows, chrome etc fitted too
3 points
-
None of the shit I blow out into the sink rusts, so I think this is the case Shower floor is pretty Rusty tho2 points
-
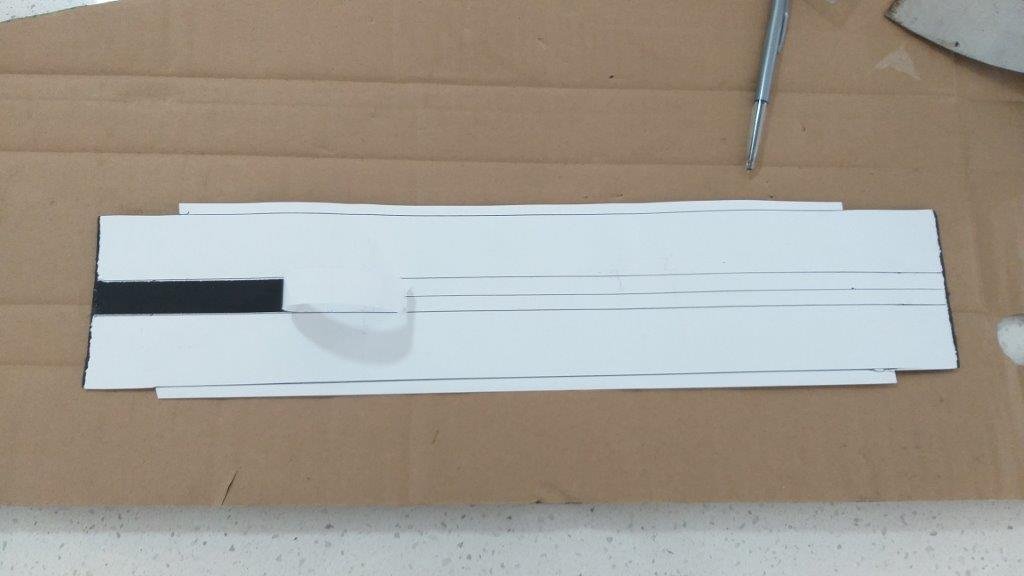
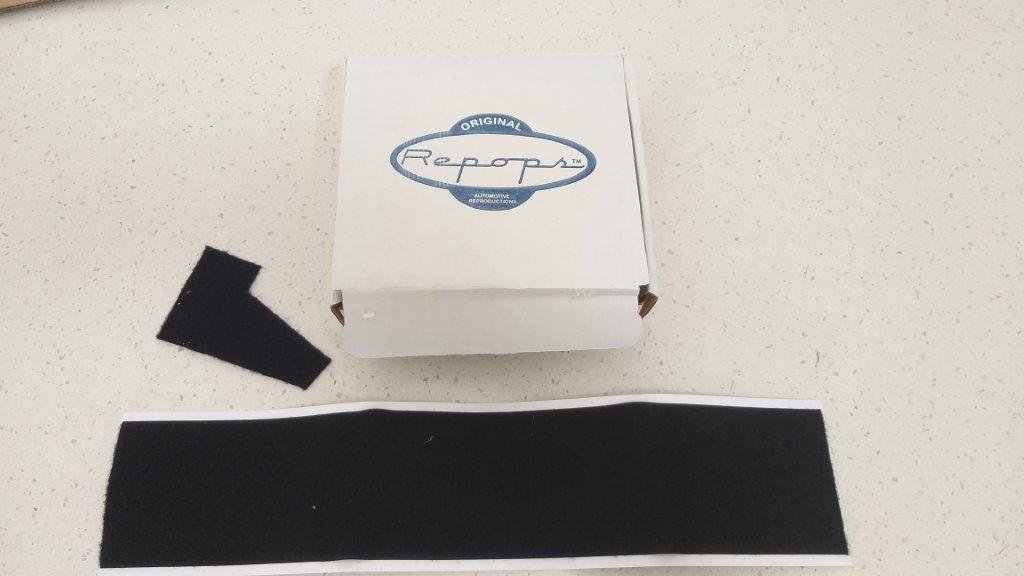
The next step is also a bit tricky as you need to peel the back off the adhesive and at the same time get the new felt perfectly stuck to all three sides inside the channel. Any lumps will be fatal as they will prevent the channel from sliding smoothly. I started by peeling one end, but it soon became apparent that this was going to end in tears so I ended up asking Uncle Google how best to do this and he suggested cutting the adhesive backing into three strips and then pulling the backing off the centre strip first. Used a carpet knife to carefully cut through the backing without injuring the felt. Got Mrs Flash to give me a hand and between the two of us we got it spot on. One down and one to go.
2 points
-
Played with wheels,
2 points
-
HQ is actually 5x120.65 / 5x 4.75” That extra 0.65 is enough to snap your wheel studs.2 points
-
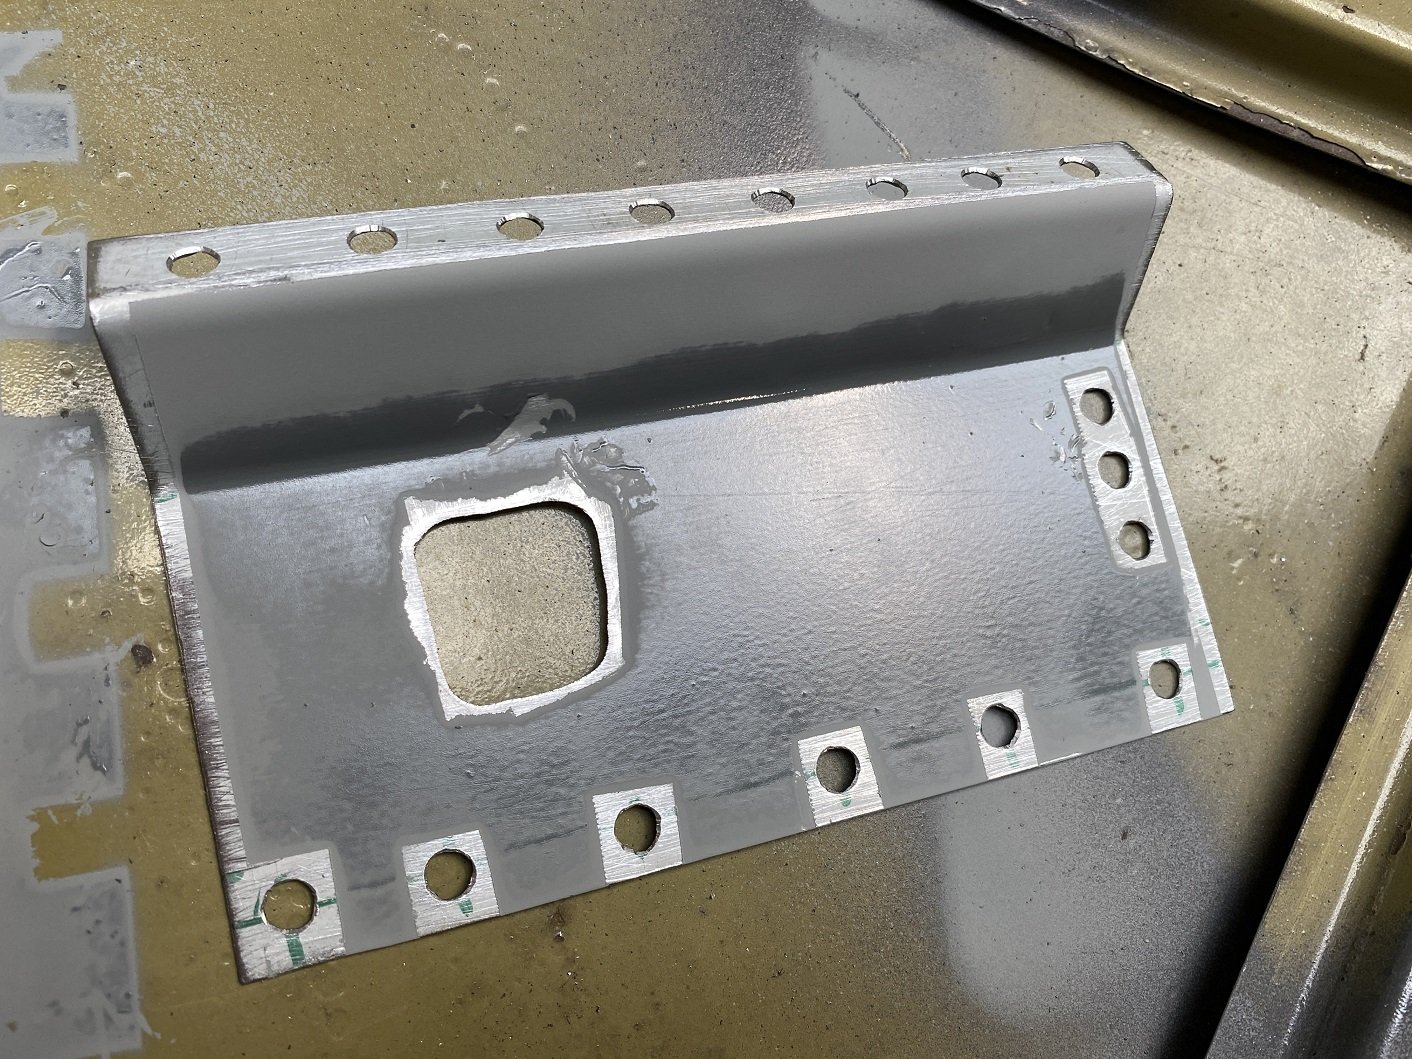
Much better. Just got to linish the welds and trim that edge. The other side jacking point has a reinforcing square around the hole... I doubt I'll ever use that jacking hole ever, let alone enough to dent the area around it... But if I don't add the reinforcing square, it won't match the other side....
2 points
-
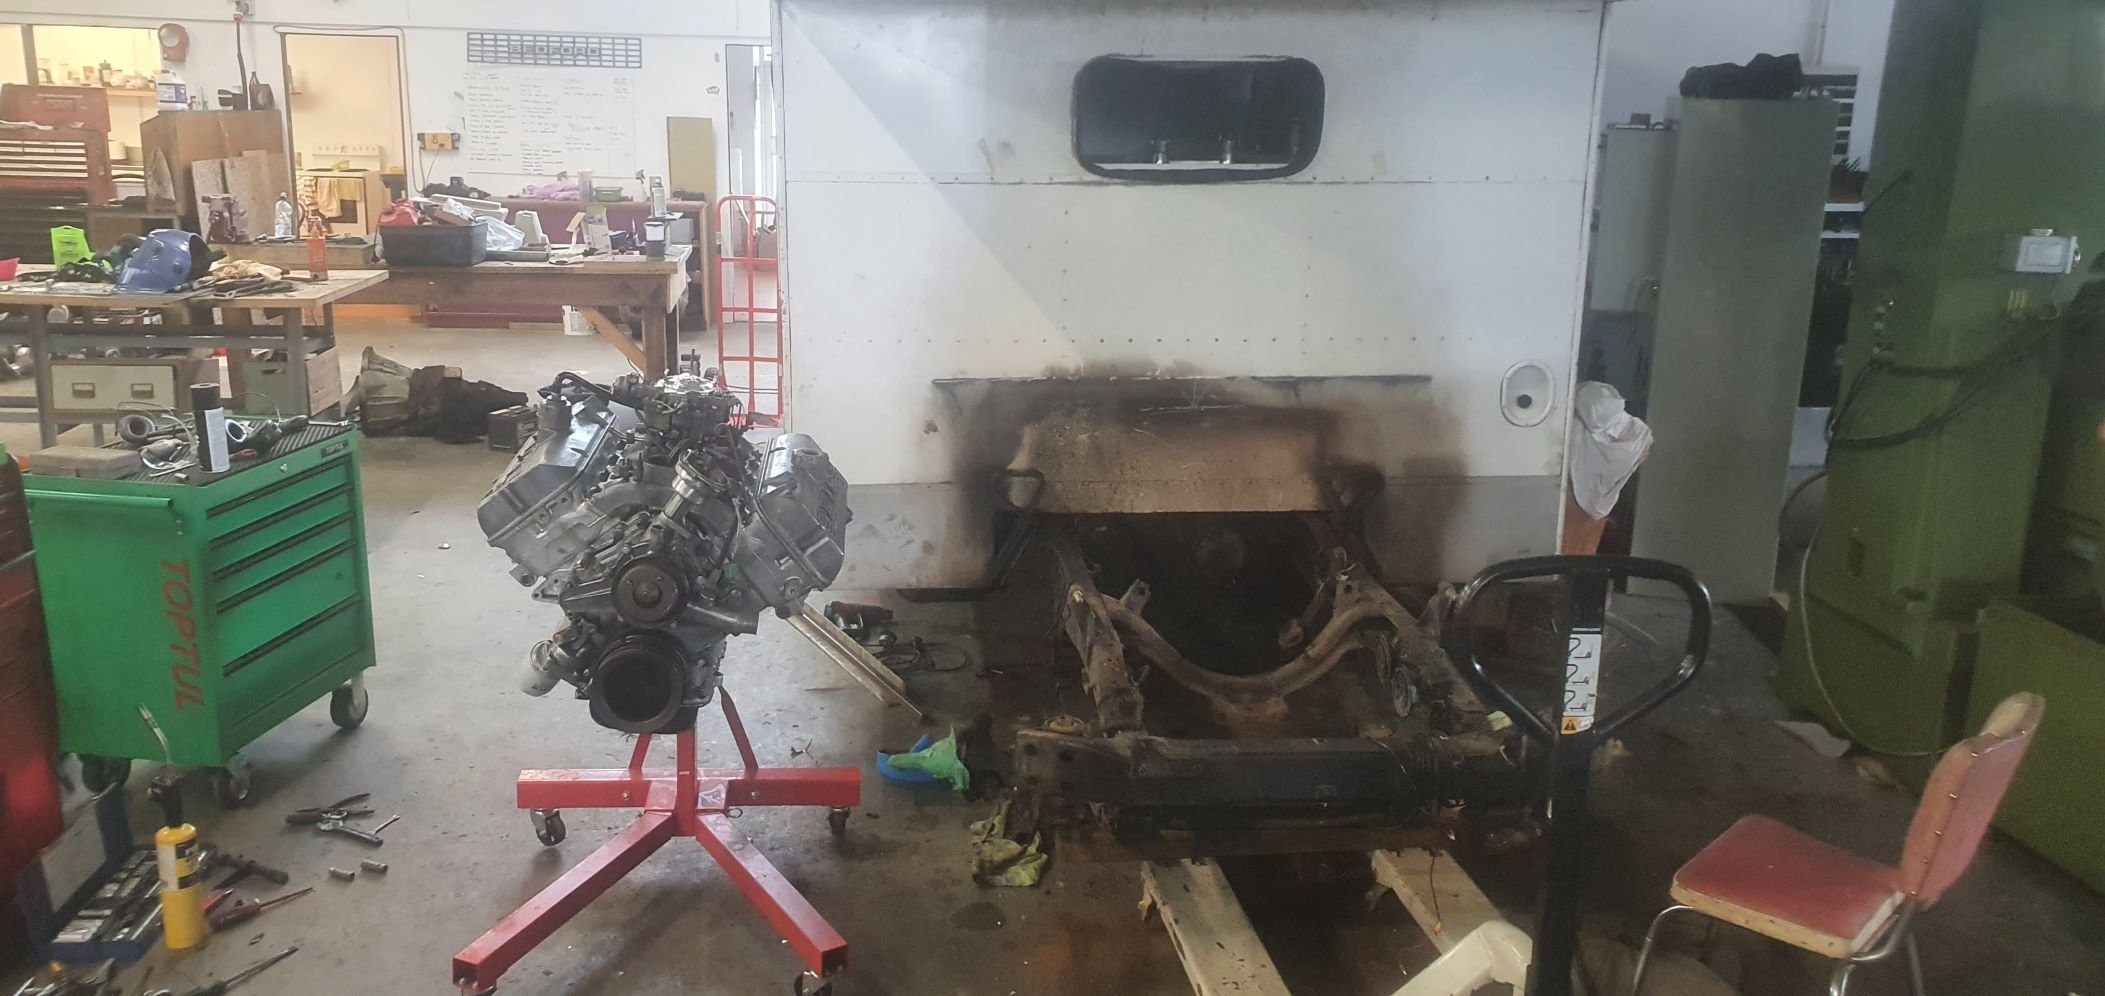
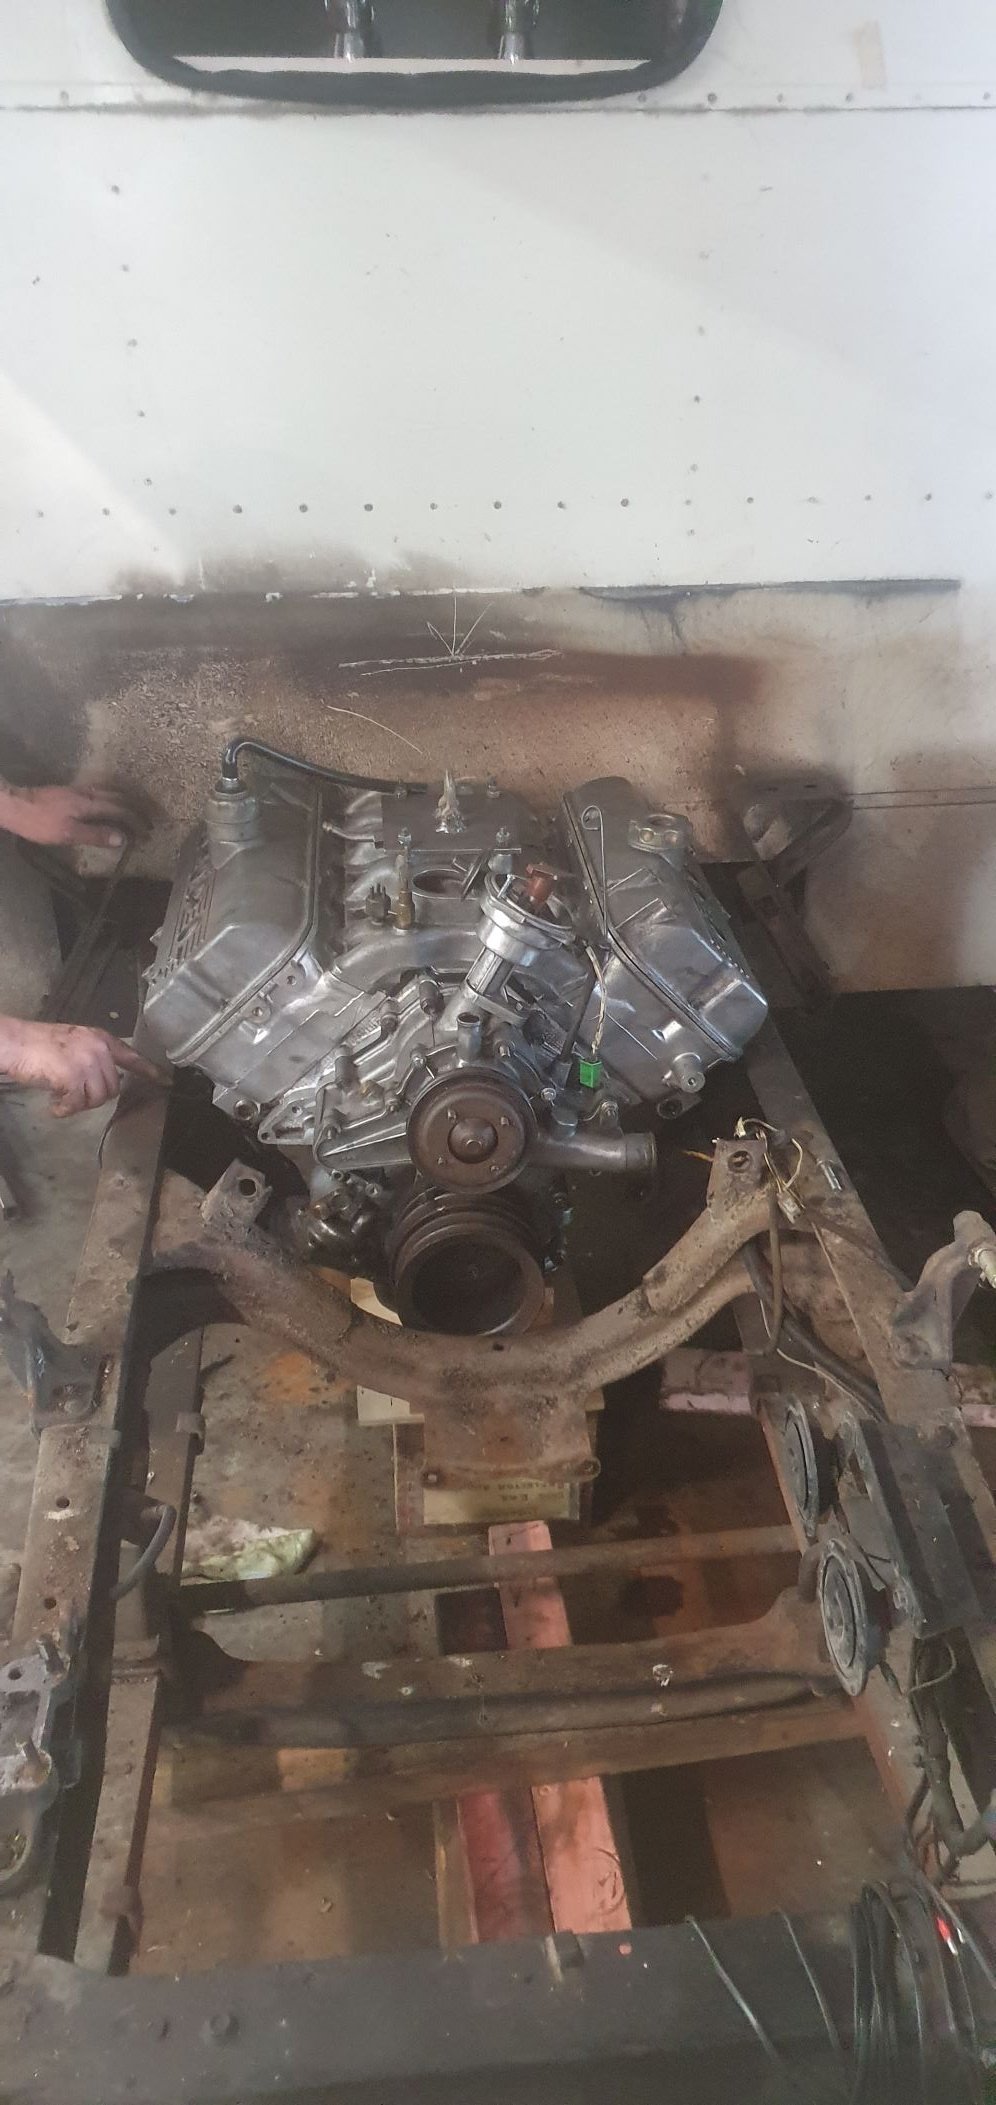
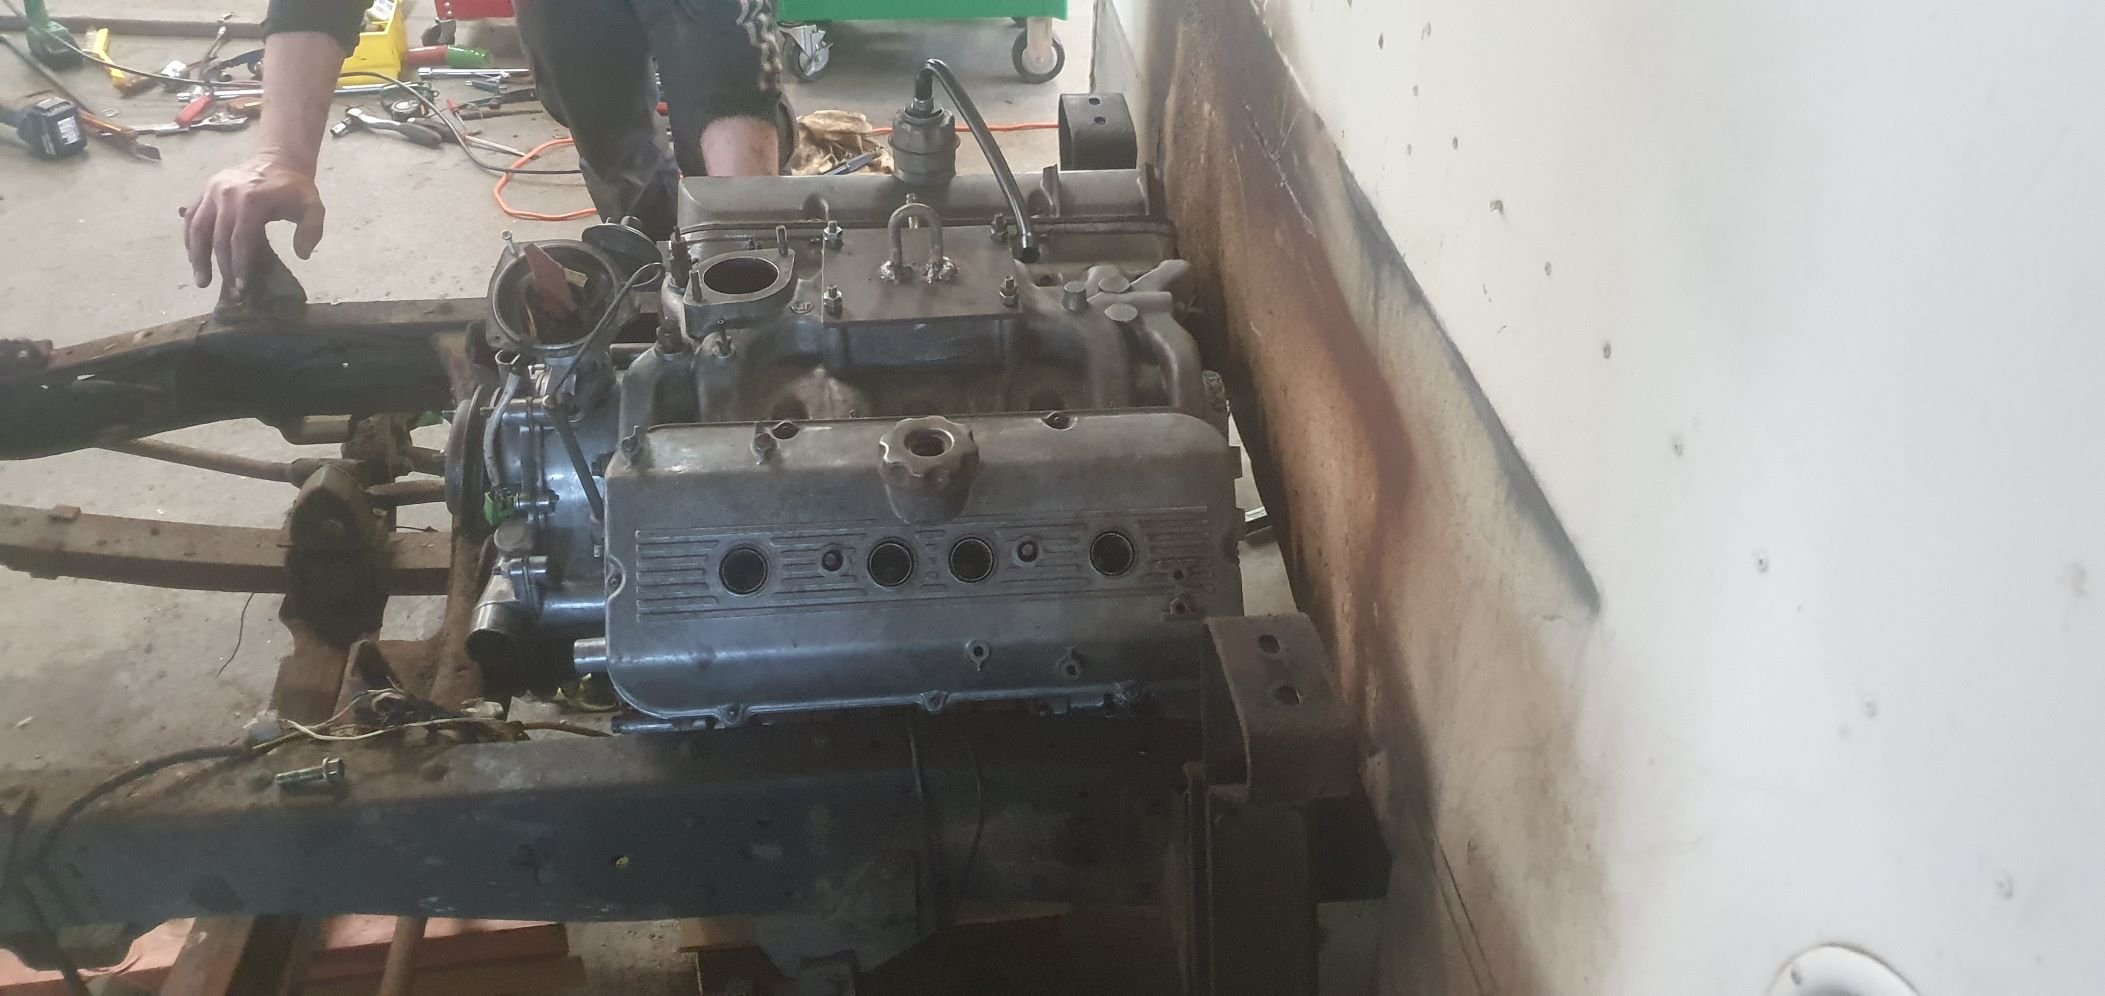
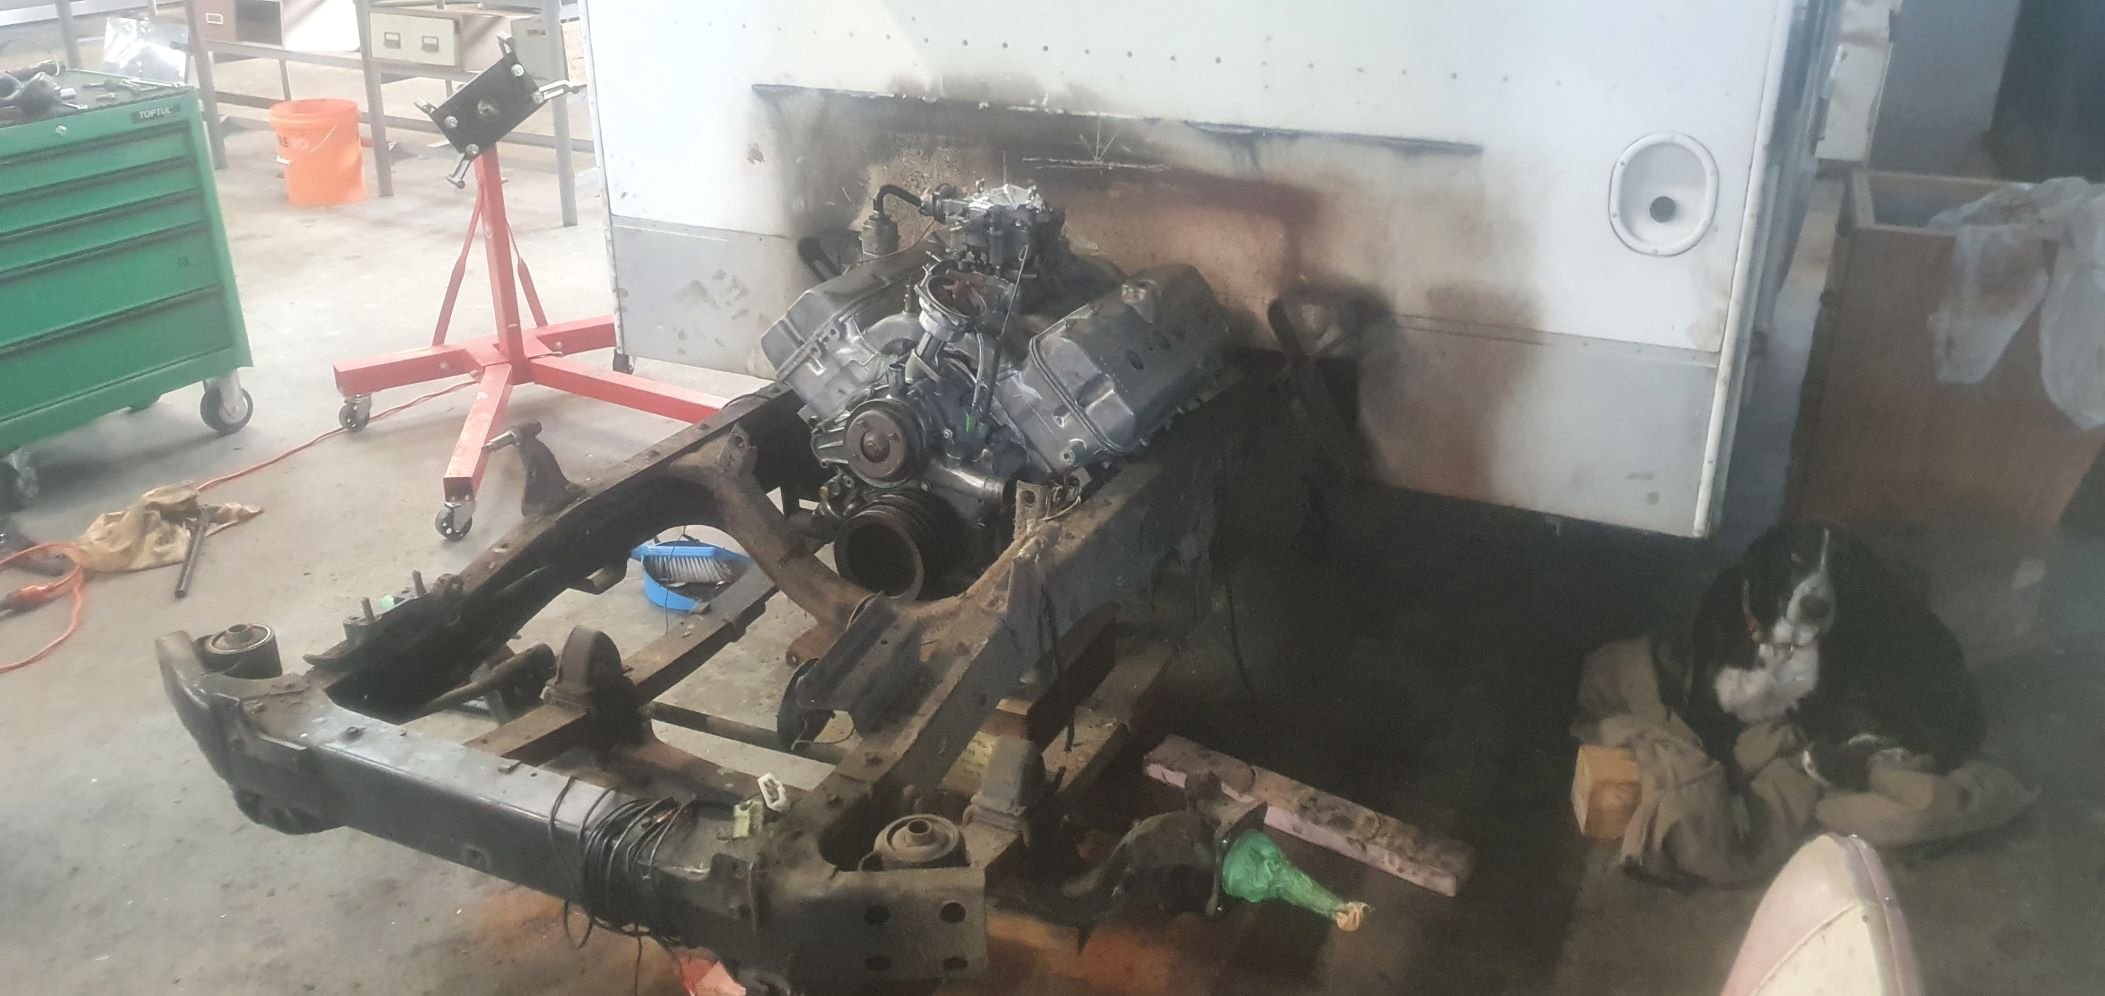
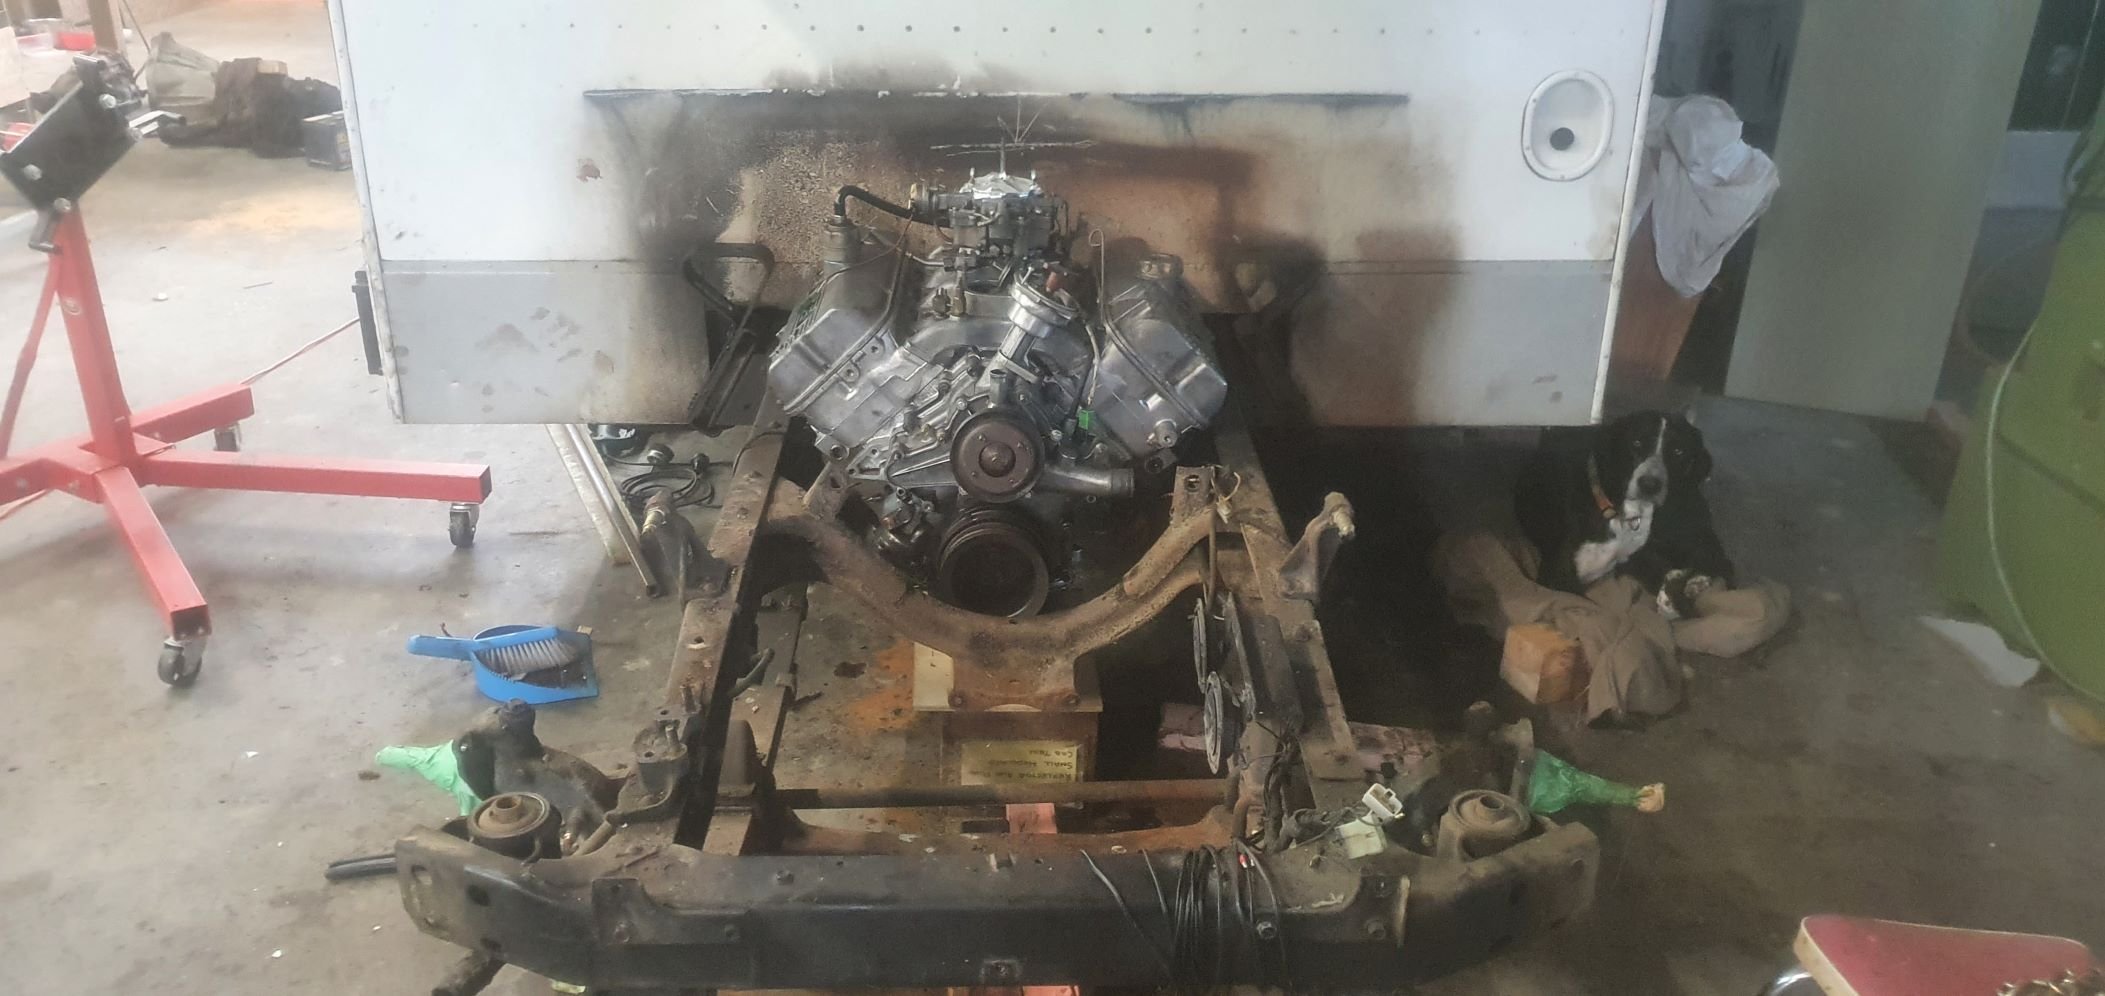
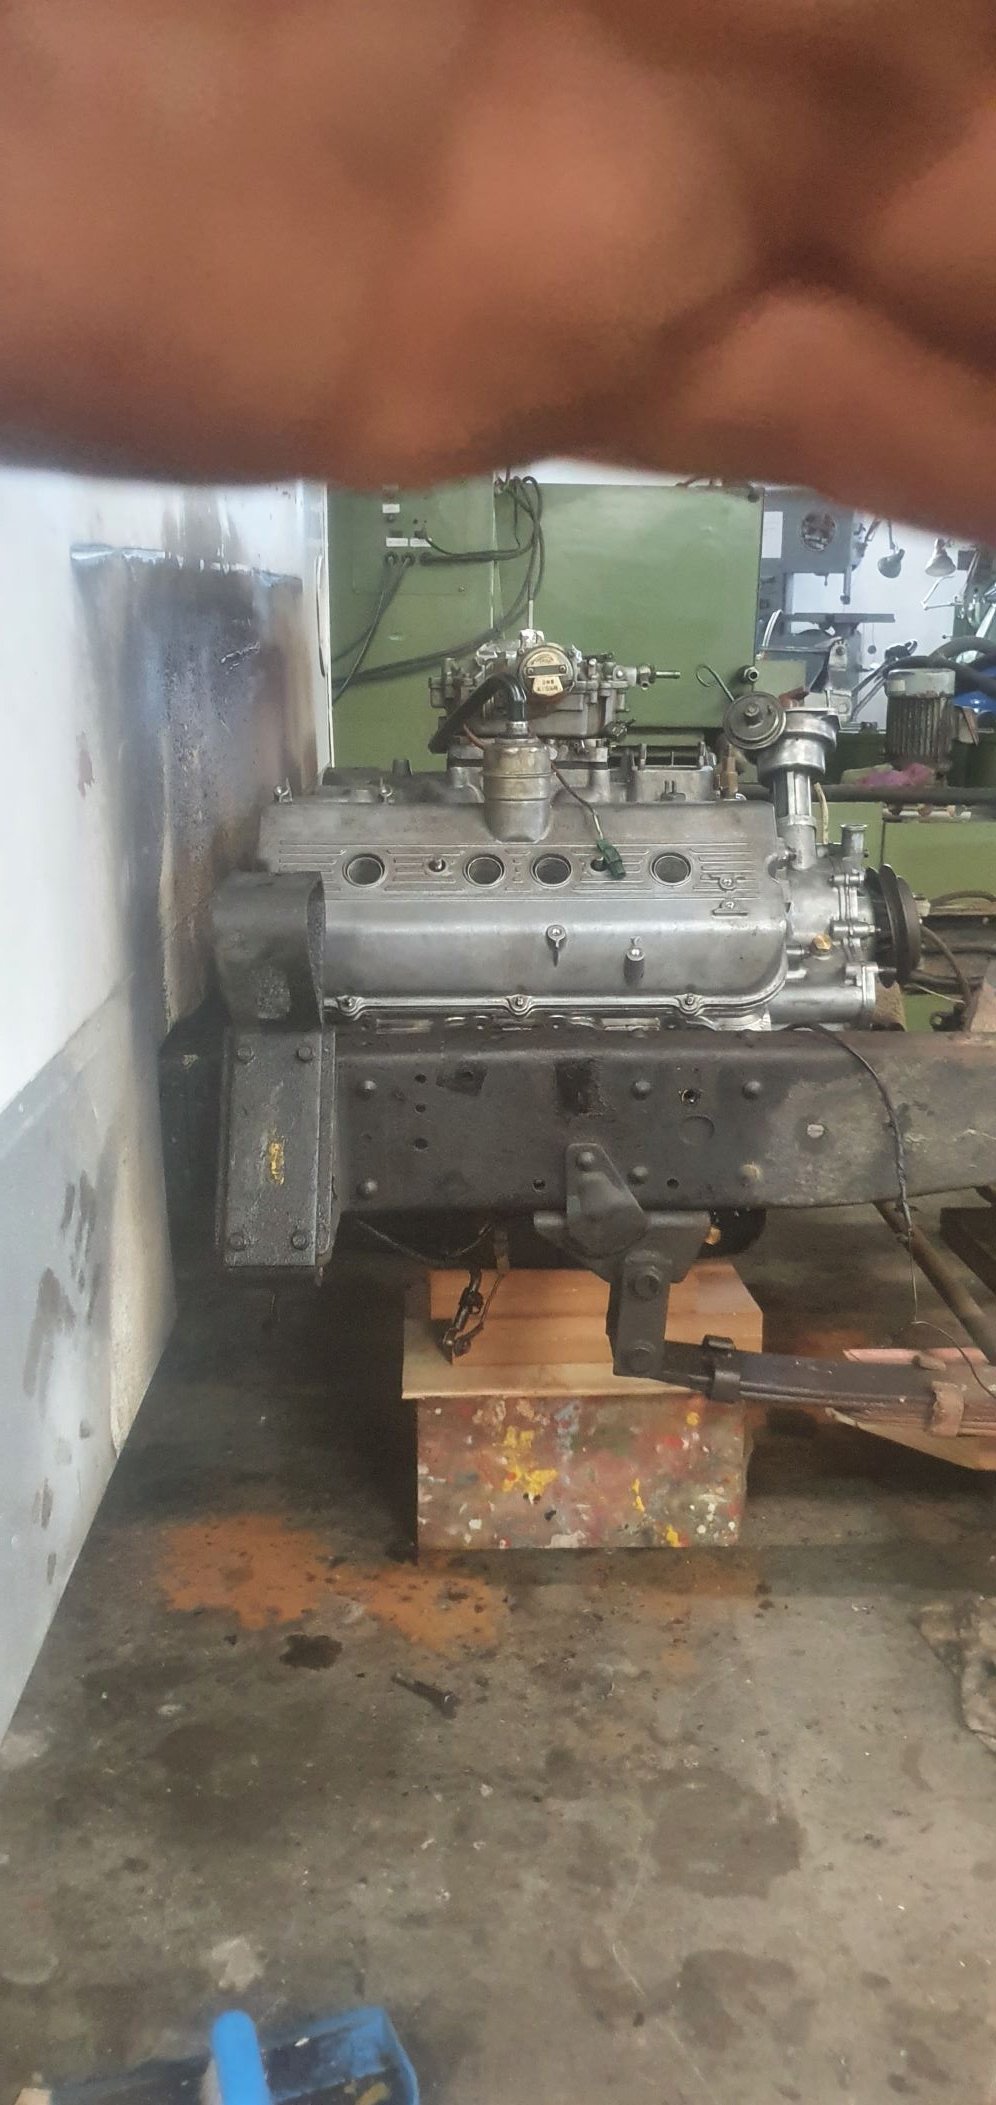
In terms of actual activity there is little to report, however the pondering, and opining from cunts like @ThePog and my worker - of near-equal cunt status - has been somewhat rampant. The main topic of conversation has over the last few days largely revolved around whether it is actually going to fit. It is largely a problem I have never encountered - just saying. So the motor has been sitting in the same position since we dumped it in there. I had to have a bit of a workshop tidy up. As many of you would well be familiar with, doing shit like this means sorting your shit out along the way and doing things in stages, so come assembly time you largely have all the shit in order, just requiring cleaning or a fufu can touch-up job. So I did that last night, and then suggested to Kyle that we wheel the cab back on, just to see (and to stop us thinking about the actual problems below). The carb had to be lifted off the engine to wheel the cab back over. But my oh my, doesnt it look pretty in the hole. Confirmed, It is Gynormous.. Also confirmed, the fucking thing is going to live in that hole regardless. Chassis chop, mid mound, fucking whadeva G. Every other possible engine option is shit in comparison, so that bit is solved. Now I need to solve the actual shit of ensuring whatever we do doesn't result in either a basket case chassis-hack job that will never be legal, or someones lunch being sucked out through their asshole by virtue of the carburetors somewhat prominent position inside the cabin. See pics - it is not optimal, the engine must go down in order for the carb to actually clear the engine cover and/or seat. The chassis rails actually widen where they pass under the camper body, and if they were that width in the engine bay we would already have that cunt mounted and half wired up - but alas that is not the case... So the present possible solutions are as follows; Option 1 - slice a 30mm ish slither out of the inside top of the chassis rails (removing some of top leg of C-channel), effectively continuing the inside line of the chassis rail (under camper body) further forward through to where the front of the engine is, then stepping in (see chalk marks). Then strengthening the Chassis with another plate on outside with folded edge to reinstate the 'beam strength' back into the chassis, or adding other folded piece over top extending further rearward and forward (kindof boxing the outside) This would allow the engine to drop down and maintain the current position. Tight set of log-style headers, removable from below should be achievable. FYI, Im an Industrial Designer by trade so drawing up, profile cutting, folding some shit, fabbing and modding the rails doesnt seem a terrible idea to me - but there are obviously rules and my cert man has already advised his 'preference' is for not modding the rails. I feel a CAD model is needed just to communicate my thinking further here.. Option 2 - start hacking out the camper body - this is effectively the area at floor level under the sink - possibly the most useless space in the entire camper. Making a removable section and shifting the motor back far enough (prob 250mm max further rearward of current position or roughly half of the engine under the camper body. Driveshaft gets rather short, as believe it or not the wheelbase of this thing is a tad under 3 metres. This area will need a massage anyway for the trans, so there is some logic in cutting here now and then reinstating removable infrastructure later for trans access etc - regardless of where the engine ends up - ie it would allow us to fully entertain that possibility. Doing this means the engine slots between the rails somewhat easier, but obviously engine access becomes more limited and opening the engine access hatch means the engine wont really be that accessible (prob dipstick, dizzy etc access but little else). And it will look weird - I like the idea of opening that hatch and there she is in all her glory.. Added bonus is there will effectively be a 'Frunk' under the seats where the engine once sat... Option 3 - the oldschool hivemind give me your opinions on my discussion thread - maybe there is something I am missing here. Its hard to communicate how tight it is, hopefully the pics below tell the full story. Be great to hear others thoughts on what is possible here - I am actually also thinking of talking to one of the local Truck Chassis mod dudes too - given this thing is actually just a truck.. Chur.
2 points
-
Spotted by journos.2 points
-
Got Impatient/bored with work today around 3pm and wandered out into the workshop, decided to poke it in the hole. No amount of tape-measury can prepare you for the shear girth of this thing. You think you have room until you are trying to jam a 4V into something. Fuck me there is some thickness there. Chassis needs to be chopped....... actually at this stage fuck knows, time to talk to the cert man about what options we have. I havent fit the cab back over it to see what wriggle room we have, but suffice to say it needs to either come up (unsure if possible without losing the middle seat...), or the top edge of the chassis rail needs some massaging. Either way its tighter than tight thing. It looks fucking cool in there, I really hope I can make it work. If I cant Im turning it into a caravan and towing it with a T-bucket fashioned from the remains of the cab with the motor in it - its the only logical maneuver The way I saw it in my head was I would remove Cab, engine would drop in, sit perfectly where I wanted it and the factory mounts lined up.. I may not only be a cunt, but an unreasonable one. Watch this space I guess, the next bits become infinitely more difficult and time consuming...
2 points
-
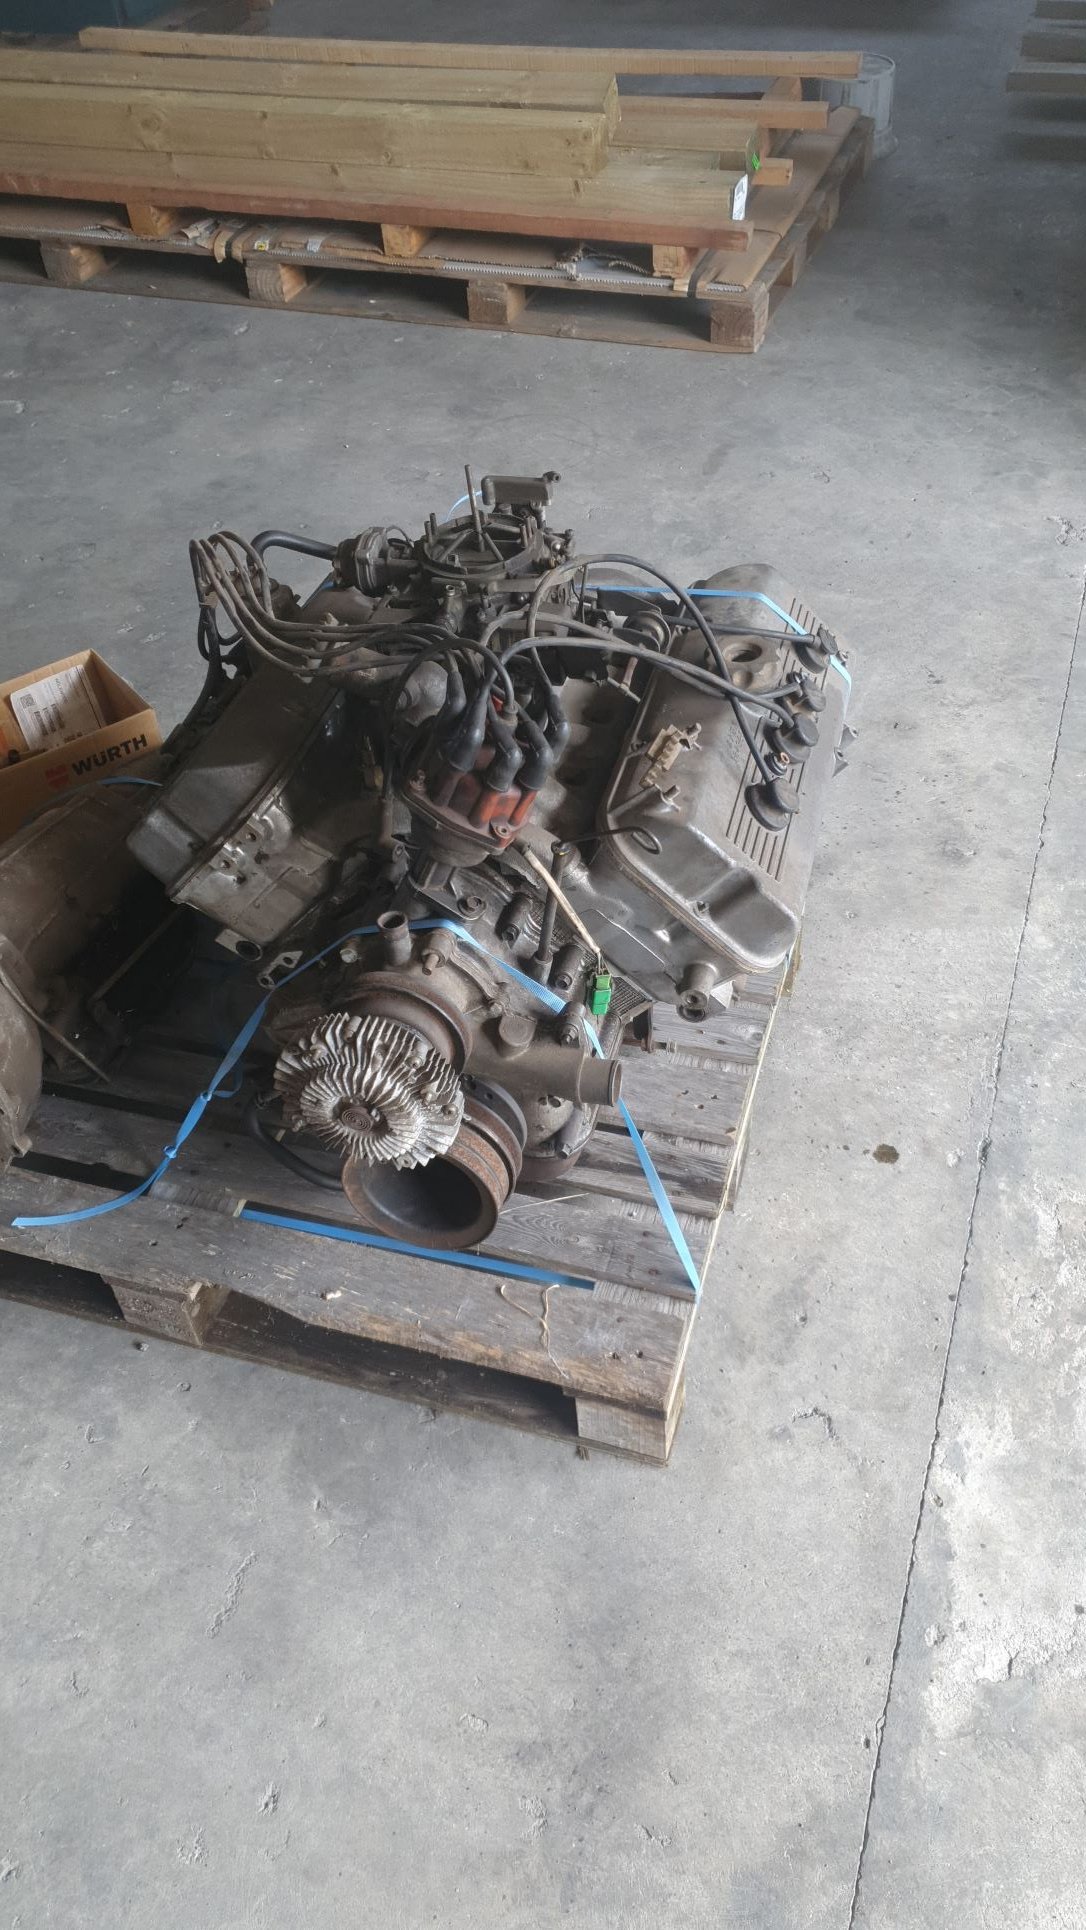
So ThePog convinced me to post up some info about my Camper Build. Its a 1977 Dyna U10 which was probably built as a camper straight from the factory - my guess is a CI Munro camper body, its very Caravan-esque. Its a cool thing in so many ways, Ive had for a bit over a year and probably done around 3-4000km in her - Far North, Raglan, Tahora...never missed a beat. Have fitted proper seats in the back for my kids, extended main bed, fitted good stereo and reverse cam, thats about it. It is on wof, which is nice, and has the mighty (79hp) 5R 2L petrol engine and 4spd L40 gearbox. As one might imagine performance is not 'spirited'... some of the best hills it will struggle to surpass 40km/h, which is not entirely conducive to making friends on the road... I am of course always willing to accept defeat and pull over. The 70s must have been glorious, certainly not in a hurry! Anyway, the wof ran out late last year, I still did some adventures through summer because, you know, the fear of actually being pulled over was of little concern! The rust issues were starting to rear their ugly head, and the engine thing was becoming tiring. FYI, it is actually surprising that, given time it will push the camper to 100km/h (@9000rpm) on a flat road, and up to about 40km/h it all sortof works, then goes downhill rather quickly. The 5R is still in good shape, but out she goes... So one night standing around having a beer ole mate from the workshop across the road comes wandering over for a brew, asks if any of us have use for an old toyota V8 hes had sitting on his floor for about 10 years. At that point, the consideration of what to put in the camper became abundantly clear. Somewhat irrational, but on-brand and period correct. Its a 4V, likely from a mid-70s VG30/35 Century. Its carbureted and came with the 3speed auto (I really want a 4 speed to avoid needing to lower diff ratio). Conveniently, it has also had a rebuild and some tickling. Has had a reasonable amount of port work, and a cam, we pulled it down to inspect and fresh hone marks on the bores, all new gaskets etc. Has the factory 4bbl Aisin Carb, which I will keep. The price ws also right at $1200.. So I have just really started, cab is nearly off and engine is likely to be slotted between the frame rails this coming week. The Cab needs an extensive amount of sheetmetal work, someones been pretty rough, lots of fibreglass, bog, gaffa tape... anyway will send cab and panels off for sandblasting/epoxy prime and then commence that bit in good time.' Plan is really just a sweet cruiser, nothing too extreme. Id like to keep it pretty quiet, so will run full twin pipes and 4 mufflers. Cab is going to be decorated in some sort of 70s/80s Toyota Orange. The Caravan body needs some loves too. A couple of roof leaks, a few rivets to be fixed etc. Have a new Solar panel to replace the tiny one on it. Also will rejig the kitchen a little and add in a better inverter, new fridge and new batteries and charge controller. Thats prob about it for now..
1 point
-
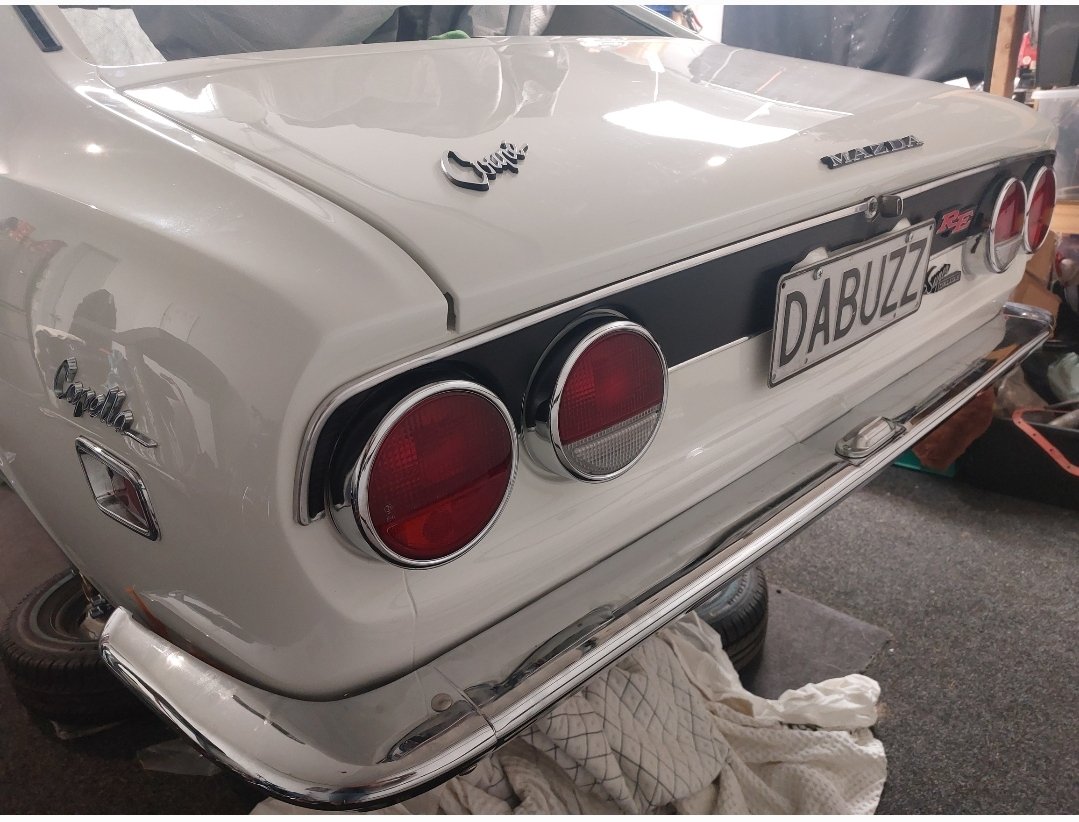
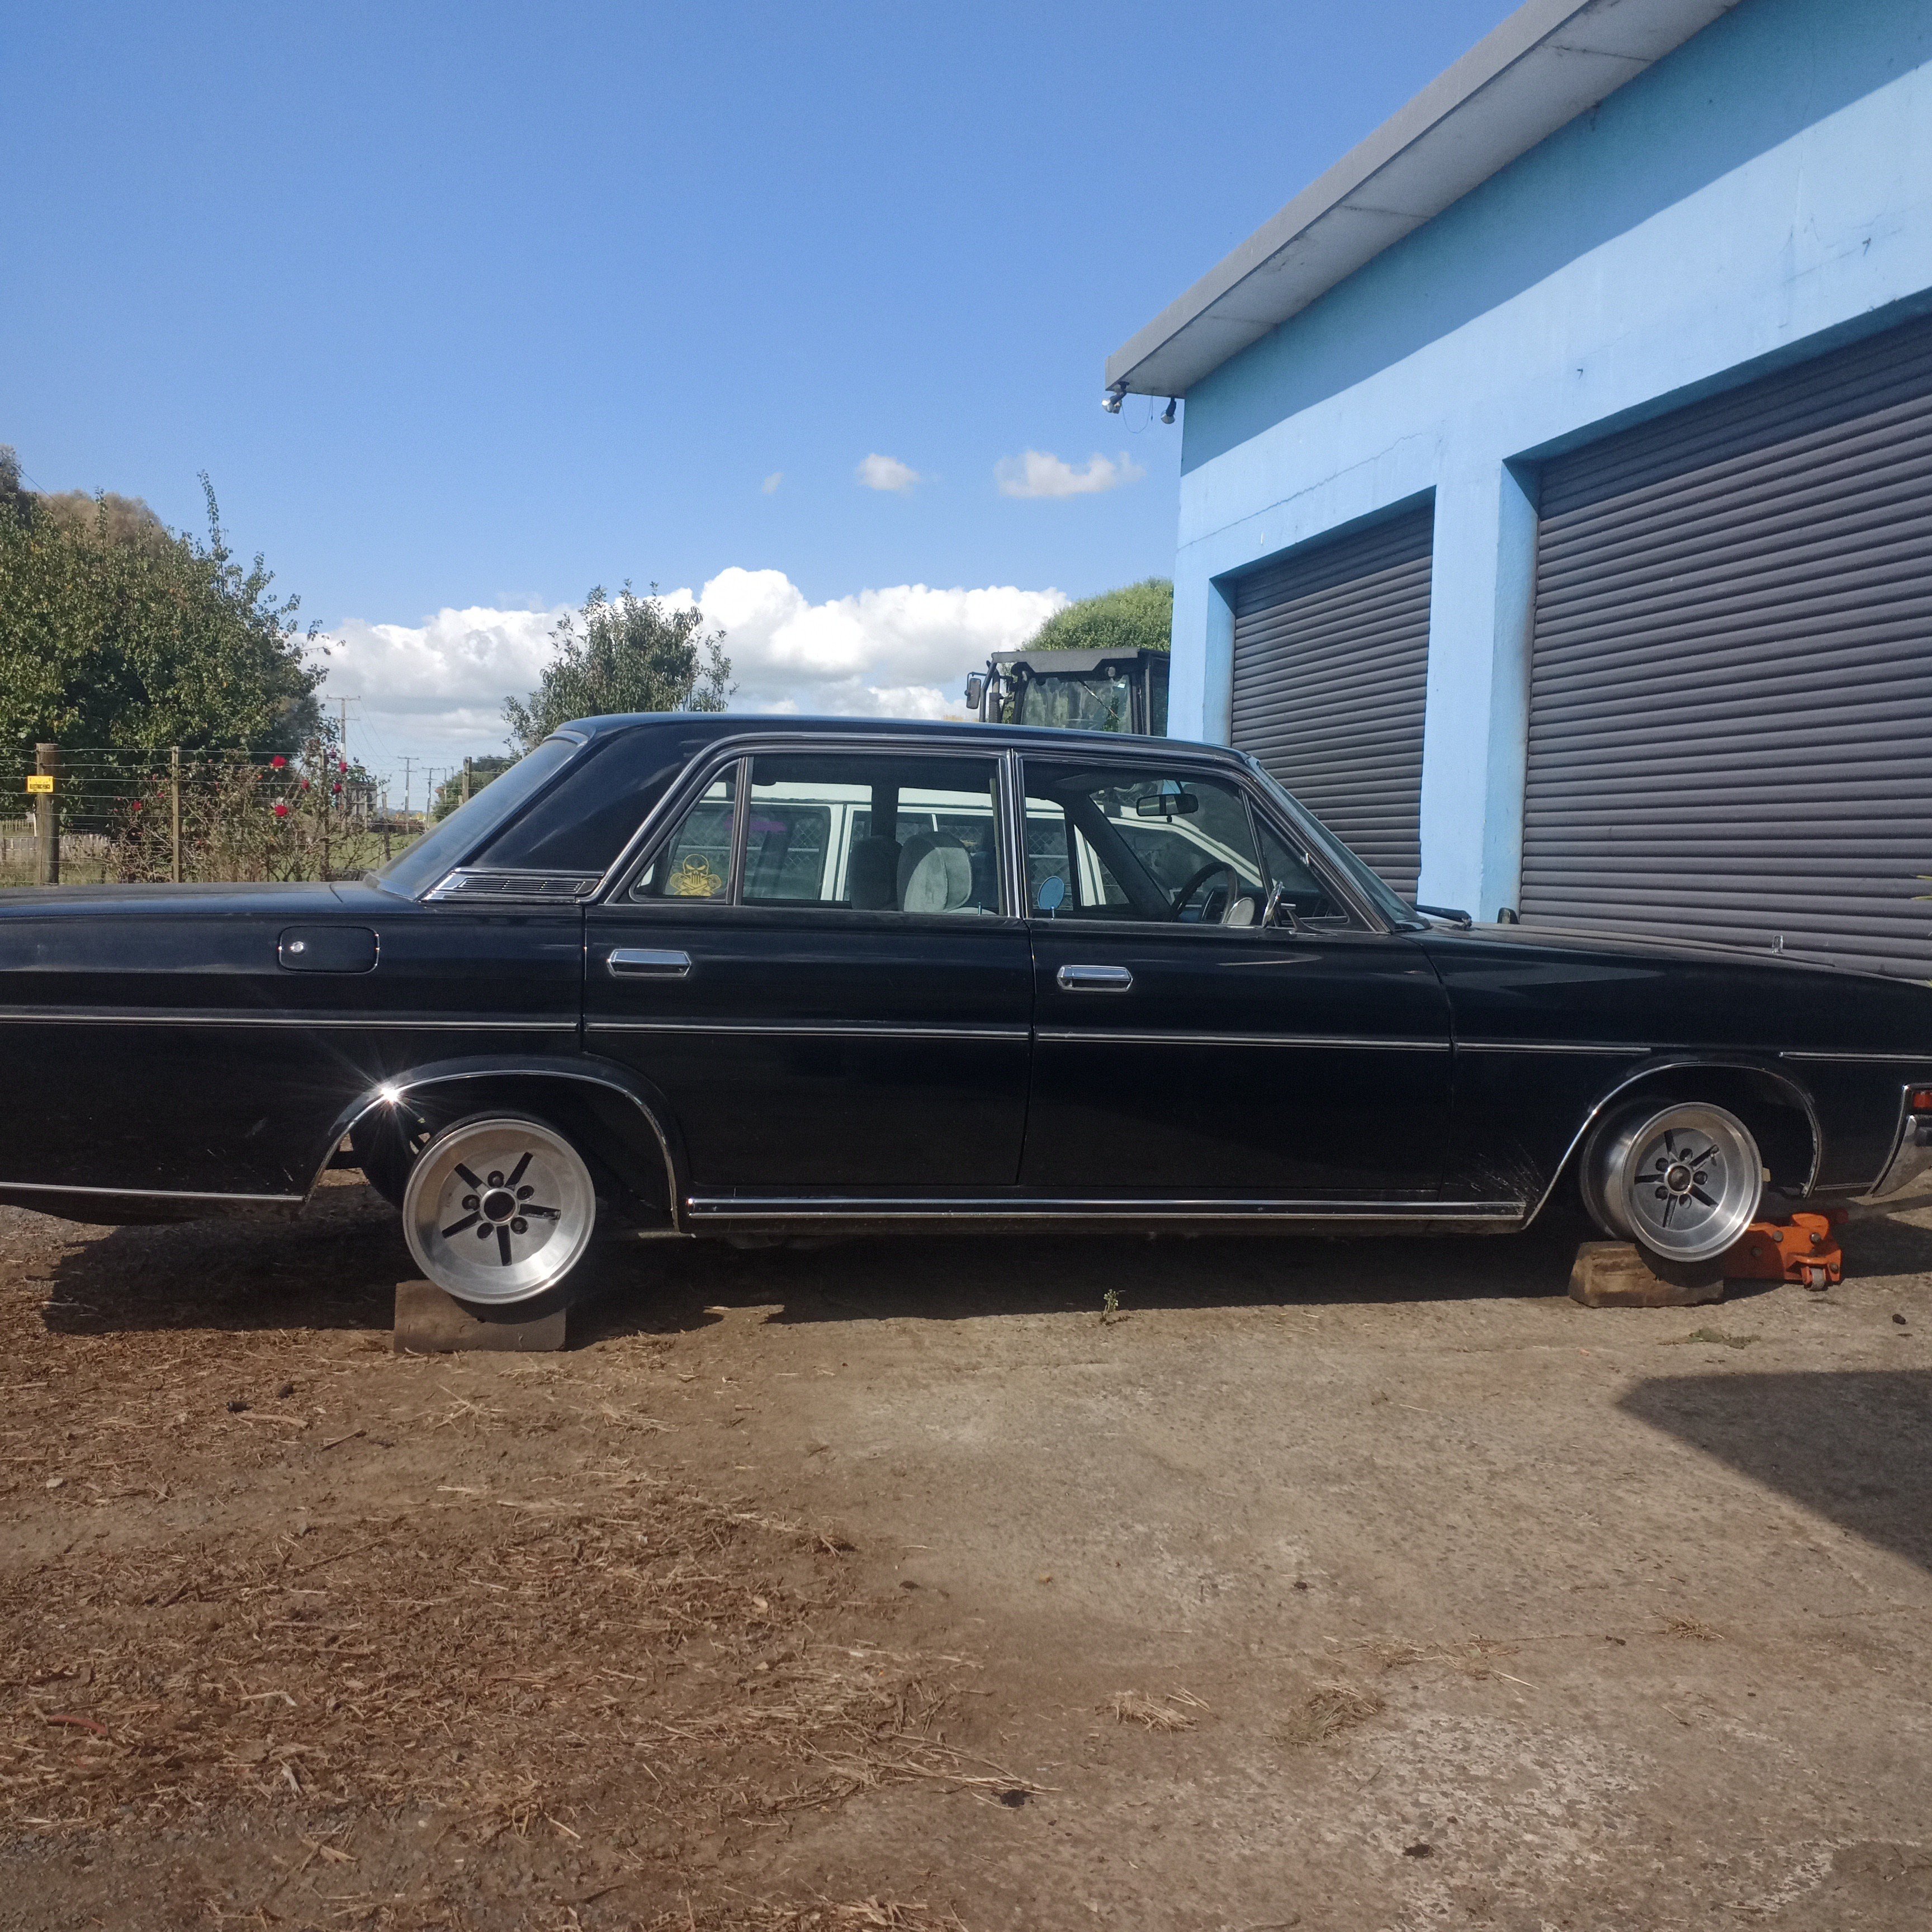
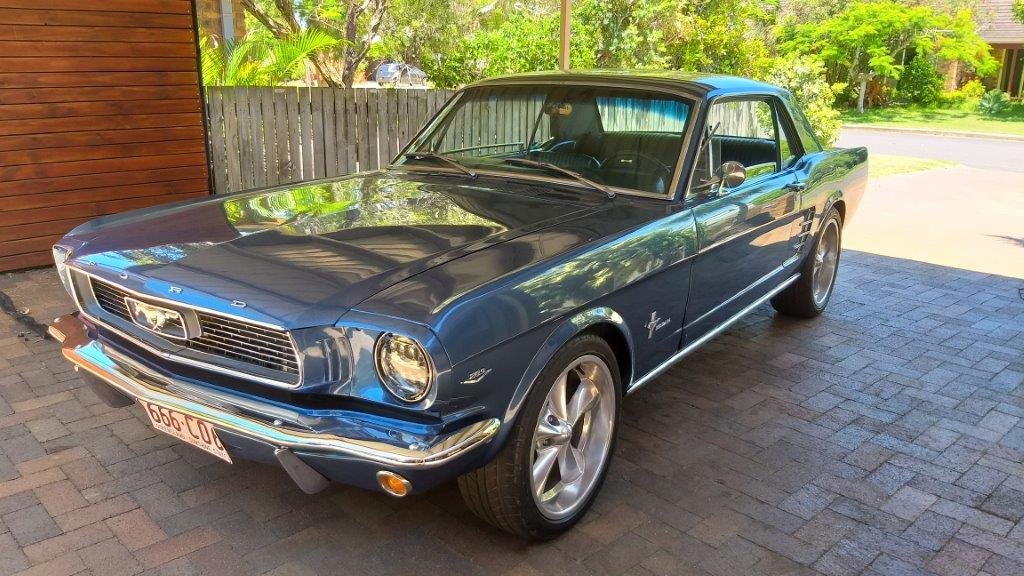
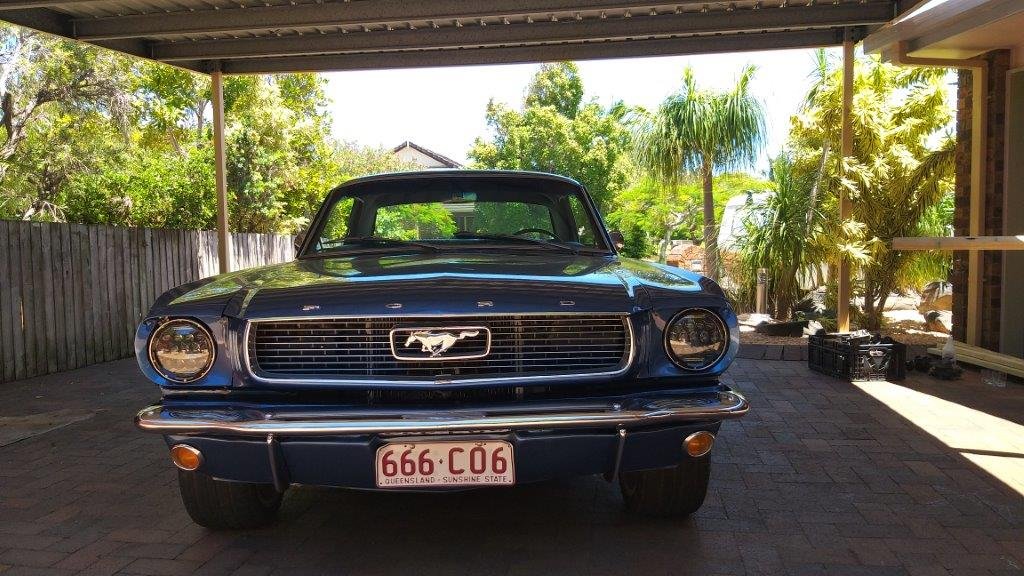
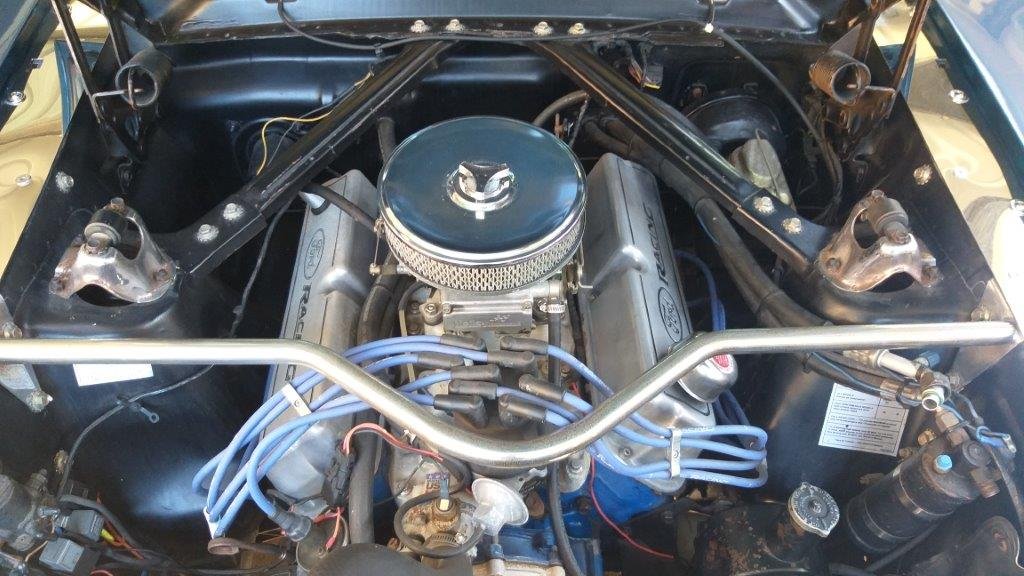
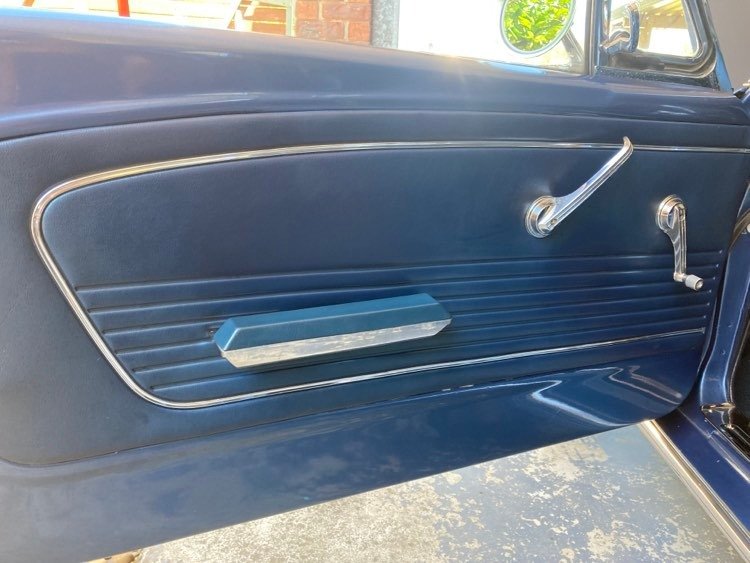
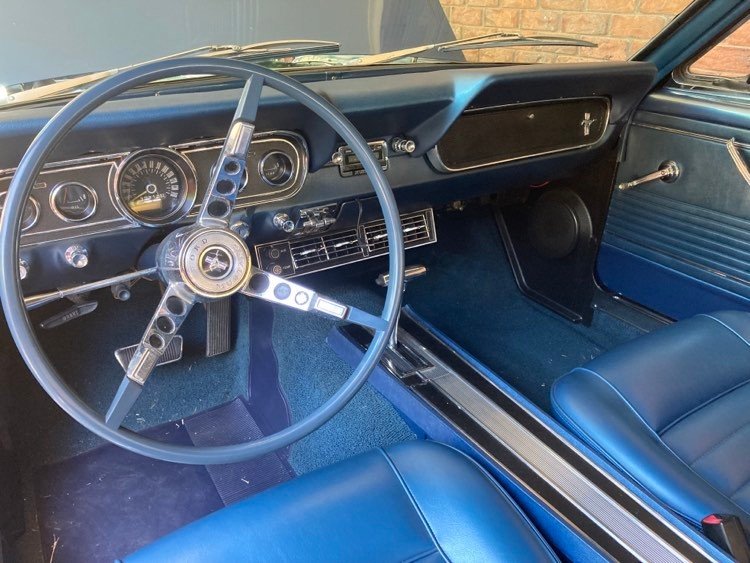
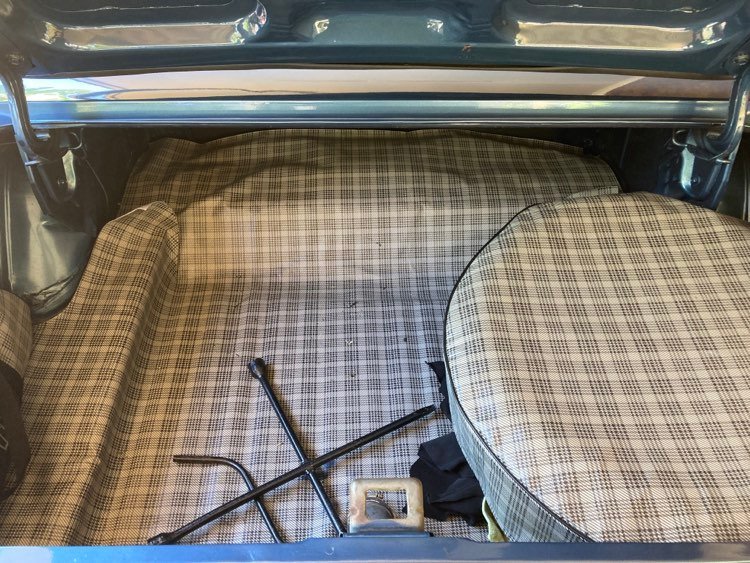
Anyone who has attended a car show or coffee run will have come across them. I’m talking about the 3 or 4 crusty old farts collectively referred to as Team Grumpy. They are usually grouped around a mid – last century American car, scowling at everyone who passes by and moaning about life in general and particularly the youth of today. I’ve always had a quite chuckle to myself as I’ve passed them. Well, life has now come around full circle and has bitten me well and truly on the arse as I officially joined their ranks today. Let me introduce Flash’s latest acquisition, a 1966 Ford Mustang Coupe. But before I delve into the detail, on our latest acquisition allow me to take a few steps back. For a few years now I’ve wanted to add a two door coupe to our small collection of vehicles. I was originally leaning towards something either Japanese or British with an early 70s Toyota Celica, Corolla or Datsun coupe or a Ford Capri topping the list. Unfortunately there is a lot of crap out there with relatively original and unmolested examples commanding asking prices well beyond my budget. They are also a bit of a niche market which makes it easy to over capitalise and if you have dropped some serious coin on one, they can be hard to offload when it comes time to sell them on. Sourcing reasonably priced replacement body, interior and trim parts is also becoming harder for some of these models. I’d almost given up hope of finding anything suitable and then one day I came across a listing for a mid 60s Mustang coupe. I’d always shunned these cars, particularly due to their association with Team Grumpy, but something about this listing just rang a bell for me. After all it is the Mustang that was the original inspiration for a lot of the coupes that were on my short list, so I started to delve a bit deeper into the subject. A bit more investigation revealed that the Mustang market is a pretty stable one with a steady demand for near original unmolested examples, parts are relatively cheap and readily available and they have some classic lines. And so the hunt began. I’d set my sights on a 65 or 66 Blue on blue version. Why this particular model ? Well I find the dashboard and in particular the 5 gauge instrument cluster of the 65/66 to be the most appealing. Why blue on blue ? Well I previously owned and daily drove a 1982 blue on blue 911 SC coupe for almost 17 years and I absolutely loved the colour combination. Anyway, now on to this particular car. Born in April 1966 this car has spent the best part of its life in San Jose California. Nine years ago it was purchased from its second owner by an Aussie visiting the USA who ended up shipping the car back to Australia at the end of his holiday. After arriving down under it quickly passed on to its 4th owner who owned it for 7 years. The sudden arrival of twin boys has increased his brood to four with the result that the family can no longer enjoy runs in the Mustang and custodianship has now moved across to me. It is one of many that I have looked at over the past year or two, but there is something about the honesty of this particular car that appealed to me. It is by no means a show pony showing a few scrapes and dings, but the interior is immaculate and the engine bay presents very well. I’m not a fan of the modern 17 inch diameter wheels and the LED headlight conversion gives me the shivers, but they are modifications that are easily reversible. The paint is not factory but it is over 10 years old so I figured “what you see is what you get”. There are a few rust bubbles in both doors and the gaps are not that good, but apart from that the car is solid. Well enough bloody chit chat Flash….. let’s see some bloody photos mate.
1 point
-
Have heard of them, meant to last about twice as long as iridium plugs. Have seen them marketed as "lifetime plugs" or something like that.1 point
-
As I dig into this I will try and keep this post updated with information on parts as I come across them. *Front wheel bearings: Inner NSK 320/22. Outer Timken A4059 *Front spindle castle nut: 12mm x 1.5 *Front/rear brake shoes: 170mm x 30mm. I couldn’t find anything available this small so sent them out to be relined. If they were 180mm there were some possibilities. *Wheel studs: 10mm x 1.25 x 30mm *Wheel bolts (bolting wheel halves): 8mm x 1.25 x 16mm *Tires: 145r10. Using Falken SN807 *Tubes: Got tubes for Subaru 360 with 90 degree stems. *Front wheel cylinders: 7/8”. Using MGB/GT cylinders with minor mods to the backing plate. These use a clip rather than nuts to mount. Raybestos WC37354. Still working on how I want to convert to the 3/8-24 thread on these. Decided to use 45* banjo adapters. Needed to shorten the bolts I got due to bottoming out before tight. *Rear wheel cylinders: 5/8”. Using early 70’s Subaru cylinders. Direct bolt on. EIS EW100920. *Brake master cylinder: 11/16”. Used rubber bits from Datsun B110 brake master kit. Have not verified it works yet. *Clutch master cylinder: 5/8”. Used rubber bits from Datsun 520 clutch master kit. Have not verified it works yet. *Clutch slave: 3/4”. Used rubber bit from Datsun 520 master kit. Have not verified it works yet. *Brake/clutch pedal pads: used pads for Datsun Z *Brake line threads: 10mm x 1.0 *Converting rubber hydraulic hoses to -3 braided SS Front 18” Rear 16” Clutch 9” *Steering coupler: used VW type 1. (Not direct fit)1 point
-
Worse than that Yoeddynz, its also Fibreglass and other (probably more nasty) things that give the disc its structure. Makes me feel sick thinking about it. Also, check the computers grille/filter on any cnc/workshop machinery. Ya breaking that shit in all day long, its terrible.1 point
-
Looking good buddy!1 point
-
pwhoaaaar !!!1 point
-
I would expect Palmside to be pretty knowledgable on which bits to go for. They are pretty into Escorts. Not saying don't ask here, but more so that when i've been in there they have been helpful. Wasn't for jets, but still.1 point
-
probably only the surface is hard. Hit it with an angle grinder first to get through1 point
-
Pipe over that machined part of the ram with a bolt thru it then weld the pipe to the wedge/go pretend you want to hire one from the hire center to have a look how they are set up1 point
-
Then started a side quest for some reason, so that’s probably going to chew up most of my time for the next few months, Shit Nissans is a mental disorder I think.1 point
-
The “ever lovely Mrs sr2” and I headed up North to the batch for the recent long weekend, the fishing was an improvement on the New Year. (It would be bloody hard to be worse; see the Jan 18, 22 post). On my return I was shocked to see that in my absence Rigamortice had been blatantly and deliberately emitting the nasty horrible dangerous carbon laden CO2 gas, (that our dear leader the "PC goddess of fertility and cultural sensitivity" has been repetitively warning us about).......... to the atmosphere! Still showing total faith in our “transparent” government (in these turbulent times) I was overwhelmed and riddled with guilt as to the long term effect Rigamortice’s senseless selfish act would have on climate change, (it used to be called global warming – but it didn’t get hot!). In desperation to restore our lost carbon credits and head off an imminent climate emergency I decided to “give it the Greta” and acquired an E-Vehicle. Being Oldschool (i.e. 75 oldschool years old) Rigamortice insisted that I hand in my man-card immediately………..begin the public humiliation….! Thankfully after a few medicinal Wild Turkeys, Rigamortice and I devised a cunning and fiendishly clever way of containing the evil fermenting concoction, preventing any further release of the nasty horrible climate changing CO2 gas…..What could possibly go wrong!
1 point
-
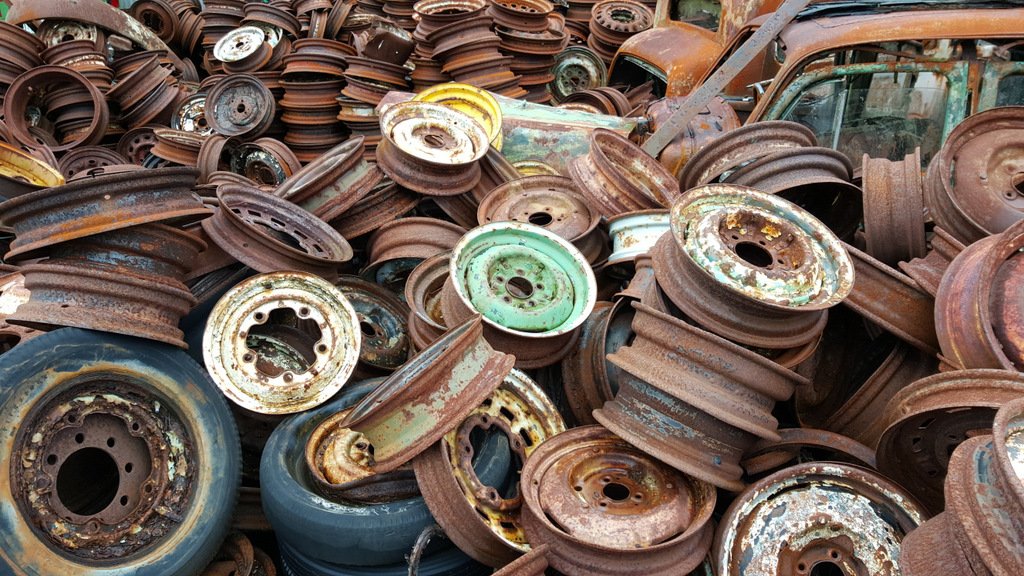
Probably some in the pile at Horopito
1 point
-
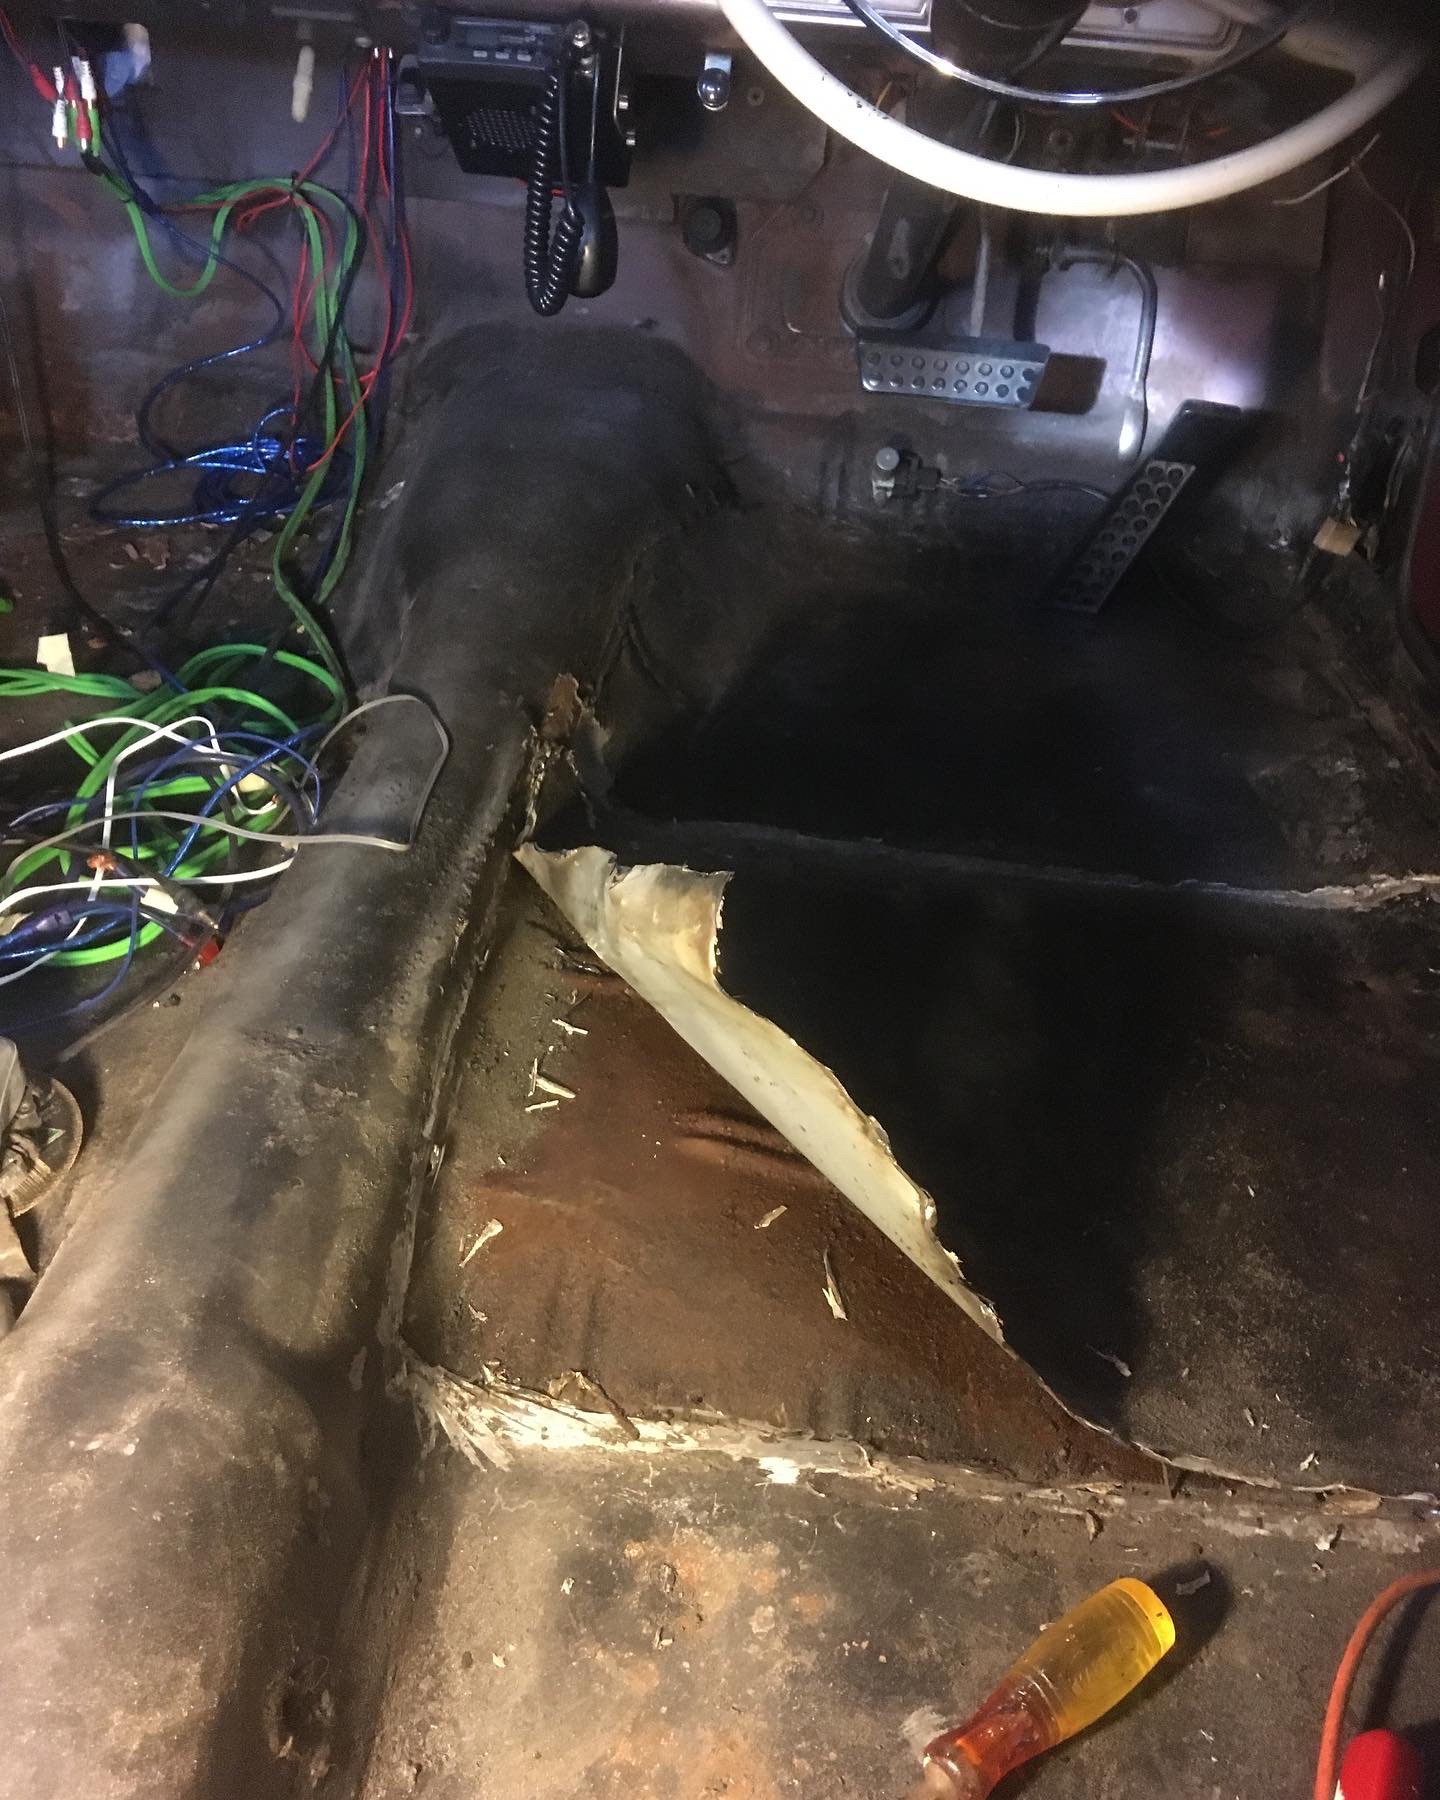
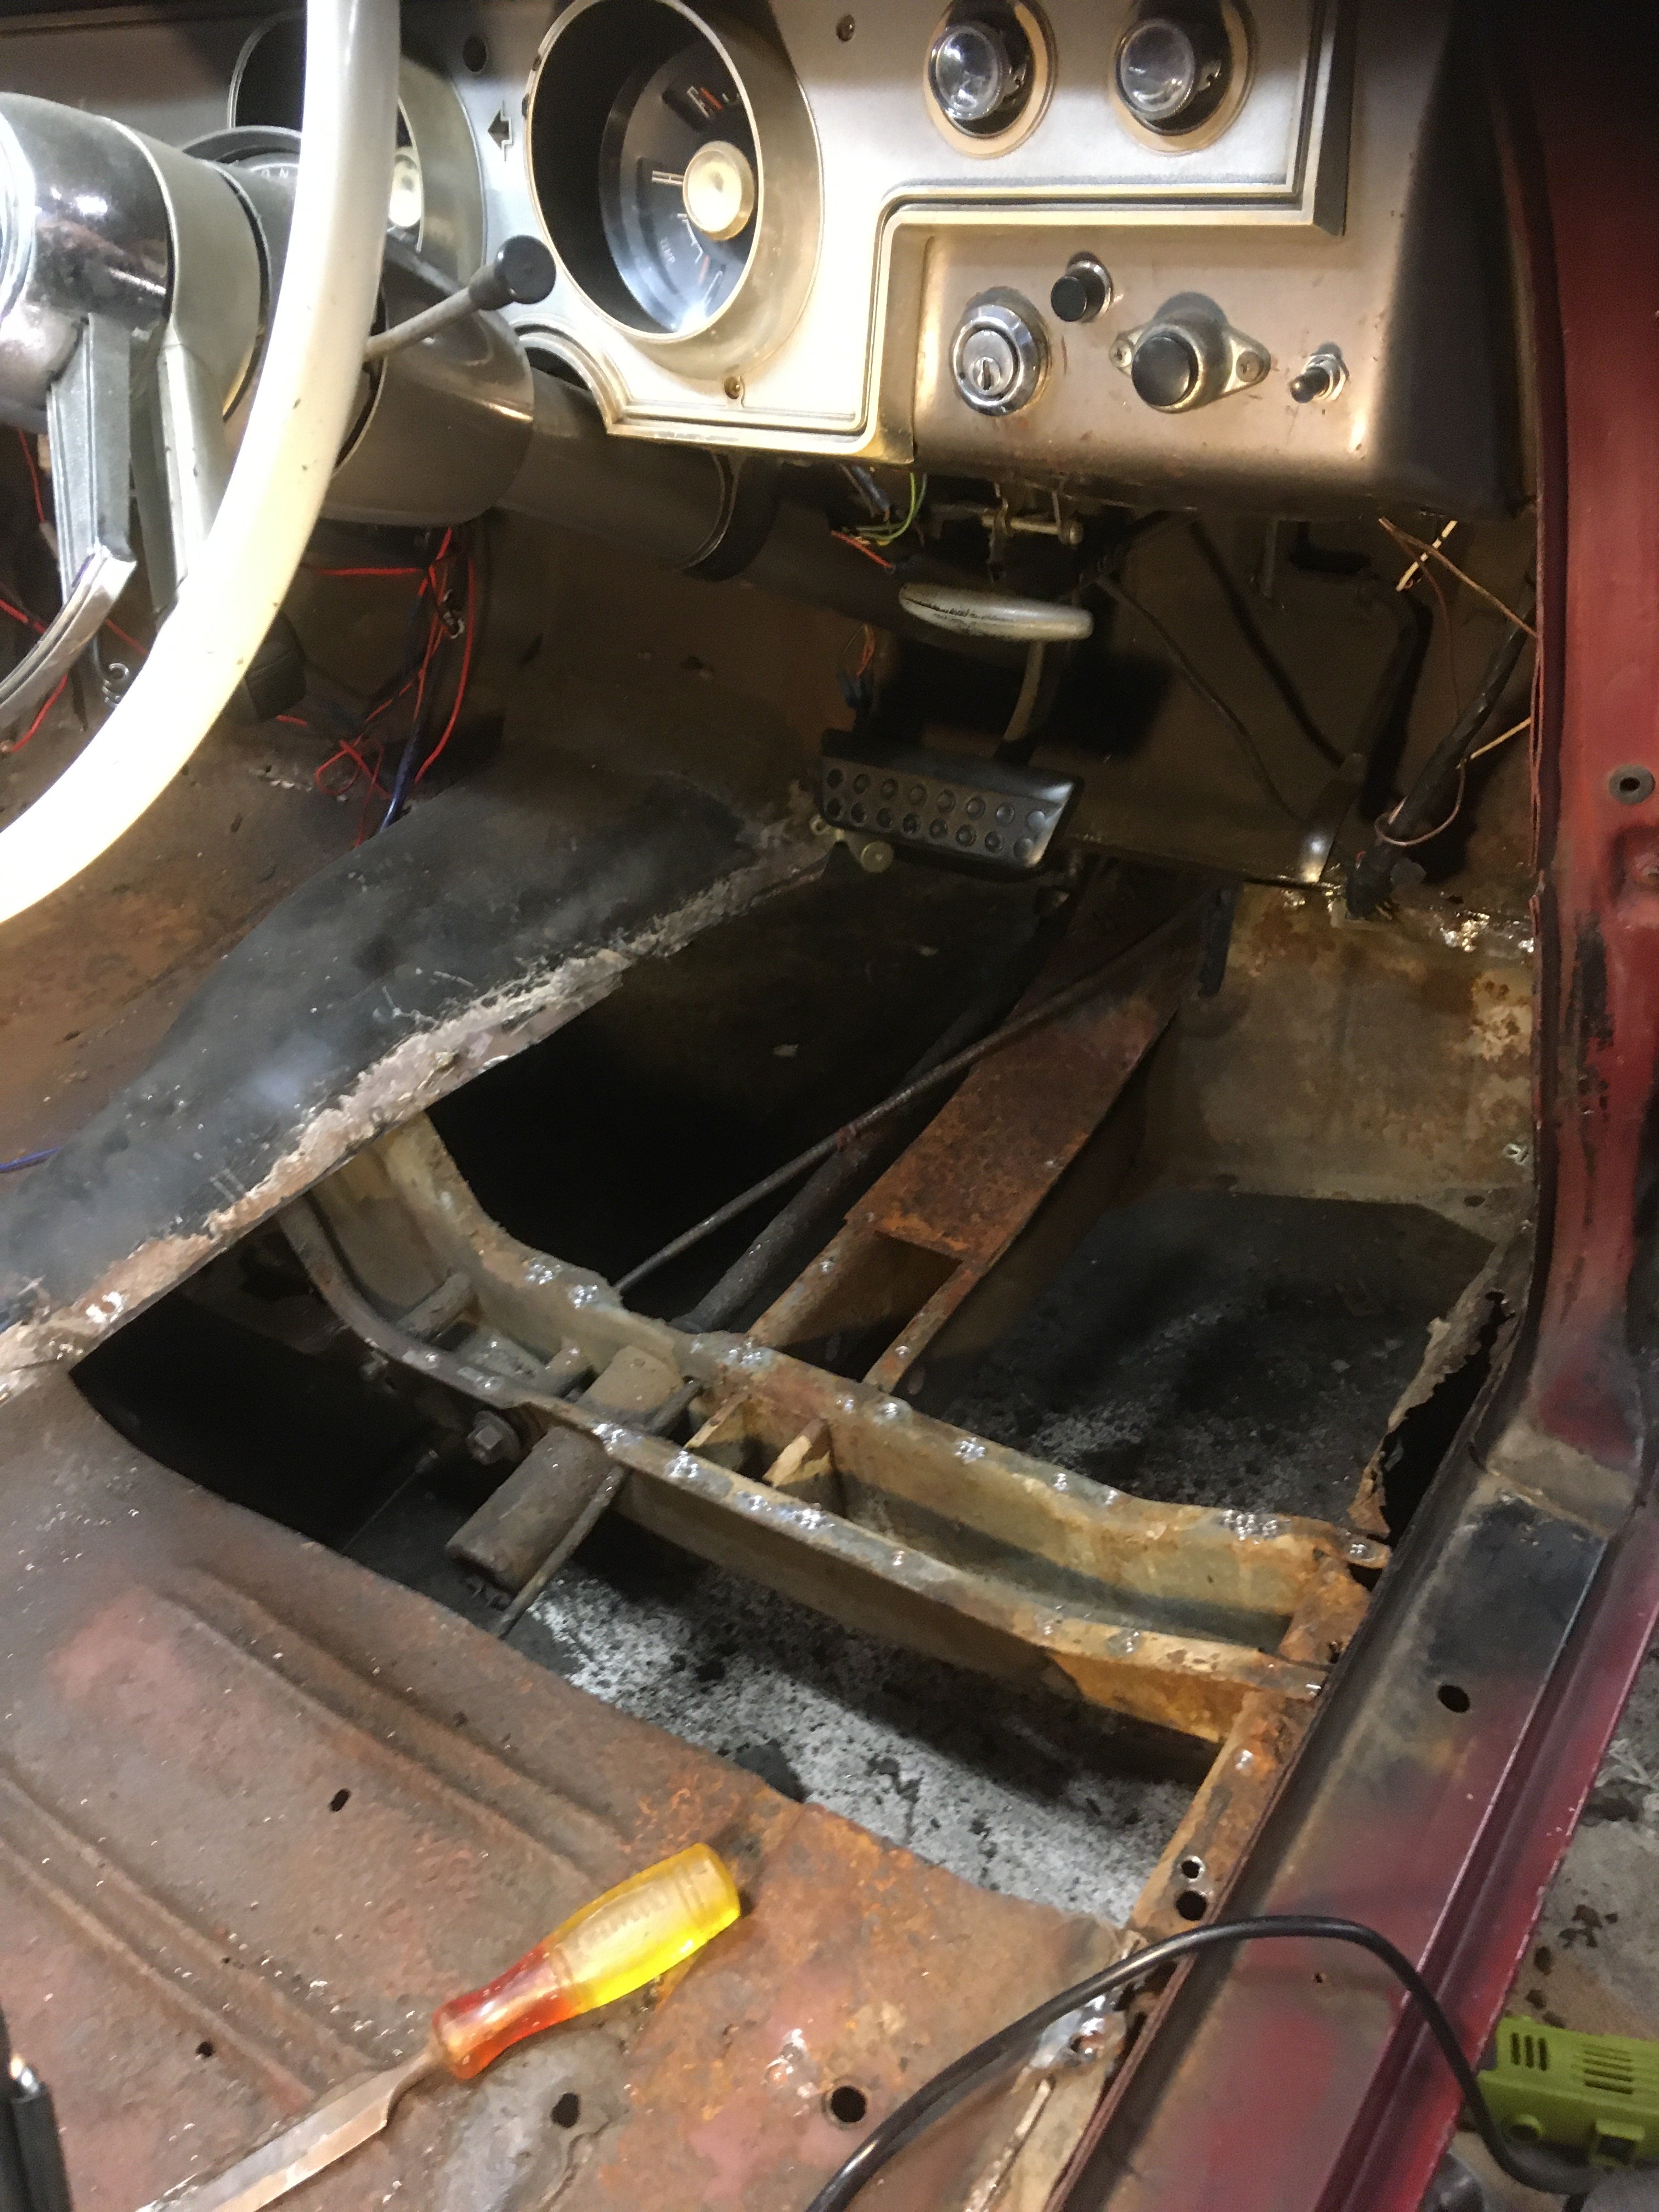
Its been a while, but i scrounged up some motivation and found some time where one of my other cars didnt need for for once, and cut the floor out of the drivers side. In hindsight, this is how i should've done the other side too. Maybe I will revisit that again one day.1 point
-
1 point
-
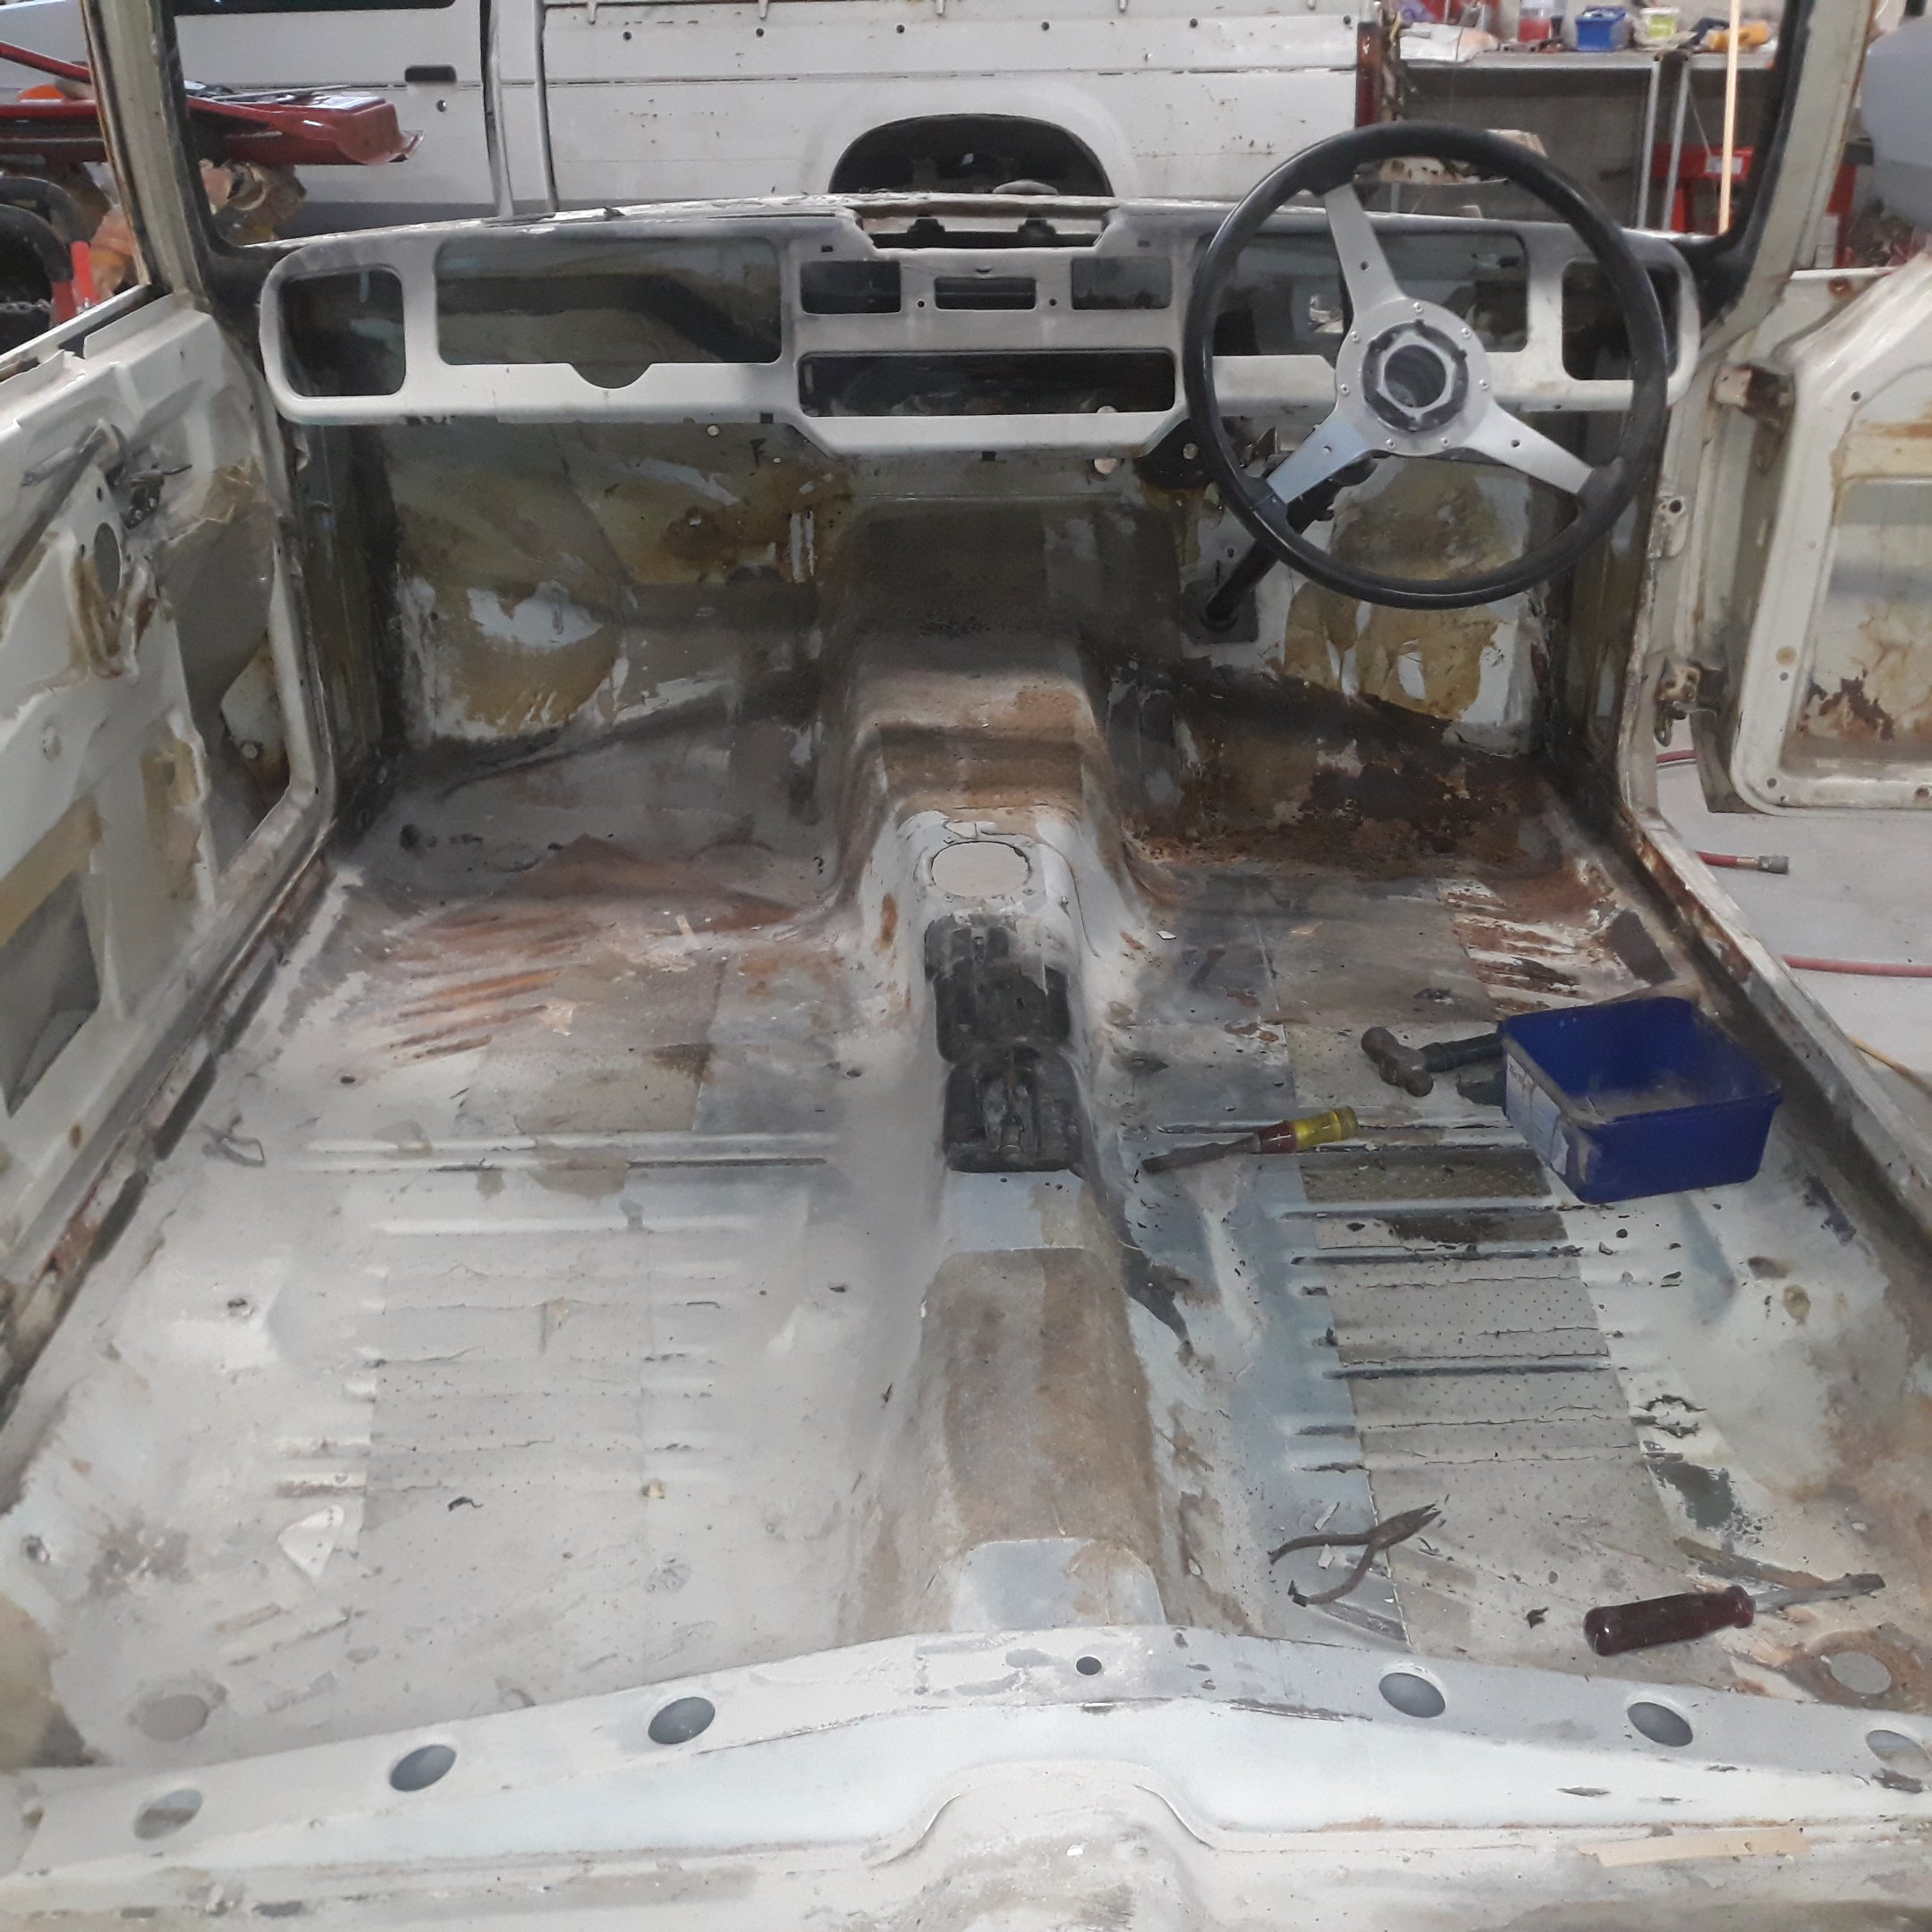
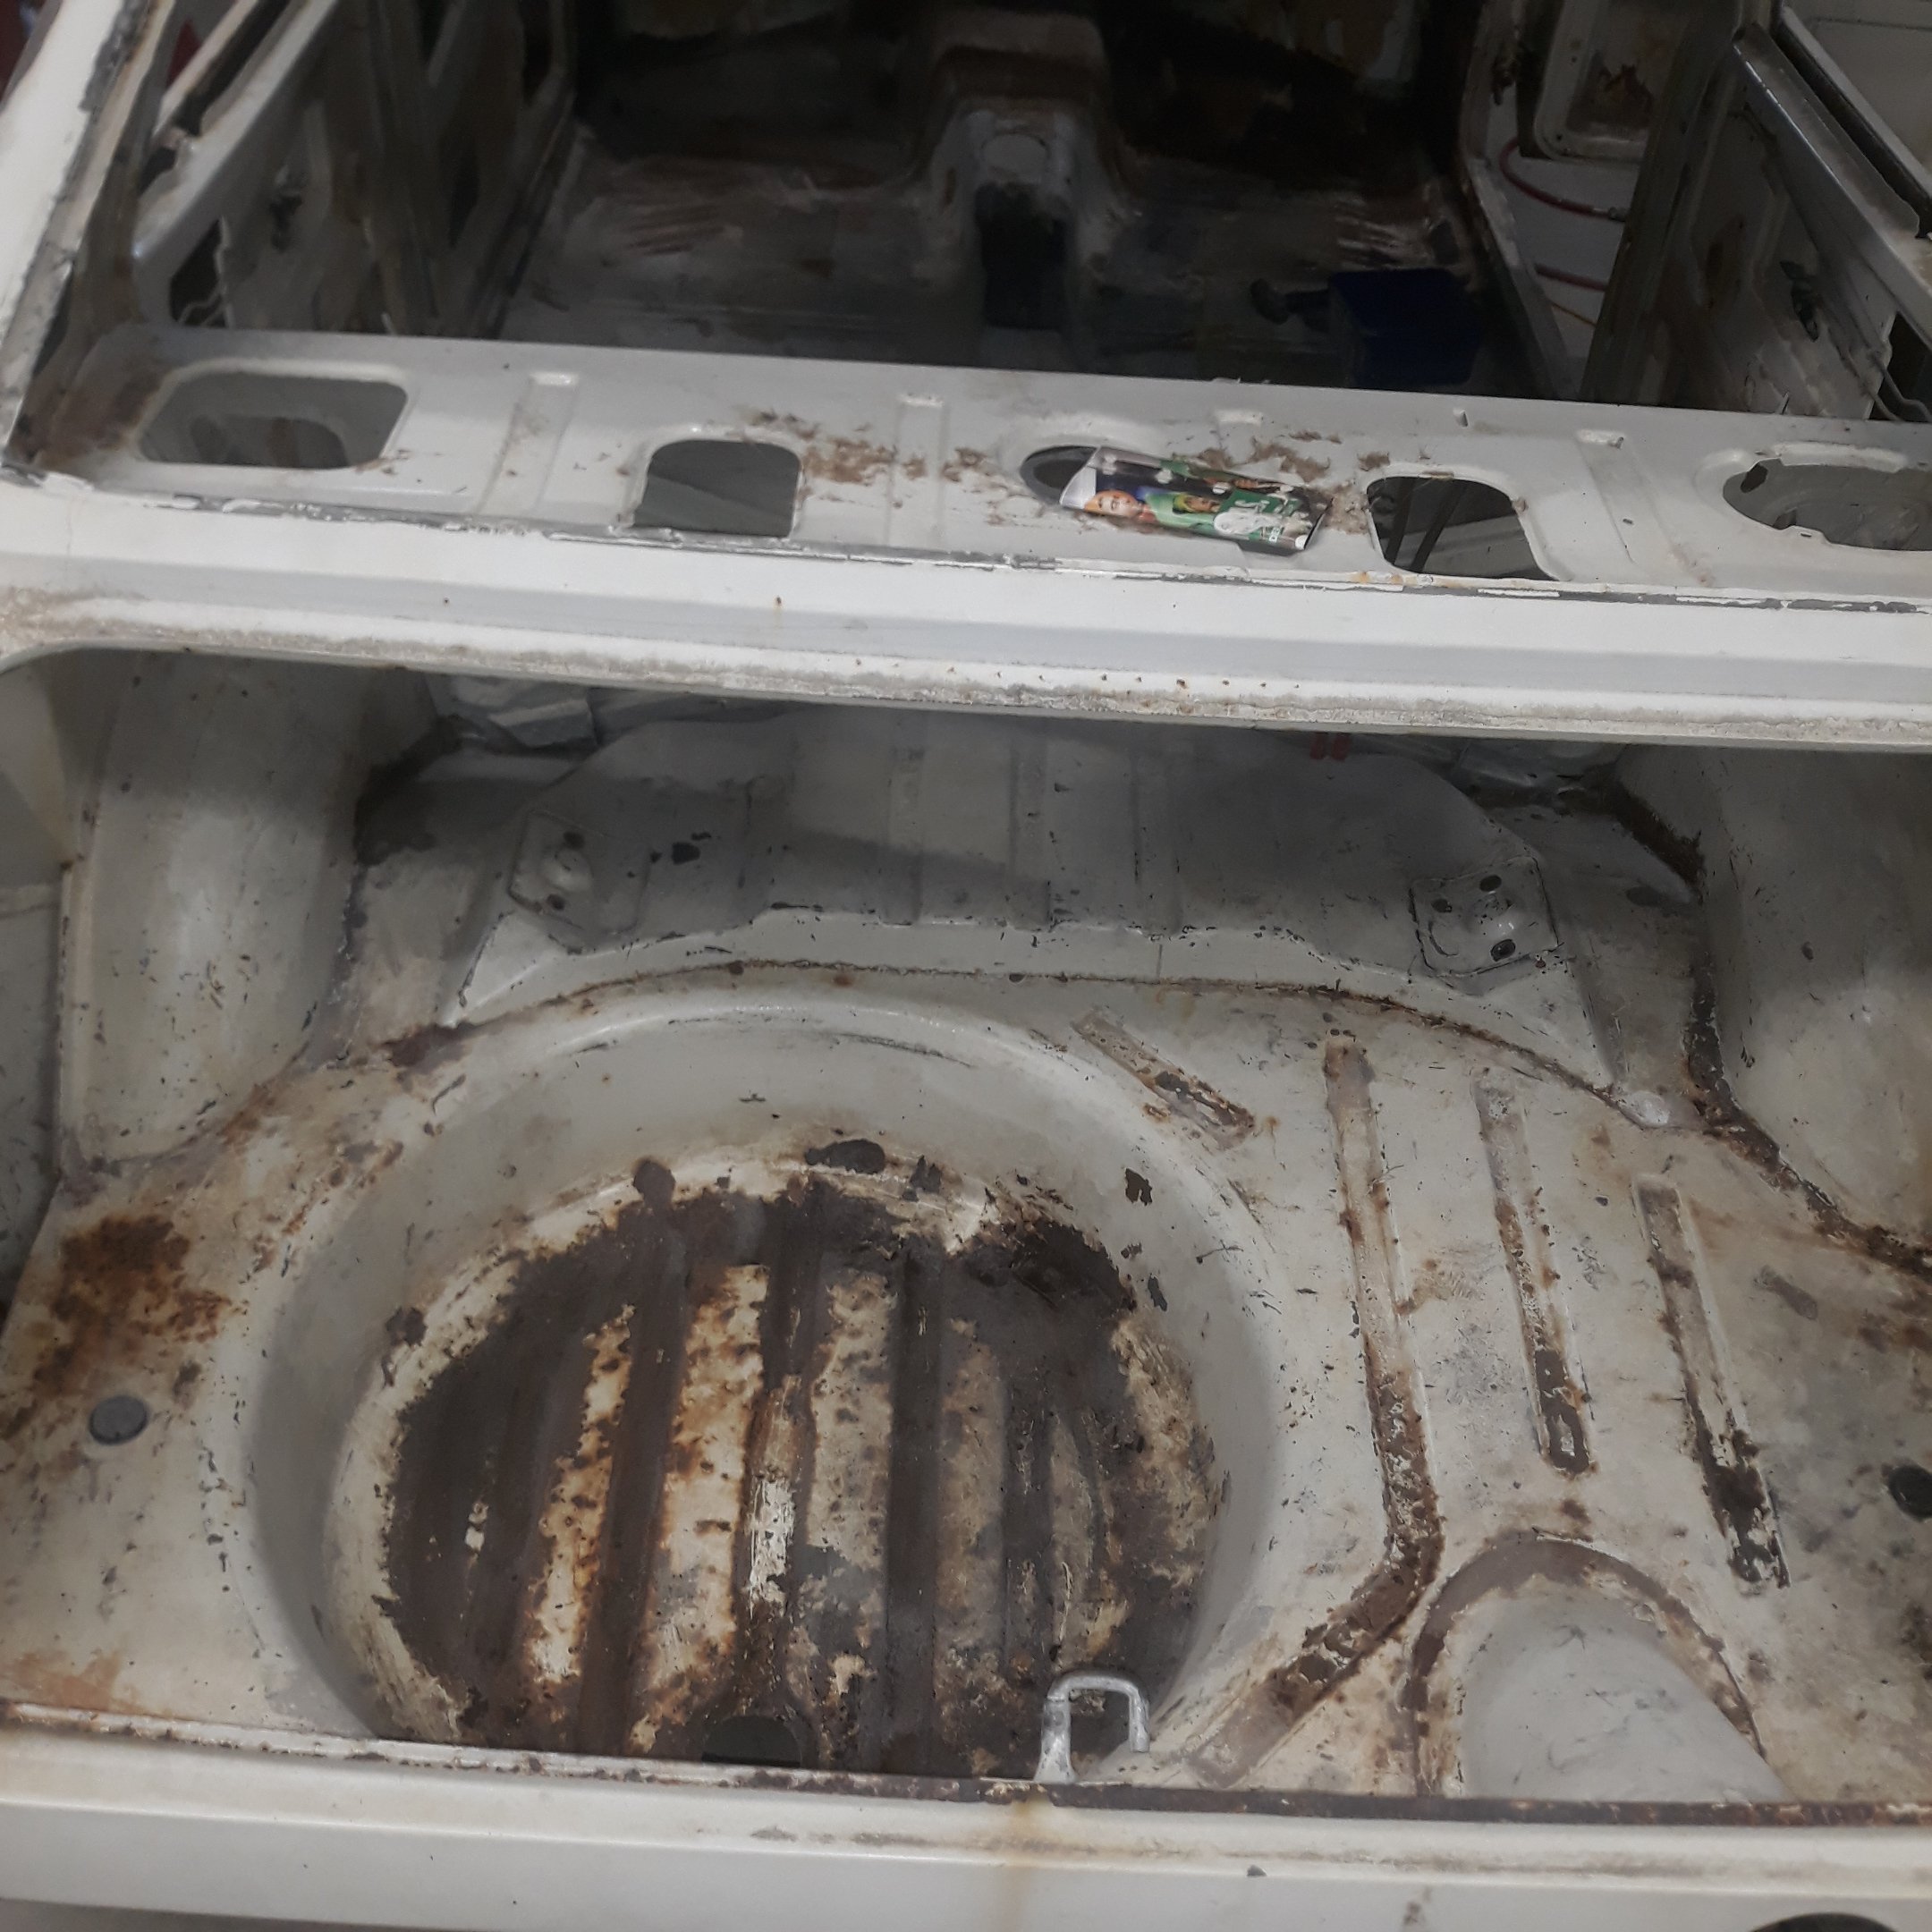
What fun lies ahead here Not so bad here. Sound deadening removal now, shouldn't be any other surprizes apart from front floor holes.
1 point
-
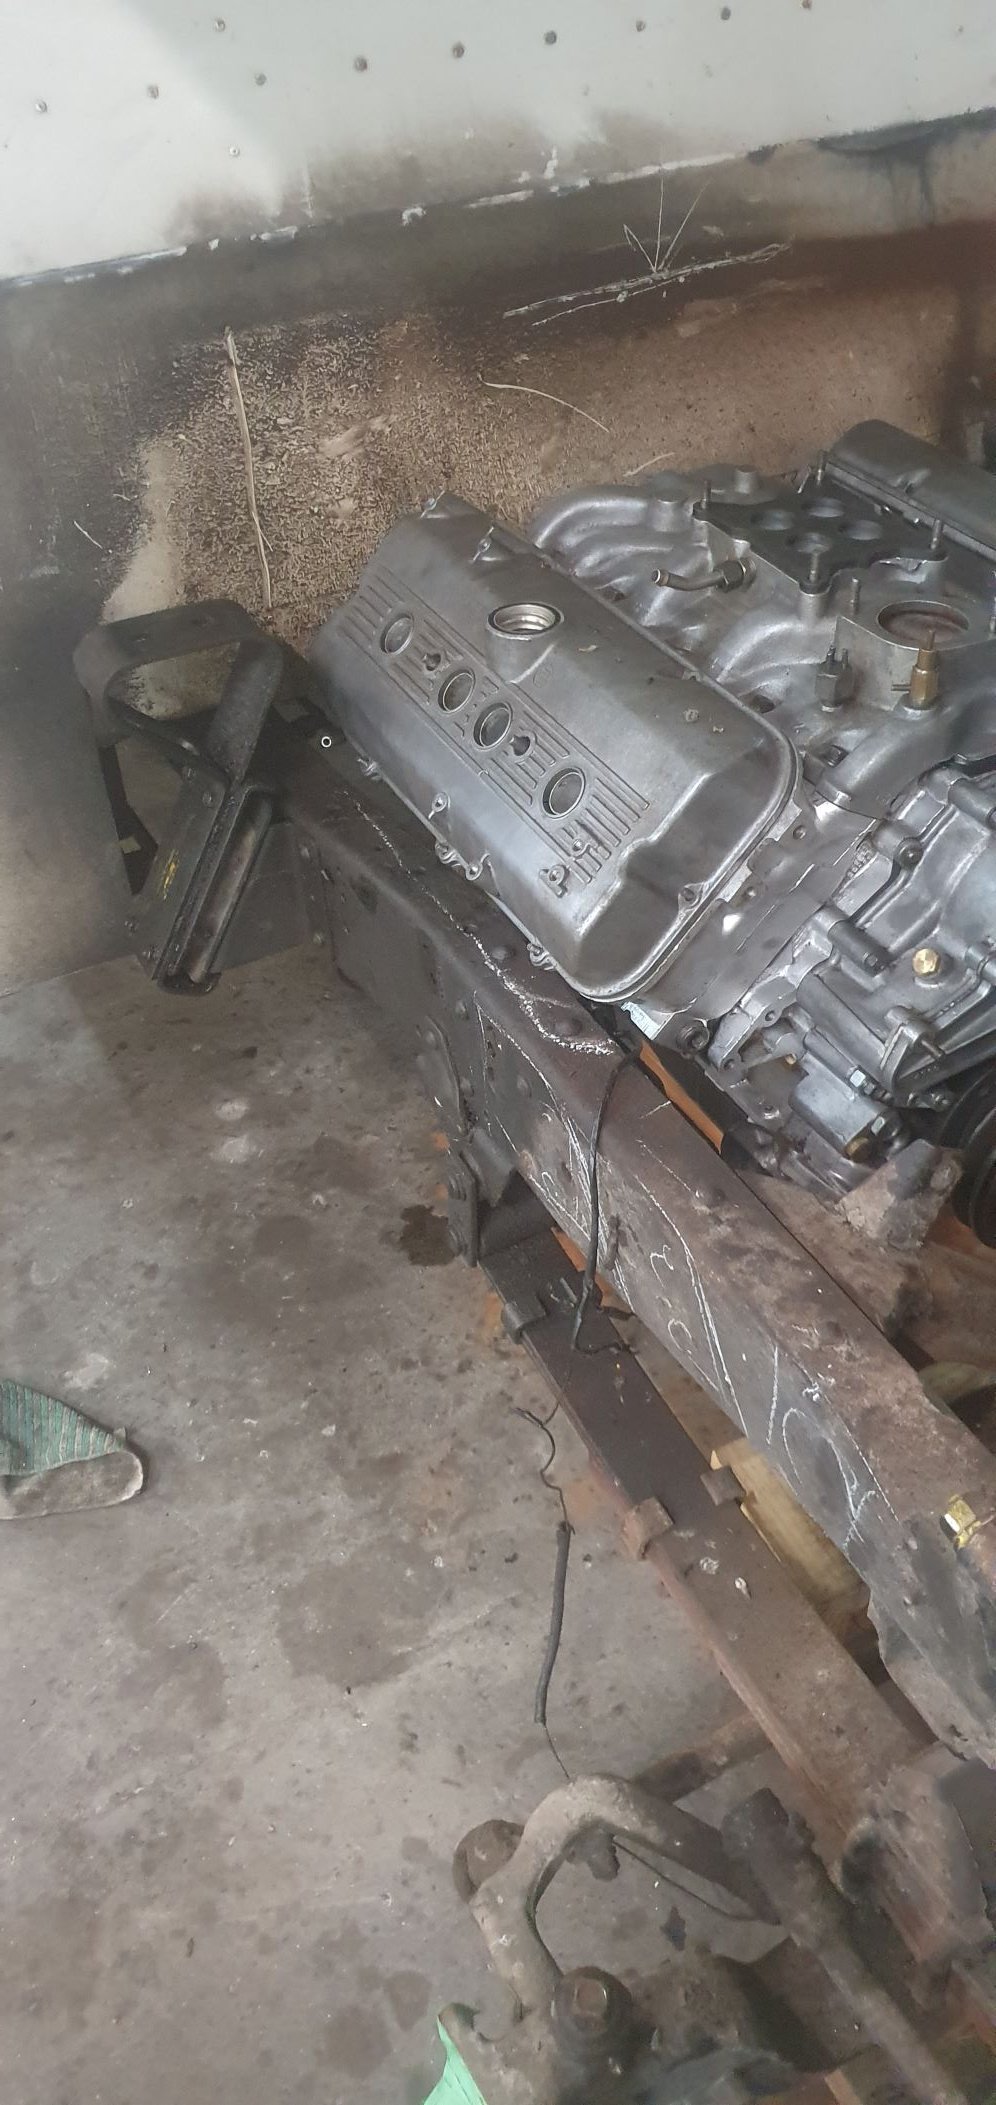
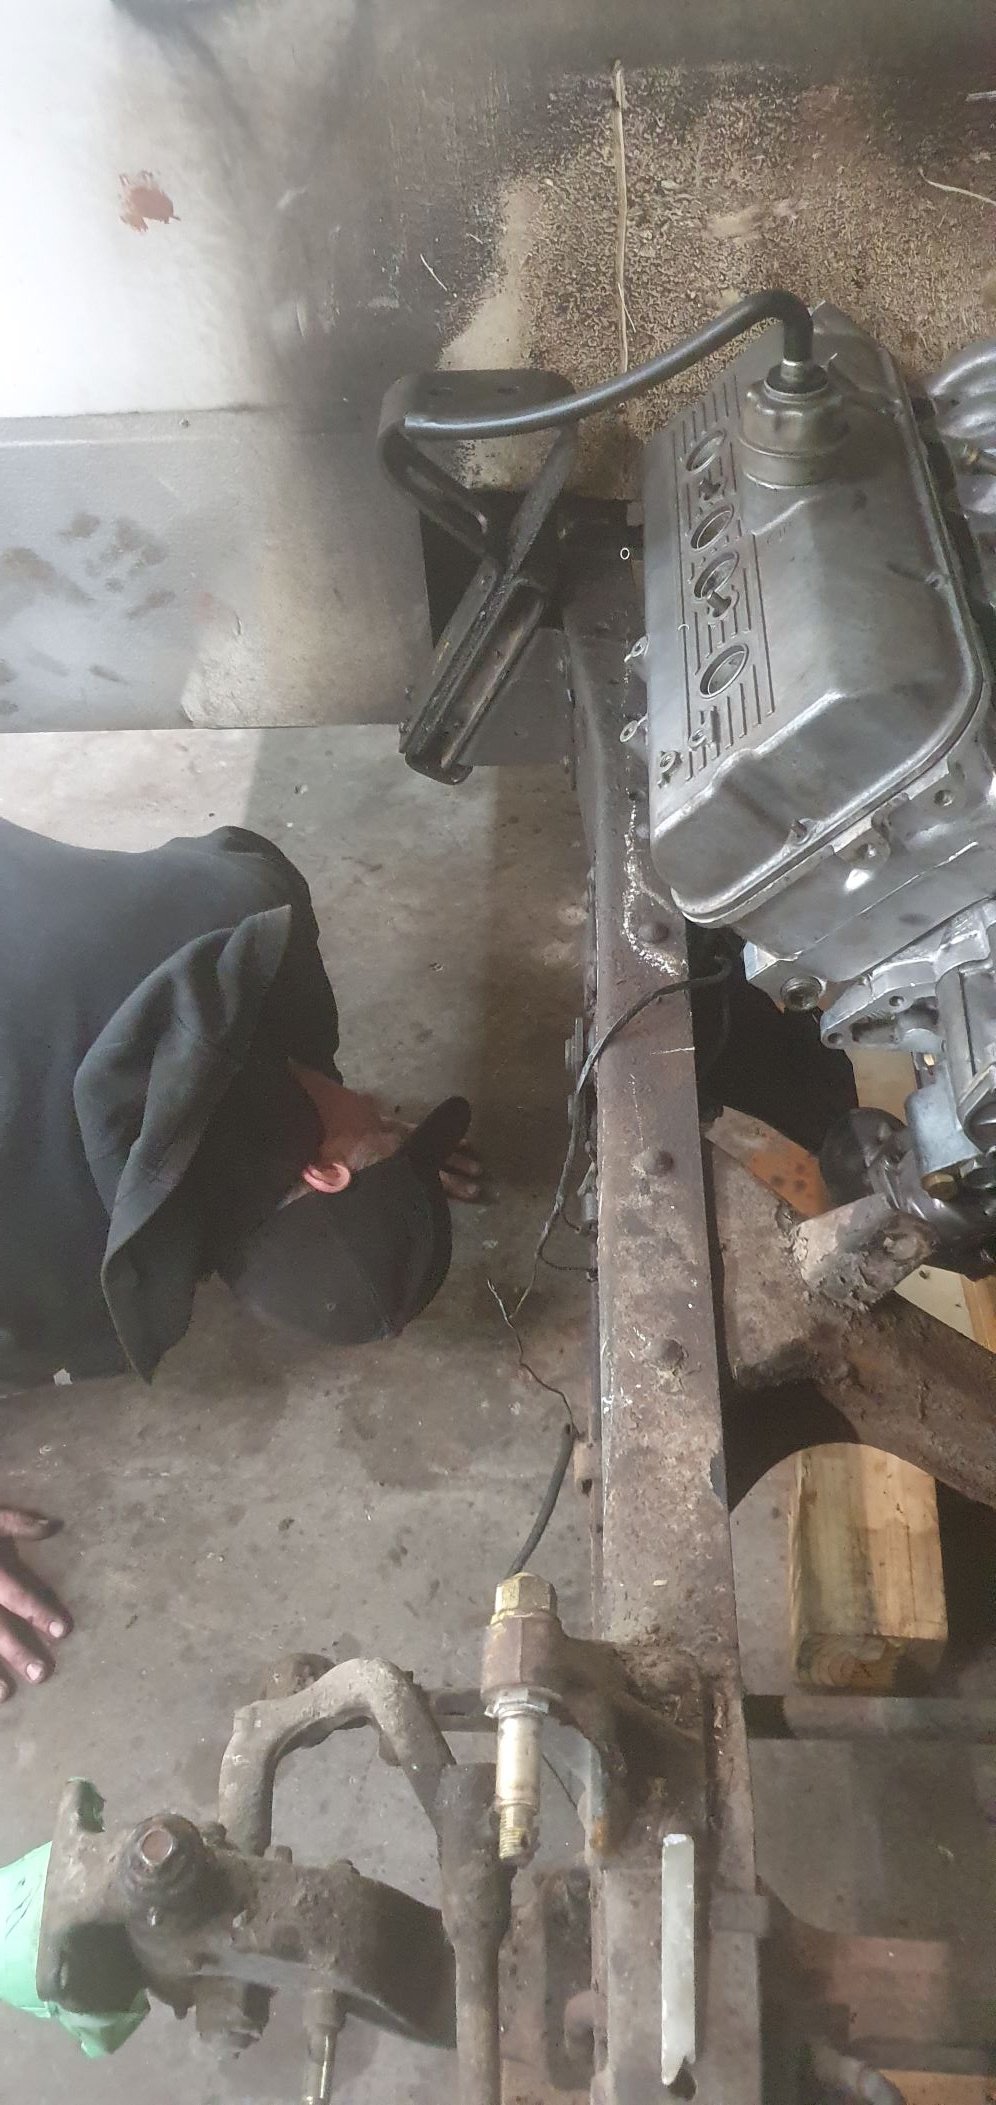
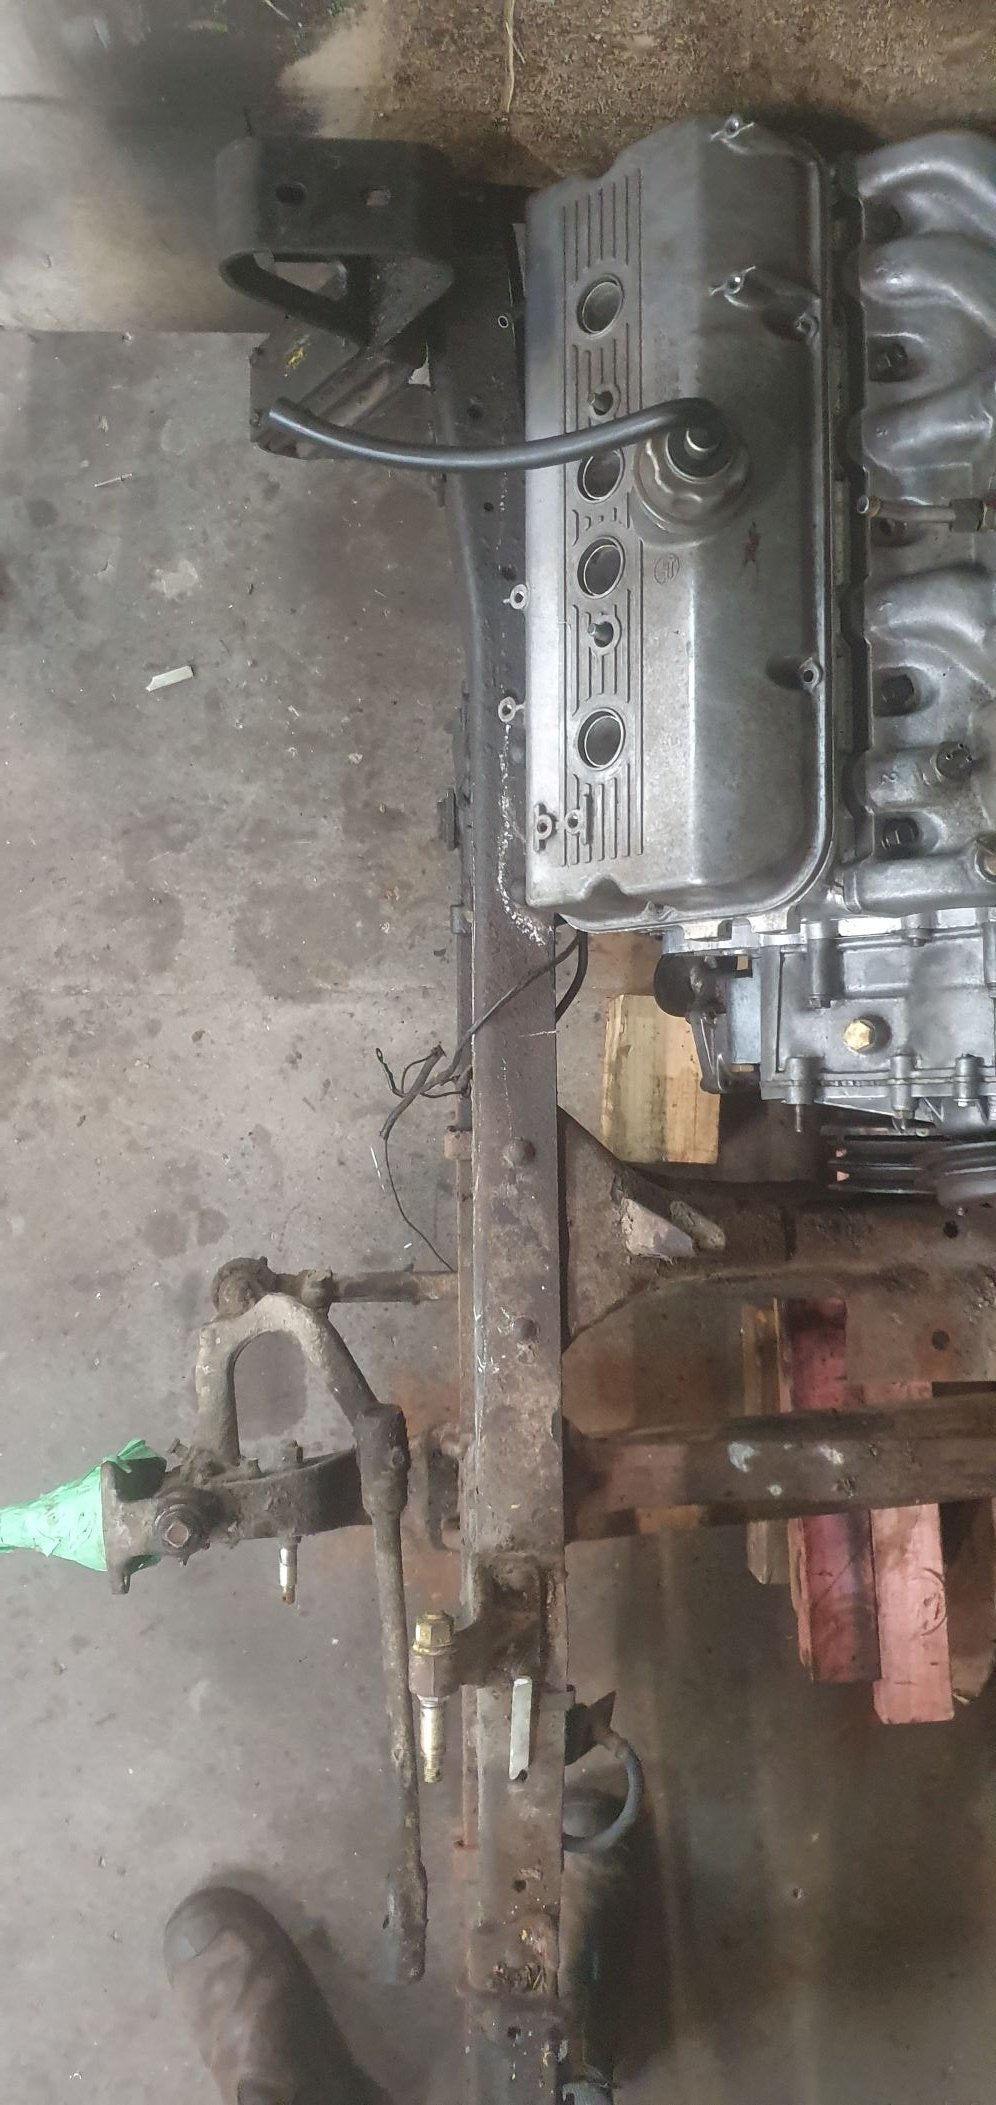
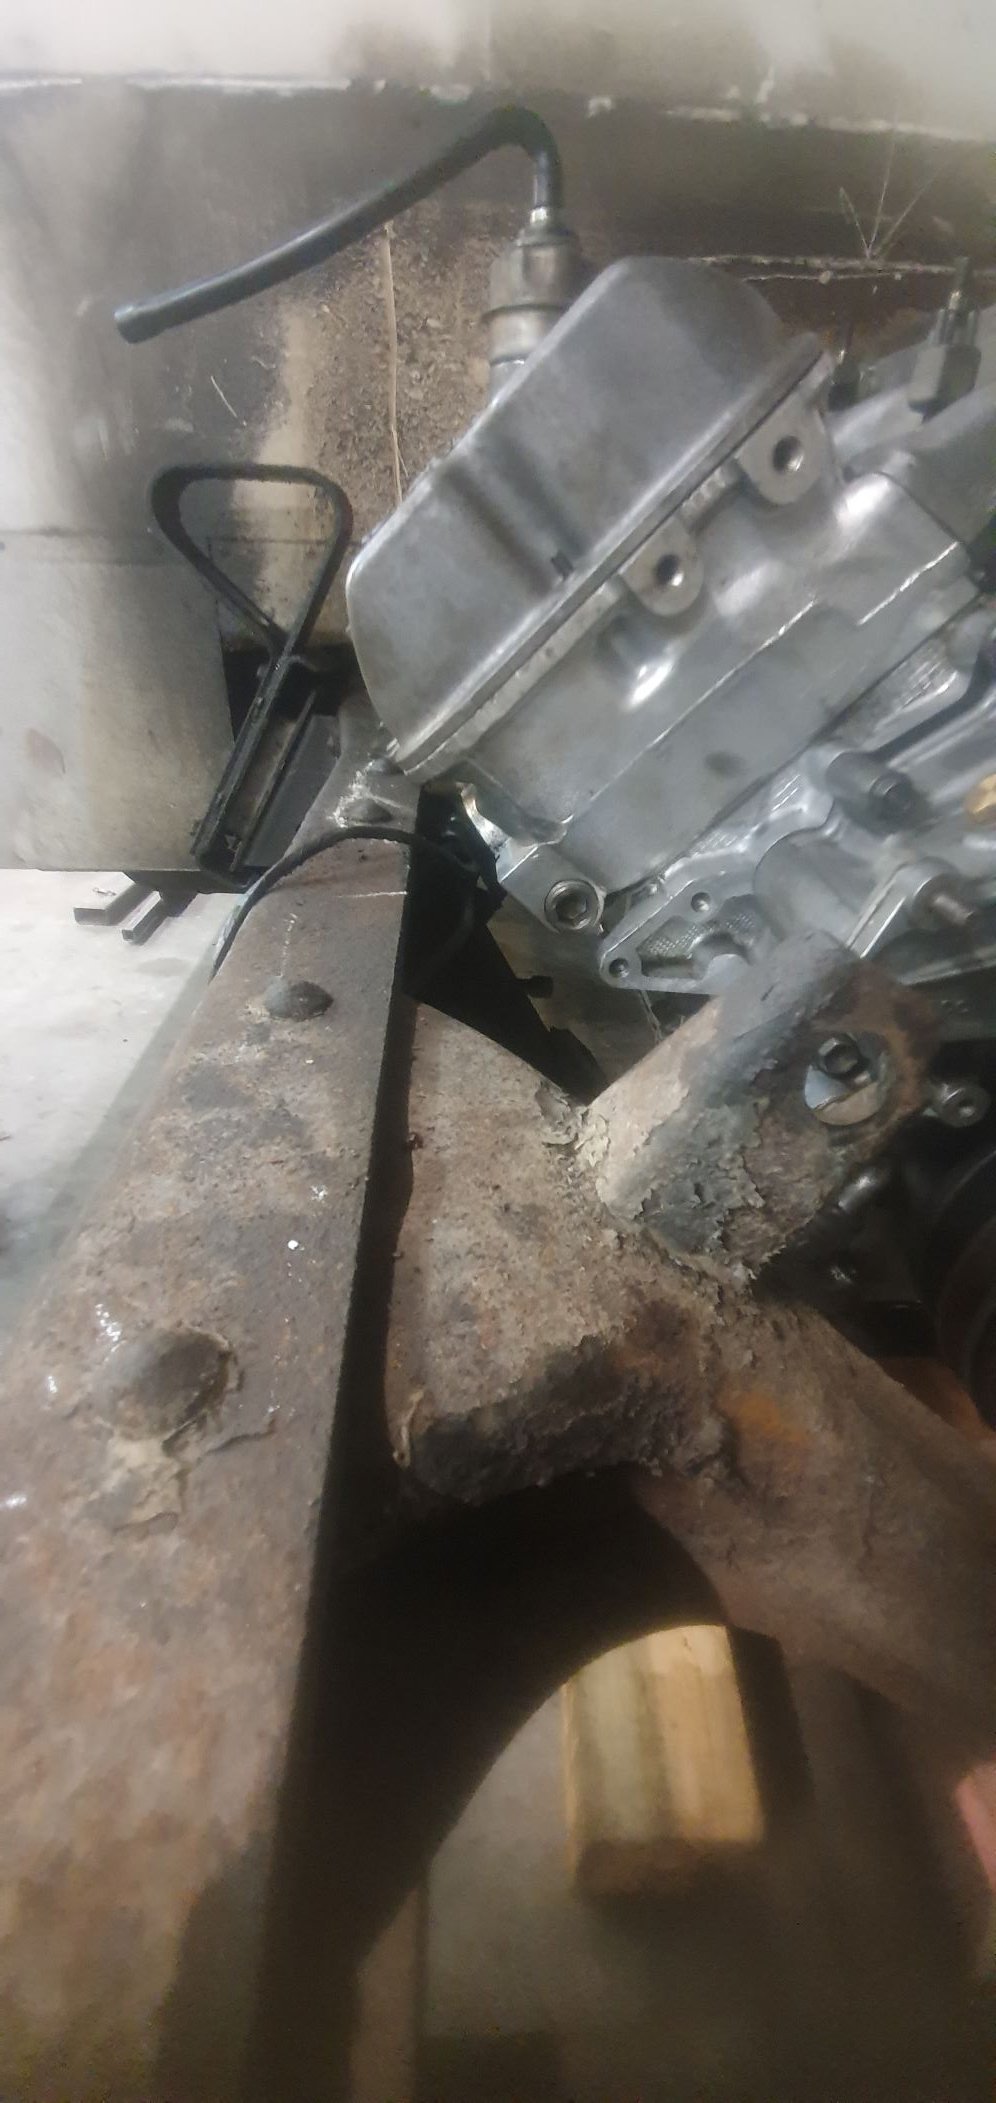
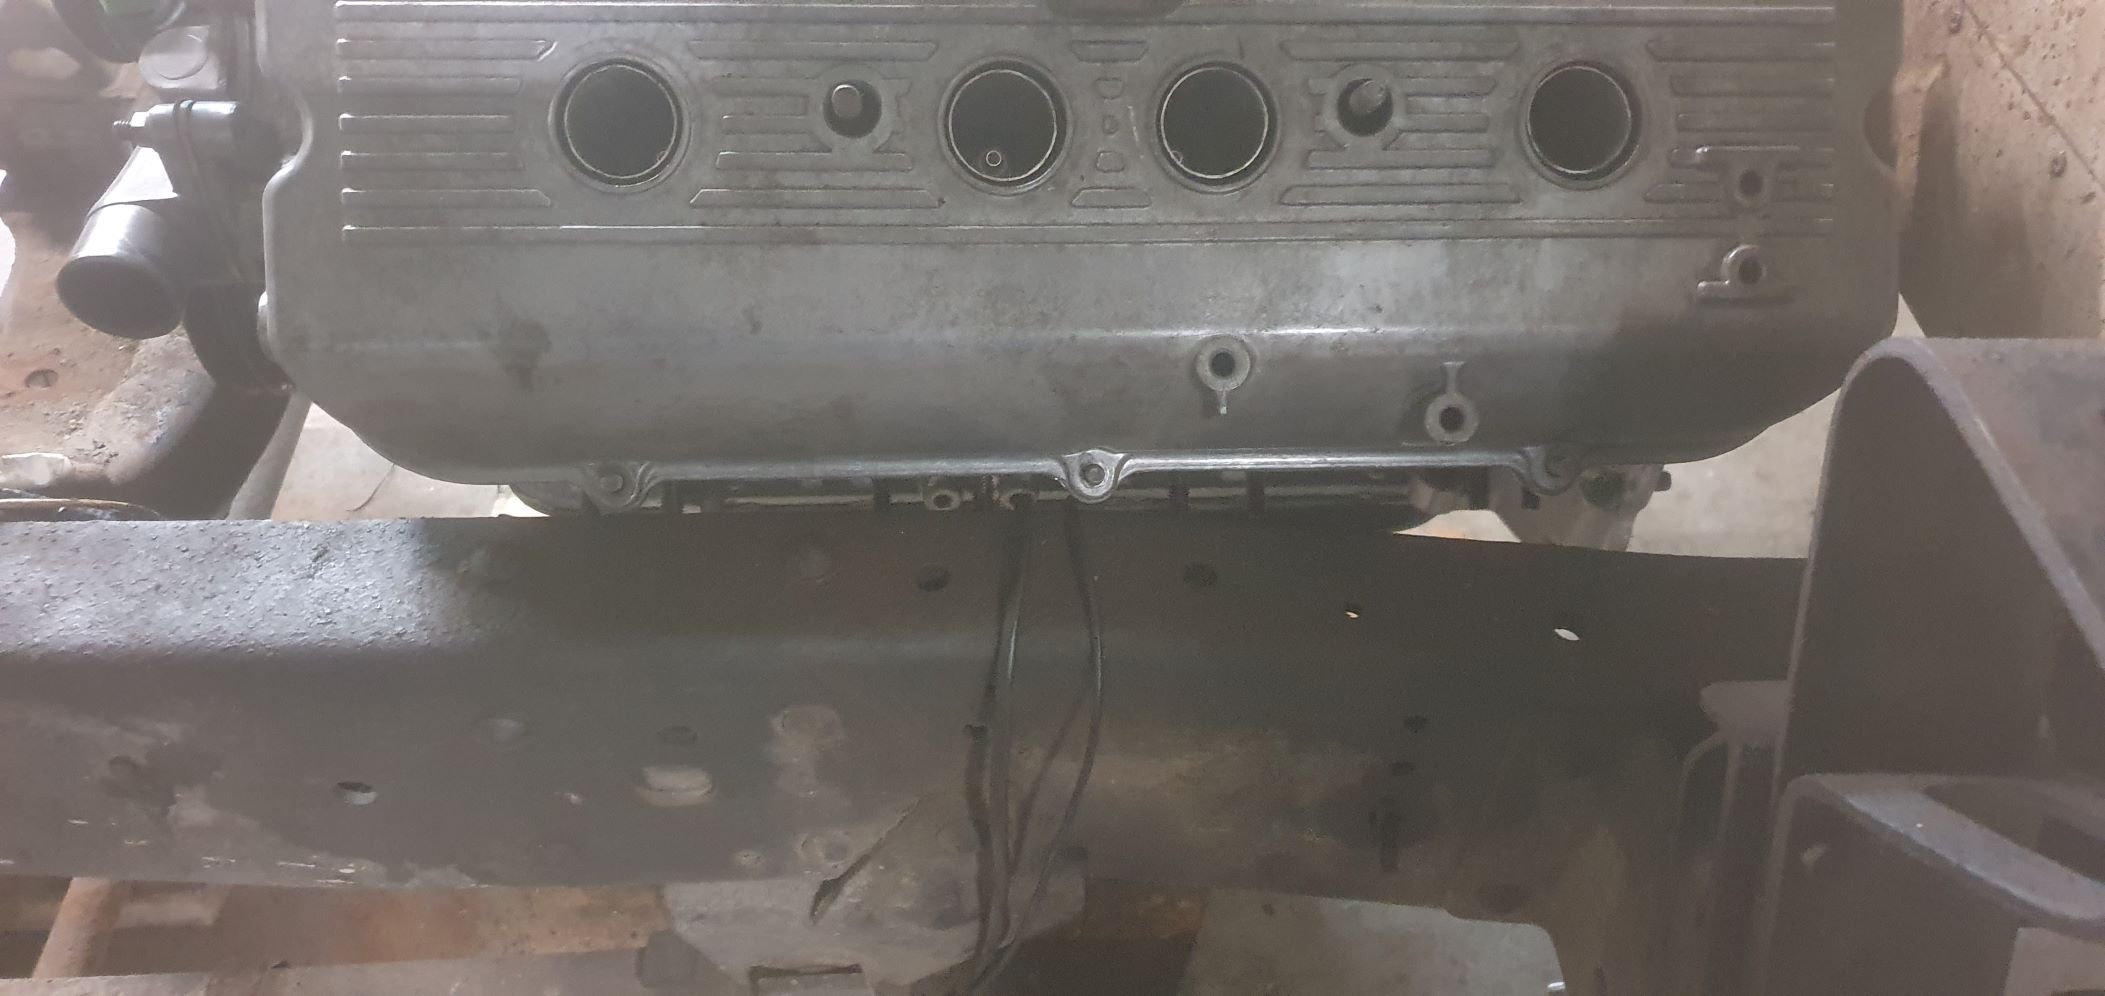
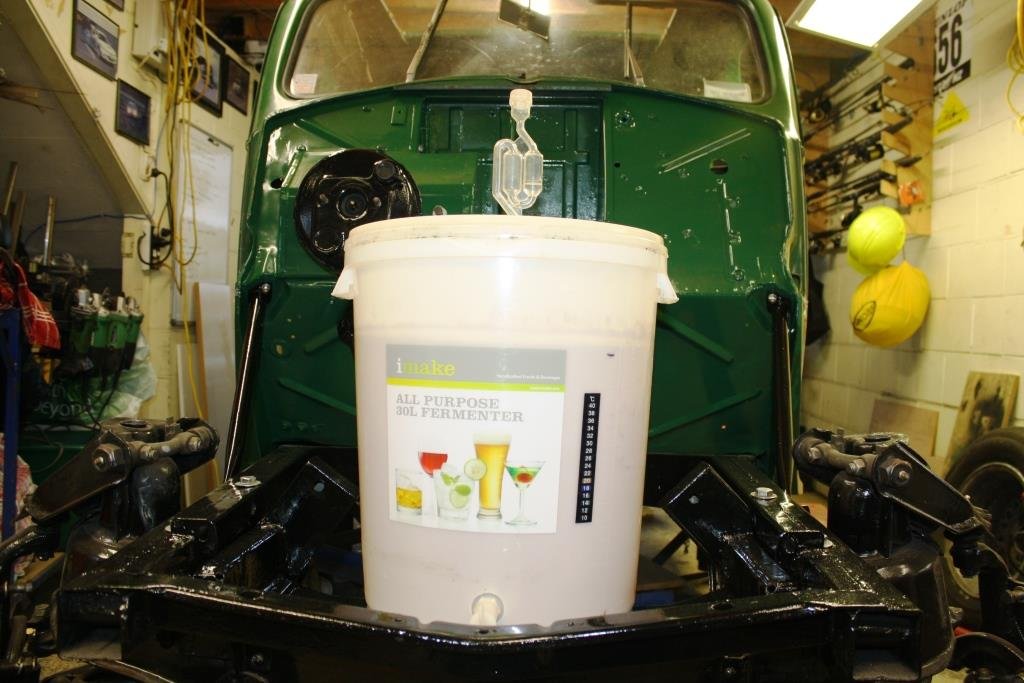
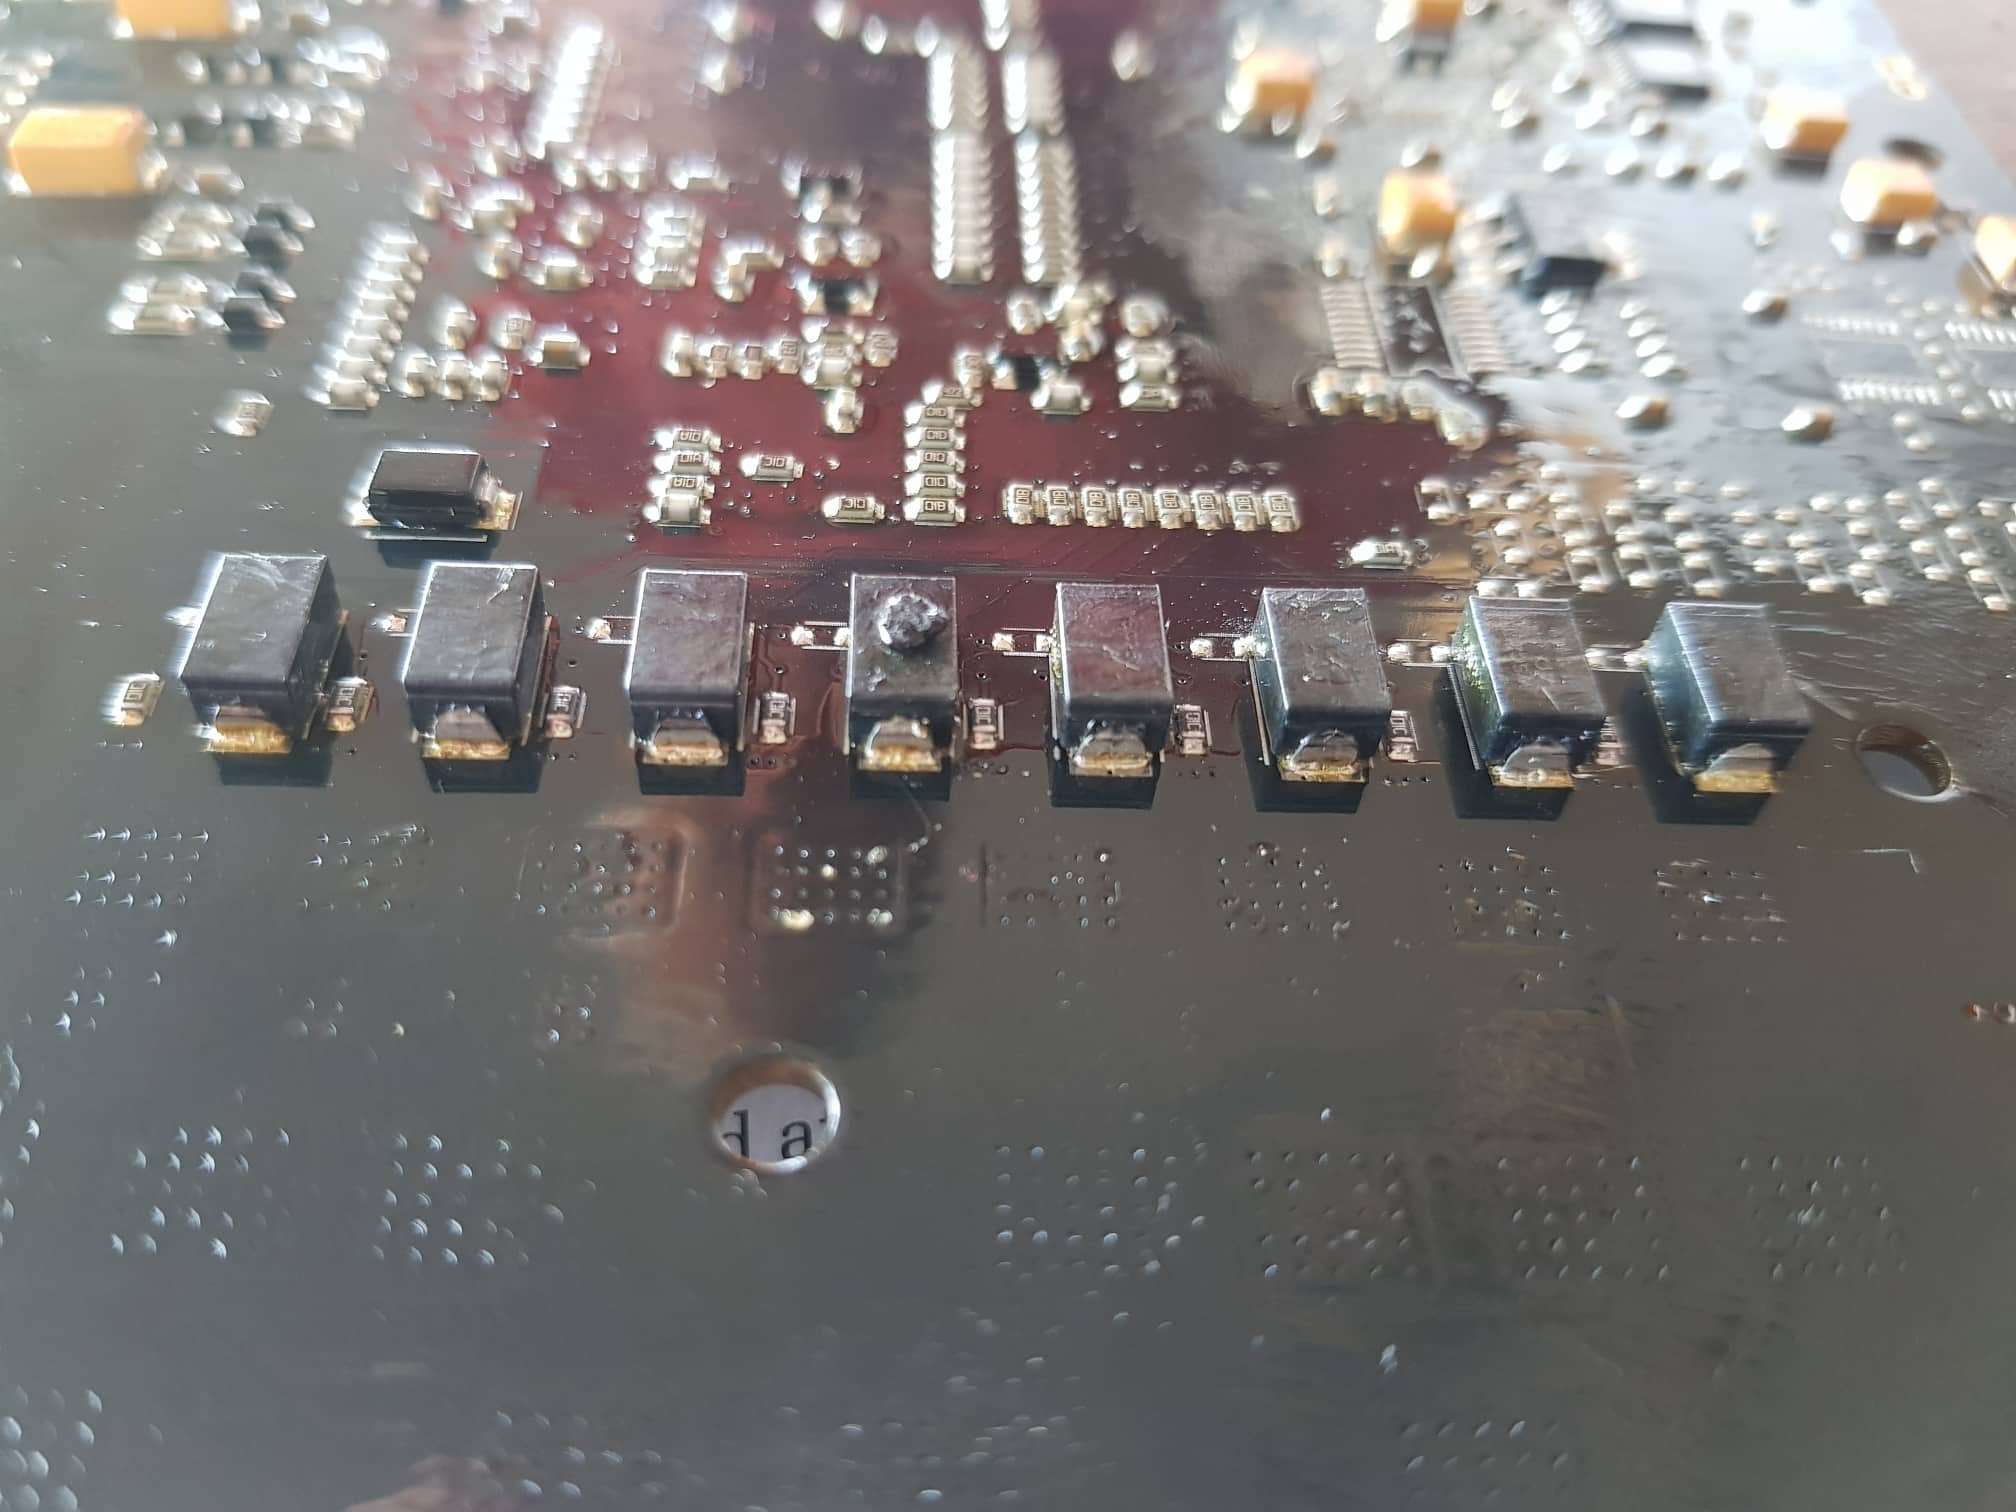
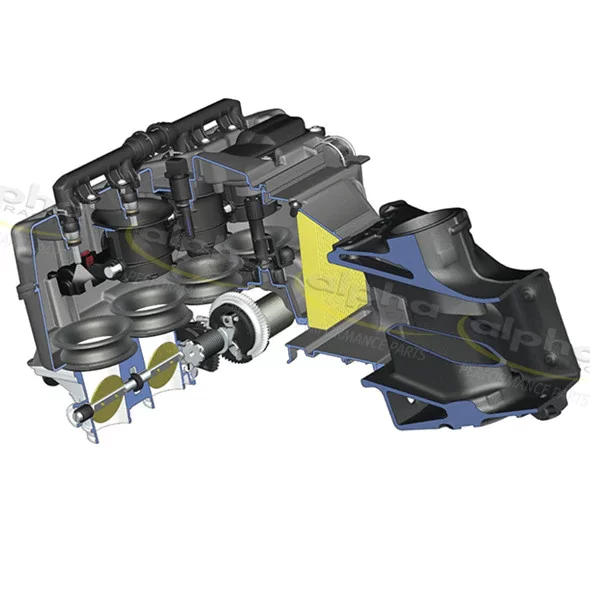
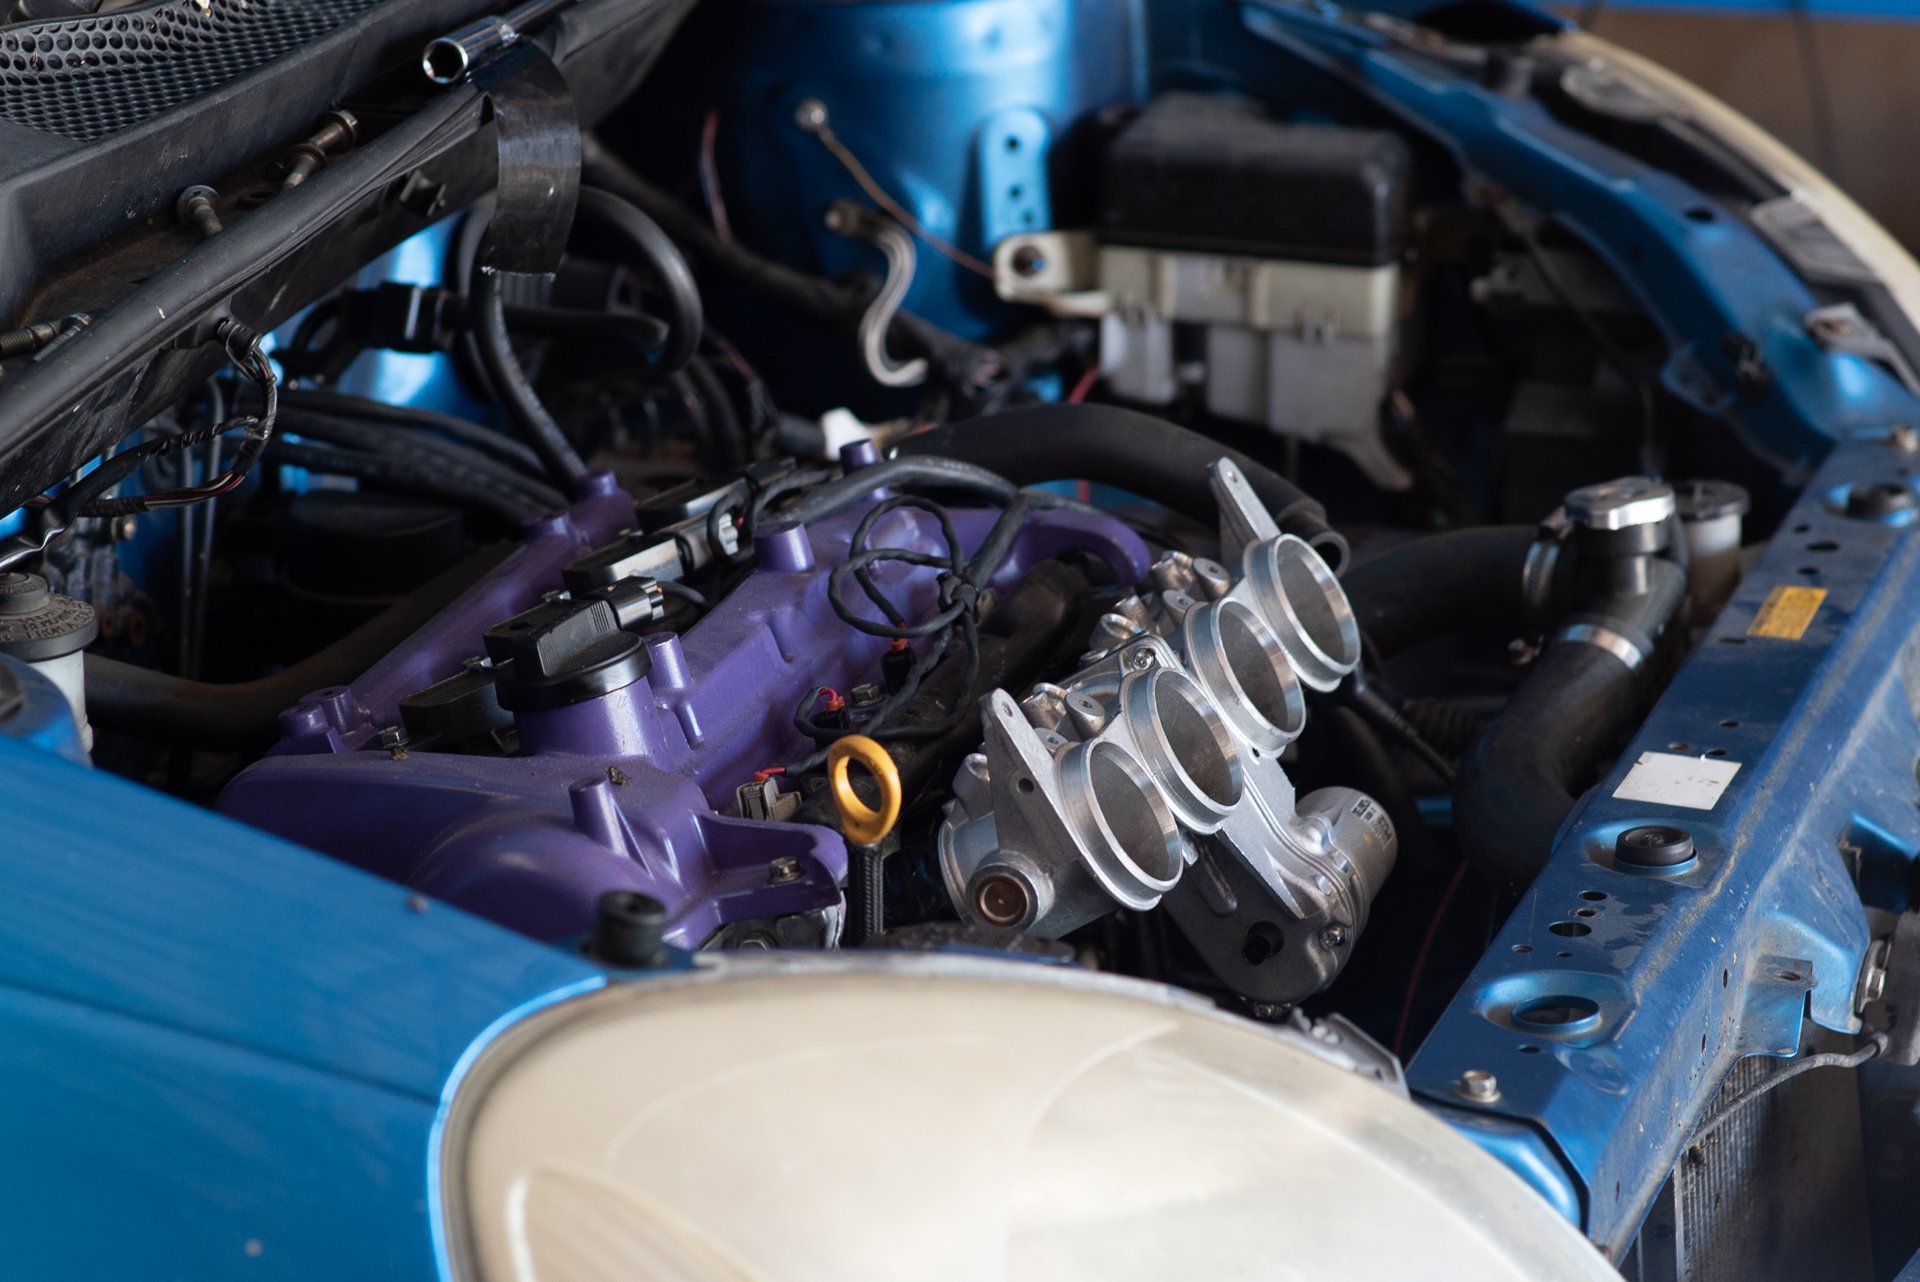
So I finally paid some money to get my exhaust done Bought a factory staged injection setup to suit my new throttles. I figure if a staged injection setup is going to achieve anything, surely it's an OEM one. It will be interesting to see if there are any tangible benefits at only 9k or under. Probably not, based on previous experience of myself and @kpr mucking around with injector position. It will be interesting to see if the injector spray pattern of the outboard injectors is anything interesting though. Hopefully the inboard injectors will be a high enough cc rating that the motor can run on just those, if needed. In order to do staged / have full control over all 8 injectors. I need to remedy the problem that one of my ECUs injector drivers stopped working. I'm not great with electronics, especially expensive ECU so I took it to Dads place so he could diagnose. Well, I managed to take the case off myself and spot the problem myself. Bravo to me! It seems one of these resistors is chooched, not hard to guess which one. The mosfet is fine, its just that this resistor blew so it went open circuit. So easy fix. Cool! Have ordered some replacements, will just take some careful soldering to fix it. If both sets of these fuel rails fit okay, then I wont need the factory 1NZ fuel rail and injectors right in the ports. So it might be worth doing a V2.0 head porting project where I can completely grind out the injector boss bumps from of the intake ports. That might be worth a smidge of power perhaps. Probably some worse cold start performance and some wall wetting grossness, from the first set of injectors being a bit further from the head. But will be easy to test before getting carried away. I also have a factory BMW airbox on the way. So this has an easy way to mount the outboard injectors, and also a cool dual length intake runner setup. When you apply 12v to a solenoid, it pushes a plunger down which lifts the upper portions of the intake runners up. Hopefully it fits, but I think it might be a bit big to fit in the available space. Fingers crossed.
1 point
-
Next step is to get the engine hooked up and running, so that means exhaust, fuel, coolant and electrical stuff first. I did a quick and easy job with the exhaust and used a 180 2" bend to join the headers to a cut down and repacked Yoshimura can I had spare. I'll see how loud it is then decide if I need to do a version 2 but that wouldn't happen till after the diff goes in.1 point
-
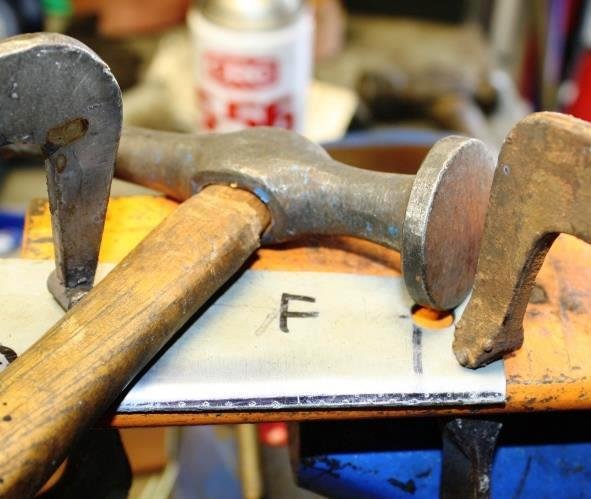
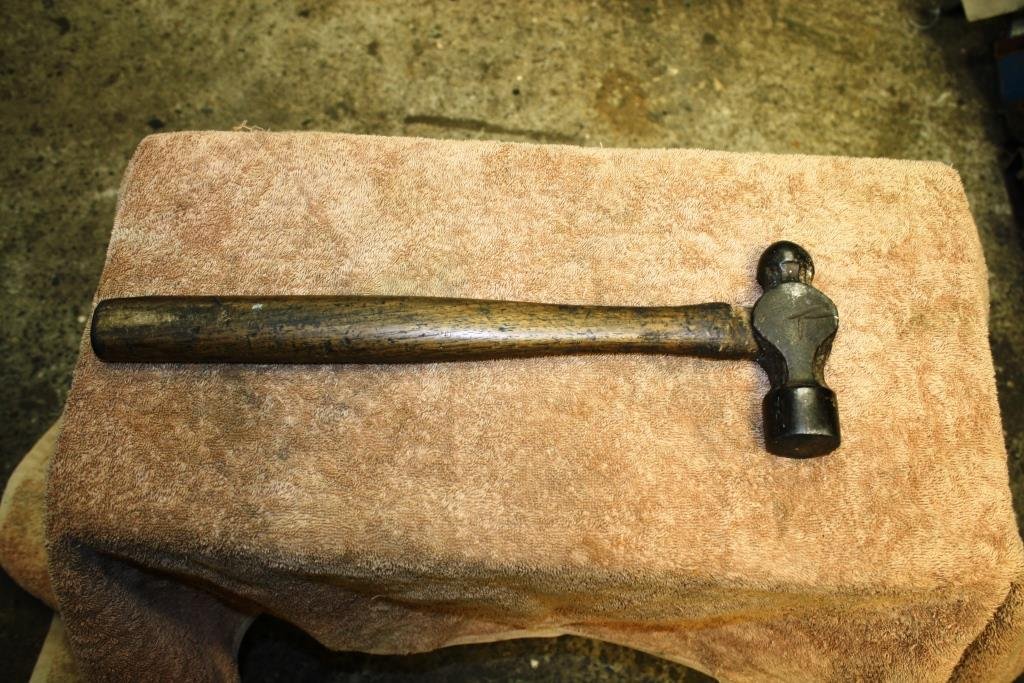
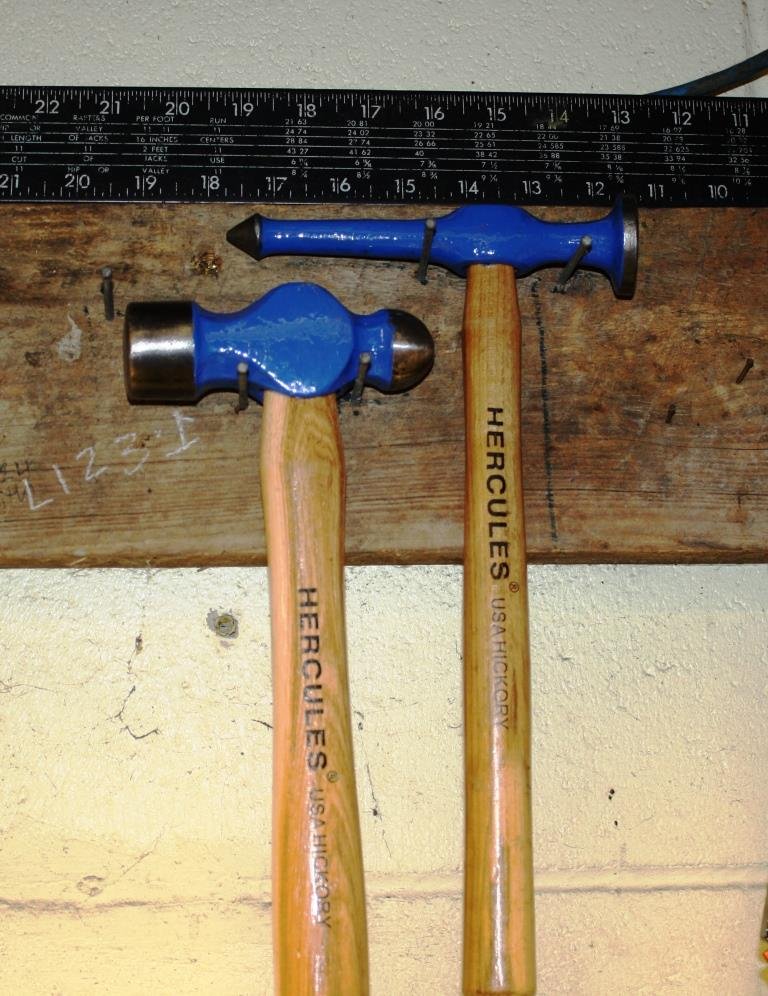
For some years now both Rigamortice and I have always shared a propensity for saving old tools and painting them blue (don’t ask!). The handle was falling off my favourite planishing hammer (bought in a junk shop years ago when we were buying our first house, ms sr2 had a baby on the way and were broke). This ball-pen was my grandfathers and we think was probably pre WWII. It’s got a name on the head with Sheffield England below it? Found a guy on Trademe selling American Hickory handles and ordered a couple. Spent a pleasant evening with Rigamortice in the “much esteemed & universally applauded” (in NZ) sr2 man cave drinking ½ a bottle of Barossa Valley Pinot Noir while linishing and painting the two hammer heads. Following day I shaped the handle ends and wedged them in tight. These hammers should outlive me and the people reading this thread – It’s easy to discard history but it is just as easy and far more rewarding to keep it alive.
1 point
-
Okay so apart from the fact I drew the flange backwards so the two outer bolts wont go in. HOW GOOD IS THIS! It's amazing how well it all fits up. 1NZ port spacing is like 83.33mm x 3 These are approx 83-82-83 and looks way tidier. I also think I've got more room for trumpets compared to before, so I can have a bit of a gentler curve in them if needed. Gonna be awesome!
1 point
-
Hmmm nah I dont think I'll bother going that far. Literally just any tyre that has actual tread will be a vast improvement haha. I weighed the 13s for the rear and they were about 9.5kg each which is incredible For context my 14" wheels I took off were 15kg each. ROH and R888s were 17kg each so nearly double! I might put smaller brakes back on the front, and go get the other pair of these and run 13s full time. I drove it down to the dump in drag spec tyres, but with passenger seat still in and quarter tank of gas. Came in at 810kg which is awesome. So 790ish drag spec once passenger seat is out.
1 point
-
Back in my day, everyone was using those mud & snow tyres that come in on jap cars, are they still a thing?1 point
-
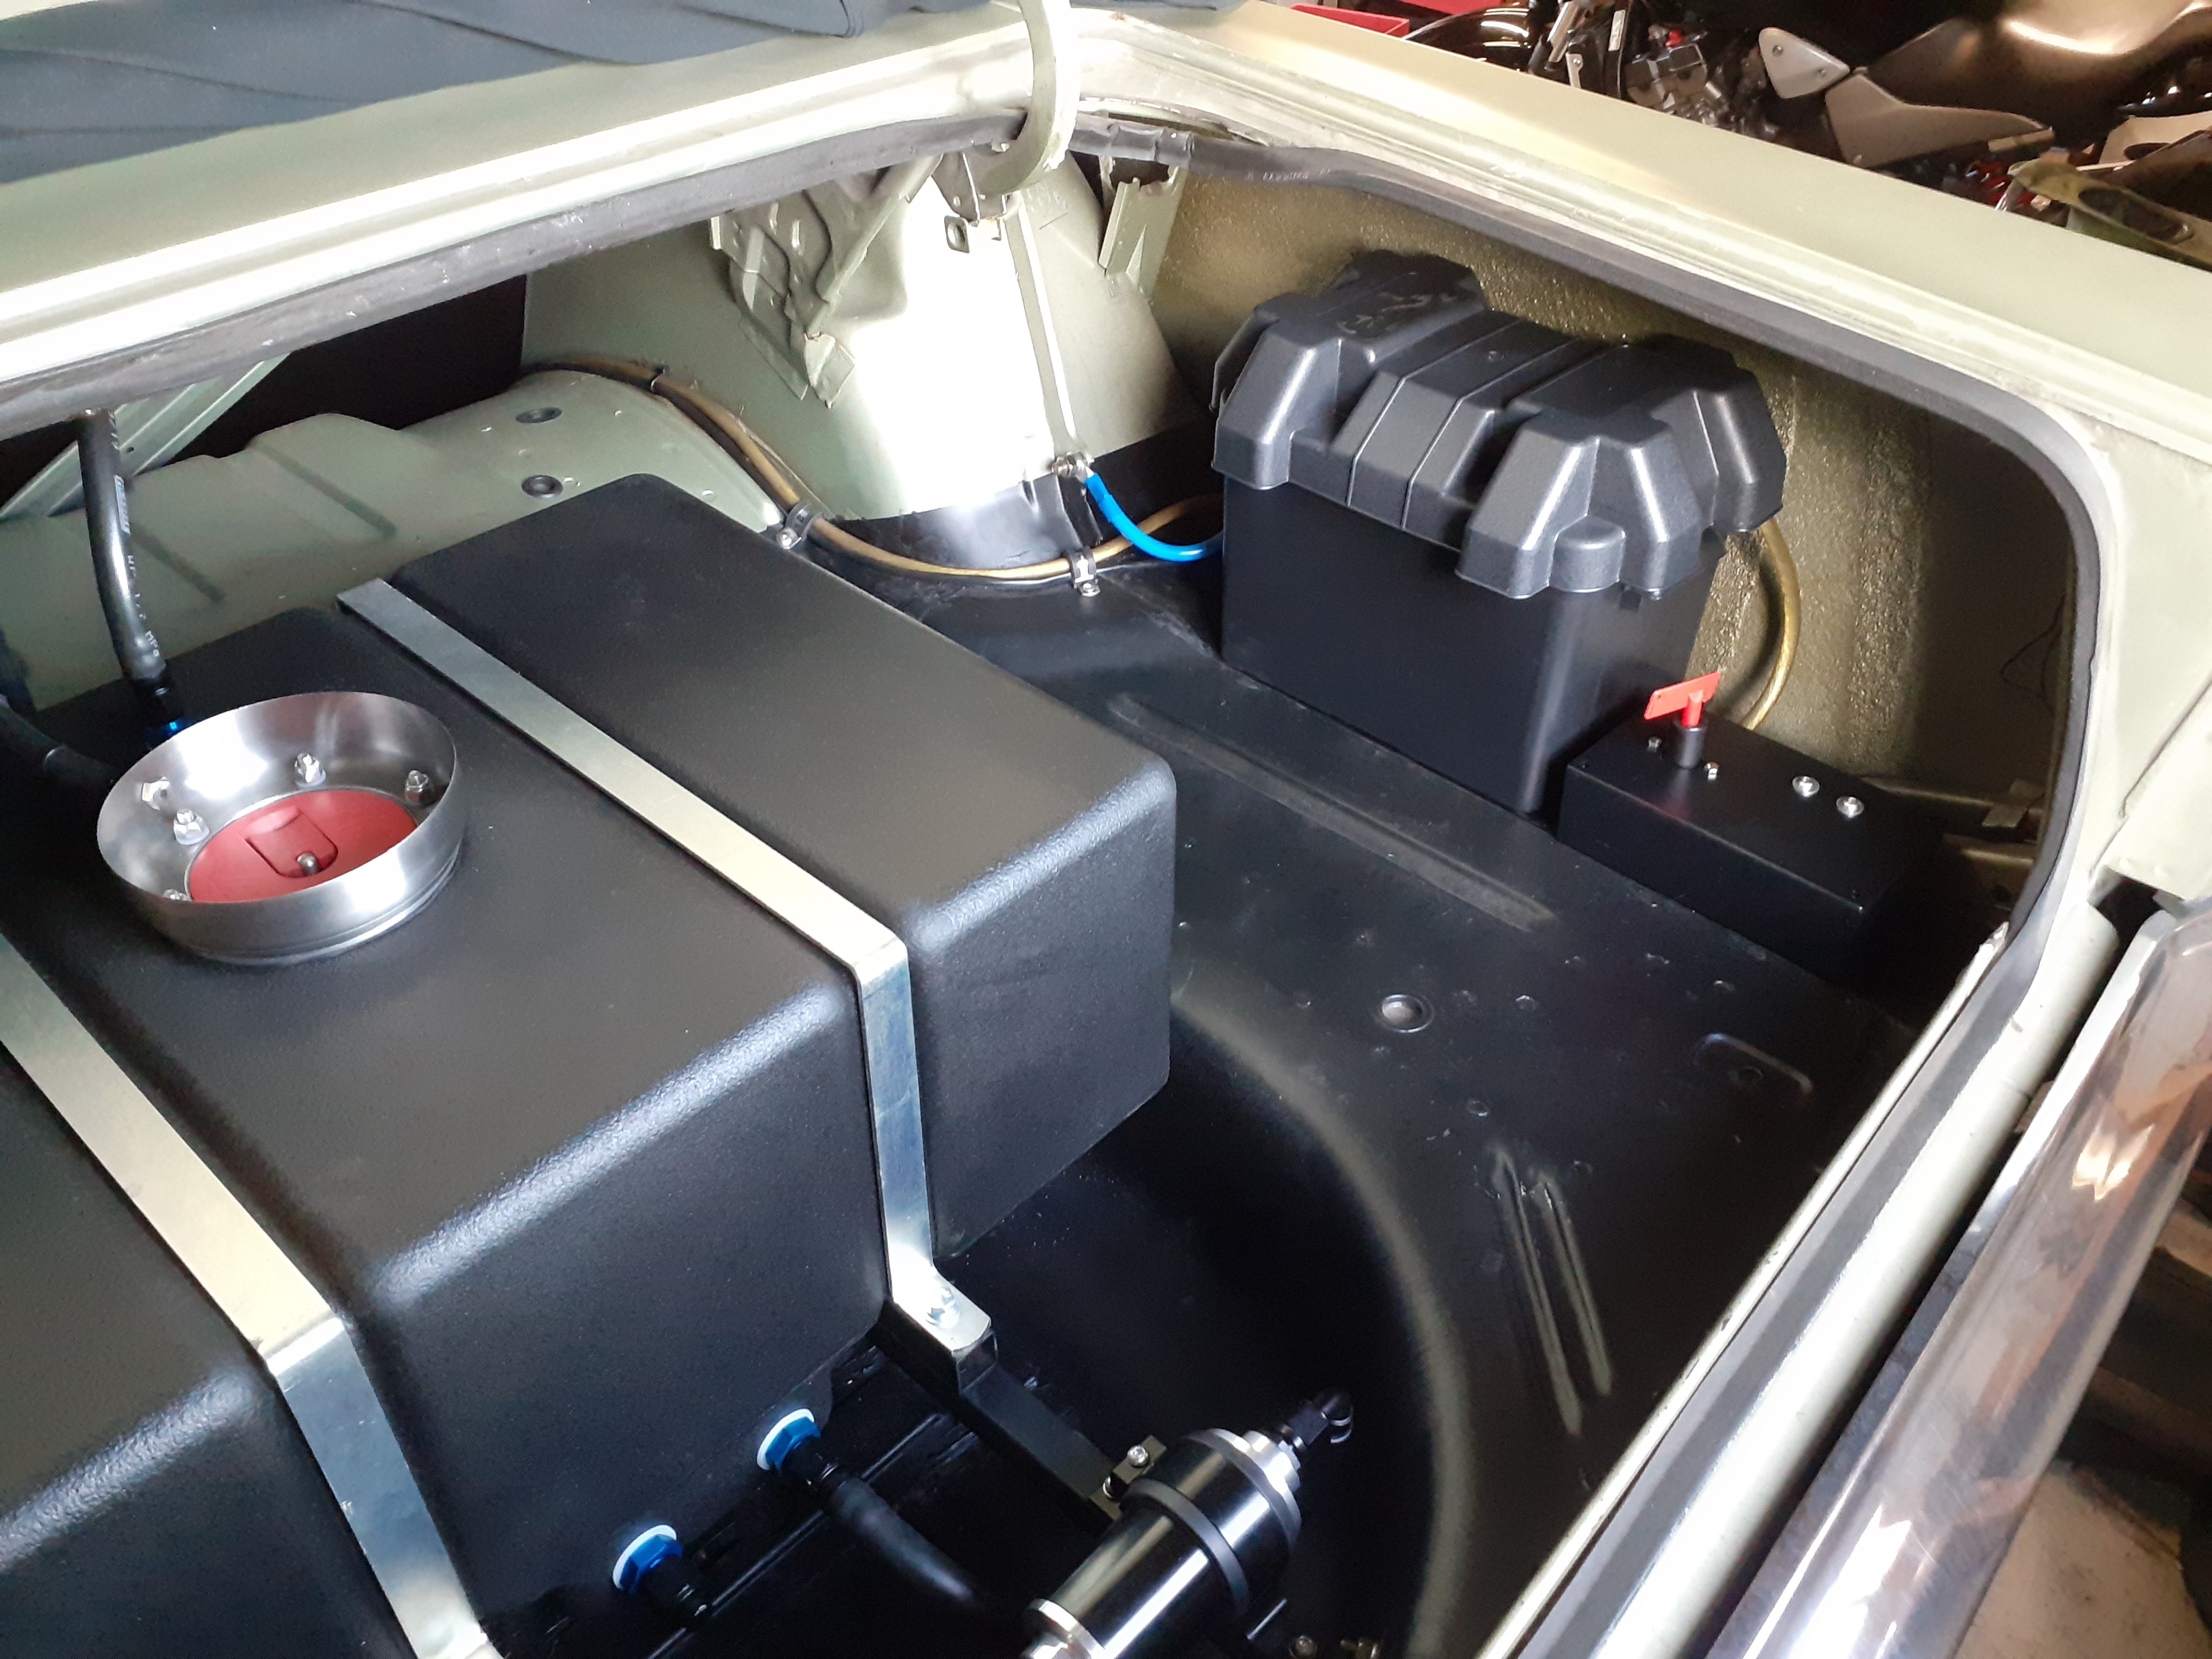
Battery mounted in a box, battery switch and fuel pump relay mounted inside an insulated box, main power wire to starter done, fuel pump wired up
1 point
-
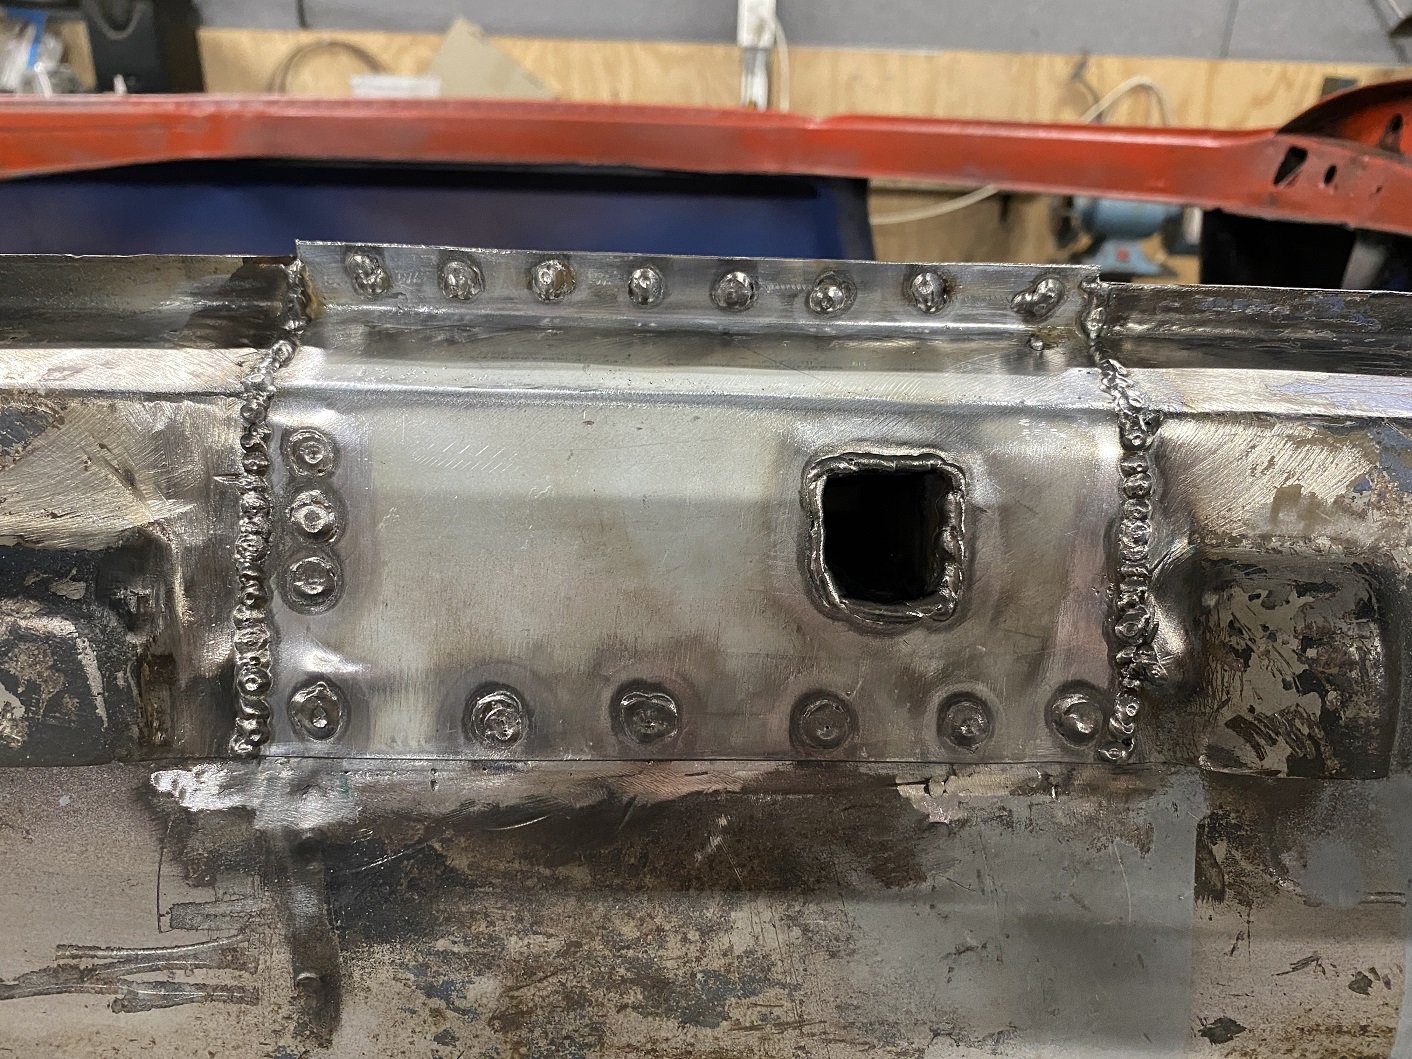
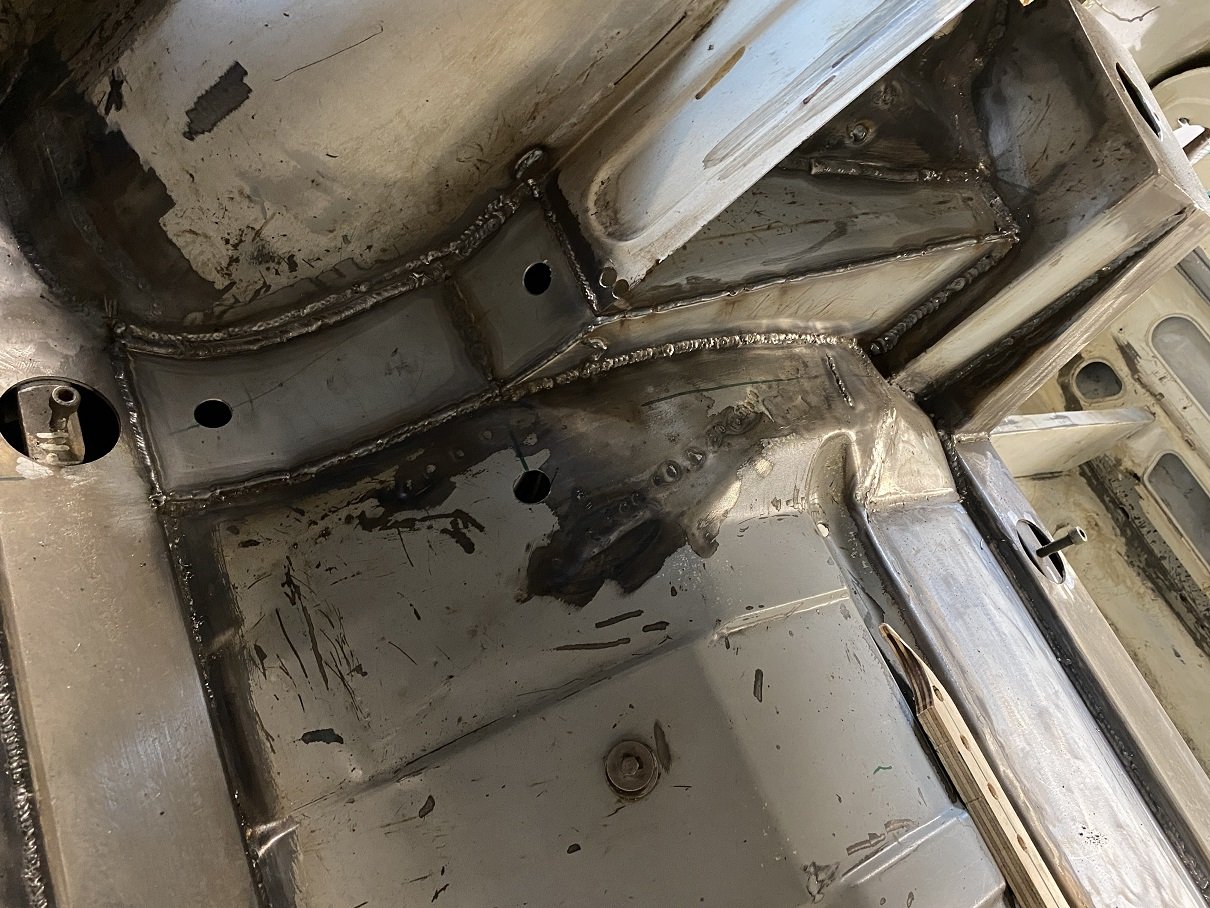
This side chassis rail... box section... whatever, is all welded. I'll linish back some of the welds.
1 point
-
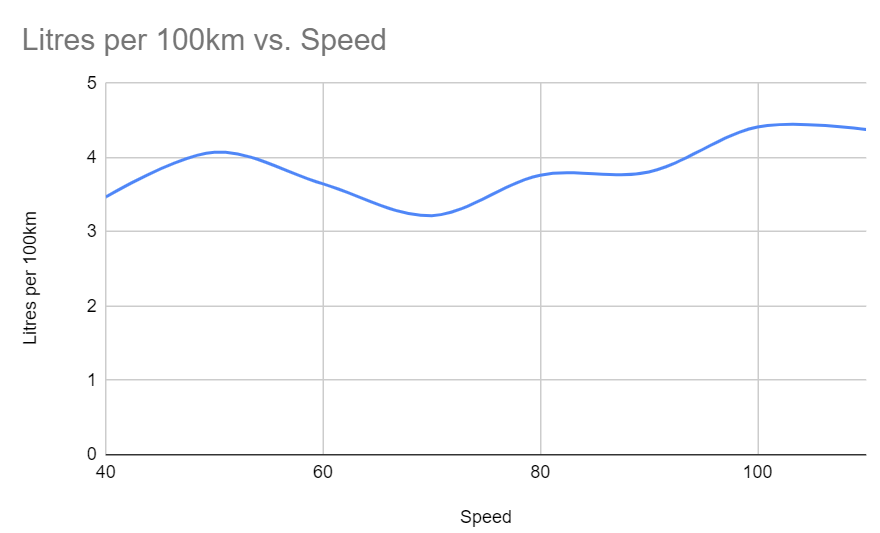
Hopefully here in a week or two, but not 100% sure these days! In the meantime I filled up a tank of 91 again, and then started on a more comprehensive economy tune. So this thing actually drives super nice at a 16.2:1 air fuel ratio under cruising conditions. then at full throttle I've leaned it out to around 13.4:1. Also set rev limiter to 7000rpm. On 91 at full throttle it was knocking quite bigly in some areas, mainly very low rpm very high load. So I pulled enough timing out to stop it from doing that, which was heaps - but then I've also adjusted e-throttle setttings so it cant get to that part of the map anyway. (Talking like, sub 2000rpm full throttle) So despite having spent the first portion of this tank of gas refining the entire map for the leaner conditions, which is obviously a fair bit of time at high throttle openings. I ended up with a near identical end result to my other tank. 729km from 36.99 litres. So again only just just just over 5L per 100km. So that bodes well for this following tank I think I could get close to 800 if I drive it nicely the entire time. By the time that's done, I think it'll be just about time to put some 98 octane back in and get these bmw throttles on there. Cant wait! EDIT: Also did some tests on same stretch of road to see which speed is most economical. Turns out that about 75kph is best economy with this gearbox, probably because at 100kph its doing over 3000rpm. Where as standard gearbox is like 2400 or something.
1 point
-
that runs 13s and also has very good ecom on pertol1 point
-
Got back home on a below empty gas tank. 732km and 37.25 litres. So 5.08l per 100km I guess the cold starts and slow parts of trips ate away my highway results a bit. Maybe if I overtook one less truck it would be in the 4s haha. But still pretty sweet. And yeah those throttles are cool. I was thinking since the s1000rr motor is only 1 litre it would have the throttle centres closer together. But it turns out that its actually got a 5mm larger bore diameter than a 1nz! And a super short stroke so it can rev to a zillion rpm. So i might need to look for a motor in the 700ish cc range to try find a nice center spacing and a little smaller diameter. 1nz ports have the area equivilent to a 37mm circle. So 40ish mm throttle should be good.1 point
-
Notice how the price of gas is increasing at the same rate that your economy is improving? Illuminati confirmed1 point
-
I guess with E-throttle you could tie that into a button?1 point
-
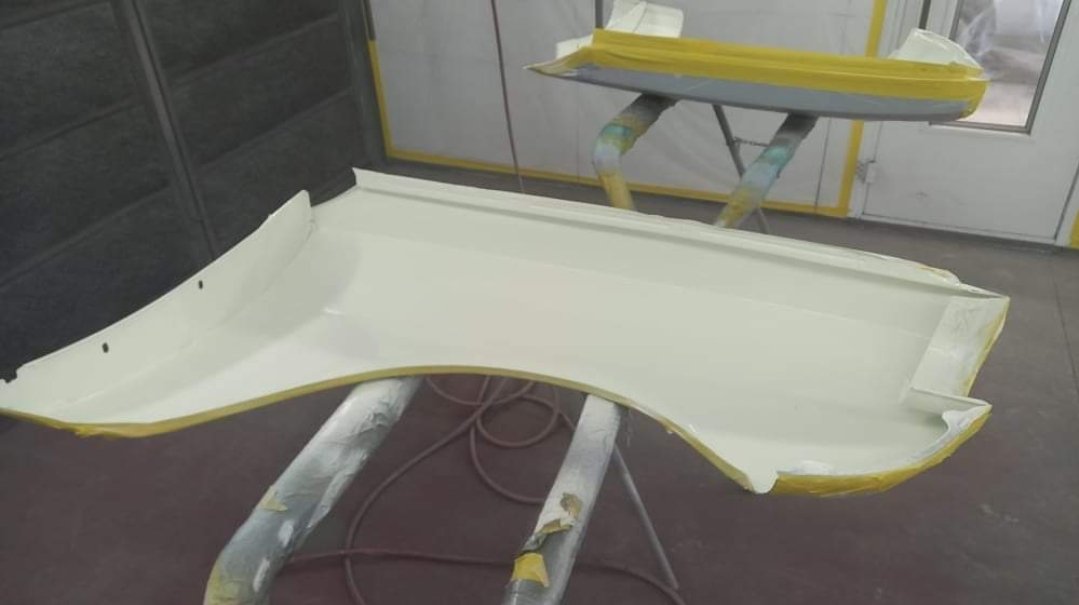
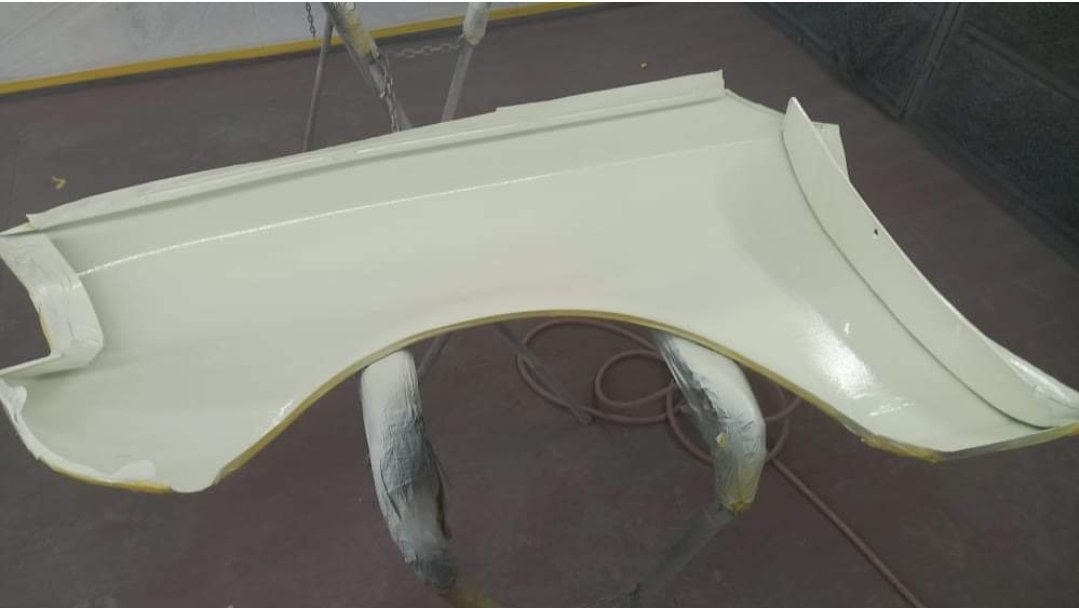
Front guard inners are texture coated, and colour laid down too
1 point
-
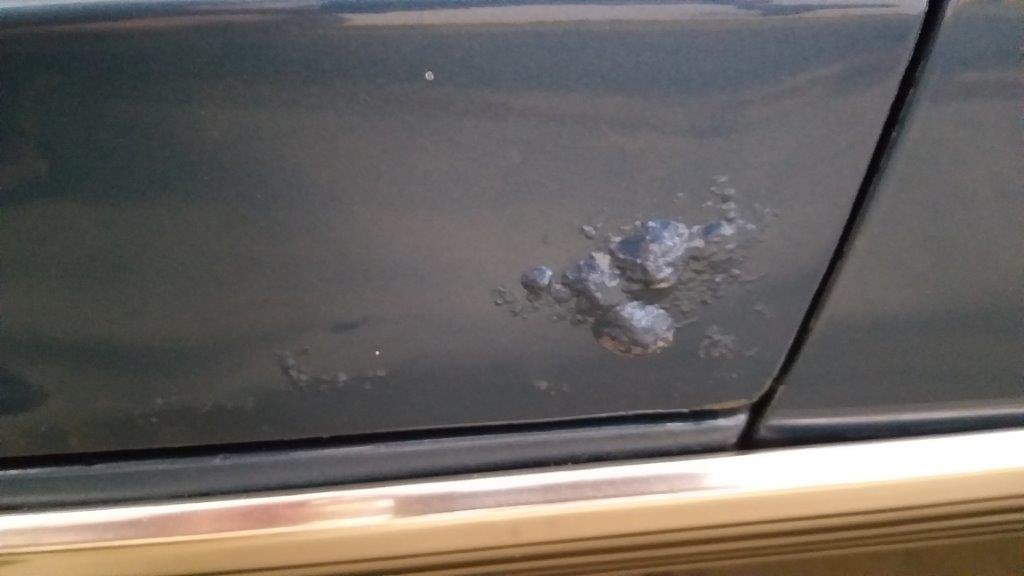
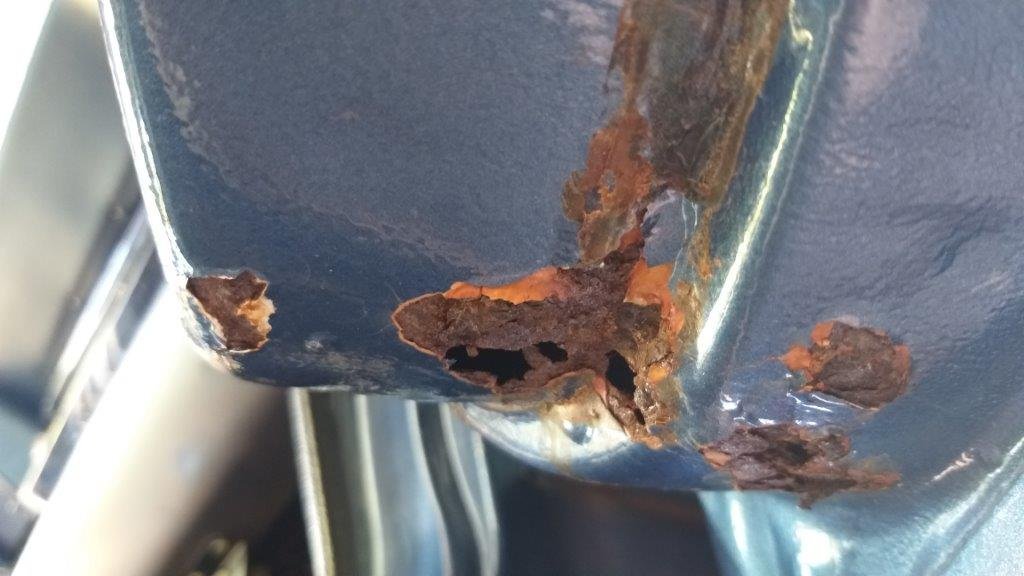
As previously mentioned there is rust in the bottom front corner of both doors. Up to now I've resisted the temptation to pick at the scabs as I know it's going to be ugly. Here are some photos of the passenger door. Too nasty.
1 point
-
She is a beauty1 point
-
1 point
-
We are using these in the cars at work now, but $$$ and you need special chargers for lifepo batteries, we have a couple of the ones they sell and also some Ctek ones. https://www.racetech.co.nz/shop/racing-products/super-b-batteries1 point


.thumb.jpeg.384ff72c8d2b0ee0d34a7bdedb55bdcf.jpeg)


This leaderboard is set to Auckland/GMT+12:00