
Leaderboard


Popular Content
Showing content with the highest reputation on 09/26/21 in all areas
-
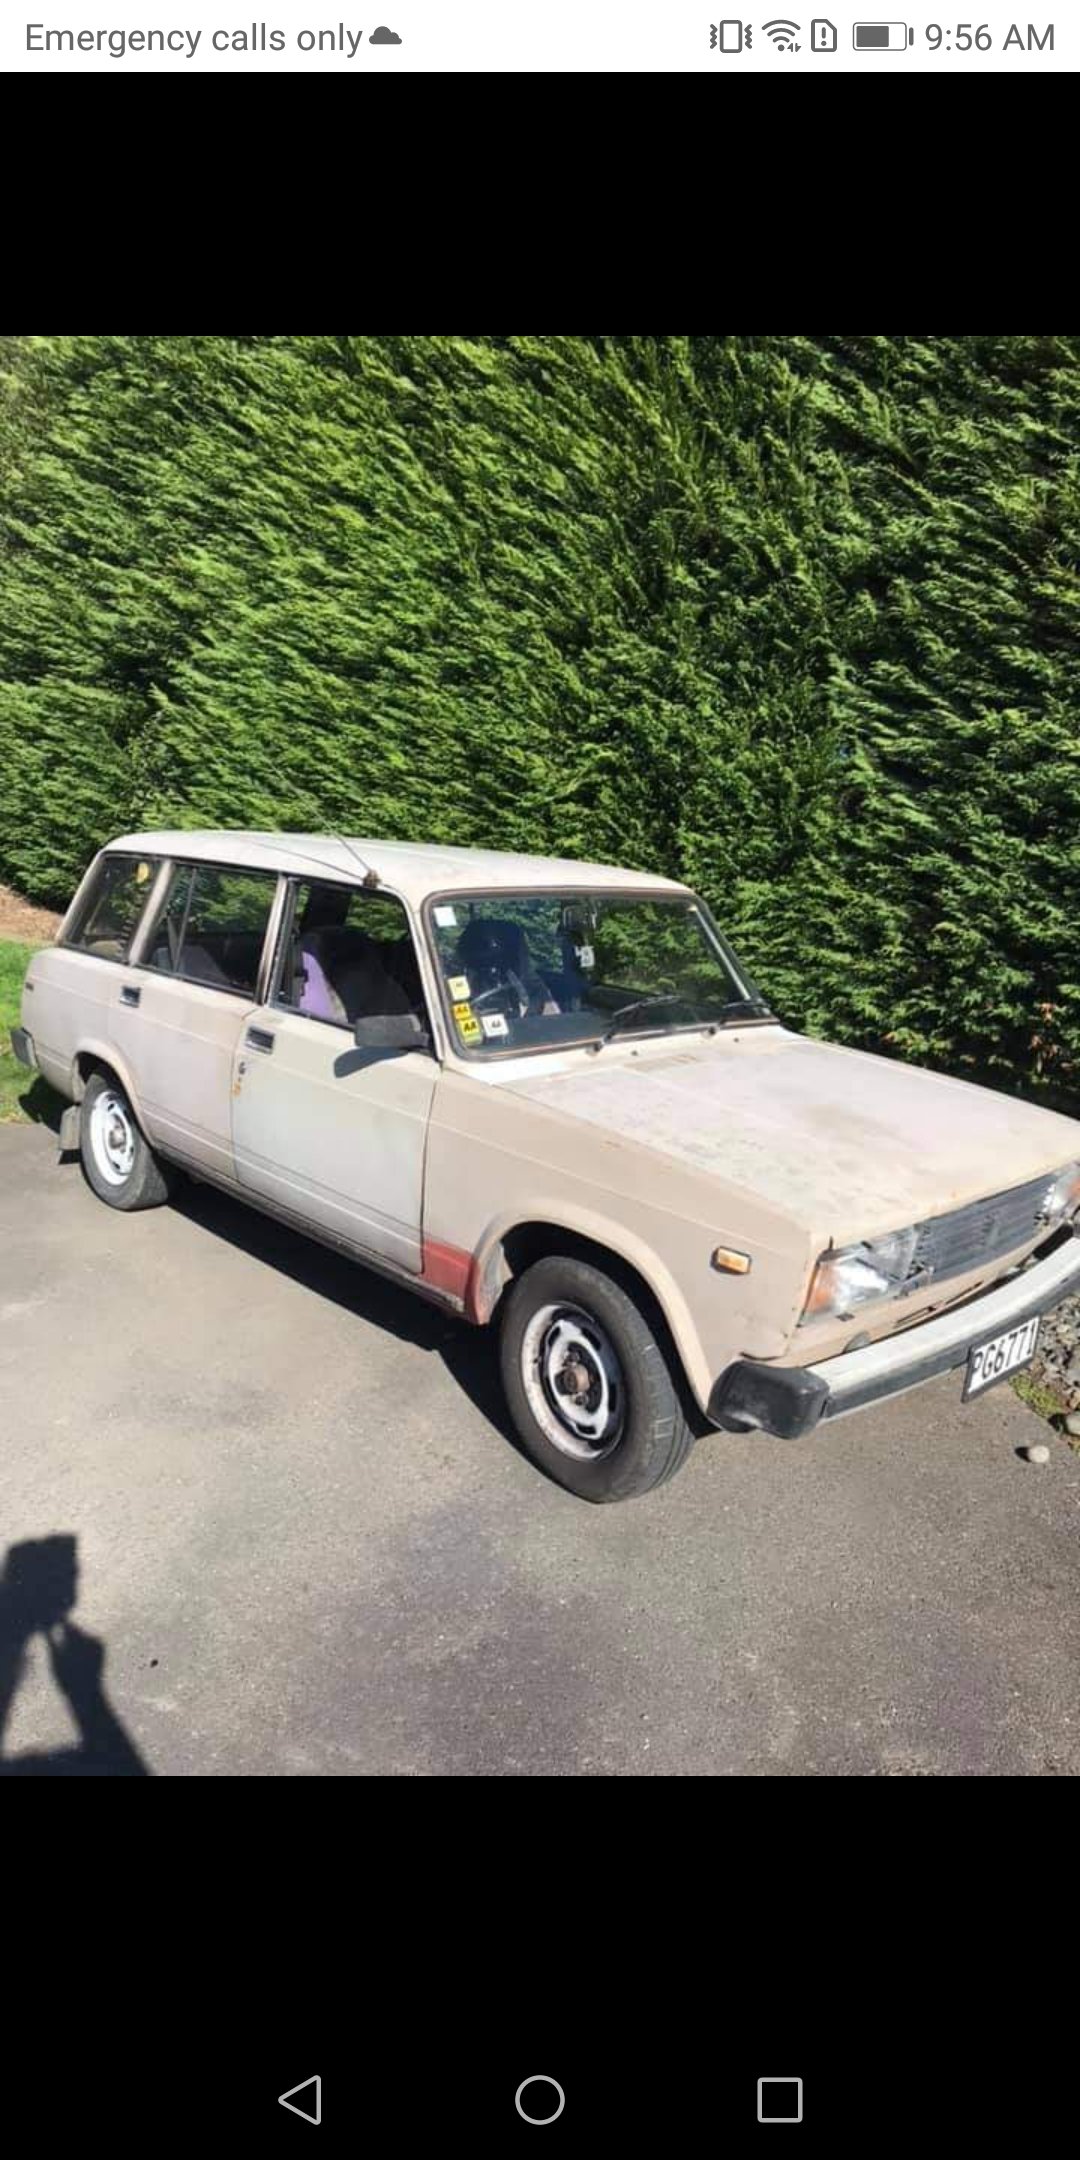
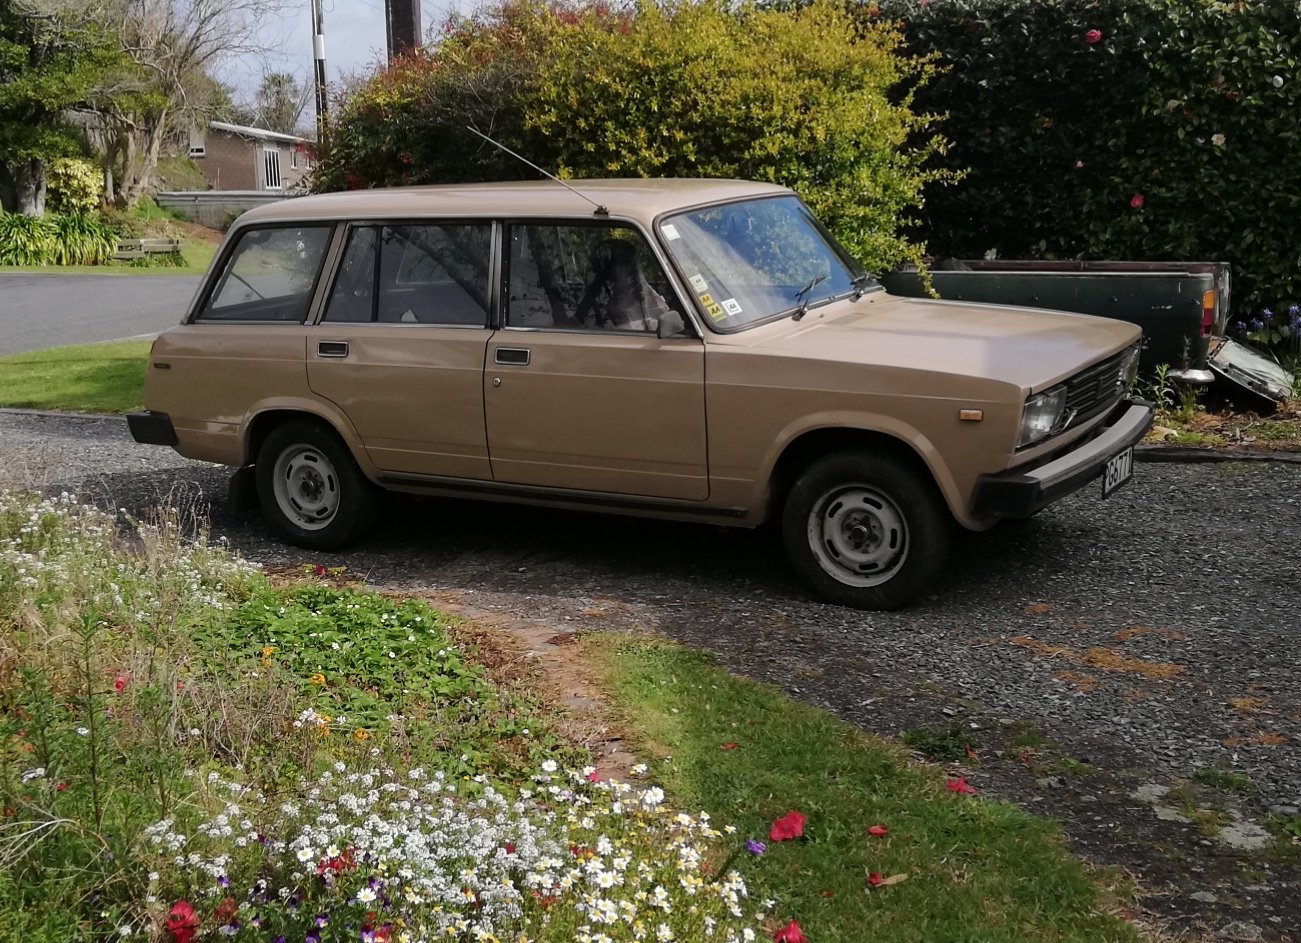
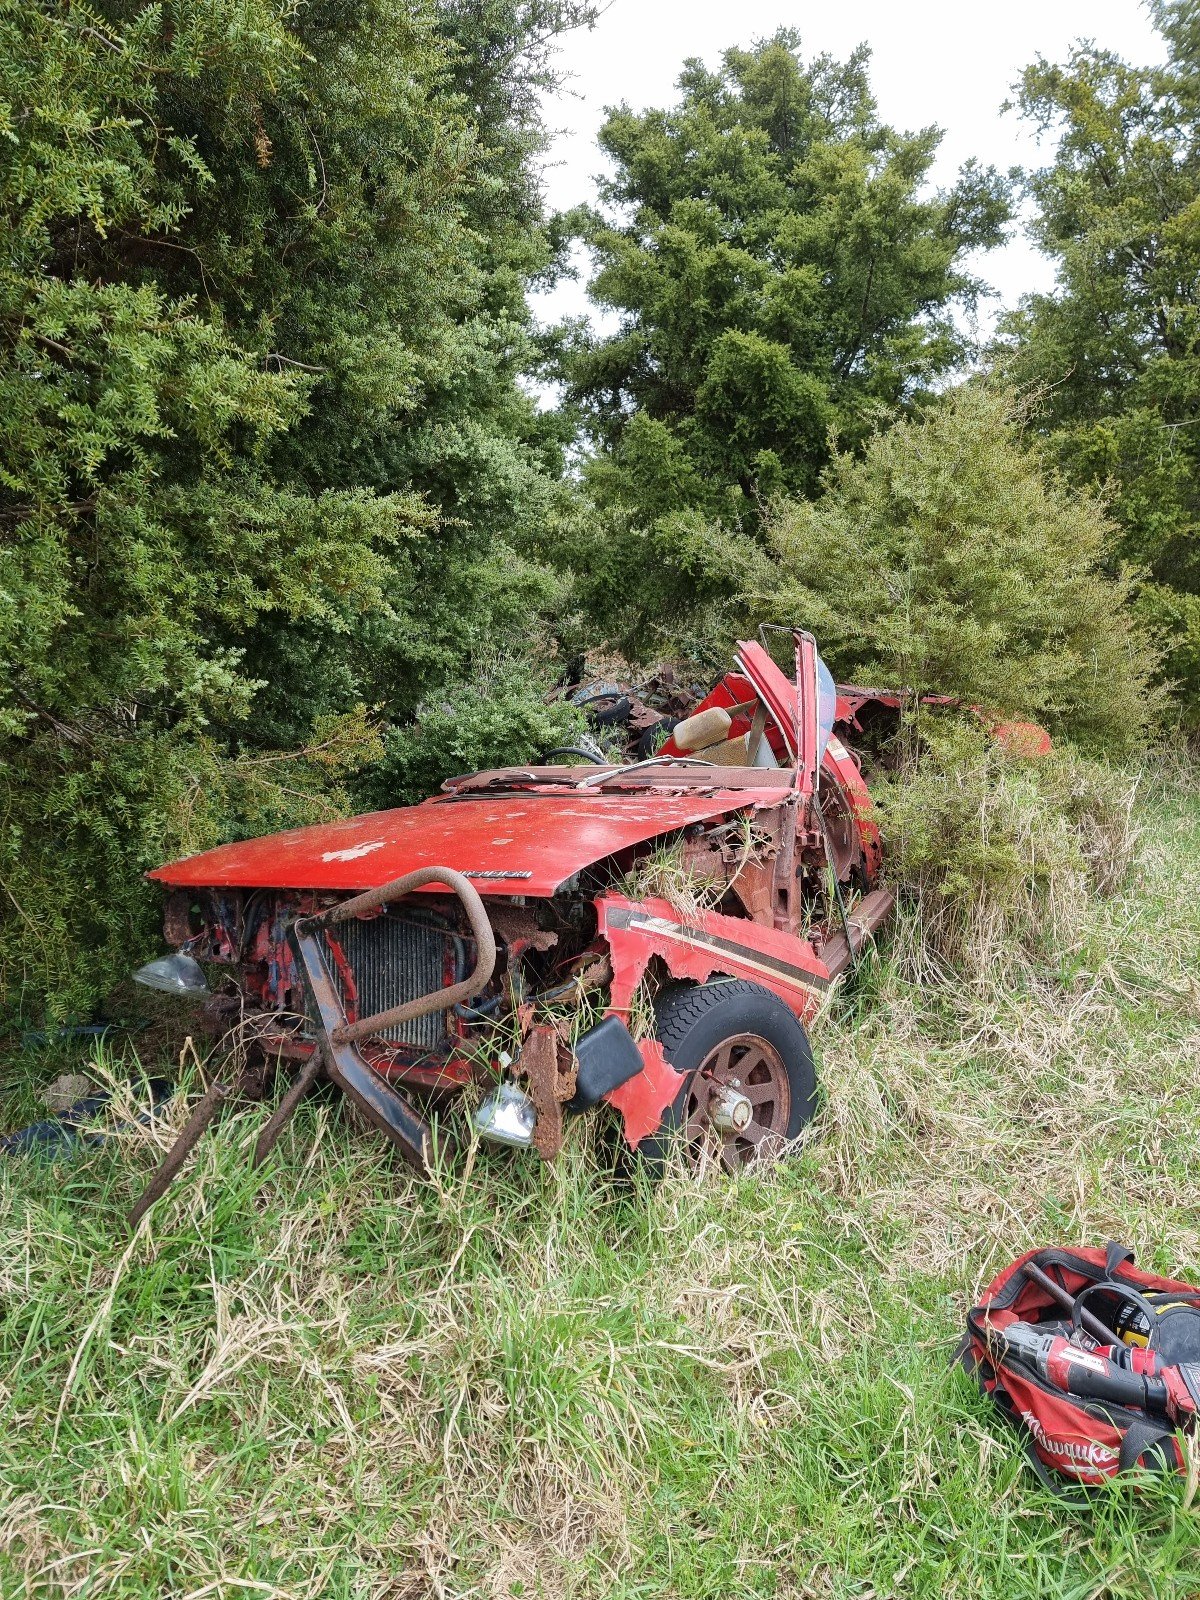
So I got another jalopy, I was searching for a decent triumph sedan when I saw this Lada for sale on marketplace. I thought "Hell, I haven't seen one of those for years!" so promptly went and got it to ensure I wouldn't miss out on the soviet driving experience. My impressions of the car are that it is great - for a car from 1970, by the time this one was made in 89' it was woefully obsolete. I understand they kept making them until 2010 in russia, and 2012 in egypt! The car had been in one family from new, and had been outside most of the time - very little rust and the interior is fine, but the paint was sunbleached to almost white from its original dark beige. I am rather enamored with its factory tool kit, with the tools all stamped cccp. I scoured the oxidation off a bit of the paint and found a good match, repainted it in the driveway, now just need to paint the windowframes black, swap the tyres onto a sweet set of fiat ward rims I found, then have some sweet proletarian adventures.
 26 points
 -
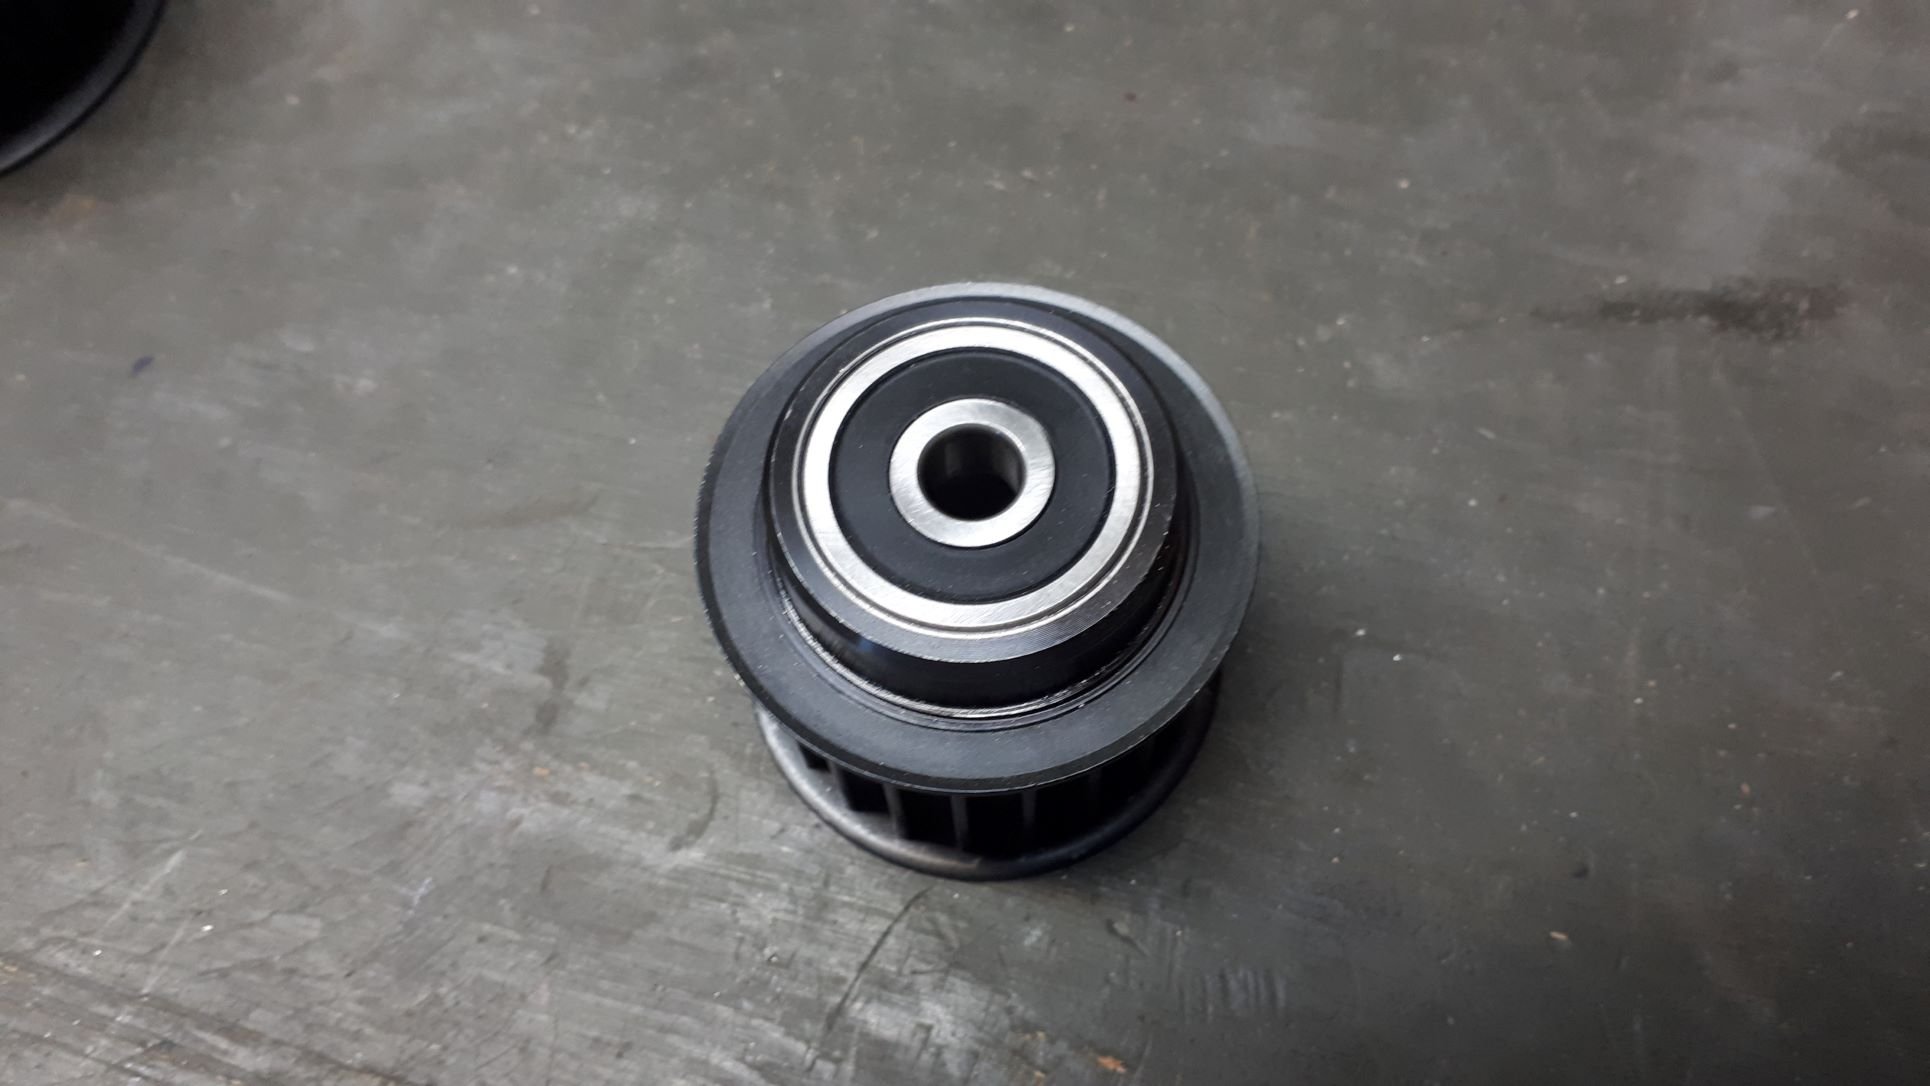
i ordered a new intercooler ages ago but it was coming from auz and they went into lockdown right when i ordered it so it took 3 months instead of 3 weeks. anywho it turned up and i went about making it fit. its wider but not as high as the one that was on the car. a quick note about the intercooler that was on the car. its an R32 GTR intercooler that i put on the car about 2007 and it has been through hell and back and it took it all. it stoved the side of Spencer's soarer in, its taken literally hundreds of hits into curbs and driveways and fucking all manner of shit and its never had a leak or a broken tube or anything. this thing needs a place in the hall of fame. so yea, new intercooler will flow WAY better than the old one and the dyno will tell the story. i made a new bracket thing to hold the cooler and it had two mounting holes on the bottom but because i cant use the top ones i thought id add two more to the bottom just because. i only had a small piece of square aluminium so i made it round and welded them on. 3the new intercooler sits about 30mm higher than the old one too so thats a good. at some point imma make a front air dam for this thing. 2021-09-25_06-12-31 by sheepers, on Flickr 2021-09-25_06-11-50 by sheepers, on Flickr 2021-09-25_06-11-58 by sheepers, on Flickr 2021-09-26_05-10-21 by sheepers, on Flickr 2021-09-26_05-10-43 by sheepers, on Flickr 2021-09-25_06-12-12 by sheepers, on Flickr 2021-09-26_05-10-37 by sheepers, on Flickr24 points
-
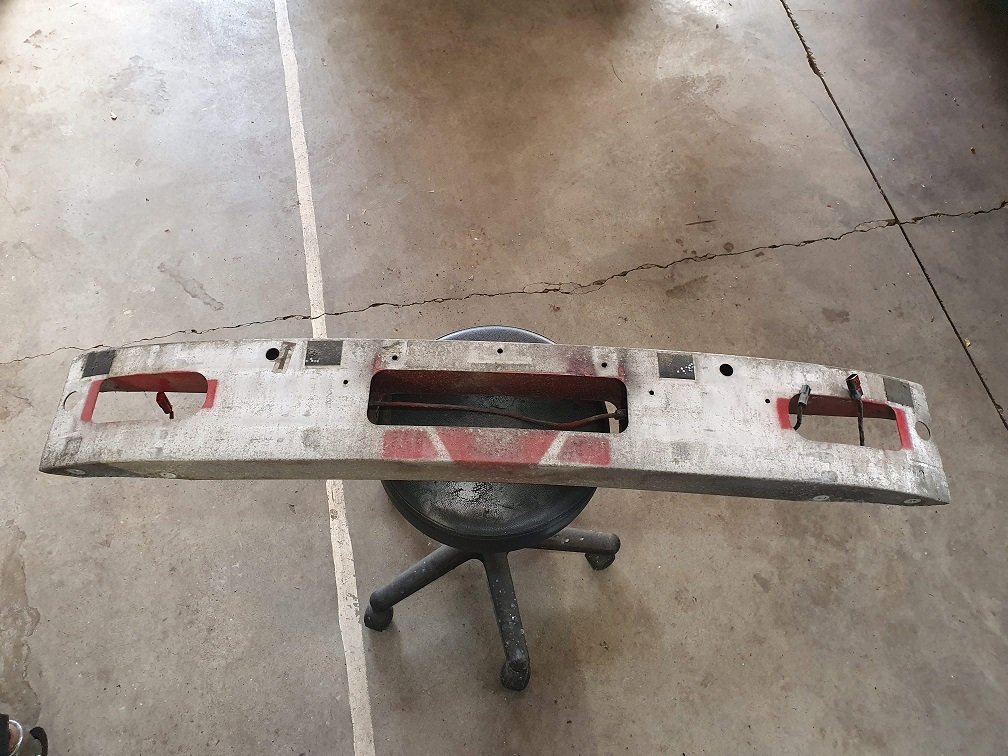
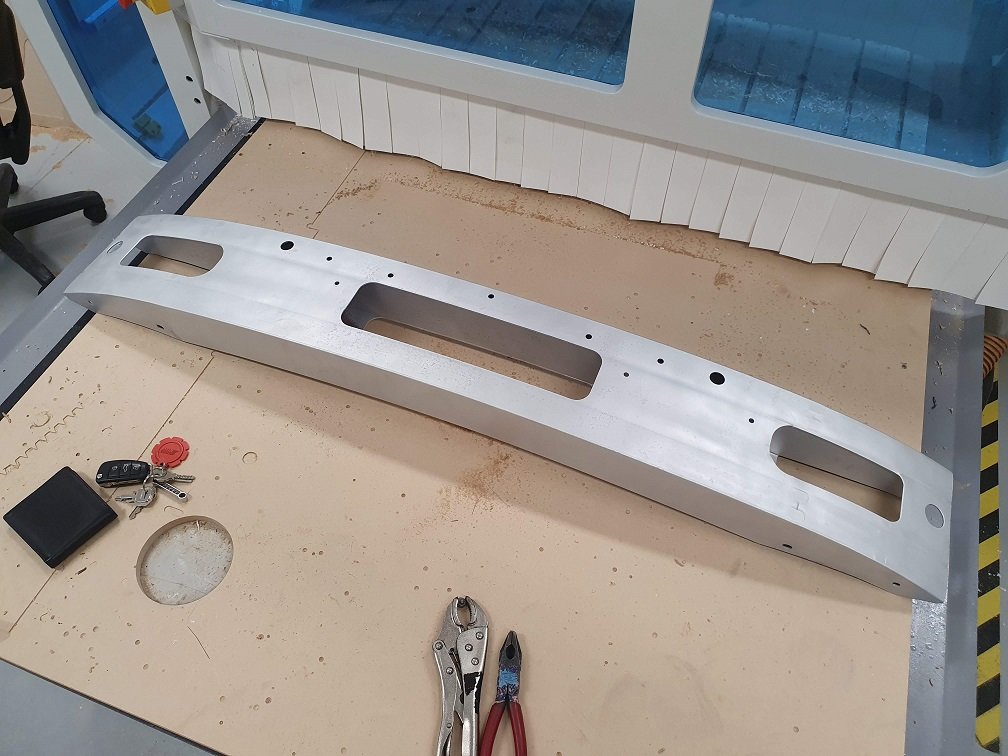
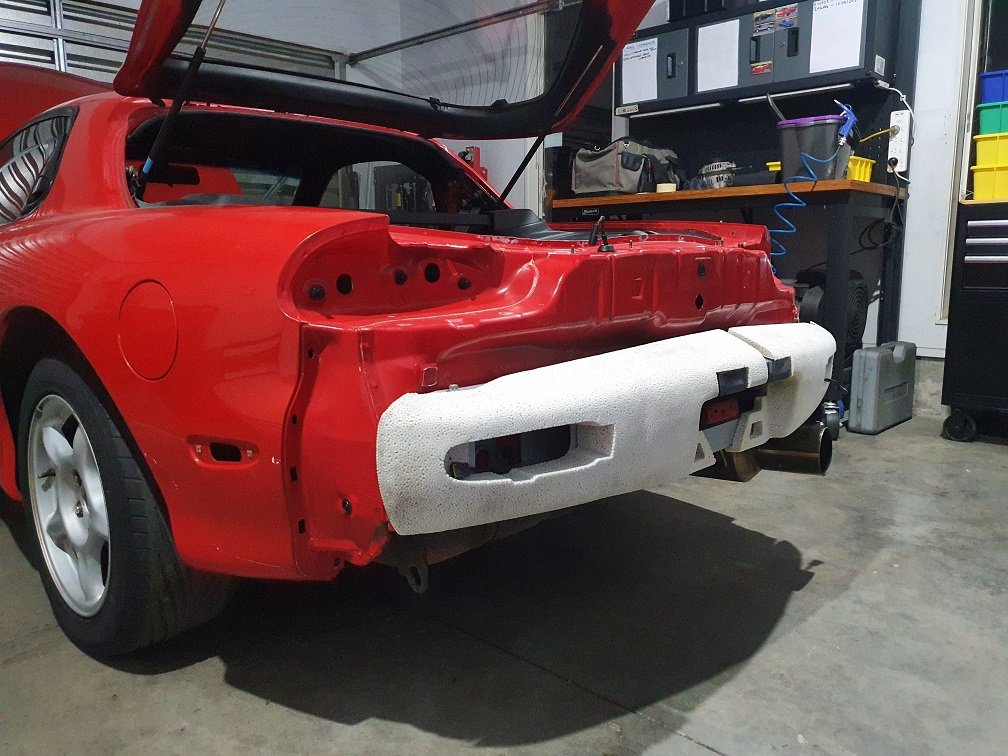
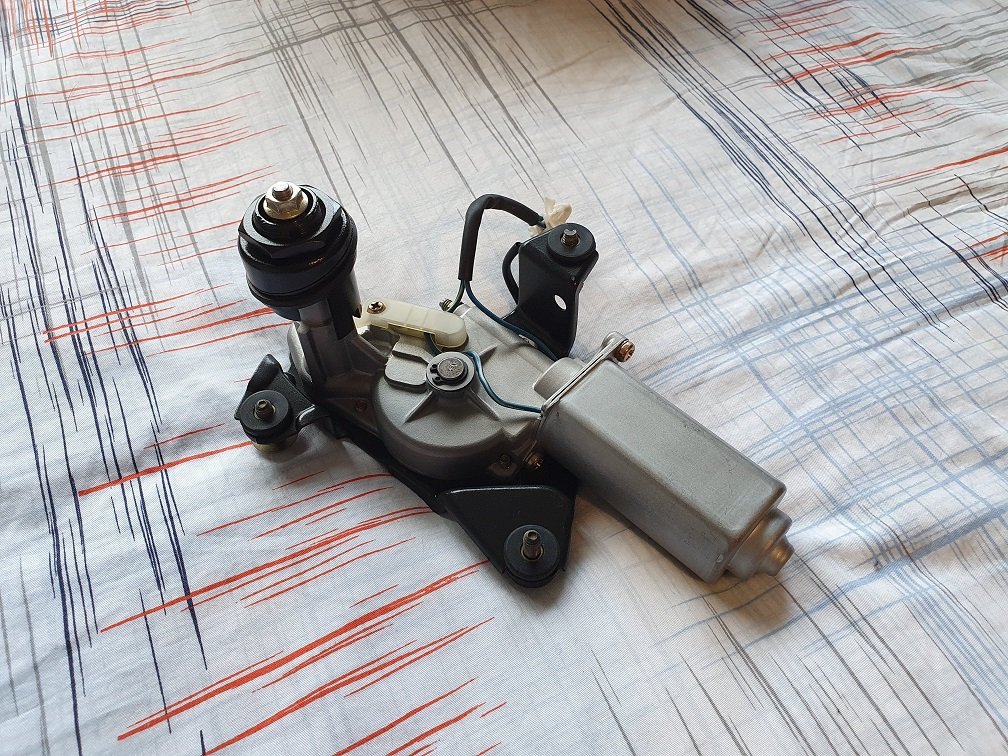
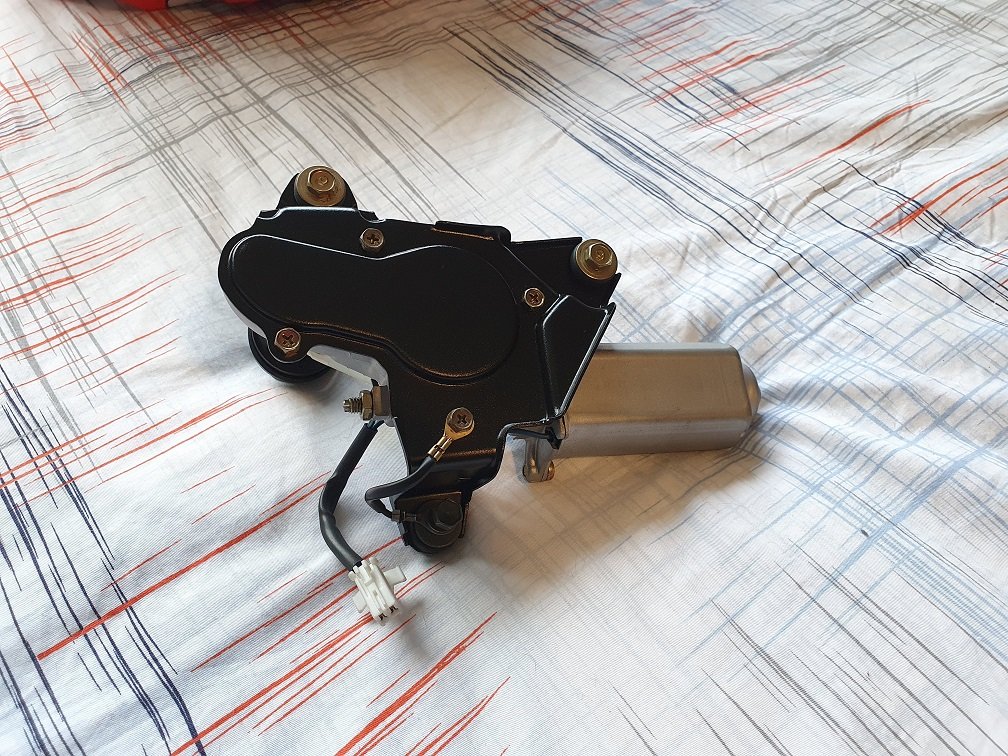
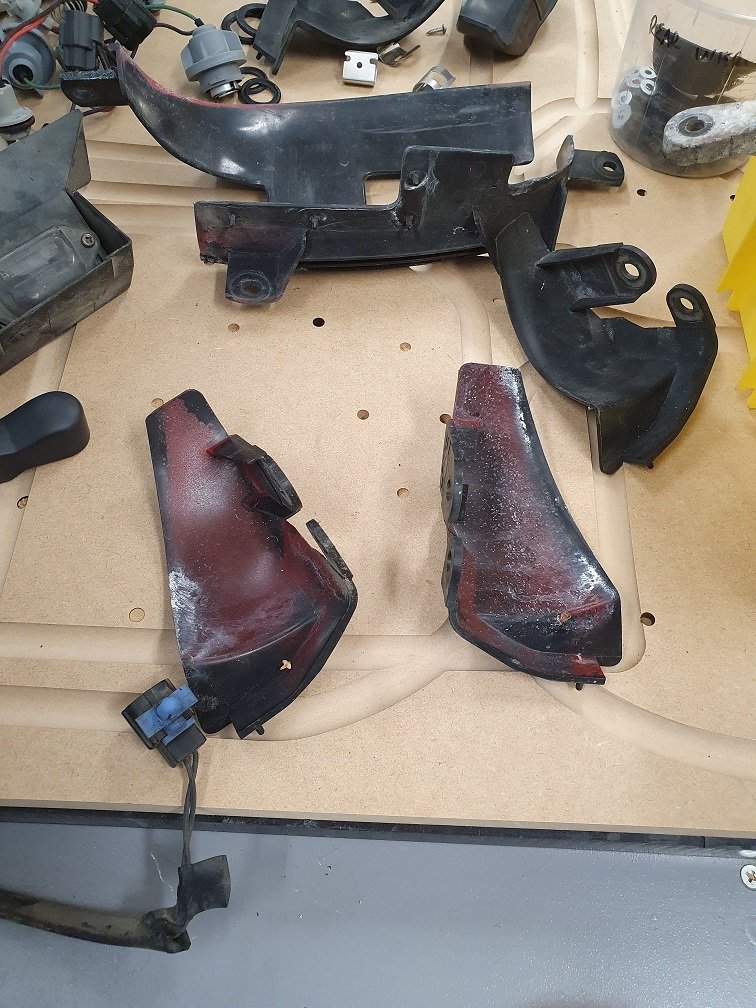
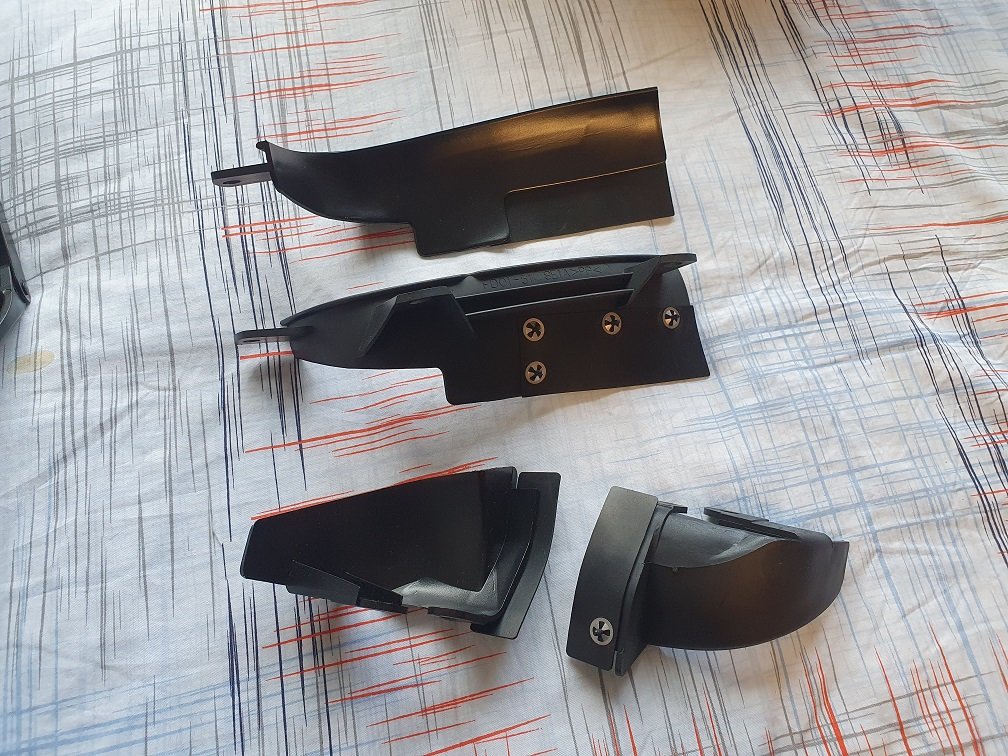
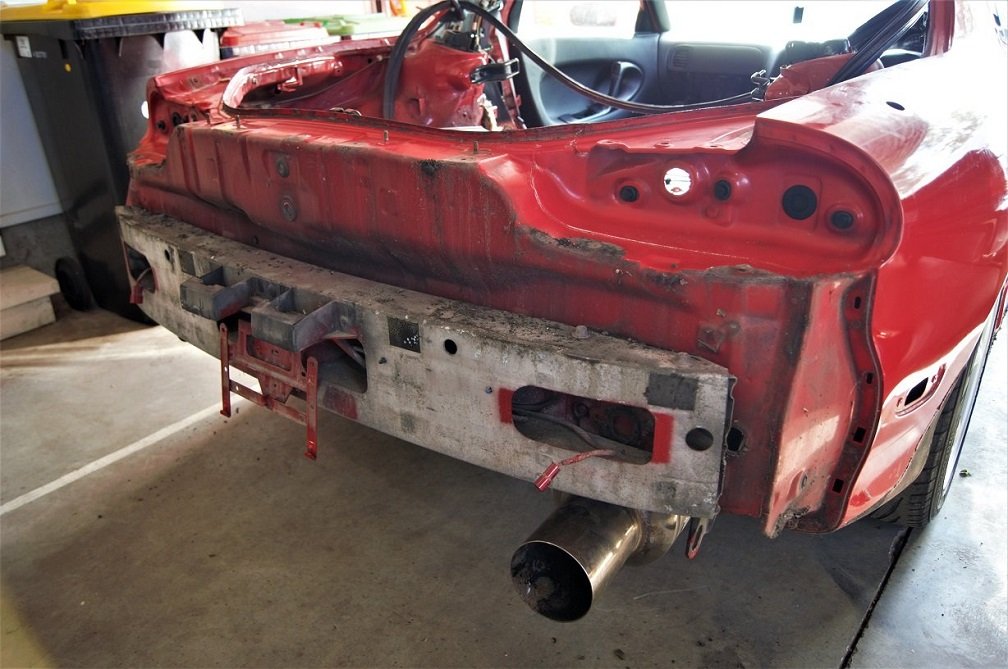
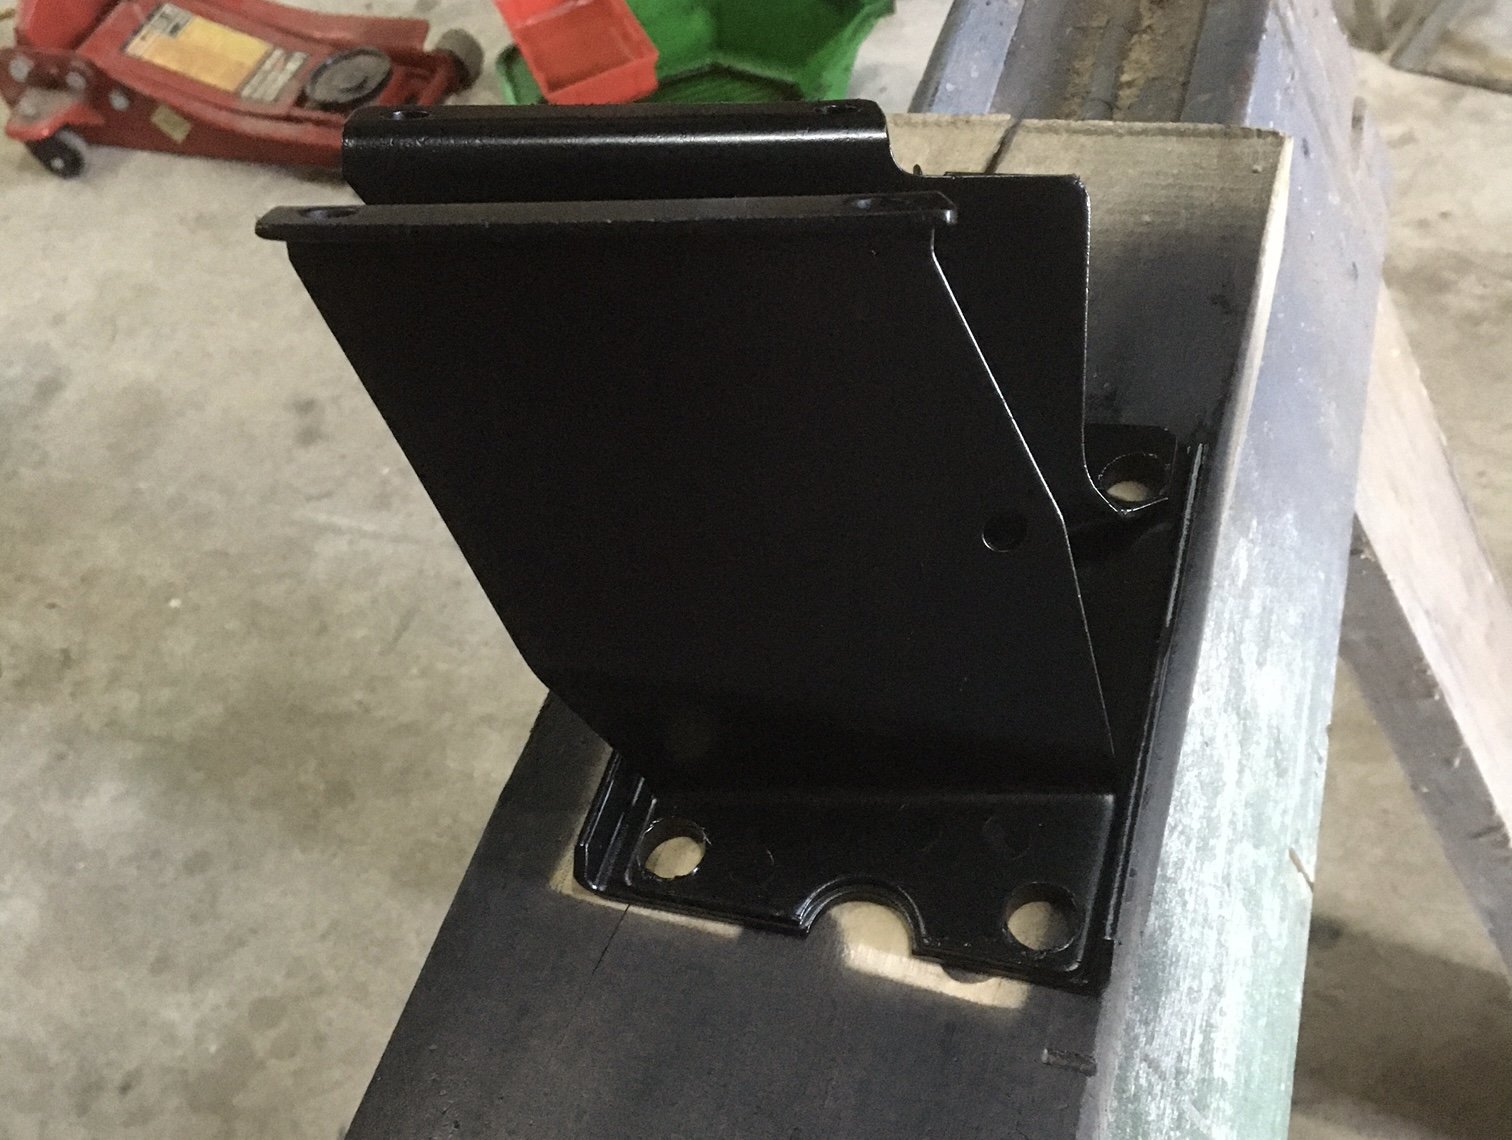
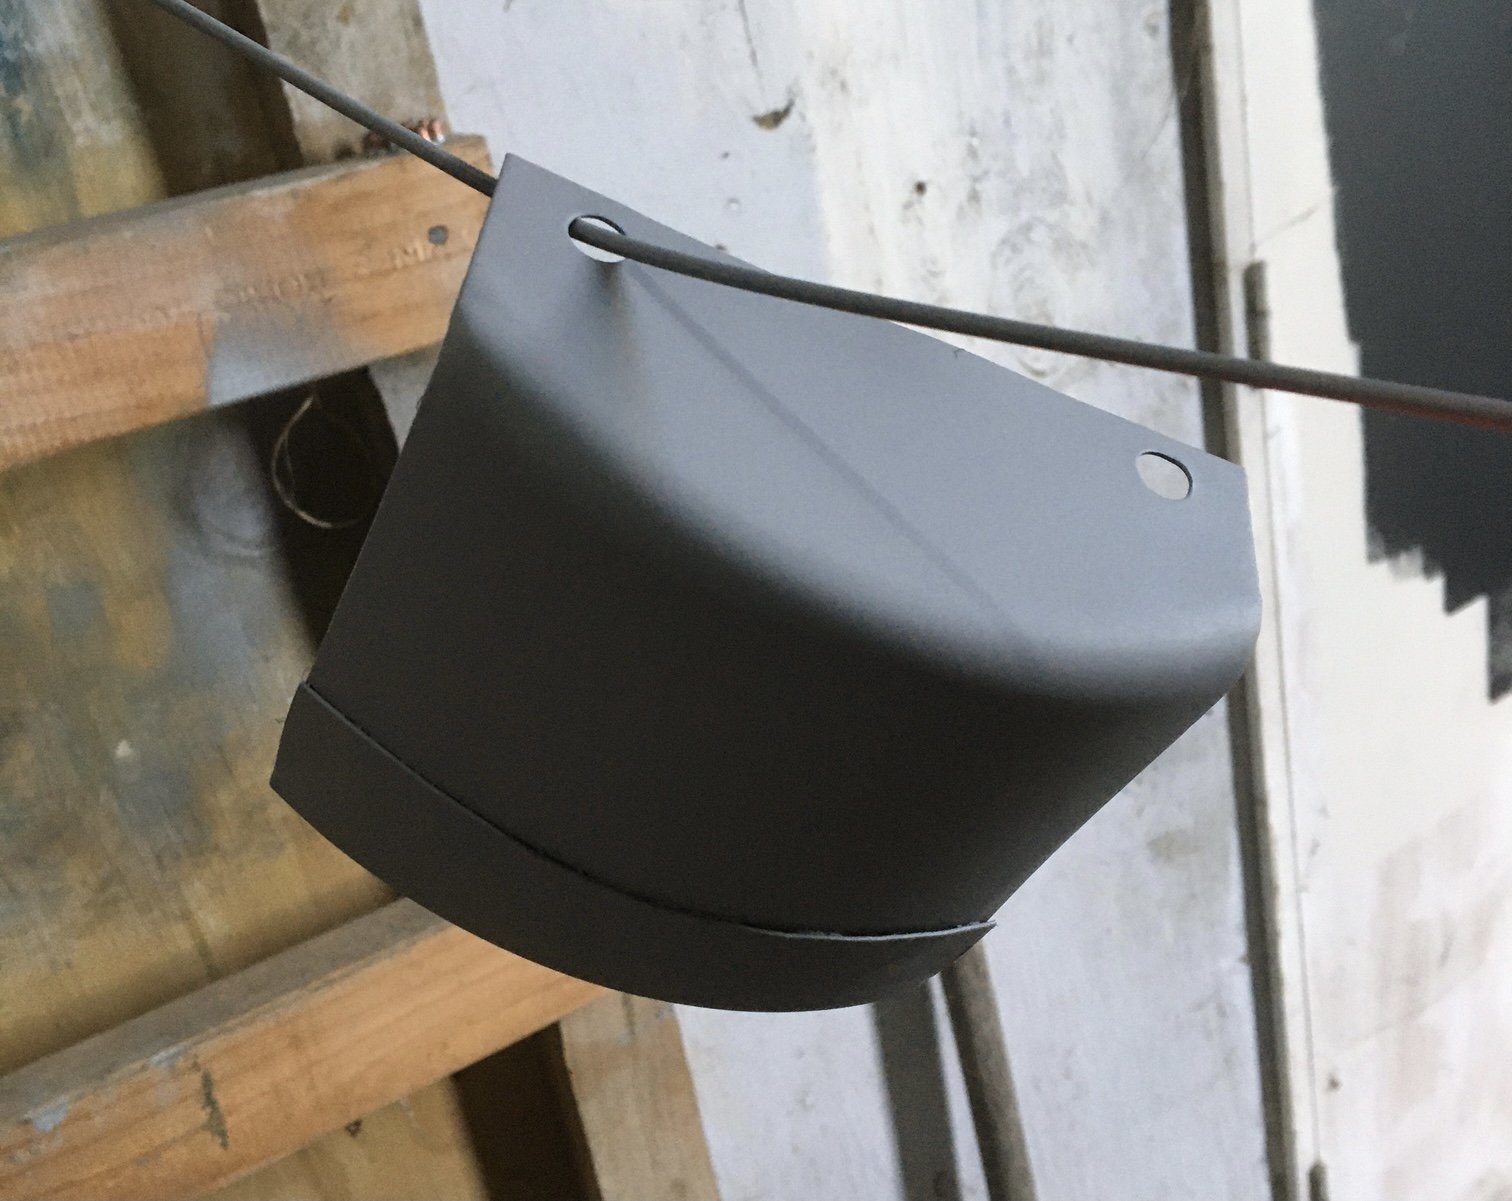
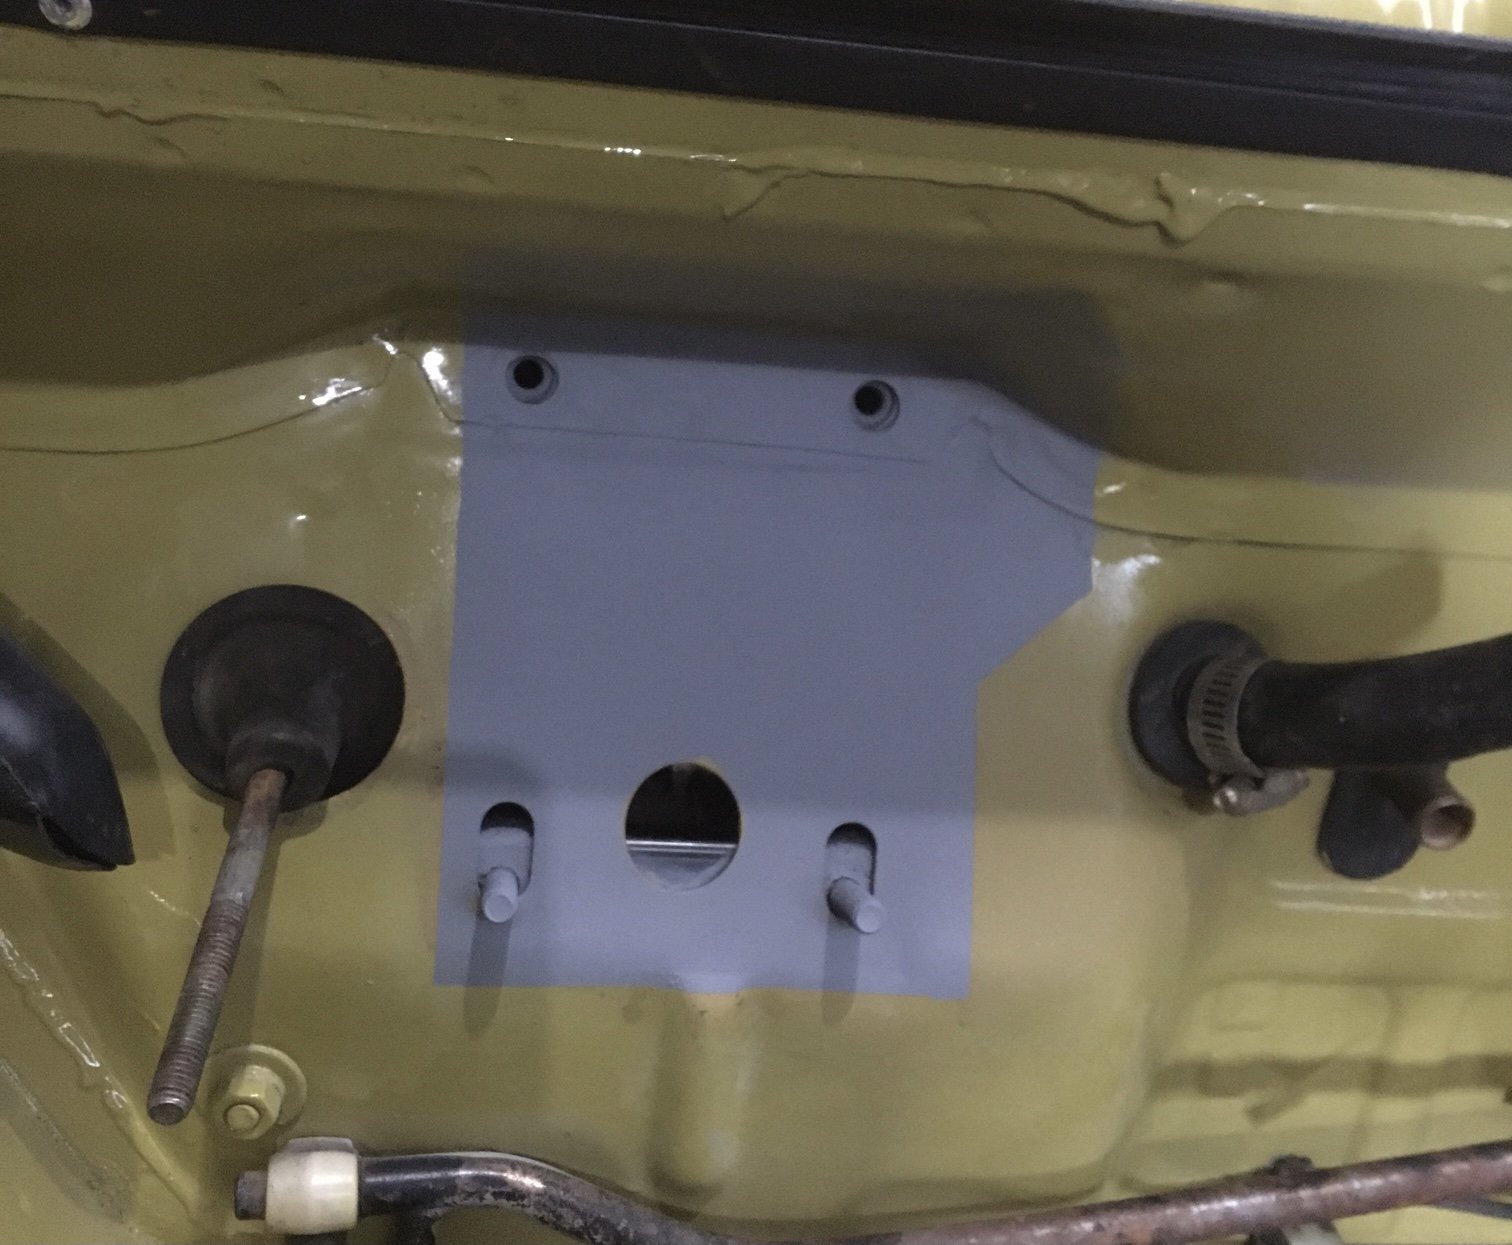
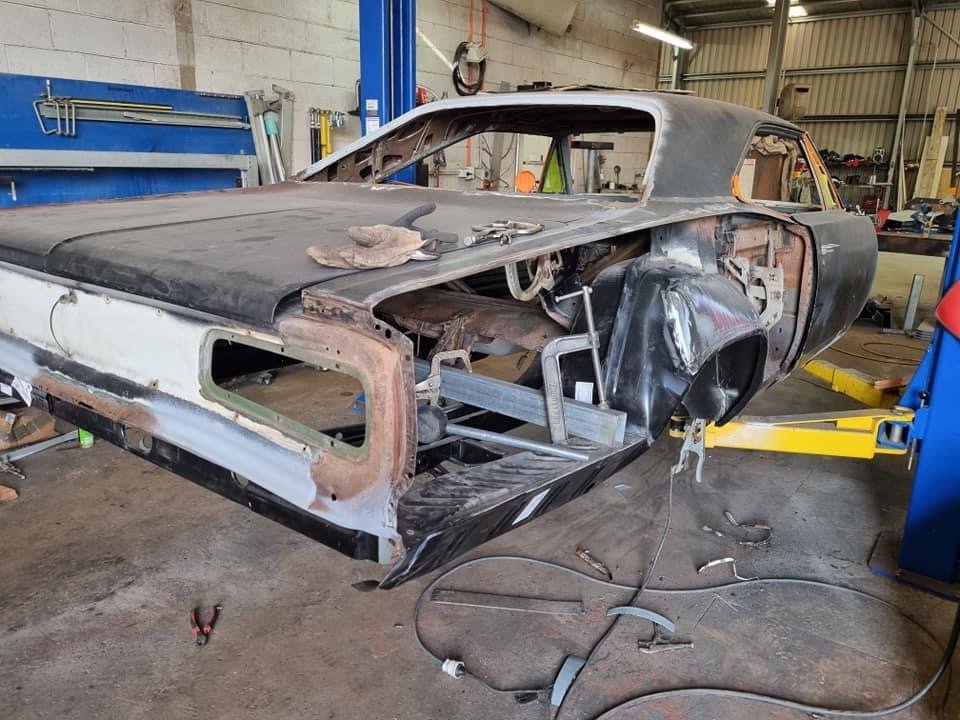
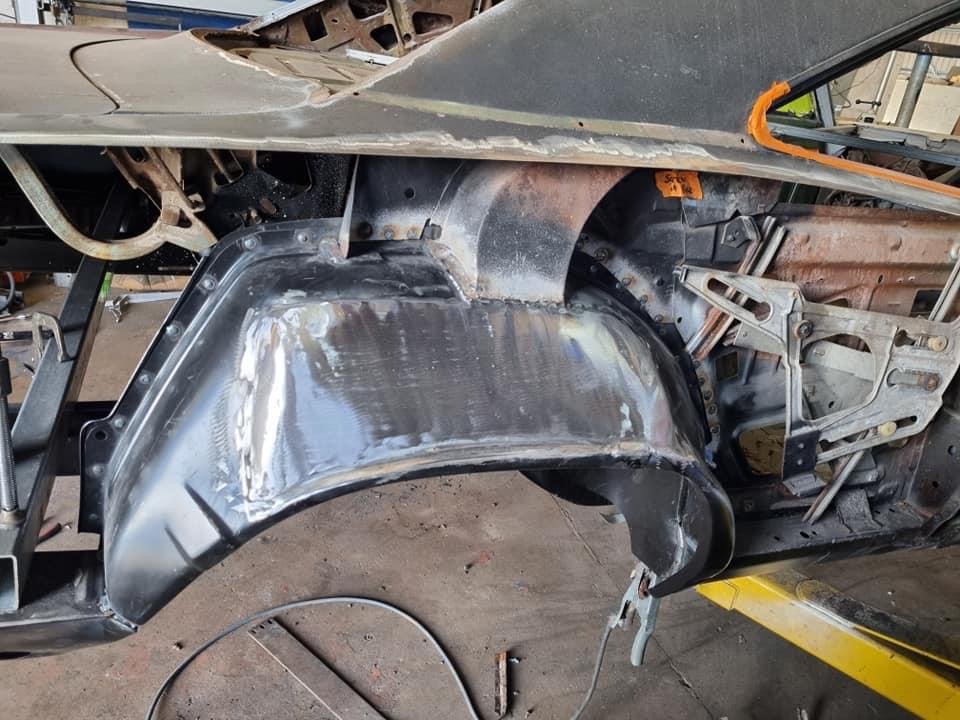
Have had a heap of work on over the last couple of months, so really haven't managed to get much done on the car. That contract winds up soon though, and I might take a break from the side hustle work for a bit and focus on making some progress on this thing. I have managed to find a little time this week to continue on with cleaning up the rear end though. I've also spent time researching and purchasing heaps of parts I know I'm going to need down the line. Had quite a bit of FOMO about stuff going out of stock and becoming NLA, so I've now got pretty much every single exterior rubber trim piece sitting in the closet for when it gets painted in a couple of years time. Wasn't cheap, the local Mazda dealer loves me, hah. I've got everything planned and ordered for the new EM harness, it's the last major piece missing that would make it a runner. I've been waiting 2 months for connector bodies and pins though, and the tracking is stalled in China, so I'm losing a bit of hope there, might have to reorder. I've never had anything not show up from Aliexpress, but a couple of times its taken 6+ months :-(. I'll eventually run an aftermarket ECU in this thing (Have a Link Fury sitting on the shelf gathering dust), but I'll build the harness to mostly factory spec (although much better materials) with a couple of additions for WB02 integration, and anything else I think of. Then I'll just make up adaptor headers if I want to change to another ECU down the track. I've got an original S6 ECU to get it up and running on, and a Power FC there also, so lots of options. Gotta say, I've never seen overspray like this thing has. It's everywhere and bloody ridiculous. The vapor blaster at work has been getting a work out this week! This is what it the rear looked like originally. A lot of the overspray is clearcoat that has dust and shit all through it. Terrible grainy texture and makes everything look permanently dirty. After some attention in the blaster though, looks much more betterer. I dismantled all the wiring too, cleaned, blaster and rewrapped it. Looks factory fresh now. Also the the impact foam, as it was basically black with a reddish tinge. Looking much tidier, you know for something you'll never see. In with my latest order from Mazda were the rear bumper brackets that had rusted into oblivion. One day soon I'll reassemble that and get the bumper skin back on there. I've been in contact with Racing Beat about their twin tip muffler, as it's the only muffler I want on this thing, and they're currently out of stock of the center section (which I also need). They said to check back later in the year. It'll be spendy to get it over here, but ultimately worth it I think as I'll never have to worry about an exhaust again. I sourced a replacement rear spoiler for this, another stock S6 one as I really like them. The one that was on there was cracked, and had been glued on with some terrible bathroom caulking like shit. I had to smash it to remove it, as it was the only way I could think of without risking lots of damage to the boot lid. As it is, the paint on the boot lid suffered, so will get a super dodgy touch up in the meantime. While I had the trunk trim off I chucked some power on the rear wiper motor. It drew lots of current, and was really slow. Popped it out and the was like a ball of rust inside, super gunked up. Blew it totally apart, gave everything in there the big clean, reassembled and now it's like a new one :-). Ready for refitting. While I was in the mood for a couple of little jobs this week, I grabbed some plastic trim pieces from the engine bay. The air guide pieces that go around the headlights were just awful. Red overspray and trapped dirt, with all the rubber pieces attached to them brittle and cracked. Disassembled, cleaned up the plastics and painted them with CRC Black Zinc, as I find it adheres really well to PP plastic as long as you do light coats, and gives a nice OEM looking finish. I scanned the remains of the rubber pieces, cad'd templates and laser cut some new ones out of some rubber sheet of a similar thickness, then put them all back together after tuning up the speed nuts a little so they would grip again. Also ready for refitting. While satisfying, none of these little jobs do anything to get the thing closer to running or driving! Really need that order of connectors to show up! Might have to bite the bullet and reorder from another supplier. If these ones show up later, I can always make another harness and sell it I suppose. Will be back into hiatus on this for the next couple of months while I 100% finish up this contract, then make some more progress over the Christmas break I hope.
15 points
-
Man, making fuel lines sucks heavily! Was ok in the vice for a start, but vice is a metre away from everything in the shed and there’s like 5 metres of line.. cable ties and clamps as I went helped a bit.. At least the brake lines are copper-nickel and much easier to manipulate (he says, having not made them yet..) Also got the hood skin goo’d to the frame and spot welded back together. Used Bostic and it was fucking awesome! I quickly buffed and painted the throttle linkages, hood latch and a fuel tank vapour breather this arvo too, have some clips soaking in vinegar.
11 points
-
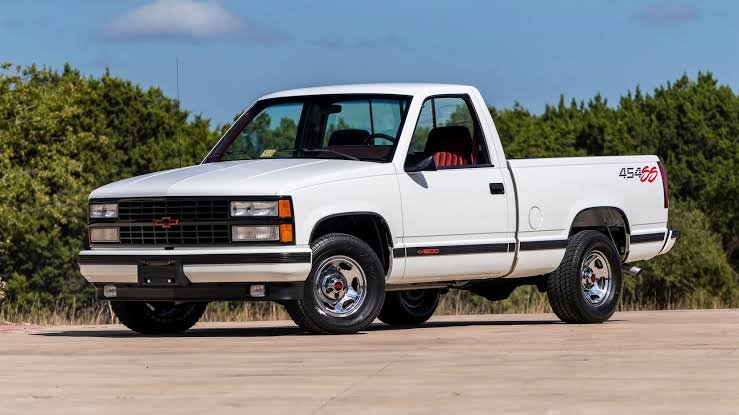
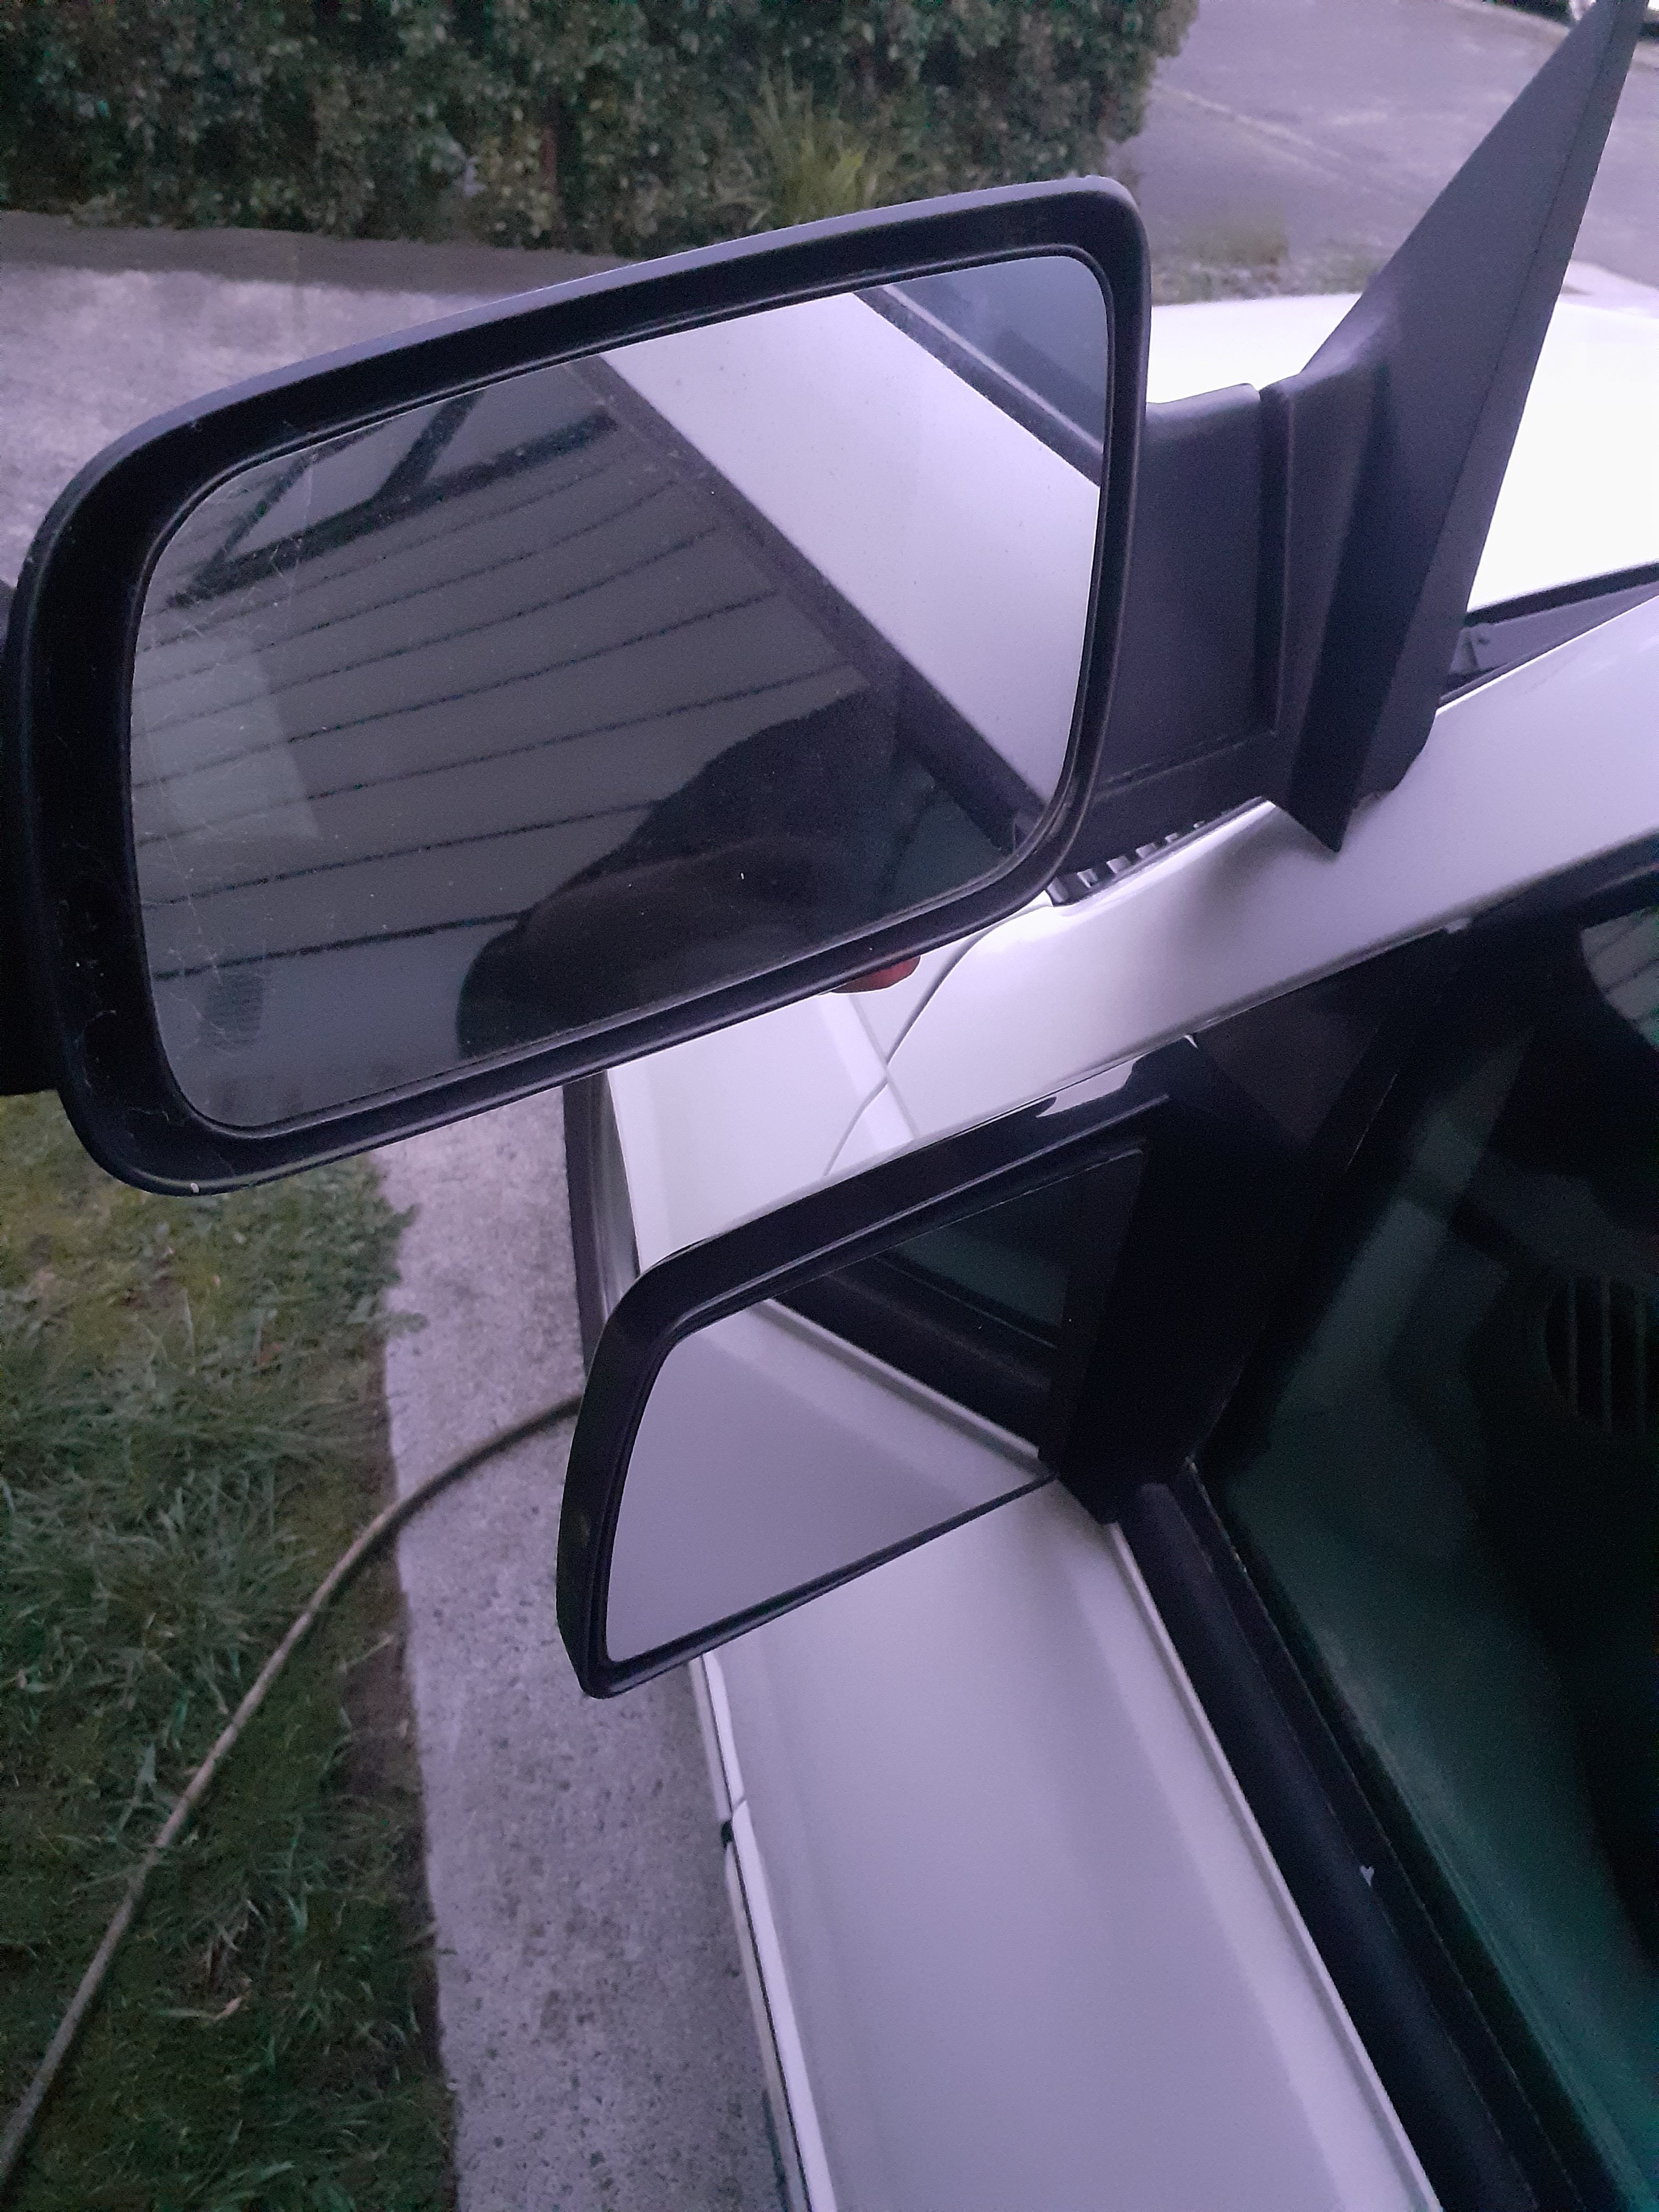
I got some different mirrors. These are "sport" mirrors. They were standard on 454SS trucks , with the powerful bathurst winning two hundred and thirty horsepower 7.4 litre engine coupled to a 3 speed automatic transmission. These were well known as being extremely fuel efficient, Toyota copied the fuel injection system for the first gen prius and were not able to get the same economy on petrol as the SS I have a theory that the SS's incredibly low fuel consumption is because of the small mirrors so I'm expecting to get a result where my 350 actually makes petrol go back into the tank. Also now I can't see behind me as good but I don't care because I'm not living in the past maaaaan
10 points
-
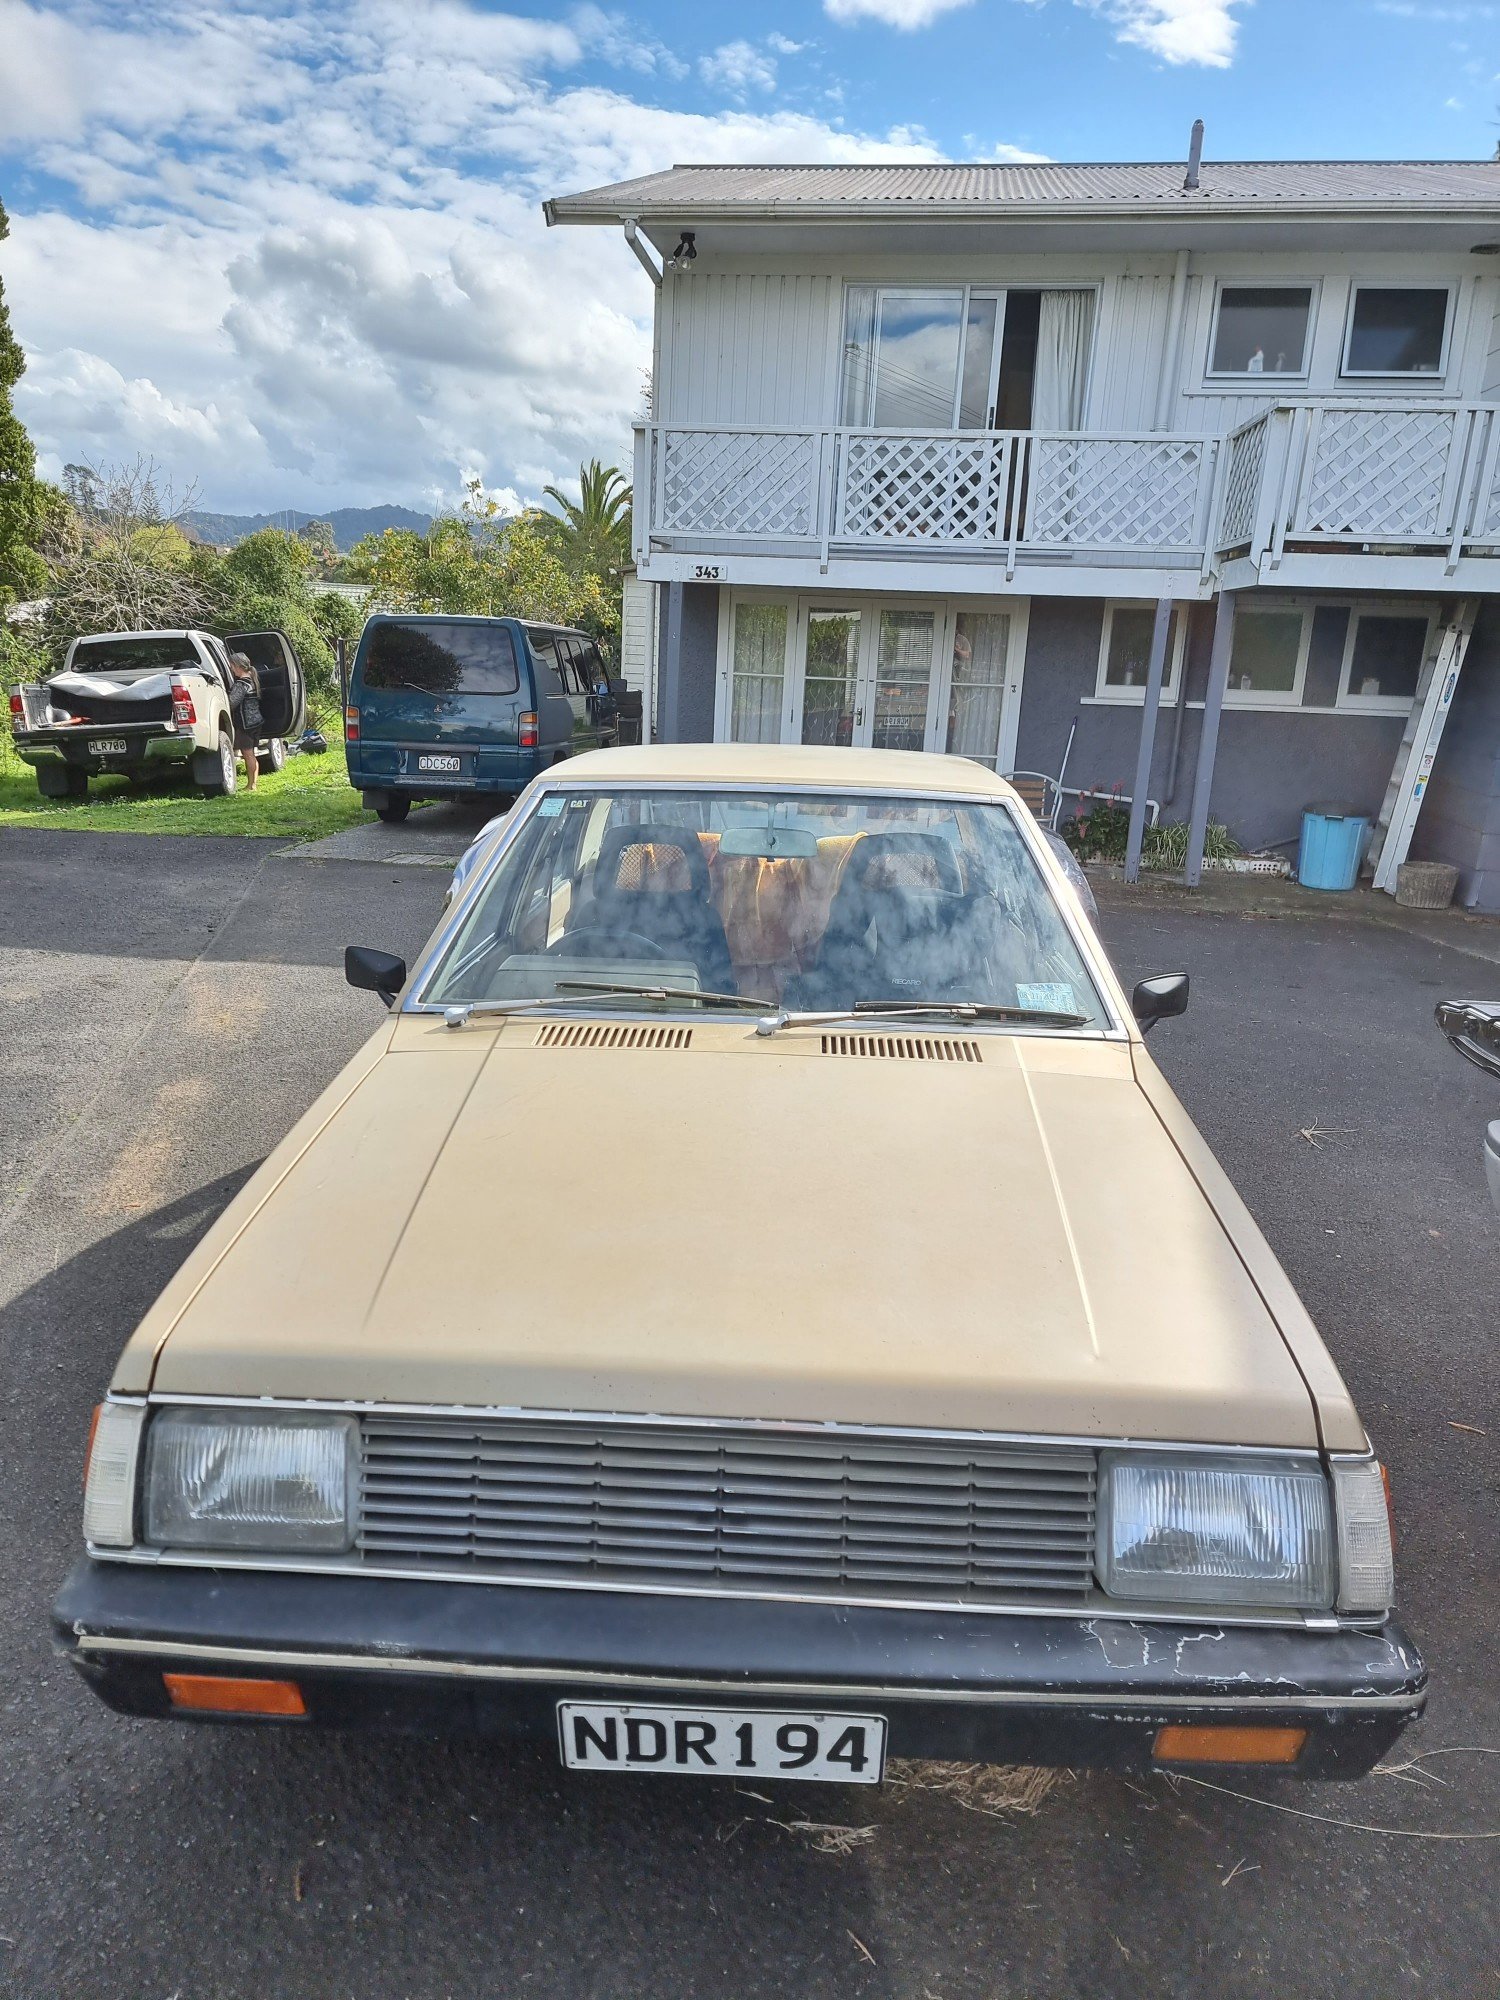
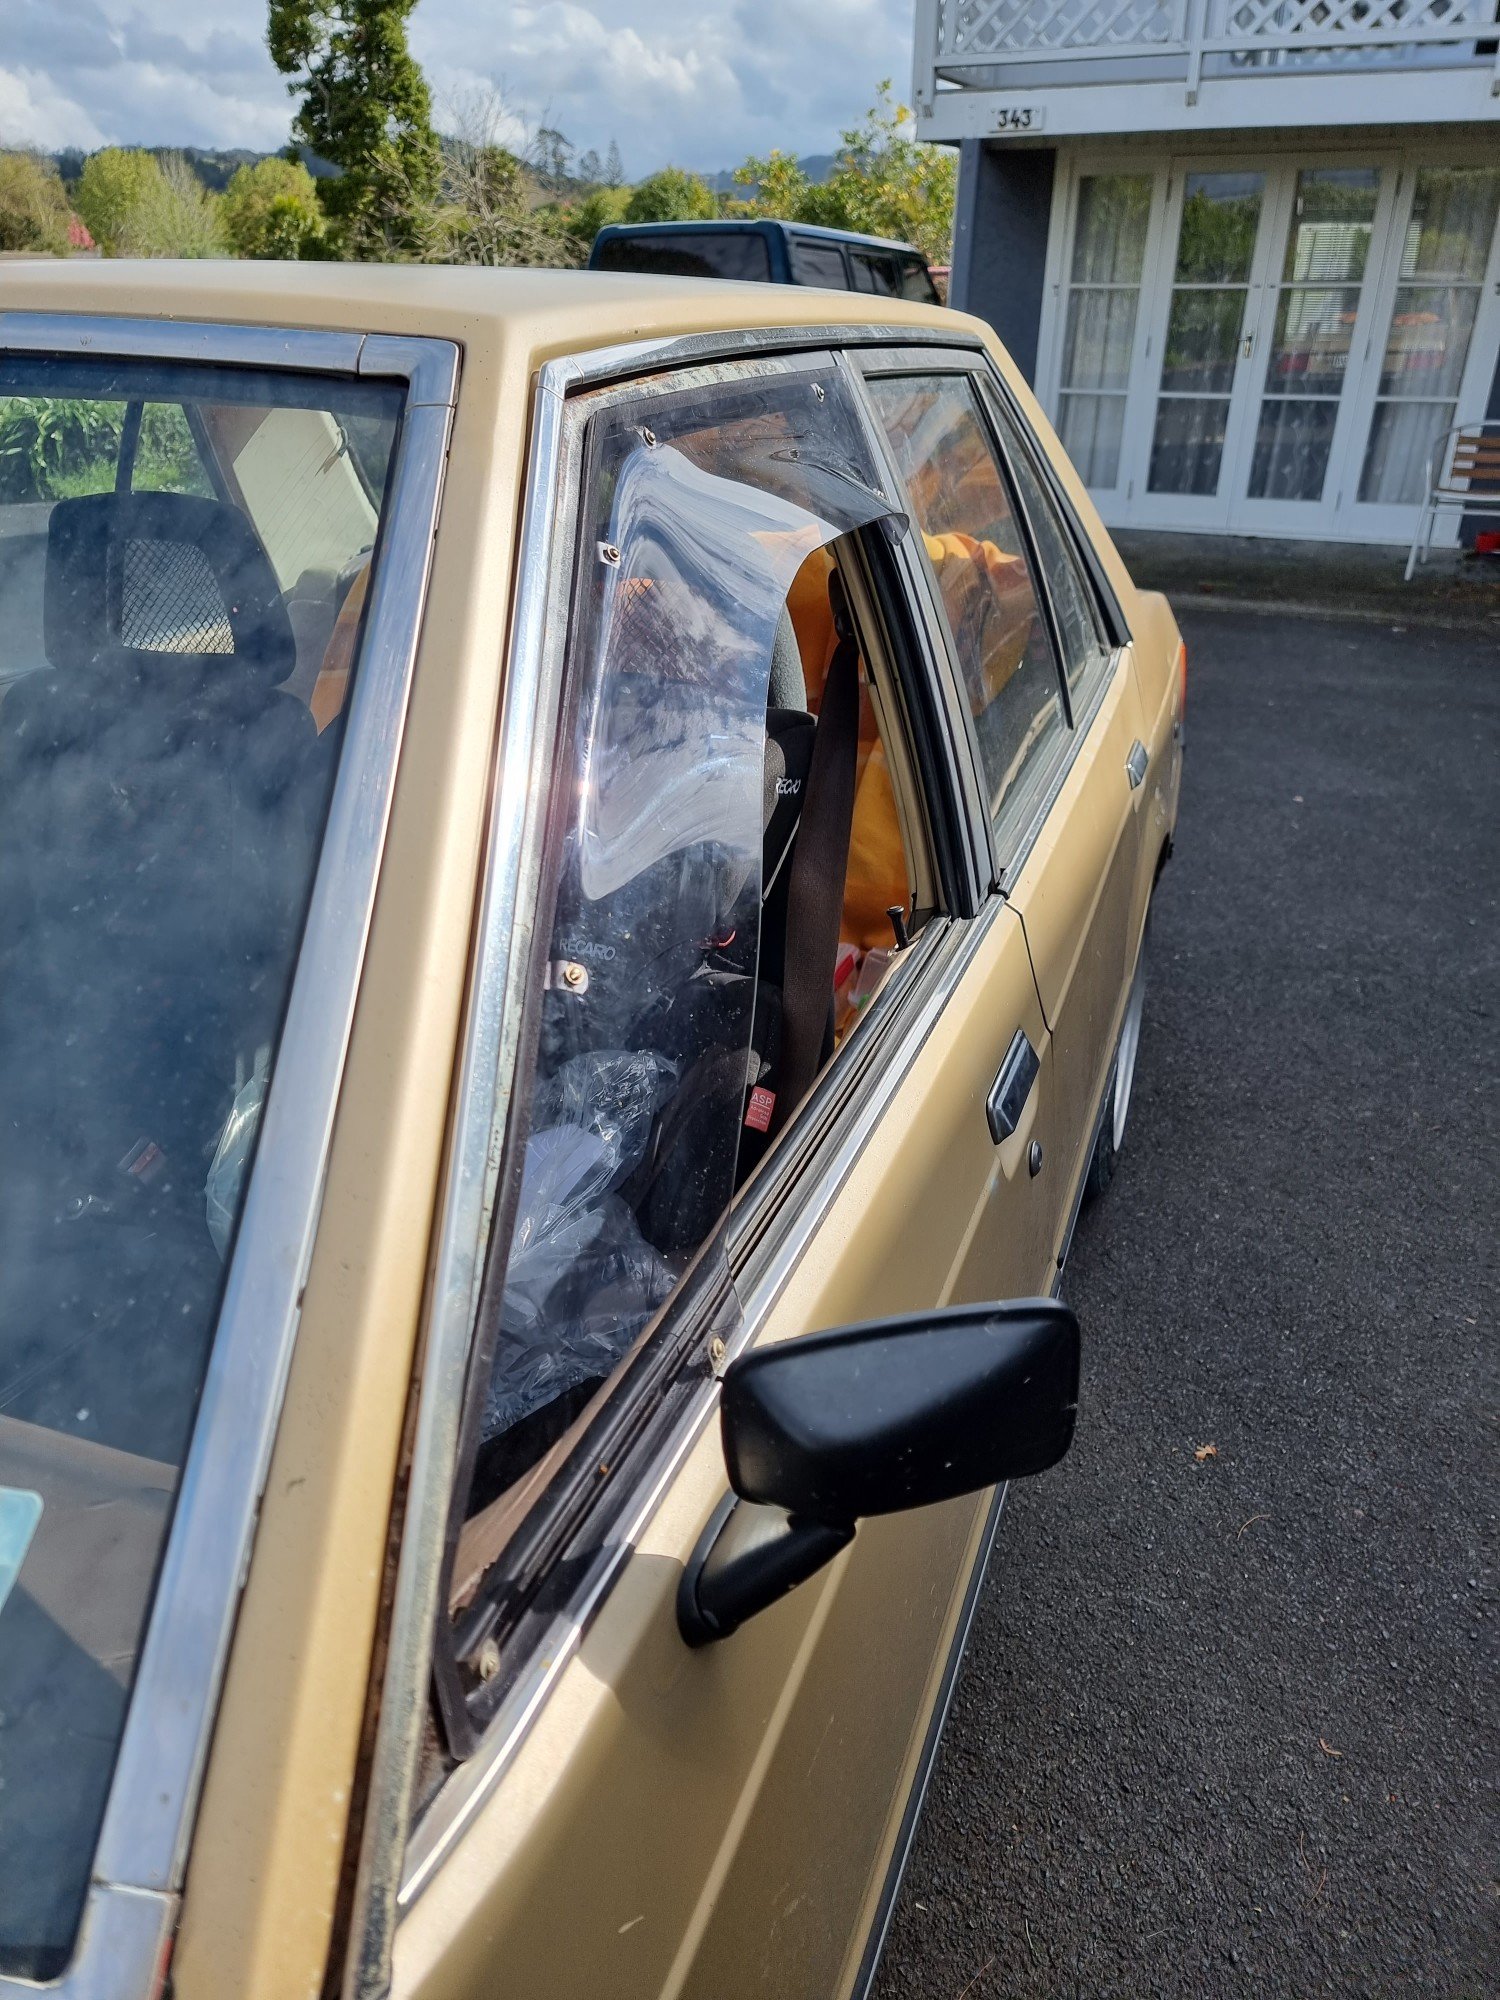
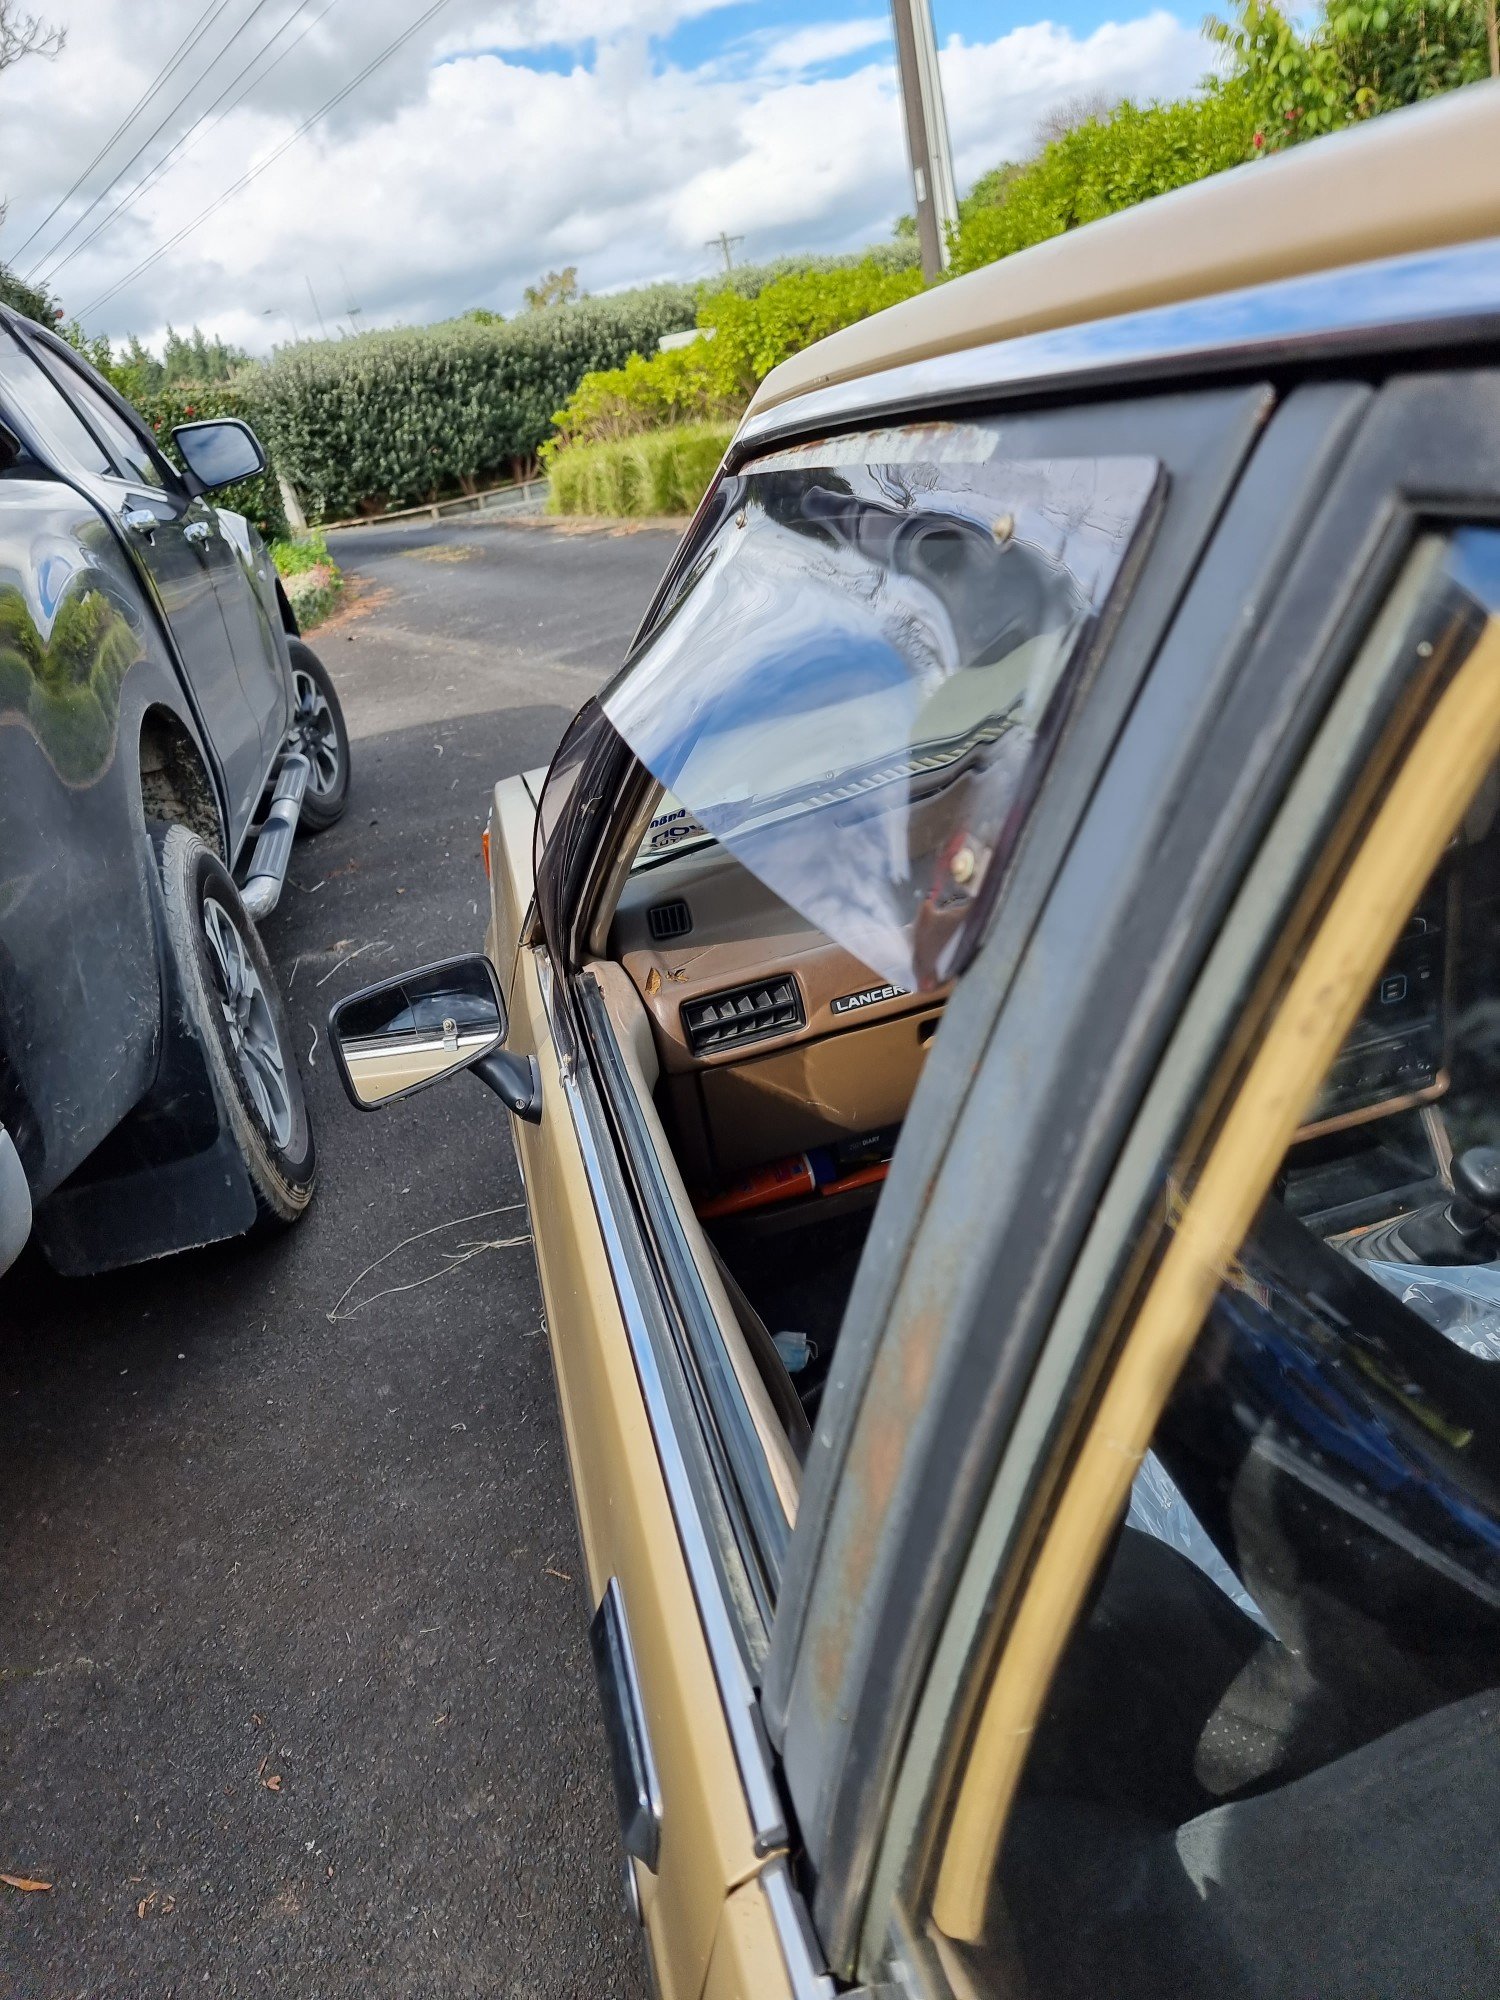
Scored some monsoon clips of this extremely tidy one lady owner l200 my mate has in their padock. So now I could finally fit my passengers side monsoon to the lancer, these are the finer things in life for sure!
8 points
-
There shouldnt be any hate, that shit is cool. I have been pondering EV converting my townace ute for my next major project. Here is one i looked at a wee while ago, boy has done a super nice job.8 points
-
Well, that didn't take long. I knew I was on borrowed time with the gearbox but didn't expect it would come around this quickly. So, I had the new tyres fitted yesterday (Yoko AD08r in the correct Turbo size), fiddled with the old brake light switch (since the replacement is AWOL) to stop the brake lights from being on all the time, and then went out to bed the new brakes in. The car was running great, it ran smoothly and was responsive. The brakes have good feel, with no shudder and the gearbox was shifting great. A few hard stops and a KM or two later I pulled over to check the wheel nut torque (not going to take the risk of not checking them after a brake job again, after the wheels nearly coming off on the Corolla). Of course, the wheels were fine, so I pull back onto the road, gave it a bit of throttle, the turbo spins up, boost comes in and then suddenly It just free revs. It felt like it popped out of gear, so I clutch in, into neutral, into second, let the clutch out, and nothing, just revs. Oh no. I roll to a stop at the side of the road and try a few more gears, nothing, I can let the clutch out with it in gear and nothing happens, doesn't even stall. I can push the car forward when it's in reverse, which is not good. I fire off a quick text to let my Wife know I might be a while and call AA to arrange a tow. "Yes, I am about 1.6KM away from home" I confirm with the rep on the phone... At least it looks good, sitting there, waiting. Whilst I waited I took a quick walk back to where I stopped to check the wheel torque A quick sniff test confirmed that was a nice trail of my fresh, rather expensive, Honda MTF gear oil. There was also a small amount under the car where it sat. After a fairly short wait, a friendly chap with a truck arrived winched the old girl aboard and dropped me home again. The Tomcat repaid his help by leaving a large amount of gear oil on the truck bed, and on the road where the car was loaded and unloaded. So what went wrong then? I jacked the front of the car up, confirmed it had no drive to the wheels and slid under to find out why. That'll do it. The shiny bit the arrow is pointing to should be inside the gearbox and shouldn't be visible. It also explains why the gearbox weed everywhere as the seal was wide open without the shaft to seal it. I did some careful levering with a prybar and popped it back into place. I'd be very surprised if this is a new issue... I suspect I'm not the first one to lever that back into the gearbox. Whilst under there I had a good look around. Noticed a couple of minor coolant leaks I will need to attend to, but also noticed this rear engine mount completely missing its nut. I found a new pre-loved nyloc nut that fit, and wound that on nice and tight. Who knows, maybe that will fix some of the movement in the engine. The driveshaft has quite a lot of radial (up and down) play when inserted back into the gearbox, which confirms my suspicions, both about the condition of the box, and why it popped out; the gearbox bearings are stuffed. These gearboxes do not tolerate being neglected, and being over a litre of oil down when I got it, I suspect it's not had a good time. When Rover had these boxes built, they chose to use hi-tech ball bearings with plastic to retain the balls. This probably seemed like a good idea at the time, and they worked well for years, as long as the plastic didn't get old and the gear oil could keep them cool Above is an example of the bearings used in the PG1 gearbox; uprated steel cage bearing on the left and stock plastic cage on the top right. Unfortunately, the bearings Rover used seem to wear badly no matter what (they tend to get pitting in the races and go a bit grindy), but when coupled with low oil and high temps, the plastic can fail, causing the bearings to no longer be sufficiently retained, as per this extreme example where the plastic has broken and the balls have all converged on the lowest point. This sort of damage is what can also break the flange off the diff center. So I suspect mine has either started to break down the plastic, or the races have worn to the point there is excessive play. The popping out drive shaft is the usual giveaway of bearing failure. With the driveshaft back in place, I have drive to the wheels again, so once I refill the gearbox with the cheapest oil I can get, the car will be mobile enough to get out of the garage and into the drive, where it will sit in shame waiting for me to rebuild the gearbox. I will be stripping the gearbox, replacing all the bearings, and oil seals. Uprated metal caged bearings will be used everywhere they are available. Whilst I'm there I will also be doing the clutch. I'm hoping to keep the Type A torsen diff, but I will need to check it's in good condition once the gearbox is split; if not, I will need to increase the budget and add a Quaife to the list. After that, the gearbox should be damn near bulletproof. I was really hoping to get more than a couple of KM (literally, I've done sub-10KM since I got it) out of the car before it seriously broke, but that's the British car game I play. Every day is a gamble.7 points
-
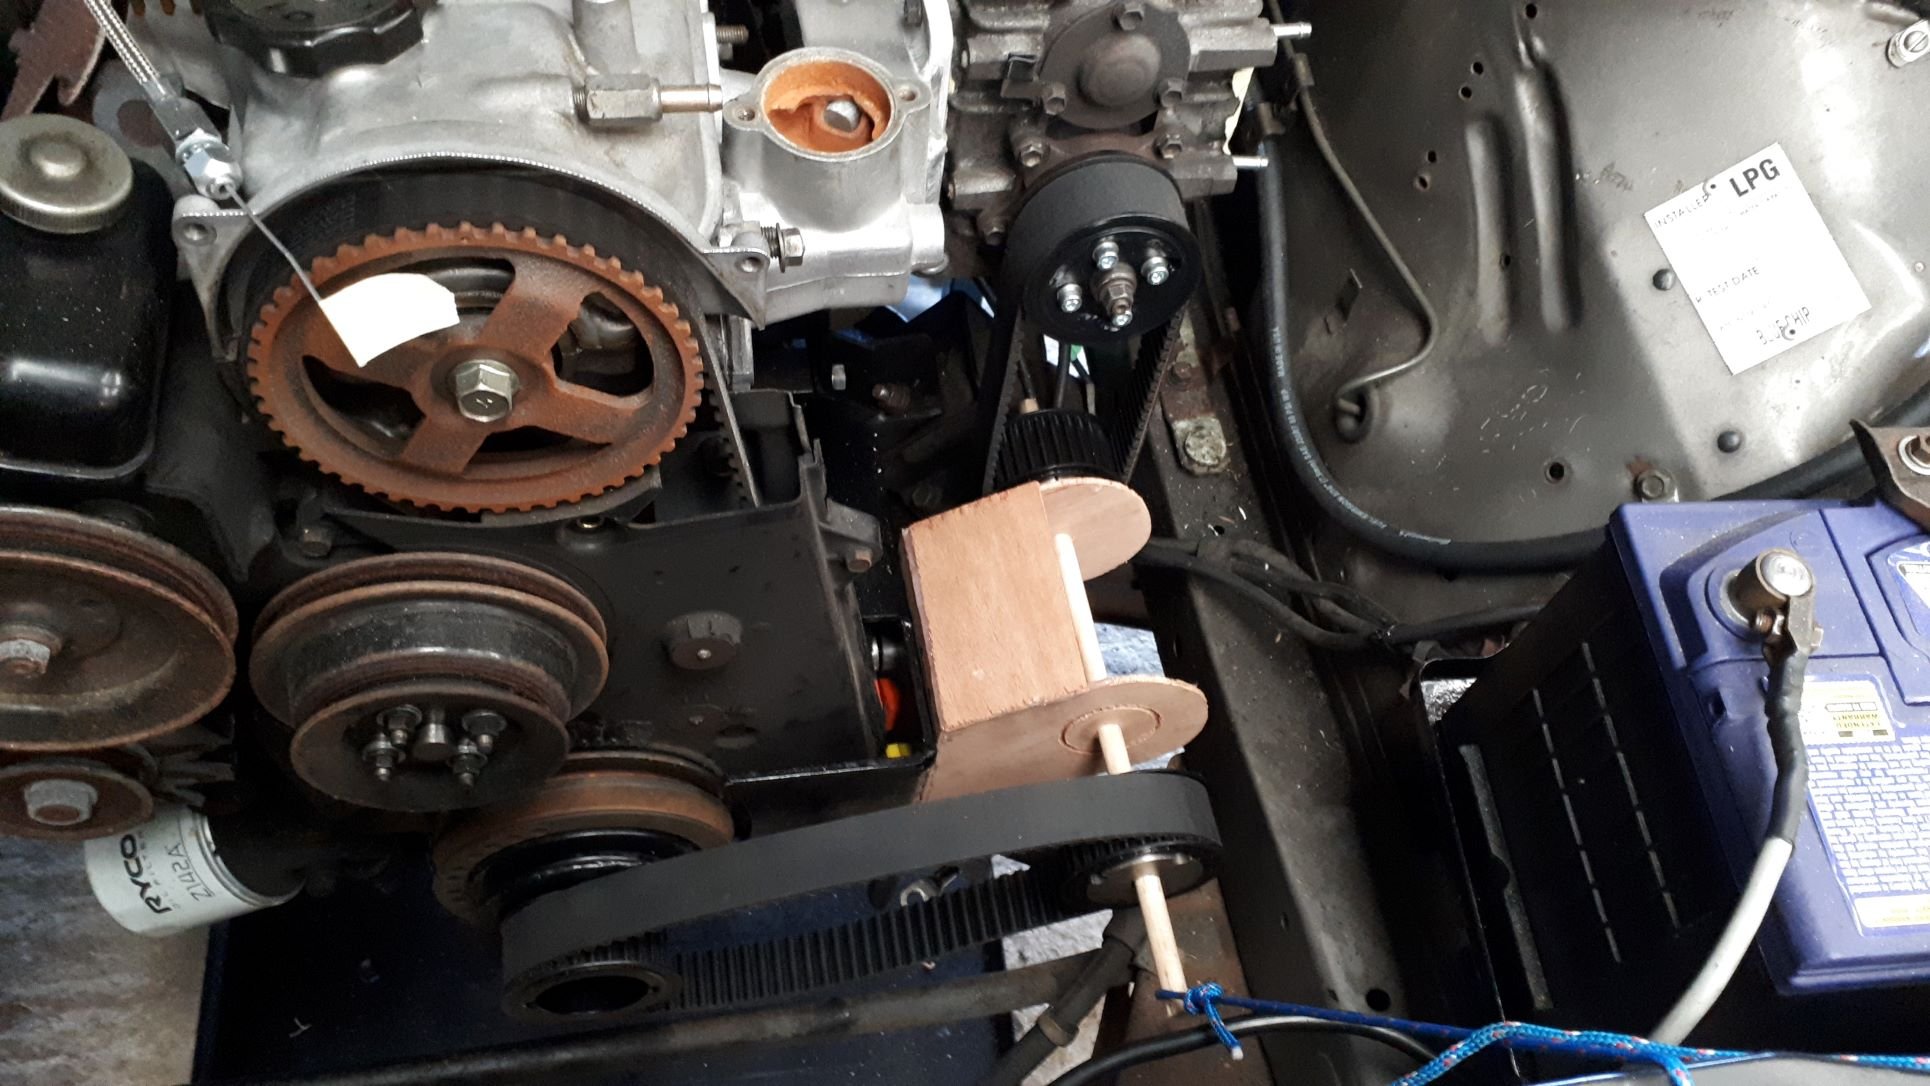
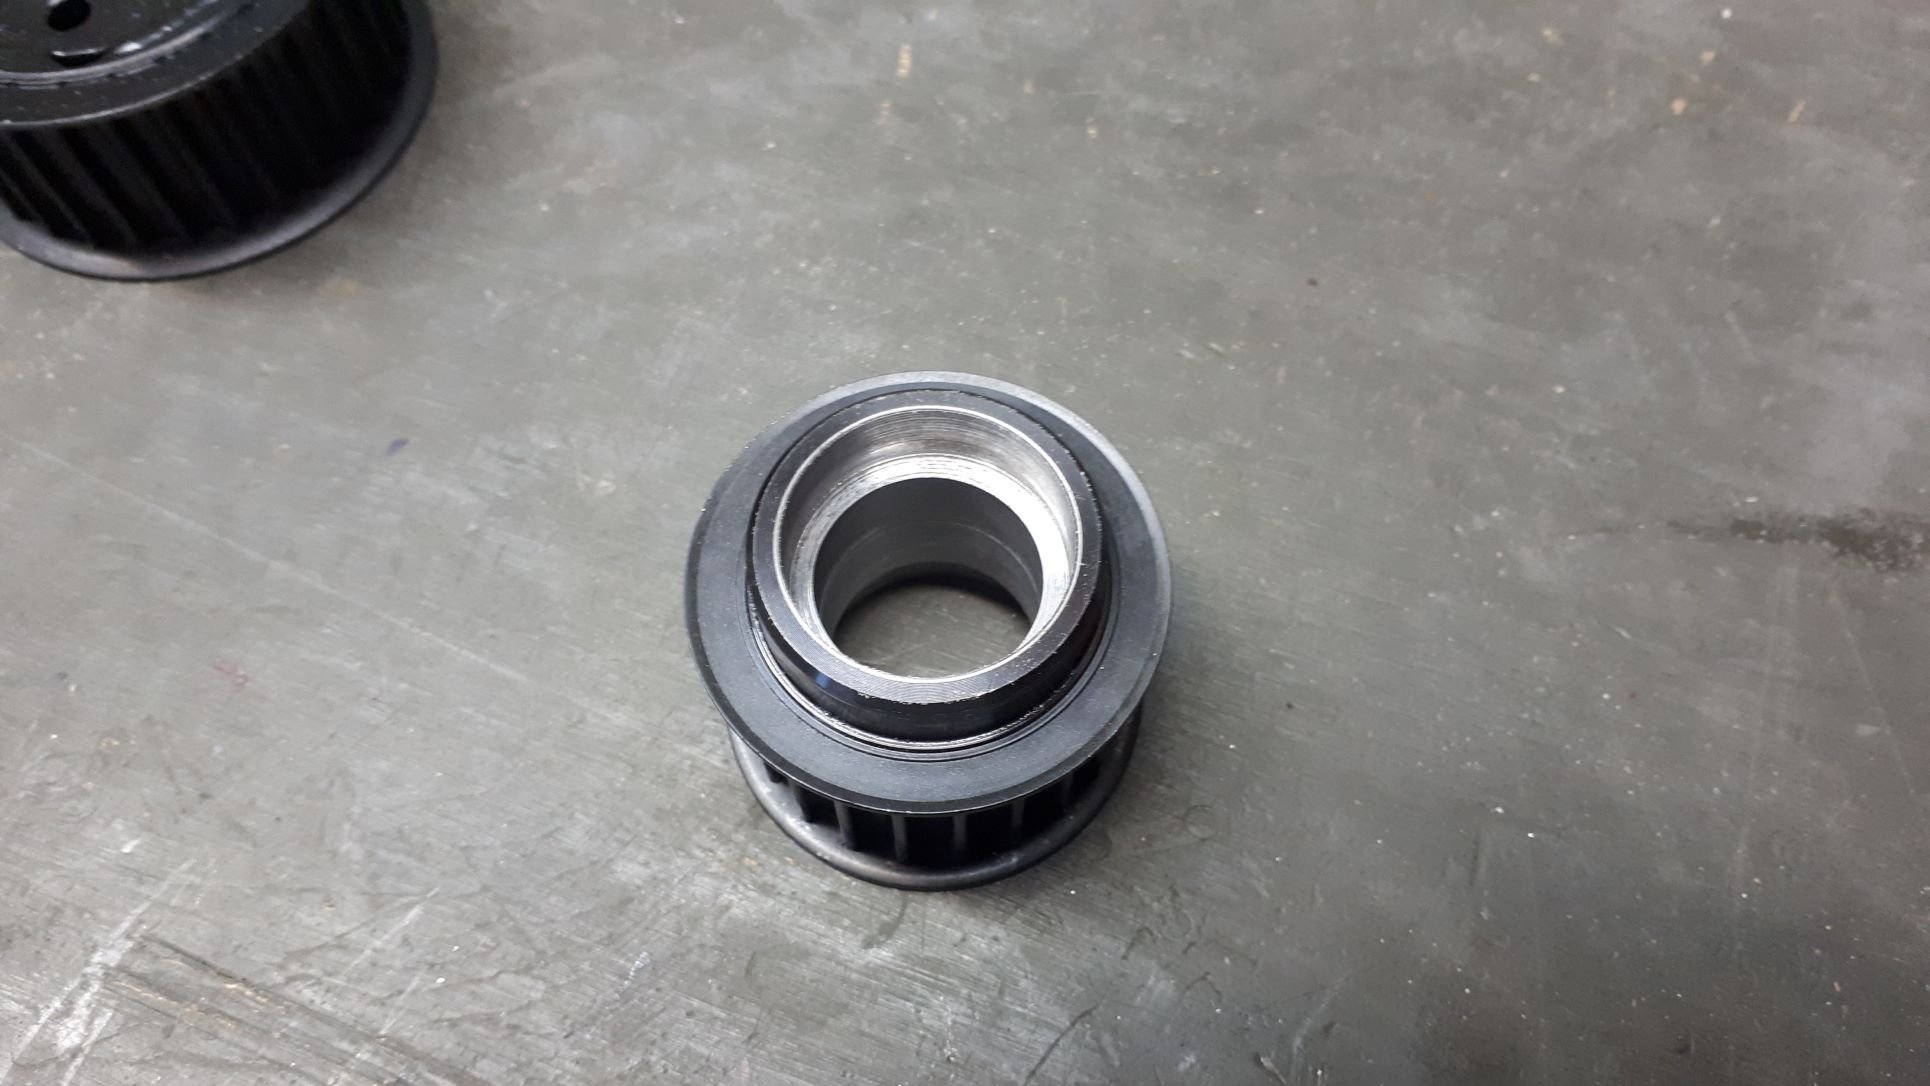
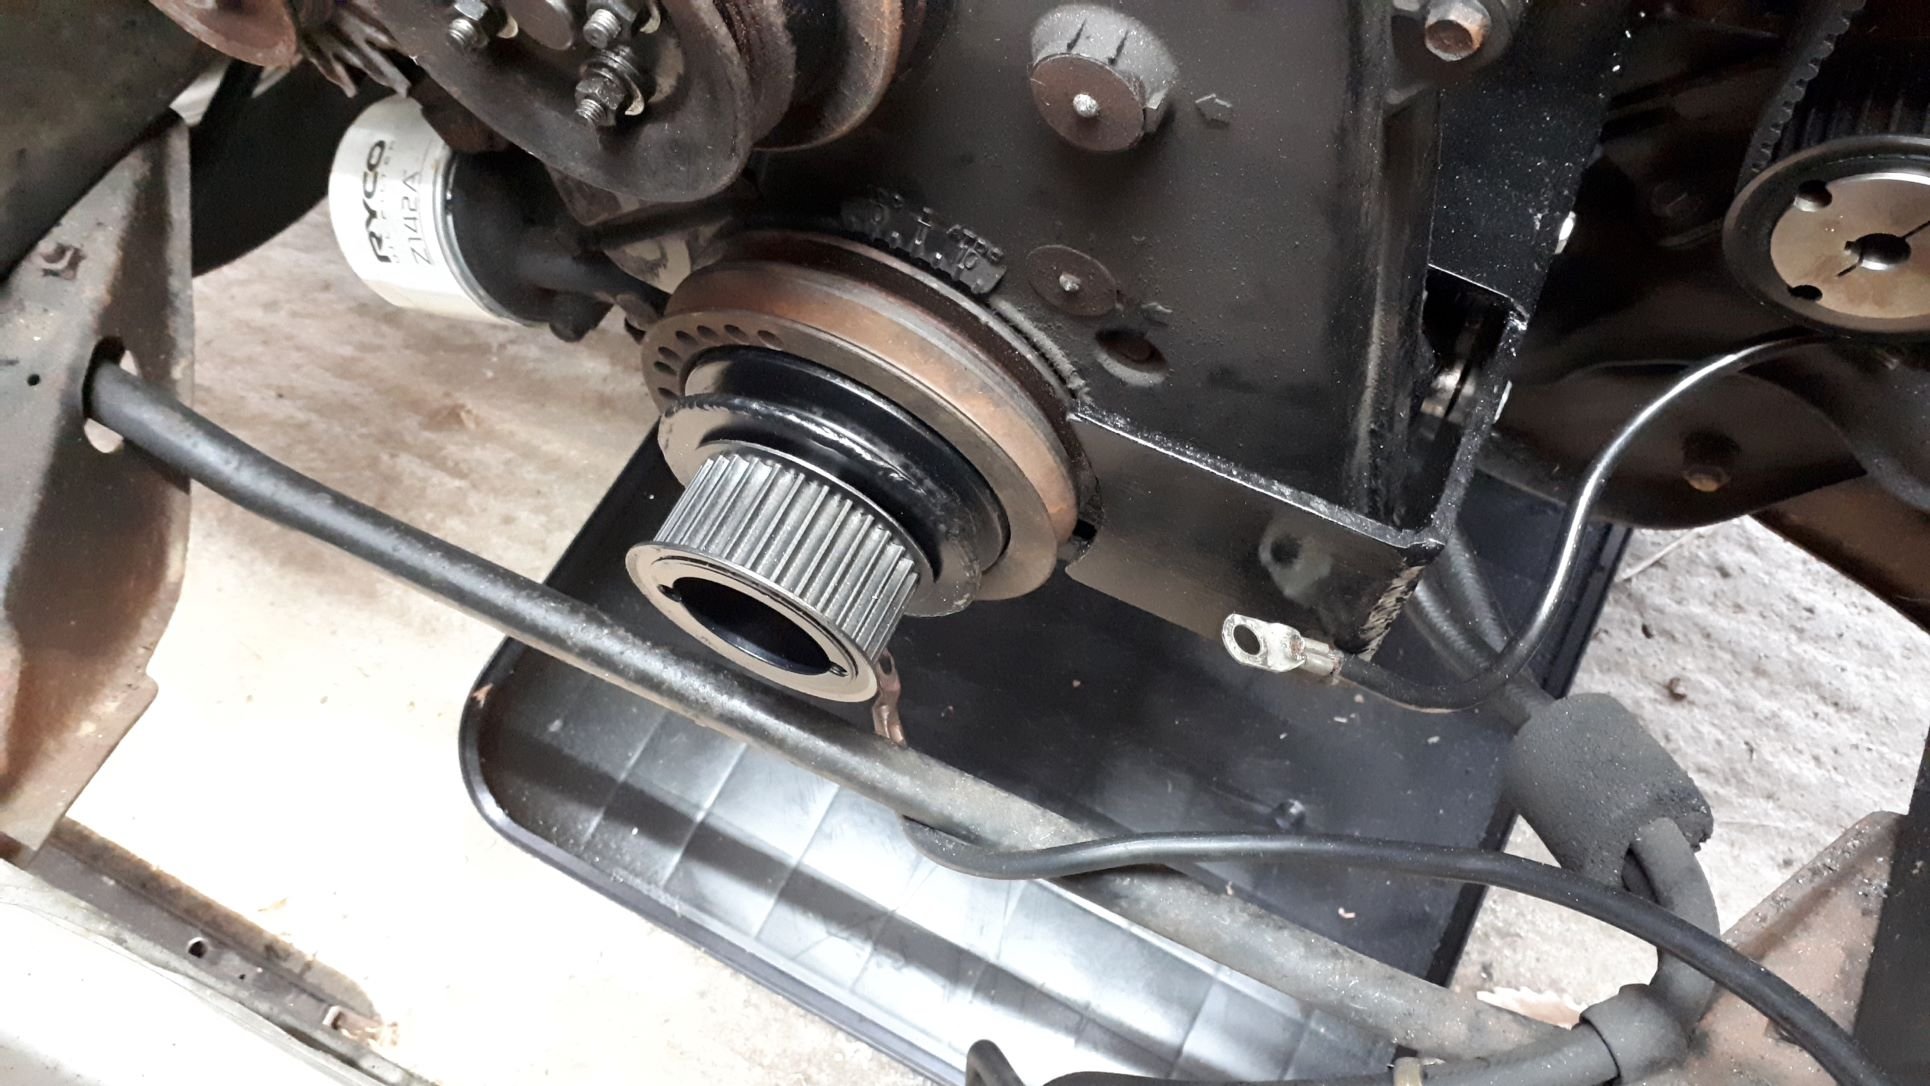
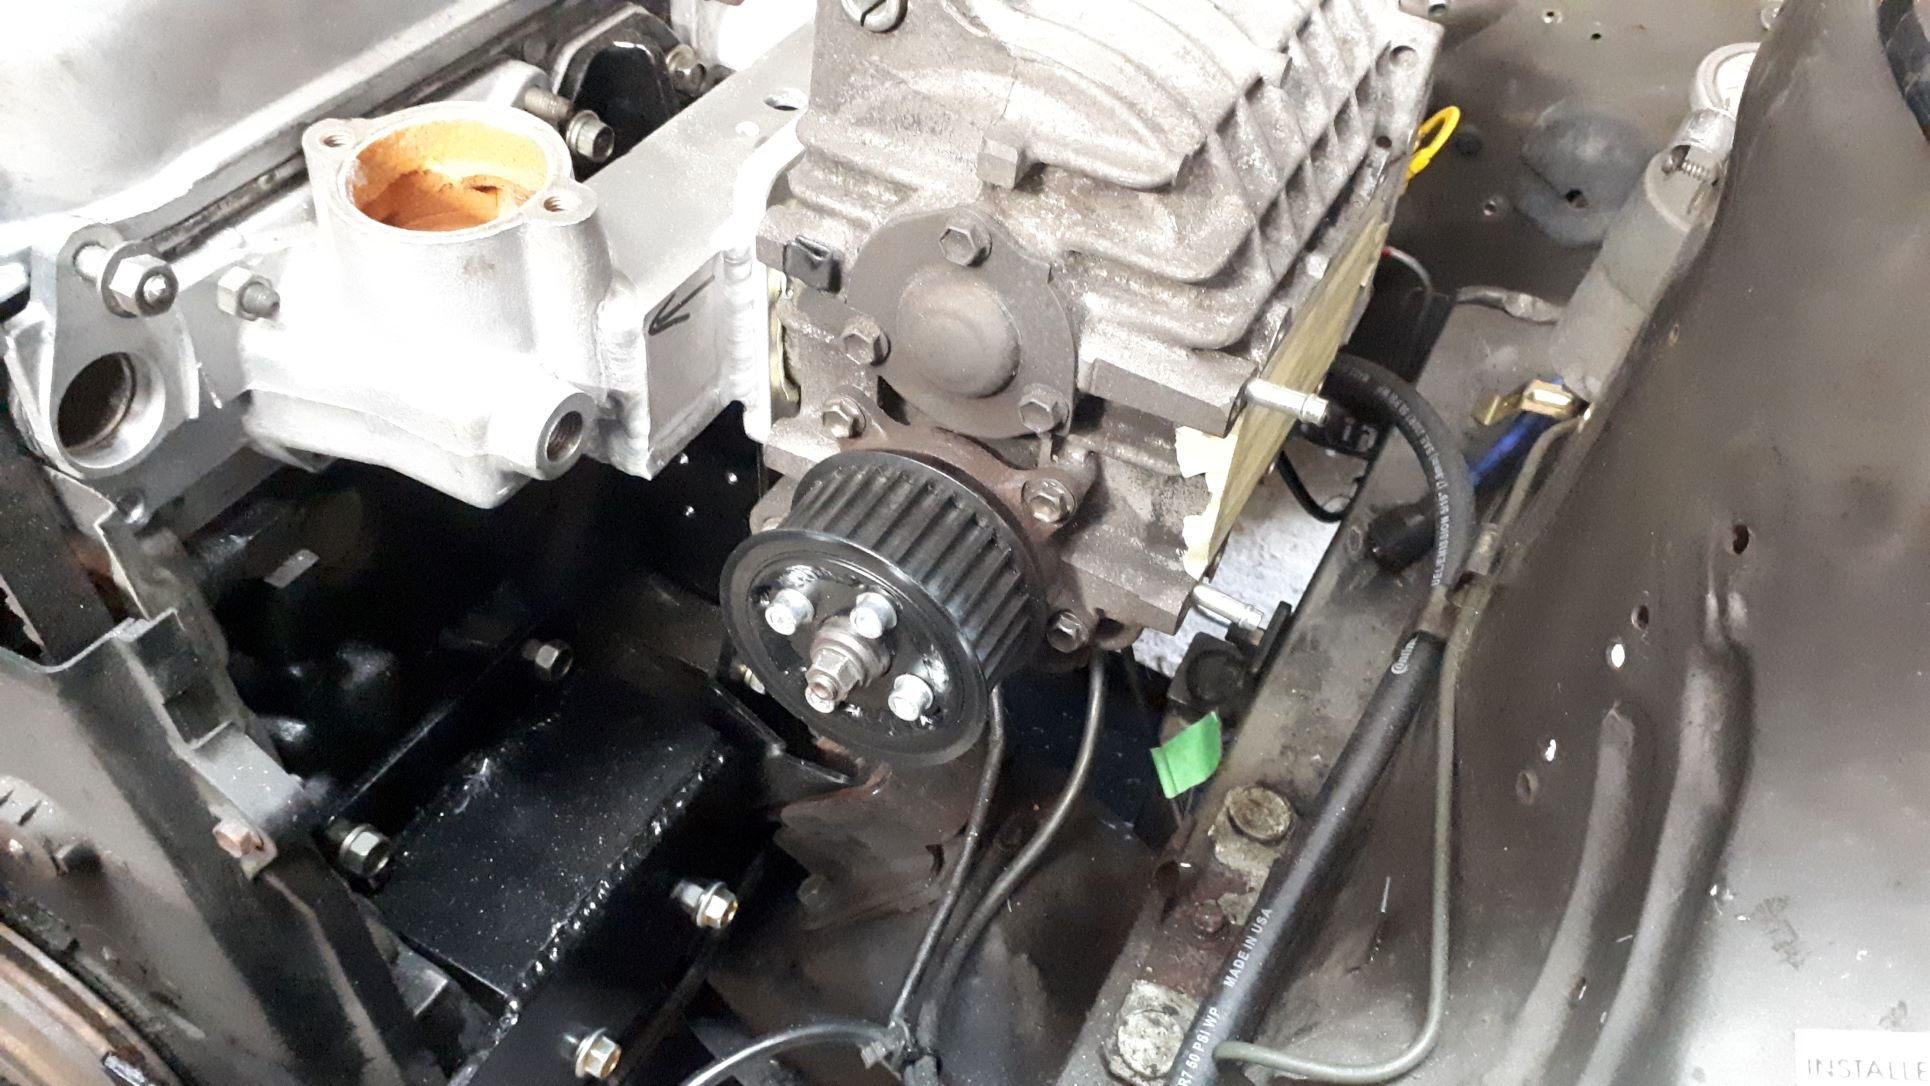
Now to figure out how to get drive from the crank to the supercharger. This was always going to be just a little Heath Robinson involving 2 belts and a lay shaft to bring the drive aft about 180mm. I mocked it up using thin plywood, hot glue and a piece of dowel and after a bit of mucking around I have the basic dimensions sorted. Now I can start fabricating something more substantial in steel. I also machined up a small pulley to accept bearings, this pulley will be the tensioner for the lower belt. The upper belt shouldn't require an additional tensioner as I can tension the belt when I position the lay shaft assembly. I am expecting this drive set up to be very noisy indeed!
7 points
-
I should update the post to explain: The roof in one of my trucks leaks. My delightful staff members put my mulitmeter in a bucket and chucked it right under the leak, so I got a new multimeter sent over It was that new MM which was telling me 6v batteries had ~ 12v charge EVIDENTLY one needs to turn the knob to DC rather that AC (not that it says either DC or AC on the MM face) or else one will see roughly double the battery's voltage on the display I went back, retested the EV and have tentatively diagnosed one dud 6V battery (the one a 12V sprayer was hooked up to)6 points
-
Nice, iforce ate shit. Oh well here's a current photo. Casually waiting for Cindy to open the door so I can come back over, sort the storage in NZ then ship it over.
6 points
-
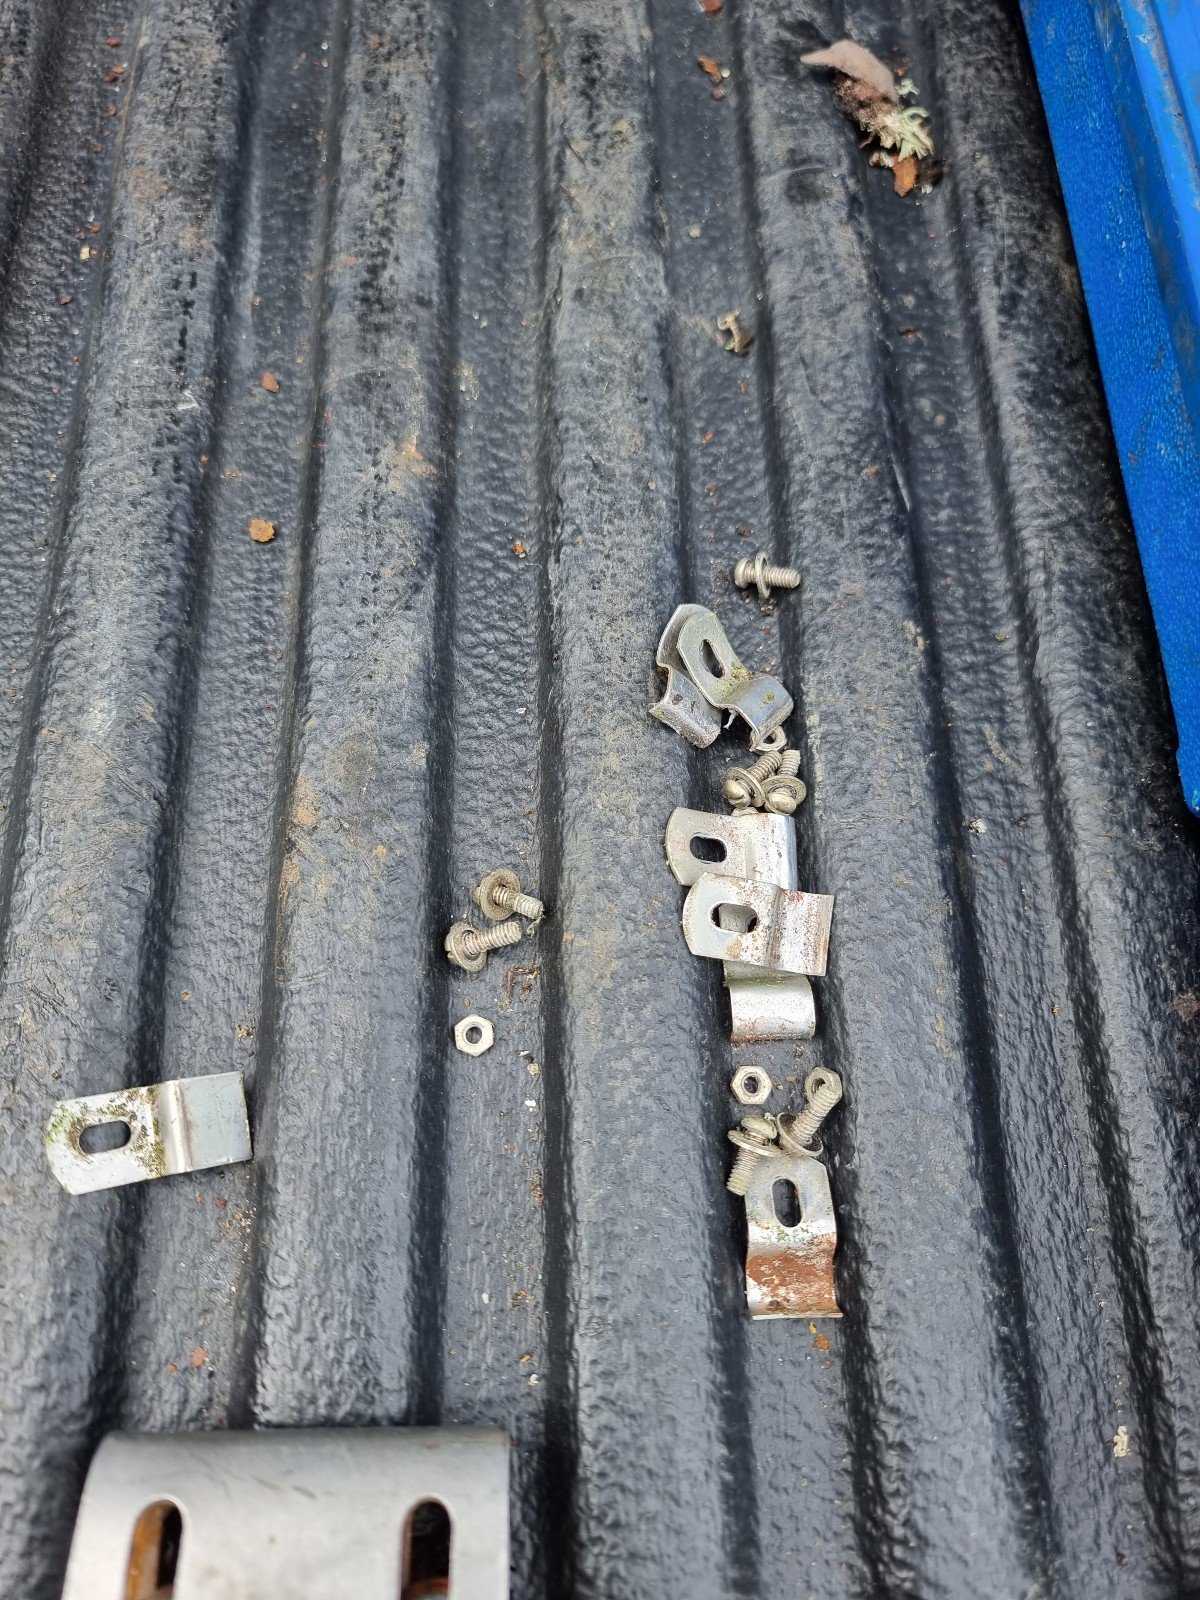
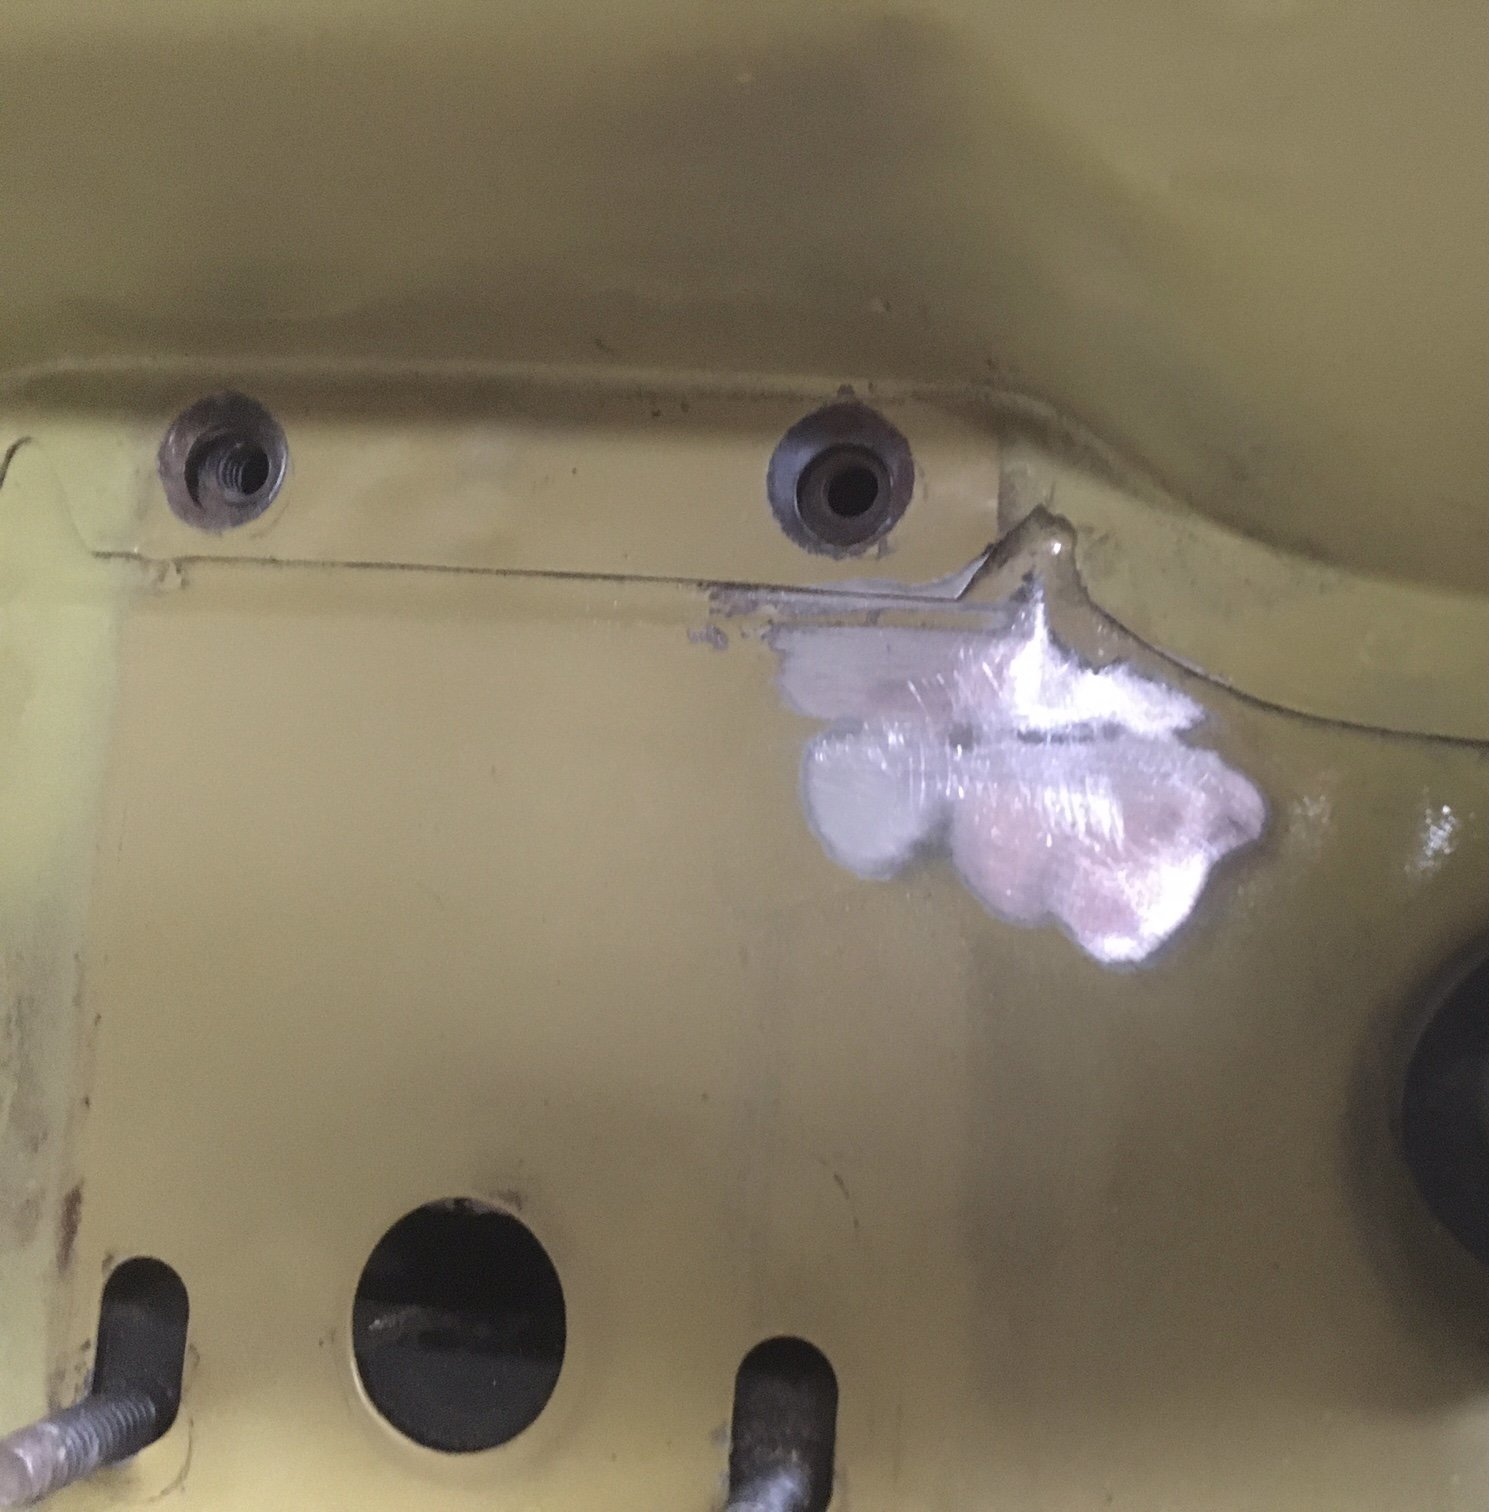
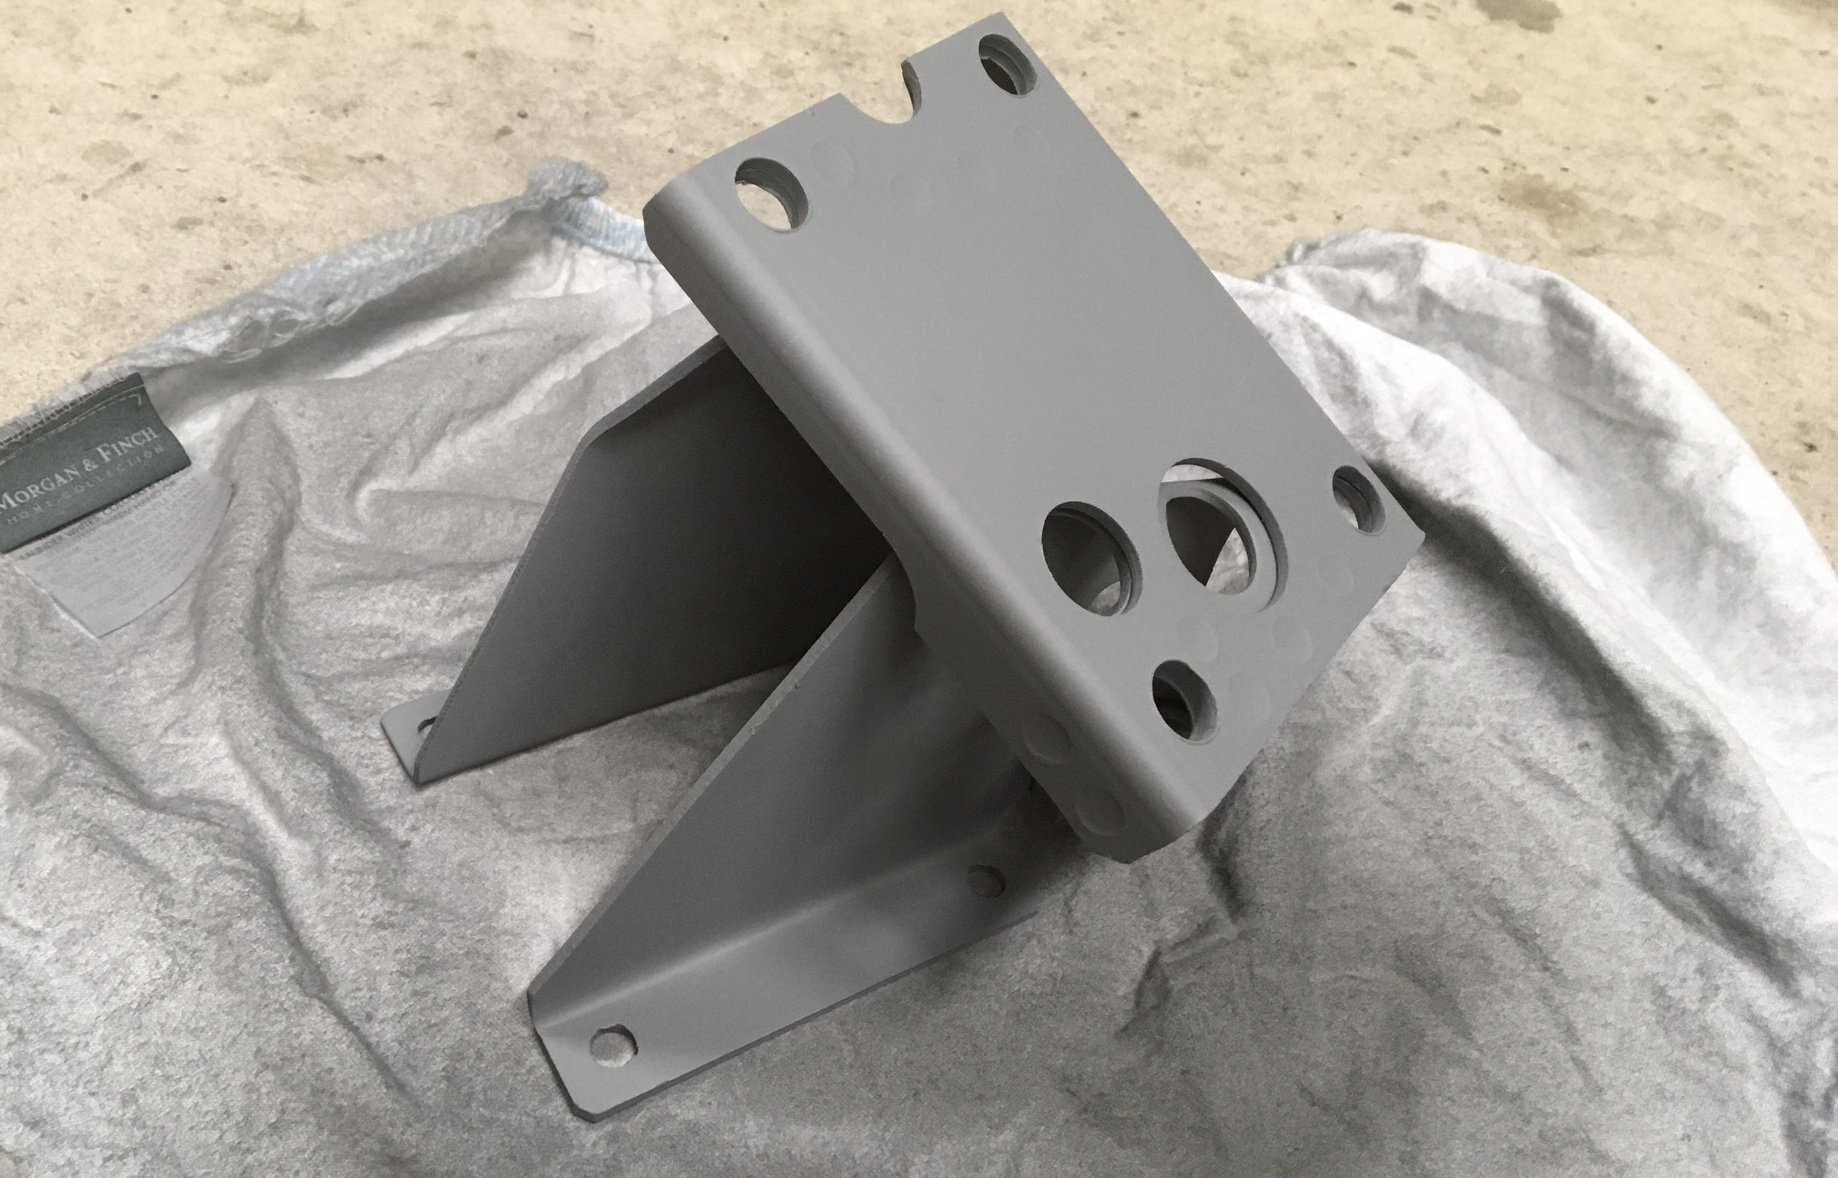
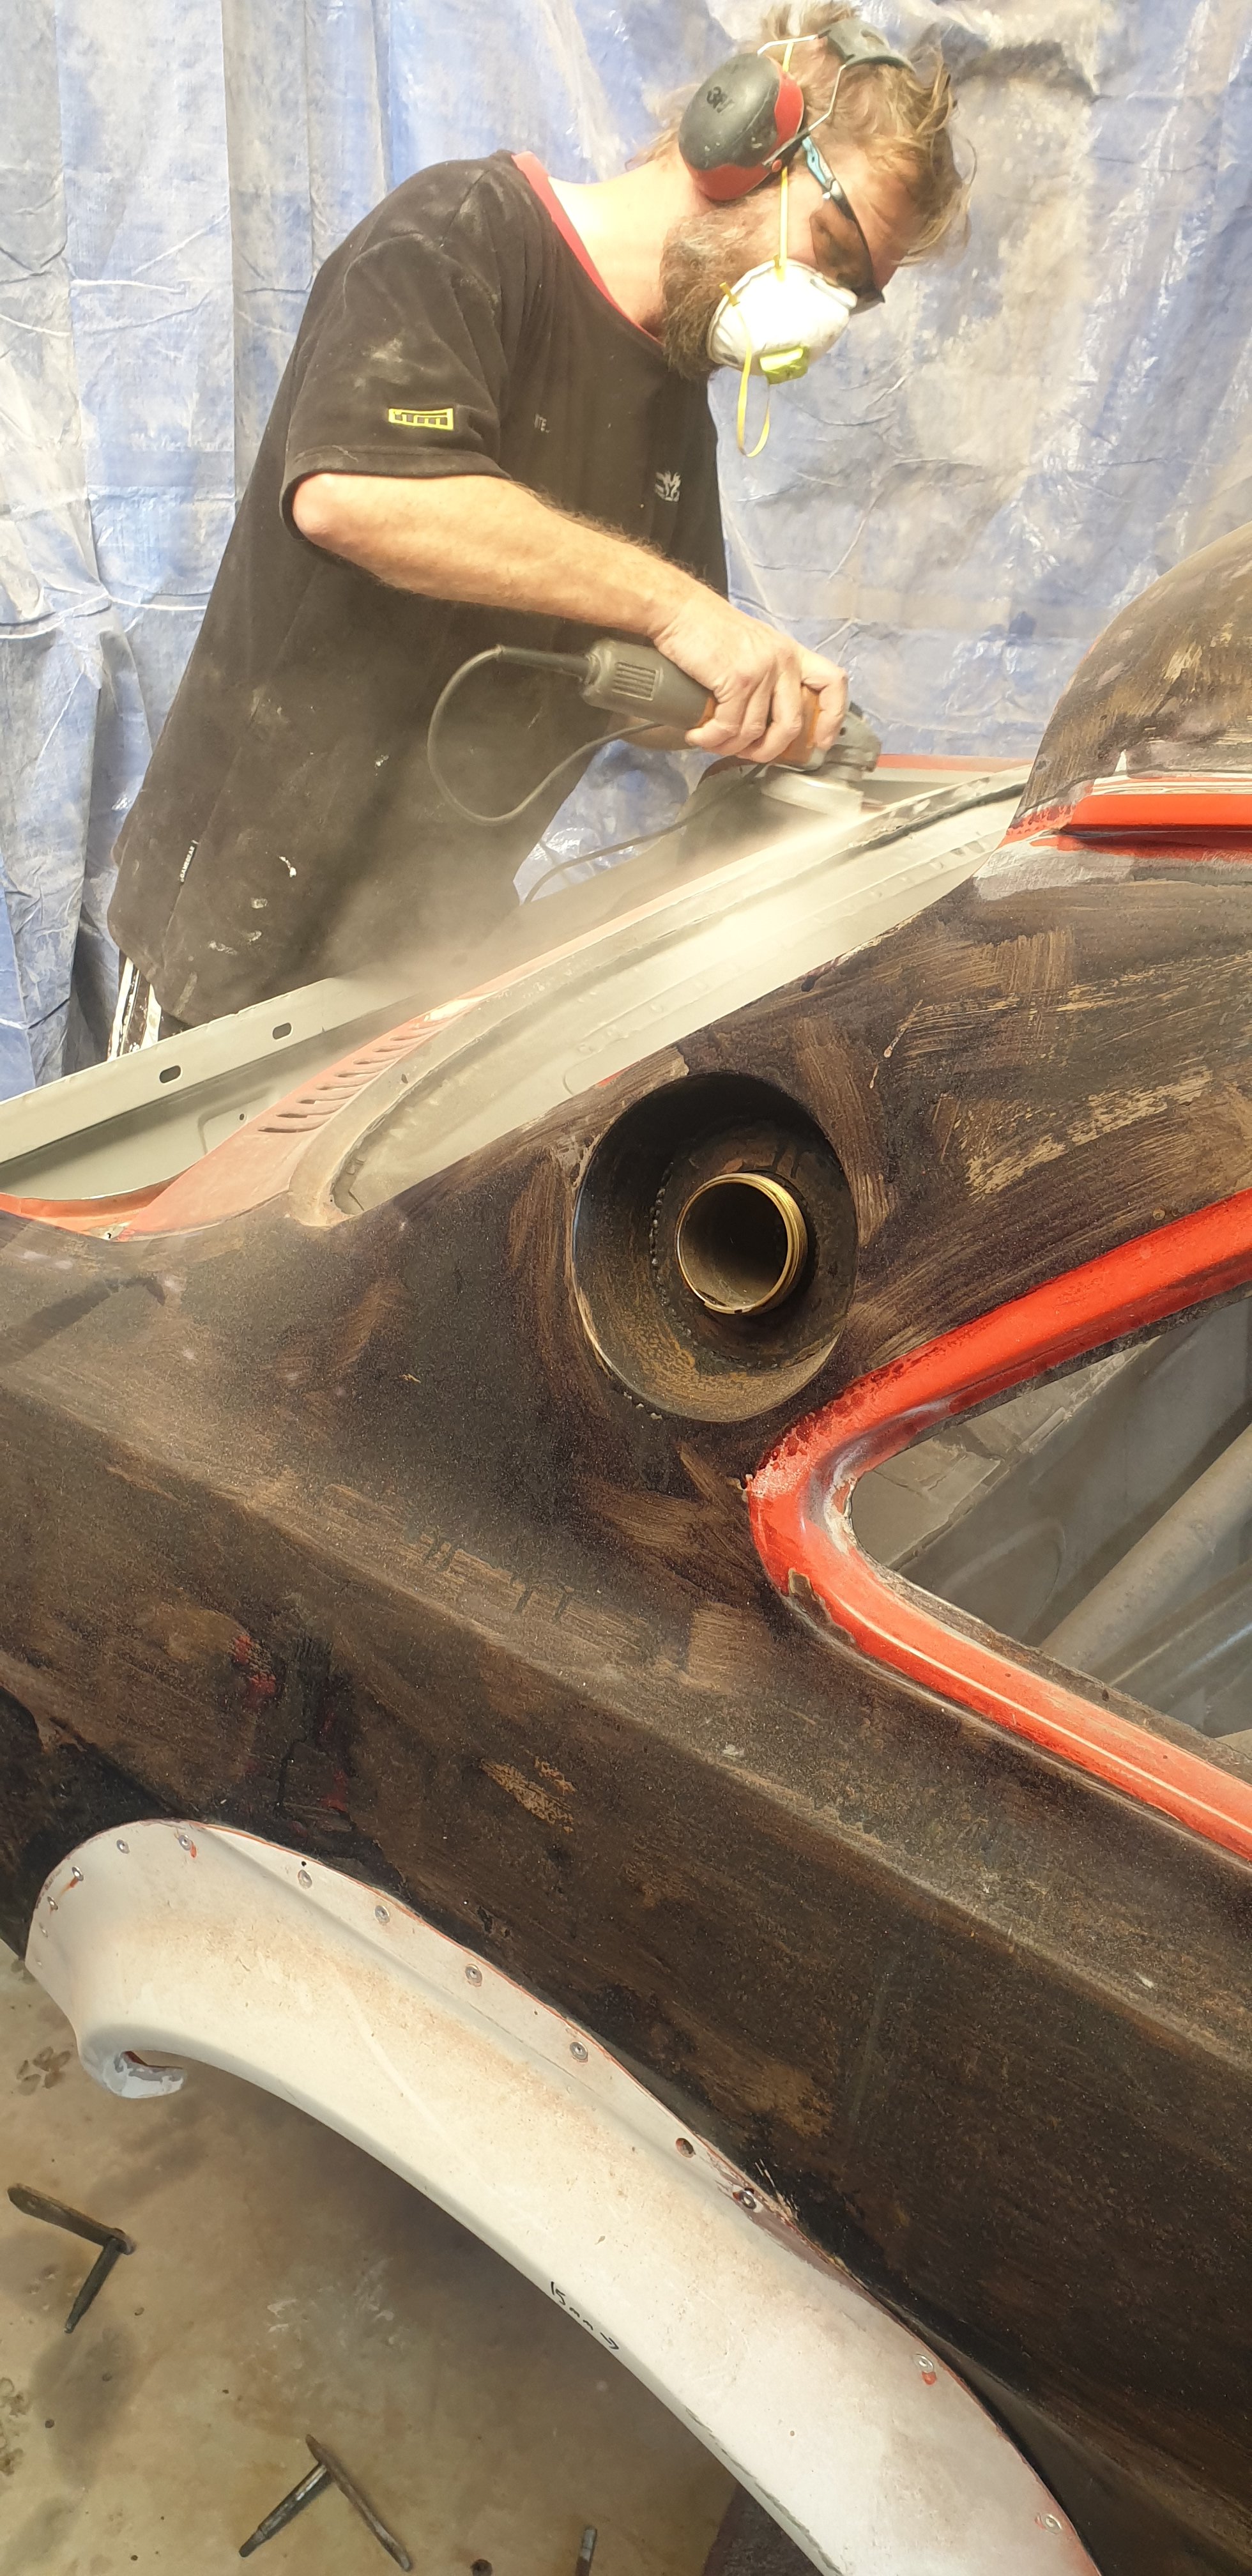
The thrust rods and swaybar are now refitted to the vehicle. The swaybar saddle bracket things are very annoying but we got there in the end. Today it was blowing a gale so I retreated to the shed, which was very loudly groaning and popping in the wind. I popped the clutch cable out. The pedal end is almost inaccessible for my sausage fingers, but I got it unhooked by pushing hard on the firewall side. I decided then that the brake booster bracket looked too crusty so I unbolted that and chucked it in the blast cabinet. Primed painted The removal of said bracket revealed a little rust bubble on the firewall. Luckily it wasn’t deep. I gave the area a scotch brite, and prepsol. then hit it with some primer Then I pulled the shield off the booster and gave that a blast and a prime. Then I gave the booster a good scrub and bolted the new master cylinder on. I have some colour matched 2k paint the panel beater gave me, but no way of spraying it, so I may have to splash out on a touch up gun.
6 points
-
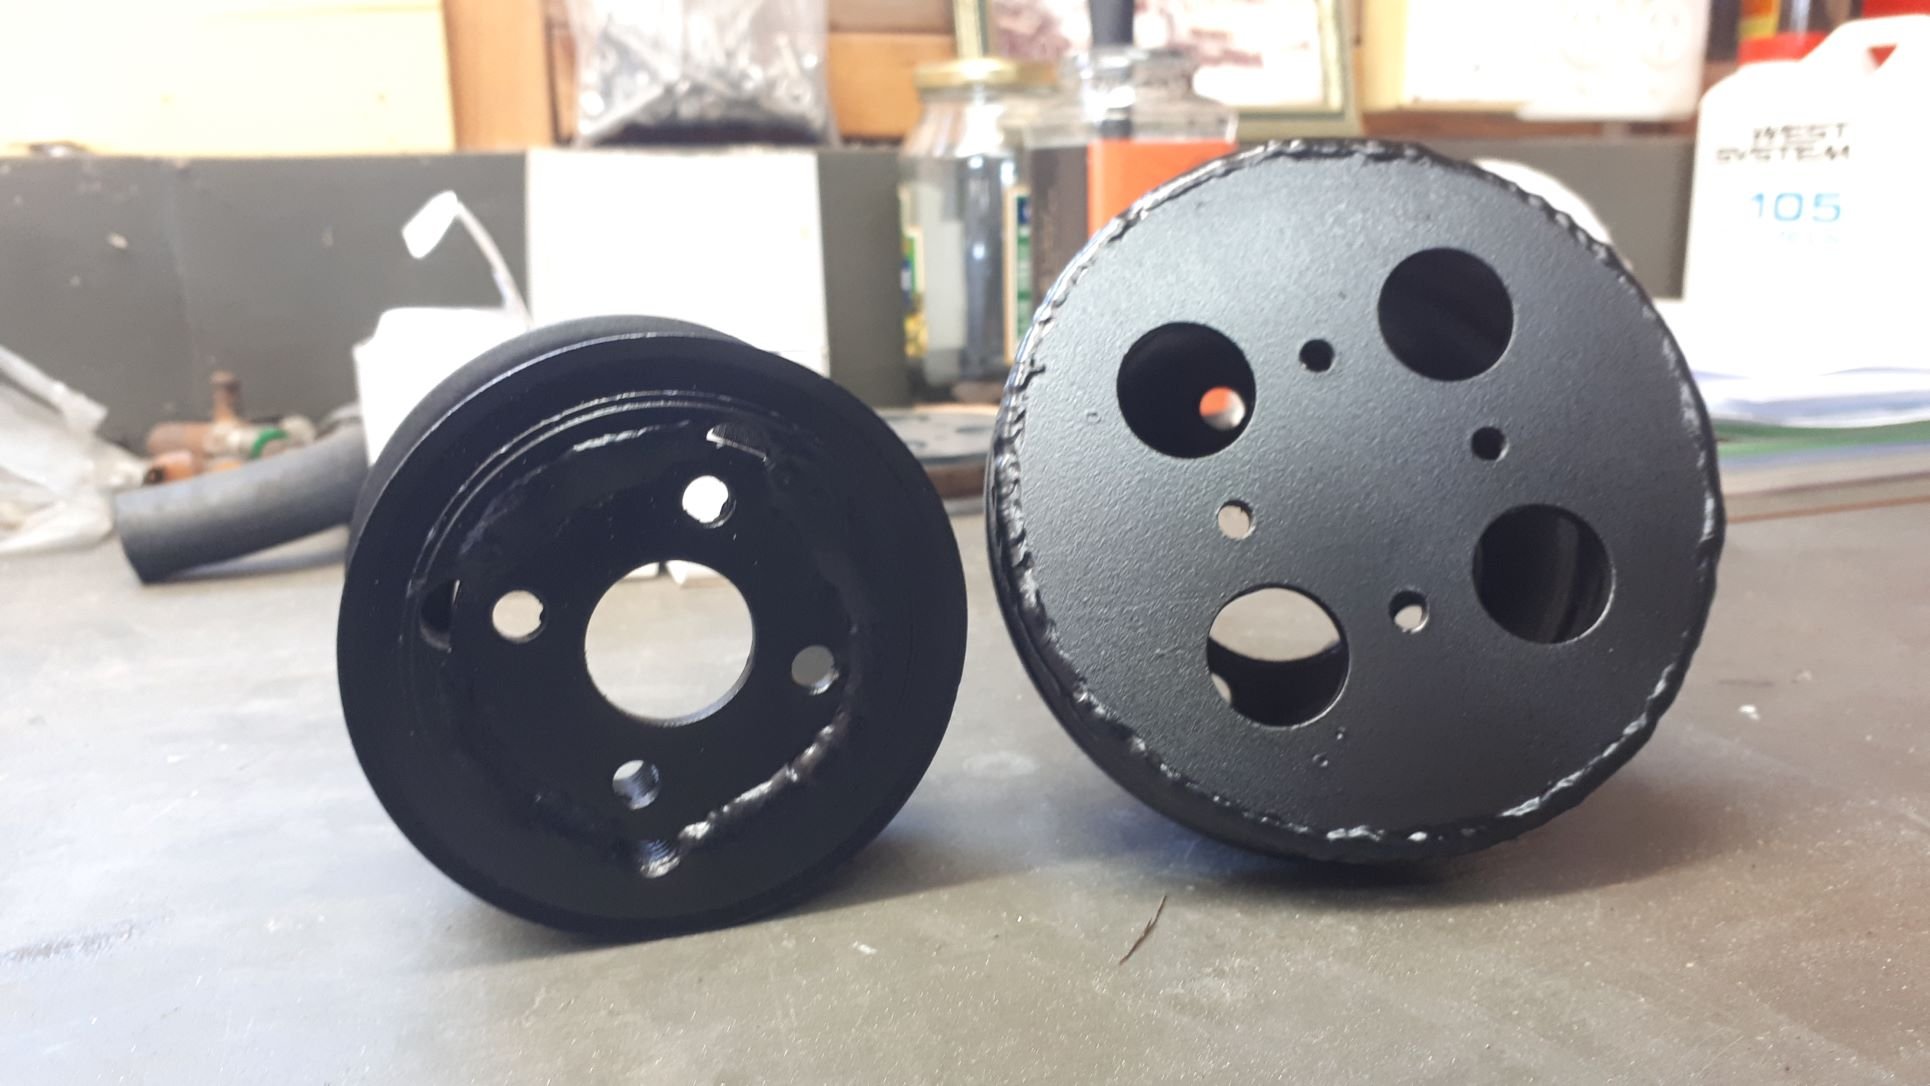
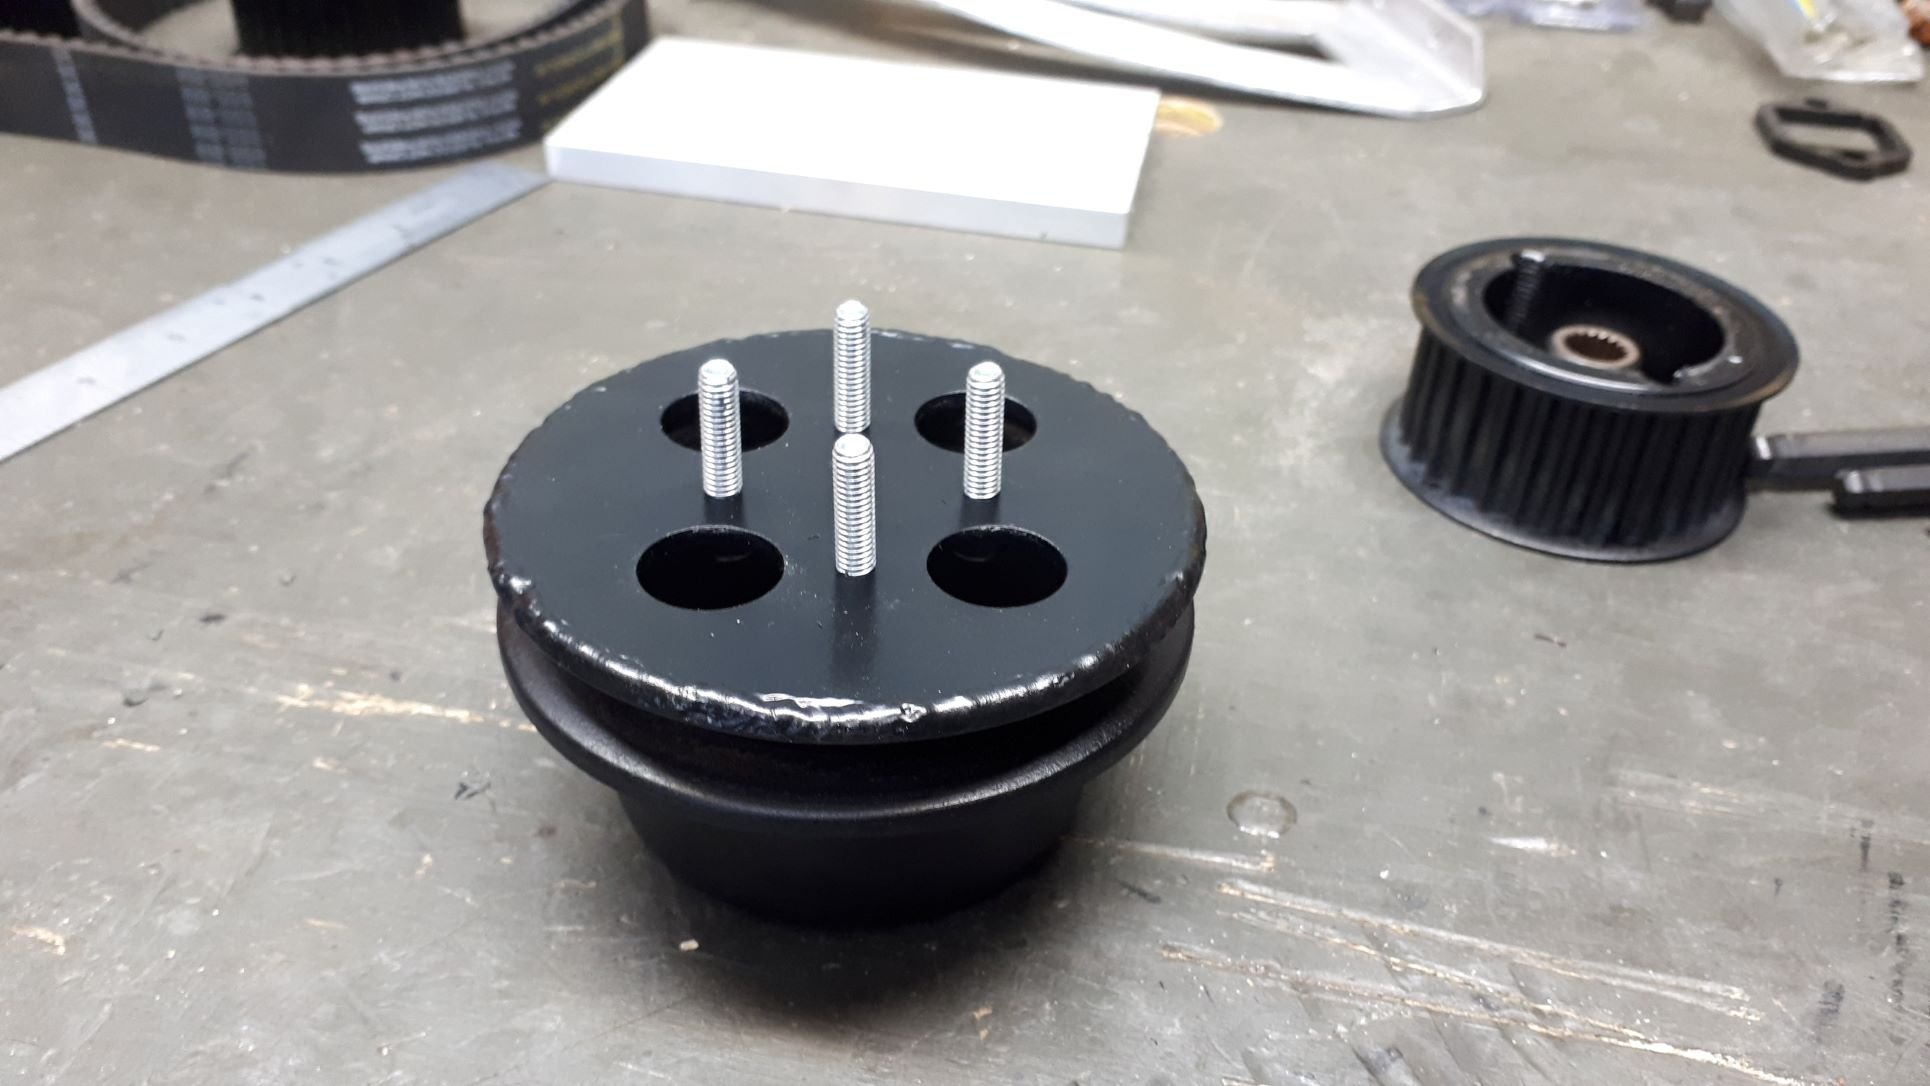
Now it's time to figure out how to get drive to the little supercharger. I had two choices when I started this project, make the drive system simple and compromise on the position of the supercharger making the manifolds awkward and difficult to fabricate, or mount the supercharger where I wanted it and get creative with the drive system. I close the latter and so the fun begins. I have started with the obvious and essential bits, a pulley on the crank and one on the supercharger. I had a nice disc laser cut to weld into the Sigma's factory crank pulley to allow attachment of the supercharger drive pulley. I modified a 8mm pitch timing belt pulley to fit the supercharger and also made one for the crank. It all bolted up alright and now I need to figure out the bits in between.
6 points
-
Don't yell at me but anyone done this or is in the electric car field on here. I saw a mk1 Cortina that had been done last week and shit it was cool.5 points
-
Neat car but I think for conversions like that to become popular, the price of ev parts will have to come down a lot. 100kw, granted it would have heaps more torque, but a stock 4age has the same power? And it cost 30k The fact it costs less to run isn't really that much of a plus unless you do heaps of kms, as the higher initial build cost would take forever to gain back in fuel savings on a weekend only sort of car5 points
-
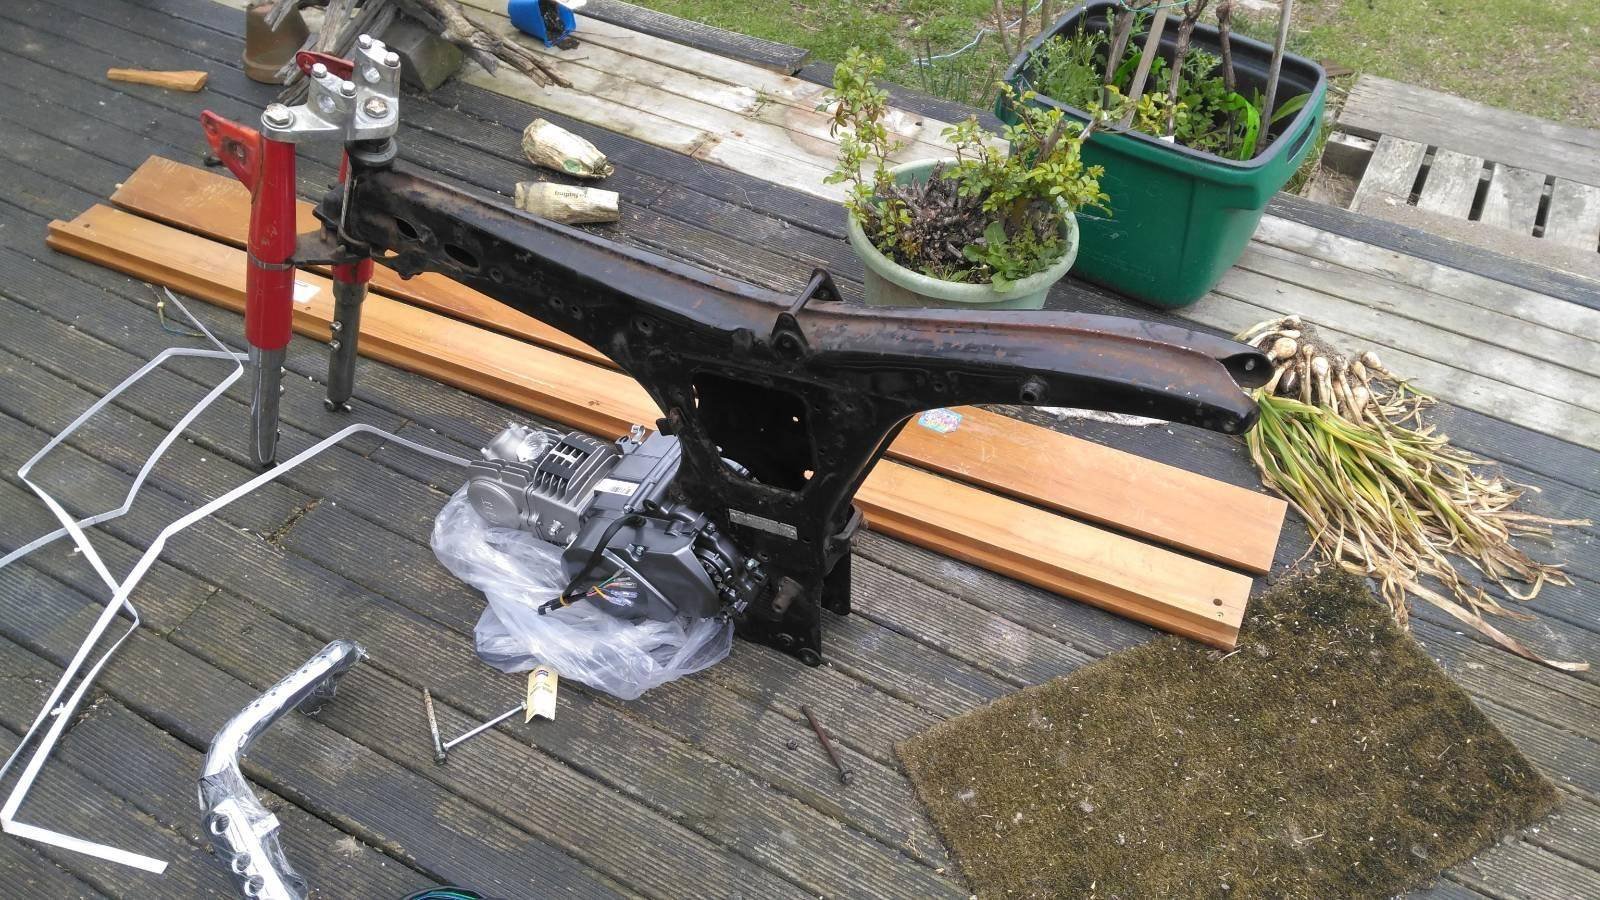
Thanks to Andy @ mBike (who was wearing one of your hats @MopedNZ) we now have a power plant. Also grabbed an exhaust to try for size as well as creaming over his collection of Dax/Chaly/Monkeys. Man, that yellow EFI Dax he has is soooo sweet. Next job will be the fettling required to fit it onto the frame while the trickle of chinese parts make their way into the country. Was slightly surprised to find the top engine mount is about 6.5mm wider than the frame so some thinking is needed there first.
5 points
-
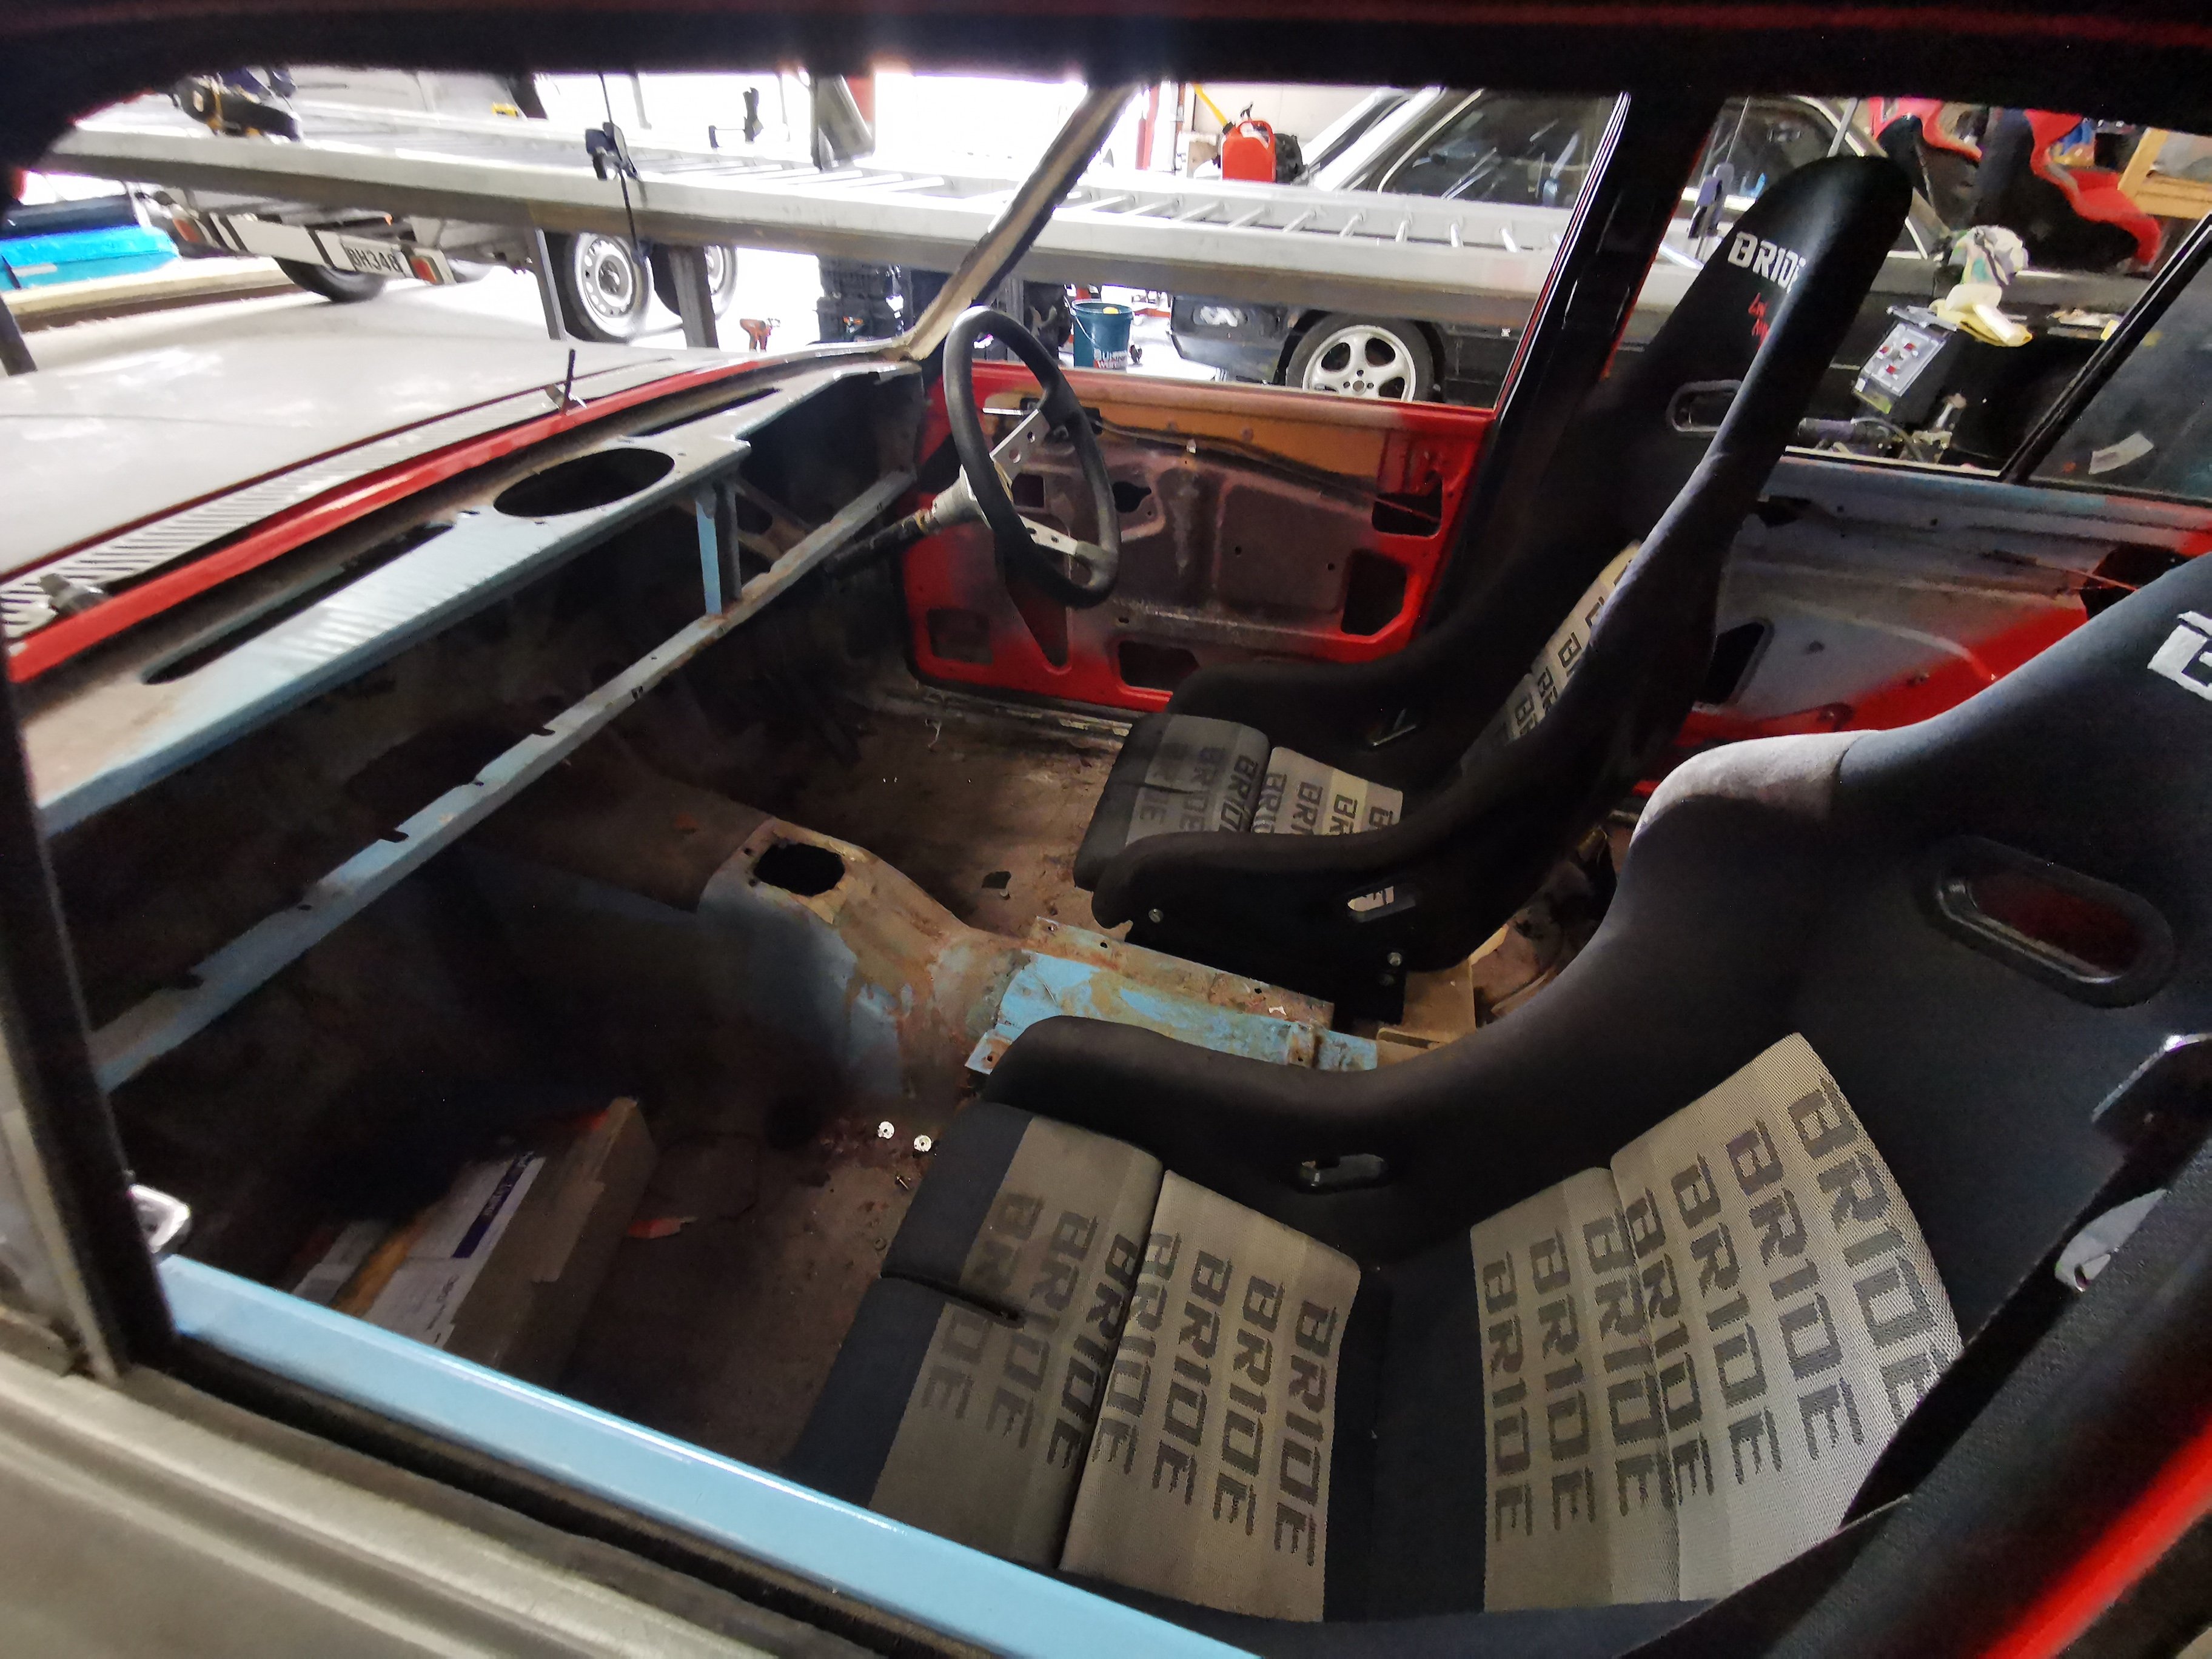
Fully gutted the cockpit.. Zero loomage. Ready for a good clean up. Have now discovered I can't run the triton top mount, so will get a floor mount pedal box.
5 points
-
Not an expert sorry, but I harbour secret thoughts of electrifying my Land Rover one day… I’m not into electric conversions for their own sake, but let’s face it, some cars aren’t about the engine so electricity can make them better. (Don’t hurt me please)4 points
-
So I picked up a 2nd hunter a while ago, another 73 super. This had a standard motor in it with twin carbs. But could not get it to play nice due to a busted fuel pump. So I decided that was going to put a 12a in this one aswell. But sourcing needed parts was too difficult. So fast forward to now.. Body situation is the previous owner spent hours doing body work on it. Deleted the mouldings which I didn't approve of.. So those weld spots need finishing off. He has sprayed the jams, boot and engine bulkhead red.. Not sure if I'm living it or not. It does have a couple of rust points to sort out. One at the base of the a puller inside, and one at the windscreen corner. And a few pin holes on the drivers foot well. Over lockdown I sold the engine, carbs, and other bits I won't use on this. And picked up my new mystery motor, see next post for these details. This car has lowered coils and blocks in it with good firm shocks.. These will get thrown into the green car, as this will get the coilovers conversion up front and turrets with coilovers in the back. So plans: Engine conversion-has cert plate for this already. Coilovers Turrets out back with coilovers 2dr conversion to extend the door openings. Rollcage and race spec interior. 15x8s and 15x8s on sticky tyres. Fuel cell and surge tank setup. Custom dash as the stock one is poked. Id like to find an escort English diff so I can run a lsd and do a disc conversion with off the shelf items. The front brakes will be escort willwood or ap calipers with capri discs. Have a tilton pedal box for it to have a bias aswell. This will get a wide body mid, I have mk1 arches on it but will try and get some mk2 arches to compare, to see what suits it best. This will be a slow build, until I get the green car finished and off the hoist. Discuss away.
3 points
-
eh, i get a flashing low fuel light in my car, but the engine doesn't change its operation in any way.3 points
-
3 points
-
3 points
-
Debating which bike to take now, depends which one has rego on it I guess lol, possibly twist and go3 points
-
Entrants in first post updated. Good to see @datlow @64valiant & @keltik in there, excellent3 points
-
Also this week I modded the towbar to be a receiver type, the towball was sitting a wee bit too high, the last time I hired a digger we had to fork the trailer up onto the ball. Now it sits lower and can be lower again if I need it, but the bare socket is no lower than before. Im just waiting for some pins to arrive.... Then as I had some 65x6 box spare I added one to the front, along with a shit-ton of bracing. If I ever get a winch I will just mount it to this. You can also see the extra strop hooks I added a while ago.. I have two separate leads on short blocks, if either comes through I will be cranking that rebuild.3 points
-
No photo, just a rant, at myself, decided to start fitting a few parts up inside starting with the wiring that runs front to back, the very first part to actually go into the car permanently.....and ive ficking lost it, searched twice, wtf, if this is a sign of things to come I'm screwed ffs.......2 points
-
I've been researching it for ages, but like Cletus said, until the costs come down it's a bit of a pipedream - because it is pretty much a besoke job for every car it's going to stay costly unless you can find some modularity sort of thing, then costs might come down. For example EV West in the states do a lot of VW/Porsche repowers and released a bolt in SBC engine conversion last year. But still at the spendy end, and every car is going to need a bespoke battery set up. Unless we just creative commons the designs... https://www.autoblog.com/2020/10/02/ev-west-tesla-motor-conversion-chevy-ls-sbc-mount/2 points
-
2 points
-
Tis next weekend.2 points
-
dont bother with rattle cans, theres not enough in them and they spray shit upsidedown i have this gun https://panelstore.co.nz/collections/all-paint/products/novol-underseal-gun i use this underbody coating https://panelstore.co.nz/collections/all-paint/products/body-underseal-anti-gravel and i use this for inside doors, chassis rails https://panelstore.co.nz/products/cavity-wax-gravit-640 sub titles on the gun has a long hose that can go on the nozzle for inside stuff2 points
-
Info dump of manwell stuff while I've found it ) gearbox from CR-V (first gen) GF-RD1 4WD. Serial number of gearbox is SBXM. To find Orthia 4WD manual gearbox impossible. There were too small amount produced. 2) Pedals from Civic 6 gen (ek) 3) Starter from any B-series manual transmission, example DENSO (31200-P3F-J01) 4) Flywheel (22100-P75-005) with bolts (90011-PH3-000) 5) Clutch master cylinder (46920-S10-003) and clutch second cylinder (46930-SR3-013) also reservoir and pipes for fluid 6) shifting arm from CR-V, Orthia, Partner or Accord Euro R 7) clutch disk (22200-P3F-035) with clutch basket (22300-P3F-005) and bolts (90034-689-000) 8 ) engine mounts for mounting gearbox: rear (50827-S10-J00), upper (50825-S10-J01) and down (50843-S10-J00) 9) half-axel (44500-S10-000) 10) and rear t bracket gearbox (50827-S10-J00) can be used from CR-V A quick look suggests crv stuff shares the same part numbers so if I grab axles/mounts/shifter/everything off the crv I should be good2 points
-
Woo hoo ! Level 3. My panelbeater is now back on the job. Hopefully a few more hours and we can etch primer the exterior.
2 points
-
These two from my brothers phone didn’t make it onto the daily updates..just an after pic with quarter panel on
2 points
-
More goodies.. Shoes, pads, LH thread wheel nuts, rocker covers The Mr. Gasket breathers have been display pieces on the shelf for ages so it’s good to finally have a use for them2 points
-
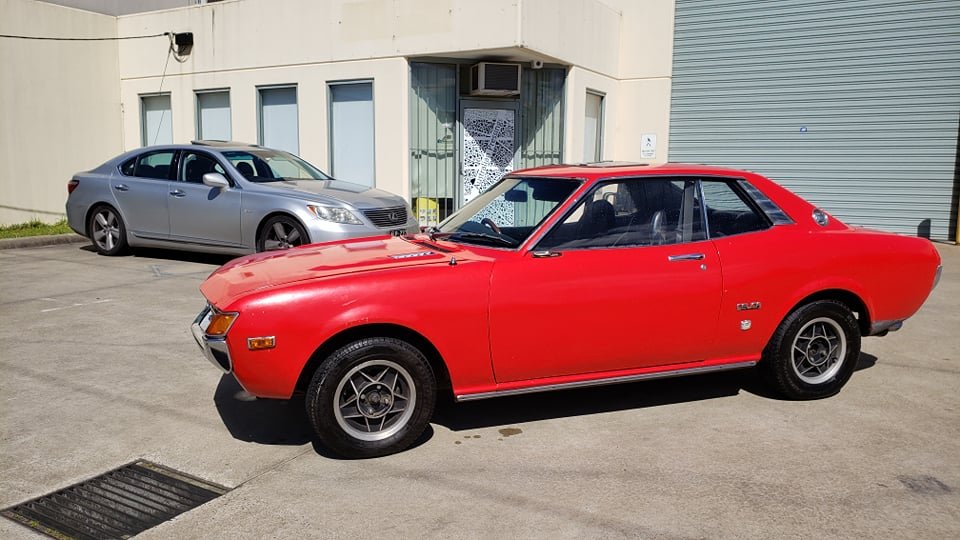
Good Morning, and welcome to another day of cars I have wanted to own for ages, but have been too scared to, until now. It should come as no surprise to any of my regulars that I am somewhat a fan of Rovers. Generally unloved and kinda forgotten about (or remembered only as "the car grandad had), Rover has always been a bit all over the place as a company, but they could push out some great cars when they needed to. When you think about Rovers, you probably think leather, wood, big engines, soft ride and luxury... not Honda. Honda? What have they got to do with anything? Well, back in the late 70s BL teamed up with Honda to expand their range and help reduce platform development costs. A few years later, and a few "successful" platforms, the R8 was developed. The R8 was a platform that was jointly developed with Honda, who on their side, turned it into the Concerto. Rover took the platform and made the 200, and 400 series cars. Initially in liftback and sedan form, but the platform also spawned the coupe, convertible and touring too. Of course, Rover couldn't leave well enough alone, and instead of the double-wishbone front suspension the JDM cars have, the European Concerto and Rover use McPherson strut in the front. Apparently this was at Rovers request, as it has longer suspension travel for a smoother ride, is cheaper to produce and easier to package. Honda obviously didn't agree with this, as for years all their JDM cars had double-wishbone up front, including the JDM version of the Concerto. The rear of course was pure Honda, with a multi-link independent rear. Among a bunch of other engines available in the 200 were the 1.6L SOHC and DOHC ZC/D-series Honda engines, the infamous K series (no BHG jokes pls), and the T series Turbo engine. The T series is the focus of my attention here. A coupe with a 200HP 2L twin-cam turbocharged engine, a manual gearbox and a super aggressive and agricultural torsen LSD (marketed as "traction control") sounds like a winning recipe to me. This was a genuine, tested and proven, record-breaking 150MPH (240KPH) car. The coupe was developed after a few years of the R8 platform being around. The name Tomcat comes from the codename used during that development, and is such a cool name. It was originally going to be marketed as a sporty MG, with even the concepts wearing MG badges, but somehow found its way into the ranks of the Rover lineup instead. So that brings us to today, where after waiting a couple of weeks that felt like an eternity, the truck with my new car on it arrived. A 1994 Rover 220 Turbo in Tahiti Blue. It arrived with a dead battery (Which was a surprise to me, I was told it had no battery), but swapping to the battery from the Marina and much to my surprise, it fired on the first turn of the key and settled into a smooth idle. No smoke, no hesitation, no roughness. A quick drive around the block, and it ran and drove smooth. The engine revved well, and made all the right noises, but seemed to have no urgency. I suspect there is a lack of boost. I was told when I purchased the car that it ran but ran badly and would hesitate, bog down and run like a bag of diddles. I'm yet to see that. It is low on fuel though, with a dicky battery, which won't help. I'd also doubt it's been run on 98 as it should. Being me, I did preemptively purchase a few service items, so will be going through the ignition system to refresh that, just in case it was a weak spark that had been causing issues. I will also get my old boost gauge temporarily hooked in and see what the turbo system is doing. I have everything needed to build a diagnostic cable for the car too. Since it doesn't use OBD1 or two, it has its own diagnostic terminal under the bonnet that taps into the MEMS ECU system, and although cables can be purchased, it's easy enough to make one. The car isn't perfect, it's far from it really. The paint is pretty good everywhere except the bonnet, which has peeling clearcoat, but overall the car has seen a lot of sun and various rubber and plastics have perished, peeled, cracked or shrunk. It will come up nice with a clean though, and looks nice from afar. Of course the first thing I did was pop the T-Tops... The interior is the same. It's filthy and some of the seat stitching has blown out due to the leather shrinking, but it's all saveable. I'm looking forward to getting some conditioner into the leather. The AC has had the pipes removed, and unfortunately the compressor outlet has just been left open to the elements for who knows how long, so that is probably ruined. Apparently the engine has had the head gasket done, but with all the oil leaks and various scum everywhere, it's hard to tell what's been done and what was porkies. We will see in time what happens with the engine I guess. Hopefully it doesn't overheat, and I can get it boosting as it should. It does make a hell of a noise though, with a straight-through exhaust to the stock rear muffler, plus the pod filter hanging off the nose of the turbo. It's all growls and whooshes. I'm looking forward to giving it a decent thrash. The other major issue is the boot, which is stuck shut. You can turn the key and pull the release all you want, but it doesn't move. On most cars this wouldn't be an issue, just fold the seats down and climb into the boot. Unfortuanately in Rovers wisdom, they put the only release for the seat backs inside the boot >_< I'll need to do some digging on that one. I don't need to use the boot, but I wouldn't sleep knowing it was broken. There is a lot to do on this car, and I feel it will be a source of pain for a while, but once it's going as it should it will be quite rewarding to drive. These are getting to be very rare cars in turbo form, even in the UK, so saving one is a good thing. Plus, it looks bloody good.1 point
-
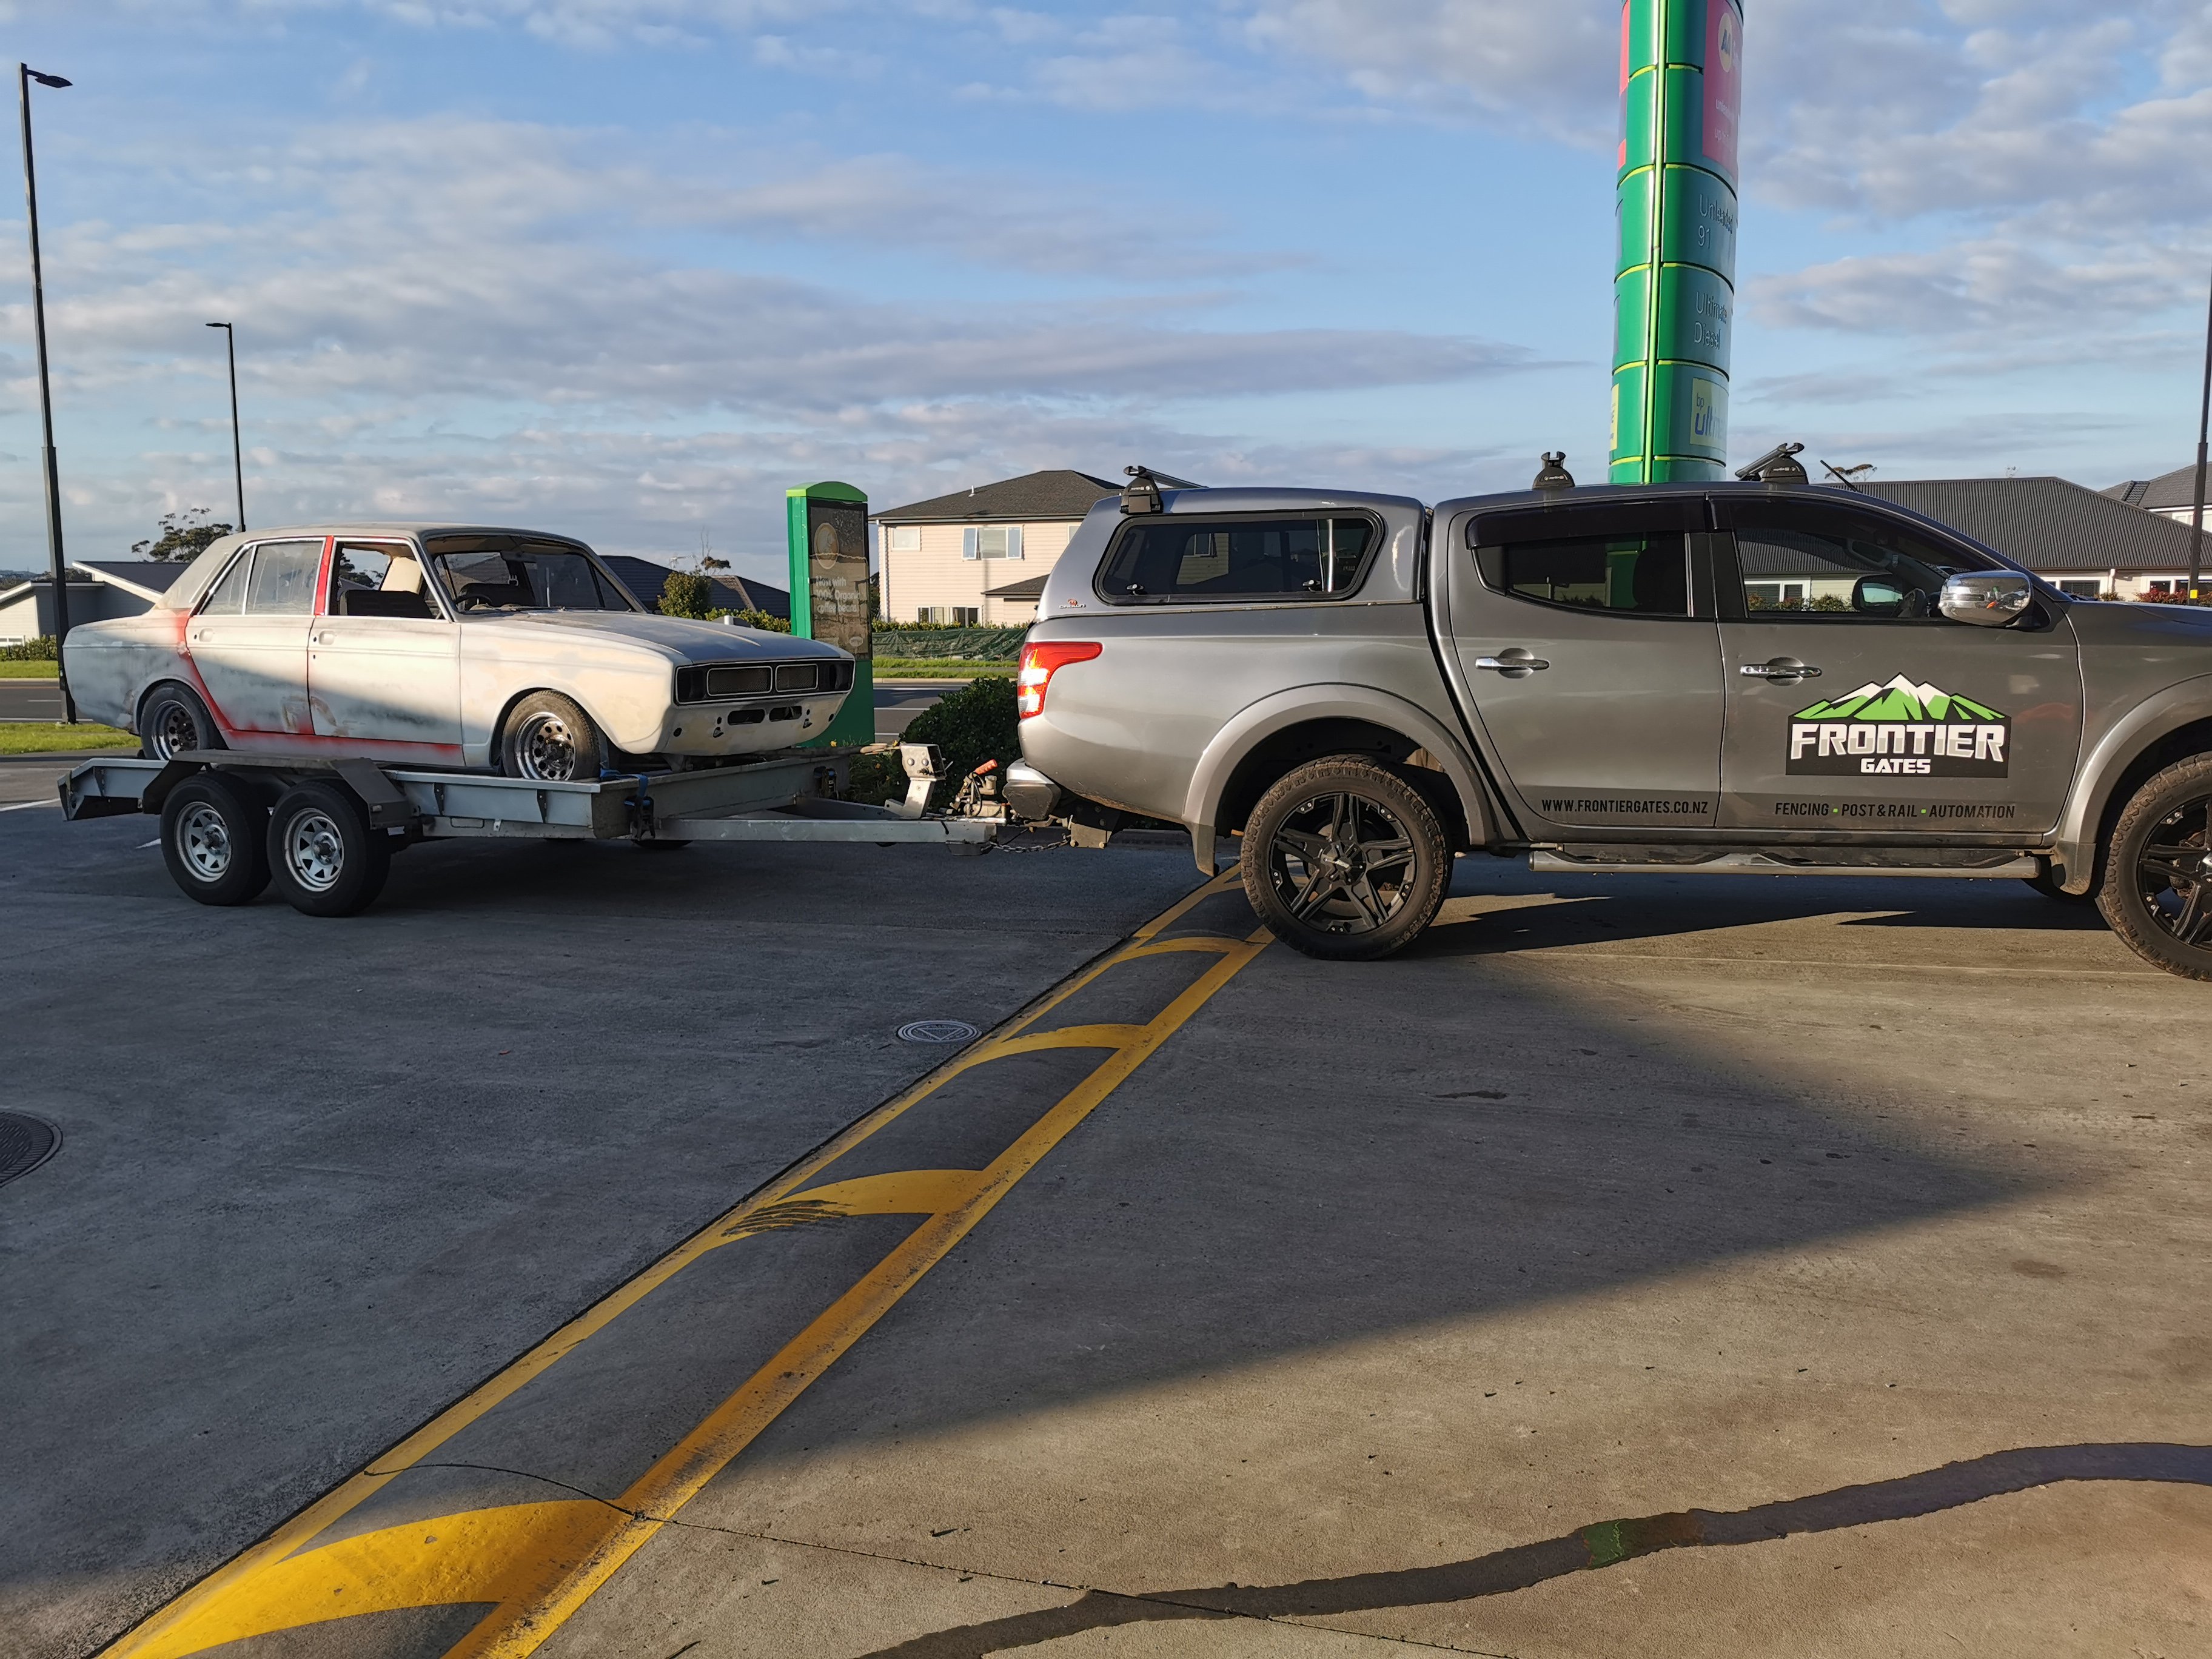
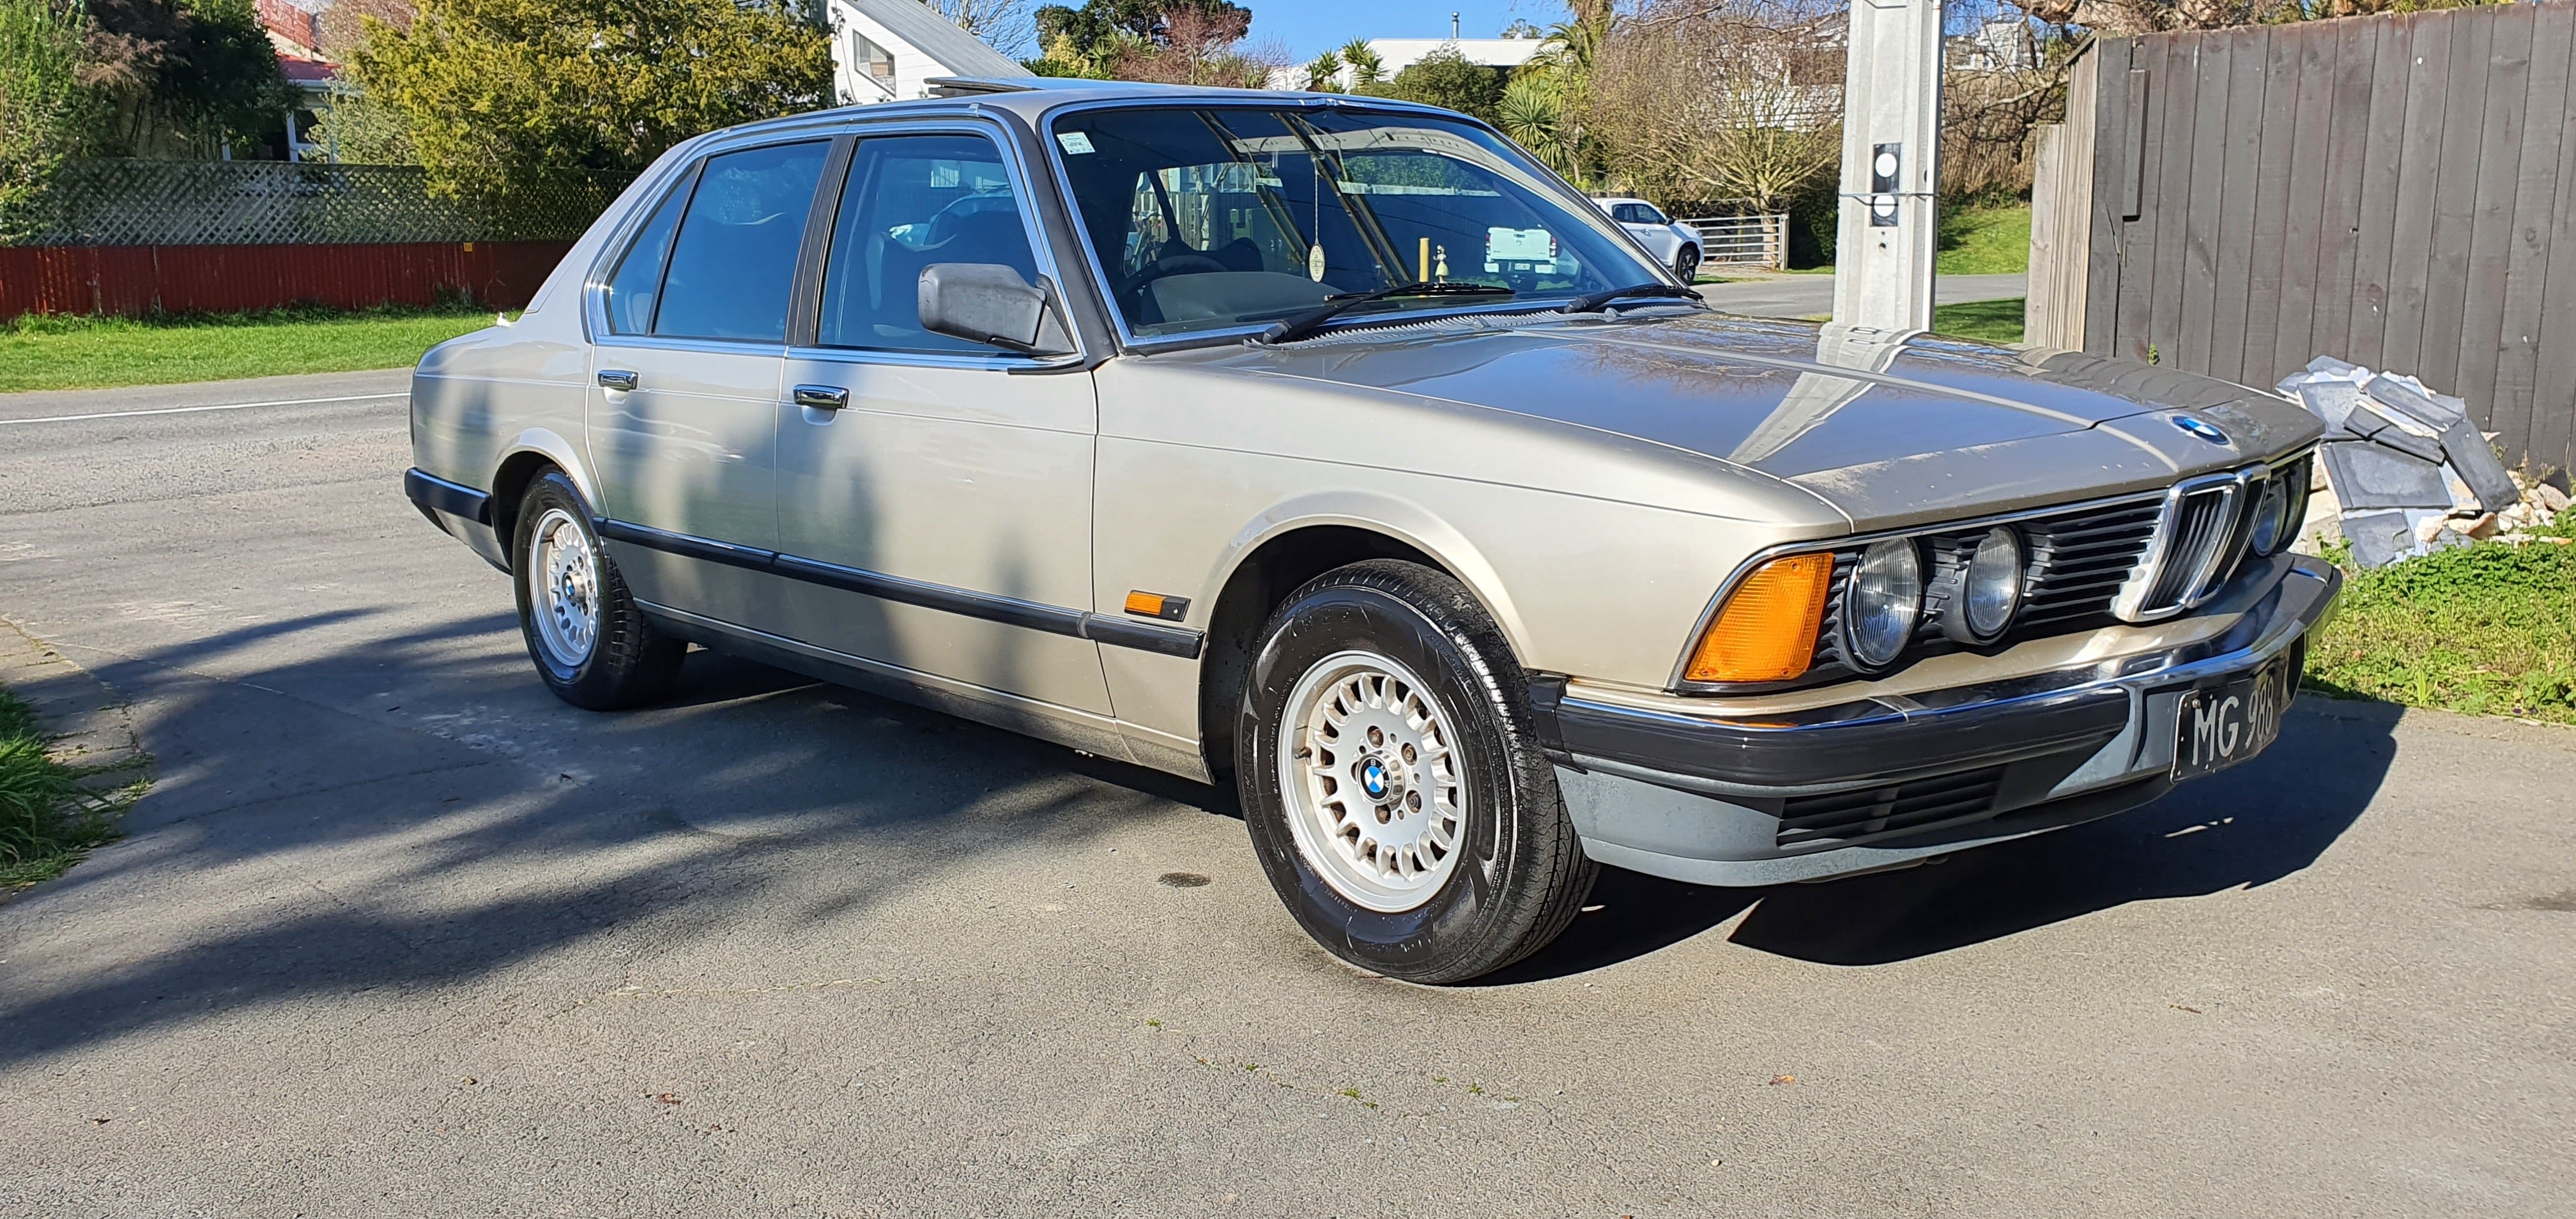
Right, the corona has blown into a big ass project which is cool. But i've decided to take my time with her and do it right. Since i'm currently operating out of a single garage crammed with shit for the next year until my new 4 bay workshop gets built ive decided to put it aside for now, not forgotten but just waiting its turn. As i've gone too long without something old, low and obnoxious to drive I kicked a few dollars towards a young man selling an old 7 series. I actually drove beside this car a while ago on the motorway thinking how much i love old 7 series and it popped up for swaps on facebook a few months later. I dropped the guy a message to see what sort of real cash $$ he was after and decided at the time since I was balls deep in the corona project that I couldn't justify another vehicle so nothing really came of it. I had some money recently for a car and decided to flick him a message and see if it was still available. Somehow it was and we sorted out a viewing. I arrived and was told the car had a fresh wof the day before. We had a look over it and decided it was worth test driving. Took it out for a drive and decided to offer him about 3/4 what he was asking. Grudgingly he accepted, we did the transfer online and i drove off in a new 7 series. So, here's a photo of when I got it.
1 point
-
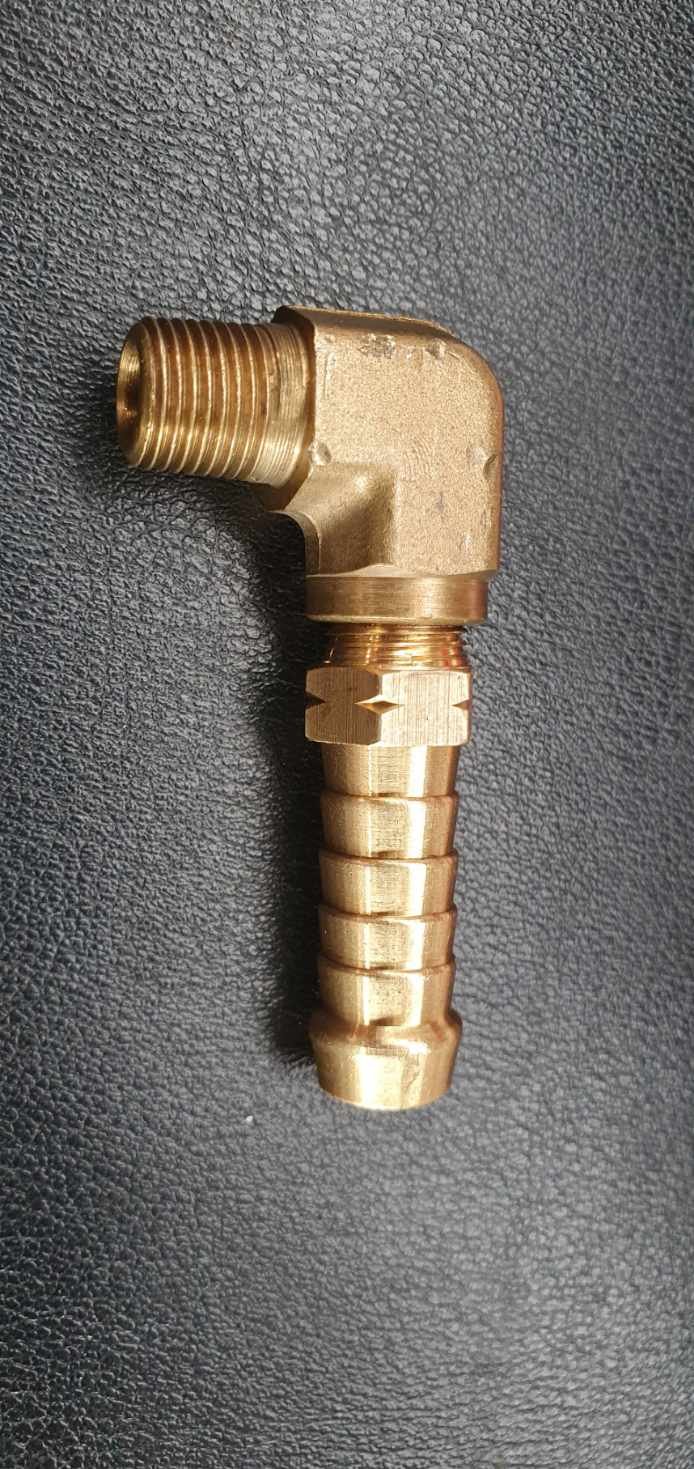
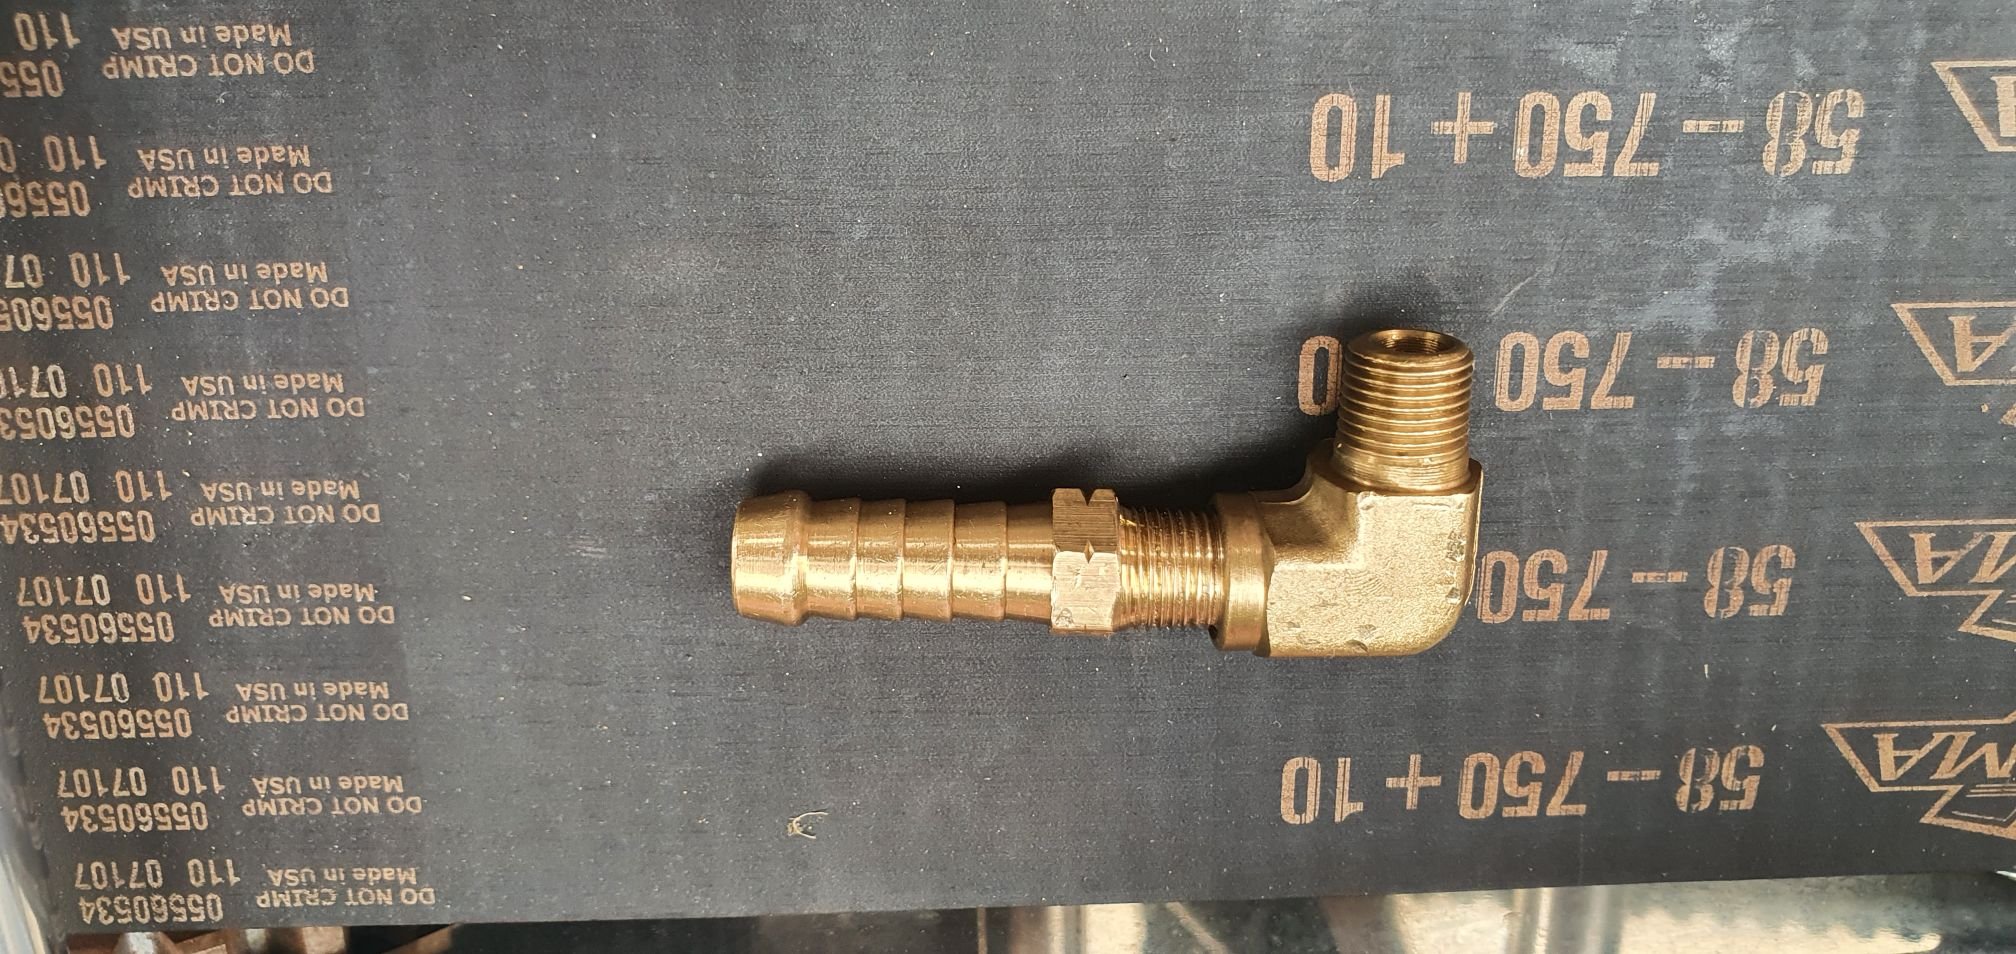
Had a weird situation. I brought 90° fittings for my oil tank, which is normal. But there's not enough space between them to be able to screw them in?? So I had to adapt some fittings to work: This should do the trick.
1 point
-
A guy in NZ is doing a couple Land Rover repowers at the moment https://youtu.be/eQENOgw6AUQ1 point
-
1 point
-
New plates No doubt I'll get screwed for them by the cops, but we'll see.
1 point
-
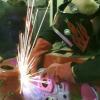
Lets drag this thread up from the dead ! its been about 4 or so years since this project had any love. Carina has been in 3 different storage locations. And in this time I've moved house 3 times. finished a qualification . and managed to buy a house !! After so many years, and moving so many times, and everything changing so much. Its hard to get started ; some times when you look at it all, such a huge daunting project full of half finished jobs and ideas, things start looking like a insurmountable task. So what do you do ?? you just look at it for awhile, look for one little job you know you can do, you break it down, ah, you make a list. and start from the top! Great idea ! So I made a list and then in my typical fashion, I just did what I do. . . I did none of the things on the list at all. hahahah I just picked something I didn't like and decided that I can do this better .I think , and with that thought I finally started , it wasn't long till I was right into it again . but ah, anyway Ill shut up now, and show you heaps of the pictures. this was how I left it, and I didn't like it, because the hoses are under allot off stress to make the bend, I can see this being a failure point. I tried to find some silicon hoses , that have sharper 90 bends at the ends, but they all have short tails and the long side here is 350. So i just decided to start again. because this all ties into the water bridge and the clearance issues there too. you can see the blue marker where the belt is going to touch. The idea , is I make the flats better ,first and then, tighten up the angle. and hopefully there will be more clearance. I was very nice here and just softly tapped it down with a panel hammer. making sure not to distort the other side, it worked better than I though it would Now I just have to tighten up the angle at the top of the water bridge . this was a bastard , its just kept bubbling up this black spotty stuff and making dirty as welds. eventually I ground enough away and welded it again then I got a nice puddle , and it flowed much better. (I'm only at home fabricator my welds are very average) here you can see that huge angle change First part done, now for the piping small adjustment has added allot of change, I hope its going to be enough clearance at the end . More supplies ! here my angles aren't as accurate as I wanted , it was meant to come out further and also parallel to the timing cover, I think I cut it a little short. and on a slight angle but it is what it is. will have to make use of it . this fit up, is not tacked, just sitting in place no tension, a lovely fit up. couldn't have done it better if I tried this is so damn hot, no one tells you when you start tig welding, just how obscenely hot aluminum gets to weld I had to hang it like this cause I couldn't touch any of it even with welding gloves on. Trusty block of wood, third hand, weight, prop, holder thingy and that is the cooling system update. seeing as that was going so well I decided to redo some more things. Some of this stuff when I do it I don't really have a end plan as such , some times its just trial and to see what its like . and then if it looks like it'll work then ill do some more research and ill make a plan later on. So the bonnet was one of these idea. where later on I would work out if it was going to be fiber glass, or I leave it to the panel and paint shop to make it look mint. or just who knows I have to cover this spinning thing with something ah shit I lets chop it up and see if I can hide it. Yeah that sounds like a good plan . . . . and then we have this monstrosity But as of now I think I can make it better. I never liked how I had left it and well now is a better time than any to give it another nudge. this is a hack job at the back of the bonnet, at the time I had no idea how to blend it all in, so I just did this, to get a feel for it. and as you can see it was a mash of a job. if I had been a little slower I could have made all this nicer right from the beginning. But its a lesson learnt. pencil line is how much i am going to trim off, this is al the way around destruction ! Tacking it all back in, but welded. back edge trying to keep it flat. this was going fairly well here. So much tacking, this took like 3 hours to weld up. do a weld., blow it down with compressed air. do this over and over. Another thing I learnt is I should have finished the extensions, completely. whilst it was off the bonnet. because effectively welding 3 strips the whole way down the entire bonnet added a shit load of warpage and heat. so much grinding !! almost there. out side done had to re trim the inside to give it strength again. i am unsure of the level of grinding i will do on the inside, i want it to look nice but i am also going to seal it all so there is no point of going hard out if the seam sealer just covers it all anyway. all metal , no filler yet......... but. yes its very very not flat. and it will need filler for sure, I hope it wont crack . time will tell. Now if I had to do this again I would go about it completely differently. There is so much i would do differently. I learnt so much doing this, and one thing I now know is warpage lol . I can make shit warp hard out ! I learnt this the hard way, so this was a valuable lesson. I will take this information forward in my next welding project. I cant do anything about it. I don't have another bonnet, so this is just going to have to be it. until I learn how to fix it, or what ever will come in time. so some of this is up loaded in the wrong order. the pictures get out of sink. but anyway , i hate the stupid rod bonnet stand thing. Its useless and it has to go ! here is it going. now I know it looks weird. but with the charger and throttle body, no gaps in the guards or on top of the strut towers. this is the only place they could go. and well for the convenience , I choose to have these and not have the bonnet hit me in the back of the head again. the first 3 times was enough Next is guards , front, and indicators, head lights, why wont it all line up? you can see here how much has been cut of them, that and no lower front valance, leaves no support for the out side of the guard or headlights. So i measured heaps of shit, found out the guards I started with were all beat up., and the mounts were all pushed back in. so I needed to make a slide hammer attachment to slide hammer the mounts back into place. This meant I needed to bend some 10mm by 50 flat I have kicking around. which means I get to play with fire ! and its a great excuse for me to use my new to me Oxy set ! shit yeah I love this stuff. ! finally the indicators fit well, the guards are where they need to be, and I got to play with a some new tools yay , no what else needs forming !?!? ah yes I need to add a support to the guard as its still pretty weak on that outer edge. heat up some 8mm flat bar, its super soft so will be mint for supports. strong, but they'll bend if then get pushed. smash flat. welded some nuts to the car. this will get finished welded on later., they just tacked there for now. this is the drivers side inner guard, you can see the guard support and the mount for the front bumper. So now the front is on , its all bolted, its firm, it has strong proper mounts, the bonnet is looking a bit better. we have a upgraded water bridge. and some bonnet stays. ! Fuck yeah I love finally having a shed again, I have been waiting for so many years to get stuck back into this project. ! This is my happy place making stuff in the shed at home!1 point
-
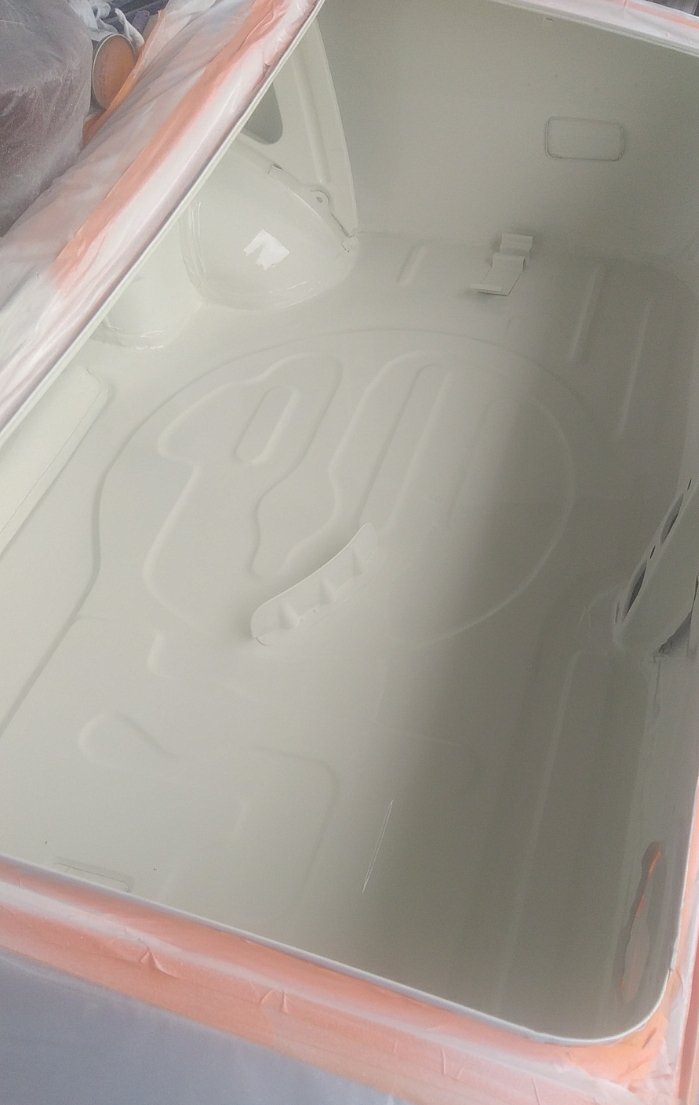
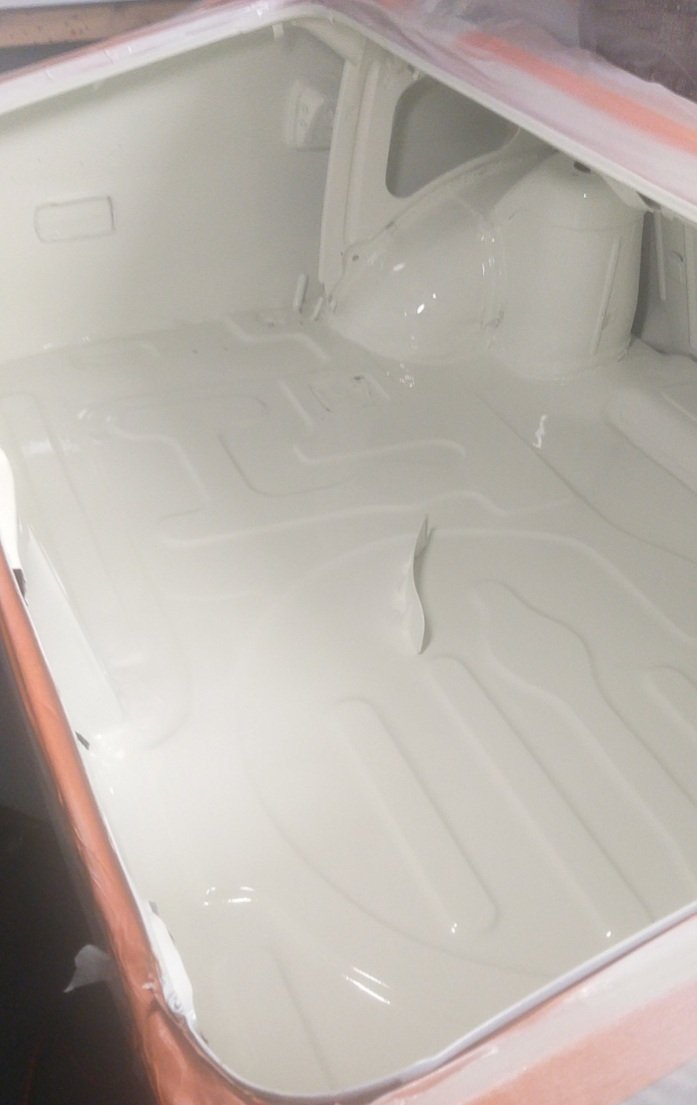
Boot all painted up now too, for a complete novice like me, it was pretty tricky getting into all the tight areas , but came out pretty good overall imo.
1 point
-
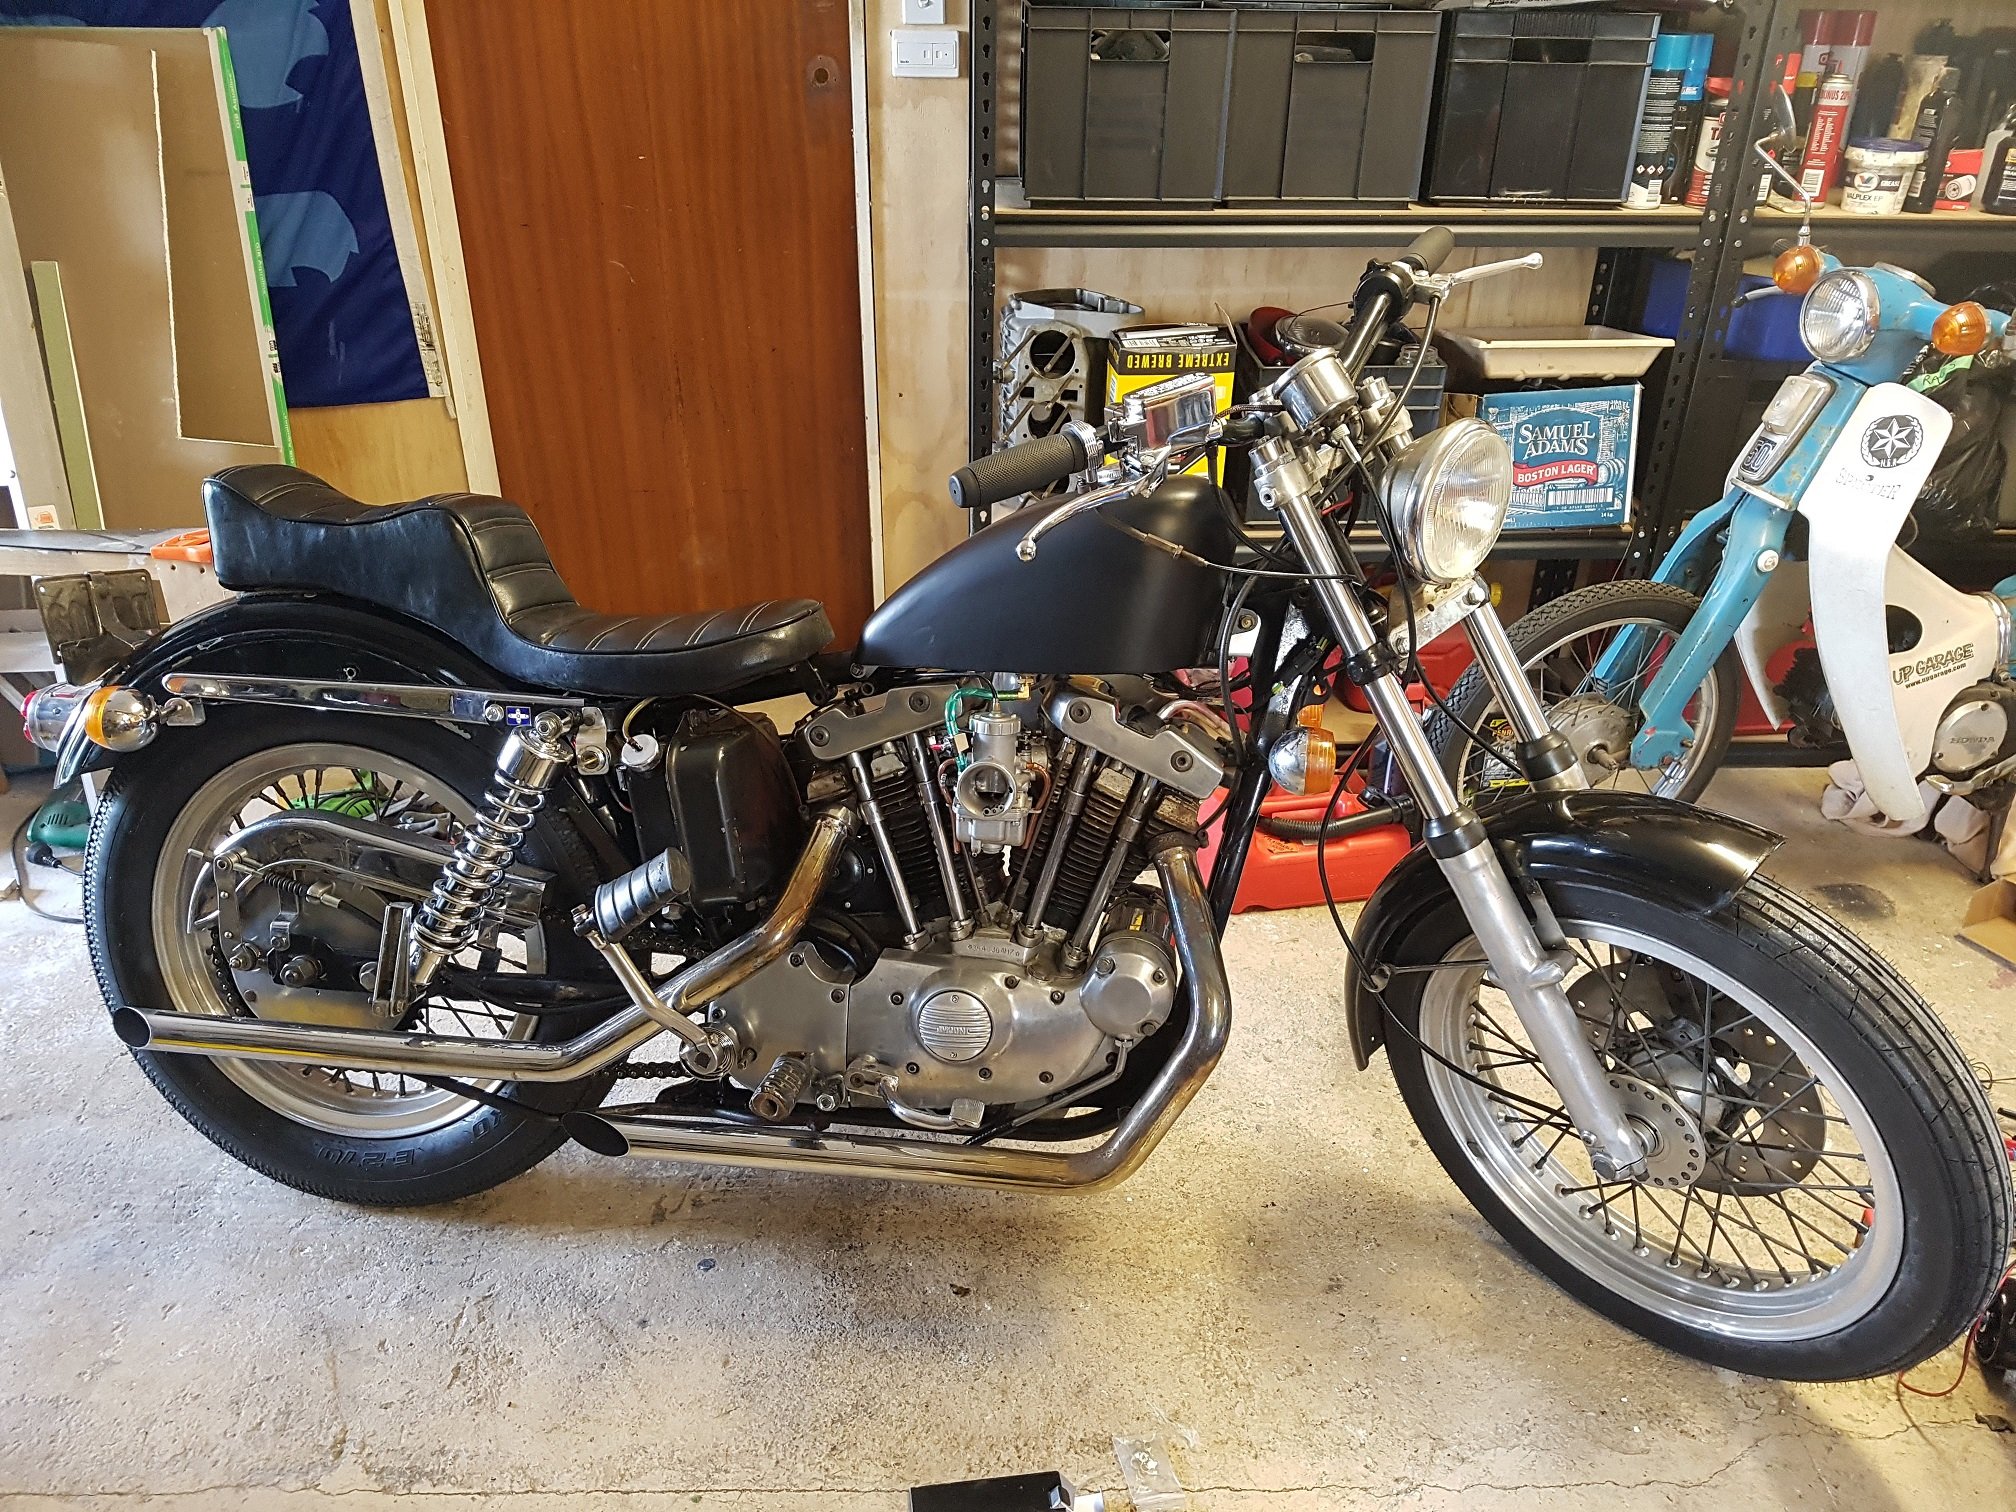
So yeah, kinda stopped taking pictures of things like wiring and the like. But fully rewired the bike. And installed an aftermarket regulator rectifier on the back of the oldschool generator. Also managed to get it running. What a cunt. Jesus, i've kicked over a few bikes in my time. But nothing as cunty as this. It can't be cos of the compression ratio, as these are like 8.5:1 or something. My japanese 4 cylinders kick over easy as. So must be the ratio or something. I'm not a small unit, and i can jump on the pedal only to bounce off due to it being on compression stroke. Mental. I gave the tank a quick satin black to get it complied. I have a full AMF sticker set in brown and orange to decorate the tank. So once its complied, i'll gloss the tank and pop the stickers on. Here is as it currently stands. I'm trying to get it complied in the next few weeks. Just chasing some paperwork misery. So will see how it goes. Once its complied, i don't know whether to cut it up straight away. Or enjoy it as is. Likely the latter, as riding it around the hood was a blast. Not only did i feel like a crim, it was actually really pleasant to ride. Will update my compliance process in detail as it unfolds.
1 point
-
Not as awesome and hectic as @Transom's beast, but I have one of those standard sized folders, they normally bolt to a bench and take up valuable bench space. I'd already done some strengthening mods, did a mod yesterday that I had been meaning to do for forever, took all of half an hour and most of that was finding the right size bit of box section. Just welded some box section to the feet of it, now it slides into the end of my welding/work bench. The bench weighs a lot so it is very sturdy once in there. Comes out easily, and I can hang it on the wall in between it's very occasional use, rather than having it in the way all the time.1 point
-
The last lot of work was to service the braking system as it wasn't quite right. In the test drives I have taken the car on the brakes have felt a bit off. The pedal is soft, with lots of travel and not much in the way of stopping. There is also quite a shudder when braking and the hand brake appears to only be working on one side. The plan was to replace the front pads and rotors and the rear pads, figuring the shudder is likely to be from the front, and the pads on the rear were looking old. The front rotors had some grooves in them, but no lip. I suspect the shudder was probably pad deposits from sitting, and may have gotten better with more use. The rotors were quite rusty through. Two 12mm bolts hold the caliper to the slider pins. Removing these allows the caliper to swing up and over. I was really worried about these rotor retaining screws as they all look quite chewed up, but they came out with no issue. I used a screwdriver bit in my impact wrench to undo them. A quick clean of the hub face and on went the new rotor. The old pads did look quite recent and had little wear. It's peace of mind to replace them though. The slider pins were well greased and sliding freely. I cleaned and regreased them anyway. These little plates that the pads ride on weren't in good shape though. Both were gunged up with old grease and brake dust. I've cleaned one half of this one with a wire brush. After cleaning all the plates up, giving them a coating of copper grease and refitting them to the bracket it was time to fit the pads. I would have liked some Mintex pads, but they aren't easy to get here and are really expensive. The piston in the caliper was pressed back with a clamp, and the caliper refitted. The bracket to hub bolts get torqued to 100NM, and the caliper slider bolts are 32NM. Rinse and repeat for the other side. The rears are a little more of a pain due to the handbrake cable. Mmm webs. This isn't even the worst, the other side was grosser. Lots of fly spray and vacuuming made it safe to work. The pads had plenty of meat but were old Lucas pads, maybe original to the car? I removed the handbrake cable pins because they are known for rusting up, and sure enough, mine was very stiff and rusty. I cleaned it with a wire brush and refitted it with plenty of copper grease. The slider pins on each side were stiff and covered in dry old grease. They weren't seized but didn't move freely. These were thoroughly cleaned and greased before refitting. The other side was much of the same. One of the boots on the slider pins hadn't been fitted correctly but thankfully still kept dirt out. The grease was still hard as a rock though. The boot should go right to the head of the pin Everything was cleaned and greased, and the piston in the caliper freed up and wound back in. The rear rotors aren't looking good. They have no lip but seem to be quite pitted. I might revisit these and if a few good hard stops don't clear them up, replace them. The handbrake mech on each caliper moves freely, so they should be working OK. I gave them a good coating on WD40 to help them move nicely. I bled the brakes next. I flushed the system, but I don't think I needed to. The fluid was quite clear and looked like it had been done somewhat recently (despite one of the bleed nipples being blocked and needing removal to clear it, and the two rear ones being rusty and taking a bit of force to shift). Bit of a mystery that. The bleed sequence with the Bosch ABS unit is LH FR, RH FR, LH RR, RH RR. The pedal still has a bit of travel but does feel firmer now. I still can't drive the car because the brake light switch is faulty but once I can I will do the bed-in procedure. I tried to adjust the hand brake after pumping the brakes 20 odd times as recommended, and the adjuster had been wound all the way out. I got it from bout 10 clicks down to 5-6 but I'm still not sure if it's working evenly. I really need to bed the brakes in first, and then adjust it again and see what happens. One other thing I noticed was that the rear muffler was hanging on by one hanger. Some WD40 and a bit of wiggling and I had it back in place. Hopefully this helps the placement of the muffler as it's a bit on the piss and doesn't match the cutout in the rear splitter. The whole exhaust is a bit woeful. I might need to take it in somewhere and have it fixed properly. It's been "modified" and has no mufflers except the back box. Since the car has all the wheels off anyway, now is a good time to replace the tyres. I find tyres can tell a lot about a previous owner. A high powered sports car like this, running on ditch finders on the front and mismatched old and cracking tyres on the rear.... the previous owner was an idiot. Yes, that is date coded 2008. All the tyres are the wrong size, being 185/55R15, not the turbo size of 195/55R15. I got the new rubber the other day, and I just need to book it in and have it fitted. Yokohama AD08R. Pretty serious street rubber. I'm hoping they are as good as the Hankook I had on the Corolla (which aren't available in this size). I'm looking forward to putting them through their paces. I will hopefully have the brake light switch this week, and tyres fitted next weekend. I might even try for a WOF when I get the tyres done and see what happens.1 point
-
Does one have to formally apply to the fuhrer for permission to spectate?1 point
-
Cleaned it up. Stoked with how they turned out.1 point
-
Cleaned it up a bit. Took some rough measurements and it looks like it has shrunk the right amount. Machine allowance. About 4-5mm.1 point
-
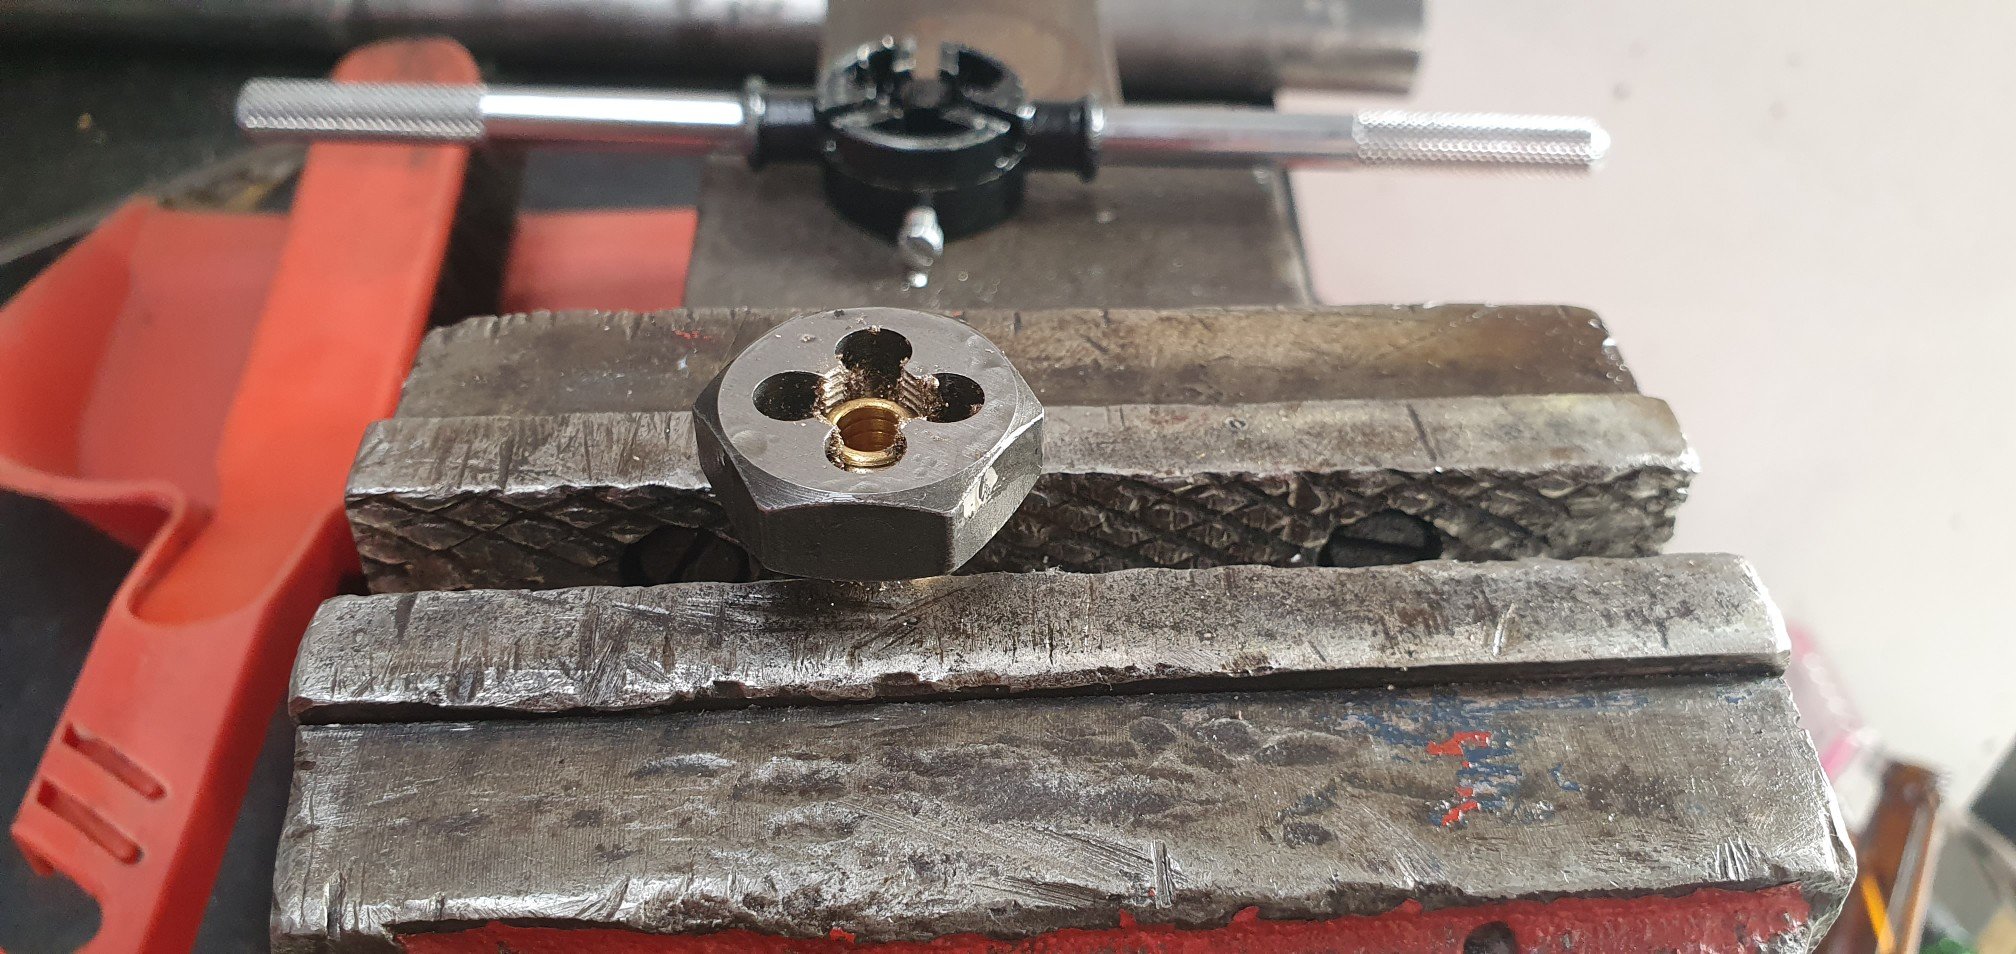
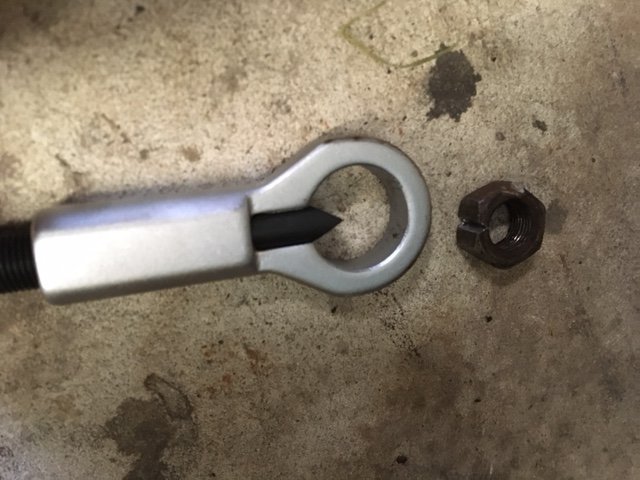
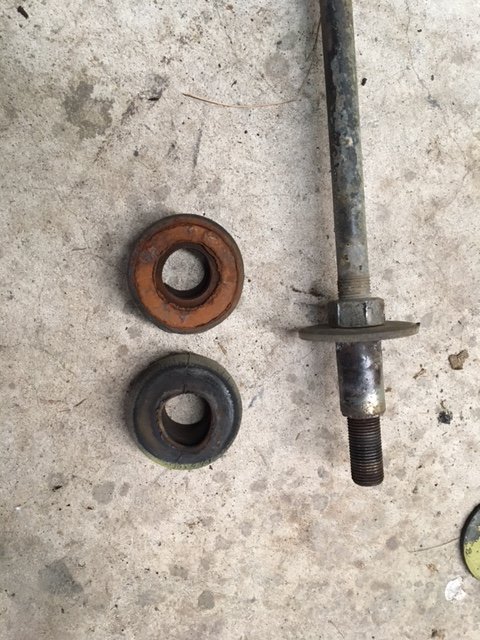
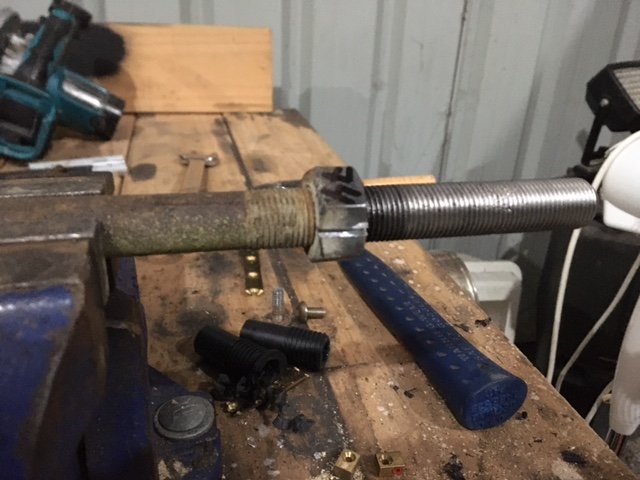
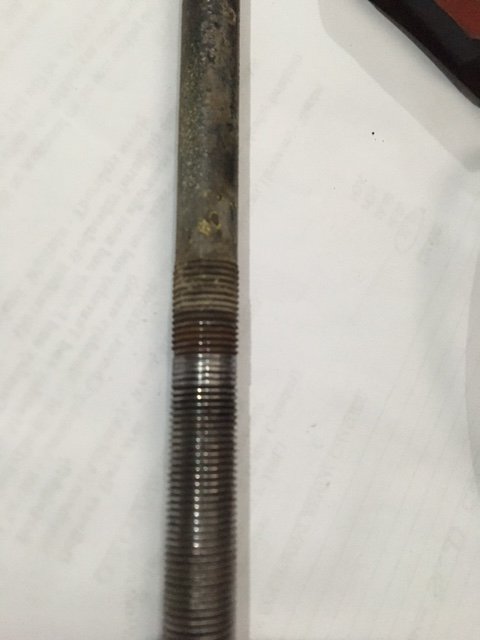
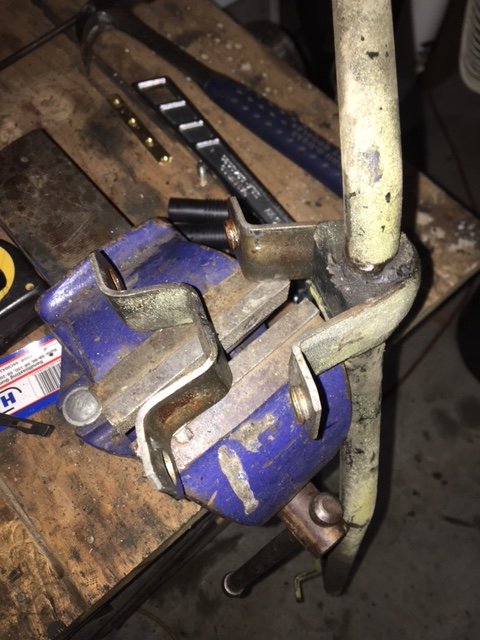
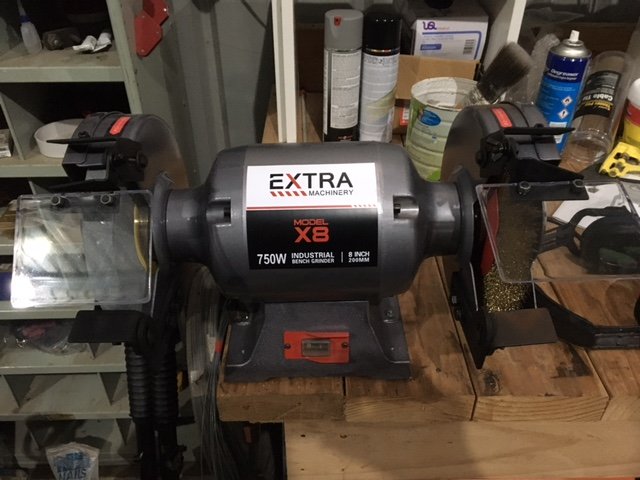
On with more serious work. Today I removed the castor rods (“thrust rods” in the manual). The nuts were no match for my new toy. The bushes are well past their prime: Then it was off to the vice to strip them. The spacer tubes came off far more easily than their crusty appearance suggested they would. Then it was time to remove the inner nut. Before attempting to wind them off, I employed my newest power tool to clean the threads. Say hello to my new friend. 8 inch bench grinder. My first mod was to buy a wire wheel for it. It’s great, but it makes it shake like MAD. I have stuff walking all over the bench whenever it’s running. Anyway, clean threads or not, the nuts wouldn’t budge. So, I cut a starter slit in the side of the nut And then finish the job with the nut splitter. My heart sank when I wound the nut off the right hand rod. The thread is absolutely stuffed. @azzurro, from all the 125s you harvested bits from, did you happen to keep any of these? Moving on, the swaybar is very easy to remove from the vehicle. I found the clamps on the inner (chassis) bushes very hard to split, but I got there in the end. It needed a beating with a sacrificial narrow flat bladed screwdriver. Now I’m looking forward to using my other new friend to clean up all the brackets and bits
1 point
-
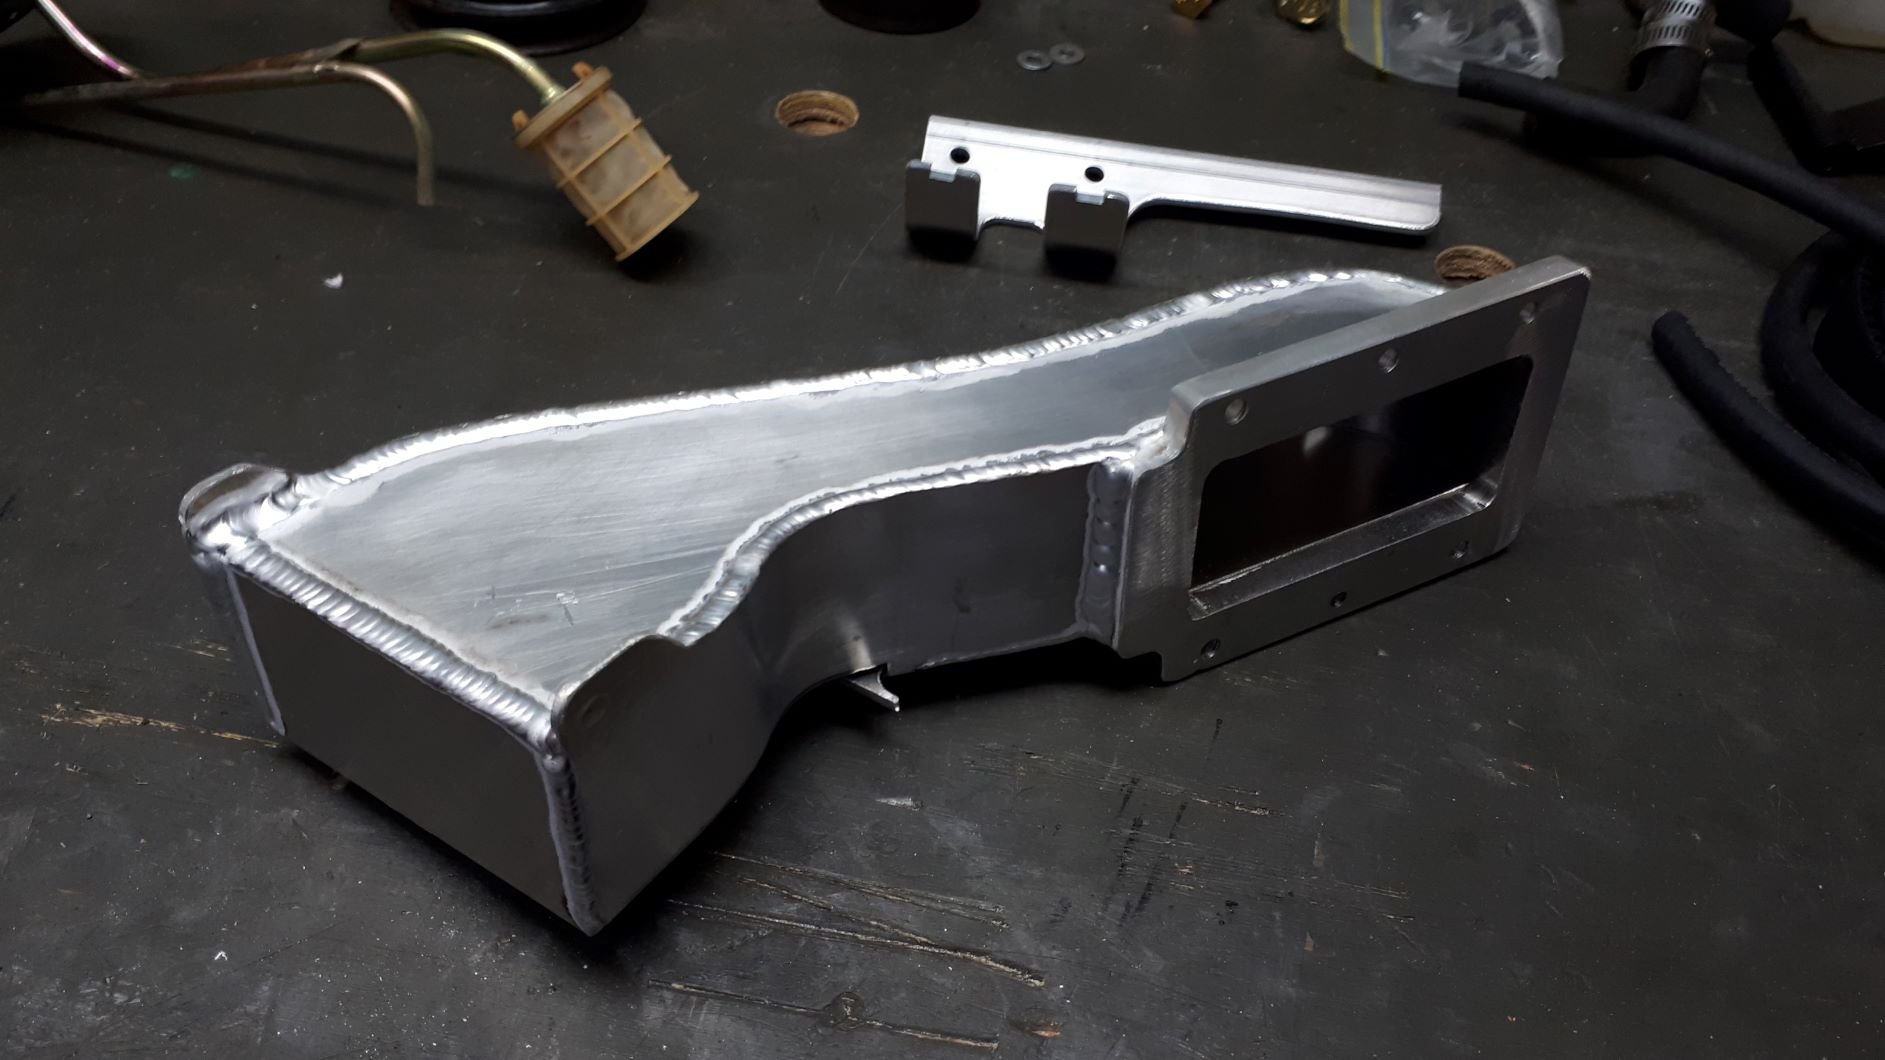
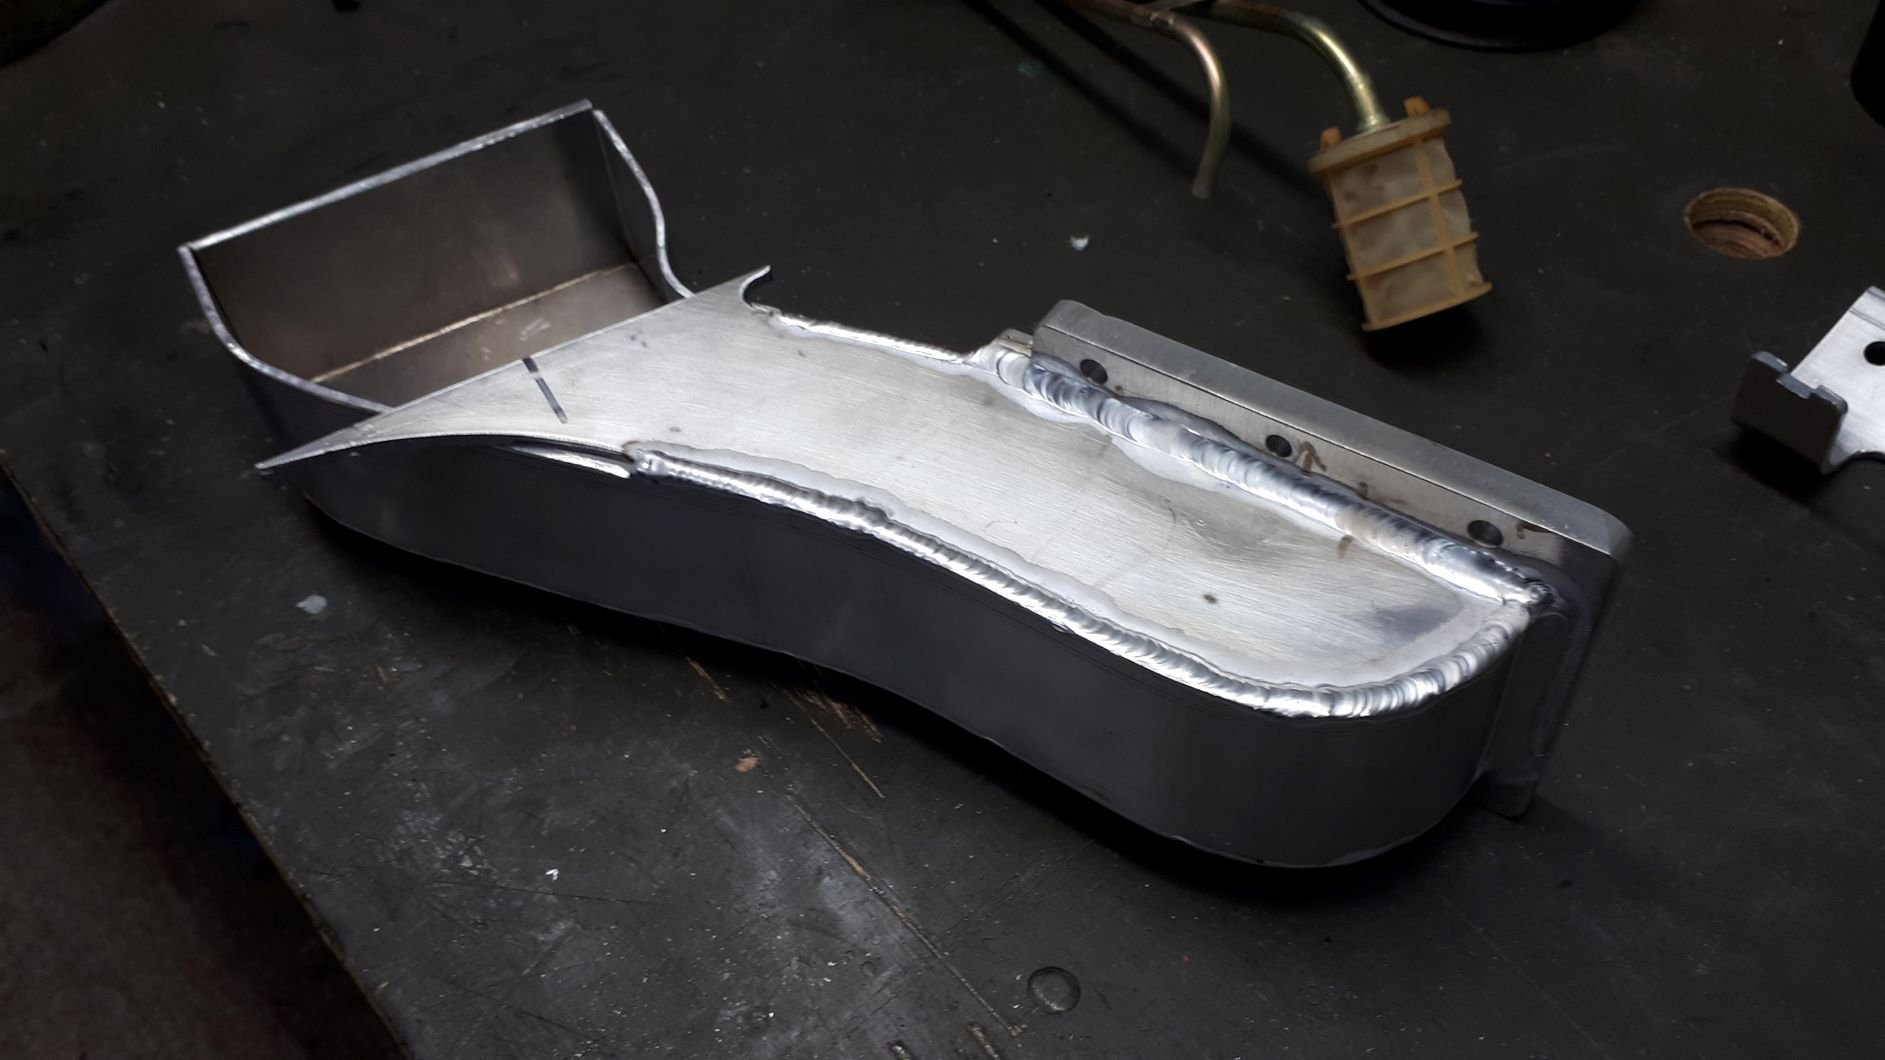
Another dozen Steinlager to the man with the aluminium welding skills and another little bit is stuck together.
1 point


.thumb.jpeg.910c6632f6e66e8cba89476e83b41634.jpeg)


.thumb.jpeg.384ff72c8d2b0ee0d34a7bdedb55bdcf.jpeg)


This leaderboard is set to Auckland/GMT+12:00