
Leaderboard


Popular Content
Showing content with the highest reputation on 08/28/19 in all areas
-
Been dailying it for nearly 4 months now! Awhile ago I took it to Napier and got Simon from Airride NZ to paint on some whitewalls. Looks so much better! A couple weeks a go I drove it up to Auckland. No issues, other than the speedo dying on the way up in Thames. Have been emailing Classic Instruments about the gauge, to see if they can find whats wrong. They have since stopped replying after I did some tests and they figured out it's completely dead. Not the first issue with it either. Have already sent it away to get fixed once, as the odometer wasn't working when I first got it. Not impressed, since they aren't exactly cheap! Brought back an engine and gearbox, a couple storage boxes and a set of wheels from Auckland. The Hoonigans also shared it on their Instagram. Some comments are pretty entertaining haha. Have some bear-claw latches to install one day, as the doors are a pain to get closing properly, keep popping open and rattling. Need to sort some electric solenoids to lock the doors first though.14 points
-
Last weekend me and @hampie were clearing out a bunch of junk at the dump and I spotted the back end of an fa50 poking out of the crap for sale section. Heather being a fan of all things scooter was on it in a heartbeat and we ended up lugging the poor old thing home. It is pretty beat up and missing a few parts so I jumped on trade me and bought a second hand piston and barrel (probably rooted but worth a shot), foot pegs and kickstart lever. Hopefully I can get it running without much drama. I am still missing a exhaust and ignition key/barrel so if anyone has one lying around hit me up! Plans at this stage are 1: Get it running 2: Make it legal 3: Seat cover replacement and general tidy up 4: Try make a spanny and general performance tinkering
 9 points
 -
Carried on with the wiring, cleaning up all the old connections and added in modern plugs. Added in a regulator/rectifier to replace the old Honda ones. Drilled holes in the underside of the clip on bars to feed the wires out and down into the headlight. Trying to keep the wiring tidy with some going through the centre of the frame. Had my other Honda round to compare factory spec to cafe spec.
9 points
-
Carbon fibre tube and titanium tube tent pole for my bivy Dunno what the original looked like or weighed. It's roughly 10g less than a comparative length of DAC alloy tent pole. I can probably shorten the titanium a bit and make that 15.... Was cheaper to make them this way then buy the alloy pole anyways
8 points
-
Stripped most exterior stuff off, except for the doors. Have cut off the a-pillar rain gutters after ajg193's suggestion, cleaned up all the rust underneath and plug welded them back on. Found some spots of rust on the hatch after removing the window. Most of it is just surface rust. Got carried away and stripped all the paint off the exterior side. Previously someone has stripped it and gone over all the rust spots and ground them out. Which I wasn't too happy about, but it seemed to have stopped it rusting further. Has a little patch welded in on the lower right as well. This top bit, just below the water squirter had a few small holes. Cut it out and made a patch to weld in, after I cleaned up the rust inside and painting it. All welded and cleaned up. Picked up a new engine! 4AGE 20V Blacktop!!! And a J160 6 speed. It already has the SQ Engineering adapter plate. The clutch/pressure plate and starter is already set up ready to bolt the two together. Pulled out the old 4K. Empty and dirty engine bay. Gave it a steam clean, came up heaps better. Test fit of the J160, definitely going to need to pull out the grinder! Laser cut out a 12mm stainless exhaust flange. Planning on building some high-rise headers at some stage. Ordered some goodies from SQ Engineering. Bought some Cusco AE86 engine mounts. Also have an AE86 water pump set up and some other bits on the way.8 points
-
That's pretty cool, how do you make em? Reminded me of this youtube video saw the other day, which is ridiculously awesome6 points
-
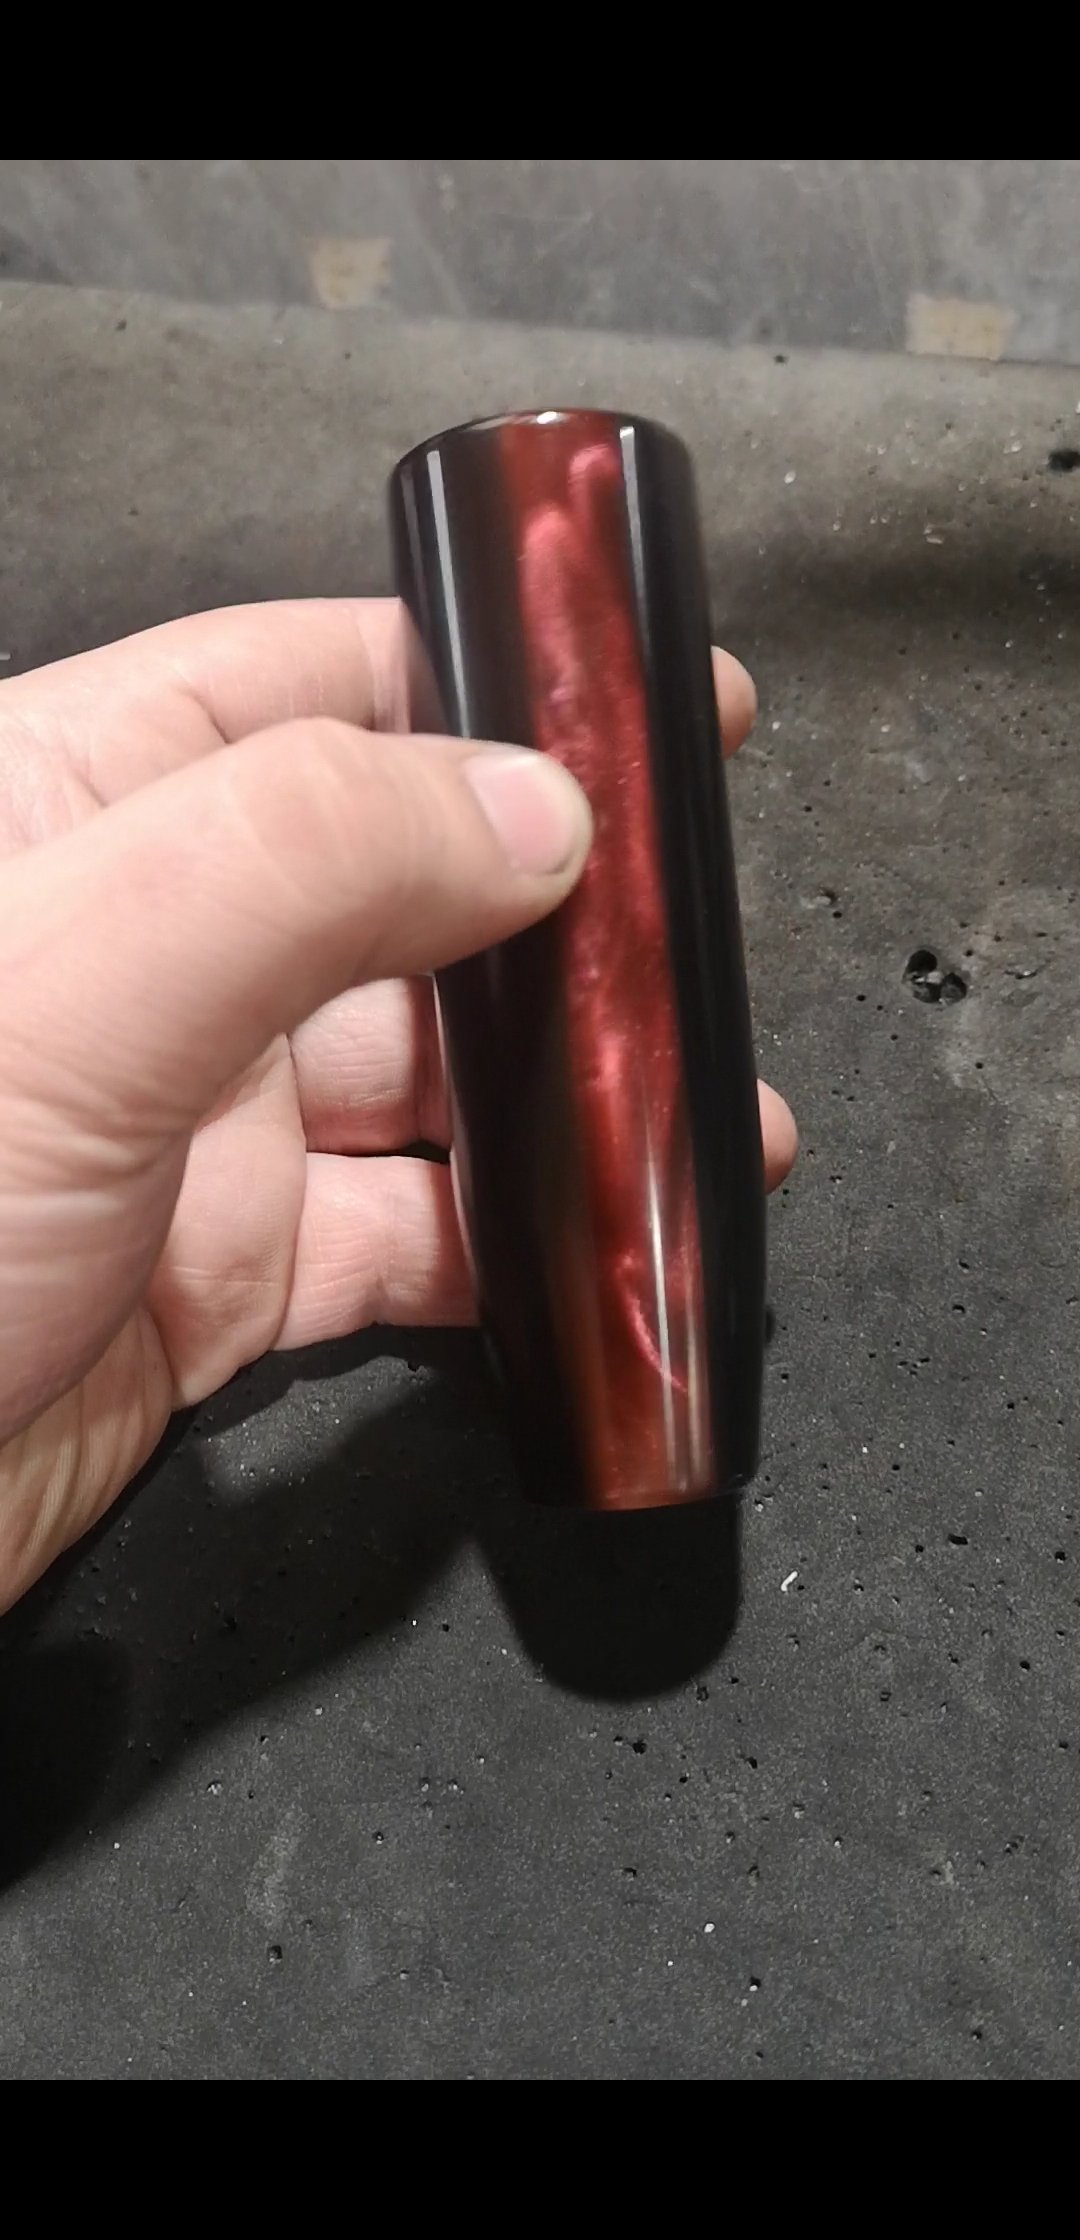
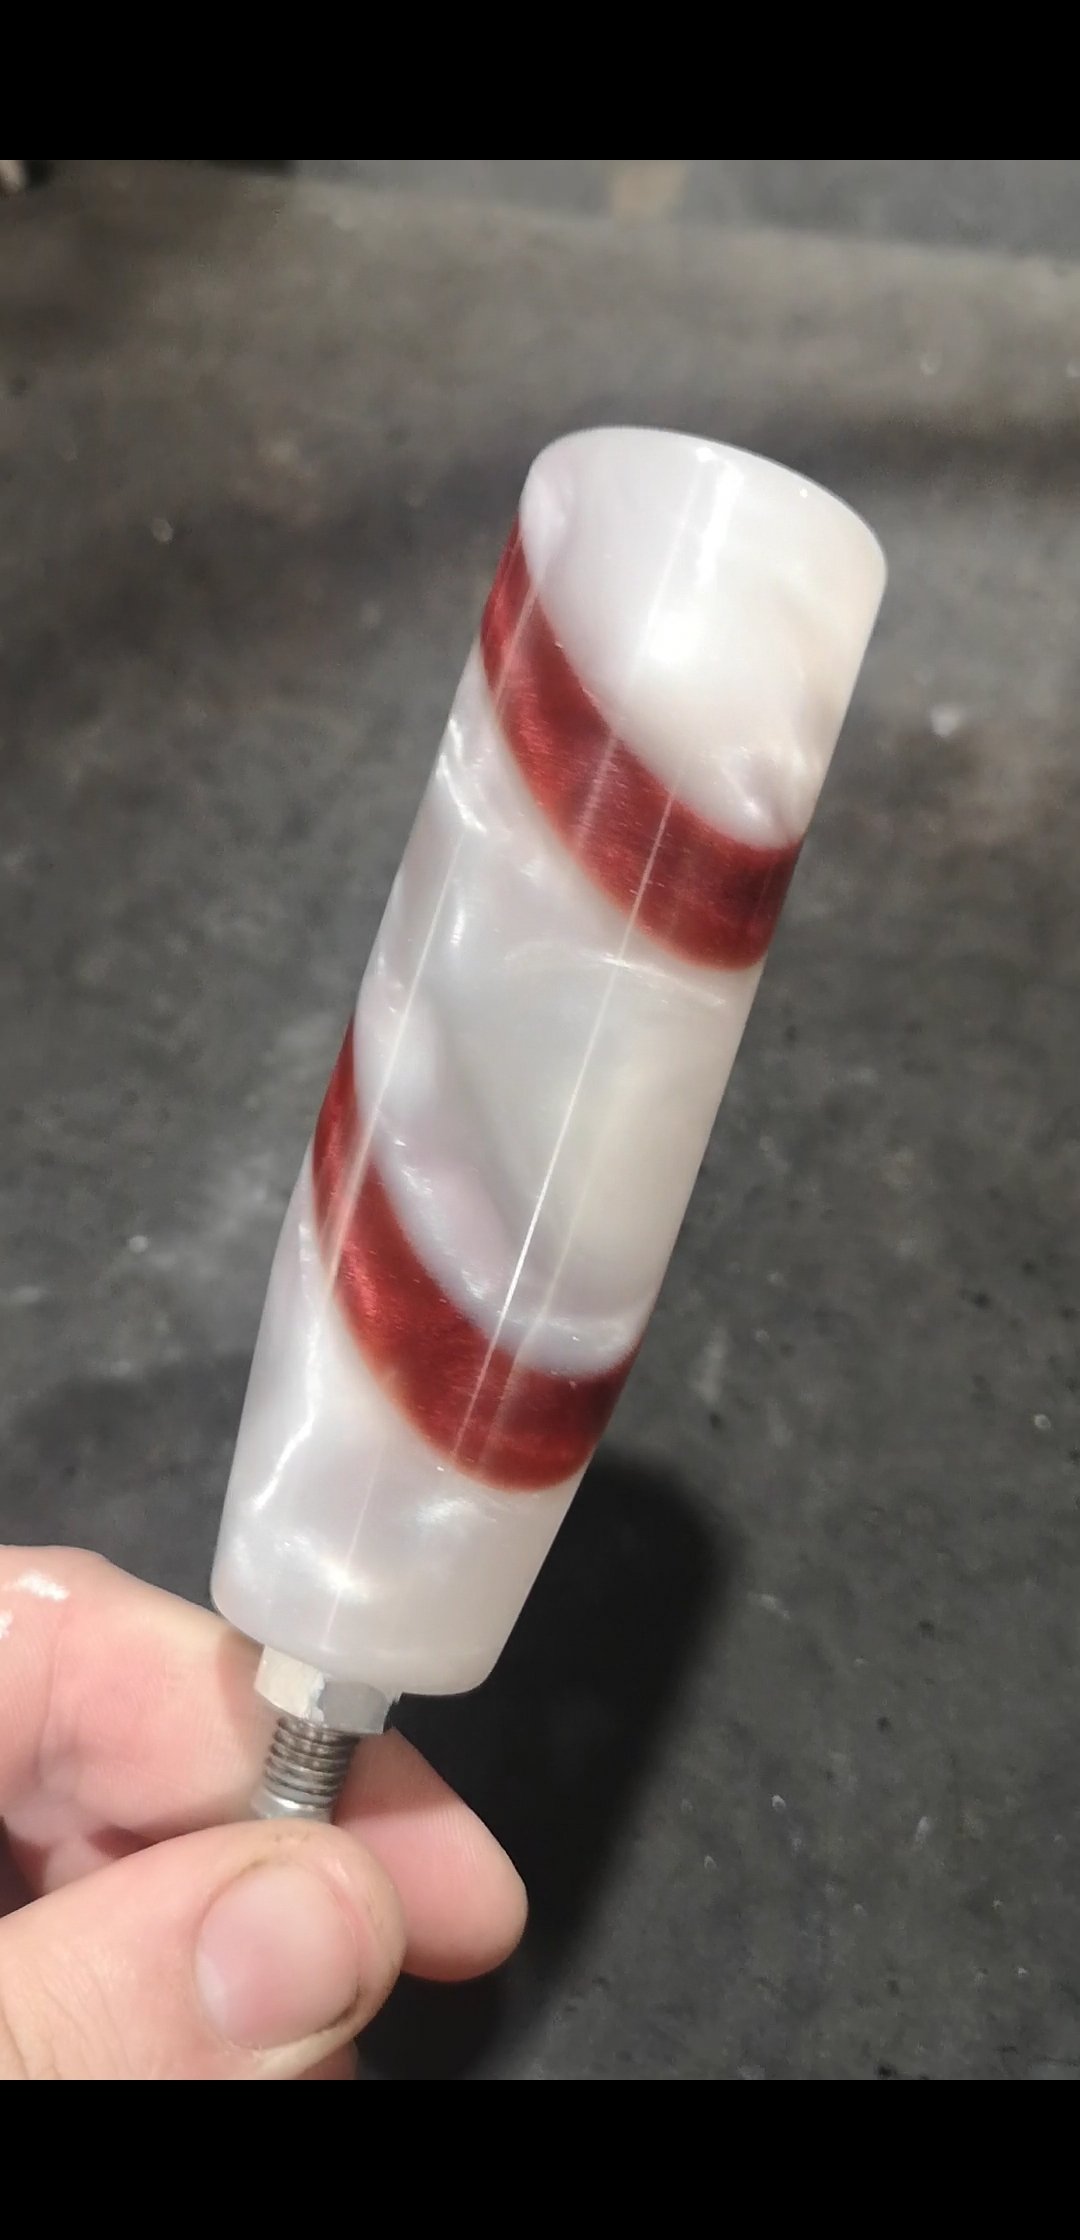
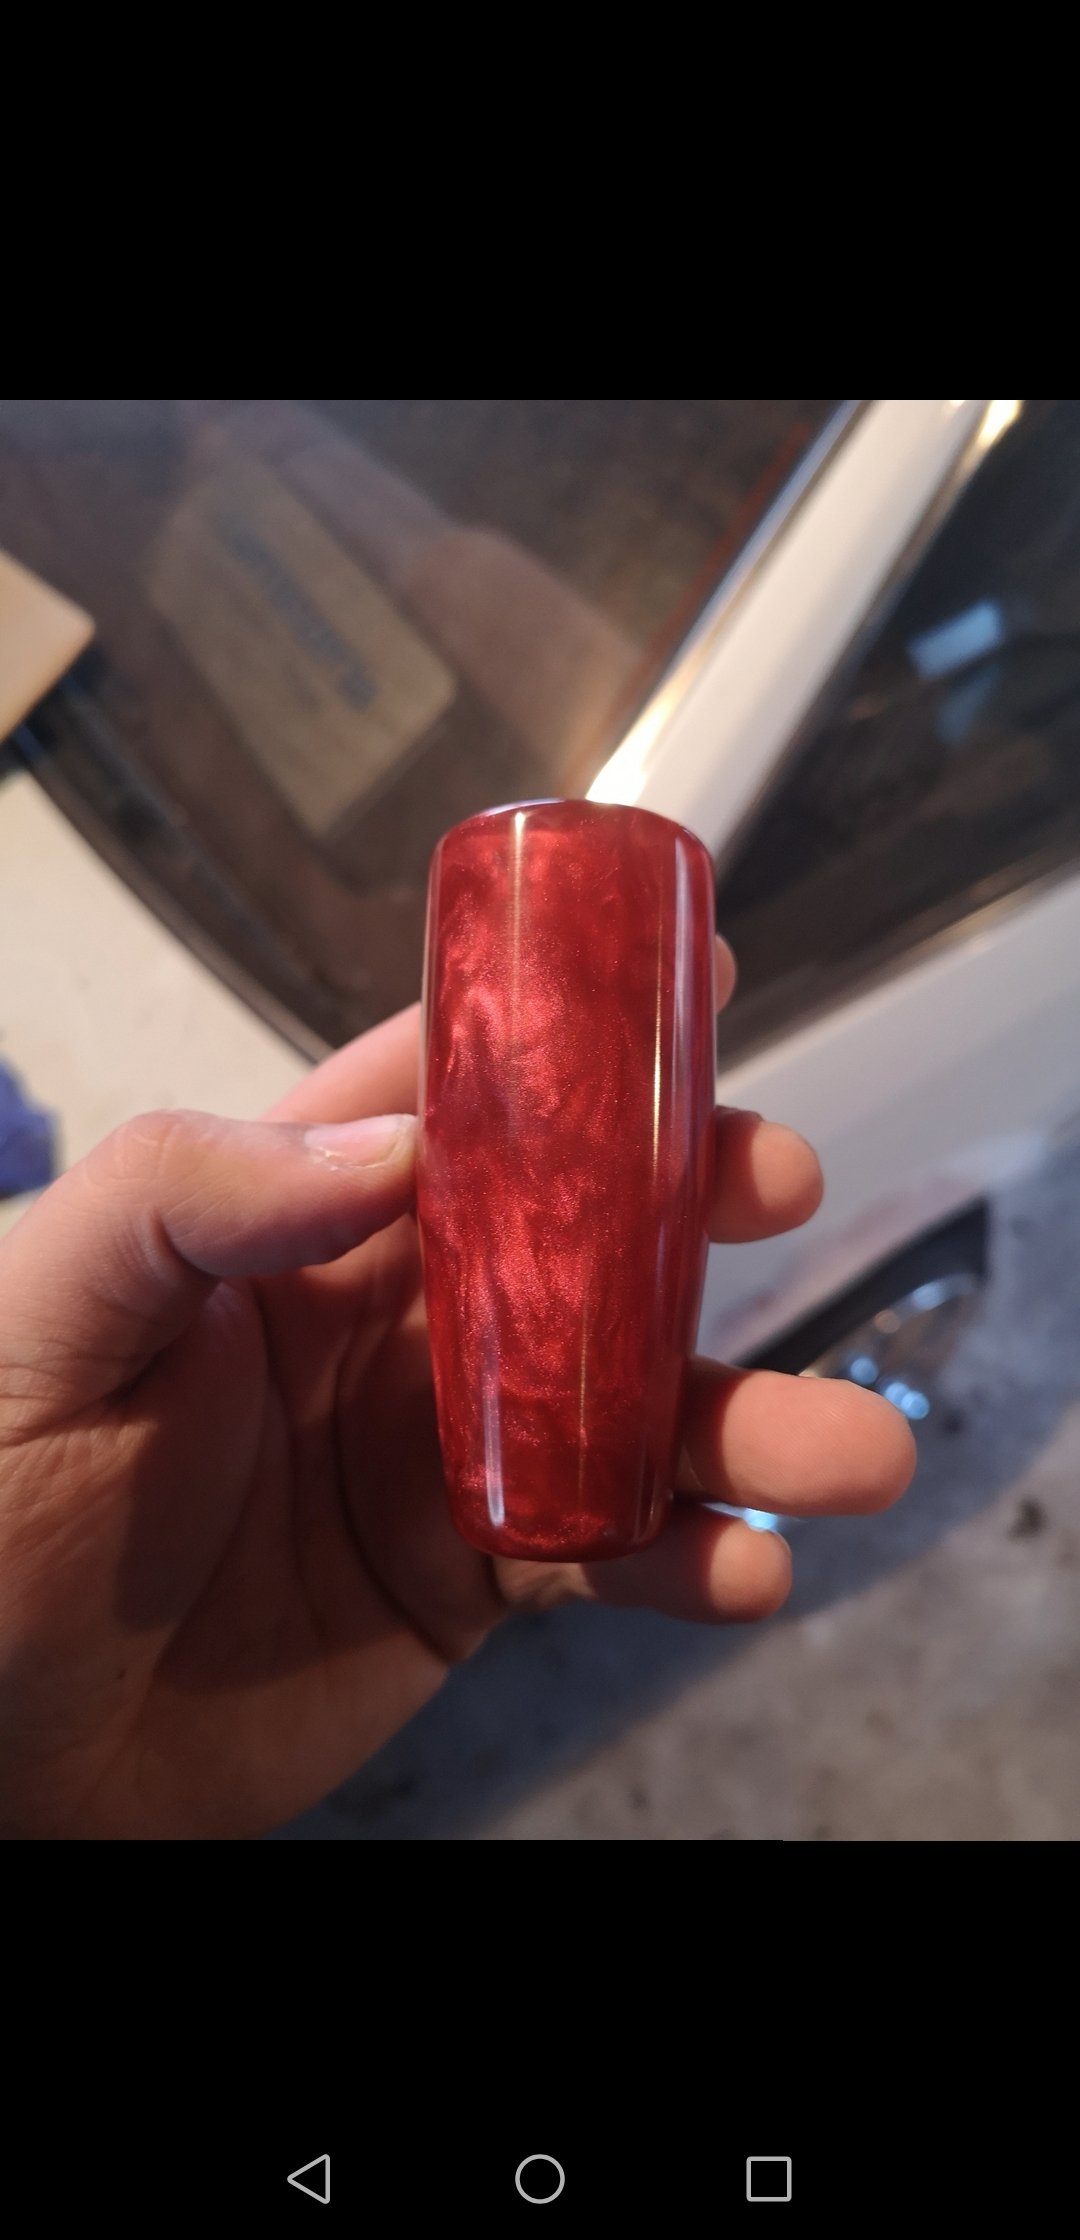
Been making some gearknobs recently for the intention of selling them eventually. A couple of done so far
6 points
-
This is the last one I did a couple of years ago (Pic of rally Mini at the bottom of the post). The one before was the SAS Land Rover that was sort of painted pink, aka the Pink Panther: Working on a Revell 1/24 Routemaster Bus, which has stalled for a couple of weeks as I have to make all the seats...
5 points
-
This happened today, and I bloody missed it happening. Don’t imagine it’s the first time around the block though being a 5 digit odometer. *next update in 99,996k
4 points
-
It would be a shame to ruin the sweet lines of the 99 with pins. Please persevere. I'm sure between now and the time you actually need to go for a wof you'll have found spare parts elsewhere to sort it.4 points
-
Finally finished off the twin carb set up. I made/modified the twin choke cable. Picked up a gyro splitter from a bike shop, pulled it apart and e,tended the tube for more throw, replaced the cables and outers and attached it to the stock cable and carbs... I do have a second w clip now to hold the cables to the carbs if the tape fails.. Then the second airbox finally turned up so I pulled the factory trumpet/ram tube out and mounted it to the carb with shorter bolts, fitted the unfilter socks and boom.. complete. I do want to order a different profile needle for the carbs. But that's all for now.. Just gonna send it
3 points
-
Shit its good driving this thing again. The picture above shows how much lower that middle muffler sits compared to the rails. You can spot it poking underneath. This will need to be priority one if i want to go any lower. Also the 3 speed auto hates hills... more than i remember3 points
-
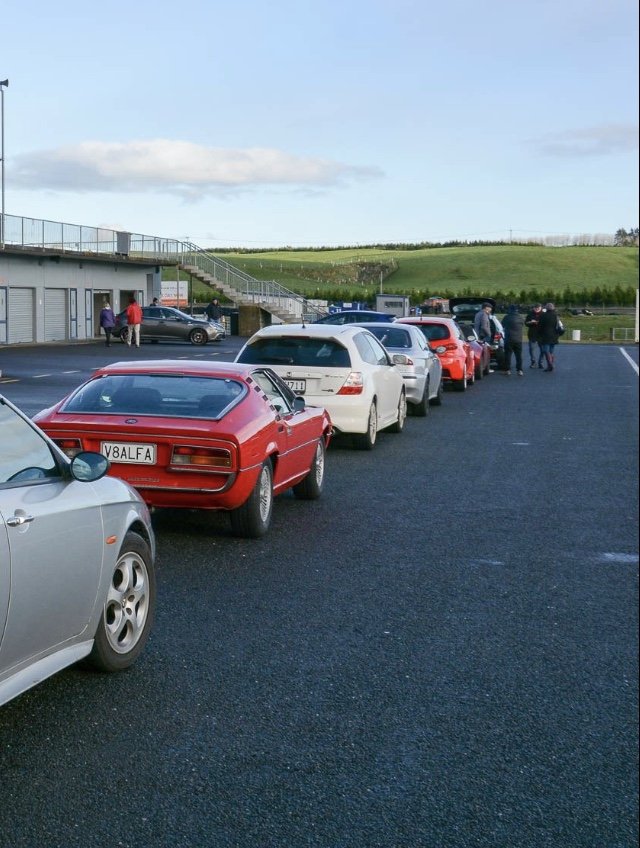
It made it in a few magazines recently. Performance Car in the 4 & Rotary Jamboree section. Petrolhead in the Beachhop section. NZV8 Beachhop Edition. And the recent NZV8 in the editorial. Had the transmission pulled apart and the forward clutch was burnt out. After waiting a month for the trans to be rebuilt and getting a price back, I decided my Dad could have the rebuilt one and I'd pull out the one that was bolted up to a dummy engine in one of his projects. It looked to be in good condition from the outside. Grabbed the bits I needed off my old one and swapped them over. Hooked it all up and put some new oil in. Went for a test drive and it goes way better than it has ever had!! Has been my daily for the past few weeks (sorry neighbours! The 6-7am coldstarts with the compressors kicking in must get annoying haha), haven't had any major issues! Have done over 1000km in it since the new trans has been in. Went out last weekend and took some decent photos of it.3 points
-
Spent some time unbolting things. plan is to remove the tray, then the cab and strip everything off the chassis. my idea is to get two massive saw horses either side of the cab. Jack the cab up and slide some 6x2’s between the two. Then roll the frame out still on its wheels. bit of a major so if anyone has any other ideas let me know.
2 points
-
You'll have to walk around to both sides to release the pins anyway?2 points
-
Flush ones?
2 points
-
Suspension done. She’s sitting kinda high considering she’s on 2” blocks. So I figure reset leafs is on the cards in the future. Full brake rebuild done with new slaves and shoes in the rear and rebuilt calipers and pads in the front. Rocking the black steelies on the front and an alignment has sorted out the geometry issues. fuel leak has been nailed down to a gasket on the sender. Which will be replaced when the new sender is fitted. wanna recover a bit from the ass reaming my wallet has suffered before the next round of changes. rad. And rear wheels are next on the to do list. Door cards. And speakers and we should be all go for a while. minor bumps and scrapes are gonna be a weekend job with my best mates dad whom happens to be a panel beater. Then rock the primer gray patches of awesome for a while while the engine rebuild/replacement gets sorted so we can gun the whole thing in one go while the motor is out. That’s the rough plan anyway.
2 points
-
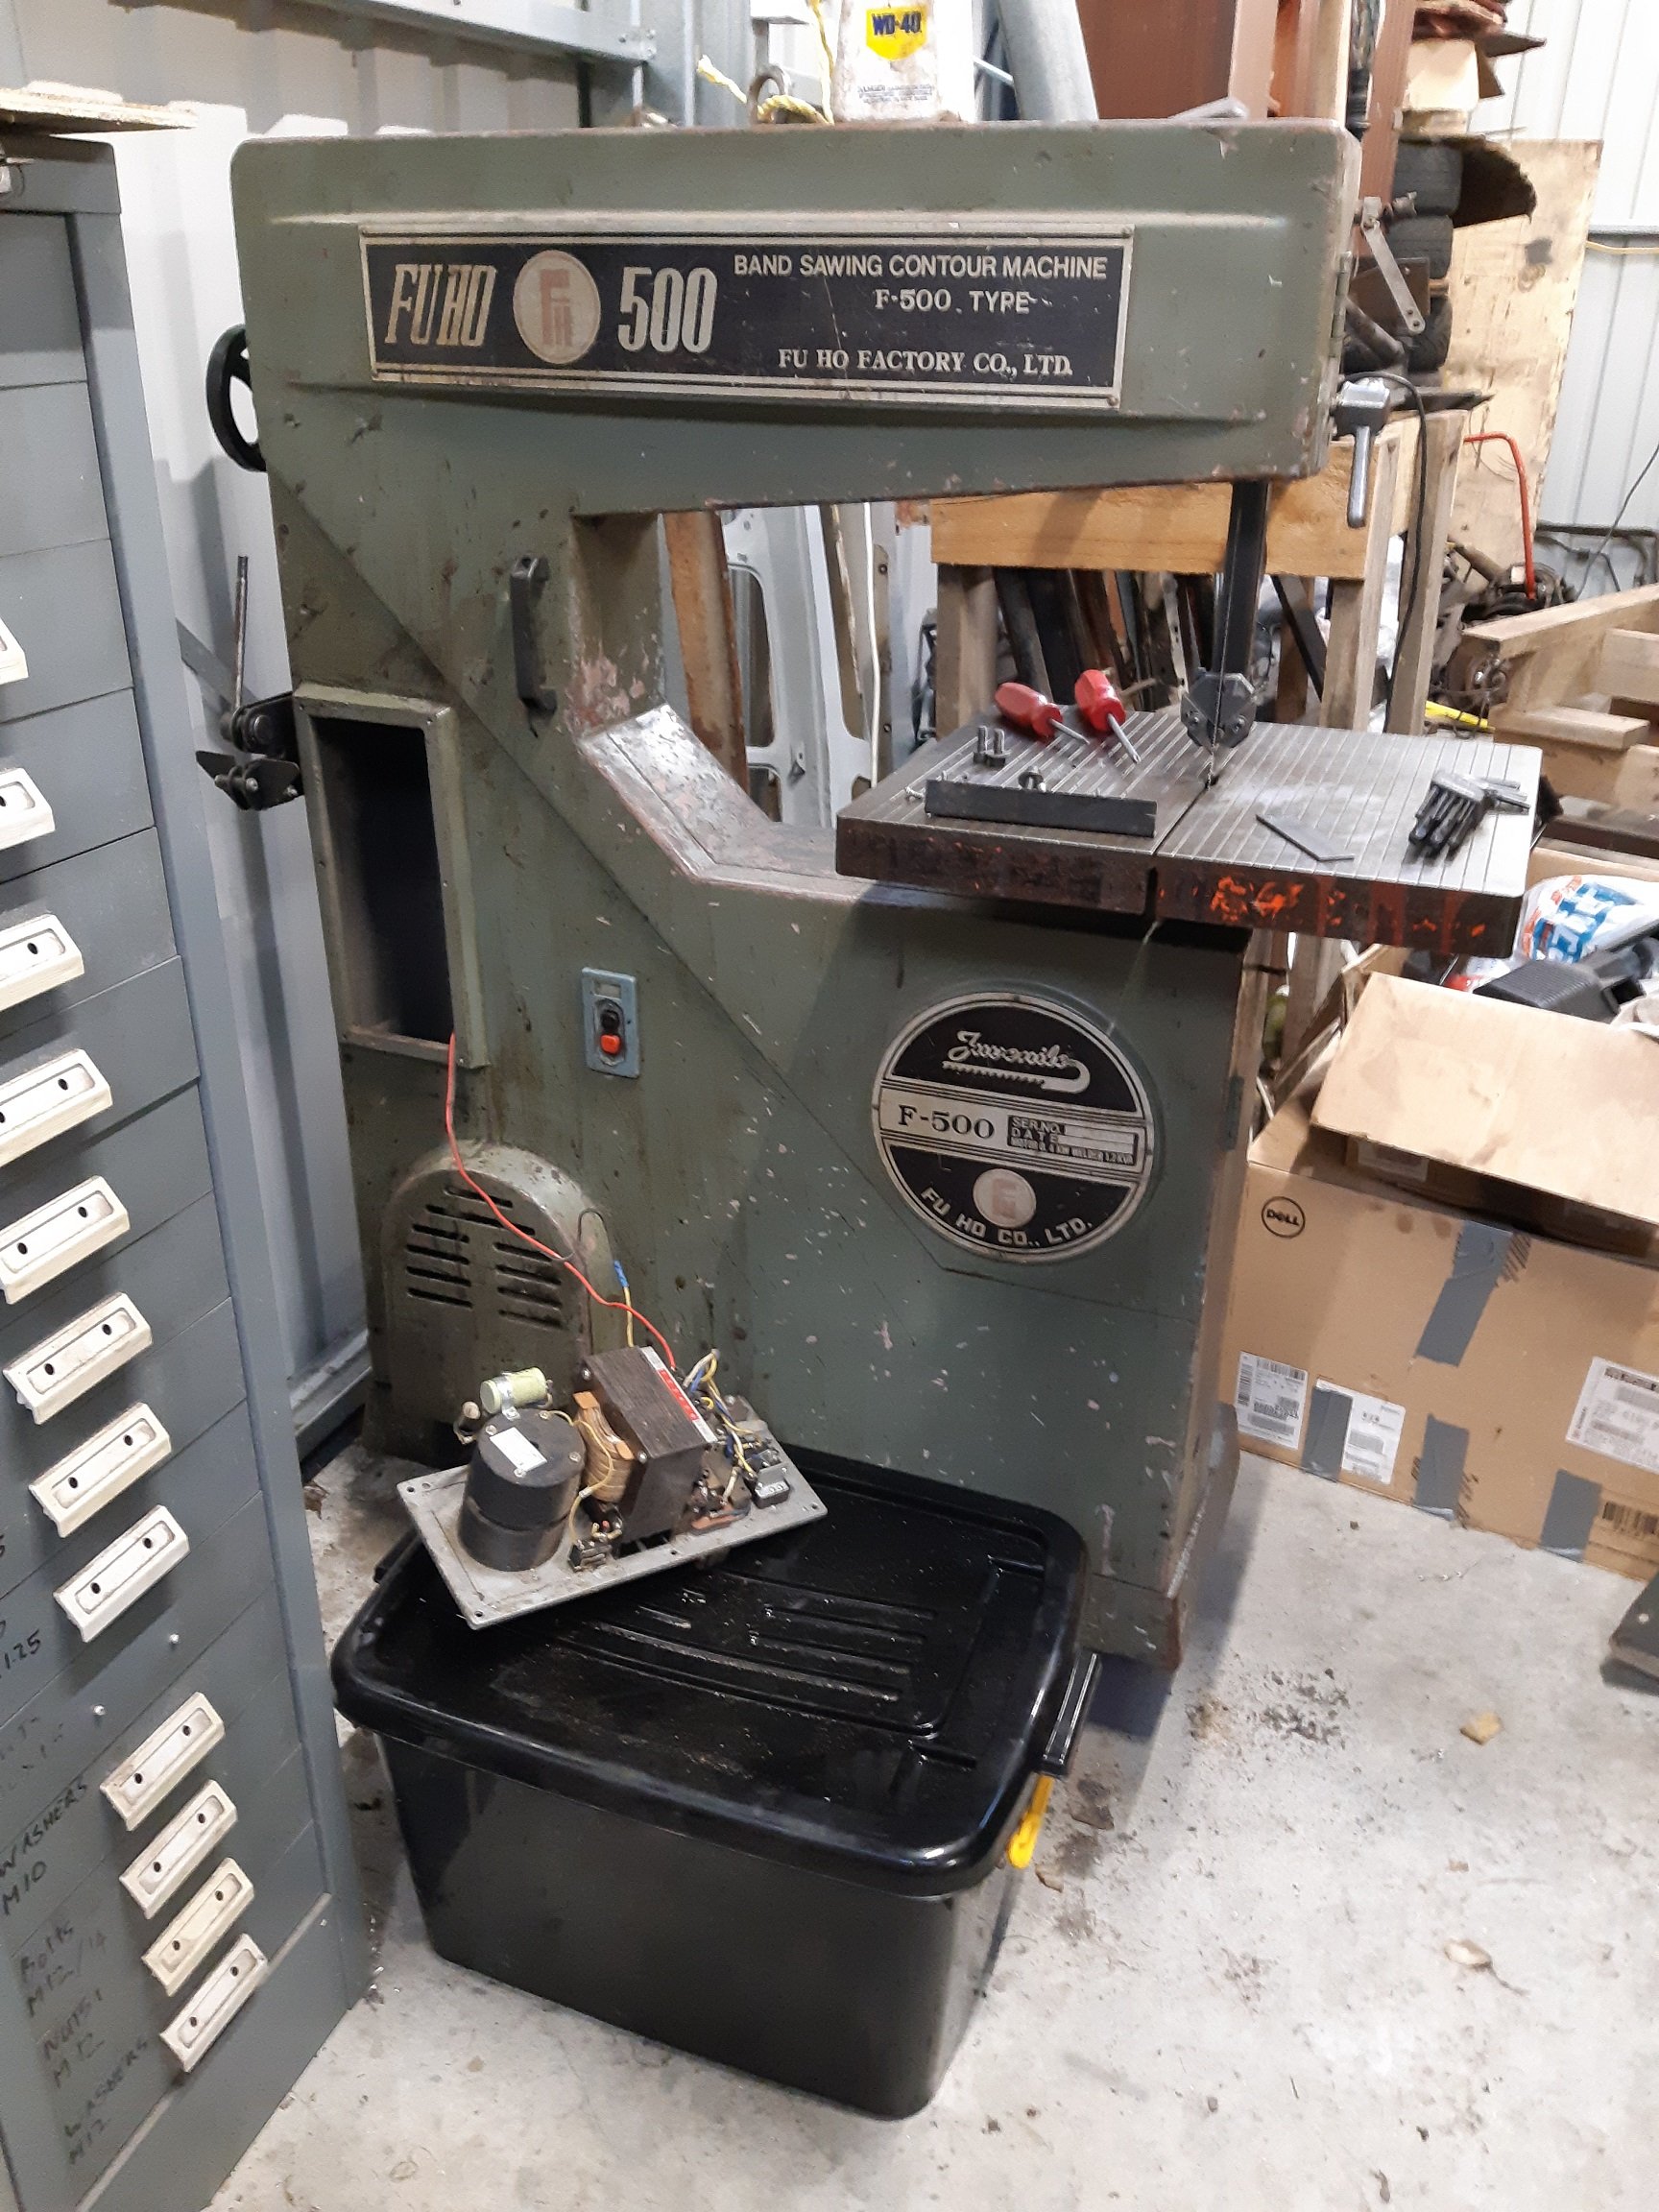
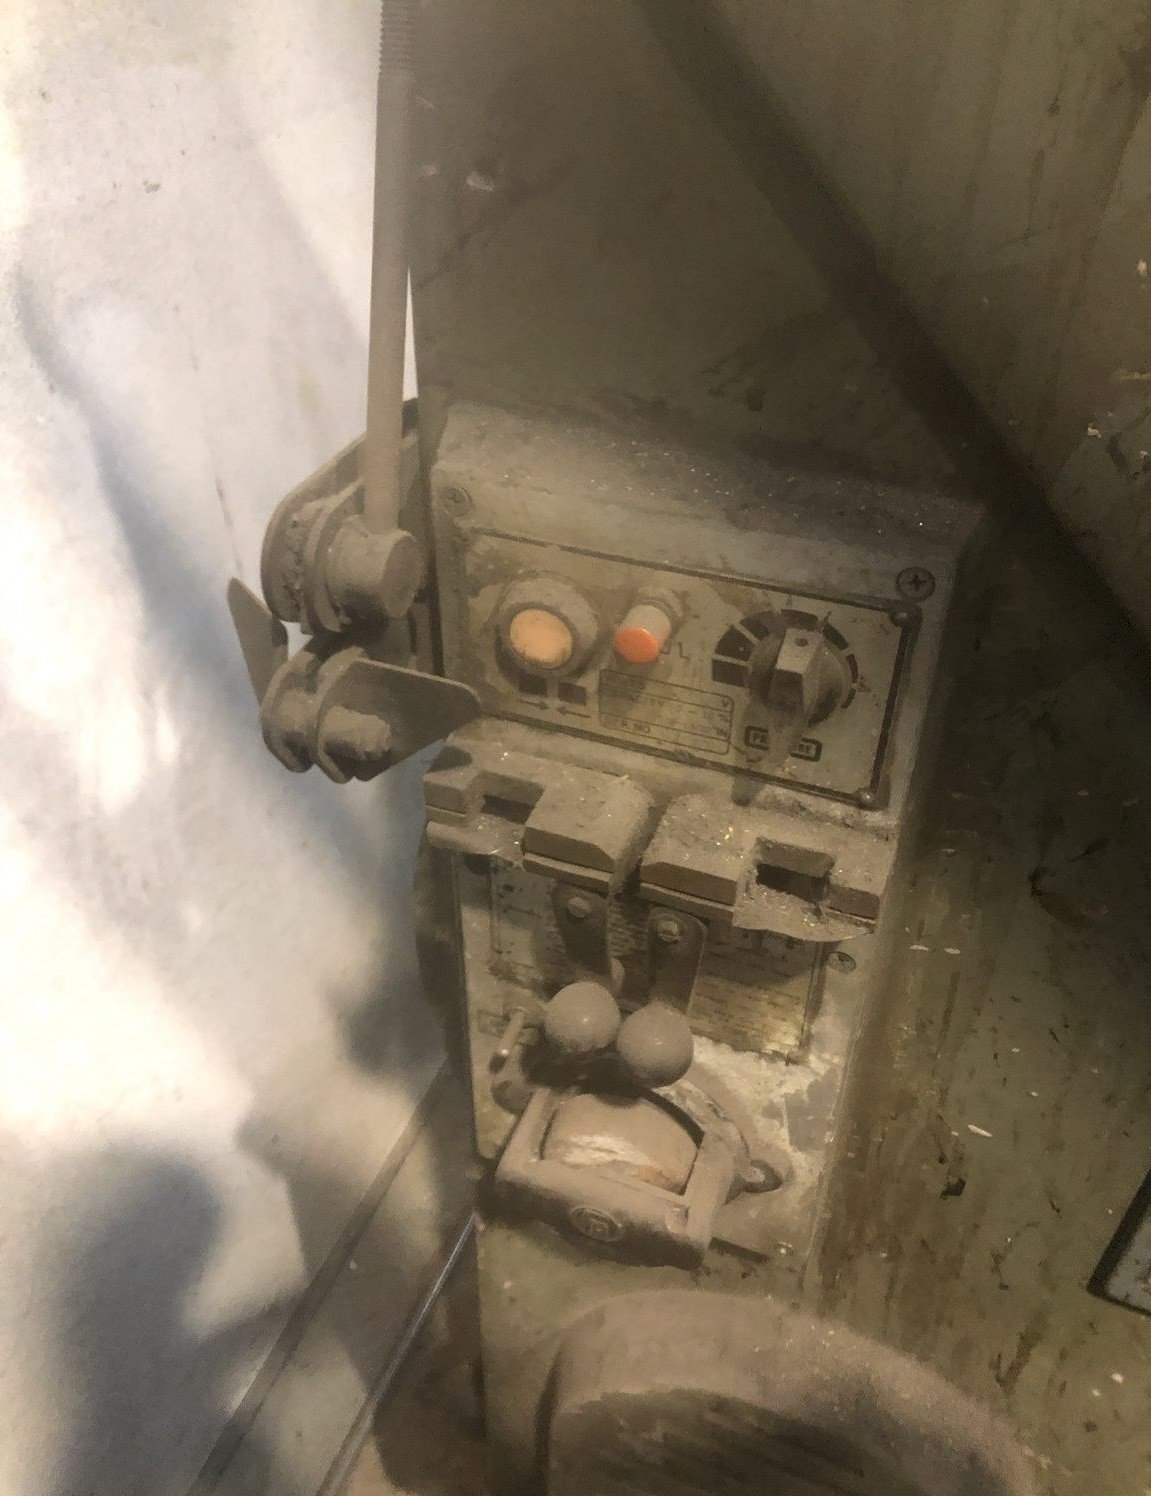
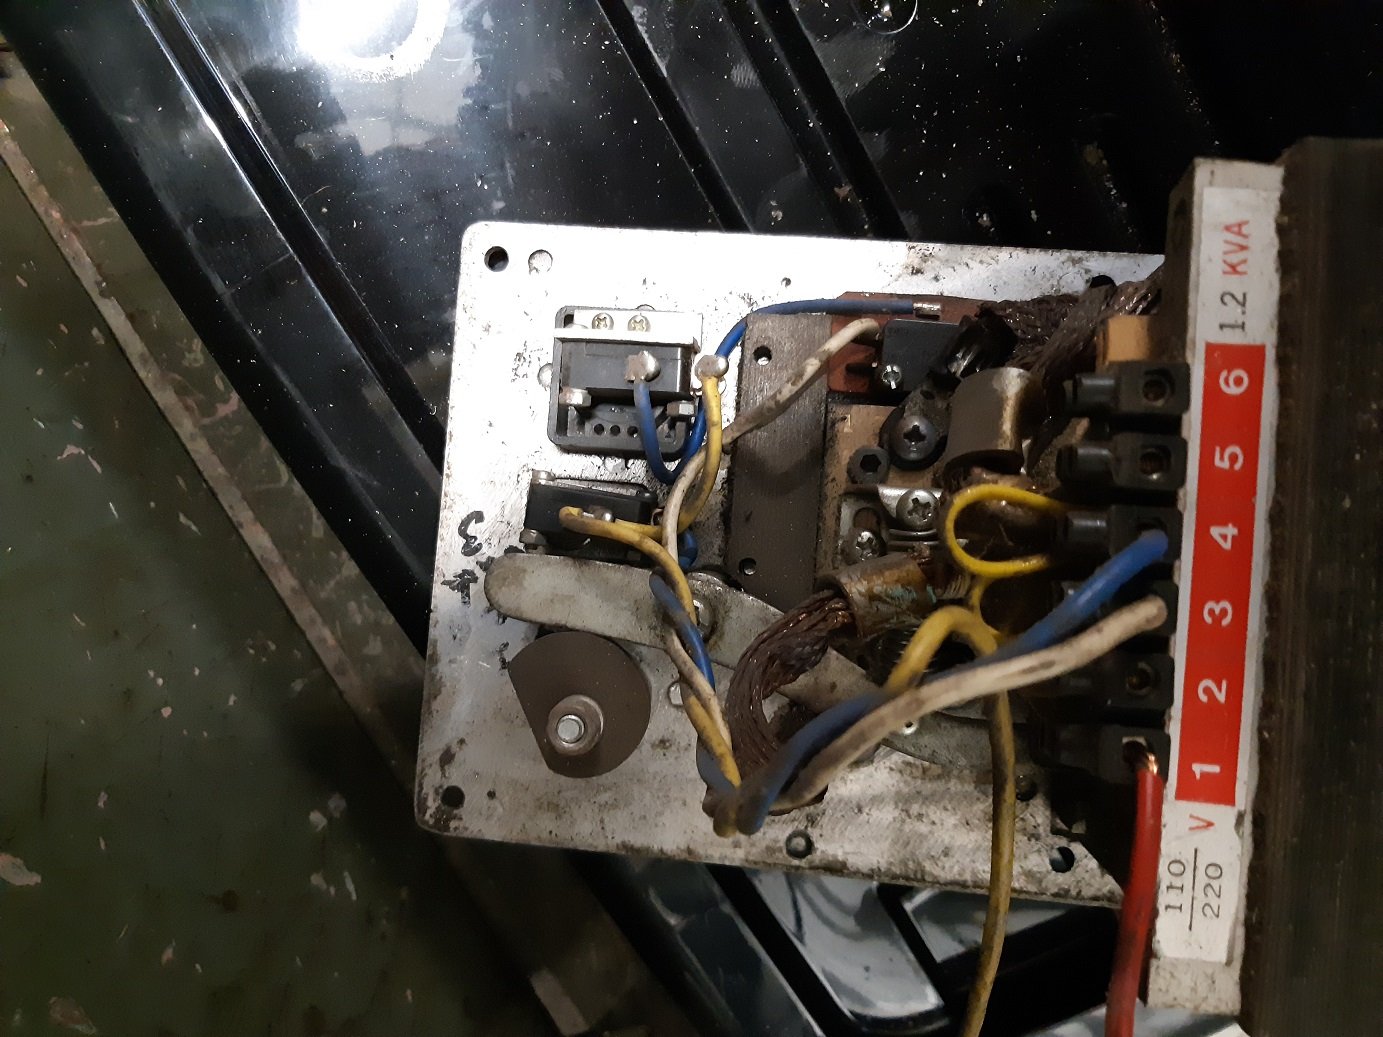
So I bought a metal cutting vertical bandsaw. It's single phase. I picked it up on the weekend. It belonged to a fabrication shop called Metalmorphic. They bought it new ~35 years ago(the plate on the motor says 1982) and stopped using it about 5 years ago because laser cutting exists. All I've had time to do is take the blade guides to bits and clean them. Looking at the photos I realised I put part of the top support in backwards, so the locking screws face the wrong way. I knew the blade welder wasn't working when I bought it, he said it had been "fixed" some years ago, but it's not working. Here is the photo from trademe, it's much cleaner now. Looking on google, it seems like many saw brands use "identical' blade welders. I'll probably never use the blade welder and just buy ready made blades. But I thought I'd take it apart and see if I could find what was wrong with it. "How complicated could it possibly be?". Someone has been in here before me... That switch with all the cut wires is to turn on the little grinder. I assume the red cable originally came here rather than the terminal block? And then yellow wires from here to the terminal block? The grinder motor also has a loose red wire with a spade connector on it that has nowhere to connect to. I assume the two wires coming from the saw are phase and neutral, and it earths through the casing? Does anyone else have a blade welder like this and can take some photos for me?
2 points
-
That mini looks sweet! Well done!2 points
-
My datsun has pins from its past life as racecar, never been a wof issue Never been dick punched for them either2 points
-
I've made some moulds up, it's a 2 part resin and use different coloured pigments to get the desired look. Have just invested in the gear to start stabilising wood so can do hybrid wood/resin ones such as the video you posted which I'm excited to try1 point
-
Received replacement wheel last night fitted the new hub brace bolted it it all together then proceeded to spin the rim inside the tyre just trying to crawl away from a stop. Fuck sake..... rim survived fine but new tyre is garbage it looked cheap and poorly made might be time to give up on the pocket bike wheel combo. Have found a 10" pit bike wheel that would go in the gap as a bonus has correct sprocket out of box. Its $ though and i am severely keen to fit it to a go kart or something else really soon.1 point
-
Nice, at least you've got the hardest part to source, the airbox.1 point
-
Slowly getting less rustic 2k black for the door jams Plan is 1k black base, 1k colour then a hardened clear over the top
1 point
-
Dick punch rule is only for cars on the road, so don't worry guys, you are safe.1 point
-
I think bonnet pins are fine. Some look better than others but if it fixes an issue then I saw go nuts. You could also visit a local sports store and purchase an item of cricketing attire that could be useful against dick punches.1 point
-
If you don't mind the look of pins, go nuts. Personally i'd do everything I could to recondition what I had to avoid having them. Especially on a car like yours, original = winning. But different strokes etc. Perhaps you could have the mechanism blasted / dipped and anodized? Would link Snoozin's KP as I think he got similar things done, but pics are goneburger.1 point
-
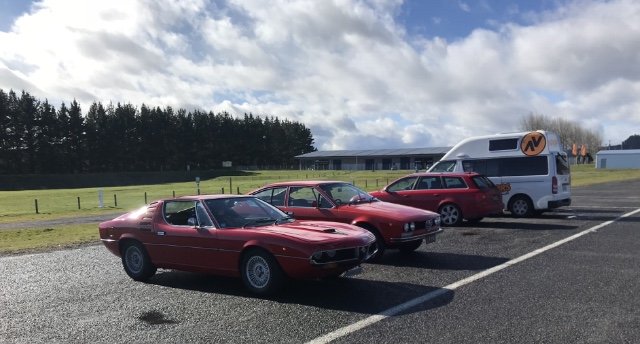
Update installed full “road/race” suspension package from classicalfa.com, incl bushes, shocks and springs. along with braided front brake lines, 4pot fronts and new rears. that sorted we hit a practice day at Taupo over the weekend run by the AROCNZ on Saturday. The result, far better handling and braking! The top trailing arm bushes were toast and now has no side to side knock and body roll is far less. Still has a bit of roll but it’s a classic car and it isn’t intended as a race car so we think it’s pretty well balanced now. new ride height has eliminated the rear tire gap and it looks far better. i drove it down from Auckland, on the track, and back again with very little issues. Now being slight exhaust knock due to ride height, a clutch that is on its way out (all though we knew this prior), and a small knock at take off and low speed. granted it’s had all new bushes, we’ll check the U joints and diff play. that, aside from much needed head room with a helmet on it ran really well! the LSD really hooks up, and even with the softish suspension you can throttle and stear it out to the outer boundary quite predictably, and ride 2nd gear out just passed 7k past the flag box. great day all round, and some small things to add to the white board ill add some track photos when the event photographers put them up
1 point
-
Ran out of time but got some stain on this. Im really enjoying this wood stuff!!
1 point
-
HOW DO YOU WEIGH A BLOODY MILLENNIAL? IN INSTAGRAMS.1 point
-
Got a little bit more done. Got an out of date unused 6 point harness, modified it to be 5 point, and fitted that. Just had to make a mounting bar for behind the seat. Then I got a small car battery (will have electric reverse + winch + lights in the future, so didn't use motorbike spec battery) and set about making a shitty mount for it. It used to be in the nose, but got the bash, so I've mounted it on the side. I might have to make a cover to stop it getting owned by debris in the future. I recycled a bit of seat belt and buckles, but couldn't get it tight, so changed it to good old fashioned rods N nuts. I also put a speed sensor on the front wheel for the trailtech dash. I just have to reroute some wiring and mount the magic electrical boxes, and it's ready for a gentle shake down run, hopefully this weekend weather permitting. If all goes well, I'll make a new front bash plate thing, as the old ones a bit rooted, Then paint all the bits that need painting (probably just rattle can it, as shit will keep getting modified) then start fitting all the alloy panels. I also have to make a dash that the bonnet will join up to. Hopefully the next post will have evidence of a successful test run. Regards, VG. XOXOX1 point
-
Picked up the injectors yesterday arvo. fitted them up just now. Car go VROOOOOOOM! /End thread.1 point
-
Dissolve rust/iron in vinegar? The acetic acid shouldn't be able to get through the aluminium oxide skin (test on something equiv to check first!). I've seen a vid where a guy was doing this to free broken studs from an alloy block, just can't find the link at the mo sorry. https://en.wikipedia.org/wiki/Acetic_acid#Reactions_with_inorganic_compounds1 point
-
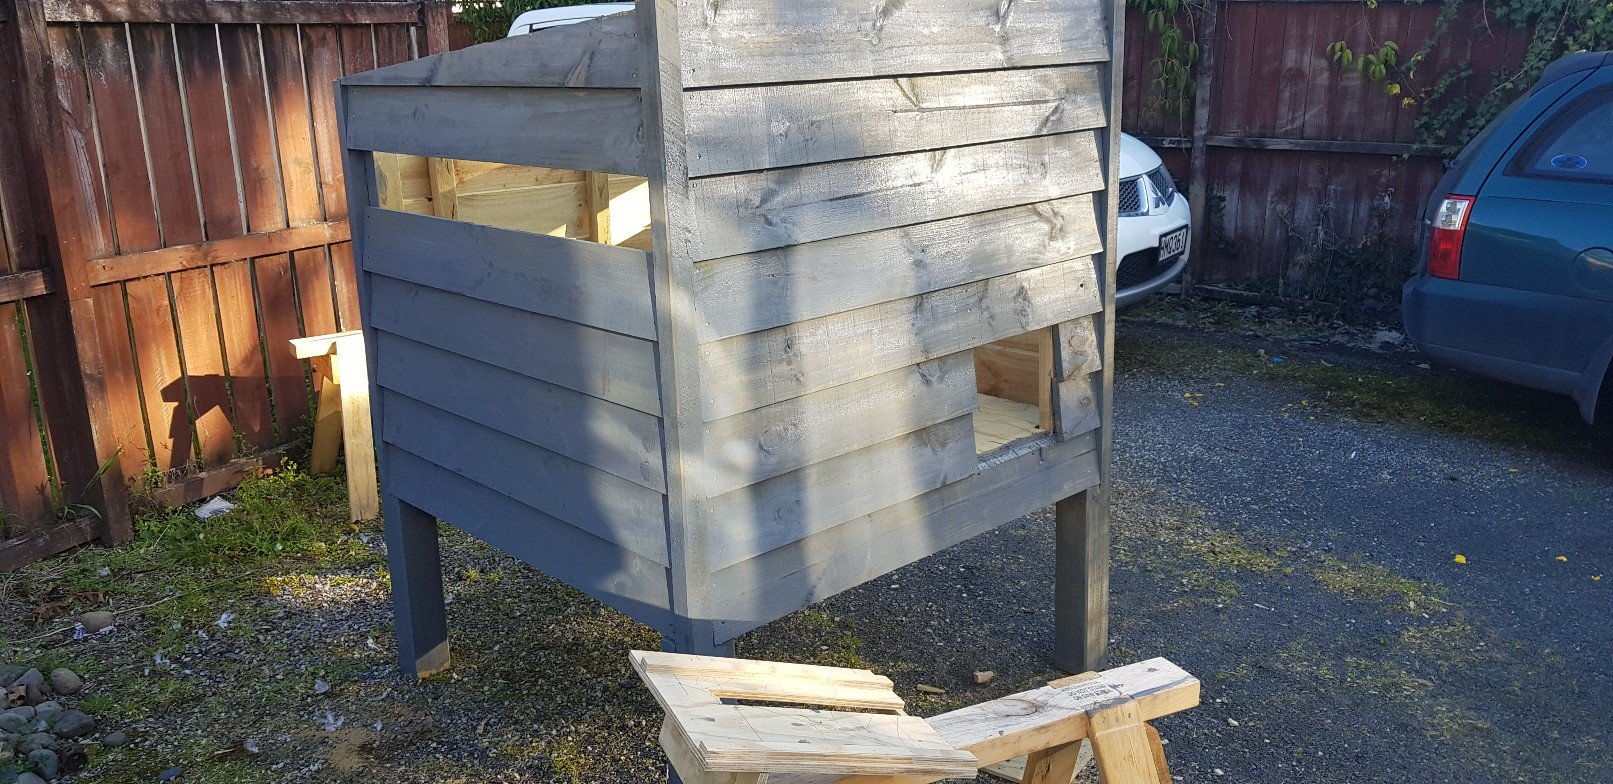
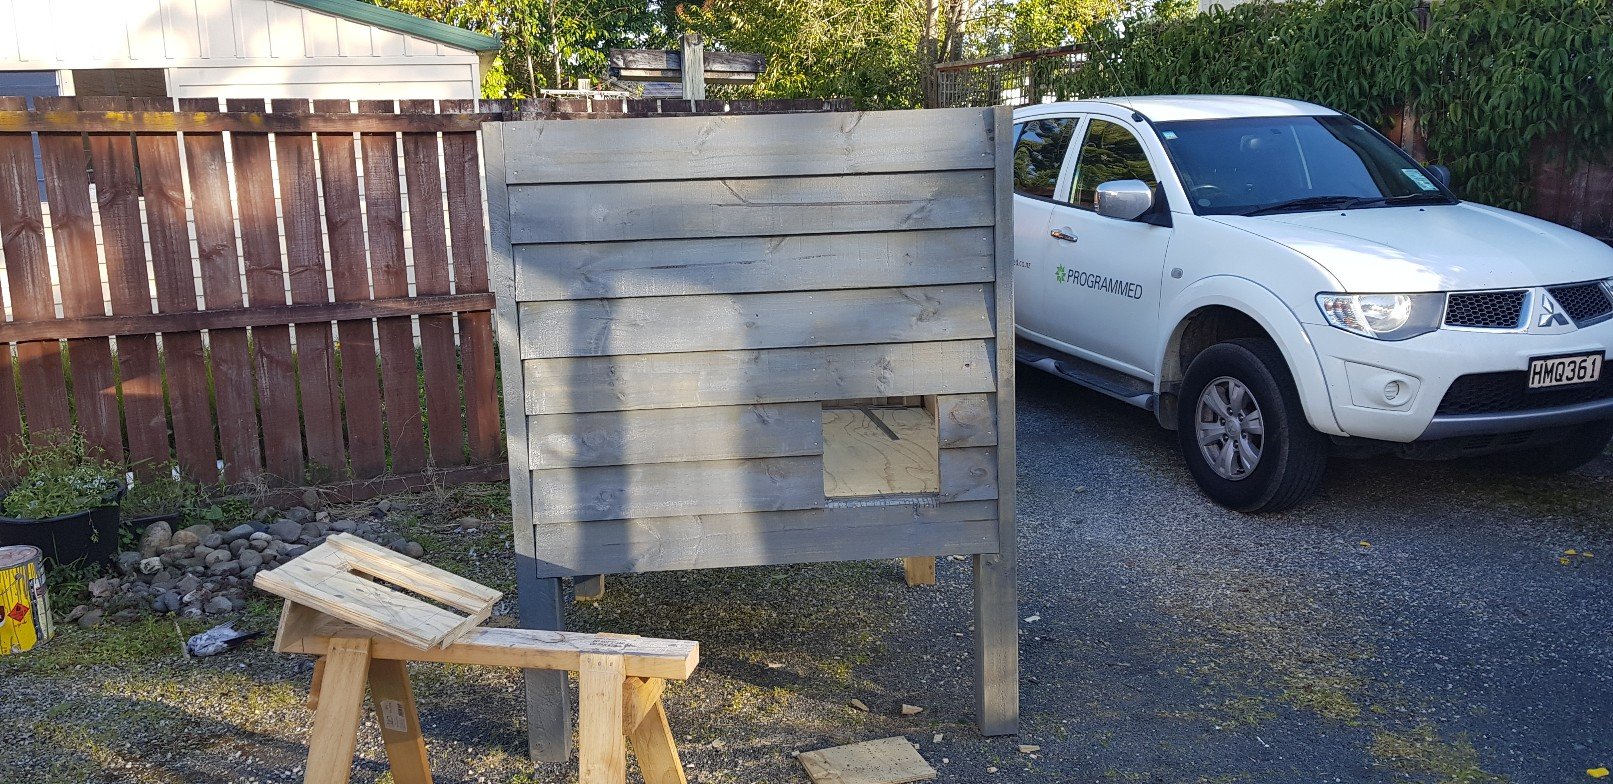
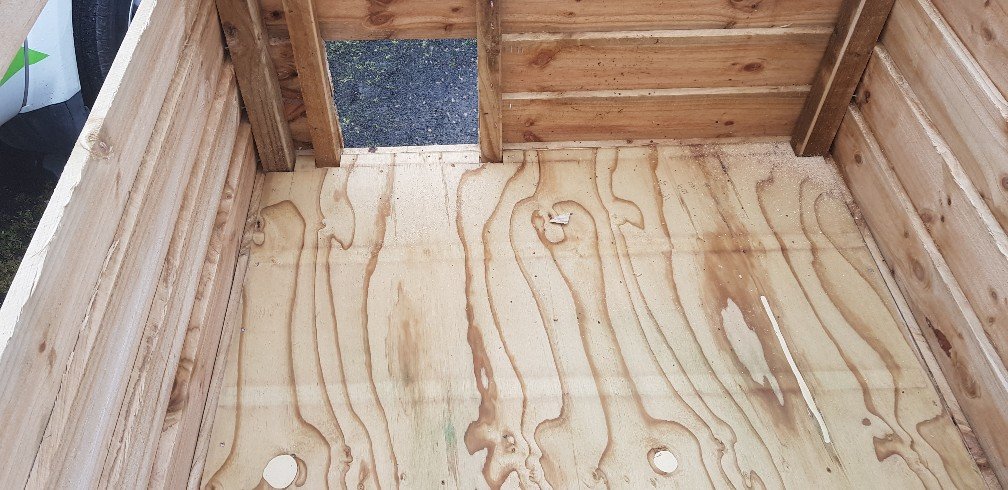
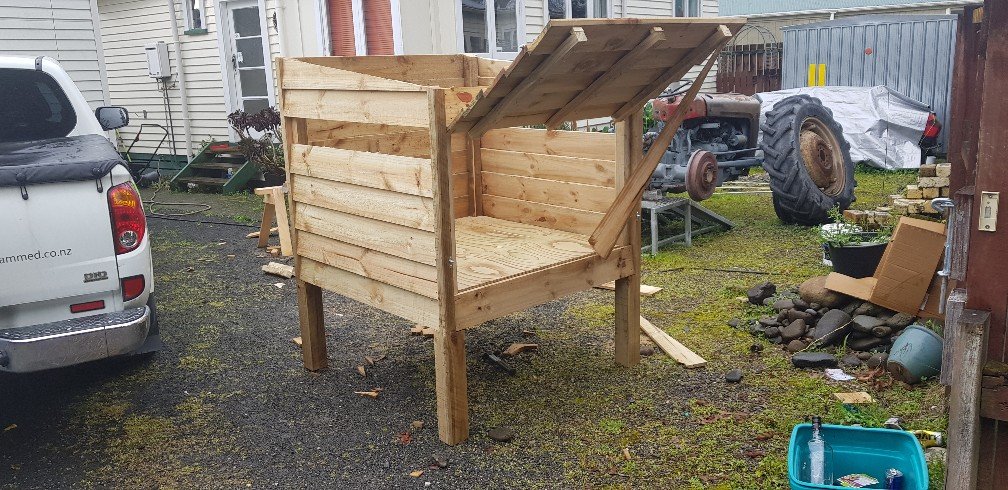
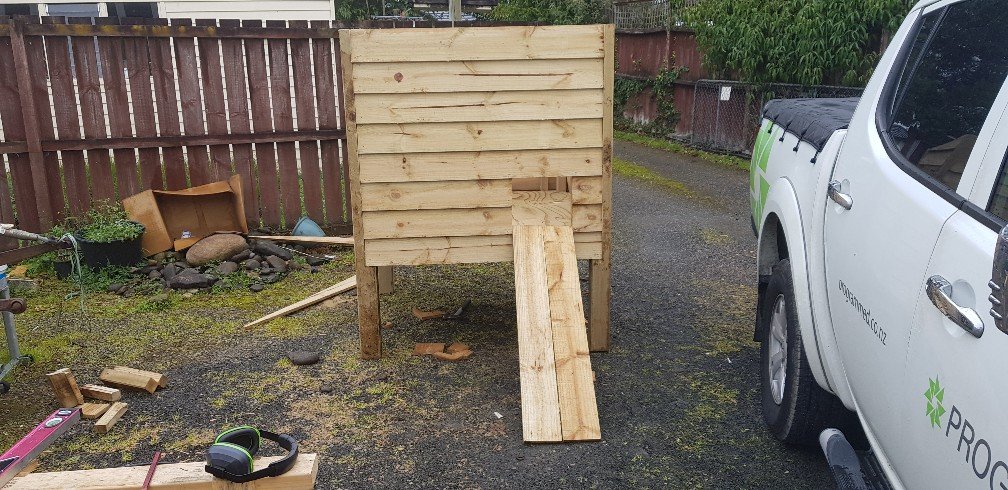
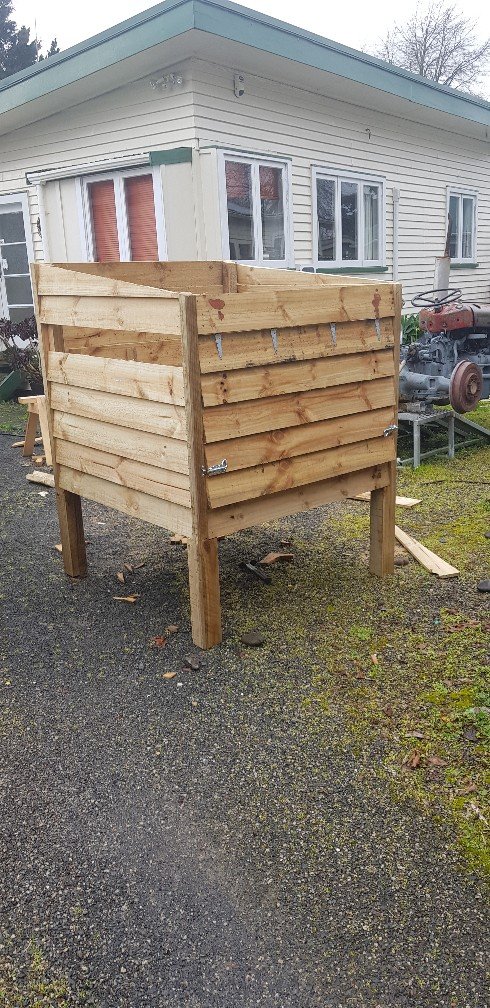
Is that your video? You spelt extended wrong I been building this. Started last weekend in between rain showers Needs roof and nesting boxes then dry weather for paint ( or stain)
1 point
-
oh yeah & these, I make these they sometimes come back for repair with Price tags attached over $1100, I've made 18 in the last year alone, & they've been a NWC product since early 2000's... one of our Higher end Products1 point
-
I have a cheapish UniT clip on multimeter, which also does dc down to ~3mA. Holy shit this makes finding current leaks easy. Neighbour was getting a soggy battery. instead of all that undoing and inline metering with the other multimeter terminals, it was just: set to DC 2A scale hold near wire(s) to reset/calibrate for the moon's magnetic field clip around wires(s). 105mA 5 minutes to check all the wires on a 24V system. --wrong link-- Added advantage, you don't then forget to put your probes back in the usual meter terminals, to it doesn't blow up the next time you measure a battery /mains.1 point
-
can you guys help take down the neon signs after a big feed thanks boys1 point
-
I will when I get back. Its been carefully placed in a show box for many years. I'd also scratch built a Volvo f10 cab out of cardboard when I was about 12-13 or so. Working interior lights, proper cloth upholstered seats etc. It even had a opening fridge with a teeny model of a can of coke in it. I'll look for photos when I'm back. Looking back at that, building such things at that age.. Hmmm. Maybe I was on the spectrum or whatever the trendy thing is.... Or just a young truck loving nerd1 point
-
Anyone here into building 1/24 trucks? I've been scratch building a tnl freighting merc skip truck. Probably the oddest truck to want to build but it just appealed to me about 27+ years ago when when I started on it. As a youngling I'd even ridden my pushy many times to the tnl yard in Blenheim and taken photos and measurements of it. It's based on an italeri kit that I have had to shorten the cab on in 3ways. Chassis cut down and converted to 2axles. Scratch built air system, underpinnings etc. I've not touched it in two decades and had a long way to finish. I'll get some photos if interested. Looking forward to quiet modelling times during a storm in a cabin with cups of tea one day1 point
-
Some things are probably better bought from a legit supplier.1 point
-
Further than the driveway. So the time had come to buy a house. The only problem - The GX was still not on the ground. I threw it back together in November of 2018 and got it somewhat derivable. Thankfully we brought our house less than 1 kilometer away which made for an easy trip. New garage has alot more space which makes working on the cars soooooooo much easier. Also notice the 2jz-ge in the bottom left. Thats the future for the GX at this stage, once the 1g gives up. I Also have itbs to suit so thats the future plans. Anyway my current position meant that i wont get around to installing it for another year as i prep everything and grab all the parts i need. But I was starting to get angry at myself for having 2 cars in my garage doing nothing. Out comes the liquid copper head gasket additive (look away now if those words hurt you). The 1g will be coming out so why not just experiment to see if it fixes it. And what do you know it worked. So an event i wanted to attend was getting near and i persuaded myself to try make it there. Out with the BC suspension and in with the stock struts. Throw it through a wof. fails on missing bumpstops (forgot to put them back in), and an indicator bulb, and lose front brake hoses. Easy enough to do then I had myself a warrant of fitness. Cutting it fine the day before the event i re-installed all the BC suspension. And put the mk 1s on. Im abit gutted the front suspension is almost at its max low, but for now im just happy its moved further than the driveway.1 point
-
Got the intake all done with a K&N filter, looks pretty good I think. Took a guy for a drive that knows transmission things up the road and back and he reckoned the trans was sweet, shifting how it should, just the engine was massively down on power. Tried to diagnose the problem myself but I couldn't really figure much out. It was throwing error codes for the secondary throttle and knock sensors. Discovered the secondary throttle sensor was only used for traction control so I didn't need to worry about that one. Was hoping the knock sensors were just reading high because the timing was out, so I took it to Danny's Autos in Palmy to go on the dyno and see if they can tune it and figure out what's wrong. They got it on the dyno, they were just bringing it up to speed and fuel started pissing out everywhere. One of the fuel hoses going up to the fuel rail split, don't know if it just happened or if it's been like that for awhile, but we never noticed any fuel in the valley before, where as there was heaps in it then. So off came the intake and manifold to replace it. Whilst they had that off they had a look at the knock sensors and they had seen better days. The wiring pins were pretty corroded and the casings were cracked. They sourced some new OEM ones and chucked them in. They also found one of the breather hoses had a split, as well as one of the igniter modules was only firing 1 of 4 cylinders on that one side. So basically this has only been running on 5 cylinders all this time. Thought it didn't sound quite right haha. The steering rack also decided to start leaking power steering fluid out of a place the fluid shouldn't be. Beach Hop was the next week and the rack had to be sent to Auckland to be rebuilt. Managed to get the engine back together and drive it home on the Tuesday night and pull out the rack to be sent off on Wednesday. Luckily they got around to rebuilding it fairly quick and sent off again so it arrived first thing on Friday morning. Got a different igniter module from the wreckers off a SR20 and it ran waaaaaay better! Chucked the rack back in Friday morning and took it for a WOF, passed with flying colours, so went and got some rego and now it's all legal!!!! On Friday/Saturday the fuel pump must of came out about a dozen times, half of which were on the side of the road. Went for a bit of a drive and the fuel pump kept dying for some reason, thought maybe the wiring in-tank was a bit dodgy, replaced it all and soldered every connector, that didn't make much difference. Discovered that if I gave the pump a good smack it would start back up pumping a bit more fuel or just die completely. Decided to get another fuel pump from Repco and chucked that in. Turns out the brand new "genuine" Walbro pump I got off ebay was shit. Went sooooo much better again!! Took it to the 4 & Rotary Jamboree show and shine at Manfield on the Sunday and took home the Best Commercial Piston trophy. Then on the Monday took it back into Danny's Autos to get dyno'd. Made 100kw at the wheels which I thought wasn't quite right (should be closer to 200kw?), but he reckoned it was running right and just the reading wasn't that accurate, he had trouble getting into 4th, kept changing down, so had to do it in third and that was maxing out the dyno's rolling speed. It had good consistent 02 sensor readings. Took it up to Beach Hop on the Wednesday. Had no issues other than getting some brake fade through the windy bits between Waihi and Whangamata, we think there must of still been some air left in the lines. After that happened I was changing it manually between 2nd and 3rd gear through the windy bits, rather than just leaving it in drive as it engine brakes way more. Survived all through Beach Hop, including going up to Whitianga, Kuaotuna and Onemana as well as cruising up and down the main street lots, the rear bumper took a few scrapes, I think it needs some titanium stripes underneath! I think it was one of the cars that got some of the most attention. Managed to get all the way back down to Marton, then when I was overtaking up a hill, noticed smoke coming from under the dash, so quickly pulled over and checked it out. The transmission sump had either smoke or steam since it was raining coming off of it, also smelt very burnt and the oil was quite dark. My parents caught up and we decided to just keep driving. I then noticed it was revving at 3500rpm at 100km/h, where as it's usually around about 1800rpm. It was only changing from first into second gear and that's it, if I took my foot off the accelerator it would drop straight down to idle. It was a slow drive home from there at 70km/h. Next couple of days I pulled the trans out, pulled off the sump and it had quite a bit of metallic build up at the bottom and just smelt very burnt. I guess it's always been slipping, as to why it didn't make much power on the dyno. Dropped it off today to get a quote on being rebuilt, so hopefully it's not too bad. It used about $400 worth of petrol over Beach Hop, which I think worked out to be 15 l/100km. After driving it for about 1200km I have decided the seat definitely needs redoing, it's way too hard, would also be nice to sit a bit lower and further back as well. Also the accelerator pedal has your foot at too much of an angle back, so gets sore rather quick. Shouldn't be too hard to fix as the seat changes should help and just modify the pedal a little. Also the door latches + door seals are terrible, takes way too much effort to get them closing right. A softer door seal might help, and you can get bear jaw latch kits that are basically a bolt in thing for these which might be the go when I have the spare money.1 point
-
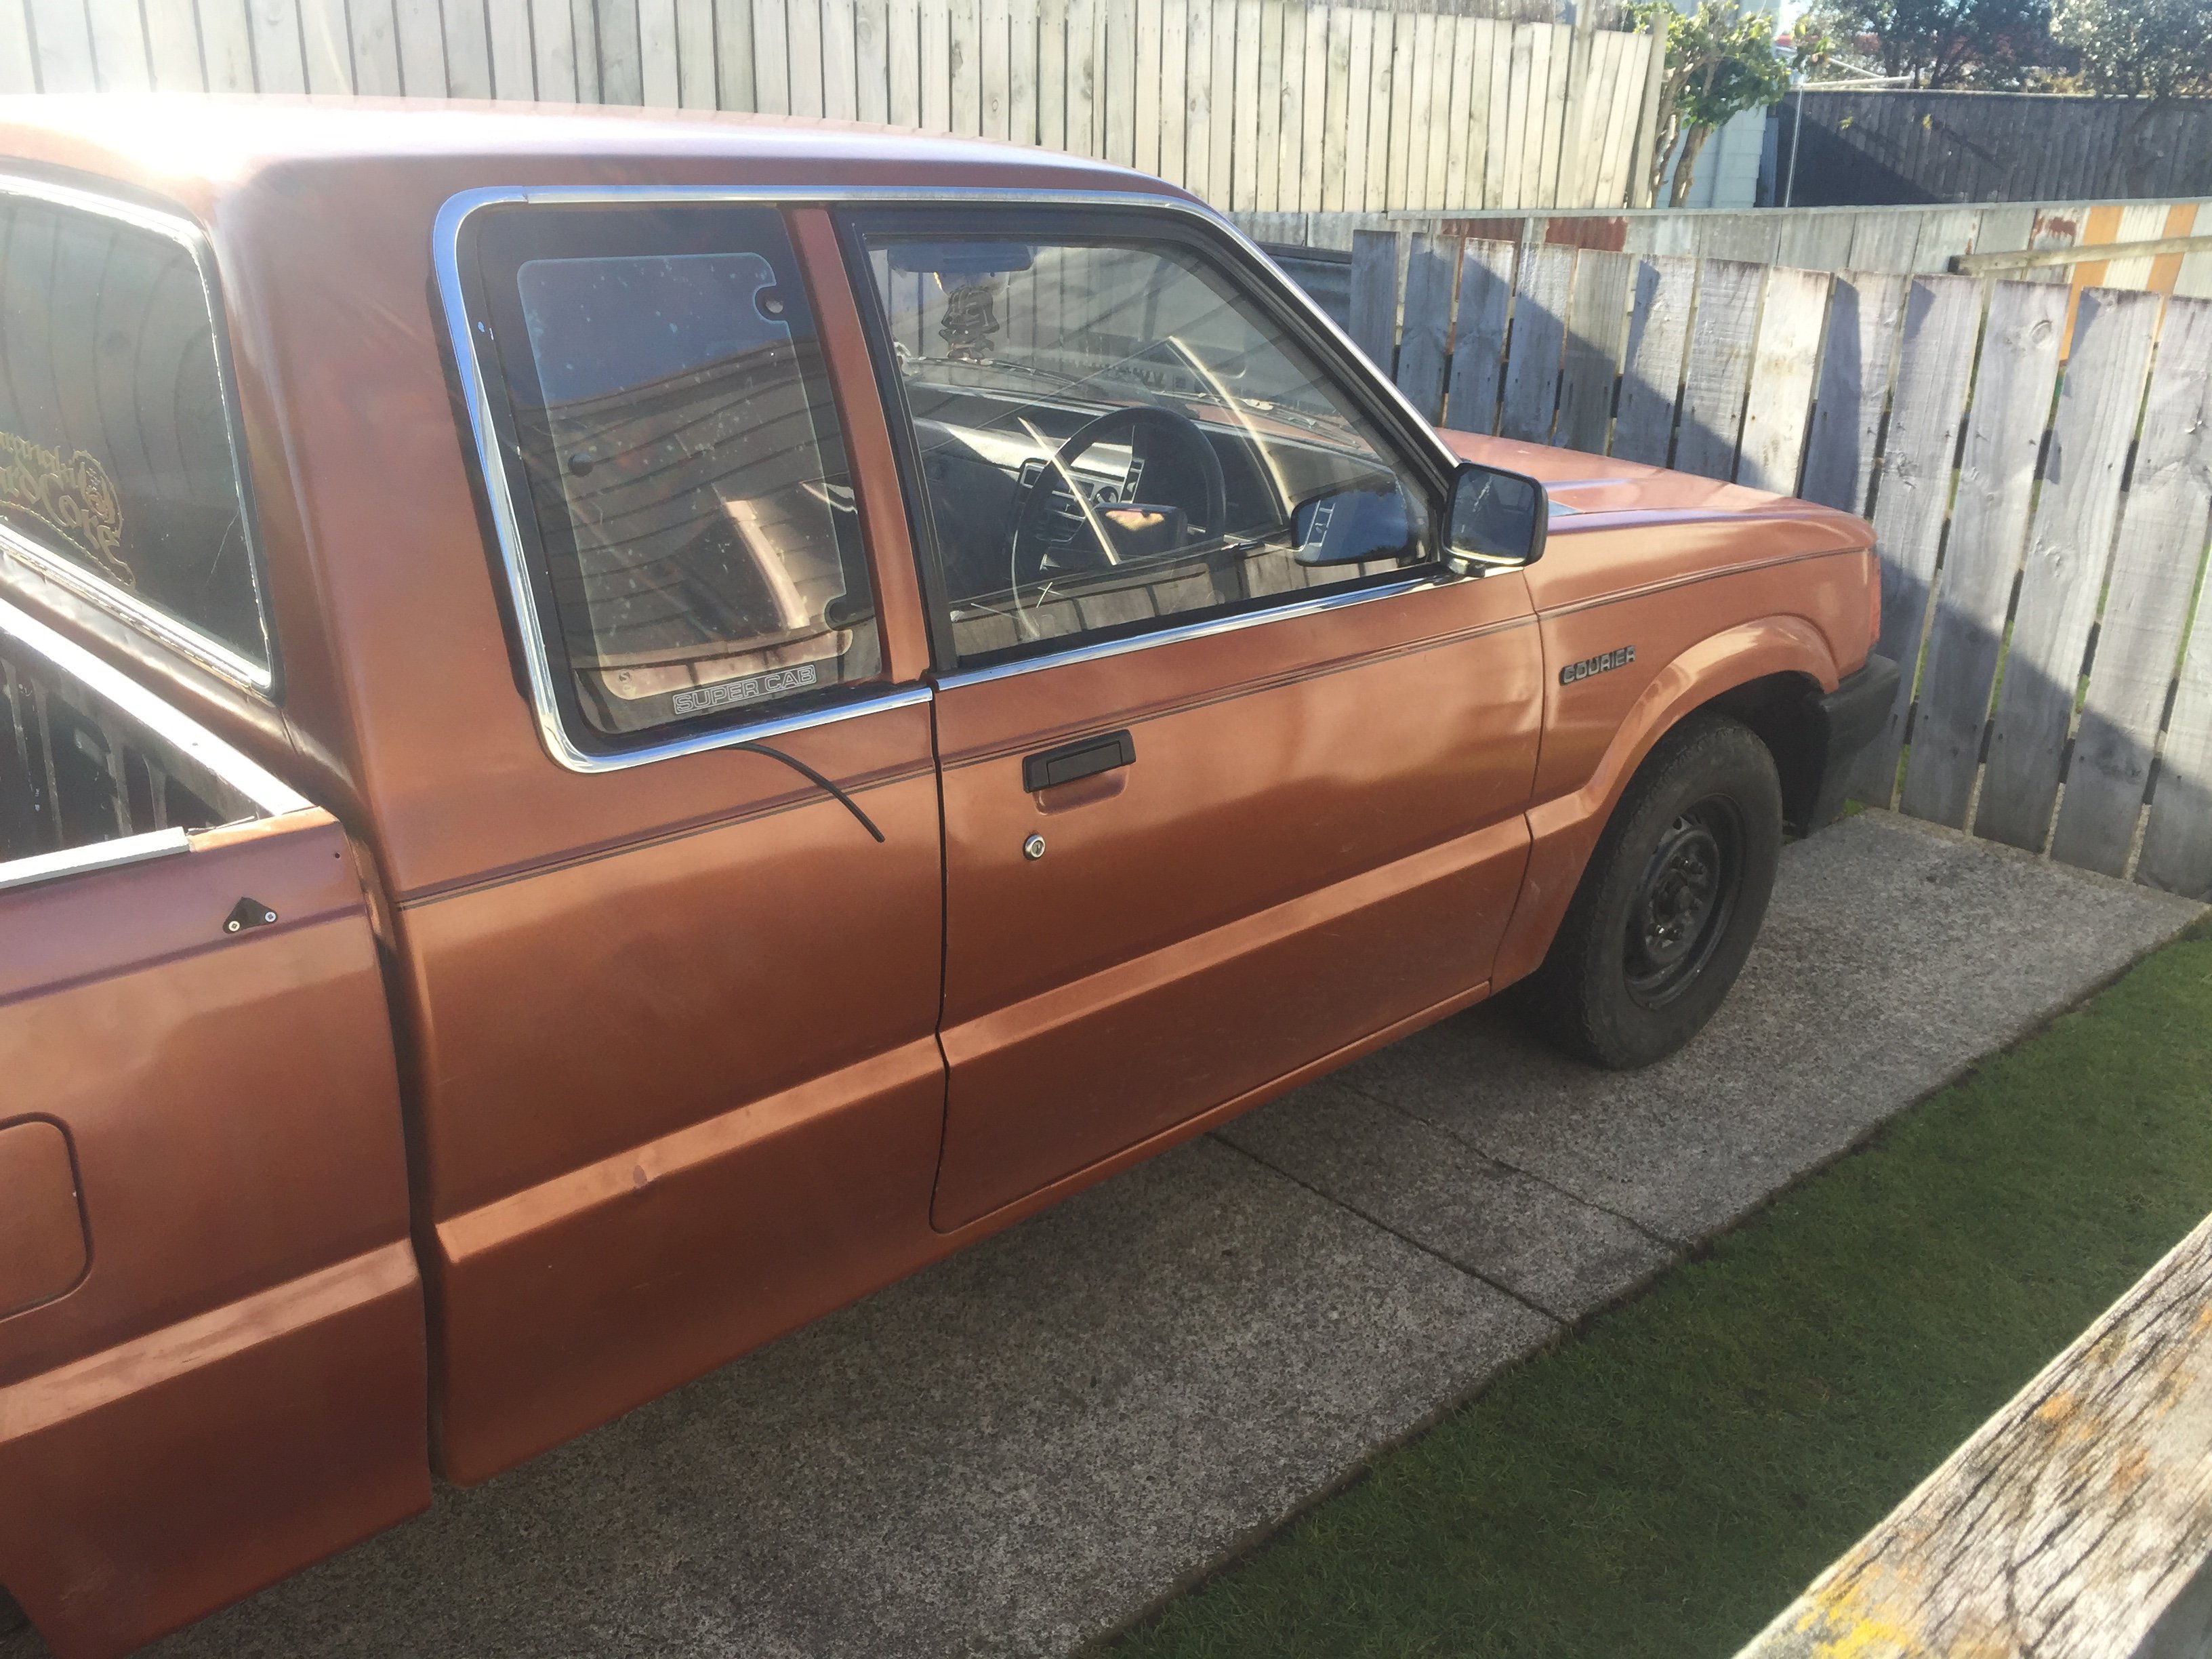
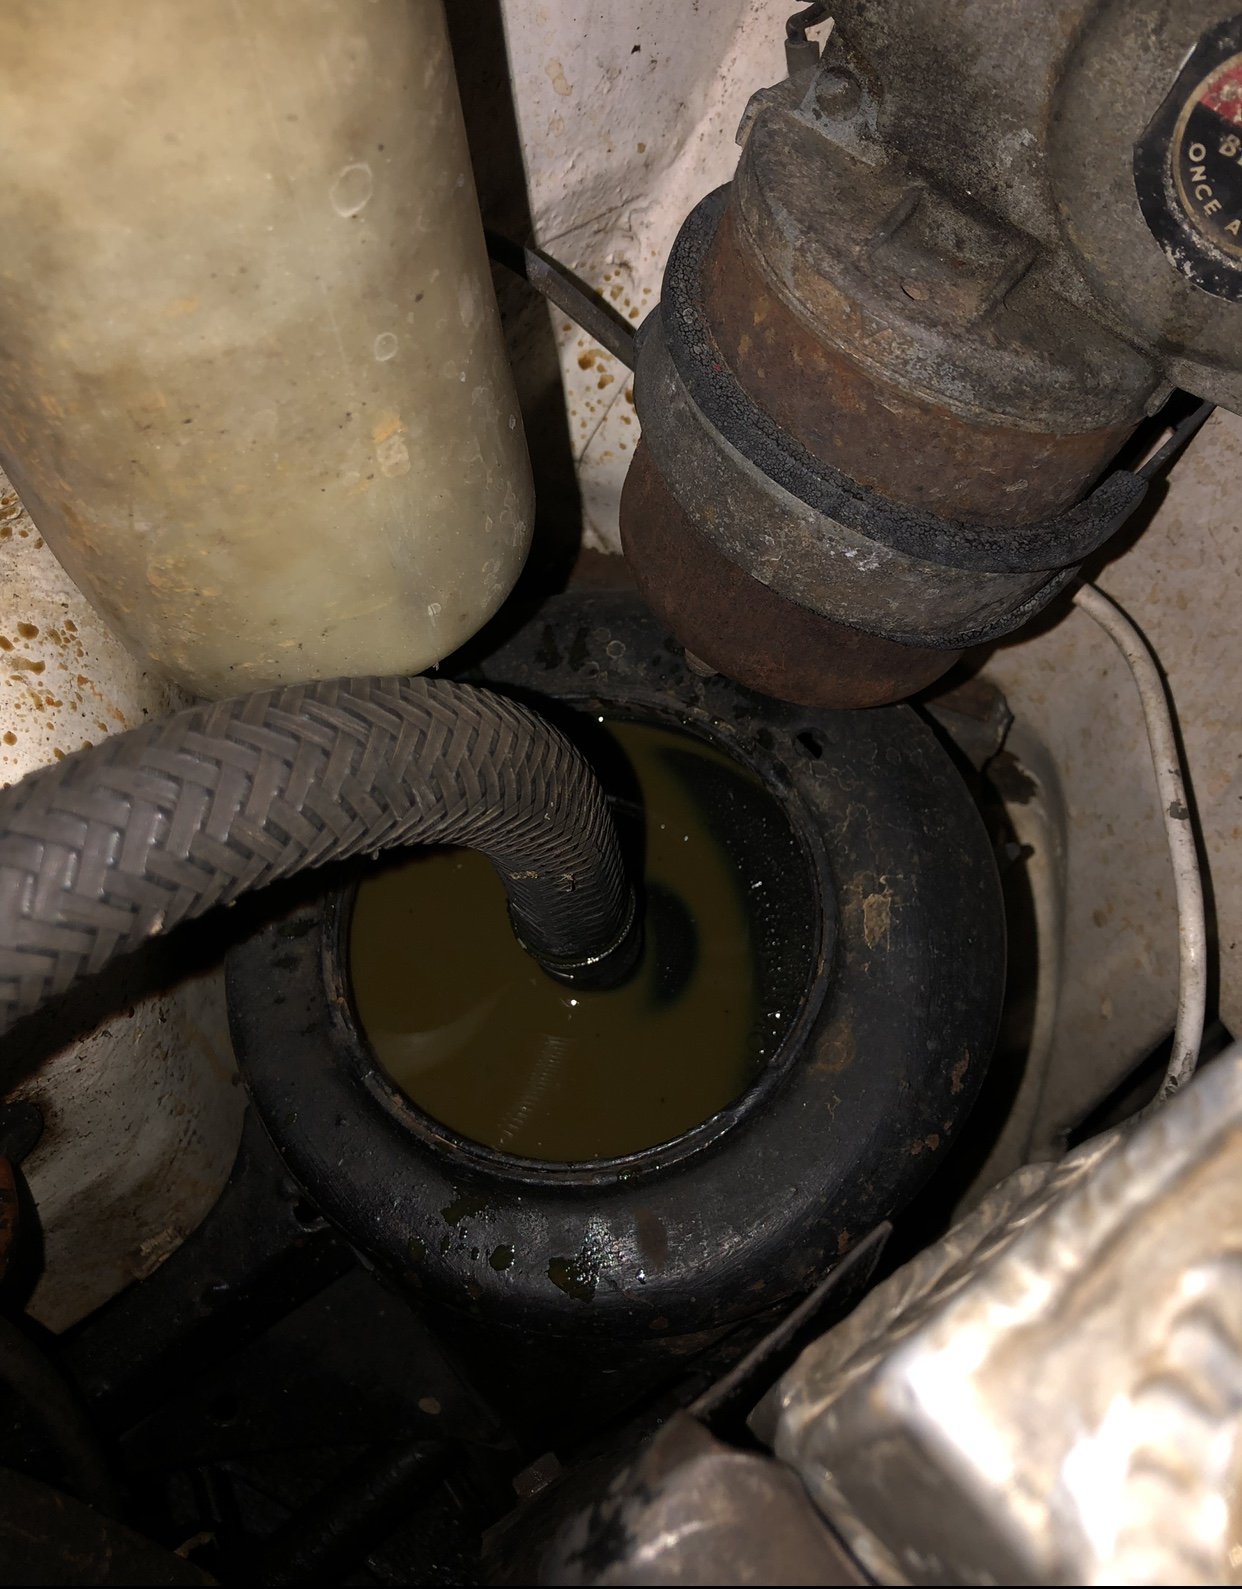
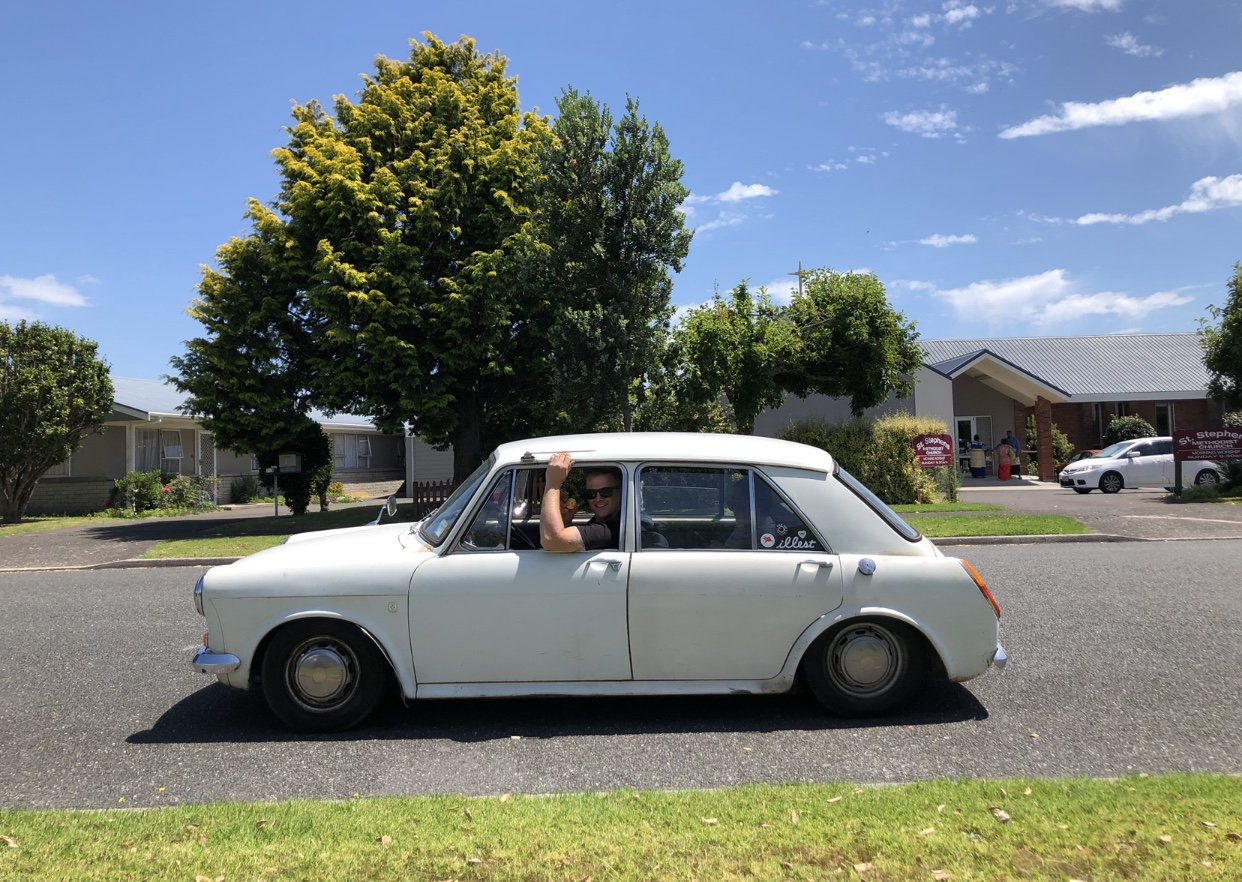
Moved to Tauranga. Drove this down from Auckland one evening. Got pulled over in Paeroa and told off for rego on hold, cop was a Barry though so loved it. Havent used it much here though, just been chilling in the garage. Carb needs a decent tune so started on that today. Parked up in town for some lunch and came back to this... #JustADO16things LF displacer let it’s juice out. It was a NOS one i picked up a couple years back so I guess the rubber just perished over the time when it was dry and let go now. Believe it’s around the hose crimp. looked cool on the drive home though. Left outer CV feels like it’s binding up at this height though. So juddery under power and engine braking. Can hear something going on down there. Boot is split so will replace that too. So, things to do for next wof; Replace displacer - I have a good spare here. Change CV joint / boot. Replace L handbrake cable - again have spare. Remake exhaust mounts - wire isn’t cutting it now. Tune crab. Ignore rust.
1 point
-
Learnt a lot in the past month and a bit. Main thing being that you should probably lube your fuel injector o-rings when you go to put them back in. Got the engine running, was only running on half the cylinders. Discovered there was no fuel going to the rear half cylinders, so decided to pull out the injectors. Took them into town and put them on an injector tester and nothing happened. Was told they can gunk up after sitting for awhile. So went off back home and gave them a spray with some cleaner and smashed them on the ground until they started clicking freely again with power to them. Got them all sounding really good, so in they went (without any lube, thinking back it should of been something that should of come to mind, but I guess I was just in a rush to get it running!), as they went in they must of torn the o-rings. I got the intake and everything back on and together and we started it up again. Ran mint!! So turned it off to see how it would start again, flat battery. Chucked the charger on, and then decided we'd put the wheels on, piece it a bit more together and go for a drive up the driveway. By time we got it together and off the hoist, a few hours had past and so had a decent amount of fuel past the o-rings and into cylinder no.5. Cranked it over and it didn't want to start very easily, so gave it a few more attempts and finally started up with a lovely knocking noise! We thought maybe it was just something loose in the bellhousing, as when we first started it we quickly realised there were no bolts in the flex plate to the torque converter. Anyway drove it up and down the driveway and then back on to the hoist. Decided over Christmas we'd pull out the transmission to have a look in there, other than the weights on the flex plate being ripped off by the torque converter there was nothing that obvious. Started the engine without the trans in and it still had the knock, which was a disappointment. Our neighbours Tony and Jason, who are a bit more mechanically minded came over on Boxing day after hearing that it wasn't transmission related, and went over everything they could think of. Eventually after a good few hours we narrowed it down and decided to check how high each piston is coming up by sticking a threaded rod with a nut on it and turning the engine over by hand. Got around to cylinder no.5 and it was about 5-6mm lower than the rest. Was obvious at this stage that we had a bent rod that was caused by hydraulicing the engine with fuel. Out came the engine, onto a stand, flipped over and then pulled the sump off. It was pretty bent! The crank smashed up the bottom of the piston, but other than the rod and piston everything else looked good. The engine is now at the rebuilders and injectors have been professionally cleaned with new o-rings. The buggered o-rings on the injectors. Since I had awhile off work over Christmas and the engine debacle halted progress a bit, we decided it was a good time to sand out all the runs in the clearcoat and give it another couple of coats with some flatter clear since I wasn't quite happy with the last stuff I used. Used some PPG autothane clear with flattening base in it this time. Was way easier to spray, looks waaaaay better, a lot smoother and a more consistent flatness. Also the extra coats covered the rust up a bit more, as before it didn't seem to be covered well in the rusty areas. With the engine out it was a good time to go through and tidy up a few things. Made up some stainless heatshields that cover the wiring on one side and the fuel and brake lines on the other. Also wrapped some of the exhaust in heat wrap to try and help keep some heat away. Ignore the plastic cable ties, the ones that came with the wrap were too short, and I'll change them soon. After trying to drain the coolant I decided it'd much easier if there was a drain plug, rather than having to disconnect a hose and having it run straight onto a crossmember. Next thing to do was sort out the fuel filler. Turned out the u-bends I bought for the headers were the correct size I needed, so took one of them, cut it to fit and welded a breather pipe on the side. Made a stainless pipe that goes from the 1 5/8" u-bend to 2" on the tank. Also added some gas struts to the rear bed lift up part. Whilst under the rear end noticed the rear airbags were only mounted on the bottom with bolts and no washers. This was mostly because the mount was so close to the diff tube and the airbag mounting holes had quite a small PCD, you couldn't fit much else in there. Came up with these plates that mount to the airbags with a countersunk screw and then have the studs stick through the outer of the slotted hole in the diff mount. Heaps of room to get a nyloc nut and washer now. Was running out of stuff that I could think of to do, so my Dad made a start planing and fitting the Matai wood planks that I bought quite a while ago. Fitted in they looked a bit weird being natural, too bright or something. Had some Japanese stain lying around that we tried and I quite liked it. So went and wiped that all over it once it was fitting well. Then wiped over some Scandinavian oil and came it out really nice. Got the windows installed, he still needs to come back and finish them off. The front window stainless trim doesn't fit as well as I'd hope it would, sorta sticks out a bit, but we're sure it's in there properly. Probably a combination of the crappy re-pro rubber and trim not being 100% right to start with, as I've heard of a heap of people having troubles with windscreen rubbers not fitting nicely on these. Supposed to be taking this to Nats in less than 6 weeks hahaha1 point
-
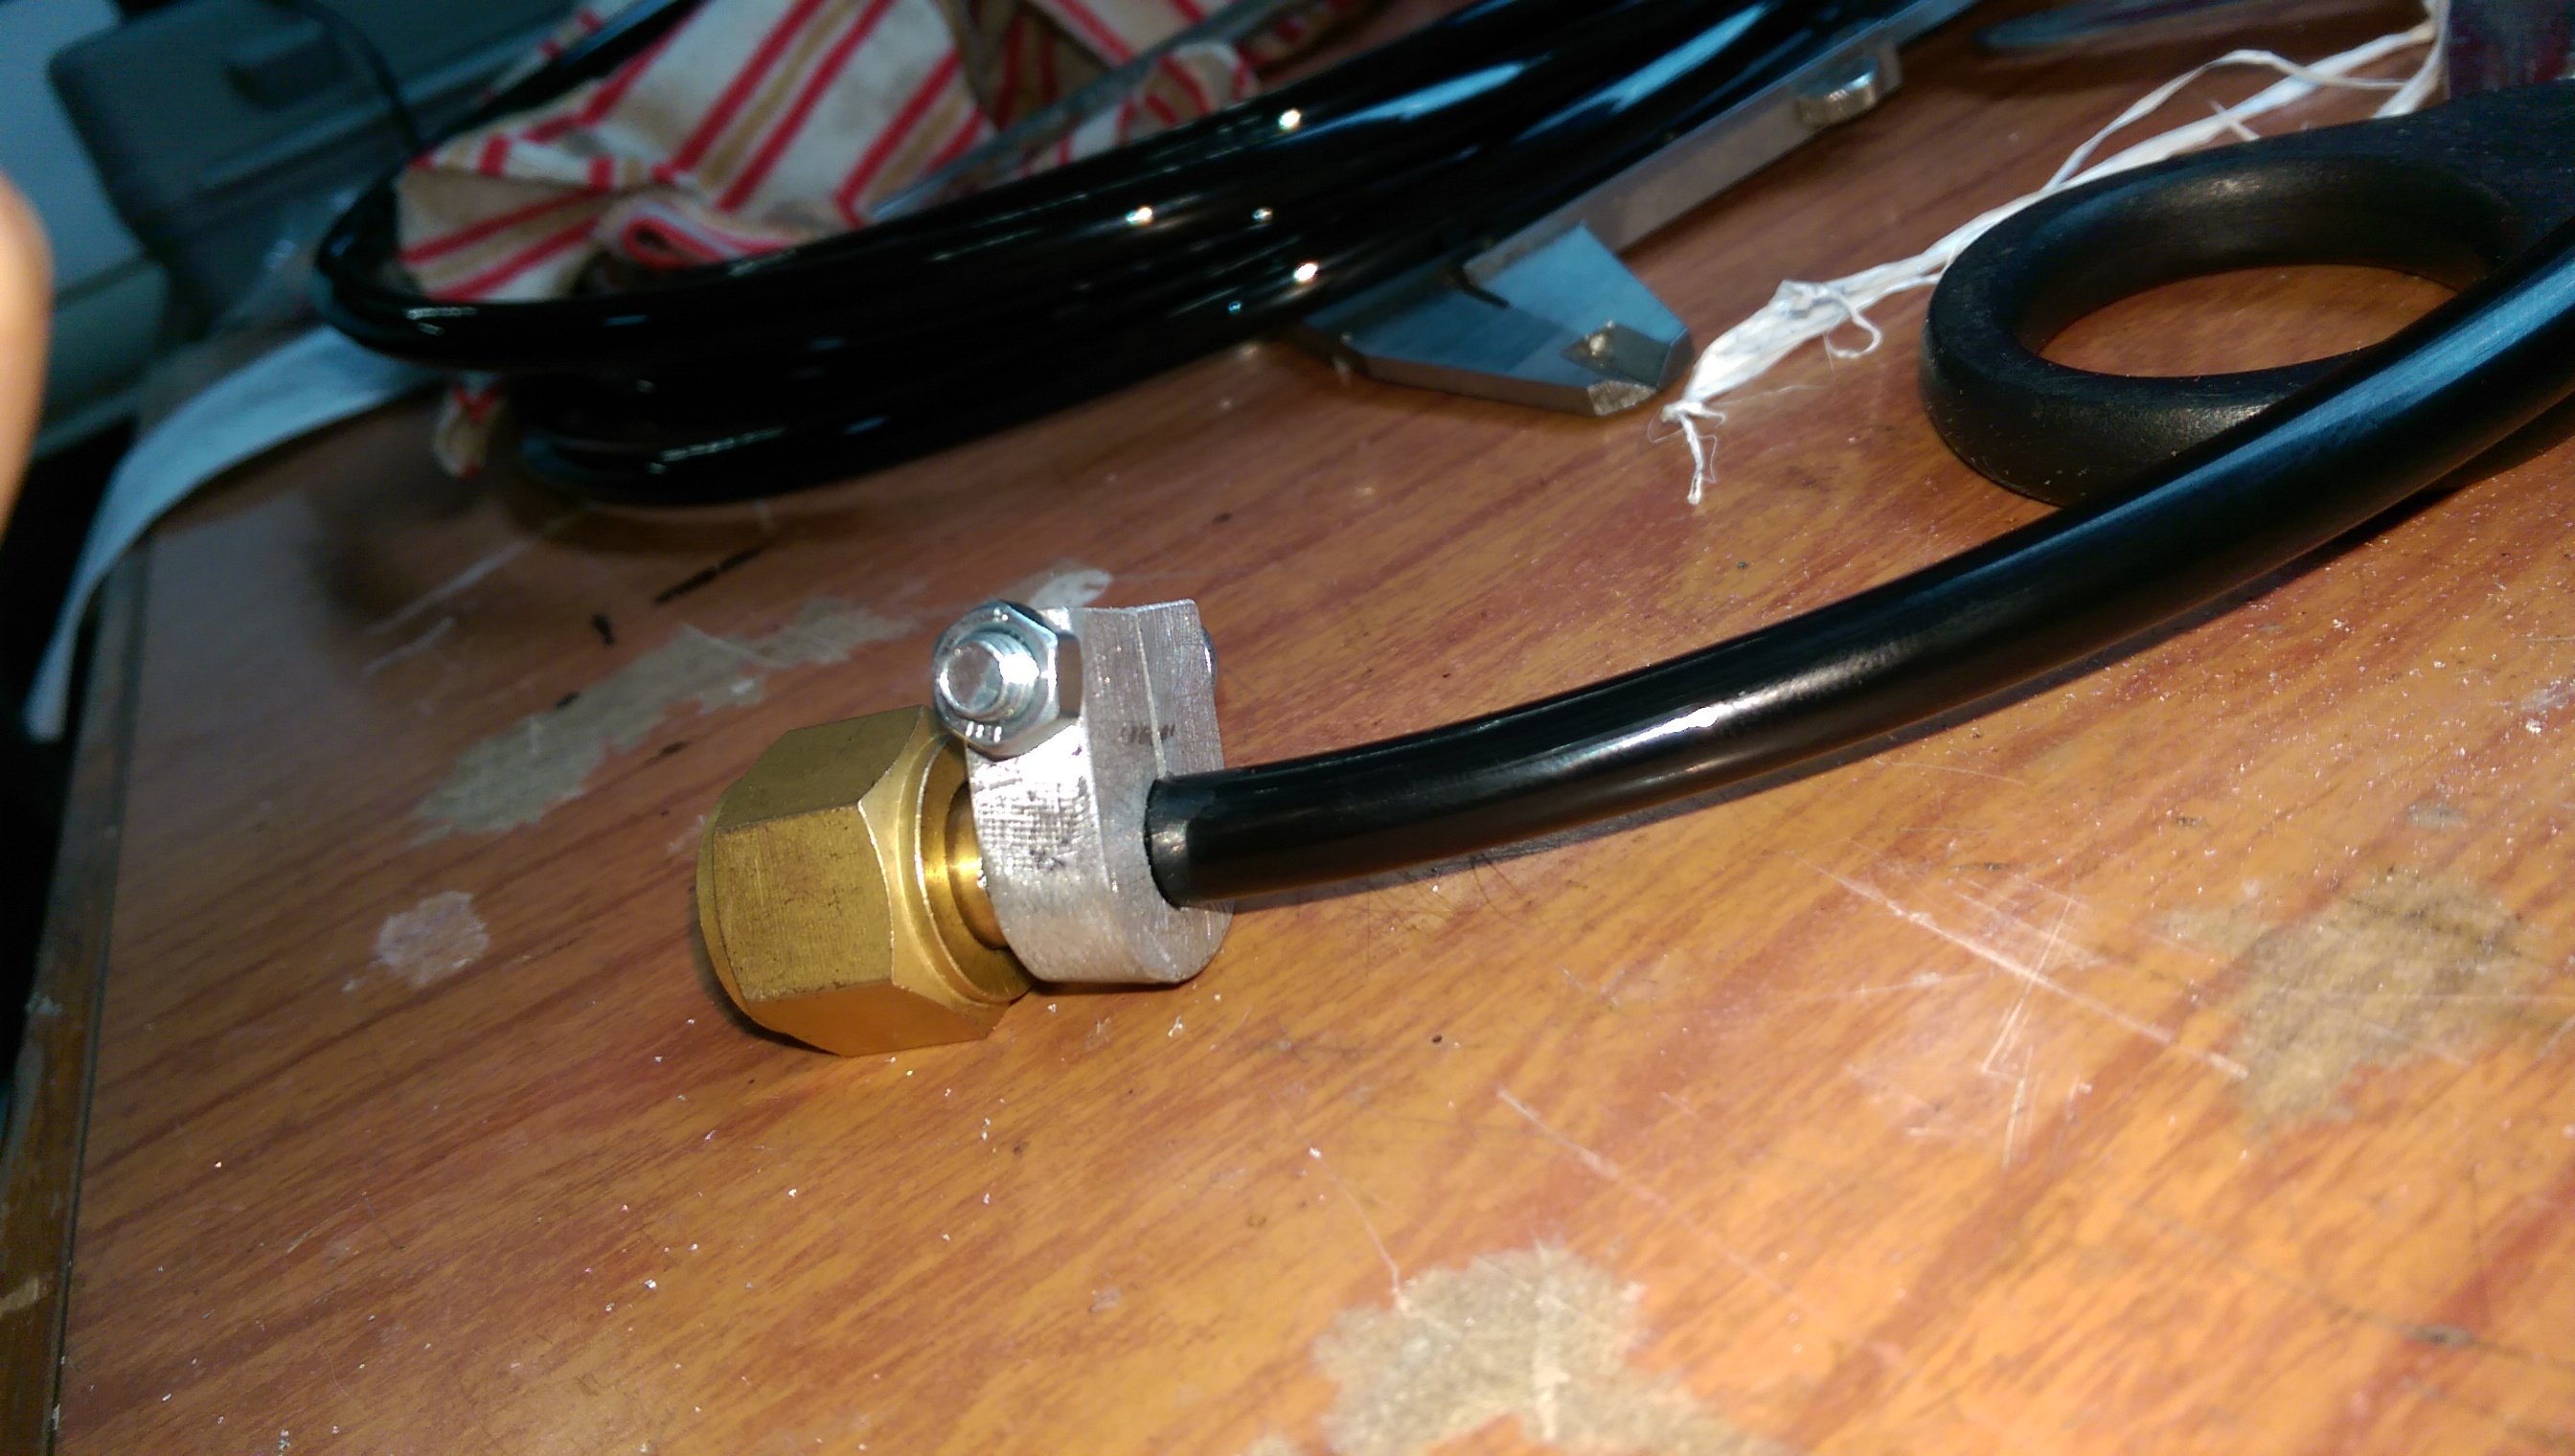
I needed a tiny hose clip, and I didn't have one small enough. I could have just bought one..... but I was expecting a courier deliver my new lawn mower, so didn't want to go out and miss it. So I made one... Works real good. After the mower arrived I did go out to get oil for it. I didn't bother getting a "normal" hose clip while I was out.
1 point
-
Need to do updates more often so they're smaller! Put the tray on as I needed to see where I could run the fuel and brake lines. Also borrowed a pair of wheels off one of my parent's cars, to test the tire sizing. Bought a fuel filter and made a stainless steel bracket to hold it. Made some mounts for the rear bumper to bed brackets, as they were welded on before. Got out the LED tail lights that I've had for ages and made up some stainless brackets and polished them. Started running the brake line out of copper-nickel tube. Also got some 5/16" lines for the fuel lines. Made some stainless clamps to hold them all together and to the firewall and chassis. Made some bits for the column change linkage. Top middle piece mounts on the firewall around the column and has some little stoppers that make it so the gear stick needs to be pulled out to change from certain gears. Left bit is what goes over the stoppers and pivots with the gear stick to push the rod bit down, which then pushes the right piece down and change gear. Thought at first it would have to be some super complex system with cables and stuff but this way was actually pretty simple to make work. Then I needed to make up a indicator on the column to show which gear it was in. Drew on up in Solidworks and laser cut it out. The accelerator cable needed some modifying to work, it's wasn't quite long enough to reach the pedal, so made a new bracket that moved the housing closer to the throttle, which allowed for more cable out the pedal end. Then all it needed was a plate with a lot in it that bolted to the pedal to hold the little ball on the end. Have had some big train air horns for ages. Couldn't find anyway with enough space to fit them, as they were originally mounted together in a triangle shape. So pulled them apart, made some new brackets and bolted them up under the cab to the chassis. Need to just run some lines to them. Some boxes of stuff finally arrived from America. They included some front windscreen stainless trim, door panels and the surrounding trim. Might replace the door panels one day as they weren't as good as I thought they'd be for the "deluxe" spec ones. Also arrived were some wheels. 15x8 Artillery steel wheels with baby moons and beauty rings. Spent ages trying to figure out what colour to paint them, didn't really want to go red (what everyone does) or black (spent too much money on them for them to be hidden). Decided a bronze colour would look good and hopefully not too out of place. Then spent more time trying to find a nice bronze.1 point
-
All the bits are clearcoated. Came up alright, got way too many runs on the cab, but that's okay as I'll be re-coating it all again once it's assembled with some flatter clear. At least it's all sealed up now. Installed some black fender welt between the bed and the guards. Started installing some of the parts. Put the door latches in, had to replace one of the springs behind the interior handle on the left side as it had snapped. Squeezed some Dynamat on to the outer skin of the doors and wooow what a difference that made to the whole door including the inner skin. Couldn't wait to see what the gauges looked like, so in they went. Got the door windows and quarter windows in, what a frustrating time that was, since they had to be installed in the right order and it all has to be fitted through the small slot in the top. Put an LED in the original interior light housing, wired it up and fitted. Puts out some decent light. Pulled apart the old headlight surrounds and put in new spring and seals. Gave them a bit of a polish up as well. Bought some new sealed beams, no-one could seem to find any semi-sealed ones with the domed glass when I was looking. Found some in America after I bought these though, but will try these out for now and if they're rubbish change them later. Fitted one of the inner guards when the engine was in and realised that trying to make headers was waaaay too much effort, time consuming and there really just is no space in there, plus the factory ones already fitted perfectly. So cut off the ugly heat shields on the factory headers, tidied up some of the welding, ground out the lumpy weld on the inside of the flange, painted them with high-temp paint and then wrapped them in heat-wrap, look much better. Would of really liked to build my own headers, maybe on the next project, as I have 20x 1-5/8" U-bends arriving from America next week haha. Put the cab on so I can see where the brake and fuel lines can run. Looks like it could actually be finished sometime soon haha.1 point
-
A bit overdue on an update. Undersealed the cab, came up pretty good! Flipped the cab back over and sanded all of the inside and door jambs. Then put some epoxy primer on. High build primed the dash and a few of the panels that will be visible once done, so they sanded up smooth and just sprayed the primer as a surfacer on the rest. Once I got it all sanded down and filled the little bits that needed doing sprayed some colour on. Pretty happy with how it turned out, other than a couple of small sags on the dash, but I'll sand them out later. Picked up a couple of boxes of Dynamat and covered it everywhere I could get it. Made a decent improvement, just need to get some inside the doors somehow and also do something with the gap in behind where the top seat belt mount is. I needed to sort a radiator as the original one wasn't in the greatest of condition. Tried searching for a couple of weeks to find somewhere to buy an aluminium core the sizes I want, but seemed to be pretty hard to get anything. So went and bought one of those universal Chevy cross-flow things that had a core close to what I needed. Cut off the tanks, drew up the radiator and support in solidworks and designed the mounts and new tanks from there. Top tank is angled at the front and with the gap at the top allows me to bring the air intake through there, as there's not really anywhere else for cold air. Drew up some aluminium brackets to mount the electric fan as well. Should clear the engine if I trim some of the pulley bolts that stick out a bit much. Started on prepping the rest of the body panels for clear coating. Left side is sanded with 800 grit which seems to work pretty well, cleans it up nice. The seam at the back was pretty rusty so gave it a sand, rust kill and then seam sealed it. The blue colour I was using for the rest of painting was quite the same as the patina'd paint some had some different stuff mixed up and used it to blend in the repairs. Came out really well! Fixed up the patches where I welded up the old mirror, spotlight holes and the area around the cowl vent.. The sanding brought back some of the original pinstripping around the cab which is cool. Had to clean up this seam on the tray as well since it was rusty and needed touching up.1 point
-
The passengers door lock actuator seized at some point, only noticed it last week. When I was pulling the door apart I noticed there was a bit of rust coming through the front inside of the door, and since the door was basically half in bits I thought I may as well fix it now. Looks like there may of been a previous repair done here. Now I just need enough courage to fix the rust that will most likely result in a respray haha1 point


.jpeg.2ff3bfe28334b0c9135accf0009742c7.jpeg)


.thumb.jpeg.384ff72c8d2b0ee0d34a7bdedb55bdcf.jpeg)


This leaderboard is set to Auckland/GMT+12:00