
Leaderboard


Popular Content
Showing content with the highest reputation on 06/28/16 in all areas
-
So uhhh more things have happened, though I have very few pics because my sd card has been failing for awhile and I didn't notice. Dave and I ummed and ahhhd about the shitty UJ angles, and it was clint who gave us the idea to use cv joints from a commodore driveshaft. So we crawled around under some smelly commodores and fetched the sloppiest driveshafts zebra had to offer. I don't have any pics of what they looked like factory but here's what an end looks like. The adaptor that bolts to the cv and slides into the gearbag Here's the adaptor that bolts between cv and diff. Got some aliexpress exhasut wrap and did a thing. Lots of grunting, swearing, hitting and drilling and driveshaft loop is in. I wanted to move the spring perch forward so the diff can happily sit back further, threaded rod tells me where to put the centre of the perch. So It was about now that I got real unhappy at how much toe in it had, and I was real eager to have a go at fixing it, unfortunately my phone didn't save heaps of pics. How to bend diff: 1) remove everything not a diff case and make a jig around it to stop it flying into orbit when the welds break. 2) remove centre bits from diff head and spin up some bushes from delrin to replace the carrier bearings 3) spin up an "axle" from a piece of bar 4) put the things in place and now you can measure where your "axle" is sitting in the housing and use secret dave maths to calculate camber and toe 5) use bottle jack to abuse the diff case into submission 6) measure, success, marvel at the simplicity After this, dave very kindly donated his steel barrels and tyres (bruh skids on) for me to make some wheels that fit, I don't have any pics of this either but it briefly features on snapchat (thanks pooman) So yea grind the flange from the barrel that used to be there from a previous life, cut the shit out of a townace centre and hydraulic press that bitch in. Bolt onto car, adjust offset and run out with DTI magnetted to a mazda engine block and you're good to go to glue it together. Somewhere in amongst all that, dave sneakily tightened the shit out of the gilies and I believe it's tuned to a high c? They look absolutely perfect on the car, I couldn't be happier. Huge thanks to dave the tame machinist, he didn't choose the brap life.19 points
-
i got a warrant!!!! its taken a damn while but Its been a long time between updates, reason being nothing much has happened while i've been waiting for my bonnet to be repaired. All that was needed for the wof was brake pads and bonnet rust fixed. After having this sit for so long with no bonnet (months) while it was getting fixed several average things happened to this seemingly cursed wag 1 - one day after moving around in my driveway the water pump decided its had enough of life and split its seal and subsequently drops half the water on the ground. Lame. Luckily i kept the new one that was on the other 1geu i replaced with this engine. 2 - Apparently spark plug threads aren't water tight when rain water sits on them for extended periods of time..... must have been pretty close to fucking itself because when i tried to start it one day it locked up solid! oops! with that shit all sorted it was time to put my sexy rust free bonnet on and get a warrant. Then upon returning home from said warrant the engine started loosing a substantial amount of power which was strange after it ran so well untill then. Had normal power for about 3-4 seconds after i buried the accelerator and then died down to almost nothing until i bcaked the throttle to about 1/4 . I decided this was probably another fuel blockage .... boy was i right Might be time to clean the tank out! And that's where I'm at right now. Must be time to lower it finally8 points
-
Yea Fizz hard - love a good 2 smoke on full song, but your chainsaws are not oldschool enough lol Canadian for Lyfe haha no chain brake or safety stuff here4 points
-
Minor update. I've done a couple of things. Made a tow bar and found a nice piece of chain on the road that now lives on the bulldozer. Made a shifter so I can change between first and second in the auxiliary gearbox. It is much faster now especially in reverse. Fitted a new exhaust. Took it to some motor scooter thing. Then I towed some stuff and posed a bit. Does anyone else here get fizzed up about chainsaws?4 points
-
I feel a chainsaw thread coming on.3 points
-
Technically didn't 'make' it, did paint it and assemble...............does that count hahaha.3 points
-
On the home straight of sanding now. One side done up to 600 grit, the other up to 120. Next up will be heat treatment. Still yet to build the legs for the mini forge, but the burner is now complete - also visible in the above pic. The non burny end of the burner has the following assembly - pretty much just a valve and a couple of brass bits fitted/brazed together to attach a standard BBQ hose and fit it to the 15mm steel pipe. Have a couple of oriface options with a 0.8mm and 1.0mm option. Can just buy more caps and have different sized holes drilled if necessary At the end of the day its just an oversized Bunsen Burner - hopefully enough to heat the forge up to the 800 degrees I need toe knife to reach before dunking it in oil3 points
-
I finally got this back after my own laziness and tbh money stuffs. (visas are expensive) But i painted my ute, triumph is chugging along nicely as a daily for the missus so i free'd up enough plastic to get these parts home Surely would've been easier to stick a 4age or CA18 or, even an RB but feck it. i love the sound of these little motors on carbies and its got a bench seat and a column 4 speed manual for epic cruising times so no fucks given fun times ahead, after another few parts are sourced. Note the size difference in the rocker gear. The Valves are 2mm bigger than stock as far as i can make out ( they're a bit difficult to measure with the verniers once installed.) inlet 38.4 exh. 32.5 Cam specs Power Band: 3000-7000rpm Valve Lift: 0.349" Duration: 286° Timing Figures: 35/71/71/35 Inlet Timing: 108° ATDC Inlet lift at TDC: 0.077" Valve Clearances: .020" inlet/.022" exhaust +60 oversize pistons. 82mm. rods are original but have been checked, balanced and 'weighted' together. dunno the proper term. this is the only thing limiting the redline really, the cam will run out of steam at about 7000 but if i wanted to stick a wilder cam in it in the future, with proper rods and the rest of the work its set for the racetrack. The difference between the old main caps Vs the new. held in with arp studs and nuts. Electronic dizzy with expensive coil (because chrome) mapped with the right curve for my cam. and a boring cover plate, but its been balanced right through with the flywheel and crank. And i got these bad boys today. Chur to Shaneo for putting me onto them. These are exaclty what i wa after Quattros 13x7. 4x10⁸PCD. Not an easy wheel to find it turns out. but man i'm chufed to bits with 'em. all i need is nuts to bolt them on too they're ready to go. bonus. She's gone from whitewall grandads car to bogan staple in 15 seconds im still shopping but that is the bulk done. thank fuck. the missus would actualy kill me is i had anymore bills to pay like these! haha (nervously laughs whilst sweating) Discussion. //oldschool.co.nz/index.php?/topic/46071-mighty-joes-english-duo-cortina-67-triumph-74/ I\l update this a bit more regularly now. i'm hoping to get the car home this weekend if i can get the trailer and work on it at home instead of having it in the workshop.3 points
-
You need to stage a battle between this and a chris amon corona at some stage3 points
-
Mmmm.. dangerous chainsaws Got given these two XL12's, both run good but could do with carbs reco'd Reds 1972 Blues 1968 and is my main saw, now has a 20 inch bar.. can only use it for about an hour and then the fuel starts to boil haha Also bought a first gen 1964 XL12 at the swap meet last year for 5 bucks with the view for parts but it started and ran so it can keep going..2 points
-
Fingers mega crossed that the CDI due to arrive tomorrow fix's my engine issues. Thought in the meantime I would tie up some loose ends. image hosting over 5mb free screen capture And a waterproof bag for tent, sleeping bag etc gif image hosting 2nd LED headlight fitted windows 7 print screen free image host Not as good as Hayhole or his mums, but made a small bash guard from a stainless steel strokers hardware door pusher plate, some more work still to go on this if i get a chance. free photo hosting2 points
-
I have been getting carried away with the second row seat mount design... Also I found a little man who does auto electrical stuff and now the charging issues are fixed, it was just a bung connector in the charging wire between the alternator and the battery. Stoked with that. There was an issue with the rear lights and the RH indicator, which turned out just to be blown bulbs - this was slightly embarrassing. Still, I am not an electricians arsehole and have never pretended to be...2 points
-
Disappointed that wasn't a skid vid2 points
-
I would have to say, yes. The engineering behind placement and fixing of intrusion bars is unlikely random and incorrectly affixed and spec'd bars could prove more dangerous in an accident than none at all. That's just a guess based on logic though.2 points
-
2 points
-
holy shit that exhaust is like an industrial dream catcher2 points
-
Small update as of last night. Always wanted to do this and I figured now was the perfect time.2 points
-
Wet ya whistle, dip ya wick.2 points
-
music video of simon at a burnout comp His palms are sweaty, knees weak, the clutch is heavy There's coolant on the ground, 155/13s fitted already He's nervous, but on the surface he looks calm and ready to drop Os, But he keeps on looking at camo skirt wearing hoes, The whole crowd goes so loud He turns the key, but the braps won't come out He's pulling out the choke now, everybody's joking now The clock's run out, time's up, over, blaow! Snap back to reality. Oh, here comes hi viz guy there goes sparky, wave him off the pad, bye He's so mad, but he won't give up that easy its goin to get some mad slap seconds believe me2 points
-
So, since last time. New cylinder head, Thanks Don! Hydraulic plumbing. Lovingly wired it with 5 core, rebuilt the alternator, new regulator, and a little switch panel with an ignition key. Made some bars to hold the blade which was a story in it's self. No body cares about that though do they? You want to see pushing, Bulldozer photos don't you? well OK here you go. So I do driveways now. And went for a burn up the road. I still have a few more plans I'll keep on working on.2 points
-
//oldschool.co.nz/index.php?/topic/52296-uteruss-kp60-pantay-dropper/#entry1676022 BRAP BRAP BRAP BRAPPED THE SPLINE OFF DASH HOLE HOLE FILLER THEN WE CHEECHED1 point
-
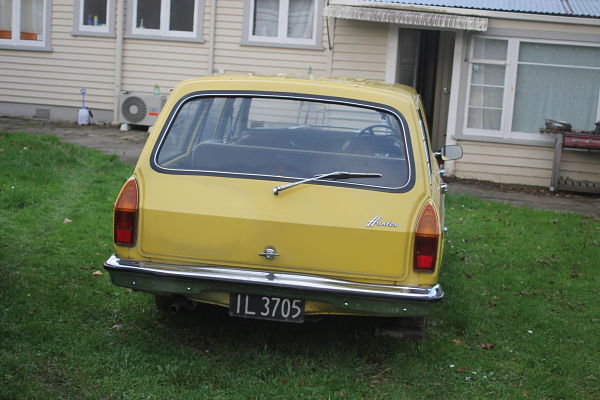
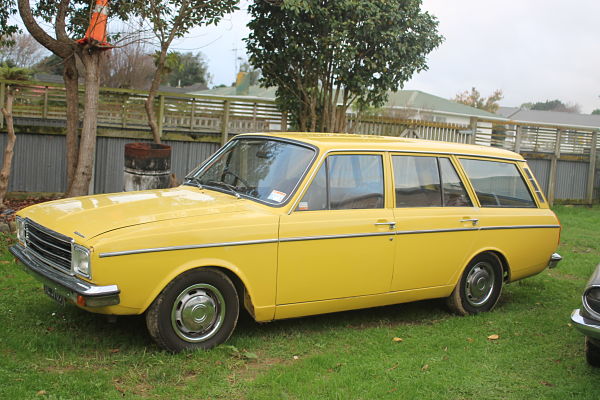
After seeing Slacker Sams Hillman Estate, i wanted one so bad. So the other weekend i scored this Hillman of a awesome oldschool member. im super stocked with it. I got a bus ticket to New Plymouth and drove it back to Levin. The car surprisingly drove and handled mint. The cars super tidy, it just has the odd imperfection. The previous owner replaced the carpet, so the interiors practically perfect. Its so nice. At some stage in the cars life it got certified for coilovers, so im happy as about that. . It looks mint as it is But the plans for it are: To wind the coils down more, and to get the leafs reset, for More lowness haha. Get the steel wheels Banded to a decent size and polish up the center caps, still contemplating on what color i should paint the wheels, i was thinking like a creme color. Find the early Hillman Minx grill and bumpers, they look alot sweeter. And probably a roof rack with some beer crates. All in all ill keep the car as mint as possible. Ill be daily driving it and trying to get the kms up super HIggggh haha.
 1 point
 -
Bought this in July Last year from Christchurch. Good drive up to Wairarapa no problems however first oil change blew a crank berring. Took the motor out and took to rebuilders only to find motor was beyond repair so needed to find new motor. Have now rebuilt a new motor and am almost on the Road.1 point
-
Then I removed the shitty seats. The front seats had some pretty dodgy frames under them.....1 point
-
DO A SKID KEARNT1 point
-
Maate hit it with the whitewalls! Just got a set of 4 195/50r15 ones off sta parts for $360 delivered... Think they do 13/14 inch aswell, cheaper aswell but performance tire they aint.1 point
-
So I am sorting the front end out and should have it 80% sorted by the end of this weekend. I bought some Tein Adjustables for $50 at the same time I bought the car and will use a gas Celica insert for now until I buy a better insert later as these are actually for another project. All in all I would say the car will sit slightly higher at the front and will be much firmer and I am hopeful this will help the roll center. I know one thing it will help loading and unloading the car as the spoiler touches without using some wooden planks at the moment I removed all the mounts and crap1 point
-
Option 1: sounds like the path of least resistance and it just may get you through; a booster would allow you to run far harder linings than standard. Option 2: if parts are available and the conversion is straightforward it would defiantly give you the improvement you’re after. Even older solid rotors have a huge advantage over drums for heat dissipation. If the B1500 and B1600 rear cylinders are the same all you would need to do is use the B1600 master cylinder to get close with brake bias. You’re correct in that you can use 2 Hydrovacs on a split system (BMW did it years back but in my post I said "single"), you just can’t use one on a split system without radically changing the bias. You can also use two dissimilar hydrovacs on a single/or split system as a way of increasing front pressure for a disc conversion (eg a 5/8" Vh44 on the front and a 7/8" Vh44D on the rear). I did quite a number of such conversions in the eighty's, they were pretty trick for the times but to be honest they took up a hell of a lot of under bonnet space, were a bloody nightmare to plumb in and bleed and gave you a very average pedal! Avoid using a ‘proportioning valve’ if you can, most are really only pressure limiting valves and are no up to radically changing brake bias (e.g. going from drum/drum to drum/disc).1 point
-
So, in a effort to fix all the small odd running issues this motor had, I managed to break the car again. The story goes like this: When the motor was in the E34, the fuel pump was jumped between the ignition 12v pin and the pump power wire to get it to work. I tried a relay (which was unknown condition) to see if it would work but it did not. The car also developed a very bad miss just before I pulled the motor out until the day I drove it to the place I was working at to pull the motor out. What would happen is the car would start ok but missed and backfired under throttle, the more you pressed the worse it was. It was driveable cold but got worse as it warmed up and became pretty much undriveable when warmed up. The day I was driving to pull the motor, it stalled on me a block from the place. I tried to start it but it wouldn't fire and the battery went completely flat. So we towed it. Once there, I jump started it to see if it would start and it started a bit rough, then came to life and ran perfectly. Drove it up and down the road a bit and it ran without a single issue. So I took it inside and pulled the motor. Once the engine was in my E28, when we first started it, it ran rough like it did in the E34 when it was missing. I fiddle around a bit, left it for a day with the battery disconnected and then the next day it started up fine. Ever since then the car was running fine, except for a slight miss at low revs, until I pulled my gearbox off to change the clutch. When I put it back on, it did the same thing. It ran rough and missed, so I let is sit for a couple hours with the battery disconnected. What do you know, started up and ran perfectly fine. Last weekend I decided to swap the loom and DME with one I bought to see if it would solve the fuel relay issue and other issues like the ICV not working at all. The fuel pump relay gets 12v to all pins when key is in except ground which is grounded, yet the relay (tried 2, one was definitely good) does not work. Anyway, so I swapped the loom and DME, turned ignition on. ICV buzzed as it should. Then I tried to start the car. Nothing. It cranked but would not fire. I triple checked everything and even tried my old ECU, still nothing. ICV no longer buzzes but gets 12v at all pins. Grounds test at 12v, however the coil only got 9v. I ran a relay for it to test but that only gave it 10v, even though the power wire was a completely new one. Also tried different coil, still nothing. Took my crank sensor out and tested it on my friend's M30 and it worked perfectly fine on his car. All issues the same as with old loom. So I swapped my old loom back on and still had the same issues and wouldn't start. Since then, I tested the ECUs/DMEs on my friend's car, the crank position sensor pinout voltage which is correct (5v at the correct pin), charged the battery so the coil now has 12v etc. Everything I could possibly think of. Got pinouts of the ECU and checked every wire that could effect starting and everything is working as it should. On Friday it came to me that maybe the lead from the coil was bad, so I tested that. The lead turned out to be fine but the plastic on the post of the distributor cap just broke off. This left me slightly hopeful but not really, and I swapped it with a spare I had. Put the battery on charge and tried it the next morning. Nothing. The last test I have to do is this afternoon I will try to put a plug straight on the coil lead and see if it sparks. Then I will put the new loom back in as a final resort, just in case. If that doesn't produce any results, I really don't know what to do next short of converting to Megasquirt or something. I don't like fixing things that way but I see no other option. For some reason I don't seem to be having much luck with this motor. TL;DR: Tried to fix/improve it, broke it again. Now have no idea what to do.1 point
-
1 point
-
Yoo, So I sold ol Bluey a fair while ago, but I wasn't really set on selling it. Anyway, one popped up on Trademe a while ago and I finally went and had a look at it yesterday. I was pretty happy with it and brought it! Have a few tidying up jobs but it's pretty sound and clean. Gearbox is making some nasty noises so I'm on the hunt for another, and maybe another engine, current motor burns loads of oil if you get up it. Today I gave the interior a good huck out and it came out really nice. Dash and door cards are all mint, headlining and seats are a wee bit discoloured but no rips. It's missing carpet so I'll sort that out asap. It looks like it's had a gbox change sometime because the shifter if a bit further back than factory. I tidied up that today and made a blank for the old hole. Anyway, jobs; -Gearbox change -Slam -Get some 165 55s for a set of 14x7 Hayashi mesh I have and pop em on. -Roof racks -Carpet After that's done I'm keen to put on some different carbs and some headers. Apparently manifolds off B series MGB fit, but I'm not sure if I want to stick with the J series or not. The head design looks fairly terrible. But we'll see. I'll take some better photos once this poo Auckland weather clears up. I'm using the same threads as I can't be bothered making new ones..1 point
-
cert brake check for something with more than 50% increase in power over factory, is 5 stops from 100kph- 0kph, under 4.4 seconds, in a total of 3min max. Fade is the main problem with drums in this test- the heat build up causes them to lose efficiency. A booster wont really help with this- as the booster just decreases the force you have to use on the pedal. I have had a few customers who have managed to get things with 4 wheel drums to pass a cert brake test by fitting hi temp linings to the shoes. If i was you id try the brake test yourself, and see what happens, it might be fine as it is1 point
-
i like this man looks cool, whitewalls could suit it with the hubbys?1 point
-
These guys sell gauge plate if anyone was interested http://www.industrialtooling.co.nz/products/gpl10571 point
-
http://iforce.co.nz/i/11bhjgyv.xof.jpeg http://iforce.co.nz/i/yi2x0igv.ha5.jpeg http://iforce.co.nz/i/thbdyegw.oug.jpeg http://iforce.co.nz/i/fjyqgw3b.f3g.jpeg http://iforce.co.nz/i/nfqnoysd.jj0.jpeg1 point
-
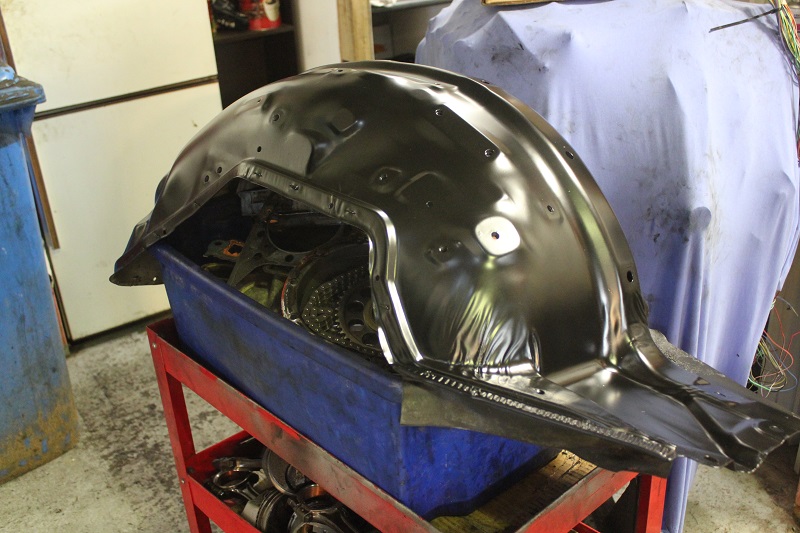
woops my build thread fell off the front page of build threads, which must mean I wasn't doing enough work or something Anyway, have been hacking away at it as time frame is getting smaller and have a few weekends away, so doing an extra half our a night currently to try catch up. Rebuild alternator as I knew it was faulty, new reg, hopefully it wasn't my wiring or something lol Also, been sorting out more motor stuff., And lot of wiring. Found homes for all the relays for the ECU and have run a plug instead of hard wiring them like last time haha Also Grotty was painting his inner guards for his impala at work so I threw him mine to do also To be honest I kinda feel the paint is too shiny for the engine bay, really distracts from all the other stuff I have painted. In half minds about whether I go over them again with a can of satin, or just deal with it. biggest concern about the satin Is that I have had a few issues recently where its turned out milky. not sure why, my guess might be heat, as it is kinda coldish at the moment slash no sun. Anyway, best make a discussion soon as I need them bolted in so can refit battery cables etc to get some power in the car to find out where I need to run wires to for ECU And yeah. exciting exciting exciting
1 point
-
Don't learn shit when you pay others to do it.1 point
-
So here is todays effort. The existing seat mounts were shit beyond belief, it was a selection of scrap steel and what looked like filing cabinet rails cobbled together with a vast variety of fasteners. This is the passenger seat mounting on one side; Note the filing cabinet bracketry. And this was the rail and fixing method on the other side of that seat; The stack of nuts was to clear the bit of box section, fuck knows what they were thinking. Anyway, I thought I had better start with the drivers seat as it is by far the most difficult seat to arrange all the required functions. I took very few pics as I was fully missioning this, but i did get pics of the results. Basically I need the seat low enough so my legs clear the steering wheel, I need plenty of forward/backward adjustment so her indoors can still drive it but it can slide far back enough the it will clear the steering wheel when swivelling. I had a few false starts, the worst of which was realising that although everything was sweet seating wise, I could no longer open the engine hatch without removing the entire seat itself. This was because all the seat tilt gubbins poked out a bit too far over the hatch. You can see the difference on the last pic of the previous post. This was after some pretty serious mods to the seat to get more low in there.... So I decided to use the other seat which had all that tilt crap on the other side, so i had to do all the same mods to the second seat... Then I had to do even more drastic surgery to the underside to clear the rail release mechanism while swivelling.... etc etc. And I had to mod the extra side engine hatch to clear all the rail mech and allow the seat to slide backwards enough. Holy shit what an effort. Naturally this one seat became an all day job. It is all sorted now though and this is the result; Shit slides forward And slides back And then swivels And then goes right around There is a locking detent for straight ahead and straight back, this is good. The passenger seat I think I will not put rails on, as all it really needs to do is swivel. This should be pretty easy to set up then. Should be able to sort this tomorrow...1 point
-
It bolted in ok, sentradave very kindly fiddled my shaft and swapped yokes. He also did the rear brake lines. Re mounted fuel pump with some rubber and ran a new fuel line as the old shit was fucked as. Clever use of rivnuts to mount the handbrake cables. It bolted in great btw, untill i tried to adjust the links to get the correct pinion angle and now nothing fits. I got a supertrapp though, so i've got that going for me. I'd like to thank the following; sentradave for engineering and moral support pooman for taming dave evan for doing the things i didn't feel like doing romandave for showing us the magical brake bleeding technique dell'orto for the sick hookups I've got a few tricks left up my sleeve to solve the diff angle problem, so I need to visit zebra and see what they have to offer.1 point
-
It's a few days past yesterday but work got in the way of playtime. Couldn't be bothered sealing the gaps so in it went anyway, I ran it in the drive with everything all assembled and thermostat in there and it is rock solid at 80 degrees so that's nice. I started unwinding tape, gauges, switches and misc wires and removed this stuff that doesn't do anything except make me angry. Next? uhhhhhh probably more wiring. Maybe even have a go at sealing some gaps in the floor/firewall so it isn't 420 every time I drive it.1 point
-
I'm a fuse Greg, could you blow me?1 point
-
It's next week ish. I was thirsty for an answer. shhhhhh This is what a shitty picture of an open thermostat looks like, one step closer to being water seals. Step 17 is to buy largest fan you can find and gently place it onto the radiator. Magic! I'll see what adhesive foam I have and try seal the edges as best I can. Tomorrow I may even see how much it doesn't fit.1 point
-
those were truely the golden years of doing laps1 point
-
I must finish the wagon, I must finish the wagon, I must finish the wagon, I must finish the wagon, I must finish the wagon, I must finish the wagon, I must finish the wagon, I must finish the wagon…… Its been put on the back while over the last couple of months while things like family visit, jobs that pay get done, land work gets sorted, swimming in the summer sun happens. Bur I have managed to sneak in a few bits here and there. I did a bit more welding repairs to the rear boot/arch corner and I started on the brakes plus I have sorted out the wheels! Its been a little Vivatastic in our workshop recently too. I had Andre's lovely genuine GT in for repairs and I also have a Firenza that has come down from Auckland for much rust removal and repairs including fitting a wide arch body kit. Its going become a 70's V8 powered road going racecar replica. For us Viva fans the workshop was looking pretty spiffy.. Firstly the welding. Pretty easy to see from photos so here we go. Where I left off on the last post was about here… Then this scabby bit.. So the rear end is pretty much done but for a couple of little bits. Lets just ignore the elephant in the room that is the very frilly tailgate (or hatch as Hannah likes to point out..) Next rust area is around the bulkhead so I can put the brake servo and master back in place. Then I can finish the brakes. So those brakes.. Well they were all knackered. I took all the bits off and evaluated their mankyness.. Luckily the calliper pistons freed up and slide out revealing good chrome and seals. So just a clean for them. The pads are still thick and dry so result. Moving to the back. I cleaned up and honed out the wheel cylinders. Usable but not perfect and for the money of new ones not worth fitting seals into. But then I discovered that new cyclinders in NZ were either non- existent or cost moon beams. So I looked to dear old Blighty. There you could get all new old stock parts for the price of a terrible greasy spoon bacon sarnie. Luckily my older brother lives in the land of greasy bacon sarnies and he was coming home to NZ for a holiday. So I started buying up old Viva bits and getting them posted to his house in Wales. He was so grateful.. and brought them over for me (along with several classic car magazines J ) Here’s some bits… Typically after these bits arrived I had been looking through my boxes of bits and discovered not one but two sets of brand new brake shoes. But they probably don’t have the real deal inside them like these beautys… So the rear end is all fresh and daisy. New cylinders, new shoes and new brake lines. I found a new master cylinder seal kit in my stash of parts and that’ll go in place once the rust is done. Wheels next. The wagon came on a lovely set of classic Cheviot Turbos. Lush! Swoon. Two had slight kerbing damage to the outer rim edge. I could have left it but it looked pretty yuck. So I tigged them up and filed them neat again. Quite satisfying. Then since the wheels were in motion…. and I was on a roll…. I gave them all a good wire brush and removed the horrible build up of oxide. That was a nice job on a sunny afternoon. They look a lot better for it. Then the wheel stud holes needed tidying up/remachining because someone in the past had used the wrong nuts, tapered, and it wasn’t very good really. This was going to be bloody tricky with just files etc. So I whipped up this little fly cutter to reface the washer face. It worked a treat and they pull up great on the hubs now. Now many, many yonks ago some might remember the nice set of Dunlop D1 alloys I had bought for my other Viva. I never ended up using them because I had discovered cracks across the hub faces on two of them. But not before I had spent some time machining up nice new stainless washers to suit the new nuts I had bought for those wheels. I found these stashed away and they are a perfect fit on the Turbos. So that was nice. A few weeks back I spent some time welding up Andres Viva GT where it had failed its WOF and he returned the favour by gifting me a set of 185/65 13 tyres he had left over. I had them fitted yesterday and they look good… Sadly one has a pin hole through the sidewall so hopefully I can get it repaired/patched inside. So next step is finish the rust in front and the tailgate (hatch) , finish the brakes and then fix the leaky Stromberg carb. I’ll swap the screen out for one I have that is not covered in scratches and then it’ll be close to going for a WOF ! Simple………. Oh yeah.. we can all discuss the merits of Cheviot Turbos here... //oldschool.co.nz/index.php?/topic/44200-yoeddynz-and-hannahs-hb-viva-wagon-discussion/1 point
-
Holy shit, I've got a running Bulldozer here! It was too dark to take any action shots, tomorrow.1 point
-
*******WARNING******* This post contains coarse language Despite all consuming thoughts I've been having to burn this shit heap thing to the ground I've been making some progress. The last two months have had thier up n downs with this. Not long after my last post i decided to pull the pin on this 1g and bought another low kms one off a member and another gc brought it up here from duniden. CBF touching it / wasting time / spending more money on another 1g i decided to just leave it and chuck it straight in as is. In it goes. now is about the time i realise there are a few subtle differences between the 1ge and 1geu. like this; and this; and some plugs and the oxygen sensors etc also i discover this. Whatever, thats fine :/ Now with that shit all sorted and everything plumbed up etc ..... its time to fire it up again right? wrong. Some scumy fuck has stolen my petrol. Again!!! Whatever, got more petrol the next day and fire it up. It ran good for a minute or so then starts missing really bad and wont idle, i can hold about 5k revs on it and it sounds ok. So i take it around the block to blow it out and it dies and wont start again After looking around for a problem i discover the back of the oil cap has gone all milky looking. WTF No. Not this shit again. The curse of the 1g Threw my toys, pack shit up and give up for the day. Under closer inspection the oil seems to smell a lot like petrol. Hmmm?? As it turns out, lots of fuel in your oil makes it look a lot like it does when there is water in it! who knew..... not me. So why the hell is it putting so dam much fuel into the engine??? I then discover the fuel return line is completely blocked and the pressure is getting so great that there is fuel squirting out past the hose clamps on the rubber lines. AH HA, that will be the cause of the issue! NOPE! did not fix the problem. Different oxygen sensors? nope The coils are different. is it the coils? nah! I checked the resistance of the 1ge injectors and they are slightly different to the other 1geu ones. So i changed them over aaaaaand it made no difference. God dam it! What else? a bung temp sensor? swapped and tested all the temp sensors. Not that! Removed and checked the cold start injector. That is fine. That only leaves two things, the ECU or the airflow meter. Now i have no way of testing either of these so i give up for a couple weeks. Which brings us to today. I took the AFM off to take and compare to my 1ggeu one and maybe try that in there. That's when i realize that the fucking flap inside it is stuck at about 3/4 of the way open! Well that will sure as hell cause a shit load of fuel to be injected unnecessarily won't it!! Nasty Its now that i realize there was possibly not much wrong with the last engine i just took out, and the fact that the compression tested good amplifies the fact that it was just doing the same dam thing this has been doing. Anyway! i put the afm back together after I regreased the rusty bearing and gave it a good clean up. Start it up and WOOOOOOO success!! it idles and revs smoothly. Finally! So i take it for a hoon around the block and it dies. Out of fuel. Who the fuck is stealing my petrol!! I feel actually feel sorry for people who are scummy enough to have to steal peoples fuel. The price of meth must be going up or something. So with all that behind me i can now make some dam progress!1 point
-
So this last week has been pretty average in regards to this whole thing. The engine went back together and in the hole all very smoothly Time came to fire it up... it started first pop! It was going good all bar a small exhaust leak. So put some water in it and 30 seconds later it died, Tried to restart it and it was farting around and not idling. This is the point in which i notice the fuel light is on..... hmm thats wierd i emptied my 20L fuel container into it just the other day. Ok thats fine, whatever, i'll put some more petrol in it then. Cue me poring 5 litres of fuel into the tank which promptly gushes straight onto the ground under the car! WTF Upon closer inspection i see some shit cunt has removed the bung for me from the fuel tank. I luckily found the bung back where the car had been parked. Fuckers! So someone ass hat has jumped a 7 foot fence to make off with my 20L + 10 of half stale petrol! Which they have emptied out using an old icecream container which they kindly left behind. At this point i give up and flush the water from the engine and push the car back to its park. Next day i filled my 20L container again with petrol went to work and poured half of it in. Turned key and it fired up and idled perfectly! Yuss! so i quickly drove it into the workshop and put it on the hoist and sorted the exhaust leak out. with that sussed i filled it back up with water and started it up. AAAAAAnnnnnnnd its running like shit again. WTF. Maybe i didn't put enough petrol in it? so i put the rest of my container in it. Still running like shit. Dies. Won't start. Finally got it going and it barely runs, i give it heaps of throttle and thats when i see it. Bubbles. Bubbles coming out of the fucking radiator!! Fuck sake! Oil under the filler cap is milky as fuck. Shit. But on the plus side, i found the spare key while it was on the hoist! So at this point i see myself having 3 options; 1 - persevere with this shit heap of a motor and replace the head gasket. (I've never done a head gasket before) 2 - Put the new water pump and cambelt on the original 1g and get new oil seals for it. and cross fingers its ok (this engine has done 280thou kms) 3 - Find another 1g-ewww and hope for the best. 4 - Buy my work mates crashed JZX 110 and put engine and transmission from that into GX60 (low kms and very reliable but lots of fab work needed and cert etc) PS - my budget is not very high. please help //oldschool.co.nz/index.php?/topic/48689-be4vers-gx60-wagon-discussion/1 point
-
Reassembled and ready to go in Took the old engine out... There is always one bolt/nut that will essentially double the removal time! If you have never used a hot water-blaster i very much recommend using one if you have a greasy engine bay with 30+ years of shit crusted to it. Cuts through it like butter! Also im after a decent rust free bonnet and a drivers tail light if anyone has anything??1 point
-
Have been chipping away at this for last couple of weekends. Got all my new, shiny bits to pop in. Have been piecing it all together. Looks delish! Next step is exhaust. Had a hard time after nats trip: Will be pretty much as it was, but a bit lower, and now that i have keeper springs etc, i should be able to get that elusive 30mm drop in the front to make it level. Can see the drop required at the front in this pic. Pretty happy with the back tbh. Finish fitting suspension Fit my new brakes Fit my replica datsun race seats Exhaust Wheel Alignment Cert Am actually getting close. Nats is the goal. So hope to have it all legal by feb. Fizzing. No life like low life!1 point
-
Finished up my wheels tonight. Hopefully get some 165 55s this week for em. U bolts I got don't fit, hopefully sort some out this week. The I can slam it. Tits.1 point


.thumb.jpeg.f619b2b09d6205c0ecd09f9f2fed36f0.jpeg)


This leaderboard is set to Auckland/GMT+12:00