
Leaderboard


Popular Content
Showing content with the highest reputation on 05/02/16 in all areas
-
my first attempt at being a spray painter went better than expected!11 points
-
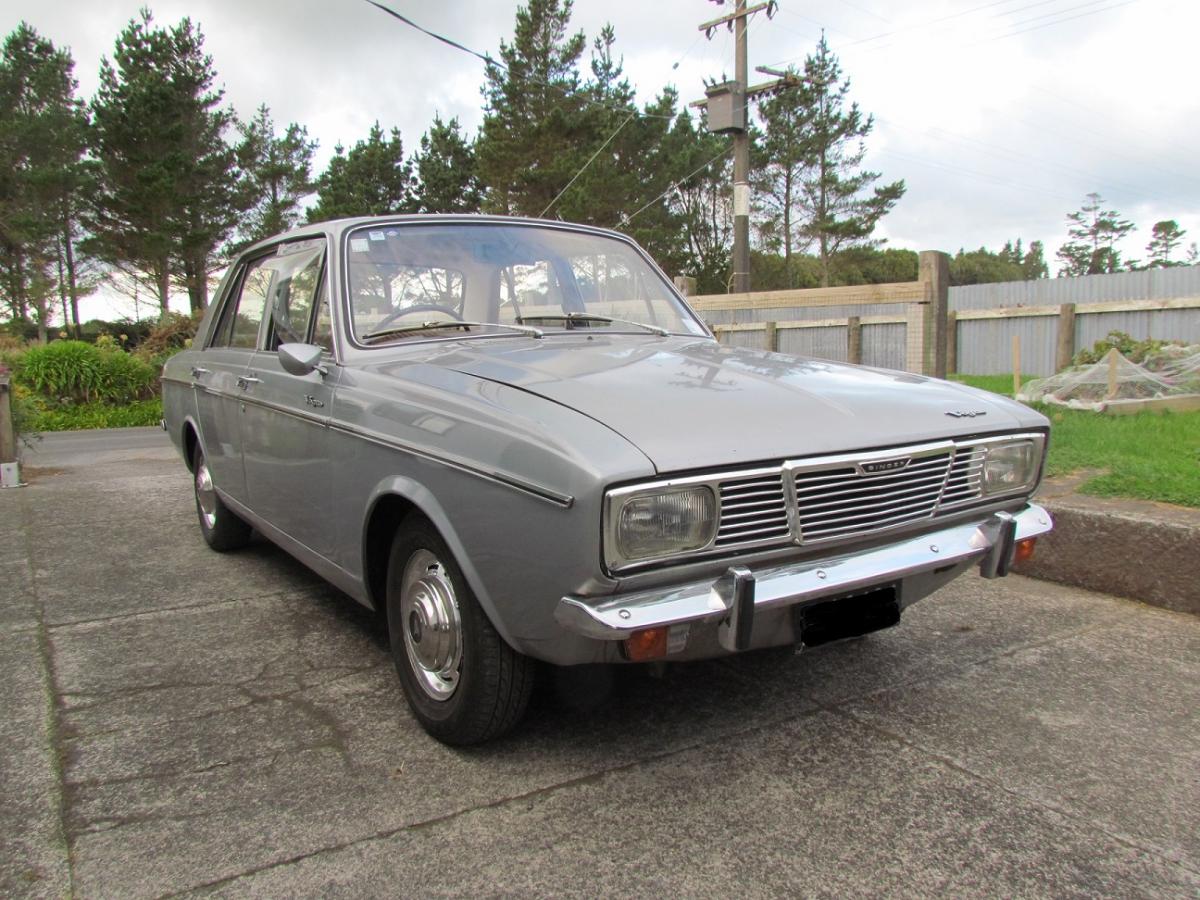
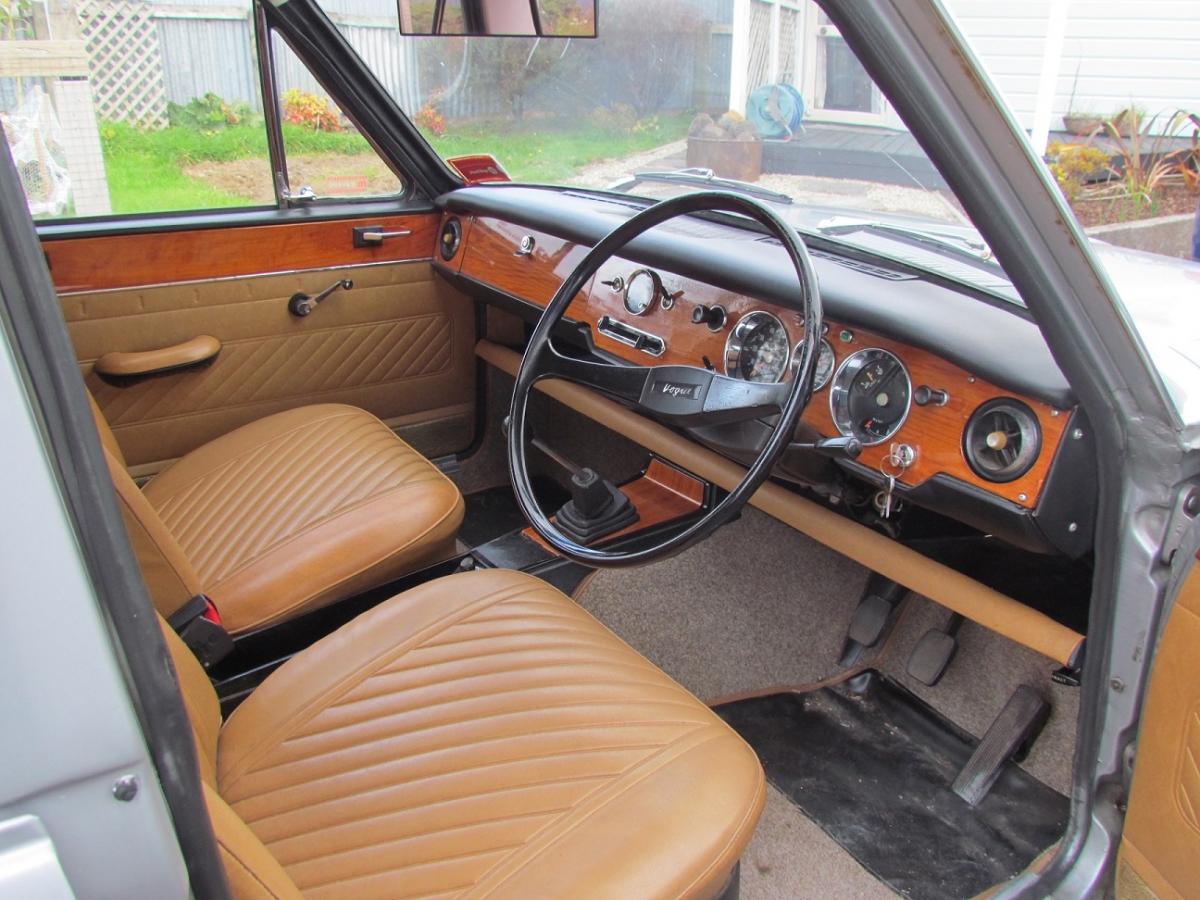
Hi All. I've been hanging around here for a while and I have a couple of poorly projects, but now I have one that works and is all legal I thought I might share. As per title I accidentally bought a Singer Vogue on the weekend. It was advertised on the down low and the old bloke who owned it let it go for a decent price. It seemed stupid to not buy it so here I am...I do in fact have another Rootes Arrow in my shed by way of a Sunbeam Sceptre, so it's not too weird I guess. Discuss //oldschool.co.nz/index.php?/topic/52739-sunbeams-1970-singer-vogue-discussion/
 10 points
 -
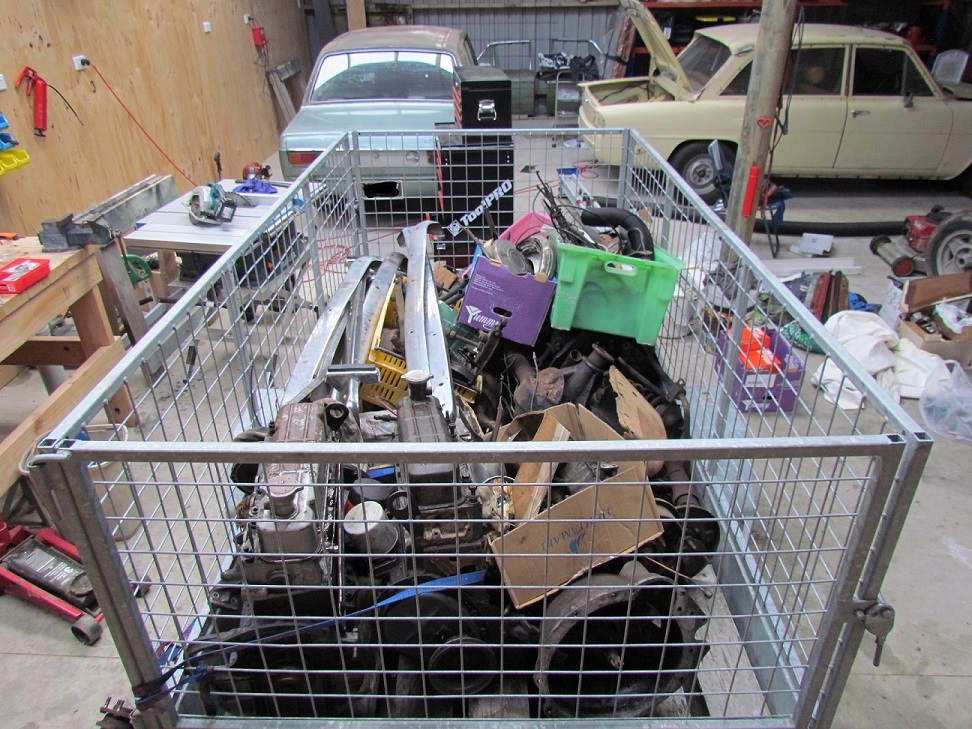
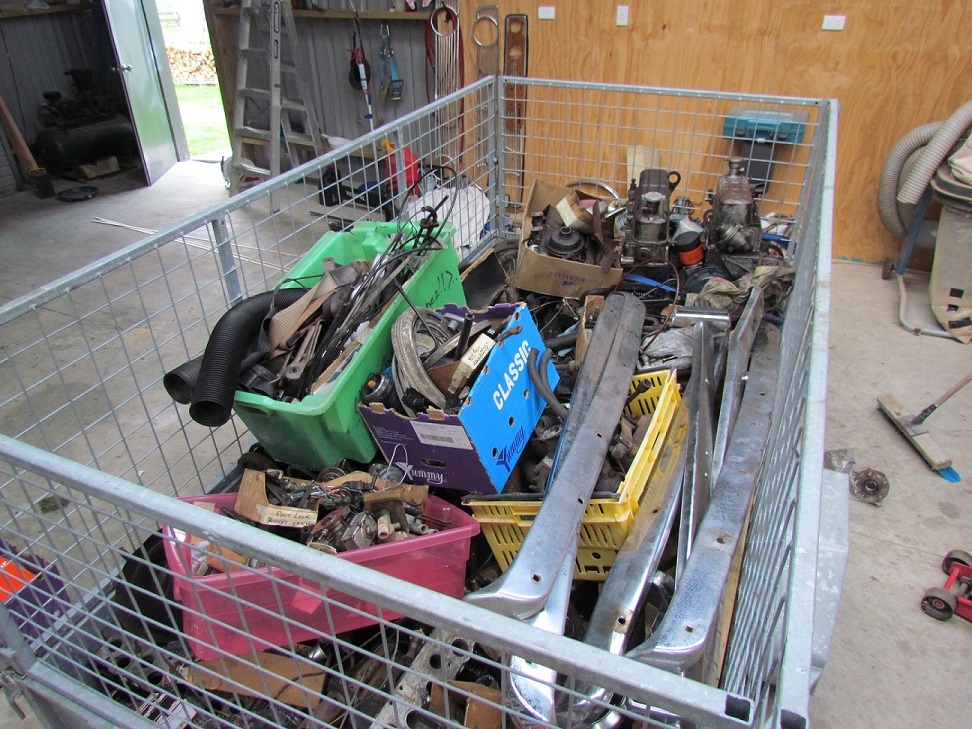
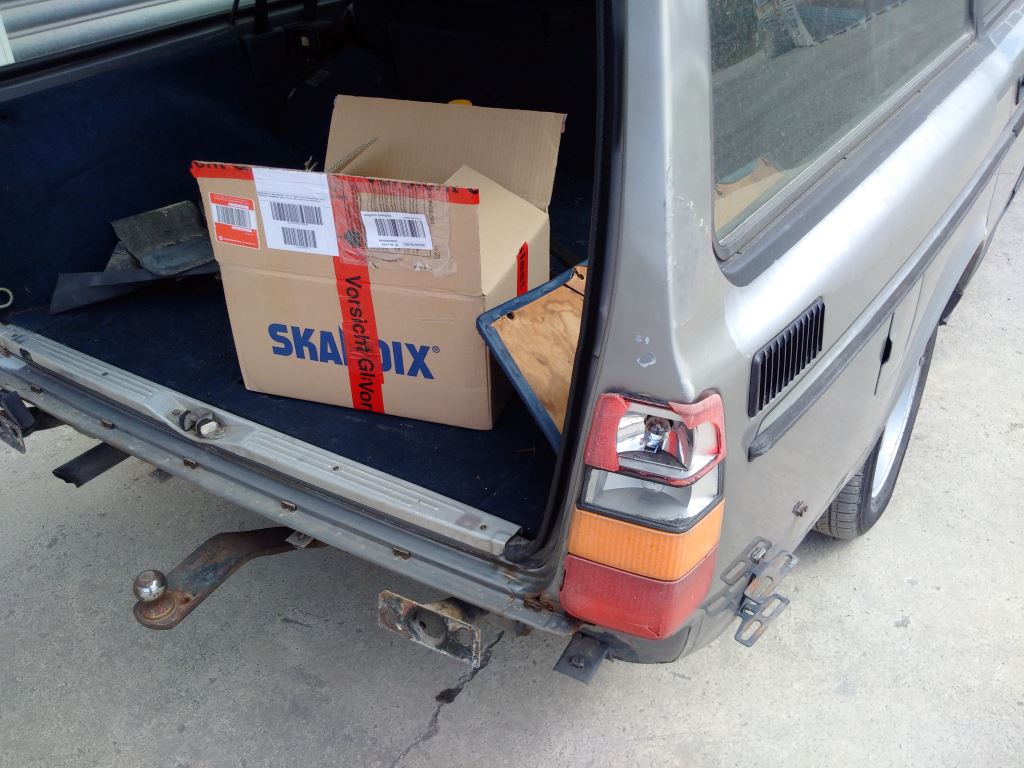
Comes with an unbelievable hoard of parts too. This is just the first load...
9 points
-
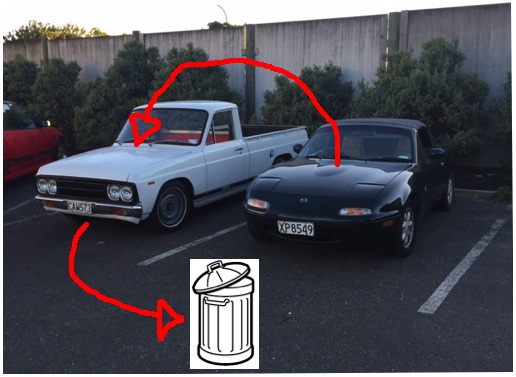
well it is all legal after a few minor things like park lights and a indicator and getting horn to work but……. since then it has developed a massive oil leak from the back of the head and is now smoking! So as I'm not to fussed on pissing around much more with these old carby engines I have found a mx5 motor and bellhousing and am going to do the swap for fuel injection life. may as well as it was always the plan for reliability and economy just had hoped to at least use it for awhile as it is. if i get motivated i may try chuck a gasket at it and see if it comes right and use it for awhile until i have all the conversion worked out. here is a very technical drawing of the plan of attack
7 points
-
Here is a photo of a not so jacked gloria wagon. 50mm blocks in the back and kawasaki special springs up front. sills are pretty much spot on level but looks whack as front guard opening is so big. would like the front a touch lower at some point but this will do for now. Next is wheels, either 15s or 16s to help fill the guards. not much room in the back so wont be anything cray cray //oldschool.co.nz/index.php?/topic/41006-beavers-87-gloria-wagon/page-65 points
-
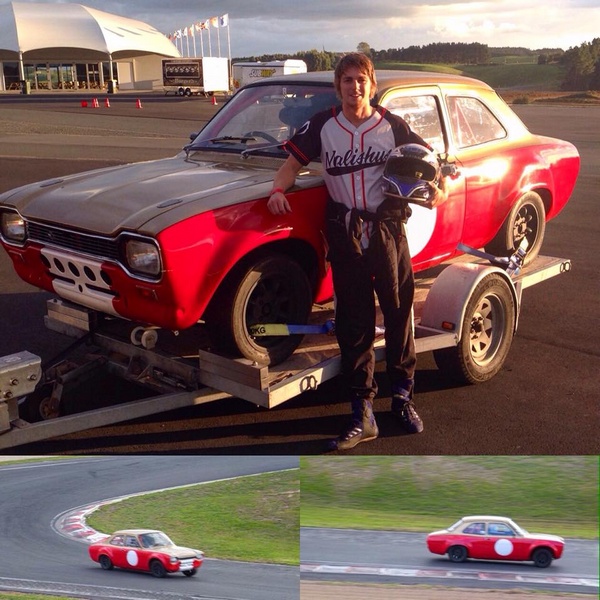
Got to do some high speed drifting at Pukekohe and even managed to finish 4th in Pro-sport class(Theres D1-Pro and Pro-sport which used to be called Pro-am) Got clocked on several entries over 160Kmh and the highest I saw was 166Kmh on the radar list. Speedo is fairly accurate as it was showing 170-175 when I last looked haha We only get to drift this track once a year because of smoke issue etc but its amazing fun, not many places you can be foot flat in 5th on entry and just never lift from the start point5 points
-
Been fiddling with the e28 over the last few days to try and sort out the little things. Firstly trying to sort the idle and TPS. Thinking that the TPS may not be working, I took the one from my eta motor and swapped that on. Didn't test drive it and went straight to the meet on Sunday, then to a friend's after. The car didn't feel quite right and then after driving for a bit when I hit WOT it would cut out completely. Then it just started randomly cutting out. Turns out that the ETA TPS actually reads the opposite way, so when I was hitting WOT it would register idle and obviously cut out. Then I did some retesting and it seems that the original TPS does infact register idle, it's just that the stopper on the throttle body was adjusted to the max (to compensate for the ICV), that even with the TPS adjusted all the way, it wouldn't click to idle mode. Anyway, that one is back in now and car runs much better, but I still suspect that it doesn't register WOT, due to the fact that one, it get no ohm reading between the two pins, and when driving it doesn't quite feel like it. Secondly I discovered that the issue is not actually the ICV itself (thanks to Ben for testing it) but that all the pins are getting positive power. I don't imagine this is meant to be happening so there may be a wiring issue. Investigations to follow. Another issue that just came up last night after driving a bit is the clutch pedal started to get vibrations. Then, coincidentally after I gave a friend to test drive it, a terribly loud squealing noise started coming from the clutch area. It only happens when the clutch is being depressed. But now the vibrations seem to be gone. I suspect this is the throwout bearing. And I can't blame my friend, I was with him in the car and he didn't do anything I wouldn't have. Haha. Also, today I went from a hot air intake to a warm air intake. I will find a better solution later but it's better than before. Now, for some memorable moments from the swap: Ben wasn't a big fan of my radiator fan. Hahaha ha. Ha. Some late night shenanigans.4 points
-
You're in...4 points
-
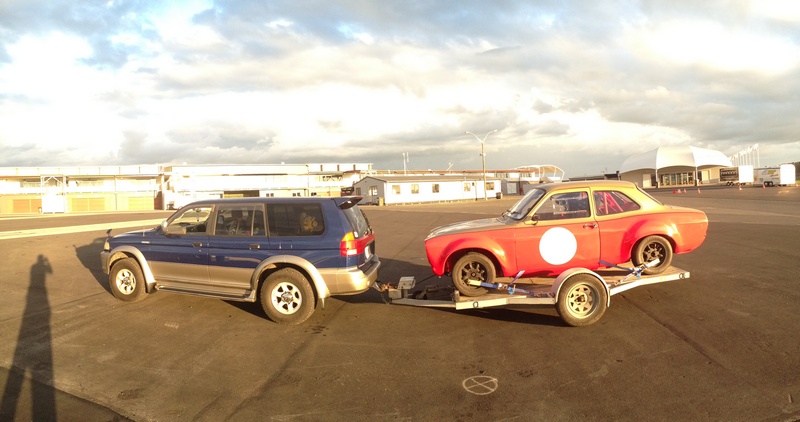
Good Test Day at Hampton Downs 80 track Kilometers done and the car didn't miss a beat and best of all , its coming home in one piece and still shiny.... phew ! unfortunately the GoPro footage got corrupted so only got some iphone footage https://www.youtube.com/watch?v=oluSeq0jKHc
4 points
-
So the first piece from the Green turd made its way onto the Orange turd this afternoon. One functional window latch, has been broken for nearly as long as I've had the car.4 points
-
romandave took some lovely pics too, thanks dave3 points
-
In some other news, the rust that I thought was rust under the rear passenger sill Has turned out not to be what I thought, just some lumpy spot welds disguising themselves as rust bubbles, which is fucken great..3 points
-
OK yeah.. so I have ended up getting a touch carried away with this little wagon and sort of going against my original mission statement of 'keeping it all manky looking and just scrape it through a wof'. The reason for the slight change of heart is because when I started cleaning out the engine bay and really noticed how deep and yucky the surface rust and crusty bits were I soon knew I would have to paint it. Then I pulled the last of the wiring out so I could clean it out and I thought to myself as I was feeding the wires through the bulkhead 'well that's an ugly bit of cable routing..I don’t really want to see that again’. Before I knew it I had Hannah inside watching for fires while I welded discs of steel into all the bulkhead holes from the outside. Rewinding back a couple of weeks, because this project has become glacial in its progress. First thing.. those wheels. I fitted them and rolled the car out the back while I used the hoist for a customers car. It looks great on the Turbos. They certainly do suit this car better than on Viva one. I had also noted that the Viva wagon is exactly the same colour as the water tank... I had been umming and erring about removing the battery tray from the engine bay. I knew if I did that I would have to fabricate a box down the back under the floor due to the wagon needing to be clear floored for max usefulness in earning its keep. I also knew the tray was hiding things. Bad things possibly. I removed it. Not easily either. It seem that the fella who spot welded it in place was either drunk, had too much coffee or was suffering from MS. There was no order to the spots and I couldn’t find them. I couldn’t just chisel it off because doing so would dent and wreak the inner wing. Took ages. Off with it and look at that. Yuck. Glad it was gone because no way would that stuff had rested from its metal eating duty. With it gone I looked over the general mankyness of the whole bay and realised it needed to be done properly. I removed the heart. It was only being held in place by two exhaust nuts and the two mounts. So tiny. With it out I whipped up a simple engine cradle/wheelie tray thingee to put it on so it can be moved about the workshop easily. Hannah is going to get paid in kind words, cups of tea and biscuits to clean the engine for me. I noticed that the frost plug on the back of the head looks very dodgy indeed so lucky it was out anyway. It could have spoiled the party later on… I filled up holes, cut our more rusty patches and generally cleared it all out for a nice clean bay look. I cut off all brackets to do with the ugly factory throttle linkage. I have instead been given a later Viva HC throttle pedal like I have fitted to Viva one. Big thanks to Andre yet again for having one in his stash of bits. Hannah laughs at my idea that if I have the same pedals then when jumping from car to car for daily driving they will feel the same to drive. I don’t think she realises the power of the mighty 1159cc Viva. I also dealt to the rust that was in the drivers side A pillar… Welded up the cut in the hinge bracket that had refused to let go of the pin ages ago at the very beginning. After welding up all the holes in the bulkhead leaving only the clutch cable and speedo cable holes I ground them all smooth. I then removed the now very scratched and sad looking screen. I think it might be the original. With it gone I was pleasantly surprised at the lack of rot in the well. Only one corner had succumbed and it was not bad at all. I cut it out, welded it up and moved around to the back where it was rotten in the pillar. With the screen out one can easily marvel at the beauty of such a mint dash top.. Now fixed and strong again I stepped back into the engine bay and continued grinding, sanding and smoothing the bay. To earn this episodes title of ‘getting carried away’ I even removed the fuse box and welded up the hole. I might have to do this mod to Viva one some day. Finally I applied some Brunox epoxy rust neutraliser. This is now where I am at with the bay… I had popped into Nelson last week for welding gas etc so while there I went to an automotive paint shop and bought some epoxy primer plus three cans of colour matched spray paint. Well they were colour matched at the time. I had forgotten to take in my little bit of steel which had un-faded paint on it. So instead me and the fella behind the till tried to match the colour off a internet photo of a Cactus green Viva off the nerdnet on my phone. Never easy. Once home I sprayed some on the car. Whoops. It’s a bit brighter. But its still nice and looks 60s so it’ll do. Anyway- any engine bay painted in one neat clean colour always looks better. So that is where I am at now. I have heaps of paid work on right now so Hannah having finished her current work in one days time will get some cleaning and painting jobs. This way she shall earn the privilege to hold up traffic in the mighty Viva wagon (hatch..) on the hills around us. I have been having many thoughts about engine swaps or sneaky turbos and simple injection systems don’t you worry. But really I have strayed far enough already. I will however be re-wiring the bay so to allow for really easy engine swap/changes in management etc for the future. Keeping all the lights/horn/starter/alternator etc separate to the engine loom. Ha..the current engine loom. All of 3 wires? Temp, oil, ignition feed. Old cars eh? Giggle3 points
-
It makes a pretty sexy journey directly under the gearbag drain plug.2 points
-
2 points
-
I see some interesting designs for people cooling their brake rotors ie. randomly pointing a pipe into the wheel well from a randomly selected part of the front of the car. A vented disc works as a centrifugal fan so air flows from the centre outwards. Often I see people trying to blow air back in from the inside. Much better is when there's a cover plate that pressurises the inner side of the vents. Which is unfortunate on my case as the "inner" part of the vent (which you'd want to blow the air into) faces my wheel so there's no easy way to run a pipe to it. Time to run a vaccum line around the wheel well area to my datalogger and see what's going on. Hopefully running some ducting will make my pads last a bit longer, currently works out to about $100 on brake pads per trackday. The guys with the big heavy cars with lots of HP must have some horrific expenses on consumables!2 points
-
Lets just say I have been through about 10 sets of rimmer ones.... Although the set i'm on now hasn't gone because i did gearbox mount at the same time i'm guessing. Have been through a few b-outs as well, I have a link somewhere for some Australian ones everyone seems to recommend though.2 points
-
The UK Triumph piners don't regard the Rimmer ones highly at all. Many tales of them falling apart after very short periods of time. I have the contact details of an old Joker who brings Triumph parts in from the UK (Not just from Rimmers). Maybe try him?2 points
-
Mate. Grab a manual either in hard form or pdf. Read up on what to do and how to do it. .....then. do it. Best way to learn is to have a go yourself. And if it doesn't work well all you've lost is some time (and pride if that actually bothers you.) You can always part it out after if you have no luck.2 points
-
bit consued really on what to do know took my gearbox to minibits and they said it was perfectly fine , they said may be axles or the shifter so i took those up they were perfectly fine then they said bring the clutch and flywheel set up and they were perfectly fine so not really sure on what to do , best thing to do might be put it back togeather and see if it works ??? not sure what im gonna do as im not really confident to try put the engine back togeather and do all the timing and stuff by myself2 points
-
I was fucking about in the shed and was looking at the bars and decided to swap them out for a set i had in box and had been humming and harring over for a while. I payed $5 i think at the mcleans island swapmeet. Pretty happy with them and theyre staying on. Next up is to mount the mudguard and mount an oil tank.2 points
-
Couple weekends ago I got sick of looking at the ugly light brown door cards, and after looking up different fabrics dyes I came across Duplicolor Vinyl& Fabric Spray. People seemed to be getting good results with it. The back cards already had punctures in them, and considering I could get a new set of door cards easy enough (and maybe more importantly, the stuff is $13 at supercheap a can), why not? Waited for a hot day, got them all extremely clean to get some adhesion going, and the old man gave me a hand to spray these up. Came out good in the heat Still looks great as of now, but ill have to report back in a year. Looks much better than I expected for $13 dollars Goes really well with all the small chrome pieces. Theres no way anyone would even be able to tell these were originally another colour, aside from how they no longer go with the light coloured interior. So what's next? -Paint/Dye a few other interior things. -I need new front seats for sure. The originals have no head rest and for a guy over 6' tall they just don't cut the mustard all. Hit me up if you're in the Canterbury area and selling a decent pair of recaros or some other reclinable bucket seat for a reasonable price. Late evo recaros would be sweet but with the prices I see them going for ... I'm not at all fussy. -I've been looking everywhere for a gauge cluster with a factory tachometer/ or just the tachometer itself, again if you know someone with one, please let me know; I'll buy it. -Looking at swaps, a narrow block dohc 4g63t engine & transmission (vr4/evo 1-3) seems the way to go. Even the latest series of 4g engines show their roots with the originals; My 4 speed gearbox can be connected to a 4g63t, and my existing rwd mounts happily fit a 4g63t - not that either of these things will be reused, haha. -Not a priority, but carpet would be nice at some stage. Speakers would be good too. BONUS PIC: How neat is this, the fuse box has a test light built in; sliding the dial over each fuse tells you whether it's good or not. Never seen a car with this. EDIT:Just tried to view this on a dsl connection. Sorry guys, I completely forgot what life was like before fibre. Ill make an effort to shrink everything from now on.2 points
-
i took the sump off and had a look up its bum to see if there was anything obvious wrong with the piston but i couldn't see fuck all so i took the head off which resulted in still not being able to see fuck all wrong so then i took number 6 piston out and i think i might have found the problem. 2016-05-01_03-08-56 by sheepers, on Flickr2 points
-
So, back in October 2015 a nice OS member from Wellington sent me this Snapchat of this glorious car, with all glass attached. In the mighty Taranaki/Midhurst. Got pretty excited, hoping I could get me a rear window, quarter window latch and well anything really. Did some streetview sleuthing® and google stalking™ and managed to track down the fella who possessed it. He reckoned he'd sold it some time ago, and the bloke was yet to pick it up. Fella reckoned he'd get in touch with the bloke to see if he still intended to take it, as he had already paid for it. Followed up every few weeks until recently with unsuccessful phone calls. Till a few weeks back he said that no, the bloke didn't want it anymore, and if I were to reimburse his purchase price I could take it. This is how I spent the most I ever have buying one of these, $200, robbery I tells ya. So yesterday I set off from the lovely sunny coastal eastern Bay of Plenty, and drove the width of the country to the also sunny coastal western Taranaki district. Was greeted by this mess, half a dozen cars deep and with a few more bits missing but it has the crucial window I need and hopefully some more is salvageable. Aired the tyres, managed to jack it up somehow and un-seize/disassemble the rear brakes and fit two OK rear wheels. Dragged it kicking and screaming onto the dolly and then drove back across the country. Made it home fairly uneventfully, although there will be a decent amount of debris trailing I think. Tell me about the sickness here. //oldschool.co.nz/index.php?/topic/22150-waimaks-gsr/page-182 points
-
got the struts crack tested yesterday and this morning i took all the bits to work and bead blasted them all. then Richard (the guy who's buying the car) came over and gave me a hand to paint the bits. we als installed the rear springs and shocks. I'm waiting on the top hats from T3 and i can put it back together and put them back in the car. 2016-04-30_02-45-49 by sheepers, on Flickr 2016-04-30_04-20-51 by sheepers, on Flickr2 points
-
rims back from halcrow , 2" bands woohoo! off to sand blasters ... the only question is should i paint black or bergundy???2 points
-
Someone finally got a video from the outside when I was drifting on the rally tyres and makings dort noises.2 points
-
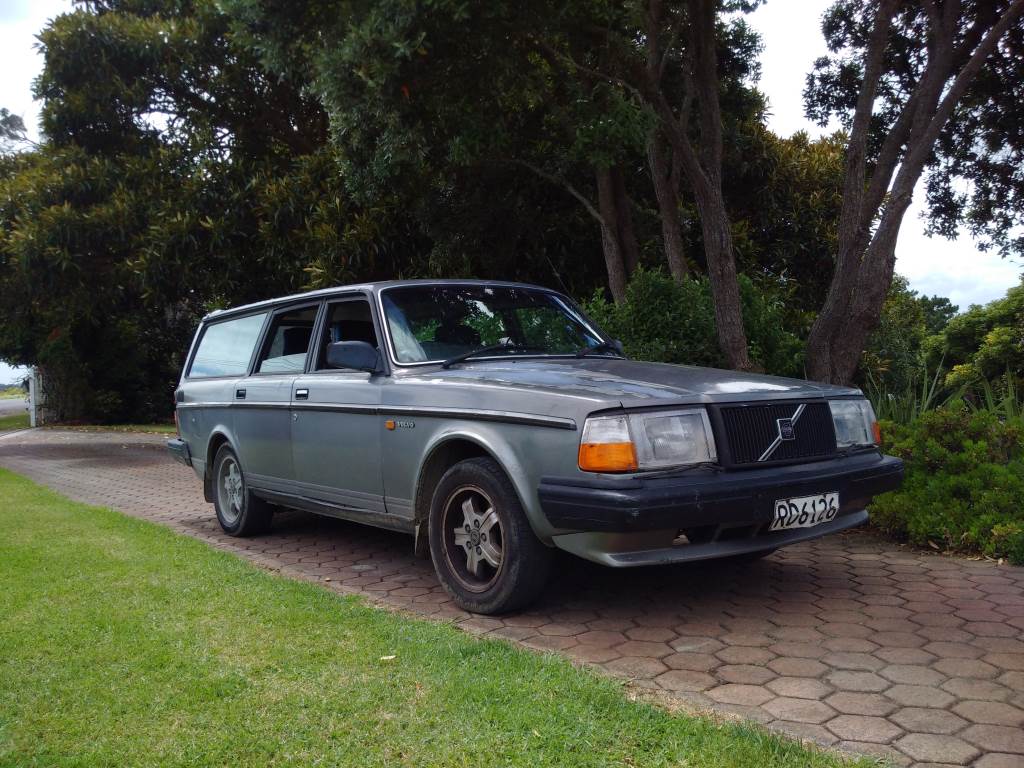
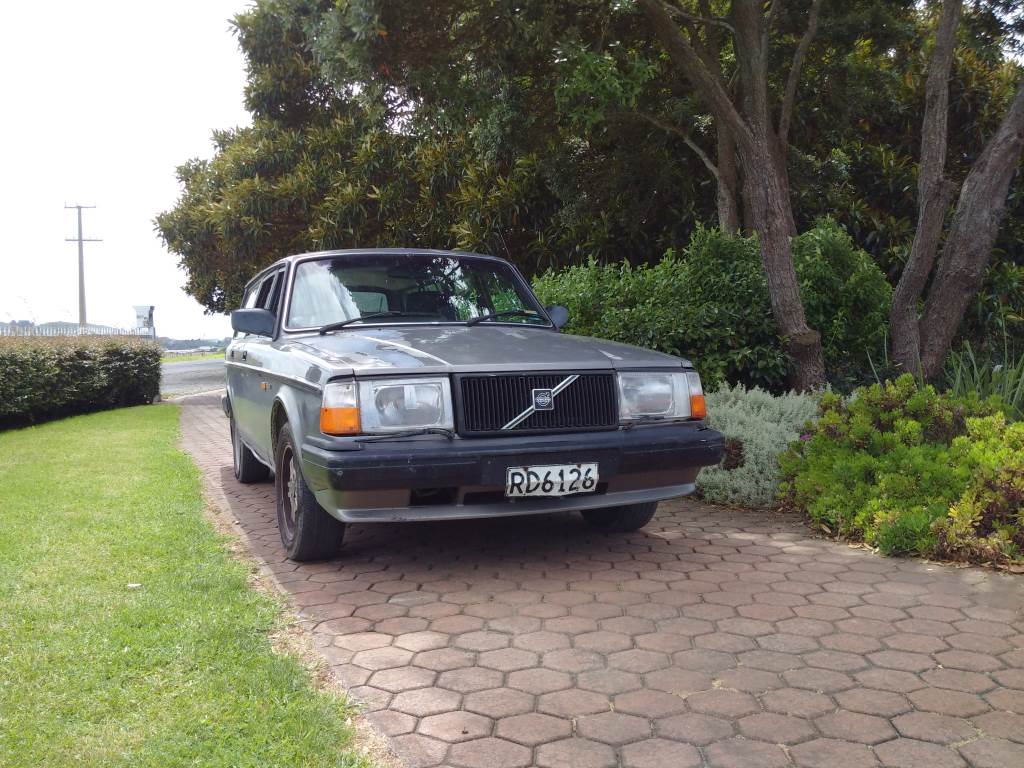
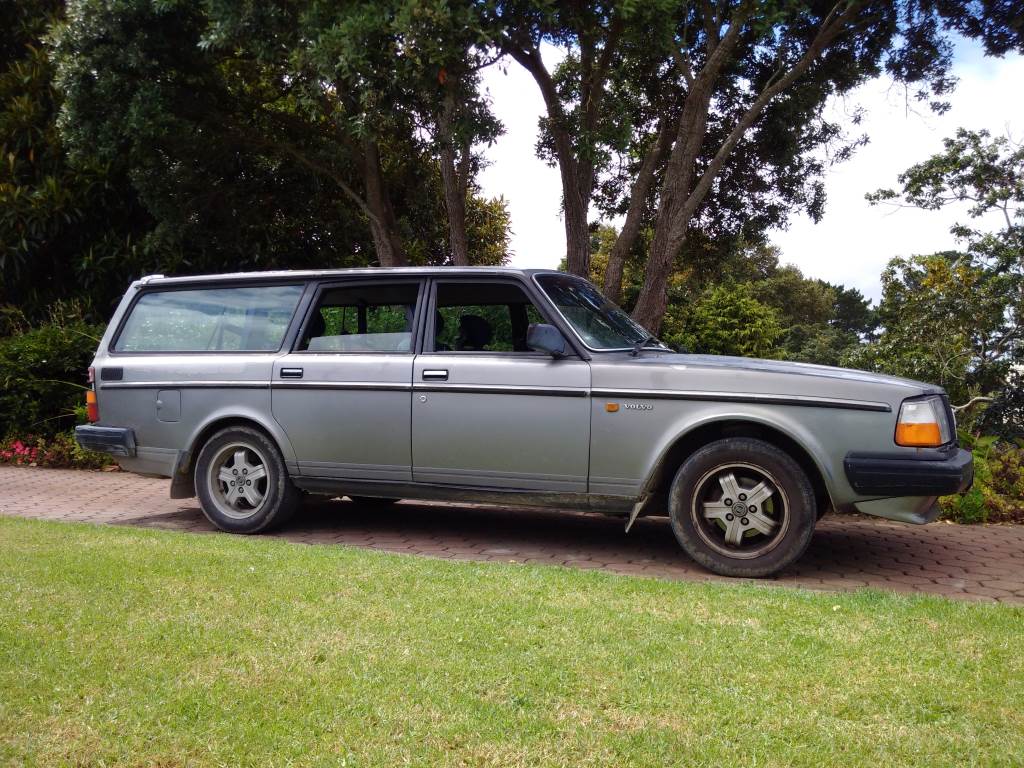
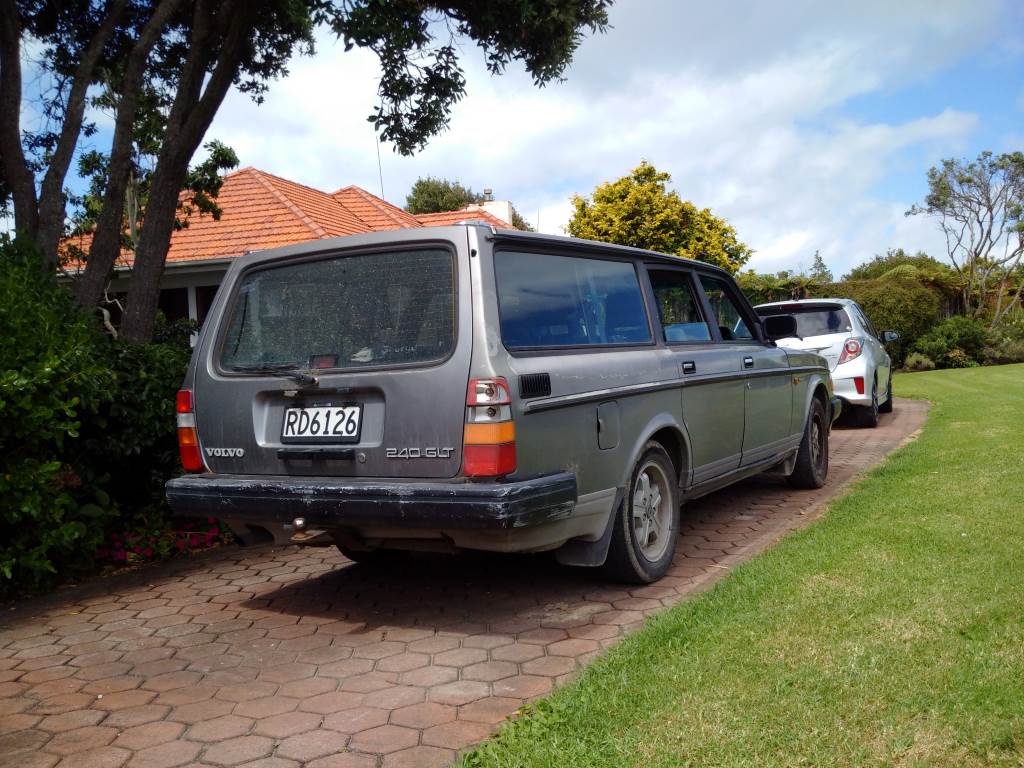
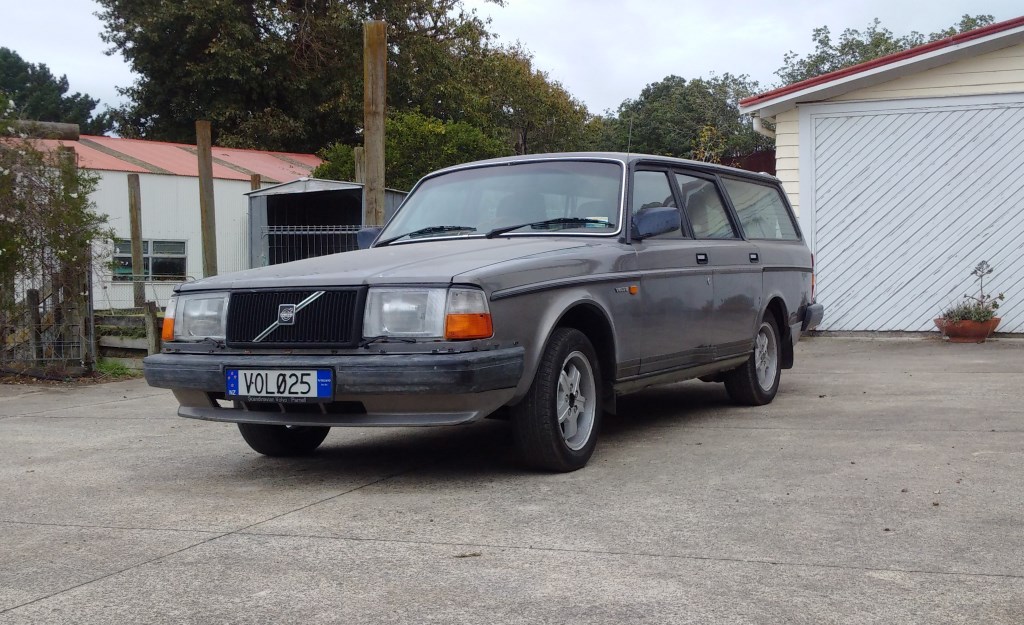
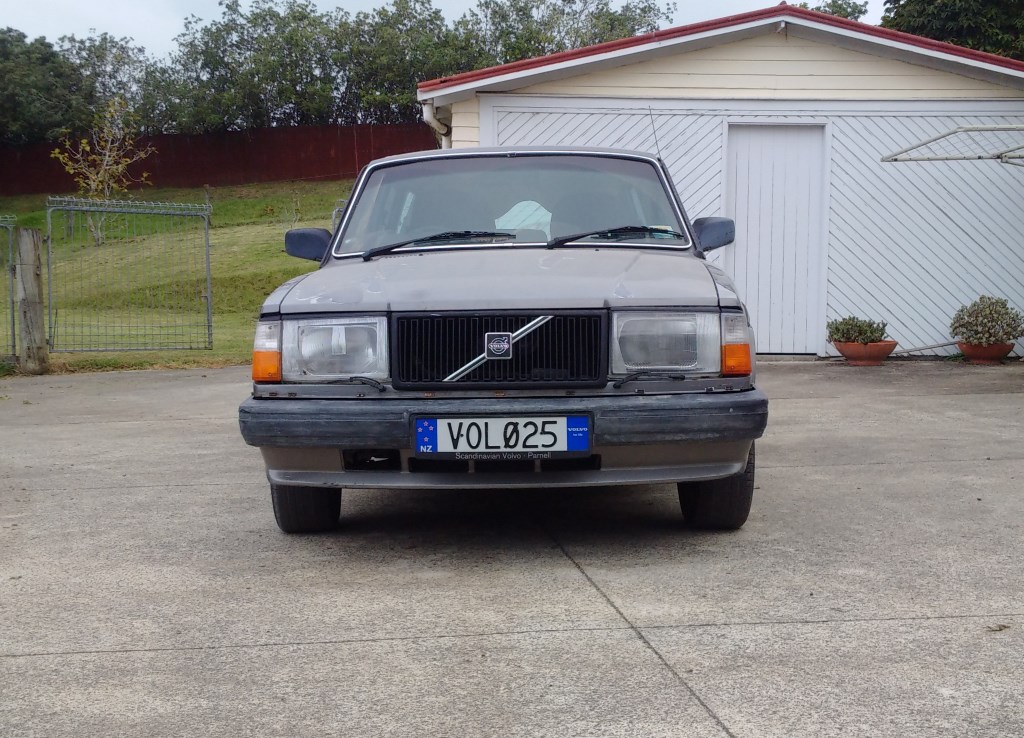
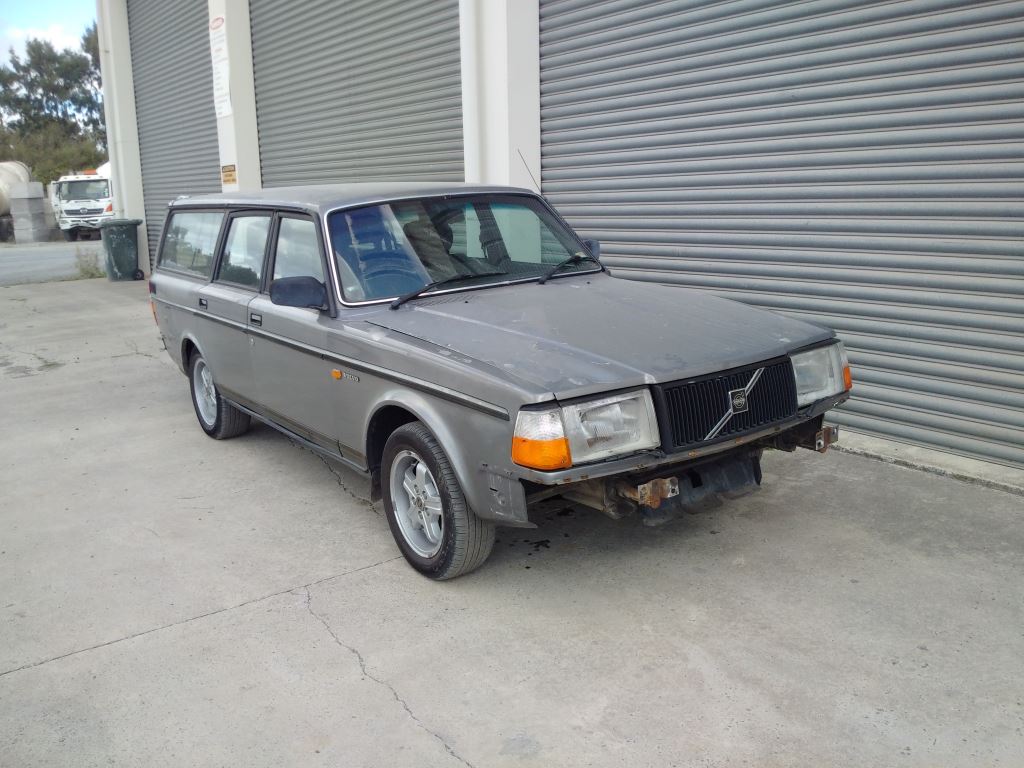
Just picked up a Volvo 240 Wagon, 2.3L of raw Swedish fury, a car so good it outlived it successor in production. The Soviet's being the fine connoisseurs they were, decided this was the model they must have for their embassy and so it was purchased, by them, new in 1988. 363,000 KM's later (the odometer stopped working shortly after) here it is: First job is to get it road legal..
1 point
-
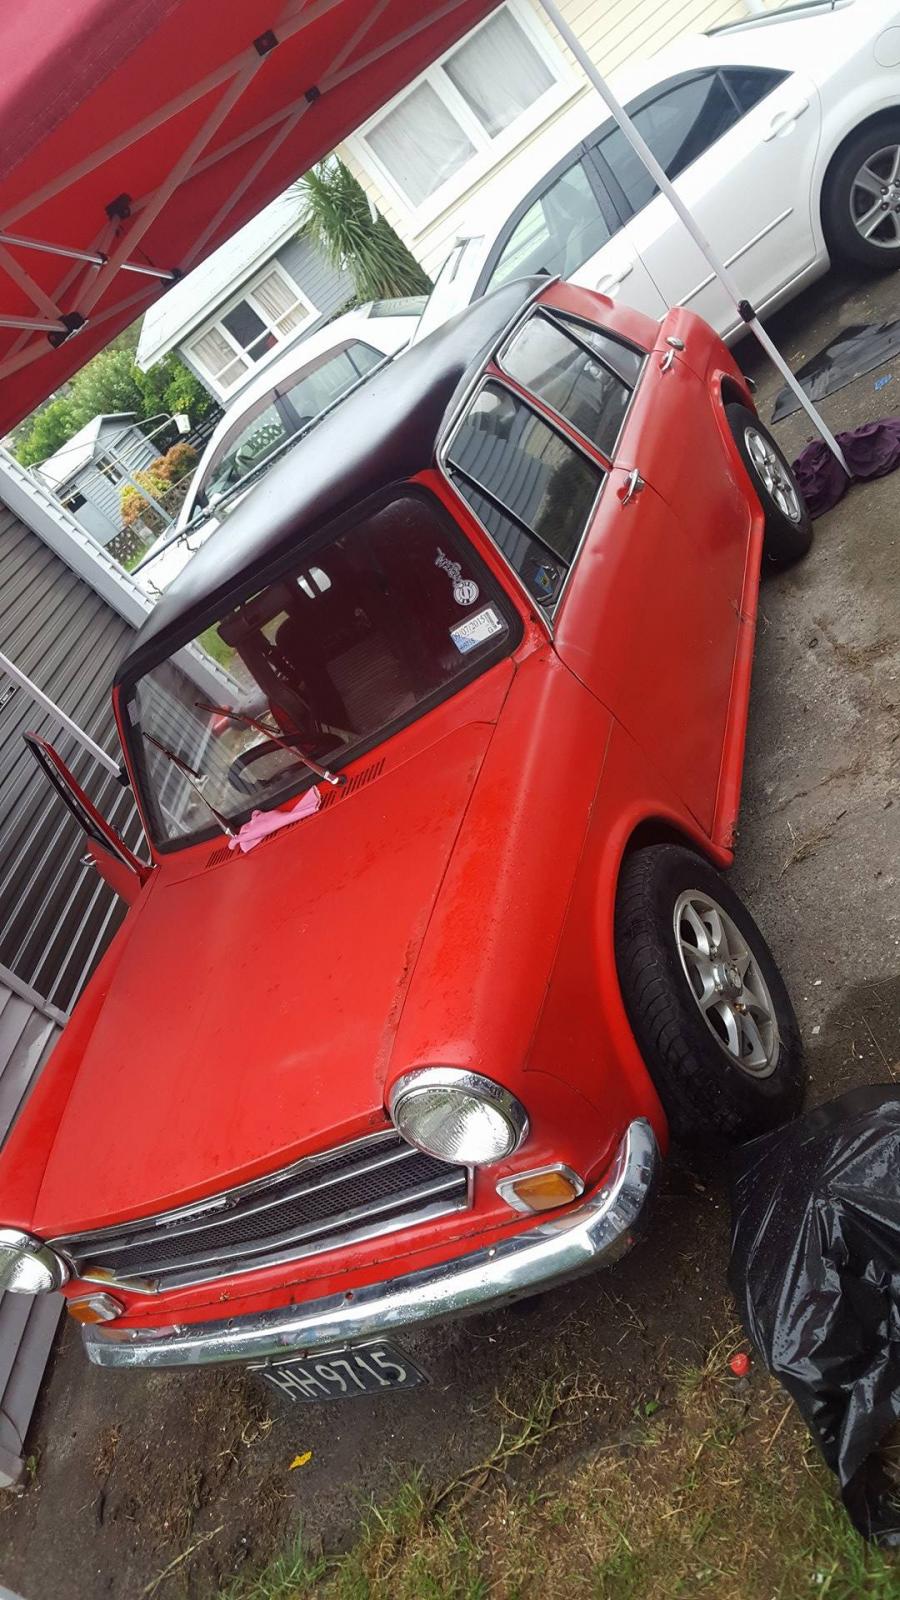
Thought i would post up a build thread on my little red austin! little story , im only 16 and had been going past this car seeing it parked for about a year since it stopped working , i asked them if they wanna sell it and ended up getting it for $100 but it has quite abit of rust and a little diff/gearbox issue ive been told , so im planning to get it back legal and on the road for my first old school car
1 point
-
I will be trying these when my Trumpy goes back on the road. http://www.vibra-technics.co.uk/mg_rover_triumph/triumph_2000_25_25pi_25tc_1964_1975 Alternatively Chris Witor seems to have an aversion to selling shite if you're looking for original styles1 point
-
Triumph Lads to the rescue. I'd appreciate the details of your contact Neal, as well as that link if you can find it Connor.1 point
-
They buy good pads. Such as carbotech's which last surprisingly well.1 point
-
Stupidest thing was i quoted 4500 for full rebuild, install and 12months warranty. They paid 2900 for 2nd hand stuffed install and no warranty. Then had to pay a tow to me and then all my labor and diagnostic costs. Total bill in the end for a pos 2nd hand transmission for them was almost 5000 (wreckers stuffed a few other items not related to transmission but needed replacement too due to shoddy install)1 point
-
Not sure what you did when you pulled the engine and box out of the car. (But you have anyway?) If unsure i usually keep a track of exactly where bolts etc come from and sit/lay them out i a sequence or pattern so i know how to piece it together again correctly. If you did something like this find your self an exploded diagram and check that someone before you hasn't mixed any bolts etc up. I once scored myself a handball wrecker job. They underpriced my quote and fityed a second hand transmission only to stuff it all up. So it ended up coming to me. What i found was they had mixed all the bolts up and fitted short bolts where long should be etc and visa versa. Some bolts went into non blind threads and were meant to be short with a locating dowel on the end of the thread. Instead they just forced a long bolt into it which fouled on rotating parts and caused jo end of bother. That was one job i never wanted to see again........ Approx 4 or 5 incorrect bolts caused no end of drama.1 point
-
Also that. On the van we have a small tarp that ties to the roofies with some extendable poles + guy ropes which is great, but the van is a lot taller and larger inside i was just going to reuse that set up initially, but maybe with a larger tarp to maintain the total covered area but reverse the inside vehicle to awning space ratio. Also, fuck mozzies, so some sort of doors-open-mozzie-proof-sleeping-box-bed-extension may need to be arranged. A bit of ply between the doors resting on a small tab at the door base and the main floor would work for the bed extension, so just need the roof and door opening bit made up + zips and clips.1 point
-
Man that must be a rush!!!!!1 point
-
I think you should add some sort of air vent. I imagine it will get pretty stuffy sleeping in there with doors shut- and you'll get heaps of condensation on the bare walls1 point
-
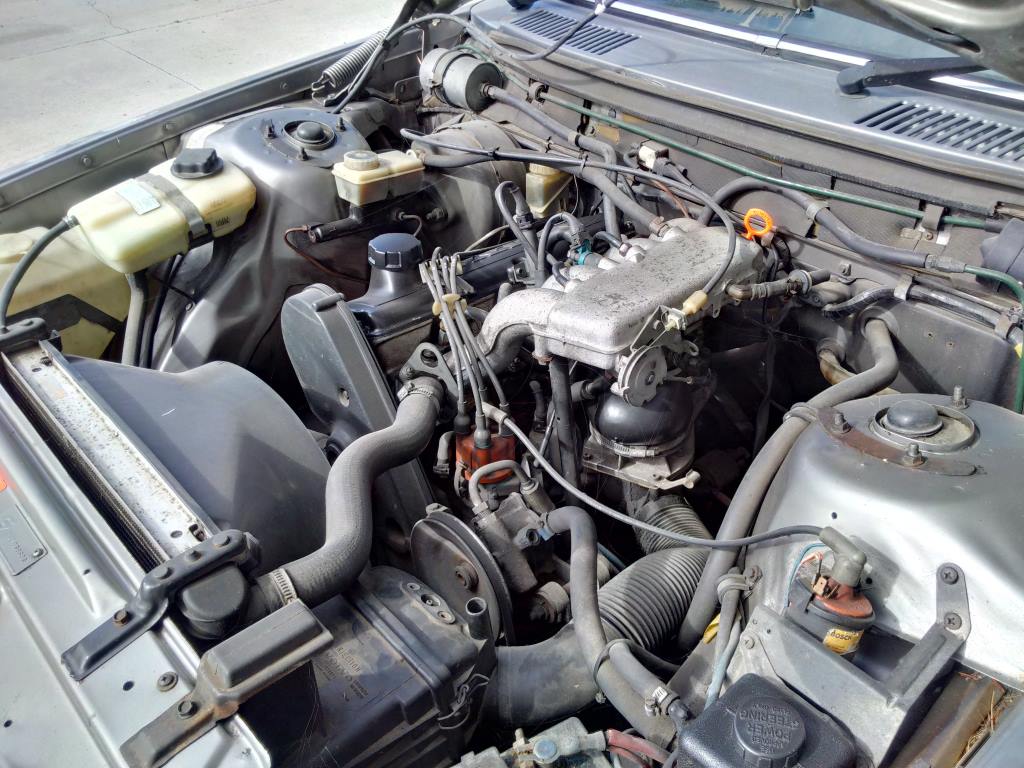
Been way too busy last month to even touch the car, bumpers are stipped but not sure if I should paint them or leave them as-is (since the rest of the paint on the car is falling off..) "New" plates on the car Also need to clean the engine to try and find the source of the oil leak, although I suppose it is to be expected with 360,000 of wear and tear.
1 point
-
Found a photo of that old rad from the inside after that accident Decided enough was enough, it obviously wanted the royal treatment. So I cleaned it right up a few weekends ago1 point
-
Yea this is just causation, the manifold was probably not strong enough for what was hanging off it, lots of shittly made exhausts just flap around off the headers instead of their mounts. Some shitty wrap material and if cars that sit around may trap moisture? I would take a pepsi challenge that some well made mild steel headers (enough strength/designed for application), prepped and painted with good shit and wrapped with something that wont hold water will last ages.1 point
-
Ahhh, interesting. I always thought 11mm = N/A, 14mm = SC and it didn't matter if they were auto or manual. The rear swaybar I got from Nick is an 11mm one off his old pre-facelift manual N/A. Even more confusing is whether Toyota made the swaybars optional after changing the suspension for facelift models, or if they "ran out of stock" like people on forums will tell you. I should have a closer look in the catalogues but it seems strange/unprofessional that if you bought an AW11 brand new after August 1986 it would be some sort of lottery whether you got a rear swaybar or not. I found a photo of my car on the Internet:1 point
-
Picked up wheels from sand blaster today, so many runs to sand out of primer they put on...and a nice metalic something over spary all over all of them... but happy nonetheless here we have 6" hq rims x2 8" hq rims x 4 and 7" val rims1 point
-
I just had to provide a letter form the company that modified my ecu to say it had been modified and the check engine light function was not functional and that was ok for a cert.1 point
-
I think I'm running the same setup, looks good1 point
-
Test Drive time for the Cert
1 point
-
New tail lights arrived from Germany: Out with the old, in with the new sparkly replacements: Done, big improvement: Gave the car a quick clean, bumpers removed to be painted. Forgot to take a photo of the engine bay, will try and remember this afternoon.
1 point
-
Recently I've rebuilt my steering box , had a "bolt in replacement" but the bolt holes were 1/2 " futher apart so must have been out or a different model. Anyway took out the internals from the not fucked new 1 and put them in origional housing with some new needle roller bearings and a seal... yae the sector shaft now dosn't move laterally 3 mm Now for sill rust , just 1 side , went on discovery adventure with angle grinder 1mm skim coat of bog dust through out garage Where they brazed on the Wagon to a sedan body can see old repairs stitched in front half of sill , hence all the bog The inside of the bottom of the A piller is also rusty , hopefully can replace it when i have the sill off... Floor pan still to come - turns out false floor (galv sheet metal) tacked in with pigeon shit over top of origional floor was a dumb idea from previous owner... not looking forward to what i find under it also need to figure out a good way to get the worlds supply of underseal off the underside... im thinking Liquid Nitrogen??1 point
-
So my Taupo D1 weekend didnt go quite to plan but was a good laugh. https://youtu.be/z_elG1nOTAs1 point
-
I've said this before, but keep doing exactly what you're doing! Watching low HP cars battle against the big boys is awesome. One day you'll have 200hp and be able to stick it with the 1000hp boys in D1. You shall be known as Keiranhiro Ueo.1 point
-
... but the bean counters made them use the 1800's doors , hence the looong wheelbase. They also shoe-horned the silky smooth 2.2l 6-cylinder version of the OHC Maxi engine into the 1800 and Princess - now that would have made the Maxi fly... The Maxi looks good lowered a tad, with some wheels that fill the arches better (imho). Nothing wrong with a quick Allegro - the UK got the 1750 twin carb engine, and BL eventually sorted the ride and handling (although too late, as usual ). A mate had one with a warmer cam for commuting from Chch to Lincoln Uni, back in the '80s. Ate Escorts for breakfast . A KV6 from a Rover 75 would have made an interesting transplant in the Maxi - an Austin Rover parts bin special.1 point


This leaderboard is set to Auckland/GMT+12:00