
Leaderboard


Popular Content
Showing content with the highest reputation on 08/02/15 in all areas
-
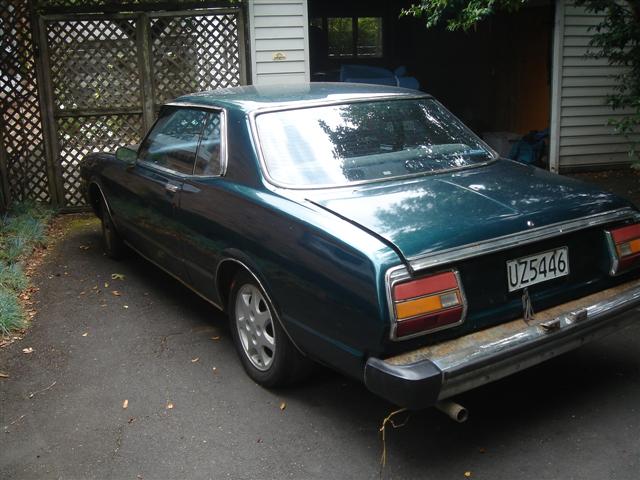
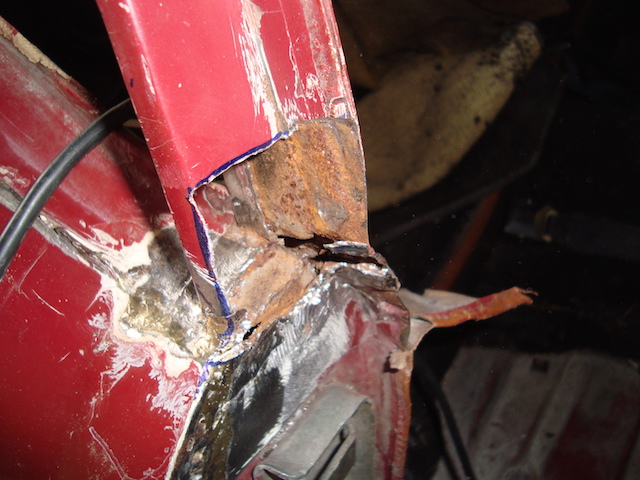
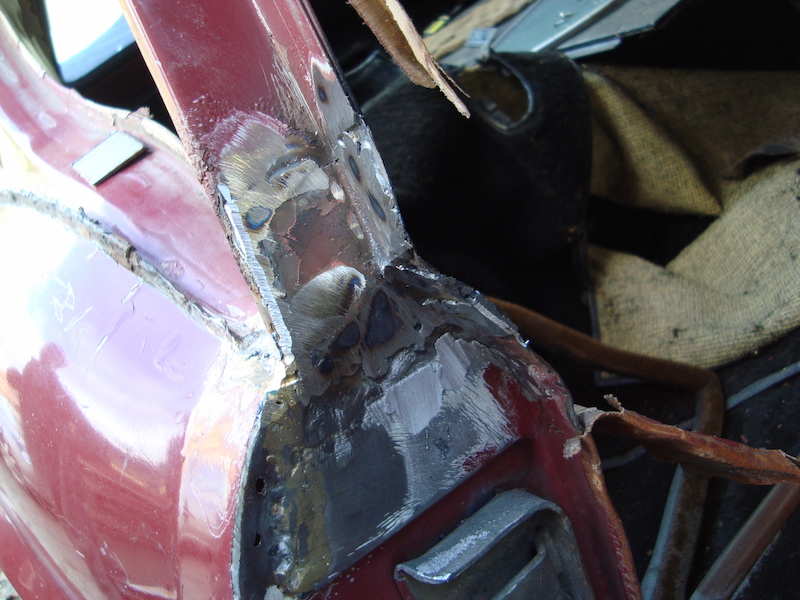
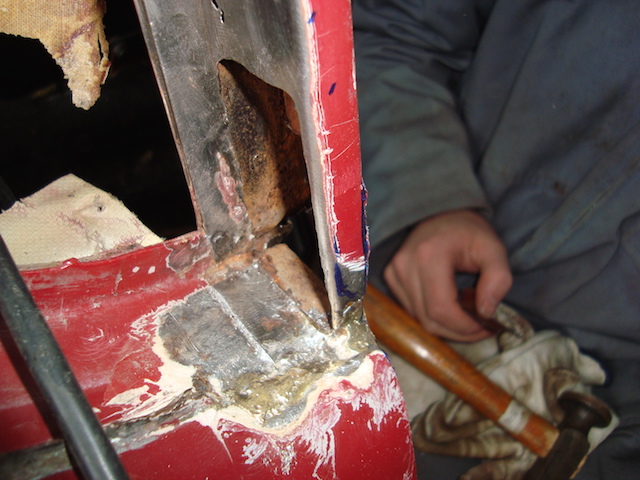
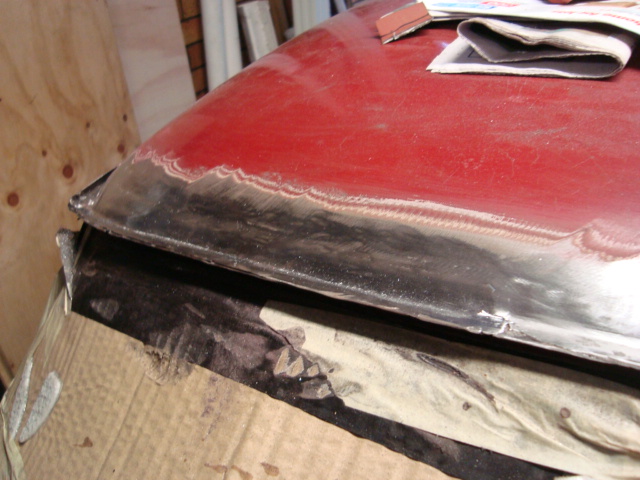
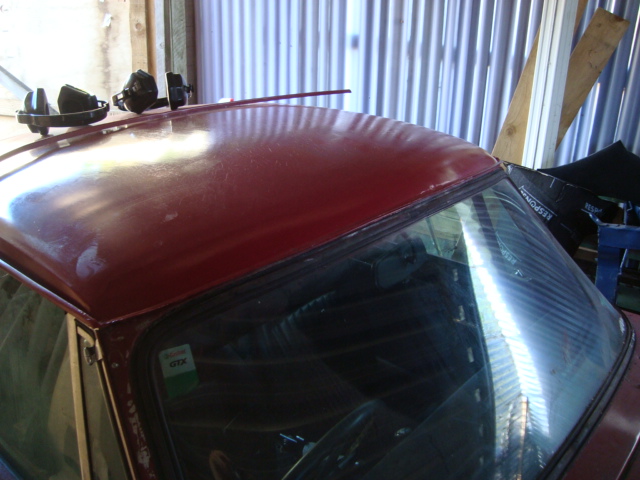
So today I bought this: It's an MGB Roadster. It's also very rusty and features some of the most extensive bodged repairs I have ever seen. Bear in mind that this car passed a WoF in 2007: It was very cheap though. I'll brace the body and pull some of the sections back into line and then start replacing/repairing the sills, floorpans, guards, bonnet, boot floor, rear valence panel, front valence panel, bulkhead, doors etc etc etc etc. Pros: Wire wheels, Should run with a few basic repairs and some fettling Cons: EVERYTHING else.13 points
-
Pulled the front diff apart today. auto locker out and: Eaton e-locker in its place. same deal as an air locker, but less stuff to go wrong. Auto locker will go in the back. couple more pics Stu took of the possum palace day7 points
-
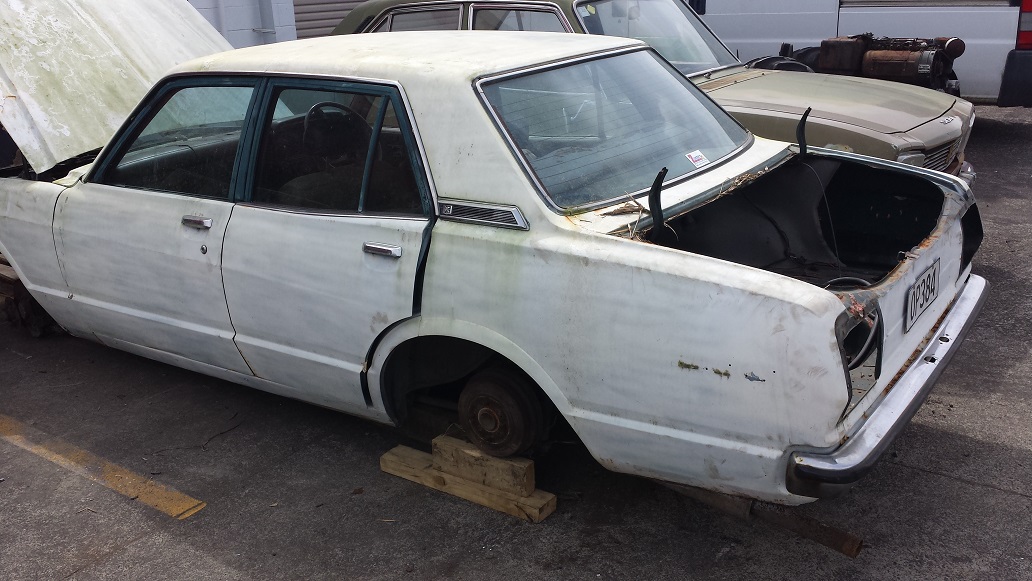
Some of the soliders that have fallen and donated their parts and before you ask yes they were all absolutely unsaveable
 7 points
 -
Let me be the first to say, finish your Holdens6 points
-
I picked some old bakelite magneto telephones recently, I had heard you can quite easily hook them up and have a closed circuit telephone line, turns out it is pretty easy. What better way for the wife to let me know it's dinner time while I am working in the garage, with the gentle chime of bells awoken from their slumber by a hand cranked magneto, aaahhhh technology. Party line party times One of the phones I got was the phone in the scoreboard at Athletic Park. There seems to be some slight variation between the telephones, mostly in the wiring, they usually have a diagram stuck inside which is handy. All the mags look like they are from the same manufacturer, I had to swap one from a front crank unit into a side crank one, just had to change over some brackets. As far as connecting them together, each phone should have 4 wires, positive, negative, line 1 and line 2. These are just connected to the same on the other phone, positive to positive, negative to negative etc. They will now be able to ring each other by cranking the handles. To get the voice circuit working a battery can be connected to each phone, 3-6v seems to be enough, I have a little AA battery holder on each which is connected to the positive and negative terminals. All hooked up and working again Next step is to run some wire to the garage and swap one of the cases to a nicer one for the house, should fit in quite nice as the house was built in the late '20s5 points
-
UIM is off, injectors are out. They show no overt signs of any leakage, which is disappointing, but doesn't rule anything out. I'll put new seals on them anyway, and maybe have them test again while they're out, because its a bit of a bitch of a job to do! Found plenty of stuffed, cracked and broken vacuum hoses, which is apparently pretty common. Took lots of pics of how it all came apart, and pretty much everything was already marked. Will replace all the hoses one by one I think.5 points
-
Parts cutting was a success for the first half, all the bits fit up nicely with a tape test. Now just waiting on getting it tigged together, then figure out some way to hold it up when it's in the car.5 points
-
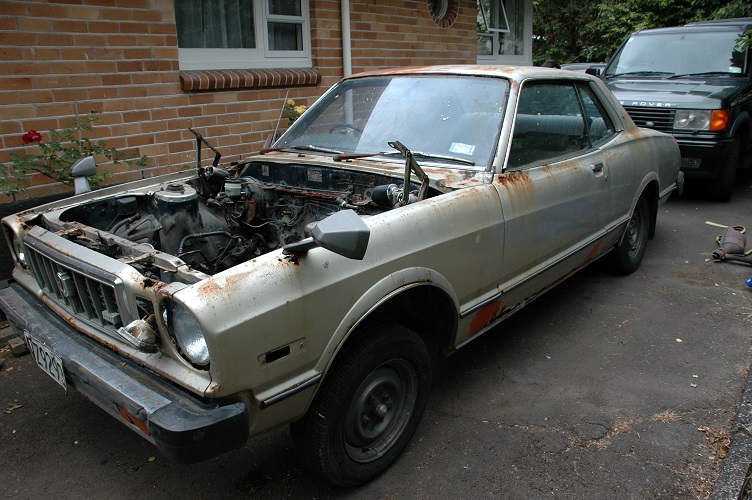
If I went home with something like that my dad would call me a fool and cut me out of his will. I want to see this fixed5 points
-
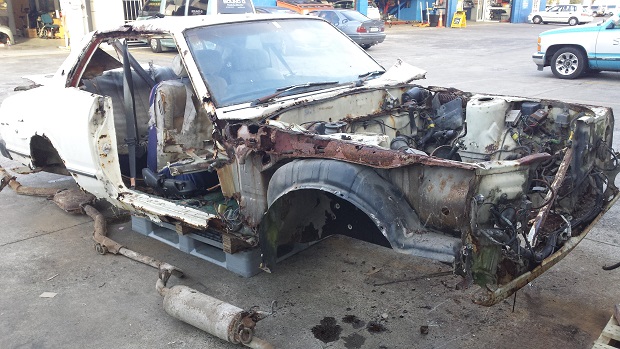
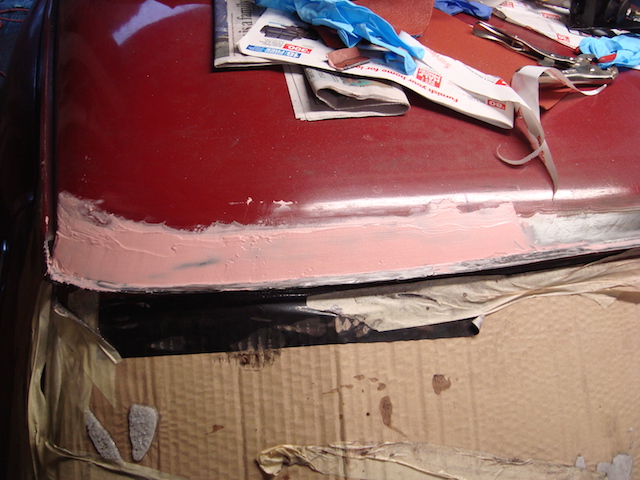
The floorpans are a mix of filing cabinet sides and part of a fridge.5 points
-
IMG_8854 by GuyWithAviators, on Flickr Testing it's off road capabilities.4 points
-
I'm trying to develop a plan here. Unfortunately even with how far I've torn into things today, there hasn't been a 'smoking gun' as to what is really wrong. I'm left with putting it back together, and hoping for the best. It's logical to perform a few fixes along the way though, I think. The loom is in pretty average shape, and Puddles is right, it doesn't look too hard to remove from the vehicle. I'll do this, inspect it, repair a few sections that look a bit abused and tone it out too. I need to gather a bit of into on the series 7's, as there really doesn't seem to be a huge amount floating around. There were plenty of cracked vacuum hoses in the turbo control system, so I'll replace all those too while I'm at it. Toning out the loom will let me create a map of what the solenoids in the 'black box' actually do, as I haven't been able to find a clear picture anywhere. I suspect the system is the same in operation to the earlier 'rats nest' models, but just with a pretty plastic manifold. If I can relate the two, I should be able to troubleshoot it more effectively. I've got those two error codes still showing up in the ECU, so I can investigate those at the same time. Summary of shit I'll be working on: Injector seals replaced, possibly have the injectors re-tested depending on cost / finding a sweet hookup. Loom out, stripped, repaired, recovered. Vacuum hoses replaced. All solenoids / sensors tested against factory specs. All along the way creating a better knowledge base of the series 7 stuff, so hopefully someone else can find it helpful in the future. There is to be none of the 'while I'm in there I could upgrade this...' performance bullshit... That road will lead to disaster. You'll all keep me honest right? My M.O. previously has been to tear shit apart, make it too big of a project, give up. Really need to not do that.4 points
-
I'm involved in this, I'm sorry Neal. Sorry that you bought this instead of me, because I freeking love it!!!!!! New Floorpans $140 each, they will take care of a lot of the Filing cabinet, wood screwed, tin plate, street signed bit. Sills $300 a side complete, and its ready to cruise, or at least ready to not snap in half. Welsh Dad say's good project son4 points
-
What have I done3 points
-
Cracked/crap vacuum lines are famous for Batty issues. It's worse in a S6, and took till S8 till Mazda sorted it out. Use good quality hose to replace it. It will save you sooooooooooooooooo many headaches at a later date. EDIT: rip the cat out. No worries for WOFs. Small worries about environment, but if your that way inclined buying a rotary was probably the wrong move haha!3 points
-
Fuck, sorry to hear man. There's some stupid cunts in this world for sure. It was a pleasure convoying to Hanmer last year with you in this. I can still picture you in my rear vision mirror getting sideways up in Molesworth Station.3 points
-
One Bonus I fully forgot was that the ol boeast still has its original glass including the front windscreen!! Proven by the original number plate plastered on it. Friday night My new cambelt etc, crank keys and seals arrived so got stuck in as soon as i got home from work. Thankfully the new crank timing pulley fitted nice and snug on the crank snout so was in mint condition giving what had happened. Everything went together well, had to remove the exhaust side rocker cover to check the camshafts alignment, whilst it was out i took the chance to clean it up and add some sealant around the gasket to keep it from pissing out everywhere till i get new ones. Come 2:00am! it was all pieced together. Now bare in mind the car hadn't been run for over a year, i cranked her over for about 2 seconds, turned the key off, primed the fuel system then she fired straight into life. Had a bit of a miss when revved but cleared up not long after and has been great ever since. Being too excited/cold I didnt manage to snap a vid but hers another one after 2 trips to town as per trip meter. https://youtu.be/W_UO4ecej-c Today I took advantage of Hawkes bays 21 degree weather and attacked the rust...cant get away from the dam s@#t. The worst that i know of at the moment is on the lhs 'A' pillar and after chatting with my boss he said back then it was a common rusting point. After pulling out the goldilocks I engulfed the whole pillar with cavity wax and cleaned up all the rust. Ended up cutting back about 70mm of the guttering as it was toast and welded up the hole followed by por15 sealer. didnt get pics of the new plate but once the sealer had cured will bog over it all and repaint with the original coloured base coat in a can. Trial fitted my A3A, i do like the look but i think the ol geezer wont be happy. Quick snap of the near completed engine, will redo the wrinkle paint on the covers at some stage and Very lightly water blast the engine bay. Todays resolution: I'm bloody stoaked with my old Cressy (or Cress as per rego tag ). During my drive into town I had to test the cruise control, to my absolute delight it worked perfectly! Its pritty crude in the way it operates but hey, a coming up 30 year old car with cruise control, that shizz is pure luxury. Lets not forget the automatic fan speed AND air direction modes. Better stop my Toyota fan-boying... Got the car up on the hoist, everything looks great underneath, sumps a bit bashed and both rackends need replacing along with one shock but other than that and the rust she'll fly through the warrant fingers crossed..3 points
-
Yet another quality meet, I really love how the Nelson region has so many great places to cruise to via sweet sweet roads. Tophouse Inn served good coffee and food, and has an interesting past. (google Tophouse tragedy) I was semi interested in this Honda, but then I realized it was auto.... and it was missing its tow hook cover All was cool until this duck turned up, taking away peoples choice, best paint, best styling and most slam. Our next meet will be at the Pigeon Valley steam museum to coincide with a car show there. Maybe we should get the South islands oldschool banner sent up?3 points
-
If it dorts harder and makes more power, you've clocked it roman.3 points
-
Yeah dude, #rotanglyfe? Checking timing, without fucking a brand new set of plugs: Seemed spot on, white mark on tone wheel lined up with the notch on the front where the FSM says it should, so that's confirmed as being good. Going to take the upper intake manifold off now, and have a look at the injectors. Most of my tests seems to be pointing towards them having some sort of sealing issue. The fun continues!
3 points
-
Time for new carpet and seats! (my arse is too big for the small bucket seats installed) started by removing the existing seats and cleaning up the floor modified seat rails, drivers side one took me a couple of attempts to get it right as i still wanted it to be able to slide but without it causing the seat to sit too high in the car nothing beats working on your car on a saturday night at work. 90% finished product, just need to make a new centre console as the sr20 gearbox is longer and shifter position is further back and a few little interior trimmings to complete the carpet3 points
-
Man this is terrible, good work.3 points
-
Metal to bog ratio is pretty good for an old english car. Can you date the repairs with newspaper articles?3 points
-
Hey Guys I've been meaning to post this project up for years but never find the time and I'm hopeless with taking photos. This project has been going on for about 8-9 years. Basically a good friend of mine has had this Chaser for years he used to sell it to people and when it rusted out he'd get it back weld some patches in it and then sell it again. I managed to convince him to give it to me back then. He had already fitted a 5mge. I bought a soarer and pulled the 1jzgte from it with plans to install it. Then after being told by a Toyota guru that there was such a thing as a Toyota V12 I managed to track one down in Japan and imported that in 2009. The thing that has made this project drag on for so long it that it's so rusty!!!. I've had to buy so many other rusty cars to get better parts from to help with the build, I've been so busy for the last 6 yeasr building my business I haven't had time to get to work on to it and trying to find a good panel beater who wants to do this kind of work has been near on impossible. It's an idiotic build but the car's rare and will be cool once done- if it is ever. I've built a chassis jig to it sits all square while we do some sill mods to help handle the torque. Thanks to Phil Bradshaw we were able to get an auto bellhousing and develop a R154 to 1GZFE bell housing so thats what we will be using to back the V12. Down the back will be a G Series unit from either a Granvia or MA70 Plans were to go 5 stud but I've decided to keep it oldschool and stay 4 stud wit SSR 15" Mesh wheels I've got some many different offsets that I'm able to play around with different options. I'm hoping this year we can get into the rust and get some progress. Sorry for the lame pics,had never planned on doing a build thread.
3 points
-
Two weeks of MK2's Part 1: To start the wild ride, I accidentally won an auction for SSR Mk2s. I was sure that I would be outbid, and placed the bid as a reminder to myself about the auction, but sure enough after 10,000,000,000 refreshes nobody outbid me and suddenly I owned these awesome wheels... in Japan. With a huge thanks to Jesse Streeter we discussed the cheapest option of around an 8 week delivery so while I was thinking of clever ways to hide their arrival through employing Karl, these sneaky sneakers were on their way for an earlier 6 week delivery. Down low, too slow Found some neat centre caps, and spent a few hours cleaning them up and snapping the rusty bolts out of the wheels. Part two: After 3.5 years (and many assignments relating to marketing motorsport events in NZ) I got to take place in Davidson Graduation Mk2. The super special thank you must go to Rodney for flying down to see me walk briskly across Aotea stage. RX3, Mk2 graduation, Mk2 wheels, Ari Catenen Part three: Really was no better way to celebrate leaving education then to go to Japan, for my Mk2 visit. rot808 and I are off on our Asian Adventure, hopefully finding our way to all the RX3 brothers and cousins. To be continued... Pics will be on my flickr (8:08 Photography) https://www.flickr.com/photos/motoreligion or instagram (theamyable)3 points
-
Have continued to strip this thing down, unfortunately most of the surprises have not been good ones. Not too many photos tho. All the interior, bumpers and lights are off, and a coat of rust kill on the floor, and and ive got the tailgate off and dissasembled and a tarp over the back end- will sort out a few holes to get into the swing of things and see how we go from there. I took a load of interior parts etc up to the storage unit just before, so i will be able to get it into the garage and start filling holes. Tidied up all the front chrome and lights so they are ready to go back on, pretty happy with how everything cleaned up Put new tyres on the original rims but thought id better have a motivational first: Check out where the hubs are presently thats actually the present ride hight, so a looong way to go yet! And in other news, the Ive been put in touch with a guy in wellington with a Wagon and he has pretty much everything I think i might need as far as non-consumable parts go, might even be able to wrangle a parts (sedan) car if its not just as bad in all the places i need rust cuts.2 points
-
So, scrap bikes you say? Yes! Over the last few months I've acquired these two old 50cc bikes thankfully before they made it to the scrappys. I have hopes and dreams of making them as cool as some of the ones I see on here and around the place lately. The first bike I scored was this beauty. A Suzuki M30 in very decent condition for its age. I was making my way back to work one day after lunch when I saw it sitting in some guys trailer amongst a bunch of scrap metal. I decided to follow it and sure enough it stopped outside the scrap metal dealers. Before he could get out of his vehicle, I ran up and asked if he was about to scrap it. Sure enough he was so I offered to buy it there and then. $100 was his price which I was more than happy to pay. (Even though he was about to get like $10 for it as scrap) Anyway here it is 2nd comes the Yamaha MR50. Out on a farm one day I spot an old fa50 in a shed so when I asked the owner if he wanted to get rid of it he said, nah but you can have this old Yamaha I want to get rid of. Shit yeah! Ok I'll take this off your hands! It's obviously had a hard life on possibly multiple farms and it's sporting some pretty awesome "on farm repairs" This I'd like to make into something like a cafe racer / scrambler. So one afternoon me and a couple mates hacked it up a bit for a laugh. Before and after. I may need some guidance.......2 points
-
You may have well found your problem if theres a bunch of vaccum hoses that are leaking. Will cause false map readings ie not reading enough vaccum whilst idleing thatll add extra fuel in that is dosnt require etc2 points
-
scored some parts off an early super saloon in the weekend,what was left of it!! some black interior trim to finish it off and these sick badges i love the detail in the badge,i also have the side pillar ones but theyll need fixing as there tarnished i now have a wee collection of fuel flaps,all but one are cracked,standard,deluxe and super saloon and a ms55 deluxe badge i could put on my spare flap2 points
-
So sorry to see what happened man. did the grill survive?2 points
-
Never met Neal but I think your correct2 points
-
So it was out with the hammer and Ethan spent the next couple of hours making up some patches and welding them in. More to come......
2 points
-
Grind it some more Bog it up Paint it
2 points
-
I worry about you. If you ever need someone to yarn to mate, I'm here.2 points
-
http://www.bmh-ltd.com/mgbshell.htm2 points
-
That 1800cc engine i was telling you about might still be around if you wanted it.2 points
-
Looks saveable. i've built cars up from worse. Once you get the new floor, sills and other stuff in place the rest will look easy.2 points
-
Jesus Christ Neal your worse than me2 points
-
Burning the late night premix oil I see....2 points
-
What the fuck neal. Just because u can doesnt mean you should. Wires are pretty, should try and convince the scrap man that there is some value in the rest. try to convince him.2 points
-
You have changed man.2 points
-
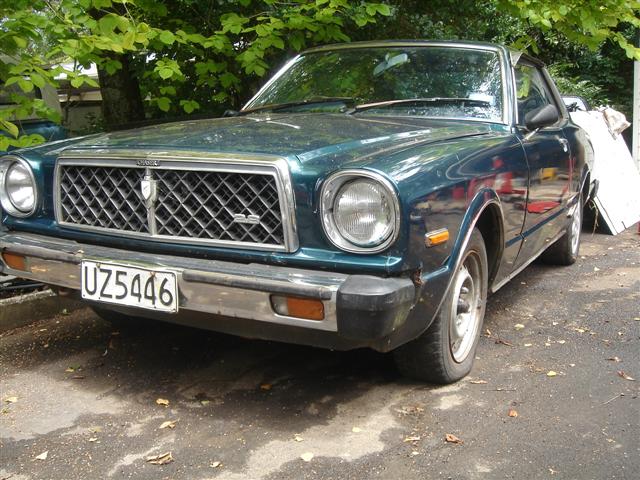
YEAHHH BOY! So lush! Will be perfect for topless summer cruising Get on it2 points
-
Little bit of an update Scored this laurel on the cheap - mostly complete but with all the bits i need. Didn't realize they still did a drum brake independant rear in these - lucky i have hubs etc from a disc brake ceffy. Next out will be the front subrame complete for measure ups and test fitting as ive only had bit and pieces to work with so far. Anyone need an RD28 lol viewtopic.php?f=18&t=16697 - PROJECT DISCUSSION.2 points
-
Thanks to fellow forum member NickTheFox I now have the underpinnings of a rear swaybar upgrade for the new AW11. The internet is awash with various conflicting theories about the supposed merits vs. downsides of having a rear swaybar fitted to an AW11 SC, as well as equally conflicting theories about availability over the various model years. Having driven AW11s with and without swaybars the only conclusions I've been able to make are the following: 1. AW11 SC, no rear swaybar fitted, but with LSD gearbox - horrific understeer when powered into corners. 2. AW11 SC, rear swaybar fitted, but no LSD gearbox - neutral handling when powered into corners, only tending to oversteer if power continues to be applied. 3. AW11 N/A, no rear swaybar fitted, no LSD gearbox - mild understeer when powered into corners. Bear in mind that SC and N/A spring and damping rates differ quite a bit. Furthermore the N/A swaybars are a smaller diameter than the SC ones (11mm as opposed to 14mm O/D) according to the Toyota parts catalog but again you'll find all sorts of reports and rumours about them. Personally, all I can say is that I found a rear swaybar to make a big difference on the last AW11 I owned compared to all the ones which preceded it, and since the new kid doesn't have one fitted from stock, adding one would definitely improve things in my mind. But have to admit that I can't remember if the swaybar was in fact the stock SC size, or aftermarket. Arrangements were made to pick up the required parts from Steelies at Palmy Swap Meat over the weekend (cheers boe!) and consisted of the following: The rear hubs will come in handy if I ever need spares. Over the years Toyota manufactured a number of different rear strut carriers for the AW11 - some with rear swaybar link tabs, others without - and according to sites like ToyoDIY the part numbers even differed between SC and N/A, pre-facelift and facelift. These ones are early N/A ones, but since the only important part is the tab, and the shock inserts happen to be removable, I suppose it's irrelevant unless you're a total purist. You can see how skinny the N/A swaybar is in this next shot of the swaybar link tab. Some places such as TwosRus used to sell aftermarket non-weld link tab collars but I'm not sure if they're still available, plus the thought of the collar sliding down the strut over time doesn't really appeal to me. If I do upgrade to a beefier swaybar and bushes (most likely aftermarket) at least all of the hardware and mounting brackets are reusable. Interestingly, the strut carriers all have warnings saying not to open or heat the shocks even though all sorts of aftermarket and OE cartridges exist. Will probably need to do a bit more research into this (I've never had to replace shocks on an AW11 before) as I'm still being swayed - no pun intended - into buying Bilstein inserts. Now that this is out of the way hopefully I'll receive an update on repair cert/compliance progress in the coming week. Discuss: //oldschool.co.nz/index.php?/topic/49412-80s-kid-part-ii-eds-aw11-sc-chit-chat/1 point
-
nice one. I've only ever seen the early rat nest so i'm no help there. Theres a tricky white plug to unplug inside the cabin behind the heater box as well as the ecu plugs to get the loom out. The sub loom for alternator powersteer and other passenger side sensors is tiny and easy to manage. I'd take out the airpump, you will need to get creative with your drive belt, and the air mix valve on the lim. Its a massive thing can't miss it. Green brothers sell nifty block off plates for stuff. To run the sequential system you don't need alot, google simplified sequential conversion. Not sure how much you want to rip out. may i just say how lovely and simple my de-sequentialed fd is to work on and look at1 point
-
Swoon, bags wrecking your paddock doing helis1 point
-
I wish. It's metal that has been attached to the remnants of original steel using self-drilling screws. I think the screws might be saveable...1 point
-
Bah, to hell with checking, I WOOHOO'd, and cut my best pelvic thrust dance moves in the middle of the street!1 point
-
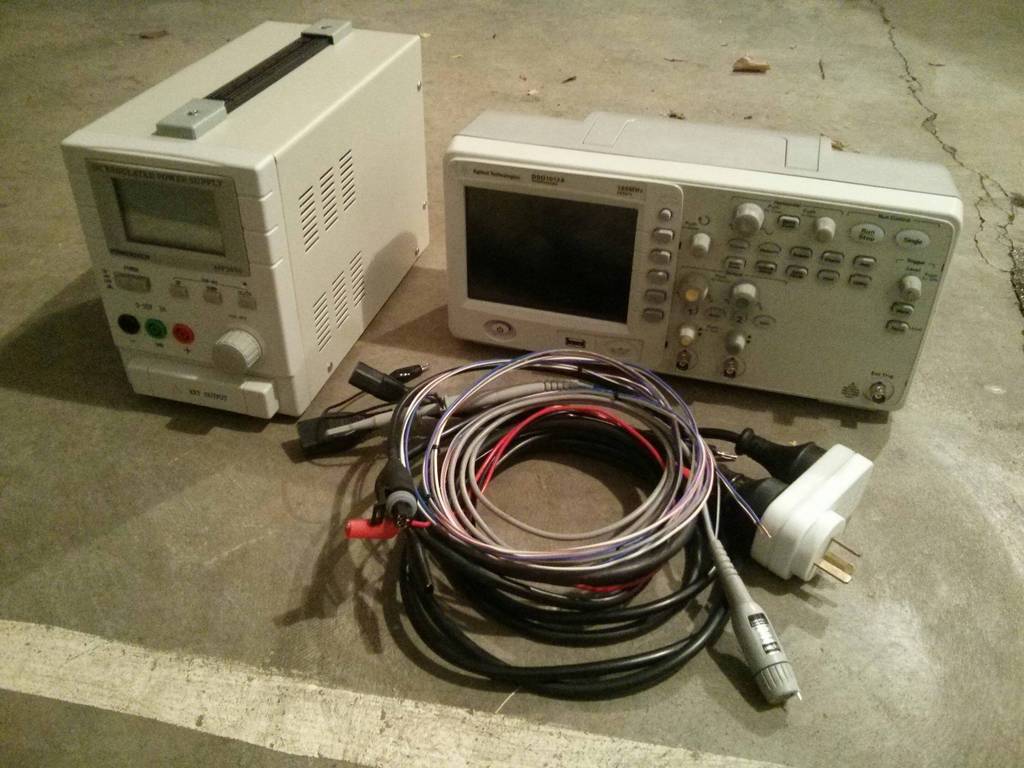
One rotary compression tester adapter: I cut away the crimp just above the sparkplug hex, and then tapped the porcelain out with a drift. Came out really easily. Spun up a bit of bar to sit in where the porcelain has been, tapped it for 1/8NPT, and welded it in place. Screwed the sensor in with some thread tape, and it's a good-un. The supporting gear needed to actually get anything useful out of the sensor: If I find time I'll make up a simple little box with a display to give the readings, but this lets me get on with fixing this car for the moment . Front rotor: Rear rotor: They look all good. The sensor measures 0-150PSI (not sure if gauge pressure, or absolute), outputting 0.5-4.5V. Working this back, the front rotor is showing ~130psi, and the rear rotor is showing ~140psi (subtract 15psi from each of these if it turns out the pressure sensor measures absolute pressure). The peak figures don'y really matter though, outside of the fact that they're all pretty even. I forgot to open the throttle when testing anyway, so they're not really accurate. What is good though, is that all the peaks are pretty even, meaning the motor seems to be sealing well. Fuel pressure testing next! [EDIT] - I didn't work out those compression number correctly. I have confirmed that the sensor measures gauge pressure, but didn't take the 0.5V offset they have into account (they output between 0.5 and 4.5V, not 0-4V. This gives peak compression values of 112psi for the front housing, and 123psi for the rear housing. Sounds much more reasonable .
1 point
-
The final sheets of ply have been laid for the flooring substrate, this prompted the need to make some decisions about shower, vanity and toilet choices as the pipe work needs to pass through the corten steel deck. Decided on a fiberglass shower liner rather than something acrylic, it would seem that there are only a few manufacturers of such things left in NZ, after choosing a model the waste location could be marked on the deck and holes cut for drains and water pipes. You will notice that a tyre has conveniently appeared where the drain will be!! Same was done for the vanity waste and pipe work. Time to start framing up the bathroom. Framed up wall, temporary until the shower stall arrives. The rear loft is now enclosed with the access now defined, the idea is that there will be a vertical ladder attached immediately below the opening. Started to run cabling about the place. Being an electrical engineer I couldn't bring myself to pay for new cabling so have decided to recycle. Most of the interior will be 24 volts DC, there will be some 240 Volt AC but only a few power points. All recycled cable will be tested especially its insulation. The next steps will be to line and create the rear loft sleeping area..............1 point
-
So got the engine out Everything was all nice and loose / clean just covered in oil from it leaking from everywhere. Got the head off and all the extras stripped off the block. Couldnt for the life of me get the front crank bolt off so left that for the engine builder (broke a socket, then had two pipes on a strong bar - should have tried when it was attached to the gearbox. When i dropped the bits to the engine builder we noticed the head had been off at some stage as there are various sanpaper marks where manifolds go and the headgasket is wrong ( a mm or so too small around the pots) so that wouldnt have been good - i checked at work and its possible it had a 4zc1 headgasket fitted. 88mm and 88.3 bores. They are going to pressure test the head and strip the bottom end and let me know if its a hone or a rebore / oversize pistons this week. Also told me to bring in all the other dirty / oily bits to get acid bathed too for a clean rebuild lol1 point


This leaderboard is set to Auckland/GMT+12:00