
Leaderboard


Popular Content
Showing content with the highest reputation on 08/11/14 in all areas
-
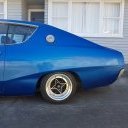
Updates and shit. Finally got a pair of tires onto the Riversides. And chucked them on the front. Poos pic but i am pretty much in love with them. Started assembling my dash/interior and got my seat mounted. And bought one of these fancy brackets which moves the throttle cable underneath the throttles rather than over the top. And had to mill out a bit of my intake manifold to make it fit. So pretty much ready for wire up. Quick question. The rear section of my driveshaft is 20mm too short. I was thinking about machining up a spacer which locates in the spigot like a normal one does. Would this be a problem? Any reason i shouldn't do it? Would be using high tensile bolts obviously and would be making it a very snug fit.7 points
-
So I have been plugging away at this. Tank is all mounted and finished. No wonder they want ~$800 for these things as they take fucken ages to make. Also some how I managed to measure correctly and everything fits?!?! I must be getting better at this hahaha.7 points
-
Finished off the rolling chassis today. My mate did a great job on the welds and everything came together pretty well. Just need to make seat, add floor, fit lake pipes, weld holes in body and paint. And one for anglia47 points
-
Another small update. Did a bunch of the usual servicing this weekend. Its had a leak in the rocker cover for ages, was pretty bad really but i just couldn't be arsed doing it. having to take all the intake manifold off etc is never fun. It started to running a little rough the last week, so decided to jump in and do it, as well as new plugs and all that. This was the offending area of the cover here, hard to see but it was leaking bad, and the reason for the engine running rough was because the spark plug holes where so full of oil they where shorting out. Wow. So off came all the vacuum lines, plenum and a few other bits. Ok, so grabbed my allen key to start undoing the rocker cover bolts. Lose as shit bolts all along one side and the front. i would say that out of the 8 or so bolts, 2 of them where barely finger tight, the rest were lose by a good 5 or so threads and one was missing. Not surprised if it has rattled out. Explains the leak huh? Checked all the rockers etc, everything looked nice. Will be awhile before im back in there fingers crossed. New rocker gasket, intake gasket and it was just a reversal of the disassembly process. Followed promptly by a good drive and inspection afterwards. no leaks, and idles a lot better. Has much better vacuum at idle. These things are bad with running rough with even the slightest vacuum leak. Small things sometimes make all the difference. Pretty happy.6 points
-
Decided to make myself a coffee table out of one of the original wheels from the Austin. A little bit cliche perhaps but still a fun wee project. Started with the wheel, a bit greasy and grimey from years of road use: Then I got a bar stool, cut down the legs, chopped the back off, painted the top black (so it didn't show up through the wheel) and put in two bolts to hold the wheel down: Hub cap before... ...and after polishing: The paint I used was colour matched from Car Colours in Albany: Sanded down and masked ready for painting: Primed: After final top coats: I put some shoe polish on the tyre to make it darker, and put on a glass top I got from another coffee table I bought from trademe and sacrificed: Finished!4 points
-
If you are going to pull it all apart to lap in the valves anyway just drop the head and barrels to an engine reconditioner (Headmaster on King St. is good) and ask if they can hot tank them for a day. Maybe ask them to give the barrels a quick hone while you are there.4 points
-
Shhhhh just come.4 points
-
rokie pls4 points
-
drain vent, main water supply, spot for water heater. kitchen bench/sink to be chopped, and bathroom basin gona be interesting to see if i can keep the end of the bench tidy once it's chopped to length. stand by for new entry in fabrication stuffup thread plumbing under bathroom. mental note to all: dig holes before container goes down, getting in between the crossmembers with digging gear is great fun as the gaps are around same width as a shovel. it's looking like i need to make the container doors bifold too, the one on the right is already annoying me: open up container - deck is blocked etc. looks ok in this pic but it is quite obtrusive in person.3 points
-
I spent this entire weekend between panelbeaters on Van, car parts shops, and the garage on this thing. Today was ment to be spent going on a facebook cruise meet in my mates MX-5 with him, but that was cancelled due to lack of people. I was sort of keen to start prep for paint on this as a learning curve for my Van. So went to bunnings and bought a cheap orbital sander, some sanding paper, and some flap discs for the grinder. Smoothed out and finished most of the welds from the rust repairs. gave most of the cab a rub down with the sander. tried to mask of windscreen. got fed up with it. pulled it out in one piece (victory). Lifted cab off chassis and pushed that out side Man the chassis filthy right now. Its so thick with dust and sanded off paint. Cab was flipped onto its back, and the underside was prepped to get it ready to prime it - I had cleaned it off back in march to paint it then but never got around to it. Primed the underside, under guards and most of the engine bay. Then left that to dry and came back later and gave it a couple of coats of the black paint I had left over from the chassis. all the grey you see is this seam sealer. I purchased this off the Wurth rep that comes through work because he said it was good stuff and cut me a mean deal on it.I resealed where all the factory sealer was that I removed and over the welds/patches. It is really good stuff, and has good coverage. but it is brush on and is horrible to spread and smooth out so unfortunately doesnt really look the tidyest. So next time I think im going to get the stuff that goes in a caulking gun as from previous experiences, it comes up a lot nicer. Once that was dry, I gave it another couple of coats of black which made it look alot better. And this. I sprayed this all over it too, Its rubberized stone guard. Hopefully should help protect underneath and minimise chances of stonechips ect. Unfortunetly I ran out of stuff halfway through so off on Monday to buy more. Close up of the stone guard and sealer on the underside. Looks really good. Once I get more of that ill finish underneath/wheelwells/enginebay then spray it all black again. All this work for something thats going to get covered in mud and dirt Ive decided on a colour for the exterior so need to get to a paint shop to price that up. Im pretty sure the underside will stay black, But should I do a black or body colour engine bay? Also, I think I need a new spray gun. The old one my Grandfather gave me is a great gun and mint for spraying primer, but seems to spray other paints a bit patchy and uneven so I think its a bit worn out. Any recommendations from you panel guys out there? Gravity fed or nah? I dont want to spend heaps, but dont want something Id get a crappy finish out of either. help me here ://oldschool.co.nz/index.php?/topic/40381-shakotoms-1985-toyota-hilux/ Thanks Disclamer *Im only slightly awkward, and I do have a social life. Im not a complete hermit/freak. :)3 points
-
Visited the dude i got the sideys from originally to grab a few bits to knock off a couple of other jobs. Got a 2L Cam cover for checking the the ign timing. Its 'pre raced', chopped down for easy access to the cam wheels and came with a nicely race-drilled dizzy shield to stop stones flicking up and cracking the dizzy (which was apparrently a common issue in rally for these cars - who knew!) Anyway, I blardy love it. Ignition Timing was also spot on Also picked up a couple of 2L 131 secondaries hoping to just be able to bolt one up. However, the routing is quite different between the two cars (131 - 125)! L-R 131 OEM 34mm ID, 131 exhaust shop special 36mm ID, 125 OEM 34mm ID 125 has a much longer pipe run which is good, but has more tight bends which is not good. Ended up using the top 40mm off the bigger diameter 131 exhaust to 'slip' on to extend the 125 secondaries about 15-20mm vertically, which is all it needed to fit perfectly. Next Job: Test drive! up the road a couple of times, then around the block, and then to the shop to get a paper. Great success, went the long way round and got it into 5th for a bit too It feels way more solid all round, pulls well (ohhh the tourque) from all revs and the induction noise is just great. Did a wheely on dry pavement. Wet is just cheating now. No problems starting when hot or cold. No leaks, no funny noises Very happy, so gave it a wash. - Ajusted the clutch. - Replaced earth strap. - Swapped the spare OEM points voltage regulator for my new electronic one (solid on just over 14V now). - Put the Pertronix dizzy back in, along with the new HEI controller & special coil. No go, no spark. Old fat Coil back in, and runs off the Pertronix fine. Hope that the HEI is not a dud will check coil too. Car is sweet now, but still a few little things TO DO: - Fuel bowl in my pressure regulator is not filling - maybe (new) pump not working right on 2L? Maybe its time to go electric. - Put konis in. - HEI? sigh. - Put front croma seatbelts in (retractable) - move amp to under passenger seat - take all unneeded engine/tranny stuff to storage - strip croma - start turbo swap...lol3 points
-
and a house for spiders and other things you don't want crawling over you3 points
-
I am, the engine is all sealed up ( well, as good as you can seal a kent TROLOLOL), and it will have a breather out of the top of the tank. And the tank isn't in the boot because I'm not that keen to run the hoses throught the already over crowded tunnel. Plus there is room there and it will offset the pie fiend in the drivers seat. And Dayfe, I bought another set of guard mounts because my ones were pooched, but the holes were different hahah.2 points
-
Ok I'm not going now Pretty gutted but I just accepted a sweet new job and they are flying me to Australia on Saturday... Dad might still go though, say hello if you see him, he will be in the #95 mustang.2 points
-
Grrrr. If I find it I'll call Danger and shadow it until he gets here. I'll even pay for his airfare and subsequent bail.2 points
-
Good weekend of small jobs all done. -Lowered the back a bit, -put some rubber spacers in the front and lifted it heaps- not as cool but no guard rub and will finalise when I find a set of steelies. -Cleaned up and straightened the scuff plates Bolted sub box down -More polishing inside and wiped down inside door jambs + paint where needed, -Finished installing 6x9s and tidied + hid wiring, -Got the glovebox lid sitting more flush -Steering wheel off to clean the indicator contacts and investigate slop.. There's a bearing in there that's rooted and might be missing a spring to stop in/out movement. The indicator wasn't returning on left turns but the dash stopped flashing so wasn't worried. Until I realised that it was continuing to flash. Must have looked like a tard until now. Made worse by the fact that the indicators are red, start off flashing slow and speed up. I have ordered a new relay in the hopes of fixing that. - moved exhaust up higher on the rear as the leading diff arm was hitting the pipe on decent bumps - thinners'd off more overspray - took the rear chrome arch trim off rusty side to investigate, not much to see so wire wheeled the scabs and zinc + painted. - made stops for the seat belt buckles so they don't need to be fished up off the floor - stashed my spare key in case of emergency - organised jack n wheel brace positioning - while I had the kick panels off for wiring I noticed that the air vent pull cable was gone. Found it amongst the spares so oiled it and freed it up, whacked it back in. Pretty cluttered in that corner with the handbrake release, heater switch and vent knob.2 points
-
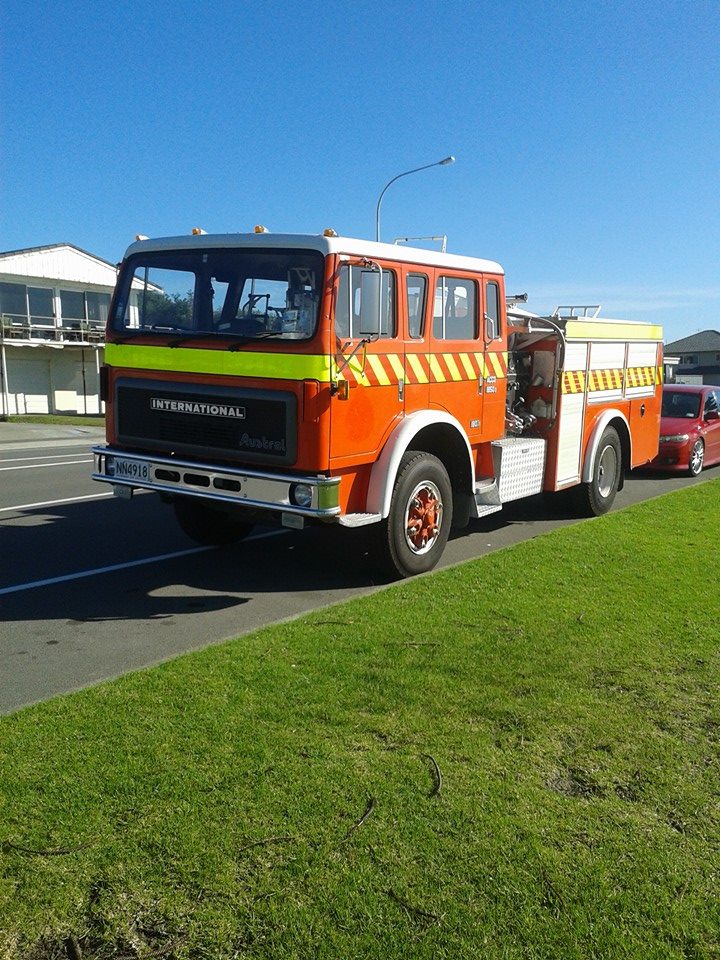
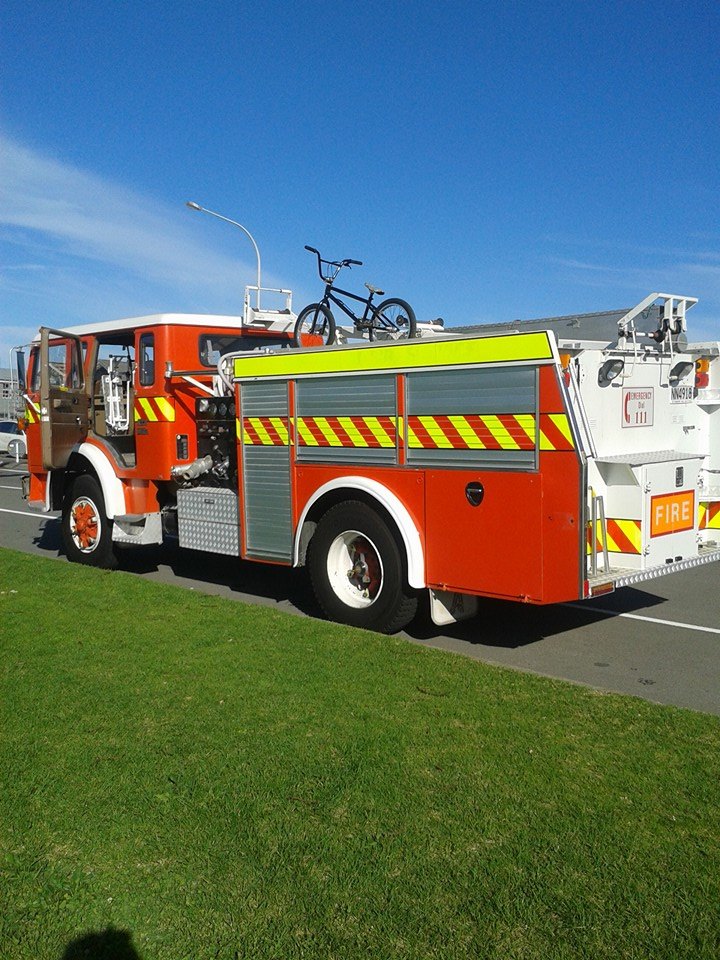
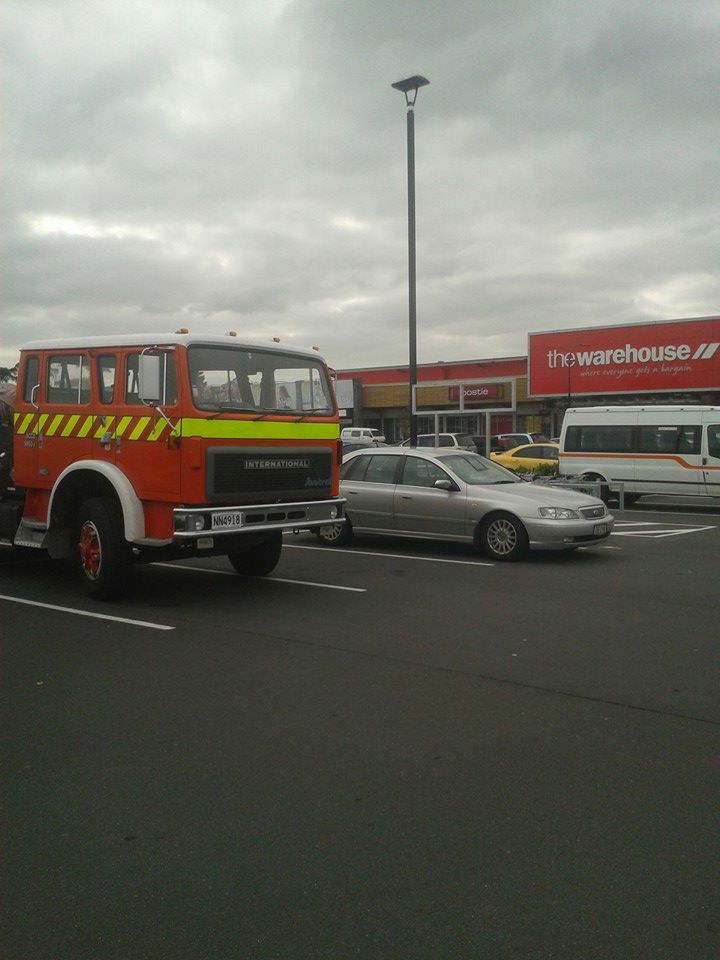
So as some of you know I used to be all about rotaries and mazdas, however sometime towards the start of the year I sprouted a chest hair and decided to ditch the childish triangle in favour of manly pistons and black smoke!! I also own a demolition company so decided it would be great as a crew truck, dust control, hosing down protesting hippies and associated pumping. Ive been looking for one of these for about 3 years, 99% of them are rusty and the commonly fitted 555 cummins V8s have electrolysis issues and corrode the bores if not looked after. So when i came across this one i was surprised to see its fitted with a Perkins Inline turbo diesel and Eaton 6 speed syncro gearbox (being a later model aussie assembled Inter/Acco) and the body is the best condition I've ever seen, a range of stickers around the cab indicate treatment with about 3 different kinds of rust protectant. It still fitted with all the pump gear and hoses, has the drafting lines for sucking water from rivers etc and is a fully functional fire appliance. I was originally planning on painting it black in the style of the american S.W.A.T team trucks, but the reception of the public and realisation of how freakin expensive/difficult it would be to paint a firetruck gloss black has prompted me to keep it red and just paint my other vehicles to match. So the future plans?? In the short term it will be tinted and sign written with my company details in the same font and style as the original fire service graphics. Next will be things like twin exhausts up the back of the cab and a decent down pipe off the turbo. Im going to attempt to find some red lights and the siren setup just because I'm sick of people asking if it has them, though i have fitted a train horn to it to aid in running red lights and scaring the crap out of pedestrians. In the long term I'm going to look at removing the artillery hubs and replacing them with newer multi studs and fitting front and rear Super Singles plus more as i think of it. Parking like a bawse...
 2 points
 -
Went over last night. Everythings all lined up looking good. Front shock mounts to weld on and heater box to cover over, hopefully a couple of weeks itl be in the booth. FItted roof and to my great relief it fitted and lined up! Getting bloody excited now!! Terrible phone pics cause camera is farked Discuss here > http://oldschool.co....la/?hl=westpala2 points
-
good man!1 point
-
Shiiiiiieeeeet I havent looked at this in ages. David, you rule! Lold at the extra hole in the guards. Did you mount them backwards again? What yo plans with this? Finish dry sump, run a bearing and then sell before you roll overseas?1 point
-
Soooo my diff has always had a bad noise under decel, from day one... After I paid money from a reputable Auckland workshop to install the LSD and set it all up many moons ago... Called them up when I got the car running (however many years later lol) but they just said "Yeah nah its sweet, will just be how its setup to be strong" Since I've had it apart though, I've tried and failed a few times to set the backlash etc since reassembling the head as above. The reason I havent been able to set it properly is that I've now found that the pinion gear had end float of 1mm or so... When it should have none and a preload on the bearings. So I take the pinion gear out to inspect it... First thing I find is that the flange nut has been bukakk'd with loctite which has gotten pretty much everywhere inside and out. Secondly, the crush tube which sets the preload for the pinion gear bearings by tightening/crushing it, had been hammered back out 'straighter' to try and reuse it. Despite the manual saying several times to never reuse one or back off the flange nut if you've gone too far. Which is most likely why there's end float, and a noisy diff from day one. It's scary to think that my utterly amateur workmanship can be better at following basic instructions than someone who's paid to do it professionally.1 point
-
I'd try paint stripper. I'm pretty sure I've done it in the past but I can't actually remember for sure (I've had a lot of past you see) EDIT: Oh, you mean the outside of the barrels? In that case oven cleaner is pretty good and relatively cheap/easy1 point
-
ive heard drain cleaner/lye solutions work - but they dissolve alloy so be careful how long you soak for. Or vinegar - http://www.bikeexif.com/custom-bsa-motorcycle its in there somewhere. cool bike too. ....To get rid of years of rust and grime, he dismantled the transmission and cases and bought 12 bottles of the cheapest vinegar he could find. (“I soaked the gearbox internals in my bedroom for about three days. It was pretty messy. I had to be extremely careful not to kick over a container in the night.”)....1 point
-
I'm not OCD about many things. But grit on my square magnet drives me fucking bonkers for some reason haha1 point
-
1 point
-
PM your address and Ill send you mine also1 point
-
Well, she's seen sunlight again... Back has spacers on just to match the front a bit more.. For my drive back to auckland soon I'm getting my mates Work Equip 03s sent down (14x7.5), the a3as just sit too far with no camber and i don't wana add camber until I'm back home, ran out of time down here.1 point
-
Brought these from Yahoo Auctions Japan arrived a month or so ago. Where supposed to be 4x 14x7.5" but 2x are 14x7 -1 Started stripping the paint on the two 7.5's And Boom, much nicer. Also picked up this TRD flywheel thanks to CaMpylobacter and Henry. 50% lighter than the factory dual mass piece.1 point
-
wats obvs. or superlites1 point
-
OK, here are some others that the Rotary Piners suggested. let me know what you reckon is the go... Discussion Thread //oldschool.co.nz/index.php?/topic/43873-popwills-rx-2-of-awesomeness/1 point
-
Found this, screwed up and neglected in a box of parts that came with the bike. IMO this pic is better than any of the spares I got!1 point
-
Wooop cherry gets a warrent on monday, cant wait for some rowdyness, much excite!1 point
-
well its been a while, a whole load of hurry up and wait has been happening, i could have had the cab on well over a week ago, but they couldnt get the power car in the shed because other power cars were being worked on, then when there was a free space, they discovered that there was rust that needed to be repaired, which fucked me off immensely as it had been sitting there for 3 weeks, then they wanted to get photos for a fucken rail magazine, which was ridiculous as they had people who haven't even come near the cab pretending they were fixing something for a photo so its been a very slack week or 2, with lots of lunch time finishes (paid for a full shift so shouldnt really complain) any way cabs on so now i can do some wiring and get this piece running again the team, me with the ginger beard on the left, the faceless apprentice in the middle, and john the english fitter on the right, cab being lifted cab almost in place, with the apprentice and fitter inside trying to get the bolts done up so thats it, we got all the mounting bolts underneath and inside all lined up and torqued to a spec that we made up on the spot, i think it was tight with a wee nip more, quite precise us earth bond done up and thats it, now its a few days of connecting the wiring to the junction box in the engine room, (very tiny space for a 110kg 6'4" kiwi to be jamming himself for a couple of days) then run all the non original wiring from the engine room back into the cab, and then the desk cover and the actual guages and what not can be fitted, my money is on they wont have the desk repaired, but i have 3 weeks before i go on my euro motorbike trip, so they best be pulling finger if they want this fucken train done1 point
-
Nearly all ready to go for tomorrow - new boots are on..... Got the correct rear panel badge on now as well1 point
-
I hear its a dark dark slippery slide once you start making things out of carbon....1 point
-
Well the attending list is at 63 or something now, so I am expecting 5 cars.1 point
-
Started on the 1st stage of the rear strut tower, markin shit up and cutting shit out! Half done with grinder and half done with plasma cutter for those hard to reach spots. IMG_1322 by postlematt, on Flickr IMG_1311 by postlematt, on Flickr IMG_1320 by postlematt, on Flickr Im going to use part of the original shock towers as support/bracing then will reinforce it with some 1.6 zintec. IMG_1341 by postlematt, on Flickr Worked out the height the new towers will be set at IMG_1328 by postlematt, on Flickr IMG_1337 by postlematt, on Flickr IMG_1335 by postlematt, on Flickr Some of the left overs "weight reduction" IMG_1333 by postlematt, on Flickr stage one complete! Cheers Matt1 point
-
Yeah so not doing the manual conversion before this Not enough $$ to buy everything I need.. But will get a wof as it is with the new windscreen and maybe I'll be able to at least slam it Edit: Also really don't want to let my passengers down and want my own ride there.1 point
-
Yes, more carina owners. This is good1 point
-
Well, bit of an update. Ive done a few things to the coon, pretty much destroyed the exhaust on the way back from Cams party in Feilding the other week. Welded up the holes in the mufflers. Looks horrible but no leaks. Will be all good for now. Will be trying some air adjustable shocks in the rear to try rectify the issues with it getting so low with passengers. Its only really become an issue after installing a sub and amp in the boot. So...my mission for today was to rebuild the door hinges. Ive already replaced the drivers door handle after that decided to disintegrate. These doors are hell heavy and the hinge design is pretty poo. You end up having to lift the door with the handle to get it off the jam. hence the reputation of door handle breaking on these things. So, i had these turn up from Ozz, took for freaking ever. But YAY, finally. Old hinge disassembled At first i thaught that the old hinges were pretty good, looked ok and only had a small about of play, but then after getting the old bushes out. They where knackered. Hinges with new pins and bushes Removed the gaurds to get at the hinges better, also wanted to check for any rust as its a common area for these. no rust. Thats a bonus. While i had the doors off i noticed the drivers door had started to crack around where it bolts to the door, Was no point in leaving it so got to work at fixing. Cleaned up and welded the crack, then also added a plate over top as well. Should be alot better. Twice as thick now. Seen a few guys in Australia repairing these like this, but they do an ugly job, but it seems to work. Final product. Has turned out ok.1 point
-
Trying to keep motivation high for this. The great thing about these bikes is that they share a lot with other models like the R5's, RD250/350's, RZ250/350's and also the Banshee quads. Another good thing is that ever since they came out people have been tuning them for HP/top speed and flogging them mercilessly on the street, tracks and drag strips, as a result there is tons of info available. For example I now have a range of parts from different machines to stick in mine. -Clutch friction plates from an FZR1000 -Small end bearings from a Kawasaki H1 -Exhaust gaskets from a Suzuki GS1000 -Reeds from a YZ125 -Intakes and carbs from an RZ -TZR front caliper -FZR front disc -RZ350 rear master cylinder and caliper etc etc I also bit the bullet and have some spoked RD250 rims coming, the rear from the UK and the front from Japan haha Also have some new forks now, strangely just like my last bike the ones it came with were mismatched Cylinders are still away getting bored, just waiting on the last of the seals to arrive before splitting the cases. More cool pics1 point
-
So awesome Missing a couple of features though1 point
-
My wish for shouty angry pinto has been answered, Oh Yeah! (thanks Ben and Chris) Reputedly from an escort with some sort of land speed record and approaching 200hp! Both of these have some salt to be taken with them but even with a large helping of salt this should do the trick. Big bunch of custom banananananas and 48 sidies should produce some good shouting… Will get it stripped and checked out before running just to be sure I think. For now it has been stashed under the bench while I sort out a few things. 2 complete cars + 3 engines + 3 gearboxes + 6 kids bikes + assorted stuff is getting a wee bit cramped in the double garage…1 point
-
So the engine dilemma has been solved by buying this little forged and forced beastie And it came bolted to this…1 point
-
Slight little update on the old girl. Have been enjoying alot of driving in it. So sweet for long distance driving. Covered over 1800km for the South Island OS Nats. Not a single issue. I was getting around 11L/100km which im pretty happy about. That was with at least 3 passengers and boot load of gear for 90% of the time. Removing the EGR and some of the emissions crap has made it better on fuel, also drives nicer, idles better etc. Seeing as whenever im driving this thing it seems its full of passengers and gear, i was getting alittle tired of riding the pump stops in the rear. There is a simple modification to increase the rear travel. Simply, its just increasing the tower top hats, known over in Ozzy as "Megatowers". Pretty much just cut and shut abit of tube in there to make them longer, thus increasing the travel. I used a bit of 75mm long 100x4mm tube, took about an hour to weld, clean up and paint, Not bad.Took it for a good drive out to one of the lakes today, roads pretty bumpy, passengers etc and it was smooooth as. Happy. Doing this also means i can achieve a shit load more slam if need be. Before and after. Fitted: Have a similar idea for the fronts, but i want to make them so they dont look like all the other shitty ones ive seen. Want to keep things looking stock as possible.1 point
-
Soooo top of the page! So back to pictureless ranting about tech related gibberish. There's been a lot of speculation about what the factory Toyota ECUs can or cannot do, in terms of being self learning etc. Since I've had the OBD diagnostic program hooked up, and then using the program called 'Torque' on Android, I've had access to an unparalled WEALTH of nerdy information about the engine. You can set up virtual gauges, or datalog ANY engine parameters you can think of. So something I've just found it useful for just today, is testing an injector size swap. The standard injector size for the Redtop 3SGE engine is 315cc. The standard injector size for the Altezza 3SGE is 340cc. One of my redtop injectors busted itself, and they are difficult to find. So I thought I would swap in a set of Altezza injectors and see what happens. Being a larger injector, you would obviously expect it to cause the engine to run rich. I set up two gauges on my tablet, one which monitors the short term fuel trim (this is like real time adjustments via the oxy sensor) and the long term fuel trim (This is where if something is lean or rich often enough at a particular load/rpm, it will adjust the actual value on the map) I fitted the new injectors, and took the car for a drive. After a while it showed that the engine sensed it was running too rich, so was incrementally reducing the amount of fuel going in. -1%.... -2.4% .....-5% etc and then eventually settled on -7.8% and didnt budge from there. Which is interesting, because.... 340cc * 7.8% = 26.5cc 340cc - 26.5cc = 313.5cc The ECU successfully guessed the size of the new injectors, to within 1.5cc and compensated perfectly for it, within an hour of driving the car. Mind blown!1 point
-
Thanks for the comments guys, stripping it down further today and hit a major problem This is looking up at the top of the B pillar where it joins the roof and the other side Now thinking about options, fix it? complete roof off another one? ???1 point
-
1 point
-
A couple of months ago fellow forum user Evan alerted me to a pair of brand new Series 2/3 inner guards for sale on Yahoo Auctions. I've been searching for a pair of these ever since I bought the car and discovered they were missing. (Series 1 inners don't fit due to the re-designed shape of the front guard lower section on the S2/3). Unfortunately this was around the time Hayatonka was going through a merger with Stacked, and as a result the auction closed without me being able to contact them to place a bid. After a nerve-wracking wait to see whether the inner guards would get relisted or not, they finally re-appeared a few weeks later, and this time I enlisted the services of Import Monster to purchase them on my behalf (after yet another series of no-replies from Stacked). Had the guards chucked on the literal slow boat to NZ, and they arrived today. Will get stuck into installing them sometime this week. Probably not worthy of an update, but sometimes it pays to categorize every little thing. Discussion: //oldschool.co.nz/index.php?showtopic=278461 point


This leaderboard is set to Auckland/GMT+12:00