
Leaderboard


Popular Content
Showing content with the highest reputation on 10/22/13 in all areas
-
JEAH great success! WOF'd, reg'd, fuelled, even maddafakkin wiper fluid'd. We are good to go people! Still on the hunt for lots of bits and pieces. If anyone spots one at a pick a part let me know.6 points
-
keep doing it I say, until they crush your car5 points
-
ok im going to de-ling this thread. we want to come across as inviting and welcoming, not a clicky bunch of wankers. we can leave that sort of carry on to the make/model specific clubs...3 points
-
Go do it, film it plz.3 points
-
Cheers, yeah parts guy at Suzuki recommended them too. Emergency cancelled for time being. Managed to make what I had work using washers and spacers, and using the alto wiper arms with early swift blades. This will get me through wof /hawkes bees. My suspension bushes arrived today, so that and assembling dash is tomorrow's job3 points
-
So today while I was waiting for my semi permanent replacement window to show up. I decided instead of doing something useful, I would go a on a magical adventure. To this place. Some of you might have heard tales of this mystical house that resides out the back of my workshop. It is absolutely stacked to the hilt with old Fiat, Lancia and a few Alfa Bits. Most of it is rotten and junk but very occasionally if you ask the magical Italian Elf super nicely, he will allow you to uncover something rare and desirable. So after a night of panic and frantic searching. I now have two replacement windows. What's the odds of that a. This one is a right hand window but that just means the catch needs swapping around and ends up upside down. After a rethink and rebuild of the pin assembly arrangement that failed on the 1st window, I am pretty confident that it can't exit stage left again. I probably should've taken pictures of the redesigned dome pin as I was quite proud of it but alas I was in a rush and just hammered it all together.2 points
-
you gon get in shit if a cop ever sees you use that from experience2 points
-
Its dutch for horsepower2 points
-
sweet sounds good! Got a txt yesterday, from a mate whos sorting the over charging issues out with my DX, saying its ready to pick up. Was at a funeral but will pick it up today, hopefully he didnt mean "pick up your piece of shit and take it out of my workshop i cant f-ing fix your f-ing nineteen eighties wiring!" bahaha2 points
-
I bought this beautiful Momo Indy wheel the other day and it needs restoring, so I'm going to fix it up and show off the end results. This is Peanut, and the motivating factor in today's sanding. Got it for $59 off trademe, it's built in 1979 according to the stamp on the back. Here's why it was not $150 like the other nice wheels. And this at each join between alloy spokes and wooden rim... The plan is to sand it back to clean blonde wood, fill the cracks with wood filler or gel-type superglue, brush the alloy back to brightness, mask off, spray varnish towards previous glory, and drive into sunset with one hand on my lucky 7 ball column shift knob and the other gripping fine Italian wood. Fuck that sounds yuck haha. Been working on the wheel for the last couple days. I ended up sanding the urethane coating off as I found it pretty easy once I bought some decent norton 60 grit paper. Detail of the cracked wood. Sanding the finger grooves. Close up of finger grooves after sanding through grits 60, 100, 150 and 400. Starting to look good. After this I figured it's as smooth as I need while still leaving some grain for the varnish to grab onto. Cleaned out the cracks by using a slim craft knife to cut any dags splintered into the cracks and blowing the dust out. Using a Kauri coloured wood filler as it was as close as I could find at Bunnings, so once the urethane was off I started saving all the sawdust from the sanding process. Mixed it with the filler to provide something a bit closer to the hue of the wood. I spatulaed the filler into the cracks using a shaved down chopstick, and a skewer to push the filler further into the crack. It was messy, but it should do. Waiting for the filler to dry now before sanding it smooth again. More photo's and progress to come, time spent so far about 6 hours over two days and 24 standard drinks. The filling in of cracks was a bit of a fail. Here's my advice, unless your filler material matches your wood colour perfectly, be very careful when applying it! I thought I had a good match, but it turned out a lot lighter once it had dried and been sanded. Since I just spooged it on with my finger, this was a bit of horror show. I had to sand extra wood away to clear the lighter filler from large finger sized swathes of wheel. I managed to do this without misshaping it by sanding the entire damn wheel again.. Here's that goddamn filler... First coat of varnish after 24hrs drying, wet sanding with 800, and a meth rub down. Not much there as I sanded really well to leave only the filled grain. Next one was pretty much the same. Exciting varnish close up!! My wrist's are all good now, I chucked some of the filler on them and they look sweet. Finally got the wheel to a point where I think it'll last a while, and it looks fucking mint! Before... After! Fitted it to the momo boss kit I scored off tm and slapped it on the ute. I still have a few little things to do, one of which is to paint in the logo on the centre spoke, it has remnants of yellow paint in the creases of the stamp so I think I'll go for a bright primary yellow. Horn and indicator stalks work perfect, and the wheel centred is straight ahead. The final stage it is at now is 6 coats of aerosol varnish (1 can from Bunnings). I allowed each coat to dry for at least 12 hours before wet sanding with 800 grit wet/dry paper. After sanding and immediately before a new coat, I would give it a thorough rub down with a clean rag and meths. 6 coats is actually a much thinner finish than I was hoping for, but I think for now it will do. One option I didn't consider until now would have been to ask the marine industry guys about urethane coating the wheel, which might have allowed a more consistent even finish. There are areas on the wheel with a mirror smooth gloss, but only where the grain is very long and running parallel to the surface, most areas have a slight orange peel texture, but not bad enough to make me keep going. Worse comes to worse I can always take it off and do it all over again if I want a smoother finish or nicer transitions into the spokes. After the masking came off I gave the alloy a quick brushing with scotchbrite, making sure to go in the same direction as the machining marks. Tell me what you think!2 points
-
WHAT DOES THAT MEAN DAVID?? ps totally was gonna chuck a thread up but then Niki has it covered!! Will have to double check with Loz what time she finishes but I think I'll fin around 12.30. Boost home, grab the car, autobots roll out. Meet at the weigh bridge at 1.30??2 points
-
Take the doors off.2 points
-
So. I worked my ass off last week and weekend, finished painting and got some clear on it. It needs a good buff back to help blend the paint together but I might leave that until after Hawkes Boes. It really doesn't look too bad I reckon... So anyway I had this back together enough on Saturday afternoon to take it home and clock up some miles on it, iron the kinks out before I try take it to Napier. First thing that was noticeable, Fuel gauge doesn't work. Second thing. any braking over very light pressure caused the most god awful squeal I have ever heard. I am pretty sure I blew out some pedestrians ear drums or at the very least broken their good crystal wear. So that was manageable, on Sunday a friend and I took her for a run out to Pirongia and back. All was going well until we were rudely disturbed by and almighty Boom and sudden increase in wind noise. The fucking L/H rear window retaining pin sheared and my very easily replaceable window hit the tarmac. I did manage to find the chrome strip that the glass is glued into, surrounded by about a million small pieces of glass. After an evening a of frantic email sending and internet trawling I came up with nothing that would be a decent solution for filling the gap before Friday. However one phonecall 1st thing on Monday morning, has given me a stop gap. Which is a huge relief. Sorted the fuel gauge, I had to modify the sender Alfaparts sent me as the meat head parts picker had sent me a 2000 GTV sender unit which is too long for the smaller Junior tanks. So I had shortened the tube and used submersible fuel hose to rejoin them. But obviously that insulated the earth circuit. So easy fix. Bastard pin. Hole. Ah yeah. Sorted the brake squeal also. Is much more pleasant to drive now.2 points
-
hey boes well this fine piece of ass fell into my hands the start of last week and it is awesome. have done a bit of work and driving in this thing and loving it to pieces! first thing was to fix the huge oil leaks and timing issues so off came the timing cover only to find the everything completely in the wrong places glad no valve damage had occured so whiped off the chain aligned up all my timing marks swaped the tensioner out as the old one was fucked slapped new gaskets and gaskets on problem solved next was the carby big shout of to our area rep deon goodest cunt! it had major issues was cloged up with shit and had isuues with ivor flooding the engine or running the fuel bowl dry which is gay! i found out the hard way in town on friday opps! deon shot out after work on friday and gave her a spruce up! whangarei old school whanu chuur gave the under side a good clean! and just been driving it round sounds soo mint with little to no exhaust! so yeah ill keep you people posted! photo dump!2 points
-
Filled Gearbox with Oil on weekend that OSGC Max hooked me up with! Just got wagon up on stands double checking everything. Will go see John and get some RCA spacers to sort out my bottom arm angle out and fit them up while up on stands. Will Bleed clutch before the Long weekend!2 points
-
So this is all sorted for a vin now, hopefully get it in this week, also spent the day flatting and buffing it, then put on a couple of coats of wax, came up pretty good. Also while we were in the states last month we picked up a set of braided leads for it, looks a lot nicer than the in your face red ones.2 points
-
Huge massive thanks to Manu (Steelies) for his shit hot tig welding of my struts. Such a sweet job and done so quickly. Thanks Man!! Unfortunately, i was fizzing too much to take pictures of strut assembly. But anyway, long story short, put struts in car. Tyres on wheels. Car on ground. Grin on face. Still gotta fine tune that ride height this week. Its all pretty much max low without becoming uncaptive. I do have a couple of tricks up my sleve though. So may be able to gain another 30mm. Can just run keeper springs anyway to get chassis on floor spec low. This will be after hawkes boes as a new exhaust will be required to get any serious low. The hilux brakes i had bought were propper rooted. They need to be rebuilt this week. Will get new pads too. Appart from that hickup, it has gone ok (for me anyway). In the words of local wellington GC Roger (All Torque) "Hawkes boes or bust". I am applying this mentality this week. GOTTA GET IT DONE! No matter what! Again, thanks to Goobie (Kicker) for use of vices/hammers/brake bleeds and general yarns. Shit hot.2 points
-
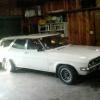
So here's my 1968 Vauxhall Victor Estate FD wagon. My dream car. She used to be a runner when I first got it (17 y/o) and I have since never driven such a beautiful car, Since then she continually broke down until I could no longer afford to fix her up. She is in dry storage at the moment and is waiting for me to throw some cash at her to fix her up (have another daily driver which has been chewing my cash). She was bought off a close family friend. Discuss here //oldschool.co.nz/index.php?/topic/40678-matts-cheviot-turbos-and-his-68-victor/?hl=victor Specs; ENGINE: 3.3, 6 Cylinder, OHV unit GEARBOX: 4 speed, Laycock, J type overdrive CARBURETTOR: Zenith Downdraught - modified ENGINE PERFORMANCE: 145HP MAXIMUM SPEED (I can testify to this): 120mph PETROL CONSUMPTION: (with o/d) 22mpg around town 35mpg open road STEERING: Ventora 1 power steering WHEELS: 205 x 60 x 13 Cheviot Turbo mags DIMENSIONS: Length 4.5 metres, Width 1.8 metres, Height 1.4 metres, Weight 1.2 tons (approx) MODIFICATIONS: Custom alloy tappet cover, Completely rewired and remodernised headlight system, full modification of front and rear brakes and suspension, heavy duty gas rear shocks with neoprene bushing, fully customised exhaust system with 3 into 1 HPC coated extractors. Full repaint Restoration of carpets, dash upholstry. Assembled at Vauxhall motors, Luton England, then shipped to Canada 1970-1973, owners shipped it to NZ with them when coming over. 2-3 owners between then and me. No rust. Body straight as apart from one minor dent. Engine is immaculate looking. Breakdowns; Power steering is leaking from both ends of the racket, needs reconditioned. Had an electrical fire at one point, lights, gauges etc no longer work. Fuel pump died and electronics fuel pump installed. Exhaust mounts broke, and had remounted + swapped the tips to twin 3" straight pipes out the back. At present she is sitting in dry storage waiting till I have enough cash to fix her up. I've been suggested to change the motor, from RB30DET, a modern holden engine, to a crate motor brand new, but I'd like to keep her original (though If i had the cash, a crate motor would be awesome). Last time I had a go at getting her started, Spark wasn't getting to the sparkplugs. I turn her over every now and then to make sure she hasn't seized and will eventually fix her up once i'm finished at Uni and have extra cash.. Will post some better pics when I get a chance1 point
-
Ok lol I think I read that under cars exempt to exhaust noise laws, which mine will not be. So I will be able to daily a 'race car' if I want to, this is good to know, thanks Clint1 point
-
This is all moist excellent Shagwag stop spamming man! or come to the event these are your only options1 point
-
This has been a while comming now but the old girl lives. I purchased her and she had done 403,000km. She is a 1984 FX-GT 16valve hatchback. I admit she was rough as guts. BUT her interior is damn near perfect, the original seats didnt even have a single rip. Currently she has: MRP Coil overs with "Race" springs AE111 Front Brakes Whiteline 18mm Rear sway bar 20v 4age engine from a GT apex LSD Box So skip forward 3 months (will update photos later) and this is her now: As you can see she is a little rough, but nothing that cant be fixed, only rust is a little on the roof and inner guard which will be fixed soon. Nice new Silvertop engine and LSD box, looks almost factory 20v Silvertop in all her glory, got to love the sound she makes.1 point
-
not good enough Dayffid1 point
-
Masking tape is also nasty shit, if you let that shit dry out it can be a cuuuuunt to remove. I wont be able to make the meet btw1 point
-
Oh, where is the wheelchair at these days?1 point
-
That sounds like a plan. I guestermate the good ship buick will be in woodville around 10:30 - 11:001 point
-
keen to leaving first thing friday aswell, maybe thursday up to Lauras in palmy and meet early convoy in woodville1 point
-
mine had to have 3mm plate welded down the lot as they were so wrecked from lowness. wof man didnt know what to say. speachless.1 point
-
The blacktop has more lift on the intake cam but the exhaust cams are the same. TBH not worth the effort but they were in the engine when we swapped it in. The 7afe headgasket rasies to comp up .5 which makes the ST 10.5 to 11 which is a bit more power. But i would personally not bother with the BT intake cam for .2mm lift. Just buy aftermarket which is what I will be doing as soon as the bank account gets a bit better, The heat is an issue but what we are doing is building a pod that seals to the bonnet when its closed and has an vent giving the ITB's cold fresh air. TBH she sounds mean at 8,000rpm with the poddy on it. The exhaust is decent, who ever did it, did a good job. Sounds sporty and not too loud or ricey.1 point
-
All that junk in his trunk?1 point
-
Sounds most excellent. So we'll see you at 3pm?1 point
-
Parcels arrived~ Got me a nice sunshade now. And some nice factory unused cotton, lace looking seat covers. They even have the factory instructions with them~ oh and a CB radio... hola1 point
-
I will try and whip Bizzo into actually leaving on time. When do people want to leave by?1 point
-
I've been working away but it's not very interesting stuff. I've cleaned up all my wiring and mounted the fuse box and rebuilt all the heater stuffs. Dash is back in. The tacho is being a total vag so I'm ditching that stupid circuit and replacing it with a stepper motor at some point when I care enough. Replaced the rubber bits on the quarter windows. If things go really well I might be driving this on the weekend. There's still lots of things to do; some upholstery, put all the windows back in, door lock actuators, all the interior panels, indicators, seats & belts. Mostly a million little thingys.1 point
-
Oh yea, while we had it jacked up also noticed the chassis rails have been eaten through, so should probably do something about that at some point1 point
-
Same here! The word "patrol" in the title put me off the project at first - then I sat in it at the tauranga meet and felt like a little kid in the front of the McDonald's plane. Thing rules. Please drive it to nats 14.1 point
-
Been in the shed tonight after a bit of landscaping! Got a heap of little bits and pieces to do, Tonight fitted fuel pump (Walbro) and sender into the Tanks Inc injected setup fuel tank . This has been setup for intank pump unlike the factory tank, perfect for my injected conversion. Tank was real cheap in comparision to some of the other "injected" impala tanks on the market, but real good quality! Have mounted up, need a few fittings before i can connect up to engine for the first start up. How the engine sits at the moment! talking stuff http://oldschool.co....la/?hl=westpala1 point
-
Drill the jets and run nitro?1 point
-
Finished my new exhaust today - 3" side pipe with one straight through muffler (glass packed). The rear edge of the muffler is now the lowest point on the car at ~70mm. Which means the rear end is empty, so I've got the option of adding a rear undertray for extra aero points. Now all it needs is a wash, a new set of slicks and an alignment before the first round of SS2000 this weekend. Choice! I had a chat to my driveshaft man and he's given me ideas for how to make the 2 piece. He has a hefty aftermarket hanger bearing and suggested mounting it slightly further back than the factory location. That's the next job after labour weekend as it needs to be sorted before Pukekohe in November!!
 1 point
 -
It's not like anyone will walk up to him, give him a firm handshake, and thank him for NOT bringing it huh? DOIT.1 point
-
Got the bonnet back on today, Small Spacers on the hinges for a little extra clearance. Fire Extinguisher all mounted in the back. have the horn, window squirters and most of the lights working. Need to take it to the electricians to see if he can figure out why the radiator fans are not working. And to wire up the tachometer for me. Then wheel alignment, Then Cert?!?!1 point
-
OH WOULD YOU JUST STOP IT!! Stokedness is on MAXIMUM.1 point
-
Got some new stuff to weld in: Sills, and a wheelbarrow for the firewall Cheers to matt (matt_spitfire) for sussing me out with the dude to get the sills from. I ended up drawing up my own shape for them, since I wanted something more angular and aggressive than stock. They line up pretty sweet! I shall be welding them in ASAP - I have a bunch of assessments for the last couple of weeks of uni though, which I REALLY need to do something about!1 point
-
So today was a bit of a fail all round! Test fit the LS into my spare chassis. The sump is a front sump so no way that was going to clear. Whipped it off to test the mounts iv got anyways. Turns out my headers wont fit either.... So need to get a rear sump of some sort from the states and get some headers made unless I can find some decent ones that will def fit for not $$$$$$$x110000 In better news the panelbeater is back and ripping into it by the sounds so a months time should see some big changes on the body! Piks for fred Yarn over here http://oldschool.co....la/?hl=westpala1 point
-
So finally got my A Into G and got the LS1 and 4L60E Trans out of the HSV. Bye bye LS1 Hello LS1 on the floor ready for some work. First job is to split the trans and engine. Sell trans and then mount engine on stand. Going to get all the excess wiring stripped out of the loom, gearbox, A/C, Powersteering, ABS, blah blah shit loads of stuff i dont need. Factory ECU gets the VATS (Imobiliser) switched off as well as all the stuff im not using to stop it throwing codes. Then I can wire up and get started on teh stand to make sure all is good with the engine. Excuse the shitty cellphone pics! Discuss away and talk some shit! http://oldschool.co....la/?hl=westpala1 point
-
So had a heap of packages turn up fiiinnnalllyyy from the states...Was a long slow trip but got here eventually. SOME of the packages! New BOSCH leads for the LS1 TANKS INC replacement fuel tank set up for a intank electric pump. Bolts into stock location even! Intank fuel pump and cradle to fit inside the fuel tank. Also a sender to connect to the factory fuel gauge so that works all properly! New driveshaft hanger bearing New waterpump and thermostat for LS1. About 1/3 of the cost of NZ at discounted price 2! Bolt in engine mounts for LS1 into Impala, flexplaet spacer & bolts to run older 700R4 trans on LS1 & Inline fuel pressure reg/filter from Corvette to assist in fuelling conversion Bolt in gearbox xmember to allow 700R4 from Commodore to bolt in (in theory) hopefully this will work with little to no mods with the ls1 1990 Chev celebrity repro calipers, 1978 Chev something rotors, and 1972 Camaro brake lines along with a aftermarket bracket makes the front end disk braked without messing up the offset like the aftermarket kits do. Hopefully it all works! New panhard bar Polished Alloy coil covers for LS1 Some of the rubbish after unpacking, half the shits still in boxes 2. Americans pack in a crazy way! Have also been working away stripping the bumpers from the irons. Was most difficult with god knows how many years of rust holding the bolts together. Nothing about 8 cutting disks and a grinder cant fix tho! Irons are going to get dipped nad powder coated, bumpers will get rechromed Have also been stripping the front grill/xmember thing to do the same Remains of a shit load of disks and rusty bolts! Discuss away and talk some shit! http://oldschool.co....la/?hl=westpala1 point
-
Man, love the cars. The tail lights on these are one of the best designs toyota had I reckon with that rectangle of light- so recognisable. It loses 1% cool because of the stretch. Just my opinion. I'd love to see one of these on fat as fuck goodyears with the yellow sidewall writing Covered in bolt on flares that haven't been blended into the body Painted Matt black or old character filled paint With no fender or side mirrors *dreams*1 point
-
Hey guys heres my 1973 mazda b1600 wellside.. loving it pretty rough but the outside is going to stay that way for the farm/hick style ..my plans for it is to take the inside back to fully original and make it shibby as (mint) and for the bay keep the original engine but work it..e.g sidedrafts, cam, extractors and port&polish,. i don't wanna go with the rotary conversion as most people tend to do that. having trouble on finding info on these badass utes online so some help would be great from the oldschool crew1 point
-
lolol don't know why I made this but the music really is something else1 point


This leaderboard is set to Auckland/GMT+12:00