
Leaderboard


Popular Content
Showing content with the highest reputation on 04/10/23 in all areas
-
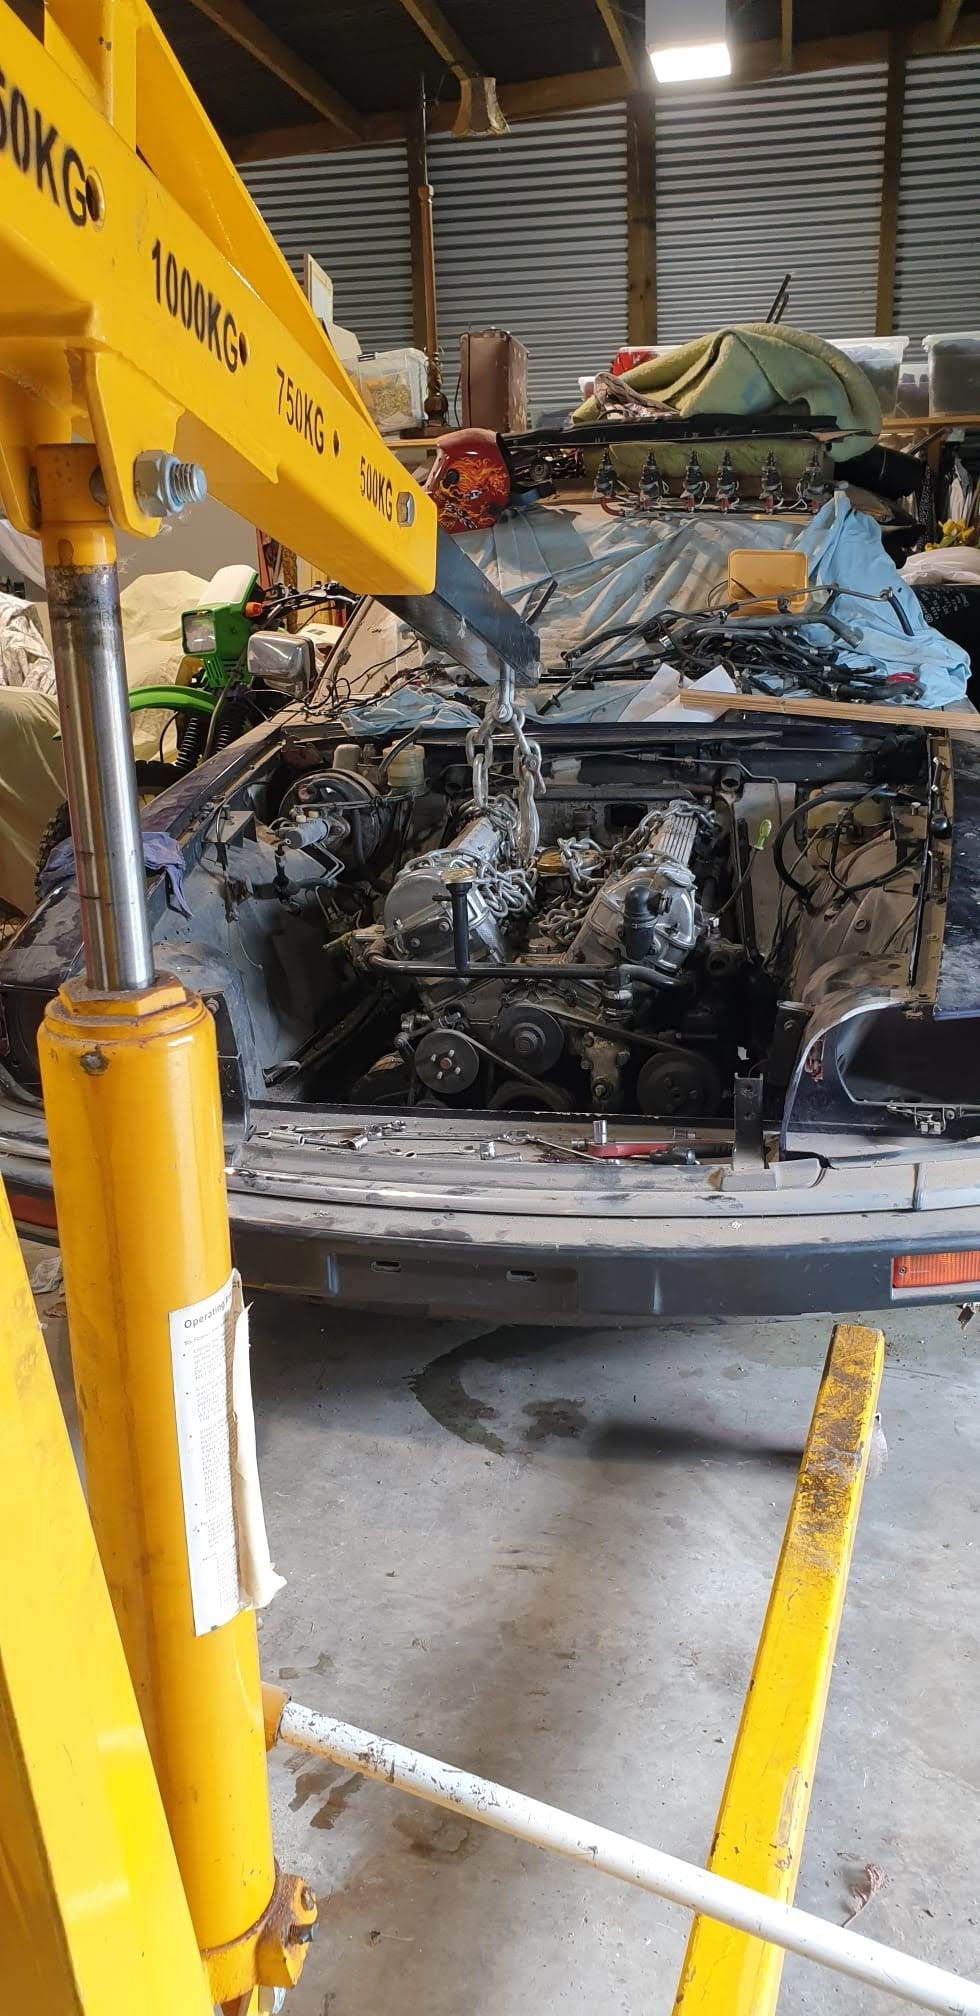
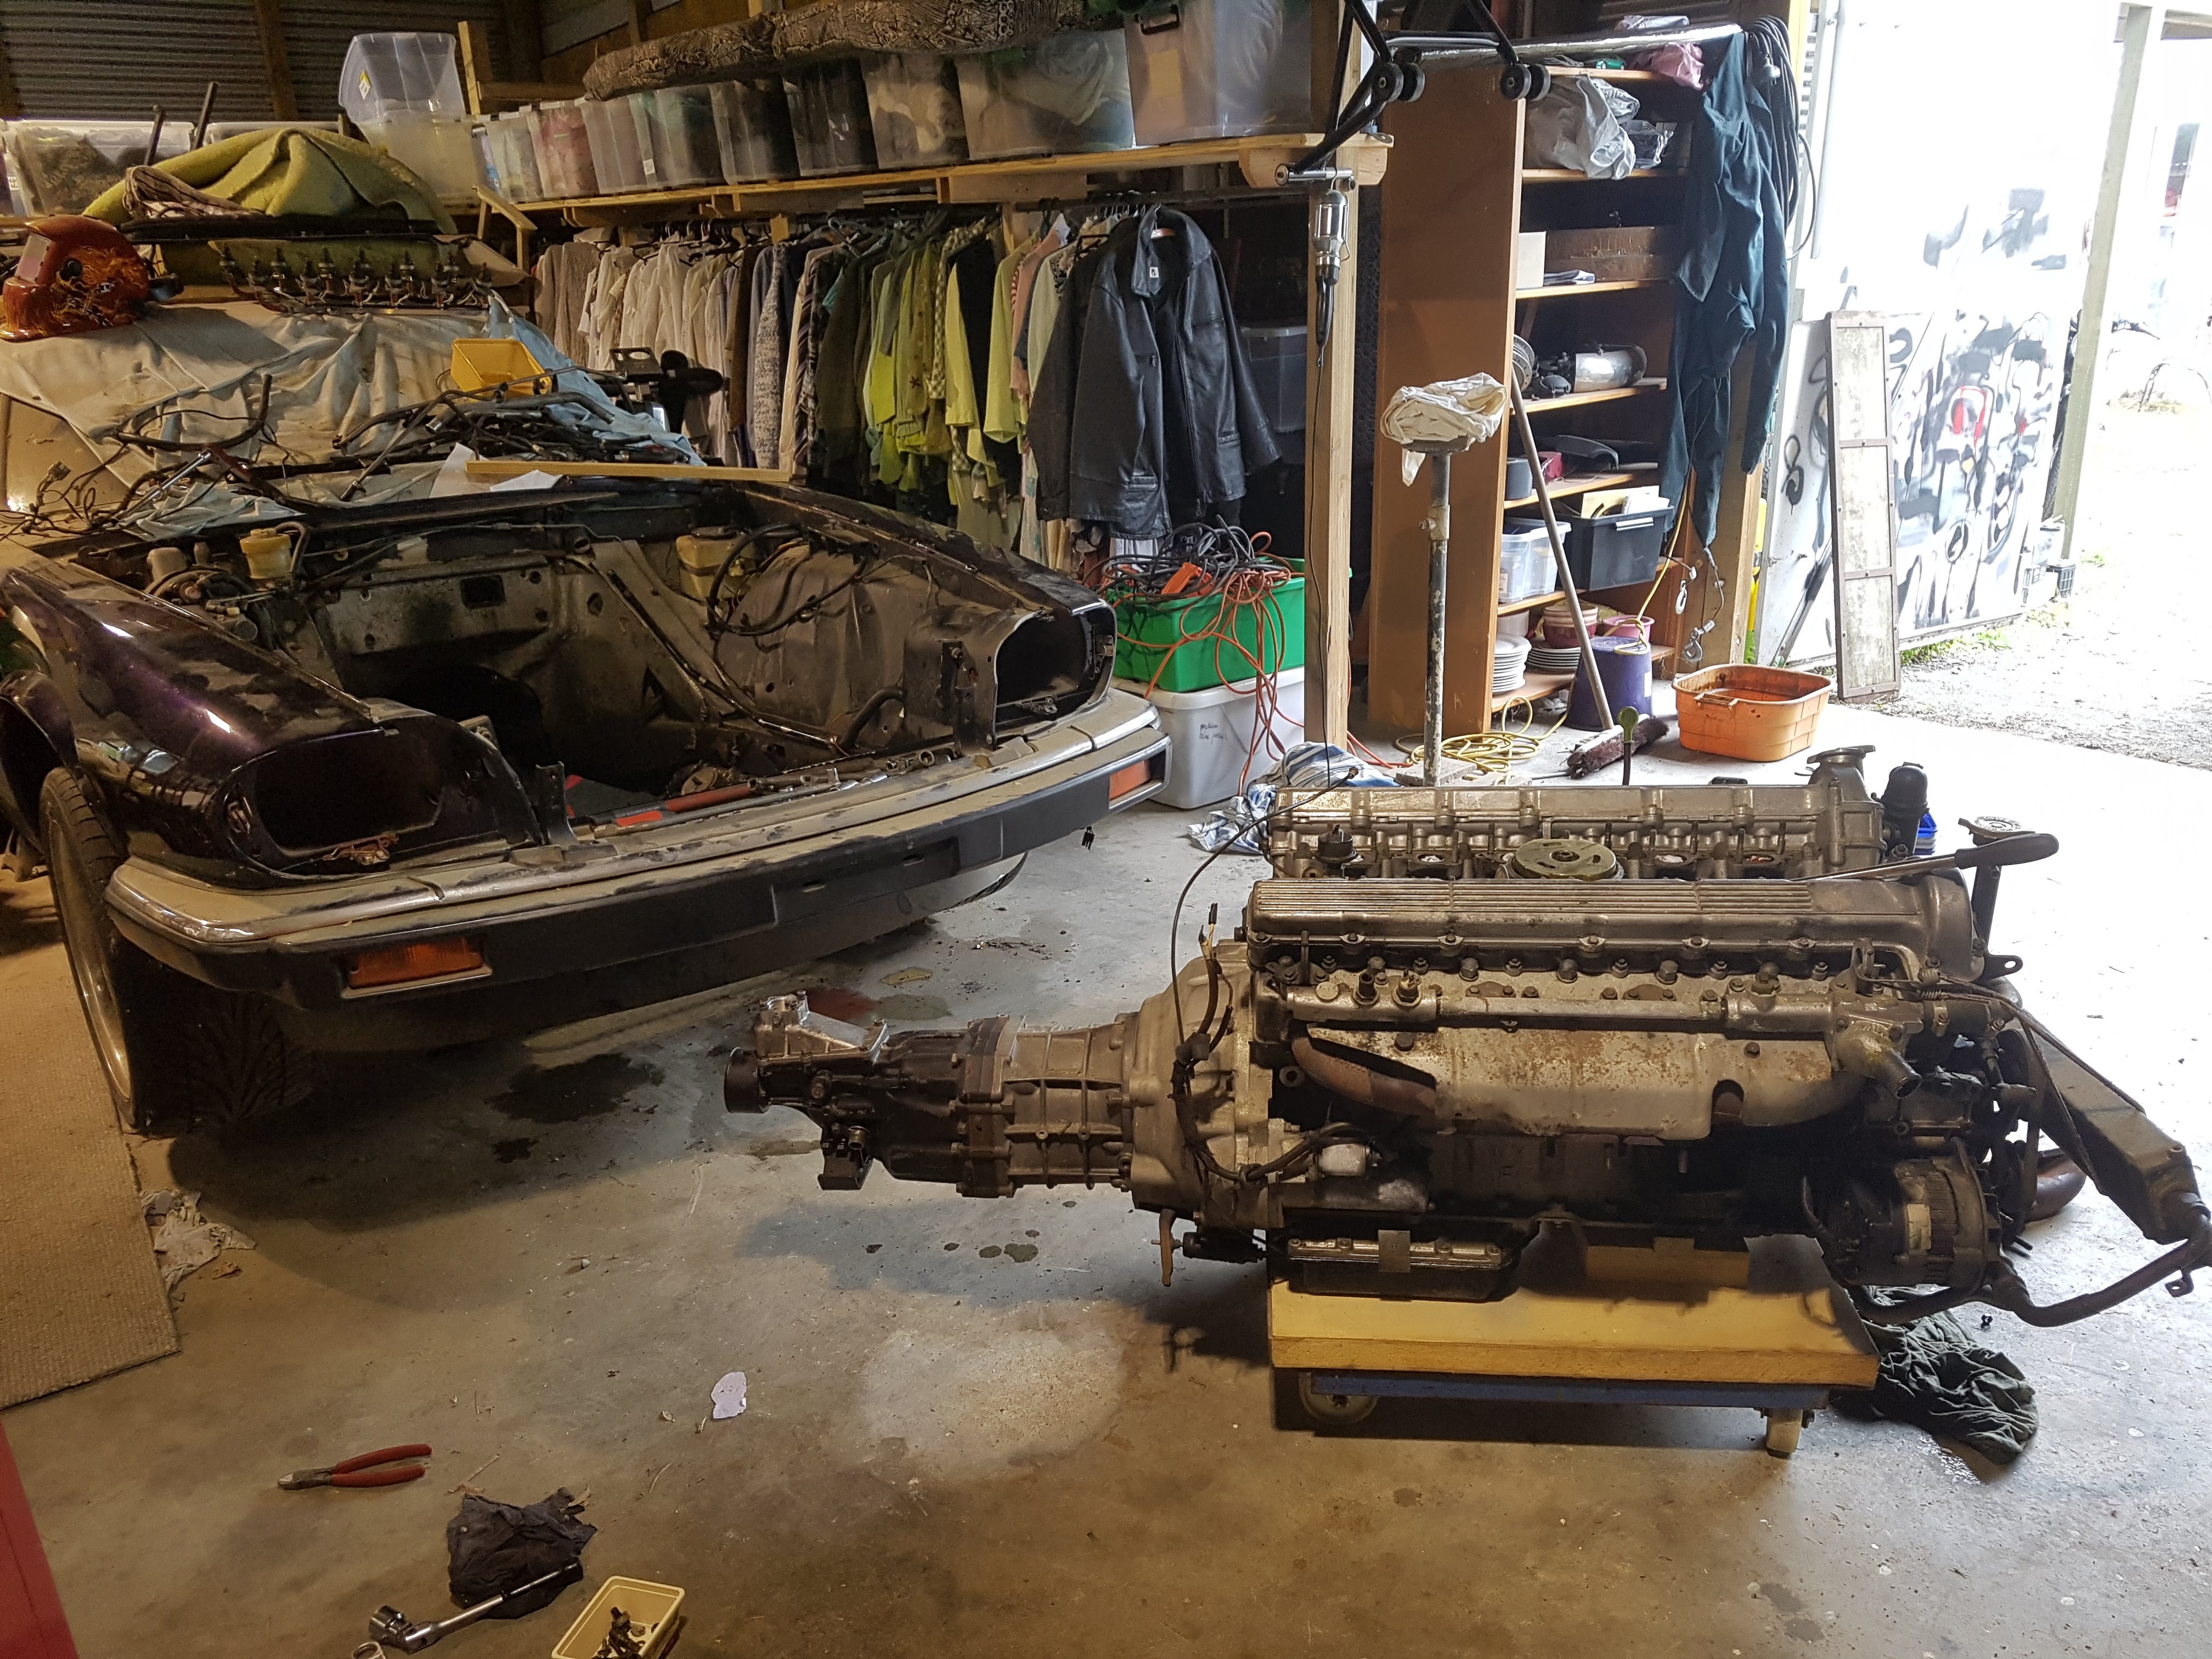
Seeing I've had this car for a little over 20 years now! Some 14 years after the last post in this thread, a thing happened: She's a big unit thats for sure. Makes a W58 look like a k40! Some things are happening and have been happening. Wasn't gonna post anything up until i'd got through most of the build. But here is a bit of a sneak peek for the jag foamers on this forum Will save up some progress before any more posts. Never got Jags out of my system. So getting back amongst it after more than 20 years of pining.
 16 points
 -
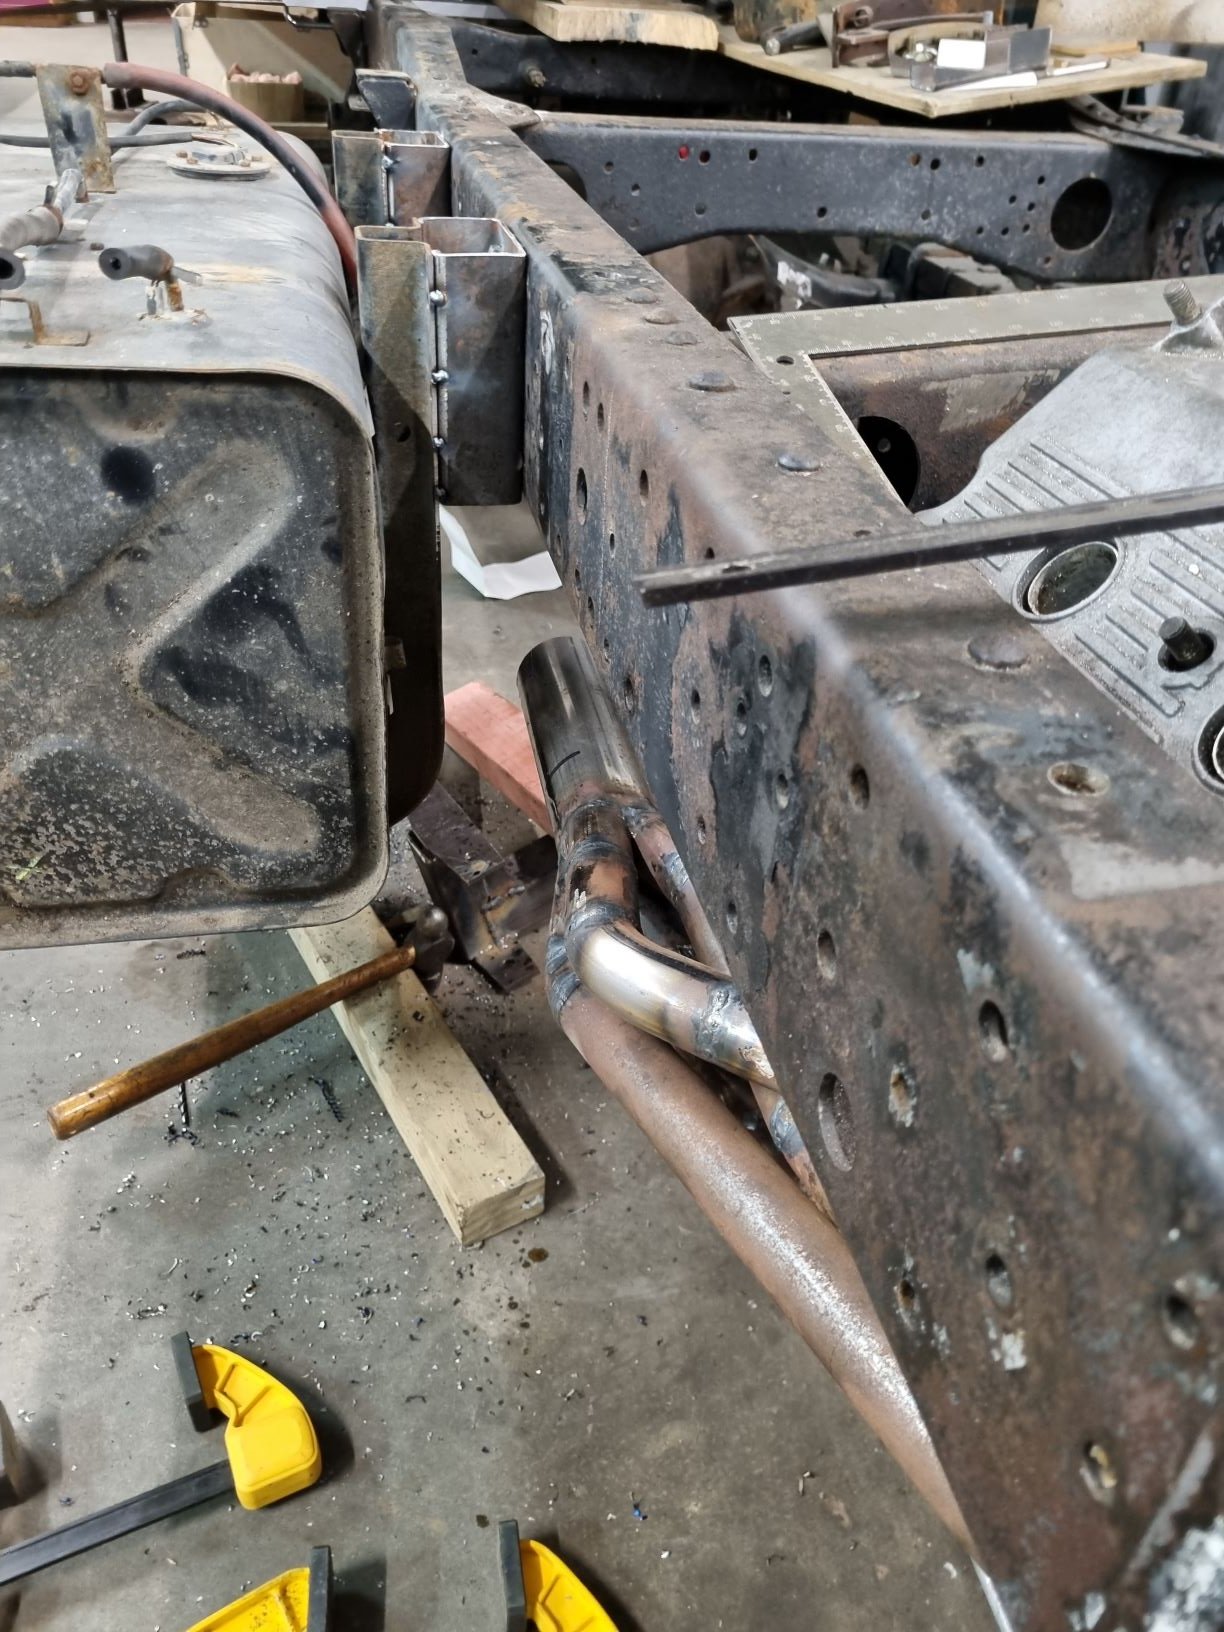
It's been a while since Lucas has been featured in a post here. Mainly because he has been flawless, but also partially because I haven't driven him much. He was flawless... but it wasn't his fault he had a hiccup. I decided the other day to jump in and take him to work for a change. A drive I have done a few times since the engine swap and haven't had an issue. This time was slightly different. The engine fired into life nicely, with no apparent issues, even after sitting for a few weeks. I back the car up the drive, noting a slight fuel smell. Thinking it was just exhaust fumes from the cold start, I ignored it and began to head off down the road. What I couldn't ignore was the niggling feeling that the raw fuel I could smell was wrong. Lucas normally has no fumes in the cabin, and no real smell, so alarm bells started to ring in my head. A couple hundred more meters down the road and the smell wasn't gone, so I turned into a side street and popped the bonnet. Raw petrol was pouring from the hose on the outlet of the fuel filter, about an inch away from the exhaust manifold which was quickly becoming rather hot. Not ideal. Having no tools and raw fuel pouring out, I shut the bonnet, hung a quick U-turn and made a swift retreat home. I've gotta say, that was a very stressful drive home, and far more stress than I needed that early in the morning. Thankfully I made the 500m drive home fine and proceeded to quickly wash the fuel off the inner guard, check it wasn't going to keep leaking, shut the bonnet and change cars to head to work. He then sat in the naughty corner feeling sorry for himself. This weekend I grabbed some new 8mm EFI hose and got to work. These were two of the last hoses that I hadn't replaced since I got the car (the other was the cold start injector hose). They were all on the radar, but I ran out of hose when I did the rest of the hoses and left this as a "they're easy to get to, I'll change them when I get more hose". Well, I didn't get more hose in time, so it forced my hand. That's a good lesson to not leave old hoses for later, just replace them; I was in a rush to have the car back on the road after the engine swap, and it nearly bit me. This is where the hose decided to finally give way It's way closer to the manifold than I am comfortable with and the hard-line creates something of a natural drip loop above the manifold. I noticed even before removing it that one of the hoses (not the one that failed) was the wrong rating. This should be R9 hose, which is EFI pressure rated and made of different rubber so is less likely to have fuel permeate it. The hose on the car was R7, which is really designed for carburetted engines and not as resistant to fuel. I drained the filter and removed both hoses. It's no real surprise that the hoses failed after all this time. The newest of the pair was date marked 1996, while the other was a couple of years older, having been made when I was about 6 years old. The oldest one was the one that failed. Both hoses were very soft (you could easily squeeze them closed by hand, which you can't do with the new hose) and when cut open the inner layer of rubber had gone soft and gummy, like it has absorbed fuel. The "better" of the two hoses was also showing signs of cracking While I was there I also replaced the cold start injector hose, as this was visibly old but had no date stamp. I cut a pair of nice new hoses for the filter, making the inlet hose slightly longer as the old one was kinked in the bend before the filter. New clamps were used, along with a new shiny P-Clamp to hold the hose. I removed the air intake hose, turned the ignition on and opened the flap to trigger the fuel pump. This successfully primed the system, with no leaks. Great success. So that was a very lucky escape on that one. Had I just ignored, or not noticed, the fuel smell, I don't know how far I would have gotten before something far worse happened. So in saying that, this now lives in the passenger's glovebox. it's a perfect fit. I hope I never have to use it, but it's good to know it's there. Since Lucas was already in the garage, there were a couple of other things I wanted to sort. One was a decent wash and vac, but the other was to remove the passenger's front door card and reconnect the window switch I forgot to connect last time it was off. I very carefully popped the clips, removed the screws and pulled the bottom of the door card away. This allowed me to see the connector I needed to join Luckily I could just reach up from the bottom of the door and reconnect it blindly, and I managed to do so without causing any damage to the door card, which is always a risk when messing with it. The window now works from its own control again, yay. I did spot something a bit weird while I was there; a section of hose in the drain channel at the top of the front guard This isn't meant to be there, it serves no purpose and is just blocking the flow. It was a little further down when I first found it, I had moved it before taking the photo. Some careful poking with a pick and then grabbing it with needle nose pliers removed it. There was a significant amount of old dirt built up around where it was, so I cleaned that out with compressed air. Now the drain channel can drain completely freely. No idea how long that hose had been lost there, but I suspect it's a decade or two. Lucas then got a nice wash, and a couple of spots touched up with polish to remove some marks in the paint The interior was treated to a decent vacuum since it was full of leaves and tree debris from living outside. It's a very inviting place, with warm white LED room lights, wood grain, and plush fabric seats. The reason for all this, other than not burning to death in a car fire, was actually to go to a car show I was planning to go to before Lucas had his whoopsie. A few friends were planning to attend the final of the local Cars and Coffee meet for the season, so I was planning to tag along. After a solid day's work, we were ready to go. My wife and I enjoyed a lovely cruise up the coast. Lucas drove perfectly and loved to stretch his legs. The show was a success. Some great cars there, and I'm looking forward to going again sometime in the new season later in the year. Out of all the cars there, Lucas was the only Rover. There were a couple of other British cars, namely a Reliant Scimitar, Morgan Plus 8, a few Minis, a TR7 race car and a couple of Trumphs. Lucas is due for a WOF in the next couple of weeks, so I will need to book that in and hope he passes again. Not much has changed, and he's only done a shade over 500km since the last one, but it's always a gamble with classic cars.13 points
-
Finally collected the guard marker lamps. Made new rubber gaskets, cleaned them up and fitted them..they even work!
10 points
-
It would only fire once per cycle. Fuel can sit in the runner waiting for its intake to open. My link only had 2 injector drivers. So was firing in batches of 6. Seemed to run ok (its all happening so fast i guess?) Anyway, on the jag front. Will be posting some updates later this year, so watch this space10 points
-
I'm happy to announce that a hardy soul (raving lunatic) has successfully completed a preliminary test run of next years route. The pictures were fantastic. But reportedly it's some proper gnarly "trails"/brutally long days riding. More info later.8 points
-
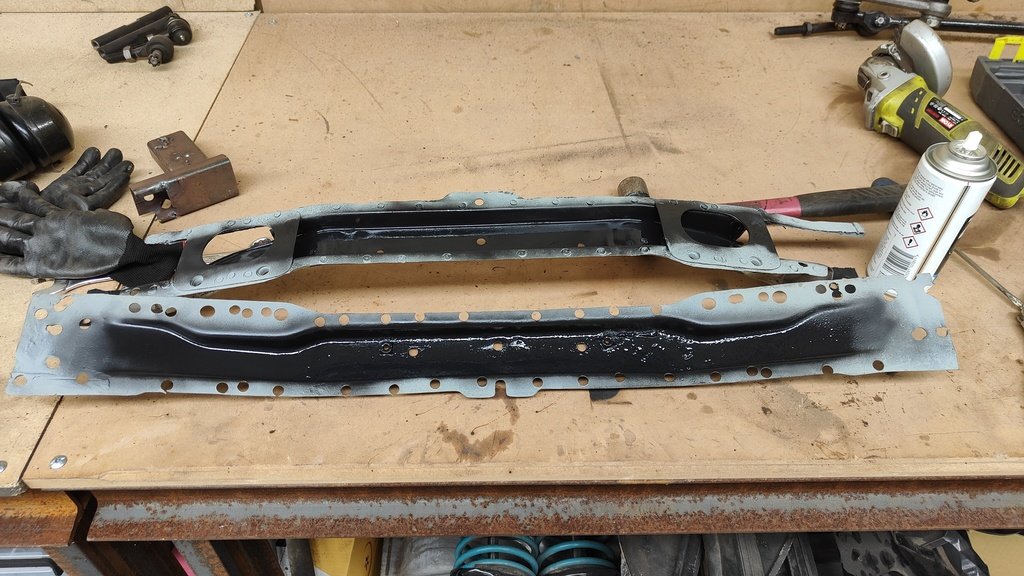
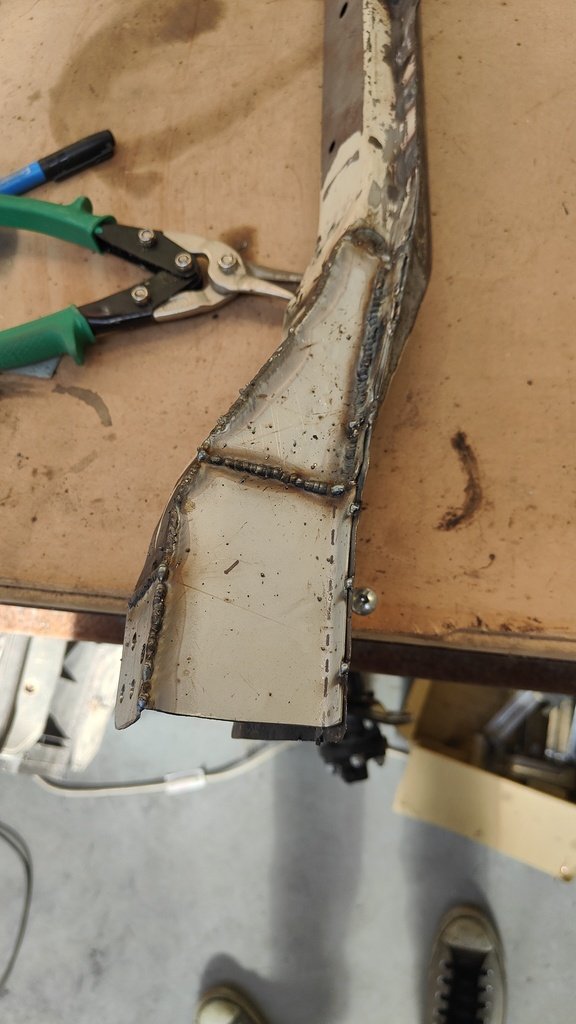
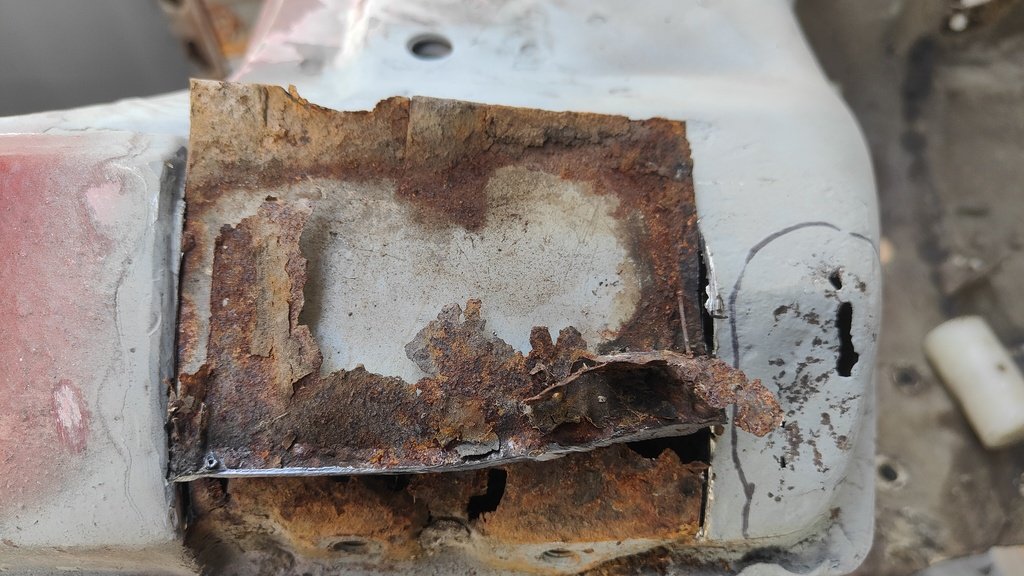
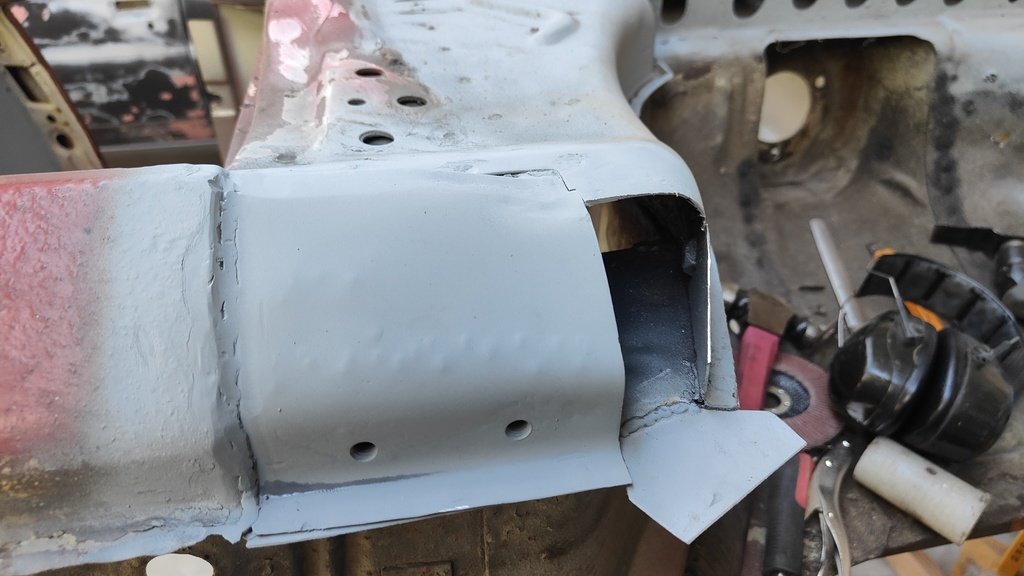
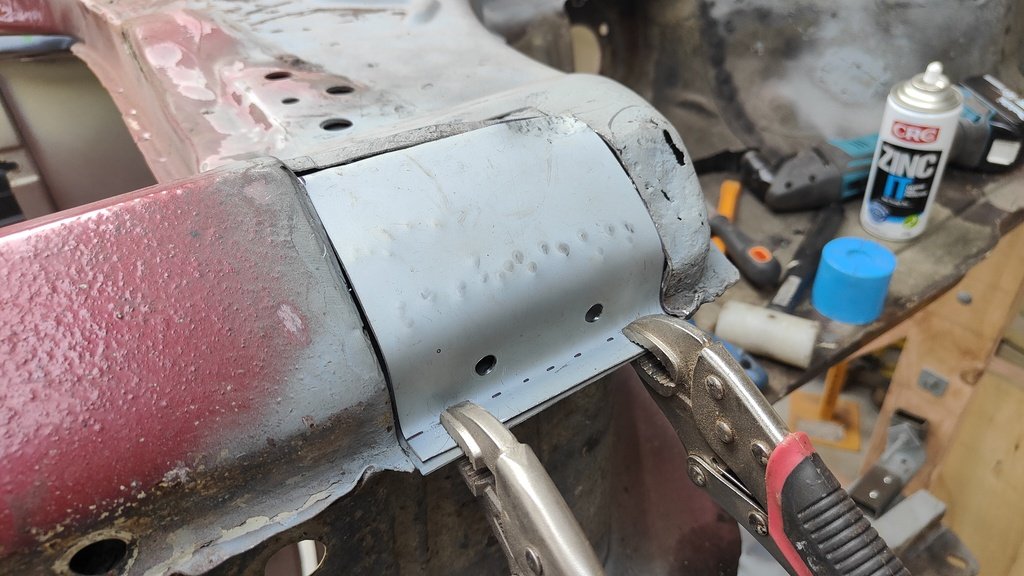
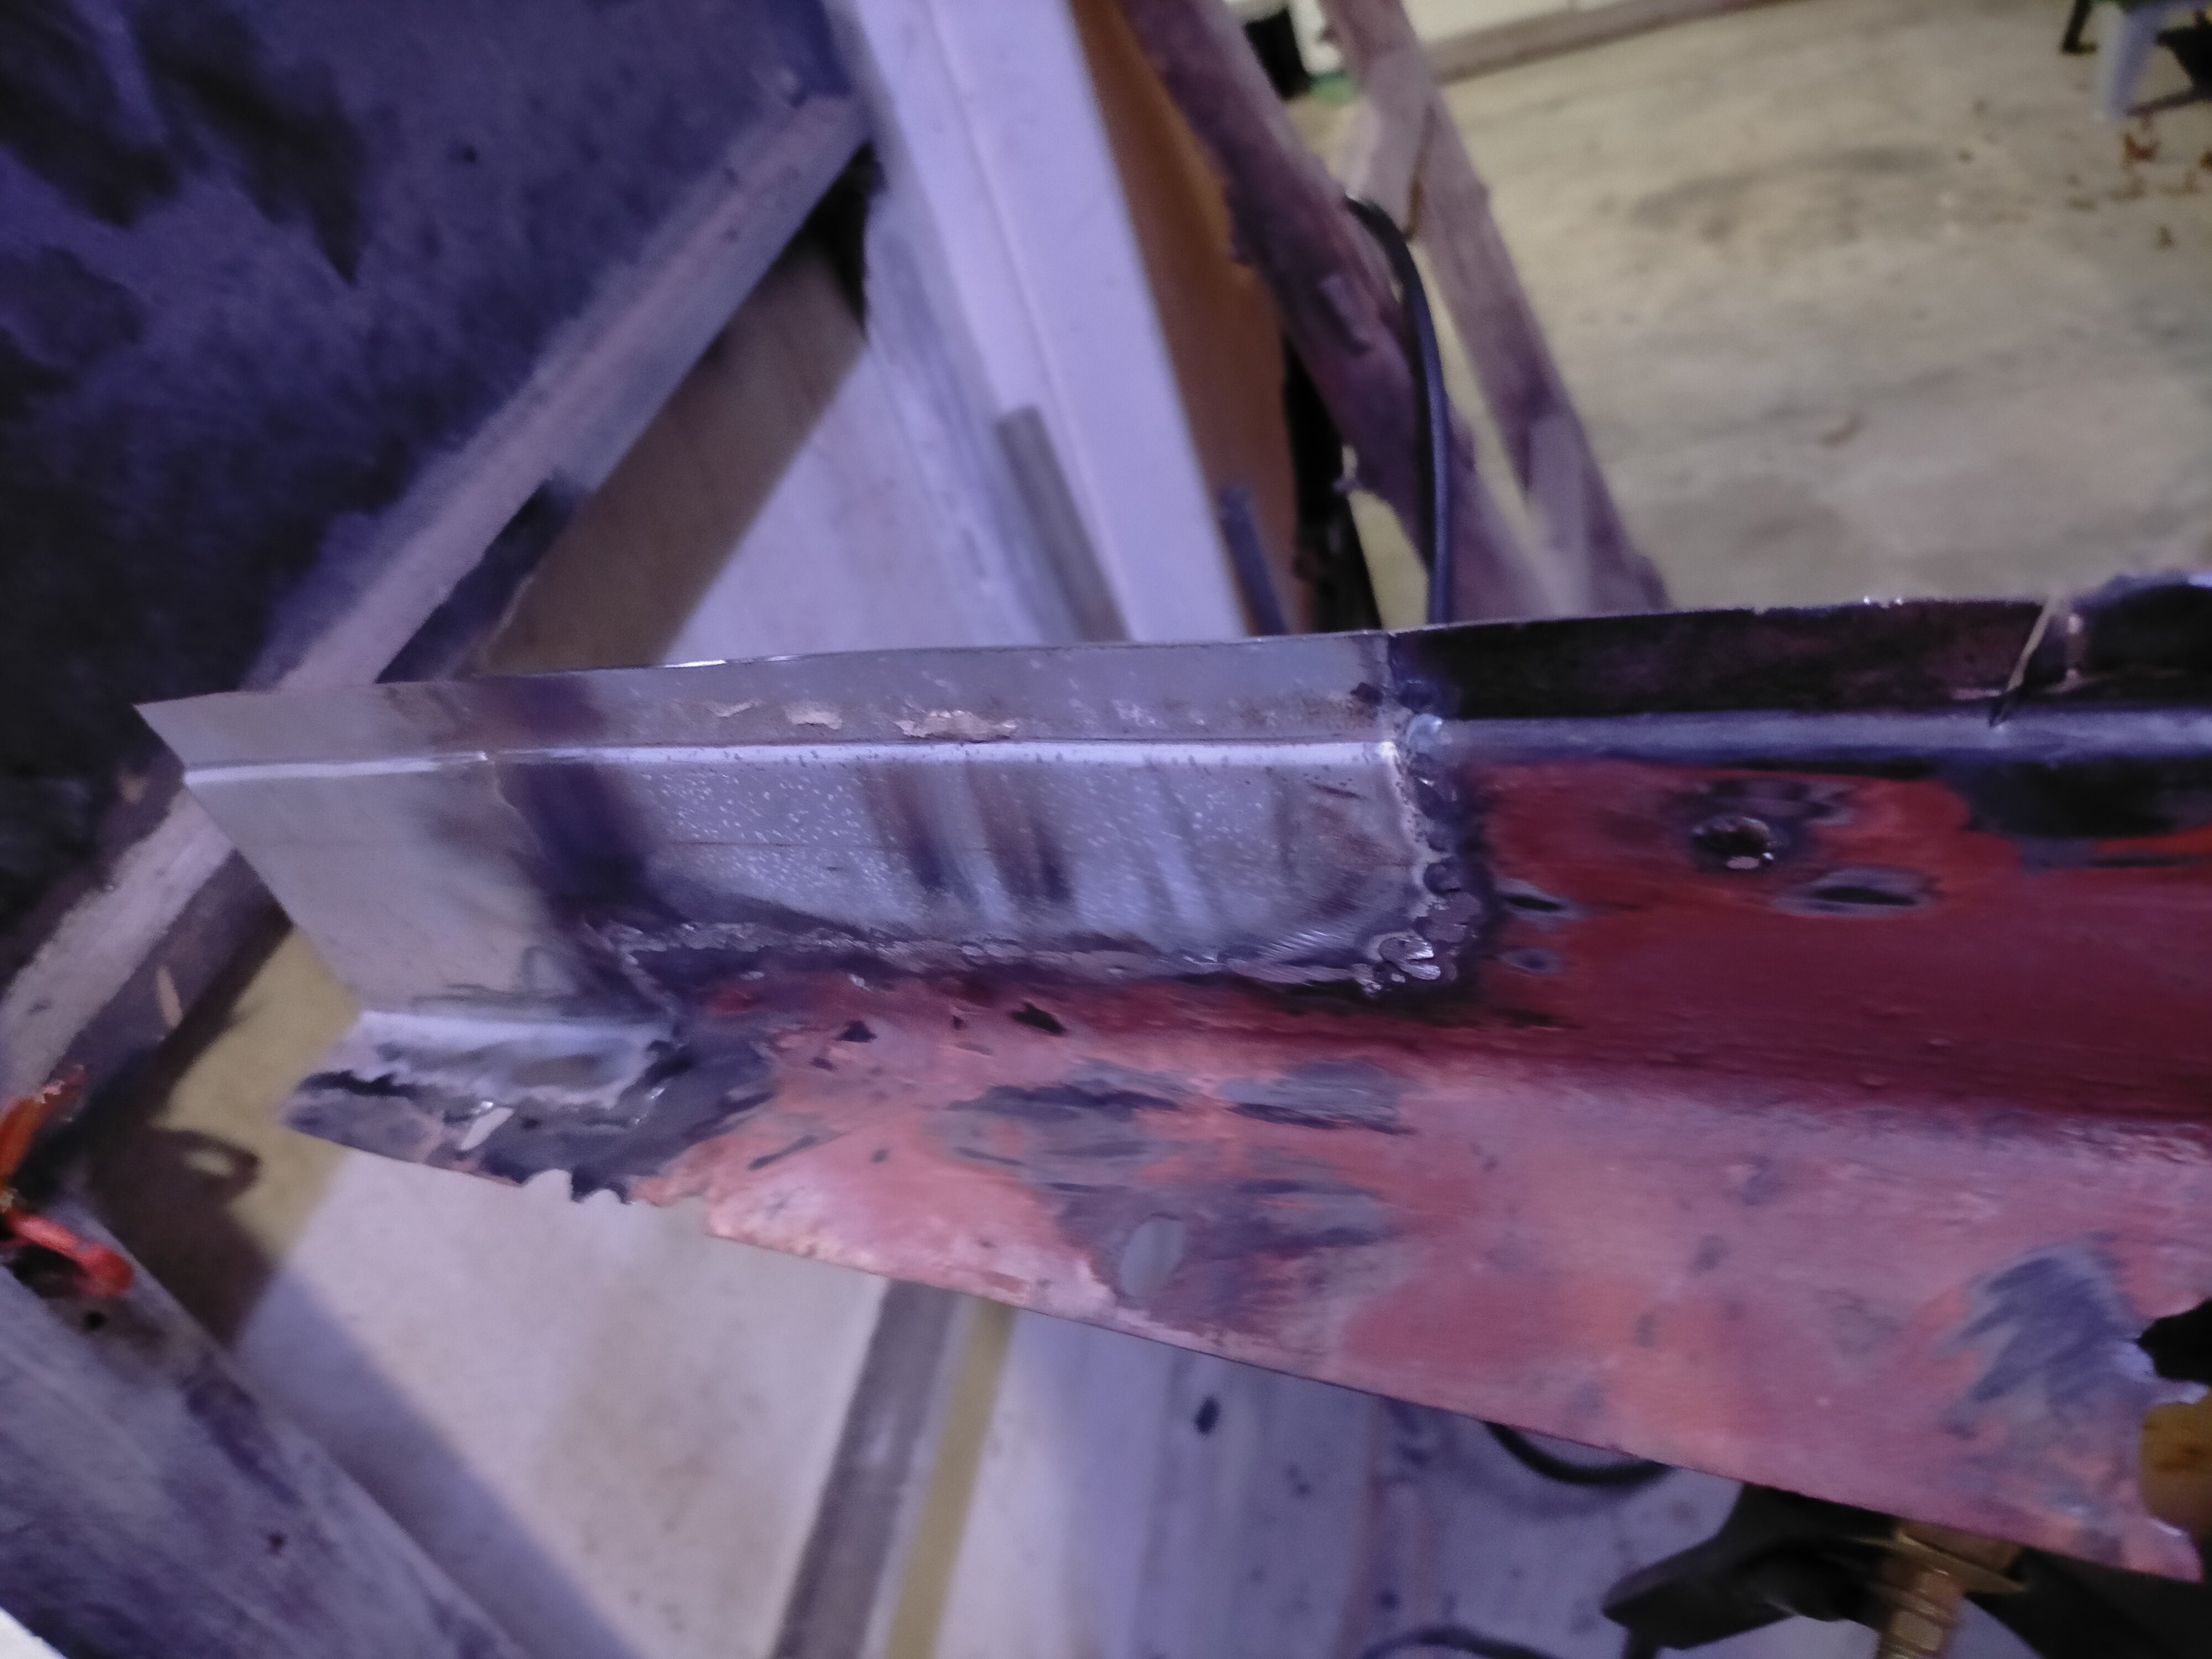
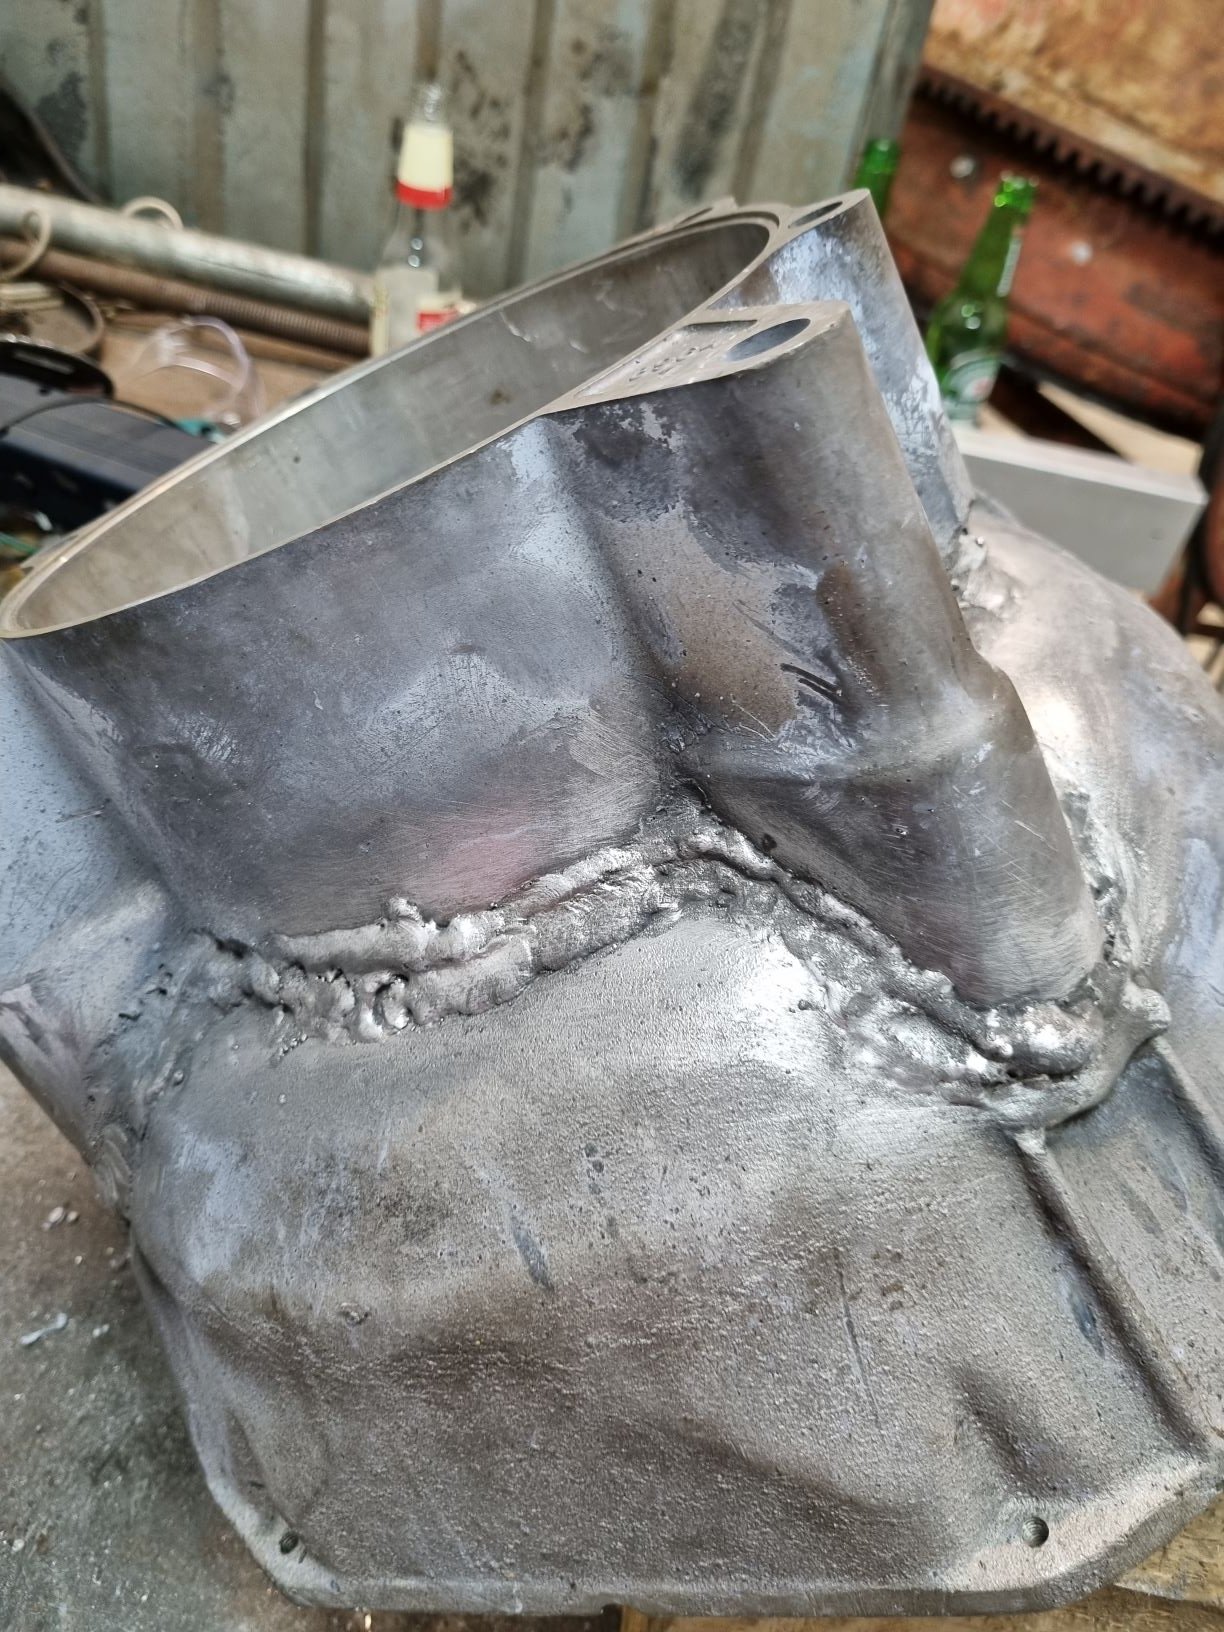
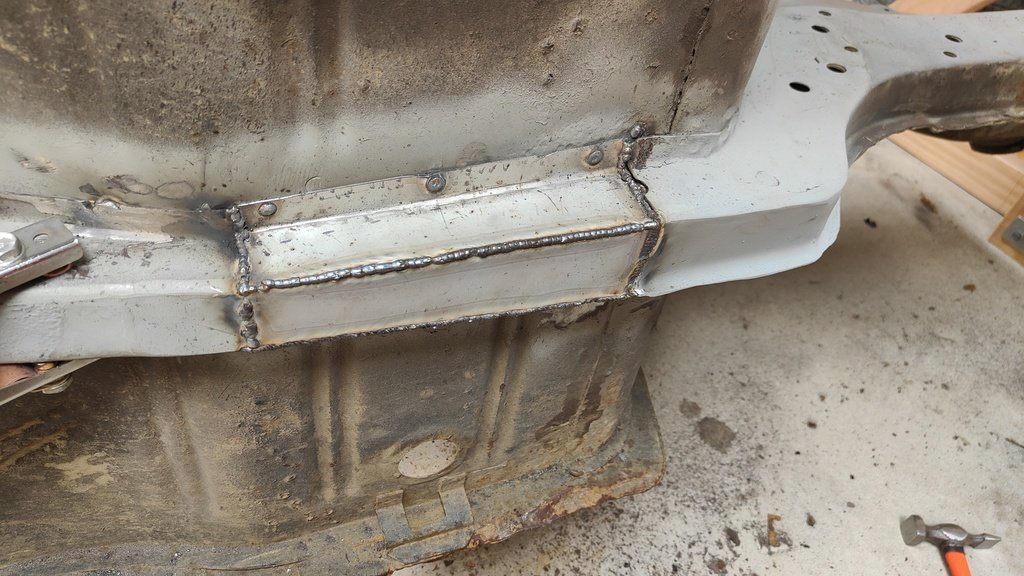
This weekend i also had a look at the radiator support, got this apart and cleaned the inside up. There was a few little pin holes in the lower section so welded these up, coat of zinc and welded it back together. I needed to replace both front parts on either side, made these in two parts since my metal working skills wouldnt allow me to do it in one, welded these up and a coat of zinc to finish it off. The last thing I did today was tidy a small part on the drivers side sill. I cut the small square out that was affected by rust, coated the inside and welded it back up. This part had a compound curve in it that I couldn't quite get right but a skim of filler will sort this out no worries.
7 points
-
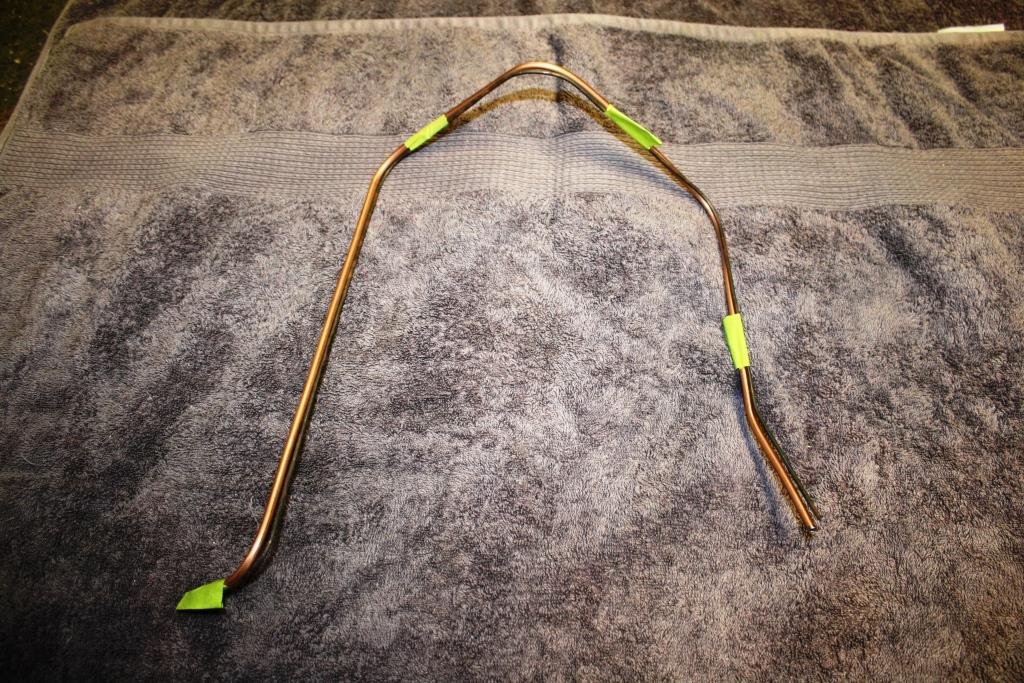
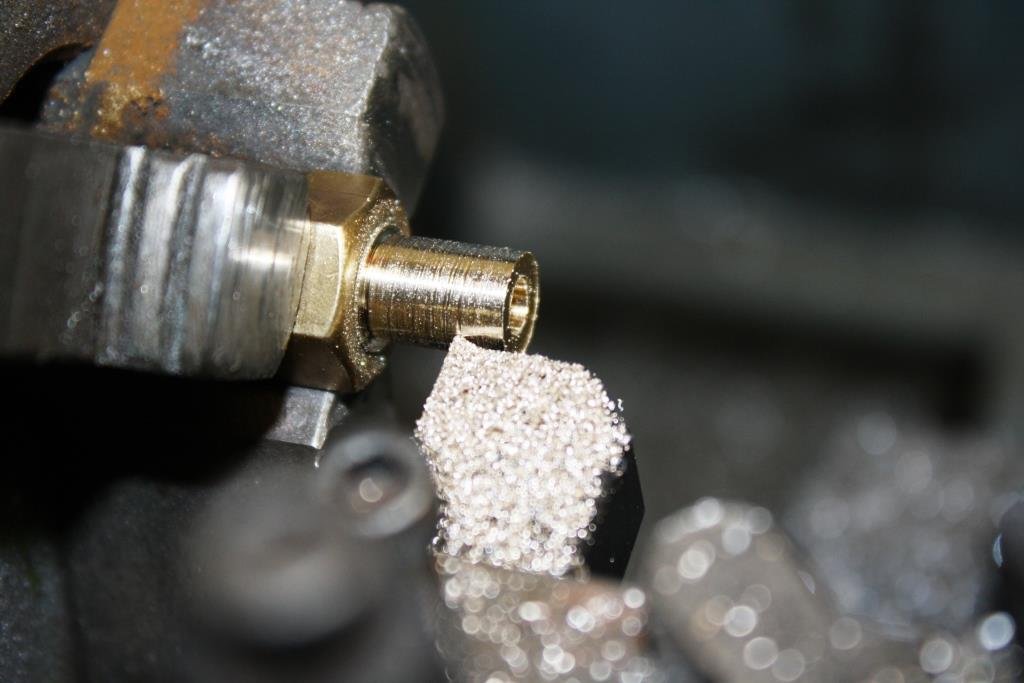
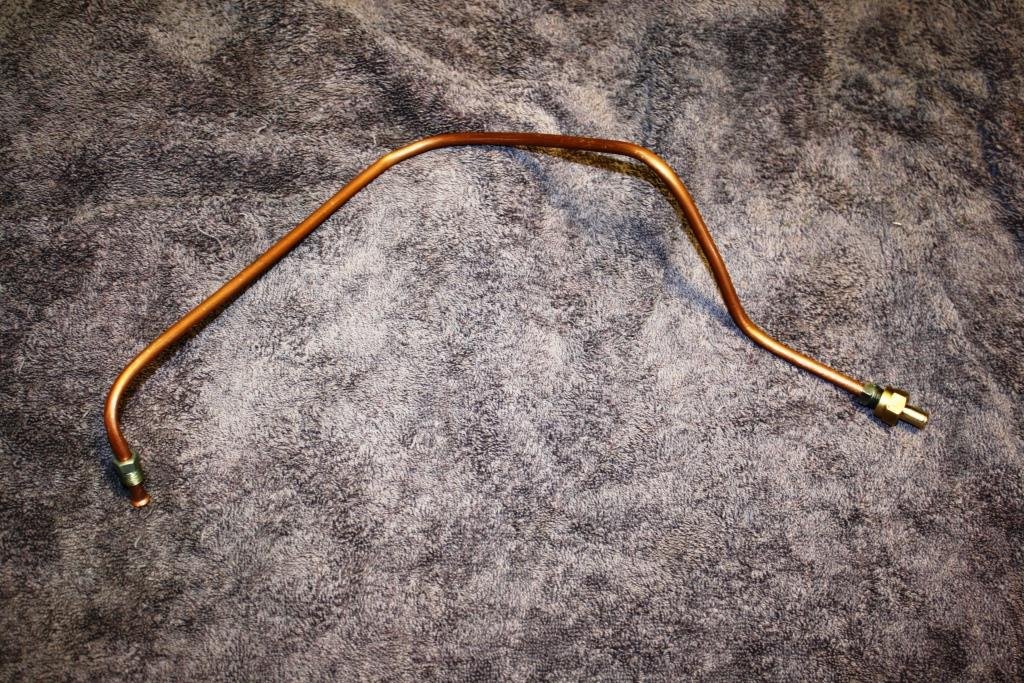
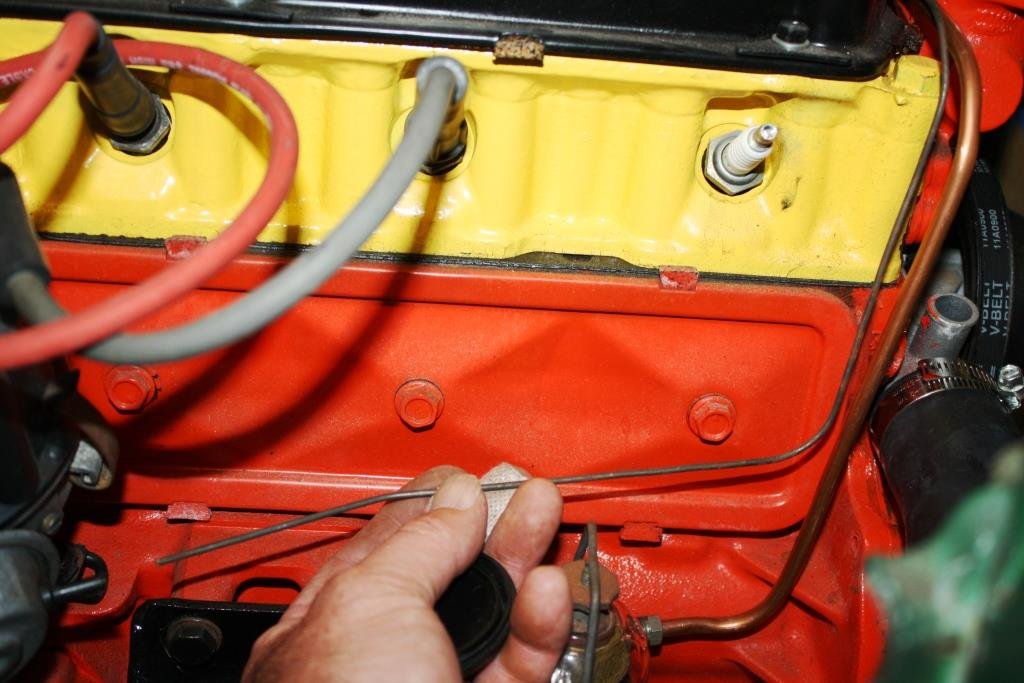
Bent up a 5/16” pipe to go over the motor from the pump to the carb. I need a fitting to go from a 5/16” copper ferrule to a 5/16” tailpiece to fit the flexible fuel hose to the Weber carb. I found an old brass fitting and turned one end into a tailpiece. I love how old brass fittings clean up so willingly on the wire buff. Very happy with the result. Made up a pipe for the vacuum advance using leftover 3/16” copper-nickel brake line. Installed the new plumbing using Oetiker clamps on the hoses. Yes they are single use only but they’re neat and tidy and easy to use. I installed the vacuum line to the booster at the same time….. I installed an additional in-line check valve to the booster to play it safe, those early Falcon Tandem Mastervac’s have a bakerlite valve body’s that self-destruct with a good backfire through the carby! All looking good to me - must be Wild Turkey time!
7 points
-
Did a sailing New Honda outboard is a peach. Had enough grunt to start bending the mounting bracket in half so will get a tig magician to lightning glue a strengthening backing plate onto it. Mrs didn't freak out this time. Put it in the boat park for a few weeks so I don't have to dick around setting it up each weekend. Next event is taking the workshop lads out for a drink/sail/fish on Saturday if the weather holds up. Then going to do the plate island race the week after.5 points
-
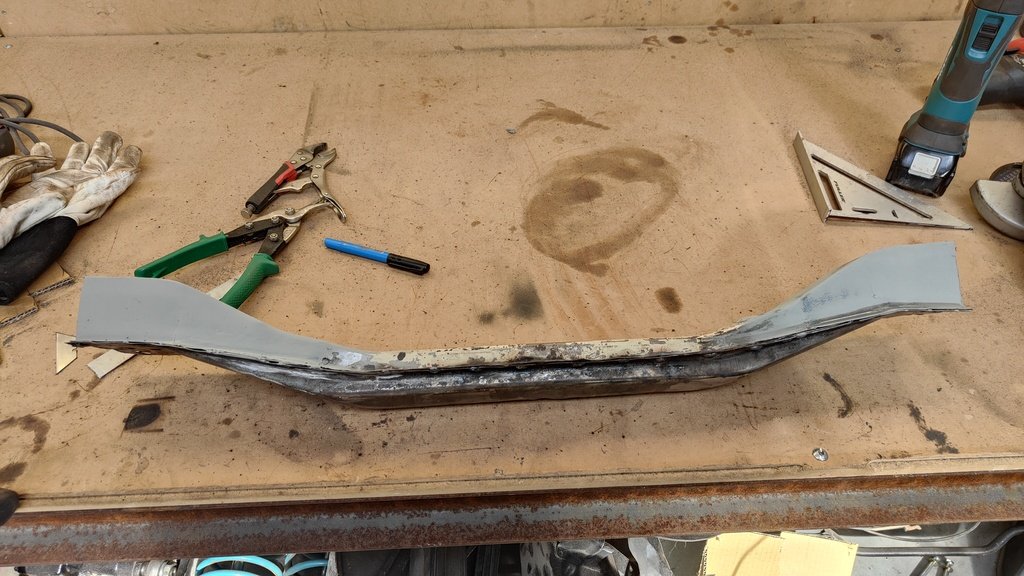
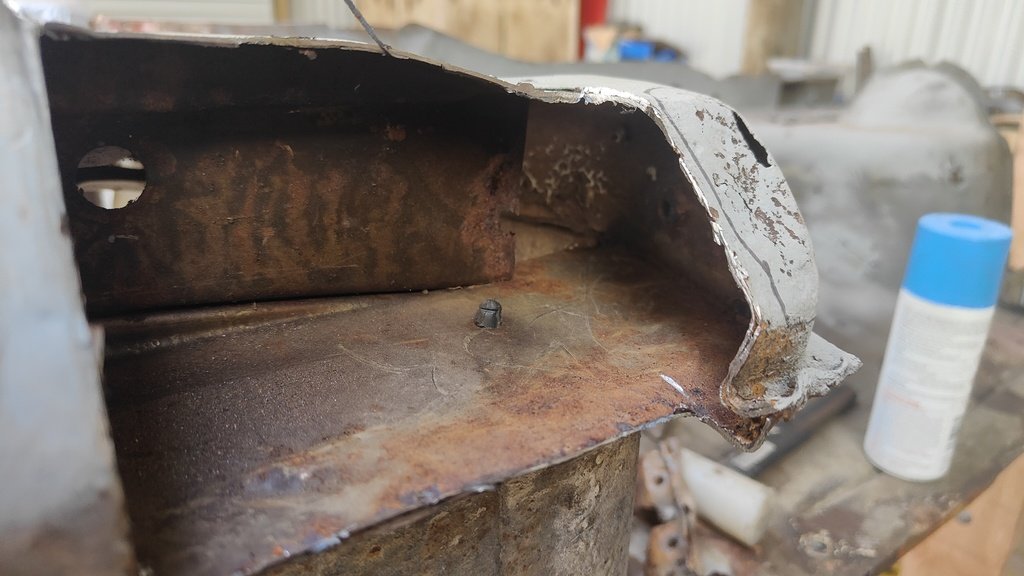
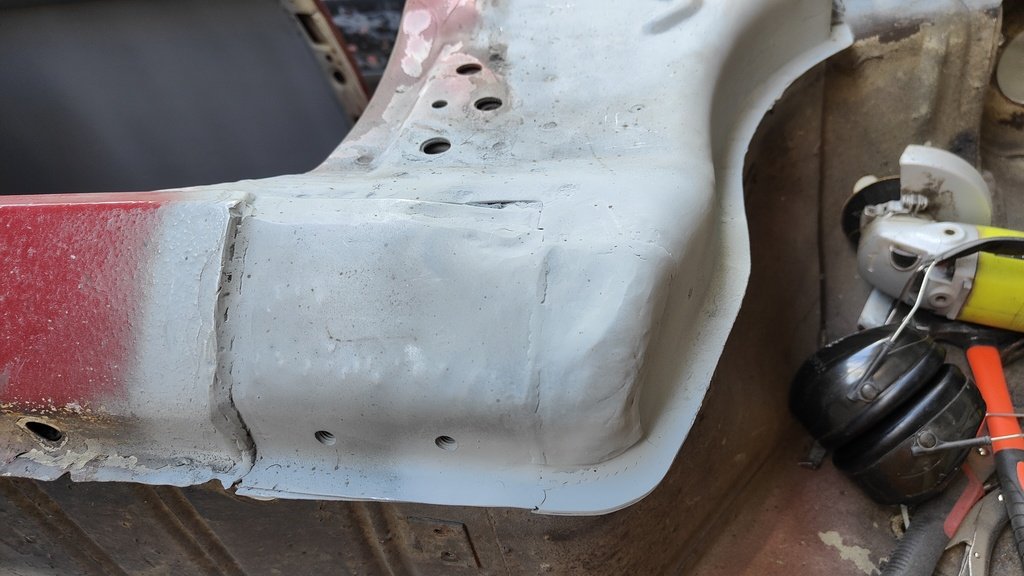
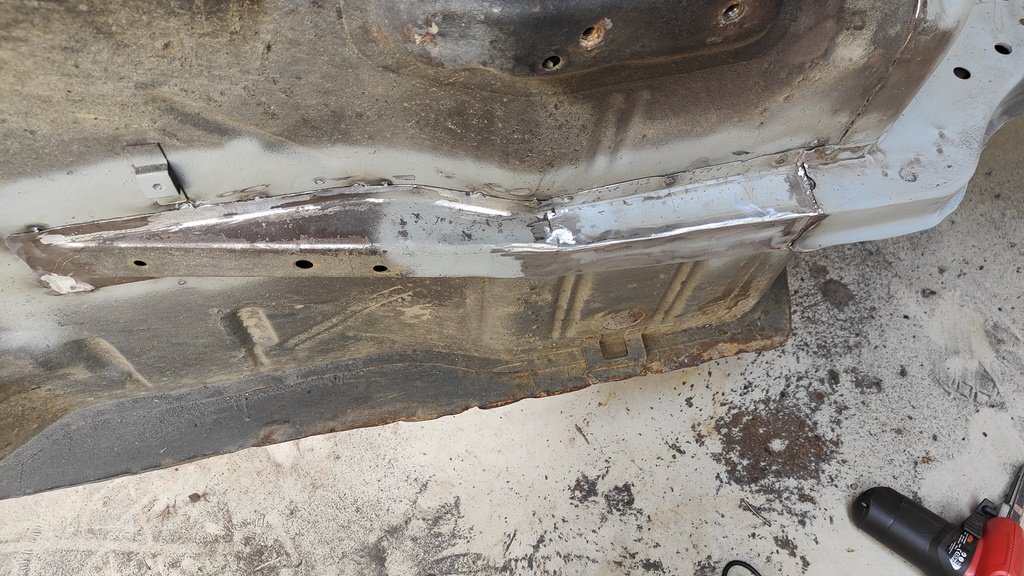
So its been a pretty productive long weekend. I decided to get stuck into the front drivers side inner guard part that was full of holes. Someone had a go at repairing this in the pasty with pretty poor results. I gve it a good clean inside and hit it with some zinc as usual. Then i moved onto remaking the part that holds the captive nuts for the fender to bolt to and welded it in. The next part was pretty tricky for me to replicate as it had a few different curves in it. I managed to get something close and welded that in, here is the finished result. Don't look too close at the welds, this will be covered by the fender anyway.
4 points
-
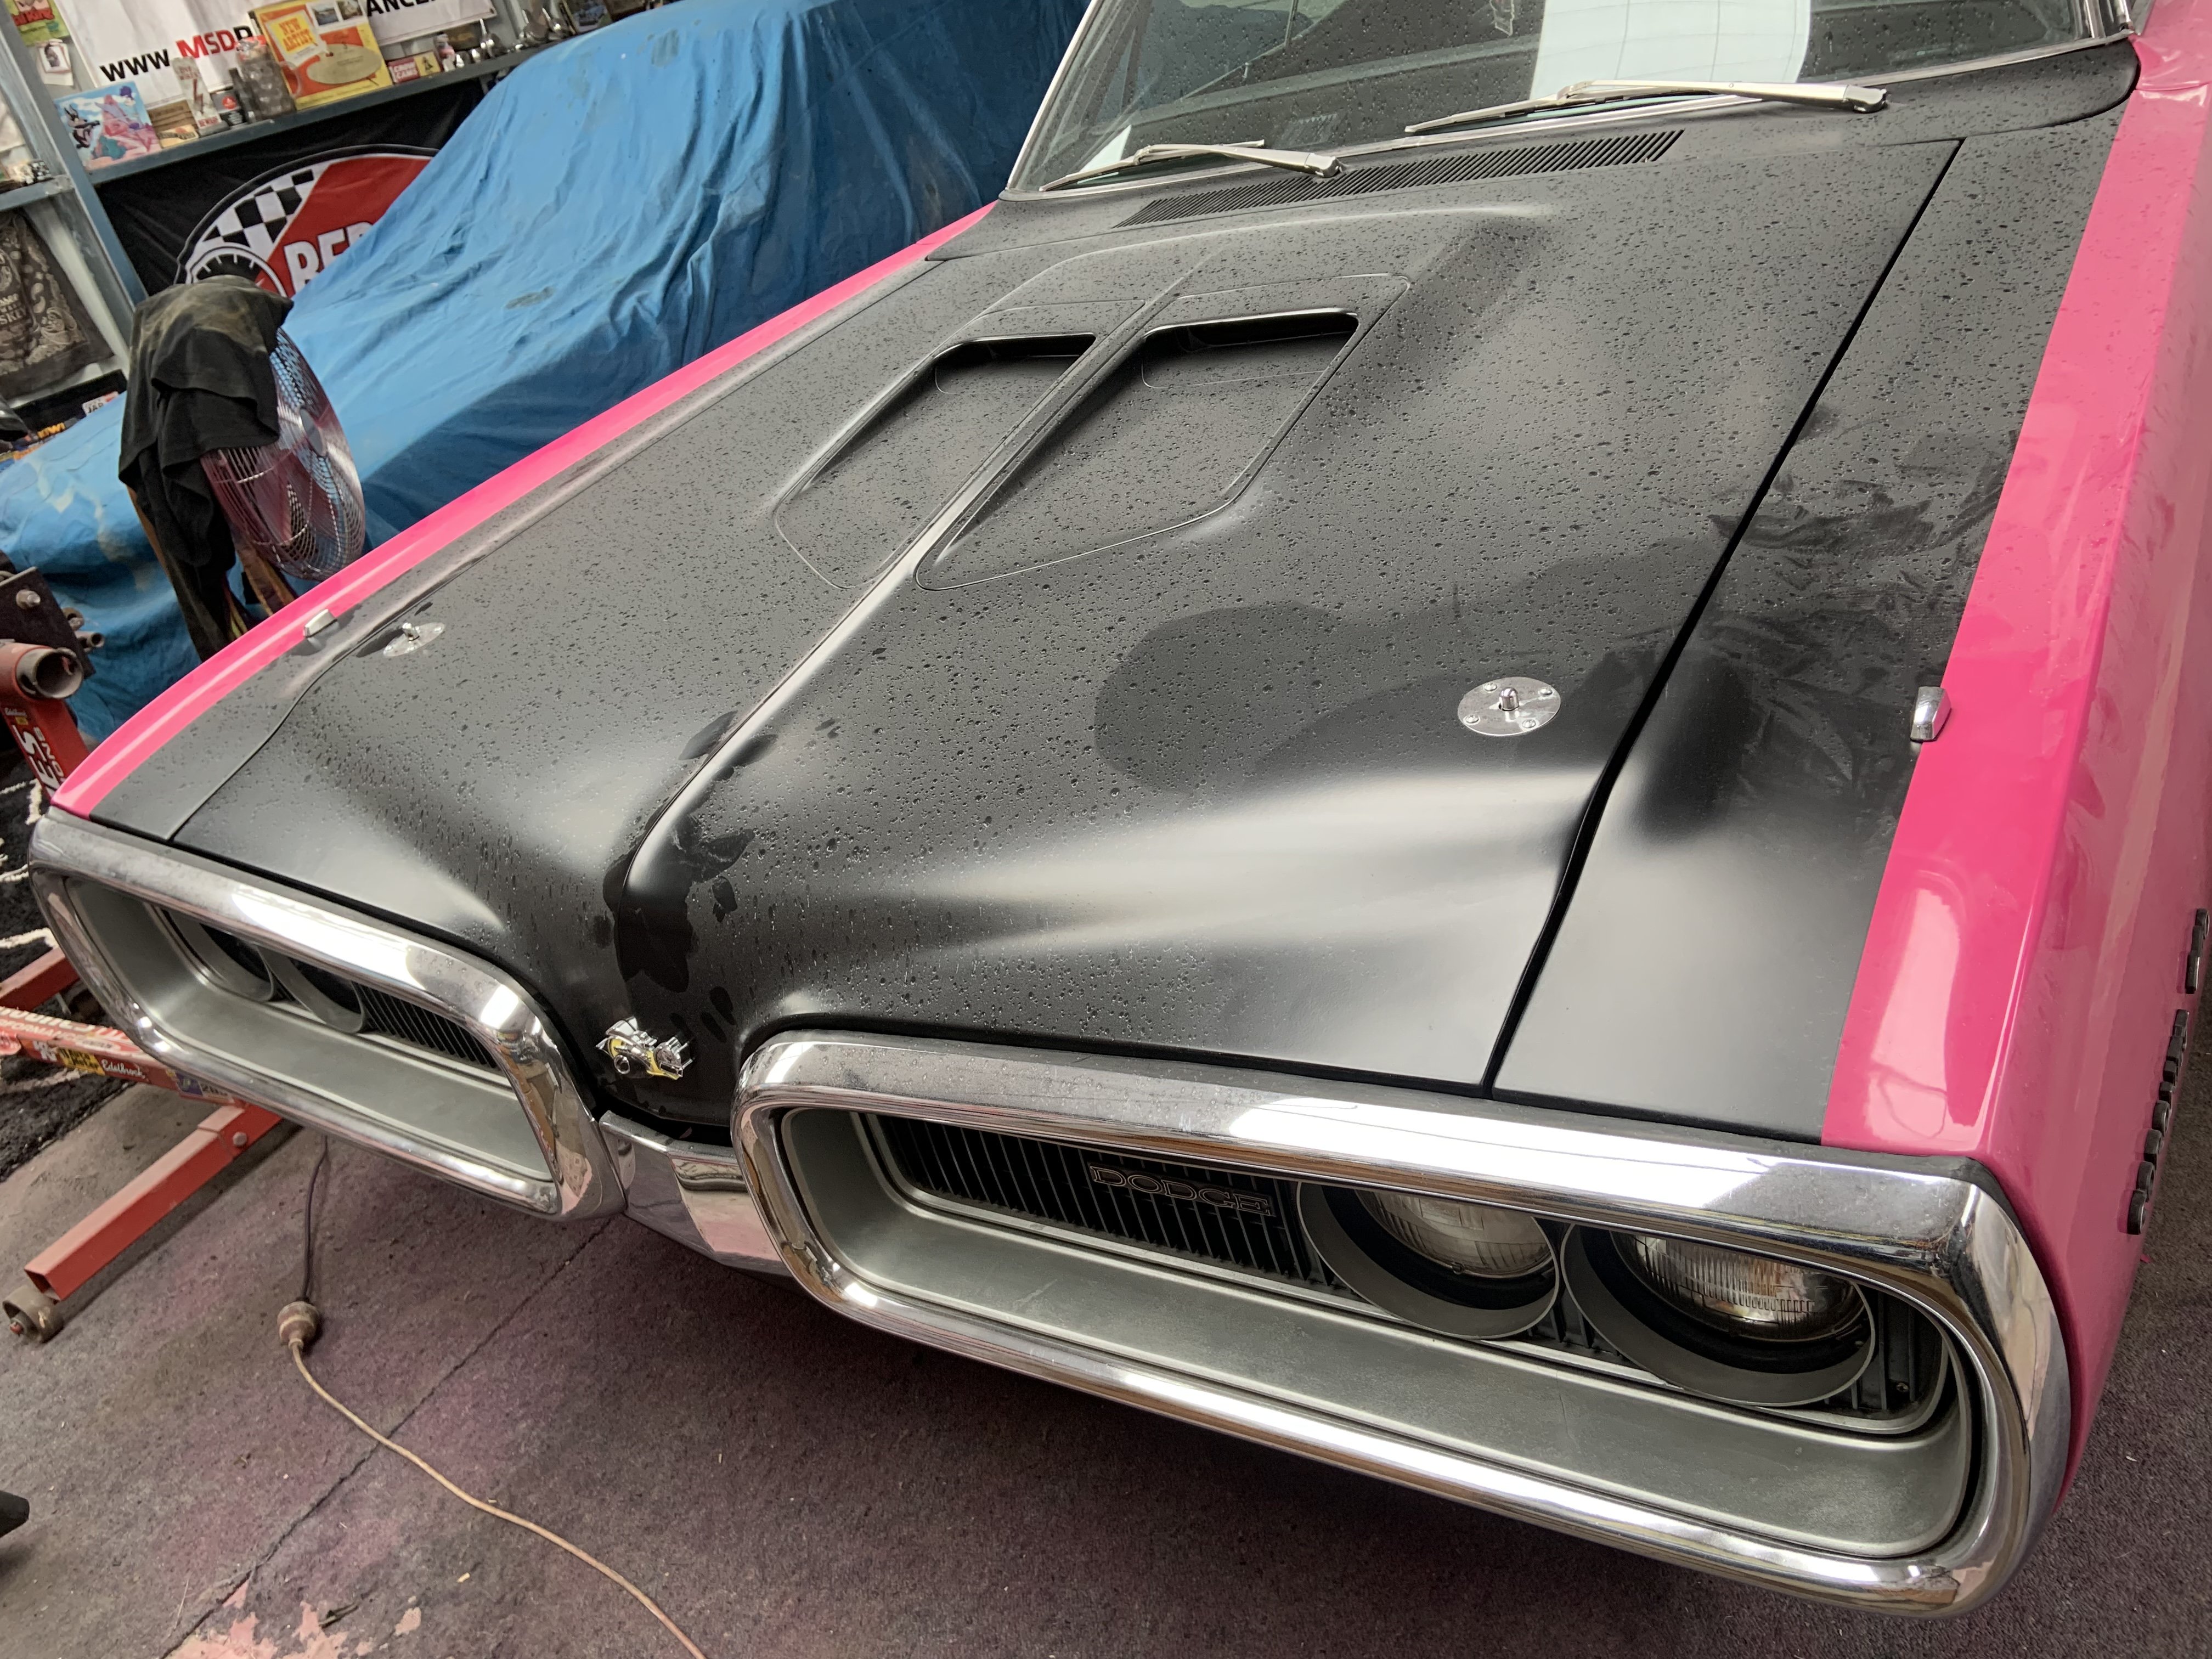
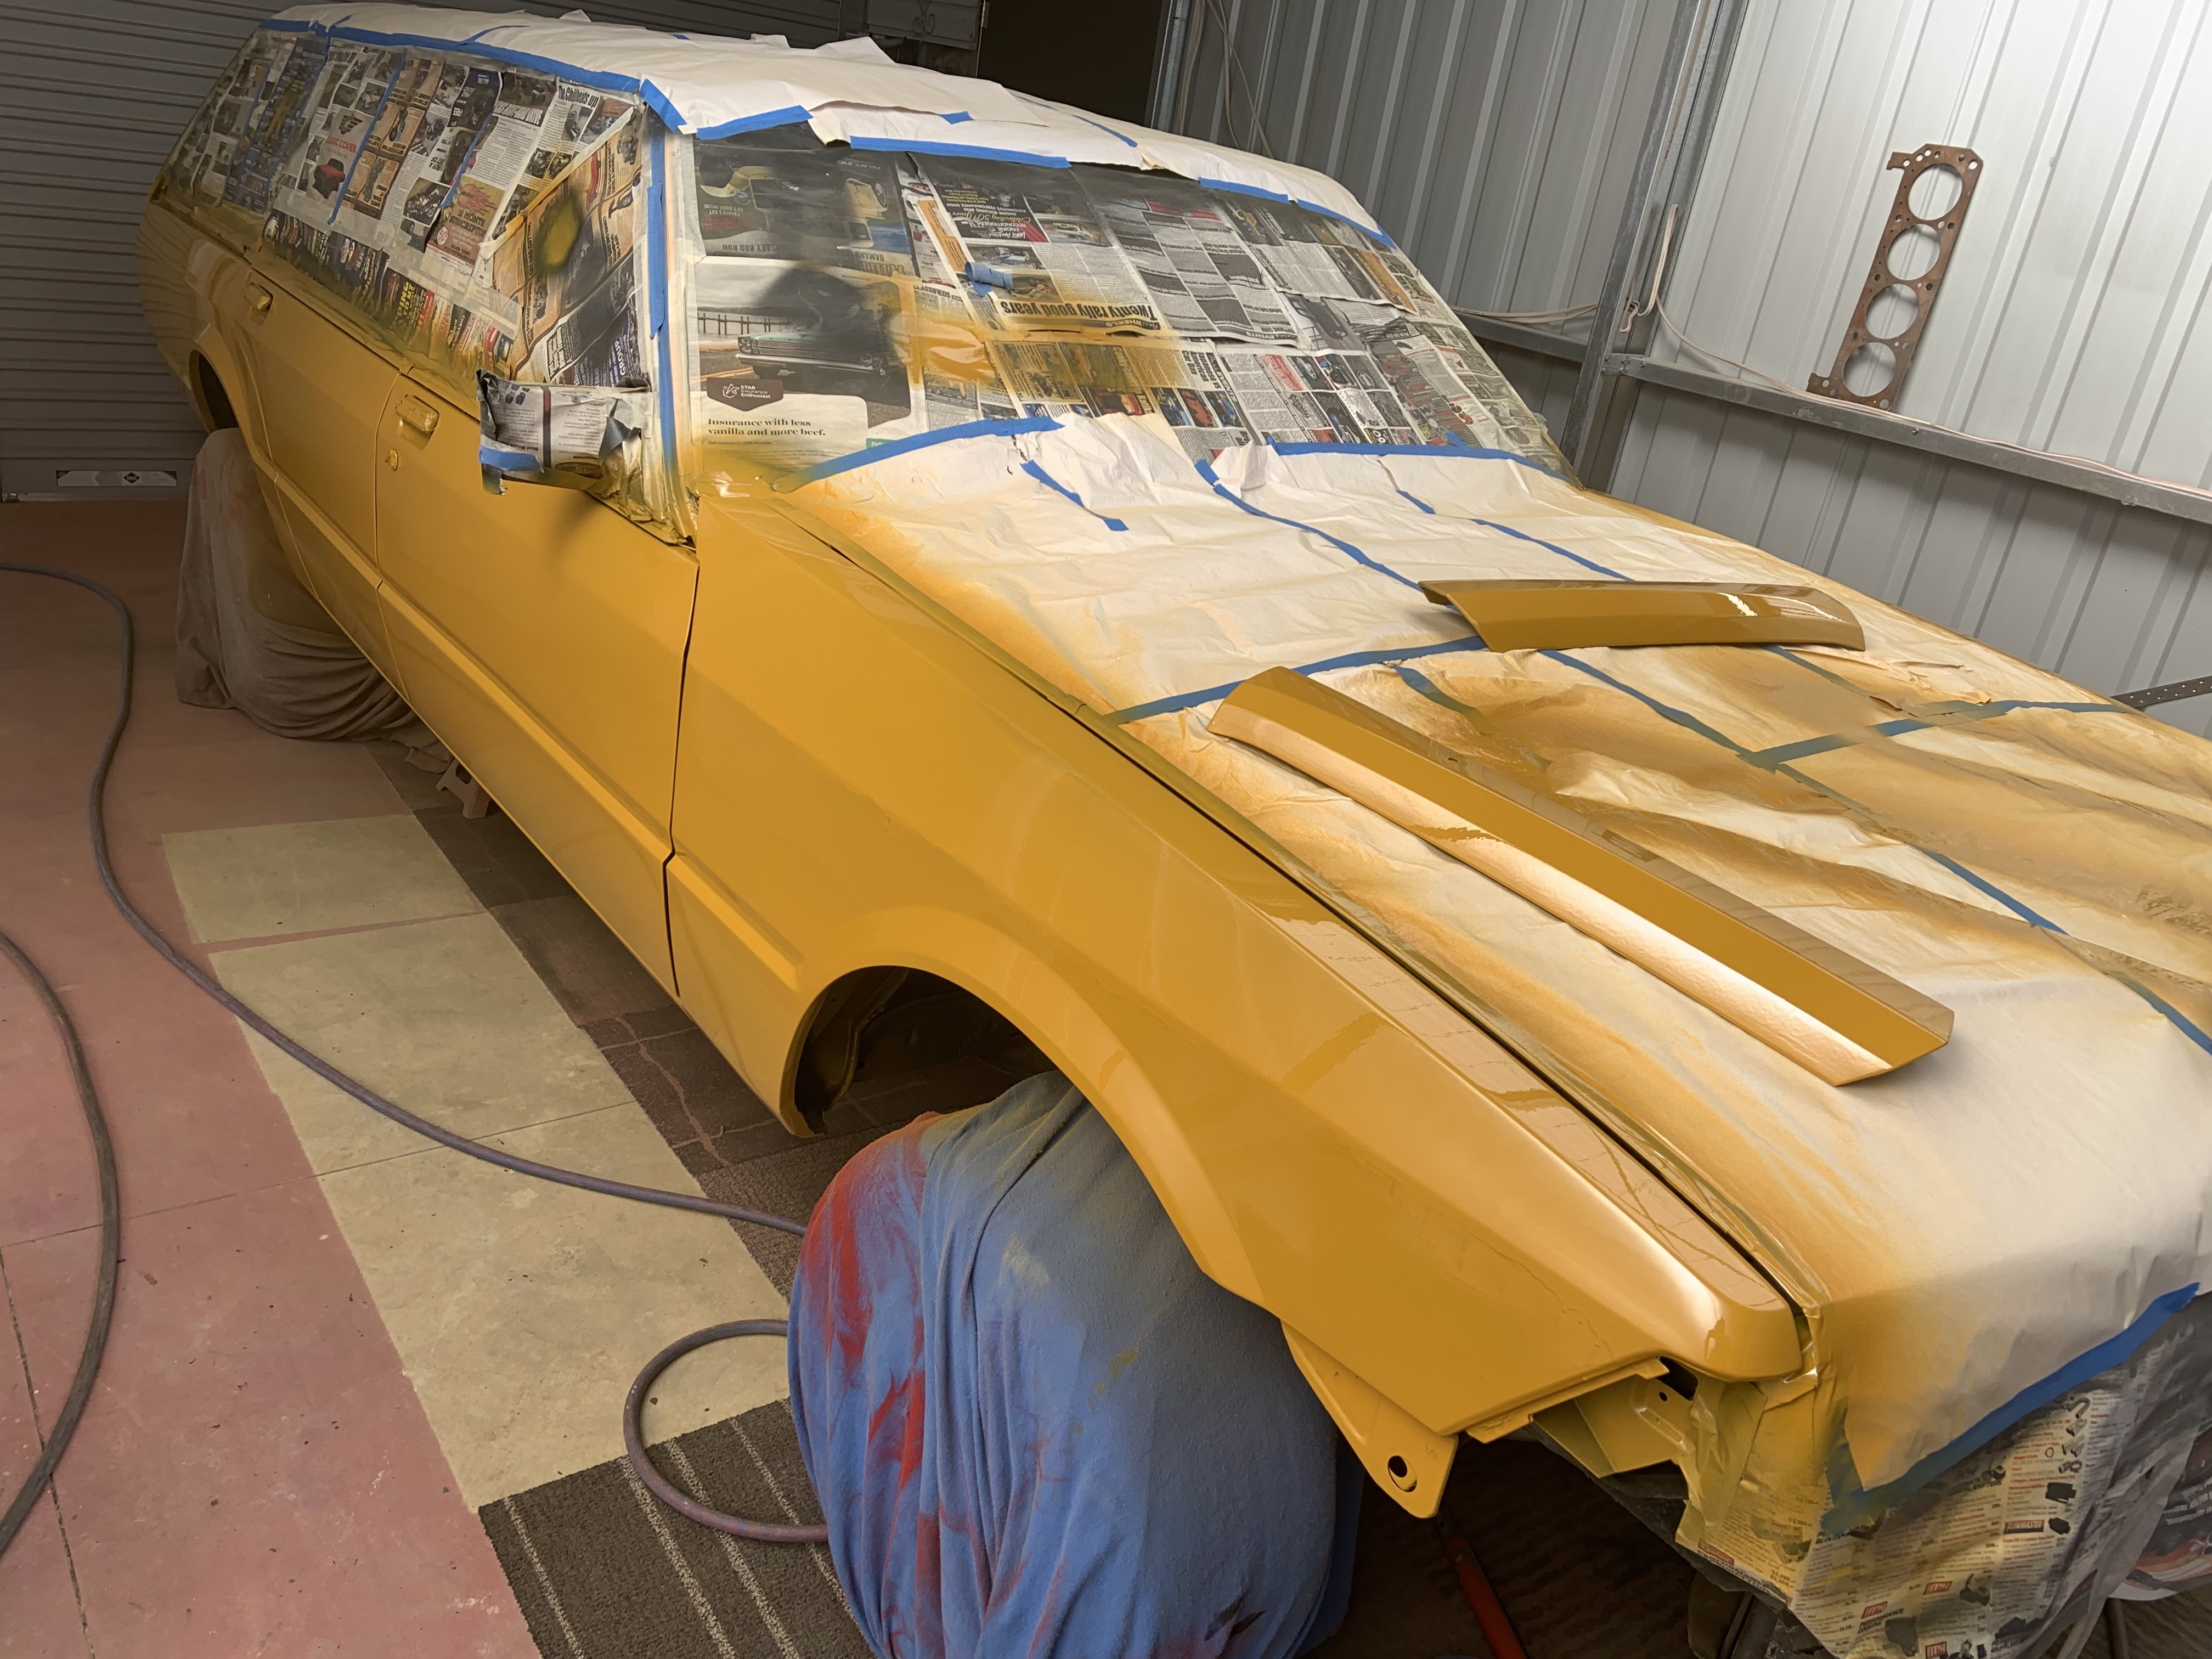
Well we got it rubbed back and I shot the base coat. Went terribly! I brought this metalux paint when I did the Datsun, and the red was transparent as fuck. Yellow being yellow, I thought oh hell, I’m in trouble. A mate had a tin of mustard yellow so I was all on to bash down the mustard then the topcoat would cover easier. My ground coat was too heavy so it ran, then a heap of fisheyes appeared. Must have come from the wax & grease rag or the last minute latex gloves I used from a hair dye set. Pretty fucked off, but glad I’d decided to mask the roof, hatch and bonnet so I could minimise overspray and have more control by doing those secondary. I was planning to wet-on-wet the base then the topcoat. was looking forward to de-dusting the shed too but I guess that has to wait!
4 points
-
I get poo-pood a bit for using Ryobi, but goddam I have put mine through some decent abuse and they still keep going. Yet to have a hub bolt the impact hasn't removed. Hell, my folding light has lost various bits of its casing from being dropped, kicked, covered in welding spatter etc, and it still goes hard. A+ would trade again for the money.4 points
-
ok ok, heres an update3 points
-
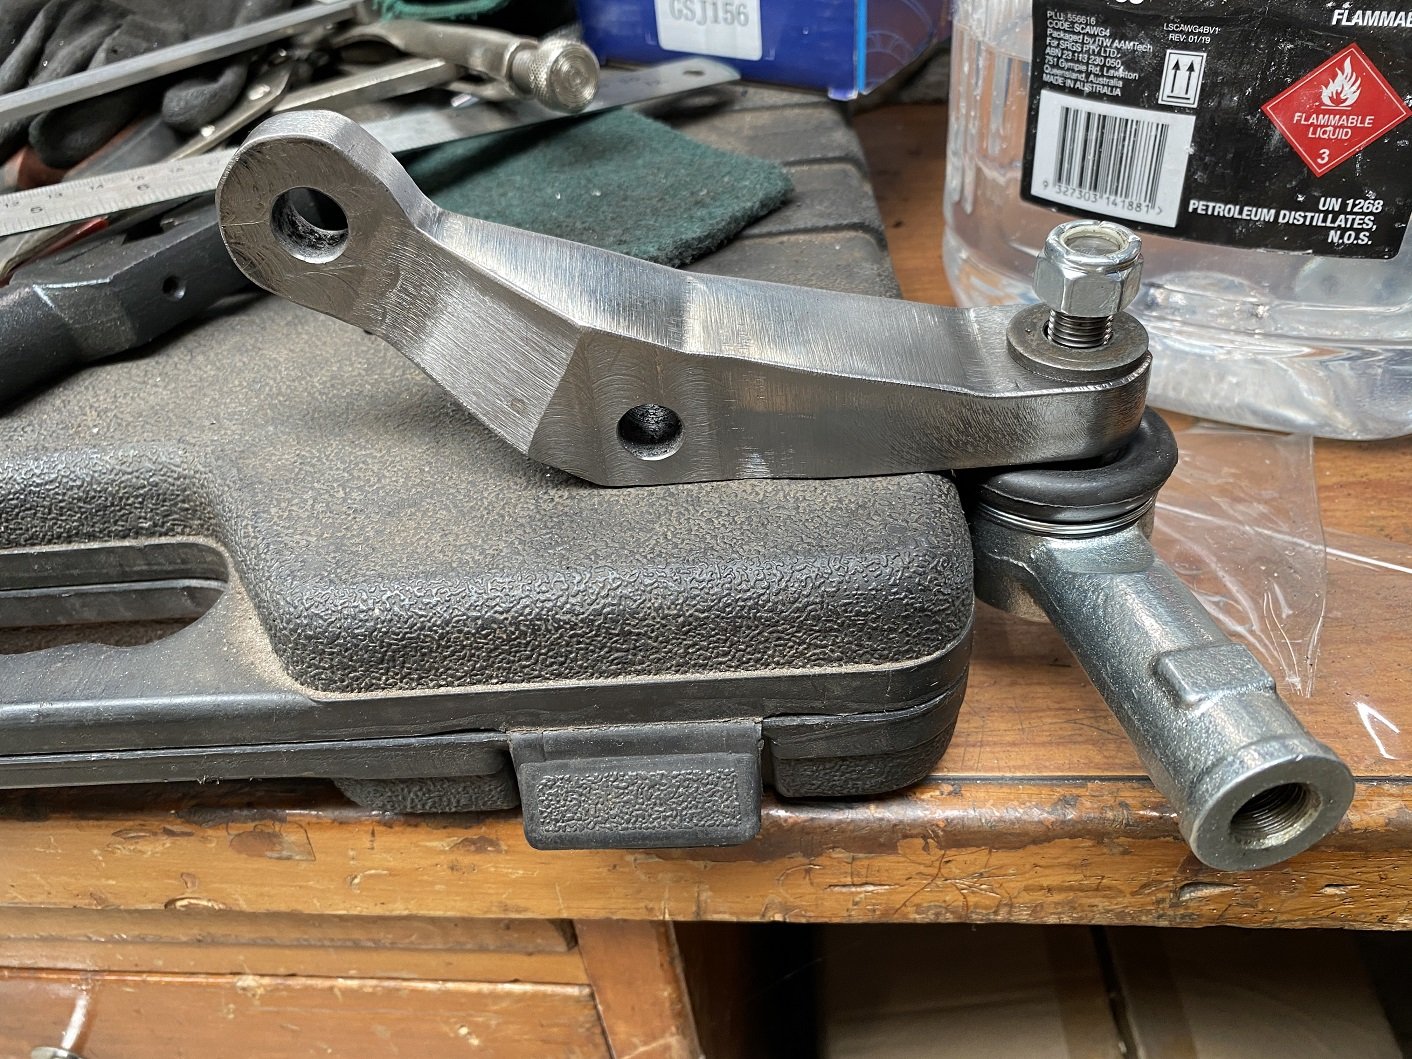
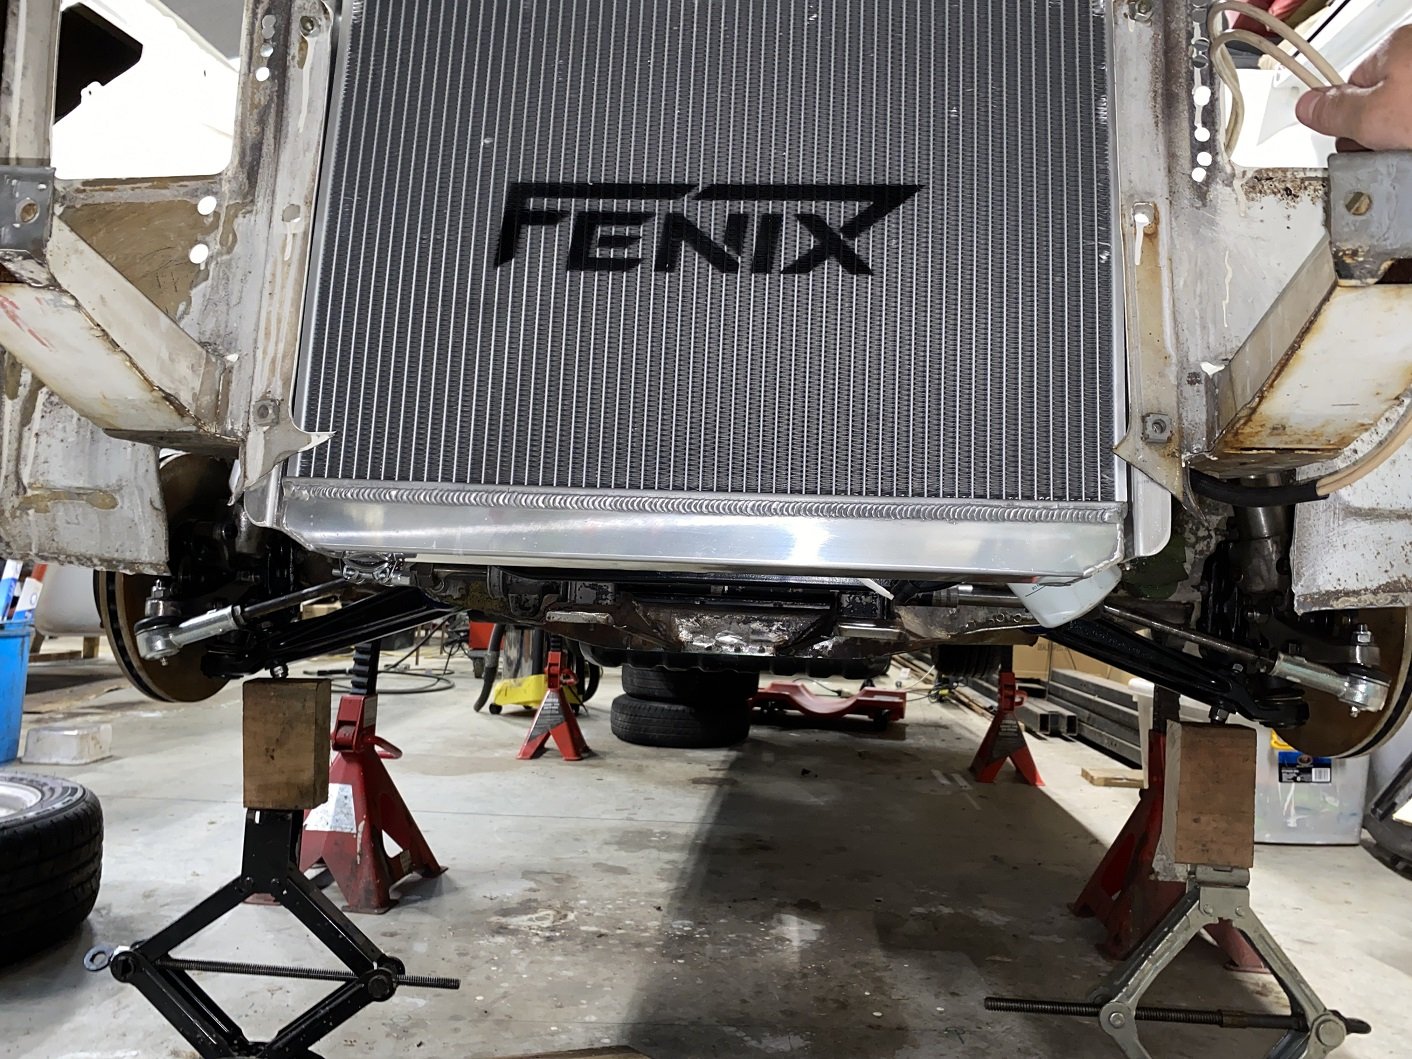
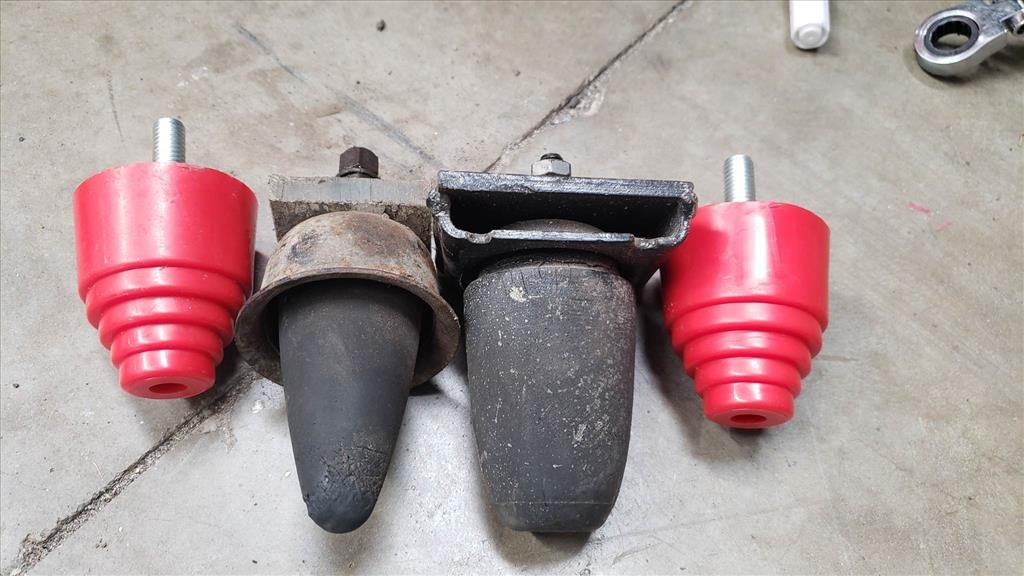
And the right side one is finished! It also fits! Both installed. This would be where full droop needs to be, any lower and the inner tie rod ball joint binds. There's another 60mm of travel to get to ride height. I guess I need to sort out doing a bump test now.
3 points
-
The benefit looks to be that it's made as cheaply as possible3 points
-
Motoring writer Harry Metcalfe just completed the build of a V12 Jaguar XJC with a manual conversion. His V12 originally ran the early injection system which was problematic and daft*, so the car's now converted to an aftermarket ECU and later Jag injection from the 6.0 V12s. He's also running a shorter diff. With a couple of intake and exhaust mods and dyno tuning, the rebuilt standard engine makes ~350hp. *the original system apparently simultaneously fires the injectors on groups of 3 adjacent cylinders, which would be at different points in the combustion cycle. I guess it just fires the injector group multiple times, so each cylinder gets fuel during its intake stroke. No wonder the fuel economy was terrible.3 points
-
Amazing how this has come out in the end. It looks like putting the new engine in was well worth the effort and the stress of the crap situation ended up being only a blip in the grand scheme.3 points
-
In its new home And test fit confirms with the M/T bracket the CF lid now works
3 points
-
3 points
-
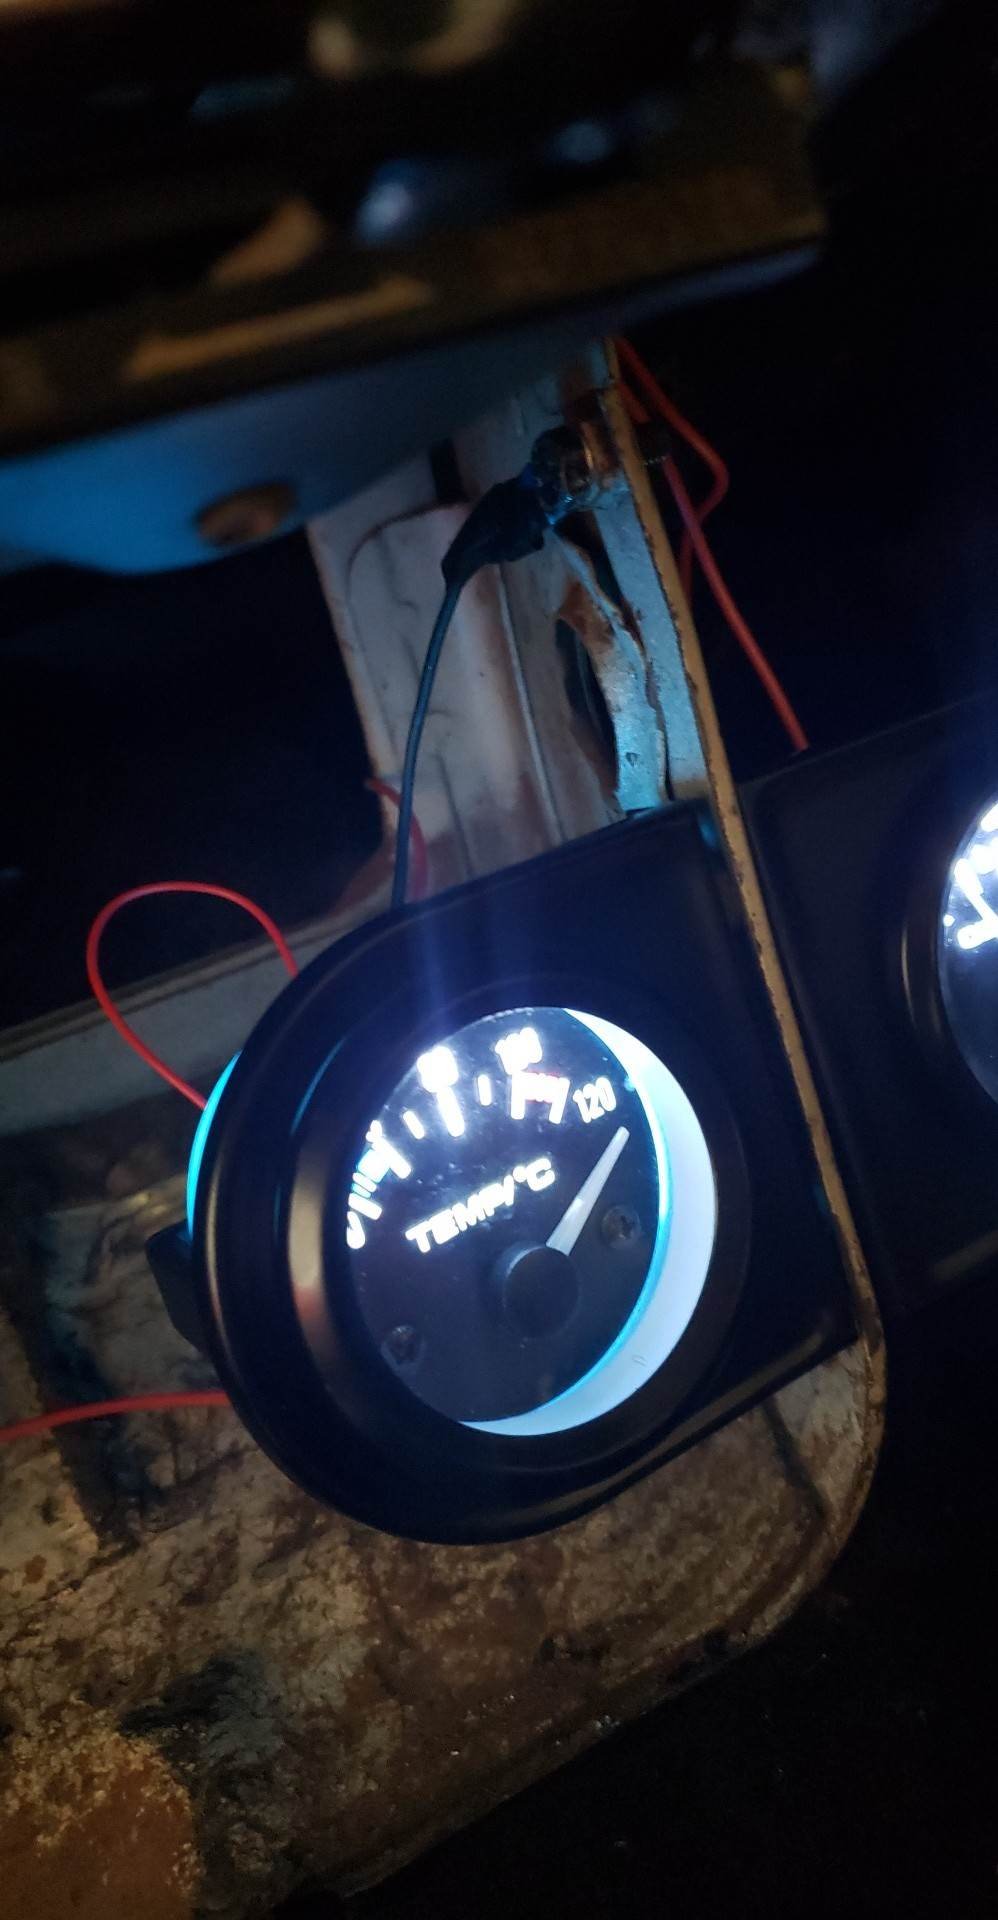
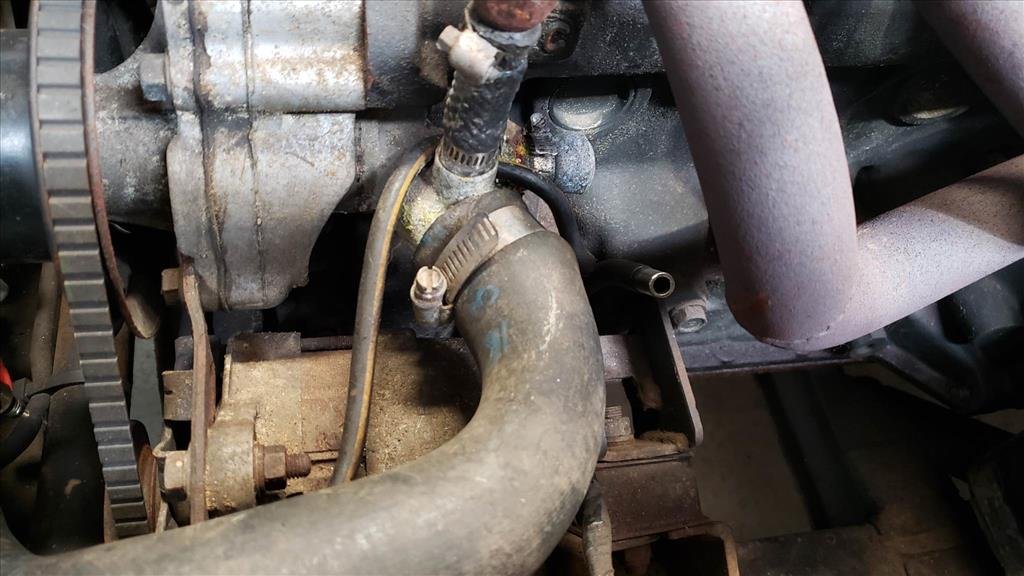
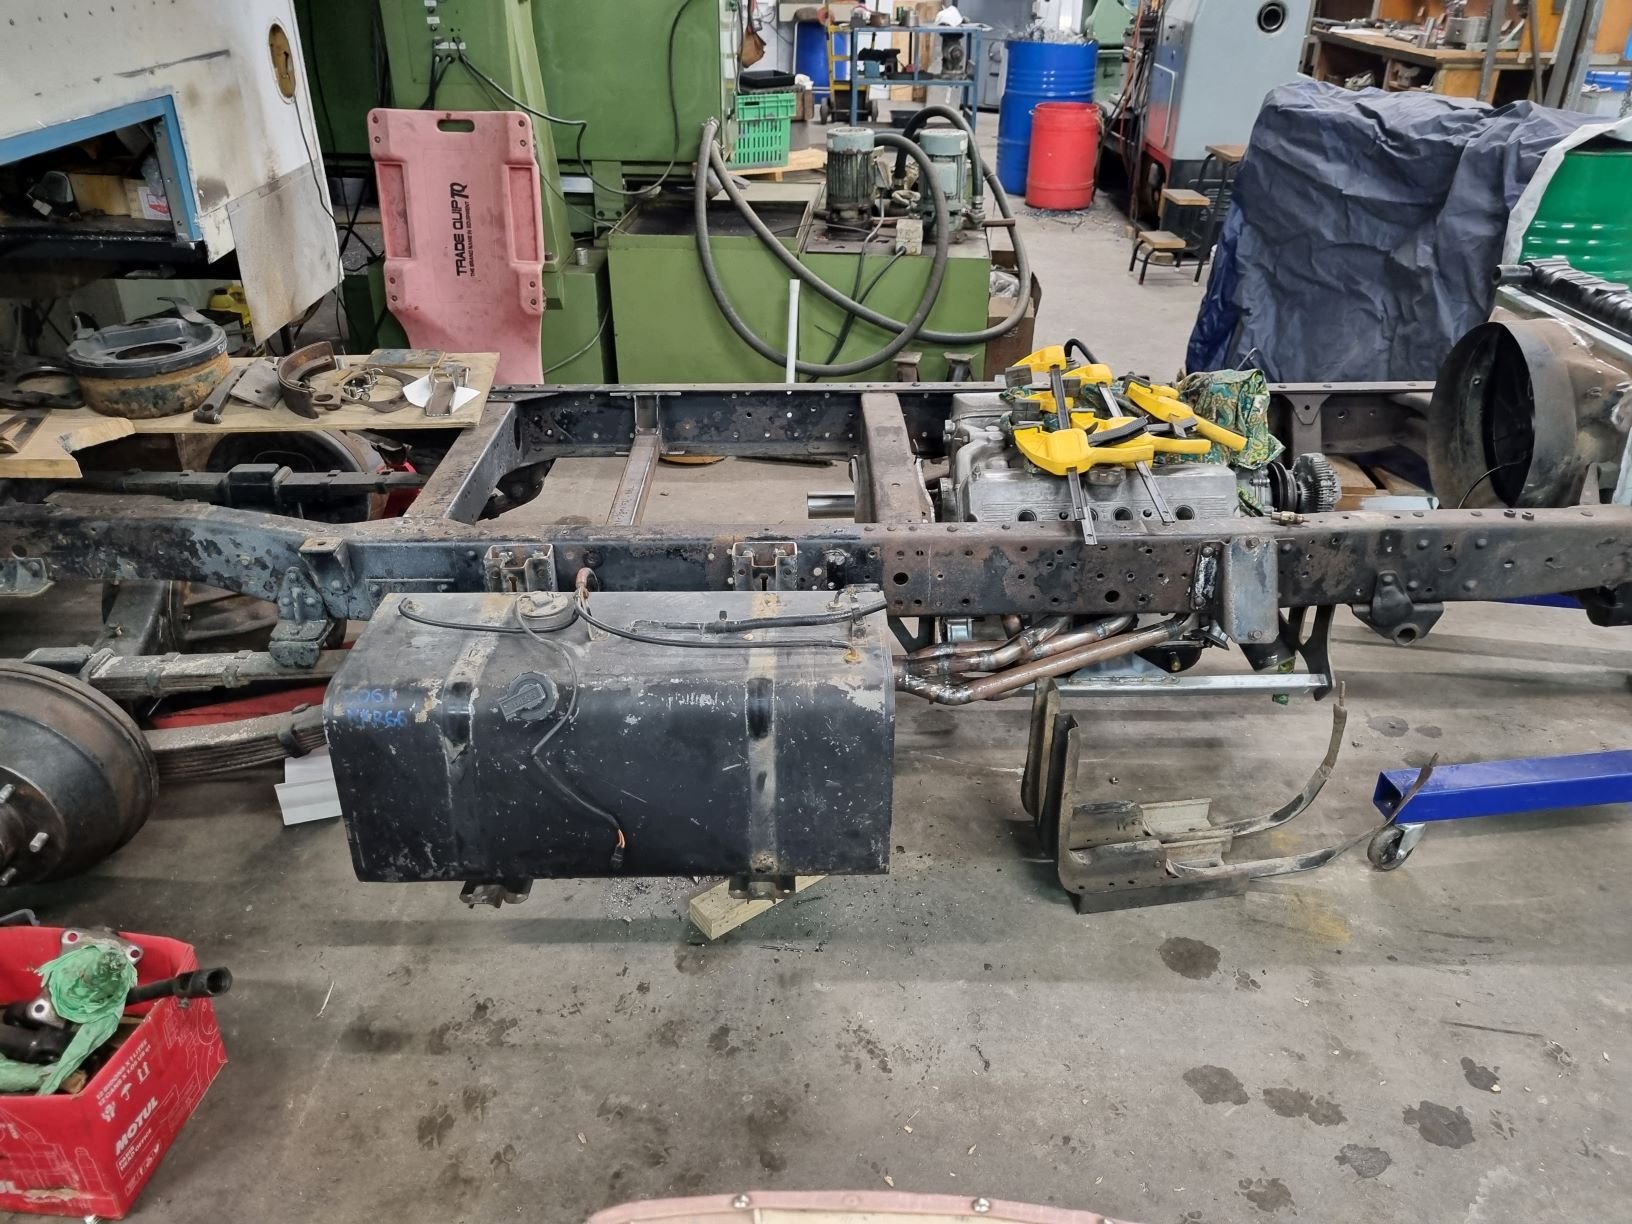
A few items arrived last week to get some more jobs ticked off on Barry's list. Actually neither of these things were even on the list I made but you know how it goes.. start doing something then you see something else you want to do then rinse and repeat. First up was to get that water temperature gauge connected. After draining the fluid out I was able to just swap out the Barry metal pipe that was there for the usual radiator hose adapter and that fits up nice, no leaks. Problem is when wired up the gauge goes flying to the maximum temperature. It even does that when it's not grounded so I can only thing that maybe there's a short somewhere or the sender is broken or something. I think the only way I'll be able to test it is to take it out and put it in some hot water or something and see. The reason I'm not scared of it actually being over 120 degrees is the second job of the day, which was actually the first. A friend of mine noted that I didn't have the fan relay actually powered so that was a simple job with some terrible wiring and crimping. I idled the car up and it turned on so we can presume that it isn't getting overly hot as the fan does turn off again. I don't know what was going through the mind of Barry when this wiring setup was done. I tried to undo the bolt to re-route the wire but it seems fairly well rounded so seems like the solution will be to pull the hose but I don't want to do that just at the moment until I take off that sensor for the gauge which will happen sometime in the future. Previously I mentioned that our shifter bushes were gone so these are the replacement items. Left is what came out, right is what is in the kit. This kit is for a whole bunch of Mazda RWD gearboxes so not all of the bushes were needed for mine but I replaced a couple of busted/missing ones and the difference was amazing. Of course there are some different bolts for the top plate, because why wouldn't there be? Was snooping around and found some wiring hanging down on the exhaust so that's cool. Tucked that up out of the way. One of the other things that was bugging me was the rear bump stops. As you can see, they are not the same. The red ones I will replace them with are for a Hiace but the idea is the same, simply a stud through a hole. Problem is said hole on the car is smaller than said stud so it needs to be drilled out. Job for another day.
3 points
-
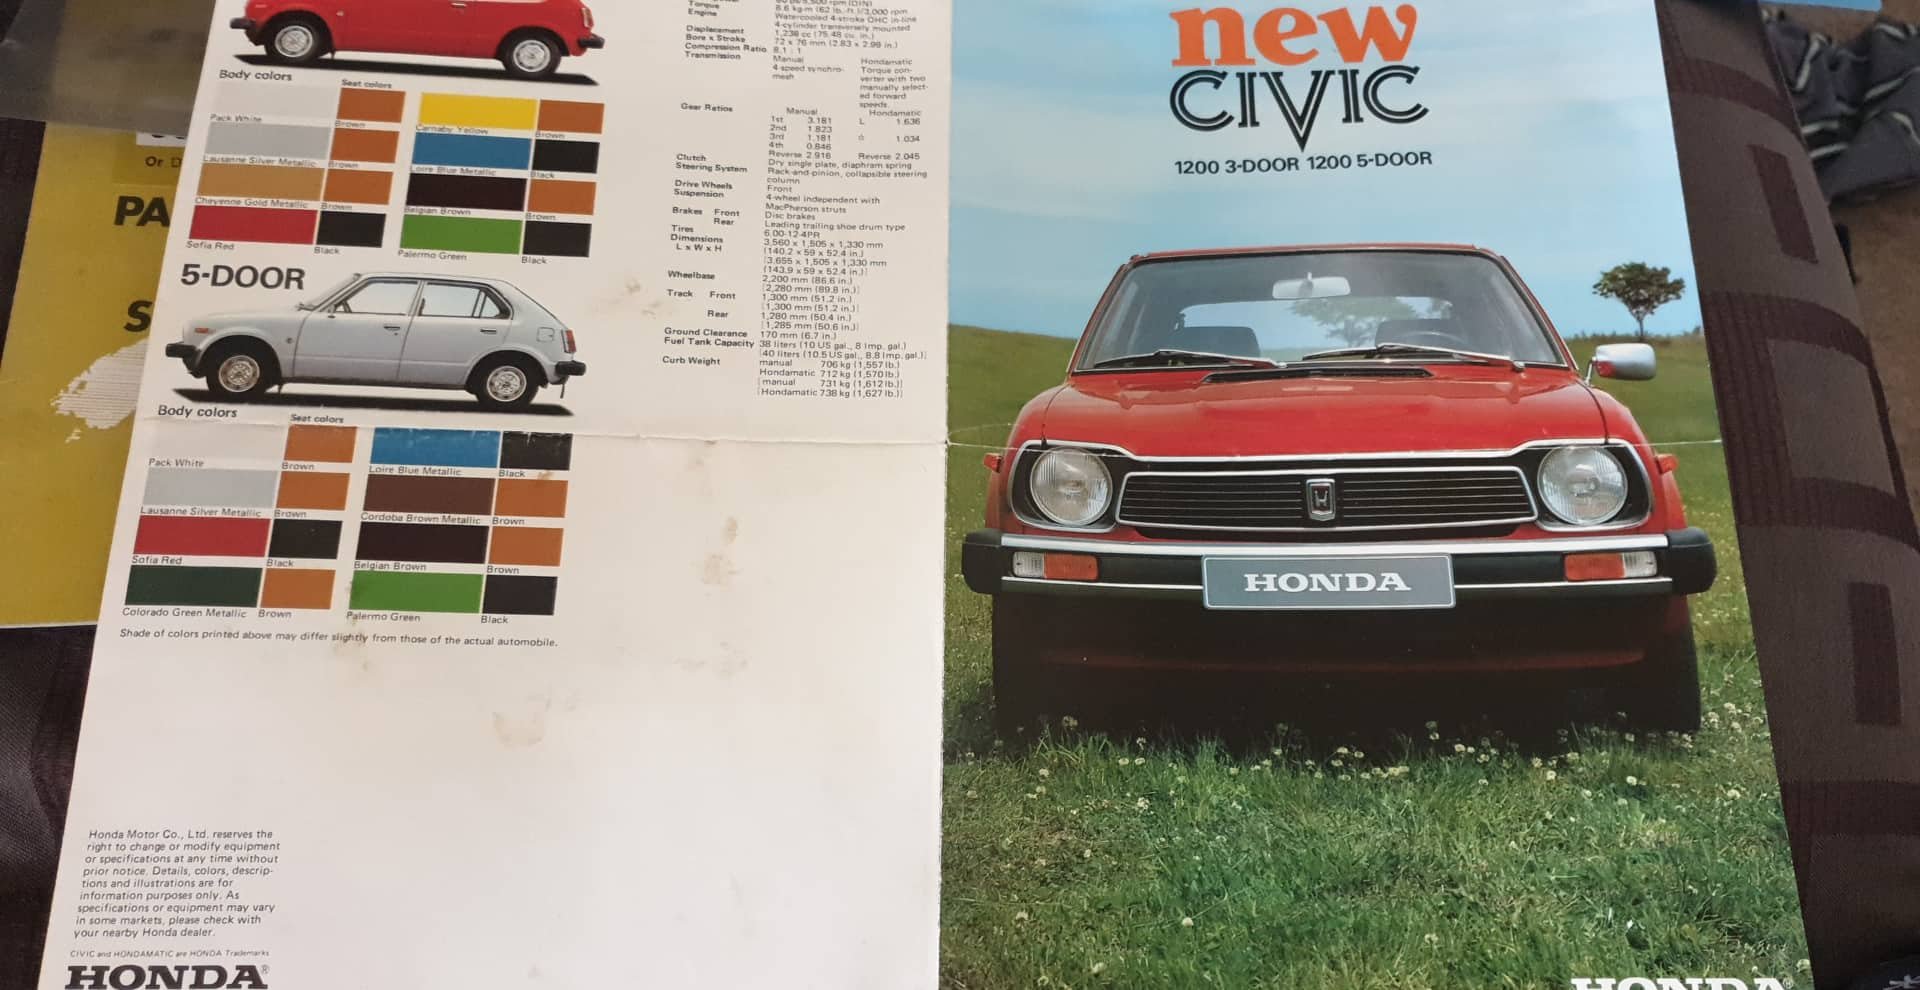
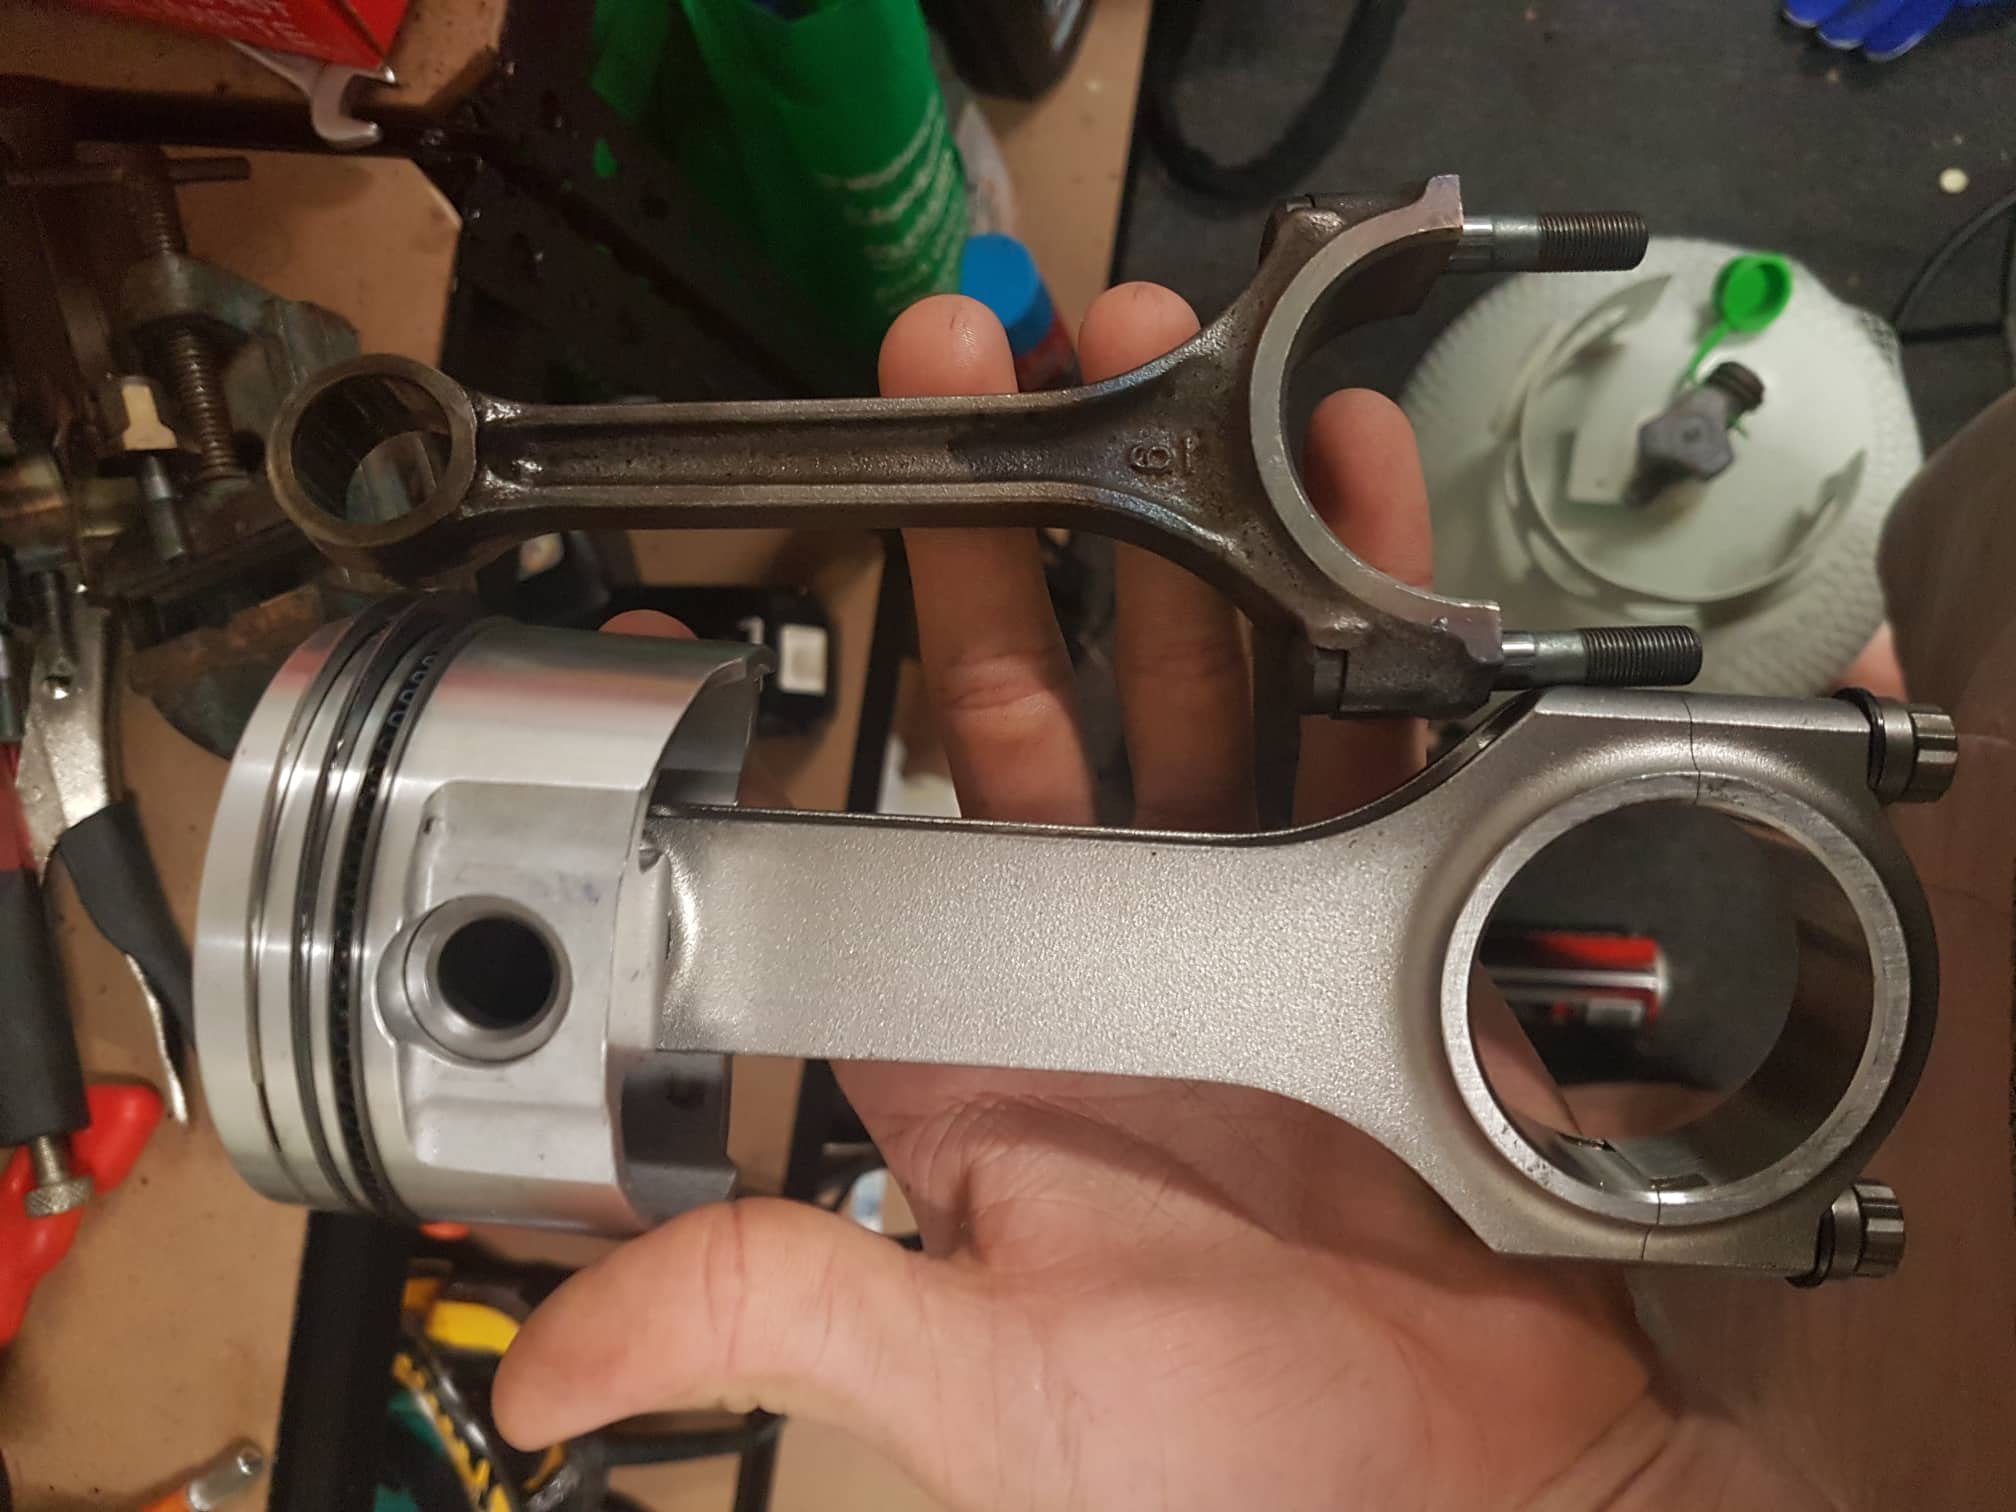
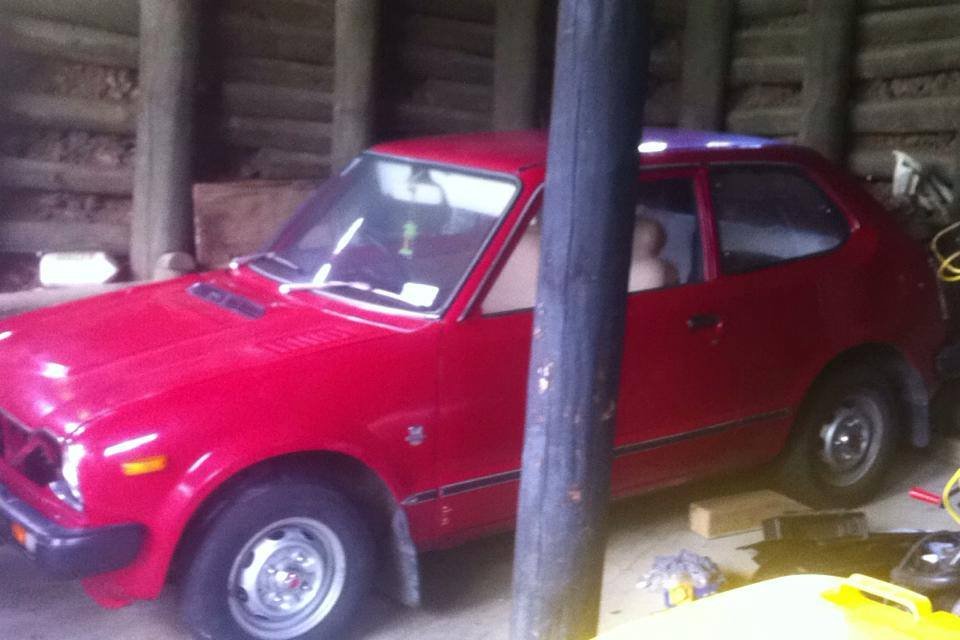
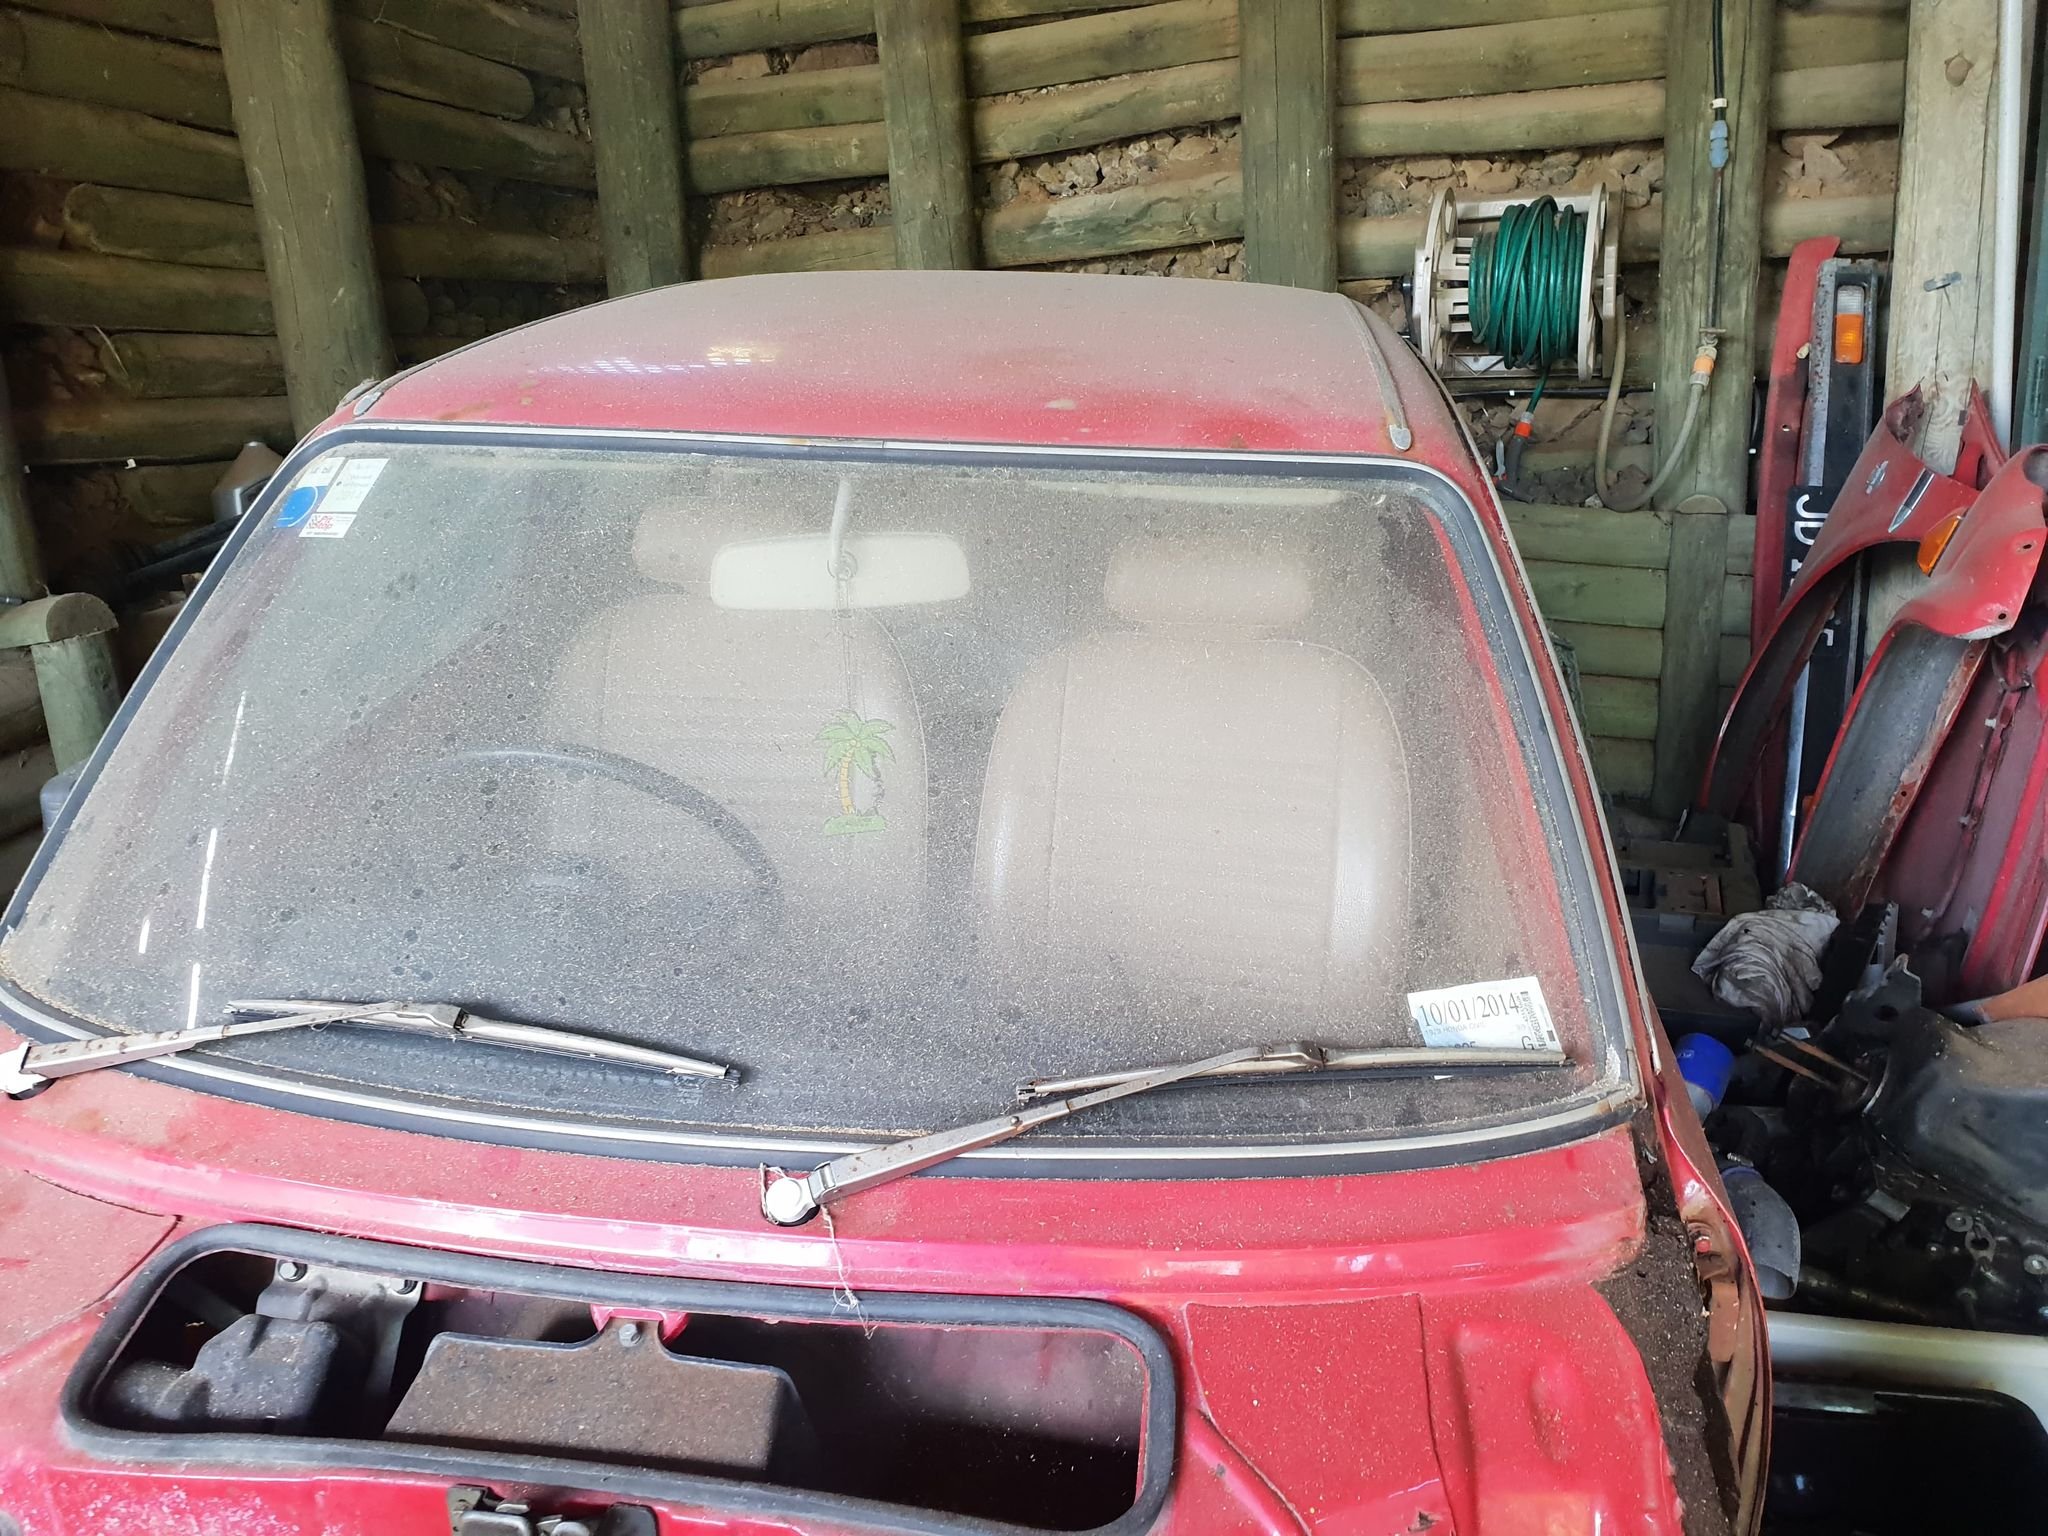
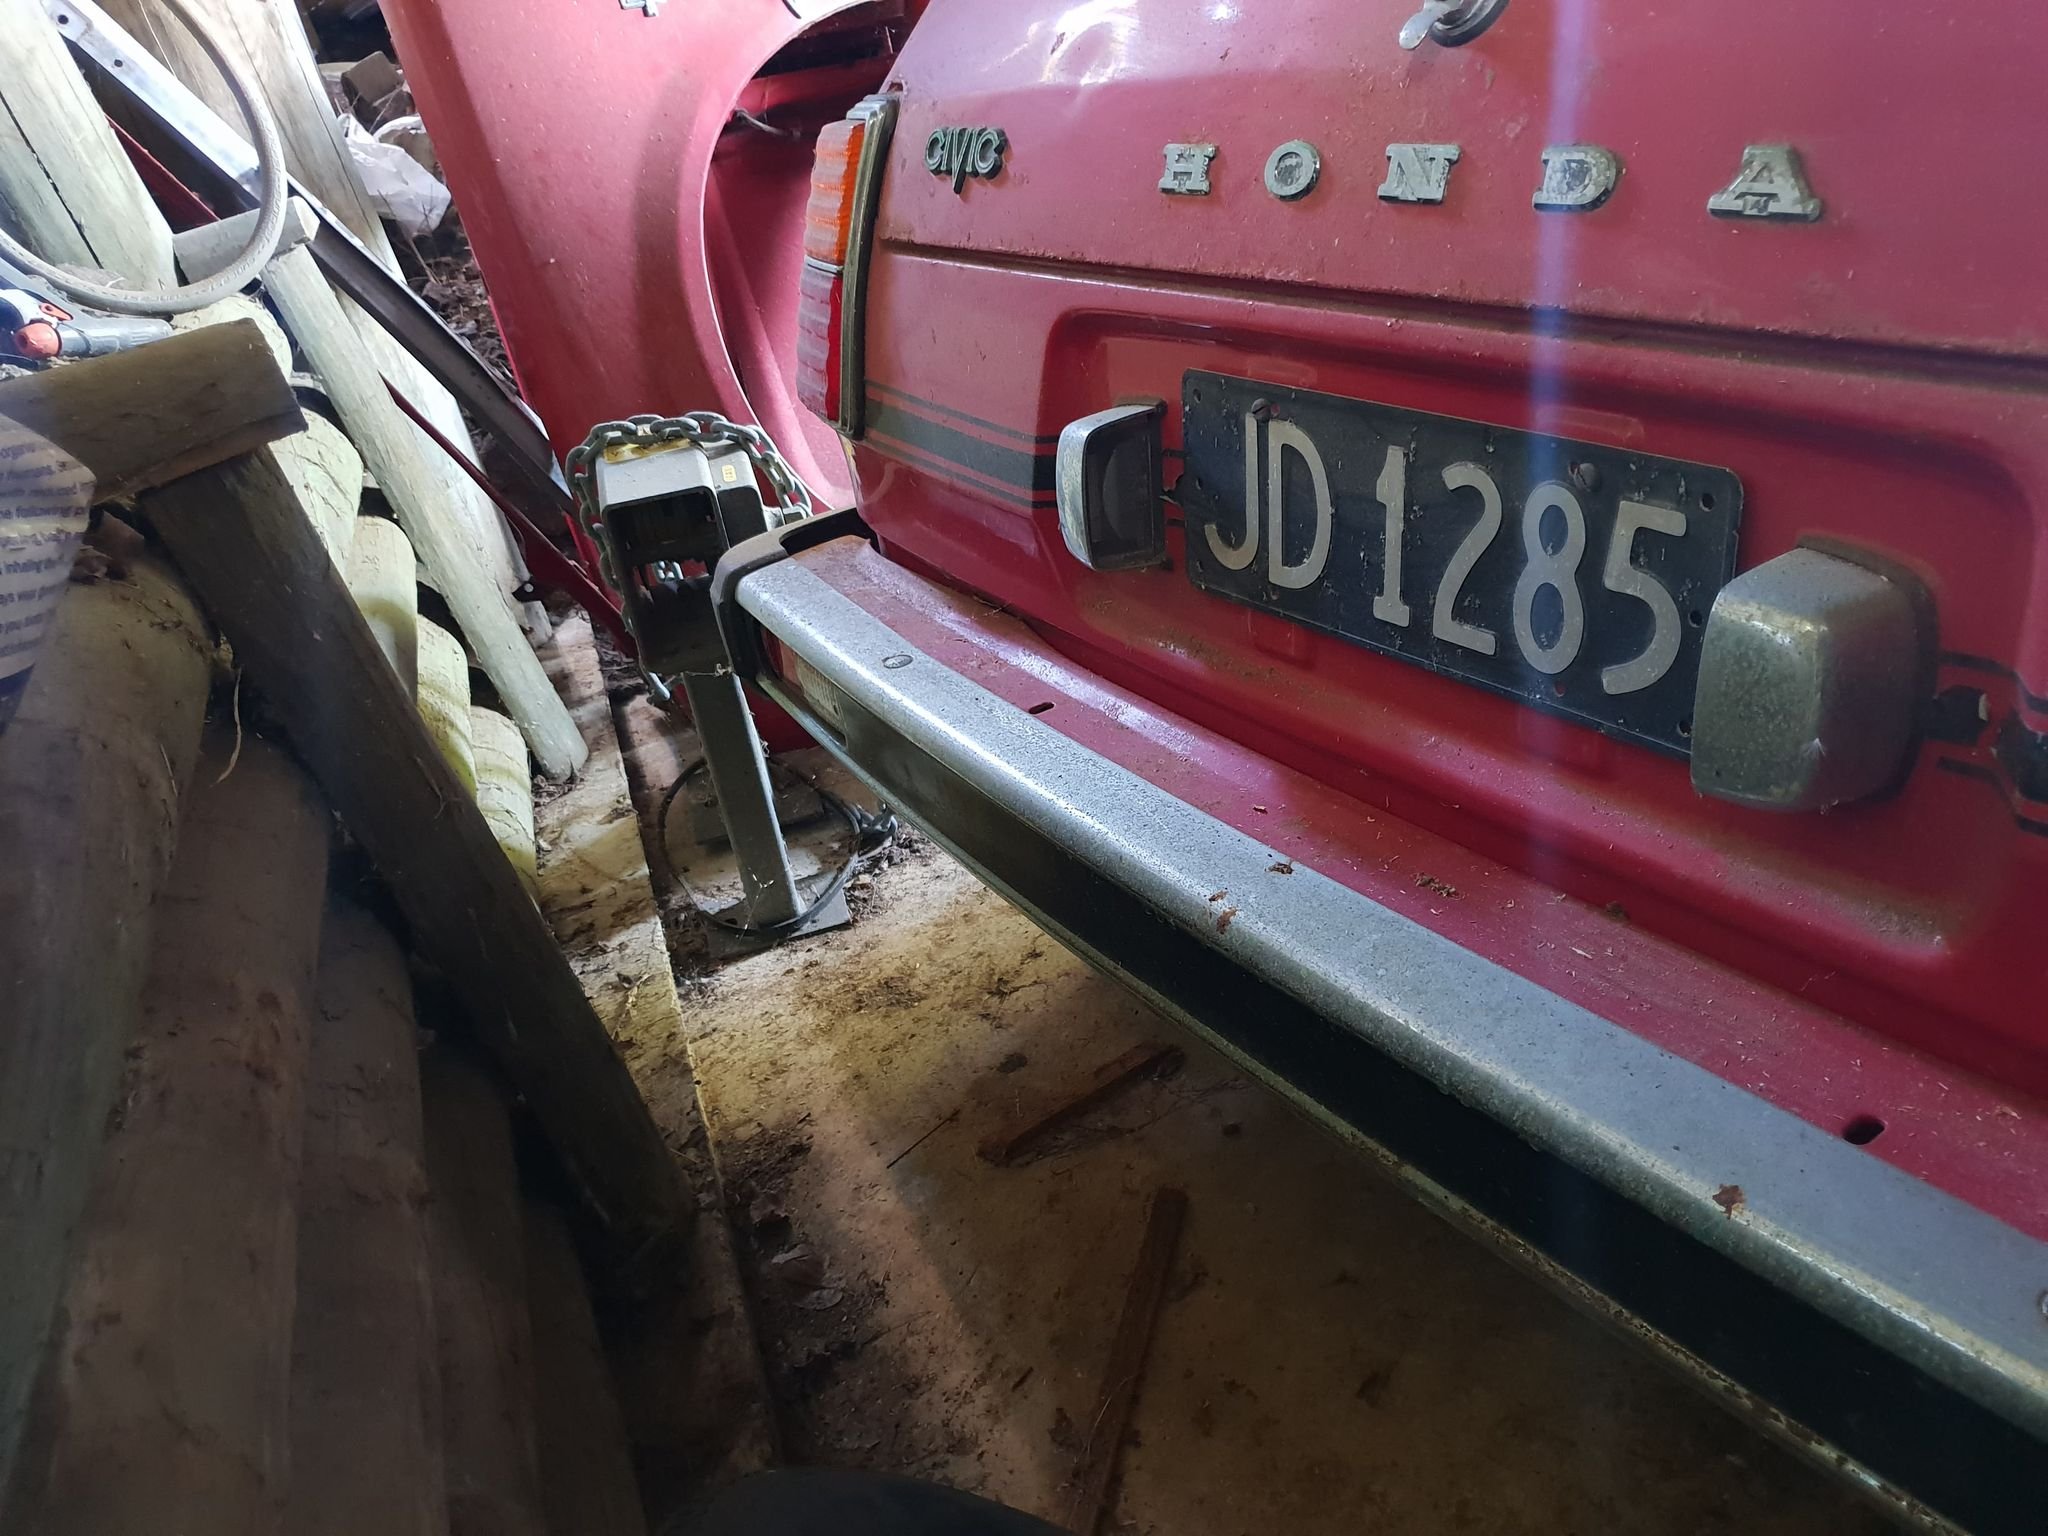
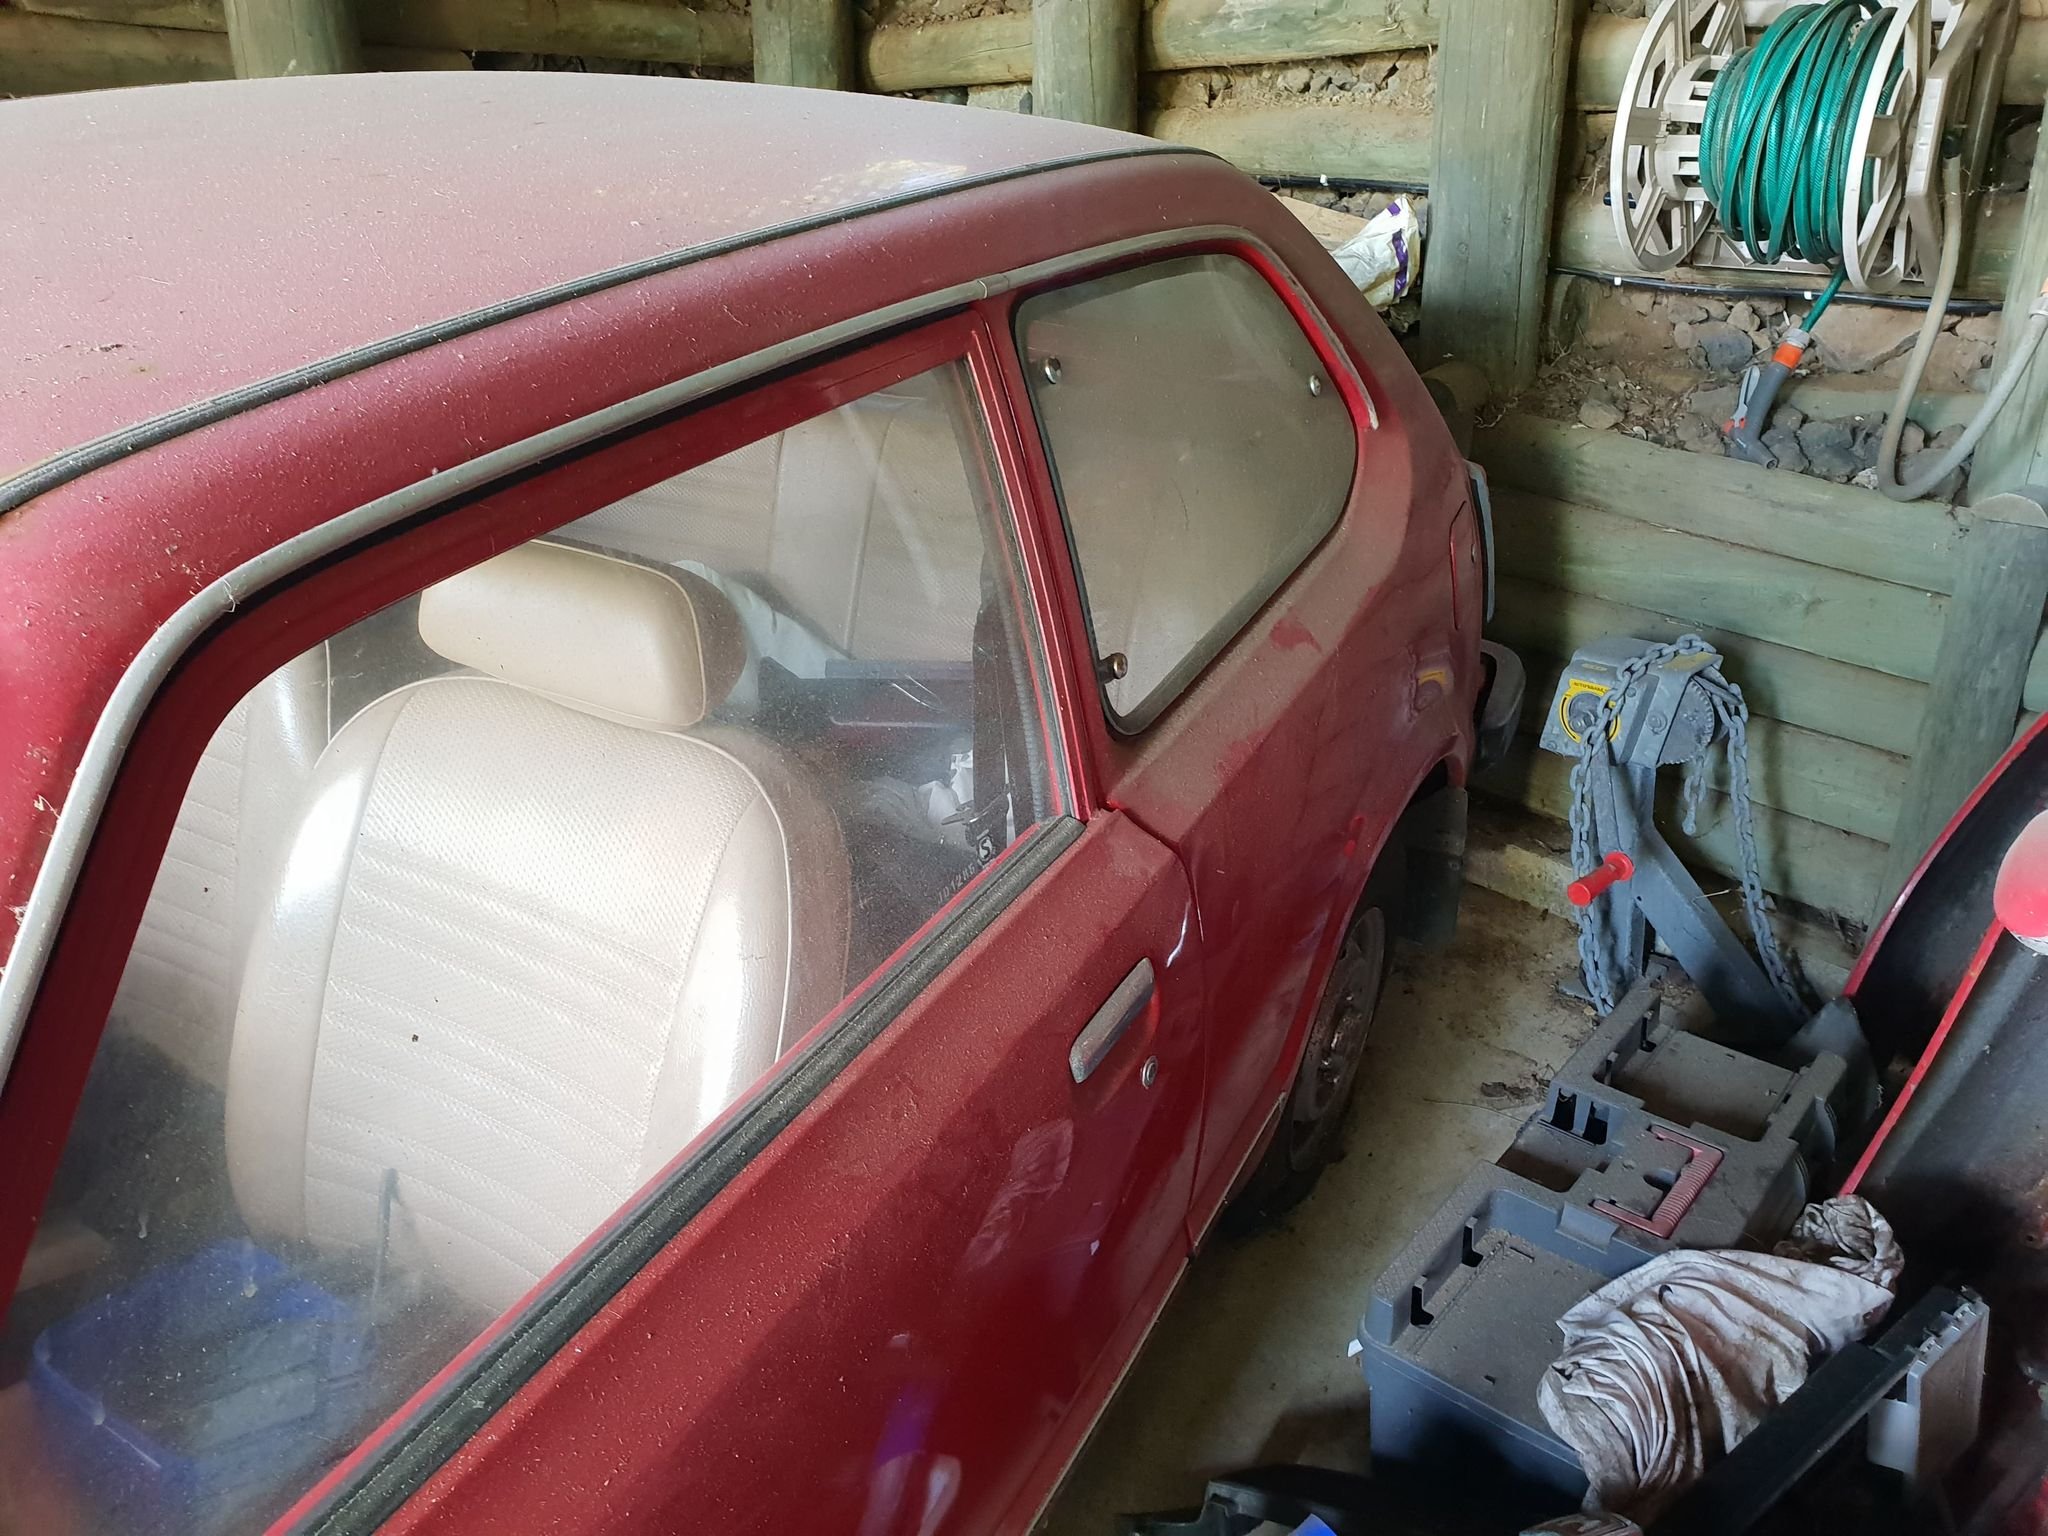
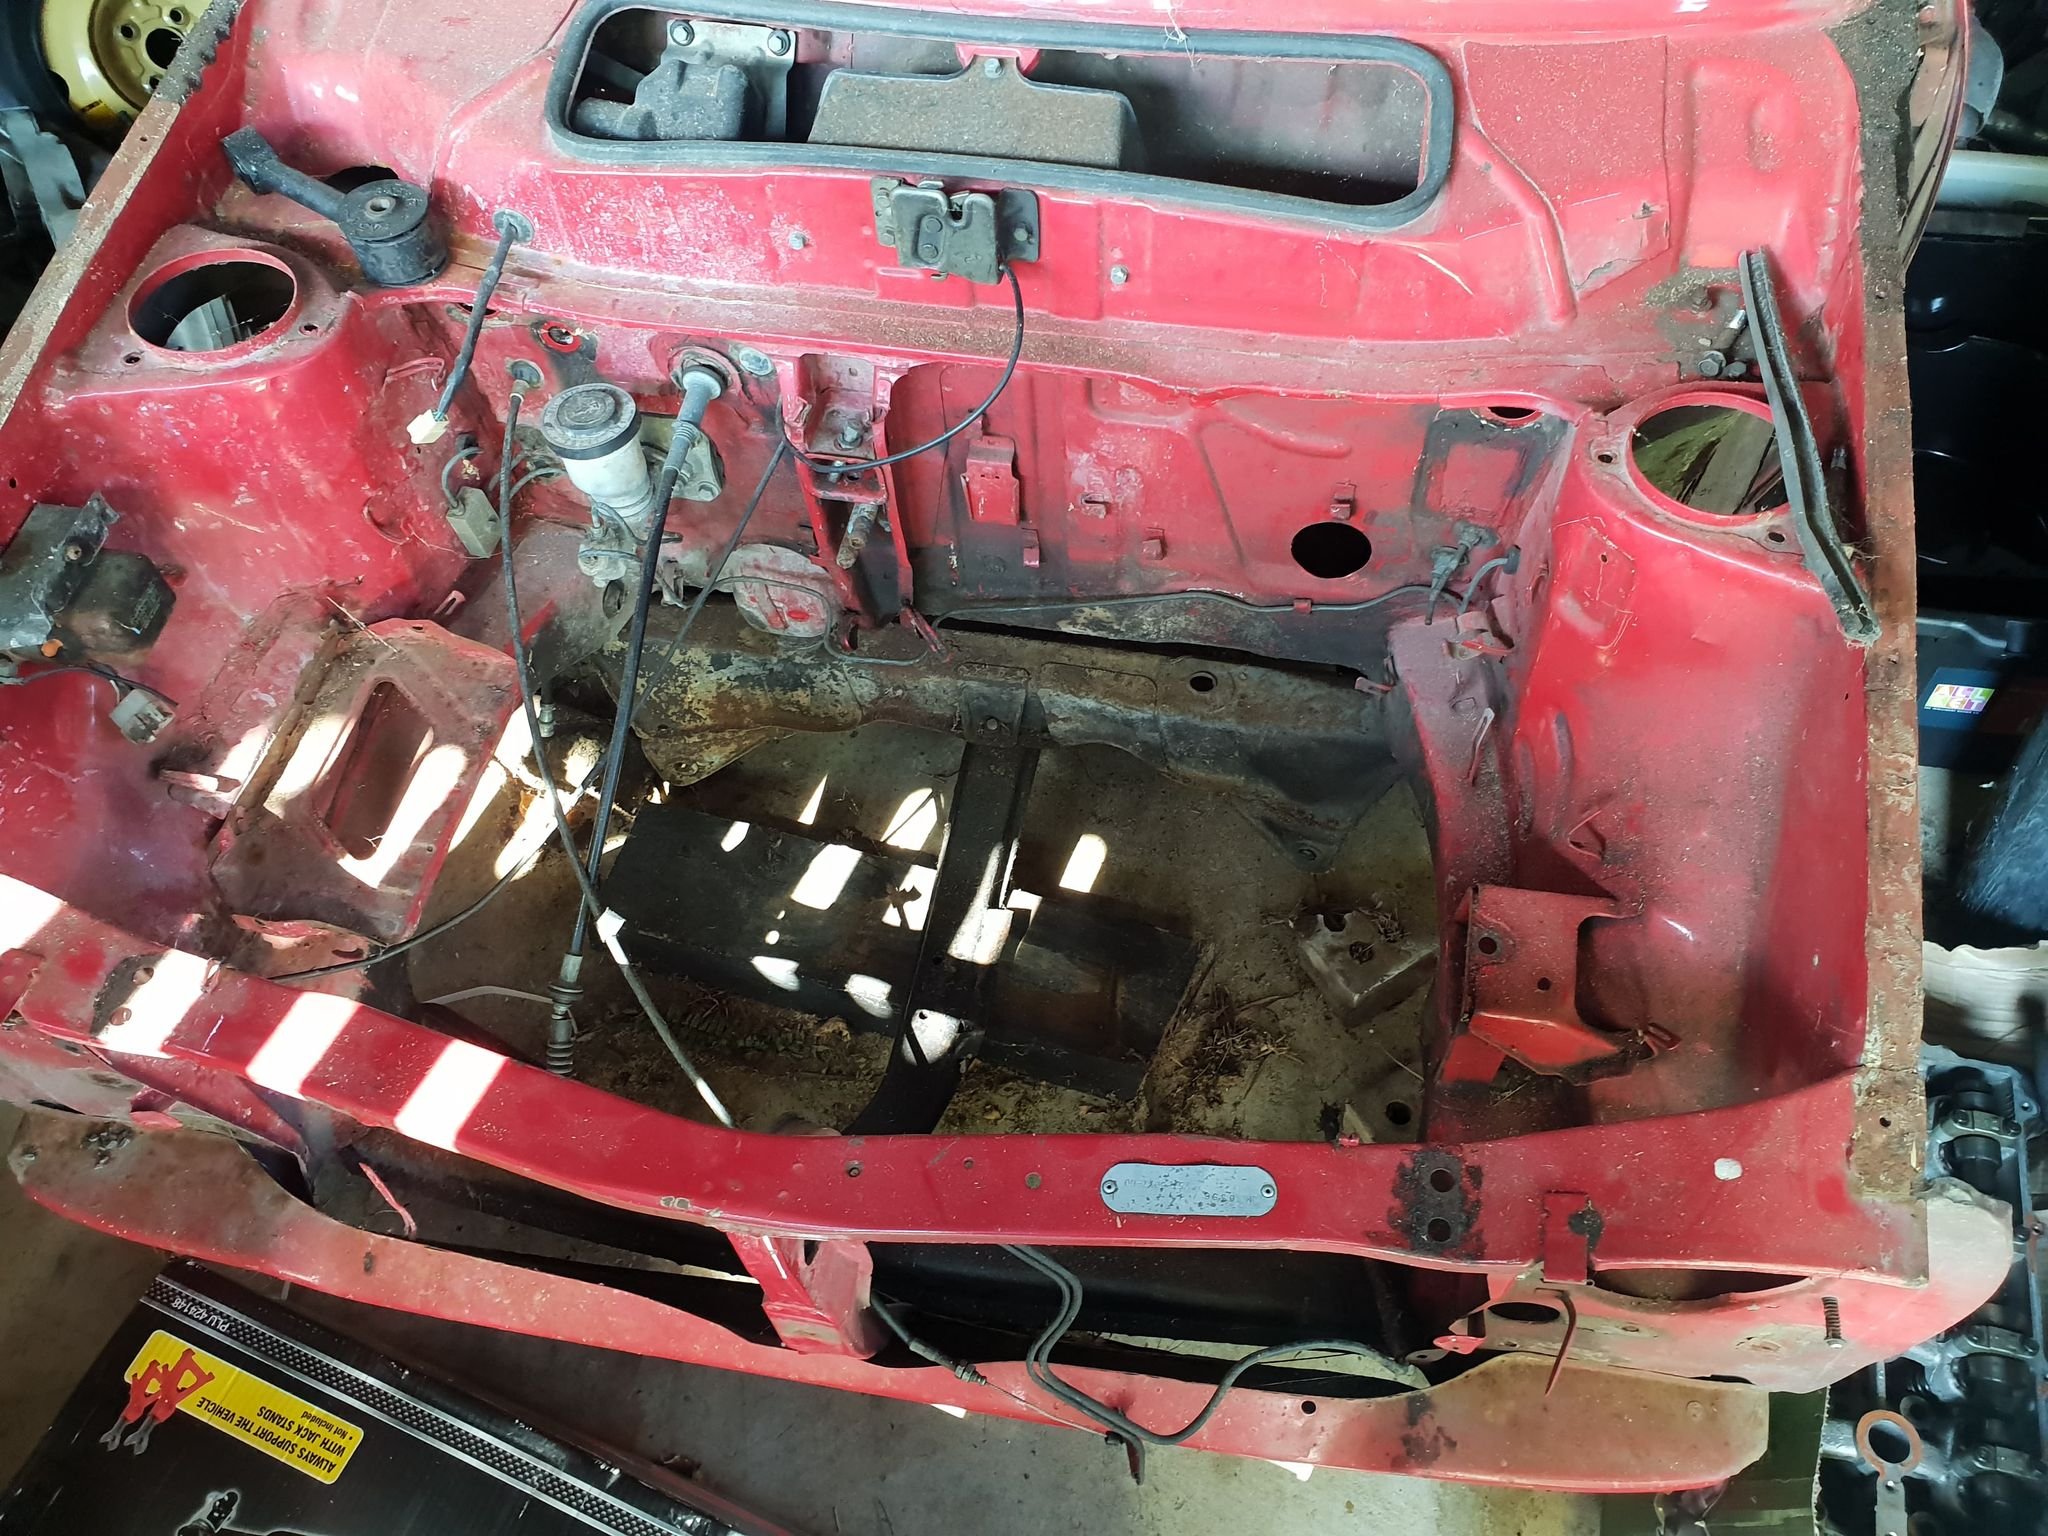
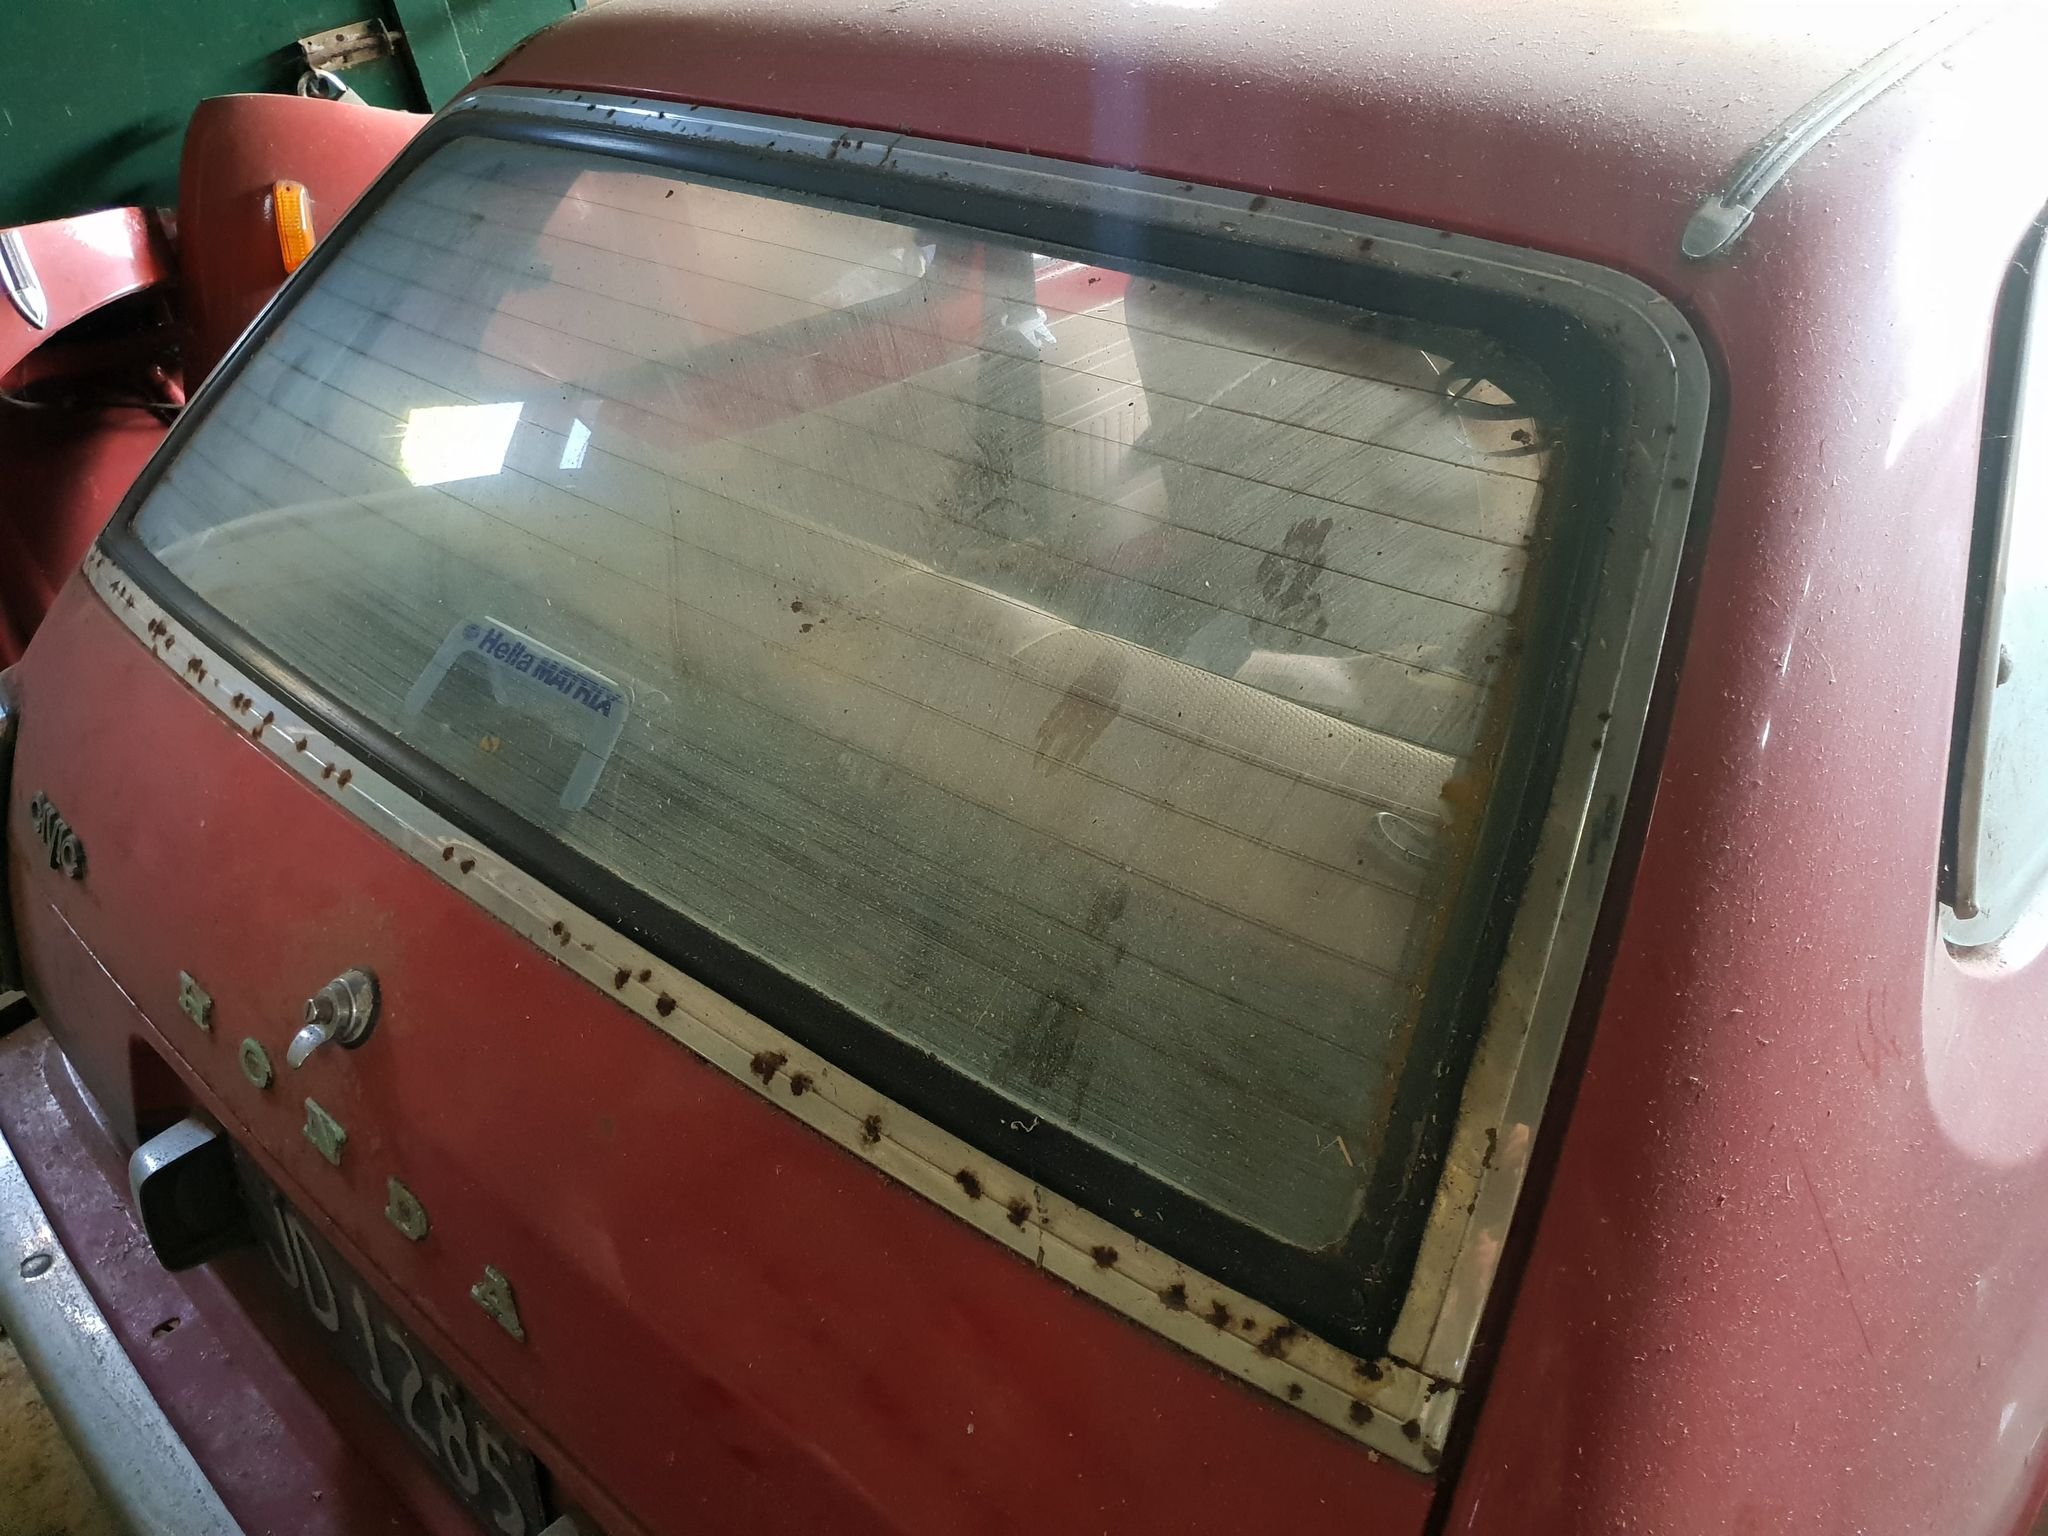
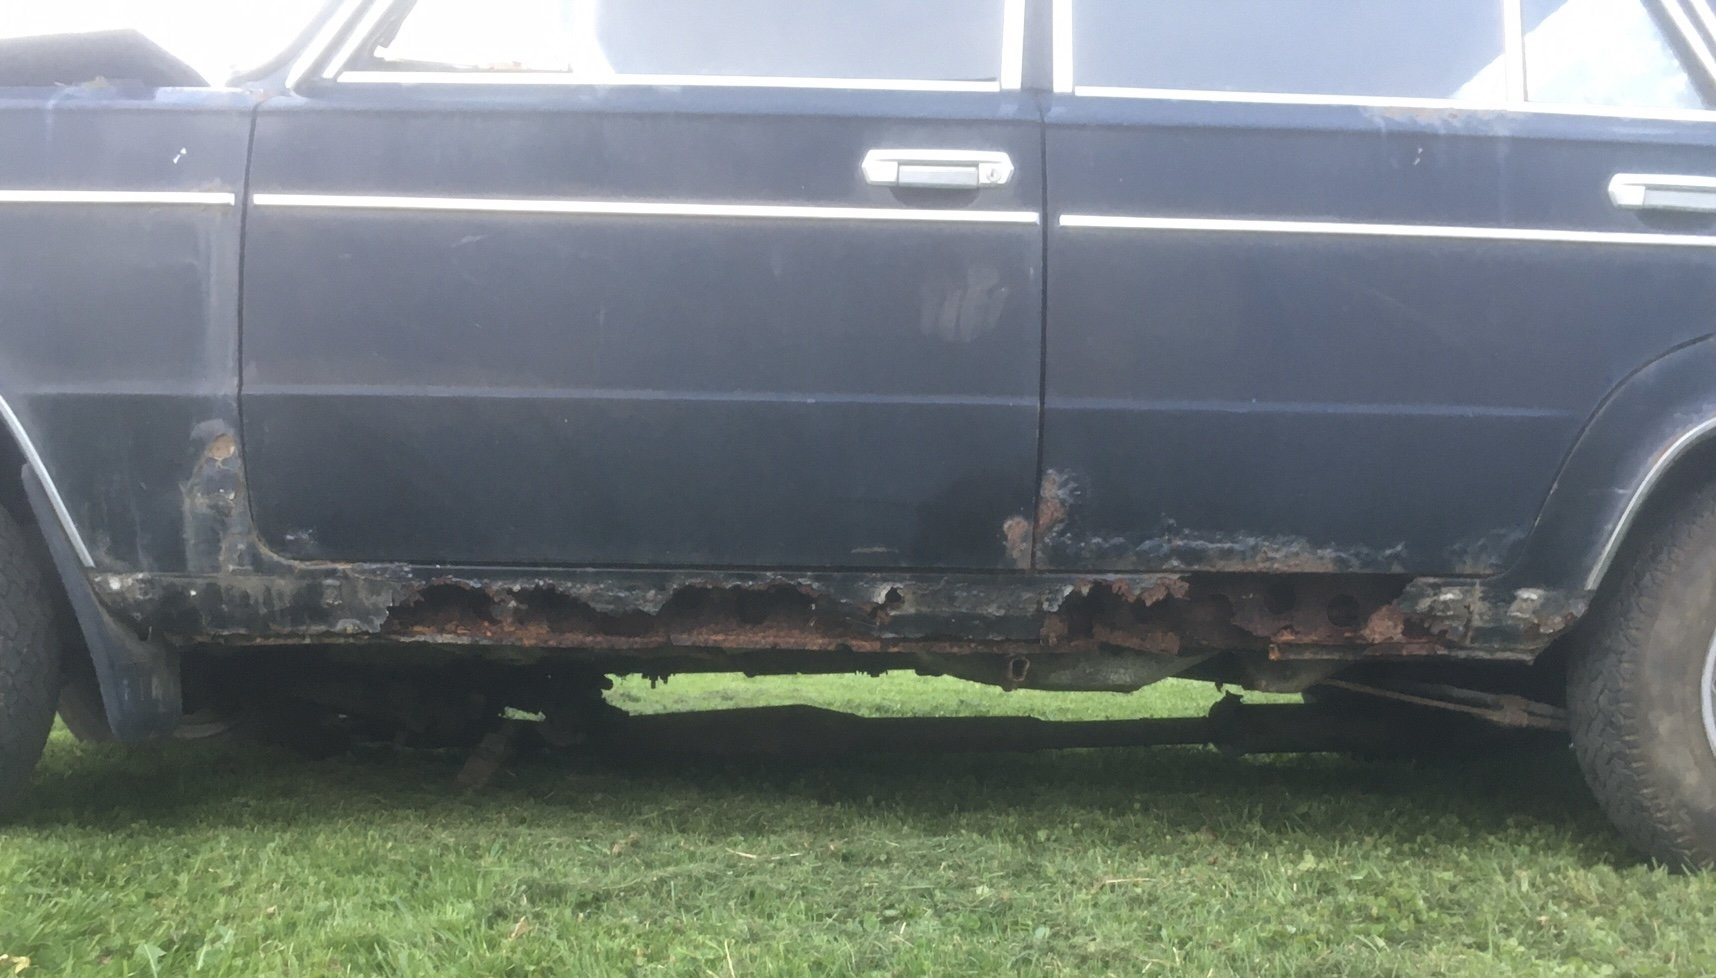
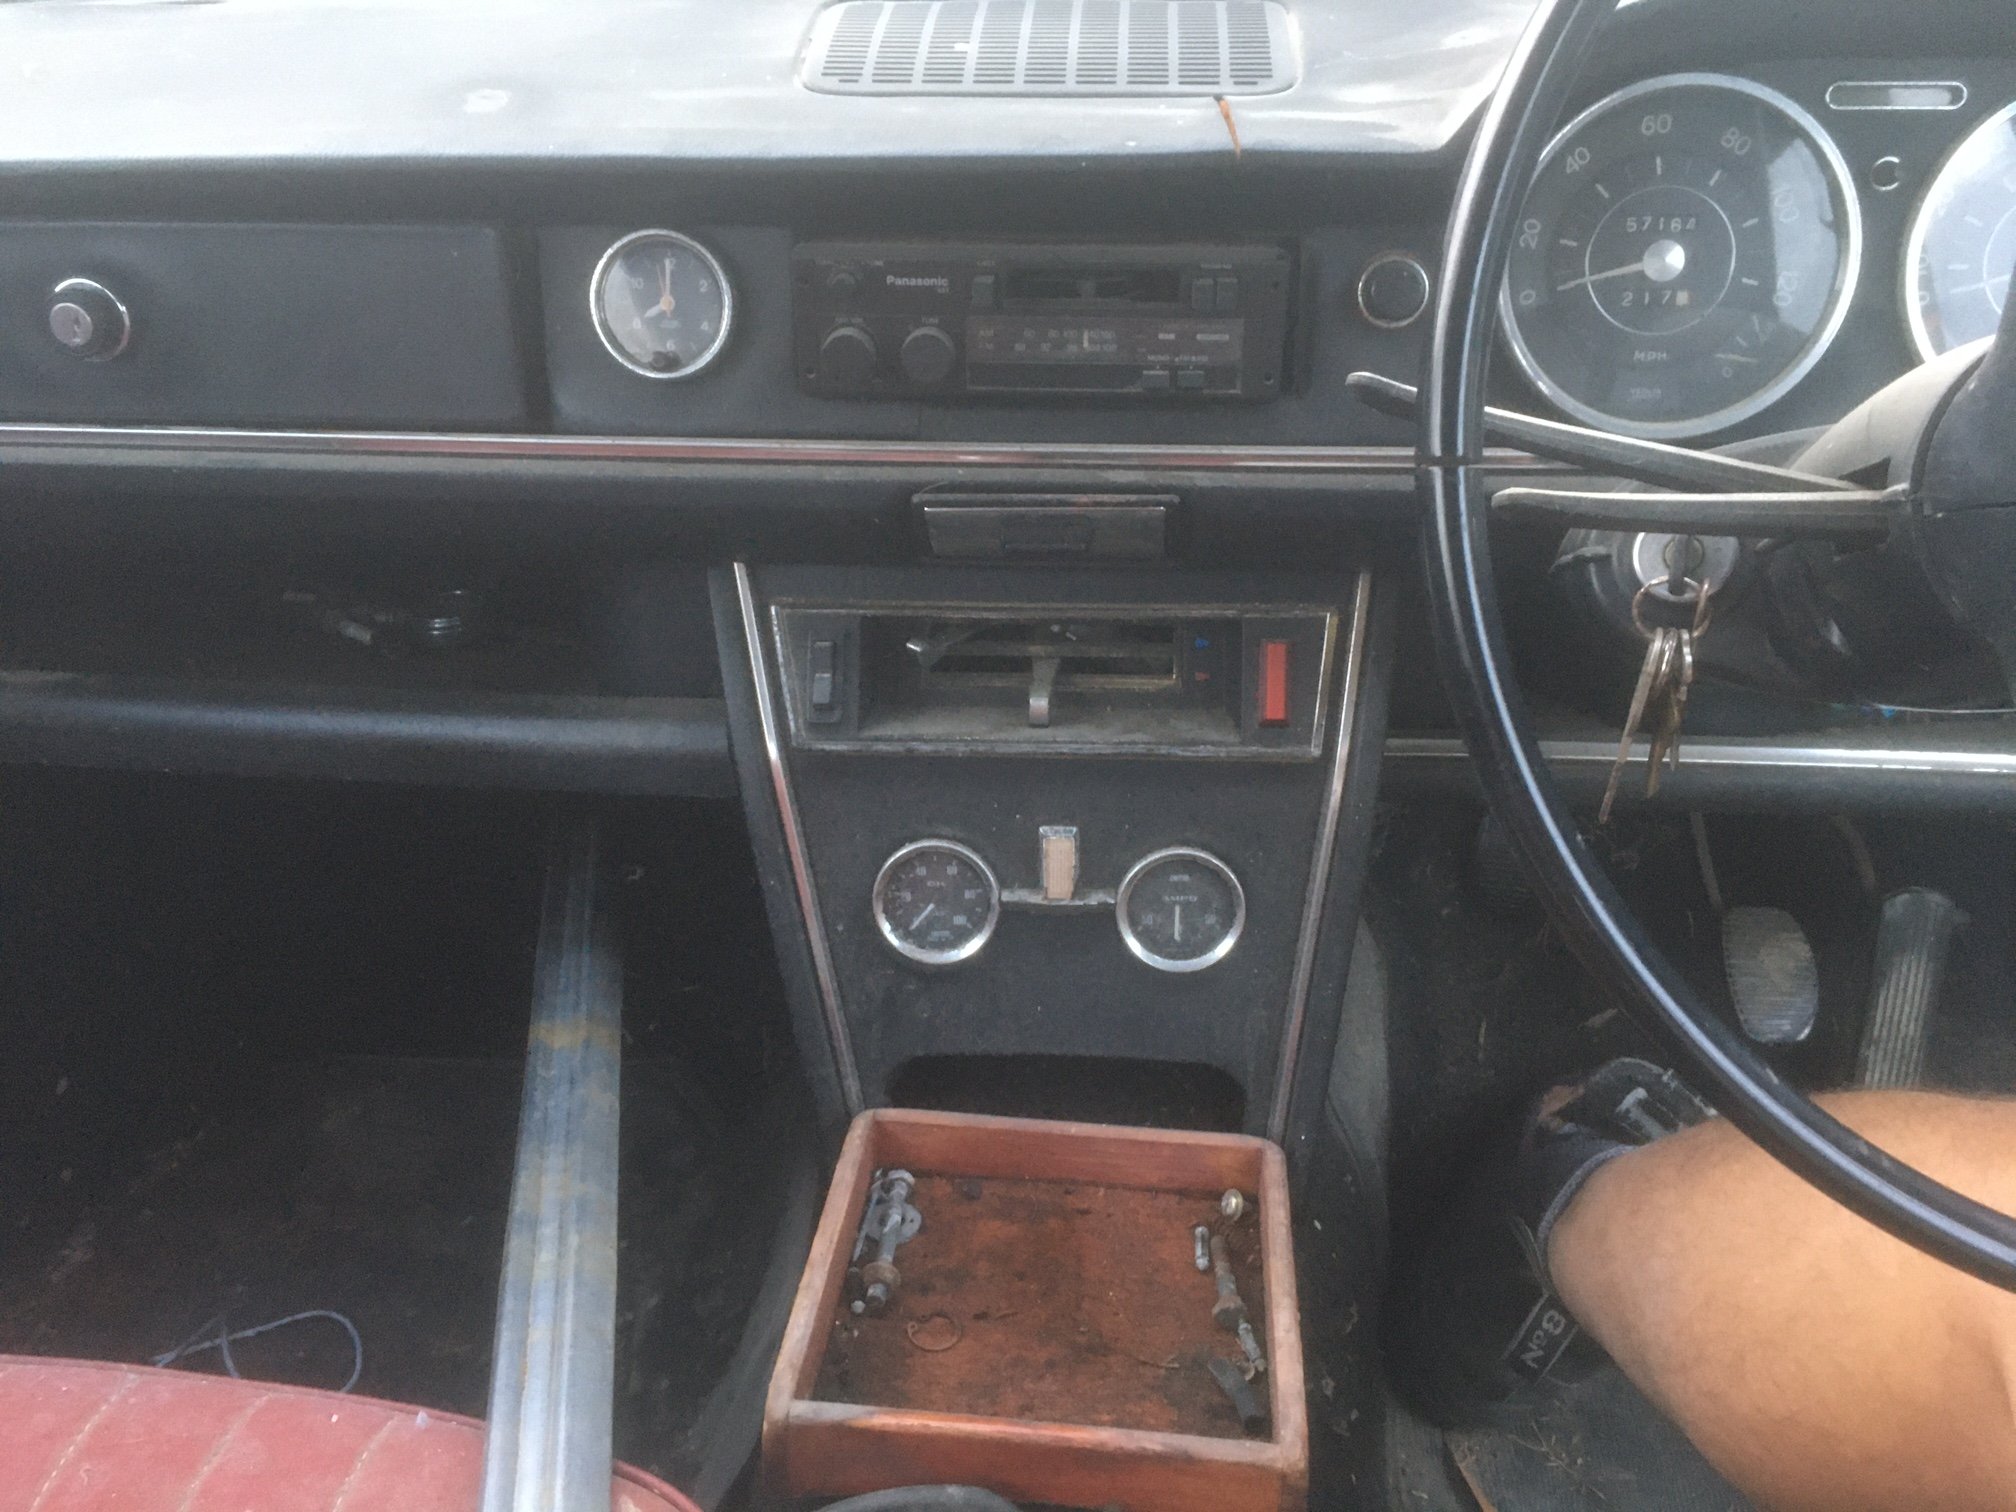
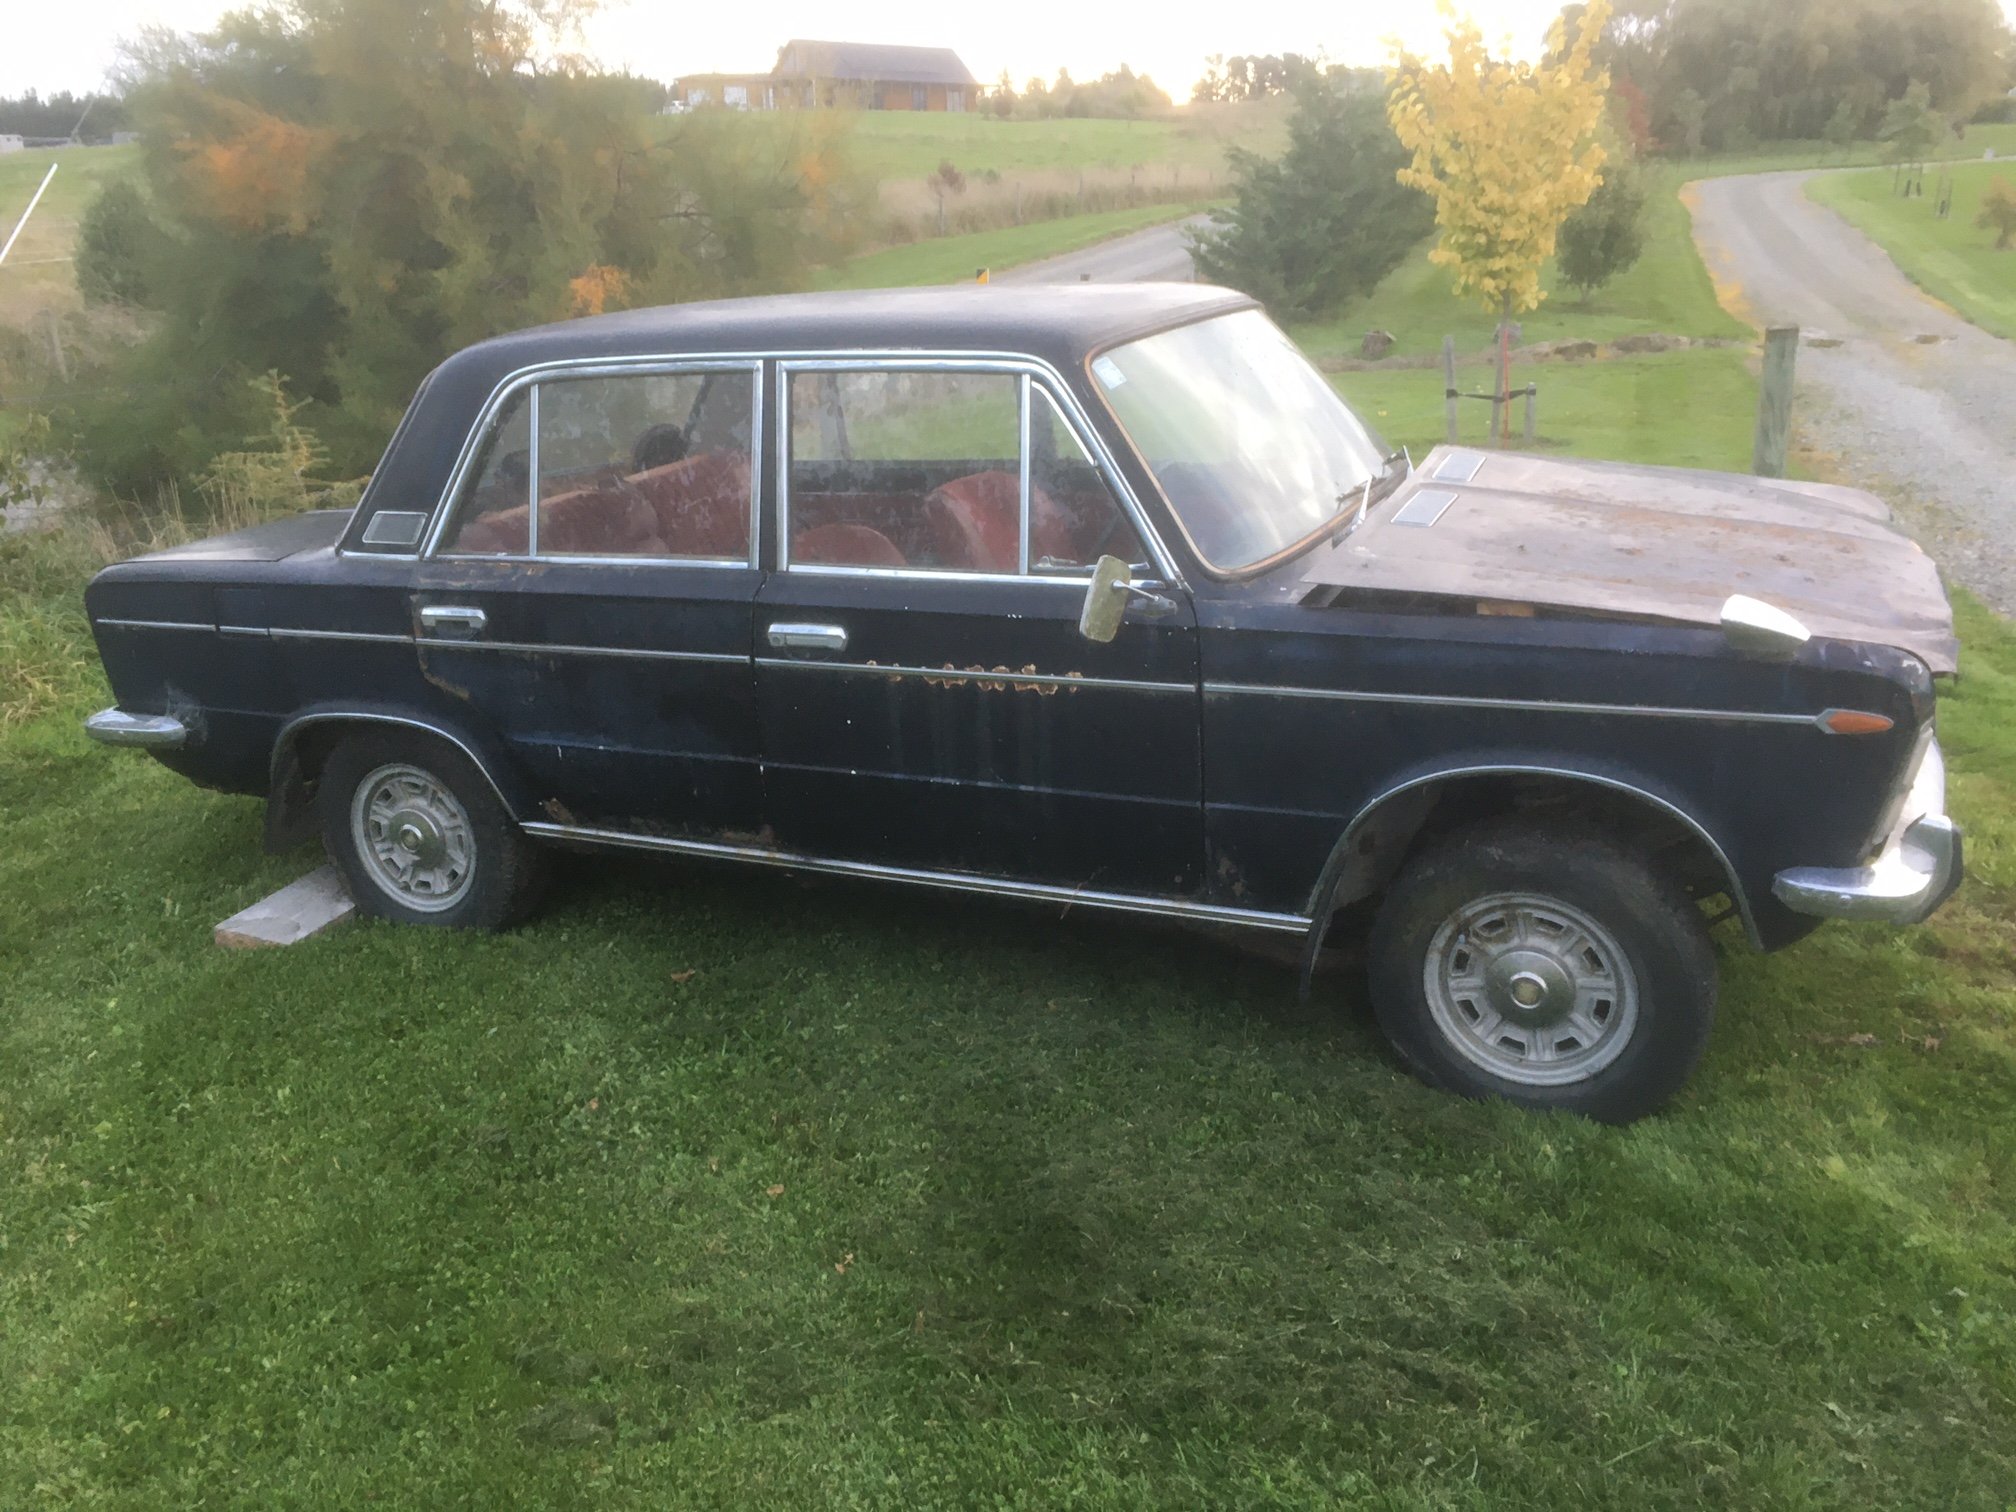
I guess this is just a placeholder first post for this car. It has been sitting under my dads house since maybe 2015, and last had a WOF in 2014. First pic is when it was first "parked". This is the only picture I can find from back then, when it actually looked like a car. It is a 1979 Honda Civic 1200, made in Nelson and originally purchased from Percy Motors Auckland on the 28th of March 1979, approximately 18 years before I was born. It has 8X,000km's on the clock, and service history for the majority of its life indicating it did not roll over. The original documentation said it was in "Signal Red" but I believe the actual colour (from the sales brochure) was Sofia Red, with the brown interior not black. This could have been swapped in, but the head lining matches brown so I'm not so sure. I purchased it with a half-complete City Turbo 2 engine swapped in, which was seized from sitting for too long so I gave up on it and pulled it out. I sold that with all of the (many!) city turbo bits that came with the car. The exterior of the car is now in pretty poor shape, with quite a bit of surface rust coming through under the paint, and some areas (like below the A-pillars) with really quite bad rust holes. I'm not sure what it is like under the car, but it was fine when I got it! The interior was pretty much immaculate, except for some minor damage to the wood veneer on the dashboard and the carpet had been stripped. I managed to acquire a DOHC ZC engine (d16a8/9) from a CRX, with forged pistons and H-beam rods. The details of the me purchasing this engine in ~2018/2019 are fuzzy, but I believe it was built for a turbo in a track car. Here you can see the new rods compared to the stock ones. The plan is to have the engine swapped in as soon as I get the car moved, with basically a hack-job of motor mounts just to get it in roughly the right place. Then I will worry about axles, suspension and chassis. I intend on using a GTX2860r Gen2 on a log-style manifold to suit the space restrictions, and modify either a 2zz-ge intake manifold or K24 RBB intake manifold to mate up to the ZC head. The intake manifold is about 1/2 the length of the engine bay in its stock form. While people have made this engine fit with a small-ish turbo, I don't want to modify the firewall at all just for an intake manifold. This will not be a fast project, I don't even have the car yet! But hopefully the end result will be a fast project. Link to discussion here:
3 points
-
You're not wrong, it's really panned out far better than I had expected. There's been a lot of blood, sweat and tears, but it's a bloody good car to drive now and it probably would've ended up in the "left to rot" thread had it gone back to the previous dickhead owner.2 points
-
2 points
-
Jag loving mate had an XJ12 for a while. Carbed one. He discovered that the bolt pattern for the puny 1 1/2 in Solexes is the same as 6 cylinder SU's. Bolted on 4 X 2in SU's. Never dyno'd it but the improvement was startling. Fuel comsumption otoh was frightening. Up past Oxford cruising at highly illegal velocity, you could watch the fuel gauge dropping.2 points
-
Looks like the sort of thing one would expect to see on a light weight trailer intended for low speed use behind a farm vehicle.2 points
-
This oil is good for old ironheads, your engine wont wet sump as bad and spew out every little place it can and your front cylinder will love you.
2 points
-
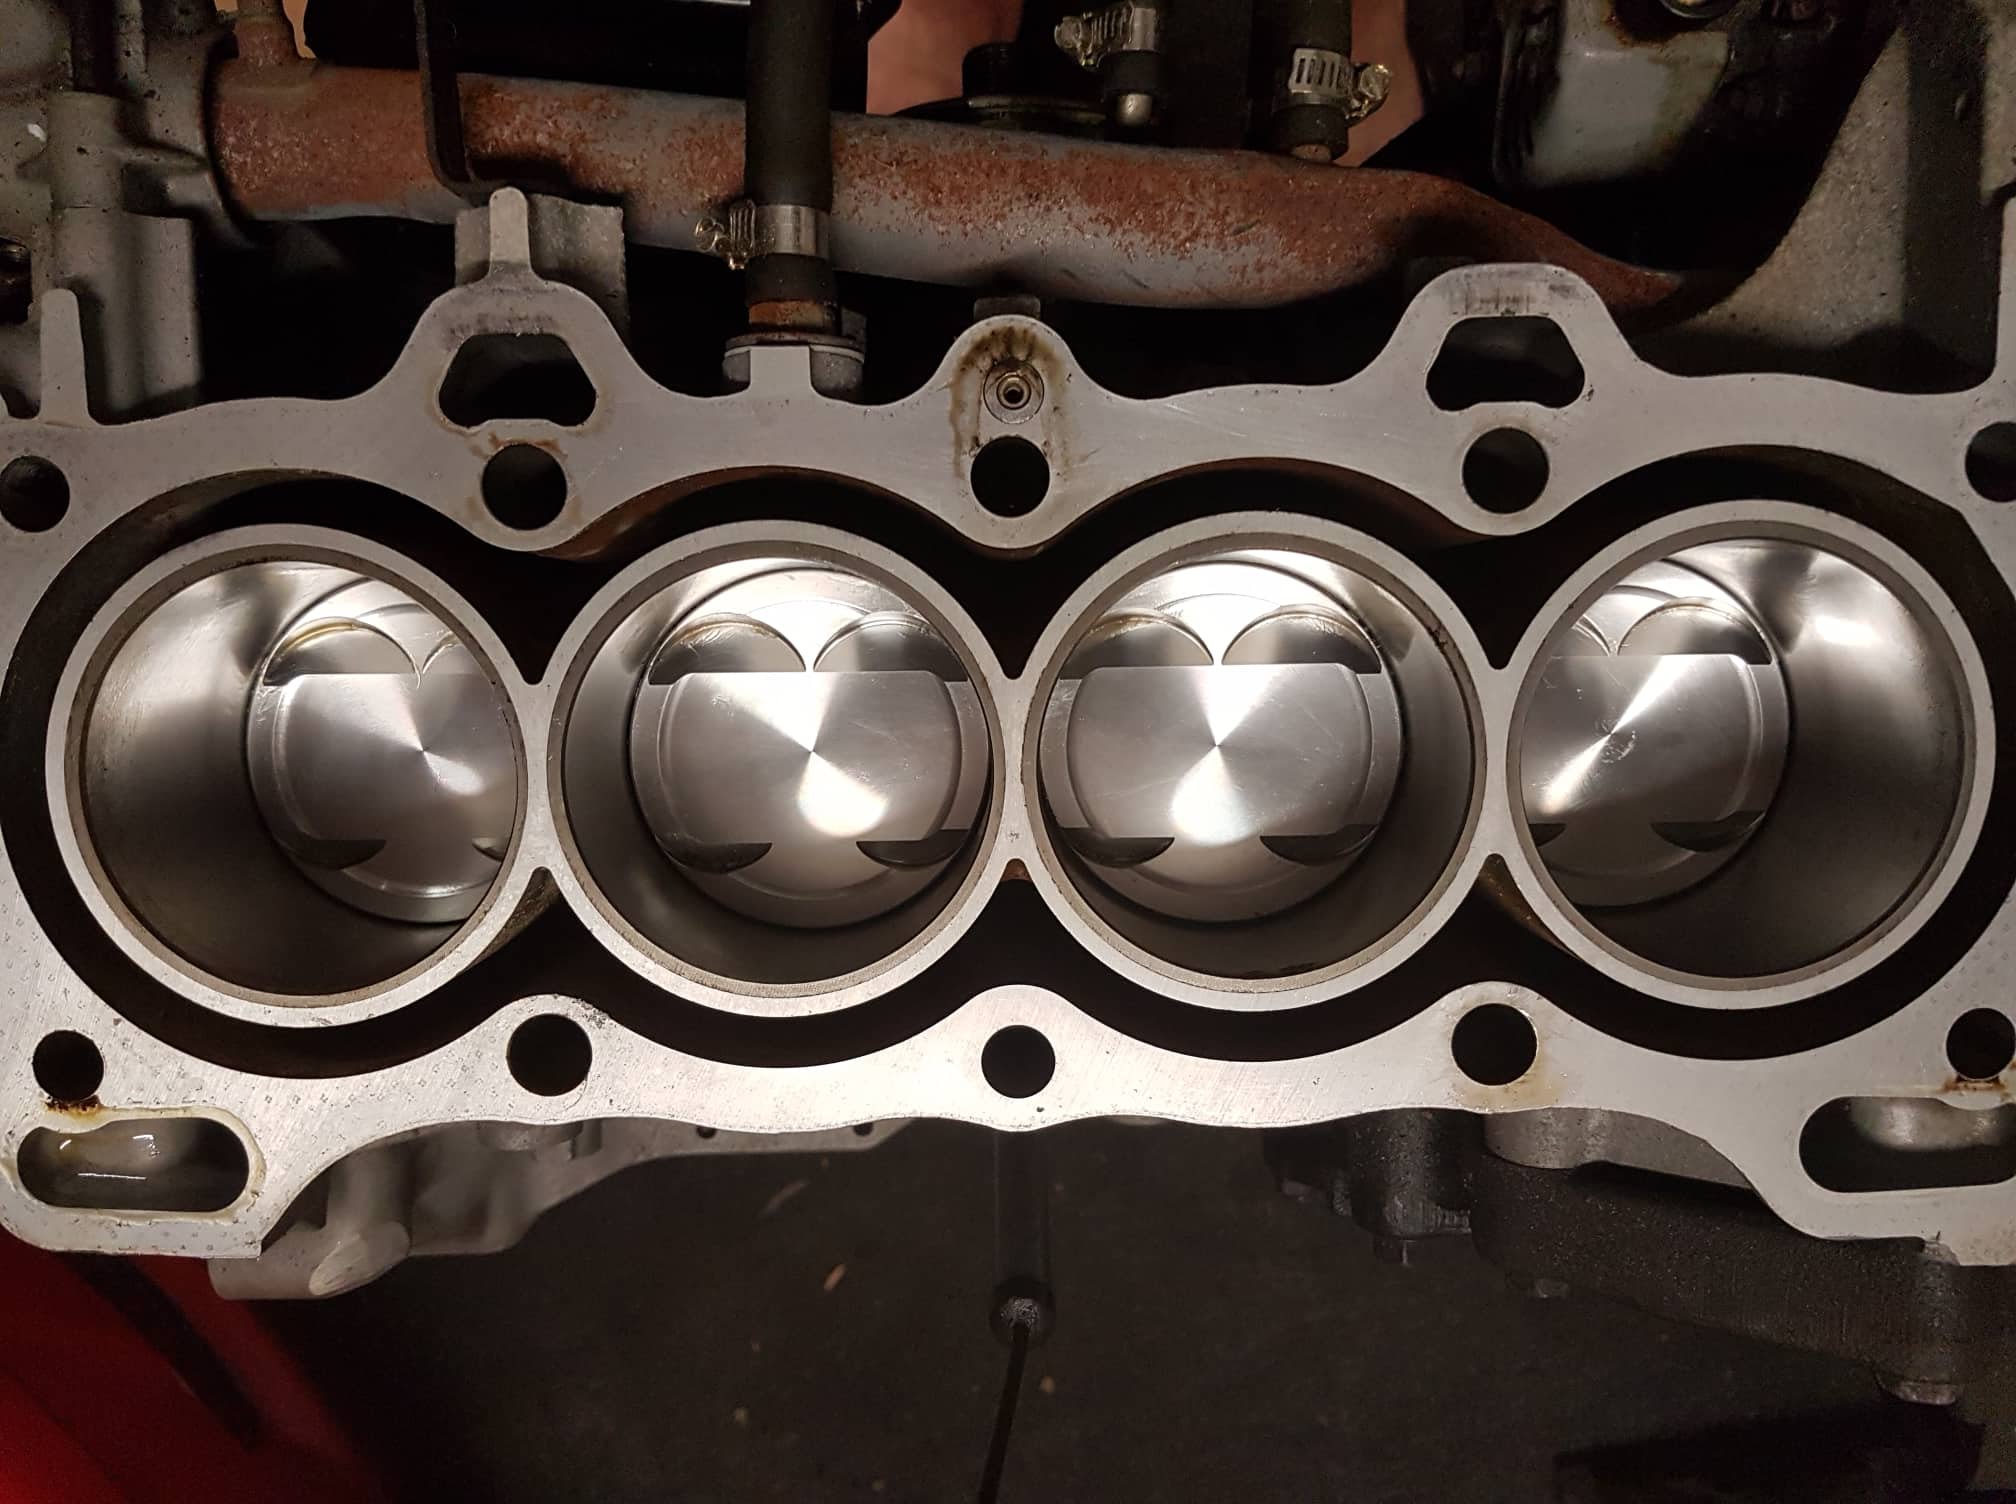
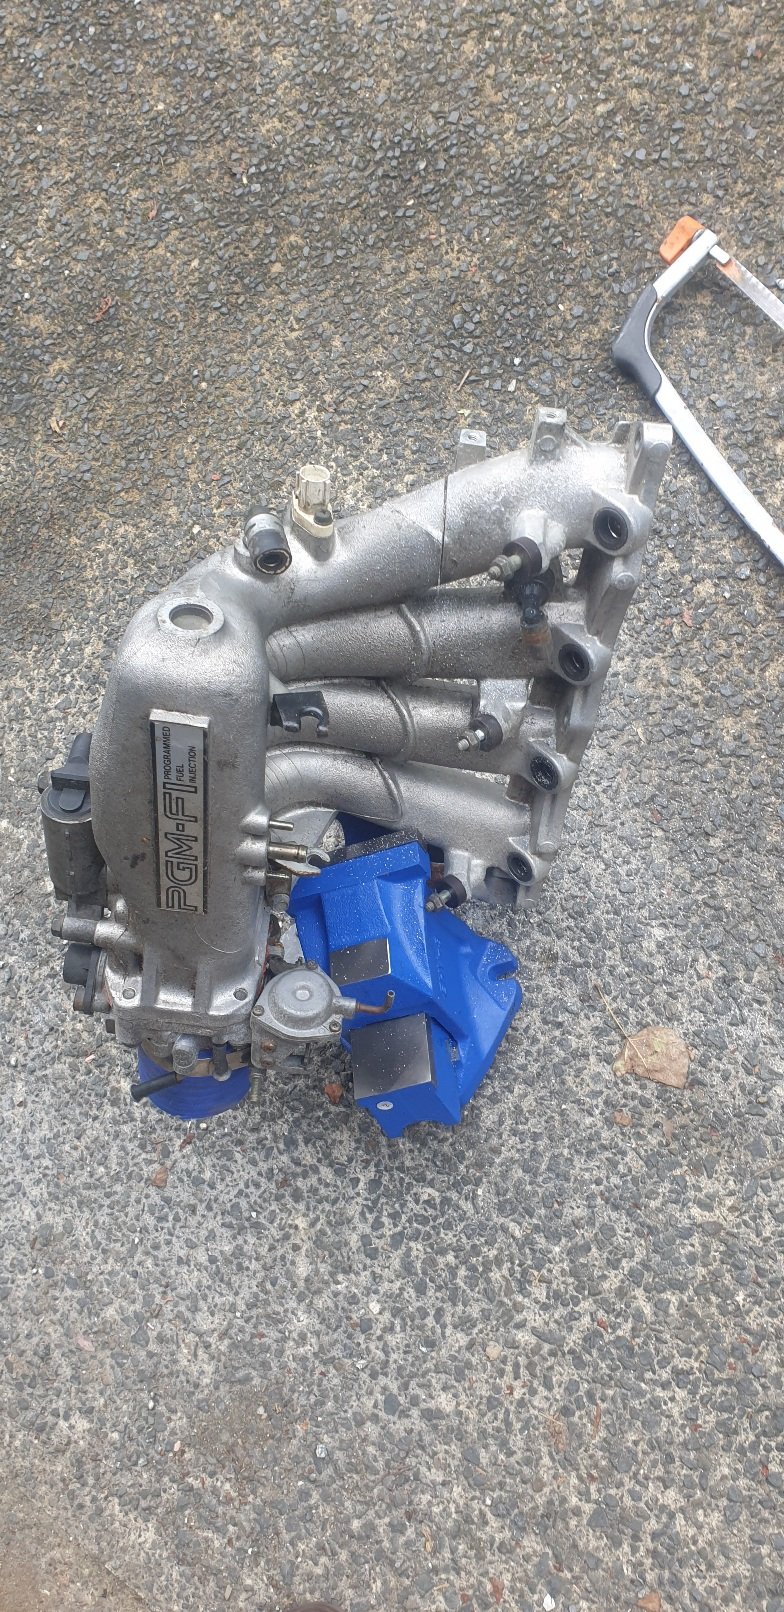
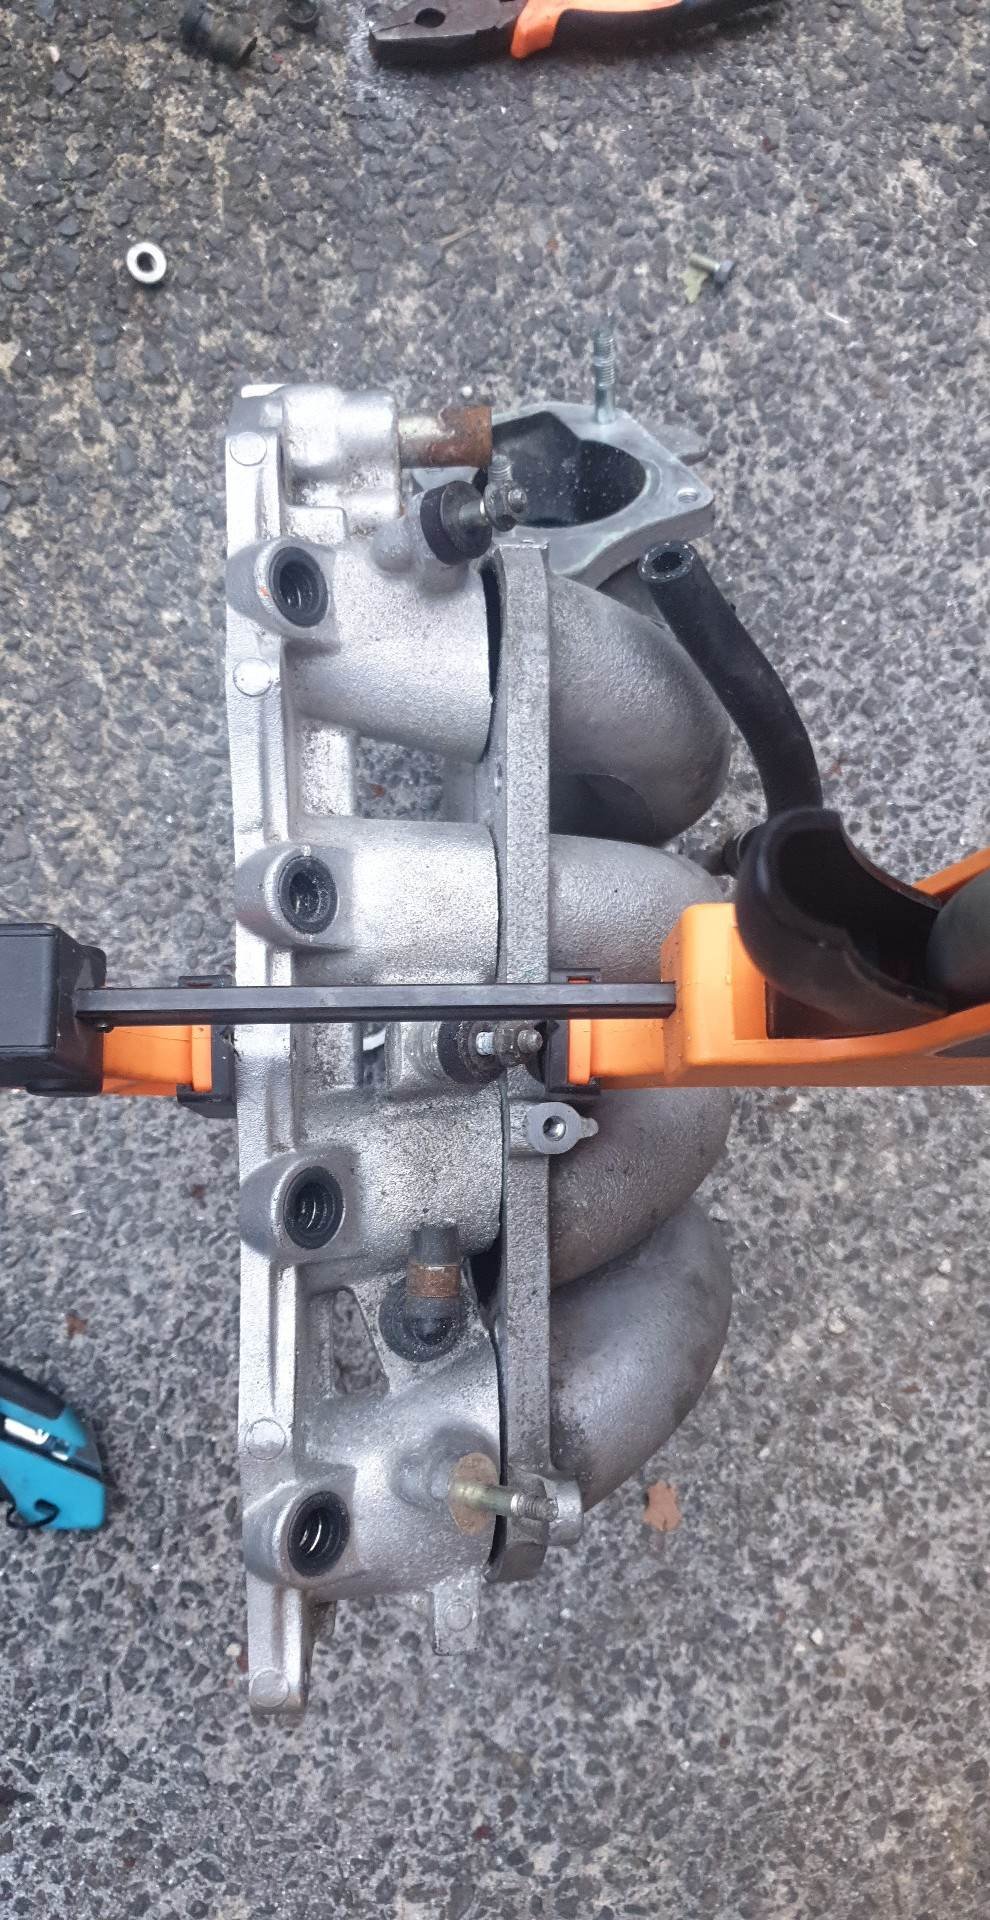
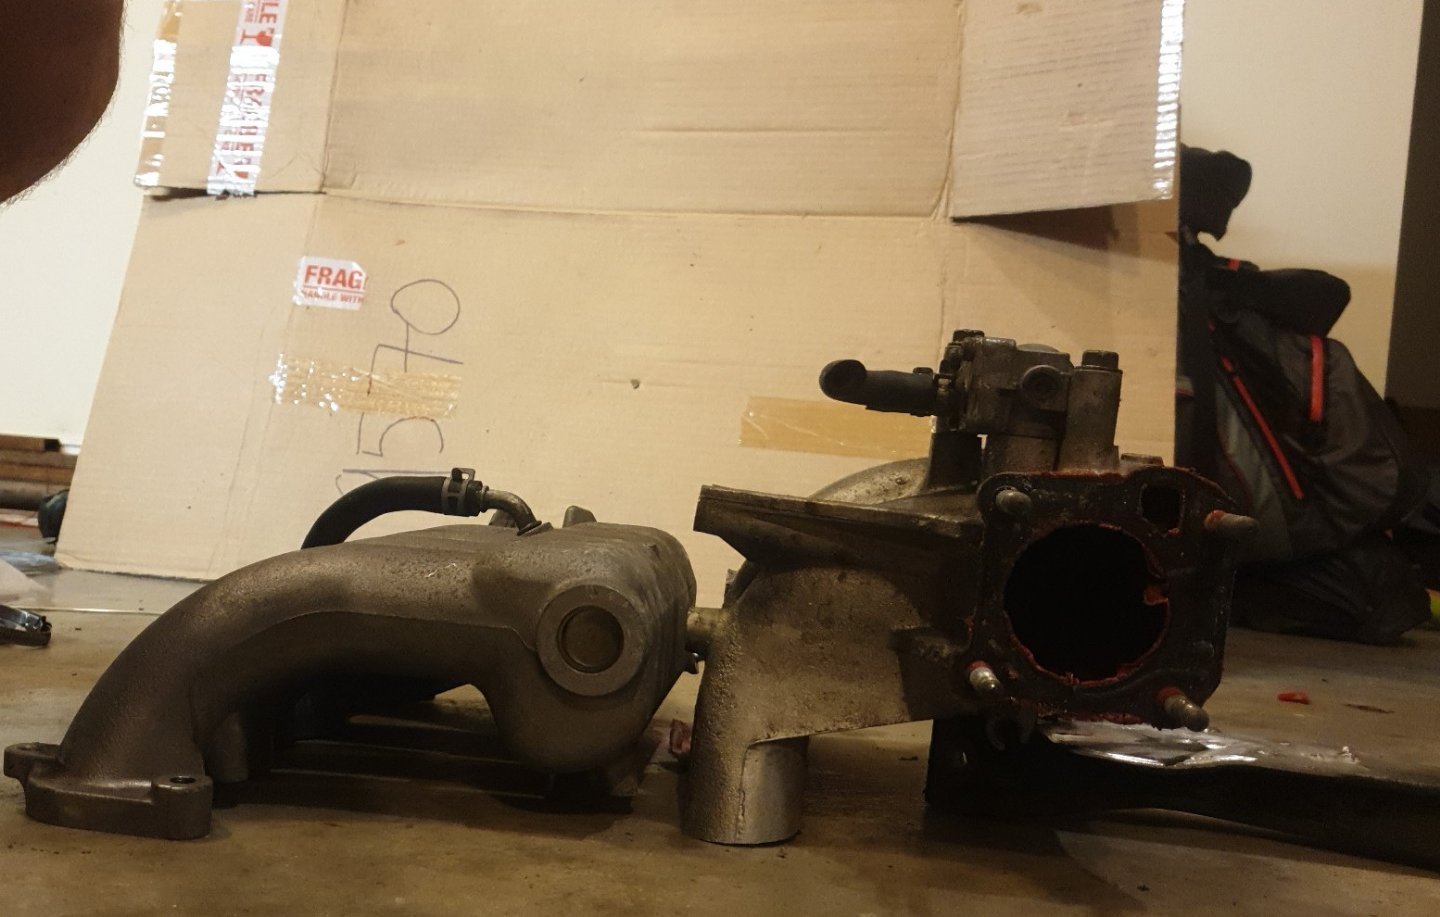
This might not be worthy of the second post here but we knew it was going to be slow, so it'll just be a small update. Anyone who's seen my Mazda knows that chopping intake manifolds seems to be my favorite pastime but I PROMISE that is not the case! Today I purchased a K24 RAA intake manifold, which has a very nice 2-piece design. I also cut my ZC intake manifold in half, shortening the runners but attempting to line them up with the RAA's plenum section. I intend on cutting a flange and welding it to what's left of the ZC manifold allowing me to bolt that to the RAA manifold. Space-wise, this has saved me maybe 10cm at the back of the engine bay which is a huge amount. In the bottom picture you can see just how much space saving this really is. The picture is only the start as I have already trimmed a further 4cm from the Honda intake manifold (up to the fuel rail mounts), saving additional space again!
2 points
-
Well after a Cyclone and 4 weeks with no mains power and then my wife getting ill I finally got back to getting the engine bay painted. It has come out in the main quite well but I will need to redo the flat areas I used filler to smooth and the top of the firewall, as I got a reaction like there was oil on the primer even though I had wiped it down with degreaser. The top flat areas I just didn't get smooth enough. I am sure going to have to get better at filler than I am now when I get to the body panels.
2 points
-
Cake is iced!
2 points
-
Few crummy pics of the progress up to today. The bonnet is like making a golf ball smooth but at least there’s no rust in it yet! It got a good dose of spritz and needs a few more hours but the rest of the car is good. Manda tidied up the bumper and scraped off the poorly adhered previous layers, it needs a wee plastic weld then it can be prepped too2 points
-
Seems I forgot to update this over a year ago with some more cancer removal.. She loves a dump run, almost all I use it for lol!2 points
-
That's a bit shit. I'm happy with the 18v gear so far, no complaints at all. I guess the saw can get a little top heavy and if you don't place it down right it will fall over, but apart from that it is great. They seem to have worked all the bugs out of the 680 in the last few years, no rattles or problems with guards retracting. I guess the 40V (actually 36 but they love marketing wank) is still quite new and hasn't had all the bugs worked out yet. But yeah, my Ryobi gear was all 2015/16 stuff and was actually quite good for what it was, the new ryobi stuff doesn't look half as well built1 point
-
Shit photo, but I've started collecting parts for this round tail frame circa 1959-62 vintage. I put a PX disc brake front fork into it, which will also come with a 10" wheel conversion. Its a bit of a resto-mod build. Frame is 100% rust free, but has a bit of front-end damage. Nothing a hammer can't fix. It was stored hanging from roof rafters for the past 30 years. So I got lucky finding one thats rust free. Pretty much have most parts to slap this together. But no hurry to do so.
1 point
-
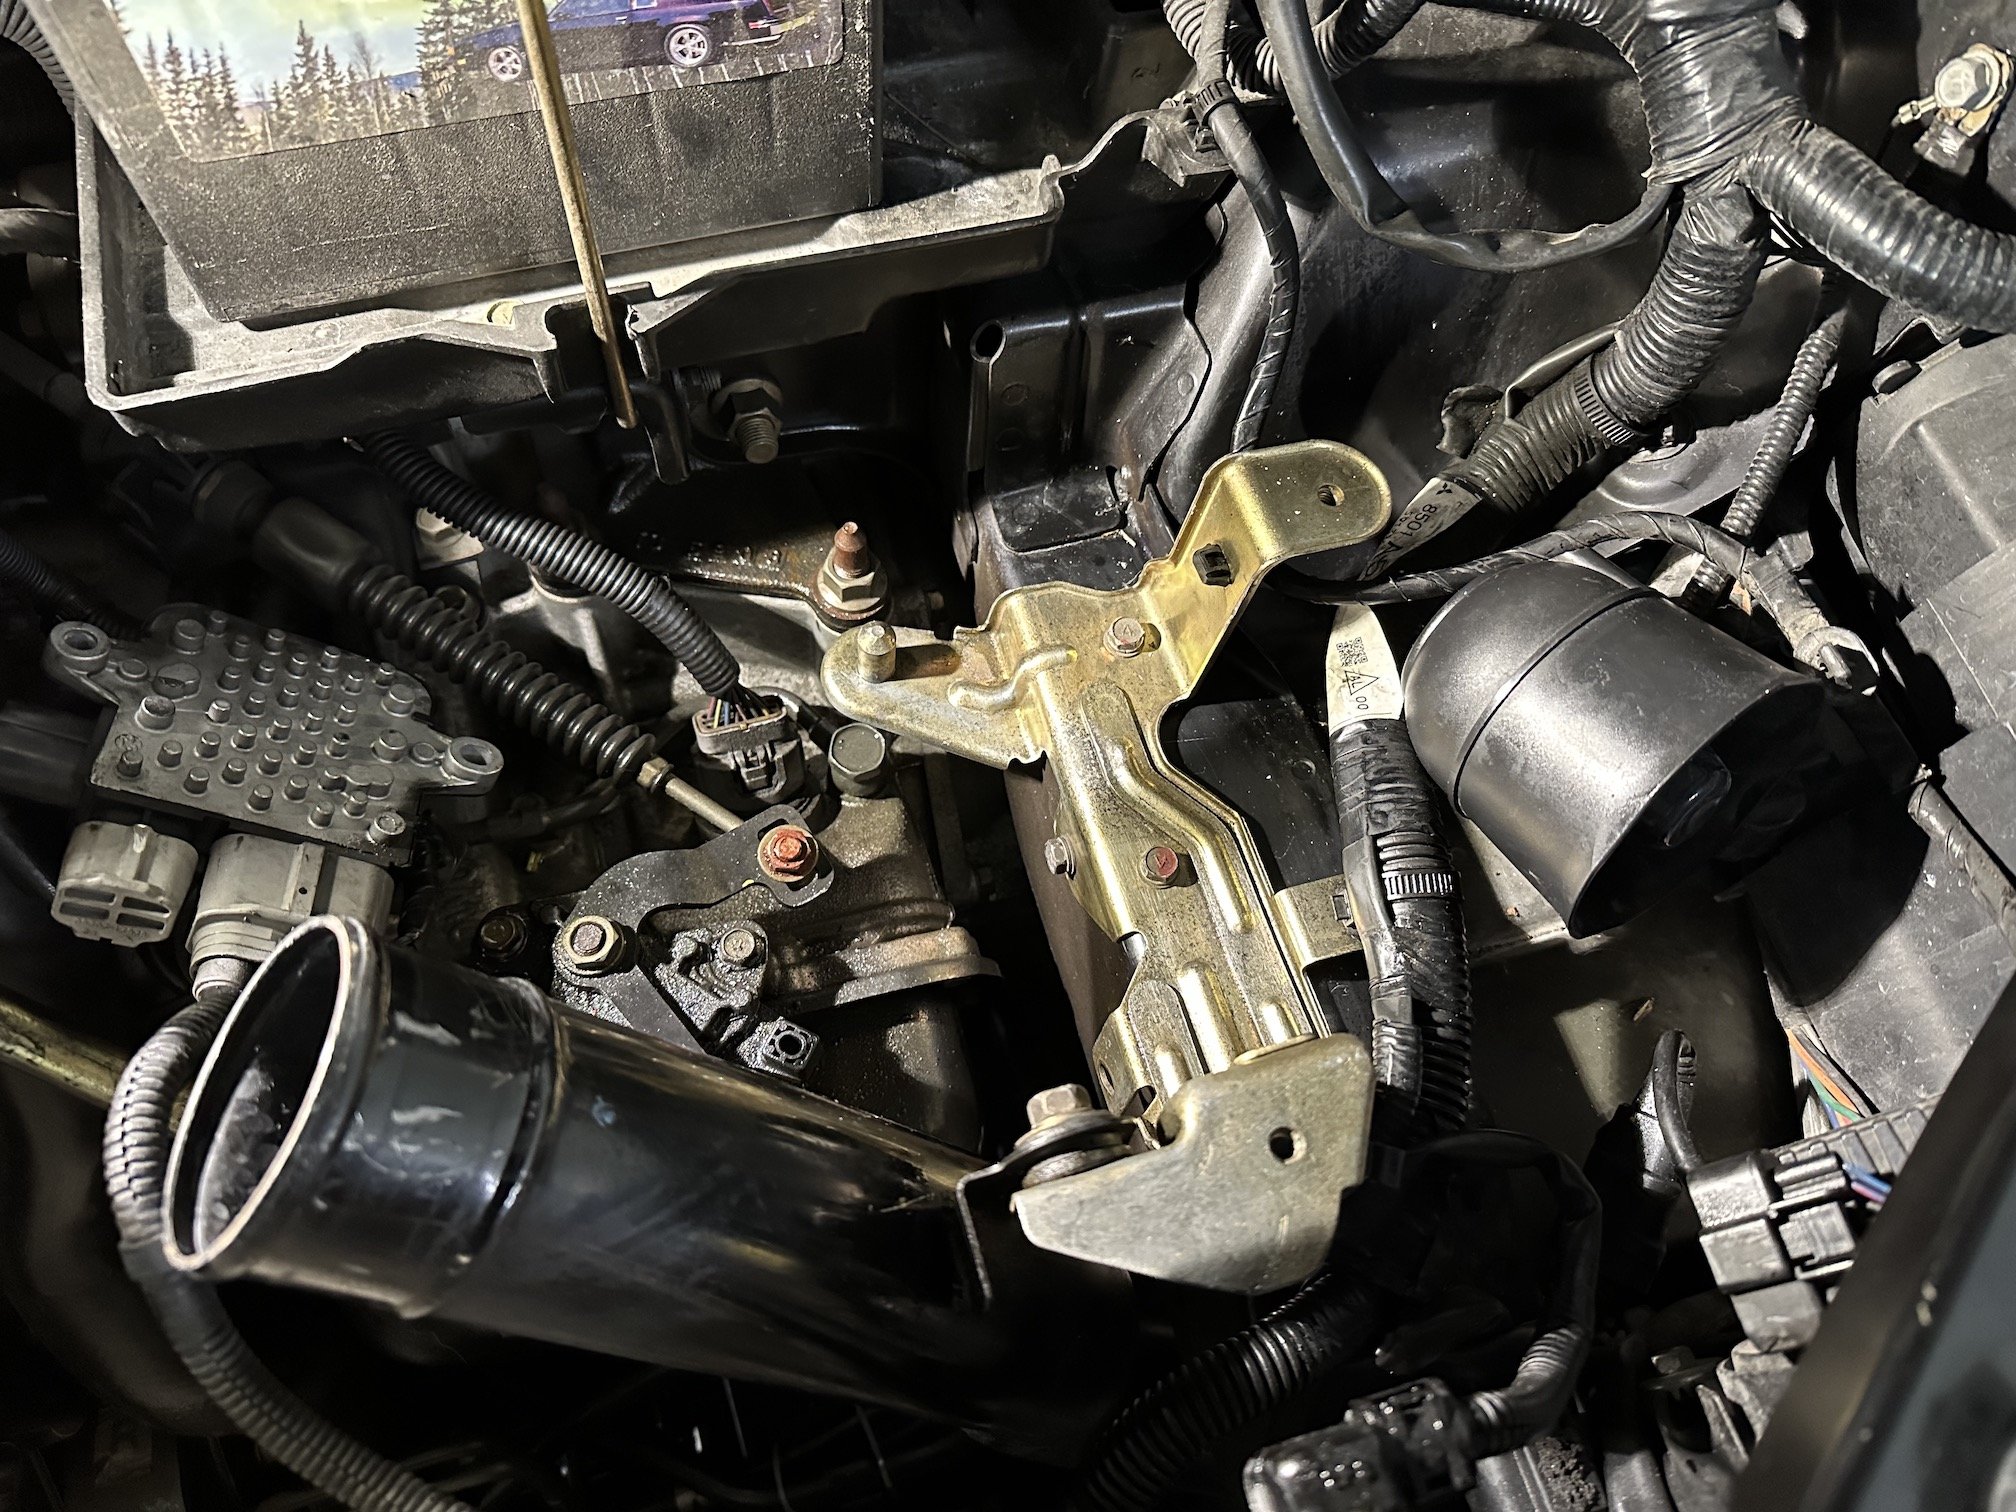
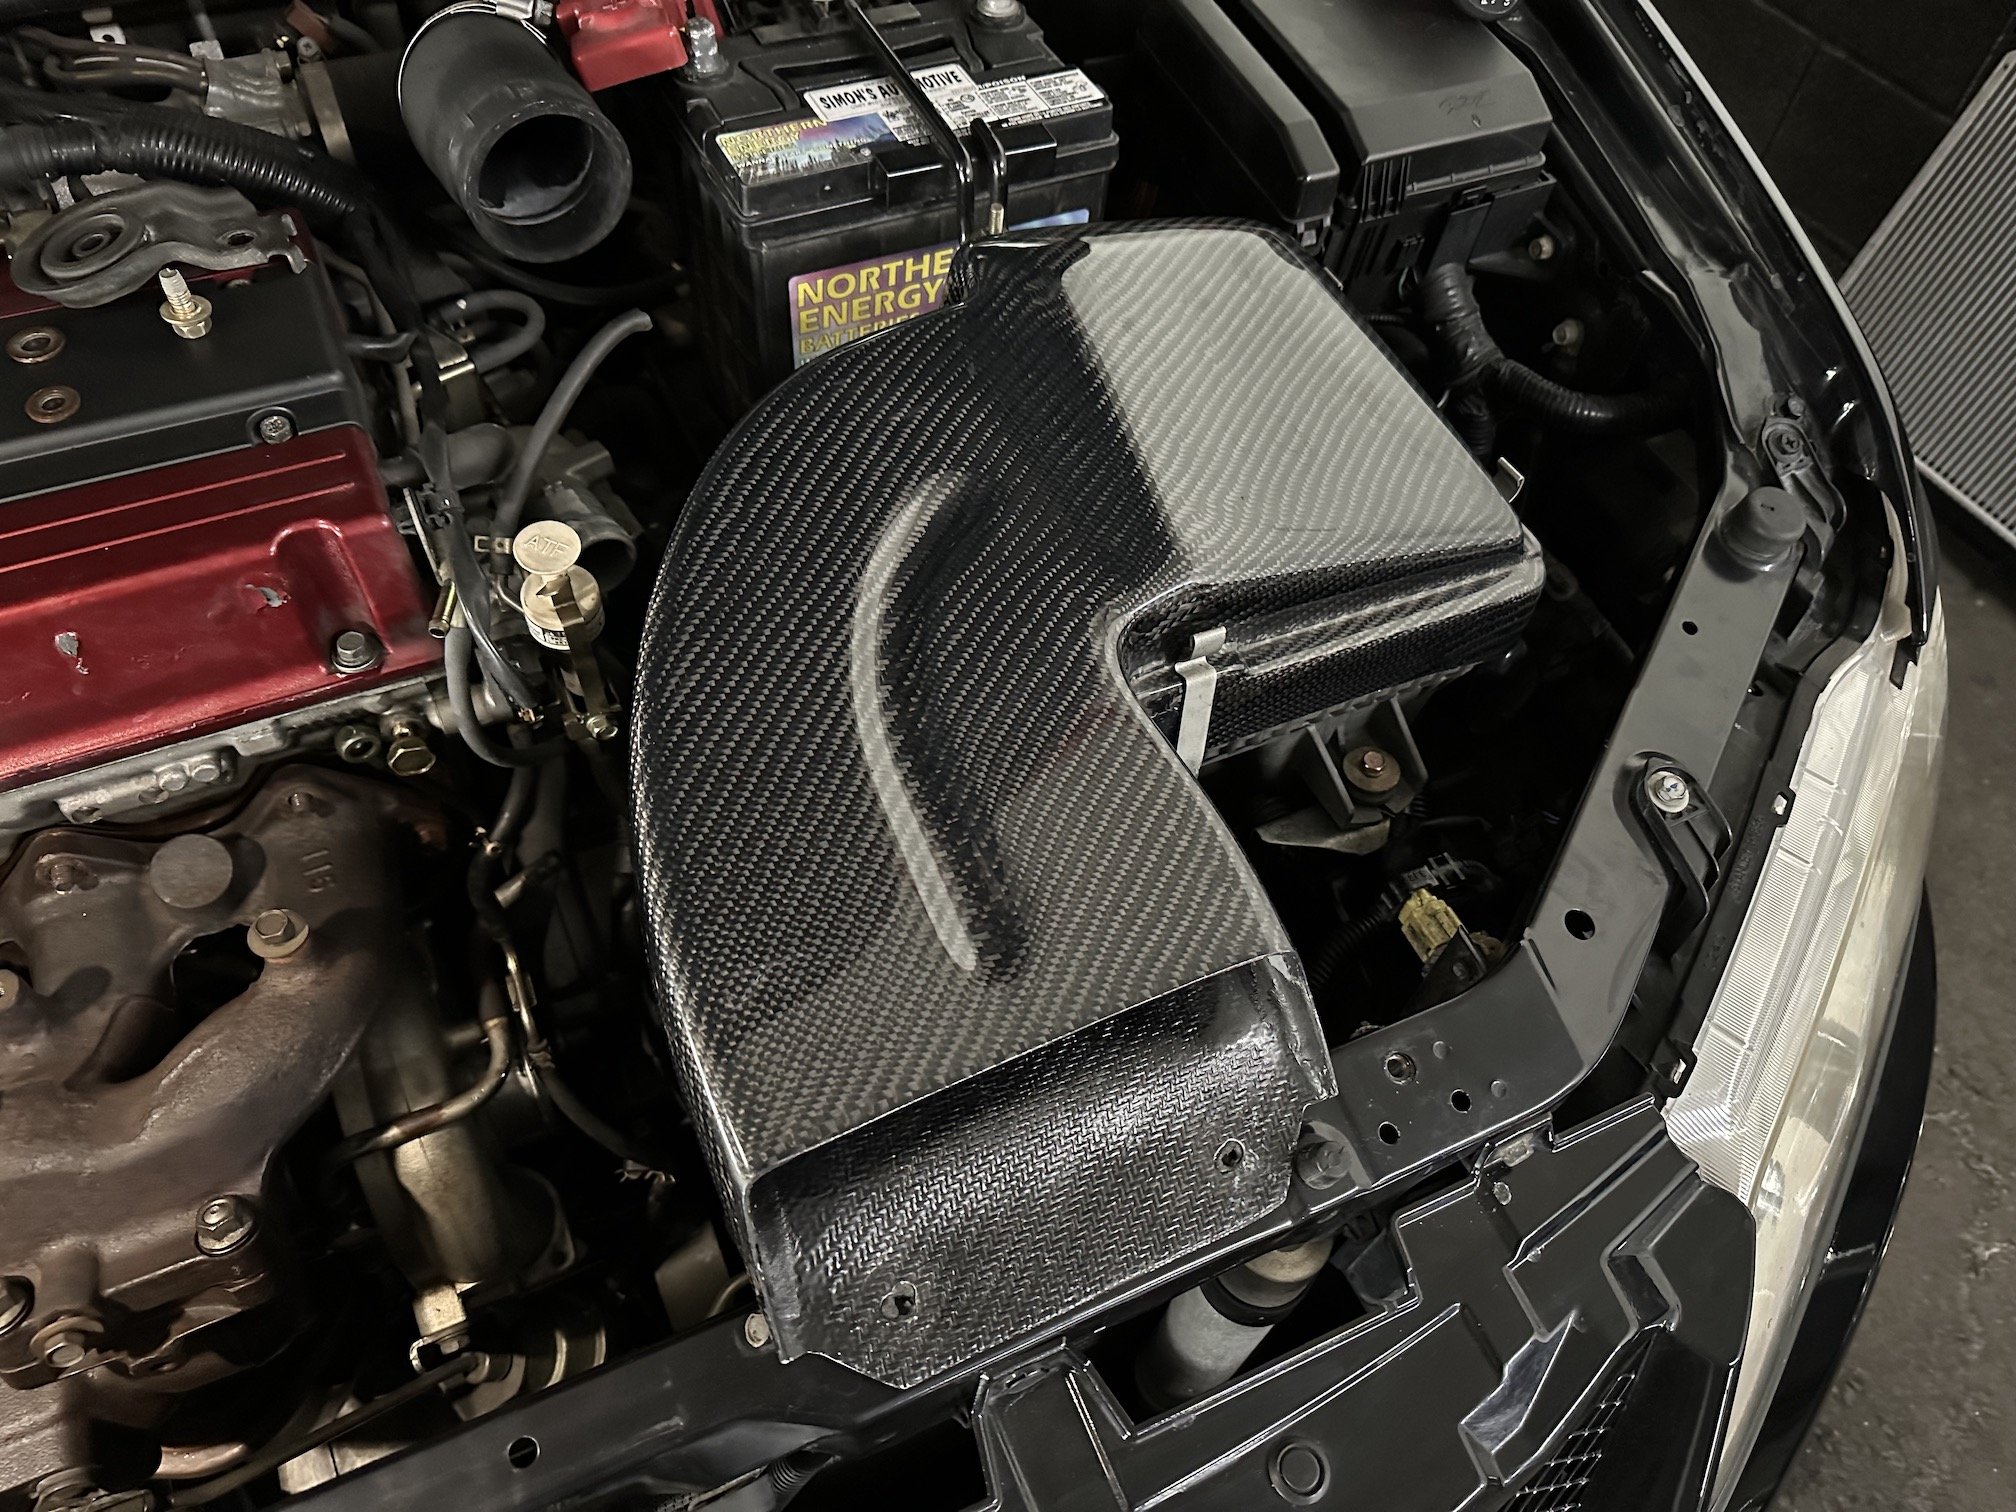
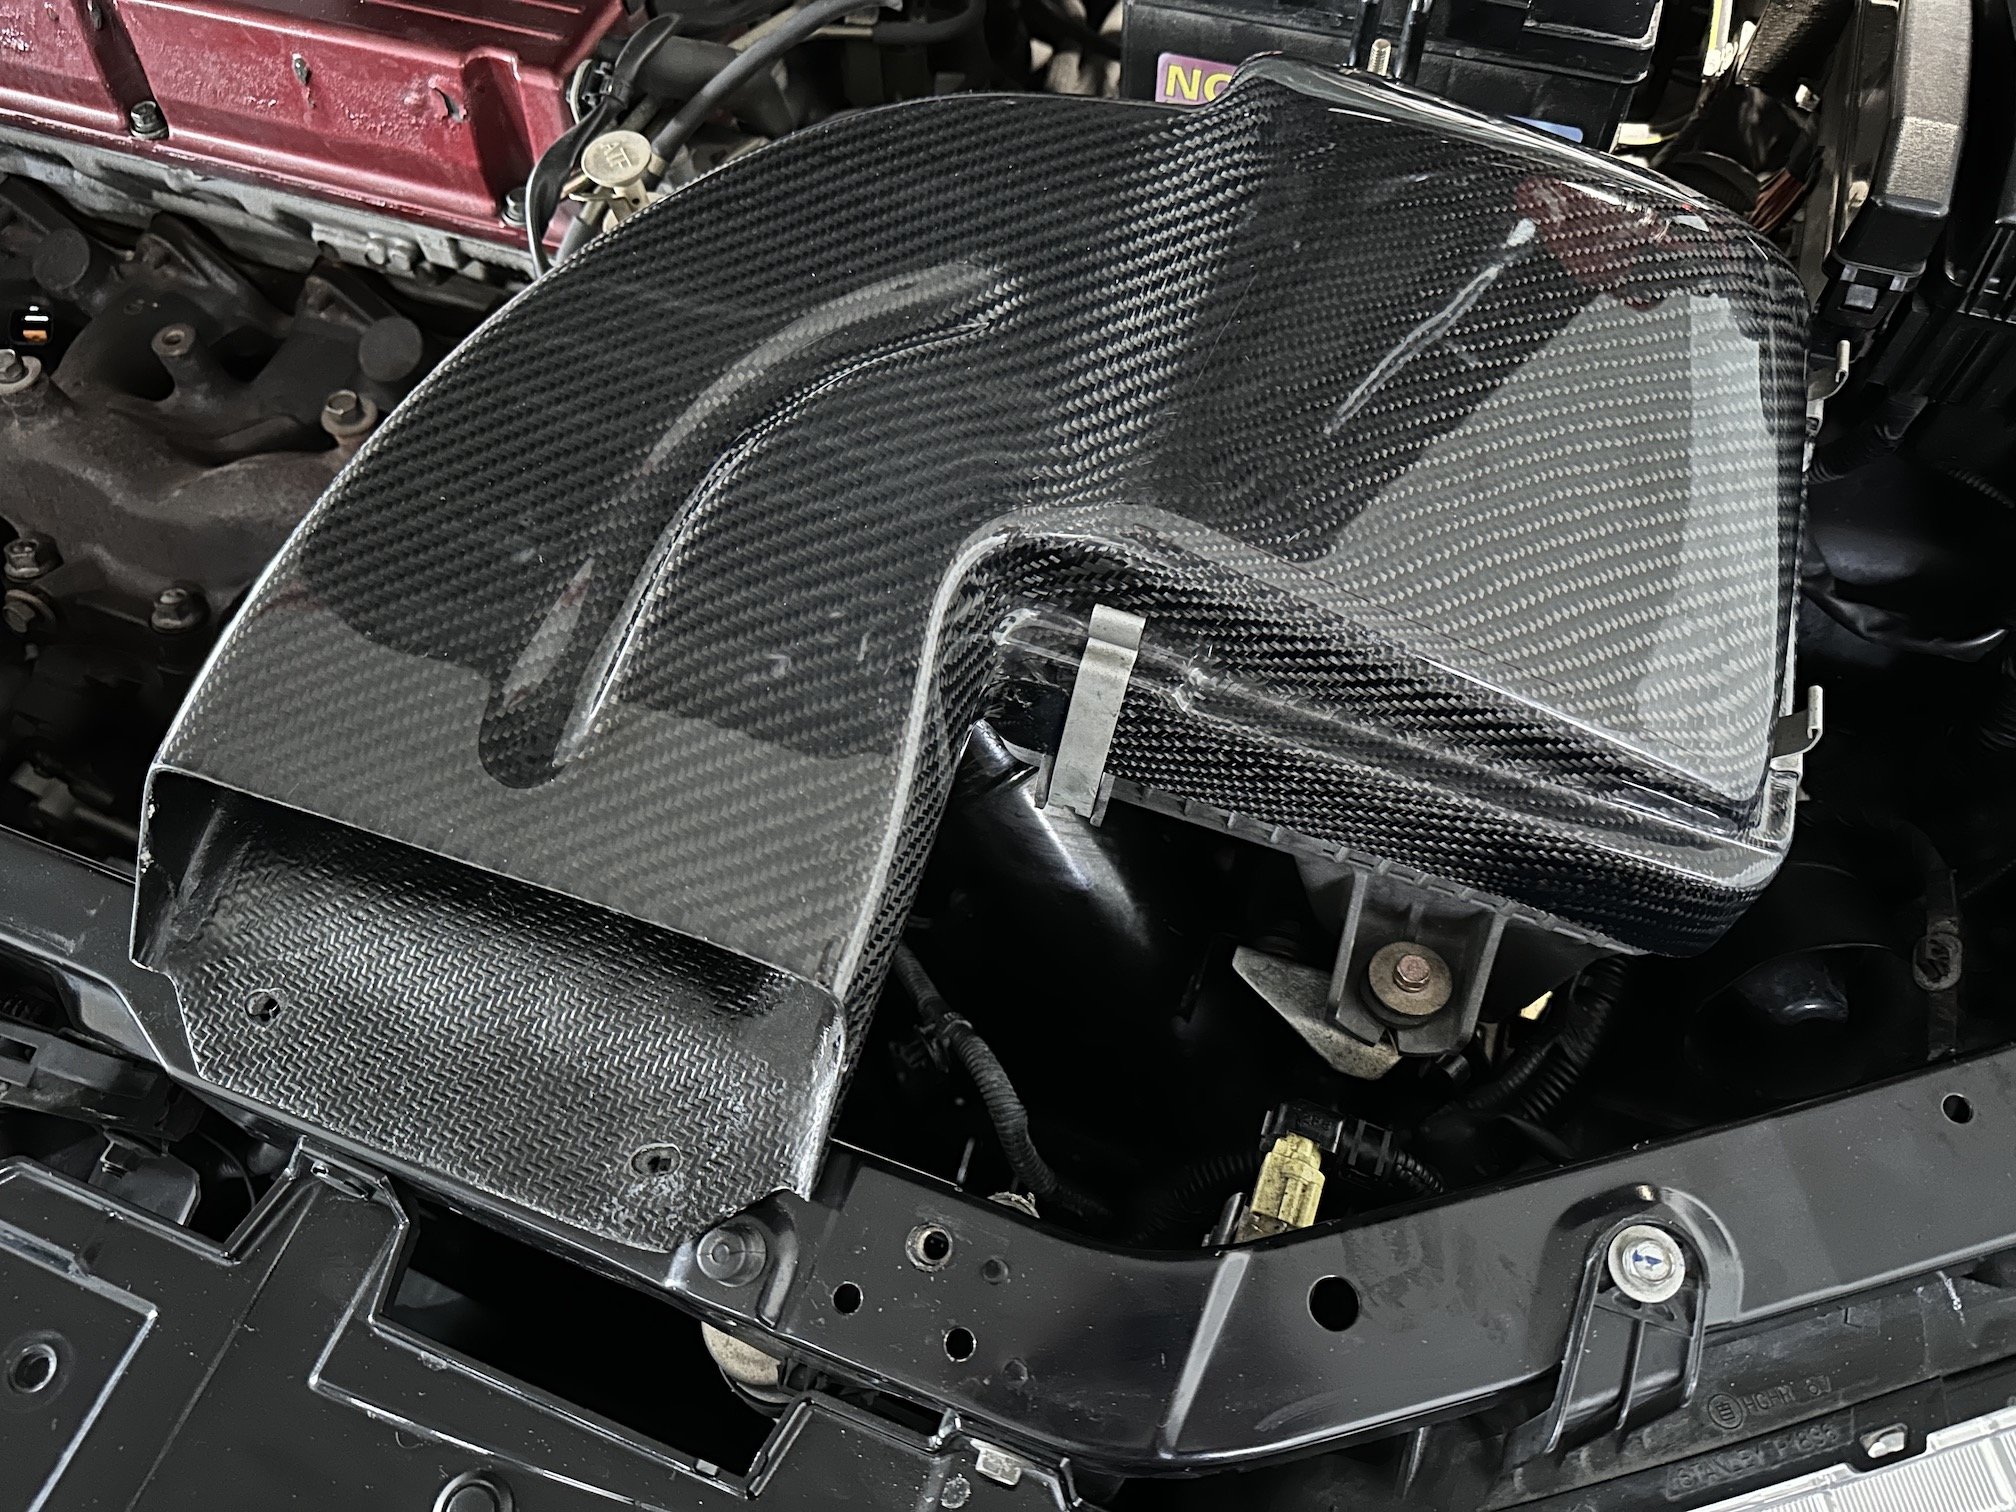
@mjrstar because I was worried my original pipe wouldn't fit the IX turbo I went and checked, and phew thank god it fits as if it's factory with no stretching. Maybe the inlet size difference is between Evo 4-6 & Evo 7-9 turbos? @ThePog if you ended up fitting the turbo to the DynaFari yet was there an inlet size difference between your old turbo and mine? The inlet pipe is definitely auto specific, it has more of a 60-75deg bend to clear the transmission and a little dimple right by the AFM to clear the inhibitor switch. As the M/T box pipe is more 45deg I was worried I would be left without a pipe that wouldn't work with both the IX M/T turbo and A/T box. Another thing that is auto specific is the air filter box bracket as it mounts the filter box at a slightly different angle (no idea why) and this necessitated a different air filter box lid and snorkel specific to the A/T models. The different air box angle prevented me from using the Ralliart one piece CF airbox lid and snorkel, so swapped on a M/T bracket I had picked up while in NZ. M/T on the left A/T on the right. In hindsight I may have got away with just bending the original bracket a little.
1 point
-
For what it’s worth… I’m a full time mechanic and a cheap bastard. I use a Ryobi 18v rattle gun at work, mainly because I already had batteries. I did have the cheaper brushed model that lasted 18 months until I wore it out. Took it back to Bunnings with no receipt and got a warranty claim. (Manufacture date is stamped on the tool). I paid the difference and got a “HP Blushless”. That meant I got a new 6 year warranty. I have used and abused it for a year so far without fault. I sure it’s not as great as a more expensive brand, but it does what it should. https://www.bunnings.co.nz/ryobi-18v-one-hp-brushless-mid-torque-impact-wrench-skin-only_p02948581 point
-
The thing is I have been 98% desk based for a while now, no time to even quote the workshop jobs, but I go down and do shit in the shed every night so still need the kit, and will need it for when the cad dries up and i can build stuff again. There was a discussion with the financial controller about whether I actually needed a drill, I said it would be exactly like having to live your normal life but without a bed.1 point
-
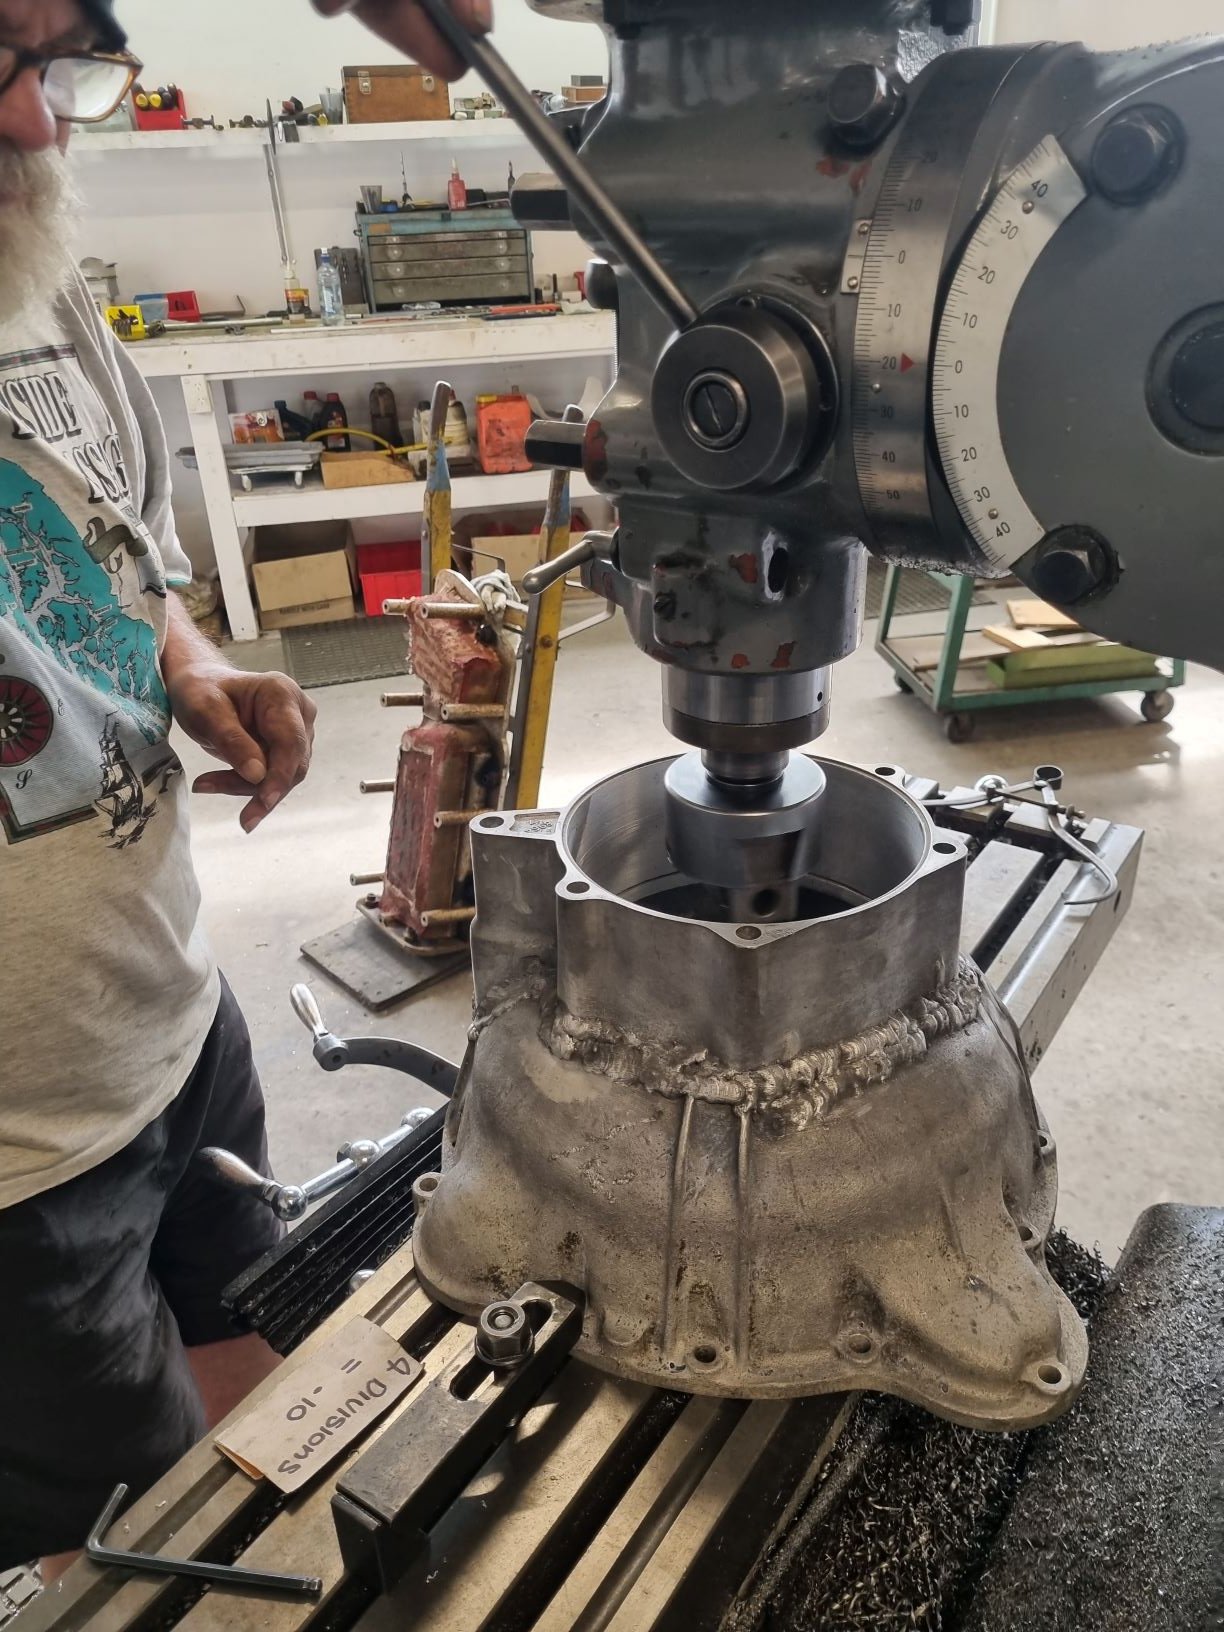
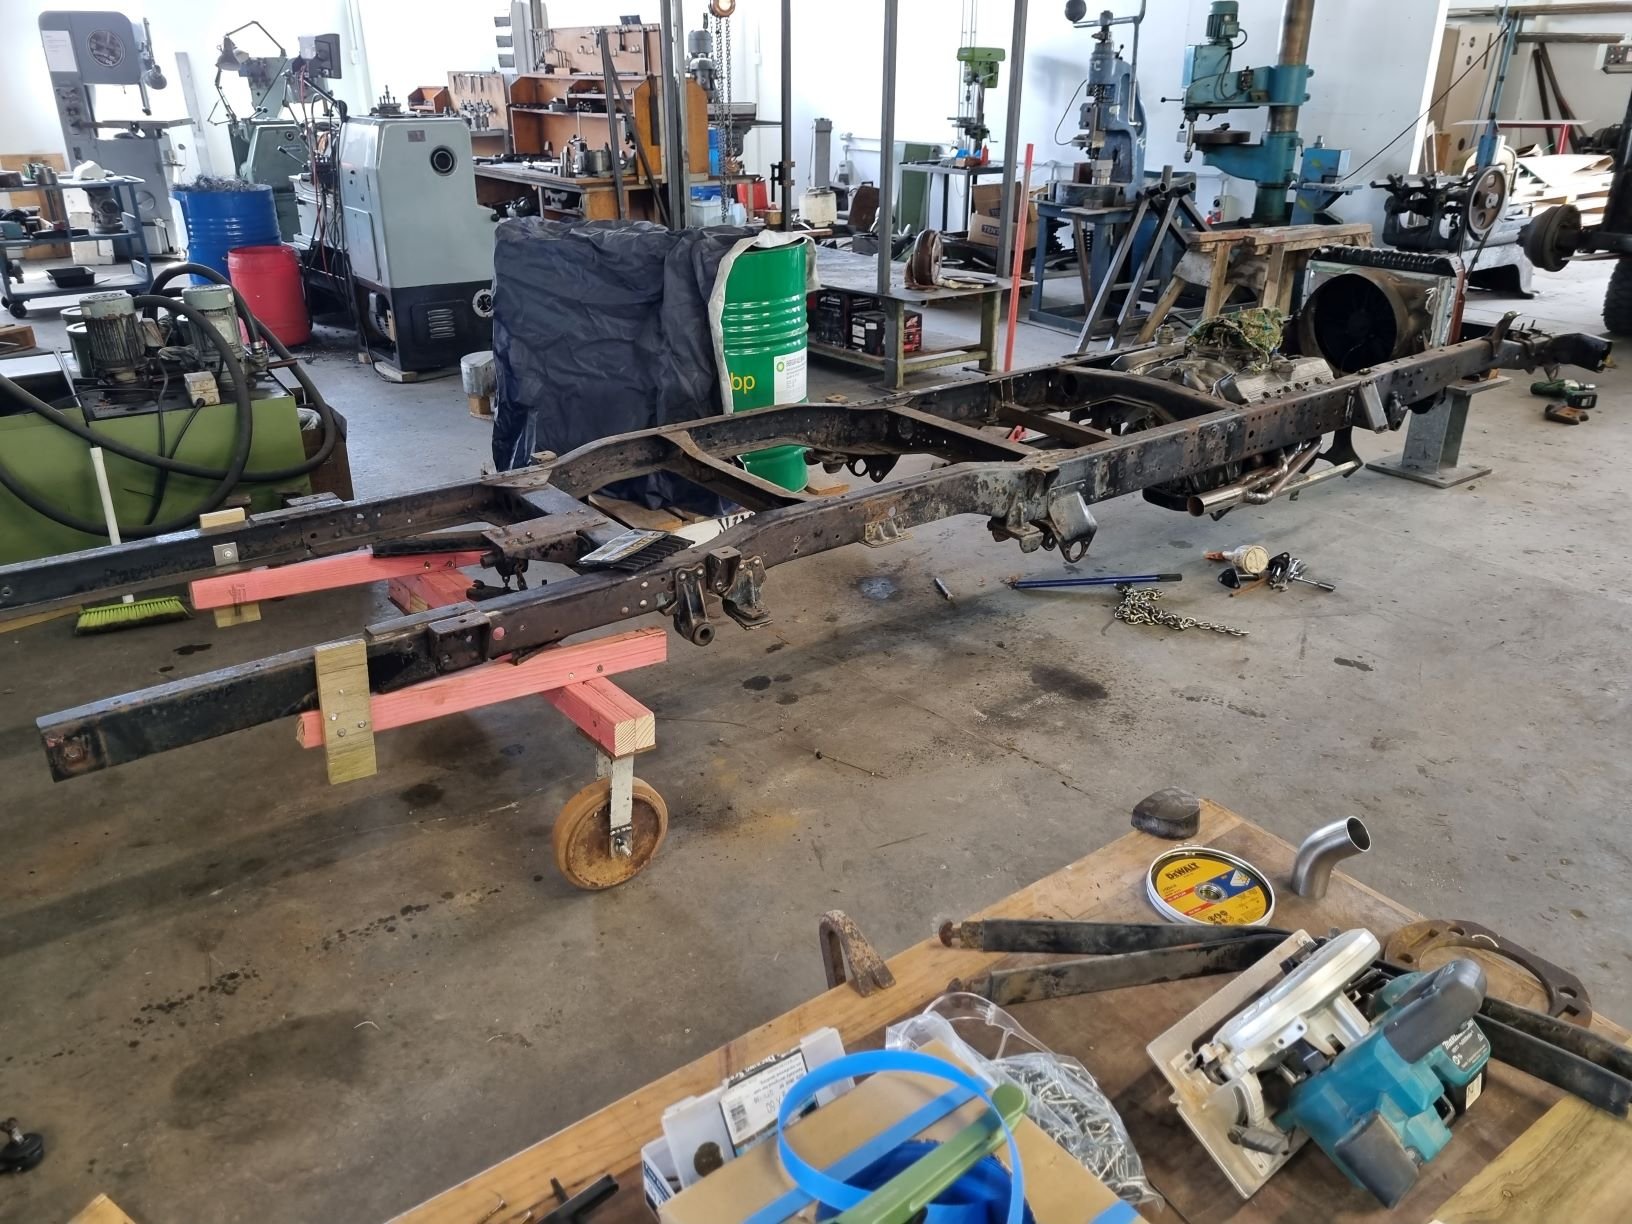
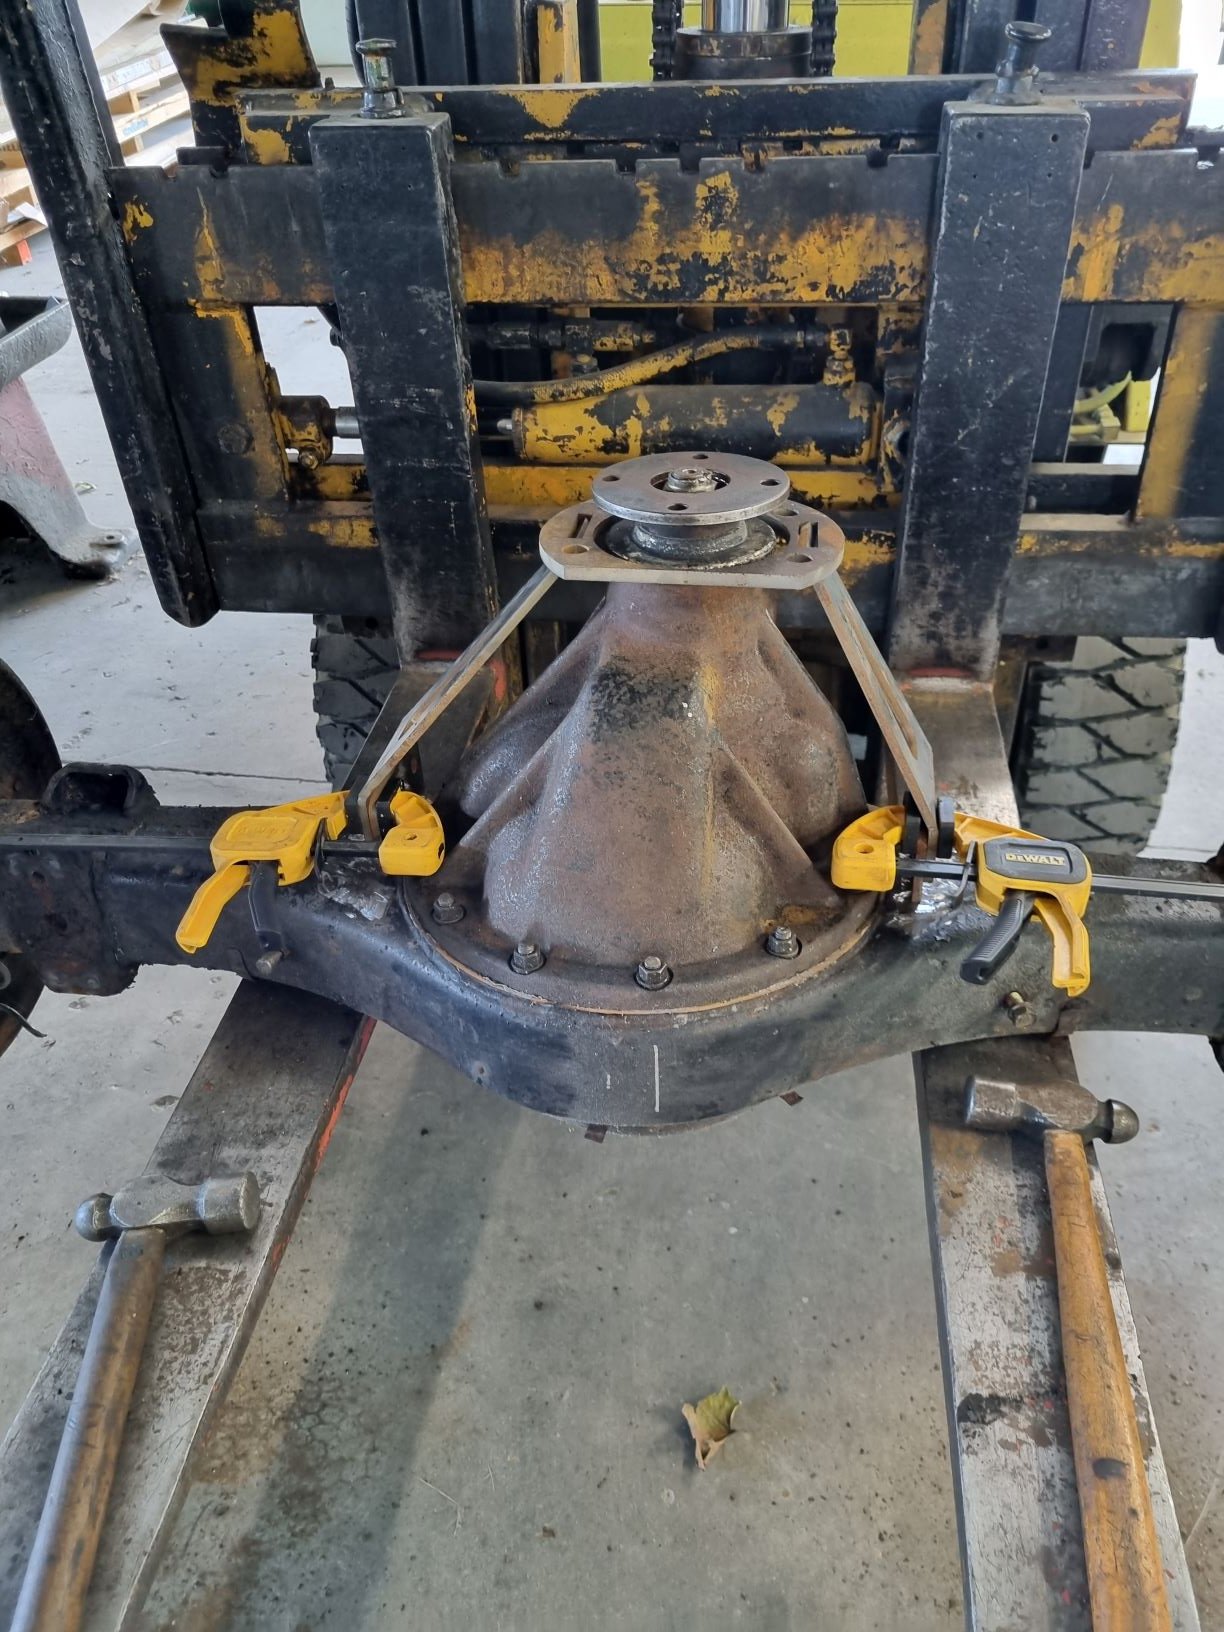
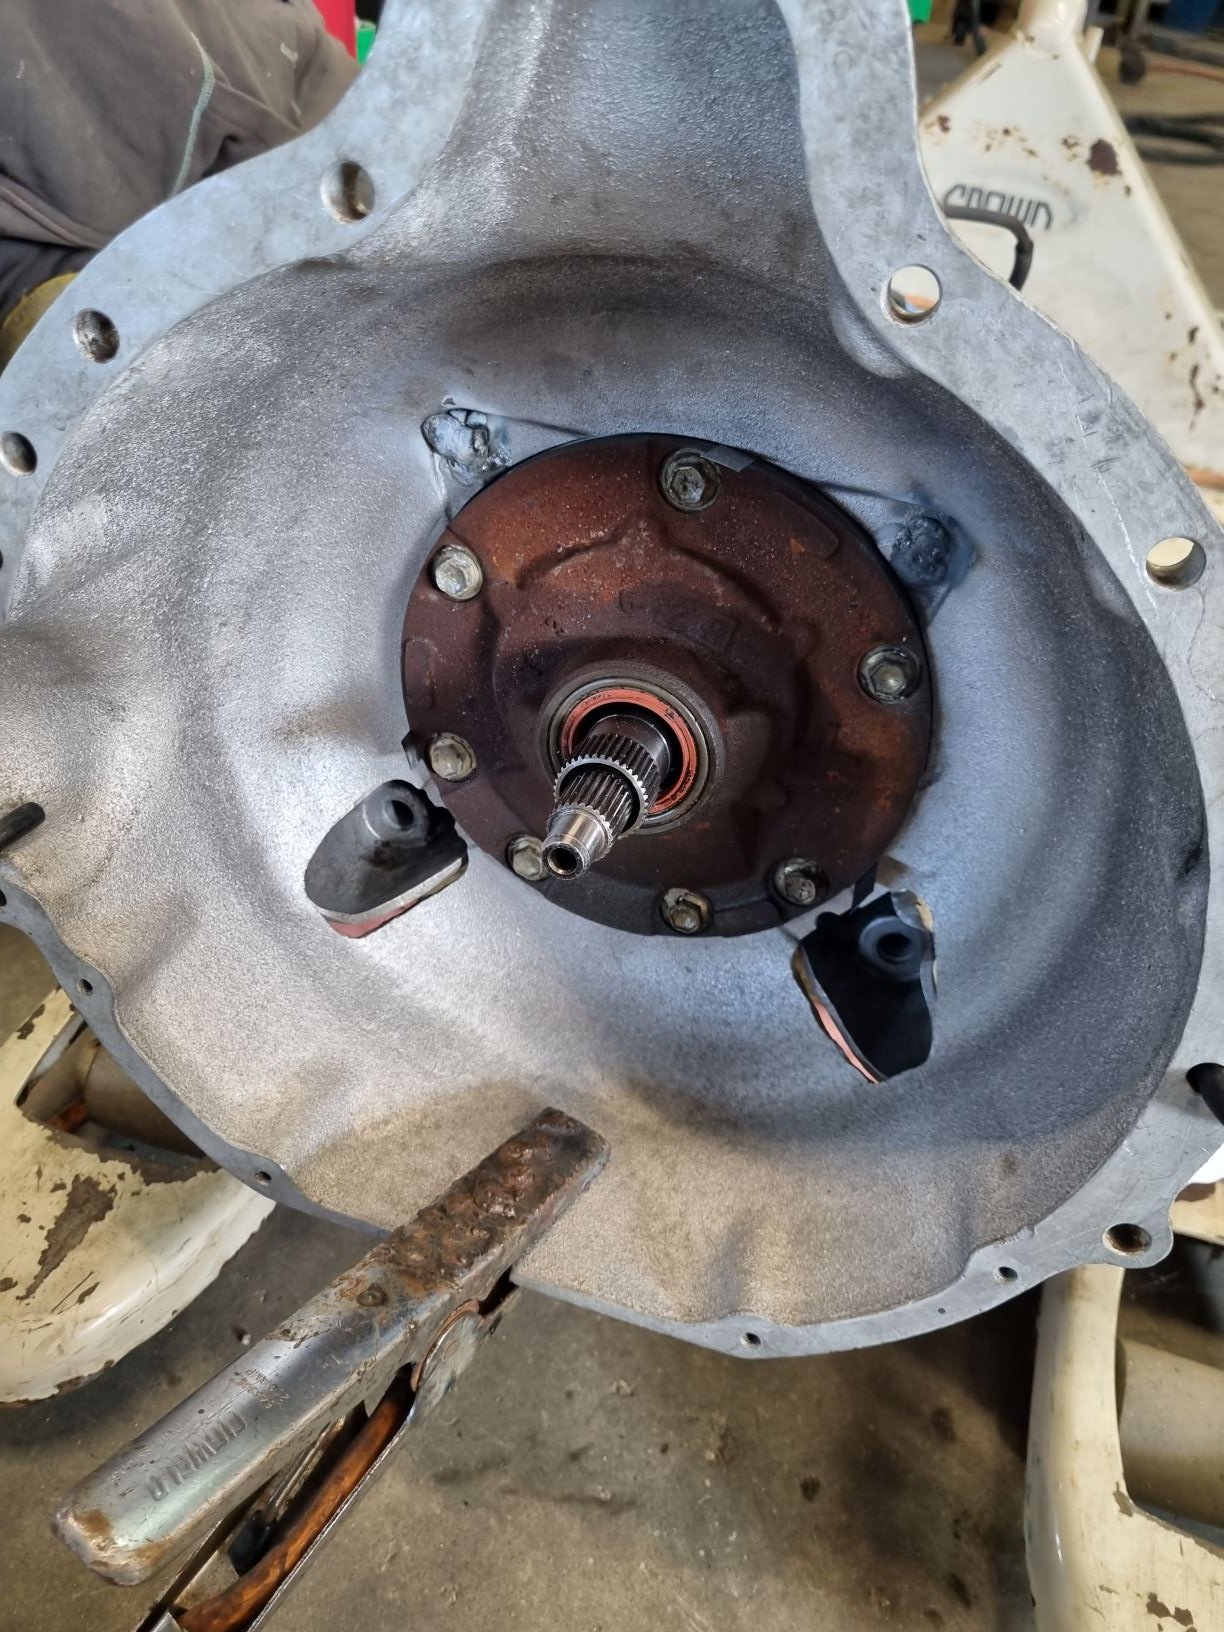
Carrying on, above pics arent quite the finished article but will get some more once the trans is all back together and happy. One of the shit things that many here will know about aluminium and welding is warpage. This thing did that shit in spades. So we ended up about 1mm oval. Enter fossil number 2, aka Wan-ye'. Wan-ye' is my business partner and a toolmaker of full dinosaur status. Showed him the shit and he decided offering it up on the mill and running a boring bar down it would sort. I was thinking lathe. Shot Wan-ye. He clocked up the top half, confirmed the 1mm ovality, then clocked the original bellhousing too and confirmed that,aside from ovality our feeler gauge trick was fucking bang-on. I was very glad to have props from him on this. We mic'd up the trans and set to with the boring bar. We figured if we got 3 points of 'low where material was removed we it would confirm we were clocked up good and that we werent removing too much. It all worked out real good. Pics of welding torch I missed in post above for interest also. Last bits of this update, I yanked the diff out, made a frame to keep chassis rolling, and started toying with handbrake things further. Think I have a bit of a plan here now. Going to Disk Brake Ive decided, found some mechanical calipers from a late 70s/early80s chev that look perfect. If anyone has some of these let me know as Id rather find S/H than pay $300 out of the states... https://www.speedwaymotors.com/1978-Up-GM-Metric-Emergency-Brake-Caliper-Kit,379663.html I havent figured out exactly what model they came on... And just because I love jumping around all over the shop like a schizo, I got back on to body-hole related matters and finished off some welding there. This bit is kinda feeling close now. I wanna finish all the detail around this, get some paint on steel bits, glue some flashings in place then get on to starting the engine cover soonish so it feels like at least on body whole is sealed up. So yeah, next plans are to finish bellhousing tidy up, bolt trans to donk and then finish gbox x-member and driveshaft hoop, both of which have most bits fabbed up for - was just awaiting belhousing goodness. Then its on to diff/handbrake matters which will be a little bit of a head scratcher, and also I want to finish the exhaust. This would effectively render the entire chassis and associated bits complete and ready for blasting and painting.... There is however one major problem with that thinking. Im fucking broke. So I might delay exhaust and handbrake matters and move on to the roof of the box body itself. There are 4000 rivets to drill and replace, and all manner of gluing stuff for weather tightness which will not cost actual money. Also starting paint stripping up there too. Ill keep myself occupied.
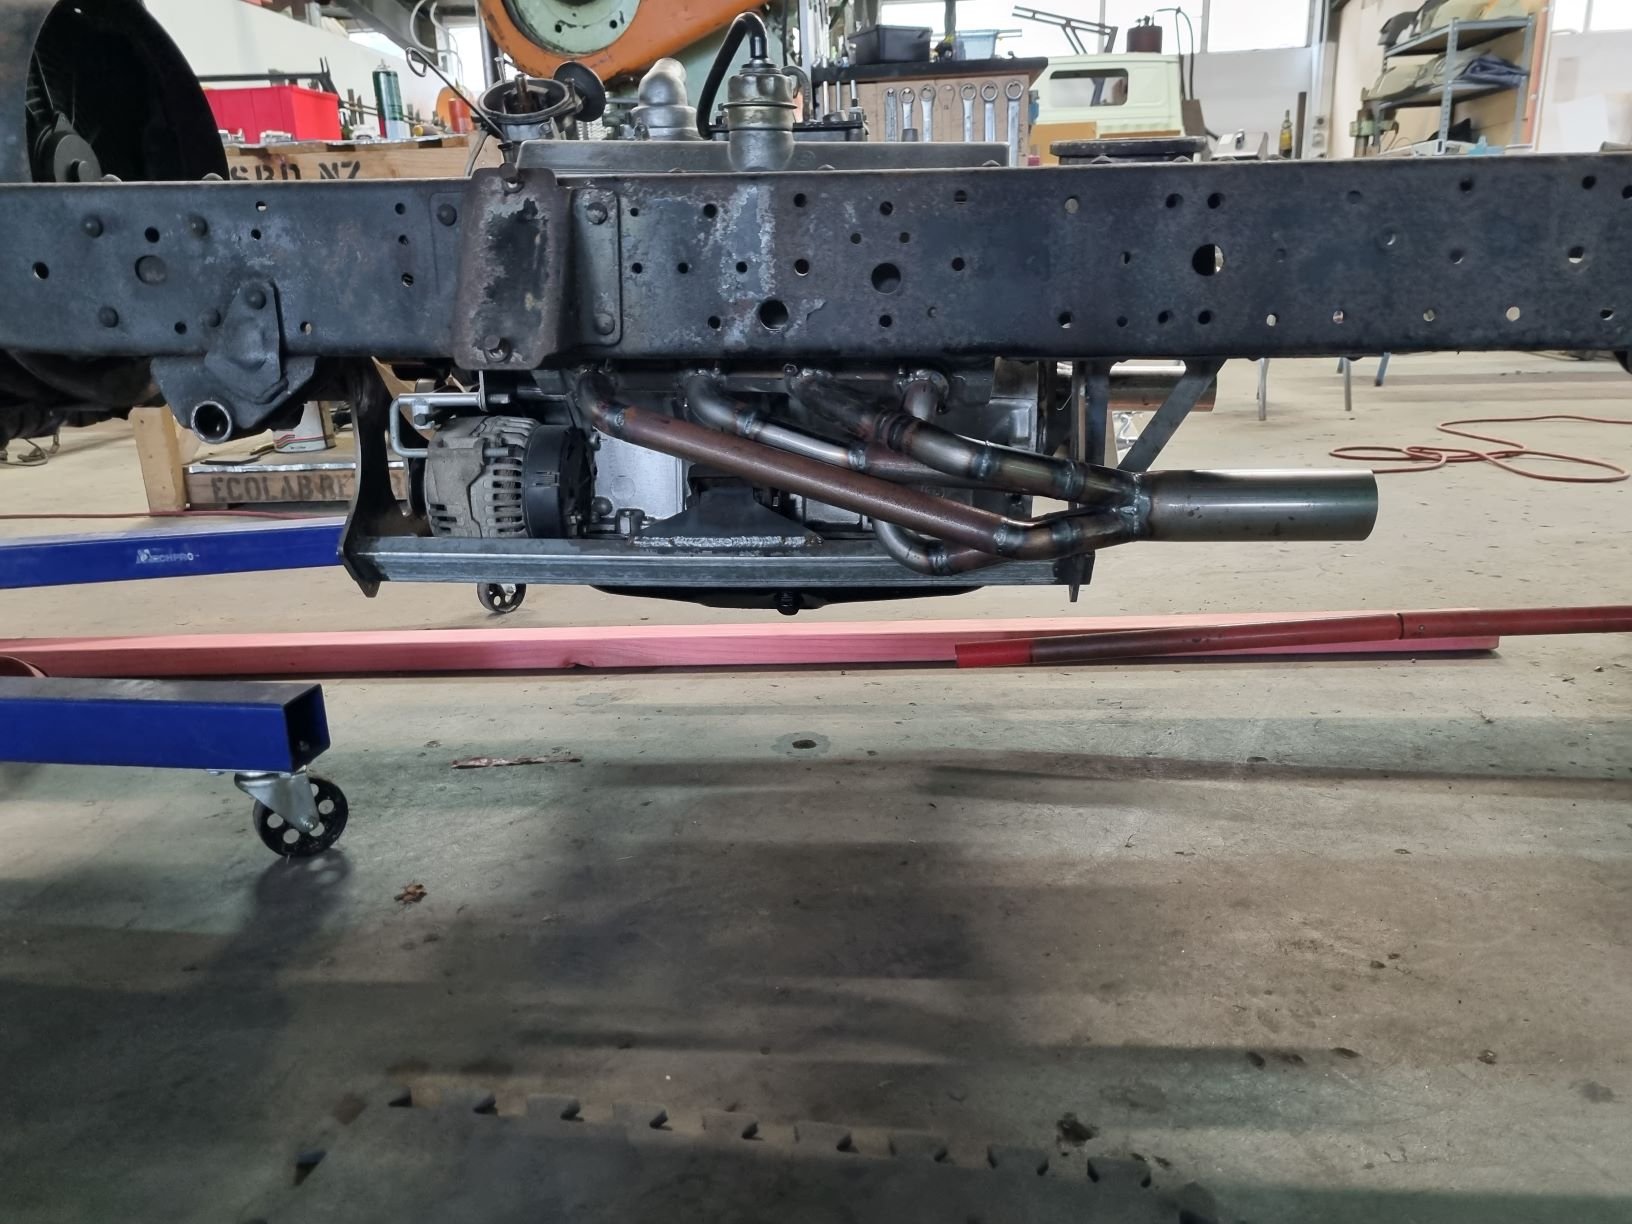
1 point
-
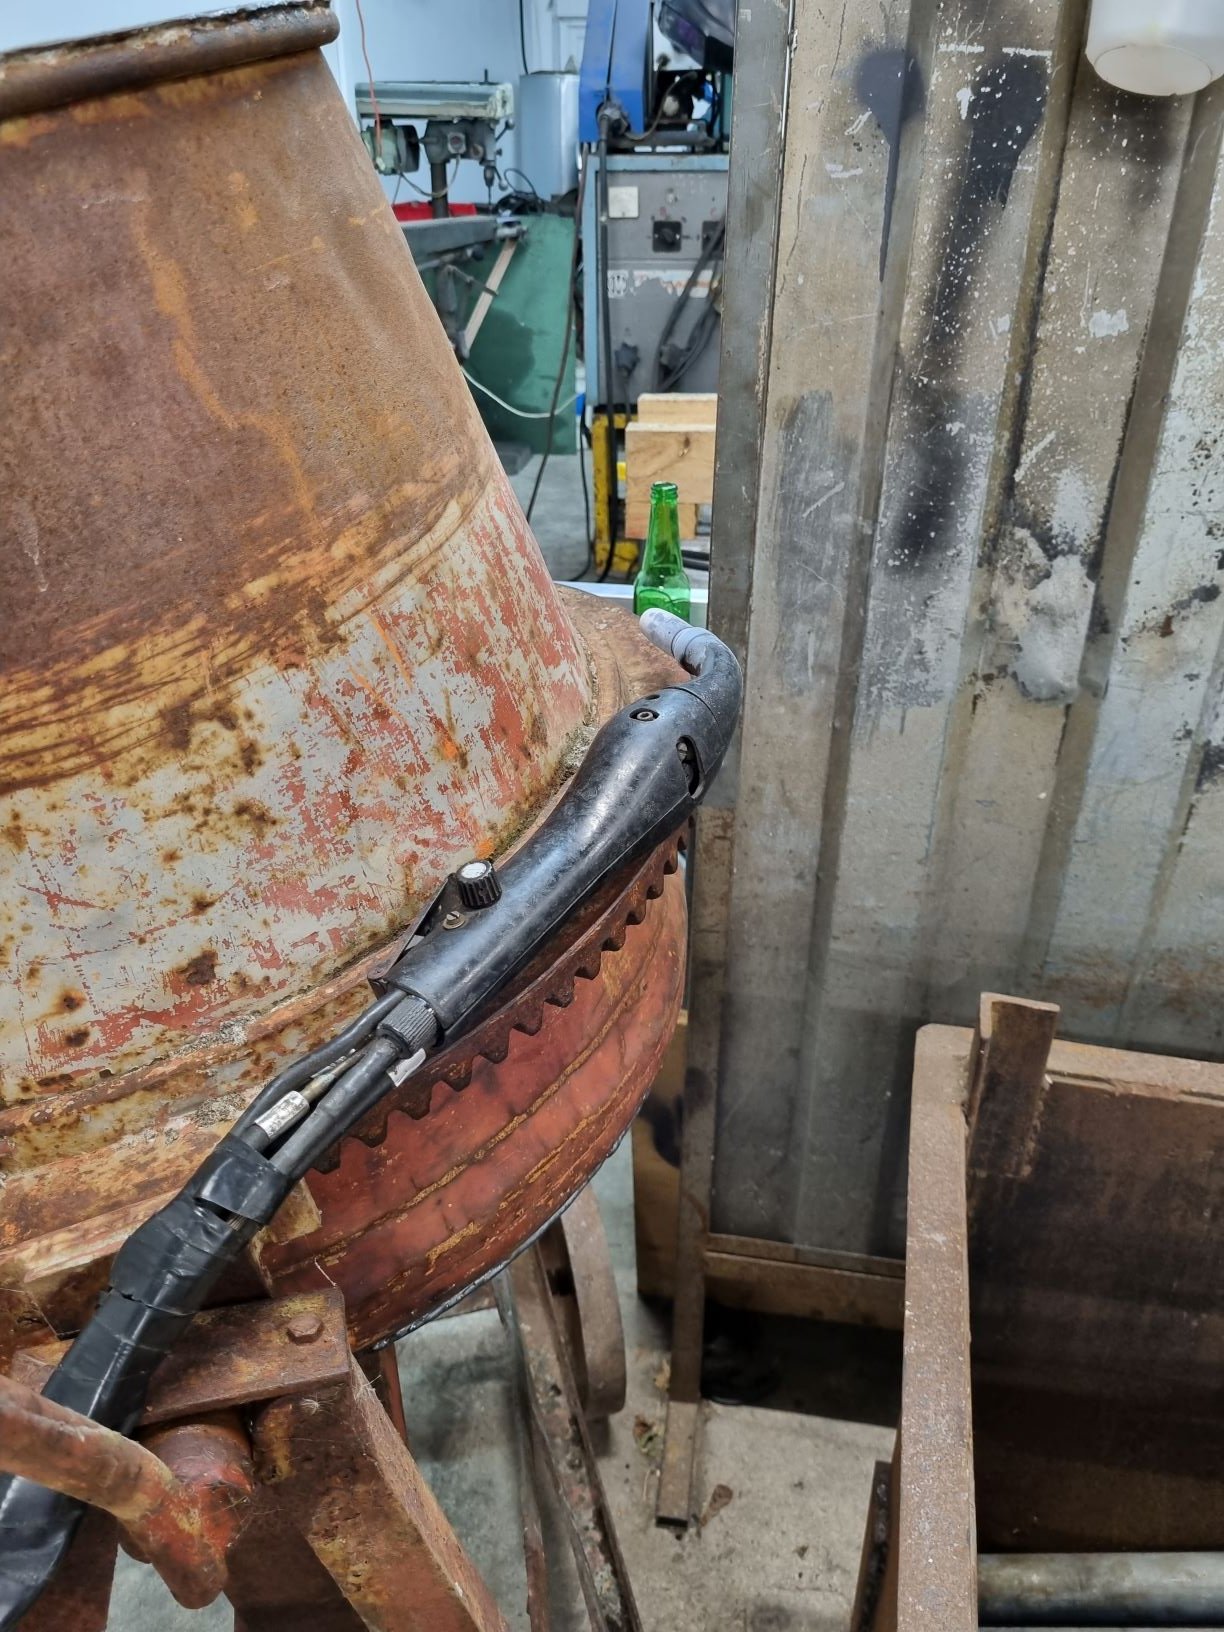
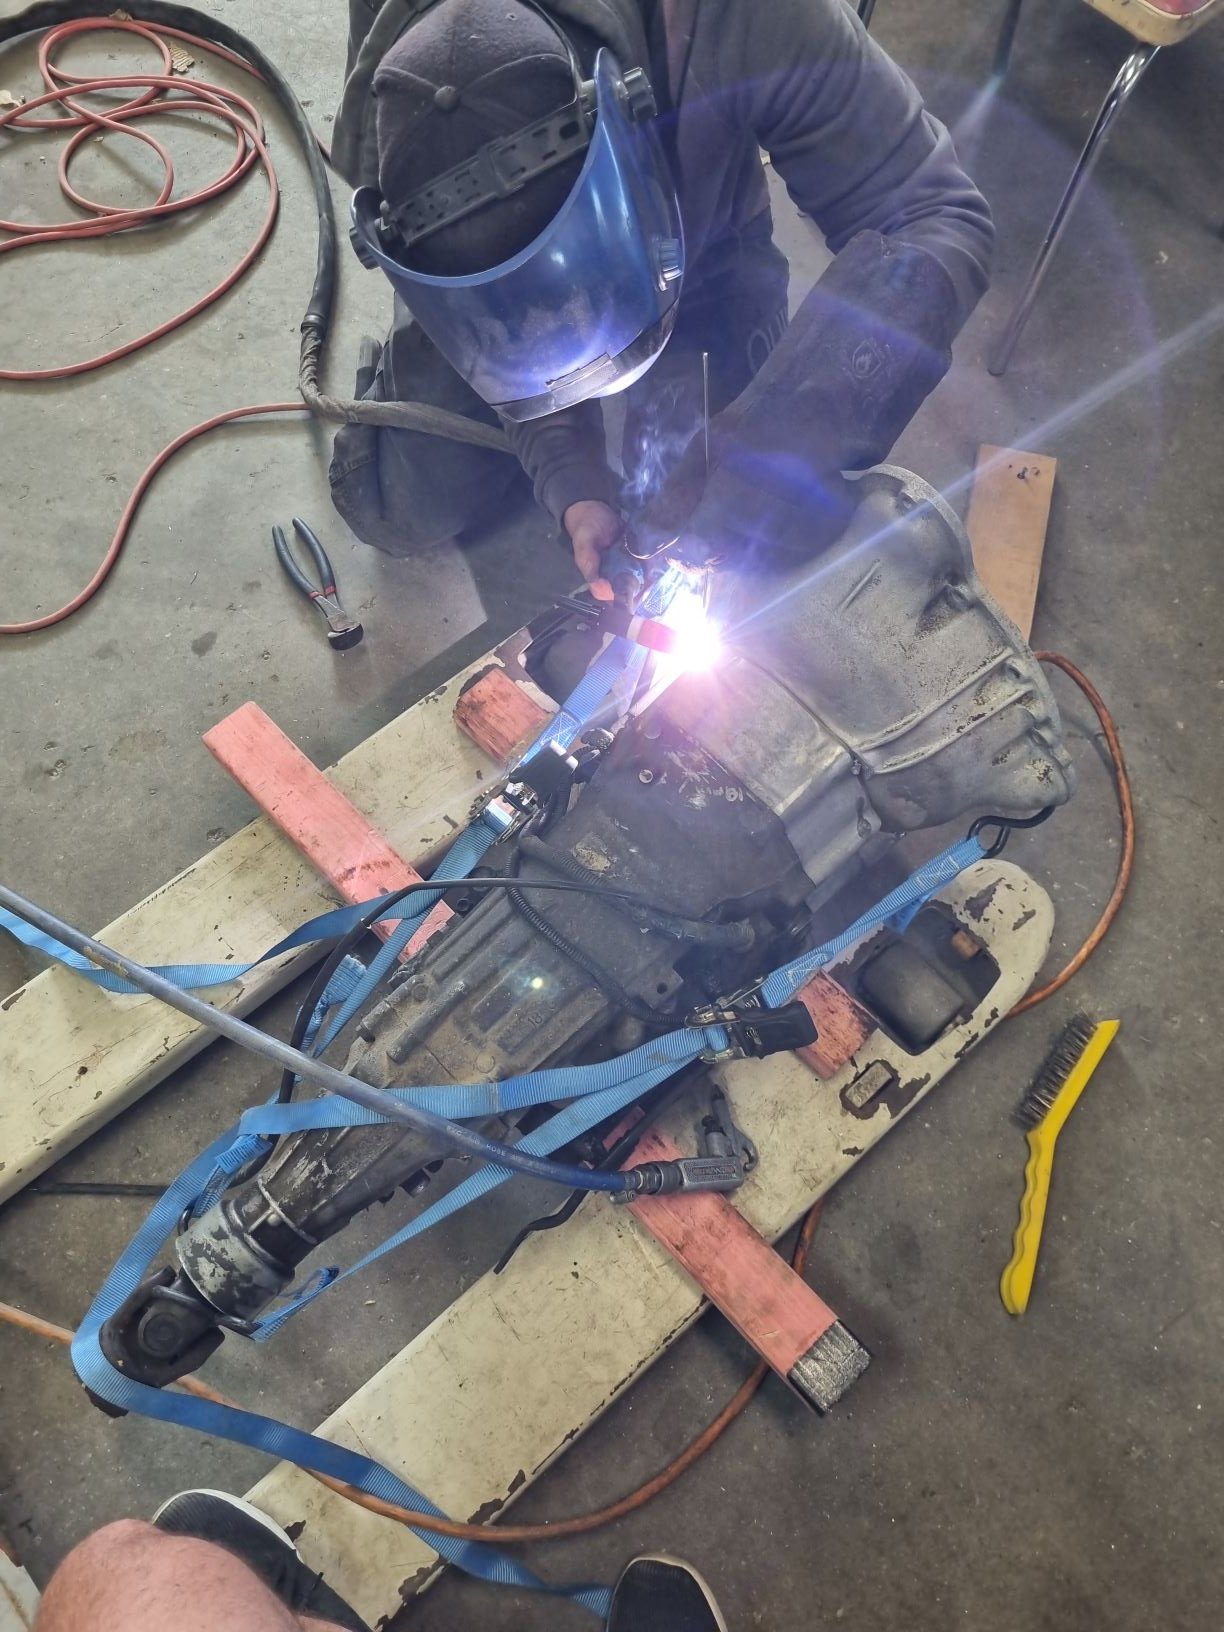
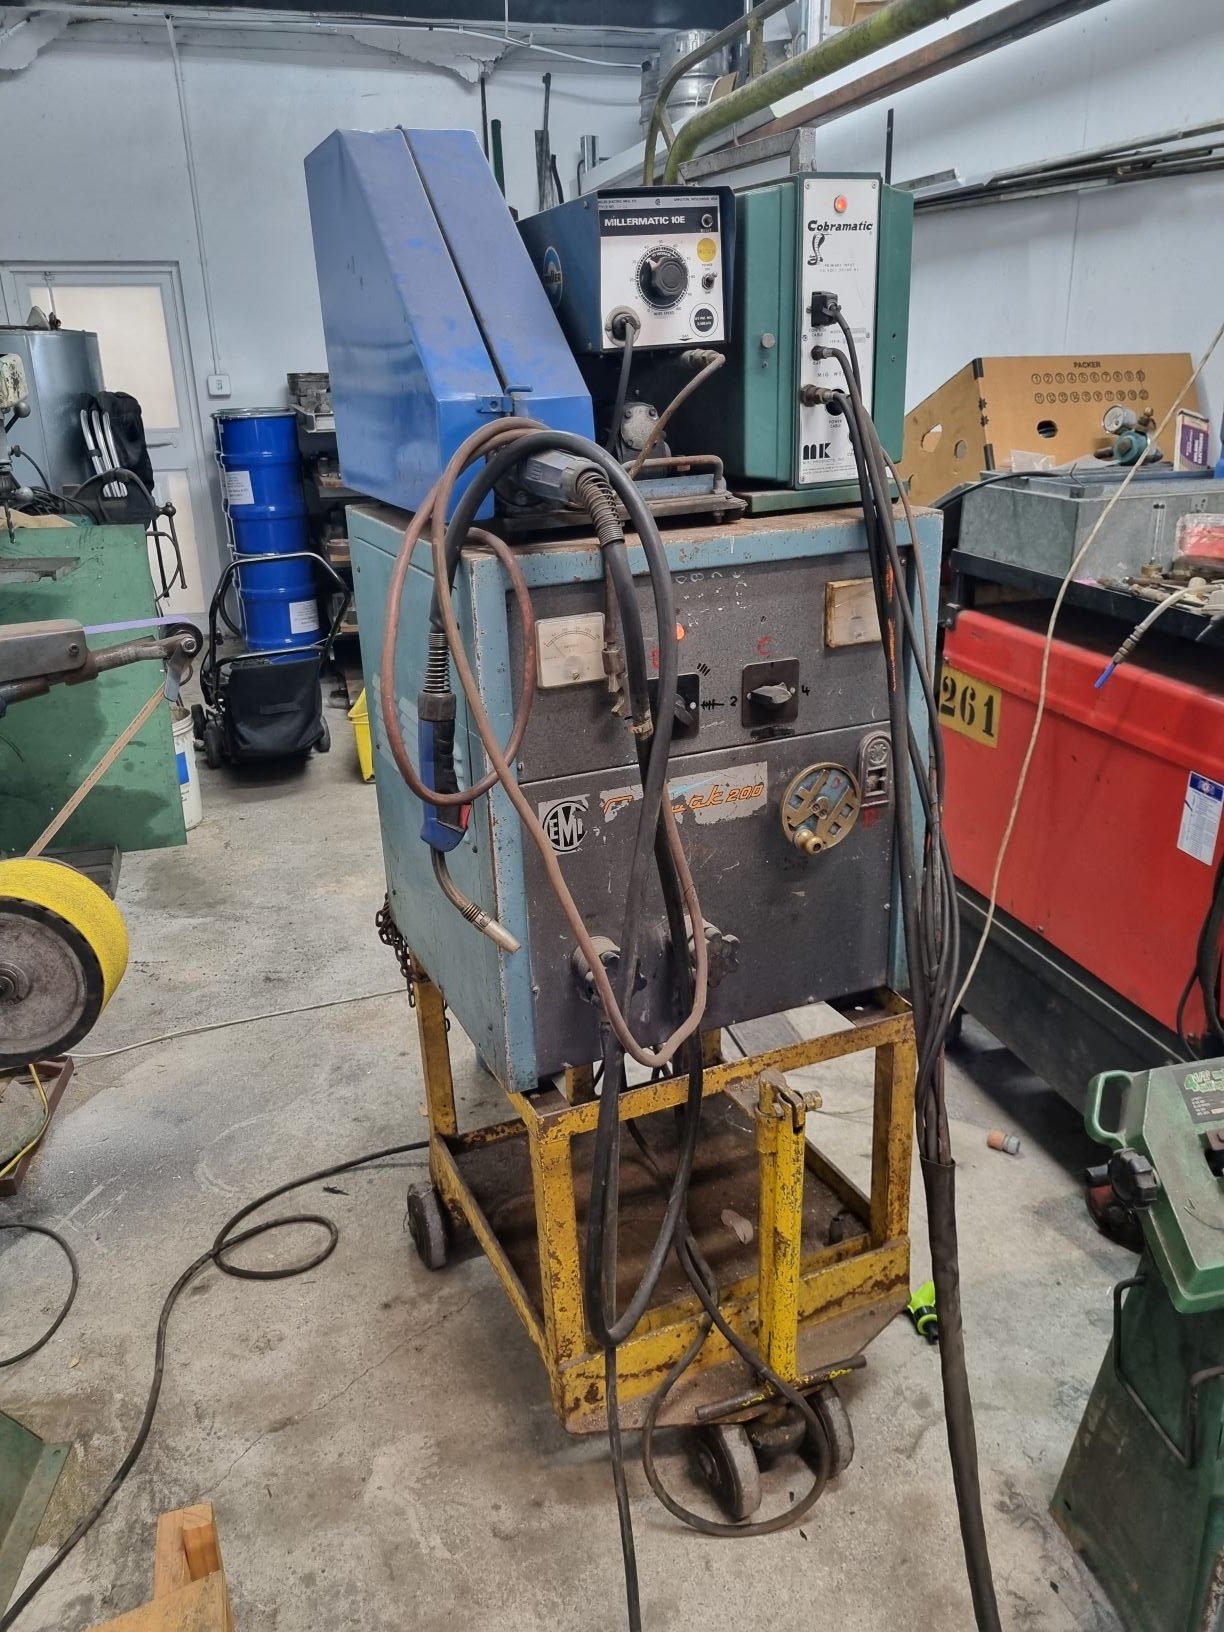
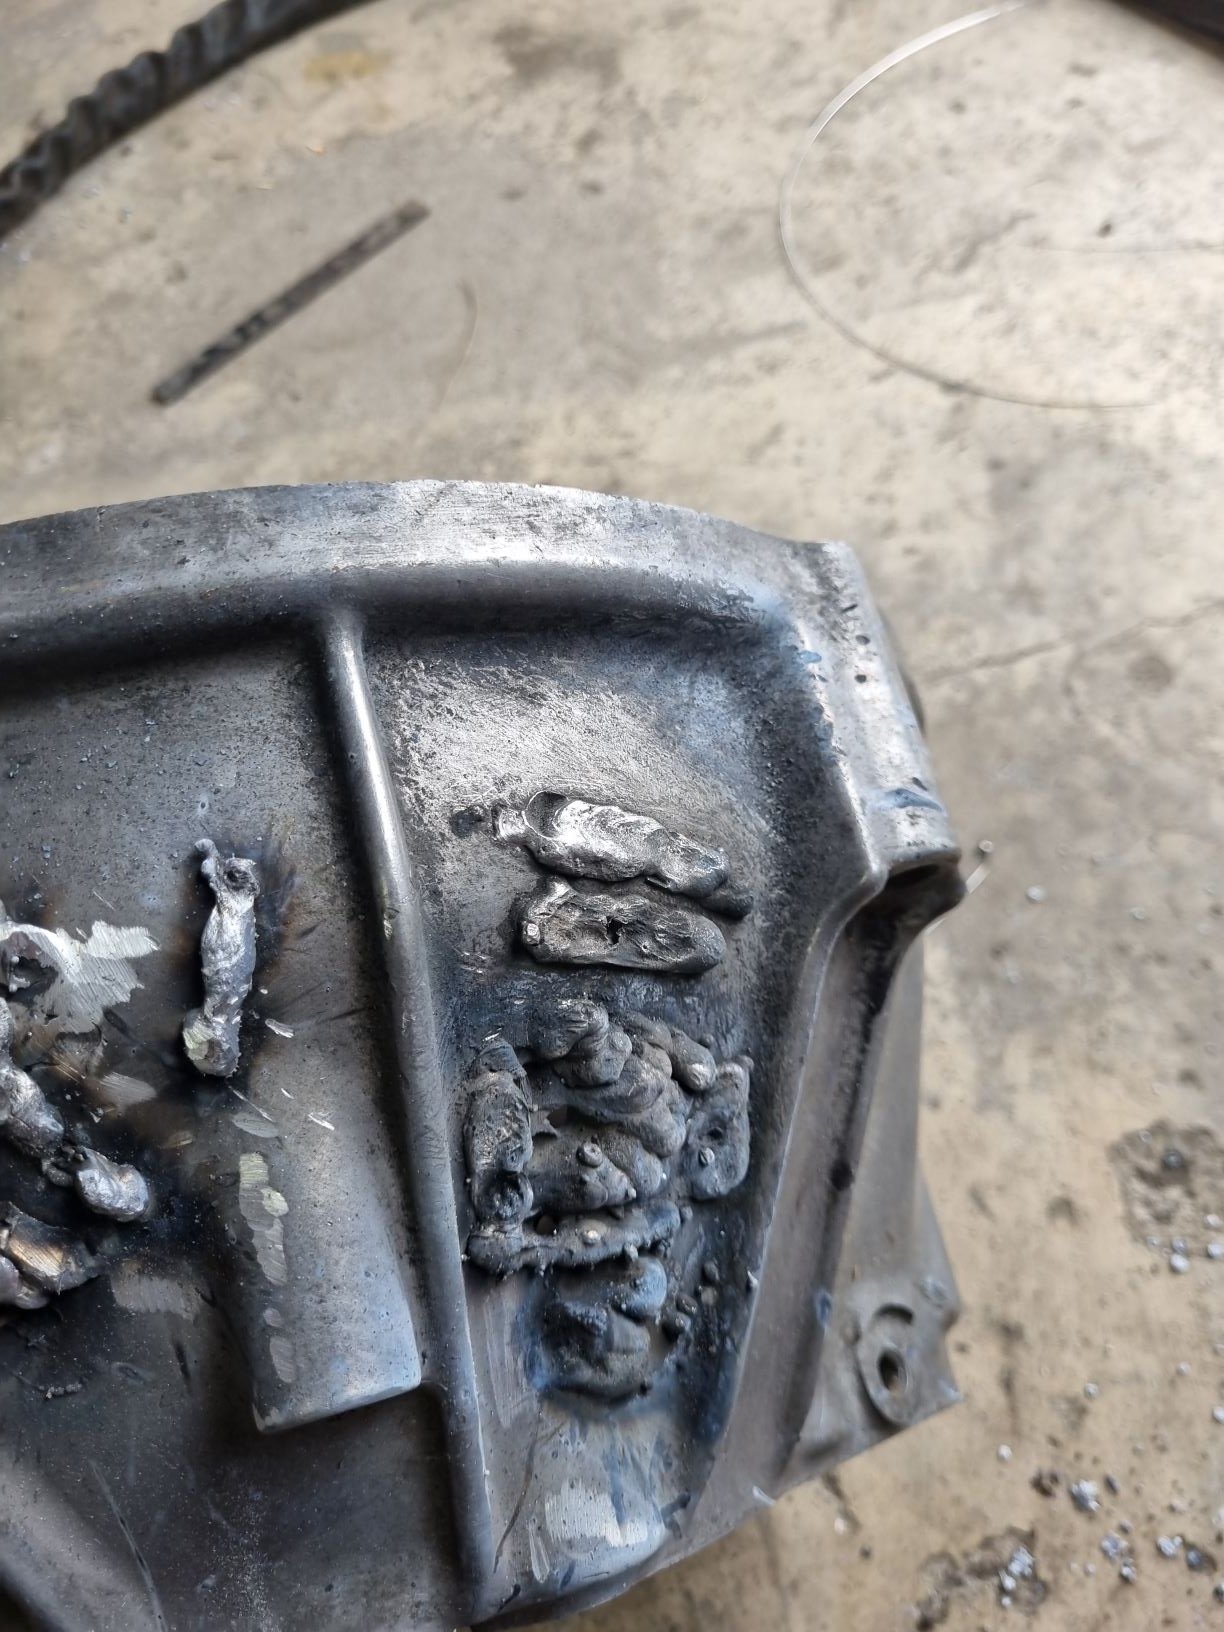
Alright time for another sporadic update. Ive just had the week off with Covid and only just now feeling like Im not half dead. wah wah, its my first time so Im a bit of a bitch about it. Anyway,still waiting for that negative RAT test, have cleaned my house as much as I care to and talked to my dog more than any sane person should. Time to entertain the masses with my somewhat productive, slightly rough but achieving foibles of Dyna. Left off last time with headers completed/near completed. Pic of other side here. Looks like it should. I became a little unhappy with my welds on header number one as I was lazy and used the mig and it was kinda playing up. So I ground back the welds and fuse-tig'd over them to make it look a little more pleasing. Passenger side was def nicer off the torch, so to speak. My aforementioned conundrum thereafter was that my header collector was a bit too close to my fuel tank for my liking. Then it dawned on me that the original tank and tank mounts had been fucked with, so I went and revisited those. Viola, they had these bits of C-channel welded on the back side to space them off the Chassis and I actually had enough room to space the tank out this far without fouling body.. As luck would also have it I happened to have an 8m length of the exact same C-channel in one of the steel racks randomly. Fate has its ways, so I sorted that, and welded captive studs to make assembly dead easy too. shitloads of room now bae. Next up started thinking Gearbox crossmember. This is work in progress and I realise I need more pics of what I have done, but this should actually be finished soon so Ill full update that in due course along with Driveshaft Hoop, sneak preview of both below. So the big milestone however was advancing things on the bellhousing front. Previously had got to the state of two pieces requiring a civil union. Some potential ugliness owing to much actual roughness in the cutting process, requiring potentially quite a lot of hot-melt gluing to fill the gaps. Anyway, bit of interweb research took me down the wormhole of appropriate filler rods for welding Cast Alloy. 4043 and 5356 both came up so I went and got a handful of 4043 rods from the local supplier. Ive done heaps of Ally Tig many years ago, but on clean extrusion not durty cast, so I wasnt entirely confident in this space.... My worker however was keen to have a crack though. So we set the two pieces up on the trans as a jig - there was a 0.5mm diameter difference between the two bits so in order to get near perfect alignment we cut up some feeler blades and stuffed them around the edges in 3 spots, pulled everything up with a ratchet strap and had at it. It was fucking hard, like really fucking hard, to get anything resembling penetration. It probably took him the better part of an hour to get 4 solid tacks on an man did they look like shit. So he messaged his old work mates down at Global Stainless in Hawera - who are frankly fucking gods when it comes to welding/fab etc (look them up) and they all just laughed, debated over the alloy etc, waxed about how cunty it was, wished us luck etc. We nearly gave in and took it to them at this point. Then we remembered something.... See about 5 years ago I brought a whole machine shop, and a bunch of random tools. It was, in hindsight the score of a lifetime. I wont piss on about it, its embarrassing. But suffice to say, to this day, case in point, it still continues to deliver the goods randomly when we get in the poo. One of these particular gems that was wrapped up in the sale was this hairy old Induction welder from 1642. It weighs about 400kg. It had the plug cut off it, which we assumed was done for a reason, but on talking to one of the old fossils that worked there for 300 years, he said it was still all good. My sparky didnt want to know about it, but gave it a courtesy glance under the covers and couldnt see much scary there. In fact, on numerous occasions when talking to the old fossil over the years he always said to me, NEVER SELL THAT WELDER. About a year ago I considered it, but I am quite lazy. And I thought It would probably fetch more as scrap due to the massive copper windings in it. Anyway, by fuck was I glad I didnt. So we fired the old bitch up and endlessly twiddles knobs until it started laying beads on an old bellhousing I had laying about. A few things to note about the welder. It has a 10m long torch lead, with a really cool spool gun type torch. We checked the alloy in it, turns out it was 5356... this was used in an old toy factory that used to make cast aluminium dies (Fun-ho here in Inglewood) so, yeah shits starting to make sense. Remember to listen to silly old cunts, they might be silly and old, but they know shit and that 2 hours chewing your ear off is always full of gems. Anyway, it started a bit ugly (actually kinda a lot ugly) but we keep fine tuning the inductance and the thing started signing, and more importantly you could feel and see it burning in to both halves of the bellhousing. The end result is not what anyone would call pretty, but its 100% bonded and totally servicable, and will prob look fine once I hit it with some paint. It took 3 full laps to get enough weld that I was happy. Pics be splainin.
1 point
-
I worked hard towards firing it up the other day but this didn’t happen because the fuel pump started pissing fuel all over the floor. I’ve ordered another. In other installation related news, the exhaust suddenly doesn’t fit properly anymore. I blame the new engine and gearbox mounts for raising the whole lot up, but principally I blame a previous bodger for WELDING the front slip joint to the downpipe so adjustments are not possible. The whole exhaust wants replacing at some stage anyway because 38mm press bent pipe is not ok, OK? In other news, this follwed me home on a trailer. PARTS CAR! She’s a 1969 125 Special hence the stainless wheel arch trims and other bling. The above is its good side… bad side: There are basically no usable body panels. A buddy of mine wants the front cut to use as a pattern for fixing his (apparently really bad with some bits missing so needs a sample to build replacements) The interior is mouldy and yuck but has decent perforated head lining and a cool centre console thing with gauges that only seem to appear in mk1 Specials. Incredibly the dash top has fewer cracks than some road going 125’s I’ve seen which is some feat for having been parked in a paddock for 10 years. Plans are to harvest trim, bumpers, door handles and catches, dashboard, window regs, any undamaged glass. All suspension, diff, driveshaft and 5 speed box (there’s no engine) and importantly the transmission tunnel which will aid future 5 speed conversion. The rest minus front cut will be scrapped.
1 point
-
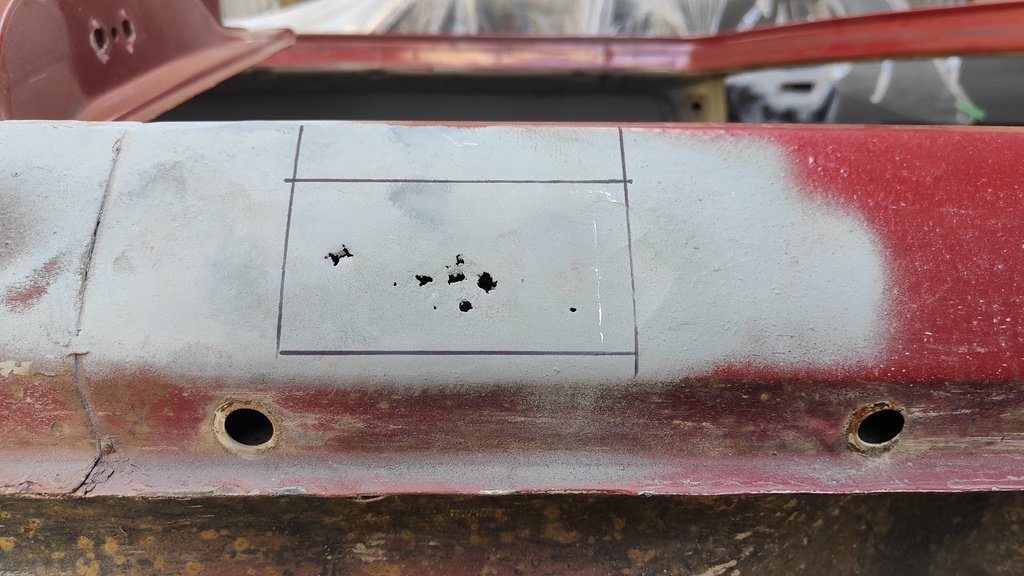
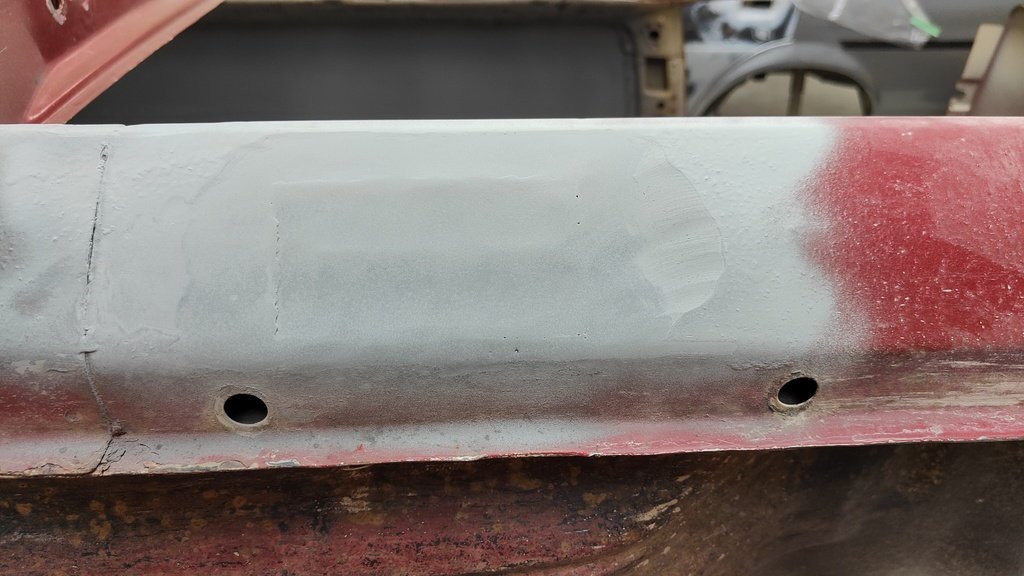
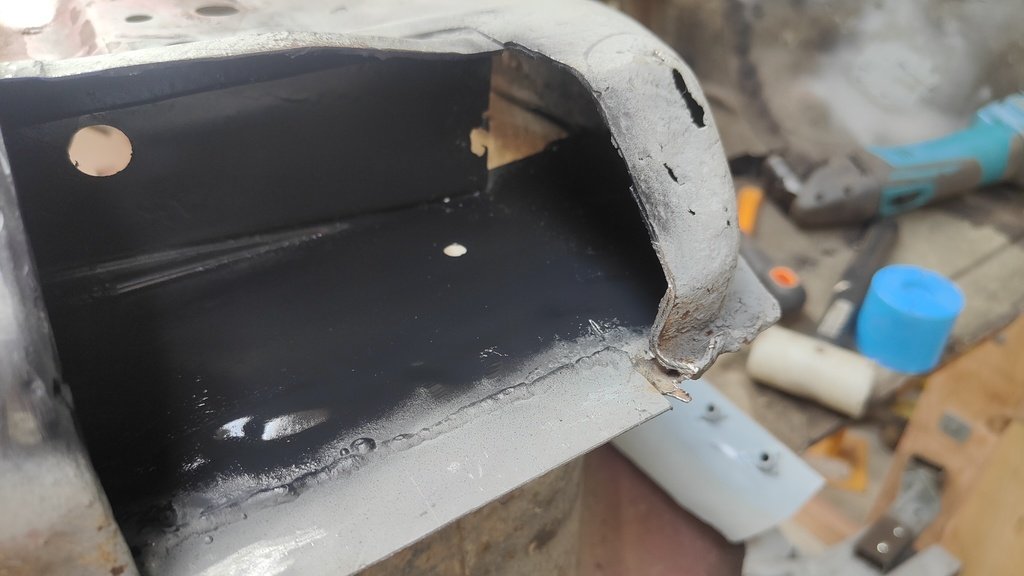
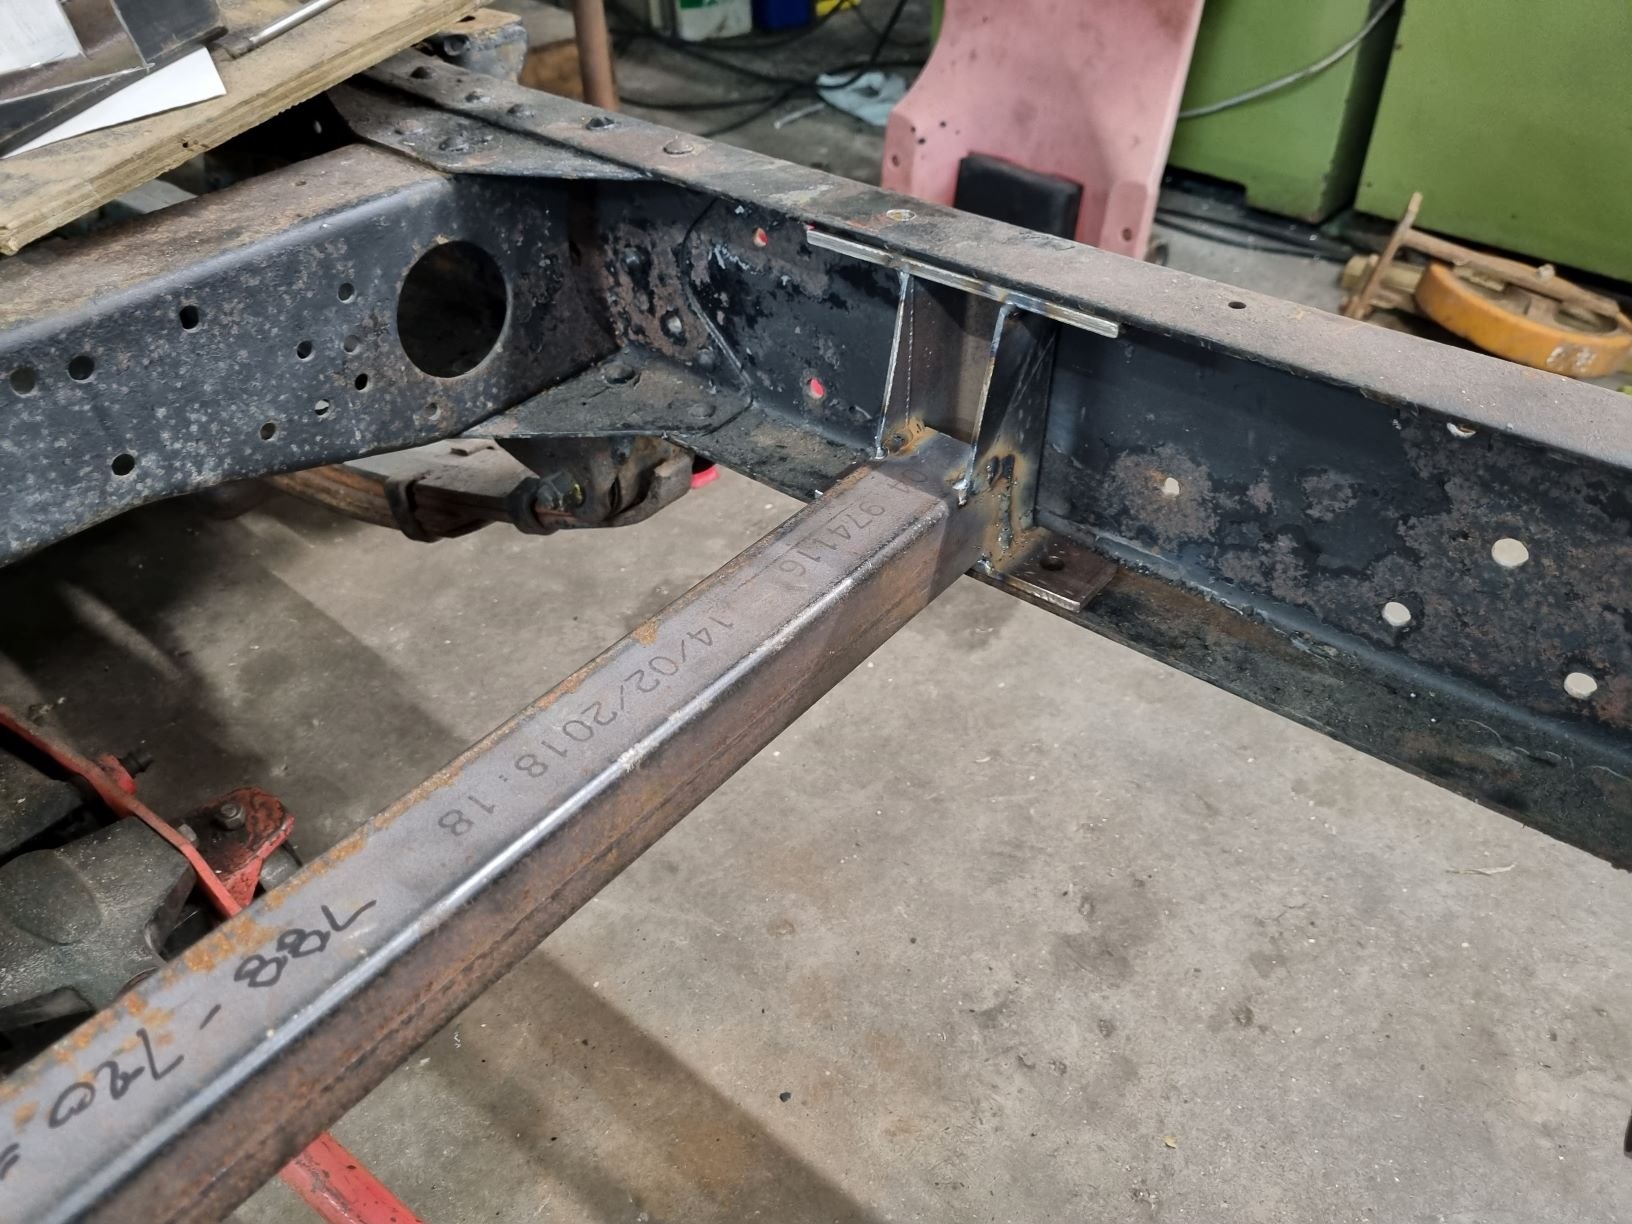
A quick update on the chassis leg repair. I managed to use the rear section that was in pretty good shape and made a new middle section. I think it turned out pretty well, as usual, coated the inside with a coat of zinc and black zinc. Shouldn't have any issues with this for a while. I also stripped the inside roof back as it was covered in the old glue and some furry left overs from the roof liner and gave it a coat of etch primer to protect it until its gets painted fully.
1 point
-
Road trip time for cert inspection. yup should be trailered. Nope, not going to sorry. this thing drives soooo good. not a rocket ship, but a nice reliable cruiser1 point
-
trophy for next year?1 point
-
I just checked my internet banking. My total Fuel bill for the whole trip came to $49.23. Not bad for 850 Kms.1 point
-
Barry thread is over that way ---------------->1 point
-
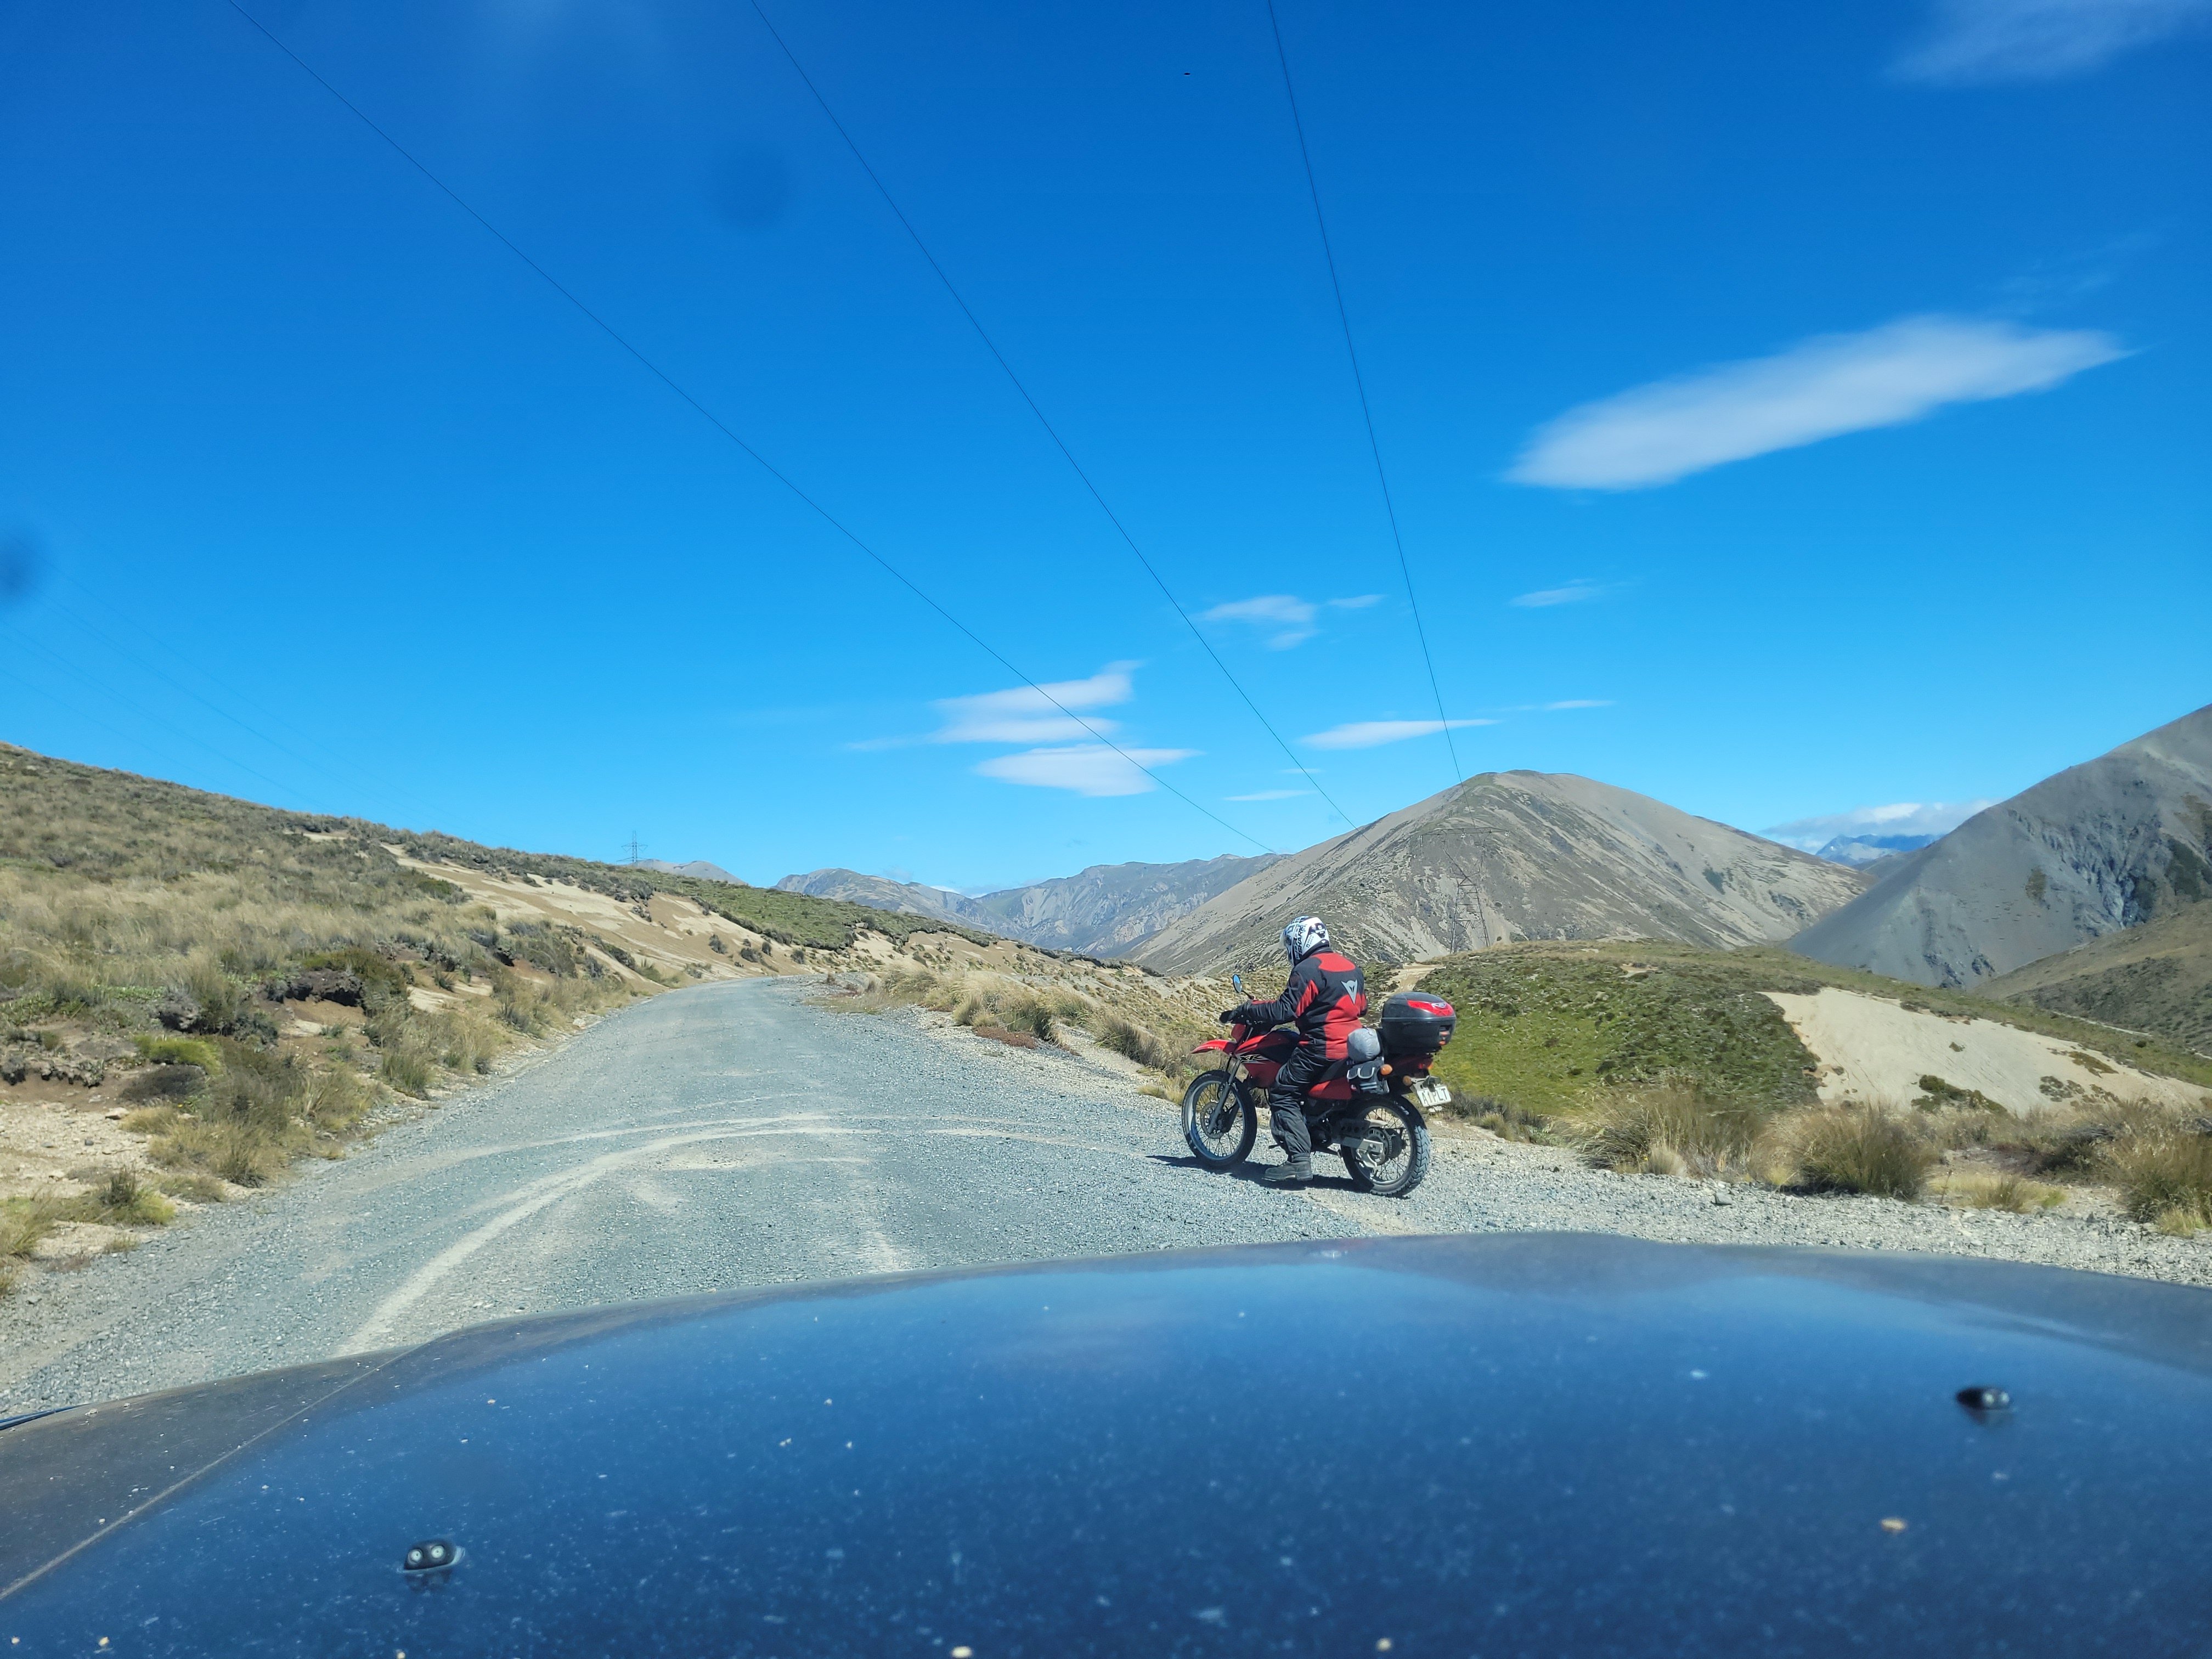
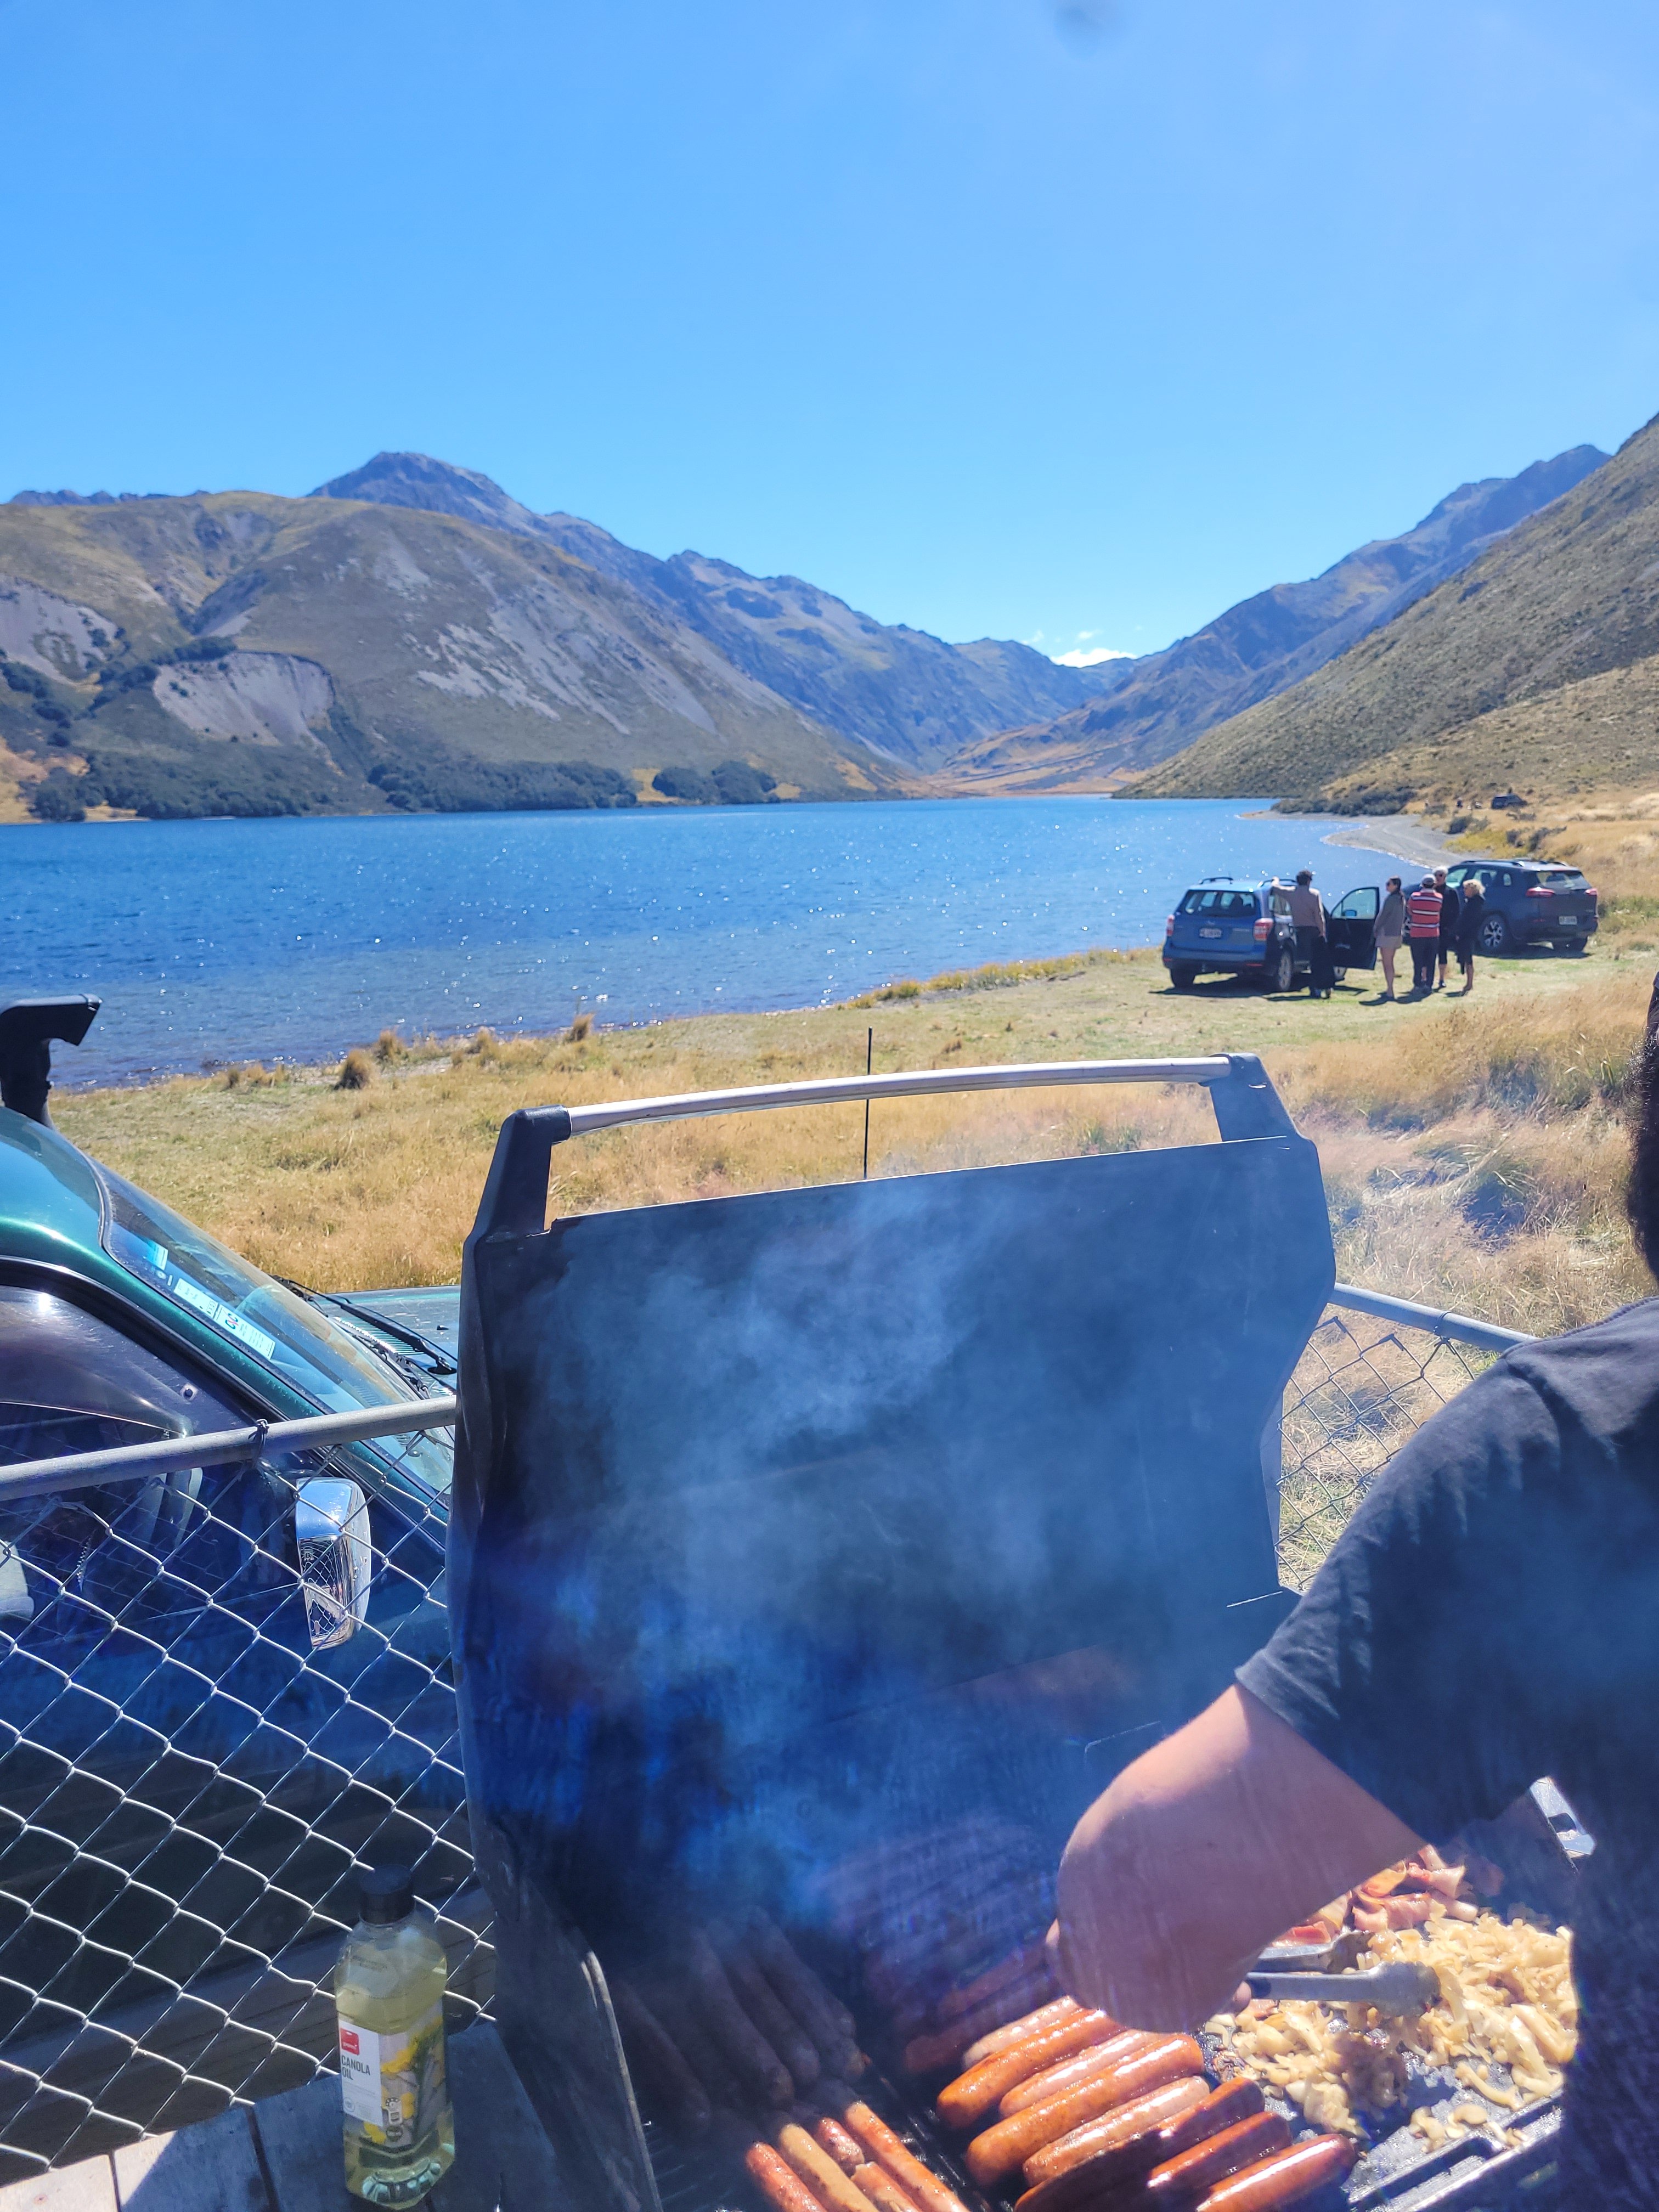
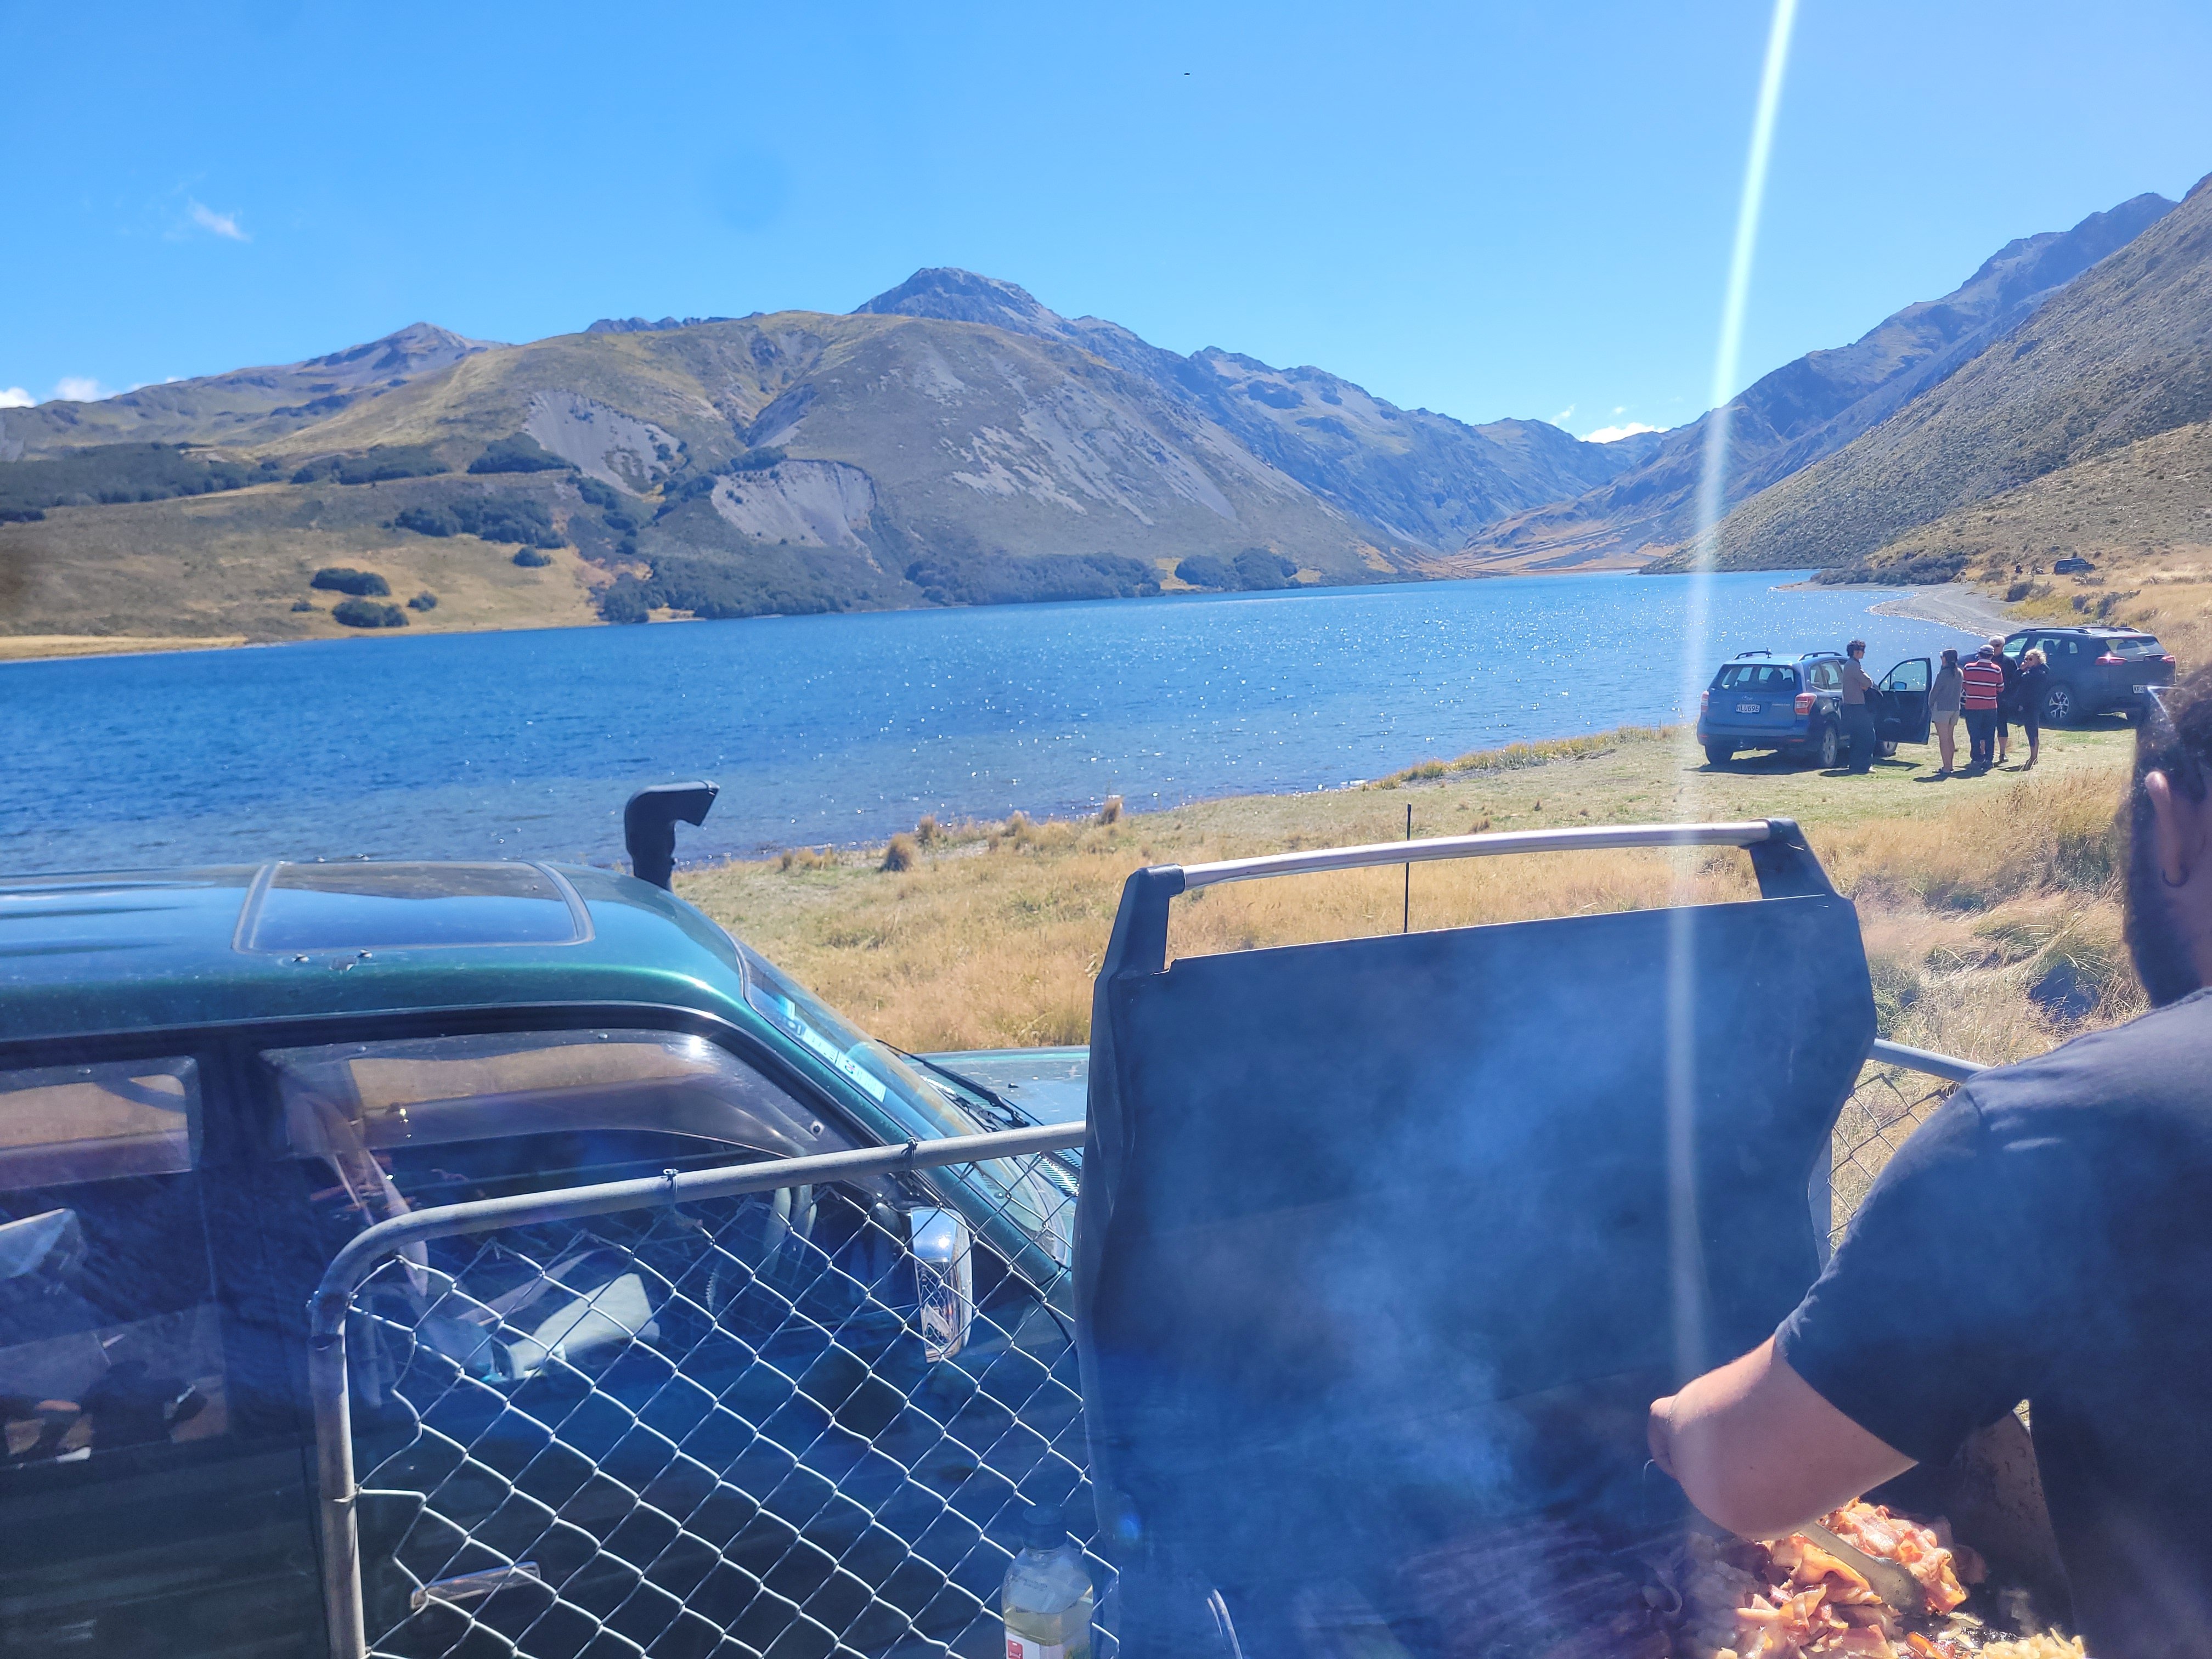
Molesworth just after the Rainbow toll Road and Tennyson BBQ with masterchef @JustHarry
1 point
-
Today's progress Trailer has a legit WOF from not my workshop. Rotten hole has been patched and faired. And painted. Not exactly Roman levels of fabrication excellence, but it's getting done. Bought some epoxy barrier coat and antifouling paint for the hull. This weekends mission is to get that sorted.1 point
-
Other than fixing a couple of minor coolant leaks that have popped up, Lucas has been flawless since the engine swap. Took him out to get some sun at the dog park yesterday. Found a couple of other doggos to chill with.
1 point
-
Got the new springs in. Managed to bleed the brakes properly by unbolting the caliper and tilting the bleeder nipple to the top as it's in the 11 o'clock position when installed. Not sure why, but it tows a million times better now. No more banging the back end of the tow vehicle around - it just follows along smoothly. Went for a WOF and failed on front wheel bearings. Previous owner said he had done them but one was rust fucked and the other had no inner bearing cage left... Just powder. Had to tidy up the seal surface on the stub axles so hit it with JB weld to fill in the pitting. Should be better than it was. Replaced the lights with some of those Narva kits that have oring sealed connectors on the harness so there's no joins - you just plug it all together and cap off any connections not used with blanking plugs. Hopefully get the WOF issued next week when I can get it back down the local for a recheck.1 point
-
1 point


.thumb.jpeg.cba3dbd83fd850104bccdf9537a099b9.jpeg)


.thumb.jpg.570970b401ac8d26ce9af7c1bf2bd8cd.jpg)


This leaderboard is set to Auckland/GMT+12:00