
Leaderboard


Popular Content
Showing content with the highest reputation on 09/02/21 in all areas
-
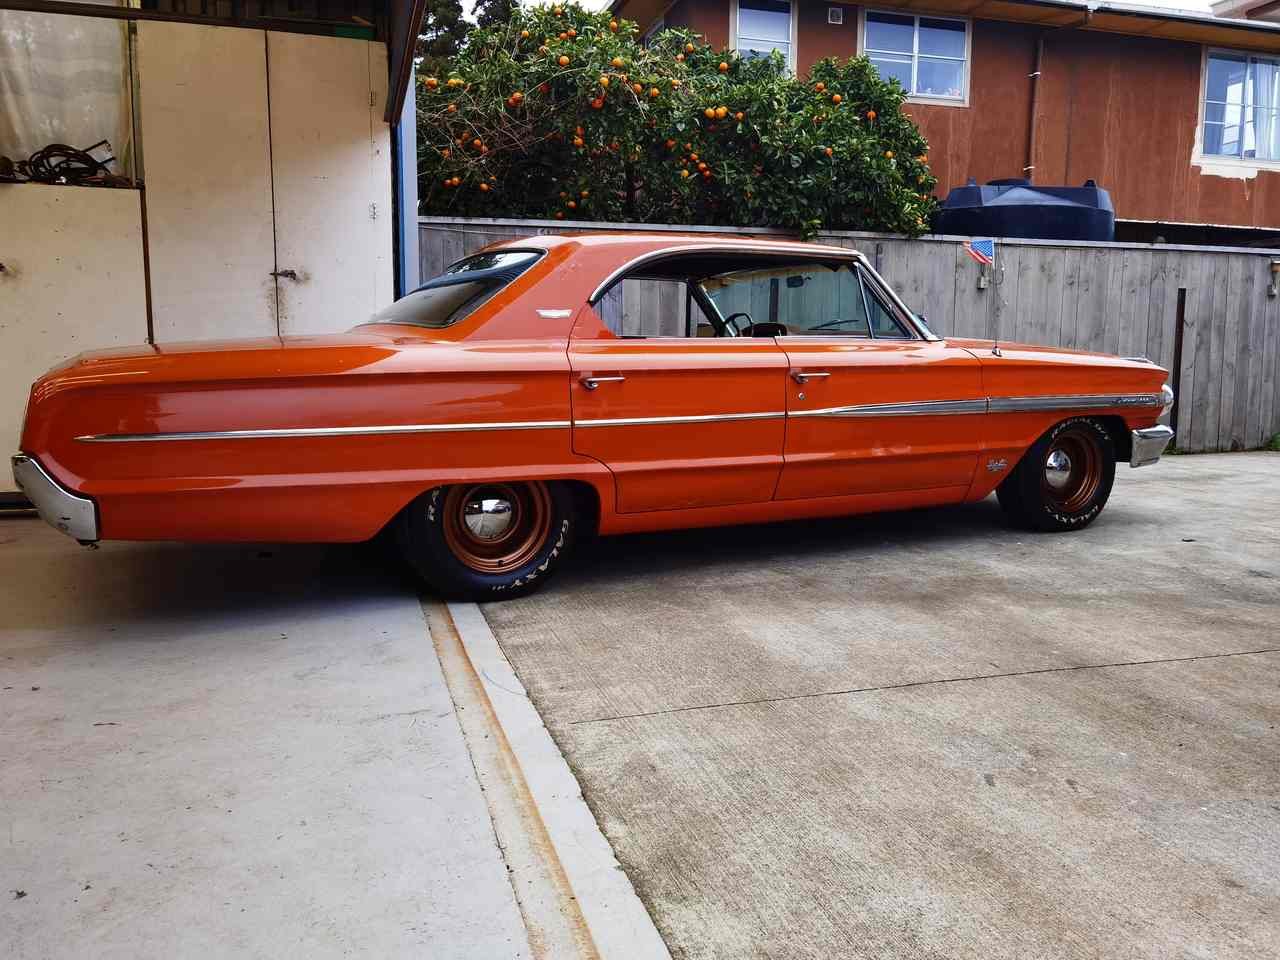
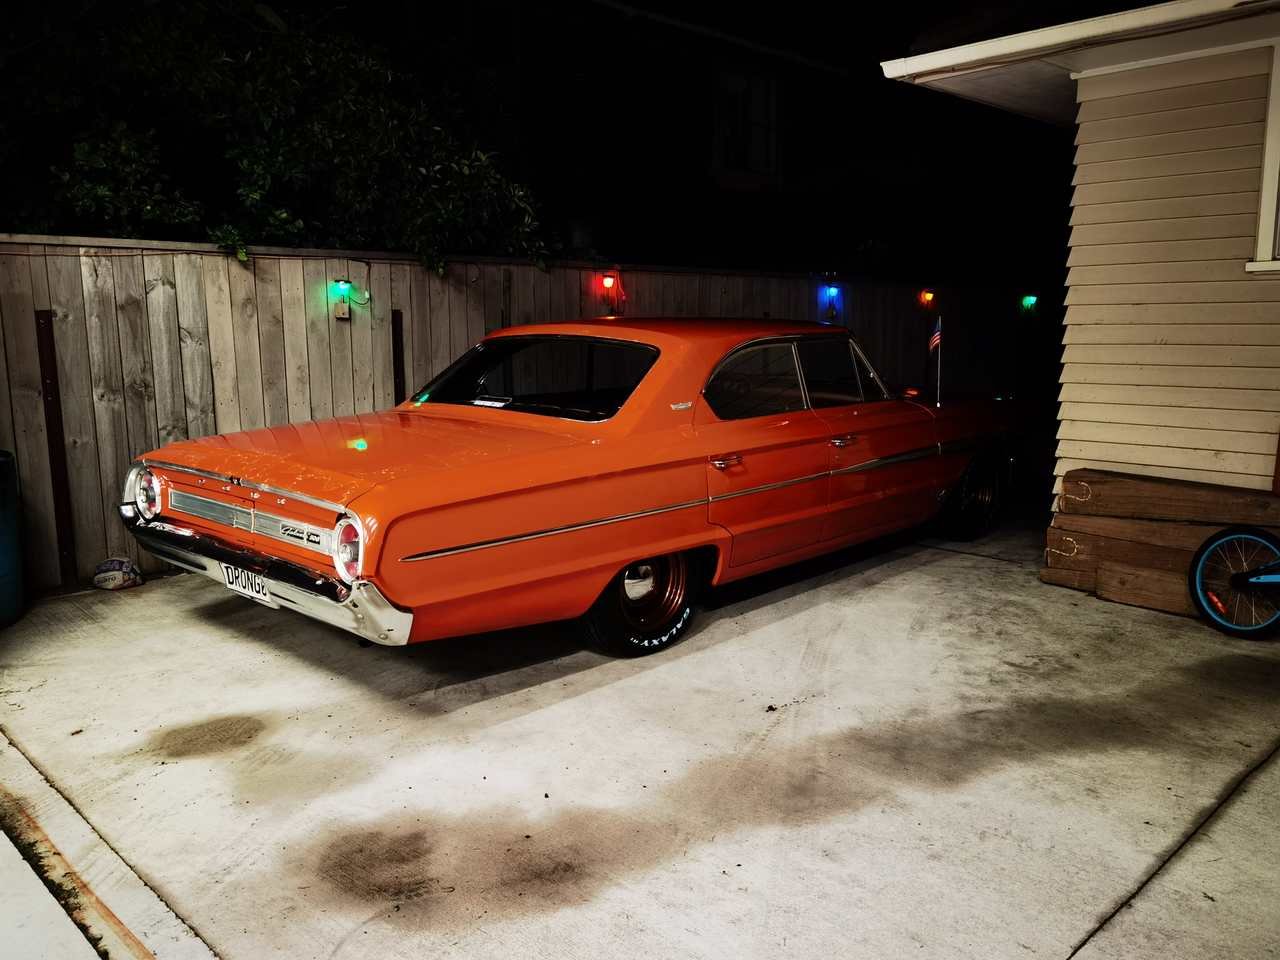
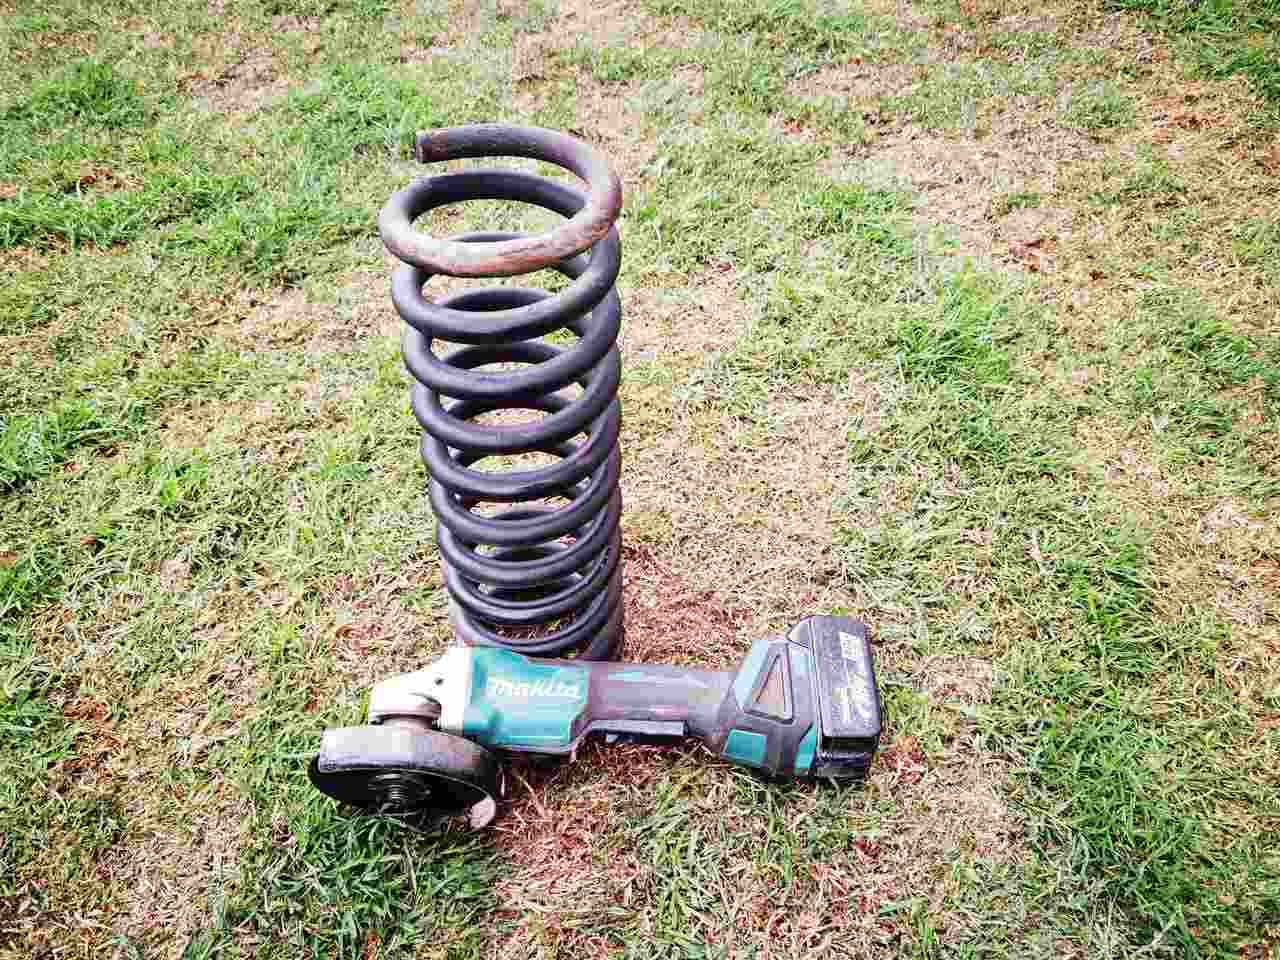
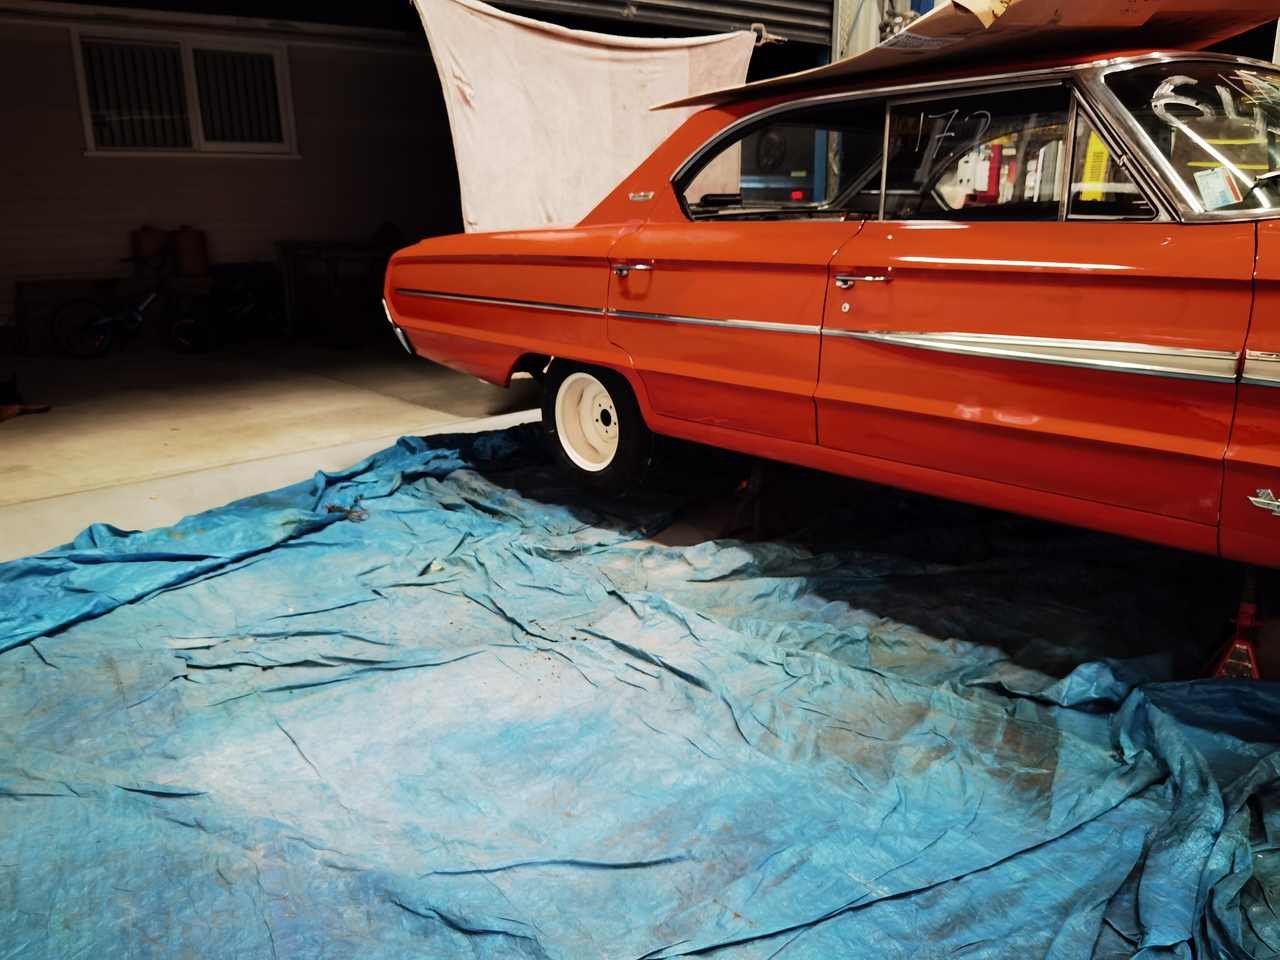
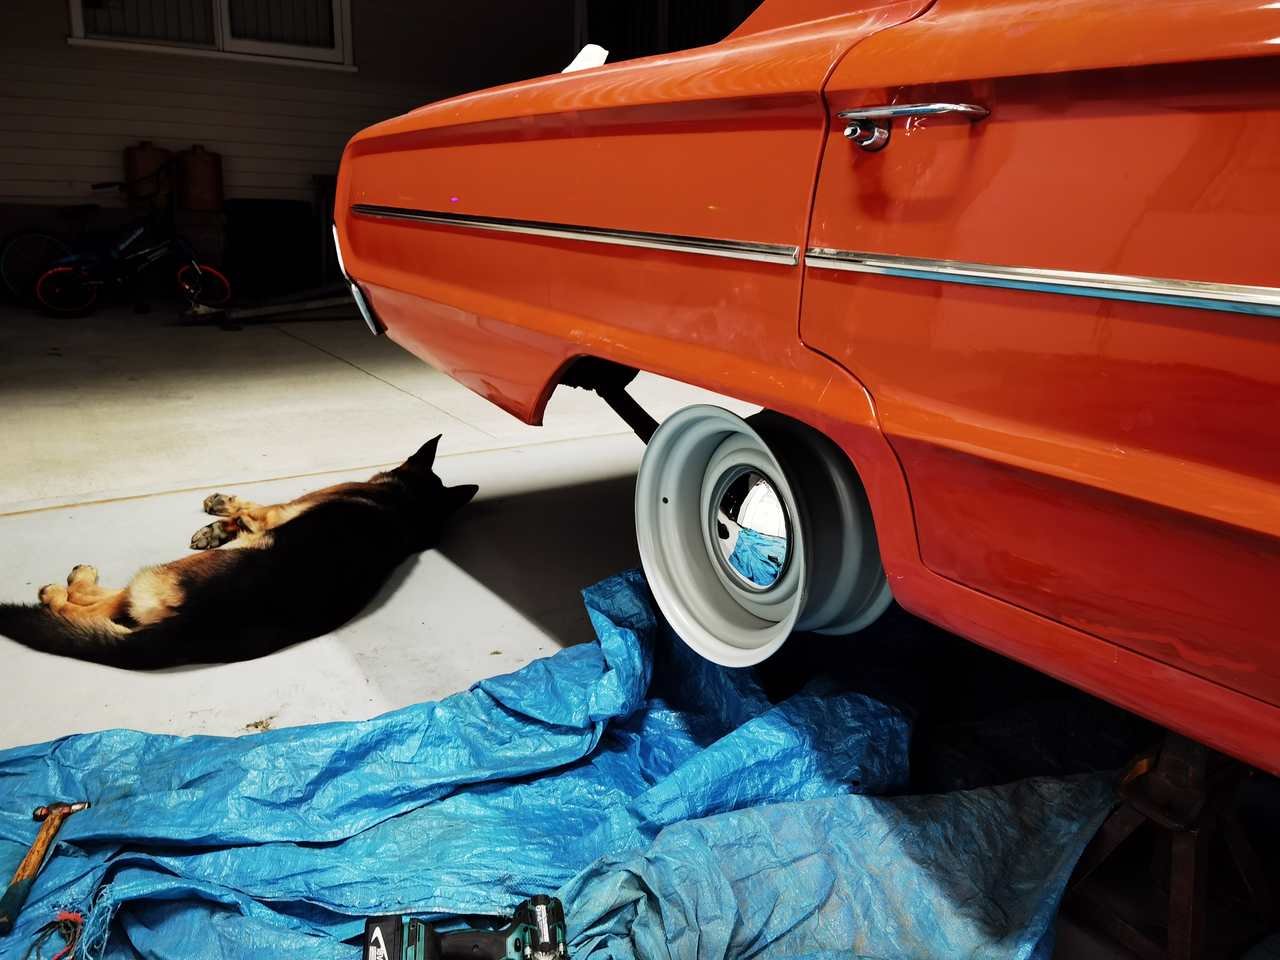
so after a road test revealed a few things. ive lost alot of steering lock due to the wheel touching the inner lip on the gaurd. i will be getting a metal expert to roll the lip on the front gaurds. the rear only rubs on extreme angles but hasn't on a bumpy highway drive. in terms of steering lock it means i can only go around big roundabouts but it scrapes haha so now that it means i go round the block than around the roundabout i may do down to a 235 width tyre but will wait until the gaurd is rolled. a couple of days after picking up from the trans shop i did a bolt check and a wash and went for a drive. went to whakatane for some mainies and back the next day you will notice the car is still a tad higher in the front than rear. its not so noticable in person unless looking so will keep it this way. quite stoked with the colour and fitment combo. first trip in this involved someone at the gas station coming for a perv at the wheels and asked a few questions about them. also vehicle handles a huge amount better now less of a boat feel. gave me a huge amount more confidence in driving it around corners too. but should really upgrade the rear shocks to something stiffer and a good wheel alignment too yes you can tell me now how ive ruined my barry car
 21 points
 -
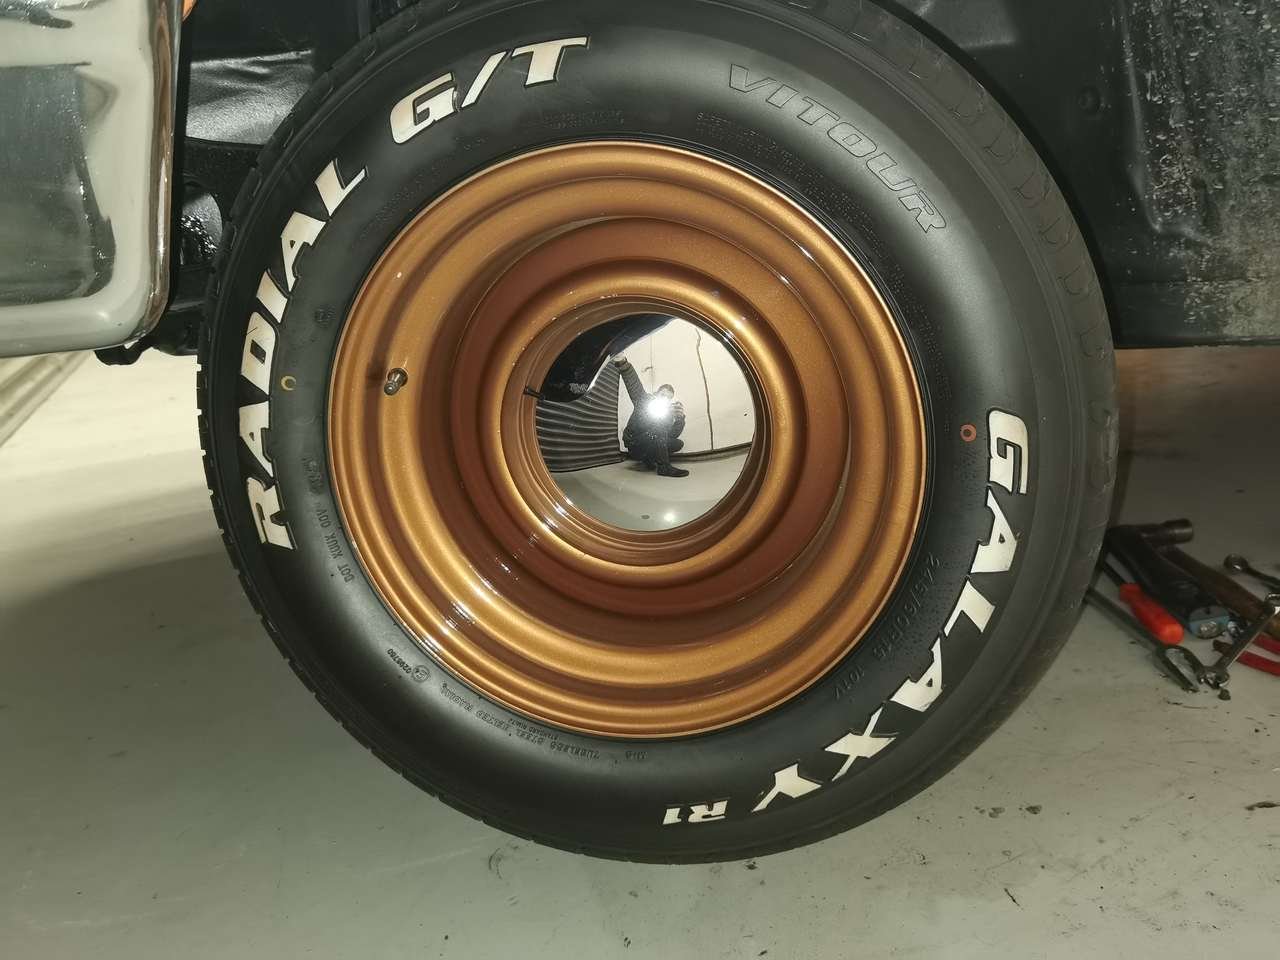
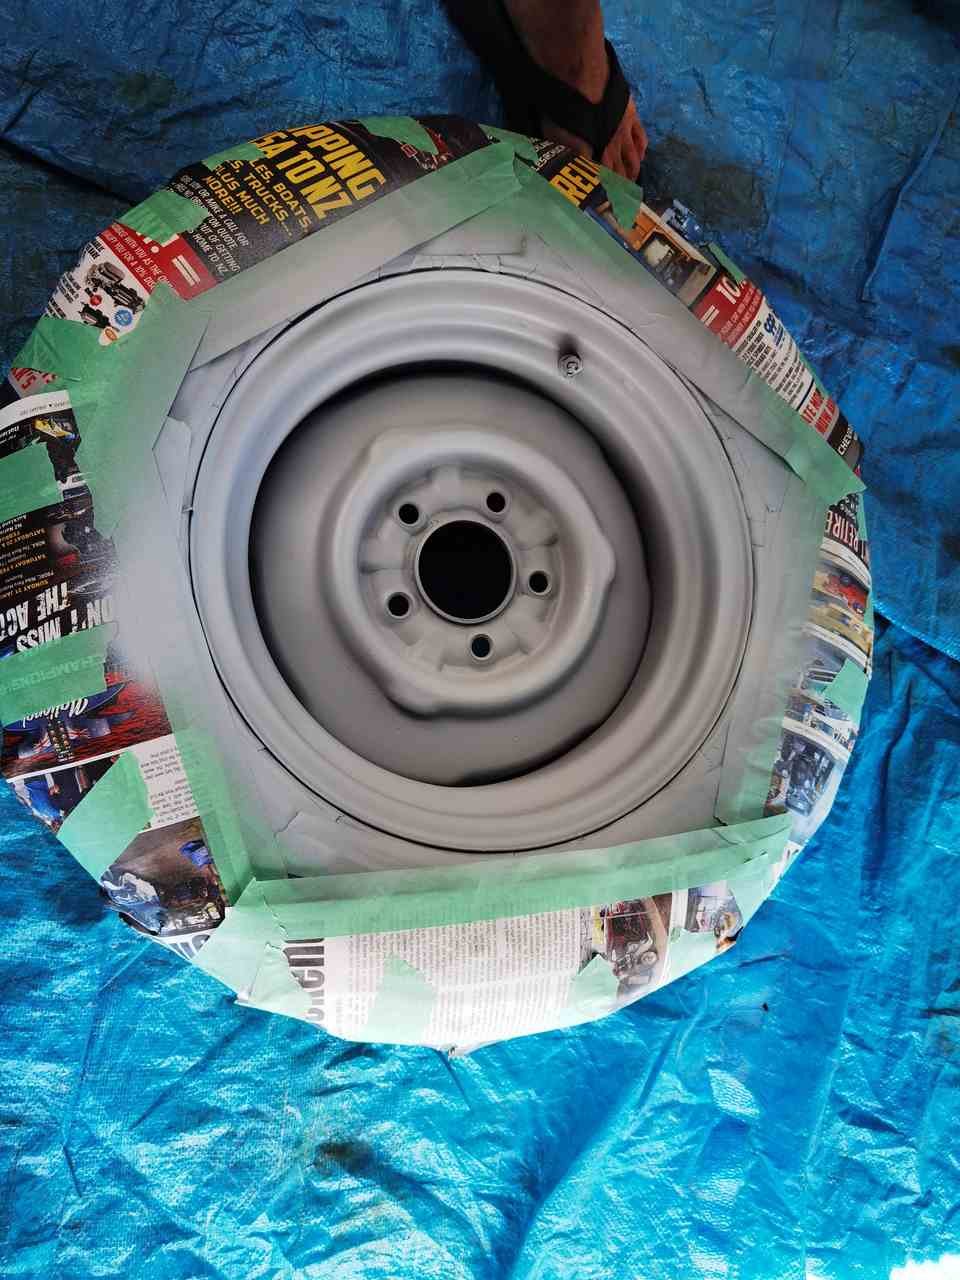
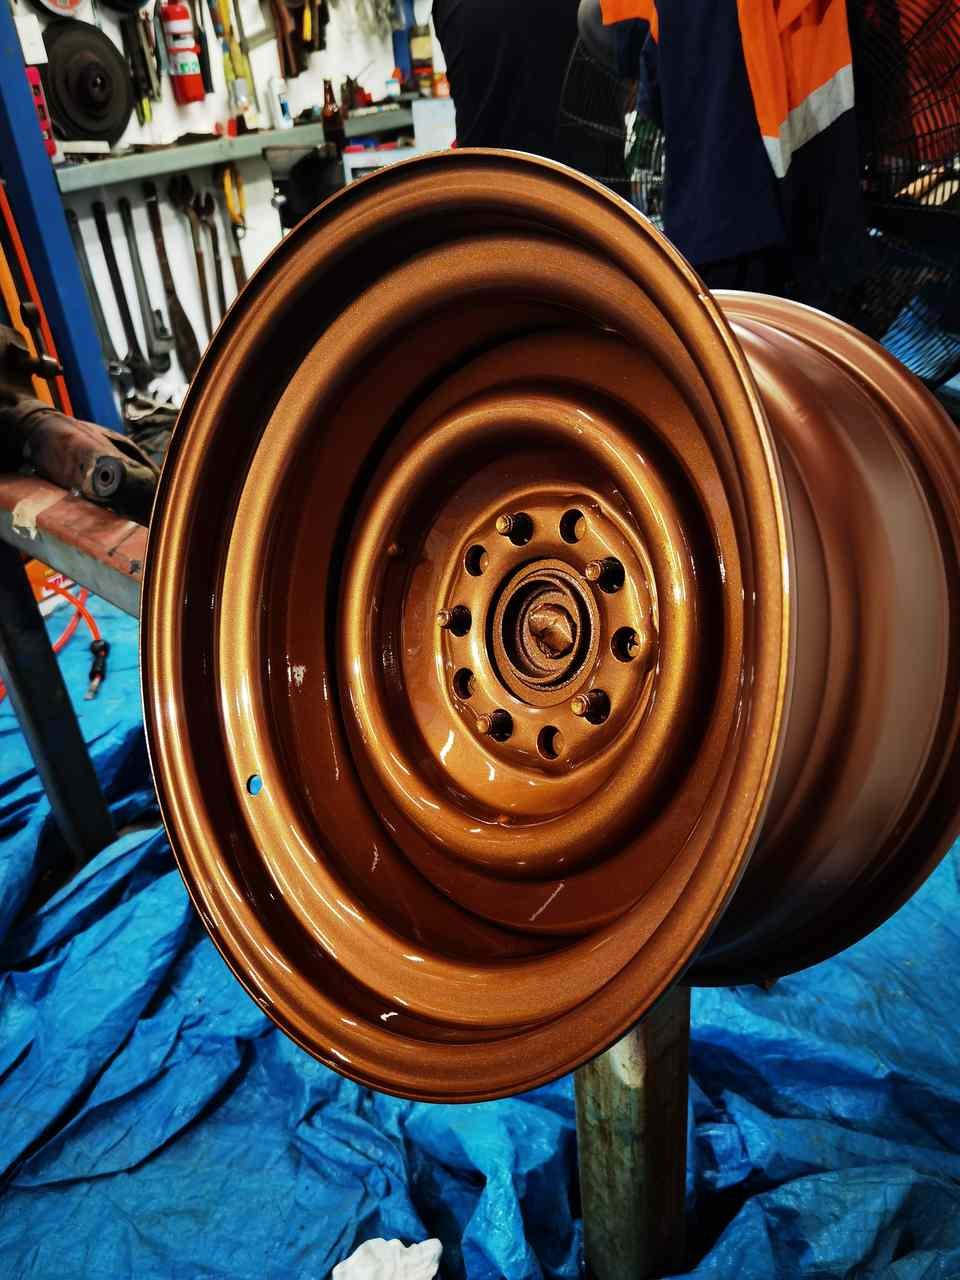
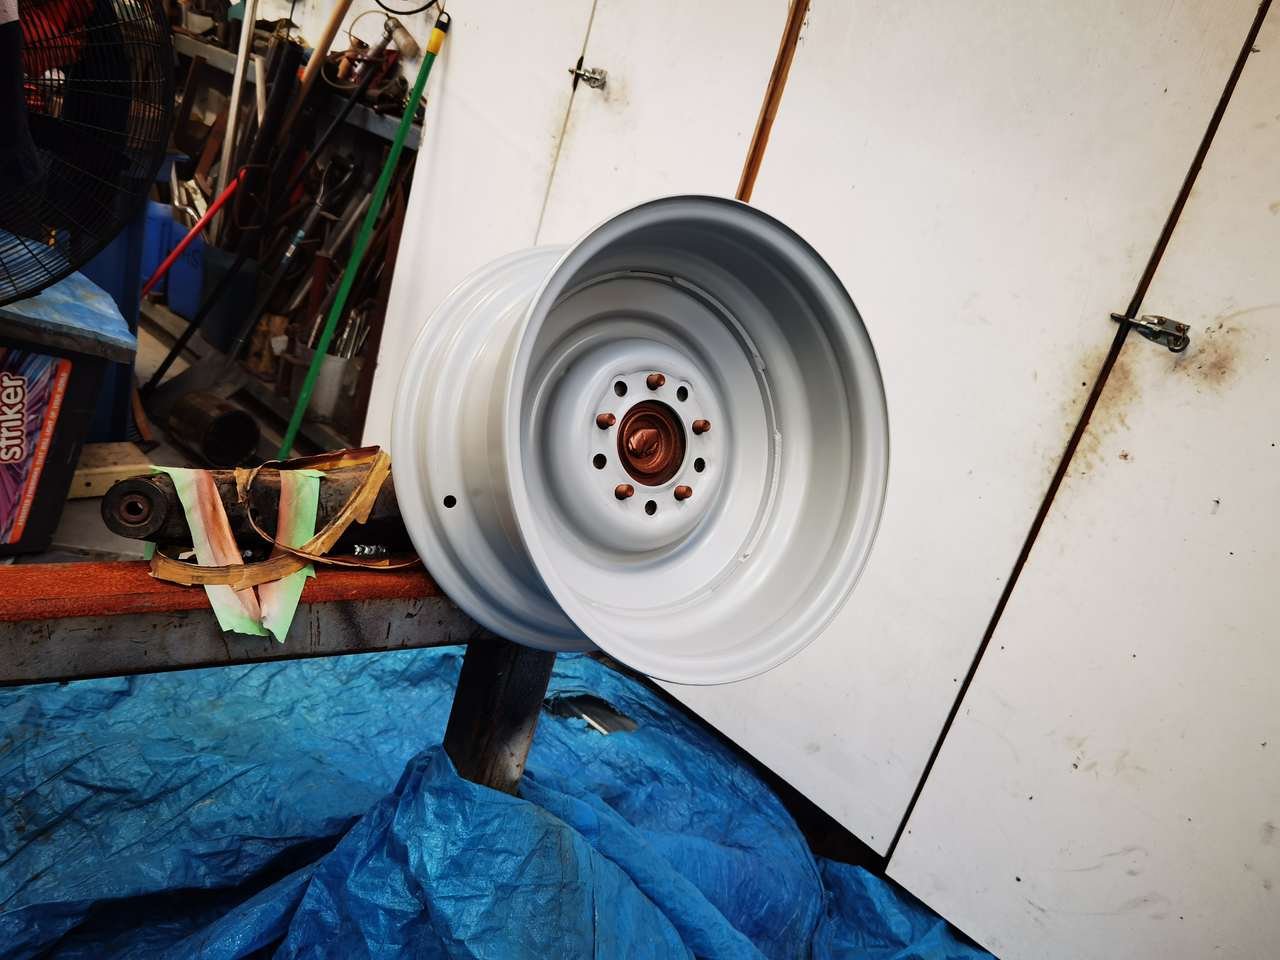
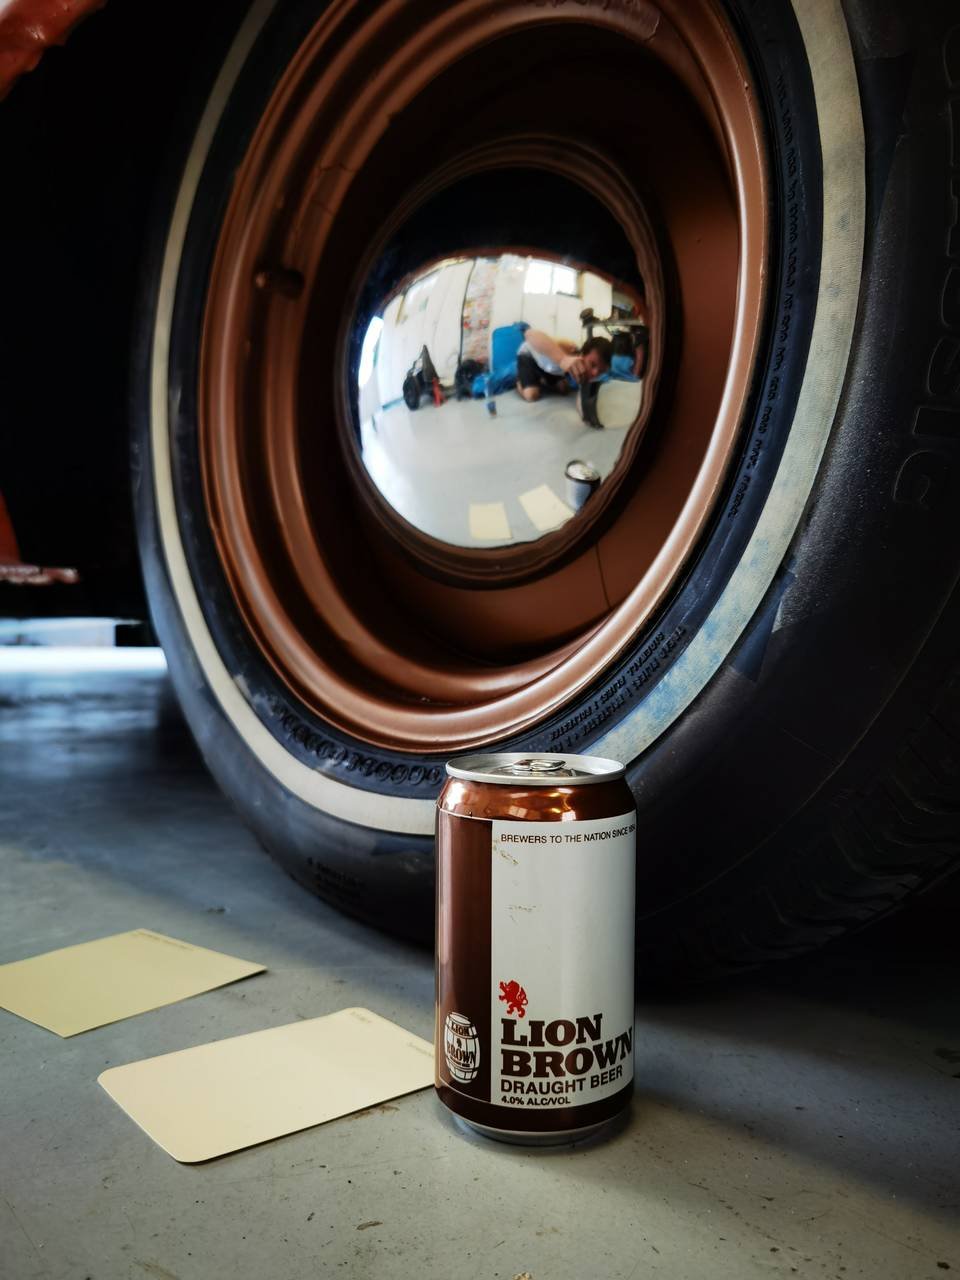
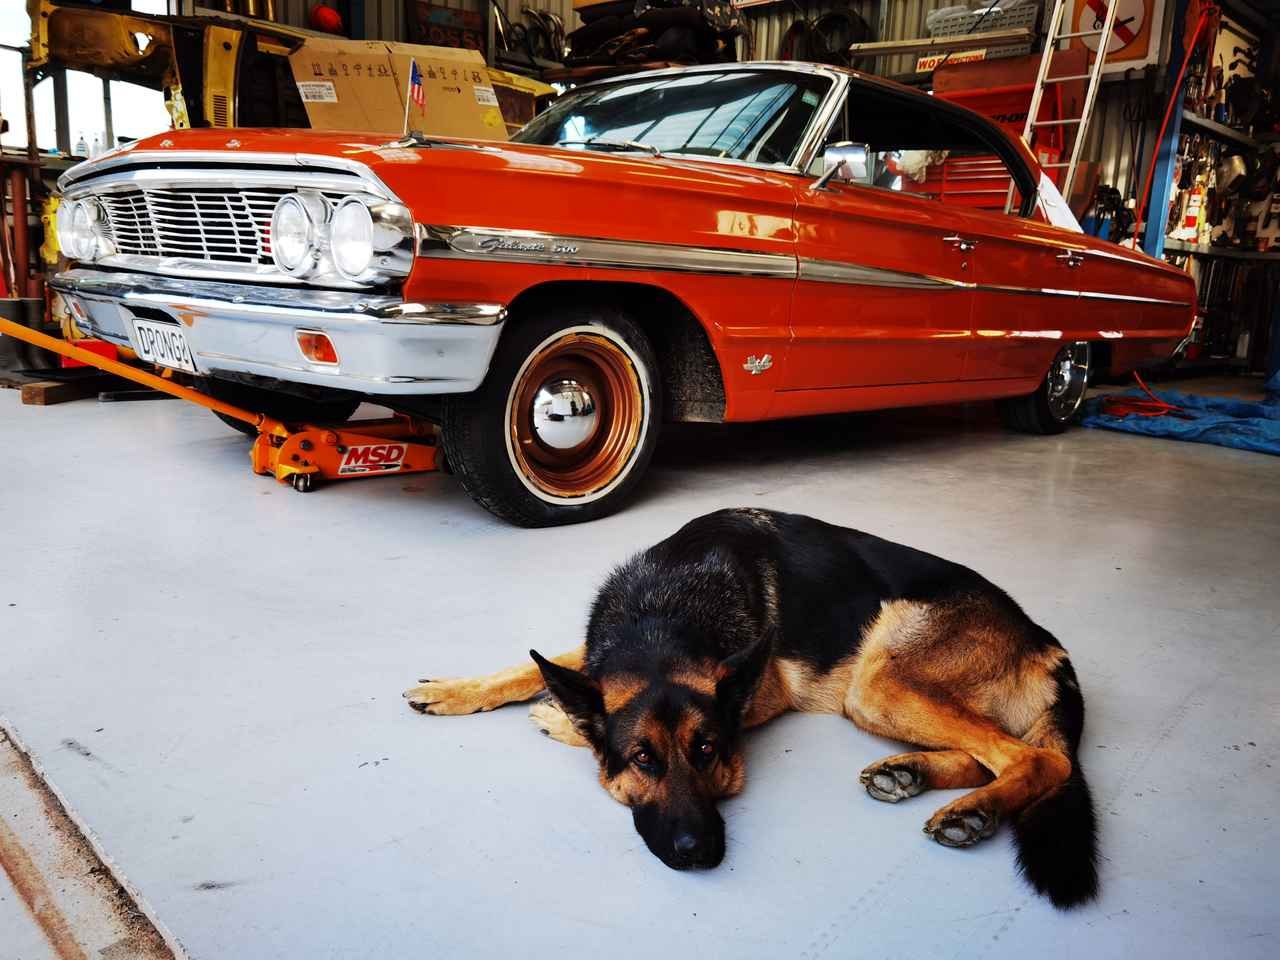
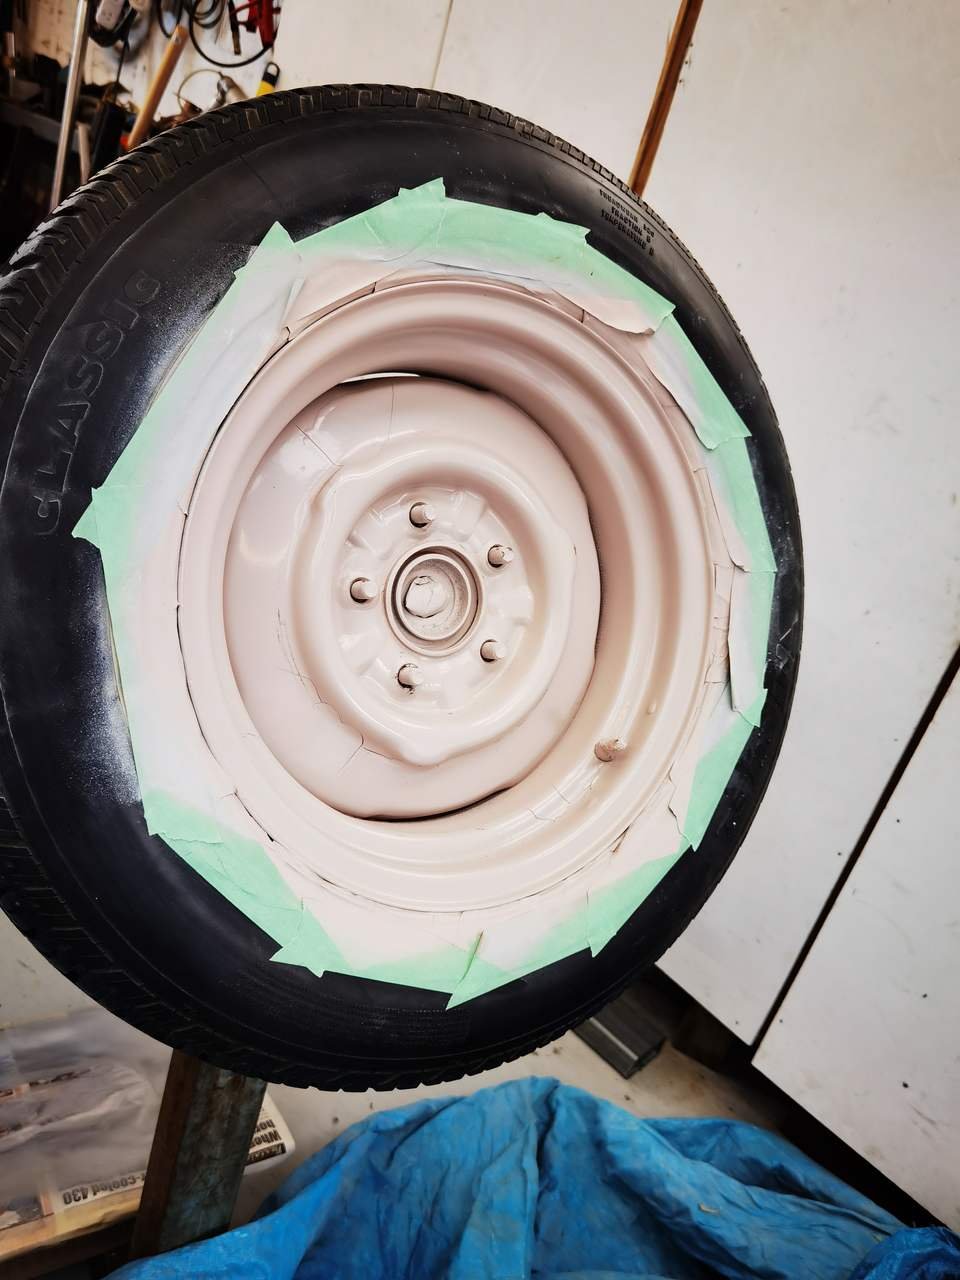
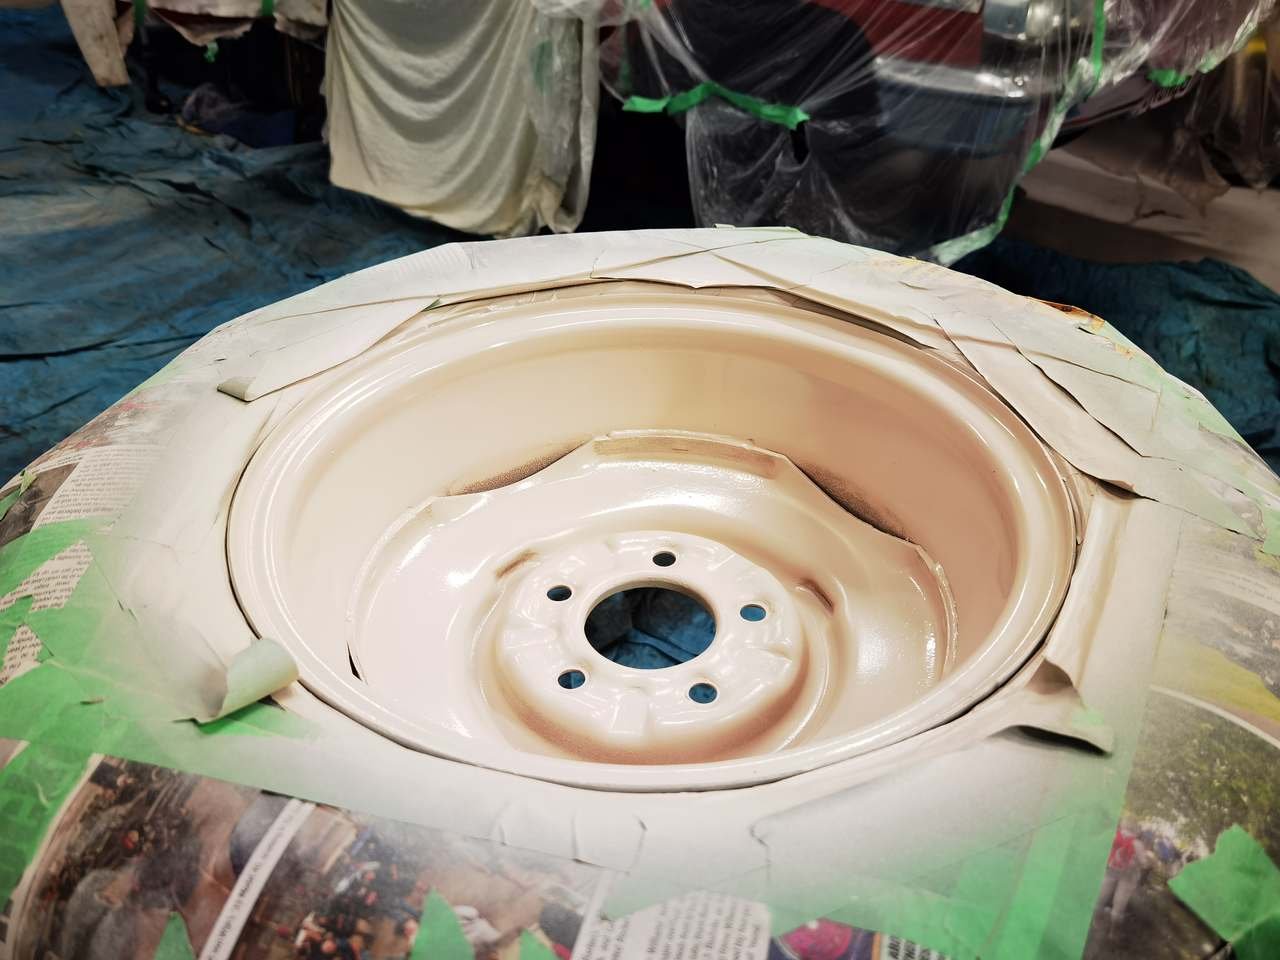
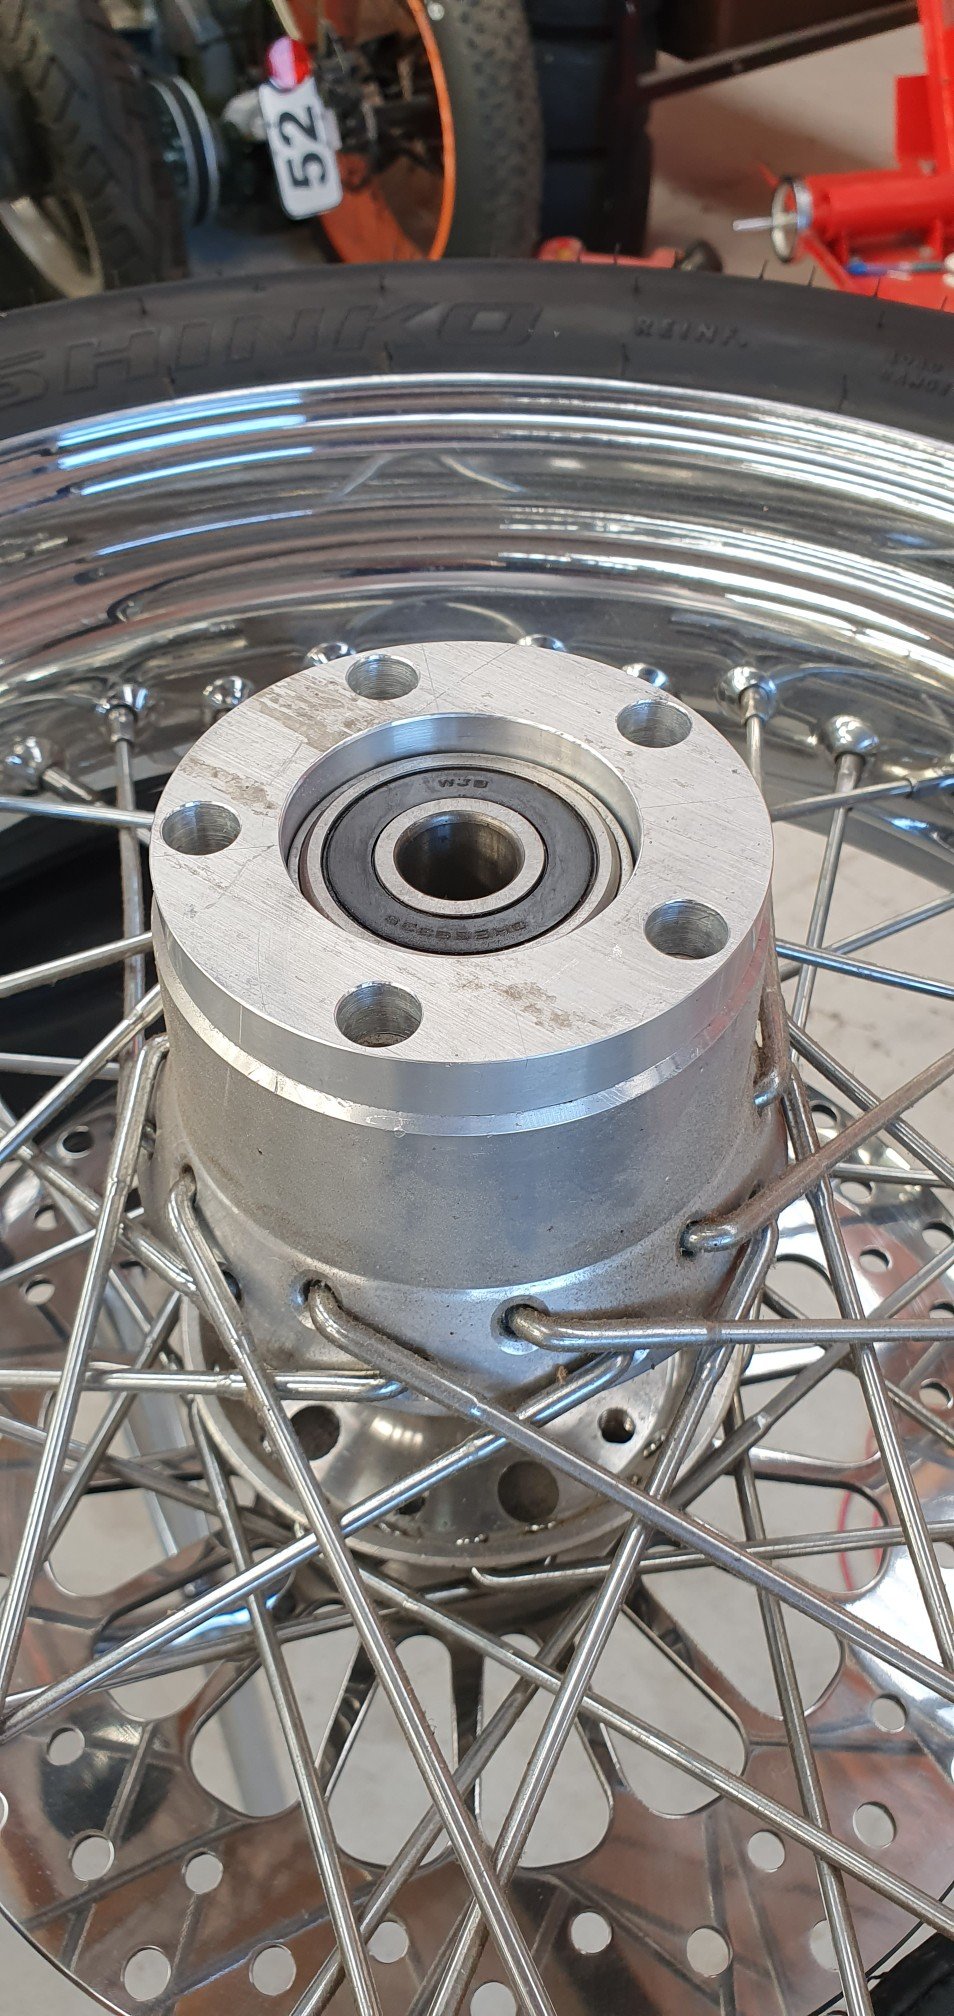
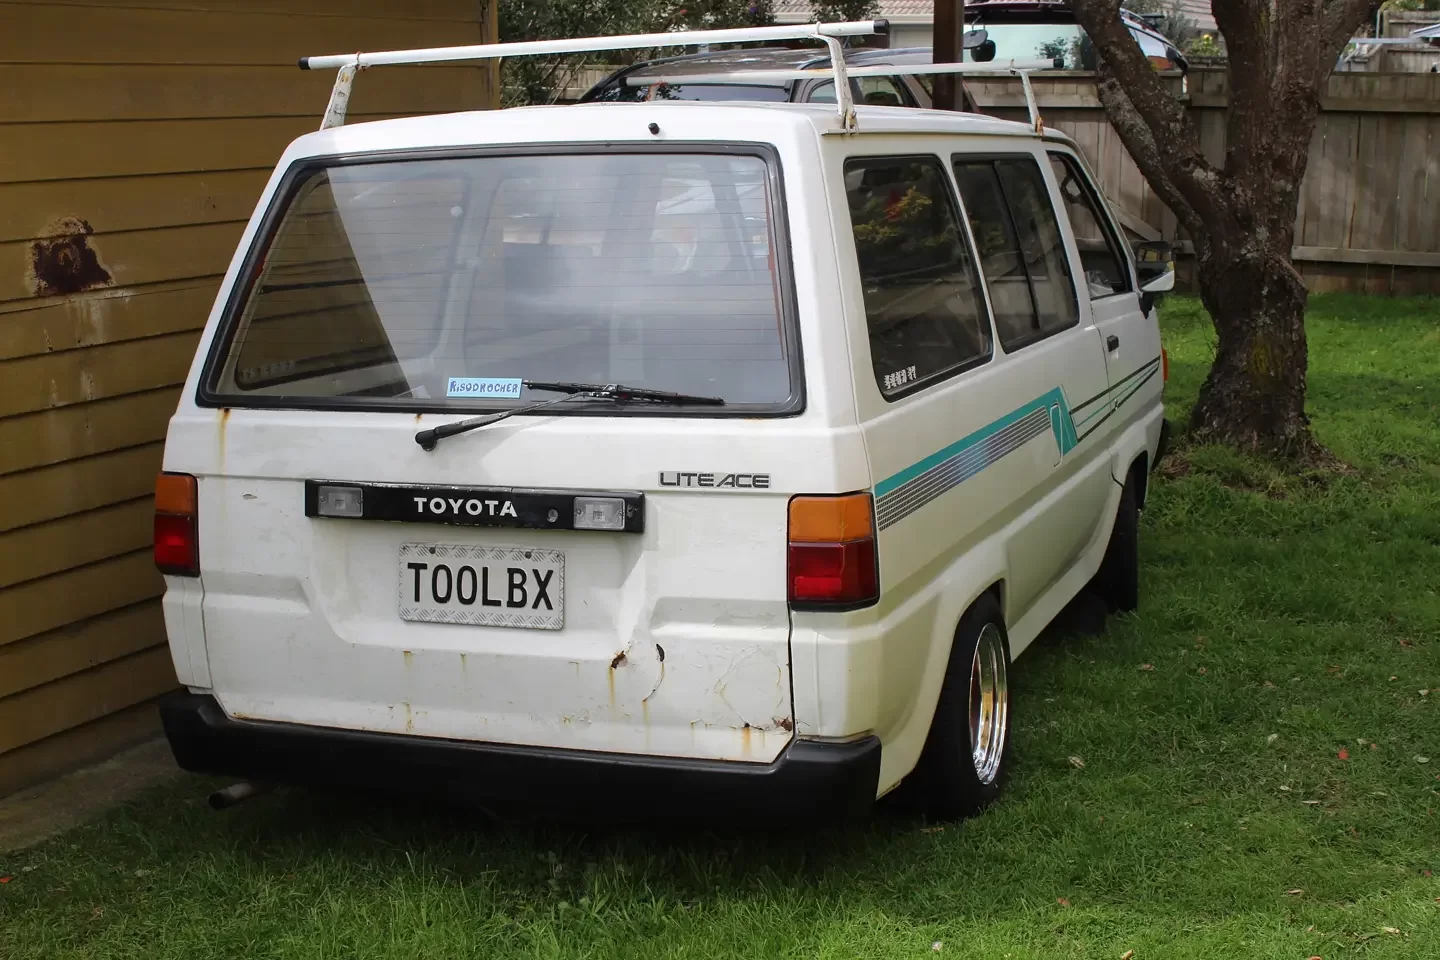
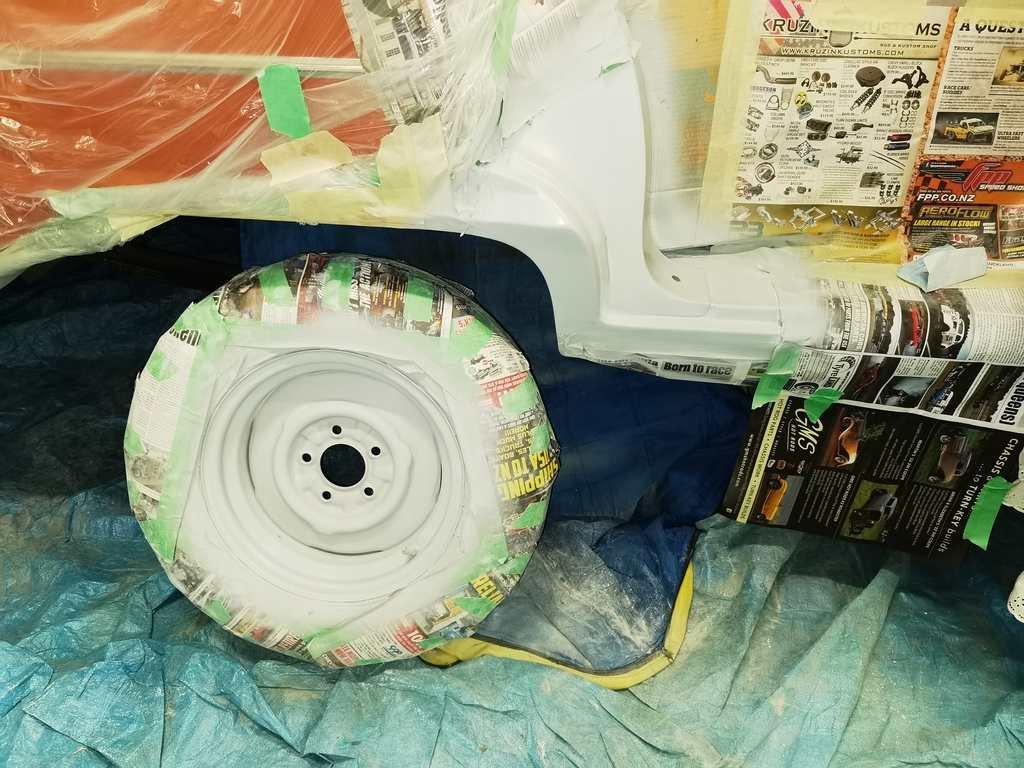
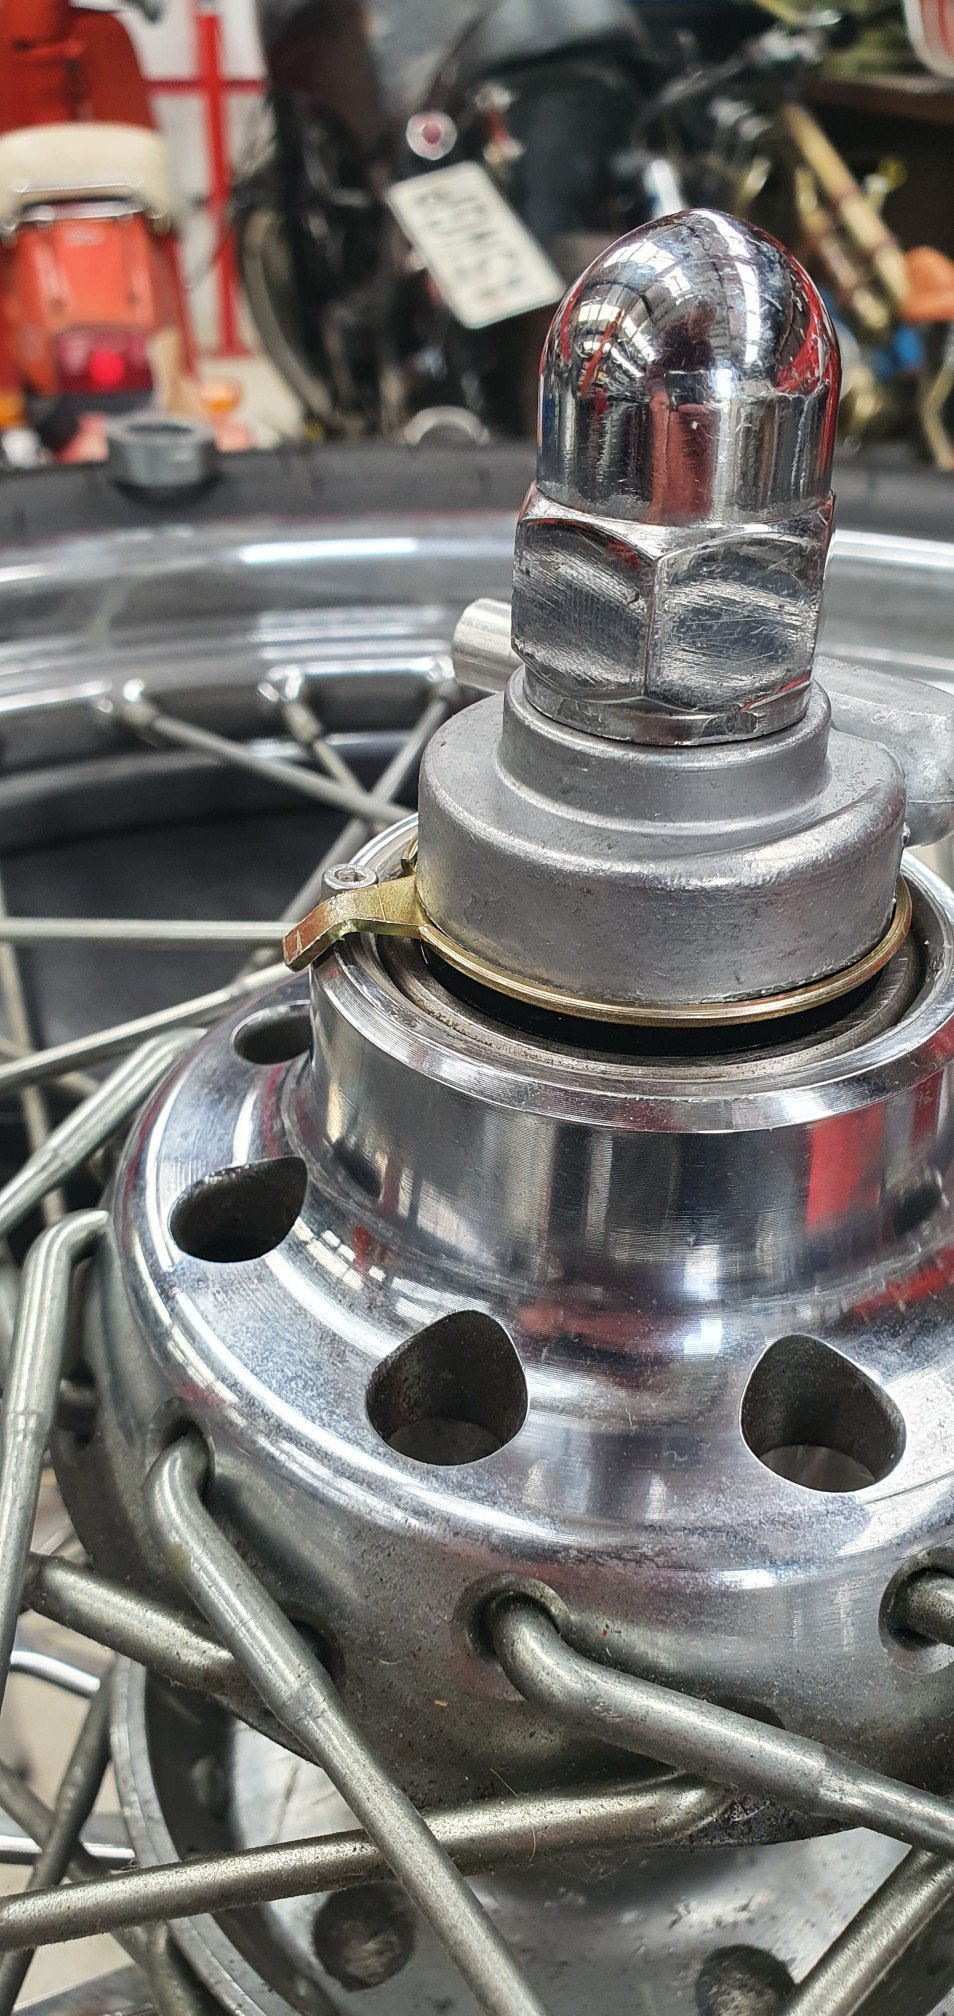
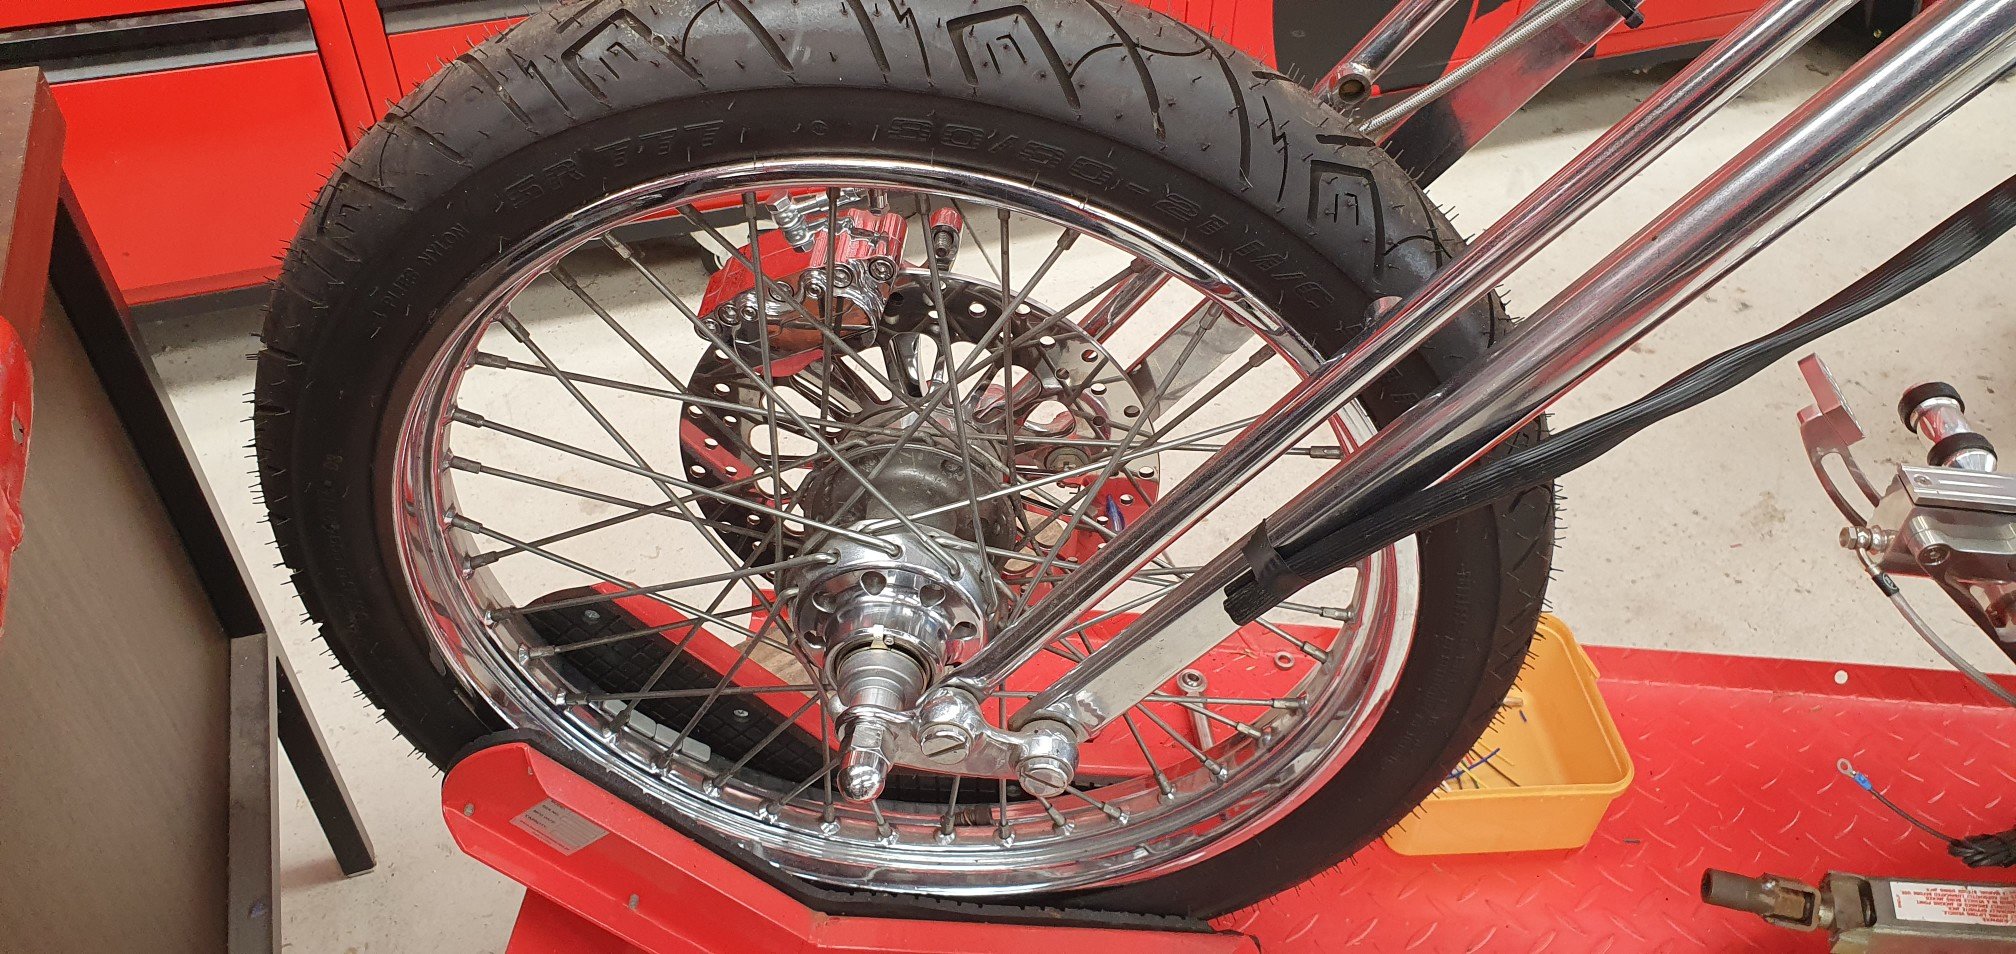
so because i told you i would fill you in with the progress i will. This would have to be the highlight of doing this old girl up and being able to use it. from getting this car back home i was never really happy with how the car sit or how the wheels didn't fill the guards but the priority was to get it legal and drive it. but liked the style of the car and wheel combo. hummed and ahhed for abit and a work friend had a contact that did mag wheels so contacted him and told him what i wanted. wanted to keep the same wheel centre caps i had but after doing some measurements i was shit out of luck. did a quick measure on the car to what wheels were available. and paid and waited two months for them to turn up. Ended up with specialty wheel smoothie in a 15x8 all round in primer. I got these through BG Marketing and got this brand over a cragar because the centre cap quality is better and i could get them in primer. special order from the US with a 7.5 inch baby moon cap now to pick a colour right. black or chrome is fine. Nah go away barry im here to not be like you. this was the hard part of the wheels i had a few colours in mind but the car being orange made it abit more difficult. so after i cleaned up a old wheel and primed it i went to the paint shop for a colour sample. asked for a colour chart to look from. couldn't find something that stood out. old indian joker says he will mix something up so calls me outside to take a look at the colour and gets it bang on first time. buy that and give it a spray. Note Don't put too much filler primer on a wheel because it cracks how about cream right this photo also shows where i had previously painted and blended it in. Unfortunately i liked the colour but just didn't suit the orange of the car. seemed too light for me so i went back to the paint shop and had the colour changed after going to bunnings and mitre 10 and going through the colour charts on a sunday. sprayed the modified colour on Found this colour was more like salmon not what i was after. so found something lying around in the shed in a different colour i liked. slept on it and went back to the paint shop with another colour to be matched. so they made me a small sample and i gave that a test spray and fitted to the car. Hmm brown you say.. so had some more mixed to paint the wheels and figured if i didn't like it ill just paint them black and be done with it. so figured ive got some nice new wheels how will i paint them nicely. figured its not easy on the ground and had an old hub lying around in funny enough the same stud pattern. so welded the hub to a steel stand And i happen to have two hubs so meant i could weld two at a time choice so a splash of this colour over all 4 wheels then gave them a shot of clear coat. couple of ugly bits but nothing much noticeable and wheels can be tricky to get all the paint into spots test fitted the wheels revealed the enviable. cut cut the front was never level with the rest of the car so this had to be done. plus it wasn't low enough painted the cut bit and put them back in for a level test. level looked good would be nice if it was much lower but the car has to be able to be driveable or get in the driveway which involved a 45 degree entry on the old wheels for tyres i purchased some vitour galaxy 245/60/15s from sta parts. i was lucky enough a good mate had a tyre machine and fitted them for me on a sunday. will balance them if they need them but currently they are good. so after the wheels were fitted i washed it and left it outside for the night where i got it towed to go back to the trans shop the next day. unfortunately i got it back 3 months later. upon me driving away he did say the wheel did scrape oops haha lets find out for myself. And if you wanted to know the colour lion brown mate makes for good beer battered fish
18 points
-
Sitting outside cafe this morning nomming down a cake and coffee, watching some barrie in the carpark looking all over my imp, hands on hips, shaking his head and tut tutting. He heads over to the cafe and orders a coffee. Works out that it's me who owns the imp and asks, in a very strong Yorkshire accent, "how long have you had the imp?" "oh maybe 3 years? I rescued it from a rusty shell in a field" I tell him, thinking to myself this could be a nice interesting conversation but having a feeling its going to be painful.. "has it still got the original engine?".. he spits out, no interest shown at all in the fact I've taken the effort to rescue a nice little classic car and done a not too bad a job at it. "nah.. Ive fitted a Datsun engine in there" I replied. Here we go, this will go one way or the other I thought. Fuck me did he roll his eyes and gave me the dirtiest look. He might as well have walked over and thumped me one with the fists i could picture him building in his fit of barry rage. The conversation stopped there and we left, hannah laughing her arse off at how I've gone and upset another barry with my choice of engine16 points
-
Had a shit as sleep so today was a proper mission. spine of both quarters is welded and ground, didn’t move too much with the tig. this is drivers side behind the end cap above tail lamp Progress shot. rear parcel tray, tulip panel and window corners being gutted out. brother fanged out a new piece for parcel tray dropdown.. it rotted as the piece above rusted. he also made that bit which is a C section same profile (not pictured) here’s a throwback reminder. I fluffed around with the corners, pretty crazy shapes involved and 3 layers.13 points
-
I got to alex about 4:30 and brother had spent most of the day on it so I snapped some pics quickly one side zipped up and quarter being welded on, other side not far behind!13 points
-
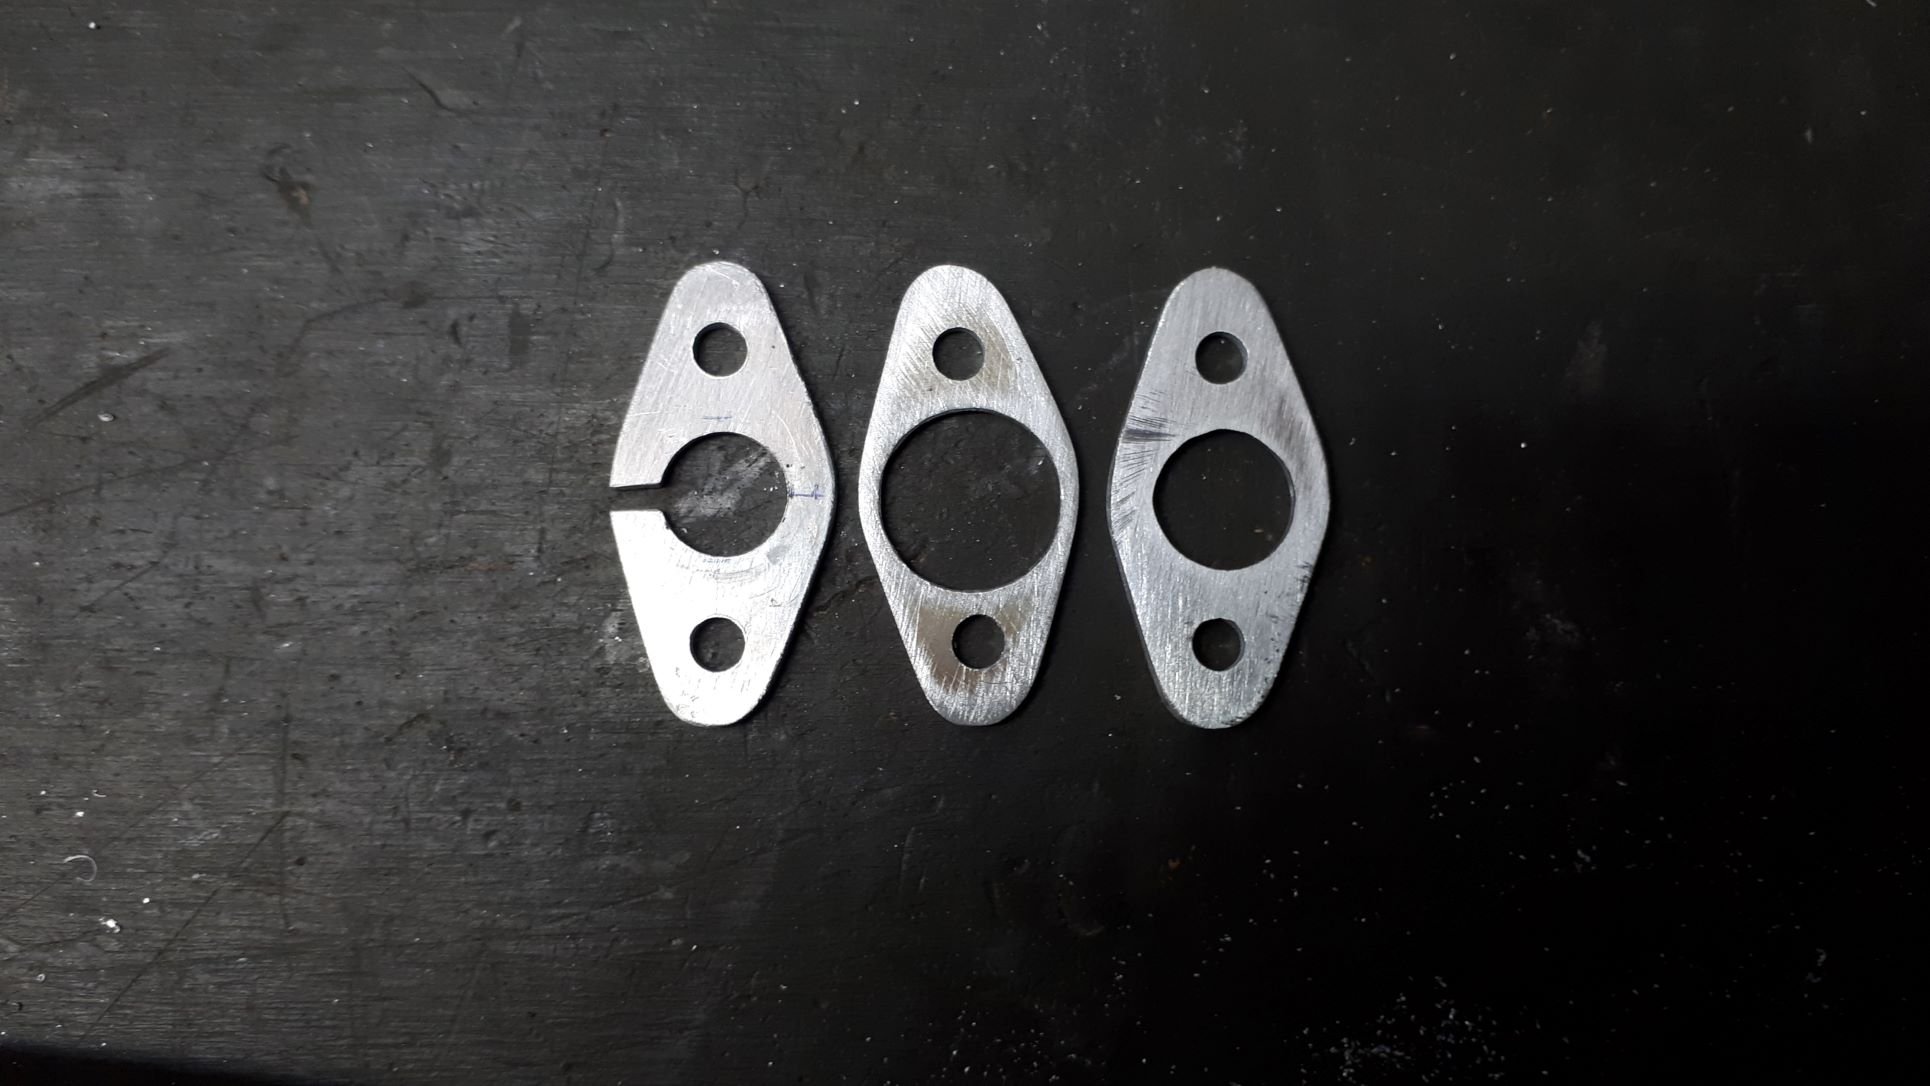
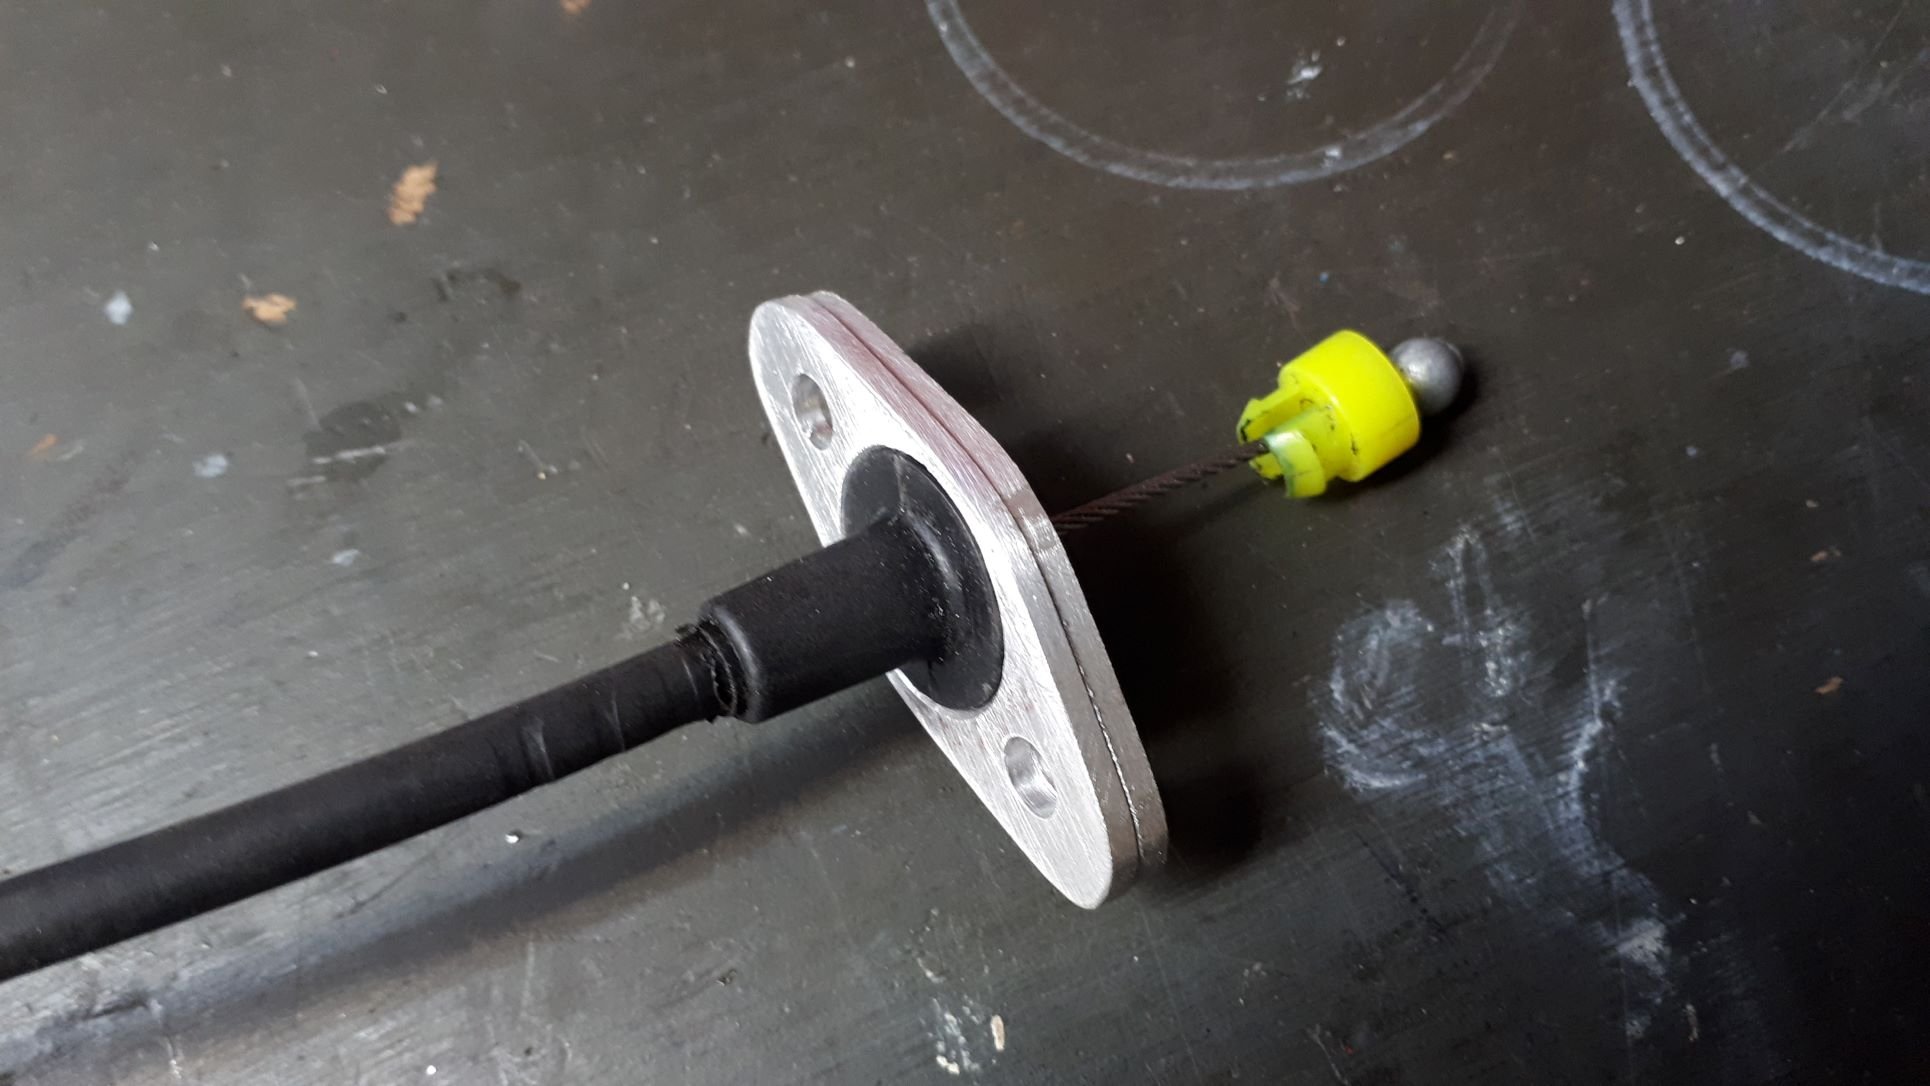
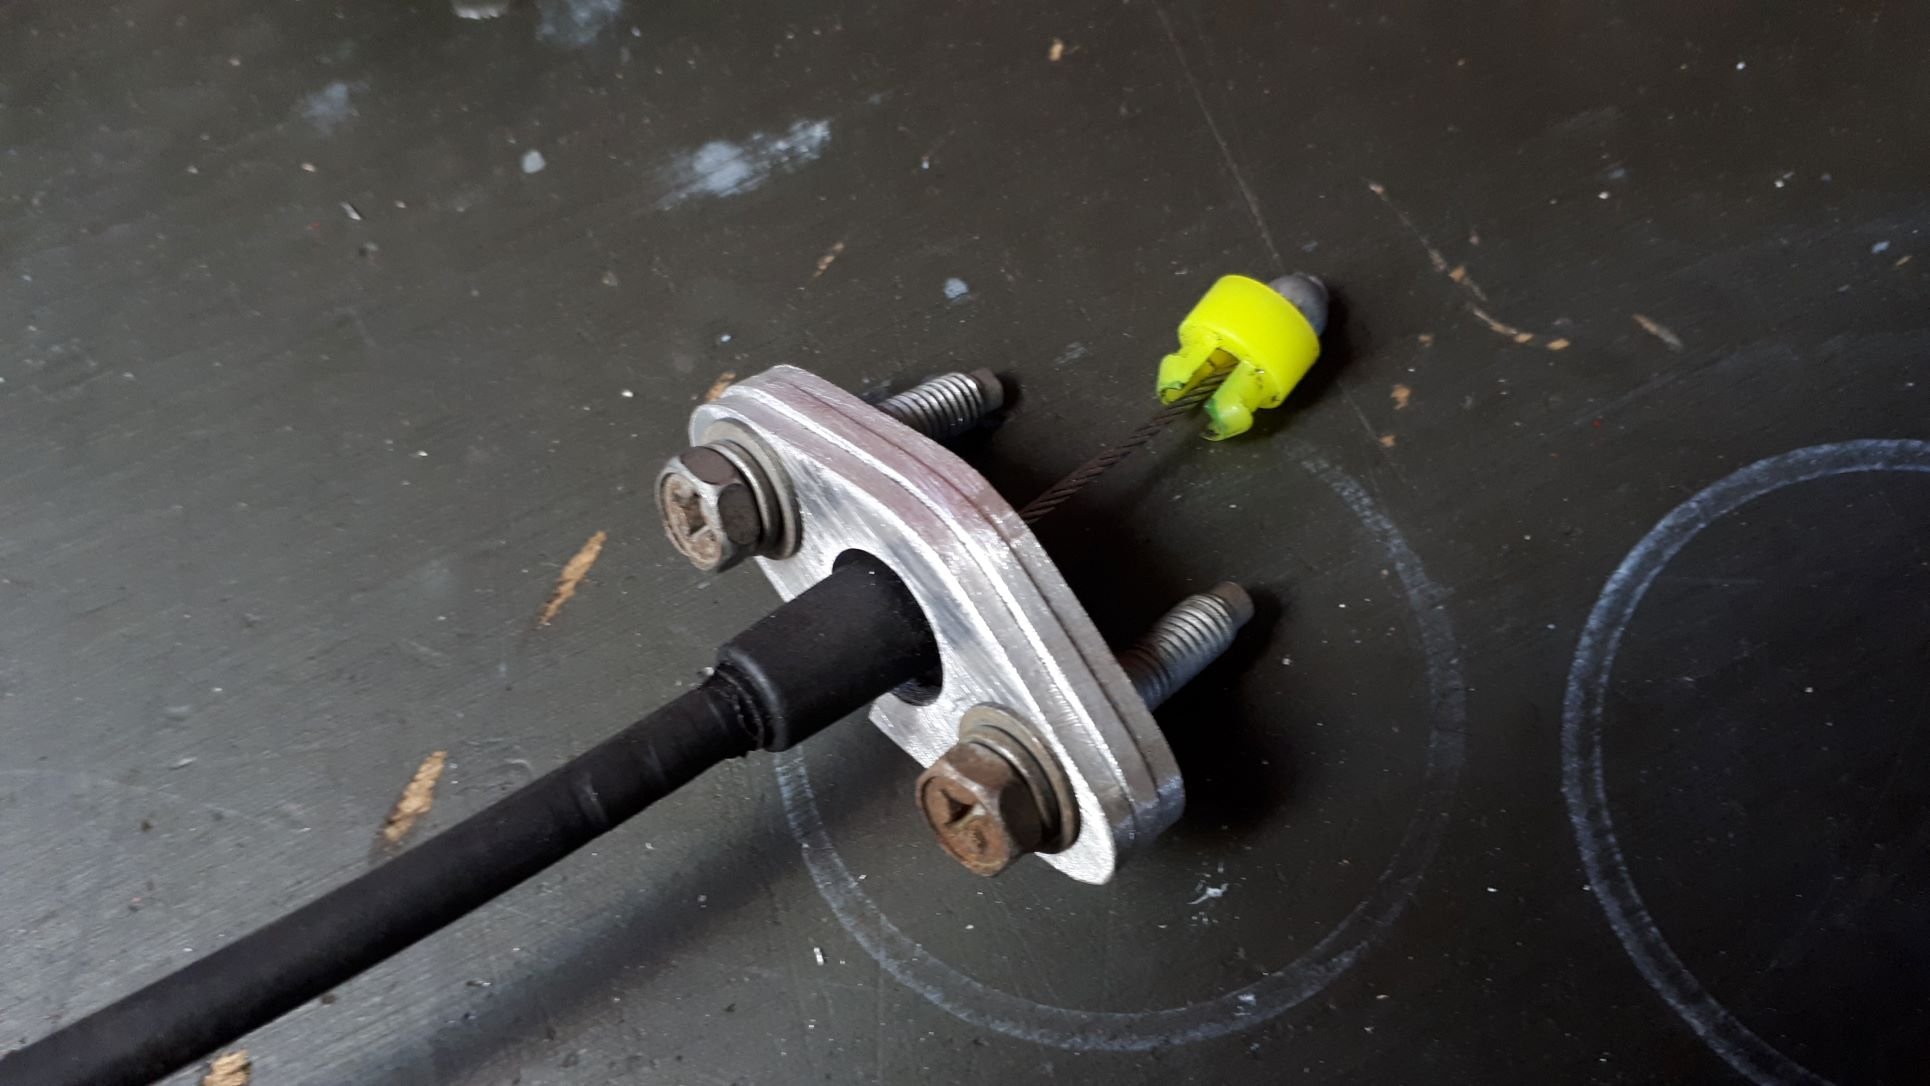
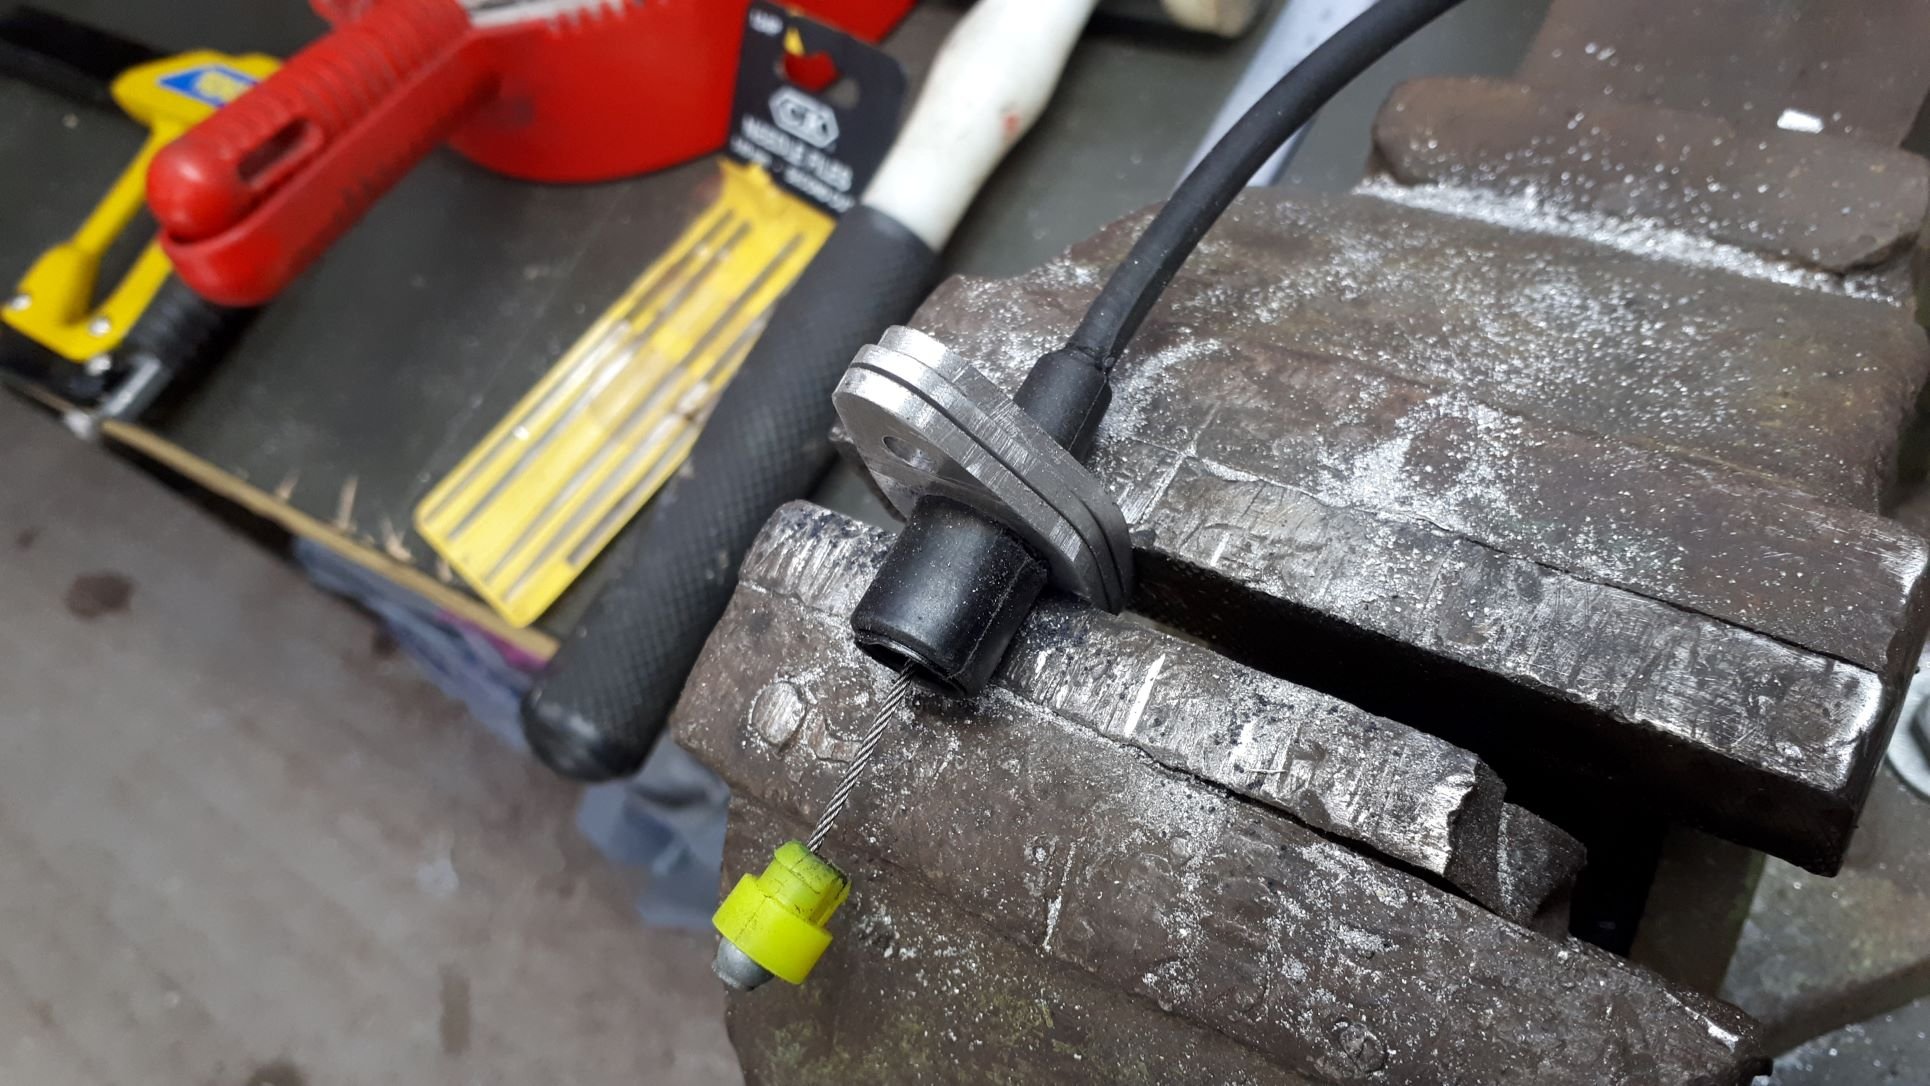
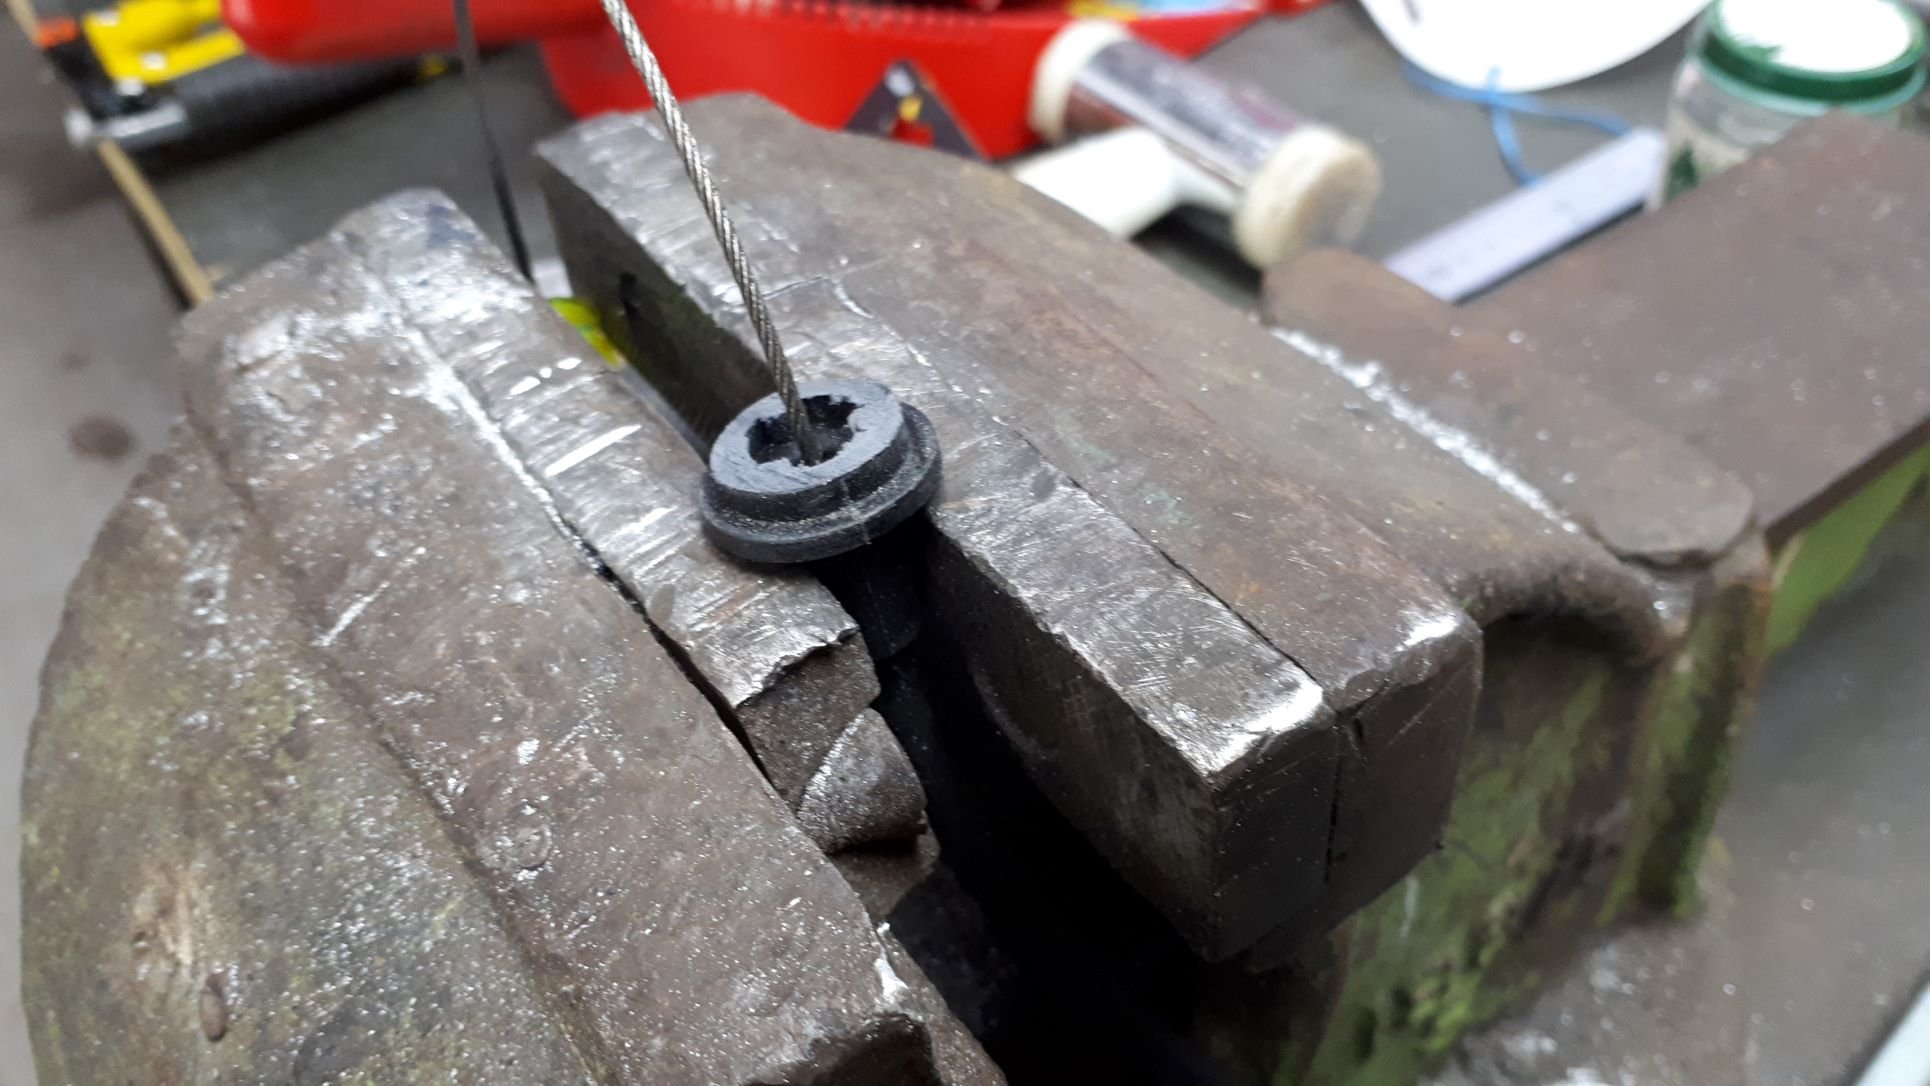
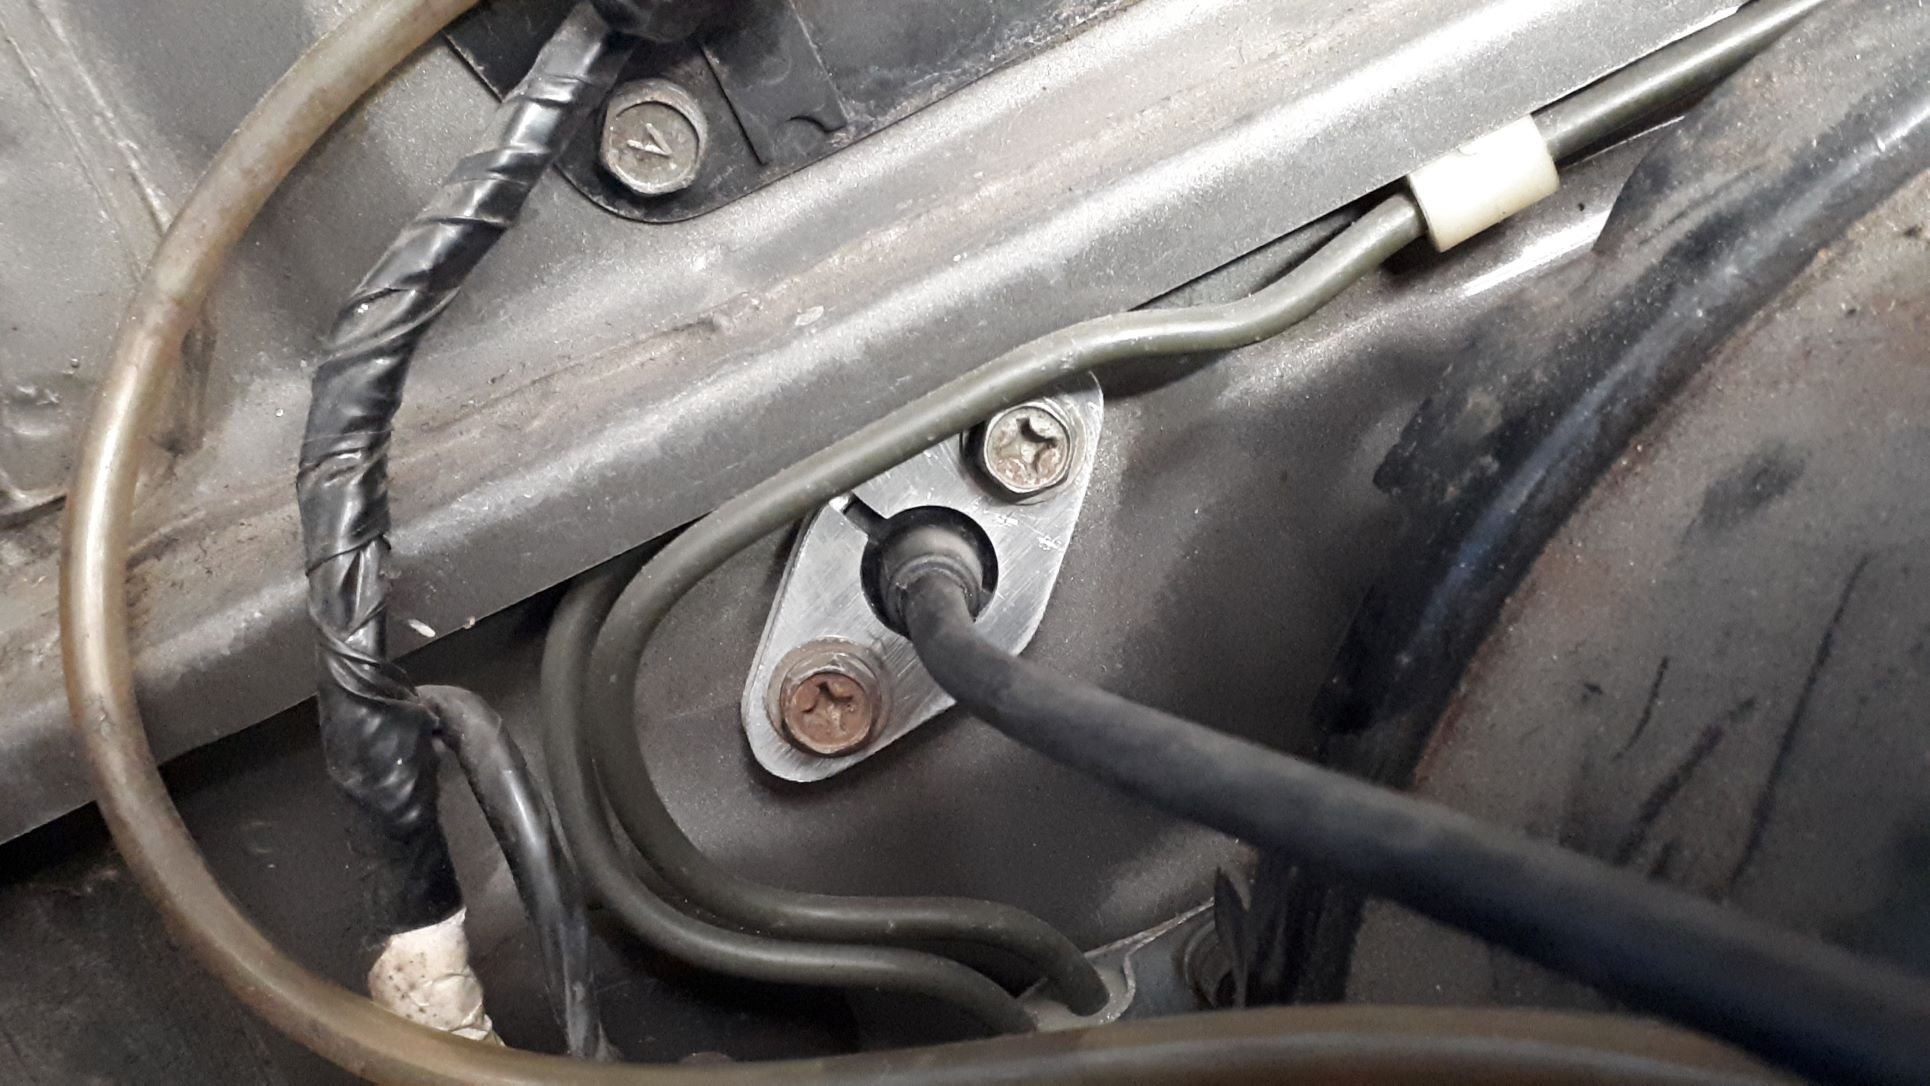
Here is a trick that others might want to use. VT-VY commodores have a good throttle cable that can be easily adapted to fit almost any car. I have one in my Valiant and now also in the Sigma. They are dirt cheap, a decent length and are available from any Pick-a-Part in NZ. You simply make three plates to clamp the cable at the firewall (with fastening holes to suit your particular car) and if required do a little trimming of plastic and it works a treat.
11 points
-
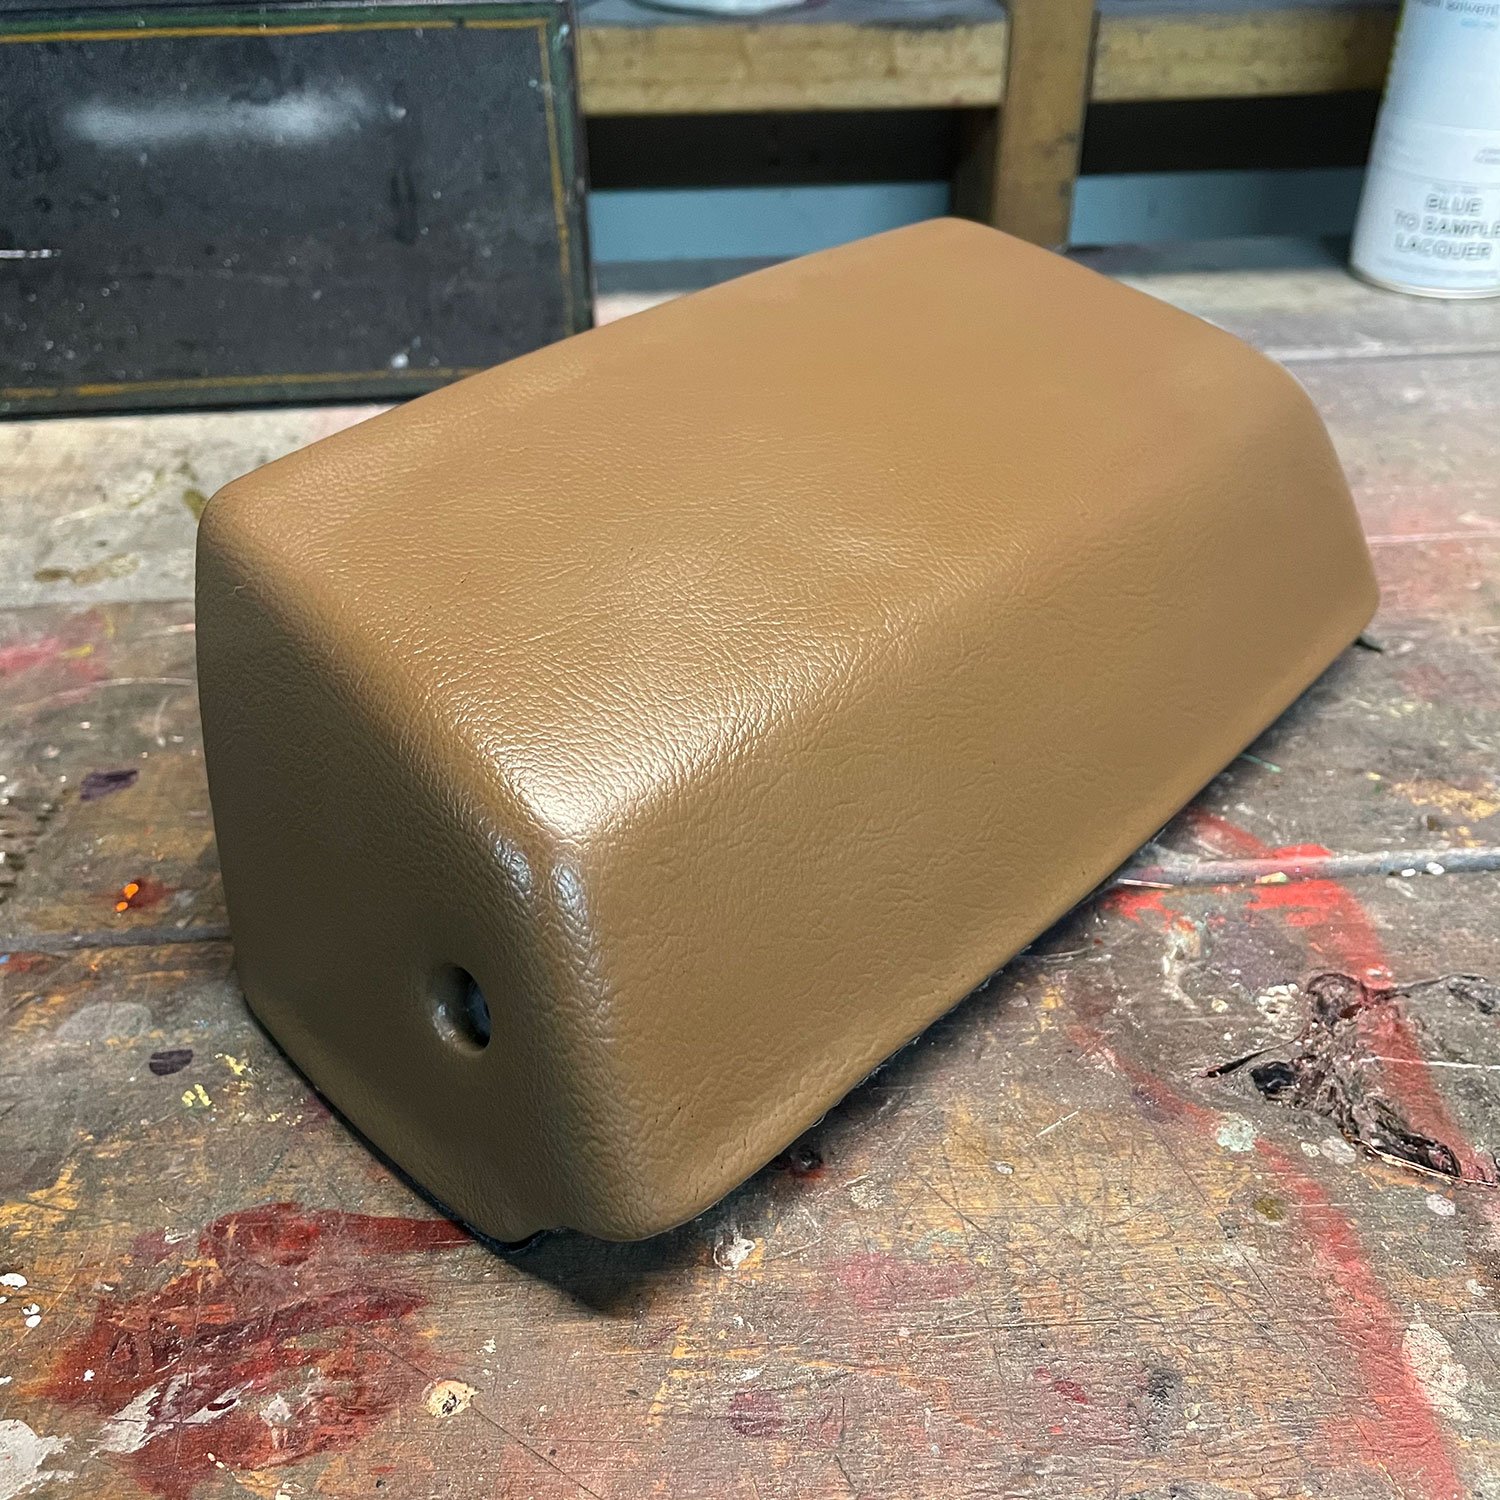
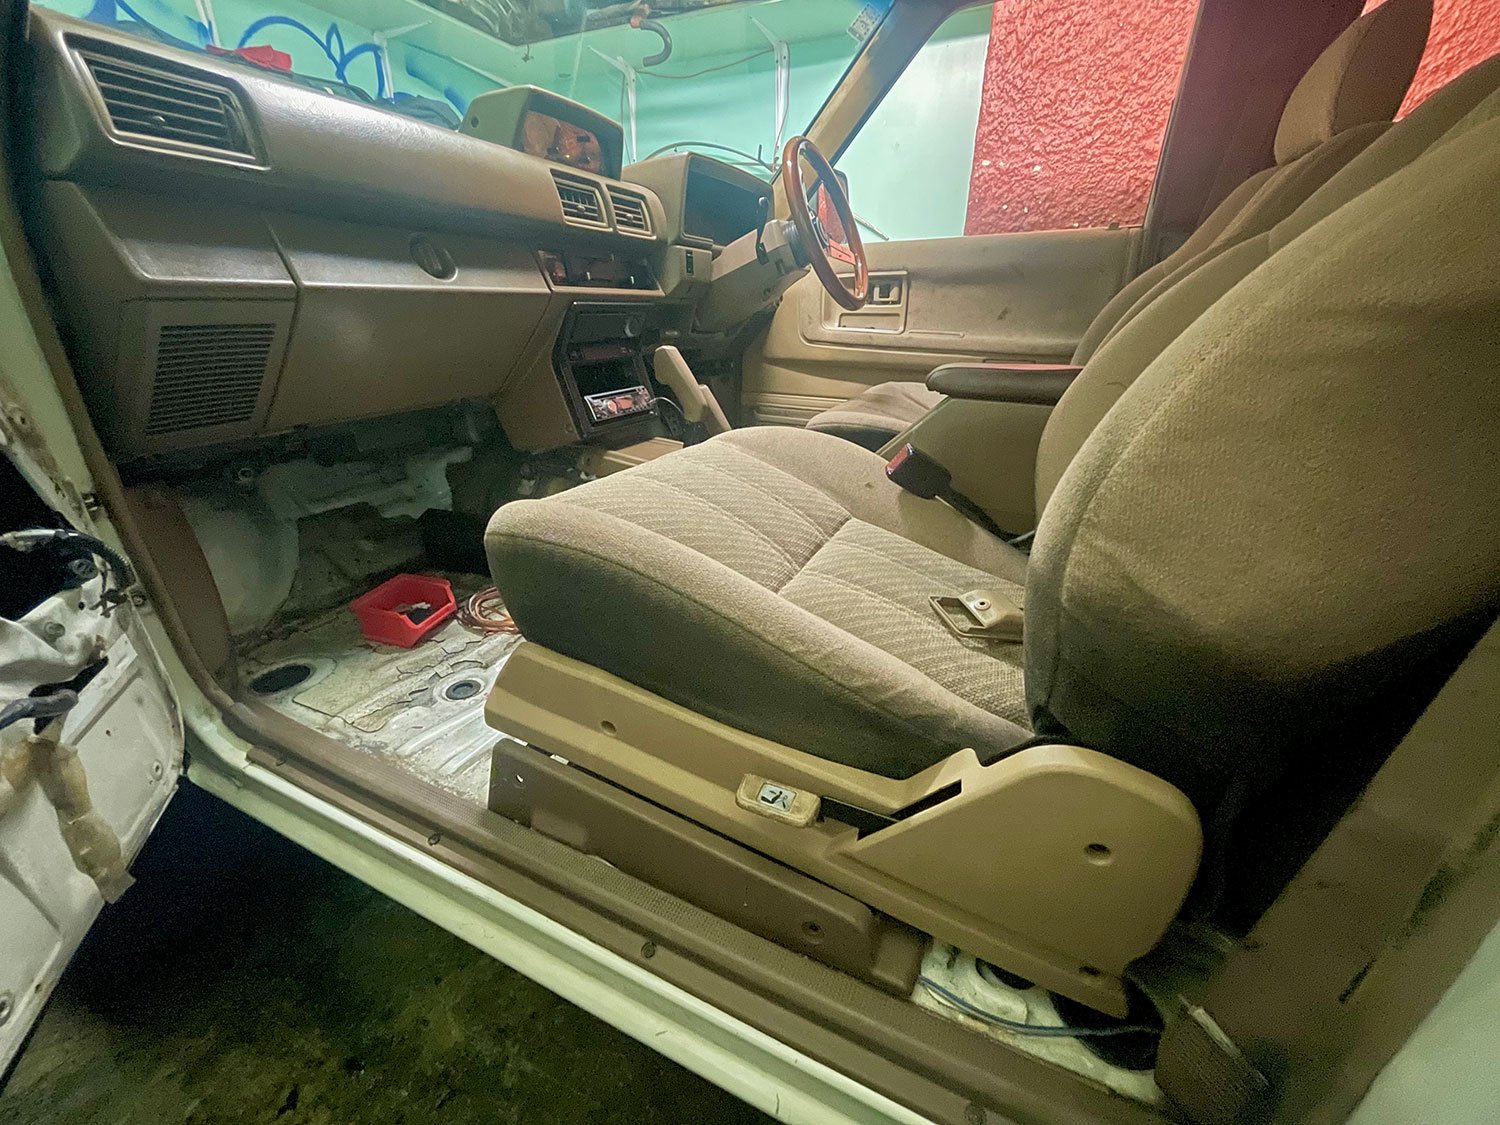
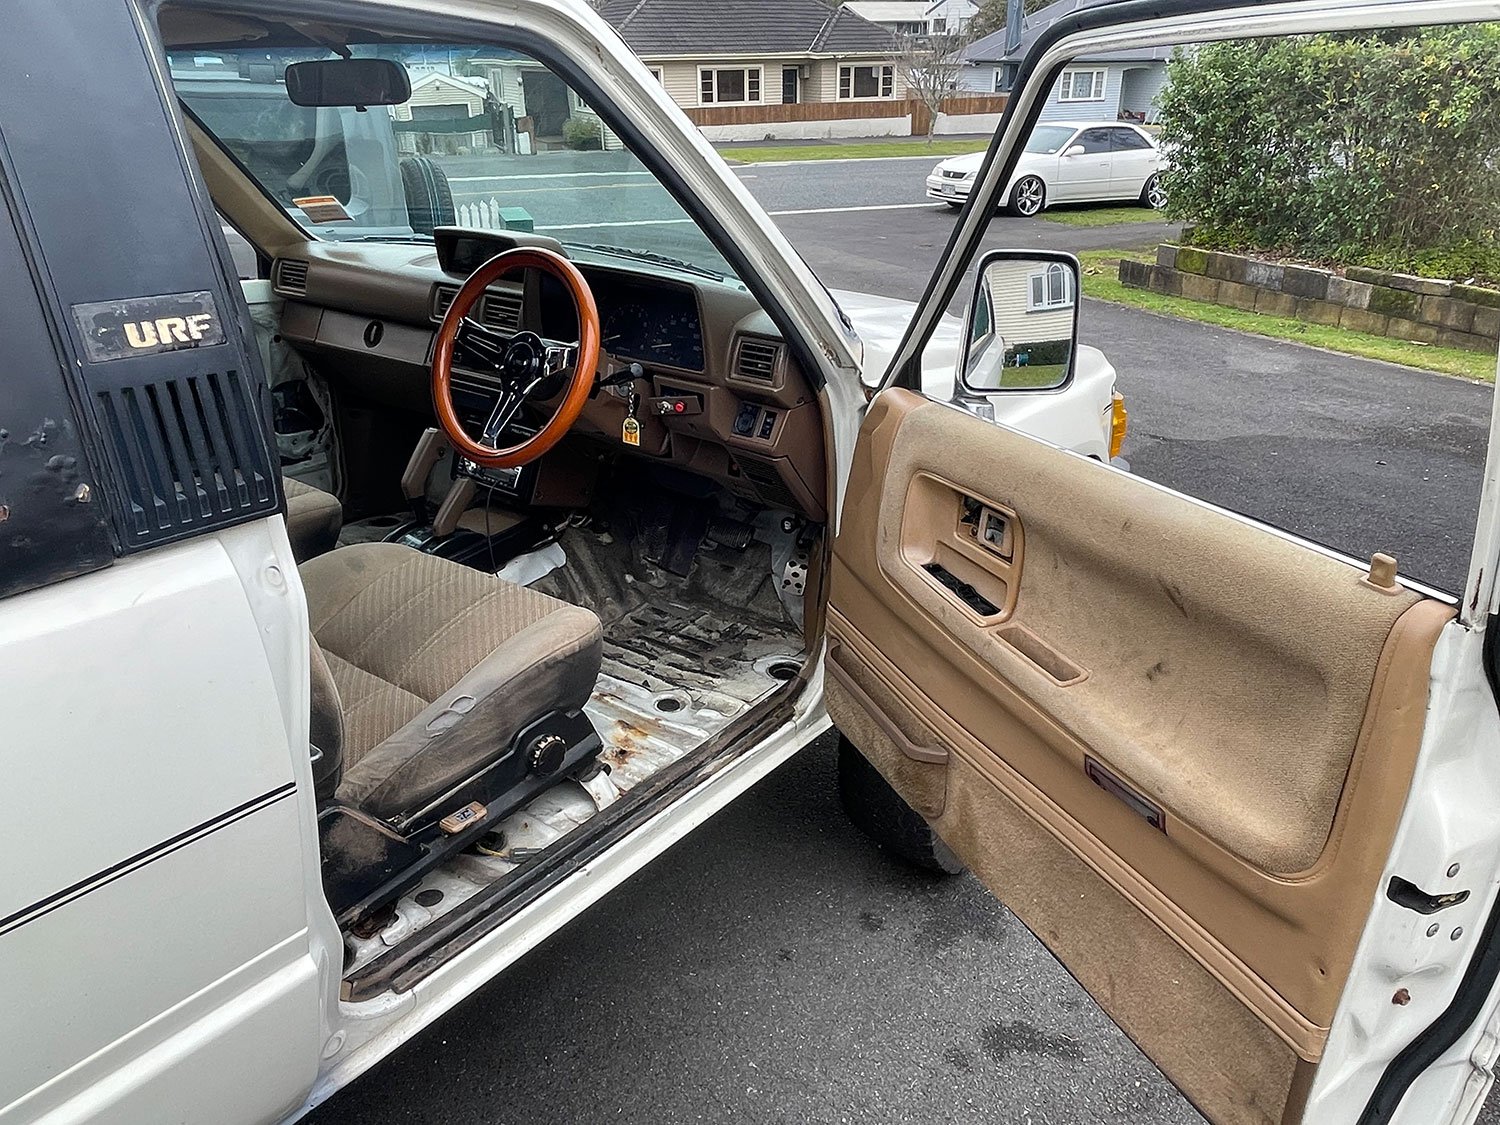
I've been working away on cleaning the interior up while I wait for my rust dude to free up. The tan interior was bombed with a black spray can. A good way to strip the paint without damaging anything is brake fluid. Takes a a little patience but works. Also, got a sweet new steering wheel. Couple before and afters...
10 points
-
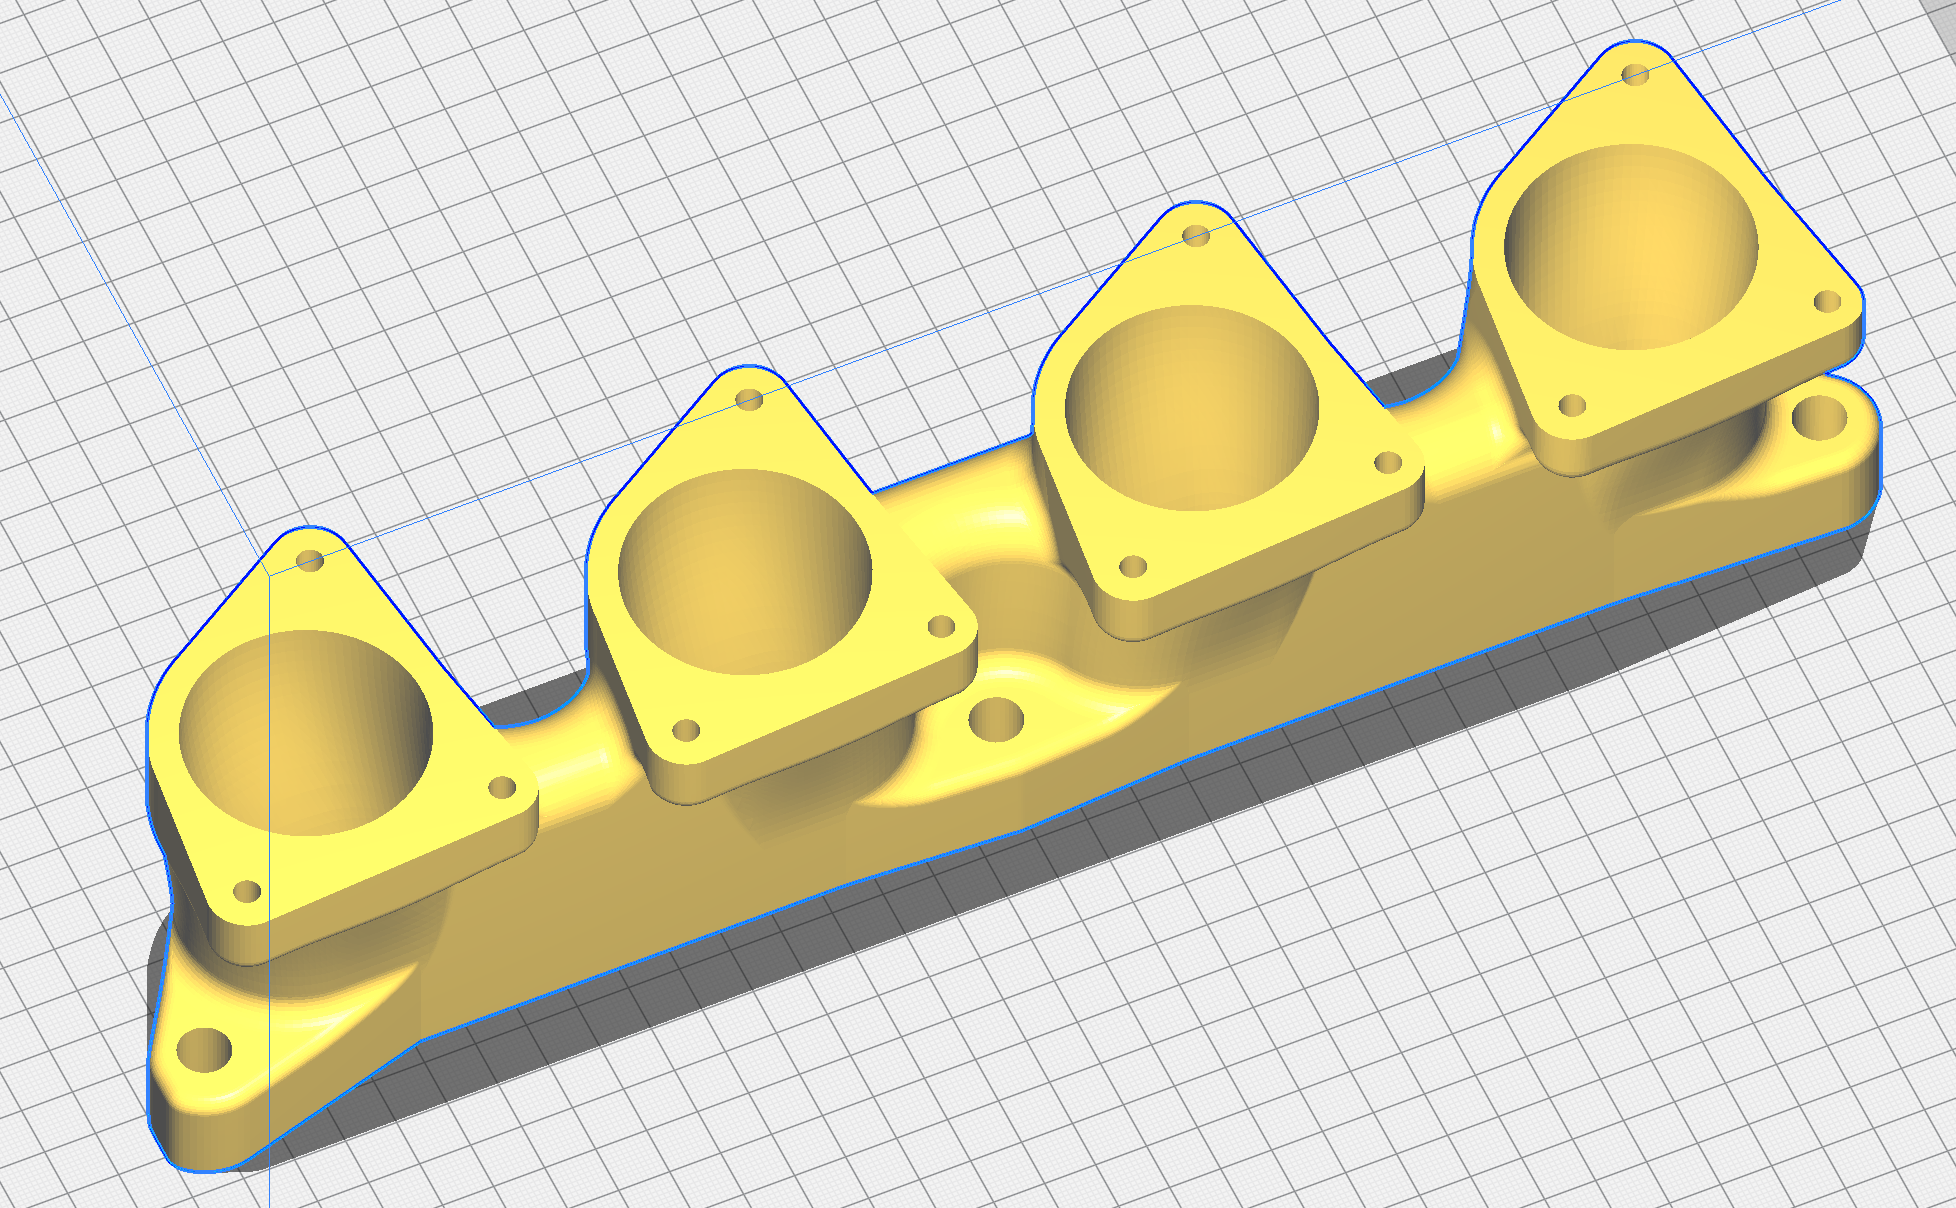
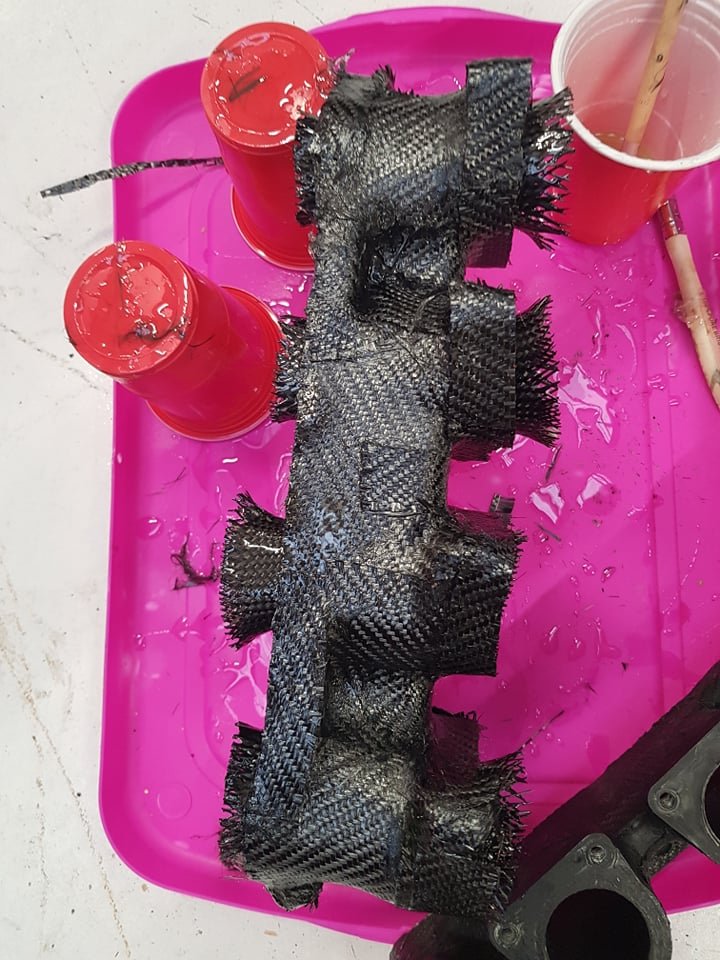
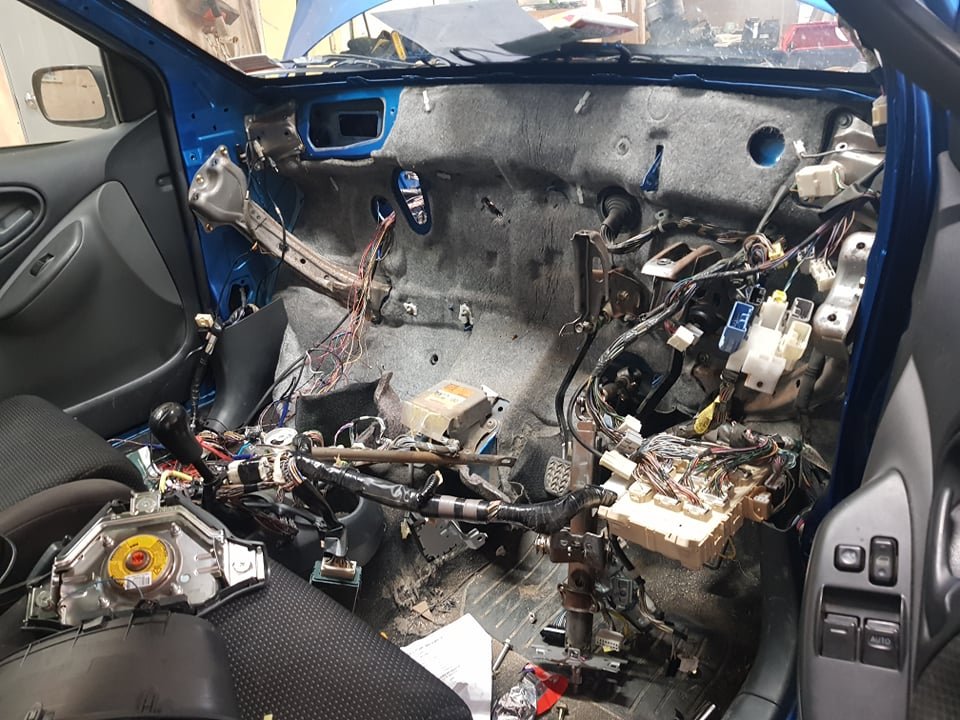
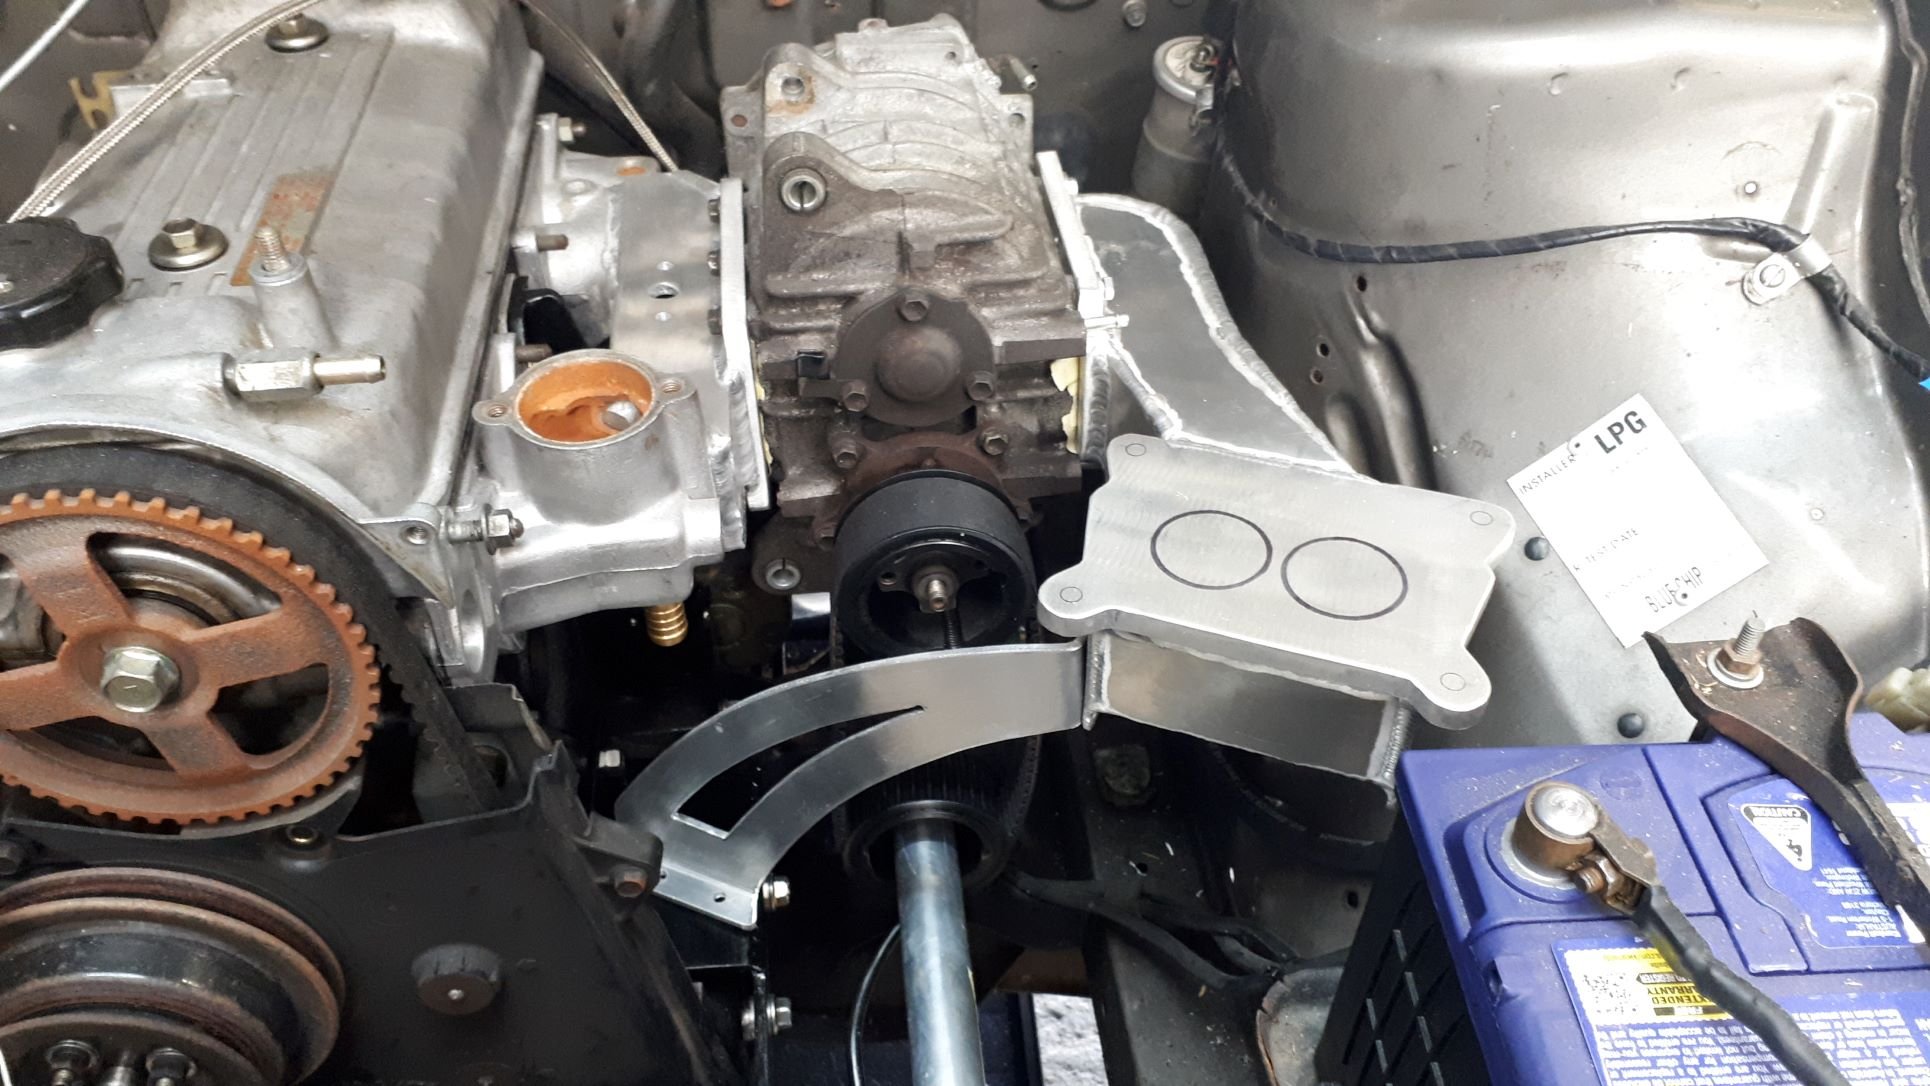
Redesigned the manifold to be a little bit stronger, better clearance on some areas, and easier to wrap with carbon with some bigger radius on things. Ahh and flips the throttles the other way up. Then it took about 3 days to print, had a bit of warping that needed fixing but turned out okay. Test fits good Take some space age materials and smoosh it on there like a cave man: Then trim it up and sand the mounting faces on a piece of glass with some 220 grit. Nearly good to go, still some sharp edges to take care of with the dremel. Carbon splinters are nasty! Also I'm making a new loom because I had managed to create independent disasters on both sides of the firewall. Tried to get the heater box out and had to pull bloody everything out to get it! But now it's gonna be much easier to make a nice loom. Will be good practice for some better projects later, this loom is nice and simple because there's not too much going on. Aircon stuff is about 10kg worth of junk.
9 points
-
Sorted.
8 points
-
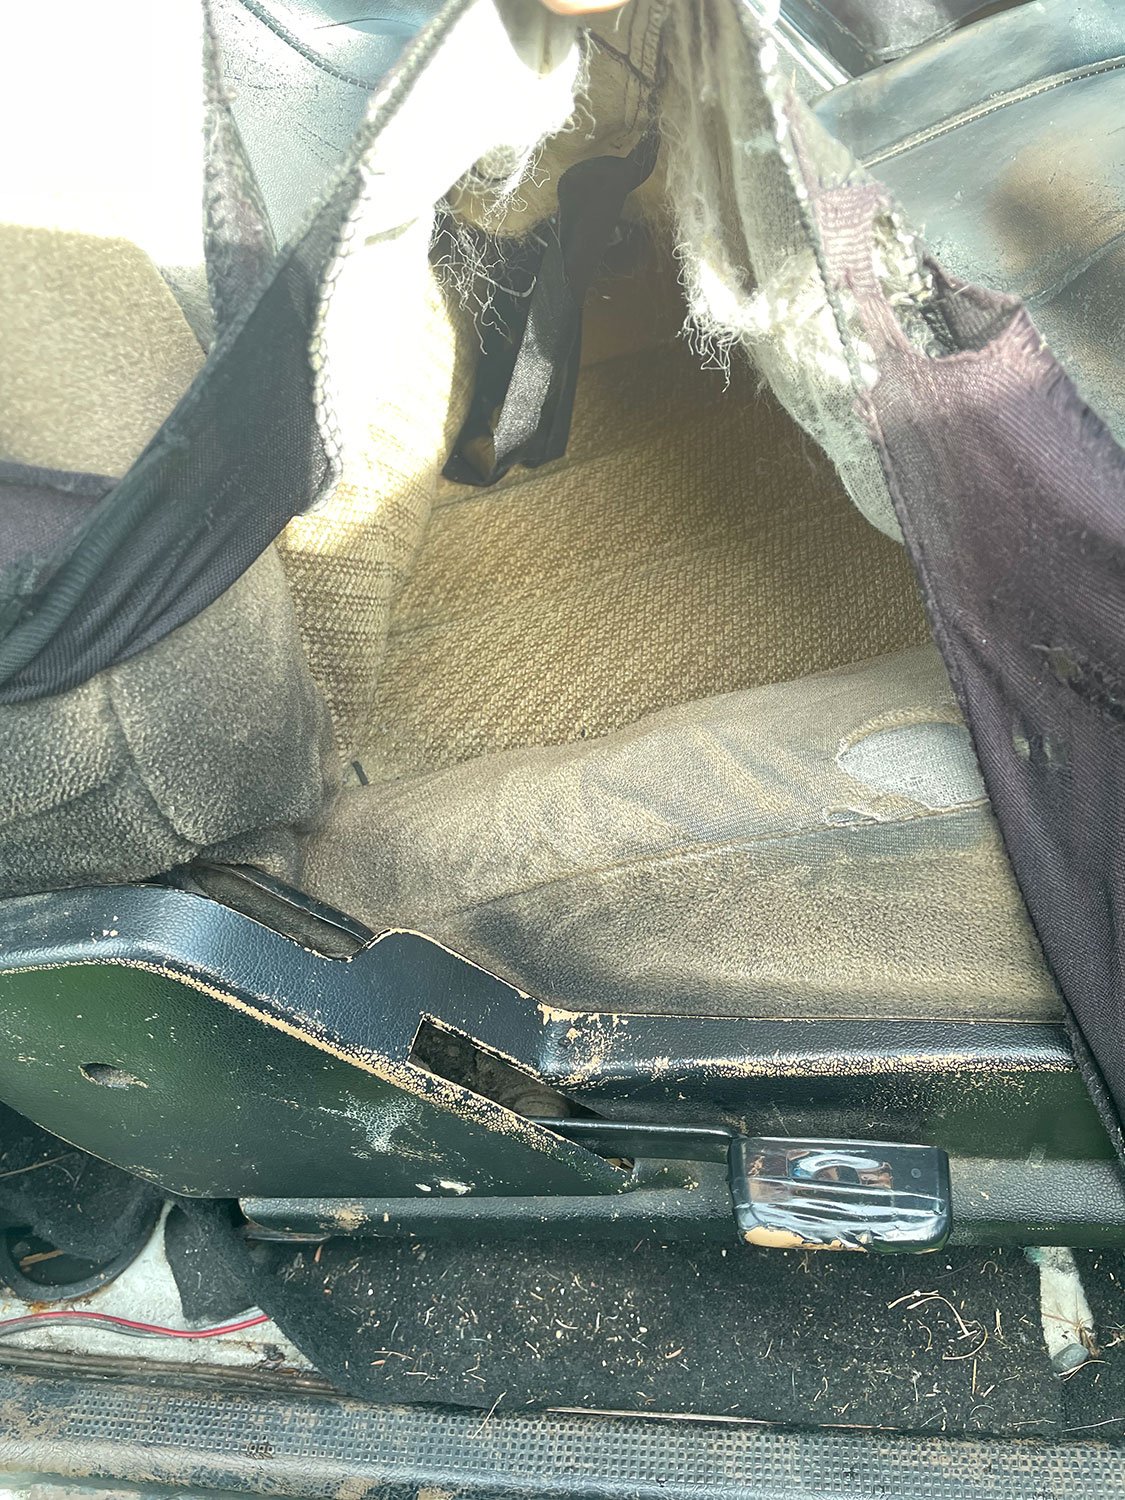
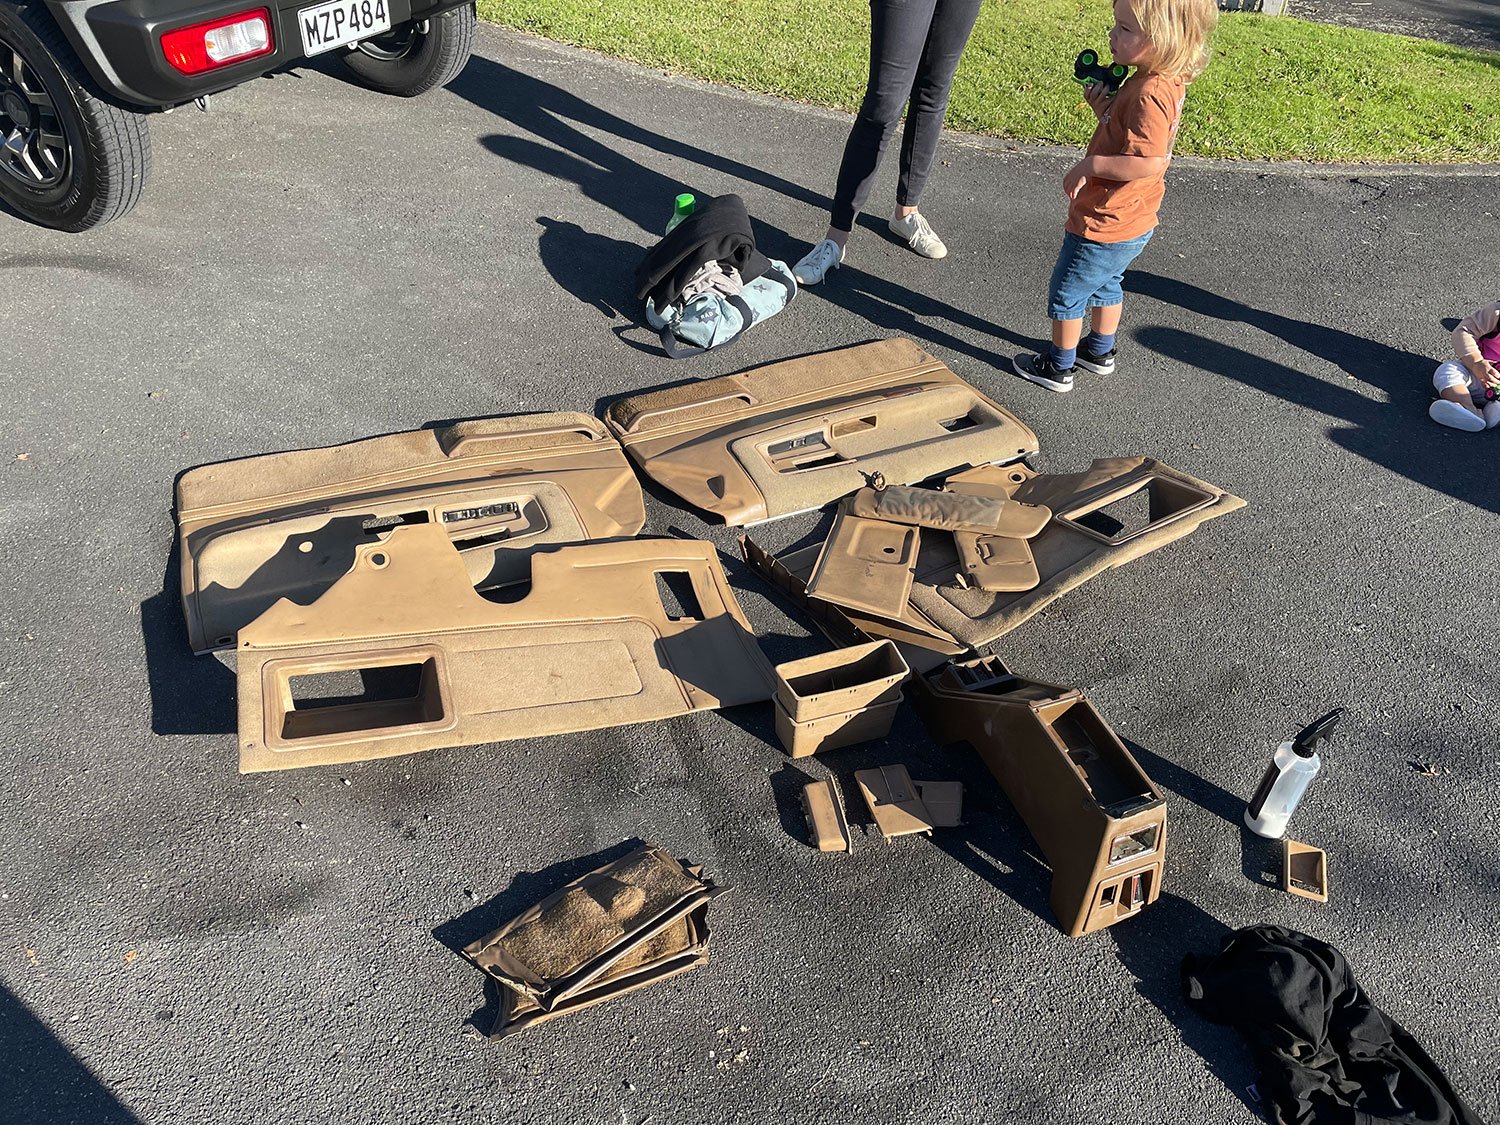
Seems the tan interiors are a lot harder to come by than the grey. It didn't come with any door cars, initially I thought I'd find some easy but turns out these are beginning to be hard to find parts for, especially interior parts. Most are thrashed. But I came up on some door cards, rear seat cards and a bunch of other stuff. Stoked! A little grubby but will clean up ok.
7 points
-
Today class we shall be discussing 'project creep'...7 points
-
Pre-empt that shit and say "no, I had to put something good in it, you know, reliable, doesn't leak like all those useless union made British engines, so I went with something Japanese, precision engineered and trustworthy. Fuck the English, if it was so great there we wouldn't be here, am I right?"7 points
-
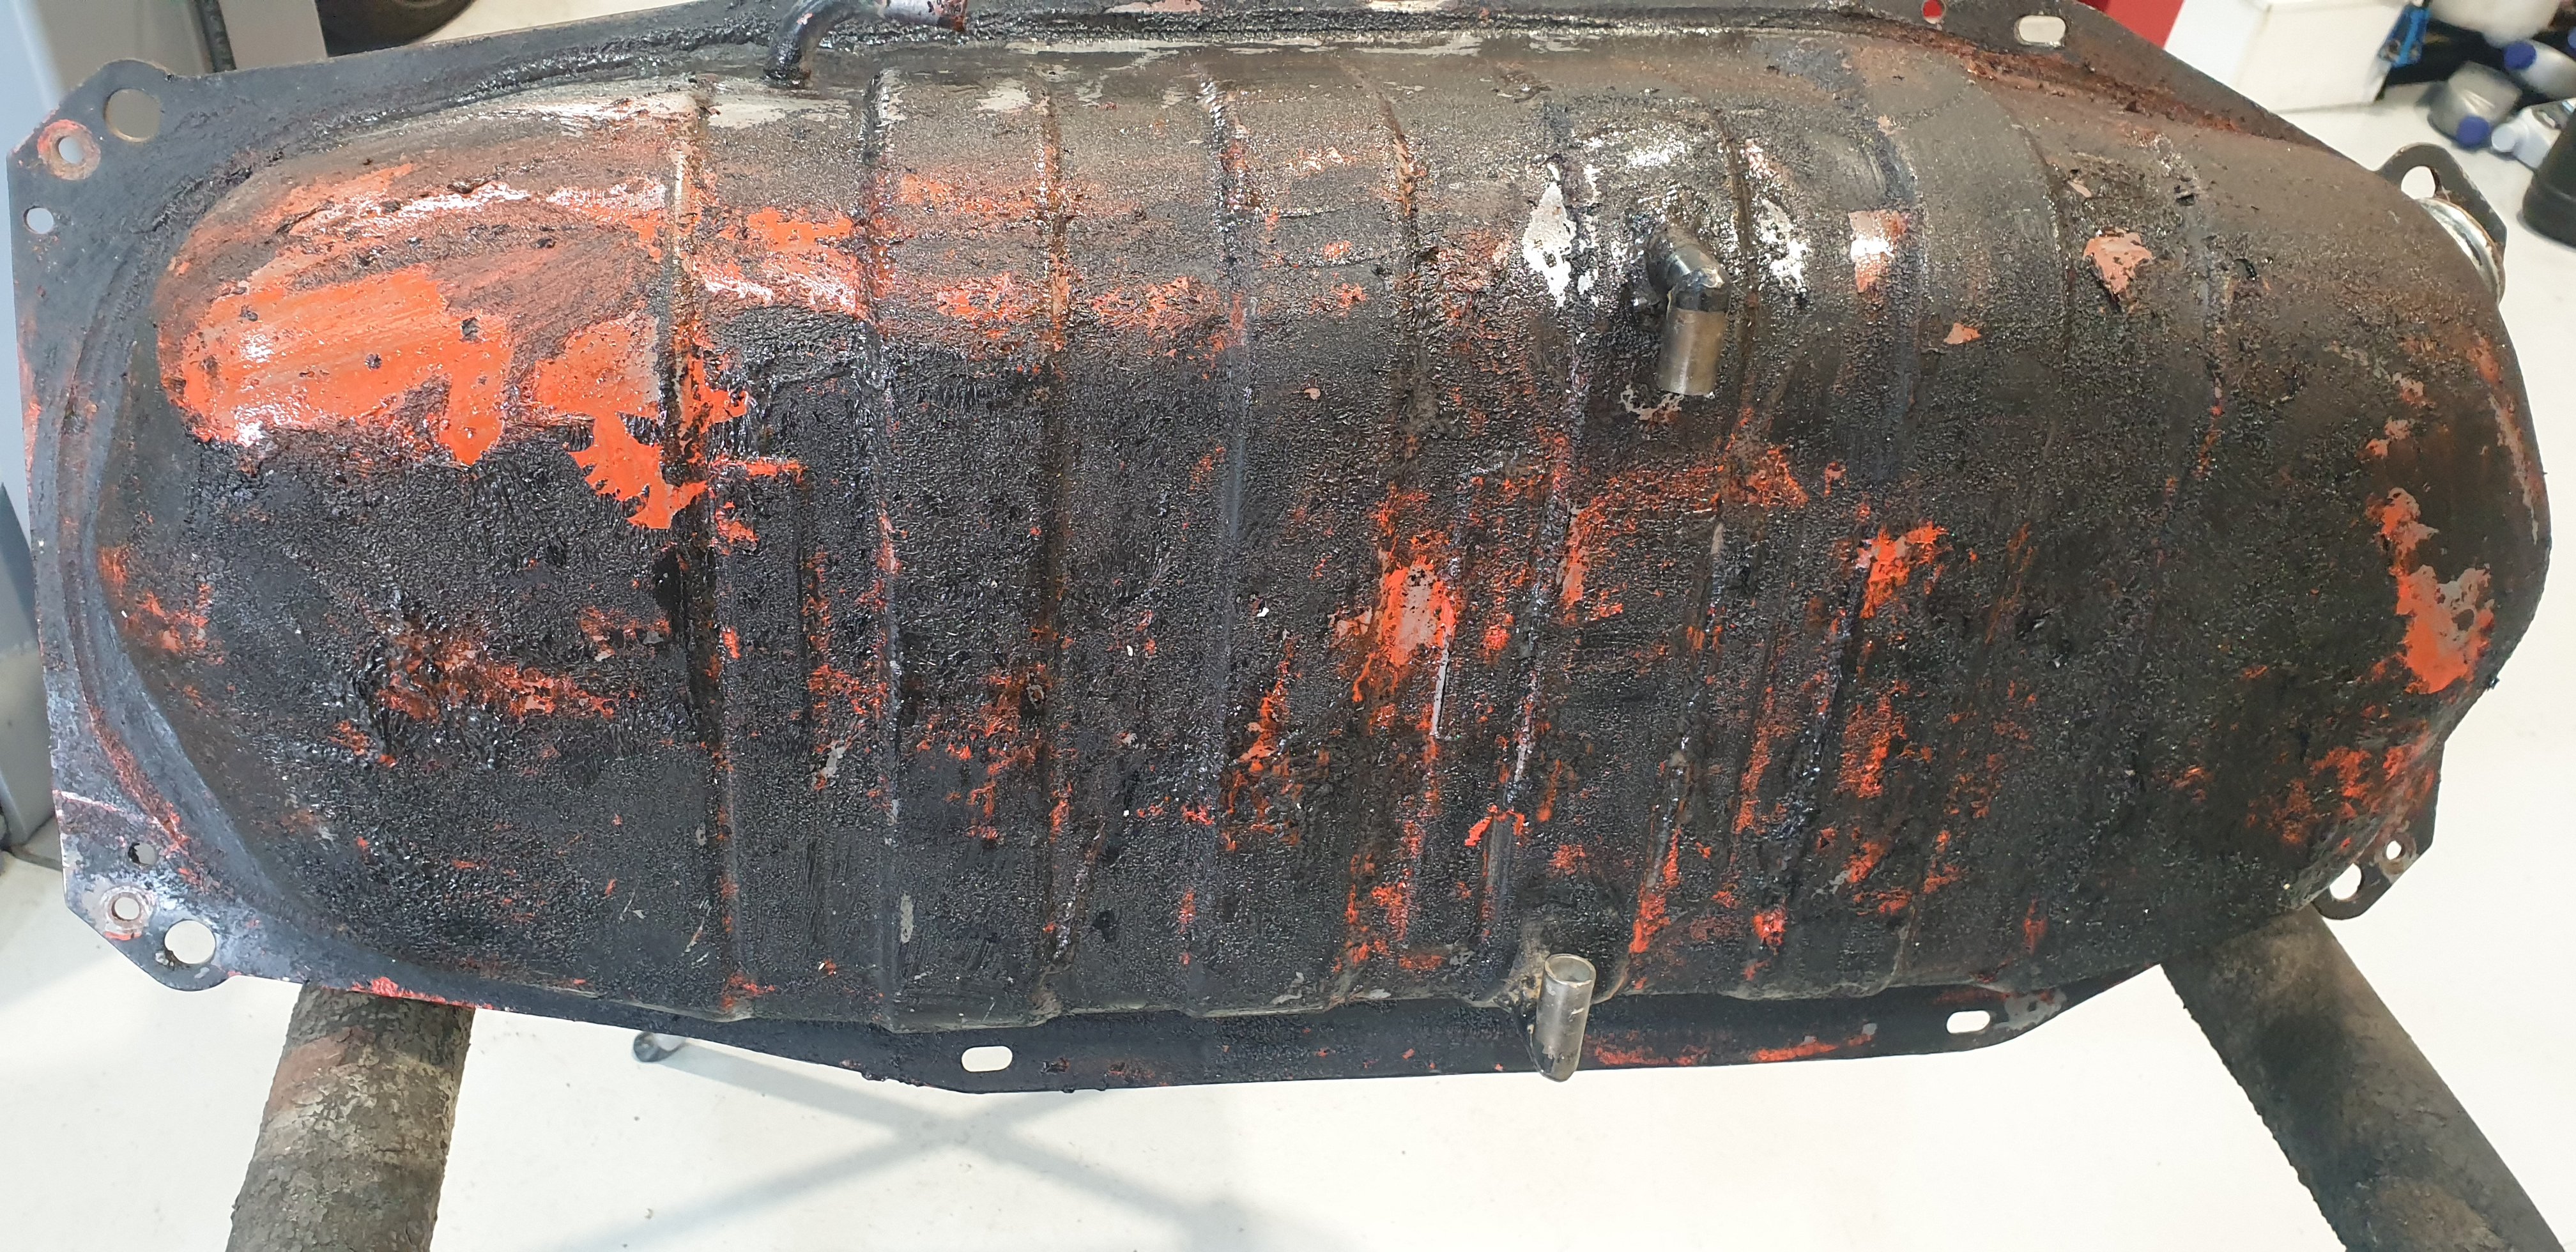
Found underneath the black paint some of the original Sebring Red paint. This is quite a cool coincidence, as this is a Capri fuel tank and the colour the car will be painted in.
6 points
-
Round two Cleaned up the old sill a bit more so I could check what I was doing. Cur the step into the lower form and clamped that down too Worked out better. I'll extend the press tool a bit more and hopefully get less of a crease for round 3. Also got the other one back from the painters after a month in paint shop / covid jail. The damage to the roof from the roof rack has been fixed up nicely.
6 points
-
He'd be even more horrified to learn what's going to be in it.5 points
-
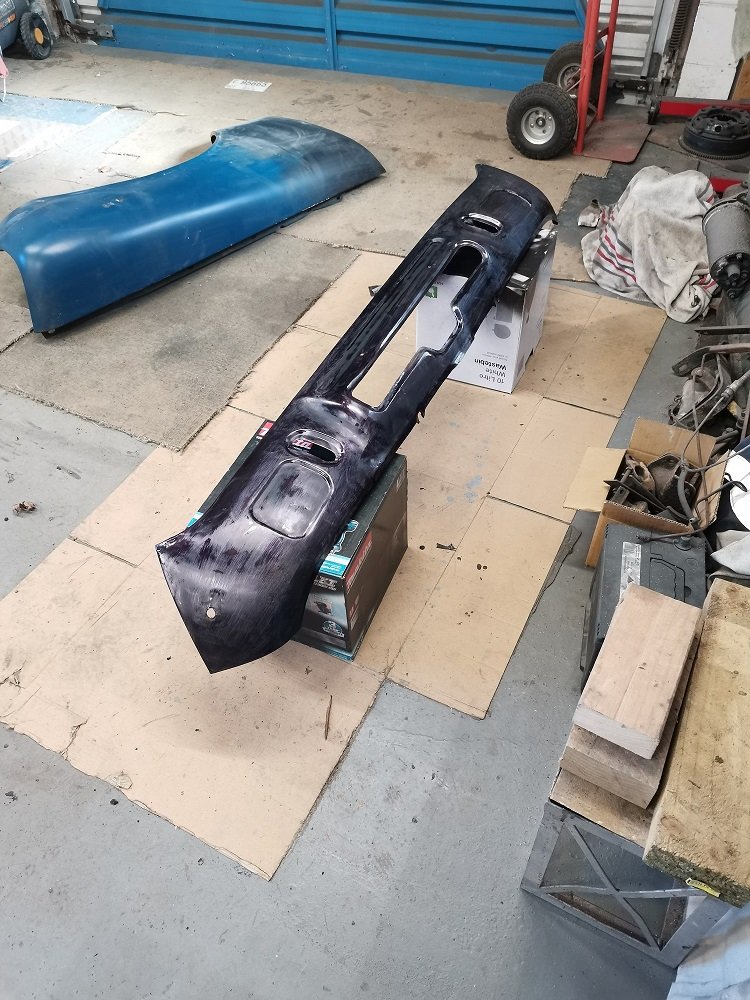
Put the 2" blocks in, rolled the rear guards and fitted the rear pair of brx Never before seen footage of the crusty tailgate. Looks a lot worse than it is due some usefull person touching the whole tailgate up with paint applied with a brush
4 points
-
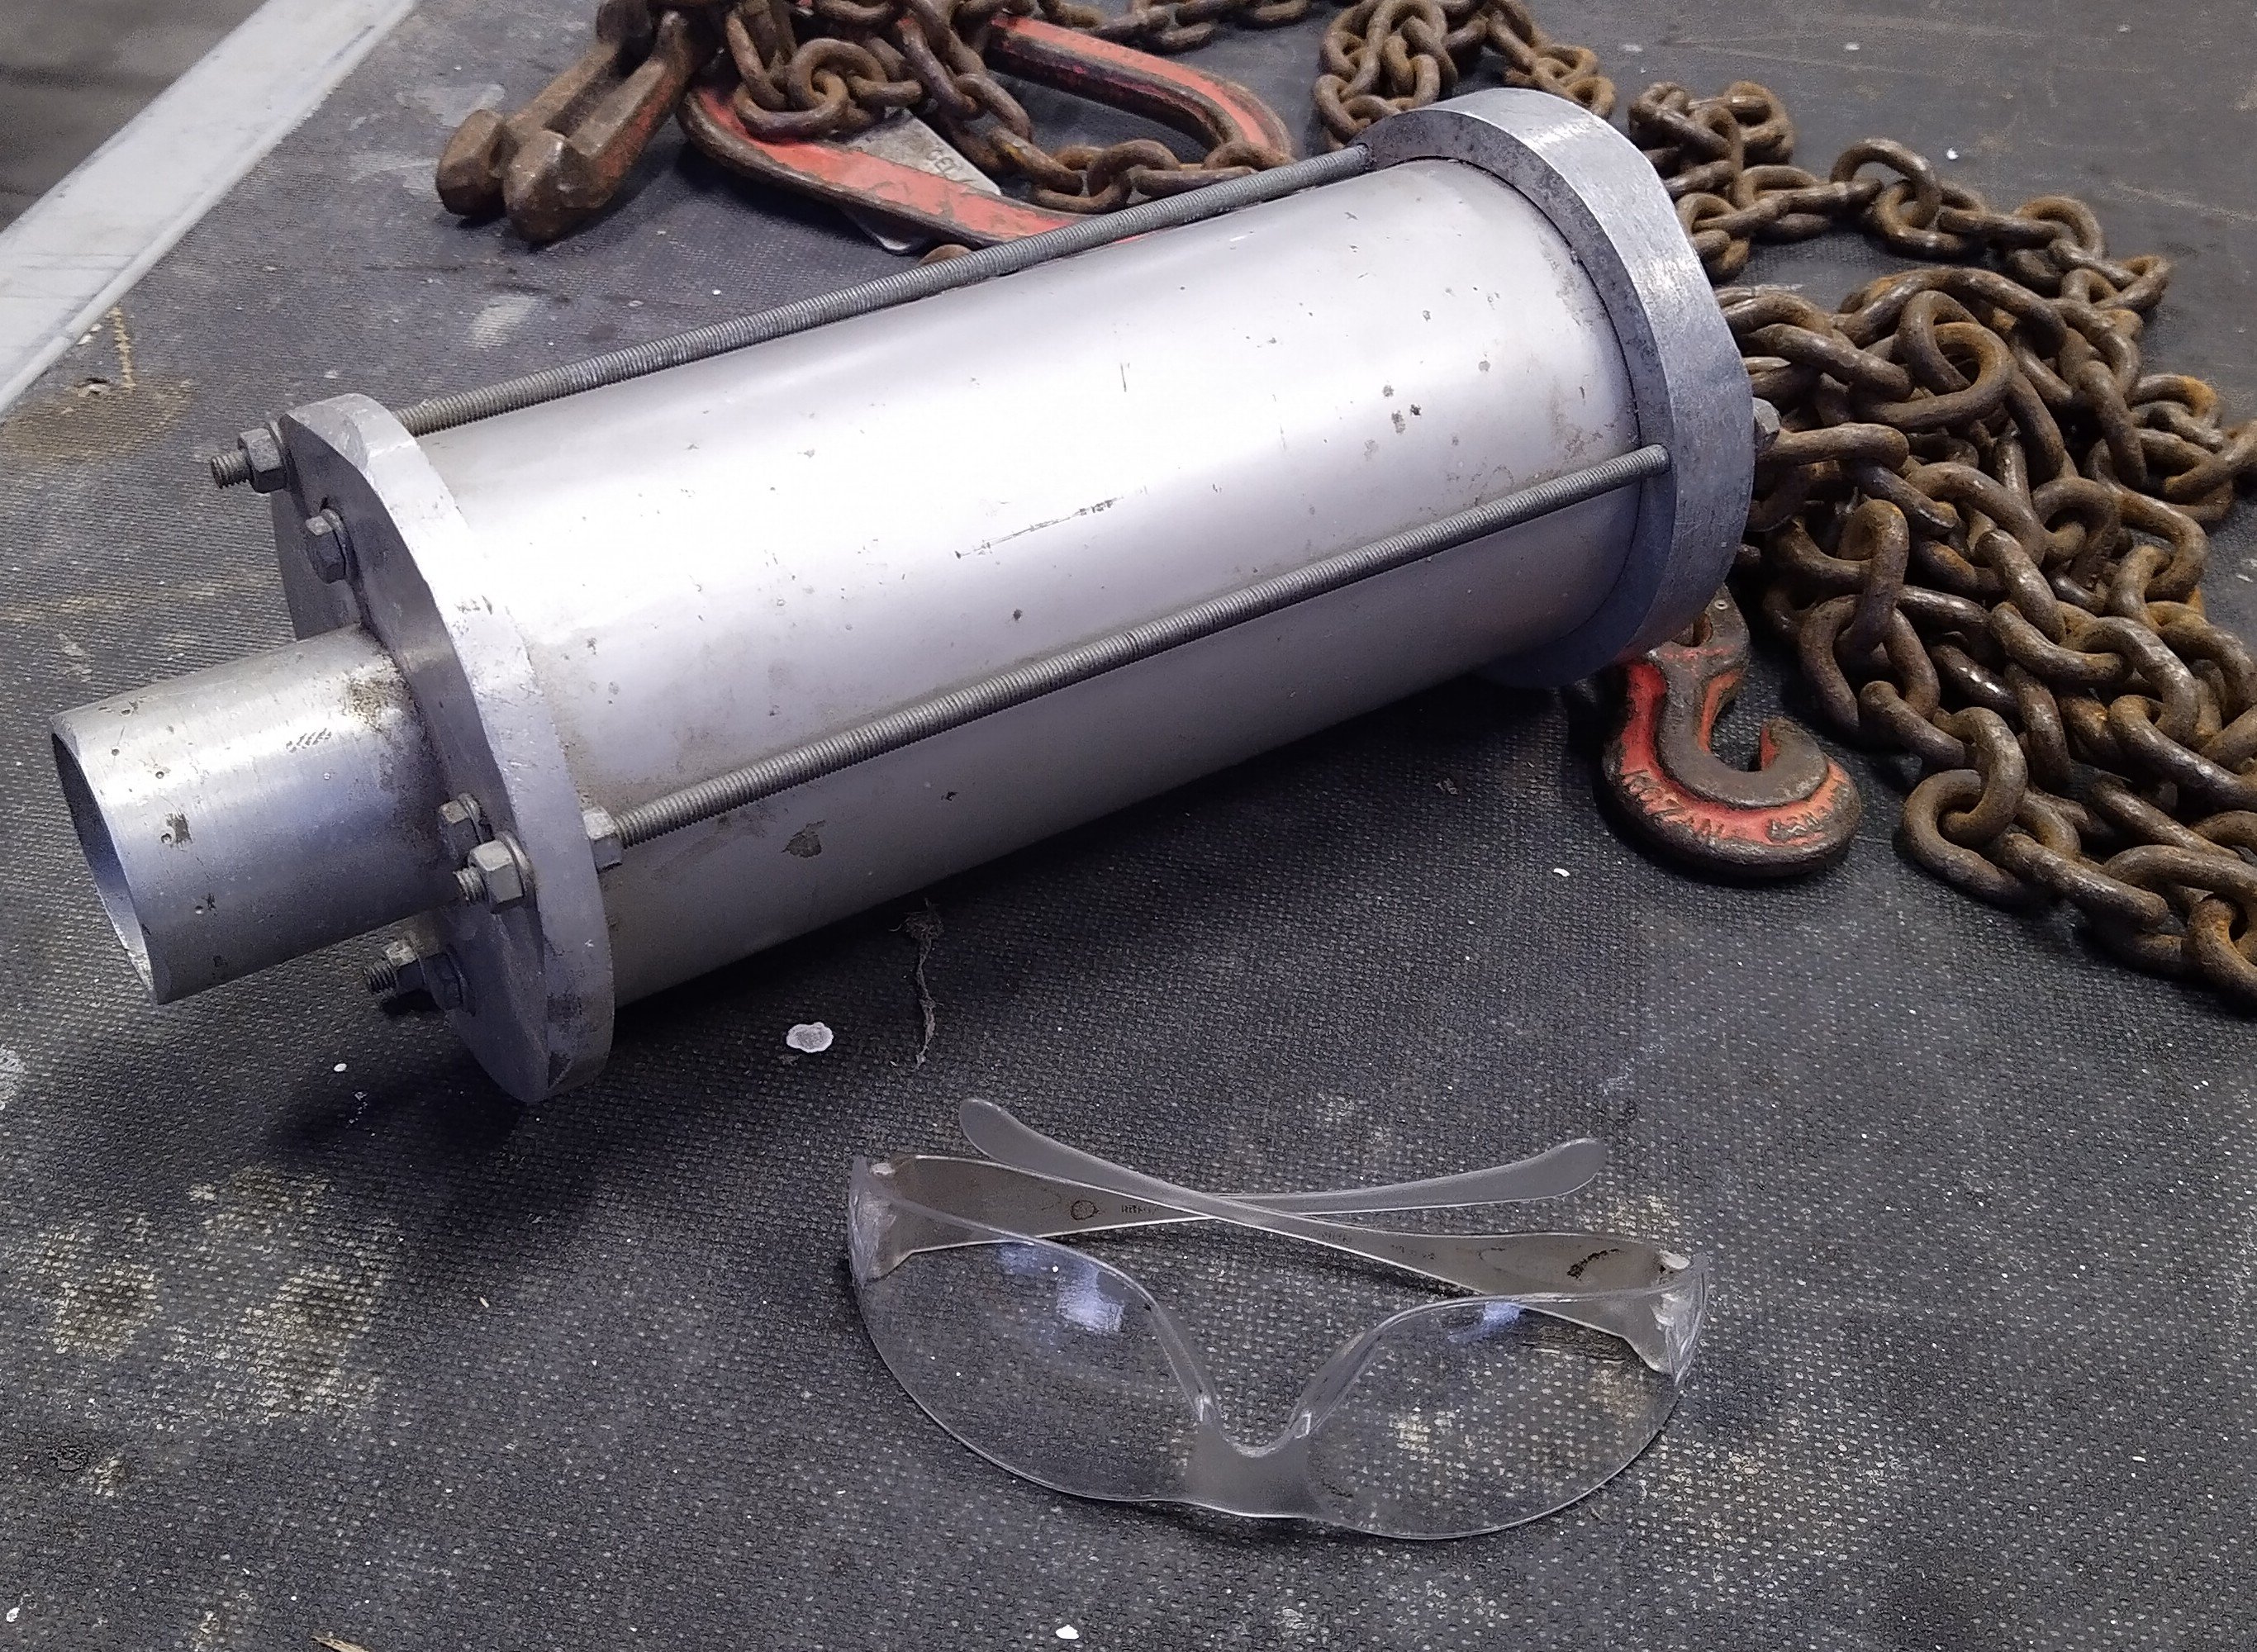
Me and a mate built this at Uni as part of the design stuff for a competition, we didn't actually win on the day due to the way the results were calculated but we went twice as far as any other entry and i think they still use it as an example... Firstly, this is how it works, the basic setup. The red is a bit of 5mm polyurethane, all else is aluminium; Then you pump air in which seals the barrel and fills the outer. Once it is pressurised you remove the pump, the valve actually has nothing in it so the removal acts as the trigger; When the valve is removed the pressure on the polyurethane seals the valve/inlet and all the air rushes out, pushing whatever is in the barrel with it. And as promised, a video of it in action and some fucking dodgy editing for lols.
4 points
-
Is that like stranger danger3 points
-
Might have to give ya fancy snap on box a squirt in the colour so it matches bro haha3 points
-
Yeah mate original Austin made A series.3 points
-
I know, stupid ecu's. I told her if this was a Triumph Herald it still wouldn't be going - but at least I would know why.3 points
-
Blardy modern cars. grumble grumble. Slap an SU on it and call it done.3 points
-
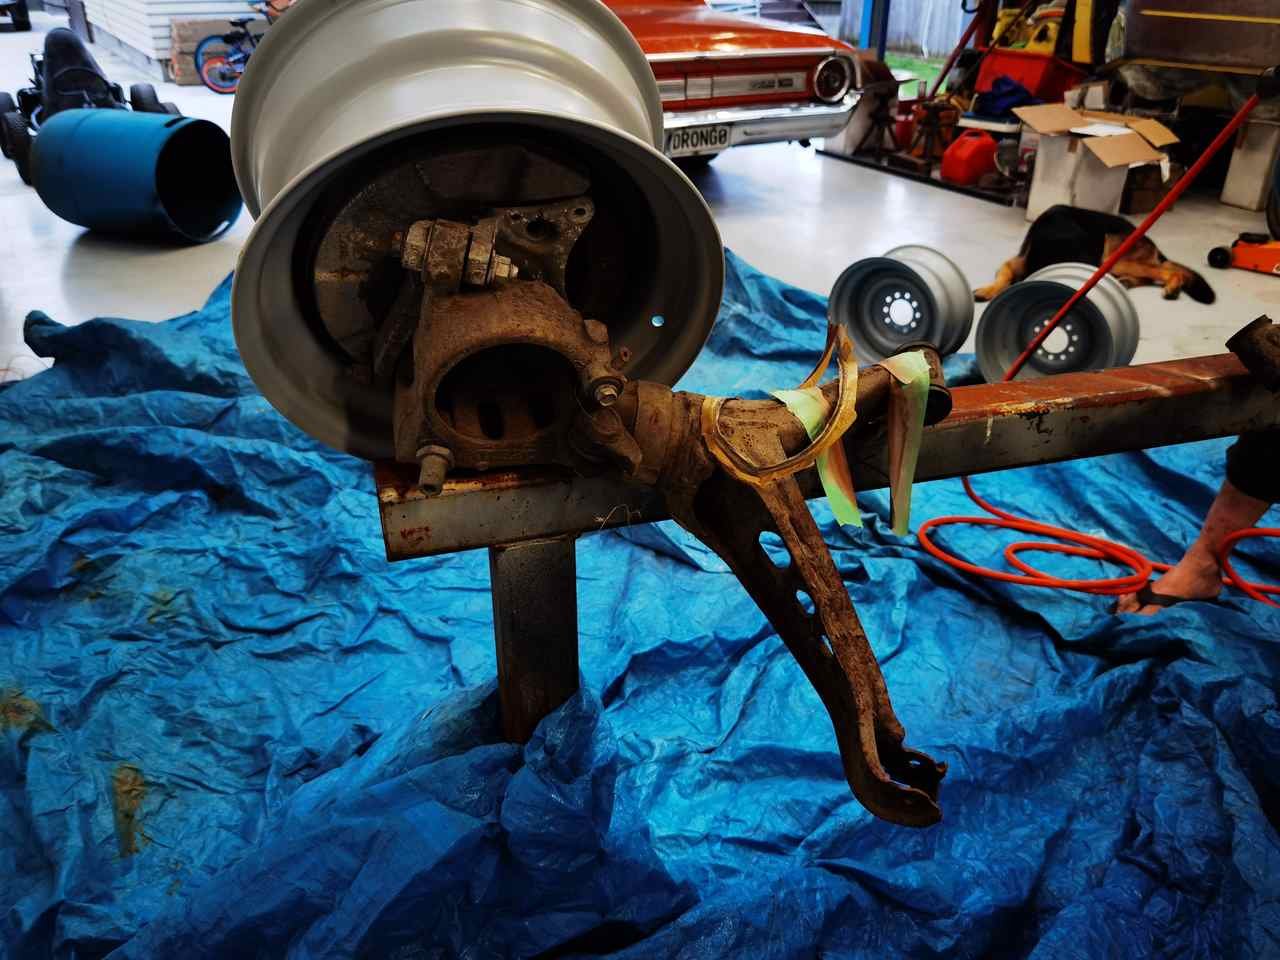
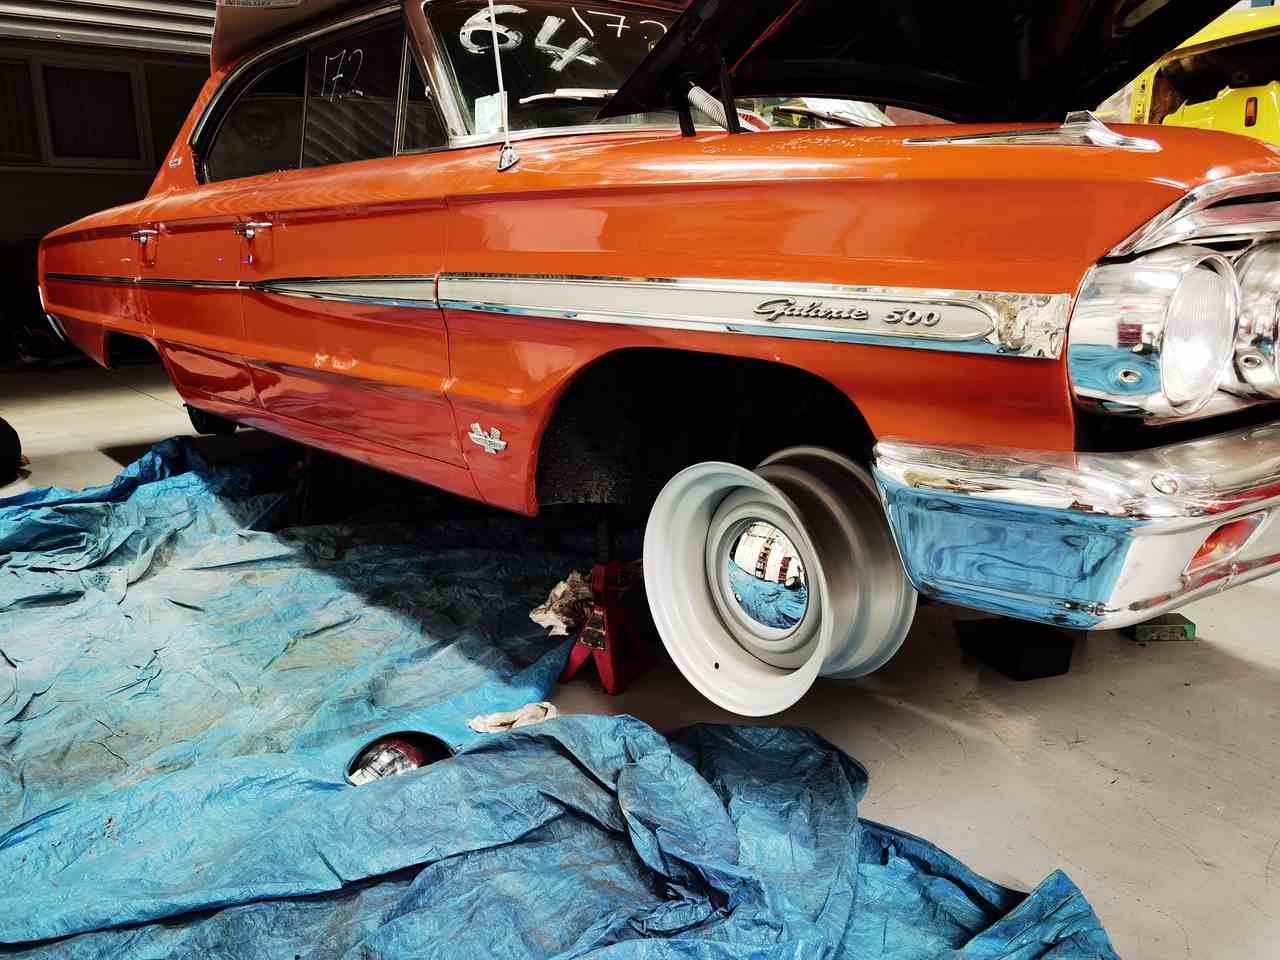
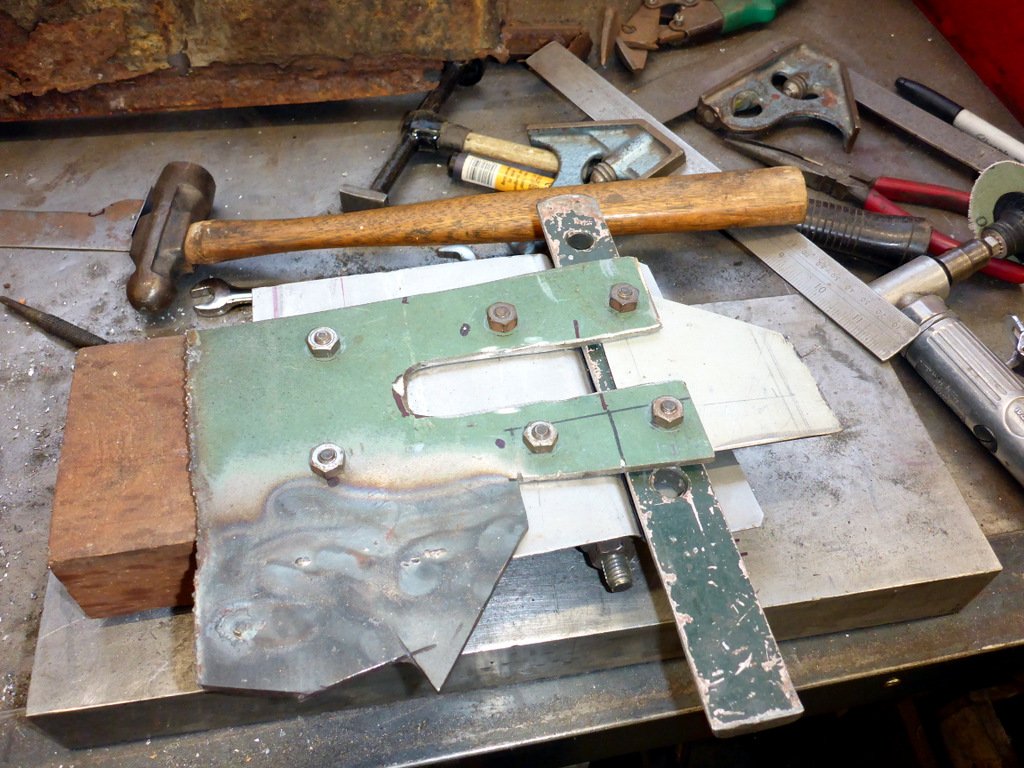
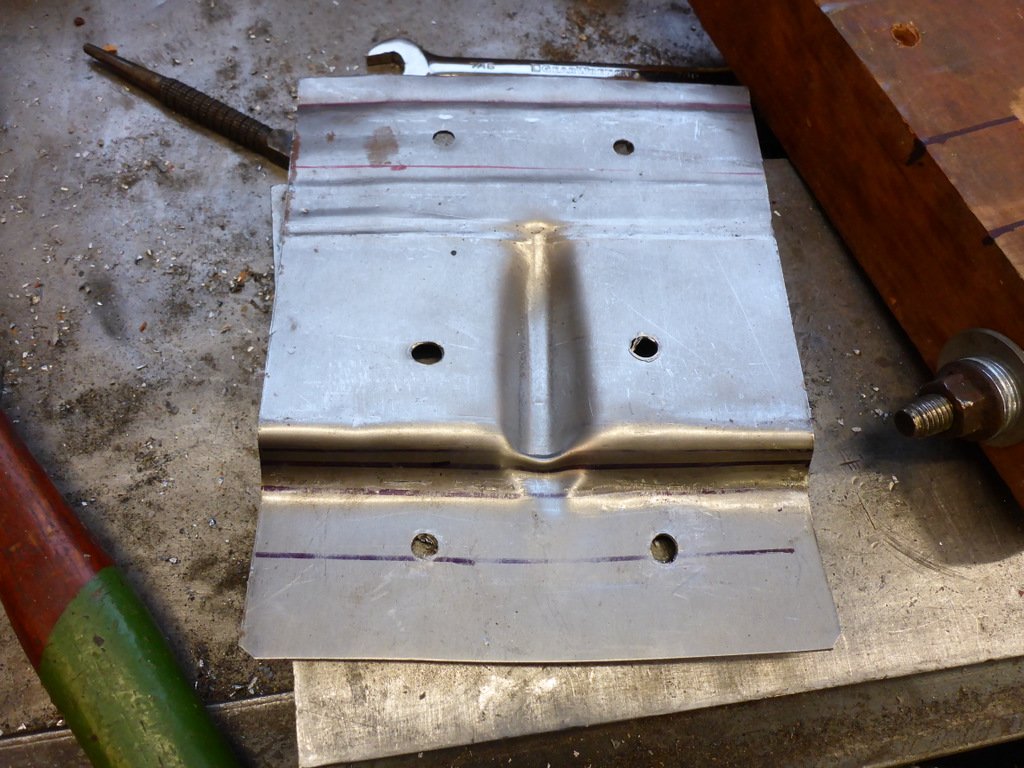
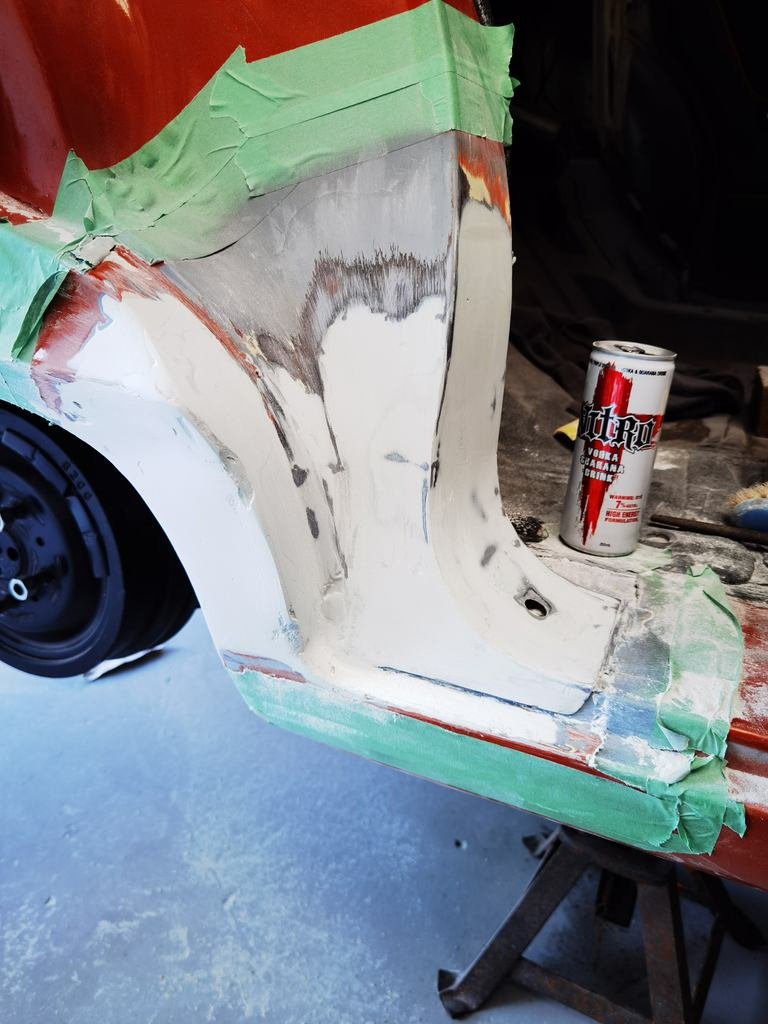
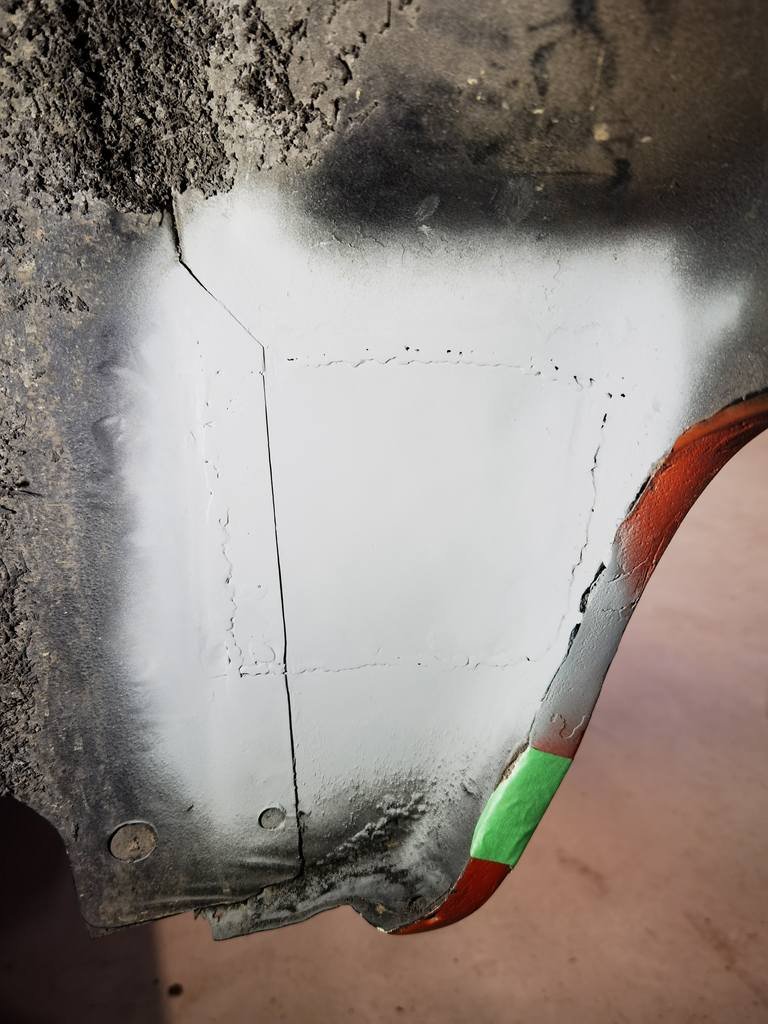
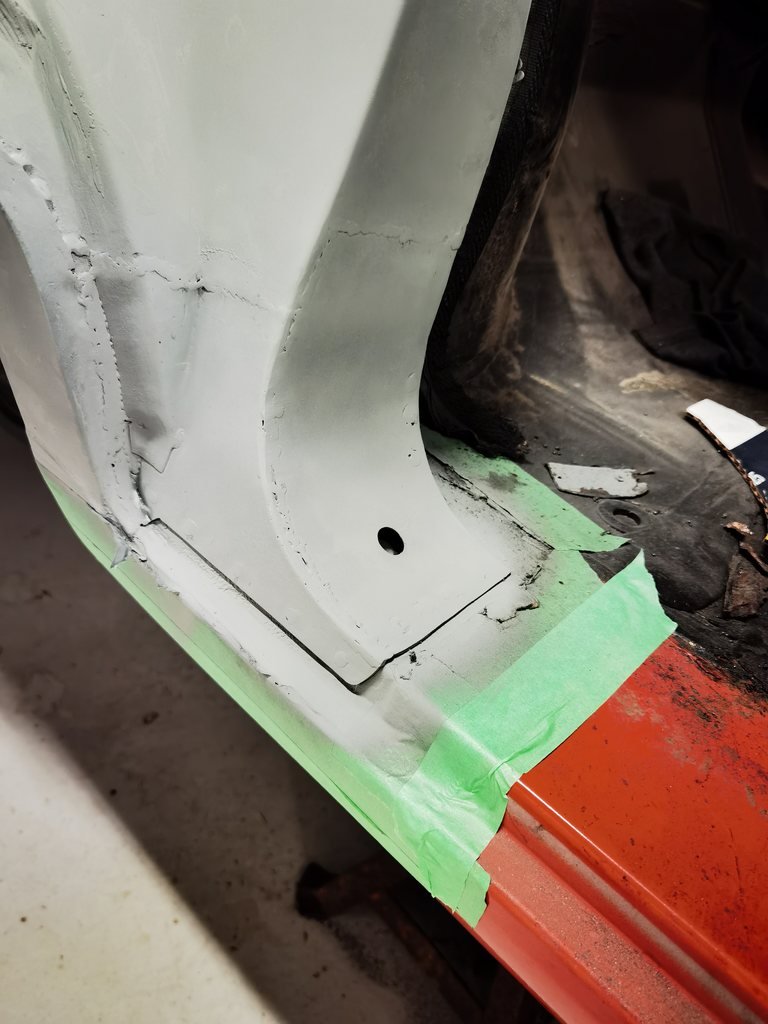
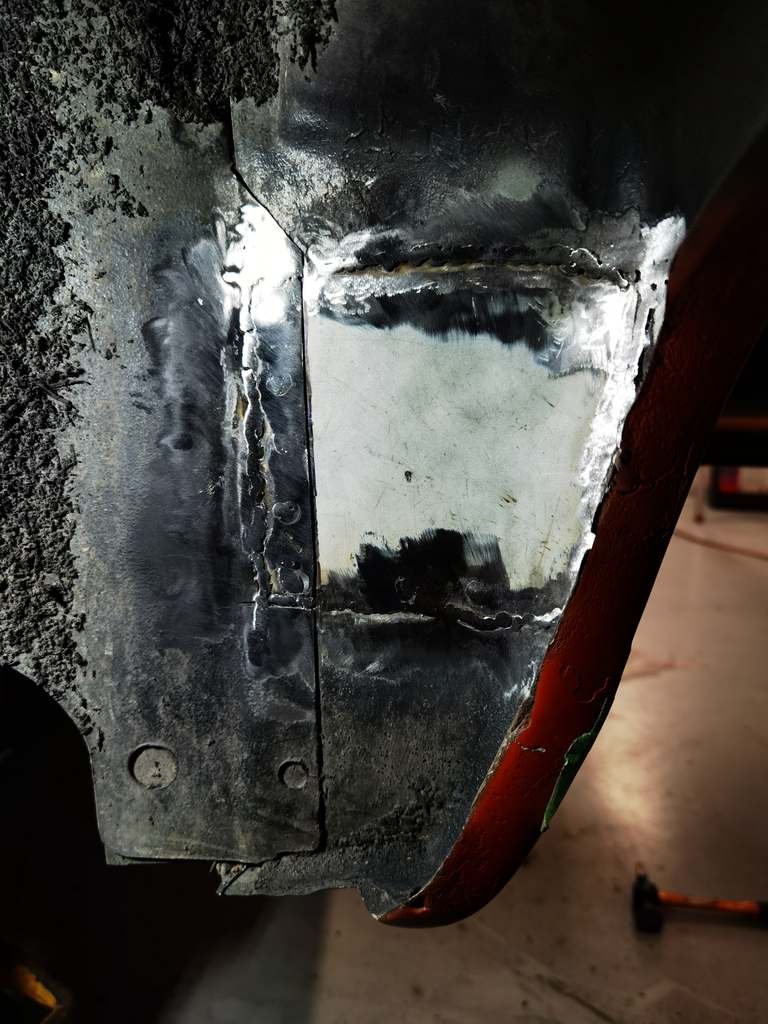
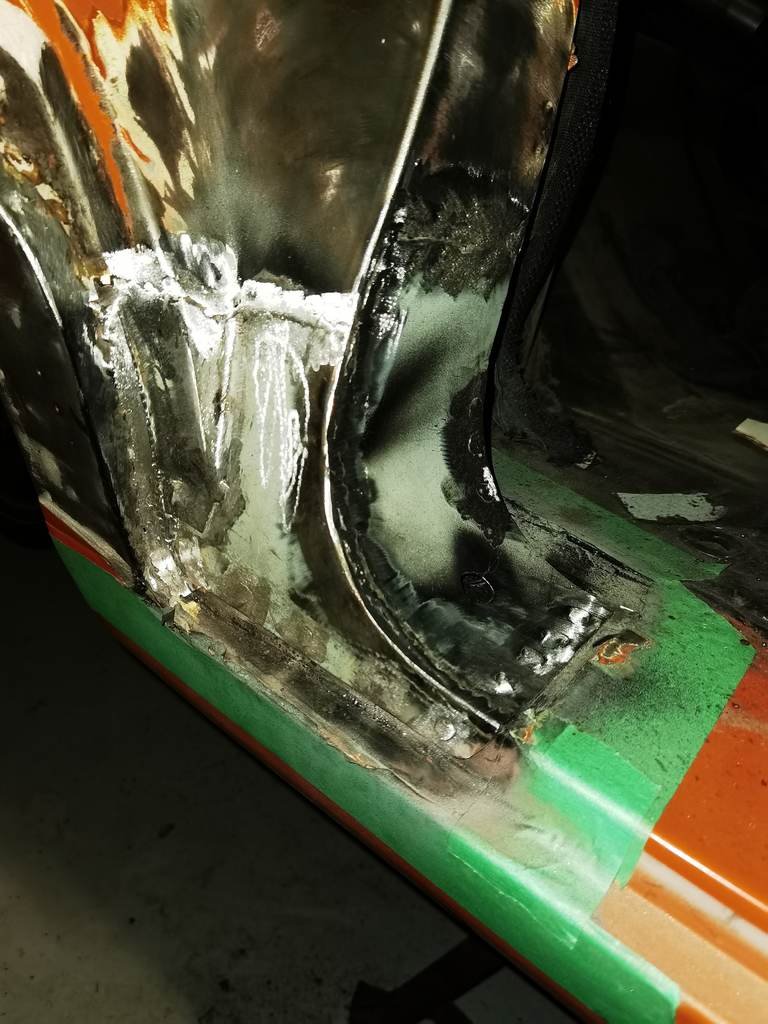
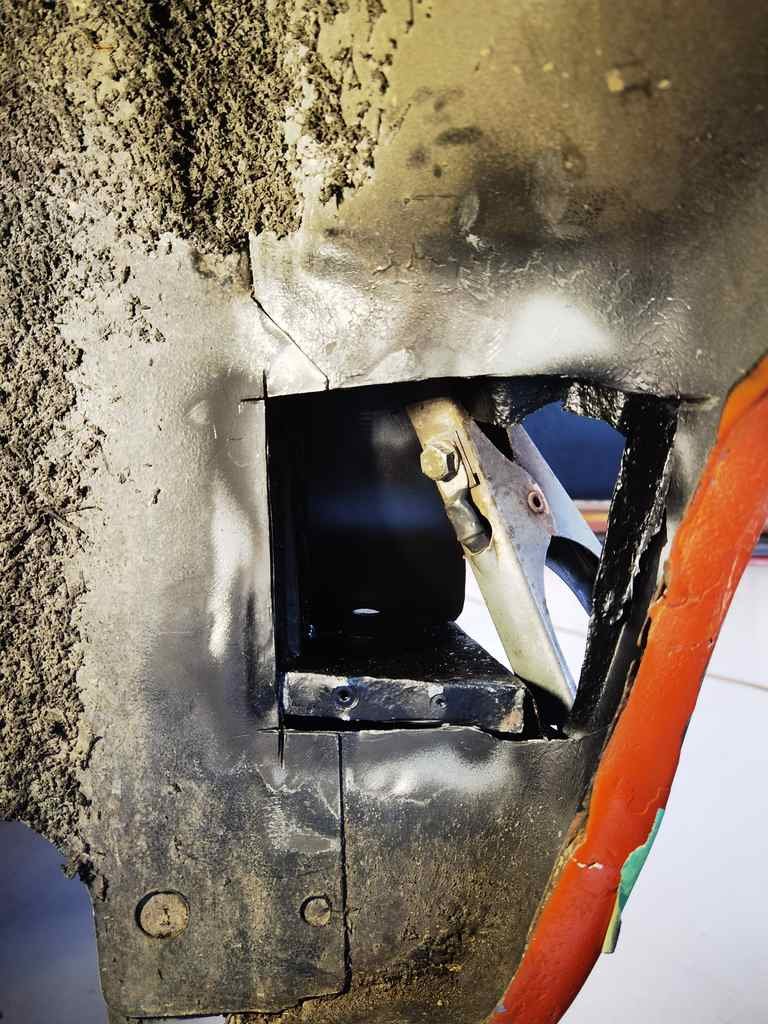
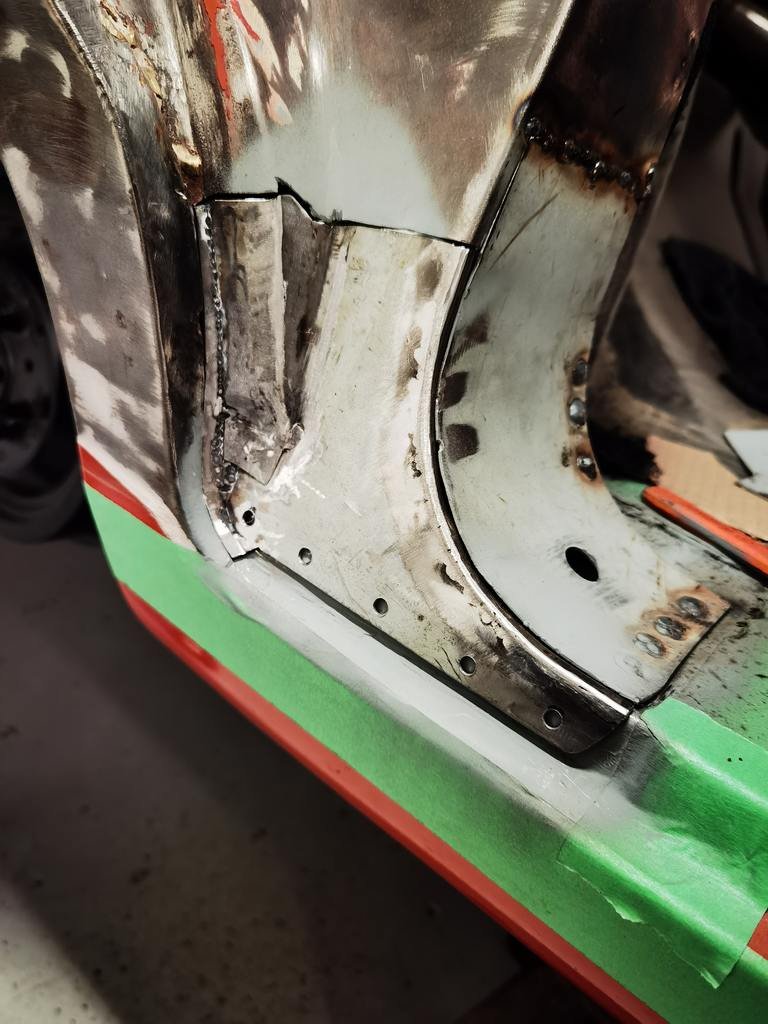
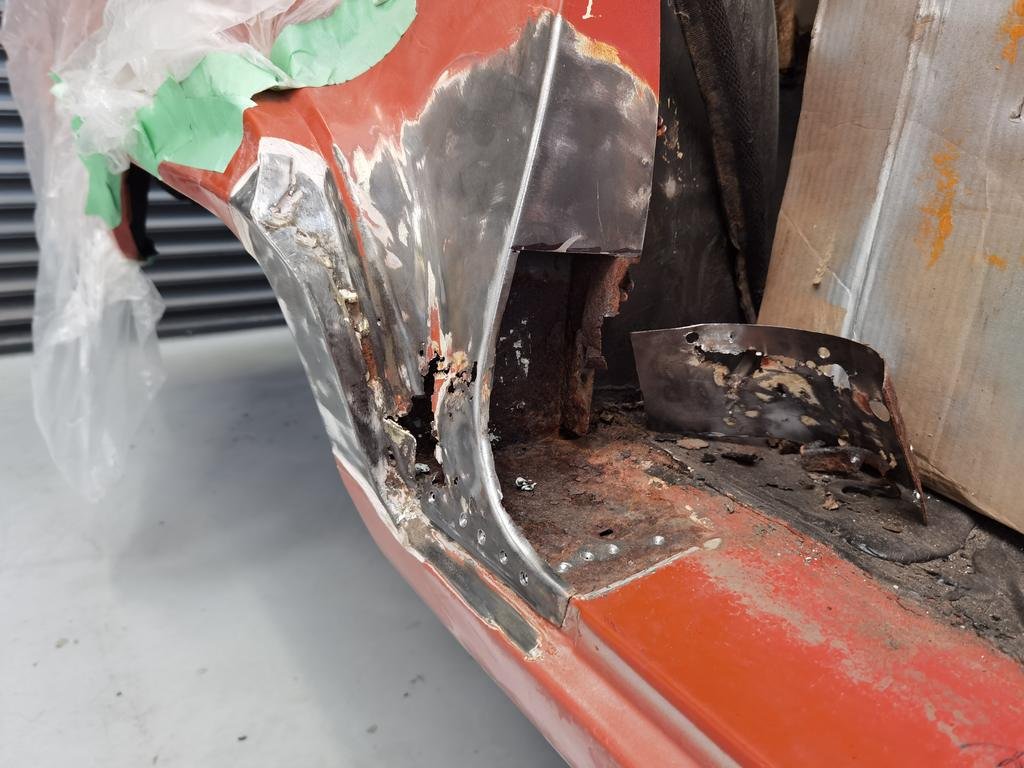
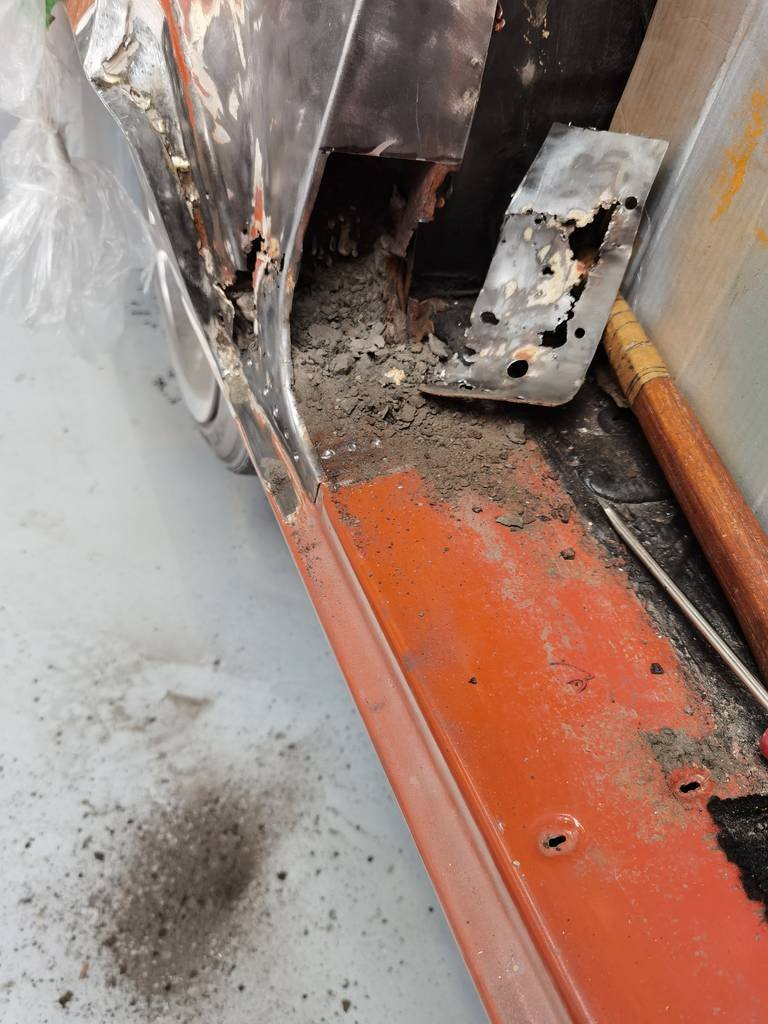
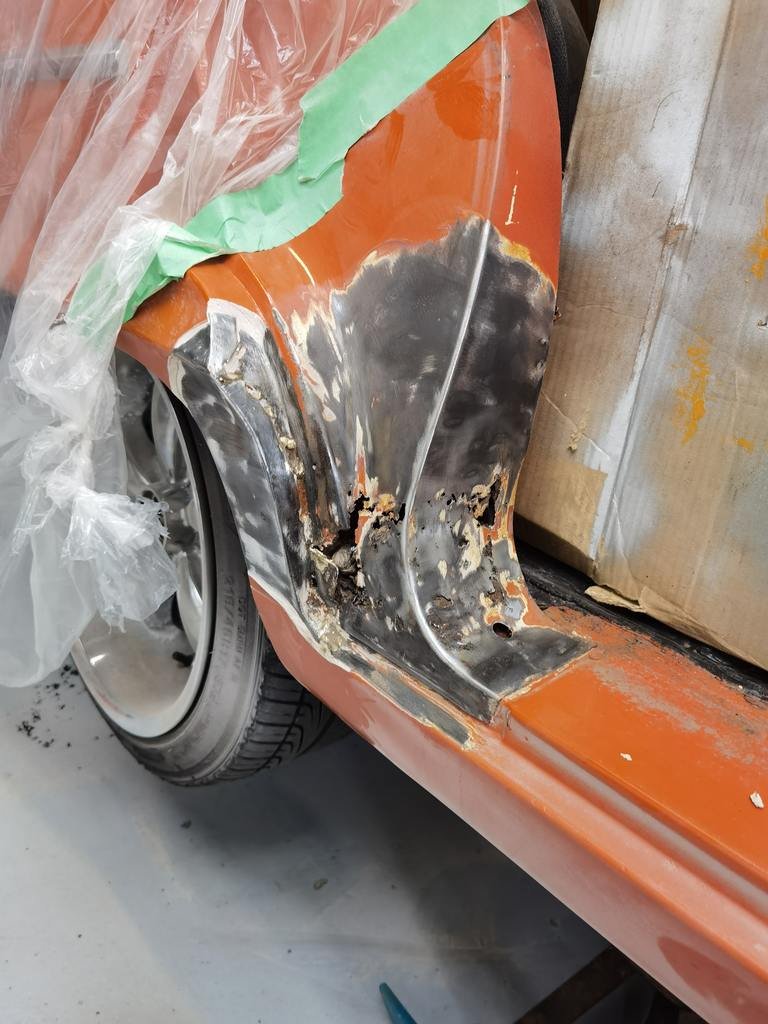
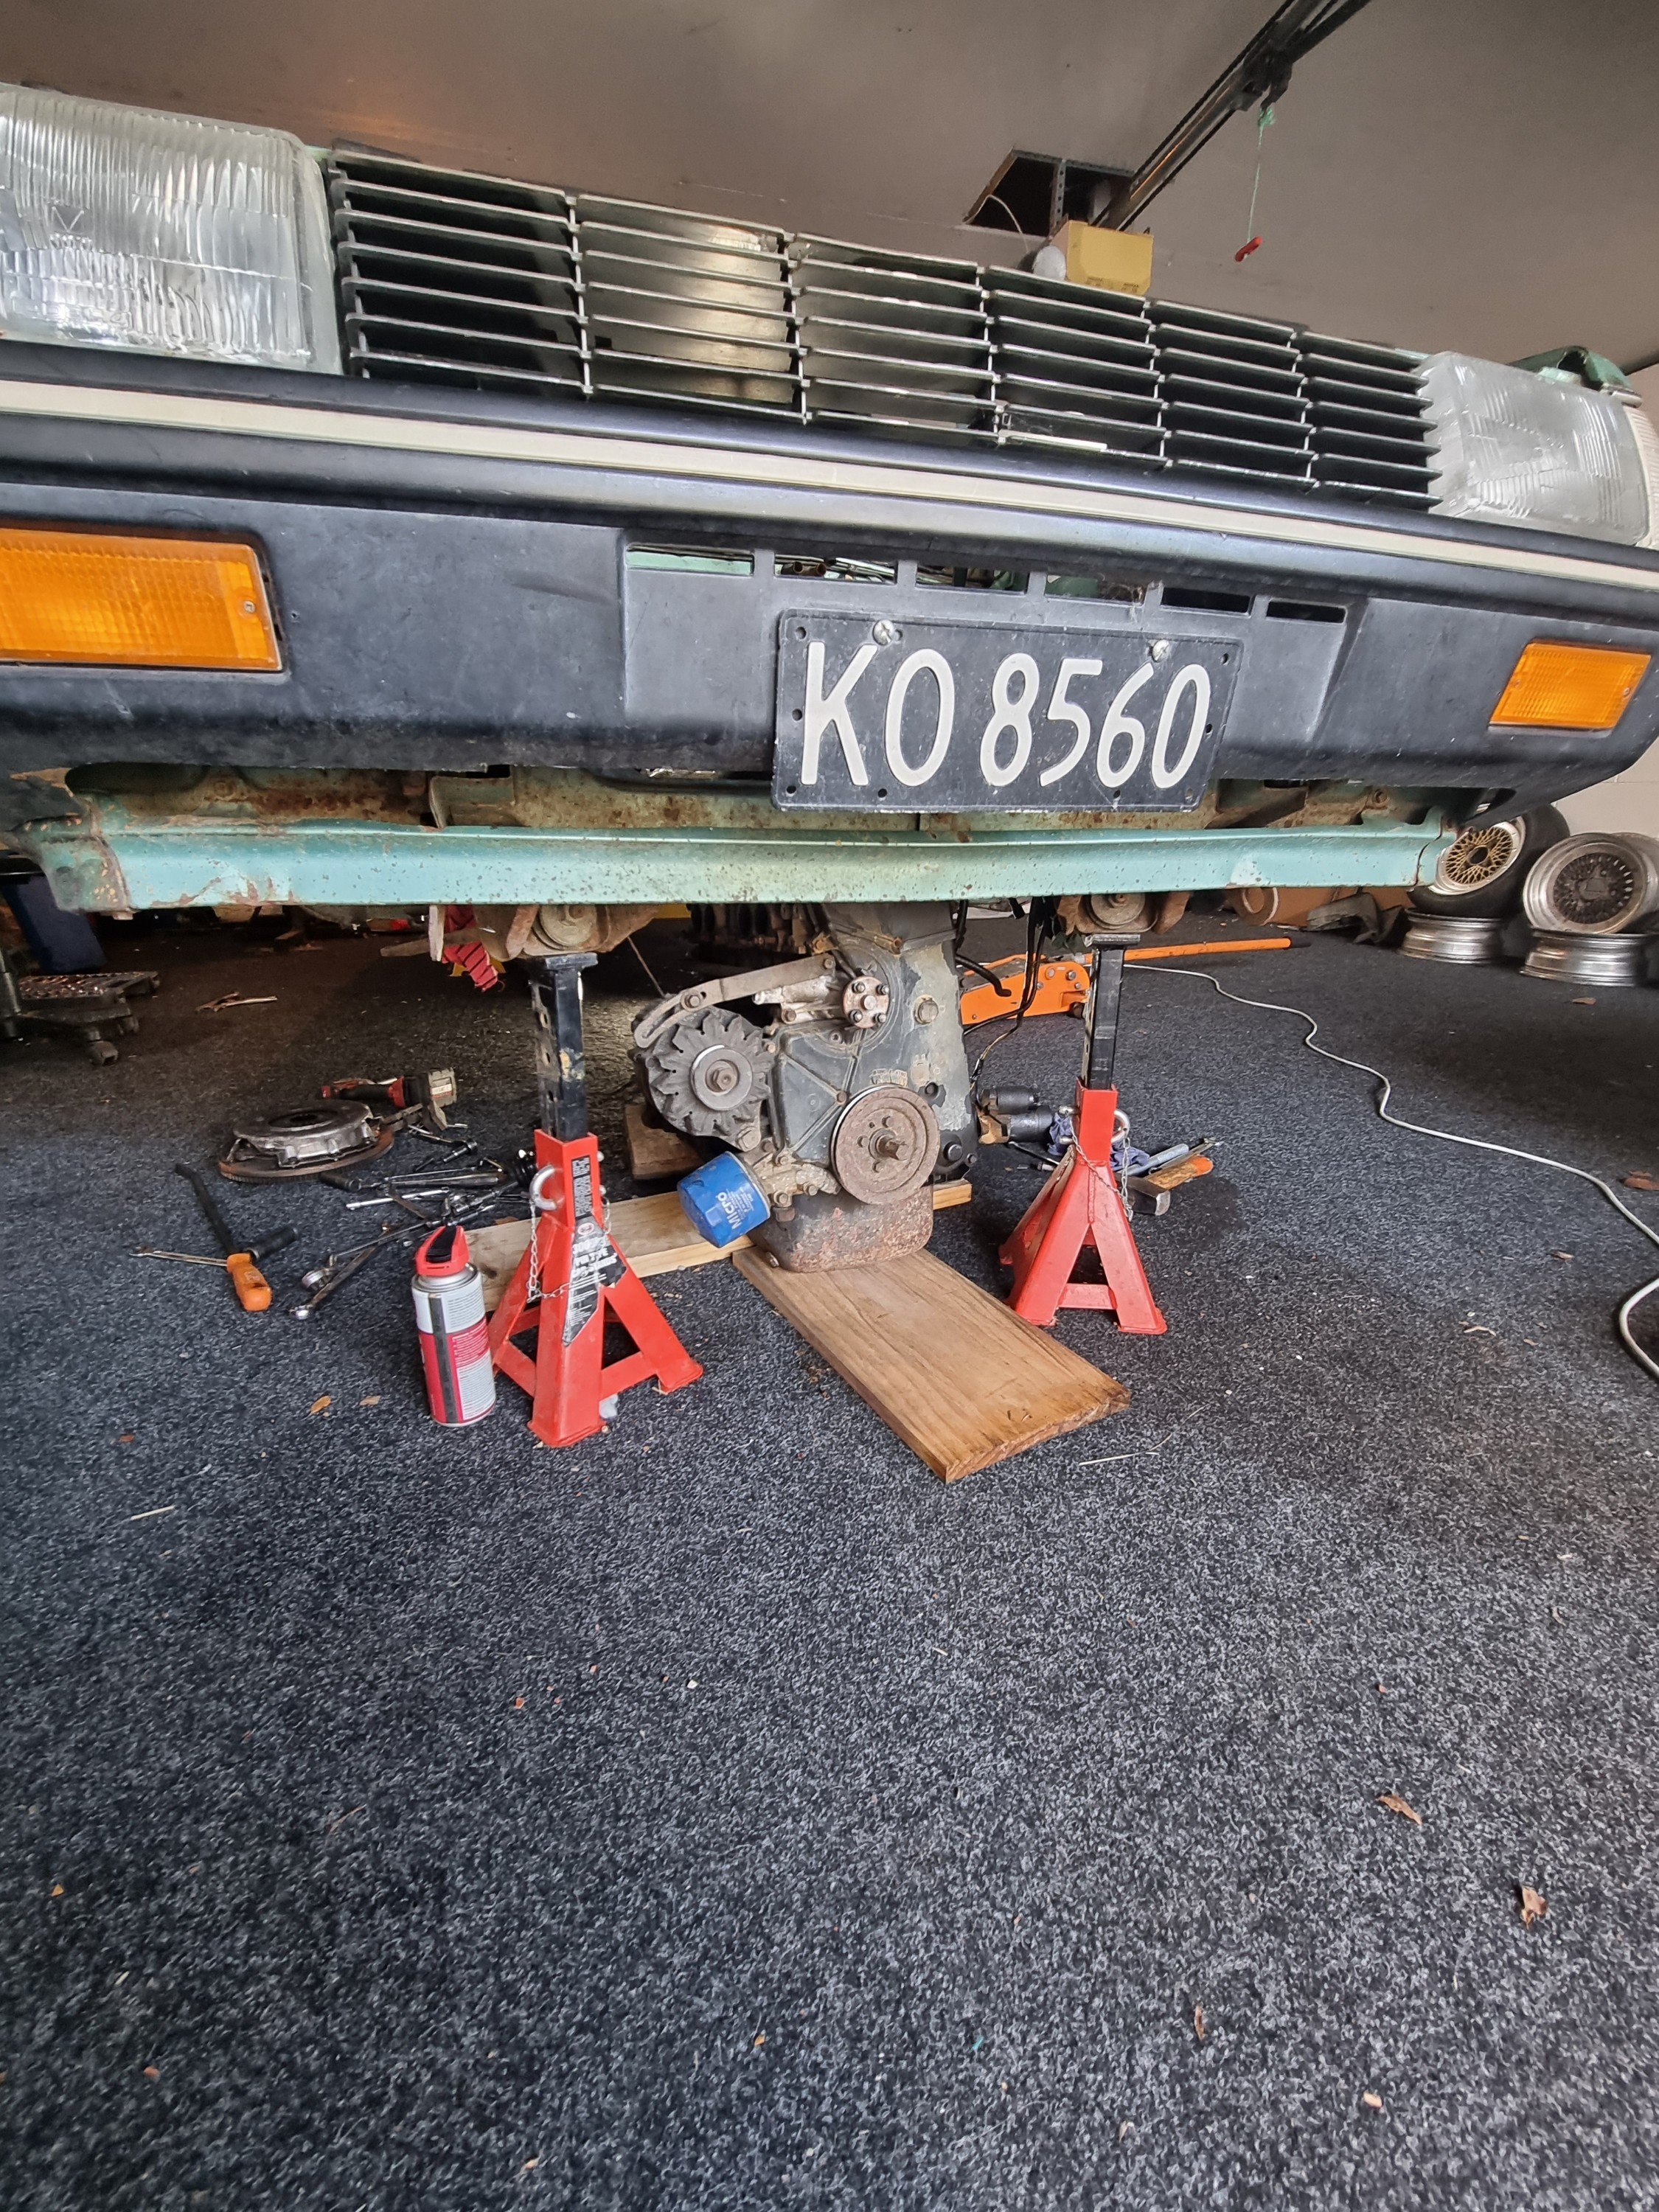
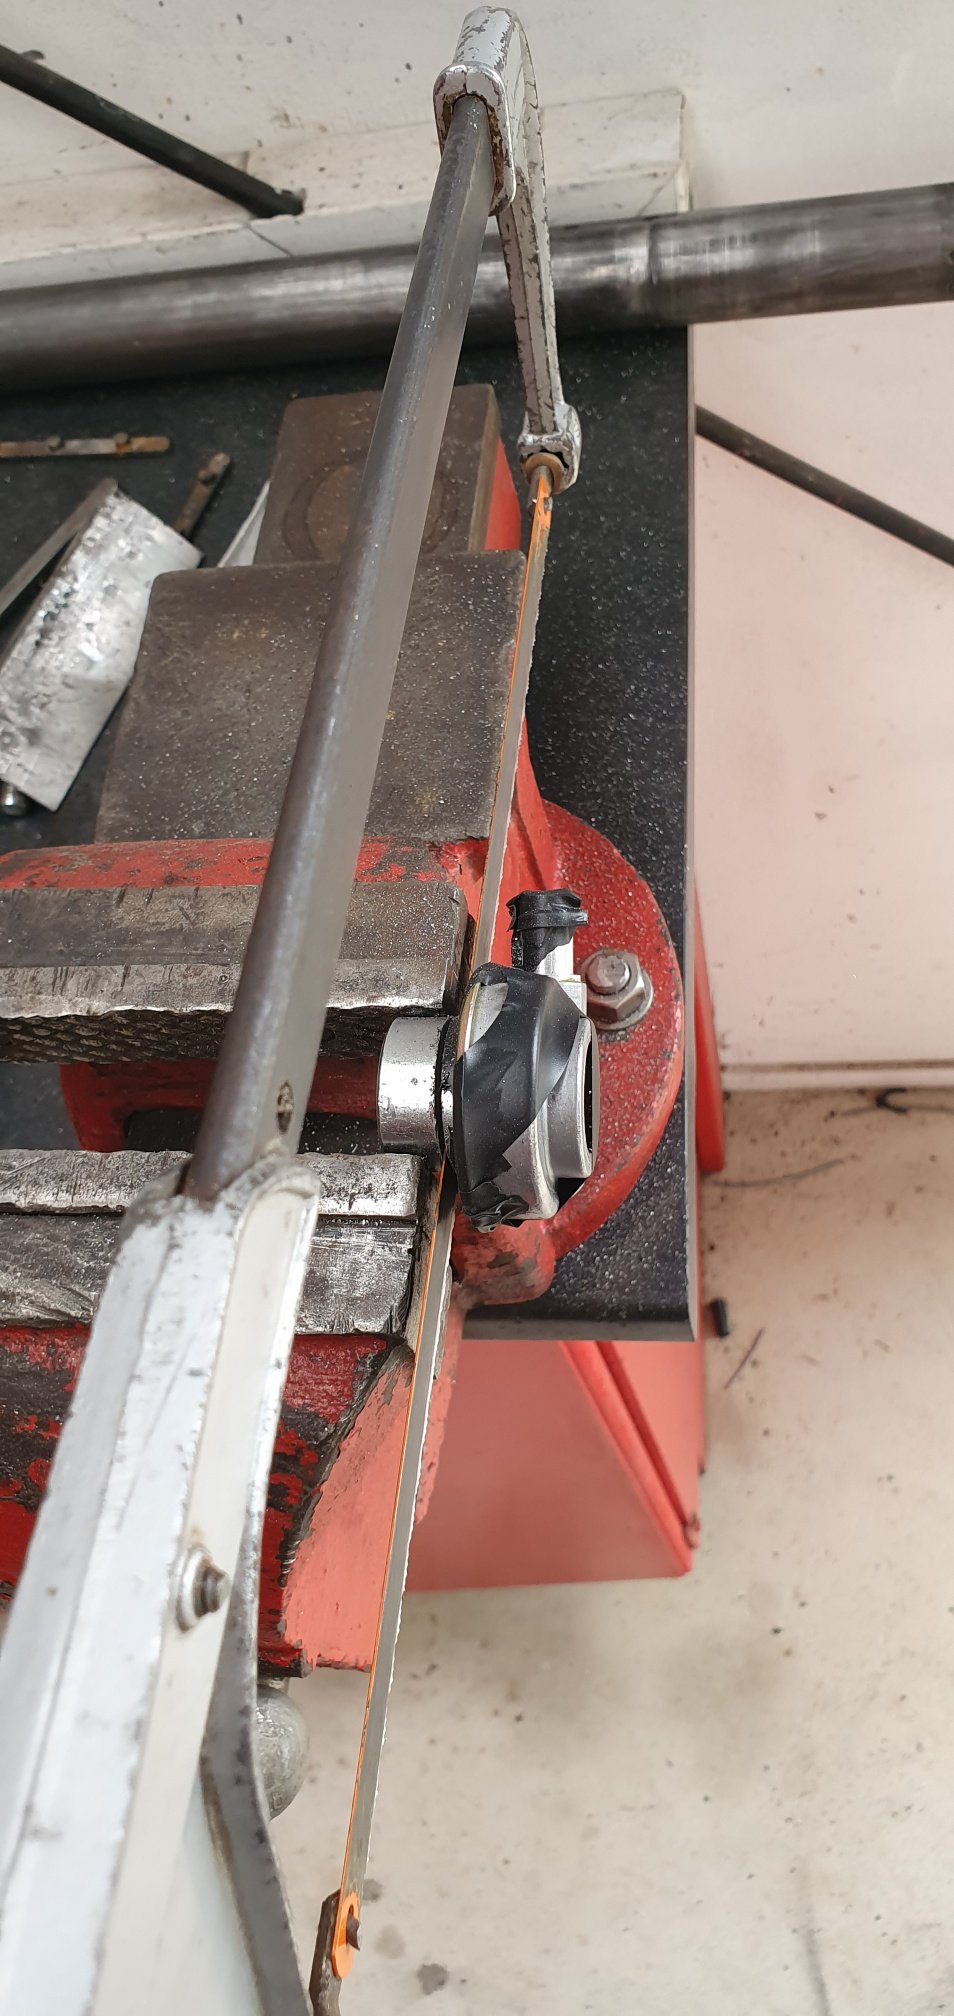
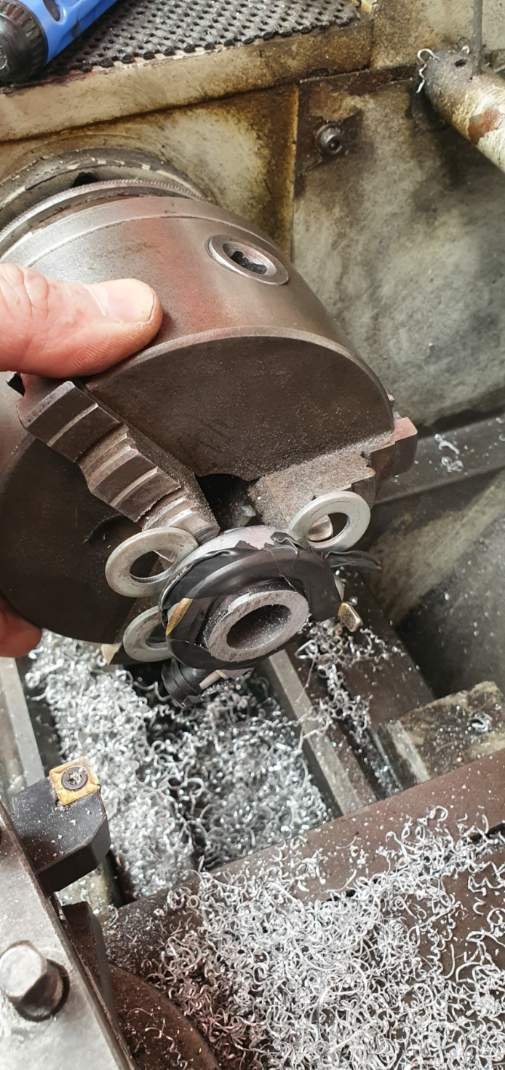
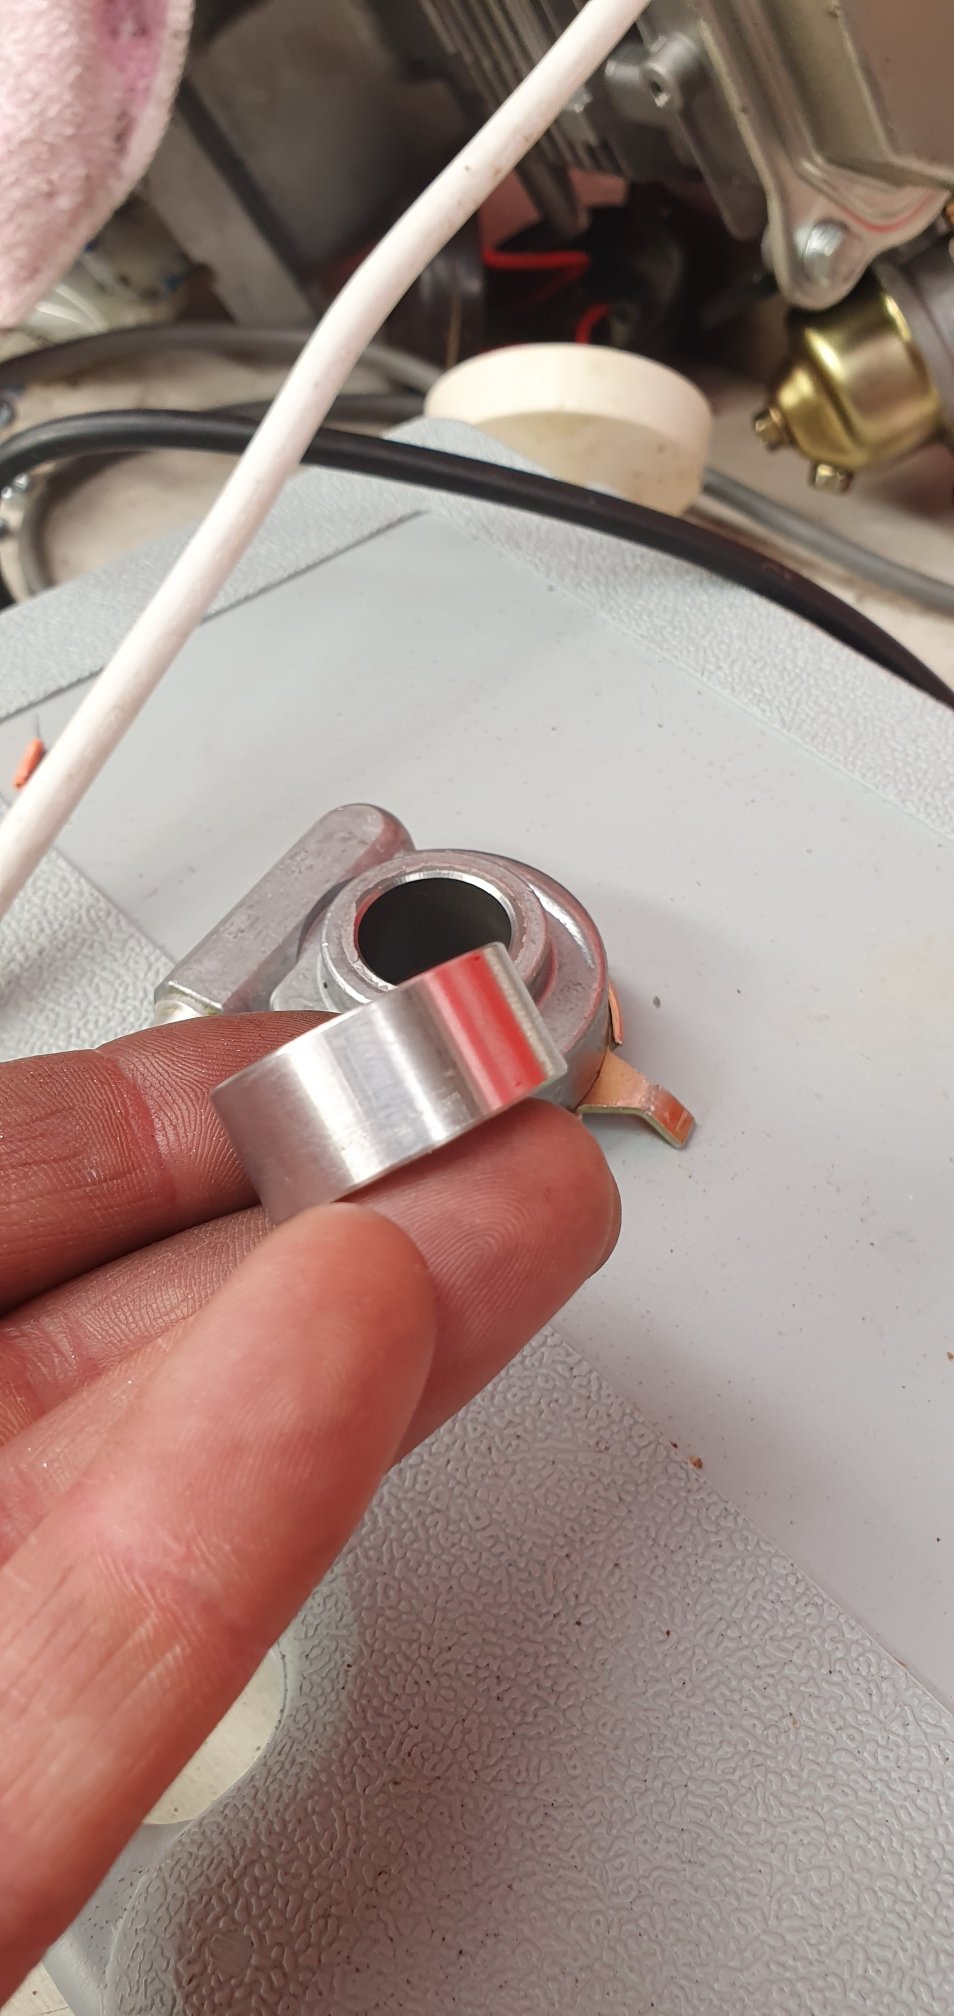
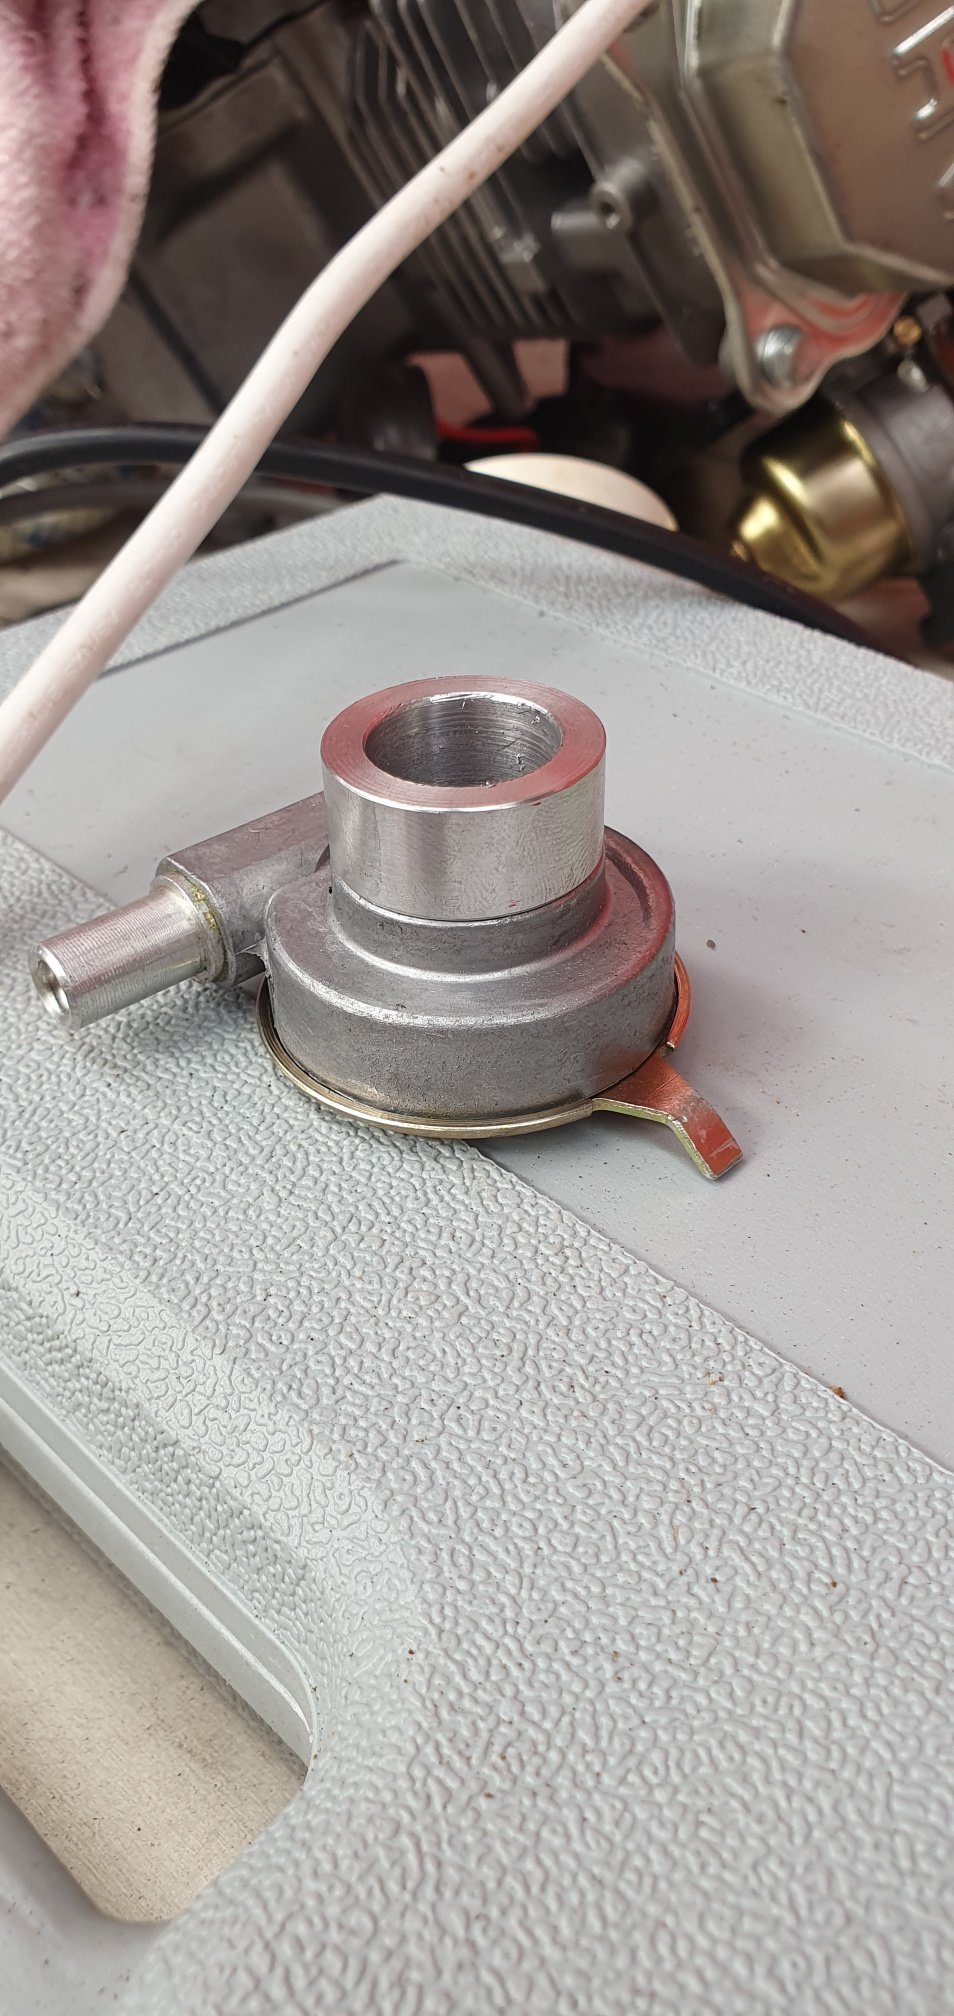
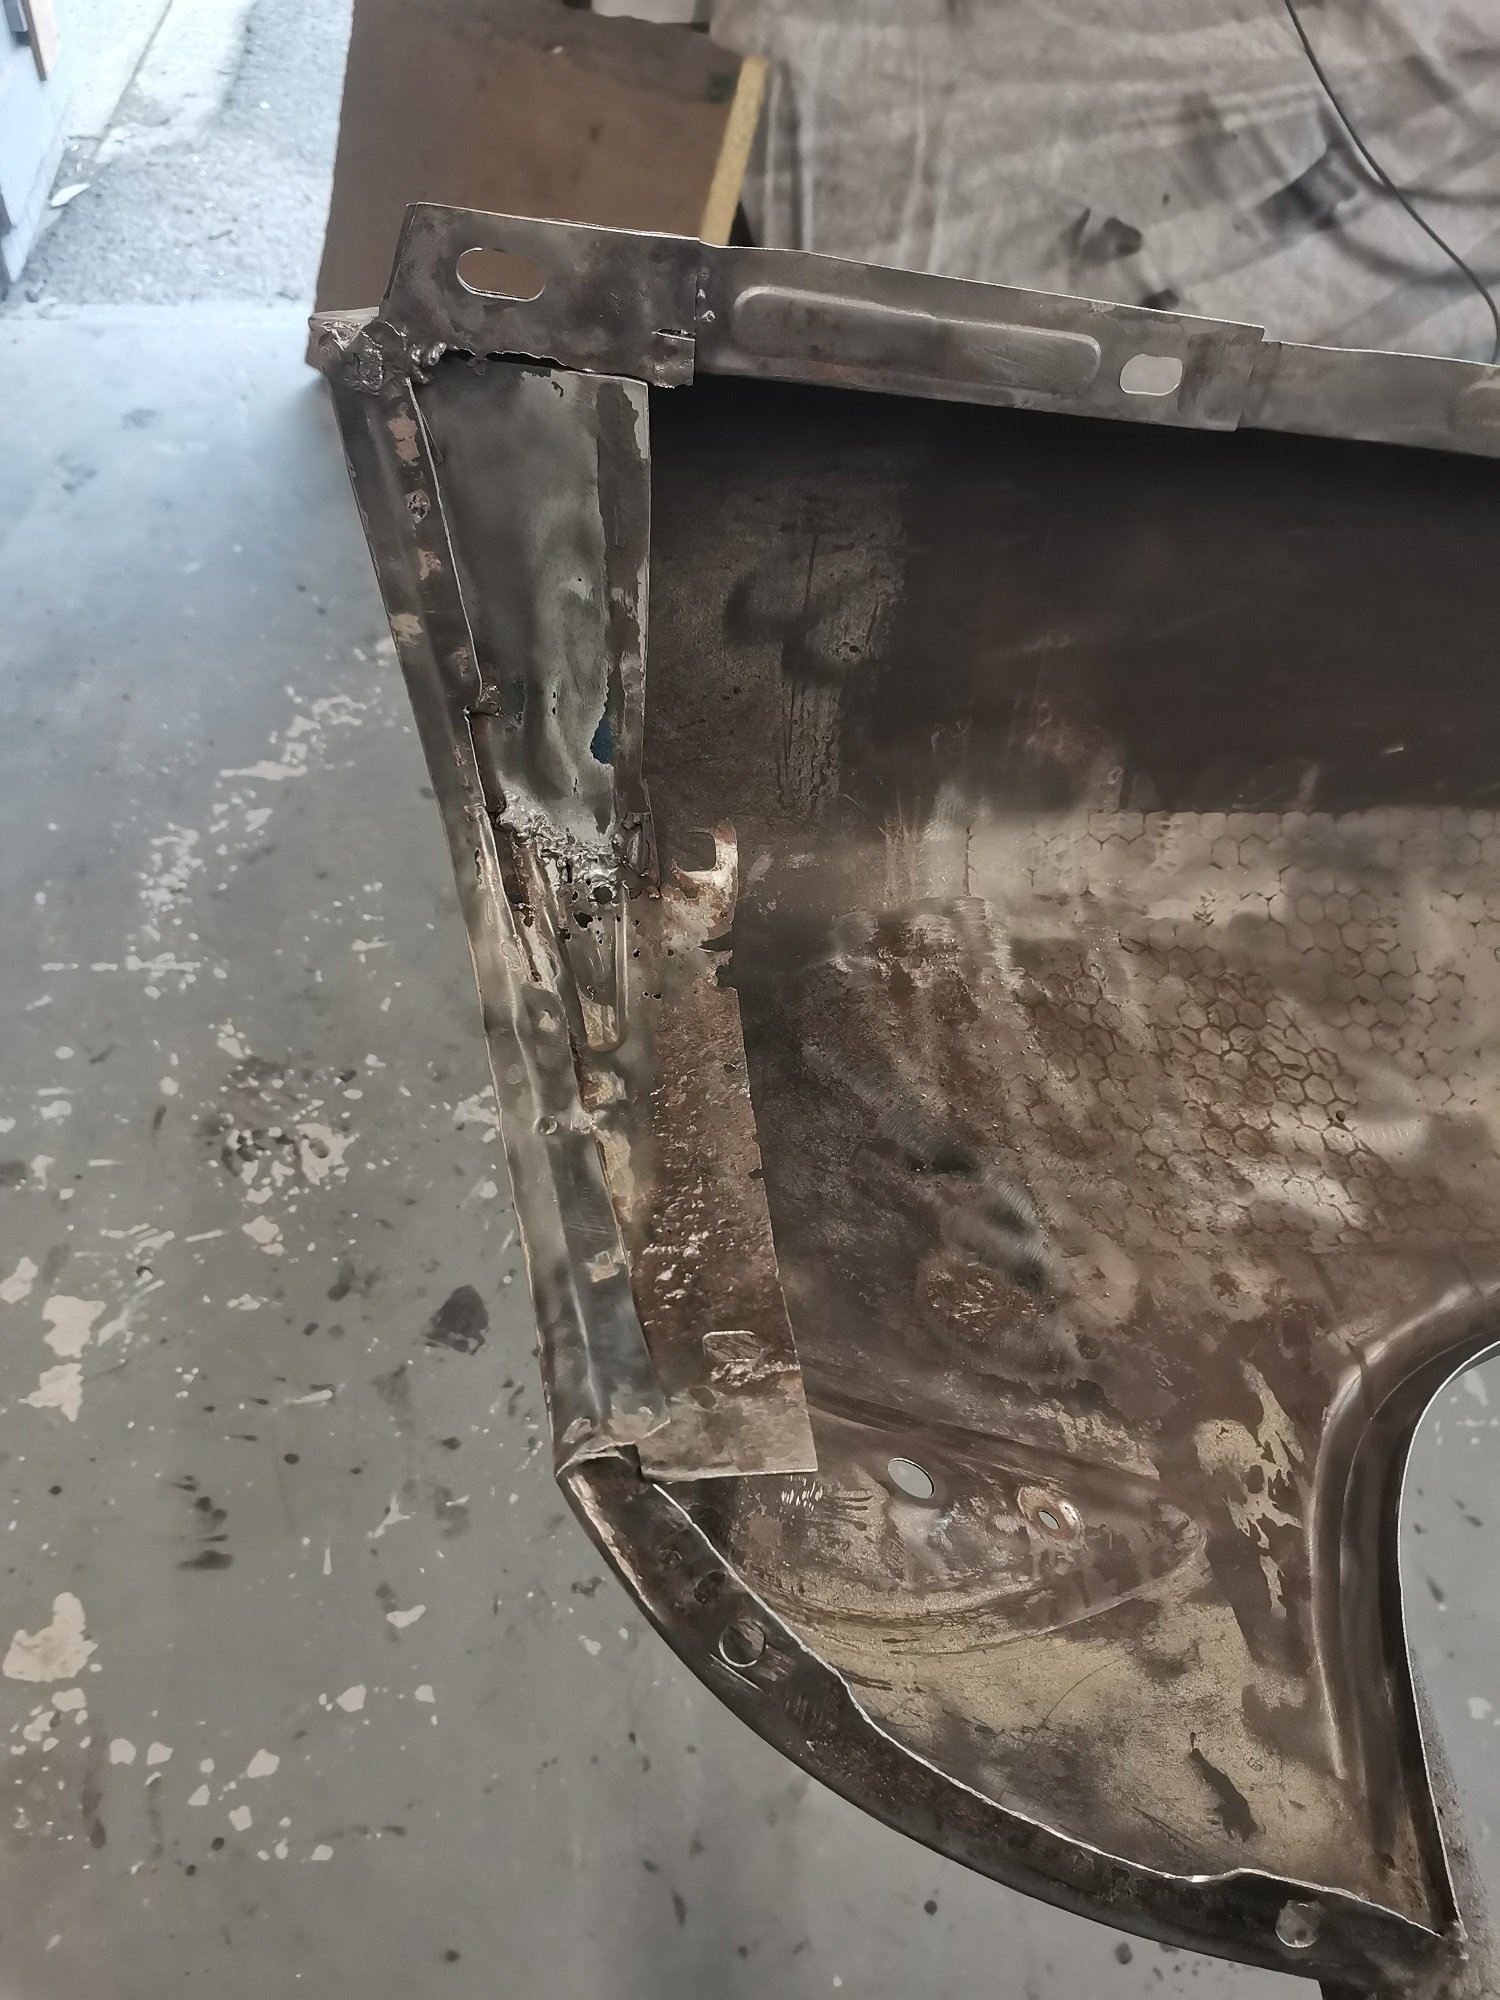
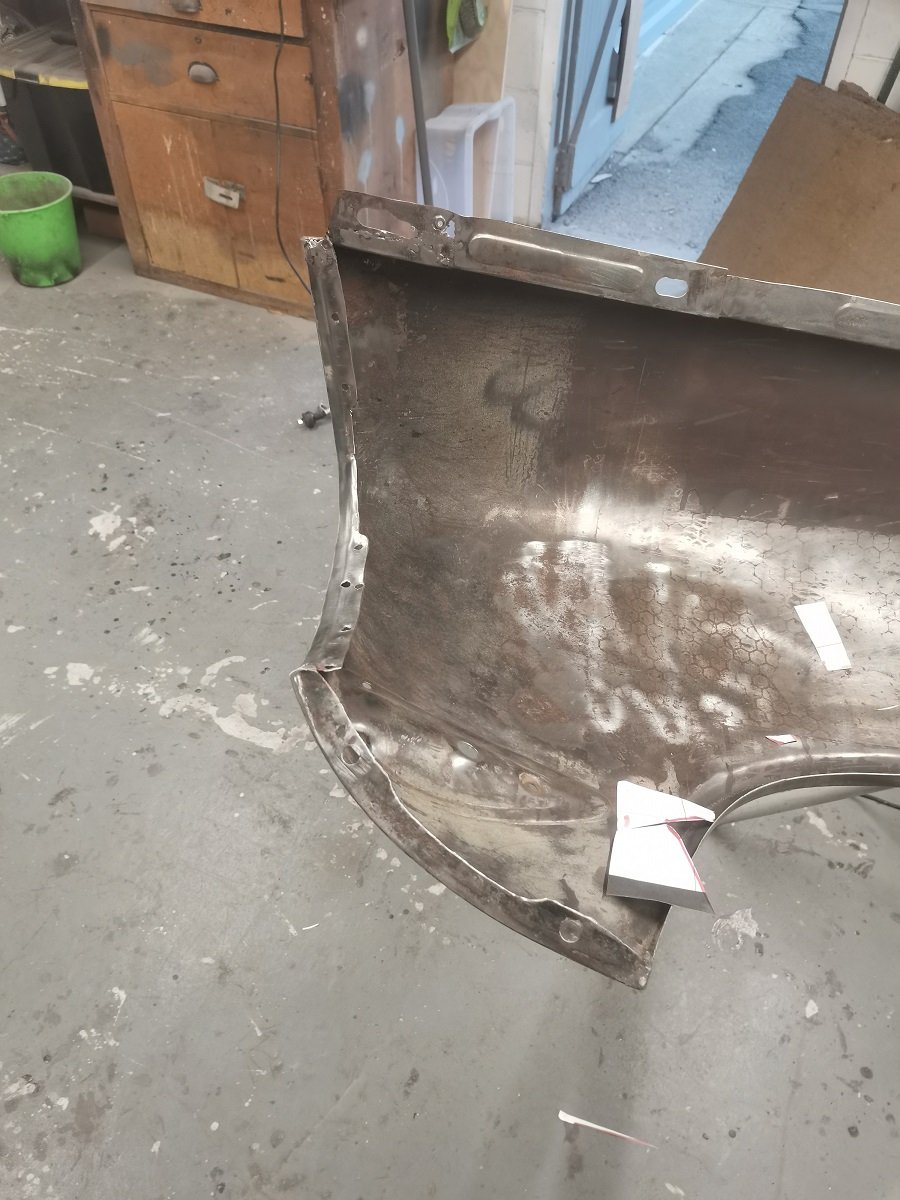
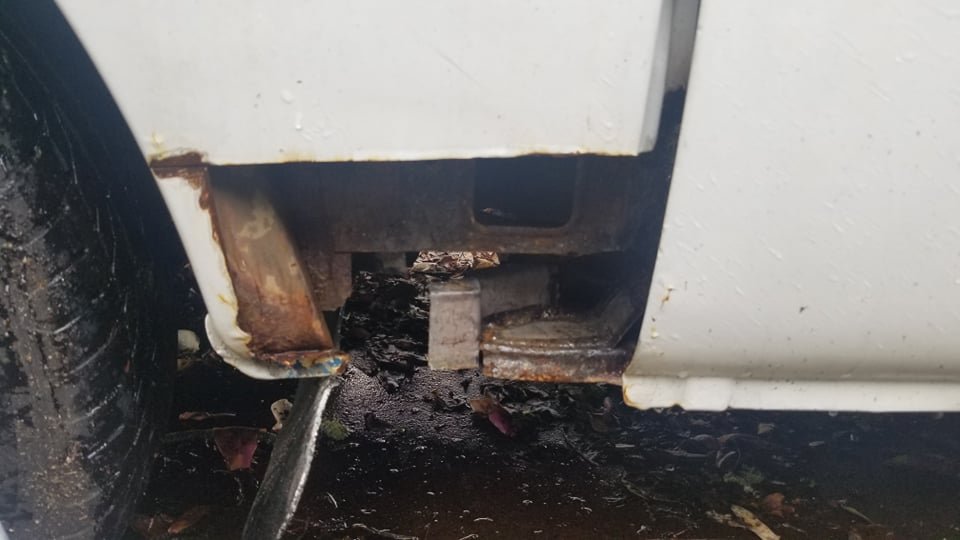
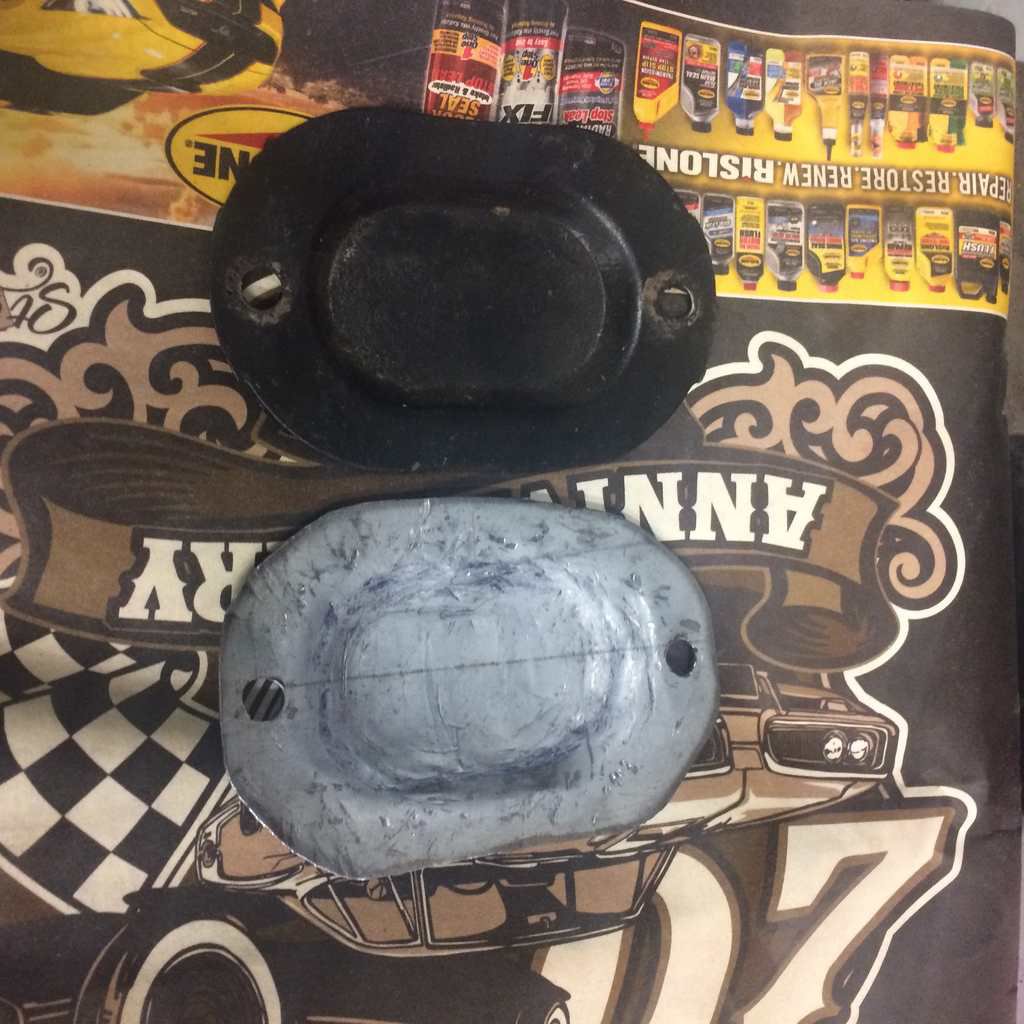
So while i had the trans out as i couldn't use the car i decided to tackle some rust the car had. My wof inspector had mentioned it a few times and thought i better fix it after him being nice and giving it two prior wofs as it was. 2nd inspection i put some insolation tape over the holes after i had poked around with a screwdriver haha. I was also lucky that this rust was never noticed while the car was complied or had the repair cert done. I knew it was there but kept my mouth shut. Ah no bondo bob has been in here. I cleaned up the bottom pieces with a portable sandblaster and applied a few layers of crc zinc it well that would be why its rusty. full of dust and dirt that at some point has been wet or had moisture in it. also cut a piece out of the inner wheel well. i had previously when the car had been blasted and painted of the underside i applied a small layer of bog over the pinholes and blended it back in with black paint. I firstly made the curved bit to keep a guide of the shape and location and welded that in. I then cut the outer piece out and made a replacement. This piece was made with 5 different bits all welded into one patch. Also made a new piece for here with 2 bits and curving it to suit the wheel well shape. Then applied a small layer of bog to keep it looking nice. sanded and painted area black to hide all the sins. Then i became bondo bobs brother The reason why this got bogged back up is because at some point the car has had a hit in the passengers rear quarter one big enough that had required the chassis to be repaired when i got the car. im not keen on removing the rear quarter of the car to get the body lines good as the rest of the car isn't that perfect either. So body filler was used to get the door and quarter lines looking good. Sanding and shaping the bog actually took me more time than the metalwork that was done. Gave it a shot of primer. You will also notice that i have prepared and primered a wheel also. Will get into detail with that in next post. Gave the primer a sand and shot of paint. Ended up happy with the result. i knew i was never with my skillset able to blend it in without being noticeable but once the sill trim and door is closed its not too noticeable. better living everyone
3 points
-
https://www.trademe.co.nz/a/motors/cars/toyota/sprinter/listing/3238902889?bof=feIc2uXl cheap diesel car2 points
-
I have run out of balls2 points
-
I require pics of golf balls being fired through various materials plz. Car doors be good2 points
-
Well I swapped the sensor back and it caught, and with a bit of encouragement it went...2 points
-
lots of parts on ebay. postage is lots tho2 points
-
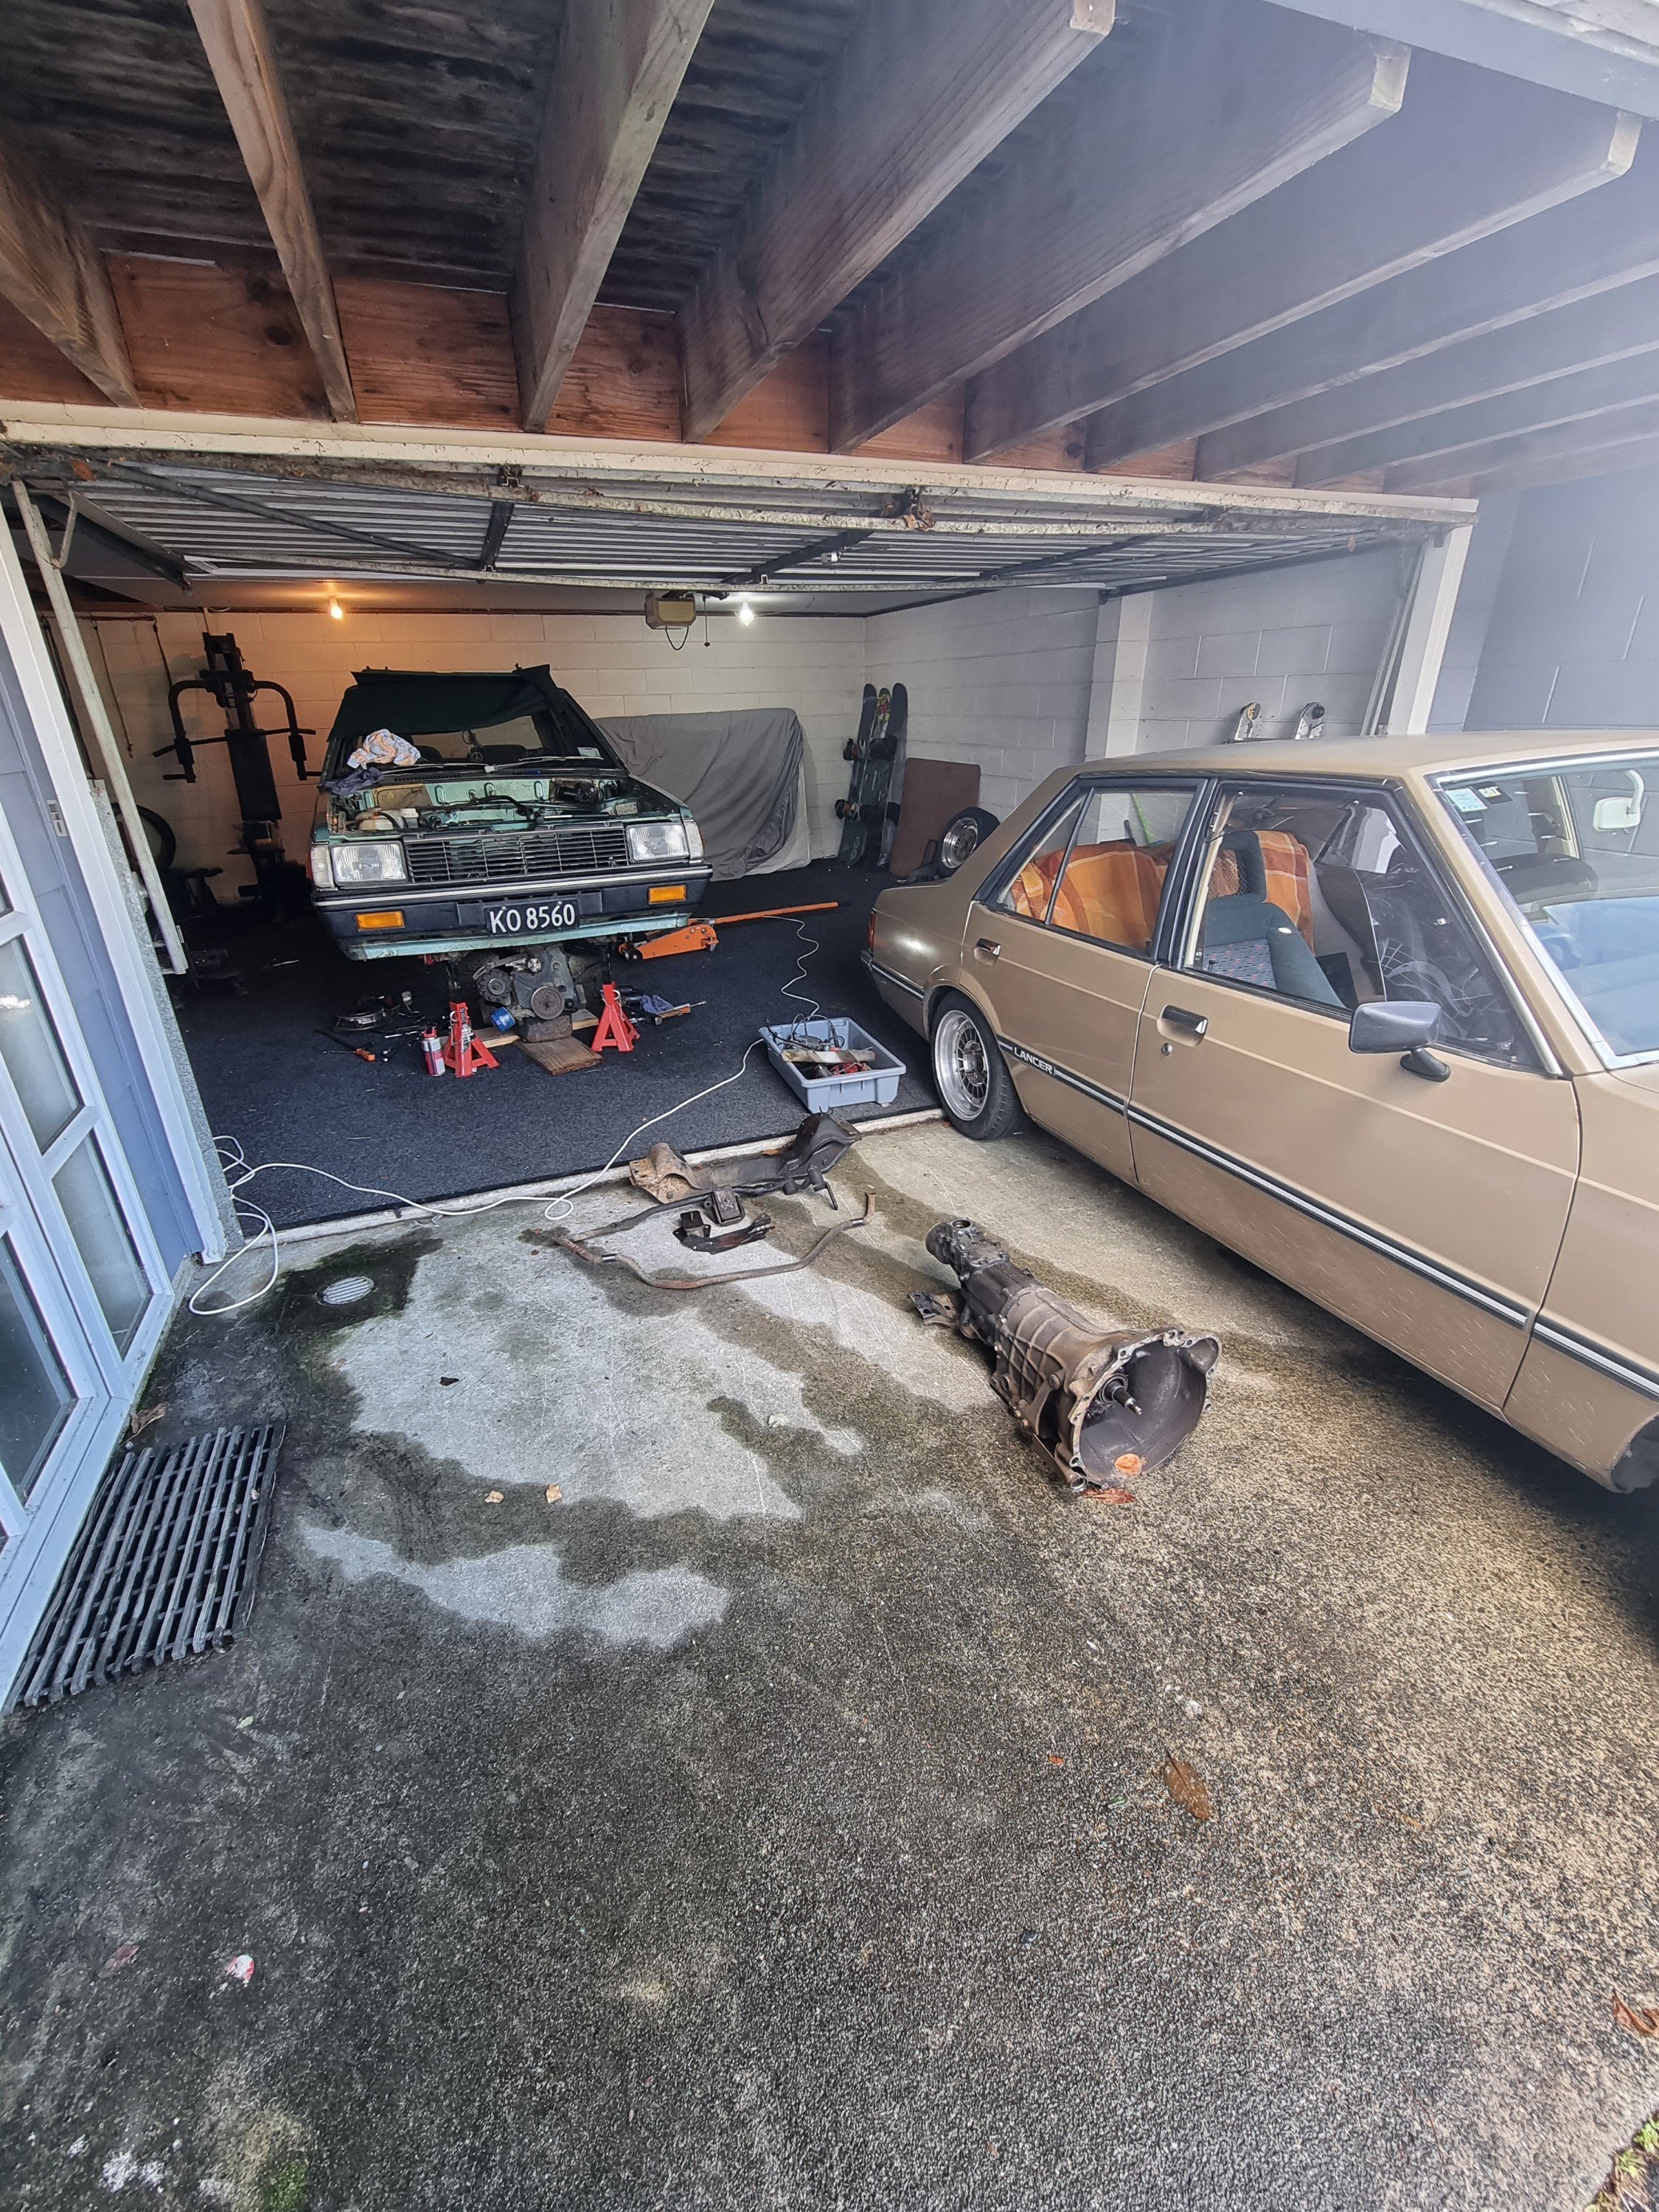
Decided to drop the motor and box during lockdown. Didn't have an engine crane so just dropped it using a trolley jack where it was until I get my hands on one off the boys. Wasn't to bad doing it that way
2 points
-
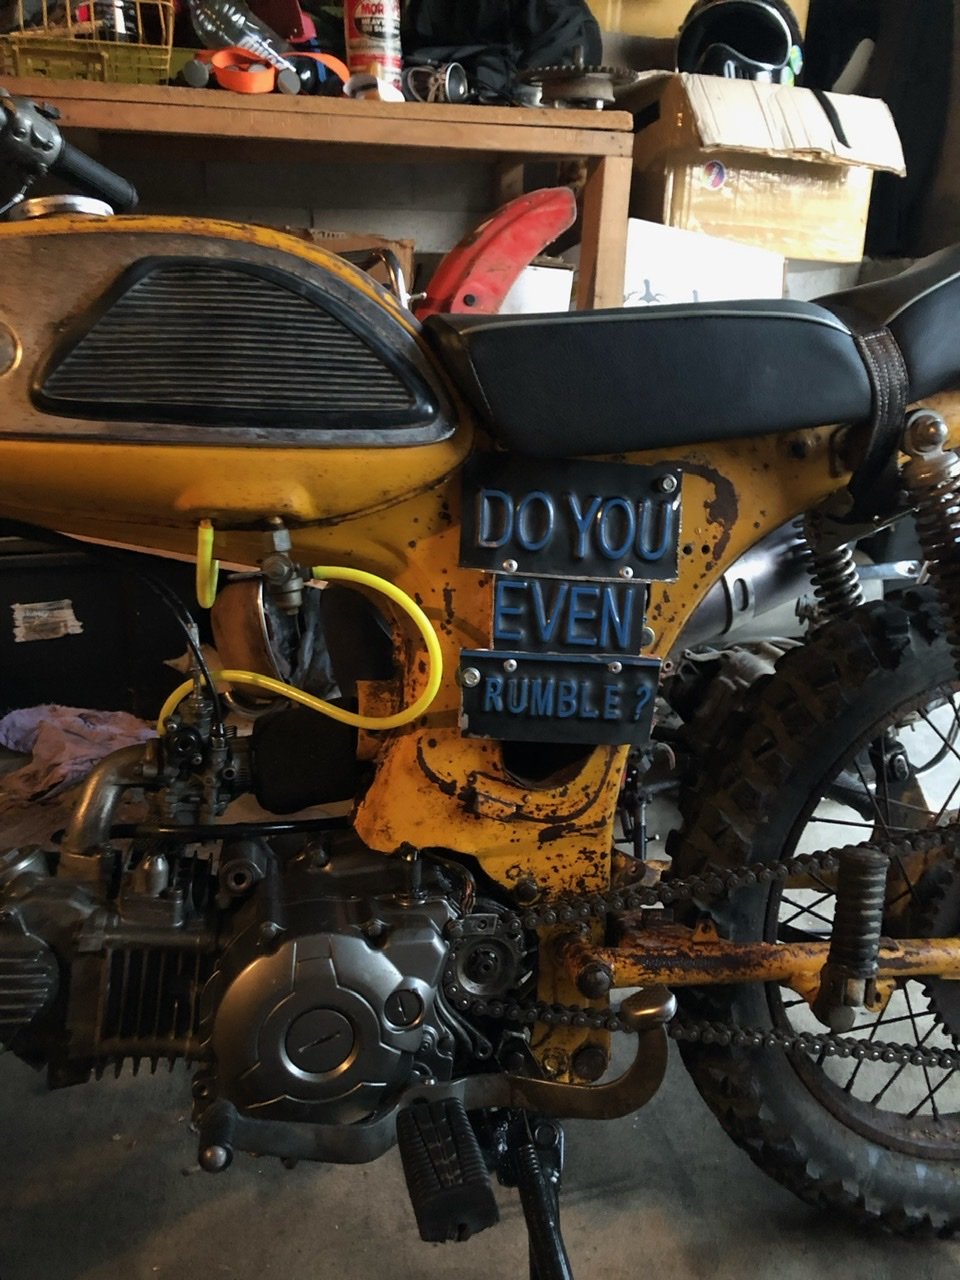
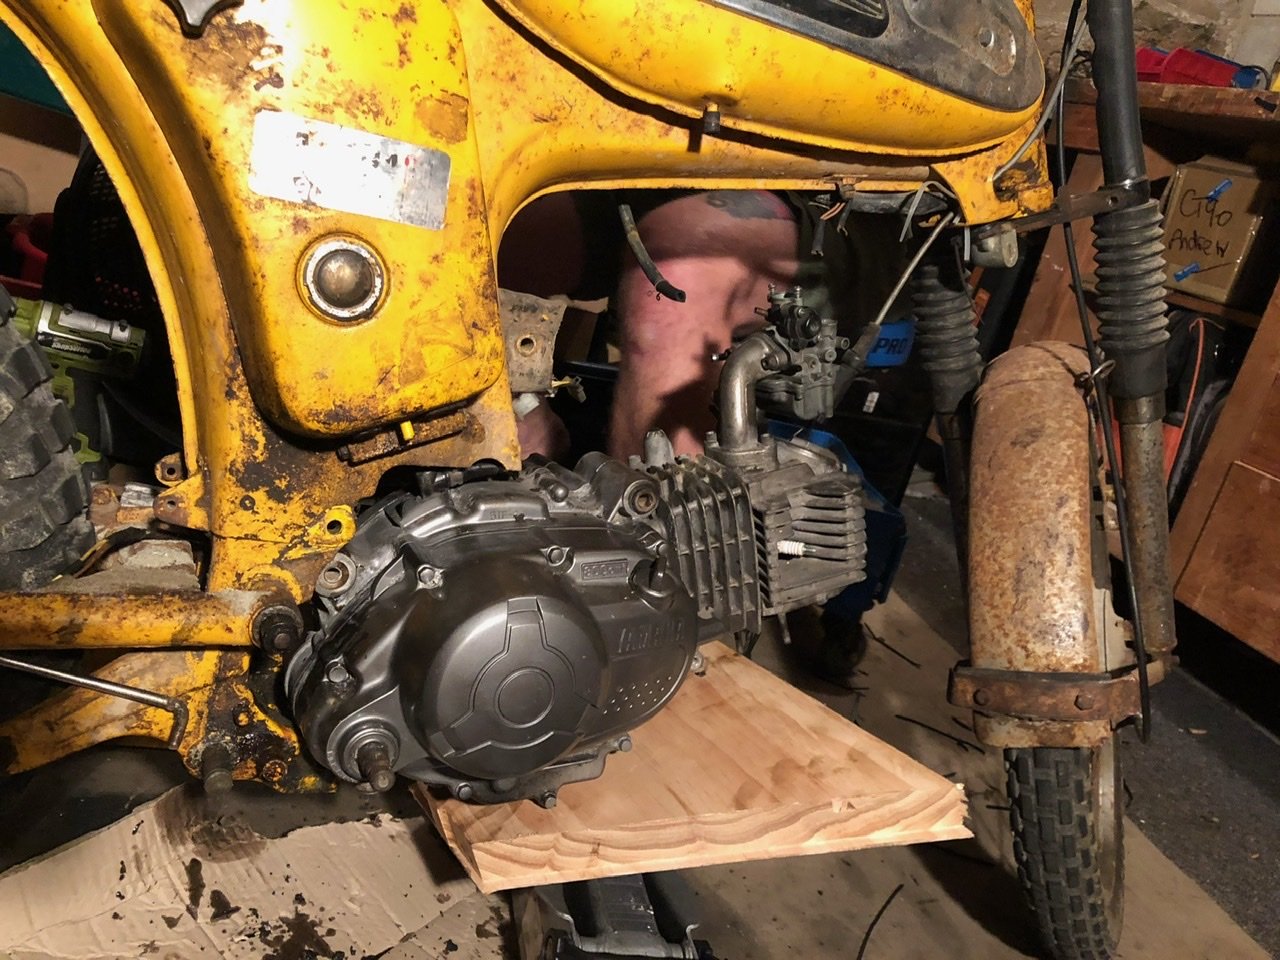
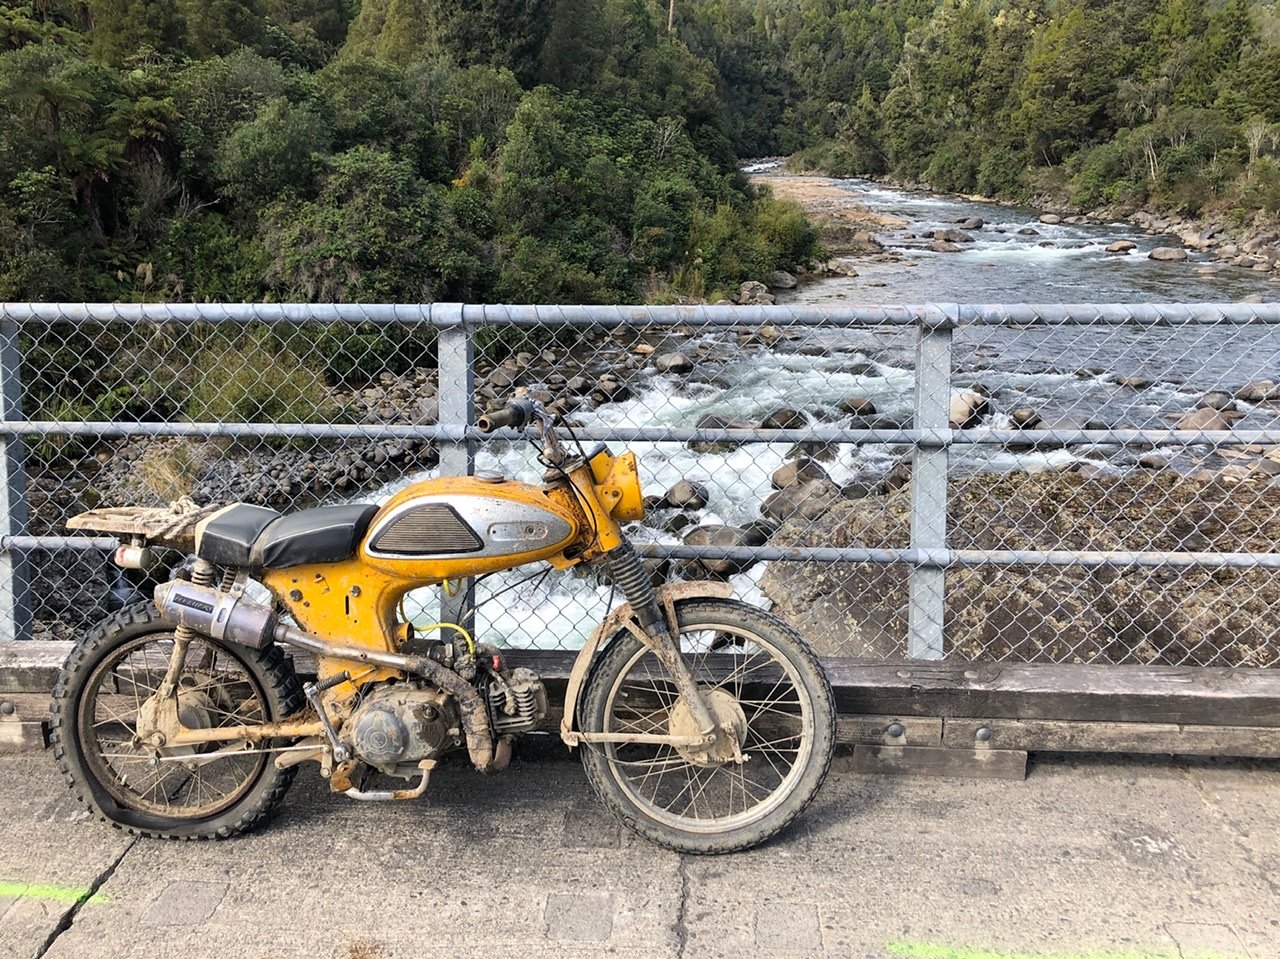
One day I’ll update this thread in more detail but basically I also have this Yamaha, a 63 YG5. It was a bit slow so I swapped the motor out for one I picked up in S.E.A. It’s similar to a TTR110 kids dirt bike but no electric start. See the story here if you’re interested in the weirder side of small bikes.
2 points
-
If you ever want to sell this, Clint. Let me know. It's perfect and I would very much like to enjoy it at some point if the cards fall that way. I'll even promise not to call you about all the things I'll never do to it.2 points
-
This runs. Is smokey as farq Wont rev hard but as half the clutch is missing thats not a priority just yet.2 points
-
Solutions: Cutting it down, machined in lathe afterwards. M4 cap head to act as a pickup. This M4 drives the tab that turns the worm thread. Spacer made to add back on, what I cut off...but on opposite side. Tadah!! Fuck yeah! All sorted.
2 points
-
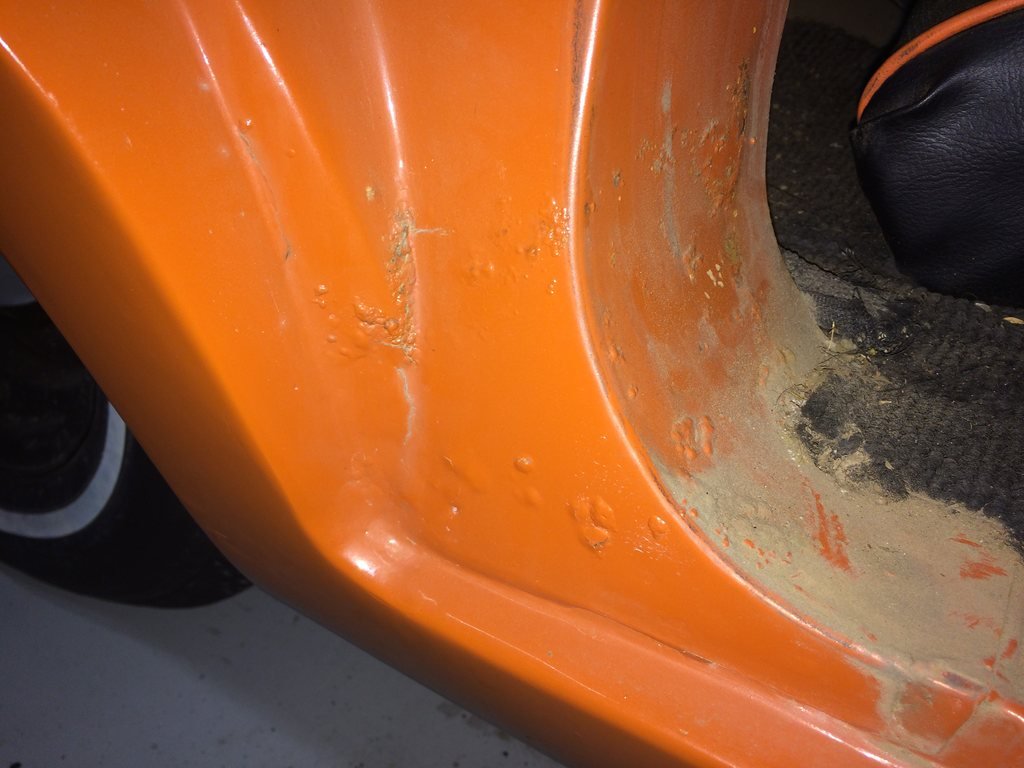
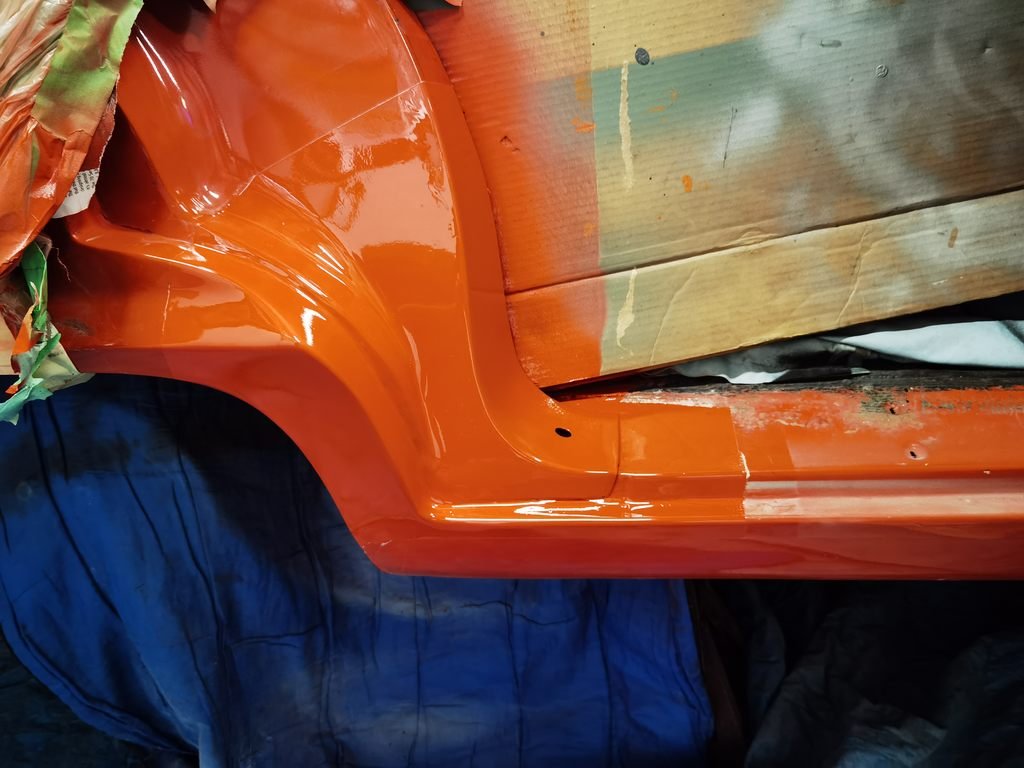
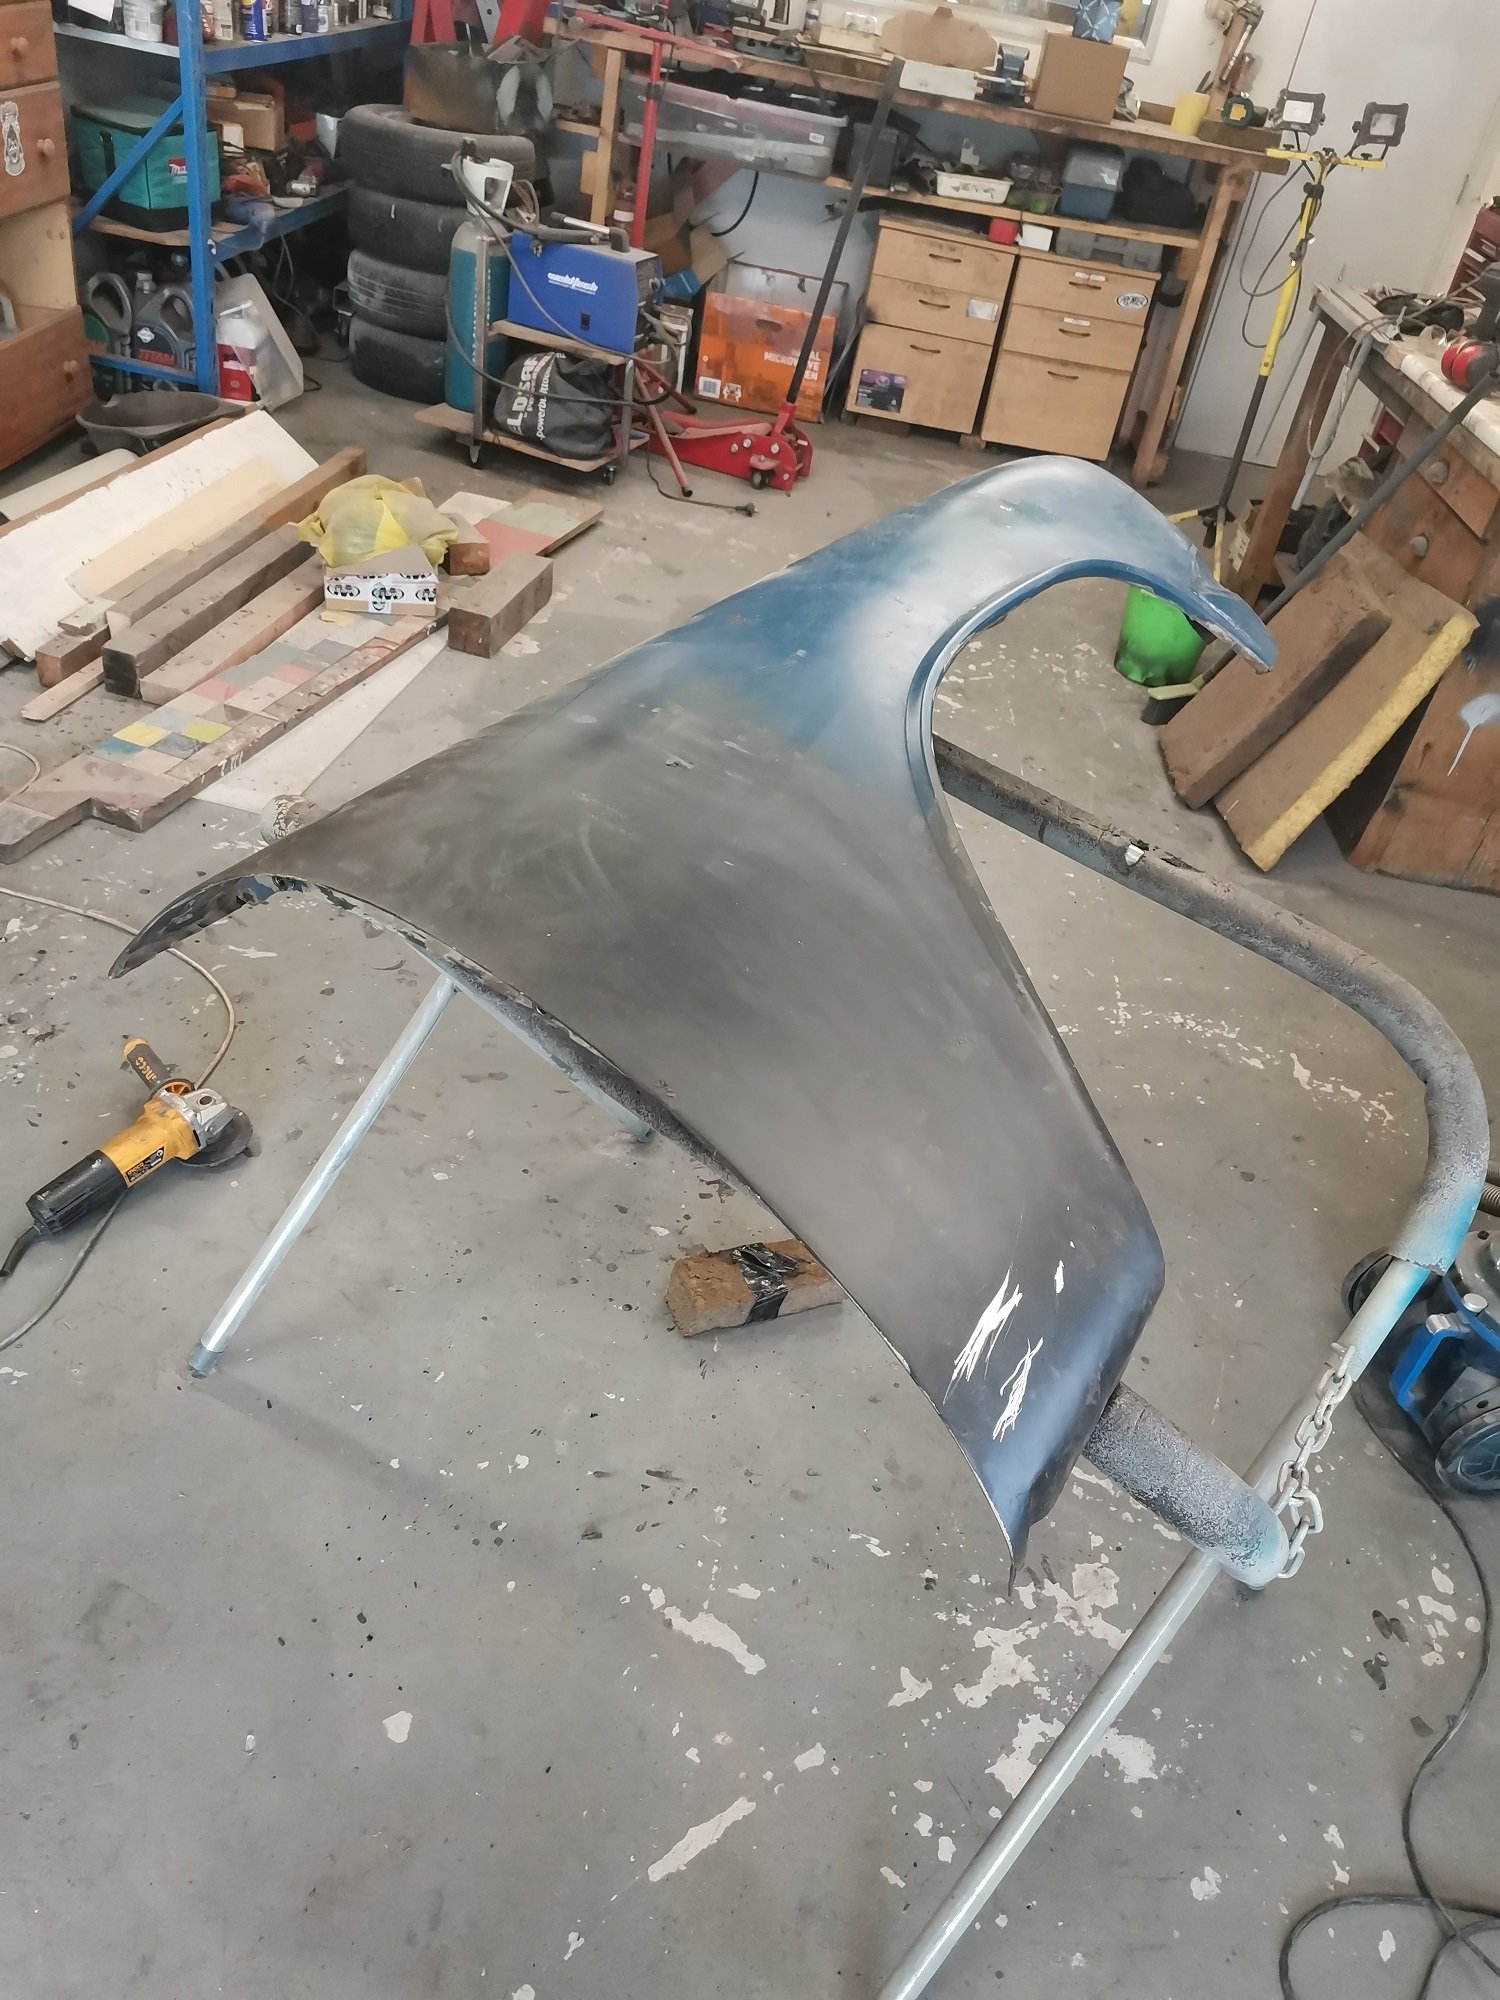
Unfortunately, I've got an office job so don't have any free time over lockdown. While the body is at the panelbeaters, I've been working on stripping the front valance and gaurds. Front valence wasn't too bad. Wee bit of bog, but I was able to mostly straighten out the wee dents without too much trouble. Can't say the same about the guards. Looked fairly good, but shitloads of bog and some horrendous repairs. Unfortunately there is a support for the guard, so I can't easily get to the back of the indented bit. I will have a go at welding on some tabs and pulling it straight. Don't mind a wee bit of bog, but that is taking the piss. Cut out the shitty bit at the front first, will sort that bit out first.
2 points
-
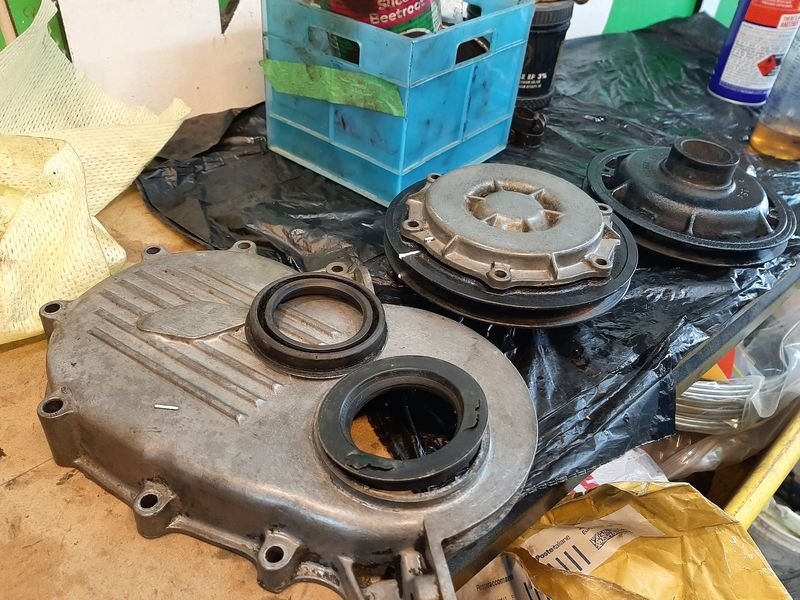
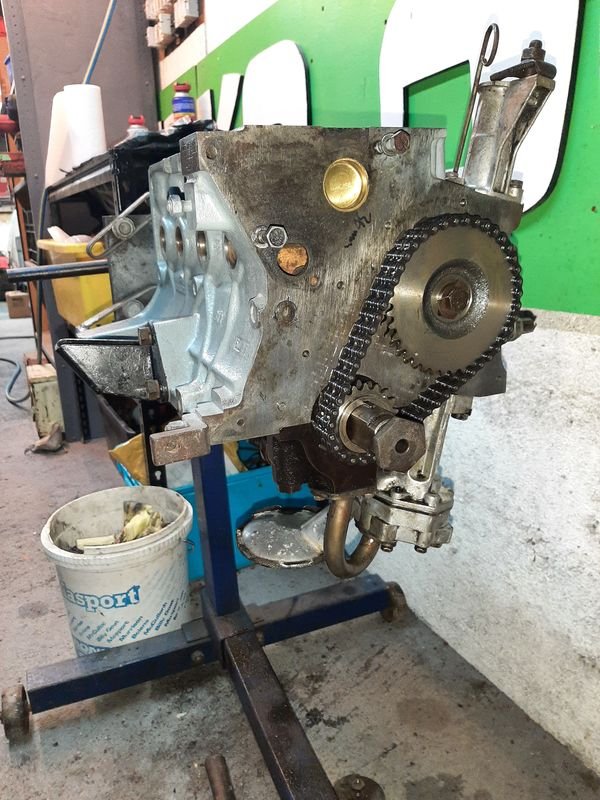
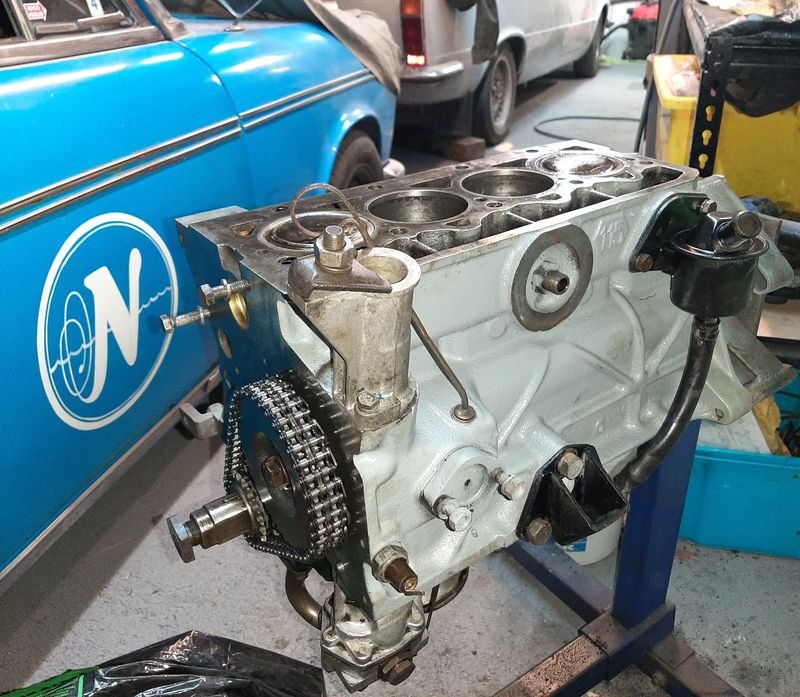
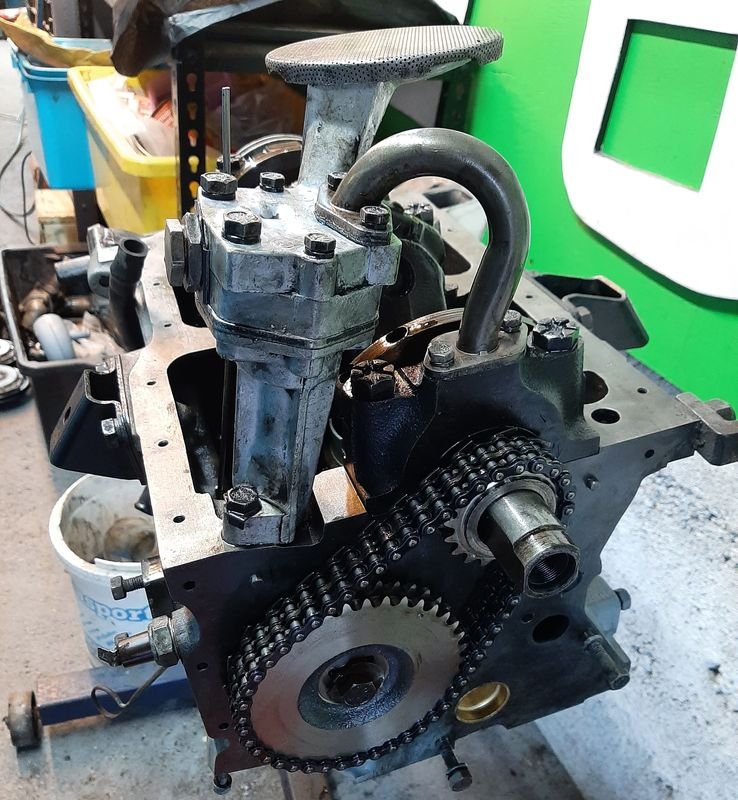
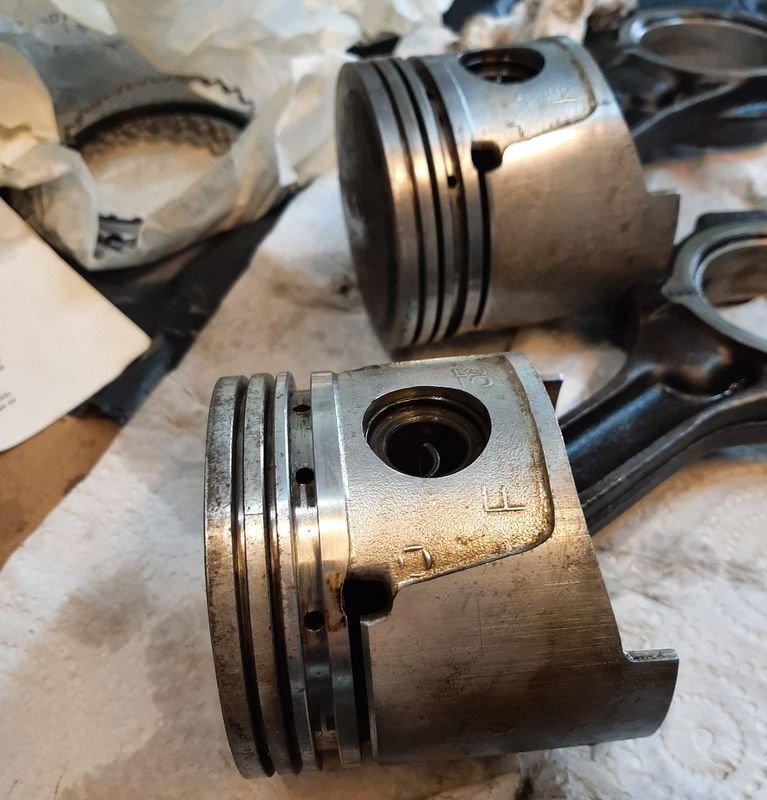
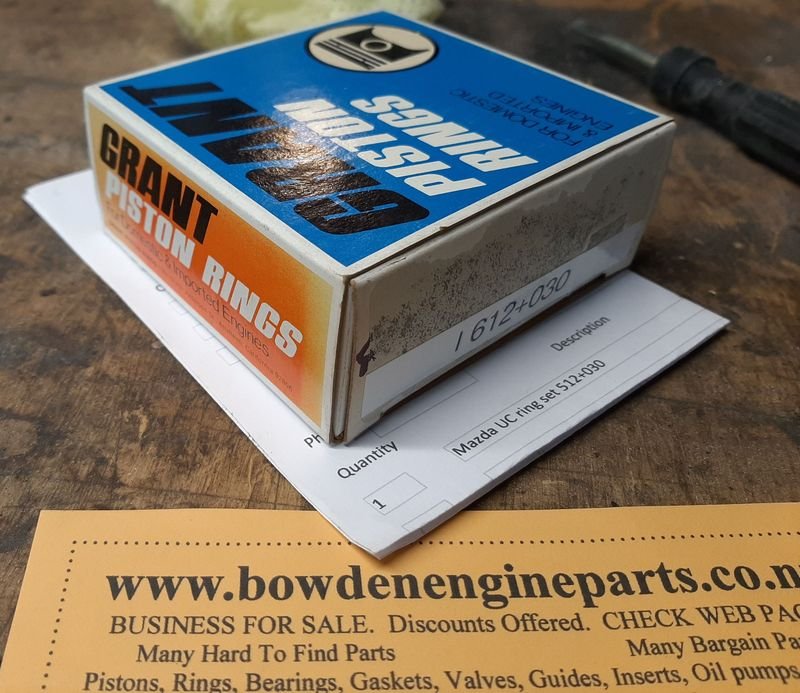
The correct Piston rings showed up quickly! The pistons cleaned up well and after getting the rusty, broken and stuck old rings out new hotness installed with lots of oil in the bores and moly grease on the bearings. Bores are pretty tapered based on the ring gap getting noticeably smaller as i moved it down the bores (and over spec all the way!) , but im just gonna send it. Installed the previously disassembled and cleaned oil pump, was pretty good under the grimness. Filled the gear housing with moly grease so its pre-primed New timing chain and gears, new crank nut and new welch/core plug. (turns out the 4 on the side are 32mm not 31mm, silly!!! More engine parts ordered... Everything turns over real smoothly, which is good enough for me. Turns out i didn't have all the seals. Its a weird stepped one that is only for Fiats that use these oil slingers, but ive taken a punt on a generic unstepped one to try. Future reference: Factory crank nose seal, shared with other fiats (500/600/850/1100/1500/2300 ) that use this oil slinger Seal 70/65x45x10
2 points
-
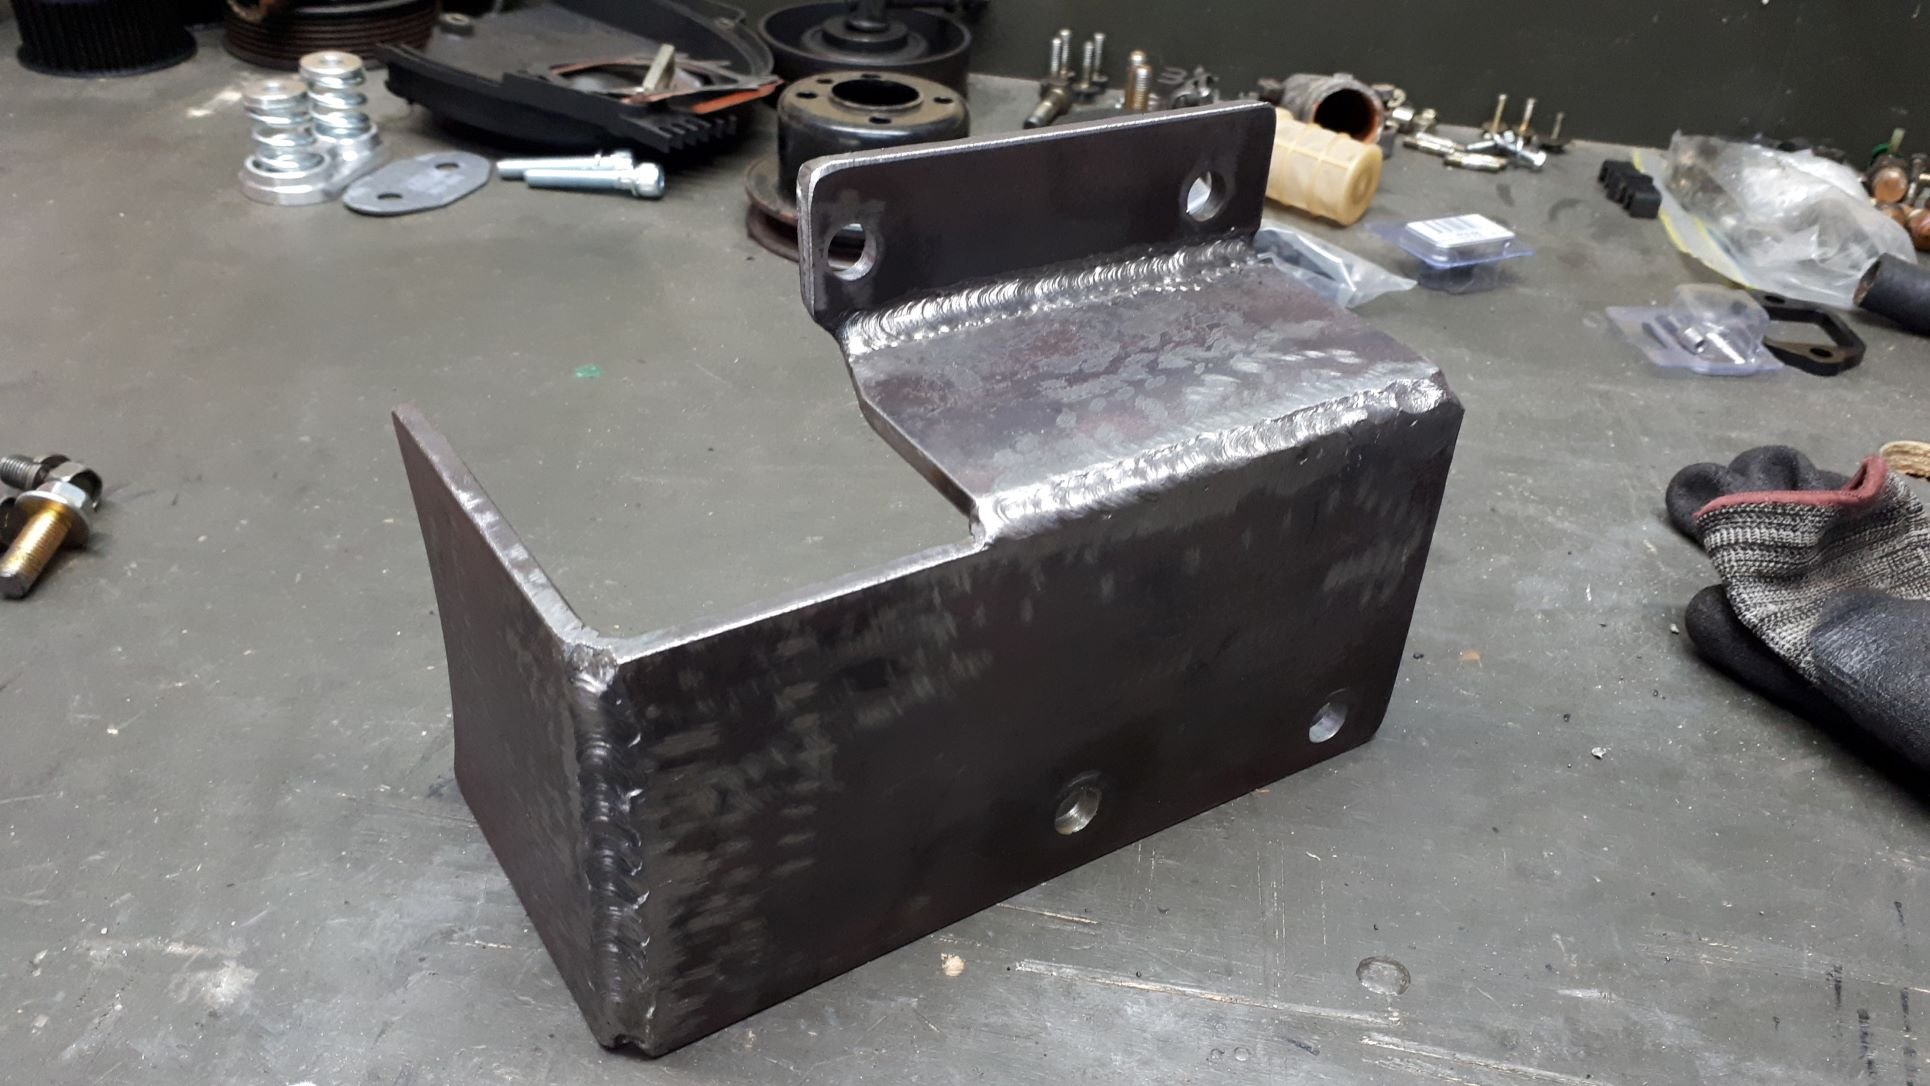
Nothing else to do this weekend but hang out in the garage and make brackets and fittings. Made a beefy bracket to fit in the A/C position, this will provide a mount for the supercharger drive layshaft, the forward belt tensioner and anything else I might choose to attach to it. Apparently Argon is not essential so I wasn’t able to purchase any. In this situation it was out with the trusty little Lincoln Electric arc welder to stick the bits of metal together. Everything went together well and the bolt holes even lined up when I was finished. Made an unnecessarily fancy brace for the manifold that may or may not be necessary and also made a fan shroud for the electric fan.
2 points
-
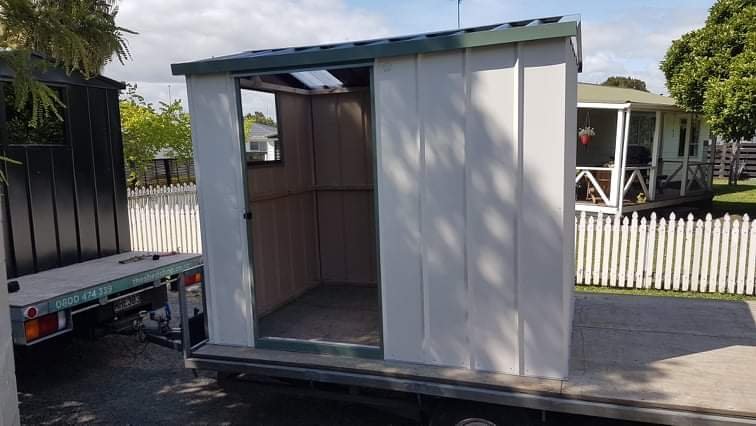
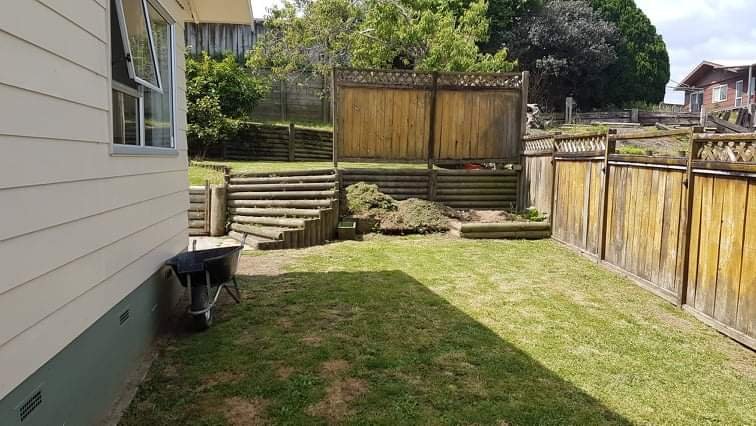
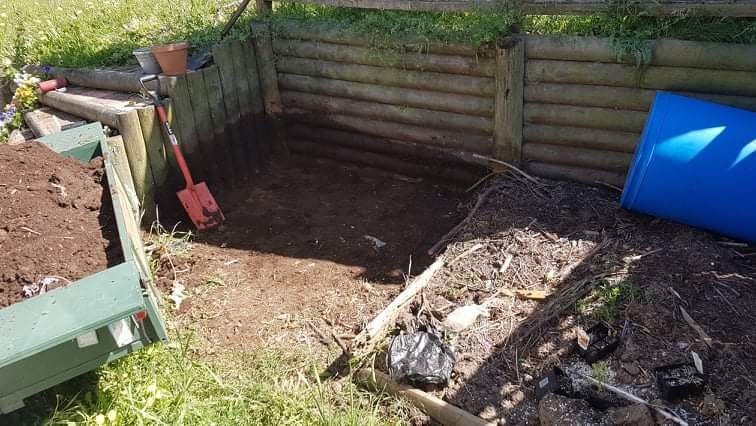
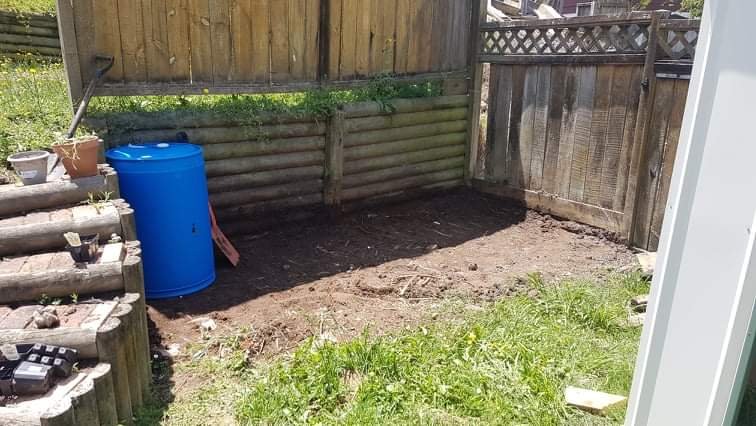
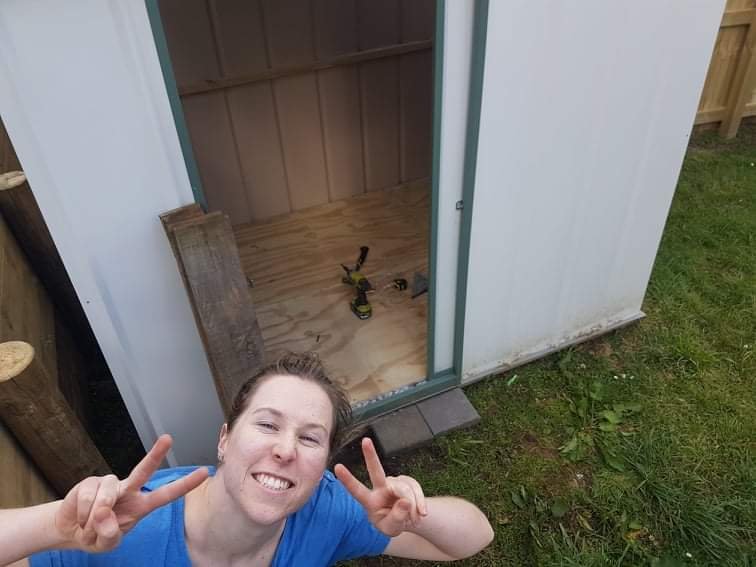
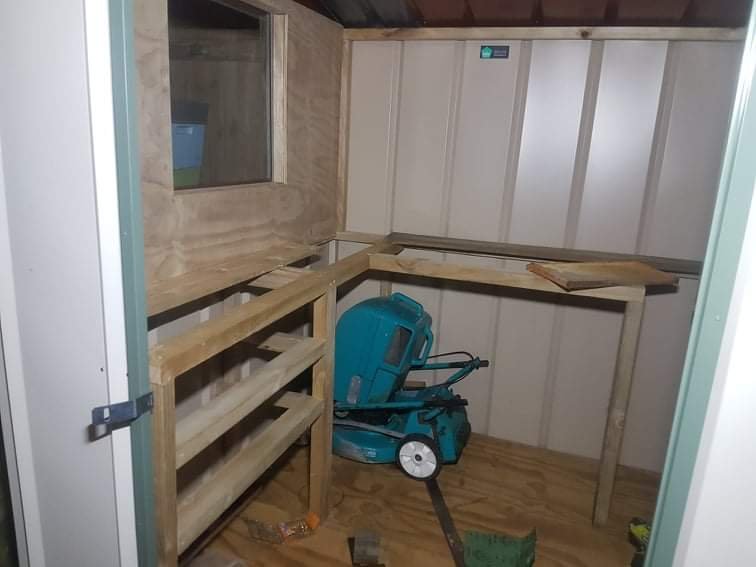
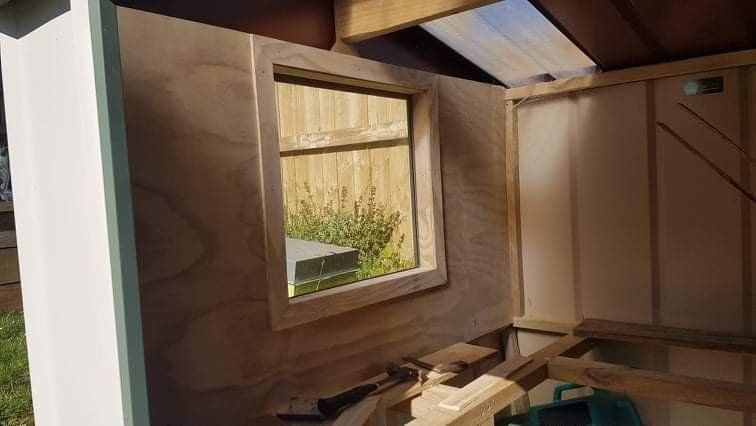
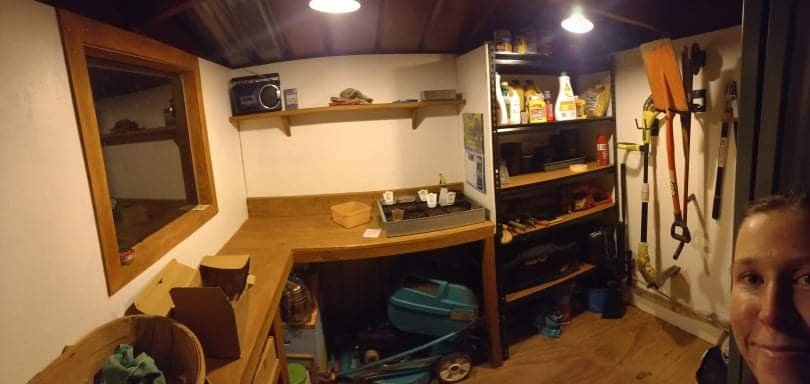
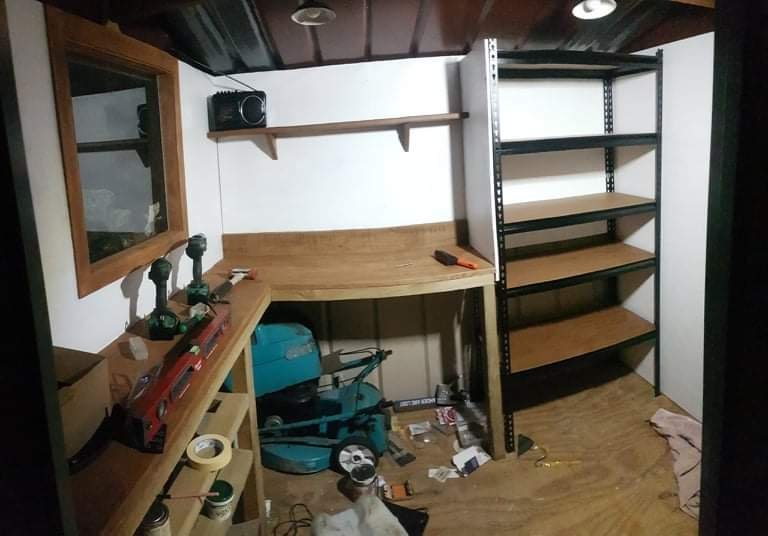
Something I have been working for on and off a year or so. @Dogwatch is keen on gardening and always figure that I have the shed for car stuff she deserves a shed for garden stuff. Looked at all the mitre 10 cheap shittas and they all looked horrific. Ended up seeing a crowd in TGA called the shed shop selling prefabbed sheds with basic wooden framing. Pulled the trigger and got free delivery through the home show. 10/10 would trade again very sturdy proper gutters and no rattles. Was awesome they clip wheels in the edges and roll it to where you wish. After a bit of exacvation Had a good pad to put shed on. @Beaver and @GuyWithAviators gave me a hand to make up a base to sit it on to get the shed off the ground, then made up a floor for it. Lined some walls, made a bench and put a bit of trim round the window and it was ready for paint. All the planks in the shed are planed down old fence palings. Gave it a lick of paint, popped some shelves in and made up some steel hooks and its good to go. Finally got the aliexpress solar lights in this afternoon shit they go good. Stoked at how it turned out is a bit fancier then we both anticipated but she does alot of gardening so it gets used alot. Its amazing how much nicer it feels inside with lined painted walls, feels like a proper shed not a cupboard.
2 points
-
Hey, thought I'd start this if anyone has any questions, comments or tips... Cheers!1 point
-
Only 3 letters needed "BHG!"1 point
-
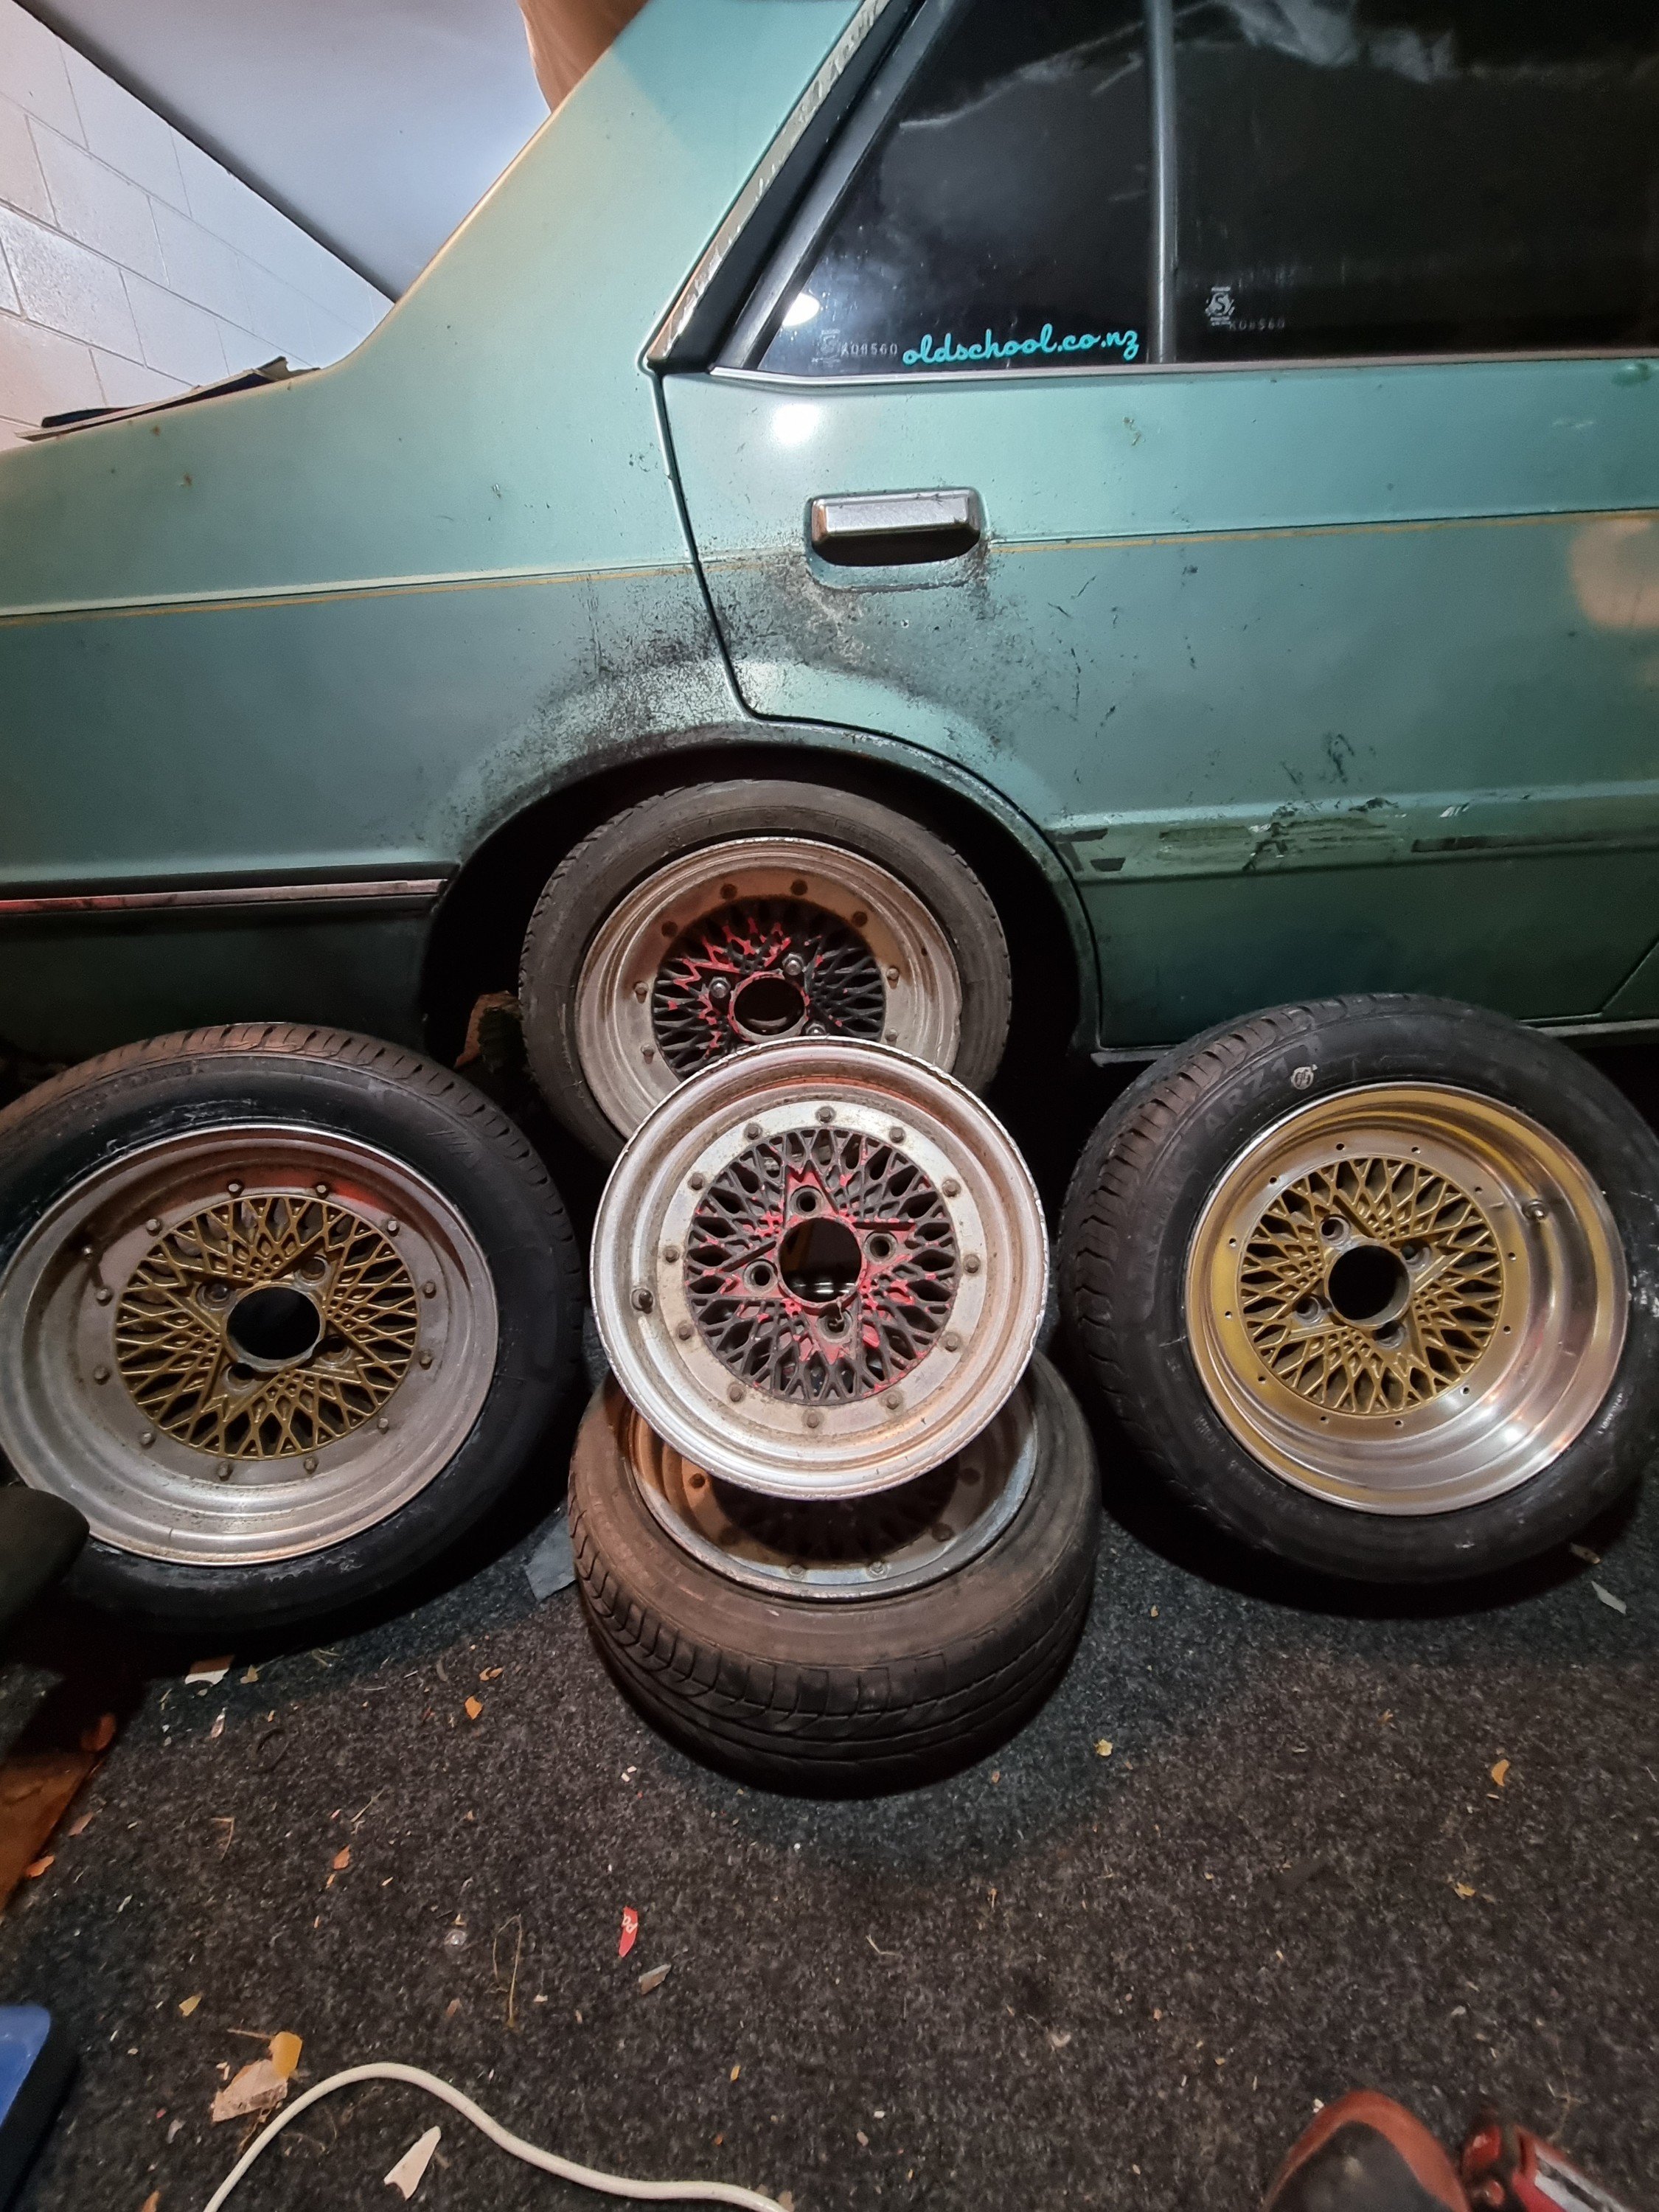
Bought 3 more wheels to match the pair i had. Cheers to dave for those. They need a good clean up, some wider lips would be ideal once funds allow. And having 5 wheels so the spare matches too will be epic
1 point
-
Pretty sure old Shayne Gooch the lecturer was jizzing over that golf ball hurler design about 5 years ago when we had to sit through his class1 point
-
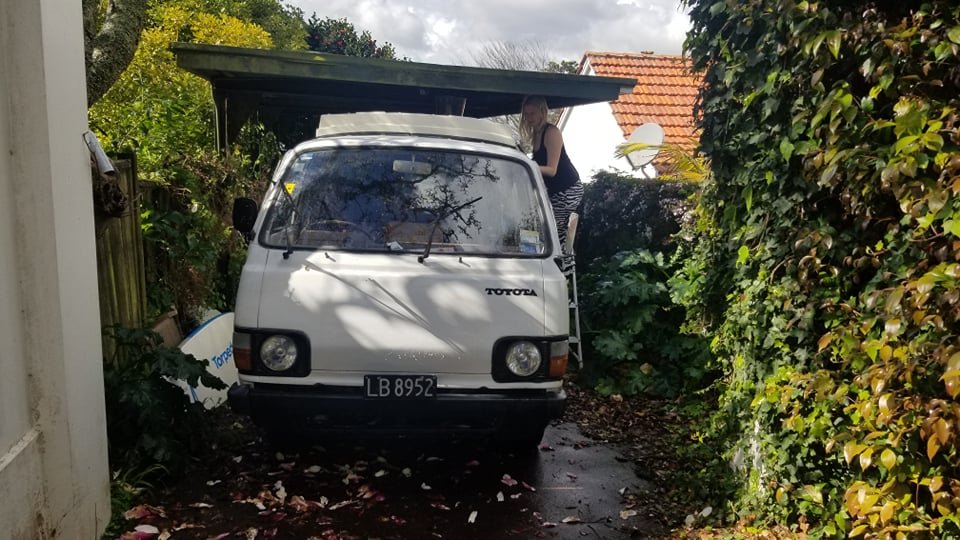
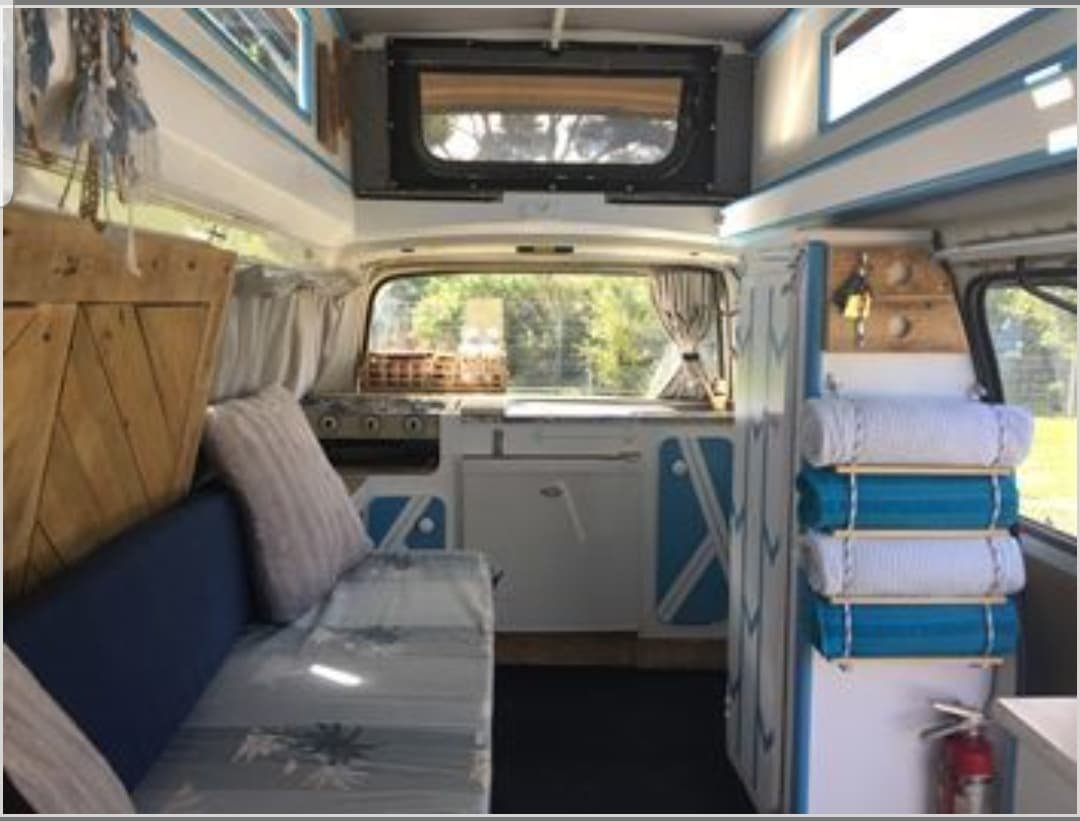
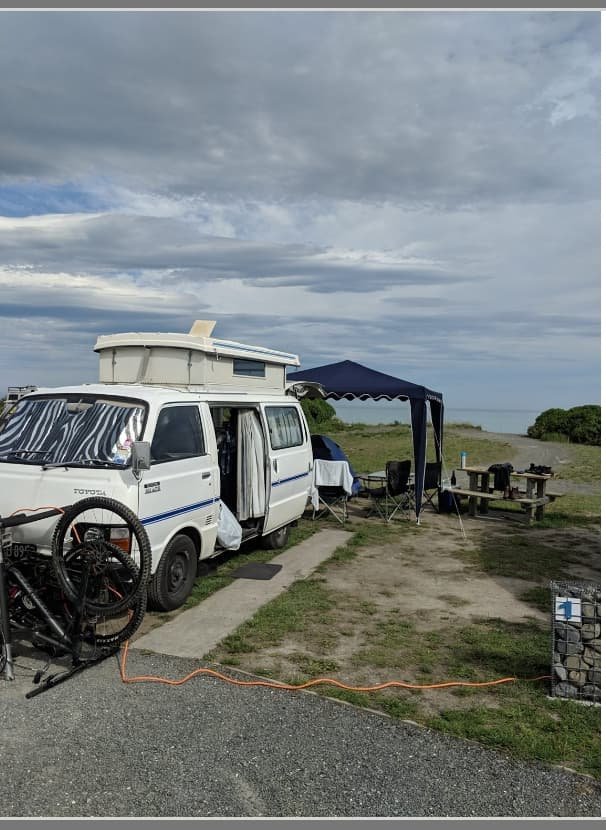
After years of being apart of this forum and benefitting from its community I've decided to post up a project build. This is my Girlfriends 1983 Toyota Hiace Camper van, with a pop top roof. Running an 18r engine. She bought it about a year ago and it ran sweet for a summer, then started breaking down. The compression is down on two cylinders. We will drop the engine out after lockdown. Open her up and get an engine rebuilder to tell us exactly what it needs. Currently we are working on getting through the mountain of rust that is throughout this poor thing. We are getting there hahah The jack point on the passenger side is the worst rust we have found so far. You could knock it and rust would fall to the ground. So we've cut it out and started fabricating a new one
1 point
-
1 point
-
Your motor in one of these, oh my! https://www.trademe.co.nz/3241799129 Does anyone know anything about them?1 point
-
Came here looking for Nissan vanette1 point
-
That skull would be an ideal night light put it on a motion sensor next to your kids bed.1 point
-
I just checked, the timing is stupidly far advanced. Good work team. I will check that shit now. I am super dumb about ecu stuff, what effect will bridging the pins have? Where the fuck is the port as well?1 point
-
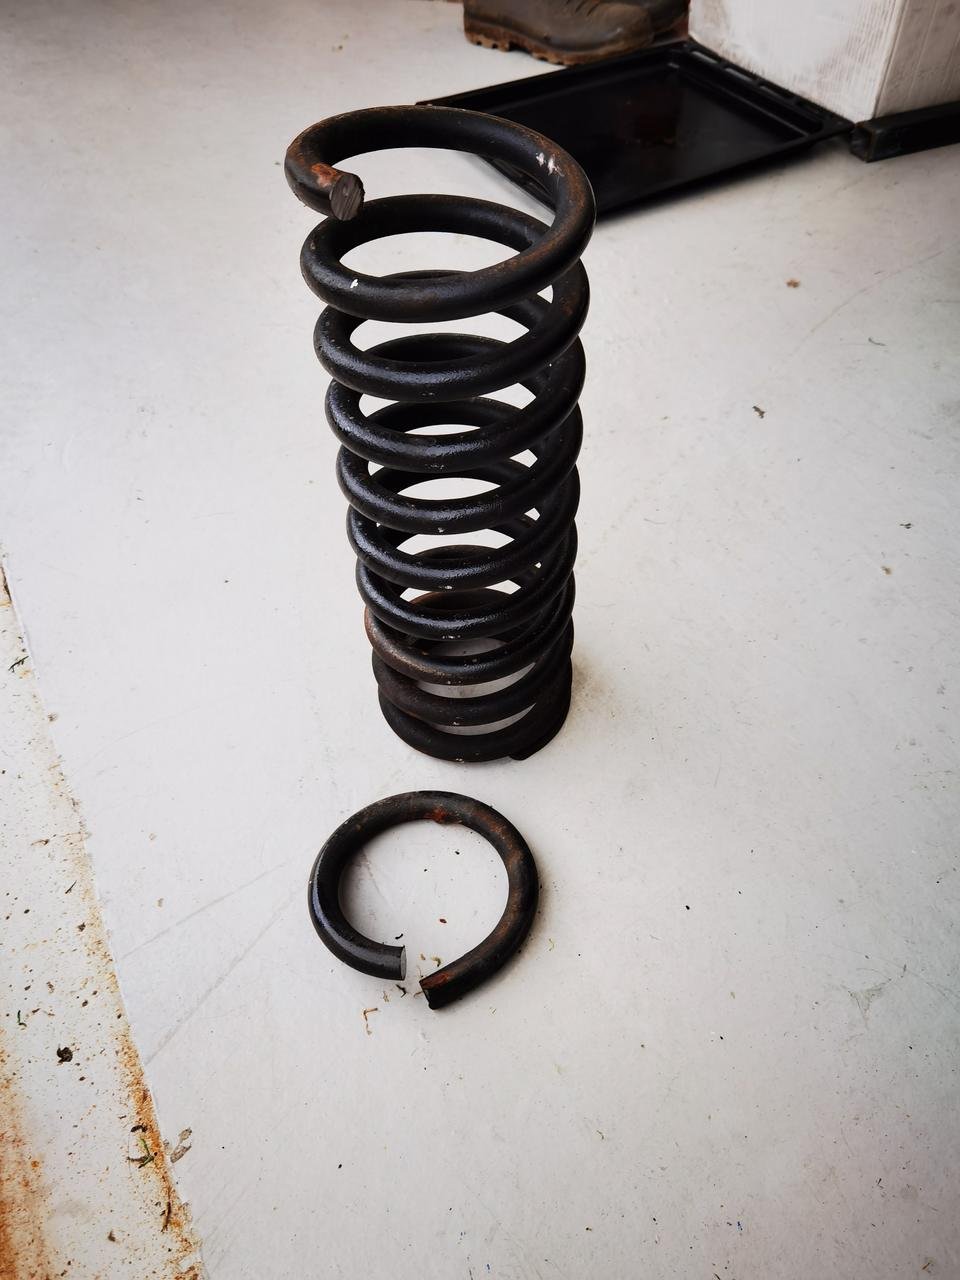
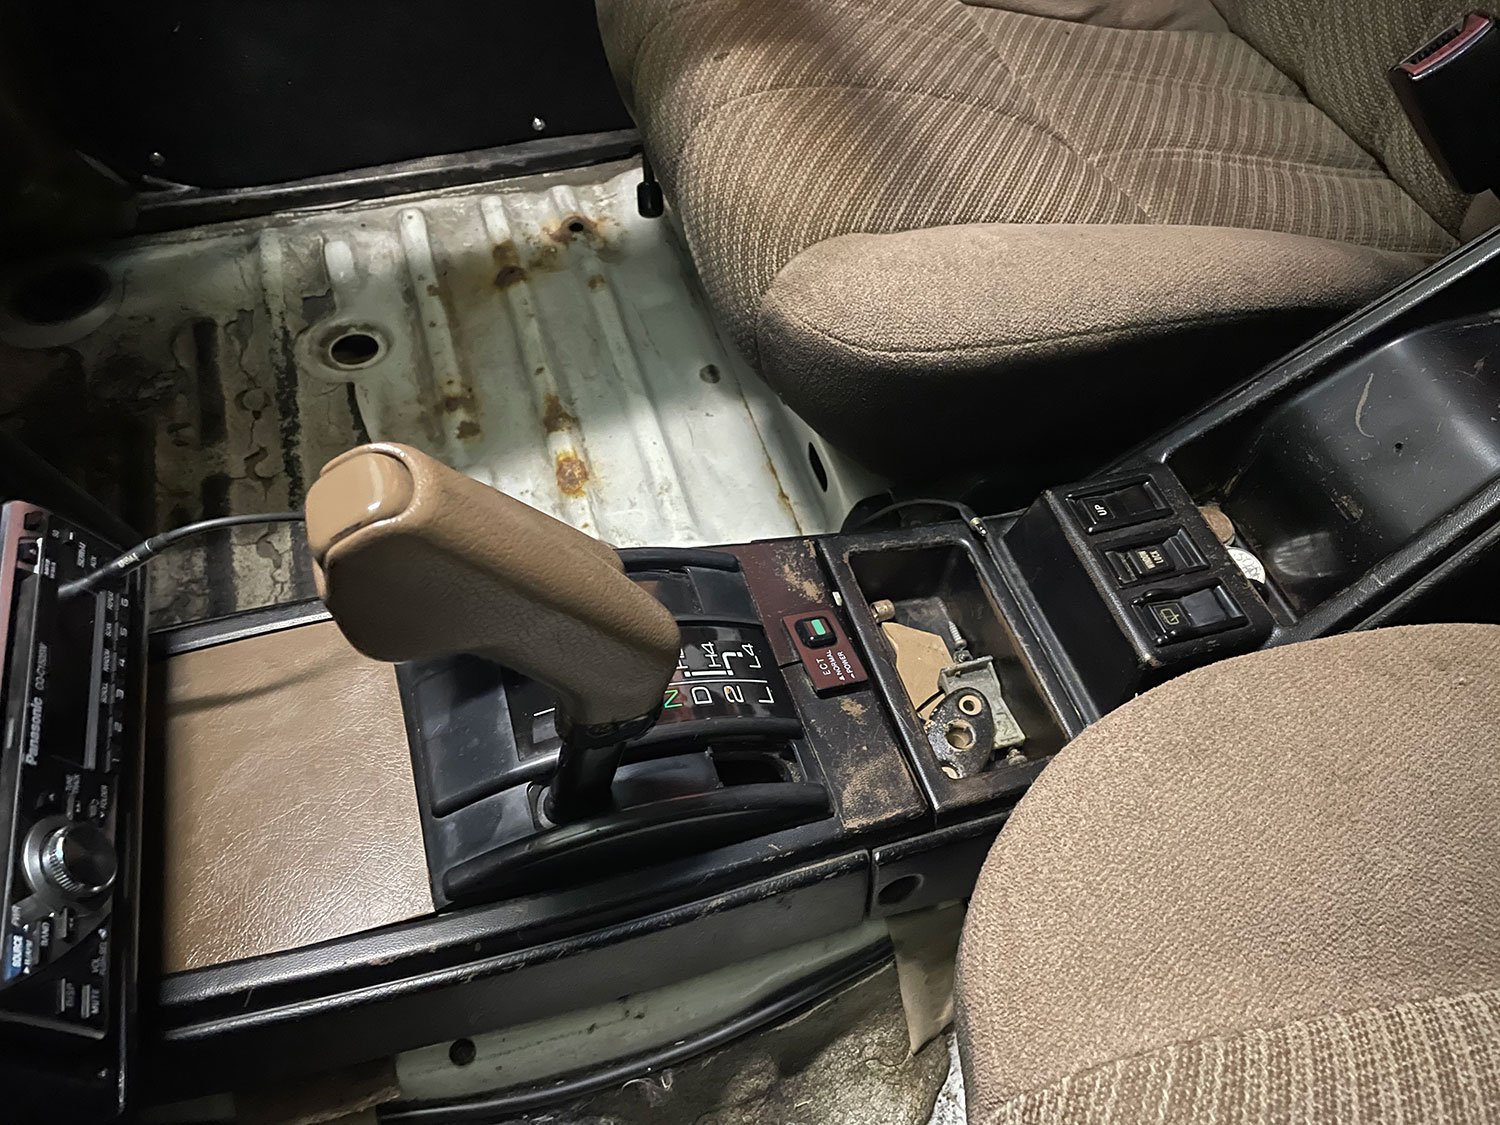
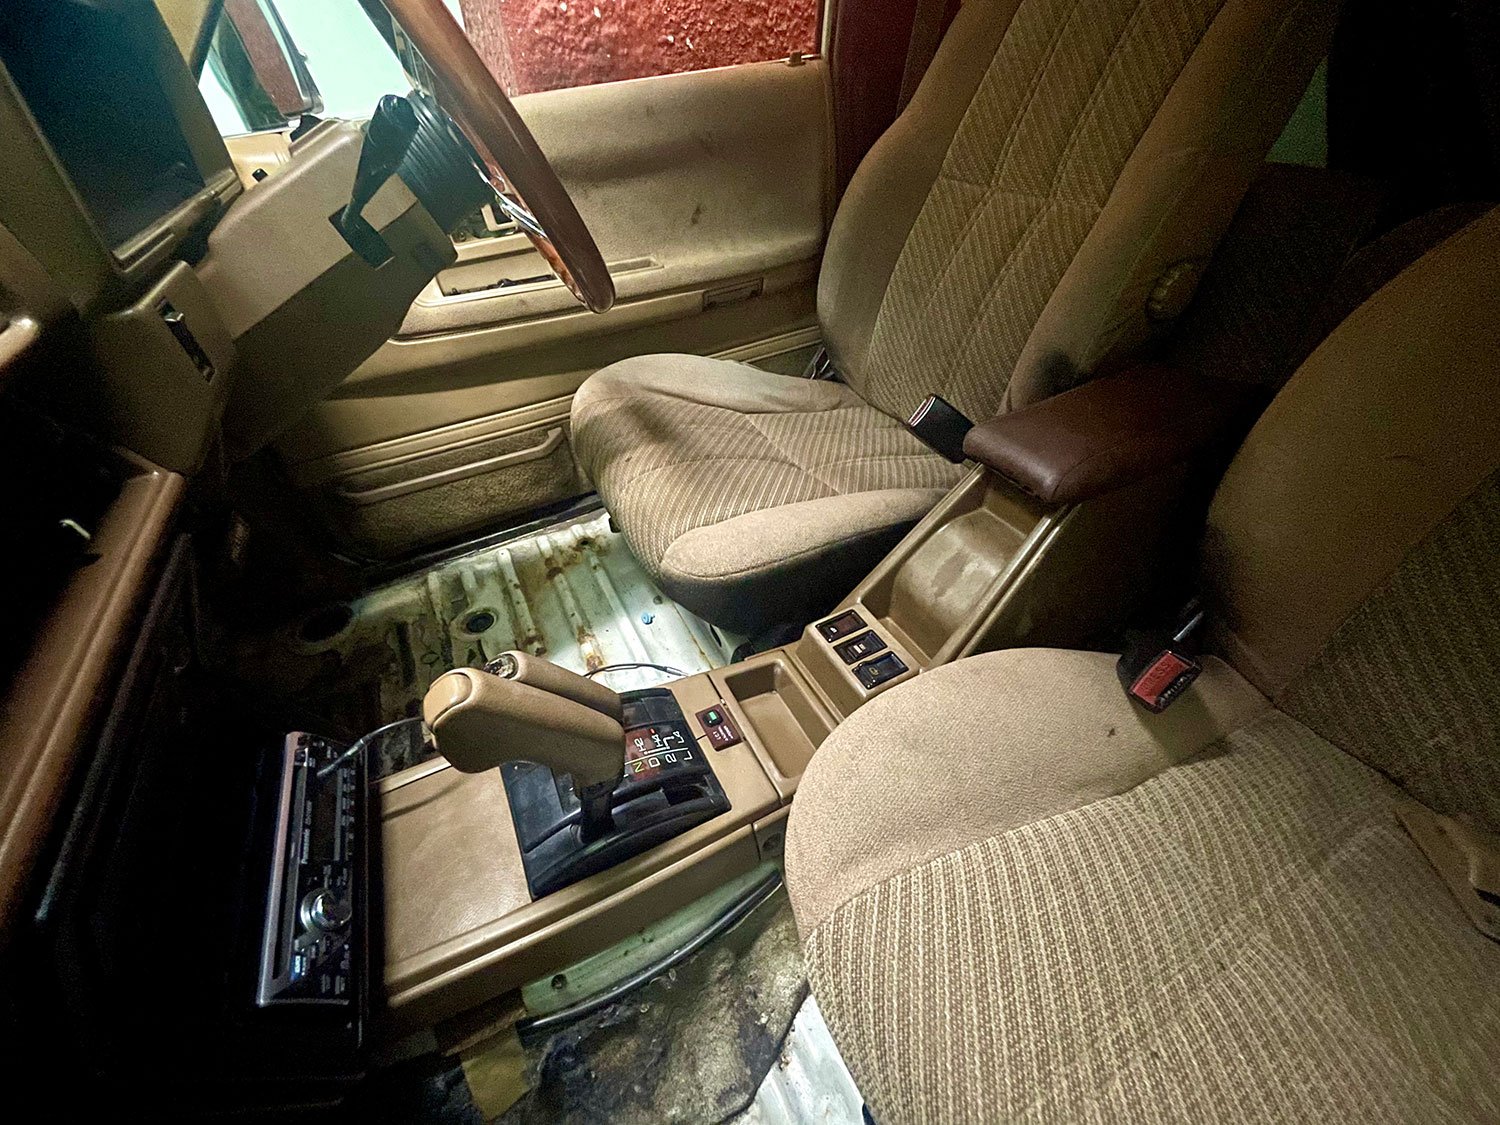
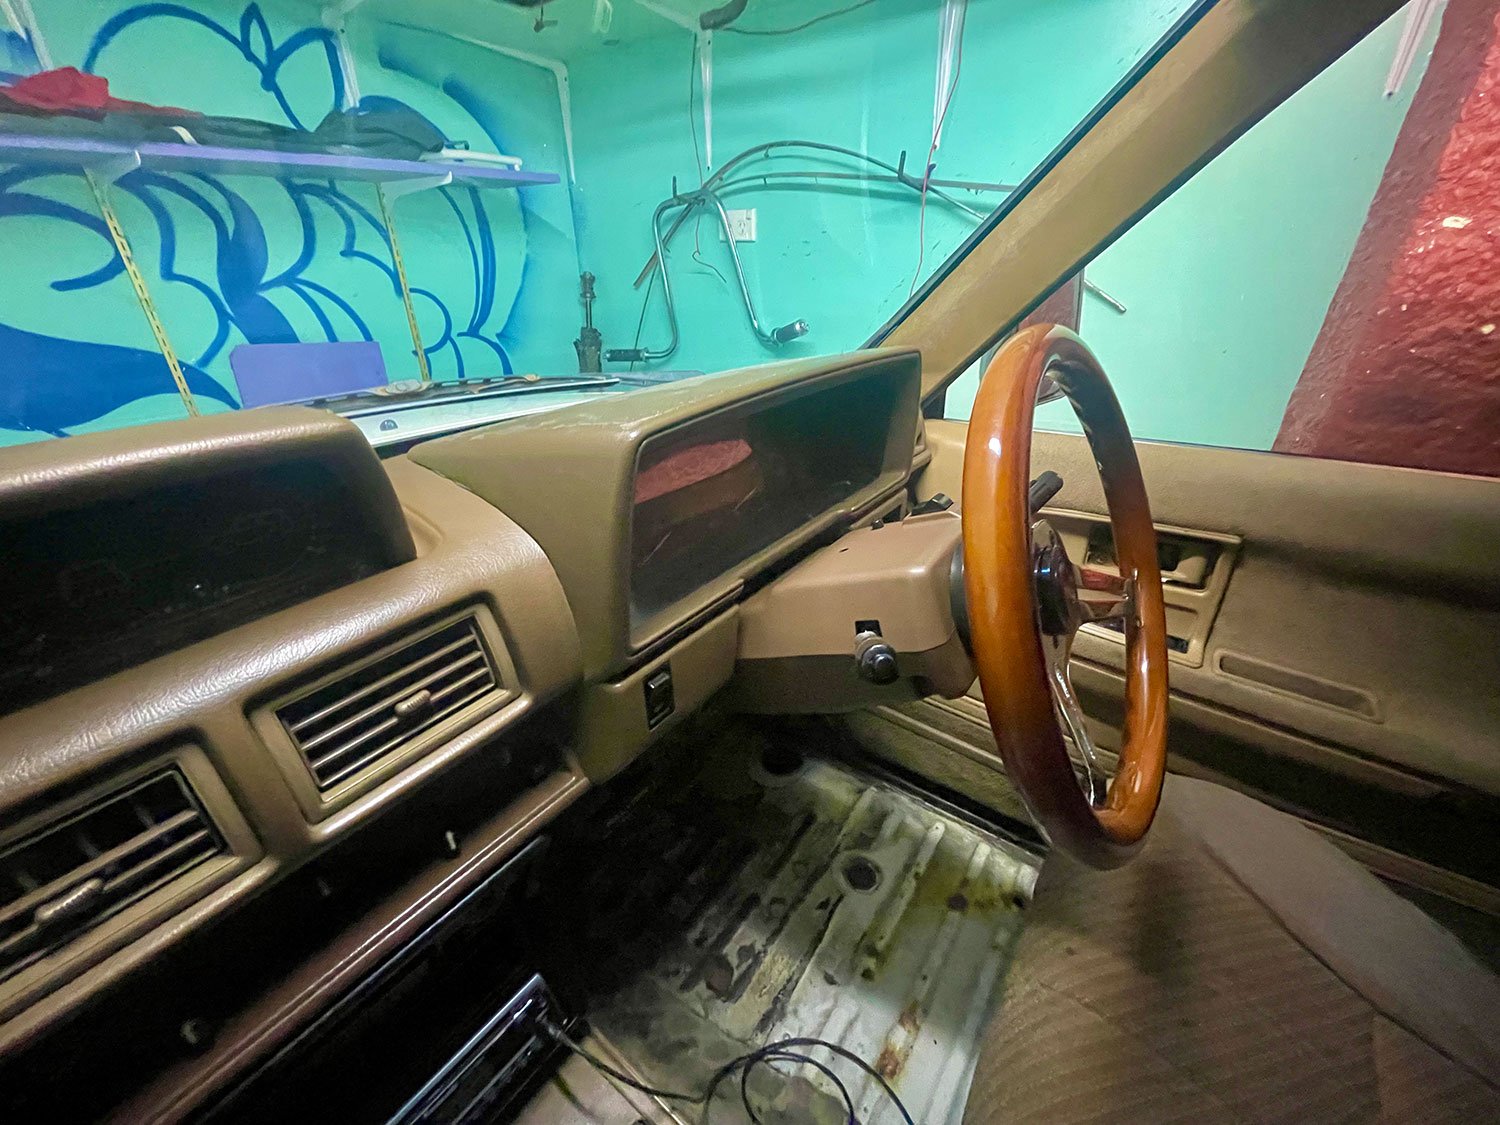
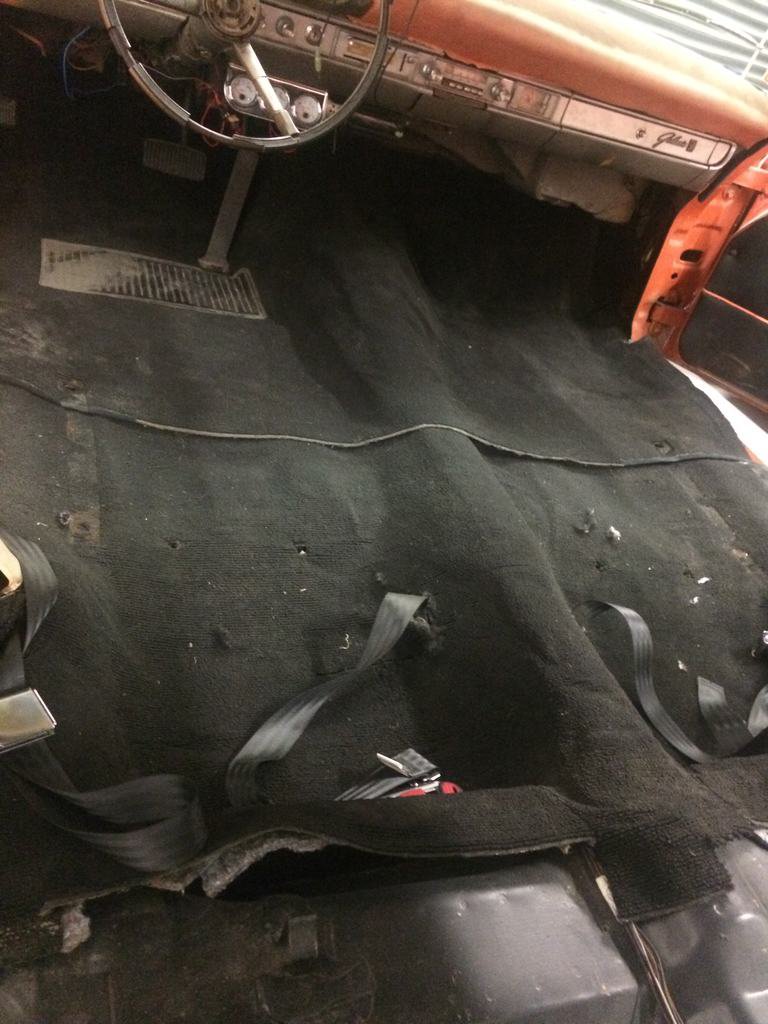
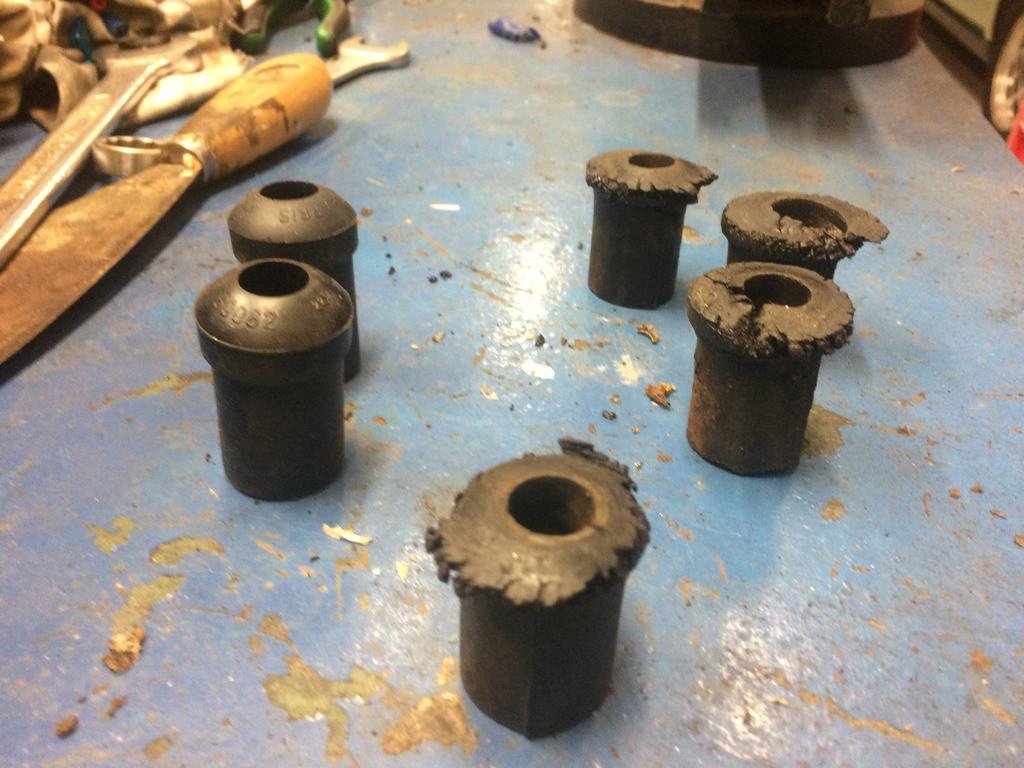
looooong overdue update. got the old girl all legal in August a week before going away on holiday last month. so with the steering joint done i did some of the other failed items which was the brake pedal rubber being worn on the edge so new one of those got put on and rear shock bottom thread bent. so out came a socket and hammer and job done and they also failed all of the rear spring bushes incl the rubber spring pads so replaced the rear shackle ones as had them in stock already but as you can see the bushes are more perished than worn due to the Arizona heat and the spring pads and front bushes on the rear springs i pulled out and showed the compliance inspector that they are cracked from age and Arizona heat. so politely showed him and told him that he doesn't really know what hes doing. Not bloody worn and as you can expect i was not impressed being a mechanic myself and them inspecting the car twice before. so lubed the bushes and spring pads and put them back in. and that fixed the rear end squeak too! took the car back and got the wof label on the window. then took a old girl home after a bit of a drive and made a floor bung and placed the carpet and other trims back in.
1 point
-
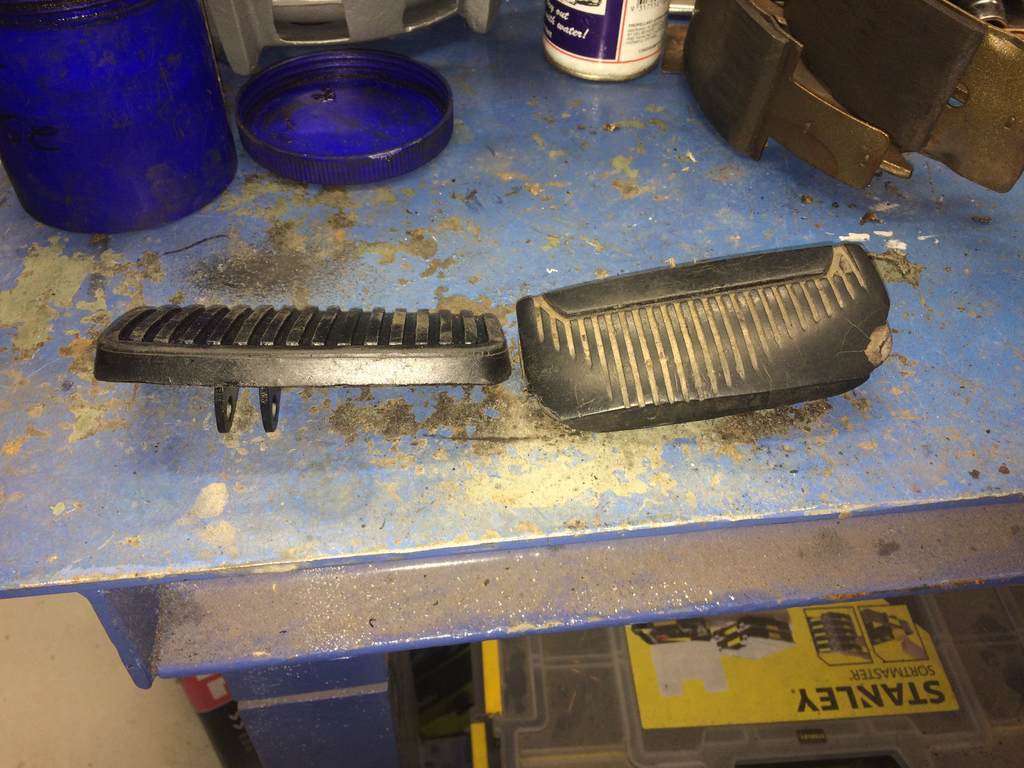
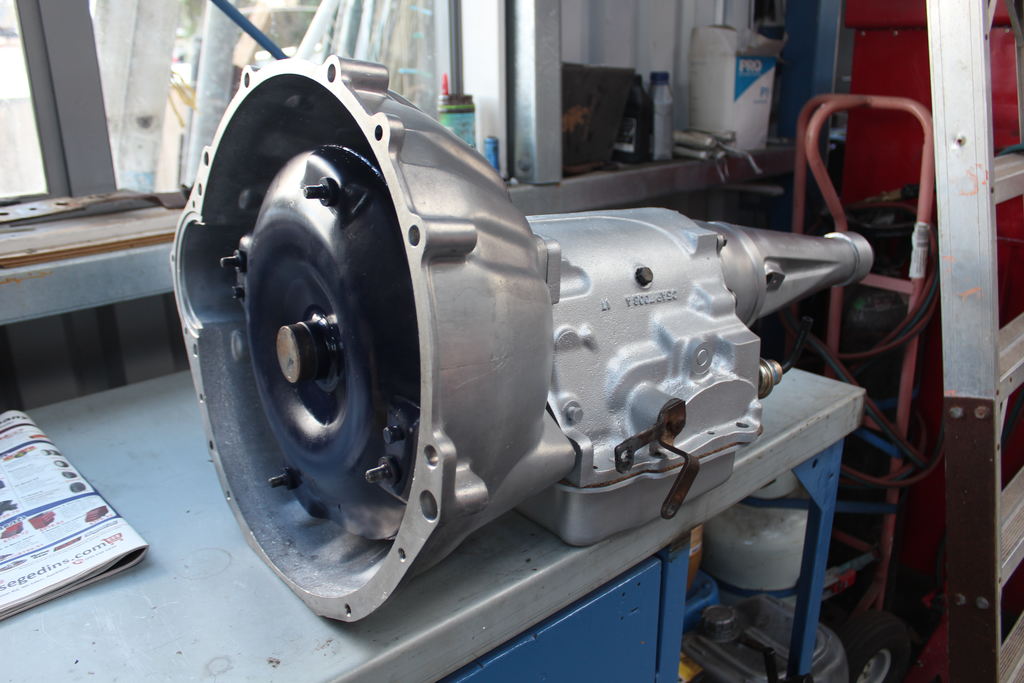
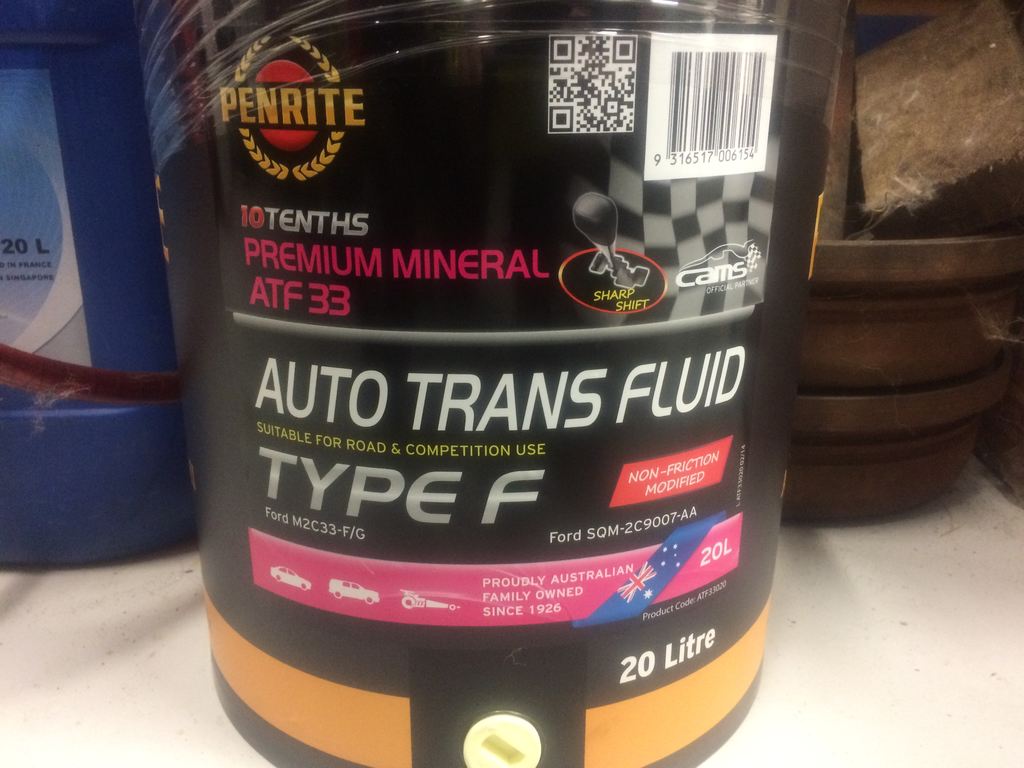
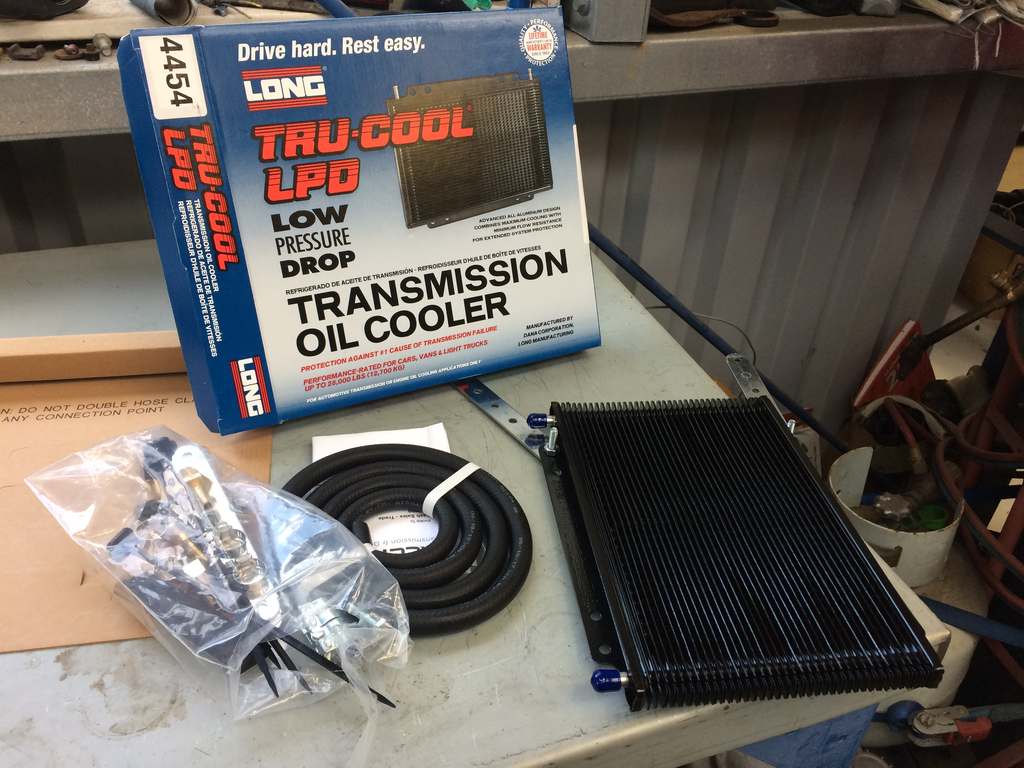
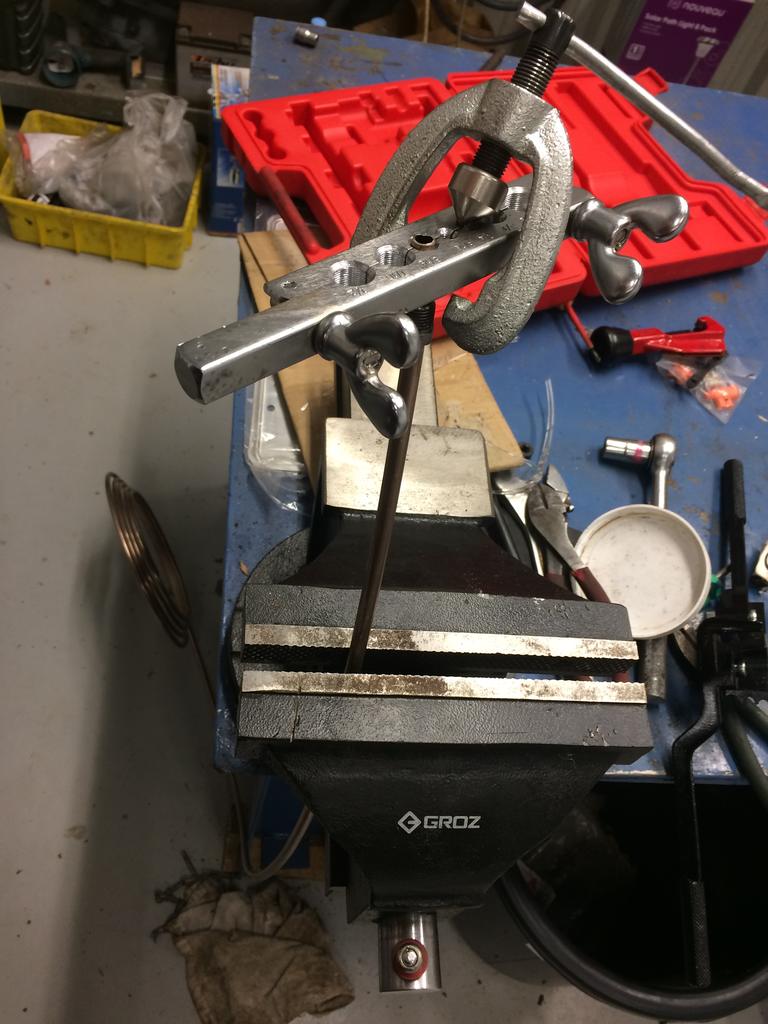
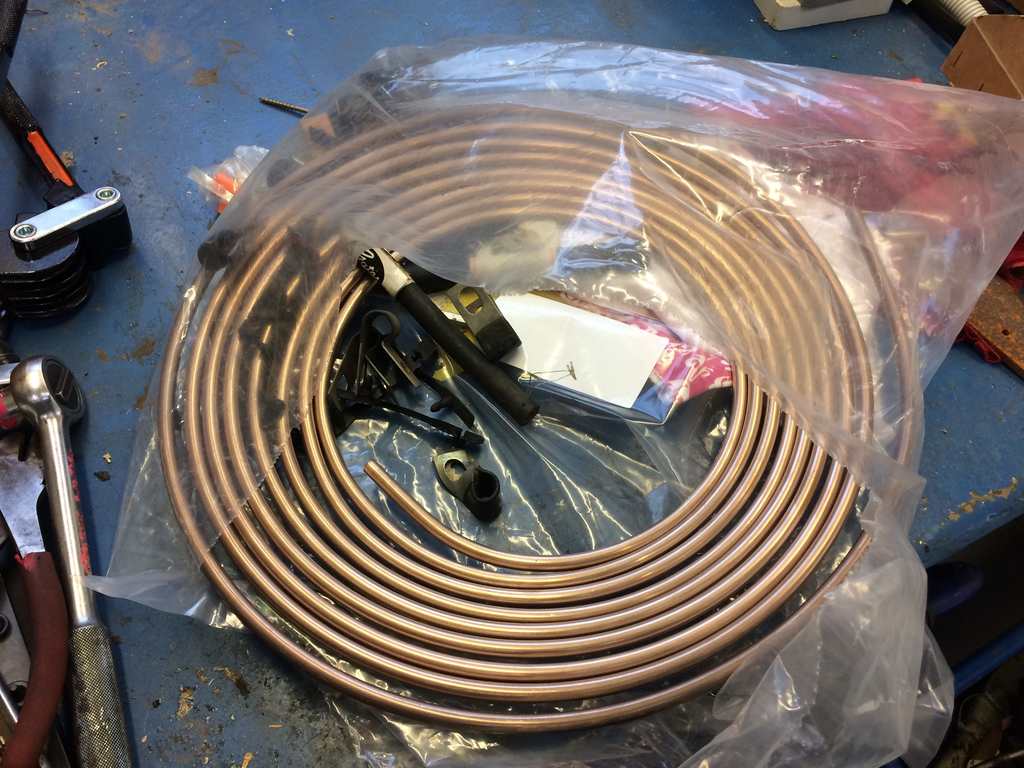
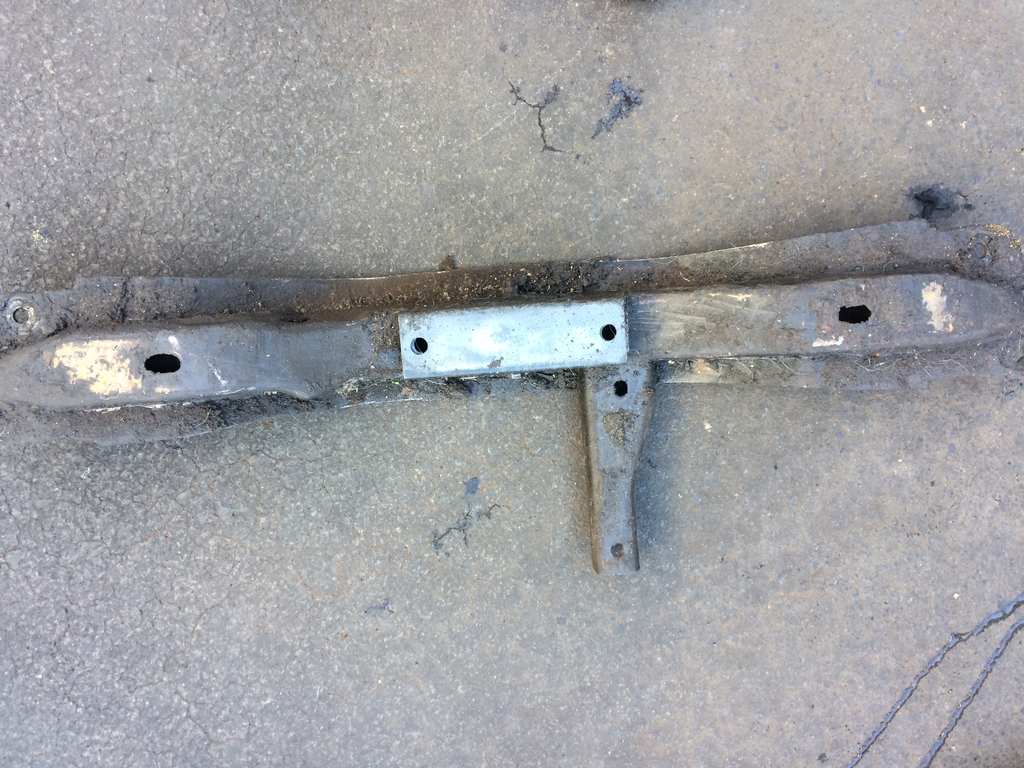
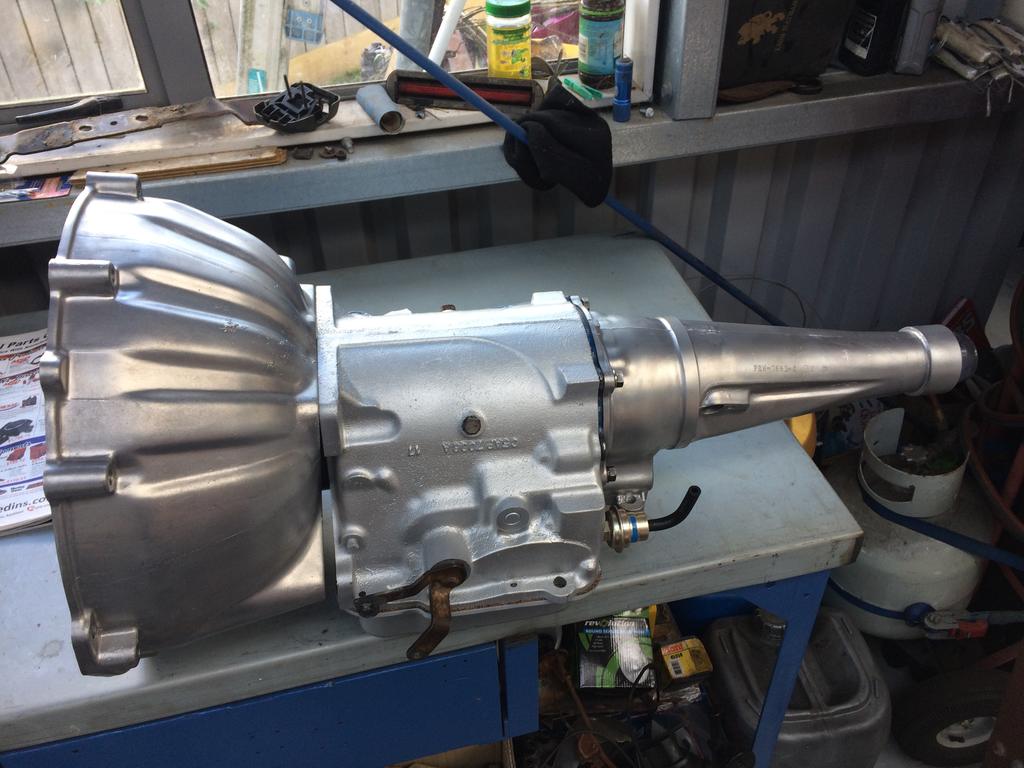
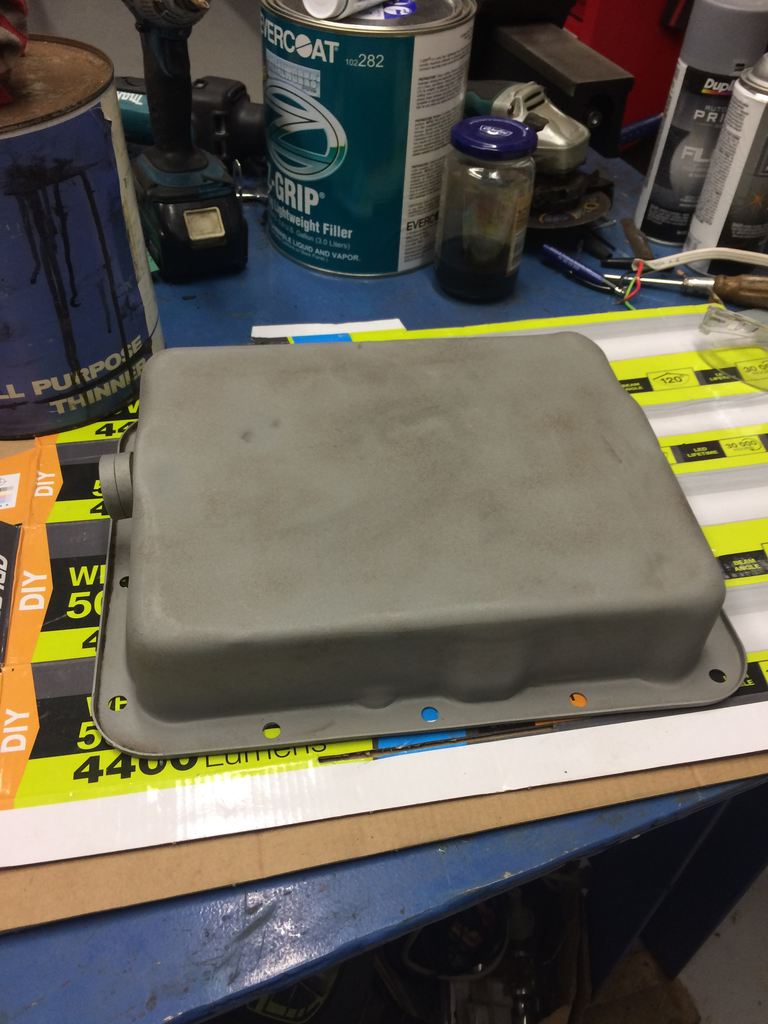
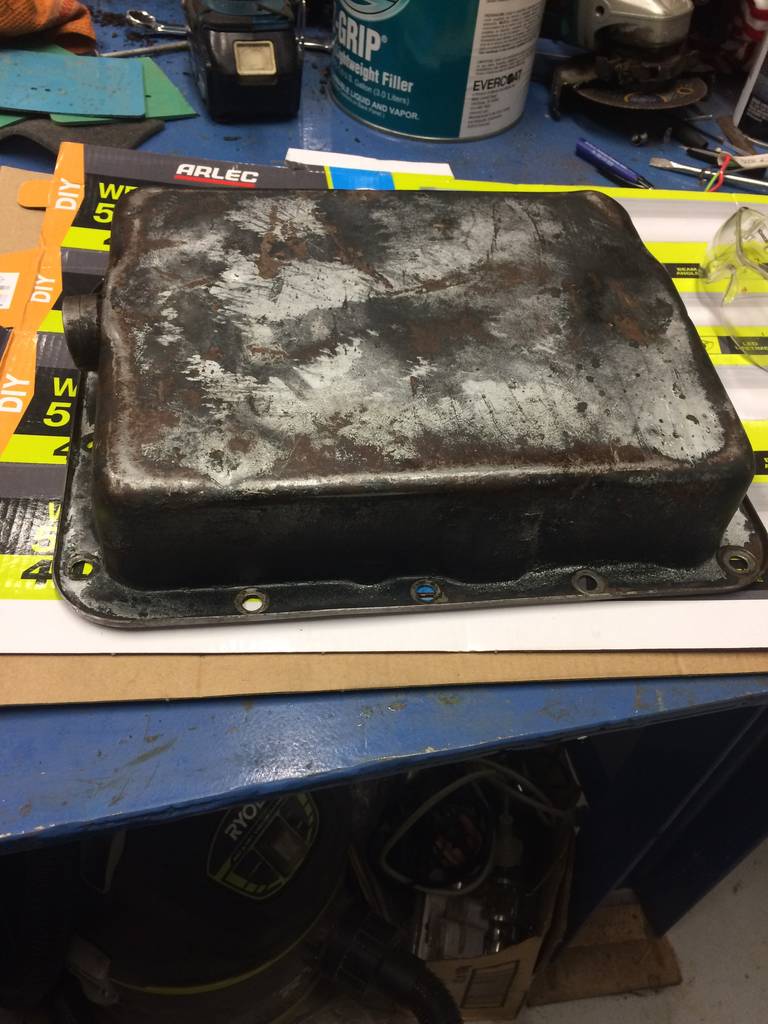
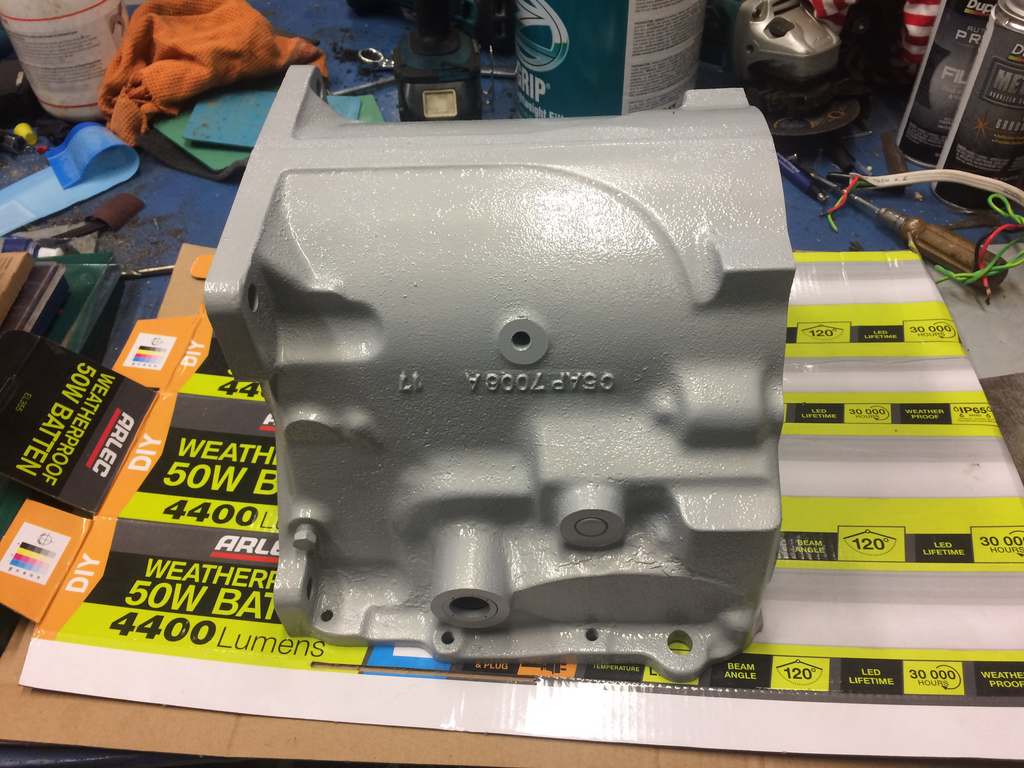
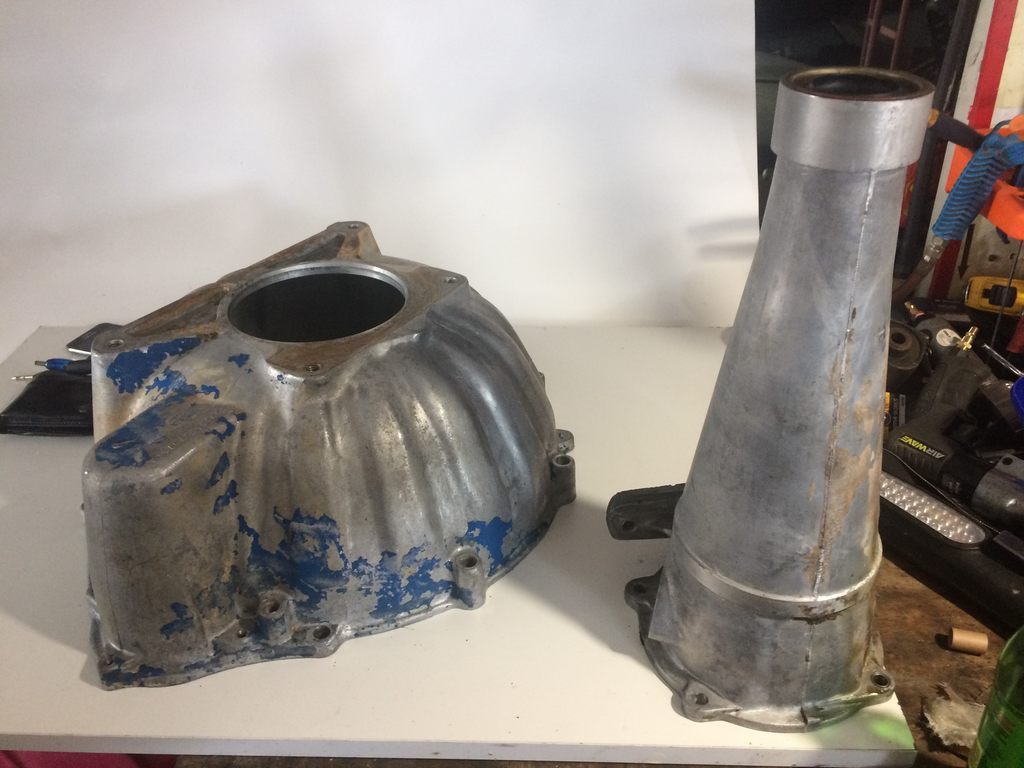
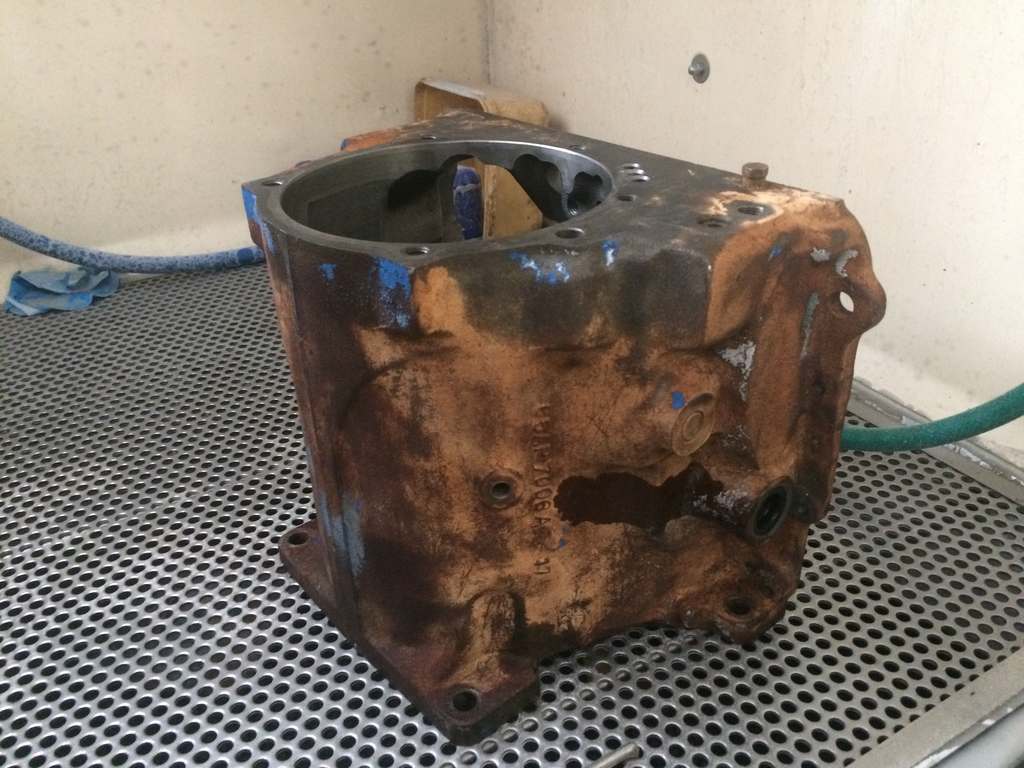
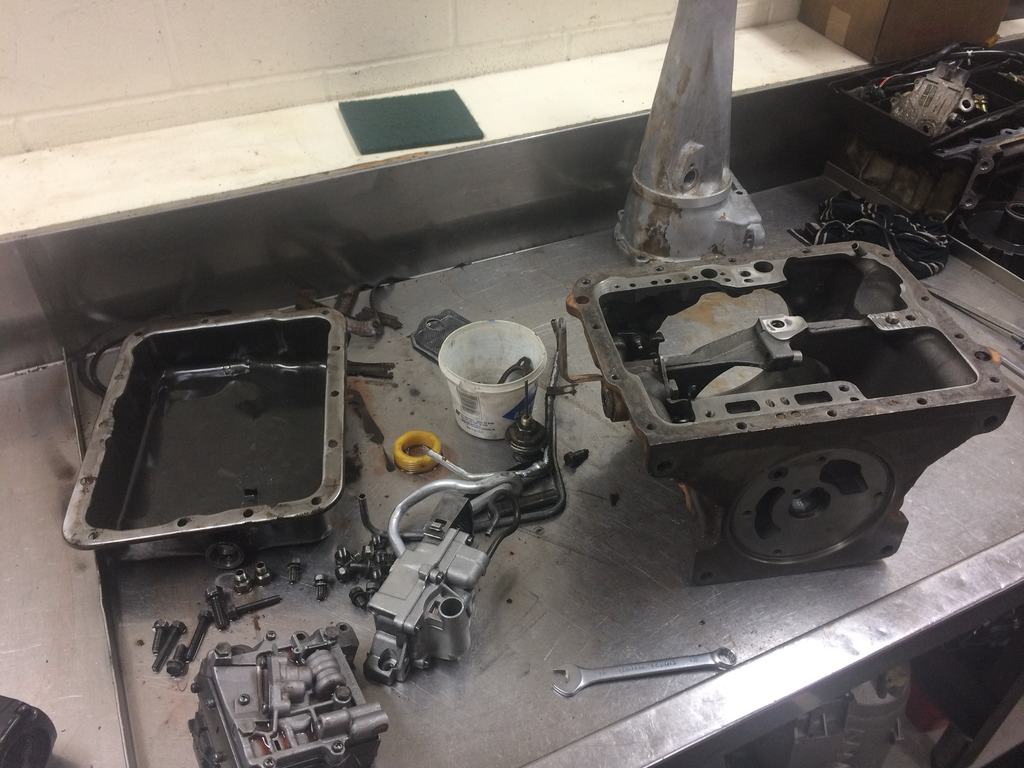
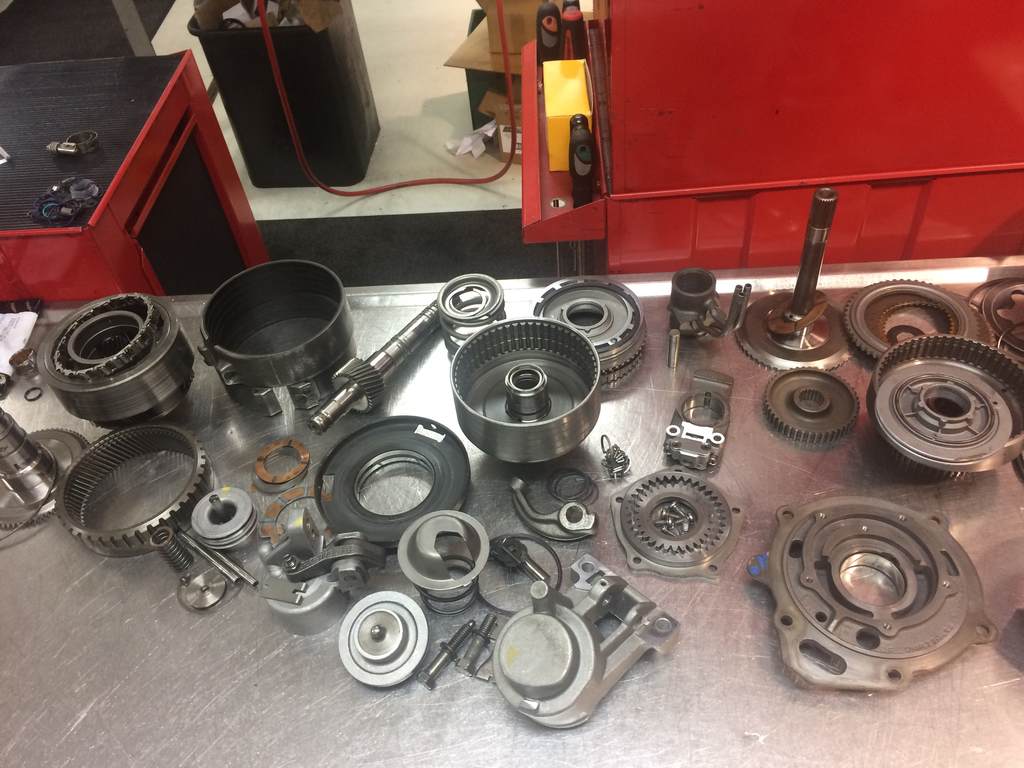
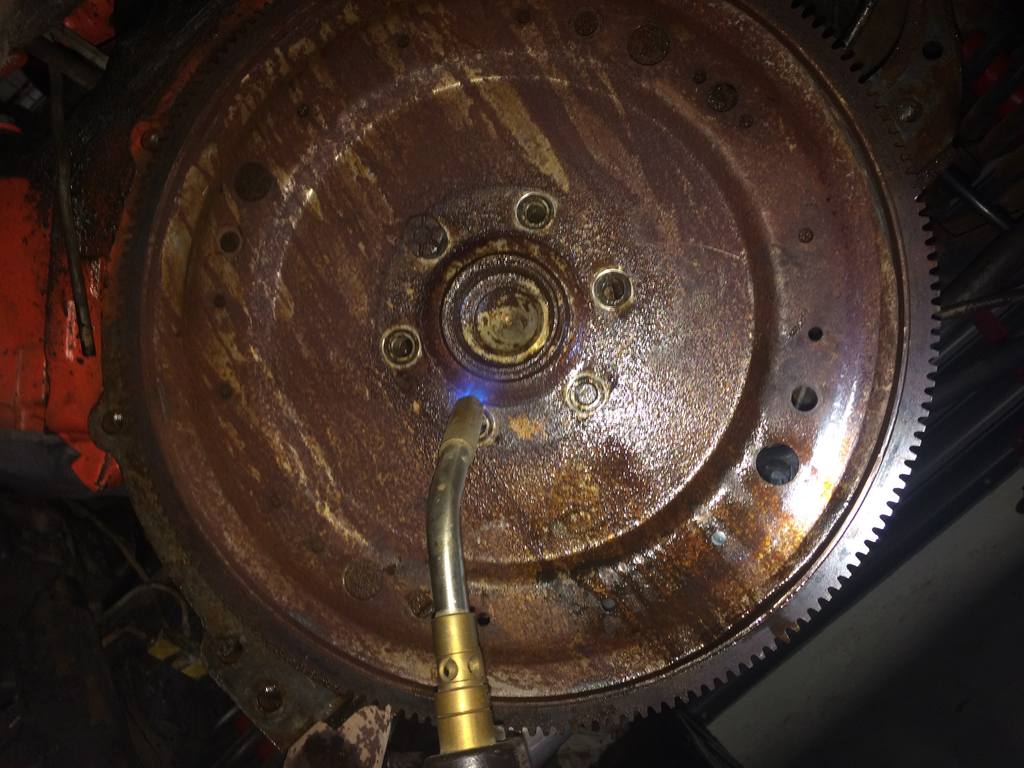
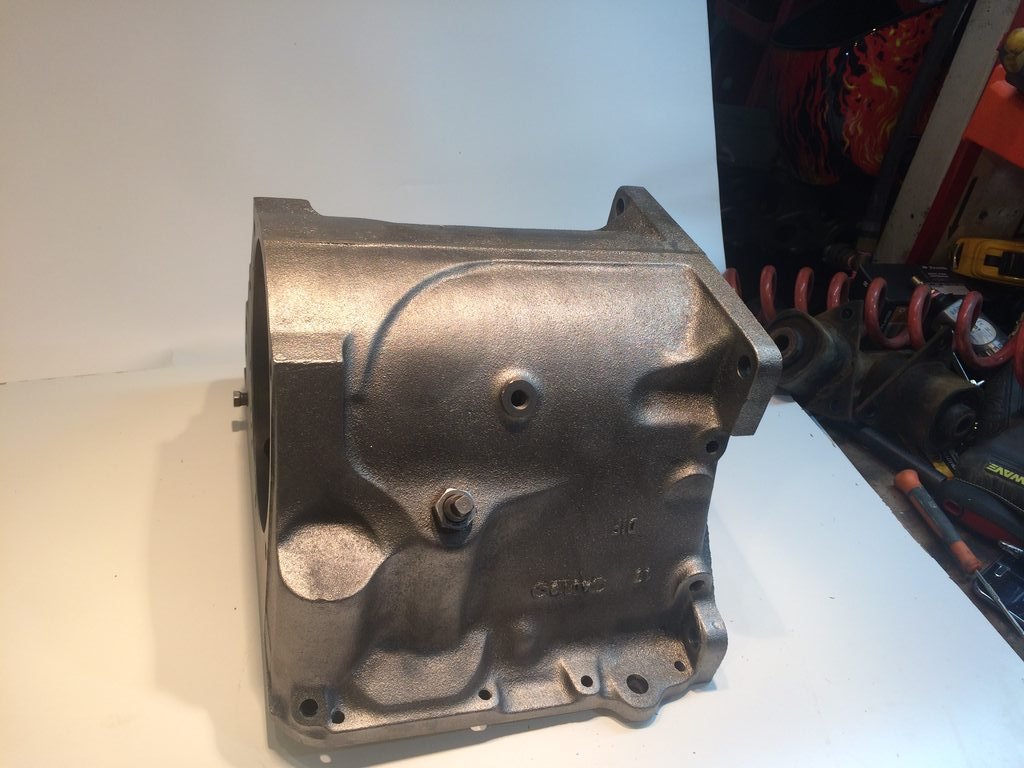
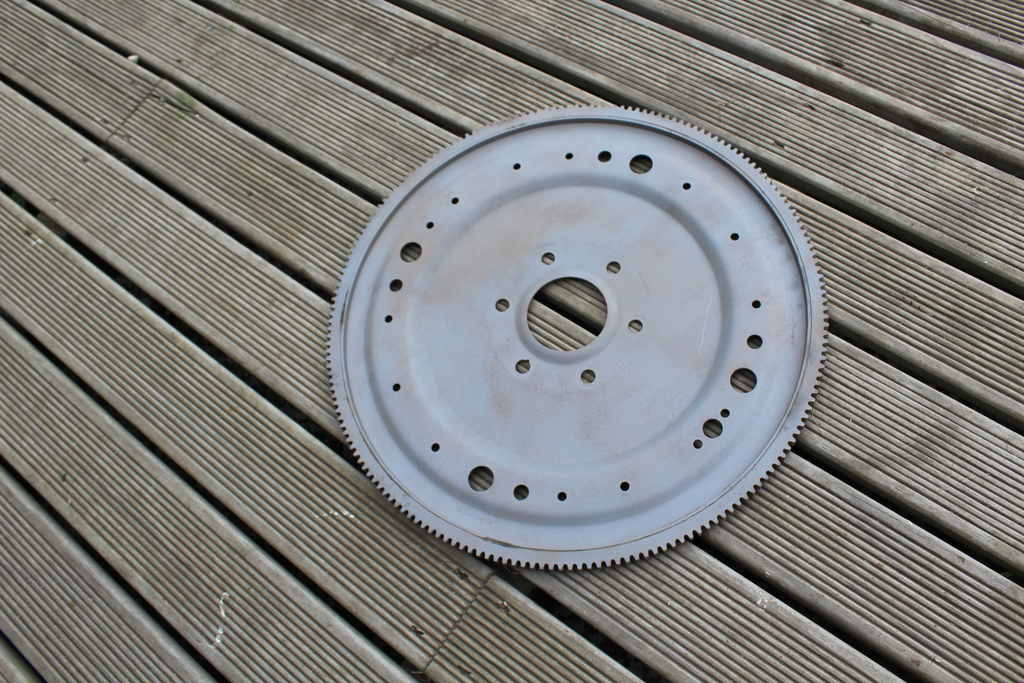
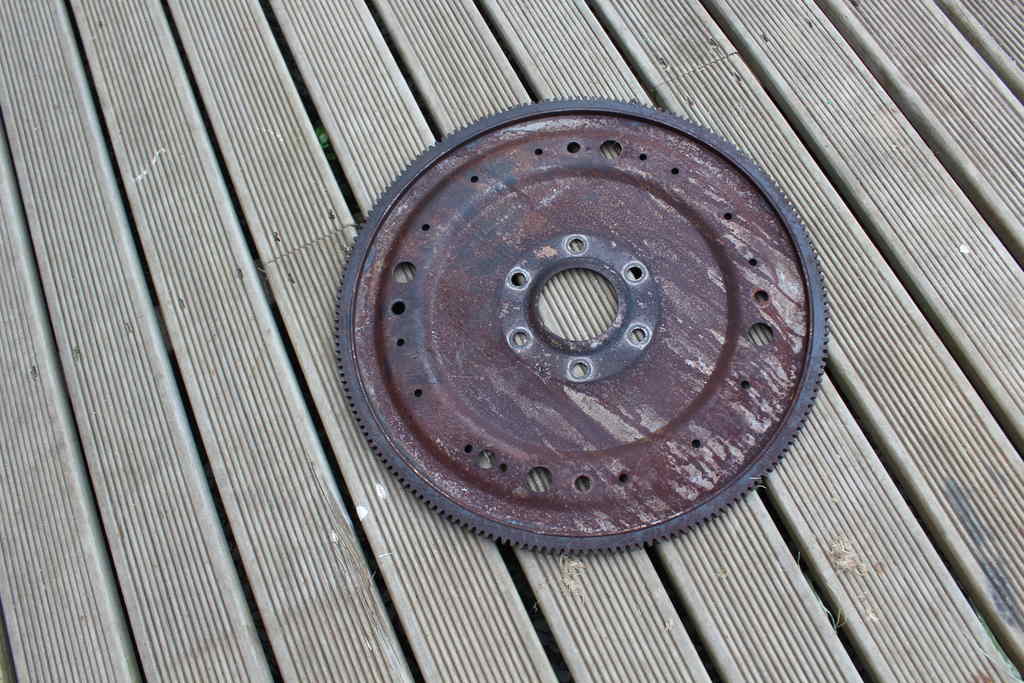
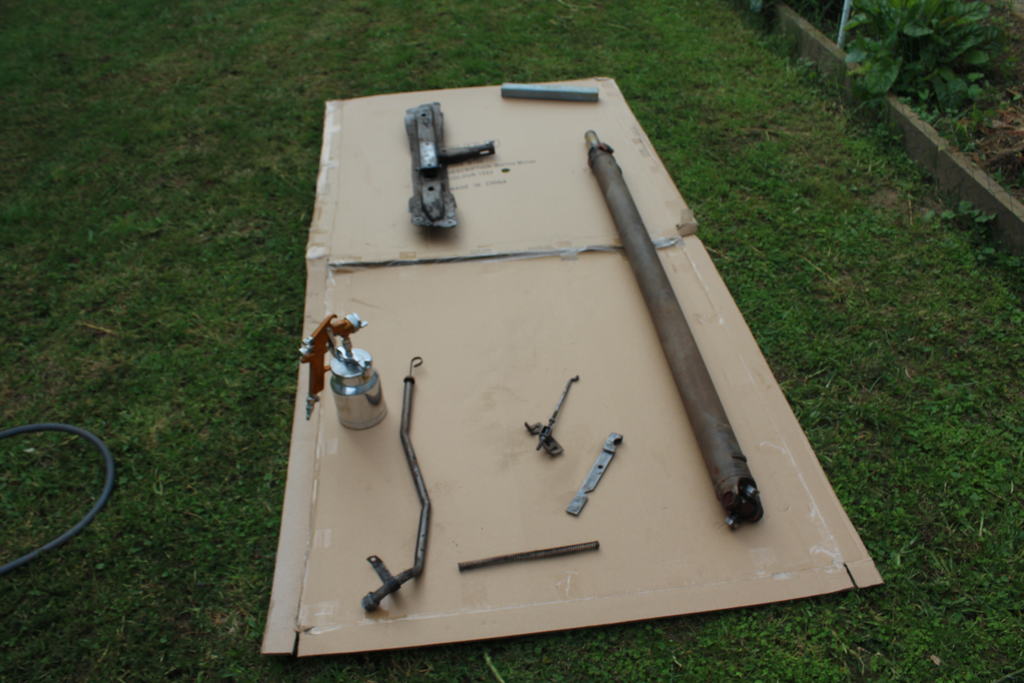
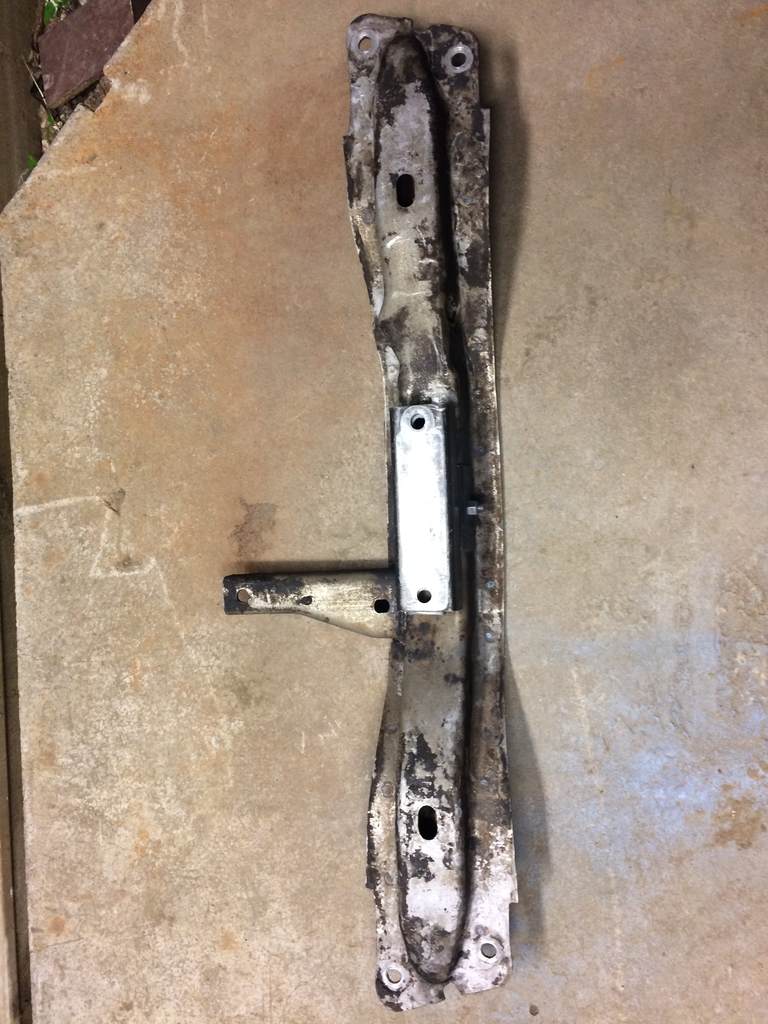
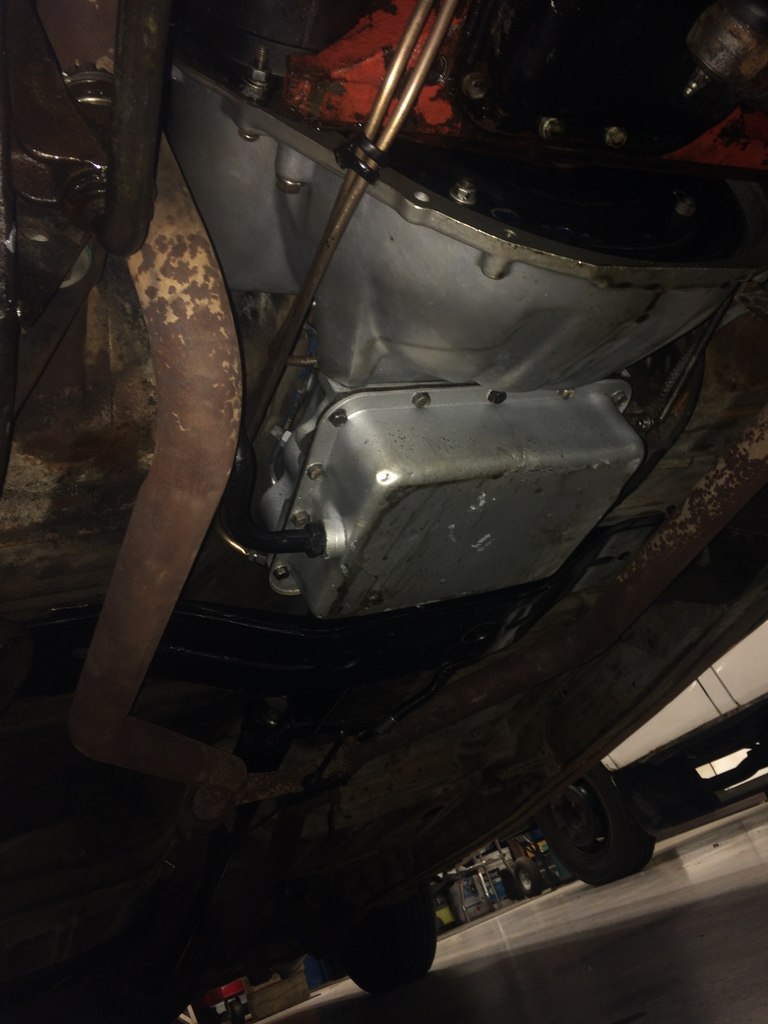
more jobs on the list have been done one that i didn't really want to open my wallet and get done but it needed to be done. The trans had and issue where it would not go into third gear (top gear) all the time and leaked from every hole bar the front seal. And after talking to the trans shop about it it was decided it had to come out to be fixed. so out it came unfortunately never got a photo of it out but the whole trans and crossmember were covered in fluid and grease so pulling it out was not much fun so off to the trans shop it went And god dam these cruise o matics are heavy also note that amount of metal fillings sitting in the trans pan so pretty much under the whole inspection nothing was found to be damaged just everything worn out and metal fillings through the torque converter and valve body which was the cause of the intermittent top gear fault but the trans had clean fluid in it due to it leaking out it required regular top ups so while the trans shop were waiting on parts from the USA i sent the housings off to get blasted even though the trans shop had already done a good job at cleaning them so this job went to @Mr Vapour before vapour blasting And after then applied some paint to the housing Then went to the job of removing the flex plate Left CRC on it for a few days and gave it a few heat cycles with the map torch Then got it hot and spent about 10 mins with 2 prybars and eventually came off then gave some of my other parts a sand blast and water blast before After a steam clean And painted the trans pan the same colour as the trans housing but no photo of that. after a light sandbast treatment then gave the parts a lick of black paint unfortunately turned out average as i thinned out the paint a bit too much then the parts went back to the trans shop and got it back a few days later looking like this too bad you don't get to see it as its under the car then in the car it went also did wreck abit of the pan paint while getting the trans in on the ground after that i made some new cooler hardlines as the old ones were steel and pretty fucked copper pipe m8 gave it a flare job then proceeded to run it from the front to the trans and using a pipe bender where it needed it and placing p clips to retain the hard line. then 2 lines later i was on to fitting this then bought one of these bad boys as the current setup was through the radiator which isn't super efficient and mounted it in front of the radiator which seems to cool it alot better than what it did before then filled the trans with this stuff ended up using about 8 liters could've used dexron 3 but type f runs no additives so is abit better for the trans friction material. so cheers too @Mr Vapour on the great blast work and quick turn around And thanks to Auckland Automatics for doing a great job and emptying my wallet
1 point


This leaderboard is set to Auckland/GMT+12:00