
Leaderboard


Popular Content
Showing content with the highest reputation on 04/09/20 in all areas
-
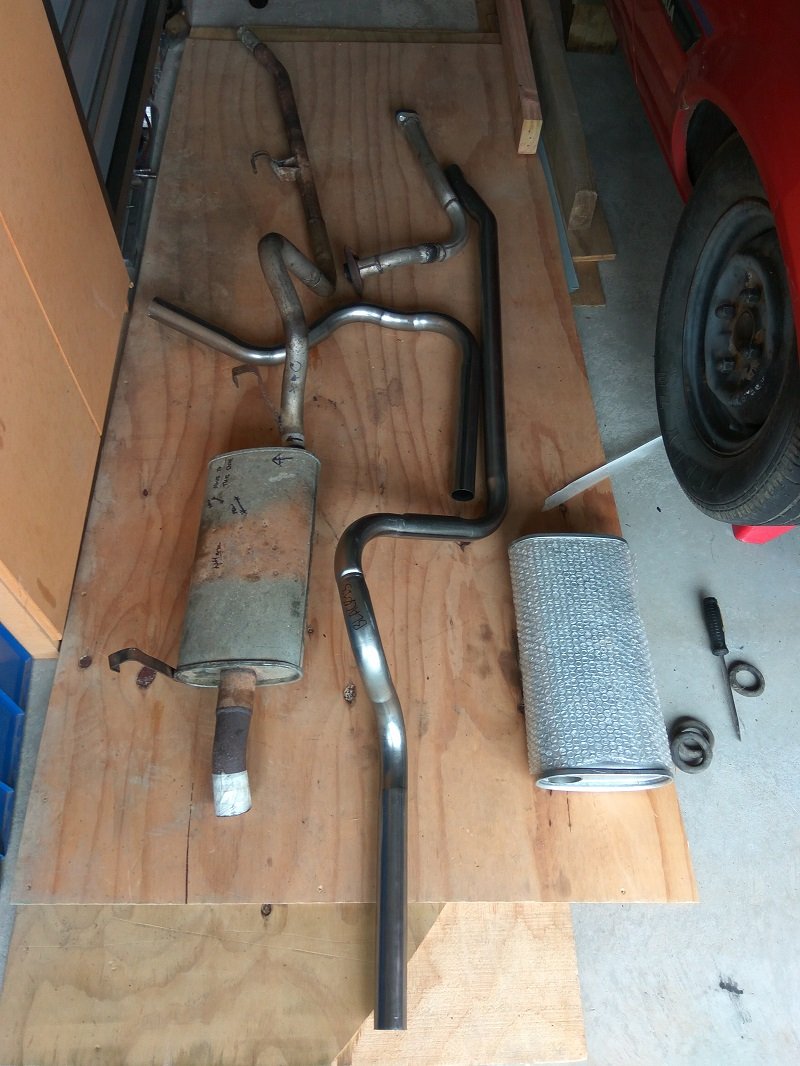
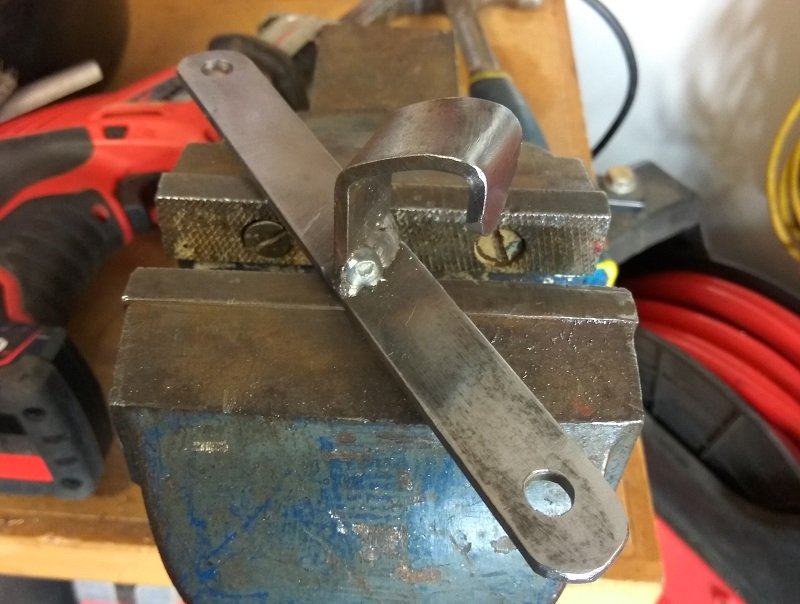
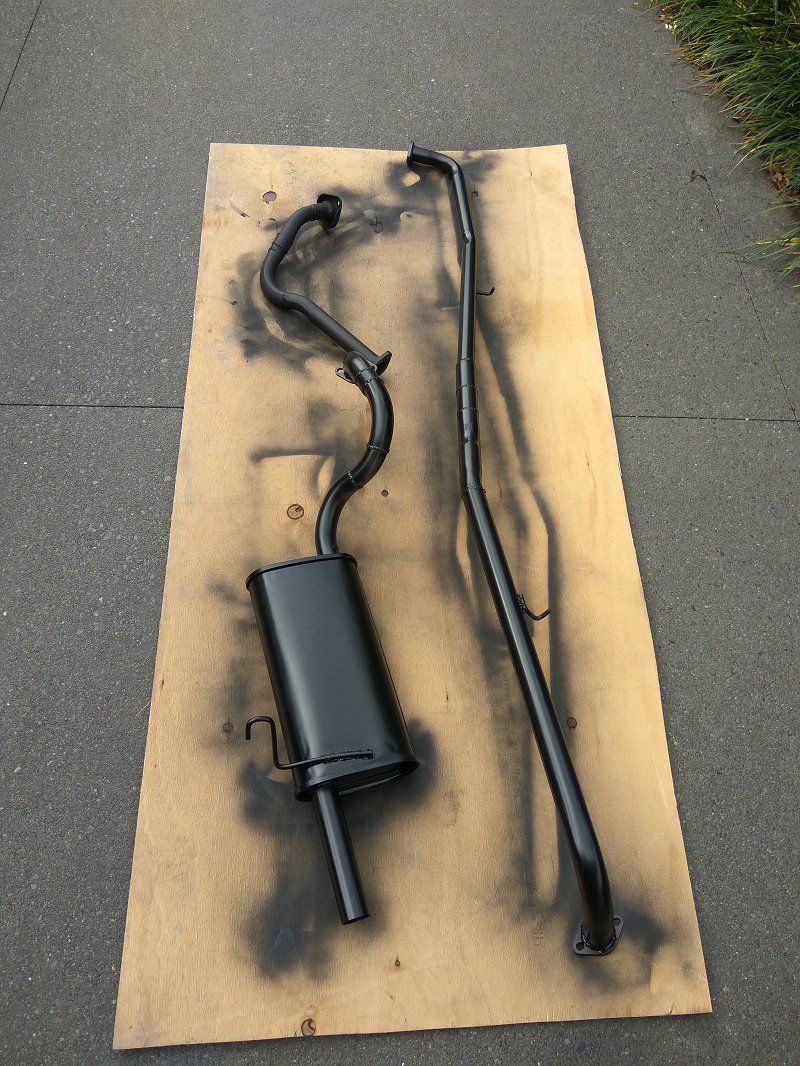
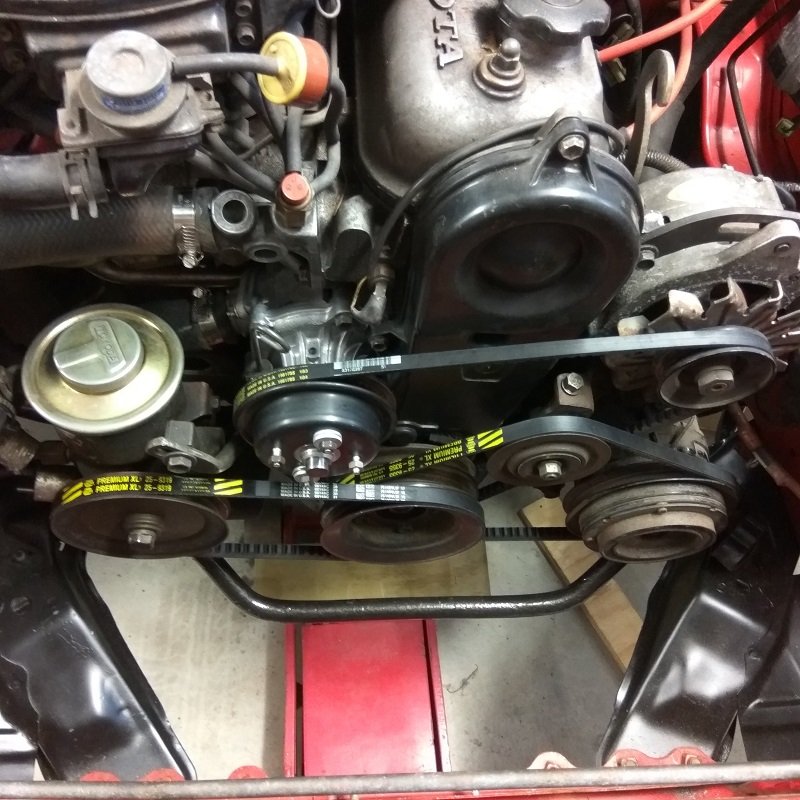
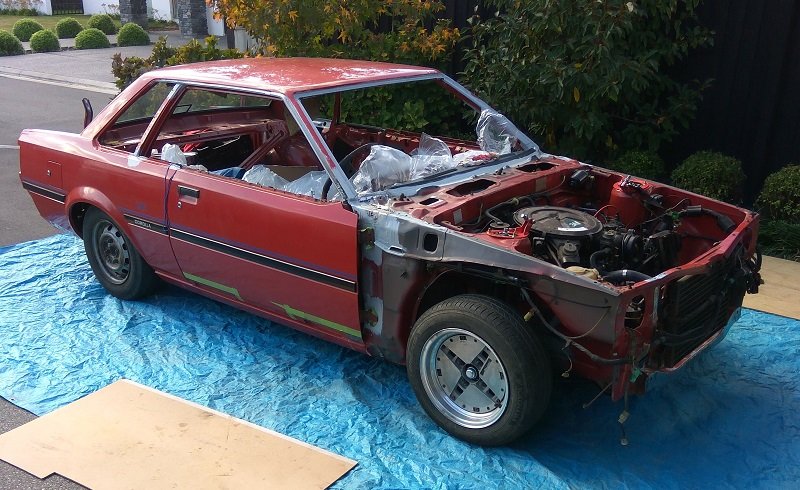
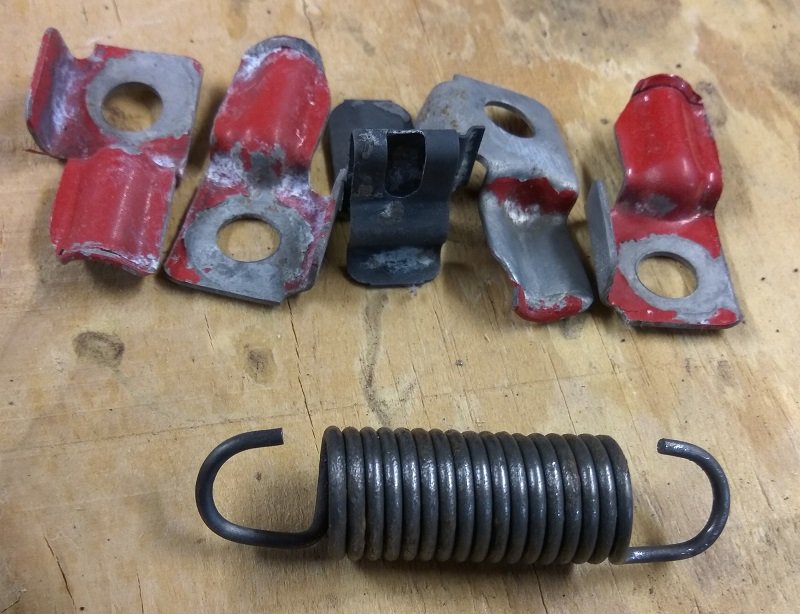
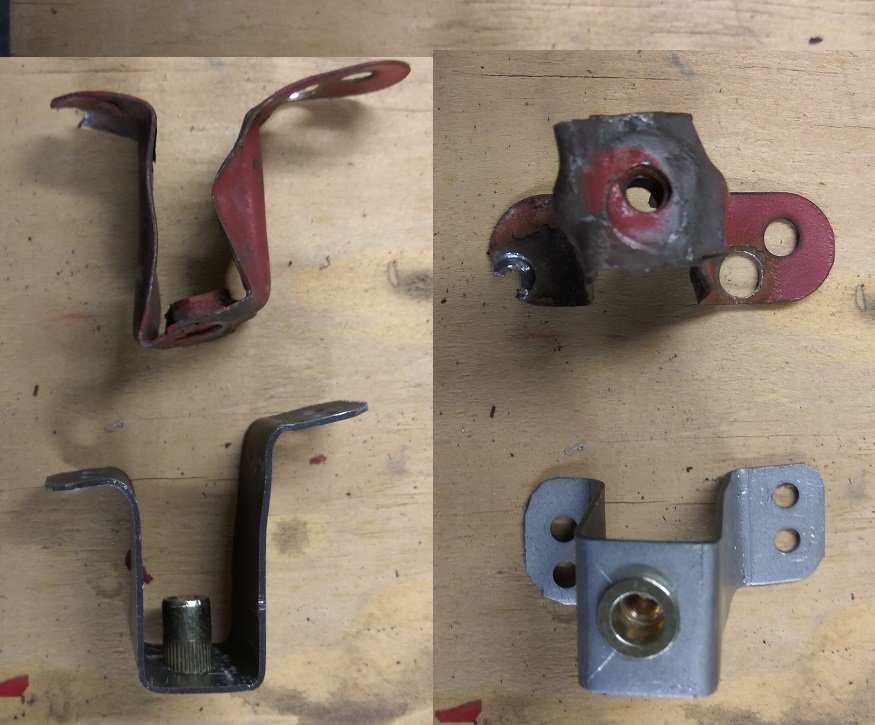
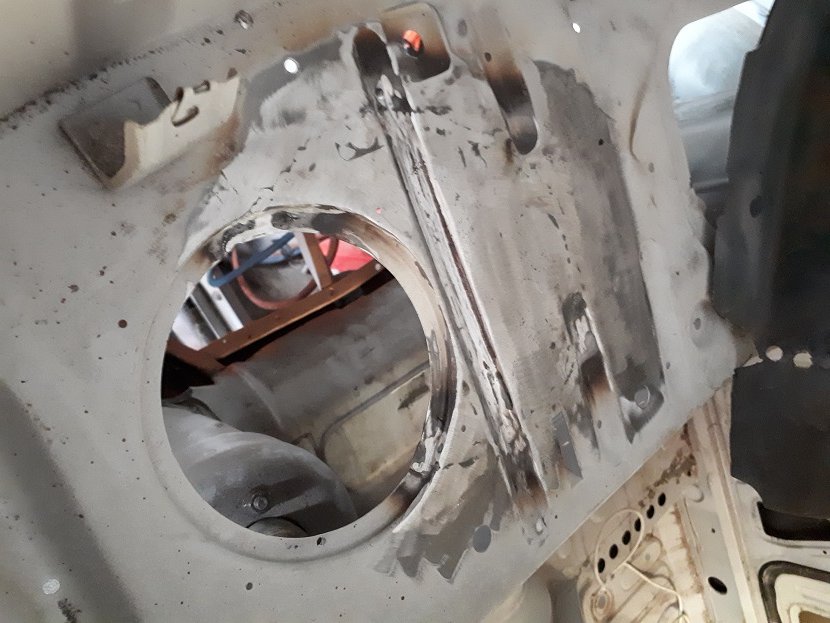
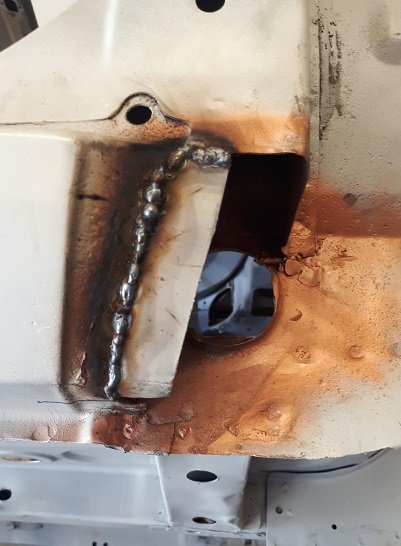
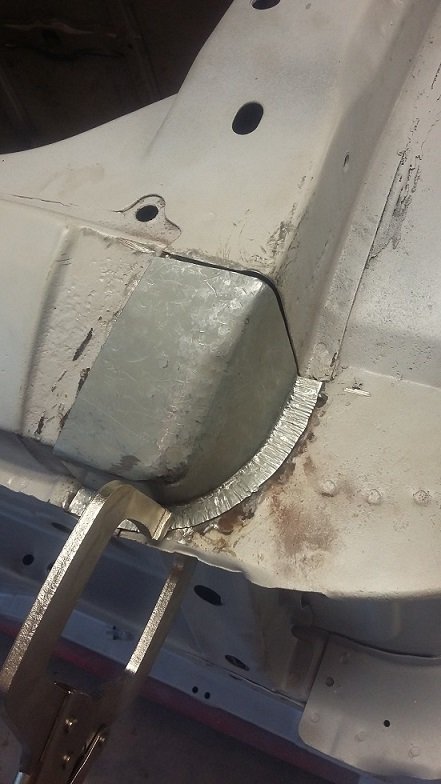
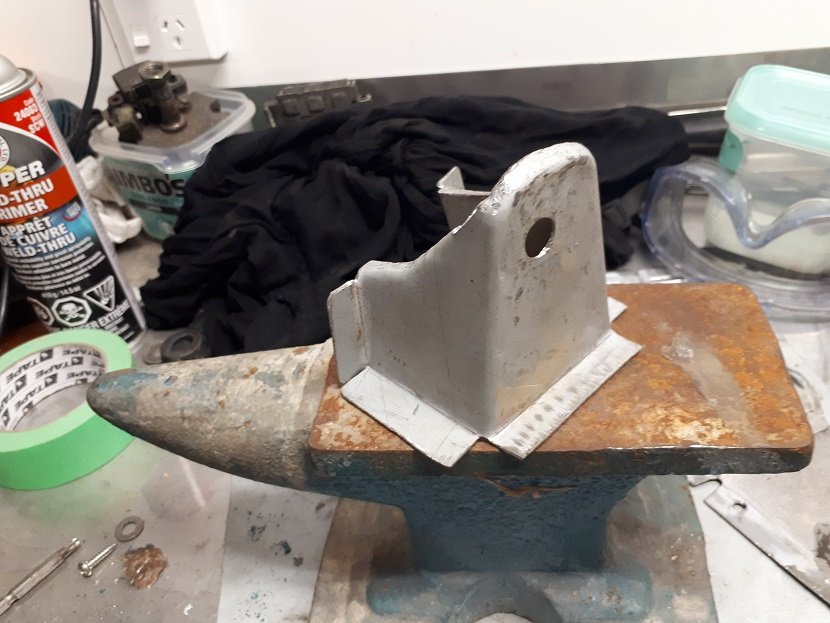
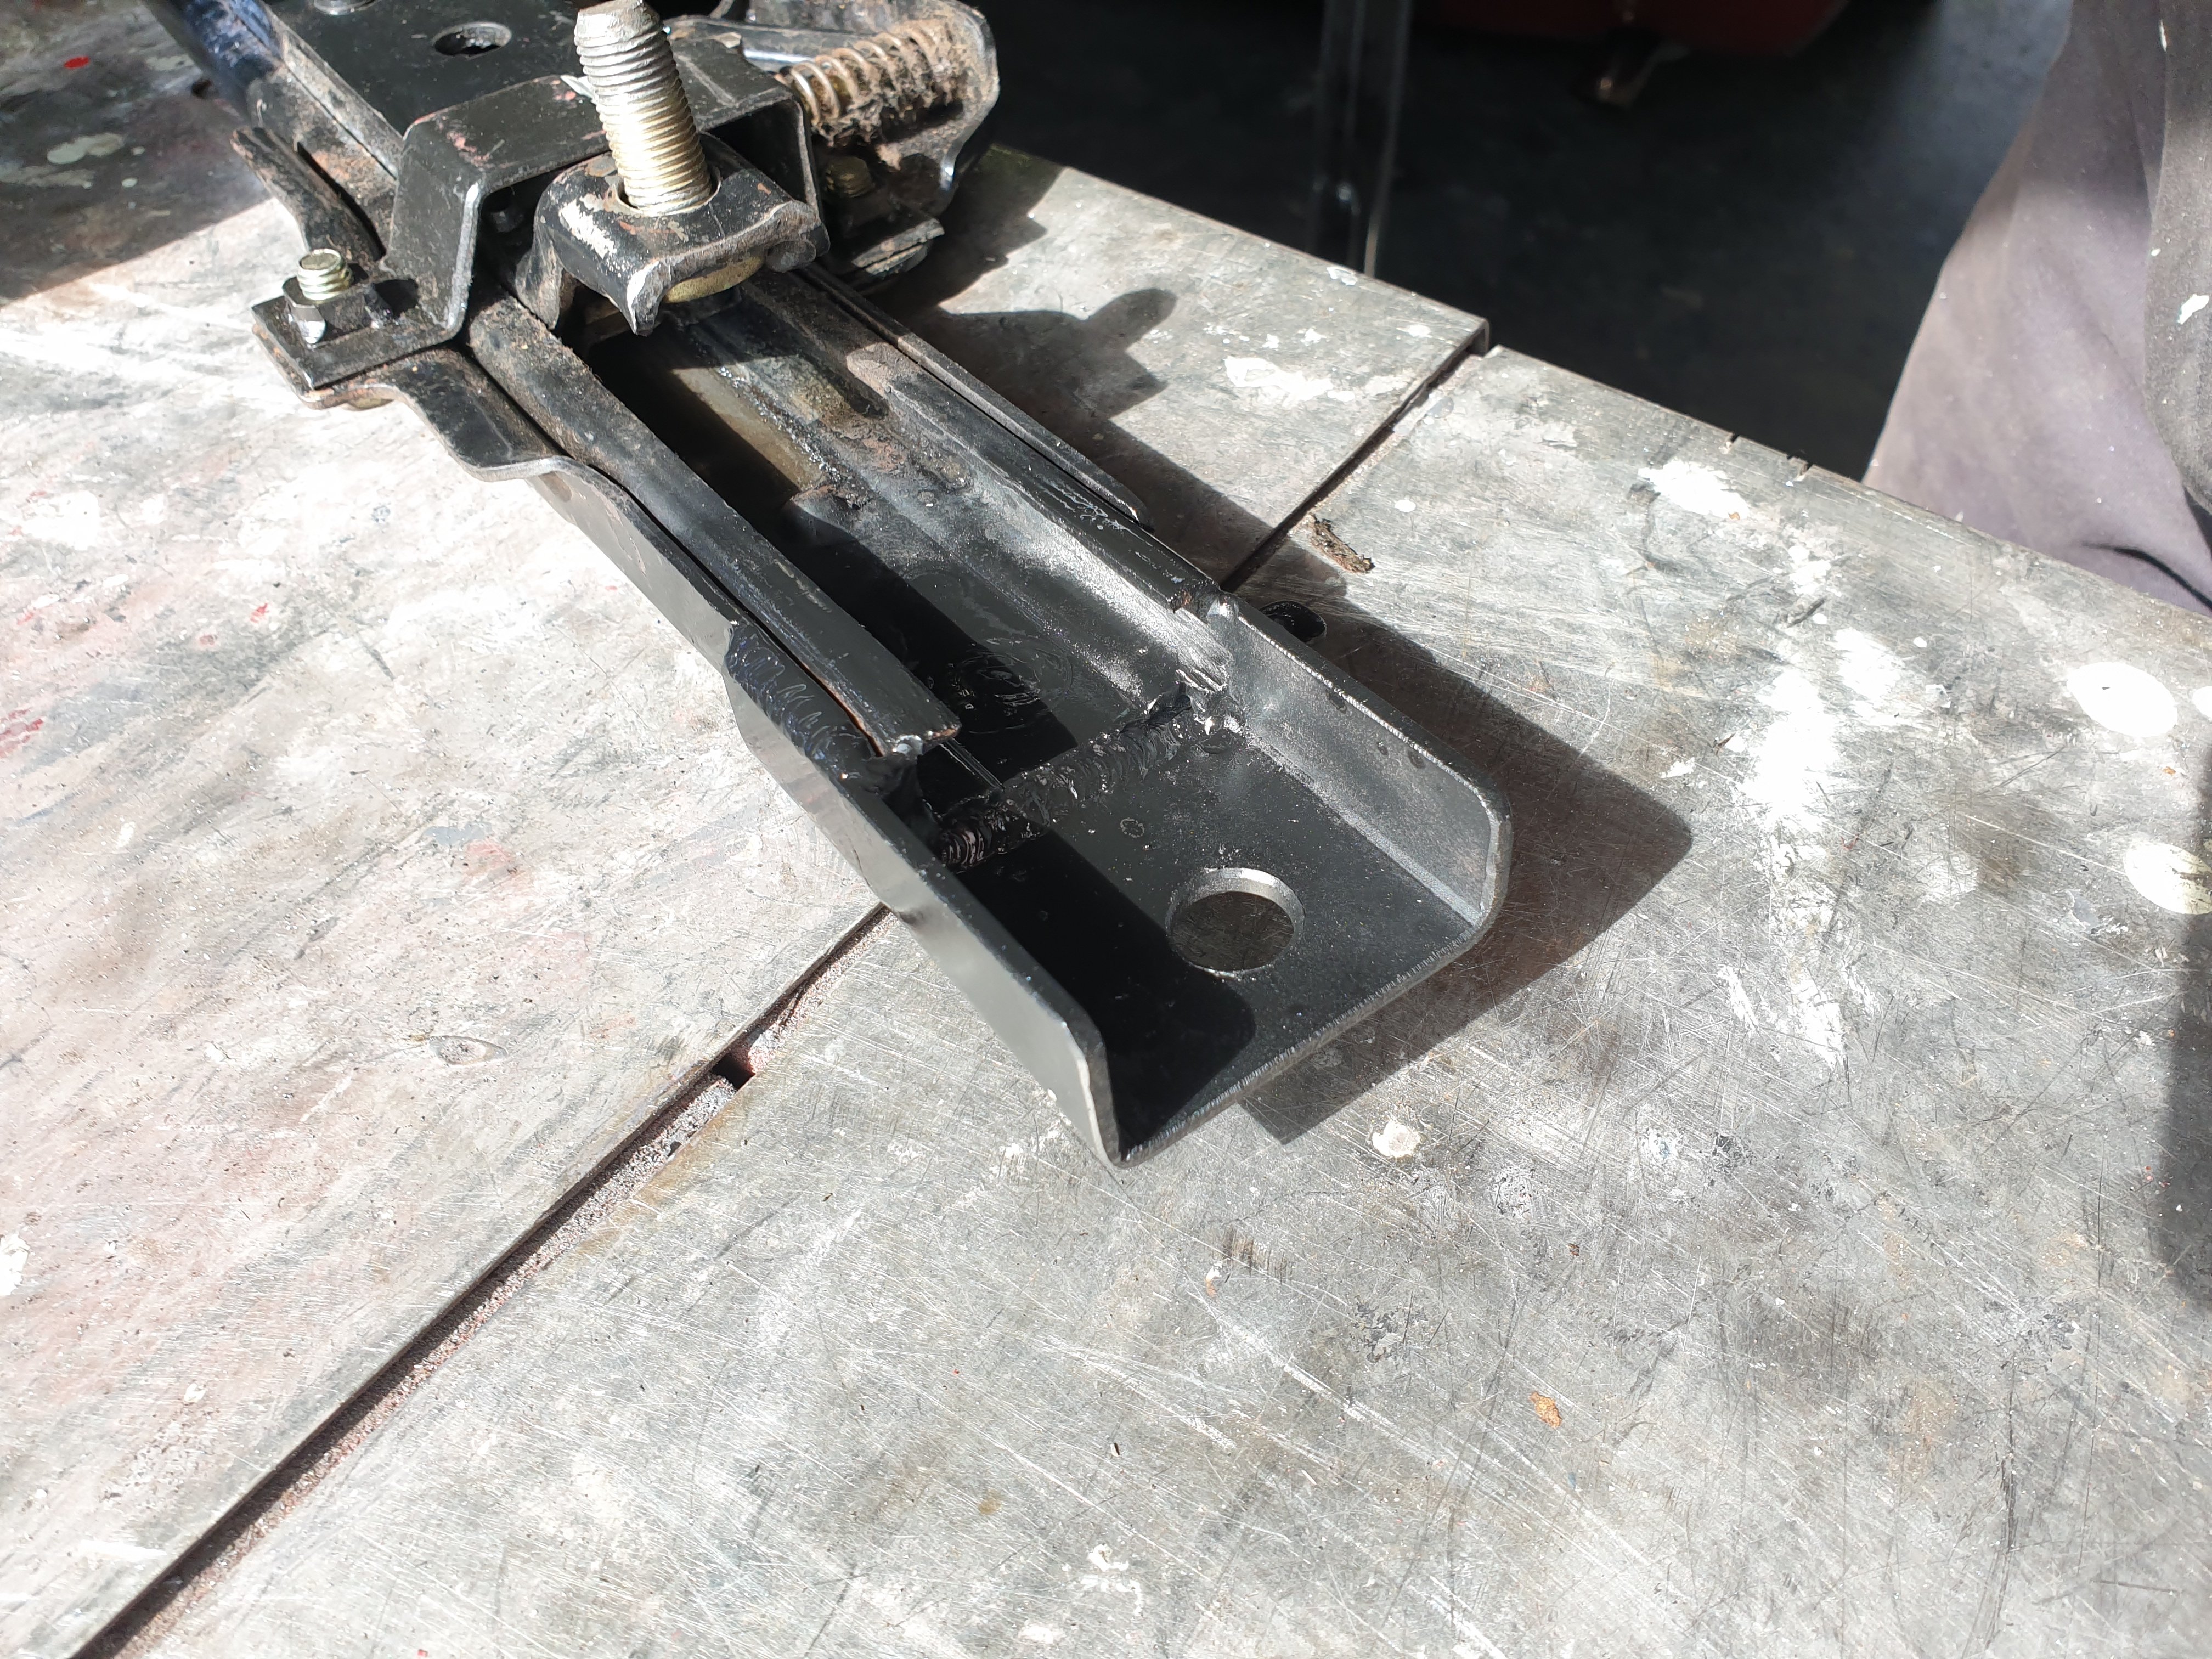
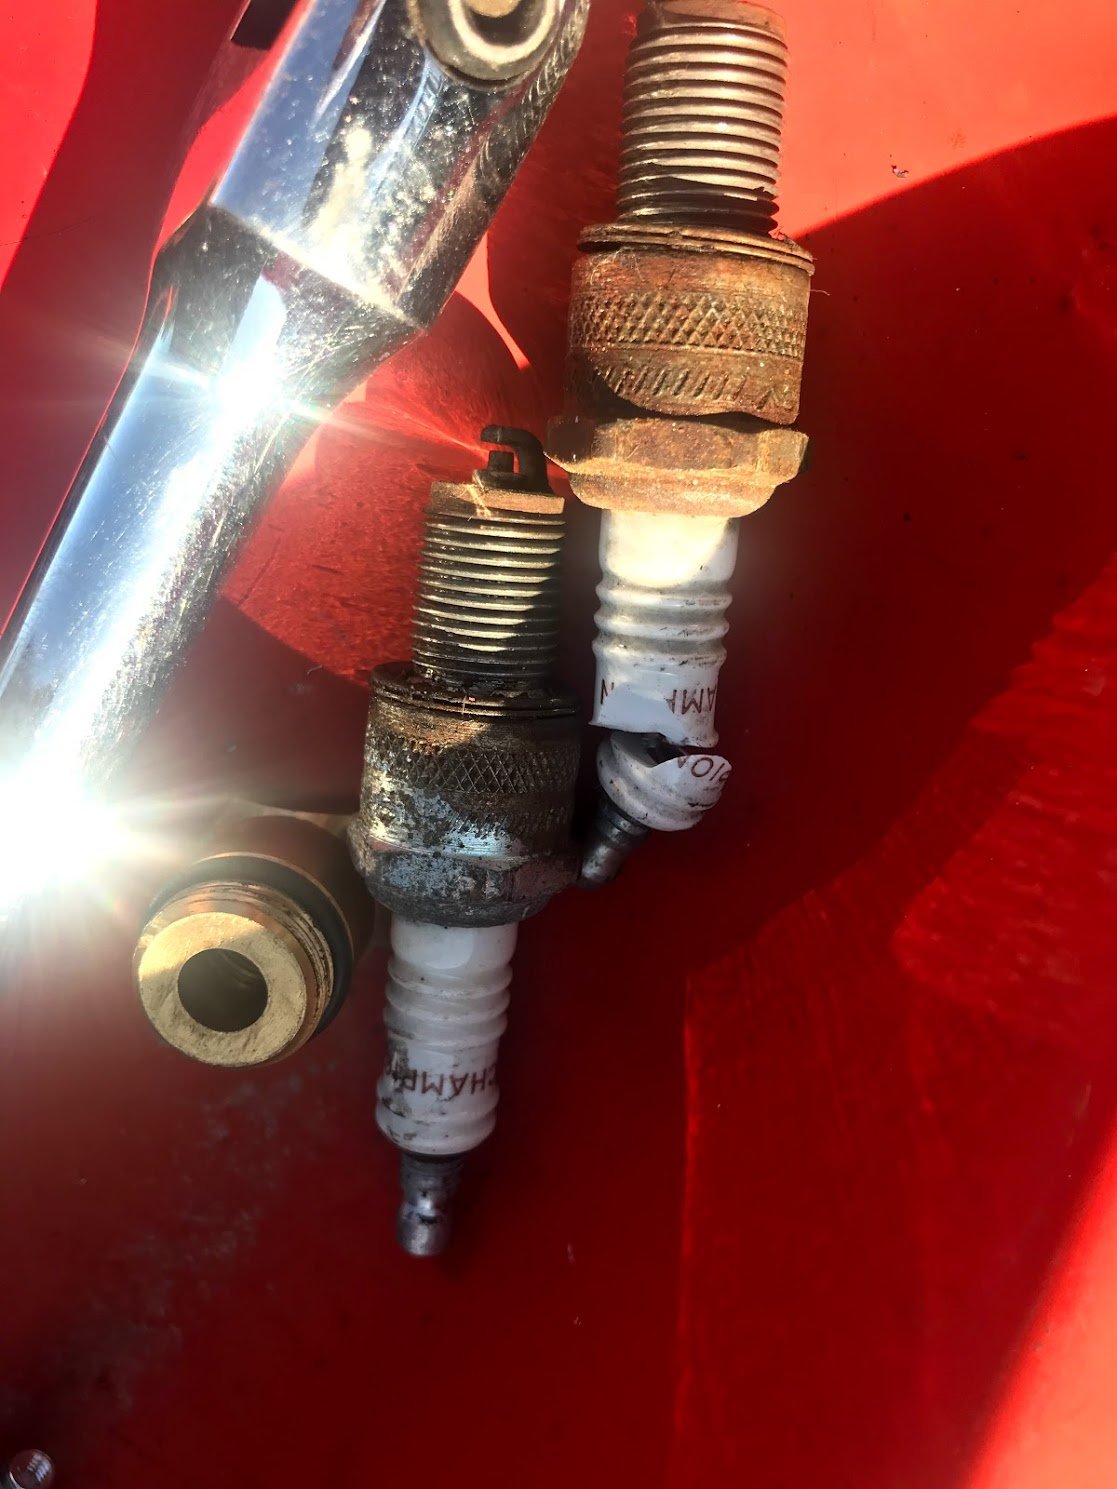
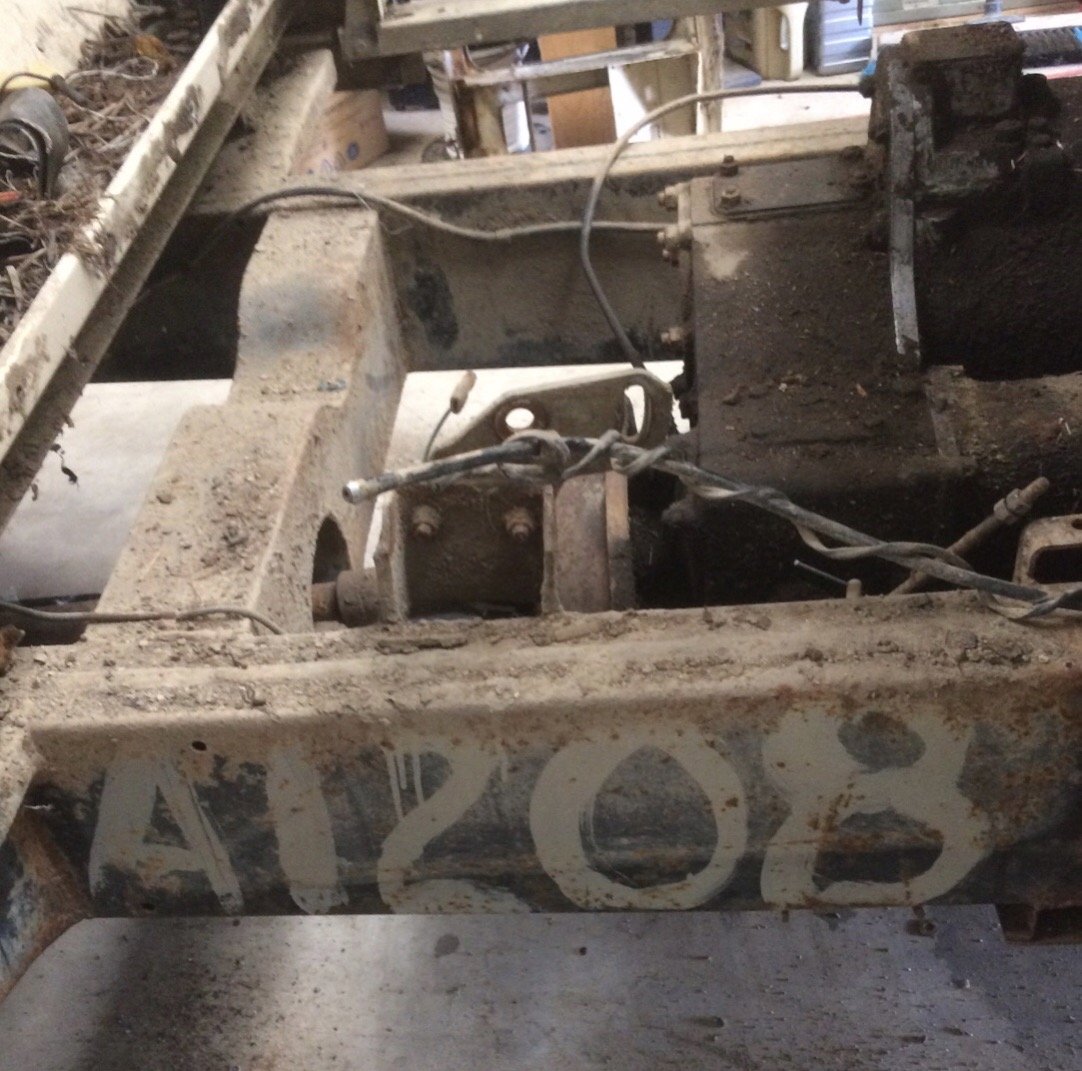
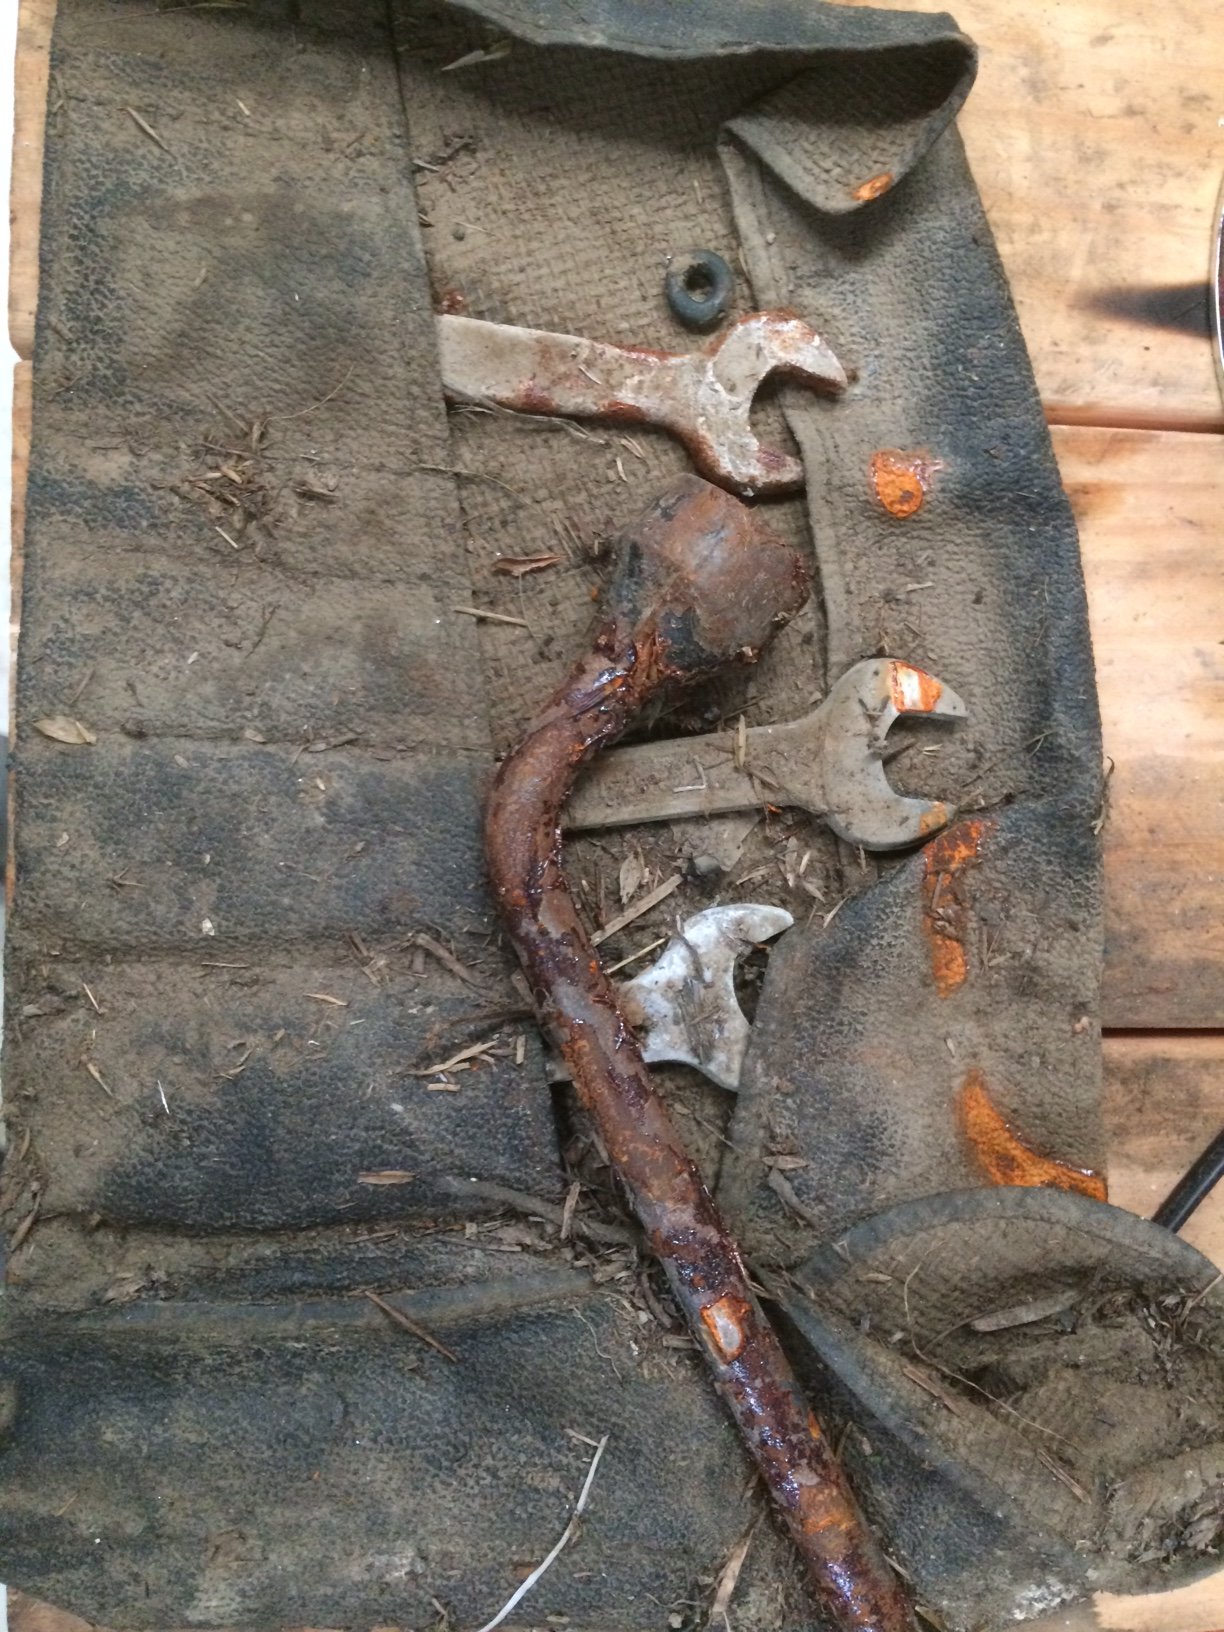
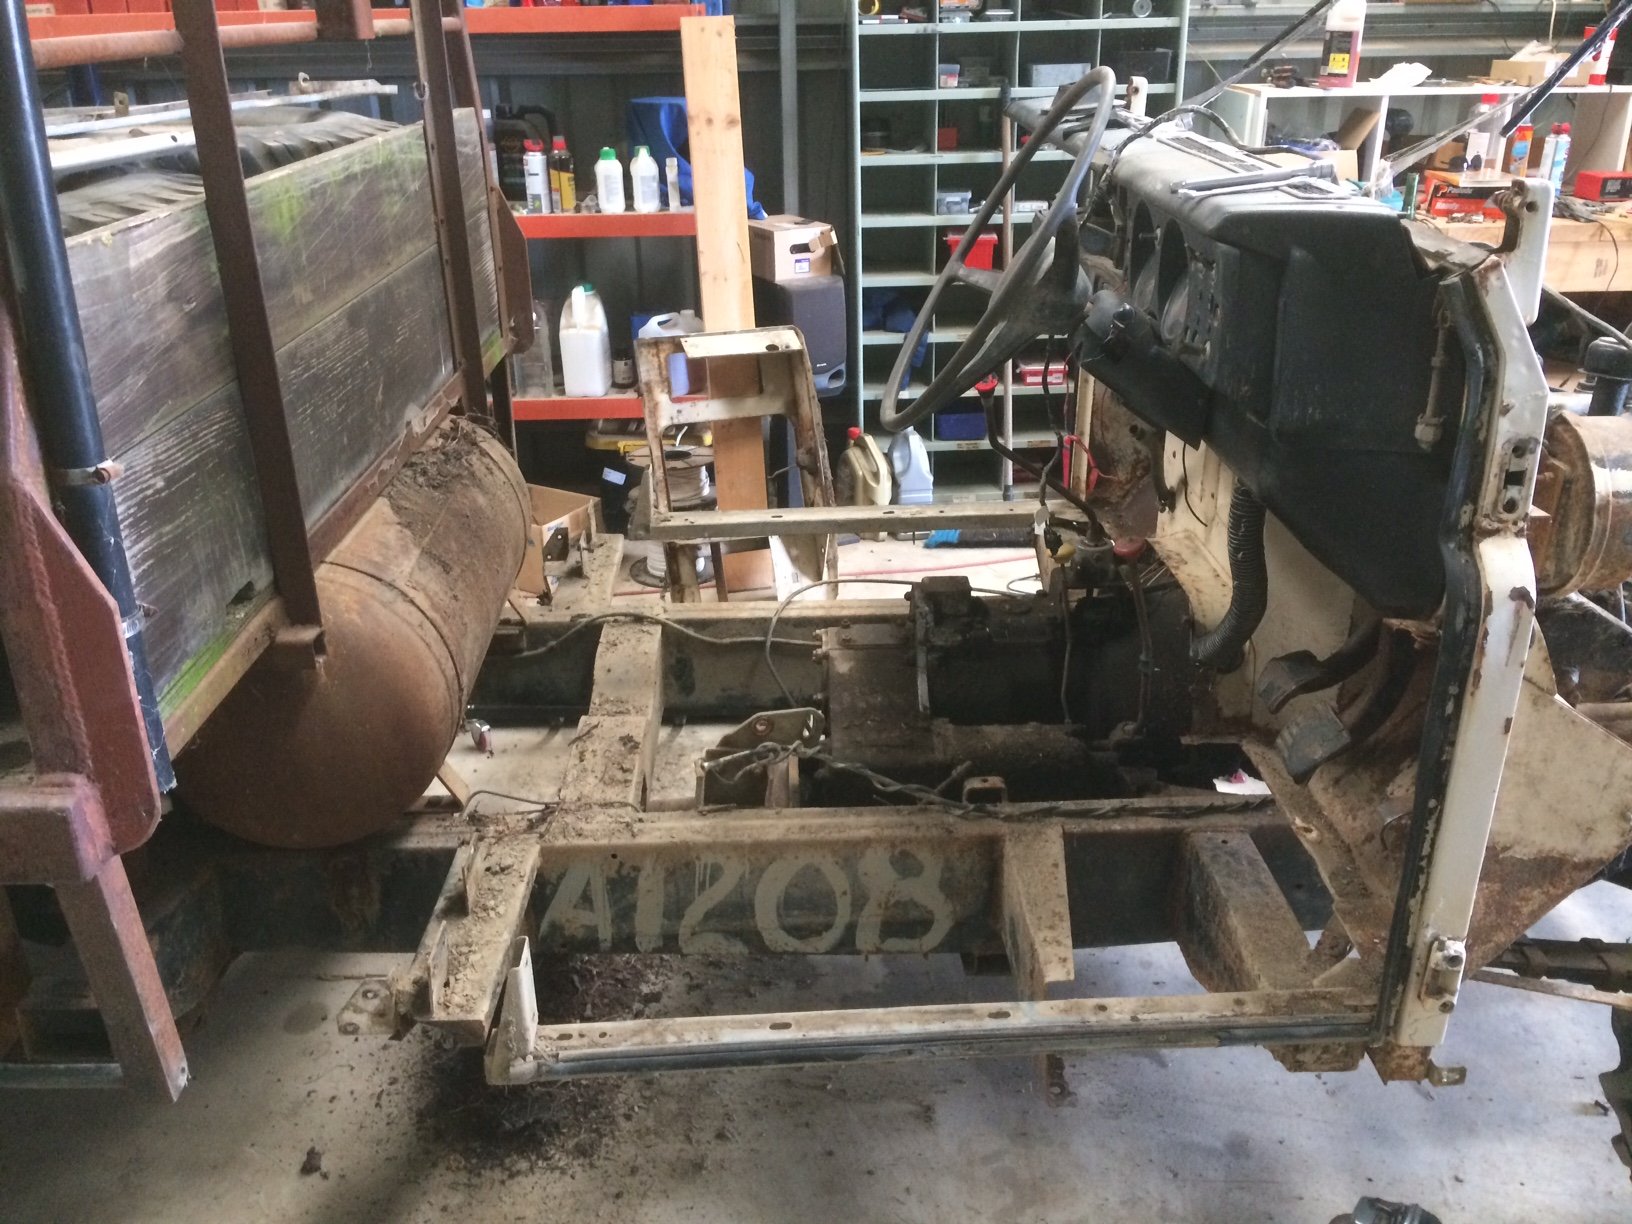
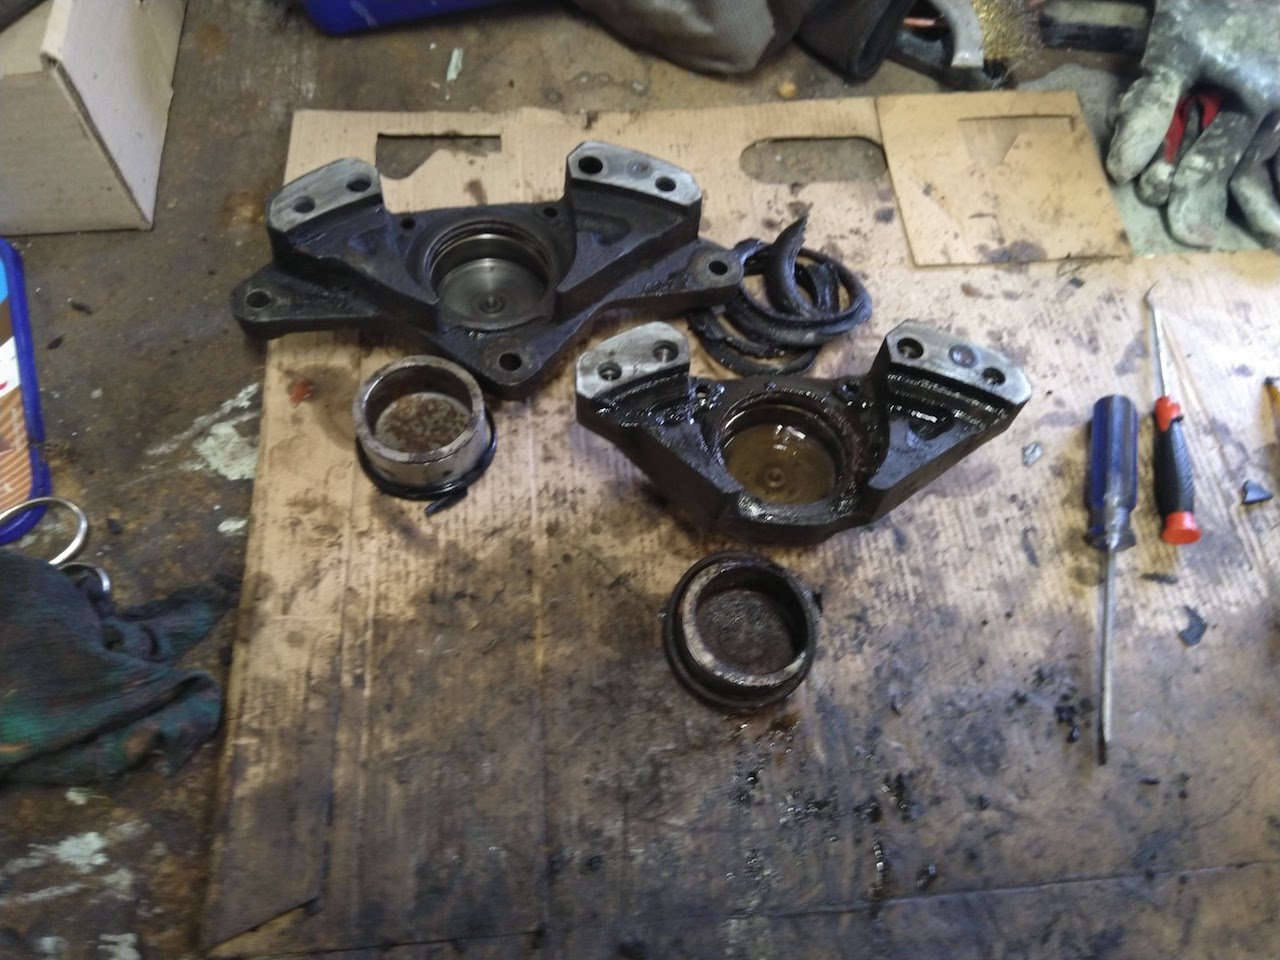
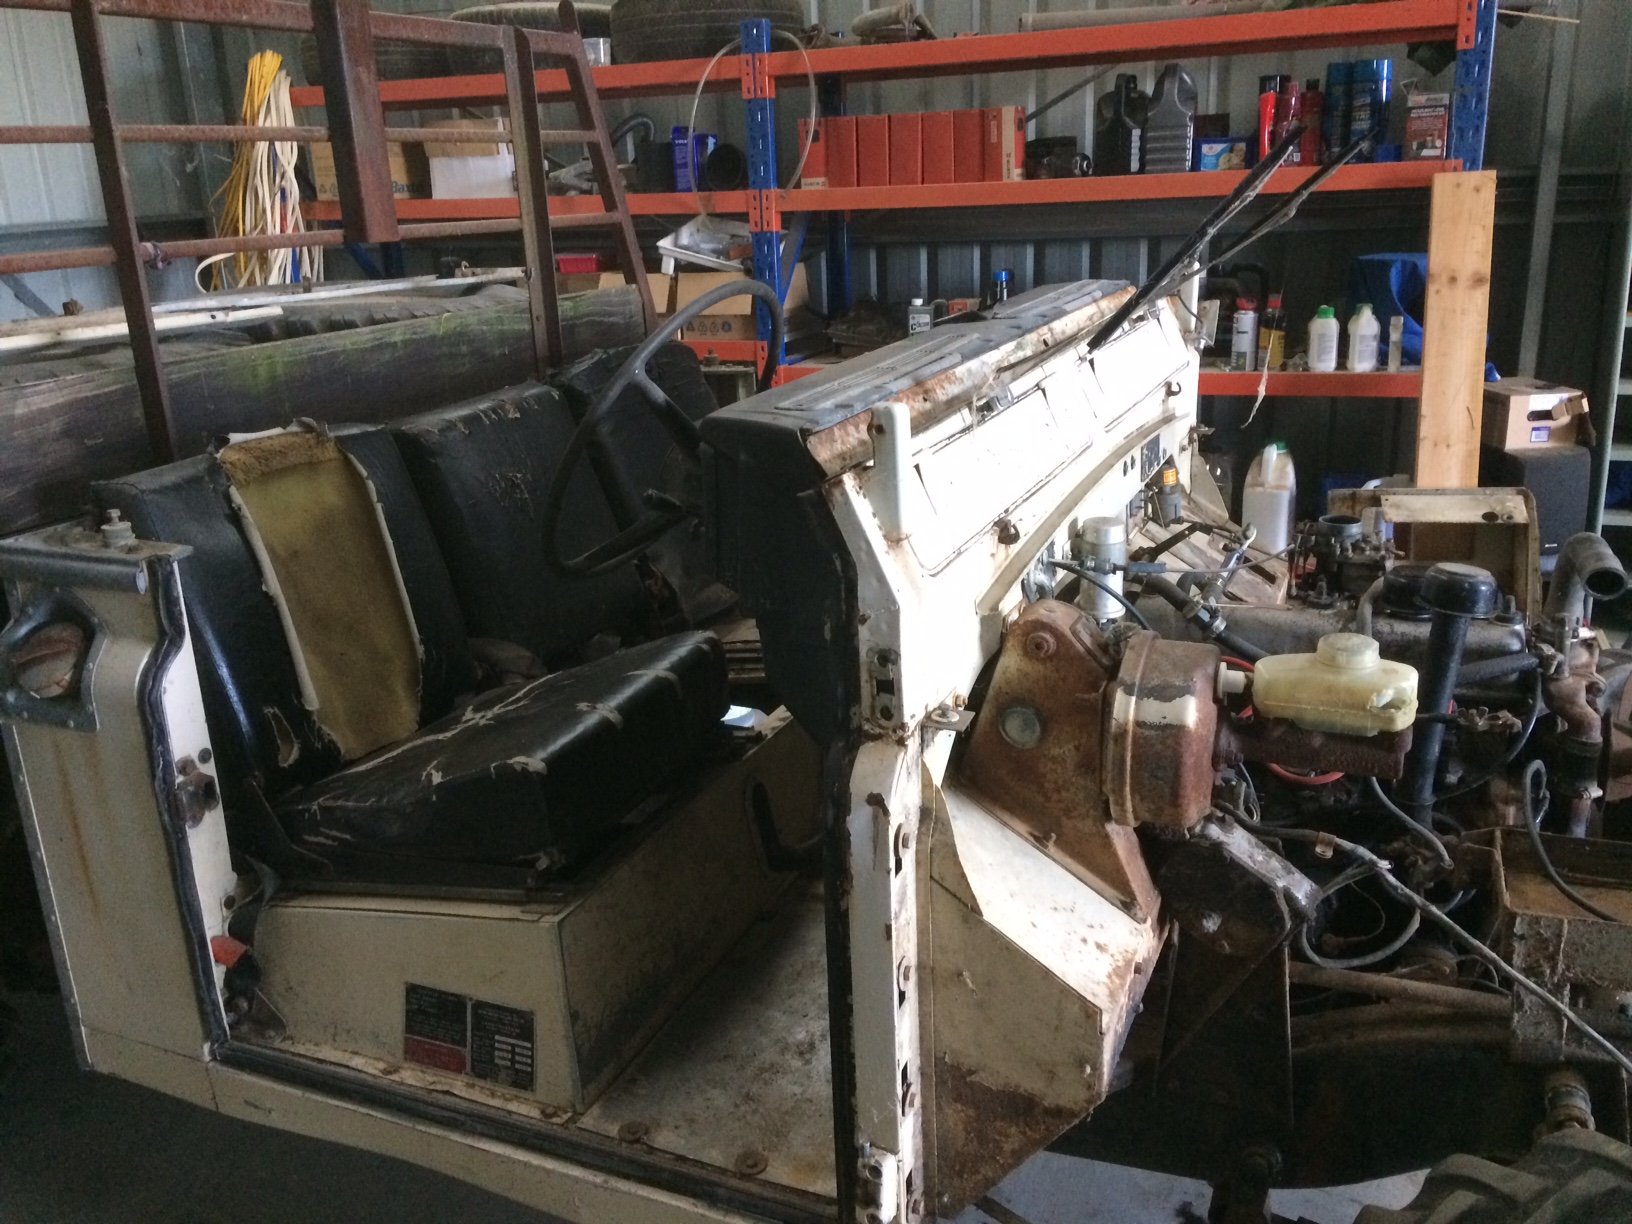
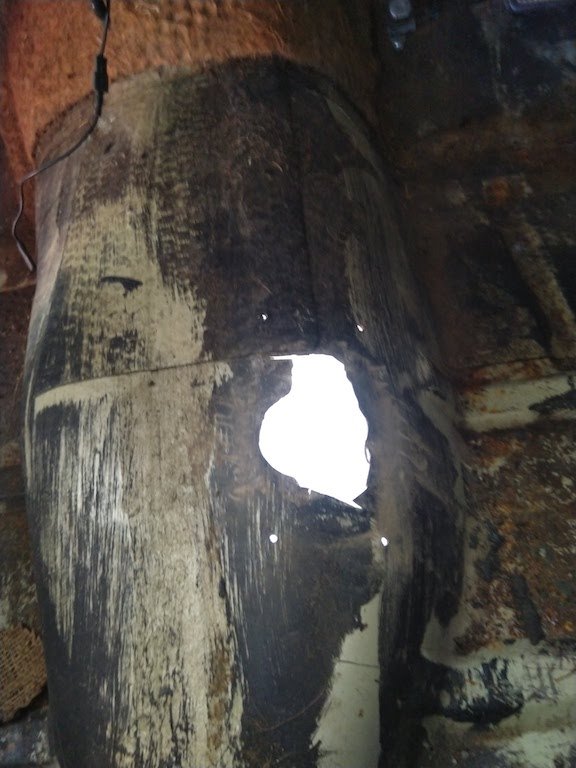
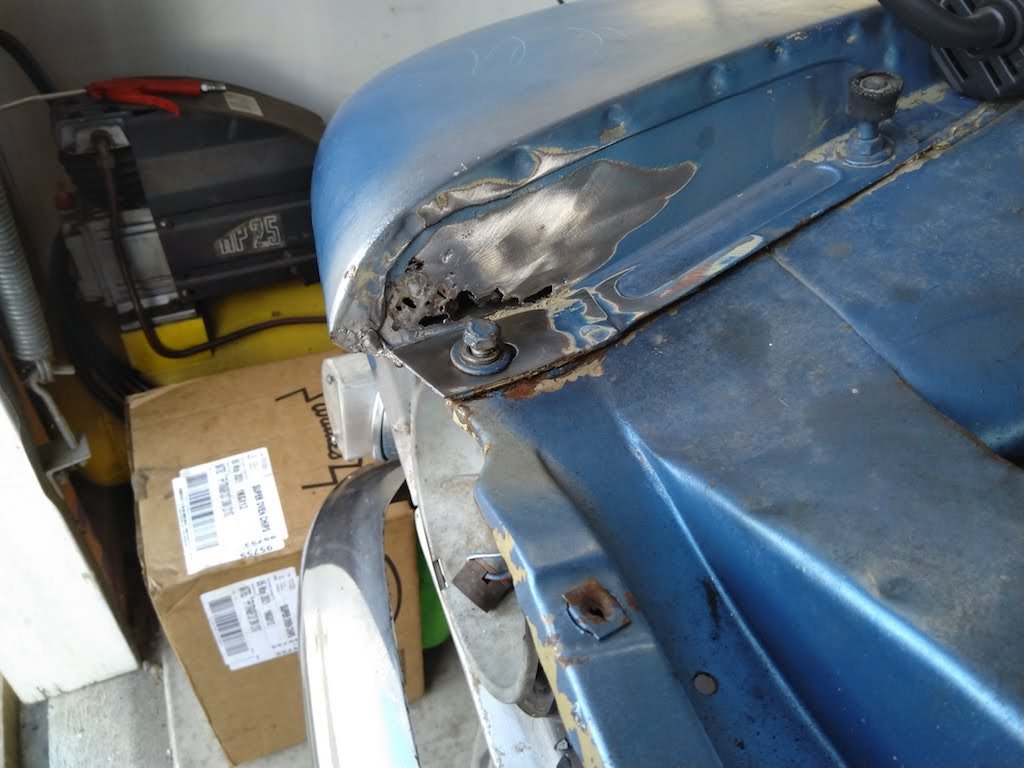
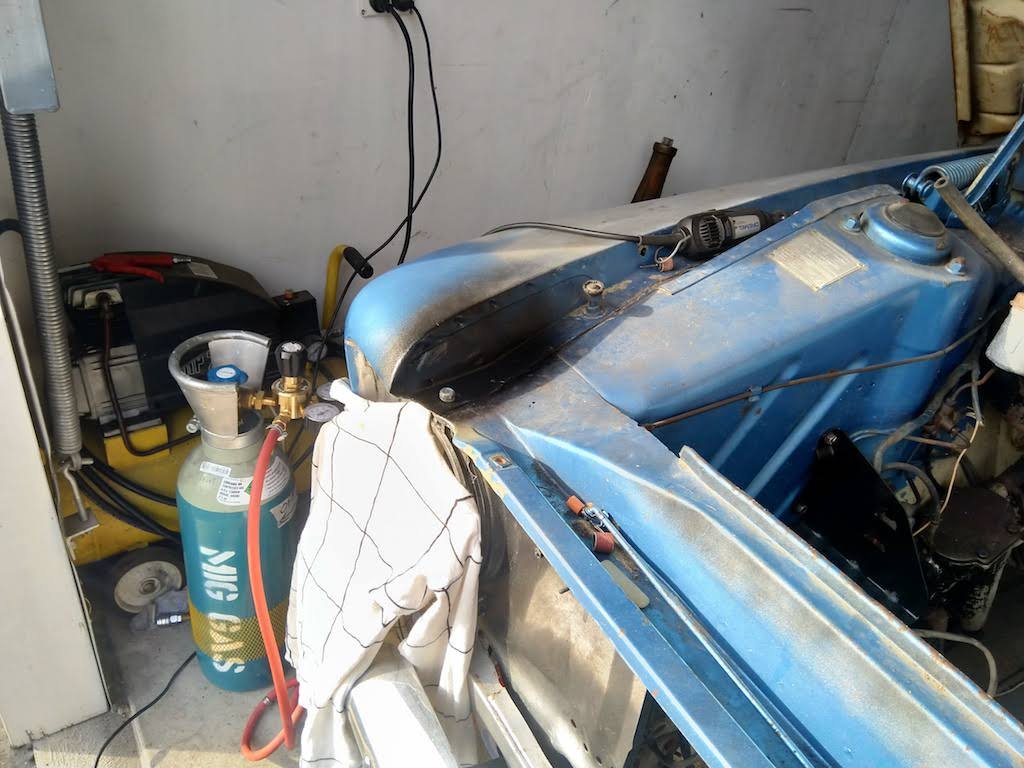
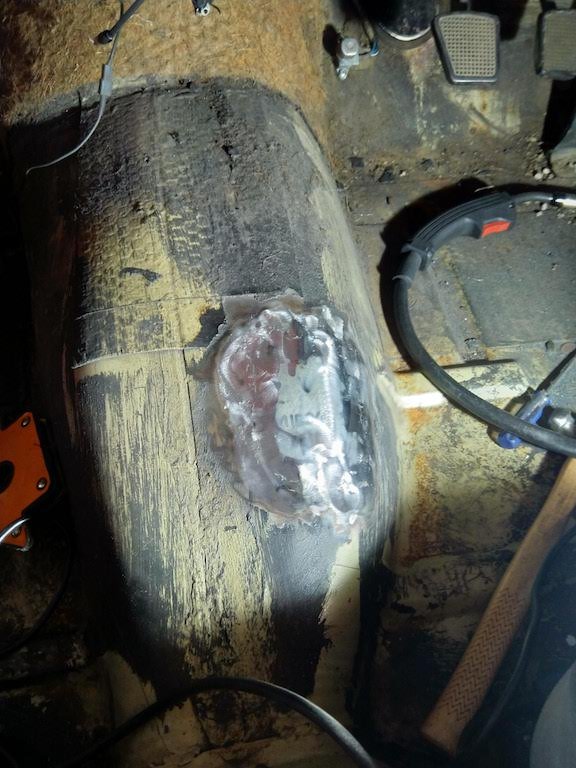
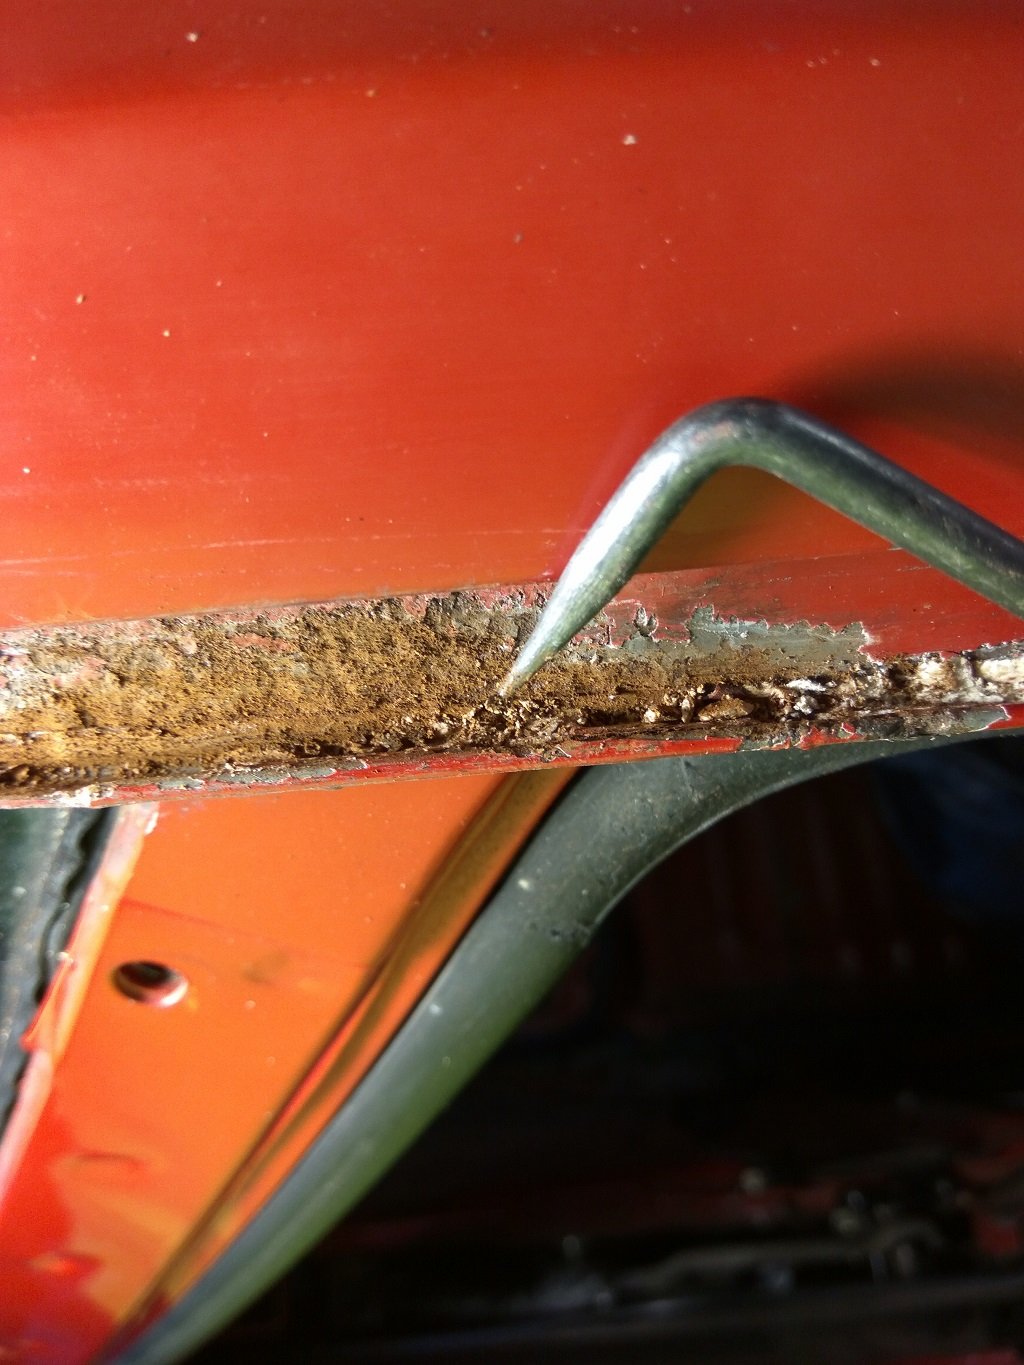
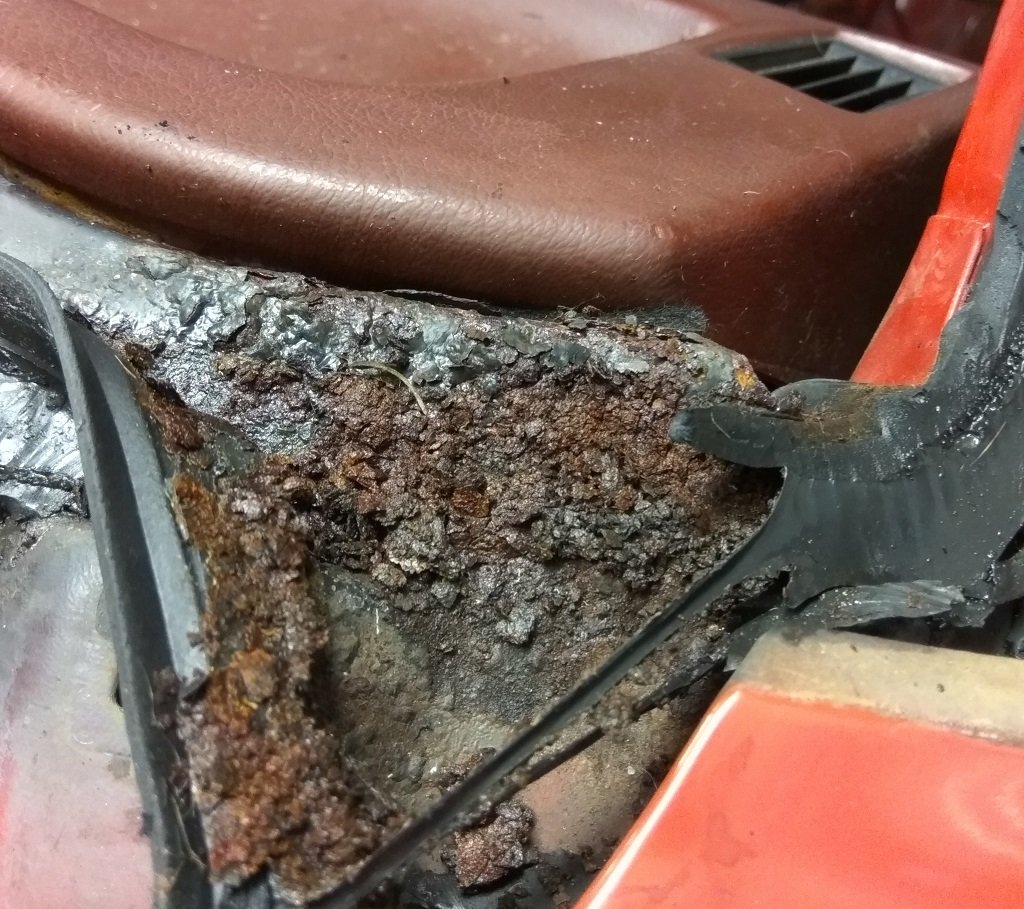
Small lock down update. Things are still happening, have just had a few issues that have taken a while to get resolved. Suspension is all in, brakes are done. Hard to get an idea of actual front height as I didn't take pic with front guard on. But it's currently sitting at it's highest setting up front and about the middle height in the rear. I aim to go as low as I can, but guard clearance and bumpsteer will likely determine final height. Recently replaced old exhaust system. Not running a resonator for now, will see how it sounds as I can easily add one later if needed. Got the impression the muffler is a good one and should cover both jobs. Had a section bent up, with some changes to try and clear everything. Some of the bends ended up being poorly done so I just cut the whole lot up and rebuilt it. It was just too hard to bend it as required to go over the diff at an angle, then bend back to get to muffler location. So I spent a fair few hours tweaking the bends to get it right. Currently prepping more areas for epoxy, and discovering more things to fix, so fixing those as I go. Aiming to get the front end finished, then i'll move to the rear and finish that off. I don't have the space to work on it all at once. Replacing a few bits and bobs as I go too as many parts are rusted beyond use. Like the bracket shown below that took a hit and is too rusty to bother straightening. Have done cambelt, waterpump, thermostat, radiator hoses, all other belts, plugs, air filter, all of which was sourced from RockAuto. Small bypass pipe was sourced from Toyota (thanks Mark) and I used the orings that came with waterpump. Radiator was flushed and repaired a while back, and is likely to be replaced at some point, it's sound, just not able to be rodded out as it will probably do damage. Not much else to post really, slowly getting there, hoping to have everything painted and back together in a few weeks. But given how long it's taken so far, even with being locked down that isn't that likely. Some proof of progress: Old exhaust + new exhaust bits Exhaust finished up: Exhaust bracket I made as not many factory hangers could be used: All new belts installed along with waterpump etc Some brackets I dunked in MetalReady for a while, along with a spring that was solid rust Replacement bracket I knocked up as old one was beyond repair As car currently sits, will play with heights when I have final wheels installed. Discussion Fred.
 18 points
 -
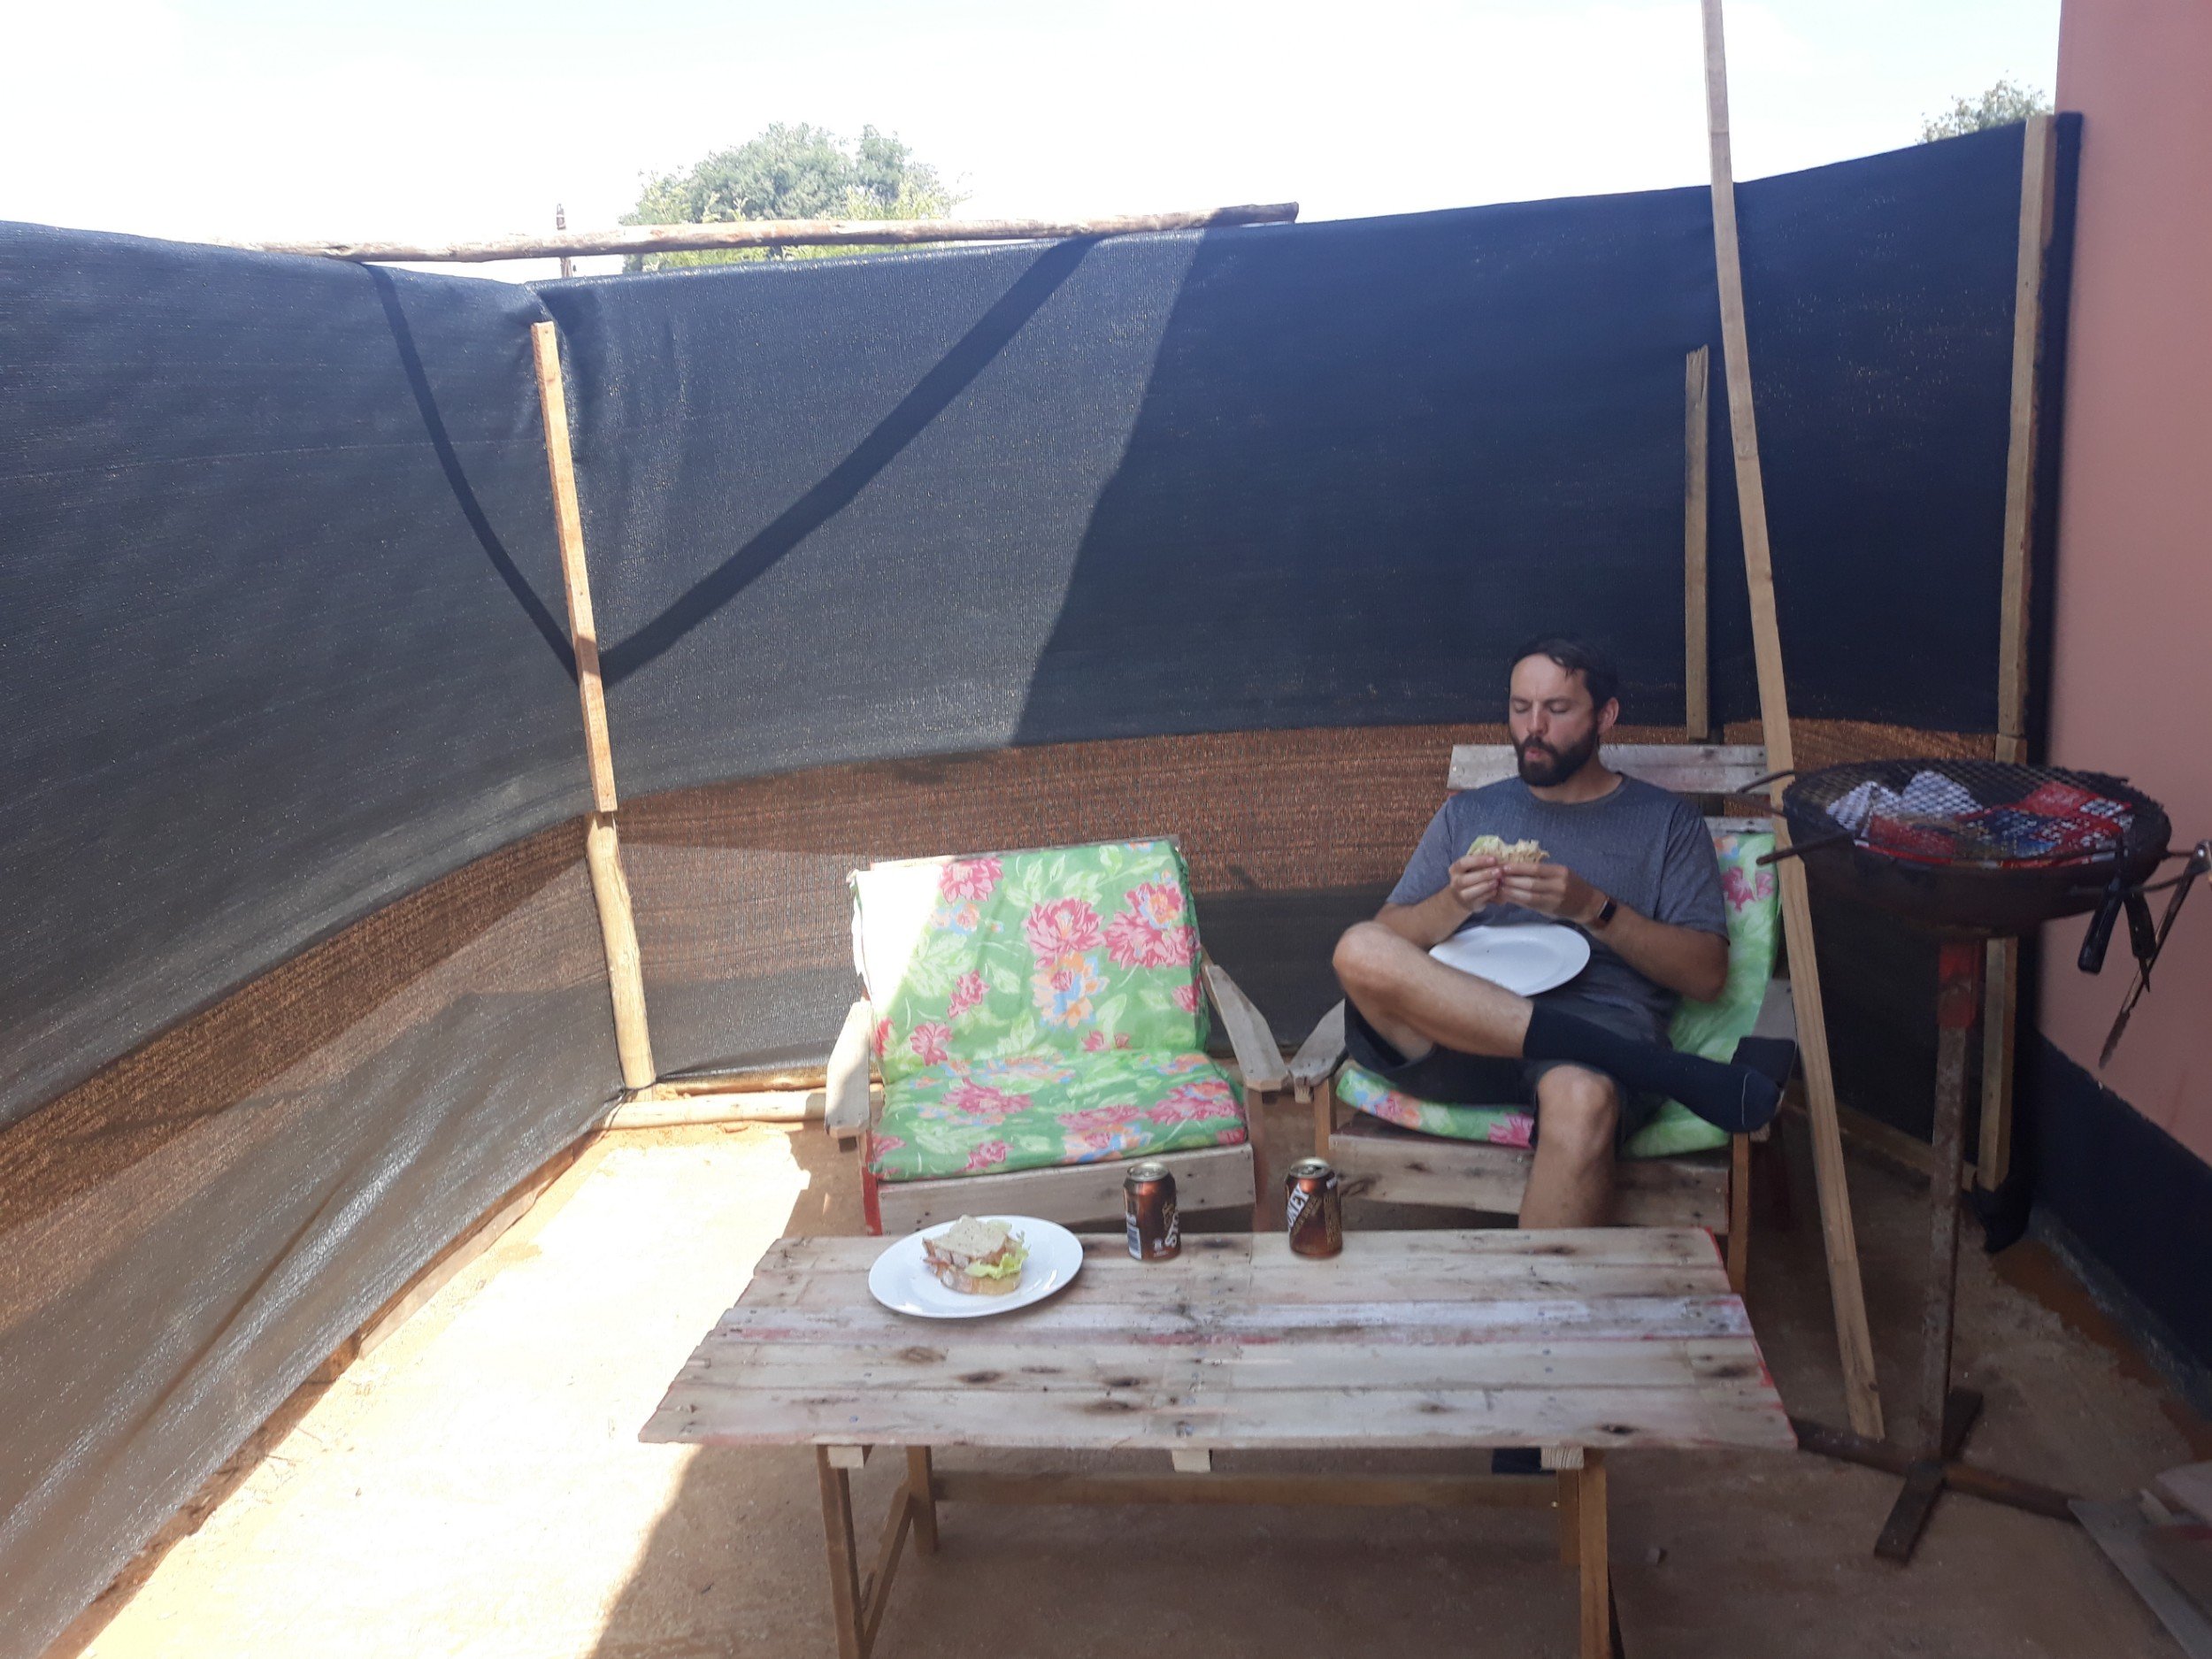
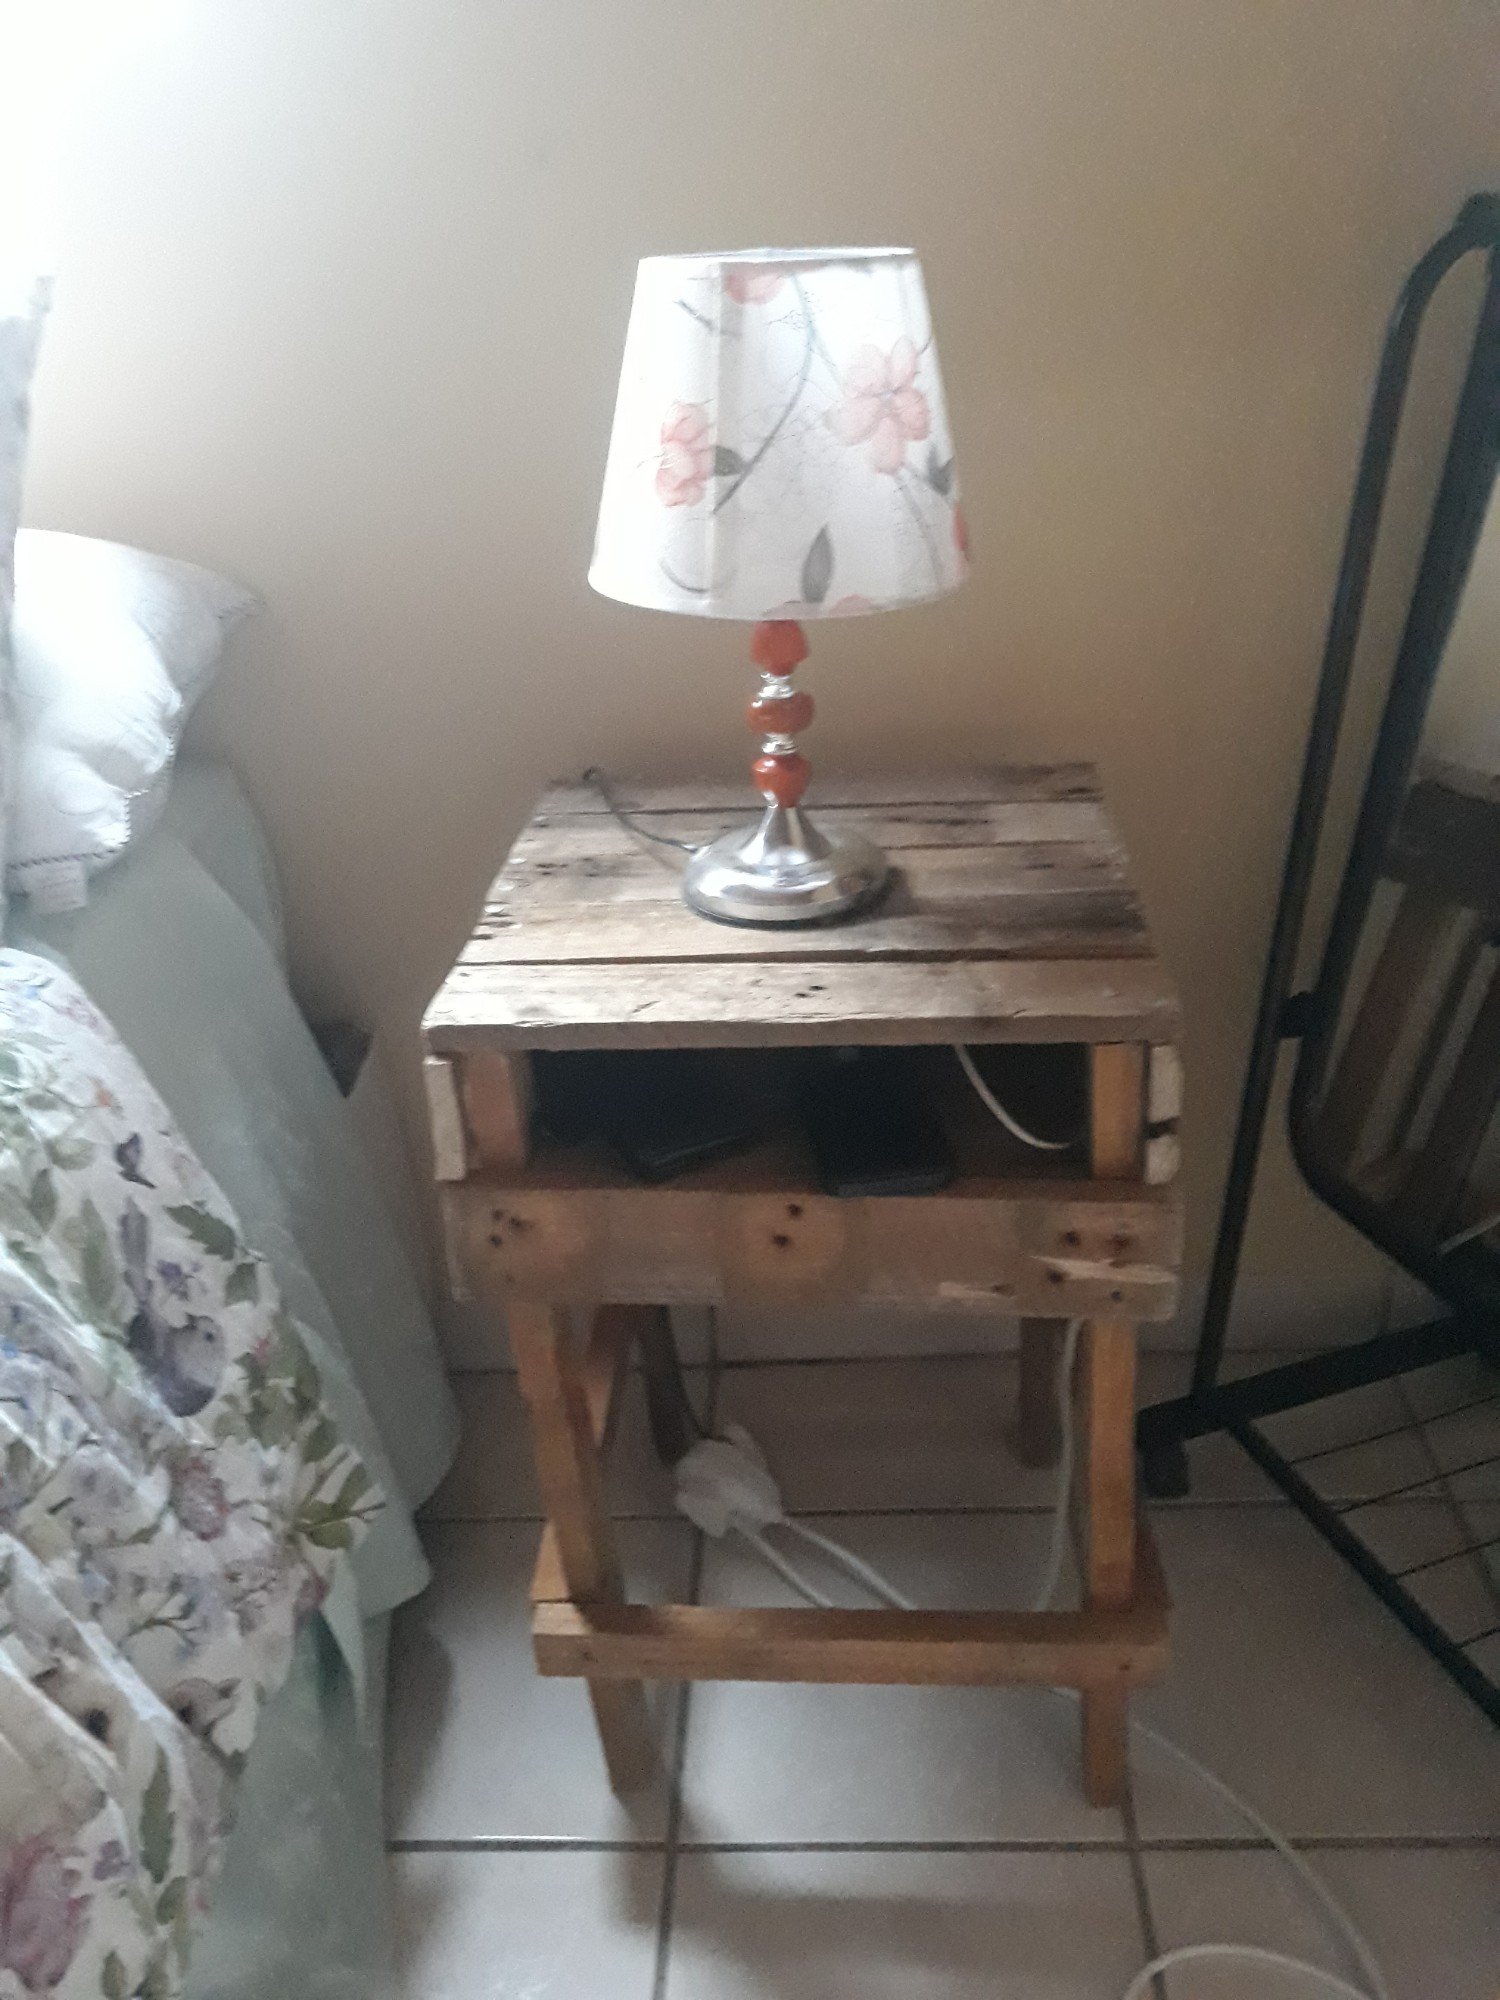
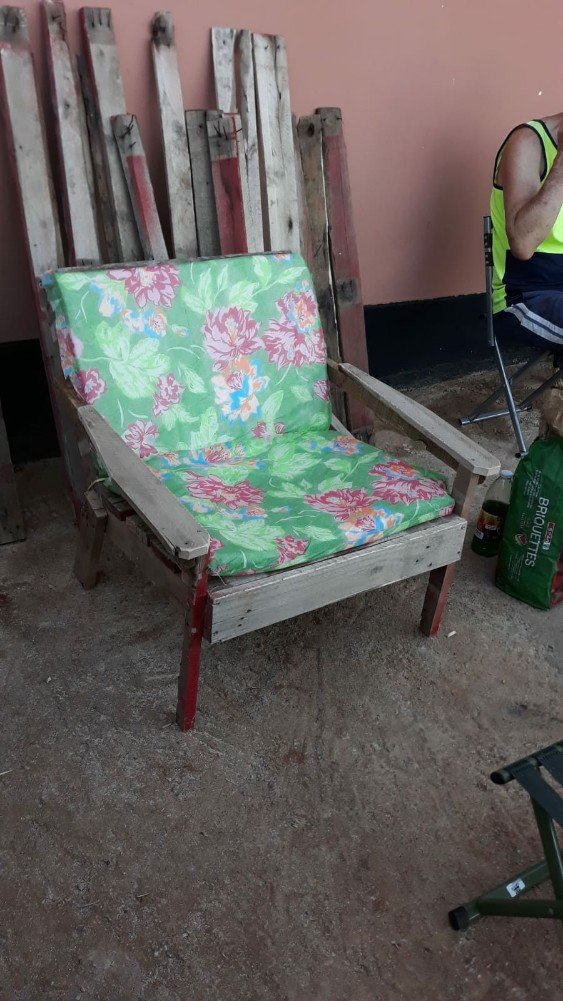
@Guypie has been building pallet furniture to make being in Africa more comfortable while we're stuck here. I made the squabs on the arm chairs by cutting a mattress and sewing the edges. The windbreak fence was us too to give a bit of privacy as the locals love to gawk and shout out to the white people which isn't bad but gets annoying after a while. The 2.4m poles cost us roughly $2.30 each
17 points
-
Repairs went well, two lazy days blocking and sanding with really limited supplies, I’m Stoked to report that it’s all rubbed back and paint will fly this weekend! Sorry the photos are so random16 points
-
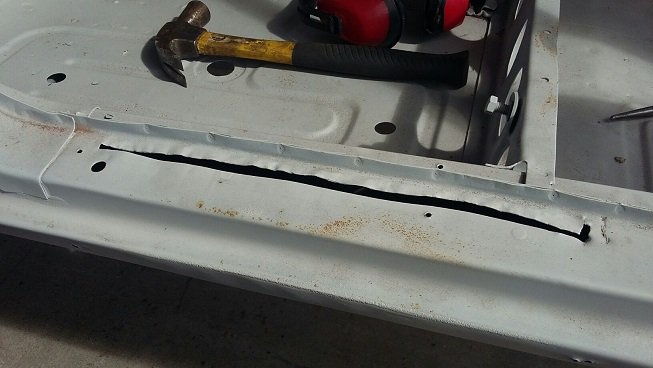
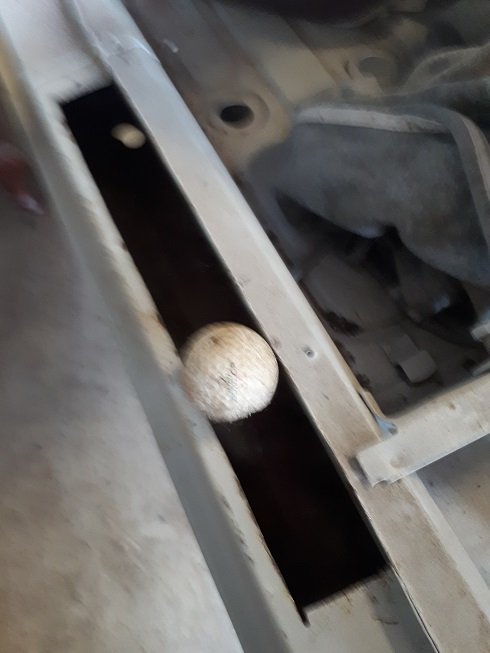
A couple of patch repairs here, speaker holes, seat mount, bottom of A-pillar, and the random cut in sill, with bonus golf ball found inside
14 points
-
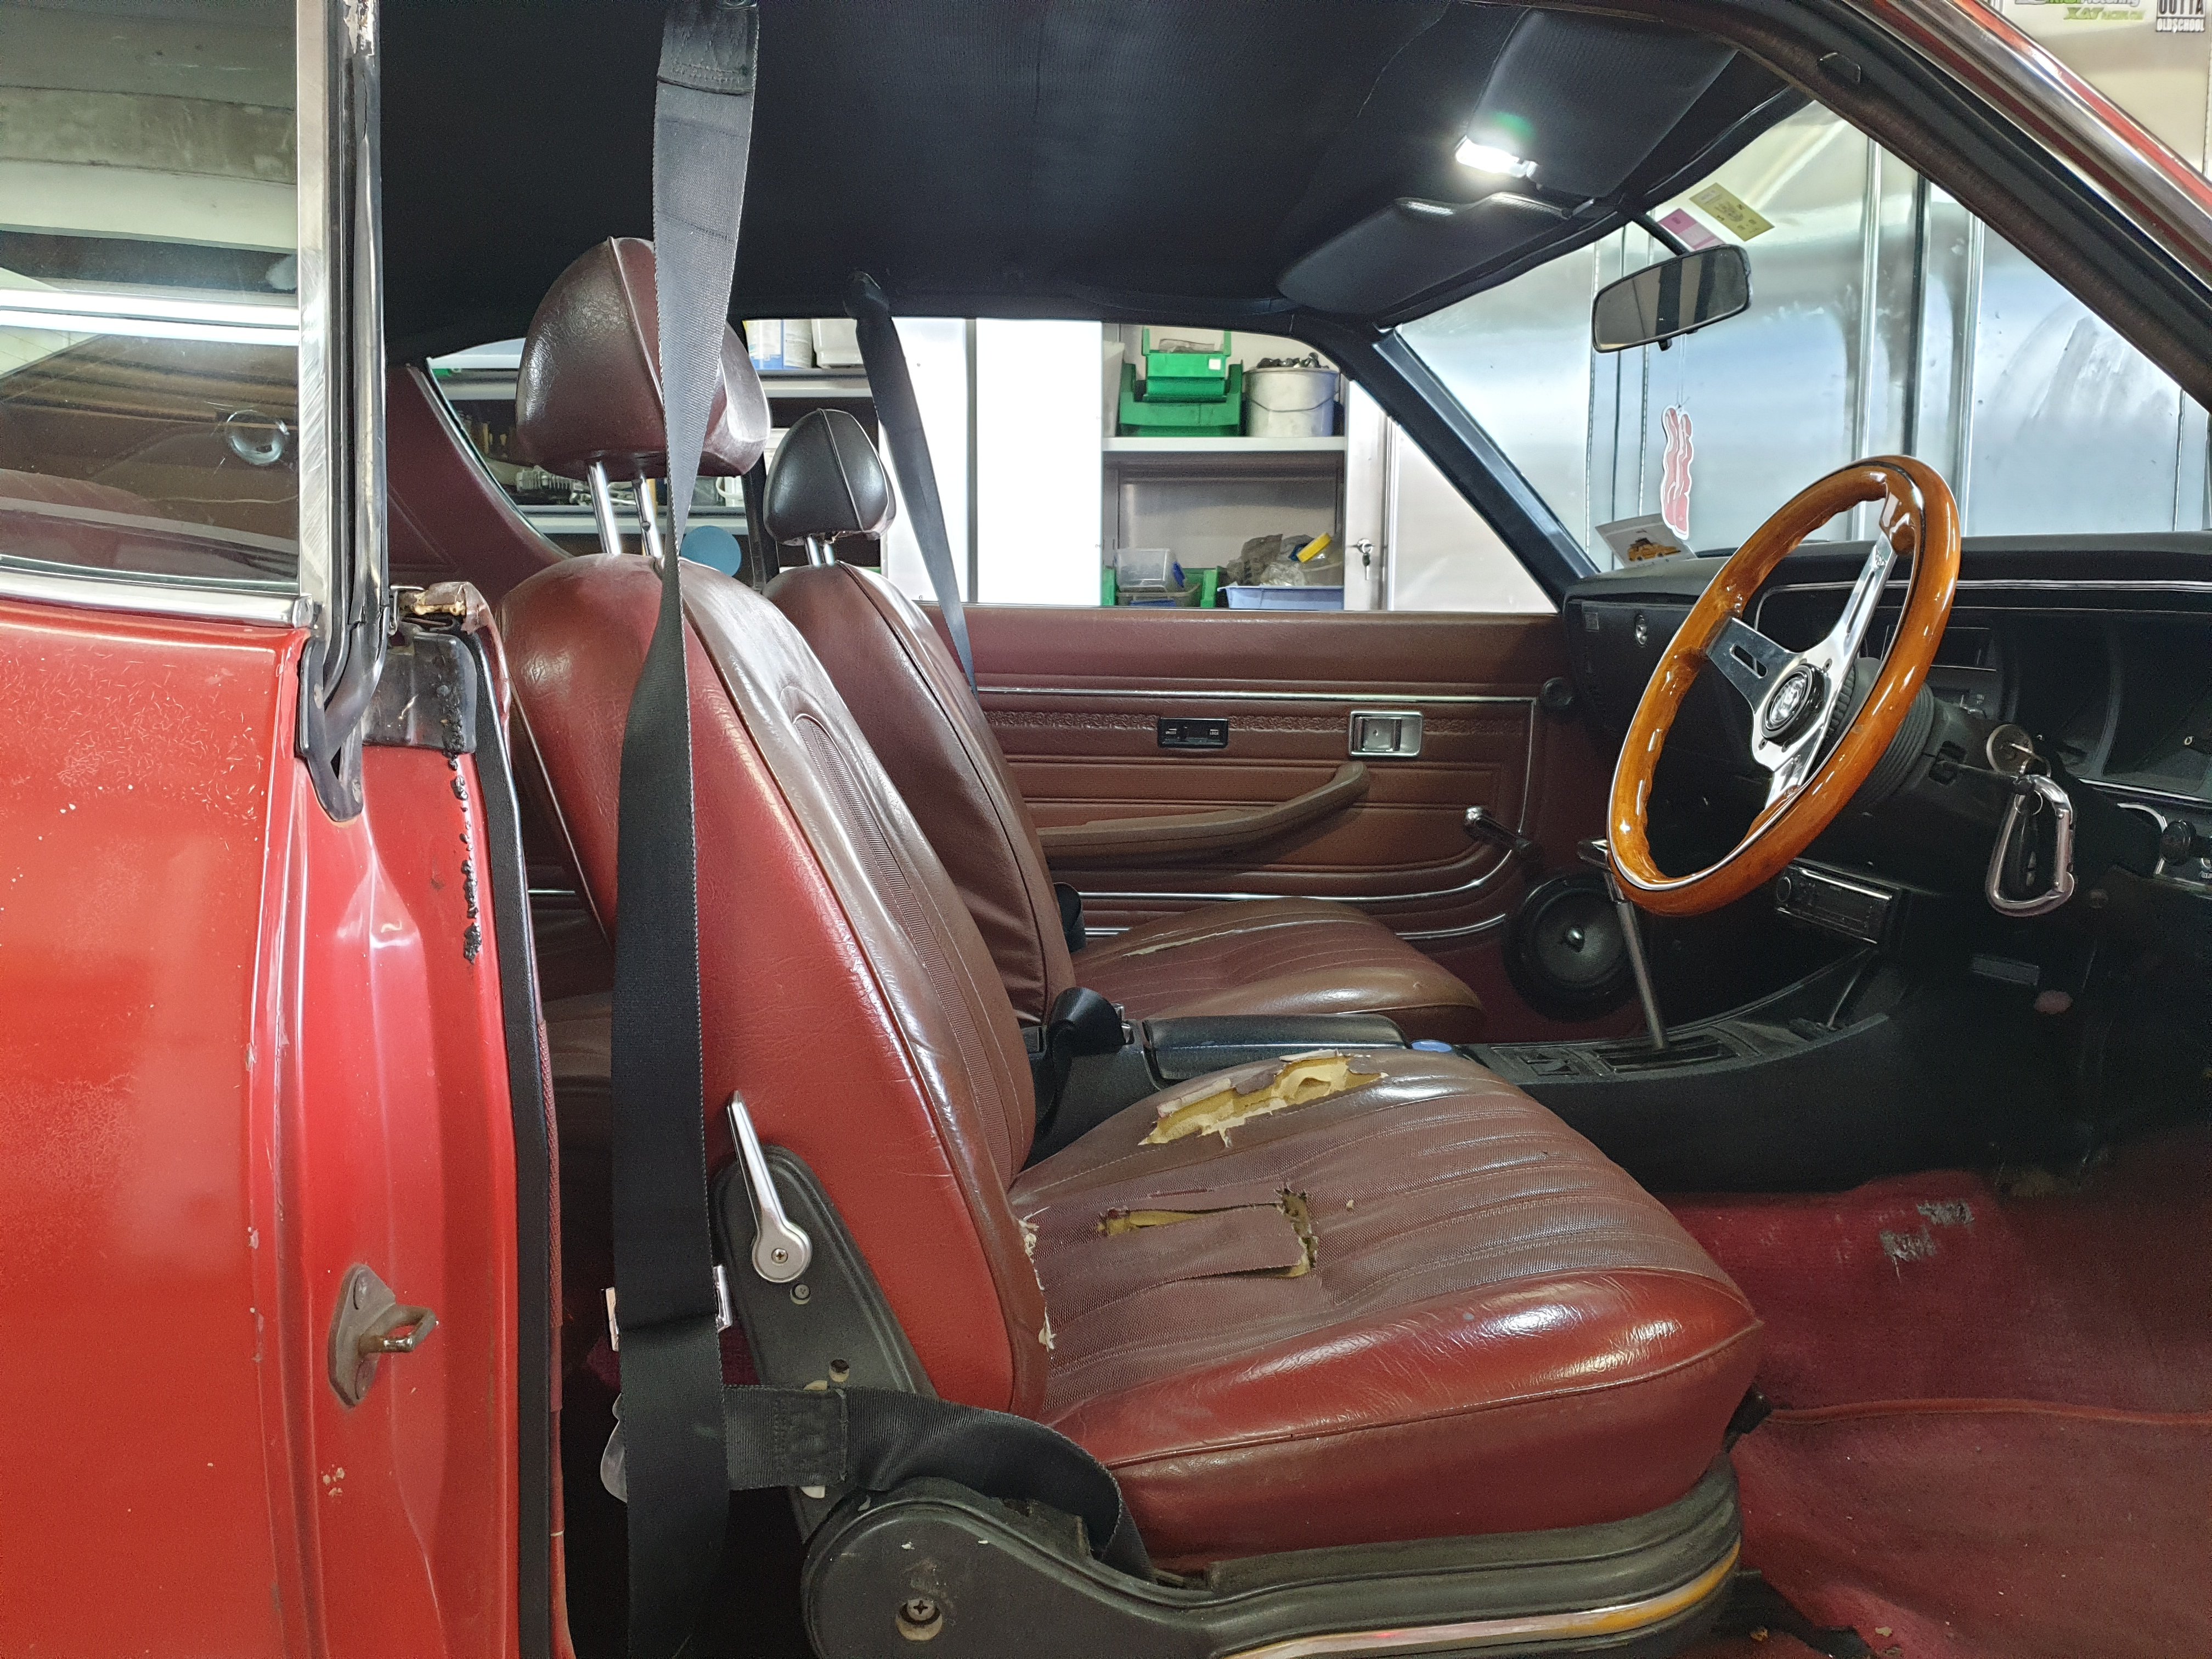
Installed electric fuel pump and removed mechanical which im pretty sure is the original one. Did alright for 48 years. Also moved the seat back 50mm so im not so cramped. It's not so bad with an auto because lack of clutch allows at least one leg some room. But it's nor a big job to move the seat so I did it.
13 points
-
Another fine day on the West Side. Nearly done ! First job, cut off all the bits I don't need. Next, continue with my jammy luck in the parts hunting. I need a sturdy bracket approx 5" long with plates set at 90 degrees both ends, but with an angle so the tyre won't cover the rear lights. Oh, and it would be nice if the bolt holes were exactly right to fit the tyre mount. Rover P6 tow bar from a car I had 15 years ago ? That'll do nicely. I did have to paint it though. Shame. All I have to do is get some 6mm plate and make a plate for the wheel to bolt to. In the best tradition of gluing the wings on your Airfix Hurricane before the paint's dry, I mocked it up just coz I wanted to. And it still works with all that tyre on there. Hopefully get it finished tomorrow and then I can get on with the paint. Or at least the primer.11 points
-
Man, a bunch of months have gone by. Lock down time now, so had a play with this. Cleaned up the points, rotor and cap. Turned over engine to see if the points open, which they do. Connected a battery directly to the coil and starter. Turns over but no spark. Tested leads and it turns out none of them have any continuity at all. I guess they have been unused for 35 years and probably over 40 years old. The Cap to Coil lead would have a connection if I bent it at the right angle. So because shops were closed I cut up some spare extension lead, not that dodgy considering the LUCAS leads just have a bent metal cap shoved into the core and jammed on. So I reused those end pieces. The spark plug ends are literally screwed into the core. I tried reusing these but there was still no continuity. It turned out all of the spark plug connector bits were the problem. So I then made it properly dodgy by stripping the rubber and wrapping the wire around each plug and jammed the old ends on. I know, pure class. But I just wanted to see if there was any life in it before spending any money on the engine. IT HAS SPARK! On what is probably 40 year old bits! Poured some fuel into the carb. Tried to start it, no life. Sprayed some carb cleaner in the throats, because that all I had and its flammable. And it almost fired!! I don't think it's getting any fuel from the carb, its probably just trying to run on the carb cleaner fumes. Once it tries to fire, the starter disengages and free spins. Not sure why since I am bypassing the ignition switch altogether. Just using a battery on the driveway and jumper leads. All the while my 2 year old girl is saying ''gen gen'' (again again) from the deck above me and my 5 year old boy is running around excited. Raising them right haha This is encouraging.11 points
-
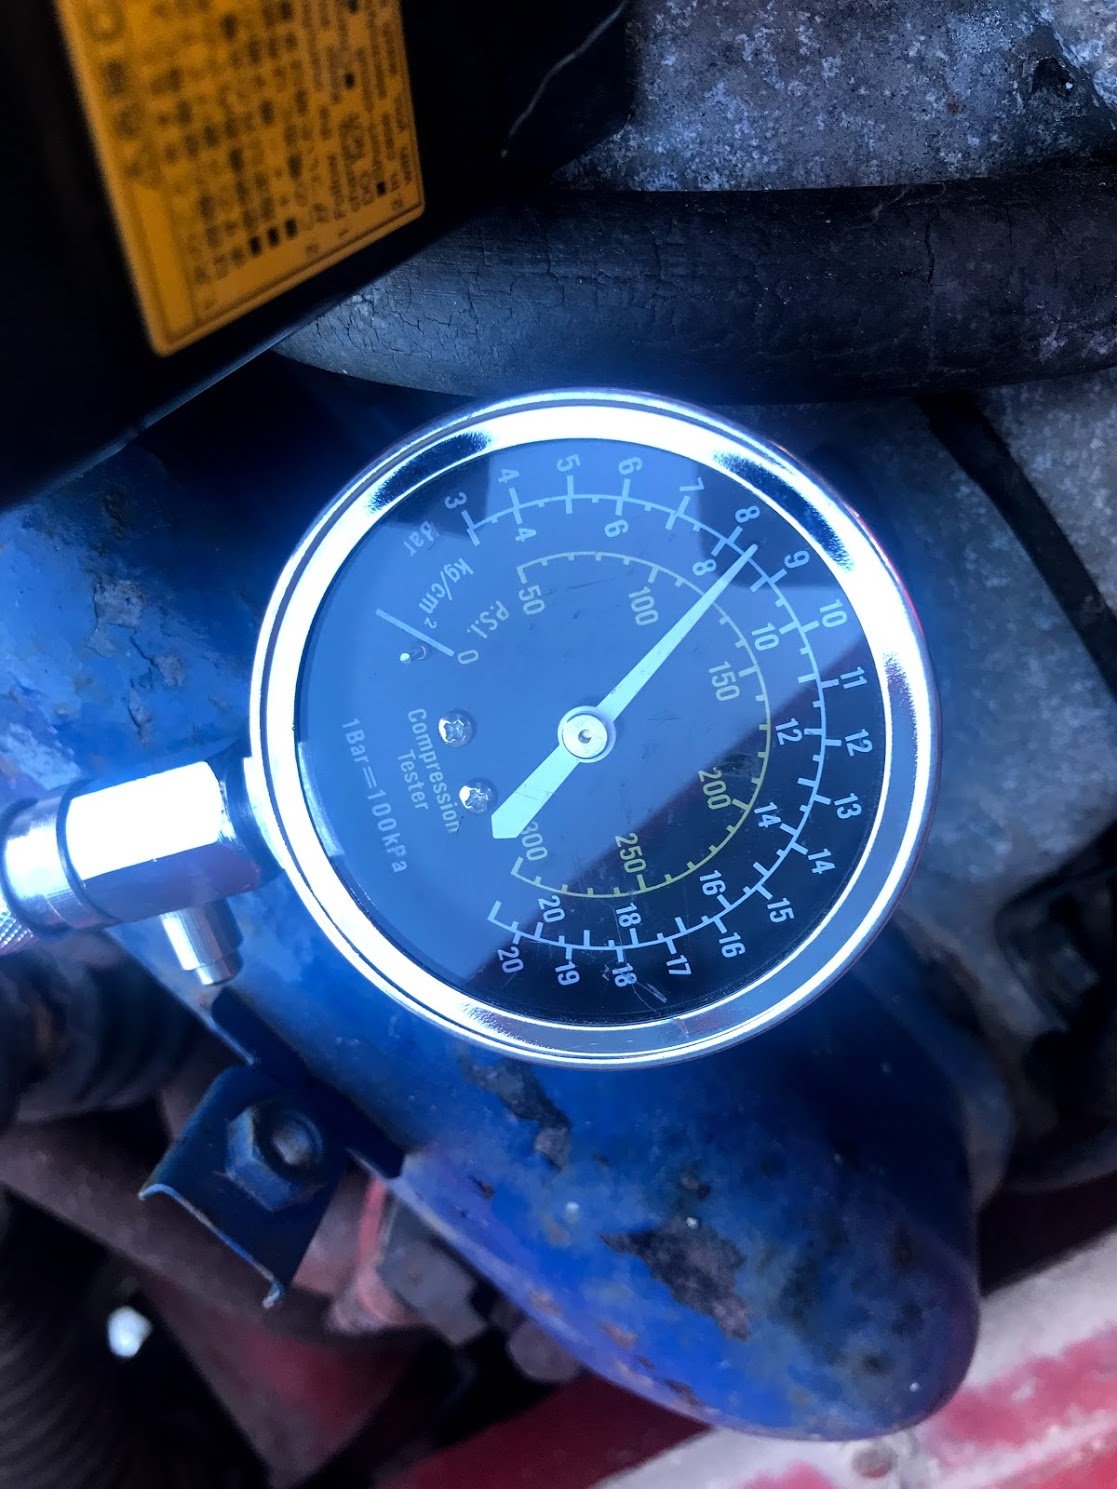
Bit more testing today, tried blasting carb cleaner through all the passages but didn't seem like any where blocked and didn't make a difference. Took out a spark plug to test for spark, nothing. Tested the lead and getting spark when held close to the engine. Tried connecting the lead without the old lead-ends jammed on (was just to hold the stripped lead core onto the spark plug) and used electrical tape to hold it onto the spark plug. Again this is just to see if there is any life in it. I'm not normally this cheap lol. Now I can see a spark on the spark plug itself. Maybe the old plug lead ends were causing resistance or something? Did this to all 4 and tried again. Still not firing. Took plugs out again, broke one spark plug....taped it back together lol... and squirted a little fuel into each cylinder. Tried again and now it almost fired again. I think that is convincing enough for me to spend a bit of money on some leads and maybe a new coil and distributor. Maybe an electronic ignition conversion? I then did a compression test since it seems to be turning over pretty well now. Remember this thing was basically seized and I had to use a power bar to get it to turn! My compression tester has always read pretty low but I was amazed to see decent compression numbers and it is obviously dead cold. Three cylinders are 120psi and one is 140psi, not ideal but bloody amazing considering its history. I reckon if I can get it started and hot it will improve, probably not a huge amount but getting some heat cycles through it wouldn't hurt.
10 points
-
Have wanted a Mizuno Works wooden shifter for a long time but decided it was money better spent elsewhere for now and made one. I had some kauri or rimu? recently machined for a furniture project that I ripped into 30x30mm strips 250mm long. I planed the corners off to get as close to round as possible before centre drilling- apparently not- the base out to 12mm and winding in a m12x1.25 bolt with hex head cut off and put the cut off end into my cordless drill It took 3 attempts to get one usable due to drilling the first one wayyy off centre and in a straight line and splitting the second. Ended up with 185mmx22mm finished size and have just applied some linseed oil which is a fairly close match to my steering wheel. Wanted to put the other half of my factory stereo back in but seem to have misplaced it so swapped out the silver cassette bottom half for a pocket instead. The black ties in with rest of interior better than the silver anyhow. My only other plan for interior is to have a leather shifter boot manufactured. Sadly the place who did my last one has caught fire back in October and doesnt look to be reopening
7 points
-
Since then I have been riding it when I can and have done over 1500 K on it now. A couple of trips out with the wife. Also got worried about the state of the OG wheels so built my self some new ones.
5 points
-
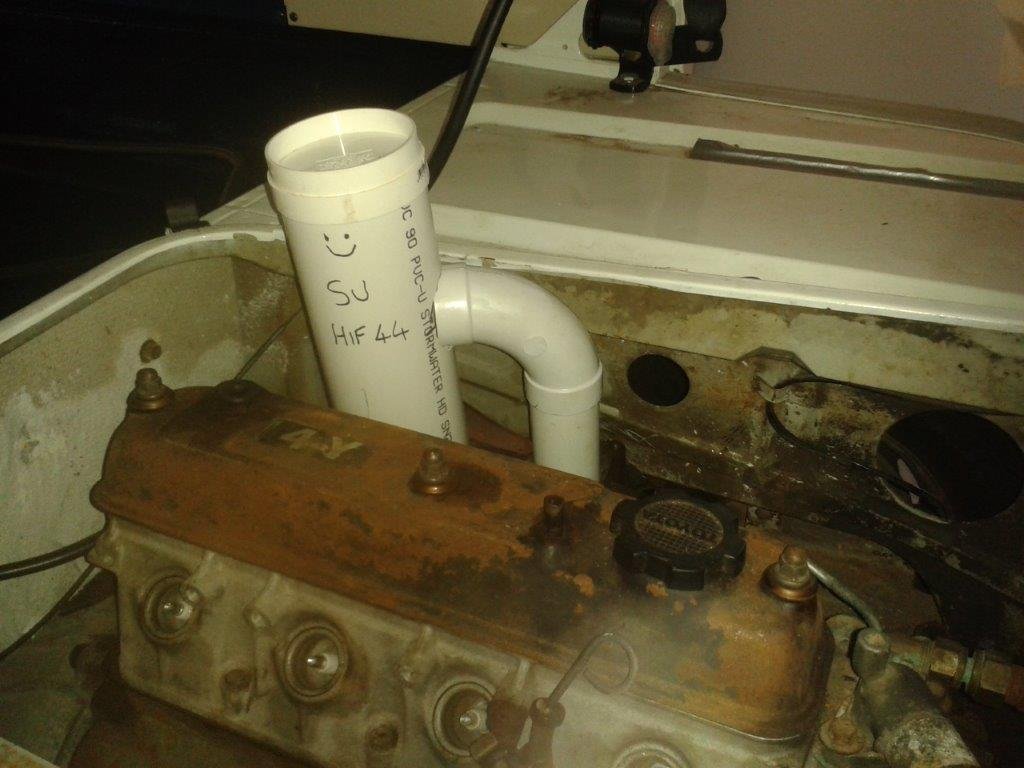
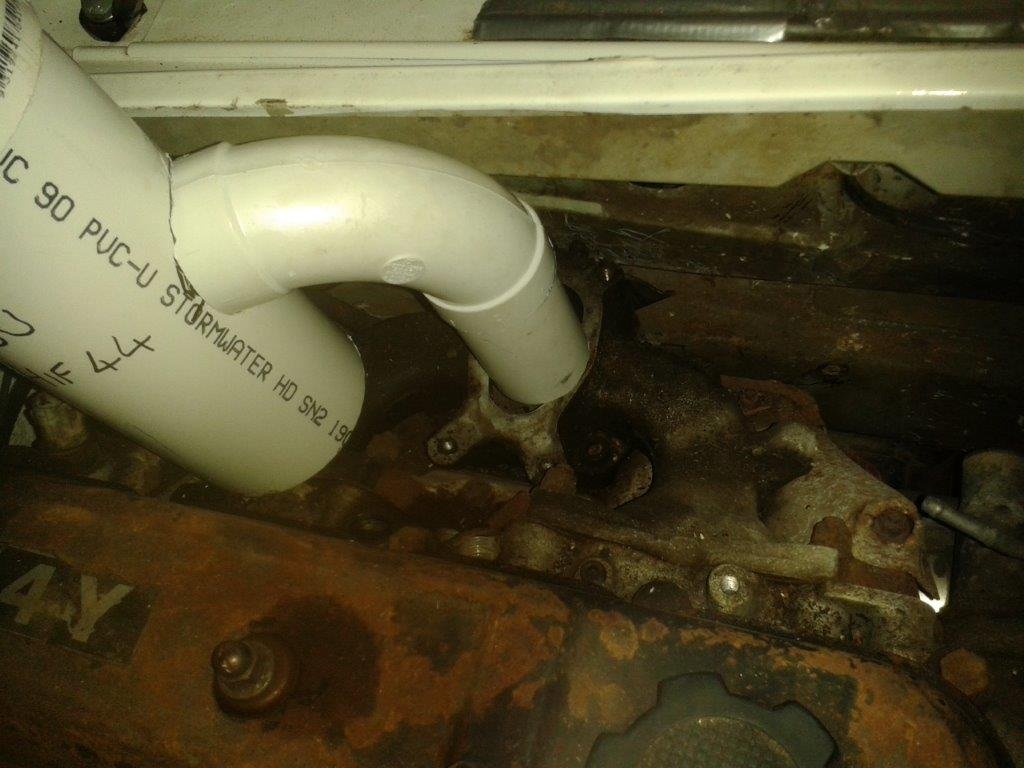
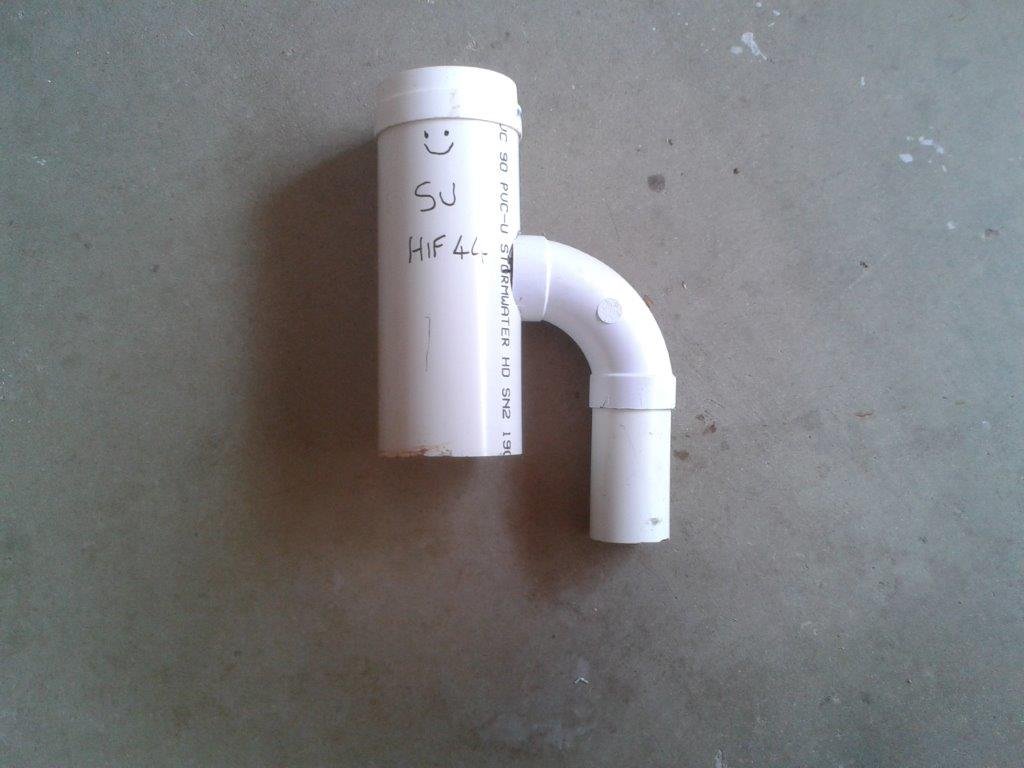
I managed to find a few crappy old bits of PVC pipe that I figured would make good mock up material. Used a bit of 90mm storm water pipe to represent the SU. Marked out the spindle height and used that as a datum. Then marked out the upper (top of pot) and lower (bottom of integrated fuel bowl) and added an extra 40 mm either side for extra clearance. With the carbie mocked up size wise I then cobbled together a mock up of the inlet adapter using a 40mm 90 degree PVC bend. The whole thing is rough as guts, but at least it gives me something to work with. I positioned the mock up under the engine cover and the good news is that the lid closes perfectly with about another 30mm of headroom so I should have more than enough space. Pictures of my rather agricultural effort in position below:
5 points
-
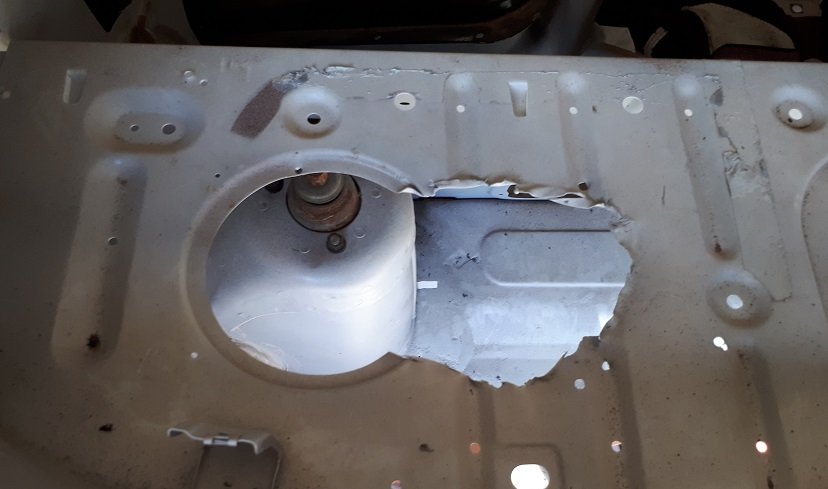
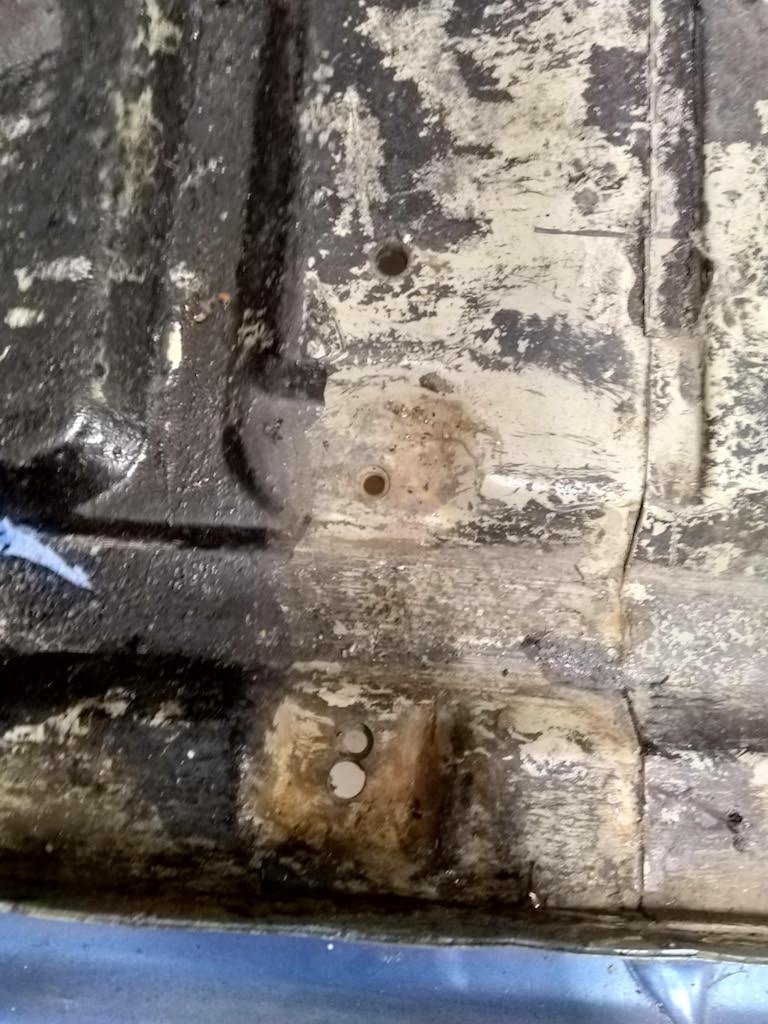
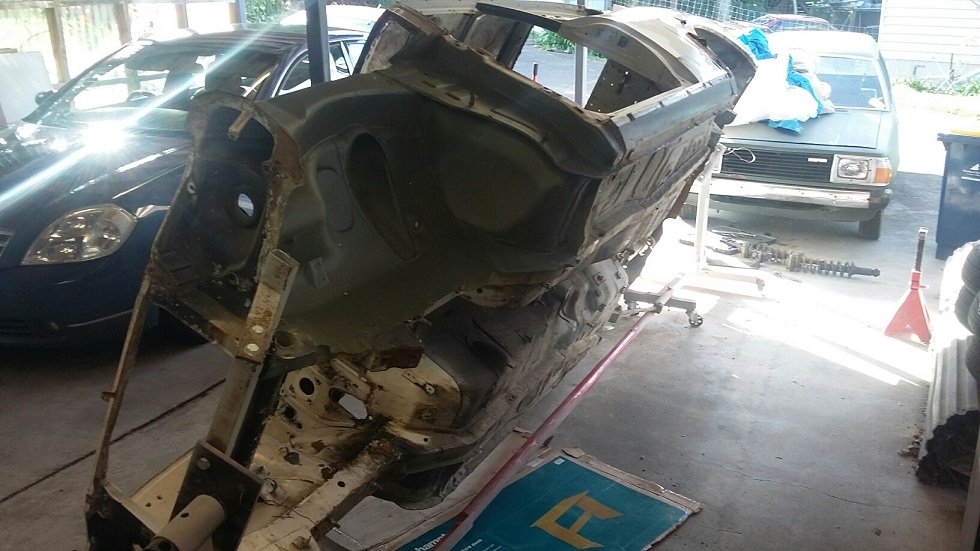
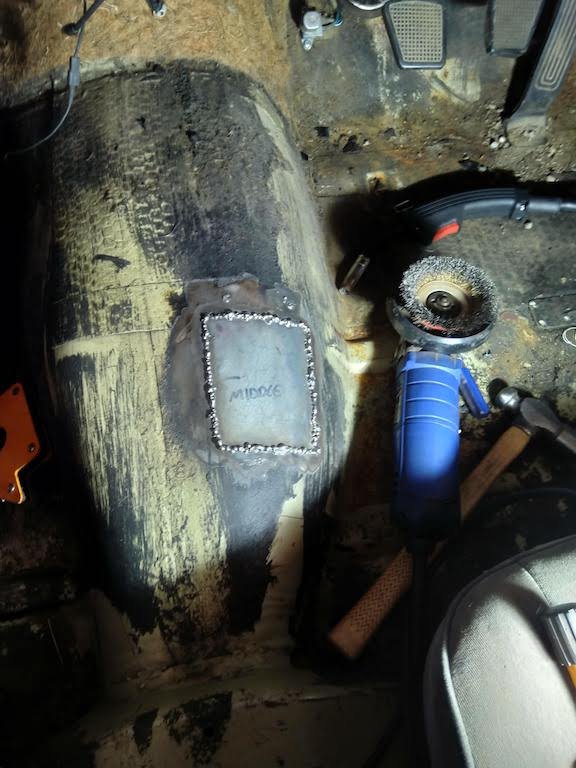
I’m on a roll. Some more dismantlation has occurred. I’m struck by how simple these cars are, but how bloody difficult at the same time! The following represents about 5 hours work, but then again I tend to work like this I can tell you all I’m thoroughly sick of getting dirt in my face, up my nose, in my eyes, ears, hair (what’s left of it), etc. once again, every single bolt was a knuckle skinning, rusty shit fight. The seat box is quite light, and easy to remove by oneself. Next was the fuel tank. The front tank outrigger was quite bent, so application of earmuffs and vicious assault with a large hammer was called for, followed up by several different socket and spanner sizes and the trusty angle grinder. I found some hieroglyphics
5 points
-
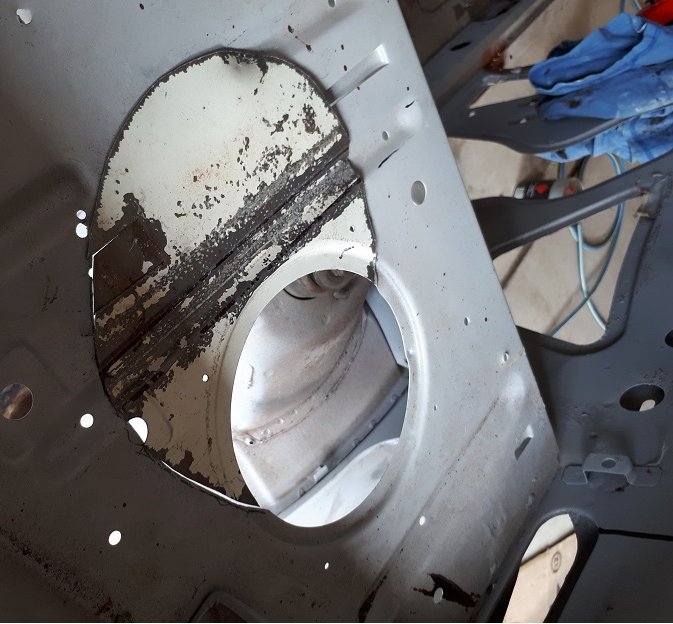
Continued from previous. Another protracted battle then followed with more nuts and bolts. There is a sill trim that runs along the bottom of the cab that is in two sections. A short section attached to the lower rear cab and a long section that runs along under the door, and ends at the rear of the front wheel arch. These trims are thin aluminium and were already quite wrinkly. Removing them has destroyed them. They would be quite easy to remove if the bolts weren’t rusty and seized, but the brackets are quite flimsy and will not stand up to high torque situations. Finally, having extracted all the bolts, the rear cab lower half lifts away, and is a bit awkward to remove without a helper, as it is a decent weight, and the galvanised sill frame now has no rear support, so you can’t put weight on them. It’s a good thing Land Rovers are not fast, the seat belt mounts don’t look like much. But hey, there’s a sticker that says they are approved by Her Majesty so they must be OK. Factory toolkit: Exploratory choppy-chop. To be fair the end caps were just about weet bix anyway Til next time
4 points
-
Like many I've taken some time during lockdown to sort out some work on the old girl. Got pretty tired of looking at the old rear bumper in its sad state, with holes dents etc all through it really ruined the car. Thankfully the sedan I parted out opened up the opportunity for me to modify a straight (sedan) rear bumper to suit my wagon bumper as they are NLA. So after some mixing and matching of bumper mounts and the careful hacking apart of the sedan bumper I ended up with a fairly reasonable looking bum. Tailgate is next on my list for a re-bog, just need it to last until I can really hack it apart and re-fabricate large amounts of it (it's very bad). Took the oppurtunity to tidy up my exhaust tip, too. It's a nice quiet car with no drone etc which is cool. But I'd like it more aggressive for the new motor. Also fitted factory grande head unit. It struggles to work so I've just wired my lights to work and I'll relocate my BT headunit under the seat for max functionality.4 points
-
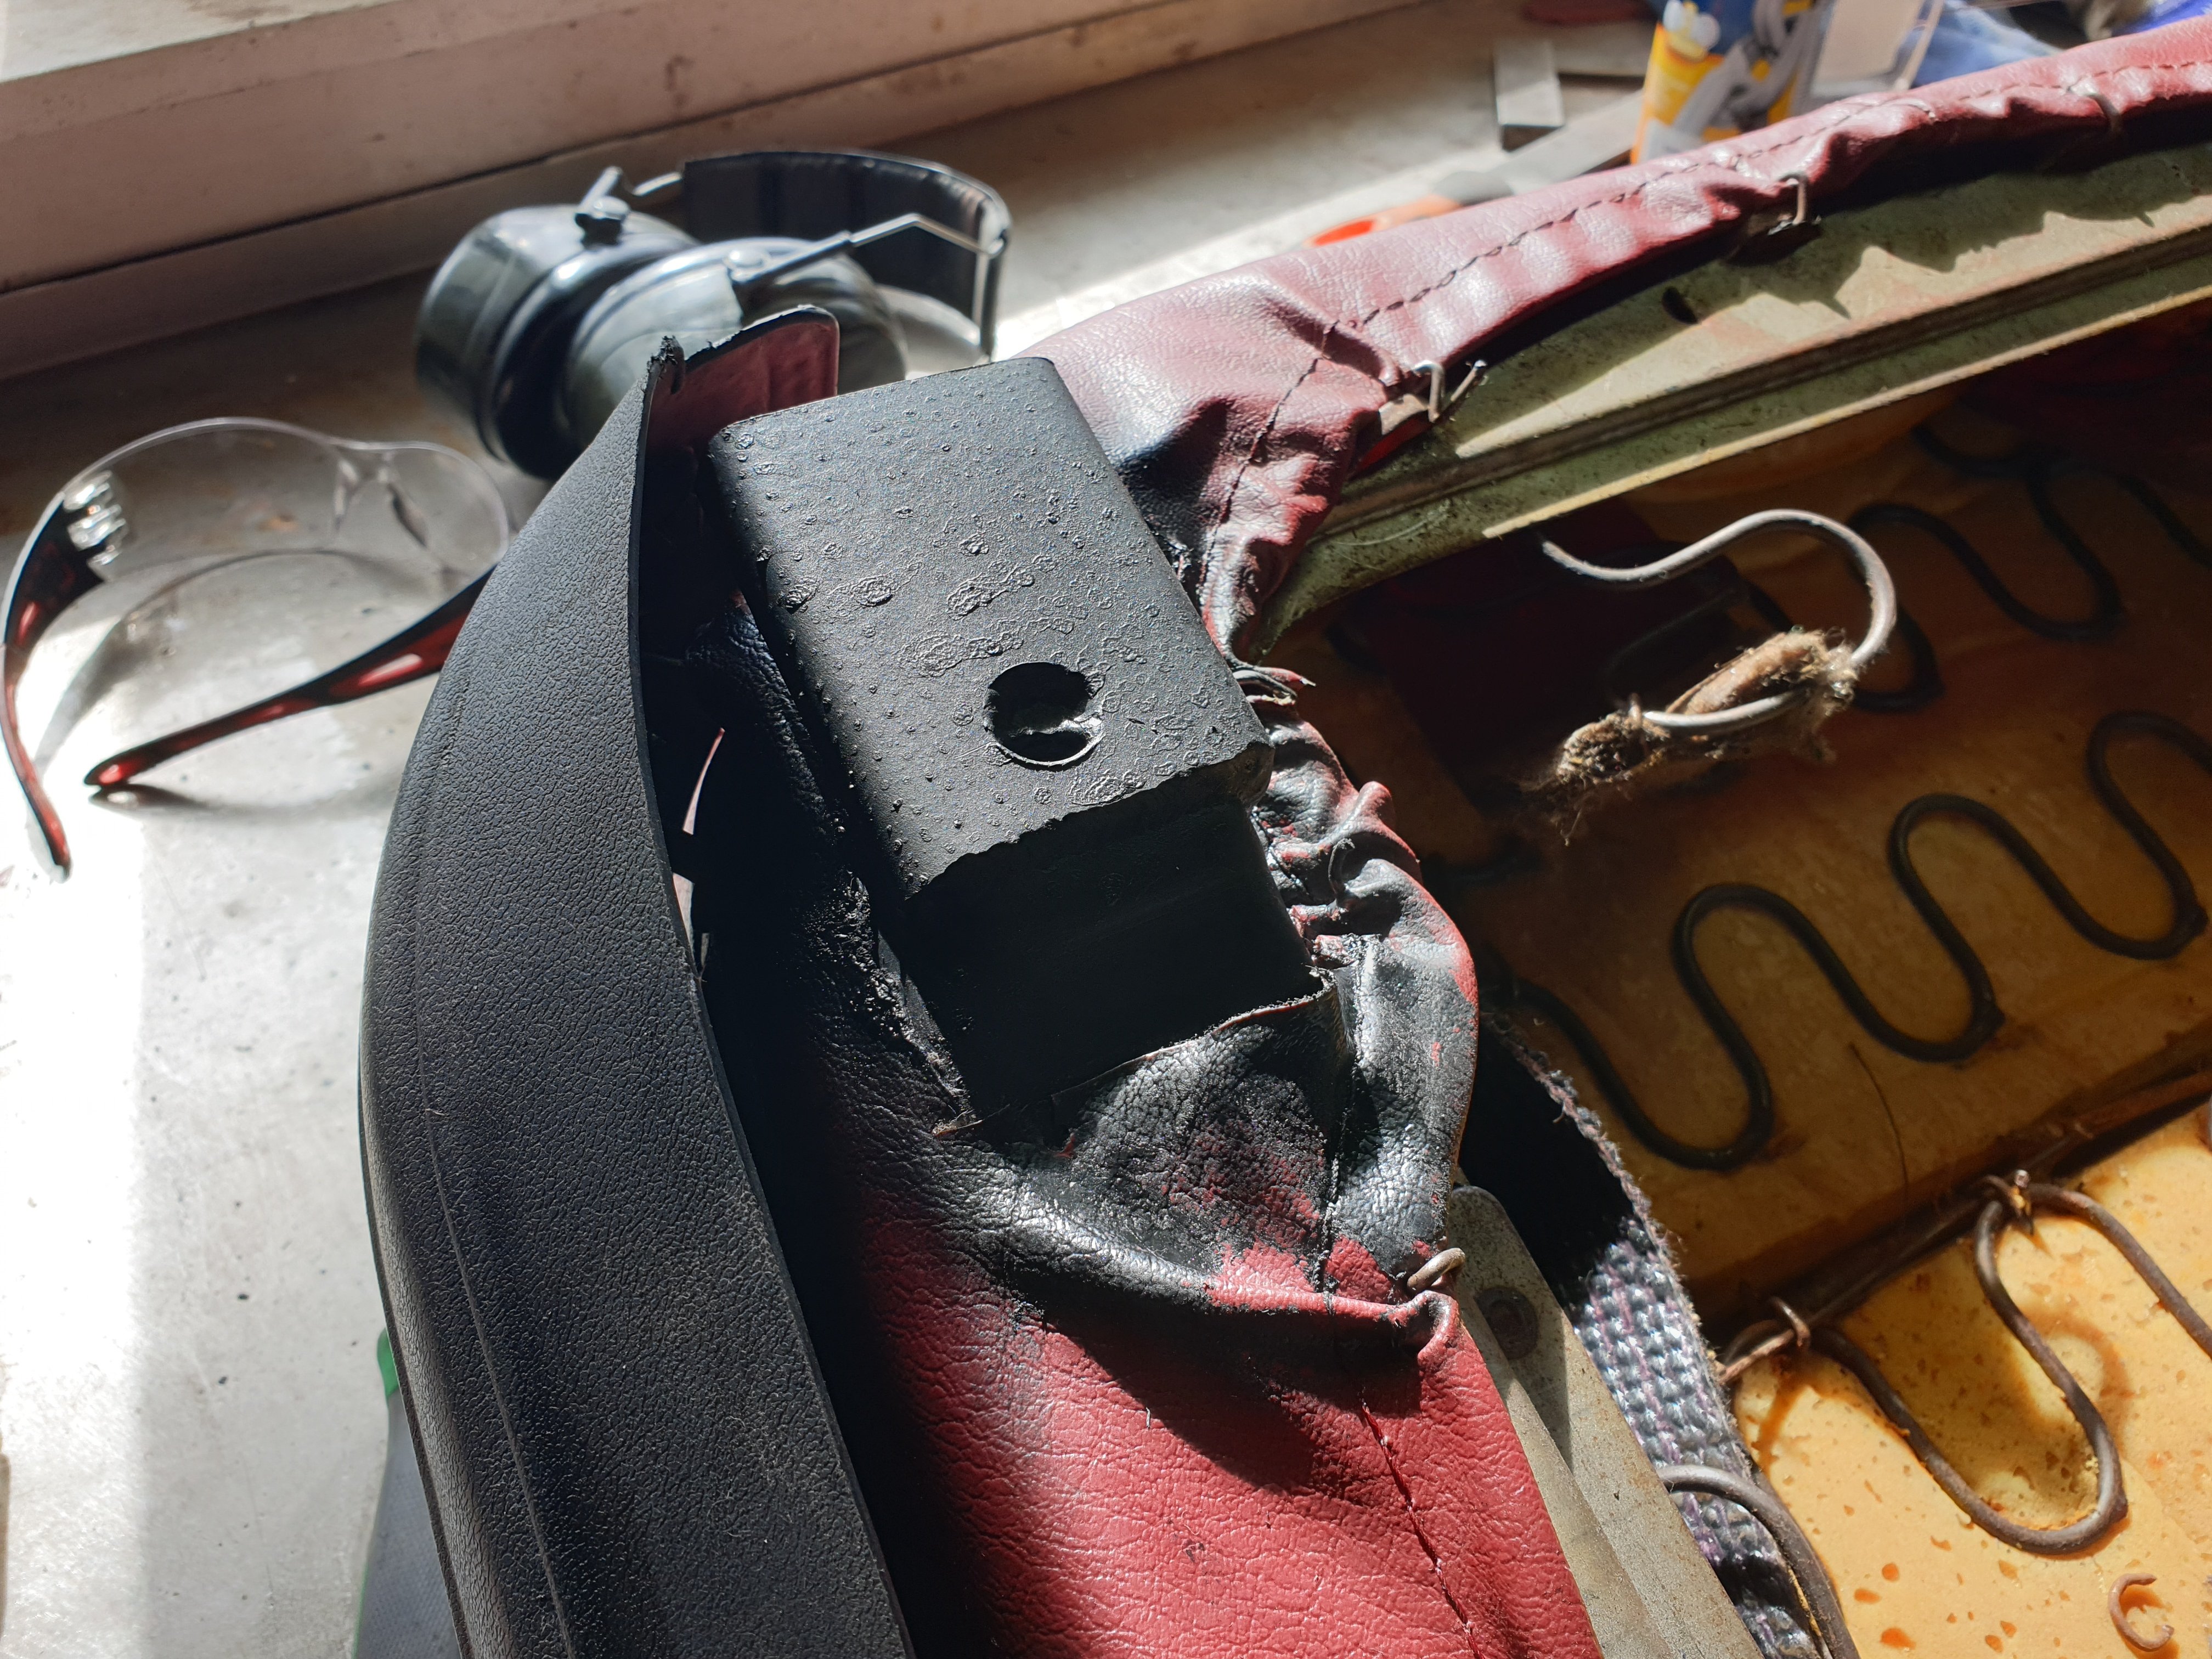
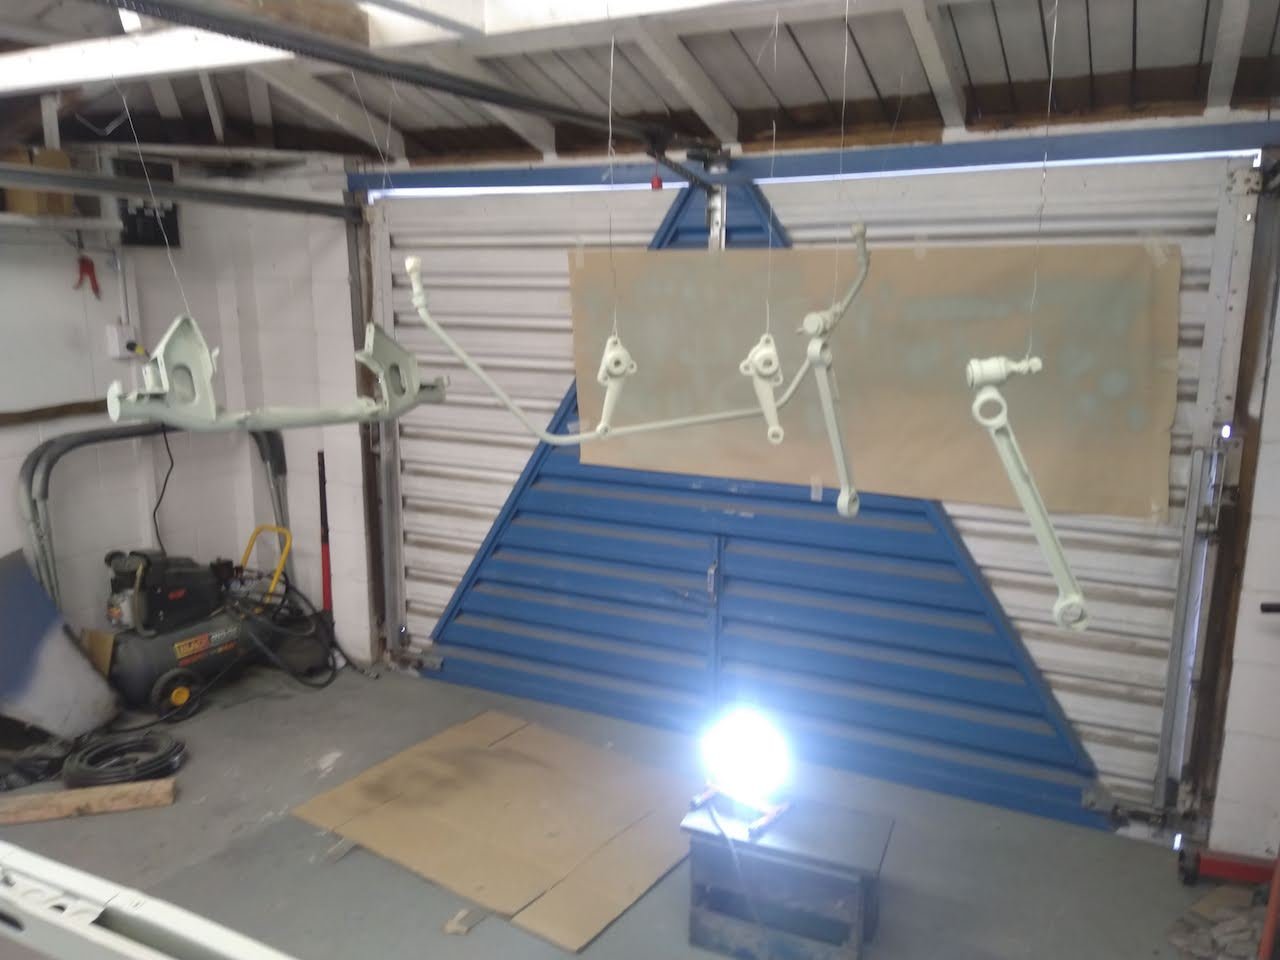
Got most of my font suspension bits stripped, rust treated with phosphoric acid and into epoxy primer. I will get some 2K black when I can. I'm going to get the struts converted to gas. Stripped the brake calipers down. The pistons had a bit of rust, but the housings have cleaned up well. Ordered a rebuild kit with new pistons. Took out the poorly installed front bucket seats and test fitted the bench seat. For some reason when they installed the bucket seats they had drilled new holes directly next to the mounting points for the original seat. Hopefully can patch without too much drama. Floor pan is generally pretty good, mostly surface rust. Only found one rust hole about the size of a finger nail so far.
4 points
-
man what a bitch this has been to do over self isolation time. a second pair of hands would had been extremely helpful today cant wait to get the front all sorted and get it on the ground. just assembling it to get it to the new shop. once it is here ill make new break lines and go over everything else. make sure she is ready to go.3 points
-
Literally the day after selling the clone Z50, I got a message from a mate -Hey I’ve got a rough Z50J sitting here that I only bought for the motor, wanna buy the rolling frame? Slept on it for the night and thought ah, it’s an actual Honda Z50, let’s do it properly this time. Got it home, and assembled it to a rolling frame. Put it in the corner of the shed while I placed a couple of orders for various bits and pieces and waited for them to turn up. then assembled. Ended up with backdated 4L tank, 8x3.50 alloy wheels, undercowl, alloy foot peg covers, Windsheild, lowering the suspension a bunch, fork brace to lower the front guard, OEM style tail light and frame extension. Fairly happy with how this has turned out this time, and it’s at about as far as I can get it during this lockdown. - need access to a welder/vice to make rear indicator mounts. Keyring Details.3 points
-
The intake length doesn't seem excessive. Just tell people it's ram-tuned....3 points
-
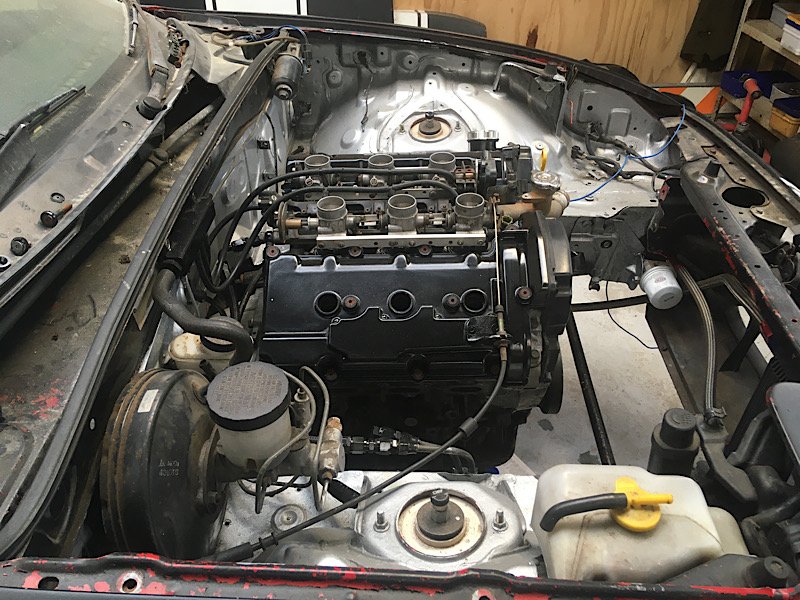
So despite it looking like a dog's breakfast, I'll take the win for now. Looking at the picture of the mock up below - apart from the fact that it looks like it needs a dose of Viagra - the only other thing worrying me for now is the length of the adapter pipe. Unfortunately this can't be helped and I'm just going to have to live with any performance degradation that the length may cause. To be fair I have over estimated the size of the carbie, so I'm hoping that once I have the actual carb in my grubby mitts, I'll be able to reduce the overall length by a bit. I also figure that the old VW Beetles ran a very long inlet manifold in standard format, so if it worked for VW surely it's going to work for my dodgy 4Y. Time will tell I guess. Next step is to start fabricating the lower plate that will bolt on to the standard 4Y inlet manifold. Valiant has suggested that I make up the adapter using steel rather than aluminium which suits me as my skill set is low and I'd need to farm out the welding if I went ali. I'm thinking to use a pipe somewhere around 45 mm ID based on the fact that the SU has a 44 mm diameter butterfly. Does this sound right ? I'm guessing that I should retain the plastic isolation spacer that currently sits on the 4Y manifold, but am open to suggestions from those more knowledgeable so feel free to point out the error of my ways. Similarly should I be putting an isolation spacer between the carb mounting plate and the carb ? Thanks for reading.
3 points
-
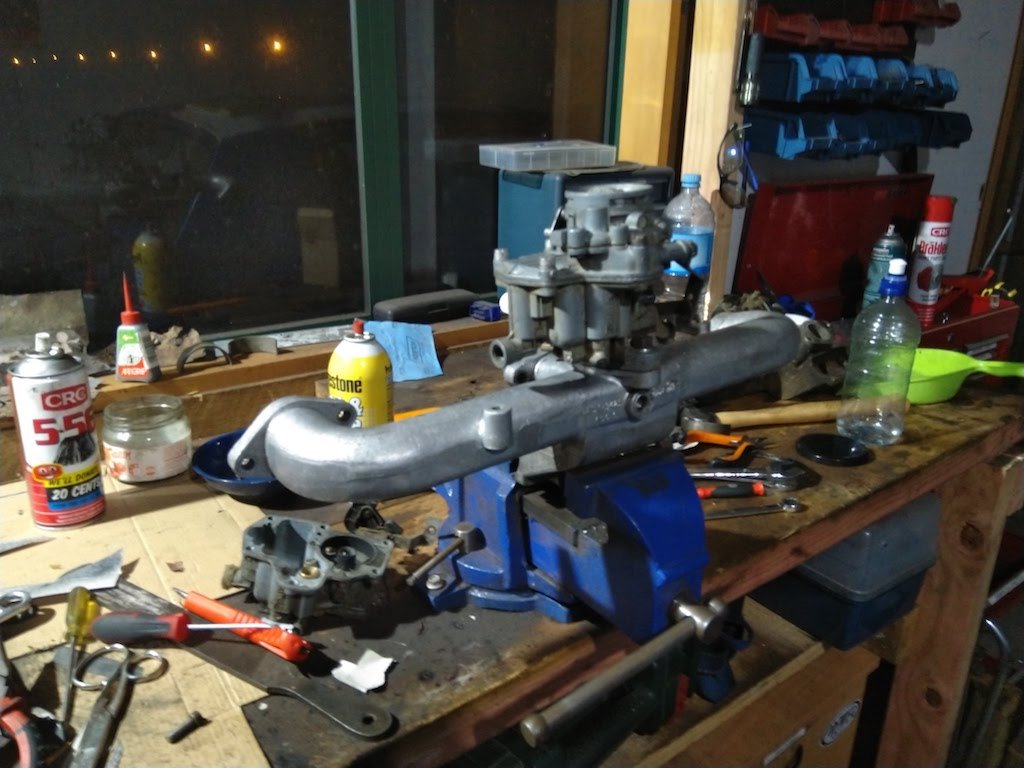
Yesterday I came across a listing on Gumtree for a HIF44 SU at a pretty decent price. It was previously fitted to a Harley so I'll likely need to up the size of the jetting. Not an issue as the UK crowd have kindly supplied the needle size that they run on the 2.25 L Landy engine, so I'll start off with that. The SU comes complete with a home fabricated inlet manifold and although it is for the Harley I can still cut off the inlet mounting flange and that will save me having to fabricate my own. If it all turns to custard I won't really have lost anything as our Moke could always do with a carbie upgrade, but hopefully it won't come to that. Anyway with some free time on my hands this morning and armed with the SU physical dimensions that kws provided me, I decided to mock up the HIF44 and an adapter to confirm that it will fit into the cavernous engine box on the Thames. As you will spot in the pic below, the engine box cover is stepped with the back being a lot higher than the front. This dictates that the SU adapter needs to sweep backwards as well as towards the centre of the engine in order to clear everything else.
3 points
-
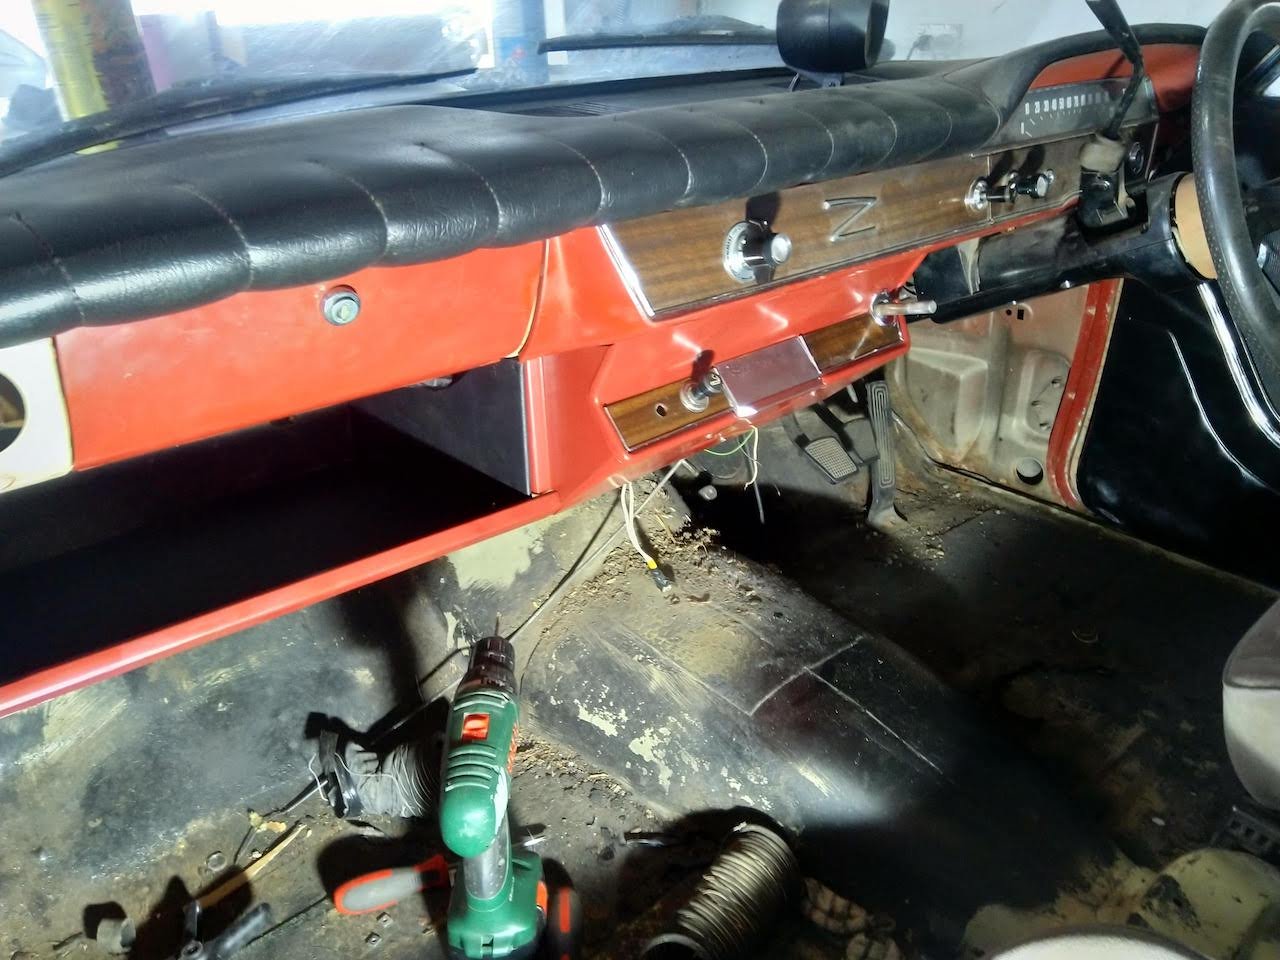
Oh my Lordy. Made some plates with the intention of plug welding them to the firewall. Got stuck in to the welding which was quite fiddly under the dash. Was smoking a bit and got to the point where the smoke was a bit worrying, so hunted round to find source and sure enough, fire! Couldn’t find it but could see orange glow. Went into full panic mode and ripped inner guard liner off to find the fire on foam attached to back of firewall. Put it out but I think it took a few years off my life. Anyway bolted pedal up and it’s not in a great position. When you hit brake pedal the side of your shoe catches the throttle. Will be great for heel/toe but maybe also bad for doing an Audi5000 and jamming on the throttle while panic braking. I think moving the go pedal back toward firewall and across to the right a little bit might fix it, but I’ll do a test drive before I make changes.
3 points
-
Think this is the most Old School thing I've ever seen on here. 1900's spec billy cart...3 points
-
I've been binging far too much DIY composite stuff during this lockdown, so figured it would be a good idea to re-read this whole thread. Man, there's some good stuff in here! @mjrstar - your dash looks amazing and I'm really impressed with the result since it's straight off the buck. I've been watching a few of this guys videos. He does quite a bit of infusion and vacuum bagging, as well as some hardcore aero mods on his own racecar and some wind tunnel work for clients. Pretty keen to build a foam cored carbon splitter panel eventually! I've got some front bumper mods that need to happen on the racecar. Will come back here and contribute my failures when it starts to happen .3 points
-
The funny thing is I was really grumpy when I made this as the perfectionist in me wanted to do a good job, but the reality is the kids couldn't give a shit and have been playing with it way more than full effort stuff I've made3 points
-
Another semi productive day in the shed. As well as replacing front wheel bearings on the ride-on and cutting the grass, I have managed to pull some more bits off the Landy. Pretty simple stuff really. A couple of the hinge screws wouldn’t budge so I just smacked the hinge pins out. The rest of the hinge screws came out very easily. The roof bolts are also a doddle, and the whole thing is very light once you break the seal. The windscreen then comes off very easily. Many archeological discoveries were made too. A pocket knife, numerous ancient, live .22 rounds and bits of Nana’s finest china. Next was the rear cab panel which also didn’t put up much of a fight. I might do the seat box next. I should get one of the kids to lie under the truck and hold the 7/16ths spanner on the nuts while I go to town with the impact driver and socket. Other observations: the driver’s door is pretty wrecked. It needs a new door top and the frame is also rusty and has some large structural cracks in it. Passenger door is fixable. The bulkhead will need some patches and new footwell panels. It’s going to be a big job...
3 points
-
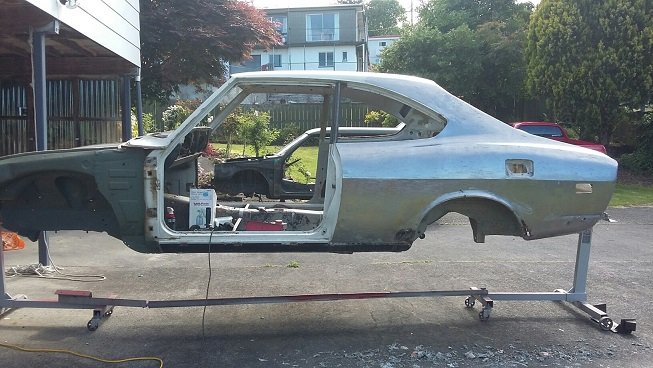
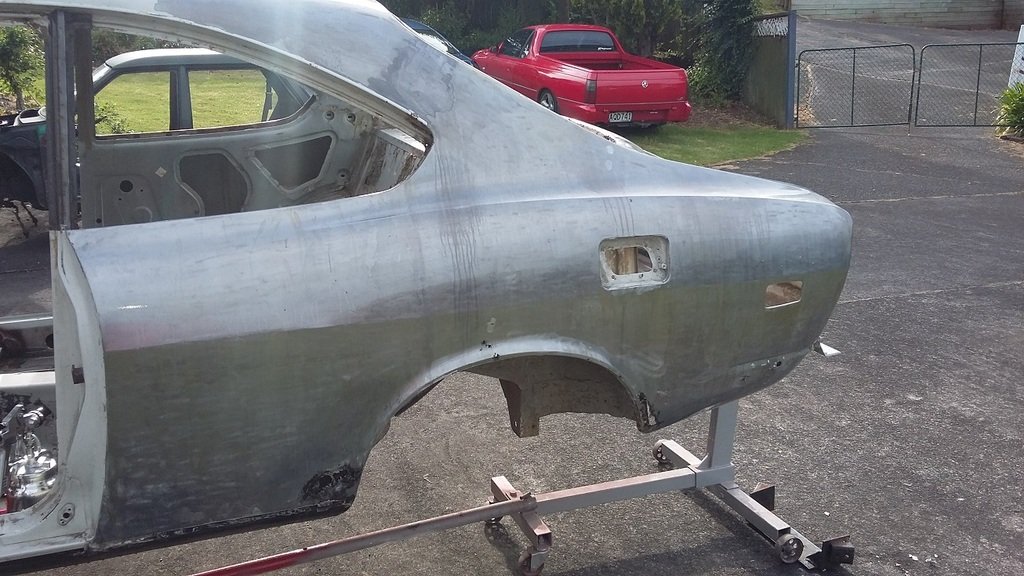
Car was fully stripped to a bare shell, and i set up a booth under my house, a mobile blaster came over and did everything except the rear 1/4s and roof. Once he was done I 2k epoxy primed the shell to lock it all in. later on I hand stripped the 1/4s etc, and epoxied again
3 points
-
Cheers to @64valiant for covering the top half. Sure its a bit less bling, but should reduce glare nicely. Also made a fibreglass blower duct for the demister which I would not have considered 12 months ago, which was pretty quick and easy with a cardboard and tape mould.
3 points
-
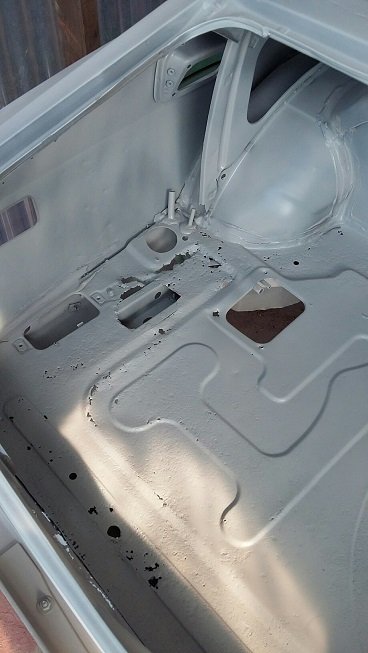
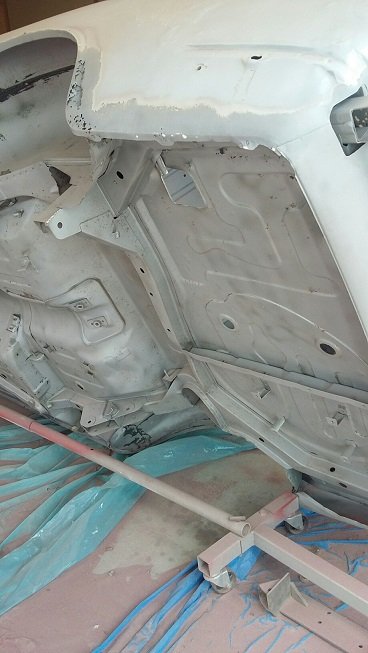
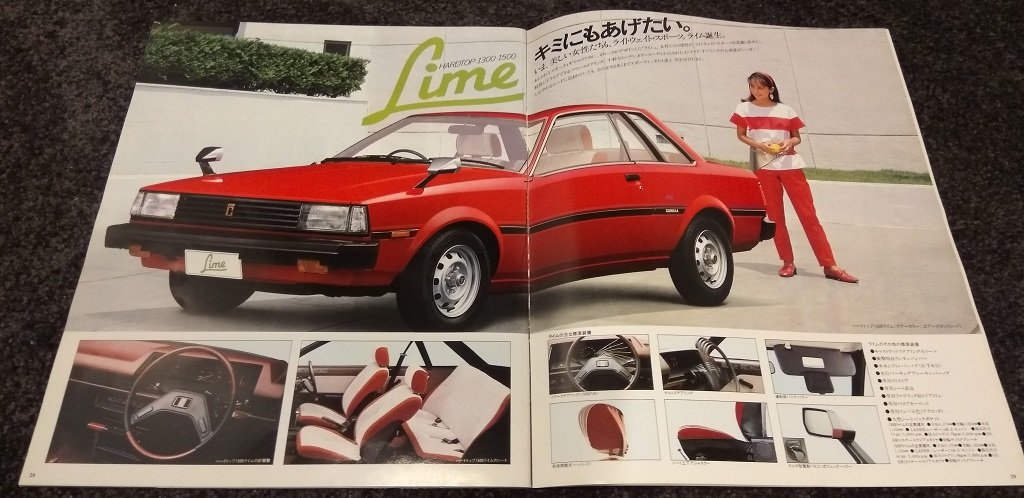
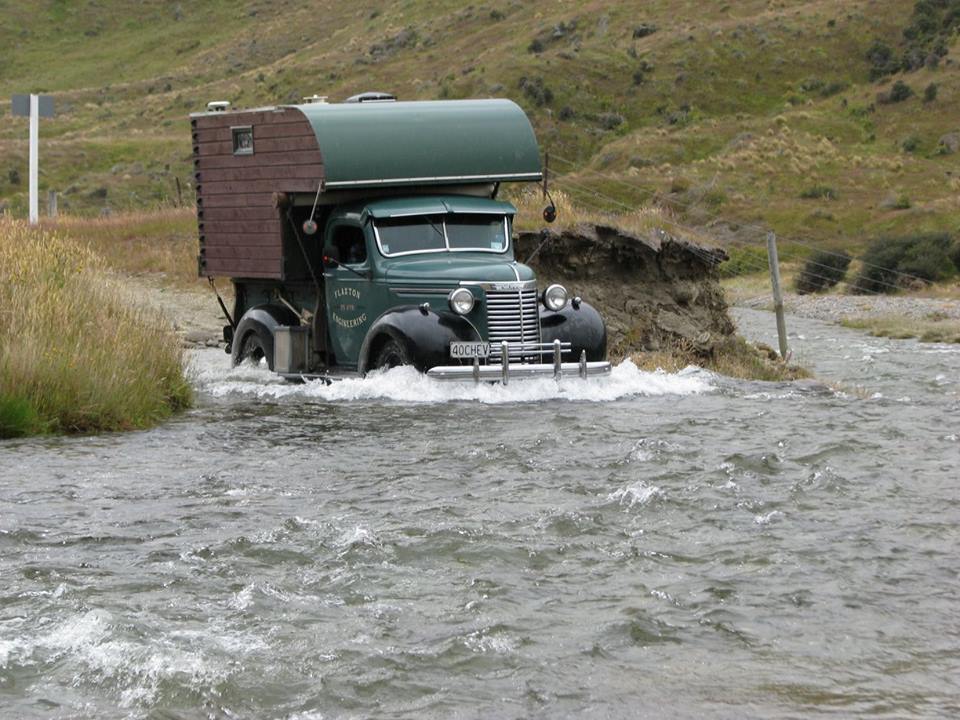
So yeah. Found out about this fine specimen right after Nats '18 after mentioning i'd like a hardtop to throw spanners at. Seedy Al mentioned I should speak to Goat, and so I did, the rest is history. It had been living in Goat / Joe's shed for a while and after some discussions I had it trucked down a couple of weeks ago. Specs: 1982 Toyota Corolla, GL “Lime” with a 3AU powerhouse and 5 speed manual trans. Lime is along the same lines as Lisse, a luxury variant of the GL model (Lisse for XL) featuring automatic transmission and power-steering. They were marketed heavily towards women in Japan. (Thanks Wikipedia). Plans including lowering it and upgrading the brakes and giving it a spruce up. Engine can come later, as it would more than double the budget given drivetrain upgrades required. There will also be all the boring bits like fixing rust, replacing half the car and all that carry on. This is actually hardtop number two, but who is counting. Teaser pics for now. Discussion Fred.
2 points
-
Back in July, I had this nugget come into my collection. pretty rough/incomplete Z50 clone. I liked monkeys and this one popped up in budget Fitted a YX140 and a few other bits too it to make it rideable and this was it at peak nuggetness rode it a couple of times and thought it was cool but too cramped for me/didn’t turn out the way I’d envisioned it so pulled the motor back out and flicked the rest.2 points
-
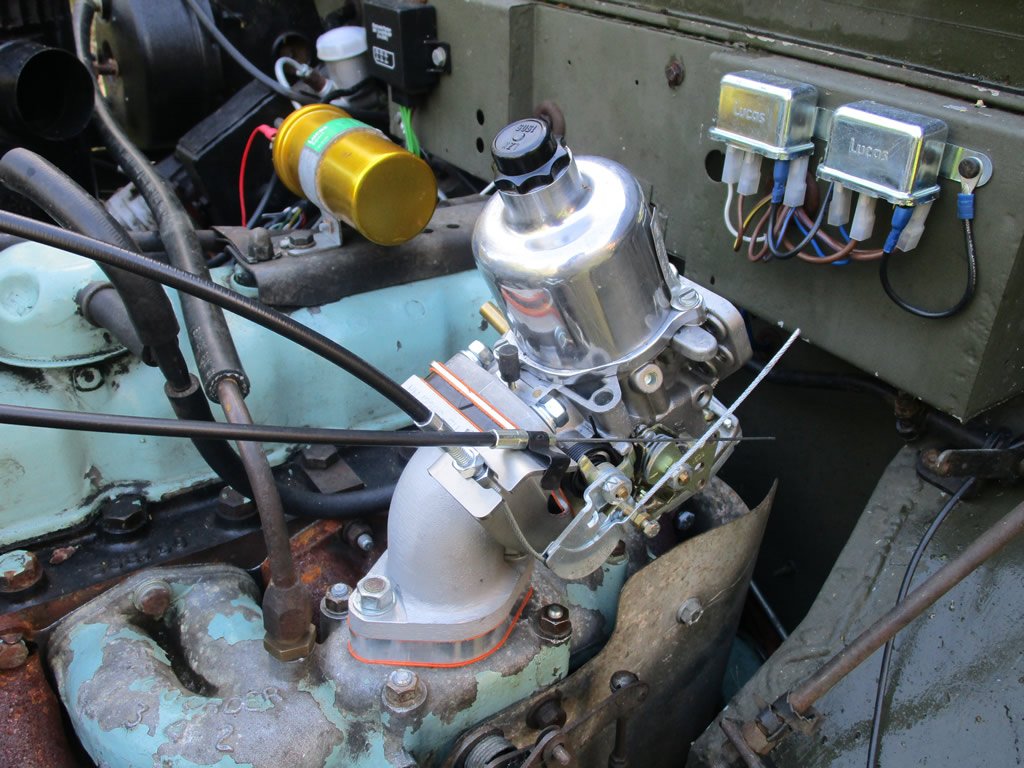
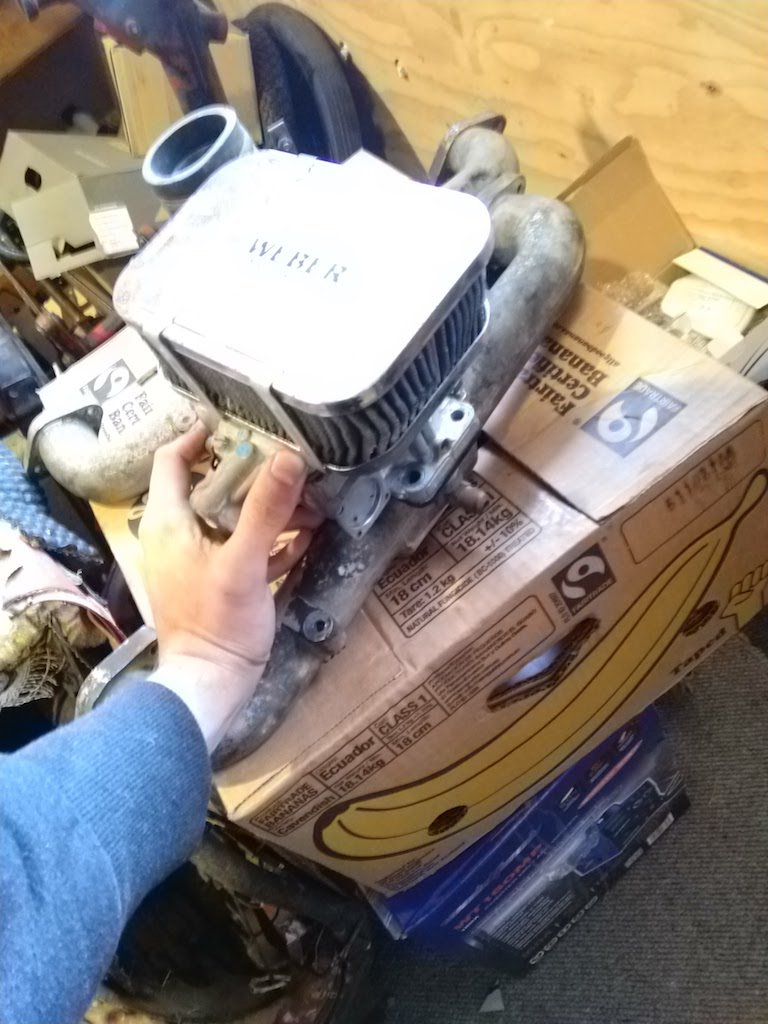
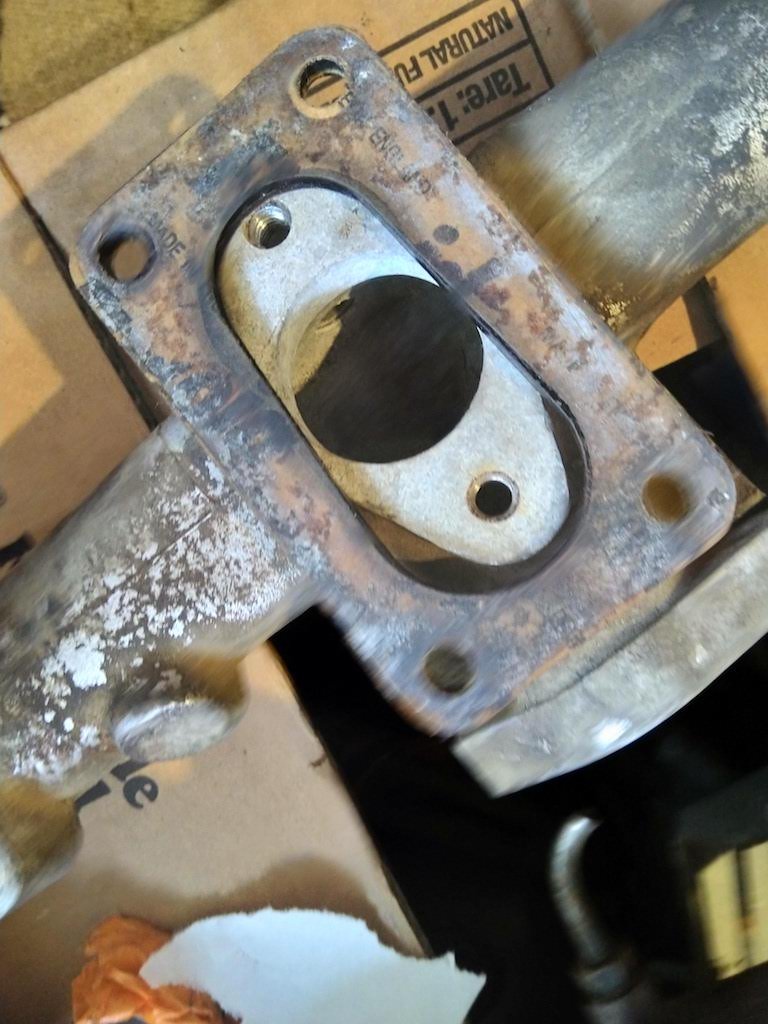
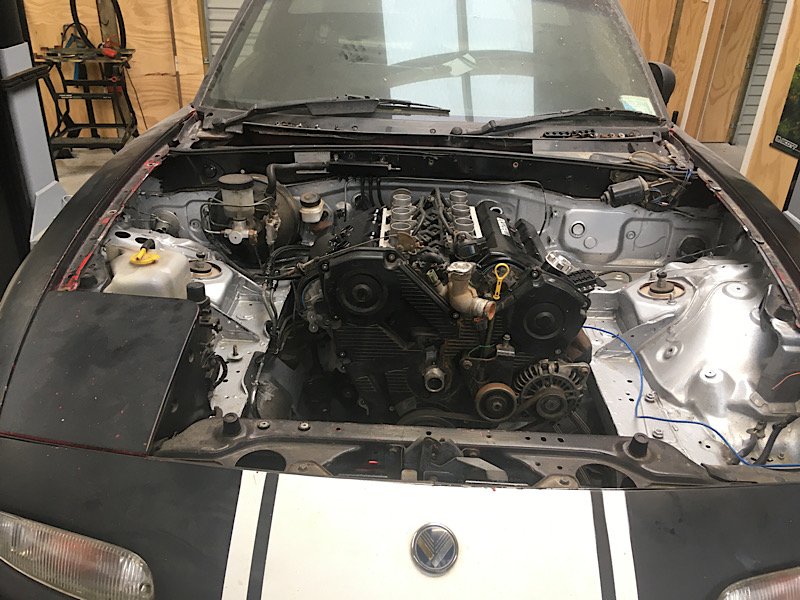
Earlier in the week I managed to get the HiAce donor van running. Started off sounding like a tractor, but I managed to swap out the blown muffler with the one from my second donor van and after tweaking the timing and giving it a couple of heat cycles it is now running sweet. Fitted the drive shaft and hooked up the gear shift mechanism, so the only thing preventing me from taking it for a sneaky squirt down the road is a leaking clutch slave cylinder. Managed to find a new Girling unit on eBay for less than the cost of a rebuild kit, so I'm just waiting for that to arrive. I've also been spending a bit of time thinking about my fueling options. You may recall that I don't have enough space in the engine box to run the standard Toyota twin downdraft so I've been looking at alternatives. I started off thinking about a DCOE side draft, but they are pretty spendy and the mighty 4Y wouldn't really do one any justice. I posted a few times in the OS Tech Section and got some really good suggestions from Valiant and Nominal. A bit more pesting on the Tech Forum also got me some good info from sr2. My sincere thanks to the aforementioned gents and everyone else who has stepped in with advice and suggestions. I gave LPG some thought but this being a budget build I just can't justify the cost of the conversion. I also spent a bit of time investigating a TBI setup suggested by sr2, but kept gravitating back to a carbie option for its simplicity and relatively low cost. Valiant and Nominal got me thinking about a SU carbie and sr2 spurred me on in this direction too so I did a bit more homework and came across a crowd in the UK who have been fitting 1 and 3/4 inch SUs to old Landies to replace the single choke Zenith. Their adapter setup looks very similar to the photo of Valiant's adapter that he shared with me. Pic of the Landy conversion below:
2 points
-
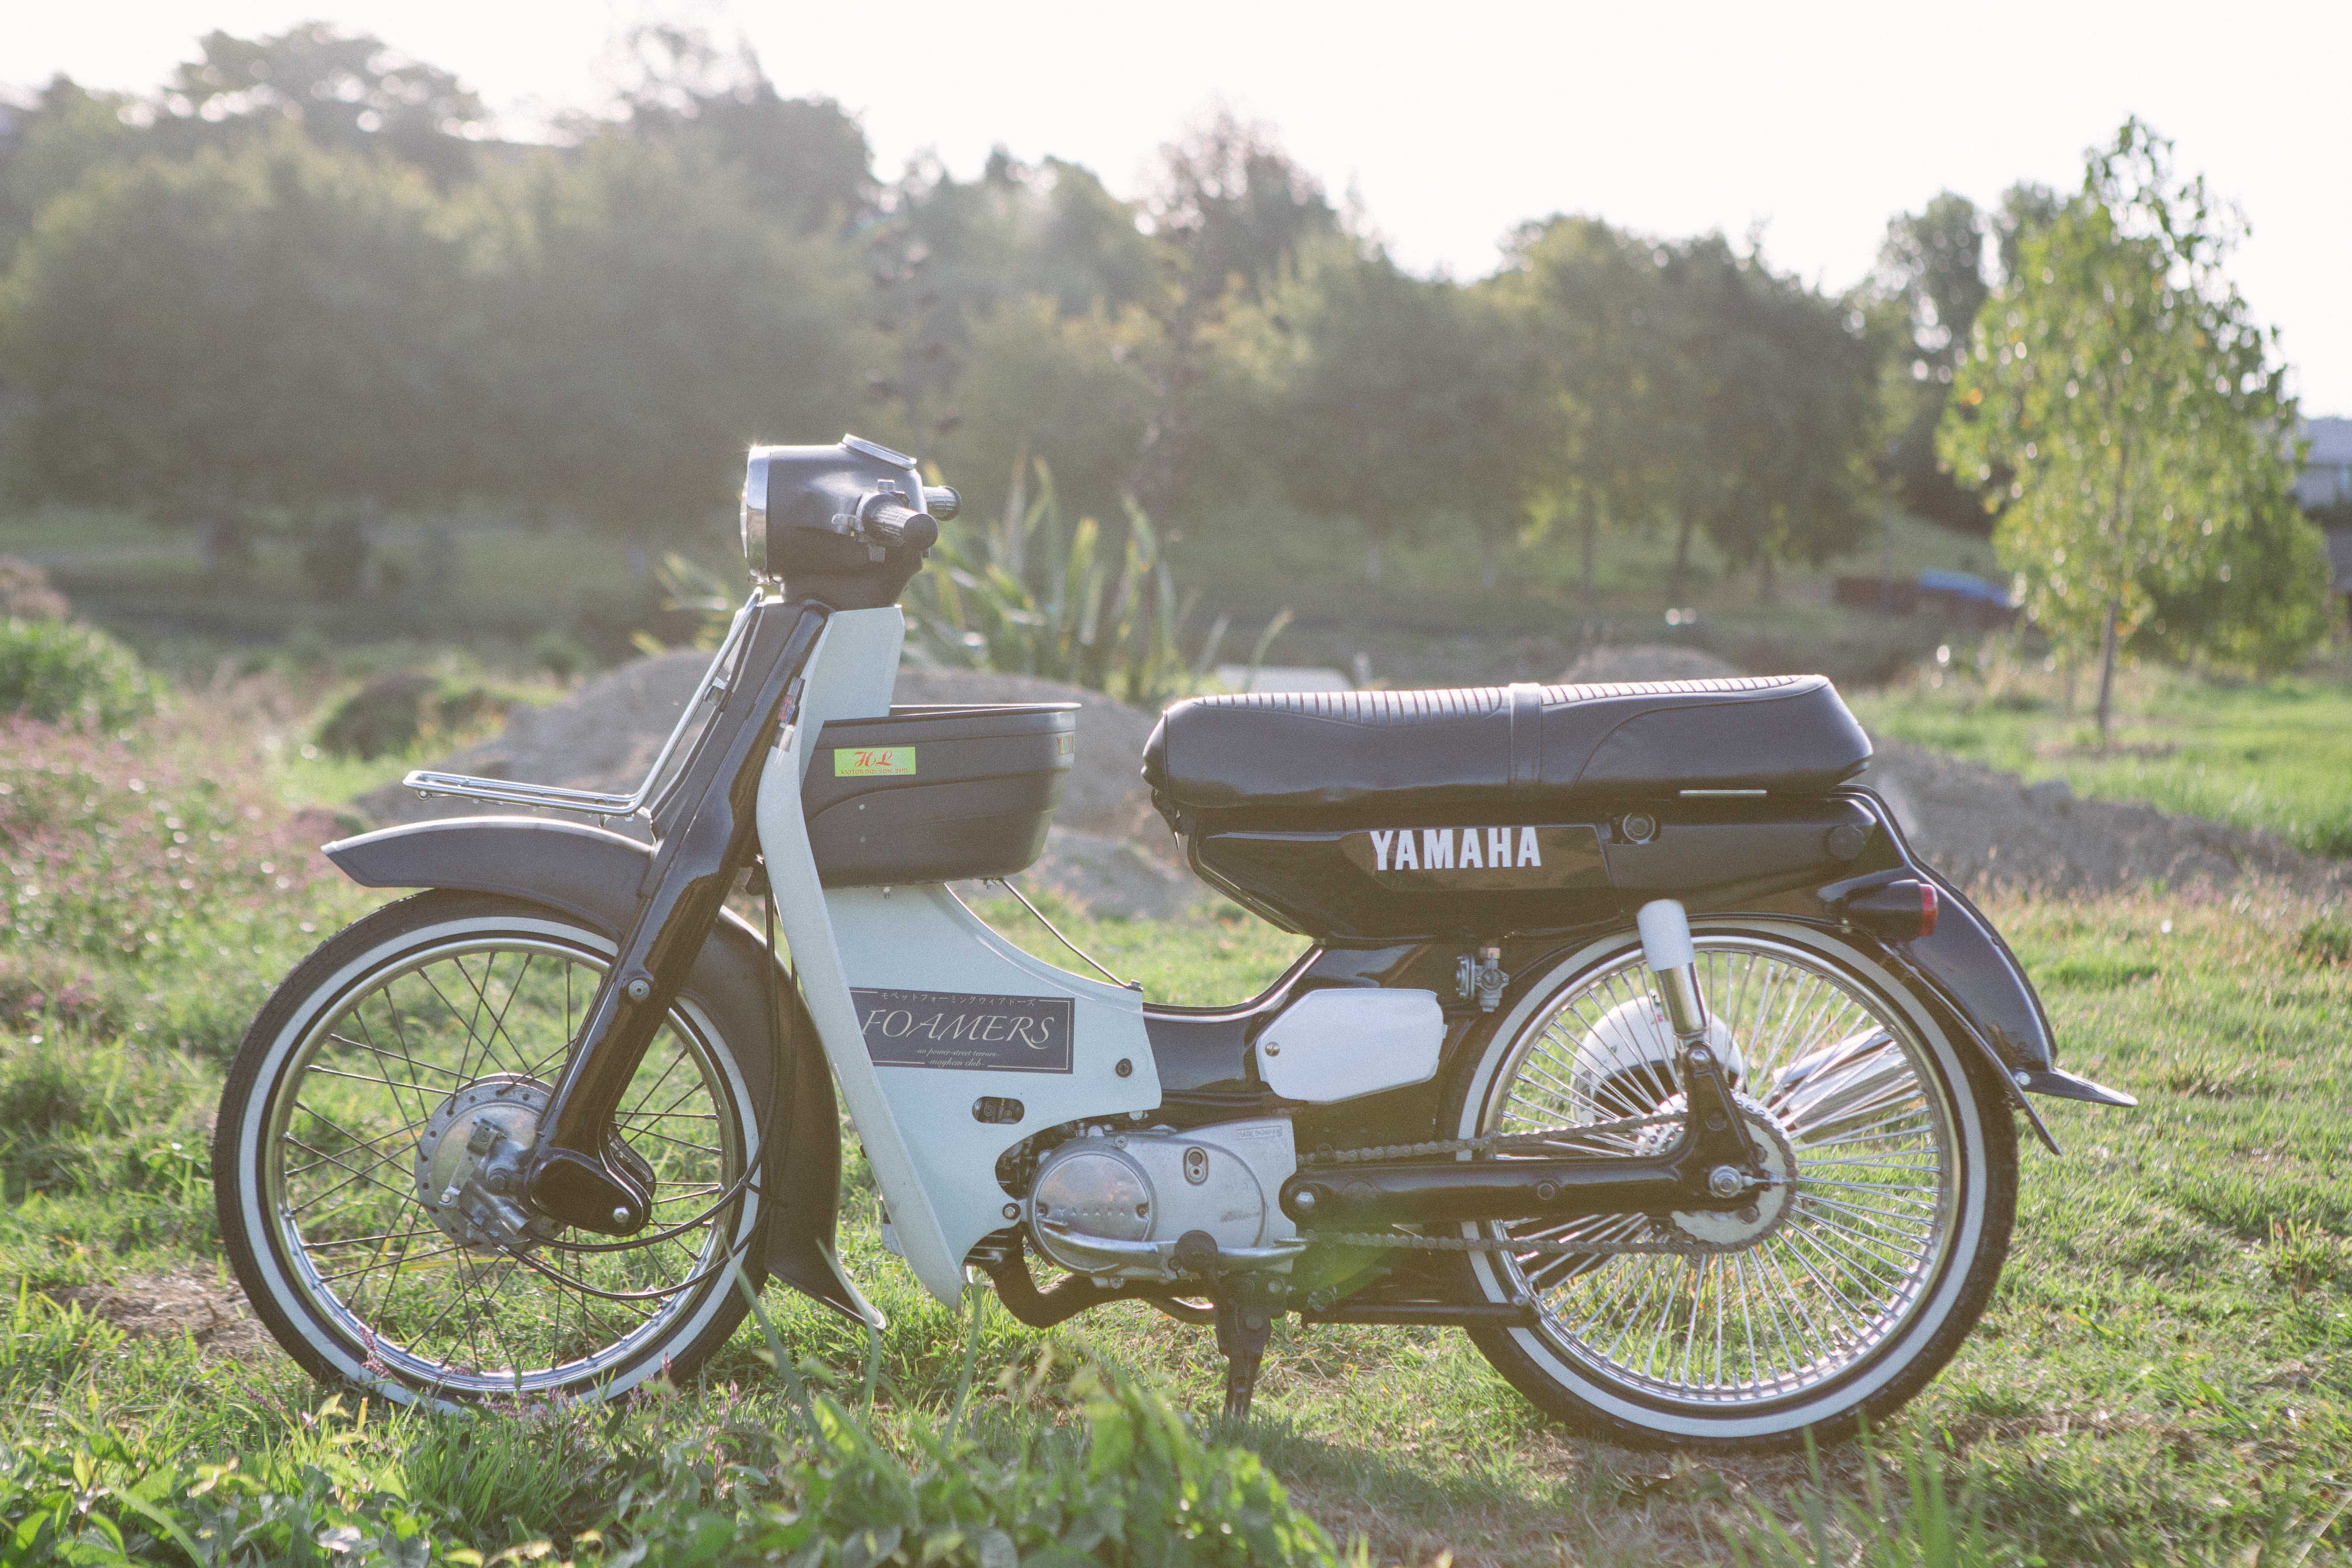
Here's a couple of side on photos of how it looks. I took these photos for @MopedNZ's article on Yamaha V series that he put on his website: https://www.smallbikestuff.com/yamaha-v-series Also discovered the massive indonesion scene for modifying and racing their V series bikes. Styles are questionable but I love the passion for these bikes regardless. https://www.instagram.com/explore/tags/vseriesracing/
2 points
-
i put the front bumper back together and put it back on and it looks ace, i did however forget to take a picture so yea.... anywho i did some other stuff. the rear muffler was too big, hit the ground a lot and made the car way to quiet so i fitted a smaller one. it doesn't hit the ground and the car is louder which is good. old muffler with custom flat bottom, 2020-04-06_05-10-26 by sheepers, on Flickr new muffler. 2020-04-06_05-10-17 by sheepers, on Flickr so the next thing i wanted to do was make new bits for the tops of the rear bumper. the ones i had were fucked so i made some new ones out of 8mm aluminium plate. ill let the photos do the talking but some points to note, the only file i used for this whole process is the one pictured which is called a dreadnought file if you've never seen one before. there is no better file for working with aluminium, you can get a great surface finish with these files if you know how to use them and they will remove heaps of material very fast too. things they dont like however include filing steel, that will fuck them. the other thing is that i used my 60mm DA sander/polisher to go from file finish to polished because DA sanders are the best thing in the world, get some. 2020-04-06_05-10-09 by sheepers, on Flickr 2020-04-06_05-10-00 by sheepers, on Flickr 2020-04-06_05-09-29 by sheepers, on Flickr 2020-04-06_05-09-46 by sheepers, on Flickr 2020-04-06_05-09-38 by sheepers, on Flickr 2020-04-06_05-09-20 by sheepers, on Flickr 2020-04-06_05-09-06 by sheepers, on Flickr 2020-04-06_05-08-56 by sheepers, on Flickr 2020-04-06_05-08-46 by sheepers, on Flickr 2020-04-06_05-08-35 by sheepers, on Flickr 2020-04-06_05-08-25 by sheepers, on Flickr 2020-04-06_05-08-15 by sheepers, on Flickr 2020-04-06_05-08-06 by sheepers, on Flickr 2020-04-06_05-07-48 by sheepers, on Flickr 2020-04-06_05-07-39 by sheepers, on Flickr 2020-04-06_05-07-31 by sheepers, on Flickr 2020-04-06_05-07-22 by sheepers, on Flickr 2020-04-06_05-07-12 by sheepers, on Flickr 2020-04-06_05-06-55 by sheepers, on Flickr 2020-04-06_05-06-45 by sheepers, on Flickr2 points
-
Well I must say I do love the new Recaro seats. They are so comfy and hold you in place soooo much better in the corners. I had still been using it heaps through summer. Got a shot of it next to an I8. Huge cars!!!... What else? We took the Imp over to Blenheim for the big classic car show they have there. Its getting bigger every year and I have kept missing it each time. Not this time though! The weather was a perfect Med like blue sky day and the cars that turned up for the show were a really nice mix of everything. My parents came along too. My dad is 87 and not too fast on his feet having pretty bad lungs now. I was worried he would struggle but I kid you not- he seemed to perk up more every minute and flitted about all the old cars really quite animated. It was great to see and I'm so happy he made it along. Mum loved it too and we met some great people. Pics.. The show.. Dad pondering if he could have fitted a V10 into his Moris traveller he once had, or maybe the 120y wagon they had... Hannah's favourite car of the show (and her dream car)... Some sweet old boats there... Me next to dad, holding a 8 month old Kelpie puppy(my favourite brand of dog, we used to have one).. The Imp (wtf the Toyota Pius was doing there we don't know..)... There was actually a car there that made the Imp look huge... The Imp was popular, being bright blue and the only one there. Lots of people checking it out all morning. I printed off some photos of the restoration onto a4 sheets and stuck them in a plastic binder with a quick note for each. People I spotted seemed to enjoy the read and I imagine it made for more admiration for the little car that was rescued from a field. The trip to and from Blenheim was fun and uneventful. The Datsun engine impressed again with its thriftyness by managing 44.8mpg and that was with some spirited motoring too Drove some nice roads near my old home town. Very very dry over there and sadly they still have not had much rain. But fantastic grape season if that's your thing. Once back home I decided to put the car up on the hoist and deal to a couple of jobs I have been putting off. Those of you with a good memory may well remember the state of the ring gear. It was worn badly in two locations, 180 degrees apart. This meant that it had a 2 in 4 chance of stopping roughly near one of those spots. It seems that sods law dictated a sliding scale of when it would stop and this scale was linked to how many people are around when I would go to start the engine. Worse if those people were probably of the type that think 'oh that a nice old car but they are very unreliable'. When the time was right the starter would ignore my want for turning over the engine and instead may a horrible loud racket as it wore the ring gear worse. I would have to then sit the car in 4th gear, put my foot out the door and rock the car- so moving the flywheel around just a bit. Then start the car and drive away red faced as the people now watching tut tutted... Never did it do this on our property btw... The other thing was that the rear main seal was leaking badly. Bad enough that the clutch was playing up and I'd have to think carefully about where I was to park the car when going to the country club* for fear of meeting those same people again and only going to reinforce their misguided opinions about old cars. I had the chance to replace the seal when I took the engine out way back at the beginning. But remember who I am - a tight wad who likes to save money and $25 seemed like an awful lot for a seal that 'looked ok' Silly me. So out with the engine then. Made easier by using my special custom made bespoke 'Datsun A12 engine cradle' Here's the worn ring gear. I drilled it and broke it off. Removed the old seal. It was indeed very hard and not very sealy. More like a ceramic ring then a seal.. The oil had coated the clutch disc.. Luckily that cleaned up sweet with a load of brake cleaner and was deemed good to use (please refer to note above about tight wad..) Went to my old workplace, Autofocus in Nelson and used the gas set there to remove the good ring gear from another flywheel that came on the A15 engine I had bought. I then dropped it onto the A12 flywheel... With that done the engine was given a quick clean whilst out and slung back in place. Oh but not before making using the opportunity of an empty engine bay to size up a different engine. That however is secret squirrel and will be announced later in the year The Datsun was all plumbed and wired back up. It started straight away and after bleeding the coolant system I took it for a hoon. Clutch feels great and no horrible starter noise roulette... However..... the bloody speedo gave up and decided that the needle should reside at around 90 mph. It had been getting ever so more optimistic over the last few months and I had read that the springs can weaken. It doesn't affect the odometer which is mechanically linked to the speedo cable, just the speed reading. Now though, having just fixed some other issues my 'unreliable old car' decided to throw another at me. When I returned home from said hoon the needle decided it would resolutely remain at around 60 mph even when the wee car was stationary. So this happened... I'm so glad that I had added plugs to the wiring birds nest that resides behind the instruments because it made removal much quicker and easier. I took the speedo apart and found this... It seems that the sponge sealing which fits between the telltale warning lamps and the speedo face had broken down and crumbled into the speedos magnetic disc area so creating drag. I'm not sure but it was messy in there with lots of friction. Rather then muck about trying to clean it all out I instead pulled the spare speedo head from my stash of Imp parts and fitted that instead. I removed all traces of the old foam, opened my little alladins drawer of various foas and double sided tapes and stuck on some new stuff... This lot will be binned in the future as I fully intend to replace the whole cluster with nicer modern gauges (but with a classic style to them) including moving over to an electronic speedo head. Speedo cables and all their wobbles can leave by the back door thank you please. So since the world has gone a bit weird and we all have extra time I decided that instead of refitting the dash into the car in the poor evening light I would instead do an update. I'll refit it tomorrow. One other job to look at is a rattle from the steering rack. I think I know what it is and I have already stripped and inspected a good spare that I might swap in. Other than that I'll just get back to using the Imp, obviously only for shopping purposes at this point in time. I now have plenty of other tinkering jobs to do and hopefully in the next update there will be some very exciting news * I don't actually belong to a country club. But I do like a spot of lawn bowls....2 points
-
So Yeh nah, the norgren air filter things didn't work. I took it for a blast on the beach, was probably like 10km away from my car, and it lost all power. The little filter things had got saturated with gas and stopped breathing. Luckily an easy fix, I just cut them off and it ran sweet again. So I thought I'd give plumbing them into the air box a try. I've welded a nipple on the very bottom of the plenum to connect too, this will also act as a drain if a float sticks and floods the plenum again. I also replaced the restricor tape with a bit of flat bar. I also did a dodgy patch on the exhaust, and put some flat bar over it to protect it a bit, as it's the lowest point. I also started building a simple trailer for transporting this thing. It's not going to have springs, and will have a hinged draw bar so it can tilt, so I don't have to have ramps. Regards, VG.2 points
-
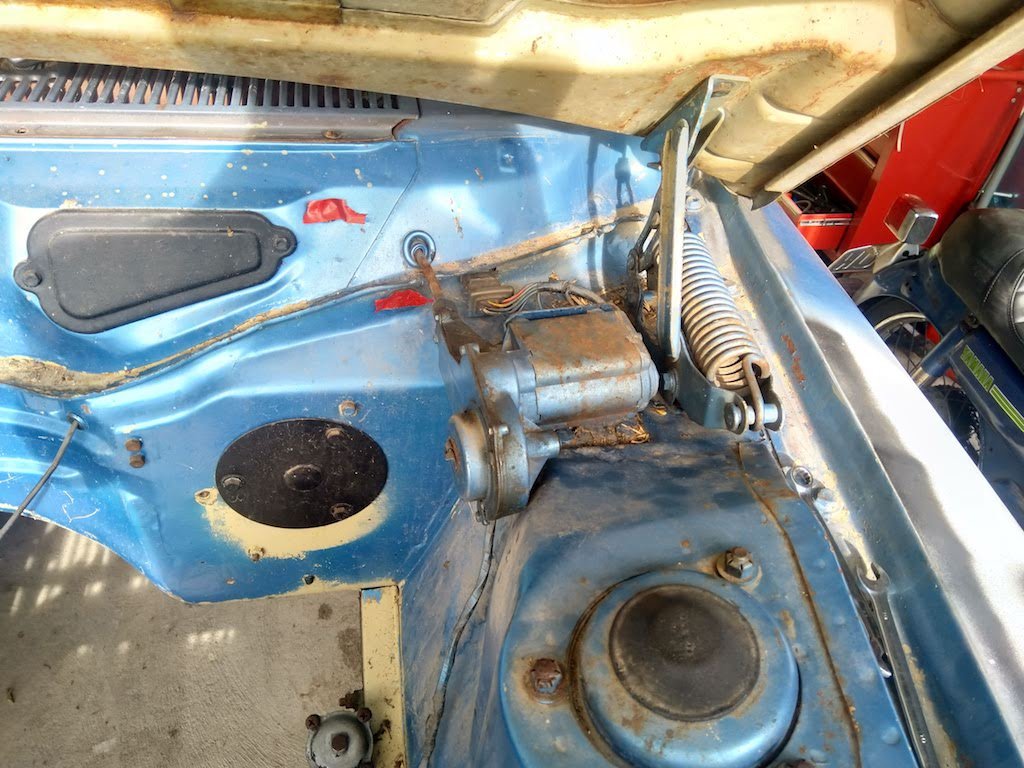
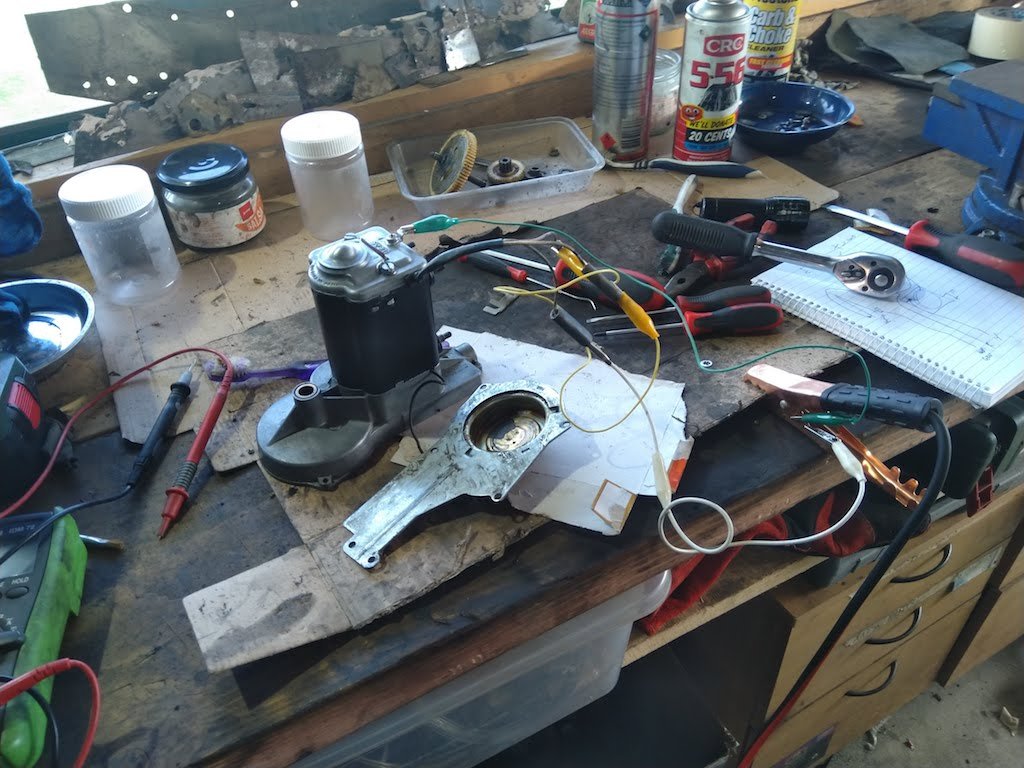
When I last updated this build thread I was struggling to get the donor HiAce to start. With some guidance from Browndog I managed to get the coil wired up correctly but wasn't getting any spark at the plugs. After swapping a few further yarns with Browndog it became apparent that the distributor needed a birthday. I had planned to source a new set of points and condenser as well as a fresh cap and rotor, but got offered a brand new replacement dizzy at a keen price, so decided to go down that path. Picked up the dizzy yesterday as well as a new fuel pump as the old one was shagged. Fitted the new dizzy first thing this morning. Chucked some fuel down the carbie. Twisted my temporary wiring together and was amazed when she fired up on the first go. Only ran for a few secs as I haven't fitted the new fuel pump yet and no exhaust so didn't want to piss off the neighbours. But to say that I am suitably stoked would be an understatement. Figured whilst I was on a roll I'd try to restore the original wiring so that I can use the ignition key rather than having to twist wires together. Only took me a few hours to sort out the wiring puzzle and she now starts with the key. Found the missing piece of exhaust in the back of the other HiAce, so fitted that too. This van hasn't run for a good few years so I was a bit dubious about the condition of the fuel tank and its contents. Figured I wouldn't fit the new fuel pump as I didn't want to fill it with crap. Dropped the bottom bung out of the HiAce fuel tank and was amazed to see that it still had about 10 litres of fuel in it. Fuel looks surprisingly fresh with no sediment so I'll take that as another win. Replaced the bung and put the juice back in the tank. Plan for tomorrow is to plumb in an inline fuel filter and fit the new mechanical fuel pump. Talking about the fuel pump I see that it has three connection points. One of the connectors has a small hole, so I'm guessing it must be some type of vacuum pipe. Can anyone confirm this ? Thanks for reading
2 points
-
Found the boost leak, one of the threads on the inlet manifold inlet was stripped and my rubber gasket was flapping like a my arsehole after a vindaloo. Must have done it up Archer tight - tighten it til it strips, then back it off half a turn. Managed to get an m8 recoil kit and sorted it, no more funny noises. I took it for a spin just now, it is boosting to 10psi which feels really quite lively. The EGT's are getting up to 600deg which is a bit much considering it's only acceleration load, it really needs a boost compensated fuel pump but this will be a lot later I reckon. I'll dial it back a tad and see what happens. It might need a fan on the intercooler, I have wiring for it now. The power steering is still playing the game, now I just need a functioning alternator. Good times. Pic edit for interest2 points
-
2 points
-
Due to it not running well last outing, I whipped the carbs off, and they were full of sand. Turns out the drain/vent tubes on the carbs must be able to suck? I assume on the motorbike they went to the air box? I think I'll put some pneumatic spec air filter/exhaust/silencer things on there, just to keep shit out. Like this, After cleaning the carbs it was running tumeke again. We took it up to some paddocks in the whops and had a hoon. At the end of the day I drove it back out to the main road (about a 10 min drive at 90kmh) to see what it's like as a daily. Its doing about 7g rpms at 90, which is quite loud, and also my whole left leg went numb/dead, and I couldn't feel the clutch pedal, so not great as a daily. The only issue we had was bashing a bit of a hole in the exhaust (lowest point) which will be an easy fix. Usual shitty vid:2 points
-
Quite a bit has happened, I removed the rust holes in the roof, welded, and refinished the areas. Had a go with spraying through the gun, don't think the results came out too bad but it was done in a bit of a hurry to beat incoming bad weather. I also cleaned up the scruffy tailgate, the bottom is still made entirely of filler and will be a major to fix, so I'll follow a lead I have on one in Australia. First time seeing it with badges! This was pushed in bad when I got the car. I also painted the front lip to blend a little nicer with the bodywork. I spent some time and fibreglassed the ends too, to reshape them for my lower panel. For anyone interested in the same lip, it was to suit a KE70 Corolla. I think it works pretty well with the car. Also picked up a low k's E series diff, unsure on the ratio but it should be fine as it was spun by a W55, which is what the wagon will eventually receive. I can make it work. Gave the diff a clean and paint tonight, even threw in some non-factory, factory looking markings for lols. Tomorrow it will get new slaves and shoes and be put into the car this weekend. The current diff is so noisy, at the pinion but also both wheelbearings, and the brakes leak. So, cheaper and easier to just put this fresh diff in, which also doesn't leak which is perfect. This month's focus is prep for next months warrant. Being entered in at drag days, and with a big road trip planned over summer I'll be screwed without it! So fingers are crossed she makes it through. I'll give it some fresh suspension bushes in the rear too, for peace of mind. Also, I managed to find a full set of NOS toyota centre caps for a corona. With the gold Hayashi Street's I think it really works. Happy with this current setup. That's all for now, I still (desperately) need springs that fit until the S13 coilover conversion next year. Cheers2 points
-
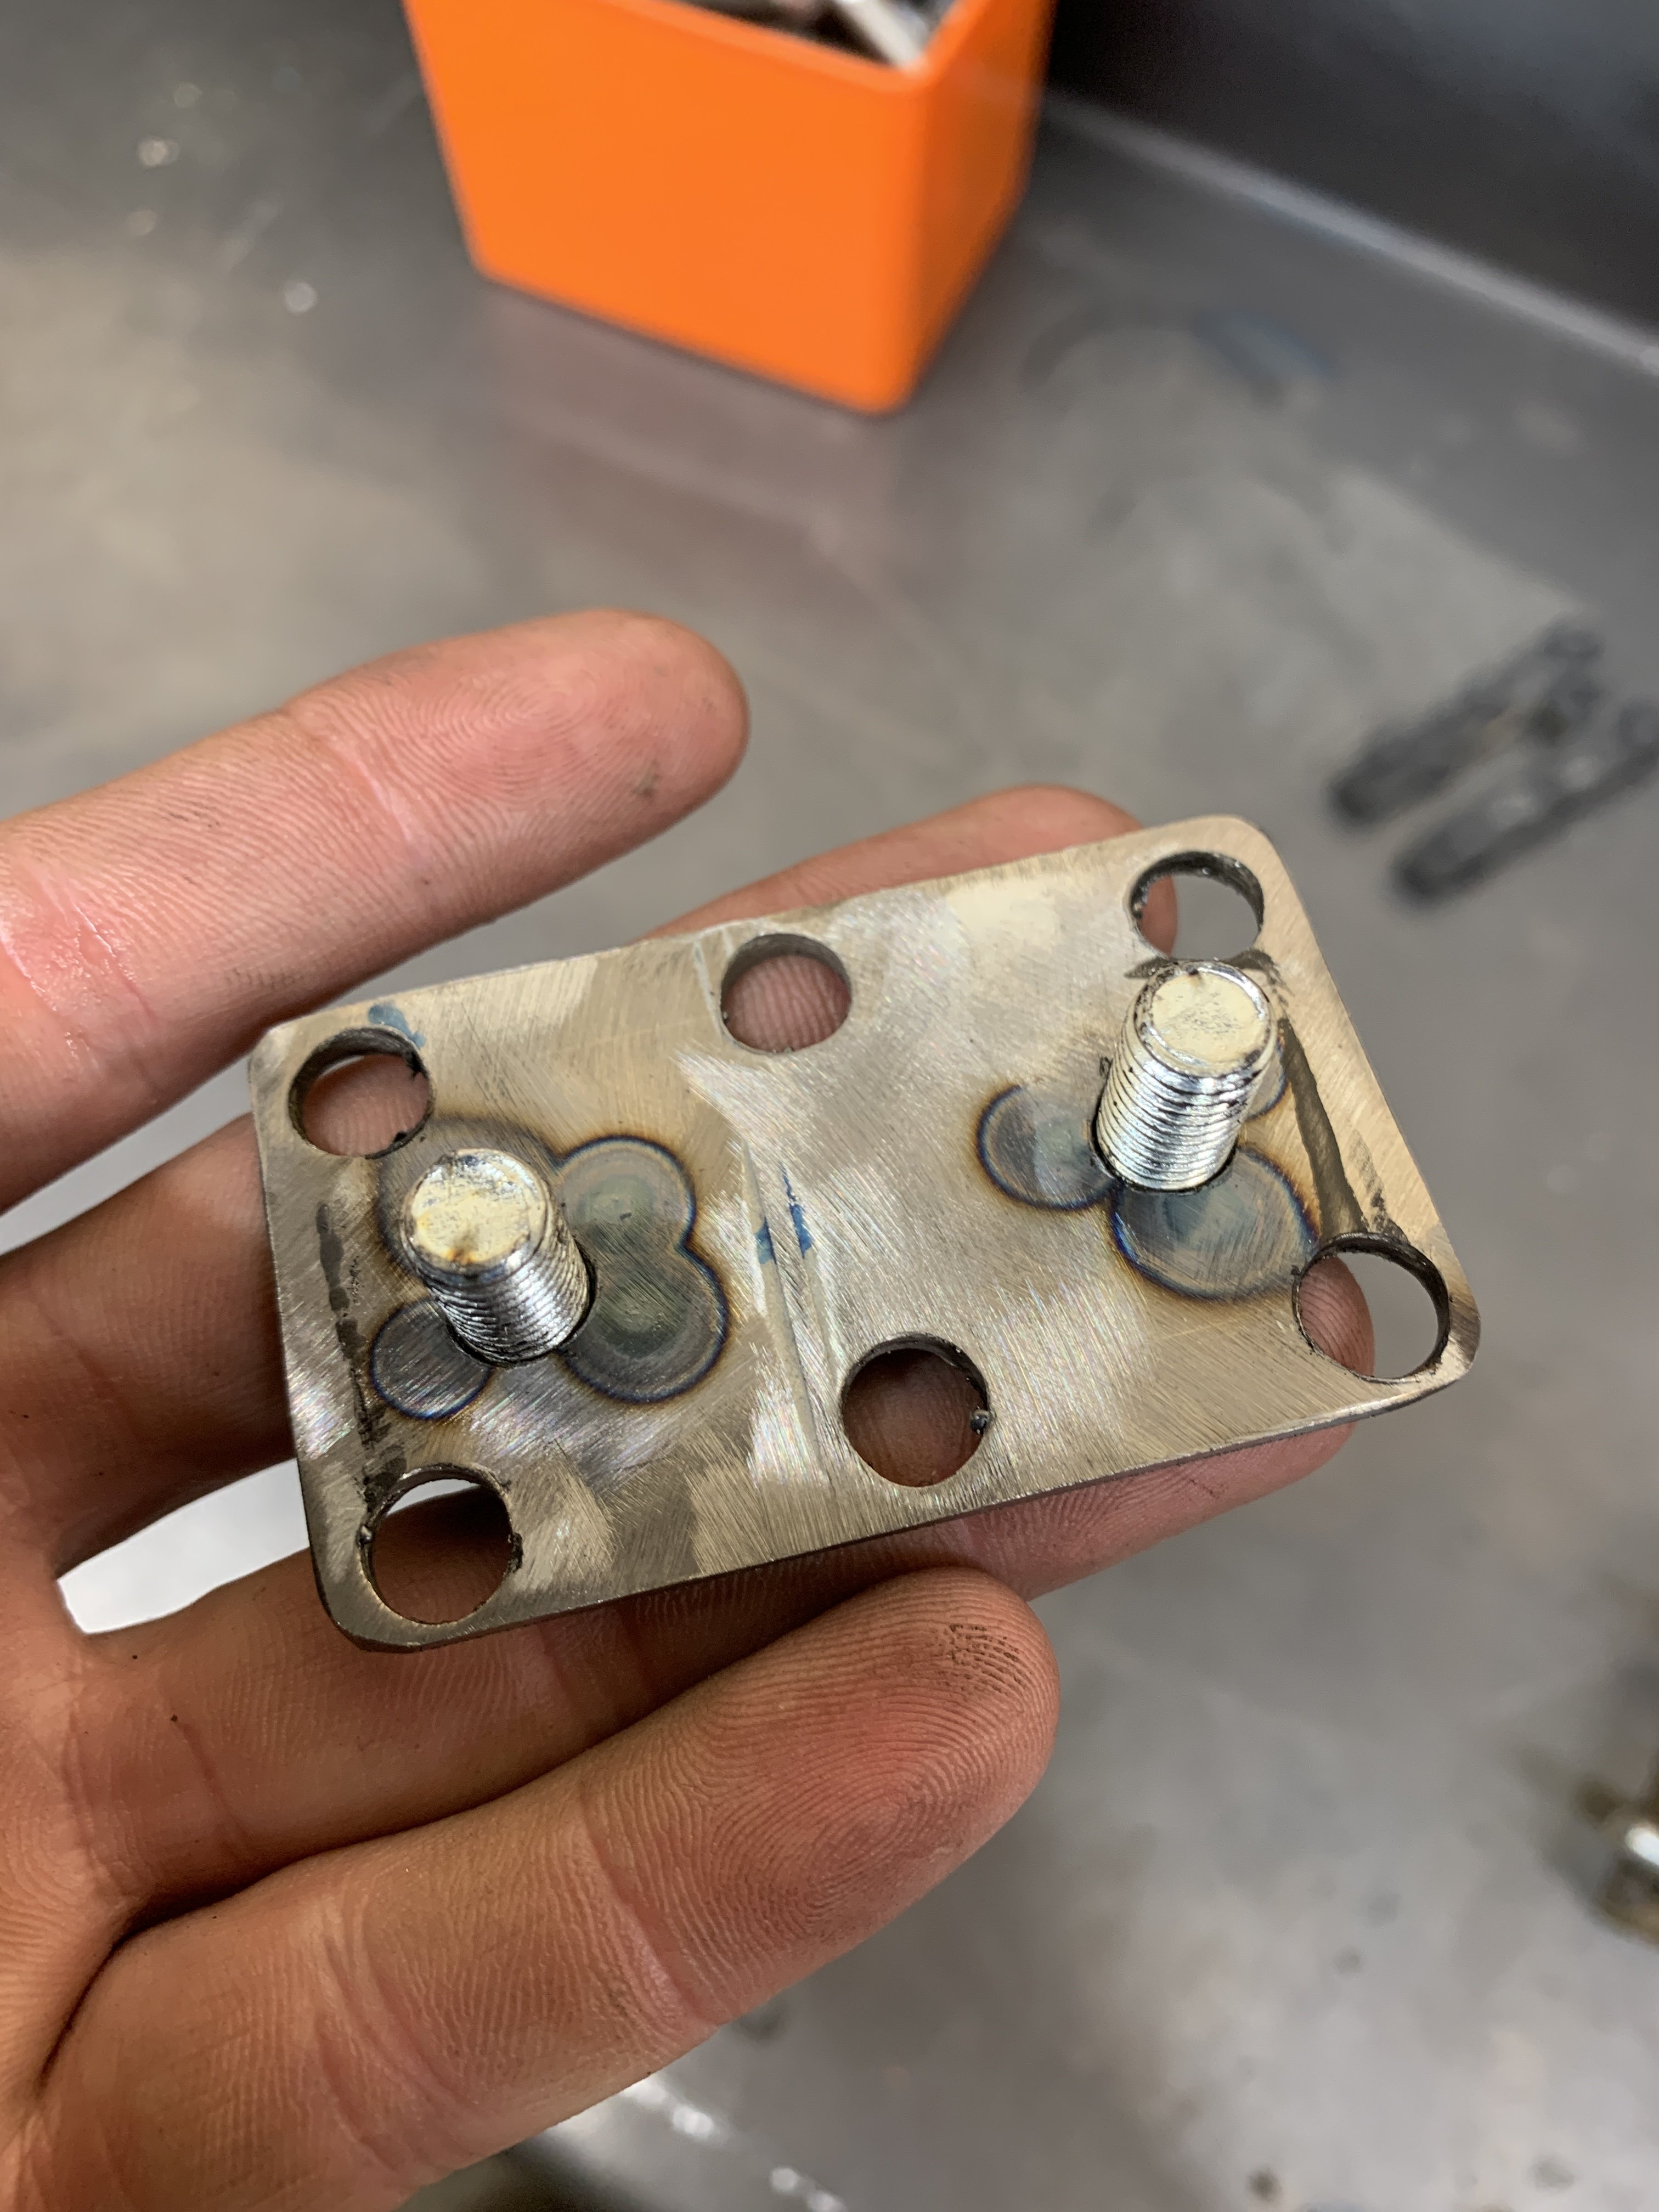
Got the dash all finished off, pretty happy with how it looks now. Got a colour matched rattle can and a can of matte clear. Looks fairly close to the original. Found someone on facebook who had adapted a factory manifold to suit a weber 32/36 carb, similar to a geddes speed one. I think I'll give it a crack, I've got a couple of spare manifolds so doesn't really matter if I screw one up. Plan is to cut off the raised mount, make a new carb flange out of 10-12mm Al plate, get that welded on then have a go at matching with a die grinder.
2 points
-
Just been doing little things on this. So far I've rebuild the starter motor, windscreen wiper motor and a carb with the best bits from several. Found a wee bit of rust on the guard, fixed that. Fixed the transmission tunnel, someone had cut it out for a floor shifter with what seemed to be an axe
2 points
-
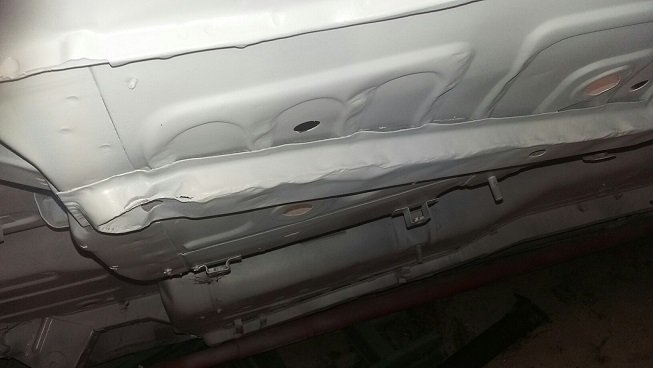
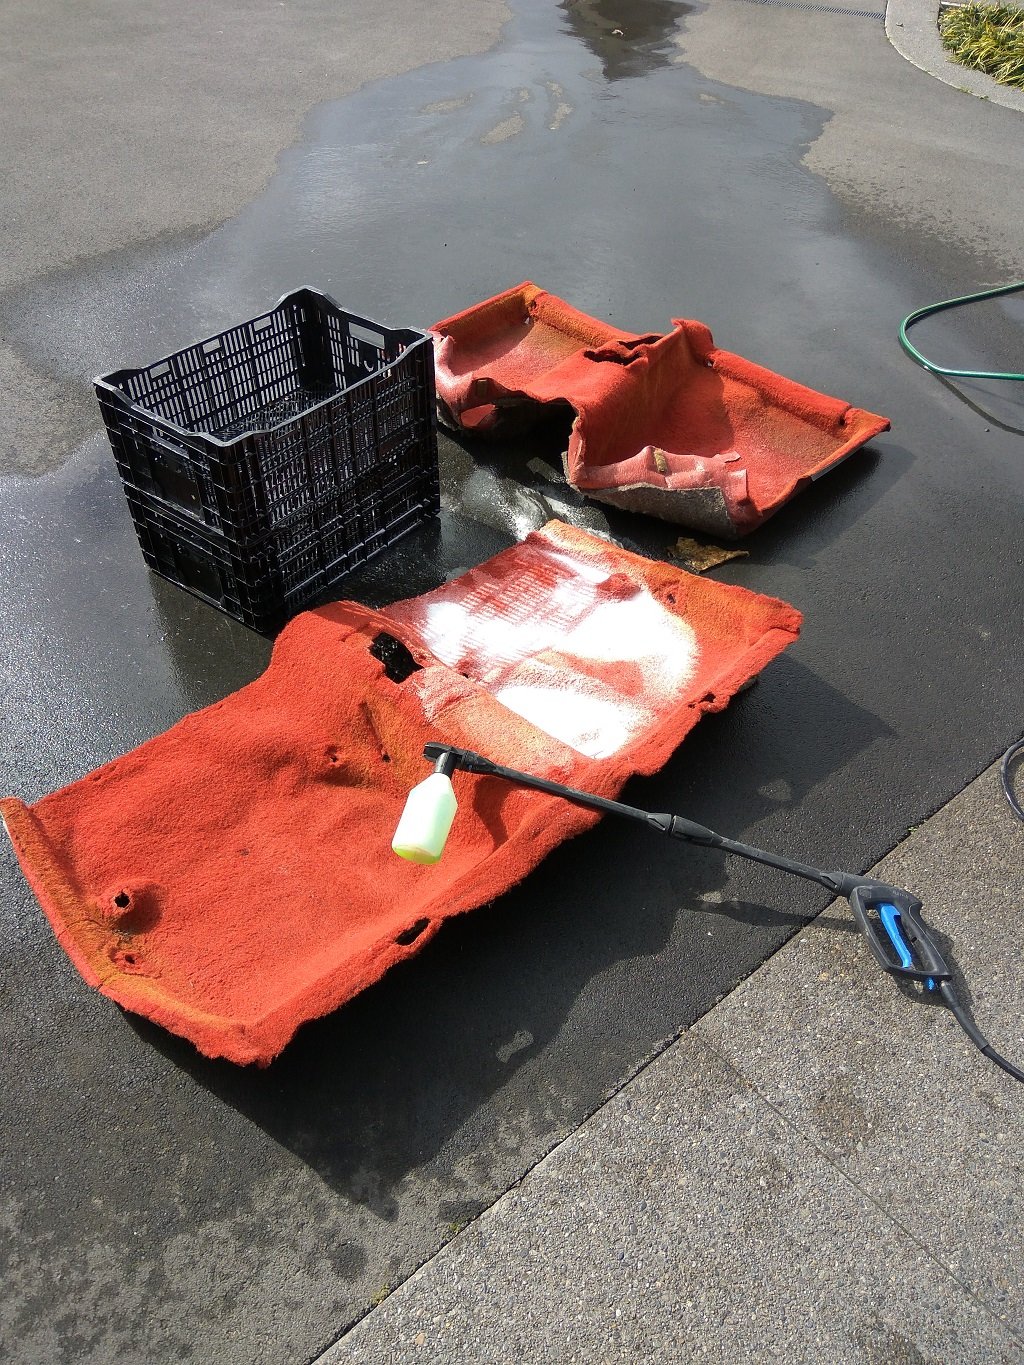
Have been steadily working away on this, so a few more progress pics. Decided to give the carpet a blast as it seemed the easiest way to de-grot it. Came up decent after drying, still aiming to give it a colour spruce up later. All of the chrome has been removed from the car now, along with most rubber seals. Some areas are pretty solid, some not so much. Windscreen had to come out to access some rust, that was good fun. Nothing a craft knife or two couldn't sort. Probably took around two hours, with much swearing, sweating and paranoia. Did some digging in the gutters to see how far the rust goes. Mostly not too far, so hopefully only a few patches to replace. Locating clip missing on this side, gotta to what you gotta do. Managed to successfully remove the plastic clip on the other side, so will try find another to match it for reinstall time. Whole bottom section of this frame will need to be remade, it's at least twice as thick as the other side (which is sound). So one more window to remove, doh. I would have left the front screen in, if not for this fine specimen of ferrous oxide. Thankfully it is localised, so just a bit of creativity with a hammer and some panel steel to sort. Nothing a knife and lots of lube can't sort. Out came the dash pad (what a PITA). I'll add some ducting in to join the fan to passenger outlet, and give it all a good blow out. Will also look to run any wiring I need to while its all easy access. So now I think I have uncovered most of the rust in the top half of the car. Next update will include front end work. The front has taken a punt so i'm going to work out a way to bring that back into line. Nothing major, just panel work beside radiator has moved inward 10-20mm pushing in the drivers side headlight bracket and all that carry on. Quite handy having another car the same next to it, easy to check how panels are supposed to be shaped! The above photos are to give a general idea, i've probably found three times as many repairs to do, so plenty of practice on the metal glue machine. No point posting 20 photos of rust though. Will post up front end removal next week.
2 points
-
For inspiration January on the Nevis Road.
2 points
-
With those being ‘done’, I dug another FR50 frame out of my stash and bought it home to make a start on. I need another two stroke scooter to keep the balance in the shed right. stay tuned.1 point
-
Yes I think you should. Looking forward to updates on this.1 point
-
Just got in from a 770km journey over the long weekend. Whangamata, Tauranga, back to Whangamata, then back to Auckland. Car had minimal trouble, aside from the diff running itself out of oil just off the southern motorway, thankfully right outside a friends shop in which we swiftly jacked it up and threw some moreys/random gear oil into it. Made the rest of the trip down the line nicely, if only a little louder in the rear than usual. Little photo spam to follow from the trip. Car is at a stage where I'm happy with it, but there's still so much more I'd like to throw at it. Plans to accomplish before the end of the year: Custom dash mat, get MOMO wheel centre and fix horn, as well as repair cracked plastics in the interior and general interior tidy (maybe seat covers too). Swap diff centre for mint replacement and install new brake shoes for safety and general maintenance purposes. Front brakes and rotors. I'll also be looking into the S13 front strut conversion. Purchase new tailgate and paint/fit. Also would like to tidy up number plates somehow. Pinstripe, cause the sides are pretty boring as it stands. The push is on to get this thing prepped up for it's warrant next month. It cuts close with OS drags, so it'll be a fun little week if she doesn't make it through! I remain pretty hopeful. Chur1 point
-
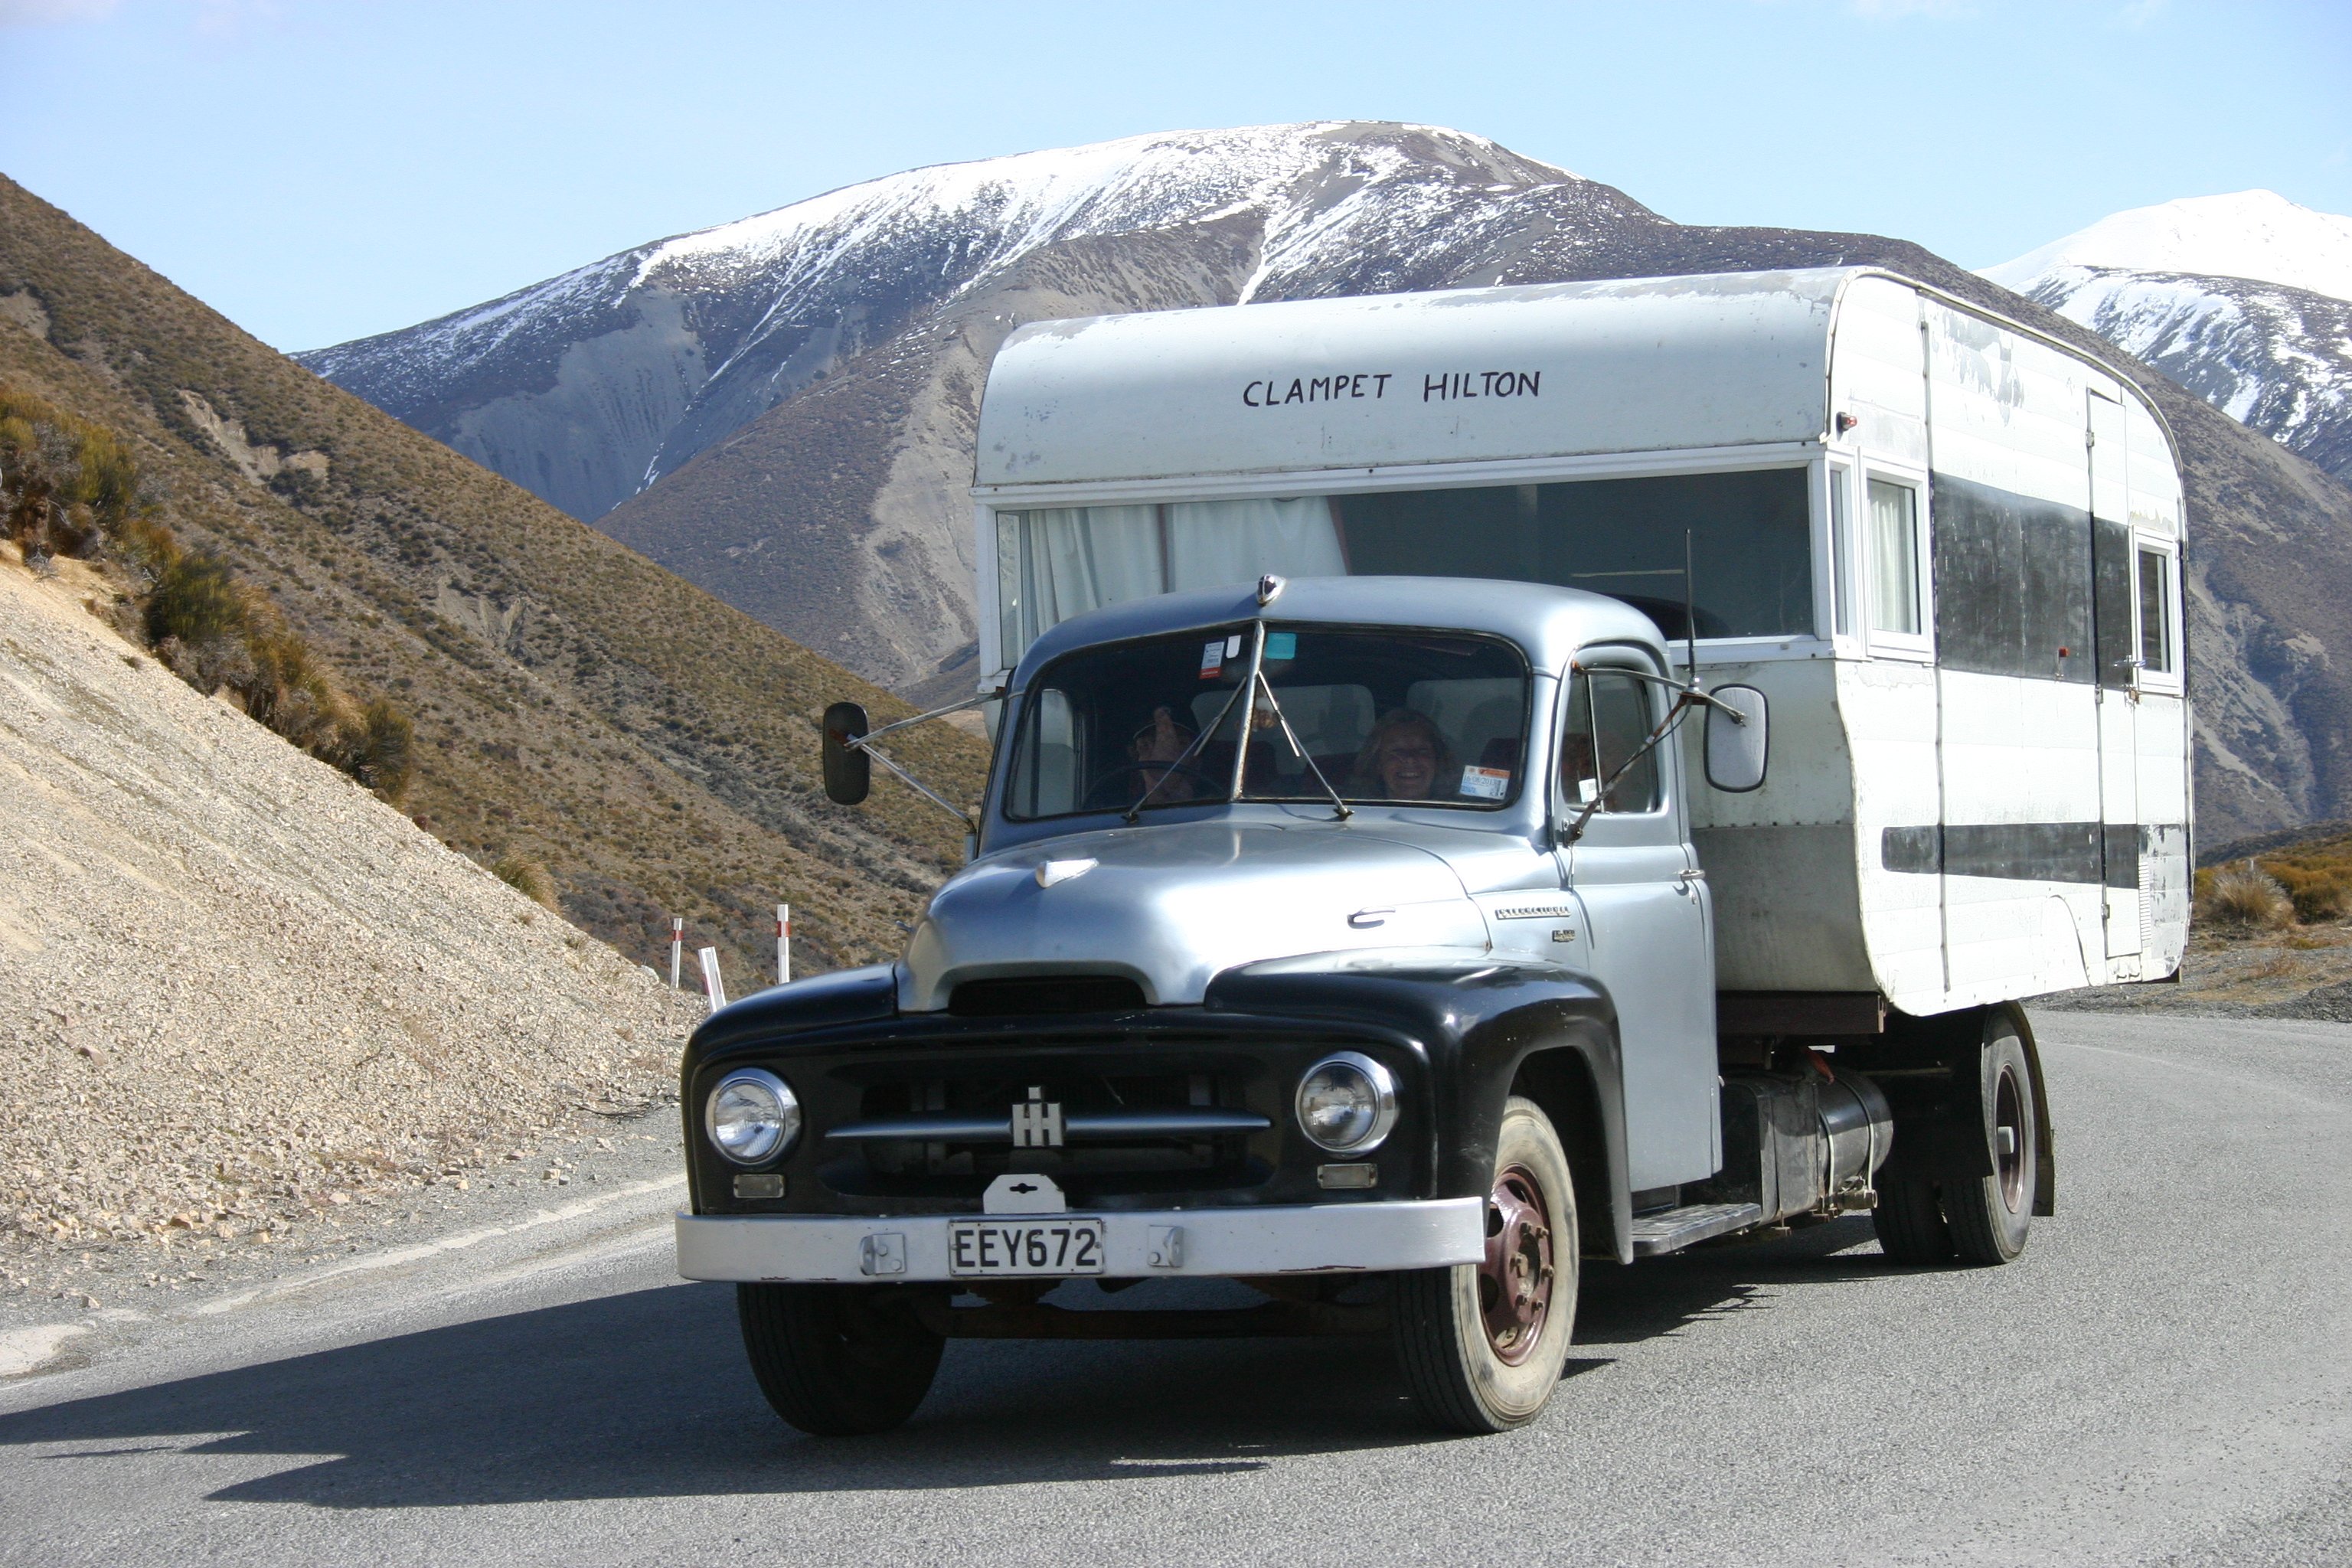
Discuss my obsession with crappy old British van's here: https://oldschool.co.nz/index.php?/topic/60227-flashs-1965-ford-thames/1 point
-
1 point
-
apology for long time not posting - busy with life - hope you all well and healthy - progress - I managed to source new pistons - +rings+piston sleeves+camshaft bearings+ full gasket set and other things - all new from USA - under the banner of Hyster UA (Mazda engine) - same thing - after getting the diff re-done +new diff bearings and backlash corrected - I cannot seem to fit back the old half shafts (using the previous shims) - I did mark them passenger and driver side - they are back into their respective positions - ok - I know tolerances have changed with the new bearings - can anyone perhaps tell my why the bloke before me had put a 5mm "spacer" before the inner wheel bearing race - and shouldered it up onto the half shaft shoulder - the added the bearing??/ also I will post pics of my new white walls - soon as I can re-take pics again with my phone also my half shafts are now touching the diff inside - as engineers blue transfers across - any ideas anyone for the critics - if I have not offended you yet......... please be patient I will get to you as soon as possible - thank you1 point


.jpg.6b694f9f965e9f4f6362647502f5e48b.jpg)


.jpg.14cb744fdbdbdd46586a604675feb582.jpg)


.thumb.jpeg.384ff72c8d2b0ee0d34a7bdedb55bdcf.jpeg)


This leaderboard is set to Auckland/GMT+12:00