
Leaderboard


Popular Content
Showing content with the highest reputation on 08/10/19 in Posts
-
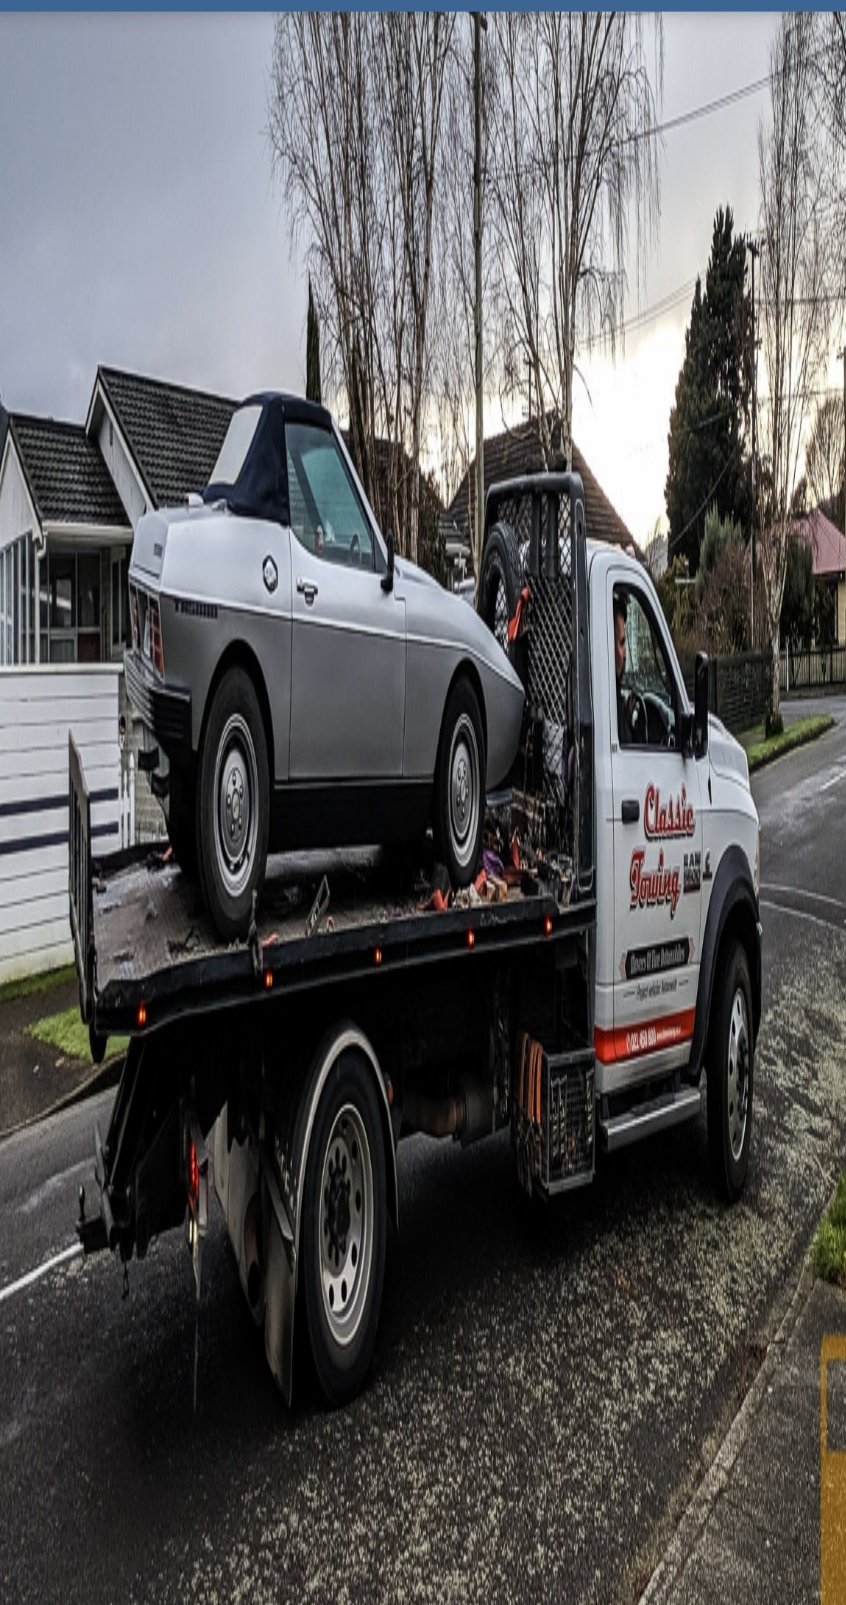
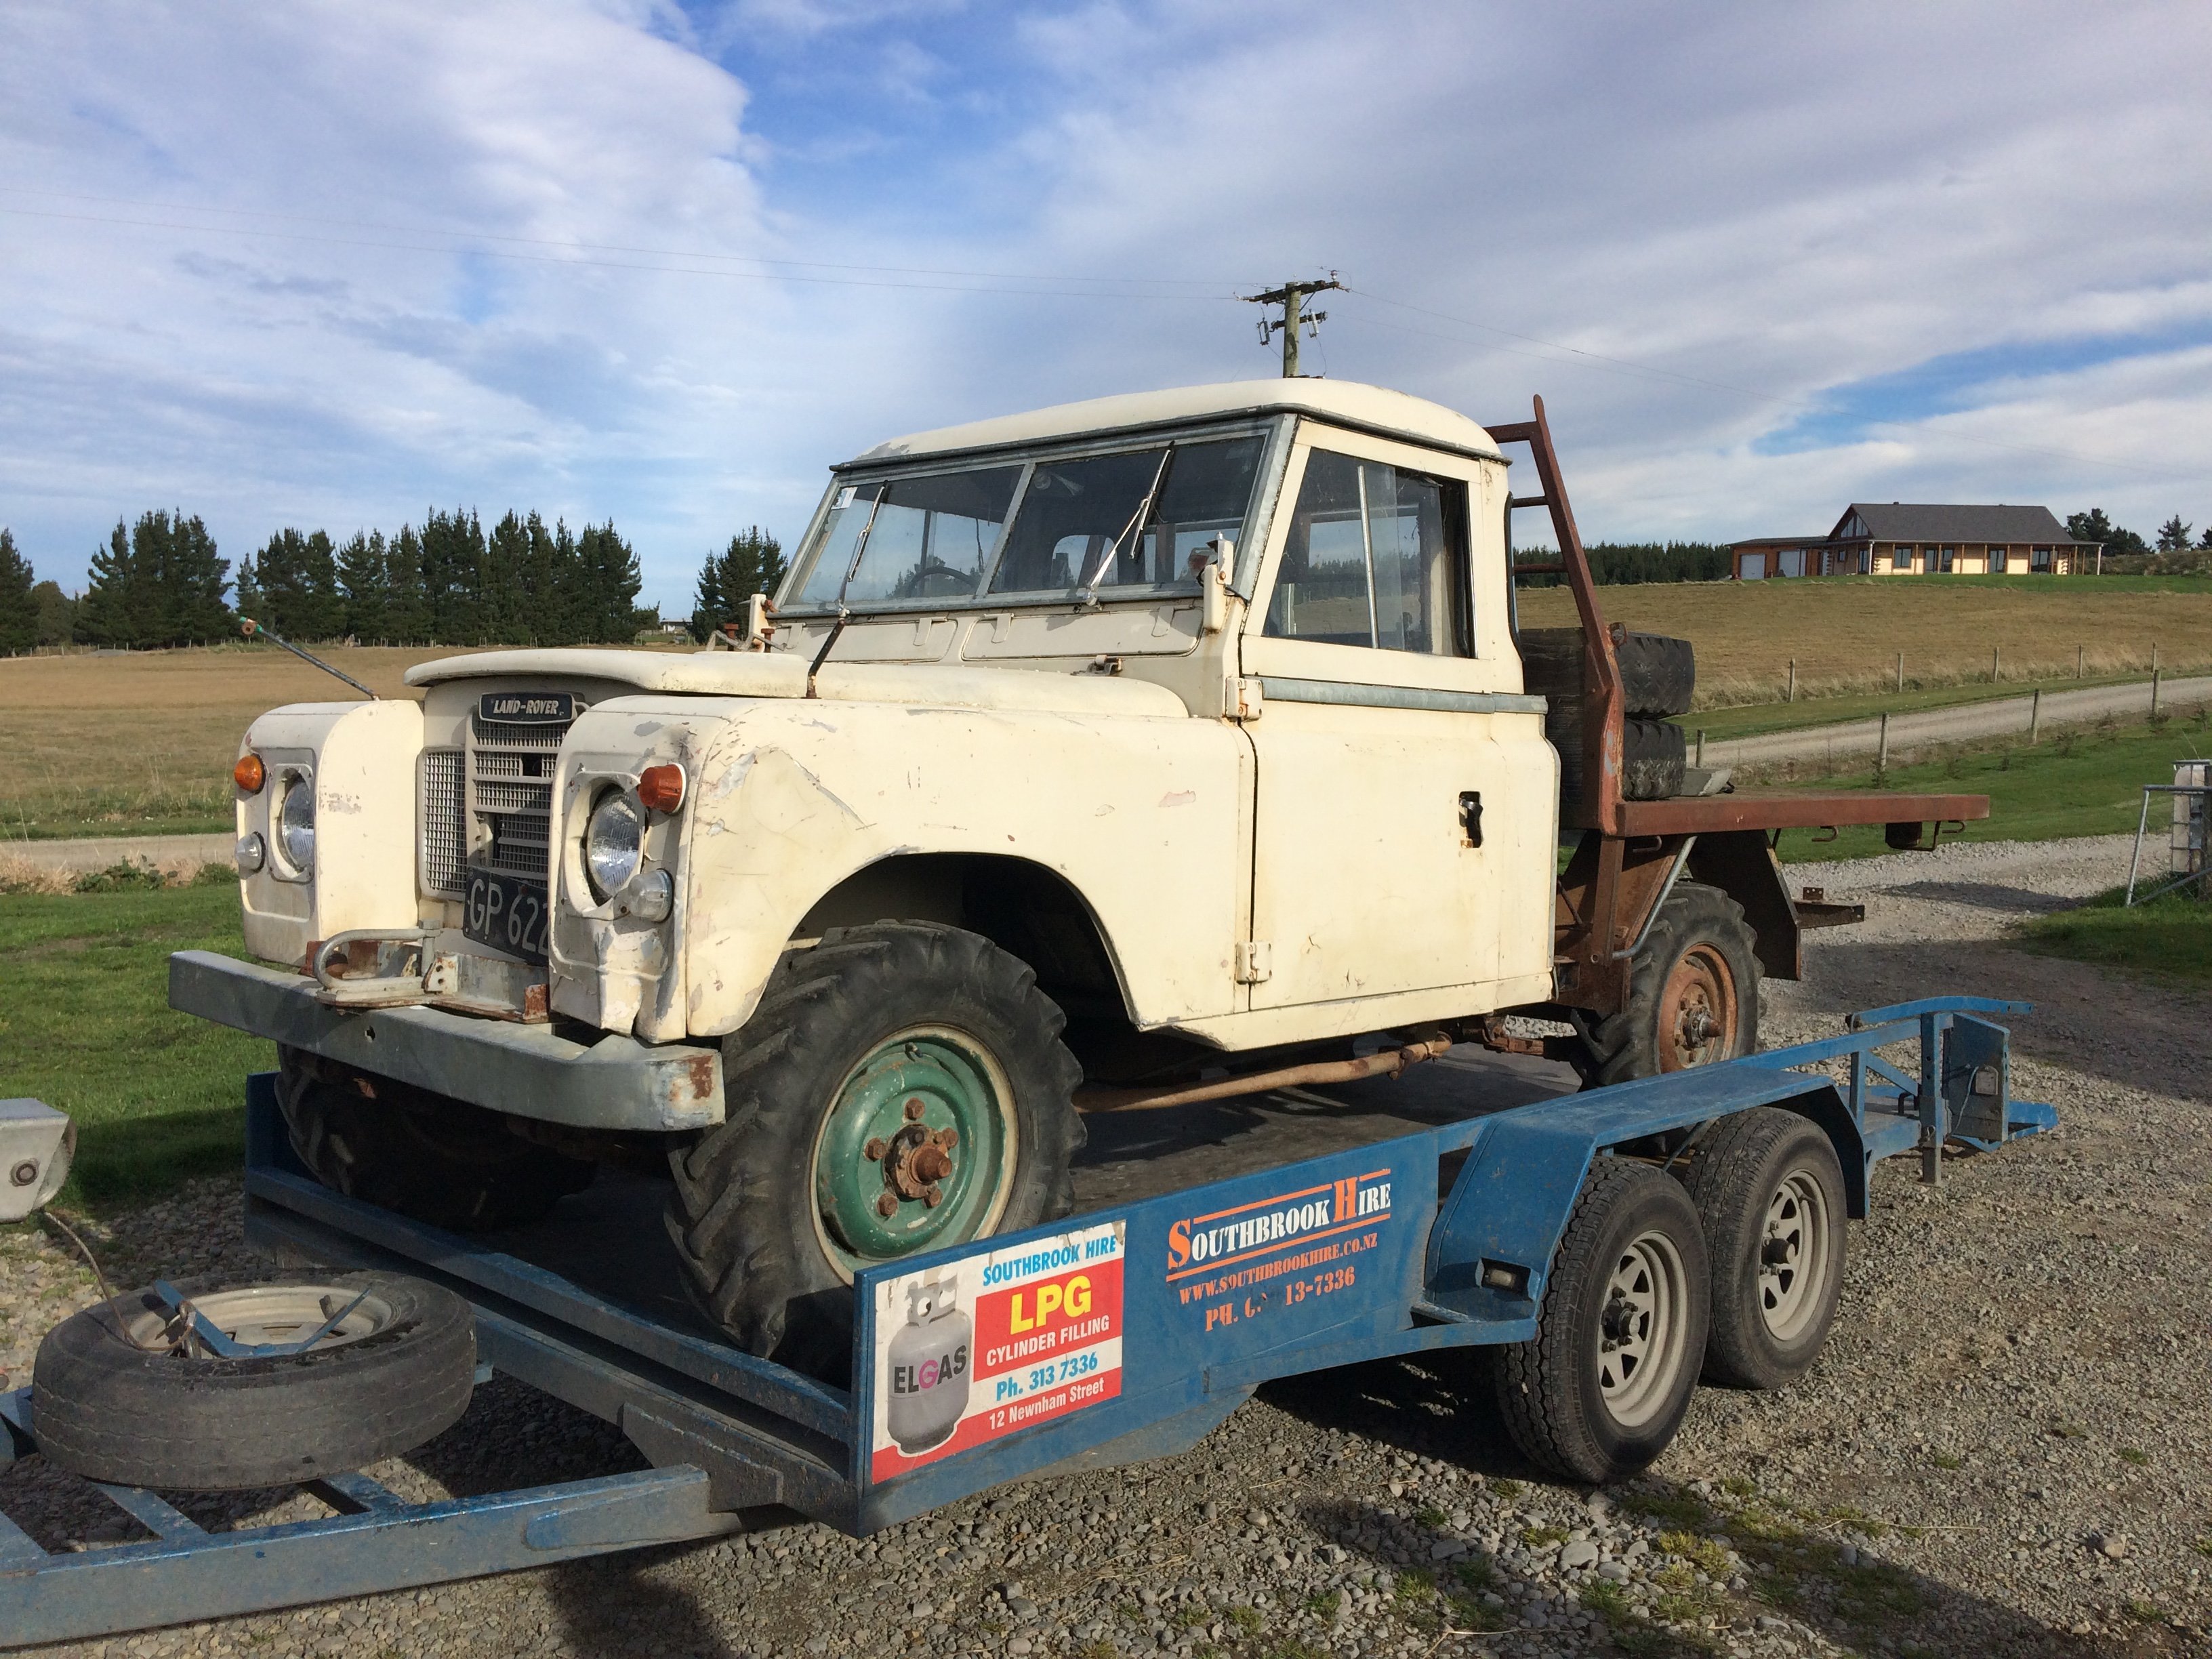
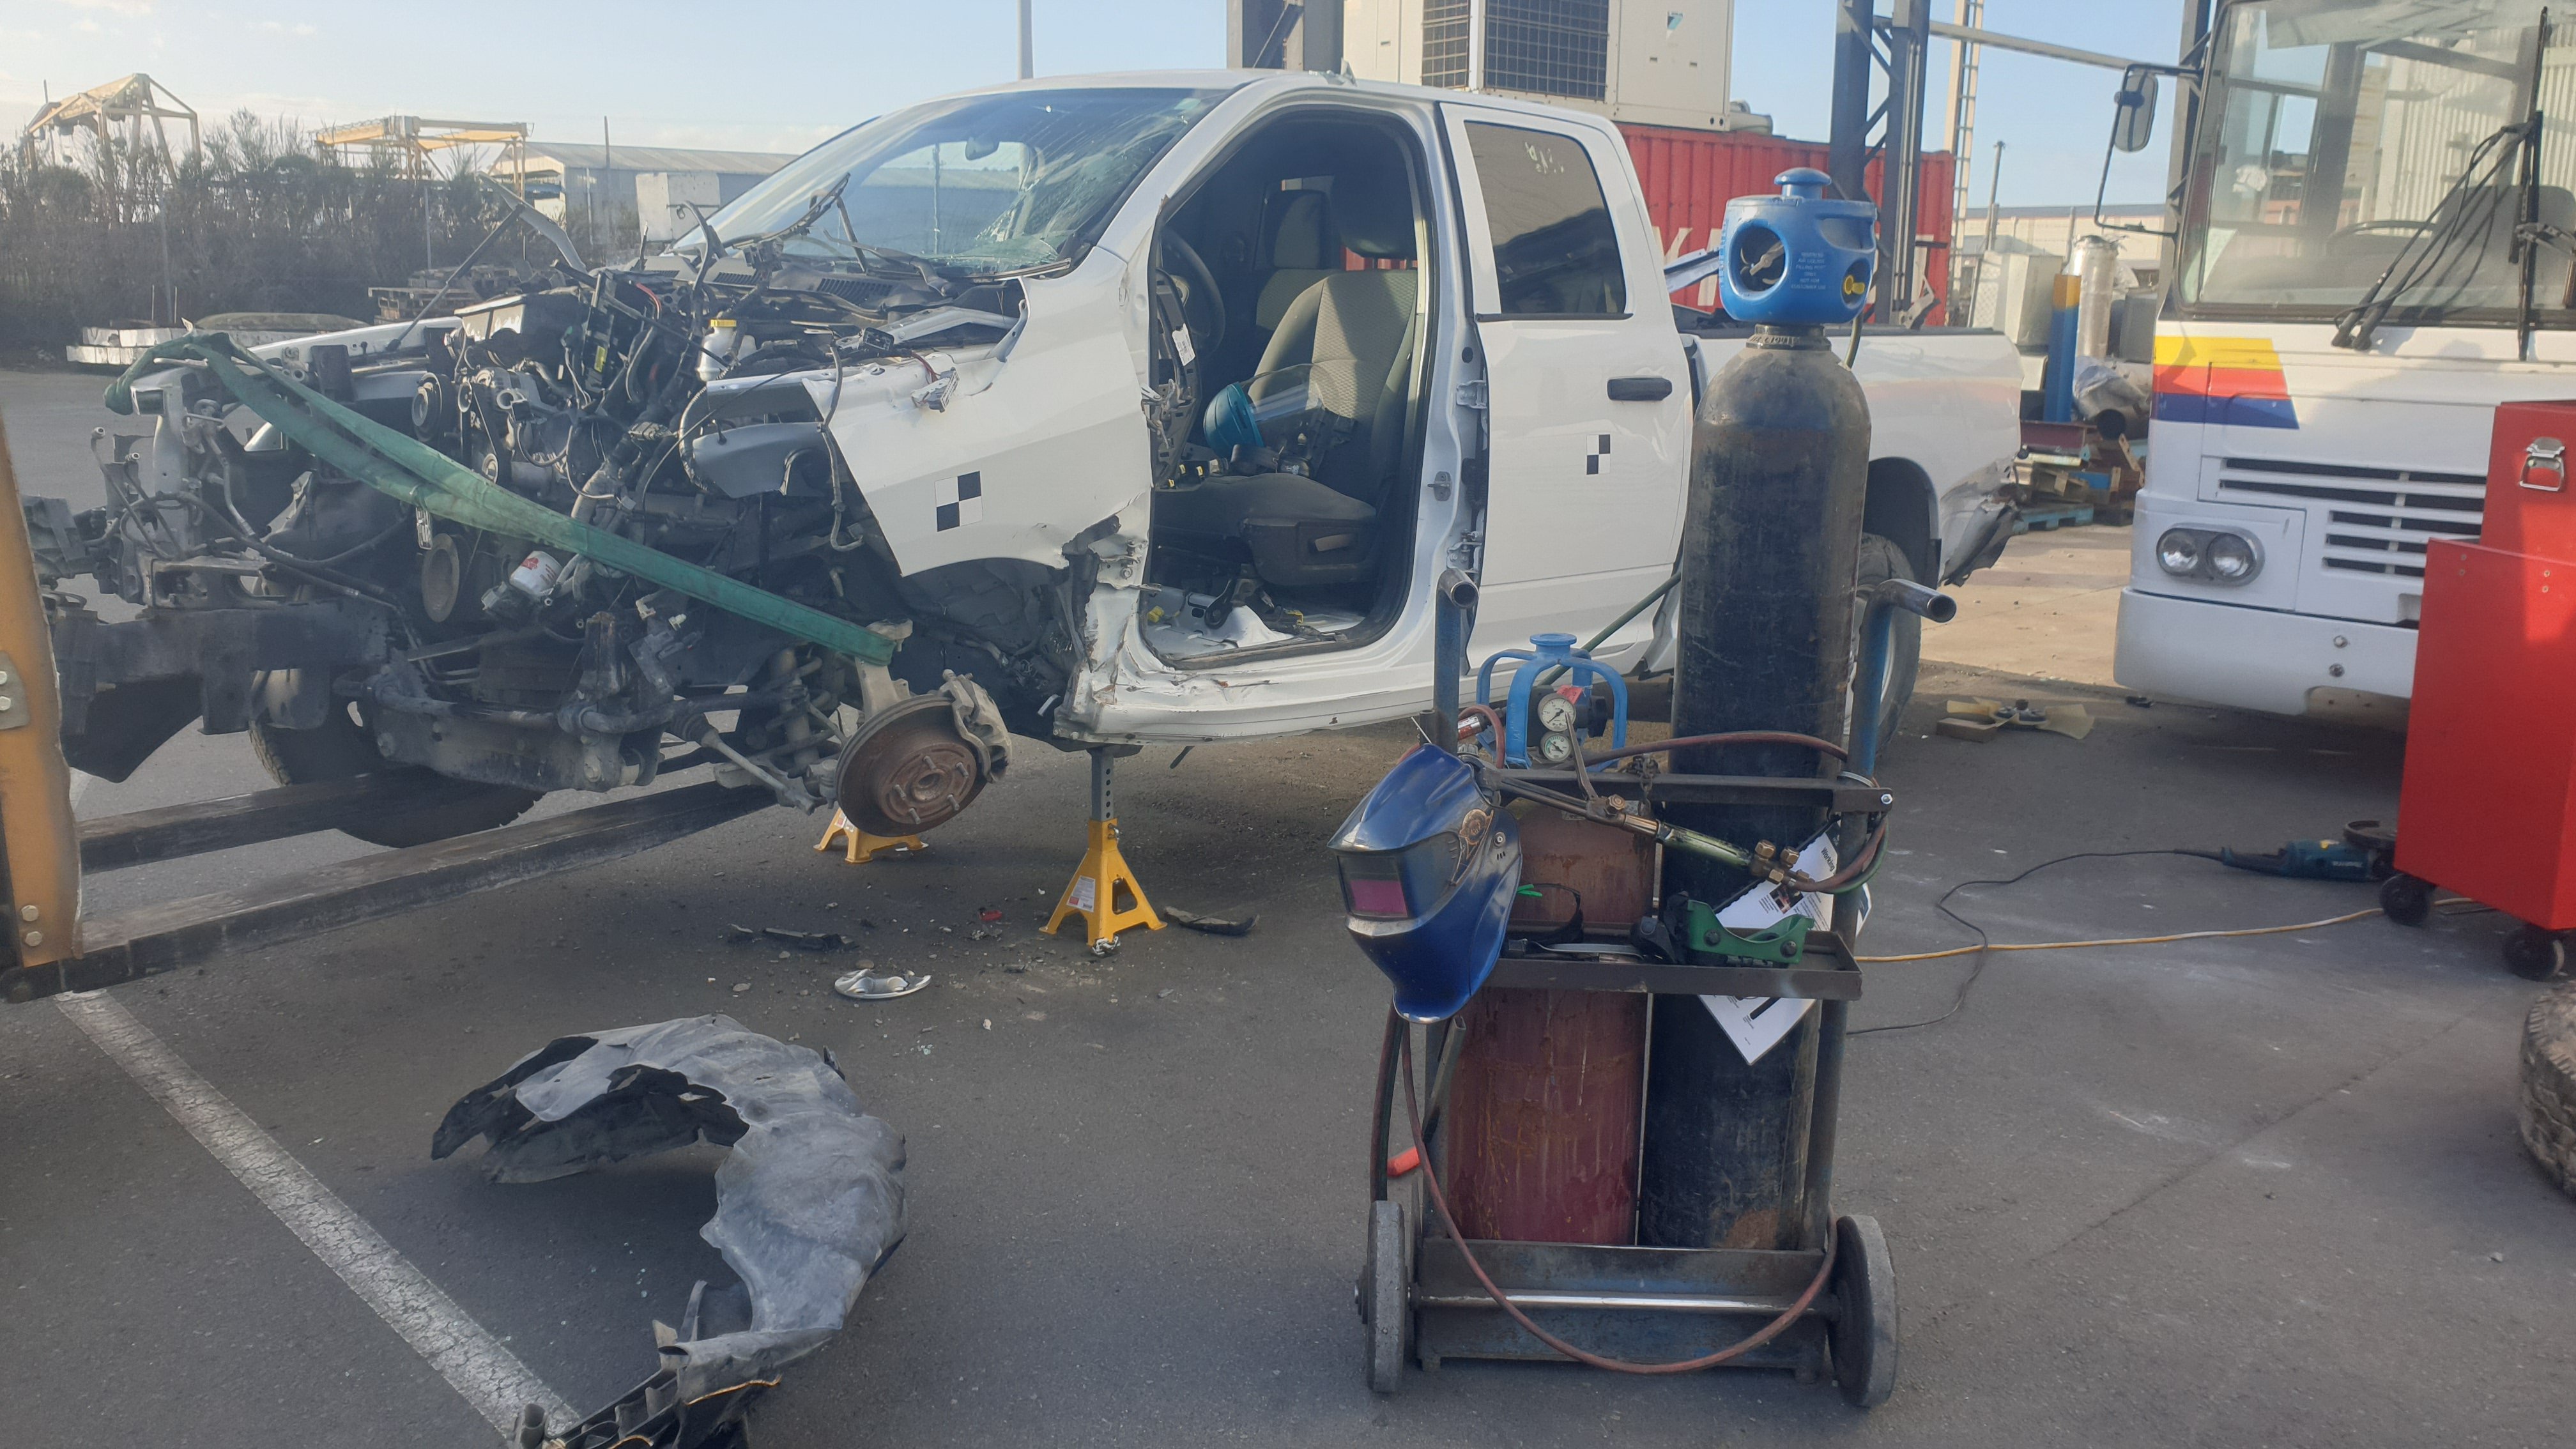
Well, it happened again. Somehow awesome old British cars that need loving find me, and of course who am I to turn them down? This car has a bit of a weird story, but I guess it adds to the history of it all. It all started when I had the M328i listed on Trademe, back in March, and in amongst all the useless time-wasters asking me dumb questions, I got asked if I wanted to swap the black leather vaders for white leather seats from another M3. Of course this was a no, white leather is one of the worst wearing colours in the E36. The fellow wasn't done there though, he wanted my seats. The next question he asked on my listing immediately had my ears perk up, and suddenly I was intrigued. Yes, that's right, a TVR. After a bit of googling I worked out an 80s TVR would be a Wedge. Not the most loved TVR, but I like them, and any TVR is a good TVR in my books. It's 80s, it's British, how bad can it be? Of course I was interested, and let him know. Later that night I get a call and discuss the car. Its been off the road for a few years getting some work done at the "local" TVR specialist, in Auckland. Ok, no problem, except the owner is down in Christchurch (about 1000km and a large body of water away from each other, and I'm somewhere in the middle of that). It turns out that he wanted my car, because he was buying a convertible E36 M3, and wanted to swap my black leather into it. He also had thoughts of "Trevors last drive" by flying up to Auckland, picking up the TVR, driving it down to me, swapping to the M3 and for him to continue on his way down south. As I found out later, this would've been a big ask for the TVR. We discuss the ins and outs, and I'm recommended to contact the specialist and discuss the car. I give the specialist a call and discuss the car. Apparently it's all sorted, and basically ready to "fly through" a WOF and to hit the road. Its had various work done, including most of the hard work like suspension. He noted it does have an issue starting, which is possibly down to a failed fuel accumulator, but does run and could be driven onto a truck. His description of the car was that its a good solid, tidy car, but may need some carpets as they are a bit worn. I was very interested, but needed photos to see what condition it was in. Ok he said, he will try and sort some for me. To cut a long story short, I tried for months to get photos of the car, with every reason under the sun for not getting them from the specialist. On the other side of it, the seller of the TVR decided not to buy that M3, and couldn't find one he wanted, so no longer had a need or want for my car. I let him know I was still interested in outright purchasing the car but would need photos. Both him and myself followed up with the specialist, to no avail. Just before I went on holiday at the end of June, the BMW sold, but I still had no proof of life that the TVR even existed, so just left it hanging whilst I chilled out in the UK (more on that in a later post). When I returned, I already had a list of cars on Trademe I wanted to look at. I had basically given up on the TVR at this point, as during the month I was away, still no photos had been sent. I looked at a couple of cars, including an Evo 4 (which I came very close to buying, but the second viewing showed too many issues, and the unmistakable smell of weed inside) and a C55 AMG (nice car, if a bit dull). I wasn't quite set on them, but noticed that the TVR specialists website had been updated, with new photos, and what happened to be dead center in the photos, but a silver Wedge! Well, there was my proof of life I guess; the car did exist! I contacted the owner and confirmed the car was still for sale, and then did the stupid thing; making an offer for the car as it sits, without so much as a real photo. Offer was accepted, and a call was made to the specialist to make sure no money was owing, that the car could come with the spare parts, and that it would drive onto the truck.... oh wait, what's that, it suddenly doesn't run but you will "try to get it going"... I pushed forward anyway, sending my hard-earned money to the seller, and booking my preferred transport, letting him know that the car doesn't run but the specialist will "try" to get it running. After a long week of waiting, this showed up this morning. Yes, that's the proper good fella Brent from Classic Towing dropping off yet another project to me. Can't recommend him enough, as even when things go a bit pear shaped, he has it all under control, and he loves weird cars almost as much as I do. My first question to him was "did it run?" to which he replied with a no, and tightened the winch ready for laying the bed flat. Such a cool truck, it lowers the bed right off onto the ground. This is half way down Brent pushed the car whilst I jumped in and steered it carefully into the garage. This was harder than you would think, being that it was raining on the outside, and inside of the windscreen, and the wiper didn't work (well, it's not even fitted). We made it safely into the garage though. The brakes work, which is something. So, what is this weird little thing? A 1980 TVR Tasmin 280i It's more or less a Ford Capri in a fibreglass body with tube-frame chassis and some weird and bespoke parts. Powered by a 2.8l V6 Ford Cologne engine topped with Bosch K-Jetronic mechanical fuel injection, backed by the latest (for the 70s) in Ford 4 speed manual gearbox technology, and driven via the rear wheels through a Jaguar XJS diff with spiffy inboard disc brakes. The pinnacle of technology, and a real parts bin special. On the plus side it does get some pretty advanced gear for something that is the same age as my green Mini. Independent rear suspension, four wheel disc brakes, fuel injection, electric windows, bonded windscreen and a targa top convertible. It does have a lot of known quirks though, such as a multitude of wiring issues, a wiring loom that consists of only black wires (seriously), diabolical K-Jet fuel injection, and a dual fuel tank system that is no end of troubles. Anyway, this car is the 106th Tasmin off the line, and appears to be the 4th DHC (Drop Head Convertible) made (1st was a concept made from a chopped up FHC). Before the DHC was in production, the FHC (Fixed Head Coupe) was the TVR to have. The FHC was soon phased out though and only the DHC survived until the end of production, albeit with some big changes. Being a very early car, my one has some specific early only "features". The first, and most obvious, is that its a TVR Tasmin, not a TVR 280i. TVR dropped the Tasmin name later on and left the names to just be the displacement of the engine (280i - 2.8 V6, 350i - 3.5 V8 etc). A couple of other early features are the weird little mirrors hanging off the doors. Later cars changed to pods in front of the side windows, like a normal car. One of my favourite really early features though, has to be the gorgeous Stewart Warner gauges The later cars got boring, but arguably more readable (and probably reliable), VDO gauges. There is just something about the way the SW gauges are clocked, and the vertical odometer. So, now that the car has been delivered, how is it? Did i win the blind buying game, or get screwed? It's not as tidy as described, and it doesn't currently run. The battery was completely dead (to the point my ctek charger won't even detect it), but with a replacement battery the electrics are slowly coming to life again. Unfortunately, it leaks like a sieve and is full of water. I tried to dry as much as I could out, but the dehumidifer will have to do the rest. The roof seals will be the major contributor to this, as they are well buggered. The water ingress is what has ruined the carpet, it's literally rotting away. The boot, once I got it open, wasn't much better, with the lid being full of water and covered in condensation on the inside. The seats are in good condition, with no obvious rips or tears, as is the rest of the general interior. The wood grain has some cracks, but overall for a car I suspect spent a lot of time sitting outside, its in good shape. Apparently blue velour and vinyl stand the test of time. Bodywork is very good, with only some stone chips on the front. The rest of the paint appears to be good and will come up well with a polish. The top is also in good condition, with only some damage to the fabric on the removable section, and the rear window is very cloudy. Hopefully, I can polish that out, but it may need replacement. I don't know how the car is mechanically as it does not run. The previous owner advised (only after I had paid for it) that there is a strong fuel smell from the tanks when sitting, but it drove well otherwise. The fuel in the tanks smells like varnish, but cannot be smelt without opening one of the two fuel caps. I will need to drain this out and throw some new fuel in before trying to start. The starting issues could be a few things, but I will get to that in due course. One cool thing about TVRs is the convertible roof with a removable targa section. You can either have the roof up, down, or the rear section up but without the targa section, which fits into the boot (roof isn't locked in this photo, so looks a bit baggy) So that's the TVR. The plan is to get get it running, get a WOF on it and then take it to the British Car Day show in Feb. In between that, just take it out for some top-down Summer cruising. Oh, and keep fixing it. Can't forget that.23 points
-
Some wiggling of wires behind the light switch (yeah, ill need to look further into that) and this happened. Thankfully headlight motors work perfectly.11 points
-
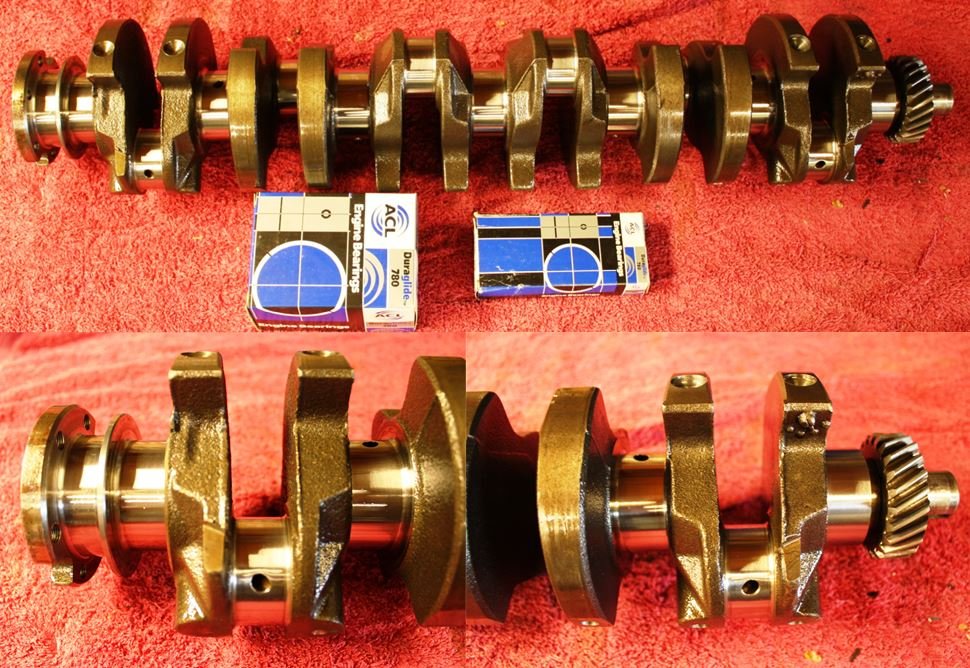
Finally picked up the finished counterbalance crank; big thanks to Engine Specialties for a not cheap but a hard job well done, good value in my books-thanks guys. Crack tested, big ends ground 10 thou, main journals reduced to fit the X2 186 block, rear seal converted from rope to neoprene (once more to fit the block) and a full balance. They insisted on supplying their preferred bearing shells and how can you argue with a bunch of guys taking full ownership of their work? For an old Holden 6 junkie, this is nothing less than pure crankshaft porn!
 10 points
 -
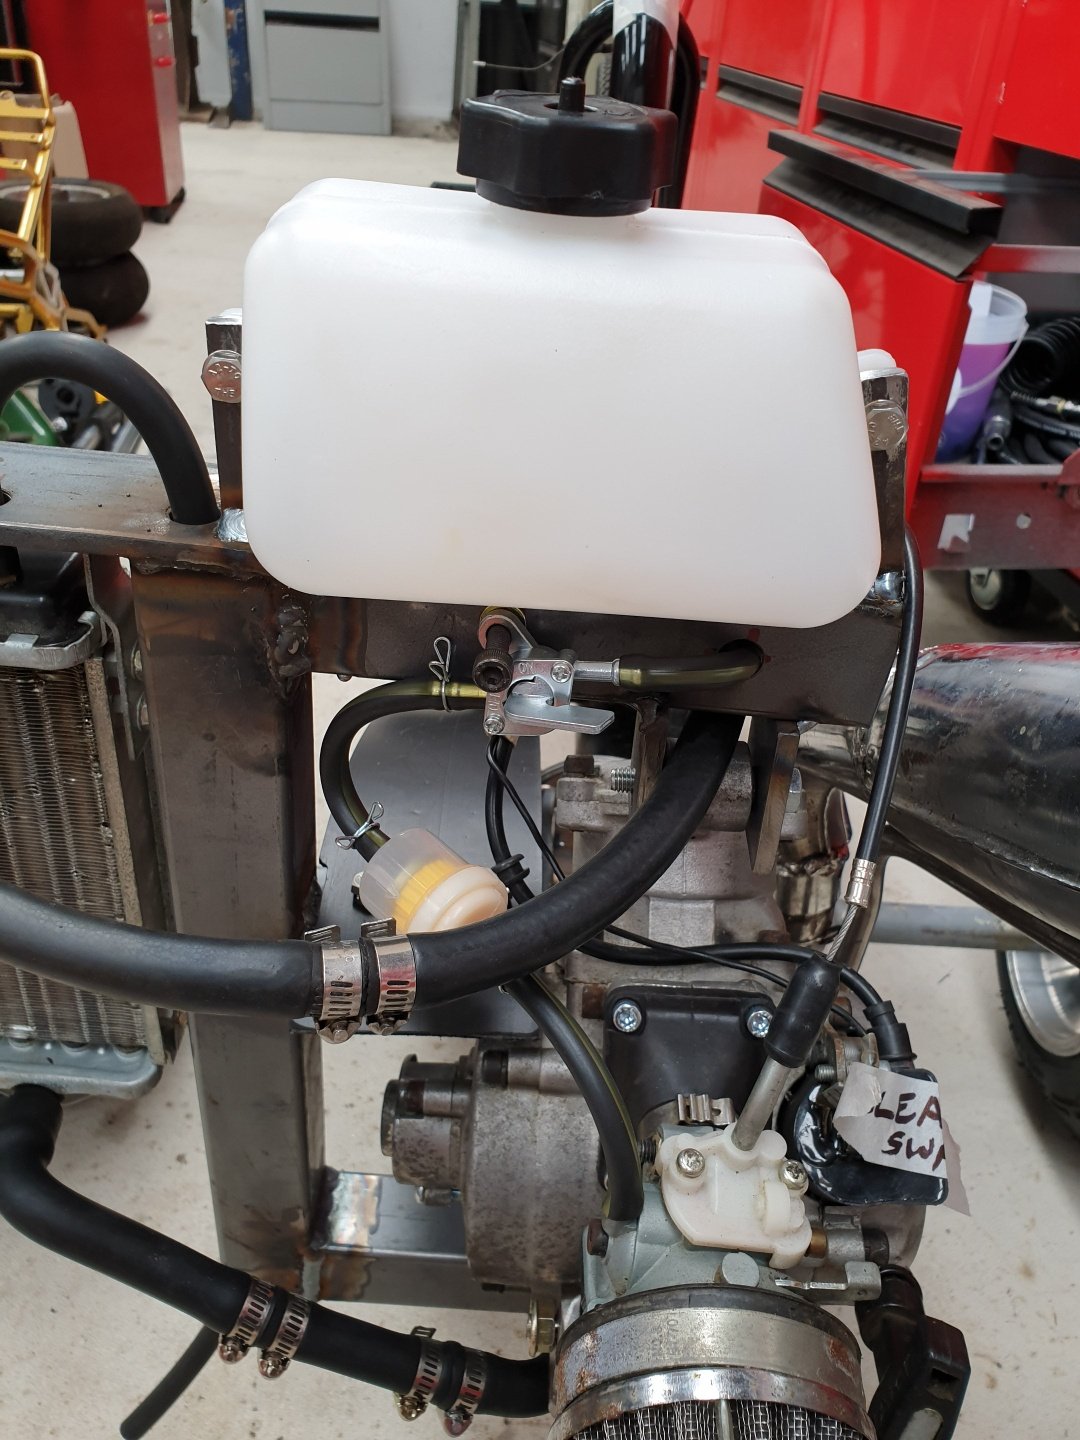
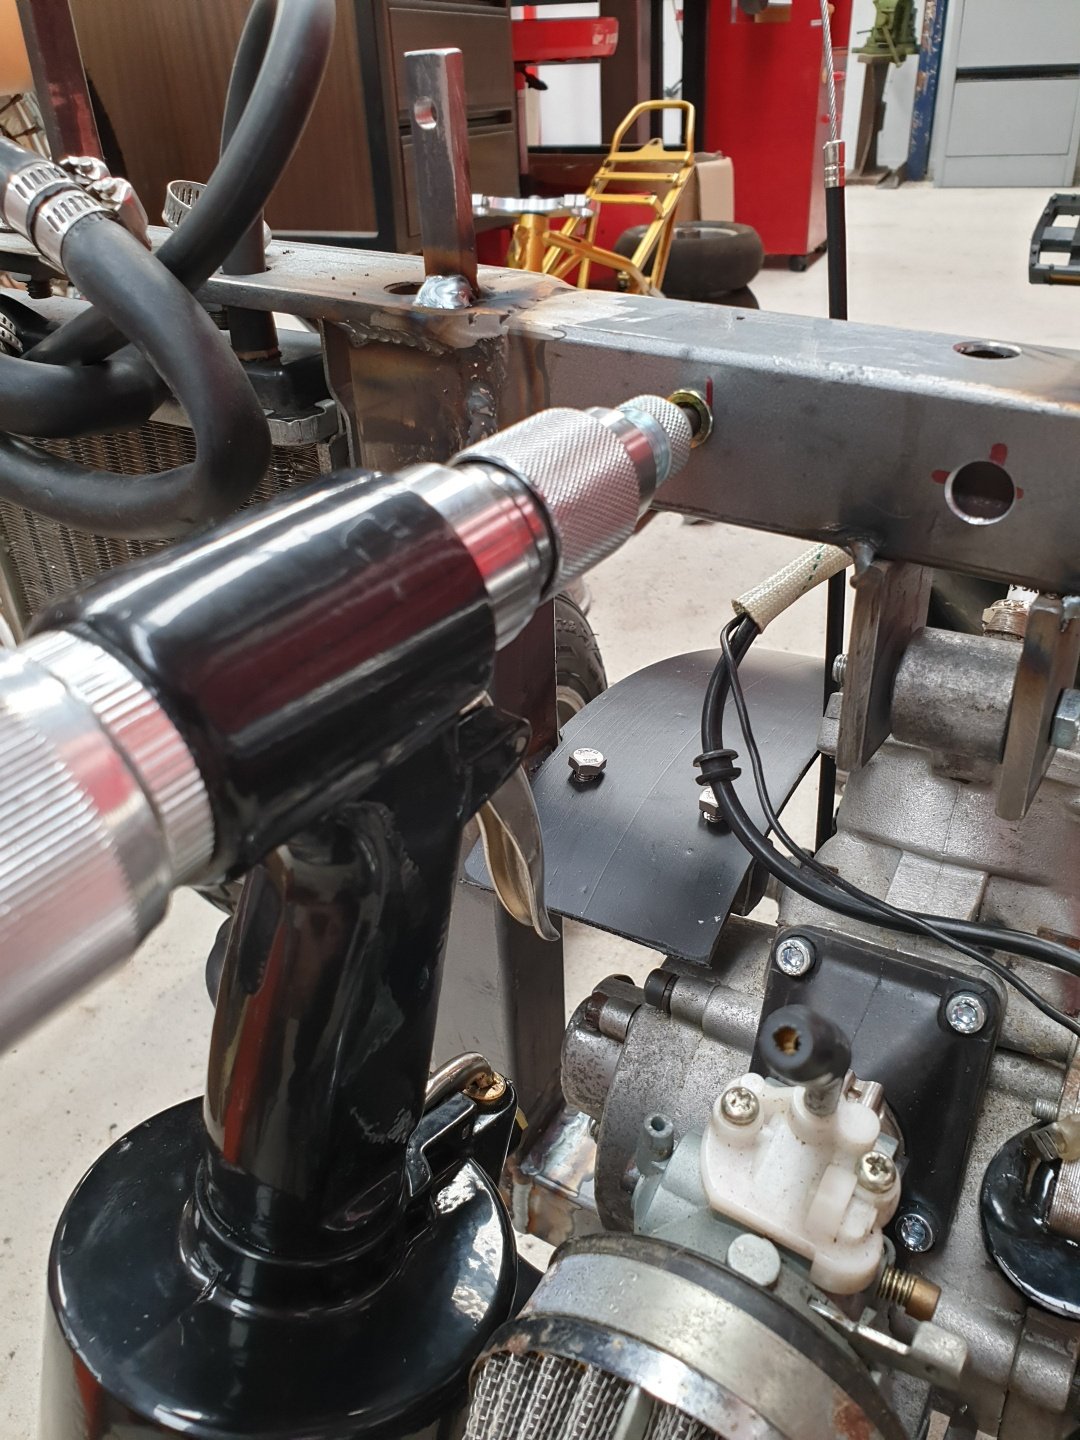
So I guess this is where we start then. The first port of call today after having the car delivered was to work out why we had no power. I popped the bonnet, and yes there was a battery. Ok, let's remove the battery and see if I can throw some charge into it. Ctek says NO. With the charger connected to the battery, nothing. No lights on the charger, and if anything, the charger started acting weird. Guess that's no bueno then. Hope my charger is OK. A quick trip to Supercheap sorted out a battery for me. There is very little space for a battery, so a bit of digging in the Century Batteries catalogue yielded the biggest battery that would fit the same footprint, an NS60LSMF Connecting this up showed that we finally had power. The dash warning lights come on with the key, the driver's electric window is working, albeit slowly, and the central locking works. Strangely the headlights did not respond to the switch, but some wiggling of the wires behind the switch sorted that out (yeah, I'll need to look into that). The next obvious step was to see what was up with the fuel tanks. Now that I had power I could see the fuel gauge was reading empty. I decided to take a risk and try dumping some of BPs finest 98 and injector cleaner into the tanks and see what happens. I split the fuel and cleaner between the two tanks as evenly as I could. Since I had been told it was possible the accumulator had failed, there is a trick to work around this and still have the car start and run normally. The accumulator works to hold fuel pressure in the lines when the engine is off, but when it fails the lines no longer have pressure, and the fuel pump only runs when the engine is turning, so it takes ages to build that pressure back up. The trick to work around this is to have the pump run when the key is turned to ON so it primes the lines. The simplest way on early cars like mine is to disconnect one connector from the side of the fuel distribution unit. This causes the pump to run when the key is on. Easy. Its the blue connector in the top photo, and the green plug goes onto it (strangely... why arent they matched colours?) I connected the battery and turned the key. Sure enough, I heard the familiar whine of a pump turning, and then the woosh of fuel heading down the lines into the fuel distributor. Now it was the moment of truth. I turned the key, and the engine turned smoothly over. It spluttered a couple of times, but wouldn't start. What a tease. Eventually, this happened. It was rough, but running, and even idling. I ran it for a while, and everything looked good. No obvious signs of leaks, but blimey does it make a noise! The longer I ran it, the smoother it was getting I checked and it seems to have gears, and a clutch, so that's a big win. It still hesitates a bit, but that's to be expected for an engine that has been sitting around. I'll take the plugs out and give them a clean (or replace), and check the cap and rotor condition. If everything looks OK, it may even be time for a quick run around the block. One must wonder though; if I can get it running with little effort, why couldn't the "specialist" have it running for the truck? Oh well, best not to dwell on it I guess.9 points
-
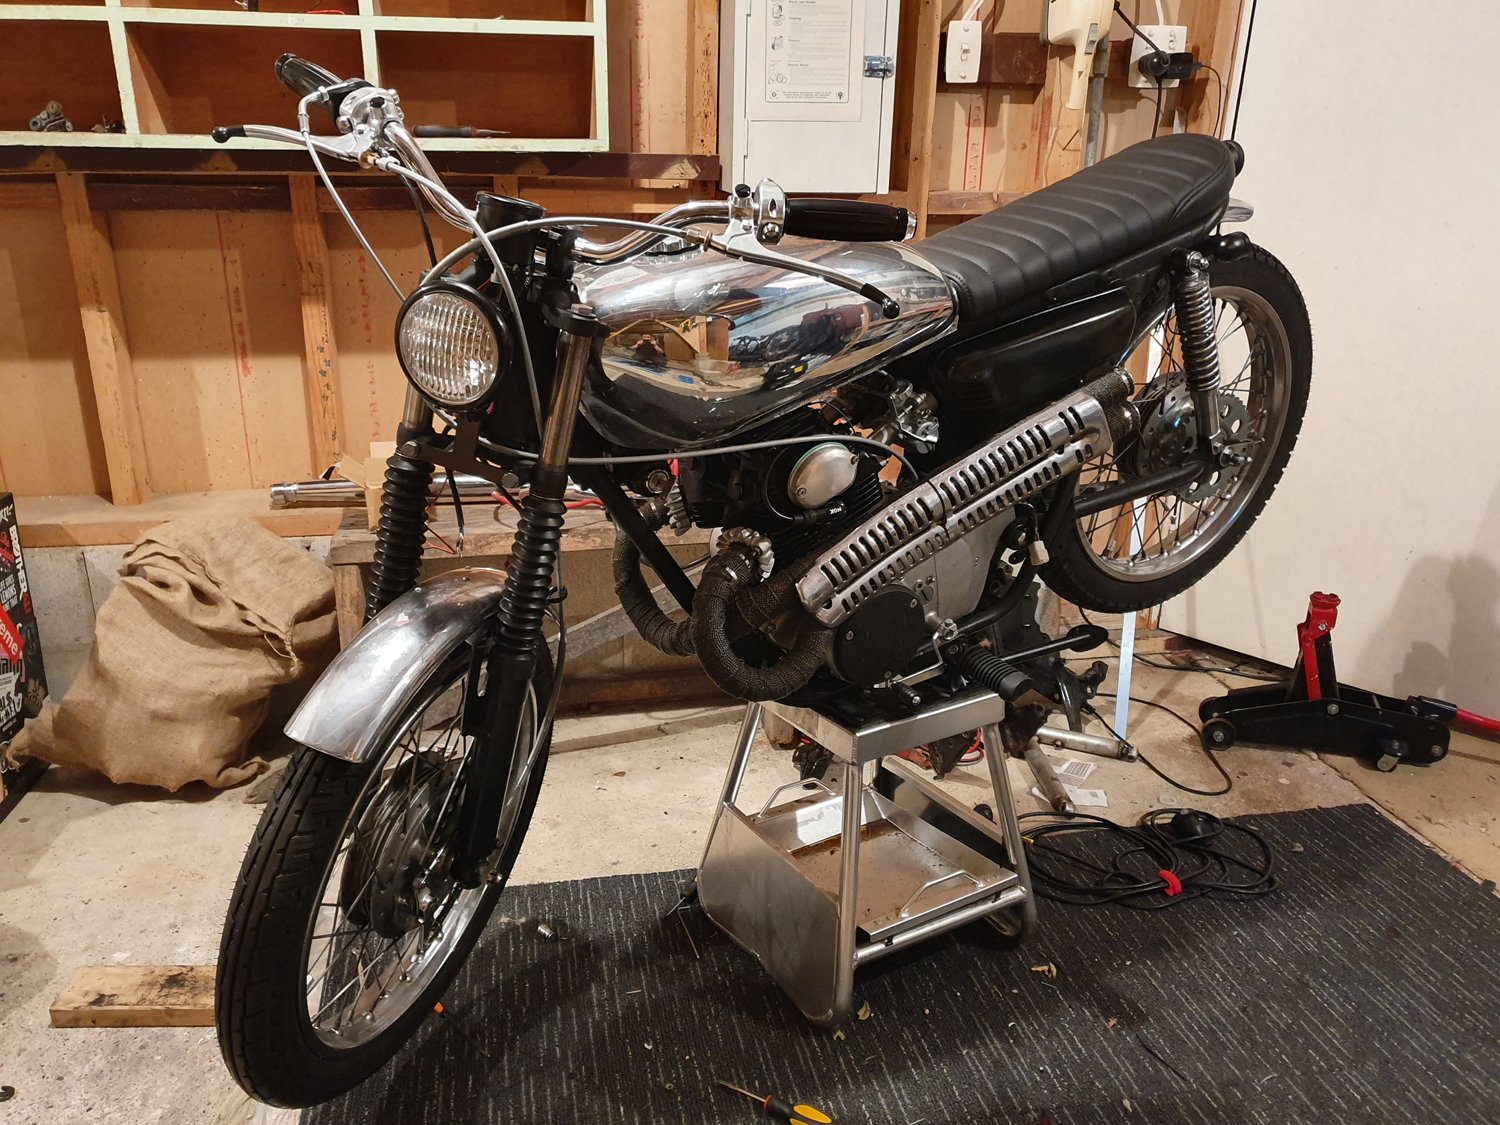
Oh yeah, so this thing is pretty much done. Wiring is in place. Just need to splash out on the M-Unit to finish. I'll probably try tidy up the control cables somehow and also fit some nice exhaust tips to my cut pipes.
5 points
-
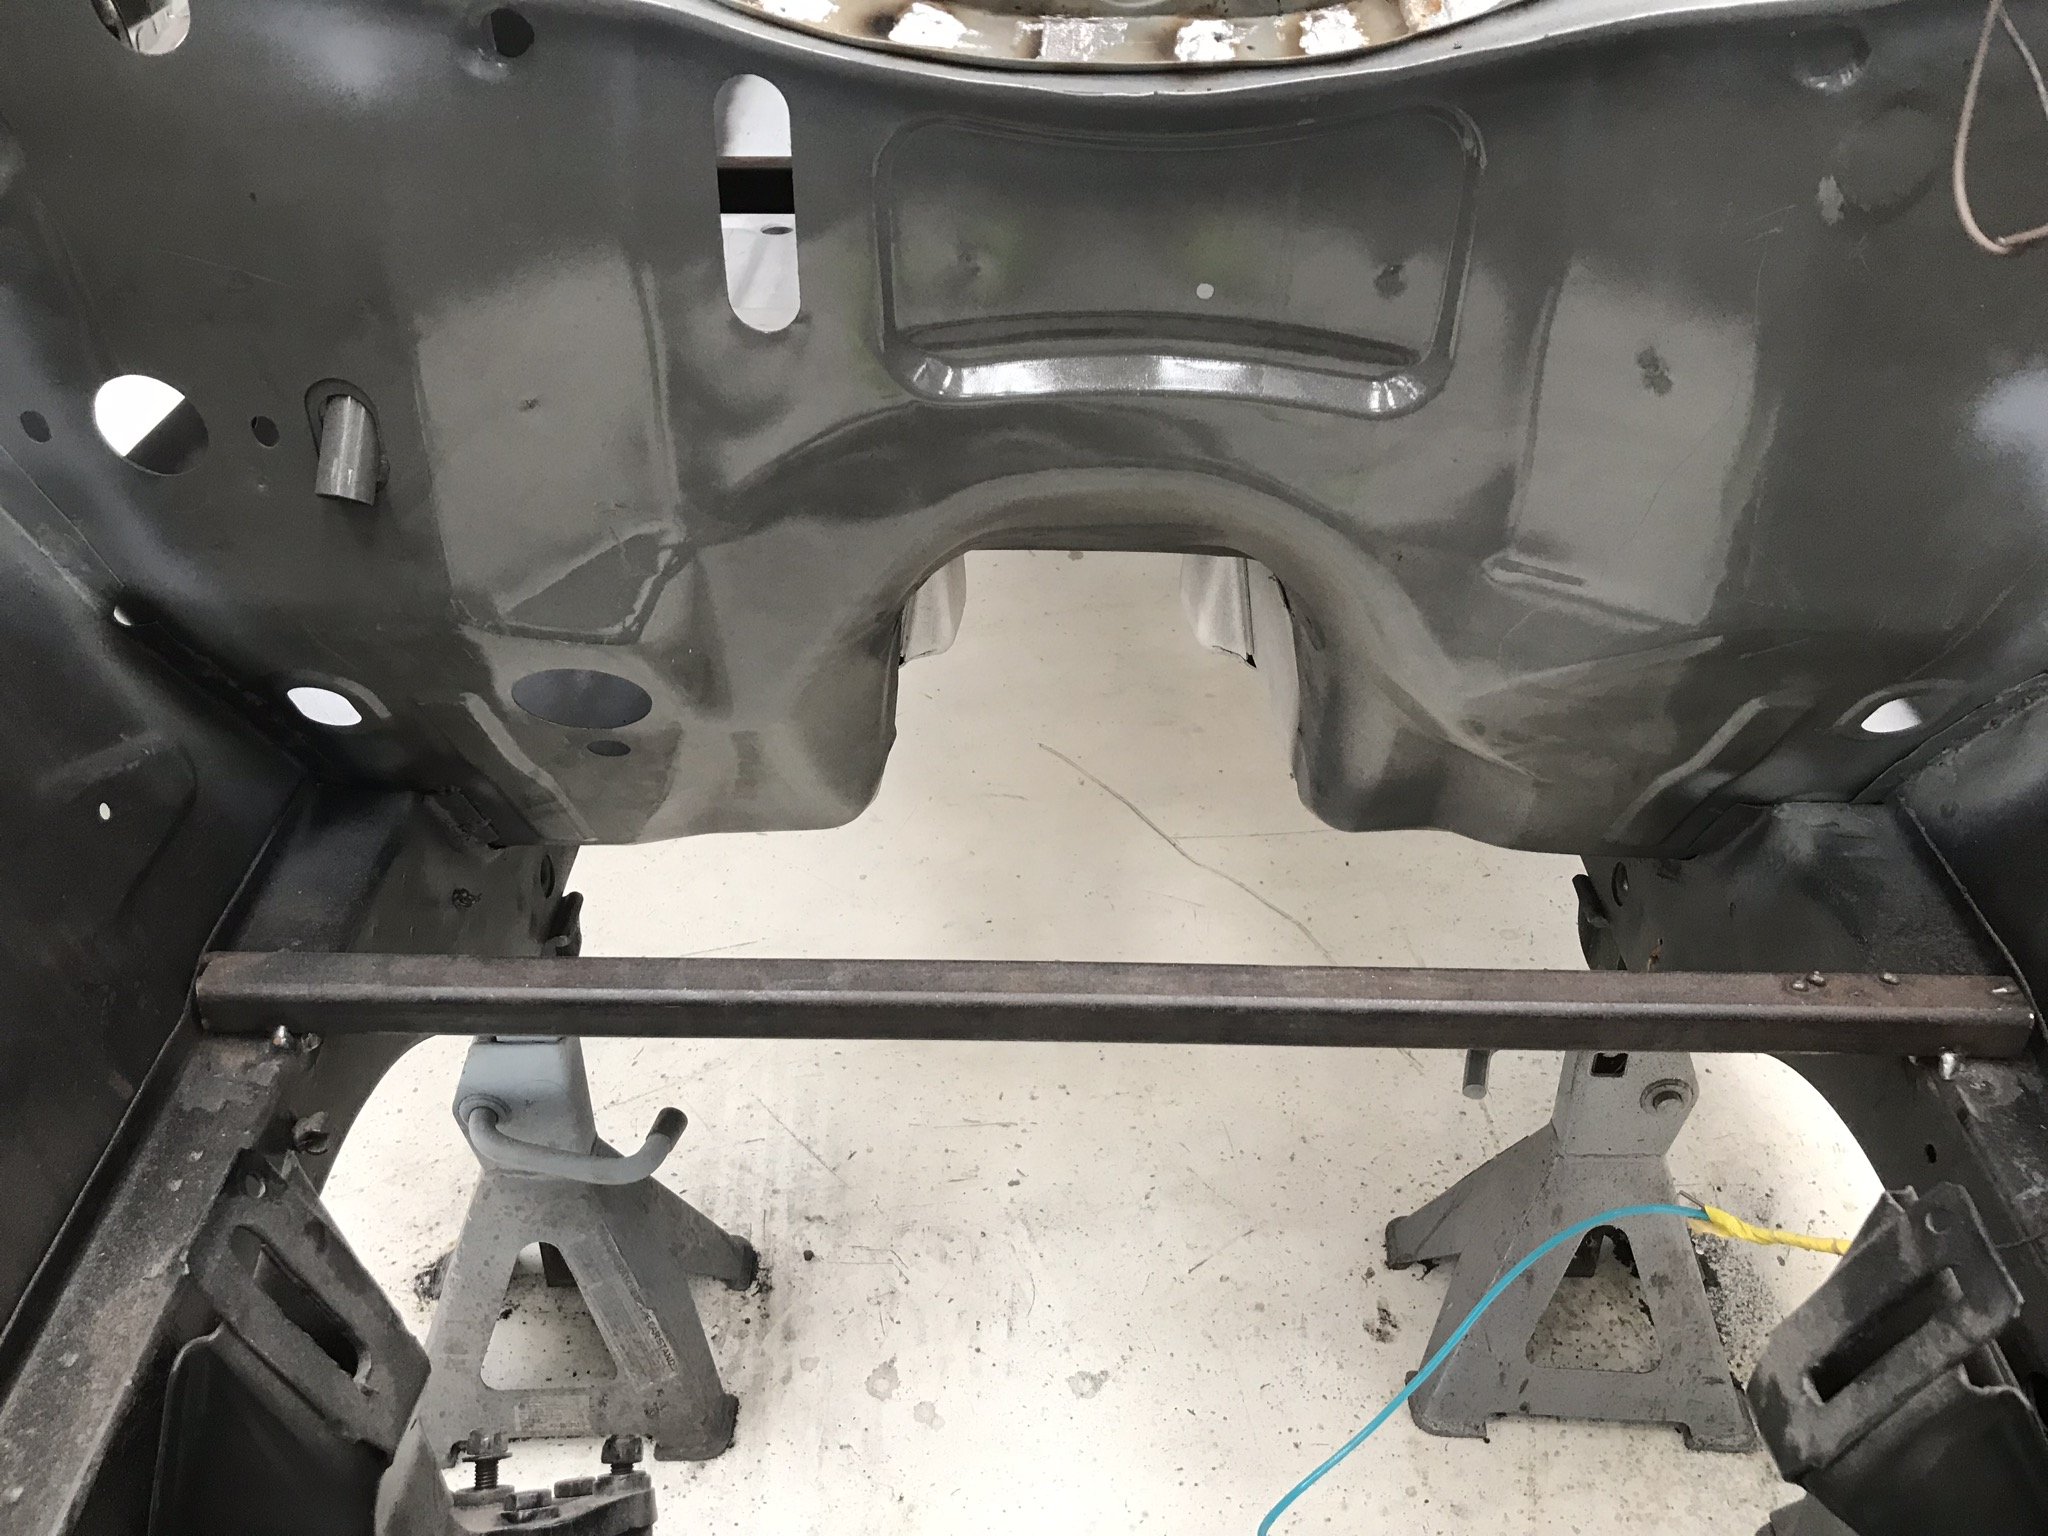
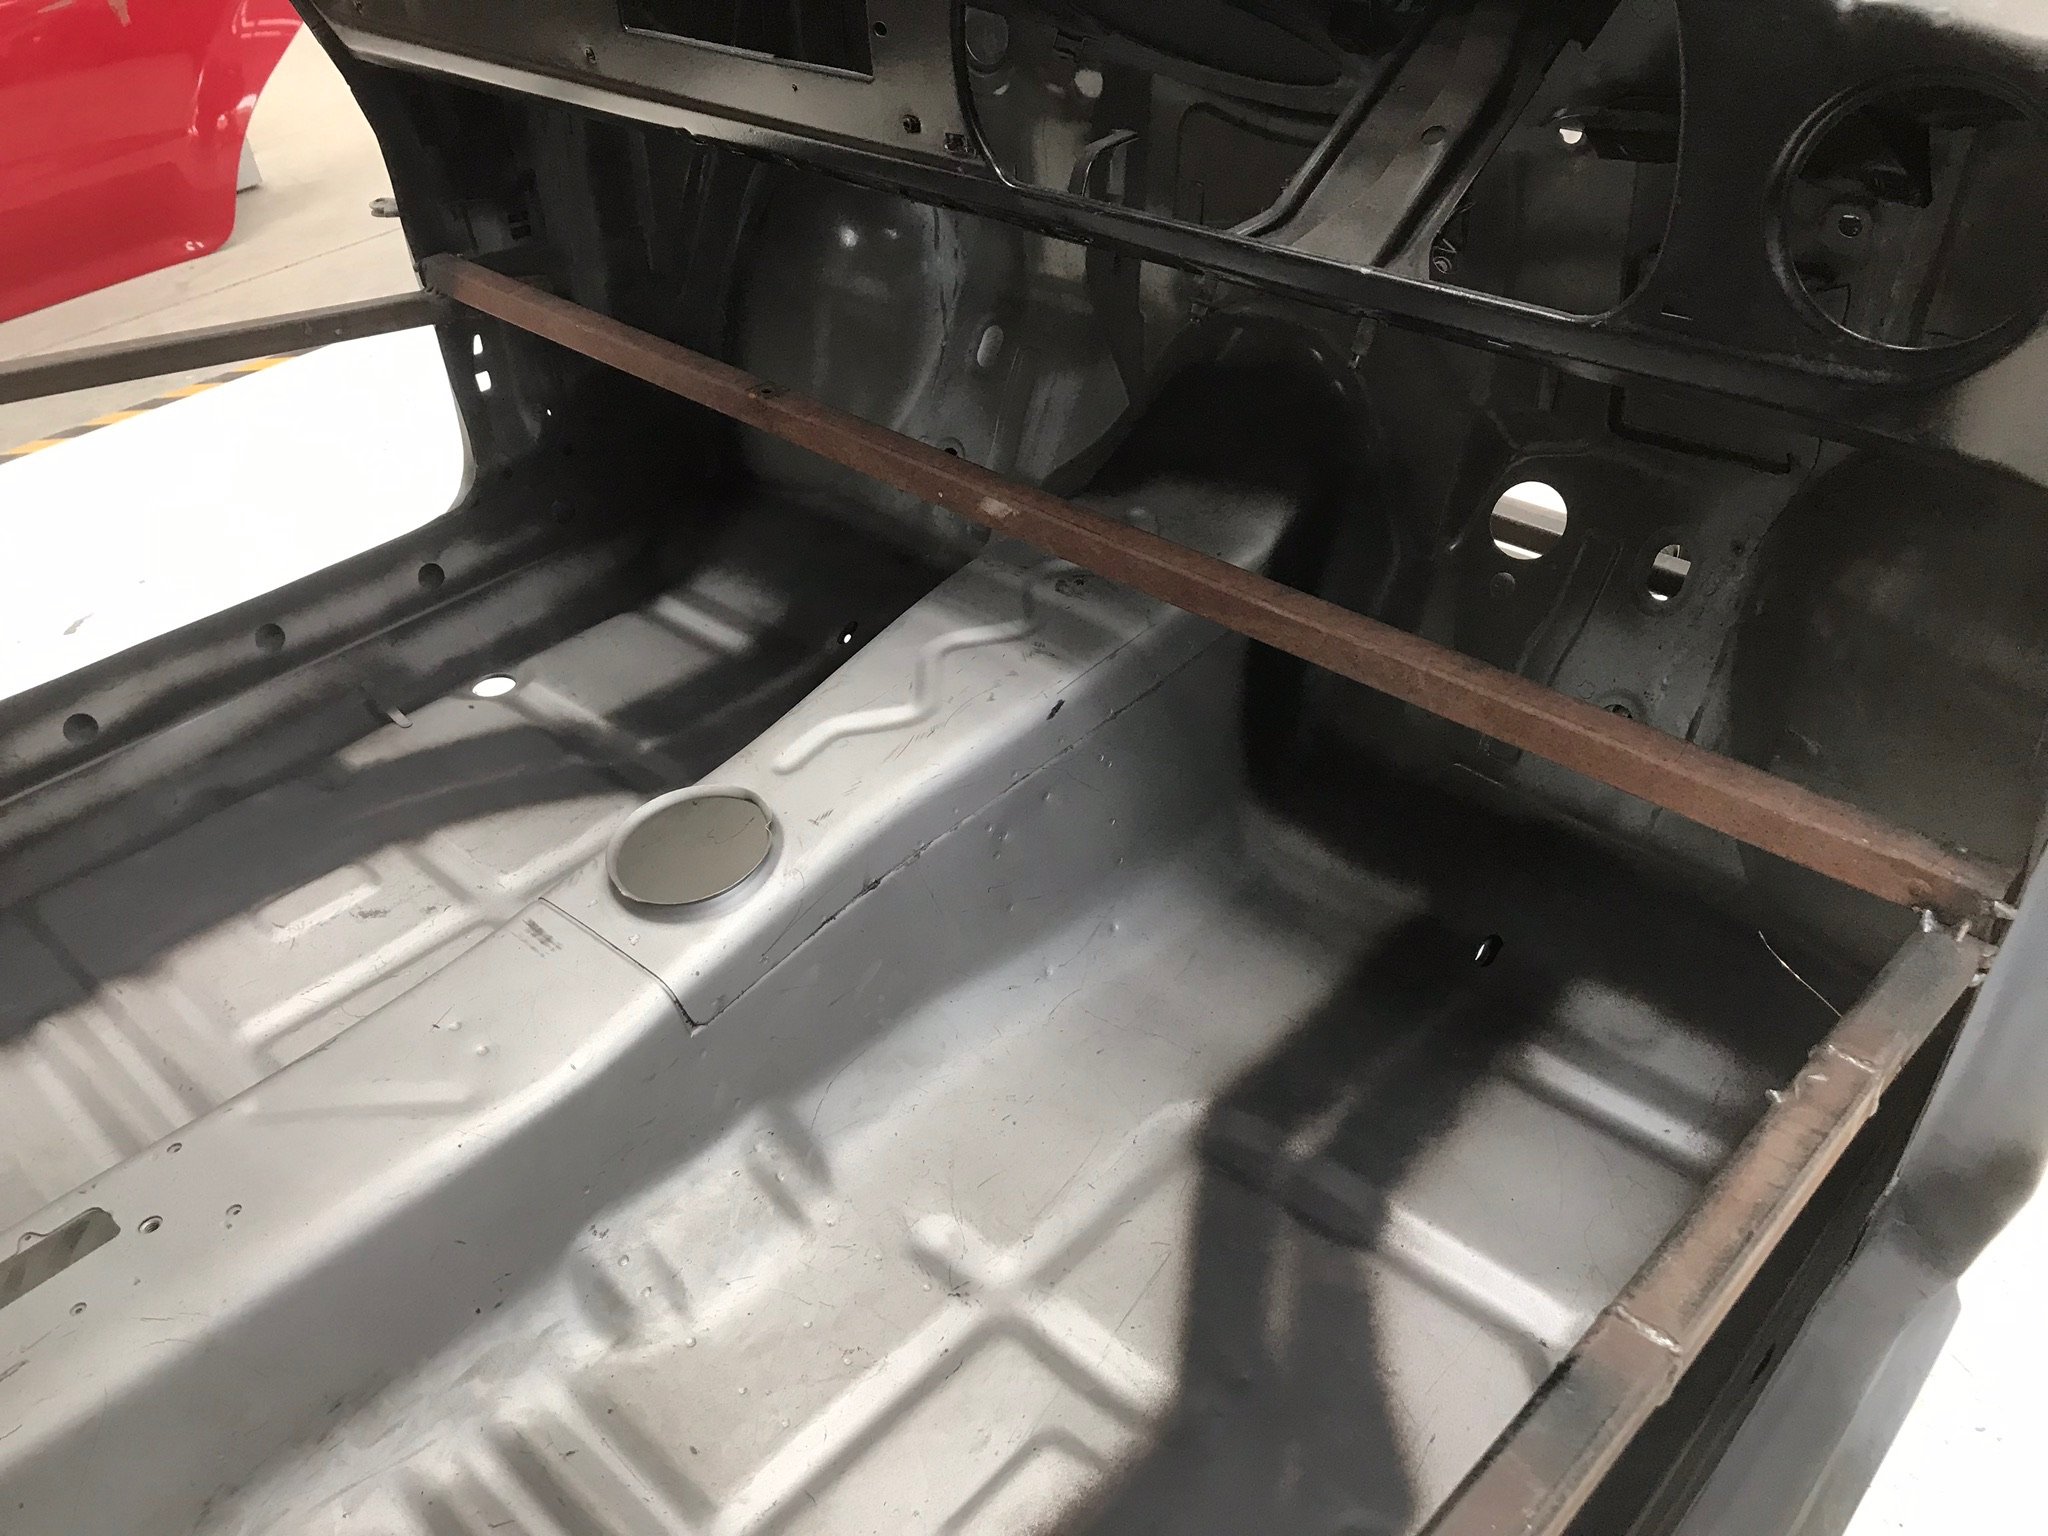
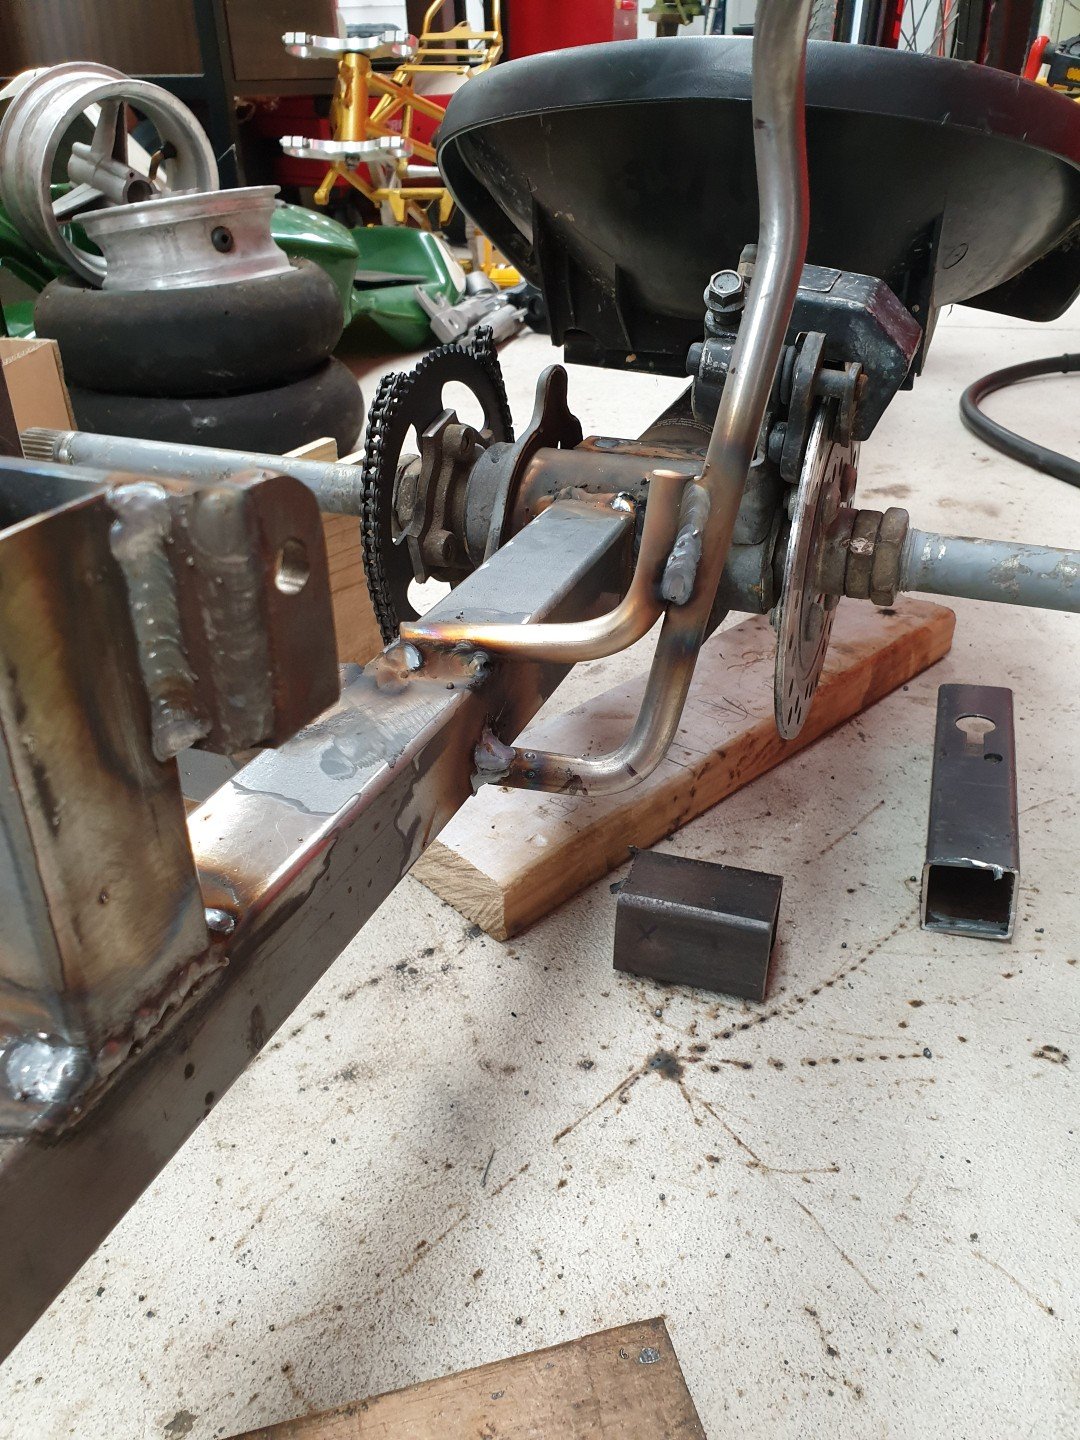
finished modifying the crossmember and put it back in the car. everything's done now, fluid lines hooked up, kick down connected, shifter connected and spedo cable hooked in. just need my drive shaft back (should be Tuesday) then its test drive time. cant hook up the converter lock until i figure out how the fluid pressure circuit works which ill know when i drive it. 2019-08-10_12-08-21 by sheepers, on Flickr 2019-08-10_12-08-29 by sheepers, on Flickr4 points
-
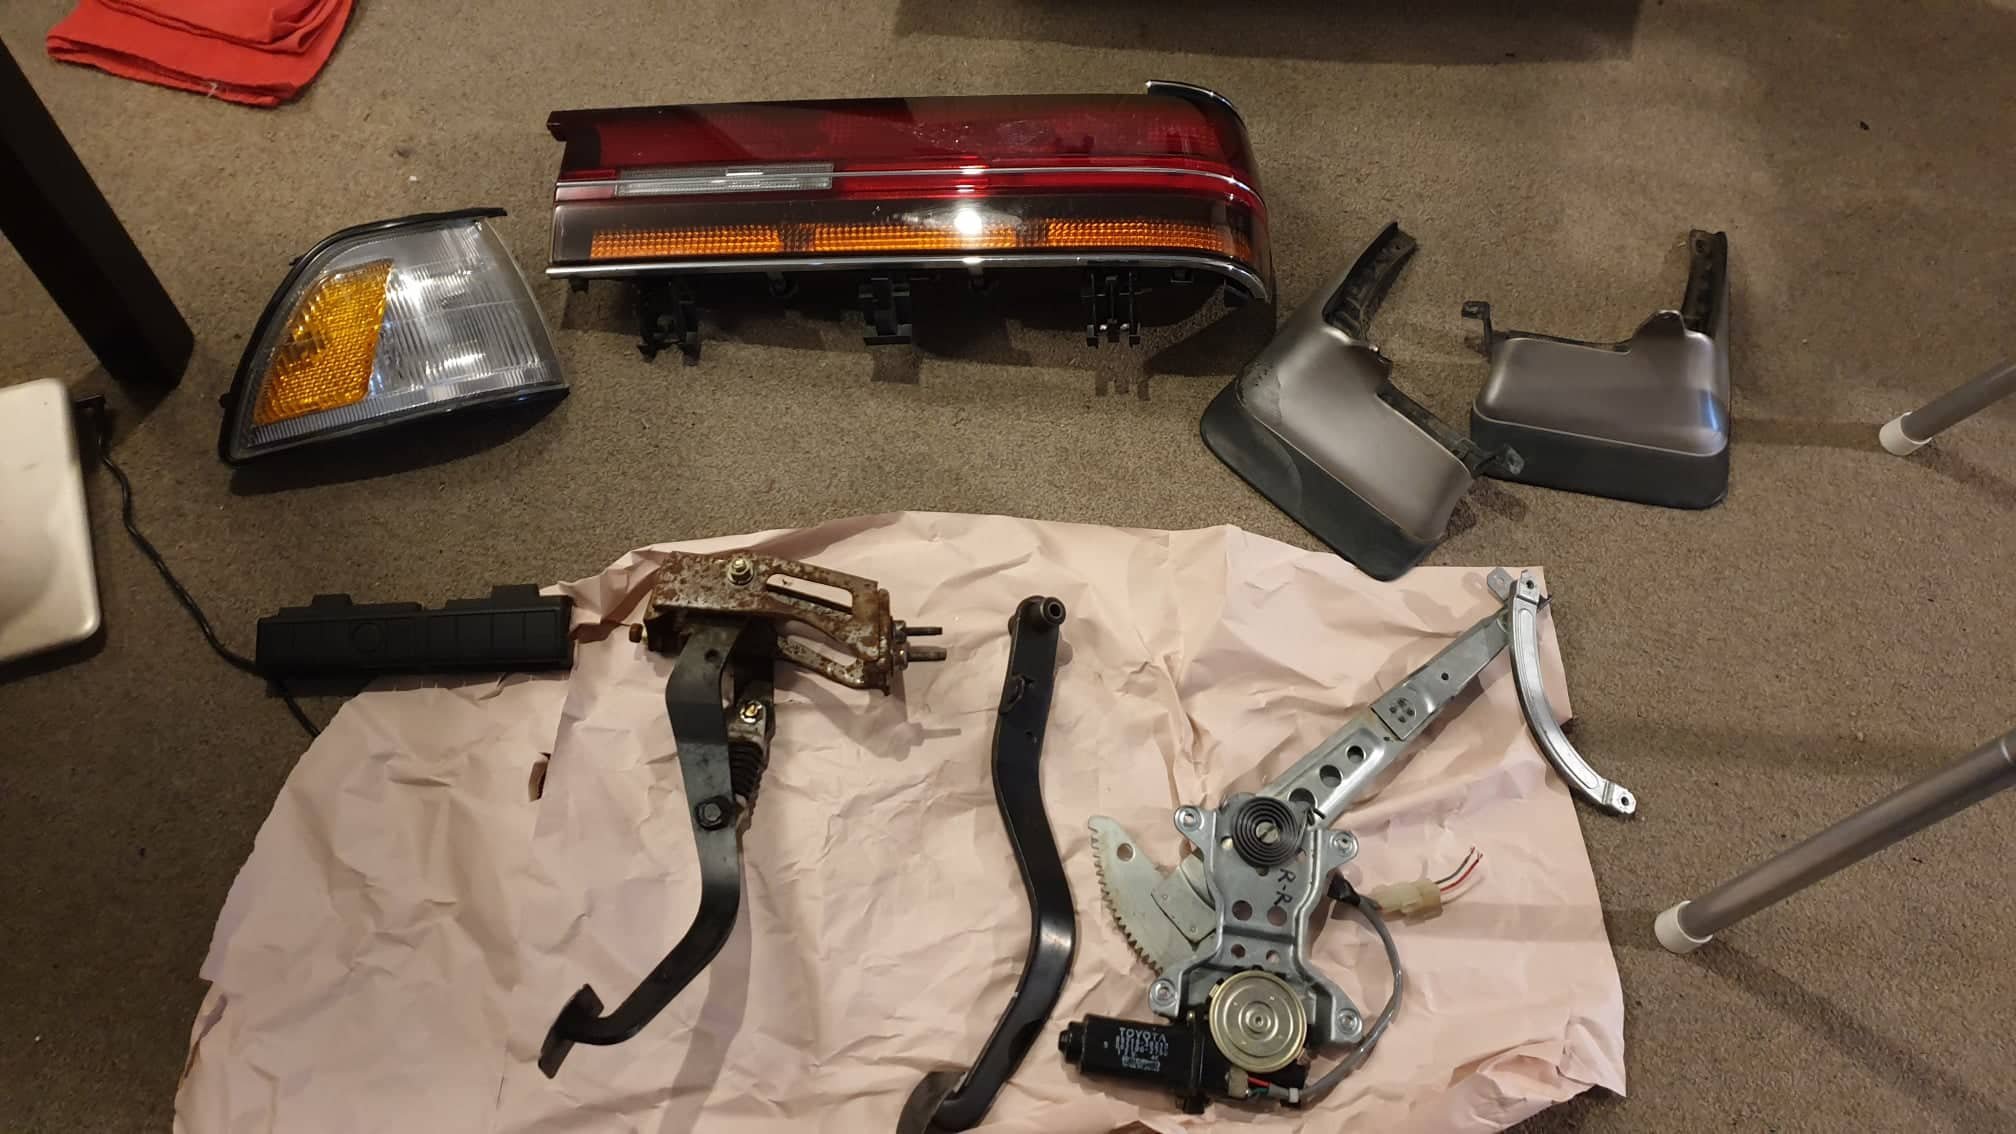
Another parcel arrived from japan this morning with more or less everything i need to tidy the car up. new tail light in the hard to find configuration and tint. super stoked on this one, it looks brand new and ill have to polish up my "good" one to match now. my old RH light had a big crack in it and water had gotten inside and made it cloudy and corroded, would have seriously let the car down post paint. corner light, again, looks almost new. existing one was cracked and suffered the same as above. has black trim where as my current one (and grill) has chrome. ill either paint the whole set black, or maybe spray chrome for the rim. either will look good. rear mud flaps. im missing the RH one and it was cheaper to buy a pair. the rear looks quite incomplete without them RH rear window regulator, current one is fucked and this will keep my daughter happy in the summer months! heater control panel, featuring working off button! a luxury my car has sorely been missing. and finally, perhaps the best score for nearly no money, a clutch pedal and manual spec brake pedal. naturally there are some other things around the interior of the car that are cracked, but i think this is the extent ill go to for importing parts. its a daily and the things remaining that are damaged can be glued or ignored, possibly found local if i get lucky, but they dont impact on the whole experience! cant wait for paint and manual, itll be like a totally different car.
4 points
-
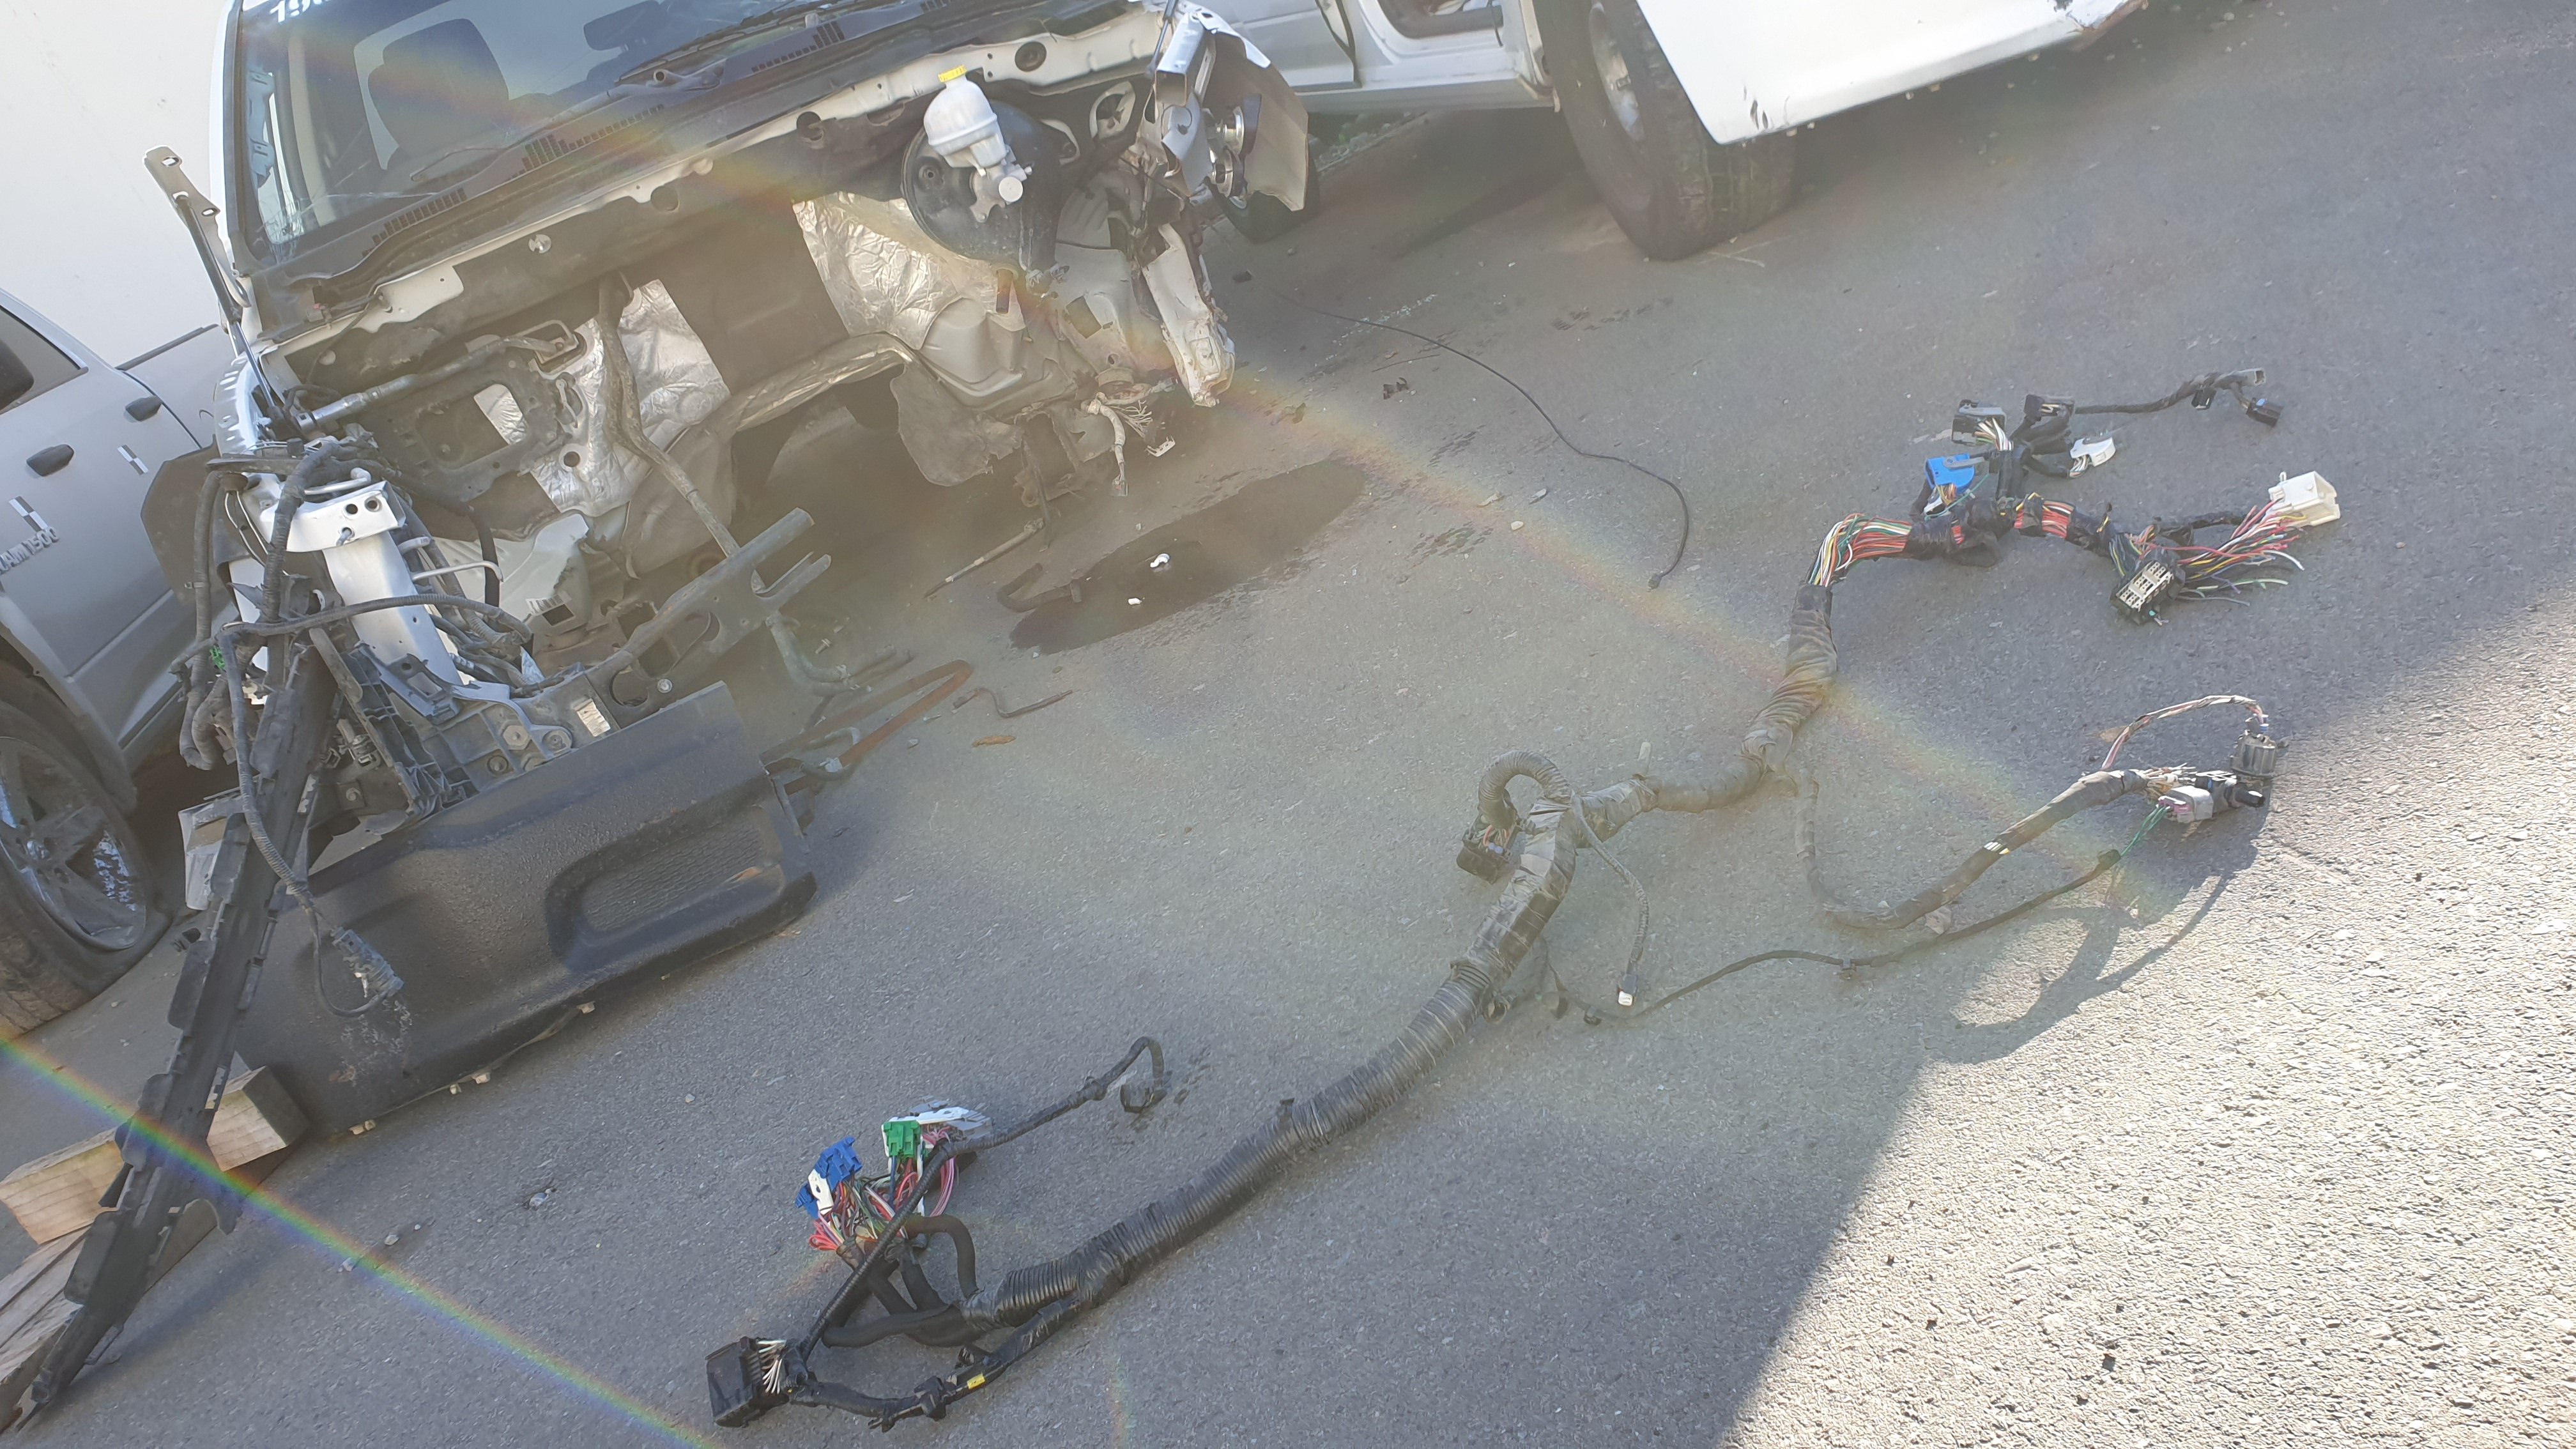
Got the final piece of wiring loom that I'll need freed up from the smashed truck. Compared to getting this out in tact, fitting the engine should be a dream! Stoked
4 points
-
Mine are squished until I turn the phone landscape Looks cute tho
3 points
-
I'm confident it should actually just start up right now if I put fluids in it. Any excuse to use this awesome tool! Nutsert in place, holes step drilled for various purposes. Fuel tank mounts welded in place. All the plumbing done, fuel lines, tap, filter, throttle cable, hydraulic brake lines...all seam to fit and be right length. Next, take it all apart and paint it. Then final assembly.
3 points
-
I love rockauto. Have been fiddling about with brake calipers for the front, I had previously got some 4 pot surf calipers from pick a part but the surf disc is narrower than the valiant ones and slightly smaller diameter so I was going to have to mill the caliper slot bigger and then I wasn't sure if the pads were going to be too fat I went to cardwells to see if there was wilwood caliper that was a bolt on, and there was 1 option, but it would have needed a bigger disc and I don't think they would have worked with the wheels I have I was doing a cert on a surf the other day, and saw it had fatter discs than the one I had got the calipers off, went on rockauto, found a v6 one of the same year had the bigger discs so ordered a pair of reconditioned calipers, $25usd each and here within a week. So now all I need to do is get the disc diameter machined down 3mm or so and it will all bolt up, yuss
3 points
-
replaced all the lip seals on the crank and both ends of the gearbox. tapped and fitted some 1/8 NPT hose tail fittings to the fluid cooler lines and then i put the box in the car. it fits. dont have the gearbox crossmember in yet, ill make the mods to that tomorrow night. 2019-08-08_07-51-57 by sheepers, on Flickr 2019-08-08_07-51-47 by sheepers, on Flickr3 points
-
Sorted2 points
-
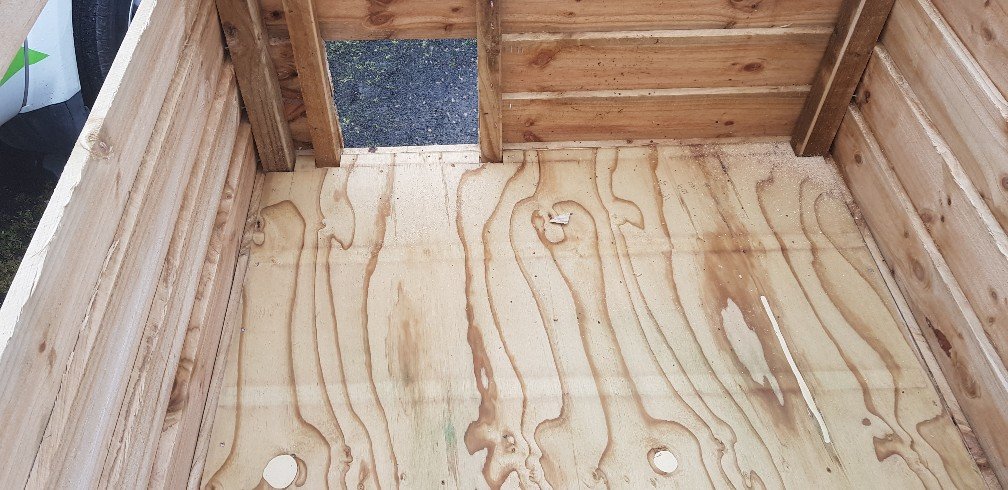
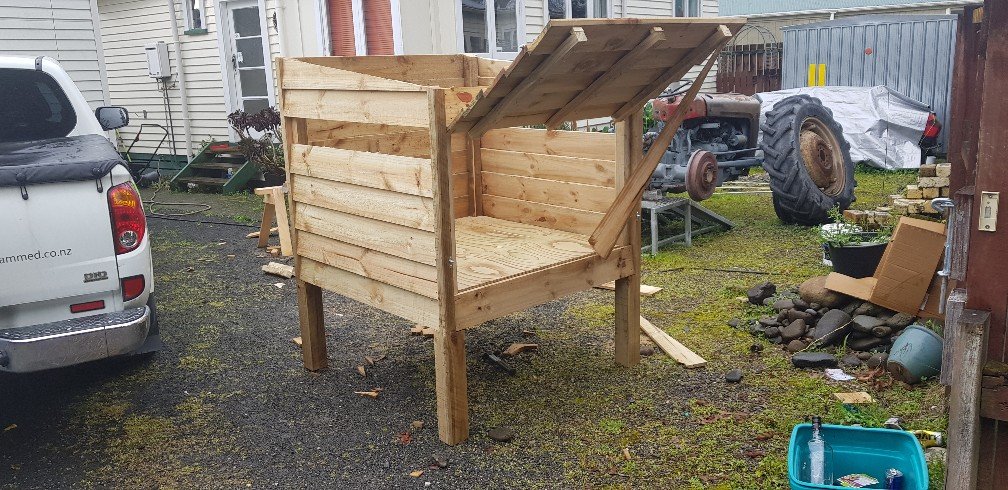
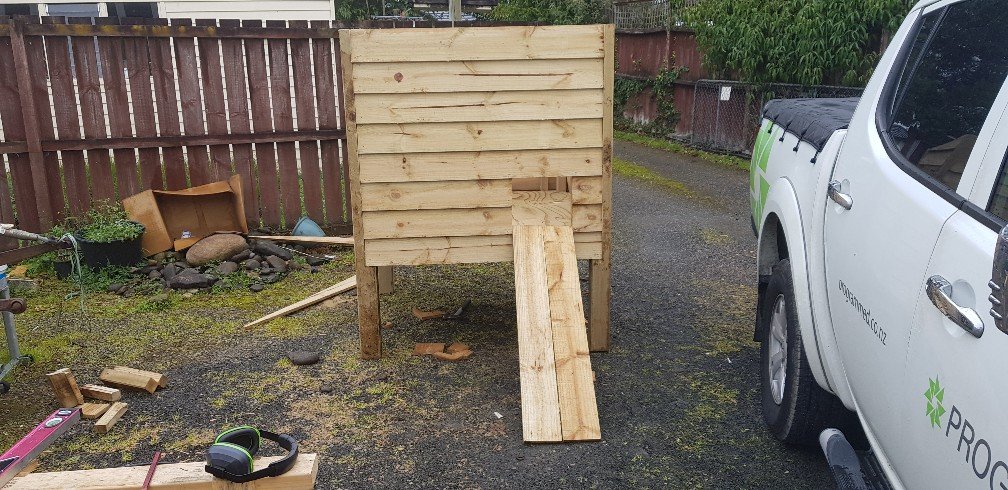
Is that your video? You spelt extended wrong I been building this. Started last weekend in between rain showers Needs roof and nesting boxes then dry weather for paint ( or stain)
2 points
-
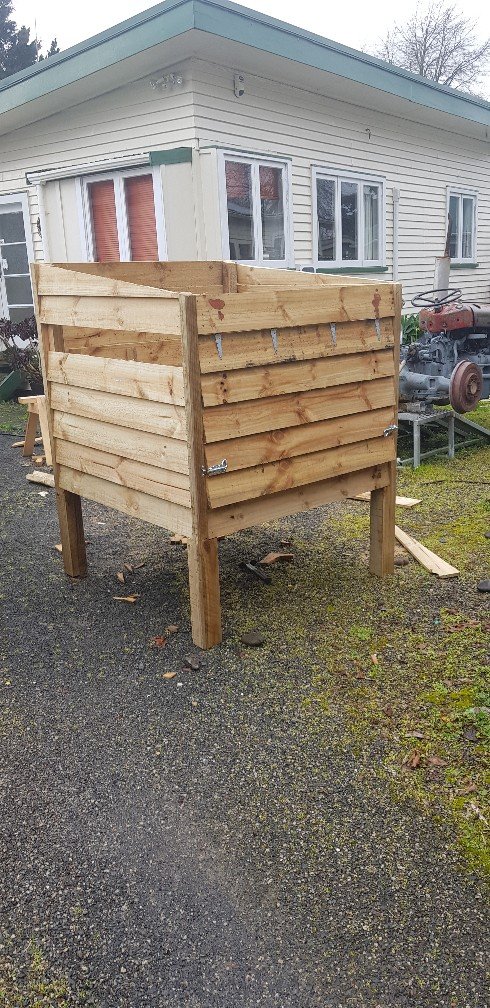
And all painted ready for assembly tomorrow when dry(ish).
2 points
-
I use a gt2056V(same as yours but bigger 1.0 ex housing) on my td27+T with a 10psi actuator on the vanes, and no wastegate, fuel controls amount of boost and i set that to ~18psi, I really like it, only tricky part is setting the vanes open enough that highway cruising is still good when at low boost, used to have a external gate fitted aswell, waste of time and money that was haha2 points
-
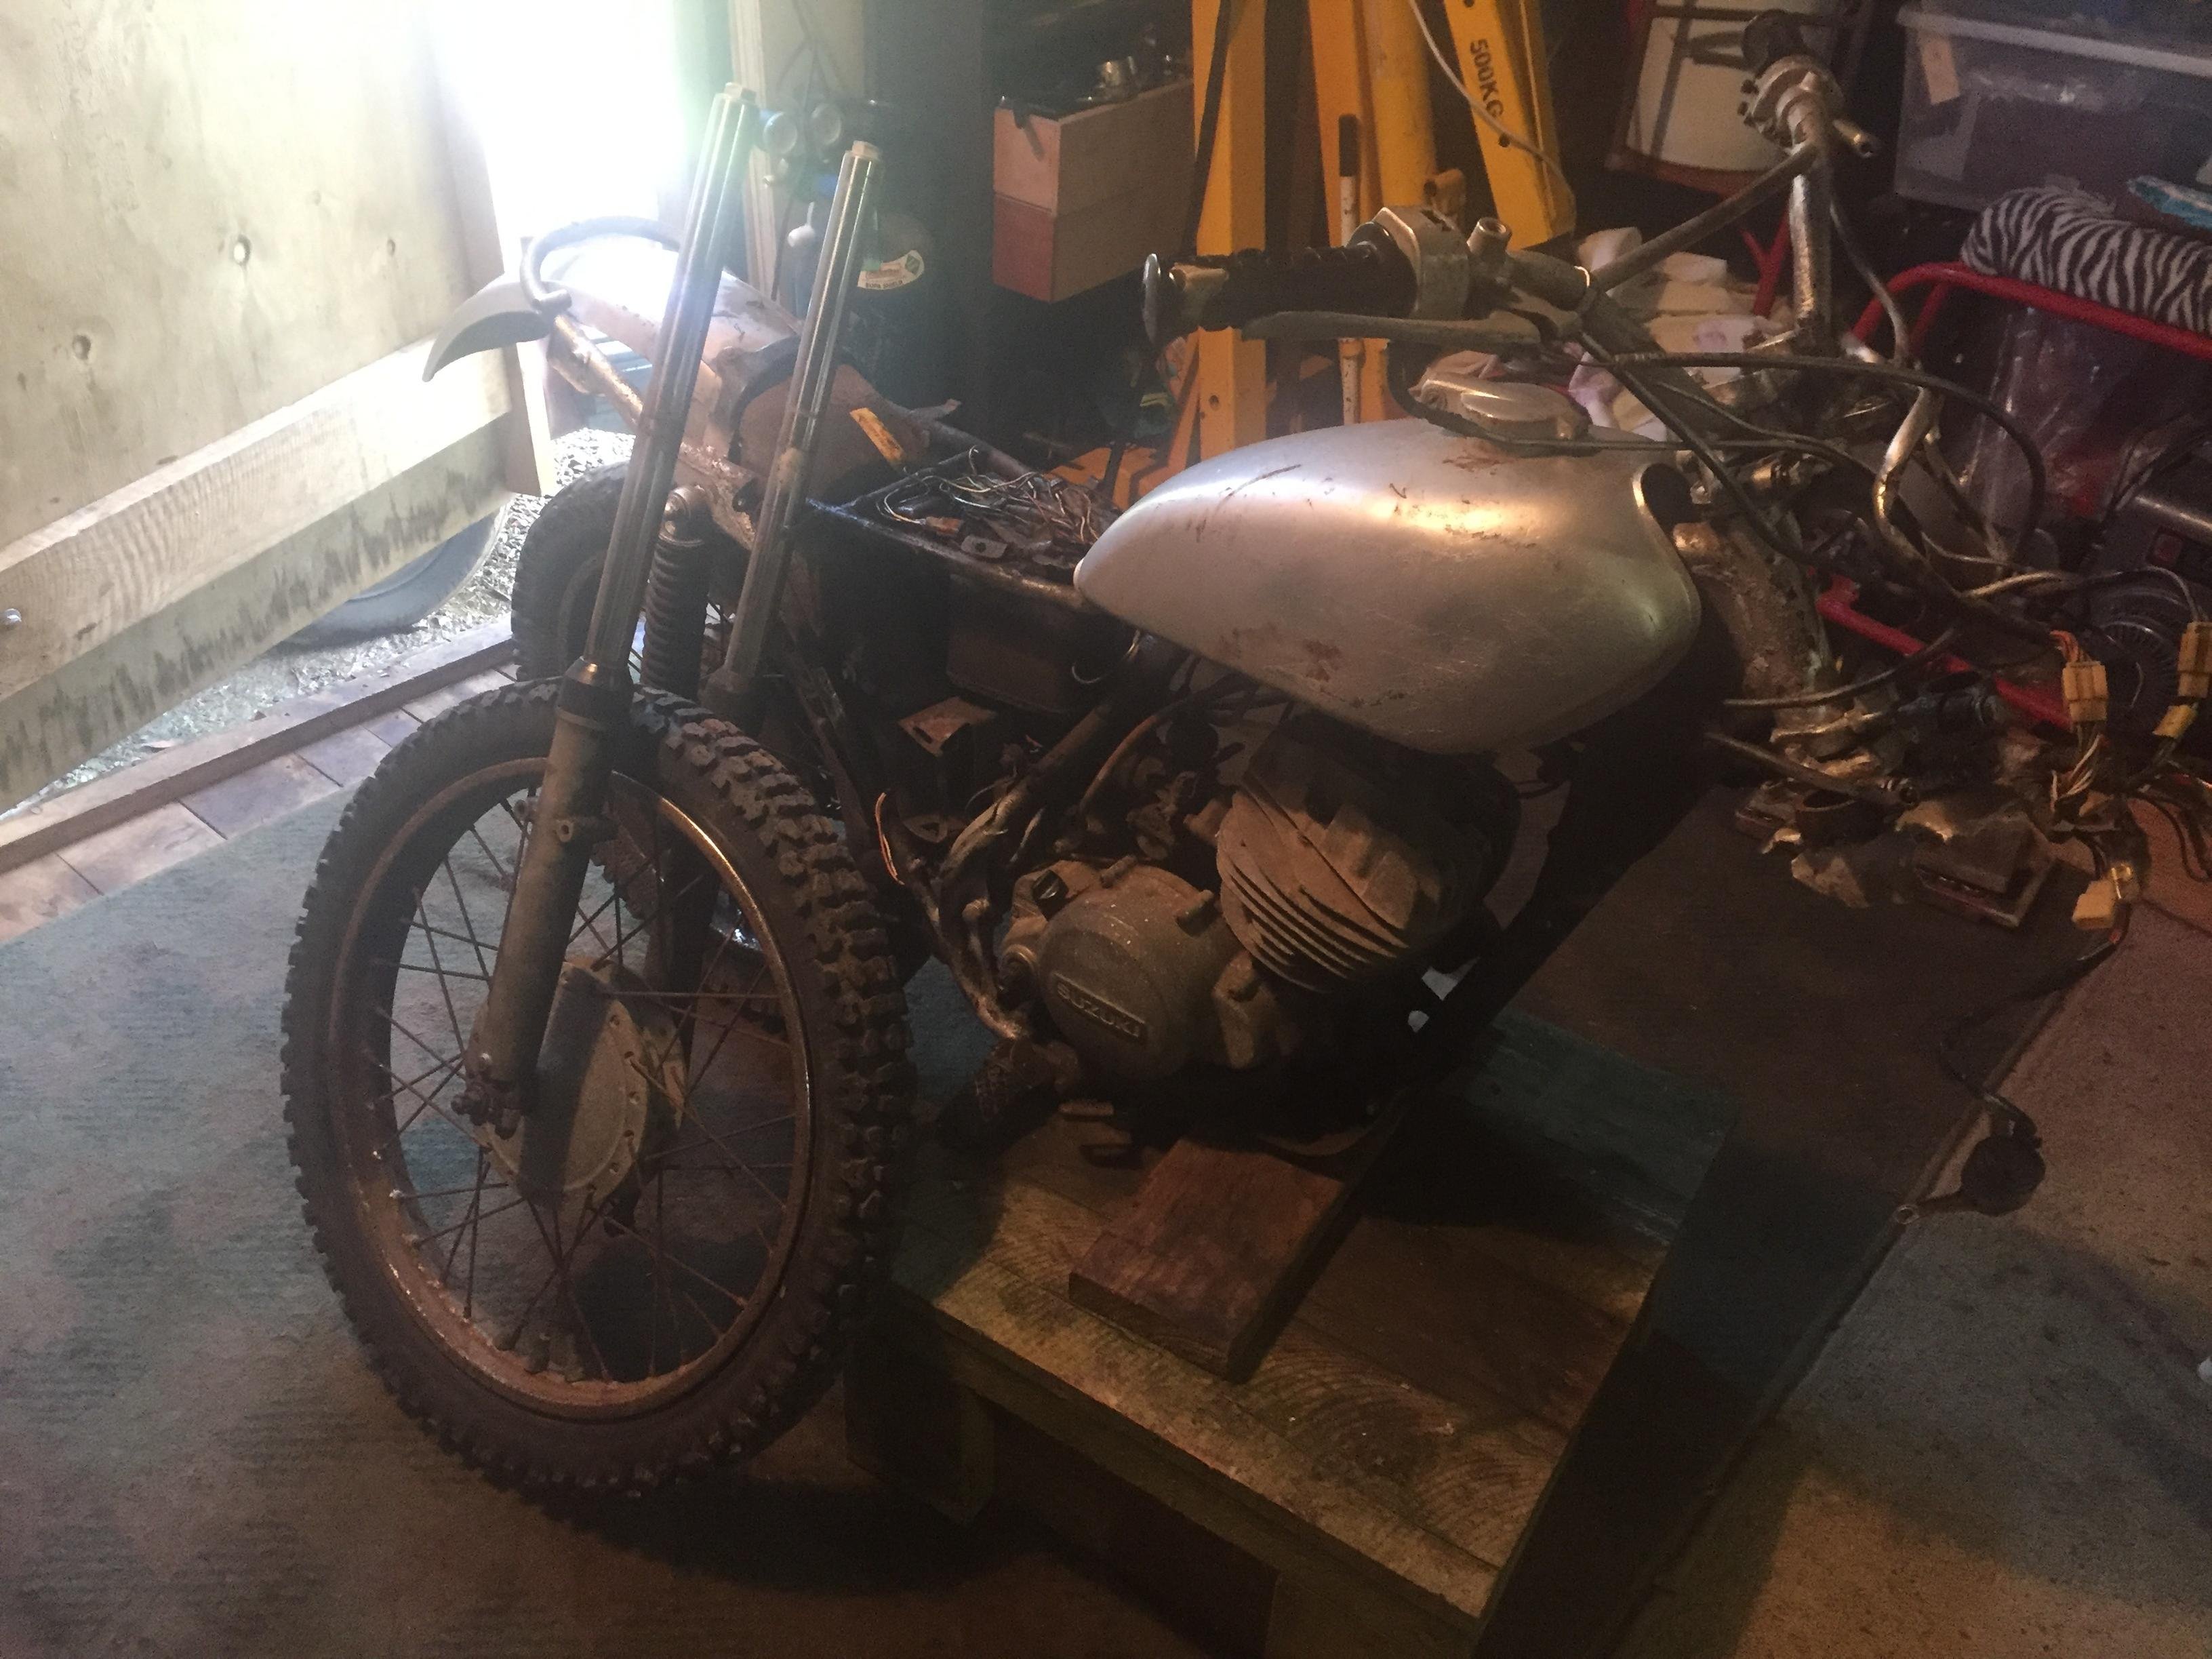
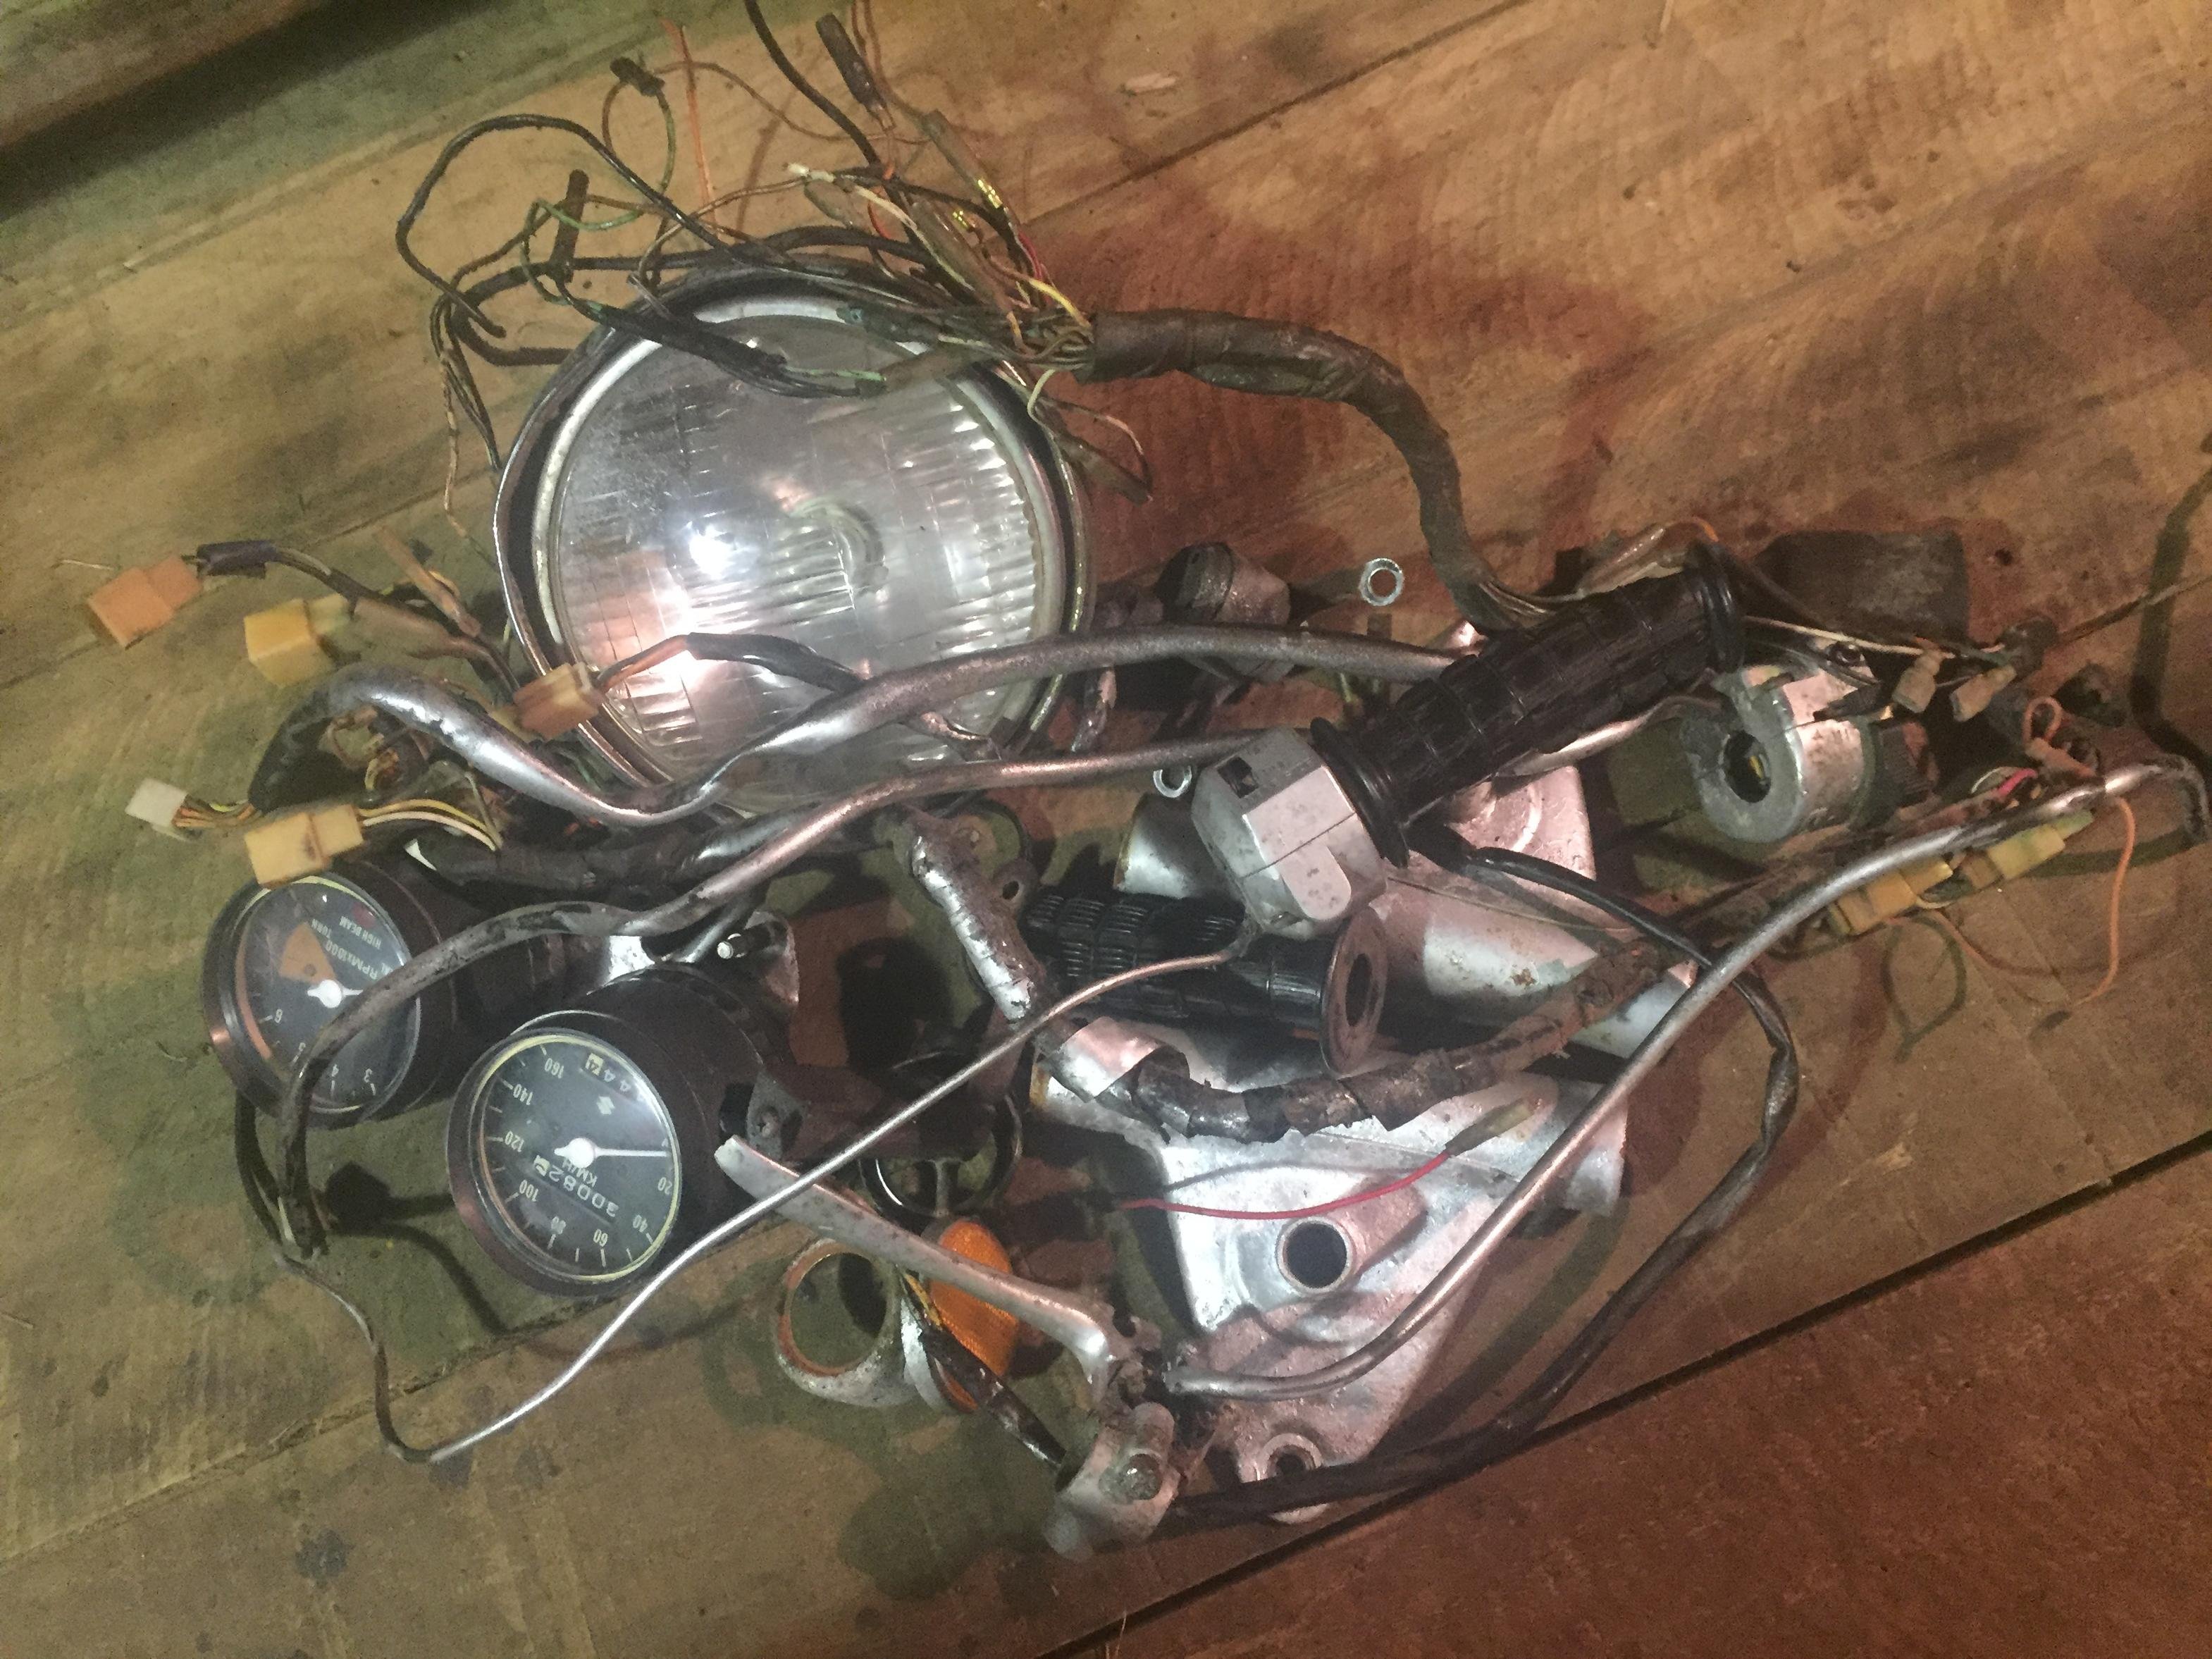
Hi, I’m Shakotom and I have a Motorcycle addiction. It all began with just one FA50 and I’ve been addicted ever since. It just starts with something small and then next thing you know, it spirals out of control and your looking for a bigger fix and that has led me to where I am today. A while ago I had a Suzuki ax100, I really enjoyed the classic aesthetic of that bike but it was punishingly slow for paying $500 a year in rego. I sold that and purchased a ‘87 2KR FZR250, and that’s a weapon of a bike, but sportsbikes aren’t really my jam, and I’m still to cheap to be paying that much in rego. Ive pined over the timeless styling of a Honda CB for many years. I think there a beautiful bike in stock form, and a versatile canvas for creating everything from a full blown classic race bike, A scrambler/Cafe racer or if you get wild enough with a welder, a chopper. Id been looking on and off for a while, I’d decided I wanted a Twin cylinder -either a 350 or a 360 just to keep the weight down. It had to have a minimum of Rego on hold and be pre 79 for cheap rego. Back in April I found a bike that happened to meet all of those requirements at a pretty good price, but I was due to fly out to America in 4 days. So I did the only sensible thing I can think of and went to view it. 8 hours before I was due to be at the airport I was dragging my new acquisition home... It’s a 1974 Honda CB360, black plate, rego on hold, failed cafe racer attempt, that’s been sitting since 2012 that I am very happy to call my own. Its not the prettiest at the moment, but it’s got good bones. I’m fairly happy with the fact someone else has done the initial job of ruining what was a tidy complete bike at some point in its life so I’m not going to have any second thoughts about changing bits and pieces on it to make it fit my requirements. Basic plan is getting it running again, do the basics to it to get it in to see what it needs for a WOF, and ride it a little bit before getting to carried away. First step is sorting out this rats nest of disconnected cables, horrible clip ons, hoses that are the wrong length, loose everything and general terribleness. It’s had the generic cheap clip ons that move if you pull on them fitted, along with headlight and indicator mounts that don’t really hold anything securely. I got a few minutes in the shed and wanged the original bar clamps back into the top plate, and a set of old bars to allow me to throw the clip ons in the rubbish bin. These will do for now to initially ride it on when I get it running, but end goal is some nice Chrome bars. So that’s where I’m at currently. I have the carbs apart and soaking as they’re filthy, waiting on a few ignition parts to fit to replace old junk, wiring for the lights and switches needs a going over, and so do brakes. Basic stuff to get it running and riding and then I’ll write a more comprehensive list once I acquire a WOF. For now however, I’m just happy to have found a bike that fitted all my requirements and here’s to hoping what I’ve learnt from playing with smaller bikes helps out with this one. At this present moment in time, my end goal is to have a fairly clean, simple and reliable bike I can ride daily that will do everything from looking good outside a cafe in Ponsonby to chucking a backpack on to going and find some gravel back roads for an adventure. Stay tuned as I get in over my head and realise I have no clue what I’m actually doing...2 points
-
Floor, firewall, sills and door posts so far......
2 points
-
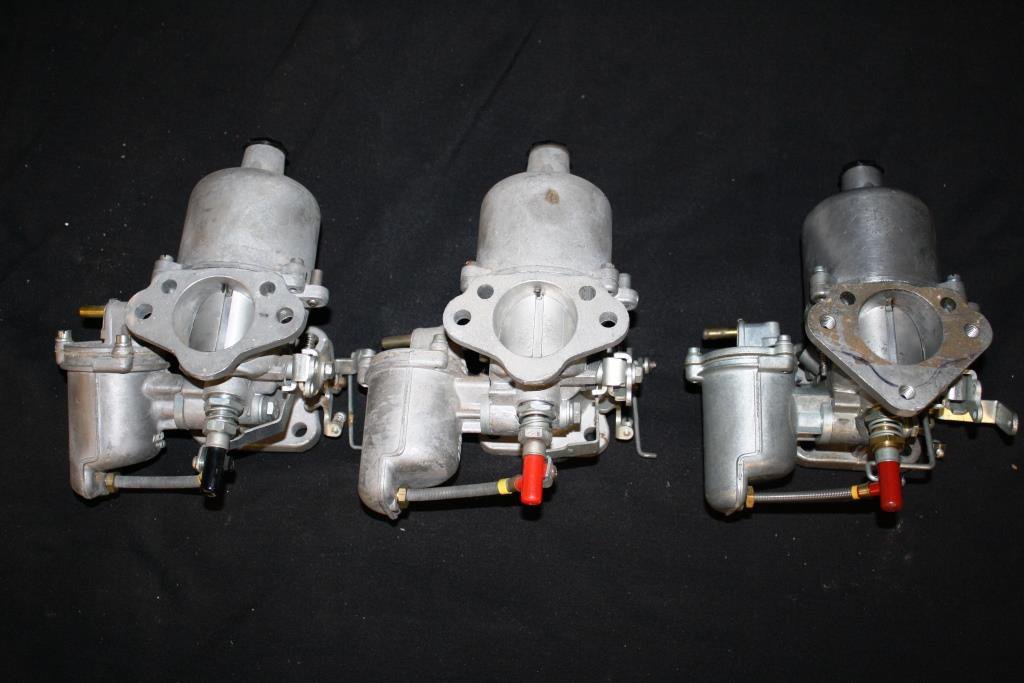
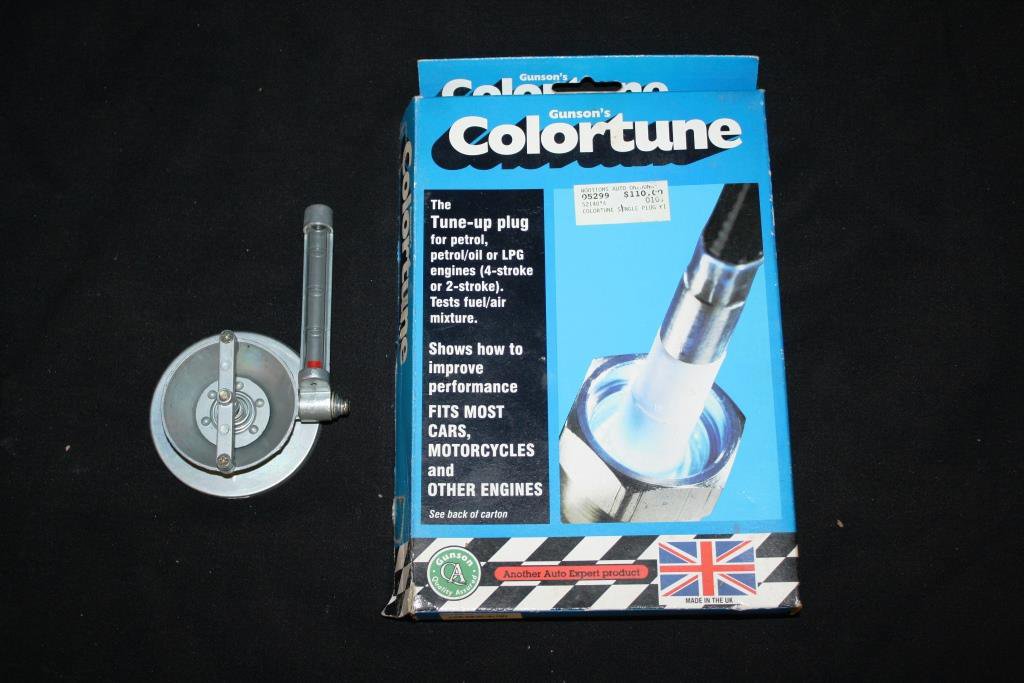
The initial plan was to replace the Spindles and Spindle Bushes and then re-kit the carbs but I managed to track down 3 new/old stock HS6 carbs for a fraction of the price – sometimes you just get lucky! The guy I bought them off even threw in a carb balancer and a Colortune Kit to sweeten the deal, there’s some good sorts out there.
2 points
-
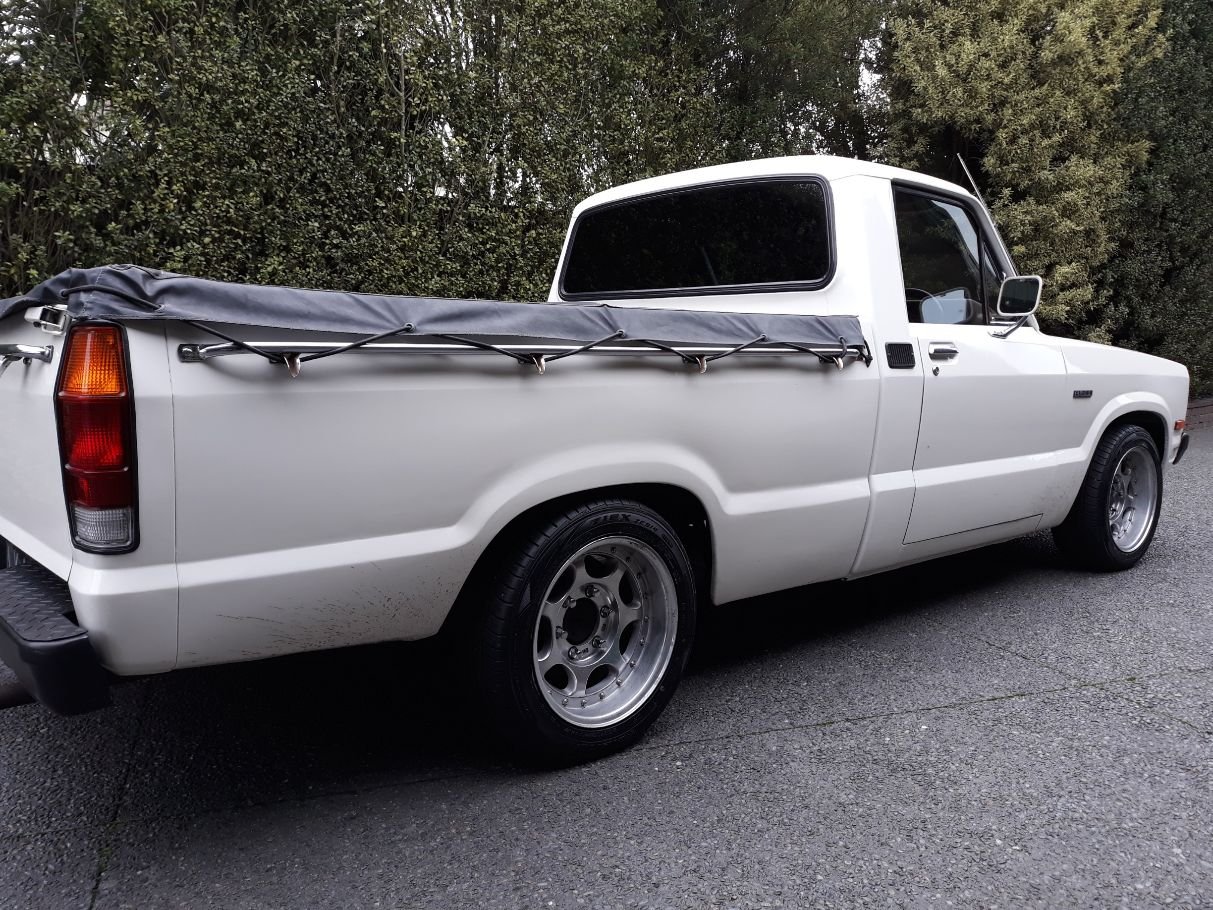
I am practically a farmer so I need a truck. Made sure my Tetanus shots were up to date and got this. But I really don’t need another project. Wow, I suck at this. Mean tractor grips though, so WIN. Thread of discussion
1 point
-
Hi All, bought this car at the end of 2018. South African import, expecting trouble. I knew it had issues, what 40yr old doesnt; just desperate to get something and get started. 1980 1600 Sport in green ( amongst other colours ) its been sand blasted, stripped and finally getting some new metal in place. ill update with more posts later, just checking this works ok. Phil
1 point
-
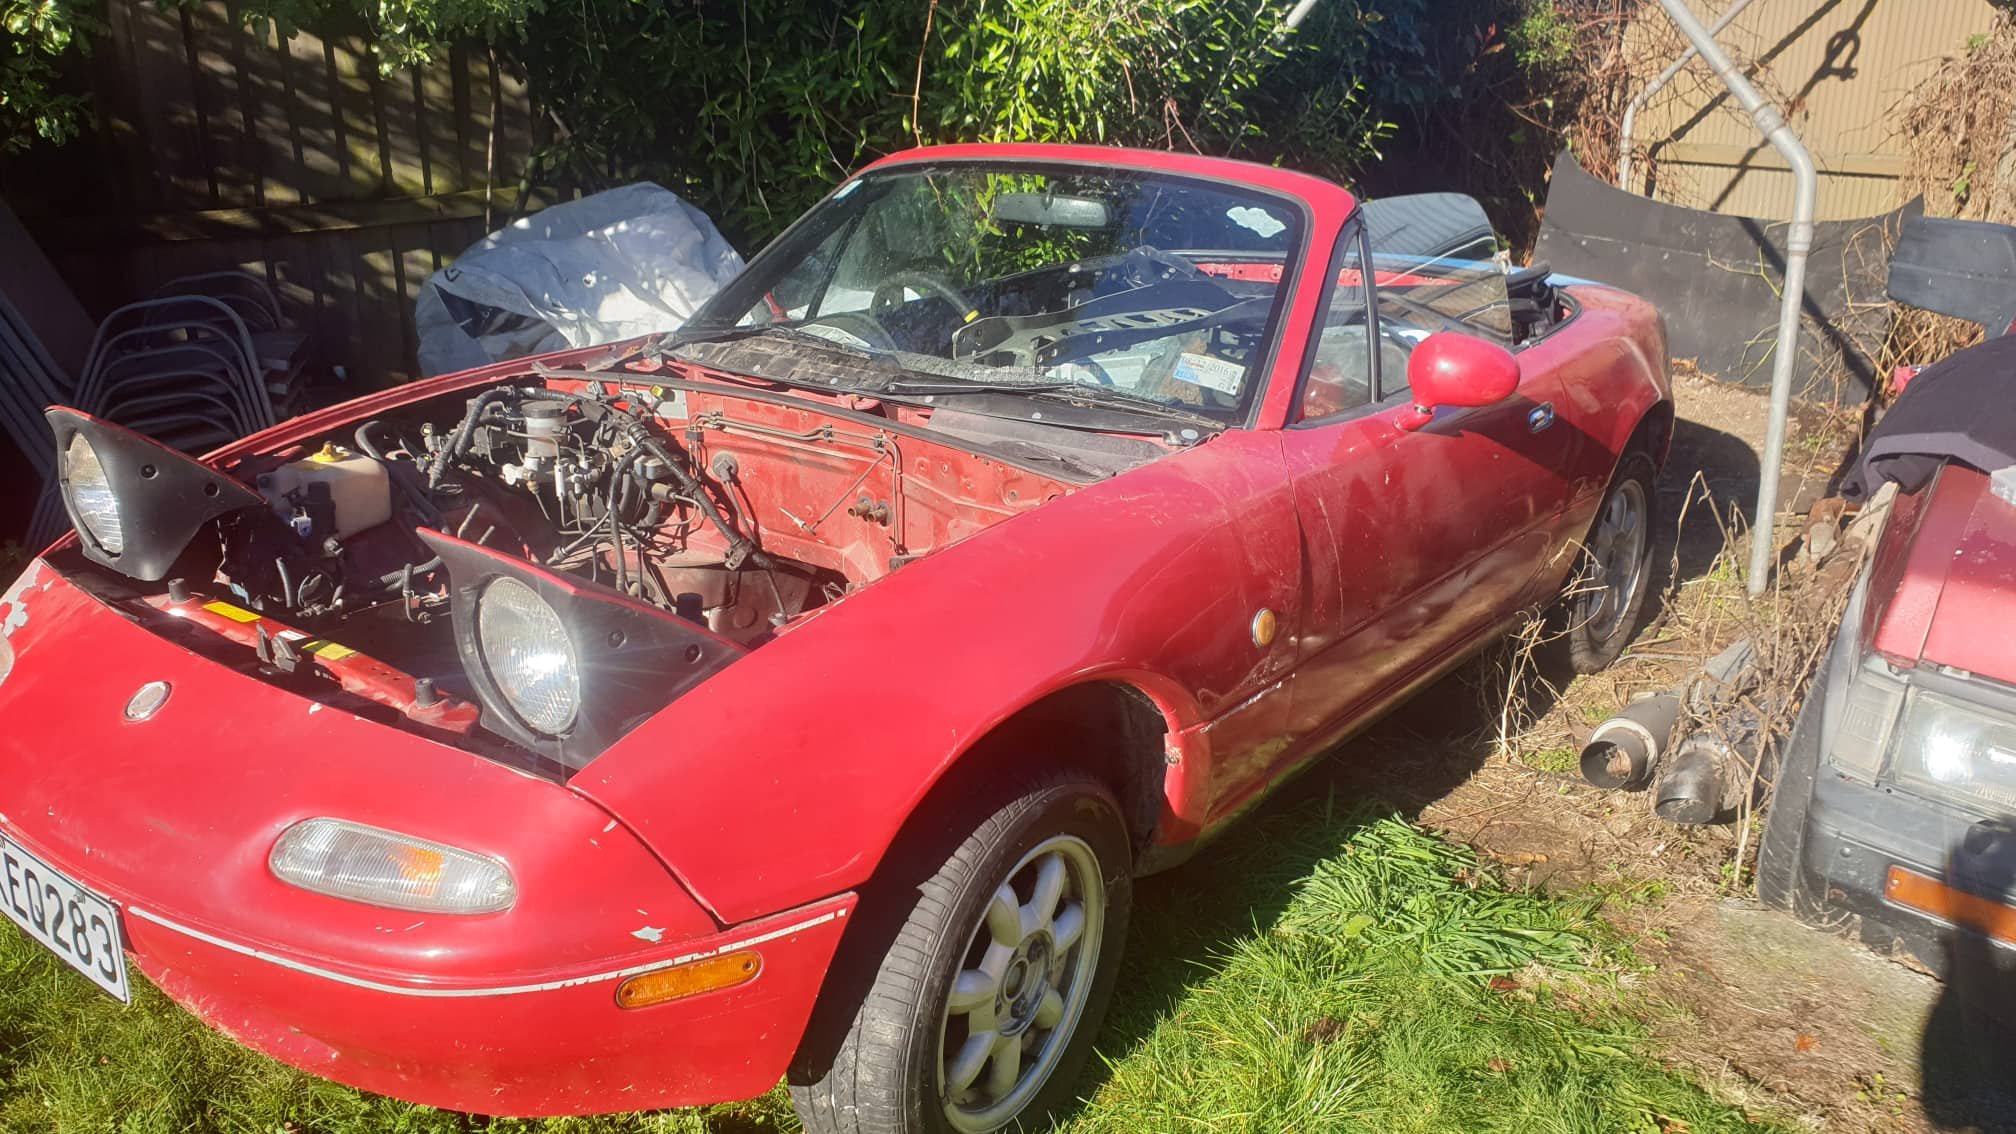
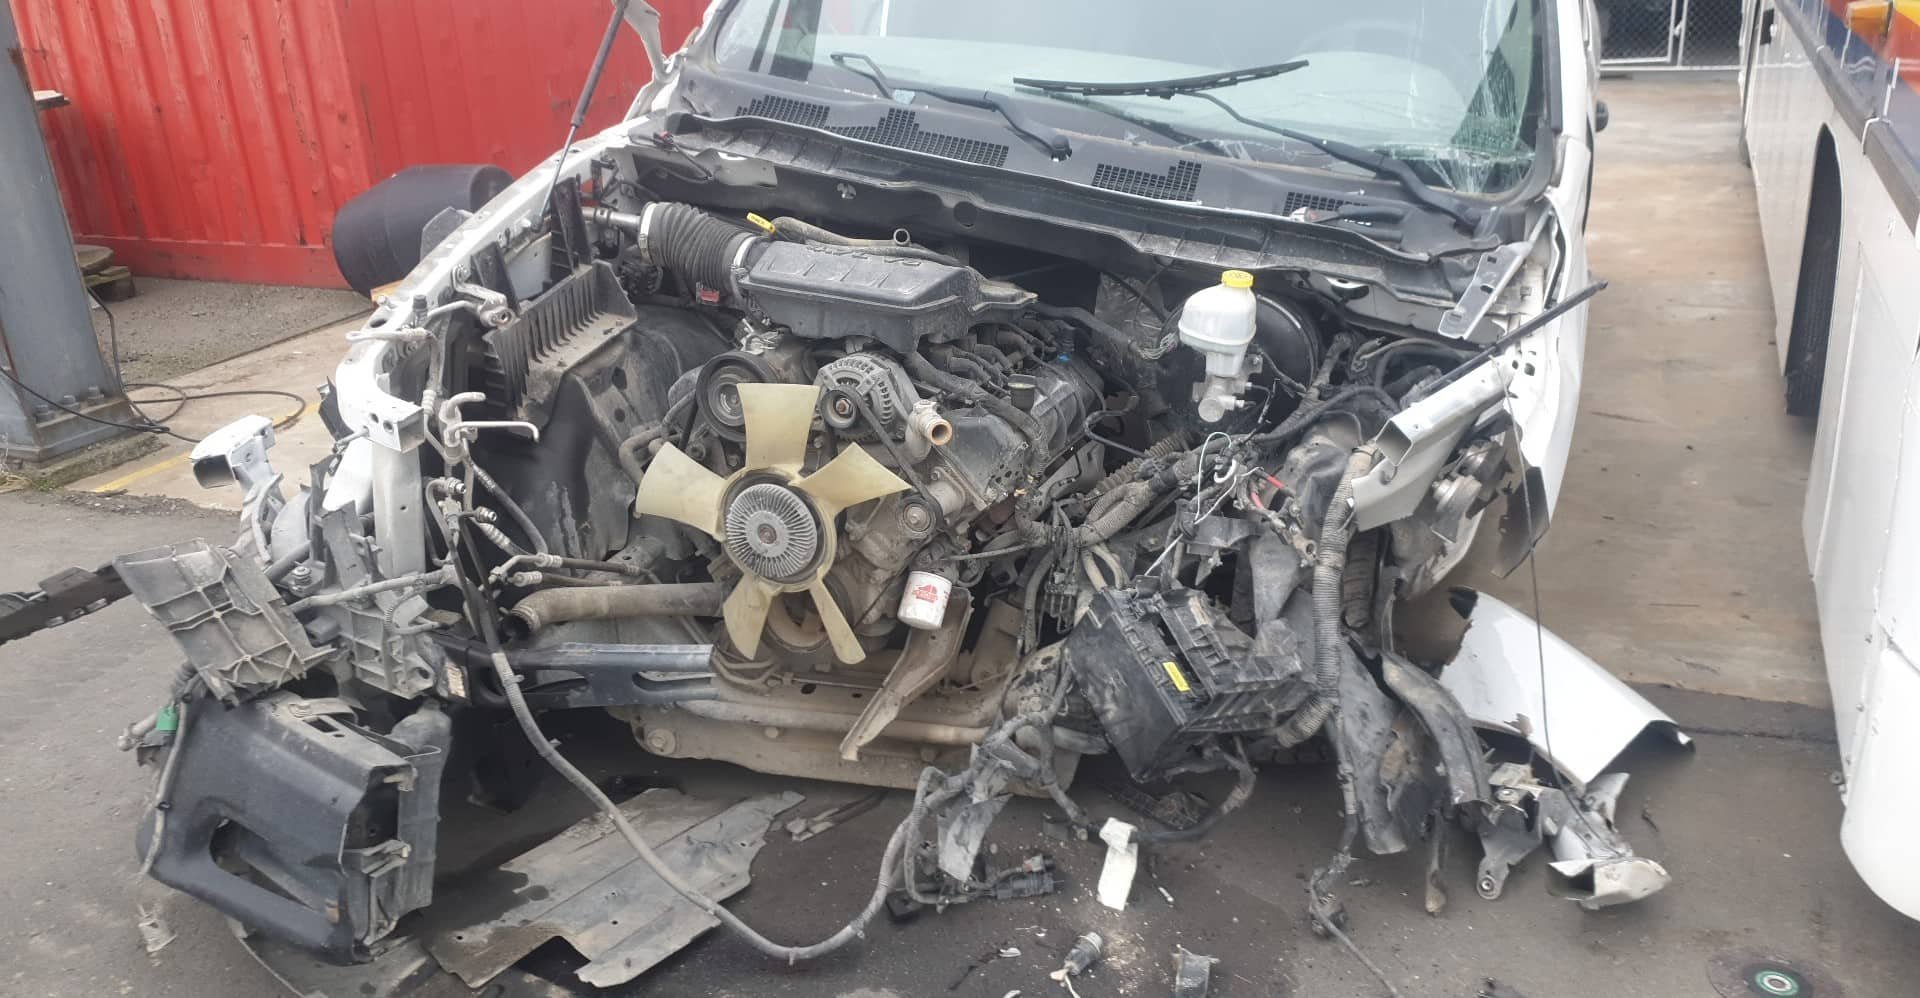
Where do i start. A while ago my brother started building an mx5 for his girlfriend and ended up with a fairly straight, but de registered rolling body, offered it to me for free and i was keen for a future track car project. I also happen to have a job which involved crashing cars, and thanks to a certain american standard roadside barriers must meet, we crash a lot of Dodge Rams. with plenty of v8 engines kicking around i hatched a plan and proceeded to talk about it for at least a year without actually doing anything about it. then the engine blew up on the corona, so while i wait to save up money to build that engine properly, i thought id make a start on this one, which by all accounts should be nearly free, with the only big ticket items needed being a roll cage, a diff swap and a driveshaft. So last weekend i dragged the mx5 into work, where i have all the tools i need to build a race car. and over the week started the efforts to remove the engine. Now that sounds easy, but boy was this truck fucked up. while the engine faired very well with the only damage being an engine mount ripped out (block still fine) and the starter motor wanged in (i have alot of spares). the chassis was bent at near 90 degrees around the engine, i also didn't really want to remove the trans. i started with a 9" angle grinder and removed as much fucked body and frame as possible. i then undid the remaining mounts and then promptly discovered this engine doesn't have lifting points? strapped it around some dubious strong points and tried to lift it out with the forklift. it rapidly became clear that the turbo fucked chassis was going to make it impossible to get out. so packed up, went back to work and had a think over the next few days. that brings us to today, what i had decided to do was cut the chassis in half just behind the trans and lift the truck off. so out came the 9" grinder again and i began by cutting access to the rails around the fucked body, and then trying to cut the rails with the grinder. sketchy at best. so thought fuck it, step it up a notch eh? though this was actually much safer. Gas axed the rails and out she came!
1 point
-
Should be a bit of a laugh eh, looks to be about ~23 people signed up at this stage I believe. I reckon thats a pretty comfortable number, not too hektik, should be sweet with one vehicle + trailer at this rate, which thphantum has offered to do for us. Dunno if we'll get many more people what with accomodation being a bit tight. But if we need another that could be sweet man cheers1 point
-
Sooo cool. Unfortunately photos are squished on my phone even in desktop mode1 point
-
You’re sick. Bravo, a commendable purchase!1 point
-
Bits and pieces moulded into the fibreglass for things like door mounts and windscreen frame, but its mostly a fibreglass tub bolted to a tube frame chassis1 point
-
I managed to wrangle the whole EFI manifold and plenum off a later TVR as part of the deal, so the option is there. Im going to try and get the Kjet working good enough to use, but the ultimate goal is EFI with my spare Speeduino. Probably use the dizzy as the trigger, and wasted spark.1 point
-
Man that is beautiful. good work!1 point
-
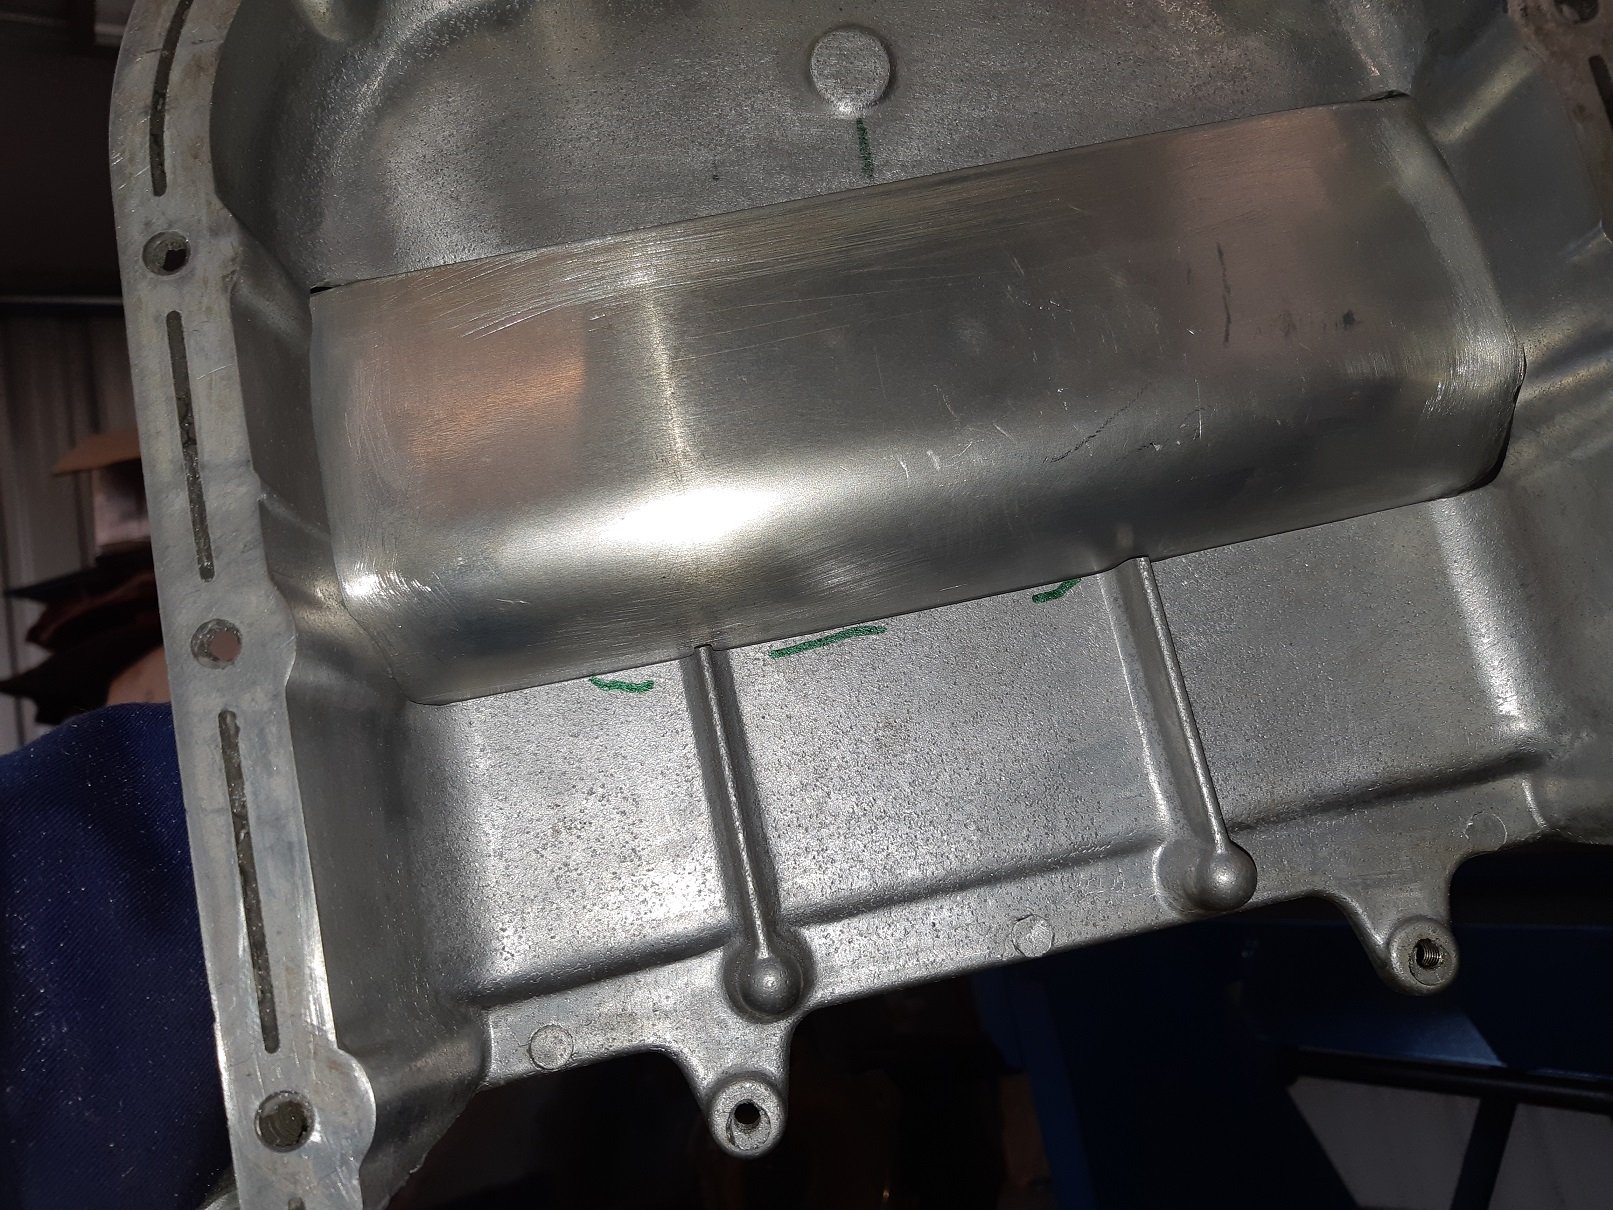
Actually needed to take more off then I marked up. got everything loosely in place and put the cover and sump back on for the night. hopefully find my torque wrench then set timing and final tighten up this weekend... if I can find time to my self..
1 point
-
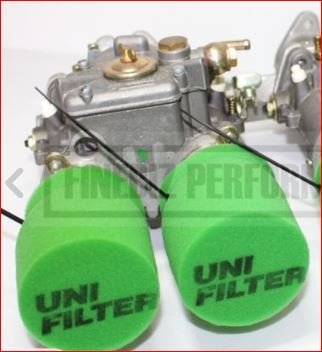
not much of an update really.. been waiting on an airbox to arrive from nelson, has only been 4 weeks.. but I ordered some uni filter trumpet socks for when it finally arrives. green socks just came in stock, more suitable than the red ones. also need to do a few laps around the block with the brakes dragging before I take it in for a wof and hope it doesnt need anything else..
1 point
-
I assembled a store bought kit, incorrectly.1 point
-
motor and box back in so i can make the tunnel ....airbox and and few other things before it goes back on rotisserie......might make some new headers as well
1 point
-
Slowly but surely1 point
-
Hell yes!!! So close... just waiting on a few parts to arrive in the post.
1 point
-
So, the more I open up this vehicle the more shades of shit I come across. Those leaf springs that I didn't really have a proper chance to look at? Heated to lower... What fuckery is this? I've heard of Barry's doing it. I'd never actually seen it. If I'm completely honest with myself. I never looked over the car properly to begin with. So it's my own fault. In an attempt to find anyone else to blame for the vast amounts of money it's starting to cost me (And find someone else to share in pouring money into it) I decided to make a visit to the issuing garage. In general garages, WOF inspectors, And the LTSA really don't give a fuck what state the car is in. If it got a wof. It got it on the day because it was legit on the day. It's just on the day and it's pretty much damn near impossible to prove a car was bullshited through a wof. It's a system that protects the inspecting authority. And let's be honest. Fair enough too. Otherwise we'd have no inspectors out of fear of themselves being blamed for everything. I spent the entire morning with the NEW wof inspector at said establishment. And they admitted the previous wof inspector was "Let go" for "reasons we'd rather not go into"... The fact that I'm getting some kinda Grimmy discount on labour tells me that as much as they daren't accepted responsibility. They are wanting to keep me as a customer and are prepared to go an extra couple steps to fix the issue. And take some blame on board. So. The ute is now in the hands of the local Mom & Pop workshop. Brand new bushes and suspension all round. Spares are coming from the donor. New rubber. Alignment, Fresh wof. And all the half ass attempts to make it cool and low are being done the right way. Which was kinda my plan for it anyway Oh yeah... remember how the guy that sold me the donor was going to rip the flat bed off but couldn't be fucked? He's been in touch and keen to get the tray back. And he's a panel beater by trade. "Yeah, you can have the tray. My ute needs straightening out in a couple places. you bring your hammers and dollys when you come to get the tray and we'll call it a day." As far as my own recovery after the slam. At the time I didn't think I'd been hurt. I'm the sorta guy that walks shit off. Pain heals, Chicks dig scars, Glory last forever. Mumma didn't raise no sissy. But my back still isn't quite right. (Don't fuck around with your back guys, If it ain't right after something like a wheel falling off at 100 clicks... Get it checked!) So after checking in with my GP, having X-Rays, and getting some serious pain killers. I should be back to "normal" within the next week to 10 days.
1 point
-
Finally after two years of sitting down viking spec for a shower.. Was a bit of a fuck around trying to find something other than that mactrack shit. Ended up going for a round extrusion from a company in Hastings, had almost the exact same bend radius I needed (300mm) so because they couldn't do a full 180 bend I had to get two halves and join them together.. The reason I went with this is because I wanted to be able to move the curtains 360deg around the track.. Made a couple of joiners out of plastic, Then I screwed and epoxied them together.. The one thing I didn't think about with this method was how, once I got one end together, I was gonna get the other end in. Solved it in the end by just pushing the joiner 80% off the way into one side, aligning the ends and sliding it back.. Was a cunt1 point
-
The better half and my self have been honing our skills of late. Thats right boss. Hours of hard yards have been put in out in the garage. You all know it and have no doubt also spent many hours doing it. .... Standing there with a beverage staring at an old jalopy, talkn shit and do'in sweet fek all. But seriously what have we been up to other than throwing back jars and chin wagging you say whilst dressed in trendy garage attire. Well ladies and gentlemen wait no longer for here is yet another riveting update to cover the little bit of work we actually did. Radiator all plumbed up. the finned metal hoses bend and hold shape well. like how its kinda central in the engine bay. Replaced the hose clamps that came with it with stronger jobbies as I couldn't be feked with hoses blowing off and coolant going everywhere. Moved on to hooking up the column shift to the trans. Using an IDIDIT GM/700R4 universal shift kit. Thinking being since im using an IDIDIT column it would all just be bolt on. Well that was the theory anyway. Basically it would work fine if I was LHD. the instructions are nice and simple and kit straight forward and well made. Would just bolt in. Being RHD its all opposite though and naturally the American brand dosnt included any instructions and when I contacted support I got no help and basically told me to fek off. LHD shifting would pull the cable out as it moves from park through the gears. RHD we push it in as we move through the gears from Park - 1st. Rejigging at the column is an easy fix. just throw the car in park pull out the cable and hook it up (As pictured). Basically doing opposite as instructed. The bracket that fits to the trans had to be bent so the tab that holds the cable pointed upwards not downwards. Then an extension made up for it. Reason being that the shift arm on the trans is made to point downwards and pull through the gears. Since im pushing through the gears it had to be mounted up top. So the bracket that holds the cable in place had to also point up. Simple enough I know but thought since IDIDIT support and engineers where about as useless as tits on a bull I would flick it up encase any other Kiwis or RHD owners needed a bit of help. Shifts easy though the gears. Clicks from Park to 1st. Ordered a heap of fittings for the fuel system. But before I start hooking all that guff up it was deemed time to finally finish up the gas tank thats mentioned in a previous post. Its made to nestle up nice and happy in this rather large hole that was cut in the boot/trunks floor. Its hard to tell but the hole has been braced up fro the underside so when its all together the floor will be sandwiched and nice and sturdy. Since the lid was still off it seemed a good time to put together the in tank fuel pump. Overkill to be sure since its only driving a few carbs and not fuel injection. But it has good reviews and is supposed to be pretty quiet so I was like mehhh seems easy enough and should be "hook it up and forget about it". Its an Aeromotive Phantom in-tank carb setup. Basically meaning it has a regulator (pictured there front center) that drops the 320psi pump down to 15psi. Also has its return blocked with a removable cap. Comes with pre-filter pictured along with that sponge tube that you cut a tad higher than your tank and acts as a filter and a baffle. Also put together the Dakota Digital universal sender. As with all there stuff its a nice bit of kit with simple instructions. Has the ability to fit in a huge range of depth tanks and works with many gauges. Anyway lid all TIGed up. Thanks lads at Kirk Irrigation for that by the way. Also got them to attach the filler neck and drain. Holes added before assembly to make life easier. Then the sender and pump just all dropped on in to place. Under the car it sits up nice. tucked just above the lowest part of the chassis. Should be no scrub line issues. Also still has a nice amount of clearance from exhaust - its why its an odd T shape. Up top it is about level with the lip of the opening. Will have a floor mounted above it latter down the track. The rest of the other bits of the fuel filler neck still to attach pictured above. Also pictured is the cradle to hold the battery box that we wiped up to hold it all nice and secure on the right side. Just using a standard marine battery box. Fits up nice in the back fender as shown. Can vent it through the floor. Will have a panel to hide it from view down the track. The battery only just fits in whats good i guess - no slipping about. The big bugger should power everything I need and flick over the engine no worries. Looking at either welding cable or 1guage wire to carry the current up the front. earths all over the place of course. So picture the above with panels. sides to hide the battery and tool kit along with fuel neck that will live on the other side. floor to protect the tank then front panel to hide the airtank and amp whilst also adding sound deadening to the shut up those two pumps. Now getting back to my original comments in this post. That being the standing staring at the car. Maybe moving something a fraction taking a drink and repeating the process. Side pipes seemed like a good excuse to practice this. We had to go through the process of draining a few cans to use to hold the pipes in place first of course. Sacrifices we make aye. Note the said cans are crimpled in the middle otherwise they are much to high to suit the air out stance with the pipes. Front grill also seemed like a good excuse. Pondering a 1950 Buick grill. Middle section should fit in well once pushed back but its overall width is wider than the car. Dont really want to cut the chrome as it is so nice so I guess if we use it we may need to flair the guards a bit. Already planned to do this a bit to get better wheel travel for steering when air out but hmm I think this is something a few more brews and staring might require. All this is much down the track of course. Tiki - such a great helper. You got a wire he will attack it. Drop a nut and he will soon have it flying across the garage floor ending up down the side of some thing out of reach or under some other heavy obstacle. Told him I would stuff him is such a pose if he keeps annoying me. Guess he is happy with that idea as the little shit hasn't stopped.1 point
-
on the suggestion of runamuck, i posted in this forum looking for wiring info, and user on there was very kind and gave me a bunch of info which should hopfully sort me out, i was gonna dump all the info in here but sort of cant be bothers, plus give those guys the traffic eh? https://www.forabodiesonly.com/mopar/threads/4-7l-corsair-wiring-diagrams.440431/ also had my weld in 'project car' engine mounts turn up from speedway motors in america, grunty looking things! they are actually for the new gen Hemi, but for the price, i couldnt have bought the materials and if they don't fit the block then worst case is a redrill or a new engine plate. easy as! hope to have the engine "fitted" soon.
1 point
-
1 point
-
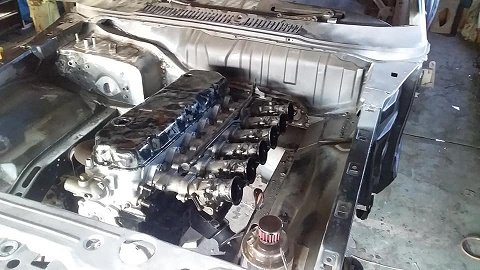
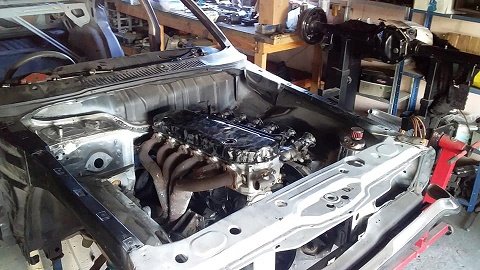
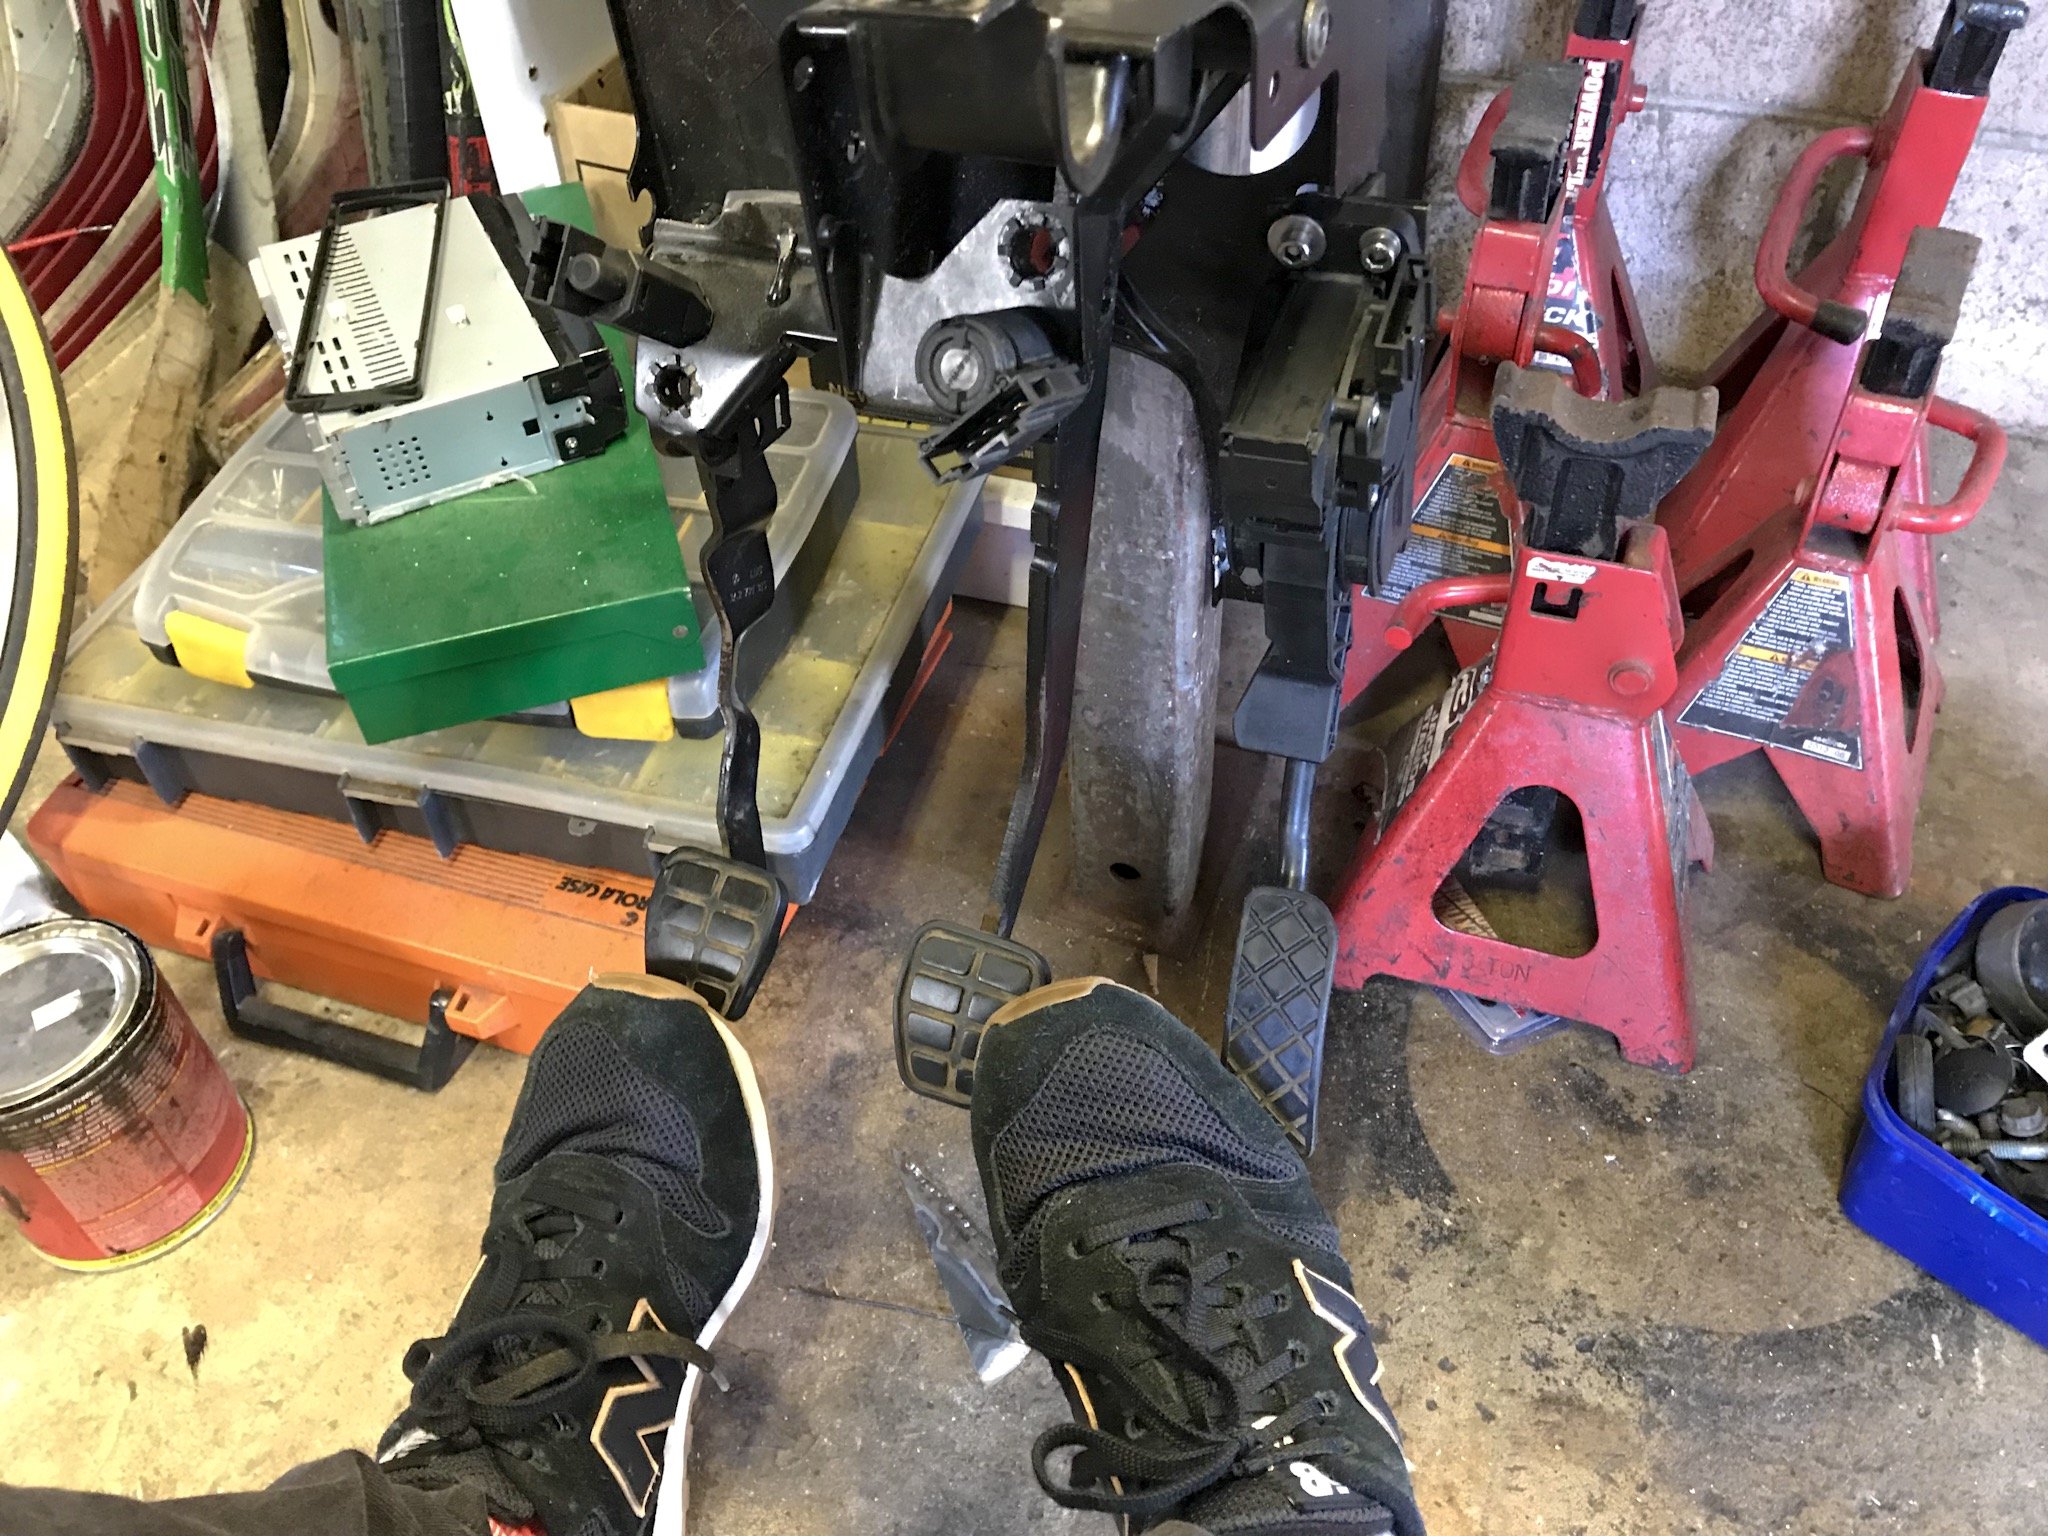
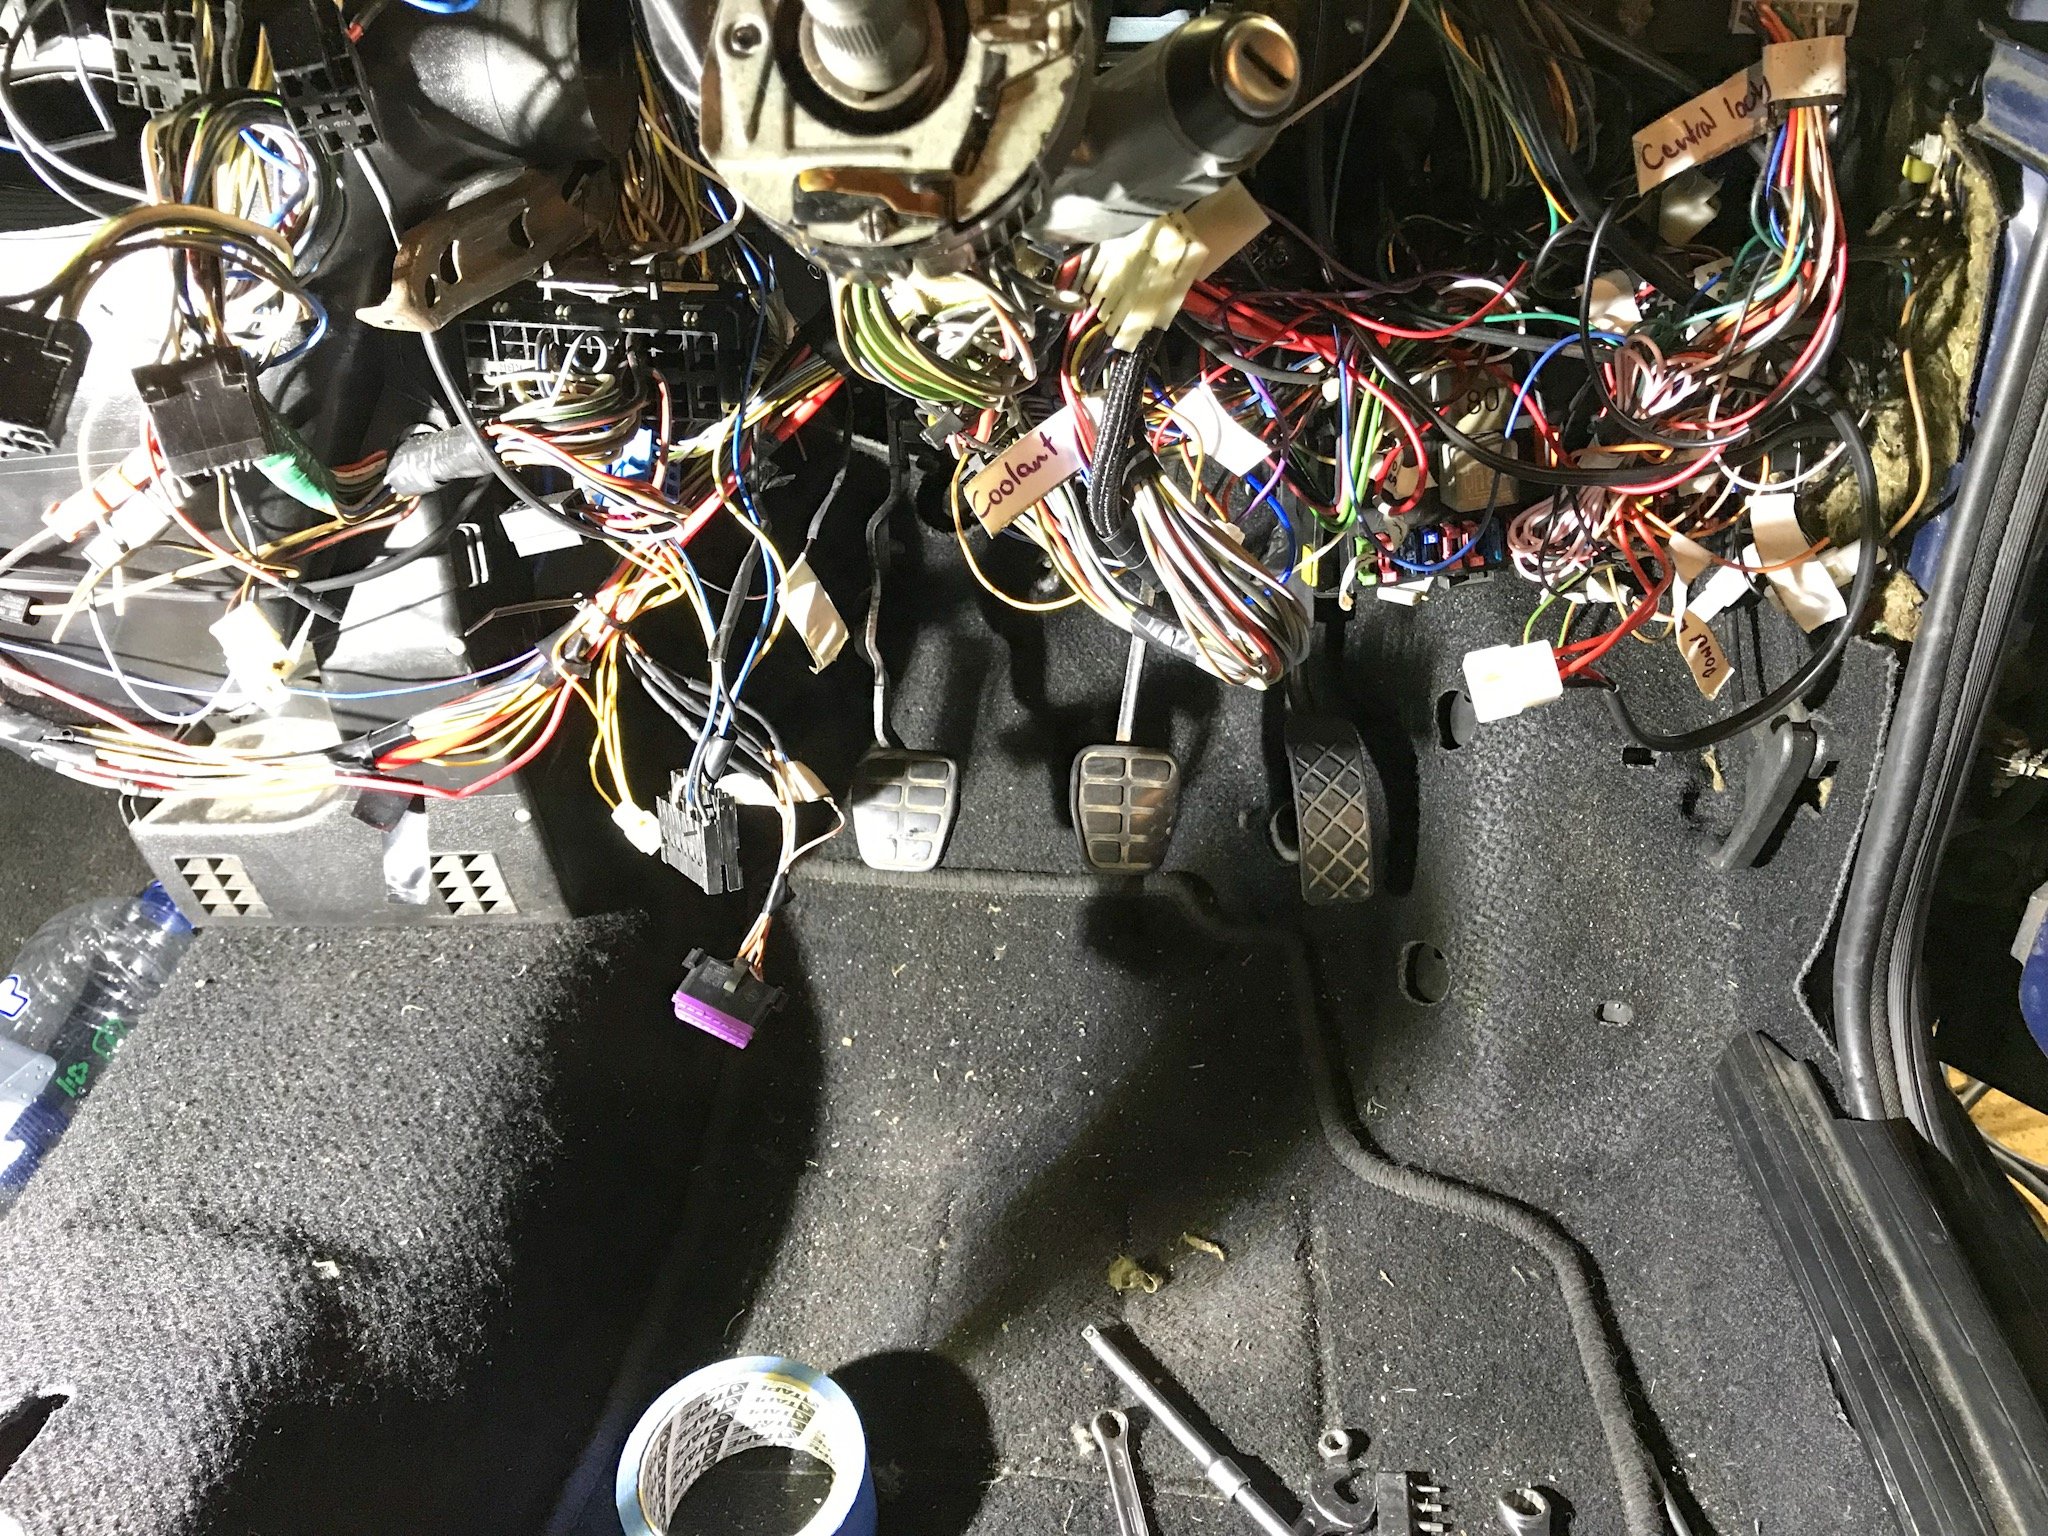
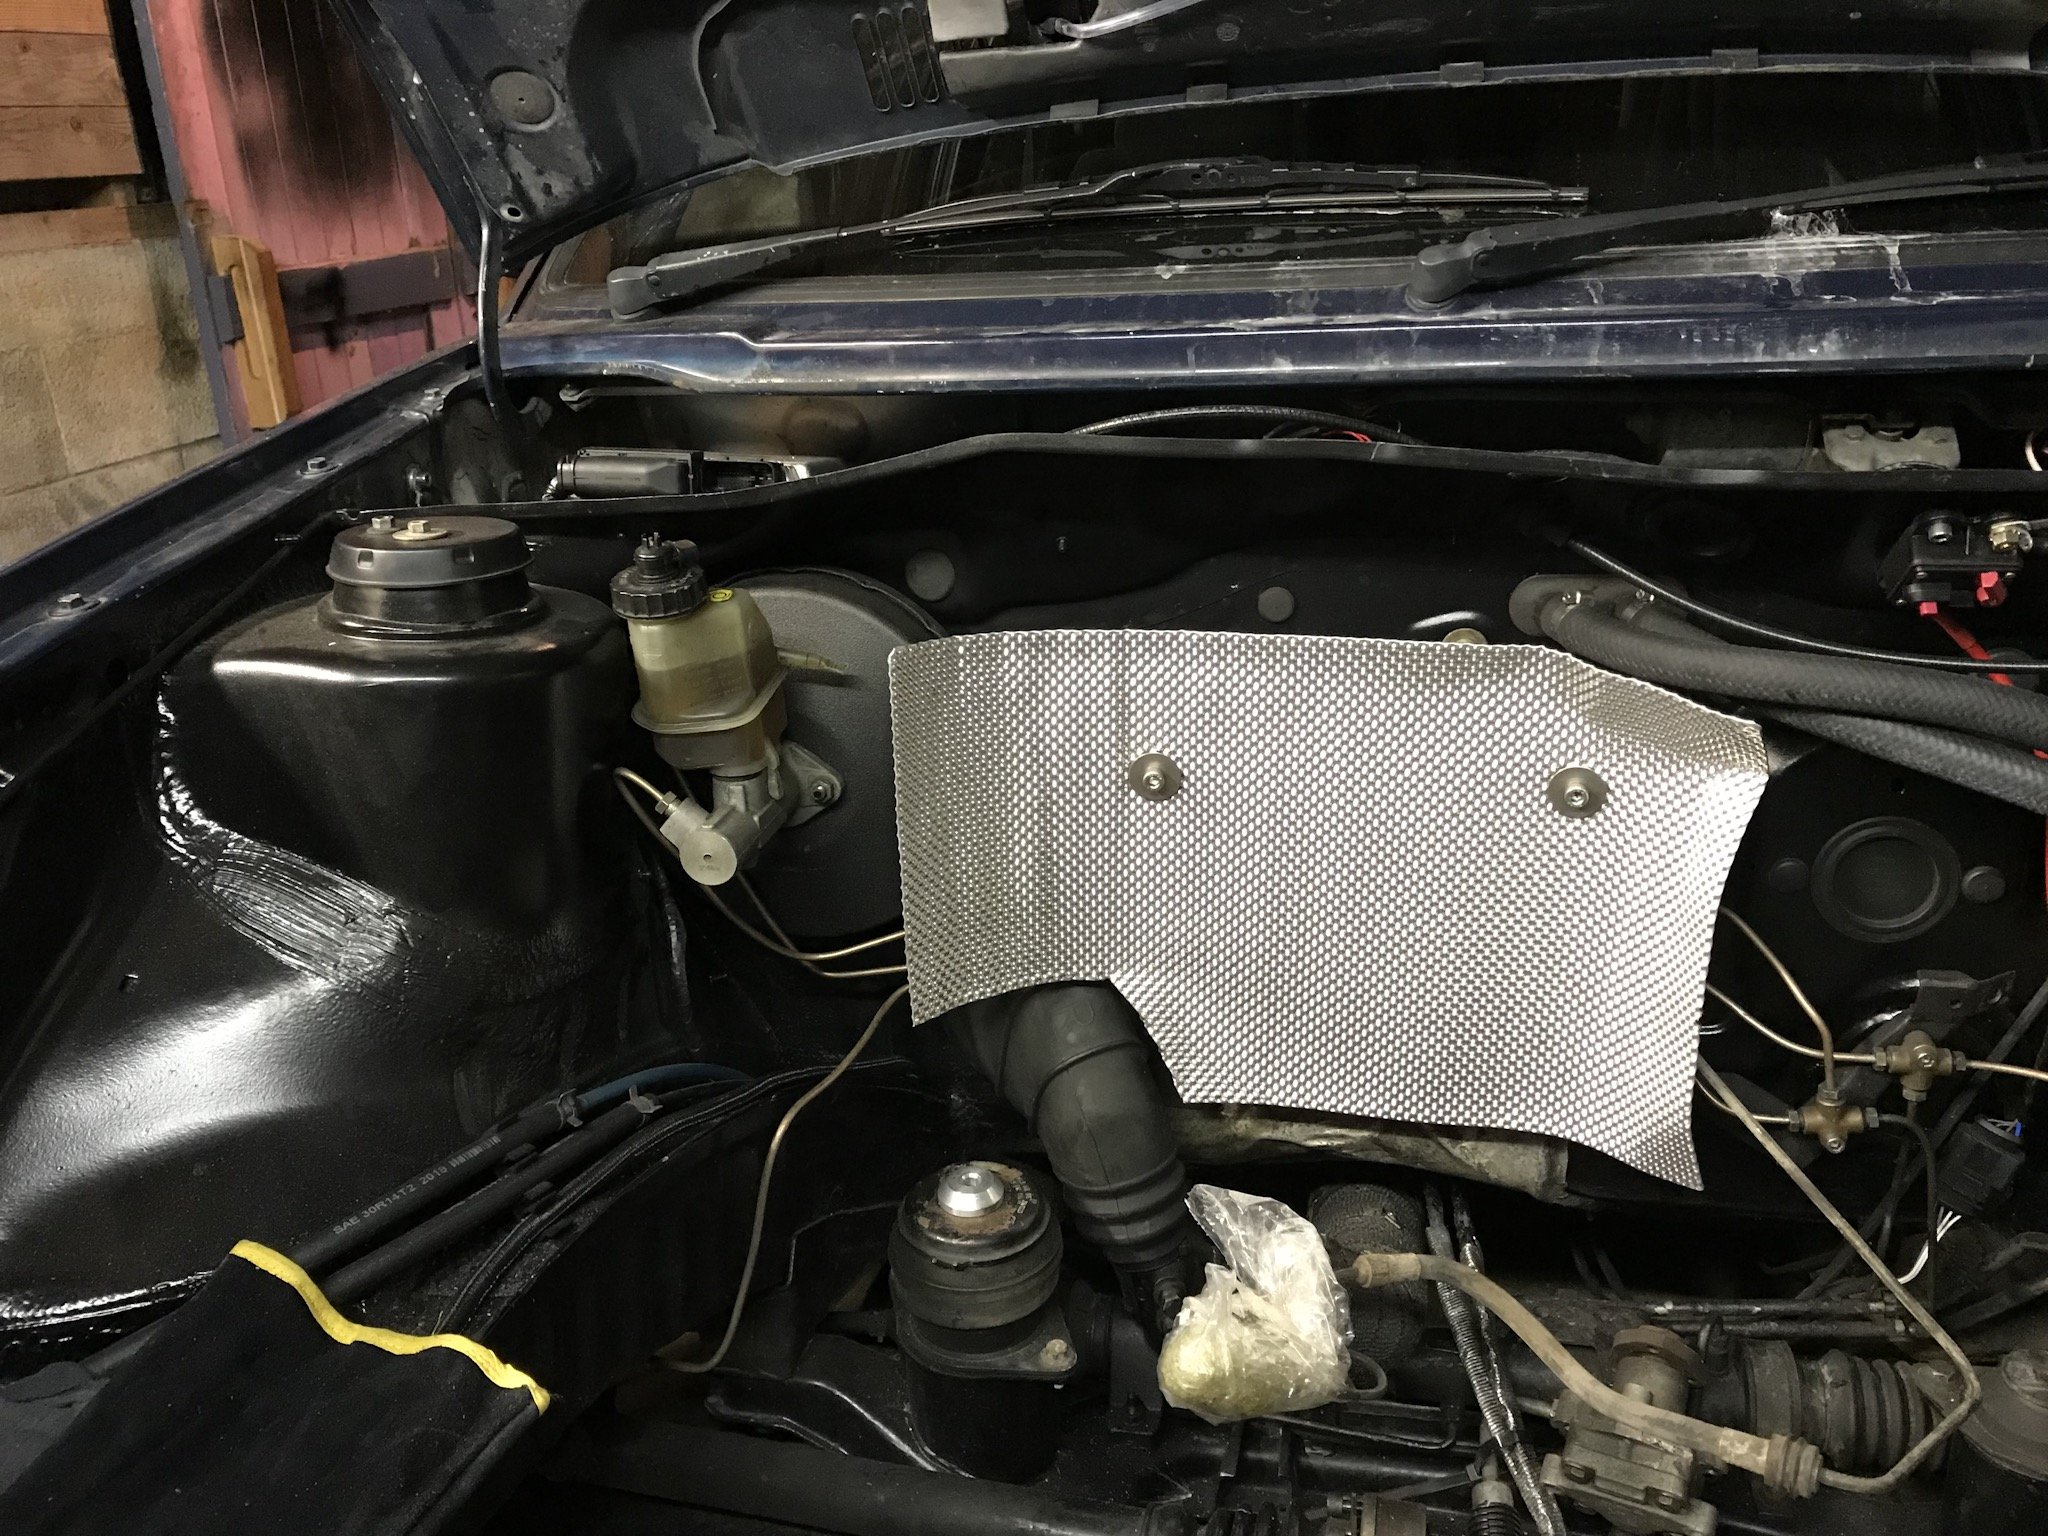
theres a fair amount of beating of the firewall and it was never going to look completely factory but I’m not worried (function over form) on that note I spent a lot of time trying to get my perfect pedal position for some heel toe action as I have to mount the drive by wire pedal to the pedal box again. clamped to my work bench you can only make car noises and pretend to heel and toe for so long before you realise you should get something done. As far as I can see now I’m very happy with the result now that I have it back in, although I really hope I get a good pedal feel. It’s all completely hidden behind the heat shielding cause the exhaust manifold is right there. I think that’s enough for tonight as I’m trying to tidy up an mistakes I’ve made so want to keep on going while I’m fresh. Hopefully the motor should be back in and running again soon.
1 point
-
Some things arrived. The rad is just mocked up for now, I will add some mounts and change the lower outlet angle.. The driveshaft is sorted, I had some adaptors machined out of 7075 ally at Topliss (I am sure I have a pic somewhere), then dumped it all at marine and turbochargers to get shortened and balanced. The shortened extension (you wot mate???) Is a 2wd Hilux shaft. I bought a new hangar bearing for it as well, so that shit represents over a grand of accumulated investment. Gulp. After having a quick check to see that it basically fit (and damaging the fins and spending 20mins with a tiny screwdriver pushing them all into place again and taping some cardboard over the tiny little fucks so I didn have to do it again), I made a fake one out of rod to get the position roughly right. Cable tied in place. Tacked in place I removed the cab to make this bit easier, I have quite a few cab off jobs to get through anyway. I did some other shit but forgot pics so that's all you get for now.1 point
-
We never got onto the interior, got a bit side tracked with my mazda. But after hunting off and on for some other wheels, a mate spotted these on facebook. Stoked with the fitment, and best of all, Rebekah agrees with me that it needs more low, so I've been given the go ahead to go down another inch and a half. After a morning at the hotrod breakfast, she now wants a small front chin spoiler/air dam.
1 point
-
I had a lot of issues with the printer. Clogging, warping, delaminating, poor quality 10kg of material wasted and 3 weeks changing parameters but learnt a lot and got it sorted. Now I need to figure out if I can recycle this stuff!1 point
-
Here is my bike, its not as bad as it looks, it hasn't been apart I think and it is just rusty, the guy just sprayed everything silver, I recovered the cost of most of the bike by selling the exhaust and the rest of the stuff in the pile.
1 point
-
Lots of junk but no junk worth purchasing1 point
-
File file file file file file file file file file file file file file file file file file file file file file file file file file file file file file file file file file file file file file file file file file file file file file file file file file file file file file file file file file file file file file file file file file file file file file file file file file file file file file file file file file file file file file file file file file file file file file file file file file file file file file file file file file file file file file file file file file file file file file file file file file file file file file file file file file file file file file file file file file file file file file file file file file file file file file file file file file file file file file file file file file file file file file file file file file file file file file file file file file file file file file file file file file file file file file file file file file file file file file file file file file file file file file file file file file file file file file file file file file file file file file file file file file file file file file file file file file file file file file file file file file file file file file file file file file file file file file file file file file file file file file file file file file file file file file file file file file file file file file file file file file file file file file file file file file file file file file file file file file file file file file file file file file file file file file file file file file file file file file file file file file file file file file file file file file file file file file file file file file file file file file file file file file file file file file file file file file file file file file file file file file file file file file file file file file file file file file file file file file file file file file file file file file file file file file file file file file file file file file file file file file file file file file file file file file file file file file file file file file file file file file file file file file file file file file file file file file file file file file file file file file file file file file file file file file file file file file file file file file file file file file file file file file file file file file file file file file file file file file file file file file file file file file file file file file file file file file file file file file file file file file file file file file file file file file file file file file file file file file file file file file file file file file file file file file file file file file file file file file file file file file file file file file file file file file file file file file file file file file file file file file file file file file file file file file file file file file file file file file file file file file file file file file file file file file file file file file file file file file file file file file file file file file file file file file file file file file file file file file file file file file file file file file file file file file file file file file file file file file file file file file file file file file file file file file file file file file file file file file file file file file file file file file file file file file file file file file file file file file file file file file file file file file file file file file file file file file file file file file file file file file file file file file file file file file file file file file file file file file file file file file file file file file file file file file file file file file file file file file file file file file file file file file file file file file file file file file file file file file file file file file file file file file file file file file file file file file file file file file file file file file file file file file file file file file file file file file file file file file file file file file file file file file file file file file file file file file file file file file etc... Unfortunately I cut the hole too big so there are some large gaps. I didn't want to push the patch in further to close up those gaps because it would create an area where the oil would not drain from. Hopefully the guy I get to weld it can deal with those gaps. I'll be making a jig to bolt the whole thing to so it doesn't turn into a banana.
1 point
-
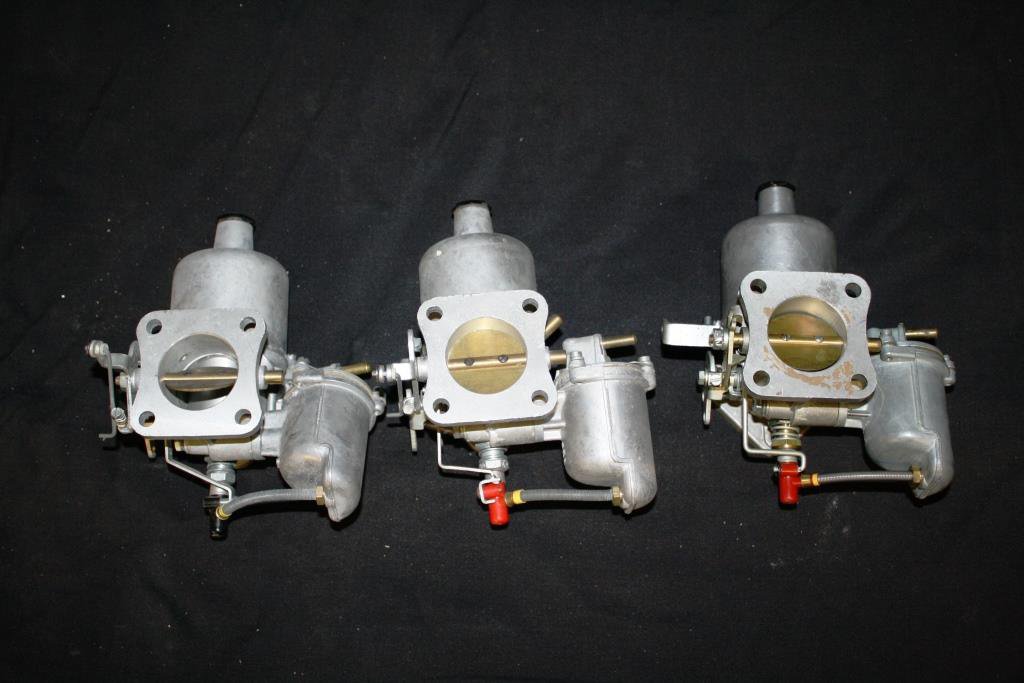
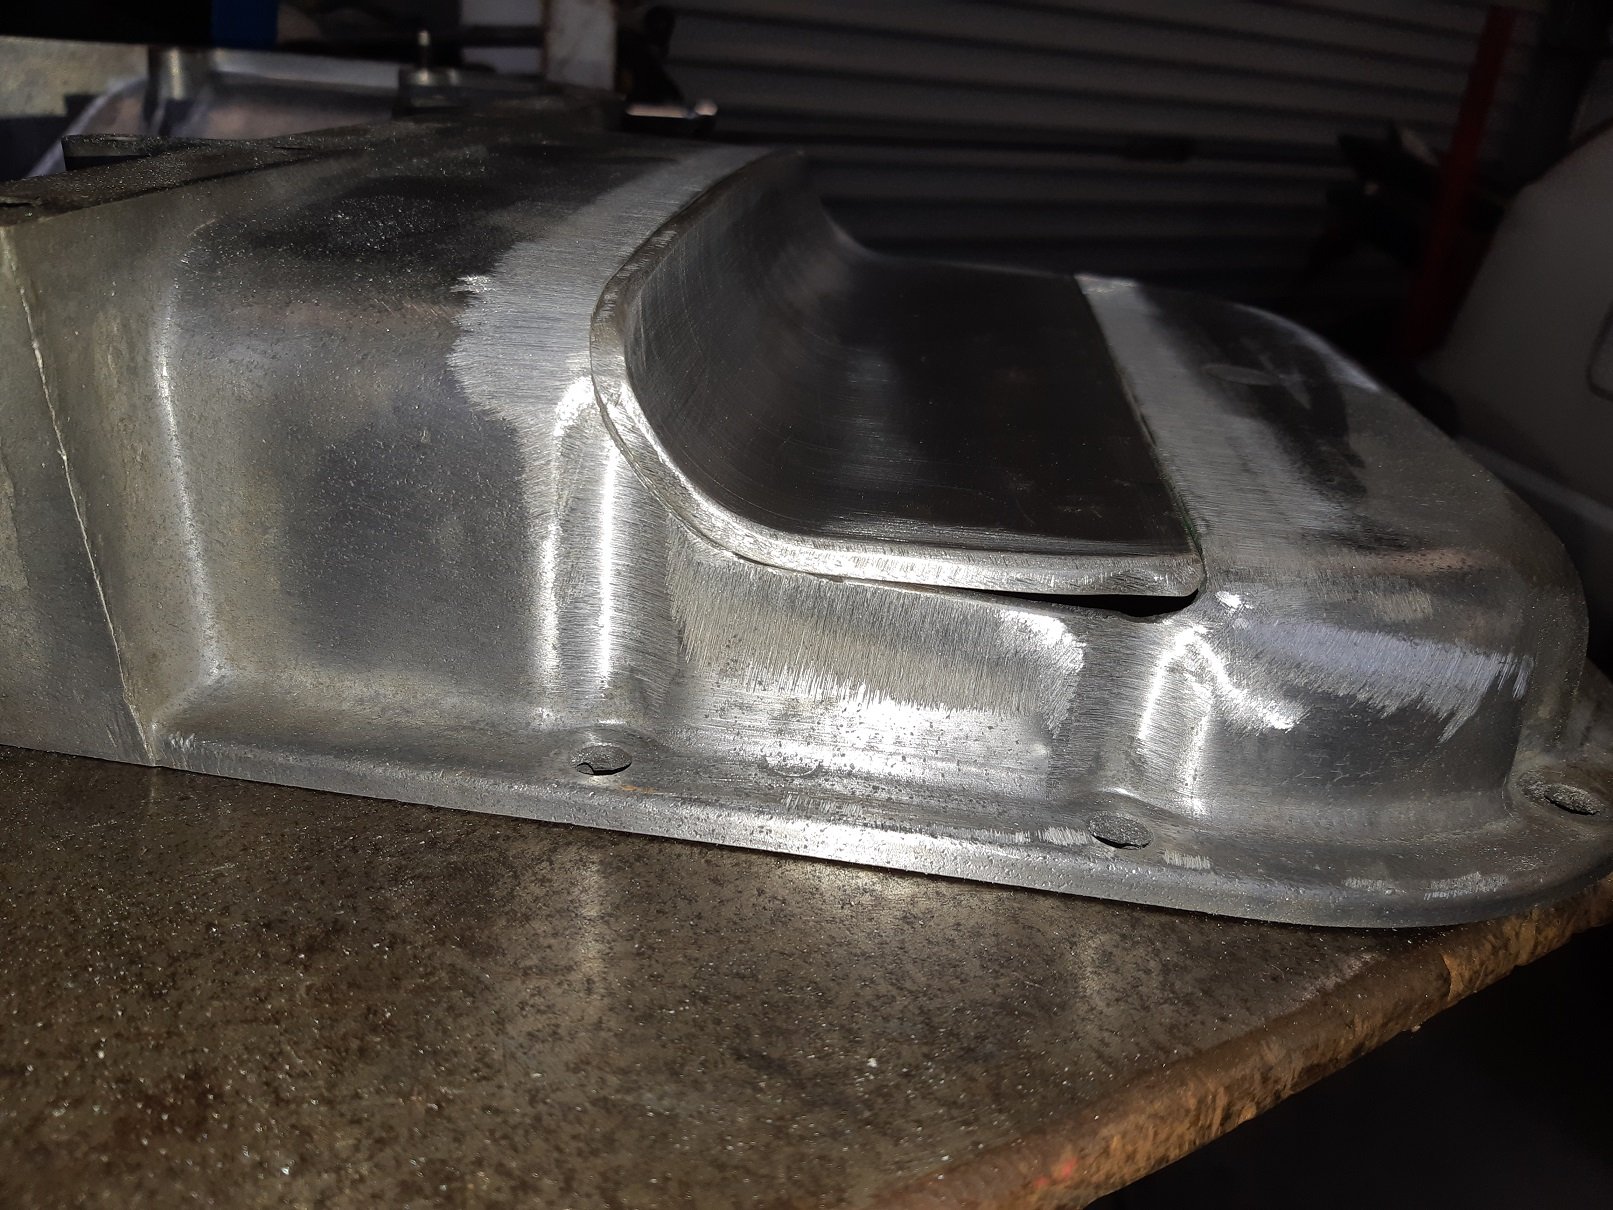
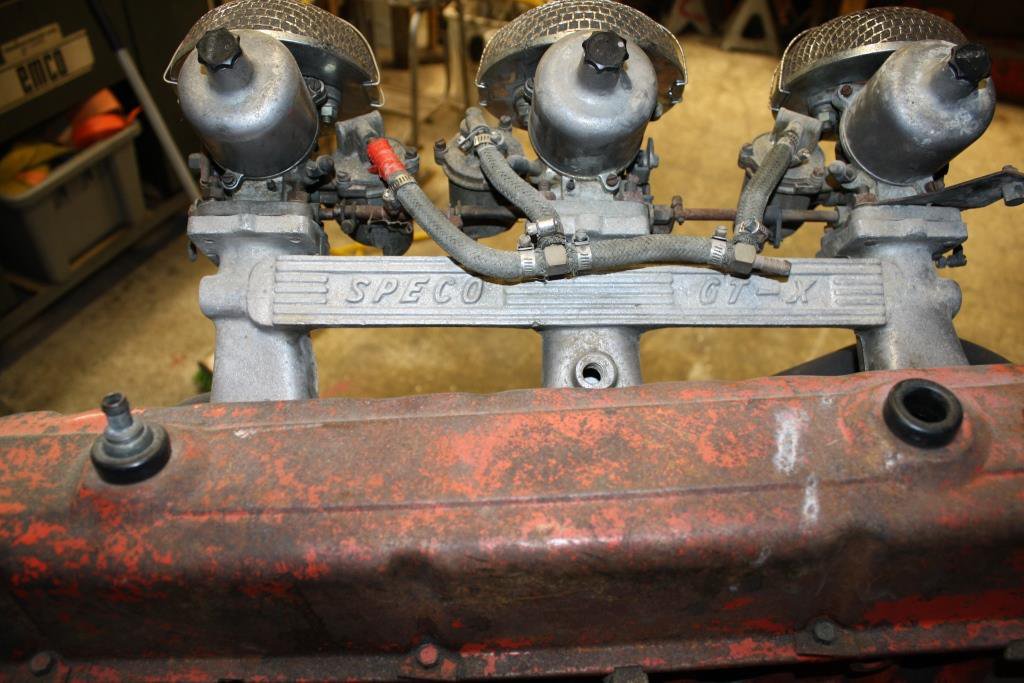
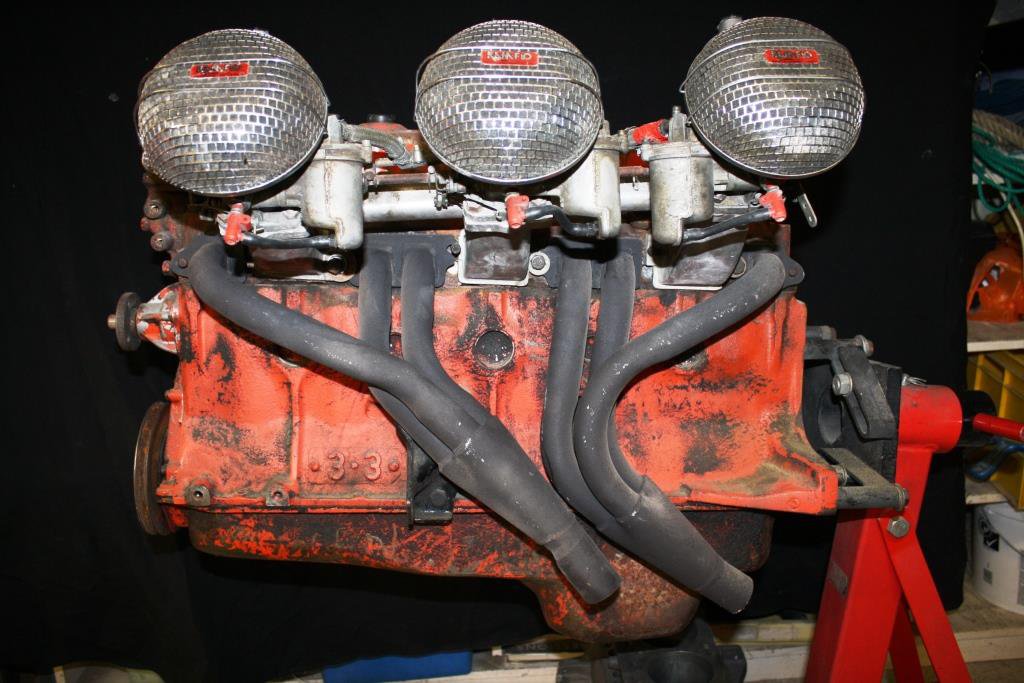
Some six months or so ago, after considerable research, (drunken chewing of the fat with our mates) and in depth self-analysis, (a Bottle of 101 Wild Turkey) both Rigamortice and myself came to the inevitable conclusion that the ideal carburation solution for the new 208ci “186 X2” had to be the period correct set of 3x 1¾ HS6 SU carbs on the vintage Speco manifold. We will however run the motor in and get the dodgy legals done with the tried and proven Weber DCD setup. (Anyone after a triple set of 40 DEOCE’s and a 9 port manifold – just ask). I did a quick dummy assembly with a spare motor for a bit of man-cave decoration.
1 point
-
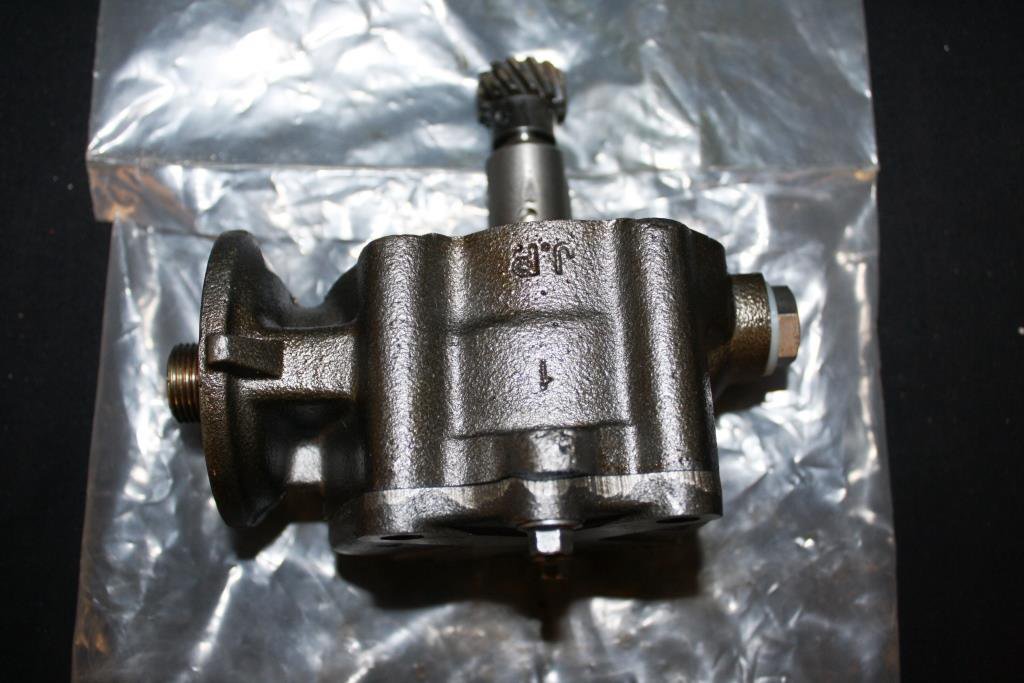
Just found a genuine J.P. high volume oil pump still in its original sealed wrapping, snapped that one up quick!
1 point
-
One of the pleasures of chasing down Oldschool car parts has to be the people you meet. I scored these timing gears off an old guy who was building a replica of the Torana he used to circuit race many years ago. Talk about a wealth of knowledge on modifying Holden 6’s, he was more than happy let me pick his brains for an hour or so when I collected them. (Thanks Grant, you've not only earned my respect - you rock!).
1 point
-
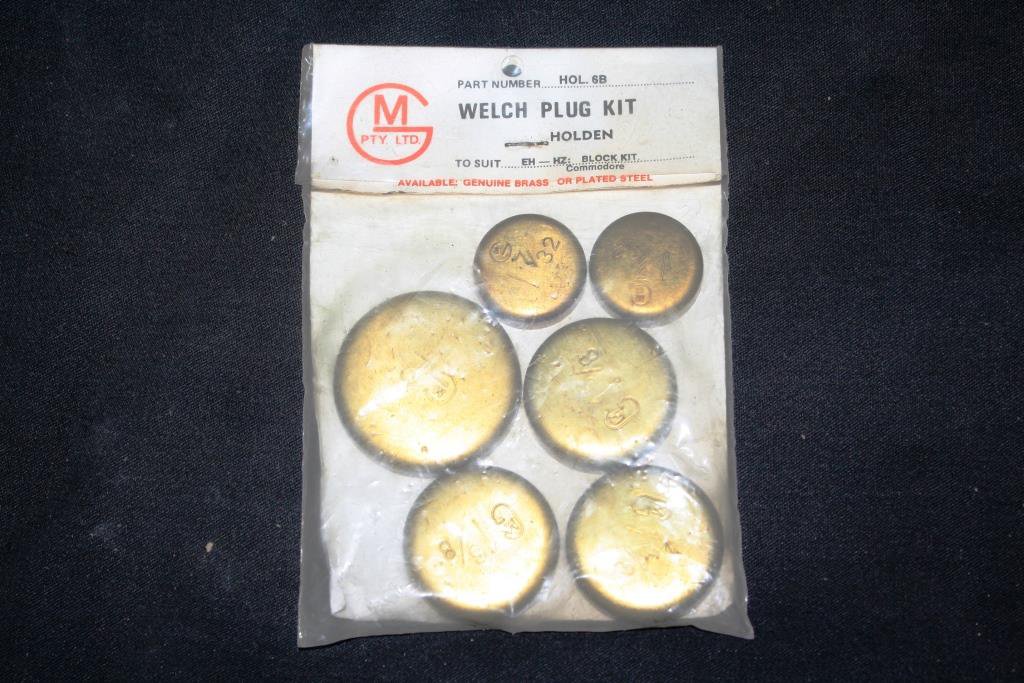
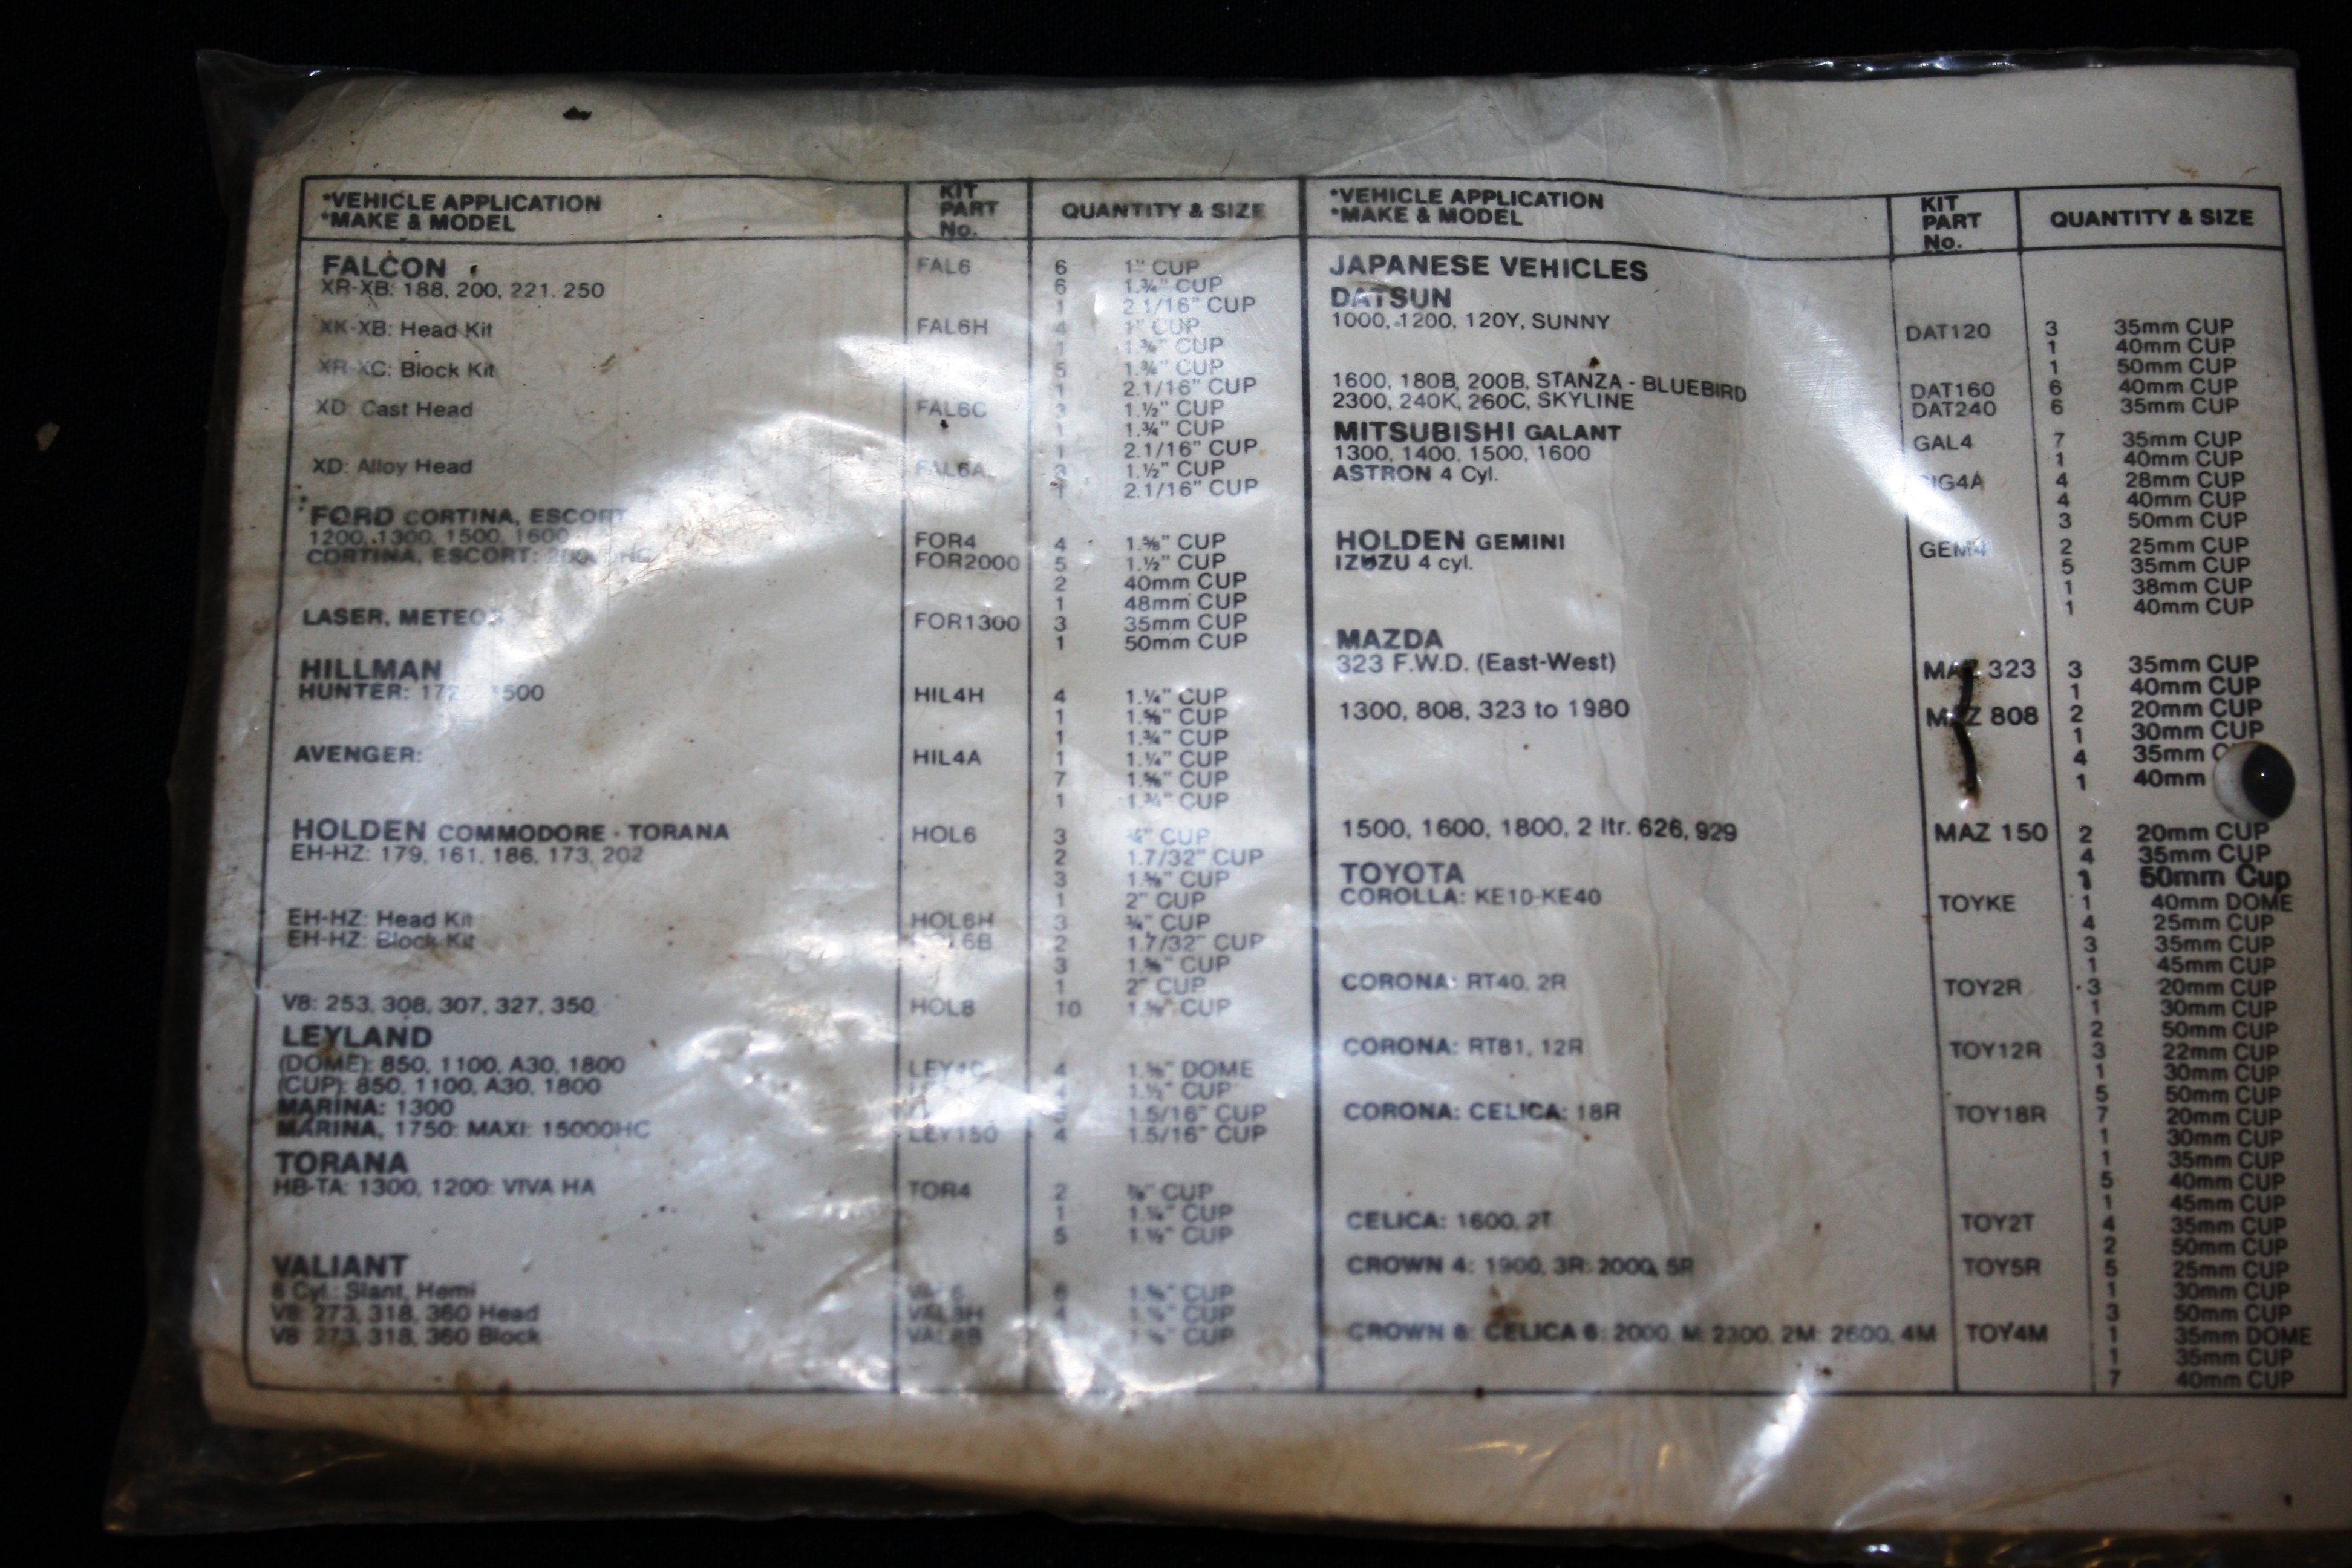
I’m always chasing after new “old stock” parts and never cease to be amazed by what’s still out there. I picked up these brass frost-plugs on Trademe, I’m guessing they’re early 80’s? What I really love is the cars listed on the back of the packet, after surviving all these years it’s almost a shame that I’ll be breaking the seal and using them.
1 point


This leaderboard is set to Auckland/GMT+12:00