
Leaderboard


Popular Content
Showing content with the highest reputation on 06/24/19 in all areas
-
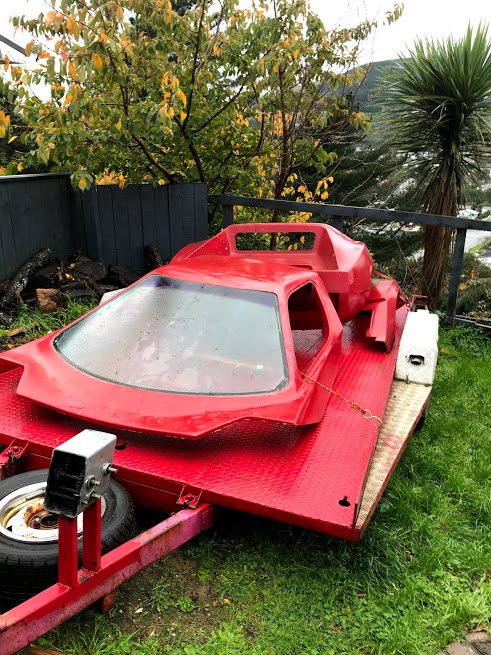
Got some very useful bits. The roof is a life saver, the glass is cracked but I knew that already. Also got a front lower section, rear lower section, the top front and rear which is supposed to be one piece but that bit has been cut in half and missing big parts. It was going to be lengthened and put on a ladder chassis but that project didn't go ahead. I mainly need the roof and the bonnet. But the other parts can be used as a mold to fix my front section. Also got a new bonnet and rear engine cover. Looks like the vw engine type cover.
 16 points
 -
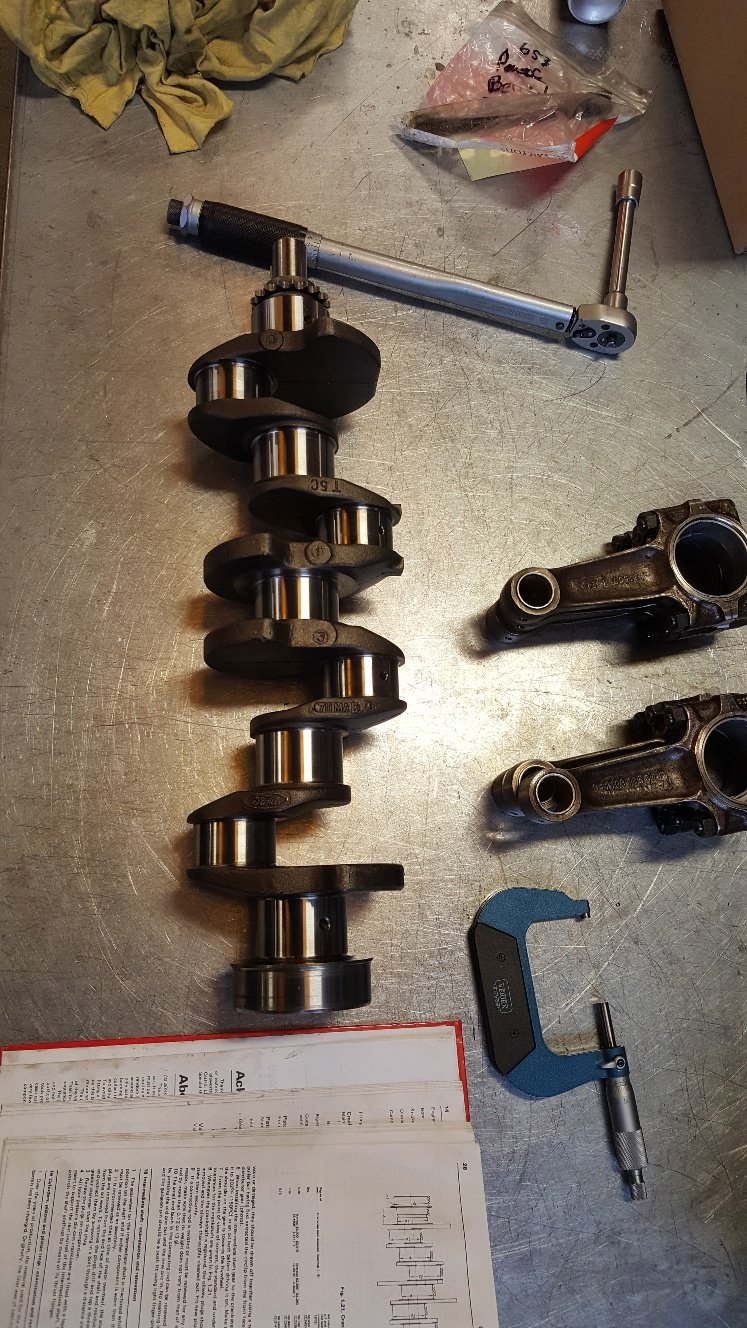
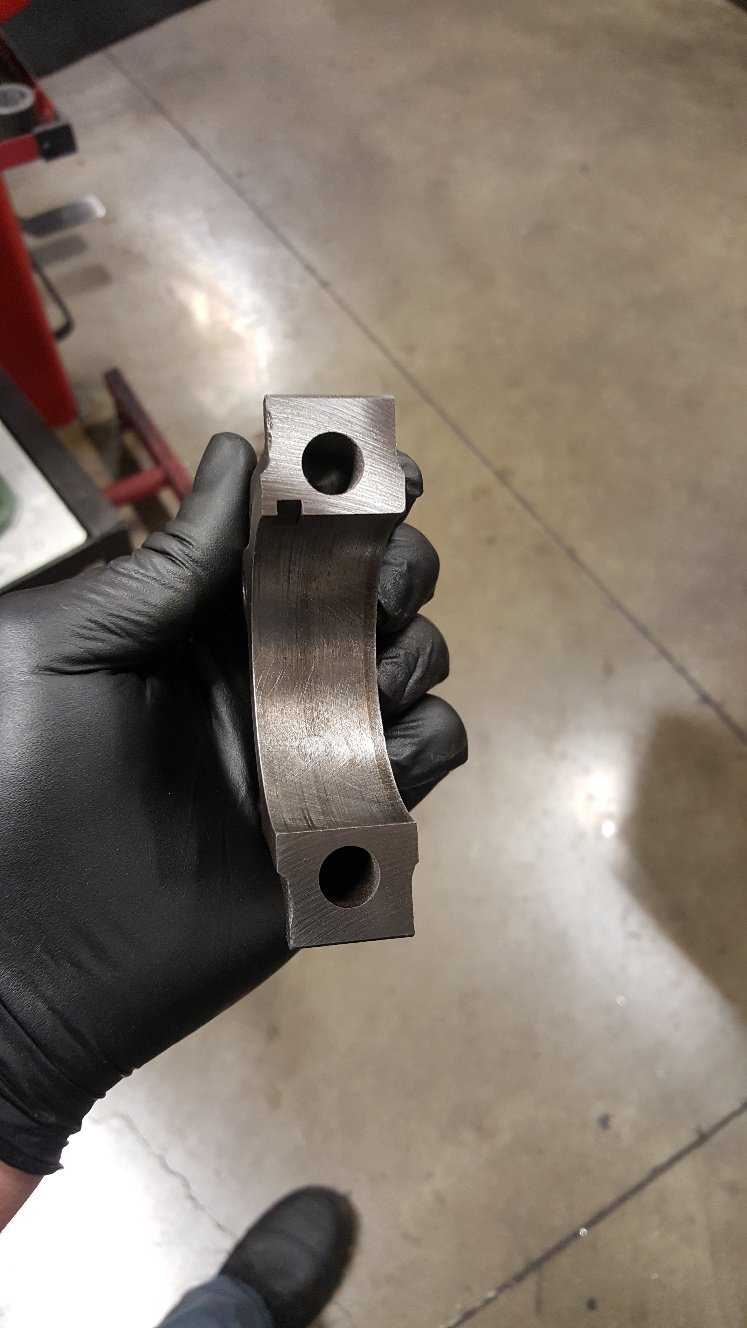
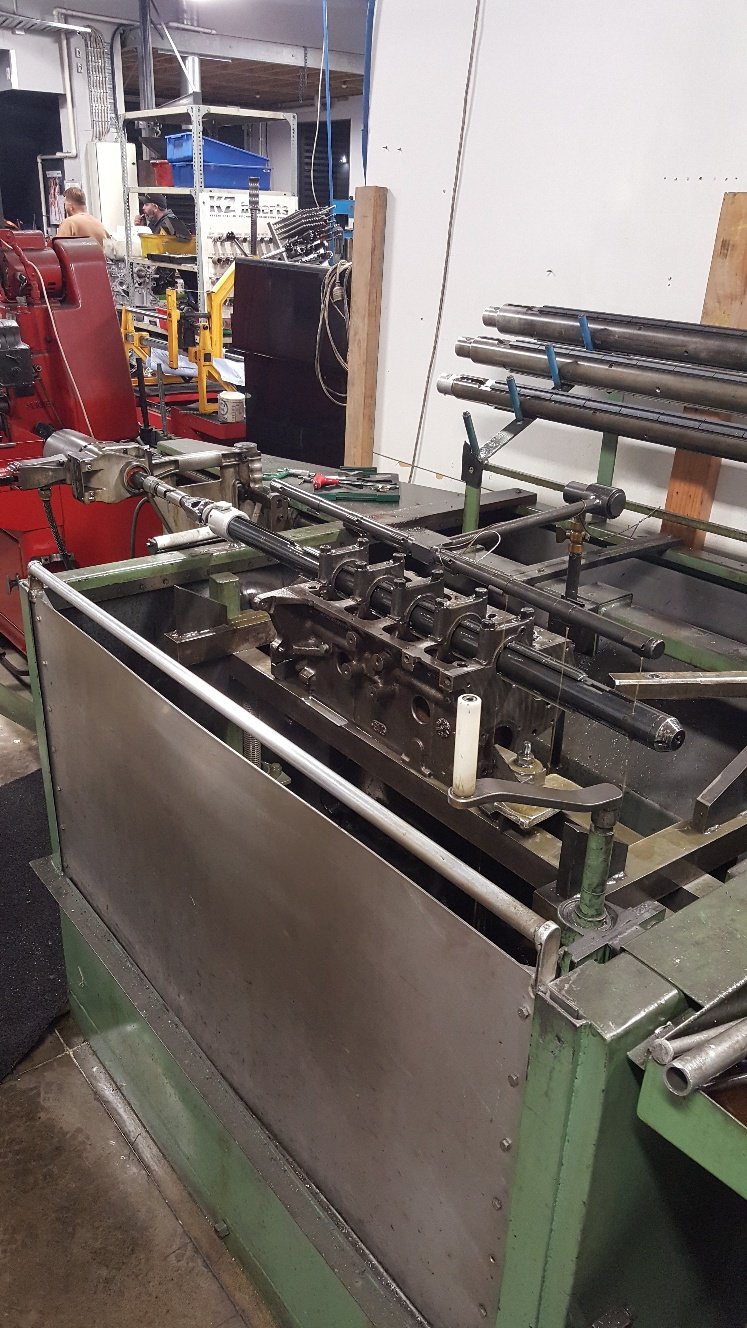
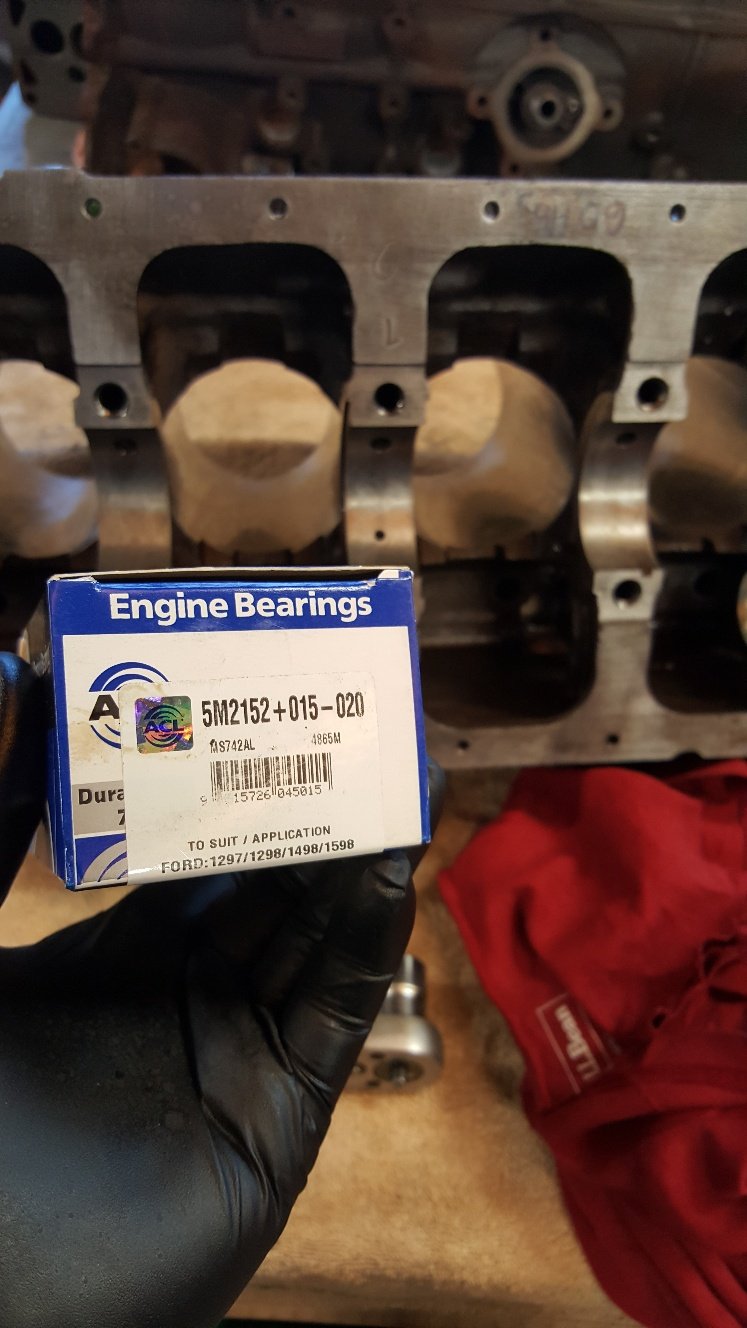
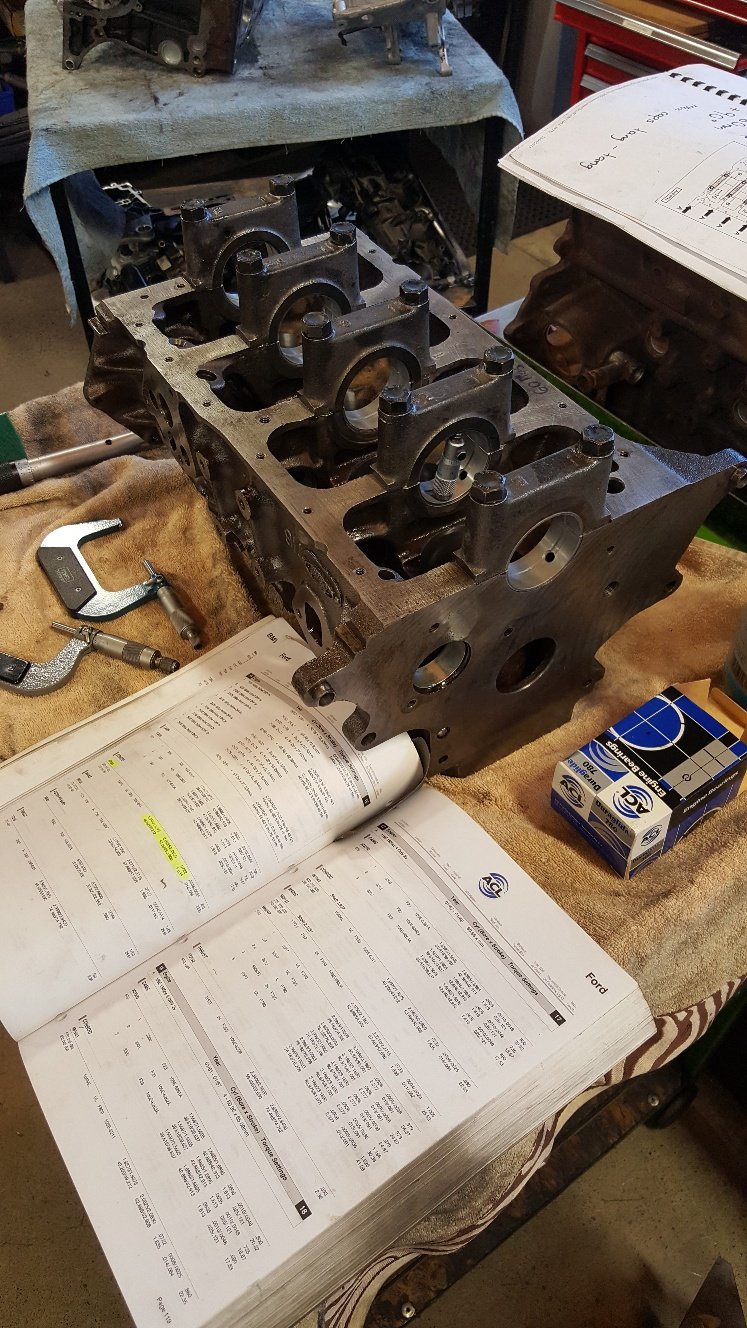
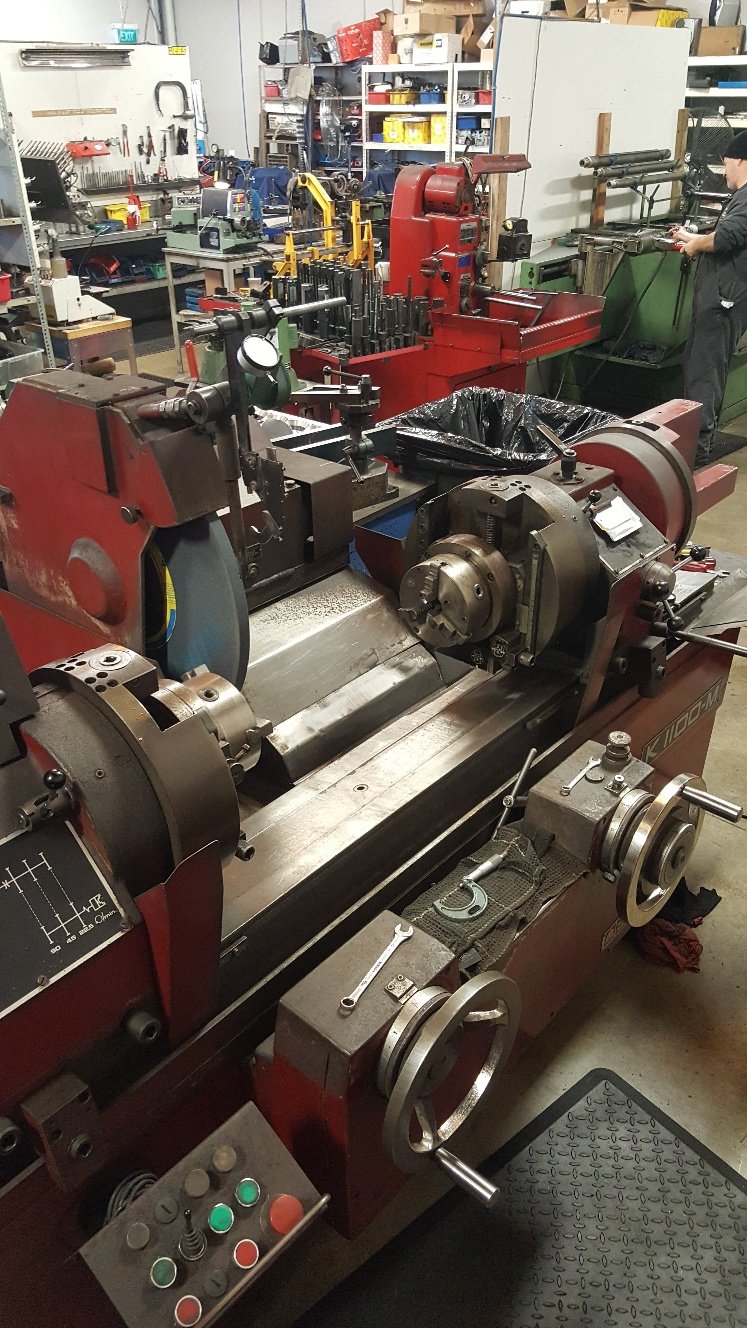
So I have the crank ground and ready to go. So I got started on the Align hone. This block didn't necessary need align honing It was within book spec in the mains. I haven't fitted aftermarket studs which is another reason for a tunnel hone, the studs normally tighten the tunnel up due to the extra torque you can apply to the stud giving better clamping load. Another reason is if you have run the main bearings this can also put the tunnel out of round and or put a bend through the tunnel. Here's a picture of the cap dresser. I used this to resize the rods earlier on. This is the main cap in it. It ground about 3 thou off each cap. First picture is the cap ground and ready to be torque up back onto the block. The next picture is with the block in the Sunnen Align hone. Sunnen is one of the industry leaders in honing. Our block hone is also a Sunnen Cv 616. So I just refitted the main bearings to check clearance. I've got 2 thou vertical oil clearance in the tunnel. Its nice and straight now. This isn't something we do to every block as some don't need any attention. But most old blocks either weren't that great from the start or have had a hard life.
13 points
-
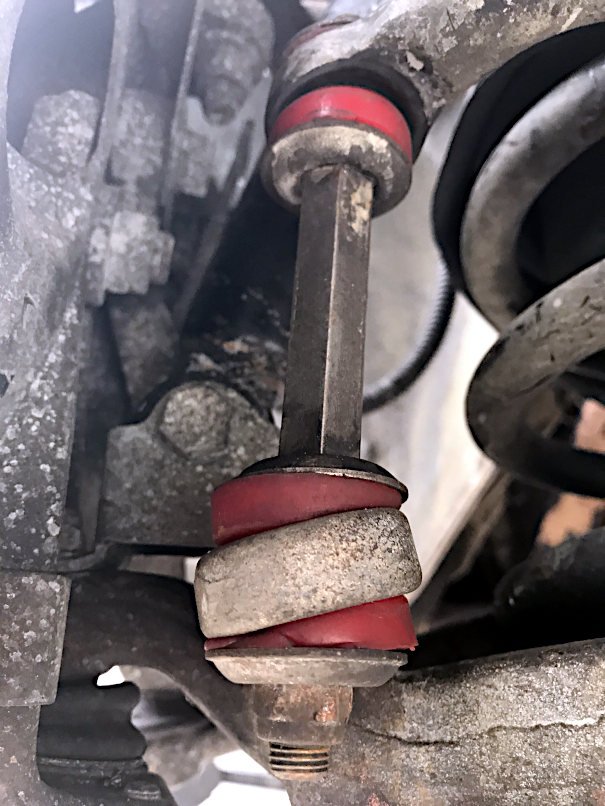
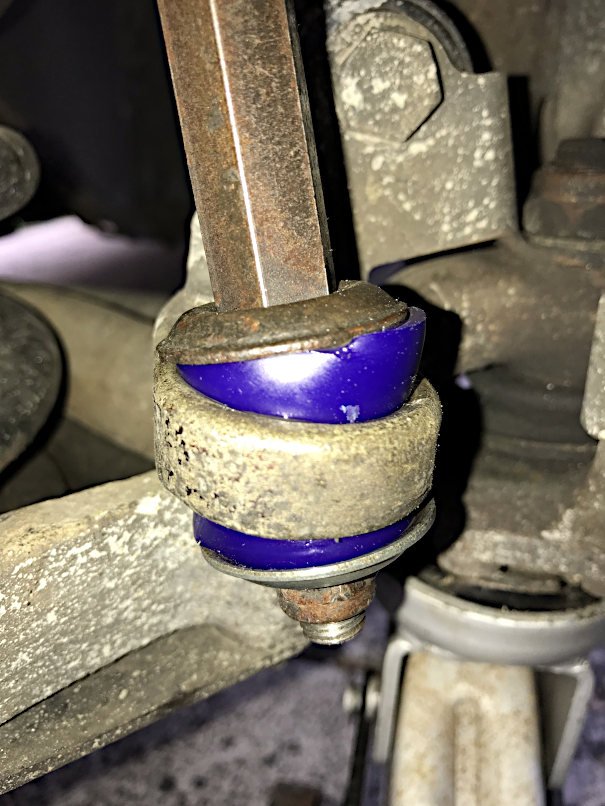
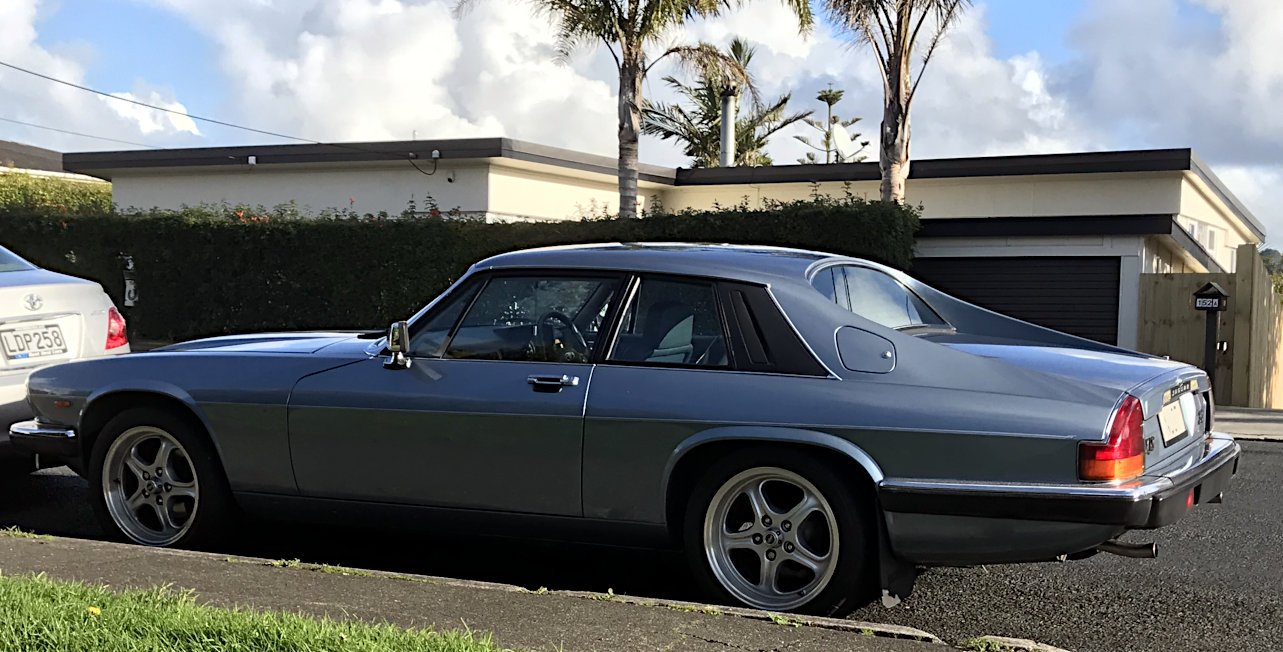
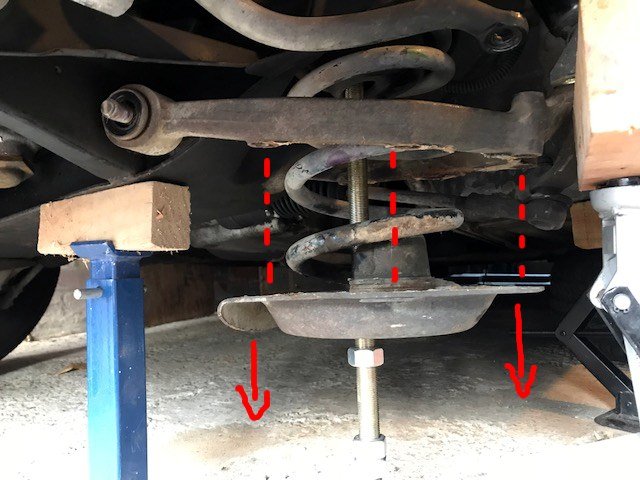
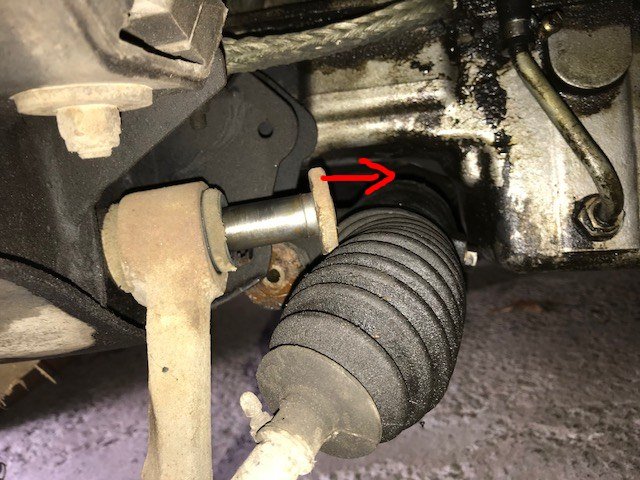
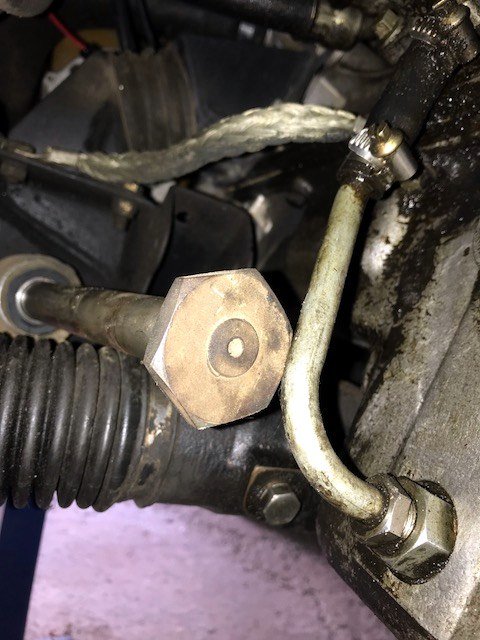
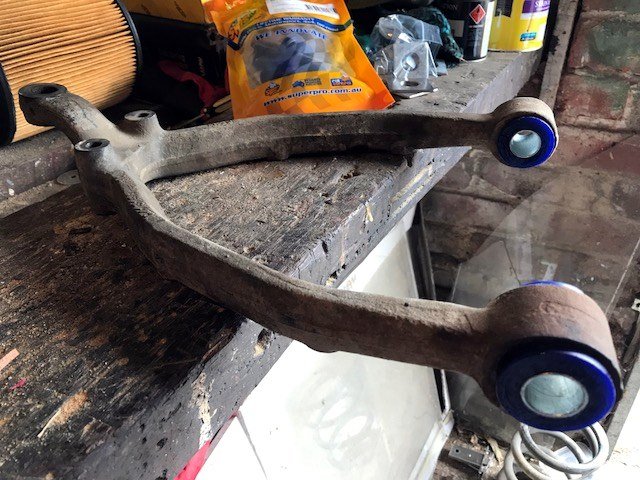
I took the car to the specialists where they rebuilt the power steering pump and rack (which was also leaking). This was not very cheap, but now the pump leak will not damage any more suspension bushes and the rack leak won't risk me failing WOFs. The specialist told me that some of my whines and clunks were the auto transmission (ZF 4HP22), which had good fluid so wouldn't improve without money being thrown at it. One of my rattles was the clips on the airbox - some idiot had taken the front cover of the airbox off for extra induction noise and hadn't figured that the resulting loose cover clips would rattle at certain engine rpm. Another rattle is either the engine fan clutch or the water pump, so I'll look into that myself at some point. I got new bushes for the front sway bar drop links. Here are the old bodged ones which are too thin and too large in diameter: And here are the new ones which don't really look any better! Oh well. Apparently you can get spherical bearings to replace these bushes if you're hardcore, but I think I'll pass. Anyway, the Jag specialists got someone to do my wheel alignment after they'd rebuilt the steering rack. This resulted in improved steering self centring, but the feeling of square wheels at 40kph and the vibration at 80kph did not go away. So I started looking at replacements for the Linglong directional tyres which were on my car when I got it. Other than more Linglongs, the only other tyres available in the right size are reproduction retro hotrod stuff - BF Goodrich Radial T/A, Cooper Cobra Radial G/T, Hercules H/P 4000, Galaxy Radial G/T... all tyres that OS report as being a bit average ("harder than a whore's heart"). I looked at going to wrong-sized tyres on the stock 15-inch mags, but this doesn't expand the tyre selection much. Jags of this era have a bolt pattern of 5x4.75" / 5x120.65, which is what a lot of old GM cars used. This means most aftermarket wheel choices are stuff like Cragar SS / Torq Thrusts which look wrong and/or only come in small diameters. But then some 17-inch "Performance" brand wheels came up on TradeMe, so I grabbed them. The seller had taken them off his old Jag to upgrade to 18s, so I knew they were gonna fit my car. Surprisingly, I could buy wheel nuts off the shelf at Repco with the right imperial 1/2" UNF thread pitch and tapered seats. I just threw the wheels straight on with no issues. I didn't have to take the dust caps off the front hubs to allow the wheels to fit as the seller said I might. I haven't even noticed the wheels rubbing so far. The fronts will be easier to clean than the original lattice design, even if the rears look a bit weird with no brake discs visible between the spokes. Dish photo! The improvements and compromises are all as you'd expect. The Potenza RE002 tyres on the new mags are obviously an improvement. Their lower profile doesn't magically give the XJ-S any steering feel though. I can't benchmark the lateral grip against other cars I've owned - when going around my 180-degree test curve, the Jag's speedometer reading decreases significantly for some British reason, only to increase once I straighten up again. Also, the vibration at 40kph may be gone but the one at 80 remains. Back to the drawing board.
10 points
-
Well now.. its been a few weeks and time for an update. So far the Imp has been reliable and not let us down but it has also been true to its English form and left a few little puddles about. I'll talk about them soon. We took it on its first big road trip which was fun, although a bit noisy. I couldn't really cane it super fast on the hills because Kevin the cat had to come on the trip with us. It was a few days away to visit my parents so we cant just leave the kid at home... The car did the trip with no hassles and returned an OK 35mpg, not bad considering its geared quite low, has had heaps of sitting on the spot being tuned and due to the constant annoying flat spot right off idle I had to accelerate faster then I'd normally bother in average driving. It certainly hoons along very very well although it has an exhaust boom right around 60mph, which is around 4000rpm thereabouts. It became a bit too tiresome however should be better now I have added a load of sound insulation on the back parcel shelf. I am super impressed with the Datsun A12 engine!! Its really peppy and fun, very smooth (allowing for the annoying carb issues) and just works so well. I can totally see why they have such a cult following around the world. Everyone who chats to us about the car (and its ALOT of people.. its a right little magnet this car) think that the Datsun conversion makes so much sense. More often than not folk are full of praise for the Imps they knew, had, learned to drive in etc , except for the standard Imp engines reliability. This is a shame because I think the standard Imp engines are great however one must accept that they do need to be cared for a bit more than many owners obviously could be bothered. But the Datsun engine- first comments are usually " what a great swap- those are bomb proof engines " usually followed with the comment "it must be hard to get those engines now because all the ministock racers have got them all"... So anyway.. the wee Imp ran well and got us to Blenheim and back. But before that big trip I wanted to sort a few things. One job was to build a cold air fed filter box and carb lid to let the engine suck on some cooler air rather then the super hot air floating about in the top of the engine bay, due to Imps not having the luxury of lots of cold air running through over the engine. So I built a filter box, sized to take a modern Honda filter. I have made the box large enough to handle bigger pipes and the volume that might be needed when I plan to upgrade the induction. Box... With filter in place... This box fitted under the parcel shelf above the gearbox. Sort of out of the way and hidden but easy enough to get to. It was fed with a flexy alloy pipe from under the car. Another section of pipe headed backwards to a plenum/tophat thinggee I made for the carb... It was all going so well I thought. I splashed some black paint on it all so it looked a bit neater... Then I fitted the tophat to the carb. This is where things went a bit... tight. It seems that I had completely forgotten to measure how much room I had just above in front of the carb. Not enough it turns out .... The engine lid wasn't able to go back in place! A few choice words that somewhat rhymed with duck along with a sentence that sounded quite similar to 'well you stupid punt' were uttered. I then calmed down, realised that at least I have now got a filter box sorted for future upgrades and with that I removed the lot and refitted the previous air filter I made. At least its winter so a bit of hot air cant hurt I did another couple of jobs before the trip. I swapped out the fuel gauge which wasn't reading correctly for a spare unit I had.. I was also fed up with trying to adjust the clutch. The slave cylinder fitted had a 7/8" (22mm) bore and being pushed by the standard Imp 5/8" (16mm) master cylinder, which happens to be the same size as what the Datsuns use. However- Datsuns use a smaller 17mm slave to get the correct amount of stroke at the slave. I wasn't getting enough stroke so the clutch pedal and release fork clearences had to be set very tight to clear the gears. But I did have a very light pedal... So I worked out that the amount of stroke available from the Imp pedal, whilst being very close to that on a Datsun, was not quite enough I could get a good working system with a slave of around 3/4" (19mm). However- there didnt seem to be any slaves available out there that had the same mounting lugs, in 3/4" bore, with a metric fine hose thread. But I did have some spare random 3/4" seals, some stainless bar for a new piston and a big lump of alloy. So I made a new slave cylinder to suit. I could have sleeved the existing one down and I have a 3/4" reamer to help but I wanted to keep that one intact in case it all went pear shaped. Plus...its more fun making things ! I offset machined the lump of alloy down in the 4 jaw, bored and reamed it to suit, milled the shape up and machined a new piston to suit. But I was having too much fun and forgot to take many photos.. New next to old... It works heaps better! I can now have a bit of slack at the pedal and at the release bearing and still get my gears. Another job was to take the carb apart for the 14th time. I'm getting very quick at this and can field strip a Hitachi 306 carb in under 15 seconds, blindfolded, with both hands tied behind my back, whilst under water breathing through a straw. The carb had a few leaks. I realised that the top lid was pulled out of shape... I carefully filed it and the body flat, cleaned it out again for the 10th time and made a new thicker gasket to suit... On the next test drive the leaks had gone but I had still had not cured the flat spot. So I gave up and made a parcel shelf instead. I did have an original Imp one but it was a bit wobbly and a pain to fit. I made a new wooden one for the passenger side so now actually had somewhere to sit our phones, wallets, bag of Werthers originals, old parking tickets, a broken pen, out of date fuel vouchers and, most importantly, a screwdriver for constantly tweaking the carb settings. Again, so much fun but no photos. I finished the shelf the morning we set to leave. We plonked Kevin the cat into the car and set off. A lovely trip was had with the only downer being that the cold I had caught at fire brigade practice a few days before was really kicking in to full runny nose time, while the weather was a bit... Wintery. Got to test the wipers out though (must fit intermittant control kit I have) On the way over to Blenheim. You can spot Kevin. I took my Dad out for a hoon in the car. He loved it and only complained about the wipers being in the way of his view. Not a car fault but more down to the fact he must only be about 4'5" tall now... Back home and more recently things have happened. I weighed the car at the local tip... 750kg. The guy said the scales are within 10kg. So its in the ballpark for what I was guessing. A bit heavier then a standard Imp to be expected with a heavier engine, seats, exhaust, radiator and associated cowling, water pipes etc. But still light enough I think standard Imps are around 700KG ? More recently- one of the output shafts on the box leaks. I think it might be the shaft moving out just a touch too much on certain corners and the seal running off the land its meant to seal on. Or the seal land on the shaft is too worn. Or the new seal I had fitted has moved. The car will soon go on the hoist and I'll have a look. Cant really drive it until I sort this. Expensive stuff this oil- even more expensive if its loss means a buggered transmission. In other news I have made a parcel shelf for the drivers side. Now I can stash all my own crap within easy reach .. I am going to make some speaker boxes to mount under the shelves alongside a headunit. At a later date when I can afford to do so I'll fit an Amp and sub. I do like my music and there is only so much of Datsun A12 at 4000 RPM booming I can cope with so I need to drown it out. That is about all for now. Wish me luck with my seals...9 points
-
Been quite busy working on this at the moment. Dropped it off to Pitstop Kapiti to get the exhaust sorted as it had a pretty nice split in th exhaust plus I had the rear section replaced and also extended Then it went to Kapiti Signs to get rebranded with my company details on it which is subtle and has come up really well! All the original decking timber had been removed ages ago and with the new Vitex we cleaned it all up, trimmed the two outside pieces down by 10mm per side and we were away! We oiled the wood first and man it came up well! 144 holes drilled, counter sunk, and fittings later... very tired hands. Also did some work on my BBQ trailer while I was at it. I had a sheet of Acacia left over from out showroom shelves from my day to day job so I cut that up, oiled it and added it to the trailer. Wouldn’t expect it to last long but time will tell. Looks nice and tidy and will look good behind the Ute as I tow it to functions. It’s a converted JetSki trailer. Ute is attempting to get a WOF today. I’m hopeful though as I’ve done heaps of work on this recently and it’s current WOF only expired last weekend. Matt8 points
-
It made it in a few magazines recently. Performance Car in the 4 & Rotary Jamboree section. Petrolhead in the Beachhop section. NZV8 Beachhop Edition. And the recent NZV8 in the editorial. Had the transmission pulled apart and the forward clutch was burnt out. After waiting a month for the trans to be rebuilt and getting a price back, I decided my Dad could have the rebuilt one and I'd pull out the one that was bolted up to a dummy engine in one of his projects. It looked to be in good condition from the outside. Grabbed the bits I needed off my old one and swapped them over. Hooked it all up and put some new oil in. Went for a test drive and it goes way better than it has ever had!! Has been my daily for the past few weeks (sorry neighbours! The 6-7am coldstarts with the compressors kicking in must get annoying haha), haven't had any major issues! Have done over 1000km in it since the new trans has been in. Went out last weekend and took some decent photos of it.6 points
-
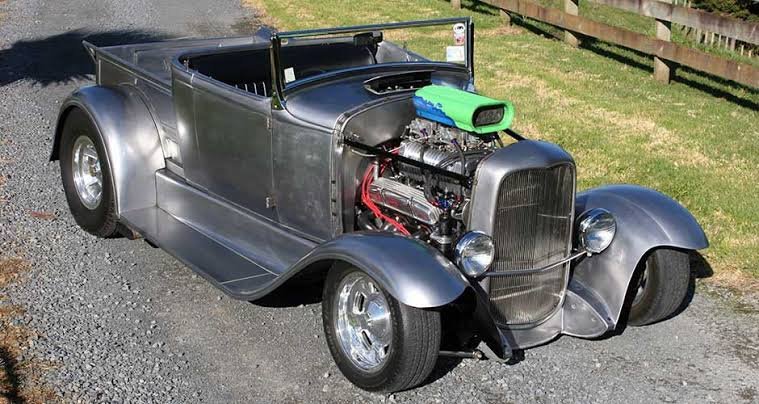
My employer has a hot rod that is bare steel, has been for a few years now. It lives inside most of the time, he has to rub it down with scotch brite and puts stuff called keyphos on it, he probably does that a couple of times a year. It sometimes gets surface rust when you touch it from sweat, or if it gets driven in the rain All the bits that you can't get to are painted so the seams don't rust
5 points
-
Good ride home feilding thru to woodvile for a pie bak home to palmy. Im gona swap the break booster hopfully get some more break power as the fronts have always been rubish.
4 points
-
It's been a couple of weeks since an update, mostly because it has been endless wiring up, which it time consuming but has fuck all to show for the effort. Basically I have been chunking away at it endlessly, with tidying things up and soldering chocolate block connections being most of it. It is all running on 24v now, all the bulbs and relays swapped over and running 2x DC DC converters for the 12v stuff. So many relays... You can see the convertors. One runs the wipers/washer/blower motor, the other runs the stereo power. The terminations are the same so if the wiper one shits itself I can use the stereo one as a backup. Halfway through wiring the instrument cluster, have to study the Haynes manual a bit more I reckon. I made a box for the fusable links, starter relay and glow relays. It needs welding in place yet. And a lid. The hole is access to the fuel filter manual pump knob. Battery positions. I stripped the old rear seat down to the frame, this is because I went back to the wreckers and bought the escudo rear seats from the car I got the fronts out of, these look like they could be pretty good as a solution; Just need to weld some mounts to the frame and create something to hold things folded away. It is nice that all the seats match too..4 points
-
Was waiting on my Ali impact hex bits to arrive before I tackled the allen bolt in the fork bottoms, as they weren't moving with normal keys. First one whizzed out perfectly with the battery impact driver, then second one rounded off to a very neat circle. At least I know the Ali bits are hard metal... So no option but to drill out... And worked well. The copper washer was a good indicator how deep and true the drill bits were... Can move on now, good clean up and new seals, not sure if I'll paint or just rough polish the lower fork legs...3 points
-
Solved one of the first world problems we have with our outdoor furniture lately. After browsing mitre 10/Bunnings and not finding any decent quality options that aren’t $500+ made me decide to build one instead. https://photos.app.goo.gl/hY6EvVE2qRRJ448H7 Built a frame then stained some ply and slapped it on the outside. https://photos.app.goo.gl/dYM4WfYmcDWqi9d79 Came up pretty sweet. Now my cushions stay dry when I want to use them https://photos.app.goo.gl/g2e2k7eh5bdaUNUx6 Edit: how do you embed/upload multiple pics? I’ve been struggling along only adding 2 pics to each of my posts to fit under the size limit but surely there’s a better way!?? thanks in advance!2 points
-
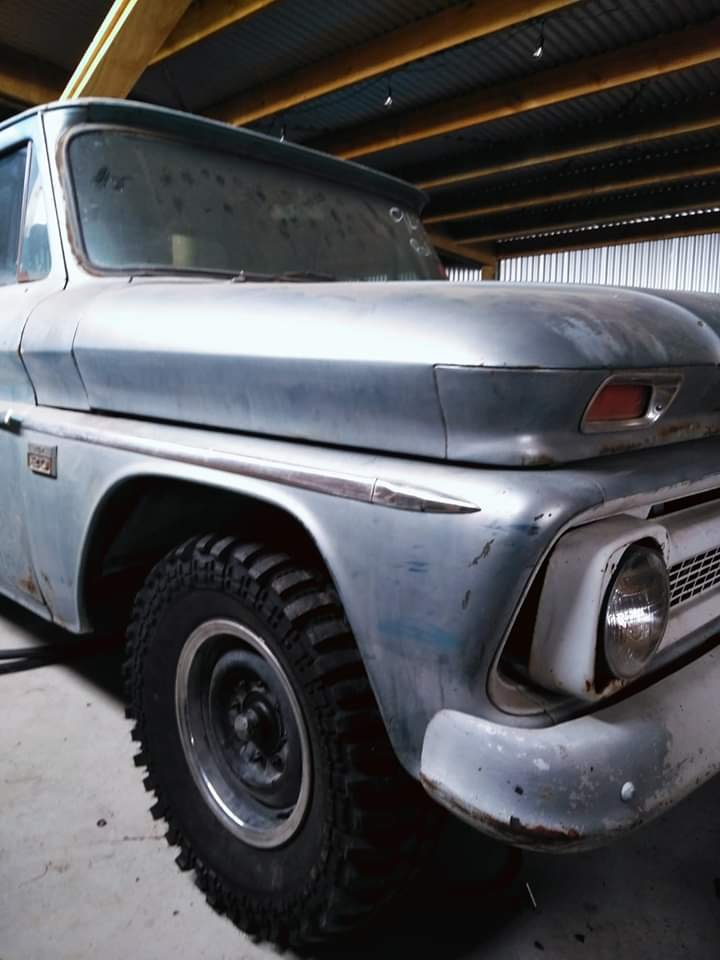
It is for my C20. I cant decide on a colour and it has far too many rattle can touch ups for my liking. You know the ones where they thought nobody would notice but just looks crap.
2 points
-
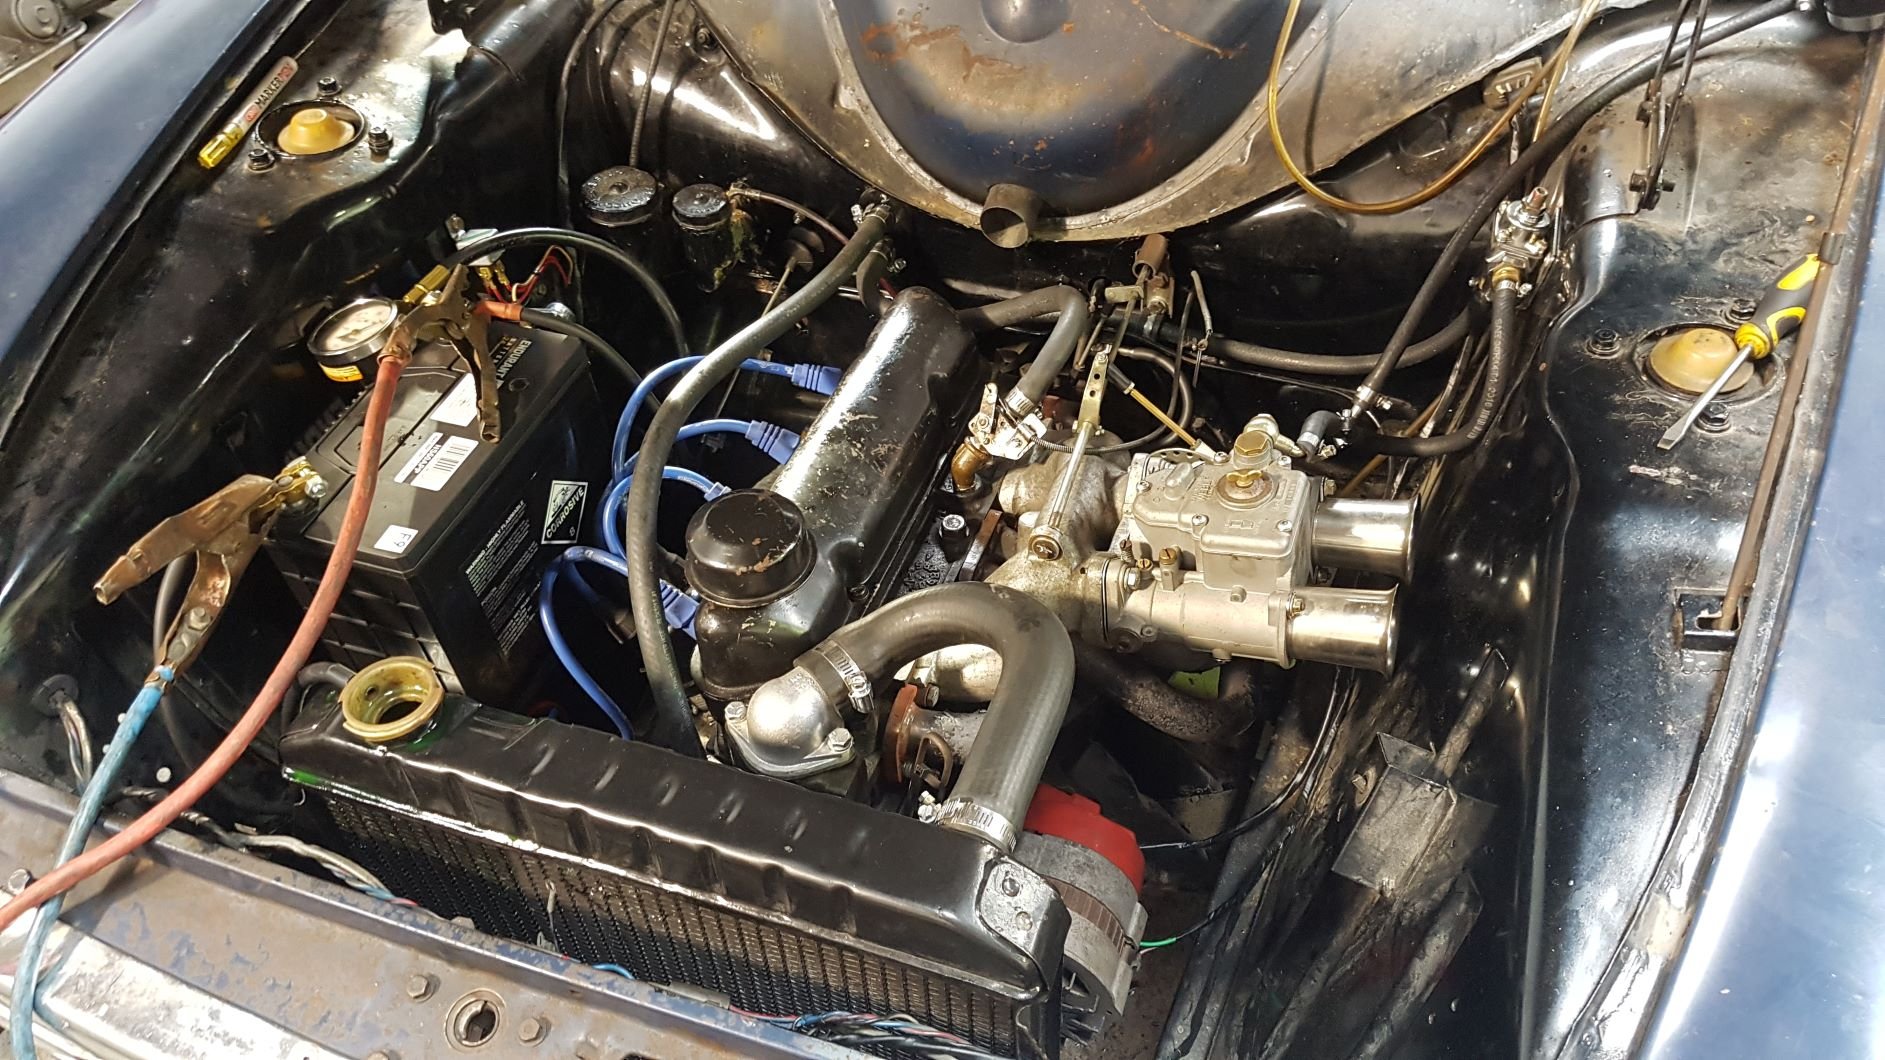
Fitted the ARP main studs, I think it's too cold in the garage to measure the clearances so I might have to take it to work to do that. Dicked around a bit with the timing stuff to make sure I've got everything I need either already or on order, it's quite a stupid/complicated setup in my opinion but oh well, if it works it works. Fitted the OEM blanking plug for the right hand balance shaft as well.2 points
-
wow 2 updates in the same year. that's a record. Am rather time poor atm so progress is slow. Loom has been pulled out. for some reason i had been adding plugs here, there and everywhere. the pic is a small percentage of the messiness. Loom after about 5 unnecessary plugs cut off. Will be bringing it straight through the firewall so will be shedding allot of length. Aiming to make the wiring as simple as possible. i was having random issues that were because of the over complicated wiring i think. Hoping to have engine running again in the next few weeks.2 points
-
Had another go this afternoon... After many attempts and mould redesign, this was the best. With the part standing vertically in the mould on the left edge, the first half is perfect and the top turns to crud. Worked it out to be the metal cooling fast during pouring as I only have 80g in the pot, more metal, more thermal mass.
2 points
-
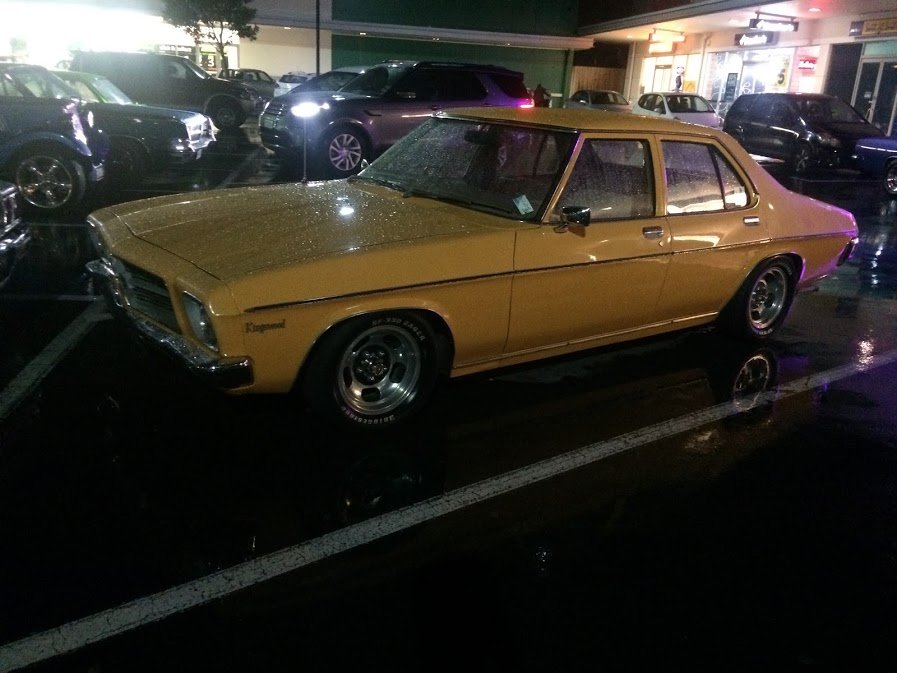
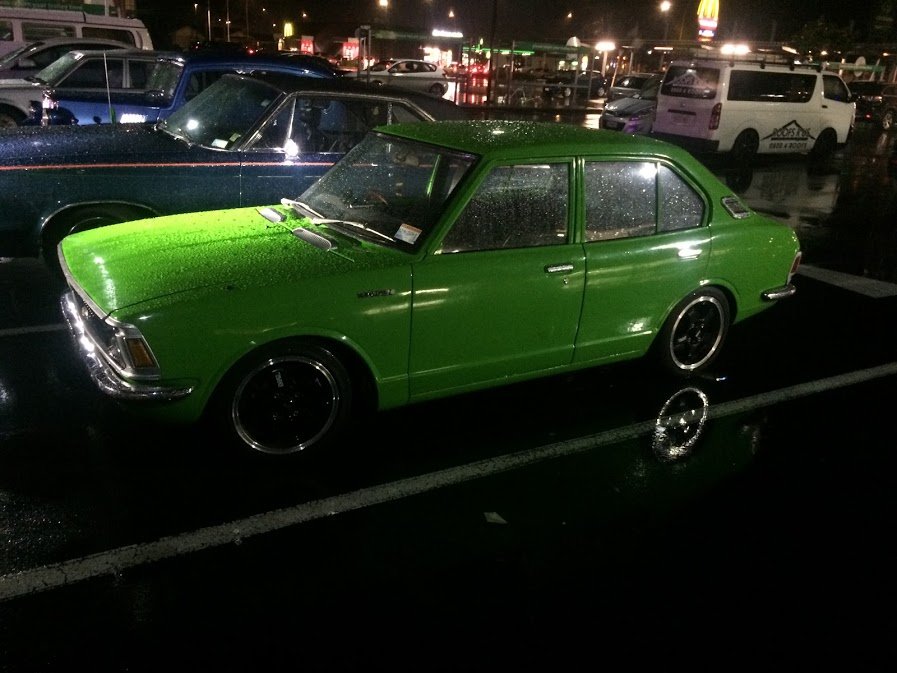
A few snaps from Thursday night. There were more cars earlier on that I missed.
2 points
-
Cool story bro, but you missed the best bit.2 points
-
2019-06-19_01-30-25 by sheepers, on Flickr 2019-06-19_12-40-53 by sheepers, on Flickr 2019-06-19_12-40-43 by sheepers, on Flickr2 points
-
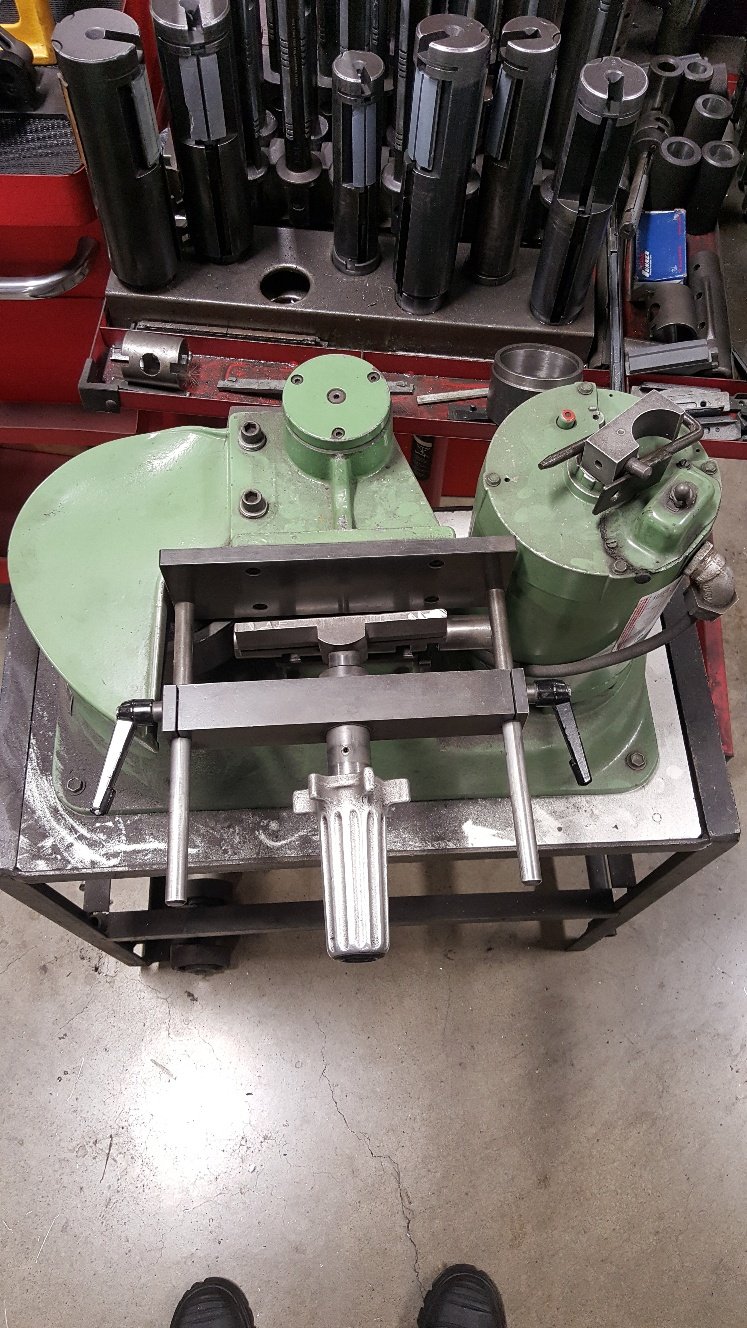
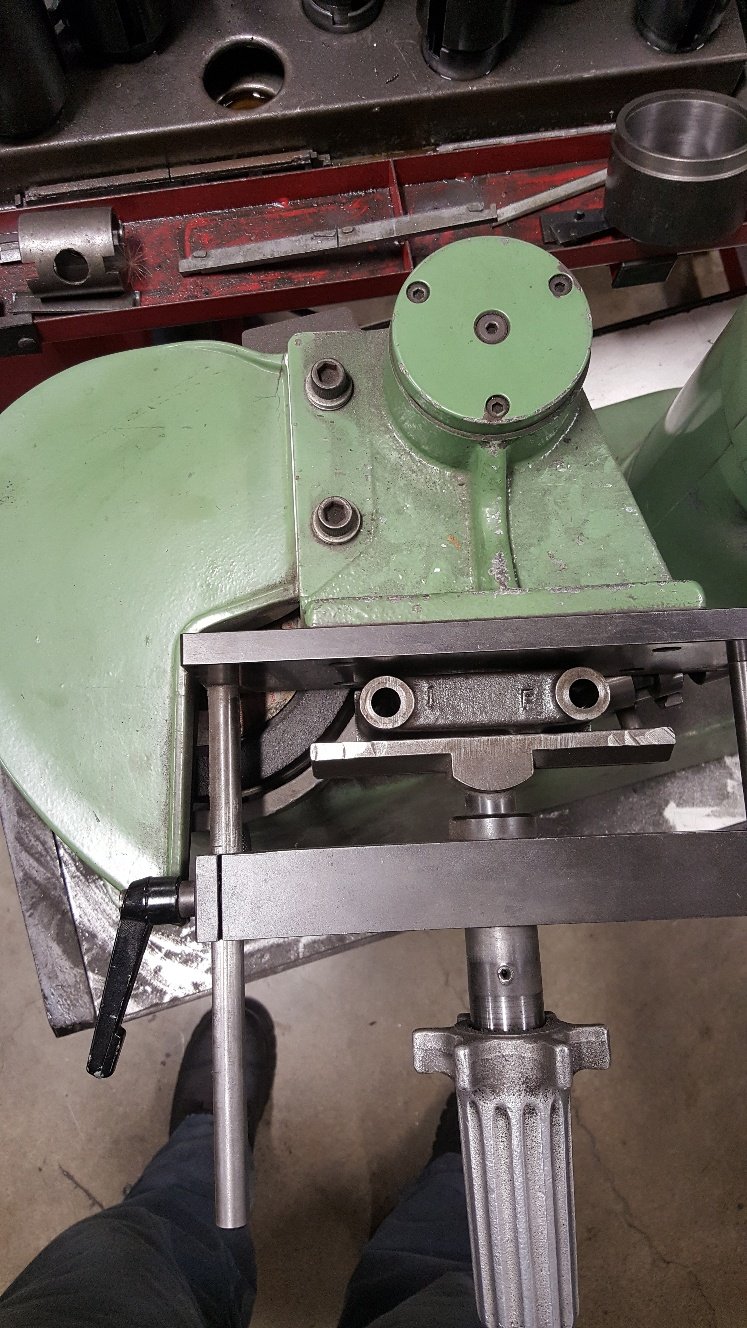
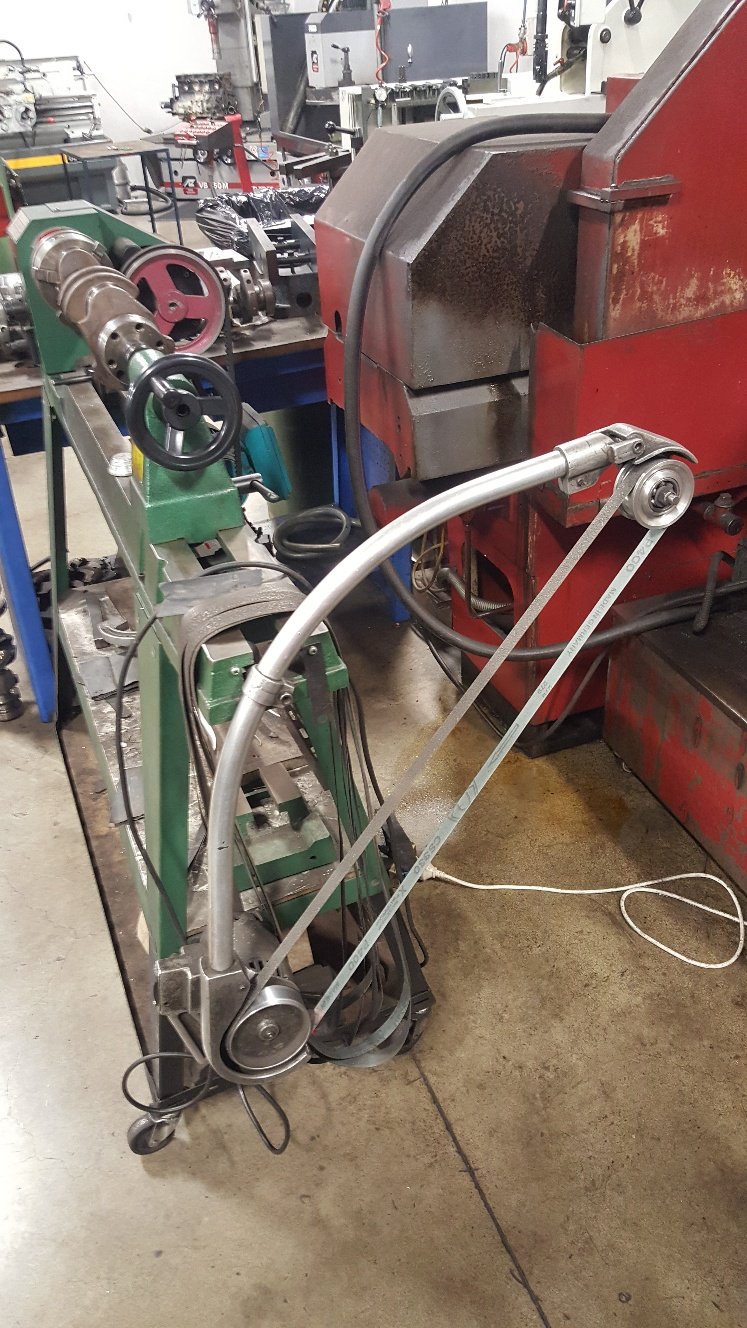
So i got my hands on some plus 15 back -20 main bearings. Thanks to Ford and their below average machining they mis machined the main tunnel on some of their blocks and had to come up with a solution of +15 back bearing to take up the slack. These can be challenging to get at times. So then I mount and measured them so I had a size to machine the crank too. Got the crank dialed in the crank grinder. Start to bring the wheel in and just touch the journal and you can see the .002 thou wear. The grinder has just started to clean up the left side and a bit in the middle. Once it's all ground we put it into this modified wood lathe we use for polishing.
2 points
-
What better to do than lay on cold asphalt in the dark at 10:30pm on a weeknight and try to hand crank a possibly seized old Kent engine? Me? Retarded? Dunno, but it's interesting anyway. I removed the spark plugs to spray some penetrating oil in there. There was a bit of junk around the plug holes even though I brushed away anything before hand so, I vacuumed in the dark. Its a perfect fit. Top of pistons don't show any signs of water or rust. Inside rocker cover is nice clean and oily. Plugs look ok, I wonder if they are 35+ years old? Found you can still buy Champion N9Y's The crank pulley is right up against the fibreglass body, barely enough to get a spanner in. At first it refused to move with the little leverage I could get on it in the space, I thought it must be seized. Then it moved maybe an 10th of a turn, moved it back and forwards a little. Then put the breaker bar on it just fitting pushed up against the fibreglass back panel and got an easy free feeling half turn! Maybe it'll live again?
2 points
-
We've all done it, right? Spotted something tasty on Trademe while browsing idly on a Friday night? Sometimes, after a few beers, you might even put in a cheeky low autobid just for the hell of it. Well, fast forward two weeks and it turns out no-one else wanted that crunched Accord you were bidding on while a little bit drunk. Damn. Thus, for a stupidly small amount of money, I added another slightly rotten Eighties classic to the fleet. This one rolled off the NZ Motor Corp production line in Nelson sometime in the early part of 1981, probably into the hands of a caring gent who treasured it for a couple of decades, adorned it with a set of THE GREATEST WHEELS EVER M8, and apparently never had a flat tyre because the original Reidrubber Award is still sitting in the boot. Fast forward a few years, it passed through several more owners, and tried to pass through a brick wall which didn't go so well for it. However, considering the reputation that first-gen Accords have for disappearing slowly before your very eyes, this one seems remarkably solid. The wall-inflicted damage was limited to the pushed-back bonnet, radiator support panel, guards and bumper, with the chassis rails thankfully having escaped damage. It was in this state that I picked it up on Saturday morning, drove it to the parents place and tore it to pieces in their driveway. By Saturday afternoon it was sans front, I had pulled the radiator support panel back to where it should be (it helps when your Grandad has a low mile, immaculate one owner example you can take measurements off) and I sprayed rust neutraliser over every bit of metal oxide I could find. The whole structure is surprisingly flexible, everything bent back into place quite easily, and by Sunday afternoon the front was starting to look more like a Honda again, and the bonnet was back to where it should be. It was solid enough to make the trip home, anyway, and to drive it round to Grandad's beforehand to spin Honda yarns and spot the differences between pre and post-facelift Accords. It was already missing parts of the grille moulding and a bumper insert though, which was a bit annoying, and the bits of chrome moulding it does have are bent. Not sure where to get replacements for these, I am unused to the lack of aftermarket support for anything that isn't an old Ford... I did however find some repro indicator/park lamps from a place in Otahuhu that turned up in the mailbox the next day, which was pretty sweet. I'll take some proper photos of it once the rain stops, but here are some phone snaps in the meantime1 point
-
Hey, does anybody know what the legalities are in driving around a vehicle in bare metal/only a clear coat?1 point
-
Those rims project that sir has a slightly caddish sensibility. Top show, old boy1 point
-
Good advice above. There is a filter. It should be a steel mesh type that can be cleaned. Not usually changed for a Toyota Trans Service, but we don’t see a lot of them over 500k. It probably is worth taking the pan off and giving it a clean up. Make sure you use the correct fluid. Recently there has been a shortage of Toyota Genuine WS atf and we have been told to use Dexron VI.1 point
-
That video is mostly correct (i install the 24mm before starting, and level it down to a fine trickle, less coming out than on the video before installing drain plug). Have serviced a few of those, just make sure you check the trans temp via obd2. At work we would do a basic flush by filling and draining a couple of times, running it through the gears between drops before doing the final fill and using the overflow tube to level it. Not sure about filter, have never had to do one.1 point
-
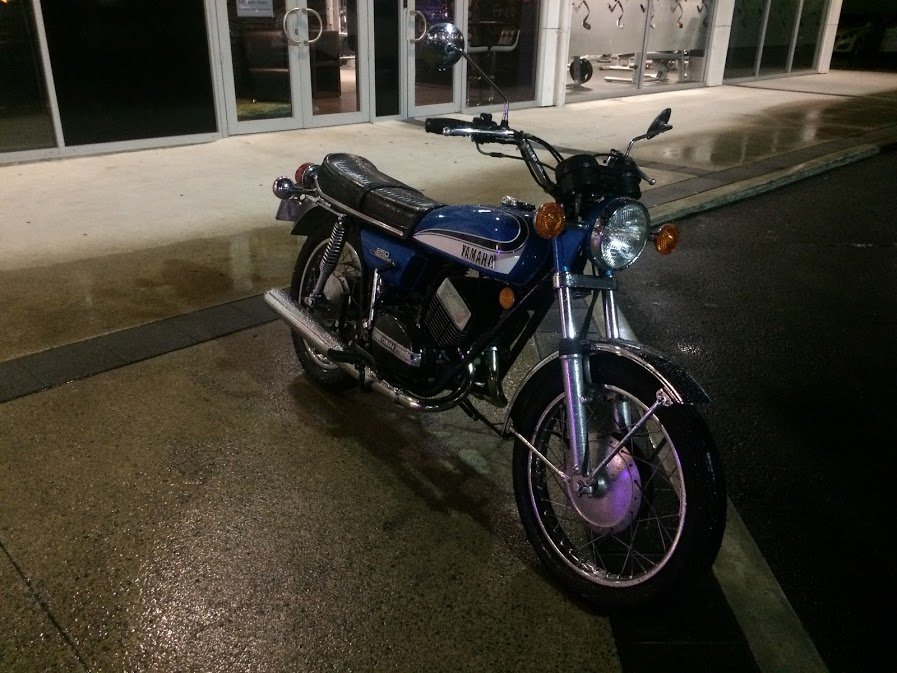
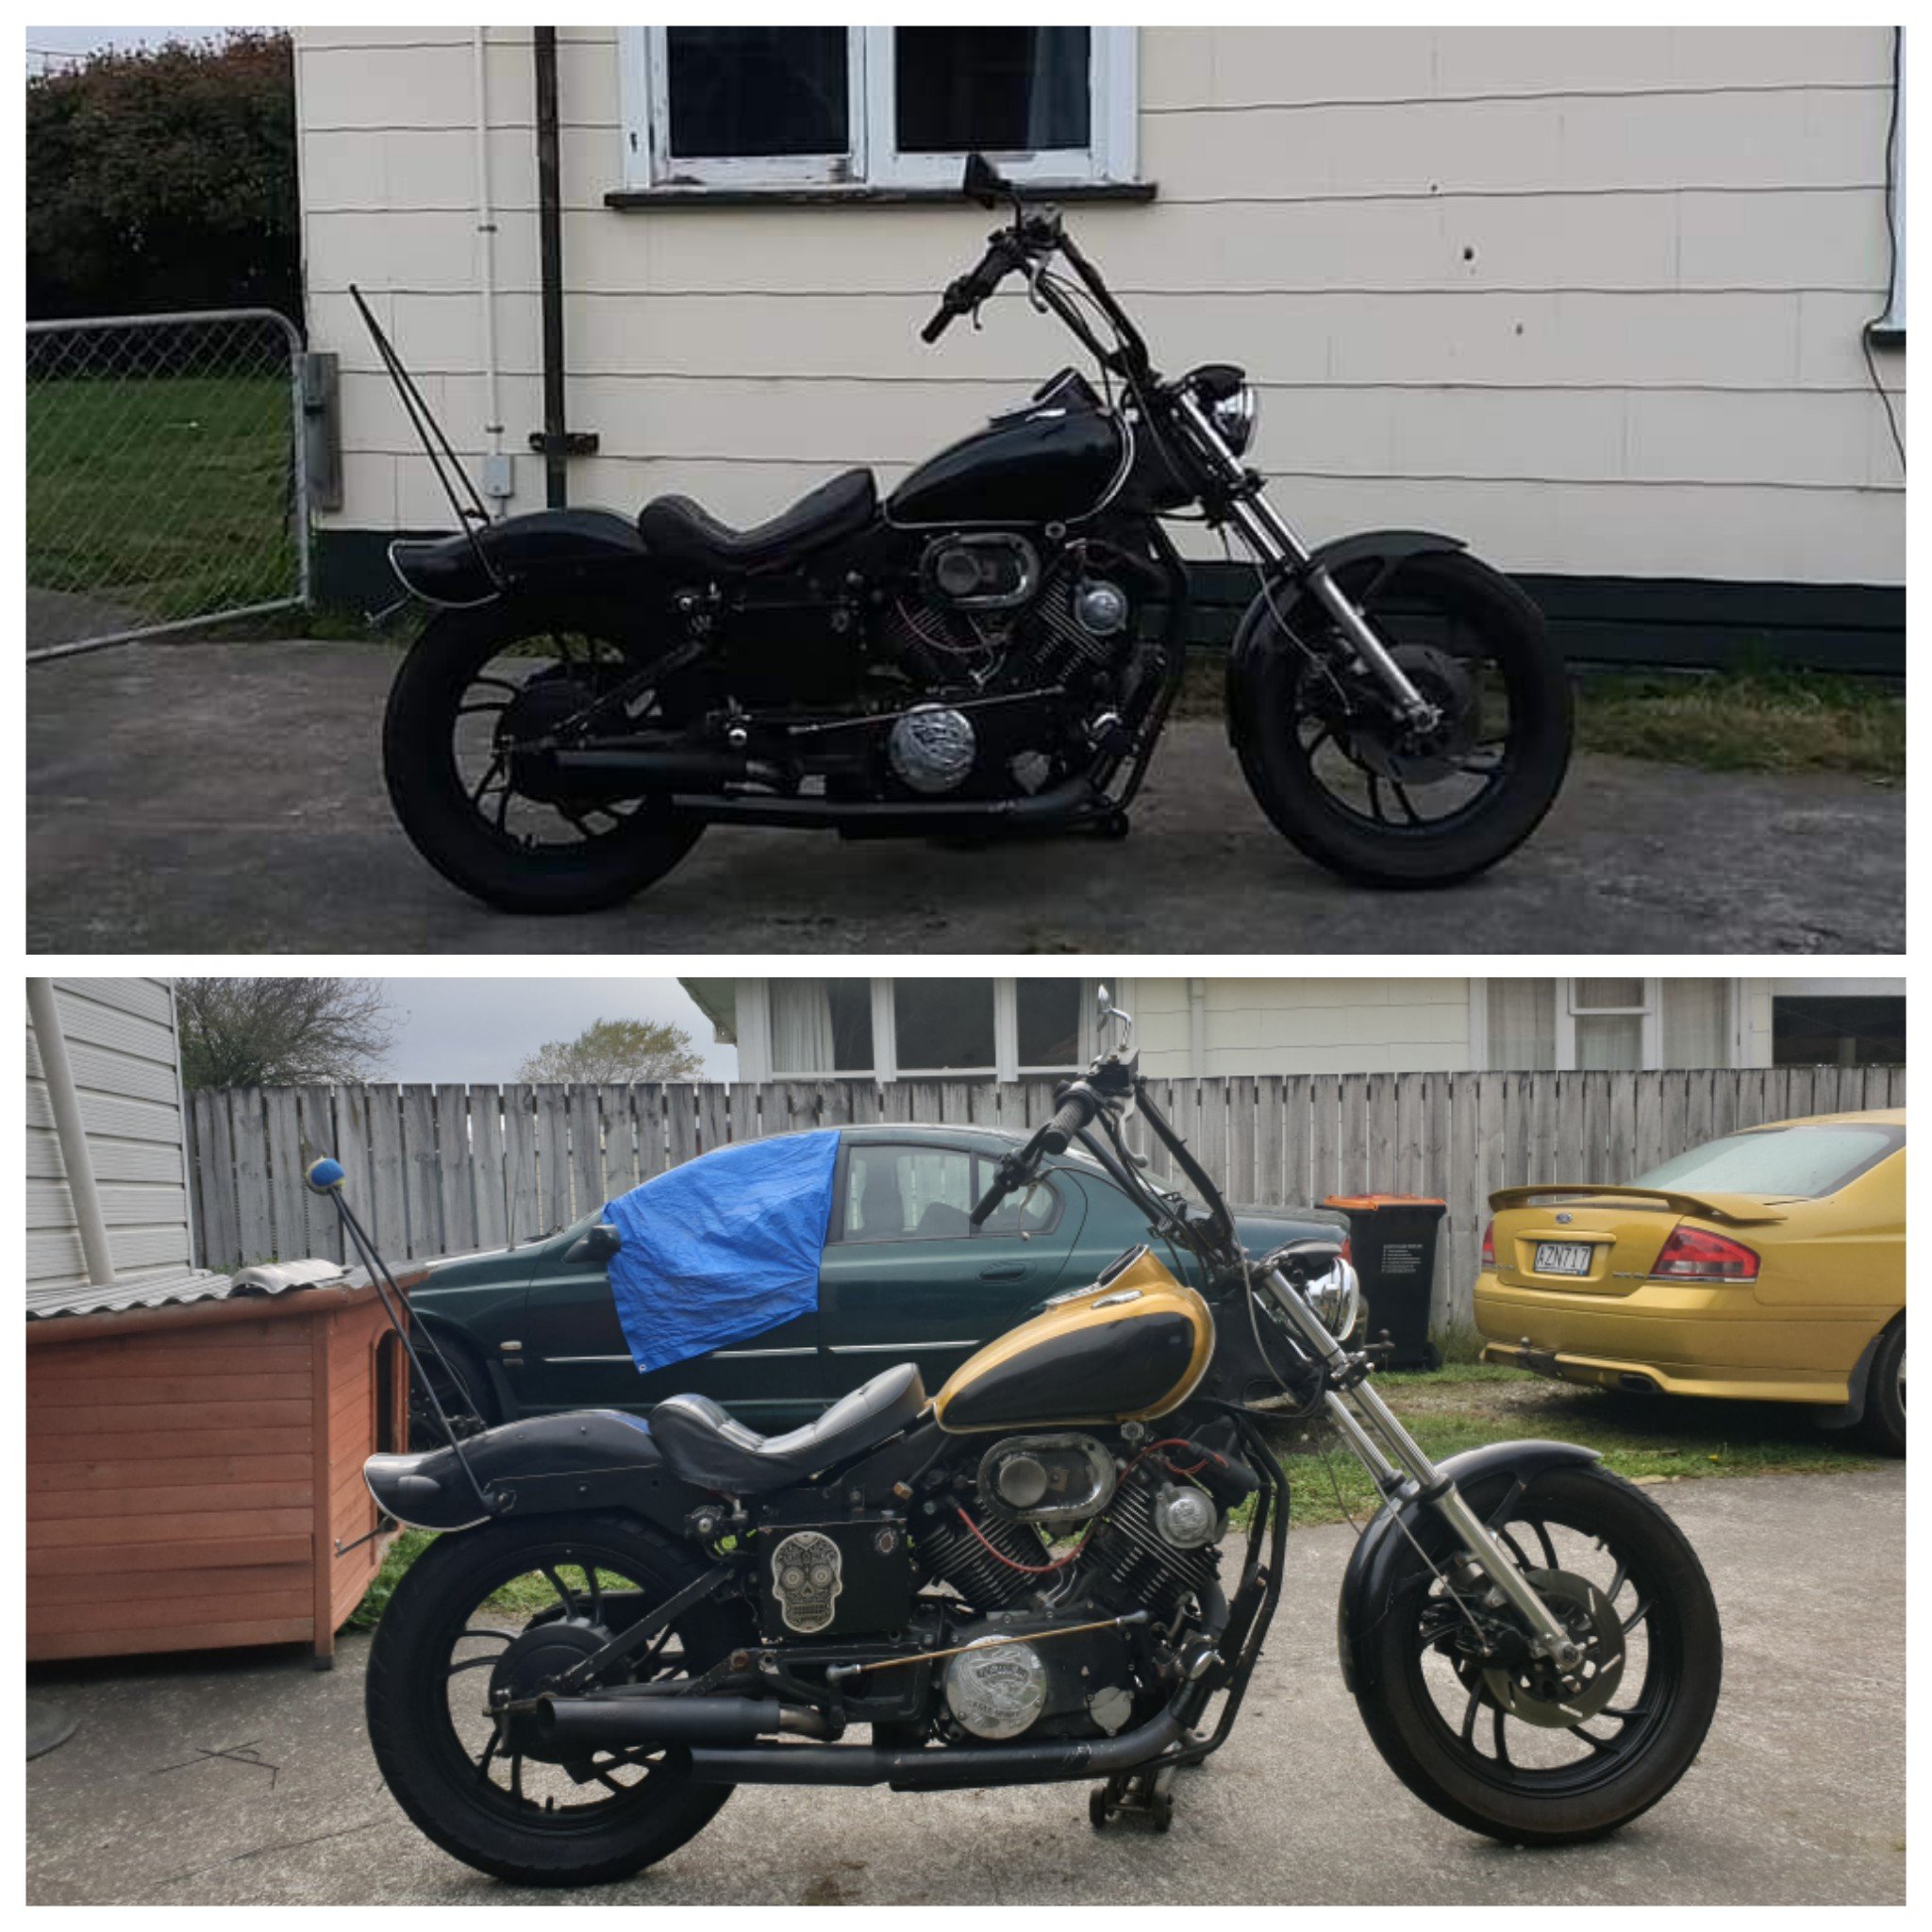
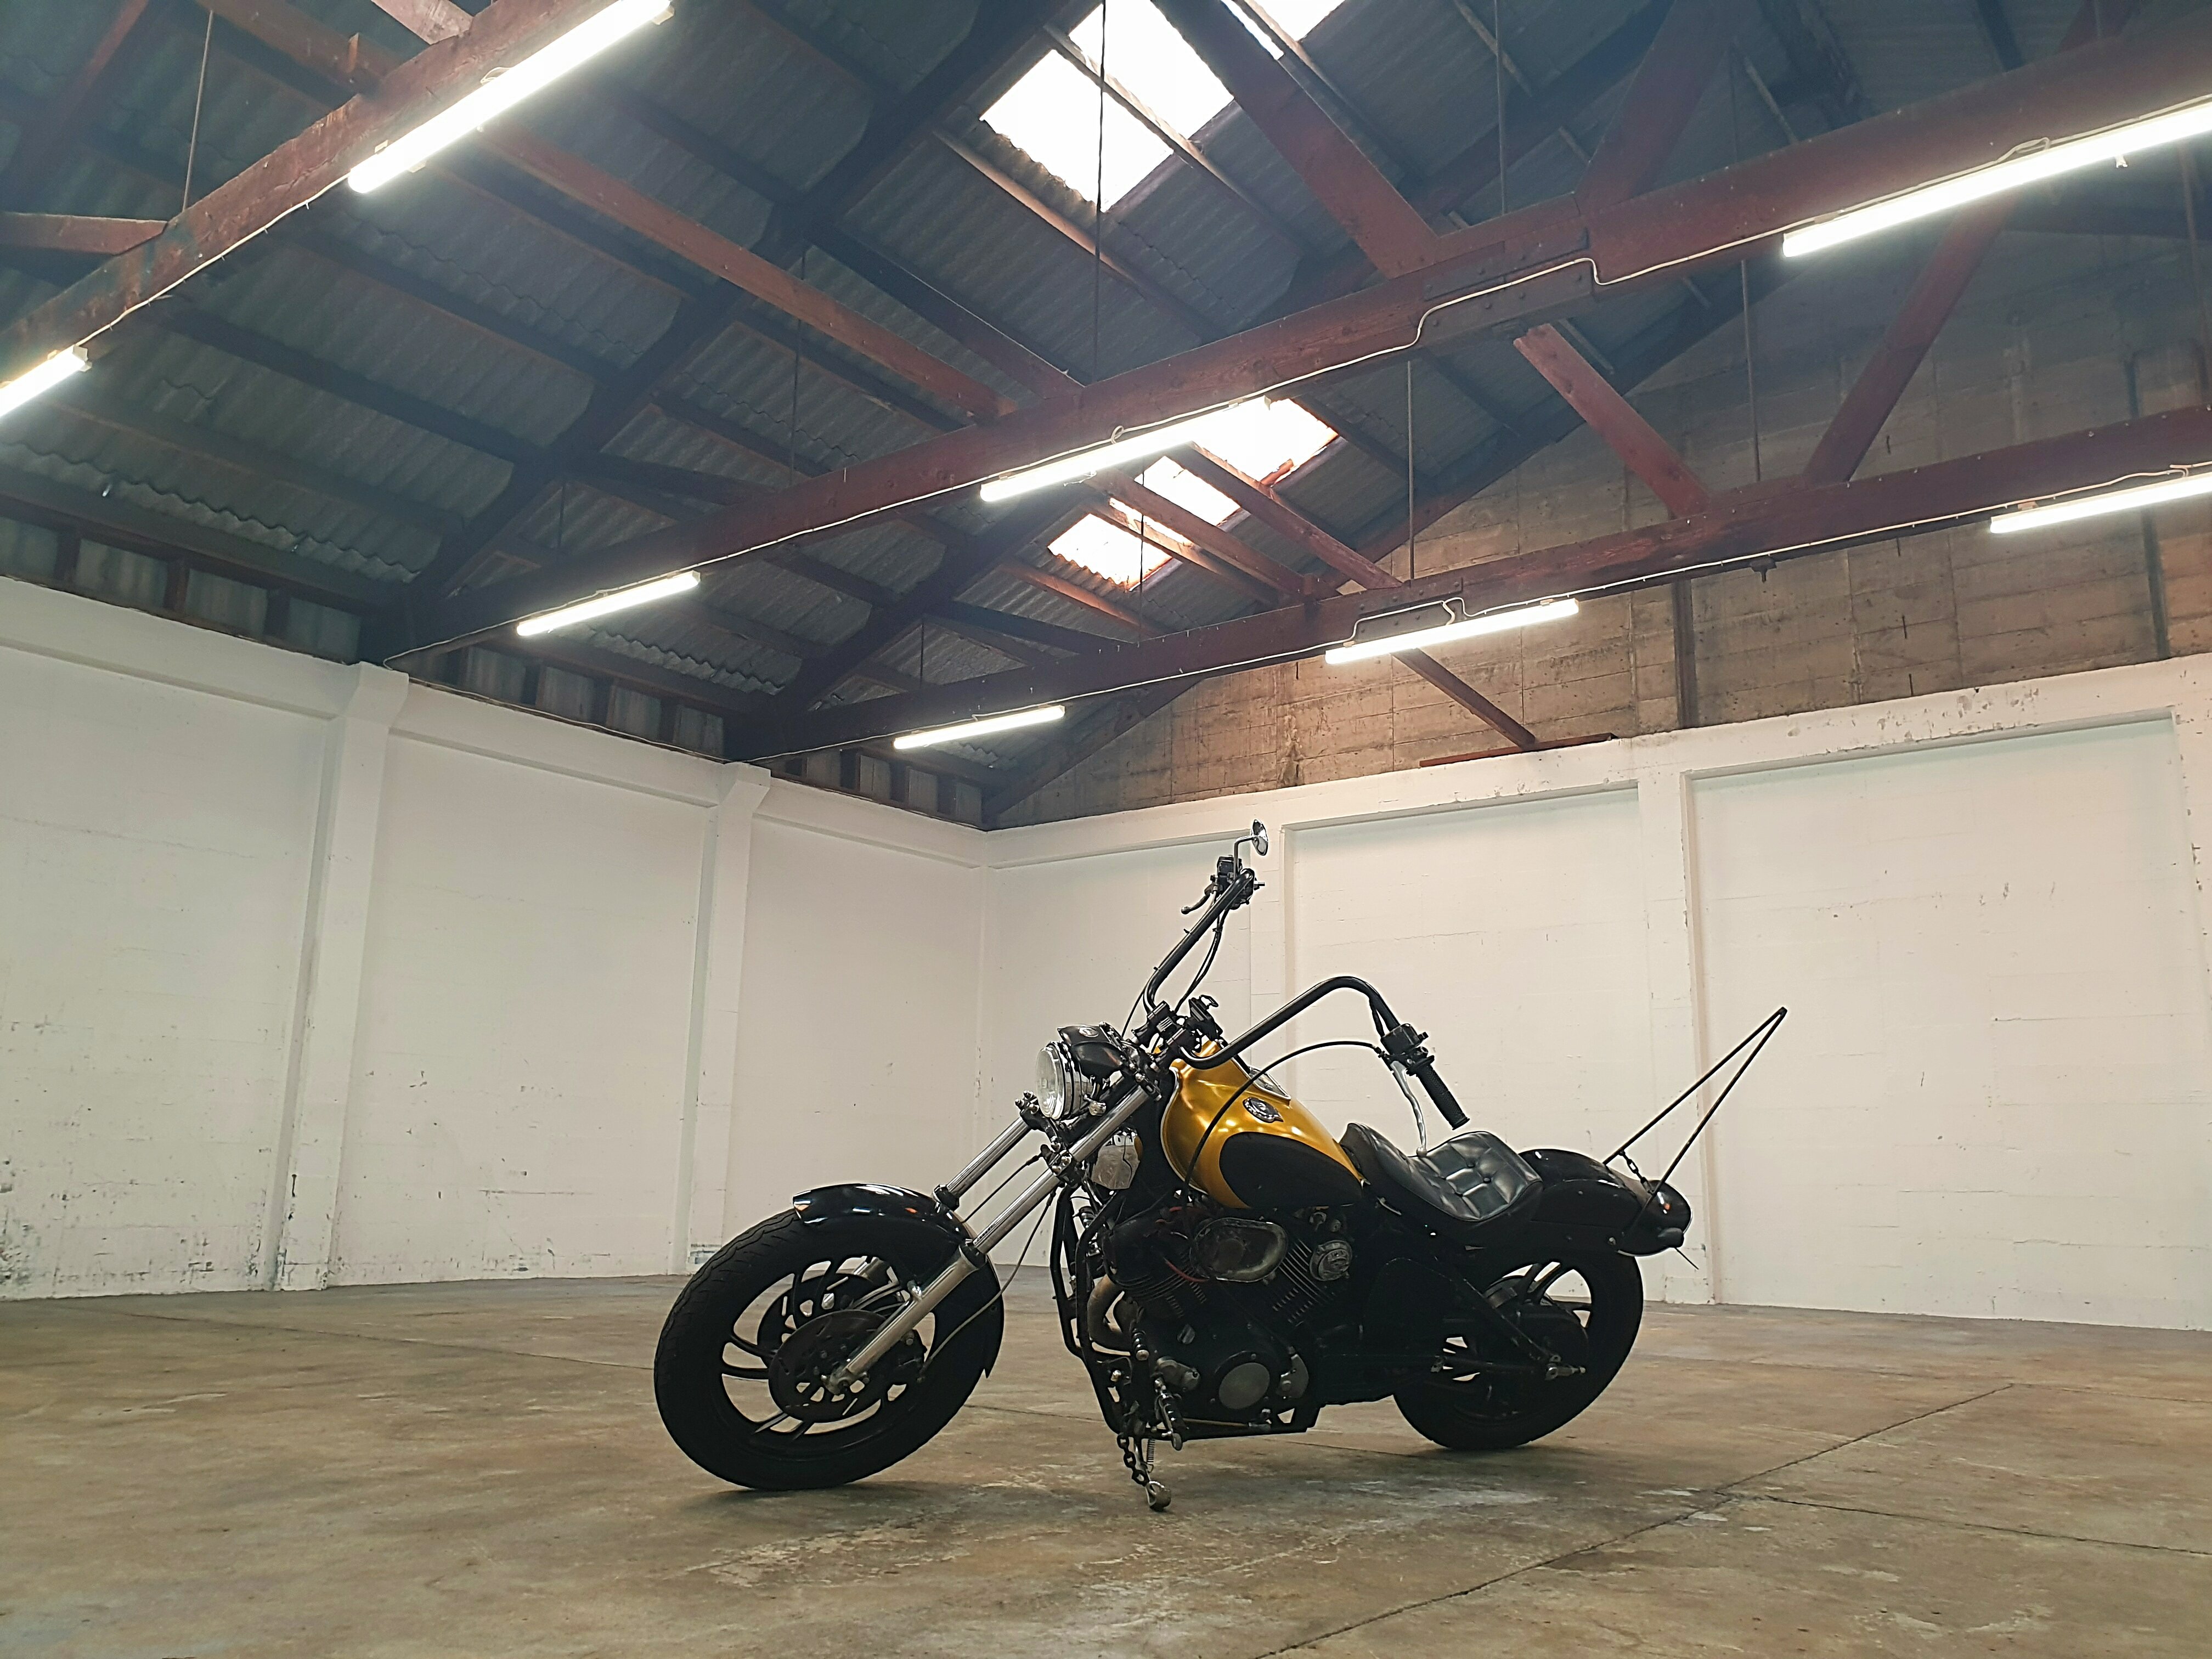
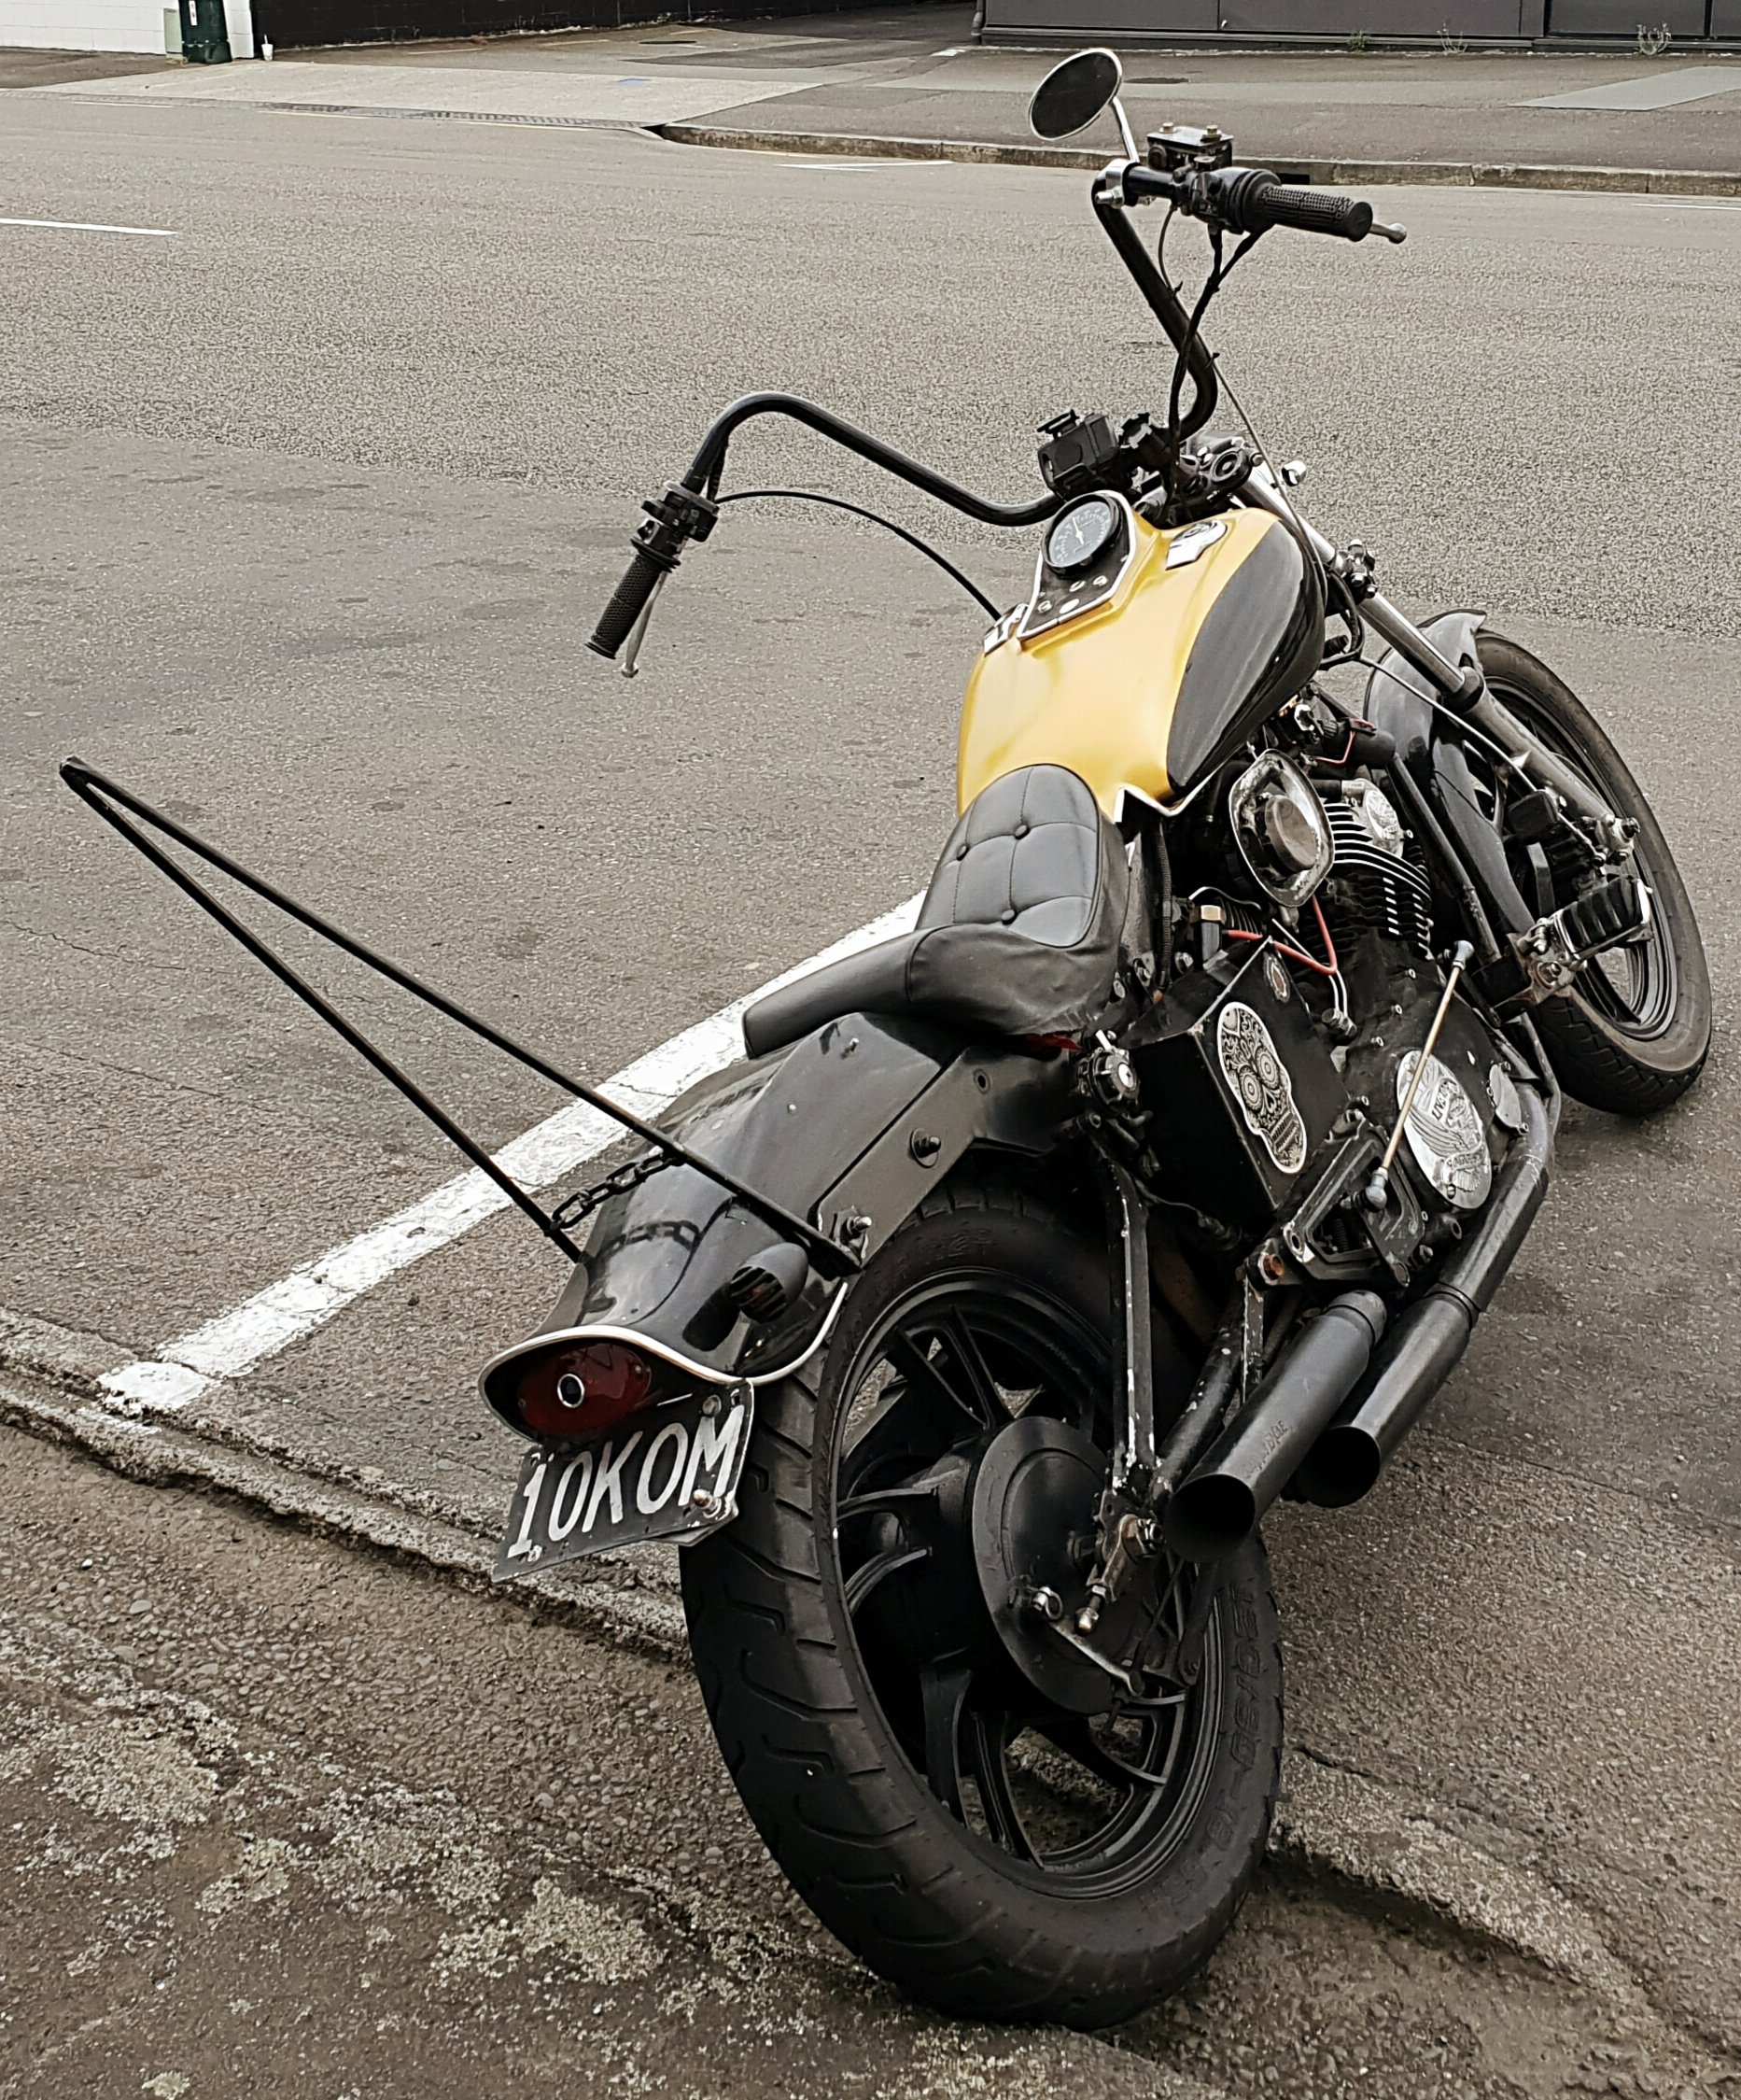
Ok guys im a lil over the gold on tank. Reason why its gold... She had rust on top and needed fixing was actually leaking.. Anywho painted gold to try somthing diffrent.. Top photo is the same bike about 6months ago just before i fixed the tank.. Thoughts guys... Go back to full black.. Or maby another colour have been thinking of a dark purple
1 point
-
Looking much better and showing potential. Do you have vents to aid fluid flow? Hard to see on my photos but I have 8x needle sized vents (4 on each half) cut into the mold to help the air escape as the metal goes in.1 point
-
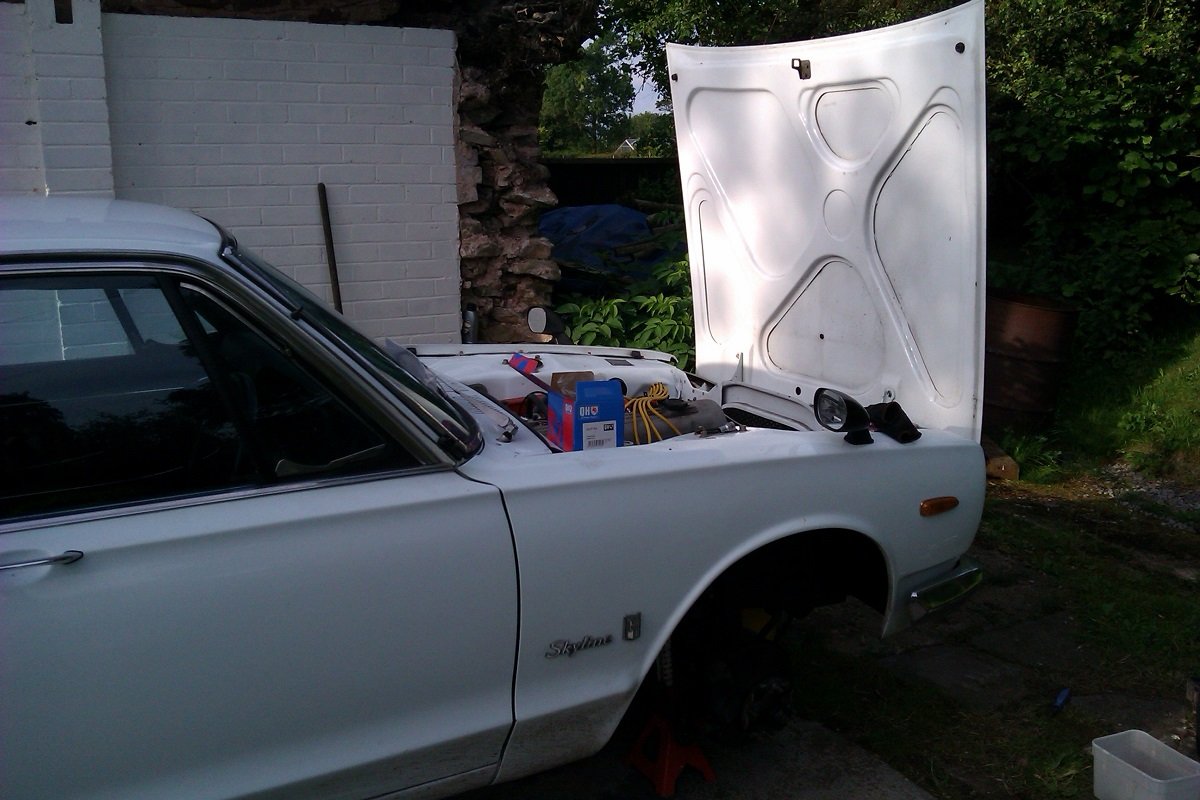
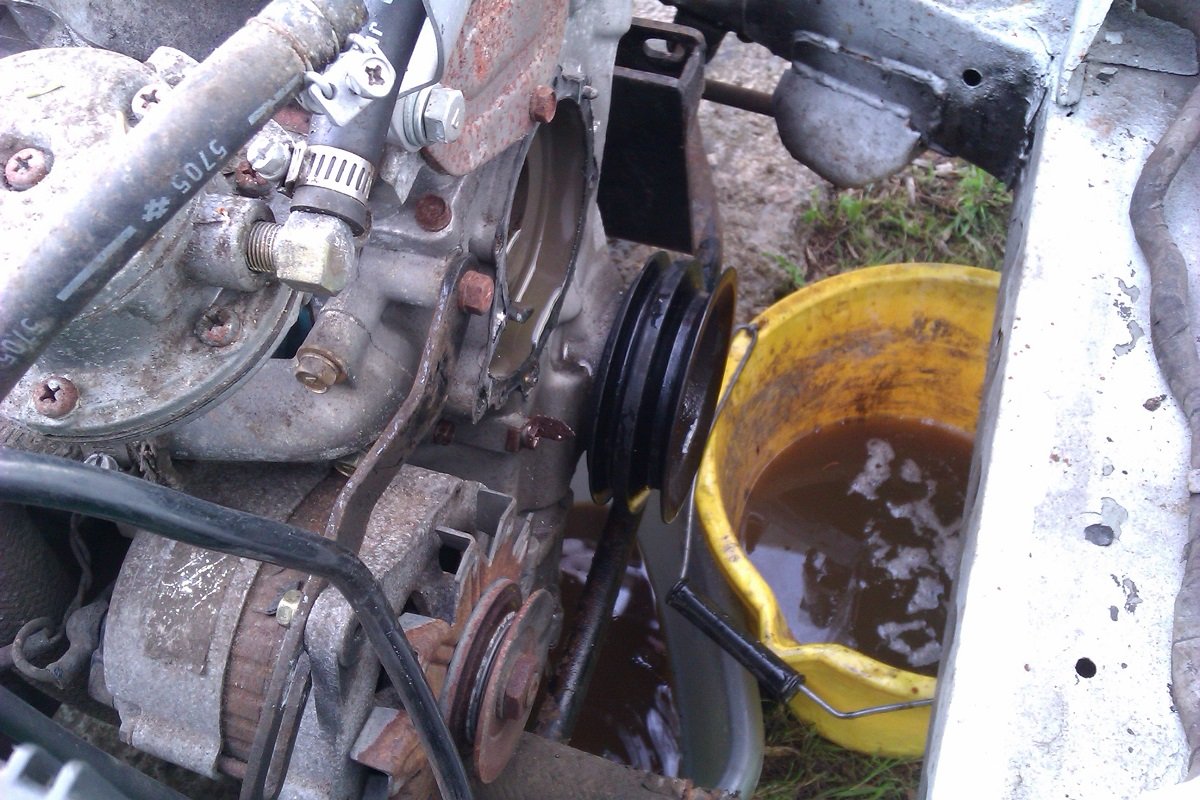
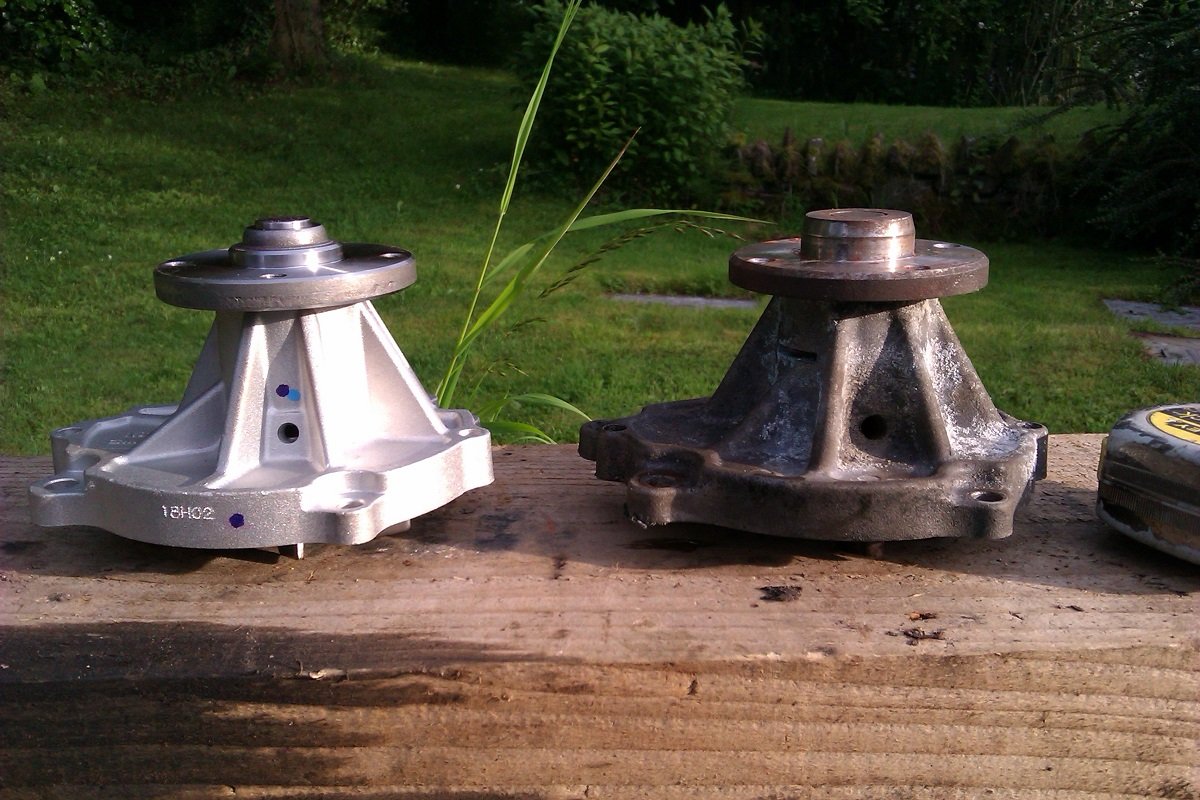
I was going to spend all day on the old crate today but didn't get on it till 6. Stupid Saturdays. Having decided not to go the Pro Stock/ Street Freak route, (see random picture thread, page 4283) I thought I'd better mend the thing. Calipers fit but the originals had the fitting in the middle of the body so the the flexies aren't long enough. By chance, Hilux chassis to rear axle hoses are 60mm longer so I may get away with that. Anyway, bailed on the brakes and pulled the water pump off. In true Japanese style, all the bolts came out fine and everything seems the same on the new pump. Came in at 7.30 in time for chips and beer. No Skylining tomorrow, taking the daggs to the beach. Want to do more Skylining TBH. PS.... Any of you GC's know what the valve gaps are for a '72 L20 ? Gonna go with 240Z specs unless I get told otherwise. /pics
1 point
-
Ok so for years i've been wondering why tractor pullers take so long to build rpm and boost, and only just thought to google it. Sorry if this is really obvious to you guys, but this blew my mind. The diesel pullers run a low compression engine.. Engine compression heats the air hot enough to ignite the injected diesel fuel. With the lower compression, diesel fuel has trouble igniting in the cylinder. This is why you see many of the diesel puller engine start with LOTS of ether assist. To build heat in the cylinder the puller will very slowly advance the throttle to speed the engine. If he pushes the throttle too quickly the additional fuel will cool the cylinder enough that the engine will die. As he advances the throttle he will load the engine by slipping the clutch. As the engine takes more load, the turbo, or turbos will start to build manifold pressure. As the manifold pressure increases the cylinder pressure rises allowing more fuel to burn. The more fuel that burns, the faster the turbo spins, the faster the turbo spins the more fuel. (you get the picture) As HP and RPM build the engine will finally be making maximum horsepower and the clutch can be released. And the pull is ON.. P.S. The low compression is so the turbo can pack more air into the cylinder without blowing a head gasket or worse. How amazing is that, it's squirting in so much fuel that it can put out the fire.1 point
-
This bitch is finally alive. Started yesterday with no exhaust so fairly rowdy. Just needs exhaust sorting, cooling fan found (looking for one currently let me know if you have one please!) I seem to have lost it over the last decade. Pretty pumped as I got the engine rebuilt over 12 years ago and was a bit worried there would be issues. Will need a tune etc and no doubt some other issue will show itself but its getting damn close. Looking forward to taking it for a fang!
1 point
-
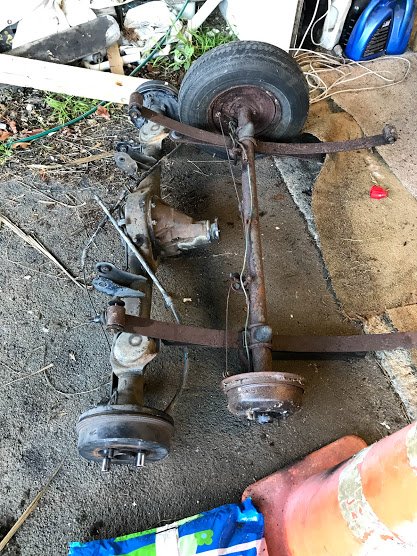
Took the axle and leaves off, jesus its tiny versus the Toyota t series one: Then played car Tetris: Just fits:
1 point
-
perfect, should hopefully be able to dimple the cutouts too, so shouldnt be any lost strength. there are already large oval holes where i want holes anyway, no clue what for. perhaps air con was an option, but id doubt it on a 71 corona.1 point
-
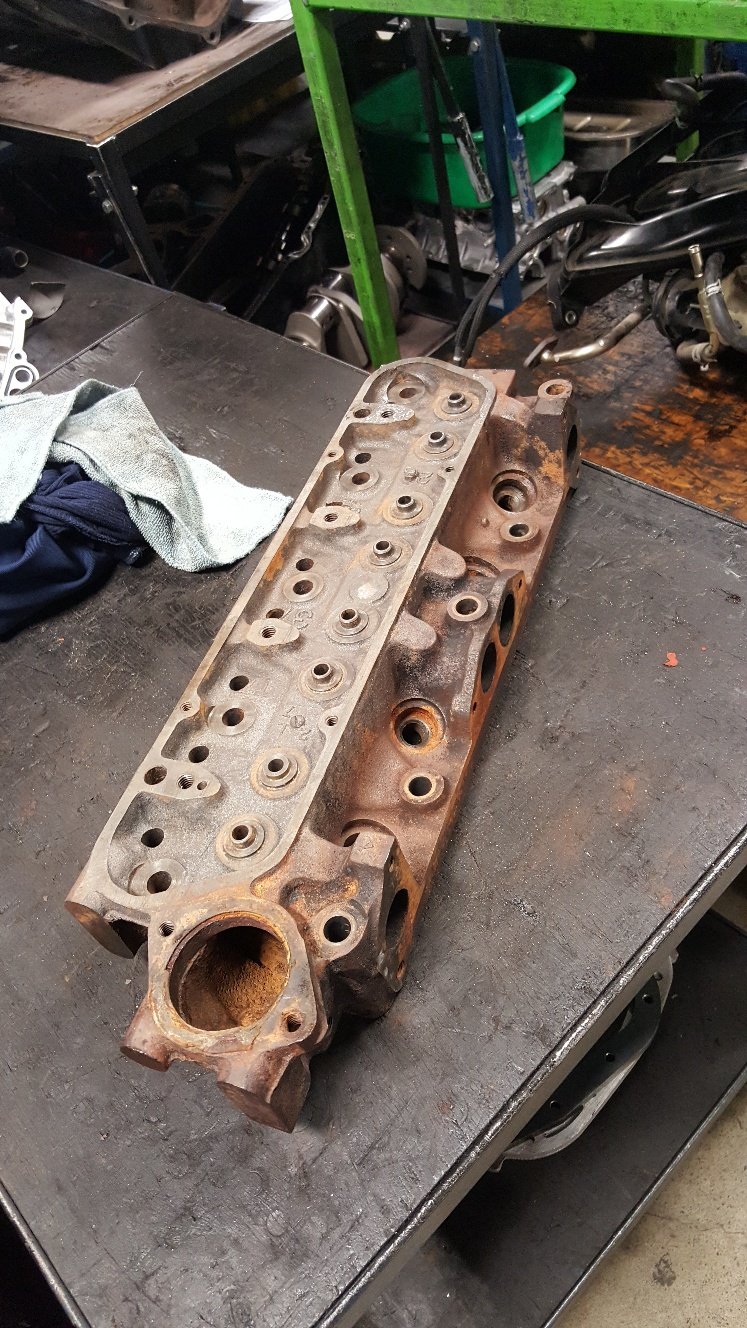
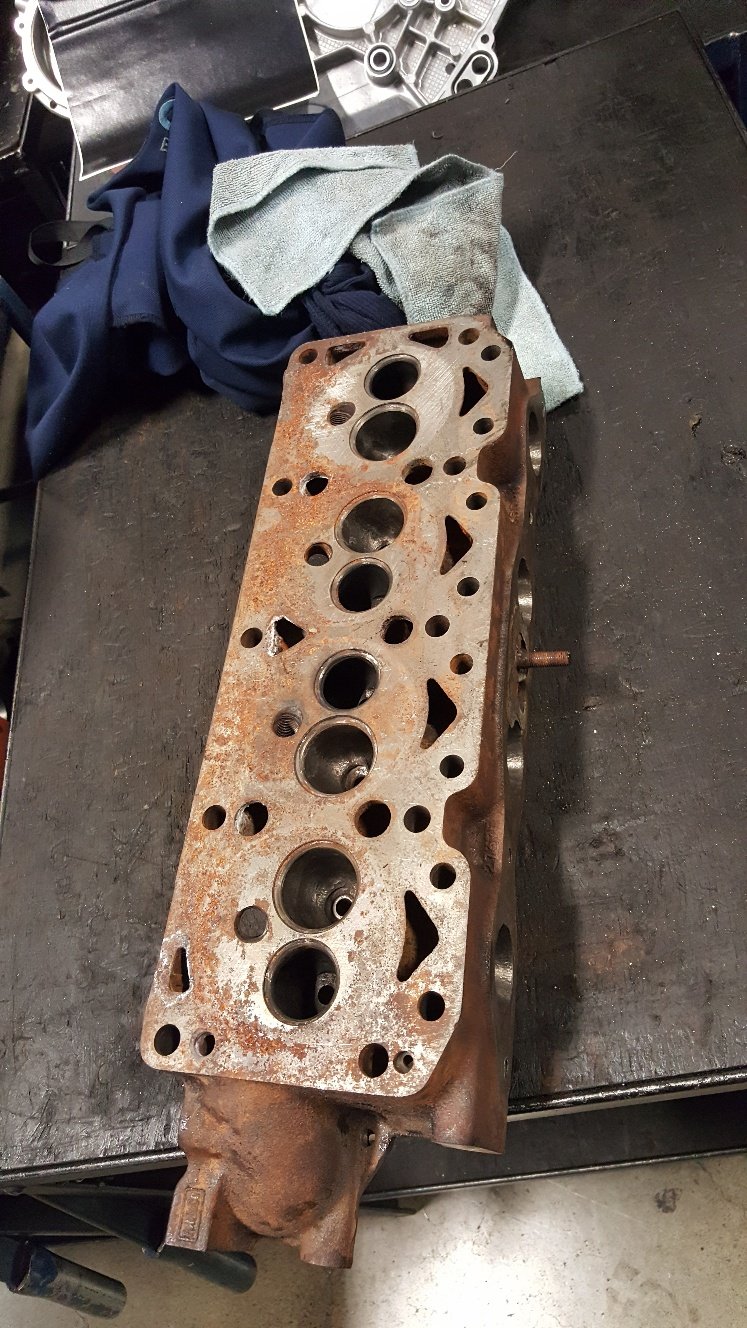
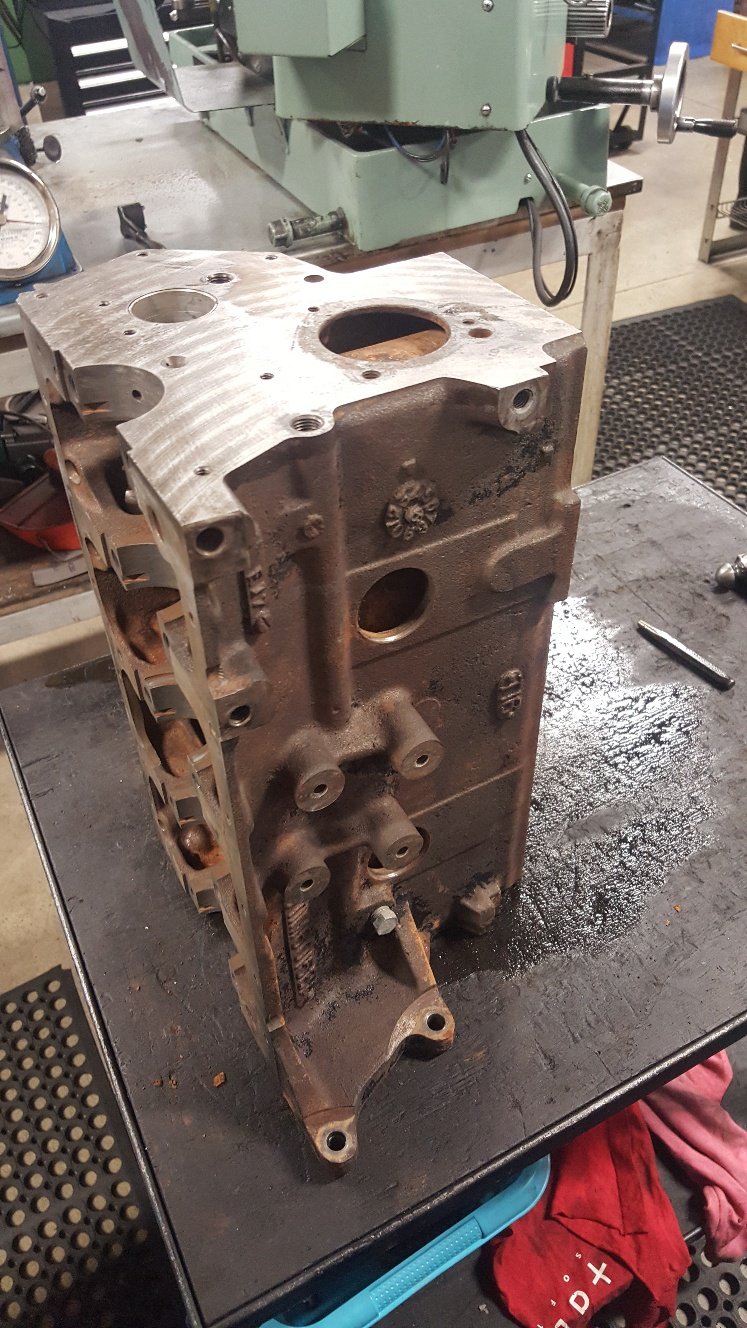
So I forgot to get a picture of the molasses. But here's a couple of pictures of the head once out. The molasses sort of just loosens the rust. Then you have to wire brush to get the rust off. I didn't put the block in what we call our hot tank as I haven't removed the cam bearing.. Our hot tank is only for ferrous metal. And the cam bearings would react with the acid. The cam bearings are in reasonable condition and this is build is on a budget. I run the tap through the head bolt threads and main threads. Removed all the gallery bungs and frost plugs. I found a decent build up of rust at the rear of the block that i chipped out with a screw driver through the rear frost plug hole. And also gave the block a good wire brushing. I gave all the machined surfaces a sand up with emery tape on a file.
1 point
-
Cavity wax seems to do a really good job, provided water can't get in from the other side of the joint. If you can't get paint into an area, the cavity wax should be able to wick it's way in and make a good seal. For Starlets, they generally don't have any rust in seams were cavity wax was applied properly.1 point
-
If the underseal is solid as fuck, i'd probably 2 pot the lot, then underseal it all. Would want to be sure moisture can't get in from behind mind you. Don't want it rusting from the inside out.1 point
-
My bike if anyone was wondering lol
1 point
-
Cool bike mate. Looks like its built to do big Km camping trips1 point
-
1 point
-
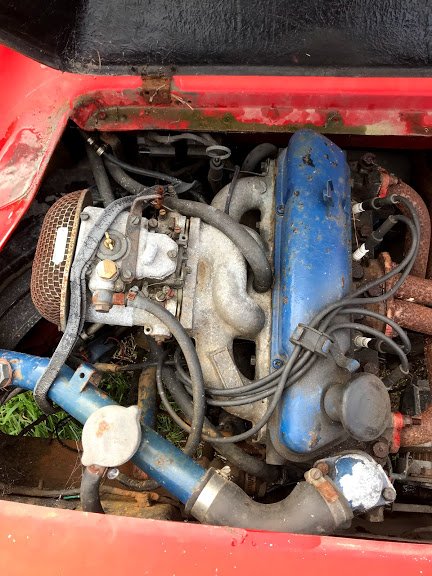
A little bit of detail on the engine, its a 711M block and L3 head which should make it a 1600 sport. But it has extractors and a 42 DCOE 8 Weber. I wonder if its standard internals and cam? I haven't tried turning it over yet. The coil was removed and inside the car, either its dead or was a way of immobilizing it. The fabricated radiator pipes are steel and rusty inside, no water in it due to dried and cracked bottom hose (I assume). It does have oil in it.
1 point
-
I changed the decals on the door after I got the Ute as I didn’t want to be driving anything with Seedys name on it haha. I do some low and slow bbqing and some catering events here and there as I am a chef by trade so I sprayed a lamb, a pig and a Weber BBQ on the door.1 point
-
Decided I didn't like the stainless trim around the windows enough to keep it, so swapped in the standard one I had. Suits the style better anyway. Then I could put the inner windscreen surrounds in, as well as the sun visors and rear view mirror, but I don't seem to have a photo of them. Took the seat to the upholsterers and got some Mexican blankets put on. Will only be temporary until I can afford to get it done properly in leather or something. Had the center dash panel straightened and polished up, as it was a bit warped. Then I polished up the glove box to match. Cut up some black vinyl strips and put them in the low spots, still need to do the glove box. Got the engine back from being rebuilt. Was mint inside and no other damage other than the piston and conrod. Chucked it back in and assembled everything back together. Started first pop and ran very well! So bolted together the whole front end and put the bonnet back on after a long time it's been off. Made a new intake pipe to get in going in the opposite direction than the standard one. Made a coolant overflow and power steering reservoir, they both seem to work pretty well so far. Attached some peep mirrors onto the doors. I think they look good, although rubbish to see anything through. Bought some tyres, ended up with BF Goodrich's, 205/65/15 front and 225/70/15 rear. Apparently 15x8's with 225/60 tyres don't fit on the front of this without massively rubbing on the fenders. Managed to return the tyres and swap them for some 205/65's and got the wheels split and narrowed to 7" wide. Had it through the cert check the past week and everything was good! Had a wheel alignment and that also went well. Just waiting on the cert plate now and then can take it for a WOF! Drives really nice and smooth, although the transmission seems to be slipping. We think it has something to do with the secondary throttle sensor that doesn't seem to be working, so need to have a look at that.1 point
-
Go go gadget homemade spring compressor! If you're also a Kiwi nutjob, you too can get high tensile fine threaded rod by bolting on down to Steelmasters. It takes all year to raise and lower the spring pan, but it works. =\ Next, remove the fulcrum shaft to get the lower wishbone off. It hits the steering rack (already lowered a bit in this photo): That's kind of understandable / forgiveable, but this (below) is a bit retarded: That pipe is in the way by just a few mm. Haynes would probably tell me to take the engine out to resolve it, but I just used violence. I finally had the lower wishbone out, and the bushes were better than they had initially looked. It was only the upper control arm bushes which had definite wear. Oh well. Replace anyway. When reassembling the suspension, you've got to try to align the spring pan with this wishbone (while it's under twisting force from the compressed spring) so you can bolt them back together. This is not a fun game, so you think "I'll go out and buy some long bolts to use as guide studs while compressing the spring." Unfortunately: Stupid imperial car. I did not realise the implications of this prior to purchase. While putting everything back together, I had a look at these red sway bar end link bushes which were fitted to the car when I bought it. I think they're the wrong part which has just been hacked to size. The flat cut surface facing upwards in this photo sits against the cupped washer, which looks like it's designed to accept a specially contoured bush and to hold it in place as the suspension moves. The result is that the bushes get pushed out of position. I shall order new ones and hope for a better fit. Meantime I reinstalled them and took the Jag camping up north, a 470km round trip (via SH16 because corners). Using the A/C and the loud pedal I averaged 12l/100km. I believe I could feel the improvement to the front end on occasion, but the feel of the rear still reminds me of old timey race car footage. I'm trying to practice different approaches to cornering than I used to use in my light FWD Alfa 33, because there's a good chance I am the problem. =) At the campground the Jag was parked right in view of our gazebo and I confess to admiring it all day. What silly thread pitches? What total loss cooling system? I even got a thumbs up from a farmer as I wooshed home in my conspicuous consumptionmobile.
1 point
-
Solo pesting today, went for a tour around whitford, beachlands, maraetai, clevedon, thru twilight road, some off roading at a new subdivision where I found a vespa kickstart lever will bring you to a sudden stop if it gets caught in gorse.
1 point
-
Buys italian project vehicle. Is surprised by random issues and electrical gremlins.1 point
-
This morning we met up with a older fella who had got in contact with me via Oldschool. He has a Sunbeam imp. Very tidy little car fitted with a later Talbot 930 engine . Took it for a spin. First time I have driven an Imp since Hannah had hers in 2002. I had forgotten how fun they are to drive and its was just the inspiration I needed to crack on with finishing my project...1 point
-
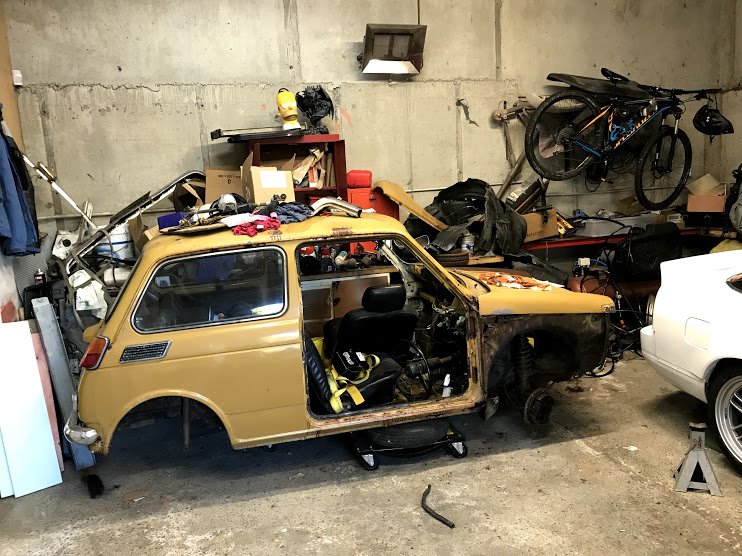
Wow! Its been a while since I've updated this thread. Work on this wee car pretty much ground to a halt after the last update. I got busy with other peoples cars for work and then took off to the UK for a holiday. 4 weeks of sunshine and loads of cycling. Nothing to do with cars at all. The one car that I spotted whilst there and liked was this absolute gem... Drool. Anyway. Got back to NZ and spent the next few weeks dealing to property jobs and more customer jobs. Finally last week I pulled the Imp out from its spot and finished off the panel work in the back. Now there's something we have to go back in time to jog memories. Normally in order to jump time I would just jump into my trusty police phone box as seen here in the Viva thread.... But I have had ongoing issues with that mode of transport. Things like oil leaks from aged seals and fading paint to name a few. So I sold it on at the end of summer to some fella called William who I met at the local market. Strange bloke. Not seen him since. With that machine gone I realised I had a desire to build another. Maybe a Delorian? Nup- prices had gone up beyond what I could afford at the time... so I based my new creation on one of Britains finest machines made. So now folks I shall introduce you to the Princlorian... With my new creation I was able to travel back in time to show you all a period in my Imp resto that I regret wasting time on. So in the beige wonder we shall travel through Hillman Imp time.... Whoops. That's too far. Hang on, try again... Oh dear. Must be the electrics. The fella at the motorist discount centre told me it was a 'new old stock' Lucas flux capacitor! Try again.... Ennnnggggrrrrrr!!!! I flicked the wrong rocker switch. Sorry. Hang on.. Righto this is annoying. But I think I've worked it out. Here we go... FINALLY!!!! Right. So way back when I first got the replacement shell I spent a long long time doing this... To this... I now wish I didn't. Instead I should have just chopped it out. Which is what I did in the end and had mentioned it in one of my last posts. Well with it all gone my next job was to rebuild it all. This is what I did last week. Imp back in its work spot with customers cars waiting... Working on building up ones shelf.... (terrible) To suit the fiberglass engine cover that came with the race car.. Fill in the blanks.. With that finished I rebuilt the rotten gutter above the bay.. Hannah has painted the lot in epoxy primer and I started on the front end which had been bent at some point when the shell was moved- probably a lifting strop or something I guess. I was originally thinking I'd have to cut it out and let in a straight front panel but actually after about an hour with lengths of wood, a jack, hammers of various sizes and many different shaped bits of steel Hannah and I managed to straighten it out fine. Very happy with result. Before... After... Now I need to remove the rot from the front of the bonnet. I carefully hammered out a small dent. Hannah laughed. It could have ended up like this scene... https://www.youtube.com/watch?v=1IL22sLF25s Then I can modify the front end to take the radiator. I must crack on because summer is coming quickly and there's so many other jobs we want to do here ! Planning on selling the housetruck this summer and building a new house trailer so that is one huge amount of time that I'll need to find. Please keep tempting me with racey little Imp photos and encouraging chit chat here... https://oldschool.co.nz/index.php?/topic/58205-discuss-here-about-yoeddynzs-little-imp-project/& Alex1 point
-
Here's what's inside a Jag electric mirror: I opened it because the mirror glass shook around too much to see anything while driving. On the left of the photo is the glass backing plate (complete with heating element because England), and on the right are the two motors. The 'fixed' central ball-and-socket pivot mount with the yellow arrow had in/out play for some reason. I put a washer down its socket hole to pack it out and take up the slack, and it's improved. Another even more important thing I needed to fix was the radio aerial. The original motorised one had failed (big surprise) and the previous owner had replaced it with a manual one. This made me die a little bit inside, especially as the aerial is out on the rear wing. One does not feel very wealthy pulling over and getting out of one's car to go and extend the aerial in view of passing commoners. I bought a new electric aerial (universal, not Lucas) and fitted it with much excitement. Antenna goes up, antenna goes down. Antenna goes up, antenna goes down. I feel like a yuppie. Antenna goes up.. ..and thankfully stops short of my very low garage door. Just need to find an adapter for the annoying coaxial connector on the Jaguar cable back to the head unit. Tomorrow the Jag is going away for a while to get those inboard rear brakes and their awful grinding noises sorted out. Expect some horror stories, but also expect some form of exhaust modifications to be done at the same time.
1 point
-
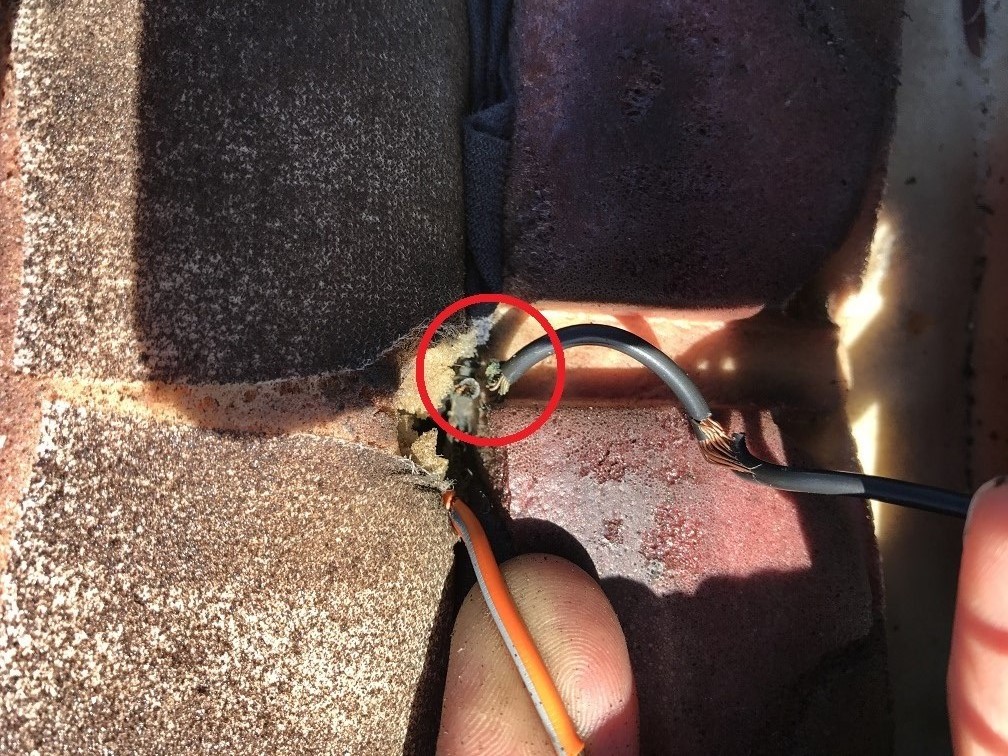
I've been trying to resist driving the Jag too much because of the condition of the rear brakes, thinking that my local Jaguar Barry was ordering me in some brake parts and would be contacting me any day once they'd arrived. Long story short, brakes not fixed and I need a new Barry. =( Meanwhile, the drivers seat had come loose and the seat heater wasn't working, so I took the seat out to have a look. What's it mounted with? Bolts that take a Torx T35. The seat heater wiring insulation was brittle and cracking and the wire had broken at an inconvenient point: I used a crimp joiner thing to fix it, and confirmed that the seat heater was working with a current clamp before putting the seat back in. Fortunately the reason for the seat being loose was just the rail coming unbolted from the frame (Jaguar appear not to have used washers), and I found a compatible replacement for the missing bolt. Now I use the seat heater at every opportunity, but considering the state of the wires and the amount of sag in the Jaguar seat bases, I don't imagine it will last long. Rather, one of these days it'll attempt to catch my arse on fire. Another thing I "fixed" is the squealing from one of the two cabin ventilation fans. I thought that the squeal plus a lack of air from the central vents meant that the motor wasn't spinning, so I took the fan out to test it. This wasn't actually too difficult - only some of the passenger side of the dash had to come out. The fan housing was getting a little rusty but the motor was OK and the brushes weren't too worn, so I lubricated it heaps and wrestled it back in place. I then realised that the central vents only lack hot air, but cold air works fine once I understand the controls. Still, the undignified motor squealing did spoil the ambience and I'm glad it's fixed (or at least stopped for a while). While trying to understand weird things about the dash, I checked the owners manual. I got a laugh out of this section, which aims to psychologically prepare you for life as an XJ-S owner:
1 point
-
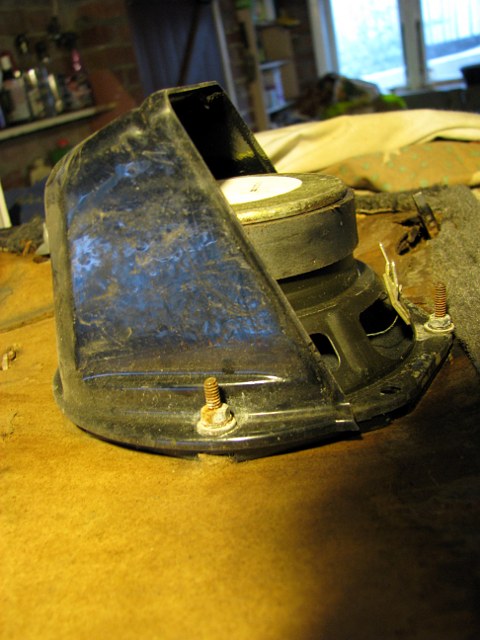
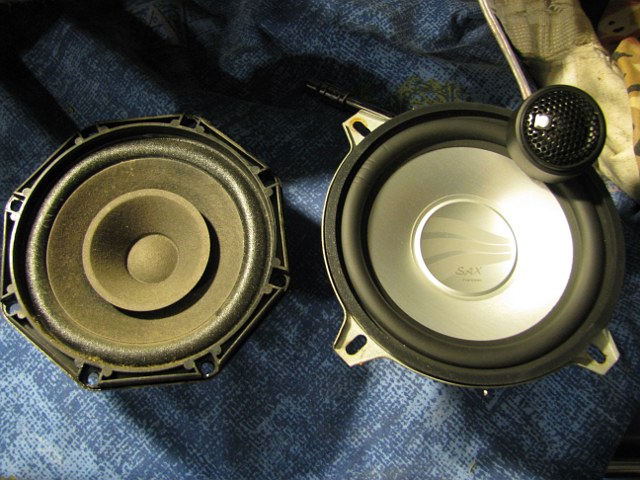
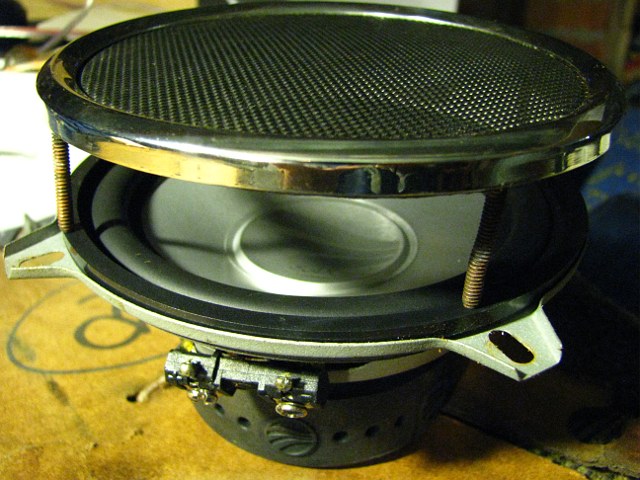
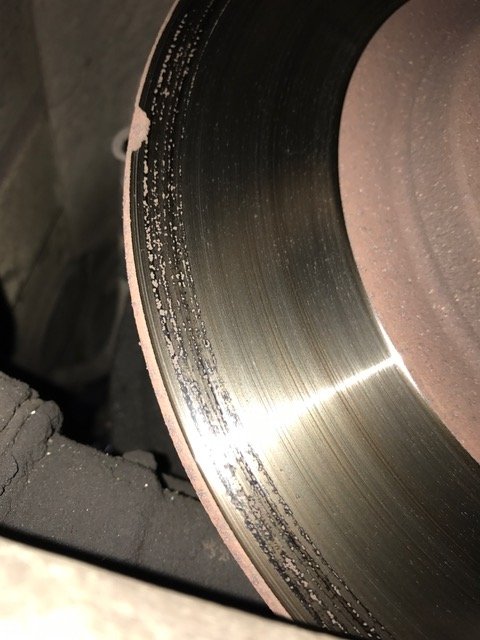
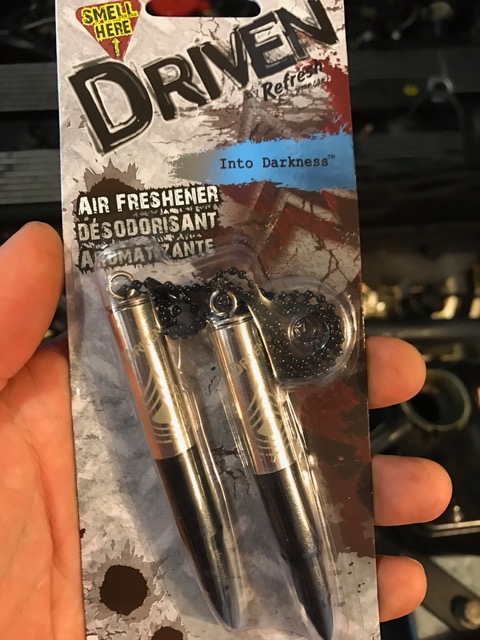
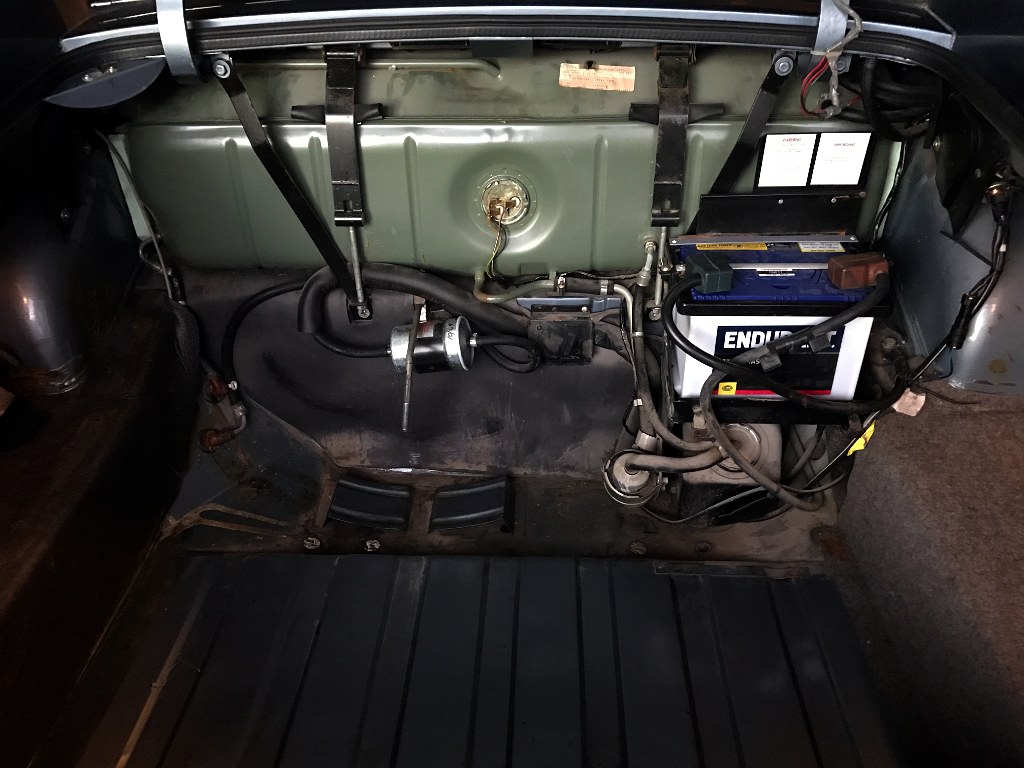
Next was to fix the soundz. I had my aging oonst oonst gear left over from my Rover stashed away and ready to go. I ripped out the Jag's existing head unit and got the door cards off. Check out the little rain hats on the factory speakers: Also notice how they're just mounted directly to the disintegrating door card. I'm not impressed. Here are the old and new speakers: They look about the same size but just like the Jag's imperial bolt sizes, the speaker hole spacing is just a little bit off. If you want to retain the original speaker grilles, you're in trouble because the new speakers have to sit on the bolts which are actually part of the grilles: I ended up slotting the mounting holes in the speakers even further and bending the mounting bolts. Then I had to cut the bolts down short cos they fouled the door metal once I'd splayed them outward. Because I was using component tweeters, I had to run extra wires between the door and the interior. I can report that the Jag is more thoroughly built than other cars I've owned, but no better designed. It was not easy to run these wires. Aaand when it was all back together, I discovered one of my tweeters was blown. Couldn't get identical replacements because obscure brand. Bought some Soundstream ones which are way too loud. I think there is a jumper on the crossover boxes to set the level of the tweeters, so I need to pull the door cards off again to check whether I can tone down the killer treble. Right now I can't be bothered. It's better than it was. Also, there's no room for my amplifier and subwoofer. The Jag's seats are so close to the floor that I don't even think a modern slim active sub would fit under there, so I'm living without a sub. =( While I was hunting around the car for spare space (there isn't any - every little cavity has mysterious relays just chilling in there already), I removed the false floor in the passenger footwell. A chill ran down my spine as I gazed upon the heart of Darkness: I quickly put the covers back, nailed them down and drove a stake into the floor. Next thing: Wheel balancing. Done. This car has actual Linglong brand tyres all round. =| Next: Grinding brake noises. I took it to a shop and they put it on their hoist..... This is one of the inboard rear brake discs. Both discs are similarly unhappy. I was directed to a Jaguar Barry, who says that if you buy cheap handbrake pads, the friction material detaches from the backing plates or the whole lot falls out of the calipers and that's probably why the discs are wrecked around the outer edges. My car is going to be booked in for new discs etc. Apparently the way to work on the rear brakes is by removing the rear seat and getting at them through an access panel in the floor! Next thing: The illumination of the '70s-tastic instrument cluster is so poor I can't really drive the car at night, and the minor gauges are all reading too low. "Experience In A Book - Help For The Jaguar XJ-S Owner" (henceforth referred to as The Barry Bible) told me this instrument cluster is some of the Prince of Darkness's finest work and I'll love it. Barry was right - look at how the electrical connections to the minor gauges are done: You get one-and-a-bit threads of screw gnawing into a copper PCB track and that's your connection. The head of this screw sits against the flexible plastic circuitry on the rear of the instrument cluster, so the screw is the current path. Also, the entire instrument cluster earths through just one pin of one plug, which is predictably prone to being rubbish. There are many reports of XJ-S gauges under-reading by a quarter just like mine were. I even found that someone in the past had removed the bulb from my alternator warning light...... Thankfully the illumination of the instruments is via conventional bulbs and not the weird fiber optic centralised system someone mentioned in the discussion thread. The main bulb for the speedo had just about gone black, so I replaced it with a higher wattage one to offset 30 years of voltage loss. Following the Barry Bible instructions, I put some solder on the minor gauge PCB pads where those screw tips bite, I cleaned every connection and I made up an additional earth for the cluster. Now I can actually make out the speedo at night (just), I've gained oil pressure and voltage and a little bit of engine temperature. The alternator light now works properly too. The Prince of Darkness' crappy electrics driving me to distraction and making me want to put a bullet in something meant that I simply HAD to buy this air freshener - "Driven Into Darkness": Fortunately it doesn't smell like Lucas smoke. I was hoping that cleaning all these instrument connections would make the engine temperature gauge read in the Normal range, but it still doesn't quite get there. A new temperature sender is a hundred bucks and fitting a new thermostat would require me to spill my new coolant everywhere. Grrr. Also, the boot smells like petrol so I pulled the spare tyre and all of the trim out. You can see the ninety-one litre fuel tank (which has already been replaced once), the fuel pump and the battery. The Barry Bible says the battery is supposed to have a special attachment to vent its gases outside of the car to stop them rusting everything. Also, Barry says condensation on the tank or rust around the rear window causes water to sit in the foam pad they cleverly mounted the tank on, rusting out the tank. The tank also leaks from stress on its overengineered and uncommon pipework fittings and basically any other excuse. This enables the XJ-S to guzzle petrol even when the engine's not running! The fix is to rip out the British and replace it with custom. Maybe some other time.
1 point


.jpg.4724025bf2b3bf42a2b76bb2baf7ca42.jpg)
This leaderboard is set to Auckland/GMT+12:00