
Leaderboard


Popular Content
Showing content with the highest reputation on 10/11/17 in all areas
-
nail biting time. sorted.12 points
-
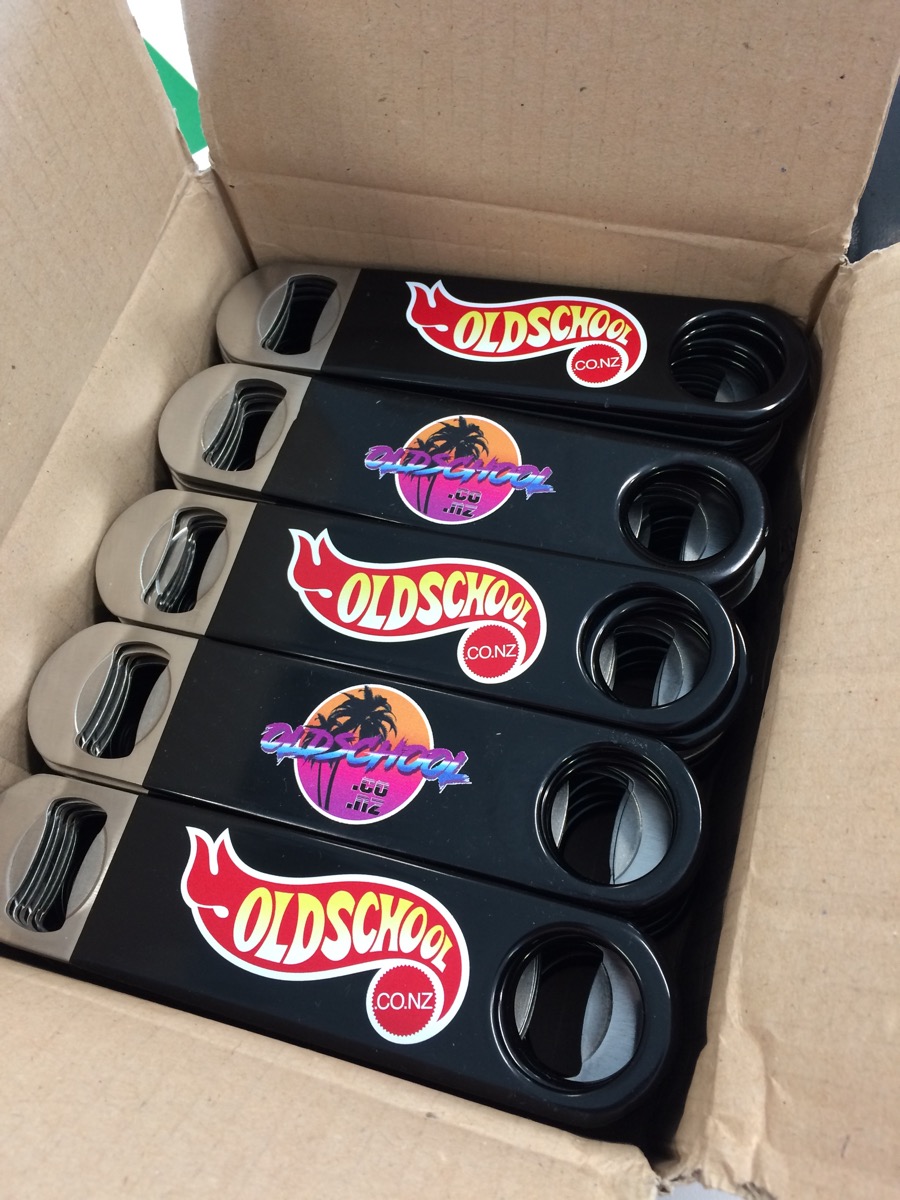
cough cough shameless plug cough cough If anyone wants to purchase one of these fine pieces of kit, ill have some on hand. $12
 8 points
 -
So a bit more digging today, i pulled out the interior, seats and carpets are fine to reuse, floors and sills and pillars are excellent. but there was a suspicious amount of no more gaps with a coat of bitumen spray over it on the rear cab/floor join, inside and the tray side. After lots of thinners soaked rags to get rid of the black tarry shit, and about an hour of wire brushing, and emptying the vacuum twice. That no more gaps sure is is sticky stuff! This is the passenger side from inside the cab and is the worst, drivers only has a couple of spots This is the drivers side from the tray side, and is the worst, but passenger side has a couple of hole too. Might be easiest to cut and shut ~100mm wide sections from a sedan floor as they never rust there. My red 125 body is in now in Hamilton and ive been meaning to grab some bits back off it so i guess thats moved up the list. This are will probalby be the last to do as a result. The cab wall itself is fine. More rust chasing I think i found the 'custombuilt' part of this truck. The vertical shock mounts have actually been removed and the angled setup installed. I didnt have a very good look underneath but it looks factory, so i wonder if its got 1500 bits under there. There are a few holes to fill in both inner arches due to the torn spot welds rusting. There are also matching holes in front of each arch where ive never seen a sedan rust. As well as adding rusty holes to the list, I crossed some off. The tail gate was rusted though in one corner, but now it isnt! I was in the zone and forget to take pics till i put the first coat of primer on, but you get the idea. Will need a skim of putty (especially to fill my wonky edge line!) but im pretty happy with that for the first patch.7 points
-
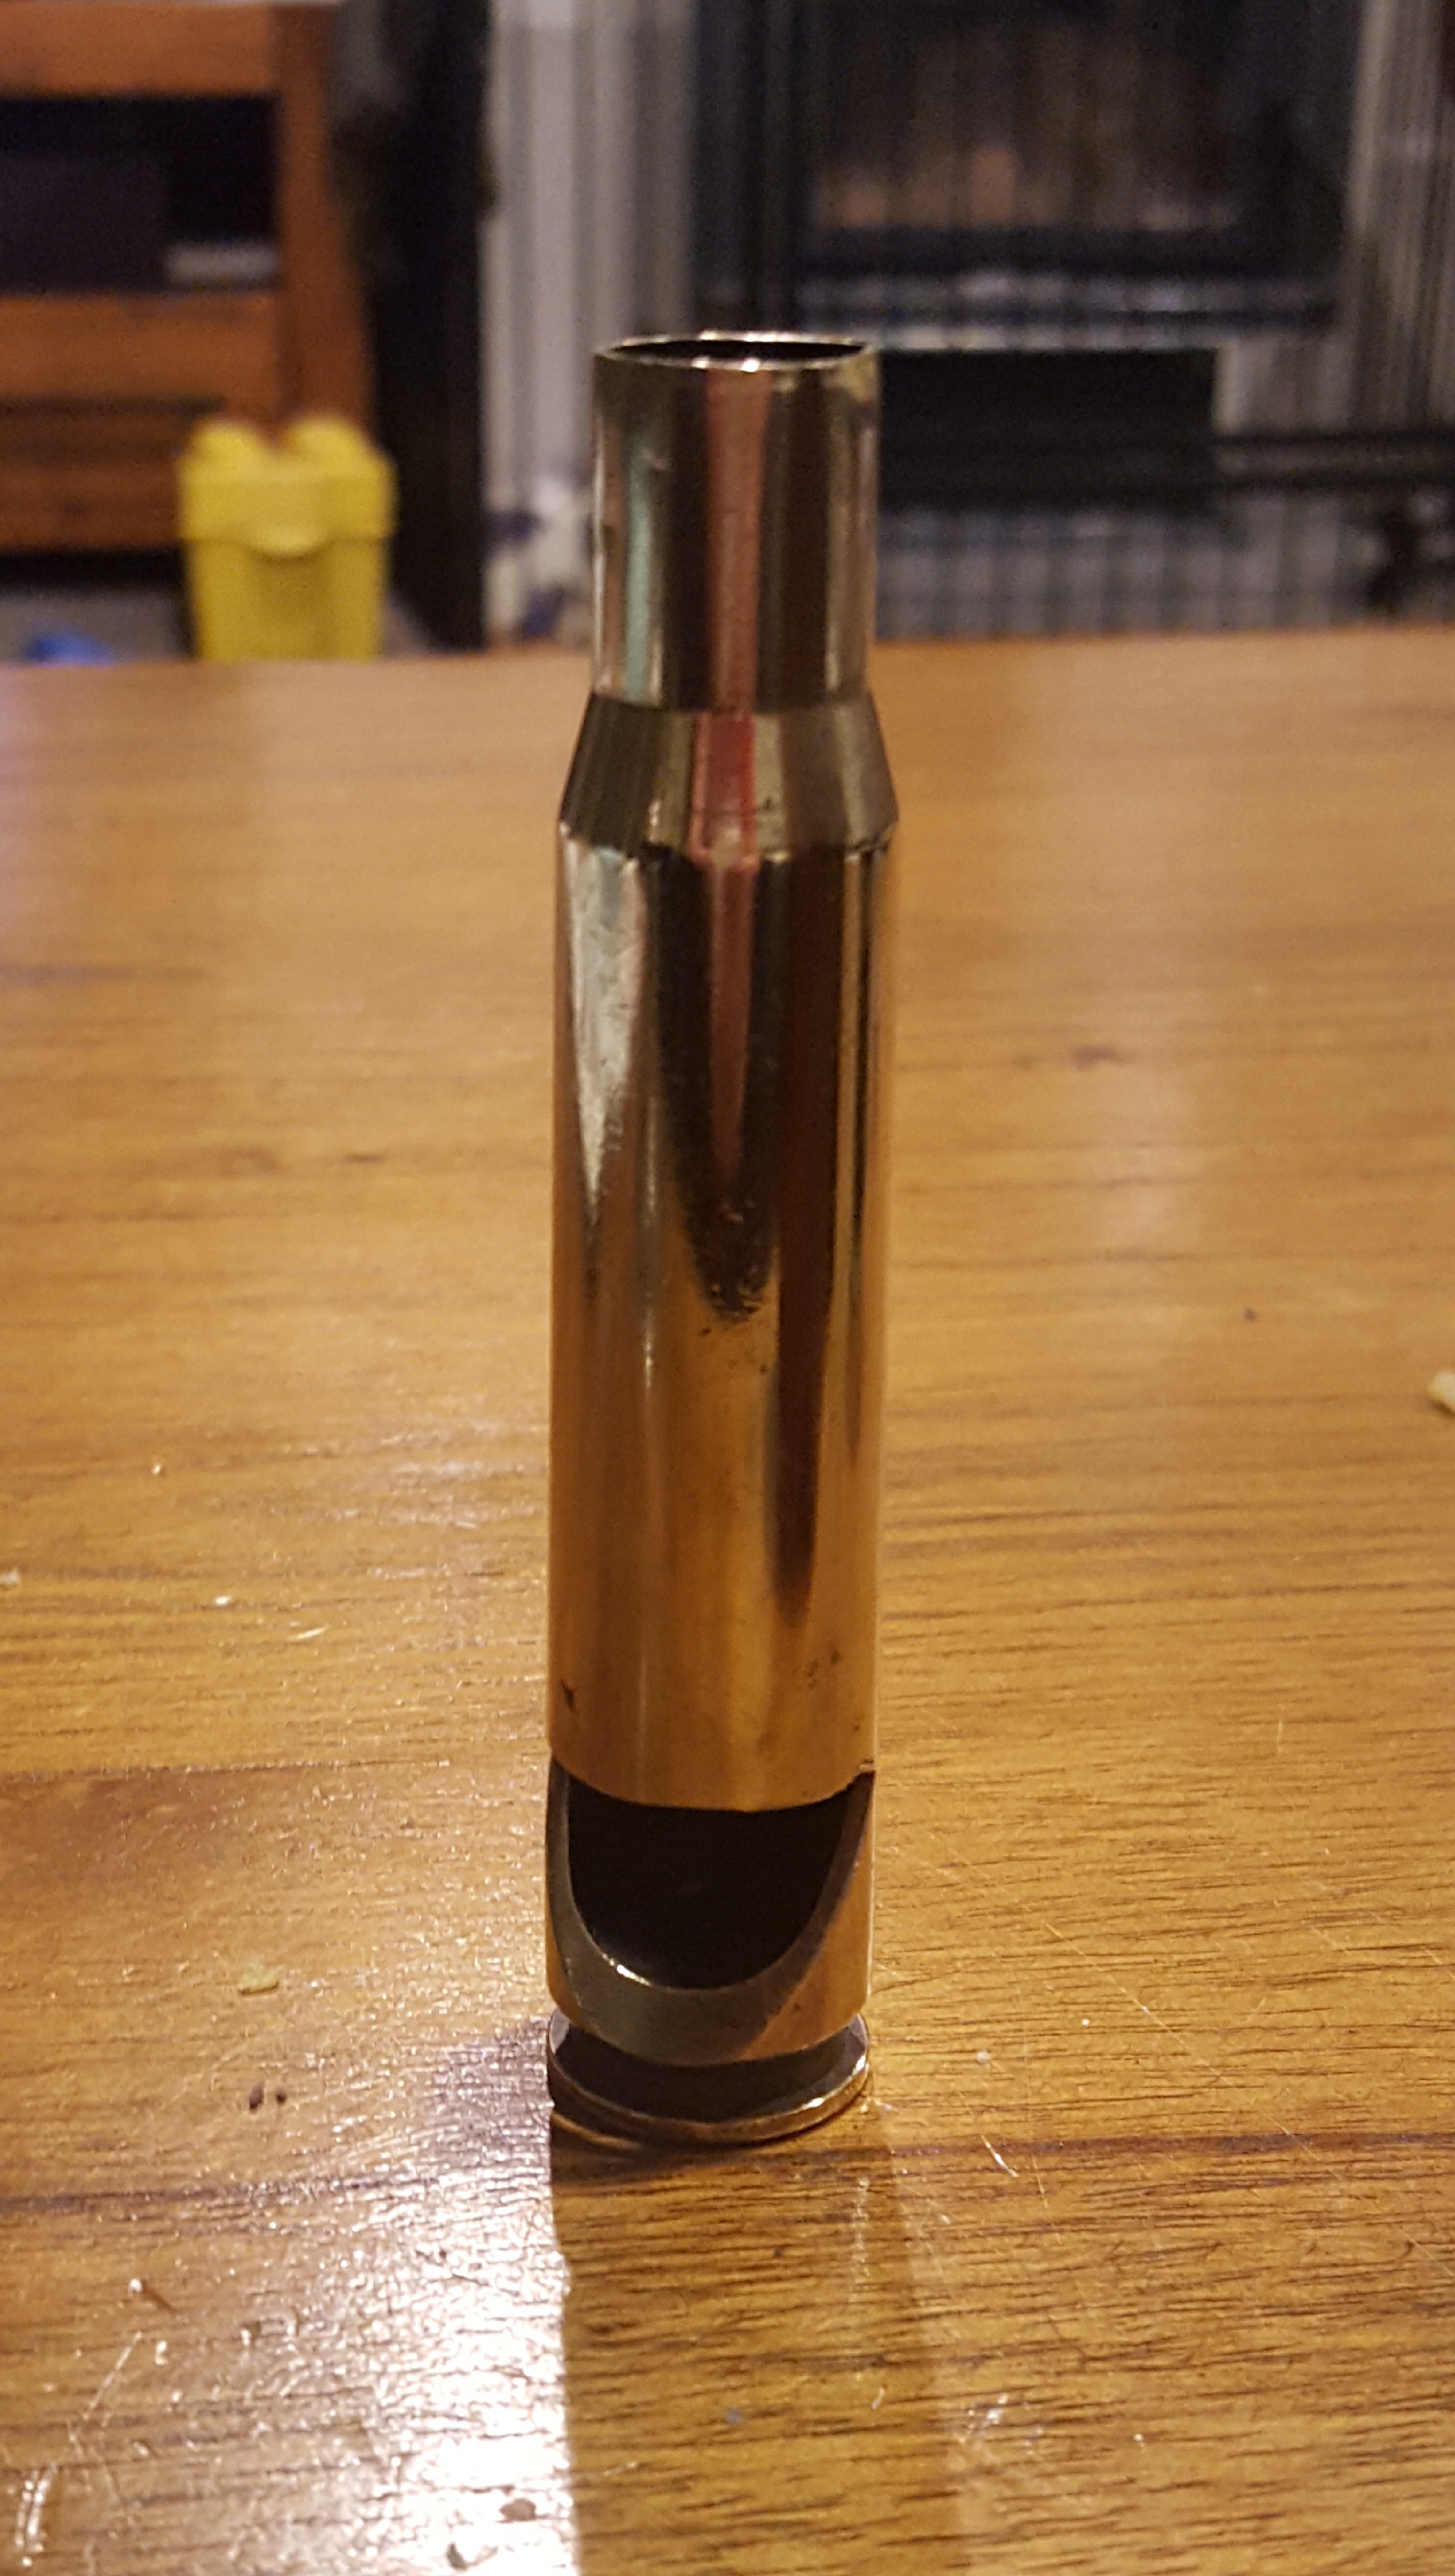
.50 cal bottle opener. Spent shell is from the long ago decommissioned and scrapped HMNZS Taranaki.
7 points
-
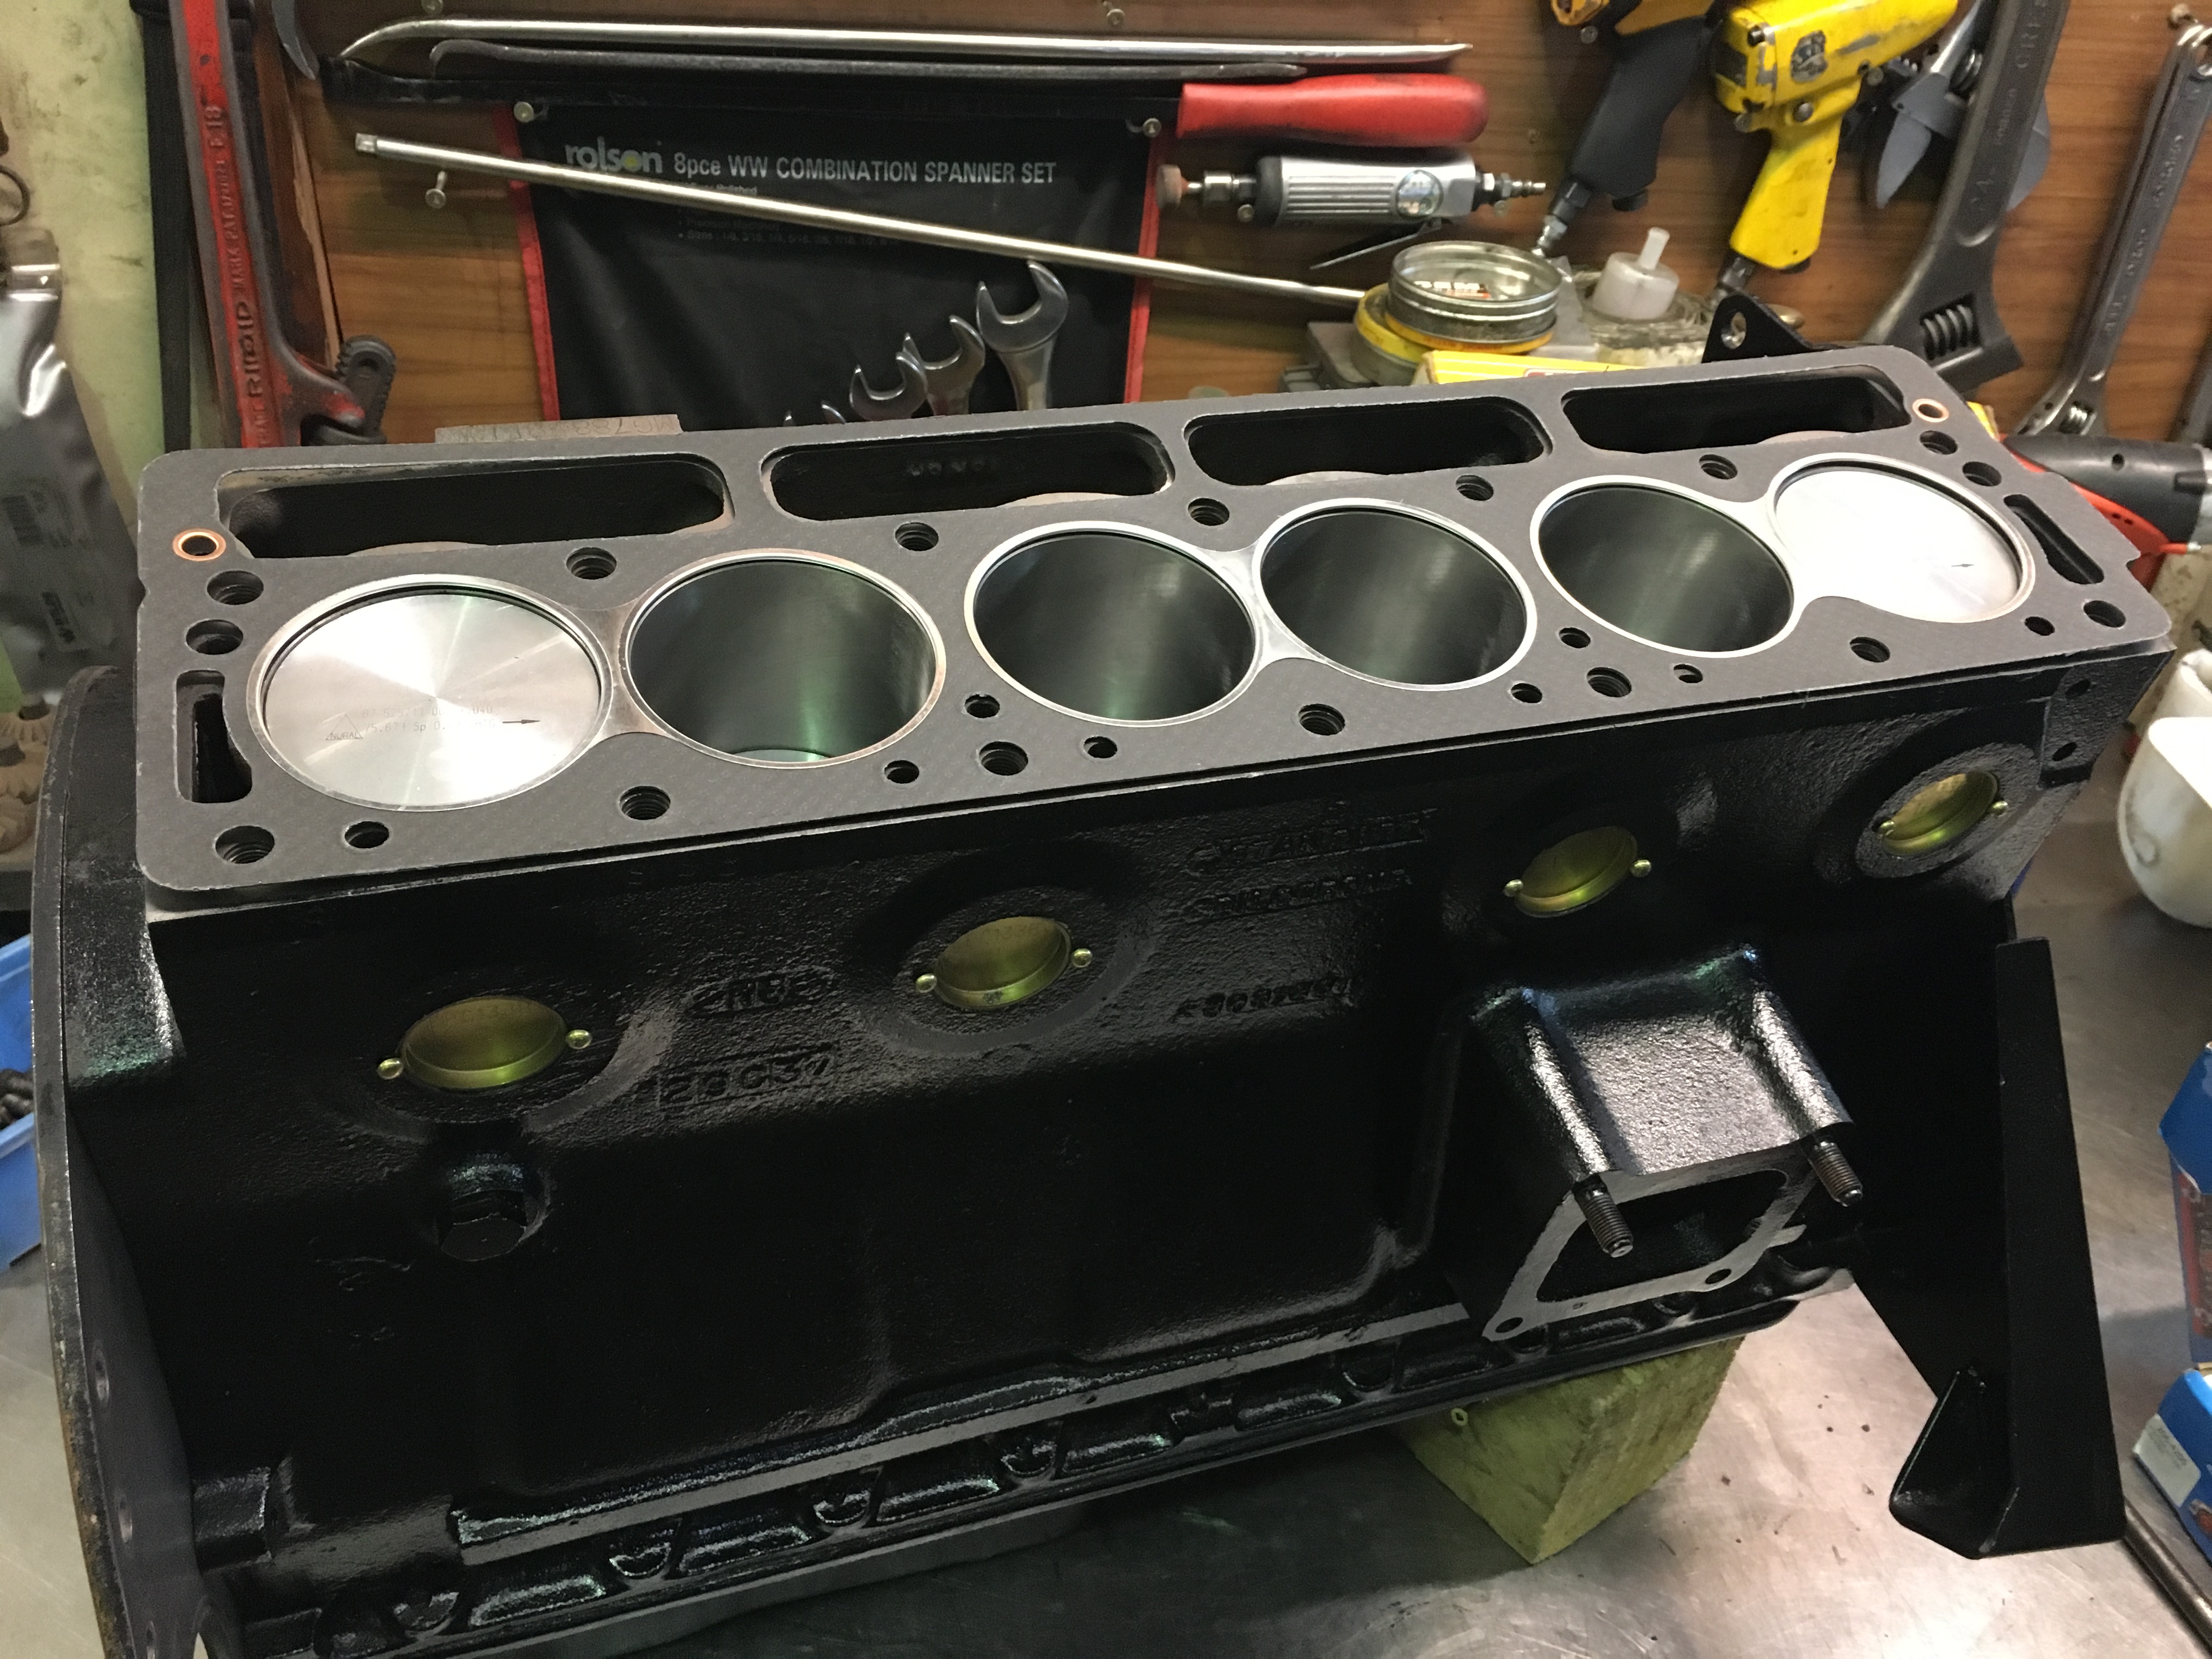
Good things are supposed to take time right? Seems like months have passed (and it fucking is) since I got this started but a milestone was reached recently. Bottom half is all done and dusted. Bored to 2.6L, fancy pistons, Newman 280/300 cam, new oil pump, line bored, new bearings, balanced everything, blah blah etc... Have had to find another head as the one I had turned out to be cracked but the new one has gone away to have the big nitrided valves fitted. Some new guides go in also, along with a little exhaust port work and a skim to get the compression ratio up to 10:1 Hopefully have it in the garage in the next couple of weeks to make a start on the EFI conversion.
7 points
-
they have started stopping. 2017-10-10_06-02-39 by sheepers, on Flickr 2017-10-10_06-02-12 by sheepers, on Flickr and i forgot to take pix but they've finished the deck as well. 2017-10-10_06-01-40 by sheepers, on Flickr 2017-10-10_06-01-20 by sheepers, on Flickr6 points
-
Oh yeah, forgot to mention how this went. I got a couple of 8mm spacers made up by @grunta of Grintec Industries Top service there. I bought some S12W Toyota calipers, all bolted up sweet, just had to widen the disc slot on the calipers from 23.3 to about 26mm and shave the ribs on the side of the caliper a little as they were just touching the rim. Also replaced the master to match the larger area of the S12W pistons, went with a 15/16 size one from a 280ZX and added a 10lb residual pressure valve to keep the rear drums working. Brakes feel good so far but vented with 4 pots would feel better than solid with 2 pots5 points
-
Man, it's looking great! I'll chortle if your neighbours ever get jealous, smash their house down and do the same thing - leaving only a hidden brick wall and some concrete from the original structure.5 points
-
Front end is all tacked up and sitting on its wheels!Happy times.Been some time since it has been rolling and its a good feeling seeing it all together upfront again.Air out its sitting pretty much where we wanted it. If you enlarge the above pic you will see the trans cross member is bleeping low. have a couple of inch clearance at this point air out. Ride height is about 2.5 inch higher so say 100mm or 110mm or so.Engine is offset 20mm to get clearance for the PS pump. Not really noticeable even when you are told.If you have been twisted enough to follow along with the progress of the build then you know the rear ends shockwave airbags mounts are adjustable. At the moment is in the middle setting. May bring it up to the highest setting. I do love that rake but the extra inch at the back will help level the carbs a bit along with all the other obvious benefits. Time will tell.Cross support and trans mount are all made up. Folded top hat with a flat bottom similar to the original Hudson braces. Bolt in for ease of access if in the future we ever need to do work under there. Front brace helps for body flex etc.Pic above gives a better idea of how low the braces are. Just lower than the trans pan to help protect it a bit with luck. You can also see eight (4 per side) front access holes to the bolts that let you remove the whole front clip. The whole idea with all this is ease of maintenance for future work.Next is taking out the engine. Welding up everything. Brace up some bits with some gazeting. Notching the front rails for bit more clearance on the steering arms. Drilling the panels holes and ya ... golden. Oh and trim those long ass rails and add the rads front brace. Sigh list goes on.And talking about panels... Flockie held them in place as i took a gander. Instant grin when I steeped back to have a look.We did this not only just to see how it would look but to check the tire clearance as there was a bit of concern the inner guard my hit the tire air out. Nope it was fine with heaps of room. You can see how much longer the chassis rails are as well. Easier to make em shorter than longer was the idea.And talking of Flockie who is doing the welding, math and all the hard stuff at the moment for me.... BAMLooking pretty happy with him self and rightly so. He has done some great work.Go like him on Facebook: https://www.facebook.com/flockieschassis/Oh and for a laugh check out my Buick gravel track fun vid on youtube here.3 points
-
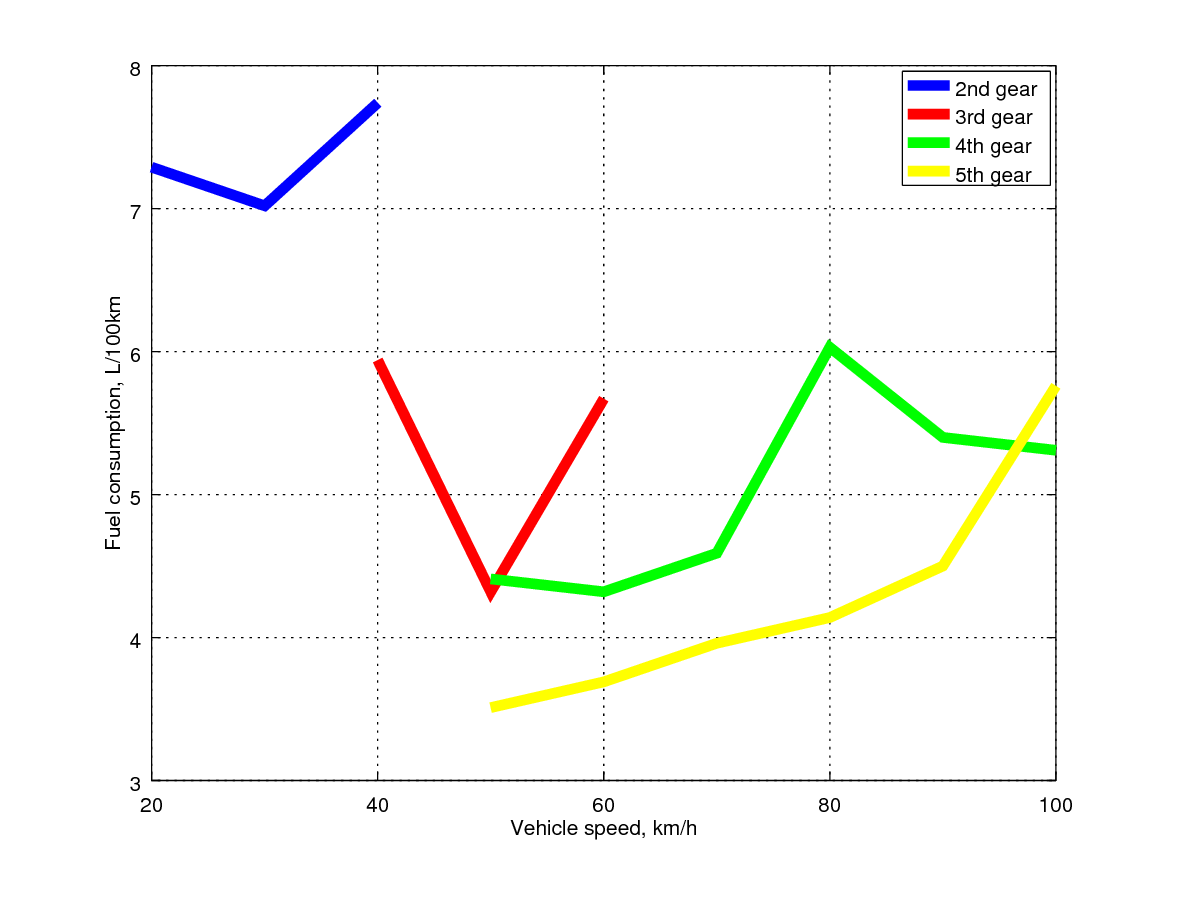
I did some fuel consumption calculations today. The MicroSquirt/TunerStudioMS seems to over estimate fuel consumption by about 10% - My belief is that this is due to my injector dead times being larger than estimated in the software. Then again, this could also be due to my data being collected from an ill-conditioned system as I only based these results off of about 35 km of driving. For the fuel consumption tests, I had the headlights on and held the car at a steady(ish) speed on a flat road to take the readings. For the fuel figures obtained for anything other than 5th gear, there was a fair bit of noise in the consumption signal as I had difficulty writing down the numbers while driving (a passenger would be useful next time). Also the samples were taken over a very short time period, with slight undulations in the road etc. For the 35 km trip, the computer estimated a fuel consumption of 2.26 L. The actual fuel consumption was 2.04 L. This gives a fuel consumption of about 5.9 L/100 km, which is very good considering I wasn't being nice to the car during this time. It's actually on par with the best result I ever had with the carburetor driving like a granny. Fuel consumption at 80 km/h in 5th gear is about 4.2 L/100 km. I think the 4th gear value is unreasonably high and I will have to take the reading again at some point. The same goes for the 100 km/h 4th gear result as earlier indications today suggested it was about 10% worse than in 5th gear. The values in the graph have been corrected by 10% to allow for computer error. Judging by these numbers, if I drive 70 km/h constantly (at sea level, without wind, in the dry) I should be able to make it to Auckland on a single tank of fuel. Conclusion: Car is great on fuel now, more testing is needed.
3 points
-
Because I'm such a spotting nerd, here's a pic I took of yours last year: And that yellow CCH one, with a 125 front end, which I took a few years ago (and totally got busted doing so by the driver): Gotta say, I much prefer the original front, as it reminds me of the way they looked when littering the streets back in my childhood in the UK. Does anyone know if a Polonez exists in NZ? I'll fish out the FSO advert in an NZ magazine I've got somewhere...3 points
-
Aww jeah eastern bloc. Need a sweet tracksuit to match the car.3 points
-
Sweet as g Interesting rear suspension design, I assume it has upper link bars as well? Does it have a panhard bar or triangulated upper links, or does it rely on the leaf spring to stop sidewerds differential actions? Fwiw valiant utes have the same sort of floor ranginess, they are all the same as sedans under the tray floor. HA HA NOW SOME OF YOUR BRAIN SPACE IS CLOGGED UP WITH THINGS ABOUT VALIANTS.3 points
-
If it's written in black and white, and someone has modified a car as per the rules, then I think if would be unreasonable and probably not legal, to require something different to what the rule says. I personally would agree with the logic behind his reasoning, but that's not what the rule says...3 points
-
Fuck yeah man Well done!2 points
-
So I went to see Greg first thing yesterday. He didn't have the right kit, but made up the seals I needed from stock he had on the shelf. Rebuilt the Master cylinder. Refitted to car. Started bleeding the rear system. Discovered one of the big fittings was leaking. GAAAH! And I could not get the spanner on it because the reservoirs and the hardline are in the way. I had to remove the brake pipe from the fitting and use a socket to tighten it. Then bleed the rear system again. No problems bleeding the front system. Test drive, doesn't pull to the right anymore. Brakes seem fine to me.... Today. Rain Rain Rain Rain Rain Rain Rain. Welding the Triumph some. 14:00, fuckit I'll just just take it for a recheck in the rain. Even though the muddy mud lake that thinks it is my driveway is extra huge. Fail AGAIN! "Back brakes doing almost nothing" Sigh. Back home. Jacked up rear of car. Removed wheels. Pulled off drums. Managed to remove a wheel cylinder without removing BASTARD springs. Winning. Wheel cylinder corroded solid. Doh. Remembered I had the PBR part number written down in the Starlet's little red book of parts origin. 16:00 call Supercheap. "I have a PBR part number for a wheel cylinder..." "what's the rego?". sigh. But he did remind me we have a local BNT. 16:05 Call BNT. "I have a PBR part number" "We have two of those on the shelf". Zoom zoom to BNT and get my wheel cylinders. 17:30 New cylinders fitted. Drums on. Bled. Wheels back on. Car down. STOP! Guess what I'm doing tomorrow.... Fuck I hope hope he still doesn't decide my brake booster isn't boosty enough.2 points
-
This might be the motivation i need to get a wof. If i get one I'll be in attendance2 points
-
Out for a wee hoon last Friday. Here's one of the better laps Still need to to increase the oil cooler size and add fuel surge tank. Youll hear I'm struggling to get power down with the hilux diff so got a Modifed centre from Rae emmerson that will go in on Friday with a new cw&p ratio to try get into 6th.
2 points
-
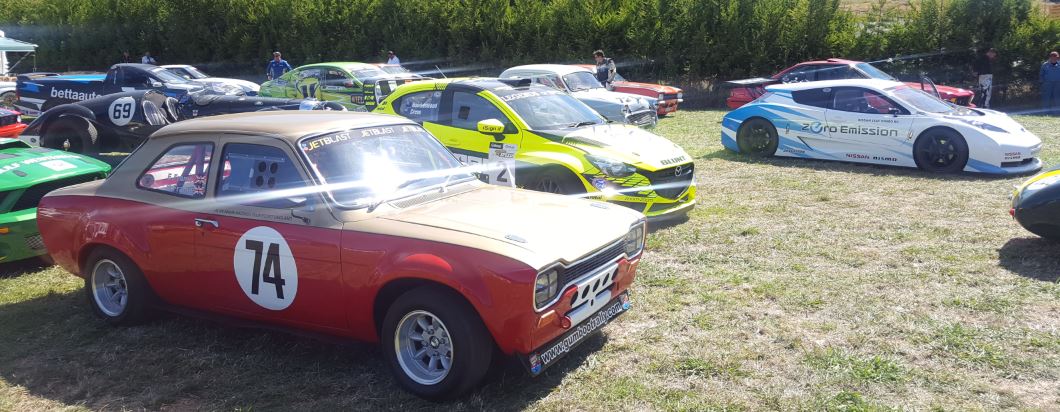
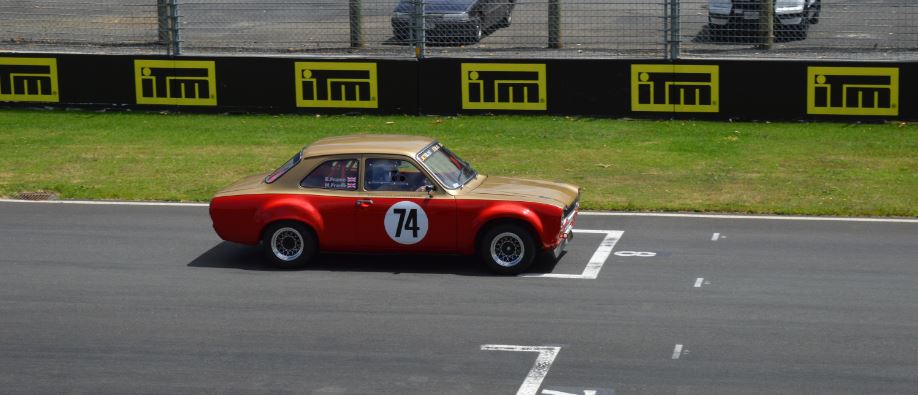
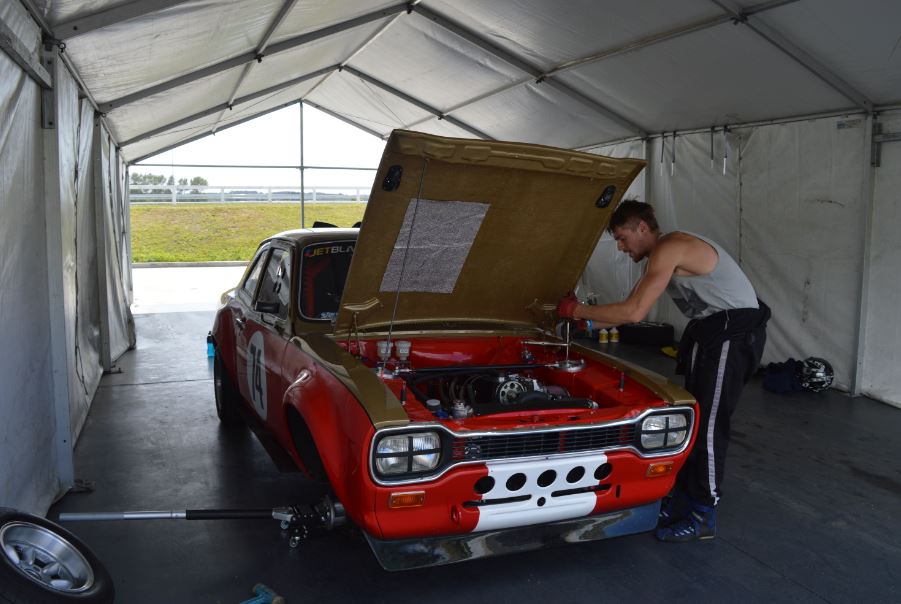
Found the money tree again so I got the escort back to Burke's metal works for the fix up. Home looking sharp once again. all back together ready ready for testing again at ruapuna.
2 points
-
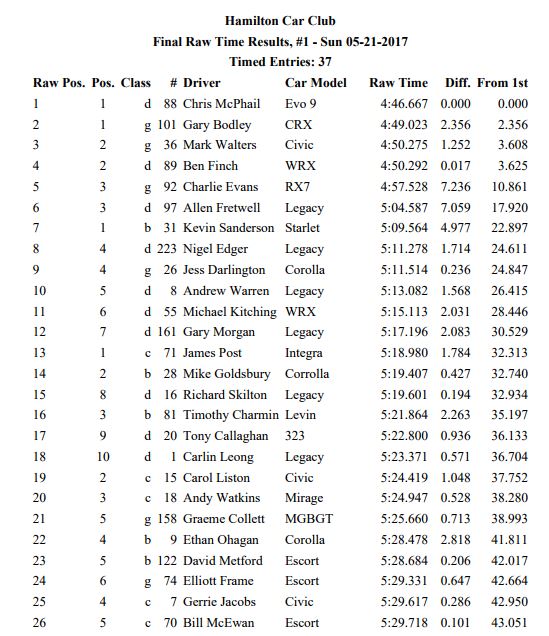
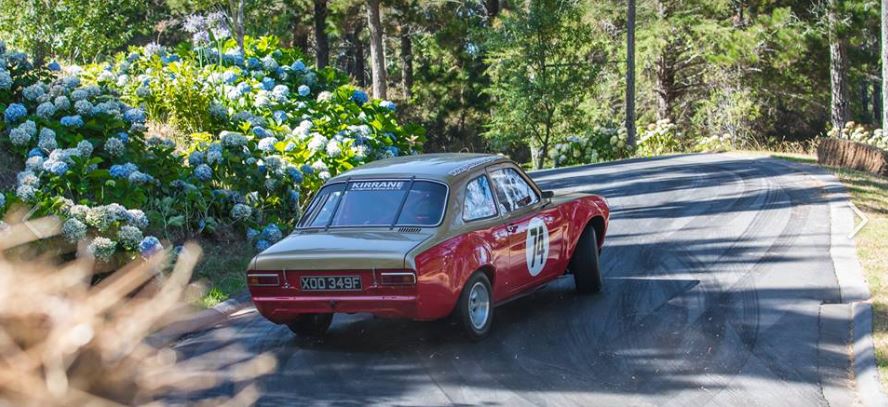
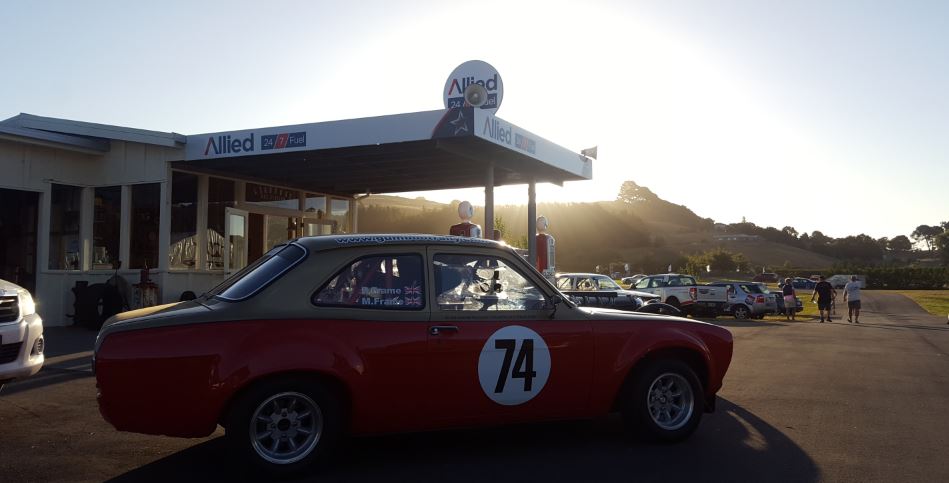
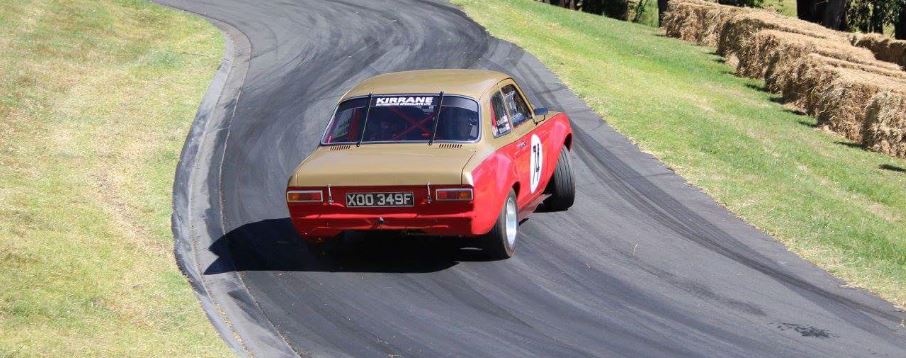
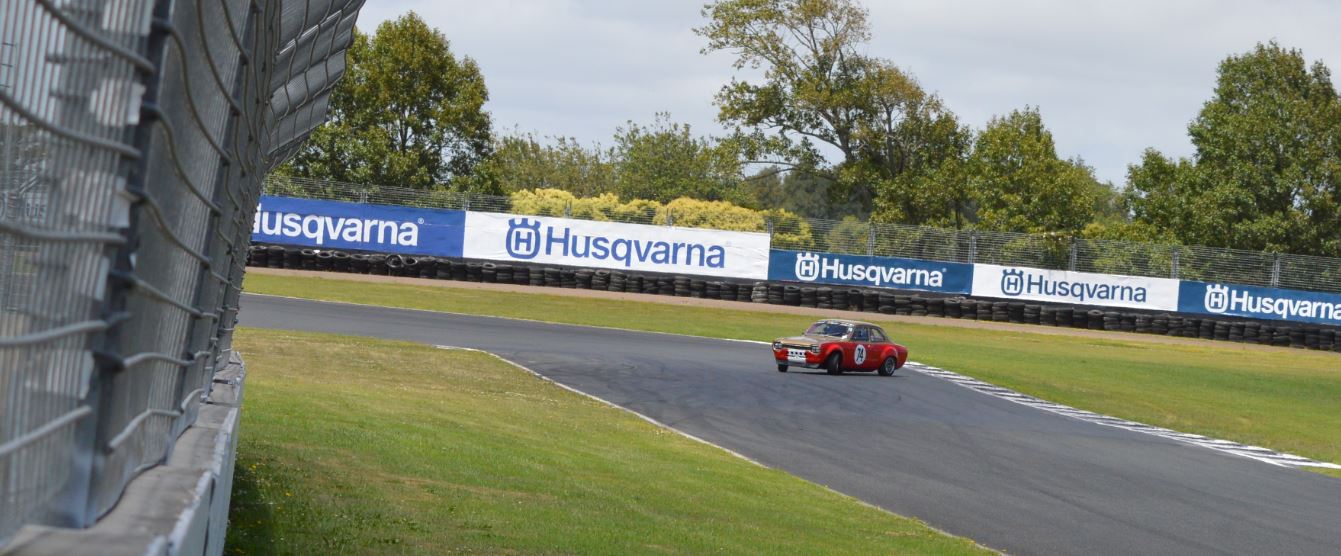
en route to Ngutunui Ready for Hamilton Car Clubs Famous 8.7km Ngutunui Hillclimb The Escort takeover Incar Footage Got to finish in style 50 Cars started - 37 Finished and we finished Mid field , great day , great people , great event , thanks again Hamilton Car Club
2 points
-
Registering interest. Gah, I thought I had until November the 24th to find a bike for Eastcapescapade, and now this event pops up!2 points
-
Come to hawkes boes too.2 points
-
Just so I got it straight in my head... Palmy crew meeting @ 101 North St, 1pm Wellington crew meeting @ Mana weighstation, 2pm? Respective cruises meeting @ Otaki Surf Lifesaving Club, 3.30pm Bring old car, F&C's and a drink or two. We hang out take pictures and then head back to Welly/Palmy early evening. Is that a reasonable summary? Chur2 points
-
Sitting a bit lower now, bled up the new brakes and went for a drive Just need to remake the rear of the exhaust, get some new shocks and fix a little bit of rubbing I'll get around to the paint at some point haha2 points
-
The guys at VTNZ were happy with the EFI system when I took it for a WoF this morning. The guy took a look at the engine, then the chassis tag, then the engine number and then scratched his head. He walked over to me and I was sure he was going to be grumpy but he just said "well done, it looks good. Good to see someone finally doing a tidy job of the wiring on a car." WoF obtained, now legal for another 6 months. I guess it's about time I put up a bit of a technical post with regards to the EFI conversion. The EFI system uses an original 4KE inlet manifold, injectors, regulator, runners, plenum, valve cover and throttle body. Most other bits were scrounged together from the internet: - TPS is from LS1 - IAT sensor is from LS1 - CLT sensor is from LS1 - MAP sensor is from a Mira - Fuel pump is Aeroflow "500 hp?" (smallest one I could find) - Air filter housing is from an EP9X Starlet - O2 sensor is Innovate LC-2 - Intake piping is 45 mm silicone hose, with a 63-45 reducer where it connects to the filter housing The ignition coil needed to be moved towards the brake booster in order to clear the EFI valve cover, looking at old brochures/documentation this appears to be the case with factory EFI Starlets also. In order to make the OEM injectors play happily with the MicroSquirt ECU I need to add some inline resistors as the injectors are low impedance (2.6 Ohm or there abouts). I ended up using 1x 10 Ohm 25 watt panel mount resistor per injector and these worked fine. I also have a stack of 8 Ohm and 4.7 Ohm resistors sitting around that I thought I would have to used if the 10 Ohm ones were too high resistance. The resistors are bolted to the panel that the ECU is mounted to. In order to make the ECU work reliably with a fuel only setup I need to replace the R20 resistor on the board with a higher power unit, so I used a 1000 Ohm, 0.5 watt resistor and this has been fine. A bead of silicone gasket goop was run around the inside of the ECU housing and the ECU was bolted to a plate which mounts directly to the existing bolts holding the radiator overflow bottle to the inner guard - the ECU is on the back side of the inner guard, above the plastic liner and seems to be in a fairly dry area that doesn't seem to have any moisture/dust issues so far. The loom runs through the existing hole in the inner guard that the indicator light wires went through. The loom is tied to existing mounting points along the chassis rail to keep it away from the exhaust manifold ( :/... long story there). The exhaust manifold for the carburetor setup has a huge hole in it for heating the bottom of the original intake manifold. This hole is now covered by a 6 mm thick aluminium plate which has been shaped to allow the intake manifold and runners to clear (well actually sit on). There were sections of the intake manifold which needed to be ground down in order to fit the manifold with the plate on the exhaust manifold but there is still enough thickness remaining that cracking shouldn't be an issue. The O2 sensor is placed in the exhaust system at the final collector, at an angle of about 35 degrees from the horizontal and has quick response. For the fuel line setup, I just put a brass T into the line at the tank, with one branch going to the old feed line (4.5 mm now return), one branch going to the fuel pump (8 mm) and the remaining branch going to the tank (5.5 mm hole). The high pressure fuel line from the pump is just a soft line, following the existing fuel line and using the existing brackets where possible (from OEM there is space for extra lines). I run the power feed lines to the pump alongside the fuel lines. The fuel pump is mounted to the chassis using an Integra fuel pump bracket and a piece of angle iron. The Integra bracket has a rubber isolation mount where the pump goes into it so there isn't too much vibration - the pump is still quite loud though so I might cover it with some silicone hose to try and damp the sounds. The pump bracket mounts between the tow bar and chassis using the original fuel tank strap. There is currently no baffling in the tank, I may look into it in the future - but I haven't had any issues yet in the 1,000+ km I have driven it. The fuel filter is a Ryco Z200 unit and fits perfectly into the original fuel filter mount in the engine bay and has barbed fittings on each end so it was simple to install. The fuel pump is running through a 20 Amp fuse, all of the injectors are running through a single 5 Amp fuse, the O2 sensor is running through a 5 Amp fuse, the ECU is also running through a 5 Amp fuse. The factory idle speed control valve seems to be a bit out of specification and doesn't open up far enough when cold - which required using foot throttle to keep it idling for the first 10 seconds or so. I bypassed the idle valve by using a heater control valve connected to the choke cable - giving easy manual control of the idle / cruise control. One day I will look into either modifying the factory valve to get more flow when cold or I will install an electrically controlled unit ($$). But for now I am happy using the choke cable when cold. I needed to make up some support braces for the intake plenum and air filter housing. The brace for the air filter housing connects to the alternator bracket, the exhaust manifold and two points on the filter housing. The two braces for the intake plenum are just simple flat bar which has been bent to shape and connect the plenum to the engine block at the OEM locations. At first I only had a brace on the front of the plenum to the engine block but there was a horrid vibration at around 4,000 - 4,200 rpm. Adding the second brace fixed this vibration. I was initially having issues with the IAT sensor heat soaking and leaning out the idle, causing the car to stall. This was fixed by changing the settings in the ECU so it completely ignores IAT at idle just uses the coolant temperature as estimated inlet temperature. All in all, the only hole that needed to be drilled in the car was for the O2 sensor to go into the exhaust, other than that everything was OE Toyota or fabricated to fit with the original holes and mounting locations. The engine definitely has more power now compared to with the carburetor, with a lot more torque around the 3000 rpm area. The engine also runs much smoother and is much more responsive to throttle inputs - no more slight stuttering during rapid transitions. The engine does seem to be a bit easier to stall though, but I'm sure this is just something to do with the VE map not being very well tuned in the <800 rpm region. The Auto Tune feature of TunerStudioMS is an absolute champ, all you have to do is define a target AFR table and let it do its thing (as well as setting up some sensible filters). Auto tuning makes it really easy to fiddle with settings such as IAT control or your actual physical setup. Two to three minutes of driving and it has pretty well returned the tune to near perfect, a feature definitely worth the money. I'd also recommend getting an inverter or something so that you can power your tuning laptop for more than an hour or two while driving. I'd be interested to throw it onto a dyno at some point to see exactly what it is putting to the ground. Does anyone know of someone with a cheap to use dyno around Christchurch? (Only really need to do one run). One of the next jobs on the car will be to look into getting the radiator recored as the fins on this one are starting to rot off and I don't really want to risk cooking the engine. I'll also look into getting the last of the rust dealt with at some point (little spot under the hatch window seal). I may throw some pretty graphs of the VE tables and other logs up tonight when I get home.2 points
-
My parents arrived back from America with all the bits I ordered. It was a little less exciting as I thought it would be, it's basically just a bunch of rubbers and screw/bolt sets haha. I also got them to pick up a pair of Classic Instrument gauges whilst they were over there. They were so expensive, but definitely way better looking and higher quality than most of the other types out there. Folded up a bit of sheet for the c-notch cover And also laser cut out the hinges for the back of the bed. Then decided how to make them pivot and turned up some bosses and sleeves. Need to get a better tap, a couple bolts and a some nylon washers to finish it off.2 points
-
Leadfoot Time - Part 2 Sunday Sideways Here's Leadfoot from behind the wheel Caught up with Tanner in the pits who was super friendly just like everyone else I had talked to over the weekend. Top Bloke Times are in and here's mine for the weekend Prize Giving time Cheers Rod , Shelly and the Leadfoot crew for a very memorable weekend One very happy Father , Son Duo
2 points
-
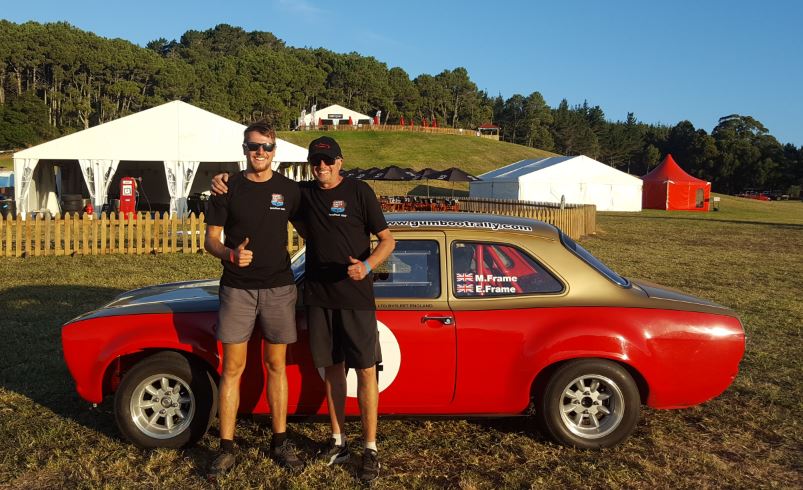
Leadfoot Time - Part 1 The fleet for the weekend All set for Racing Me and Rod at the themed warm up party Lined up for Day 1's racing First Run - Done Getting the hang of it now End of Day 1 - Cool photo opportunity Brothers Reunited . Alan Mann Racing made the original car for Chitty Chitty Bang Bang , Gen11 Below
2 points
-
Apologies for the big gap in my posts - I've had some computer issues Pukekohe Test Day before the Leadfoot Festival Bit of Incar Taking some funny race lines Spin Time on the last session of the day
2 points
-
While on a family jaunt to Papamoa last week, Mr Chris Grant was taking photos of trash on the side of the road, and messaged me some pics: a 1989 Fabryka Samochodów Osobowych (FSO) 125p Pickup, which is a Polish licenced version of a FIAT 125 (Russian Ladas are FIAT 124 based) https://en.wikipedia.org/wiki/Polski_Fiat_125p These have 125-eque bodies and the preceeding 1300/1500 model running gear Anyway, i got him to investigate further and he sent me this: Its got a twin cam it instead of the factory 1500 pushrod (same engine as my 2300 with 2 less cylinders) Anyway, seems legit and i ring the guy to organise a viewing the following weekend (on my way to wellington) and if (LOL) i buy it, to collect it on the way home a week later. So thats what happened... discussion \/1 point
-
@kdotlowe do you even have a XL250 if you don’t ride it on gravel roads in Raglan?1 point
-
Oh dang, I am quite partial to bumpstrips though. I take it you will replace the decal with a newer and improvered vajazzle of 90s hues?!?1 point
-
That ngutunui is a long haul, i took it on as my second ever competitive event. Can't wait for next year.. are you looking at competing at golden cross road on the 29th?1 point
-
Yo They are not hard to do. BMW gearboxes are quite light and easy to move around. I pulled one at Zebra last week and I could reach all the bolts from the ground. Main issue I find is they use 18mm bolts on the guibo and I don’t have a 18mm spanner. I got lucky last time and used a good quality adjustable. They also have a clip on top holding the gear linkage in place that can be a pain in the ass. not a major just annoying Go for the single mass flywheel. The weight difference is massive and it will rev much quicker. Less chance of failure in the future also. Some people report the gearbox becomes a little rattily after but this causes no issues I can recall hearing about. Im not sure about the fork and bearing @MM can you answer this? M33b35 is more your area of knowledge. E34 are a great car.1 point
-
No Wof No Worries... espically in a convoy! just drive in the middle of it1 point
-
Hey , Thanks , been having a blast in it lately. All the small little developments and mods are coming together That squeak is really annoying ! Its only on the rears and the brakes work really nicely, good from cold and no lock ups but are just really noisy. I started with Wilwood PolyMatrix E which is what I run up front but have gone to a softer wilwood pad like you did, a BP-20 (which I was using for that last hillclimb), my next one to try is a BP-10 which is softer again. I've also tried the anti vibration shims and new discs with no luck... Cheers Bro ! My grin was ear to ear after that and so was my dads in the codriver seat1 point
-
I have Beaver keen to jump in my car. A long with mourning cupcake of course. Goat is possibly going to bike if weather is good enough. Who else from smelling town is keen! @grunta @Steelies @lowlife @kicker @oldnrusty Etc1 point
-
I can neither confirm nor deny any involvement or pressure associated to this purchase*1 point
-
Been have been having a nightmare getting this thing legal, Drove it to work a couple weeks back as I was feeling to weak with a headcold to ride my bike anymore, Knocked off early and went to see Frank at the local vw workshop, but he had staff off sick also and was flatout himself. So I rolled the dice at a nice looking garage across the road from work.I didn't want to leave my baby with any fuckwit or some young guy who wouldn't even know how to drive a real old car, this guy has been in the trade for nearly 30 years and use to own/work on bugs back in the day, Sorted.Or so I thought, it failed, which I was fully expecting, as the brakes are not great and the rear tyres are old,hard and nearly bald. But it didn't fail on any of those things, there were a few small things like rear seat belts are old and one won't adjust, somehow though the rear tyres pasted and the front one didn't because apparently they are full on drift spec stretched tyres, ie to narrow for the rims and the real kicker the chassis number doesn't match the paper work, this was something I've always know about, this car is build from about 12 bugs, but no one has ever worried or picked up on it before, so I was off to the vtnz, handly just up the road also, filled out MR16 change of reg details form, waited a week, computer says no. can't just be swapping chassis numbers around I guess.So now I'm waiting again for the faceless bureaucrats to rubber stamp me a new VIN number and I should be good to go! still need to sort a couple small things but tyres really piss me off,I looked up the rim size they fit on(145.65.15) a smart car and it's 5inchs, these mags are 5.5inch, that an't stretched fuck all and in my opinion, the rear tyres are more dangerous as most of the vehicles weight is on the rear.rant rant ranty rant, I know the guy is just doing his job, but I'm running out of energy at this point.anyway as our recently departed friend Mr Petty sang, Waiting is the hardest part.so I didn't rush hour still sucks1 point
-
@Hitman Sorry, ScottyMac has not been online for almost 2 years. I would suggest asking around if anybody knows him or of him. Alternatively there are plenty of other members here who could assist with Beams and RT104 questions: Please comment in the discussion thread below rather than in the build thread. All the best.1 point
-
mounted up fuel pumps. enough pump for 1000hp on e85 . Current motor/turbo etc won't make that much but decided to put the extra pump in now. more of everyone's favourite CAD design program tacked on patch and sump fitted up, bracket for fuel filters welded on then ran out of argon so stopped and watched the last couple of hours of Bathurst1 point
-
hello internet (if that is your real name), three weeks after they were supposed to start the gib putter uppers finally turned up and putted upp some gib. and well fuck, they smashed it out in two days. what the fuck are you going on about sheepers, get to the fucking point! never in the history in of human house building, has so little, built by so few, transformed to lives of this two. 2017-10-07_08-25-08 by sheepers, on Fli its a house now. just like that its a house, before it was a bunch of sticks with some wires and shit but now its a house. we can see it. its real and it feels like any minute now we can live in it. this morning if you had have asked me "how long before you move in sheepers? " i would have said "umm i guess about 10 weeks?" but now, tonight, a mere 8 hours later its a 3 week journey of paint and laying carpet and were done. *actual times may vary* but its REAL now. hard to explain. but anywho, its a happening thing and its happening to us. shuddup.1 point
-
go go go! haha, I had a massive grin by the end of that video, nice work man.1 point
-
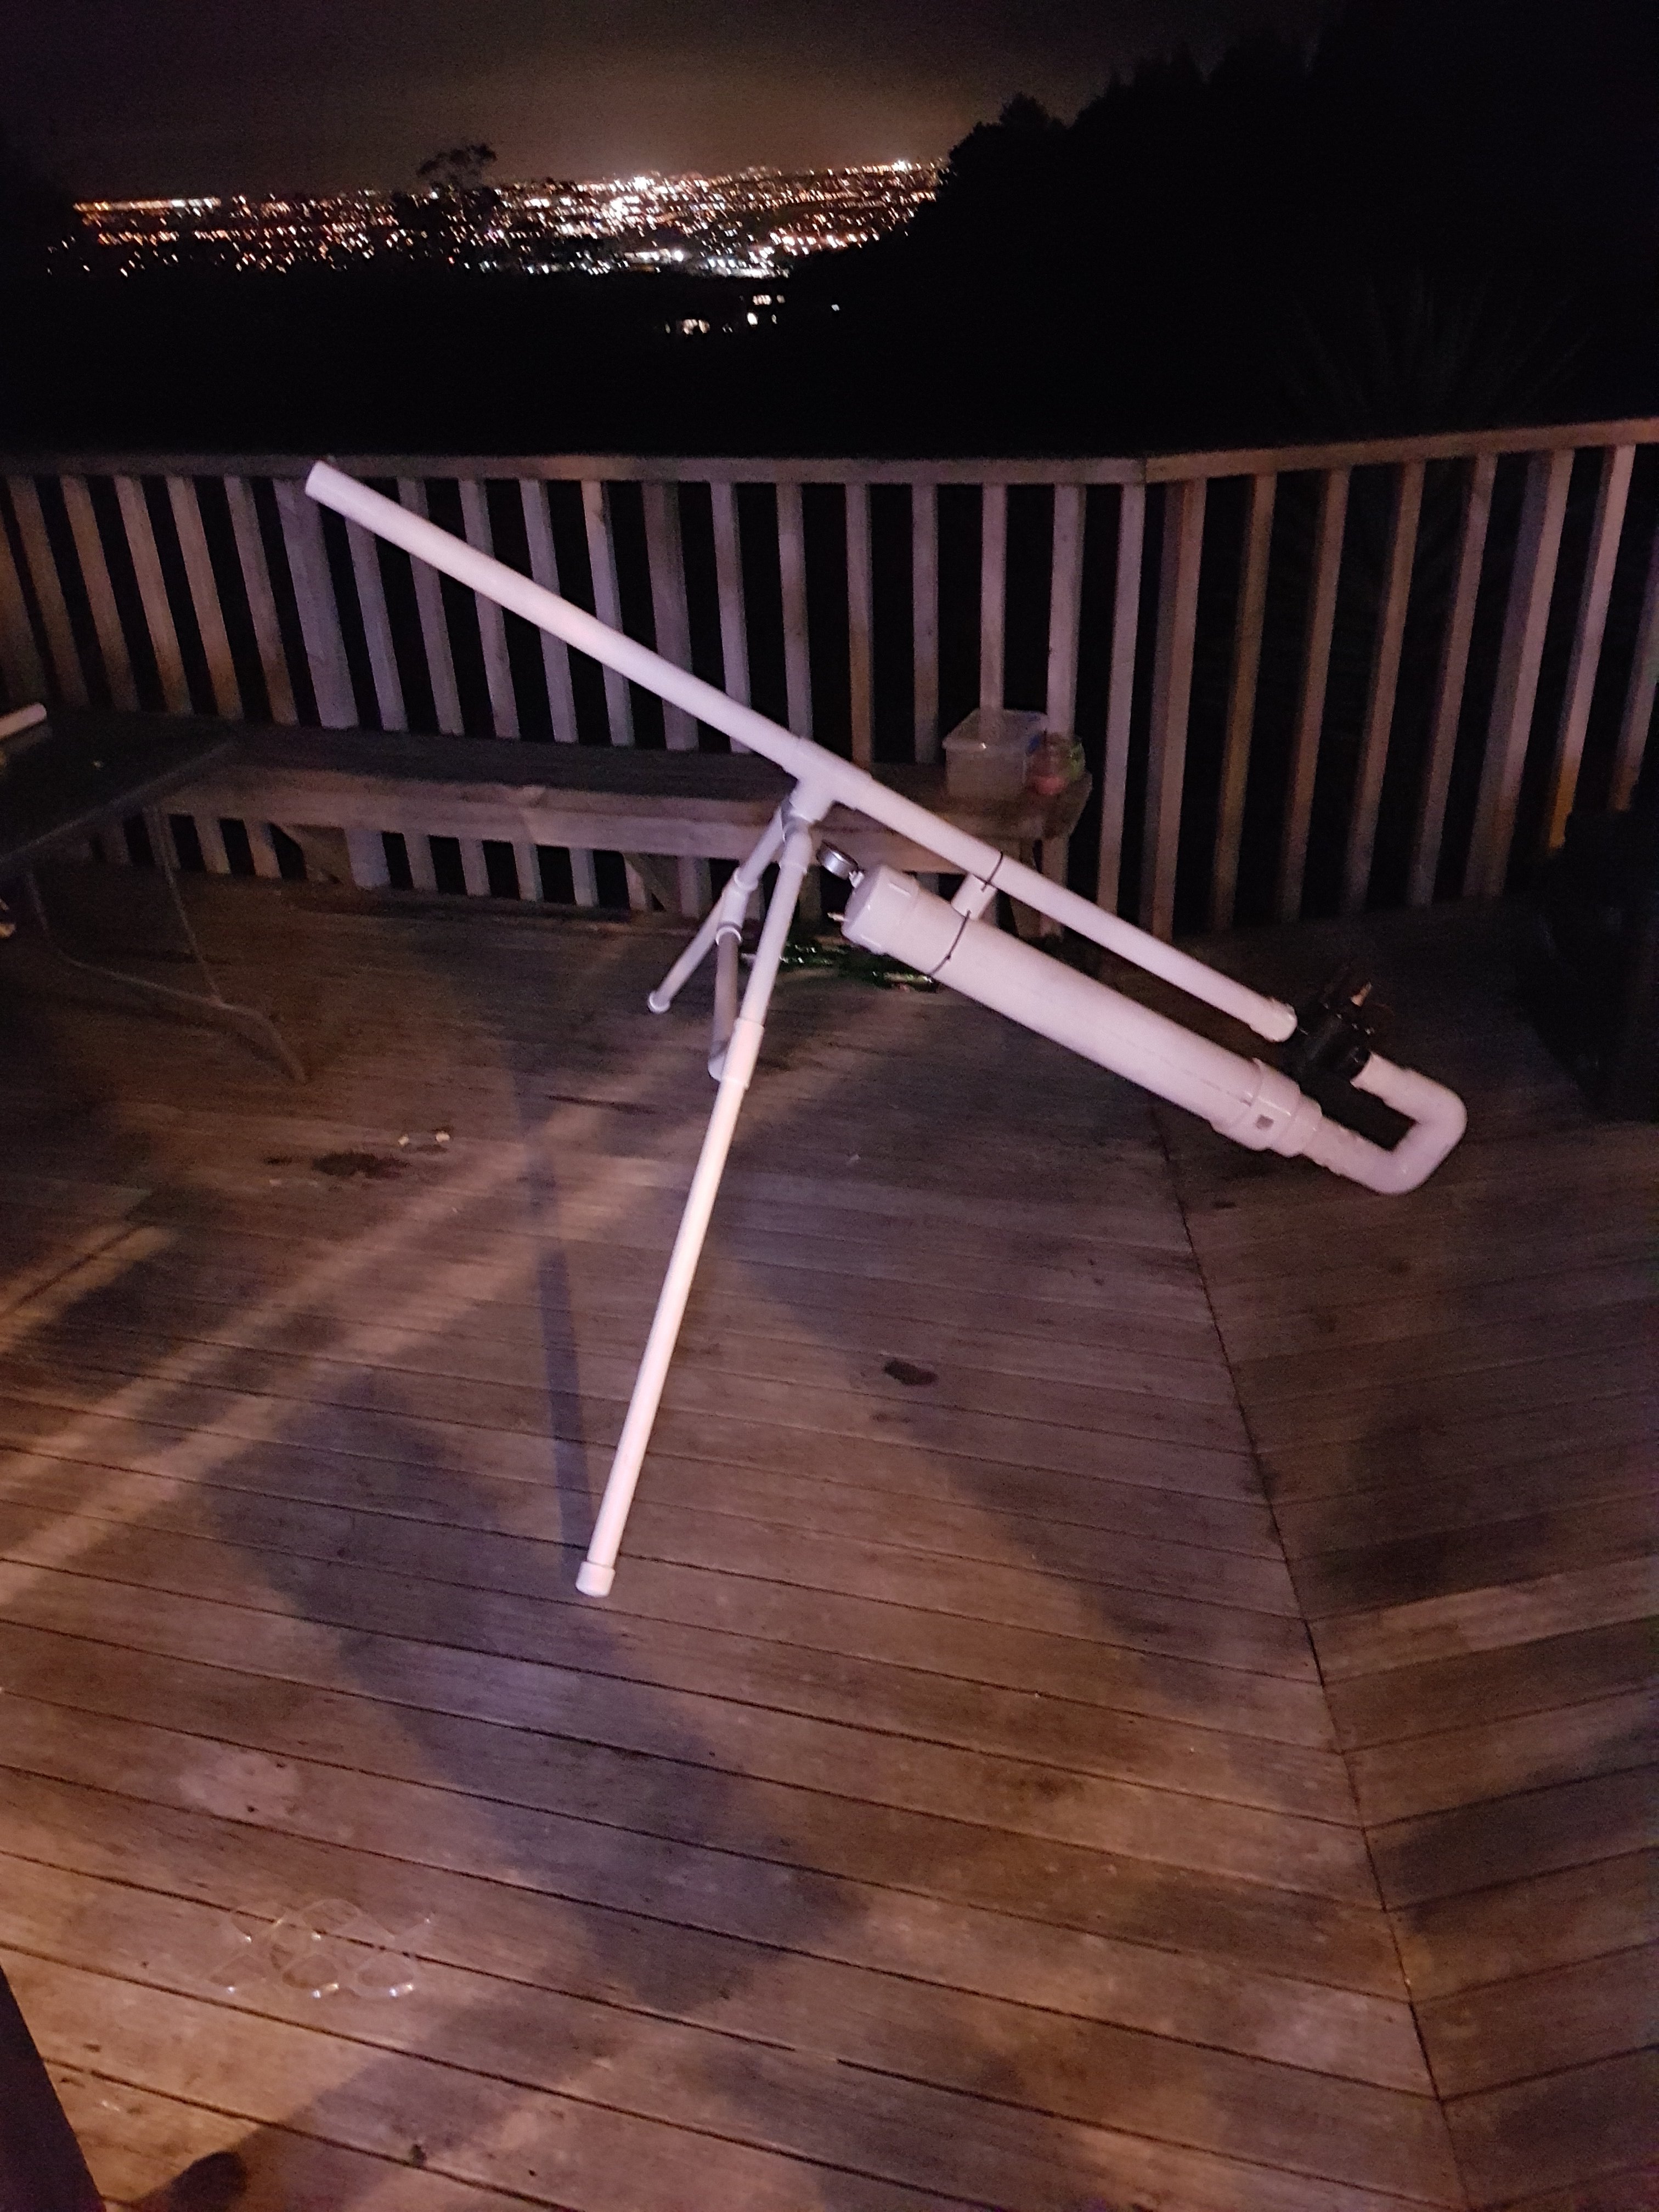
Had a pile of pvc pipe lying around, so decided to put it to good use. Made a bait cannon for surf casting. Made from high pressure pvc and a irrigation valve. Makes a huge noise when it fires. Powered by a bike pump. Had it up to 80psi. Couldn't see where the spud went.
1 point
-
So dishwasher packed a sad. Dreading expense I googled the fault code, which indicated a faulty heating plate, which would probably be uneconomic to fix unless I faffed around finding second hand parts. I went through the diagnostics, and sure enough plate not heating (you can trigger it on/off via sequence of operating buttons). Testing for resistance the element tested out ok, so possibly worth fixing. It's an F&P dish drawer (early one, been in the house since we moved in) and I was really surprised how user-friendly it was to pull apart. A couple of pins and everything dropped out/unplugged for inspection. Pulling the main board and removing cover plate revealed obvious burn marks indicating a fault at a 24V/230V relay... And cleaning it with Contact Cleaner revealed the disconnect... As the pin had burnt off I looked at sourcing a replacement relay. Of course it was an obsolete item, but Mr Ebay provided one for $10 US delivered. Bit of a time delay to get it but not a major as other drawer operates ok while the guts are pulled out of the faulty one... I got to use my Aliexpress octopus thing, bit of solder action and wahayy, I am an appliance god. Houswives everewhere will offer me sexual favours in awe of my skills... [Disclaimer] apparently somebody wanted a shiny new one instead of faffing about for a couple of months. Sexual reward withheld despite silly bloke feeling rampant/chuffed with himself...1 point
-
This wee project started with my son having a hoon on a mates PS4 racing game and loving it, but he was pretty shit at using the controller. Got the seat for $1 on trademe. $1 reserve win. The Drink Drive 2000. patent pending.1 point
-
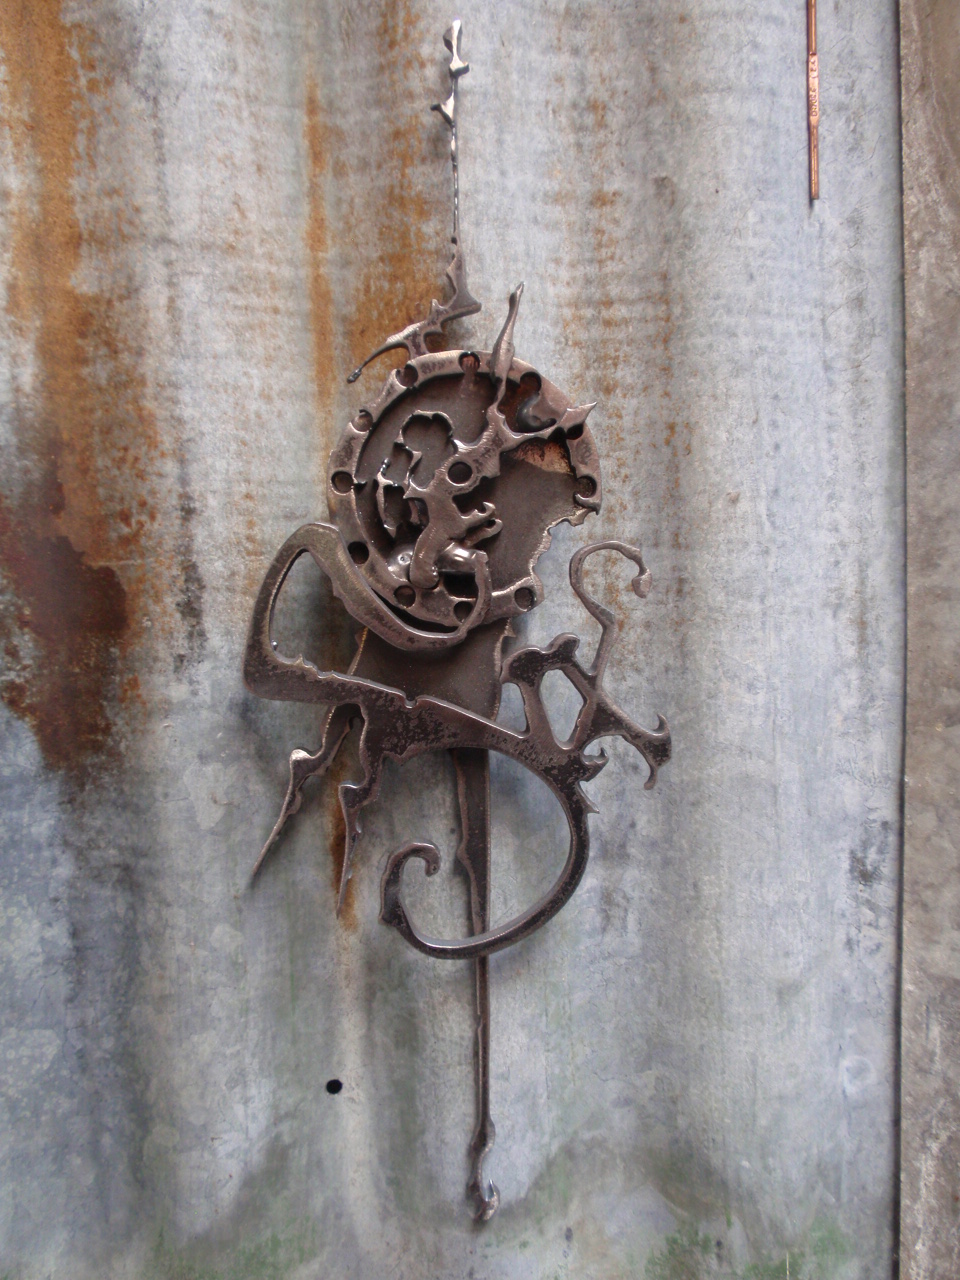
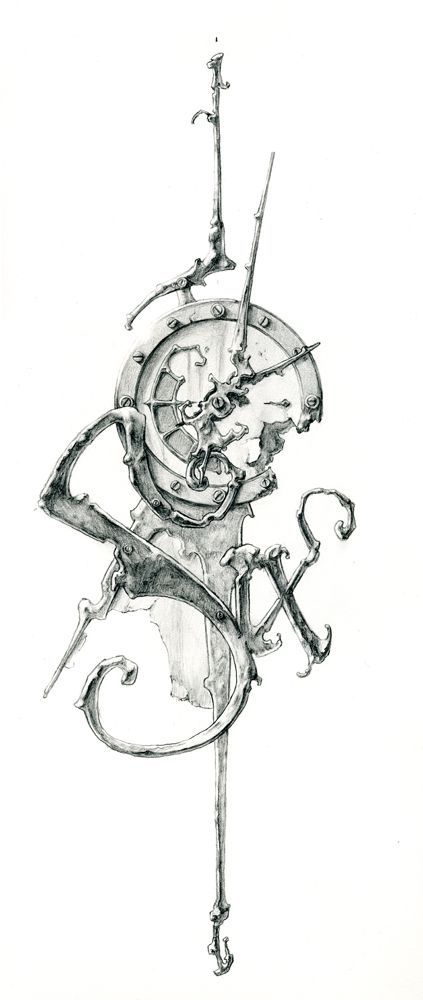
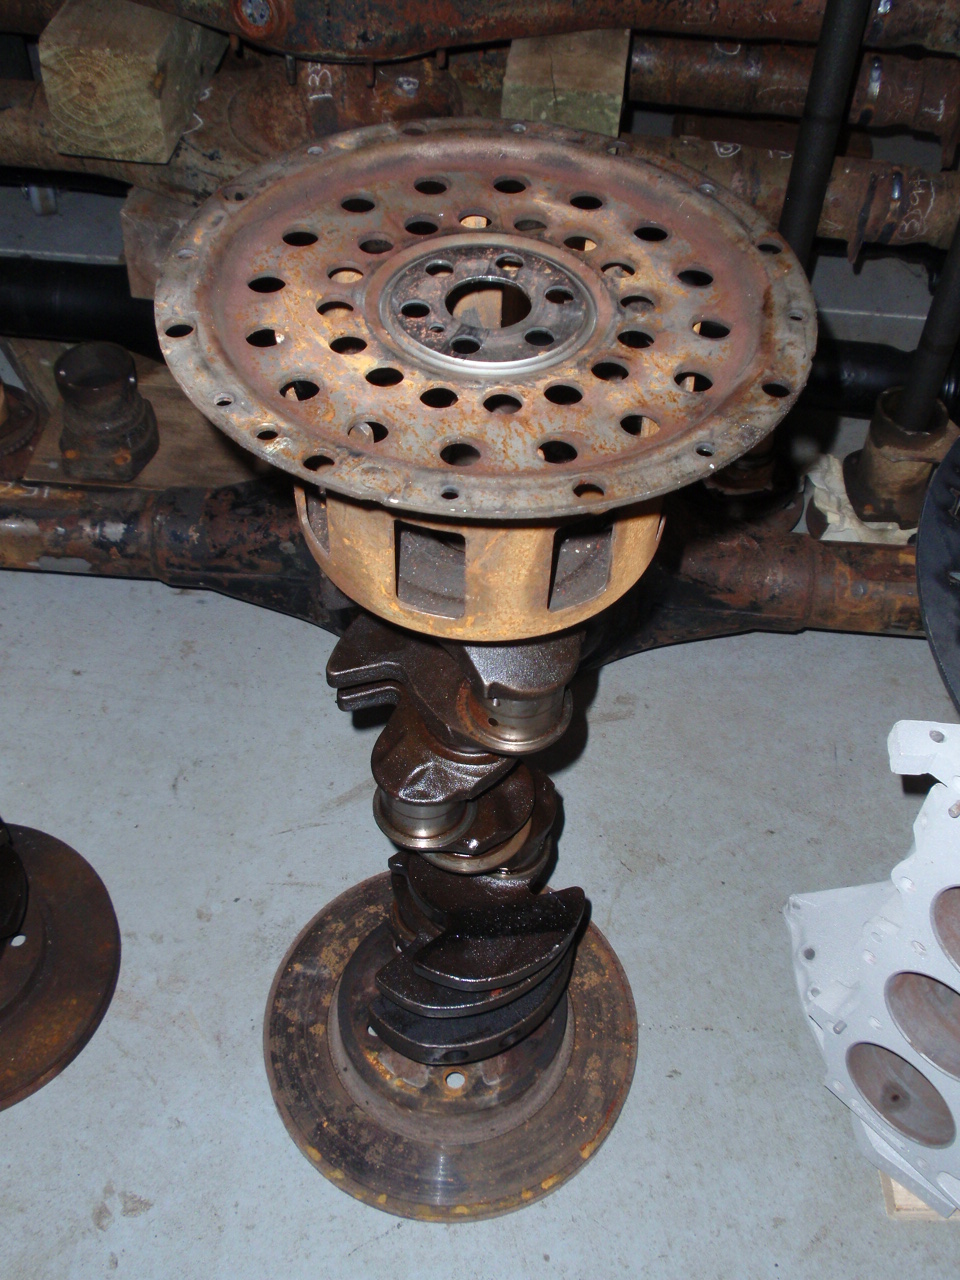
Saw this Steampunk genre drawing and made a real one.
1 point
-
When you should be trying to earn an income or advancing progress on your hotrod ... your mind wanders and this shit happens, lol! More recycling/re-purposing. I fucking love it! Of late, I have dragged my toosh to a couple of art craft show/market thingies and had a look round. Attended a Steampunk thing too. Decided I had enuff dirt under my fingernails, the gear and resources to have a go at doing it myself. Free heat from scrap mixed with waste oil. I love living the life of a fucking shedrat.
1 point
-
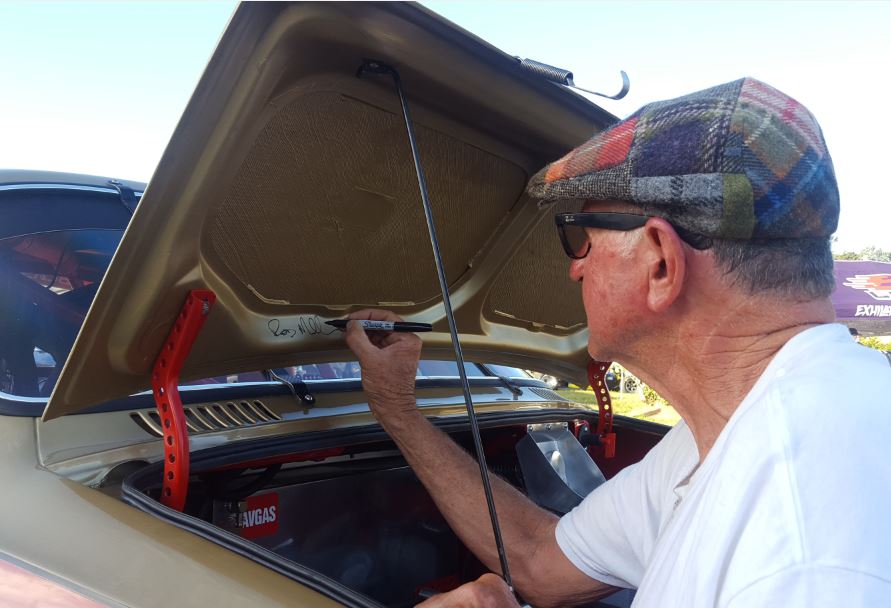
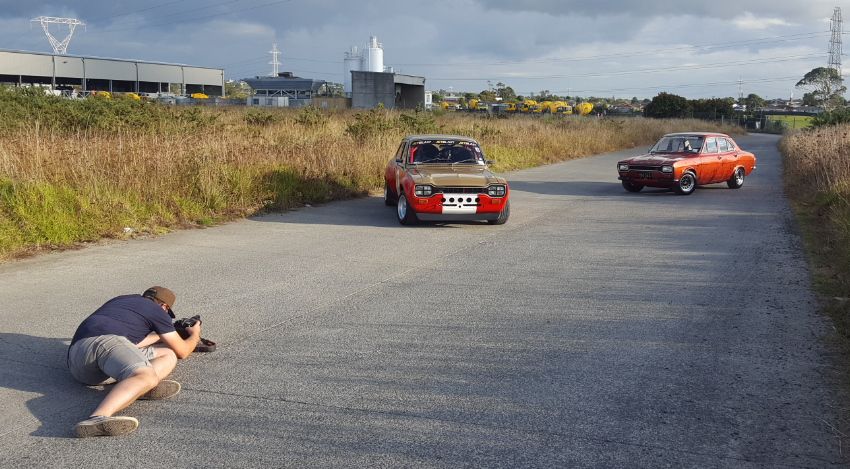
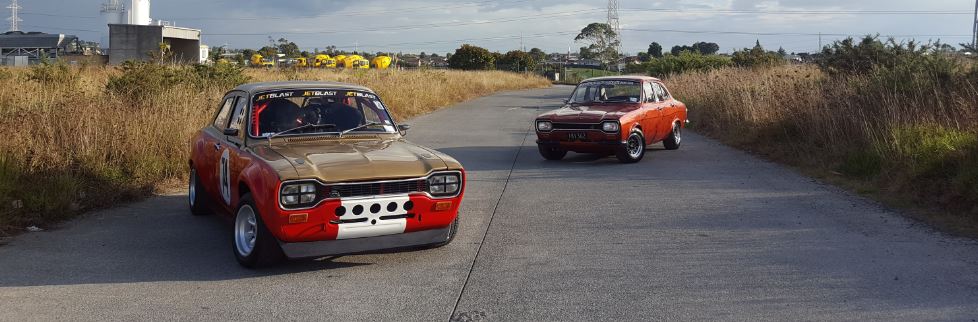
Snoozin hooking me up with a sweet photo shoot for NZ Autocar magazine on both my escorts Working his magic as the sun goes down Some rolling shots to finish the shoot Thanks Richie for the opportunity , great fun
1 point
-
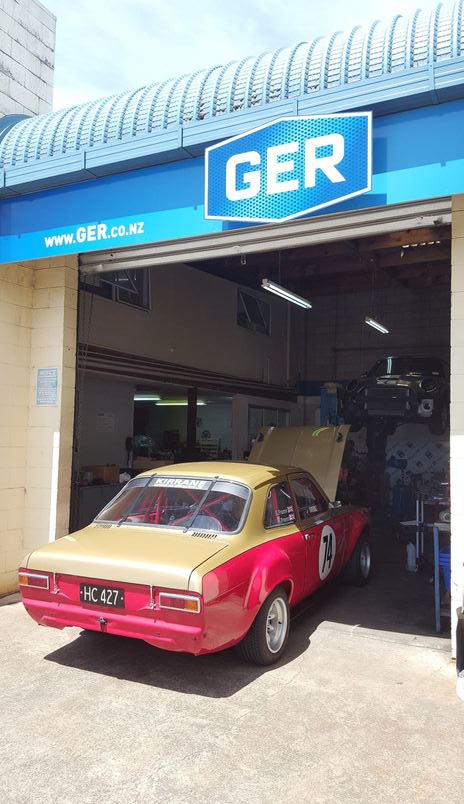
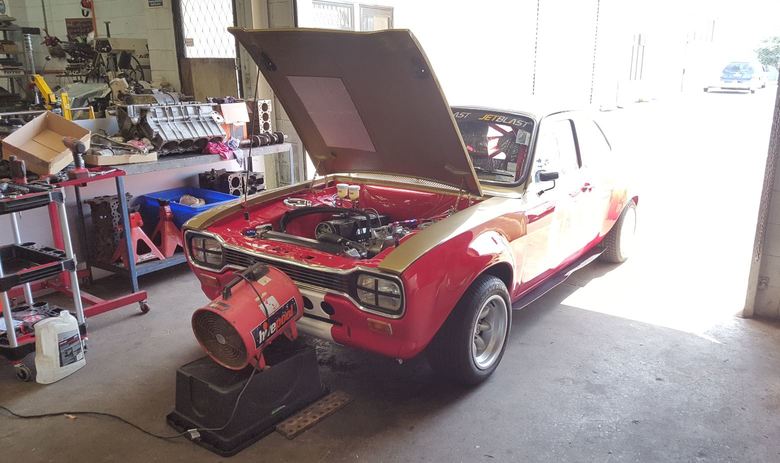
Back at GER for the start up Fired up first time and sounds mint
1 point


.JPG.77b8f678c949234cc144ae8bbf5c92ec.JPG)
.JPG.630f89ff7e80305ae1a160992219ae18.JPG)
.JPG.0838c2cb5215dc2b7f3bc5718b42e4af.JPG)
.JPG.29de412bb077ba5f52f3350ad4b9207e.JPG)
.JPG.be86e97ceedfa372e3fe99c0318b4ca3.JPG)
.JPG.948f5b797a1c868c0a2fc55ccc95e3b4.JPG)


This leaderboard is set to Auckland/GMT+12:00