
Leaderboard


Popular Content
Showing content with the highest reputation on 10/05/17 in all areas
-
5 points
-
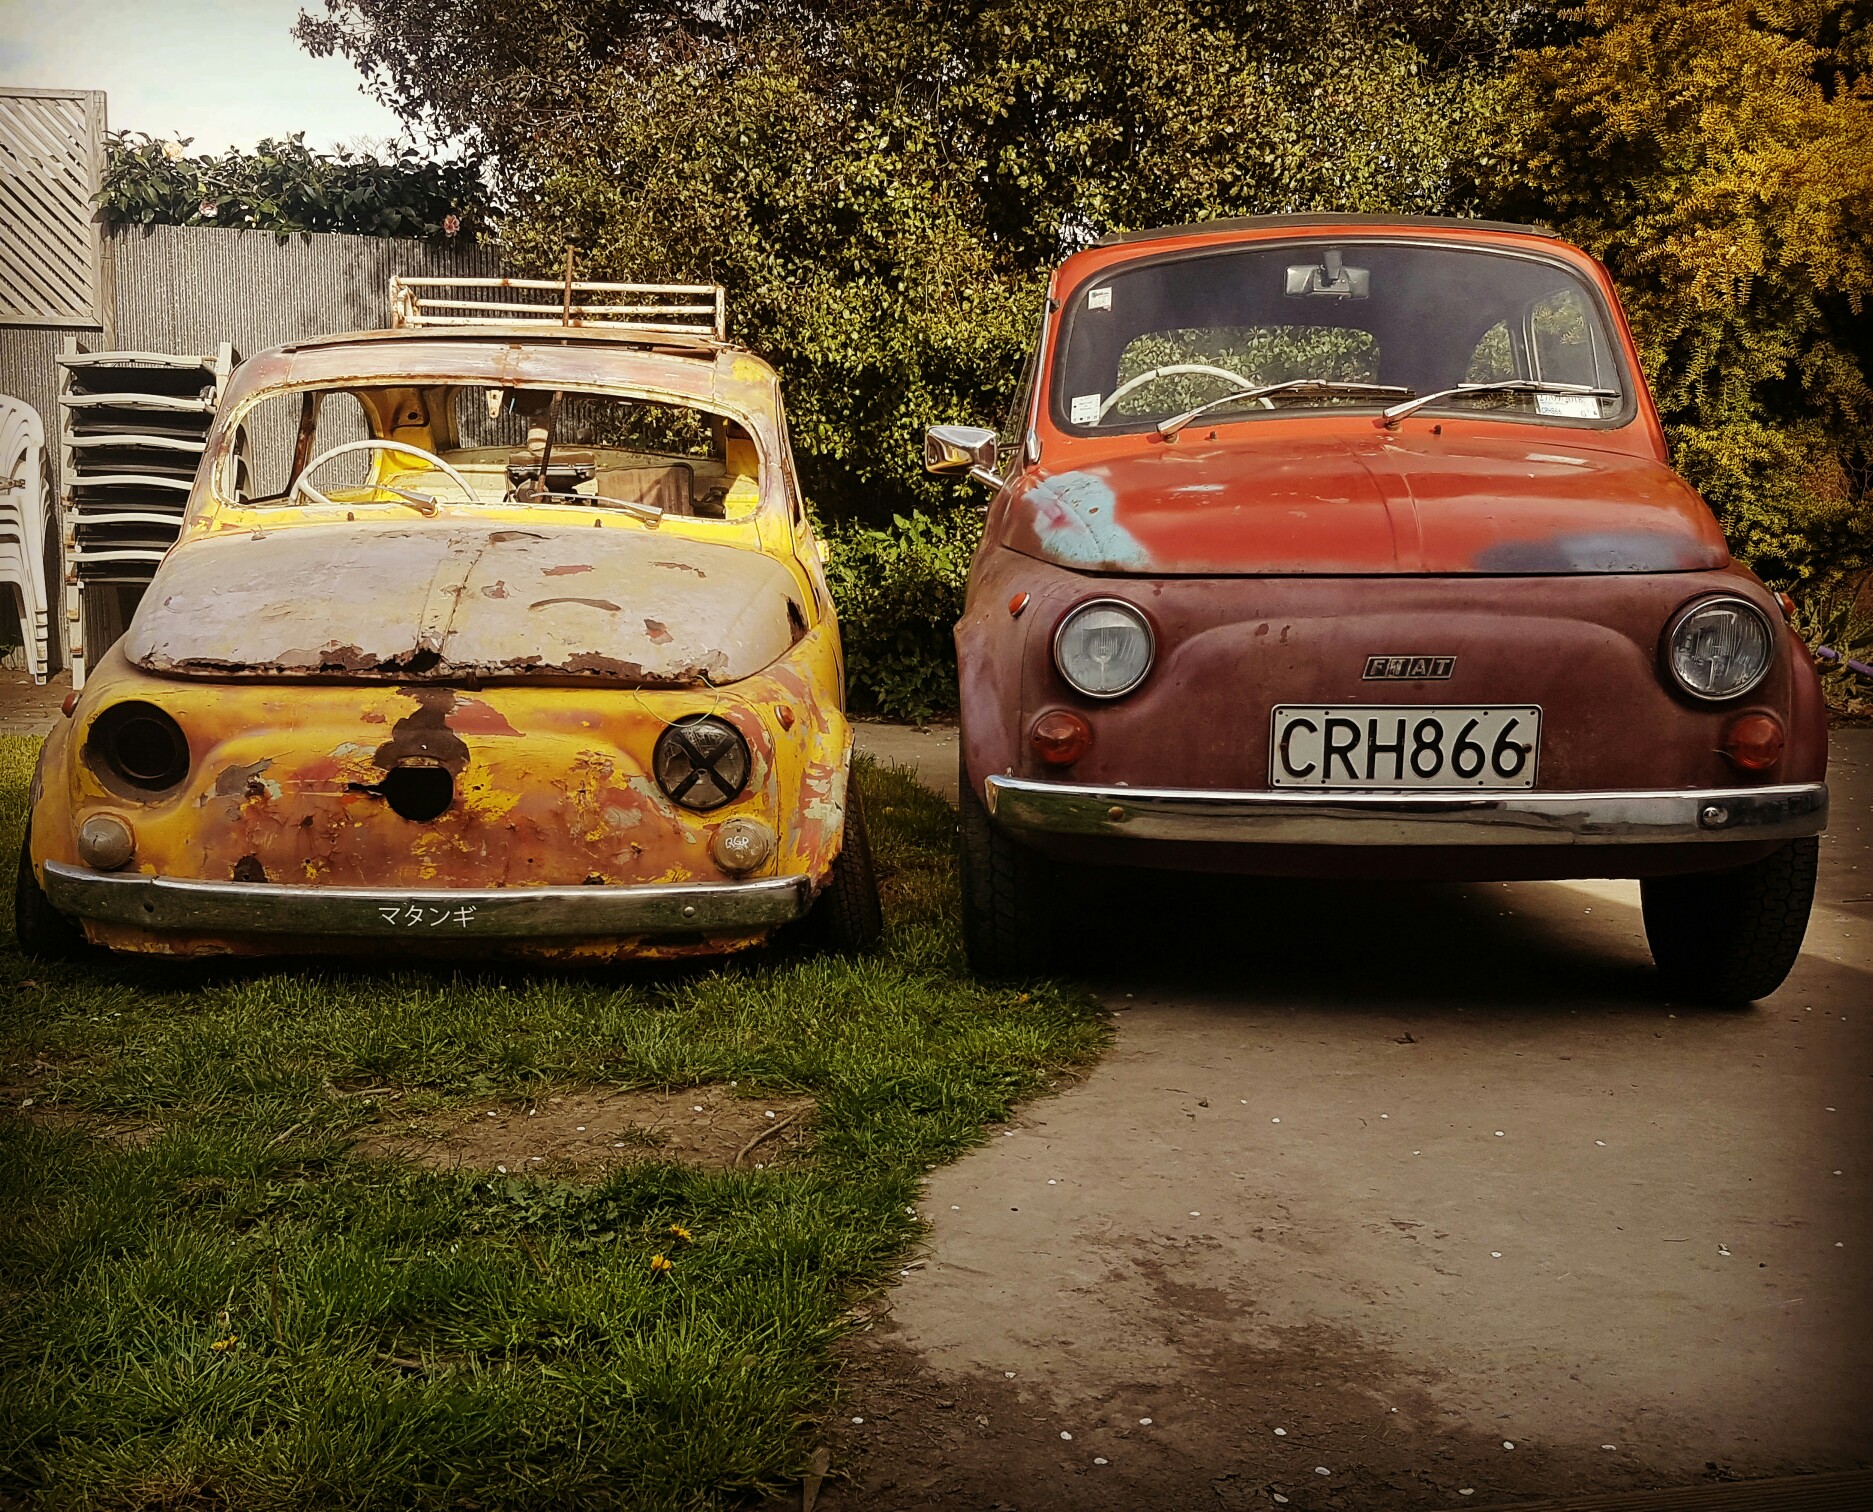
1 Avenger for sale supposedly goes hard, 1 lady owner, uses no oil or water pick up from my lawn5 points
-
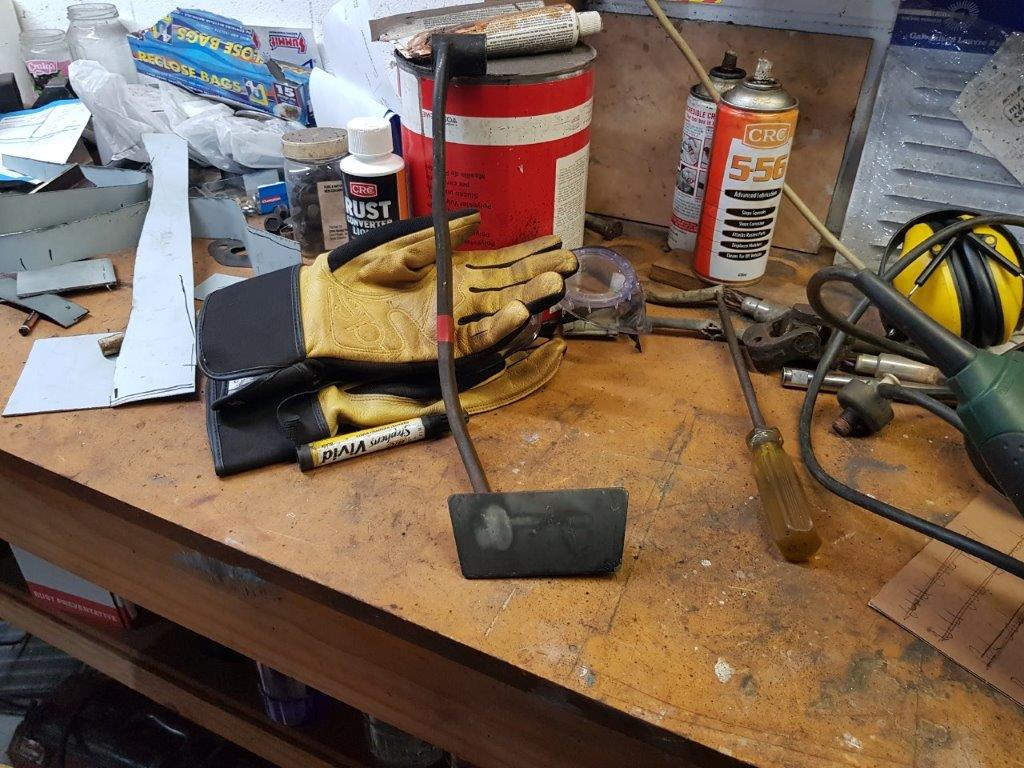
Time for a little update I think. Thursday arvo I chucked the bracket that the battery hold down bolts to/the battery cover attaches to along with some very rusty bolts into some white vinegar to soak for a couple hours, then I promptly forgot about them on the bench and went out of town for a few nights lol. Took my AF35 front wheel and one of my spare CVT covers along for a ride to Auckland, can't remember if it was this cover or the worse one now @Mr Vapour worked his magic on them and they now look like this Bit of a drastic improvement! Grabbed a Pirelli SL26 and a couple (wrong) lights from Scootling And then today my levers arrived from Aliexpress and I got my parts back from the powder coaters, so happy I went with satin black, looks like the factory Honda finish! Of course the levers aren't going to work though. Aliexpress indicators look the part to me though! Remember the bolts I forgot? I didn't get any before pics, but they looked trashed and the bracket was 2 tone bad black paint and rust. We got home early hours this AM and the Mrs complained the house stunk of vinegar and metal... oops Quick rinse under the tap I'm impressed!5 points
-
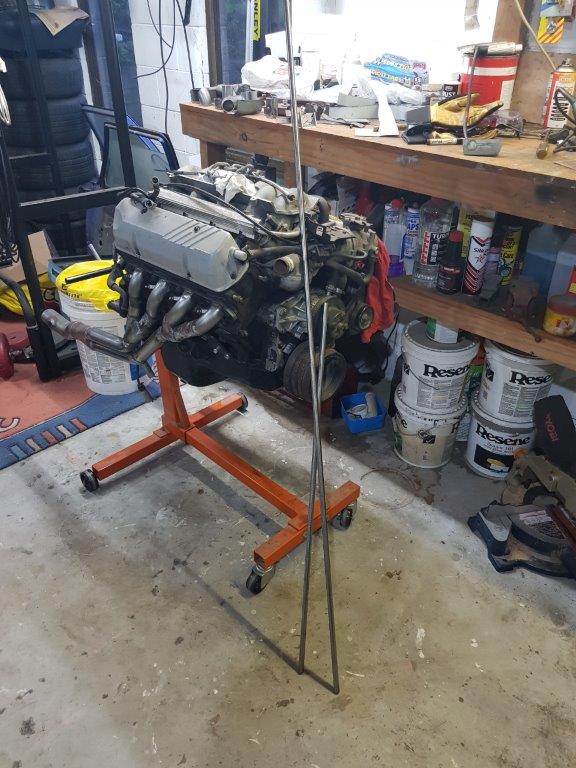
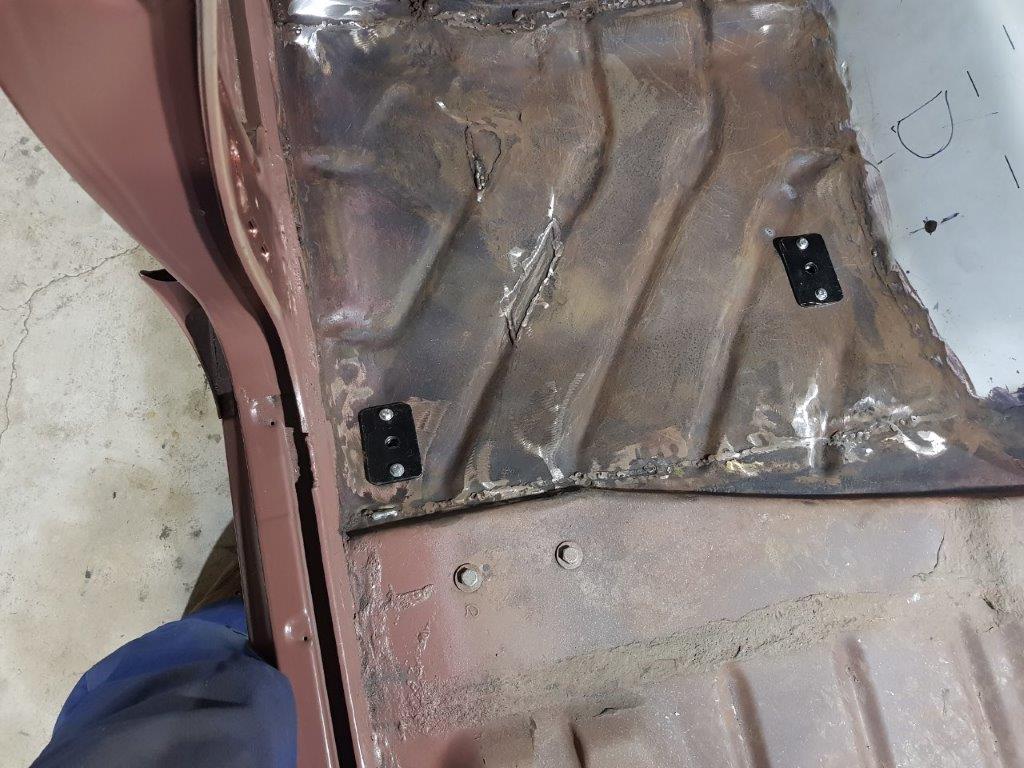
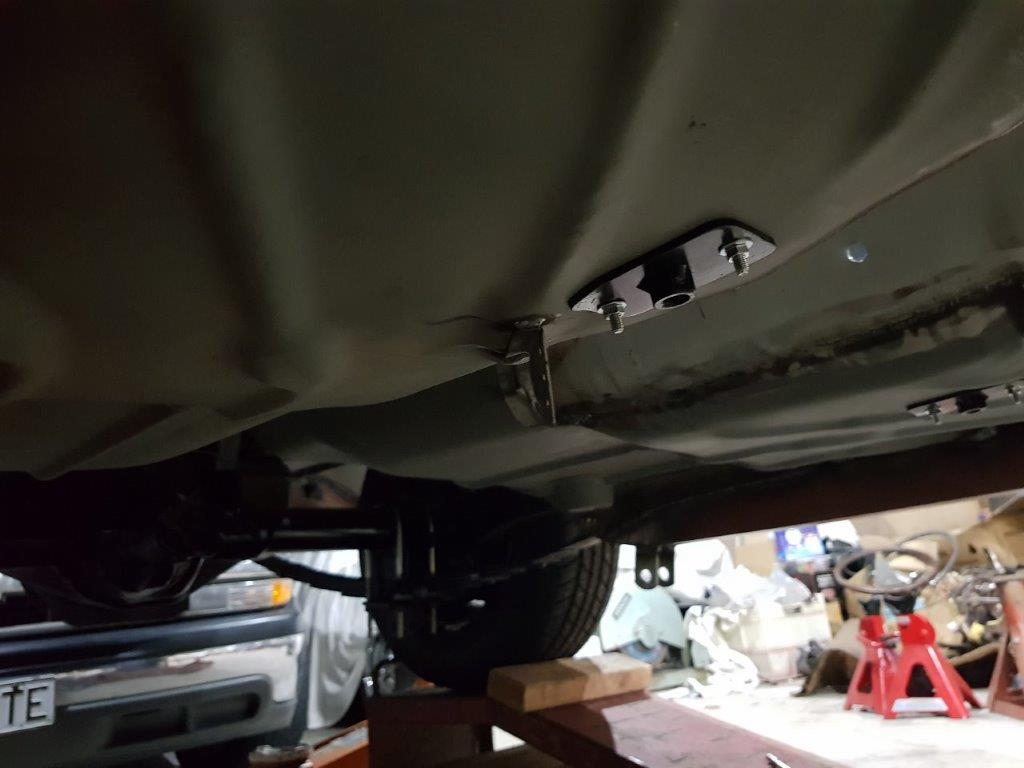
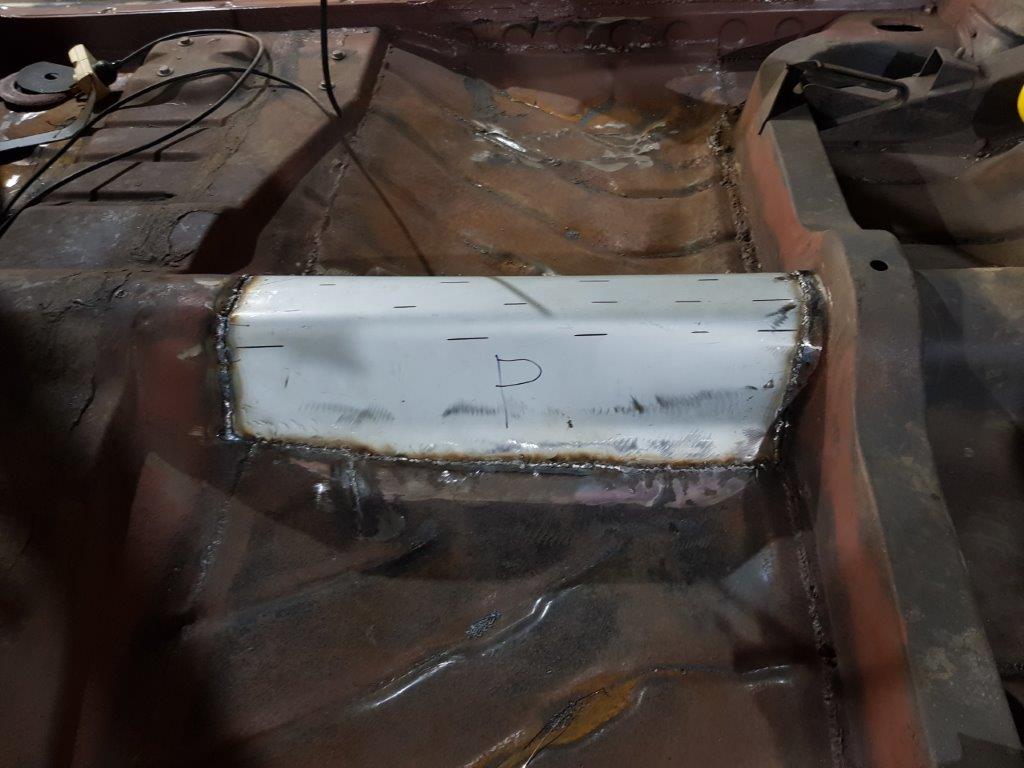
Here is another view of the steering shaft A photo of my extra length of 9/16 bar if anyone needs some. Engine is back on the stand waiting for wiring, sorting out fuel lines, dip stick......... First seatbelt mounts installed. The one by the door way and the hole in the trans tunnel are in the original places, The plate on the floor is for the centre belt. And the other side. I used bolts on the plates as per the lvvta manual and they pulled up nice and tight to the floor. The thing that looks like a a shark fin is the mount for the handbrake return spring. Originally it was a tab off the floor. I'm worried about drive shaft clearance to mad it longer Another job ticked of the list was welding the pad to the brake pedal. Comments and ideas welcome as always
 4 points
 -
Someone had deemed these "junk" and left them in a fish bin full of water outside for a year. Some time ago i cut open a dead RB25 coil hoping to see what was inside. Such fine wire, so many windings. About a million of the finest wire windings i had ever seen, trapped in resin plastic, sealed and unable to be unwound at all. At least by any methods i could see. These 100 year old ford ones remind me of the same thing, except the wire is slightly thicker and there is 2 lots of 1million windings. 2 per coil around a heavy primary winding. Accidentally put a chisel into the primary and is still works. Not for 100 years anymore as it'll corrode now it's damaged but still... not many ignition coils you can pull the windings out of, involving chipping away or melting the tar they were packed in. Those brown paper things are capacitors. Condensers effectively, like you have for a distributor. While i'd heard of old timers making their own from paper and chewing gum wrappers back in the 1940s when they were poor kids fixing their first car... i'm not that keen. These had real tin foil, not the alloy foil we have today so they solder really nicely. A couple tested within spec' so i re-used them. Others i replaced with orange things. Mix and matched the wood. And going ot do the same with the burnt out windings so i can turn 8 burnt ones into 4 good ones... hopefully. Had some burn up after 10 minutes of driving because i didn't realize how keen they were to have inch long sparks jumping inside the box if i didn't put the glass plates and tar back in. Opps. Bit marked up, some have clear borer holes in them but not too bad for 100 year old ignition parts. How many of you are still running original coils and points at 1/3rd the age?3 points
-
3 points
-
figuring out shopping list of what else i need to complete fuel and oil system plumbing. just like work, everything has different thread and fitting size so you have to step through each connection one by one and think which adaptor, which hose end etc. is needed, plus measure and check threads because you cannot believe anyone or anything until proven right. e.g. a 3/8 -18tpi NPT male fitting goes about 5 turns into a 9/16 -18tpi female thread because of the taper but its wrong. would seal with loctite 567 and ptfe tape if you had to but trying to do a better job on this occasion. up next.....giant flaming hole in wallet2 points
-
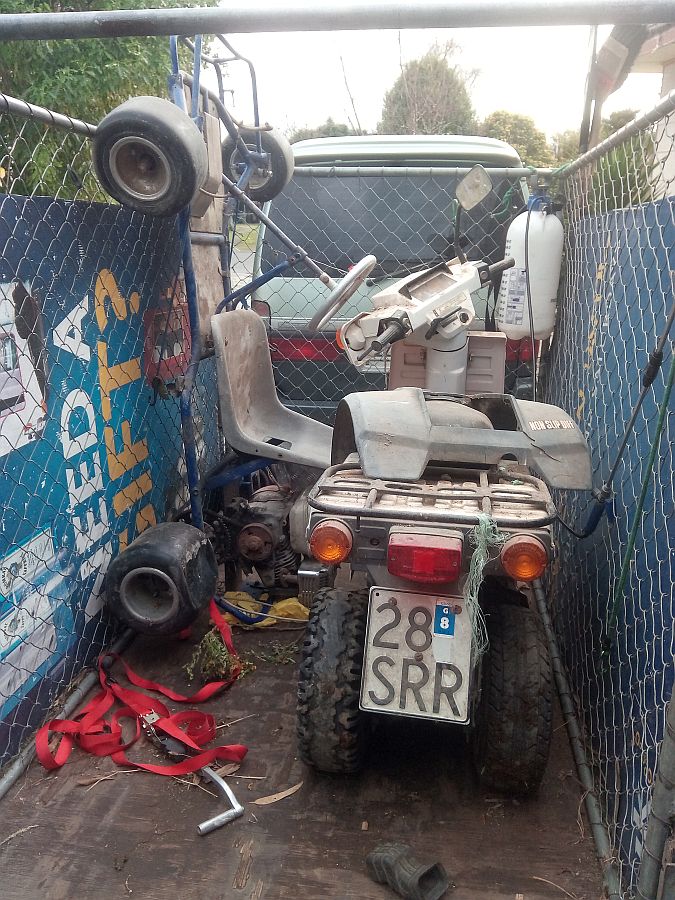
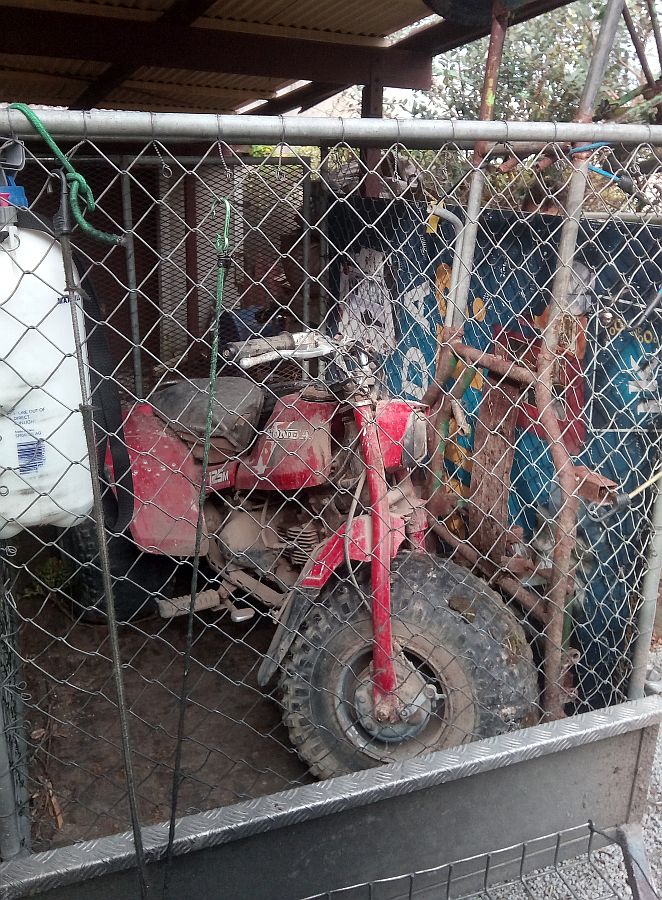
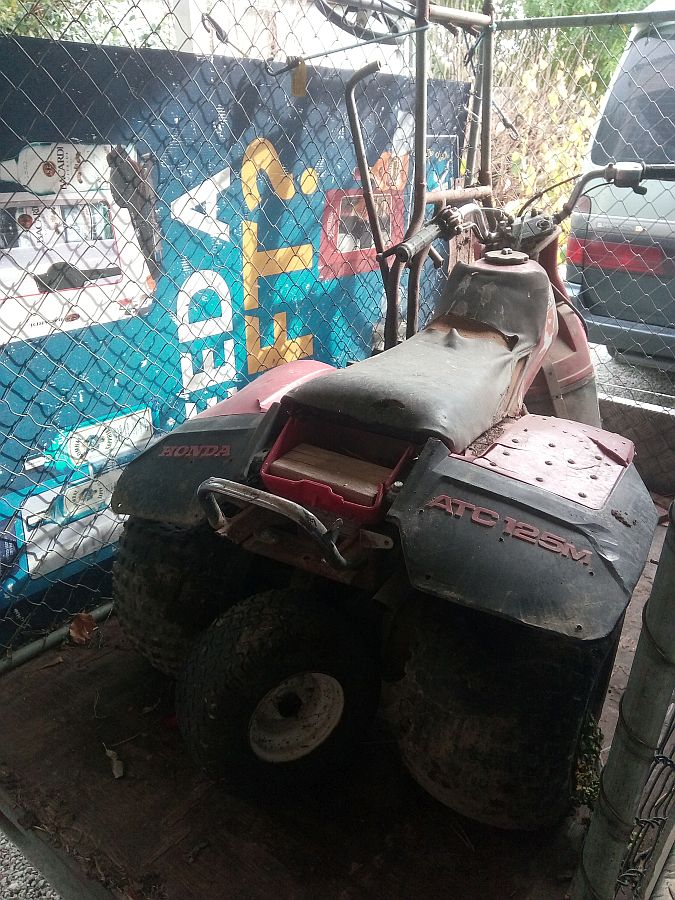
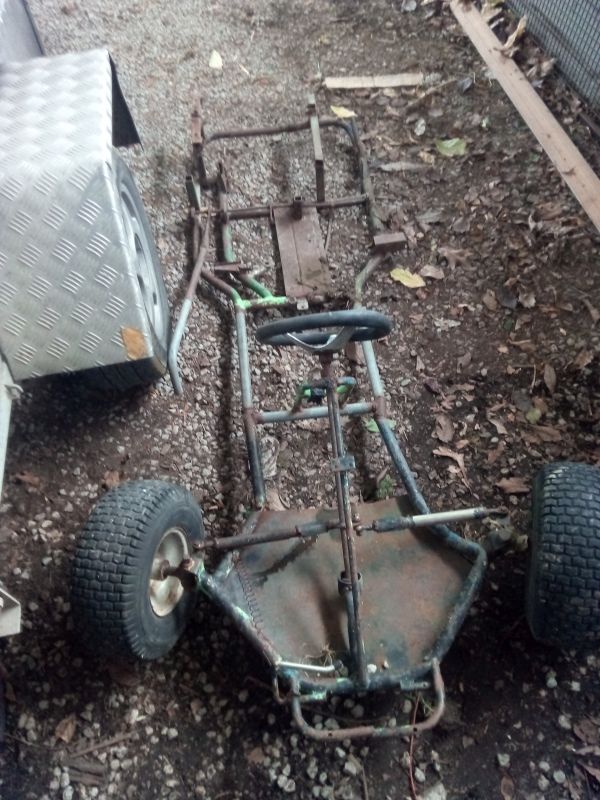
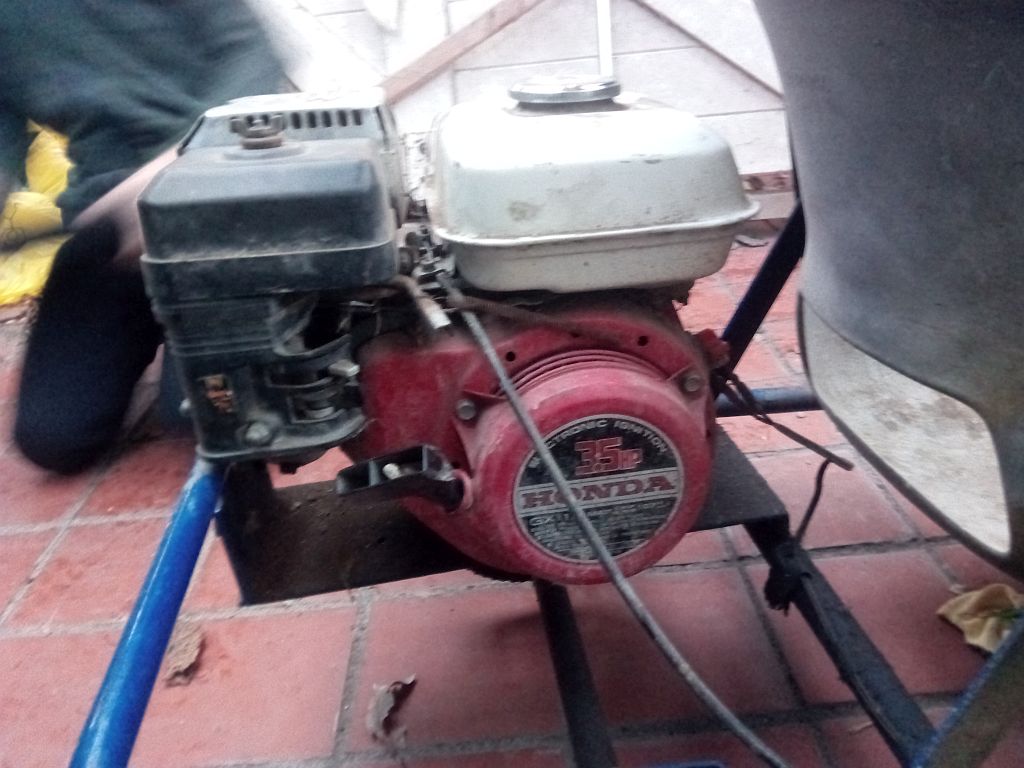
Brought home 2 trailer loads of death/Honda/toys today, with the reputation that at least one of them has, I may have found exactly how I am going to die haha 1st off the one that's supposedly too dangerous to ride 1985(?) Honda ATC125m trike, looks mostly complete, told it was running a while ago, but the gearbox mucks around and it's got no brakes, will try and get it going tomorrow. That frame thing in the corner of the trailer is a home built/modded go kart He's dropping the axle and bearing blocks etc off next week. 2nd trailer is where it gets a bit more fun in my mind 1990 Honda Gyro X, 49cc with the correct amount of strokes, looks like it was regged as a motorcycle rather than a moped, so hopefully I can get it on a moped rego!! Also to share the death, Aaron got a Honda powered kart out of the deal Carb clean, oil and fresh gas and away it went! Clutch slips a lot though and I need to find a brake disk for it as well as get the caliper mount welded back to the frame, he's very impressed with it though lol He got a bit braver after a while. Gyro only needed fresh gas and a jump start to get going, so we gave it a half ass wash and I took off on it, got 5k from home when it died and then would only run at less than 1/4 throttle, managed to ride it home feathering the throttle at a blistering 7kph. Quick squirt of carb cleaner and it was away again, it's a fucking hoot to ride, tops out at 45 but shit it feels like it's flying and yeah I think I'm in love. Got several thumbs up from random people too haha. Shit I hope I can get it on moped reg!!! If I can't it'll be a tidy up and on sell Otherwise I'm thinking 70cc kit, big carb, custom pipe, 12x10 or 10x8 ATV rims from eBay with stretched scooter tyres on the back, 10" or 12" Dio front end with disk brake etc, the stock 8" front 6" rear wheels with tiny drums leave a lot to be desired! Something like these but rougher and cheaper
1 point
-
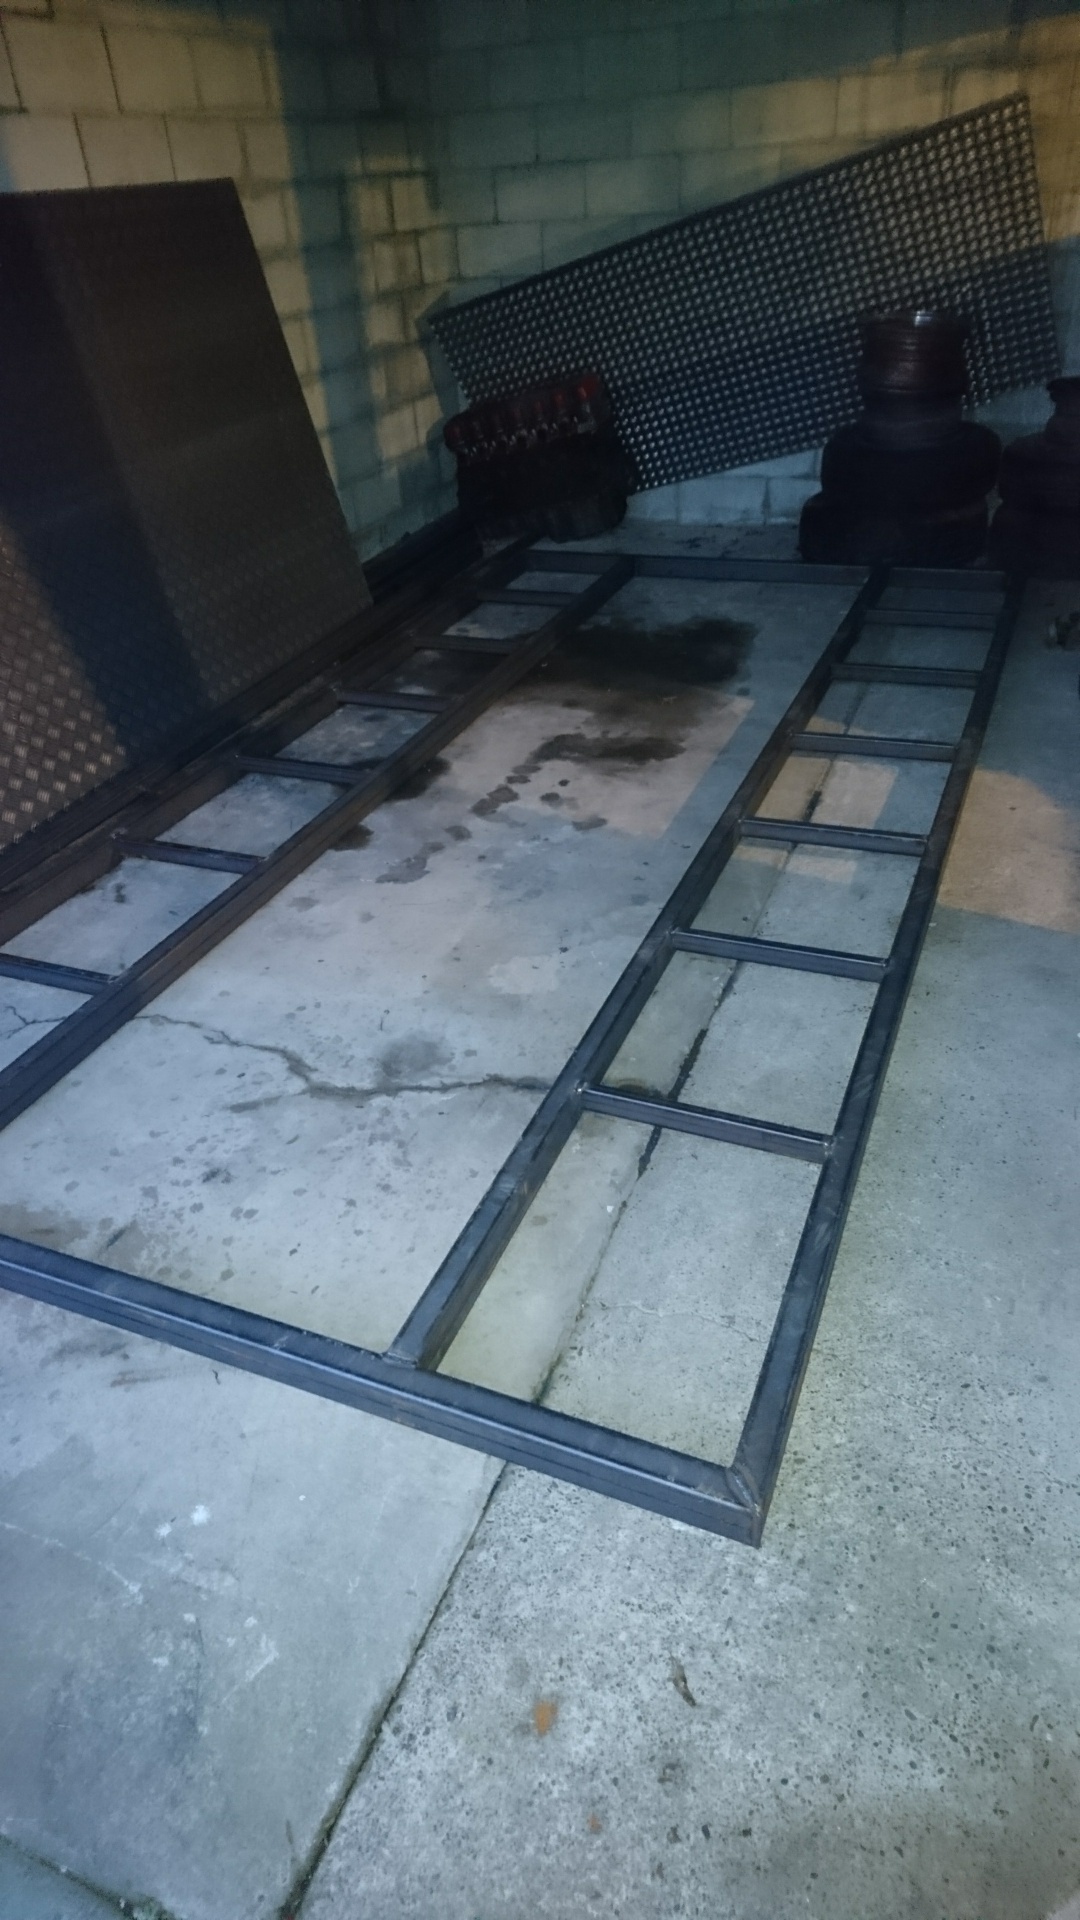
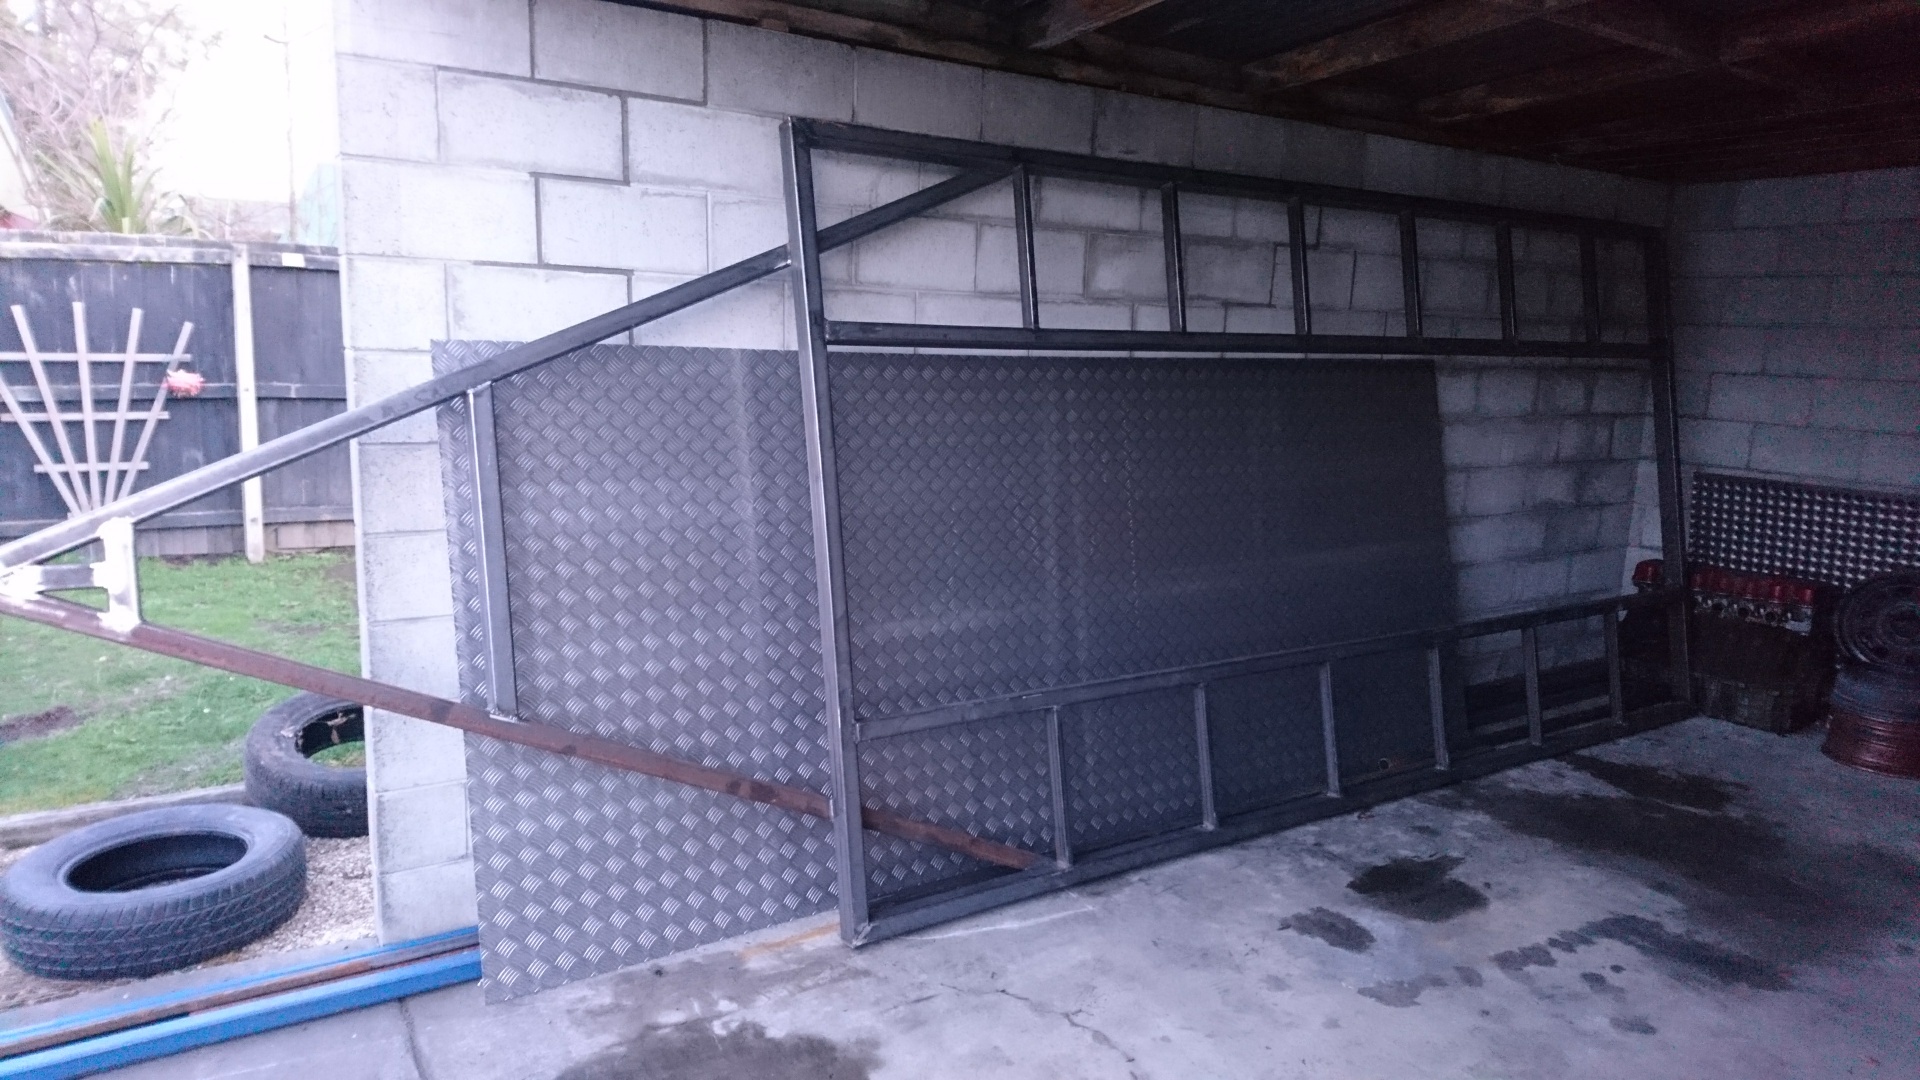
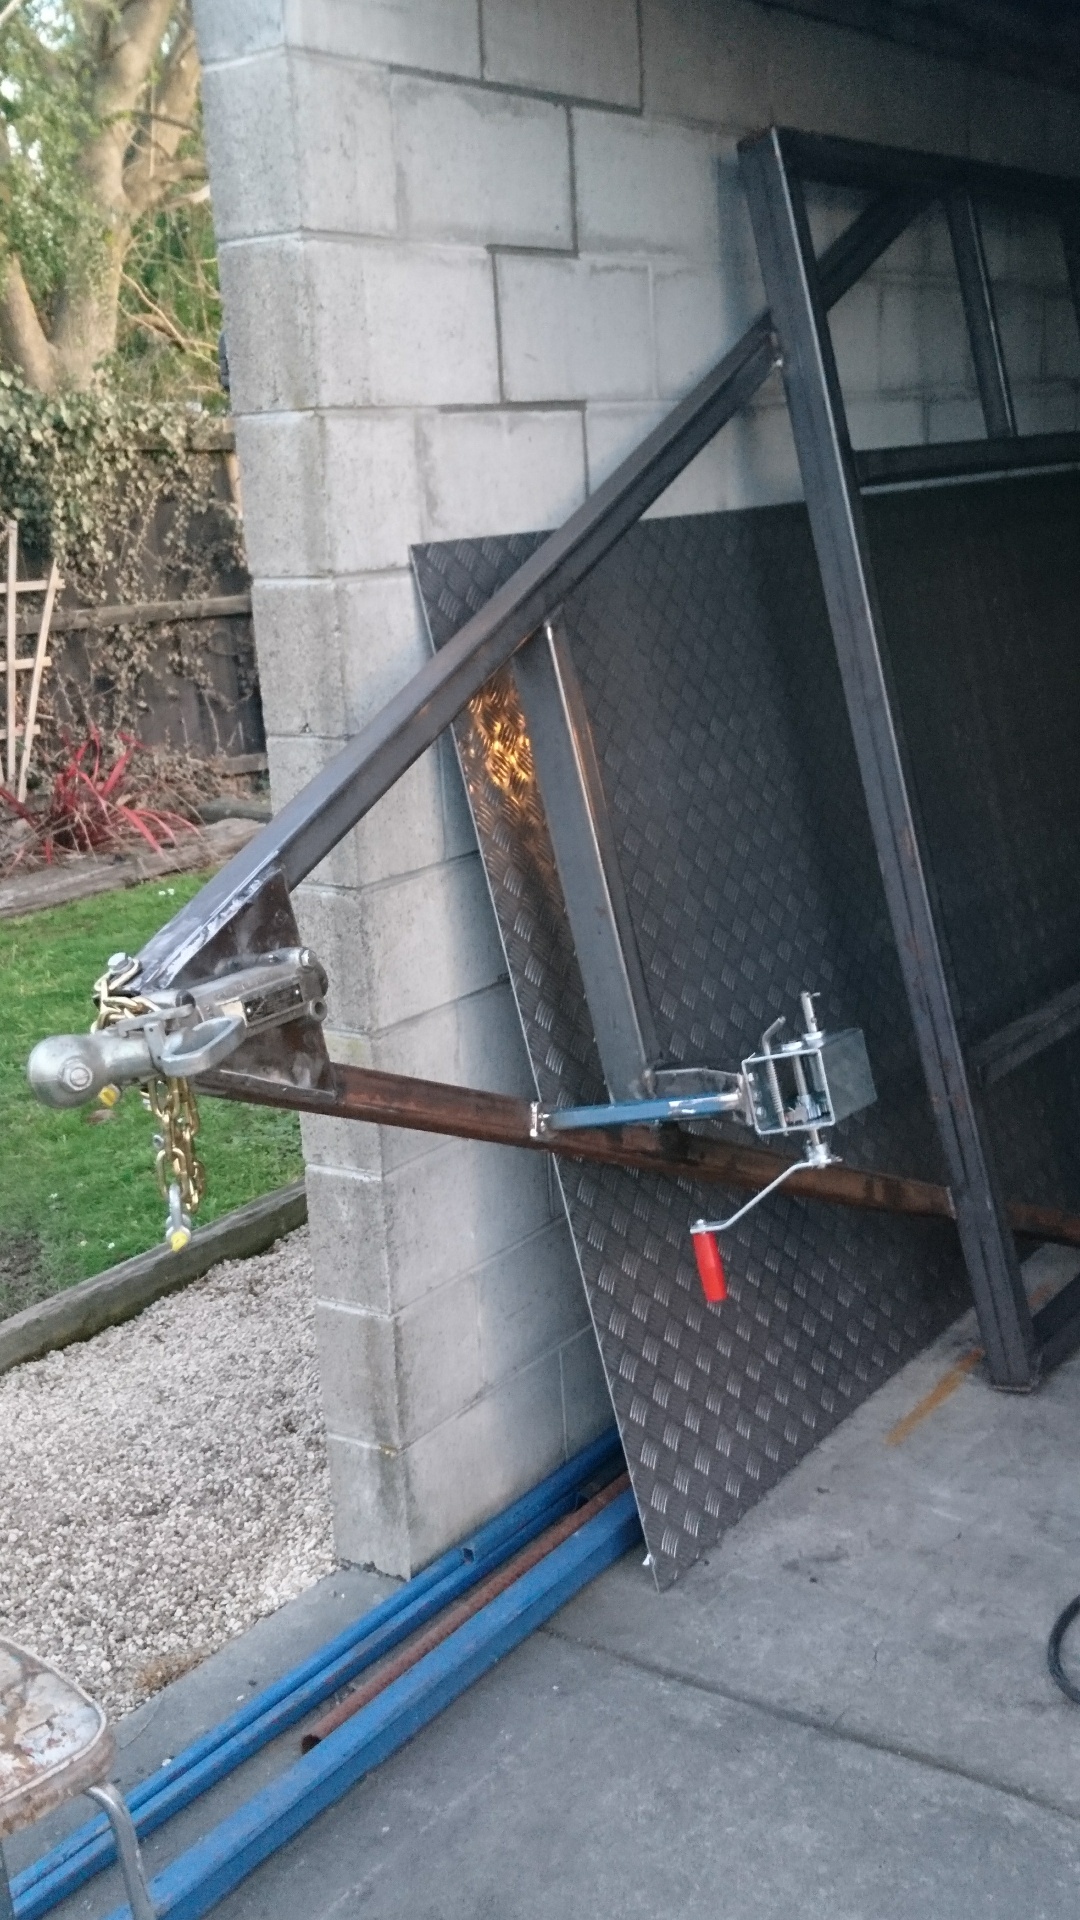
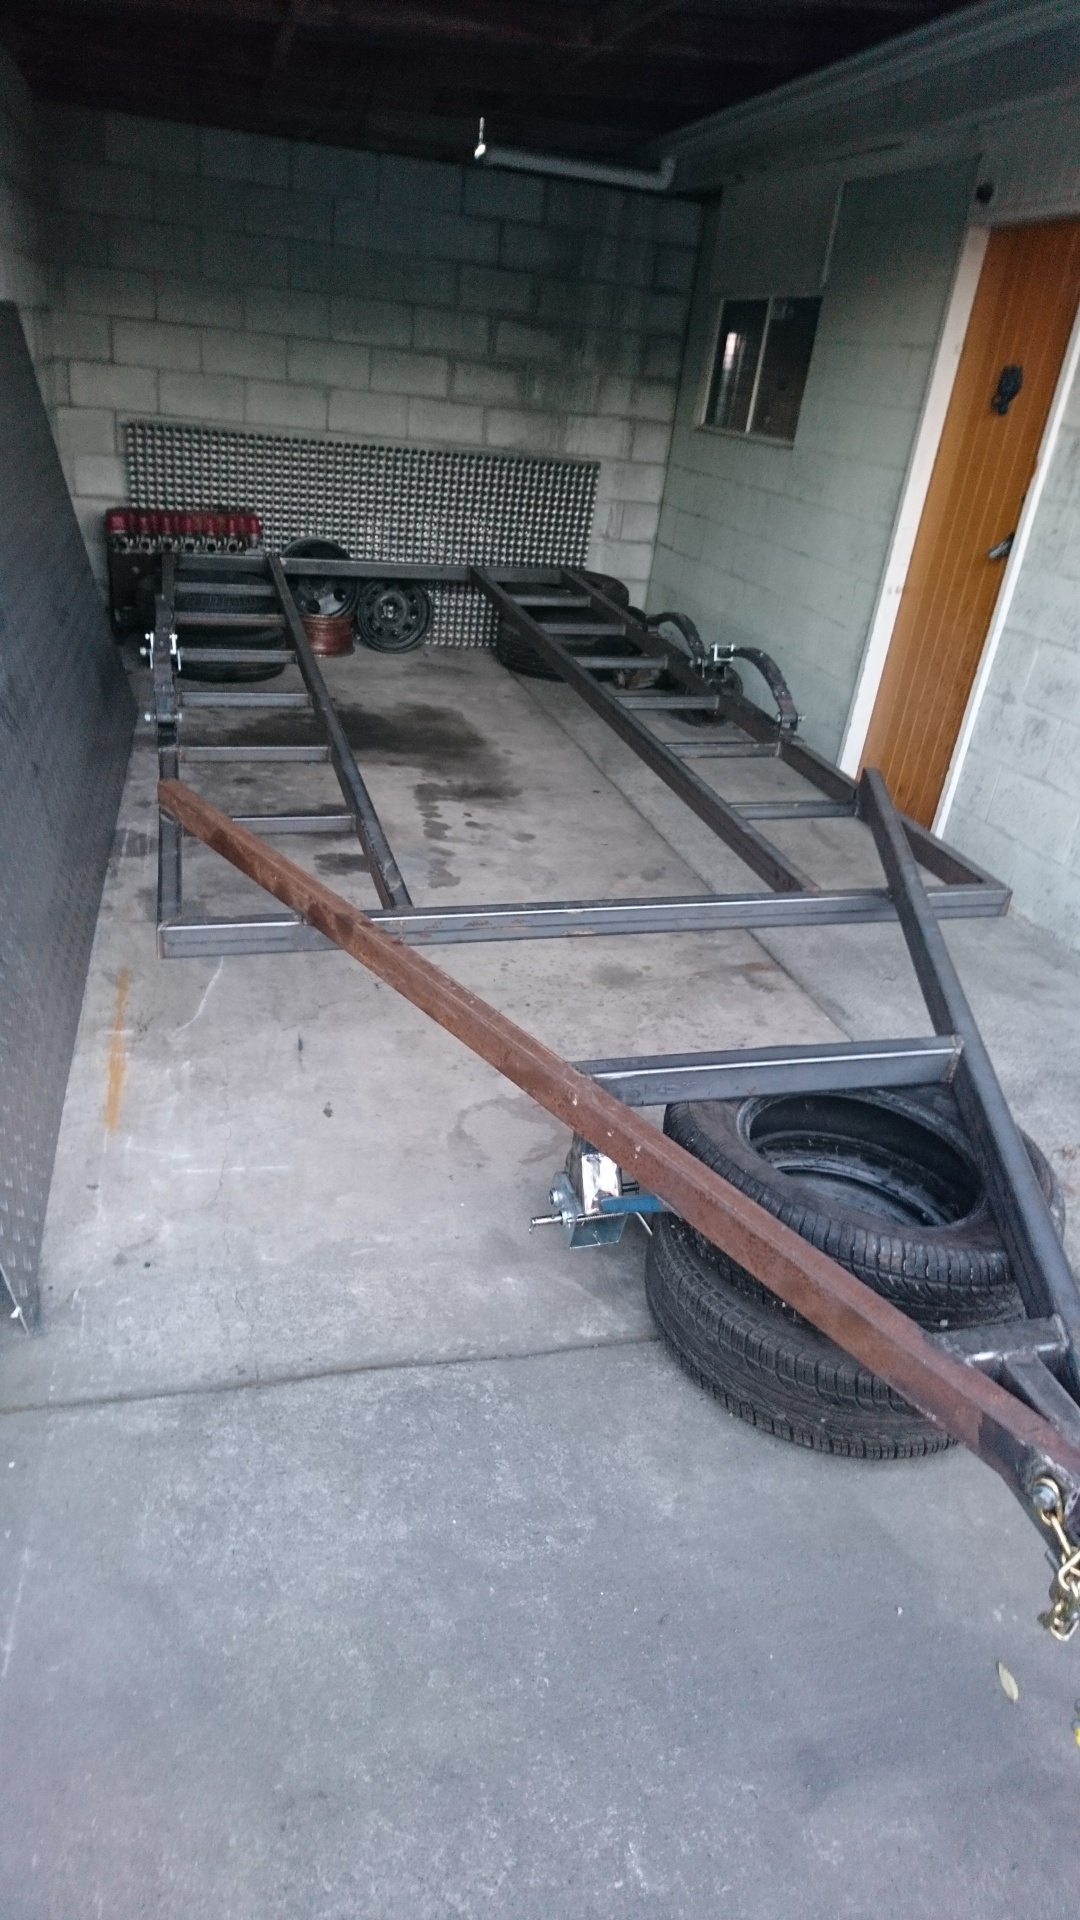
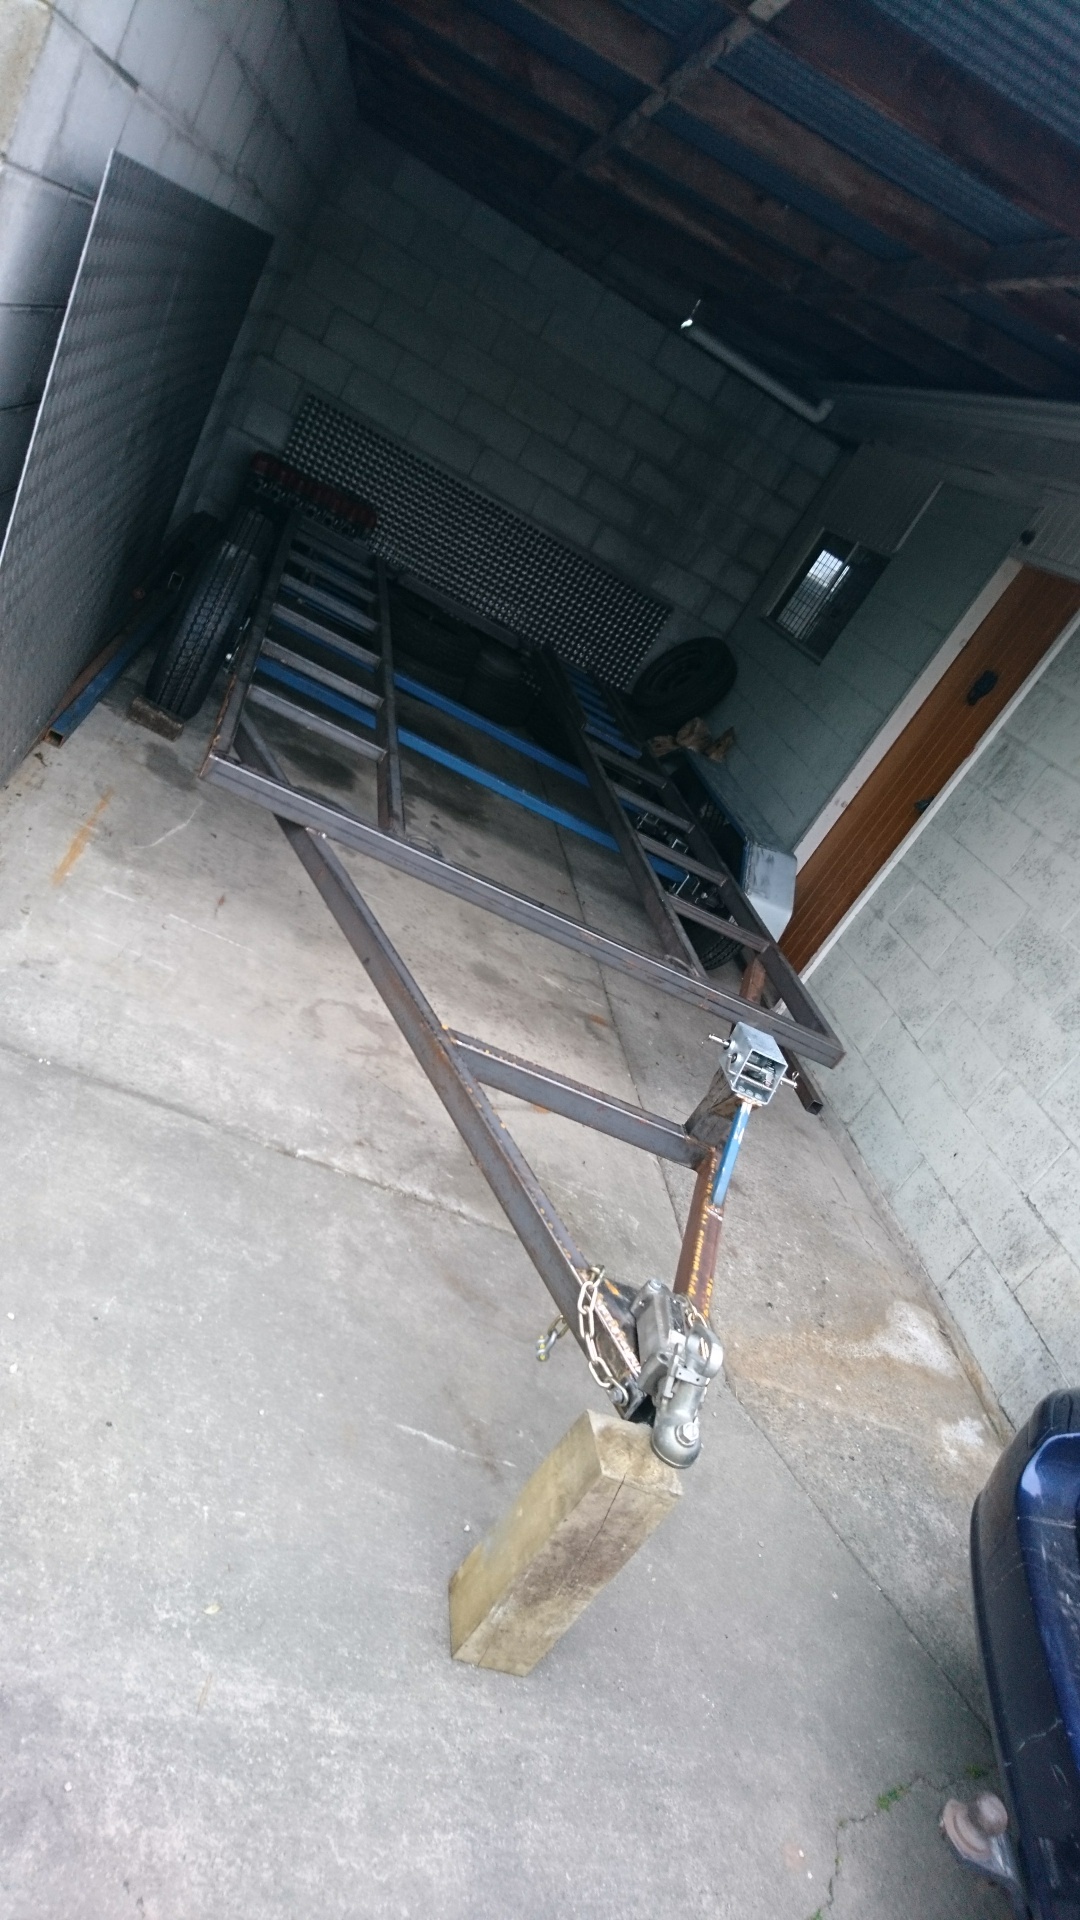
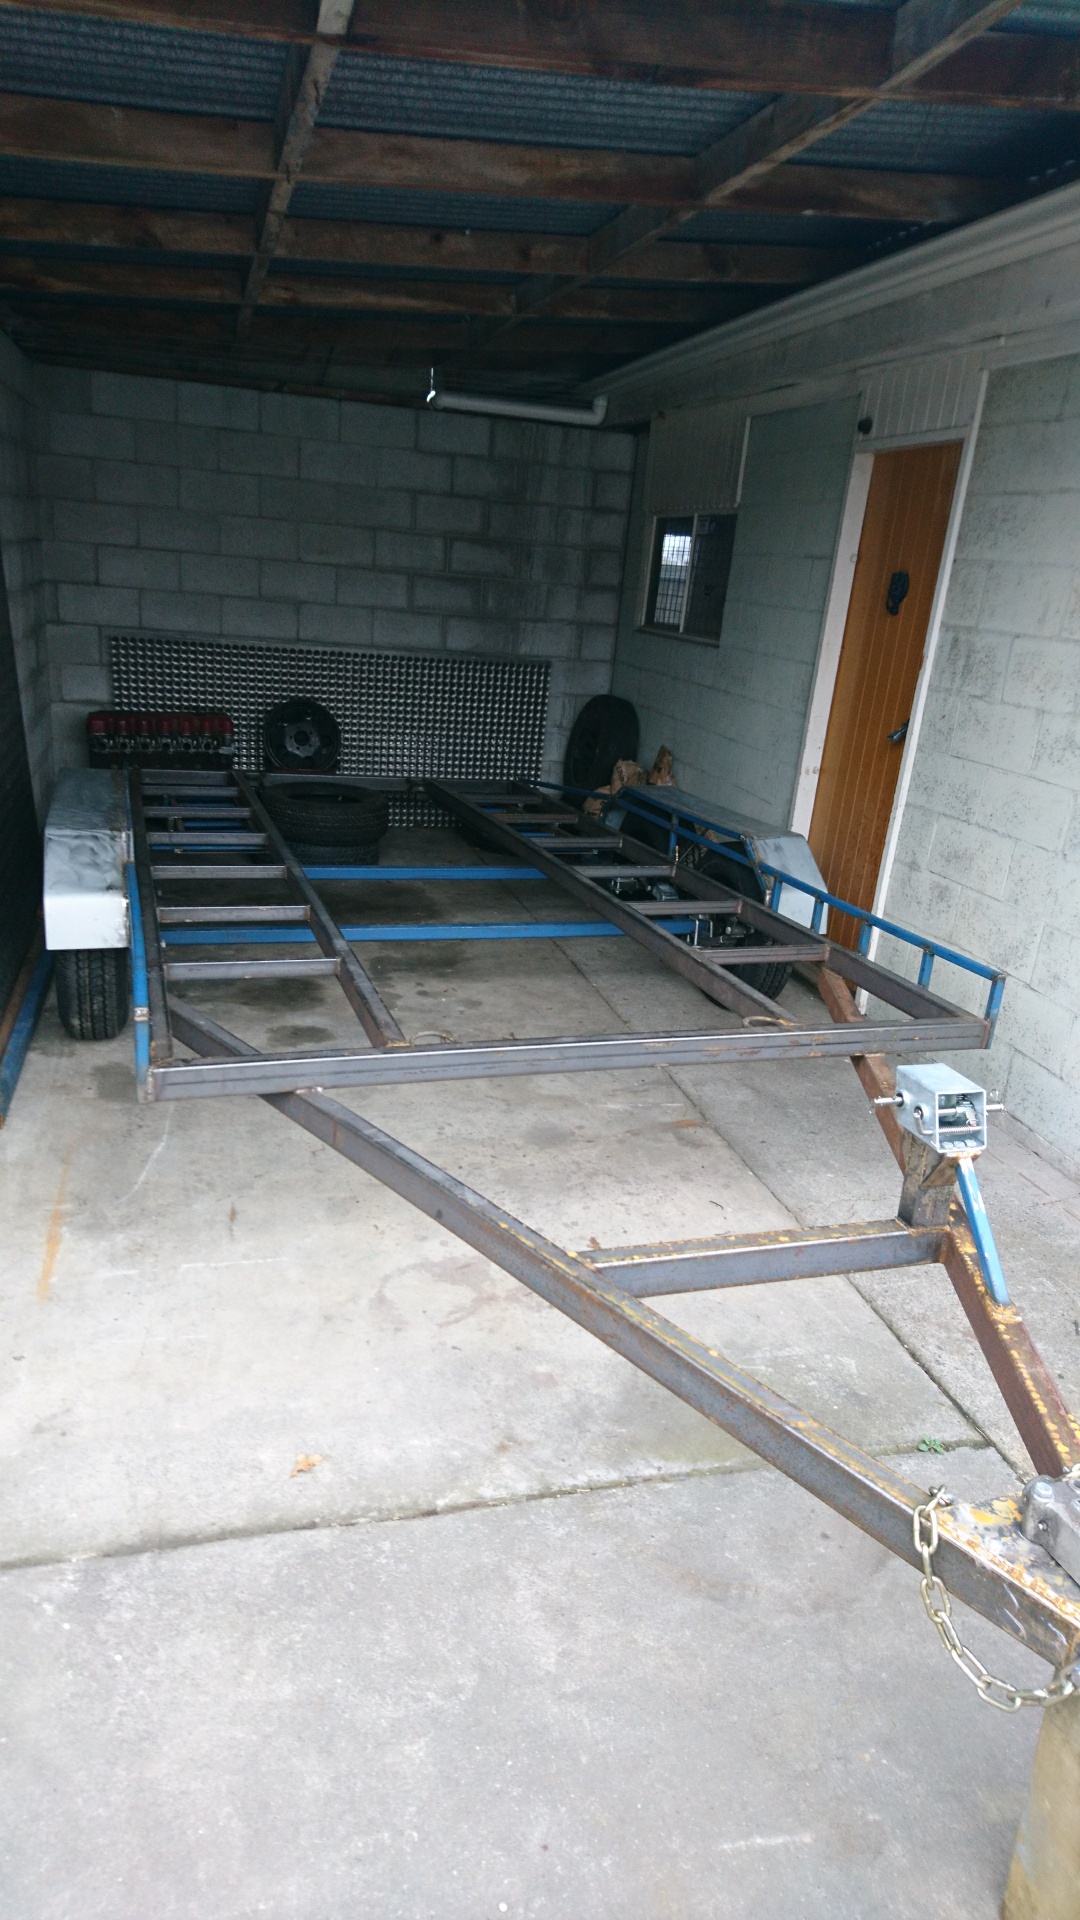
So, after a couple of years of borrowing mum's trailer for my racing, having to ask to borrow it or retrieve and fix/maintain it after being lent to randoms, I'd decided to build my own, quite similar in design to what I've used, but with a few lessons learnt. Originally was going to Hot dip Galv the trailer, but strong CBF factor for drilling holes and warping the guards, tipping it over soon put me off. Have decided it will be Sandblasted, epoxy primed then painted in 2k. This took me roughly 2 hours to have tacked together; Added Draw bar, flipped it over for storage, couple of braces for drawbar & hydraulic couping mount Offset the winch, rather than have it pull from the centre where its a pain to stand and winch - and no cars ever have the tow point dead in the centre really.. Doubler plates for the safety chains - pain in the ass welding outside with the slightest breeze 3 Ton springs installed Made the axles - braked on the front - such a ball ache calculating them with offset, clearance, dowels for the springs.
1 point
-
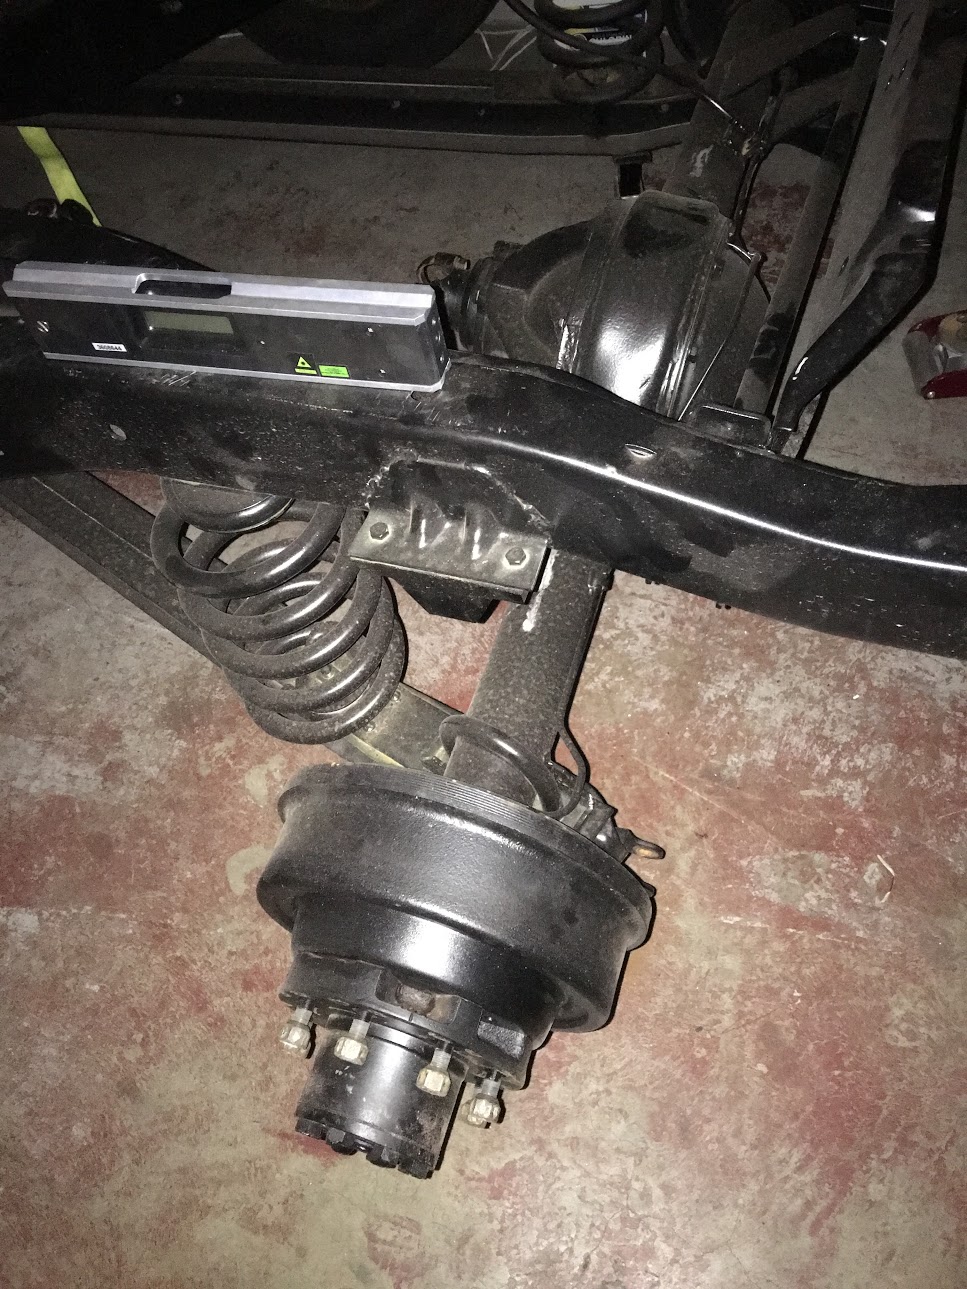
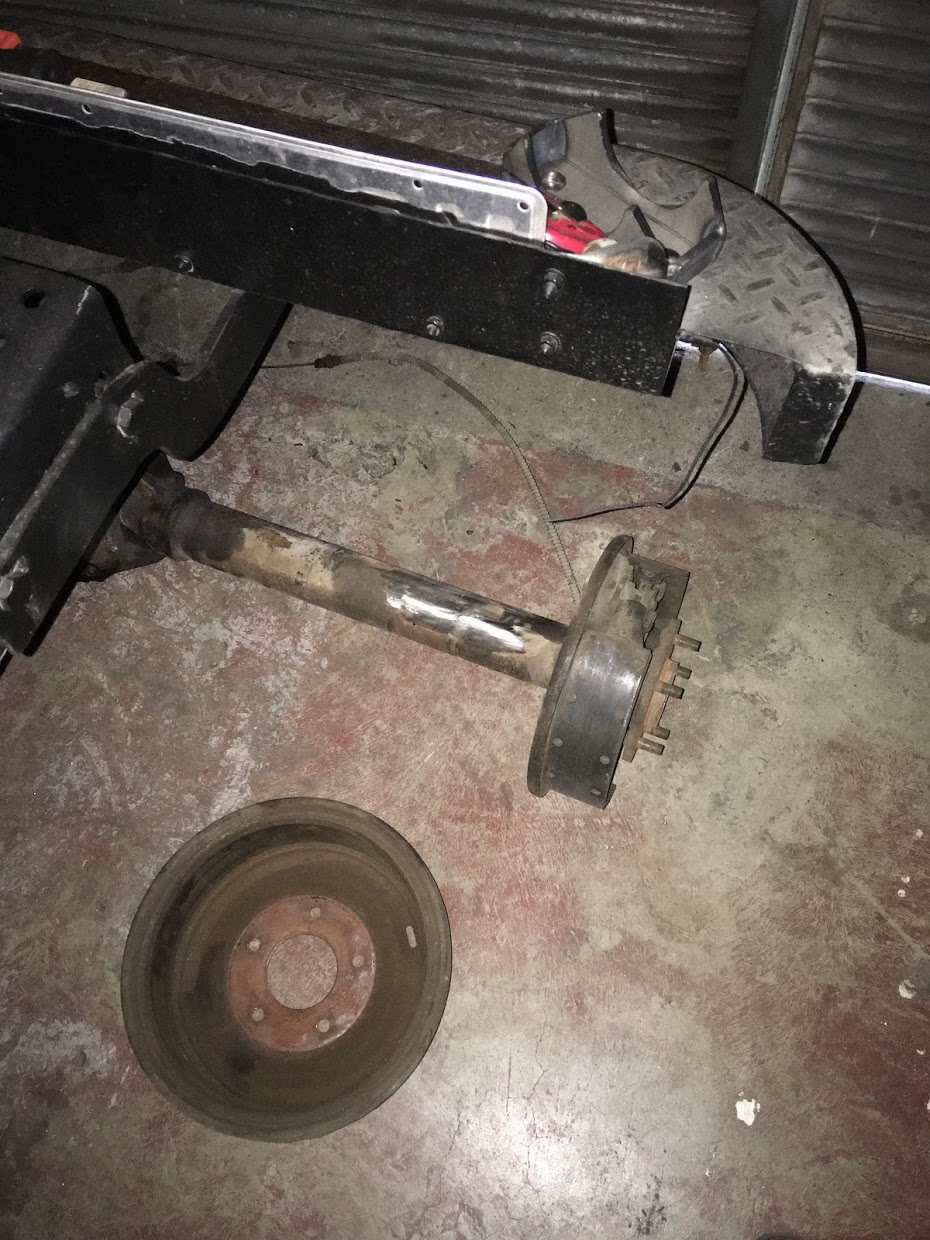
Im Torn... The ratio in the current diff is 4.56:1 which is way to high, I can get a 3.14 for this which would be sweet, but, LSD's are virtually unobtanium for this year, and Id have to do a bit of a work around on parking brakes, cause theres no provision for these, it did have a drive shaft mounted drum..... So I can swap to a C10 diff (photo 2) throw an eaton tru track in there and do 11's. But the C10 diff looks sooo whimpy, the C20 is 8 stud, and manly, but single spinner... Thoughts ? Gratuitous outdoor shot because.
1 point
-
Ohhhhhhhhhhhh so it sticking out past the end of the bar/your fingers having to be bent sideways is the problem, durrrr, I was thinking travel of the lever was the problem, which makes no sense. Don't mind me.1 point
-
I don't get it, whats different?1 point
-
Oh come on AliExpress Might explain why they don't fit like they should!1 point
-
More tubes turned up today so I carried on assembling the board this evening. Because I'm tired and wasn't paying attention I put one of the ICs in the wrong way and its not working properly now. I have ordered some replacements and will try again tomorrow.It is meant to be displaying zero but clearly isn't1 point
-
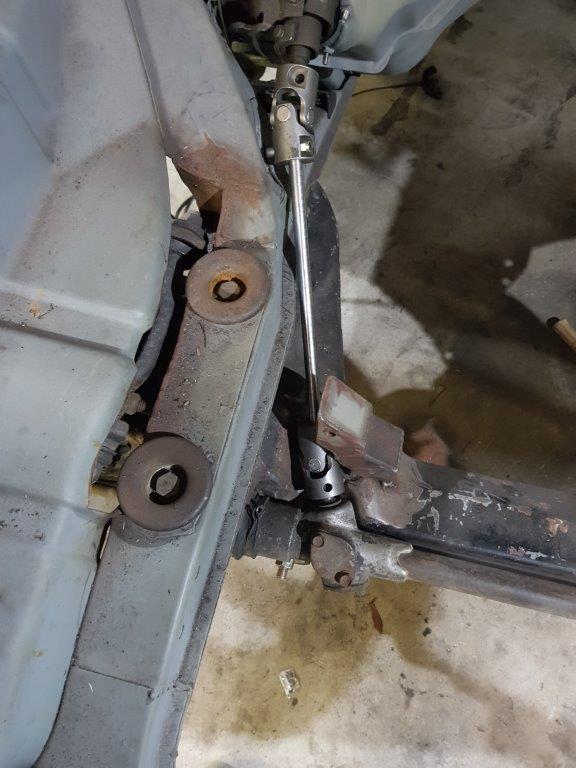
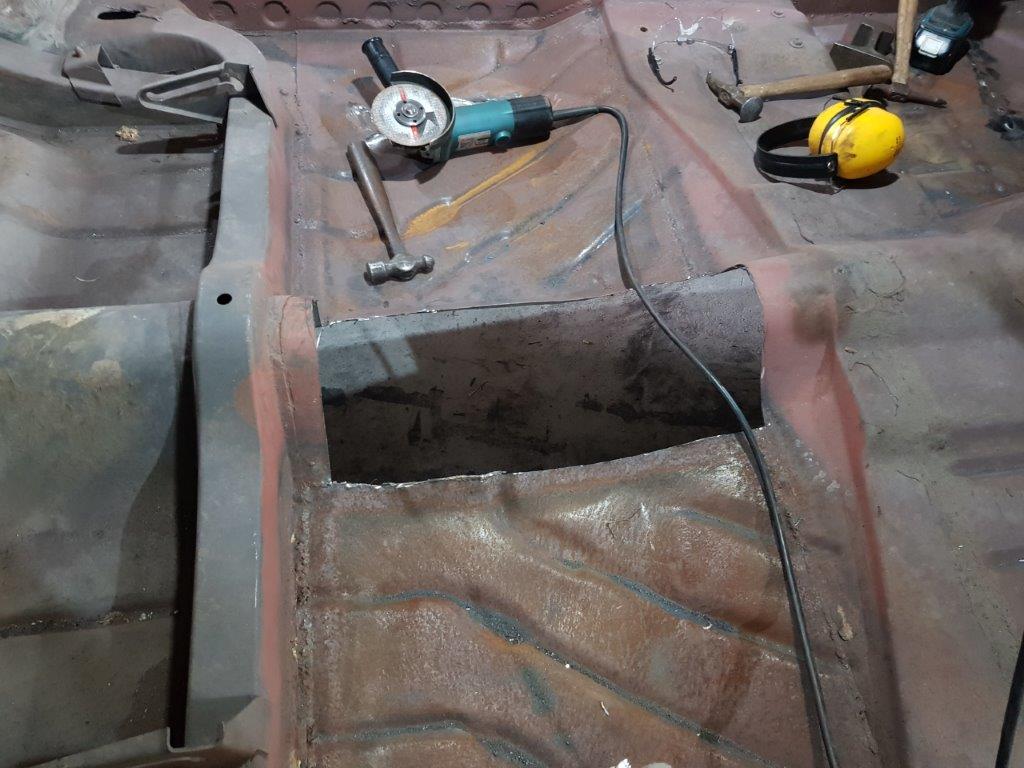
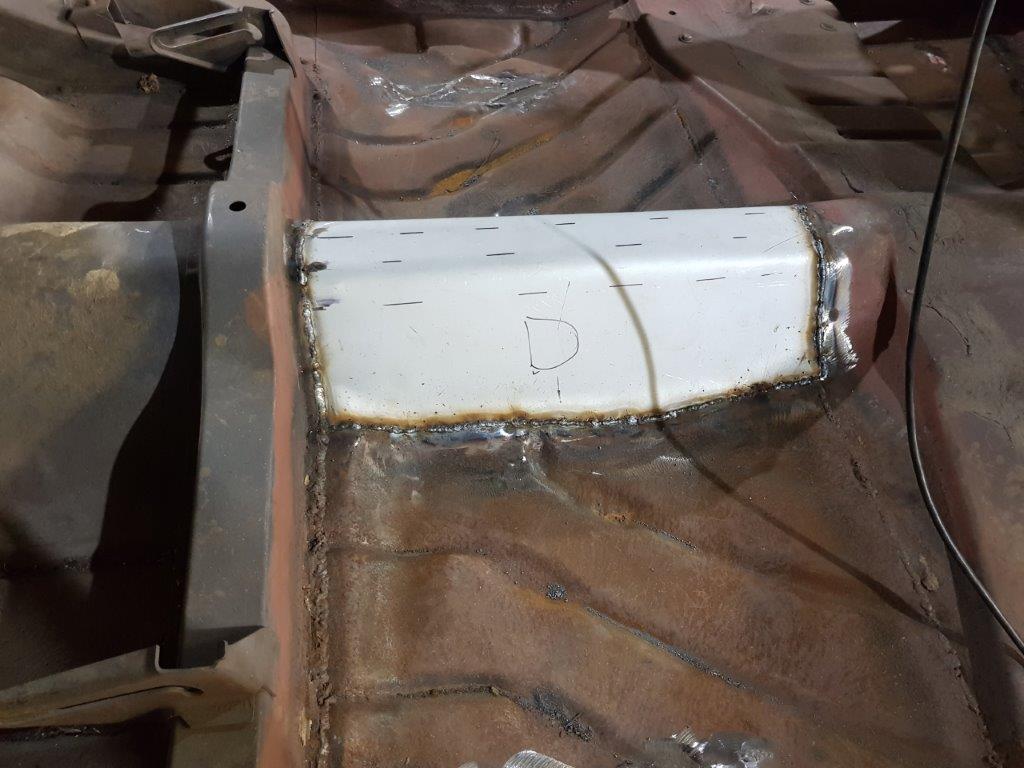
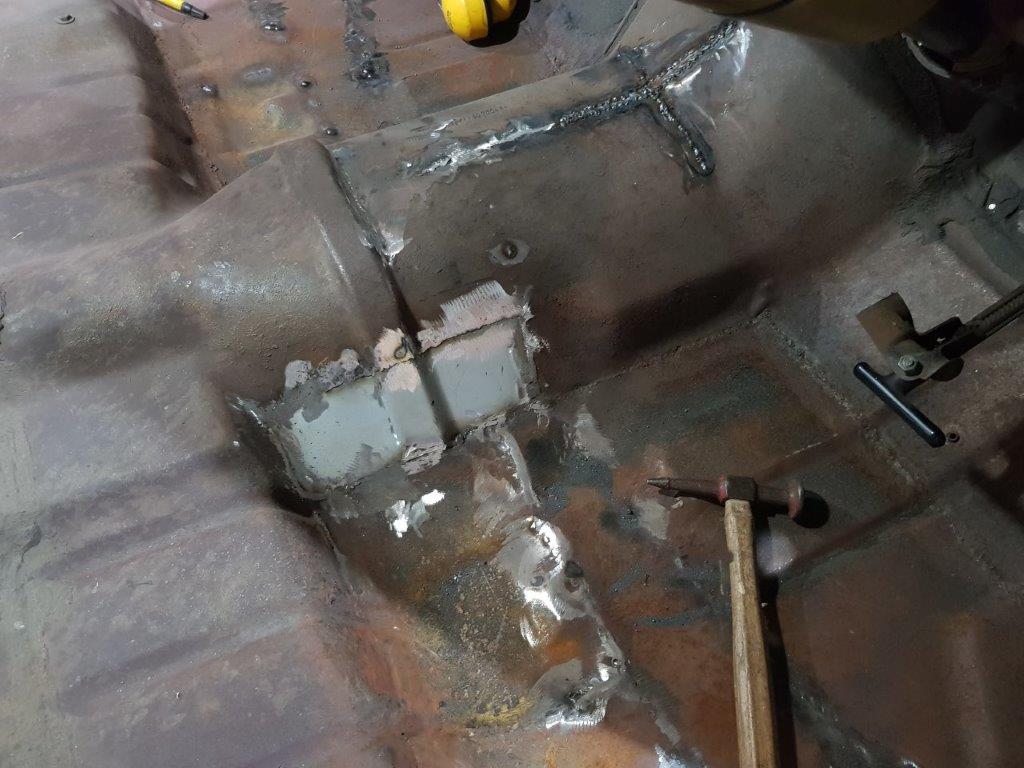
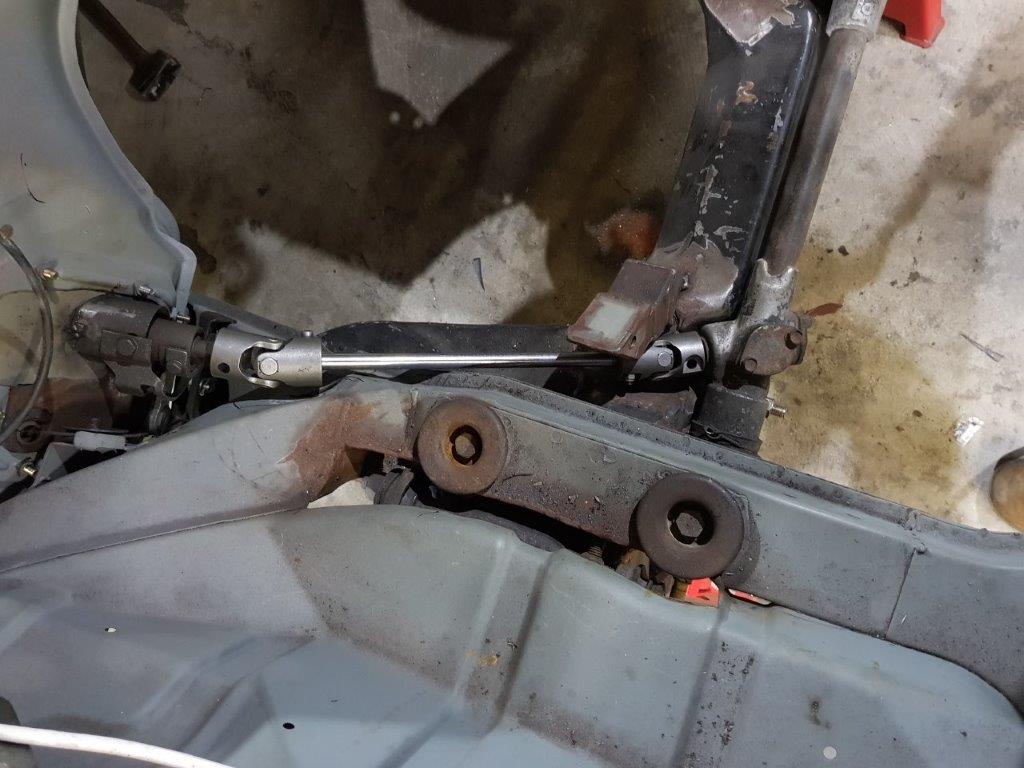
At the last monthly meeting I got told off for not putting up photos. Here are some updates. Section of the trans tunnel that looked like swiss cheese cut out New section welded in. Sounds really easy in 2 pictures but took about 4 hours to get right And some more swiss cheese gone as well as the big cut I put into the tunnel to make the trans fit welded up. Here is the steering shaft. With universals fitted. Amazingly enough nothing touches. The lip on the chassis rail will get removed beside the shaft as a precaution.
1 point
-
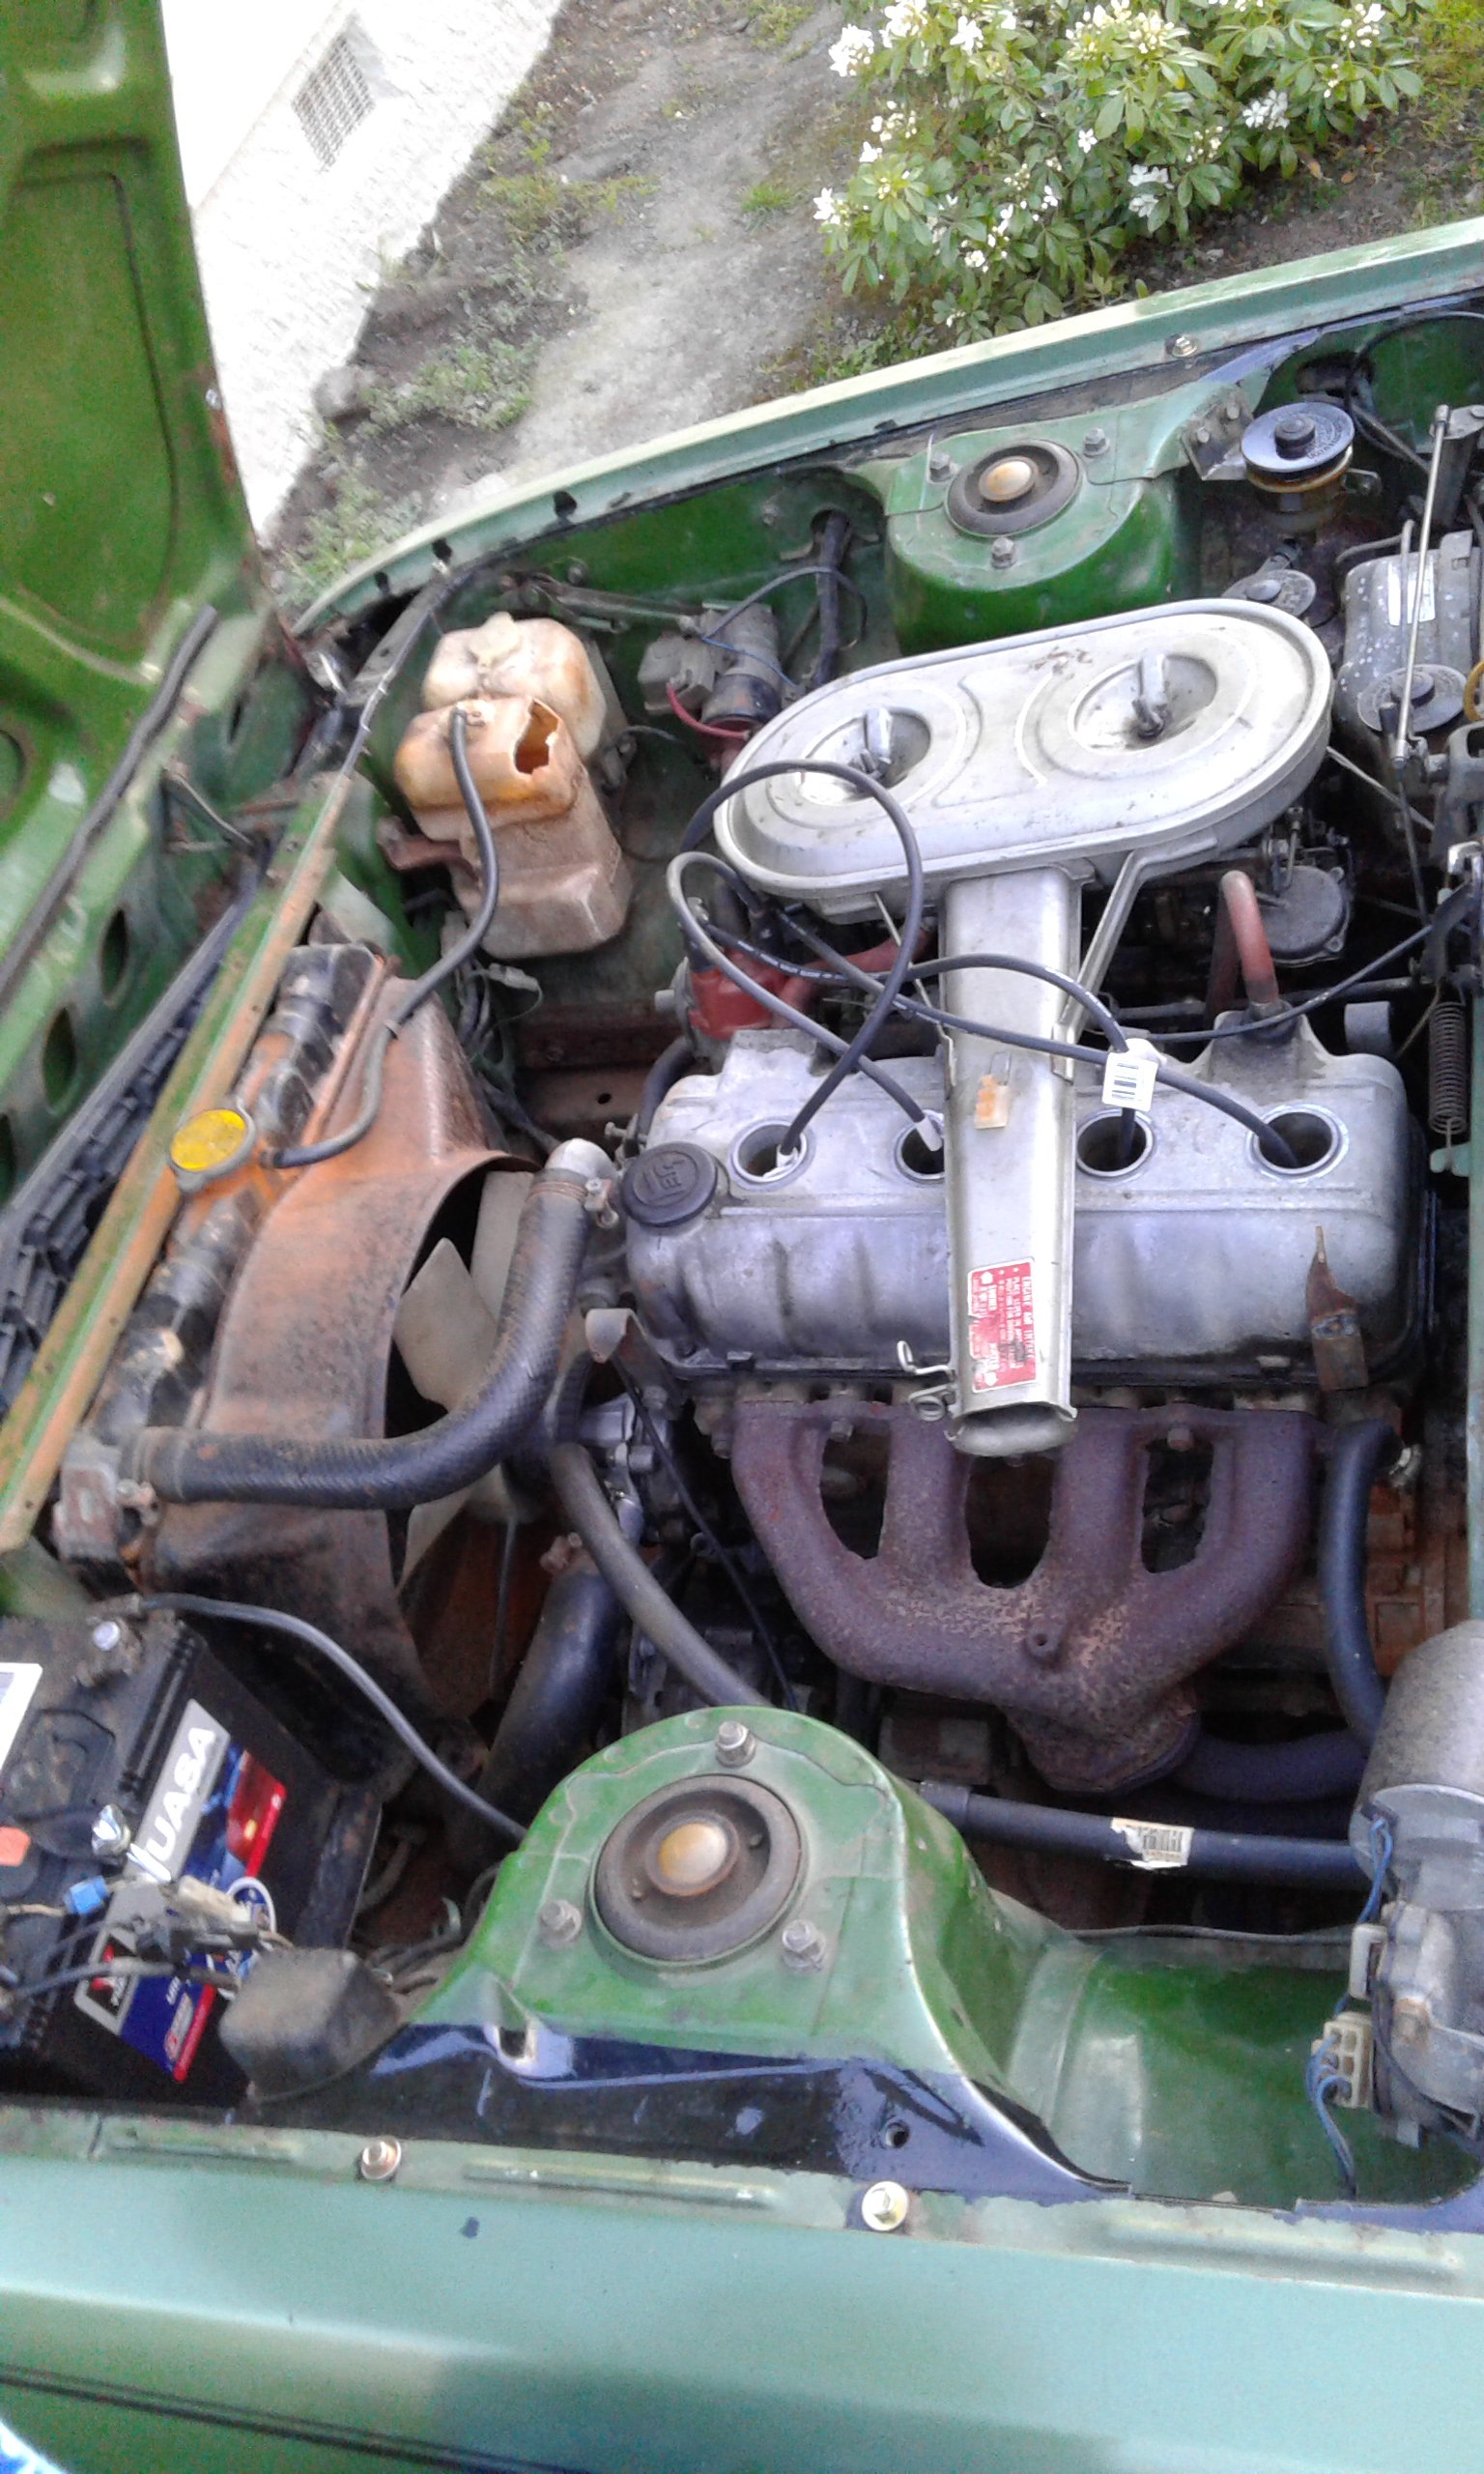
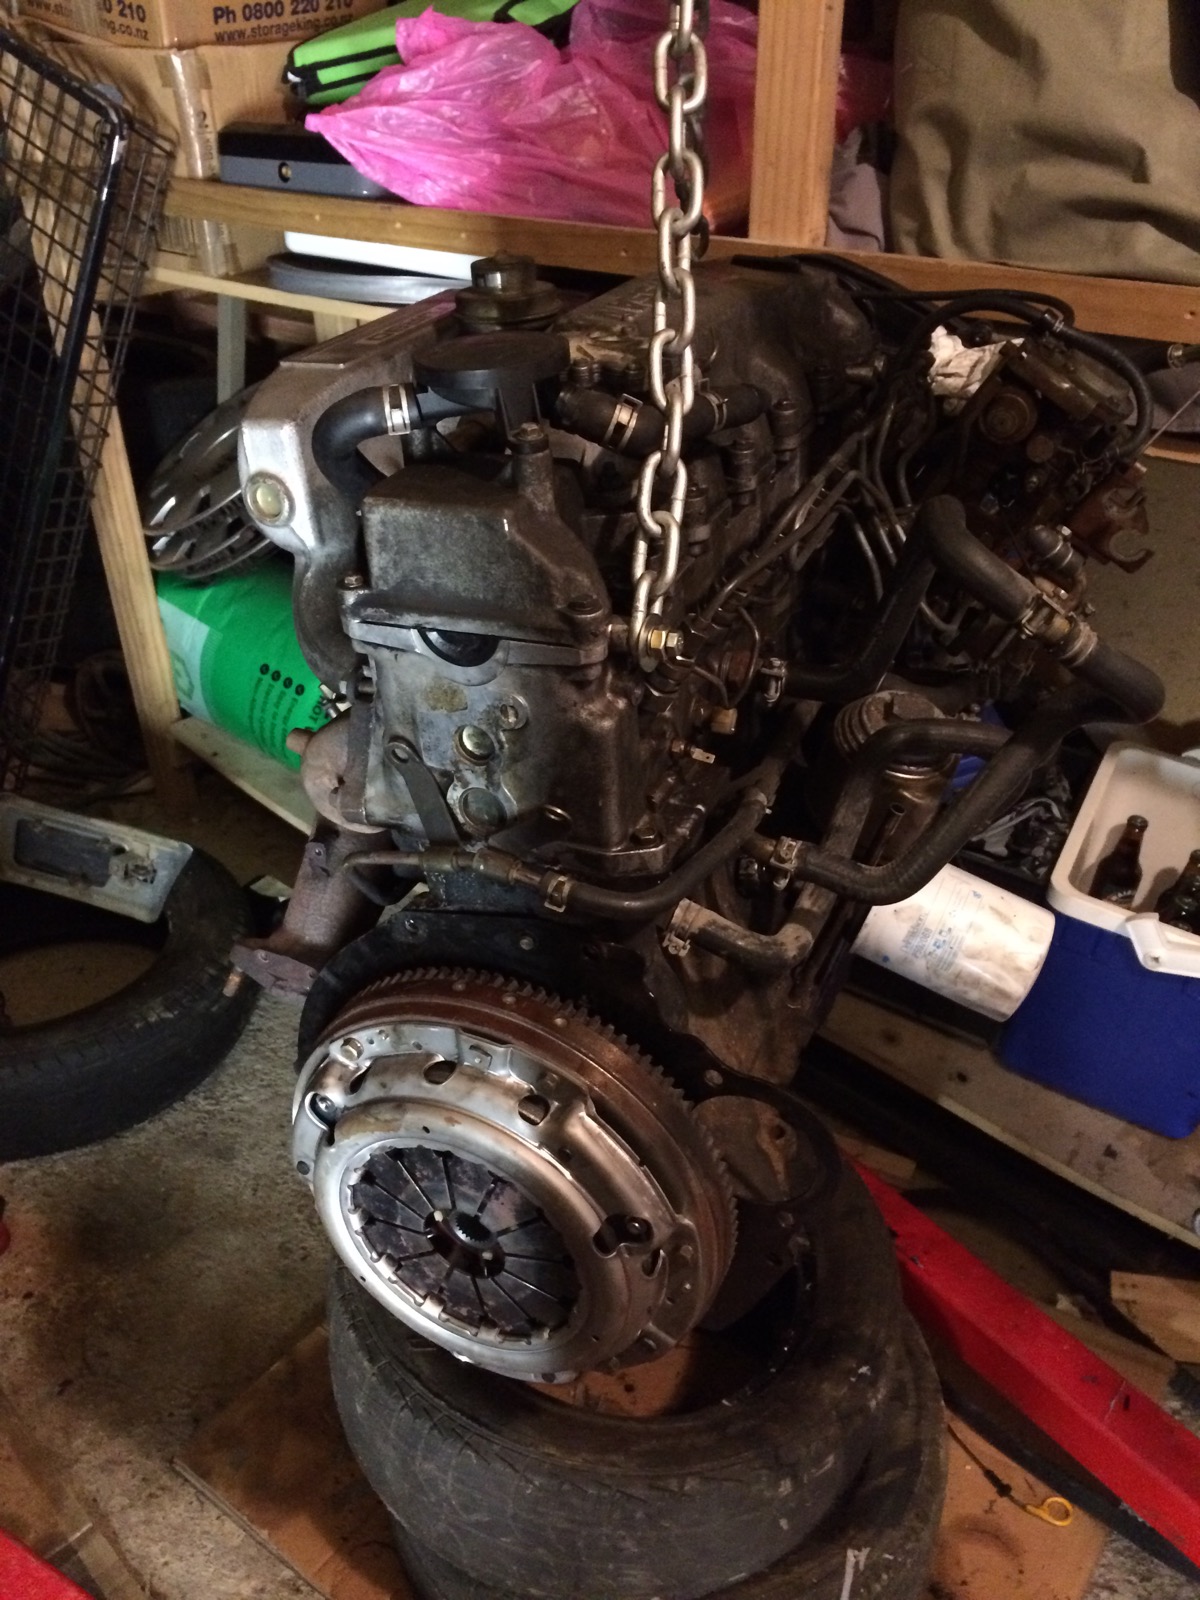
Couple pics of the powerhouse,amazing reliability really goes hard for what it is? Filled the sump right up with fuel the other day,going to pull the carbs down and rekit think the front float must be sticking open sometimes Changed the oil and filter let it run on the hoist got up to temp then repeat Shifted leads 1 to 4 round sending compression up through the carbs Worked a treat! Must of had a blocked jet somewhere idles way smoother starts a bit better and for now floats not wide open Still try to sort some carb kits just not as urgently as I first thought
1 point
-
1 point
-
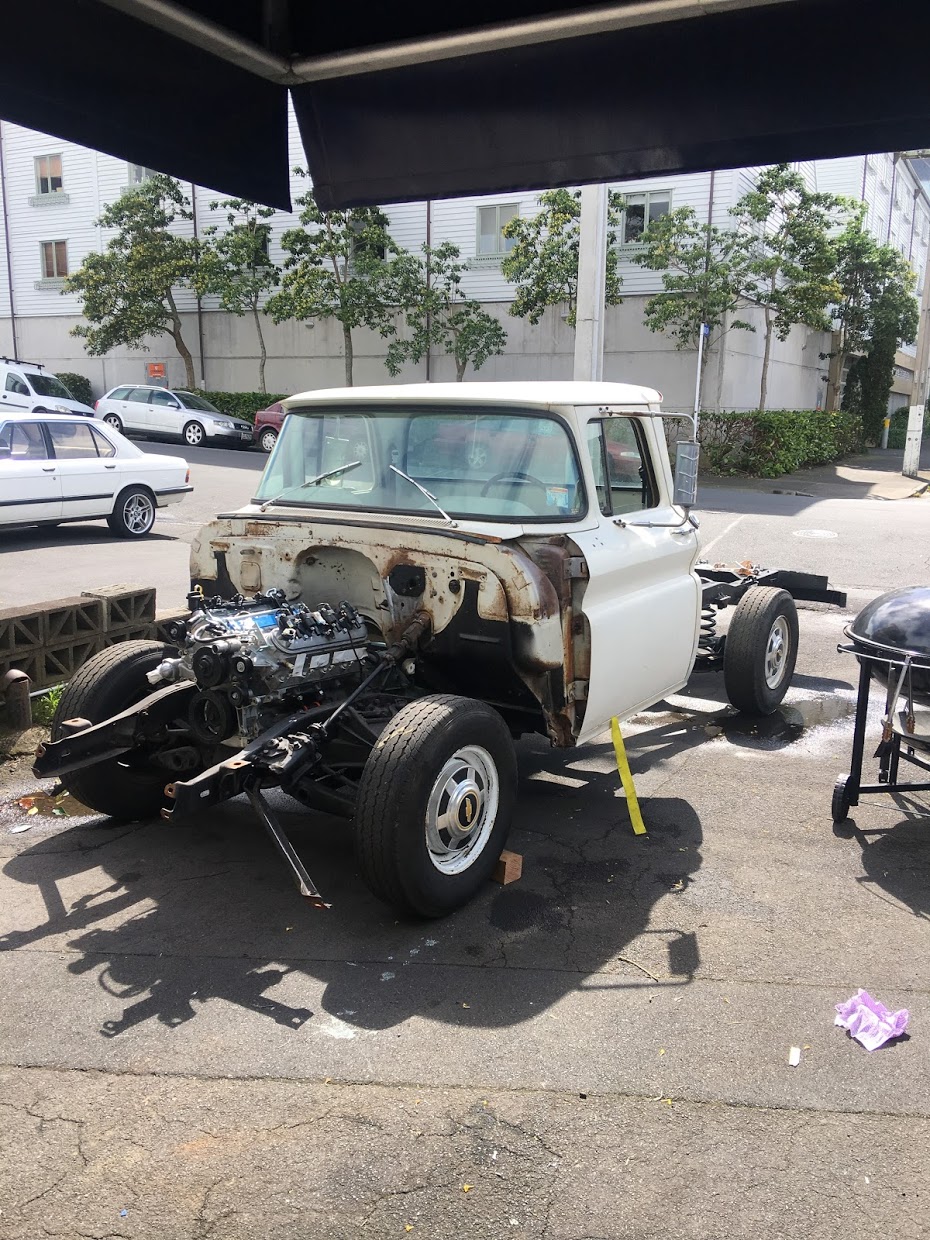
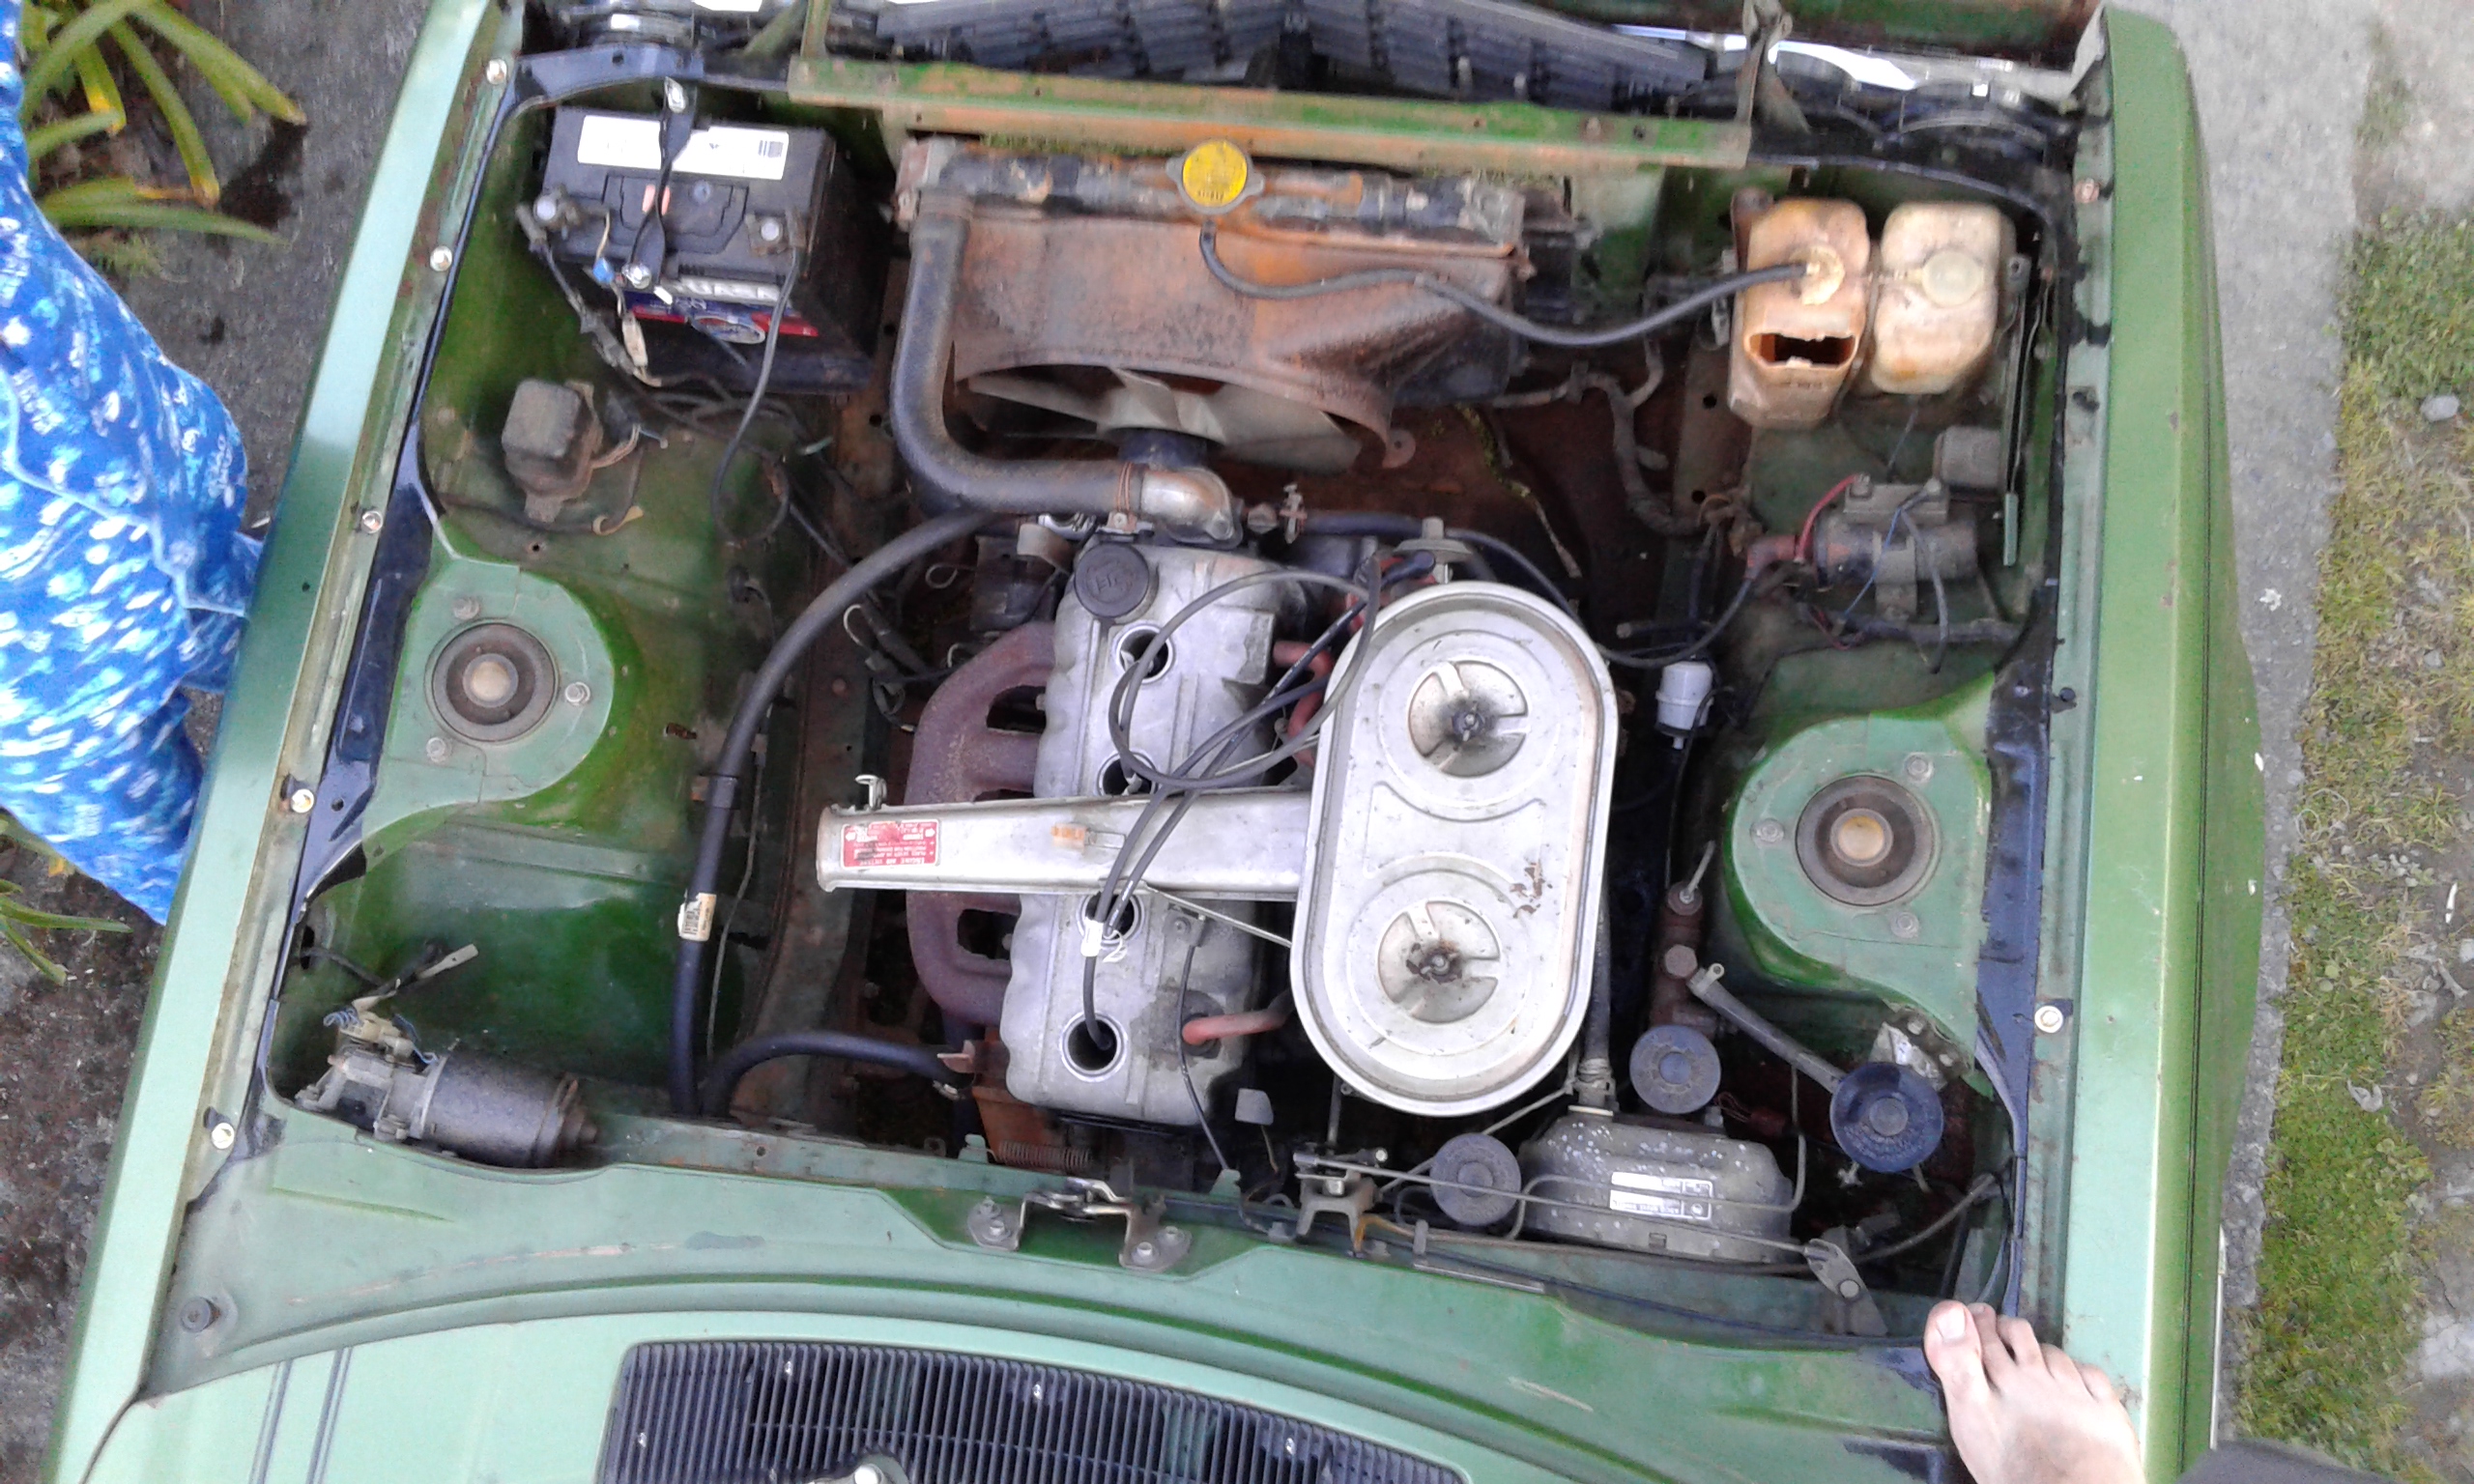
Right! I've made a good start on the mechanical's by getting into the little 850, and the front sub-frames. The engine is rumored to have traveled a mere 40,077 miles since it's birth in early 1962. It even had its original cast iron water pump and fan belt! I've deconstructed it enough for my liking (Short Block, the crank doesn't need to come out), and as soon as the gaskets and assorted new bits arrive it will be going back together. No lip on the lifters, bore, or any other parts. The clutch has a ton of meat left on it, and I didn't even snap any of the bolts off in the strip down That's always a plus! The grand plan is to give the engine a big birthday, new gaskets, thermostat housing and thermostat, water pump, hoses, fan belt, paint up, plugs, points, leads, extractors and a better carburetor. If the engine is anything to go by, then I'm expecting the gearbox to be in great shape too! As far as subframes go, I'm happy to have a pre '64 Mk1, as 1964 was the year hydrospastic suspension was introduced to the mini. Since my two front rubber cones sat still for 23 odd years, they've been naturally compressed and are holding their, so I'm expecting the car to sit a little lower in the front. After we construct a rotisserie, the body will be properly rust proofed and under-sealed. Then paint will follow. Even though I can understand doing a period correct colour, there aren't many solid colors that I actually like. I'm liking the looks of the light metallic blue on the new BMW mini's. Was thinking I could do this with an old English white roof for a sort of modern take on a classic (old mini with a new mini colour scheme kinda thing). Anyways, I don't currently have enough money to splash out on paint at the moment so I have plenty of time to think! Cheers -Jack1 point
-
well its been about 15 mouths since i actually worked on this (not just fucking around with it.) ..we said we would have an awesome holiday last xmas as it will be the last for a while so stopped working on it and saved .,took 5 weeks of work over xmas and we took the kids on a road trip around NZ...... during this time the wife and i decided it might be time to bite the bullet and buy a house.so we decided that what we would do this year ...so once again i put the old girl on hold till we had our own home. we we finally managed to buy a house .....so our gilrs have a place to call home and so do my projects.(twice as big as the last garage) i had done 2 trips to the new house and i could kinda see the mk2 in the old garage. and the 1st time she has been out side in a while. and after move all my shit i have come to the conclusion the old garage was the fucking tardis as i have no idea how it all fitted... as its fulled the new garage. so once i get all of this sorted i will be back into it......normally i would have sold this off agers ago but i love it to bits and i bought the mk5 after xmas to keep me amused .. also bought a mk3 last week so i will see what thats like when i get around to picking it up. cheers
1 point
-
try it with the standard setup first. timing requirements probably wont change a whole lot. unless its a real aggressive setup. As above use some kind of knock detection, and some small base timing adjustments maybe enough. With the higher compression it will more likely want to knock. but the best answer isn't retarding the timing. Throw some decent fuel in it. 98 or at least 95. cam may screw up the vac advance a little if its fairly aggressive. which will give you less advance at cruise. but again try it before spending the money on another setup1 point
-
Its going to depend on the dizzy to do this. Generally you need to really be able to have a range of springs (how quick the timing comes in) and the ability to adjust the max timing (the stop). Then once you have done these mods or got a dizzy that can be modified you then need to tune it on the road. You can setup a knock sensor and some headphones with some kind of amplifier (laptop) and go nuts tuning spark till your ears bleed. I did some of this on my car but I am lucky enough to have a murican V8 so a new adjustable dizzy is a off the shelf item. I tuned it pretty bleeding edge (its a donk so timing all in @ 2500rpm) and then when it was extra loaded (like 6-700kg) on a very hot day up a hill I got some knock as my cruise RPM was way up. So lesson learned on safety margin and tuning for conditions. Lucky you can just pull over and guess dial it back to keep going. I probably wouldn't trust a shop to do anything apart from some machine work if possible to make the dizzy adjustable? after that I can't imagine a shop road tuning a carby car for you without many hours being spent and lots of $$. Seems a journey best traveled in DIY and learning shit. Saying all that the car will work with the stock dizzy for now (which you seem to think it wont from above comments?) all you may want to do is limit max timing (mod the stops) so you can put more base timing in. Or electronic control like above but that ads complexity.1 point
-
did some sweet hoons on this thing couply weeks ago down at DGR welly. Had a good ride with Russ and the boys on saturday out to makara beach and she ran without fault, its pretty deafening / hilarious to ride and gets a good share of attention. So i can tick this project off as complete, on to the G/S paris dakar resto now1 point
-
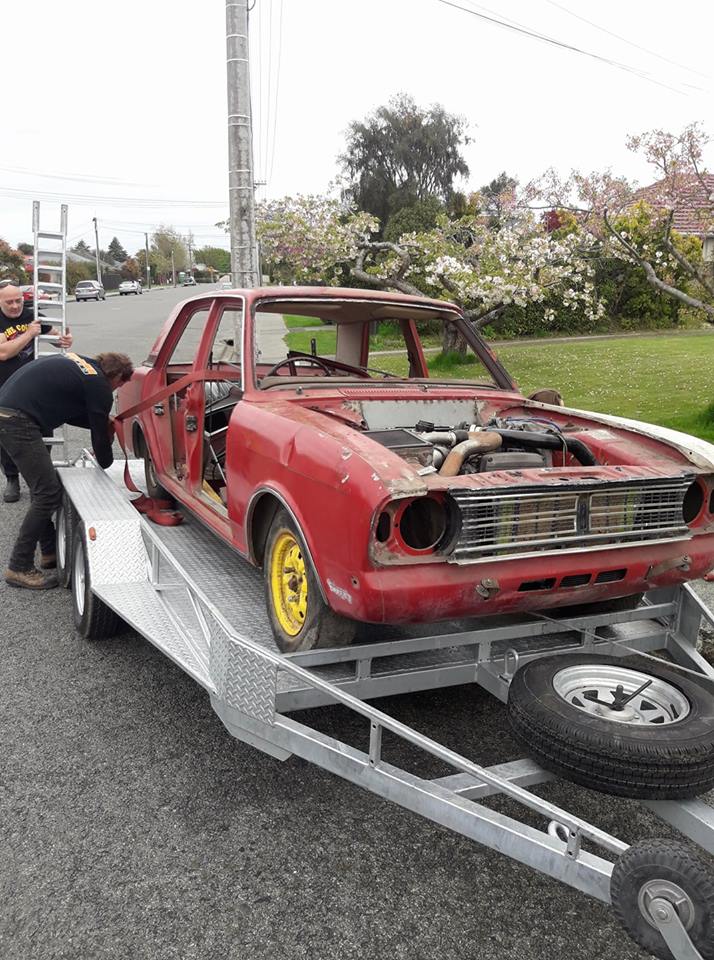
Okay soooooooo as awesome as it was living in a beautiful place and having a cool Automotive related job, life in Cromwell/Queenstown wasnt quite right for me. It was awesome fun working at HPA, made some friends and great memories which will last a long time. But, it just didnt quite feel like somewhere I wanted to settle down and in some ways it wasnt the career direction I wanted to take. So for a variety of reasons I ended up coming back up to Auckland. Being landlocked so many hours away from the ocean just didnt feel right! It was a bloody awesome experience though and it felt like it reinvigorated my life and got me back on track after some hard times lately. But anyway! It was good that I never got to the point of attempting to drive the Carina down, as the new driveshaft combination wasnt good. It took a bunch more mucking around after I got back to get this right again. But sadly it looks like the previous incident may have stuffed the bearings in the gearbox as it's pretty noisy now and leaks fluid out the rear main seal even after replacing it. Pooz. But it was great to get back home and be able to go drive it around again! The R888s are on my normal wheels so I've been driving around with a 15x6 running 205/50/15 and have noticed no negative effects to handling. Possibly because the sidewall of the AD08R is so stiff. Since I've been back, I started with a fresh sheet of paper on the tune file in the ECU. As it had some old junk in there, as well as some stuff that I setup when I ahhhh knew less than I do haha. The staged injection seemed to work well enough in terms of delivering the right amount of fuel and blah blah... But it was always a bit crappy in transient conditions. I decided I would turn on the outer injectors 100% of the time and try tune the car using just those, and get the accel enrichment and so on working as best I could. But it just felt boggy. When I reverted back to 100% inboard instead, holy moly the throttle response difference was amazing. And so the pull out of corners was much better and it felt like you could more accurately mash the gas and know what the car was going to do. So I ditched it and put a standard manifold back on. My theory is that since my intake manifold is thermally isolated from the head, it is not able to use the heat of the runner walls to evaporate the fuel so you have massive fuel pooling issues... Which means you lose control of your fuelling as some fuel you squirted in several cycles ago is only just entering the combustion chamber as it evaporates. So fuel you add at say 5800rpm only enters the cylinder by the time you get to 6000rpm and so on. And so if you tune your car with the acceleration rate of say 3rd gear fuelling isnt right for 1st gear anymore. Just lots of headaches that you cant really address well enough with the accel enrichment available on a G4+ In the documentation from Toyota on their wall wetting experiments they note that on a cold port (engine cold starts) fuel can take over 1.5 seconds to evaporate and contribute back to fuel in the engine so even if it was only half as long on the runner walls. It's a massive surface area covered in fuel which is always going to be a ball ache to compensate for. Going back to a standard manifold looks to have cured a vaccum leak or two as well, haha so the idle and so on is much better too. I've been playing around a bit with a few variables such as injection timing and VVTI advance as well. I have found that changing the injector timing so it's injecting fuel as the intake valve is open helps a lot with cold starts, and results in a lower fuel consumption when the engine is hot too. Since it's been cold I've also spent a bunch of time getting the cold idle really nice, closed loop lambda adjustment works really well if you set the adjustment rate to 1hz so its only slowly adjusting it. Otherwise it makes the idle surge if you try to run closed loop at say 20hz like you could if you were doing 4000rpm or whatever. Under cruising conditions it seems that advancing the intake cam at all just means worse economy. This may relate to the tuned length of the primaries and secondaries of the exhaust causing some undesirable something something at cruising rpm compared to a standard exhaust manifold... But for whatever reason, it isnt beneficial to advance the cam. And at high rpm low load, rather than retarding the cam I figure I may as well keep the cam advanced so when you stab your foot back on the throttle the cam is not having to "catch up". And this seems to have made the throttle response even better as well. So the engine response is better than ever! I picked up a cheap Altezza engine, planning to give it a freshen up and at some point swap it over. I'll be losing the fancy ported head of my current engine, but will be gaining: -Exhaust side VVTI -Higher compression ratio -better alternator position -Better water line setup -Better engine mount setup -Better PCV valve arrangement -And a few other minor advantages so I think it's worth the trade but will be interesting to see. The state of the oil and colour of the coolant in the altezza engine though is bloody disgusting though so it'll need a strip down and hot tanking or whatever before doing anything with it. So might be a while until it's ready to swap in. But looking forward to having a play with the exhaust side VVTI. I think I'll wire in an exhaust pressure sensor when I do an overhaul of the loom to suit some of the changes needed. Will be interesting if this will show anything relating to tuned lengths of the primary and secondary pipes. In the immediate future however I'm just really enjoying living at the start of Scenic Drive in Titirangi now and being able to go for some awesome drives on some backroads making doort noises again1 point
-
thems some holes in my tinfoil hat Ah well, at least its clean inside1 point
-
I was looking forward to driving it to work the other Saturday cause my work car is boring, but when I did it was flat as fuck, boring and generally disappointing. when I got home I put the timing light on it to find it had moved a little, so tightened. Needed a warrant so I put a standard carb on, so it had choke and wasn’t a jerk to start for them. hosed gas into the engine when you shut it off. pulled it apart and cleaned it, did the same thing. then discovered the power valve actuator was frozen up Freed that up and it was mint, but The morning of the warrant it started doing it again. passed with a clean sheet! Was a totaI knob to start afterwards so I hotwired it and wouldn’t rev out, popped and banged, so chugged it home. They didn’t mention it doing this to them so she must have behaved. more of the same. Have since thrown the twin carbs back on. it pulled a bit under brakes so I ripped the other caliper off (did the opposite side before last warrant) and: one Piston was a bit scabby so used a spare and got it back together, cheers to mint16 for the bleeding help! cheers also to the above for making my sweet rocker shaft spacers. likely overkill but it’s a cool old school mod which replaces the springs with a brass bushes to stop the rockers moving laterally under revs I also modified the mazda air box a while back so the bonnet closes over it. required me to cut most of the base, push down at front and then fill the pie-cut section with panel steel. and found out the hard way that if you leave the key on while you go check something else, it can get ultra hot,produce a lot of rank smelling smoke, drip Brown shit out of it and fail! Lucky I had a spare generic one, cooked one was a GT40. I have a new one, but I’m planning to go electronic dizzy soon so needed to be a non-resistor type. Heres a shot of the current state of play. I used to have the fuel line running over the rocker cover into a tee, but discovered that the factory hard line will reach with a little bending. Much tidier and safer.1 point
-
Replaced the front wheel bearings, and it's now all road legal and still owes me sub a thousand. Now the boring bits over time for some fun. Also took it back to the old owner and he said he still has its original black plates and will dig them out so I'll hopefully get them back on the car
1 point
-
Bit more progress, got all the bits on that weren’t on. Next step is too try jam it back in the hole Boring picture so here’s a dam
1 point
-
definately try running it first before you go bore it larger and fuck it LOL1 point
-
Rabble? What/who is this "rabble" you speak of? '
1 point
-
Hey, if it devalues the street enough i might be able to get into the housing market1 point
-
My parents spotted this in their travels in the USA, so sweet!1 point
-
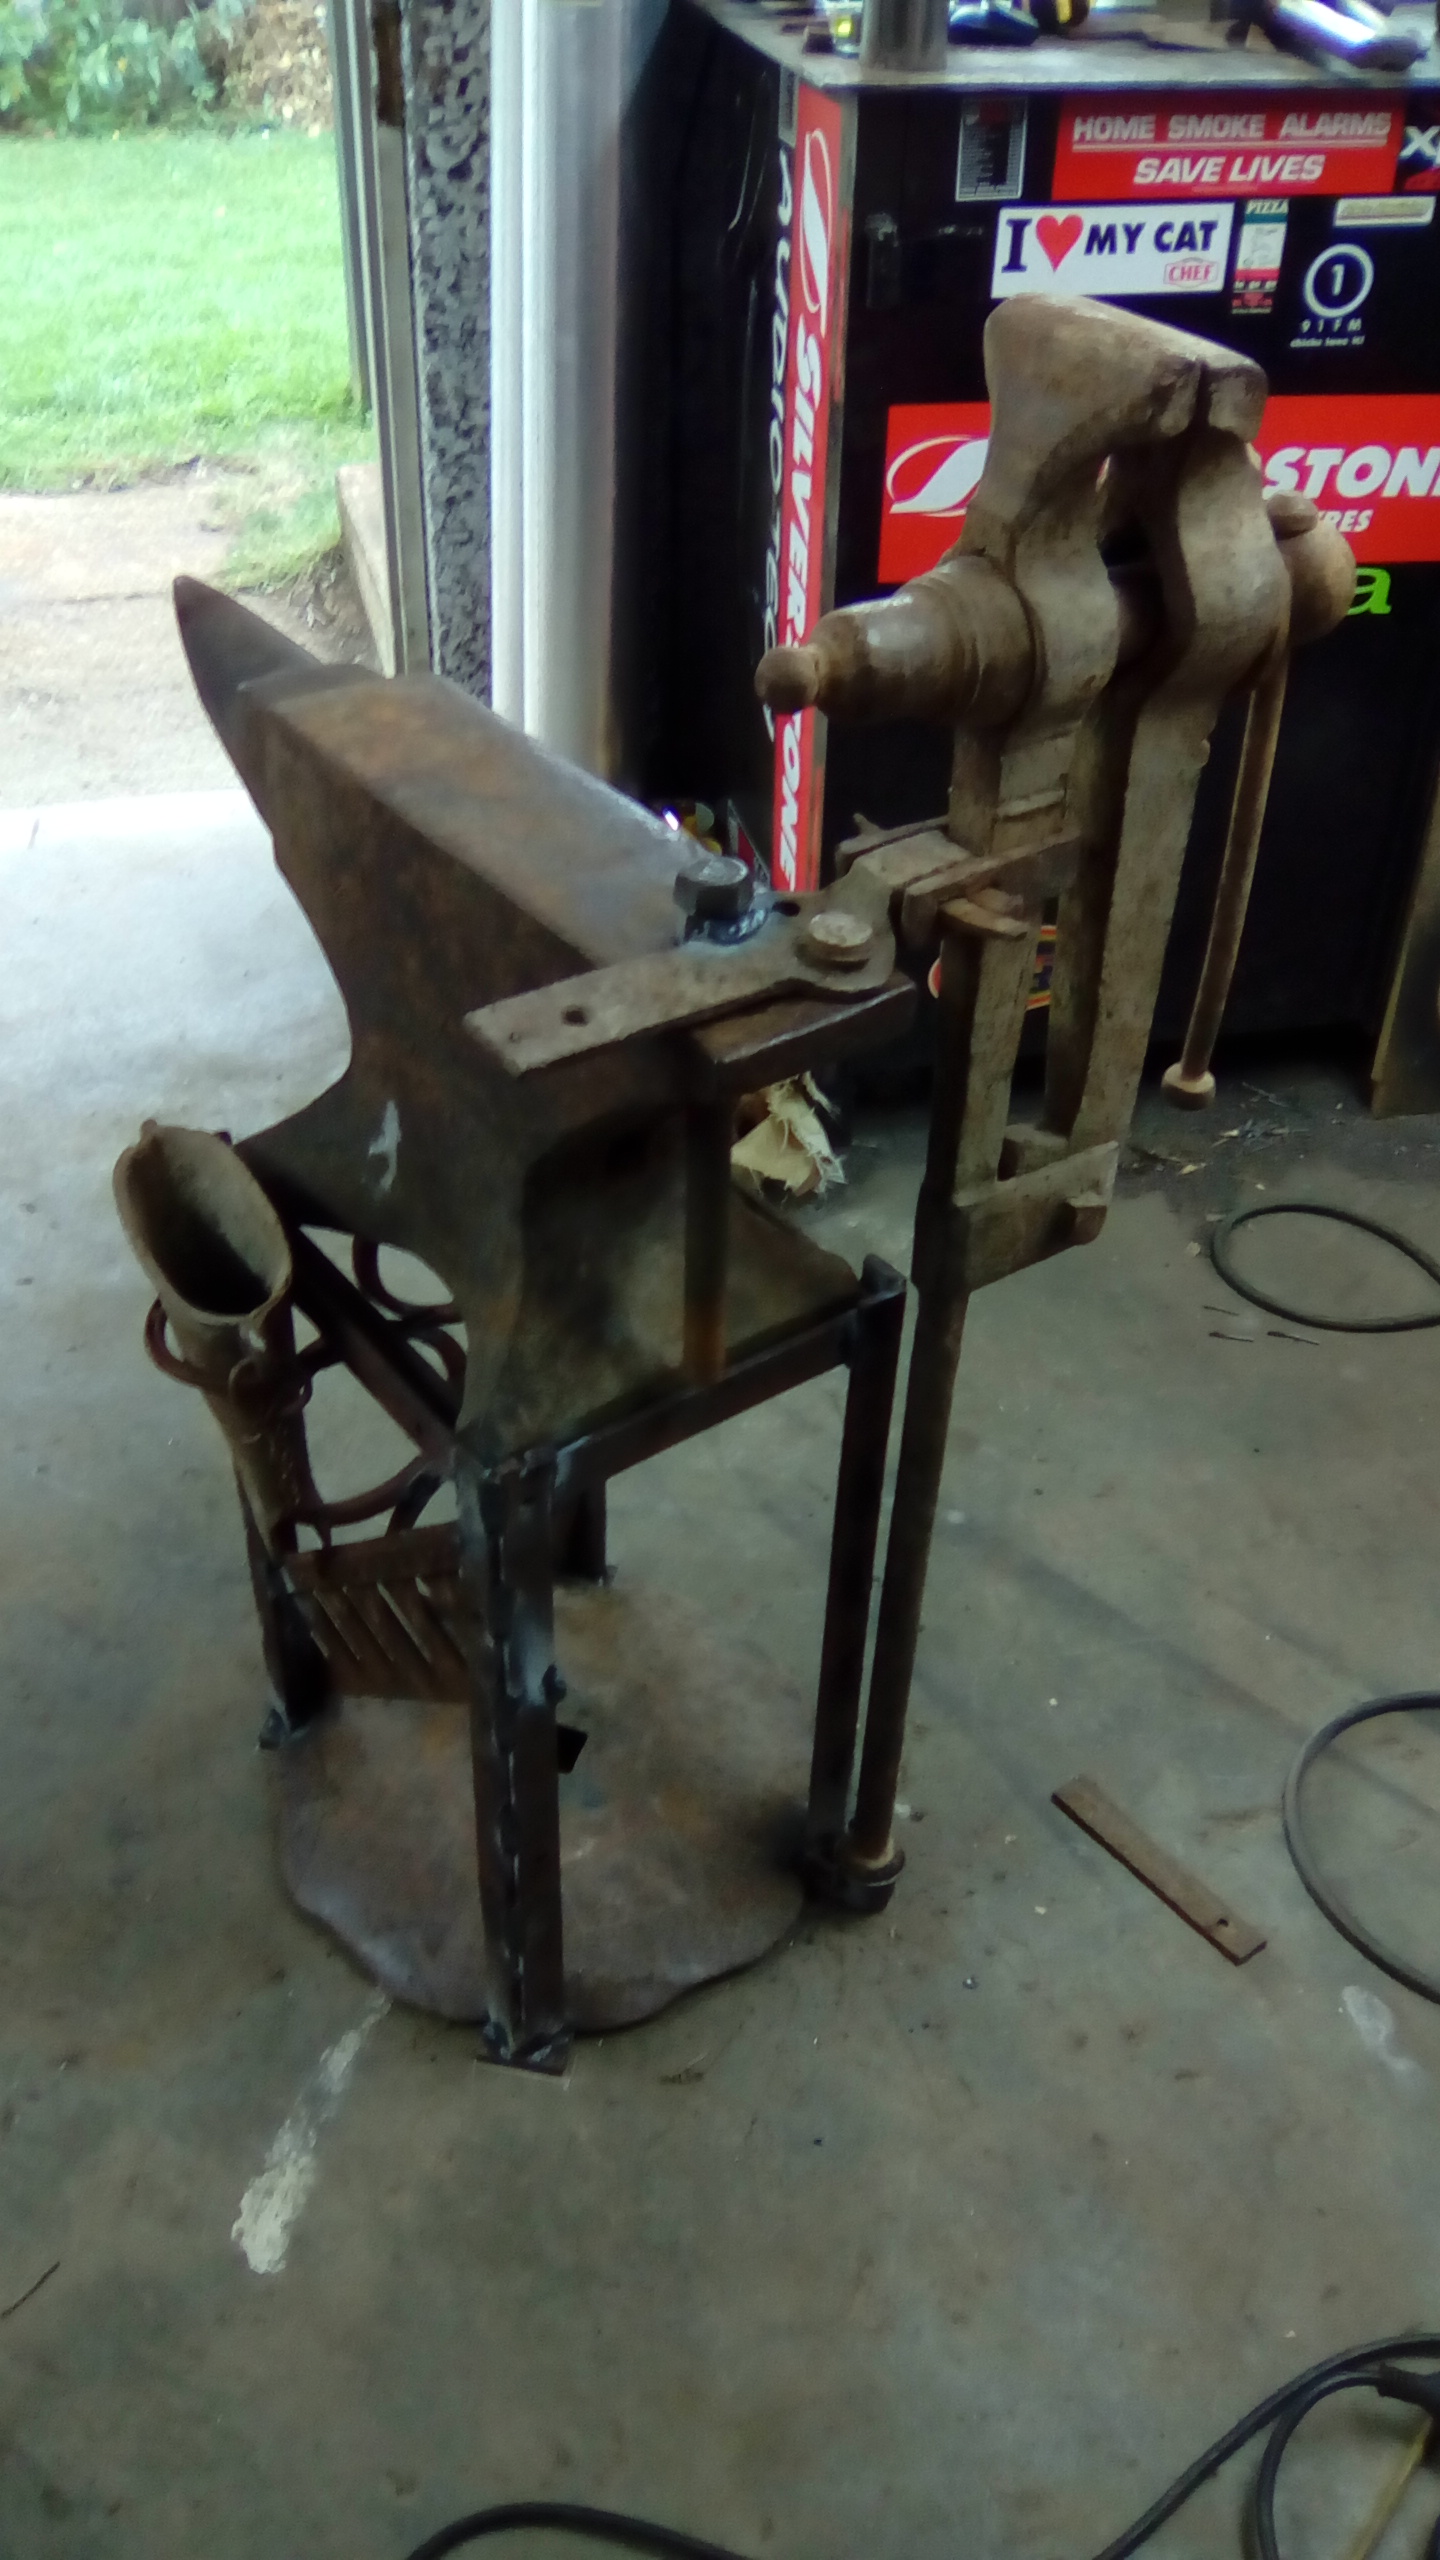
Also this anvil stand, the black smiths leg vice locks into the anvil holes but is easily removable. Stand's mainly made from fencing standards, disc's blade, bits of harrows and an old mower blade. Sorry I do have better pictures but not on my phone. Just realized this isn't a finished picture, a bit more bracing went in as the anvil was about 90-100kg. Got good muscles building this
1 point
-
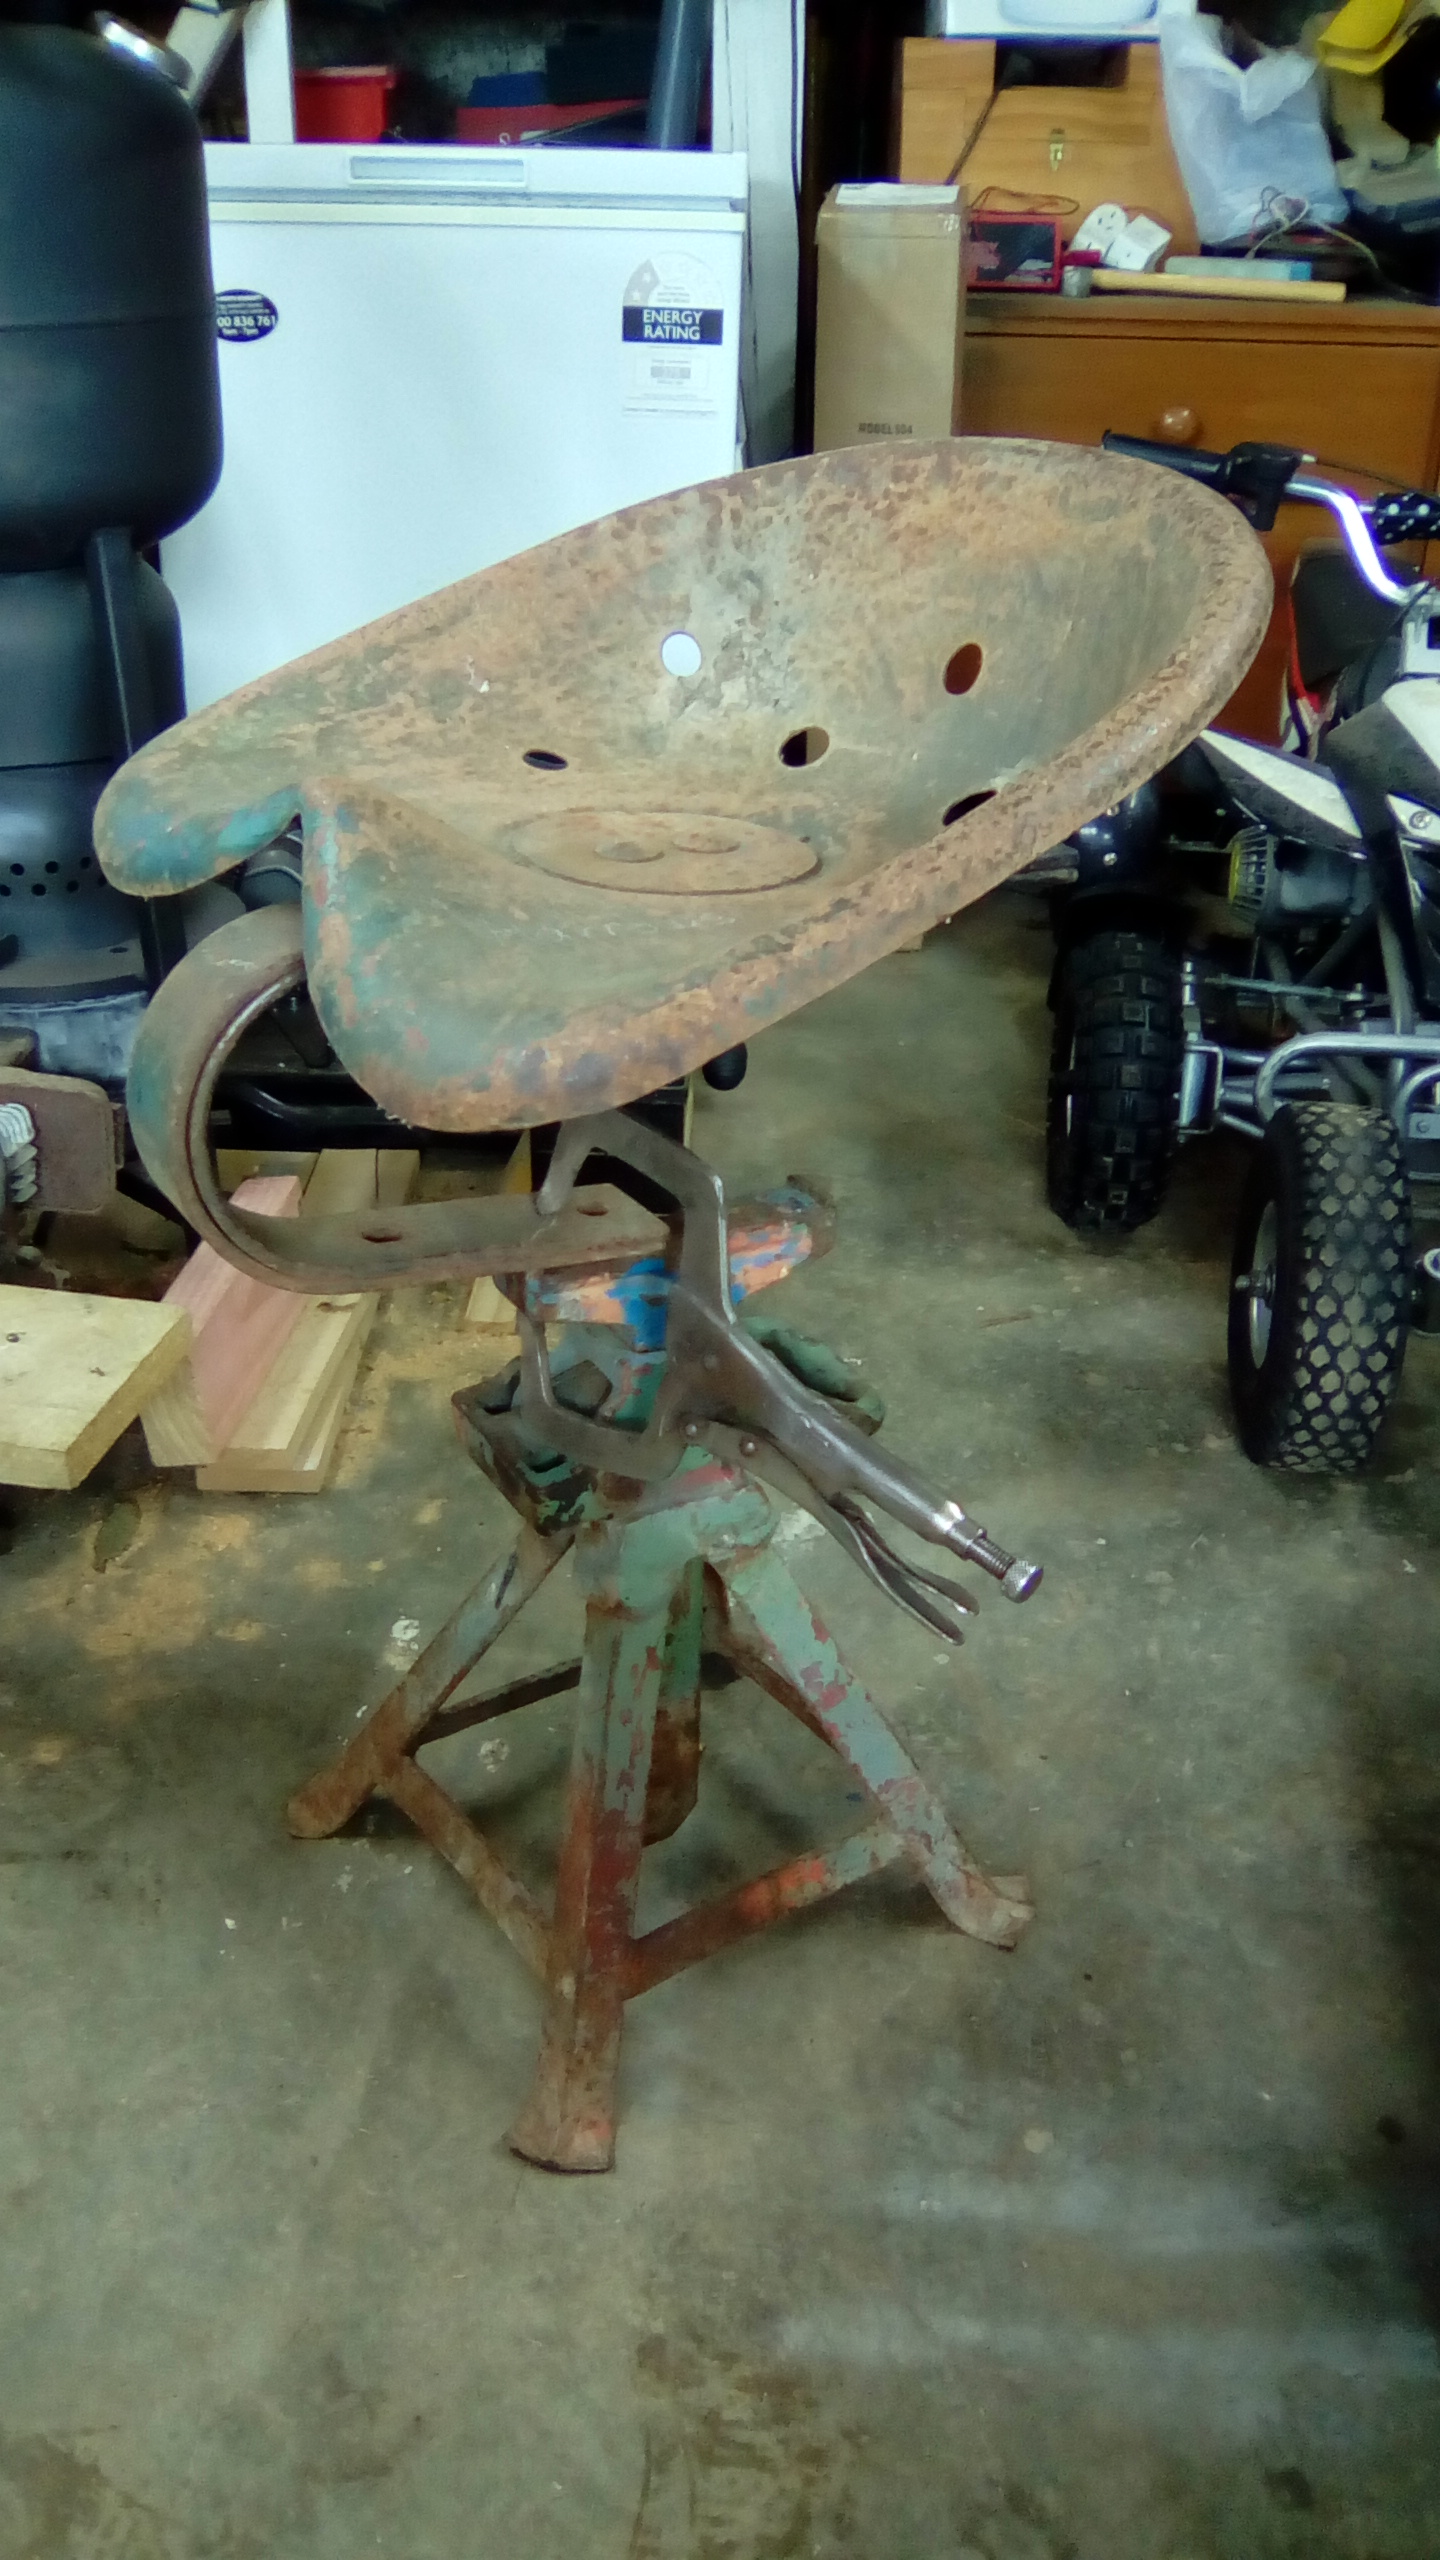
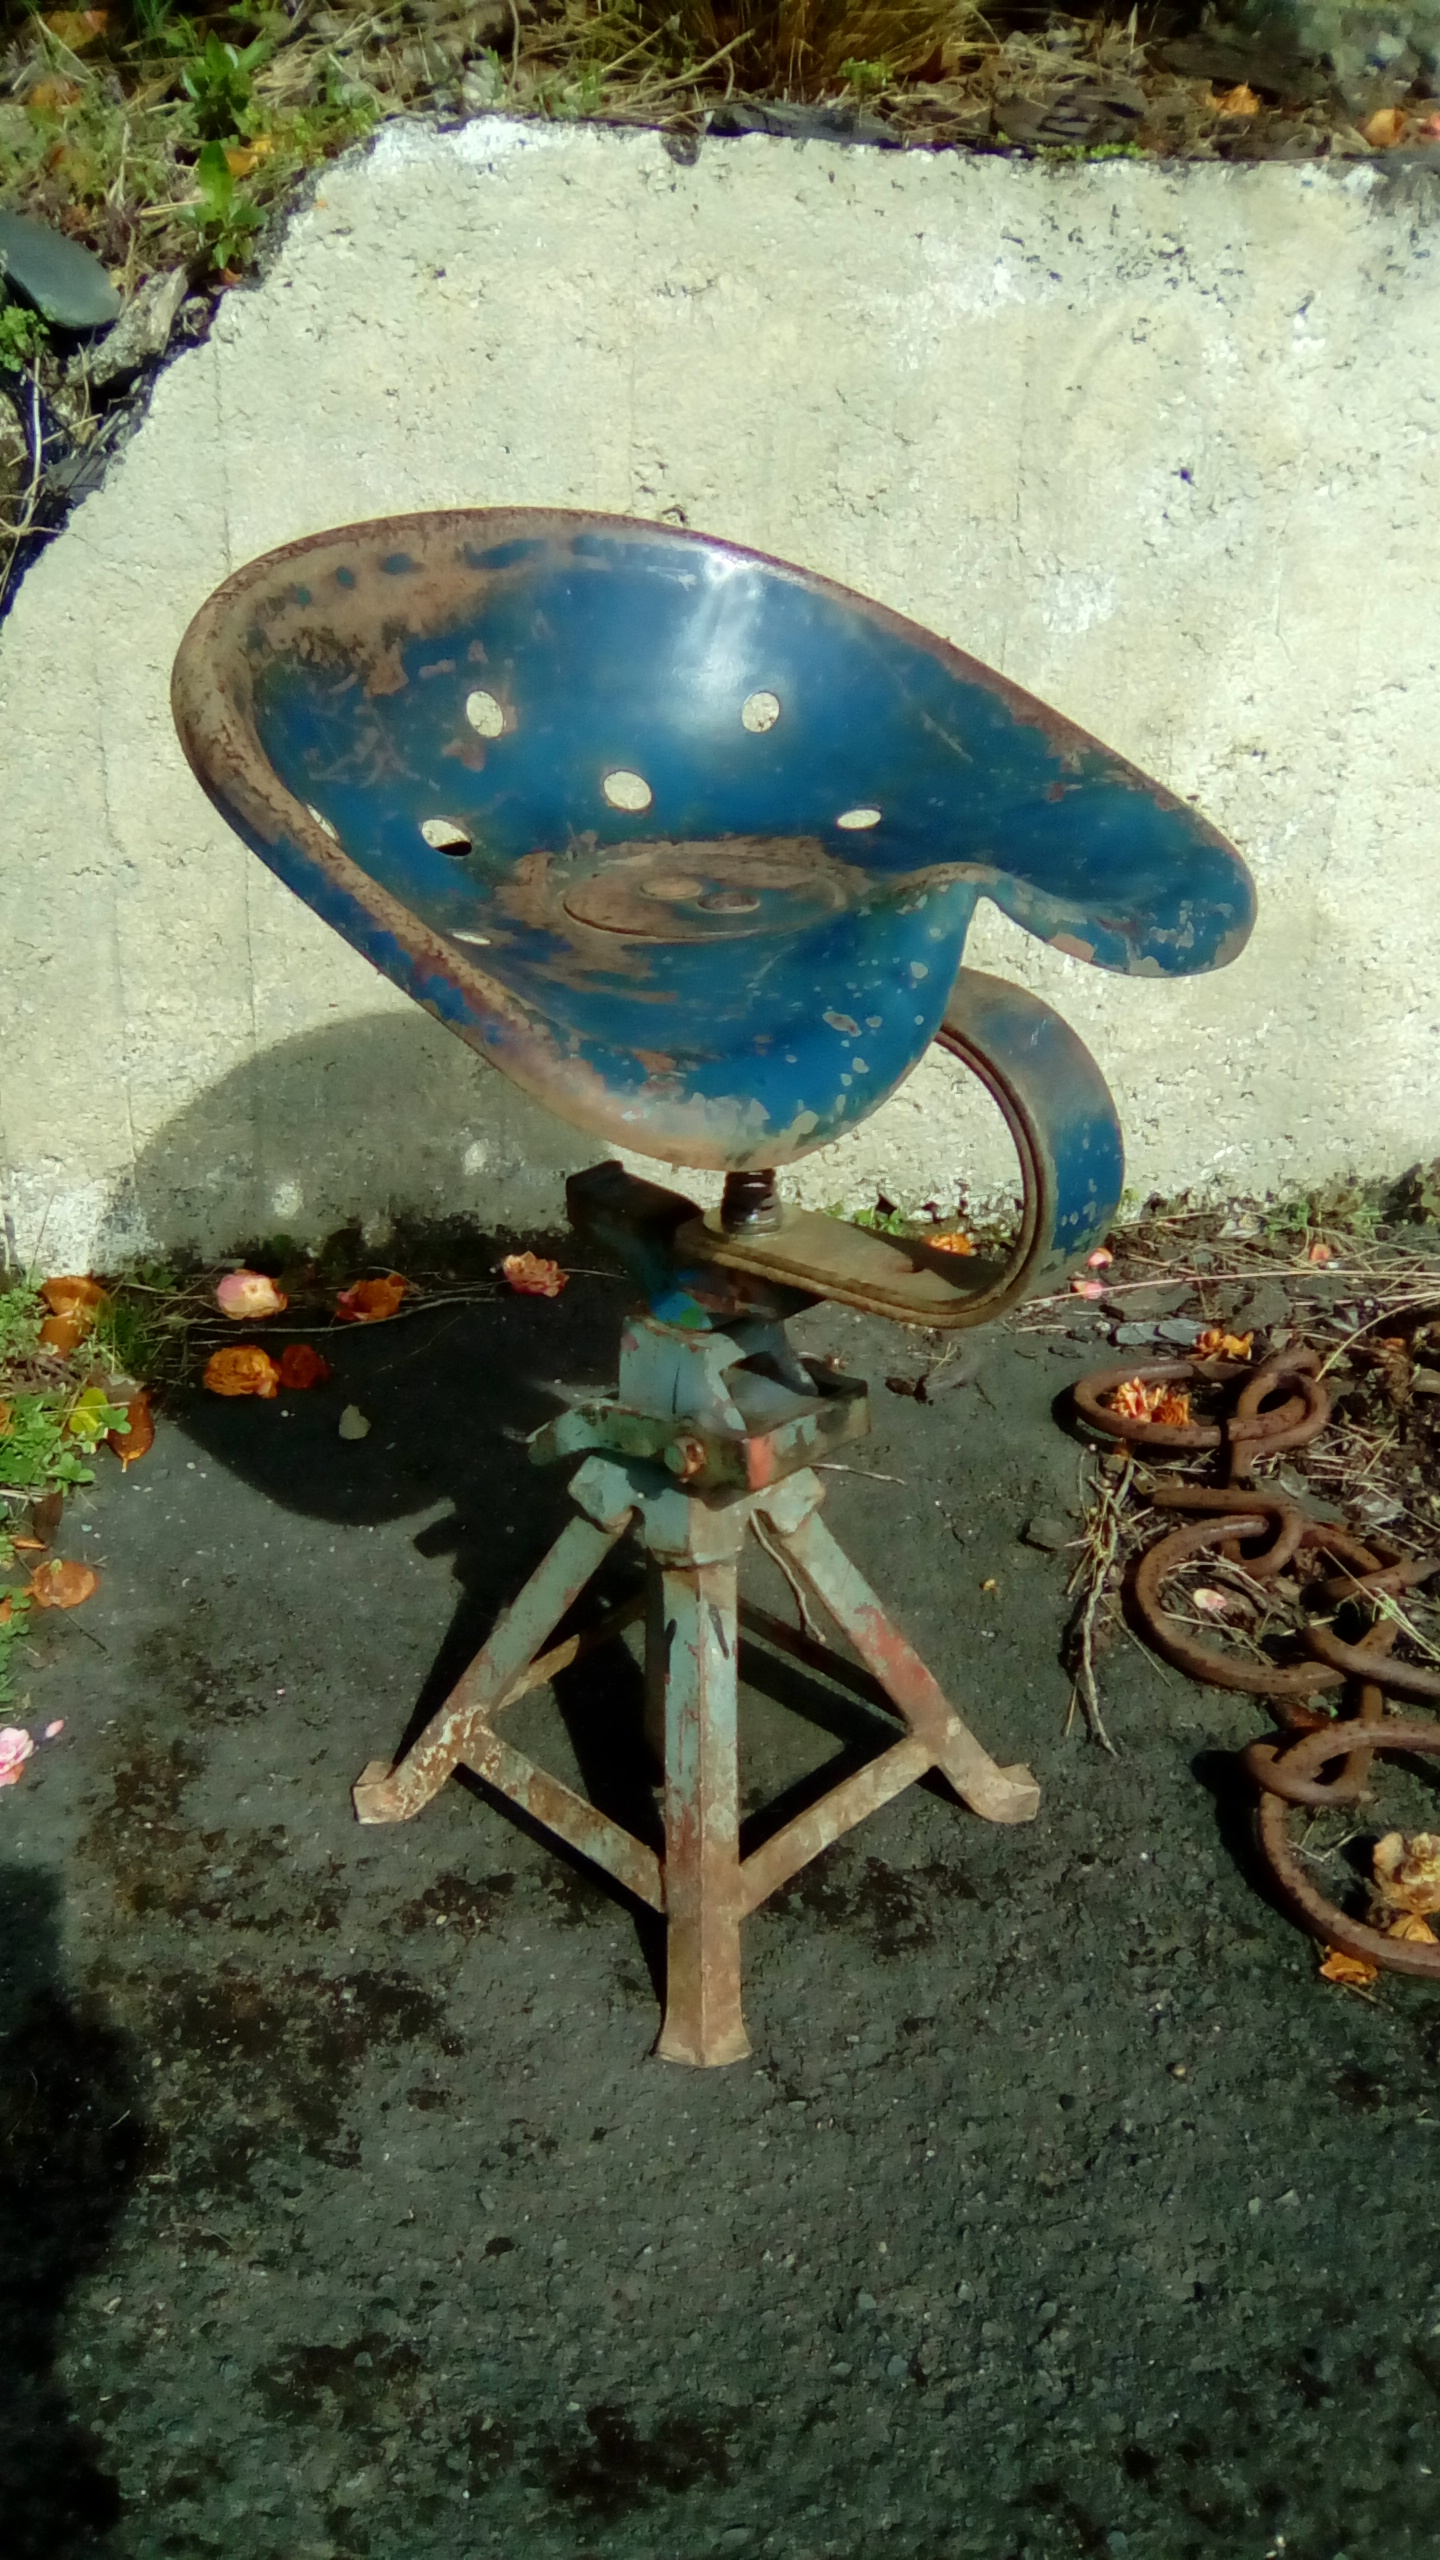
I've got a customer that collects interesting pieces of old farm machinery etc then gives them to me to make something out of. The simple things are sometimes the best. A mock up of a tractor seat and stand And bolted in place and a light wet sand to bring out what's left of the ford blue paint.
1 point
-
Hello there. If only it were that easy. When it comes to our woes, we seem to go all out above and beyond the standard poo scenarios to epidemic OMFGs. What an absolute mission! Outcome pending ... Hello there. It is a work in progress! Despite giving the UJ measurements to the genuinely nice lads at Repco in Howick, the UJ given was not the right one (luckily confirmed with a gut instinct), so we vibrated our way to the Repco Distribution Centre in Mount Wellington to buy what was then supposedly the right one ... ish. Long story short, the Tunland is at @98cc casa, drive shaft on the workshop floor, waiting for another UJ that will actually fit which we will HOPEFULLY source tomorrow! We cannot thank @98cc enough for his AMAZING help, and his family also for their overwhelming generosity welcoming us into their home and offering us a bed for the night and yummy hot toasted sandwiches! Absolutely shattered, was a 4am start on only 2hrs sleep, so time to shut the eyes and dream of UJs that fit, Austin Sevens, Villiers engines, and albion gearboxes1 point
-
Started populating the board tonight I realized I've put the bar the wrong way around. I need to trim all the leads and make up the power supply so I'll double check everything another day I had a look through my box of tubes and they are all too small. I'll just have to order some more1 point
-
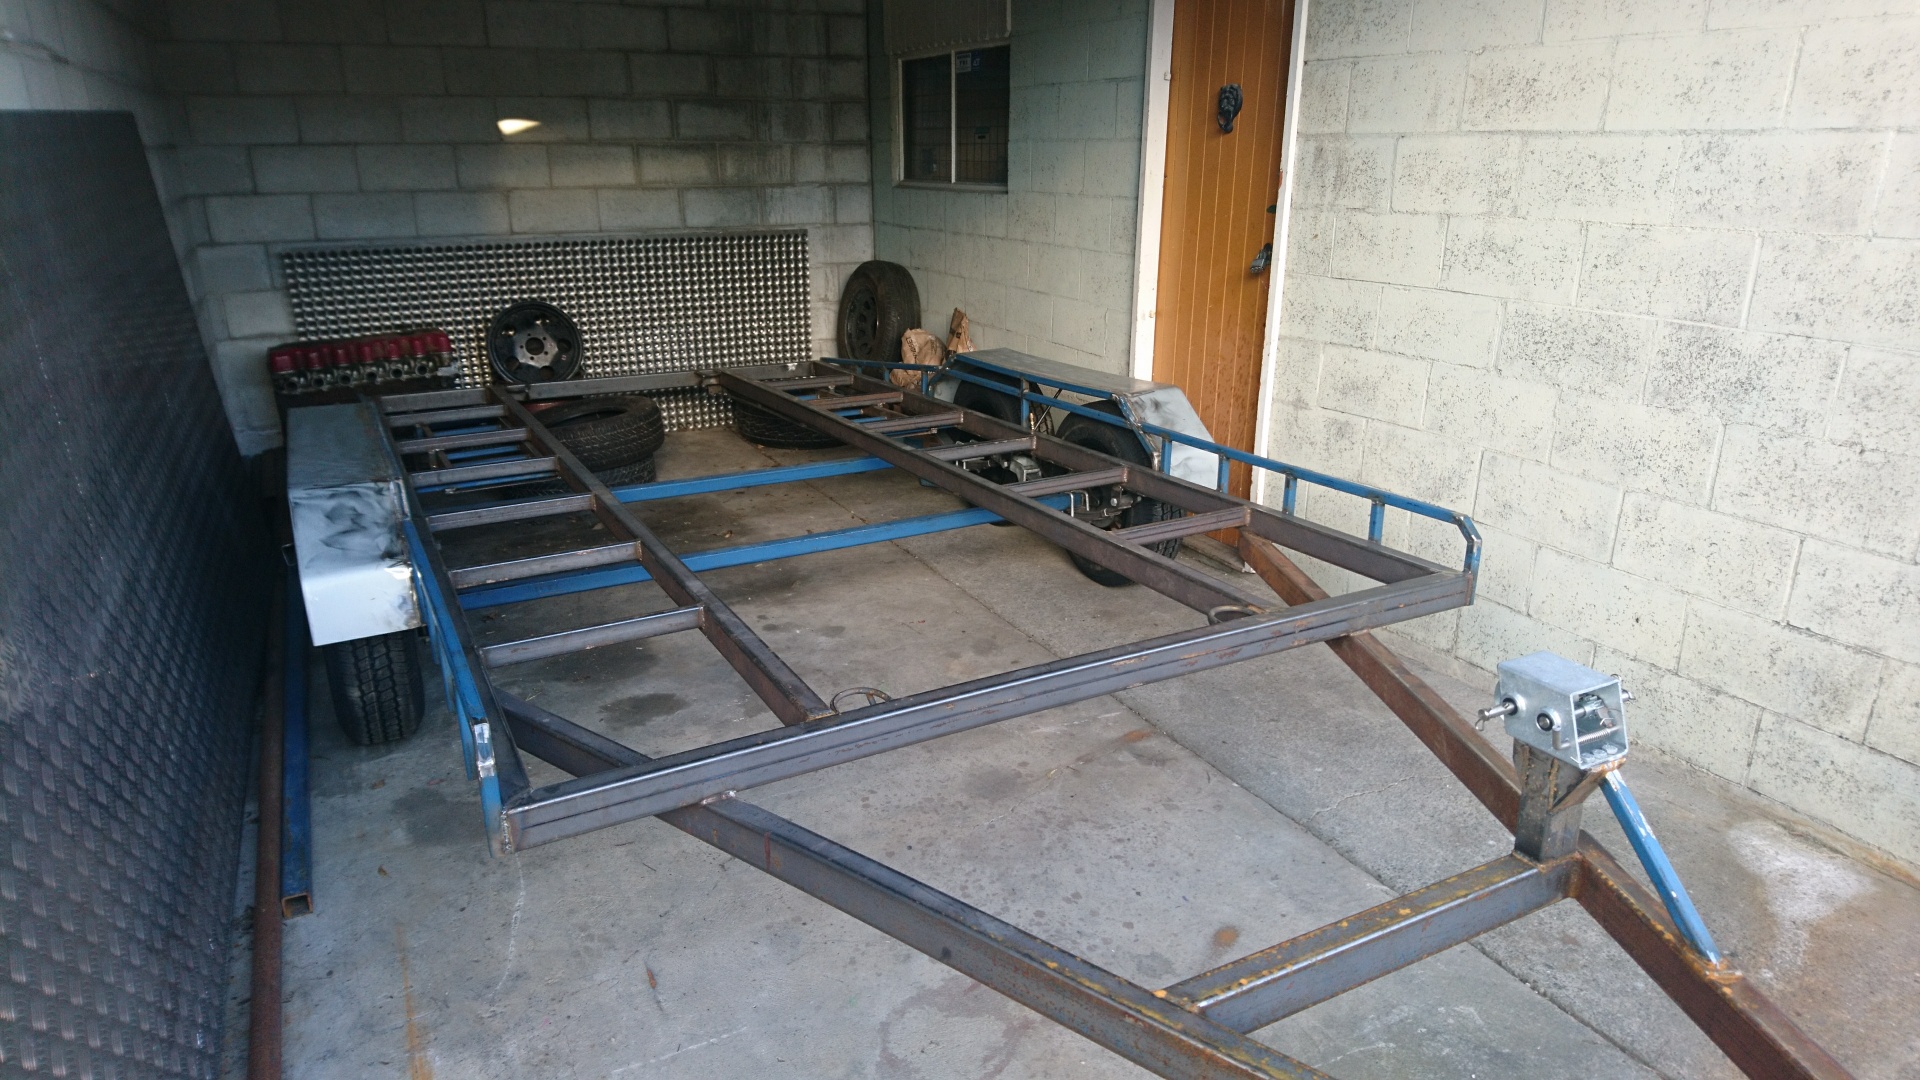
Didn't like the straight 90 deg at the end of the tie downs, support braces, so 45'd them. Flapped back the welds for a tidy finish. Sloped back the rear braces As you can see by the photo's, the guards have inch box section welded along them - two reasons strength for the guards for when people inevitably stand/sit on them, and when loading cars so the guards cannot be directly smacked. I also weld a stay underneath in the middle of them for more strength What you cant see here, is the ramps are welded up, and mounted underneath, slide in/out (forgot to take photos) - although they may not seem like it, there is almost as much work in the ramps themselves as there is the plain chassis itself
1 point
-
The stuff arrived today. I'm looking forward to assembling it. I'll have to find a cool looking box for it to sit in1 point
-
Last night I welded up the 2 little leaks I found on the exhaust, one I had just finished the weld about 1mm short leaving a pin hole, hammered the flange flat so it actually seals against the bore which got rid of a major leak and a lot of the excess noise. Then I went back through the carb to see if I could figure out why it was running so rich, turned out I'd missed that the needle had been lifted to it's max height so yeah dropped it back to the centre slot and reassembled everything. Should have got a video, but it's running so much nicer, still a bit of tuning needed I'd say but we'll see once it is ridable again. Courier came again this morning! Placed this order on the 13th of August, thanks to the big summer holiday it wasn't sent from Japan until the 22nd but it only took 4 days to get here, and that's when the fun started! Customs tried to charge me an obscene amount of $$ to apply for some special permit or license as they had decided this was a commercial order and that I must be running a business etc. Took so many phone calls and emails with everybody I talked to giving me a different story about what was going on and what I needed to do to get it cleared. Finally yesterday I managed to convince someone it was just bits for my own scooter and had it released, annoyingly between the 13th and yesterday the NZD/JPY exchange rates had changed and put the total over the threshold so I still had to fork out an extra $120. but thats much better then the $650odd I was being told earlier in the week!!! So enough words, you all just want to have a nose in my box right? A whole pile of genuine Honda goodness!! Would have really liked the rear plastic too, but not for $500 before shipping! So now it's pretty much time for paint and to tidy up all the little details, sort out bar controls and other smaller bits. If the rear plastic wasn't so far out of my reach I may have even considered sticking with the white, it's so crisp looking all fresh and new lol1 point
-
I'd always though the Gyro was a uniquely Honda idea, turns out it's pivot system is a British invention, which played a part in BSA's demise Ariel 3 by BSA Then Diahatsu had a go at it with there Hallo1 point
-
1 point
-
Sweet trike. My parents have an even older version where the rims and tyres are one piece. Think about 4 inch rims with really big balloons moulded onto them. Rode it all the time when we were kids and noone died or even got hurt. It floated too so was fun in the creek Just googled and found out what it is. I must go save it now1 point
-
20 K USD http://barnfinds.com/4wd-motorhome-1975-mercedes-l9111 point
-
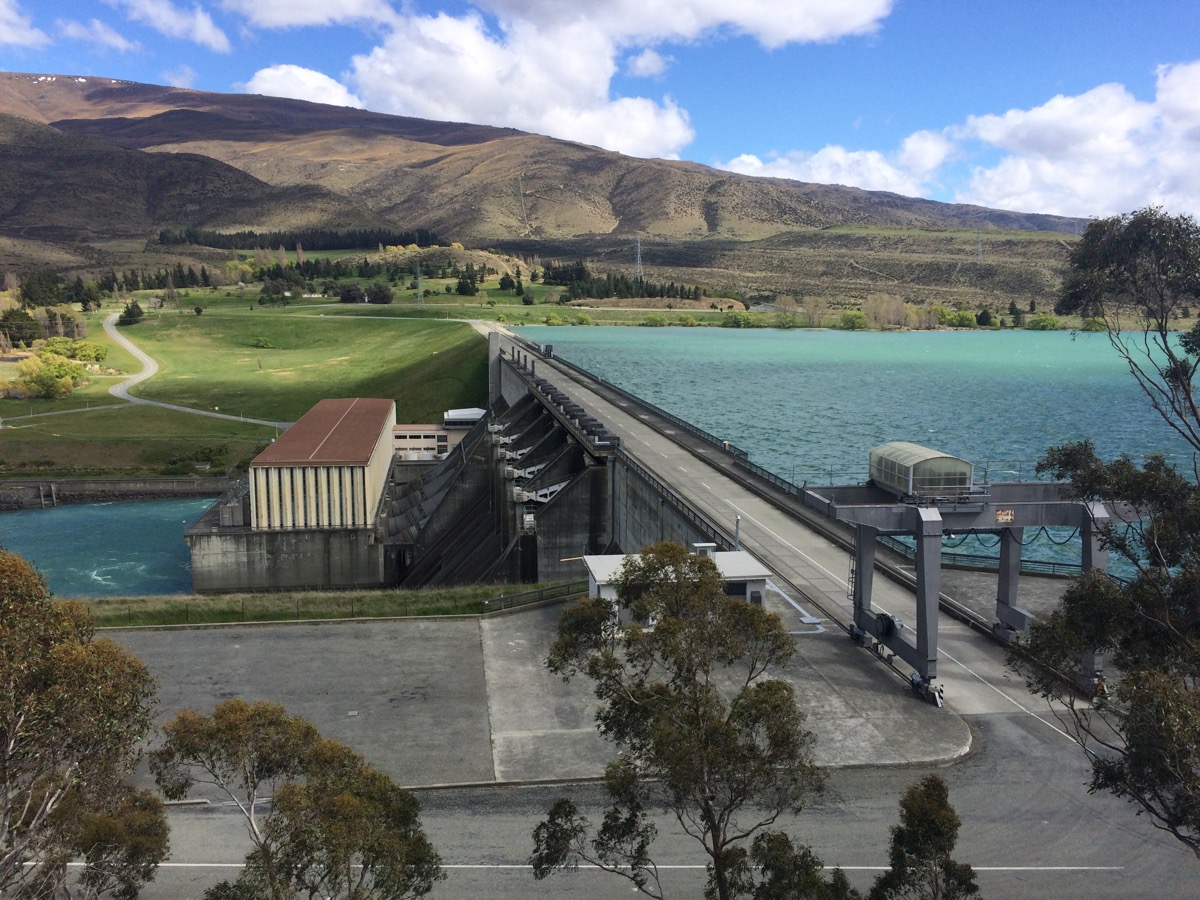
For inspiration January on the Nevis Road.
1 point
-
photo uploading1 point
-
1 point
-
1 point
-
I don't see the point. The entire towed member is only as capable as the vehicle towing it. So in order to get the benefit of having such extreme suspension travel/ground clearance/tyres/articulation etc, the tow vehicle would need to be even more capable. And even then, it's off road performance will be severely compromised by having to tow such a larger trailer behind it. The best idea would be to make one of these: Have a 'daily vehicle' that is capable off road and the camper sits on stilts in storage until you want to take it away. Then just reverse under it, lower it into the bed and you're away.1 point


.thumb.jpeg.384ff72c8d2b0ee0d34a7bdedb55bdcf.jpeg)


This leaderboard is set to Auckland/GMT+12:00